

Page 1

MULTI COMPACT DISC PLAYERMULTI COMPACT DISC PLAYER
MULTI COMPACT DISC PLAYER
MULTI COMPACT DISC PLAYERMULTI COMPACT DISC PLAYER
REPRODUCTOR DE MULTIDISCOS COMPACTOSREPRODUCTOR DE MULTIDISCOS COMPACTOS
REPRODUCTOR DE MULTIDISCOS COMPACTOS
REPRODUCTOR DE MULTIDISCOS COMPACTOSREPRODUCTOR DE MULTIDISCOS COMPACTOS
多片唱碟鐳射唱機
PD-M407
PD-M427
Operating Instructions
Manual de instrucciones
操作說明書
'
Page 2
Thank you for buying this Pioneer product.
Please read through these operating instructions so you will know
how to operate your model properly. After you have finished
reading the instructions, put them away in a safe place for future
reference.
In some countries or regions, the shape of the power plug and
power outlet may sometimes differ from that shown in the
explanatory drawings. However, the method of connecting and
operating the unit is the same.
THE STANDBY/ON SWITCH IS SECONDARY CONNECTED AND
THEREFORE DOES NOT SEPARATE THE UNIT FROM MAINS
POWER IN STANDBY POSITION.
LINE VOLTAGE SELECTOR SWITCH
Mains voltages in Saudi Arabia are 127V and 220V
only.
WARNING: TO PREVENT FIRE OR SHOCK HAZARD, DO
NOT EXPOSE THIS APPLIANCE TO RAIN OR MOISTURE.
CAUTION: This product satisfies FCC regulations when
shielded cables and connectors are used to connect the
unit to other equipment. To prevent electromagnetic
interference with electric appliances such as radios and
televisions, use shielded cables and connectors for
connections.
This player is for consumer use. If the player is used in a
business (for example, used for a period at a restaurant),
the player will not be covered under warranty.
CD Video, VIDEO CD, CD graphics and CD-ROM discs
cannot be played with this player.
IMPORTANT
CAUTION
RISK OF ELECTRIC SHOCK
DO NOT OPEN
The lightning flash with arrowhead symbol, within an
equilateral triangle, is intended to alert the user to the
presence of uninsulated "dangerous voltage" within the
product's enclosure that may be of sufficient magnitude
to constitute a risk of electric shock to persons.
CAUTION:
TO PREVENT THE RISK OF ELECTRIC SHOCK, DO NOT
REMOVE COVER (OR BACK). NO USER-SERVICEABLE
PARTS INSIDE. REFER SERVICING TO QUALIFIED
SERVICE PERSONNEL.
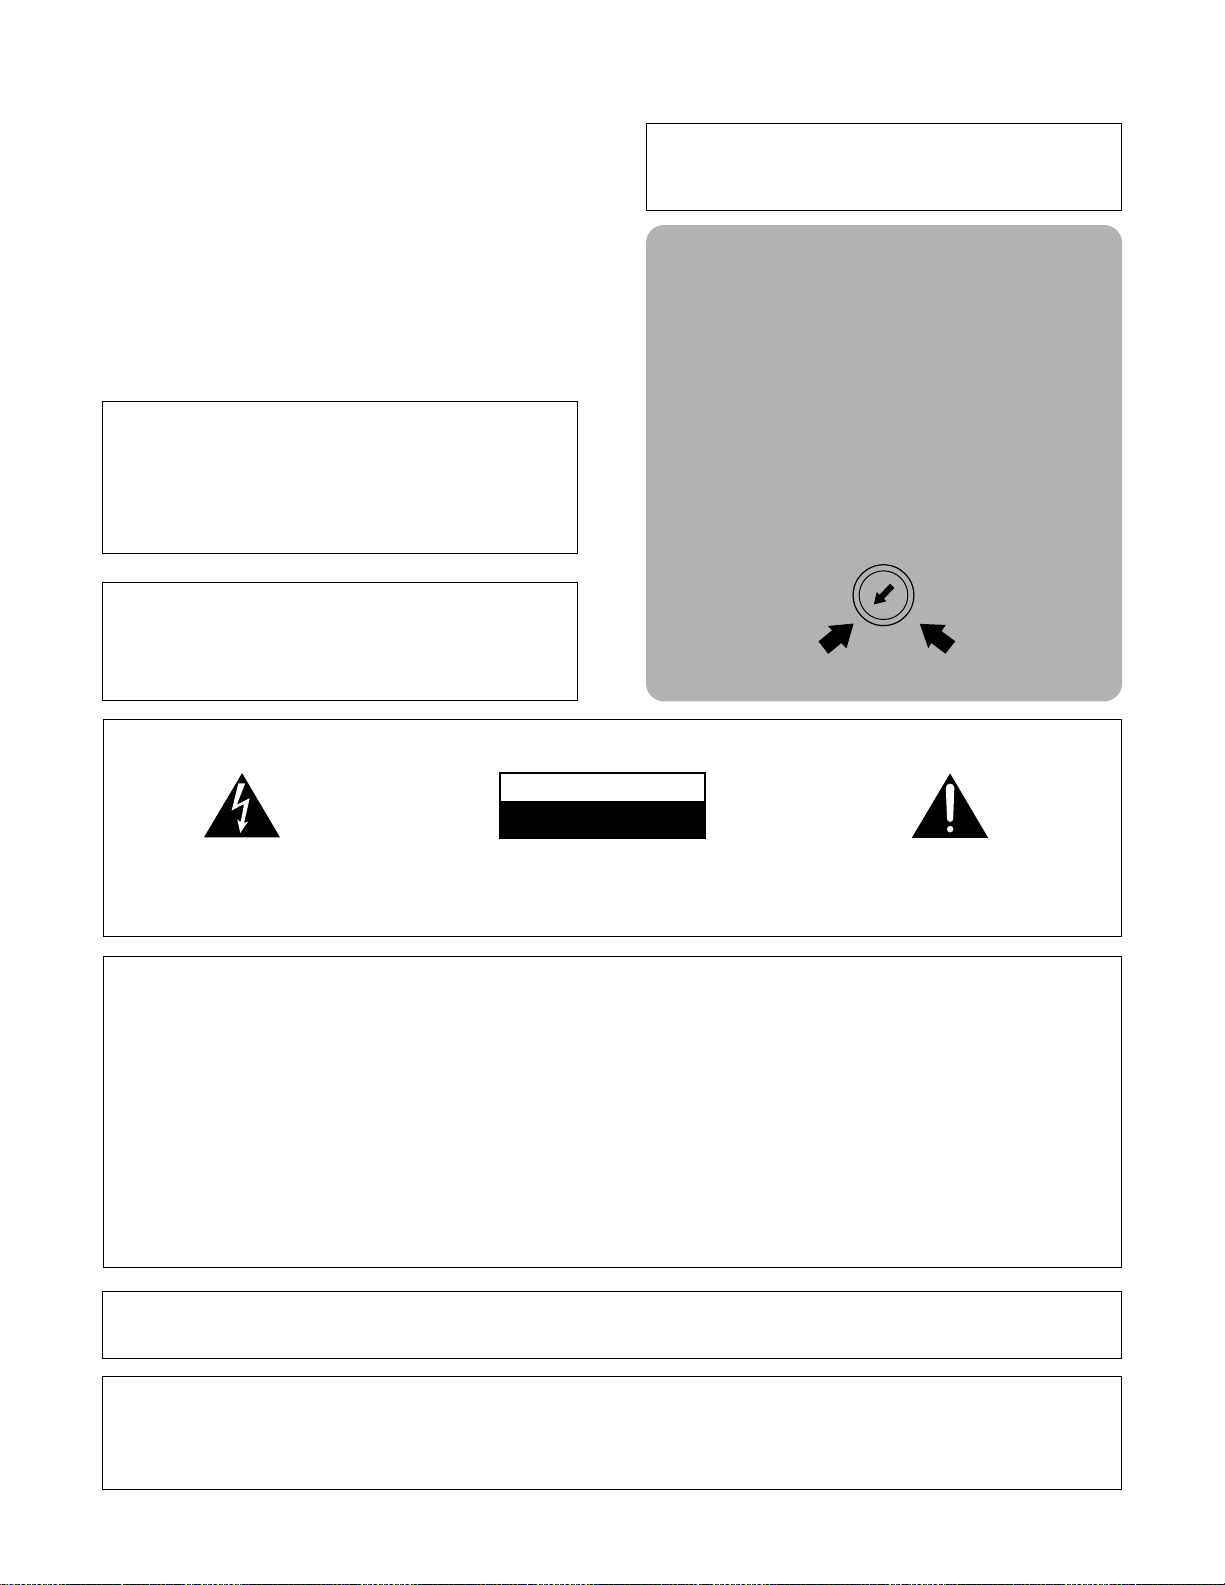
The line voltage selector switch is located on the rear panel of
this player. Check that it is set properly before plugging the
power cord into the outlet. If the voltage is not properly set or if
you move to an area where the voltage requirements differ,
adjust the selector switch as follows:
÷ Be sure to disconnect the power cord from its outlet be-
fore making this adjustment.
÷ Use a medium-sized (flat blade) screwdriver. Insert the
tip of the screwdriver into the groove of the selector
switch and turn it so that the power voltage making
of your area points to the arrow.
220-240V 110-127V
The exclamation point within an equilateral triangle is
intended to alert the user to the presence of important
operating and maintenance (servicing) instructions in the
literature accompanying the appliance.
This equipment has been tested and found to comply with the limits for a Class B digital device, pursuant to Part 15 of the FCC Rules.
These limits are designed to provide reasonable protection against harmful interference in a residential installation. This equipment
generates, uses, and can radiate radio frequency energy and, if not installed and used in accordance with the instructions, may cause
harmful interference to radio communications. However, there is no guarantee that interference will not occur in a particular
installation. If this equipment does cause harmful interference to radio or television reception, which can be determined by turning
the equipment off and on, the user is encouraged to try to correct the interference by one or more of the following measures:
– Reorient or relocate the receiving antenna.
– Increase the separation between the equipment and receiver.
– Connect the equipment into an outlet on a circuit different from that to which the receiver is connected.
– Consult the dealer or an experienced radio/TV technician for help.
Information to User
Alteration or modifications carried out without appropriate authorization may invalidate the user's right to operate the equipment.
CAUTION
÷ Use of controls or adjustments or performance of procedures other than those specified herein may result in hazardous
radiation exposure.
÷ The use of optical instruments with this product will increase eye hazard.
2
En
Page 3
PUT BATTERIES INTO THE REMOTE
CONTENTS
CONFIRM SUPPLIED ACCESSORIES ............................... 3
PUT BATTERIES INTO THE REMOTE CONTROL UNIT .... 3
REMOTE CONTROL OPERATIONS................................... 3
CAUTIONS REGARDING HANDLING ................................ 4
BEFORE OPERATING THE PLAYER .................................. 5
CONNECTIONS.................................................................. 6
NAMES AND FUNCTIONS OF PARTS ............................... 7
BASIC OPERATION ........................................................... 8
VARIOUS OPERATIONS .................................................... 9
TO PLAY ONLY DESIRED TRACKS/DISCS ...................... 11
TROUBLESHOOTING ...................................................... 14
SPECIFICATIONS ............................................................. 14
CONFIRM SUPPLIED ACCESSORIES
1
4
2
'
Î
3
5
CONTROL UNIT
2
(PD-M427 only)
3
1
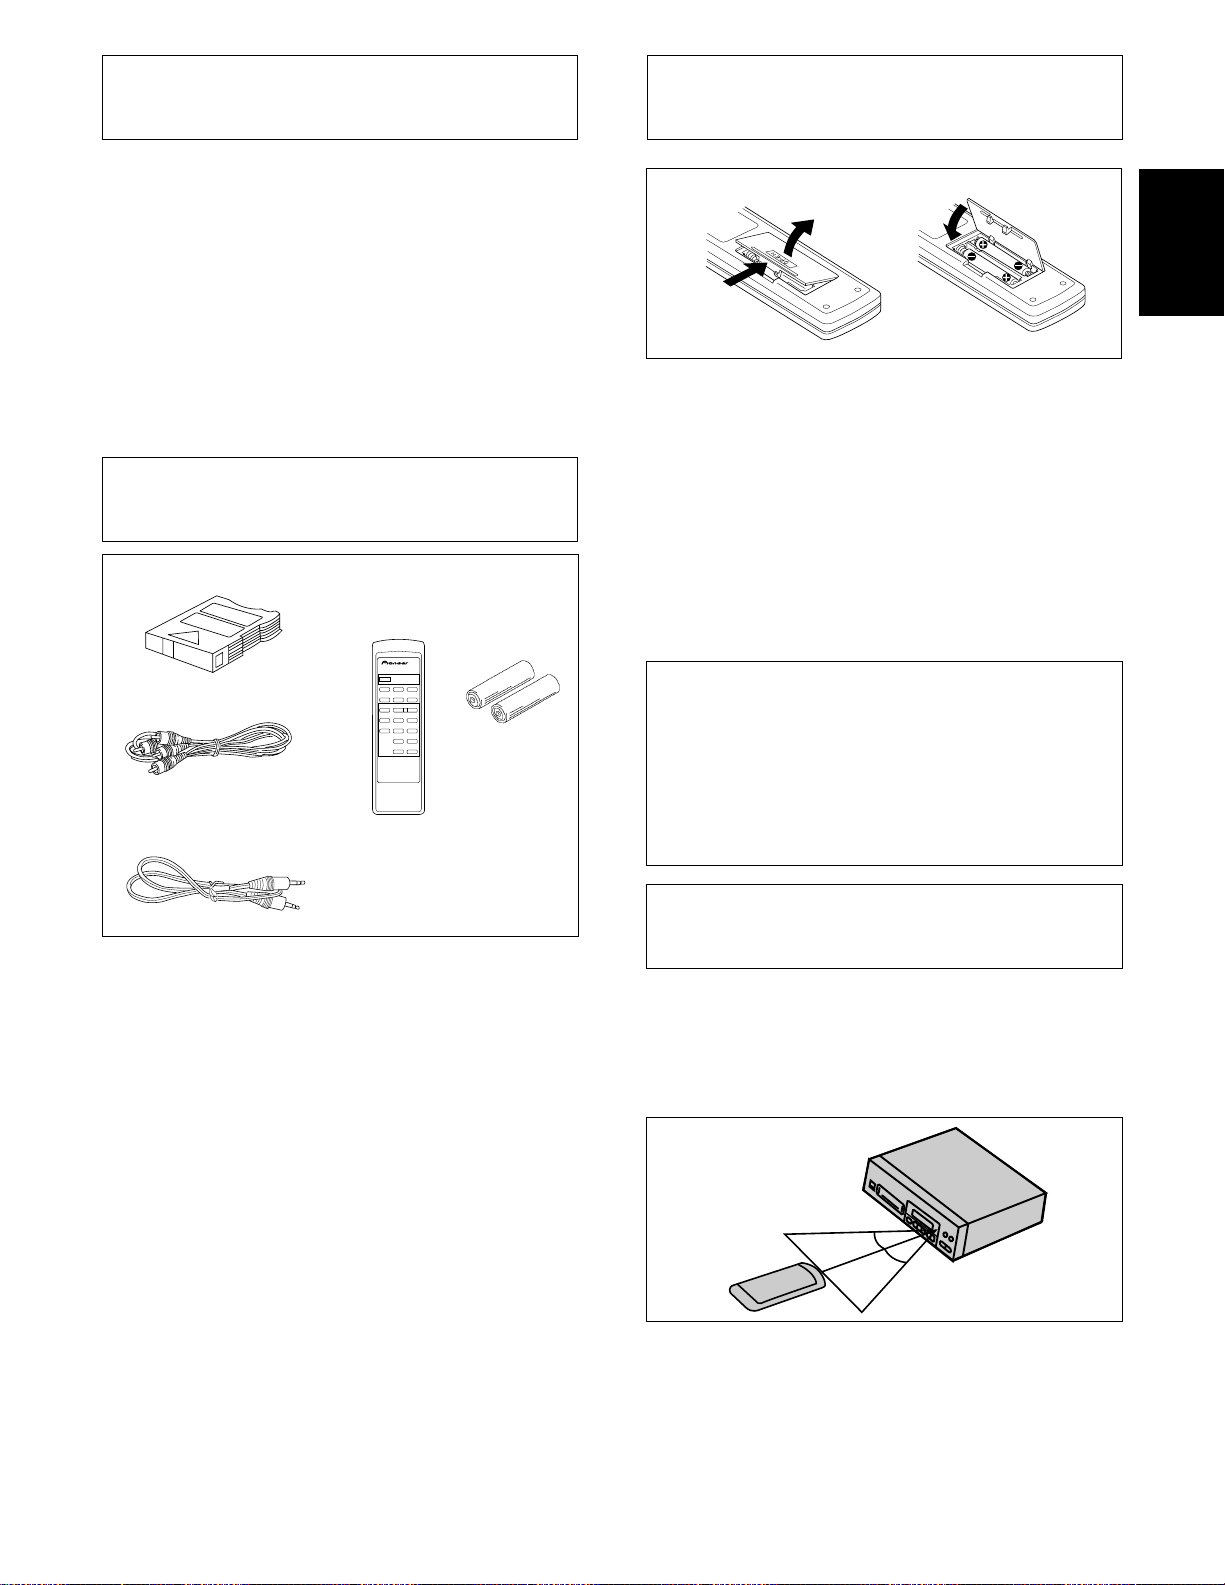
Open the lid of the battery compartment on the rear of the
remote control unit, and insert the batteries ( size "AAA" (IEC
R03)), taking care to align the ª and · polarities correctly.
NOTES:
÷
In order to prevent battery leakage, remove the batteries
when not using the remote control unit for an extended
period (one month or more). If leakage occurs, carefully
wipe away any battery fluid inside the compartment, and
replace the batteries with new ones.
÷
Do not allow books or other objects to rest on top of the
remote control unit, since the buttons may be depressed,
causing faster exhaustion of the batteries.
Incorrect use of batteries may cause leakage or rupture.
Always be sure to follow these guidelines:
A. Always insert batteries into the battery compartment
correctly matching the positive ª and negative
·polarities, as shown by the display inside the
compartment.
B. Never mix new and used batteries.
C. Batteries of the same size may have different voltages,
depending on brand. Do not mix different brands of
batteries.
English
1 6-Compact Disc Magazine x 1
(Called 6-disc magazine in the explanatory text.)
NOTE:
The supplied 6-disc magazine is for 12 cm ( 5-inch) disc
only.
2 Output cable x 1
3 Control cable x 1
4 Remote control unit x 1 (PD-M427 only)
5 AAA/R03 dry cell batteries x 2 (PD-M427 only)
POWER-CORD CAUTION
Handle the power cord by the plug. Do not pull out the plug by tugging
the cord and never touch the power cord when your hands are wet
as this could cause a short circuit or electric shock. Do not place the
unit, a piece of furniture, etc., on the power cord, or pinch the cord.
Never make a knot in the cord or tie it with other cords. The power
cords should be routed such that they are not likely to be stepped on.
A damaged power cord can cause a fire or give you an electrical shock.
Check the power cord once in a while. When you find it damaged, ask
your nearest PIONEER authorized service center or your dealer for a
replacement.
REMOTE CONTROL OPERATIONS
(PD-M427 only)
When operating the remote control unit, point the unit’s
infrared signal transmitter at the remote control receiver
(REMOTE SENSOR) on the front panel of the player. The
remote control unit can be used within a range of about 7
meters (23 feet) from the remote sensor, and within angles
of up to about 30 degrees.
30˚
7 m
NOTE:
If the remote control sensor window is in a position where it
receives strong light such as sunlight or fluorescent light,
control may not be possible.
NOTE for PD-M407:
Operate the PD-M407 using the remote control unit which
accompanies the amplifier. (See page 6.)
30˚
3
En
Page 4
CAUTIONS REGARDING HANDLING
LOCATION
Install the player in a well-ventilated location where it will not be
exposed to high temperatures or humidity.
Do not install the player in a location which is exposed to direct rays
of the sun, or near stoves or radiators. Excessive heat can adversely
affect the cabinet and internal components. Installation of the player
in a damp or dusty environment may also result in a malfunction or an
accident. (Avoid installation near cookers etc., where the player may
be exposed to oily smoke, steam or heat.)
Do not install the player on a tottered stand nor in an unstable or
inclined place.
PRECAUTIONS REGARDING INSTALLATION
÷ Placing and using the compact disc player for long periods on heatgenerating sources such as amplifiers will affect performance. Avoid
placing the player on heat-generating sources.
÷ Install this compact disc player as far as possible from tuners and
TV sets. A compact disc player installed in close proximity to such
equipment may cause noise or degradation of the picture.
÷ Such noise may be particularly noticeable when an indoor antenna
is used. In such cases, make use of an outdoor antenna, or turn off
power to the compact disc player.
÷ Please place this unit on a level surface.
CONDENSATION
When this unit is brought into a warm room from previously cold
surroundings or when the room temperature rises sharply,
condensation may form inside, and the unit may not be able to attain
its full performance. If this occurs, allow the unit to stand for about an
hour or raise the room temperature gradually.
CLEANING AND HANDLING COMPACT DISCS
÷ Always keep your discs clean by wiping them gently with a soft
cloth from the inner edge toward the outer periphery.
÷ If a disc becomes very dirty, dip a soft cloth in water, and after
wringing it out well, wipe the dirt away gently, and then remove
any water drops with another soft, dry cloth.
÷ Do not use record cleaning sprays or anti-static agents on discs.
Also, never clean discs with benzene, thinner, or other volatile
solvents, since damage to the disc surface may result.
With this unit, use a Compact Disc carrying the mark shown
below. Do not use other disc, for this may result in
malfunction or damage.
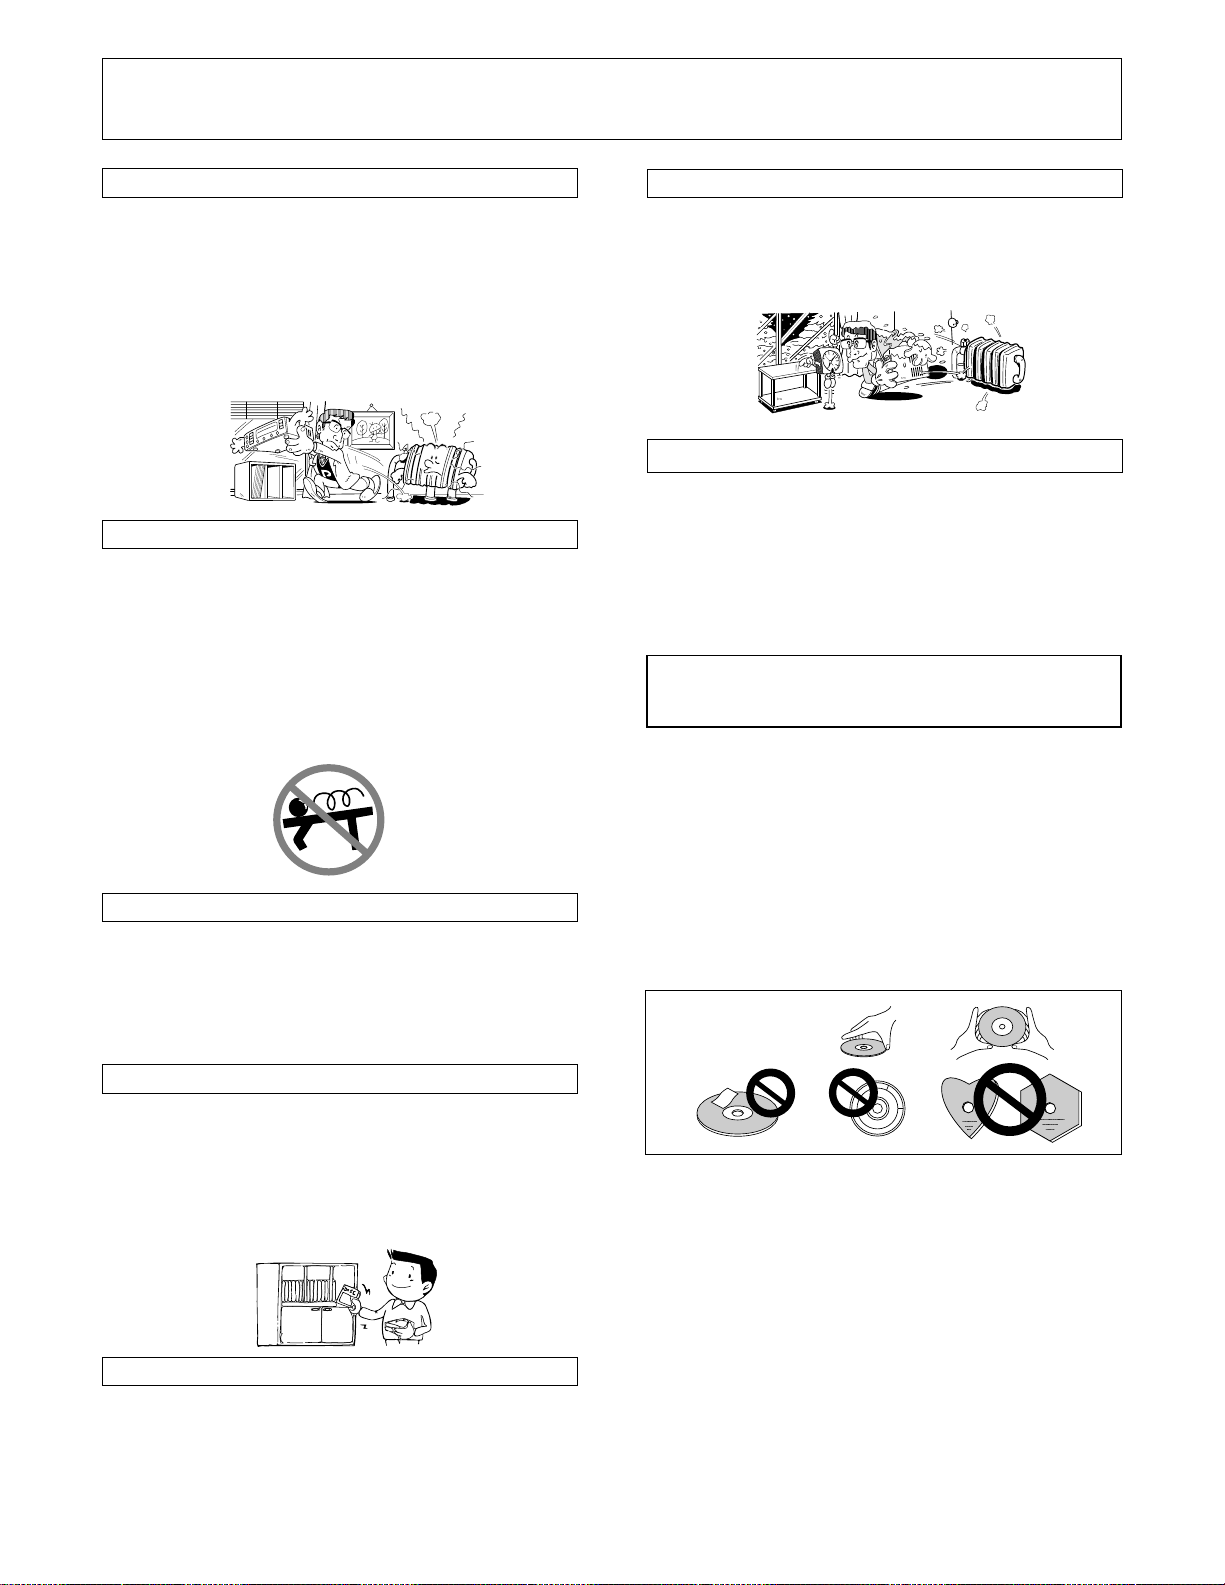
÷ When holding discs, do not touch their signal surfaces (the side
reflecting a "rainbow" pattern, opposite the label side). Hold by the
edges, or by one edge and the center hole.
÷ Do not affix gummed labels or tape to the label surfaces. Also, do
not scratch or damage the label.
÷ Discs rotate at high speed inside the player. Do not use damaged
(cracked or warped) discs.
CLEANING THE PLAYER AND THE MAGAZINE
To clean the PLAYER and the MAGAZINE, wipe with a soft, dry cloth.
For stubborn dirt, wet a soft cloth with a mild detergent solution made
by diluting one part detergent to 5 or 6 parts water, wring well, then
wipe off the dirt. Also use a dry cloth to wipe the surface dry. Do not
use volatile liquids such as benzene and thinner which are harmful to
the unit.
STORING DISCS
÷ Discs are made of the same kinds of plastic used for conventional
analog audio records. Be careful not to allow discs to warp; always
store discs in their cases vertically, avoiding locations with high heat
or humidity, or extremely low temperatures. Avoid leaving discs in
cars, since the seat of a car in direct sunlight can become unbelievably
hot.
÷ Always read and abide by the precautionary notes listed on disc
labels.
CD LENS CLEANER
The player's pickup lens should not become dirty in normal use, but
if for some reason it should malfunction due to soiling, consult your
nearest PIONEER authorized service center. Lens cleaners for CD
players are commercially available, but special care should be exercised
in their use since some may cause damage to the lens.
4
CAUTION RE: USE OF SHAPED CD's
This product is designed for use with conventional, fully circular CD's
only. Use of shaped CD's is not recommended for this product.
Pioneer disclaims all liability arising in connection with the use of
shaped CD's.
'
NOTES:
÷
In order to play an 8-cm (3-inch) CD you will need a special
Multi CD Magazine (JD-M108, JD-M308) which is sold separately.
Be sure to thoroughly read the Operating Instructions before using
it.
÷
8-cm (3-inch) CD Adapters
It is possible that even an adapter which meets recommended
standard CD specifications will not be usable with the CD player.
It is recommended that the special Multi CD Magazine (JD-M108,
JD-M308) be used.
÷
Never load an 8-cm (3-inch) CD or its adapter into a standard 12cm (5-inch) magazine. This may seriously damage the CD player.
÷
Do not insert only an 8-cm (3-inch) disc and adapter into the
supplied magazine.
En
Page 5
BEFORE OPERATING THE PLAYER
INSERT DISCS INTO THE 6-DISC MAGAZINE
Insert any discs which you may have into the supplied
magazine. Up to six discs may be inserted. The numbering of
the discs begins with 1 at the topmost tray, and then increases
in order downwards to 6 for the lowest tray. The magazine has
a window through which the pulled-out disc tray can be
checked. Even during playback, the number of the disc being
played back can be checked through this window.
1. Pull out only one disc tray.
2. Position discs with the label side downward.
Label side
downward
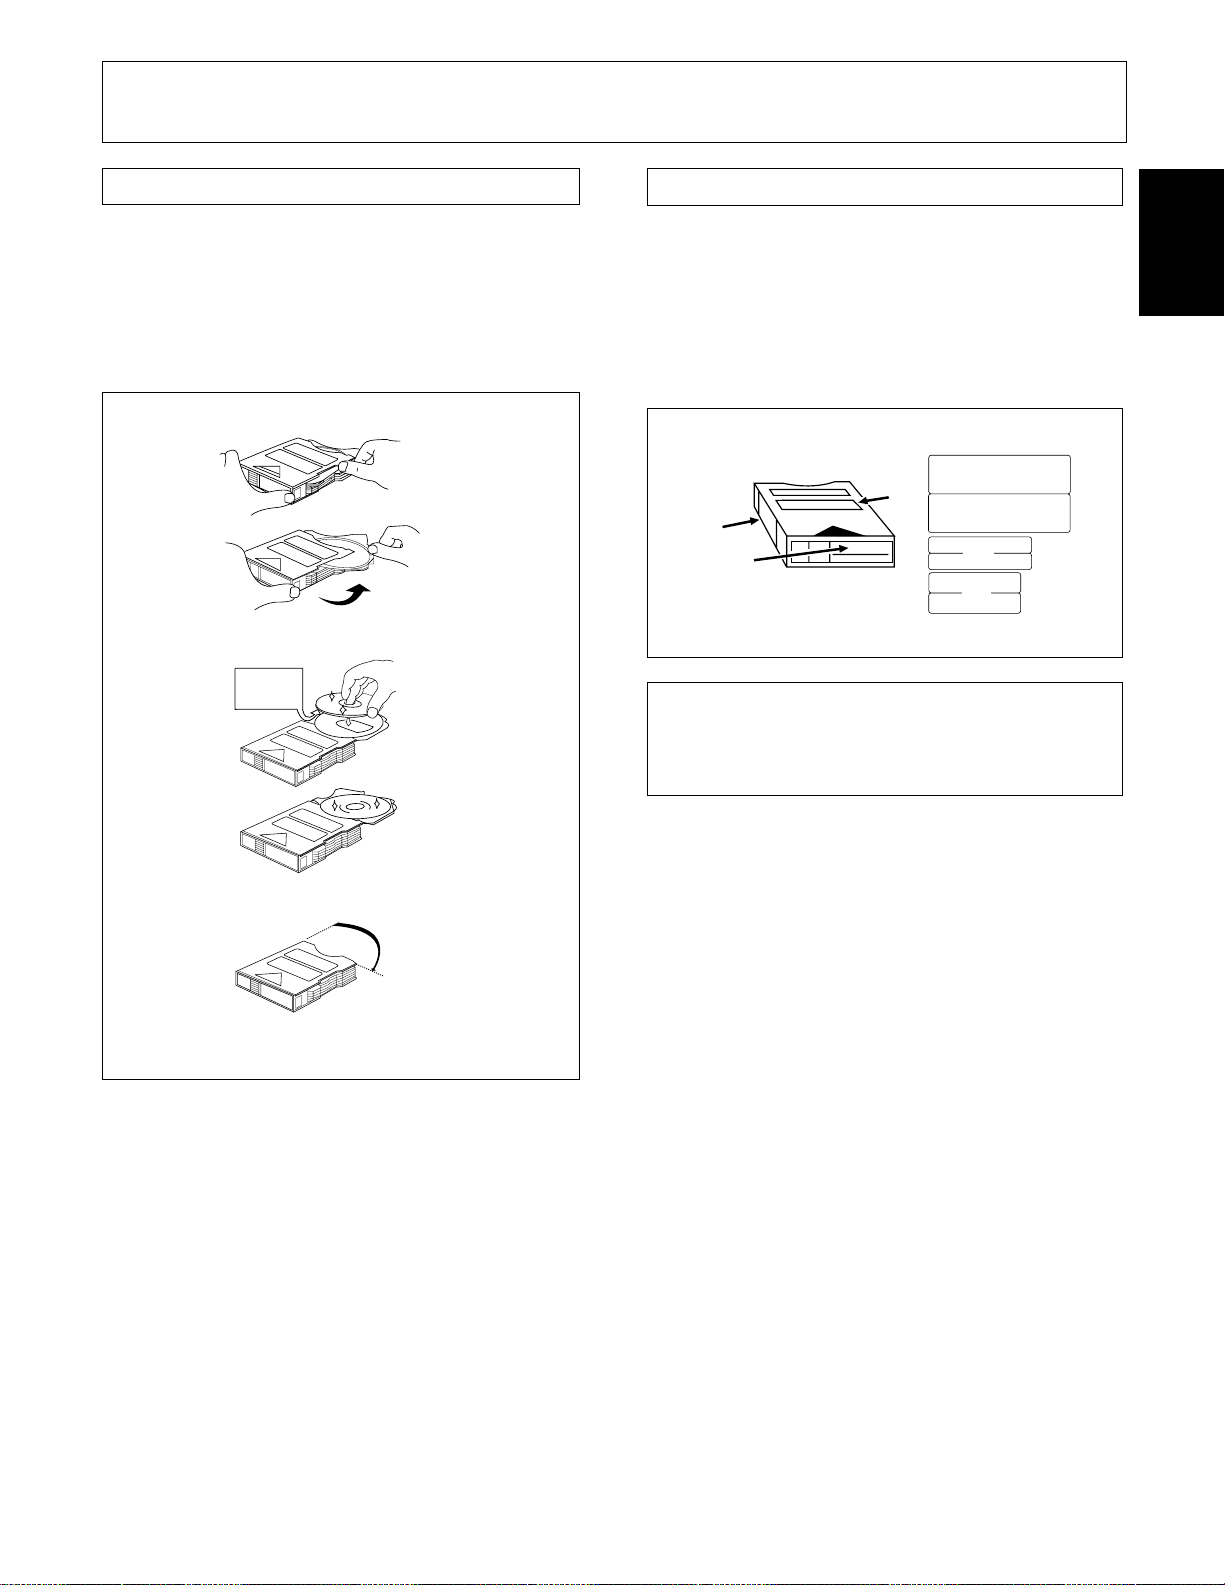
AFFIXING LABELS TO THE MAGAZINE
÷ Always attach the labels provided in the designated locations.
Correct operation may not be possible if labels or tape are
attached in other locations.
÷ The following are convenient ways of using labels:
A: For titles
B: For disc names
C: For classification
÷ Do not attach labels on top of other labels.
B
B
C
A
Additional magazines identical to the one supplied are
available as options (*JD-M100, JD-M200, JD-M300, JDM108, JD-M308). Please use them to make your own disc
library, with separate magazines for each artist or genre.
B
A
C
English
3. Put the disc tray back as it was originally.
4. Insert other discs by repeating steps 1 to 3.
CAUTIONS:
÷ Please make sure to only pull out one disc tray at a time.
(When a disc tray has been pulled out, do not pull out other
disc trays.)
÷ If discs are inserted label side upward, it will not be possible
for them to be played. Please make sure to insert them with
the label side downward.
÷ Objects other than discs (song cards, explanations of disc
contents, etc.), must never be inserted into the disc trays.
÷ Do not touch the playing surface of discs (iridescent side)
with hands or fingers.
* JD-M100/JD-M200/JD-M300
..................................... Magazine for 12-cm (5-inch) discs
JD-M108/JD-M308 ......... Magazine for 8-cm (3-inch) discs
NOTE:
Do not load 8-cm (3-inch) discs into the magazine for 12-cm (5inch) discs.
En
5
Page 6
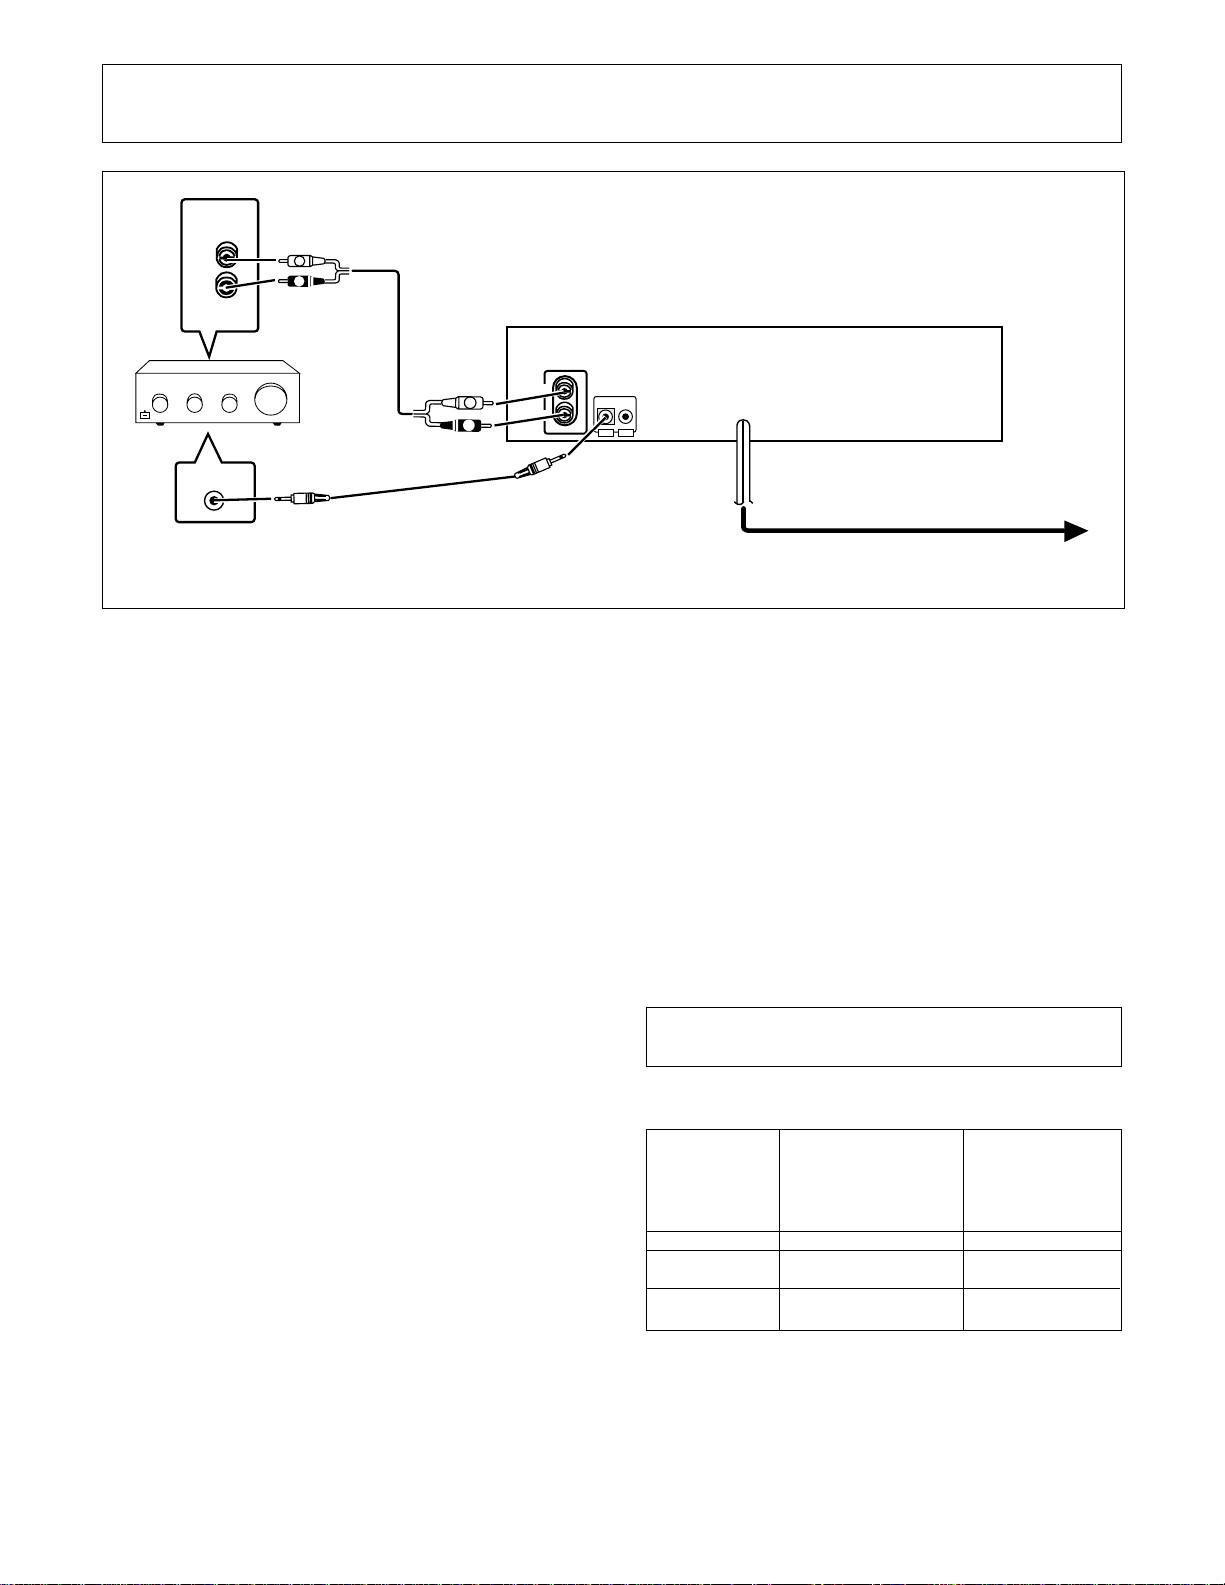
CONNECTIONS
CD
L
R
White
L
R
Red
÷ Before making or changing the connections, switch
off the STANDBY/ON switch and disconnect the power
cord from the AC outlet.
Output cable
CD player
LINE OUT
L
R
CONTROL
OUT
Stereo amplifier
White
L
R
Red
Control cable
Making connections
1. Connect the LINE OUT jacks of this unit to the
input jacks (CD or AUX) of the amplifier. Make
sure that the white plugs are connected to the
left (L) jacks and the red plugs to the right (R)
jacks.
÷ Be sure not to connect this unit to the amplifier’s
PHONO jacks, as sound will be distorted and normal
playback will not be possible.
2. Connect the power cord to a household AC wall
outlet or an AC outlet on your amplifier.
÷ Make sure plugs are inserted fully into the jacks and wall
outlet.
System remote control with a Pioneer stereo
amplifier that has the Î mark
When a Pioneer stereo amplifier bearing the Î mark is used,
connect the CONTROL IN jack on the rear panel of the CD
player to the CONTROL OUT jack of the amplifier. This will
enable the CD player to be controlled using the remote control
unit supplied with the stereo amplifier. If you do not plan to
use this feature, it is not necessary to connect CONTROL IN/
OUT jacks.
÷ Be sure to use the supplied control cable.
÷ The remote control unit supplied with the amplifier can be
used to control Play, Stop, Pause, Track/Disc Search and
Disc Change operations.
÷ For instructions regarding connections and operation, refer
to the operating instruction manual provided with your
stereo amplifier.
CONTROL
IN
OUT
Power cord
NOTES:
÷
When a control cord is connected to the player’s CONTROL
IN jack, direct control of the player with the remote control
unit is not possible. Operate the player with the remote
control unit by aiming it at the amplifier.
÷
Be sure to connect both of the control cord’s plugs securely
to the CONTROL IN and CONTROL OUT terminals. Do not
connect only one end of the cable.
÷
Be sure to turn off the power of the amplifier before
connecting the power cord and output cord.
Connecting the power cord
Connect the power cord to a household AC wall outlet or an
AC outlet on your amplifier.
÷ Make sure plugs are inserted fully into the jacks and wall
outlet.
AC POWER CORD CONNECTION AND
FUNCTIONS
Some functions cannot be carried out depending on the
connection of AC power cord.
Function
Timer playback
Program
memory
Delete program
memory
When the AC power
cord is connected to the
switched outlet of an
amplifier or audio timer
Yes
No
No
When the AC power
cord is connected to
the unswitched
outlet of an amplifier
or wall outlet
To AC
Wall outlet
No
Yes
Yes
6
En
For details, refer to the description of each function in these
Operating Instructions.
Page 7
NAMES AND FUNCTIONS OF PARTS
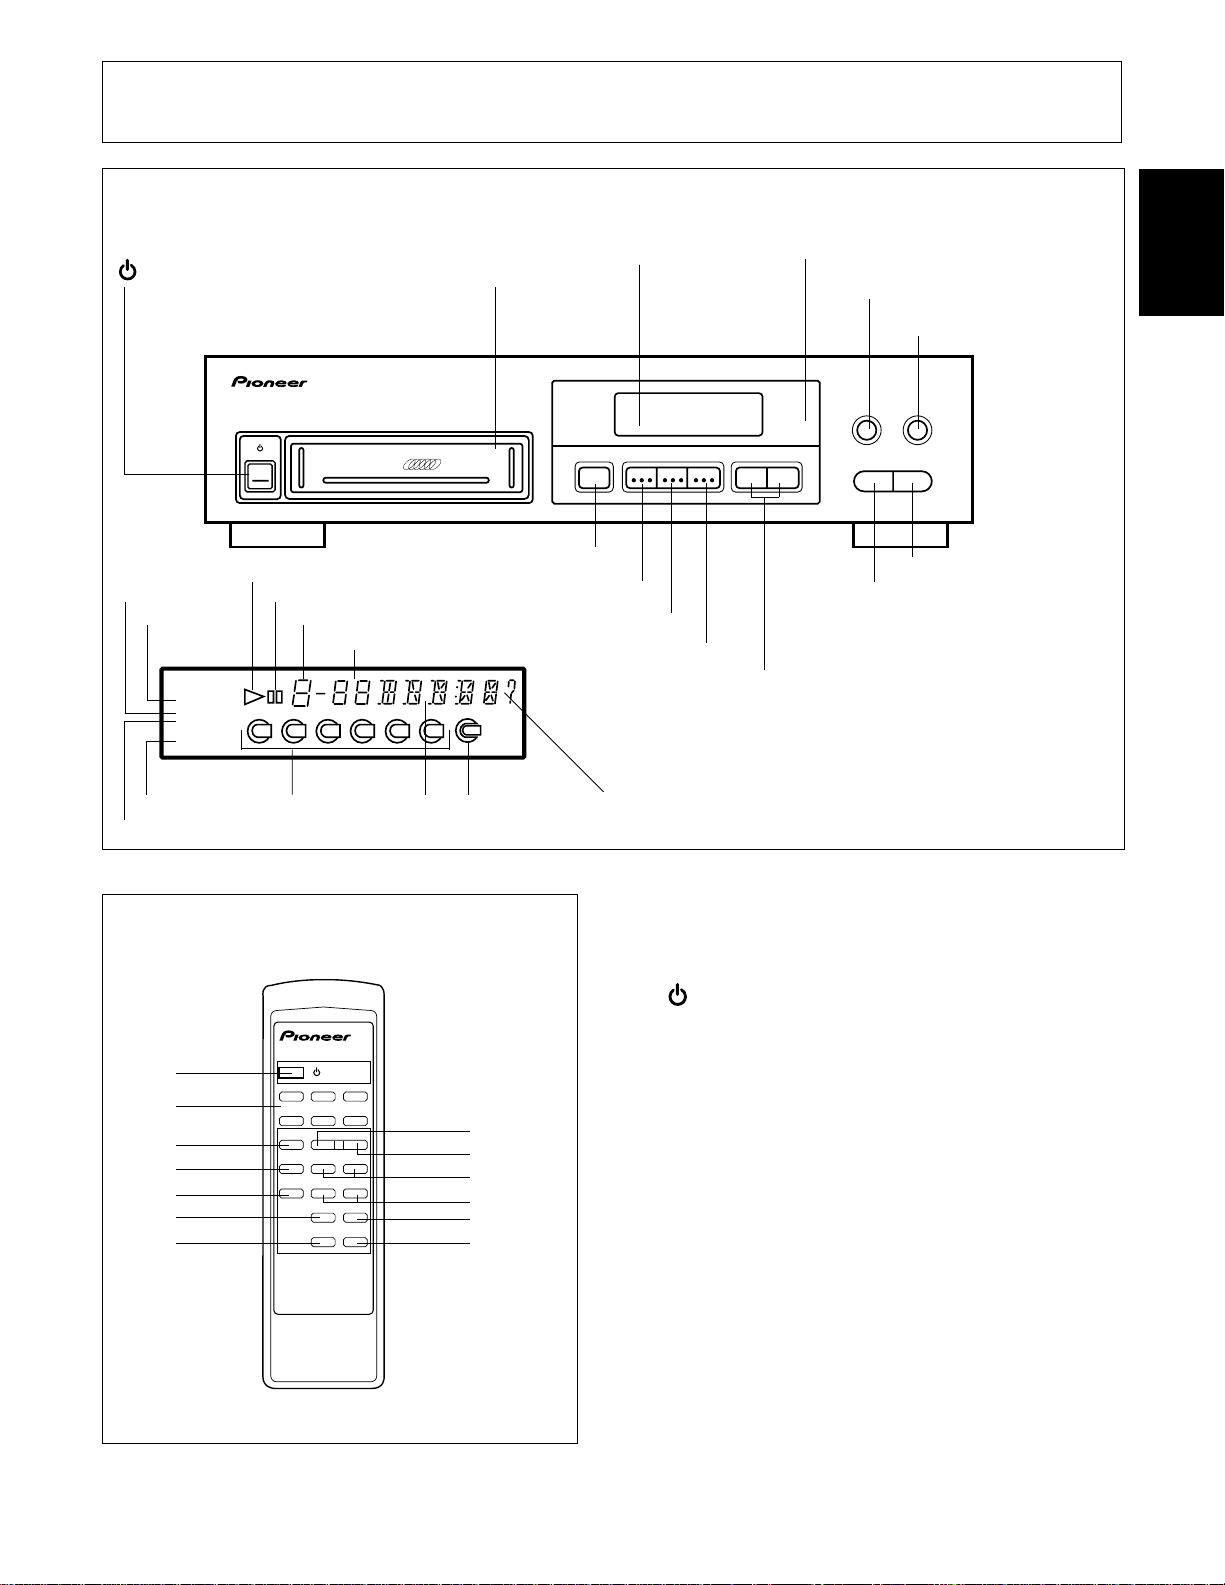
FRONT PANEL
Display window
STANDBY/ON
MAGAZINE
insertion slot
Remote sensor window (PD-M427 only)
Receive the signal from the remote control unit.
RANDOM
HI-LITE
English
MULTI COMPACT DISC PLAYER
STANDBY/ON
PD–M427
-DISC
MULTI CD
6
Play
RANDOM
DELETE
Pause
DISC number
TRACK number
TRACKDISC MIN SEC
DELETE
RANDOM
PROGRAM
REPEAT–1
REPEAT
2
1
4
3
5
MinutesDISC Seconds
DISC
6
SCAN
DISC SCAN
PROGRAM
REMOTE CONTROL UNIT (PD-M427 only)
'
EJECT REPEAT PROGRAM DISC
0
EJECT
REPEAT
PROGRAM
DISC TRACK MIN SEC
TRACK/MANUAL
41 ¢¡
RANDOM
Î
1-BIT•DLC
HI–LITE
STOP PLAY/PAUSE
7
6
DIRECT LINEAR CONVERSION
PLAY/PAUSE
STOP
DISC
TRACK/MANUAL
Remote control buttons with the same names or marks as
buttons on the front panel of the player control the same
operations as the corresponding front panel buttons.
1 STANDBY/ON button
2 DISC NUMBER buttons (DISC 1-DISC 6)
3 STOP button (7)
1
2
3
4
5
6
7
STANDBY/ON
DISC 1 DISC 2
DISC 4 DISC 5 DISC 6
783
1¡
RANDOM
HI–LITE
4¢
PROGRAM DELETE
'
Î
MULTI
COMPACT DISC PLAYER
REMOTE CONTROL UNIT
DISC 3
CLEARCHECK
8
9
10
11
12
13
4 RANDOM button
5 Hl-LlTE button
6 PROGRAM button
7 CHECK button
8 PAUSE button
9 PLAY button ( 3)
10 MANUAL search buttons (1 , ¡)
11 TRACK search buttons (4 , ¢)
12 DELETE button
13 CLEAR button
7
En
Page 8
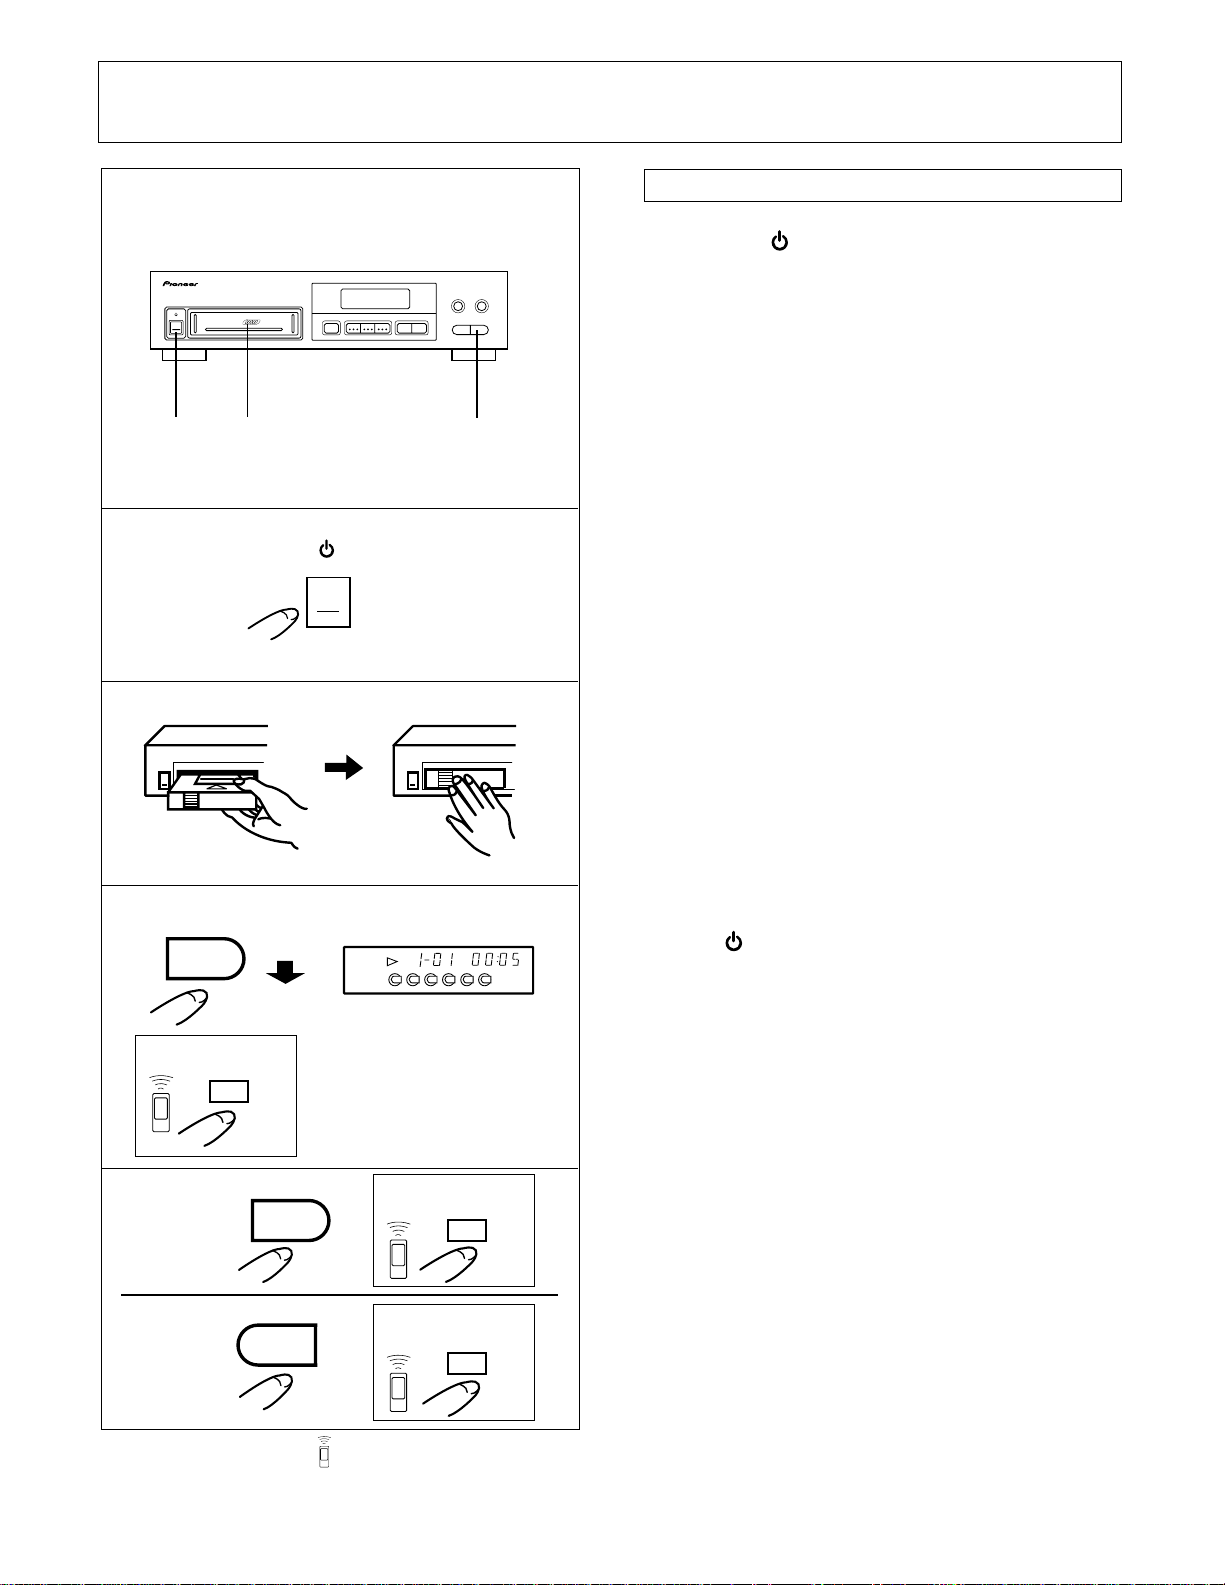
BASIC OPERATION
1
2
MULTI COMPACT DISC PLAYER
STANDBY/ON
1
-DISC
MULTI CD
6
23
'
EJECT REPEAT PROGRAM DISC
0
STANDBY/ON
DISC TRACK MIN SEC
TRACK/MANUAL
41 ¢¡
RANDOM
1-BIT•DLC
STOP PLAY/PAUSE
7
DIRECT LINEAR CONVERSION
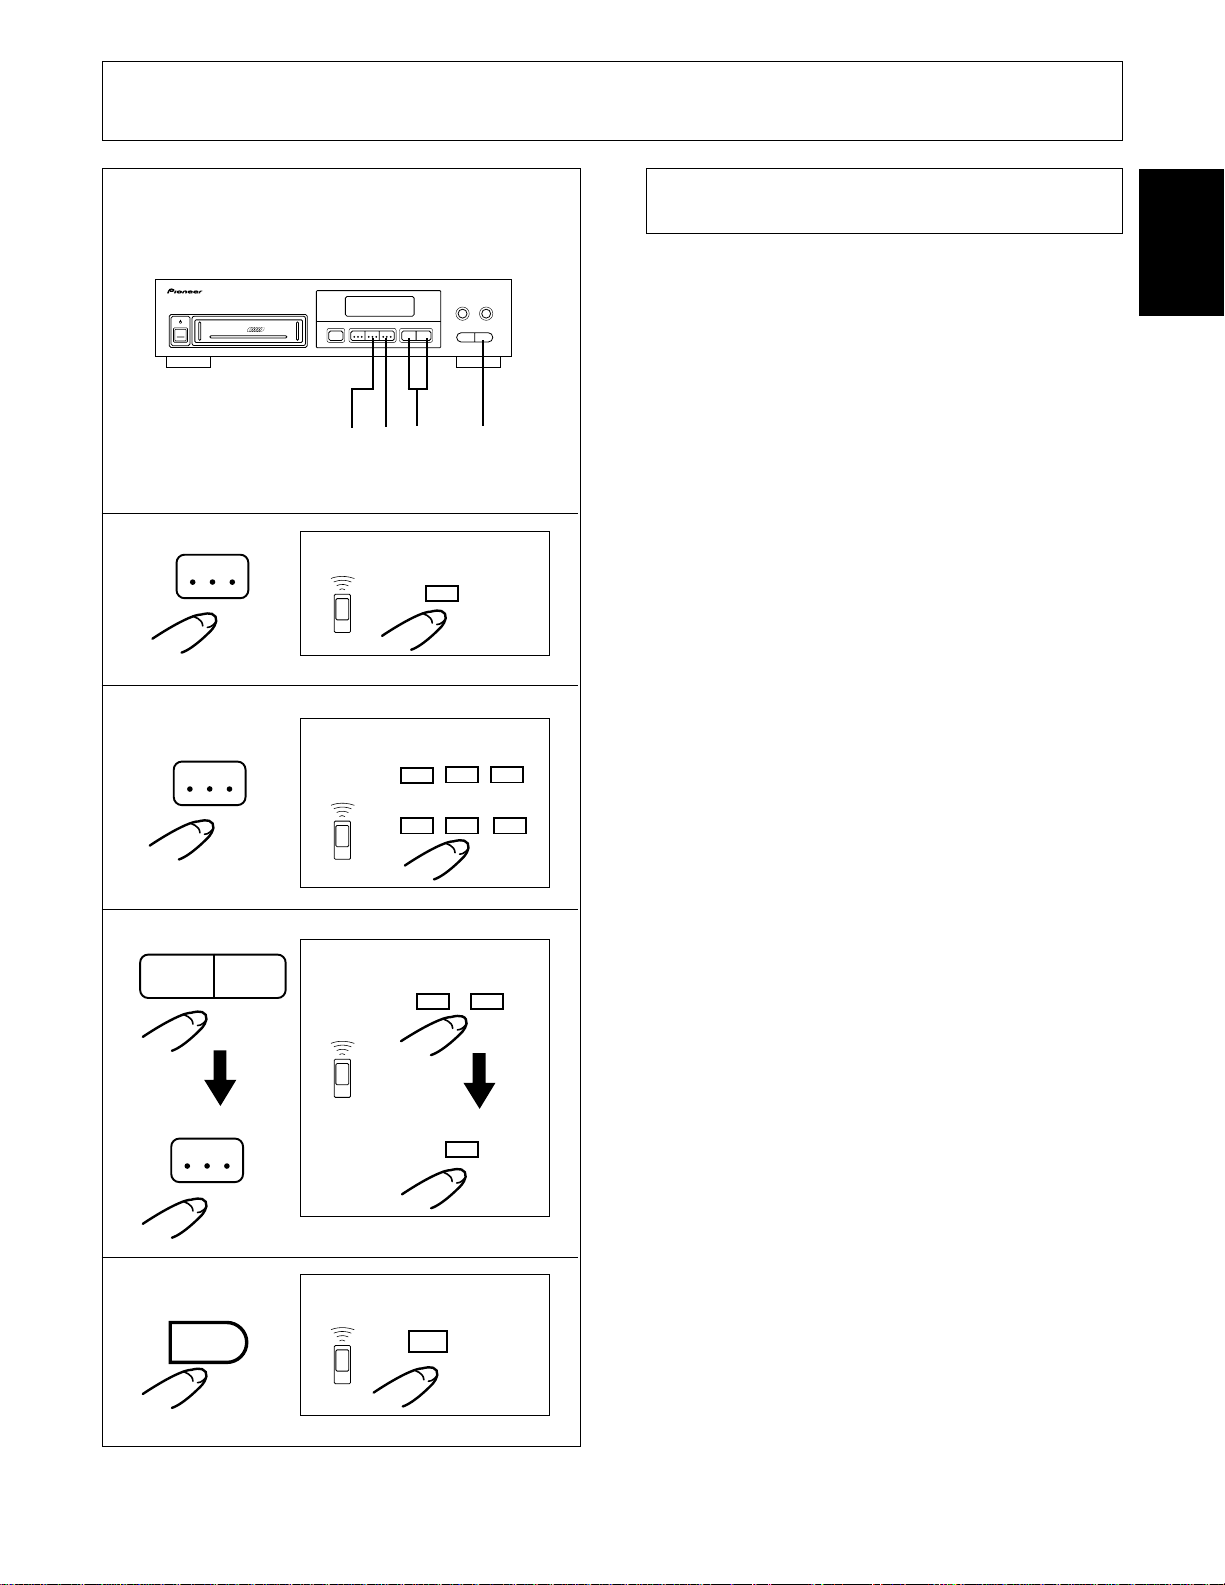
TO PLAY A COMPACT DISC
1. Press the STANDBY/ON switch to turn the
poweron.
HI–LITE
6
2. Insert a magazine, pushing it in until a click sound
is heard.
÷ Insert the discs to be played into the magazine beforehand.
(Refer to “BEFORE OPERATING THE PLAYER” on page 5.)
÷ When the power is turned off (in standby mode), inserting a
magazine automatically turns on the power (Automatic Power
On function).
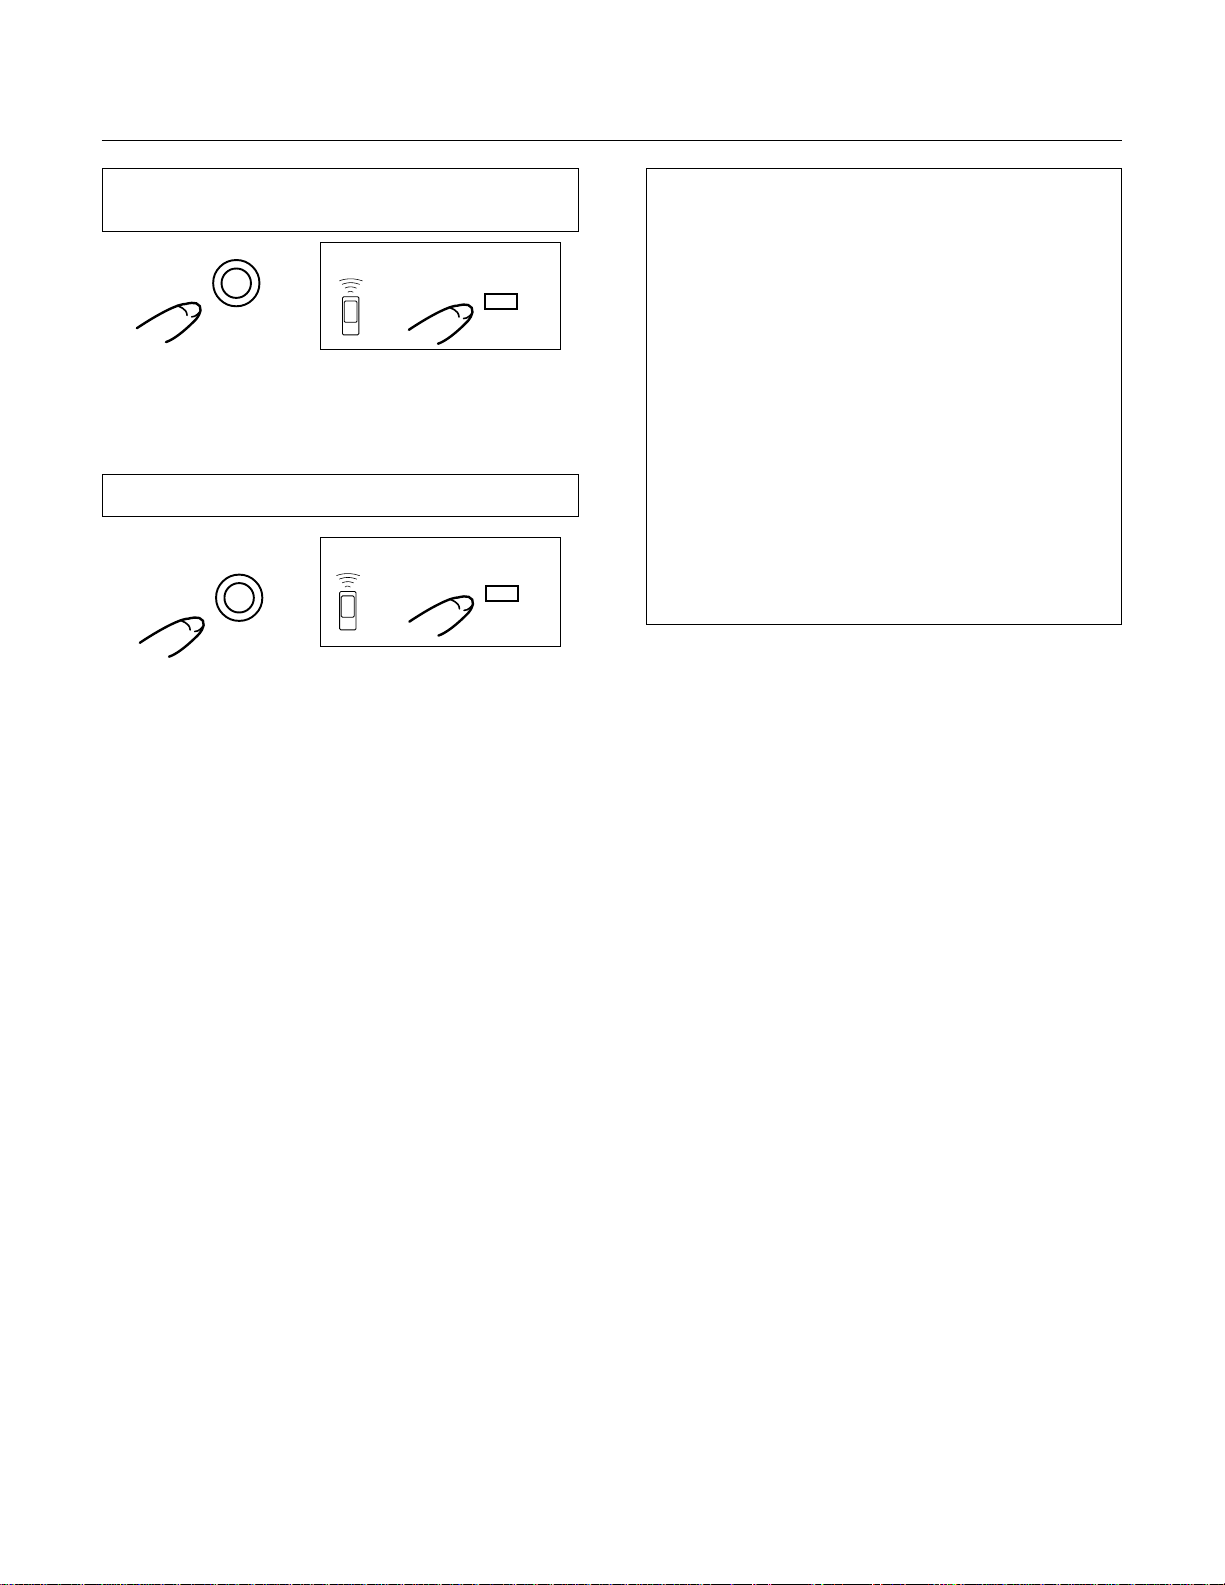
3. Press the 6 button to start playback.
To pause playback temporarily:
Press the 6 button during playback. The 8 indicator lights
and playback is paused at that point. Pressing the 6 button
again or 3 button resumes playback from the position where
pause mode was entered.
To stop playback:
Press the 7 button. The player returns to the beginning of the
first track on the disc at which playback was stopped. If the 7
button is pressed twice, the player returns to the beginning
of the first track on the first disc and enters stop mode.
NOTE:
When the power is turned off while a magazine is in the player,
the player memorizes which disc was played just before the
power was turned off. Thus, when the power is next turned
on, pressing the 6 button starts playback from the first
track on the memorized disc.
PLAY/PAUSE
3
TRACKDISC MIN SEC
6
12345
6
(PD-M427 only)
3
PLAY/PAUSE
PAUSE
88
8
88
77
7
77
STOP
6
STOP
7
Operations indicated the [ ] mark are performed with the
remote control unit.(PD-M427 only)
(PD-M427 only)
8
(PD-M427 only)
7
8
To stop playback and take out the magazine:
Press the EJECT button (0), remove the magazine, and then
press the
STANDBY/ON switch to turn off the power.
Even when the power is turned off (in standby mode), the
magazine will be ejected by pressing the EJECT button.
Cautions regarding handling of magazines:
÷ When inserting a magazine into the player, make sure that
the direction of insertion is correct.
÷ After use, store in the case provided. Do not place in
locations subject to high temperatures or exposed to direct
sunlight.
÷ Do not take magazines apart.
÷ Be careful not to drop, or hit magazines against things. Also
do not apply strong force to trays which have been withdrawn.
÷ Application of benzene, thinner, insecticide or other volatile
liquids to a magazine may damage the surface, so keep
magazines away from such substances.
En
Page 9
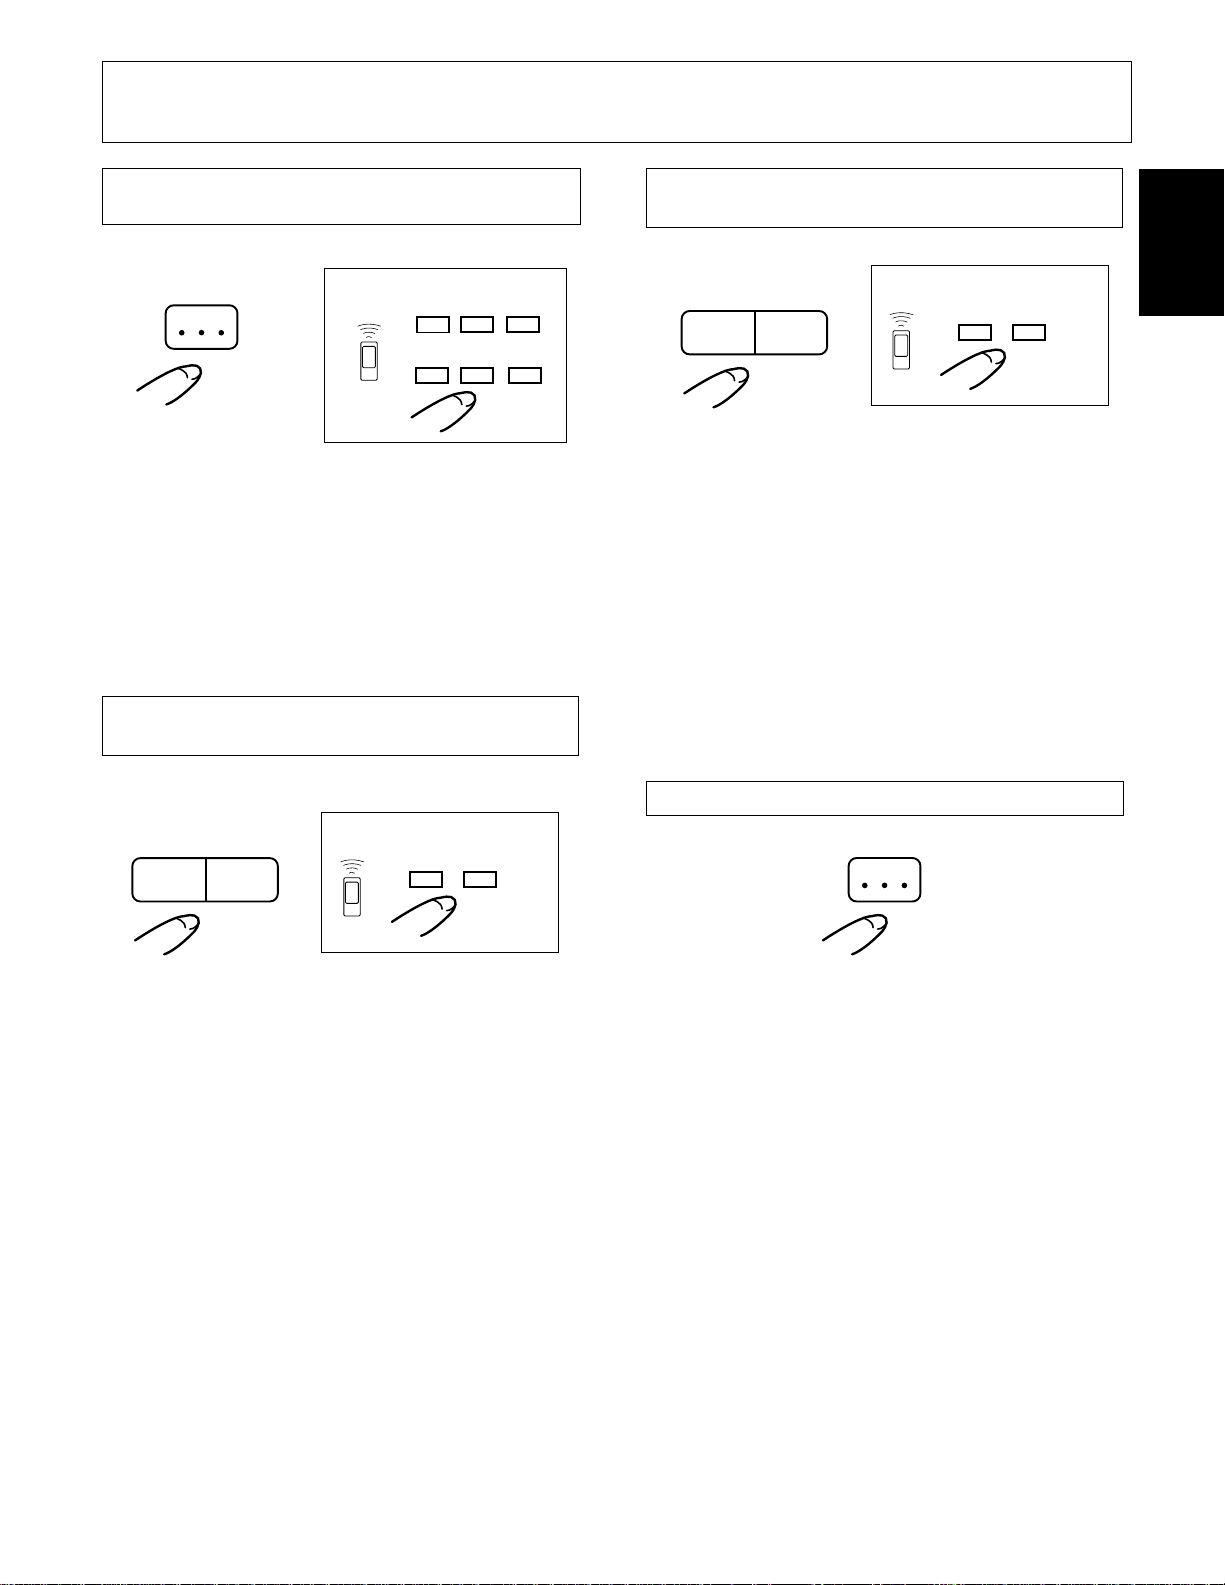
VARIOUS OPERATIONS
DISC SEARCH - TO SEARCH FOR A
PARTICULAR DISC
During playback or stop mode
DISC
Use the DISC button to select the desired disc number, then
press the 6 button, or one of the DISC NUMBER (DISC 1-
DISC 6) buttons; the player will then search for the selected
disc and begin playback from the beginning of the disc.
(PD-M427 only)
DISC 1
DISC 4 DISC 5
DISC 2 DISC 3
DISC 6
NOTES:
÷
If “no DISC” appears on the display, you have pressed the
disc number of a tray which does not contain a disc.
÷
During program playback, Disc Search cannot be carried
out.
TRACK SEARCH - TO SEARCH FOR A
PARTICULAR TRACK
During playback, pause or stop mode
TRACK/MANUAL
41
¡¢
(PD-M427 only)
4
¢
MANUAL SEARCH - TO SEARCH FOR A
PARTICULAR PASSAGE
During playback or pause mode
TRACK/MANUAL
41
While the ¡ ¢ button is kept pressed, playback rapidly
advances toward the end of the disc. When playback reaches
the end of the disc, the player enters pause mode and “END”
is displayed. While the 4 1 button is kept pressed,
playback rapidly reverses toward the beginning of the disc.
When the desired passage is reached, release the ¡ ¢
button or 4 1 button. The player enters original mode
(playback or pause) where ¡ ¢ button or 4 1 button
is released.
¡¢
(PD-M427 only)
1
¡
NOTES:
÷
During normal playback, Manual Search can be carried out
on one disc only.
÷
During program playback, Manual Search can be carried
out in one program step only.
TO REPEAT PLAYBACK (REPEAT PLAY)
REPEAT
English
When the ¡ ¢ button is pressed once or a number of
times, playback advances to the beginning of a track located
after the track being played. The position of the located track
corresponds to the number of times the button is pressed.
When the 4 1 button is pressed once, playback returns
to the beginning of the track being played. When this button
is pressed more than once, playback is returned to a track
located before the track being played.
÷ When the ¡ ¢ button or 4 1 button is operated
in pause mode or stop mode, press the 6 button to start
playback.
NOTES:
÷
During program playback, the
41
(or 4) button can be used to select the
¡¢
(or ¢) button or
programmed track.
÷
During normal playback, Track Search can be carried out on
one disc only. In stop mode, this operation can be carried
out from 1st track through 99th track.
To repeatedly play the displayed track, press the REPEAT
button once. The REPEAT-1 indicator lights. The REPEAT
button can be pressed in any playback mode.
To repeatedly play all tracks on all of the discs in normal
playback mode or in the specified playback mode (Program
playback, Delete program playback or Random playback),
press the REPEAT button twice. The REPEAT indicator
lights.
÷ To exit repeat mode, press the REPEAT button so that the
REPEAT-1 or REPEAT indicator goes off.
9
En
Page 10
VARIOUS OPERATIONS
RANDOM PLAYBACK - TO PLAY ALL TRACKS
IN RANDOM ORDER
RANDOM
Press the RANDOM button. All tracks on all discs are played
in a random order. To play tracks other than the deleted tracks
in a random order, press the RANDOM button after carrying
out the Delete Program procedure. See “Delete Program
Playback” on page 13.
(PD-M427 only)
RANDOM
MAGAZINE HI-LITE SCAN
During stop mode
HI-LITE
When the Hl-LlTE button is pressed once during stop mode,
playback starts from a point 1 minute after the beginning of
the first track, and the first track of each disc is played for
about 10 seconds. The DISC SCAN indicator blinks during
Disc Scan mode. After the first tracks of all discs are scanned,
the player enters stop mode.
When the Hl-LlTE button is pressed twice during stop mode,
playback starts from a point 1 minute after the beginning of
the track, and each track is played for about 10 seconds. The
SCAN indicator blinks during Track Scan mode. After all tracks
of all discs are scanned, the player enters stop mode.
(PD-M427 only)
HI-LITE
Timer playback:
By using a commercially available audio timer, it is possible
to initiate playback at any time automatically.
1. Insert a magazine into the magazine slot.
2. Set the time at which you wish playback to begin.
The timer will supply power to both the amplifier and the
player at the preset time, turning all the components on
and initiating the playback mode. Playback starts from the
first track on the first disc.
Cautions:
÷ Do not unplug the power cord or do not turn off the
power with an audio timer during playback, as this
could result in damage to the disc.
÷ If a power failure occurs while the power is turned off
(standby mode), the power is automatically turned on
with the timer playback function when the power is
restored.
THEREFORE, DISCONNECT THE AC POWER CORD WHEN
THE PLAYER IS NOT USED FOR A LONG PERIOD OF TIME.
To exit Magazine Hi-Lite Scan mode:
Press the 7, 6 or DISC NUMBER (DISC 1-DISC 6) button.
When the 6 button is pressed, normal playback starts from
the current point. When the DISC NUMBER (DISC 1-DISC 6)
button is pressed, the selected disc is played from the
beginning.
NOTES:
÷
Hi-Lite Scan can be carried out from the desired elapsed
time of the track. During playback, press the HI-LITE
button at the point you want to start Hi-Lite Scan playback.
The player memorizes the minute and second of the point
and Track Scan playback is carried out from the memorized
point on each track.
÷
Each time the HI-LITE button is pressed, the mode switches
between Disc Scan and Track Scan.
÷
Programming of only desired tracks is possible during Track
Scan playback. See “Direct program” on page 12.
÷
During Track Scan playback, you can skip to the desired
track with the 4 1 button or ¡
÷
When the REPEAT button is pressed, Hi-Lite Scan playback
¢
button.
will be repeated.
÷
When playback time of a track is less than one minute or is
shorter than the memorized time, Hi-Lite Scan playback is
carried out from the beginning of the track for about 10
seconds. When playback time of a track is less than 10
seconds, the track is played from the beginning to the end.
10
En
Page 11
TO PLAY ONLY DESIRED TRACKS/DISCS
PROGRAM PLAYBACK - TO PROGRAM
TRACKS/DISCS IN DESIRED ORDER
1. With the player stopped, press the PROGRAM
button, so that the PROGRAM indicator lights.
2. Use the DISC button or one of the DISC NUMBER
(DISC 1-DISC 6) buttons to select the desired disc
number.
The selected disc number will be displayed.
3. Then, press the 41 or ¡¢ button to
select the desired track.
The selected track number will be displayed.
4. Finally press the PROGRAM button, or wait for
about two seconds; the program will be stored in
memory.
If the PROGRAM button is pressed after selecting only
the disc number, the "AL" indicator will appear, indicating
selection of the "Disc All Program" mode (the entire
contents of the disc is entered into the program as a single
step).
While the "AL" indicator is displayed, however, if the 4
1 or ¡¢ button is used to designate a track number
and the PROGRAM button is then pressed (or after two
seconds elapses), the selected track will be stored as that
program step.
5. Repeat steps 2, 3 and 4 to program other tracks.
6. Press the 6 button.
The tracks are played in the programmed order. When all
programmed tracks have been played, the player enters
stop mode.
1
2
MULTI COMPACT DISC PLAYER
STANDBY/ON
-DISC
MULTI CD
6
PROGRAM
DISC
DISC TRACK MIN SEC
'
EJECT REPEAT PROGRAM DISC
0
1,4
TRACK/MANUAL
41 ¢¡
3
2
(PD-M427 only)
PROGRAM
(PD-M427 only)
DISC 1
DISC 4 DISC 5
RANDOM
HI–LITE
STOP PLAY/PAUSE
7
6
1-BIT•DLC
DIRECT LINEAR CONVERSION
6
DISC 2 DISC 3
DISC 6
English
TRACK/MANUAL
3
41
PROGRAM
4
6
PLAY/PAUSE
6
¡¢
(PD-M427 only)
(PD-M427 only)
¢
4
PROGRAM
3
NOTE:
When a track is selected with the 4 1 or ¡ ¢ button
in step 3, the displayed track number is automatically
programmed if the 4 1 or ¡ ¢ button is not pressed
within 2 seconds. Therefore, be sure to press the 4 1 or
¡ ¢
button sequentially until the desired track number
appears on the display.
To stop Program playback, press the 7 button.
To exit program mode:
During program playback, select a DISC number with the
DISC NUMBER button and then press the 6 button. The
player enters normal playback mode and playback starts from
the beginning of the selected disc.
÷ Programs containing up to 32 steps can be created.
÷ To go to the previous or next step in a program, press the
4 1 or ¡ ¢ button.
÷ If the magazine is in the player, the program contents will
not be erased even if the power is turned off.
NOTE:
During Delete programming the PROGRAM button cannot
be operated.
11
En
Page 12

TO PLAY ONLY DESIRED TRACKS/DISCS
Direct Program:
During normal playback or Magazine Hi-Lite Scan playback,
the track being played can be programmed.
1. Press the PROGRAM button to enter the program
mode.
2. To search for a desired track during normal play
back, it is possible to skip to succeeding tracks by
pressing the 4 1 or ¡ ¢ button.
Also, Magazine Hi-Lite Scan function can be used to move
from track to track through the disc.
3. If you wish to program the track currently playing,
press the PROGRAM button while the track is
playing.
÷ Direct programming is not possible during program
playback.
To check the program contents (PD-M427 only) :
During program mode, set the player to stop mode and press
the CHECK button on the remote control unit. The program
contents will be displayed in the programmed order.
÷ After confirming the last program step, the display will
show “0-00”.
PROGRAMMING A PAUSE (PD-M427 only)
Inserting a pause in your program can be very useful when
carrying out recording. Press the 8 button on the remote
control unit instead of entering a track number. “PA” appears
on the display panel.
÷ For example, when recording on both sides of a cassette
tape, if you program a pause after the last track to be
recorded on the first side, program playback will pause at
that point to allow you to switch tape sides. To resume
program playback after the player enters pause mode,
press the 8 button on the remote control unit or 6
button on the front panel.
To erase a program (PD-M427 only) :
During program mode, press the CLEAR button on the
remote control unit.
The last program step is erased and the contents of the
previous program step are displayed.
NOTE:
Contents of a program can be erased during playback as well.
However tracks preceding the currently playing track cannot
be erased in this way.
To clear all of the program contents:
A. During stop mode, press the 7 button.
B. When the magazine is ejected, the program contents will
be cleared.
To modify the program contents (PD-M427 only) :
1. During program mode, set the player to stop
mode and press the CHECK button on the remote
control unit so that the program step to be
corrected appears on the display.
2. Enter the new disc number with the DISC
NUMBER (DISC 1-DISC 6) buttons and then press
the 4 1 or ¡ ¢ button so that the new
track number appears on the display.
3. Press the PROGRAM button.
÷ Repeat steps 1 through 3 to change other tracks as
desired.
÷ If the 4 1 or ¡ ¢ button is not pressed within
2 seconds when correcting the track number, the
displayed track number is automatically memorized.
NOTES:
÷
A pause can be programmed only when the program
procedure is performed under stop mode.
÷
A pause cannot be programmed at the beginning of a
program (P–01), nor can two pauses be programmed one
after the other
÷
A pause inserted in a program is counted as one step.
÷
If a pause is programmed as the last step of a program, the
player will not enter the pause mode.
12
En
Page 13

TO PLAY ONLY DESIRED TRACKS/DISCS
STANDBY/ON
DISC 1 DISC 2
DISC 3
1
2
DISC
DISC 4 DISC 5 DISC 6
783
1¡
RANDOM
HI–LITE
4¢
PROGRAM DELETE
CLEARCHECK
'
Î
MULTI
COMPACT DISC PLAYER
REMOTE CONTROL UNIT
(PD-M427 only)
(PD-M427 only)
2
6
3
1,4
DELETE
DISC 2 DISC 3
DISC 1
DISC 4 DISC 5
DISC 6
DELETE PROGRAM PLAYBACK - TO DELETE
UNDESIRED TRACKS/DISCS (PD-M427 only)
1. With the player stopped, press the DELETE button,
so that the DELETE indicator lights.
2. Use the DISC button or one of the DISC NUMBER
(DISC 1 - DISC 6) buttons to select the disc
number.
The selected disc number will be displayed.
3. Then, press the 41 or ¡¢ button to
select the track number.
The selected track number will be displayed.
4. Press the DELETE button, or wait two seconds;
the track to be deleted will be input.
If the DELETE button is pressed after selecting the disc
number only, the "AL" indicator will appear, indicating
selection of the "Disc All Delete" mode (the entire disc
contents will be deleted from the program memory). While
the "AL" indicator is displayed, however, if the 41 or
¡¢ button is used to designate a track number and
the DELETE button is then pressed (or after two seconds
elapses), the selected track will be deleted as that program
step.
5. Repeat steps 2, 3 and 4 to delete other tracks.
6. Press the 6 button.
All tracks other than deleted tracks/discs are played in the
order of the discs and track numbers. When tracks have
been played, the player enters stop mode.
English
3
TRACK/MANUAL
41
4
6
PLAY/PAUSE
6
¡¢
(PD-M427 only)
(PD-M427 only)
4
DELETE
3
¢
NOTE:
When a track is selected with the 4 1 or ¡ ¢ button
in step 3, the displayed track number is automatically
programmed if the 4 1 or ¡ ¢ button is not pressed
within 2 seconds. Therefore, be sure to press the 4 1 or
¡ ¢
button sequentially until the desired track number
appears on the display.
To stop Delete program playback, Press the 7
button.
÷ Track number 33 or above cannot be deleted.
÷ To go to the previous or next disc/track other than the
deleted disc/track, press the 4 1 or ¡ ¢ button.
÷ If the magazine is in the player, the delete program contents
will not be erased even if the power is turned off.
NOTE:
After programming for Program playback or during Program
playback mode, Delete programming can not be carried out.
To clear all of the Delete program contents:
A During stop mode, press the 7 button.
B When the magazine is ejected, the program contents will
be cleared.
C Press the CLEAR button on the remote control unit during
stop mode or play mode. When the CLEAR button is
pressed during Delete program playback mode, the player
enters normal playback mode.
13
En
Page 14

TROUBLESHOOTING
Incorrect operations are often mistaken for trouble and malfunctions. If you think that there is something wrong with this component, check the
points below. Sometimes the trouble may lie in another component. Investigate the other components and electrical appliances being used.
If the trouble cannot be rectified even after exercising the checks listed below, ask your nearest PIONEER authorized service center or your dealer
to carry out repair work.
Symptom
Magazine is not expelled when the EJECT
button is pressed.
When playback is started, it stops
immediately.
Pauses or stops during playback.
No sound
Sound is distorted, noise is output.
The picture of the TV screen is fluctuating
or FM broadcast has noise interference.
Remote control will not function.
(PD-M427 only)
Cause
÷ Power plug is disconnected from outlet.
÷ Disc is loaded upside down.
÷ Smudges, etc., on the disc.
÷ Output cords are connected incorrectly or
loosely.
÷ Incorrect operation of stereo amplifier.
÷ Pin plugs and/or amplifier terminals are dirty.
÷ Player is in pause mode.
÷ Incorrect connections.
÷ Pin plugs and/or amplifier terminals are dirty.
÷ Interference is being picked up from a TV set.
÷ Interference is being picked up from the CD
player.
÷ Dead batteries.
÷ Too far from player or wrong angle.
÷ Obstruction between player and remote control
unit.
Remedy
÷ Connect plug to amplifier or wall outlet.
÷ Load the disc correctly with the label side
DOWN.
÷ Clean the smudges from the disc and then
play it again.
÷ Connect properly.
÷ Check the settings of amplifier switches
and sound volume controls.
÷ Clean away dirt.
÷ Press the 6 (3 or 8) button.
÷ Connect to amplifier’s AUX or CD terminals.
Do not connect to PHONO terminals.
÷ Clean away dirt.
÷ Switch OFF TV set, or move player away
from TV set.
÷ Unplug the AC power cord, or move the
player away from TV or tuner.
÷ Replace batteries.
÷ The distance between remote control unit
and player should be no more than about 7
meters (23 feet).
The operational angle against the front
panel is within 30° from right or left end of
player.
÷ Relocate remote control unit or remove
obstruction.
Abnormal functioning of this unit may be caused by static electricity, or other external interference. To restore operation, turn the
power off and then on again, or unplug the AC power cord and then plug it in again.
SPECIFICATIONS
General
Type ............................... Compact disc digital audio system
Power requirements ........................ AC 110-127/220-240 V
(switchable), 50/60Hz
Power consumption .....................................................12 W
Operating temperature...................................... +5°C-+35°C
(+41°F– +95°F)
Weight (without package) ......................... 3.7 kg (8 lb, 3 oz)
External dimensions ............ 420(W) x 294 (D) x 105 (H) mm
16-9/16 (W) x 11-9/16 (D) x 4-1/8 (H) in
Audio section
Frequency response ...................................... 2 Hz – 20 kHz
Output voltage ............................................................. 2.0 V
Wow and flutter ................................ Limit of measurement
(0.001% W.PEAK) or less (EIAJ)
Channels .................................................. 2-channel (stereo)
14
Output terminal
Audio line output
Control input/output jacks
Accessories
÷ Remote control unit (PD-M427 only) .............................. 1
÷ Size AAA/R03 dry batteries (PD-M427 only) ................... 2
÷ Six-compact-disc magazine ............................................. 1
÷ Control cable ................................................................... 1
÷ Output cable ................................................................... 1
÷ Operating instructions .................................................... 1
NOTE:
Specifications and design subject to possible modification
without notice, due to improvements.
The Magazine Type Multi CD Players with mark and
the Magazines with the same mark are compatible for 5 inch
(12 cm) discs.
Published by Pioneer Electronic Corporation.
Copyright © 1999 Pioneer Electronic Corporation.
All rights reserved.
En
Page 15

ÍNDICE
Gracias por la adquisición de este producto Pioneer.
Para saber cómo utilizar correctamente su modelo, lea
cuidadosamente este manual de instrucciones. Después de
haber finalizado su lectura, guárdelo en un lugar seguro para
futuras referencias.
En algunos países o regiones, la forma de la clavija de
alimentación y de la toma de corriente pueden ser diferentes
a la indicada en las ilustraciones explicatorias, sin embargo el
método de conexión y operación de la unidad es idéntico.
ADVERTENCIA: PARA EVITAR INCENDIOS Y
DESCARGAS ELÉCTRICAS, NO EXPONGA ESTE APARATO
A LA LLUVIA NI A LA HUMEDAD.
SELECTOR DE TENSIÓN DE LÍNEA
Las tensiones de la red eléctrica en Arabia Saudí son de
127 V y 220 V solamente.
El selector de tensión está situado en el panel posterior de
este reproductor. Antes de que el reproductor salga de
fábrica, el selector se ajusta al valor de la tensión del país
de destino.
Compruebe que esté correctamente ajustado antes de
enchufar el cable de alimentación a la toma de alimentación.
Si la tensión no está correctamente ajustada, ajuste el
selector del modo siguiente:
÷ Asegúrese de haber desenchufado el cable de
alimentación de la toma de alimentación antes de realizar
este ajuste.
÷ Utilice un destornillador de tamaño medio (cabeza plana).
Inserte la punta del destornillador en la ranura del
selector y gírelo de modo que la marca de la tensión de
su zona señale a la flecha.
CONFIRMACIÓN DE LOS ACCESORIOS ........................ 15
INSTALACIÓN DE LAS PILAS EN LA UNIDAD DE
CONTROL REMOTO ................................................... 16
OPERACIÓN A CONTROL REMOTO .............................. 16
PRECAUCIONES REFERENTES AL MANEJO ................. 17
ANTES DE UTILIZAR EL REPRODUCTOR....................... 18
CONEXIONES .................................................................. 19
NOMBRES Y FUNCIONES DE LOS CONTROLES .......... 20
FUNCIONAMIENTO BÁSICO........................................... 21
DIVERSAS OPERACIONES .............................................. 22
PARA REPRODUCIR SOLAMENTE LAS CANCIONES/
DISCOS DESEADOS ................................................... 24
SOLUCIÓN DE PROBLEMAS .......................................... 27
ESPECIFICACIONES ........................................................ 27
CONFIRMACIÓN DE LOS
ACCESORIOS
1
4
2
'
Î
3
5
Español
220-240V 110-127V
1 1 cartucho de 6 discos compactos
(Llamado cartucho de 6 discos en las explicaciones.)
NOTA:
El cartucho de 6 discos compactos es sólo para discos de
12 cm.
2 1 cable de salida
3 1 cable de control
4 1 unidad de control remoto (sólo en el PD-M427)
5 2 pilas secas (AAA/R03) (sólo en el PD-M427)
15
Sp
Page 16

INSTALACIÓN DE LAS PILAS EN LA UNIDAD
DE CONTROL REMOTO (sólo en el PD-M427)
Para usar la unidad de control remoto, apunte el transmisor de
2
1
3
señales infrarrojas de la unidad hacia el sensor de control
remoto (REMOTE SENSOR) del panel delantero del
reproductor. La unidad de control remoto puede emplearse a
una distancia de aproximadamente 7 metros del sensor de
control remoto, y en un ángulo de hasta 30 grados.
OPERACIÓN A CONTROL
REMOTO (sólo en el PD-M427)
Abra la tapa del compartimiento de las pilas, situado en la
parte posterior de la unidad de control remoto, e inserte las
pilas (tamaño “AAA” (IEC R03)), asegurándose de alinear
correctamente las polaridades ª y ·.
NOTAS:
÷
Para evitar que las pilas sufran pérdidas, extráigalas cuando
no vaya a usar la unidad de control remoto por un período
prolongado de tiempo (un mes o más). Si las pilas sufren
pérdidas, limpie cuidadosamente el interior del
compartimiento hasta eliminar todo residuo de electrólito
de pila, y reemplace las pilas por pilas nuevas.
÷
No permita que libros u otros objetos queden encima de la
unidad de control remoto, ya que los botones podrían
presionarse, haciendo que las pilas se desgasten más
rápido.
El uso incorrecto de las pilas puede causar pérdidas o
ruptura. Considere siempre las siguientes
recomendaciones:
A. Inserte las pilas en el compartimiento en la dirección
correcta, observando la polaridad positiva ª y
negativa ·, como se indica en el interior del
compartimiento.
B. Nunca mezcle pilas nuevas con pilas usadas.
C. Dependiendo de la marca, las pilas de un mismo
tamaño pueden tener distinta tensión. No mezcle
pilas de distintas marcas.
Aproximadamente
7m
NOTA:
Si la ventanilla del sensor de control remoto queda expuesta
a luz intensa, como ser la luz del sol o luz fluorescente, el
control podrá verse imposibilitado.
NOTA para el PD-M407:
Opere el PD-M407 usando la uniddad de control remoto
proporcionada viene con el amplificador. (Consulte la página
19).
7 m
30˚
30˚
16
Sp
Page 17

PRECAUCIONES REFERENTES AL MANEJO
UBICACIÓN
Instale el reproductor en un lugar bien ventilado, donde no
quede expuesto a gran temperatura ni humedad.
No instale el reproductor en un lugar expuesto a los rayos directos del
sol, ni cerca de estufas o radiadores. El calor excesivo puede dañar la
caja y los componentes internos.
Además, la instalación en un ambiente húmedo o polvoriento puede
resultar en mal funcionamiento o accidentes. (Además, evite la
instalación cerca de cocinas, etc., donde el reproductor pueda quedar
expuesto al humo de aceite, vapor o calor.)
No instale el reproductor sobre una superficie inestable o inclinada.
PRECAUCIONES REFERENTES A LA
INSTALACIÓN
÷
Si se instala y emplea el reproductor de discos compactos durante
períodos prolongados sobre fuentes que generan calor, tales
como amplificadores, el rendimiento se verá afectado. No ponga
el reproductor sobre fuentes generadoras de calor.
÷ Instale este reproductor de discos compactos lo más alejado
posible de sintonizadores y aparatos de TV. Un reproductor de
discos compactos instalado cerca de tales equipos puede causar
ruidos o la degradación de la imagen.
÷ Tal ruido puede ser especialmente notable cuando se emplee una
antena interior. En tal caso, utilice una antena exterior, o desconecte
la alimentación del reproductor de discos compactos.
÷ Coloque este aparato sobre una superficie plana.
LIMPIEZA DEL REPRODUCTOR Y DEL
CARTUCHO
Para limpiar el REPRODUCTOR y el CARTUCHO, frótelos con un
paño suave y seco. Para partes muy sucias, humedezca un paño
suave en una solución de detergente con concentración de 5 ó 6
partes de agua, escurra bien el paño, y frote la suciedad. Emplee un
paño seco para frotar la superficie y secarla. No emplee líquidos
volátiles como puedan ser benica o disolvente, porque podrían dañar
el aparato.
ALMACENAJE DE LOS DISCOS
÷
Los discos compactos están hechos del mismo tipo de plástico
que el empleado para los discos analógicos convencionales.
Tenga cuidado de que no se alabeen; guárdelos siempre
verticalmente en sus cajas, evitando lugares muy cálidos o de gran
humedad, o de temperatura extremadamente baja. Evite dejar los
discos en automóviles, ya que el asiento de un automóvil a la luz
solar directa puede calentarse mucho, lo cual es perjudicial.
÷ Lea y realice siempre lo indicado en las precauciones de los discos.
LIMPIADOR DE LENTES DE REPRODUCTORES
DE DISCOS COMPACTOS
Las lentes del fonocaptor del reproductor no deben ensuciarse
durante la reproducción normal, pero si por alguna que otra razón
funciona mal debido a suciedad, lea la sección sobre solución de
consulte al centro de servicio técnico PIONEER autorizado más
cercano. Los limpiadores de lentes para reproductores de discos
compactos están desponibles en las tiendas del ramo, pero debe
tenerse mucho cuidado en su empleo porque algunos productos
pueden causar daños en las lentes.
CONDENSACIÓN
Cuando el reproductor se desplaza de un lugar frío a otro cálido, o
cuando la temperatura de la sala aumenta repentinamente, puede
condensarse humedad en el interior, y es posible que el reproductor
no rinda al máximo. En tal caso, deje el reproductor en reposo durante
una hora o aumente gradualmente la temperatura de la sala.
LIMPIEZA DE DISCOS Y MANIPULACIÓN DE
DISCOS COMPACTOS
÷ Mantenga siempre los discos limpios frotándolos suavemente
con un paño suave desde el centro hacia la periferia.
÷ Si un disco se ensucia demasiado, humedezca un paño suave en
agua y, después de escurrirlo bien, limpie suavemente la suciedad,
y después seque bien las gotas de agua con otro paño suave y
seco.
÷ No emplee rociadores para limpieza de discos convencionales ni
agentes antiestáticos. Además, no limpie nunca los discos con
bencina, diluidor de pintura, ni ningún otro disolvente volátil, ya
que podría dañar la superficie de los discos.
Nesta unidade, usar urn disco compacto que tenha a marca
mostrada abaixo. Não usar outro disco, pois isso pode resultar
em mau funcionamento ou danos.
÷ Cuando manipule discos no toque las superficies de las
señales (el lado con los colores del arco iris, el lado
opuesto al de la etiqueta).
Sujételos por los bordes, o por un borde y su orificio
central.
÷ No pegue etiquetas ni cintas en la superficie de la etiqueta
central. Además, no raye ni dañe dicha etiqueta.
÷ Los discos giran a gran velocidad dentro del reproductor.
No emple discos dañados (rajados o alabeados).
PRECAUCIÓN: EMPLEO DE DISCOS CD CON FORMAS
ESPECIALES
Este producto está diseñado para emplear solamente discos CD
totalmente circulares convencionales. El empleo de discos CD con
formas especiales no se recomienda para este producto. Pioneer no
se hace responsable por los problemas que puedan surgir con
relación al empleo de discos CD de formas especiales.
'
NOTAS:
÷
Para poder reproducir un disco compacto de 8 cm, necesitará un
cartucho de multidiscos especial (JD-M108, JD-M308), que está
a la venta por esparado. Lea su manual de instrucciones antes de
utilizarlo.
÷
Adaptadores para discos de 8 cm
Es posible que incluso un adaptador que satisfaga las
especificaciones de CD estándar recomendadas no pueda utilizarse
con el reproductor de discos compactos. Se recomienda el empleo
de un cartucho de multidiscos especial (JD-M108, JD-M308).
÷
No inserte nunca un disco compacto de 8 cm o su adaptador en un
cartucho de disco estándar de 12 cm, porque podría dañarse
seriamente el reproductor.
÷
No inserte solamente un disco de 8 cm y el adaptador en el
cartucho suministrado.
17
Español
Sp
Page 18

ANTES DE UTILIZAR EL REPRODUCTOR
INSERCIÓN DE DISCOS EN EL
CARTUCHO DE 6 DISCOS
Inserte los discos que desee en el cartucho suministrado.
Pueden insertarse hasta 6 discos. La numeración de los
discos empieza por el número 1 para el disco superior. El
número va aumentando según va bajando la posición del
disco; hasta el número 6 que corresponde al disco inferior. El
cartucho tiene una mirilla por la que puede comprobarse la
bandeja del disco seleccionado. Incluso durante la
reproducción, a través de esta mirilla puede comprobarse el
número del disco que se está reproduciendo.
1. Extraiga una sola bandeja de disco.
2. Coloque los discos con el lado de la etiqueta mirando
hacia abajo.
El lado de la
etiqueta mirando
hacia abajo.
COLOCACIÓN DE ETIQUETAS EN EL
CARTUCHO
÷ Coloque siempre en los lugares asignados las etiquetas
suministradas. El funcionamiento quizá no sea correcto si
coloca las etiquetas en otros lugares.
÷ Formas convenientes de utilizar las etiquetas:
A: Para títulos
B: Para nombres de discos
C: Para clasificación
÷ No ponga etiquetas sobre otras etiquetas.
B
B
C
A
Hay disponibles a modo opcional cartuchos adicionales
idénticos al suministrado (*JD-M100/JD-M200, JD-M300,
JD-M108, JD-M308).
Utilice estos cartuchos para preparar su propia discografía
con cartuchos separados para cada músico o estilo.
B
A
C
3. Introduzca la bandeja de disco a su posición original.
4. Inserte los otros discos repitiendo los pasos 1 al 3.
PRECAUCIÓN:
÷ Cerciórese de sacar sólo una bandeja de disco cada vez.
(Cuando se ha sacado una bandeja de disco, no saque otras
bandejas.)
÷ Si se insertan los discos con el lado de la etiqueta arriba, no
podrán ser reproducidos. Cerciórese de que queden
insertados con el lado de la etiqueta abajo.
÷ Nunca deben insertarse objetos que no sean discos (tarjetas
de canciones, explicaciones del contenido de los discos,
etc.) en las bandejas de discos.
÷ No toque la superficie de reproducción de los discos (el
lado iridescente) con las manos ni con los dedos.
* JD-M100/JD-M200/JD-M300
....................................... Cartucho para discos de 12 cm.
JD-M108/JD-M308 .......... Cartucho para discos de 8 cm.
NOTA:
No ponga discos de 8 cm en el cartucho para discos de 12 cm.
PRECAUCIONES CONCERNIENTES A LA
MANIPULACIÓN DEL CABLE DE ALIMENTACIÓN
Tome el cable de alimentación por la clavija. No extraiga la
clavija tirando del cable. Nunca toque el cable de alimentación
cuando sus manos estén mojadas, ya que esto podría causar
cortocircuitos o descargas eléctricas. No coloque la unidad,
algún mueble, etc., sobre el cable de alimentación. Asegúrese
de no hacer nudos en el cable ni de unirlo a otros cables. Los
cables de alimentación deberán ser dispuestos de tal forma
que la probabilidad de que sean pisados sea mínima. Un cable
de alimentación dañado podrá causar incendios o descargas
eléctricas. Revise el cable de alimentación está dañado,
solicite el reemplazo del mismo al centro de servicio autorizado
PIONEER más cercano, o a su distribuidor.
18
Sp
Page 19

CONEXIONES
CD
L
R
Blanco
L
R
Rojo
÷ Antes de hacer o cambiar las conexiones, ponga el
interruptor STANDBY/ON en OFF y desconecte el
cable de alimentación del tomacorriente de CA.
Cable de salida
Reproductor de discos compactos
LINE OUT
L
R
Amplificador estéreo
CONTROL
OUT
Blanco
L
R
Rojo
Cable de control
Conexiones
1. Conecte las tomas LINE OUT de este aparato a las
tomas de entrada (CD o AUX) del amplificador.
Cerciórese de que los enchufes blancos estén
conectados a las tomas izquierdas (L) y los enchufes
rojos a las tomas derechas (R).
÷ Cerciórese de no conectar este aparato a las tomas PHONO
del amplificador porque el sonido se distorsionará y no
podrá obtenerse una reproducción normal.
2. Conecte el cable de alimentación a una toma de
corriente de CA del hogar o una toma de CA de su
amplificador.
÷ Cerciórese de que los enchufes estén firmemente
insertados en las tomas, incluida la de CA de la pared.
Control remoto del sistema con un amplificador estéreo
Pioneer que tenga la marca Î
Cuando se usa un amplificador estéreo Pioneer provisto de la
marca Î, conecte la toma CONTROL IN del panel posterior del
reproductor de discos compactos a la toma CONTROL OUT
del amplificador. De este modo podrá controlar el reproductor
de discos compactos usando la unidad de control remoto
suministrada con el amplificador estéreo. Si no tiene la intención
de emplear esta función, no es necesario conectar las tomas
CONTROL IN/OUT.
÷ El cable de control se suministra con el reproductor de
discos compactos.
÷ La unidad de control remoto suministrada con el amplificador
puede usarse para las operaciones de reproducción, parada,
pausa, búsqueda de canciones/discos y de cambio de
disco.
÷ Para las instrucciones relacionadas con las conexiones y la
operación, consulte el manual de instrucciones provisto
con el amplificador estéreo.
CONTROL
IN
OUT
A la toma de corriente de CA.
Cable de la alimentación
NOTAS:
÷
Cuando haya un cable de control conectado al conector de
entrada de control (CONTROL IN) del reproductor, el
control directo del reproductor mediante la unidad de
control remoto no será posible. En este caso, para operar
el reproductor con la unidad de control remoto, apúntela
hacia el amplificador.
÷
Asegúrese de conectar las clavijas del cable de control con
seguridad a los terminales CONTROL IN y CONTROL
OUT. No conecte sólo un extremo del cable.
÷
Asegúrese de desconectar la alimentación del amplificador
antes de conectar el cable de alimentación y el cable de
salida.
Conexión del cable de alimentación
Conecte el cable de alimentación a una toma de corriente de
CA del hogar o una toma de CA de su amplificador.
÷ Asegúrese de que las clavijas estén insertadas por completo
a las tomas y al tomacorriente.
CONEXIÓN DEL CABLE DE
ALIMENTACIÓN DE CA Y FUNCIONES
Algunas funciones no pueden llevarse a cabo dependiendo de
la conexión del cable de alimentación de CA.
Cuando el cable de
alimentación de CA se
conecta a la toma
Función
Reproducción
con temporizador
Memoria de
programa
Memoria de programa con
borrado
interconectada de un
amplificador o a un
temporizador de audio.
Sí
No
No
Para más detalles, consulte la descripción de cada función de
este manual de instrucciones.
Cuando el cable de
alimentación de CA se
conecta a la toma
independiente de un
amplificador o a un
tomacorriente de la
red eléctrica.
Español
No
Sí
Sí
19
Sp
Page 20

NOMBRES Y FUNCIONES DE LOS CONTROLES
PANEL FRONTAL
Interruptor de alimentación/
reserva ( STANDBY/ON)
MULTI COMPACT DISC PLAYER
STANDBY/ON
Aleatoria (RANDOM)
Reproducción
Pausa
Borrado
(DELETE)
DELETE
RANDOM
PROGRAM
REPEAT–1
1
Número de discos
(DISC) Número de canción (TRACK)
2
6
TRACKDISC MIN SEC
4
3
Ranura de
inserción del
cartucho de
discos
PD–M427
-DISC
MULTI CD
6
5
DISC
SCAN
Ventanilla del sensor de control remoto (sólo en el PD-M427)
Recibe la señal desde la unidad de control remoto.
Aleatoria (RANDOM)
Visualizador
Exploración Hi-Lite
(HI-LITE )
DISC TRACK MIN SEC
'
EJECT REPEAT PROGRAM DISC
0
TRACK/MANUAL
41 ¢¡
RANDOM
Î
1-BIT•DLC
HI–LITE
STOP PLAY/PAUSE
7
6
DIRECT LINEAR CONVERSION
Expulsión
(EJECT)
Repetición
(REPEAT)
Programación
(PROGRAM)
Parada (STOP)
Canción/manual
(TRACK/MANUAL)
Reproducción/pausa
(PLAY/PAUSE)
Disco (DISC)
Repetición
(REPEAT)
Programación (PROGRAM)
Disco
(DISC)
Minutos
Exploración de discos
(DISC SCAN)
UNIDAD DE CONTROL REMOTO (sólo en el PDM427)
1
2
3
4
5
6
7
STANDBY/ON
DISC 1 DISC 2
DISC 4 DISC 5 DISC 6
783
1¡
RANDOM
HI–LITE
4¢
PROGRAM DELETE
'
Î
MULTI
COMPACT DISC PLAYER
REMOTE CONTROL UNIT
DISC 3
CLEARCHECK
8
9
10
11
12
13
Segundos
Los botones de la unidad de control remoto tienen las mimas
funciones que los botones correspondientes (aquellos con el
mismo nombre o símbolo) del panel delantero del reproductor.
1 Interruptor de alimentación (
STANDBY/ON)
2 Botones selectores de número de disco (DISC
NUMBER)(DISC 1 – DISC 6)
3 Botón de parada (STOP) (7)
4 Botón de aleatoria (RANDOM)
5 Botón de exploración selectiva (HI-LITE)
6 Botón de programa (PROGRAM)
7 Botón de verificación (CHECK)
8 Botón de pausa (PAUSE)
9 Botón de reproducción (PLAY) (3)
10 Botones de búsqueda manual (MANUAL) (1, ¡)
11 Botones de búsqueda de pista (TRACK) (4, ¢)
12 Botón de borrado (DELETE)
13 Botón de borrado (CLEAR)
20
Sp
Page 21

FUNCIONAMIENTO BÁSICO
MULTI COMPACT DISC PLAYER
STANDBY/ON
1
1
2
PLAY/PAUSE
3
6
(sólo en el PD-M427)
-DISC
MULTI CD
6
2
STANDBY/ON
3
DISC TRACK MIN SEC
'
EJECT REPEAT PROGRAM DISC TRACK/MANUAL
0
12345
41 ¢¡
TRACKDISC MIN SEC
RANDOM
1-BIT•DLC
STOP PLAY/PAUSE
7
DIRECT LINEAR CONVERSION
3
6
PARA REPRODUCIR UN DISCO COMPACTO
1. Pulse el interruptor STANDBY/ON para conectar la
alimentación.
2. Inserte un cartucho empujándolo hasta que se escuche
HI–LITE
6
un ruido seco.
÷ Inserte de antemano en el cartucho el disco que va a
reproducir. (Consulte “ANTES DE UTILIZAR EL
REPRODUCTOR” en la página 18.)
÷ Cuando se desconecta la alimentación (en el modo de
reserva), al inserte un cartucho se conecta automáticamente
la alimentación (función de conexión automática de la
alimentación).
3. Pulse el botón
66
6 para comenzar la reproducción.
66
Para hacer temporalment una pausa en la
reproducción:
Presione el botón 6 durante la reproducción. El indicador 8
se encenderá y se pausará la reproducción en tal punto. Al
presionar de nuevo el botón 6 o el botón 3, se reanudará
la reproducción desde la posición en que se estableció el
modo de pausa.
Para parar la reproducción:
Pulse el botón 7. El reproductor vuelve al principio de la
primera melodía del disco en el que paró la reproducción. Si se
pulsa el botón 7 dos veces, el reproductor vuelve al comienzo
de la primera melodía del primer disco y luego se pone en el
modo de parada.
NOTA:
Si se desconecta la alimentación habiendo un cartucho en el
reproductor, el reproductor memoriza el disco que estaba
reproduciéndose en el momento de desconectar la
alimentación. Por lo tanto, cuando conecte de nuevo la
alimentación, al pulsar el botón 6, la reproducción comienza
desde la primera melodía del disco memorizado.
Para detener la reproducción y sacar el cartucho:
Presione el botón de expulsión (EJECT) (0), saque el cartucho,
y luego presione el interruptor
desconectar la alimentación.
Incluso cuando la alimentación está desconectada (en el
modo de reserva), el cartucho se expulsará al presionar el
botón de expulsión (EJECT).
STANDBY/ON para
Español
PLAY/PAUSE
PAUSE
88
8
88
77
7
77
STOP
6
STOP
7
Las operaciones indicadas con el símbolo [
(sólo en el PD-M427)
8
(sólo en el PD-M427)
7
] se efectúan
mediante la unidad de control remoto.(sólo en el PD-M427)
Precauciones relacionadas con la manipulación de
cartuchos:
÷ Al insertar un cartucho en el reproductor, cerciórese de que
la dirección de inserción sea la correcta.
÷ Después de la utilización, guárdelo en la caja suministrada.
No lo ponga en lugares sujetos a altas temperaturas o
expuesto a los rayos directos del sol.
÷ No separe los cartuchos.
÷ Tenga cuidado de que no se caigan ni golpeen los cartuchos.
No aplique fuerza a las bandejas que se han abierto.
÷ La aplicación de bencina, diluidor de pintura, insecticida, u
otros líquidos volátiles a un cartucho puede ocasionar
daños en la superficie, por lo que deberá guardar los
cartuchos apartados de tales substancias.
21
Sp
Page 22

DIVERSAS OPERACIONES
BÚSQUEDA DE DISCO – PARA BUSCAR
UN DISCO ESPECIFICADO
Durante el modo de reproducción o parada
DISC
Use el botón selector de disco (DISC) para seleccionar el
número de disco deseado, y presione luego el botón 6, o
uno de los botones selectores de número de disco (DISC
NUMBER) (DISC 1 – DISC 6); el reproductor localizará el disco
seleccionado e iniciará la reproducción desde el principio del
mismo.
(sólo en el PD-M427)
DISC 2 DISC 3
DISC 1
DISC 4 DISC 5
DISC 6
NOTAS:
÷
Si aparece “no DISC” en el visualizador, significa que
usted ha presionado un número de disco de una bandeja
que no tiene ningún disco.
÷
Durante la reproducción programada, no puede efectuarse
la búsqueda de discos.
BÚSQUEDA DE CANCIONES – PARA
BUSCAR UNA CANCIÓN ESPECIFICADA
Durante el modo de reproducción, pausa, o parada
TRACK/MANUAL
41
¡¢
(sólo en el PD-M427)
¢
4
BÚSQUEDA MANUAL – PARA BUSCAR
UN PASAJE ESPECIFICADO
Durante el modo de reproducción o pausa
TRACK/MANUAL
41
Mientras se mantiene pulsado el botón ¡¢, la
reproducción avanza rápidamente hasta el final del disco.
Cuando la reproducción llegue al final del disco, el reproductor
entra en el modo de pausa y se visualiza la palabra “END”.
Mientras se mantiene pulsado el botón 41, la
reproducción retrocede rápidamente hasta el comienzo del
disco.
Al llegar al pasaje especificado, deje de pulsar el botón ¡
¢ o 41. El reproductor entra en el modo original
(reproducción o pausa) en el momento en que deja de pulsar
el botón ¡¢ o 41.
¡¢
(sólo en el PD-M427)
1¡
NOTAS:
÷
Durante la reproducción normal, la búsqueda manual puede
realizarse en un solo disco.
÷
Durante la reproducción de programas la búsqueda manual
puede realizarse en un paso de programa solamente.
PARA REPETIR LA REPRODUCCIÓN
(REPETICIÓN DE REPRODUCCIÓN)
REPEAT
Cuando se presiona el botón ¡¢ una vez o varias veces,
la reproducción avanza al principio de la canción ubicada
después de la canción que se está reproduciendo. La posición
de la canción localizada corresponde al número de veces que
se presiona el botón.
Cuando el botón 41 se presiona un vez, la reproduccion
retorna al principio de la canción que se esté reproduciendo.
Cuando se presiona más de una vez, la reproducción retrocede
a la canción anterior de la que se está reproduciendo.
÷ Cuando se opera el botón ¡¢ o botón 41 en el
modo de pausa o modo de parada, presione el botón 6
para iniciar la reproducción.
NOTAS:
÷
Durante la reproducción de programas, el botón
(o ¢) o
41
(o 4) puede utilizarse para seleccionar
¡¢
la canción programada.
÷
Durante la reproducción normal, la búsqueda de canciones
puede realizarse en un solo disco. En el modo de parada,
esta operación puede realizarse desde la 1ª canción hasta
la 99ª.
22
Sp
Para repetir la reproducción de la canción visualizada, pulse
una vez el botón REPEAT. El indicador REPEAT-1 se enciende.
El botón REPEAT puede pulsarse en cualquier modo de
reproducción.
Pare reproducir repetidamente todas las canciones de todos
los discos en el modo de reproducción normal o en el modo
de reproducción especificado (reproducción de programas,
reproducción de programas con supresión o reproducción
aleatoria), pulse dos veces el botón REPEAT. El indicador
REPEAT se enciende.
÷ Para cancelar el modo de repetición, pulse el botón REPEAT
de forma que se apague el indicador REPEAT-1 o REPEAT.
Page 23

DIVERSAS OPERACIONES
REPRODUCCIÓN ALEATORIA – PARA
REPRODUCIR ALEATORIAMENTE
TODAS LAS CANCIONES
RANDOM
Presione el botón de aleatoria (RANDOM). Todas las pistas de
todos los discos serán reproducidas en orden arbitrario. Para
reproducir en orden arbitrario las pistas que no han sido
borradas, presione el botón de aleatoria (RANDOM) después
de llevar a cabo el procedimiento de borrado de programa.
Consulte la sección “Reproducción programada con borrado”
en la página 26.
EXPLORACIÓN HI-LITE DEL CARTUCHO
Durante el modo de parada
HI-LITE
Cuando se presiona una vez el botón de exploración Hi-Lite
(HI-LITE) durante el modo de parada, la reproducción se inicia
desde un punto de 1 minuto después del principio de la
primera canción, y se reproduce la primera canción de cada
disco durante unos 10 segundos. El indicador DISC SCAN
parpadea durante el modo de exploración de discos. Después
de haber explorado la primera canción de todos los discos, el
reproductor se establece en el modo de parada.
Cuando se presiona dos veces el botón de exploración Hi-Lite
(HI-LITE) durante el modo de parada, la reproducción se inicia
desde un punto de 1 minuto después del principio de la
canción, y se reproduce cada canción durante unos 10
segundos. El indicador SCAN parpadea durante el modo de
exploración de canciones. Después de haber explorado todas
las canciones de todos los discos, el reproductor se establece
en el modo de parada.
(sólo en el PD-M427)
RANDOM
(sólo en el PD-M427)
HI-LITE
Para abandonar el modo de exploración Hi-Lite del
cartucho:
77
Presione el botón
número de disco (DISC NUMBER) (DISC 1 – DISC 6). Cuando
el botón
reanudada desde dicho punto. Cuando se presione un botón
selector de número de disco (DISC NUMBER) (DISC 1 – DISC
6), el disco seleccionado será reproducido desde el principio.
NOTAS:
÷
÷
÷
÷
÷
÷
66
6 sea presionado, la reproducción normal será
66
La exploración Hi-Lite podrá realizarse desde el tiempo
transcurrido deseado de la canción. Durante la reproducción,
presione el botón de exploración Hi-Lite (HI-LITE) en el
punto en que desee iniciar la reproducción con exploración
Hi-Lite. El reproductor memorizará el minuto y segundo del
punto y la reproducción con exploración de canciones se
realizará desde el tiempo memorizado en cada canción.
Cada vez que se presiona el botón de exploración Hi-Lite
(HI-LITE\), el modo cambia entre exploración de discos y
exploración de canciones.
La programación sólo de las canciones deseadas es posible
durante la reproducción con exploración de canciones.
Consulte “Programación directa” en la página 25.
Durante la reproducción con exploración de canciones,
podrá saltar a la canción deseada con el botón
botón
¡¢
Cuando se presiona el botón REPEAT, se repetirá la
reproducción con exploración Hi-Lite.
Cuando el tiempo de reproducción de una canción sea
inferior a un minuto o inferior al tiempo memorizado, la
reproducción con exploración HI-LITE se realiza desde el
comienzo de la canción durante unos 10 segundos. Cuando
el tiempo de reproducción de la canción es inferior a 10
segundos, la canción se reproduce de principio a final.
66
7,
6 o uno de los botones selectores de
77
66
41
.
o
Español
Reproducción con temporizador:
Utilizando un temporizador de audio de venta en el comercio
del ramo será posible iniciar automáticamente la
reproducción en cualquier momento deseado.
1. Inserte el cartucho en la ranura para el cartucho.
2. Fije la hora a la que desea que comience la
reproducción.
El temporizador suministrará alimentación eléctrica al
amplificador y al reproductor de discos compactos a la hora
prefijada, encendiendo todos los componentes e iniciando
el modo de reproducción. La reproducción comienza por la
primera melodía del primer disco.
Precaución:
÷ No desenchufe el cable de la alimentación ni desconecte
la alimentación con un temporizador de audio durante la
reproducción. De lo contrario, el disco podría estropearse.
÷ Si se produce un fallo en la alimentación estando ésta
desconectada (modo de alimentación en reserva), la
alimentación se conecta automáticamente con la función
de reproducción con temporizador al reponerse la
alimentación.
POR LO TANTO, DESCONECTE EL CABLE DE ALIMENTACIÓN
DE CA CUANDO NO PIENSE UTILIZAR EL REPRODUCTOR
DURANTE UN LARGO PERÍODO DE TIEMPO.
23
Sp
Page 24

PARA REPRODUCIR SOLAMENTE LAS CANCIONES/DISCOS DESEADOS
REPRODUCCIÓN DE PROGRAMA – PARA
PROGRAMAR CANCIONES/DISCOS EN
EL ORDEN DESEADO
1
2
MULTI COMPACT DISC PLAYER
STANDBY/ON
PROGRAM
DISC
DISC TRACK MIN SEC
'
-DISC
MULTI CD
6
EJECT REPEAT PROGRAM DISC
0
TRACK/MANUAL
41 ¢¡
RANDOM
1-BIT•DLC
STOP PLAY/PAUSE
7
DIRECT LINEAR CONVERSION
HI–LITE
6
1. Con el reproductor parado, presione el botón PROGRAM
de modo que se encienda el indicador PROGRAM.
2. Use el botón selector de disco (DISC) o los botones
selectores de número de disco (DISC NUMBER) para
seleccionar el número de disco deseado.
Se visualizará el número de disco seleccionado.
3. Entonces, presione el botón 41 o ¡¢ para
seleccionar la canción deseada.
1,4
3
2
6
Se visualizará el número de la canción seleccionada.
4. Finalmente, presione el botón PROGRAM o espere
unos dos segundos; el programa se almacenará en la
memoria.
(sólo en el PD-M427)
PROGRAM
Si el botón PROGRAM se presiona después de haber
seleccionado sólo el número de disco, el indicador “AL”
aparecerá indicando la selección del modo de “Disc All
Program” (se introduce todo el contenido del disco en el
programa como un solo paso).
Sin embargo, mientras se esté visualizando el indicador
“AL”, si se utiliza el botón 41 o ¡¢ para designar
un número de canción y entonces se presiona el botón
PROGRAM (o después de transcurrir dos segundos), la
(sólo en el PD-M427)
DISC 2 DISC 3
DISC 1
canción selecionada se almacenará como este paso de
programa.
5. Repita los pasos 2, 3 y 4 para las demás canciones que
DISC 4 DISC 5
DISC 6
va a programar.
6. Pulse el botón
66
6.
66
Las canciones se reproducen en el orden programado. El
reproductor entra en el modo de parada una vez
reproducidas todas las canciones programadas.
TRACK/MANUAL
3
41
PROGRAM
4
6
PLAY/PAUSE
24
¡¢
6
(sólo en el PD-M427)
4
PROGRAM
(sólo en el PD-M427)
3
¢
NOTA:
Cuando seleccione la canción con
41
o
¡¢
en el
paso 3, el número de canción visualizado se programa
automáticamente si no se pulsa el botón
41
o
¡¢
antes de que pasen 2 segundos. Por lo tanto, no se olvide de
pulsar
41
o
¡¢
de forma continua hasta que el
número de la canción deseada aparezca en el visualizador.
Para parar la reproducción de programas,
pulse el botón 7.
Para abandonar el modo de programa:
Durante la reproducción de programas, seleccione un N.° de
disco con el botón DISC NUMBER y presione luego el botón
66
6. El reproductor se establecerá en el modo de reproducción
66
normal y la reproducción se iniciará desde el principio de la
canción seleccionada.
÷ Pueden crearse programas de hasta 32 pasos.
÷ Para pasar al paso anterior o al siguiente en un programa,
pulse el botón 41 o ¡¢.
÷ Si el cartucho está en el reproductor de discos compactos,
el contenido del programa no se borrará, incluso cuando
esté desconectada la alimentación.
NOTA:
Durante el borrado del programa, el botón de programa
(PROGRAM) no podrá ser accionado.
Sp
Page 25

PARA REPRODUCIR SOLAMENTE LAS CANCIONES/DISCOS DESEADOS
Programación directa:
Durante la reproducción normal o la reproducción con
exploración Hi-Lite del cartucho, la canción que está siendo
reproducida puede programarse.
1. Pulse el botón PROGRAM para entrar en el modo de
programación.
2. Para buscar una canción deseada durante la reproducción
normal es posible avanzar o retroceder pulsando el botón
4 1 o ¡¢.
Además, la función de exploración Hi-Lite del cartucho
puede utilizarse para pasar de canción a melodía del disco.
3. Si usted desea programar la canción que está siendo
reproducida, pulse el botón PROGRAM mientras se
reproduce la canción.
÷ La programación directa no puede realizarse durante la
reproducción de programa.
Para verificar el contenido del programa
(sólo en el PD-M427) :
Durante el modo de programa, ponga el reproductor en modo
de detención y presione el botón de verificación (CHECK) de
la unidad de control remoto. El contenido del programa será
exhibido en el orden en que haya sido programado.
÷ Después de confirmar el último paso de programa, el
visualizador indicará “0-00”.
PROGRAMACIÓN DE UNA PAUSA
(sólo en el PD-M427)
La inserción de una pausa en un programa puede ser de gran
utilidad al efectuar una grabación. Presione el botón de pausa
(8) de la unidad de control remoto en lugar de ingresar un
número de pista. La indicación “PA” aparecerá en el panel
visualizador.
÷ Por ejemplo, al grabar en ambos lados de un cassette, si
usted programa una pausa después de la última pista a ser
grabada en el primer lado de la cinta, la reproducción
programada se interrumpirá momentáneamente en dicho
punto, permitiéndole a usted dar vuelta el cassette. Para
reanudar la reproducción una vez que el reproductor ha
asumido el modo de pausa, presione el botón 8 de la
unidad de control remoto o el botón 6 del panel delantero.
Cómo borrar un programa (sólo en el PD-M427) :
Estando el reproductor en modo de programa, presione el
botón de borrado (CLEAR) de la unidad de control remoto.
El último paso del programa será borrado y el contenido del
paso de programa anterior será exhibido.
NOTA:
El contenido de un programa también puede ser borrado
durante la reproducción. Sin embargo, usted no podrá borrar
de esta forma las pistas que precedan a la que esté siendo
reproducida.
Para borrar el contenido completo de un programa:
A: Estando el reproductor en modo de detención, presione el
botón 7.
B: Cuando el magazín sea expulsado, el contenido del
programa se borrará.
Para modificar el contenido del programa
(sólo en el PD-M427) :
1. Durante el modo de programa, ponga el reproductor
en modo de detención y presione el botón de
verificación (CHECK) de la unidad de control remoto
para hacer que el paso de programa a ser corregido sea
exhibido en el visualizador.
2. Ingrese el nuevo número de disco con los botones de
núm. de disco (DISC NUMBER), y presione luego el
botón 41 o ¡¢ para hacer que el nuevo
número de pista aparezca en el visualizador.
3. Presione el botón de programa (PROGRAM).
÷ Repita los pasos 1 a 3 para cambiar otras pistas según
lo desee.
÷ Si el botón 41 o ¡¢ no es presionado en el
transcurso de 2 segundos al corregir el núm. de pista,
el número de pista exhibido será automáticamente
memorizado.
Español
NOTAS:
÷
Sólo es posible programar pausas cuando el procedimiento
de programación es efectuado en modo de detención.
÷
No es posible programar una pausa al principio de un
programa (P-01), ni tampoco dos pausas seguidas.
÷
Una pausa insertada en un programa cuenta como un paso.
÷
Si se programa una pausa como el último paso de un
programa, el reproductor no asumirá el modo de pausa.
25
Sp
Page 26

PARA REPRODUCIR SOLAMENTE LAS CANCIONES/DISCOS DESEADOS
REPRODUCCIÓN PROGRAMADA CON
BORRADO – BORRADO DE LAS PISTAS/
DISCOS NO DESEADOS (sólo en el PD-M427)
STANDBY/ON
DISC 1 DISC 2
1
2
3
TRACK/MANUAL
41
4
6
PLAY/PAUSE
26
DISC
6
¡¢
DISC 3
DISC 4 DISC 5 DISC 6
783
1¡
RANDOM
4¢
HI–LITE
PROGRAM DELETE
CLEARCHECK
'
Î
MULTI
COMPACT DISC PLAYER
REMOTE CONTROL UNIT
(sólo en el PD-M427)
(sólo en el PD-M427)
DISC 1
DISC 4 DISC 5
(sólo en el PD-M427)
4¢
DELETE
(sólo en el PD-M427)
3
2
6
3
1,4
DELETE
DISC 2 DISC 3
DISC 6
1. Estando el reproductor detenido, presione el botón de
borrado (DELETE); el indicador DELETE se iluminará.
2. Use el botón selector de disco (DISC) o uno de los
botones selectores de número de disco (DISC NUMBER)
para seleccionar el número de disco deseado.
El número de disco seleccionado será exhibido.
3. Luego, presione el botón 41 o ¡¢ para
seleccionar el número de pista.
El número de pista seleccionado será exhibido.
4. Presione el botón de borrado (DELETE), o espere dos
segundos; la pista a ser borrada será ingresada.
Si el botón de borrado (DELETE) es presionado después de
seleccionar el número de disco, el indicador “AL” será
exhibido, indicando selección de la función de “borrado
de todo el disco” (el contenido completo del disco será
borrado de la memoria de programa). Sin embargo, mientras
el indicador “AL” esté siendo exhibido, si usted usa el
botón 41 o ¡¢ para especificar un número de
pista y luego presiona el botón de borrado (DELETE) (o deja
transcurrir dos segundos), la pista seleccionada será borrada
de dicho paso de programa.
5. Repita los pasos 2, 3 y 4 para borrar otras pistas.
6. Presione el botón
66
6.
66
Todas las pistas/discos que no hayan sido borrados serán
reproducidos en el orden de los discos y números de pista.
Una vez que todas las pistas hayan sido reproducidas, el
reproductor asumirá el modo de detención.
NOTA:
Al seleccionar una pista con el botón
3, el número de pista exhibido será automáticamente programado si
no se vuelve a presionar el botón
de 2 segundos. Por lo tanto, asegúrese de presionar secuencialmente
el botón
41
o
¡¢
aparezca en el visualizador.
41
41
hasta que el número de pista deseado
Para cancelar la operación de reproducción programada
con borrado, presione el botón 7.
÷ Los números de pista desde el 33 en adelante no pueden ser
borrados.
÷ Para desplazarse al disco/pista siguiente o anterior que no sea el
disco/pista que haya sido borrado, presione el botón 41 o ¡
¢.
÷ Si el magazín está en el reproductor, el contenido del programa no
se borrará si la alimentación es desconectada.
NOTA:
Después de programar para reproducción programada, o durante el
modo de reproducción programada, la programación con borrado no
podrá ser efectuada.
Para borrar el contenido completo del programa de
borrado:
A Estando el reproductor en modo de detención, presione el botón
7.
B Cuando el magazín sea expulsado, el contenido del programa se
borrará.
C Estando el reproductor en modo de detención o reproducción,
presione el botón CLEAR de la unidad de control remoto. Cuando
el botón CLEAR sea presionado durante el modo de reproducción
programada con borrado, el reproductor asumirá el modo normal
de reproducción.
o
¡¢
o
¡¢
en el transcurso
en el paso
Sp
Page 27

SOLUCIÓN DE PROBLEMAS
Frecuentemente se toman por averías problemas debidos a operaciones incorrectas. Si usted cree que hay algo que no funciona
con normalidad en este aparato, compruebe los puntos siguientes. A veces el problema reside en otro componente. Investigue los
demás componentes y aparatos eléctricos que esté utilizando.
Si el problema no puede solucionarse incluso después de haber realizado las comprobaciones de la lista de abajo, lleve el aparato
a reparar al centro de servico técnico autorizado por PIONEER o al establecimiento donde lo compró.
Síntoma
El cartucho no sale cuando se presiona el
botón EJECT.
Al intentar iniciar la reproducción ésta se
detiene inmediatamente.
Pausas o interrupciones durante la
reproducción.
No hay sonido.
El sonido está distorsionado, ruido en la
salida.
La imagen del televisor fluctúa o las
radiodifusiones de FM tienen ruidos.
La unidad de control remoto no funciona.
(sólo en el PD-M427)
Causa
÷ La clavija de alimentación está desenchufada de
la toma de la red.
÷ El disco está al revés.
÷ El disco está sucio, etc.
÷ Los cables de salida están incorrectamente
conectados o flojos.
÷ Operación incorrecta del amplificador estéreo.
÷ Las clavijas y/o terminales del amplificador están
sucios.
÷ El reproductor está en el modo de pausa.
÷ Conexiones incorrectas.
÷ Las clavijas y/o las tomas del amplificador están
sucias.
÷ Interferencias causadas por un aparato de TV.
÷ Las interferencias provienen del reproductor de
discos compactos.
÷ Las pilas están agotadas.
÷ Demasiada distancia al reproductor, o ángulo
incorrecto.
÷ Hay un obstáculo entre el reproductor y la unidad
de control remoto.
Remedio
÷ Conecte la clavija al tomacorriente del
amplificador o a una toma de la red.
÷ Colóquelo correctamente con la cara de la
etiqueta hacia ABAJO.
÷ Limpie el disco y vuélvalo a reproducir.
÷ Conéctelos correctamente.
÷ Compruebe el ajuste de los selectores y de
los controles de volumen del amplificador.
÷ Limpie la suciedad.
÷ Presione el botón 6 (3 o 8).
÷ Conecte a las tomas CD o AUX del
amplificador. No conecte a las tomas de
entrada PHONO.
÷ Limpie la suciedad.
÷ Desconecte la alimentación del aparato de
TV, o aleje de éste el reproductor.
÷ Desenchufe el cable de alimentación de CA
o separe el reproductor del televisor o del
sintonizador.
÷ Reemplace las pilas.
÷ La distancia entre la unidad de control remoto
y el reproductor no debe ser superior a 7
metros, aproximadamente.
El ángulo de operación respecto del panel
delantero es máximo 30° a la derecha o
izquierda del reproductor.
÷ Relocalice la unidad de control remoto o
quite el obstáculo.
Español
La electricidad estática, y otras interferencias externas, pordrán ser causa de un funcionamiento anormal de la unidad. Para reanudar la operación
normal, desactive el interruptor de alimentación y actívelo nuevamente, o desconecte el cable de alimentación de CA y conéctelo luego nuevamente.
ESPECIFICACIONES
Generalidades
Tipo ......................... Sistema de audio digital de discos compactos
Alimentación ...................................... 110–127 V CA/220–240 V CA
.................................................................. (seleccionable) 50/60 Hz
Consumo .................................................................................. 12 W
Temperatura de operación ....................................... +5° C – +35° C
Peso (sin embalaje) ................................................................ 3,7 kg
Dimensiones exteriores
........................................ 420 (Ancho) x 294 (Prof) x 105 (Alto) mm
Sección de audio
Respuesta de frecuencia ........................................... 2 Hz – 20 kHz
Voltaje de salida ....................................................................... 2,0 V
Fluctuación y trémolo ......................................... Límite mensurable
(±0,001 % W.PEAK) o menos (EIAJ)
Canales .............................................................. 2 canales (estéreo)
Terminal de salida
Salida de línea de audio
Tomas de entrada/salida de control
Accesorios
÷ Unidad de control remoto (sólo en el PD-M427) ....................... 1
÷ Pilas secas (AAA/R03) (sólo en el PD-M427) ............................ 2
÷ Cartucho para seis discos compactos ....................................... 1
÷ Cable de control ........................................................................ 1
÷ Cable de salida .......................................................................... 1
÷ Manual de instrucciones ........................................................... 1
Las especificaciones y el diseño están sujetos a cambios sin previo
aviso con motivos de mejoras.
Los reproductores de CD múltiples que llevan el símbolo
y los cargadores múltiples con el mismo símblol, son
compatibles con los discos de 12 cm.
Publicado por Pioneer Electronic Corporation.
Copyright C 1999 Pioneer Electronic Corporation.
Todos los derechos reservados.
27
Sp
Page 28

承蒙惠顧本先鋒產品,甚表感謝!
務請通讀本使用說明書,了解正確的使用方法。閱後請妥善保存,以
便今後查用。
在某些國家和地區,電源插頭和插座的形狀可能輿文中插圖有別,但
是本機的連接輿操作方法是相同的。
警告﹕本機不可受到雨淋或置於潮濕之處,以免發生著火或觸電。
線路電壓選擇開關
沙特阿拉伯用機型的主電源僅為127V和220V。
線路電壓選擇開關位於本鐳射唱機的後板上。該開關在出廠前概已
按出口目的地的電源要求調好電壓位置。若電壓位置不正確,或若
在電壓不同的地區使用本機,請按下述方法調整此選擇開關。
÷ 進行調整之前務請先從電源插座拔下電源線。
÷ 用中等尺寸的螺絲起子(平頭)進行調整彼把螺絲起子的頭部插入
選擇開關的槽內,轉動開關使箭頭對准當地電源電壓位置。
220-240V 110-127V
28
ChH
Page 29

目錄
確認各種隨帶附件 ........................................ 2 9
將電池裝入遙控器 ........................................ 2 9
遙控器之操作 ............................................ 2 9
使用注意事項 ............................................ 3 0
操作本鐳射唱機之前 ...................................... 3 1
連接 .................................................... 3 2
各部分名稱及其功能 ...................................... 3 3
基本操作方法 ............................................ 3 4
特殊操作方法 ............................................ 3 5
僅播放所需的曲子/唱碟 .................................... 3 7
排除故障 ................................................ 4 0
規格 .................................................... 4 0
確認各種隨帶附件
1
4
2
5
將電池裝入遙控器
(只限PD-M427型號)
2
1
打開遙控器後面電池艙蓋子,並放入電池(尺寸' A A A ' (IEC
R03)),注意正確調好(ª)與(·)極性。
備註﹕
•
為了防止電池漏電,當長期(如一個月或更長)不使用遙控器時,
應將電池取出。如已發生漏電,請細心擦去電池艙內的電池液,並
用新電池更換之。
•
請勿將書籍或其他物體擱在遙控器上面,因為按鈕會被按下,引起
電池迅速消耗。
不當使用電池會引起漏電或破裂。
務必確認以下事項﹕
A.按電池艙內所示的正(ª)、負(·)極將電池正確插入電
池艙。
B.不要混用新舊電池。
C.有些電池大小相同,但電壓不同,這要看電池上的標記。不要
將不同標記的電池混用。
3
中國語
'
Î
3
1 6張唱碟播放庫 × 1
(本6張唱碟播放庫的規格請見下面備註)
備註﹕
隨帶的6張唱碟播放庫僅適用於12cm(5吋)唱碟。
2 輸出電纜 × 1
3 控制電纜 × 1
4 遙控器 × 1 (只限PD-M427型號)
5 AAA/R03型乾電池 × 2 (只限PD-M427型號)
遙控器之操作
(只限PD-M427型號)
當操作遙控器時,應將遙控器的紅外信號傳送器對準播放機前面板上
的遙控接收器(遙控傳感器(REMOTE SENSOR))。遙控器可在距
離傳感器大約7米、並可在離中心線30˚ 角的範圍內進行操作。
30˚
7 m
備注:
如果遙控器傳感窗受強光照射,如日光或熒光,遙控會無法進行。
關於PD-M407型號的備注:
要對PD-M407型號進行遙控,應使用隨放大器供應的遙控器(請參閱
第32頁)。
30˚
29
ChH
Page 30

使用注意事項
安裝
請把機器置於通風良好,并且不是高溫或潮濕的場所。
請勿把本機放在處於陽光直接照射,或附近有爐子或散熱器的地方,
過熱會對機轂及內部部件產生壞影響。而且,把機器放在潮濕及多塵
的地方,會引起誤動作或事故。(避免將本機置於有油煙、蒸氣或高
溫等地方如靠近廚房處)。
也不要置本機在不穩定或傾斜的表面處。
關於安裝前的注意事項
÷ 若長期把機器放在如放大器等的放熱源上使用,則會對性能產生影
響。因此應避免將其置於此類地方。
÷ 盡量將本機放置遠離調諧器機電視機。若該唱機放置場所接近於這
些設備,則可能引起噪音或圖像劣化。
÷ 使用室內天線時,噪音會特別明顯。這時請使用室外天線或關掉本
機電源。
÷ 請把機器放於水平的平坦場所。
鐳射唱碟拾音透鏡清潔器
在正常使用條件下,本鐳射唱機的拾音透鏡一般不會變髒。但是,如
果由於某種原因此透鏡變髒而功能不正常時,則請就近詢問
PIONEER認可的維修服務中心。鐳射唱機的拾音透鏡清潔器在市面
上可買到,但應特別注意,萬一使用不當則可能會導致透鏡損壞。
唱碟的保存
結露
若從一較寒冷環境,把機器一下子拿到較暖和房間、或者房間溫度突
然升高,機內會結露,從而造成機器功能失靈。為防止這種情況發
生,請慢慢使房間內溫度升高,或在打開機器電源開關之前,請把機
器放置一小時再用。
清潔及使用雷射唱碟時
÷ 平時常用軟布從內緣向外緣輕輕擦拭以保持清潔。
÷ 若唱碟很臟,則可把軟布蘸水並擰乾後,輕輕擦拭掉臟處。然後用
其他柔軟乾紙擦乾。
÷ 請勿使用唱碟清潔噴霧劑或防靜電藥劑,亦勿用苯稀釋劑或其他揮
發性溶劑清潔唱碟,否則會傷唱碟表面。
在本機上只能使用標有以下標記的CD碟片。不要使用其它碟片,
否則盒引起故障或造成損壞。
÷ 拿唱碟時,請勿觸摸信號面(標簽的反面,反射出“彩虹”模樣之
面)。拿邊緣,或邊緣與中心孔。
÷ 請勿在標簽面上貼標簽或膠帶,亦勿塗寫或破壞商標面。
÷ 唱碟在唱機內將高速旋轉,請勿使用已破損(破裂或彎曲)唱碟。
使用唱碟的注意事項
本機只適用於常規的,正圓形的唱碟。
請不要使用其它形狀的唱碟。
對於使用使用其它形狀的唱碟所產生的一切後果概不負責。
÷ 唱碟由同樣種類的塑料制成,這些塑料用於一般摹擬式音頻錄音。
切勿6唱碟彎曲:平時將唱碟放在唱碟盒內垂直放置保存,并且避免
放置在高熱、潮濕或超低溫的地方。也請避免將唱碟放在汽車里,
因為直射陽光照射的密閉汽車里溫度會極度上升。
÷ 請閱讀并遵守唱碟標簽上的注意事項。
唱碟透鏡清潔器
正常使用的話,唱機的拾音透鏡不會變臟,若由於某種原因使唱機誤
動作了,請與附近的PIONEER專門維修中心聯系。唱碟機的透鏡清
潔器雖在市面上有出售,但使用時千萬要小心,不要弄毀透鏡。
30
'
備註﹕
÷ 要播放8cm(3吋)唱碟時,您必須準備好一個另行出售的專用多片播
放唱碟庫(JD-M108、JD-M308)。在使用前務必仔細閱讀它的使
用說明書。
÷ 8cm(3吋)唱碟適配唱碟盤
本鐳射唱機不宜使用適配唱碟盤,即使它符合推荐的標準唱碟規格
彼建議您使用專用的多片播放唱碟庫(JD-M108、JD-M308)。
÷ 切勿把8cm(3吋)唱碟或它的適配唱碟盤裝入標准的12cm(5寸)唱碟
庫內,否則會嚴重損傷鐳射唱機。
÷ 不要僅把8cm(3吋)唱碟及其適配唱碟盤插入所提供的唱碟庫內。
ChH
Page 31

操作本鐳射唱機之前
把唱碟裝入6張唱碟播放庫
把您備有的唱碟插入隨帶的唱碟庫,最多可裝入六張唱碟。位於最上
面唱碟盤內的唱碟編號為1,並依此類推將最下面唱碟盤編號為6。唱
碟庫有一個窗口,通過這個窗口能拉出唱碟盤加以檢查。即使在放音
中,也能通過這個窗口確認正在放音的唱碟標號。
1. 僅拉出一個唱碟盤。
2. 使標簽面向下安放唱碟。
標簽面
向下
在唱碟庫上黏貼標簽
• 一定要將隨帶的標簽貼在指定的位置。如果標簽或膠帶貼在其他位
置則就不能正確動作。
• 使用標簽可帶來下列方便之處:
A﹕可書寫標題
B﹕可書寫唱碟名牌
C﹕可進行分類
• 不要將標簽貼在另一張標簽的上面。
B
B
C
A
與隨帶唱碟庫相同的附加唱碟庫(*JD-M100、JD-M200、JDM300、JD-M108、JD-M308)是作為選購件出售的。請用它們
以每個藝術家或型式加以分類來建立您自己的唱碟圖書館。
B
A
C
中國語
3. 將唱碟盤放回到原始位置。
4. 重覆步驟13,裝入其他唱碟。
注意﹕
• 每次務請僅拉出一個唱碟盤。(當一個唱碟盤已被拉出時,不可再拉
出其他唱碟盤。)
• 如果裝入的唱碟其標簽面向上,則將不能放音。因此,務請在標簽
面向下的狀態下裝入唱碟。
• 切勿將唱碟以外的物品(歌卡、唱碟內容說明等)插入唱碟盤。
• 不要用手指觸碰唱碟的放音面(閃光面)。
* JD-M100/JD-M200/JD-M300
.............................. 用於12cm(5吋)唱碟的唱碟庫
JD-M108/JD-M308 ............. 用於8cm(3吋)唱碟的唱碟庫
備註﹕
不要把8cm(3吋)唱碟裝入12cm(5吋)唱碟用的唱碟庫內。
電源線使用的注意事項
用插頭插拔電源線。不要拉著電線拉出插頭,切勿用濕手觸碰電源
線,否則可能會導致短路或觸電。不要讓本機、家俱等壓在電源線上
或挾住電源線。切勿在電源線上打結或用其他繩索繫住它。電源線應
布放在人踩踏不到的地方。已損傷的電源線會導致著火或使您觸電。
因此,應時常檢查電源線。當發現有損傷時,請就近與PIONEER認
可的維修中心或銷售店聯係進行更換。
31
ChH
Page 32

連接
CD
L
R
CONTROL
OUT
白色
L
R
紅色
立體聲放大器
輸出電纜
白色
紅色
L
R
鐳射唱機
LINE OUT
L
R
控制電纜
連接方法
1. 把本機的LINE OUT插口連接到放大器的輸入接口(CD或AUX)。務
必將白色插頭接在左(L)插口上,紅色插頭接在右(R)插口上。
• 切勿把本機連接到放大器的PHONO插口,否則聲音將會失真而
不能正常放音。
2.把電源線連接到室中牆上的交流電源插座或放大器上的交流電源插
座。
• 務必將各種插頭完全插入插口和牆上的插座。
用帶有 Î 記號的先鋒立體聲放大器進行系統遙控
當使用帶有 Î 記號的先鋒立體聲放大器時,請把本鐳射唱機後板上
的CONTROL IN插口連接到放大器的CONTROL OUT插口。這樣就
可以用立體聲放大器隨帶的遙控器遙控操作本鐳射唱機。如果您不打
算使用此功能,則就不必連接CONTROL IN/OUT插口。
• 使用本鐳射唱機隨帶的控制電纜。
• 放大器隨帶的遙控器能用於控制放音、停止、暫停、曲子/唱碟搜索
和換片操作。
• 有關連接和操作的說明,請參閱立體聲放大器隨帶的使用說明書。
CONTROL
IN
÷ 在進行或改變連接之前,將待機/開(STANDBY/ON)開關置
於關,然后從交流電源插座上拔下插頭。
OUT
接至牆上交流電源插座
電源線
備註﹕
•
當把控制線連接到播放機的CONTROL IN插口時,不能使用遙控器
直接遙控播放機。應將遙控器對準功率放大器來操作播放機。
•
務必將控制線的兩側插頭確實地插入CONTROL IN和CONTROL
OUT端子。不要僅連接電纜的一端。
•
在連接電源線和輸出線之前,務必先關斷電源。
電源線的連接
把電源線連接到室中牆上的交流電源插座或放大器上的交流電源插
座。
• 務必把各插頭完全插入插口和牆上插座。
交流電源線的連接和功能
根據交流電源線所接插座型式的不同,有些功能將不起作用。
交流電源線被連接到放
功能
大器或音響定時器的開
關式電源插座上時
定時播放
編程記憶
取消編程記憶
可
不可
不可
有關詳細內容請參閱本使用說明書中的各有關功能的說明部分。
交流電源線被連接到放
大器的非開關式電源插
座或牆上電源插座上時
不可
可
可
32
ChH
Page 33

各部分名稱及其功能
前面面板
顯示窗
遙控傳感窗(只限PD-M427型號)
接收來自遙控器的訊號。
STANDBY/ON(電源待用/接通)
STANDBY/ON
顯示窗
RANDOM(隨機)
DELETE(取消)
DELETE
RANDOM
PROGRAM
REPEAT–1
REPEAT(重覆)
PROGRAM(編程)
播放
暫停
1
DISC(唱碟)
MULTI COMPACT DISC PLAYER
-DISC
MULTI CD
6
DISC(唱碟)號碼
TRACK(曲子)號碼
TRACKDISC MIN SEC
2
4
3
PD–M427
5
分鐘
唱碟庫插入口
DISC
6
SCAN
DISC SCAN
(唱碟掃描)
'
EJECT REPEAT PROGRAM DISC
0
EJECT(彈出)
REPEAT(重覆)
PROGRAM(編程)
DISC TRACK MIN SEC
DISC(唱碟)
秒鐘
RANDOM(任意)
HI-LITE (特定位置掃描)
RANDOM
Î
TRACK/MANUAL
41 ¢¡
STOP PLAY/PAUSE
7
1-BIT•DLC
DIRECT LINEAR CONVERSION
PLAY/PAUSE(播放/暫停)
STOP(停止)
TRACK/MANUAL(曲子/手動)
HI–LITE
6
中國語
遙控器 (只限PD-M427型號)
1
2
3
4
5
6
DISC 1 DISC 2
DISC 4 DISC 5 DISC 6
783
1¡
RANDOM
4¢
HI–LITE
PROGRAM DELETE
7
Î
MULTI
COMPACT DISC PLAYER
REMOTE CONTROL UNIT
STANDBY/ON
DISC 3
CLEARCHECK
'
8
9
10
11
12
13
與播放機前面板上的按鈕名稱或記號相同的遙控器上的按鈕,其操作
功能與前面板上的相同。
1 STANDBY/ON(電源待用/接通)按鈕
2 DISC NUMBER(唱碟號碼)按鈕(DISC1-DISC6)
3 STOP(停止)按鈕( 7 )
4 RANDOM(任意)按鈕
5 HI-LITE(特定位置掃描)按鈕
6 PROGRAM(編程)按鈕
7 CHECK(確認)按鈕
8 PAUSE(暫停)按鈕
9 PLAY(播放)按鈕( 3 )
10 MANUAL(手動)搜尋按鈕(1 , ¡)
11 TRACK(音軌)搜尋按鈕( 4 , ¢ )
12 DELETE(取消)按鈕
13 CLEAR(消除)按鈕
33
ChH
Page 34

基本操作方法
STANDBY/ON
MULTI COMPACT DISC PLAYER
-DISC
MULTI CD
6
'
DISC TRACK MIN SEC
EJECT REPEATPROGRAM DISC
0
TRACK/MANUAL
41 ¢¡
1-BIT•DLC
RANDOM
STOP PLAY/PAUSE
7
DIRECT LINEAR CONVERSION
CD唱碟的播放
1. 按下待機/開( STANDBY/ON)開關,打開電源。
2. 裝入唱碟盒,將其推入,直到聽到“卡嗒”聲。
HI–LITE
6
• 事先把要播放的唱碟裝入唱碟庫。
(請參閱第31頁上的“操作本鐳射唱機之前”一章。)
• 當電源被關斷(待用方式)時,如把唱碟庫插入則將自動接通電源
(電源自動接通功能)。
3. 按下 6 按鈕,開始放音。
1
1
2
PLAY/PAUSE
3
6
(只限PD-M427型號)
2
3
STANDBY/ON
TRACKDISC MIN SEC
12345
3
要暫停放音時﹕
在放音中按下 6 按鈕。此時 8 指示器點亮並在那個位置暫停放
音。再按一次 6 按鈕則又從暫停的位置起恢復放音。
要停止放音時﹕
按下 7 按鈕。此時鐳射唱機返回唱碟上第一首曲子的曲首位置並停
止放音。如果按兩次 7 按鈕,鐳射唱機將返回到第一張唱碟上第一
首曲子的曲首位置並進入停止位置。
備註﹕
當鐳射唱機內有唱碟庫而關斷電源時,鐳射唱機將記憶電源剛被關斷
之前所放音的那張唱碟。這樣,當下次再接通電源並按下 6 按鈕
時,唱機就從所記憶的唱碟上的第一首曲子開始放音。
要停止放音並取出唱碟庫時﹕
按下EJECT按鈕(0) 取出唱碟庫,然後再按下 STANDBY/ON開關
關斷電源。
即使在電源關斷狀態(待用方式)下,只要按下EJECT按鈕唱碟庫也被
彈出。
有關唱碟庫使用的注意事項﹕
• 在把唱碟庫裝入鐳射唱機時,務必保持正確的插入方向。
• 使用後要將唱碟庫存放在隨帶的唱碟庫盒內。不要放在高溫或受陽
光直射的地方彼
6
• 不要拆開唱碟庫。
• 應注意,不要掉落或打擊唱碟庫。亦不要對拉出的唱碟盤施加強
力。
• 汽油、塗料稀釋劑、殺虫劑或其他溶液會損傷唱碟庫的表面,因此
要使唱碟庫遠離這類物品。
PLAY/PAUSE
PAUSE
88
8
88
77
STOP
7
77
用〔 〕記號表示的操作可使用遙控器進行。(只限PD-M427型號)
6
STOP
7
(只限PD-M427型號)
8
(只限PD-M427型號)
7
34
ChH
Page 35

特殊操作方法
唱碟搜索-搜索特定的唱碟
在放音中停止狀態下
DISC
使用DISC按鈕來選擇需要的唱片號碼,然後按下 6 按鈕,或DISC
NUMBER(DISC1-DISC6)按鈕之一﹔播放機即會搜尋被選唱片並從唱
片開頭處開始播放。
備註﹕
•
如果顯示器上出現“no DISC”的信息,則表示您所選擇的唱碟盤
內沒有唱碟。
•
在編程放音中不能進行唱碟搜索。
(只限PD-M427型號)
DISC 2 DISC 3
DISC 1
DISC 4 DISC 5
DISC 6
曲子搜索-搜索特定的曲子
在放音、暫停中或停止狀態下
TRACK/MANUAL
41
¡¢
(只限PD-M427型號)
¢
4
手動搜索-搜索特定的曲段
在放音中或暫停狀態下
TRACK/MANUAL
41
當 ¡ ¢ 按鈕被按著不放時,放音位置將迅速進到該唱碟的尾端。
當放音位置達到唱碟的尾端時,鐳射唱機將進入暫停狀態並顯示出“
END”。當 4 1 按鈕被按著不放時,放音位置將迅速退到該唱
碟的開頭。當找到所需的曲段時,放開 ¡ ¢ 或 4 1 按鈕則
唱機就在 ¡ ¢ 或 4 1 按鈕被放開時的位置起進入正常方式
(放音或暫停)。
備註﹕
•
在正常放音中,只能在一張唱碟上進行手動搜索。
•
在編程放音中,只能在一個程式段內進行手動搜索。
¡¢
(只限PD-M427型號)
¡
1
要重覆放音時(重覆放音)
REPEAT
中國語
按一次或若干次 ¡ ¢ 按鈕時,放音位置將進到位於正在放音中曲
子後面的曲子之首。尋找到的曲子位置與按下按鈕的次數相對應。
按一次 4 1 按鈕時,放音位置將退回到正在放音曲子的曲首。當
這個按鈕被下一次以上時,放
音位置將退回到正在放音曲子前面的曲子。
• 在暫停或停止狀態下操作 ¡ ¢ 按鈕或 4 1 按鈕時,須按
下 6 按鈕才開始放音。
備註﹕
•
在編程放音中, ¡ ¢ (或 ¢)按鈕或 4 1 (或 4 )按鈕不
能用於選擇已被編程的曲子。
•
在正常放音中,只能在一張唱碟上進行曲子搜索。在停止狀態下,
此操作能從第1首曲子至第99首曲子之間進行。
要重覆播放所顯示的曲子時,請按一次REPEAT按鈕,此時
REPEAT-1指示器點亮。在任何方式下都能按重覆按鈕。要在正常放
音方式或特殊放音方式(編程放音、刪曲編程放音或隨機放音)下重覆
播放全部唱碟上的所有曲子時,其按兩次REPEAT按鈕,此時
RE P E A T 指示器點亮。
• 要退出重覆方式時,其按下REPEAT按鈕使REPEAT-1或
RE P E A T 指示器熄滅。
35
ChH
Page 36

特殊操作方法
隨機放音-以隨機次序播放所有曲子
RANDOM
(只限PD-M427型號)
RANDOM
按下RANDOM播放按鈕。全部唱片上的全部音軌按任意順序被播放。
如欲播放被取消的音軌以外的音軌,可在完成取消編程步驟之後按下
RANDOM播放按鈕。參見第39頁上的“取消編程播放”。
唱碟庫特定位置掃描
在停止狀態下
(只限PD-M427型號)
HI-LITE
HI-LITE
當在停止狀態下按一次HI-LITE按鈕時,唱機將從第一首曲子曲首後面
1分鐘的位置起開始放音,每張唱碟上的第一首曲子都被播放10秒鐘
左右。在唱碟掃描方式中DISC SCAN指示器點亮。所有唱碟上的第
一首曲子被掃描後,唱機進入停止狀態。當在停止狀態下按兩次HI-
LITE按鈕時,唱機將從曲首後面1分鐘的位置起開始放音,每個曲子
都被播放10秒鐘左右。在曲子掃描方式中SCAN指示器點亮。所有唱
碟上的全部曲子被掃描
後,唱機進入停止狀態。
定時播放﹕
使用市面上出售的音響定時器,可使唱機在某一時間自動開始放
音。
1. 把唱碟庫裝入唱碟庫插入口。
2. 設定您想開始放音的時間。
到達預先設定的時間時,本定時器將向放大器和鐳射唱機供電,
使所有的裝置接通並開始放音。放音從第一張唱碟上的第一首曲
子開始。
注意﹕
• 在放音中不要拔出電源線或關斷音響定時器的電源,否則會導
致唱碟損壞。
• 如果在電源關斷的狀態(待用)下出現電源故障,當電源恢復時
定時器播放功能仍能自動接通電源。
因此,當打算長時間不使用鐳射唱機時,請脫開交流電源線。
要退出唱碟庫特定位置掃描方式時﹕
按下 7、6 按鈕。
當 6 按鈕被按下後即從當前的位置起開始正常放音。
備註﹕
•
特定位置掃描能從所需的已經過的曲子時間起進行。在放音中在您
想要開始特定位置掃描放音的位置按下HI-LITE 按鈕。唱機記憶該
位置的分鐘和秒鐘數並從每個曲子被記憶的位置起進行曲子掃描放
音。
•
每按一次HI-LITE 按鈕,掃描方式在唱碟掃描與曲子掃描間交替轉
換。
•
在曲子掃描放音中可將所需的曲子編成選曲程式,詳見第38頁上
的“直接編程〞一節。
•
在曲子掃描放音中,您可用 4 1 或 ¡ ¢ 按鈕跳到所需的
曲子位置。
•
當REPEAT按鈕被按下時將重覆進行特定位置掃描放音。
•
若曲子的放音時間小於1分鐘或短於被記憶的時間,則特定位置掃描
放音將從該曲子的曲首起進行10秒鐘左右。若曲子的放音時間小於
10秒鐘,則該曲子將被從頭播放到結束。
36
ChH
Page 37

僅播放所需的曲子/唱碟
1
MULTI COMPACT DISC PLAYER
STANDBY/ON
PROGRAM
-DISC
MULTI CD
6
(只限PD-M427型號)
DISC TRACK MIN SEC
'
EJECT REPEATPROGRAM DISC TRACK/MANUAL
0
1,4
41 ¢¡
2
PROGRAM
RANDOM
STOP PLAY/PAUSE
7
1-BIT•DLC
3
HI–LITE
6
DIRECT LINEAR CONVERSION
6
編程放音-以所需的次序編排曲子/唱碟
1.在鐳射唱機停止狀態下按下PROGRAM按鈕,使PROGRAM指示
器點亮。
2.使用DISC按鈕或DISC NUMBER按鈕,選擇需要的唱片號碼。
3. 按 下 4 1 或 ¡ ¢ 按鈕選擇所需的曲子。
所選擇的曲子號碼被顯示出。
4. 最後按下PROGRAM按鈕或等待2 秒鐘左右,已編成的選曲程式將
被存入記憶體。
如果僅在選擇了唱碟號碼後就按下PROGRAM按鈕,“AL”指示
器將顯示出,這表示選擇了“唱碟全編程”方式(唱碟上的全部曲目
都作為單獨程式段被編入程式)。但是,當“AL”指示器被顯示著
的時候,如果用 4 1 或 ¡ ¢ 按鈕指定曲子號碼,然後再
按下PROGRAM按鈕(或經過2 秒鐘後)則所選擇的曲子將被存入那
個程式段內。
5. 重覆進行步驟2、3和4編排其他曲子。
6. 按 下 6 按鈕。
按照編程次序播放各曲子。當編程的全部曲子都被放完後,唱機
進入停止狀態。
2
TRACK/MANUAL
3
41
PROGRAM
4
DISC
¡¢
(只限PD-M427型號)
DISC 2 DISC 3
DISC 1
DISC 4 DISC 5
(只限PD-M427型號)
4¢
PROGRAM
DISC 6
備註﹕
當在第3步驟中用 4 1 或 ¡ ¢ 按鈕選擇了所需的曲子後,如
果在兩秒鐘內不再按下 4 1 或 ¡ ¢ 按鈕,那麼顯示出的曲
子號碼將自動被編入程式。因此,務必依次地按撳 4 1 或 ¡
¢ 按鈕直至所需的曲子號碼顯示在顯示屏上。
要停止編程放音時請按下 7 按鈕。
要退出編程方式時﹕
在編程放音中用DISC NUMBER按鈕選擇DISC號碼,然後按下 6
按鈕。此時唱機進入正
常放音方式,並且從所選擇的唱碟之開頭起放音。
• 編程放音能建立最多包含32個程式段的選曲程式。
• 要進入程式中的前面或下一個程式段時,請按撳 4 1 或 ¡
¢ 按鈕。
• 如果鐳射唱機內有唱碟庫,則即使關斷電源編程內容也不會被清
除。
備註﹕
在取消編程期間,PROGRAM按鈕不能被操作。
中國語
6
PLAY/PAUSE
(只限PD-M427型號)
3
6
37
ChH
Page 38

僅播放所需的曲子/唱碟
直接編程﹕
在正常放音或唱碟庫特定位置掃描放音中,可把正在放音中的曲子編
入程式。
1.按下PROGRAM按鈕使唱機進入編程方式。
2. 要在正常放音中搜索所需的曲子時,按撳 4 1 或 ¡ ¢ 按
鈕可跳到後面的曲子。
又,唱碟庫特定位置掃描功能可用於在整張唱碟上從曲子移到曲
子。
3.如果您想把當前在放音中的曲子編入程式,請在該曲子放音時按下
PROGRAM按鈕。
• 在編程放音中不可進行直接編程。
如欲確認編程內容(只限PD-M427型號)
在編程方式時,將播放機設至停止方式並按下遙控器上的CHECK按
鈕。編程內容將按所編順序被顯示。
• 在確認最後的編程步驟之後,顯示器顯示"0-00"。
編入暫停(只限PD-M427型號)
在程序中插入暫停對實現錄音非常有用。
在輸入音軌號碼時按下遙控器上的 8 按鈕。"PA"被顯示在顯示板上。
• 例如,當您在卡式磁帶兩面上進行錄音時,如果接在第一面上要錄
音的最後音軌之後插入暫停,則程序將在該處暫停,便於您變換磁
帶面。如欲在播放機進入暫停方式之後恢復程序播放,按下遙控器
上的 8 按鈕或前面板上的6按鈕。
備註﹕
• 僅當在停止方式下完成編程步驟時才可編入暫停。
•
在程序開始處(P-01)不能編入暫停﹔在編入了暫停之後,不可再編
入另一個暫停。
•
編入程序中的暫停算作一個程序步驟。
•
如果編入的暫停作為程序的最後步驟,則播放機將不再進入暫停方
式。
若要清除程序(只限PD-M427型號)
在編程方式時,按下遙控器上的CLEAR按鈕。
最後的程序步驟被消除,並且前一個程序步驟的內容被顯示。
備註﹕
播放時編程內容可以被很好地清除。但當前播放音軌之前的音軌不能
按此方法清除。
如欲消除全部編程內容﹕
A.在停止方式時,按下 7 按鈕。
B.當唱片艙被退出時,編程內容即被清除。
如欲修改編程內容(只限PD-M427型號)
1. 在編程方式中,將播放機設至在停止方式,並且按下遙控器上的
CHECK按鈕,則需要修改的程序步驟即出現在顯示器上。
2.用DISC NUMBER按鈕輸入新的唱片號碼,然後按下 4 1 或
¡ ¢ 按鈕,則新的音軌號碼出現在顯示器上。
3.按下PROGRAM按鈕
• 重複步驟1至3以便按需要改變其他音軌。
• 當修改音軌號碼時,如果在2秒鐘內不按下 4 1 或 ¡ ¢
按鈕,則所顯示的音軌號碼將被自動存儲。
38
ChH
Page 39

僅播放所需的曲子/唱碟
取消編程播放-如何取消不需要的音軌/唱片
(只限PD-M427型號)
1
2
DISC
STANDBY/ON
DISC 1 DISC 2
DISC 3
DISC 4 DISC 5 DISC 6
783
1¡
RANDOM
HI–LITE
4¢
PROGRAM DELETE
Î
MULTI
COMPACT DISC PLAYER
REMOTE CONTROL UNIT
CLEARCHECK
'
2
6
3
1,4
(只限PD-M427型號)
DELETE
(只限PD-M427型號)
DISC 2 DISC 3
DISC 1
DISC 4 DISC 5
DISC 6
1. 播放機停止時,按下DELETE按鈕,DELETE指示燈點亮。
2.使用DISC按鈕或DISC按鈕之一,選擇唱片號碼。
被選號碼被顯示。
3.然後按下 4 1 或 ¡ ¢ 按鈕,選擇音軌號碼。
被選音軌號碼被顯示。
4.按下DELETE按鈕,或等待2秒鐘,要取消的音軌將被輸入。
如果只在選擇唱片號碼之後按下DELETE按鈕,則
"AL" 指示被顯
示,這表示選擇了“唱片全取消”方式(整張唱片內容將從程序存
儲中取消)。但是,當 "AL" 被顯示時,如果使用 4 或 ¢
按鈕來指定音軌號碼,然後按下了DELETE按鈕(或經過了2秒鐘
之後),則被選音軌將按程序步驟取消。
5. 重複步驟2, 3以及4, 取消其他音軌。
6. 按 下 6按鈕。
除了被取消的音軌/唱片外,全部音軌將按唱片和音軌號碼順序被播
放。當音軌已被播放時,播放機進入停止方式。
備註﹕
在步驟3中,當用 4 1 或 ¡ ¢ 按鈕選擇音軌時,如果在2秒
鐘內未按下 4 1 或 ¡ ¢ 按鈕,則被顯示的音軌號碼將被自
動編入程序。因此,務必接著按下 4 1 或 ¡ ¢ 按鈕,直到
所需音軌號碼出現在顯示器上為止。
如欲停止取消編程播放,按下 7 按鈕。
•
號碼為33或以上的音軌不能被取消。
•
除被取消的唱片/音軌外,如要達到前面或後面的唱片/音軌,請按
下 4 1 或 ¡ ¢ 按鈕。
•
如果唱盤處在播放中,則即便電源已被關掉,取消編程內容即不會
被消去。
中國語
TRACK/MANUAL
3
41
4
6
PLAY/PAUSE
6
¡¢
(只限PD-M427型號)
4¢
DELETE
(只限PD-M427型號)
3
備註﹕
在為程序播放進行編程之後或在程序播放方式期間,不能進行取消編
程的操作。
如欲清除全部消除編程內容﹕
A 在停止方式中,按下 7 按鈕。
B 當唱片艙退出時,編程內容將被清除。
C 在停止或播放方式時,按下遙控器上的CLEAR按鈕。當在取消編
程播放方式期間按下CLEAR按鈕時,播放機進入通常播放方式。
39
ChH
Page 40

排除故障
不正確地操作常常會造成故障和異常。在您認為本機器出了毛病時,請按下表所述要領進行檢查。有時,故障可能發生在其他機器。
因此請檢查其他機器和所使用的電子器件。如果按下表檢查之後仍不能排除故障,則請委托就近的PIONEER認可的維修服務中心或經銷店進行修
理。
症狀
當按下EJECT按鈕時唱碟庫不伸出。
開始放音後又立即停止。
在播放時暫停或停止。
無聲音。
聲音失真,有噪聲。
電視機的圖像波動或FM廣播有躁聲干
擾。
遙控器不起作用(只限PD-M427型號)
靜電或其他外部干擾可能會導致本機的功能不正常。此時,請關斷電源,然後再接通﹔或者拔下交流電源線,然後再將它插上則可使本機恢復正常
工作。
• 電源插頭從電源插座脫開。
• 裝入的唱碟其上下面顛倒。
• 唱碟上有污點等。
• 輸出線連接不正確或鬆動。
• 立體聲放大器的操作不正確。
• 針形插頭和(或)放大器端子髒。
• 鐳射唱機處於停止狀態。
• 連接不正確。
• 針形插頭和(或)放大器端子髒。
• 拾音受電視機干擾。
• 干擾來自鐳射唱機的拾音器。
• 電池耗盡了
• 離播放機太遠或角度不對。
• 播放機與遙控器之間置有障礙物
原因
排除措施
• 把電源插頭接到放大器或牆上的電源插座。
• 是標簽面向下,正確地裝入唱碟。
• 清除唱碟上的污點,然後再放音。
• 正確地連接。
• 檢查放大器各開關和音量控制旋鈕的設定狀況。
• 清除髒物。
• 按下 6 (3 或 8)按鈕。
• 連接到放大器的A U X 或C D 端子。
不要連接到PHONO端子。
• 清除髒物。
• 關掉電視機或把鐳射唱機移到遠離電視機的位置。
• 拔下交流電源線,或將唱機從電視機或調諧器旁移
開。
• 更換電池
• 遙控器與播放機之間的距離不應超過大於7米。對前
面板的操作角度應在播放機左或右側30˚ 角之內。
• 移動遙控器或將障礙物移開。
規格
整機規格
型式 .............................. 鐳射唱碟數字式聲音系統。
電源要求 ........... 交流110-127V/220240V(可轉換)50/60Hz
電力消耗 ............................................. 1 2 W
工作溫度 ......................................... +5+35℃
重量(不包括包裝箱) .................................... 3.7kg
外形尺寸 ...................... 420(寬)×294(深)×105(高)mm
音頻部分
音頻響應 ....................................... 2Hz20kHz
輸出電壓 ............................................. 2.0V
晃抖度 ............... 測量極限(0.001% W. PEAK)以下(EIAJ)
聲道 ........................................ 變聲道(立體聲)
輸出端子
音頻線路輸出
控制輸入/輸出插口
PIONEER ELECTRONIC CORPORATION 4-1, Meguro 1-Chome, Meguro-ku, Tokyo 153-8654, Japan
PIONEER ELECTRONICS [USA] INC. P.O. BOX 1540, Long Beach, California 90801-1540
PIONEER ELECTRONICS OF CANADA, INC. 300 Allstate Parkway, Markham, Ontario L3R OP2, Canada
PIONEER ELECTRONIC [EUROPE] N.V. Haven 1087, Keetberglaan 1, 9120 Melsele, Belgium TEL: 03/570.05.11
PIONEER ELECTRONICS AUSTRALIA PTY. LTD. 178-184 Boundary Road, Braeside, Victoria 3195, Australia, TEL: [03] 9586-6300
PIONEER ELECTRONICS DE MEXICO, S.A. DE C.V. San Lorenzo Num 1009 3er piso Desp. 302 Col. Del Valle, Mexico D.F. C.P. 03100 TEL: 5-688-52-90
附件
• 遙控器(只限PD-M427型號) ............................ 1
• 尺寸為AAA/R03乾電池(只限PD-M427型號)............. 2
• 六張唱碟播放庫 ......................................... 1
• 控制電纜 ............................................... 1
• 輸出電纜 ............................................... 1
• 使用說明書 ............................................. 1
為了改進、提高產品,規格和設計如有更改,恕不預先通知。
帶 標記的唱碟庫型多片唱碟鐳射唱機與帶相同標記的
唱碟庫對於5吋(12cm)唱碟具有相容性。
日本先鋒公司發行
版權 © 1999年日本先鋒公司
版權所有
<99B00ZF0P00>
Printed in <PRE1281-A>
 Loading...