

Page 1

E
N
> Before Start > Part Names > Install > Initial Setup > Playback
Before Start
NETWORK AUDIO PLAYER
N-70AE
N-50AE
Instruction
Manual
What's in the box .................................................................... 2
Part Names
Front Panel (N-70AE) ............................................................. 3
Front Panel (N-50AE) ............................................................. 4
Rear Panel (N-70AE) .............................................................. 5
Rear Panel (N-50AE) .............................................................. 6
Remote Controller .................................................................. 7
Display .................................................................................... 8
Install
Connections with an amplifier ................................................. 9
Connecting the power cord, etc. ............................................11
Initial Setup
Power On & Initial Setup ...................................................... 12
Playback
USB Storage Device/HDD .................................................... 14
Internet Radio ....................................................................... 16
Spotify ................................................................................... 17
®
AirPlay
Music Server ......................................................................... 19
Using a computer to save and delete the music on a USB HDD
connected to this unit ............................................................ 21
Using this unit as a D/A converter ........................................ 22
Adjusting sound quality ......................................................... 24
Entering text ......................................................................... 25
Supplementary information
Supplementary information for player functions .................... 26
Advanced Setup
Advanced Settings................................................................. 27
Firmware Update .................................................................. 30
Others
Troubleshooting .................................................................... 32
General Specifications .......................................................... 34
License and Trademark Information ..................................... 35
................................................................................ 18
Supplementary information | Advanced Setup | Others
Page 2
> Before Start > Part Names > Install > Initial Setup > Playback
E
N
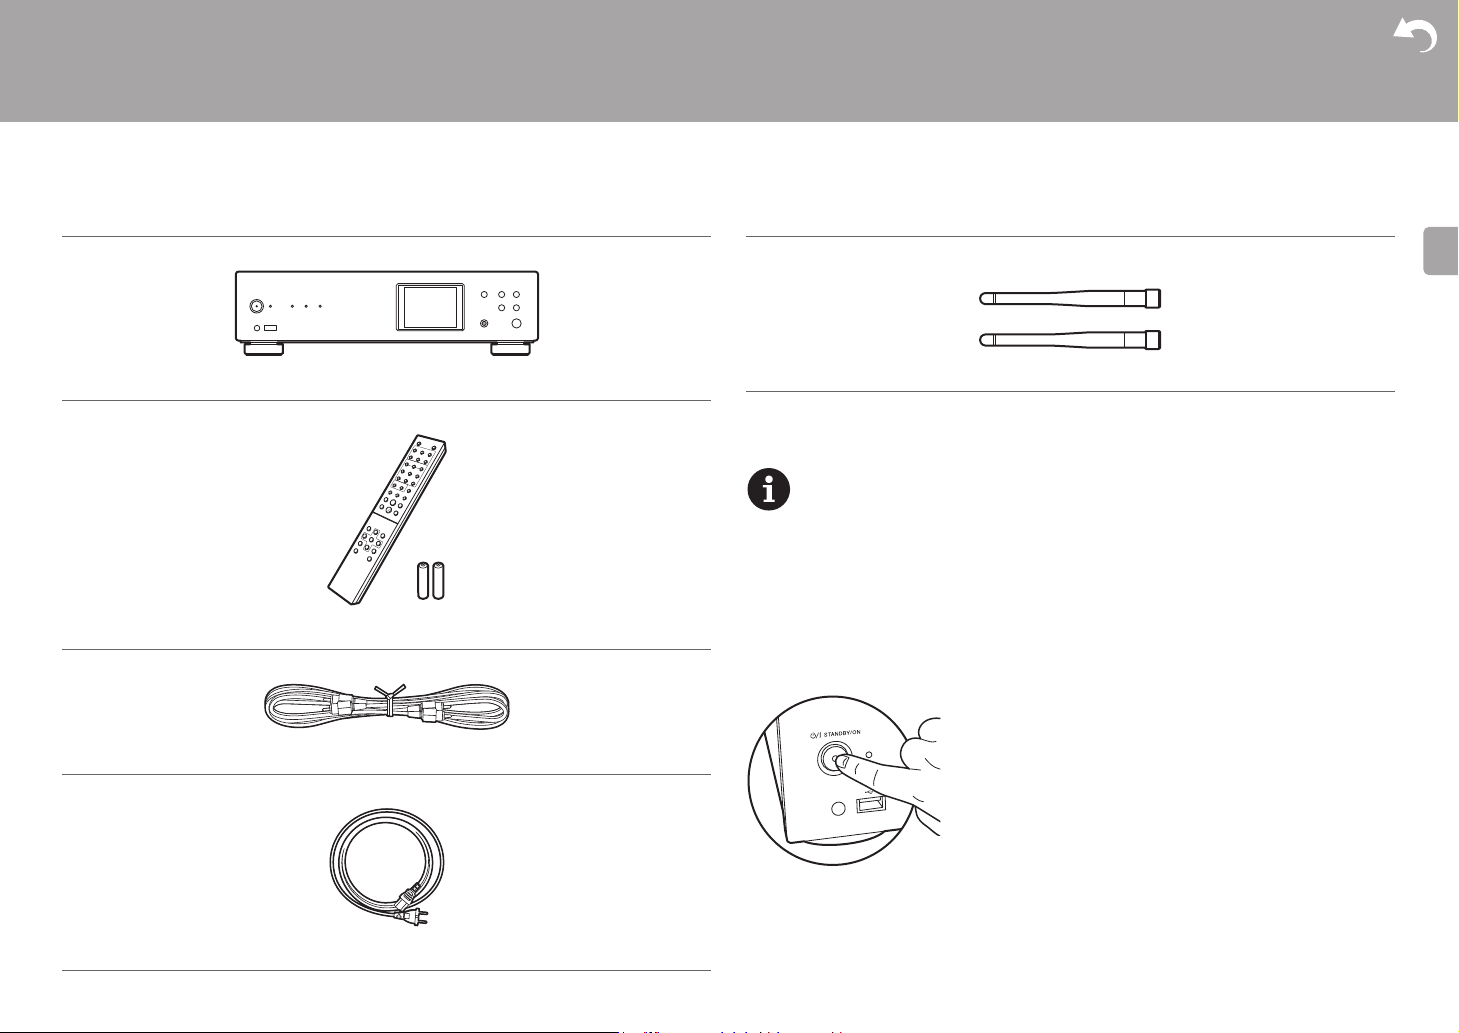
What's in the box
Before Start
≥ N-70AE only
Supplementary information | Advanced Setup | Others
Main unit (1) (N-70AE is used in the illustrations)
Remote controller (RC-931S) (1), Batteries (AAA/R03) (2)
Analog Audio Cable (1)
Power Cord (1)
Wireless antenna (2)
0 Quick Start Guide (1)
0 This document is an online instruction manual. It is not included as an accessory.
0 The power cord must be connected only after all other cable connections are completed.
0 We will not accept responsibility for damage arising from the connection of equipment
manufactured by other companies.
0 Functionality may be introduced by firmware updates and service providers may cease
services, meaning that some network services and content may become unavailable in
the future.
0 Specifications and appearance are subject to change without prior notice.
The main power cannot be turned on or off with the remote controller. Use the Í/I
STANDBY/ON button on the main unit.
2
Page 3
> Before Start >Part Names > Install > Initial Setup > Playback
E
N
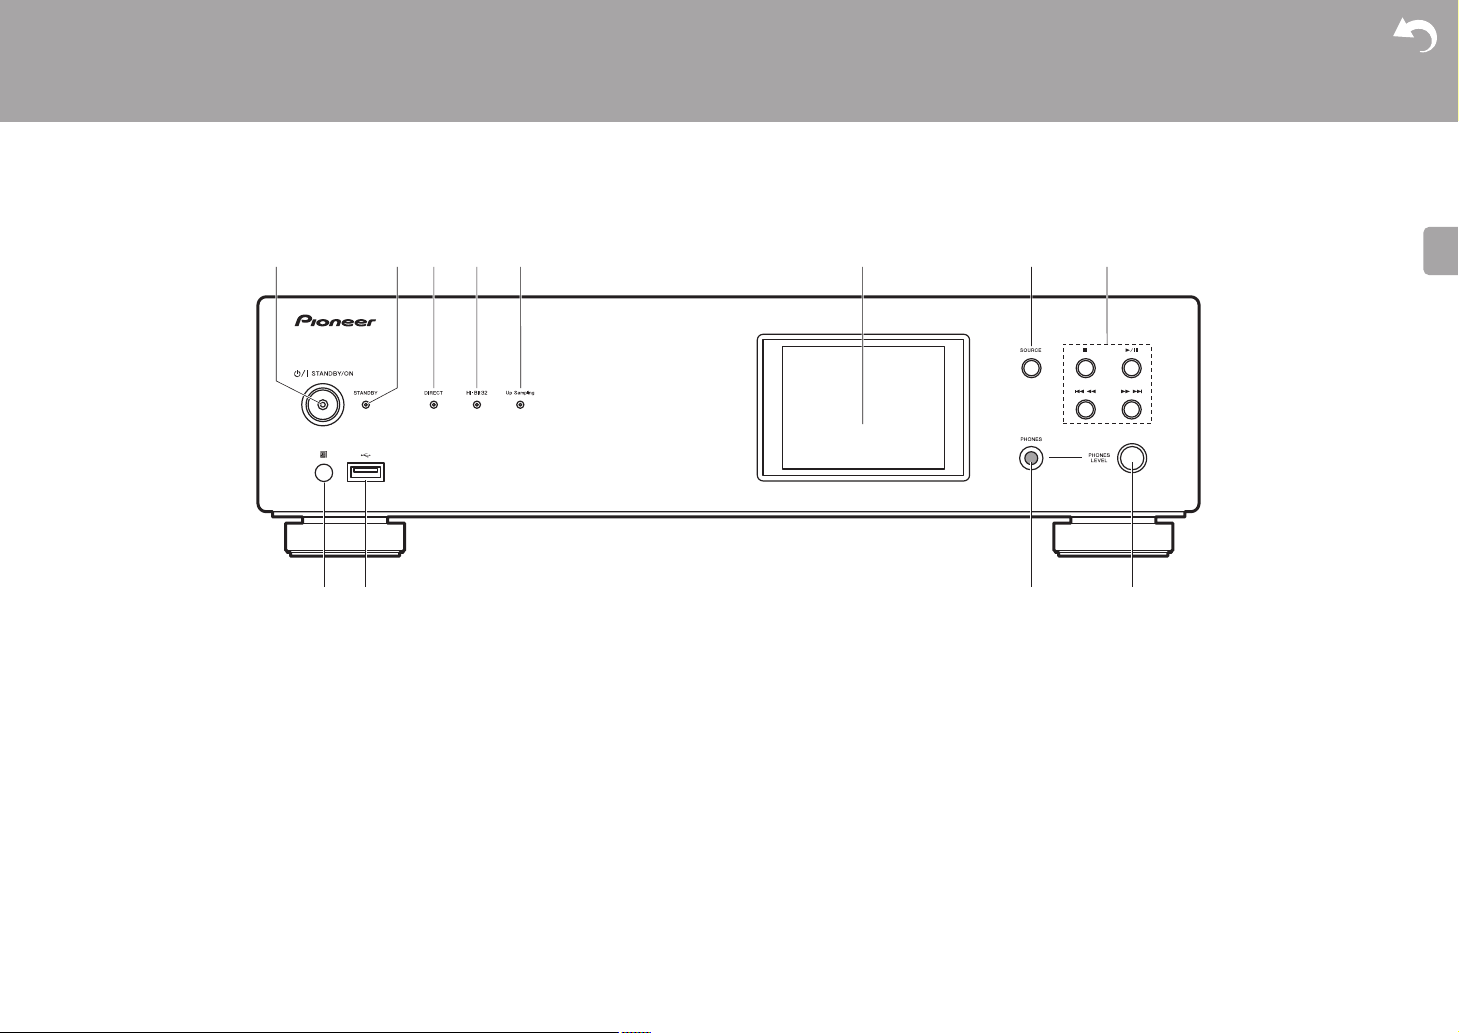
Front Panel (N-70AE)
Part Names
Supplementary information | Advanced Setup | Others
1. Í/I STANDBY/ON button/indicator: Switch the main power of the unit on and off. While
the unit is starting up, the indicator in the center of the button slowly flashes blue, then
lights blue when it has started.
2. STANDBY indicator: Lights red when the unit is in standby mode.
3. DIRECT indicator: Lights when the DIRECT mode is on. (P24)
4. Hi-Bit32 indicator: Lights when the Hi-Bit32 feature is on. (P24)
5. Up Sampling indicator: Lights when the Up Sampling feature is on. (P24)
6. Display (P8)
7. SOURCE button: Switches the input to be played.
8. Play buttons:
∫
: This button stops playback.
1
/; : This button pauses the playback.
:6
: Move to the track before the one being played.
59
: Move to the next track.
0 Depending on the input, these buttons may be disabled.
9. Remote control sensor
10.
USB port: Connect a USB storage device or HDD (hard disk drive) to play music files. You
can also supply power (maximum 5 V/0.5 A) to USB devices with a USB cable.
0 When connecting a HDD that requires more than 5 V/0.5 A, connect to the USB port
(maximum 5 V/1 A) on the rear of the unit.
11.
PHONES jack: Connect headphones with a standard plug (‰6.3 mm diameter).
12.
PHONES LEVEL dial: Adjust the volume of the headphones.
3
Page 4
> Before Start >Part Names > Install > Initial Setup > Playback
E
N
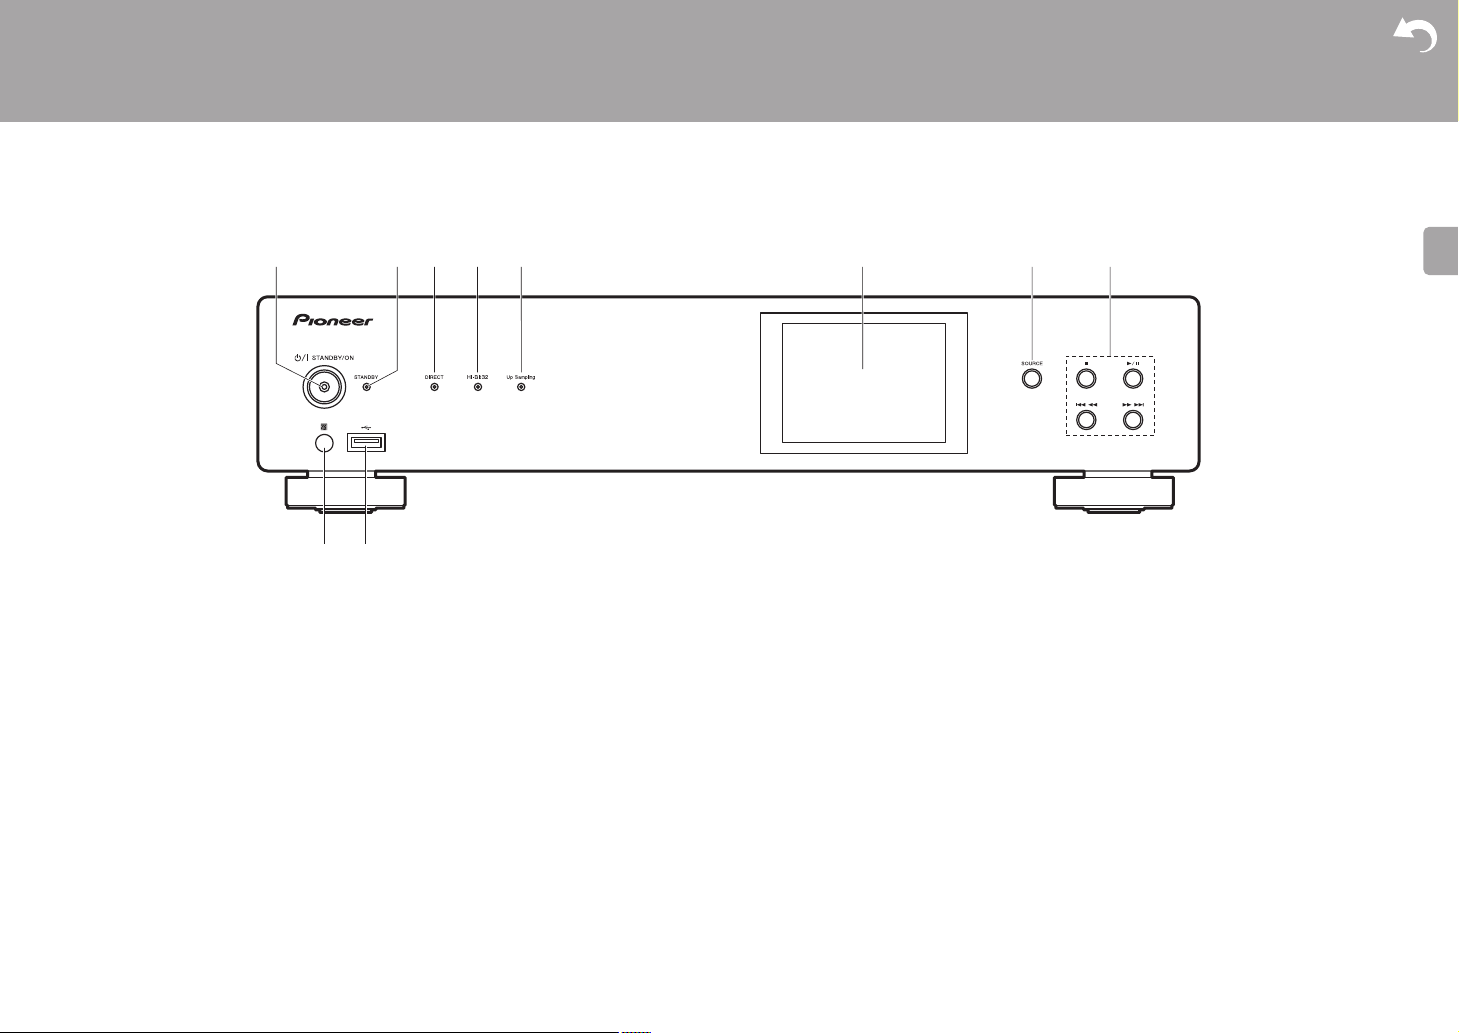
Front Panel (N-50AE)
Part Names
Supplementary information | Advanced Setup | Others
1. Í/I STANDBY/ON button/indicator: Switch the main power of the unit on and off. While
the unit is starting up, the indicator in the center of the button slowly flashes blue, then
lights blue when it has started.
2. STANDBY indicator: Lights red when the unit is in standby mode.
3. DIRECT indicator: Lights when the DIRECT mode is on. (P24)
4. Hi-Bit32 indicator: Lights when the Hi-Bit32 feature is on. (P24)
5. Up Sampling indicator: Lights when the Up Sampling feature is on. (P24)
6. Display (P8)
7. SOURCE button: Switches the input to be played.
8. Play buttons:
∫
: This button stops playback.
1
/; : This button pauses the playback.
:6
: Move to the track before the one being played.
59
: Move to the next track.
0 Depending on the input, these buttons may be disabled.
9. Remote control sensor
10.
USB port: Connect a USB storage device or HDD (hard disk drive) to play music files. You
4
can also supply power (maximum 5 V/0.5 A) to USB devices with a USB cable.
0 When connecting a HDD that requires more than 5 V/0.5 A, connect to the USB port
(maximum 5 V/1 A) on the rear of the unit.
Page 5
> Before Start >Part Names > Install > Initial Setup > Playback
E
N
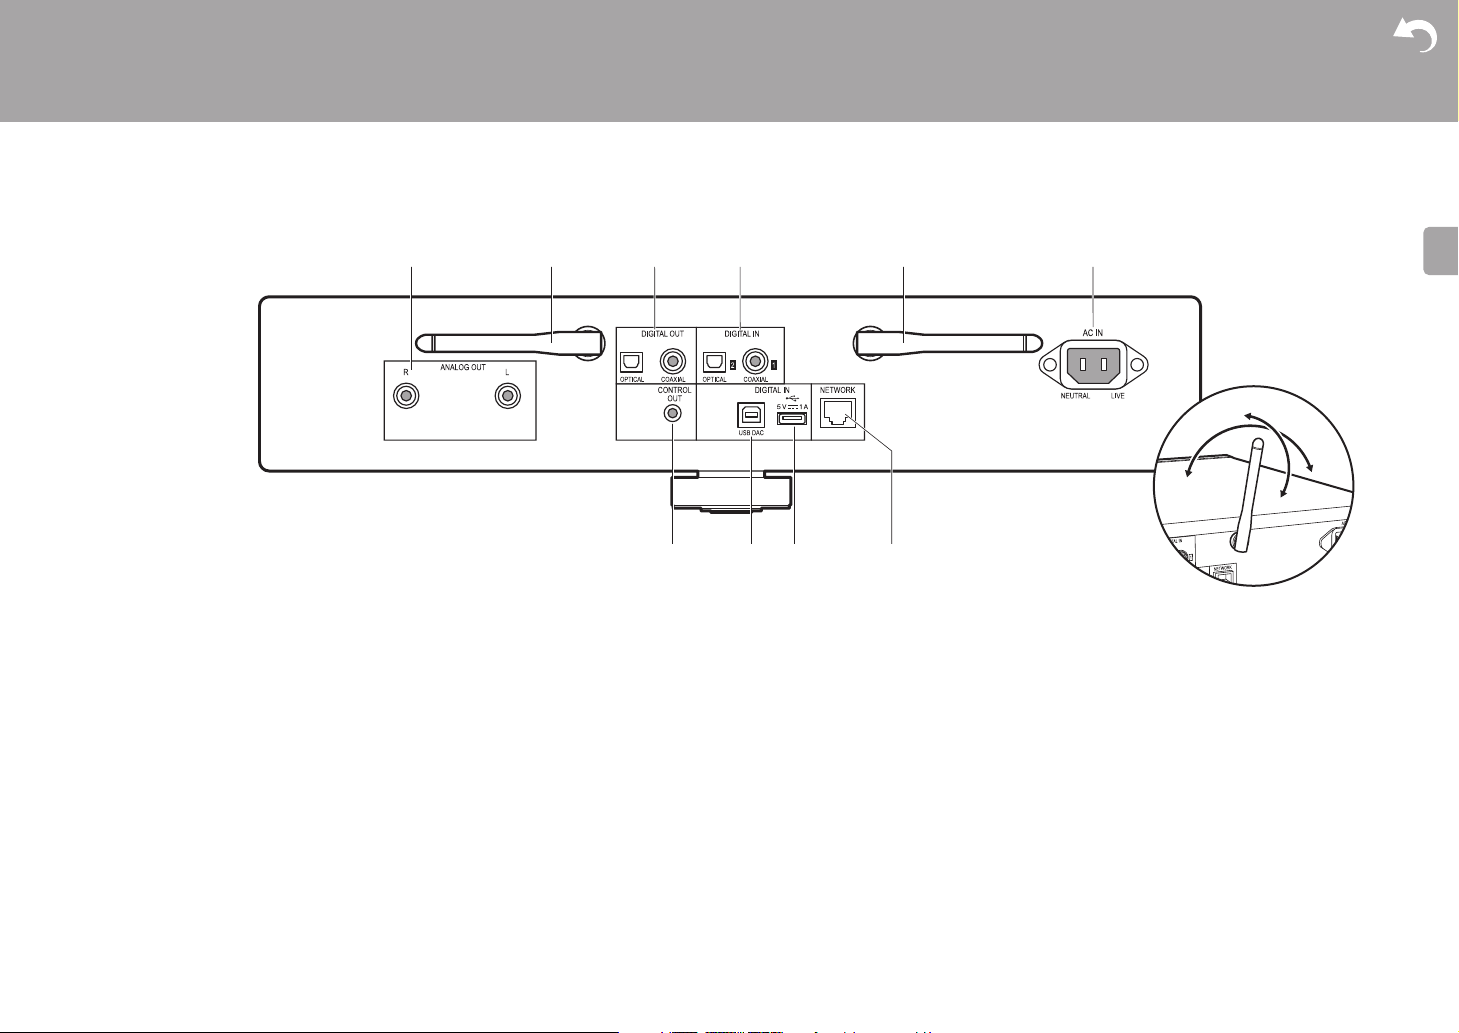
Rear Panel (N-70AE)
Supplementary information | Advanced Setup | Others
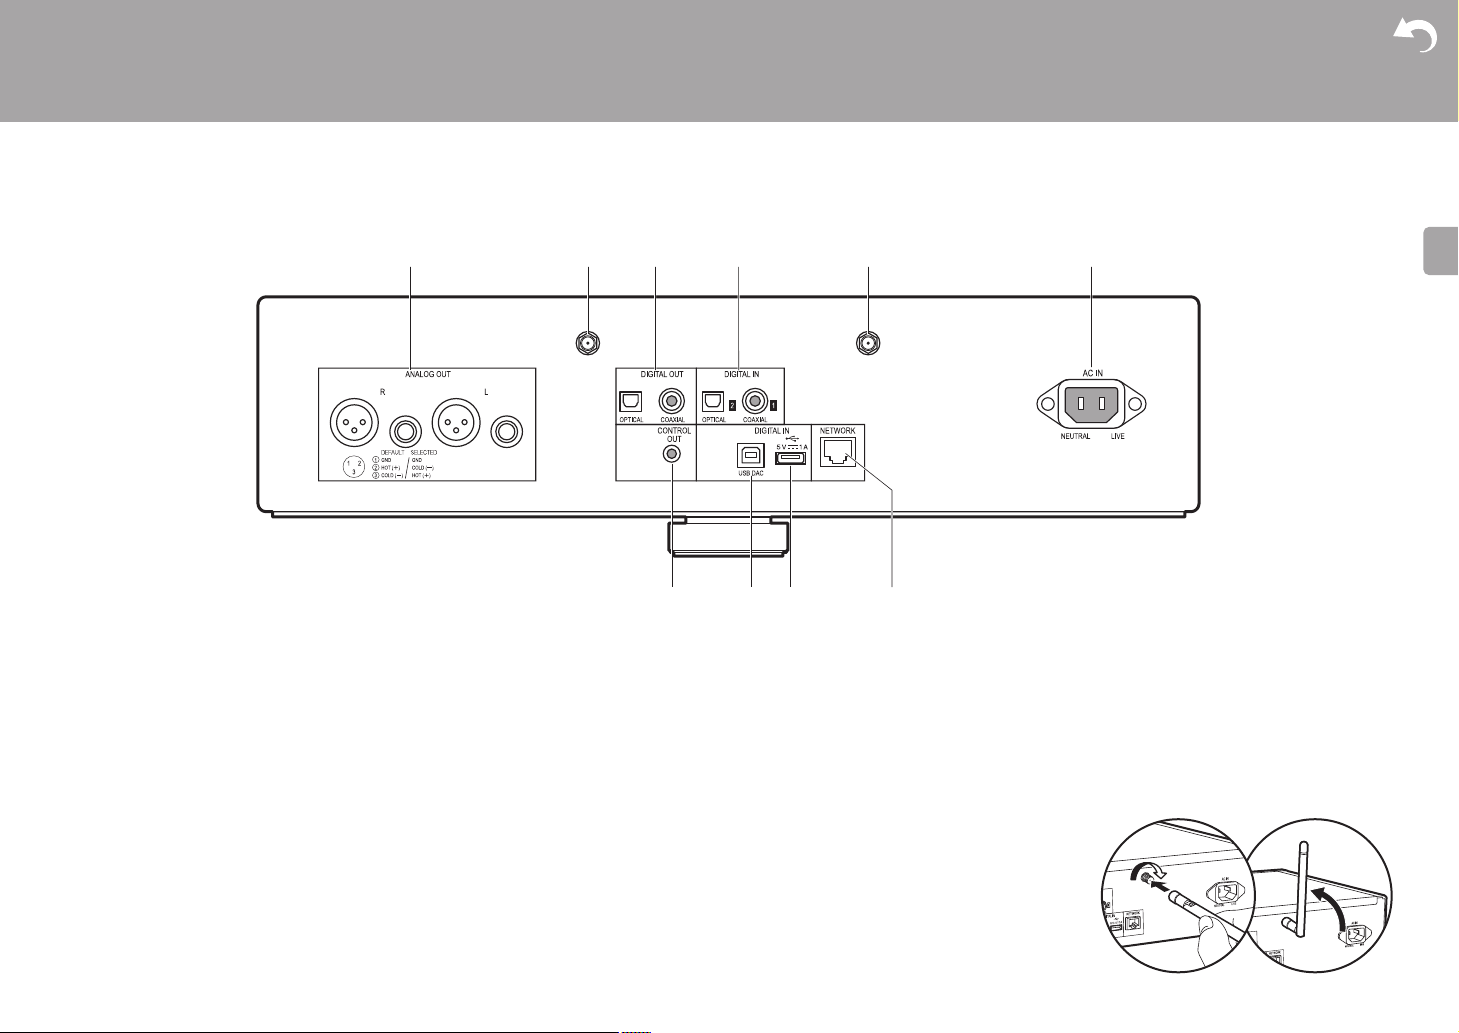
1. ANALOG OUT jack: Use the supplied analog audio cable or a commercially available
XLR cable to connect an integrated amplifier, for example.
2. Wireless antenna jack: Connect the supplied wireless antenna to connect wirelessly. After
firmly attaching the antenna, adjust the angle according to the connection status.
0 When re-packaging the unit, etc., remove the wireless antenna to prevent damage.
3. DIGITAL OUT OPTICAL/COAXIAL jack: Use a digital optical cable or digital coaxial cable
to connect an integrated amplifier, for example.
4. DIGITAL IN OPTICAL/COAXIAL jack: Use a digital optical cable or digital coaxial cable to
connect a CD player, for example.
5. AC IN: Connect the supplied power cord.
6. CONTROL OUT jack: By connecting Pioneer brand amplifiers and CD players,
centralized control is possible, for example you can control the amplifiers and CD players
from the Pioneer Remote App.
7. USB DAC port: Use a USB cable (A—B type) to connect a computer.
8. USB port: Connect a USB storage device or HDD (hard disk drive) to play music files. You
can also supply power (maximum 5 V/1 A) to USB devices with a USB cable. It is also
possible to save or delete music files on the USB HDD with a computer over the network.
(P21)
9. NETWORK jack: Connect to the network with an ethernet cable.
5
Page 6
> Before Start >Part Names > Install > Initial Setup > Playback
E
N
180°
90°
Rear Panel (N-50AE)
Supplementary information | Advanced Setup | Others
1. ANALOG OUT jacks: Use the supplied analog audio cable to connect an integrated
amplifier, for example.
2. Wireless antenna: Erect this to connect wirelessly. The diagram shows the movable range
for the wireless antenna. Do not try to force it beyond this range otherwise you may break
it.
3. DIGITAL OUT OPTICAL/COAXIAL jack: Use a digital optical cable or digital coaxial cable
to connect an integrated amplifier, for example.
4. DIGITAL IN OPTICAL/COAXIAL jack: Use a digital optical cable or digital coaxial cable to
connect a CD player, for example.
5. AC IN: Connect the supplied power cord.
6. CONTROL OUT jack: By connecting Pioneer brand amplifiers and CD players,
centralized control is possible, for example you can control the amplifiers and CD players
from the Pioneer Remote App.
7. USB DAC port: Use a USB cable (A—B type) to connect a computer.
8. USB port: Connect a USB storage device or HDD (hard disk drive) to play music files. You
can also supply power (maximum 5 V/1 A) to USB devices with a USB cable. It is also
possible to save or delete music files on the USB HDD with a computer over the network.
6
(P21)
9. NETWORK jack: Connect to the network with an ethernet cable.
Page 7
> Before Start >Part Names > Install > Initial Setup > Playback
E
N
30°
30°
Approx.7 m
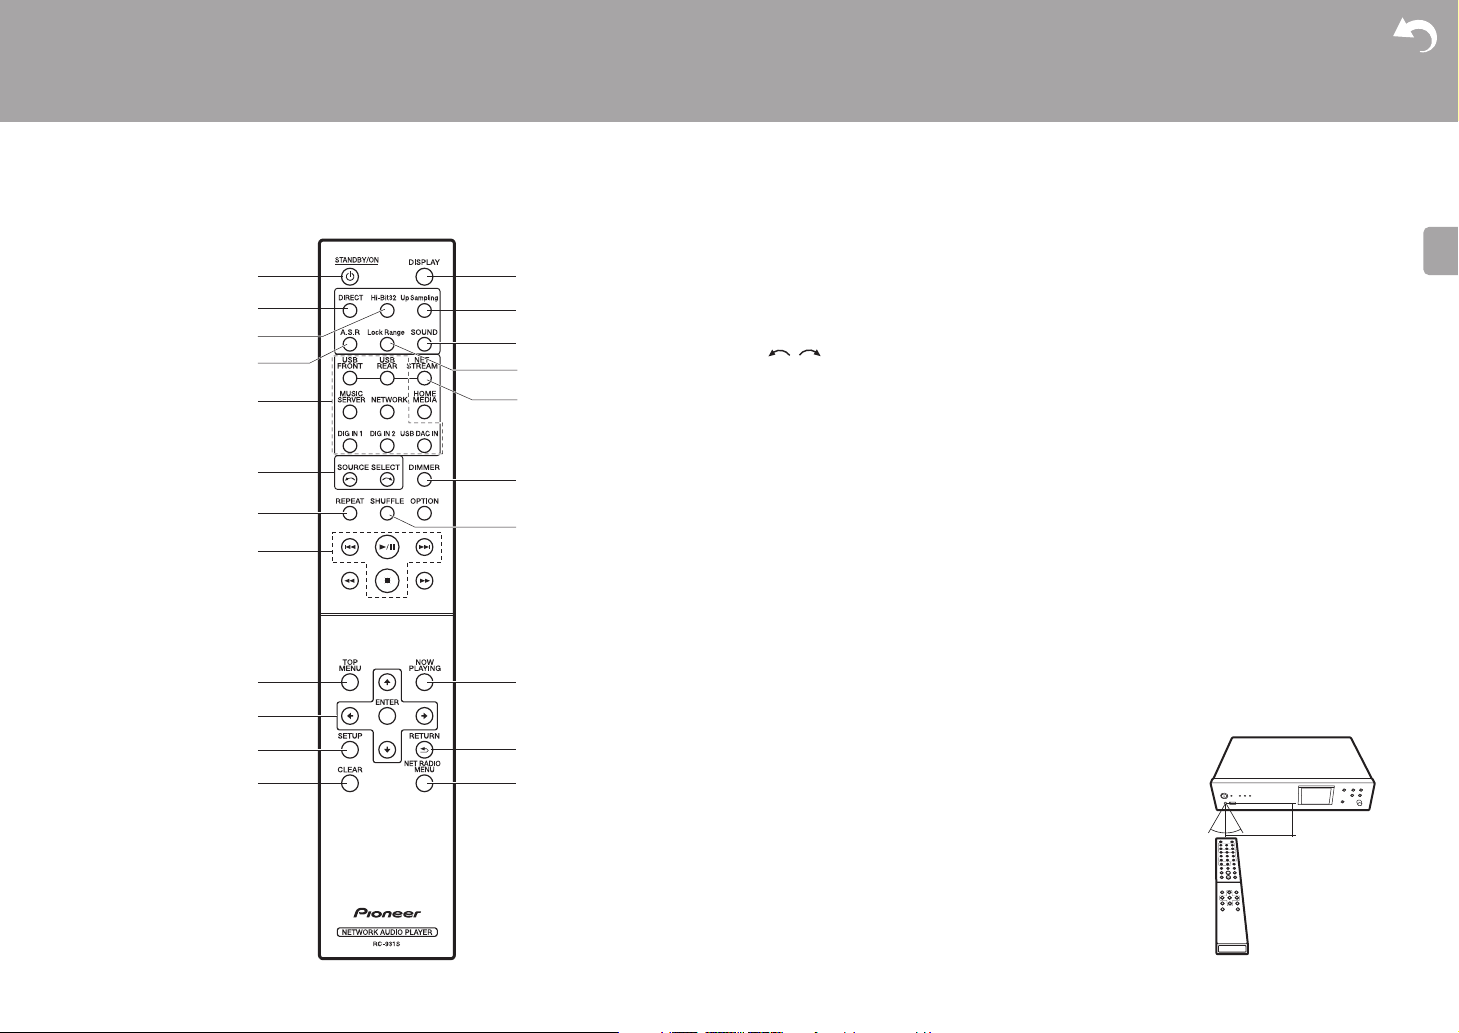
Remote Controller
1. Í STANDBY/ON button: When the main power of the unit is on, this turns the unit on or
into standby mode. The main power cannot be turned on or off with the remote controller.
2. DIRECT button: Switch the DIRECT mode on and off.(P24)
3. Hi-Bit32 button: Switch the Hi-Bit32 feature on and off.(P24)
4. A.S.R button: Switch the Auto Sound Retriever feature on and off. (P24)
5. INPUT SELECTOR buttons: Switches the input to be played.
6. button: Input source played switches each time you press one of these buttons.
7. REPEAT button: Set repeat play.
8. Play buttons:
:: Move to the track before the one being played.
/;: Play or pause play.
9: Move to the next track.
∫: Stop playback.
0 Depending on the input, the operation may not start.
9. TOP MENU button: Move to the top menu of the selected input.
10.
Cursors, ENTER button: Select the item with the cursors and press ENTER to confirm.
11.
SETUP button: Displays the Setup menu. (P27)
12.
CLEAR button: Used when entering text, etc.
13.
DISPLAY button: Press to turn off the display of this unit. Press again to turn the display
on.
14.
Up Sampling button: Switch the Up Sampling feature on and off. (P24)
15.
SOUND button: Displays the SOUND menu. (P24)
16.
Lock Range button: Displays the Lock Range Adjust settings screen. (P24)
17.
NET STREAM button: Switch the network services, such as internet radio, each time you
press the button.
18.
DIMMER button: You can adjust the brightness of the
display in three steps.
19.
SHUFFLE button: Set shuffle play.
20.
NOW PLAYING button: When you have changed the
display during play, for example, this button returns the
display to show information about the file being played.
21.
RETURN button: Returns the display to the previous state.
22.
NET RADIO MENU button: Use this when playing the
internet radio.
0 HOME MEDIA, OPTION, 22, and 11 are not used.
Supplementary information | Advanced Setup | Others
7
Page 8
> Before Start >Part Names > Install > Initial Setup > Playback
E
N
00:01:45 / 00:03:23
FLAC
44.1
kHz
/24
bit
USB Front
Song
Artist
Album
L.R.A A SR D.OUT
1
Display
Supplementary information | Advanced Setup | Others
1. The source is displayed.
(USB Front / USB Rear / USB DAC In / Music Server / Network / Digital In 1 / Digital In 2)
2. The name of the file, artist, album, etc., is displayed.
3. Displays the play status.
4. Displays file format, sampling frequency, and quantization bit information.
5. The file play status is displayed. This may not be displayed depending on the input or file.
6. This is displayed when the Lock Range Adjust setting is set to other than "Range 7".
(P24)
7. Lights in the following conditions.
:
When the connection setting on the unit is "Wired" and the unit is connected to the network.
:
When the connection setting on the unit is "Wired" and the unit is not connected to the network.
:
When the connection setting on the unit is "Wi-Fi" and the unit is connected to the network.
:
When the connection setting on the unit is "Wi-Fi" and the unit is not connected to the network.
8. If an album jacket is recorded for the file being played, it is displayed here.
9. This is displayed when the digital audio output setting is on. (P29)
8
10.
Lights in the following conditions.
: When all track repeat play is on
: When one track repeat play is on
: When shuffle play is on
11.
This is displayed when the Auto Sound Retriever feature is on. (P24)
0 When DISPLAY on the remote controller is pressed to turn off the display, the unit may
appear the same as if you had unplugged the unit from the power outlet, but electricity is
still being supplied to the unit. To completely cut the unit off from the power supply, you
need to unplug the power plug (shutoff device) unit from the power outlet.
Page 9
E
N
> Before Start > Part Names >Install > Initial Setup > Playback
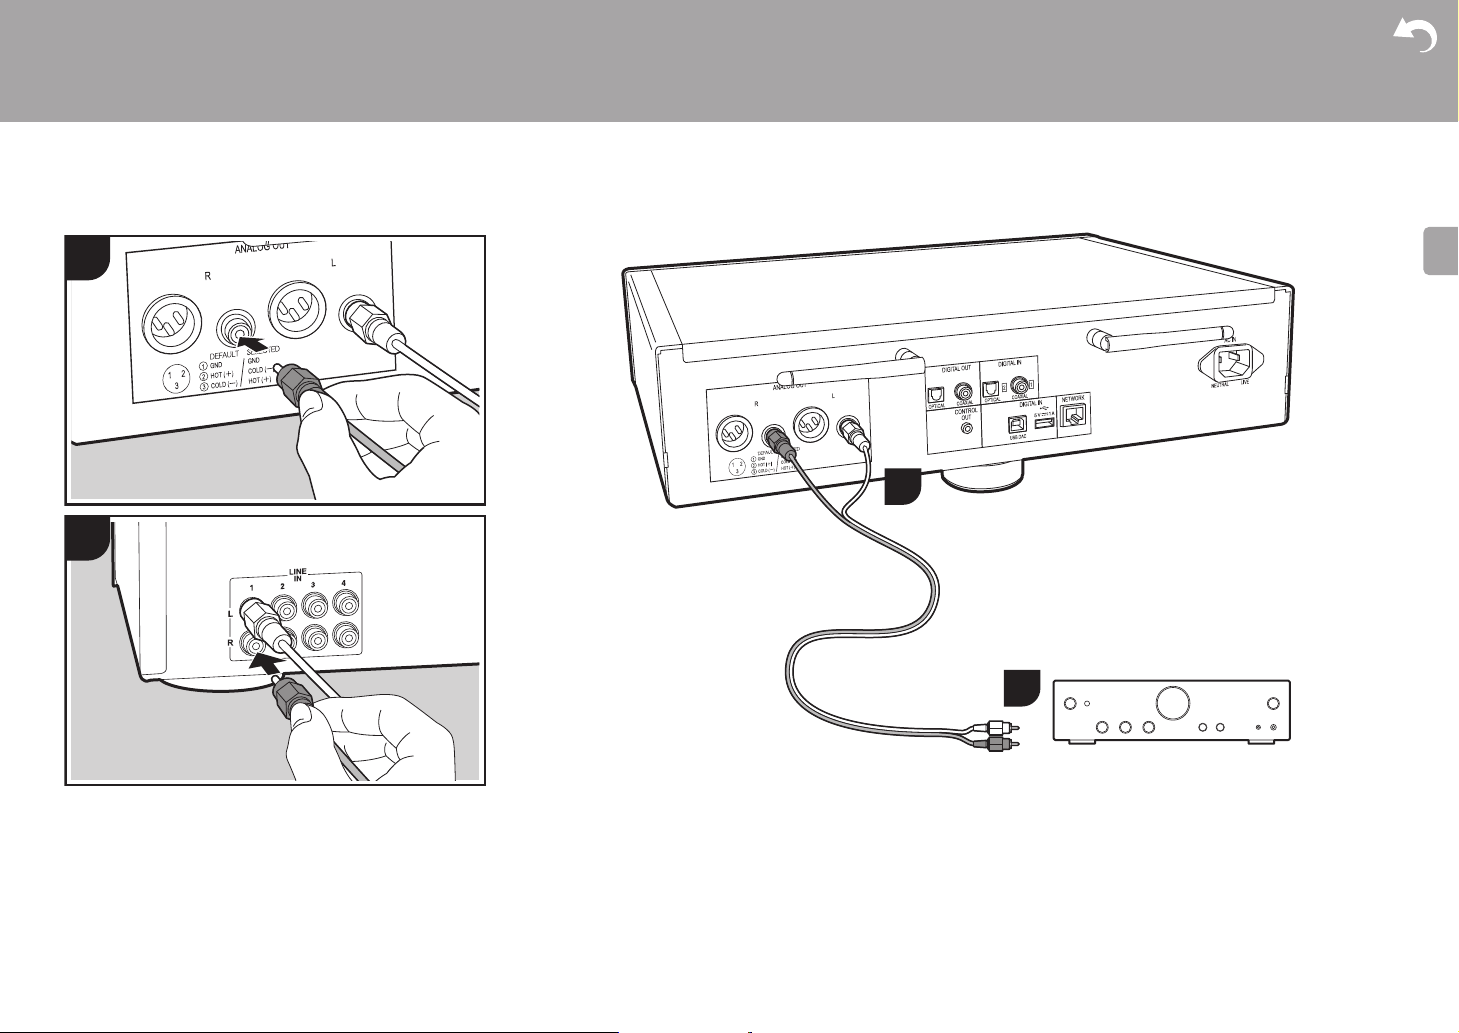
1
2
a
N-70AE is used in the illustrations. N-50AE does not
have an XLR jack.
a
1
2
Integrated amplifier, AV receiver, etc.
This unit
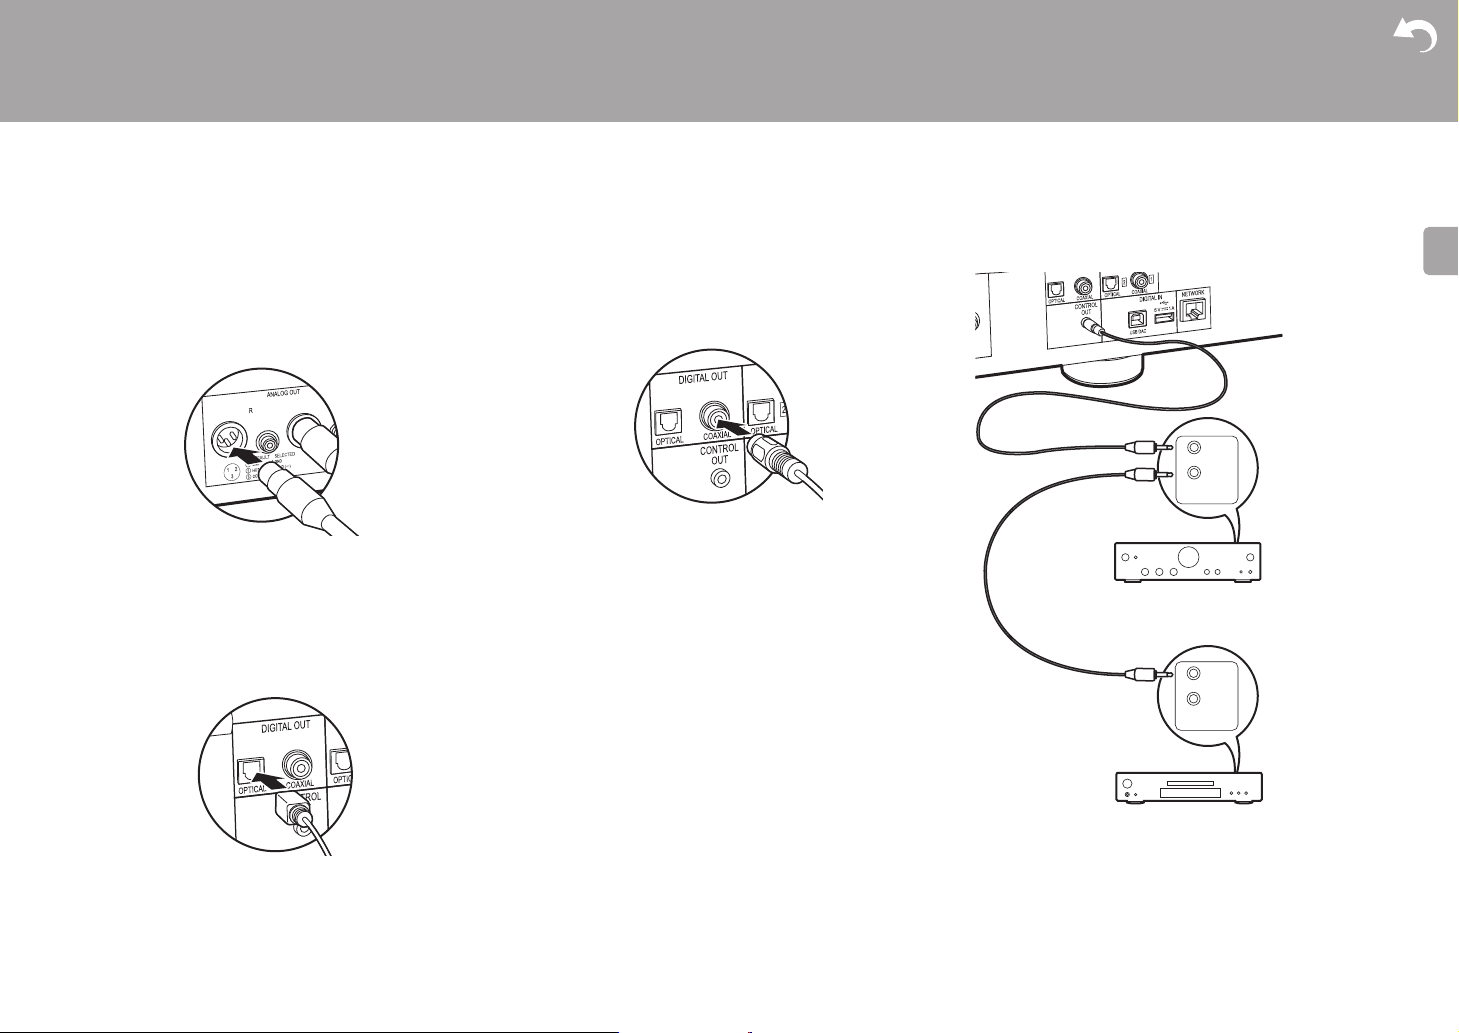
Connections with an amplifier
Install
Supplementary information | Advanced Setup | Others
a
a Analog Audio Cable
You can play the audio from network features such as
internet radio and from devices connected to this unit
through speaker systems connected to integrated
amplifiers or AV receivers. Connect to suit the input jacks
on your amplifier.
Connecting with an analog audio cable
The signal is converted to analog in the D/A converter of
this unit and then output to an integrated amplifier, for
example. Connect the LINE IN jacks on an integrated
amplifier with the supplied analog audio cable to the
ANALOG OUT jack on this unit.
9
Page 10
> Before Start > Part Names >Install > Initial Setup > Playback
E
N
a
a
CONTROL
IN
OUT
CONTROL
IN
OUT
CD player
Amplifier
This unit
Supplementary information | Advanced Setup | Others
Connecting with an XLR cable (N-70AE only)
The signal is converted to analog in the D/A converter of
this unit and then output to an integrated amplifier, for
example. Connect the XLR input jack on an integrated
amplifier with an XLR cable to the ANALOG OUT jack (XLR
jack) on this unit.
Connecting with a digital optical cable
The signal is converted to analog in the D/A converter of the
integrated amplifier, for example. Connect the OPTICAL IN
jack on an integrated amplifier with a digital optical cable to
the DIGITAL OUT OPTICAL jack on this unit.
0 The digital signals that can be output by this unit are
linear PCM signals with a sampling frequency and
quantization bit rate of 192 kHz/24 bit (operation may not
be possible with all connected devices or environments).
a Monaural Miniplug Cables (without resistors)
10
Connecting with a digital coaxial cable
The signal is converted to analog in the D/A converter of the
integrated amplifier, for example. Connect the COAXIAL IN
jack on an integrated amplifier with a digital coaxial cable to
the DIGITAL OUT COAXIAL jack on this unit.
0 The digital signals that can be output by this unit are
linear PCM signals with a sampling frequency and
quantization bit rate of 192 kHz/24 bit (operation may not
be possible with all connected devices or environments).
The control jack
By connecting Pioneer brand amplifiers or CD players, for
example, that have control jacks using monaural miniplug
cables (without resistors), you can centralize control of the
devices using the Pioneer Remote App.
Furthermore, even when the other devices are put in places
where the remote control signal is unable to reach, you can
enable operation of the other components through the
remote control sensor of this unit.
0 Also make sure to connect with the analog audio cable.
Centralized control cannot work correctly with only the
control jack connection.
0 With this connection, the remote control sensors on the
amplifier and CD player stop working. Point the remote
controller at remote control sensor of this unit.
Page 11
> Before Start > Part Names >Install > Initial Setup > Playback
E
N
a
1 2
a
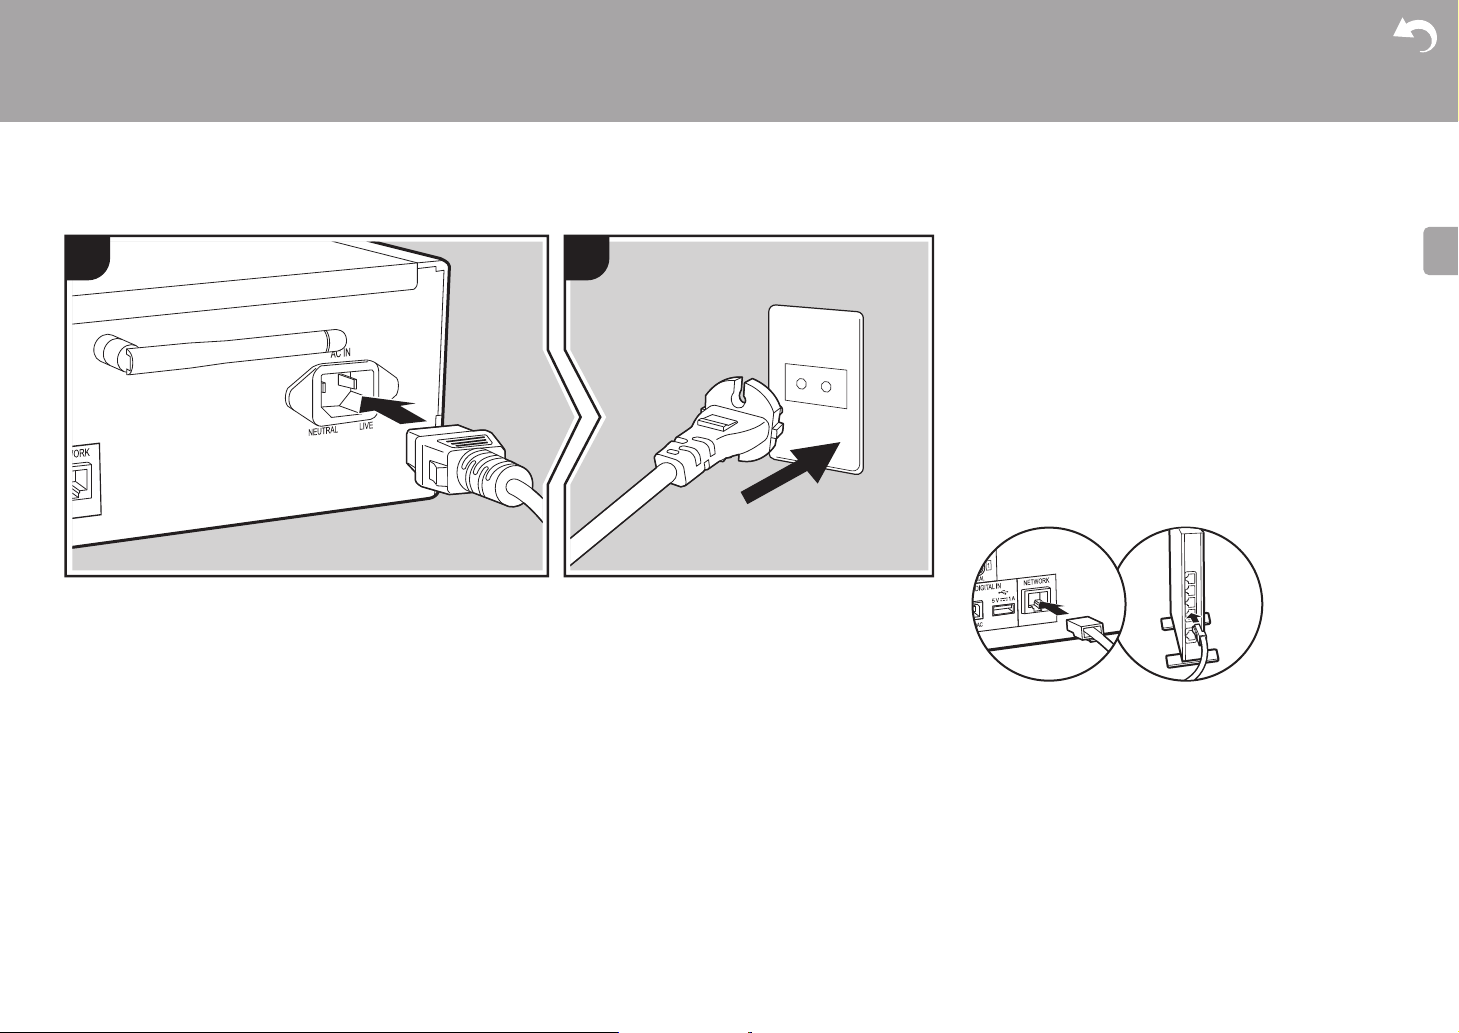
Connecting the power cord, etc.
Supplementary information | Advanced Setup | Others
Power cord connection
This model includes a removable power cord.
The power cord must be connected only after all other
connections are completed. Make sure you first connect the
power cord to AC IN terminal of the unit and then connect to
the outlet. Always disconnect the outlet side first when
disconnecting the power cord.
Ethernet cable connection
To connect to the network with an ethernet cable, use the
NETWORK jack. When using Wi-Fi connection, make
settings in initial settings (P12). When using N-70AE,
make sure you have connected the supplied wireless
antenna. (P5) You can enjoy features such as internet
radio and AirPlay by connecting to the network.
a Power Cord
11
Page 12
> Before Start > Part Names > Install > Initial Setup >Playback
E
N
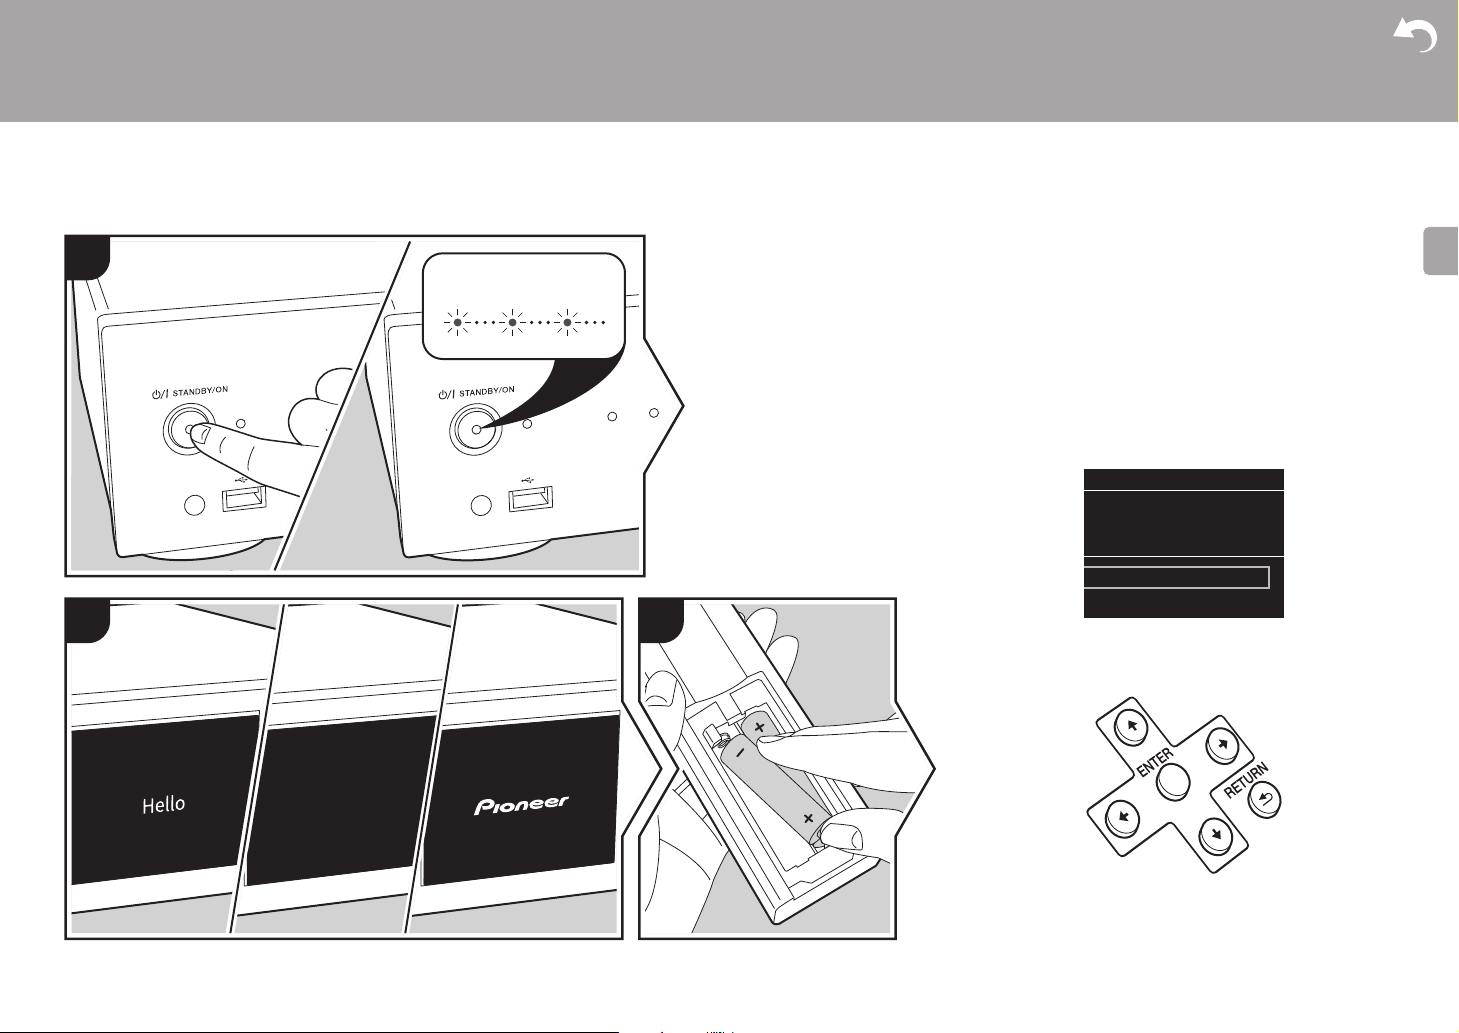
Power On & Initial Setup
Initial Setup
1
BLUE BLINKING
32
Supplementary information | Advanced Setup | Others
Starting up: When you press Í/I STANDBY/ON on the
main unit, the STANDBY/ON indicator in the center of the
button slowly flashes blue, then "Hello" is displayed on the
display about 20 seconds later. After this, the display goes
blank, then after the Pioneer logo is displayed, you can start
operating the unit.
Wi-Fi connection settings
When you first turn the power on, the initial setup screen is
displayed automatically, allowing you to easily make Wi-Fi
connection settings.
Initial Setup
Selects the method of network
connection
Wi-Fi
Wired (Exit)
To set, select the item with the cursors on the remote
controller and press ENTER to confirm. To return to the
previous display, press RETURN.
To make Wi-Fi settings, select "Wi-Fi". If you have
connected with an ethernet cable, select "Wired (Exit)" and
confirm. If you select "Wi-Fi", select the method for setting
in the next screen (for example "Scan Networks").
12
Page 13
> Before Start > Part Names > Install > Initial Setup >Playback
E
N
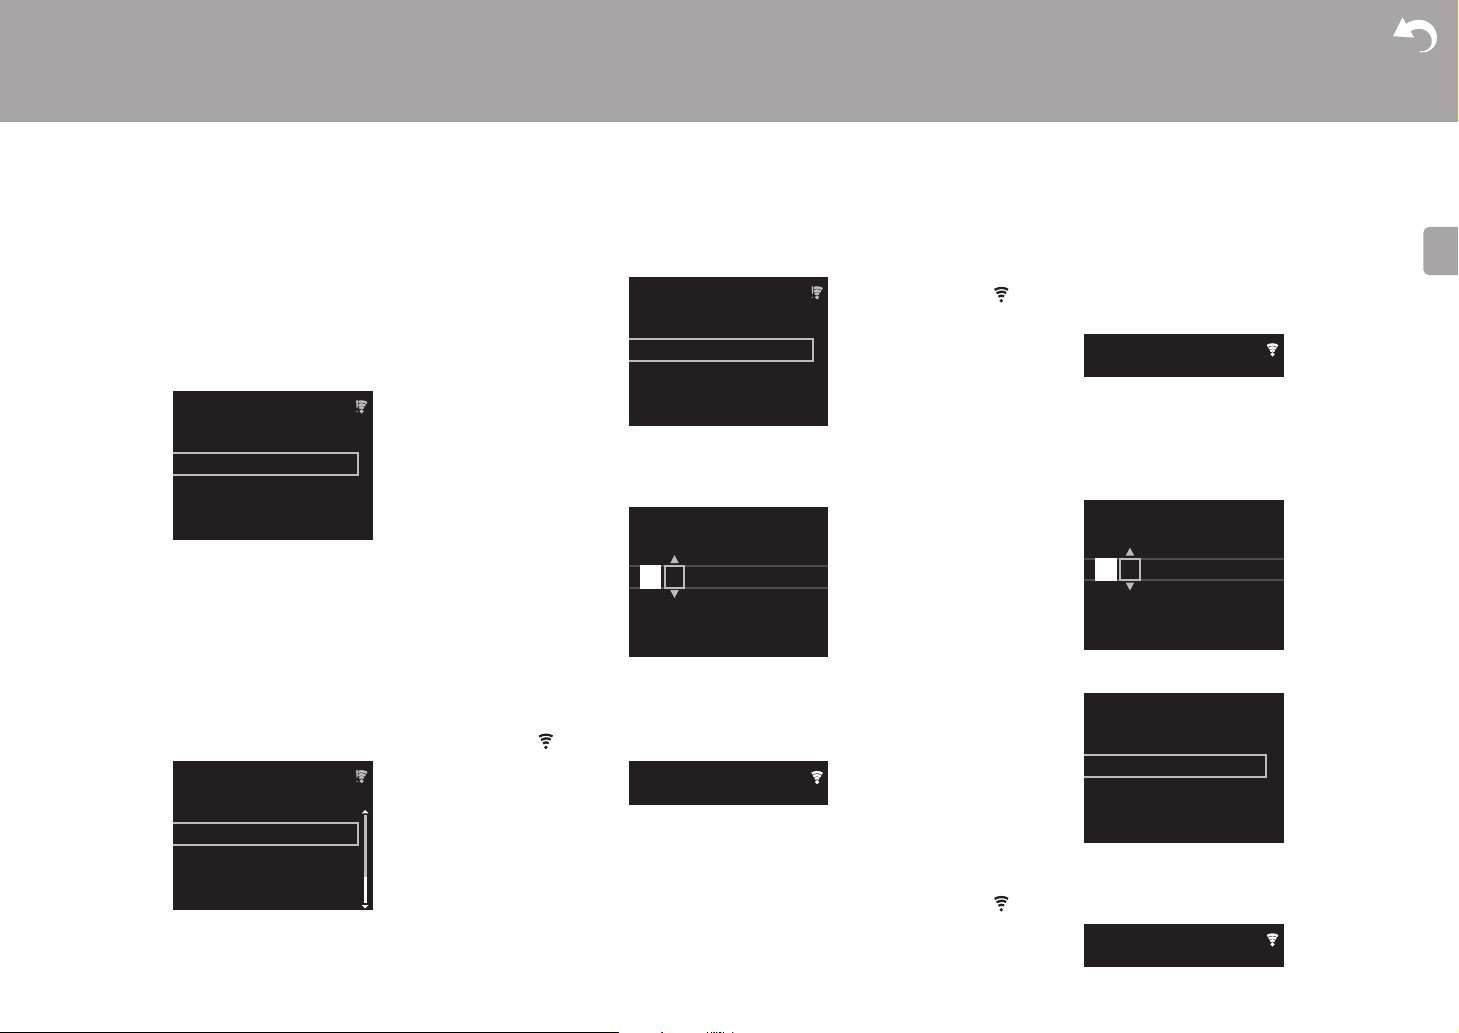
Wireless
Input SSID
Use iOS Device
Wireless
ddddddddddddddddd
ccccccccccccccccccc
bbbbbbbbbbbbbbbbb
Wireless
Push Button
Password
A
Delete One Character[CLEAR]
Change Text[REPEAT]
SSID
A
Delete One Character[CLEAR]
Change Text[REPEAT]
Security Method
WPA2
WPA
WEP
None
Supplementary information | Advanced Setup | Others
0 While setting up the network, screens asking you to
accept the Onkyo Group privacy policy and agree to the
privacy policies required to use the Chromecast built-in
feature are displayed. Select "Accept" and press ENTER
to indicate agreement. For information on the settings
required to use the Chromecast built-in feature and the
operations to play it, refer to the included Chromecast
built-in instruction sheet.
Scan Networks
0 To redo the initial settings, press SETUP on the remote
controller, select "Wi-Fi" in "Network Setting" "Connection", then select "Wi-Fi Setup".
∫ Scan Networks
From the list of SSID for access points such as wireless
LAN routers, select the required SSID and make the
settings.
1. Select the SSID of the access point you want to connect
and then confirm.
button, by selecting "Push Button" you can connect
without entering a password.
Enter Password
3. If you select "Enter Password", enter the password of the
access point and press ENTER. For details on how to
enter text, refer to "Entering text" (P25).
If you select "Push Button", then after pressing and holding the
automatic setting button on the access point for the required
amount of time, press ENTER on the remote controller.
4. is displayed when the settings are complete.
"Pioneer N-50AE XXXXXX".
3. After establishing the connection, select "Done" on the
screen of the iOS device.
4. is displayed on the display of the unit when the
settings are complete.
∫ Enter SSID of the access point
Set by entering the SSID of the access point you want to connect.
1. Enter the SSID. For details on how to enter text, refer to
"Entering text" (P25).
2. Select and confirm the authentication method.
aaaaaaaaaaaaaaaa
2. Select either "Enter Password" or "Push Button" and
confirm. If the access point has an automatic setting
∫ Use iOS Device
Set by sharing the iOS device's Wi-Fi settings with this unit.
1. Connect the iOS device by Wi-Fi.
2. Select this device in the "SET UP NEW AIRPLAY SPEAKER..."
item on the screen of the iOS device and select "Next".
0 This unit is displayed as "Pioneer N-70AE XXXXXX" or
0
If you select "None", proceed to step 3. If you select "WEP",
"WPA", or "WPA2", enter the password and confirm.
3. is displayed when the settings are complete.
13
Page 14
> Before Start > Part Names > Install > Initial Setup >Playback
E
N
1
2
a
b
d
c
e
f
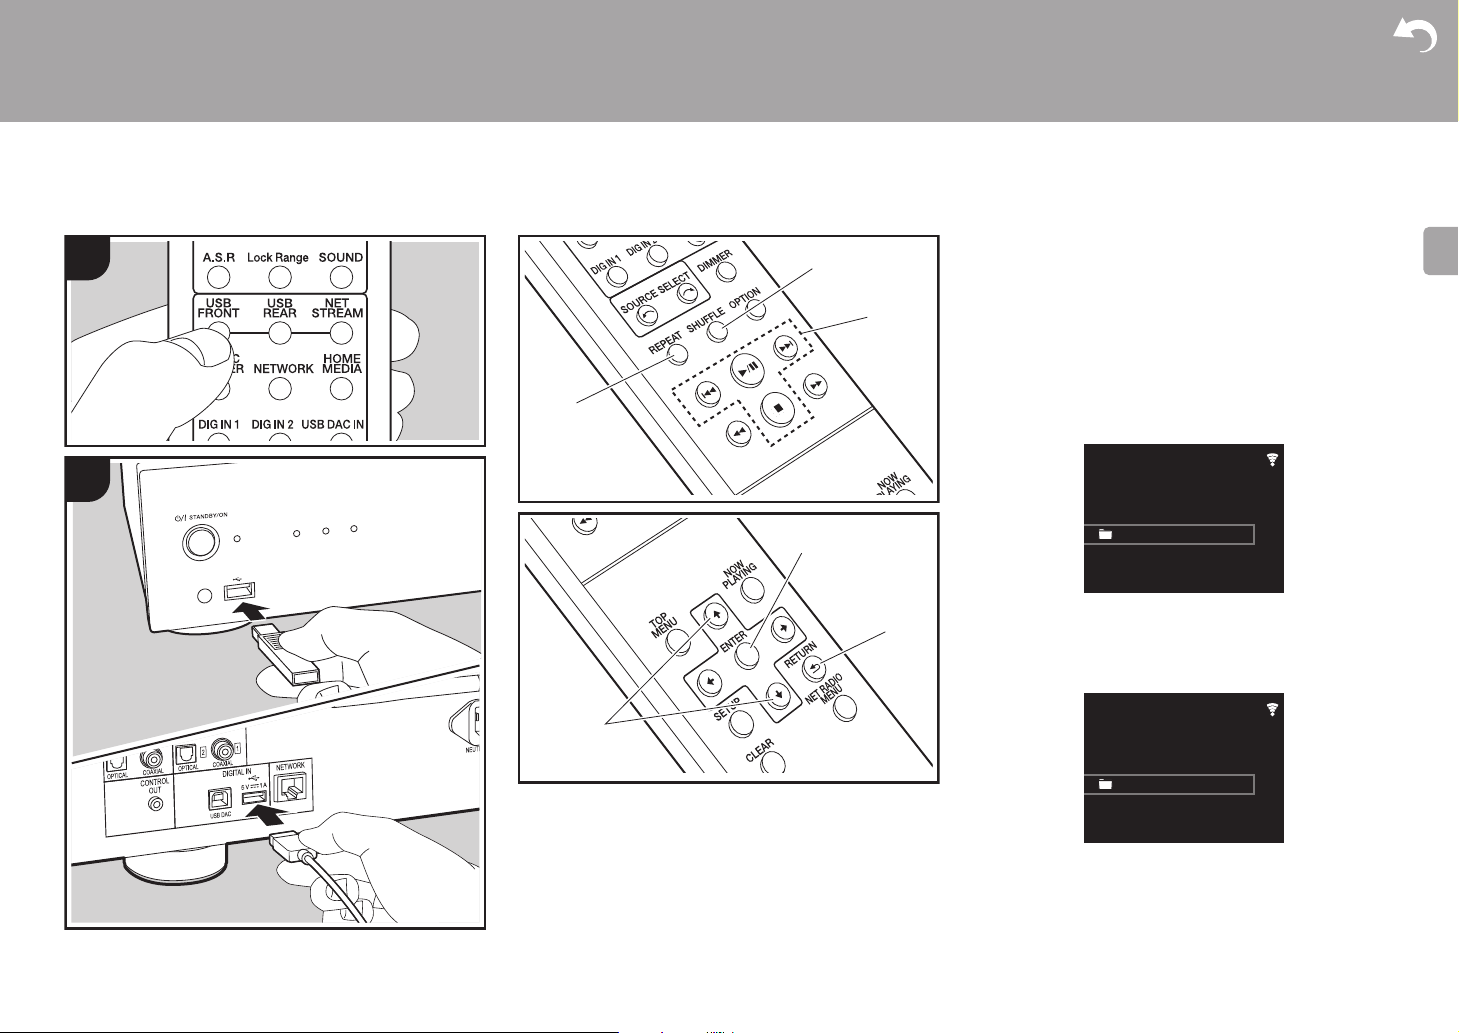
USB Storage Device/HDD
Playback
Supplementary information | Advanced Setup | Others
Basic operations
You can play music files by connecting a USB storage
device or HDD (hard disk drive) to the USB port on the front
or rear of the unit.
0 The USB port on the front supports a maximum 5 V/0.5 A
power supply. If the HDD requires more than this,
connect to the USB port (maximum 5 V/1 A) on the rear
of the unit.
1. Turn the unit on.
2. Press USB FRONT or USB REAR.
USB Front
3. Plug your USB storage device or HDD into the USB port
on the front or rear.
4. Folders and music files are displayed on the display
when loading is complete.
USB Front
No Storage
USB Front
USB Front
USB Storage
5. Select the folder or music file with the cursors (d) of the
remote controller and press ENTER (e) to confirm. To
return to the previous display, press RETURN (f).
6. Use play buttons (c) to stop play or choose tracks to play.
0 The display of album name, artist name, and album art is
supported with MP3/WMA/Apple Lossless/FLAC/AAC/
14
Page 15
> Before Start > Part Names > Install > Initial Setup >Playback
E
N
1
Supplementary information | Advanced Setup | Others
DSD (DSF only) format music files. The formats for
embedded images are JPEG and PNG.
0 Characters that cannot be displayed by this unit appear
as "
¢
".
0 The USB port of this unit conforms with the USB 2.0
standard. The transfer speed may be insufficient for
some content you play, which may cause some
interruption in sound.
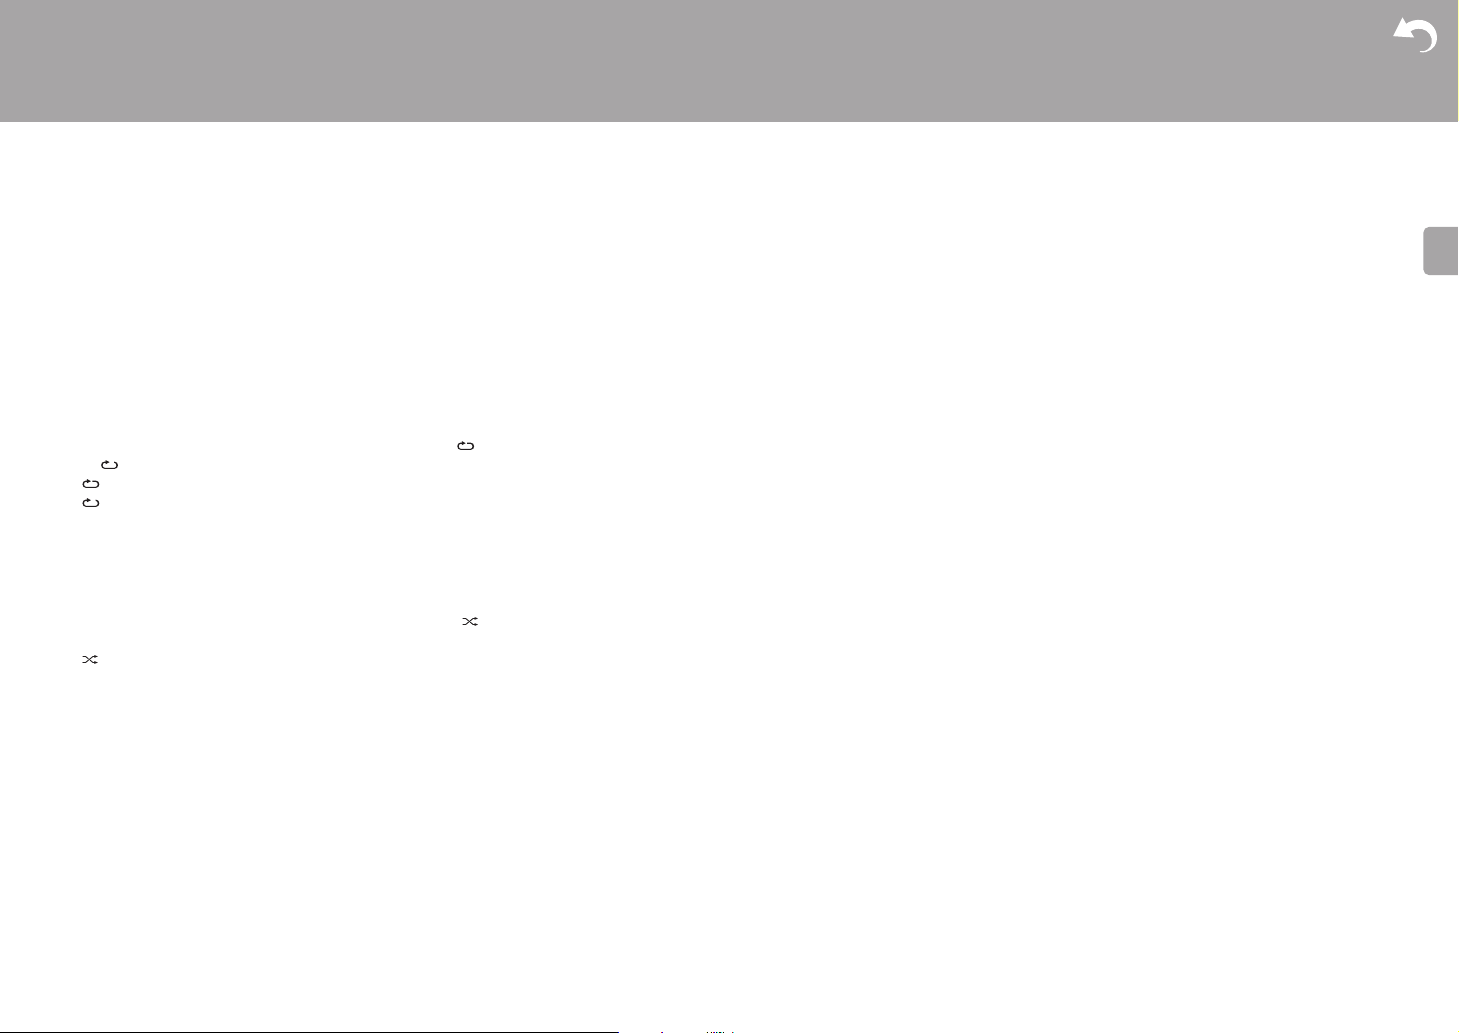
Repeat play
1. Repeatedly press REPEAT (a) during play to display
or on the display.
: Repeat play of all tracks.
1
: Repeat play of the selected individual track.
To cancel repeat play, press REPEAT (a) several times
until the icons disappear.
Shuffle play
1. Repeatedly press SHUFFLE (b) during play to display
on the display.
: Play tracks in a folder randomly.
To cancel shuffle play, press SHUFFLE (b) until the icon
disappears.
USB Storage / HDD Device Requirements
0 Note that operation is not guaranteed with all USB
storage devices or HDD.
0 This unit can use USB storage devices that comply with
the USB mass storage device class standard. (However,
there are still devices that cannot be played by this unit
even if they comply with the USB mass storage class
standard.)
0 The unit is also compatible with USB storage devices
using the FAT16 or FAT32 file system formats. Other
formats such as exFAT, NTFS, and HFS cannot be
played by this unit.
0 If the USB storage device has been partitioned, each
section will be treated as an independent device.
0 Up to 20,000 tracks per folder can be displayed, and
folders may be nested up to 16 levels deep.
0 USB hubs and USB storage devices with hub functions
are not supported. Do not connect these devices to the
unit.
0 USB storage devices with security function are not
supported on this unit.
0 If the USB storage device or HDD comes with an AC
adapter, we recommend that you use its AC adapter to
power it.
0 Media inserted to the USB card reader may not be
available in this function. Furthermore, depending on the
USB storage device, proper reading of the contents may
not be possible.
0 We accept no responsibility whatsoever for the loss or
damage to data stored on a USB storage device when
that device is used with this unit. We recommend that you
back up your important music files beforehand.
Supported Audio Formats
This unit supports the following music file formats. Note that
sound files that are protected by copyright cannot be played
on this unit.
MP3 (.mp3/.MP3):
0 Supported formats: MPEG-1/MPEG-2 Audio Layer 3
0 Supported sampling rates: 44.1 kHz, 48 kHz
0 Supported bitrates: Between 8 kbps and 320 kbps and
VBR.
WMA (.wma/.WMA):
0 Supported sampling rates: 44.1 kHz, 48 kHz
0 Supported bitrates: Between 5 kbps and 320 kbps and
VBR.
0 WMA Pro/Voice/WMA Lossless formats are not
supported
WAV (.wav/.WAV):
WAV files include uncompressed PCM digital audio.
0 Supported sampling rates: 44.1 kHz, 48 kHz, 88.2 kHz,
96 kHz, 176.4 kHz, 192 kHz
0 Quantization bit: 8 bit, 16 bit, 24 bit
AIFF (.aiff/.aif/.AIFF/.AIF):
AIFF files include uncompressed PCM digital audio.
0 Supported sampling rates: 44.1 kHz, 48 kHz, 88.2 kHz,
96 kHz, 176.4 kHz, 192 kHz
0 Quantization bit: 8 bit, 16 bit, 24 bit
AAC (.aac/.m4a/.mp4/.3gp/.3g2/.AAC/.M4A/.MP4/.3GP/
.3G2):
0 Supported formats: MPEG-2/MPEG-4 Audio
0 Supported sampling rates: 44.1 kHz, 48 kHz, 88.2 kHz,
96 kHz
0 Supported bitrates: Between 8 kbps and 320 kbps and
VBR.
FLAC (.flac/.FLAC):
0 Supported sampling rates: 44.1 kHz, 48 kHz, 88.2 kHz,
96 kHz, 176.4 kHz, 192 kHz
0 Quantization bit: 8 bit, 16 bit, 24 bit
Apple Lossless (.m4a/.mp4/.M4A/.MP4):
0 Supported sampling rates: 44.1 kHz, 48 kHz, 88.2 kHz,
96 kHz, 176.4 kHz, 192 kHz
0 Quantization bit: 16 bit, 24 bit
DSD (.dsf/.dff/.DSF/.DFF):
0 Supported formats: DSF/DSDIFF
0 Supported sampling rates: 2.8 MHz, 5.6 MHz, 11.2 MHz
15
Page 16
> Before Start > Part Names > Install > Initial Setup >Playback
E
N
1
a
d
b
c
Network
TIDAL
Deezer
Spotify
TuneIn Radio
Internet Radio
Basic operations
You can use internet radio services such as TuneIn by
connecting this unit to a network that has an internet
connection.
Depending on the internet radio service, the user may need
to register from their computer first.
1. Turn the unit on.
2. Press NETWORK.
3. Select "TuneIn Radio" with the cursors (a) of the remote
controller and press ENTER (b) to confirm. After
switching the display to the internet radio service, you
can select stations with the cursors (a) on the remote
controller and press ENTER (b) to confirm. To return to
the previous display, press RETURN (c).
Supplementary information | Advanced Setup | Others
16
TuneIn
You can register a station you have played as a favorite.
1. Press NET RADIO MENU (d) while playing TuneIn.
2. Select "Add to My Presets" on the display and confirm.
3. To play a favorite, in the top screen of TuneIn, select the
registered station in "My Presets" and confirm. To delete
favorites, press NET RADIO MENU (d) during play,
select "Remove from My Presets" and confirm.
Page 17
> Before Start > Part Names > Install > Initial Setup >Playback
E
N
Wi-Fi
PioneerN-70AExxxxxx
DevicesAvailable
d
b
e
a
c
1
4
3
2
Device
Spotify
Supplementary information | Advanced Setup | Others
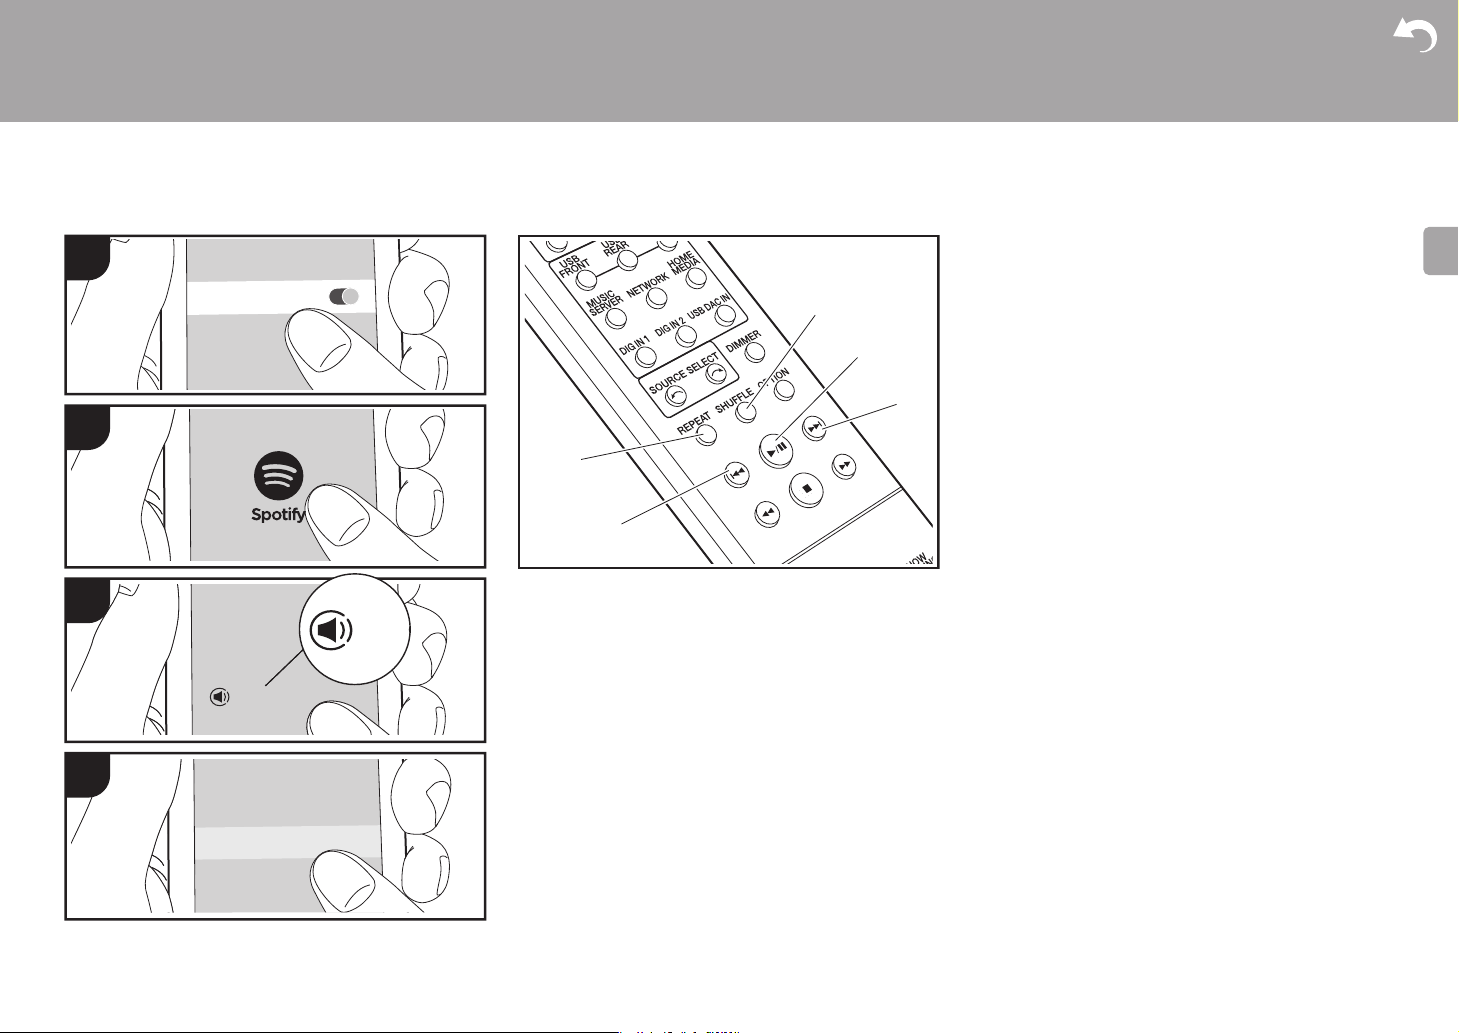
Basic Operation
Spotify Connect play is possible by connecting this unit to
the same network as a smart phone or tablet. To enable
Spotify Connect, install the Spotify application on your
smartphone or tablet and create a Spotify premium account.
1. Connect the smartphone to the same network as this
unit.
2. Start the Spotify app.
3. Play the track in the Spotify app, then after switching to
the screen for controlling play, tap "Devices Available" at
the bottom of the screen.
4. Select this unit.
0 This unit is displayed as "Pioneer N-70AE XXXXXX" or
"Pioneer N-50AE XXXXXX".
5. This unit turns on automatically and the input selector
changes to Network and streaming of Spotify starts.
0 If "Option Setting" - "Power Off Setting" - "Network
Standby" is set to "Off" in the Setup menu, manually
turn the unit on and then press NETWORK on the
remote controller.
0 Refer to the following for Spotify settings:
www.spotify.com/connect/
The following remote controller operations are also
possible.
(a) This button starts repeat play.
(b) This button plays the previous track.
(c) This button starts shuffle play.
(d) Pressed during play this button pauses playback.
Pressed while paused, and it restarts play.
(e) This button plays the next track.
17
Page 18
> Before Start > Part Names > Install > Initial Setup >Playback
E
N
1
3
PioneerN-70AEXXXXXX
iPhone
4
2
e.g., iOS 10
Supplementary information | Advanced Setup | Others
AirPlay
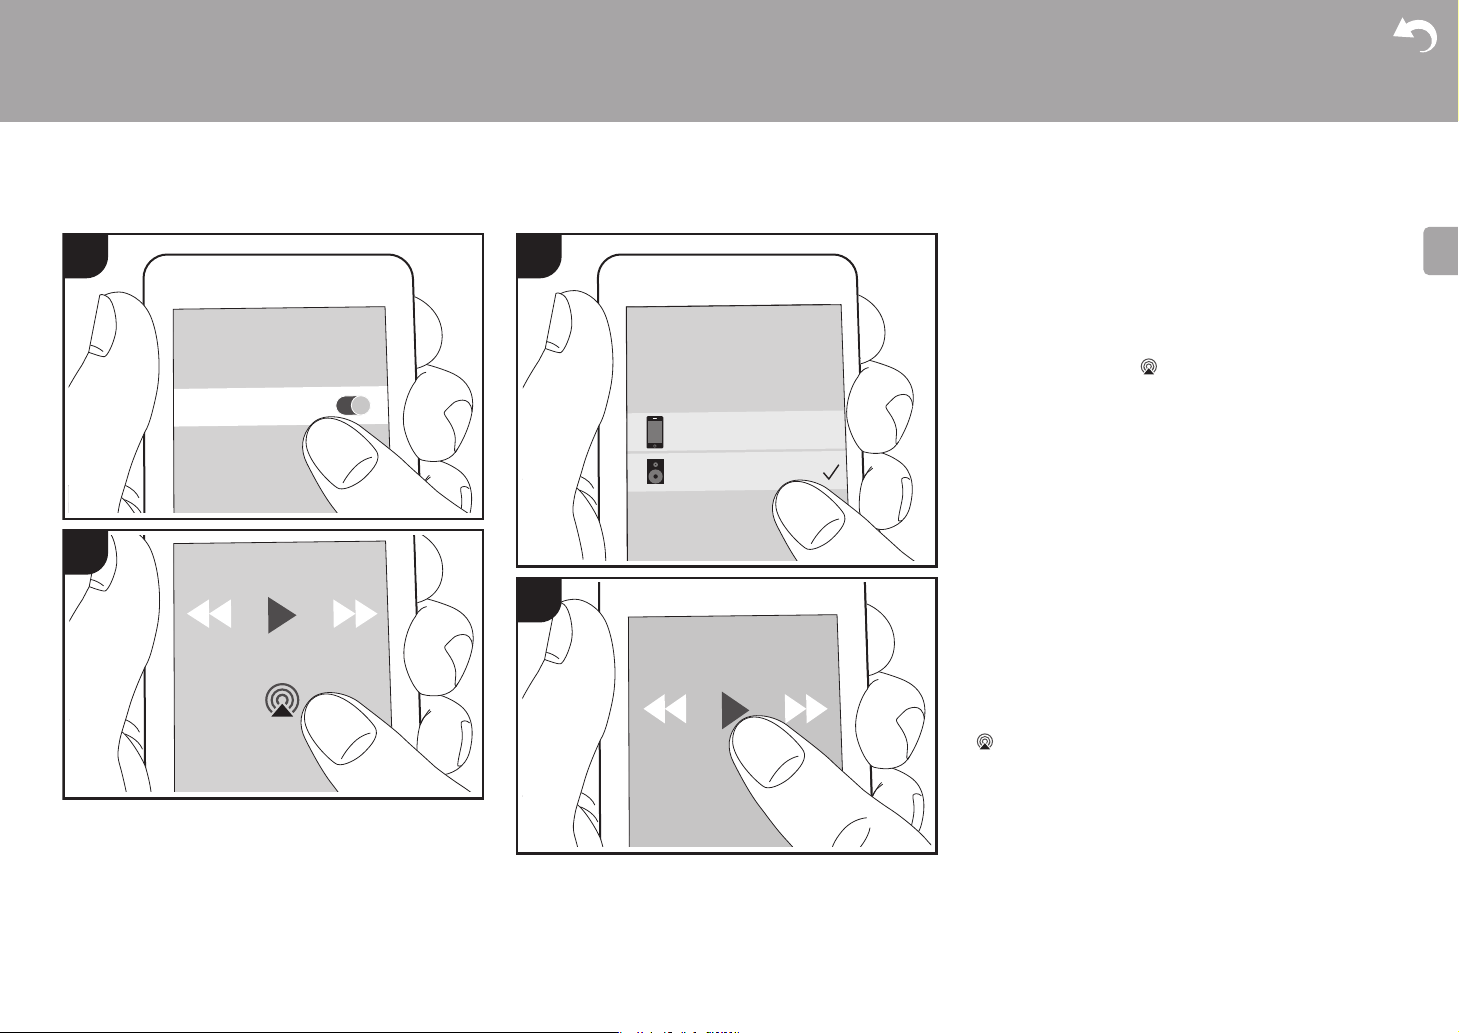
®
Wi-Fi
Basic Operation
You can wirelessly enjoy the music files on an iPhone®,
iPod touch
as this unit. Update the OS version on your iOS device to
the latest version.
1. Connect the iOS device to the same network as this unit.
2. Tap the AirPlay icon in the play screen of the music
3. Play the music files on the iOS device.
0 At the time of purchase, the Network Standby feature is
0 Due to the characteristics of AirPlay wireless technology,
0 SHUFFLE and REPEAT on the remote controller do not
You can also play the music files on a computer with iTunes
(Ver. 10.2.2 or later). Make sure this unit and the computer
are connected to the same network, click the AirPlay icon
displayed, and start play of a music file.
®
, or iPad® connected to the same access point
app on the iOS device and select this unit from the list of
devices displayed.
0 This unit is displayed as "Pioneer N-70AE XXXXXX" or
"Pioneer N-50AE XXXXXX".
0 If an "AirPlay Password" has been set on this unit,
enter the password you set.
set to On, and when play of AirPlay starts, the power of
this unit automatically comes on and play starts.
the sound produced on this unit may slightly be behind
the sound played on the AirPlay-enabled device.
work. Operate from the iOS device.
in iTunes, select this unit from the list of devices
18
Page 19
> Before Start > Part Names > Install > Initial Setup >Playback
E
N
1
a
b
c
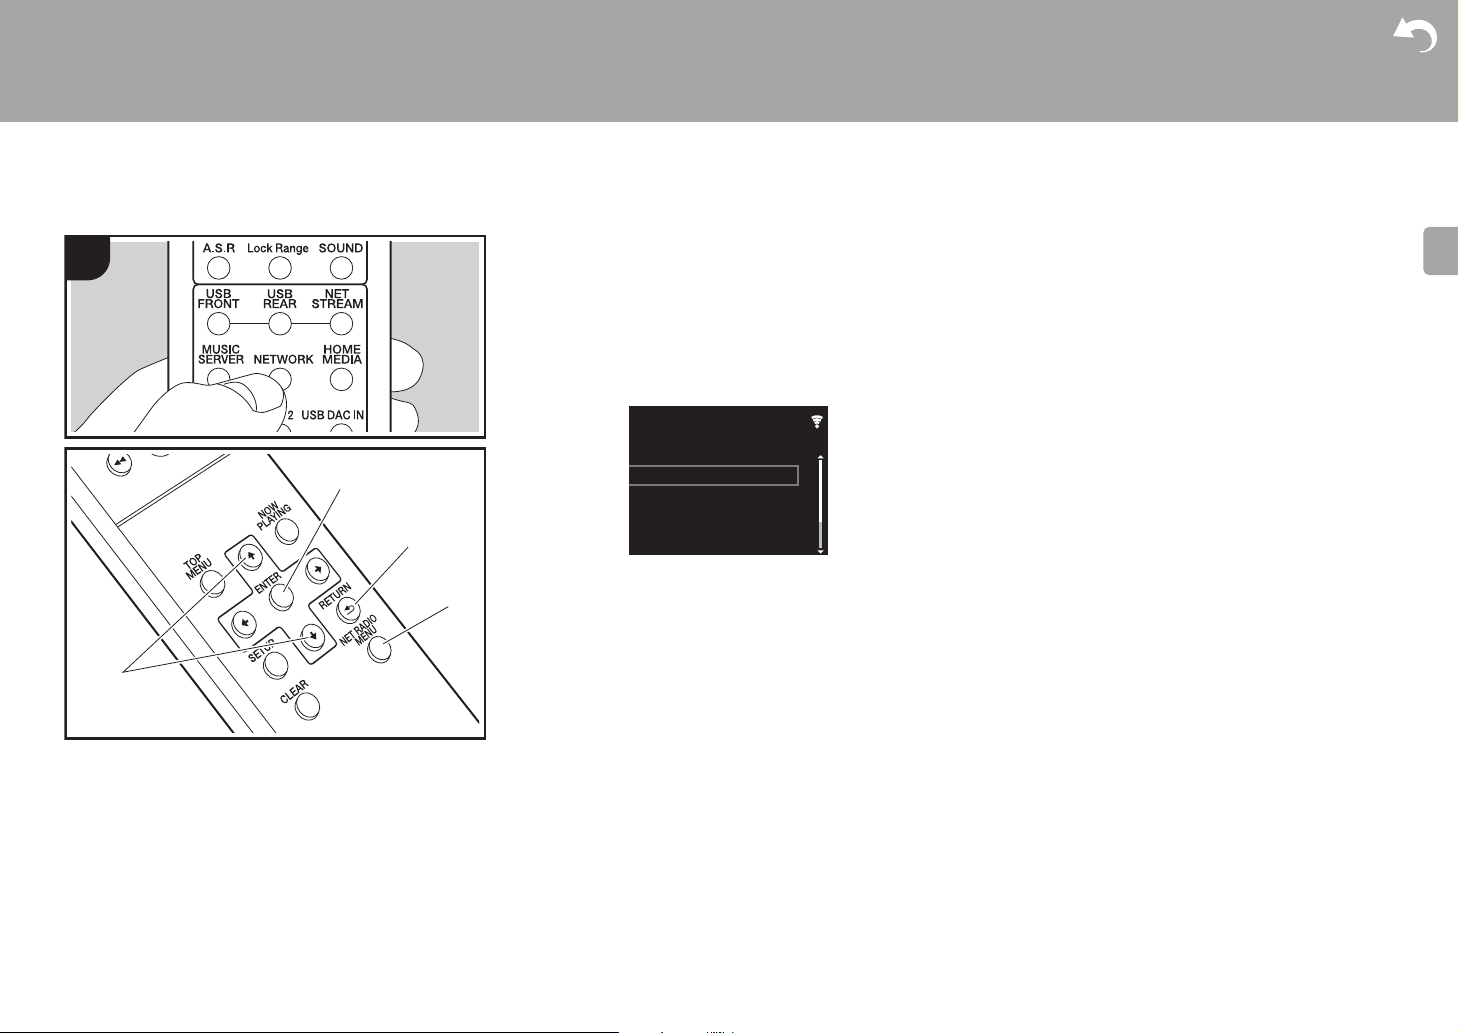
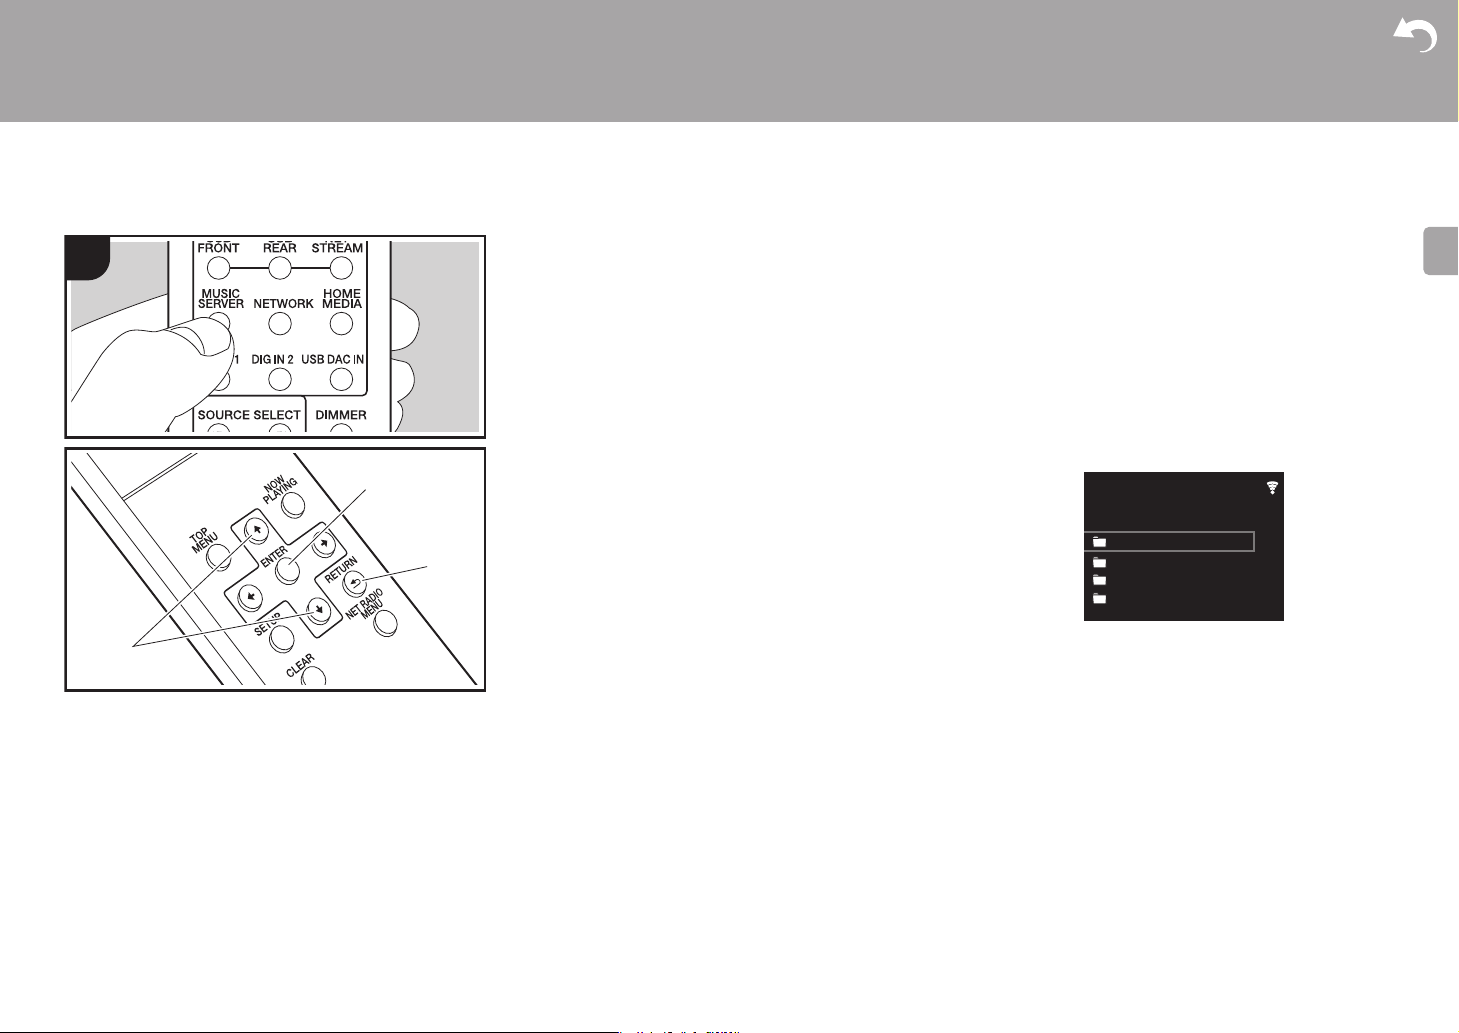
Music Server
Supplementary information | Advanced Setup | Others
It is possible to stream music files stored on PCs or NAS
devices connected to the same network as this unit. The
network servers this unit is compatible with are those PCs
with players installed that have the server functionality of
Windows Media
compatible with home network functionality. You may need
to make some settings in advance to use Windows Media
Player 11 or 12. Note that only music files registered in the
library of Windows Media
®
Player 11 or 12, or NAS that are
®
Player can be played.
®
Configuring Windows Media® Player
∫ Windows Media® Player 11
®
1. Turn on your PC and start Windows Media
2. In the "Library" menu, select "Media Sharing" to display a
dialog box.
3. Select the "Share my media" check box, and then click
"OK" to display the compatible devices.
4. Select this unit, and then click "Allow".
0 When it is clicked, the corresponding icon is checked.
5. Click "OK" to close the dialog.
0 Depending of the version of Windows Media
there may be differences in the names of items you can
select.
∫ Windows Media
1. Turn on your PC and start Windows Media
2. In the "Stream" menu, select "Turn on media streaming"
to display a dialog box.
0 If media streaming is already turned on, select "More
streaming options..." in the "Stream" menu to list
players in the network, and then go to step 4.
3. Click "Turn on media streaming" to list players in the
network.
4. Select this unit in "Media streaming options" and check
that it is set to "Allow".
5. Click "OK" to close the dialog.
0 Depending of the version of Windows Media
®
Player 12
Player 11.
®
Player,
®
Player 12.
®
Player,
there may be differences in the names of items you can
select.
Playing
1. Turn the unit on.
2. Start the server (Windows Media
3. Make sure that the PCs and/or NASs are properly
4. Press MUSIC SERVER.
5. Select the server or music file with the cursors (a) of the
®
Media
Player 12, or NAS device) containing the music
files to play.
connected to the same network as this unit.
Music Server
Music Server
aaa
bbb
ccc
ddd
remote controller and press ENTER (b) to confirm. To
return to the previous display, press RETURN (c).
0 If "No Server" is displayed, check whether the network is
properly connected.
0 Depending on the server being used and the files played,
elapsed play time and remaining play time may not be
displayed.
0 For music files on a server, there can be up to 20,000
tracks per folder, and folders may be nested up to 16
levels deep.
®
Player 11, Windows
19
Page 20

> Before Start > Part Names > Install > Initial Setup >Playback
E
N
Supplementary information | Advanced Setup | Others
Controlling Remote Playback from a PC
You can use this unit to play music files stored on your PC
by operating the PC inside your home network. The unit
supports remote playback with Windows Media
1. Turn on your PC and start Windows Media
2. Open the "Stream" menu and check that "Allow remote
control of my Player..." is checked. Click "Turn on media
streaming" to list players in the network.
3. Select and right-click the music file to play with Windows
4. Select this unit in "Play to" to open the "Play to" window
Supported Audio Formats
This unit supports the following music file formats.
MP3 (.mp3/.MP3):
®
Media
Player 12. To remotely play a music file on
another server, open the target server from "Other
Libraries" and select the music file to play.
of Windows Media
unit. If your PC is running on Windows
to", and then select this unit. If your PC is running on
Windows
Operations during remote playback are possible from the
"Play to" window on the PC.
0 Remote playback is not possible when using a network
service or playing music files on a USB storage device.
0 Depending of the version of Windows, there may be
differences in the names of items you can select.
0 Note that playback via wireless LAN of sampling rates of
88.2 kHz or higher, and DSD are not supported.
0 Remote play of FLAC, and DSD is also not supported.
0 Variable bit-rate (VBR) files are supported. However,
playback times may not be displayed correctly.
0 Remote playback does not support the gapless playback.
0 Supported formats: MPEG-1/MPEG-2 Audio Layer-3
0 Supported sampling rates: 44.1 kHz, 48 kHz
®
®
Player 12 and start playback on the
10, click "Cast to Device", and select this unit.
®
Player 12.
®
8.1, click "Play
®
Player 12.
0 Supported bitrates: Between 8 kbps and 320 kbps and
VBR.
WMA (.wma/.WMA):
0 Supported sampling rates: 44.1 kHz, 48 kHz
0 Supported bitrates: Between 8 kbps and 320 kbps and
VBR.
0 WMA Pro/Voice/WMA Lossless formats are not
supported.
WAV (.wav/.WAV):
WAV files include uncompressed PCM digital audio.
0 Supported sampling rates: 44.1 kHz, 48 kHz, 88.2 kHz,
96 kHz, 176.4 kHz, 192 kHz
0 Quantization bit: 8 bit, 16 bit, 24 bit
AIFF (.aiff/.aif/.AIFF/.AIF):
AIFF files include uncompressed PCM digital audio.
0 Supported sampling rates: 44.1 kHz, 48 kHz, 88.2 kHz,
96 kHz, 176.4 kHz, 192 kHz
0 Quantization bit: 8 bit, 16 bit, 24 bit
AAC (.aac/.m4a/.mp4/.3gp/.3g2/.AAC/.M4A/.MP4/.3GP/
.3G2):
0 Supported formats: MPEG-2/MPEG-4 Audio
0 Supported sampling rates: 44.1 kHz, 48 kHz, 88.2 kHz,
96 kHz
0 Supported bitrates: Between 8 kbps and 320 kbps and
VBR.
FLAC (.flac/.FLAC):
0 Supported sampling rates: 44.1 kHz, 48 kHz, 88.2 kHz,
96 kHz, 176.4 kHz, 192 kHz
0 Quantization bit: 8 bit, 16 bit, 24 bit
LPCM (Linear PCM):
0 Supported sampling rates: 44.1 kHz, 48 kHz
0 Quantization bit: 16 bit
Apple Lossless (.m4a/.mp4/.M4A/.MP4):
0 Supported sampling rates: 44.1 kHz, 48 kHz, 88.2 kHz,
96 kHz, 176.4 kHz, 192 kHz
0 Quantization bit: 16 bit, 24 bit
DSD (.dsf/.dff/.DSF/.DFF):
0 Supported formats: DSF/DSDIFF
0 Supported sampling rates: 2.8 MHz, 5.6 MHz, 11.2 MHz
20
Page 21
> Before Start > Part Names > Install > Initial Setup >Playback
E
N
1
2
3
Network Standby
On
Off
On (USB Power)
Supplementary information | Advanced Setup | Others
Using a computer to save and delete the music on a USB HDD connected to this unit
Basic operations
Without having to disconnect the HDD (hard disk drive)
connected to the USB port on the rear of the main unit and
reconnecting to a computer, you can save and delete music
files directly over a network.
1. Plug your HDD into the USB port on the rear
unit. Use an HDD for Windows
HDD.
0 To use this feature, plug your HDD into the USB port
on the rear
2. Format the connected HDD. Select "Option Setting" "Storage" - "Format" in this unit's Setup menu, select
"Start" and then press ENTER.
0 Formatting by this unit is necessary when using this
feature.
0 Do not switch the power of the main unit to standby
until formatting is complete.
0 When you format the HDD, all data on the HDD will be
deleted, so you should backup data before formatting.
0 If you cannot format on this unit, format firstly on your
computer, then try to format using this unit again.
3. Select "Option Setting" - "Power Off Setting" - "Network
Standby" in this unit's Setup menu, select "On (USB
Power)" and then press ENTER.
of the main unit.
®
when connecting an
of the main
unit, display a list of devices connected to the network.
0 This unit is displayed as "Model name XXXXXX".
(XXXXXX are alphanumeric characters identifying
each unit)
If on Windows
computer rather than the one that shows it as a media
device.
6. In the "USB Storage" folder in the folder of this unit you
will see the content of the HDD connected to the USB
port on the rear of the main unit. Use normal computer
operations to save or delete the files.
0 We have confirmed the operation of this feature on the
following OS's. (As of March 2017)
Windows
Windows
Windows
macOS Sierra 10.12
0 If this unit is not shown in the network list in Windows
perform the "Updating to the latest information"
operation.
0 We do not guarantee operation when playing the tracks,
etc., saved on an HDD connected to this unit, on other
equipment over a network.
®
®
®
®
, click the icon that shows the unit as a
7
8.1
10
®
,
4. Switch this unit to standby.
0 When this unit is on, you cannot use a computer to
access the HDD connected to the USB port on the rear
of the main unit.
5. On a computer connected to the same network as this
21
Page 22
> Before Start > Part Names > Install > Initial Setup >Playback
E
N
a
b
c
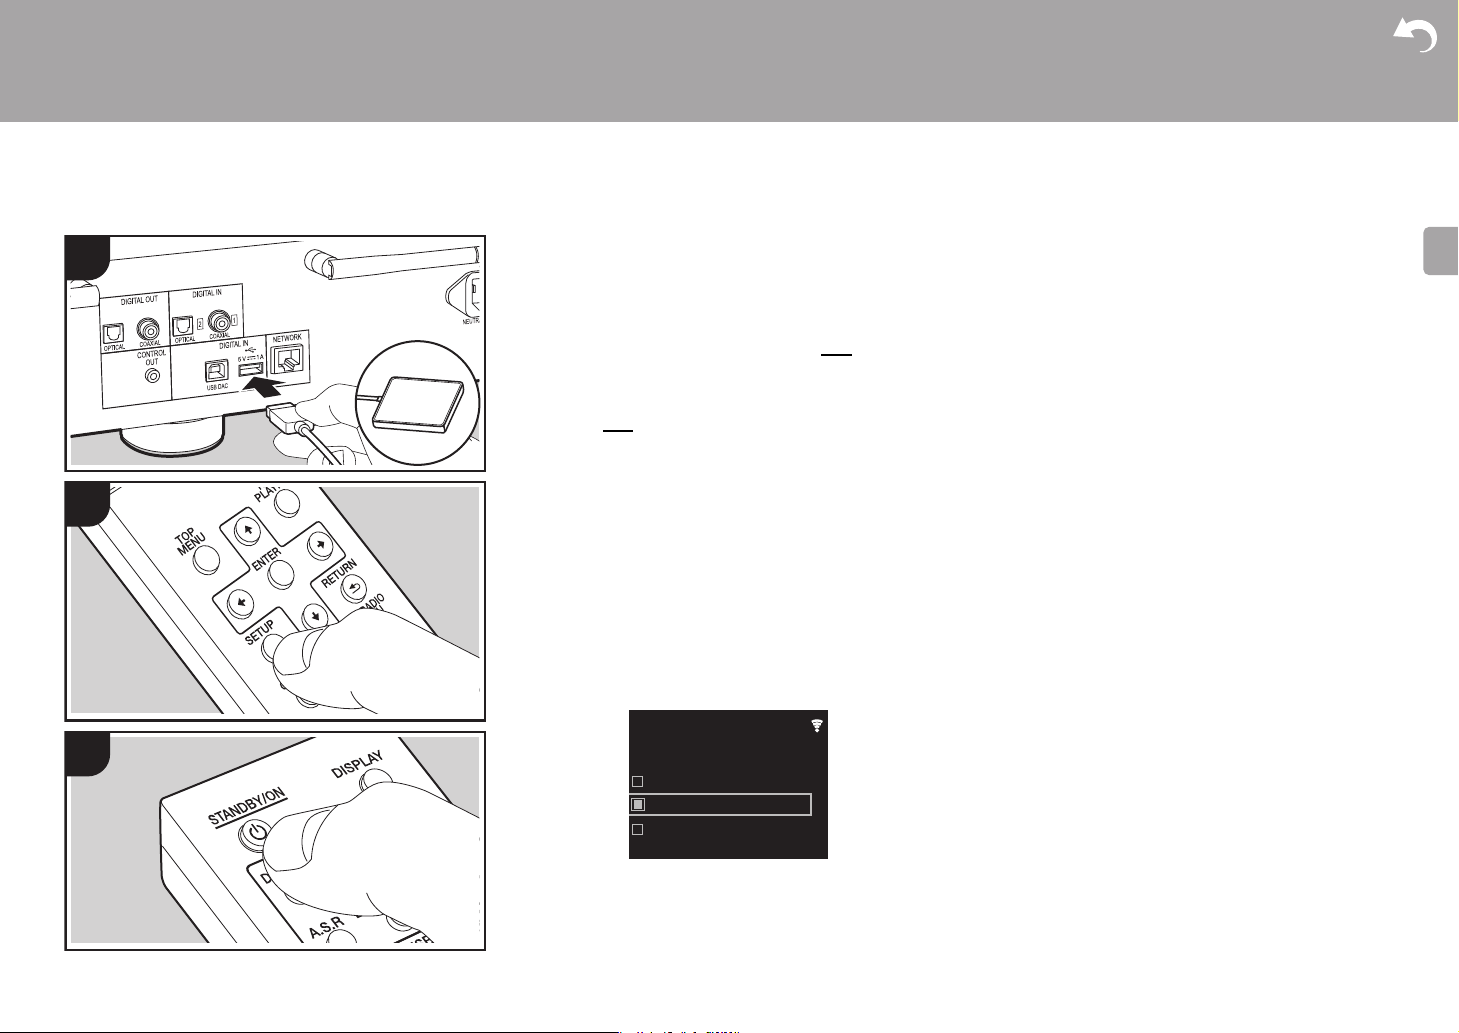
Using this unit as a D/A converter
1
2
Supplementary information | Advanced Setup | Others
You can convert the digital audio from computers and audio
devices such as CD players to analog, then output them
from the ANALOG OUT jacks.
To play the audio from a computer, you need to install the
special driver on your computer. Download the driver
software from our website.
http://www.pioneer-audiovisual.eu/
Connections
Use an A—B type USB cable to connect a computer. Use
either a digital optical cable or digital coaxial cable,
depending on the jacks on the device to be connected, to
connect audio devices such as CD players.
Playing Back
1. Turn the unit on.
2. When playing a computer connected to the USB DAC
port, press USB DAC IN to change the input on this unit
to "USB DAC In".
USB DAC In
a USB Cable, b Digital Optical Cable, c Digital Coaxial Cable
22
Page 23

> Before Start > Part Names > Install > Initial Setup >Playback
E
N
Digital In 2
Digital In 1
When playing a device connected to the DIGITAL IN
OPTICAL jack, press DIG IN 2 to change the input on this
unit to "Digital In 2".
When playing a device connected to the DIGITAL IN
COAXIAL jack, press DIG IN 1 to change the input on
this unit to "Digital In 1".
Supplementary information | Advanced Setup | Others
3. Start play on the player.
0 The digital signals you can input with this unit are as
follows.
(Operation may not be possible depending on the
connected device and environment)
– Signals that can be input through the USB DAC port:
Linear PCM signals with a sampling frequency and
quantization bit rate of up to 384 kHz/32 bit, and DSD
with a sampling frequency up to 11.2 MHz
– Signals that can be input through the DIGITAL IN
OPTICAL/COAXIAL jacks: Linear PCM signals with a
sampling frequency and quantization bit rate of up to
192 kHz/24 bit
23
Page 24

> Before Start > Part Names > Install > Initial Setup >Playback
E
N
Sound
Up Sampling
Lock Range Adjust
Hi-Bit32
Adjusting sound quality
Supplementary information | Advanced Setup | Others
a
24
Reproduce the original sound faithfully
(DIRECT mode)
d
e
f
Processing that affects sound quality is shut down so sound
closer to the original is reproduced.
1. Press DIRECT (a).
0 The DIRECT indicator on the front of the main unit lights
when the DIRECT mode is on.
0 When the DIRECT mode is on, Auto Sound Retriever, Hi-
Bit32, and Up Sampling are fixed to off.
Playing even better quality sound (SOUND
menu)
b
c
h
Use the SOUND menu to process the audio in a variety of
ways to get even better playback sound quality.
1. Press SOUND (f).
Auto Sound Retriever
i
2. Select the item or setting value with the cursors of the
remote controller (g) and press ENTER (h) to confirm
your selection. To return to the previous display, press
g
RETURN (i).
3. To exit the settings, press SOUND (f).
∫ Auto Sound Retriever
By compensating for the parts deleted during the
processing to compress the audio, the unit is able to enrich
and improve the inflection of the sound.
0 You can also press A.S.R (b) to turn the feature on and
off.
0 This feature cannot be used when the DIRECT mode is
on.
∫ Hi-Bit32
The dynamic range is expanded by converting audio with bit
rate quantizations of between 16 bits and 24 bits to have a
bit rate quantization of 32 bits. This achieves a smoother
and more refined sound reproduction.
0 The Hi-Bit32 indicator on the front of the main unit lights
when this feature is on.
0 You can also press Hi-Bit32 (e) to turn the feature on and
off.
0 This feature cannot be used when the DIRECT mode is
on.
∫ Up Sampling
Increasing the sampling frequency helps achieve sound
reproduction with a higher degree of clarity.
0 The Up Sampling indicator on the front of the main unit
lights when this feature is on.
0 You can also press Up Sampling (d) to turn the feature on
and off.
0 This feature cannot be used when the DIRECT mode is
on.
∫ Lock Range Adjust
Sound quality is improved by narrowing the lock range to
reduce incidental sounds. However, narrowing the lock
range too much can cause interruptions to sound and noise.
Adjust the lock range while listening to some audio.
Different settings can be set for this setting for each input
selector.
"Range 7" (default value) to "Range 1 (for Expert)"
0 You can also press Lock Range (c) to display the Lock
Range Adjust setting screen.
Page 25

> Before Start > Part Names > Install > Initial Setup >Playback
E
N
Password
A
Delete One Character[CLEAR]
Change Text[REPEAT]
Entering text
Text entry, for passwords, etc., uses the following remote
controller buttons.
c
d
e
f
a
/ buttons (a): Each press changes the character.
CLEAR button (b): Deletes the character in the cursor
position.
REPEAT button (c): Each press changes text type in the
order upper case lower case numbers symbols.
ENTER button (d): Confirms the entered content.
/ buttons (e): Move the position (cursor position) where
the character is to be entered.
RETURN button (f): Cancels input and returns you to the
previous display.
Supplementary information | Advanced Setup | Others
b
25
Page 26

> Before Start > Part Names > Install > Initial Setup > Playback
E
N
Supplementary information for player functions
Supplementary information
Due to firmware (the software for the system) updates after
you make your purchase or firmware changes during
production of the product, there may be additions or
changes to the features available compared to what is in the
instruction manual.
For information about player functions that have been
added or changed, see the following references.
Supplementary information for player functions
>>> Click here <<<
Supplementary information | Advanced Setup | Others
26
Page 27

> Before Start > Part Names > Install > Initial Setup > Playback
E
N
Setup
Factory Reset
System Info
Option Setting
Network Setting
Advanced Settings
Advanced Setup
The unit allows you to configure advanced settings to provide you with an even better
1
experience.
1. Press SETUP on the remote controller.
2. After the Setup screen is displayed, select the content or the setting with the cursors on
the remote controller and press ENTER to confirm your selection. To return to the
previous screen, press RETURN.
3. To exit the settings, press SETUP.
Supplementary information | Advanced Setup |Others
Network Setting
∫ Connection
Select the network connection type.
"Wi-Fi": To connect via wireless LAN
"Wired" (Default Value): To connect via wired LAN
Perform "Wi-Fi Setup" if you select "Wi-Fi".
∫ Wi-Fi Setup
Make Wi-Fi connection settings. (P12)
This can be set only when "Wi-Fi" is selected in "Connection".
27
Page 28

> Before Start > Part Names > Install > Initial Setup > Playback
E
N
Supplementary information | Advanced Setup |Others
0 You can make Wi-Fi connection settings using a web browser on a computer. For details,
refer to “Web Setup” (P29).
∫ DHCP
"On" (Default Value): Auto configuration by DHCP
"Off": Manual configuration without DHCP
If selecting "Off", you must set "IP Address", "Subnet Mask", "Gateway", and "DNS Server"
manually.
∫ IP Address
Displays/Sets the IP address.
∫ Subnet Mask
Displays/Sets the subnet mask.
∫ Gateway
Displays/Sets the gateway.
∫ DNS Server
Displays/Sets the primary DNS server.
∫ Proxy URL
Displays/Sets the proxy server URL.
∫ Proxy Port
Displays/Sets the proxy server port number when you enter "Proxy URL".
∫ Friendly Name
Change the device name for this unit which is shown on other devices connected to the
network to an easily recognized name. You can input up to 31 characters. For details on how
to enter text, refer to "Entering text" (P25). After finishing input, press ENTER.
∫ AirPlay Password
You can set a password of up to 31 characters so that only registered users can use AirPlay.
For details on how to enter text, refer to "Entering text" (P25). After finishing input, press
ENTER.
∫ Network Check
You can check the network connection.
Option Setting
∫ Power Off Setting
Auto Standby This setting places the unit on standby automatically after 20
Network Standby
∫ Digital Filter
"Slow": Soft and fluid sound
"Sharp" (Default Value): Sound with more structure and firmness
"Short": Sound that starts quick and seems to move forward "Short"
∫ Storage
Information The file system, available capacity, and total capacity of the HDD
minutes of inactivity without any audio input.
"On" (Default Value): The unit will automatically enter standby
mode.
"Off": The unit will not automatically enter standby mode.
When this feature is turned "On", you can turn on the power of the unit
via the network using an application that can control this unit
0 When you have selected "On (USB Power)" and this unit is on
standby, you can use a computer connected to the same
network as this unit to access an HDD connected to the USB
port on the rear of the main unit.
0 If either "On" (default setting) or "On (USB Power)" is selected,
power consumption during standby becomes larger than
normal.
0 When the connection to the network is lost, "Network Standby"
may be disabled to reduce power consumption.
connected to the USB port on the rear of the main unit is displayed.
.
28
Page 29

> Before Start > Part Names > Install > Initial Setup > Playback
E
N
Supplementary information | Advanced Setup |Others
Format Format the HDD connected to the USB port on the rear of the main
∫ Language
Select the language displayed on the display.
English (Default Value), German, French, Spanish, Italian, Dutch, Swedish, Russian,
Chinese
∫ Digital Out
Make settings for digital audio output.
"On" (Default Value), "Off"
∫ Balance Out (N-70AE only)
You can switch the phase of the XLR ANALOG OUT jack of this unit to match the phase of
the XLR jack on the connected device.
"2-HOT/3-COLD" (default value), "2-COLD/3-HOT"
0 When connecting an integrated amplifier or other device with an analog audio cable,
select "2-HOT/3-COLD". The phase of the output audio is reversed when you select "2COLD/3-HOT".
unit. In order to use a computer connected to the same network as
this unit to access an HDD connected to this unit, the HDD needs
to be formatted by this unit. When you format the HDD, all data on
the HDD will be deleted, so you should backup data before
formatting. To format, select "Start", and then press ENTER.
0 The tracks, files, etc., on an HDD formatted on this unit cannot
be viewed even when directly connected to a computer.
System Info
The MAC address of this unit and the current firmware version will be displayed.
Factory Reset
Reset the settings of this unit to the status at the time of shipment. We recommend that you
take a note of the settings you have changed before going ahead with a factory reset. Select
"Start" and confirm to go ahead. The unit will be placed on standby automatically when
initializing is completed.
Update
"Update" is not displayed if there are no firmware updates.
∫ via Network
Press ENTER to select when you want to update the firmware via network.
∫ via USB
Press ENTER to select when you want to update the firmware via USB.
Web Setup
You can make Wi-Fi connection settings using a web browser on a computer. Be sure your
computer is connected to the router wirelessly.
If this unit is connected to the router using ethernet cable, you can not do this setting.
1. Turn the unit on.
2. Press SETUP on the remote controller, select "Wi-Fi" in "Network Setting" - "Connection",
then select "Wi-Fi Setup".
3. Press / to select "Use iOS Device" and press ENTER.
4. In the list of wireless LAN connections on your computer, select SSID of this unit
(softap_0009B0xxxxxx).
0 "xxxxxx" in SSID is the lower three bytes of the MAC address.
5. Open the web browser on your computer and access http://192.168.200.1.
6. The "Web Setup" menu is displayed. Make network settings for this unit.
0 Depending on the equipment being used or connection environment, this function may
not work.
0
Consult the appropriate operating instructions for information regarding operation of the computer.
0 Since this kind of connection is not encoded, a minor security risk may be involved.
29
Page 30

> Before Start > Part Names > Install > Initial Setup > Playback
E
N
Setup
Factory Reset
System Info
Option Setting
Network Setting
Firmware Update
Firmware Update
Supplementary information | Advanced Setup |Others
The updating function on this unit
This unit has functionality to update the firmware (the
system software) over a network or by the USB port. This
enables us to make improvements to a variety of operations
and to add features.
30
How to update
There are two methods for updating the firmware: via
network and via USB. The update may take about 5
minutes to complete for either method: via network or via
USB. Furthermore, existing settings are guaranteed
regardless of the method used for update.
0 For the latest information on updates, visit our company’s
website. There is no need to update the firmware on this
unit if there is no update available.
0 When performed over the network, it may take even
more time depending on the connection status.
0 During an update, do not
– Disconnect and reconnect any cable or USB storage
device, or perform any operation on the component
such as turn off its power
– Accessing this unit from a PC or smartphone using an
application
Disclaimer: The program and accompanying online
documentation are furnished to you for use at your own risk.
We will not be liable and you will have no remedy for
damages for any claim of any kind whatsoever concerning
your use of the program or the accompanying online
documentation, regardless of legal theory, and whether
arising in tort or contract.
In no event will we be liable to you or any third party for any
special, indirect, incidental, or consequential damages of
any kind, including, but not limited to, compensation,
reimbursement or damages on account of the loss of
present or prospective profits, loss of data, or for any other
reason whatsoever.
Updating the Firmware via Network
0 Check that the unit is turned on, and the connection to
the Internet is secured.
0 Turn off the controller component (PC etc.) connected to
the network.
0 Stop any playing Internet radio, USB storage device, or
server content.
1. The setup screen is displayed on the display when
SETUP on the remote controller is pressed.
2. Press / and ENTER to select "Update" - "via Network"
in order.
Setup
Update
0 "Update" is not displayed if there are no firmware
updates.
3. Press ENTER to start the firmware update.
0 "COMPLETE" is displayed when the update is
complete.
4. Press Í/I STANDBY/ON on the main unit to switch the
power of the unit off. The process is completed and your
firmware is updated to the latest version.
Page 31

> Before Start > Part Names > Install > Initial Setup > Playback
E
N
Setup
Factory Reset
System Info
Option Setting
Network Setting
Setup
Update
Supplementary information | Advanced Setup |Others
If an error message is displayed: When an error occurs,
"¢-¢¢ Error!" is displayed on the display of this unit. ("¢"
represents an alphanumeric character.) Check the
following:
0 ¢-01, ¢-10: Ethernet cable not found. Connect the
Ethernet cable properly.
0 ¢-02, ¢-03, ¢-04, ¢-05, ¢-06, ¢-11, ¢-13, ¢-14, ¢-16,
¢-17, ¢-18, ¢-20, ¢-21: Internet connection error.
Check the following:
– The router is turned on
– This unit and the router are connected via the network
Try to disconnect and then connect again the power to
the unit and router. This may solve the problem. If you
are still unable to connect to the Internet, the DNS server
or proxy server may be temporarily down. Check the
service status with your ISP provider.
0 Others: Disconnect then reconnect the power cord, then
repeat from the beginning.
Updating via USB
0 Prepare a 128 MB or larger USB storage device (FAT16
or FAT32 file system format).
0 Delete any data stored on the USB storage device.
0 Turn off the controller component (PC etc.) connected to
the network.
0 Stop any playing Internet radio, USB storage device, or
server content.
0 Some USB storage devices may take long to load, may
not be loaded correctly, or may not be correctly fed
depending on the device or their content.
0 We will not be liable whatsoever for any loss or damage
of data, or storage failure arising from the use of the USB
storage device with this unit. Thank you for your
understanding.
1. Connect the USB storage device to your PC.
2. Download the firmware file from our company’s website
to your PC and unzip.
Firmware files are named in the following way:
PIONAP¢¢¢¢_¢¢¢¢¢¢¢¢¢¢¢¢¢¢_¢¢¢.zip
Unzip the file on your PC. The number of unzipped files
and folders varies depending on the model.
3. Copy all unzipped files and folders to the root folder of
the USB storage device.
0 Make sure to copy the unzipped files.
4. Connect the USB storage device to the USB port of this
unit.
0 If you connect a USB hard disk drive to the USB port of
the unit, we recommend that you use its AC adapter to
power it.
0 If the USB storage device has been partitioned, each
section will be treated as an independent device.
5. The Setup screen is displayed on the display when
SETUP button on the remote controller is pressed.
6. Press / and ENTER to select "Update" - "via USB" in
order.
0 "Update" is not displayed if there are no firmware
updates.
7. Press ENTER to start the firmware update.
0 "COMPLETE" is displayed when the update is
complete.
8. Press Í/I STANDBY/ON on the main unit to switch the
power of the unit off. The process is completed and your
firmware is updated to the latest version.
9. Remove the USB storage device from this unit.
If an error message is displayed: When an error occurs,
"¢-¢¢ Error!" is displayed on the display of this unit. Check
the following:
0 ¢-01, ¢-10: USB storage device not found. Check
whether the USB storage device or USB cable is
correctly inserted to the USB port of this unit.
Connect the USB storage device to an external power
source if it has its own power supply.
0 ¢-05, ¢-13, ¢-20, ¢-21: The firmware file is not present
in the root folder of the USB storage device, or the
firmware file is for another model. Retry from the
download of the firmware file.
0 Others: Disconnect then reconnect the power cord, then
repeat from the beginning.
31
Page 32

> Before Start > Part Names > Install > Initial Setup > Playback
E
N
Troubleshooting
Others
Supplementary information | Advanced Setup | Others
Before starting the procedure
When operation is unstable, problems may be solved by
simply turning the power on or to standby or disconnecting/
connecting the power cord, rather than reviewing settings
and operations. Try the simple measures on both the unit
and the connected device. If the problem isn't fixed after
referring to "Troubleshooting", resetting the unit to the
status at the time of shipment may solve the problem. Note
that your settings will also be initialized when you reset, so
we recommend that you note down your settings before
doing the following.
Resetting the unit (this resets the unit settings to
the default)
1. Press SETUP on the remote controller, select "Factory
Reset" - "Start" in the Setup screen and press ENTER.
2. Press ENTER.
3. The unit switches to standby and the settings are reset.
∫ Power
Cannot turn on the unit
0 Unplug the power cord from the wall outlet, wait
2 minutes or more, then plug it in again.
The unit turns off unexpectedly
0 The unit automatically switches to standby when the
"Option Setting" - "Power Off Setting" - "Auto Standby"
setting in the Setup menu functions.
The Í/I STANDBY/ON indicator on the main unit
continues to flash blue and operations are not possible
0 Unplug the power cord from the wall outlet, wait 2
minutes or more, then plug it in again. If this doesn't fix
the issue, there may be a malfunction. Unplug the power
cord from the wall outlet and contact the dealer or our
customer support.
∫ The display doesn't light
0 It is possible that the display has been turned off by
pressing DISPLAY. Press DISPLAY to turn the display
on.
∫ Wi-Fi Connection
0 Try plugging/unplugging the power supply of this unit and
the router, and try rebooting the router.
Cannot connect to the access point
0 Check that the setting of SSID and encryption (WEP,
etc.) is correct.
0 Connection to an SSID that includes multi-byte
characters is not supported. Name the SSID of the
wireless LAN router using single-byte alphanumeric
characters only and try again.
0 When the wireless LAN router setting is at stealth mode
(mode to hide the SSID key) or when ANY connection is
off, the SSID is not displayed. Change the setting and try
again.
Connected to an SSID different to the SSID selected
0 Some access points allow you to set multiple SSIDs for
one unit. If you use the automatic setting button on such
a router, you may end up connecting with a different
SSID from the SSID you wanted to connect to. Use the
connection method requiring you to enter a password if
this happens.
Playback is interrupted and communication does not
work
0 Shorten the distance from the access point or remove
obstacles to improve visibility, and try again. Place the
unit away from microwave ovens or other access points.
It is recommended to place the access point and the unit
in the same room.
0 If there is a metallic object near the unit, wireless LAN
connection may not be possible as the metal can effect
on the radio wave.
0 When other access point are used near the unit, several
issues such as interrupted playback and communication
may occur. You can avoid these issues by changing the
channel of the access point. For instructions on changing
channels, see the instruction manual provided with the
access point.
∫ Audio
Sound is interrupted
0 Narrowing the lock range too much with the Lock Range
Adjust setting can cause interruptions to sound and also
may cause noise. Sound interruptions caused by
adjustments to the lock range are not covered by our
guarantees of operation. Listen to some audio while
adjusting the lock range.
There is no digital sound
0 Set "Option Setting" - "Digital Out" in the Setup menu to
"On".
0 DSD audio cannot be output digitally.
∫ Cannot Play USB storage device / HDD
0 Check whether the USB storage device or USB cable is
correctly inserted to the USB port of the unit.
0 Disconnect the USB storage device from the unit, and
then try reconnecting.
0 This unit may not recognize USB storage devices and
HDDs as proper devices sometimes. Try switching this
unit to standby and then turning it on again.
0 Depending on the type of format, the playback may not
be performed normally. Check the type of the file formats
that is supported. (P15)
0 Cautions regarding USB and HDD devices (P15)
32
Page 33

> Before Start > Part Names > Install > Initial Setup > Playback
E
N
Supplementary information | Advanced Setup | Others
∫ Network function
0 If you cannot select a network service, it will become
selectable when the network function is started.
0 Try plugging/unplugging the power supply of this unit and
the router, and try rebooting the router.
Cannot access the Internet radio
0 Certain network service or contents available through the
unit may not be accessible in case the service provider
terminates its service.
0 Make sure that your modem and router are properly
connected, and make sure they are both turned on.
0 Depending on ISP, setting the proxy server is necessary.
0 Make sure that the used router and/or modem is
supported by your ISP.
Cannot access the network server
0 This unit needs to be connected to the same router as
the network server.
0 This unit is compatible with Windows Media
12 network servers or NAS that are compatible with
home network functionality. Furthermore, when using a
PC, only music files registered in the Windows Media
Player library can be played.
Playback stops while listening to music files on the
network server
0 When the PC is serving as the network server, try quitting
any application software other than the server software
(Windows Media
0 If the PC is downloading or copying large files, the
playback may be interrupted.
The album names and artist names for the Music Server
are not displayed
0 Meta data, such as album names and artist names,
needs to be recognized on the server for distribution to
this unit, so this depends on the specifications of the NAS
or server you are using.
®
Player 12, etc.).
®
Player 11 or
®
0 The file formats supported depend on the NAS or server
software. For details, contact the manufacturer of NAS or
the server software.
Album art in Music Server is displayed sometimes but
not other times
0 Music Server depends on the specifications of the server
software.
0 The formats supported depend on the server software.
0 For details, contact the manufacturer of the server
software.
∫ Saving and deleting the music on a USB
HDD connected to this unit from a computer
When an HDD formatted with this unit is connected to a
computer, the files are not shown or cannot be read or
written by the computer
0 As the HDD formatted by this unit is formatted with a
special format, it will not be possible to view or read/write
files even when connected to a computer (Windows or
Macintosh).
This unit is not displayed in the list of network
connected devices on the computer
0 When this unit is on, you cannot use a computer to
access the HDD connected to the USB port on the rear of
the main unit. You need to first set "Network Standby" to
"On (USB Power)", then switch this unit to standby. In the
Setup menu select "Option Setting" - "Power Off Setting"
- "Network Standby", then select "On (USB Power)" and
press ENTER, and finally press Í STANDBY/ON on the
remote controller to switch this unit to standby.
∫ D/A converter feature
0 Make sure that the devices are properly connected.
0 Play audio compatible with the input jacks on this unit.
(P23)
Cannot play audio from computers
0 Cancel the muting on your computer.
0 Select this unit in the audio output settings on your
computer. If this unit's input is set to anything other than
"USB DAC In", the computer will not detect this unit.
0 To play the audio from a computer, you need to install the
special driver on your computer. Download the driver
software from our website.
http://www.pioneer-audiovisual.eu/
0 If there are multiple applications running on the
computer, shut down those applications that you are not
using.
Sampling frequency is always the same through the
USB DAC In input
0 Depending on the computer settings, even if the
sampling frequencies of the files being played are
different, they are converted to the same sampling
frequency for output.
Computer sounds other than music are heard through
the USB DAC In input
0 Depending on the settings on the computer, sounds such
as the computer startup tone or error sounds may be
played through this unit.
33
Page 34

> Before Start > Part Names > Install > Initial Setup > Playback
E
N
General Specifications
Supplementary information | Advanced Setup | Others
∫ Analog Audio Output
Rated Output Level and Impedance
0 RCA OUT: 2.2 Vrms (1 kHz, 0 dB) / 500 ≠
0 XLR OUT (N-70AE): 4.2 Vrms (1 kHz, 0 dB) / 500 ≠
Frequency Response
0 4 Hz - 90 kHz (-3 dB)
Signal to Noise Ratio
0 (N-70AE) RCA OUT: 114 dB (A-weighting),
XLR OUT: 117 dB (A-weighting)
0 (N-50AE) RCA OUT: 112 dB (A-weighting)
Dynamic Range
0 117dB (24bit, 32bit)
THD+N
0 0.0017 %
Channel Separation
0 110 dB (1 kHz)
∫ Phones Output (N-70AE)
Output Power
0 100 mW + 100 mW (32 ≠, 1 kHz THD 1%)
Supported Phones Impedance
0 16 ≠ - 600 ≠
Frequency Response
0 4 Hz - 80 kHz (-3 dB)
THD+N
0 0.01 %
∫ Digital Audio Input
FRONT/REAR USB
0 Type A, USB2.0 High Speed
0 DC Output: 5 V 1 A (Rear) / 5 V 0.5 A (Front)
USB DAC
0 Type B, USB2.0 High Speed
Coaxial Digital Input
0 RCA Jack, 0.5 Vp-p / 75 ≠
Optical Digital Input
0 Optical Jack, -24 dBm or more / 660 nm
∫ Digital Audio Output
Coaxial Digital Output
0 RCA Jack, 0.5 Vp-p / 75 ≠
Optical Digital Output
0 Optical Jack, -14 - -21 dBm / 660 nm
∫ Network
Wired LAN
0 Ethernet Jack
0 10BASE-T/100BASE-TX
Wireless LAN (Wi-Fi)
0 IEEE 802.11 a/b/g/n standard
0 5 GHz/2.4 GHz band
∫ Other
Control Out
0 ‰3.5 mini-jack (mono)
∫ General
Power Supply
0 AC 220 - 240 V, 50/60 Hz
Power Consumption
0 N-70AE: 40.0 W
0 N-50AE: 30.0 W
0 0.3 W (In Standby)
0 2.0 W (In Standby, Network Standby: On, Network
Setting: Wired)
0 2.4 W (In Standby, Network Standby: On, Network
Setting: Wi-Fi)
Auto Standby
0 On (20 min) / Off
Dimensions (W t H t D)
0 N-70AE: 435 mm k 121 mm k 364 mm
0 N-50AE: 435 mm k 99 mm k 340 mm
Weight
0 N-70AE: 11.4 kg
0 N-50AE: 7.4 kg
34
Page 35

> Before Start > Part Names > Install > Initial Setup > Playback
E
N
License and Trademark Information
The Wi-Fi CERTIFIED Logo is a certification mark of Wi-Fi Alliance®.
AirPlay, iPad, iPhone, iPod, iPod classic, iPod nano and iPod touch are
trademarks of Apple Inc., registered in the U.S. and other countries.
iPad Air and iPad mini are trademarks of Apple Inc.
“Made for iPod”, “Made for iPhone” and “Made for iPad” mean th at an electronic
accessory has been designed to connect specifically to iPod, iPhone, or iPad,
respectively, and has been certified by the developer to meet Apple
performance standards. Apple is not responsible for the operation of this device
or its compliance with safety and regulatory standards.
Please note that the use of this accessory with iPod, iPhone or iPad may affect
wireless performance.
AirPlay works with iPhone, iPad, and iPod touch with iOS 4.3.3 or later, Mac
with OS X Mountain Lion or later, and PC with iTunes 10.2.2 or later.
The Spotify software is subject to third party licenses found here:
https://developer.spotify.com/esdk-third-party-licenses/
Chromecast is a trademark of Google Inc.
This product is protected by certain intellectual property rights of Microsoft. Use
or distribution of such technology outside of this product is prohibited without a
license from Microsoft.
Windows 7, Windows Media, and the Windows logo are trademarks or
registered trademarks of Microsoft Corporation in the United States and/or other
countries.
macOS is a trademark of Apple Inc., registered in the U.S. and other countries.
DSD and the Direct Stream Digital logo are trademarks of Sony Corporation.
All other trademarks are the property of their respective owners. / Toutes les
autres marques commerciales sont la propriété de leurs détenteurs respectifs. /
El resto de marcas comerciales son propiedad de sus respectivos propietarios.
/ Tutti gli altri marchi di fabbrica sono di proprietà dei rispettivi proprietari. / Alle
anderen Warenzeichen sind das Eigentum ihrer jeweiligen Eigentümer. / Alle
andere handelsmerken zijn eigendom van de desbetreffende rechthebbenden. /
Alla andra varumärken tillhör deras respektive ägare.
Supplementary information | Advanced Setup | Others
35
Page 36

Register your product on
/ Enregistrez votre produit sur / Registre su producto en /
Registrare il proprio prodotto su / Registrieren Sie hier Ihr Produkt / Registreer uw product op / Registrera din produkt på
http://www.pioneer.eu (Europe / Europe / Europa / Europa / Europa / Europa / Europa)
<Germany>
Hanns-Martin-Schleyer-Straße 35, 47877 Willich, Germany
Tel: +49(0)8142 4208 188 (Product Support)
<UK>
Anteros Building, Odyssey Business Park, West End Road, South Ruislip,
Middlesex, HA4 6QQ United Kingdom
Tel: +44(0)208 836 3612
<France>
6, Avenue de Marais F - 95816 Argenteuil Cedex FRANCE
Tel: +33(0)969 368 050
<U.S.A.>
18 PARK WAY, UPPER SADDLE RIVER, NEW JERSEY 07458, U.S.A.
Tel: 1-201-785-2600
Te l: 1-844-679-5350
1-10-5 Yokoami, Sumida-ku, Tokyo 130-0015 JAPAN
F1712-1
SN
29403190A
*29403190A*
“Pioneer” is a trademark of Pioneer Corporation, and is used under license.
© 2017 Onkyo & Pioneer Corporation. All rights reserved.
© 2017 Onkyo & Pioneer Corporation. Tous droits de reproduction et de traduction réservés.
http://pioneer-audiovisual.com/privacy/
E
N
Page 37

F
R
> Avant de Démarrer > Nom des pièces > Installation > Initial Setup > Lecture
Informations supplémentaires | Configuration avancée | Autres
Avant de Démarrer
NETWORK AUDIO PLAYER
N-70AE
N-50AE
Mode d'emploi
Ce que contient la boîte .......................................................... 2
Nom des pièces
Panneau frontal (N-70AE) ...................................................... 3
Panneau frontal (N-50AE) ...................................................... 4
Panneau arrière (N-70AE) ...................................................... 5
Panneau arrière (N-50AE) ...................................................... 6
Télécommande ....................................................................... 7
Afficheur ................................................................................. 8
Installation
Raccordements avec un amplificateur ................................... 9
Branchement du cordon d'alimentation, etc. .........................11
Initial Setup
Mise sous tension & Configuration initiale ............................ 12
Lecture
Périphérique de stockage USB/DD ...................................... 15
Radio Internet ....................................................................... 18
Spotify ................................................................................... 19
®
AirPlay
Music Server ......................................................................... 21
Utilisation d'un ordinateur pour sauvegarder et supprimer la musique
présente sur un HDD USB raccordé à cet appareil ......................... 23
Utilisation de cet appareil comme convertisseur D/A ........... 24
Réglage de la qualité du son ................................................ 26
Saisie du texte ...................................................................... 27
Informations supplémentaires
Informations supplémentaires concernant les fonctions du
lecteur.................................................................................... 28
Configuration avancée
Configuration avancée........................................................... 29
Mise à jour du micrologiciel .................................................. 32
Autres
Dépannage ........................................................................... 34
Caractéristiques générales ................................................... 37
Licence et Marque commerciale ........................................... 38
................................................................................ 20
Page 38

> Avant de Démarrer > Nom des pièces > Installation > Initial Setup > Lecture
F
R
Informations supplémentaires | Configuration avancée | Autres
Ce que contient la boîte
Avant de Démarrer
≥ Pour le N-70AE uniquement
Appareil principal (1) (les illustrations montrent le modèle N-70AE)
Télécommande (RC-931S) (1), Piles (AAA/R03) (2)
Câble audio analogique (1)
Cordon d'alimentation (1)
Antenne sans fil (2)
0 Guide de démarrage rapide (1)
0 Ce document est un mode d'emploi en ligne. Il n'est pas inclus comme accessoire.
0 Le cordon d'alimentation devra être branché uniquement lorsque tous les autres
raccordements seront effectués.
0 Nous n’acceptons en aucun cas la responsabilité des dommages résultant d'une
connexion à des équipements fabriqués par d'autres sociétés.
0 Des fonctionnalités peuvent être mises en place par des mises à jour du micrologiciel et
des services de fournisseurs pourraient cesser, ce qui signifie que certains services
réseau ainsi que leurs contenus pourraient devenir inaccessibles dans le futur.
0 Les spécifications et l'aspect peuvent changer sans préavis.
La mise sous tension ou hors tension ne peut pas être effectuée avec la télécommande.
Utiliser la touche Í/I STANDBY/ON de l'appareil principal.
2
Page 39

> Avant de Démarrer > Nom des pièces > Installation > Initial Setup > Lecture
F
R
Informations supplémentaires | Configuration avancée | Autres
Panneau frontal (N-70AE)
Nom des pièces
1. Í/I Touche/témoin STANDBY/ON : Permet de mettre l'appareil sous tension ou hors
tension. Pendant la mise en route de l'appareil, le témoin au centre de la touche clignote
lentement en bleu, puis reste fixe une fois que l'appareil a démarré.
2. Témoin STANDBY : Est rouge lorsque l'appareil est en mode veille.
3. Témoin DIRECT : Est allumé lorsque le mode DIRECT est actif. (P26)
4. Témoin Hi-Bit32 : Est allumé lorsque la fonctionnalité Hi-Bit32 est active. (P26)
5. Témoin Up Sampling : Est allumé lorsque la fonctionnalité Up Sampling est active.
(P26)
6. Afficheur (P8)
7. Touche SOURCE : Change l'entrée à lire.
8. Touches Lecture :
∫
: Cette touche permet d'arrêter la lecture.
1
/; : Cette touche permet de suspendre la lecture.
:6
: Permet de retourner sur la piste qui précède celle en cours de lecture.
59
: Passer à la piste suivante.
0 Selon l’entrée, ces touches peuvent être désactivées.
9. Capteur de la télécommande
10.
Port USB : Raccorder un périphérique de stockage USB ou un DD (disque dur) pour lire
des fichiers de musique. Vous pouvez également fournir l’alimentation (maximum 5 V/
0,5 A) aux périphériques USB avec un câble USB.
0 Lorsque vous raccordez un DD qui nécessite plus de 5 V/0,5 A, branchez-le sur le port
USB (maximum 5 V/1 A) à l’arrière de l’appareil.
11.
Prise PHONES : Permet de brancher un casque avec une fiche standard (‰6,3 mm de
diamètre).
12.
Molette PHONES LEVEL : Permet de régler le volume du casque.
3
Page 40

> Avant de Démarrer > Nom des pièces > Installation > Initial Setup > Lecture
F
R
Informations supplémentaires | Configuration avancée | Autres
Panneau frontal (N-50AE)
Nom des pièces
1. Í/I Touche/témoin STANDBY/ON : Permet de mettre l'appareil sous tension ou hors
tension. Pendant la mise en route de l'appareil, le témoin au centre de la touche clignote
lentement en bleu, puis reste fixe une fois que l'appareil a démarré.
2. Témoin STANDBY : Est rouge lorsque l'appareil est en mode veille.
3. Témoin DIRECT : Est allumé lorsque le mode DIRECT est actif. (P26)
4. Témoin Hi-Bit32 : Est allumé lorsque la fonctionnalité Hi-Bit32 est active. (P26)
5. Témoin Up Sampling : Est allumé lorsque la fonctionnalité Up Sampling est active.
(P26)
6. Afficheur (P8)
7. Touche SOURCE : Change l'entrée à lire.
8. Touches Lecture :
∫
: Cette touche permet d'arrêter la lecture.
1
/; : Cette touche permet de suspendre la lecture.
:6
: Permet de retourner sur la piste qui précède celle en cours de lecture.
59
: Passer à la piste suivante.
0 Selon l’entrée, ces touches peuvent être désactivées.
9. Capteur de la télécommande
4
10.
Port USB : Raccorder un périphérique de stockage USB ou un DD (disque dur) pour lire
des fichiers de musique. Vous pouvez également fournir l’alimentation (maximum 5 V/
0,5 A) aux périphériques USB avec un câble USB.
0 Lorsque vous raccordez un DD qui nécessite plus de 5 V/0,5 A, branchez-le sur le port
USB (maximum 5 V/1 A) à l’arrière de l’appareil.
Page 41

> Avant de Démarrer > Nom des pièces > Installation > Initial Setup > Lecture
F
R
Informations supplémentaires | Configuration avancée | Autres
Panneau arrière (N-70AE)
1. Prise ANALOG OUT : Permet d'utiliser le câble audio analogique fourni ou un câble XLR
disponible dans le commerce pour raccorder un amplificateur intégré, par exemple.
2. Prise d'antenne sans fil : Permet de brancher l'antenne sans fil fournie pour la connexion
à distance. Après avoir correctement fixé l'antenne, régler l'angle en fonction de l'état de
la connexion.
0 Pour remettre l'appareil dans sa boite, etc., retirer l'antenne sans fil pour éviter de
l'endommager.
3. Prise DIGITAL OUT OPTICAL/COAXIAL : Permet d'utiliser un câble optonumérique ou un
câble coaxial numérique pour raccorder un amplificateur intégré, par exemple.
4. Prise DIGITAL IN OPTICAL/COAXIAL : Permet d'utiliser un câble optonumérique ou un
câble coaxial numérique pour raccorder un lecteur CD, par exemple.
5. AC IN : Permet de brancher le cordon d'alimentation fourni.
6. Prise CONTROL OUT : En y raccordant des amplificateurs et des lecteurs CD de marque
Pioneer, le contrôle centralisé est possible. Vous pouvez, par exemple, contrôler les
amplificateurs et les lecteurs CD avec Pioneer Remote App.
7. Port USB DAC : Permet d'utiliser un câble USB (type A—B) pour raccorder un ordinateur.
8. Port USB : Permet de raccorder un périphérique de stockage USB ou un HDD (disque
dur) pour lire des fichiers musicaux. Vous pouvez également fournir l’alimentation
(maximum 5 V/1 A) aux périphériques USB avec un câble USB. Il est également possible
de sauvegarder ou de supprimer des fichiers musicaux présents sur le HDD USB avec un
ordinateur par le réseau. (P23)
9. Prise NETWORK : Sert à se connecter au réseau à l'aide d'un câble LAN.
5
Page 42

> Avant de Démarrer > Nom des pièces > Installation > Initial Setup > Lecture
F
R
180°
90°
Informations supplémentaires | Configuration avancée | Autres
Panneau arrière (N-50AE)
1. Prises ANALOG OUT : Permet d'utiliser le câble audio analogique fourni pour raccorder
un amplificateur intégré, par exemple.
2. Antenne sans fil : La redresser pour effectuer une connexion sans fil. L'illustration montre
l'amplitude de déplacement de l'antenne sans fil. Ne pas essayer de la déplacer au-delà
de cette amplitude pour ne pas la casser.
3. Prise DIGITAL OUT OPTICAL/COAXIAL : Permet d'utiliser un câble optonumérique ou un
câble coaxial numérique pour raccorder un amplificateur intégré, par exemple.
4. Prise DIGITAL IN OPTICAL/COAXIAL : Permet d'utiliser un câble optonumérique ou un
câble coaxial numérique pour raccorder un lecteur CD, par exemple.
5. AC IN : Permet de brancher le cordon d'alimentation fourni.
6. Prise CONTROL OUT : En y raccordant des amplificateurs et des lecteurs CD de marque
Pioneer, le contrôle centralisé est possible. Vous pouvez, par exemple, contrôler les
amplificateurs et les lecteurs CD avec Pioneer Remote App.
7. Port USB DAC : Permet d'utiliser un câble USB (type A—B) pour raccorder un ordinateur.
8. Port USB : Permet de raccorder un périphérique de stockage USB ou un HDD (disque
dur) pour lire des fichiers musicaux. Vous pouvez également fournir l’alimentation
(maximum 5 V/1 A) aux périphériques USB avec un câble USB. Il est également possible
6
de sauvegarder ou de supprimer des fichiers musicaux présents sur le HDD USB avec un
ordinateur par le réseau. (P23)
9. Prise NETWORK : Sert à se connecter au réseau à l'aide d'un câble LAN.
Page 43

> Avant de Démarrer > Nom des pièces > Installation > Initial Setup > Lecture
F
R
30°
30°
Environ
7 m
Informations supplémentaires | Configuration avancée | Autres
Télécommande
1. Touche Í STANDBY/ON : Lorsque l'appareil est sous tension, ceci permet de mettre
l'appareil en marche ou en veille. La mise sous tension ou hors tension ne peut pas être
effectuée avec la télécommande.
2. Touche DIRECT : Permet d'activer ou de désactiver le mode DIRECT. (P26)
3. Touche Hi-Bit32 : Permet d'activer ou de désactiver la fonctionnalité Hi-Bit32. (P26)
4. Touche A.S.R : Permet d'activer ou de désactiver la fonctionnalité Auto Sound Retriever. (P26)
5. Touches INPUT SELECTOR : Change l'entrée à lire.
6. Touche : La source d’entrée lue change chaque fois que vous appuyez sur l’une
de ces touches.
7. Touche REPEAT : Sélectionne la répétition de lecture.
8. Touches Lecture :
: : Retourner à la piste précédant celle en cours de lecture.
/;: Lecture ou pause.
9: Passer à la piste suivante.
∫ : Arrêter la lecture.
0 Selon l’entrée, il se peut que l’opération ne démarre pas.
9. Touche TOP MENU : Accède au menu principal de l'entrée sélectionnée.
10.
Touches du curseur et ENTER : Permet de sélectionner l'élément à l'aide des touches du
curseur et d'appuyer sur ENTER pour valider.
11.
Touche SETUP : Affiche le menu Setup. (P29)
12.
Touche CLEAR : Utilisé pour l'entrée de texte, etc.
13.
Touche DISPLAY : Appuyez pour éteindre l'afficheur de cet appareil. Appuyez une
nouvelle fois pour allumer l'afficheur.
14.
Touche Up Sampling : Permet d'activer ou de désactiver la fonctionnalité Up Sampling. (P26)
15.
Touche SOUND : Affiche le menu SOUND. (P26)
16.
Touche Lock Range : Permet d'afficher l'écran des paramètres Lock Range Adjust. (P26)
17.
Touche NET STREAM : Permet de commuter les services réseau,
comme la radio Internet, chaque fois que la touche est pressée.
18.
Touche DIMMER : Permet de régler la luminosité de
l'afficheur sur trois niveaux.
19.
Touche SHUFFLE : Permet de sélectionner la lecture aléatoire.
20.
Touche NOW PLAYING : Si vous avez changé l'affichage
durant la lecture, par exemple, cette touche sert à afficher une
nouvelle fois les informations du fichier en cours de lecture.
21.
Touche RETURN : Permet à l'affichage de retourner à son
état précédent.
22.
Touche NET RADIO MENU : À utiliser pour lire la radio Internet.
0 HOME MEDIA, OPTION, 22, et 11 ne sont pas utilisés.
7
Page 44

> Avant de Démarrer > Nom des pièces > Installation > Initial Setup > Lecture
F
R
00:01:45 / 00:03:23
FLAC
44.1
kHz
/24
bit
USB Front
Song
Artist
Album
L.R.A A SR D.OUT
1
Informations supplémentaires | Configuration avancée | Autres
Afficheur
1. La source s'affiche.
(USB Front / USB Rear / USB DAC In / Music Server / Network / Digital In 1 / Digital In 2)
2. Le nom du fichier, l'artiste, l'album, etc. s'affiche.
3. Affiche l'état de la lecture.
4. Affiche le format de fichier, la fréquence d'échantillonnage, et les bits de quantification.
5. L'état de lecture du fichier s'affiche. Cet élément peut ne pas être affiché en fonction de
l'entrée ou du fichier.
6. Ceci est affiché lorsque le paramètre Lock Range Adjust est réglé sur autre chose que
"Range 7". (P26)
7. S'allume sous les conditions suivantes.
:
Lorsque la configuration de connexion de l'appareil est "Wired" et que l'appareil est connecté
au réseau.
:
Lorsque la configuration de connexion de l'appareil est "Wired" et que l'appareil n'est pas
connecté au réseau.
:
Lorsque la configuration de connexion de l'appareil est "Wi-Fi" et que l'appareil est connecté
8
au réseau.
:
Lorsque la configuration de connexion de l'appareil est "Wi-Fi" et que l'appareil n'est pas
connecté au réseau.
8. Si une pochette d'album est enregistrée pour le fichier en lecture, elle s'affiche ici.
9. Ceci est affiché lorsque le paramètre de la sortie audio numérique est activé. (P31)
10.
S'allume sous les conditions suivantes.
: Lorsque la répétition de toutes les pistes est activée
: Lorsque la répétition d'une piste est activée
: Lorsque la lecture aléatoire est activée
11.
Ceci est affiché lorsque la fonctionnalité Auto Sound Retriever est activée. (P26)
0 Lorsque vous appuyez sur DISPLAY de la télécommande pour désactiver l'affichage,
l'appareil a le même aspect que lorsque l'alimentation est débranchée, mais il est toujours
alimenté en électricité. Pour couper totalement l'alimentation électrique, vous devez
débrancher la fiche d'alimentation (dispositif d'arrêt) de la prise d'alimentation.
Page 45

F
R
> Avant de Démarrer > Nom des pièces > Installation > Initial Setup > Lecture
1
2
a
Le modèle N-70AE sert aux illustrations. Le modèle N50AE ne possède pas de prise XLR.
a
1
2
Amplificateur intégré, récepteur AV, etc.
Cet appareil
Informations supplémentaires | Configuration avancée | Autres
Raccordements avec un amplificateur
Installation
a
a Câble audio analogique
Vous pouvez lire le son des fonctionnalités réseau comme
la radio internet et des périphériques raccordés à cet
appareil par le système d'enceintes raccordé à des
amplificateurs intégrés ou à des récepteurs AV. Raccordez
selon les prises d'entrée de votre amplificateur.
Raccordement à l'aide d'un câble audio
analogique
Le signal est converti en analogique par le convertisseur D/
A de cet appareil puis reproduit vers un amplificateur
intégré, par exemple. Raccordez les prises LINE IN d'un
amplificateur intégré à l'aide du câble audio analogique
fourni à la prise ANALOG OUT de cet appareil.
9
Page 46

> Avant de Démarrer > Nom des pièces > Installation > Initial Setup > Lecture
F
R
Lecteur CD
Amplificateur
Cet appareil
Informations supplémentaires | Configuration avancée | Autres
Raccordement à l'aide d'un câble XLR (N70AE uniquement)
Le signal est converti en analogique par le convertisseur D/
A de cet appareil puis reproduit vers un amplificateur
intégré, par exemple. Raccordez l'entrée XLR d'un
amplificateur intégré à l'aide d'un câble XLR à la prise
ANALOG OUT (prise XLR) de cet appareil.
Raccordement à l'aide d'un câble optonumérique
Le signal est converti en analogique par le convertisseur D/A de
l'amplificateur intégré, par exemple. Raccordez la prise OPTICAL
IN d'un amplificateur intégré à l'aide d'un câble optonumérique à la
prise DIGITAL OUT OPTICAL de cet appareil.
0 Les signaux numériques pouvant être reproduits par cet
appareil sont des signaux PCM linéaires avec une
fréquence d'échantillonnage et un débit de quantification
de 192 kHz/24 bits (Le fonctionnement pourrait ne pas
a Câbles de connexion miniprise monaural (sans résistance)
10
être possible avec tous les périphériques raccordés ou
tous les environnements).
Raccordement à l'aide d'un câble coaxial
numérique
Le signal est converti en analogique par le convertisseur D/A de
l'amplificateur intégré, par exemple. Raccordez la prise COAXIAL
IN d'un amplificateur intégré à l'aide d'un câble coaxial numérique
à la prise DIGITAL OUT COAXIAL de cet appareil.
0 Les signaux numériques pouvant être reproduits par cet
appareil sont des signaux PCM linéaires avec une
fréquence d'échantillonnage et un débit de quantification
de 192 kHz/24 bits (Le fonctionnement pourrait ne pas
être possible avec tous les périphériques raccordés ou
tous les environnements).
La prise de contrôle
En raccordant des amplificateurs ou des lecteurs CD de
marque Pioneer, par exemple, munis de prises de contrôle
avec des câbles de connexion mini-prise en monaural (sans
résistances), vous pouvez centraliser le contrôle des
appareils en utilisant Pioneer Remote App.
De plus, si les autres appareils sont placés dans des endroits
difficilement accessibles par le signal de la télécommande, vous
pouvez quand même les faire fonctionner en utilisant le capteur de
la télécommande de cet appareil.
0 Assurez-vous d'effectuer également le raccordement
avec le câble audio analogique. Le contrôle centralisé ne
peut pas fonctionner correctement avec seulement le
raccordement de la prise de contrôle.
0 Avec ce raccordement, les capteurs de télécommande
de l'amplificateur et du lecteur CD arrêtent de
fonctionner. Pointez la télécommande vers le capteur de
télécommande de cet appareil.
a
IN
OUT
CONTROL
a
IN
OUT
CONTROL
Page 47

> Avant de Démarrer > Nom des pièces > Installation > Initial Setup > Lecture
F
R
a
1 2
a
Informations supplémentaires | Configuration avancée | Autres
Branchement du cordon d'alimentation, etc.
Branchement du cordon d'alimentation
Ce modèle dispose d’un cordon d’alimentation amovible.
Le cordon d'alimentation doit être connecté uniquement
lorsque toutes les autres connexions sont effectuées.
Assurez-vous de brancher d'abord le cordon d'alimentation
à la prise AC IN de l'appareil puis de le brancher à la prise
d'alimentation. Toujours débrancher de la prise en premier
lorsque vous retirez le cordon d'alimentation.
Raccordement du câble Ethernet
Pour vous connecter au réseau à l’aide d’un câble Ethernet,
utilisez la fiche NETWORK. Si vous utilisez une connexion
Wi-Fi, indiquez les paramètres lors de la configuration
initiale (P12). Si vous utilisez le modèle N-70AE, assurezvous d'avoir branché l'antenne sans fil fournie. (P5) Vous
pouvez profiter des fonctionnalités comme la radio Internet
et AirPlay en vous connectant au réseau.
a Cordon d’alimentation
11
Page 48

> Avant de Démarrer > Nom des pièces > Installation > Initial Setup >Lecture
F
R
Initial Setup
Wired (Exit)
Wi-Fi
Selects the method of network
connection
Informations supplémentaires | Configuration avancée | Autres
Mise sous tension & Configuration initiale
Initial Setup
Mise en route : Lorsque vous appuyez sur la touche Í/I
1
BLUE BLINKING
32
STANDBY/ON de l'appareil principal, le témoin STANDBY/
ON au centre de la touche clignote lentement en bleu, puis
"Hello" apparait sur l'afficheur environ 20 secondes plus
tard. Après quoi, l'écran devient noir quelques instants et le
logo Pioneer s'affiche. Vous pouvez, dès lors, commencer à
utiliser l'appareil.
Paramètres de connexion Wi-Fi
Lors de la première mise sous tension, l'écran de configuration
initiale s'affiche automatiquement, et vous permet de définir
facilement les paramètres de connexion Wi-Fi.
12
Pour les définir, sélectionnez l'élément grâce aux curseurs de
la télécommande et appuyez sur ENTER pour valider. Pour
revenir sur l'affichage précédent, appuyez sur RETURN.
Pour définir les paramètres Wi-Fi, sélectionnez "Wi-Fi". Si
vous avez raccordé l'appareil avec un câble LAN,
sélectionnez "Wired (Exit)" et validez. Si vous sélectionnez
Page 49

> Avant de Démarrer > Nom des pièces > Installation > Initial Setup >Lecture
F
R
Wireless
Input SSID
Use iOS Device
Wireless
ddddddddddddddddd
ccccccccccccccccccc
bbbbbbbbbbbbbbbbb
Wireless
Push Button
Password
A
Delete One Character[CLEAR]
Change Text[REPEAT]
SSID
A
Delete One Character[CLEAR]
Change Text[REPEAT]
Security Method
WPA2
WPA
WEP
None
Informations supplémentaires | Configuration avancée | Autres
"Wi-Fi", sélectionnez la méthode de configuration sur
l'écran suivant (par exemple "Scan Networks").
0
Lors de la configuration réseau, des écrans vous
demandant d'accepter la politique de confidentialité du
Groupe Onkyo et d'accepter les règles de confidentialité
nécessaires pour utiliser la fonctionnalité Chromecast
built-in s'affichent. Sélectionnez "Accept" et appuyez sur
ENTER pour valider. Pour avoir des informations sur les
paramètres nécessaires pour utiliser la fonctionnalité
Chromecast built-in et les commandes pour l'utiliser,
consultez le feuillet d'instructions Chromecast built-in joint.
Scan Networks
0 Pour recommencer la configuration initiale, appuyez sur
la touche SETUP de la télécommande, sélectionnez "WiFi" dans "Network Setting" - "Connection" puis
sélectionnez "Wi-Fi Setup".
∫ Scan Networks
Dans la liste des SSID pour les points d'accès tels que les
routeurs LAN sans fil, sélectionnez le SSID requis et
effectuez les réglages.
1. Sélectionnez le SSID du point d'accès à connecter puis validez.
2. Sélectionnez "Enter Password" ou "Push Button" et
validez. Si le point d'accès a une touche de configuration
automatique, en sélectionnant "Push Button" vous
pouvez vous connecter sans saisir de mot de passe.
Enter Password
3. Si vous sélectionnez "Enter Password", saisissez le mot
de passe du point d'accès et appuyez sur ENTER. Pour
plus de détails sur la saisie de texte, voir "Saisie du texte"
(P27).
Si vous sélectionnez "Push Button", après avoir
maintenu la touche de configuration automatique du
point d'accès appuyée pendant la durée nécessaire,
appuyez sur la touche ENTER de la télécommande.
4. s'affiche lorsque les réglages sont terminés.
1. Connectez le dispositif iOS par Wi-Fi.
2. Sélectionnez cet appareil dans l'élément "SET UP NEW
AIRPLAY SPEAKER..." sur l'écran du périphérique iOS
et sélectionnez "Next".
0 Cet appareil s'affiche sous le nom "Pioneer N-70AE
XXXXXX" ou "Pioneer N-50AE XXXXXX".
3. Une fois la connexion établie, sélectionnez "Done" sur
l'écran du périphérique iOS.
4. s'affiche sur l'écran de l'appareil lorsque le réglage est
terminé.
∫ Saisissez le SSID du point d'accès
Pour effectuer le réglage, saisissez le SSID du point
d'accès à connecter.
1. Saisissez le SSID. Pour plus de détails sur la saisie de
texte, voir "Saisie du texte" (P27).
2. Sélectionnez et validez la méthode d'authentification.
aaaaaaaaaaaaaaaa
∫ Use iOS Device
Effectuez le réglage en partageant les paramètres Wi-Fi du
périphérique iOS avec cet appareil.
13
Page 50

> Avant de Démarrer > Nom des pièces > Installation > Initial Setup >Lecture
F
R
Informations supplémentaires | Configuration avancée | Autres
0 Si vous sélectionnez "None", passez à l'étape 3. Si
vous sélectionnez "WEP", "WPA" ou "WPA2",
saisissez le mot de passe puis validez.
3. s'affiche lorsque les réglages sont terminés.
14
Page 51

> Avant de Démarrer > Nom des pièces > Installation > Initial Setup >Lecture
F
R
1
2
a
b
d
c
e
f
Informations supplémentaires | Configuration avancée | Autres
Périphérique de stockage USB/DD
Lecture
Commandes de base
Vous pouvez lire des fichiers musicaux en connectant un
périphérique de stockage USB ou un DD (disque dur) au
port USB situé à l'avant ou à l'arrière de l'appareil.
0 Le port USB à l’avant peut supporter une charge
maximale de 5 V/0,5 A. Si le DD nécessite une
alimentation supérieure, branchez sur le port USB
(maximum 5 V/1 A) situé à l’arrière de l’appareil.
1. Mettez en marche l'appareil.
2. Appuyez sur USB FRONT ou USB REAR.
USB Front
3. Branchez votre périphérique de stockage USB ou votre
DD au port USB situé à l'avant ou à l'arrière de l'appareil.
4. Les dossiers et les fichiers musicaux s'affichent à l'écran
lorsque le chargement est terminé.
USB Front
No Storage
USB Front
USB Front
USB Storage
5. Sélectionnez le dossier ou le fichier musical grâce aux
curseurs (d) de la télécommande et appuyez sur ENTER
(e) pour valider. Pour revenir sur l’affichage précédent,
appuyez sur RETURN (f).
6. Utilisez les touches de lecture (c) pour arrêter la lecture
ou choisir les pistes à lire.
15
Page 52

> Avant de Démarrer > Nom des pièces > Installation > Initial Setup >Lecture
F
R
1
1
Informations supplémentaires | Configuration avancée | Autres
0 L'affichage du nom de l'album, du nom de l'artiste et de la
pochette de l'album est pris en charge avec les fichiers
musicaux aux formats MP3/WMA/Apple Lossless/FLAC/
AAC/DSD (DSF uniquement). Les formats des images
intégrées sont JPEG et PNG.
0 Les caractères qui ne peuvent pas être affichés par cet
appareil sont remplacés par "
0 Le port USB de cet appareil est conforme à la norme
USB 2.0. La vitesse de transfert peut être insuffisante
pour certains des contenus que vous lisez, ce qui peut
causer des coupures du son.
¢
".
Répétition de lecture
1. Appuyez plusieurs fois sur REPEAT (a) pendant la
lecture pour afficher ou sur l'écran.
: répète la lecture de toutes les pistes.
: répète la lecture de la piste sélectionnée.
Pour annuler la répétition de lecture, appuyez sur
REPEAT (a) plusieurs fois jusqu'à ce que les icônes
disparaissent.
Lecture aléatoire
1. Appuyez plusieurs fois sur SHUFFLE (b) pendant la
lecture pour afficher sur l'écran.
: lit aléatoirement les pistes présentes dans un
dossier.
Pour annuler la lecture aléatoire, appuyez sur SHUFFLE
(b) jusqu'à ce que l'icône disparaisse.
Configuration requise du périphérique de
stockage USB/DD
0 Notez que cette commande n'est pas garantie avec tous
les périphériques de stockage USB ou DD.
0 Cet appareil peut utiliser les périphériques de stockage
USB conformes à la norme USB MSC. (Toutefois,
certains périphériques ne peuvent pas être lus par cet
appareil même s'ils sont conformes à la norme de
stockage de masse USB.)
0 L'appareil est également compatible avec les
périphériques de stockage USB utilisant les formats de
système de fichier FAT16 ou FAT32. D'autres formats tels
qu'exFAT, NTFS et HFS ne peuvent pas être lus par cet
appareil.
0 Si le périphérique de stockage USB a été partitionné,
chaque section sera considérée comme étant un
périphérique indépendant.
0 Vous pouvez afficher jusqu'à 20.000 pistes par dossier,
et les dossiers peuvent être imbriqués jusqu'à 16 niveaux
de profondeur.
0 Les concentrateurs USB et les périphériques de
stockage USB avec des fonctions de concentrateur ne
sont pas pris en charge. Ne branchez pas ces
périphériques à l’appareil.
0 Les périphériques de stockage USB avec des fonctions
de sécurité ne sont pas pris en charge sur cet appareil.
0 Si le périphérique de stockage USB ou le DD est fourni
avec un adaptateur secteur, nous vous recommandons
d'utiliser son adaptateur pour l'alimenter.
0 Un média inséré dans le lecteur de carte USB peut ne
pas être disponible dans cette fonction. De plus, en
fonction du périphérique de stockage USB, une lecture
correcte du contenu peut être impossible.
0 Nous déclinons toute responsabilité pour la perte ou
l'endommagement des données sauvegardées sur un
périphérique de stockage USB lorsque ce périphérique
est utilisé avec cet appareil. Nous vous recommandons
de sauvegarder à l'avance les fichiers musicaux
importants.
Formats audio pris en charge
Cet appareil prend en charge les formats de fichiers
musicaux suivants. Notez que les fichiers sonores protégés
par droits d'auteur ne peuvent pas être lus sur cet appareil.
MP3 (.mp3/.MP3):
0 Formats pris en charge: MPEG-1/MPEG-2 Audio Layer 3
0 Taux d’échantillonnage pris en charge: 44,1 kHz, 48 kHz
0 Débits binaires pris en charge: Entre 8 kbps, 320 kbps et
VBR.
WMA (.wma/.WMA):
0 Taux d’échantillonnage pris en charge: 44,1 kHz, 48 kHz
0 Débits binaires pris en charge: Entre 5 kbps, 320 kbps et
VBR.
0 Les formats WMA Pro/Voice/WMA Lossless ne sont pas
pris en charge
WAV (.wav/.WAV):
Les fichiers WAV comprennent des données audio
numériques PCM non compressées.
0 Taux d’échantillonnage pris en charge : 44,1 kHz,
48 kHz, 88,2 kHz, 96 kHz, 176,4 kHz, 192 kHz
0 Bits de quantification: 8 bits, 16 bits, 24 bits
AIFF (.aiff/.aif/.AIFF/.AIF):
Les fichiers AIFF comprennent des données audio
numériques PCM non compressées.
0 Taux d’échantillonnage pris en charge : 44,1 kHz,
48 kHz, 88,2 kHz, 96 kHz, 176,4 kHz, 192 kHz
0 Bits de quantification: 8 bits, 16 bits, 24 bits
AAC (.aac/.m4a/.mp4/.3gp/.3g2/.AAC/.M4A/.MP4/.3GP/
.3G2):
0 Formats pris en charge: MPEG-2/MPEG-4 Audio
0 Taux d’échantillonnage pris en charge : 44,1 kHz,
48 kHz, 88,2 kHz, 96 kHz
0 Débits binaires pris en charge: Entre 8 kbps, 320 kbps et
VBR.
FLAC (.flac/.FLAC):
0 Taux d’échantillonnage pris en charge : 44,1 kHz,
48 kHz, 88,2 kHz, 96 kHz, 176,4 kHz, 192 kHz
16
Page 53

> Avant de Démarrer > Nom des pièces > Installation > Initial Setup >Lecture
F
R
Informations supplémentaires | Configuration avancée | Autres
0 Bits de quantification: 8 bits, 16 bits, 24 bits
Apple Lossless (.m4a/.mp4/.M4A/.MP4):
0 Taux d’échantillonnage pris en charge : 44,1 kHz,
48 kHz, 88,2 kHz, 96 kHz, 176,4 kHz, 192 kHz
0 Bits de quantification: 16 bits, 24 bits
DSD (.dsf/.dff/.DSF/.DFF):
0 Formats pris en charge: DSF/DSDIFF
0 Taux d’échantillonnage pris en charge: 2,8 MHz,
5,6 MHz, 11,2 MHz
17
Page 54

> Avant de Démarrer > Nom des pièces > Installation > Initial Setup >Lecture
F
R
1
a
d
b
c
Network
TIDAL
Deezer
Spotify
TuneIn Radio
Informations supplémentaires | Configuration avancée | Autres
Radio Internet
Commandes de base
Vous pouvez utiliser les services de radio Internet comme
TuneIn en connectant cet appareil à un réseau possédant
une connexion Internet.
Selon le service de radio Internet, il se peut que l’utilisateur
doive s’inscrire d’abord sur l’ordinateur.
1. Mettez en marche l'appareil.
2. Appuyez sur NETWORK.
3. Sélectionnez "TuneIn Radio" à l'aide des touches du
curseur (a) de la télécommande et appuyez sur ENTER
(b) pour confirmer. Après avoir basculé l’affichage vers le
service de radio Internet, vous pouvez sélectionner des
stations avec les curseurs (a) de la télécommande et
appuyer sur ENTER (b) pour confirmer. Pour revenir sur
l’affichage précédent, appuyez sur RETURN (c).
18
TuneIn
Vous permet d'enregistrer une station déjà lue dans les
favoris.
1. Appuyez sur NET RADIO MENU (d) pendant la lecture
TuneIn.
2. Sélectionnez "Add to My Presets" sur l'écran et validez.
3. Pour lire un favori, sur l'écran du haut de TuneIn,
sélectionnez la station enregistrée dans "My Presets" et
validez. Pour supprimer des favoris, appuyez sur NET
RADIO MENU (d) pendant la lecture, sélectionnez
"Remove from My Presets" et validez.
Page 55

> Avant de Démarrer > Nom des pièces > Installation > Initial Setup >Lecture
F
R
Wi-Fi
PioneerN-70AExxxxxx
DevicesAvailable
d
b
e
a
c
1
4
3
2
Device
Informations supplémentaires | Configuration avancée | Autres
Spotify
Commandes de base
La lecture Spotify Connect est possible en connectant cet
appareil au même réseau qu’un smartphone ou une
tablette. Pour utiliser Spotify Connect, vous devez installer
l'appli Spotify sur votre smartphone ou votre tablette et
créer un compte Spotify Premium.
1. Connectez le smartphone au même réseau que cet
appareil.
2. Lancez l'application Spotify.
3. Lisez la piste dans l'appli Spotify, puis après avoir
basculé sur l'écran servant à contrôler la lecture, touchez
"Devices Available" au bas de l'écran.
4. Sélectionnez cet appareil.
0 Cet appareil s'affiche sous le nom "Pioneer N-70AE
XXXXXX" ou "Pioneer N-50AE XXXXXX".
5. Cet appareil s’allume automatiquement, le sélecteur
d’entrée passe automatiquement sur Network et la
diffusion en flux de Spotify démarre.
0 Si "Option Setting" - "Power Off Setting" - "Network
Standby" est réglé sur "Off" dans le menu Setup,
mettez en marche l’appareil manuellement et appuyez
sur la touche NETWORK de la télécommande.
0 Consultez ce qui suit pour configurer Spotify :
www.spotify.com/connect/
Les actions suivantes sur la télécommande sont également
possibles.
(a) Cette touche permet de démarrer la répétition de
lecture.
(b) Cette touche permet de lancer la lecture de la piste
précédente.
(c) Cette touche permet de démarrer la lecture aléatoire.
(d) Pressée durant la lecture, cette touche permet de mettre
en pause la lecture. Pressée durant la pause, elle
reprend la lecture.
(e) Cette touche permet de lancer la lecture de la piste
suivante.
19
Page 56

> Avant de Démarrer > Nom des pièces > Installation > Initial Setup >Lecture
F
R
1
3
PioneerN-70AEXXXXXX
iPhone
4
2
e.g., iOS 10
Informations supplémentaires | Configuration avancée | Autres
AirPlay
®
Wi-Fi
Fonctionnement de base
Vous pouvez profiter à distance des fichiers musicaux
présents sur un iPhone
connecté au même point d'accès que cet appareil. Mettez à
jour la version OS de votre périphérique iOS.
1. Connectez le périphérique iOS au même réseau que
celui de cet appareil.
2. Touchez l'icône AirPlay présente sur l'écran de
lecture de l'appli musicale du périphérique iOS et
sélectionnez cet appareil dans la liste des périphériques
affichée.
0 Cet appareil s'affiche sous le nom "Pioneer N-70AE
XXXXXX" ou "Pioneer N-50AE XXXXXX".
0 Si un "AirPlay Password" a été défini sur cet appareil,
saisissez le mot de passe défini.
3. Lisez les fichiers musicaux sur le dispositif iOS.
0 Au moment de l'achat, la fonctionnalité Network Standby
est réglée sur On, et lorsque la lecture de AirPlay se
lance, l'alimentation de cet appareil s'active
automatiquement et la lecture démarre.
0 À cause des caractéristiques de la technologie sans fil
AirPlay, le son produit par cet appareil peut être
légèrement en retard par rapport au son lu par le
périphérique compatible AirPlay.
0 Les touches SHUFFLE et REPEAT de la télécommande
ne fonctionnent pas. Utilisez le périphérique iOS.
Vous pouvez également lire les fichiers musicaux sur
l’ordinateur avec iTunes. (Ver. 10.2.2 ou ultérieure). Vérifiez
que cet appareil et l’ordinateur sont connectés au même
réseau, cliquez sur l’icône AirPlay dans iTunes,
sélectionnez cet appareil dans la liste des périphériques
affichée et démarrez la lecture d’un fichier musical.
®
, iPod touch®, ou un iPad®
20
Page 57

> Avant de Démarrer > Nom des pièces > Installation > Initial Setup >Lecture
F
R
1
a
b
c
Informations supplémentaires | Configuration avancée | Autres
Music Server
Il est possible de diffuser en flux des fichiers de musique
présents sur les ordinateurs ou dispositifs NAS connectés
au même réseau que cet appareil. Le serveur réseau de cet
appareil est compatible avec les ordinateurs ayant la
fonctionnalité serveur de Windows Media
installée, ou les NAS compatibles avec la fonctionnalité
réseau domestique. Vous devez effectuer certains réglages
au préalable pour utiliser Windows Media
Notez que seuls les fichiers de musique enregistrés dans la
bibliothèque de Windows Media
®
®
Player 11 ou 12
®
Player 11 ou 12.
Player peuvent être lus.
Configuration de Windows Media® Player
∫ Windows Media® Player 11
1. Mettez en marche votre PC et lancez Windows Media
Player 11.
2. Dans le menu "Library", sélectionnez "Media Sharing"
pour afficher une boîte de dialogue.
3. Sélectionnez la case à cocher "Share my media", puis
cliquez sur "OK" pour afficher les périphériques
compatibles.
4. Sélectionnez cet appareil, puis cliquez sur "Allow".
0 Lorsque vous cliquez dessus, l'icône correspondante
est cochée.
5. Cliquez sur "OK" pour fermer la boîte de dialogue.
0 En fonction de la version de Windows Media
peut y avoir des différences de nom avec les éléments
que vous sélectionnez.
∫ Windows Media
1. Mettez en marche votre PC et lancez Windows Media
Player 12.
2. Dans le menu "Stream", sélectionnez "Turn on media
streaming" pour afficher une boîte de dialogue.
0 Si la diffusion multimédia en continu est déjà activée,
sélectionnez « More streaming options... » dans le
menu « Stream » pour afficher la liste de lecteurs
réseau, puis passez à l’étape 4.
®
Player 12
®
Player, il
3. Cliquez sur "Turn on media streaming" pour afficher une
liste de lecteurs dans le réseau.
4. Sélectionnez cet appareil dans "Media streaming
options" et vérifiez qu’il est réglé sur "Allow".
5. Cliquez sur "OK" pour fermer la boîte de dialogue.
0 En fonction de la version de Windows Media
peut y avoir des différences de nom avec les éléments
que vous sélectionnez.
Lire
1. Mettez en marche l'appareil.
2. Démarrez le serveur (Windows Media
Windows Media
®
®
contenant les fichiers musicaux à lire.
3. Assurez-vous que les ordinateurs et/ou les NAS sont
correctement connectés au même réseau que cet appareil.
4.
Appuyez sur MUSIC SERVER
5. Sélectionnez le serveur ou le fichier musical à l'aide des
touches du curseur (a) de la télécommande et appuyez
sur ENTER (b) pour valider. Pour revenir sur l’affichage
précédent, appuyez sur RETURN (c).
0 Si "No Server" s’affiche, vérifiez si le réseau est connecté
correctement.
0
En fonction du serveur utilisé et des fichiers lus, le temps de
lecture écoulé et le temps restant peuvent ne pas s'afficher.
0
Pour les fichiers de musique sur un serveur, il peut y avoir
jusqu'à 20.000 pistes par dossier, et les dossiers peuvent
être imbriqués jusqu'à 16 niveaux de profondeur.
®
Player 12, ou le périphérique NAS)
.
Music Server
Music Server
aaa
bbb
ccc
ddd
®
®
Player, il
Player 11,
21
Page 58

> Avant de Démarrer > Nom des pièces > Installation > Initial Setup >Lecture
F
R
Informations supplémentaires | Configuration avancée | Autres
Contrôler la lecture distance à partir d'un PC
Vous pouvez utiliser cet appareil pour lire des fichiers
musicaux stockés sur votre ordinateur en utilisant
l’ordinateur à l’intérieur de votre réseau domestique. Cet
appareil prend en charge la lecture à distance avec
Windows Media
1. Mettez en marche votre PC et lancez Windows Media
Player 12.
2. Ouvrez le menu "Stream" et vérifiez que "Allow remote
control of my Player..." est coché. Cliquez sur "Turn on
media streaming" pour afficher une liste de lecteurs dans
le réseau.
3. Sélectionnez avec un clic droit le fichier de musique à lire
avec Windows Media
musique à distance sur un autre serveur, ouvrez le
serveur cible à partir de "Other Libraries" et sélectionnez
le fichier de musique à lire.
4. Sélectionnez cet appareil dans "Play to" pour ouvrir la
fenêtre "Play to" de Windows Media
démarrez la lecture sur l’appareil. Si votre PC fonctionne
sous Windows
sélectionnez cet appareil. Si votre PC fonctionne sous
Windows
sélectionnez cet appareil. Des actions sont possibles
pendant la lecture à distance à partir de la fenêtre "Play
to" du PC.
0 La lecture à distance n’est pas possible en utilisant un
service réseau ou pour lire des fichiers de musique
présents sur un périphérique de stockage USB.
0 En fonction de la version de Windows, il peut y avoir des
différences de nom avec les éléments que vous
sélectionnez.
®
Player 12.
®
Player 12. Pour lire un fichier de
®
Player 12 et
®
8.1, cliquez sur "Play to", puis
®
10, cliquez sur "Cast to Device" et
Formats audio pris en charge
Cet appareil prend en charge les formats de fichiers
musicaux suivants.
0 Notez que la lecture via une connexion LAN sans fil des
taux d'échantillonnage de 88,2 kHz ou plus, et DSD ne
sont pas pris en charge.
0 La lecture à distance des formats FLAC, et DSD n'est
pas prise en charge non plus.
0 Les fichiers à débit binaire variable (VBR) sont pris en
®
charge. Cependant, les temps de lecture peuvent ne pas
s'afficher correctement.
0 La lecture à distance ne prend pas en charge la lecture
sans intervalle.
MP3 (.mp3/.MP3) :
0 Formats pris en charge: MPEG-1/MPEG-2 Audio Layer-3
0 Taux d’échantillonnage pris en charge: 44,1 kHz, 48 kHz
0 Débits binaires pris en charge: Entre 8 kbps, 320 kbps et
VBR.
WMA (.wma/.WMA) :
0 Taux d’échantillonnage pris en charge: 44,1 kHz, 48 kHz
0 Débits binaires pris en charge: Entre 8 kbps, 320 kbps et
VBR.
0 Les formats WMA Pro/Voice/WMA Lossless ne sont pas
pris en charge.
WAV (.wav/.WAV) :
Les fichiers WAV comprennent des données audio
numériques PCM non compressées.
0 Taux d’échantillonnage pris en charge : 44,1 kHz,
48 kHz, 88,2 kHz, 96 kHz, 176,4 kHz, 192 kHz
0 Bits de quantification: 8 bits, 16 bits, 24 bits
AIFF (.aiff/.aif/.AIFF/.AIF):
Les fichiers AIFF comprennent des données audio
numériques PCM non compressées.
0 Taux d’échantillonnage pris en charge : 44,1 kHz,
48 kHz, 88,2 kHz, 96 kHz, 176,4 kHz, 192 kHz
0 Bits de quantification: 8 bits, 16 bits, 24 bits
AAC (.aac/.m4a/.mp4/.3gp/.3g2/.AAC/.M4A/.MP4/.3GP/
.3G2) :
0 Formats pris en charge: MPEG-2/MPEG-4 Audio
0 Taux d’échantillonnage pris en charge : 44,1 kHz,
48 kHz, 88,2 kHz, 96 kHz
0 Débits binaires pris en charge: Entre 8 kbps, 320 kbps et
VBR.
FLAC (.flac/.FLAC) :
0 Taux d’échantillonnage pris en charge : 44,1 kHz,
48 kHz, 88,2 kHz, 96 kHz, 176,4 kHz, 192 kHz
0 Bits de quantification: 8 bits, 16 bits, 24 bits
LPCM (PCM linéaire) :
0 Taux d’échantillonnage pris en charge: 44,1 kHz, 48 kHz
0 Bits de quantification: 16 bits
Apple Lossless (.m4a/.mp4/.M4A/.MP4) :
0 Taux d’échantillonnage pris en charge : 44,1 kHz,
48 kHz, 88,2 kHz, 96 kHz, 176,4 kHz, 192 kHz
0 Bits de quantification: 16 bits, 24 bits
DSD (.dsf/.dff/.DSF/.DFF) :
0 Formats pris en charge: DSF/DSDIFF
0 Taux d’échantillonnage pris en charge: 2,8 MHz,
5,6MHz, 11,2MHz
22
Page 59

> Avant de Démarrer > Nom des pièces > Installation > Initial Setup >Lecture
F
R
1
2
3
Network Standby
On
Off
On (USB Power)
Informations supplémentaires | Configuration avancée | Autres
Utilisation d'un ordinateur pour sauvegarder et supprimer la musique présente sur un HDD USB raccordé à
cet appareil
Commandes de base
Sans avoir à débrancher le HDD (lecteur de disque dur)
raccordé au port USB arrière de l'appareil principal et à le
rebrancher à un ordinateur, vous pouvez sauvegarder et
supprimer les fichiers musicaux directement par la
connexion réseau.
1. Branchez votre HDD au port USB situé à l'arrière
l'appareil principal. Utilisez un HDD pour Windows
raccorder.
0 Pour utiliser cette fonctionnalité, branchez votre HDD
au port USB situé à l'arrière
2. Formatez le HDD raccordé. Sélectionnez "Option
Setting" - "Storage" - "Format" dans le menu Setup de cet
appareil, sélectionnez "Start" puis appuyez sur ENTER.
0 Le formatage par cet appareil est nécessaire pour
utiliser cette fonctionnalité.
0 Ne mettez pas l'alimentation de l'appareil principal en
veille avant que le formatage soit terminé.
0 Lorsque vous formatez le HDD, toutes les données
qu'il contient sont supprimées, c'est pourquoi vous
devez effectuer une sauvegarde des données avant le
formatage.
0 Si vous n'arrivez pas à le formater à l'aide de cet
appareil, formatez-le d'abord sur votre ordinateur puis
réessayez de le faire avec cet appareil.
3. Sélectionnez "Option Setting" - "Power Off Setting" "Network Standby" dans le menu Setup de cet appareil,
sélectionnez "On (USB Power)" puis appuyez sur
ENTER.
de l'appareil principal.
de
®
à
4. Mettez cet appareil en veille.
0 Lorsque cet appareil est en marche, vous ne pouvez
pas utiliser d'ordinateur pour accéder au HDD
raccordé au port USB situé à l'arrière de l'appareil
principal.
5. Sur un ordinateur connecté au même réseau que cet
appareil, affichez la liste des dispositifs connectés au
réseau.
0 Cet appareil s'affiche sous le nom "Model name
XXXXXX". (XXXXXX représentent des caractères
alphanumériques identifiant chaque appareil)
Sous Windows
l'appareil comme un ordinateur plutôt que sur celle qui
le montre comme un lecteur de support.
6. Dans le dossier "USB Storage" du dossier de cet
appareil, vous verrez le contenu du HDD raccordé au
port USB situé à l'arrière de l'appareil principal. Utilisez
les commandes normales de l'ordinateur pour
sauvegarder et supprimer les fichiers.
0 Nous avons vérifié le bon fonctionnement de cette
fonctionnalité sur les systèmes d'exploitation suivants. (À
compter de mars 2017)
Windows
Windows
Windows
macOS Sierra 10.12
0 Si cet appareil n'est pas visible dans la liste réseau sous
Windows
informations".
0 Nous ne garantissons pas le bon fonctionnement de la
lecture des pistes, etc., sauvegardées sur un HDD
raccordé à cet appareil, par un autre équipement
connecté au réseau.
®
®
®
®
®
, cliquez sur l'icône qui montre
7
8.1
10
, effectuez la "Mise à jour des dernières
23
Page 60

> Avant de Démarrer > Nom des pièces > Installation > Initial Setup >Lecture
F
R
a
b
c
USB DAC In
Informations supplémentaires | Configuration avancée | Autres
Utilisation de cet appareil comme convertisseur D/A
Vous pouvez convertir le son numérique provenant des
1
2
ordinateurs et des périphériques audio comme les lecteurs
CD en analogique, puis le diffuser depuis les prises
ANALOG OUT.
Pour lire le son provenant d'un ordinateur, vous aurez
besoin d'installer un pilote spécial sur votre ordinateur.
Téléchargez le pilote depuis notre site Web.
http://www.pioneer-audiovisual.eu/
Connexions
Utilisez un câble USB de type A—B pour raccorder un
ordinateur. Utilisez un câble optonumérique ou bien un
câble coaxial numérique, en fonction des prises présentes
sur le périphérique à raccorder, pour raccorder des
périphériques audio comme des lecteurs CD.
24
a Câble USB, b Câble Optonumérique , c Câble Coaxial Numérique
Écouter
1. Mettez en marche l'appareil.
2. Pour lire un ordinateur raccordé au port USB DAC,
appuyez sur USB DAC IN pour mettre l'entrée de cet
appareil sur "USB DAC In".
Page 61

> Avant de Démarrer > Nom des pièces > Installation > Initial Setup >Lecture
F
R
Digital In 2
Digital In 1
Informations supplémentaires | Configuration avancée | Autres
Pour lire un périphérique raccordé à la prise DIGITAL IN
OPTICAL, appuyez sur DIG IN 2 pour mettre l'entrée de
cet appareil sur "Digital In 2".
Pour lire un périphérique raccordé à la prise DIGITAL IN
COAXIAL, appuyez sur DIG IN 1 pour mettre l'entrée de
cet appareil sur "Digital In 1".
3. Démarrez la lecture sur le lecteur.
0 Les signaux numériques que vous pouvez faire entrer
avec cet appareil sont les suivants.
(Le fonctionnement pourrait ne pas être possible en
fonction du périphérique raccordé et de l'environnement)
– Signaux pouvant être introduits par le port USB DAC :
Signaux PCM linéaires avec une fréquence
d'échantillonnage et un débit de quantification allant
jusqu'à 384 kHz/32 bits et DSD avec une fréquence
d'échantillonnage allant jusqu'à 11,2 MHz
– Signaux pouvant être introduits par les prises DIGITAL
IN OPTICAL/COAXIAL : Signaux PCM linéaires avec
une fréquence d'échantillonnage et un débit de
quantification allant jusqu'à 192 kHz/24 bits
25
Page 62

> Avant de Démarrer > Nom des pièces > Installation > Initial Setup >Lecture
F
R
Sound
Up Sampling
Lock Range Adjust
Hi-Bit32
Informations supplémentaires | Configuration avancée | Autres
Réglage de la qualité du son
a
26
Reproduire fidèlement le son original (mode
DIRECT)
d
e
f
Le traitement qui affecte la qualité audio est désactivé ce
qui fait qu'un son proche de l'original est reproduit.
1. Appuyez sur DIRECT (a).
0 Le témoin DIRECT à l'avant de l'appareil principal
s'allume lorsque le mode DIRECT est actif.
0 Lorsque le mode DIRECT est actif, Auto Sound
Retriever, Hi-Bit32, et Up Sampling sont désactivés.
Lecture avec une qualité sonore encore
meilleure (menu SOUND)
b
c
Utilisez le menu SOUND pour traiter le son de différentes
manières pour avoir une qualité de lecture du son encore
meilleure.
1. Appuyez sur SOUND (f).
h
Auto Sound Retriever
i
2. Sélectionnez l'élément ou la valeur de réglage à l'aide des
touches du curseur de la télécommande (g) et appuyez sur
g
ENTER (h) pour valider votre sélection. Pour revenir sur
l’affichage précédent, appuyez sur RETURN (i).
3. Pour quitter les réglages, appuyez sur SOUND (f).
∫ Auto Sound Retriever
En corrigeant les parties supprimées durant le traitement de
compression du son, l'appareil est en mesure d'enrichir et
d'améliorer les inflexions sonores.
0 Vous pouvez également appuyer sur A.S.R (b) pour
activer ou désactiver la fonctionnalité.
0 Cette fonctionnalité ne peut pas être utilisée si le mode
DIRECT est activé.
∫ Hi-Bit32
La portée dynamique est étendue en convertissant le son
ayant un débit de quantification compris entre 16 bits et 24
bits pour en avoir un de 32 bits. Ceci permet d'obtenir une
reproduction sonore plus fluide et plus épurée.
0 Le témoin Hi-Bit32 à l'avant de l'appareil principal
s'allume lorsque cette fonctionnalité est active.
0 Vous pouvez également appuyer sur Hi-Bit32 (e) pour
activer ou désactiver la fonctionnalité.
0 Cette fonctionnalité ne peut pas être utilisée si le mode
DIRECT est activé.
∫ Up Sampling
L'augmentation de la fréquence d'échantillonnage aide à
obtenir une reproduction sonore ayant un degré plus élevé
de clarté.
0 Le témoin Up Sampling à l'avant de l'appareil principal
s'allume lorsque cette fonctionnalité est active.
0 Vous pouvez également appuyer sur Up Sampling (d)
pour activer ou désactiver la fonctionnalité.
0 Cette fonctionnalité ne peut pas être utilisée si le mode
DIRECT est activé.
∫ Lock Range Adjust
La qualité du son est améliorée par la réduction de la plage
de verrouillage minimisant les bruits de fond. Cependant,
une réduction trop importante de la plage de verrouillage
peut causer des coupures du son et des parasites sonores.
Réglez la plage de verrouillage tout en écoutant du son.
Différents réglages peuvent être définis pour ce paramètre
pour chaque sélecteur d'entrée.
"Range 7" (valeur par défaut) à "Range 1 (for Expert)"
0 Vous pouvez également appuyer sur Lock Range (c)
pour afficher l'écran de réglage Lock Range Adjust.
Page 63

> Avant de Démarrer > Nom des pièces > Installation > Initial Setup >Lecture
F
R
Password
A
Delete One Character[CLEAR]
Change Text[REPEAT]
Informations supplémentaires | Configuration avancée | Autres
Saisie du texte
La saisie de texte, pour les mots de passe, etc. nécessite
l'utilisation des touches suivantes de la télécommande.
c
d
e
f
a
Tou ches / (a): Chaque pression permet de modifier le
caractère.
Tou che CLEAR (b) : Permet de supprimer le caractère
situé sur la position du curseur.
Touche REPEAT (c) : Chaque pression permet de modifier
le type de texte, dans l'ordre majuscules minuscules
chiffres symboles.
Touche ENTER (d) : permet de confirmer le contenu saisi.
Tou ches / (e) : permet de déplacer la position du
curseur à l'endroit ou l'on souhaite placer le caractère.
Tou che RETURN (f) : permet d'annuler la saisie et de
revenir à l’affichage précédent.
b
27
Page 64

> Avant de Démarrer > Nom des pièces > Installation > Initial Setup > Lecture
F
R
Informations supplémentaires | Configuration avancée | Autres
Informations supplémentaires concernant les fonctions du lecteur
Informations supplémen taires
À cause des mises à jour du micrologiciel (le logiciel du
système) effectuées après l'achat ou des modifications du
micrologiciel durant la production du produit, il pourrait y
avoir des ajouts ou des changements des fonctionnalités
disponibles par rapport à ce qui est indiqué dans ce mode
d'emploi.
Pour avoir des informations sur les fonctions du lecteur qui
ont été ajoutées ou modifiées, lisez les références
suivantes.
Informations supplémentaires concernant les fonctions du
lecteur
>>> Cliquer ici <<<
28
Page 65

> Avant de Démarrer > Nom des pièces > Installation > Initial Setup > Lecture
F
R
Setup
Factory Reset
System Info
Option Setting
Network Setting
Informations supplémentaires | Configuration avancée |Autres
Configuration avancée
Configuration avancée
L'appareil vous permet de configurer les paramètres avancés pour qu'ils vous fournissent
1
une expérience encore meilleure.
1. Appuyez sur SETUP de la télécommande.
2. Une fois l’écran Setup affiché, sélectionnez le contenu ou le réglage avec les curseurs de
la télécommande et appuyez sur ENTER pour valider votre sélection. Pour revenir sur
l'écran précédent, appuyez sur RETURN.
3. Pour quitter les réglages, appuyez sur SETUP.
Network Setting
∫ Connection
Sélectionnez le type de connexion réseau.
"Wi-Fi" : Pour une connexion LAN sans fil
"Wired" (Valeur par défaut) : Pour une connexion LAN filaire
Effectuez "Wi-Fi Setup" si vous sélectionnez "Wi-Fi".
∫ Wi-Fi Setup
Effectuez les réglages de la connexion Wi-Fi. (P12)
Ce réglage peut être effectué uniquement lorsque "Wi-Fi" est sélectionné dans "Connection".
29
Page 66

> Avant de Démarrer > Nom des pièces > Installation > Initial Setup > Lecture
F
R
Informations supplémentaires | Configuration avancée |Autres
0 Vous pouvez effectuer le réglage des paramètres de connexion Wi-Fi à l’aide d’un
navigateur web sur ordinateur. Pour plus de détails, voir "Web Setup" (P31).
∫ DHCP
"On" (Valeur par défaut) : Configuration automatique via le protocole DHCP
"Off": Configuration manuelle sans protocole DHCP
En sélectionnant "Off", vous devez régler manuellement "IP Address", "Subnet Mask",
"Gateway", et "DNS Server".
∫ IP Address
Affiche/Définit l'adresse IP.
∫ Subnet Mask
Affiche/Définit le masque de sous-réseau.
∫ Gateway
Affiche/Définit la passerelle.
∫ DNS Server
Affiche/Définit le serveur DNS primaire.
∫ Proxy URL
Affiche/Définit l'URL du serveur proxy.
∫ Proxy Port
Affiche/Définit le numéro de port du serveur proxy quand vous saisissez "Proxy URL".
∫ Friendly Name
Changez le nom de périphérique de cet appareil qui apparait sur les autres périphériques
connectés au réseau pour un nom facilement reconnaissable. Vous pouvez saisir jusqu'à 31
caractères. Pour plus de détails sur la saisie de texte, voir "Saisie du texte" (P27). Une
fois la saisie terminée, appuyez sur ENTER.
∫ AirPlay Password
Vous pouvez saisir un mot de passe pouvant avoir jusqu'à 31 caractères pour que seuls les
utilisateurs mémorisés puissent utiliser AirPlay. Pour plus de détails sur la saisie de texte,
voir "Saisie du texte" (P27). Une fois la saisie terminée, appuyez sur ENTER.
∫ Network Check
Vous pouvez vérifier la connexion réseau.
Option Setting
∫ Power Off Setting
Auto Standby Ce réglage met automatiquement l’appareil en veille après 20
minutes d’inactivité sans aucune entrée audio.
"On" (Valeur par défaut) : L’appareil passera automatiquement en
mode veille.
"Off" : L’appareil ne passe pas automatiquement en mode veille.
Network Standby Lorsque cette fonctionnalité est mise sur "On", vous pouvez
mettre sous tension l'appareil via le réseau en utilisant une
application qui peut commander cet appareil.
0 Si vous avez sélectionné "On (USB Power)" et que cet appareil
est en veille, vous pouvez utiliser un ordinateur connecté au
même réseau que cet appareil pour accéder au HDD raccordé
au port USB situé à l'arrière de l'appareil principal.
0 Si "On" (paramètre par défaut) ou "On (USB Power)" est activé,
la consommation électrique durant la veille sera plus importante
que la consommation normale.
0 Lorsque la connexion réseau est perdue, "Network Standby"
peut se désactiver pour réduire la consommation électrique.
∫ Digital Filter
"Slow" : son doux et fluide
"Sharp" (Valeur par défaut) : son ayant davantage de structure et de fermeté
"Short" : son qui démarre rapidement et donne l'impression d'un déplacement vers l'avant
∫ Storage
Information Le système de fichiers, la capacité disponible ainsi que la capacité
totale du HDD raccordé au port USB situé à l'arrière de l'appareil
principal s'affichent.
30
Page 67

> Avant de Démarrer > Nom des pièces > Installation > Initial Setup > Lecture
F
R
Informations supplémentaires | Configuration avancée |Autres
Format Formatez le HDD branché au port USB situé à l'arrière de l'appareil
∫ Language
Choisissez la langue d'affichage.
English (Valeur par défaut), German, French, Spanish, Italian, Dutch, Swedish, Russian,
Chinese
∫ Digital Out
Effectuez les réglages pour la sortie audio numérique.
"On" (Valeur par défaut), "Off"
∫ Balance Out (N-70AE uniquement)
Vous pouvez changer la phase de la prise XLR ANALOG OUT de cet appareil pour qu'elle
corresponde à celle de la prise XLR du périphérique raccordé.
"2-HOT/3-COLD" (valeur par défaut), "2-COLD/3-HOT"
0 En raccordant un amplificateur intégré ou un autre périphérique à l'aide d'un câble audio
analogique, sélectionnez "2-HOT/3-COLD". La phase de la sortie audio est inversée
lorsque vous sélectionnez "2-COLD/3-HOT".
principal. Afin de pouvoir utiliser un ordinateur connecté au même
réseau que cet appareil pour accéder au HDD raccordé à ce
dernier, le HDD doit être formaté par cet appareil. Lorsque vous
formatez le HDD, toutes les données qu'il contient sont
supprimées, c'est pourquoi vous devez effectuer une sauvegarde
des données avant le formatage. Pour formater, sélectionnez
"Start", puis appuyez sur ENTER.
0 Les pistes, fichiers, etc. présents sur un HDD formaté par cet
appareil ne sont pas visibles même si celui-ci est raccordé
directement à un ordinateur.
System Info
L'adresse MAC de cet appareil et la version actuelle du micrologiciel s'affichent.
Factory Reset
Réinitialisez les réglages de cet appareil pour le remettre dans l'état où il était au moment de
son achat. Nous vous recommandons de prendre note des réglages modifiés avant de
procéder à la réinitialisation aux réglages d'usine. Sélectionnez "Start" et validez pour
continuer. L'appareil se met automatiquement en veille une fois l'initialisation terminée.
Update
"Update" ne s'affiche pas si aucune mise à jour du micrologiciel n'est disponible.
∫ via Network
Appuyez sur ENTER pour sélectionner lorsque vous désirez mettre à jour le micrologiciel via
le réseau.
∫ via USB
Appuyez sur ENTER pour sélectionner lorsque vous désirez mettre à jour le micrologiciel via
USB.
Web Setup
Vous pouvez effectuer le réglage des paramètres de connexion Wi-Fi à l’aide d’un navigateur
web sur ordinateur. Veillez à ce que votre ordinateur soit connecté au routeur en sans-fil.
Si cet appareil est connecté au routeur à l’aide d’un câble Ethernet, vous ne pouvez pas
effectuer ce réglage.
1. Mettez en marche l’appareil.
2. Appuyez sur la touche SETUP de la télécommande, sélectionnez "Wi-Fi" dans "Network
Setting" - "Connection", puis sélectionnez "Wi-Fi Setup".
3. Appuyez sur / pour sélectionner "Use iOS Device" et appuyez sur ENTER.
4. Dans la liste des connexions LAN sans fil figurant sur votre ordinateur, sélectionnez le
SSID de cet appareil (softap_0009B0xxxxxx).
0 "xxxxxx" dans le SSID correspond aux trois bits inférieurs de l’adresse MAC.
5. Ouvrez le navigateur web sur votre ordinateur et accédez à l’adresse http://192.168.200.1.
6. Le menu "Web Setup" s’affiche. Effectuez les nombreux réglages de cet appareil.
0 En fonction de l’équipement utilisé ou de l’environnement de connexion, cette fonction
peut ne pas fonctionner.
0 Consultez les bonnes instructions d’exploitation pour obtenir des informations sur
l’utilisation de l’ordinateur.
0 Étant donné que ce type de connexion n’est pas encodé, un risque de sécurité mineur
peut exister.
31
Page 68

> Avant de Démarrer > Nom des pièces > Installation > Initial Setup > Lecture
F
R
Setup
Factory Reset
System Info
Option Setting
Network Setting
Informations supplémentaires | Configuration avancée |Autres
Mise à jour du micrologiciel
Mise à jour du micrologiciel
La fonction de mise à jour de cet appareil
Cet appareil possède une fonctionnalité qui permet la mise
à jour du micrologiciel (logiciel du système) via le réseau ou
le port USB. Ceci nous permet de pouvoir effectuer des
améliorations d’une variété de commandes et d’ajouter des
fonctionnalités.
32
Comment mettre à jour
Il y a deux méthodes de mise à jour du micrologiciel : via
réseau et via USB. La mise à jour peut prendre environ 5
minutes pour s'effectuer avec l'une ou l'autre des
méthodes : Via réseau ou via USB. De plus, les paramètres
actuels sont garantis, quelle que soit la méthode utilisée
pour la mise à jour.
0 Pour connaître les dernières informations sur les mises à
jour, visitez le site internet de notre société. Il n'est pas
nécessaire de mettre à jour le micrologiciel de cet
appareil s'il n'y a aucune mise à jour disponible.
0
Si la mise à jour est effectuée en ligne, elle peut nécessiter
plus de temps en fonction de l'état de la connexion.
0 Lors d'une mise à jour, ne pas
– Débranchez et rebranchez un câble ou un
périphérique de stockage USB ou bien effectuez
n'importe quelle action sur le composant comme par
exemple l'éteindre
– Accès à cet appareil à partir d'un ordinateur ou d'un
smartphone à l'aide d'une application
Avertissement : Le programme et la documentation en
ligne qui l'accompagne vous sont fournis pour une
utilisation à vos propres risques.
Nous ne serons pas tenu responsable et vous n'aurez
aucun recours en dommages et intérêts pour toute
réclamation de quelque nature que ce soit concernant votre
utilisation du programme ou la documentation en ligne qui
l'accompagne, quelle que soit la théorie juridique et si
délictuelle ou contractuelle.
En aucun cas, Nous ne sommes responsables envers vous
ou un tiers pour tous dommages spéciaux, indirects,
accessoires ou consécutifs de toute nature, y compris, mais
sans s'y limiter, à la compensation, le remboursement ou
des dommages et intérêts en raison de la perte de profits,
présents ou futurs, perte de données, ou pour toute autre
raison que ce soit.
Mise à jour du micrologiciel via le réseau
0 Vérifiez que l'appareil est en marche et que la connexion
à Internet fonctionne.
0 Éteignez le composant du contrôleur (PC, etc.) connecté
au réseau.
0 Arrêtez la lecture de la webradio, un périphérique de
stockage USB, ou le contenu d'un serveur.
1. L'écran de configuration s'affiche lorsque vous appuyez
sur la touche SETUP de la télécommande.
2. Appuyez sur / et ENTER pour sélectionner "Update" -
"via Network" dans l'ordre indiqué.
Setup
Update
0 "Update" ne s'affiche pas si aucune mise à jour du
micrologiciel n'est disponible.
3. Appuyez sur ENTER pour démarrer la mise à jour du
micrologiciel.
0 "COMPLETE" s'affiche lorsque la mise à jour est
terminée.
4. Appuyez sur la touche Í/ISTANDBY/ON de l'appareil
principal pour éteindre l'appareil. Le processus est
Page 69

> Avant de Démarrer > Nom des pièces > Installation > Initial Setup > Lecture
F
R
Setup
Factory Reset
System Info
Option Setting
Network Setting
Informations supplémentaires | Configuration avancée |Autres
terminé et votre micrologiciel est mis à jour à la dernière
version.
Si un message d'erreur s'affiche : Lorsqu'une erreur se
produit, "¢-¢¢ Error!" apparait sur l'afficheur de cet
appareil. ("¢" représente un caractère alphanumérique.)
Vérifiez les points suivants :
0 ¢-01, ¢-10 : Câble Ethernet introuvable. Raccordez le
câble Ethernet correctement.
0 ¢-02, ¢-03, ¢-04, ¢-05, ¢-06, ¢-11, ¢-13, ¢-14,
¢-16, ¢-17, ¢-18, ¢-20, ¢-21 : Erreur de connexion
Internet. Vérifiez les points suivants :
– Le routeur est activé
– Cet appareil et le routeur sont connectés via le réseau
Essayez de débrancher puis connectez de nouveau
l'alimentation de l’appareil et du routeur. Ceci permet de
résoudre le problème. Si vous ne parvenez toujours pas
à vous connecter à Internet, le serveur DNS ou le
serveur proxy peuvent être temporairement
indisponibles. Vérifiez l'état du service avec votre
fournisseur d'accès à internet.
0 Autres : Débranchez puis rebranchez le cordon
d'alimentation, puis répétez depuis le début.
Mise à jour via USB
0 Préparez un périphérique de stockage USB de 128 Mo
ou plus (Format du système de fichiers FAT16 ou
FAT32).
0 Supprimez toutes les données enregistrées sur le
périphérique de stockage USB.
0 Éteignez le composant du contrôleur (PC, etc.) connecté
au réseau.
0 Arrêtez la lecture de la webradio, un périphérique de
stockage USB, ou le contenu d'un serveur.
0 Certains périphériques de stockage USB peuvent
prendre du temps à charger, risquent de ne pas être
chargés correctement, ou peuvent ne pas être
correctement alimentés en fonction du périphérique ou
de son contenu.
0 Nous ne pourrons être tenus responsables des pertes ou
de l’endommagement des données, ou des défaillances
de stockage causées par l'utilisation d'un périphérique de
stockage USB avec cet appareil. Nous vous remercions
de votre compréhension.
1. Connectez le périphérique de stockage USB à votre PC.
2. Téléchargez le fichier du micrologiciel sur votre
ordinateur depuis le site Web de notre société et
décompressez-le.
Les fichiers du micrologiciel sont nommés de la manière
suivante :
PIONAP¢¢¢¢_¢¢¢¢¢¢¢¢¢¢¢¢¢¢_¢¢¢.zip
Décompressez le fichier sur votre PC. Le nombre de
fichiers et de dossiers décompressés varie en fonction
du modèle.
3. Copiez tous les fichiers et dossiers décompressés dans
le dossier racine du périphérique de stockage USB.
0 Assurez-vous de copier les fichiers décompressés.
4. Branchez le périphérique de stockage USB au port USB
de cet appareil.
0 Si vous connectez un disque dur USB au port USB de
l'appareil, nous vous recommandons d'utiliser son
adaptateur secteur pour l'alimenter.
0 Si le périphérique de stockage USB a été partitionné,
chaque section sera considérée comme étant un
périphérique indépendant.
5. L'écran Setup apparait sur l'afficheur lorsque la touche
SETUP de la télécommande est pressée.
6. Appuyez sur / et ENTER pour sélectionner "Update" -
"via USB" dans l'ordre indiqué.
Setup
Update
0 "Update" ne s'affiche pas si aucune mise à jour du
micrologiciel n'est disponible.
7. Appuyez sur ENTER pour démarrer la mise à jour du
micrologiciel.
0 "COMPLETE" s'affiche lorsque la mise à jour est
terminée.
8. Appuyez sur la touche Í/ISTANDBY/ON de l'appareil
principal pour éteindre l'appareil. Le processus est
terminé et votre micrologiciel est mis à jour à la dernière
version.
9. Retirez le périphérique de stockage USB de cet appareil.
Si un message d'erreur s'affiche : Lorsqu'une erreur se
produit, "¢-¢¢ Error!" apparait sur l'afficheur de cet
appareil. Vérifiez les points suivants :
0 ¢-01, ¢-10 : Périphérique de stockage USB introuvable.
Vérifiez si le périphérique de stockage USB ou si le câble
USB est correctement inséré dans le port USB de cet
appareil.
Br
anchez le périphérique de stockage USB à une source
d'alimentation externe s'il dispose de sa propre
alimentation.
0 ¢-05, ¢-13, ¢-20, ¢-21 : Le fichier du micrologiciel n'est
pas présent dans le dossier racine du périphérique de
stockage USB, ou le fichier du micrologiciel est destiné à
un autre modèle. Essayez à nouveau à partir du
téléchargement du fichier du micrologiciel.
0 Autres : Débranchez puis rebranchez le cordon
d'alimentation, puis répétez depuis le début.
33
Page 70

> Avant de Démarrer > Nom des pièces > Installation > Initial Setup > Lecture
F
R
Informations supplémentaires | Configuration avancée | Autres
Dépannage
Autres
Avant de démarrer la procédure
Lorsque le fonctionnement est instable, les problèmes
peuvent être résolus simplement en mettant l'appareil sous
tension ou en veille, ou en débranchant/rebranchant le
cordon d'alimentation, plutôt qu'en passant en revue les
réglages et les opérations. Essayez d'effectuer les mesures
les plus simples à la fois sur l'appareil et sur le périphérique
connecté. Si la consultation de "Dépannage" ne résout pas
le problème, réinitialiser l'appareil dans l'état dans lequel il
était au moment de l'achat peut le résoudre. Veuillez noter
que vos réglages seront également initialisés lorsque vous
réinitialiserez l'appareil ; nous vous recommandons par
conséquent de noter vos réglages avant de commencer la
procédure suivante.
Réinitialisation de l'appareil (ceci réinitialise les
paramètres de cet appareil sur leur valeur par
défaut)
1. Appuyez sur la touche SETUP de la télécommande,
sélectionnez "Factory Reset" - "Start" sur l'écran Setup et
appuyez sur ENTER.
2. Appuyez sur ENTER.
3. L'appareil se met en veille et les réglages sont
réinitialisés.
∫ Alimentation
Impossible d'allumer cet appareil
0 Débranchez le cordon d'alimentation de la prise murale,
attendez au moins 2 minutes, puis rebranchez-le une
nouvelle fois.
L'appareil s'éteint de manière inattendue
0 L'appareil passe automatiquement en mode veille
lorsque le paramètre "Option Setting" - "Power Off
Setting" - "Auto Standby" dans les fonctions du menu
Setup est actif.
Le témoin Í/I STANDBY/ON sur l'appareil principal
continue de clignoter en bleu et aucune action n'est
possible.
0 Débranchez le cordon d'alimentation de la prise murale,
attendez 2 minutes ou plus, puis rebranchez-le une
nouvelle fois. Si cela ne règle pas le problème, il pourrait
y avoir un dysfonctionnement. Débranchez le cordon
d'alimentation de la prise murale et contactez le
revendeur ou notre service après-vente.
∫ L'afficheur ne s'allume pas
0 Il est possible que l'afficheur ait été éteint par une
pression sur DISPLAY. Appuyez sur la touche DISPLAY
pour allumer l'afficheur.
∫ Connexion Wi-Fi
0 Essayez de brancher/débrancher la prise électrique de
cet appareil et du routeur, et essayez de redémarrer le
routeur.
Impossible de se connecter au point d'accès.
0 Vérifiez si le réglage du SSID et le cryptage (WEP, etc.)
sont corrects.
0
La connexion à un SSID qui comprend des caractères multibytes n’est pas pris en charge. Nommez le SSID du routeur
LAN sans fil à l'aide de caractères alphanumériques à un
octet uniquement et essayez à nouveau.
0 Lorsque le routeur LAN sans fil est réglé en mode furtif
(mode pour masquer la clé SSID) ou lorsque
N'IMPORTE QUELLE connexion est désactivée, le SSID
ne s'affiche pas. Changez les paramètres et réessayez.
Connecté à un SSID différent du SSID sélectionné
0
Certains point d'accès vous permettent de définir plusieurs
SSID pour un seul appareil. Si vous utilisez la touche de
réglage automatique sur ce genre de routeur, vous pouvez
finir par vous connecter à un SSID différent du SSID que
vous désiriez. Si cela arrive, utilisez la méthode de
connexion nécessitant la saisie d'un mot de passe.
La lecture est interrompue et la communication ne
fonctionne pas
0 Réduisez la distance avec le point d'accès ou retirez tout
obstacle pour améliorer la visibilité, et essayez de
nouveau. Placez l’appareil à l’écart des fours à microondes ou d’autres points d’accès.
Il est recommandé de placer le point d’accès et l’appareil
dans la même pièce.
0 S’il y a un objet métallique à proximité de l’appareil, la
connexion LAN sans fil peut ne pas être possible du fait
que le métal peut avoir des effets sur les ondes radio.
0 Lorsque d’autres point d'accès sont utilisés à proximité
de l’appareil, plusieurs problèmes tels que l’interruption
de la lecture et de la communication peuvent se produire.
Vous pouvez éviter ces problèmes en modifiant le canal
de votre point d'accès. Pour plus d’informations sur la
modification de canaux, reportez-vous au manuel
d’instructions fourni avec le point s'accès.
∫ Audio
Le son est interrompu
0 Une réduction trop importante de la plage de verrouillage
avec le paramètre Lock Range Adjust peut causer des
coupures du son ainsi que des parasites sonores. Les
coupures du son causées par des réglages de la plage
de verrouillage ne sont pas couvertes par notre garantie
de fonctionnement. Écoutez du son pendant le réglage
de la plage de verrouillage.
Il n'y a pas de son numérique
0 Réglez "Option Setting" - "Digital Out" dans le menu
Setup sur "On".
0 Le son DSD ne peut pas être reproduit numériquement.
34
Page 71

> Avant de Démarrer > Nom des pièces > Installation > Initial Setup > Lecture
F
R
Informations supplémentaires | Configuration avancée | Autres
∫ Impossible de lire un périphérique de
stockage USB/DD
0
Vérifiez si le périphérique de stockage USB ou si le câble
USB est correctement inséré dans le port USB de l'appareil.
0 Débranchez le périphérique de stockage USB de
l’appareil, puis essayez de le rebrancher.
0 Il peut arriver que cet appareil ne reconnaisse pas les
périphériques de stockage USB et les DD comme
dispositifs adaptés. Essayer de mettre en veille cet
appareil, puis de le remettre en marche.
0 Selon le type de format, la lecture peut ne pas s’effectuer
normalement. Vérifiez les formats de fichiers pris en
charge. (P16)
0 Précautions concernant les périphériques USB et DD
(P16)
∫ Fonction réseau
0 Si vous ne pouvez pas sélectionner de service réseau, il
deviendra sélectionnable lorsque la fonction réseau sera
lancée.
0 Essayez de brancher/débrancher la prise électrique de
cet appareil et du routeur, et essayez de redémarrer le
routeur.
Impossible d'accéder à la webradio
0 Certains services de réseau ou de contenus accessibles
à partir de l’appareil risquent de ne pas être accessibles
au cas où le fournisseur de services interrompt son
service.
0 Assurez-vous que votre modem et routeur soient
correctement connectés, et assurez-vous qu’ils soient
tous les deux allumés.
0 En fonction du FAI, le réglage du serveur proxy est
nécessaire.
0 Assurez-vous que le routeur utilisé et/ou le modem est
bien pris en charge par votre FAI.
Impossible d'accéder au serveur de réseau
0 Cet appareil doit être connecté au même routeur que le
serveur réseau.
0 Cet appareil est compatible avec Windows Media
Player 11 ou 12, les serveurs réseau ou les NAS
compatibles avec la fonctionnalité réseau domestique.
De plus, en utilisant un ordinateur, seuls les fichiers de
musique mémorisés dans la bibliothèque de Windows
®
Media
Player peuvent être lus.
La lecture s'arrête pendant que vous écoutez des
fichiers de musique sur le réseau du serveur
0 Lorsque l'ordinateur est utilisé comme serveur réseau,
essayez de quitter tout programme autre que le logiciel
du serveur (Windows Media
0 Si le PC télécharge ou copie des fichiers volumineux, il
se peut que la lecture soit interrompue.
Les noms des albums et des artistes de Music Server
ne sont pas affichés
0 Les métadonnées, telles que les noms des albums et des
artistes, doivent être reconnues sur le serveur pour
pouvoir être distribuées vers cet appareil ; cela dépend
des spécifications du périphérique NAS ou du serveur
que vous utilisez.
0 Les formats de fichiers pris en charge dépendent du
logiciel du serveur ou du NAS. Pour plus de détails,
contactez le fabricant du logiciel du serveur ou du NAS.
La pochette de l'album dans Music Server s'affiche
parfois, mais pas à chaque fois
0 Music Server dépend des spécifications du logiciel du
serveur.
0 Les formats pris en charge dépendent du logiciel du
serveur.
0 Pour plus de détails, contactez le fabricant du logiciel du
serveur.
®
Player 12, etc.).
®
∫ Sauvegarde et suppression de la musique
présente sur un HDD USB raccordé à cet
appareil depuis un ordinateur
Lorsqu'un HDD formaté avec cet appareil est raccordé
à un ordinateur, les fichiers ne s'affichent pas ou bien
ne peuvent pas être lus ou écrits par l'ordinateur.
0 Puisque le HDD formaté par cet appareil l'est avec un
format spécial, il ne sera pas possible de voir ou de lire/
écrire des fichiers même s'il est raccordé à un ordinateur
(Windows ou Macintosh).
Cet appareil n'apparait pas dans la liste des
périphériques connectés au réseau sur l'ordinateur.
0 Lorsque cet appareil est en marche, vous ne pouvez pas
utiliser d'ordinateur pour accéder au HDD raccordé au
port USB situé à l'arrière de l'appareil principal. Vous
devez tout d'abord régler "Network Standby" sur "On
(USB Power)", puis mettez cet appareil en veille. Dans le
menu Setup, sélectionnez "Option Setting" - "Power Off
Setting" - "Network Standby", puis sélectionnez "On
(USB Power)" et appuyez sur ENTER, puis finalement
appuyez sur la touche Í STANDBY/ON de la
télécommande pour mettre cet appareil en veille.
∫ Fonctionnalité convertisseur D/A
0 Assurez-vous que les périphériques sont correctement
raccordés.
0 Lisez le son compatible avec les prises d'entrée de cet
appareil. (P25)
Impossible de lire le son provenant des ordinateurs
0 Annulez la sourdine sur votre ordinateur
0 Sélectionnez cet appareil dans les paramètres de sortie
audio sur votre ordinateur. Si l'entrée de cet appareil est
réglée sur autre chose que "USB DAC In", l'ordinateur ne
détectera pas cet appareil.
0 Pour lire le son provenant d'un ordinateur, vous aurez
35
Page 72

> Avant de Démarrer > Nom des pièces > Installation > Initial Setup > Lecture
F
R
Informations supplémentaires | Configuration avancée | Autres
besoin d'installer un pilote spécial sur votre ordinateur.
Téléchargez le pilote depuis notre site Web.
http://www.pioneer-audiovisual.eu/
0 Si plusieurs applications tournent sur l'ordinateur, quittez
les applications que vous n'utilisez pas.
La fréquence d'échantillonnage est toujours la même
par le biais de l'entrée USB DAC In
0 En fonction des paramètres de l'ordinateur, même si les
fréquences d'échantillonnage des fichiers en cours de
lecture sont différentes, elles sont converties vers la
même fréquence d'échantillonnage pour la sortie.
Les sons de l'ordinateur autres que la musique sont
audibles au travers de l'entrée USB DAC In
0 En fonction des paramètres de l'ordinateur, les sons
comme les bips de démarrage ou d'erreurs peuvent être
lus par le biais de cet appareil.
36
Page 73

> Avant de Démarrer > Nom des pièces > Installation > Initial Setup > Lecture
F
R
Informations supplémentaires | Configuration avancée | Autres
Caractéristiques générales
∫ Sortie audio analogique
Niveau de sortie et impédance nominale
0 RCA OUT: 2,2 Vrms (1 kHz, 0 dB) / 500 ≠
0 XLR OUT (N-70AE): 4,2 Vrms (1 kHz, 0 dB) / 500 ≠
Réponse en fréquence
0 4 Hz - 90 kHz (-3 dB)
Rapport signal-bruit
0 (N-70AE) RCA OUT: 114 dB (A-weighting),
XLR OUT : 117 dB (A-weighting)
0 (N-50AE) RCA OUT: 112 dB (A-weighting)
Plage dynamique
0 117dB (24bits, 32bits)
THD+N
0 0,0017 %
Séparation canal
0 110 dB (1 kHz)
∫ Sortie téléphones (N-70AE)
Puissance de sortie
0 100 mW + 100 mW (32 ≠, 1 kHz DHT 1%)
Impédance téléphones prise en charge
0 16 ≠ - 600 ≠
Réponse en fréquence
0 4 Hz - 80 kHz (-3 dB)
THD+N
0 0,01 %
∫ Entrée audio numérique
FRONT/REAR USB
0 Type A, USB 2.0 haute vitesse
0 Sortie CC : 5 V 1 A (Arrière) / 5 V 0,5 A (Avant)
USB DAC
0 Type B, USB 2.0 haute vitesse
Entrée numérique coaxiale
0 Prise RCA, 0,5 Vp-p / 75 ≠
Entrée optonumérique
0 Prise optique, -24 dBm ou plus / 660 nm
∫ Sortie audio numérique
Sortie numérique coaxiale
0 Prise RCA, 0,5 Vp-p / 75 ≠
Sortie optonumérique
0 Prise optique, -14 - -21 dBm / 660 nm
∫ Réseau
Réseau local (LAN) filaire
0 Prise Ethernet
0 10BASE-T/100BASE-TX
Réseau LAN sans fil (Wi-Fi)
0 Norme IEEE 802.11 a/b/g/n
0 Bande 5 GHz/2,4 GHz
∫ Autre
Sortie Contrôle
0 Mini prise ‰3,5 (mono)
∫ Général
Alimentation
0 CA 220 - 240 V, 50/60 Hz
Consommation d'énergie
0 N-70AE : 40,0 W
0 N-50AE : 30,0 W
0 0,3 W (en Veille)
0 2,0 W (en Veille, Network Standby : On, Network Setting :
Wired)
0 2,4 W (en Veille, Network Standby : On, Network Setting :
Wi-Fi)
Auto Standby
0 On (20 min) / Off
Dimensions (L t H t P)
0 N-70AE : 435 mm k 121 mm k 364 mm
0 N-50AE : 435 mm k 99 mm k 340 mm
Poids
0 N-70AE : 11,4 kg
0 N-50AE : 7,4 kg
37
Page 74

> Avant de Démarrer > Nom des pièces > Installation > Initial Setup > Lecture
F
R
Informations supplémentaires | Configuration avancée | Autres
Licence et Marque commerciale
The Wi-Fi CERTIFIED Logo is a certification mark of Wi-Fi Alliance®.
AirPlay, iPad, iPhone, iPod, iPod classic, iPod nano and iPod touch are
trademarks of Apple Inc., registered in the U.S. and other countries.
iPad Air and iPad mini are trademarks of Apple Inc.
“Made for iPod”, “Made for iPhone” and “Made for iPad” mean th at an electronic
accessory has been designed to connect specifically to iPod, iPhone, or iPad,
respectively, and has been certified by the developer to meet Apple
performance standards. Apple is not responsible for the operation of this device
or its compliance with safety and regulatory standards.
Please note that the use of this accessory with iPod, iPhone or iPad may affect
wireless performance.
AirPlay works with iPhone, iPad, and iPod touch with iOS 4.3.3 or later, Mac
with OS X Mountain Lion or later, and PC with iTunes 10.2.2 or later.
The Spotify software is subject to third party licenses found here:
https://developer.spotify.com/esdk-third-party-licenses/
Chromecast is a trademark of Google Inc.
This product is protected by certain intellectual property rights of Microsoft. Use
or distribution of such technology outside of this product is prohibited without a
license from Microsoft.
Windows 7, Windows Media, and the Windows logo are trademarks or
registered trademarks of Microsoft Corporation in the United States and/or other
countries.
macOS is a trademark of Apple Inc., registered in the U.S. and other countries.
DSD and the Direct Stream Digital logo are trademarks of Sony Corporation.
All other trademarks are the property of their respective owners. / Toutes les
autres marques commerciales sont la propriété de leurs détenteurs respectifs. /
El resto de marcas comerciales son propiedad de sus respectivos propietarios.
/ Tutti gli altri marchi di fabbrica sono di proprietà dei rispettivi proprietari. / Alle
anderen Warenzeichen sind das Eigentum ihrer jeweiligen Eigentümer. / Alle
andere handelsmerken zijn eigendom van de desbetreffende rechthebbenden. /
Alla andra varumärken tillhör deras respektive ägare.
38
Page 75

Register your product on
/ Enregistrez votre produit sur / Registre su producto en /
Registrare il proprio prodotto su / Registrieren Sie hier Ihr Produkt / Registreer uw product op / Registrera din produkt på
http://www.pioneer.eu (Europe / Europe / Europa / Europa / Europa / Europa / Europa)
<Germany>
Hanns-Martin-Schleyer-Straße 35, 47877 Willich, Germany
Tel: +49(0)8142 4208 188 (Product Support)
<UK>
Anteros Building, Odyssey Business Park, West End Road, South Ruislip,
Middlesex, HA4 6QQ United Kingdom
Tel: +44(0)208 836 3612
<France>
6, Avenue de Marais F - 95816 Argenteuil Cedex FRANCE
Tel: +33(0)969 368 050
<U.S.A.>
18 PARK WAY, UPPER SADDLE RIVER, NEW JERSEY 07458, U.S.A.
Tel: 1-201-785-2600
Te l: 1-844-679-5350
1-10-5 Yokoami, Sumida-ku, Tokyo 130-0015 JAPAN
F1712-1
SN
29403190A
*29403190A*
“Pioneer” is a trademark of Pioneer Corporation, and is used under license.
© 2017 Onkyo & Pioneer Corporation. All rights reserved.
© 2017 Onkyo & Pioneer Corporation. Tous droits de reproduction et de traduction réservés.
http://pioneer-audiovisual.com/privacy/
F
R
 Loading...