

Page 1
N-70A
-K/-S
N-50A
Network Audio Player
Lecteur réseau audiophile
Network Audio Player
lettore audio di rete
Netwerk Audio Player
Reproductor Network Audio
Сетевой аудио плeep
-K/-S
Quick Start Guide
Guide rapide
Kurzanleitung
Guida di avvio rapido
Snelstartgids
Guía de inicio rápido
Краткое руководство пользователя
Thank you for buying this Pioneer product. This Quick Start Guide includes instructions for basic connections and operations to allow simple use of the
player. For detailed descriptions of the player, see the “Operating Instructions” provided on the included CD-ROM ( ).
Merci pour l’achat de ce produit Pioneer. Ce guide de démarrage rapide contient les instructions relatives aux raccordements et operations de base,
permettant une utilisation simple de ce lecteur. Pour des descriptions plus détaillées, reportez-vous au “Mode d’emploi”, figurant sur le CD-ROM ( ) fourni.
Wir danken Ihnen, dass Sie sich für dieses Pioneer-Produkt entschieden haben. Diese Kurzanleitung enthält Anweisungen für die grundlegenden Anschlüsse
und Bedienvorgänge, um eine einfache Bedienung des Players zu ermöglichen. Detaillierte Beschreibungen des Players finden Sie in der „Bedienungsanleitung“ auf der mitgelieferten CD-ROM ( ).
Vi ringraziamo per avere acquistato questo prodotto Pioneer. Questa Guida di avvio rapido include istruzioni per i collegamenti fondamentali e le operazioni
essenziali del lettore. Per una descrizione dettagliata del lettore, vedere le “Istruzioni per l’uso” contenute nel CD-ROM ( ) accluso.
Hartelijk dank voor de aanschaf van dit Pioneer product. Deze snelstartgids bevat de instructies voor de basisaansluitingen en de basisbediening voor eenvoudig
gebruik van de speler. Voor meer gedetailleerde aanwijzingen van de speler wordt u verwezen naar de “Handleiding” op de bijgeleverde CD-ROM ( ).
Gracias por comprar un producto Pioneer. Esta Guía de inicio rápido incluye las instrucciones sobre las conexiones y las operaciones básicas para poder
utilizar el reproductor con facilidad. Para ver las descripciones detalladas del reproductor, consulte el “Manual de instrucciones” que encontrará en el
CD-ROM ( ) incluido.
Благодарим вас за покупку данного изделия компании Pioneer. Настоящее краткое руководство пользователя содержит инструкции,
касающиеся основных соединений и операций, позволяющих быстро и просто приступить к использованию проигрывателя. За подробным
описанием проигрывателя обращайтесь к «Инструкциям по эксплуатации» на прилагаемом в комплекте поставки CD-ROM ( ).
STANDBY/ON
DISPLAY
DIRECT
A.S.R
iPod/USB
FRONT
MUSIC
SERVER
DIG IN 1
SOURCE SELECT
REPEAT
TOP
MENU
SETUP
CLEAR
NETWORK AUDIO PLAYER
Remote Control
Up SamplingHi-Bit32
Télécommande
A.L.C
SOUND
Fernbedienung
iPod/USB
iPod
REAR
CONTROL
NET
SERVICE
FAVORITES
Telecomando
DIG IN 2
USB DAC IN
Afstandsbediening
DIMMER
Mando a distancia
SHUFFLE
SORT
Пульт дистанционного управления
NOW
PLAYNG
ENTER
RETURN
+Favorite
RCA Audio Cable
Câble audio RCA
Audio-Cinchkabel
Cavo audio RCA
RCA-audiokabel
Cable de audio RCA
Аудиокабель RCA
What’s in the box
Contenu du carton d’emballage
Lieferumfang
Contenuto della confezione
Сухие батарейки размера AAA IEC R03, 2 шт.
Power cord
Cordon d’alimentation
Netzkabel
Cavo di alimentazione
Netsnoer
Cable de alimentación
Кабель питания
Inhoud van de doos
Contenido de la caja
Комплект поставки
AAA size IEC R03 dry cell batteries x2
Piles à anode sèche AAA IEC R03 x 2
AAA/IEC/R03 Trockenbatterien x2
Pile a secco AAA IEC R03 x2
AAA/IEC/R03 drogecelbatterijen x2
Pilas secas AAA, IEC R03 x 2
These quick start guide
Le présent Guide de démarrage
Diese Kurzanleitung
Guida per l’avvio rapido
Deze Quick Start-gids
Esta guía de inicio rápido
Это краткое руководство пользователя
CD-ROM (Operating instructions)
CD-ROM (Mode d’emploi)
CD-ROM (Bedienungsanleitung)
CD-ROM (Istruzioni per l’uso)
CD-ROM (Handleiding)
CD-ROM (Manual de instrucciones)
CD-ROM (Инструкции по эксплуатации)
Warranty card
Carte de garantie
Garantiekarte
Documento di garanzia
Garantiebewijs
Tarjeta de garantía
Гарантийный сертификат
Safety Brochure
Instructions de sécurité
Sicherheitsbroschüre
Istruzioni per la sicurezza
Folder veiligheid
Folleto de seguridad
Брошюра по технике безопасности
Page 2

English
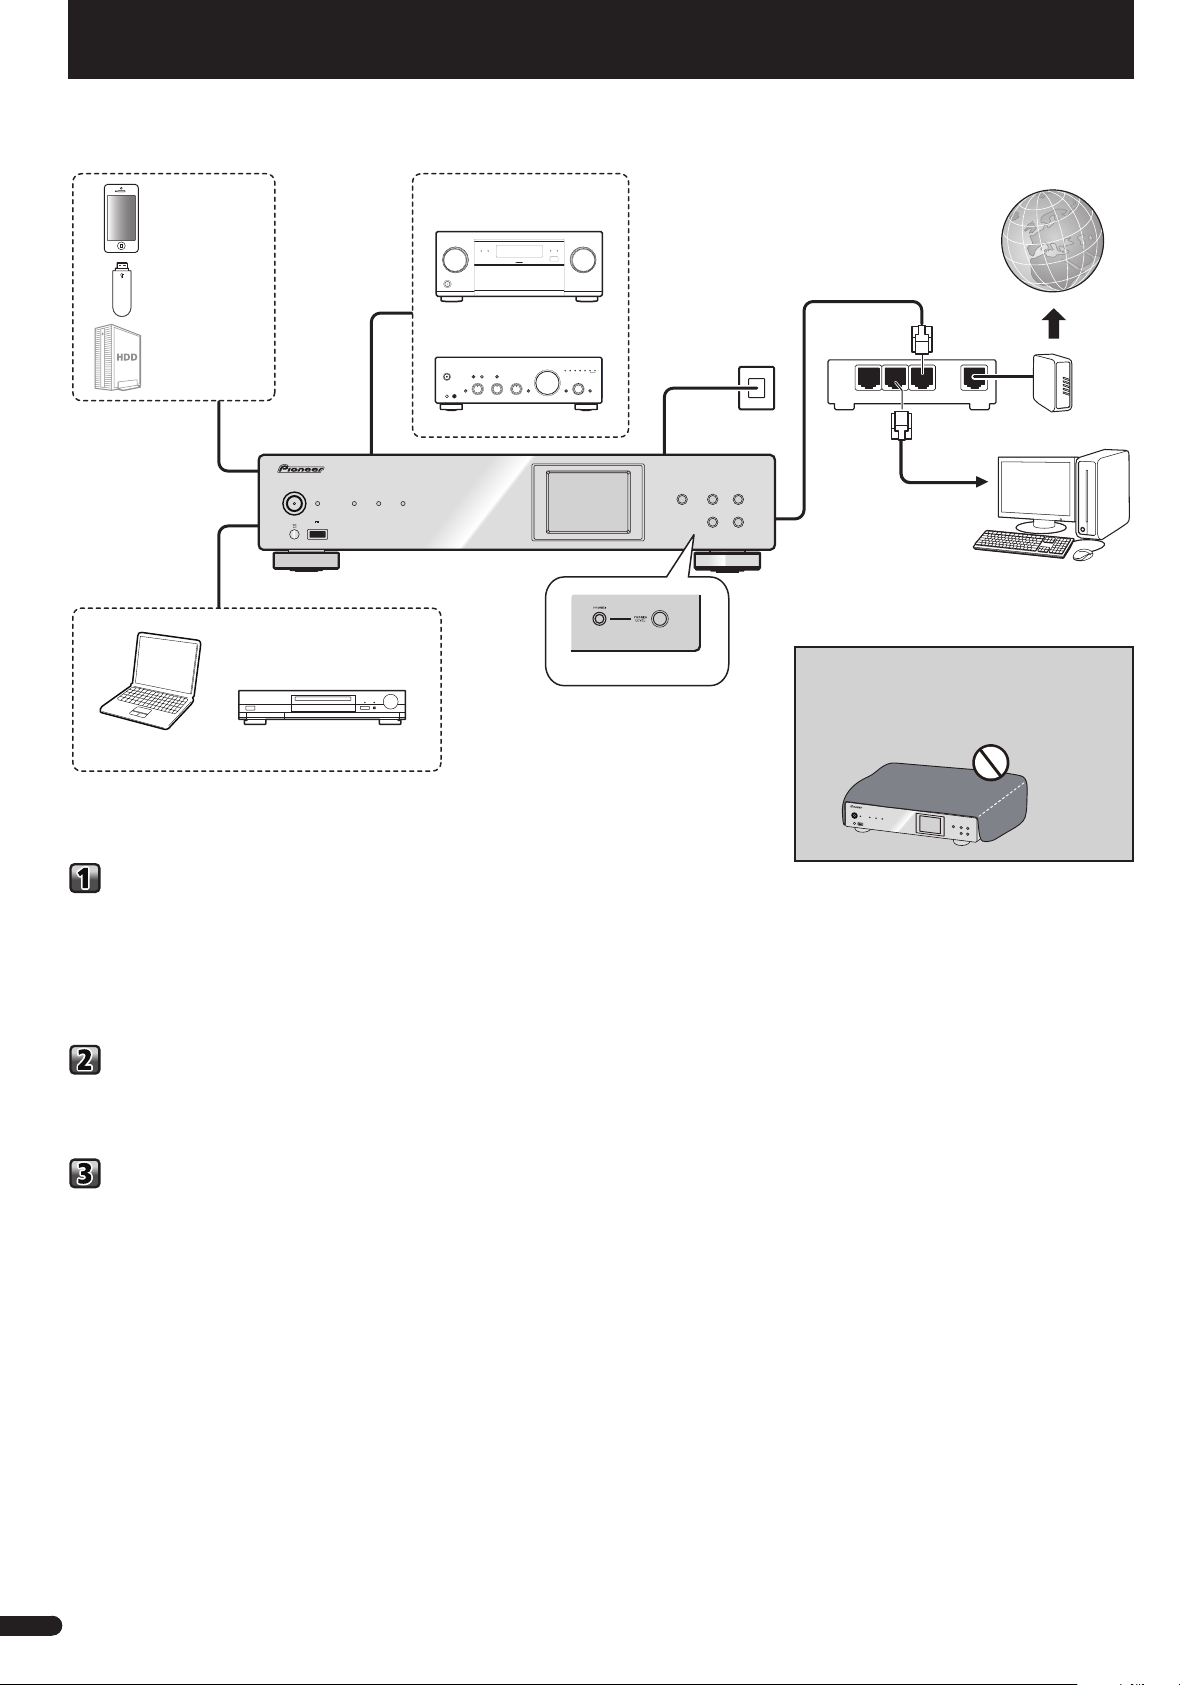
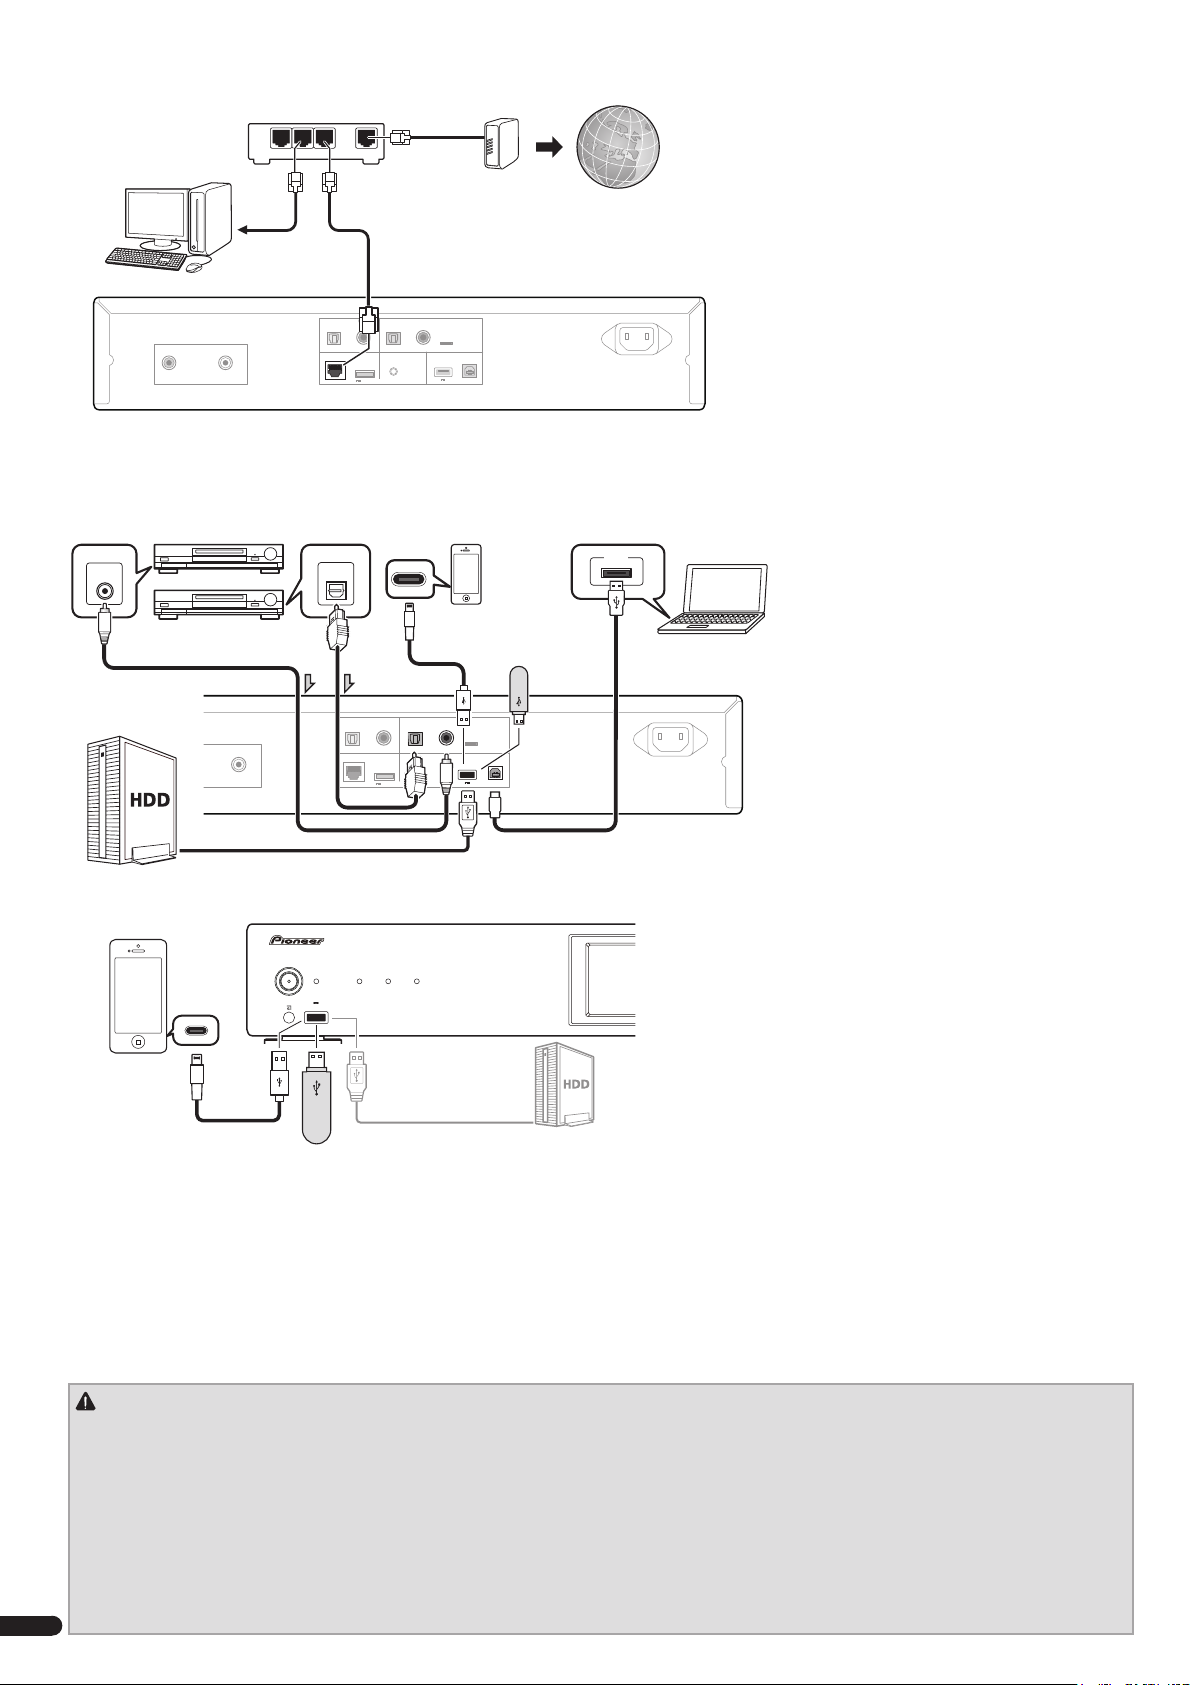
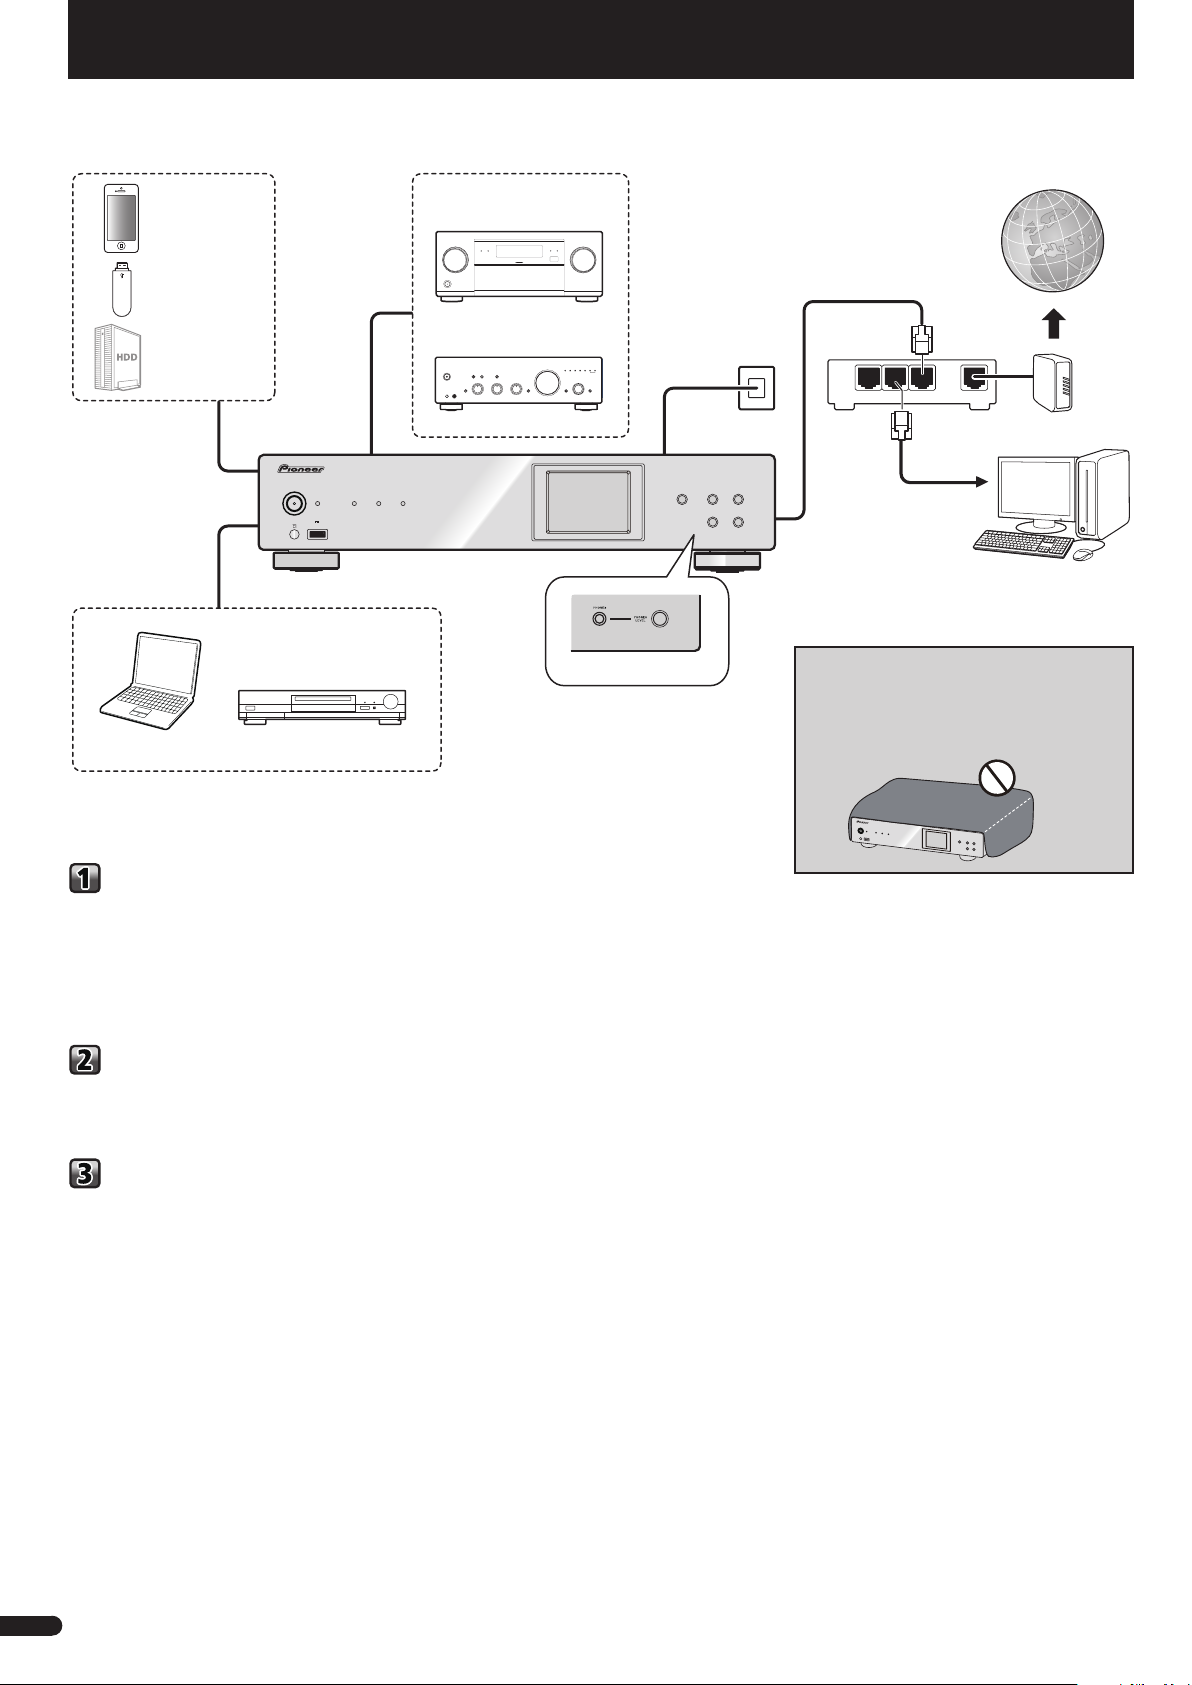
Flow of settings on the network audio player
iPod/iPhone
USB storage
device
External HDD
Computer
3
3
1
/I STANDBY/ON
STANDBY
DIRECT Hi-Bit 32 Up Sampling
5V 1A
iPod/iPhone
This Network Audio Player
Digital audio equipment
AV receiver,
D/A converter, etc.
Amplifier
SOURCE
SOURCE
N-70A
4
NETWORK AUDIO PLAYER
N-50A
N-50A
Internet
2
Router
LAN
321
to LAN port
VENTILATION CAUTION
When installing this unit, make sure to leave space
around the unit for ventilation to improve heat radiation
(at least 10 cm at top, 10 cm at rear, and 10 cm at each
side).
WAN
Modem
Computer
D3-4-2-1-7d*_A1_En
Connecting
–1 Connecting the amplifier
–2 Connecting to the network
–3 Connecting playback component
–4 Plugging the unit
Initial Setup
– Before you start
– Network setting
Basic Playback
– Playback with NETWORK feature
– iPod/iPhone playback
– Playing files stored on USB storage devices/External HDDs
– Using the D/A converter
– Using Headphone (N-70A only)
2
En
Page 3
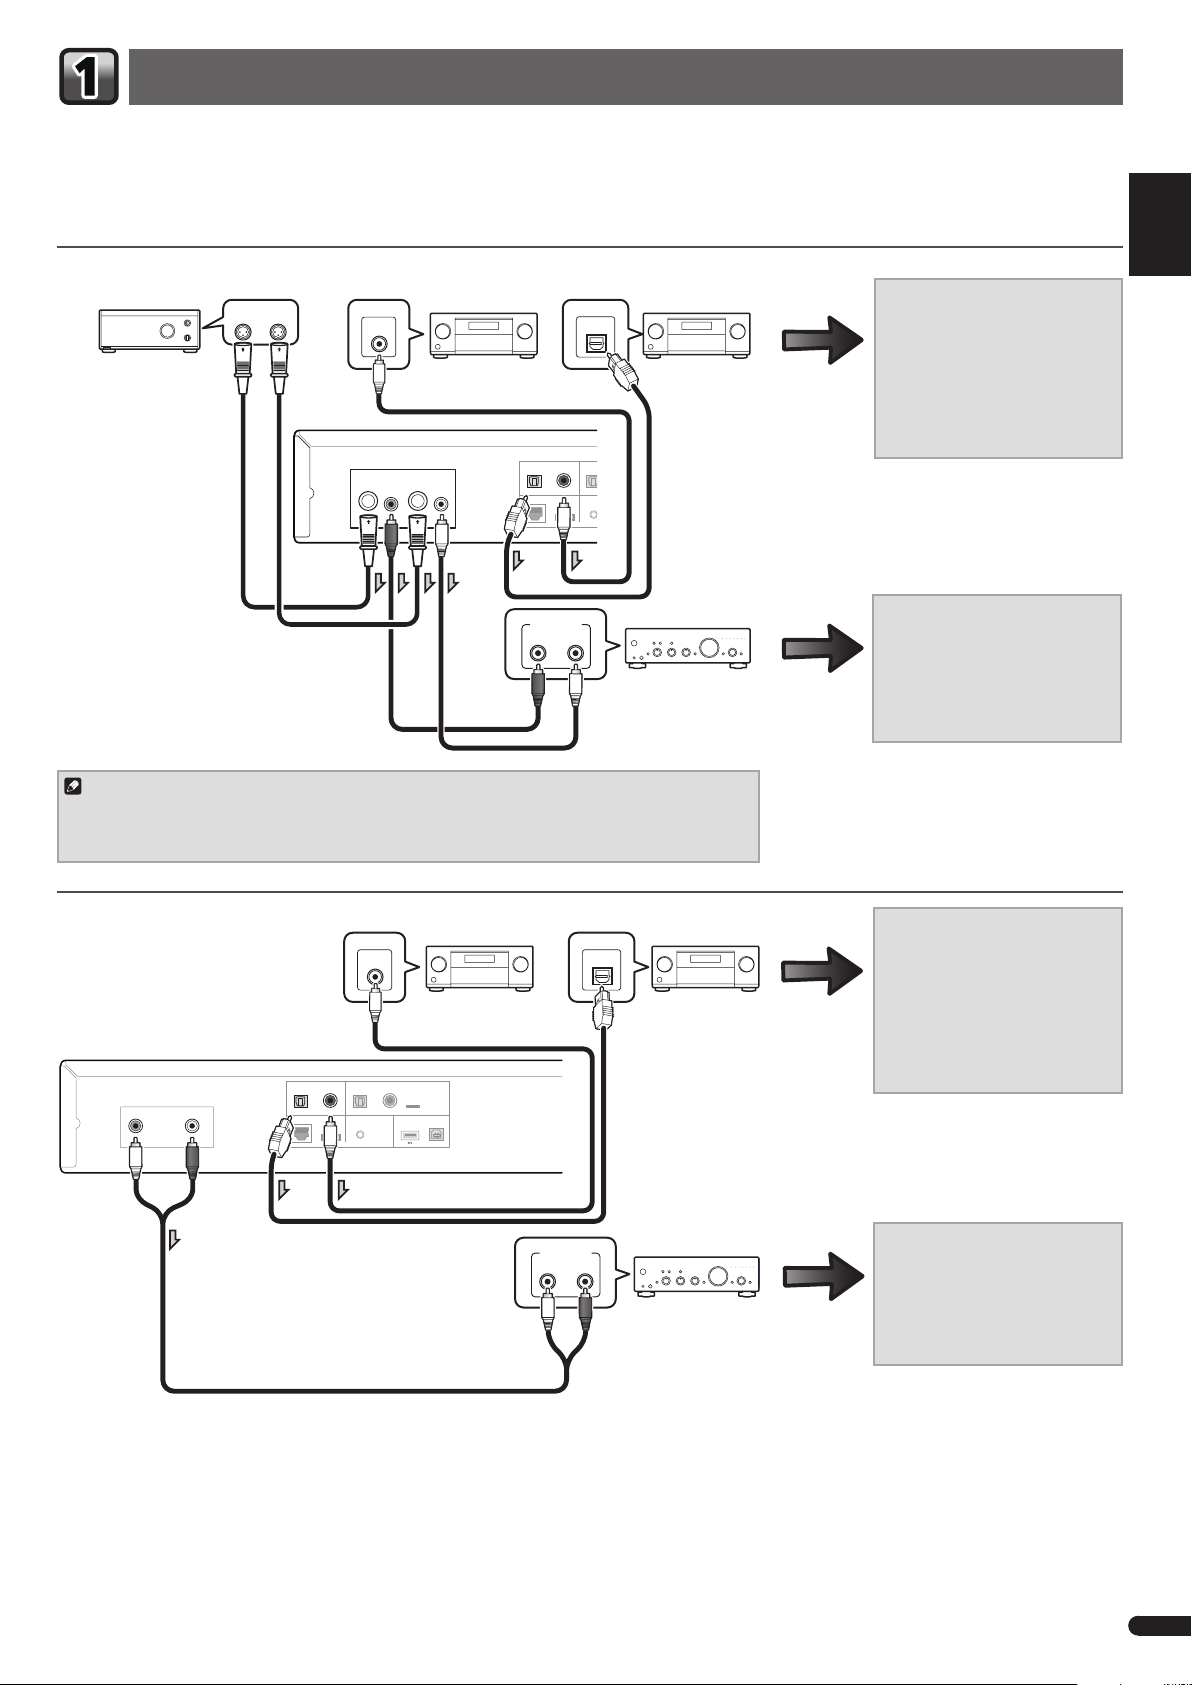
Connecting
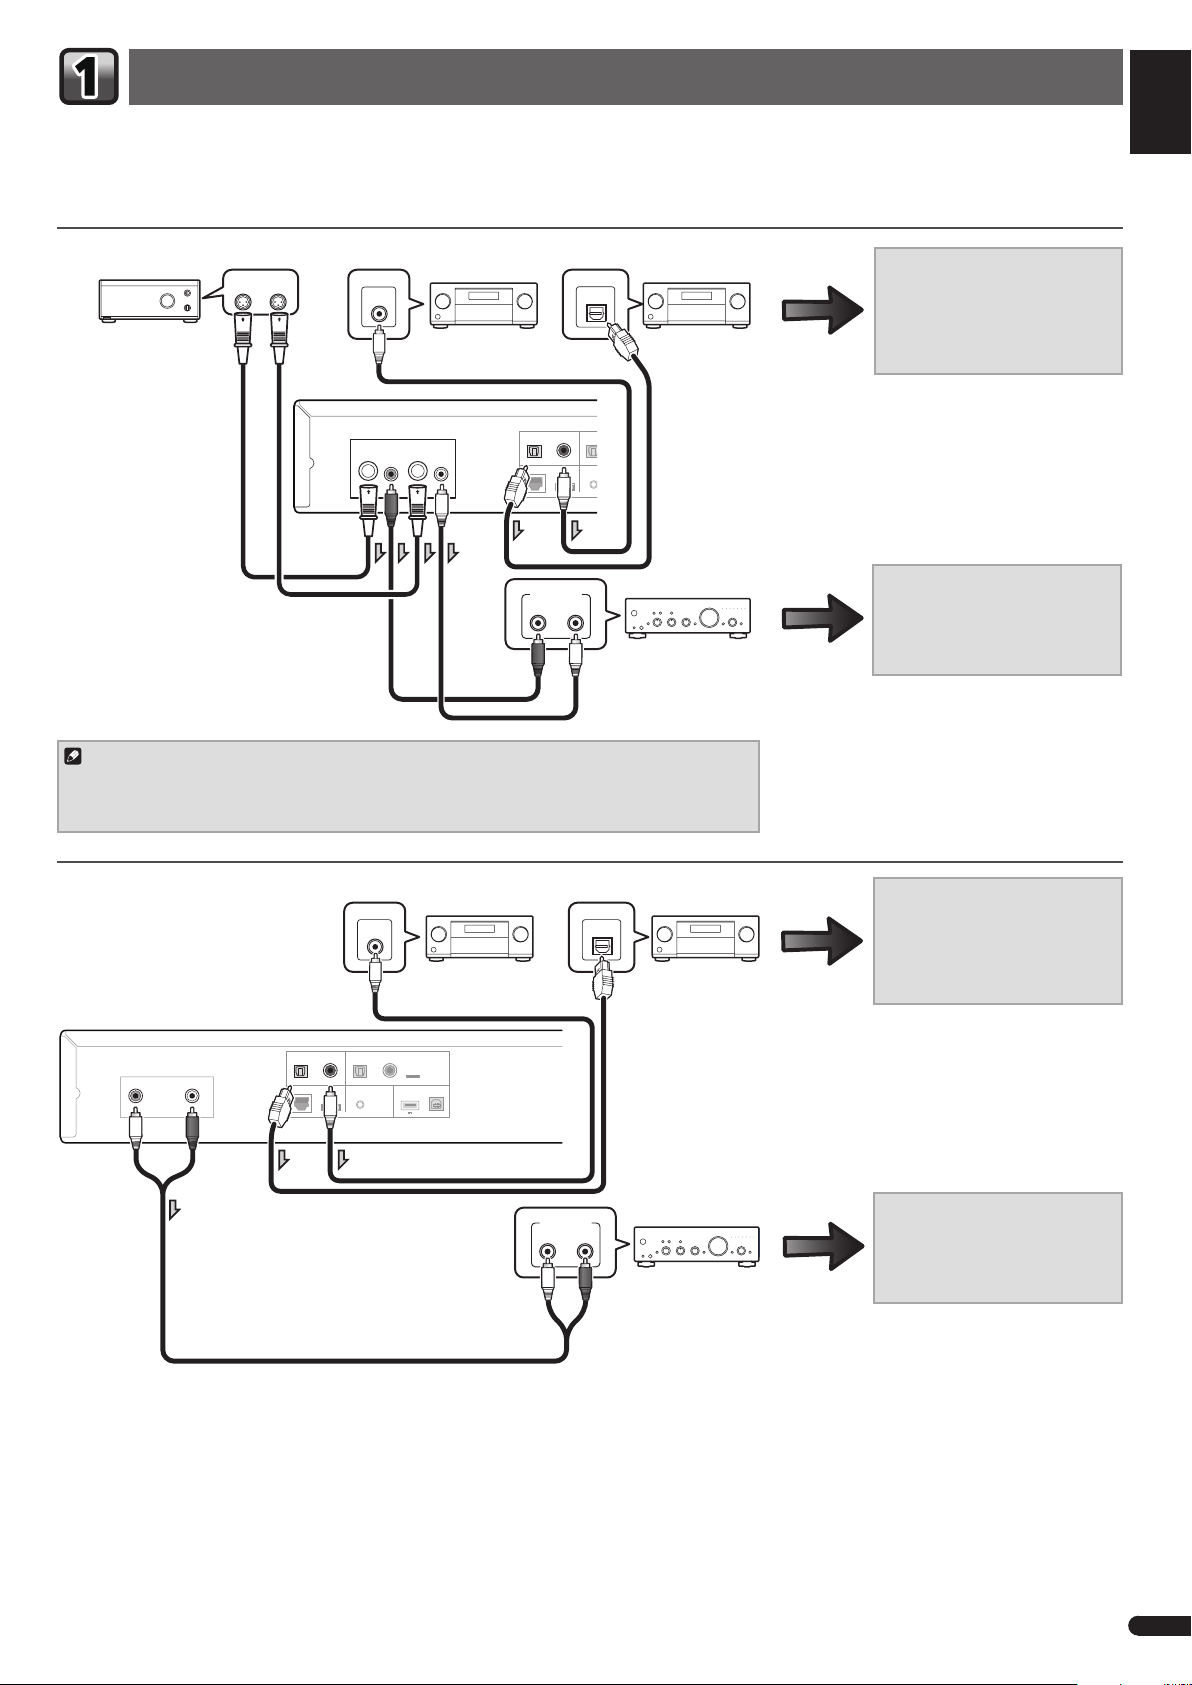
Connecting the amplifier
English
•Be sure to turn off the power and unplug the power cord from the power outlet whenever making or changing connections.
•Connect the power cord after all the connections between devices have been completed.
N-70A
RL
Pre-main amplifier,
etc., furnished with
balanced type input
DIGITAL IN
COAXIAL
AV receiver,
D/A converter, etc.
connectors
ANALOG OUT
R
L
Analog audio
output connections
Note
A polarity setting can be performed, allowing the signal from the unit to match with the balance
from the connected device. Please see the operating instructions on the enclosed CD-ROM for
more details.
DIGITAL OUT
OPTICAL
COAXIAL
DC OUTPUT
LAN (10/100)
For
WIRELESS
LAN
(5V 0.6A MAX)
AUDIO INPUT
RL
ANALOG
DIGITAL IN
OPTICAL
AV receiver,
D/A converter, etc.
OPTIC
CONTR
OUT
Pre-main amplifier
with RCA (pin plug)
input connectors
By connecting this unit’s digital
audio output to the digital audio
input of an AV receiver or D/A
converter, etc, you can use the
amplifier to enjoy digital audio
produced from this unit.
By connecting this unit’s analog
audio output to the analog audio
input of an amplifier, you can
use the amplifier to enjoy analog
audio produced from this unit.
Français
Deutsch
Italiano
Nederlands
Español
N-50A
ANALOG OUT
R
L
Analog audio
output connections
OPTICAL
LAN (10/100)
DIGITAL OUT
COAXIAL
DC OUTPUT
WIRELESS
(5V 0.6A MAX)
For
LAN
DIGITAL IN
COAXIAL
DIGITAL IN
OPTICAL COAXIAL
CONTROL
OUT
AV receiver,
D/A converter, etc.
12
DIGITAL IN
iPod/iPhone
5V 1A
USB DAC
DIGITAL IN
OPTICAL
AUDIO INPUT
RL
ANALOG
AV receiver,
D/A converter, etc.
Digital audio output
connections
Amplifier
By connecting this unit’s digital
audio output to the digital audio
input of an AV receiver or D/A
converter, etc, you can use the
amplifier to enjoy digital audio
produced from this unit.
By connecting this unit’s analog
audio output to the analog audio
input of an amplifier, you can
use the amplifier to enjoy analog
audio produced from this unit.
3
En
Page 4
Connecting to the network through the LAN interface
Router
Router
LAN
321
WAN
Modem
Internet
Computer
R
ANALOG OUT
DIGITAL OUT
L
OPTICAL
LAN (10/100)
COAXIAL
DC OUTPUT
For
WIRELESS
LAN
(5V 0.6A MAX)
DIGITAL IN
OPTICAL COAXIAL
CONTROL
OUT
12
iPod/iPhone
5V 1A
DIGITAL IN
USB DAC
Connecting playback component
DIGITAL IN
COAXIAL
Digital audio
equipment, etc.
External HDD*1,
and such
LOG OUT
L
DIGITAL IN
OPTICAL
DIGITAL OUT
OPTICAL
LAN (10/100)
COAXIAL
DC OUTPUT
For
WIRELESS
LAN
(5V 0.6A MAX)
iPod/iPhone
DIGITAL IN
OPTICAL COAXIAL
CONTROL
OUT
USB storage
device
12
DIGITAL IN
iPod/iPhone
5V 1A
USB DAC
A-type
B-type
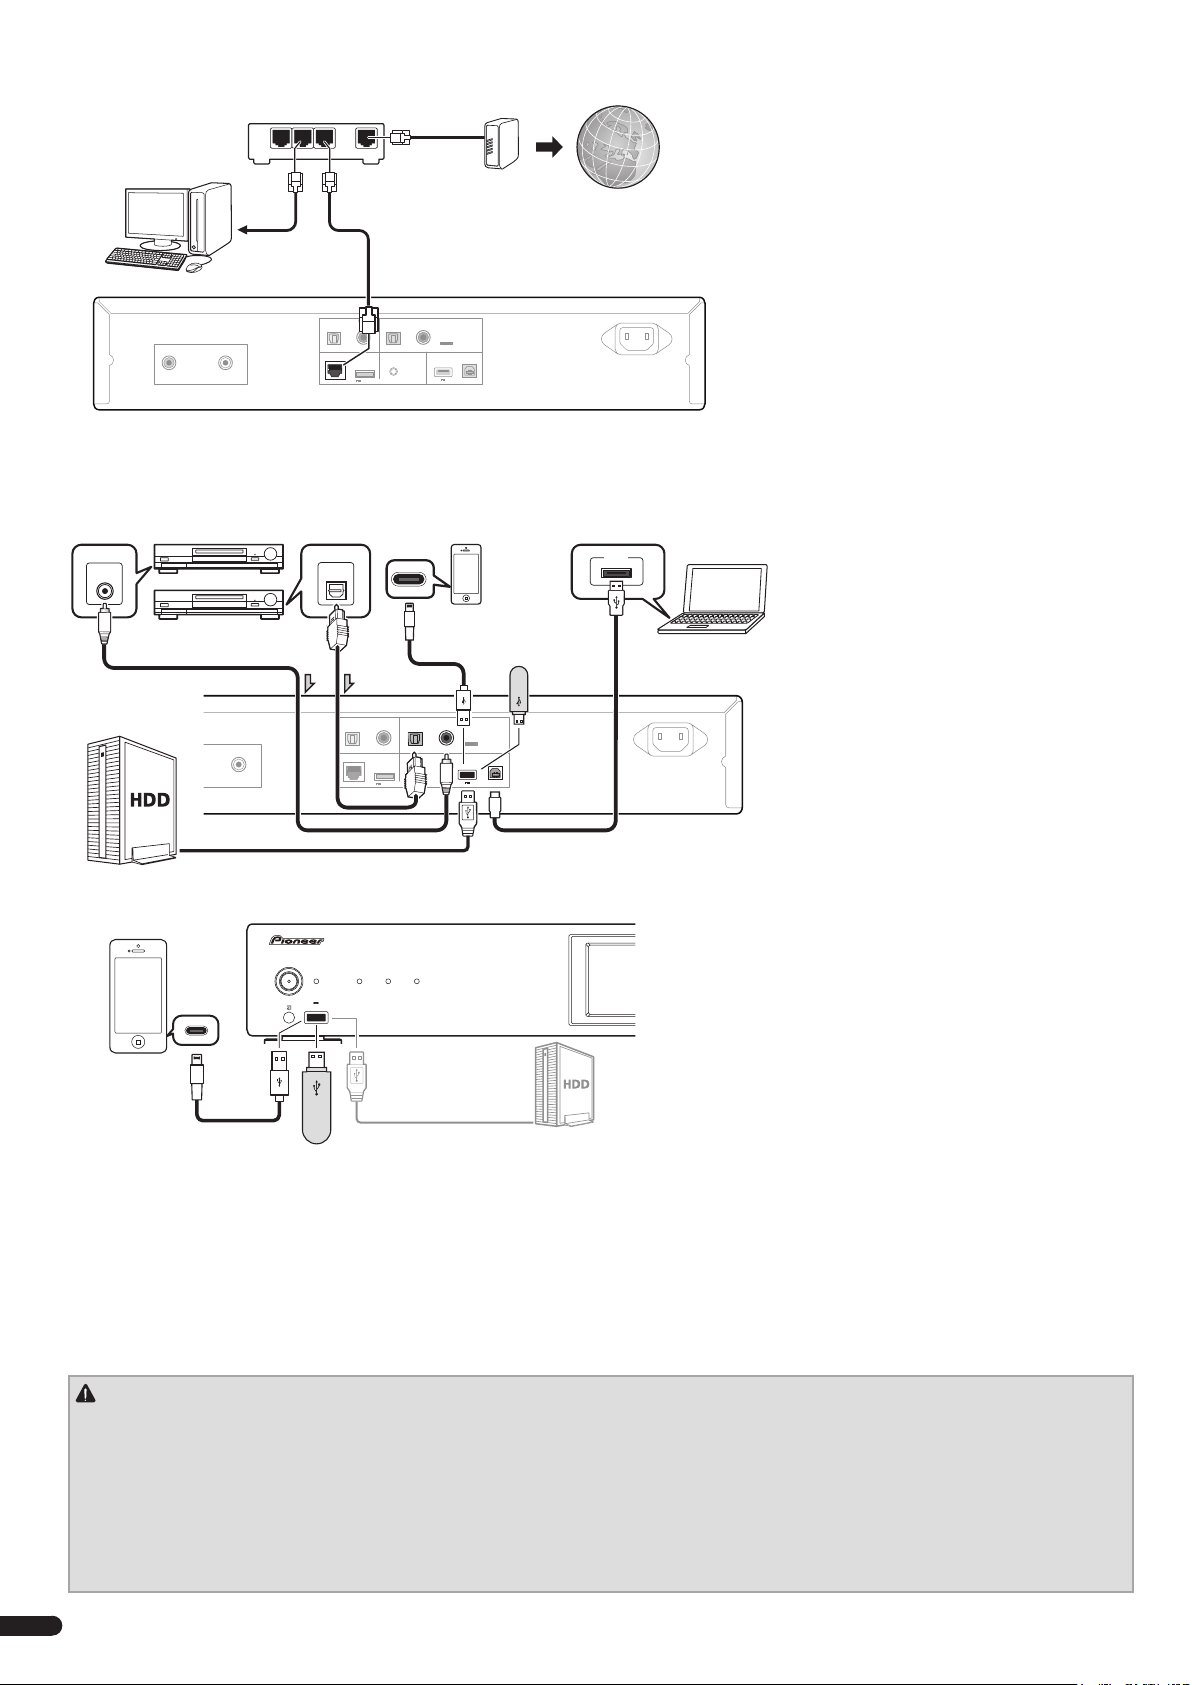
By connecting this unit to the network via the
LAN interface, you can play back audio files
stored on components on the network, including
your computer, and listen to Internet radio
stations.
Connect the LAN terminal on this unit to the
LAN terminal on your router (with or without the
built-in DHCP server function) with a straight
LAN cable (CAT 5 or higher).
Turn on the DHCP server function of your
AC IN
router. If your router does not have a built-in
DHCP server function, you have to set up the
network manually. For details, see the Operating
Instructions provided on the included CD-ROM.
N-50A
• Connect the digital audio output on a digital
USB
audio device to the DIGITAL IN 1 or DIGITAL
IN 2 terminal on the unit to playback a digital
audio signal.
• Connect a computer’s USB terminal with the
Computer
DIGITAL IN USB DAC terminal on the unit to
playback a digital audio signal.
– When using this connection to playback a
music file from a computer through the unit,
AC IN
the computer must have the special driver
installed. Please see the Pioneer website for
more details.
– You will not be able to input audio using the
unit if the connected computer does not
N-50A
have Media Player installed.
• We recommend that you connect the external
HDD to the back of this unit. When it is
connected to the front of this unit, it may take
time for the unit to recognize the external HDD
if switched to iPod/USB Front Function.
/I STANDBY/ON
STANDBY
DIRECT Hi-Bit 32 Up Sampling
5V 1A
iPod/iPhone
iPod/iPhone
External HDD*1,
and such
USB storage device
*1: Only those external HDD that was formatted as FAT32 and head partitioned can be used.
Plugging the unit
Only plug in after you have connected all your components to this unit.
1
Plug the supplied power cord into the AC IN socket on the back of the unit.
2
Plug the other end into a power outlet.
CAUTION
•Handle the power cord by the plug part. Do not pull out the plug by tugging the cord, and never touch the power cord when your hands are wet, as
this could cause a short circuit or electric shock. Do not place the unit, a piece of furniture, or other object on the power cord or pinch the cord in
any other way. Never make a knot in the cord or tie it with other cables. The power cords should be routed so that they are not likely to be stepped
on. A damaged power cord can cause a fire or give you an electric shock. Check the power cord once in a while. If you find it damaged, ask your
nearest Pioneer authorized independent service company for a replacement.
•Do not use any power cord other than the one supplied with this unit.
•Do not use the supplied power cord for any purpose other than that described below.
•The unit should be disconnected by removing the mains plug from the wall socket when not in regular use, e.g., when on vacation.
4
En
Page 5
Initial Setup
English
Before you start
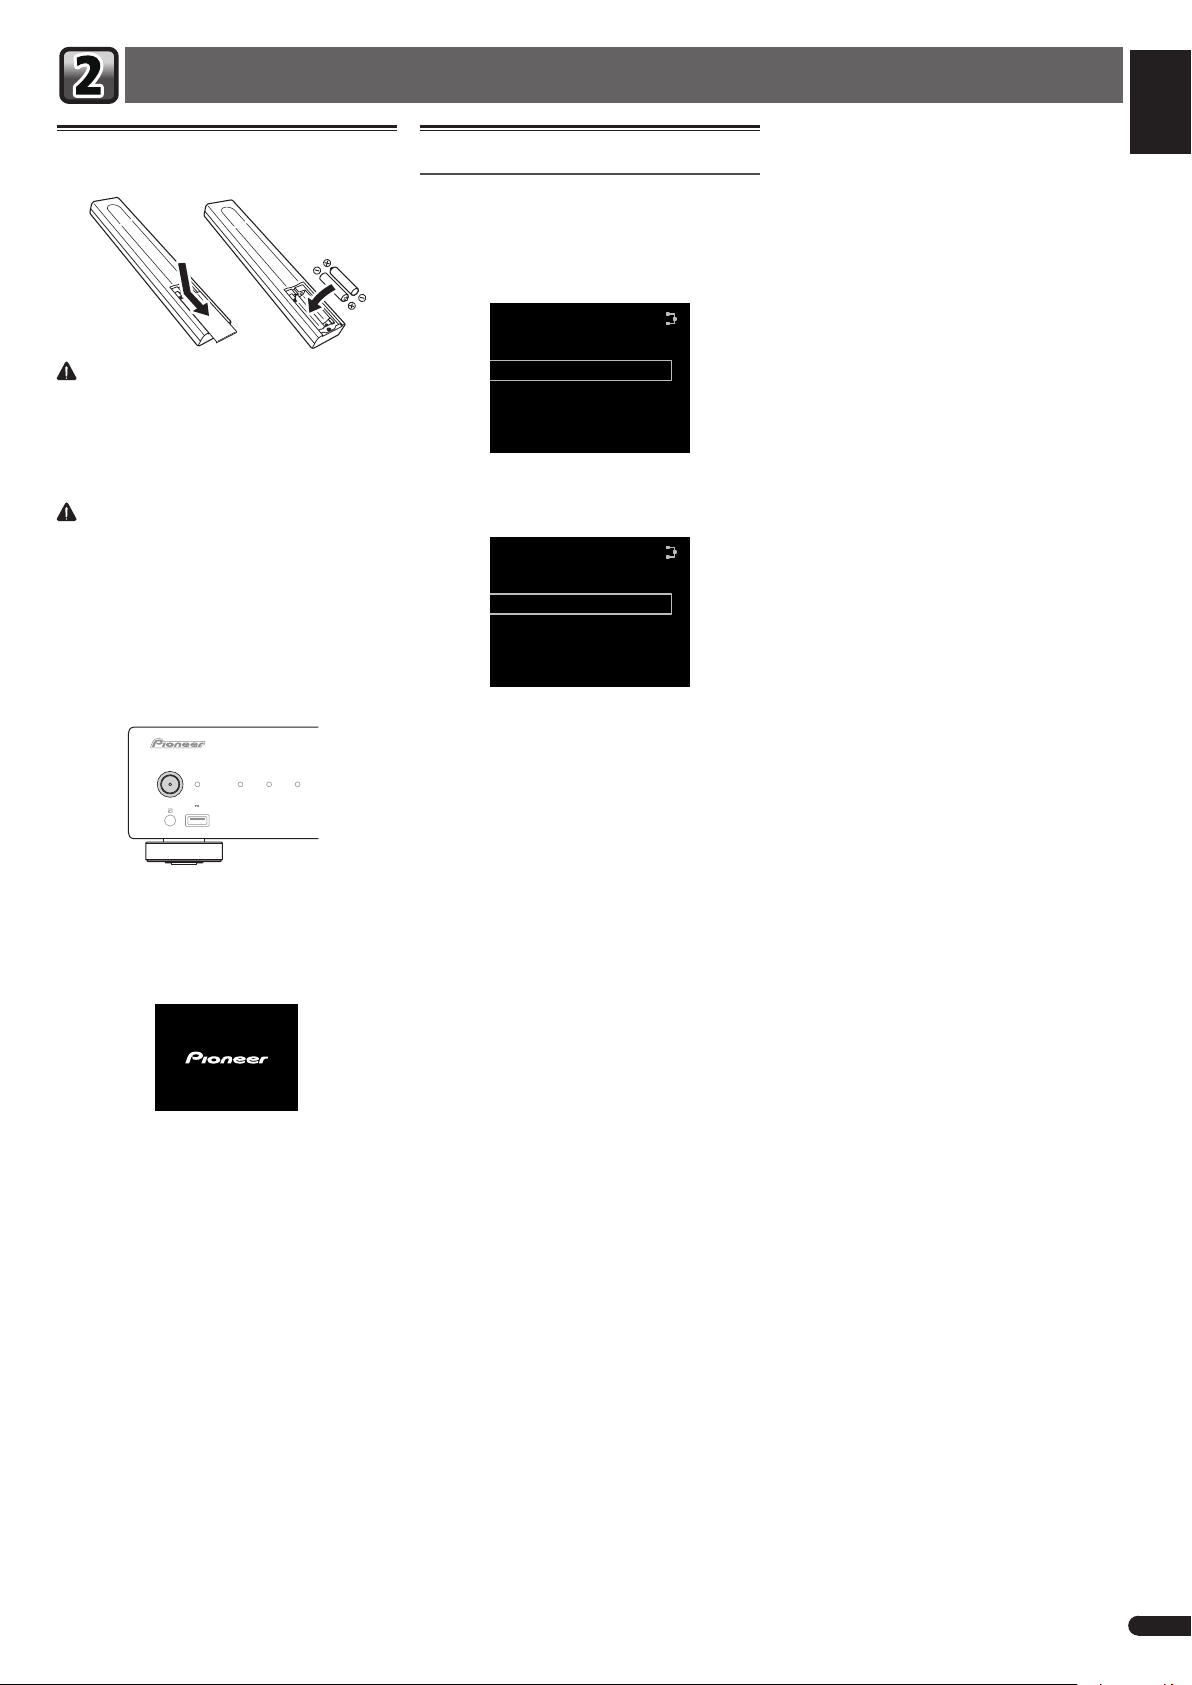
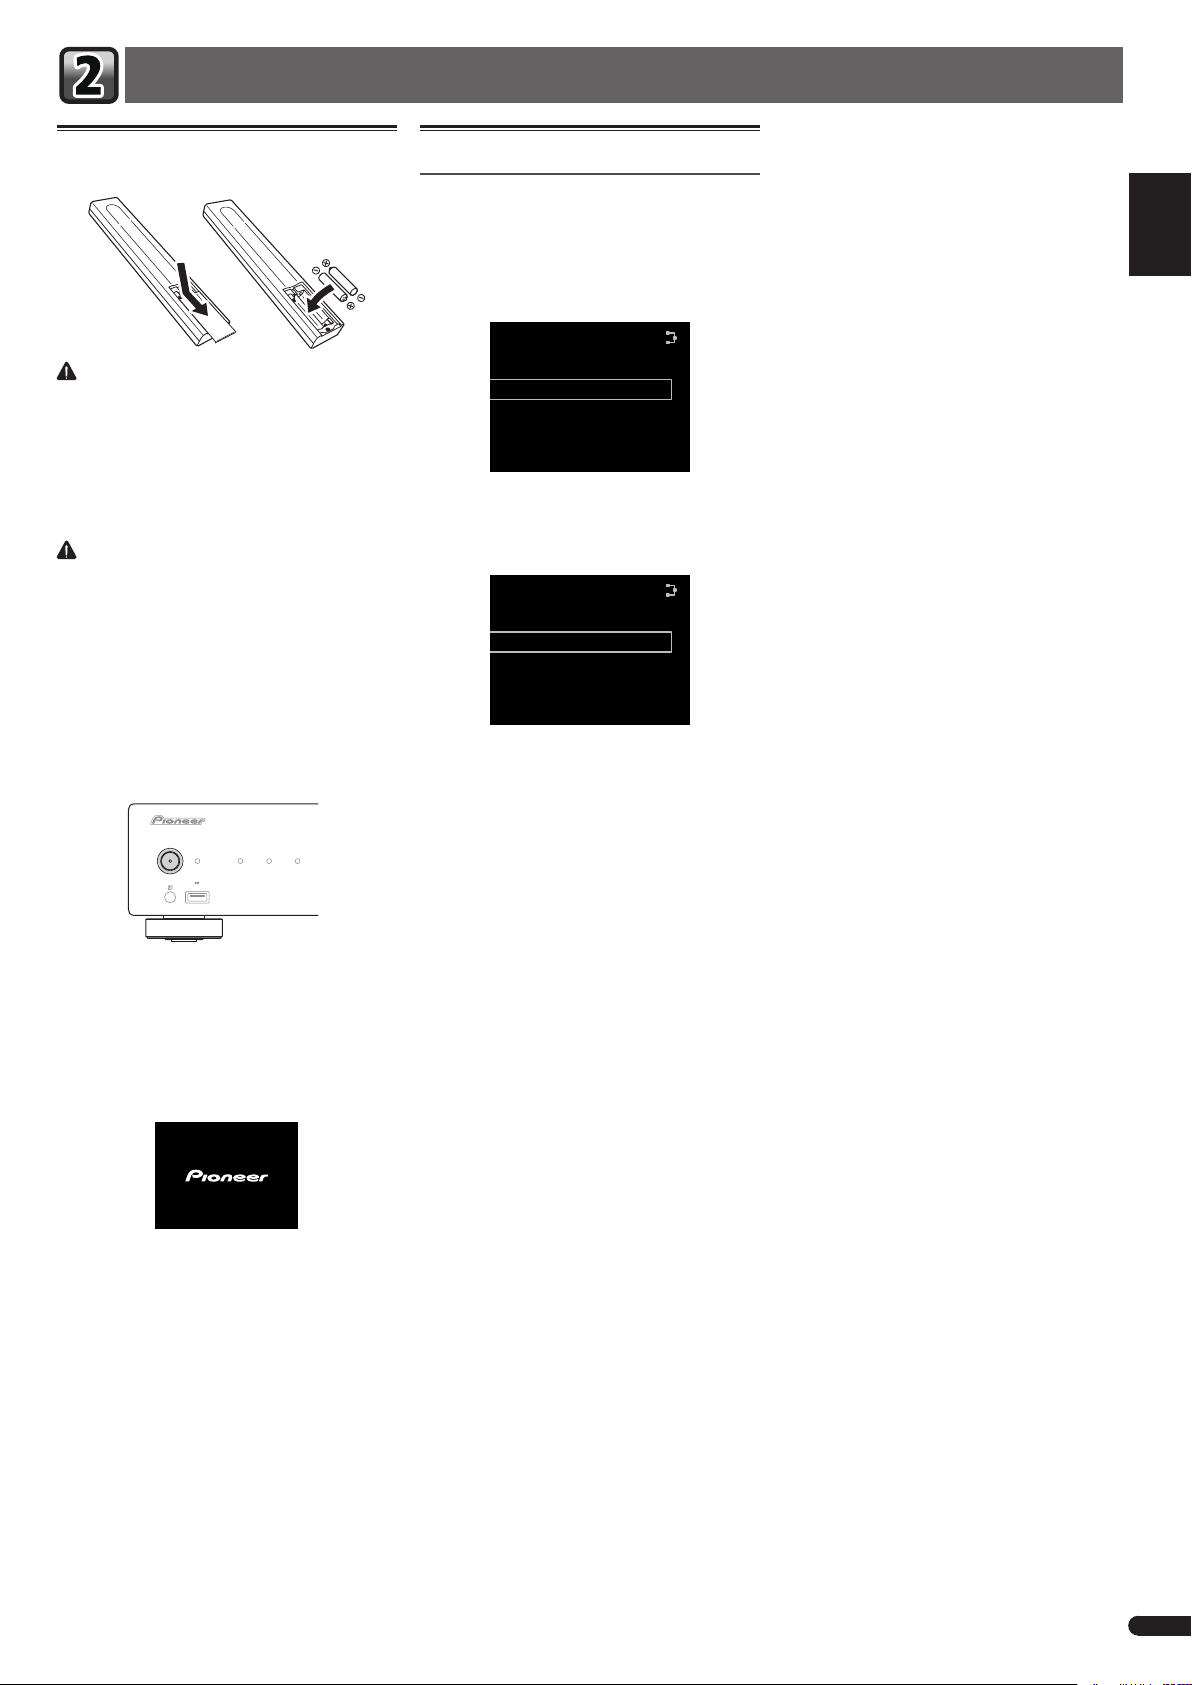
1
Loading the batteries.
WARNING
•Do not use or store batteries in direct sunlight
or other excessively hot place, such as
inside a car or near a heater. This can cause
batteries to leak, overheat, explode or catch
fire. It can also reduce the life or performance
of batteries.
CAUTION
•When disposing of used batteries, please
comply with governmental regulations or
environmental public institution’s rules that
apply in your country/area.
2
Switch on your system components and
this unit.
Start by switching on the playback component,
then this unit (press
on the front panel).
/I STANDBY/ON
/I STANDBY/ON
u
STANDBY
DIRECT Hi-Bit 32 Up Sampling
5V 1A
iPod/iPhone
button
Network setting
Automatic setting
1
Press SETUP.
Initial Setup
The
2
Select Network Setting Network
Configuration.
3
Use
ENTER.
Don’t Use Proxy Server
Select
If your router does not support DHCP, please
manually set the network settings. Please see
the operating instructions on the enclosed CDROM for more details.
screen is shown on the display.
Network Setting
Network Configuration
Friendly Name
to select DHCP On, then press
.
Network Configration
DHCP On
DHCP Off
Français
Deutsch
Italiano
Nederlands
Español
•The unit turns on. The button’s central power
indicator will flash slowly.
About twenty seconds after turning on the
power, the following screen appears. About
thirty seconds are required between turning
the power on and completion of startup.
5
En
Page 6
Basic Playback
LAN (10/100)
A
Playback with NETWORK feature
This unit is equipped with the LAN terminal
and you can enjoy the following features by
connecting your components to these terminals.
•Playback the music files stored in computers.
Playing audio files stored on
computers or other components
REPEAT
STANDBY/ON
DIRECT
A.S.R
iPod/USB
FRONT
MUSIC
SERVER
1
DIG IN 1
SOURCE SELECT
REPEAT
1
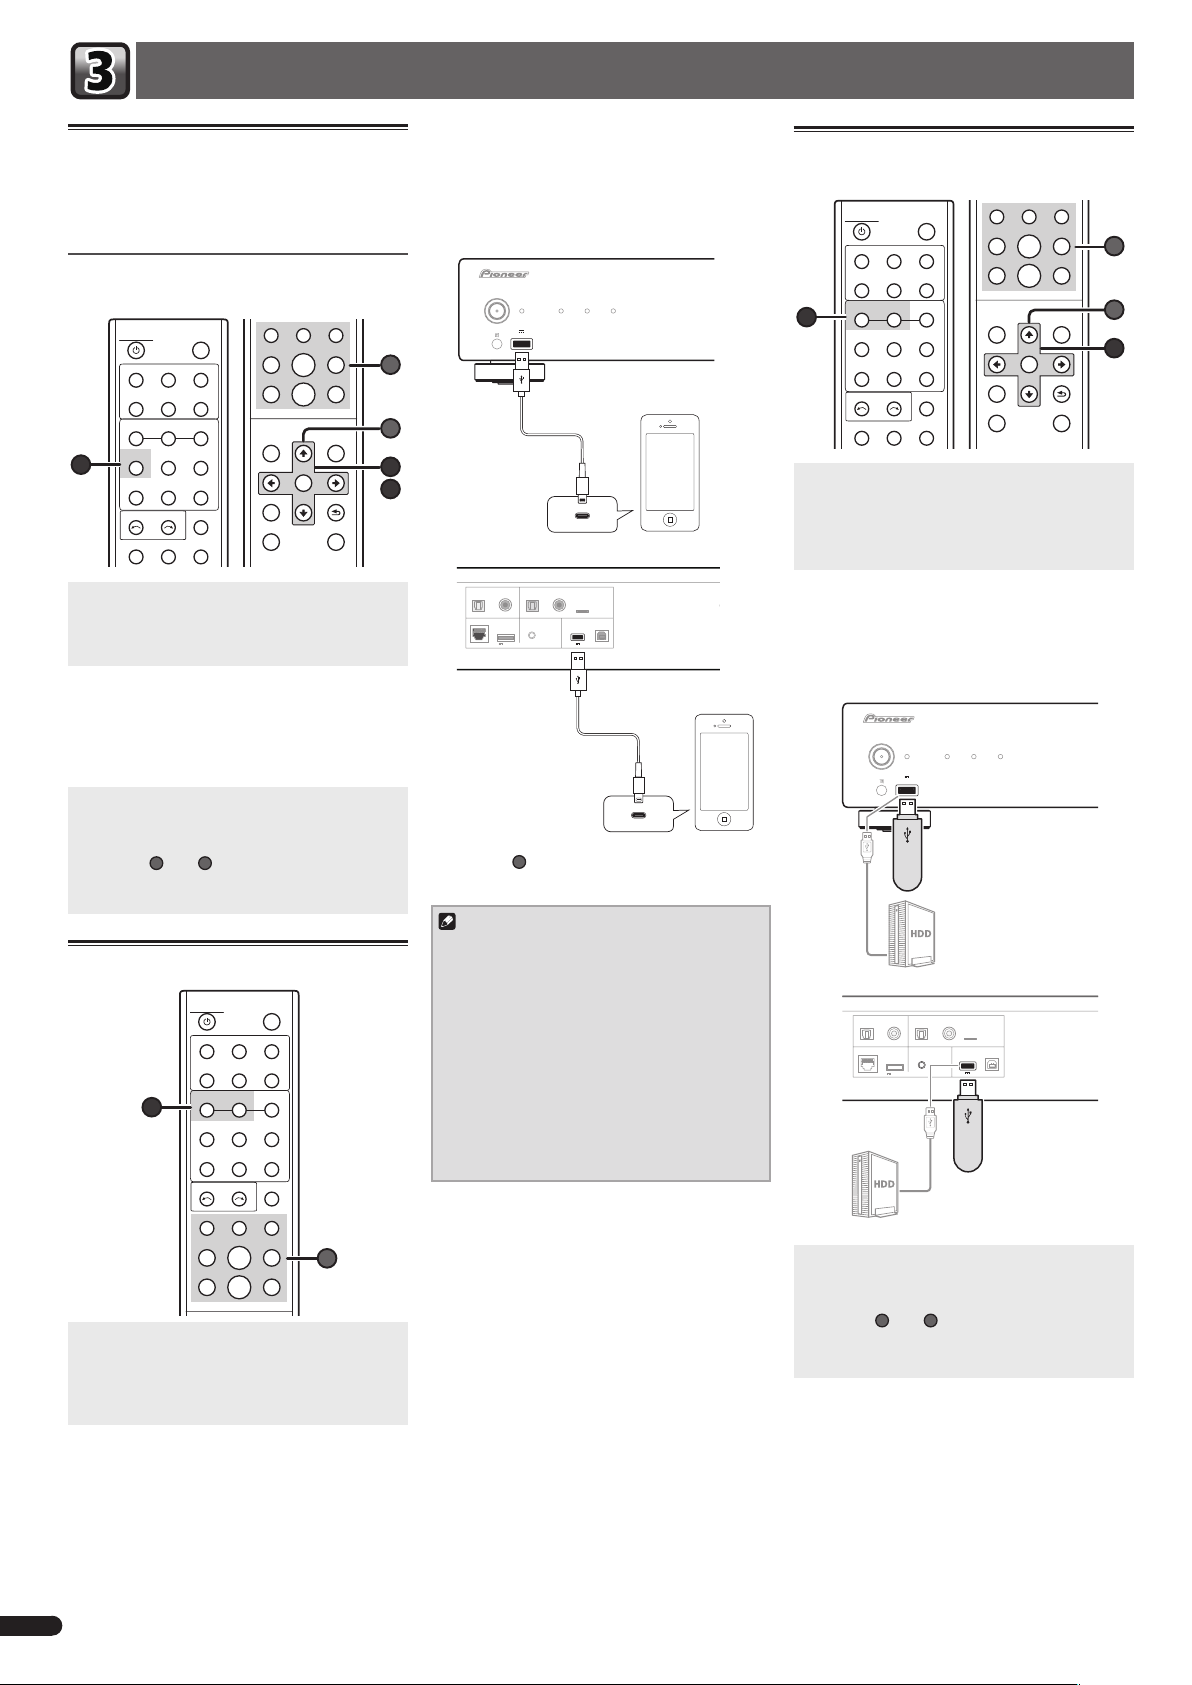
Press MUSIC SERVER to select Music
A.L.C
iPod/USB
REAR
NET
SERVICE
DIG IN 2
SHUFFLE
DISPLAY
Up SamplingHi-Bit32
SOUND
iPod
CONTROL
FAVORITES
USB DAC IN
DIMMER
SORT
Server as the input source.
•When no sever is available to play, "
wait...
" will be displayed.
2
Use
to select the server that the file
you want to play is stored on, then press
ENTER.
The folders/files stored on the server are shown
on the display.
3
Use
to select the file you want to
play, then press ENTER.
Playback starts.
A
•Some of
and B buttons can be used
for basic playback of music files stored on
components on the network.
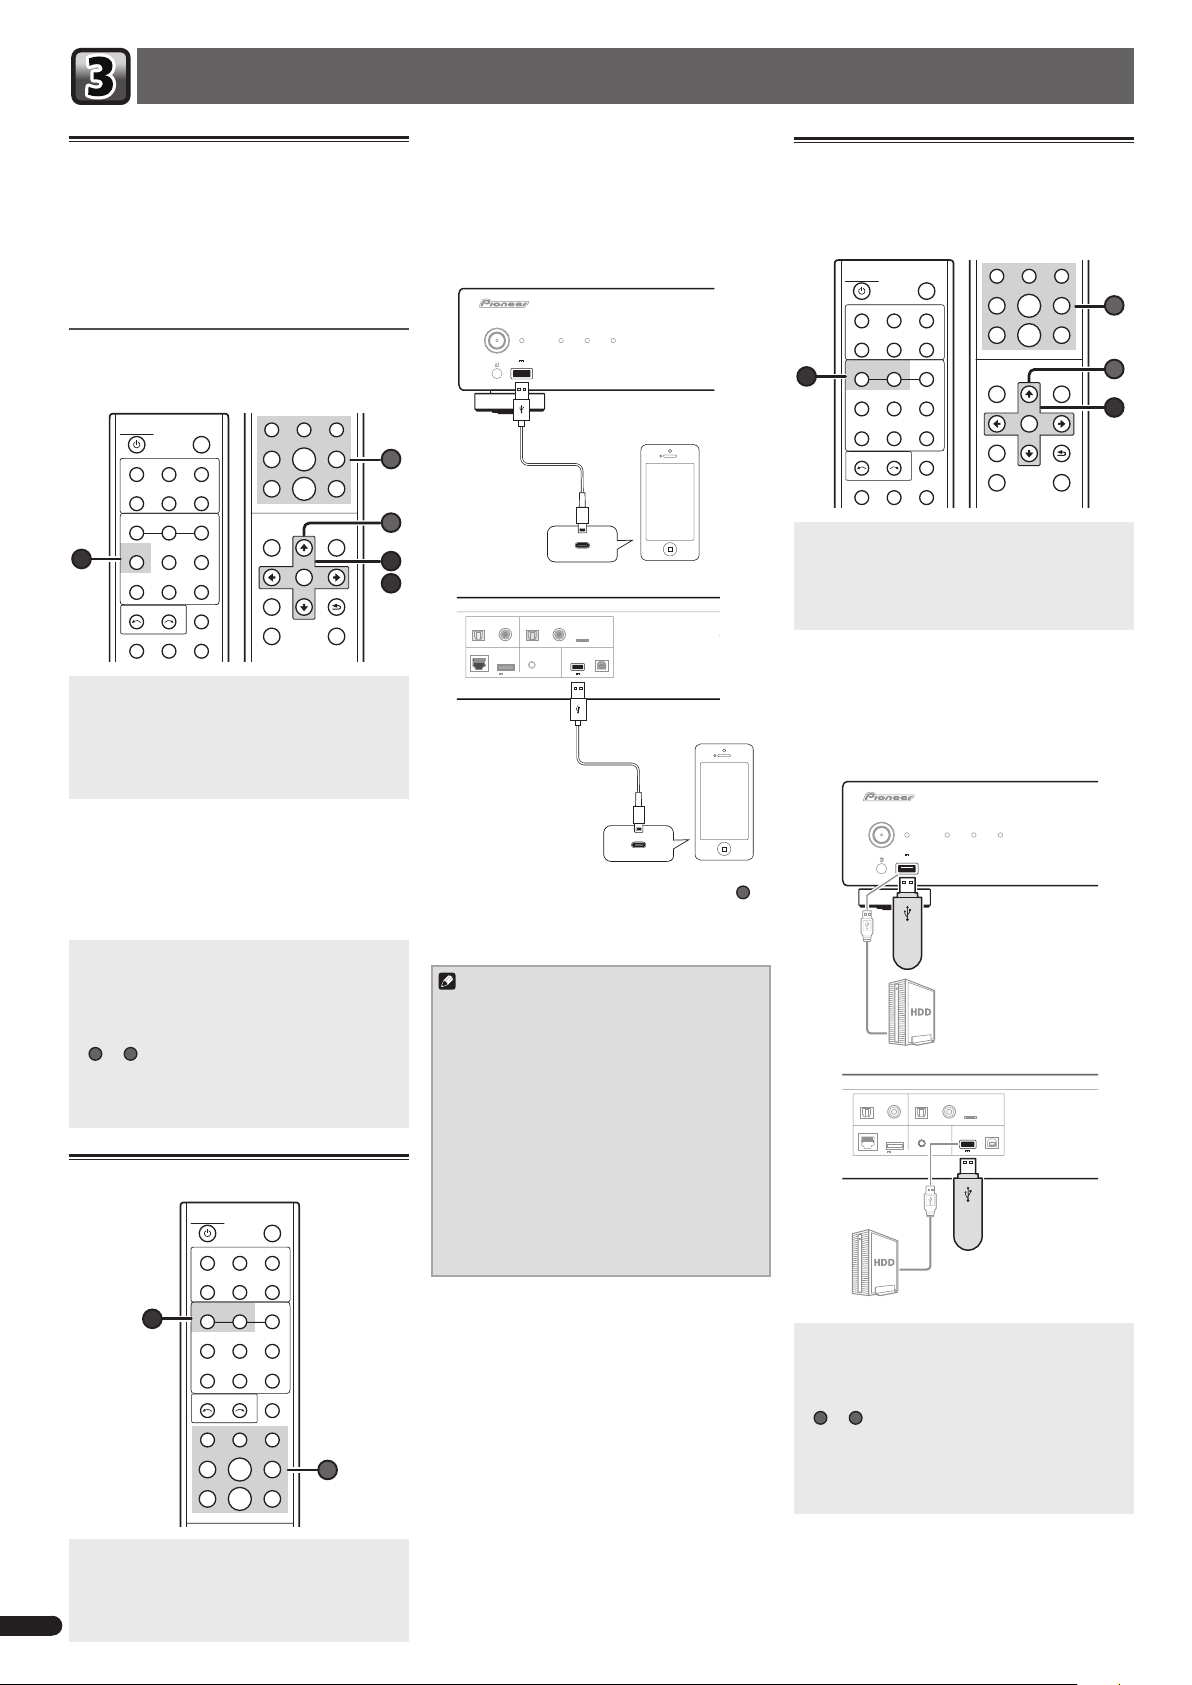
iPod/iPhone playback
STANDBY/ON
DIRECT
A.S.R
iPod/USB
iPod/USB
FRONT
1
MUSIC
SERVER
SERVICE
DIG IN 1
DIG IN 2
SOURCE SELECT
REPEAT
SHUFFLE
SHUFFLE SORT
MENU
SET UP
CLEAR
TOP
ENTER
NOW
PLAYNG
B
A
2
3
RETURN
+Favorite
Please
DISPLAY
Up SamplingHi-Bit32
SOUND
A.L.C
iPod
CONTROL
REAR
NET
FAVORITES
USB DAC IN
DIMMER
SORT
2
Connect your iPod/iPhone.
Connect your iPod/iPhone to the USB port
on the unit’s front or rear panel. Use the iPod
cable supplied with your iPod/iPhone for the
connection.
Front panel
/I STANDBY/ON
STANDBY DIRECT Hi-Bit 32
5V
iPod/iPhone
1A
Up Sampling
iPod/iPhone
Cable for iPod
Rear panel
DIGITAL OUT
DIGITAL IN
OPTICAL COAXIAL
CONTROL
OUT
12
iPod/iPhone
DIGITAL IN
5V 1A
USB DAC
OPTICALCOAXIAL
DC OUTPUT
WIRELESS
(5V 0.6A MAX)
For
LAN
iPod/iPhone
Cable for iPod
•Some of B buttons can be used for basic
playback of files stored on iPod/iPhone.
Note
•When the iPod/iPhone is connected to this
unit, the playback information for the songs
are displayed on the iPod/iPhone display.
Pressing
iPod CONTROL
button on the
remote will switch the display and display
the information on the front panel of the
unit.
•This unit supports AirPlay. For details, see
“Using AirPlay on iPod touch, iPhone, iPad,
and iTunes” of the operating instructions
and the Apple website (http://www.apple.
com).
Playing files stored on USB
storage devices/External HDDs
REPEAT
STANDBY/ON
DIRECT
A.S.R
iPod/USB
FRONT
1
MUSIC
SERVER
DIG IN 1
SOURCE SELECT
REPEAT
1
Press iPod/USB FRONT or iPod/USB REAR
A.L.C
iPod/USB
REAR
NET
SERVICE
DIG IN 2
SHUFFLE
DISPLAY
Up SamplingHi-Bit32
SOUND
iPod
CONTROL
FAVORITES
USB DAC IN
DIMMER
SORT
on the remote control to select USB as the
input source.
iPod/USB Front or iPod/USB Rear
the display.
2
Connect the USB storage device/External
HDD.
Connect your USB storage device/External HDD
to the USB port on the unit’s front or rear panel.
Front panel
u/I STANDBY/ON
STANDBY
DIRECT Hi-Bit 32 Up Sampling
5V 1A
iPod/iPhone
USB storage device
External HDD
Rear panel
DIGITAL OUT
DIGITAL IN
OPTICAL COAXIAL
OPTICAL COAXIAL
DC OUTPUT
LAN (10/100)
CONTROL
For
OUT
WIRELESS
LAN
(5V 0.6A MAX)
iPod/iPhone
External HDD
SHUFFLE SORT
TOP
MENU
ENTER
SET UP
CLEAR
+Favorite
is shown on
b
12
DIGITAL IN
5V 1A
USB DAC
USB storage device
NOW
PLAYNG
RETURN
B
A
3
1
Press iPod/USB FRONT or iPod/USB REAR
on the remote control to select iPod/USB
as the input source.
iPod/USB Front or iPod/USB Rear
the display.
6
En
B
3
Use
to select the file, then press
ENTER.
Playback starts.
•Some of
and B buttons can be used for
basic playback of files stored on USB storage
devices/External HDDs.
is shown on
Page 7
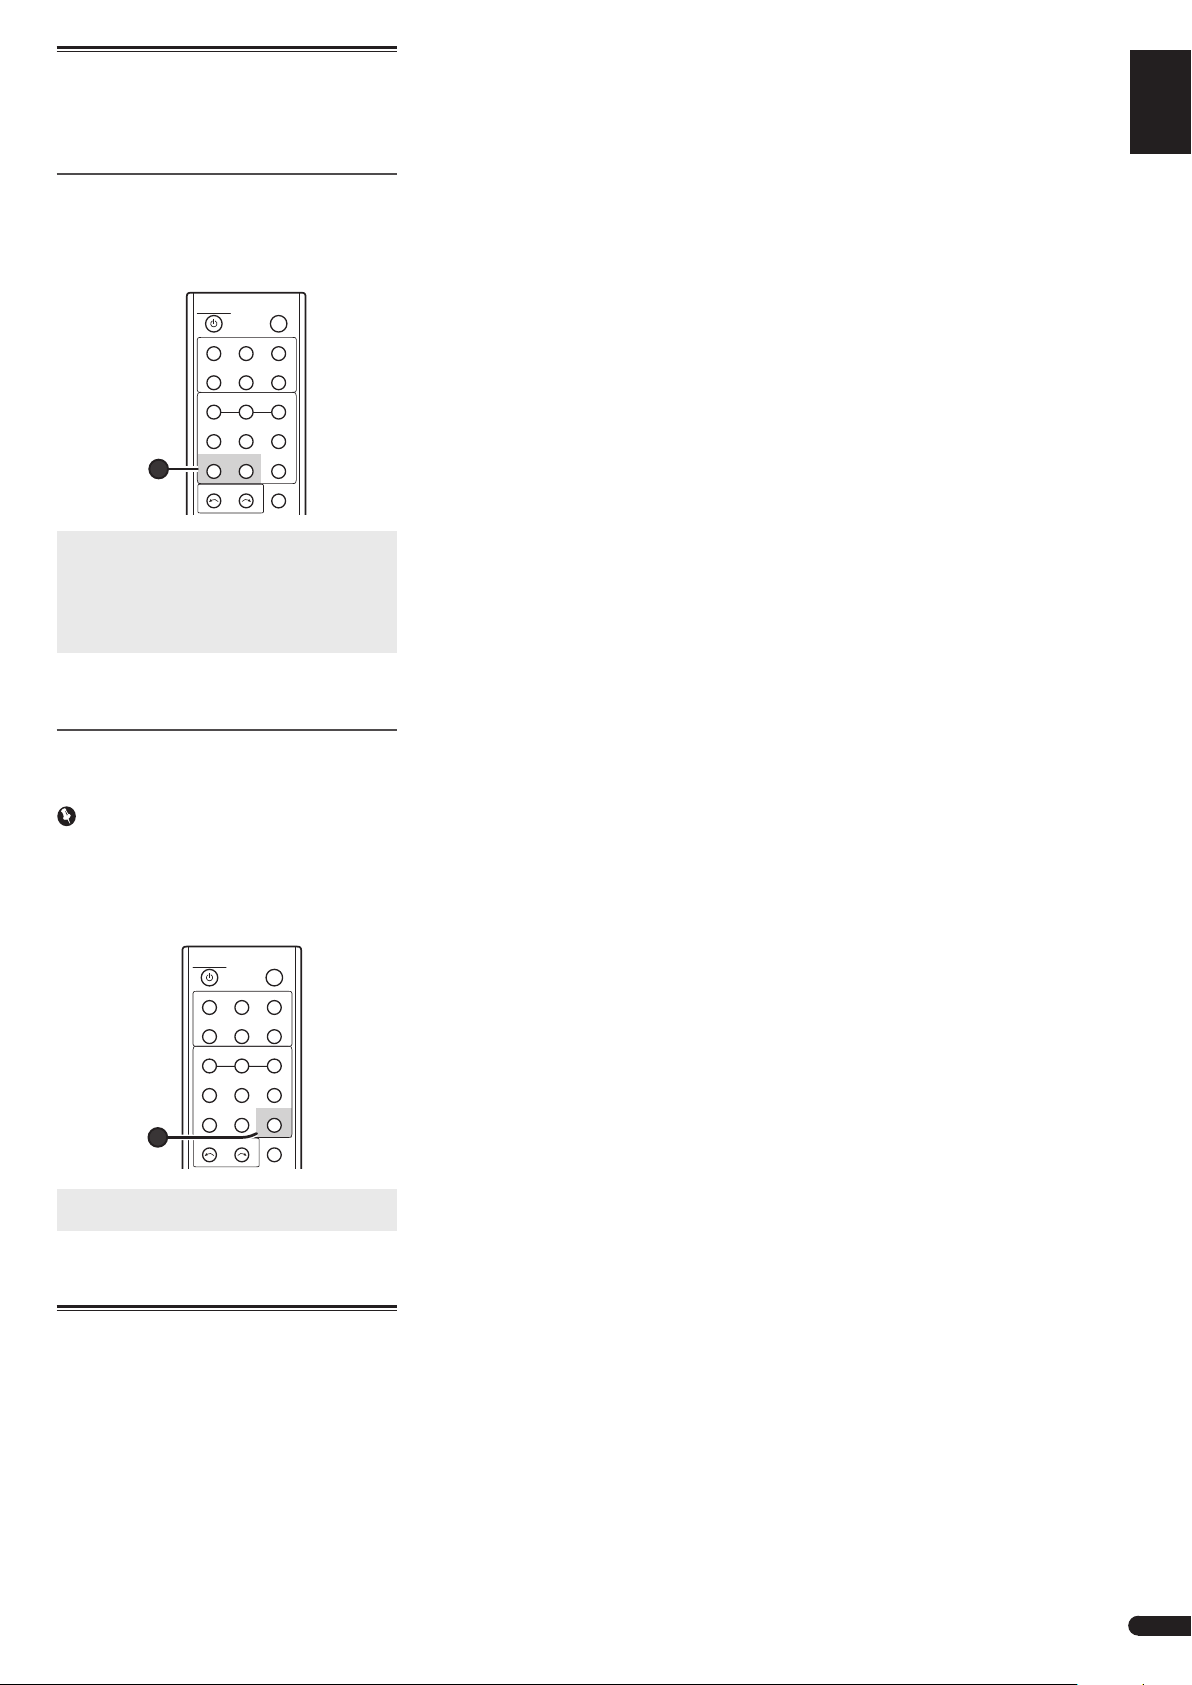
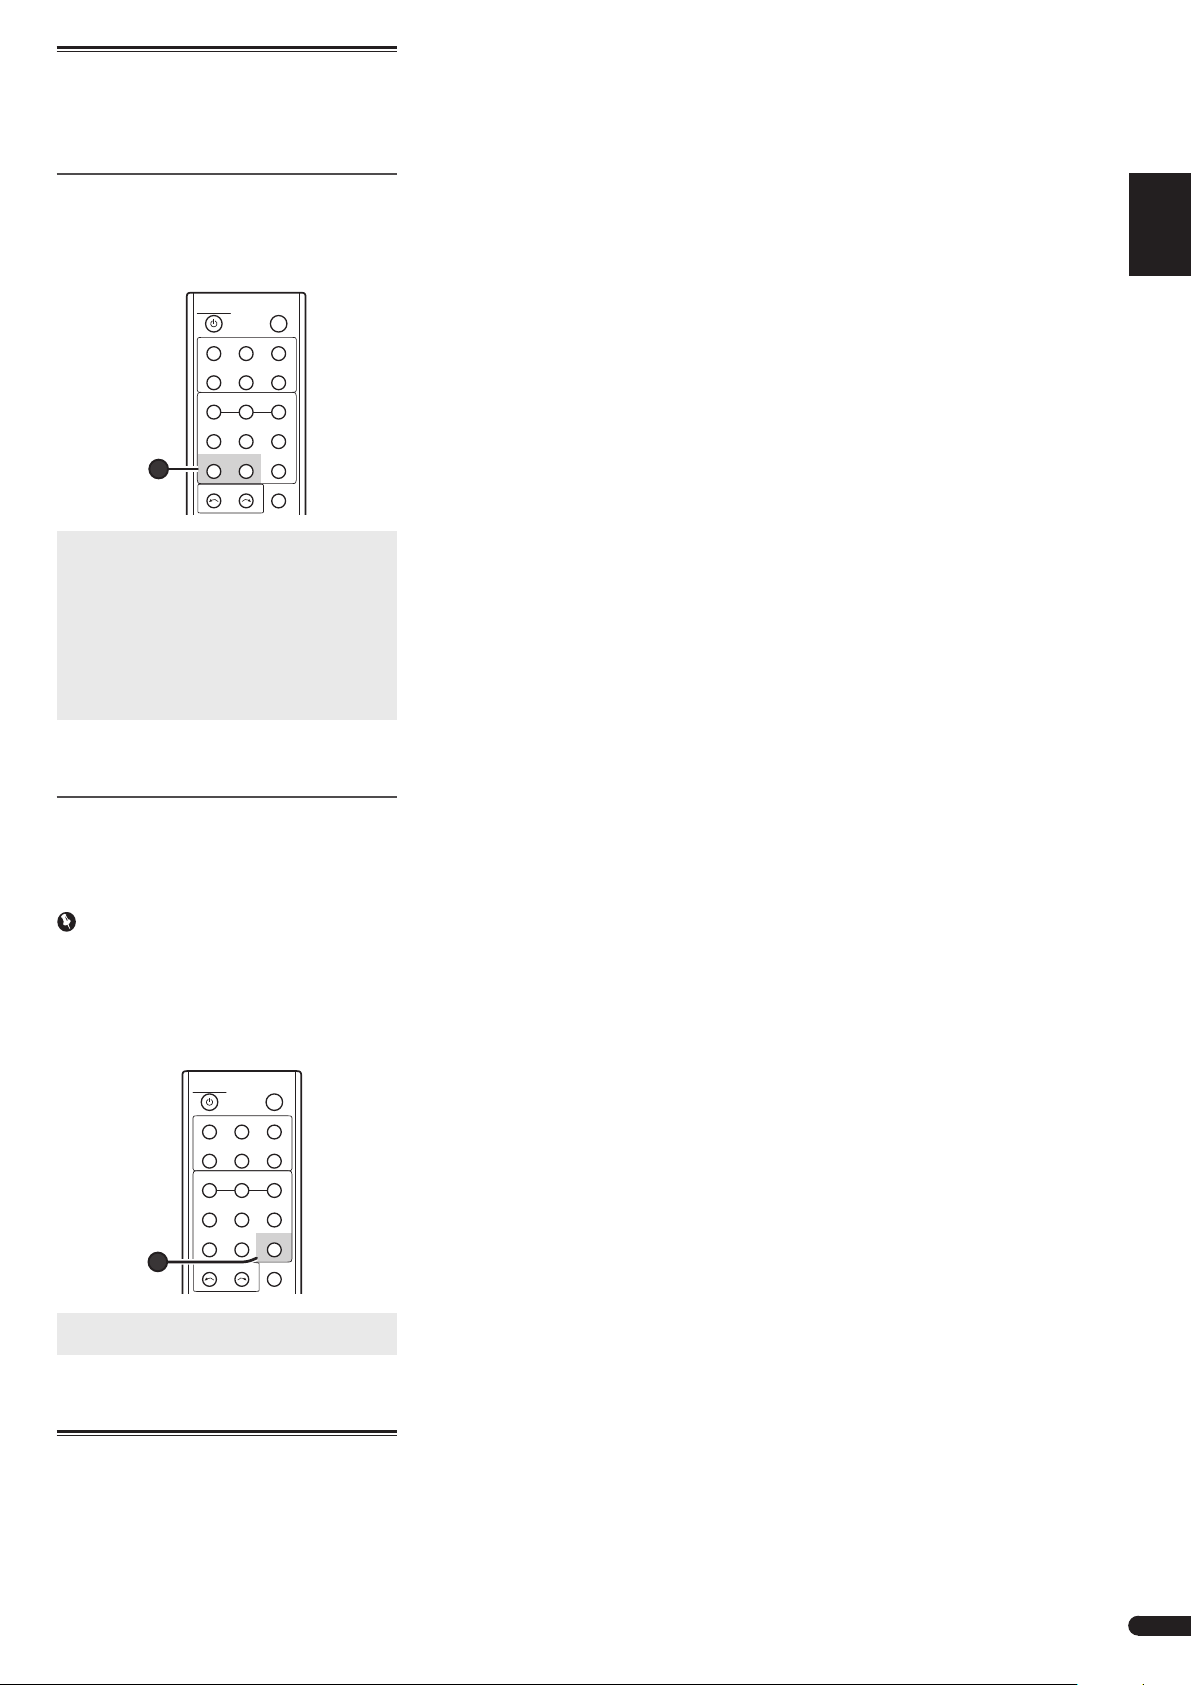
Using the D/A converter
Digital signals input to the rear-panel
IN 1, DIGITAL IN 2
DIGITAL IN USB DAC
or
connectors are converted to analog signals and
output from the
ANALOG OUT
Playing music from a digital audio
component
Outputs digital signals input to the
IN 1 (COAXIAL)
connectors.
DIGITAL IN 2 (OPTICAL)
or
STANDBY/ON
DIRECT
A.L.C
A.S.R
iPod/USB
iPod/USB
REAR
FRONT
NET
MUSIC
SERVICE
SERVER
DIG IN 2
DIG IN 1
1
SOURCE SELECT
DIGITAL
connectors.
DIGITAL
DISPLAY
Up SamplingHi-Bit32
SOUND
iPod
CONTROL
FAVORITES
USB DAC IN
DIMMER
English
Français
Deutsch
Italiano
1
Press DIG IN 1 or DIG IN 2 to select Digital
In 1 or Digital In 2 as the input source.
Digital In 1
When
signals from the
Digital In 2
when
signals from the
2
Begin playback on the digital audio
is selected, digital input
COAXIAL
connector are played;
is selected, digital input
OPTICAL
connector are played.
equipment.
Playing music from a computer
Use this function to play digital audio input to
the unit's rear panel
Important
•When using the
input audio files from a computer to this unit,
it may be necessary to install a special driver
on the computer. For details, see the website
of Pioneer.
DIGITAL IN USB DAC
DIGITAL IN USB DAC
STANDBY/ON
DIRECT
A.L.C
A.S.R
iPod/USB
iPod/USB
REAR
FRONT
NET
MUSIC
SERVICE
SERVER
DIG IN 2
DIG IN 1
1
SOURCE SELECT
DISPLAY
Up SamplingHi-Bit32
SOUND
iPod
CONTROL
FAVORITES
USB DAC IN
DIMMER
port.
port to
Nederlands
Español
1
Press USB DAC IN select USB DAC IN as
the input source.
2
Begin playback on the computer.
Using Headphone (N-70A only)
You can also enjoy listening to music by
connecting headphones.
© 2014 PIONEER HOME ELECTRONICS CORPORATION.
All rights reserved.
7
En
Page 8
Français
Configuration du lecteur réseau audio
iPod/iPhone
Périphérique de
stockage USB
Disque dur
externe
Ordinateur
3
/I STANDBY/ON
STANDBY
5V 1A
iPod/iPhone
3
Équipement audio numérique
Récepteur AV, convertisseur
numérique/analogique, etc.
1
DIRECT Hi-Bit 32 Up Sampling
Ce lecteur réseau audio
Amplificateur
SOURCE
SOURCE
N-70A
4
NETWORK AUDIO PLAYER
N-50A
N-50A
Internet
2
Routeur
LAN
321
au port LAN
PRÉCAUTION DE VENTILATION
Lors de l’installation de l’appareil, veillez à laisser un
espace suffisant autour de ses parois de manière à
améliorer la dissipation de chaleur (au moins 10 cm sur
le dessus, 10 cm à l’arrière et 10 cm de chaque côté).
WAN
Modem
Ordinateur
D3-4-2-1-7d*_A1_Fr
Connexion
–1 Connexion à l’amplificateur
–2 Connexion au réseau
–3 Connexion des composants de lecture
–4 Branchement à une prise secteur
Congurationinitiale
– Préparatifs
– Configuration réseau
Lecturedebase
– Utilisation de la fonction de lecture réseau (NETWORK)
– Lecture par un iPod/iPhone
– Lecture de fichiers enregistrés sur des périphériques de stockage USB/Disques durs externes
– Utilisation du convertisseur N/A
– Utilisation avec un casque (N-70A uniquement)
2
Fr
Page 9
Connexion
Connexion à l’amplificateur
English
•Veillez à mettre l’appareil hors tension et à débrancher le cordon d’alimentation de la prise secteur à chaque fois que vous effectuez ou que vous
modifiez des connexions.
•Branchez le cordon d’alimentation une fois que toutes les connexions entre les différents équipements ont été effectuées.
N-70A
En connectant la sortie audio
numérique de cet appareil à
l’entrée audio numérique d’un
récepteur AV, d’un convertisseur
numérique/analogique, etc., vous
pouvez utiliser l’amplificateur
pour restituer une source audio
numérique provenant de cet
appareil.
En connectant la sortie audio
analogique de cet appareil à
l’entrée audio analogique d’un
amplificateur, vous pouvez
restituer une source audio
analogique provenant de cet
appareil.
Ampli/pré-ampli etc,
équipé de connecteurs
d’entrée symétrique
RL
Connexions de sortie
audio analogique
DIGITAL IN
COAXIAL
Récepteur AV,
convertisseur numérique/
analogique, etc.
ANALOG OUT
R
L
DIGITAL OUT
OPTICAL
COAXIAL
DC OUTPUT
LAN (10/100)
For
WIRELESS
LAN
(5V 0.6A MAX)
AUDIO INPUT
RL
ANALOG
DIGITAL IN
OPTICAL
Récepteur AV,
convertisseur
numérique/
analogique, etc.
OPTIC
CONTR
OUT
Ampli/pré-ampli équipé
de connecteurs d’entrée
RCA
Français
Deutsch
Italiano
Nederlands
Español
Remarque
Il est possible d’effectuer un réglage de la polarité pour que le signal de l’appareil soit équilibré
avec l’équipement connecté. Pour plus d’informations, veuillez consultez le Mode d’emploi sur le
CD-ROM fourni.
N-50A
ANALOG OUT
R
L
Connexions de sortie
audio analogique
OPTICAL
LAN (10/100)
DIGITAL OUT
COAXIAL
DC OUTPUT
WIRELESS
(5V 0.6A MAX)
For
LAN
DIGITAL IN
COAXIAL
DIGITAL IN
OPTICAL COAXIAL
CONTROL
OUT
Récepteur AV,
convertisseur numérique/
analogique, etc.
12
DIGITAL IN
iPod/iPhone
5V 1A
USB DAC
DIGITAL IN
OPTICAL
AUDIO INPUT
RL
ANALOG
Récepteur AV,
convertisseur
numérique/
analogique, etc.
Connexions de sortie
audio numérique
Amplificateur
En connectant la sortie audio
numérique de cet appareil à
l’entrée audio numérique d’un
récepteur AV, d’un convertisseur
numérique/analogique, etc., vous
pouvez utiliser l’amplificateur
pour restituer une source audio
numérique provenant de cet
appareil.
En connectant la sortie audio
analogique de cet appareil à
l’entrée audio analogique d’un
amplificateur, vous pouvez
restituer une source audio
analogique provenant de cet
appareil.
3
Fr
Page 10
Connexion au réseau via l’interface LAN
Router
Routeur
LAN
321
WAN
Modem
Internet
Ordinateur
AC IN
R
ANALOG OUT
DIGITAL OUT
L
OPTICAL
LAN (10/100)
COAXIAL
DC OUTPUT
For
WIRELESS
LAN
(5V 0.6A MAX)
DIGITAL IN
OPTICAL COAXIAL
CONTROL
OUT
12
iPod/iPhone
5V 1A
DIGITAL IN
USB DAC
N-50A
Connexion des composants de lecture
DIGITAL IN
COAXIAL
Équipement audio
numérique, etc.
Disque dur externe
HDD*1, etc.
LOG OUT
L
/I STANDBY/ON
STANDBY
5V 1A
iPod/iPhone
DIGITAL IN
OPTICAL
OPTICAL
LAN (10/100)
DIGITAL OUT
COAXIAL
OPTICAL COAXIAL
DC OUTPUT
CONTROL
For
OUT
WIRELESS
LAN
(5V 0.6A MAX)
DIRECT Hi-Bit 32 Up Sampling
iPod/iPhone
Périphérique de
stockage USB
DIGITAL IN
12
DIGITAL IN
iPod/iPhone
5V 1A
USB
Type A
Ordinateur
AC IN
USB DAC
Type B
N-50A
En connectant cet appareil au réseau via
l’interface LAN, vous pouvez lire des fichiers
audio stockés sur d’autres composants du
réseau, tels que votre ordinateur, ou encore
écouter des stations de radio Internet.
Raccordez la borne LAN de cet appareil sur la
borne LAN de votre routeur (avec ou sans la
fonction de serveur DHCP incorporée) au moyen
d’un câble LAN (CAT 5 ou supérieur).
Mettez la fonction de serveur DHCP de votre
routeur en service. Si votre routeur ne possède
pas de fonction de serveur DHCP intégrée,
vous devrez configurer les paramètres réseau
manuellement. Pour plus d’informations, veuillez
consultez le Mode d’emploi sur le CD-ROM
fourni.
• Connectez la sortie audio numérique d’un
équipement audio numérique à la prise
DIGITAL IN 1 ou DIGITAL IN 2 de l’appareil
pour lire un signal audio numérique.
• Connectez la prise USB d’un ordinateur à la
prise DIGITAL IN USB DAC de l’appareil pour
lire un signal audio numérique.
– Lors de l’utilisation de cette connexion pour
lire des fichiers audio sur cet appareil à
partir d’un ordinateur, un pilote spécial doit
être installé sur l’ordinateur. Veuillez visiter
le site Web Pioneer pour plus d’informations.
– Il n’est pas possible de lire des fichiers audio
sur cet appareil à partir d’un ordinateur si
le Lecteur Windows Media n’est pas installé
sur l’ordinateur.
• Nous vous recommandons de connecter
le disque dur externe à la prise USB située
à l’arrière de l’appareil. Le fait d’utiliser
la prise USB située à l’avant de l’appareil
pour connecter un disque dur externe peut
demander un certain temps à l’appareil pour
reconnaître le disque dur externe sur l’entrée
iPod/USB Front.
iPod/iPhone
Disque dur externe
HDD*1, etc.
Périphérique de stockage USB
*1: Seuls les disques durs externes comportant une partition principale et formatés selon le système
de fichiers FAT32 peuvent être utilisés.
Branchement à une prise secteur
Ne branchez l’appareil au secteur qu’après avoir raccordé tous les équipements voulus à l’appareil.
1
Branchez le cordon d’alimentation fourni à la prise AC IN située à l’arrière de l’appareil.
2
Enfichez l’autre extrémité dans une prise électrique.
ATTENTION
•Tenez le cordon d’alimentation par sa prise lorsque vous le manipulez. Ne débranchez pas l’appareil en tirant sur le cordon et ne touchez jamais le
cordon d’alimentation avec les mains mouillées ; vous pourriez provoquer un court-circuit ou prendre un choc électrique. Ne placez pas l’appareil,
un meuble ou tout autre objet sur le cordon d’alimentation, et évitez de le pincer de toute autre manière. Ne faites jamais de nœud dans le cordon
et ne le liez jamais avec d’autres câbles. Les cordons d’alimentation doivent être acheminés de façon à ce qu’on ne puisse pas marcher dessus. Un
cordon d’alimentation endommagé peut provoquer un incendie ou un choc électrique. Vérifiez l’état du cordon de temps à autre. Si le cordon est
endommagé, demandez-en le remplacement auprès du service après-vente agréé Pioneer le plus proche.
•N’utilisez aucun autre cordon d’alimentation que celui fourni avec cet appareil.
•N’utilisez pas le cordon d’alimentation fourni à d’autres fins que celles décrites ci-dessous.
•L’appareil doit être débranché en retirant le connecteur du cordon d’alimentation de la prise secteur en cas de période prolongée de non utilisation
(par exemple, avant un départ en vacances).
4
Fr
Page 11
Configuration initiale
English
Préparatifs
1
Chargement des piles.
AVERTISSEMENT
•N’utilisez, ni ne conservez vos piles à la
lumière directe du soleil ou dans un endroit
fortement exposé à la chaleur, comme une
voiture ou à proximité d’un appareil de
chauffage. Les piles risqueraient de suinter,
surchauffer, exploser ou s’enflammer. La
durée de vie et la performance des piles
peuvent également être réduites.
ATTENTION
•Lorsque vous éliminez des piles/batteries
usées, veuillez vous conformer aux normes
gouvernementales ou aux règles des
institutions publiques environnementales en
vigueur dans votre pays ou région.
2
Mettez sous tension les équipements
connectés puis cet appareil.
Commencez par mettre sous tension
l’équipement de lecture, puis cet appareil
(appuyez sur le bouton
l’avant de l’appareil).
/I STANDBY/ON
/I STANDBY/ON
u
STANDBY
DIRECT Hi-Bit 32 Up Sampling
5V 1A
iPod/iPhone
à
Configuration réseau
Conguration automatique
1
Appuyez sur SETUP.
Initial Setup
L’écran
apparaît à l’affichage.
2
Sélectionnez Network Setting Network
Configuration.
3
Utilisez les touches
DHCP On, puis appuyez sur ENTER.
Sélectionnez
utiliser de serveur Proxy).
Si votre routeur ne prend pas en charge
le protocole DHCP, veuillez configurer
manuellement les paramètres réseau. Pour
plus d’informations, veuillez consultez le Mode
d’emploi sur le CD-ROM fourni.
(configuration initiale)
Network Setting
Network Configuration
Friendly Name
pour sélectionner
Don’t Use Proxy Server
Network Configration
DHCP On
DHCP Off
(ne pas
Français
Deutsch
Italiano
Nederlands
Español
•L’appareil est mis sous tension. Le voyant
intégré au bouton se met à clignoter
lentement.
Environ vingt secondes après avoir mis
l’appareil sous tension, l’écran suivant
apparaît. L’opération de démarrage prend
environ trente secondes à partir de la mise
sous tension.
5
Fr
Page 12
LAN (10/100)
Lecture de base
Utilisation de la fonction de
lecture réseau (NETWORK)
Cet appareil est équipé d’une prise réseau LAN,
qui vous permet de bénéficier des fonctionnalités
suivantes en connectant vos équipements à
cette prise.
•Lecture de fichiers de musique stockés sur
des ordinateurs.
Lecture de fichiers audio stockés
sur des ordinateurs ou sur d’autres
équipements
REPEAT
STANDBY/ON
DIRECT
A.S.R
iPod/USB
FRONT
MUSIC
SERVER
1
DIG IN 1
SOURCE SELECT
REPEAT
1
Appuyez sur la touche MUSIC SERVER
A.L.C
iPod/USB
REAR
NET
SERVICE
DIG IN 2
SHUFFLE
DISPLAY
Up SamplingHi-Bit32
SOUND
iPod
CONTROL
FAVORITES
USB DAC IN
DIMMER
SORT
de la télécommande pour sélectionner
l’entrée Music Server.
•Si aucun serveur n’est disponible pour
la lecture, l’indication «
apparaît.
2
Utilisez les touches
le serveur sur lequel le fichier que vous
souhaitez lire est stocké, puis appuyez sur
ENTER.
Les dossiers/fichiers stockés sur le serveur
apparaissent sur l’affichage.
3
Utilisez les touches
le fichier que vous désirez lire, puis
appuyez sur ENTER.
La lecture commence.
•Certaines touches des groupes de touches
A
et B de la télécommande peuvent être
utilisées pour les opérations de lecture de
base de fichiers de musique stockés sur un
équipement connecté au réseau.
Lecture par un iPod/iPhone
STANDBY/ON
DIRECT
A.S.R
iPod/USB
iPod/USB
FRONT
1
MUSIC
SERVER
SERVICE
DIG IN 1
DIG IN 2
SOURCE SELECT
REPEAT
SHUFFLE
SHUFFLE SORT
TOP
MENU
ENTER
SET UP
CLEAR
Please wait...
pour sélectionner
pour sélectionner
DISPLAY
Up SamplingHi-Bit32
SOUND
A.L.C
iPod
CONTROL
REAR
NET
FAVORITES
USB DAC IN
DIMMER
SORT
NOW
PLAYNG
RETURN
+Favorite
B
B
A
2
3
»
2
Connectez votre iPod/iPhone.
Connectez votre iPod/iPhone à l’une des deux
prises USB, situées respectivement à l’avant
et à l’arrière de l’appareil. Pour effectuer cette
connexion, utilisez le câble iPod fourni avec votre
iPod/iPhone.
Panneau avant
/I STANDBY/ON
STANDBY DIRECT Hi-Bit 32
5V
iPod/iPhone
1A
Up Sampling
iPod/iPhone
Câble pour iPod
Panneau arrière
DIGITAL OUT
DIGITAL IN
OPTICAL COAXIAL
CONTROL
OUT
12
iPod/iPhone
DIGITAL IN
5V 1A
USB DAC
OPTICALCOAXIAL
DC OUTPUT
WIRELESS
(5V 0.6A MAX)
For
LAN
iPod/iPhone
Câble pour iPod
•Certaines touches du groupe de touches B de
la télécommande peuvent être utilisées pour
les opérations de lecture de base de fichiers
stockés sur un iPod/iPhone.
Remarque
•Lorsqu’un iPod/iPhone est connecté à
cet appareil, les informations de lecture
des morceaux de musique sont affichées
sur l’écran de l’iPod/iPhone. Le fait
d’actionner la touche
iPod CONTROL
de
la télécommande a pour effet de basculer
l’affichage des informations sur la zone
d’affichage du panneau avant de l’appareil.
•Cet appareil prend en charge le protocole
AirPlay. Pour plus d’informations, veuillez
consulter la section « Utilisation d’AirPlay
sur un iPod touch, iPhone, iPad et iTunes »
du Mode d’emploi, et visitez le site Web
Apple (http://www.apple.com).
Lecture de fichiers enregistrés
sur des périphériques de
stockage USB/Disques durs
externes
REPEAT
STANDBY/ON
DIRECT
A.S.R
iPod/USB
FRONT
1
MUSIC
SERVER
DIG IN 1
SOURCE SELECT
REPEAT
1
Appuyez sur la touche iPod/USB FRONT
A.L.C
iPod/USB
REAR
NET
SERVICE
DIG IN 2
SHUFFLE
DISPLAY
Up SamplingHi-Bit32
SOUND
iPod
CONTROL
FAVORITES
USB DAC IN
DIMMER
SORT
ou iPod/USB REAR de la télécommande
pour sélectionner l’entrée USB.
L’indication
iPod/USB Front
apparaît sur l’affichage.
2
Connectez le périphérique de stockage
USB/disque dur externe.
Connectez votre périphérique de stockage USB/
disque dur externe au port USB à l’avant ou à
l’arrière de l’appareil.
Panneau avant
u/I STANDBY/ON
STANDBY
DIRECT Hi-Bit 32 Up Sampling
5V 1A
iPod/iPhone
Périphérique de
stockage USB
Disque dur externe
Panneau arrière
DIGITAL OUT
DIGITAL IN
OPTICAL COAXIAL
OPTICAL COAXIAL
DC OUTPUT
LAN (10/100)
CONTROL
For
OUT
WIRELESS
LAN
(5V 0.6A MAX)
iPod/iPhone
Disque dur externe
3
Utilisez les touches
le fichier, puis appuyez sur ENTER.
La lecture commence.
•Certaines touches des groupes de touches
A
et B peuvent être utilisées pour exécuter
les fonctions de lecture basiques de fichiers
enregistrés sur des périphériques de stockage
USB/disques durs externes.
SHUFFLE SORT
TOP
MENU
ENTER
SET UP
CLEAR
iPod/USB Rear
ou
b
12
DIGITAL IN
5V 1A
USB DAC
Périphérique de
stockage USB
pour sélectionner
NOW
PLAYNG
RETURN
+Favorite
B
A
3
1
Appuyez sur la touche iPod/USB FRONT
ou iPod/USB REAR de la télécommande
pour sélectionner l’entrée iPod/USB.
L’indication
6
apparaît sur l’affichage.
Fr
iPod/USB Front
iPod/USB Rear
ou
Page 13
Utilisation du convertisseur N/A
Les signaux numériques entrés sur les prises
DIGITAL IN 1, DIGITAL IN 2
DAC
sont convertis en signaux analogiques et
sortis sur les prises
ANALOG OUT
Lecture de musique à partir d’un
équipement audio numérique
Les signaux numériques sont entrés sur les
DIGITAL IN 1 (COAXIAL)
prises
2 (OPTICAL)
.
STANDBY/ON
DIRECT
A.S.R
iPod/USB
FRONT
MUSIC
SERVER
DIG IN 1
1
SOURCE SELECT
DIGITAL IN USB
ou
ou
DISPLAY
Up SamplingHi-Bit32
SOUND
A.L.C
iPod
iPod/USB
CONTROL
REAR
NET
SERVICE
FAVORITES
USB DAC IN
DIG IN 2
DIMMER
.
DIGITAL IN
English
Français
Deutsch
Italiano
1
Appuyez sur la touche DIG IN 1 ou DIG IN
2 de la télécommande pour sélectionner
l’entrée Digital In 1 ou Digital In 2,
respectivement.
La source
numériques entrés sur la prise
tandis que la source
Digital In 1
permet de lire les signaux
Digital In 2
COAXIAL
,
permet de
lire les signaux numériques entrés sur la prise
OPTICAL
2
.
Commencez la lecture sur l’équipement
audio numérique.
Lecture de musique à partir d’un
ordinateur
Cette fonction permet de lire un signal audio
numérique entré sur la prise
DAC
à l’arrière de l’appareil.
Important
•Pour utiliser la prise
afin de lire des fichiers audio sur cet appareil
à partir d’un ordinateur, il peut être nécessaire
d’installer un pilote spécial sur l’ordinateur.
Pour plus d’informations, veuillez visiter le
site Web de Pioneer.
STANDBY/ON
iPod/USB
1
DIGITAL IN USB
DIGITAL IN USB DAC
DISPLAY
Up SamplingHi-Bit32
DIRECT
SOUND
A.L.C
A.S.R
iPod
iPod/USB
CONTROL
REAR
FRONT
NET
MUSIC
SERVICE
SERVER
FAVORITES
USB DAC IN
DIG IN 2
DIG IN 1
SOURCE SELECT
DIMMER
Nederlands
Español
1
Appuyez sur la touche USB DAC IN pour
sélectionner l’entrée USB DAC IN.
2
Lancez la lecture sur l’ordinateur.
Utilisation avec un casque (N-70A
uniquement)
Vous pouvez aussi écouter de la musique en
utilisant un casque ou des écouteurs.
© 2014 PIONEER HOME ELECTRONICS CORPORATION.
Tous droits de reproduction et de traduction réservés.
7
Fr
Page 14
Deutsch
VORSICHTSHINWEIS ZUR BELÜFTUNG
Fließbild der Einstellungen auf dem Netzwerk-Audioplayer
iPod/iPhone
USB-Speichergerät
Externe Festplatte
3
3
Computer
1
/I STANDBY/ON
STANDBY
DIRECT Hi-Bit 32 Up Sampling
5V 1A
iPod/iPhone
Dieser Netzwerk-Audioplayer
Digitale Audio-Ausstattung
AV-Receiver,
D/A-Umsetzer usw.
Verstärker
SOURCE
SOURCE
N-70A
4
NETWORK AUDIO PLAYER
N-50A
N-50A
Internet
2
Router
LAN
321
zum LAN-Anschluss
Bei der Aufstellung dieses Gerätes muss für einen
ausreichenden Freiraum gesorgt werden, um eine
einwandfreie Wärmeabfuhr zu gewährleisten
(mindestens 10 cm oberhalb des Gerätes, 10 cm hinter
dem Gerät und jeweils 10 cm an der Seite des Gerätes).
WAN
Modem
Computer
D3-4-2-1-7d*_A1_De
Anschließen
–1 Anschließen des Verstärkers
–2 Anschluss an das Netzwerk
–3 Anschließen des Wiedergabegerätes
–4 Anschließen der Einheit
Initial-Setup
– Vor der Inbetriebnahme
– Netzwerk-Einstellung
GrundlegendeWiedergabe
– Wiedergabe mit der NETWORK-Funktion
– iPod/iPhone-Wiedergabe
– Wiedergabe von Dateien, die auf USB-Einheiten/internen Festplatten gespeichert sind
– Verwendung eines D/A-Umsetzers
– Verwendung von Kopfhörern (nur N-70A)
2
De
Page 15

Anschließen
Anschließen des Verstärkers
•Achten sie darauf, immer dann, wenn Sie Anschlüsse vornehmen oder ändern, vorher den Strom auszuschalten und das Netzkabel aus der
Netzsteckdose zu ziehen.
•Schließen Sie das Stromkabel erst an, nachdem alle Anschlüsse zwischen den Geräten vorgenommen worden sind.
N-70A
Durch Anschluss des digitalen
Audio-Ausgangs dieser Einheit an
den digitalen Audioeingang eines
AV-Receivers oder D/A-Umsetzers
usw. können Sie den Verstärker
verwenden, um sich an digitalem
Audio zu erfreuen, das von dieser
Einheit produziert wurde.
Vor-Hauptverstärker
usw., ausgestattet
mit symmetrischen
Input-Anschlüssen
RL
DIGITAL IN
COAXIAL
AV-Receiver,
D/A-Umsetzer usw.
DIGITAL IN
OPTICAL
AV-Receiver,
D/A-Umsetzer usw.
English
Français
Deutsch
Italiano
ANALOG OUT
R
L
DIGITAL OUT
OPTICAL
COAXIAL
DC OUTPUT
LAN (10/100)
For
WIRELESS
LAN
(5V 0.6A MAX)
AUDIO INPUT
RL
ANALOG
OPTIC
CONTR
OUT
Analoge AudioausgangsAnschlüsse
Vor-Hauptverstärker mit
RCA-Inputanschlüssen
(Pin-Stecker)
Hinweis
Eine Polaritäts-Einstellung kann vorgenommen werden. Sie ermöglicht, das Signal von der Einheit
an die Symmetrie von dem angeschlossenen Gerät anzupassen. Zu näheren Einzelheiten siehe die
Bedienungsanleitung auf der mitgelieferten CD-ROM.
N-50A
R
ANALOG OUT
DIGITAL IN
COAXIAL
AV-Receiver,
D/A-Umsetzer usw.
DIGITAL OUT
L
OPTICAL
LAN (10/100)
COAXIAL
DC OUTPUT
For
WIRELESS
LAN
(5V 0.6A MAX)
DIGITAL IN
OPTICAL COAXIAL
CONTROL
OUT
12
iPod/iPhone
5V 1A
DIGITAL IN
USB DAC
DIGITAL IN
OPTICAL
AV-Receiver,
D/A-Umsetzer usw.
Digitale
AudioausgangsAnschlüsse
Durch Anschluss des analogen
Audio-Ausgangs dieser Einheit
an den analogen Audioeingang
eines Verstärkers können Sie den
Verstärker verwenden, um sich
an analogem Audio zu erfreuen,
das von dieser Einheit produziert
wurde.
Durch Anschluss des digitalen
Audio-Ausgangs dieser Einheit an
den digitalen Audioeingang eines
AV-Receivers oder D/A-Umsetzers
usw. können Sie den Verstärker
verwenden, um sich an digitalem
Audio zu erfreuen, das von dieser
Einheit produziert wurde.
Nederlands
Español
Analoge AudioausgangsAnschlüsse
AUDIO INPUT
RL
ANALOG
Verstärker
Durch Anschluss des analogen
Audio-Ausgangs dieser Einheit
an den analogen Audioeingang
eines Verstärkers können Sie den
Verstärker verwenden, um sich
an analogem Audio zu erfreuen,
das von dieser Einheit produziert
wurde.
3
De
Page 16

Herstellen der Verbindung zum Netzwerk über die LAN-Schnittstelle
Router
Router
LAN
321
WAN
Modem
Internet
Computer
AC IN
R
ANALOG OUT
DIGITAL OUT
L
OPTICAL
LAN (10/100)
COAXIAL
DC OUTPUT
For
WIRELESS
LAN
(5V 0.6A MAX)
DIGITAL IN
OPTICAL COAXIAL
CONTROL
OUT
12
iPod/iPhone
5V 1A
DIGITAL IN
USB DAC
Anschließen des Wiedergabegerätes
DIGITAL IN
COAXIAL
Digitale AudioAusstattung
Externe Festplatte*1
und Derartiges
LOG OUT
L
/I STANDBY/ON
STANDBY
5V 1A
iPod/iPhone
DIGITAL IN
OPTICAL
OPTICAL
LAN (10/100)
DIGITAL OUT
COAXIAL
OPTICAL COAXIAL
DC OUTPUT
CONTROL
For
OUT
WIRELESS
LAN
(5V 0.6A MAX)
DIRECT Hi-Bit 32 Up Sampling
iPod/iPhone
USB-Speichergerät
DIGITAL IN
12
DIGITAL IN
iPod/iPhone
5V 1A
USB DAC
USB
A-Typ
B-Ty p
N-50A
Computer
AC IN
N-50A
Durch Anschließen dieser Einheit über die
LAN-Schnittstelle an das Netzwerk können
Sie in Geräten im Netzwerk einschließlich
Ihrem Computer gespeicherte Audiodateien
wiedergeben und können Internet-Radio hören.
Verbinden Sie die LAN-Buchse an diesem Gerät
mit der LAN-Buchse an Ihrem Router (mit oder
ohne eingebauter DHCP-Server-Funktion) über
ein gerade verdrahtetes LAN-Kabel (CAT 5 oder
höher).
Aktivieren Sie die DHCP-Server-Funktion Ihres
Routers. Wenn Ihr Router keine eingebaute
DHCP-Serverfunktion besitzt, müssen Sie das
Network manuell einstellen. Zu Einzelheiten
siehe die Bedienungsanleitung auf der
mitgelieferten CD-ROM.
• Schließen Sie den digitalen Audioausgang an
einem digitalen Audiogerät an den Anschluss
DIGITAL IN 1 oder DIGITAL IN 2 an der Einheit
an, um digitale Audiosignale wiederzugeben.
• Verbinden Sie einen USB-Anschluss eines
Computers mit dem Anschluss DIGITAL
IN USB DAC an der Einheit, um digitale
Audiosignale wiederzugeben.
– Bei der Verwendung dieses Anschlusses
zur Wiedergabe einer Musikdatei von einem
Computer durch die Einheit muss auf dem
Computer ein spezieller Treiber installiert
sein. Zu Einzelheiten siehe die PioneerWebsite.
– Sie können mit der Einheit keine
Audiosignale eingeben, wenn auf dem
angeschlossene Computer kein MediaPlayer installiert ist.
• Wir empfehlen Ihnen, die externe Festplatte auf
der Rückseite dieser Einheit anzuschließen.
Wenn sie auf der Vorderseite dieser Einheit
angeschlossen wird, kann es sein, dass
die Einheit einige Zeit braucht, die externe
Festplatte zu erkennen, wenn auf die Funktion
iPod/USB Front umgeschaltet wird.
iPod/iPhone
Externe Festplatte*1
und Derartiges
USB-Speichergerät
*1: Es können nur solche externen Festplatten verwendet werden, die als FAT32 formatiert und
Head-partitioniert wurden.
Anschließen der Einheit
Schließen Sie die Einheit erst an das Netz an, nachdem Sie all Ihre Komponenten an diese Einheit angeschlossen haben.
1
Schließen Sie das mitgelieferte Netzkabel an die AC-IN-Steckdose auf der Rückseite der Einheit an.
2
Stecken Sie das andere Ende in eine Wandsteckdose.
ACHTUNG
•Beim Anschließen und Trennen des Netzkabels immer den Stecker anfassen. Ziehen Sie den Stecker nicht durch Ziehen am Kabel heraus, und
berühren Sie das Netzkabel niemals mit nassen Händen, da dies einen Kurzschluss oder einen elektrischen Schlag verursachen könnte. Das
Gerät, Möbelstücke oder andere Gegenstände nicht auf das Netzkabel stellen und jegliches Einklemmen des Netzkabels vermeiden. Niemals einen
Knoten ins Netzkabel machen oder es an anderen Kabeln festbinden. Das Netzkabel sollte so verlegt werden, dass niemand darauf treten kann.
Ein beschädigtes Netzkabel kann einen Brand oder einen elektrischen Schlag verursachen. Überprüfen Sie das Netzkabel hin und wieder. Bei
Beschädigung wenden Sie sich bitte wegen Ersatz an die nächste Pioneer-Kundendienststelle.
•Verwenden Sie kein anderes als das mit dem Gerät mitgelieferte Netzkabel.
•Verwenden Sie das mitgelieferte Netzkabel für keinen anderen als den unten beschriebenen Zweck.
•Die Einheit sollte, wenn sie nicht in regelmäßigem Gebrauch ist, zum Beispiel während des Urlaubs, vom Stromnetz getrennt werden, indem der
Stecker aus der Wandsteckdose gezogen wird.
4
De
Page 17

Initial-Setup
English
Vor der Inbetriebnahme
1
Einlegen der Batterien.
WARNUNG
•Bewahren Sie Batterien nicht in direktem
Sonnenlicht oder an anderen, extrem heißen
Orten auf wie z. B. im Innenraum eines
Fahrzeugs oder in der Nähe einer Heizung.
Dadurch können die Batterien auslaufen,
sich überhitzen, explodieren oder in Brand
geraten. Auch kann dies die Lebensdauer der
Batterien verringern.
ACHTUNG
•Beachten Sie bei der Entsorgung verbrauchter
Batterien und Akkus die gesetzlichen und
umweltrechtlichen Bestimmungen Ihres
Wohnortes.
2
Schalten Sie Ihre Systemkomponenten
und diese Einheit ein.
Starten Sie durch Einschalten des
Wiedergabegerätes und dann dieser Einheit
(drücken Sie die Taste
dem vorderen Bedienfeld).
/I STANDBY/ON
/I STANDBY/ON
u
STANDBY
DIRECT Hi-Bit 32 Up Sampling
5V 1A
iPod/iPhone
auf
Netzwerk-Einstellung
Automatische Einstellung
1
Drücken Sie SETUP.
Auf dem Display wird der
Bildschirm angezeigt.
2
Wählen Sie Network Setting Network
Configuration.
Network Setting
Network Configuration
Friendly Name
3
Verwenden Sie
wählen, und drücken Sie dann ENTER.
Wählen Sie
Server nicht verwenden).
Wenn Ihr Router nicht DHCP unterstützt,
dann führen Sie die Einstellungen von Hand
aus. Zu näheren Einzelheiten siehe die
Bedienungsanleitung auf der mitgelieferten CDROM.
Don’t Use Proxy Server
Network Configration
DHCP On
DHCP Off
Initial-Setup
, um den DHCP On zu
(Proxy-
-
Français
Deutsch
Italiano
Nederlands
Español
•Das Gerät schaltet sich ein. Die zentrale
Stromanzeige der Taste blinkt langsam.
Etwa 20 Sekunden nach dem Einschalten des
Stroms erscheint der folgende Bildschirm.
Vom Einschalten des Stroms bis zum
Abschluss der Startphase dauert es etwa 30
Sekunden.
5
De
Page 18

A
LAN (10/100)
Grundlegende Wiedergabe
Wiedergabe mit der NETWORKFunktion
Diese Einheit ist mit dem LAN-Anschluss
versehen, und Sie können sich durch
Anschließen Ihrer Komponenten an diese
Anschlüsse an den folgenden Funktionen
erfreuen.
•Wiedergabe der in Computern gespeicherten
Musikdateien.
Wiedergabe von Audiodateien,
die auf Computern oder anderen
Komponenten gespeichert sind
REPEAT
STANDBY/ON
DIRECT
A.S.R
iPod/USB
FRONT
MUSIC
SERVER
1
DIG IN 1
SOURCE SELECT
REPEAT
1
Drücken Sie MUSIC SERVER, um den
A.L.C
iPod/USB
REAR
NET
SERVICE
DIG IN 2
SHUFFLE
DISPLAY
Up SamplingHi-Bit32
SOUND
iPod
CONTROL
FAVORITES
USB DAC IN
DIMMER
SORT
Musikserver als die Eingangsquelle zu
wählen.
•Wenn kein Server zur Wiedergabe verfügbar
ist, wird „
2
Verwenden Sie
Please wait...
zu wählen, auf dem die Datei, die Sie
abspielen möchten, gespeichert ist, und
drücken Sie dann ENTER.
Die auf dem Server gespeicherten Verzeichnisse/
Dateien werden auf dem Display gespeichert.
3
Verwenden Sie
wählen, die Sie möchten, und drücken Sie
dann ENTER.
Die Wiedergabe beginnt.
•Einige der
- oder B-Tasten können für die
elementare Wiedergabe von Musikdateien
verwendet werden, die auf Komponenten im
Network gespeichert sind.
iPod/iPhone-Wiedergabe
STANDBY/ON
DIRECT
A.S.R
iPod/USB
iPod/USB
FRONT
1
MUSIC
SERVER
SERVICE
DIG IN 1
DIG IN 2
SOURCE SELECT
REPEAT
SHUFFLE
SHUFFLE SORT
MENU
SET UP
CLEAR
TOP
ENTER
NOW
PLAYNG
RETURN
+Favorite
“ angezeigt.
, um den Server
, um die Datei zu
DISPLAY
Up SamplingHi-Bit32
SOUND
A.L.C
iPod
CONTROL
REAR
NET
FAVORITES
USB DAC IN
DIMMER
SORT
B
A
2
3
2
Schließen Sie Ihr iPod/iPhone an.
Schließen Sie Ihr iPod/iPhone an den USBAnschluss auf dem vorderen oder dem hinteren
Bedienfeld der Einheit an. Verwenden Sie das
mit Ihrem iPod/iPhone mitgeliefete iPod-Kabel
für den Anschluss.
Vorderes Bedienfeld
/I STANDBY/ON
STANDBY DIRECT Hi-Bit 32
5V
iPod/iPhone
1A
Up Sampling
iPod/iPhone
iPod-Kabel
Rückseitiges Bedienfeld
DIGITAL OUT
DIGITAL IN
OPTICAL COAXIAL
CONTROL
OUT
12
iPod/iPhone
DIGITAL IN
5V 1A
USB DAC
OPTICALCOAXIAL
DC OUTPUT
WIRELESS
(5V 0.6A MAX)
For
LAN
iPod/iPhone
iPod-Kabel
•Einige der B-Tasten können für die einfache
Wiedergabe von auf einem iPod/iPhone
gespeicherten Dateien verwendet werden.
Hinweis
•Wenn das iPod/iPhone an diese Einheit
angeschlossen ist, werden die WiedergabeInformationen für die Songs auf dem
iPod-/iPhone-Display angezeigt. Das
Drücken der Taste
iPod CONTROL
auf der
Fernbedienung schaltet das Display um, so
dass die Informationen auf dem vorderen
Bedienfeld der Einheit angezeigt werden.
•Diese Einheit unterstützt AirPlay. Zu
Einzelheiten siehe unter „Verwendung von
AirPlay auf iPod touch, iPhone, iPad und
iTunes“ der Bedienungsanleitungen sowie
die Apple-Website (http://www.apple.com).
Wiedergabe von Dateien, die
auf USB-Einheiten/internen
Festplatten gespeichert sind
REPEAT
STANDBY/ON
DIRECT
A.S.R
iPod/USB
FRONT
1
MUSIC
SERVER
DIG IN 1
SOURCE SELECT
REPEAT
1
Drücken Sie iPod/USB FRONT oder iPod/
A.L.C
iPod/USB
REAR
NET
SERVICE
DIG IN 2
SHUFFLE
DISPLAY
Up SamplingHi-Bit32
SOUND
iPod
CONTROL
FAVORITES
USB DAC IN
DIMMER
SORT
USB REAR auf der Fernbedienung, um
USB als die Eingangsquelle zu wählen.
Auf dem Display erscheint
iPod/USB Rear
2
Schließen Sie die USB-Einheit/externe
.
Festplatte an.
Schließen Sie Ihre USB-Einheit/externe Festplatte
an den USB-Anschluss auf dem vorderen oder
dem hinteren Bedienfeld der Einheit an.
Vorderes Bedienfeld
u/I STANDBY/ON
STANDBY
DIRECT Hi-Bit 32 Up Sampling
5V 1A
iPod/iPhone
USB-Speichergerät
Externe Festplatte
Rückseitiges Bedienfeld
DIGITAL OUT
DIGITAL IN
OPTICAL COAXIAL
OPTICAL COAXIAL
DC OUTPUT
LAN (10/100)
CONTROL
For
OUT
WIRELESS
LAN
(5V 0.6A MAX)
iPod/iPhone
Externe Festplatte
3
Verwenden Sie
wählen, und drücken sie dann ENTER.
Die Wiedergabe beginnt.
A
•Einige der
- und B-Tasten können für die
einfache Wiedergabe von auf einer USBEinheit/externen Festplatte gespeicherten
Dateien verwendet werden.
SHUFFLE SORT
MENU
SET UP
CLEAR
TOP
ENTER
NOW
PLAYNG
RETURN
+Favorite
iPod/USB Front
b
12
DIGITAL IN
5V 1A
USB DAC
USB-Speichergerät
, um die Datei zu
B
A
3
oder
1
Drücken Sie iPod/USB FRONT oder iPod/
USB REAR auf der Fernbedienung, um
iPod/USB als die Eingangsquelle zu
wählen.
Auf dem Display erscheint
6
iPod/USB Rear
De
iPod/USB Front
B
oder
.
Page 19

Verwendung eines
D/A-Umsetzers
Digitale Signale, die in die auf dem hinteren
Bedienfeld befindlichen Anschlüsse
IN 1, DIGITAL IN 2
DAC
eingegeben werden, werden in analoge
DIGITAL IN USB
oder
Signale umgewandelt und von den Anschlüssen
ANALOG OUT
ausgegeben.
Wiedergabe von Musik von einem
digitalen Audiogerät
Gibt digitale Signale aus, die in die Anschlüsse
DIGITAL IN 1 (COAXIAL)
(OPTICAL)
eingegeben wurden.
oder
DIGITAL
DIGITAL IN 2
Verwendung von Kopfhörern
(nur N-70A)
Sie können sich auch am Hören von Musik
durch das Anschließen von Kopfhörern erfreuen.
English
Français
Deutsch
STANDBY/ON
DIRECT
A.S.R
iPod/USB
FRONT
MUSIC
SERVER
DIG IN 1
1
SOURCE SELECT
1
Drücken Sie DIG IN 1 oder DIG IN 2,
A.L.C
iPod/USB
REAR
NET
SERVICE
DIG IN 2
DISPLAY
Up SamplingHi-Bit32
SOUND
iPod
CONTROL
FAVORITES
USB DAC IN
DIMMER
um Digital In 1 oder Digital In 2 als die
Eingangsquelle zu wählen.
Digital In 1
Wenn
gewählt wird, werden die
digitalen Eingangssignale vom Koaxialanschluss
COAXIAL
(
In 2
) wiedergegeben, und wenn
gewählt wird, werden die digitalen
Digital
Eingangssignale vom Optischen Anschluss
OPTICAL
(
2
) wiedergegeben.
Beginn der Wiedergabe auf dem digitalen
Audiogerät.
Wiedergabe von Musik von einem
Computer
Verwenden Sie diese Funktion zur Wiedergabe
von digitalen Audiosignalen, die in den
Anschluss
hinteren Bedienfeld der Einheit eingegeben
wurden.
DIGITAL IN USB DAC
auf dem
Wichtig
•Bei der Verwendung des Anschlusses
DIGITAL IN USB DAC
zur Eingabe von
Audiodateien von einem Computer in
diese Einheit kann es erforderlich sein, auf
dem Computer einen speziellen Treiber zu
installieren. Zu Einzelheiten siehe die Website
von Pioneer.
Italiano
Nederlands
Español
STANDBY/ON
DIRECT
A.S.R
iPod/USB
FRONT
MUSIC
SERVER
DIG IN 1
1
SOURCE SELECT
1
Drücken Sie USB DAC IN, um USB DAC IN
A.L.C
iPod/USB
REAR
SERVICE
DIG IN 2
DISPLAY
Up SamplingHi-Bit32
SOUND
iPod
CONTROL
NET
FAVORITES
USB DAC IN
DIMMER
als die Eingangsquelle zu wählen.
2
Beginn der Wiedergabe auf dem
Computer
© 2014 PIONEER HOME ELECTRONICS CORPORATION.
Alle Rechte vorbehalten.
7
De
Page 20

Italiano
Flusso di impostazioni sul lettore audio di rete
iPod/iPhone
Dispositivo di
memoria di
massa USB
HDD esterno
Computer
3
3
1
/I STANDBY/ON
STANDBY
DIRECT Hi-Bit 32 Up Sampling
5V 1A
iPod/iPhone
Questo Lettore audio di rete
Apparecchio audio digitale
Ricevitore AV,
convertitore D/A ecc.
Amplificatore
SOURCE
SOURCE
N-70A
4
NETWORK AUDIO PLAYER
N-50A
N-50A
Internet
2
Router
LAN
321
ad una porta LAN
AVVERTENZA PER LA VENTILAZIONE
Installare l’apparecchio avendo cura di lasciare un
certo spazio all’intorno dello stesso per consentire una
adeguata circolazione dell’aria e migliorare la
dispersione del calore (almeno 10 cm sulla parte
superiore, 10 cm sul retro, e 10 cm su ciascuno dei lati).
WAN
Modem
Computer
D3-4-2-1-7d*_A1_It
Connettere
–1 Connettere l’amplificatore
–2 Connettersi alla rete
–3 Connettere i componenti di riproduzione
–4 Attaccare l’unità alla presa di corrente
Impostazioni iniziali
– Prima di cominciare
– Impostazioni di rete
Riproduzionedibase
– Playback con caratteristica NETWORK
– Riproduzione con iPod/iPhone
– Leggere file salvati su dispositivi di memoria USB/HDD esterni
– Usare il convertitore D/A
– Usare le cuffie (solo N-70A)
2
It
Page 21

Connettere
Connettere l’amplificatore
English
•Assicurarsi di spegnere la corrente e togliere la spina del cavo di corrente dalla presa mentre si eseguono o modificano le connessioni.
•Connettere il cavo di corrente solo dopo aver completato tutte le connessioni tra gli apparecchi.
N-70A
Connettendo l’uscita audio
digitale di questa unità
all’entrata di un ricevitore AV
o un convertitore D/A ecc. è
possibile usare l’amplificatore per
ascoltare l’audio digitale prodotto
da questa unità.
Connettendo l’uscita audio
analogica di questa unità
all’entrata audio analogica di un
amplificatore, è possibile usare
l’amplificatore per ascoltare
l’audio prodotto da questa unità.
Pre-amplificatore,
ecc. fornito con
connettori di tipo
RL
DIGITAL IN
COAXIAL
Ricevitore AV,
convertitore D/A ecc.
DIGITAL IN
OPTICAL
Ricevitore AV,
convertitore D/A ecc.
bilanciato
ANALOG OUT
R
L
DIGITAL OUT
OPTICAL
COAXIAL
DC OUTPUT
LAN (10/100)
For
WIRELESS
LAN
(5V 0.6A MAX)
AUDIO INPUT
RL
ANALOG
OPTIC
CONTR
OUT
Connessioni uscita
audio analogica
Pre-amplificatore con
connettori di entrata
RCA (spinotto)
Nota
È possibile eseguire un’impostazione di polarità, che permette al segnale dell’unità di essere
conforme al bilanciamento dell’apparecchio connesso. Vedi le istruzioni per l’uso sull’accluso CDROM per maggiori dettagli.
Français
Deutsch
Italiano
Nederlands
Español
N-50A
ANALOG OUT
R
L
Connessioni uscita
audio analogica
OPTICAL
LAN (10/100)
DIGITAL OUT
COAXIAL
DC OUTPUT
WIRELESS
(5V 0.6A MAX)
For
LAN
DIGITAL IN
COAXIAL
Ricevitore AV,
convertitore D/A ecc.
DIGITAL IN
12
OPTICAL COAXIAL
CONTROL
DIGITAL IN
OUT
iPod/iPhone
5V 1A
USB DAC
DIGITAL IN
OPTICAL
AUDIO INPUT
RL
ANALOG
Ricevitore AV,
convertitore D/A ecc.
Connessioni uscita
audio digitale
Amplificatore
Connettendo l’uscita audio
digitale di questa unità
all’entrata di un ricevitore AV
o un convertitore D/A ecc. è
possibile usare l’amplificatore per
ascoltare l’audio digitale prodotto
da questa unità.
Connettendo l’uscita audio
analogica di questa unità
all’entrata audio analogica di un
amplificatore, è possibile usare
l’amplificatore per ascoltare
l’audio prodotto da questa unità.
3
It
Page 22

Collegamento alla rete via interfaccia LAN
Router
Router
LAN
321
WAN
Modem
Internet
Computer
AC IN
R
ANALOG OUT
DIGITAL OUT
L
OPTICAL
LAN (10/100)
COAXIAL
DC OUTPUT
For
WIRELESS
LAN
(5V 0.6A MAX)
DIGITAL IN
OPTICAL COAXIAL
CONTROL
OUT
12
iPod/iPhone
5V 1A
DIGITAL IN
USB DAC
N-50A
Connettere i componenti di riproduzione
DIGITAL IN
COAXIAL
Apparecchio audio
digitale, ecc.
HDD*1 esterno e
similari
LOG OUT
L
/I STANDBY/ON
STANDBY
5V 1A
iPod/iPhone
DIGITAL IN
OPTICAL
OPTICAL
LAN (10/100)
DIGITAL OUT
COAXIAL
OPTICAL COAXIAL
DC OUTPUT
CONTROL
For
OUT
WIRELESS
LAN
(5V 0.6A MAX)
DIRECT Hi-Bit 32 Up Sampling
iPod/iPhone
Dispositivo di memoria
di massa USB
DIGITAL IN
12
DIGITAL IN
iPod/iPhone
5V 1A
USB DAC
Tipo B
USB
Tipo A
Computer
AC IN
N-50A
Se si connette questa unità tramite interfaccia
LAN, è possibile riprodurre i file audio salvati
su componenti di rete, compreso il computer, e
ascoltare le stazioni di Internet Radio.
Collegare il terminale LAN di questa unità al
terminale LAN del proprio router (con o senza
server DHCP incorporato) usando un cavo LAN
diritto (CAT 5 o superiore).
Attivare la funzione di server DHCP del proprio
router. Se il router non ha una funzione server
DHCP incorporata, si dovrà impostare la rete
manualmente. Per maggiori dettagli, vedi le
Istruzioni per l’uso sul CD-ROM allegato.
• Connettere l’uscita audio digitale a un
terminale del dispositivo digitale audio DIGITAL
IN 1 o DIGITAL IN 2 sull’unità per riprodurre un
segnale audio digitale.
• Connettere il terminale USB di un computer
con il terminale DIGITAL IN USB DAC sull’unità
per riprodurre un segnale audio digitale.
– Se si usa questa connessione per riprodurre
un file digitale da un computer attraverso
l’unità, il computer deve avere un driver
speciale installato. Per maggiori dettagli,
vedi il sito internet Pioneer.
– Non sarà possibile immettere audio usando
l’unità se Media Player non è installato sul
computer connesso.
• Si consiglia di connettere l’HDD esterno alla
parte posteriore di questa unità. Se connesso
alla parte frontale di questa unità ci potrebbe
volere del tempo per riconoscere l’HDD
esterno se commutato su iPod/USB Front
Function.
iPod/iPhone
HDD*1 esterno e
similari
Dispositivo di memoria
di massa USB
*1: Si possono usare solo gli HDD esterni che sono stati formattati come FAT32 con la partizione di
sistema.
Attaccare l’unità alla presa di corrente
Attaccare questa unità alla presa di corrente, ma solo dopo aver connesso tutti i componenti.
1
Inserire il cavo di corrente in dotazione nella presa AC IN nella parte posteriore dell’unità.
2
Inserire l’altra estremità in una presa di corrente.
ATTENZIONE
•Maneggiare il cavo di alimentazione dal lato della spina. Non estrarre la spina tirando il cavo e non toccare mai il cavo d’alimentazione con le
mani bagnate, altrimenti si può verificare un corto circuito o scosse elettriche. Non appoggiare l’apparecchio, mobili o altri oggetti sul cavo di
alimentazione, né comprimerlo in alcun modo. Non fare mai nodi al cavo, né legarlo ad altri cavi. Far passare i cavi d’alimentazione in modo tale che
non sia possibile calpestarli. Un cavo d’alimentazione danneggiato può causare un incendio o folgorazione. Controllare il cavo d’alimentazione ogni
tanto. Se si dovesse trovare il cavo danneggiato, rivolgersi al più vicino centro di assistenza autorizzato Pioneer per richiederne la sostituzione.
•Utilizzare solo ed esclusivamente il cavo di alimentazione fornito con questo apparecchio.
•Utilizzare il cavo di alimentazione fornito solo ed esclusivamente al fine descritto qui di seguito.
•L’unità dovrebbe essere disconnessa rimuovendo la spina principale dalla presa nel muro se non viene usata regolarmente, ad esempio, quando si
va in vacanza.
4
It
Page 23

Impostazioni iniziali
English
Prima di cominciare
1
Installazione delle batterie.
AVVERTENZA
•Non usare né conservare le batterie alla luce
diretta del sole o in luoghi eccessivamente
caldi, ad esempio all’interno di un’automobile
o in prossimità di un calorifero. Le batterie
potrebbero perdere liquido, surriscaldarsi,
esplodere o prendere fuoco. Anche la durata
e le prestazioni delle batterie potrebbero
risultare ridotte.
ATTENZIONE
•Quando si smaltiscono le batterie esauste, si
raccomanda di rispettare la normativa vigente
o le regole degli enti pubblici in materia di
ambiente applicabili alla propria nazione/
regione.
2
Commutare sui componenti di sistema e
su questa unità.
Iniziare commutando sul componente di
riproduzione, poi su questa unità (premere il
/I STANDBY/ON
tasto
u
/I STANDBY/ON
sul pannello frontale).
STANDBY
DIRECT Hi-Bit 32 Up Sampling
5V 1A
iPod/iPhone
Impostazioni di rete
Impostazione automatica
1
Premere SETUP.
La schermata
schermo.
2
Selezionare Network Setting Network
Configuration.
3
Usare
premere ENTER.
Selezionare
Se il router non supporta DHCP, si consiglia di
eseguire le impostazioni manualmente. Vedi le
istruzioni per l’uso sull’accluso CD-ROM per
maggiori dettagli.
Initial Setup
Network Setting
Network Configuration
Friendly Name
per selezionare DHCP On, poi
Don’t Use Proxy Server
Network Configration
DHCP On
DHCP Off
apparirà sullo
.
Français
Deutsch
Italiano
Nederlands
Español
•L’unità si accende. L’indicatore di corrente
centrale del tasto lampeggerà lentamente.
Circa venti secondi dopo aver acceso la
corrente, comparirà la seguente schermata.
Si richiedono circa trenta secondi
dall’accensione al completamento dell’avvio.
5
It
Page 24

LAN (10/100)
Riproduzione di base
Playback con caratteristica
NETWORK
Questa unità è dotata di terminale LAN che offre
le seguenti caratteristiche se si connettono i
componenti a questi terminali.
•Riprodurre file musicali archiviati su
computer.
I file di riproduzione audio salvati su
computer o altri componenti
REPEAT
TOP
MENU
SET UP
CLEAR
DISPLAY
Up SamplingHi-Bit32
SOUND
A.L.C
iPod
CONTROL
REAR
NET
FAVORITES
USB DAC IN
DIMMER
SORT
iPod/USB Front
SHUFFLE SORT
PLAYNG
ENTER
RETURN
+Favorite
”.
B
B
A
NOW
2
3
o
STANDBY/ON
DIRECT
A.S.R
iPod/USB
FRONT
MUSIC
SERVER
1
DIG IN 1
SOURCE SELECT
REPEAT
1
Premere MUSIC SERVER per selezionare
A.L.C
iPod/USB
REAR
NET
SERVICE
DIG IN 2
SHUFFLE
DISPLAY
Up SamplingHi-Bit32
SOUND
iPod
CONTROL
FAVORITES
USB DAC IN
DIMMER
SORT
Music Server come sorgente di entrata.
•Se non vi sono server disponibili per la lettura,
si visualizzerà “
2
Usare
Please wait...
per selezionare il server su
cui avete salvato il file da leggere, poi
premere ENTER.
Le cartelle/file salvati su server compaiono sullo
schermo.
3
Usare
per selezionare il file che si
desidera leggere, poi premere ENTER.
Il playback si avvia.
A
•Alcuni tasti
e B possono essere usati per
il playback di base di file musicali, salvati su
componenti del network.
Riproduzione con iPod/iPhone
STANDBY/ON
DIRECT
A.S.R
iPod/USB
iPod/USB
FRONT
1
MUSIC
SERVER
SERVICE
DIG IN 1
DIG IN 2
SOURCE SELECT
REPEAT
SHUFFLE
1
Premere iPod/USB FRONT o iPod/USB
REAR sul telecomando per selezionare
iPod/USB some sorgente di entrata.
Si visualizzerà sullo schermo
iPod/USB Rear
.
2
Connettere l’iPod/iPhone.
Connettere l’iPod/iPhone al terminale USB sul
pannello frontale o posteriore dell’unità. Usare il
cavo iPod in dotazione con l’iPod/iPhone per la
connessione.
Pannello anteriore
/I STANDBY/ON
STANDBY DIRECT Hi-Bit 32
5V
iPod/iPhone
1A
Up Sampling
iPod/iPhone
Cavo per iPod
Pannello posteriore
DIGITAL OUT
DIGITAL IN
OPTICAL COAXIAL
CONTROL
OUT
12
iPod/iPhone
DIGITAL IN
5V 1A
USB DAC
OPTICALCOAXIAL
DC OUTPUT
WIRELESS
(5V 0.6A MAX)
For
LAN
iPod/iPhone
Cavo per iPod
•Alcuni dei tasti B possono essere usati per la
riproduzione basica di file archiviati su iPod/
iPhone.
Nota
•Se si connette un iPod/iPhone a questa
unità, le informazioni di riproduzione dei
brani saranno visualizzate sullo schermo
di iPod/iPhone. Premere il tasto
CONTROL
sul telecomando commuterà la
iPod
schermata visualizzando le informazioni sul
pannello frontale dell’unità.
•Questa unità supporta AirPlay. Per
maggiori dettagli, vedi “Uso di AirPlay con
iPod touch, iPhone, iPad e iTunes” con le
istruzioni per l’uso e il sito internet Apple
(http://www.apple.com).
Leggere file salvati su dispositivi
di memoria USB/HDD esterni
REPEAT
STANDBY/ON
DIRECT
A.S.R
iPod/USB
FRONT
1
MUSIC
SERVER
DIG IN 1
SOURCE SELECT
REPEAT
1
Premere iPod/USB FRONT o iPod/USB
A.L.C
iPod/USB
REAR
NET
SERVICE
DIG IN 2
SHUFFLE
DISPLAY
Up SamplingHi-Bit32
SOUND
iPod
CONTROL
FAVORITES
USB DAC IN
DIMMER
SORT
REAR sul telecomando per selezionare
USB come sorgente di entrata.
Si visualizzerà sullo schermo
iPod/USB Rear
2
Connettere il dispositivo di memoria USB/
.
HDD esterno.
Connettere il dispositivo di memoria USB/HDD
esterno al portale USB dell’unità sul pannello
frontale o posteriore.
Pannello anteriore
u/I STANDBY/ON
STANDBY
DIRECT Hi-Bit 32 Up Sampling
5V 1A
iPod/iPhone
Dispositivo di memoria
di massa USB
HDD esterno
Pannello posteriore
DIGITAL OUT
DIGITAL IN
OPTICAL COAXIAL
OPTICAL COAXIAL
DC OUTPUT
LAN (10/100)
CONTROL
For
OUT
WIRELESS
LAN
(5V 0.6A MAX)
iPod/iPhone
HDD esterno
3
Usare
per selezionare il file, poi
premere ENTER.
Il playback si avvia.
A
•Alcuni dei tasti
e B possono essere usati
per la riproduzione basica di file archiviati su
dispositivi di memoria USB/HDD esterni.
SHUFFLE SORT
TOP
MENU
ENTER
SET UP
CLEAR
iPod/USB Front
b
12
DIGITAL IN
5V 1A
USB DAC
Dispositivo di
memoria di massa
USB
NOW
PLAYNG
RETURN
+Favorite
B
A
3
o
6
It
Page 25

Usare il convertitore D/A
Le uscite del segnale digitale dai connettori sul
pannello posteriore
2
DIGITAL IN USB DAC
o
in segnali analogici ed emessi dai connettori
ANALOG OUT
Leggere musica da un componente
audio digitale
L’entrata dei segnali digitali ai connettori
DIGITAL IN 1 (COAXIAL)
(OPTICAL)
1
Se si seleziona
segnali di entrata dal connettore
selezionando
dal connettore
.
Premere DIG IN 1 o DIG IN 2 per
selezionare Digital In 1 o Digital In 2 come
sorgente di entrata.
DIGITAL IN 1, DIGITAL IN
vengono convertiti
.
DIGITAL IN 2
o
STANDBY/ON
DIRECT
A.S.R
iPod/USB
FRONT
MUSIC
SERVER
DIG IN 1
1
SOURCE SELECT
Digital In 1
Digital In 2
OPTICAL
DISPLAY
Up SamplingHi-Bit32
SOUND
A.L.C
iPod
iPod/USB
CONTROL
REAR
NET
SERVICE
FAVORITES
USB DAC IN
DIG IN 2
DIMMER
, saranno letti i
saranno letti i segnali
.
COAXIAL
;
English
Français
Deutsch
Italiano
Nederlands
Español
2
Iniziare la riproduzione sul dispositivo
audio digitale.
Leggere musica da un computer
Usare questa funzione per leggere l’entrata di
audio digitale sul portale del pannello posteriore
dell’unità
1
DIGITAL IN USB DAC
.
Importante
•Se si usa il portale
DIGITAL IN USB DAC
per immettere file audio da un computer su
questa unità, potrebbe essere necessario
installare un driver speciale sul computer.
Per maggiori dettagli, vedi il sito internet di
Pioneer.
STANDBY/ON
DIRECT
A.S.R
iPod/USB
FRONT
MUSIC
SERVER
DIG IN 1
1
SOURCE SELECT
A.L.C
iPod/USB
REAR
SERVICE
DIG IN 2
DISPLAY
Up SamplingHi-Bit32
SOUND
iPod
CONTROL
NET
FAVORITES
USB DAC IN
DIMMER
Premere USB DAC IN e selezionare USB
DAC IN come sorgente in entrata.
2
Iniziare la riproduzione sul computer.
Usare le cuffie (solo N-70A)
Inoltre, è possibile ascoltare la musica
connettendo le cuffie.
© 2014 PIONEER HOME ELECTRONICS CORPORATION.
Tutti i diritti riservati.
7
It
Page 26

Nederlands
BELANGRIJKE INFORMATIE BETREFFENDE
Volgorde van instellingen op de netwerkaudiospeler
iPod/iPhone
USBgeheugenapparaat
Externe HDD
3
3
Computer
1
/I STANDBY/ON
STANDBY
DIRECT Hi-Bit 32 Up Sampling
5V 1A
iPod/iPhone
Deze Netwerk Audiospeler
Digitale audioapparatuur
AV-receiver,
D/A-convertor, enz.
Versterker
SOURCE
SOURCE
N-70A
4
NETWORK AUDIO PLAYER
N-50A
N-50A
Internet
2
Router
LAN
321
naar LAN-poort
DE VENTILATIE
Let er bij het installeren van het apparaat op dat er
voldoende vrije ruimte rondom het apparaat is om een
goede doorstroming van lucht te waarborgen
(tenminste 10 cm boven, 10 cm achter en 10 cm aan de
zijkanten van het apparaat).
WAN
Modem
Computer
D3-4-2-1-7d*_A1_Nl
Verbinding
–1 De versterker aansluiten
–2 Aansluiten op het netwerk
–3 Het weergavecomponent aansluiten
–4 Het systeem op het net aansluiten
Aanvankelijke Instellingen
– Voordat u begint
– Netwerkinstelling
Basisbedieningvoorafspelen
– Weergave met NETWORK-functie
– iPod/iPhone weergave
– Afspelen van bestanden die op USB-opslagapparatuur/externe HDD’s zijn opgeslagen
– De D/A-convertor gebruiken
– De hoofdtelefoon gebruiken (alleen N-70A)
2
Nl
Page 27

Verbinding
De versterker aansluiten
English
•Zorg er te allen tijde voor dat het apparaat is uitgeschakeld en verwijder het netsnoer van het stopcontact als u aansluitingen doet of wijzigt.
•Sluit het netsnoer aan nadat alle aansluitingen tussen de diverse apparaten zijn voltooid.
N-70A
Door aansluiting van de digitale
audio-uitgang van dit systeem
op de digitale audio-ingang van
een AV-receiver of D/A-convertor
enz., kan de versterker worden
gebruikt voor het beluisteren van
digitale audio via dit systeem.
Als de analoge audio-uitgang van
dit systeem wordt aangesloten
op de analoge audio-ingang van
een versterker, kan de versterker
worden gebruikt om analoge
audio die door dit systeem wordt
weergegeven te beluisteren.
Pre-main versterker
enz., uitgerust met
gebalanceerde
RL
DIGITAL IN
COAXIAL
AV-receiver,
D/A-convertor, enz.
DIGITAL IN
OPTICAL
AV-receiver,
D/A-convertor, enz.
ingangsaansluitingen
ANALOG OUT
R
L
DIGITAL OUT
OPTICAL
COAXIAL
DC OUTPUT
LAN (10/100)
For
WIRELESS
LAN
(5V 0.6A MAX)
AUDIO INPUT
RL
ANALOG
OPTIC
CONTR
OUT
Analoge audiouitgangsaansluitingen
Pre-main versterker
met RCA (pinstekker)
-ingangsaansluitingen
Opmerking
De polariteit kan worden ingesteld waardoor het signaal uit het systeem overeenkomt met de
balans van het aangesloten apparaat. Raadpleeg de bedieningshandleiding op bijgesloten cd-rom
voor meer gegevens.
Français
Deutsch
Italiano
Nederlands
Español
N-50A
ANALOG OUT
R
L
Analoge audiouitgangsaansluitingen
OPTICAL
LAN (10/100)
DIGITAL OUT
COAXIAL
DC OUTPUT
WIRELESS
(5V 0.6A MAX)
For
LAN
DIGITAL IN
COAXIAL
DIGITAL IN
OPTICAL COAXIAL
CONTROL
OUT
AV-receiver,
D/A-convertor, enz.
12
DIGITAL IN
iPod/iPhone
5V 1A
USB DAC
DIGITAL IN
OPTICAL
AUDIO INPUT
RL
ANALOG
AV-receiver,
D/A-convertor, enz.
Digitale audiouitgangsaansluitingen
Versterker
Door aansluiting van de digitale
audio-uitgang van dit systeem
op de digitale audio-ingang van
een AV-receiver of D/A-convertor
enz., kan de versterker worden
gebruikt voor het beluisteren van
digitale audio via dit systeem.
Als de analoge audio-uitgang van
dit systeem wordt aangesloten
op de analoge audio-ingang van
een versterker, kan de versterker
worden gebruikt om analoge
audio die door dit systeem wordt
weergegeven te beluisteren.
3
Nl
Page 28

Aansluiten op het netwerk via de LAN-interface
Router
Router
LAN
321
WAN
Modem
Internet
Computer
AC IN
R
ANALOG OUT
DIGITAL OUT
L
OPTICAL
LAN (10/100)
COAXIAL
DC OUTPUT
For
WIRELESS
LAN
(5V 0.6A MAX)
DIGITAL IN
OPTICAL COAXIAL
CONTROL
OUT
12
iPod/iPhone
5V 1A
DIGITAL IN
USB DAC
Het weergavecomponent aansluiten
DIGITAL IN
COAXIAL
Digitale audioapparatuur, enz.
Externe HDD*1, enz.
LOG OUT
L
/I STANDBY/ON
STANDBY
5V 1A
iPod/iPhone
DIGITAL IN
OPTICAL
OPTICAL
LAN (10/100)
DIGITAL OUT
COAXIAL
OPTICAL COAXIAL
DC OUTPUT
CONTROL
For
OUT
WIRELESS
LAN
(5V 0.6A MAX)
DIRECT Hi-Bit 32 Up Sampling
iPod/iPhone
USBgeheugenapparaat
DIGITAL IN
12
DIGITAL IN
iPod/iPhone
5V 1A
USB DAC
USB
Type A
Type B
N-50A
Computer
AC IN
N-50A
Door verbinding van dit apparaat via de
LAN-interface met het netwerk, kunt u
audiobestanden afspelen die op componenten
op het netwerk zijn opgeslagen, zoals uw
computer, en internet radiostations beluisteren.
Verbind de LAN-aansluiting van dit apparaat met
de LAN-aansluiting van de router (met of zonder
ingebouwde DHCP-serverfunctie) met behulp
van een straight LAN-kabel (CAT 5 of hoger).
Schakel de DHCP-serverfunctie van de router
in. Als uw router geen ingebouwde DHCPserverfunctie heeft, dan moet u het netwerk
handmatig instellen. Raadpleeg de op de cd-rom
meegeleverde bedieningshandleiding voor meer
gegevens.
• Sluit de digitale audio-uitgang van een digitaal
audioapparaat aan op het aansluitpunt
DIGITAL IN 1 of DIGITAL IN 2 van het systeem
om een digitaal audiosignaal af te spelen.
• Sluit een USB-aansluitpunt van de computer
aan op het aansluitpunt DIGITAL IN USB DAC
van het systeem om een digitaal audiosignaal
af te spelen.
– Als deze aansluiting wordt gebruikt om een
muziekbestand vanaf een computer via
dit systeem af te spelen, dient de speciale
driver op de computer te zijn geïnstalleerd.
Raadpleeg de website van Pioneer voor meer
gegevens.
– U kunt geen audio invoeren via het systeem
indien Media Player niet op de aangesloten
computer is geïnstalleerd.
• Aanbevolen wordt om de externe HDD op de
achterzijde van dit systeem aan te sluiten. Bij
aansluiting op de voorzijde van dit systeem kan
het enige tijd duren voordat het systeem de
externe HDD herkent wanneer deze op iPod/
USB Front Function is ingesteld.
iPod/iPhone
Externe HDD*1, enz.
USB-geheugenapparaat
*1: Alleen een externe HDD met de indeling FAT32 en waarvan de kop is gepartitioneerd kan worden
gebruikt.
Het systeem op het net aansluiten
Sluit het systeem pas aan op het net wanneer alle componenten op dit systeem zijn aangesloten.
1
Sluit het meegeleverde netsnoer aan op het AC IN-contactpunt aan de achterzijde van het systeem.
2
Steek de stekker van het netsnoer in het stopcontact.
LET OP
•Pak het netsnoer alleen bij het stekkerdeel beet. Trek de stekker niet uit door aan het snoer te rukken en raak het netsnoer nooit met natte handen
aan; dit kan een kortsluiting of elektrische schok tot gevolg hebben. Plaats het apparaat, een meubelstuk of enig ander voorwerp niet op het
netsnoer en knel het netsnoer op geen enkele manier af. Maak nooit een knoop in het netsnoer of knoop deze samen met andere kabels. Leid
de netsnoeren zodanig dat de kans klein is dat er iemand op trapt. Een beschadigd netsnoer kan brand of een elektrische schok veroorzaken.
Controleer regelmatig de staat van het netsnoer. Wanneer u beschadigingen aantreft, vraagt u uw dichtstbijzijnde Pioneer-erkende, onafhankelijke
servicecentrum om het netsnoer te vervangen.
•Gebruik uitsluitend het netsnoer dat bij dit apparaat is meegeleverd.
•Gebruik het netsnoer uitsluitend voor het doel dat hieronder staat beschreven.
•Verwijder de netstekker uit het wandstopcontact als het apparaat een tijd lang niet wordt gebruikt, zoals ingeval van vakantie.
4
Nl
Page 29

Aanvankelijke Instellingen
English
Voordat u begint
1
De batterijen plaatsen.
WAARSCHUWING
•Gebruik of bewaar batterijen niet in direct
zonlicht of op een hete plaats, zoals in de auto
of bij een kachel. Batterijen kunnen hierdoor
gaan lekken, oververhitten, exploderen of in
brand vliegen. Bovendien vermindert dit de
levensduur of prestaties van de batterijen.
LET OP
•Wanneer u lege batterijen weggooit, gelieve
daarbij de geldende wetgeving en bepalingen
na te leven.
2
Schakel uw systeemcomponenten en dit
systeem in.
Schakel eerst het weergavecomponent in en
vervolgens dit systeem (druk op de toets
/I STANDBY/ON
u
op het voorpaneel).
/I STANDBY/ON
STANDBY
DIRECT Hi-Bit 32 Up Sampling
5V 1A
iPod/iPhone
Netwerkinstelling
Automatische instelling
1
Druk op SETUP.
Het scherm
display.
2
Selecteer Network Setting Network
Configuration.
3
Gebruik
en druk daarna op ENTER.
Selecteer
Als DHCP niet door uw router wordt ondersteund,
stel dan handmatig de netwerkinstellingen
in. Raadpleeg de bedieningshandleiding op
bijgesloten cd-rom voor meer gegevens.
Initial Setup
Network Setting
Network Configuration
Friendly Name
Don’t Use Proxy Server
Network Configration
DHCP On
DHCP Off
verschijnt op de
om DHCP On te selecteren
.
Français
Deutsch
Italiano
Nederlands
Español
•Het apparaat wordt ingeschakeld. Het
centrale powerlampje knippert nu langzaam.
Het volgende scherm verschijnt zo’n twintig
seconden nadat het apparaat is ingeschakeld.
Ongeveer dertig seconden zijn nodig tussen
inschakeling en de voltooiing van de opstart.
5
Nl
Page 30

A
LAN (10/100)
Basisbediening voor afspelen
Weergave met NETWORK-functie
Dit apparaat is uitgevoerd met het LANaansluitpunt en de volgende functies kunnen
worden gebruikt door aansluiting van de
componenten op deze aansluitpunten.
•Speel de in de computer opgeslagen
muziekbestanden af.
Afspelen van audiobestanden die op
computers of andere componenten
zijn opgeslagen
REPEAT
STANDBY/ON
DIRECT
A.S.R
iPod/USB
FRONT
MUSIC
SERVER
1
DIG IN 1
SOURCE SELECT
REPEAT
1
Druk op MUSIC SERVER om Music Server
A.L.C
iPod/USB
REAR
NET
SERVICE
DIG IN 2
SHUFFLE
DISPLAY
Up SamplingHi-Bit32
SOUND
iPod
CONTROL
FAVORITES
USB DAC IN
DIMMER
SORT
als ingangsbron te kiezen.
•Als er geen server beschikbaar is om af te
spelen, verschijnt “
2
Gebruik
Please wait...
om de server te selecteren
waarop het bestand dat u wilt afspelen is
opgeslagen, en druk daarna op ENTER.
De mappen/bestanden die op de server zijn
opgeslagen worden op de display getoond.
3
Gebruik
om het bestand dat u wilt
afspelen te selecteren, en druk daarna op
ENTER.
De weergave gaat van start.
•Sommige
- en B-toetsen kunnen voor
standaardweergave van muziekbestanden
die op componenten op het netwerk zijn
opgeslagen worden gebruikt.
iPod/iPhone weergave
STANDBY/ON
DIRECT
A.S.R
iPod/USB
iPod/USB
FRONT
1
MUSIC
SERVER
SERVICE
DIG IN 1
DIG IN 2
SOURCE SELECT
REPEAT
SHUFFLE
1
Druk op iPod/USB FRONT of iPod/USB
REAR van de afstandsbediening om iPod/
USB als de ingangsbron te kiezen.
iPod/USB Front
display weergegeven.
iPod/USB Rear
of
SHUFFLE SORT
MENU
SET UP
CLEAR
TOP
ENTER
NOW
PLAYNG
B
A
2
3
RETURN
+Favorite
”.
DISPLAY
Up SamplingHi-Bit32
SOUND
A.L.C
iPod
CONTROL
REAR
NET
FAVORITES
USB DAC IN
DIMMER
SORT
B
wordt op de
2
Aansluiting van de iPod/iPhone.
Sluit de iPod/iPhone aan op de USB-poort van
het voor- of achterpaneel van het systeem.
Gebruik de iPod-kabel die bij uw iPod/iPhone
voor de aansluiting is meegeleverd.
Voorpaneel
/I STANDBY/ON
STANDBY DIRECT Hi-Bit 32
5V
iPod/iPhone
1A
Up Sampling
iPod/iPhone
Kabel voor
de iPod
Achterpaneel
DIGITAL OUT
DIGITAL IN
OPTICAL COAXIAL
CONTROL
OUT
12
iPod/iPhone
DIGITAL IN
5V 1A
USB DAC
OPTICALCOAXIAL
DC OUTPUT
WIRELESS
(5V 0.6A MAX)
For
LAN
iPod/iPhone
Kabel voor
de iPod
•Sommige B-toetsen kunnen worden gebruikt
voor de basisweergave van op de iPod/iPhone
opgeslagen bestanden.
Opmerking
•Als de iPod/iPhone op dit systeem is
aangesloten, wordt de weergave-informatie
voor de songs op de display van de iPod/
iPhone weergegeven. Als de toets
CONTROL
van de afstandsbediening wordt
iPod
ingedrukt, wijzigt de display en wordt
de informatie op het voorpaneel van het
systeem weergegeven.
•Dit systeem ondersteunt AirPlay.
Raadpleeg “Gebruiken van AirPlay op iPod
touch, iPhone, iPad en iTunes” van de
bedieningshandleiding en de website van
Apple (http://www.apple.com) voor meer
gegevens.
Afspelen van bestanden die op
USB-opslagapparatuur/externe
HDD’s zijn opgeslagen
REPEAT
STANDBY/ON
DIRECT
A.S.R
iPod/USB
FRONT
1
MUSIC
SERVER
DIG IN 1
SOURCE SELECT
REPEAT
1
Druk op iPod/USB FRONT of iPod/USB
A.L.C
iPod/USB
REAR
NET
SERVICE
DIG IN 2
SHUFFLE
DISPLAY
Up SamplingHi-Bit32
SOUND
iPod
CONTROL
FAVORITES
USB DAC IN
DIMMER
SORT
REAR van de afstandsbediening om USB
als ingangsbron te kiezen.
iPod/USB Front
iPod/USB Rear
of
display weergegeven.
2
Sluit het USB-opslagapparaat/de externe
HDD aan.
Sluit het USB-opslagapparaat/externe HDD aan
op de USB-poort aan het voor- of achterpaneel
van het systeem.
Voorpaneel
u/I STANDBY/ON
STANDBY
DIRECT Hi-Bit 32 Up Sampling
5V 1A
iPod/iPhone
USBgeheugenapparaat
Externe HDD
Achterpaneel
DIGITAL OUT
DIGITAL IN
OPTICAL COAXIAL
OPTICAL COAXIAL
DC OUTPUT
LAN (10/100)
CONTROL
For
OUT
WIRELESS
LAN
(5V 0.6A MAX)
iPod/iPhone
Externe HDD
3
Gebruik
om het bestand te
selecteren en druk daarna op ENTER.
De weergave gaat van start.
A
•Sommige
en B-toetsen kunnen worden
gebruikt voor de basisweergave van
bestanden die op USB-opslagapparatuur/
externe HDD’s zijn opgeslagen.
SHUFFLE SORT
TOP
MENU
ENTER
SET UP
CLEAR
wordt op de
b
12
DIGITAL IN
5V 1A
USB DAC
USBgeheugenapparaat
NOW
PLAYNG
RETURN
+Favorite
B
A
3
6
Nl
Page 31

De D/A-convertor gebruiken
Digitale signalen die via de aansluitingen
DIGITAL IN 1, DIGITAL IN 2
DAC
aan de achterzijde van het paneel worden
ingevoerd, worden geconverteerd naar analoge
signalen en via de aansluitingen
uitgevoerd.
Afspelen van muziek via een digitaal
audiocomponent
Voert de digitale signalen uit die via de
aansluitingen
DIGITAL IN 2 (OPTICAL)
DIGITAL IN 1 (COAXIAL)
DIGITAL IN USB
of
ANALOG OUT
zijn ingevoerd.
of
English
Français
Deutsch
STANDBY/ON
DIRECT
A.S.R
iPod/USB
FRONT
MUSIC
SERVER
DIG IN 1
1
SOURCE SELECT
1
Druk op DIG IN 1 of DIG IN 2 om Digital In
A.L.C
iPod/USB
REAR
NET
SERVICE
DIG IN 2
DISPLAY
Up SamplingHi-Bit32
SOUND
iPod
CONTROL
FAVORITES
USB DAC IN
DIMMER
1 of Digital In 2 als ingangsbron te kiezen.
Digital In 1
Als
wordt geselecteerd, worden
digitale ingangssignalen via de aansluiting
COAXIAL
afgespeeld; als
Digital In 2
wordt
geselecteerd, worden digitale ingangssignalen
via de aansluiting
2
Start de weergave op een digitaal
OPTICAL
afgespeeld.
audioapparaat.
Muziek via een computer afspelen
Gebruik deze functie om digitale audio die via de
DIGITAL IN USB DAC
poort
van het systeem is ingevoerd af te spelen.
Belangrijk
•Wanneer de poort
DAC
wordt gebruikt voor de invoer van
audiobestanden van een computer naar dit
systeem, dient mogelijk een speciale driver
op de computer te worden geïnstalleerd.
Raadpleeg de website van Pioneer voor meer
gegevens.
aan de achterzijde
DIGITAL IN USB
Italiano
Nederlands
Español
STANDBY/ON
DIRECT
A.S.R
iPod/USB
FRONT
MUSIC
SERVER
DIG IN 1
1
SOURCE SELECT
1
Druk op USB DAC IN en selecteer USB
A.L.C
iPod/USB
REAR
SERVICE
DIG IN 2
DISPLAY
Up SamplingHi-Bit32
SOUND
iPod
CONTROL
NET
FAVORITES
USB DAC IN
DIMMER
DAC IN als ingangsbron.
2
Start de weergave op de computer.
De hoofdtelefoon gebruiken
(alleen N-70A)
Muziek kan tevens worden beluisterd door de
hoofdtelefoons aan te sluiten.
© 2014 PIONEER HOME ELECTRONICS CORPORATION.
Alle rechten voorbehouden.
7
Nl
Page 32

Español
PRECAUCIÓN PARA LA VENTILACIÓN
Diagrama de flujo de la configuración del Reproductor Network
Audio
iPod/iPhone
Dispositivo de
almacenamiento
USB
HDD externo
3
3
Ordenador
1
/I STANDBY/ON
STANDBY
DIRECT Hi-Bit 32 Up Sampling
5V 1A
iPod/iPhone
Este Reproductor Network Audio
Equipo de audio digital
Receptor AV,
convertidor D/A, etc.
Amplificador
SOURCE
SOURCE
N-70A
4
NETWORK AUDIO PLAYER
N-50A
N-50A
Internet
2
Enrutador
LAN
321
al un puerto LAN
Cuando instale este aparato, asegúrese de dejar
espacio en torno al mismo para la ventilación con el fin
de mejorar la disipación de calor (por lo menos 10 cm
encima, 10 cm detrás, y 10 cm en cada lado).
WAN
Módem
Ordenador
D3-4-2-1-7d*_A1_Es
Conexión
–1 Conexión del amplificador
–2 Cómo conectarse a la red
–3 Conexión de un componente de reproducción
–4 Conexión de la unidad a una toma de CA
Conguracióninicial
– Antes de comenzar
– Configuración de red
Reproducciónbásica
– Reproducción con opción NETWORK
– Reproducción del iPod/iPhone
– Reproducción de archivos guardados en dispositivos de almacenamiento USB/HDD (discos
duros) externos
– Uso del convertidor D/A
– Uso de auriculares (solo N-70A)
2
Es
Page 33

Conexión
Conexión del amplificador
English
•Siempre que realice o modifique conexiones deberá apagar la unidad y desenchufar el cable de alimentación de la toma de corriente.
•Conecte el cable de alimentación después de que haya llevado a cabo todas las conexiones entre los distintos dispositivos.
N-70A
Si conecta la salida de audio
digital de esta unidad a la entrada
de audio digital de un receptor
AV o de un convertidor D/A, etc.,
podrá utilizar el amplificador
para disfrutar de audio digital
generado a partir de esta unidad.
Si conecta la salida de audio
analógico de esta unidad a la
entrada de audio analógico de
un amplificador, podrá utilizar
el amplificador para disfrutar de
audio analógico generado a partir
de esta unidad.
Preamplificador
principal, etc., provisto
de conectores de
RL
DIGITAL IN
COAXIAL
Receptor AV,
convertidor D/A, etc.
DIGITAL IN
OPTICAL
Receptor AV,
convertidor D/A, etc.
entrada de tipo
equilibrado
ANALOG OUT
R
L
DIGITAL OUT
OPTICAL
COAXIAL
DC OUTPUT
LAN (10/100)
For
WIRELESS
LAN
(5V 0.6A MAX)
AUDIO INPUT
RL
ANALOG
OPTIC
CONTR
OUT
Conexiones de
salida de audio
analógico
Preamplificador
principal provisto de
conectores de entrada
tipo RCA (clavija)
Nota
Puede llevar a cabo un ajuste de polaridad, lo que le permitirá obtener un mejor acoplamiento
entre la señal de la unidad y el dispositivo conectado. Para más información, consulte las
instrucciones de funcionamiento que encontrará en el CD-ROM facilitado.
Français
Deutsch
Italiano
Nederlands
Español
N-50A
ANALOG OUT
R
L
Conexiones de salida
de audio analógico
OPTICAL
LAN (10/100)
DIGITAL OUT
COAXIAL
DC OUTPUT
WIRELESS
(5V 0.6A MAX)
For
LAN
DIGITAL IN
COAXIAL
DIGITAL IN
OPTICAL COAXIAL
CONTROL
OUT
Receptor AV,
convertidor D/A, etc.
12
DIGITAL IN
iPod/iPhone
5V 1A
USB DAC
DIGITAL IN
OPTICAL
AUDIO INPUT
RL
ANALOG
Receptor AV,
convertidor D/A, etc.
Conexiones de salida
de audio digital
Amplificador
Si conecta la salida de audio
digital de esta unidad a la entrada
de audio digital de un receptor
AV o de un convertidor D/A, etc.,
podrá utilizar el amplificador
para disfrutar de audio digital
generado a partir de esta unidad.
Si conecta la salida de audio
analógico de esta unidad a la
entrada de audio analógico de
un amplificador, podrá utilizar
el amplificador para disfrutar de
audio analógico generado a partir
de esta unidad.
3
Es
Page 34

Conexión a la red mediante la interfaz LAN
Router
Enrutador
LAN
321
WAN
Módem
Internet
interfaz LAN, podrá reproducir archivos de
audio guardados en componentes de la red —
incluyendo su ordenador— y escuchar emisoras
de radio por Internet.
Conecte el terminal LAN de esta unidad al
terminal LAN de su enrutador (con o sin la
Si conecta esta unidad a la red mediante la
Ordenador
función del servidor DHCP incorporada) con un
cable LAN recto (CAT 5 o mejor).
Active la función del servidor DHCP en su
enrutador. Si su router no dispone de una
función integrada de servidor DHCP (protocolo
de configuración dinámica de host), deberá
configurar la red de forma manual. Para más
información, consulte las instrucciones de
R
ANALOG OUT
DIGITAL OUT
L
OPTICAL
LAN (10/100)
COAXIAL
DC OUTPUT
For
WIRELESS
LAN
(5V 0.6A MAX)
DIGITAL IN
OPTICAL COAXIAL
CONTROL
OUT
12
iPod/iPhone
5V 1A
DIGITAL IN
USB DAC
AC IN
funcionamiento que encontrará en el CD-ROM
N-50A
facilitado.
Conexión de un componente de reproducción
DIGITAL IN
COAXIAL
Equipo de audio
digital, etc.
HDD externo*1 y
similares
LOG OUT
DIGITAL IN
OPTICAL
iPod/iPhone
Dispositivo de
almacenamiento USB
DIGITAL OUT
L
OPTICAL
LAN (10/100)
COAXIAL
DC OUTPUT
For
WIRELESS
LAN
(5V 0.6A MAX)
DIGITAL IN
OPTICAL COAXIAL
CONTROL
OUT
12
iPod/iPhone
5V 1A
DIGITAL IN
USB DAC
Tipo B
/I STANDBY/ON
STANDBY
DIRECT Hi-Bit 32 Up Sampling
5V 1A
iPod/iPhone
USB
Tipo A
Ordenador
AC IN
N-50A
• Para reproducir una señal de audio digital,
conecte la salida de audio digital de un
dispositivo de audio digital al terminal DIGITAL
IN 1 o DIGITAL IN 2 de la unidad.
• Para reproducir una señal de audio digital,
conecte el terminal USB de un ordenador al
terminal DIGITAL IN USB DAC de la unidad.
• Le recomendamos que conecte el HDD
externo a la parte posterior de esta unidad. Si
lo conecta a la parte frontal, es posible que
la unidad tarde cierto tiempo en reconocer
el HDD externo si cambia a iPod/USB Front
Function.
– Cuando utilice esta conexión para reproducir
archivos de música desde un ordenador a
través de la unidad, el equipo deberá tener
instalado el controlador especial. Para
más información, consulte el sitio web de
Pioneer.
– Si el ordenador conectado no tiene instalado
Media Player, no podrá escuchar audio a
través de la unidad.
iPod/iPhone
HDD externo*1 y
similares
Dispositivo de
almacenamiento USB
*1: Solo se pueden utilizar HDD externos particionados y formateados en FAT32.
Conexión de la unidad a una toma de CA
Solo deberá conectar la unidad a la corriente después de que haya conectado todos los componentes a esta unidad.
1
Introduzca el cable de alimentación suministrado en la toma AC IN situada en la parte posterior de la unidad.
2
Enchufe el otro extremo a una toma de corriente.
PRECAUCIÓN
•Sujete el cable de alimentación por la parte del enchufe. No desconecte la clavija tirando del cable; nunca toque el cable de alimentación con las
manos mojadas, ya que esto puede causar cortocircuitos o descargas eléctricas. No coloque el equipo, un mueble ni ningún objeto encima del
cable de alimentación. No dañe el cable de alimentación. No anude el cable ni lo ate a otros cables. Los cables de alimentación deben ser tendidos
de manera tal que la probabilidad de que alguien los pise sea mínima. Un cable de alimentación dañado puede causar incendios y descargas
eléctricas. Revise el cable de alimentación cada cierto tiempo. Si encuentra que está dañado, pida un cable de recambio al representante autorizado
de Pioneer más cercano.
•No utilice ningún cable de alimentación que no sea el suministrado con esta unidad.
•No utilice el cable de alimentación suministrado para ninguna finalidad distinta a la descrita a continuación.
•Si no va a utilizar la unidad durante algún tiempo −por ejemplo, durante las vacaciones−, deberá desconectarla retirando el enchufe de la toma de
4
Es
corriente.
Page 35

Configuración inicial
English
Antes de comenzar
1
Instalación de las pilas.
ADVERTENCIA
•No utilice ni guarde pilas expuestas
directamente a la luz del sol o en ubicaciones
con demasiado calor como el interior de un
coche o cerca de un calentador. Esto podría
provocar que las pilas tuvieran pérdidas, se
sobrecalentaran, explotaran o se prendieran.
También puede reducir la vida o rendimiento
de las mismas.
PRECAUCIÓN
•Cuando tenga que desembarazarse de
las baterías usadas, por favor respete
los reglamentos gubernamentales o las
disposiciones de las instituciones públicas de
protección del medio ambiente en vigor en su
país o región.
2
Encienda los componentes del sistema y
esta unidad.
Primero deberá encender el componente de
reproducción; después, esta unidad (pulse el
/I STANDBY/ON
botón
frontal).
u
situado en el panel
Configuración de red
Conguración automática
1
Presione SETUP.
En el display se mostrará la pantalla de
Setup
.
2
Seleccione Network Setting Network
Configuration.
Network Setting
Network Configuration
Friendly Name
3
Utilice
para seleccionar DHCP On;
después, pulse ENTER.
Seleccione
Si su router no es compatible con DHCP,
deberá configurar los ajustes de red de forma
manual. Para más información, consulte las
instrucciones de funcionamiento que encontrará
en el CD-ROM facilitado.
Don’t Use Proxy Server
Network Configration
DHCP On
DHCP Off
Initial
.
Français
Deutsch
Italiano
Nederlands
Español
/I STANDBY/ON
STANDBY
DIRECT Hi-Bit 32 Up Sampling
5V 1A
iPod/iPhone
•Se enciende la unidad. El botón-indicador
de alimentación principal parpadeará
lentamente.
Unos veinte segundos después de haber
encendido el receptor, se mostrará la
siguiente pantalla. Desde que se enciende
la unidad hasta que finaliza el proceso de
puesta en marcha transcurren unos treinta
segundos.
5
Es
Page 36

A
LAN (10/100)
Reproducción básica
Reproducción con opción
NETWORK
Esta unidad está equipada con un terminal LAN,
lo que le permitirá disfrutar de las siguientes
funciones mediante la conexión de sus
componentes a este terminal.
•Reproducción de archivos de música
guardados en ordenadores.
Cómo reproducir archivos de audio
guardados en ordenadores u otros
componentes
REPEAT
TOP
MENU
SET UP
CLEAR
DISPLAY
Up SamplingHi-Bit32
SOUND
A.L.C
iPod
CONTROL
REAR
NET
FAVORITES
USB DAC IN
DIMMER
SORT
SHUFFLE SORT
NOW
PLAYNG
ENTER
RETURN
+Favorite
Please wait...
y B pueden
B
B
A
2
3
”.
STANDBY/ON
DIRECT
A.S.R
iPod/USB
FRONT
MUSIC
SERVER
1
DIG IN 1
SOURCE SELECT
REPEAT
1
Pulse MUSIC SERVER para seleccionar
A.L.C
iPod/USB
REAR
NET
SERVICE
DIG IN 2
SHUFFLE
DISPLAY
Up SamplingHi-Bit32
SOUND
iPod
CONTROL
FAVORITES
USB DAC IN
DIMMER
SORT
Music Server como fuente de entrada.
•Cuando no haya ningún servidor disponible
para reproducir, se mostrará “
2
Utilice
para seleccionar el servidor en
el que esté guardado el archivo que desee
reproducir; a continuación, pulse ENTER.
Las carpetas/archivos guardados en el servidor
se mostrarán en el display.
3
Utilice
para seleccionar el archivo
que desee reproducir; a continuación,
pulse ENTER.
Dará comienzo la reproducción.
•Algunos de los botones
emplearse para la reproducción básica
de archivos de música guardados en
componentes de la red.
Reproducción del iPod/iPhone
STANDBY/ON
DIRECT
A.S.R
iPod/USB
iPod/USB
FRONT
1
MUSIC
SERVER
SERVICE
DIG IN 1
DIG IN 2
SOURCE SELECT
REPEAT
SHUFFLE
2
Conecte el iPod/iPhone.
Conecte un iPod/iPhone al puerto USB situado
en el panel frontal o posterior de la unidad. Para
conectarlo, utilice el cable de iPod suministrado
con el iPod/iPhone.
Panel frontal
/I STANDBY/ON
STANDBY DIRECT Hi-Bit 32
5V
iPod/iPhone
1A
Up Sampling
iPod/iPhone
Cable para iPod
Panel trasero
DIGITAL OUT
DIGITAL IN
OPTICAL COAXIAL
CONTROL
OUT
12
iPod/iPhone
DIGITAL IN
5V 1A
USB DAC
OPTICALCOAXIAL
DC OUTPUT
WIRELESS
(5V 0.6A MAX)
For
LAN
iPod/iPhone
Cable para iPod
•Algunos de los botones B se pueden utilizar
para la reproducción básica de archivos
guardados en un iPod/iPhone.
Nota
•Cuando haya un iPod/iPhone conectado a
esta unidad, en el display del dispositivo se
mostrará la información de reproducción
de las canciones. Si pulsa el botón
CONTROL
del mando a distancia, el display
iPod
cambiará y dicha información se mostrará
en el panel frontal de la unidad.
•Esta unidad es compatible con AirPlay. Para
más información, consulte “Usando AirPlay
en iPod touch, iPhone, iPad e iTunes” en las
instrucciones de funcionamiento y el sitio
web de Apple (http://www.apple.com).
Reproducción de archivos
guardados en dispositivos de
almacenamiento USB/HDD (discos
duros) externos
REPEAT
STANDBY/ON
DIRECT
A.S.R
iPod/USB
FRONT
1
MUSIC
SERVER
DIG IN 1
SOURCE SELECT
REPEAT
1
Pulse iPod/USB FRONT o iPod/USB REAR
A.L.C
iPod/USB
REAR
NET
SERVICE
DIG IN 2
SHUFFLE
DISPLAY
Up SamplingHi-Bit32
SOUND
iPod
CONTROL
FAVORITES
USB DAC IN
DIMMER
SORT
en el mando a distancia para seleccionar
USB como fuente de entrada.
En el display se mostrará
iPod/USB Rear
2
Conecte el dispositivo de almacenamiento
.
USB/HDD externo.
Conecte el dispositivo de almacenamiento USB/
HDD externo al puerto USB situado en el panel
frontal o posterior de la unidad.
Panel frontal
u/I STANDBY/ON
STANDBY
DIRECT Hi-Bit 32 Up Sampling
5V 1A
iPod/iPhone
Dispositivo de
almacenamiento USB
HDD externo
Panel trasero
DIGITAL OUT
DIGITAL IN
OPTICAL COAXIAL
OPTICAL COAXIAL
DC OUTPUT
LAN (10/100)
CONTROL
For
OUT
WIRELESS
LAN
(5V 0.6A MAX)
iPod/iPhone
HDD externo
3
Utilice
para seleccionar el archivo; a
continuación, pulse ENTER.
Dará comienzo la reproducción.
•Algunos de los botones
utilizar para la reproducción básica de
archivos guardados en dispositivos de
almacenamiento USB/HDD externos.
SHUFFLE SORT
TOP
MENU
ENTER
SET UP
CLEAR
iPod/USB Front
b
12
DIGITAL IN
5V 1A
USB DAC
Dispositivo de
almacenamiento
USB
A
y B se pueden
NOW
PLAYNG
RETURN
+Favorite
B
A
3
o
1
Pulse iPod/USB FRONT o iPod/USB REAR
en el mando a distancia para seleccionar
iPod/USB como fuente de entrada.
En el display se mostrará
iPod/USB Rear
6
Es
iPod/USB Front
o
.
Page 37

Uso del convertidor D/A
Las señales digitales transmitidas a través de
los conectores
DIGITAL IN USB DAC
o
posterior, son convertidas a señales analógicas y
generadas a través de los conectores
OUT
.
Cómo reproducir música desde un
componente de audio digital
Genera señales digitales transmitidas a través
de los conectores
DIGITAL IN 2 (OPTICAL)
DIGITAL IN 1, DIGITAL IN 2
, situados en el panel
ANALOG
DIGITAL IN 1 (COAXIAL)
.
o
English
Français
Deutsch
STANDBY/ON
DIRECT
A.S.R
iPod/USB
FRONT
MUSIC
SERVER
DIG IN 1
1
SOURCE SELECT
1
Pulse DIG IN 1 o DIG IN 2 para seleccionar
A.L.C
iPod/USB
REAR
NET
SERVICE
DIG IN 2
DISPLAY
Up SamplingHi-Bit32
SOUND
iPod
CONTROL
FAVORITES
USB DAC IN
DIMMER
Digital In 1 o Digital In 2 como fuente de
entrada.
Cuando haya seleccionado
Digital In 1
, se
reproducirán las señales de entrada digital
desde el conector
seleccionado
COAXIAL
Digital In 2
; cuando haya
, se reproducirán las
señales de entrada digital desde el conector
OPTICAL
2
.
Inicie la reproducción en el equipo de
audio digital.
Cómo reproducir música desde un
ordenador
Utilice esta función para reproducir audio digital
transmitido a través del puerto
DAC
situado en el panel posterior de la unidad.
Importante
•Cuando utilice el puerto
DAC
para la entrada de archivos de audio
desde un ordenador a esta unidad, es posible
que deba instalar un controlador especial en
el ordenador. Para más información, consulte
el sitio web de Pioneer.
DIGITAL IN USB
DIGITAL IN USB
Italiano
Nederlands
Español
STANDBY/ON
DIRECT
A.S.R
iPod/USB
FRONT
MUSIC
SERVER
DIG IN 1
1
SOURCE SELECT
1
Pulse USB DAC IN para seleccionar USB
A.L.C
iPod/USB
REAR
SERVICE
DIG IN 2
DISPLAY
Up SamplingHi-Bit32
SOUND
iPod
CONTROL
NET
FAVORITES
USB DAC IN
DIMMER
DAC IN como fuente de entrada.
2
Inicie la reproducción en el ordenador.
Uso de auriculares (solo N-70A)
También puede escuchar música mediante la
conexión de unos auriculares.
© 2014 PIONEER HOME ELECTRONICS CORPORATION.
Todos los derechos reservados.
7
Es
Page 38

Русский
ОБЯЗАТЕЛЬНАЯ ВЕНТИЛЯЦИЯ
Порядоквыполнениянастроекнасетевомаудиоплеере
iPod/iPhone
Запоминающее
устройство
USB
1
Внешний
жесткий диск
3
/I STANDBY/ON
STANDBY
DIRECT Hi-Bit 32 Up Sampling
5V 1A
iPod/iPhone
3
Компьютер Цифровая аудиосистема
Данныйсетевойаудиоплеер
AV ресивер,
цифроаналоговый
преобразователь и т. д.
Усилитель
SOURCE
SOURCE
N-70A
4
NETWORK AUDIO PLAYER
N-50A
N-50A
Интернет
2
LAN
321
к порту LAN
При установке устройства обеспечьте достаточное
пространство для вентиляции во избежание
повышения температуры внутри устройства (не
менее 10 см сверху, 10 см сзади и по 10 см слева и
справа).
WAN
Маршрутизатор
Компьютер
Модем
D3-4-2-1-7d*_A1_Ru
Подключение
Подключение усилителя
–
1
Подключение к сети
–
2
Подключение компонента воспроизведения
–
3
Включение в сеть устройства
–
4
Начальнаянастройка
Перед началом работы
–
Настройка сети
–
Основныеоперациивоспроизведения
Воспроизведение с функцией NETWORK
–
Воспроизведение с iPod/iPhone
–
Воспроизведение файлов, сохраненных на запоминающих устройствах USB/внешних жестких
–
дисках
Использование цифроаналогового преобразователя
–
Использование наушников (только N-70A)
–
2
Ru
Page 39

Подключение
Подключениеусилителя
•Обязательно выключите питание и отсоедините кабель питания от розетки при выполнении подключений или изменении соединений.
•Подключите кабель питания после выполнения всех соединений между устройствами.
English
Français
N-70A
RL
Предусилитель и
т.д., оснащенные
балансными
входными разъемами
DIGITAL IN
COAXIAL
AV ресивер,
цифроаналоговый
преобразователь и т. д.
ANALOG OUT
R
L
Соединения аналоговых
аудиовыходов
Примечание
Можно выполнить настройку полярности, что позволяет сбалансировать сигнал из устройства с
подключенным компонентом. Более подробные сведения см. в руководстве по эксплуатации на
входящем в комплект диске CD-ROM.
DIGITAL OUT
OPTICAL
COAXIAL
DC OUTPUT
LAN (10/100)
For
WIRELESS
LAN
(5V 0.6A MAX)
AUDIO INPUT
RL
ANALOG
DIGITAL IN
OPTICAL
AV ресивер,
цифроаналоговый
преобразователь и т. д.
OPTIC
CONTR
OUT
Предусилитель с
входными разъемами RCA
(штырьковыми вилками)
При подключении цифрового
аудиовыхода устройства к
цифровому аудиовходу AV
ресивера или цифроаналогового
преобразователя можно
использовать усилитель для
прослушивания цифрового аудио,
воспроизводимого из этого
устройства.
При подключении аналогового
аудиовыхода устройства к
аналоговому аудиовходу
усилителя можно использовать
усилитель для прослушивания
аналогового аудио,
воспроизводимого из этого
устройства.
Deutsch
Italiano
Nederlands
Español
N-50A
ANALOG OUT
R
L
Соединения аналоговых
аудиовыходов
OPTICAL
LAN (10/100)
DIGITAL OUT
COAXIAL
DC OUTPUT
WIRELESS
(5V 0.6A MAX)
For
LAN
DIGITAL IN
COAXIAL
DIGITAL IN
OPTICAL COAXIAL
CONTROL
OUT
AV ресивер,
цифроаналоговый
преобразователь и т. д.
12
DIGITAL IN
iPod/iPhone
5V 1A
USB DAC
DIGITAL IN
OPTICAL
AUDIO INPUT
RL
ANALOG
AV ресивер,
цифроаналоговый
преобразователь и т. д.
Соединения цифровых
аудиовыходов
Усилитель
При подключении цифрового
аудиовыхода устройства к
цифровому аудиовходу AV
ресивера или цифроаналогового
преобразователя можно
использовать усилитель для
прослушивания цифрового аудио,
воспроизводимого из этого
устройства.
При подключении аналогового
аудиовыхода устройства к
аналоговому аудиовходу
усилителя можно использовать
усилитель для прослушивания
аналогового аудио,
воспроизводимого из этого
устройства.
3
Ru
Page 40

ПодключениексетичерезинтерфейсLAN
Router
Маршрутизатор
LAN
321
WAN
Модем
Интернет
Компьютер
AC IN
R
ANALOG OUT
DIGITAL OUT
L
OPTICAL
LAN (10/100)
COAXIAL
DC OUTPUT
For
WIRELESS
LAN
(5V 0.6A MAX)
DIGITAL IN
OPTICAL COAXIAL
CONTROL
OUT
12
iPod/iPhone
5V 1A
DIGITAL IN
USB DAC
N-50A
Подключениекомпонентавоспроизведения
DIGITAL IN
COAXIAL
Цифровая
аудиосистема и т.д.
Внешний жесткий
диск*1 и т.п.
LOG OUT
L
/I STANDBY/ON
STANDBY
5V 1A
iPod/iPhone
DIGITAL IN
OPTICAL
OPTICAL
LAN (10/100)
DIGITAL OUT
COAXIAL
OPTICAL COAXIAL
DC OUTPUT
CONTROL
For
OUT
WIRELESS
LAN
(5V 0.6A MAX)
DIRECT Hi-Bit 32 Up Sampling
iPod/iPhone
Запоминающее
устройство USB
DIGITAL IN
12
DIGITAL IN
iPod/iPhone
5V 1A
USB DAC
B-тип
USB
A-тип
Компьютер
AC IN
N-50A
Подключив данную микросистему к сети
через интерфейс LAN, можно воспроизводить
аудиофайлы, сохраненные на компонентах в
сети, включая компьютер, и прослушивать
Радиорадиостанции.
Подсоедините разъем LAN на данном аппарате к
разъему LAN на маршрутизаторе (с встроенной
функцией DHCP-сервера или без нее) с помощью
прямого кабеля LAN (CAT 5 или выше).
Включите функцию DHCP-сервера на
маршрутизаторе. Если на маршрутизаторе
отсутствует функция DHCP сервера, необходимо
настроить сеть вручную. Подробные сведения
см. в Руководстве по эксплуатации на входящем в
комплект диске CD-ROM.
•Подключите цифровой аудиовыход на
цифровом аудиокомпоненте к разъему DIGITAL
IN 1 или DIGITAL IN 2 на устройстве для
воспроизведения цифрового аудиосигнала.
•Соедините разъем USB компьютера с разъемом
DIGITAL IN USB DAC на устройстве для
воспроизведения цифрового аудиосигнала.
–При использовании этого соединения для
воспроизведения файла музыки с компьютера
через это устройство, на компьютере
следует установить специальный драйвер.
Дополнительную информацию см. на вебсайте Pioneer.
–Вы не сможете воспроизвести аудиофайл,
если на подключенном компьютере не
установлен Media Player.
•Рекомендуется подключать внешний жесткий
диск к задней панели этого устройства.
При подключении к передней панели этого
устройства и включении функции iPod/USB
Front устройству может понадобиться время
для распознания внешнего жесткого диска.
iPod/iPhone
Внешний жесткий
диск*1 и т.п.
Запоминающее
устройство USB
*1: Можно использовать только внешние жесткие диски, сформатированные в файловой системе
FAT32 и разделенные на сектора.
Включениевсетьустройства
Включайте вилку в сеть только после подключения к этому устройству всех компонентов.
1
ВставьтеприлагаемыйкабельпитаниявгнездоACINназаднейсторонеустройства.
2
Вставьтевилкупитаниянадругомконцекабеляврозетку.
ВНИМАНИЕ
•Держите кабель питания за вилку. Вынимая вилку из электророзетки, никогда не тяните за сам кабель, никогда не дотрагивайтесь до кабеля питания
влажными руками, так как это может стать причиной короткого замыкания и поражения электрическим током. Не ставьте на кабель питания
устройство, мебель или другие предметы и не зажимайте его каким-либо иным образом. Запрещается завязывать узлы на кабеле питания или
связывать его с другими кабелями. Кабели питания следует прокладывать в таких местах, где возможность наступить на них будет маловероятной.
Поврежденный кабель питания может стать причиной возгорания или поражения электрическим током. Периодически проверяйте кабель питания.
Если кабель питания поврежден, обратитесь за сменным кабелем в ближайший уполномоченный независимый сервис-центр Pioneer.
•Используйте только кабель питания, входящий в комплект поставки данного устройства.
•Используйте прилагаемый кабель питания только по его прямому назначению, как описано ниже.
•Когда устройство не используется (например, во время отпуска), его следует отключать от питания, вынув вилку из розетки электросети.
4
Ru
Page 41

Начальнаянастройка
English
Передначаломработы
1
Установкаэлементовпитания.
ПРЕДУПРЕЖДЕНИЕ
•Не используйте и не храните батарейки на
прямом солнечном свету или в других жарких
местах (например, в салоне автомобиля или
рядом с обогревателем). Это может привести
к утечке жидкости из батареек, перегреву,
взрыву или возгоранию. Кроме того, срок
службы или емкость батареек может
уменьшиться.
ВНИМАНИЕ
•Избавляясь от использованных батареек,
пожалуйста, выполняйте действующие
в вашей стране или регионе требования
правительственных предписаний или
соблюдайте правила, установленные
общественной природоохранной
организацией.
2
Включитекомпонентысистемыиэто
устройство.
Начните с включения компонента
воспроизведения, затем включите это устройство
(нажмите кнопку
панели).
/I STANDBY/ON
u
на передней
Настройкасети
Автоматическаянастройка
1
НажмитекнопкуSETUP.
На дисплее отобразится экран
2
Выберите
Configuration
3
Используйтекнопки
Network Setting
.
Network Setting
Network Configuration
Friendly Name
Initial Setup
,чтобы
выбратьDHCPOn,затемнажмите
ENTER.
Выберите
Если ваш маршрутизатор не поддерживает
DHCP, выполните сетевые настройки вручную.
Более подробные сведения см. в руководстве по
эксплуатации на входящем в комплект диске CDROM.
Don’t Use Proxy Server
Network Configration
DHCP On
DHCP Off
.
Network
.
Français
Deutsch
Italiano
Nederlands
Español
/I STANDBY/ON
STANDBY
DIRECT Hi-Bit 32 Up Sampling
5V 1A
iPod/iPhone
•Устройство включится. Индикатор питания на
центральной кнопке будет медленно мигать.
Примерно через двадцать секунд после
включения питания появляется следующий
экран. Потребуется около тридцати секунд от
включения питания до завершения запуска.
5
Ru
Page 42

LAN (10/100)
Основныеоперациивоспроизведения
Воспроизведениесфункцией
NETWORK
Данное устройство оснащено разъемом LAN
и, подключив компоненты к данным разъемам,
можно воспользоваться следующими функциями.
•Воспроизведение музыкальных файлов,
сохраненных на компьютерах
Воспроизведениеаудиофайлов,
сохраненныхнакомпьютерахили
другихкомпонентах
REPEAT
TOP
MENU
SET UP
CLEAR
A
и B можно
DISPLAY
Up SamplingHi-Bit32
SOUND
A.L.C
iPod
CONTROL
REAR
NET
FAVORITES
USB DAC IN
DIMMER
SORT
SHUFFLE SORT
NOW
PLAYNG
ENTER
RETURN
+Favorite
Please
,чтобы
B
B
A
2
3
STANDBY/ON
DIRECT
A.S.R
iPod/USB
FRONT
MUSIC
SERVER
1
DIG IN 1
SOURCE SELECT
REPEAT
1
НажмитекнопкуMUSICSERVER,чтобы
A.L.C
iPod/USB
REAR
NET
SERVICE
DIG IN 2
SHUFFLE
DISPLAY
Up SamplingHi-Bit32
SOUND
iPod
CONTROL
FAVORITES
USB DAC IN
DIMMER
SORT
выбратьсервермузыкивкачестве
источникавхода.
•Когда сервер становится доступным для
воспроизведения, отображается «
».
wait...
2
Используйте
длявыборасервера,
накоторомхранитсяфайл,которыйвы
хотитевоспроизвести,затемнажмите
ENTER.
На дисплее отображаются папки/файлы,
сохраненные на сервере.
3
Используйтекнопки
выбратьфайл,которыйвыхотите
воспроизвести,затемнажмитеENTER.
Начинается воспроизведение.
•Некоторые из кнопок
использовать для основного воспроизведения
музыкальных файлов, сохраненных на
компонентах в сети.
ВоспроизведениесiPod/iPhone
STANDBY/ON
DIRECT
A.S.R
iPod/USB
iPod/USB
FRONT
1
MUSIC
SERVER
SERVICE
DIG IN 1
DIG IN 2
SOURCE SELECT
REPEAT
SHUFFLE
2
ПодключитевашiPod/iPhone.
Подключите iPod/iPhone к разъему USB на
передней или задней панели устройства. Для
подключения используйте кабель iPod, входящий
в комплект iPod/iPhone.
Передняя панель
/I STANDBY/ON
STANDBY DIRECT Hi-Bit 32
5V
iPod/iPhone
1A
Up Sampling
iPod/iPhone
Кабель для iPod
Задняя панель
DIGITAL OUT
DIGITAL IN
OPTICAL COAXIAL
CONTROL
OUT
12
iPod/iPhone
DIGITAL IN
5V 1A
USB DAC
OPTICALCOAXIAL
DC OUTPUT
WIRELESS
(5V 0.6A MAX)
For
LAN
iPod/iPhone
Кабель для iPod
•Некоторые из кнопок B можно использовать
для основного воспроизведения файлов,
сохраненных на iPod/iPhone.
Примечание
•Если к данному устройству подключается
устройство iPod/iPhone, информация о
воспроизведении песен отображается
на дисплее устройства iPod/iPhone. При
нажатии кнопки
iPod CONTROL
на
пульте ДУ переключается дисплей, и на
передней панели устройства отображается
информация.
•Эта микросистема поддерживает AirPlay.
Более подробные сведения см. в разделе
«Использование AirPlay на iPod touch,
iPhone, iPad и iTunes» руководства по
эксплуатации и на веб-сайте Apple (http://
www.apple.com).
Воспроизведениефайлов,
сохраненныхназапоминающих
устройствахUSB/внешних
жесткихдисках
REPEAT
STANDBY/ON
DIRECT
A.S.R
iPod/USB
FRONT
1
MUSIC
SERVER
DIG IN 1
SOURCE SELECT
REPEAT
1
НажмитекнопкуiPod/USBFRONTили
A.L.C
iPod/USB
REAR
NET
SERVICE
DIG IN 2
SHUFFLE
DISPLAY
Up SamplingHi-Bit32
SOUND
iPod
CONTROL
FAVORITES
USB DAC IN
DIMMER
SORT
iPod/USBREARнапультеДУ,чтобы
выбратьUSBвкачествеисточника
входа.
На передней панели отображается i
или
Front
2
iPod/USB Rear
Подключитезапоминающееустройство
USB/внешнийжесткийдиск.
Подключите запоминающее устройство USB/
внешний жесткий диск к разъему USB на
передней или задней панели устройства.
Передняя панель
u/I STANDBY/ON
STANDBY
DIRECT Hi-Bit 32 Up Sampling
5V 1A
iPod/iPhone
Запоминающее
устройство USB
Внешний
жесткий диск
Задняя панель
DIGITAL OUT
DIGITAL IN
OPTICAL COAXIAL
OPTICAL COAXIAL
DC OUTPUT
LAN (10/100)
CONTROL
For
OUT
WIRELESS
LAN
(5V 0.6A MAX)
iPod/iPhone
Внешний жесткий диск
3
Используйтекнопки
файла,затемнажмитеENTER.
Начинается воспроизведение.
•Некоторые из кнопок
использовать для основного воспроизведения
файлов, сохраненных на запоминающих
устройствах USB/внешних жестких дисках.
SHUFFLE SORT
TOP
MENU
ENTER
SET UP
CLEAR
.
b
12
DIGITAL IN
5V 1A
USB DAC
Запоминающее
устройство USB
длявыбора
A
и B можно
NOW
PLAYNG
RETURN
+Favorite
Pod/USB
B
A
3
1
НажмитекнопкуiPod/USBFRONT
илиiPod/USBREARнапультеДУ,
чтобывыбратьiPod/USBвкачестве
источникавхода.
На передней панели отображается
или
Front
6
Ru
iPod/USB Rear
iPod/USB
.
Page 43

Использованиецифроаналогового
Дату изготовления оборудования можно определить по серийному номеру, который содержит информацию о
преобразователя
Цифровые сигналы, входящие в разъемы задней
панели
DIGITAL IN 1, DIGITAL IN 2
IN USB DAC
, преобразуются в аналоговые
сигналы и выходят из разъемов
Воспроизведениемузыкииз
цифровогоаудиокомпонента
Выводятся цифровые сигналы, входящие в
разъемы
IN 2 (OPTICAL)
DIGITAL IN 1 (COAXIAL)
.
или
DIGITAL
ANALOG OUT
или
DIGITAL
.
Воспроизведениемузыкис
компьютера
Используйте эту функцию для воспроизведения
цифрового аудио, входящего в разъем
IN USB DAC
ВАЖНО
задней панели устройства.
•При использовании разъема
для входа аудиофайлов с компьютера
DAC
на это устройство, может потребоваться
установить специальный драйвер на
компьютер. Подробные сведения см. на вебсайте Pioneer.
DIGITAL
DIGITAL IN USB
Использованиенаушников
(толькоN-70A)
Вы можете прослушивать музыку через
наушники.
English
Français
Deutsch
STANDBY/ON
DIRECT
A.S.R
iPod/USB
FRONT
MUSIC
SERVER
DIG IN 1
1
SOURCE SELECT
1
НажмитеDIGIN1илиDIGIN2,чтобы
A.L.C
iPod/USB
REAR
NET
SERVICE
DIG IN 2
DISPLAY
Up SamplingHi-Bit32
SOUND
iPod
CONTROL
FAVORITES
USB DAC IN
DIMMER
выбратьDigitalIn1(Цифровойвход
1)илиDigitalIn2(Цифровойвход2)в
качествеисточникавхода.
Когда выбирается
Digital In 1
цифровые входные сигналы с разъема
когда выбирается
Digital In 2
цифровые входные сигналы с разъема
2
Начинаетсявоспроизведениена
, воспроизводятся
COAXIAL
, воспроизводятся
OPTICAL
цифровомаудиокомпоненте.
месяце и годе производства.
STANDBY/ON
DIRECT
A.L.C
A.S.R
iPod/USB
iPod/USB
REAR
FRONT
NET
MUSIC
SERVICE
SERVER
DIG IN 2
DIG IN 1
1
SOURCE SELECT
1
НажмитеUSBDACIN,чтобывыбрать
USBDACINвкачествеисточника
входа.
2
Начинаетсявоспроизведениена
;
компьютере.
.
DISPLAY
Up SamplingHi-Bit32
SOUND
iPod
CONTROL
FAVORITES
USB DAC IN
DIMMER
Italiano
Nederlands
Español
Серийный номер
12 цифр
2 цифры
10 цифр
P1 P2
Дата изготовления оборудования
P1 - Год изготовления
Год 2001A2002B2003C2004D2005E2006F2007G2008H2009I2010
Символ
Год
2011K2012L2013M2014N2015O2016P2017Q2018R2019S2020
Символ
P2 - Месяц изготовления
Месяц 1
Символ
A
2
B
3
C
4
D
5
E
6
F
7
G
8
H
9
10
I
J
11
K
D3-7-10-7_A1_Ru
J
T
12
L
© PIONEER HOME ELECTRONICS CORPORATION, 2014.
Все права защищены.
7
Ru
Page 44

Примечание:
В соответствии со статьей 5 Закона Российской Федерации “О защите прав потребителя” и Указанием
Правительства Российской Федерации № 720 от 16 июня 1997 года корпорация Pioneer Europe NV устанавливает
условие на следующую продолжительность срока службы официально поставляемых на Российский рынок товаров.
Аудио и видеооборудование: 7 лет
Переносное аудиооборудование: 6 лет
Другое оборудование (наушники, микрофон и т.д.): 5 лет
Автомобильная электроника: 6 лет
D3-7-10-6_A1_Ru
Discover the benefits of registering your product online at http://www.pioneer.co.uk (or http://www.pioneer.eu).
Découvrez les nombreux avantages offerts en enregistrant votre produit en ligne maintenant sur http://www.pioneer.fr
(ou http://www.pioneer.eu).
Bitte nutzen Sie die Möglichkeit zur Registrierung Ihres Produktes unter http://www.pioneer.de (oder
http://www.pioneer.eu)
Registra il tuo prodotto su
http://www.pioneer.it
(o http://www.pioneer.eu) e scopri subito quali vantaggi puoi ottenere!
Ontdek nu de voordelen van online registratie! Registreer uw Pioneer product via
http://www.pioneer.nl - http://www.pioneer.be (of http://www.pioneer.eu).
Registre su producto en
Descubra los beneficios de registrarse on-line:
Зарегистрируйте Baшe изделие на http://www.pioneer-rus.ru (или http://www.pioneer.eu). Oзнакомьтесь с
преимуществами регистрации в Интернет
Download an electronic version of this manual from our website.
Télécharger une version électronique de cette notice depuis notre site Internet.
Электронная версия руководства доступна для скачивания на сайте www.pioneer-rus.ru
Scarica la versone elettronica di questo manuale dal nostro sito internet.
Download een elektronische versie van de handleiding via de website.
Descarguese una versión electrónica de este manual desde nuestra web.
Laden Sie eine elektronische Version dieser Anleitung von unserer Website.
PIONEER HOME ELECTRONICS CORPORATION
1-1, Shin-ogura, Saiwai-ku, Kawasaki-shi, Kanagawa 212-0031, Japan
Корпорация Пайонир Хоум Электроникс
1-1, Син-Огура, Сайвай-ку, г. Кавасаки, префектура Канагава, 212-0031, Япония
Импортер: ООО "ПИОНЕР РУС"
125040, Россия, г. Москва, ул. Правды, д.26 Тел.: +7(495) 956-89-01
PIONEER ELECTRONICS (USA) INC.
P. O. BOX 1540, Long Beach, California 90801-1540, U.S.A. TEL: (800) 421-1404
PIONEER ELECTRONICS OF CANADA, INC.
340 Ferrier Street, Unit 2, Markham, Ontario L3R 2Z5, Canada TEL: 1-877-283-5901, 905-479-4411
PIONEER EUROPE NV
Haven 1087, Keetberglaan 1, B-9120 Melsele, Belgium TEL: 03/570.05.11
PIONEER ELECTRONICS ASIACENTRE PTE. LTD.
253 Alexandra Road, #04-01, Singapore 159936 TEL: 65-6472-7555
PIONEER ELECTRONICS AUSTRALIA PTY. LTD.
5 Arco Lane, Heatherton, Victoria, 3202, Australia, TEL: (03) 9586-6300
PIONEER ELECTRONICS DE MEXICO S.A. DE C.V.
Blvd.Manuel Avila Camacho 138 10 piso Col.Lomas de Chapultepec, Mexico, D.F. 11000 TEL: 55-9178-4270
K002*_B5_Ru
http://www.pioneer.es (o en http://www.pioneer.eu)
© 2014 PIONEER HOME ELECTRONICS CORPORATION.
© 2014 PIONEER HOME ELECTRONICS CORPORATION.
Tous droits de reproduction et de traduction réservés.
Printed in Vietnam / Imprimé au Vietnam
All rights reserved.
Сделано во Вьетнаме
<5707-00000-964-0S>
 Loading...