

Page 1
Operating Instructions
Mode d’emploi
Network Audio Player
Gestion des médias réseau
N-
50
N-
30
Page 2
IMPORTANT
The lightning flash with arrowhead symbol,
within an equilateral triangle, is intended to
alert the user to the presence of uninsulated
“dangerous voltage” within the product’s
enclosure that may be of sufficient
magnitude to constitute a risk of electric
shock to persons.
Read these instructions.
1)
Keep these instructions.
2)
Heed all warnings.
3)
Follow all instructions.
4)
Do not use this apparatus near water.
5)
Clean only with dry cloth.
6)
Do not block any ventilation openings. Install in
7)
accordance with the manufacturer’s
instructions.
Do not install near any heat sources such as
8)
radiators, heat registers, stoves, or other
apparatus (including amplifiers) that produce
heat.
Do not defeat the safety purpose of the polarized
9)
or grounding-type plug. A polarized plug has two
blades with one wider than the other. A
grounding type plug has two blades and a third
grounding prong. The wide blade or the third
prong are provided for your safety. If the provided
plug does not fit into your outlet, consult an
electrician for replacement of the obsolete outlet.
Protect the power cord from being walked on or
10)
pinched particularly at plugs, convenience
receptacles, and the point where they exit from
the apparatus.
CAUTION:
TO PREVENT THE RISK OF ELECTRIC
SHOCK, DO NOT REMOVE COVER (OR
BACK). NO USER-SERVICEABLE PARTS
INSIDE. REFER SERVICING TO QUALIFIED
SERVICE PERSONNEL.
CAUTION
RISK OF ELECTRIC SHOCK
DO NOT OPEN
11)
Only use attachments/accessories specified by
the manufacturer.
12)
Use only with the cart, stand, tripod, bracket, or
table specified by the manufacturer, or sold with
the apparatus. When a cart is used, use caution
when moving the cart/apparatus combination to
avoid injury from tip-over.
13)
Unplug this apparatus during lightning storms
or when unused for long periods of time.
14)
Refer all servicing to qualified service personnel.
Servicing is required when the apparatus has
been damaged in any way, such as power-supply
cord or plug is damaged, liquid has been spilled
or objects have fallen into the apparatus, the
apparatus has been exposed to rain or moisture,
does not operate normally, or has been dropped.
The exclamation point within an equilateral
triangle is intended to alert the user to the
presence of important operating and
maintenance (servicing) instructions in the
literature accompanying the appliance.
D3-4-2-1-1_A1_En
D3-7-13-69_En
WARNING
This equipment is not waterproof. To prevent a fire or
shock hazard, do not place any container filled with
liquid near this equipment (such as a vase or flower
pot) or expose it to dripping, splashing, rain or
moisture.
D3-4-2-1-3_A1_En
WARNING
Before plugging in for the first time, read the following
section carefully.
The voltage of the available power supply differs
according to country or region. Be sure that the
power supply voltage of the area where this unit
will be used meets the required voltage (e.g., 230 V
or 120 V) written on the rear panel.
D3-4-2-1-4*_A1_En
WARNING
To prevent a fire hazard, do not place any naked flame
sources (such as a lighted candle) on the equipment.
D3-4-2-1-7a_A1_En
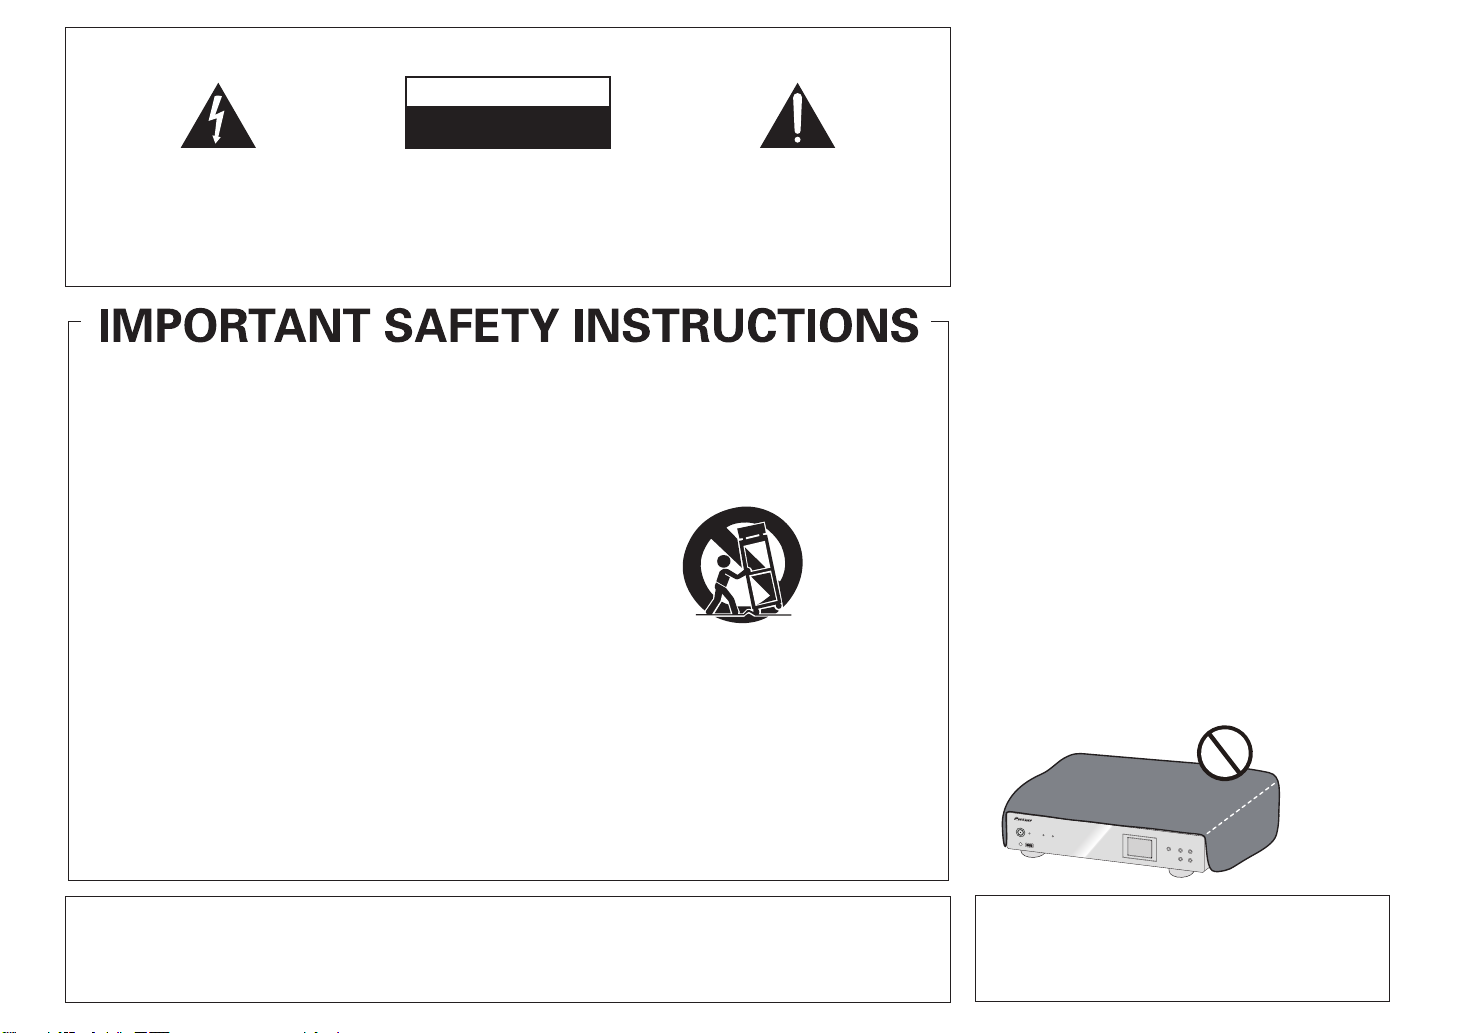
VENTILATION CAUTION
When installing this unit, make sure to leave space
around the unit for ventilation to improve heat radiation
(at least 10 cm at top, 10 cm at rear, and 10 cm at each
side).
WARNING
Slots and openings in the cabinet are provided for
ventilation to ensure reliable operation of the product,
and to protect it from overheating. To prevent fire
hazard, the openings should never be blocked or
covered with items (such as newspapers, table-cloths,
curtains) or by operating the equipment on thick carpet
or a bed.
D3-4-2-1-7b*_A1_En
IMPORTANT NOTICE
THE MODEL NUMBER AND SERIAL NUMBER OF THIS EQUIPMENT ARE ON THE REAR OR BOTTOM.
RECORD THESE NUMBERS ON YOUR ENCLOSED WARRANTY CARD AND KEEP IN A SAFE PLACE FOR FUTURE
REFERENCE.
D36-AP9-1_A1_En
Information to User
Alterations or modifications carried out without
appropriate authorization may invalidate the user’s
right to operate the equipment.
D8-10-2_A1_En
Page 3

NOTE:
This equipment has been tested and found to comply with the limits for a Class B digital device, pursuant to Part 15
of the FCC Rules. These limits are designed to provide reasonable protection against harmful interference in a
residential installation. This equipment generates, uses, and can radiate radio frequency energy and, if not installed
and used in accordance with the instructions, may cause harmful interference to radio communications. However,
there is no guarantee that interference will not occur in a particular installation. If this equipment does cause
harmful interference to radio or television reception, which can be determined by turning the equipment off and on,
the user is encouraged to try to correct the interference by one or more of the following measures:
— Reorient or relocate the receiving antenna.
— Increase the separation between the equipment and receiver.
— Connect the equipment into an outlet on a circuit different from that to which the receiver is connected.
— Consult the dealer or an experienced radio/TV technician for help.
D8-10-1-2_A1_En
If the AC plug of this unit does not match the AC
outlet you want to use, the plug must be removed
and appropriate one fitted. Replacement and
mounting of an AC plug on the power supply cord of
this unit should be performed only by qualified
service personnel. If connected to an AC outlet, the
cut-off plug can cause severe electrical shock. Make
sure it is properly disposed of after removal.
The equipment should be disconnected by removing
the mains plug from the wall socket when left unused
for a long period of time (for example, when on
vacation).
D3-4-2-2-1a_A1_En
FEDERAL COMMUNICATIONS COMMISSION DECLARATION OF CONFORMITY
This device complies with part 15 of the FCC Rules. Operation is subject to the following two conditions: (1) This
device may not cause harmful interference, and (2) this device must accept any interference received, including
interference that may cause undesired operation.
Product Name:
NETWORK AUDIO PLAYER
Model Number: N-50
Responsible Party Name: PIONEER ELECTRONICS (USA) INC.
SERVICE SUPPORT DIVISION
Address: 1925 E. DOMINGUEZ ST. LONG BEACH, CA 90810-1003, U.S.A.
Phone: 1-800-421-1404
URL: http://www.pioneerelectronics.com
This Class B digital apparatus complies with
Canadian ICES-003.
D8-10-1-3_A1_En
CAUTION
The /I STANDBY/ON switch on this unit will not
completely shut off all power from the AC outlet.
D8-10-4*_C1_En
Since the power cord serves as the main disconnect
WARNING: Handling the cord on this product or
cords associated with accessories sold with the
product may expose you to chemicals listed on
proposition 65 known to the State of California and
other governmental entities to cause cancer and
birth defect or other reproductive harm.
D36-P5_B1_En
This product is for general household purposes. Any
failure due to use for other than household purposes
(such as long-term use for business purposes in a
restaurant or use in a car or ship) and which requires
repair will be charged for even during the warranty
period.
K041_A1_En
device for the unit, you will need to unplug it from the
AC outlet to shut down all power. Therefore, make
sure the unit has been installed so that the power
cord can be easily unplugged from the AC outlet in
case of an accident. To avoid fire hazard, the power
cord should also be unplugged from the AC outlet
when left unused for a long period of time (for
example, when on vacation).
D3-4-2-2-2a*_A1_En
Operating Environment
Operating environment temperature and humidity:
+5 °C to +35 °C (+41 °F to +95 °F); less than 85 %RH
(cooling vents not blocked)
Do not install this unit in a poorly ventilated area, or in
locations exposed to high humidity or direct sunlight (or
strong artificial light)
D3-4-2-1-7c*_A1_En
The Safety of Your Ears is in Your Hands
Get the most out of your equipment by playing it at a
safe level – a level that lets the sound come through
clearly without annoying blaring or distortion and, most
importantly, without affecting your sensitive hearing.
Sound can be deceiving. Over time, your hearing
“comfort level” adapts to higher volumes of sound, so
what sounds “normal” can actually be loud and
harmful to your hearing. Guard against this by setting
your equipment at a safe level BEFORE your hearing
adapts.
ESTABLISH A SAFE LEVEL:
• Set your volume control at a low setting.
• Slowly increase the sound until you can hear it
comfortably and clearly, without distortion.
• Once you have established a comfortable sound
level, set the dial and leave it there.
BE SURE TO OBSERVE THE FOLLOWING
GUIDELINES:
• Do not turn up the volume so high that you can’t
hear what’s around you.
• Use caution or temporarily discontinue use in
potentially hazardous situations.
• Do not use headphones while operating a motorized
vehicle; the use of headphones may create a traffic
hazard and is illegal in many areas.
S001a_A1_En
WARNING
Store small parts out of the reach of children and
infants. If accidentally swallowed, contact a doctor
immediately.
Page 4

Thank you for buying this Pioneer
product. Please read through these
operating instructions so that you will
know how to operate your model
properly. After you have finished reading
the instructions, put them in a safe place
for future reference.
Contents
01 Before you start
What’s in the box. . . . . . . . . . . . . . . . . . . . . . . . . 5
Loading the batteries in the remote control . . . . 5
Using the remote control . . . . . . . . . . . . . . . . . . . . 5
Remote operation on an iPod touch/iPhone
/iPad . . . . . . . . . . . . . . . . . . . . . . . . . . . . . . . . . . 5
02 Connections
About the audio connection . . . . . . . . . . . . . . . . 6
Analog audio output connections. . . . . . . . . . . . 6
Digital audio connections . . . . . . . . . . . . . . . . . . 6
Digital audio output connections . . . . . . . . . . . . . . 6
Digital audio input connections . . . . . . . . . . . . . . . 6
Connecting optional Bluetooth® adapter . . . . . . 7
Using a USB cable to connect to a computer. . . 7
Connecting to the network through the LAN
interface. . . . . . . . . . . . . . . . . . . . . . . . . . . . . . . . 7
Connecting using LAN cable . . . . . . . . . . . . . . . . . 7
Connecting using wireless LAN . . . . . . . . . . . . . . . 8
Plugging in . . . . . . . . . . . . . . . . . . . . . . . . . . . . . 8
03 Part names and functions
Remote control . . . . . . . . . . . . . . . . . . . . . . . . . . 9
Font panel . . . . . . . . . . . . . . . . . . . . . . . . . . . . . 10
Display. . . . . . . . . . . . . . . . . . . . . . . . . . . . . . . . 10
04 Basic Playback
Getting started . . . . . . . . . . . . . . . . . . . . . . . . . .11
iPod/iPhone/iPad playback . . . . . . . . . . . . . . . . 11
Confirm what iPod/iPhone/iPad models are
supported . . . . . . . . . . . . . . . . . . . . . . . . . . . . . . . 11
Playing your iPod/iPhone/iPad . . . . . . . . . . . . . . . 11
Playing files stored on USB storage devices . . .12
05
Bluetooth®
Audio playback
(optional)
Music playback using Bluetooth wireless
technology . . . . . . . . . . . . . . . . . . . . . . . . . . . . . 13
Remote control operation . . . . . . . . . . . . . . . . . . . 13
Connecting optional Bluetooth® adapter . . . . . 13
Setting the PIN code . . . . . . . . . . . . . . . . . . . . . 13
Pairing Bluetooth® adapter and Bluetooth
wireless technology device . . . . . . . . . . . . . . . . 13
Listening to Music Contents of Bluetooth
wireless technology device . . . . . . . . . . . . . . . . 14
AIR JAM . . . . . . . . . . . . . . . . . . . . . . . . . . . . . . . 14
06 Internet radio
Listening to the internet radio . . . . . . . . . . . . . . 15
Connecting to a LAN network . . . . . . . . . . . . . . . . 15
Listening to the internet radio for the first time . . . 15
Tune into a station . . . . . . . . . . . . . . . . . . . . . . . . 15
Adding the stations to the Favorites . . . . . . . . . 15
To delete the stations from the list . . . . . . . . . . . . 15
Advanced operations for the internet radio . . . .15
Registering broadcast stations not on the
vTuner list from the special Pioneer site . . . . . . . . 15
07 Music server
Introduction . . . . . . . . . . . . . . . . . . . . . . . . . . . . 17
About playable DLNA network devices . . . . . . . . . 17
Using AirPlay on iPod touch, iPhone, iPad and
iTunes . . . . . . . . . . . . . . . . . . . . . . . . . . . . . . . . . . 17
About the DHCP server function . . . . . . . . . . . . . .17
Authorizing this unit . . . . . . . . . . . . . . . . . . . . . . . 17
Playing audio files stored on PCs or other
components . . . . . . . . . . . . . . . . . . . . . . . . . . . . 17
Connecting to the LAN network . . . . . . . . . . . . . . 17
Playback with Music Server . . . . . . . . . . . . . . . . . 17
08 Using other functions
Using the Sound mode . . . . . . . . . . . . . . . . . . . 18
For greatest fidelity to the original sound. . . . . 18
Using the D/A converter . . . . . . . . . . . . . . . . . . 18
Playing music from a digital audio component . . .18
Playing music from a computer . . . . . . . . . . . . . .18
09 Changing the settings
Network setting . . . . . . . . . . . . . . . . . . . . . . . . . 19
Friendly Name . . . . . . . . . . . . . . . . . . . . . . . . . . 20
Parental lock setup . . . . . . . . . . . . . . . . . . . . . . 20
Turn on/off the parental lock . . . . . . . . . . . . . . . . . 20
Changing the password . . . . . . . . . . . . . . . . . . . . 20
Software Update . . . . . . . . . . . . . . . . . . . . . . . . 20
Software Update error messages . . . . . . . . . . . . . 20
Power Off settings. . . . . . . . . . . . . . . . . . . . . . . 20
Changing the Auto Power Off function setting . . . 20
Changing the Quick Start Mode . . . . . . . . . . . . . . 20
Resetting the system. . . . . . . . . . . . . . . . . . . . . 20
10 Additional information
Troubleshooting . . . . . . . . . . . . . . . . . . . . . . . . 21
Playable file formats . . . . . . . . . . . . . . . . . . . . . 25
Cautions on use. . . . . . . . . . . . . . . . . . . . . . . . . 25
When moving this unit . . . . . . . . . . . . . . . . . . . . . 25
Place of installation. . . . . . . . . . . . . . . . . . . . . . . . 25
Do not place objects on this unit. . . . . . . . . . . . . . 25
Cleaning the product . . . . . . . . . . . . . . . . . . . . . . 25
About network playback . . . . . . . . . . . . . . . . . . 26
Windows Media Player . . . . . . . . . . . . . . . . . . . . . 26
Windows Media DRM . . . . . . . . . . . . . . . . . . . . . . 26
DLNA . . . . . . . . . . . . . . . . . . . . . . . . . . . . . . . . . . 26
Content playable over a network . . . . . . . . . . . . . . 26
Disclaimer for Third Party Content . . . . . . . . . . . .26
About playback behavior over a network . . . . . . . . 26
Authorizing this unit . . . . . . . . . . . . . . . . . . . . . . . 26
aacPlus. . . . . . . . . . . . . . . . . . . . . . . . . . . . . . . . . 26
FLAC . . . . . . . . . . . . . . . . . . . . . . . . . . . . . . . . . . . 26
About iPod/iPhone/iPad . . . . . . . . . . . . . . . . . . 27
Specifications . . . . . . . . . . . . . . . . . . . . . . . . . . 27
4
En
Page 5
Before you start 01
Chapter 1:
Before you start
What’s in the box
Please confirm that the following accessories are in the
box when you open it.
• Remote Control
•Power cord
• RCA audio cable (red/white plugs)
• AAA batteries (R03) x 2
• Operating instructions (this document)
Loading the batteries in the remote
control
1 Open the rear lid and load the batteries
as illustrated below.
2 Close the rear lid.
Caution
• When inserting the batteries, make sure not to
damage the springs on the battery’s terminals.
• Do not use any batteries other than the ones
specified. Also, do not use a new battery together
with an old one.
• When loading the batteries into the remote control,
set them in the proper direction, as indicated by the
polarity marks ( and ).
• Do not heat batteries, disassemble them, or throw
them into flames or water.
• Batteries may have different voltages, even if they
are the same size and shape. Do not use different
types of batteries together.
• To prevent leakage of battery fluid, remove the
batteries if you do not plan to use the remote
control for a long period of time (1 month or more).
If the fluid should leak, wipe it carefully off the
inside of the case, then insert new batteries. If a
battery should leak and the fluid should get on your
skin, flush it off with large quantities of water.
• When disposing of used batteries, please comply
with governmental regulations or environmental
public institution’s rules that apply in your country/
area.
• WARNING
Do not use or store batteries in direct sunlight or
other excessively hot place, such as inside a car or
near a heater. This can cause batteries to leak,
overheat, explode or catch fire. It can also reduce
the life or performance of batteries.
Using the remote control
The remote has a range of about 7 m (23 ft.) at an angle
of about 30º from the remote sensor.
Keep in mind the following when using the remote
control:
• Make sure that there are no obstacles between the
remote and the remote sensor on the unit.
• Remote operation may become unreliable if strong
sunlight or fluorescent light is shining on the unit’s
remote sensor.
• Remote controllers for different devices can
interfere with each other. Avoid using remotes for
other equipment located close to this unit.
• Replace the batteries when you notice a fall off in
the operating range of the remote.
Remote operation on an iPod touch/
iPhone/iPad
• Operation via LAN is possible from an iPod touch,
iPhone or iPad by downloading a Pioneer original
application from the iTunes Store.
This special application may be changed or
discontinued without notice.
English
Français Español
The batteries included with the unit have been provided
to allow you check product operation and may not last
long. We recommend using alkaline batteries that have
a longer life.
30°
30°
7 m (23 ft.)
/I STANDBY/ON
STANDBY
PURE AUDIO Hi-Bit32
iPod/USB
5V 2.1A
5
En
Page 6
Connections02
D
Amplifier
I
T
S
AV receiver, D/A
converter, etc.
AV receiver, D/A
converter, etc.
COAXIAL OPTICAL COAXIAL
12
DIGITAL IN
DIGITAL IN
ADAPTER PORT
DC OUTPUT
for WIRELESS LAN
USB
(OUTPUT 5V
0.1A MAX)
(OUTPUT 5V
0.6A MAX)
AC IN
DIGITAL OUT
COAXIAL
DIGITAL OUT
OPTICAL
Digital audio
equipment, etc.
Digital audio
equipment, etc.
Chapter 2:
Connections
• Be sure to turn off the power and unplug the power
cord from the power outlet whenever making or
changing connections.
• Connect the power cord after all the connections
between devices have been completed.
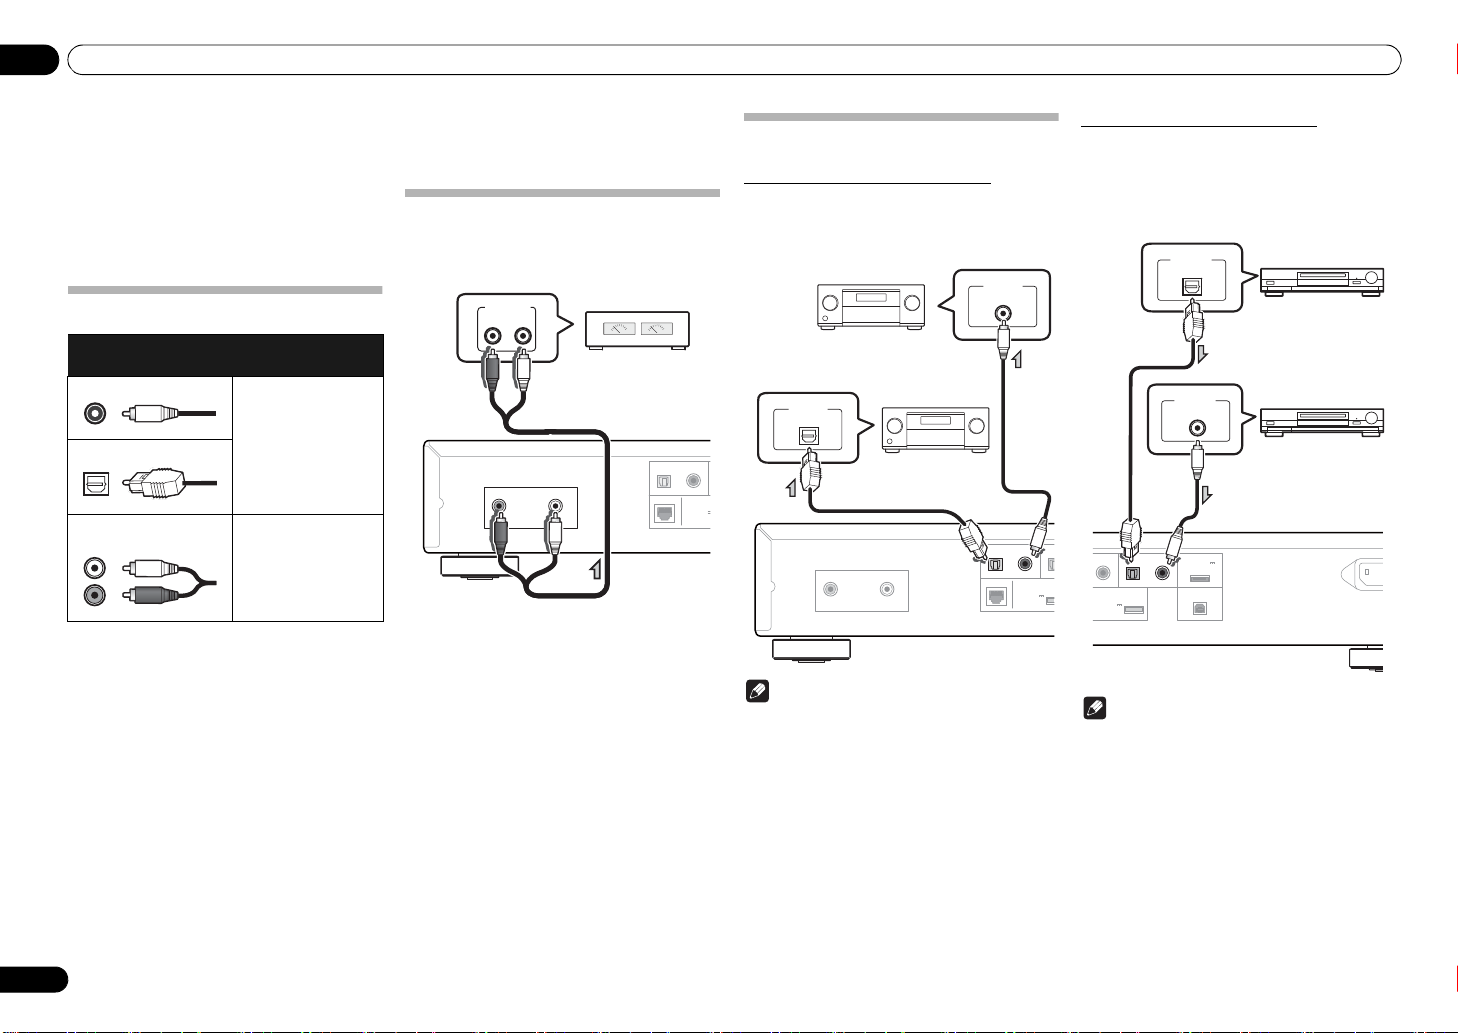
About the
Types of cables and
audio connection
terminals
Digital (Coaxial) Conventional
Digital (Optical)
RCA (Analog)
(White/Red)
Transferable audio
signals
digital audio
Conventional
analog audio
Analog audio output connections
By connecting this unit’s analog audio output to the
analog audio input of an amplifier, you can use the
amplifier to enjoy analog audio produced from this unit.
AUDIO INPUT
RL
ANALOG
DIGITAL OUT
R
ANALOG OUT
L
OPTICAL COAXIAL
LAN (10/100)
(OUTPUT 5V
0.6A MAX)
for W
Digital audio connections
Digital audio output connections
By connecting this unit’s digital audio output to the
digital audio input of an AV receiver or D/A converter,
etc, you can use the amplifier to enjoy digital audio
produced from this unit.
DIGITAL IN
COAXIAL
DIGITAL IN
OPTICAL
DIGITAL OUT
ANALOG OUT
R
L
Note
• Digital signal formats that can be output from this
unit include linear PCM signals with sampling rate
and quantitative bits up to 192 kHz/24 bits
(Depending on the connected device and
environment, operation may not be successful).
• Digital audio signals that can be output from this
unit’s DIGITAL OUT connectors include the
following inputs: iPod, Internet Radio, USB, Music
Server, Digital In 1 and Digital In 2.
OPTICAL COAXIAL OPT
LAN (10/100) DC OU
(OUTPUT 5V
0.6A MAX)
Digital audio input connections
N-50 only:
By connecting a digital audio component’s audio output
to this unit’s digital audio input, this unit can be used as
a D/A converter. For details regarding the audio output
of signals input to the DIGITAL IN connectors, see the
section Using the D/A converter on page 18.
2
for WIRELE
Note
• Digital signal formats that can be input to this unit
include linear PCM signals with sampling rate and
quantitative bits up to 192 kHz/24 bits. (Depending
on the connected device and environment,
operation may not be successful).
6
En
Page 7
Connections 02
English
Français Español
COAXIAL OPTICAL COAXIAL
12
DIGITAL IN
DIGITAL IN
ADAPTER PORT
DC OUTPUT
for WIRELESS LAN
USB
(OUTPUT 5V
0.1A MAX)
(OUTPUT 5V
0.6A MAX)
AC IN
Bluetooth® adapter (commercially available)
COAXIAL OPTICAL COAXIAL
12
DIGITAL IN
DIGITAL IN
ADAPTER PORT
DC OUTPUT
for WIRELESS LAN
USB
(OUTPUT 5V
0.1A MAX)
(OUTPUT 5V
0.6A MAX)
AC IN
USB cable
(commercially available)
A-type
B-type
PC
DIGITAL OUT
OPTICAL COAXIAL OPTICAL COAXIAL
12
DIGITAL IN
DIGITAL IN
ADAPTER PORT
LAN (10/100) DC OUTPUT
for WIRELESS LAN
USB
(OUTPUT 5V
0.1A MAX)
(OUTPUT 5V
0.6A MAX)
Internet
Modem
Router
PC2
PC1
LAN cable
(commercially
available)
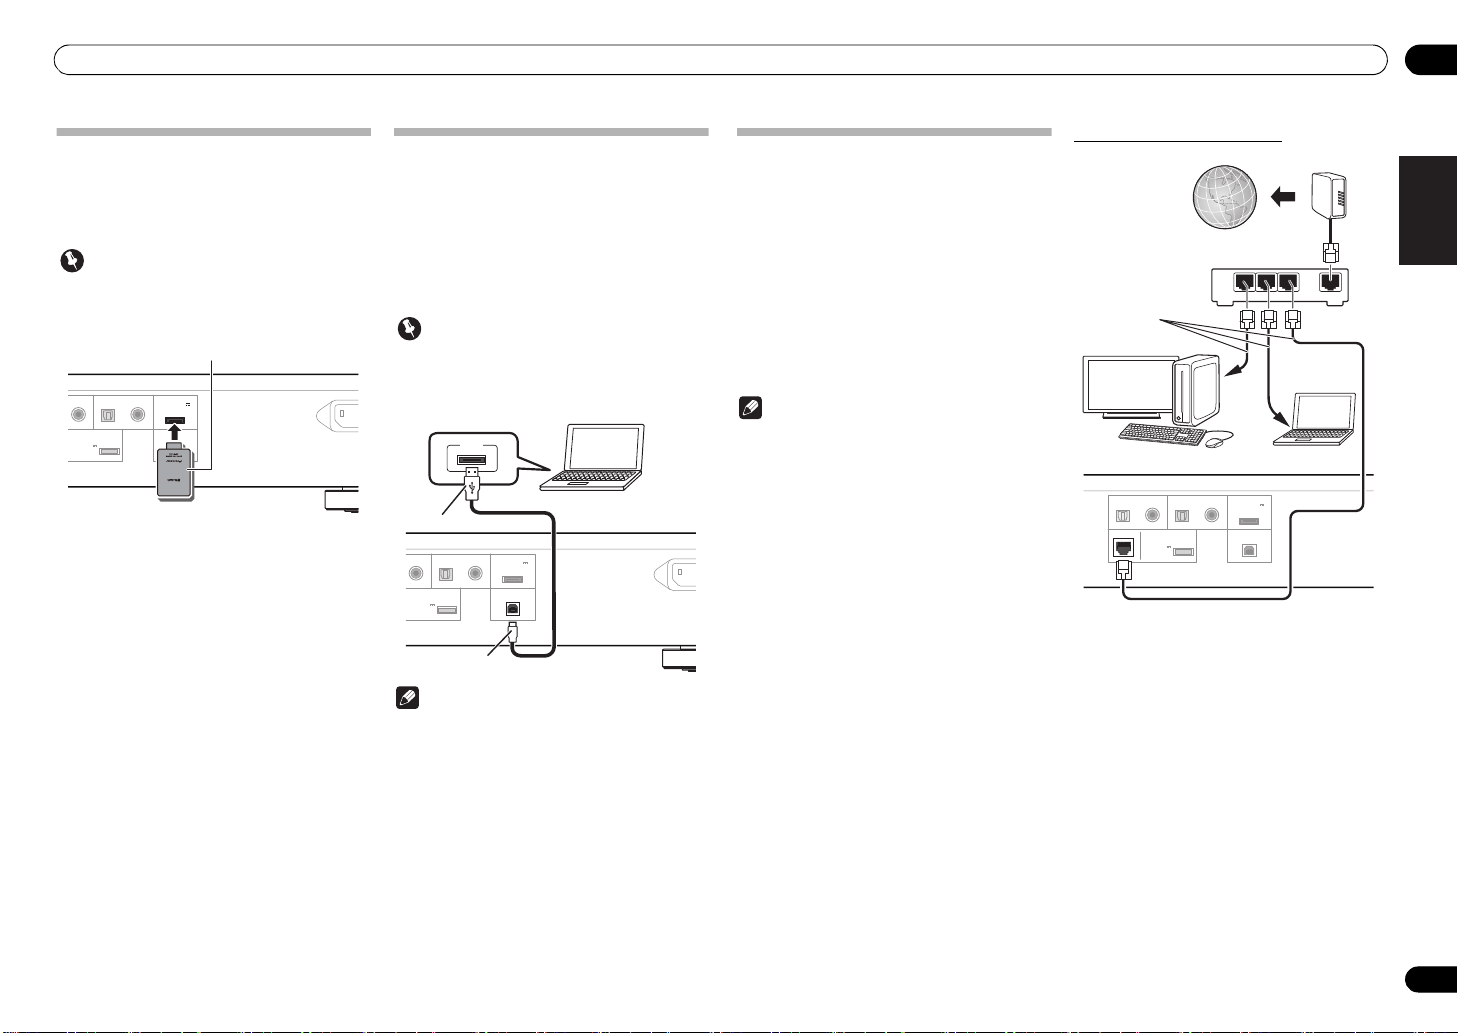
Connecting optional
Bluetooth®
adapter
Connect the Bluetooth® adapter (Pioneer Model No.
AS-BT200) to ADAPTER PORT terminal on the rear
panel.
Important
• Do not move the unit with the Bluetooth ADAPTER
connected. Doing so could cause damage or faulty
contact.
• For instructions on playing the Bluetooth wireless
technology device, see Bluetooth
(optional) on page 13.
®
Audio playback
Using a USB cable to connect to a
computer
N-50 only:
By using a USB cable (sold separately) to connect this
unit’s DIGITAL IN USB port to the USB port on a
computer, this unit can be used as a D/A converter.
For details regarding the output of signals input to the
DIGITAL IN USB port, see section Playing music from a
computer on page 18.
Important
• When using this connection to input audio files
from a computer to this unit, it may be necessary to
install a special driver on the computer. For details,
see the website of Pioneer.
USB
Note
• This unit cannot be used to play audio files from a
computer unless Media Player is installed on the
connected computer.
Connecting to the network through
the LAN interface
By connecting this unit to the network via the LAN
interface, you can play back audio files stored on
components on the network, including your PC, and
listen to Internet radio stations.
Connect the LAN terminal on this unit to the LAN
terminal on your router (with or without the built-in
DHCP server function) with a straight LAN cable (CAT 5
or higher).
Turn on the DHCP server function of your router. If your
router does not have a built-in DHCP server function, you
have to set up the network manually. For details, see
page 19.
Note
• In order to connect to the Internet, you must
conclude a contract with an Internet Service
Provider (ISP).
• To listen to Internet radio stations, you must sign a
contract with an ISP (Internet Service Provider)
beforehand.
• Photo or video files cannot be played back.
• With Windows Media Player 11or 12, you can even
play back copyrighted audio files on this unit.
Connecting using LAN cable
LAN
321
WAN
7
En
Page 8
Connections02
DIGITAL OUT
OPTICAL COAXIAL OPTICAL COAXIAL
12
DIGITAL IN
DIGITAL IN
ADAPTER PORT
LAN (10/100) DC OUTPUT
for WIRELESS LAN
USB
(OUTPUT 5V
0.1A MAX)
(OUTPUT 5V
0.6A MAX)
Internet
Modem
Wireless LAN
Router
Wireless LAN converter (AS-WL300)
(commercially available)
AC IN
To AC outlet
Power cord
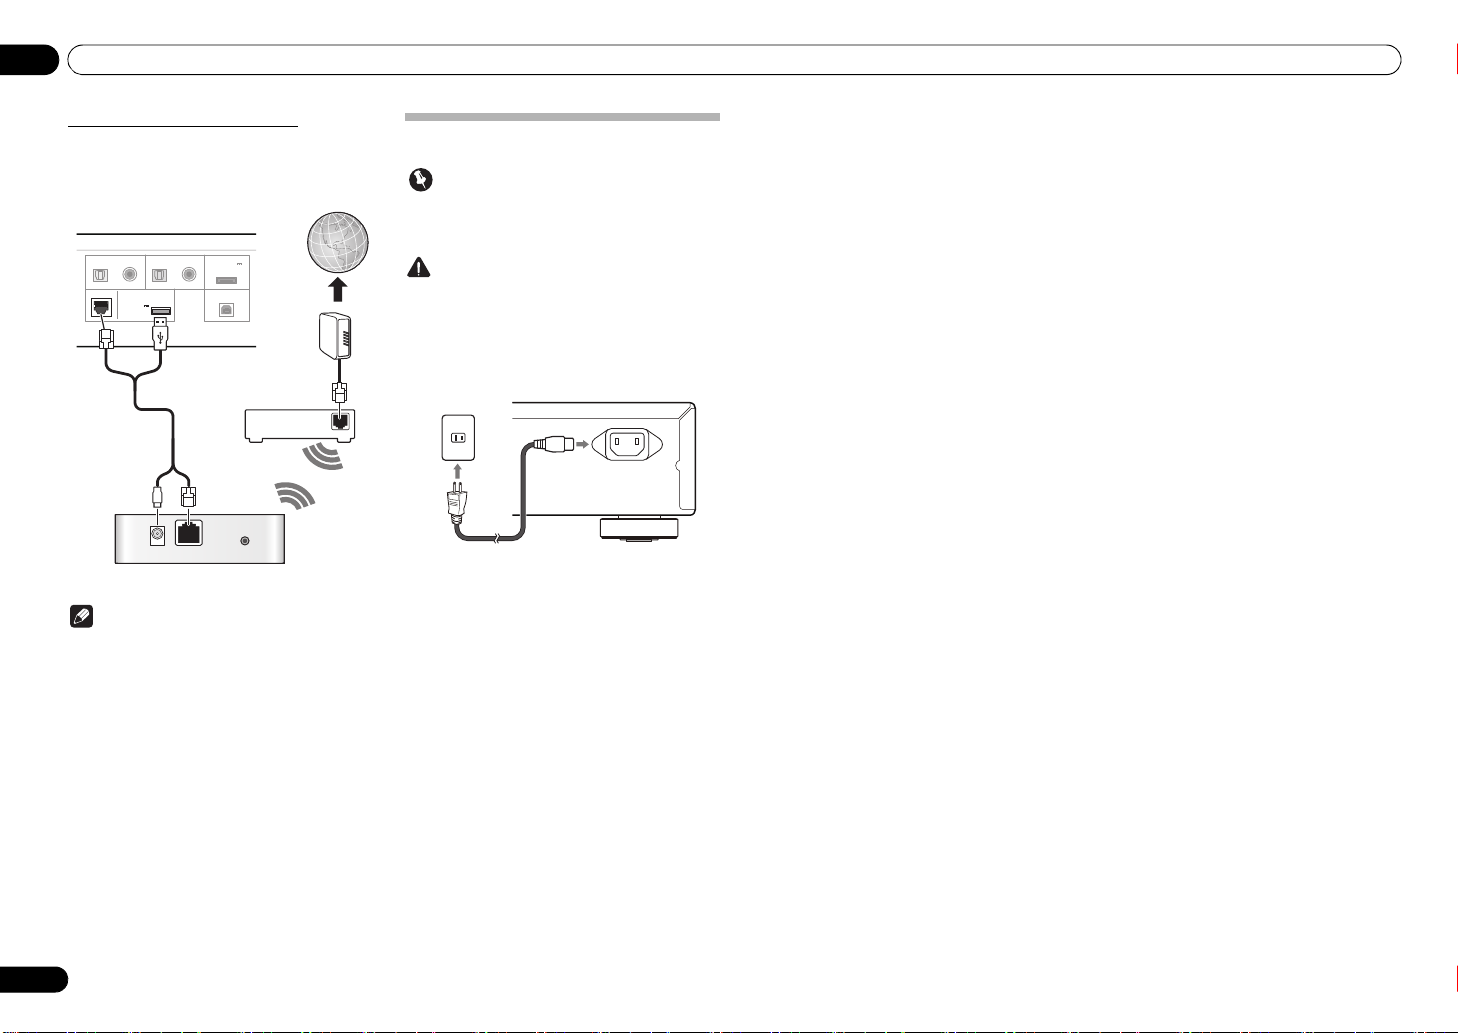
Connecting using wireless LAN
Wireless connection to the network is possible through
a wireless LAN connection. Use the separately sold
wireless LAN converter (Pioneer Model No. AS-WL300)
for connection.
WAN
DC 5V WPS
Ethernet
Note
• Use only the furnished accessory connecting cable.
• For instructions on setting the wireless LAN
converter, refer to the operating instructions for the
AS-WL300.
Plugging in
Important
• Before making or changing the connections,
switch off the power and disconnect the power cord
from the AC outlet.
Caution
• Do not use any power cord other than the one
supplied with this unit.
• Do not use the supplied power cord for any purpose
other than that described below.
After you’ve finished making all connections, plug the
unit into an AC outlet.
1 Plug the supplied power cord into the
AC IN
socket on the back of the unit.
2 Plug the other end into a power outlet.
8
En
Page 9
Part names and functions 03
Chapter 3:
Part names and functions
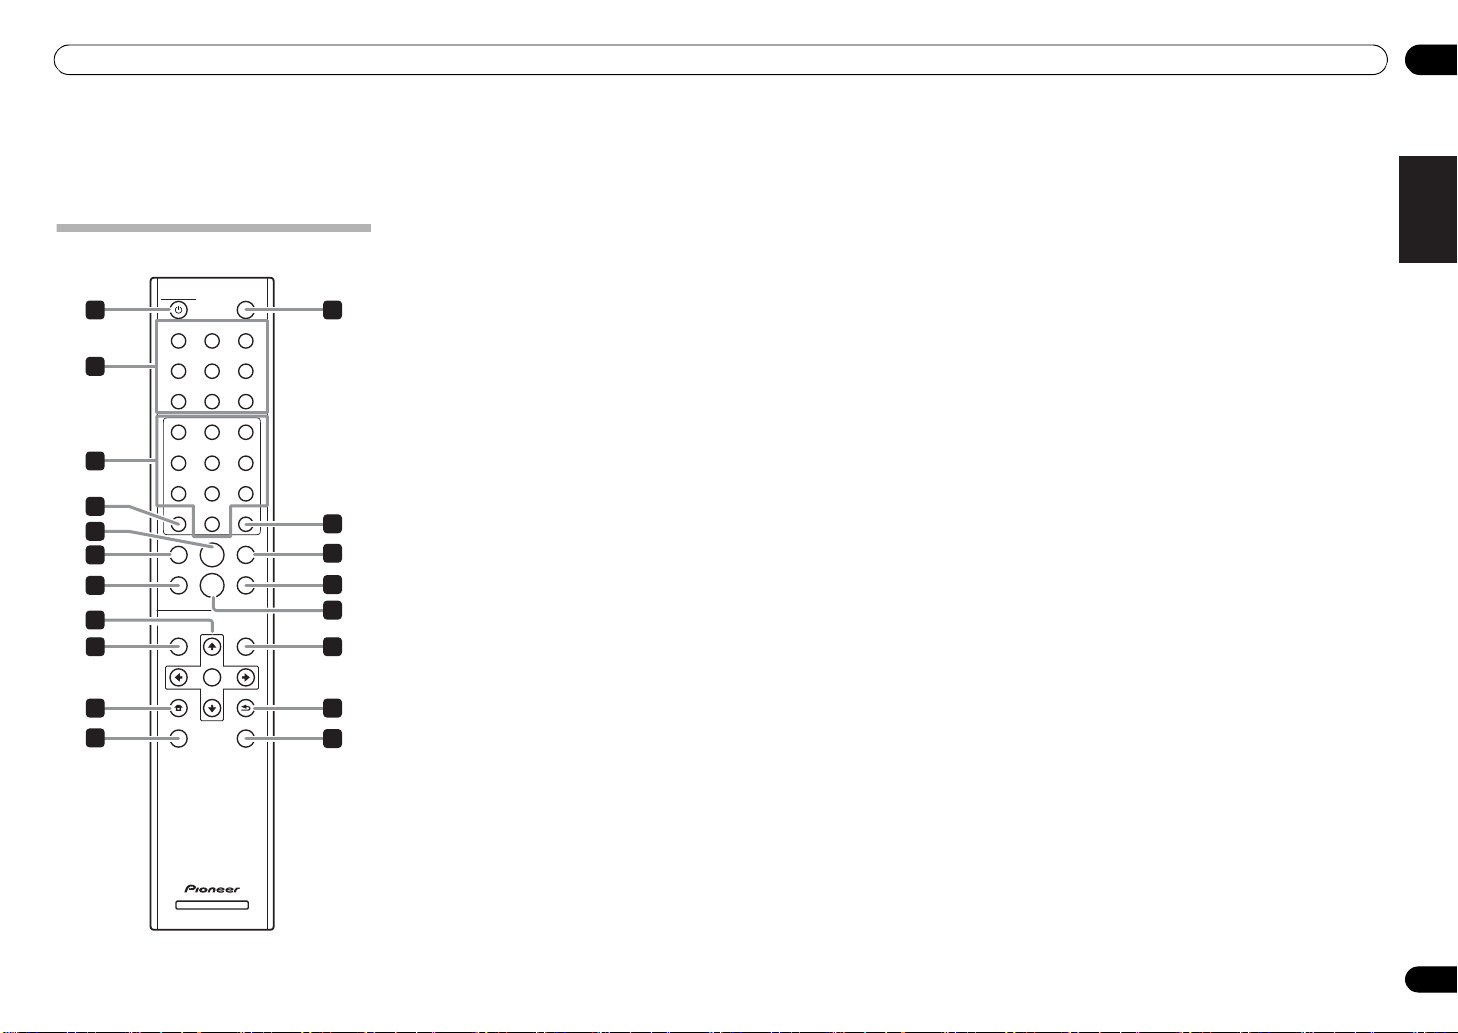
1 STANDBY/ON
Remote control
1
2
3
4
5
6
7
8
9
10
11
STANDBY/ON
iPod
USB
DIG IN USB
1
4
7
CLEAR
SETUP
HOME MENU
PURE AUDIO
DISPLAY
MUSIC
INTERNET
SERVER
RADIO
Air Jam
Bluetooth
DIG IN 2
DIG IN 1
2
5
8
0
ENTER
REPEATSHUFFLE
SOUND
ENTER
RETURN
Hi-Bit 32
NETWORK AUDIO PLAYER
12
3
6
9
13
14
15
16
17
18
19
This button operates when the unit’s main /I
STANDBY/ON bu tt on is set to ON. Each time this button
is pressed, the unit’s status alternates between ON and
STANDBY modes.
2 Function buttons
Use to change the input source.
• DIG IN 1, DIG IN 2 and DIG IN USB functions are
supported only by the N-50.
3 Number buttons (0 to 9)
These are used to input numbers for network and other
settings.
4
CLEAR
Press to clear the selected item.
Use this for example if you input the wrong number.
5
Press to start playback. During playback, pause/
unpause playback.
6
Press to return to the beginning of the currently playing
file.
• Depending on the input function selected, it may
not be possible to return to the beginning of the
currently playing file.
7
SHUFFLE
Perform shuffle play of files on the selected iPod/iPhone/
iPad, USB storage device or Music Server (page 11, 12,
17).
8
///
Use these to select items, change settings and
move the cursor.
ENTER
Use this to implement the selected item or enter a
setting that you have changed.
9 SETUP
Use this to change the settings such as Display Setting
(page 19), Network Setting (page 19), Option Setting
(page 20) and see System Info (page 19).
This button is also used to reinitialize unit settings as
described in the section Reset (page 20).
10 HOME MENU
Select and play the file from the menu screen.
11 PURE AUDIO
Press this button to activate the PURE AUDIO mode. In
this mode, audio playback is performed with greatest
fidelity to the original sounds (page 18).
12 DISPLAY
Press to turn the display off when you do not need it.
When an action is performed on the unit, the display will
automatically light, then turn off again after ten seconds.
Press the button once again to cancel the Display OFF
mode.
13
ENTER
Press to enter the selected item.
14
Press during playback to skip ahead to the beginning of
the next file.
15 REPEAT
Perform repeat play of files on the selected iPod/iPhone/
iPad, USB storage device or Music Server (page 11, 12,
17).
16
Press to stop playback.
17
SOUND
Turns Auto Sound Retriever, Auto Level Control,
Hi-Bit 32 and Sound Retriever Air on and off (page 18).
• Sound Retriever Air can be set only when the
Bluetooth or Air Jam functions have been
selected.
18
RETURN
Press to return to the previous screen. Also, use to
cancel the sound setting.
19 Hi-Bit 32
Press this button to turn on the SOUND mode’s
Hi-Bit 32 function. This expands the dynamic range (and
frequency direction band) for digital audio signals,
producing smoother and more detailed playback
(page 18).
(N-50 only)
(N-50 only)
(N-50 only)
English
Français Español
En
9
Page 10
Part names and functions03
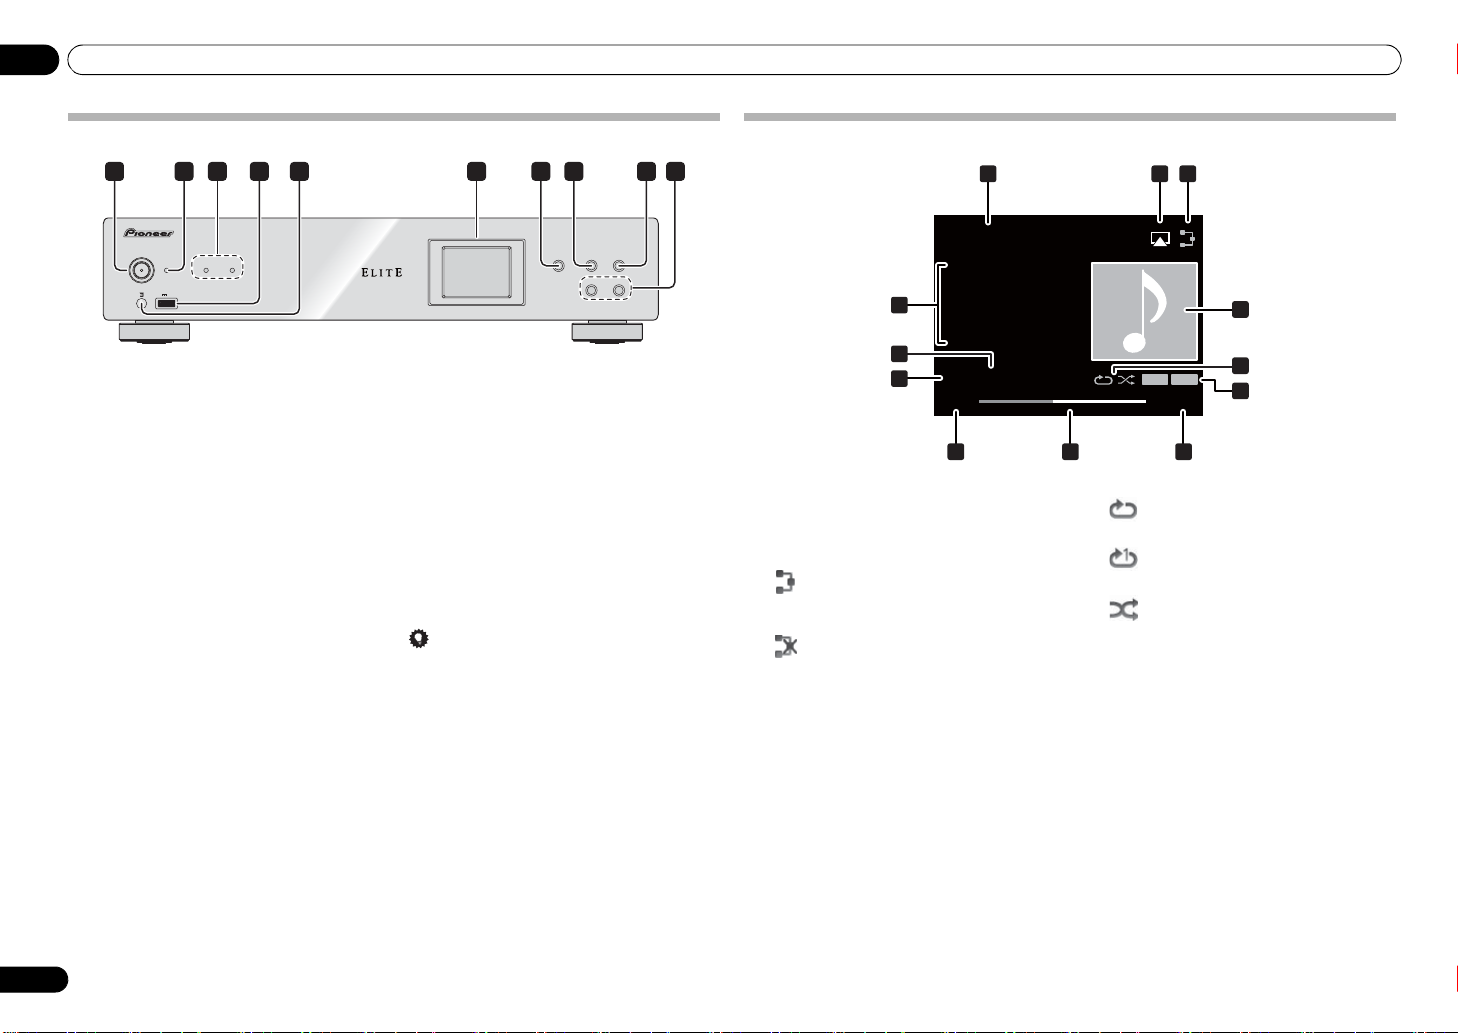
Font panel
2 3 4 5 61 7 8 9 10
/I STANDBY/ON
STANDBY
PURE AUDIO Hi-Bit32
iPod/USB
5V 2.1A
1 /I STANDBY/ON
Press to turn the power on and off.
The button’s center power indicator lights when power is
on.
2
STANDBY indicator
Lights when the power is standby.
3 PURE AUDIO indicator
Lights when the PURE AUDIO mode switched on.
Hi-Bit 32 indicator
Lights when the Hi-Bit 32 mode switched on.
4 iPod/USB port
Use to connect your Apple iPod/iPhone/iPad (page 11)
or connect a USB device (page 12).
5 Remote sensor
Receives the signals from the remote control (page 5).
6Display
7 FUNCTION
Use to change the input source. The source changes as
below.
iPod Internet Radio Music Server USB BT
Audio Air Jam Digital In USB Digital In 1
Digital In 2 Return to the beginning (Undisplayed).
•To use BT Audio and Air Jam function, you need to
connect the commercially available Bluetooth
adapter: AS-BT200 to the unit. See Connecting
optional Bluetooth
• Digital In 1, Digital In 2 and Digital In USB
functions are supported only by the N-50.
®
(N-50 only)
(N-50 only)
®
adapter on page 7 for details.
NETWORK AUDIO PLAYER N-50
FUNCTION
N-50
8
Press to stop playback.
9
Press to start playback. During playback, pause/
unpause playback.
10
Press to return to the beginning of the currently
playing file. (Depending on the input function
selected, it may not be possible to return to the
beginning of the currently playing file.)
Press to skip to the beginning of the next file.
Tip
When an input function other than iPod is selected and
the display does not show the playback status, the
following buttons on the main unit can be used to
perform item select, enter, and return.
• :
• :
• : Enter
• : Return
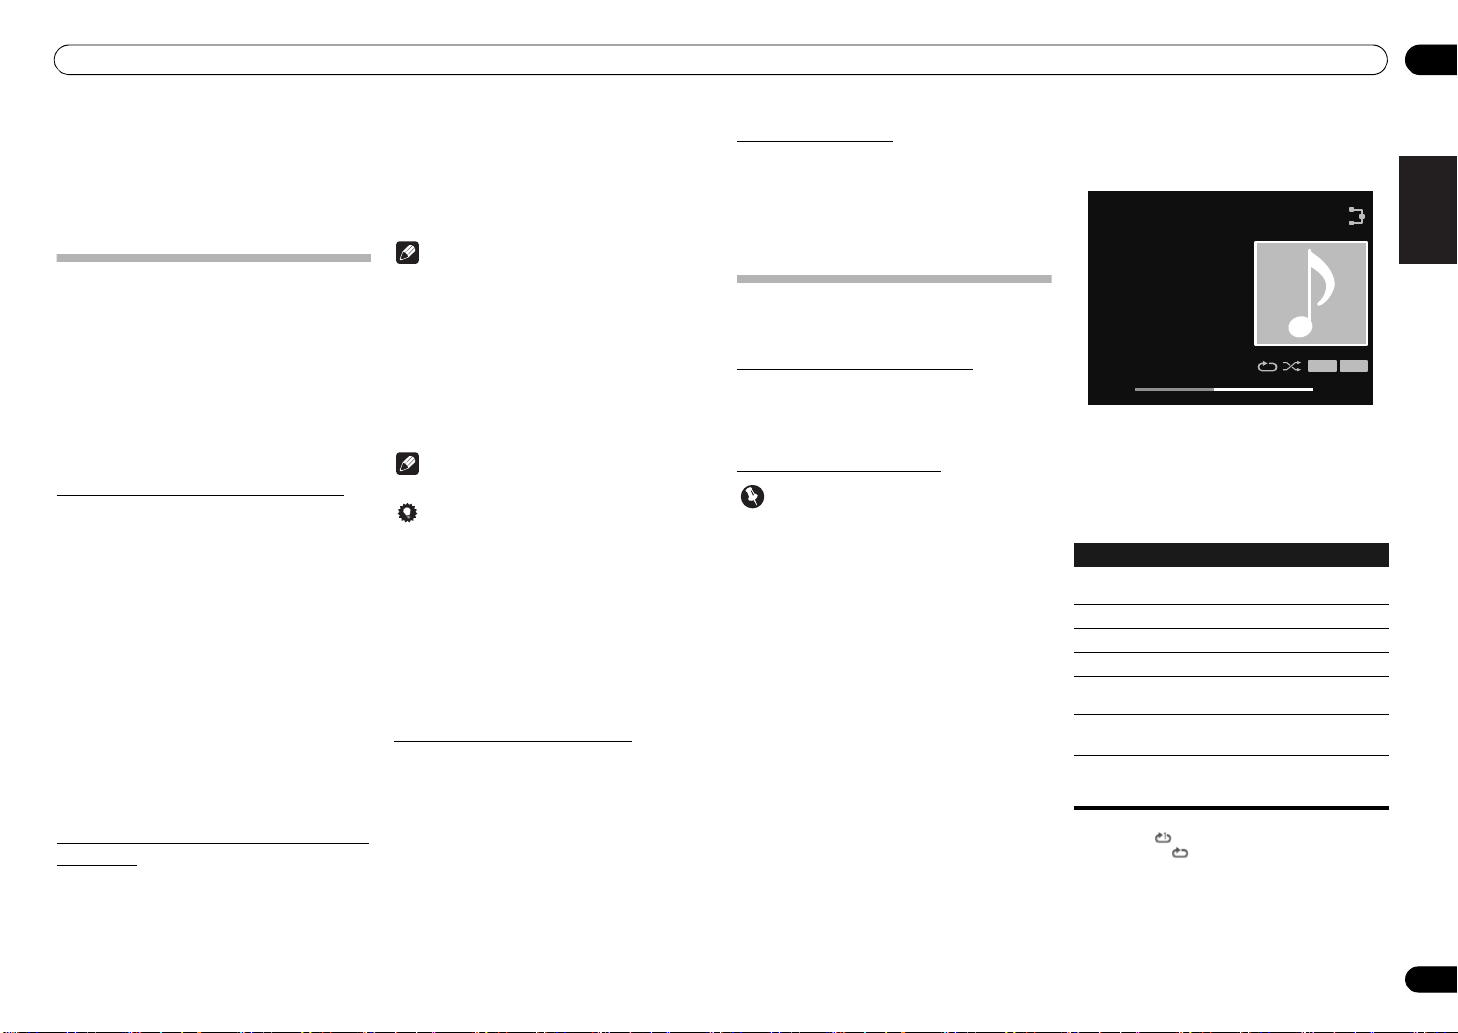
Display
1 32
Music Server
Song 1
4
Artist
Album
5
6
1 Input source
2
AirPlay
This appears during AirPlay operation.
3
Network connection status
When the unit is connected to the network, this
indicator lights.
When the unit is not connected to the network, this
indicator lights.
4
Name of folder/file/artist/album/
station, etc.
5 File information
Displays file format, sampling rate and quantization
bitrate.
6
Play status
7 Artwork
Displayed when the currently playing file includes an
album jacket image, etc.
FLAC 44.1 / 24
44:38 - 44:02
10 11 12
7
7
8
ASR A.L.C
7
9
7
8 Repeat and Shuffle
Repeat all files.
Repeat a file.
Shuffle
9 SOUND feature indicator
ASR
Lights when the Auto Sound Retriever switched
on.
A.L.C
Lights when the Auto Level Control switched on.
10
Elapsed playing time
11 Play bar
The bar becomes longer together with the elapsed
playback time.
12
Remaining playing time
10
En
Page 11
Basic Playback 04
iPod/iPhone/iPad
iPod cable
Chapter 4:
Basic Playback
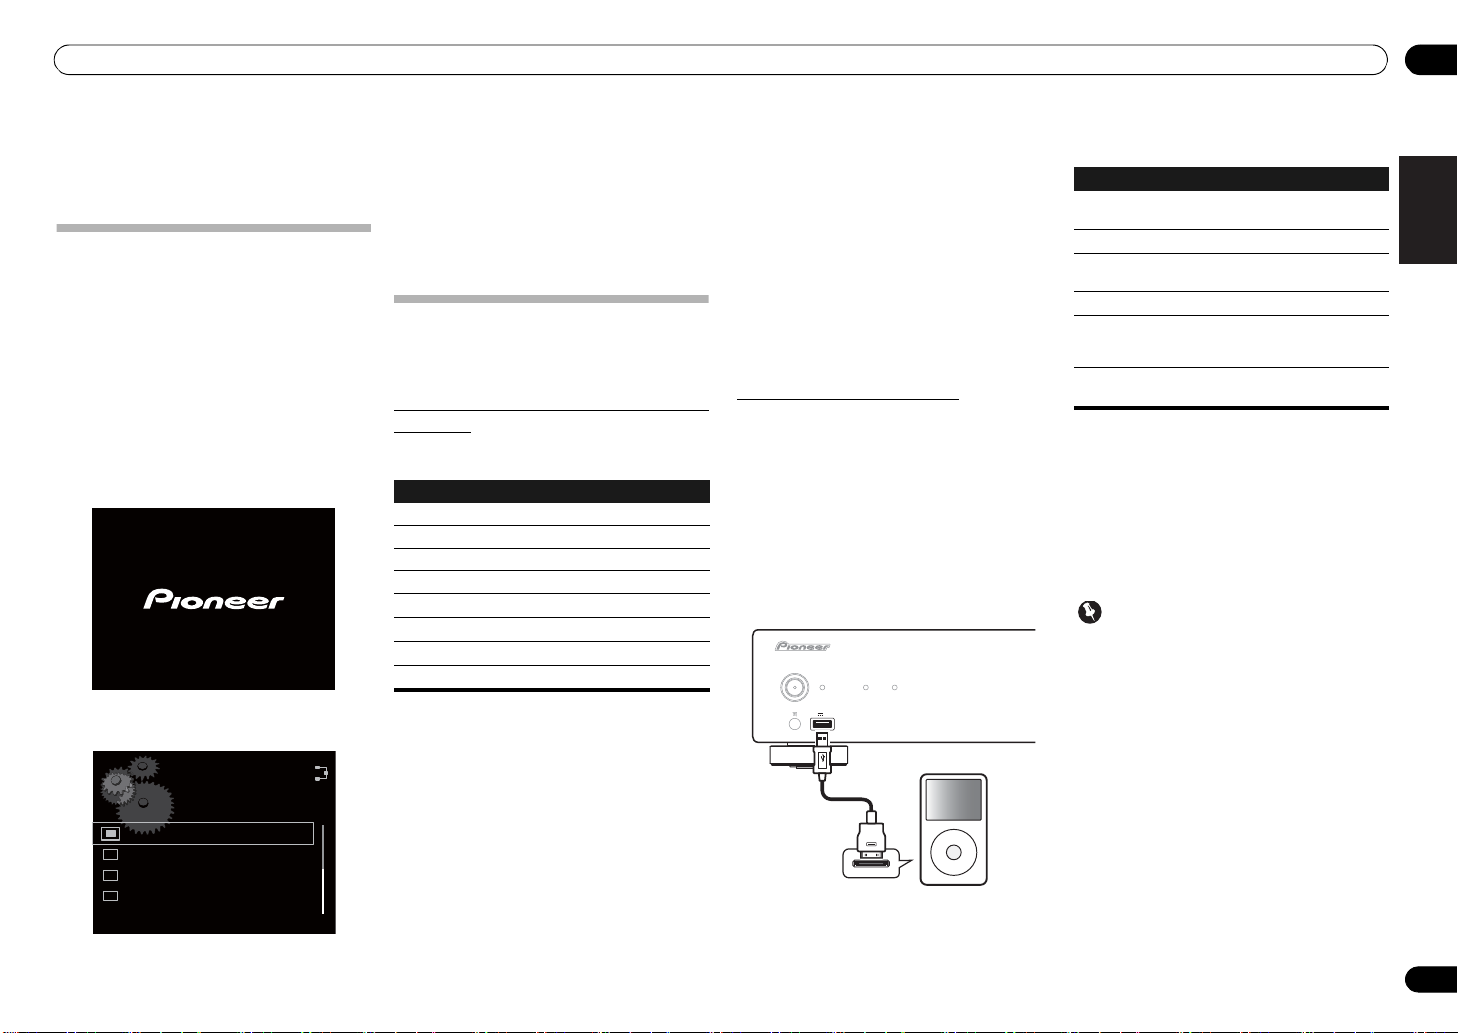
Getting started
When you use the unit for the first time, the following
screens will be displayed.
Set up the following items to customize the unit.
1 Press the
the front panel.
The unit turns on.
The button’s central power indicator will flash slowly.
About twenty seconds after turning on the power, the
following screen appears. About one minute is required
between turning the power on and completion of
startup.
Setting Quick Start Mode to On will allow faster startup
(page 20).
The screen below will automatically appear after the
screen in step 1.
/I STANDBY/ON
Language
English
Français
Deutsch
Nederlands
button on
2Use
/
to select the menu language of
ENTER
this unit, then press
The setting is done.
.
iPod/iPhone/iPad playback
Merely by connecting your iPod/iPhone/iPad to this unit,
you can enjoy high-quality sound from your iPod/iPhone/
iPad.
Confirm what iPod/iPhone/iPad models are
supported
The iPod/iPhone/iPad playable on this unit are shown
below.
iPod/iPhone/iPad Audio Control
iPod nano 2/3/4/5/6G
iPod classic
iPod touch 1/2/3/4G
iPhone
iPhone 3G/3GS
iPhone 4
iPad
iPad 2
• Pioneer does not guarantee that this unit plays
iPod/iPhone/iPad models other than the ones
specified.
• Some functions may be restricted depending on
the model or software version.
• iPod/iPhone/iPad is licensed for reproduction of
non-copyrighted materials or materials the user is
legally permitted to reproduce.
• Features such as the equalizer cannot be controlled
using this system, and we recommend switching
the equalizer off before connecting.
• Pioneer cannot under any circumstances accept
responsibility for any direct or indirect loss arising
from any inconvenience or loss of recorded
material resulting from iPod/iPhone/iPad failure.
• For detailed instructions on using the iPod/iPhone/
iPad, please refer to the manual supplied with the
iPod/iPhone/iPad.
• This system has been developed and tested for the
software version of iPod/iPhone/iPad indicated on
the website of Pioneer.
• Installing software versions other than indicated on
the website of Pioneer to your iPod/iPhone/iPad
may result in incompatibility with this system.
1Select “
When using iPod touch or iPhone, select “General” after
selecting “Settings”.
2Select
The software version will be displayed.
Settings
About
” from the top menu.
.
Playing your iPod/iPhone/iPad
1 Press
select
You can also perform the same operation by pressing the
FUNCTION on the front panel repeatedly.
iPod is shown on the display.
2 Connect your iPod/iPhone/iPad.
Connect your iPod/iPhone/iPad to the USB port on the
unit’s front panel. Use the iPod cable supplied with your
iPod/iPhone/iPad for the connection.
iPod
on the remote control to
iPod
as the input source.
• For the cable connection, also refer to the operating
instructions for your iPod/iPhone/iPad.
/I STANDBY/ON
STANDBY
PURE AUDIO Hi-Bit32
iPod/USB
5V 2.1A
MENU
The following operations are possible for iPod/iPhone/
iPad.
Button What it does
SHUFFLE
REPEAT
aEach time you press REPEAT the repeat modes
changes as below.
Repeat 1
Repeat 1: Repeats a file currently played back.
Repeat all: Repeats all files.
When no iPod/iPhone/iPad is connected to the unit, or
if connected, is not played, the unit will automatically
turn Off after 30 minutes of no operation.
•Only when
(
Important
If this unit cannot play your iPod/iPhone/iPad, perform
the following troubleshooting checks:
• Check whether the iPod/iPhone/iPad is supported
by this unit.
• Reconnect the iPod/iPhone/iPad to the unit. If this
doesn’t seem to work, try resetting your iPod/
iPhone/iPad.
• Check the iPod/iPhone/iPad software is supported
by this unit.
If the iPod/iPhone/iPad cannot be operated, check the
following items:
• Is the iPod/iPhone/iPad connected correctly?
Reconnect the iPod/iPhone/iPad to the unit.
• Is the iPod/iPhone/iPad experiencing a hangup? Try
resetting the iPod/iPhone/iPad, and reconnect it to
the unit.
Starts playback. During pl ayback, pause/
unpause playback.
Pauses playback.
Press to skip to the start of the current file,
then previous files.
Press to skip to the next file.
The currently selected iPod/iPhone/iPad
files are played back in random order
(shuffle play).
The currently selected iPod/iPhone/iPad
files are played back repeatedly.
Repeat all Normal playback
Auto Power Off is selected in On
page 20).
a
English
Français Español
11
En
Page 12
Basic Playback04
USB storage device
(commercially available)
Tip
• iPod/iPhone/iPad recharging occurs whenever an
iPod/iPhone is connected to this unit. (Recharging
is enabled only when the unit’s power is turned
On.)
• When input is switched from iPod to another
function, the iPod/iPhone/iPad’s playback will be
stopped automatically.
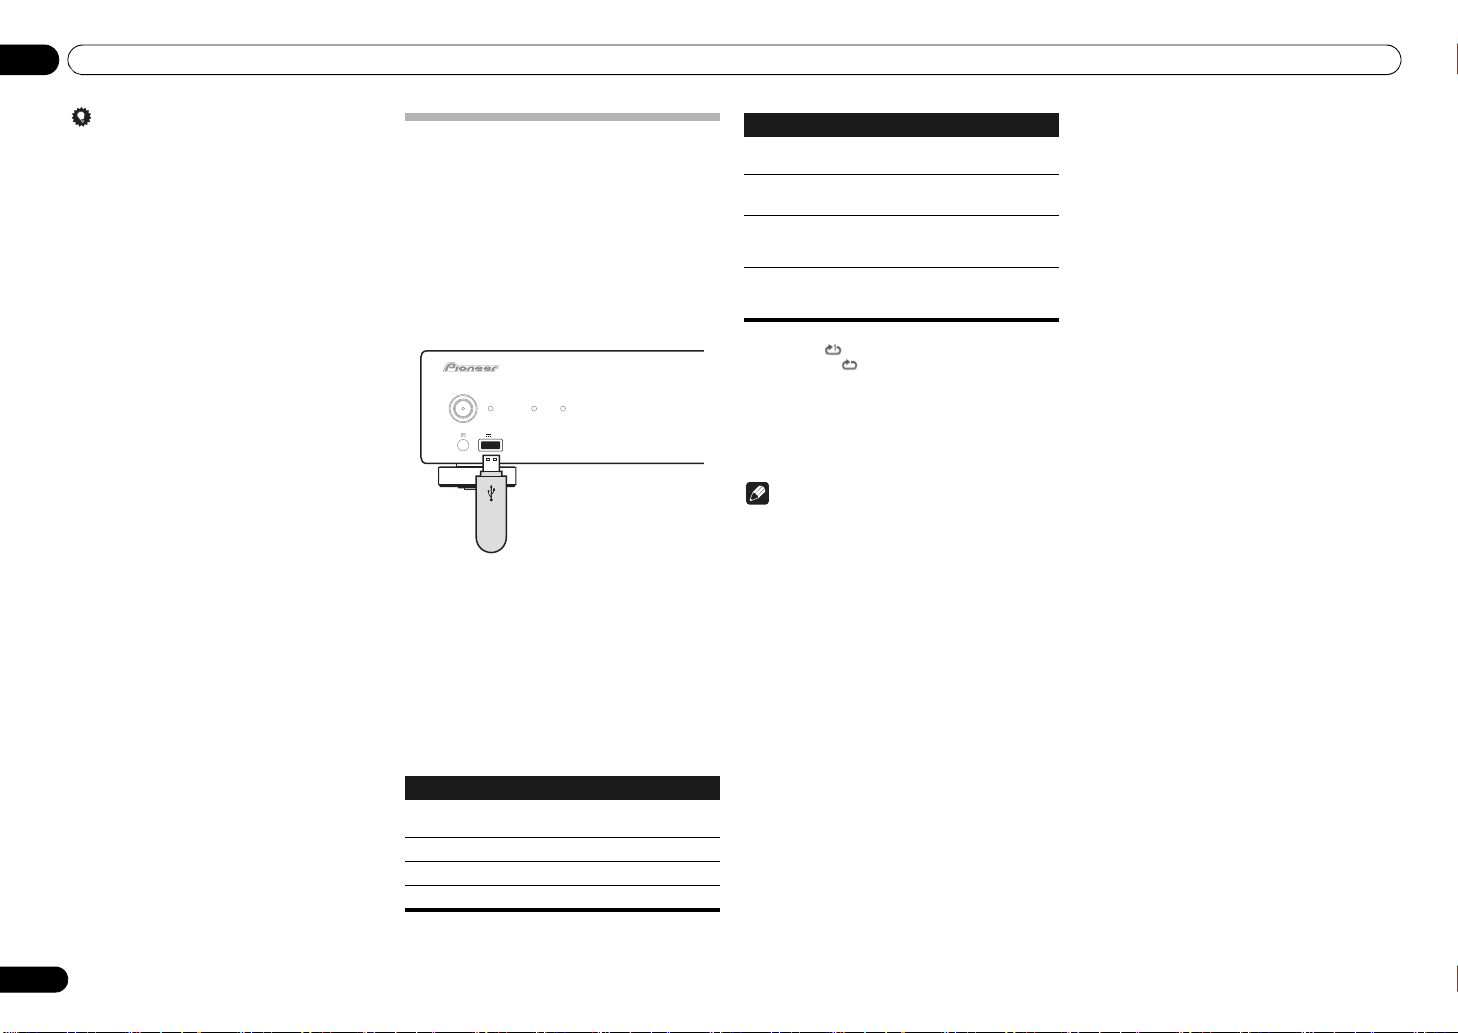
Playing files stored on USB storage
devices
1 Press
source.
You can also perform the same operation by pressing the
FUNCTION on the front panel repeatedly.
USB is shown on the display.
2 Connect the USB storage device.
Connect your USB storage device to the USB port on the
unit’s front panel.
The folders/files stored on the connected USB storage
device appear on the display automatically.
3Use
ENTER
Playback starts.
You can perform the following operations. Note that
some buttons are not available for operation depending
on the category currently being played back.
Button What it does
USB
to select USB as the input
/I STANDBY/ON
STANDBY PURE AUDIO Hi-Bit32
iPod/USB
5V 2.1A
/
to select the file, then press
.
• To return to the previous screen, press RETURN.
• Turn the power off before removing the USB
storage device.
Starts playback. During playback, pause/
unpause playback.
Stops playback.
Press to skip to the previous files.
Press to skip to the next file.
Button What it does
SHUFFLE
REPEAT
RETURN
a Press repeatedly to switch between repeat play
options. ‘ ’ plays the currently playing file
repeatedly. ‘ ’ plays all the files repeatedly.
When a USB storage device is not playing and the unit
has not been operated for 30 minutes or more, the power
will automatically turn off.
•Only when
(
The currently selected files are played back
in random order (shuffle play).
The currently selected files are played
a
repeatedly.
When pressed during use of the file
selection menu, the screen for the
currently playing file will be displayed.
If button is pressed duri ng display of the
currently playing menu, the file selection
menu will appear.
Auto Power Off is selected in On
page 20).
Note
• This unit may not recognize the USB storage
device, play files or supply power to the USB
storage device. For details, see When a USB storage
device is connected on page 22.
• Pioneer does not guarantee that any file recorded
on a USB storage device will play or that power will
be supplied to a USB storage device. Also note that
Pioneer will accept no responsibility whatsoever for
loss of files on USB storage devices caused by
connection to this unit.
• This unit does not support use of a USB hub.
12
En
Page 13
Bluetooth® Audio playback(optional)
Remote control operation
This unit
Bluetooth
®
adapter
Device not equipped with Bluetooth
wireless technology:
Digital music player
+
Bluetooth® audio transmitter
(commercially available)
Bluetooth wireless technology
enabled device:
Digital music player
Bluetooth wireless technology
enabled device:
Cell phone
05
Chapter 5:
Bluetooth® Audio playback
DISPLAY
MUSIC
SERVER
DIGITAL 1
V TUNER
STANDBY ON
iPod
DIGITAL 2
Bluetooth
3
AirJam
USB-A
6
2
USB-B
9
5
1
8
4
ENTER
0
7
REPEAT
CLEAR
SOUND
SHUFFLE
RETURN
ENTER
SETUP
Hi-Bit
HOME MENU
PURE AUDIO
NETWORK PLAYER
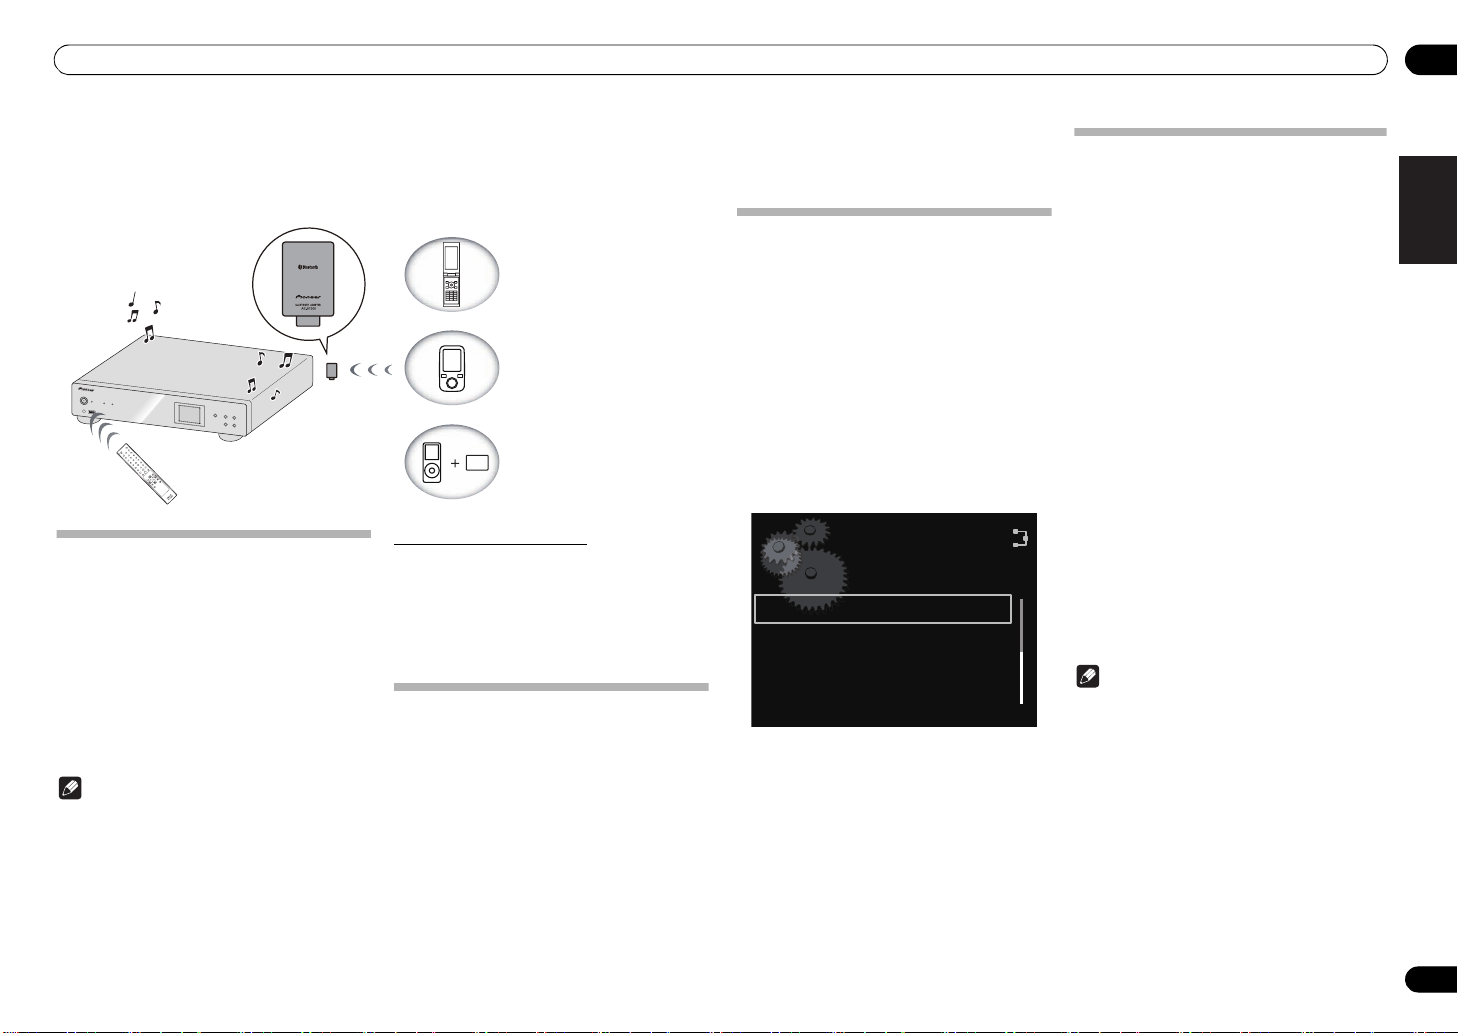
Music playback using
Bluetooth
wireless technology
When the Bluetooth® adapter (Pioneer Model No. ASBT200) is connected to this unit, a product equipped
with Bluetooth wireless technology (portable cell phone,
digital music player, etc.) can be used to listen to music
wirelessly. Also, by using a commercially available
transmitter supporting Bluetooth wireless technology,
you can listen to music on a device not equipped with
Bluetooth wireless technology. The AS-BT200 model
supports SCMS-T contents protection, so music can also
be enjoyed on devices equipped with SCMS-T type
Bluetooth wireless technology.
Note
•The Bluetooth wireless technology enabled device
must support A2DP profiles.
•
Pioneer does not guarantee proper connection and
operation of this unit with all
technology enabled devices.
•
The
Bluetooth® word mark and logos are registered
trademarks owned by
of such marks by PIONEER CORPORATION is under
license. Other trademarks and trade names are those
of their respective owners.
Bluetooth
Bluetooth
wireless
SIG, Inc. and any use
Remote control operation
The remote control supplied with this unit allows you to
play and stop media, and perform other operations.
•The Bluetooth wireless technology enabled device
must support AVRCP profiles.
• Remote control operations cannot be guaranteed
for all Bluetooth wireless technology enabled
devices.
Connecting optional
adapter
1 Connect the Bluetooth® adapter to the
unit when the unit is in the standby mode.
2Press
power on.
3Press
to select
You can also perform the same operation by pressing the
FUNCTION on the front panel repeatedly.
• To connect the Bluetooth® adapter, see Connecting
optional Bluetooth
STANDBY/ON
Bluetooth
BT Audio
(optional)
Bluetooth®
®
adapter on page 7.
to turn the
on the remote control
as the input source.
• When the Bluetooth® adapter is not connected and
BT Audio is selected as the input source, the error
message BT Adapter Not Connected will be
shown on the display.
Setting the PIN code
Set this unit’s PIN code to the same setting as that for
the Bluetooth wireless technology device used.
Supported PIN code setting values include 0000, 1234 or
8888.
• Default setting: 0000
1 Press
to select
You can also perform the same operation by pressing the
FUNCTION on the front panel repeatedly.
Bluetooth
BT Audio
on the remote control
as the input source.
BT Audio is shown on the display.
2 Press
3Use
BT PIN Select
SETUP
.
/
to select
, then press
Option Setting
Option Setting
ENTER
.
BT PIN Select
Internet Parental Lock
Power Off Setting
Language
4Use
/
to select the PIN code, then
ENTER
press
The PIN code is stored.
.
Pairing
Bluetooth
“Pairing” must be done before you start playback of
Bluetooth wireless technology content using Bluetooth
adapter. Make sure to pair devices the first time you
operate the system or any time pairing data is cleared.
“Pairing” is the step necessary to register Bluetooth
wireless technology device to enable Bluetooth
communications. For more details, see also the
operating instructions of your Bluetooth wireless
technology device.
1 Press
to select
You can also perform the same operation by pressing
the FUNCTION on the front panel repeatedly.
Bluetooth® adapter and
wireless technology device
Bluetooth
BT Audio
on the remote control
as the input source.
BT Audio is shown on the display.
2 Turn on the Bluetooth wireless
technology device that you want to make
pairing, place it near the system and set it
into the pairing mode.
Pairing starts.
3 Check to see that the Bluetooth
adapter is detected by the Bluetooth
wireless technology device.
•If the Bluetooth wireless technology device cannot
be connected to the unit, perform the connection
operation from the Bluetooth wireless technology
device.
Note
• Pairing is required when you first use Bluetooth
wireless technology device and Bluetooth
adapter.
• To enable Bluetooth communication, pairing
should be done with both of your system and
Bluetooth wireless technology device.
English
®
Français Español
®
®
13
En
Page 14

05
Bluetooth® Audio playback(optional)
Listening to Music Contents of
Bluetooth
1 Press
to select
You can also perform the same operation by pressing the
FUNCTION on the front panel repeatedly.
BT Audio is shown on the display.
2 Make connection between the
Bluetooth wireless technology device and
the unit.
• See Pairing Bluetooth® adapter and Bluetooth
3 Press to start playback.
The following operations are now possible for Bluetooth
wireless technology devices, using the remote control.
Button What it does
When no Bluetooth wireless technology device is
connected and no operation has been done for 30
minutes or more, the power will automatically turn off.
•Only when
•The Bluetooth wireless technology enabled device
•
wireless technology device
Bluetooth
BT Audio
wireless technology device on page 13.
(
page 20).
Note
must support AVRCP profiles.
The operation of some Bluetooth wireless technology
devices may differ from what is shown in the above
table.
on the remote control
as the input source.
Starts playback. During playback, pause/
unpause playback.
Stops playback.
Press to skip to the start of the current file,
then previous files.
Press to skip to the next file.
Auto Power Off is selected in On
AIR JAM
Air Jam – a Pioneer-exclusive application and available
for free.
Air Jam lets you connect multi compatible devices to
this unit using Bluetooth wireless technology. With it,
you can make a group playlist directly on a supported
device to play in your home theater through the unit. You
and your friends can add songs from your devices to the
playlist. Also Air Jam lets you delete the song before
anyone has to hear it.
1 Press
select
You can also perform the same operation by pressing the
FUNCTION on the front panel repeatedly.
Air Jam is shown on the display.
For more details of using Air Jam, access to our website.
http://pioneer.jp/product/soft/iapp_airjam/en.html
Air Jam
Air Jam
as the input source.
on the remote control to
14
En
Page 15
Internet radio 06
English
Français Español
Find Net Radio
Favorites
Internet Radio
Internet Radio
Chapter 6:
Internet radio
Listening to the internet radio
Connecting to a LAN network
Connect to the network using the LAN interface.
For the details of the connections, see Connecting to the
network through the LAN interface on page 7.
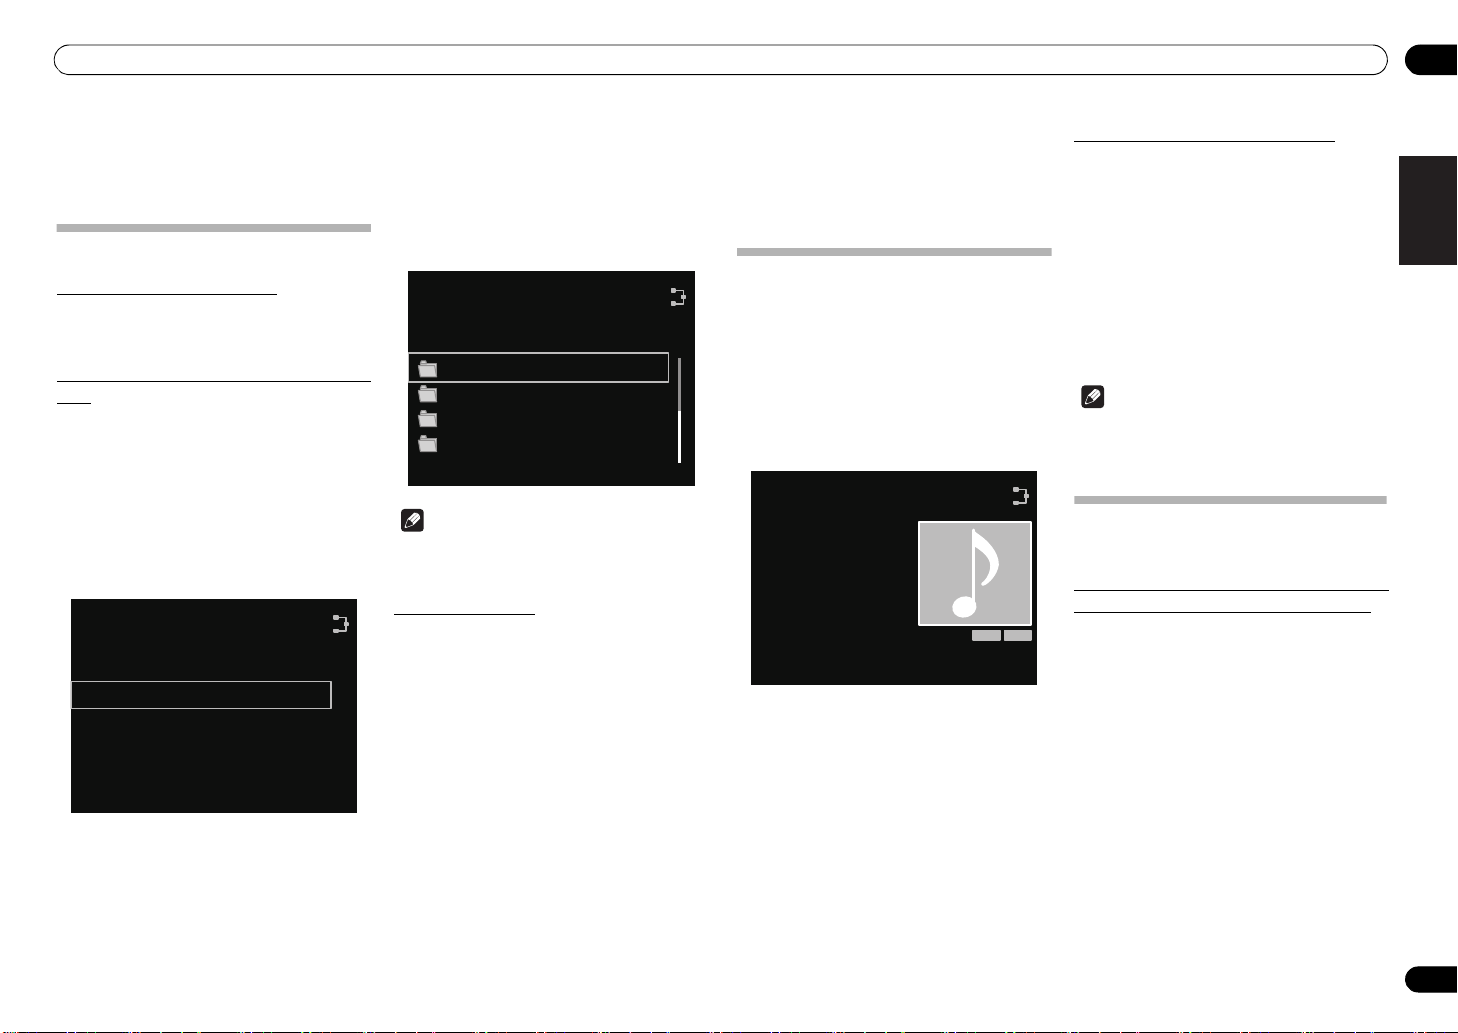
Listening to the internet radio for the first
time
When you listen to the internet radio fist time, follow the
instructions below to tune into your desired station.
1 Press
Internet Radio
You can also perform the same operation by pressing the
FUNCTION on the front panel repeatedly.
Internet Radio is shown on the display.
2Use
press
INTERNET RADIO
as the input source.
/
to select
ENTER
.
to select
Find Net Radio
, then
/
3Use
press
to select the station, then
ENTER
.
Internet Radio
Genres
Countries
Podcasts By Genre
Podcasts By Location
Note
• When is pressed during use of the station select
menu, the screen for the currently playing track will
be displayed.
Tune into a station
1Press
Internet Radio
You can also perform the same operation by pressing the
FUNCTION on the front panel repeatedly.
2Press
Internet Radio
3Use
Favorites
INTERNET RADIO
to select
as the input source.
• The information of the station you last selected is
displayed on the display.
HOME MENU
to display the
menu screen.
/
to select
, then press
• Select Find Net Radio when you want to tune into
the station which has not been added to Favorites.
• Select Favorites when you want to tune into a
station which has been added to Favorites already.
• To add the stations to the Favorites, see Adding the
stations to the Favorites on page 15.
Find Net Radio
ENTER
.
or
4Use
/
to select the station, then
ENTER
press
Playback starts.
• When you select Find Net Radio, you also can
select the available stations from the internet radio
menu.
.
Adding the stations to the Favorites
You can register up to 20 of your favorite Internet radio
stations in the Favorites folder.
1 Tune into the station from Find Net
Radio.
• Follow the instructions Tune into a station on
page 15.
• The information of the station is displayed on the
display.
2 Press and hold
ENTER
for a few seconds.
Internet Radio
No Title #001......
Pioneer Radio.com
256
kbps
[ENTER] (Press and Hold) :
Add to Favorites
ENTER
3 Press
The station information is recorded in the Favorites
folder.
When 20 stations have already been recorded, the
“Favorites already full. Item cannot be added.” error
message will appear, and further recording to favorites
will not be possible.
again.
ASR A.L.C
To delete the stations from the list
1 Press
internet radio menu screen.
2Use
ENTER
3Use
to delete, then press
4Use
ENTER
Select OK to confirm.
Note
HOME MENU
/
to select Favorites, then press
to display the
.
/
to select the station you want
ENTER
.
/
to select Delete, then press
.
• To cancel deleting the station, press RETURN.
• Using the operation in step 4 (above), the Move Up
or Move Down can be selected, followed by the
ENTER button, to move the position of recorded
stations.
Advanced operations for the internet
radio
Registering broadcast stations not on the
vTuner list from the special Pioneer site
With this unit, broadcast stations not included on the list
of station distributed by vTuner can be registered and
played. Check the access code required for registration
on this unit, use this access code to access the special
Pioneer Internet radio site and register the desired
broadcast stations in your favorites. The address of the
special Pioneer Internet radio site is:
http://www.radio-pioneer.com
1Display
To display the internet radio list screen, perform steps 1
to 3 at Listening to the internet radio for the first time on
page 15.
2Use
ENTER
3Use
then press
The access code required for registration on the special
Pioneer Internet radio site is displayed. Make a memo of
this address.
Find Net Radio
/
to select
.
/
to select
ENTER
screen.
Help
Get Access Code
.
, then press
,
15
En
Page 16

Internet radio06
The following can be checked on the Help screen:
• Get Access Code
registration on the special Pioneer Internet radio
site is displayed.
• Show Your WebID/PW
special Pioneer Internet radio site, the registered ID
and password are displayed.
• Reset Your WebID/PW
information registered on the special Pioneer
Internet radio site. When reset, all the registered
broadcast stations are also cleared. If you want to
listen to the same stations, re-register after
resetting.
4 Access the special Pioneer Internet radio
site from your computer and perform the
registration process.
Access the above site and use the access code in step 3
to perform user registration, following the instructions
on the screen.
5 Register the desired broadcast stations
as your favorites, following the instructions
on the computer’s screen.
Both broadcast stations not on the vTuner list and
stations on the vTuner list can be registered. In this case
they are registered on the unit as favorite broadcast
stations and can be played.
-
The access code required for
-
After registering on the
-
Resets all the
16
En
Page 17
Music server 07
Music Server
Song 1
Artist
Album
FLAC 44.1/24
44:38 - 44:02
ASR A.L.C
Chapter 7:
Music server
This unit can play the audio files stored on the PCs or
other components on a Local Area Network (LAN).
Introduction
This unit allows you to listen to audio files or listen to
Internet radio stations on a computer or other
component connected to the unit via LAN interface. This
chapter describes the setup and playback procedures
required to enjoy these features. It is advisory that you
also refer to the operation manual supplied with your
network component.
• Photo or video files cannot be played back.
• With Windows Media Player 11 or Windows Media
Player 12, you can even play back copyrighted
audio files on this unit.
About playable DLNA network devices
This unit allows you to play music on media servers
connected on an identical Local Area Network (LAN) as
the unit. This unit allows you to play files stored on the
following devices:
• PCs running Microsoft Windows Vista or XP with
Windows Media Player 11 installed
• PCs running Microsoft Windows 7 with Windows
Media Player 12 installed
• DLNA-compatible digital media servers (on PCs or
other components)
Files stored in a PC or DMS (Digital Media Server) as
described above can be played via command from an
external Digital Media Controller (DMC). Devices
controlled by this DMC to play files are called DMRs
(Digital Media Renderers). This unit supports this DMR
function. When in the DMR mode, such operations as
playing and stopping files can be performed from the
external controller. The DMR mode is canceled if the
remote control unit is operated while in the DMR mode
(aside from certain button, including the DISPLAY).
Using AirPlay on iPod touch, iPhone, iPad
and iTunes
This unit supports AirPlay audio streaming from iPod
touch (2nd, 3rd and 4th generations), iPhone 4, iPhone
3GS, iPad, iPad 2 with iOS 4.2 or later, and iTunes 10.1
(Mac and PC) or later.
To use AirPlay, select your unit on your iPod touch,
iPhone, iPad or in iTunes and start playback.
Note
• For more information, see the Apple website
(http://www.apple.com).
Input to the unit will switch automatically when AirPlay
is in use.
The following operations can be performed when in
AirPlay mode:
• Pause/resume, next/previous file, and shuffle/
repeat from the remote control of the unit.
• Display of the currently playing file information on
the unit’s main display, including artist, song/
album name and album artwork.
Note
• It may not be displayed other than song name.
Tip
• A network environment is required to use AirPlay.
• The unit’s name that shows up in the AirPlay UI on
iPod touch, iPhone, iPad and iTunes can be
changed by Friendly Name from Network
Setting.
• AirPlay provided on this unit has been developed
and tested based on the software versions for the
iPod touch, iPhone, iPad and the software versions
for iTunes that are indicated on the Pioneer
website. AirPlay may not be compatible with iPod
touch, iPhone, iPad or iTunes software versions
other than those indicated on the Pioneer website.
About the DHCP server function
To play back audio files stored on components on the
network, you must turn on the DHCP server function of
your router.
In case your router does not have the built-in DHCP
server function, it is necessary to set up the network
manually. Otherwise, you cannot play back audio files
stored on components on the network or listen to
Internet radio stations. See Network setting on page 19
for more on this.
Authorizing this unit
This unit must be authorized to enable playback. The unit
is automatically authorized when it is connected to a PC
over a network. If not, please authorize this unit manually
on the PC. The authorization (or permission) method for
access varies depending on the type of server currently
being connected. For more information on authorizing
this unit, refer to the instruction manual of your server.
Playing audio files stored on PCs or
other components
Connecting to the LAN network
Be sure to connect the PC or other components to the
network using the LAN interface before you use this
function.
For the details of the connections, see page 7.
Playback with Music Server
Important
• You cannot access a PC on a network while you are
logged onto a domain that is configured in a
Windows network environment. Instead of logging
onto the domain, log onto the local machine.
• There are cases where the time elapsed may not be
correctly displayed.
1 Press
Server
You can also perform the same operation by pressing the
FUNCTION on the front panel repeatedly.
All available servers are shown on the display.
2Use
you want to play is stored on, then press
ENTER
The folders/files stored on the server are shown on the
display.
MUSIC SERVER
to select
Music
.
• When no sever is available to play, “Empty” will be
displayed.
/
to select the server that the file
.
3Use
/
to select the file you want to
play, then press ENTER.
Playback starts.
• When the file you want to play is in the folder, select
folder first.
•If you press RETURN during playback, the previous
(folders/files) screen will be displayed.
You can perform the following operations. Note that
some buttons are not available for operation depending
on the category currently being played back.
Button What it does
SHUFFLE
REPEAT
*. Press repeatedly to switch between repeat play
options. ‘ ’ plays the currently playing file
repeatedly. ‘ ’ plays all the files repeatedly.
Starts playback. During pl ayback, pause/
unpause playback.
Stops playback.
Press to skip to the previous files.
Press to skip to the next file.
The currently selected files are played back
in random order (shuffle play).
The currently selected files are played back
*
repeatedly.
When pressed during use of the file
selection menu, the screen for the
currently playing f ile will be displayed.
English
Français Español
17
En
Page 18

Using other functions08
Chapter 8:
Using other functions
Using the Sound mode
N-50 only:
This function allows you to utilize various sound modes
during playback.
• This function cannot be used when the PURE
AUDIO mode is on.
• This function is effective only when playing analog
audio.
1 Press
menu.
2Use
press
3Use
ENTER
Settings What it does
Auto
Sound
Retriever
Auto Level
Control
Hi-bit 32
Sound
Retriever
Air
SOUND
to show the Sound option
/
to select the setting, then
ENTER
.
/
to select On or
.
• The factory default settings are Off.
With the
Auto Sound Retriever
DSP processing is used to compensate for
the loss of audio data upon compression,
improving the sound’s sense of density and
modulatio n.
When On is selected, the
Retriever
effect is optimized based on the
bitrate information of the contents input to
the
USB, Music Server
to achieve high sound quality.
In the Auto level control mode, this unit
equalizes playback sound levels.
Creates a wider dynamic range with digital
sources. Smoother, more delicate musical
expression can be achieved by requantizing
16 bit to 24 bit audio signals to 32 bit.
Suitable for listening to the sound from a
Bluetooth wireless technology device. The
Sound Retriever Air
selected when the
input.
Off
Auto Sound
and
mode can only be
BT Audio
, then press
function,
Internet Radio
or
Air Jam
For greatest fidelity to the original
sound
N-50 only:
The PURE AUDIO mode allows audio signals to be
played via the shortest playback circuit without passing
through the DSP, thus reducing noise and producing
playback sound with greatest fidelity to the original.
1 Press
PURE AUDIO
Audio mode on or off.
Using the D/A converter
N-50 only:
Digital signals input to the rear-panel DIGITAL IN or
DIGITAL IN USB connectors are converted to analog
signals and output from the ANALOG OUT connectors.
Playing music from a digital audio
component
Outputs digital signals input to the DIGITAL IN
(COAXIAL or OPTICAL) connectors.
1 Make a digital input connection.
• See Digital audio input connections on page 6.
2 Press
Digital In 1
source.
You can also perform the same operation by pressing the
FUNCTION on the front panel repeatedly.
When Digital In 1 is selected, digital input signals from
the COAXIAL connector are played; when Digital In 2 is
selected, digital input signals from the OPTICAL
connector are played.
DIG IN 1
or
Note
• Digital signal formats that can be input to this unit
include linear PCM signals with sampling rates and
quantitative bits up to 192 kHz/24 bits (Depending
on the connected device and environment,
operation may not be successful).
to switch the Pure
or
DIG IN 2
Digital In 2
to select
as the input
Playing music from a computer
Use this function to play digital audio input to the unit's
rear panel DIGITAL IN USB port.
1 Connect the unit to a computer via USB
cable
• See Using a USB cable to connect to a computer on
page 7.
2 Press
the input source.
You can also perform the same operation by pressing the
FUNCTION on the front panel repeatedly.
3 Begin playback on the computer.
DIG IN USB
Note
• When using a USB cable to connect this unit to a
computer for playing music files, the following
linear PCM digital signals are supported:
-
Quantitative bits: 16 bit, 24 bit, 32 bit
-
Sampling rates: 44.1 kHz, 48 kHz, 88.2 kHz, 96 kHz,
192 kHz
• Output from the DIGITAL OUT connectors is not
supported during Digital In USB input.
• Playback cannot be controlled from this unit during
use of this function; use your computer to control
playback.
• When disconnecting the USB cable, always stop
playback on the computer first.
• Sound may not be produced if your computer does
not support USB 2.0 HS.
• This unit does not support use of a USB hub.
Always use a USB cable to connect the unit directly
to the computer.
Important
• When using the DIGITAL IN USB port to input
audio files from a computer to this unit, it may be
necessary to install a special driver on the
computer. For details, see the website of Pioneer.
select
Digital In USB
as
18
En
Page 19

Changing the settings
Network Setting
Network Configuration
Friendly Name
Chapter 9:
Changing the settings
The factory default settings are indicated in italic.
1 Press
2Use
3 Follow the descriptions on the main display to change the setting.
Settings What it does
Display Setting
(Level3/Level2/
System Info
Reset
SETUP
to show the
/
to select the setting, then press
Level1
/1234/
8888
)
)
Network Setting
Network Configuration
Friendly Name
Option Setting
BT PIN Select
(
0000
Internet Parental Lock
(Change Password/Internet
Parental Lock)
Power Off Setting
(Auto Power Off/Quick Start
Mode)
Language
(
English/Other languages
Software Update
Initial Setup
Dims or brightens the display.
Network setting, see page 19.
The name of this system displayed on a computer or other device connected to the
network can be changed.
Use this to set up the
Restricts usage of internet radio using password. Select
Off
. (page 20)
You can set up the password from
Auto Power Off
Quick Start Mode
Change the language of the operation messages displayed on the main display.
)
Other languages: French, German, Netherlands, Ital ian, Spanish, Russian, Japanese
Use this to update this unit software.
Use this to check this unit information details.
Please check the following items:
LAN connection status, MAC Address, IP Address, Gateway Address, Proxy Server
setting, Subnet Mask. Also confirm that this unit’s software version (Release ID) is up to
date.
Use this procedure to reset all settings to the factory default.
screen.
ENTER
Bluetooth
, see page 20.
, see page 20.
.
PIN code. (page 13)
Change Password
Internet Parental Lock
. (page 20)
to On/
Network setting
If a broadband router (with built-in DHCP server
function) is connected to this unit, you can simply turn
on the DHCP server function without having to set up t he
network manually. A broadband router without a DHCP
server function connected to this unit must be set up as
described below. Before you set up the network, consult
with your ISP or the network manager for the required
settings.
It is advised that you also refer to the operation manual
supplied with your network component.
• Any changes made to a router without the DHCP
server function must be reflected to unit network
settings.
1 Press
The Initial Setup screen is shown on the main display.
2 Select Network Setting
Configuration
SETUP
.
Network
.
3Use
/
ENTER
The IP address setting screen is displayed.
4Use
adjust the numbers, then press
to select DHCP Off, then press
.
///
or number buttons to
ENTER
Static IP Address
192
•Using / moves the adjusting digit.
•Using / increase or decrease the values.
Static IP Address
The IP address to be entered must be defined
within the following ranges. If the IP address
defined is beyond the following ranges, you cannot
play back audio files stored on components on the
network or listen to Internet radio stations.
Class A: 10.0.0.1 to 10.255.255.254 / Class B:
172.16.0.1 to 172.31.255.254 / Class C: 192.168.0.1
to 192.168.255.254
Subnet Mask
If an xDSL modem or a terminal adapter is directly
connected to this unit, enter the subnet mask listed
in your ISP documentation. In most of the cases,
enter 255.255.255.0.
Gateway address
In case a gateway (router) is connected to this unit,
enter the corresponding IP address.
Preferred DNS/Alternate DNS
If there is only one DNS server address listed in your
ISP documentation, enter Preferred DNS. In case
there are more than two DNS server addresses,
enter Alternate DNS in the other DNS server
address field.
168 2 4
.
..
09
English
.
Français Español
19
En
Page 20

09
Changing the settings
Proxy Setup
Select Use Proxy Server when you connect this
unit to the Internet via a proxy server. Enter the IP
address of your proxy server in the Proxy Server
Address field. Also, enter the port number of your
proxy server in the ‘Proxy Port’ field.
Friendly Name
1 Press
2Select
Name
3Use
then press ENTER.
SETUP
.
Network Setting
Friendly
.
///
• / : Moves the adjusting digit.
• / : Changes displayed character.
• SOUND : Switches character types.
• CLEAR : Deletes one characters at a time.
to enter
Friendly Name
Parental lock setup
Restrict internet radio access for children. When
Internet Parental Lock is set to On, you cannot listen to
internet radio without entering the password.
Note
• Even if Internet Parental Lock is set to On,
automatic clock adjustment using network will
work.
Turn on/off the parental lock
1 Press
The Initial Setup screen is displayed on the main
display.
2 Select Option Setting
Parental Lock
3Use
enter the password, then press ENTER.
SETUP
.
Internet
Internet Parental Lock
///
• / : Moves the adjusting digit.
• / : Increase or decreases the numbers.
• CLEAR : Deletes one characters at a time.
• The factory default setting is "0000".
or number buttons to
.
4Use
/
ENTER
to select On or Off, then press
.
Changing the password
1 Press
The Initial Setup screen is displayed on the main
display.
2 Select Option Setting
Parental Lock
3Use
enter the current password, then press
ENTER.
,
4Use
enter the new password, then press ENTER.
SETUP
.
Internet
Change Password
///
///
• If you press RETURN, the previous screen will be
displayed.
or number buttons to
or number buttons to
Software Update
Use this procedure to update the unit’s software. You
can update the software via a USB storage device.
Updating via a USB storage device is performed by
downloading the update file from a computer, reading
this file onto a USB storage device then inserting the
USB storage device into the USB port on the unit’s front
panel.
• If an update file is provided on the Pioneer website,
download it onto your computer. When
downloading an update file from the Pioneer
website onto your computer, the file will be in ZIP
format. Unzip the ZIP file before saving it on the
USB storage device. If there are any files or folders
on the USB storage device, delete them.
Important
• DO NOT unplug the power cord during updating.
• When updating via a USB storage device, do not
disconnect the USB storage device.
1 Press
The Initial Setup screen is displayed on the main
display.
SETUP
.
2 Select Option Setting Software
Start
Update
, then press ENTER.
2 Select Option Setting
Setting
3Use
Auto Power Off
/
to select On or
Power Off
.
Off
.
Changing the Quick Start Mode
Software Update
Start
.
Cancel
3 To update, press ENTER.
The display will temporarily disappear, and after about
twenty seconds, the update menu will be displayed and
update will begin.
• When the update is completed, the unit will
automatically reboot.
Software Update error messages
Status
messages
File Not
Found.
Descriptions
No update file was found on the USB
storage device. Store the file in the USB
storage device’s root directory.
Power Off settings
Make settings to control the power ON/OFF mode.
Changing the Auto Power Off function
setting
The factory default setting for the Auto Power Off
function is On. As a resu lt, when no action is perform ed
for thirty minutes, the unit will automatically turn Off.
This setting can be changed as follows:
1 Press
The Initial Setup screen is displayed on the display.
SETUP
.
When this is set to On, the time required for bootup will
be shortened. In addition, power-on will occur
simultaneously when AirPlay or DMR is performed. The
unit’s factory default setting for this mode is Off, to
reduce electrical consumption in the STANDBY mode.
1Press
The Initial Setup screen is displayed on the display.
2 Select Option Setting
Setting
3Use
SETUP
.
Quick Start Mode
/
to select On or
Power Off
.
Off
.
Resetting the system
Use this procedure to reset all system settings to the
factory default.
Important
• Disconnect all components connected to this unit
before the operation.
1Press
The Initial Setup screen is displayed on the display.
2Select
screen, then press ENTER.
The display shows Reset?.
3 To reset settings, press
The unit turns off (standby mode).
All the settings will be reset to the factory default next
time the unit is turned on.
SETUP
.
Reset
from the Initial Setup
SETUP
.
20
En
Page 21

Additional information 10
Chapter 10:
Additional information
Troubleshooting
Incorrect operations are often mistaken for trouble and malfunctions. If you think that there is something wrong with
this component, check the points below. Sometimes the trouble may lie in another component. Investigate the other
components and electrical appliances being used. If the trouble cannot be rectified even after exercising the checks
listed below, ask your nearest Pioneer authorized service center or your dealer to carry out repair work.
• If the unit does not operate normally due to external effects such as static electricity disconnect the power plug
from the outlet and insert again to return to normal operating conditions.
General problem
Problem Check Remedy
The power does not turn
on.
Long time required before
power is supplied.
The unit automatically
turns off.
The unit suddenly
switches off and the
STANDBY
indicator
blinks.
Settings you have made
have been cleared.
Difference in volume
between MP3, WMA and
iPod/iPhone/iPad.
This unit cannot be
operated with the remote
control.
When
Quick Start Mode
On
, if the power cord is
disconnected, the next time the
power cord is connected the unit will
not respond for about one minute.
In its factory default status, the unit
requires about 20 seconds before
power is supplied.
Is
Auto Power Off
This unit may have a serious
problem. Do not try switching the
unit on.
Did you suddenly turn off the power? Be sure to press
This is not a problem with this unit. The volume may sound differently depending on the input
Are you operating from far away? Operate from within a distance of Operate within 7 m (23 ft.),
Is the remote control sensor exposed
to direct sunlight or strong artifici al
light from a fluorescent bulb, etc.?
Are the batteries dead? Replace the batteries (page 5).
is set to
set to On? Change the setting of
Wait at least one minute, then press
the front panel.
To shorten the time required until power is supplied, change
the
Power Off Setting
On
. However, when
consumption during
(page 20).
Disconnect from the power and call a Pioneer authorized
independent service company.
then press
/I STANDBY/ON
for the
STANDBY
off before unplugging the power cord.
source and recording format.
30° of the remote sensor on the front panel (page 5).
The remote control signals may not be received properly if
the remote control sensor is exposed to direct sunlight or
strong artificial light from a fluorescent bulb, etc.
indicator on the front panel display to turn
so as to turn
Quick Start Mode
STANDBY
mode will increase
Auto Power Off
STANDBY/ON
on the remote control,
on the front panel and wait
/I STANDBY/ON
Quick Start Mode
is On, power
to
Off
(page 20).
on
When an iPod/iPhone/iPad is connected
Problem Check Remedy
Can’t operate the iPod/
iPhone/iPad.
Sound not produced from
iPod/iPhone/iPad.
Power is not supplied to
the Pod/iPhone/iPad.
Bluetooth
Bluetooth
wireless
is displayed
When an
Problem Check Remedy
The
technology device cannot
be connected or operated.
Sound from the
wireless technology
device is not emitted or
the sound is interrupted.
BT Error 5
and the unit cannot be
operated.
Is sound being produced from the
speaker of the iPod/iPhone/iPad?
Does an error message appear in the
front panel display?
No power is supplied if the power
consumption is too high.
adapter is connected
Check that no object that emits
electromagnetic waves in the 2.4 GHz
band (microwave oven, wireless LAN
Bluetooth
device or
Bluetooth
technology apparatus) is near the
unit.
Check that the
technology device is not too far from
the unit and that obstruct ions are not
set between the
technology device and the unit.
The
Bluetooth
device may not be set to the
communication mode supporting the
Bluetooth
Check that pairing is correct. The pairing setting was deleted from this unit or the
Check that the profile is correct. Use a
The
Bluetooth
damaged.
wireless
Bluetooth
wireless
Bluetooth
wireless
wireless technology
wireless technology.
adapter may be
Make sure the iPod/iPhone/iPad is connected correctly
(refer to
Also, try disconnecting the iPod/iPhone/iPad then
reconnecting it.
If the iPod/iPhone/iPad is experiencing a hangup, try
resetting the iPod/iPhone/iPad, and reconnect it to the unit.
Disconnect power to the unit, then turn on again. After
setting for iPod input, connect the iPod/iPhone/iPad.
Turn the power off then back on.
Turn the power off, then disconnect and reconnect the iPod/
iPhone/iPad.
If such an object is near the unit, set the unit far from it. Or,
stop using the object emitting the electromagnetic waves.
Set the
that the distance between them is less than about 10 m and
no obstructions exist between them.
Check the setting of the
device.
Bluetooth
A2DP profile and AVRCP profile.
Turn the unit’s power off, disconnect the
then try turning the power on again. If the symptom is
corrected, the
and should be serviced.
iPod/iPhone/iPad playback
Bluetooth
wireless technology device and the unit so
wireless technology device. Reset the pairing.
Bluetooth
wireless technology device that supports
Bluetooth
on page 11).
Bluetooth
wireless technology
Bluetooth
adapter may have been damaged
English
Français Español
adapter,
21
En
Page 22

Additional information10
When a USB storage device is connected
Problem Check Remedy
USB storage device is not
recognized.
A USB storage device is
connected and displayed,
but the audio files stored
on the USB storage
device cannot be played
back.
Much time is required to
recognized the USB
storage device.
Power is not suppli ed to
the USB storage device.
Is the USB storage device properly
connected?
Is the USB storage device connected
via a USB hub?
This is not a problem with this unit. Turn the power off then back on.
The audio files are copyrighted. Copyrighted audio files stored on a USB storage device
The file format cannot be properly
played back on this unit.
What is the USB storage devices
capacity?
Does an error message appear in the
front panel display?
No power is supplied if the power
consumption is too high.
Connect the device securely (all the way in).
This unit does not support USB hubs. Connect the USB
storage device directly.
Some USB storage devices may not be recognized properly.
This unit only supports USB mass storage class devices.
Only the FAT16 and FAT32 file systems are supported. Other
file systems (ex. FAT, NTFS, etc.) are not supported.
This device does not support the use of external hard disc
drives.
cannot be played back. Attempting to import music data
from a CD, etc., to a computer may cause the invocation of
copy protection, depending on the settings.
See the list of file formats that can be played back on this
receiver (page 25).
Some time may be required to load the data when large
capacity USB storage devices are connected (this could
take several minutes).
Turn the power off then back on.
Turn the power off, then disconnect and reconnect the USB
storage device.
Pres s
again to the
USB
.)
When computer is connected via USB cable
Problem Check Remedy
When the
DIGITAL IN
USB
port is connected to
a computer via USB
cable, audio files on the
computer cannot be
played.
Has the proper device driver been
installed on the computer?
When using a USB cable to connect the unit’s
USB
computer, the proper device driver must be downloaded
from the Pioneer website and installed on your computer.
Consult the Pioneer website for instructions on installing
the driver.
FUNCTION
to switch to the other mode, then switch
USB
mode. (When the input is switched back to
port to a computer in order to play audio files on the
DIGITAL IN
Problem Check Remedy
No sound is produced
when attempting to play
files on a computer.
Are volume settings correct for the
OS and application program?
Is the OS audio output set to MUTE? Cancel the MUTE setting.
Are multiple applications running
simultaneously?
Are volume settings correct for the
OS and application program?
Raise the volume settings as required.
Try closing applications that are not in use.
For audio device select “Pioneer USB Audio Device”.
Network
Problem Check Remedy
Cannot access to the
network.
Cannot access to the
component or PC
connected via network.
Playback does not start. The component is currently
The PC or Internet radio is
not properly operated.
The LAN cable is not firmly
connected.
The router is not switched on. Switch on the router.
Internet security software is currently
installed in the connected
component.
The audio component on the network
which has been switched off is
switched on.
The component connected to the
network is not properly set.
There are no playable audio files on
the component connected to the
network.
disconnected from this receiver or
the power supply.
The corresponding IP address is not
properly set.
The IP address is being automatically
configured.
Firmly connect the LAN cable (page 7).
There are cases where a component with Internet security
software installed cannot be accessed.
Switch on the audio component on the network before
switching on this unit.
If the client is automatically authorized, you need to enter
the corresponding information again. Check whether the
connection status is set to “Do not authorize”.
Check the audio files stored on the component connected to
the network.
Check whether the component is properly connected to this
receiver or the power supply.
Switch on the built-in DHCP ser ver function of your router,
or set up the network manually according to your network
environment (page 19).
The automatic configuration process takes time. Please
wait.
22
En
Page 23

Additional information 10
Problem Check Remedy
The audio files stored on
components on the
network, such as a PC,
cannot be played back.
Cannot access Windows
Media Player 11 or
Windo ws Media Pl ayer 12.
Windows Media Player 11 or
Windows Media Player 12 is not
currently installed on your PC.
Audio files were recorded in formats
other than MP3, WAV (LPCM only),
MPEG-4 AAC, FL AC, and WMA.
Audio files recorded in MPEG-4 AAC
or FLAC are being played back on
Windows Media Player 11 or
Windows Media Player 12.
The component connected to the
network is not properly operated.
The component connected to the
network does not permit file sharing.
The folder stored on the component
connected to the network has been
deleted or damaged.
Network connections could be
restricted due to the computer’s
network settings, security settings,
etc.
In case of Windows Media Player 11:
You are currently logged onto the
domain through your PC with
Windows XP or Windows Vista
installed.
In case of Windows Media Player 12:
You are currently logged onto the
domain through your PC with
Windows 7 installed.
Install Windows Media Player 11 or Windows Media Player
12 on your PC (page 17).
Play back audio files recorded in MP3, WAV (LPCM only),
MPEG-4 AAC, FLAC, or WMA. Note that some audio files
recorded in these formats may not be played back on this
unit.
Audio files recorded in MPEG-4 AAC or FLAC cannot be
played back on Windows Media Player 11 or Windows
Media Player 12. Try using another server. Refer to the
operation manual supplied with your server.
Check whether the component is affected by special
circumstances or is in the sleep mode. Try rebooting the
component if necessary.
Try changing the settings for the component connected to
the network.
Check the folder stored on the component connected to the
network.
Check the computer’s network settings, security settings,
etc.
Instead of logging onto the domain, log onto the local
machine (page 17).
Problem Check Remedy
Audio playback is
undesirably stopped or
disturbed.
Cannot listen to Internet
radio stations.
The audio file currently being played
back was not recorded in a format
playable on this unit.
The LAN cable is currently
disconnected.
There is heavy traffic on the network
with the Internet being accessed on
the same network.
There is a connect ion routed through
a wireless LAN on the same network.
The firewall settings for components
on the network are currently in
operation.
You are currently disconnected from
the Internet.
The broadcasts from an Internet
radio station are stopped or
interrupted.
Check whether the audio file was recorded in a format
supported by this unit.
Check whether the folder has been damaged or corrupted.
Even audio files list ed as playable on this unit may
sometimes n ot be played back or d isplayed (page 25) .
Connect the LAN cable properly (page 7).
Use 100BASE-TX to access the components on the network.
There may be a shortage of bandwidth on the 2.4 GHz band
used by the wireless L AN. Make wired LAN connections not
routed through a wireless L AN.
Install away from any devices emitting electromagnetic
waves on the 2.4 GHz band (microwave ovens, game
consoles, etc.). If this does not solve the problem, stop using
other devices that emit electromagnetic waves.
Check the firewall settings for components on the network.
Check the connection settings for components on the
network, and consult with your network service provider if
necessary (page 7).
Some Internet radio stations on the list of Internet radio
stations for this unit may occasionally not be available for
listening.
English
Français Español
23
En
Page 24

Additional information10
Wireless LAN
Problem Check Remedy
Network cannot be
accessed via wireless
LAN.
Wireless LAN converter’s power is
not on. (Wireless LAN converter’s
Power, WPS
indicators are not all lit.)
Error 8
display window.
The LAN cable is not firmly
connected.
Wireless LAN converter and base
unit (wireless LAN router, etc.) are
too far apart or there is an obstacle
between them.
There is a microwave oven or other
device generating electromagnetic
waves near the wireless LAN
environment.
Multiple wireless LAN converters
are connected to the wireless LAN
router.
Wireless LAN connections cannot be
established between the wireless
LAN converter and base unit
(wireless LAN router, etc.).
and
Wireless
is displayed on the unit’s
Check that the USB cable connecting the wireless LAN
converter to the player’s
terminal is properly connected (page 8).
There is a problem with the wireless LAN converter’s power
supply. Turn the unit’s power off, then disconnect the USB
cable, reconnect the USB cable and turn the unit’s power
back on.
If
Error 8
procedure several times, there is a problem with the unit or
the USB cable. Unplug the unit from the wall and call a
Pioneer authorized independent service company.
Firmly connect the LAN cable (page 7).
Improve the wireless LAN environment by moving the
wireless LAN converter and base unit closer together, etc.
Use the system in a place away from microwave ovens or
others device generating electromagnetic waves.
Avoid using devices generating electromagnetic waves as
much as possible when using the system with the wireless
LAN.
When connecting multiple wireless LAN converters, their IP
addresses must be changed.
The wireless LAN converter must be set in order to establish
wireless LAN connections.
LAN
on page 8.
DC OUTPUT for WIRELESS LAN
is still displayed after repeating the above
See
Connecting using wireless
Problem Check Remedy
Network cannot be
accessed via wireless
LAN.
The IP address settings of the player
and wireless LAN converter do not
match the settings of the wireless
LAN router, etc.
Try making the wireless LAN
converter’s advanced settings.
The access point is set to conceal the
SSID.
The access point’s security settings
use WEP 152-bit length code key or
shared key authentication.
Network connections cannot be
established even when the above
measures are taken.
Check the IP address settings of the player and wireless
LAN converter (including the DHCP setting).
If the player’s DHCP setting is on, turn the player’s power
off, then turn the power back on.
Check that the IP address of the player and wireless LAN
converter matche the settings of the wireless LAN router,
etc.
If the player’s DHCP setting is off, set an IP address
matching the network of the base unit (wireless LAN router,
etc.).
For example, if the wireless LAN router’s IP address is
“192.168.1.1”, set the player’s IP address to “192.168.1.XXX”
(*1), the subnet mask to “255.255.255.0”, the gateway and
DNS to “192.168.1.1”.
Next, set the wireless LAN converter’s IP address to
“192.168.1.249” (*2).
(*1) Set the “XXX” in “192.168.1.XXX” to a number between 2
and 248 that is not assigned to other devices.
(*2) Set the “249” in “192.168.1.249” to a number between 2
and 249 that is not assigned to other devices.
The wireless LAN converter can be connected to a computer
to make the advanced wireless LAN settings. For details, see
the CD-ROM included for the wireless LAN converter. Check
the settings of the wireless LAN router, etc., then change
the settings of the wireless LAN converter.
Note, however, that making the advanced wireless LAN
settings will not necessarily improve the wireless LAN
environment. Be careful when changing the settings.
In this case, the SSID may not be displayed on the access
point list screen. If not, set the SSID, etc., by making the
wireless LAN converter settings on the receiver manually.
The player does not support WEP 152-bit length code key or
shared key authentication.
Reset the wireless LAN converter. After this, redo the
wireless LAN converter’s settings.
About resetting
1. Check that the wireless LAN converter’s power is on.
2. Press the wirel ess LAN converter’s reset button for at
least 3 seconds.
3. Release the reset button.
When the wireless LAN converter is restarted, the resetting
procedure is completed.
24
En
Page 25

Additional information 10
Playable file formats
This unit supports the following file formats.
• Note that some file formats are not available for
playback although they are listed as playable file
formats.
• I f an a ttem pt is made to pl ay fi les w ith u nsup port ed
formats, the sound may be intermittent or be
accompanied by noise. In such cases, confirm that
the file format is compatible with this unit.
• The compatibility of file formats varies depending
on the type of server. Check with your server to
ensure the compatibility of file formats supported
by your server.
• Depending on the server, some file types not
supported by this unit may be converted and
output. For details, consult the server’s operating
instructions.
• Internet radio playback may be affected by the
Internet communications environment, and in this
case playback may not be possible even with the file
formats listed here
Category
MP3
<*1>
Extension
.mp3
Stream
MPEG-1
Audio
Layer-3
Sampling
frequency
Quantizat
ion bitrate
Channel 2 ch
Bitrate 8 kbps to
VBR/CBR Supported/
32 kHz to
48 kHz
16 bit
320 kbps
Supported
Category
LPCM
WAV .wav LPCM
WMA .wma
Extension
—
<*2>
Stream
LPCM
WMA2/7/
8/9/10
Sampling
frequency
Quantizat
ion bitrate
Channel 2 ch
Sampling
frequency
Quantizat
ion bitrate
Channel 2 ch
Sampling
frequency
Quantizat
ion bitrate
Channel 2 ch
Bitrate 5 kbps to
VBR/CBR Supported/
32 kHz to
48 kHz
(
Internet
Radio
)
44.1 kHz,
48 kHz,
88.2 kHz,
96 kHz,
192 kHz
(
Digital In
USB
)
16 bit
(
Internet
Radio
)
16 bit,
24 bit, 32 bit
(
Digital In
USB
)
32 kHz to
192 kHz
(
Music
Server
)
32 kHz to
96 kHz
(
USB
)
16 bit,
20 bit, 24 bit
32 kHz to
48 kHz
16 bit
320 kbps
Supported
Category
Extension
.m4a
.aac
AAC
.3gp
.3g2
FLAC .flac FLAC
*1 ”MPEG Layer-3 audio decoding technology licensed
from Fraunhofer IIS and Thomson multimedia.”
*2 Onl y streaming data from se rvers is co ncerned, so there
is no extension.
Stream
MPEG-4
AAC
MPEG-4
HE AAC
(AAC Plus
v1/2)
Sampling
32 kHz to
frequency
48 kHz
Quantizat
16 bit
ion bitrate
Channel 2 ch
Bitrate 16 kbps to
320 kbps
VBR/CBR Supported/
Supported
Sampling
32 kHz to
frequency
192 kHz
(
Music
Server
)
32 kHz to
96 kHz
(
USB
)
Quantizat
16 bit, 24 bit
ion bitrate
Channel 2 ch
Cautions on use
When moving this unit
When moving this unit, be sure to first disconnect the
iPod/iPhone, USB storage device, LAN cable or any
other equipment connected to the unit. Then press
STANDBY/ON on the remote control, then press
/I
STANDBY/ON on this unit, wait for the STANDBY
indicator on the front panel display to turn off, then
unplug the power cord. If a iPod/USB or other device is
left connected during transport, damage or malfunction
may result.
Place of installation
• Choose a stable place near the TV or stereo system
being used with this unit.
• Do not place this unit on top of a TV or color
monitor. Also install it away from cassette decks
and other devices easily affected by magnetic
forces.
Avoid the following types of places:
• Places exposed to direct sunlight
• Humid or poorly ventilated places
•Extremely hot places
• Places exposed to vibrations
• Places in which there is much dust or cigarette
smoke
• Places exposed to soot, steam or heat (kitchens,
etc.)
Do not place objects on this unit
Do not place any objects on top of this unit.
Do not obstruct the ventilation holes.
Do not use this unit on shaggy rugs, beds, sofas, etc., or
wrapped in cloth, etc. Doing so will prevent the heat
from dispersing, leading to damage.
Do not expose to heat.
Do not place this unit on top of an amplifier or other
component that generates heat. When rack mounting it,
to avoid the heat given off by the amplifier or other audio
component, place it on a shelf below the amplifier.
• Turn off the unit’s power when not using it.
• Depending on signal conditions, striped patterns
may appear on a TV screen and noise may enter the
sound of radio broadcasts when the unit’s power is
on. If this happens, turn the unit’s power off.
Cleaning the product
• Unplug the power cord from the power outlet when
cleaning this unit.
• Clean this unit using a soft cloth. For tough dirt,
apply some neutral detergent diluted in 5 to 6 parts
water to a soft cloth, wring out thoroughly, wipe off
the dirt, then wipe again with a soft, dry cloth.
• Alcohol, thinner, benzene, insecticides, etc., could
cause the print or paint to peel off. Also, leaving
rubber or vinyl products in contact with this unit for
long periods of time could mar the cabinet.
• When using chemical-impregnated wipes, etc.,
read the cautions included with the wipes carefully.
English
Français Español
25
En
Page 26

Additional information10
About network playback
The network playback function such as Internet Radio or
Music Server of this unit uses the following
technologies:
Windows Media Player
See Windows Media Player 11/Windows Media Player 12
on page 17 for more on this.
Windows Media DRM
Microsoft Windows Media Digital Rights Management
(WMDRM) is a platform to protect and securely deliver
content for playback on computers, portable devices and
network devices. Music Server functions as a WMDRM
10 for networked devices. WMDRM protected content
can only be played on media servers supporting
WMDRM.
Content owners use WMDRM technology to protect their
intellectual property, including copyrights. This device
uses WMDRM software to access WMDRM protected
content. If the WMDRM software fails to protect the
content, content owners may ask Microsoft to revoke the
software’s ability to use WMDRM to play or copy protected
content. Revocation does not affect unprotected content.
When you download licenses for protected content, you
agree that Microsoft may include a revocation list with the
licenses. Content owners may require you to upgrade
WMDRM to access their content. If you decline an
upgrade, you will not be able to access content that
requires the upgrade.
This product is protected by certain intellectual property
rights of Microsoft. Use or distribution of such technology
outside of this product is prohibited without a license from
Microsoft.
DLNA
DLNA CERTIFIED® Audio Player
The Digital Living Network Alliance (DLNA) is a crossindustry organization of consumer electronics,
computing industry and mobile device companies.
Digital Living provides consumers with easy sharing of
digital media through a wired or wireless network in the
home.
The DLNA certification logo makes it easy to find
products that comply with the DLNA Interoperability
Guidelines. This unit complies with DLNA
Interoperability Guidelines v1.5.
When a PC running DLNA server software or other DLNA
compatible device is connected to this player, some
setting changes of software or other devices may be
required. Please refer to the operating instructions for
the software or device for more information.
®
DLNA
, the DLNA Logo and DLNA CERTIFIED® are
trademarks, service marks, or certification marks of the
Digital Living Network Alliance.
Content playable over a network
• Even when encoded in a compatible format, some
files may not play correctly.
• Movie or Photo files cannot be played back.
• There are cases where you cannot listen to an
Internet radio station even if the station can be
selected from a list of radio stations.
• Some functions may not be supported depending
on the server type or version used.
• Supported file formats vary by server. As such, files
not supported by your server are not displayed on
this unit. For more information check with the
manufacturer of your server.
Disclaimer for Third Party Content
ACCESS TO THIRD PARTY CONTENT SERVICES,
INCLUDING ALL ASSOCIATED FEATURES AND
FUNCTIONALITIES, IS PROVIDED
AVAILABLE
WITHOUT WARRANTY OF ANY KIND. PIONEER
DISCLAIMS ALL WARRANTIES, EXPRESS OR IMPLIED,
IN CONNECTION WITH ACCESS TO AND USE OF
CONTENT SERVICES THROUGH THIS DEVICE,
INCLUDING WITHOUT LIMITATION WARRANTIES OF
MERCHANTABILITY, SATISFACTORY QUALITY, FITNESS
FOR A PARTICULAR PURPOSE, AND NONINFRINGEMENT. PIONEER DOES NOT GUARANTEE,
REPRESENT, OR WARRANT THAT CONTENT SERVICES
WILL BE FREE FROM ERRORS, INTERRUPTION, LOSS,
CORRUPTION, ATTACK, VIRUSES, INTERFERENCE,
HACKING, OR OTHER SECURITY INTRUSION, AND
PIONEER DISCLAIMS ANY LIABILITY IN CONNECTION
WITH THE FOREGOING. PIONEER IS NOT LIABLE OR
RESPONSIBLE FOR ANY LOSS OR DAMAGE ARISING
”
AND AT THE USER’S OWN RISK,
“
AS IS,” “AS
FROM ACCESS TO OR USE OF CONTENT. NO ORAL OR
WRITTEN INFORMATION OR ADVICE GIVEN BY
PIONEER OR ITS CUSTOMER SERVICES
REPRESENTATIVES WILL CREATE ANY SUCH
WARRANTY.
IN NO EVENT WILL PIONEER, ITS AFFILIATES, OR THEIR
RESPECTIVE OFFICERS, DIRECTORS, OR EMPLOYEES
BE LIABLE IN CONNECTION WITH YOUR USE OF THIRD
PARTY CONTENT SERVICES THROUGH THIS DEVICE
FOR PERSONAL INJURY OR SPECIAL, INCIDENTAL,
INDIRECT OR CONSEQUENTIAL DAMAGES OF ANY
KIND, INCLUDING WITHOUT LIMITATION DAMAGES
FOR ATTORNEY
REGARDLESS OF THE THEORY OF LIABILITY AND
WHETHER OR NOT ADVISED OF THE POSSIBILITY OF
SUCH DAMAGES. IN NO EVENT WILL PIONEER
TOTAL LIABILITY TO YOU FOR ALL DAMAGES ARISING
FROM THE USE OR INABILITY TO USE THIRD PARTY
CONTENT SERVICES (OTHER THAN AS MAY BE
REQUIRED BY LAW IN CASES INVOLVING PERSONAL
INJURY) EXCEED $10.00. THE FOREGOING
LIMITATIONS WILL APPLY EVEN IF THE ABOVE
REMEDY FAILS OF ITS ESSENTIAL PURPOSE. IF ANY
APPLICABLE AUTHORITY HOLDS ANY PORTION OF
THIS SECTION TO BE UNENFORCEABLE, THEN
LIABILITY WILL BE LIMITED TO THE MAXIMUM EXTENT
PERMITTED BY APPLICABLE LAW.
’
S FEES, LOST DATA OR LOST PROFITS,
’
S
About playback behavior over a network
• Playback may stall when the PC is switched off or
any media files stored on it are deleted while
playing content.
• If there are problems within the network
environment (heavy network traffic, etc.) content
may not be displayed or played properly (playback
may be interrupted or stalled). For best
performance, a 100BASE-TX connection between
player and PC is recommended.
• If several clients are playing simultaneously, as the
case may be, playback is interrupted or stalled.
• Depending on the security software installed on a
connected PC and the setting of such software,
network connection may be blocked.
Pioneer is not responsible for any malfunction of the
player and/or the Music Server features due to
communication error/malfunctions associated with your
network connection and/or your PC, or other connected
equipment. Please contact your PC manufacturer or
Internet service provider.
Windows Media is either a registered trademark or
trademark of Microsoft Corporation in the United States
and/or other countries.
This product includes technology owned by Microsoft
Corporation and cannot be used or distributed without a
license from Microsoft Licensing, Inc.
®
Microsoft
Windows
Windows
trademarks or trademarks of Microsoft Corporation in the
United States and/or other countries.
, Windows®7, Windows®Vista, Windows®XP,
®
2000, Windows®Millennium Edition,
®
98, and WindowsNT® are either registered
Authorizing this unit
In order to be able to play with Music Server, this unit
must be authorized. This happens automatically when
the unit makes a connection over the network to the PC.
If not, please authorize this unit manually on the PC.
The authorization (or permission) method for access
varies depending on the type of server currently being
connected. For more information on authorizing this
unit, refer to the instruction manual of your server.
aacPlus
The AAC decoder uses aacPlus developed by Coding
Technologies
(www.codingtechnologies.com).
FLAC
FLAC Decoder
Copyright c 2000, 2001, 2002, 2003, 2004, 2005, 2006, 2007
Josh Coalson
Redistribution and use in source and binary forms, with
or without modification, are permitted provided that the
following conditions are met:
• Redistributions of source code must retain the
above copyright notice, this list of conditions and
the following disclaimer.
• Redistributions in binary form must reproduce the
above copyright notice, this list of conditions and
the following disclaimer in the documentation and/
or other materials provided with the distribution.
• Neither the name of the Xiph.org
Foundation nor the names of its contributors may
be used to endorse or promote products derived
from this software without specific prior written
permission.
26
En
Page 27

Additional information 10
THIS SOFTWARE IS PROVIDED BY THE COPYRIGHT
HOLDERS AND CONTRIBUTORS “AS IS” AND ANY
EXPRESS OR IMPLIED WARRANTIES, INCLUDING, BUT
NOT LIMITED TO, THE IMPLIED WARRANTIES OF
MERCHANTABILITY AND FITNESS FOR A PARTICULAR
PURPOSE ARE DISCLAIMED. IN NO EVENT SHALL THE
FOUNDATION OR CONTRIBUTORS BE LIABLE FOR
ANY DIRECT, INDIRECT, INCIDENTAL, SPECIAL,
EXEMPLARY, OR CONSEQUENTIAL DAMAGES
(INCLUDING, BUT NOT LIMITED TO, PROCUREMENT
OF SUBSTITUTE GOODS OR SERVICES; LOSS OF USE,
DATA, OR PROFITS; OR BUSINESS INTERRUPTION)
HOWEVER CAUSED AND ON ANY THEORY OF
LIABILITY, WHETHER IN CONTRACT, STRICT LIABILITY,
OR TORT (INCLUDING NEGLIGENCE OR OTHERWISE)
ARISING IN ANY WAY OUT OF THE USE OF THIS
SOFTWARE, EVEN IF ADVISED OF THE POSSIBILITY OF
SUCH DAMAGE.
About iPod/iPhone/iPad
“Made for iPod”, “Made for iPhone” and “Made for iPad”
mean that an electronic accessory has been designed to
connect specifically to iPod, iPhone or iPad, respectively,
and has been certified by the developer to meet Apple
performance standards. Apple is not responsible for the
operation of this device or its compliance with safety and
regulatory standards. Please note that the use of this
accessory with iPod, iPhone, or iPad may affect wireless
performance.
Apple, AirPlay, the AirPlay logo, iPad, iPhone, iPod, iPod
shuffle, iPod nano, iPod classic, iPod touch, iTunes and
Mac are trademarks of Apple, Inc., registered in the U.S.
and other countries.
Specifications
• Generalites
System . . . . . . . . . . . . . . . . . . . . . . .Network Audio Player
Power requirements . . . . . . . . . . . . . . . . .AC 120 V, 60 Hz
Power consumption
N-50. . . . . . . . . . . . . . . . . . . . . . . . . . . . . . . . . . . . .34 W
N-30. . . . . . . . . . . . . . . . . . . . . . . . . . . . . . . . . . . . .31 W
Power consumption (In standby mode) . . . . . . . . . 0.3 W
Weight (without package)
N-50. . . . . . . . . . . . . . . . . . . . . . . . . . . . .7.3 kg (16.1 lb)
N-30. . . . . . . . . . . . . . . . . . . . . . . . . . . . . . 5.0 kg (11 lb)
Dimensions
N-50. . . . . . . . 435 mm (W) x 99 mm (H) x 330 mm (D)
(17 3/16 in. (W) x 3 15/16 in. (H) x 13 in. (D))
N-30. . . . . . 435 mm (W) x 97.5 mm (H) x 330 mm (D)
(17 3/16 in. (W) x 3 15/16 in. (H) x 13 in. (D))
Operating temperature. . . . . . . . . . . . . . +5 °C to +35 °C
Operating humidity. . . . . . . . . . . . . . . . . . . . . 5 % to 85 %
•Network
Ethernet interface . . . . . . . . . . . 10 BASE-T/100 BASE-TX
DLNA . . . . . . . . . . . . . . . . . . . . . . . . . Ver 1.5 (DMP/DMR)
• Analog audio output
Output level (During audio output)
. . . . . . . . . . . . . . . . . . . . . . . . . . . . . 2 V rms (1 kHz, 0 dB)
Number of channels. . . . . . . . . . . . . . . . . . . . . . . . . . . . . 2
Jack . . . . . . . . . . . . . . . . . . . . . . . . . . . . . . . . . . . . . . . RCA
Frequency response . . . . . . . . . . . . 4 Hz to 80 kHz –3 dB
Signal-to-Noise Ratio
1 kHz, 0 dB, fs 192 kHz . . . . . . . . . . . . . . . . . >111 dB
Dynamic range
1 kHz, 0 dB, fs 192 kHz . . . . . . . . . . . . . . . . . >111 dB
Total harmonic distortion
1 kHz, 0 dB, fs 192 kHz . . . . . . . . . . . . . . . . .<0.002 %
Channel separation
1 kHz, 0 dB, fs 192 kHz . . . . . . . . . . . . . . . . . >105 dB
• Digital audio output
Coaxial digital output . . . . . . . . . . . . . . . . . . . . . RCA jack
Optical digital output . . . . . . . . . . . . . Optical digital jack
• Digital audio input (N-50 only)
Coaxial digital input . . . . . . . . . . . . . . . . . . . . . . RCA jack
Optical digital input . . . . . . . . . . . . . . Optical digital jack
USB type-B . . . . . . . . . . . . . . . . . . . . . . . . . . . USB 2.0 HS
• Accessories
Remote control . . . . . . . . . . . . . . . . . . . . . . . . . . . . . . . . .1
AAA batteries (R03) . . . . . . . . . . . . . . . . . . . . . . . . . . . . . 2
RCA audio cable (red/white plugs) . . . . . . . . . . . . . . . . .1
Power cord
Operating instructions (This document)
Note
• Specifications and the design are subject to
possible modifications without notice, due to
improvements.
• This product is not designed for use in Japan.
© 2011 PIONEER CORPORATION.
All rights reserved.
English
Français Español
27
En
Page 28

IMPORTANT
ATTENTION
DANGER D´ELECTROCUTION
NE PAS OUVRIR
Ce symbole de l’éclair, placé dans un
triangle équilatéral, a pour but d’attirer
l’attention de l’utilisateur sur la présence, à
l’intérieur du coffret de l’appareil, de
“tensions dangereuses” non isolées d’une
grandeur suffisante pour représenter un
risque d’électrocution pour les êtres
humains.
AVERTISSEMENT
Cet appareil n’est pas étanche. Pour éviter les risques
d’incendie et de décharge électrique, ne placez près de
lui un récipient rempli d’eau, tel qu’un vase ou un pot
de fleurs, et ne l’exposez pas à des gouttes d’eau, des
éclaboussures, de la pluie ou de l’humidité.
AVERTISSEMENT
Avant de brancher l’appareil pour la première, lisez
attentivement la section suivante.
La tension de l’alimentation électrique disponible
varie selon le pays ou la région. Assurez-vous que
la tension du secteur de la région où l’appareil sera
utilisé correspond à la tension requise (par ex. 230
V ou 120 V), indiquée sur le panneau arrière.
AVERTISSEMENT
Pour éviter les risques d’incendie, ne placez aucune
flamme nue (telle qu’une bougie allumée) sur
l’appareil.
Milieu de fonctionnement
Température et humidité du milieu de fonctionnement :
De +5 °C à +35 °C (de +41 °F à +95 °F) ; Humidité
relative inférieure à 85 % (orifices de ventilation non
obstrués)
N’installez pas l’appareil dans un endroit mal ventilé ou
un lieu soumis à une forte humidité ou en plein soleil
(ou à une forte lumière artificielle).
ATTENTION :
POUR ÉVITER TOUT RISQUE
D’ÉLECTROCUTION, NE PAS ENLEVER LE
COUVERCLE (NI LE PANNEAU ARRIÈRE).
AUCUNE PIÈCE RÉPARABLE PAR
L’UTILISATEUR NE SE TROUVE À
L’INTÉRIEUR. CONFIER TOUT ENTRETIEN À
UN PERSONNEL QUALIFIÉ UNIQUEMENT.
D3-4-2-1-3_A1_Fr
D3-4-2-1-4*_A1_Fr
D3-4-2-1-7a_A1_Fr
D3-4-2-1-7c*_A1_Fr
Ce point d’exclamation, placé dans un
triangle équilatéral, a pour but d’attirer
l’attention de l’utilisateur sur la présence,
dans les documents qui accompagnent
l’appareil, d’explications importantes du
point de vue de l’exploitation ou de
l’entretien.
D3-4-2-1-1_A1_Fr
PRÉCAUTION DE VENTILATION
Lors de l’installation de l’appareil, veillez à laisser un
espace suffisant autour de ses parois de manière à
améliorer la dissipation de chaleur (au moins 10 cm sur
le dessus, 10 cm à l’arrière et 10 cm de chaque côté).
AVERTISSEMENT
Les fentes et ouvertures du coffret sont prévues pour la
ventilation, pour assurer un fonctionnement stable de
l’appareil et pour éviter sa surchauffe. Pour éviter les
risques d’incendie, ne bouchez jamais les ouvertures et
ne les recouvrez pas d’objets, tels que journaux, nappes
ou rideaux, et n’utilisez pas l’appareil posé sur un tapis
épais ou un lit.
D3-4-2-1-7b*_A1_Fr
Ce produit est destiné à une utilisation domestique
générale. Toute panne due à une utilisation autre qu'à
des fins privées (comme une utilisation à des fins
commerciales dans un restaurant, dans un autocar
ou sur un bateau) et qui nécessite une réparation
sera aux frais du client, même pendant la période de
garantie.
K041_A1_Fr
Si la fiche d’alimentation secteur de cet appareil ne
convient pas à la prise secteur à utiliser, la fiche doit
être remplacée par une appropriée. Ce
remplacement et la fixation d’une fiche secteur sur le
cordon d’alimentation de cet appareil doivent être
effectués par un personnel de service qualifié. En cas
de branchement sur une prise secteur, la fiche de
coupure peut provoquer une sérieuse décharge
électrique. Assurez-vous qu’elle est éliminée
correctement après sa dépose.
L’appareil doit être déconnecté en débranchant sa
fiche secteur au niveau de la prise murale si vous
prévoyez une période prolongée de non utilisation
(par exemple avant un départ en vacances).
D3-4-2-2-1a_A1_Fr
ATTENTION
L’interrupteur /I STANDBY/ON de cet appareil ne
coupe pas complètement celui-ci de sa prise secteur.
Comme le cordon d’alimentation fait office de
dispositif de déconnexion du secteur, il devra être
débranché au niveau de la prise secteur pour que
l’appareil soit complètement hors tension. Par
conséquent, veillez à installer l’appareil de telle
manière que son cordon d’alimentation puisse être
facilement débranché de la prise secteur en cas
d’accident. Pour éviter tout risque d’incendie, le
cordon d’alimentation sera débranché au niveau de
la prise secteur si vous prévoyez une période
prolongée de non utilisation (par exemple avant un
départ en vacances).
D3-4-2-2-2a*_A1_Fr
Cet appareil numérique de la Classe B est conforme
à la norme NMB-003 du Canada.
D8-10-1-3_A1_Fr
Page 29

La protection de votre ouïe est entre vos
mains
Pour assurer le rendement optimal de votre matériel
et – plus important encore – la protection de votre ouïe,
réglez le volume à un niveau raisonnable. Pour ne pas
altérer votre sens de la perception, le son doit être clair
mais ne produire aucun vacarme et être exempt de
toute distorsion. Votre ouïe peut vous jouer des tours.
Avec le temps, votre système auditif peut en effet
s’adapter à des volumes supérieurs, et ce qui vous
semble un « niveau de confort normal » pourrait au
contraire être excessif et contribuer à endommager
votre ouïe de façon permanente. Le réglage de votre
matériel à un volume sécuritaire AVANT que votre ouïe
s’adapte vous permettra de mieux vous protéger.
CHOISISSEZ UN VOLUME SÉCURITAIRE:
• Réglez d’abord le volume à un niveau inférieur.
• Montez progressivement le volume jusqu’à un niveau
d’écoute confortable ; le son doit être clair et exempt
de distorsions.
• Une fois que le son est à un niveau confortable, ne
touchez plus au bouton du volume.
N’OUBLIEZ PAS DE RESPECTER LES
DIRECTIVES SUIVANTES:
• Lorsque vous montez le volume, assurez-vous de
pouvoir quand même entendre ce qui se passe
autour de vous.
• Faites très attention ou cessez temporairement
l’utilisation dans les situations pouvant s’avérer
dangereuses.
• N’utilisez pas des écouteurs ou un casque d’écoute
lorsque vous opérez un véhicule motorisé ; une telle
utilisation peut créer des dangers sur la route et est
illégale à de nombreux endroits.
S001a_A1_Fr
NOTE IMPORTANTE SUR LE CABLE
D’ALIMENTATION
Tenir le câble d’alimentation par la fiche. Ne pas
débrancher la prise en tirant sur le câble et ne pas
toucher le câble avec les mains mouillées. Cela risque
de provoquer un court-circuit ou un choc électrique. Ne
pas poser l’appareil ou un meuble sur le câble. Ne pas
pincer le câble. Ne pas faire de noeud avec le câble ou
l’attacher à d’autres câbles. Les câbles d’alimentation
doivent être posés de façon à ne pas être écrasés. Un
câble abîmé peut provoquer un risque d’incendie ou un
choc électrique. Vérifier le câble d’alimentation de
temps en temps. Contacter le service après-vente
PIONEER le plus proche ou le revendeur pour un
remplacement.
S002*_A1_Fr
AVERTISSEMENT
Rangez les petites pièces hors de portée des petits
enfants. En cas d’ingestion accidentelle, consultez
immédiatement un médecin.
Page 30

Nous vous remercions d’avoir acheté ce
produit Pioneer. Veuillez lire
attentivement ce mode d’emploi afin
d’utiliser votre modèle correctement.
Après avoir lu ces explications,
conservez-les en lieu sûr pour les
consulter éventuellement plus tard.
Table des
matières
01 Avant de commencer
Contenu de la boîte . . . . . . . . . . . . . . . . . . . . . . . 5
Mise en place des piles dans la
télécommande. . . . . . . . . . . . . . . . . . . . . . . . . . . 5
Utilisation de la télécommande . . . . . . . . . . . . . . 5
Fonctionnement télécommandé d’un iPod touch/
iPhone/iPad. . . . . . . . . . . . . . . . . . . . . . . . . . . . . 5
02 Connexions
A propos des connexions audio . . . . . . . . . . . . . 6
Connexions de sortie audio analogiques . . . . . . 6
Connexions audio numériques . . . . . . . . . . . . . . 6
Connexions de sortie audio numériques. . . . . . . . 6
Connexions d’entrée audio numériques . . . . . . . . 6
Connexion d’un adaptateur
option. . . . . . . . . . . . . . . . . . . . . . . . . . . . . . . . . . 7
Utilisation d’un câble USB pour la connexion à un
ordinateur . . . . . . . . . . . . . . . . . . . . . . . . . . . . . . 7
Connexion au réseau via l’interface LAN . . . . . . 7
Connexion avec un câble LAN . . . . . . . . . . . . . . . 7
Connexion avec une interface LAN sans fil . . . . . . 8
Connexion au secteur . . . . . . . . . . . . . . . . . . . . . 8
03 Les organes et leurs fonctions
Télécommande . . . . . . . . . . . . . . . . . . . . . . . . . . 9
Panneau avant. . . . . . . . . . . . . . . . . . . . . . . . . . 10
Afficheur . . . . . . . . . . . . . . . . . . . . . . . . . . . . . . 10
Bluetooth
® en
04 Démarches de base pour la lecture
Mise en marche . . . . . . . . . . . . . . . . . . . . . . . . . 11
Lecture iPod/iPhone/iPad . . . . . . . . . . . . . . . . . 11
Vérifiez quels modèles d’iPod/iPhone/iPad sont pris
en charge
Lecture par votre iPod/iPhone/iPad. . . . . . . . . . . 11
Lecture des fichiers enregistrés sur des clés de
mémoire USB . . . . . . . . . . . . . . . . . . . . . . . . . . . 12
05 Lecture audio
. . . . . . . . . . . . . . . . . . . . . . . . . . . . . 11
Bluetooth
® (en
option)
Lecture de musique par la technologie sans fil
Bluetooth
Connexion d’un adaptateur
option . . . . . . . . . . . . . . . . . . . . . . . . . . . . . . . . .13
Réglage du code PIN . . . . . . . . . . . . . . . . . . . . .13
Appariement de l’adaptateur
périphérique à technologie sans fil
Bluetooth
Écoute de contenus musicaux d’un périphérique à
technologie sans fil
AIR JAM . . . . . . . . . . . . . . . . . . . . . . . . . . . . . . .14
. . . . . . . . . . . . . . . . . . . . . . . . . . . . . . 13
Fonctionnement par télécommande . . . . . . . . . .13
. . . . . . . . . . . . . . . . . . . . . . . . . . . . . . 13
Bluetooth
Bluetooth
® en
Bluetooth
® et du
. . . . . . . . . . . . . . 14
06 Radio Internet
Écoute de la radio Internet (web radio) . . . . . . .15
Connexion à un réseau local LAN . . . . . . . . . . . . 15
Première écoute de radios sur Internet . . . . . . . . 15
Syntonisation sur une station . . . . . . . . . . . . . . .15
Ajout de stations à Favorites . . . . . . . . . . . . . . .15
Effacement de stations de la Liste. . . . . . . . . . . . 15
Démarches avancées pour la radio Internet . . .15
Mémorisation de stations émettrices absentes de la
liste vTuner depuis le site spécial Pioneer
. . . . . .15
07 Serveur de musique
Introduction . . . . . . . . . . . . . . . . . . . . . . . . . . . . 17
A propos des périphériques de réseau DLNA
utilisables
Utilisation d’AirPlay sur iPod touch, iPhone, iPad et
iTunes
A propos de la fonction de serveur DHCP . . . . . .17
Autorisation de cet appareil . . . . . . . . . . . . . . . . 17
Lecture de fichiers audio mémorisés sur PC ou
d’autres composants . . . . . . . . . . . . . . . . . . . . . 17
Connexion à un réseau local LAN . . . . . . . . . . . . 17
Lecture avec Serveur de Musique . . . . . . . . . . . .17
. . . . . . . . . . . . . . . . . . . . . . . . . . . . . 17
. . . . . . . . . . . . . . . . . . . . . . . . . . . . . . .17
08 Utilisation des autres fonctions
Utilisation du mode Sound . . . . . . . . . . . . . . . . 18
Pour une parfaite fidélité au son original . . . . . 18
Utilisation du convertisseur N/A. . . . . . . . . . . . 18
Lecture de la musique d’un autre composant audio
numérique
Lecture de la musique d’un ordinateur. . . . . . . . 18
. . . . . . . . . . . . . . . . . . . . . . . . . . . . 18
09 Changement des paramètres
Réglage du réseau. . . . . . . . . . . . . . . . . . . . . . . 19
Nom convivial . . . . . . . . . . . . . . . . . . . . . . . . . . 20
Réglage de blocage parental. . . . . . . . . . . . . . . 20
Mise en/hors service du blocage parental. . . . . . 20
Changement du mot de passe. . . . . . . . . . . . . . 20
Mise à jour du logiciel . . . . . . . . . . . . . . . . . . . . 20
Messages d’erreur de mise à jour de logiciel . . . 20
Paramètres de mise hors tension . . . . . . . . . . . 20
Changement des paramètres de mise hors tension
automatique
Changement du mode Quick Start. . . . . . . . . . . 20
Réinitialisation du système. . . . . . . . . . . . . . . . 20
. . . . . . . . . . . . . . . . . . . . . . . . . . 20
10 Informations complémentaires
Guide de dépannage . . . . . . . . . . . . . . . . . . . . . 21
Formats de fichiers utilisables . . . . . . . . . . . . . 25
Précautions d’emploi . . . . . . . . . . . . . . . . . . . . 25
Lors d’un déplacement de l’appareil. . . . . . . . . . 25
Endroit d’installation . . . . . . . . . . . . . . . . . . . . 25
Ne posez pas d’objets sur cet appareil . . . . . . . . 25
Nettoyage de l’appareil . . . . . . . . . . . . . . . . . . . 26
À propos de la lecture en réseau. . . . . . . . . . . . 26
Windows Media Player . . . . . . . . . . . . . . . . . . . 26
Windows Media DRM. . . . . . . . . . . . . . . . . . . . 26
DLNA . . . . . . . . . . . . . . . . . . . . . . . . . . . . . . . 26
Contenus lisibles via un réseau . . . . . . . . . . . . . 26
Clause de non-responsabilité pour contenu de
. . . . . . . . . . . . . . . . . . . . . . . . . . . . . . . . 26
tiers
Anomalies lors de la lecture en réseau. . . . . . . . 26
Autorisation de cet appareil . . . . . . . . . . . . . . . 26
aacPlus . . . . . . . . . . . . . . . . . . . . . . . . . . . . . . 27
FLAC . . . . . . . . . . . . . . . . . . . . . . . . . . . . . . . . 27
À propos d’iPod/iPhone/iPad . . . . . . . . . . . . . . 27
Fiche technique . . . . . . . . . . . . . . . . . . . . . . . . . 27
4
Fr
Page 31

Avant de commencer 01
English
Français Español
Chapitre 1 :
Avant de commencer
Contenu de la boîte
Veuillez confirmer que les accessoires suivants sont
présents dans la boîte quand vous l’ouvrez.
• Télécommande
• Cordon d’alimentation
• Câble audio RCA (fiches rouges/blanches)
• Piles AAA (R03) x 2
• Mode d’emploi (ce document)
Mise en place des piles dans la
télécommande
1 Ouvrez le couvercle arrière et insérez les
piles comme sur l’illustration ci-dessous.
2 Refermez le couvercle arrière.
Les piles sont fournies avec l’appareil pour vous
permettre de vérifier son fonctionnement ; il se peut
donc qu’elles ne durent pas longtemps. Nous
conseillons d ’utiliser des piles alcalines dont la durée de
fonctionnement est plus longue.
Attention
• Lors de l’insertion des piles, veillez à ne pas
endommager les ressorts des bornes de chaque
pile.
• N’utilisez que les piles spécifiées, en excluant toute
autre. N’utilisez pas non plus une pile neuve avec
une pile usée.
• Lorsque vous insérez les piles dans la
télécommande, orientez-les correctement, comme
indiqué par les symboles de polarité ( et ).
• Ne chauffez pas les piles, ne les ouvrez pas et ne les
jetez pas au feu ou dans l’eau.
• Les piles peuvent avoir des tensions différentes,
même si elles ont une taille et une forme
identiques. N ’utilisez pas en semble différents t ypes
de pile.
• Pour éviter toute fuite d’électrolyte, retirez les piles
si vous prévoyez de ne pas utiliser la télécommande
pendant un certain temps (un mois ou plus). Si une
pile devait suinter, essuyez soigneusement
l’intérieur du logement, puis insérez de nouvelles
piles. Si l’électrolyte d’une pile devait couler et se
répandre sur votre peau, nettoyez le liquide avec
une grande quantité d’eau.
• Lorsque vous mettez des piles usées au rebut,
veuillez vous conformer à la réglementation
gouvernementale ou environnementale en vigueur
dans votre pays ou région.
• AVERTISSEMENT
N’utilisez pas et ne rangez pas les piles en plein
soleil ou dans un endroit excessivement chaud,
comme dans une voiture ou près d’un appareil de
chauffage. Les piles risqueraient de couler, de
surchauffer, d’exploser ou de s’enflammer. Leur
durée de vie et/ou leur performance pourrait
également être réduite.
Utilisation de la télécommande
La télécommande a une portée d’environ 7 mètres avec
un angle de 30° par rapport au capteur de
télécommande.
/I STANDBY/ON
STANDBY
PURE AUDIO Hi-Bit32
iPod/USB
5V 2.1A
30°
30°
7 m
Gardez à l’esprit ce qui suit lorsque vous utilisez la
télécommande :
• Veillez à ce qu’il n’y ait pas d’obstacles entre la
télécommande et le capteur de l’appareil.
• La télécommande risque de ne pas fonctionner
correctement si la lumière du soleil ou une lampe
fluorescente puissante éclaire le capteur de
l’appareil.
• Les télécommandes de différents appareils
peuvent interférer mutuellement. Evitez d’utiliser
des télécommandes, contrôlant d’autres
équipements placés à proximité de cet appareil.
• Remplacez les piles lorsque vous constatez une
diminution de la portée de fonctionnement de la
télécommande.
Fonctionnement télécommandé d’un
iPod touch/iPhone/iPad
• Un fonctionnement via LAN est possible depuis un
iPod touch, un iPhone ou un iPad en téléchargeant
une application Pioneer originale depuis l’iTunes
Store.
Cette application spéciale peut être modifiée ou
arrêtée sans préavis.
5
Fr
Page 32

Connexions02
D
Amplificateur
I
T
S
Récepteur AV,
Convertisseur N/A, etc.
Récepteur AV,
Convertisseur N/A, etc.
COAXIAL OPTICAL COAXIAL
12
DIGITAL IN
DIGITAL IN
ADAPTER PORT
DC OUTPUT
for WIRELESS LAN
USB
(OUTPUT 5V
0.1A MAX)
(OUTPUT 5V
0.6A MAX)
AC IN
DIGITAL OUT
COAXIAL
DIGITAL OUT
OPTICAL
Lecteur audio
numérique, etc.
Lecteur audio
numérique, etc.
6
Fr
Chapitre 2 :
Connexions
• Veillez toujours à éteindre les appareils et à
débrancher le cordon d’alimentation de la prise
secteur avant de raccorder un appareil ou de
changer les connexions.
• Lorsque tous les appareils ont été raccordés, vous
pouvez brancher le cordon d’alimentation.
A propos des
Types de câbles et de
Numériques (Coaxiaux) Audio numériques
Numériques (Optiques)
RCA (Analogiques)
(Blanc/Rouge)
connexions audio
bornes
Signaux audio
transférables
conventionnels
Audio analogiques
conventionnels
Connexions de sortie audio
analogiques
En raccordant la sortie audio analogique de cet appareil
sur l’entrée audio analogique d’un amplificateur, vous
pouvez utiliser ce dernier pour bénéficier des sons
analogiques produits par cet appareil.
AUDIO INPUT
RL
ANALOG
DIGITAL OUT
R
ANALOG OUT
L
OPTICAL COAXIAL
LAN (10/100)
(OUTPUT 5V
0.6A MAX)
for W
Connexions audio numériques
Connexions de sortie audio numériques
En raccordant la sortie audio numérique de l’appareil à
l’entrée audio numérique d’un récepteur AV ou d’un
convertisseur N/A, etc, vous pouvez utiliser
l’amplificateur pour bénéficier des sons numériques
produits par cet appareil.
DIGITAL IN
COAXIAL
DIGITAL IN
OPTICAL
DIGITAL OUT
ANALOG OUT
R
L
Remarques
• Les formats de signaux numériques qui peuvent
être produits par cet appareil comprennent les
signaux PCM linéaires ayant un taux
d’échantillonnage et des bits quantitatifs allant
jusqu’à 192 kHz/24 bits. (Selon l’appareil raccordé
et l’environnement, il se peut que le
fonctionnement échoue.)
• Les signaux audio numériques, pouvant être
fournis par les connecteurs DIGITAL OUT de cet
appareil, comportent les entrées suivantes : iPod,
Internet Radio, USB, Music Server, Digital In 1 et
Digital In 2.
OPTICAL COAXIAL OPT
LAN (10/100) DC OU
for WIRELE
(OUTPUT 5V
0.6A MAX)
Connexions d’entrée audio numériques
N-50 seulement :
En raccordant la sortie audio d’un composant audio
numérique à l’entrée audio numérique de cet appareil,
ce dernier peut être utilisé comme convertisseur N/A.
Pour des détails sur la sortie audio de signaux fournis
aux connecteurs DIGITAL IN, reportez-vous à la section
Utilisation du convertisseur N/A à la page 18
2
Remarque
• Les formats de signaux numériques pouvant être
fournis à cet appareil comprennent les signaux
PCM linéaires dont le taux d’échantillonnage et les
bits quantitatifs sont de 192 kHz/24 bits au
maximum. (Selon l’appareil raccordé et
l’environnement, il se peut que le fonctionnement
échoue.)
Page 33

Connexions 02
COAXIAL OPTICAL COAXIAL
12
DIGITAL IN
DIGITAL IN
ADAPTER PORT
DC OUTPUT
for WIRELESS LAN
USB
(OUTPUT 5V
0.1A MAX)
(OUTPUT 5V
0.6A MAX)
AC IN
Adaptateur Bluetooth® (disponible dans le commerce)
COAXIAL OPTICAL COAXIAL
12
DIGITAL IN
DIGITAL IN
ADAPTER PORT
DC OUTPUT
for WIRELESS LAN
USB
(OUTPUT 5V
0.1A MAX)
(OUTPUT 5V
0.6A MAX)
AC IN
Câble USB (disp onible dans
le commerce)
Type A
Type B
Ordinateur
DIGITAL OUT
OPTICAL COAXIAL OPTICAL COAXIAL
12
DIGITAL IN
DIGITAL IN
ADAPTER PORT
LAN (10/100) DC OUTPUT
for WIRELESS LAN
USB
(OUTPUT 5V
0.1A MAX)
(OUTPUT 5V
0.6A MAX)
WAN
321
LAN
Internet
Modem
Routeur
Ordinateur 2
Ordinateur 1
Câble LAN
(disponible
dans le
commerce)
Connexion d’un adaptateur
Bluetooth
Branchez l’adaptateur Bluetooth® (Modèle No.
AS-BT200 de Pioneer) sur la borne ADAPTER PORT du
panneau arrière.
• Ne déplacez pas l’appareil alors que l’adaptateur
• Pour des détails sur la lecture d’un périphérique à
®
en option
Important
Bluetooth est raccordé. Sinon, vous pourriez
l’endommager ou provoquer un contact
défectueux.
technologie sans fil Bluetooth, reportez-vous à
Lecture audio Bluetooth® (en option) à la page 13.
Utilisation d’un câble USB pour la
connexion à un ordinateur
N-50 seulement :
En utilisant un câble USB (vendu séparément) pour
raccorder le port DIGITAL IN USB de cet appareil au port
USB d’un ordinateur, cet appareil peut servir comme
convertisseur N/A.
Pour des détails sur la sortie audio de signaux fournis au
port DIGITAL IN USB, reportez-vous à la section Lecture
de la musique d’un ordinateur à la page 18.
Important
• Lorsque vous utilisez cette connexion pour fournir
des fichiers audio d’un ordinateur vers cet appareil,
l’installati on d’un pilote de périphé rique spécial sur
l’ordinateur peut s’avérer nécessaire. Pour des
détails, consultez le site web de Pioneer.
USB
Remarque
• Cet appareil ne permet pas de lire des fichiers
audio d’un ordinateur si le logiciel Media Player
n’est pas installé sur l’ordinateur raccordé.
Connexion au réseau via l’interface
LAN
En raccordant cet appareil au réseau par l’interface
LAN, vous pourrez écouter des fichiers audio enregistrés
sur des composants en réseau, par exemple votre
ordinateur, ainsi que des stations radio Internet.
Raccordez la borne LAN de cet appareil sur la borne LAN
de votre routeur (avec ou sans la fonction de serveur
DHCP incorporée) au moyen d’un câble LAN (CAT 5 ou
supérieur).
Activez la fonction de serveur DHCP de votre routeur. Si
votre routeur n’intègre pas cette fonction, il faudra
paramétrer le réseau manuellement. Pour les détails,
reportez-vous à la page 19.
Remarque
• Afin de pouvoir vous connecter à Internet, vous
devez conclure un contrat avec un fournisseur de
service Internet (FSI).
• Pour pouvoir écouter des stations radio Internet,
vous devez vous abonner auprès d’un fournisseur
de service Internet (FSI).
• Les fichiers photo ou vidéo ne peuvent pas être lus.
• Avec Windows Media Player 11 ou 12, vous pouvez
même écouter des fichiers audio protégés sur cet
appareil.
Connexion avec un câble LAN
English
Français Español
7
Fr
Page 34

Connexions02
DIGITAL OUT
OPTICAL COAXIAL OPTICAL COAXIAL
12
DIGITAL IN
DIGITAL IN
ADAPTER PORT
LAN (10/100) DC OUTPUT
for WIRELESS LAN
USB
(OUTPUT 5V
0.1A MAX)
(OUTPUT 5V
0.6A MAX)
Internet
Modem
Routeur LAN
sans fil
Convertisseur LAN sans fil (AS-WL300)
(disponible dans le commerce)
AC IN
À la prise secteur
Cordon d’alimentation
Connexion avec une interface LAN sans fil
Un branchement sans fil au réseau est possible via une
connexion LAN sans fil. Utilisez le convertisseur LAN
sans fil vendu séparément (modèle Pioneer No. ASWL300) pour cette connexion.
WAN
DC 5V WPS
Ethernet
Remarque
• Utilisez uniquement le câble de branchement
fourni comme accessoire.
• Pour des explications sur le paramétrage du
convertisseur LAN sans fil, reportez-vous au mode
d’emploi du AS-WL300.
Connexion au secteur
Important
• Avant d’effectuer ou de modifier les
raccordements, mettez l’appareil hors tension et
débranchez le cordon d’alimentation au niveau de
la prise secteur.
Attention
• Nutilisez pas un cordon d’alimentation autre que
celui qui est fourni avec cet appareil.
• Nutilisez pas le cordon d’alimentation fourni à des
fins autres que celles décrites ci-après.
Après avoir effectué toutes les connexions, branchez
l’appareil sur une prise secteur.
1 Branchez le cordon d’alimentation
fourni sur la prise
cet appareil.
2 Branchez l’autre extrémité sur une prise
secteur.
AC IN
, située à l’arrière de
8
Fr
Page 35

Les organes et leurs fonctions 03
English
Français Español
Chapitre 3 :
Les organes et leurs fonctions
1
STANDBY/ON
Télécommande
10
11
1
STANDBY/ON
iPod
2
USB
DIG IN USB
3
4
CLEAR
5
6
7
8
SETUP
9
HOME MENU
PURE AUDIO
INTERNET
RADIO
Bluetooth
DIG IN 1
1
2
4
5
7
8
0
ENTER
DISPLAY
MUSIC
SERVER
Air Jam
DIG IN 2
ENTER
REPEATSHUFFLE
SOUND
RETURN
Hi-Bit 32
12
3
6
9
13
14
15
16
17
18
19
NETWORK AUDIO PLAYER
Ce bouton fonctionne quand le bouton /I STANDBY/
ON de l’appareil principal est réglé sur ON. A chaque
pression sur ce bouton, l’appareil alterne entre les
modes ON et STANDBY.
2 Boutons de fonction
A utiliser pour changer la source d’entrée.
•Les fonctions DIG IN 1, DIG IN 2 et DIG IN USB sont
prises en compte uniquement par le N-50.
3 Touches numériques (0 à 9)
Elles servent à la saisie des valeurs pour les
paramétrages de réseau et d’autres réglages.
4
CLEAR
Appuyez pour supprimer l’élément sélectionné.
Vous pouvez l’utiliser, par exemple, si vous vous trompez
de numéro.
5
Appuyez pour lancer la lecture. Pendant la lecture, cette
touche interrompt et faire reprendre la lecture.
6
Permet de revenir au début du fichier en cours de
lecture.
• Selon la fonction d’entrée sélectionnée, il peut
s’avérer impossible de revenir au début du fichier
en cours de lecture.
7
SHUFFLE
Pour effectuer une lecture aléatoire des fichiers sur
l’iPod/iPhone/iPad, la clé de mémoire USB ou le Serveur
de Musique choisi (page 11, 12, 17).
8
///
Elles servent à sélectionner des éléments, à
changer des paramètres et à déplacer le curseur.
ENTER
A utiliser pour activer le poste sélectionné ou saisir
un réglage que vous avez modifié.
9 SETUP
A utiliser pour changer les paramètres, tels que Display
Setting (page 19), Network Setting (page 19), Option
Setting (page 19) et pour voir System Info (page 19).
Ce bouton permet aussi de réinitialiser les paramètres
de l’appareil, tel qu’expliqué à la section Reset
(page 20).
10 HOME MENU
Pour sélectionner et reproduire un fichier à partir de
l’écran de menu.
11 PURE AUDIO
Appuyez sur ce bouton pour activer le mode PURE
AUDIO. Dans ce mode, la lecture audio s’accomplit
avec la plus grande fidélité possible aux sons originaux
(page 18).
(N-50 seulement)
12 DISPLAY
Appuyez pour éteindre l’afficheur quand il n’est pas
nécessaire. Dès qu’une action est effectuée sur
l’appareil, l’afficheur s’allume automatiquement, puis il
s’éteint à nouveau après 10 secondes. Appuyez une
nouvelle fois sur ce bouton pour annuler le mode Display
OFF (désactivation Afficheur).
13 ENTER
Appuyez pour saisir l’élément sélectionné.
14
Pendant la lecture, appuyez pour sauter au début du
fichier suivant.
15 REPEAT
Pour effectuer une lecture répétée des fichiers sur
l’iPod/iPhone/iPad, une clé de mémoire USB ou le
Serveur de Musique choisi (page 11, 12, 17).
16
Appuyez pour arrêter la lecture.
17
SOUND
Pour la mise en service et hors service de Auto Sound
Retriever, Auto Level Control, Hi-Bit 32 et Sound
Retriever Air (page 18).
• Sound Retriever Air peut être réglé uniquement
18
Appuyez pour revenir à la page précédente. A utiliser
également pour annuler le réglage du son.
19 Hi-Bit 32
Appuyez sur ce bouton pour activer la fonction
Hi-Bit 32 du mode SOUND. Ceci élargit la plage
dynamique (et la bande de fréquence) pour les signaux
audio numériques, ce qui produit une lecture plus douce
et mieux détaillée (page 18).
(N-50 seulement)
quand les fonctions Bluetooth ou Air Jam ont été
sélectionnées.
RETURN
(N-50 seulement)
9
Fr
Page 36

Les organes et leurs fonctions03
Panneau avant
2 3 4 5 61 7 8 9 10
/I STANDBY/ON
STANDBY
PURE AUDIO Hi-Bit32
iPod/USB
5V 2.1A
1
/I STANDBY/ON
Appuyez pour mettre l’appareil sous ou hors tension.
Le voyant au centre du bouton s’allume quand l’appareil
est sous tension.
2
STANDBY voyant
S’allume quand l’appareil est en veille.
3 PURE AUDIO voyant
S’allume quand le mode PURE AUDIO est activé.
Hi-Bit 32 voyant (N-50 seulement)
S’allume quand le mode Hi-Bit 32 est activé.
4 Port iPod/USB
A utiliser pour raccorder votre iPod/iPhone/iPad d’Apple
(page 11) ou pour brancher une clé USB (page 12).
5 Capteur de télécommande
Il capte les signaux émis par la télécommande (page 5).
6 Afficheur
7 FUNCTION
A utiliser pour changer la source d’entrée. La source
change dans l’ordre suivant.
iPod Internet Radio Music Server USB BT
Audio Air Jam Digital In USB Digital In 1
Digital In 2 Retour au début (non affiché)
• Pour utiliser les fonctions BT Audio et Air Jam,
vous devez raccorder l’adaptateur Bluetooth
disponible dans le commerce : AS-BT200 sur cet
appareil. Pour des détails, reportez-vous à
Connexion d’un adaptateur Bluetooth® en option à
la page 7.
(N-50
seulement
®
NETWORK AUDIO PLAYER N-50
FUNCTION
N-50
•Les fonctions Digital In 1, Digital In 2 et Digital In
USB sont prises en compte uniquement par le N-50.
8
Appuyez pour arrêter la lecture.
9
Appuyez pour lancer la lecture. Pendant la lecture, cette
touche interrompt et faire reprendre la lecture.
)
10
Permet de revenir au début du fichier en cours de
lecture. (Selon la fonction d’entrée sélectionnée, il
peut s’avérer impossible de revenir au début du
fichier en cours de lecture.)
Appuyez pour sauter au début du fichier suivant.
Conseil
Si une fonction d’entrée autre que iPod est sélectionnée
et que l’afficheur n’indique pas l’état de la lecture, les
boutons suivants de l’appareil principal peuvent servir
pour effectuer la sélection de poste, la saisie et le retour.
• :
• :
• : Saisie
• : Retour
Afficheur
1 32
Music Server
Song 1
4
Artist
Album
5
6
1 Source d’entrée
2 AirPlay
Ce voyant apparaît pendant le fonctionnement AirPlay.
3 Etat de connexion au réseau
Quand l’appareil est raccordé au réseau, ce voyant
s’allume.
Quand l’appareil n’est pas raccordé au réseau, ce
voyant s’allume.
4 Nom de dossier/fichier/artiste/album/
station, etc.
5 Informations sur fichier
Affiche le format, la fréquence d’échantillonnage et le
débit binaire de quantification du fichier.
6 Etat de lecture
7 Maquette
Affiché quand le fichier en cours de lecture comprend
une image de pochette d’album, etc.
FLAC 44.1 / 24
44:38 - 44:02
10 11 12
7
7
8
ASR A.L.C
7
9
7
8 Lecture répétée and Lecture aléatoire
Répétition de tous les fichiers.
Répétition d’un fichier.
Lecture aléatoire
9 Voyant de fonction SOUND
ASR
S’allume quand la fonction Auto Sound Retriever
est activée.
A.L.C
S’allume quand la fonction Auto Level Control est
activée.
10 Durée de lecture écoulée
11 Barre de lecture
La barre s’allonge en suivant la durée de lecture écoulée.
12 Durée de lecture restante
10
Fr
Page 37

Démarches de base pour la lecture 04
English
Français Español
English
Français
Deutsch
Nederlands
Language
MENU
iPod/iPhone/iPad
Câble iPod
Chapitre 4 :
Démarches de base pour la lecture
Mise en marche
Lorsque vous utilisez l’appareil pour la première fois, les
écrans suivants sont affichés.
Programmez les paramètres suivants pour
personnaliser l’appareil.
1 Appuyez sur le bouton
ON
du panneau avant.
L’appareil est mis sous tension.
Le voyant central du bouton clignote lentement.
Environ 20 secondes après la mise sous tension, l’écran
suivant apparaît. Environ une minute est nécessaire
entre la mise sous tension et la fin de la phase de
démarrage.
Le fait de régler Quick Start Mode sur On (activé)
permettra une mise en marche plus rapide (page 20).
/I STANDBY/
L’écran suivant apparaîtra automatiquement après
l’écran de l’étape 1.
2 Utilisez
des menus de votre appareil, puis appuyez
sur
Les réglages sont ainsi terminés.
Lecture iPod/iPhone/iPad
En raccordant simplement votre iPod/iPhone/iPad à cet
appareil, vous pouvez profiter de sons d’une grande
qualité directement à partir de votre iPod/iPhone/iPad.
Vérifiez quels modèles d’iPod/iPhone/iPad
sont pris en charge
Les iPod/iPhone/iPad utilisables sur cet appareil sont
indiqués ci-après.
iPod/iPhone/iPad Audio Commande
iPod nano 2/3/4/5/6G
iPod classic
iPod touch 1/2/3/4G
iPhone
iPhone 3G/3GS
iPhone 4
iPad
iPad2
• Pioneer ne garantit pas que cet appareil convienne
• Certaines fonctions peuvent ne pas être
• iPod/iPhone/iPad est autorisé pour la reproduction
• Les fonctions telles que l’égaliseur ne peuvent pas
/
pour sélectionner la langue
ENTER
.
à des iPod/iPhone/iPad, autres que ceux qui sont
spécifiés.
accessibles en fonction du modèle et de la version
du logiciel.
de contenus non protégés ou de contenus que
l’utilisateur est autorisé à reproduire légalement.
être commandées en utilisant ce système et nous
recommandons de désactiver l’égaliseur avant la
connexion.
• Pioneer ne peut en aucun cas être tenu
responsable pour toute perte directe ou indirecte,
liée à un problème ou une perte des données
enregistrées à la suite d’une défaillance de l’iPod/
iPhone/iPad.
• Pour des instructions détaillées sur l’utilisation de
l’iPod/iPhone/iPad, veuillez vous reporter au mode
d’emploi qui accompagne votre iPod/iPhone/iPad.
• Ce système a été mis au point et testé pour la
version de logiciel de l’iPod/iPhone/iPad indiquée
sur le site web de Pioneer.
• L’installation sur votre iPod/iPhone/iPad de
versions de logiciel autres que celles indiquées sur
le site web de Pioneer peut résulter en une
incompatibilité avec ce système.
1 Sélectionnez “
Settings
” sur le menu
principal.
Si vous utilisez un iPod touch ou un iPhone, sélectionnez
“General” après avoir sélectionné “Settings”.
2 Sélectionnez
La version du logiciel sera affichée.
About
.
Lecture par votre iPod/iPhone/iPad
1 Appuyez sur
iPod
comme source d’entrée.
Vous pouvez effectuer la même opération en appuyant
de façon répétée sur FUNCTION du panneau avant.
iPod apparaît sur l’affichage.
2 Connexion de votre iPod/iPhone/iPad
Branchez votre iPod/iPhone/iPad sur le port USB du
panneau avant de l’appareil. Utilisez le câble
iPhone/iPad fourni avec votre iPod pour cette connexion.
iPod
pour sélectionner
iPod/
• Pour le branchement du câble, consultez aussi le
mode d’emploi de votre
/I STANDBY/ON
STANDBY
iPod/USB
5V 2.1A
Les opérations suivantes sont possibles avec l’iPod/
iPhone/iPad.
Touches Leur rôle
SHUFFLE
REPEAT
* Chaque fois que vous appuyez sur REPEAT, les
modes de répétition changent dans l’ordre suivant.
Repeat 1
Repeat 1 : Répète le fichier en cours de lecture.
Repeat all : Répète tous les fichiers.
Démarre la lecture. Pendant la lecture,
cette touche interrompt et faire reprendre
la lecture.
Interrompt la lecture.
Appuyez sur cette touche pour sauter au
début du fichier en cou rs, puis aux fichiers
précédents.
Appuyez sur cette touche pour sauter au
fichier suivant.
Les fichiers de l’iPod/iPhone/iPad
actuellement sélecti onnés sont lus en
ordre aléatoire (Lecture aléatoire).
Les fichiers de l’iPod/iPhone/iPad
actuellement sélectionnés sont lus de
façon répétée.*
Repeat all Lecture normale
iPod/iPhone/iPad.
PURE AUDIO Hi-Bit32
11
Fr
Page 38

Démarches de base pour la lecture04
iPod/USB
5V 2.1A
Clé de mémoire USB
(disponible dans le
commerce)
Si aucun iPod/iPhone/iPad n’est raccordé à l’appareil,
ou s’il est débranché, l’appareil sera automatiquement
désactivé après 30 minutes de non fonctionnement.
• Uniquement quand le paramètre
été sélectionné sous On (
Auto Power Off a
page 20).
Important
Si cet appareil ne peut assurer la lecture de votre iPod/
iPhone/iPad, effectuez les vérifications suivantes :
• Vérifiez si l ’iPod/iPhone/iPad est pris en charge par
cet appareil.
• Reconnectez l’iPod/iPhone/iPad à l’appareil. Si
cela ne fonctionne pas, essayez de réinitialiser
votre iPod/iPhone/iPad.
• Assurez-vous que l’iPod/iPhone/iPad est pris en
charge par cet appareil.
Si l’iPod/i Phone/iPad ne peut pas être utilisé, vérifiez les
points suivants :
• L’iPod/iPhone/iPad est-il raccordé correctement ?
Reconnectez l’iPod/iPhone/iPad à l’appareil.
• L’iPod/iPhone/iPad a-t-il subi une immobilisation ?
Essayez de réinitialiser l’iPod/iPhone/iPad et
reconnectez-le à l’appareil.
Conseil
• L’iPod/iPhone/iPad se charge chaque fois qu’il est
connecté à cet appareil. (La recharge s’accomplit
seulement quand cet appareil est sous tension
(On).)
• Lorsque l’entrée passe de l’iPod à une autre
fonction, la lecture de l’iPod/iPhone/iPad est
arrêtée automatiquement.
Lecture des fichiers enregistrés sur
des clés de mémoire USB
1 Appuyez sur
comme source d’entrée.
Vous pouvez effectuer la même opération en appuyant
de façon répétée sur FUNCTION du panneau avant.
USB apparaît sur l’afficheur.
2 Raccordez la clé de mémoire USB.
Branchez votre clé de mémoire USB sur le port USB du
panneau avant de l’appareil.
/I STANDBY/ON
Les dossiers / fichiers mémorisés sur la clé USB
apparaissent automatiquement sur l’afficheur.
3Utilisez
fichier, puis appuyez sur
La lecture commence.
• Pour revenir à l’écran précédent, appuyez sur
RETURN.
• Mettez l’appareil hors tension avant de débrancher
la clé de mémoire USB.
Vous pouvez utiliser les fonctionnalités suivantes. Notez
que, selon la catégorie en cours de lecture, certaines
touches ne seront pas utilisables.
Touches Leur rôle
USB
pour sélectionner USB
STANDBY PURE AUDIO Hi-Bit32
/
pour sélectionner le
ENTER
.
Démarre la lecture. Pendant la lecture,
cette touche interrompt et faire reprendre
la lecture.
Arrête la lecture.
Appuyez pour sauter vers les fichiers
précédents.
Touches Leur rôle
SHUFFLE
REPEAT
RETURN
* Appuyez de façon répétée pour permuter entre les
options de lecture répétée. ‘ ’ effectue de façon
répétée la lecture du fichier en cours. ‘ ’ effectue
de façon répétée la lecture de tous les fichiers.
Si une clé de mémoire USB n’est pas en cours de lecture
et que l’appareil n’est pas utilisé pendant 30 minutes ou
davantage, l’alimentation sera automatiquement
coupée.
• Uniquement quand le paramètre
été sélectionné sous On (
Appuyez sur cette touche pour sauter au
fichier suivant.
Les fichiers actuellement sélectionnés
sont lus en ordre imprévisible (Lecture
aléatoire).
Les fichiers actuellement sélectionnés
sont lus de façon répétée.*
Quand cette touche est actionnée sur le
menu de sélection de fichier, l’écran pour
le fichier en cours de lecture est affiché.
Si ce bouton est actionné pendant
l’affichage du menu de lecture en cours, le
menu de sélection des fichiers apparaîtra.
Auto Power Off a
page 20).
Remarque
• Il se peut que cet appareil ne reconnaisse pas
certaines clés USB et qu’il ne puisse pas lire les
fichiers ou fournir le courant à une clé de mémoire
USB. Pour les détails, reportez-vous à Lorsqu’une
clé de mémoire USB est raccordée à la page 22.
• Pioneer ne garantit pas que tout fichier, enregistré
sur u ne clé de mémoire USB, pou rra être lu ou que
le courant électrique sera fourni à tous les types de
clé USB. Notez aussi que Pioneer décline toute
responsabilité en cas de perte de fichiers d’une clé
USB, résultant de la connexion à cet appareil.
• Ce récepteur ne peut pas être raccordé par un
concentrateur USB.
12
Fr
Page 39

Lecture audio
English
Français Español
Fonctionnement par télécommande
Cet appareil
Adaptateur
Bluetooth
®
Périphérique non équipé de la
technologie sans fil Bluetooth :
Lecteur de musique numérique
+
Émetteur audio Bluetooth
®
(disponible dans le commerce)
Périphérique optimisé pour la
technologie sans fil Bluetooth :
Lecteur de musique numérique
Périphérique optimisé pour la
technologie sans fil Bluetooth :
Téléphone portable
Bluetooth
®
(en option)
05
Chapitre 5 :
Lecture audio
DISPLAY
MUSIC
SERVER
DIGITAL 1
V TUNER
STANDBY ON
iPod
DIGITAL 2
Bluetooth
3
AirJam
USB-A
6
2
USB-B
9
5
1
8
4
ENTER
0
7
REPEAT
CLEAR
SOUND
SHUFFLE
RETURN
ENTER
SETUP
Hi-Bit
HOME MENU
PURE AUDIO
NETWORK PLAYER
Lecture de musique par la technologie
sans fil
Lorsque l’adaptateur Bluetooth® (modèle Pioneer nº ASBT200) est raccordé à cet appareil, un produit équipé de
la technologie sans fil Bluetooth (téléphone portable,
lecteur de musique numérique, etc.) peut être utilisé
pour écouter de la musique sans fil. De plus, en utilisant
un émetteur disponible dans le commerce prenant en
charge la technologie sans fil Bluetooth, vous pouvez
écouter de la musique sur un périphérique non équipé
de la technologie sans fil Bluetooth. Le modèle AS-BT200
prend en charge la protection de contenus SCMS-T ;
ainsi, il est possible de profiter de la musique sur des
périphériques équipés de la technologie sans fil
Bluetooth de type SCMS-T.
Bluetooth
Remarque
• Le périphérique adapté pour la technologie sans fil
Bluetooth doit prendre en charge les profils A2DP.
Pioneer ne garantit pas une connexion et un
•
fonctionnement corrects de cet appareil avec tous
les périphériques adaptés à la technologie sans fil
Bluetooth
.
Bluetooth
®
• La marque de mot et les logos
marques deposees appartenant a
et toute utilisation de ces marques par PIONEER
CORPORATION est faite sous licence. Les autres
marques de commerce ou noms commerciaux sont
la propriete de leur proprietaire respectif.
Fonctionnement par télécommande
La télécommande fournie avec cet appareil vous permet
de lire et d’arrêter le support média et d’effectuer
d’autres opérations.
• Le périphérique adapté pour la technologie sans fil
Bluetooth doit prendre en charge les profils AVRCP.
• Le fonctionnement de la télécommande n’est pas
garanti pour tous les périphériques, adaptés à la
technologie sans fil Bluetooth.
Connexion d’un adaptateur
Bluetooth
1 Branchez l’adapateur
l’appareil alors que celui-ci est en mode
veille.
®
en option
(en option)
Bluetooth® sont des
Bluetooth
Bluetooth® sur
SIG, Inc.
• Pour raccorder l’adaptateur Bluetooth®, reportezvous à Connexion d’un adaptateur Bluetooth® en
option à la page 7.
2 Appuyez sur
STANDBY/ON
pour
mettre l’appareil sous tension.
3 Appuyez sur
sélectionner
d’entrée.
Vous pouvez effectuer la même opération en appuyant
de façon répétée sur FUNCTION du panneau avant.
• Si l’adaptateur Bluetooth
que BT Audio est sélectionné comme source
d’entrée, le message d’erreur BT Adapter Not
Connected apparaîtra sur l’afficheur.
Bluetooth
BT Audio
pour
comme source
®
n’est pas raccordé et
Réglage du code PIN
Réglez le code PIN de cet appareil à la même valeur que
celui du périphérique à technologie sans fil Bluetooth
utilisé. Les valeurs de réglage prises en charge pour le
code PIN sont du type 0000, 1234 ou 8888.
• Réglage par défaut : 0000
1 Appuyez sur
sélectionner
Bluetooth
BT Audio
pour
comme source
d’entrée.
Vous pouvez effectuer la même opération en appuyant
de façon répétée sur FUNCTION du panneau avant.
BT Audio apparaît sur l’afficheur.
2 Appuyez sur
3Utilisez
Setting
ENTER
.
Option Setting
SETUP
/
pour sélectionner
BT PIN Select
.
Option
, puis appuyez sur
BT PIN Select
Internet Parental Lock
Power Off Setting
Language
/
4Utilisez
PIN, puis appuyez sur
Le code PIN est mémorisé.
pour sélectionner le code
ENTER
.
Appariement de l’adaptateur
Bluetooth
technologie sans fil
“L’appariement (Pairing)” doit être effectué avant de
commencer la lecture de contenu à technologie sans fil
Bluetooth à l’aide de l’adaptateur Bluetooth
vous d’effe ctuer l’appariement la p remière fois que vous
utilisez le système ou à chaque fois que les données
d’appariement sont effacées. L’“appariement” est
l’étape nécessaire pour enregistrer le périphérique à
technologie sans fil Bluetooth afin de permettre les
communications Bluetooth. Pour plus de détails,
reportez-vous aussi au mode d’emploi de votre
périphérique à technologie sans fil Bluetooth.
1 Appuyez sur
sélectionner
d’entrée.
Vous pouvez effectuer la même opération en appuyant
de façon répétée sur FUNCTION du panneau avant.
BT Audio apparaît sur l’afficheur.
2 Allumez le périphérique à technologie
sans fil
effectuer l’appariement, placez-le près du
système et réglez-le sur le mode
d’appariement.
L’appariement s’accomplit.
3 Vérifiez que l’adaptateur
est détecté par le périphérique à technologie
sans fil
• Si le périphérique à technologie sans fil Bluetooth
• L’appariement est requis la première fois que vous
®
et du périphérique à
Bluetooth
®
. Assurez-
Bluetooth
BT Audio
Bluetooth
Bluetooth
ne peut pas être raccordé sur l’appareil, effectuez l a
connexion à partir du périphérique à technologie
sans fil Bluetooth.
Remarque
utilisez le périphérique à technologie sans fil
Bluetooth et l’adapateur Bluetooth
avec lequel vous souhaitez
.
pour
comme source
Bluetooth
®
.
®
13
Fr
Page 40

05
Lecture audio
Bluetooth
®
(en option)
• Pour permettre la communication Bluetooth,
l’apparieme nt doit être effectué a vec votre système
ainsi qu’avec le périphérique à technologie sans fil
Bluetooth.
Écoute de contenus musicaux d’un
périphérique à technologie sans fil
Bluetooth
1 Appuyez sur
sélectionner
d’entrée.
Vous pouvez effectuer la même opération en appuyant
de façon répétée sur FUNCTION du panneau avant.
BT Audio apparaît sur l’afficheur.
2 Effectuez la connexion entre le
périphérique à technologie sans fil
Bluetooth
•Reportez-vous à Appariement de l’adaptateur
Bluetooth® et du p ériphérique à technologie sans fil
Bluetooth à la page 13.
3 Appuyez sur pour lancer la lecture.
Les opérations suivantes sont maintenant accessibles
pour les périphériques à technologie sans fil Bluetooth
en utilisant la télécommande.
Touches Leur rôle
Si aucun périphérique adapté pour la technologie sans
fil Bluetooth n’est raccordé et qu’aucune opération n’est
effectuée pendant 30 minutes ou davantage,
l’alimentation sera automatiquement coupée.
• Uniquement quand le paramètre
été sélectionné sous On (
Bluetooth
BT Audio
pour
comme source
et l’appareil.
Démarre la lecture. Pendant la lecture,
cette touche interrompt et faire reprendre
la lecture.
Arrête la lecture.
Appuyez sur cette touche pour sauter au
début du fichier en cours, puis aux fichiers
précédents.
Appuyez sur cette touche pour sauter au
fichier suivant.
Auto Power Off a
page 20).
Remarque
• Le périphérique adapté pour la technologie sans fil
Bluetooth doit prendre en charge les profils AVRCP.
• Le fonctionnement de certains périphériques
adaptés pour la technologie sans fil Bluetooth peut
être différent de ce qui est indiqué sur le tableau cidessus.
AIR JAM
Air Jam – une application exclusive de Pioneer, est
disponible gratuitement.
Air Jam vous permet de raccorder plusieurs
périphériques compatibles sur cet appareil en utilisant
la technologie sans fil Bluetooth. Grâce à cette
application, vous pouvez composer directement une
liste de lecture de groupe sur un périphérique pris en
charge pour la jouer sur votre Home Theater via cet
appareil. Vous-même et vos amis pouvez ajouter à la
Liste des chansons, provenant de vos périphériques. Air
Jam vous permet aussi d’effacer une chanson avant que
personne ne l’ait entendue.
1 Appuyez sur
Air Jam
comme source d’entrée.
Vous pouvez effectuer la même opération en appuyant
de façon répétée sur FUNCTION du panneau avant.
Air Jam apparaît sur l’afficheur.
Pour plus d’informations sur l’emploi de l’application Air
Jam, consultez notre site Web.
http://pioneer.jp/product/soft/iapp_airjam/en.html
Air Jam
pour sélectionner
14
Fr
Page 41

Radio Internet 06
Internet Radio
256
kbps
[ENTER] (Press and Hold) :
Add to Favorites
ASR A.L.C
No Title #001......
Pioneer Radio.com
Chapitre 6 :
Radio Internet
Écoute de la radio Internet (web
radio)
Connexion à un réseau local LAN
Connexion au réseau via l’interface LAN
Pour les détails sur les connexions, reportez-vous à
Connexion au réseau via l’interface LAN à la page 7.
Première écoute de radios sur Internet
Lorsque vous écoutez des radios sur Internet
(webradios) pour la première fois, suivez les instructions
ci-après pour vous syntoniser sur la station souhaitée.
1 Appuyez sur
sélectionner
d’entrée.
Vous pouvez effectuer la même opération en appuyant
de façon répétée sur FUNCTION du panneau avant.
Internet Radio apparaît sur l’afficheur.
2Utilisez
Radio
, puis appuyez sur
Internet Radio
Internet Radio
Find Net Radio
Favorites
INTERNET RADIO
Internet Radio
/
pour sélectionner
ENTER
pour
comme source
Find Net
.
/
3 Utilisez
station, puis appuyez sur
pour sélectionner la
ENTER
.
Internet Radio
Genres
Countries
Podcasts By Genre
Podcasts By Location
Remarque
• Quand la touche est actionnée sur le menu de
sélection de station, l’écran pour la plage en cours
de lecture est affiché.
Syntonisation sur une station
1 Appuyez sur
sélectionner
d’entrée.
Vous pouvez effectuer la même opération en appuyant
de façon répétée sur FUNCTION du panneau avant.
• Les informations relatives à la station sélectionnée
en dernier lieu apparaissent sur l’afficheur.
2 Appuyez sur
l’écran de menu
3 Utilisez
Radio
ou
ENTER
.
• Sélectionnez Find Net Radio si vous souhaitez
faire l’accord sur une station qui ne se trouve pas
encore sur Favorites.
• Sélectionnez Favorites si vous souhaitez faire
l’accord sur une station qui a déjà été ajoutée à
Favorites.
INTERNET RADIO
Internet Radio
HOME MENU
Internet Radio
/
pour sélectionner
Favorites
comme source
pour afficher
.
, puis appuyez sur
pour
Find Net
• Pour ajouter des stations à Favorites, reportez-
vous à Ajout de stations à Favorites à la page 15.
4Utilisez
station, puis appuyez sur
La lecture commence.
• Lorsque vous sélectionnez Find Net Radio, vous
/
pour sélectionner la
pouvez aussi choisir les stations disponibles à
partir du menu de radio internet.
ENTER
.
Ajout de stations à Favorites
Vous pouvez mémoriser jusqu’à 20 de vos chansons ou
de vos stations webradio préférées dans le dossier
Favorites.
1 Faites l’accord sur la station à partir de
Find Net Radio.
• Suivez les instructions Syntonisation sur une
station à la page 15.
• Les informations relatives à la station apparaissent
sur l’afficheur.
2 Appuyez sur
enfoncé pendant quelques secondes.
3 Appuyez à nouveau sur
Les informations relatives à la station sont mémorisées
dans le dossier Favorites.
Lorsque 20 stations sont mémorisées, le message
d’erreur “Favorites already full. Item cannot be added.”
apparaît et il n’est plus possible d’ajouter des stations
sous “Favorites”.
ENTER
et maintenez
ENTER
.
Effacement de stations de la Liste
1 Appuyez sur
afficher l’écran de menu de radio internet.
2Utilisez
Favorites, puis appuyez sur
3Utilisez
station à effacer, puis appuyez sur
4Utilisez
(effacer), puis appuyez sur
Sélectionnez OK pour valider.
• Pour annuler l’effacement de la station, appuyez
sur RETURN.
Remarque
• Par la démarche à l’étape 4 ci-dessus, le
mouvement haut/bas (Move Up ou Move Down)
peut être sélectionné, puis une pression sur le
bouton ENTER permet de déplacer la position des
stations enregistrées.
HOME MENU
/
pour sélectionner
ENTER
/
pour sélectionner la
/
pour sélectionner Delete
ENTER
pour
.
.
ENTER
.
Démarches avancées pour la radio
Internet
Mémorisation de stations émettrices
absentes de la liste vTuner depuis le site
spécial Pioneer
Grâce à cet appareil, des stations émettrices non
comprises sur la liste de celles distribuées par vTuner
peuvent être enregistrées et restituées. Vérifiez le code
d’accès requis pour l’enregistrement sur cet appareil,
utilisez ce code d’accès pour accéder au site de radio
internet spécial de Pioneer et enregistrez les stations
que vous souhaitez dans le dossier Favorites. L’adresse
du site de radio Internet spécial de Pioneer est la
suivante :
http://www.radio-pioneer.com
1 Affichez l’écran
Pour afficher l’écran de la liste radio Internet, effectuez
les étapes 1 à 3 sous Première écoute de radios sur
Internet à la page 15.
Find Net Radio
.
English
Français Español
15
Fr
Page 42

Radio Internet06
2Utilisez
puis appuyez sur
3Utilisez
Access Code
Le code d’accès requis pour l’enregistrement sur le site
radio Internet spécial de Pioneer est affiché. Inscrivez
cette adresse pour la conserver.
Les points suivants peuvent être vérifiés sur l’écran Aide :
• Get Access Code
• Show Your WebID/PW
• Reset Your WebID/PW
/
pour sélectionner
ENTER
.
/
pour sélectionner
, puis appuyez sur
l’enregistrement sur le site radio Internet spécial de
Pioneer est affiché.
sur le site de radio Internet spécial de Pioneer, le
code d’identification (ID) et le mot de passe
enregistrés sont affichés.
les informations enregistrées sur le site de radio
Internet spécial de Pioneer. Après la
réinitialisation, toutes les stations émettrices
enregistrées sont effacées. Si vous souhaitez
écouter les mêmes stations, vous devrez les
enregistrer à nouveau.
Le code d’accès requis pour
-
Après enregistrement
-
Pour réinitialiser toutes
Help
Get
ENTER
,
.
4 Accédez au site de radio Internet spécial
de Pioneer depuis votre ordinateur et
effectuez les démarches d’enregistrement.
Accédez au site indiqué ci-avant et utilisez le code
d’accès de l’étape 3 pour effectuer l’enregistrement
d’utilisateur en suivant les instructions sur l’écran.
5 Enregistrez les stations émettrices
souhaitées comme vos préférées en suivant
les instructions apparaissant sur l’écran de
l’ordinateur.
Il est possible d’enregistrer des stations ne figurant pas
sur la liste vTuner et des stations qui s’y trouvent. Dans
ce cas, elles sont enregistrées sur l’appareil comme
stations favorites et elles peuvent être reproduites.
16
Fr
Page 43

Serveur de musique 07
English
Français Español
Chapitre 7 :
Serveur de musique
Cet appareil permet de lire des fichiers audio mémorisés
sur des PC ou d’autres composants sur un Réseau local
(LAN).
Introduction
Cet appareil vous permet d’écouter des fichiers audio ou
de profiter des stations de radio Internet sur un
ordinateur ou un autre composant, raccordé à cet
appareil via l’interface LAN. Ce chapitre décrit les
démarches de configuration et de lecture, requises pour
bénéficier de ces fonctionnalités. Il est conseillé aussi de
vous reporter au mode d’emploi, fourni avec votre
composant réseau.
• Les fichiers photo ou vidéo ne peuvent pas être lus.
• Avec Windows Media Player 11 ou Windows Media
Player 12, vous pouvez même écouter des fichiers
audio protégés sur cet appareil.
A propos des périphériques de réseau
DLNA utilisables
Cet appareil permet d’écouter la musique mémorisée
sur les serveurs de média, raccordés au même réseau
local (LAN) que l’appareil. Cet appareil vous permet de
lire les fichiers mémorisés sur les supports suivants :
• Les ordinateurs fonctionnant sous Microsoft
Windows Vista ou Windows XP, sur lesquels
Windows Media Player 11 est installé
• Les ordinateurs fonctionnant sous Microsoft
Windows 7, sur lesquels Windows Media Player 12
est installé
• Les serveurs de média numériques compatibles
avec la norme DLNA (sur les ordinateurs ou
d’autres composants)
Les fichiers mémorisés sur un PC ou une passerelle
multimédia (Digital Media Server ou DMS), tel que décrit
ci-avant, peuvent être lus par une commande provenant
d’un contrôleur multimédia (Digital Media Controller ou
DMC) externe. Les périphériques contrôlés par DMC
pour lire des fichiers portent le nom DMR (Digital Media
Renderer). Cet appareil prend en compte la
fonctionnalité DMR. Lorsque l’appareil est en mode
DMR, des opérations telles que la lecture et l’arrêt de
fichiers sont possibles à partir du contrôleur externe. Le
mode DMR est annulé si la télécommande est utilisée
en mode DMR (hormis certains boutons, tels que
DISPLAY).
Utilisation d’AirPlay sur iPod touch,
iPhone, iPad et iTunes
Cet appareil accepte le streaming audio AirPlay d’un
iPod touch (2ème, 3ème et 4ème générations), iPhone 4,
iPhone 3GS, iPad, iPad 2 avec iOS 4.2 ou ultérieur, et
iTunes 10.1 (Mac et PC) ou ultérieur.
Pour utiliser AirPlay, sélectionnez votre appareil sur
votre iPod touch, iPhone, iPad ou iTunes et lancez la
lecture.
Remarque
• Pour un complément d’informations, consultez le
site web d’Apple (http://www.apple.com).
L’entrée vers cet appareil permute automatiquement
quand AirPlay est en service.
En mode AirPlay, les opérations suivantes sont
disponibles :
• Pause/relance, plage suivante/précédente, lecture
aléatoire/répétée depuis la télécommande de
l’appareil.
• Affichage des informations relatives à la plage en
cours de lecture sur l’afficheur de l’appareil, y
compris nom d’artiste, chanson/album, design
d’album.
Remarque
• Il se peut que seul le nom de la chanson soit
affiché.
Conseil
• Un environnement de réseau donné est requis pour
utiliser AirPlay.
• Le nom de l’appareil, apparaissant sur l’iPod touch,
iPhone and iTunes, peut être modifié par Friendly
Name depuis Network Setting.
• AirPlay fournit sur cet appareil a été mis au point et
testé en se fondant sur les versions logicielles pour
l’iPod touch, l’iPhone, l’iPad et les versions
logicielles pour l’iTunes, indiquées sur le site web
de Pioneer. Il se peut qu’AirPlay ne soit pas
compatible avec des versions logicielles d’iPod
touch, d’iPhone, d’iPad ou d’iTunes, autres que
celles indiquées sur le site web de Pioneer.
A propos de la fonction de serveur DHCP
Pour lire les fichiers audio mémorisés sur des
composants en réseau, la fonction serveur DHCP de
votre routeur doit être mise en service.
Si votre routeur n’intègre pas cette fonction, il faudra
paramétrer le réseau manuellement. Sinon, vous ne
pourrez pas lire les fichiers audio enregistrés sur les
composants en réseau ni écouter les stations radio
Internet. R eportez-vous à Réglage du réseau à la page 19
pour plus d’informations.
Autorisation de cet appareil
Cet appareil doit être autorisé pour permettre la lecture.
Cet appareil est automatiquement autorisé lorsqu’il est
raccordé à un PC via un réseau. Si ce n’est pas le cas,
autorisez l’appareil manuellement sur l’ordinateur. La
méthode d’autorisation (ou de permission) d’accès
dépend du type de serveur auquel vous vous connectez.
Pour plus d’informations sur l’autorisation de l’appareil,
reportez-vous au mode d’emploi de votre serveur.
Lecture de fichiers audio mémorisés
sur PC ou d’autres composants
Connexion à un réseau local LAN
Prenez soin de raccorder le PC ou les autres
composants au réseau au moyen de l’interface LAN
avant d’utiliser cette fonction.
Pour les détails sur les connexions, reportez-vous à 7.
Lecture avec Serveur de Musique
Important
• Vous ne pouvez pas accéder à un PC sur un réseau
pendant que vous êtes raccordé à un domaine
configuré en un environnement de réseau
WIndows. Au lieu de vous connecter au domaine,
connectez-vous sur la machine locale.
• Dans certains cas, la durée écoulée n’est pas
affichée correctement.
1 Appuyez sur
sélectionner
Vous pouvez effectuer la même opération en appuyant
de façon répétée sur FUNCTION du panneau avant.
Tous les serveurs disponibles sont indiqués sur
l’afficheur.
• Si aucun serveur n’est disponible, le message
“Empty” sera affiché.
2Utilisez
serveur sur lequel est mémorisé le fichier
souhaité, puis appuyez sur
Les dossiers / fichiers mémorisés sur le serveur sont
indiqués sur l’afficheur.
MUSIC SERVER
Music Server
/
pour sélectionner le
.
ENTER
pour
.
3Utilisez
à reproduire, puis appuyez sur ENTER.
La lecture commence.
/
pour sélectionner le fichier
Music Server
Song 1
Artist
Album
FLAC 44.1/24
44:38 - 44:02
• Si le fichier que vous voulez lire se trouve dans le
dossier, sélectionnez d’abord le dossier.
• Si vous appuyez sur RETURN pendant la lecture,
l’écran (dossiers/fichiers) précédent apparaît.
Vous pouvez utiliser les fonctionnalités suivantes. Notez
que, selon la catégorie en cours de lecture, certaines
touches ne seront pas utilisables.
Touches Leur rôle
SHUFFLE
REPEAT
* Appuyez de façon répétée pour permuter entre les
options de lecture répétée. ‘ ’ effectue de façon
répétée la lecture du fichier en cours. ‘ ’ effectue
de façon répétée la lecture de tous les fichiers.
Démarre la lecture. Pendant la lecture,
cette touche interrompt et fait reprendre la
lecture.
Arrête la lecture.
Appuyez pour sauter vers les fichiers
précédents.
Appuyez sur cette touche pour sauter au
fichier suivant.
Les fichiers actuellement sélectionnés
sont lus en ordre imprévisible (Lecture
aléatoire).
Les fichiers actuellement sélectionnés
sont reproduits de façon répétée.*
Quand cette touche est actionnée sur le
menu de sélection de fichier, l’écran pour
le fichier en cours de lecture est affiché.
ASR A.L.C
17
Fr
Page 44

Utilisation des autres fonctions08
Chapitre 8 :
Utilisation des autres fonctions
Utilisation du mode Sound
N-50 seulement :
Cette fonction vous permet d’utiliser divers modes
sonores pendant la lecture.
• Cette fonction n’est pas utilisable quand le mode
PURE AUDIO est activé.
• Cette fonction agit uniquement à la lecture de sons
analogiques.
1 Appuyez sur
menu d’option Sound.
2Utilisez
réglage, puis appuyez sur
3Utilisez
Off
, puis appuyez sur
• Le réglage par défaut est Off (désactivé).
Réglages Leur rôle
Auto
Sound
Retriever
Auto Level
Control
Hi-bit 32
Sound
Retriever
Air
SOUND
pour afficher le
/
pour sélectionner le
/
pour sélectionner On ou
Par la f onction
traitement DSP est utilisé pour compenser la
perte de données audio due à la compression,
ce qui améliore le sens de densité et de
modulation des sons.
Lorsque ’On’ est choisi, l’effet
Retriever
est optimisé à partir des
informations du débit binaire du contenu
entré à
USB, Music Server
pour atteindre une haute qualité sonore.
En mode de contrôle de niveau Auto, cet
appareil égalise les niveaux sonores
reproduits.
Ce paramètre crée une plage dynamique plus
large dans le cas de sources numériques.
Une expression musicale plus souple et
délicate peut être obtenue en requantifiant les
signaux audio de 16 bits à 24 bits en signaux
à 32 bits.
Convient pour la lecture de sons provenant
d’un périphérique à technologie sans fil
Bluetooth
. Le mode
peut être sélectionné seulement quand
l’entrée est
ENTER
ENTER
.
Auto Sound Retriever
et
Sound Retriever Air
BT Audio
ou
Air Jam
.
Auto Sound
Internet Radio
.
, le
Pour une parfaite fidélité au son
original
N-50 seulement :
Le mode PURE AUDIO permet une lecture des signaux
audio via le plus court circuit possible, sans passer par
le DSP, ce qui réduit les parasites et fournit une lecture
d’une grande fidélité aux sons originaux.
1 Appuyez sur
PURE AUDIO
ou désactiver le mode Pure Audio.
Utilisation du convertisseur N/A
N-50 seulement :
Les signaux numériques fournis aux connecteurs
DIGITAL IN ou DIGITAL IN USB du panneau arrière sont
convertis en signaux analogiques et sortis au niveau des
connecteurs ANALOG OUT.
Lecture de la musique d’un autre
composant audio numérique
Fournit les signaux numériques, entrés aux connecteurs
DIGITAL IN (COAXIAL ou OPTICAL).
1 Effectuez une connexion d’entrée
numérique.
•Reportez-vous à Connexions d’entrée audio
numériques à la page 6.
2 Appuyez sur
sélectionner
comme source d’entrée.
Vous pouvez effectuer la même opération en appuyant
de façon répétée sur FUNCTION du panneau avant.
Quand Digital In 1 est sélectionné, les signaux d’entrée
numérique du connecteur COAXIAL sont reproduits ;
quand Digital In 2 est sélectionné, ce sont les signaux
d’entrée numérique du connecteur OPTICAL qui sont
reproduits.
DIG IN 1
Digital In 1
ou
ou
pour activer
DIG IN 2
Digital In 2
pour
Remarque
• Les formats de signaux numériques qui peuvent
être entrés dans cet appareil comprennent les
signaux PCM linéaires ayant un taux
d’échantillonnage et des bits quantitatifs allant
jusqu’à 192 kHz/24 bits. (Selon l’appareil raccordé
et l’environnement, il se peut que le
fonctionnement échoue.)
Lecture de la musique d’un ordinateur
Utilisez cette fonctionnalité pour reproduire les sons
numériques entrés au port DIGITAL IN USB sur le
panneau arrière de l’appareil.
1 Raccordez l’appareil à un ordinateur via
un câble USB.
•Reportez-vous à Utilisation d’un câble USB pour la
connexion à un ordinateur à la page 7.
2 Appuyez sur
sélectionner
d’entrée.
Vous pouvez effectuer la même opération en appuyant
de façon répétée sur FUNCTION du panneau avant.
3 Commencez la lecture sur l’ordinateur.
Remarque
• Si vous utilisez un câble USB pour raccorder cet
appareil à un ordinateur pour la lecture de fichiers
de musique, les signaux numériques PCM linéaires
suivants sont pris en compte :
-
Bits quantitatifs : 16 bits, 24 bits, 32 bits
-
Taux d’échantillonnage : 44,1 kHz, 48 kHz, 88,2 kHz,
96 kHz, 192 kHz
• La sortie des connecteurs DIGITAL OUT n’est pas
prise en compte pendant l’entrée Digital In USB.
• La lecture ne peut pas être contrôlée depuis cet
appareil à l’emploi de cette fonction ; utilisez votre
ordinateur pour contrôler la lecture.
• Avant de débrancher le câble USB, arrêtez t oujours
au préalable la lecture sur l’ordinateur.
• Il se peut que les sons ne soient pas restitués si
votre ordinateur ne prend pas en compte USB 2.0
HS.
• Cet appareil ne prend pas en compte un
concentrateur USB. Utilisez toujours un câble USB
pour raccorder l’appareil directement à
l’ordinateur.
DIG IN USB
Digital In USB
pour
comme source
Important
• Lorsque vous utilisez le port DIGITAL IN USB pour
fournir des fichiers audio d’un ordinateur vers cet
appareil, l’installation d’un pilote de périphérique
spécial sur l’ordinateur peut s’avérer nécessaire.
Pour des détails, consultez le site web de Pioneer.
18
Fr
Page 45

Changement des paramètres
English
Français Español
Network Setting
Network Configuration
Friendly Name
Static IP Address
192
.
168 2 4
..
Chapitre 9 :
Changement des paramètres
Les paramètres par défaut sont indiqués en italique.
1 Appuyez sur
2Utilisez
3 Suivez les instructions sur l’afficheur pour modifier le paramètre.
Réglages Leur rôle
Display Setting
(
Level3/Level2/Level1
Network Sett ing
Network Config uration
Friendly Name
Option Setting
BT PIN Select
(
0000/1234/8888
Internet Parental Lock
(Change Password/Internet
Parental Lock)
Power Off Setting
(Auto Power Off/Quick Start
Mode)
Language
(
English/Autres langues
Software Update
System Info
Reset
SETUP
pour obtenir l’écran
/
pour sélectionner le paramètre, puis appuyez sur
)
)
Permet d’obscurcir ou d’éclaircir l’affichage.
Pour les détails, reportez-vous à la page 19.
Le nom de ce système, affiché sur un ordinateur ou un autre dispositif raccordé au
réseau, peut être changé.
A utiliser pour définir le code PIN
Permet de limiter l’accès à la radio Internet en faisant appel à un mot de passe. Réglez
Internet Parental Lock
Vous pouvez définir le mot de passe à partir de
Auto Power Off
Quick Start Mode
Pour changer la langue des messages, apparaissant sur l’afficheur principal.
)
Autres langues : Français, All emand, Néerlandais, Italien, Espagnol, Russe, Japonais
A utiliser pour mettre à jour le logiciel de cet appareil.
A utiliser pour vérifier les détails des informations.
Vérifiez les points suivants :
Etat de connexions LAN, Adresse MAC, Adresse IP, Adresse de passerelle, Réglage
Serveur mandataire, Masque de sous-réseau. Confirmez a ussi que la version du logiciel
de l’appareil (ID publication) a été mise à jour.
Utilisez cette procédure pour ramener tous les paramètres du système à leurs valeurs
par défaut.
Initial Setup
sur On/
, voir page 20.
, voir page 20.
Bluetooth
Off
.
. (page 13)
. (page 20)
Change Password
ENTER
.
. (page 20)
Réglage du réseau
Si un routeur à large bande (avec fonction de serveur
DHCP intégrée) est raccordé à cet appareil, vous pourrez
simplement mettre la fonction de service DHCP en
service sans avoir à le configurer manuellement au
réseau. Un routeur à large bande sans fonction de
serveur DHCP raccordé à cet appareil devra être
configuré comme expliqué ci-après. Avant de configurer
le réseau, consultez votre ISP (fournisseur de services
Internet) ou le gestionnaire de réseau pour connaître les
réglages requis.
Il est conseillé aussi de vous reporter au mode d’emploi,
fourni avec votre composant pour réseau.
• Toute modification apportée au routeur sans
fonction de serveur DHCP doit être apportée aussi
aux paramètres de réseau de l’appareil.
1 Appuyez sur
L’écran Initial Setup apparaît sur l’afficheur principal.
2 Sélectionnez Network Setting
Network Configuration
SETUP
.
.
/
3Utilisez
Off, puis appuyez sur
L’écran de réglage de l’adresse IP apparaît.
4Utilisez
pour sélectionner DHCP
ENTER
.
///
ou les touches
numériques pour ajuster les chiffres, puis
appuyez sur
•Utiliser / pour déplacer le chiffre à ajuster.
•L’emploi de / permet d’augmenter ou de
diminuer les valeurs.
ENTER
.
Static IP Address
L’adresse IP à saisir doit être définie dans les
plages suivantes. Si l’adresse IP définie dépasse les
limites indiquées, vous ne pourrez ni lire les fichiers
audio, mémorisés sur composants du réseau, ni
écouter les stations radio Internet.
Classe A : 10.0.0.1 à 10.255.255.254 / Classe B :
172.16.0.1 à 172.31.255.254 / Classe C : 192.168.0.1
à 192.168.255.254
Subnet Mask
Si un modem xDSL ou un adapteur de terminal est
raccordé directement à cet appareil, inscrivez le
masque de sous-réseau, indiqué dans votre
documentation IPS. Dans la plupart des cas, entrez
255.255.255.0.
Gateway address
Au cas ou une passerelle (routeur) est raccordée à
cet appareil, entrez l’adresse IP correspondante.
Preferred DNS/Alternate DNS
S’il n’y a qu’une adresse de serveur DNS
mentionnée dans votre documentation ISP,
saisissez Preferred DNS. Au cas ou il y a plus de
deux adresses de serveur DNS, entrez Alternate
DNS dans l’autre champ d’adresse de serveur
DNS.
09
19
Fr
Page 46

09
Changement des paramètres
Proxy Setup
Sélectionnez Use Proxy Server si vous raccordez
cet appareil à Internet via un serveur mandataire.
Entrez l’adresse IP de votre serveur mandataire
dans le champ Proxy Server Address. Entrez
également le numéro de port de votre serveur
mandataire dans le champ ‘Proxy Port’.
Nom convivial
1 Appuyez sur
2 Sélectionnez
Friendly Name
3Utilisez
Name
, puis appuyez sur ENTER.
• /: Déplace le chiffre à ajuster.
• /: Change le caractère affiché.
• SOUND: Modifie les types de caractères.
• CLEAR: Efface un caractère à la fois.
SETUP
Network Setting
.
///
.
pour entrer
Friendly
Réglage de blocage parental
Il permet de limiter l’accès des enfants à la radio
Internet. Quand Internet Parental Lock est réglé sur
On, vous ne pouvez pas écouter une radio Internet sans
saisir un mot de passe.
Remarque
•Même si Internet Parental Lock est réglé sur On,
les réglages automatiques de l’horloge via le
réseau fonctionneront.
Mise en/hors service du blocage parental
1 Appuyez sur
L’écran Initial Setup apparaît sur l’afficheur.
2 Sélectionnez Option Setting
Parental Lock
3Utilisez
numériques pour saisir votre mot de passe,
puis appuyez sur ENTER.
• /: Déplace le chiffre à ajuster.
• /: Augmente ou diminue les chiffres.
• CLEAR: Efface un caractère à la fois.
• Le réglage par défaut est “0000”.
SETUP
.
Internet Parental Lock
///
ou les touches
Internet
.
4Utilisez
Off, puis appuyez sur
/
pour sélectionner On ou
ENTER
.
Changement du mot de passe
1 Appuyez sur
L’écran Initial Setup apparaît sur l’afficheur.
2 Sélectionnez Option Setting
Parental Lock
3Utilisez
numériques pour saisir le mot de passe
actuel, puis appuyez sur ENTER.
4Utilisez
numériques pour saisir le nouveau mot de
passe, puis appuyez sur ENTER.
• Si vous appuyez sur RETURN, l’écran précédent
apparaît.
SETUP
Change Password
///
///
.
Internet
.
ou les touches
ou les touches
Mise à jour du logiciel
Utilisez cette procédure pour mettre à jour le logiciel de
l’appareil. Vous pouvez mettre à jour le logiciel via une
clé de mémoire USB.
La mise à jour via une clé de mémoire USB s’accomplit
en téléchargeant le fichier de mise à jour depuis un
ordinateur, en stockant ce fichier sur une clé USB et en
insérant ensuite cette clé USB dans le port USB sur le
panneau avant de l’appareil.
• Si un fichier de mise à jour est fourni sur le site Web
de Pioneer, téléchargez-le sur votre ordinateur. Lors
du téléchargement d’un fichier de mise à jour
depuis le site Web de Pioneer sur votre ordinateur,
le fichier sera en format ZIP. Dézippez
(décompressez) le fichier ZIP avant de le
sauvegarder sur la clé de mémoire USB. Si des
fichiers ou dossiers existent sur la clé de mémoire
USB, effacez-les.
Important
• NE débranchez PAS le cordon d’alimentation
pendant la mise à jour.
• Lor s de la mise à jour vi a une clé de mémo ire USB,
ne débranchez pas la clé de mémoire USB.
1 Appuyez sur
L’écran Initial Setup apparaît sur l’afficheur principal.
SETUP
.
2 Sélectionnez Option Setting
Software Update
Start
, puis appuyez sur
ENTER.
Software Update
Start
Cancel
3 Pour la mise à jour, appuyez sur ENTER.
L’affichage disparaît temporairement et, après 20
secondes environ, le menu de mise à jour est affiché et
la mise à jour s’accomplit.
• Lorsque la mise à jour sera terminée, l’appareil ser a
automatiquement réamorcé.
Messages d’erreur de mise à jour de
logiciel
Messages
d’état
File Not
Found.
Description
Aucun fichier de mise à jour n’a été trouvé
sur la clé de mémoire USB. Mémorisez le
fichier dans le répertoire racine de la clé
de mémoire USB.
Paramètres de mise hors tension
Effectuez ces réglages pour contrôler le mode de mise
sous/hors tension.
Changement des paramètres de mise hors
tension automatique
Le réglage par défaut pour la fonction de mise hors
tension automatique est On. Par conséquent, si aucune
action n’est effectuée pendant 30 minutes, l’appareil se
place automatiquement hors tension. Ce paramètre
peut être changé comme suit :
1 Appuyez sur
L’écran Initial Setup apparaît sur l’afficheur.
2 Sélectionnez Option Setting
Off Setting
3 Utilisez
Off
.
SETUP
.
Auto Power Off
/
pour sélectionner On ou
Power
.
Changement du mode Quick Start
Quand ce paramètre est réglé sur On, la durée requise
pour l’amorçage sera réduite. De plus, la mise sous
tension se produit simultanément quand AirPlay ou
DMR est utilisé. Le paramètre par défaut de l’appareil
pour ce mode est Off pour réduire la consommation de
courant en mode STANDBY.
1 Appuyez sur
L’écran Initial Setup apparaît sur l’afficheur.
2 Sélectionnez Option Setting
Off Setting
3 Utilisez
Off
.
SETUP
.
Quick Start Mode
/
pour sélectionner On ou
Power
.
Réinitialisation du système
Utilisez cette procédure pour ramener tous les
paramètres du système à leurs valeurs par défaut.
Important
• Débranchez tous les composants raccordés à cet
appareil avant cette opération.
1 Appuyez sur
L’écran Initial Setup apparaît sur l’afficheur.
2 Sélectionnez
Setup, puis appuyez sur ENTER.
L’affichage indique Reset?.
3 Pour réinitialiser les paramètres,
appuyez sur
L’appareil se met hors tension (mode Attente).
Tous les paramètres seront ramenés à leurs valeurs par
défaut lors de la prochaine mise sous tension de
l’appareil.
SETUP
Reset
SETUP
.
sur le menu Initial
.
20
Fr
Page 47

Informations complémentaires 10
English
Français Español
Chapitre 10 :
Informations complémentaires
Guide de dépannage
Des opérations incorrectes sont souvent interprétées comme des problèmes et des mauvais fonctionnements. Si
vous pensez qu’il y a un problème avec ce composant, vérifiez les points ci-dessous. Parfois le problème peut provenir
d’un autre composant. Examinez les autres composants et appareils électriques utilisés. Si le problème ne peut pas
être résolu en dépit des vérifications ci-dessous, consultez le service après-vente Pioneer le plus proche pour faire
réparer l’appareil.
• Si l’appareil ne fonctionne pas normalement en raison de causes externes comme l’électricité statique,
débranchez la fiche d’alimentation de la prise de courant et insérez-la de nouveau pour rétablir les conditions
normales de fonctionnement.
Problèmes d’ordre général
Problèmes Vérification Solutions
Impossible de mettre
sous tension.
Une durée prolongée est
requise avant que
l’appareil ne soit
aliment é.
L’appareil se met
automatiquement hors
tension.
L’appareil se met tout à
coup hors tension et le
voyant
clignote.
Les réglages effec tués ont
été effacés.
Différence de volume
entre MP3, WMA et iPod/
iPhone/iPad.
Le contrôle de cet
appareil au moyen de la
télécommande n’est pas
possible.
STANDBY
Quand
Quick Start Mode
sur On, si le cordon d’alimentation
est débranché, l’appareil ne
répondra pas pendant une minute
environ lorsque le cordon sera à
nouveau branché.
A l’état par défaut, environ 20
secondes sont nécessaires avant que
l’appareil ne soit alimenté.
Est-ce que
Auto Power Off
réglé sur On?
Il se peut que l’appareil ait un sérieux
problème. N’essayez pas de le
remettre sous tension.
Avez-vous brusquement coupé le
courant ?
Ce problème ne provient pas de cet
appareil.
Est-ce que vous êtes éloigné de
l’appareil ?
Est-ce que le capteur de
télécommande est exposé à la
lumière directe du soleil ou à la
lumière d’une lampe fluorescente,
etc. ?
Est-ce que les piles sont épuisées ? Remplacez les piles (page 5).
est réglé
est
Attendez au moins une minute, puis appuyez sur
STANDBY/ON
Pour réduire la durée nécessaire à l’alimentation initiale,
changez le paramètre
activer
Start Mode
en mode
Changez le réglage de
Débranchez l’appareil et contactez une compagnie de
service indépendante agréée par Pioneer.
Veillez à appu yer sur
puis appuyez sur
attendez que le voyant
s’éteigne avant de débrancher le cordon d’alimentation.
Le volume peut sembler différent selon la source d’entrée et
le format d’enregistrement.
Utilisez à moins de 7 m, 30° du capteur de télécommande
du panneau avant (page 5).
Il est possible que les signaux de télécommande ne soient
pas reçus correctement si le capteur de télécommande est
exposé, par exemple, à la lumière directe du soleil ou d’une
lampe fluorescente puissante.
du panneau avant.
Quick Start Mode On
STANDBY
Power Off Setting
est On (activé), la consommation de courant
/I STANDBY/ON
. Cependant, quand
augmentera (page 20).
Auto Power Off
STANDBY/ON
STANDBY
de la télécommande,
du panneau avant et
du panneau avant
/I
de manière à
à
Off
(page 20).
Quick
Quand un iPod/iPhone/iPad est raccordé
Problèmes Vérification Solutions
Impossible d’utiliser
l’iPod/iPhone/iPad.
Aucun son n’est produit
par l’iPod/iPhone/iPad.
L’alimentation n’est pas
fournie à l’iPod/iPhone/
iPad.
Quand un adaptateur
Problèmes Vérification Solutions
Le périphérique à
technologie sans fil
Bluetooth
ne peut pas être
raccordé ou utilisé. Le son
en provenance du
périphérique à
technologie sans fil
Bluetooth
n’est pas émis
ou le son est interrompu.
Le message
est affiché et l’appareil ne
fonctionne plus.
BT Error 5
Le son est-il produit par le hautparleur de l’iPod/iPhone/iPad ?
Le message d’erreur apparaît-il sur
l’écran du panneau avant ?
L’alimentation n’est pas fournie si la
consommation est trop élevée.
Bluetooth
Vérifiez qu’aucun objet émettant des
ondes électromagnétiques dans la
bande 2,4 GHz (four à micro-ondes,
périphérique LAN sans fil ou a ppareil
à technologie sans fil
se trouve à proximité de l’appareil.
Vérifiez que le périphérique à
technologie sans fil
pas trop éloigné de l’appareil et qu’il
n’y a pas d’obstructions entre le
périphérique à technologie sans fil
Bluetooth
Il se peut que le périphérique à
technologie sans fil
pas réglé au mode de
communication pren ant en charge la
technologie sans fil
Vérifiez que l’appariement est
correct.
Vérifiez que le profil est correct. Utilisez un périphérique à technologie sans fil
Il se peut que l’adaptateur
soit endommagé.
est branché
Bluetooth
Bluetooth
et l’appareil.
Bluetooth
Bluetooth
Bluetooth
Assurez-vous que l’iPod/iPhone/iPad est correctement
raccordé (voir
Essayez aussi de débrancher l’iPod/iPhone/iPad, puis de le
rebrancher.
Si l’iPod/iPhone/iPad a subi une immobilisation, essayez de
le réinitialiser et rebranchez-le ensuite sur cet appareil.
Mettez l’appareil hors tension, puis à nouveau sous tension.
Après réglage de l’entrée d’iPod, raccordez l’iPod/iPhone/
iPad.
Mettez l’appareil hors tension, puis de nouveau sous
tension.
Mettez l’appareil hors tension, débranchez et rebranchez
l’iPod/iPhone/iPad, puis rebranchez-le.
Si un tel objet se trouve à proximité de l’ appareil, éloignez-en
l’appareil. Vous pouvez aussi cesser d’utiliser l’objet,
émettant les ondes électromagnétiques.
) ne
Placez le périphérique à technologie sans fil
n’est
l’appareil de façon à ce que la distance entre eux soit
inférieure à 10 m et qu’il n’y ait pas d’obstructions entre eux.
Vérifiez le réglage du périphérique à technologie sans fil
ne soit
Bluetooth
.
Le réglage d’appariement a été supprimé de cet appareil ou
du périphérique à technologie sans fil
nouveau l’appariement.
prenant en charge le profil A2DP et le profil AVRCP.
Mettez l’appareil hors tension, débranchez l’adaptateur
Bluetooth
Si le symptôme disparaît, il se peut que l’adaptateur
Bluetooth
Lecture iPod/iPhone/iPad
.
, puis essayez de remettre l’appareil sous tension.
soit endommagé et il doit alors être réparé.
à la page 11).
Bluetooth
Bluetooth
. Réglez de
Bluetooth
et
,
21
Fr
Page 48

Informations complémentaires10
Lorsqu’une clé de mémoire USB est raccordée
Problèmes Vérification Solutions
La clé de mémoire USB
n’est pas reconnue.
Une clé de mémoire USB
est connectée et affichée,
mais les fichiers audio
qu’elle contient ne
peuvent pas être lus.
L’appareil a besoin d’un
temps considérable pour
reconnaître la clé de
mémoire USB.
L’alimentation n’est pas
fournie à la clé de
mémoire USB.
La clé de mémoire USB est-elle
raccordée correctement ?
La clé de mémoire USB est-elle
raccordée via un concentrate ur USB ?
Ce problème ne provient pas de cet
appareil.
Les fichiers audio sont protégés. Les fichiers audio protégés stockés dans une clé de
Le format de fichier ne peut pas être
lu correctement par cet appareil.
Quelle est la capacité de la clé USB ? Le chargement des données peut prendre un certain temps
Le message d’erreur apparaît-il sur
l’écran du panneau avant ?
L’alimentation n’est pas fournie si la
consommation est trop élevée.
Raccordez la clé correctement (enfoncée à fond).
Cet appareil ne prend pas en compte les concentrateurs
USB. Raccordez directement la clé de mémoire USB.
Mettez l’appareil hors tension, puis de nouveau sous
tension.
Il se peut que certaines clés de mémoire USB ne soient pas
reconnues correctement.
Cet appareil prend en charge seulement les clés de
mémoire auxiliaire USB.
Seuls les systèmes de fichiers FAT16 et FAT32 sont pris en
charge. Les autres systèmes de fichier (par ex. FAT, NTFS,
etc.) ne sont pas pris en charge.
Cet appareil n’accepte pas l’emploi de lecteurs de disque
dur externes.
mémoire USB ne peuvent pas être lus. Selon les réglages
effectués, il se peut que le fait d’essayer d’importer des
données musicales d’un CD, etc., vers un ordinateur
déclenche la fonction de protection anticopie.
Reportez-vous à la liste des formats de fichiers pouvant être
lus par cet appareil (page 25).
(plusieurs minutes) quand des clé USB à grande capacité
sont branchées .
Mettez l’appareil hors tension, puis de nouveau sous
tension.
Mettez l’appareil hors tension, débranchez la clé de
mémoire USB, puis rebranchez-la.
Appuyez sur
revenez au mode
USB
.)
FUNCTION
pour basculer à l’autre mode, pui s
USB
. (Lorsque l’entrée est ramenée à
Quand l’ordinateur est raccordé via un câble USB
Problèmes Vérification Solutions
Quand le port
IN USB
ordinateur via un câble
USB, les fichiers audio
présents sur l’ordinateur
ne peuvent pas être lus.
Aucun son n’est obtenu
quand on essaie de lire
des fichiers présents sur
un ordinateur.
DIGITAL
est raccordé à un
Le pilote de périphérique approprié at-il été installé sur l’ordinateur ?
Les réglages du volume sont-ils
adéquats pour le système
d’exploitation et le programme
d’application ?
La sortie audio du système
d’exploitation est-elle réglée sur
MUTE (sourdine) ?
Plusieurs applications fonctionnentelles simultanément ?
Les réglages du volume sont-ils
adéquats pour le système
d’exploitation et le programme
d’application ?
Si vous utilisez un câble USB pour raccorder le port
DIGITAL IN USB
reproduire les fichiers audio présents sur l’ordinateur, vous
devez télécharger le pilote de périphérique approprié depuis
le site web de Pioneer et l’installer sur votre ordinateur.
Consultez le site web de Pioneer pour y trovuer les
explications relatives à l’installation du pilote.
Elevez les réglages du volume selon les besoins.
Annulez le réglage MUTE.
Essayez en refermant les applications non utilisées.
Comme dispositif audio, sélectionnez “Pioneer USB Audio
Device”.
Réseau
Problèmes Vérification Solutions
Impossible d’accéder au
réseau.
Impossible d’accéder au
composant ou au PC
raccordé via le réseau.
La lecture ne commence
pas.
Le câble LAN n’est pas bien
raccordé.
Le routeur n’est pas sous tension. Mettez le routeur sous tension.
Un logiciel antivirus est actuellement
installé sur le composant raccordé.
Le composant audio en réseau qui a
été mis hors tension est mis sous
tension.
Le composant raccordé au réseau
n’est pas réglé correctement.
Il n’y a aucun fichier audio lisible sur
le composant raccordé au réseau.
Le composant est actuellement
débranché du récepteur ou de la
source d’alimentation.
Raccordez fermement le câble LAN dans la prise (page 7).
Dans certains cas, il n’est pas possible d’accéder à un
composant sur lequel un logiciel antivirus a été installé.
Mettez le composant audio en réseau sous tension avant cet
appareil.
Si le l’autorisation est automatique, vous devez saisir de
nouveau les informations appropriées. Vérifiez si la
connexion n’est pas réglée sur “Do not authorize” (Ne pas
autoriser).
Vérifiez les fichiers audio enregistrés sur le composant
raccordé au réseau.
Vérifiez si le composant est correctement raccordé à ce
récepteur ou à la source d’alimentation.
de l’appareil à un ordinateur pour
22
Fr
Page 49

Informations complémentaires 10
English
Français Español
Problèmes Vérification Solutions
Le PC ou la radio Internet
ne fonctionne pas
correctement.
Les fichiers audio
enregistrés sur les
composants en réseau,
par exemple sur un
ordinateur, ne peuvent
pas être lus.
Impossible d’accéder à
Windows Media Player 11
ou Windows Media Player
12.
L’adresse IP correspondante n’a pas
été réglée correctement.
L’adresse IP est configurée
automatiquement.
Windows Media Player 11 ou
Windows Media Player 12 n’est pas
installé sur votre ordinateur.
Des fichiers audio ont été enregistrés
dans d’autres formats que MP3, WAV
(LPCM seulement), MPEG-4 AAC,
FLAC et WMA.
Les fichiers audio enregistrés en
MPEG-4 AAC ou FLAC sont lus avec
Windows Media Player 11 ou
Windows Media Player 12.
Le composant raccordé au réseau ne
fonctionne pas correctement.
Le composant raccordé au réseau ne
permet pas le partage de fichiers.
Le dossier enregistré sur le
composant raccordé au réseau a été
supprimé ou endommagé.
Il se peut que les connexions au
réseau soient limitées en raison des
réglages de réseau, des réglages
antivirus, etc., effectués sur
l’ordinateur.
Dans le cas du Windows Media
Player 11 : Vous êtes actuellement
connecté au domaine par un
ordinateur sur lequel Windows XP ou
Windows Vista est installé.
Dans le cas du Windows Media
Player 12 : Vous êtes actuellement
connecté au domaine par un
ordinateur sur lequel Windows 7 est
installé.
Mettez en service la fonction s erveur DHCP de votre routeur,
ou paramétrez le réseau manuellement pour votre
environnement réseau (page 19).
Le paramétrage automatique prend un certain temps.
Veuillez attendre.
Installez Windows Media Player 11 ou Windows Media
Player 12 sur votre ordinateur (page 17).
Lisez des fichiers audio enregistrés dans les formats MP3,
WAV (LPCM seulement), MPEG-4 AAC, FLAC et WMA. Il se
peut toutefois que certains fichiers audio enregistrés dans
ces formats ne puissent pas être lus sur cet appareil.
Les fichiers audio enregistrés en MPEG-4 AAC ou FLAC ne
sont pas lus avec Windows Media Player 11 ou Windows
Media Player 12. Essayez d’utiliser un autre serveur.
Reportez-vous au mode d’emploi fourni avec votre serveur.
Vérifiez si le composant est affecté par quelque chose ou s’il
est en veille. Essayez de remettre le composant en marche,
si nécessaire.
Essayez de changer les réglages du composant raccor dé au
réseau.
Vérifiez le dossier enregistré sur le composant raccordé au
réseau.
Vérifiez les réglages de réseau, les réglages anti virus, etc. de
l’ordinateur.
Au lieu de vous connecter au domaine, connectez-vous sur
la machine locale (page 17).
Problèmes Vérification Solutions
La lecture audio s’arrête
ou est perturbée.
Impossible d’écouter des
stations radio Internet.
Le fichier audio actuellement en
cours de lecture n’a pas été
enregistré dans un format lisible par
cet appareil.
Le câble LAN est actuellement
débranché.
Le trafic est très important sur le
réseau auquel vous avez accès par
Internet.
Une connexion routée par un réseau
local LAN sans fil existe sur le même
réseau.
Les réglages de pare-feu des
composants en réseau agissent
actuellement.
Vous êtes actuellement déconnecté
d’Internet.
Les émissions d’une station radio
Internet ont été arrêtées ou
interrompues.
Vérifiez si le fichier audio a été enregistré dans un format
pris en charge par cet appareil.
Vérifiez si le dossier a été endommagé ou détruit.
Il se peut que certains fichiers audio indiqués comme
lisibles sur cet appareil ne puissent pas être lus ou affichés
(page 25).
Raccordez le câble LAN correctement (page 7).
Utilisez une liaison 100BASE-TX pour accéder aux
composants en réseau.
Une insuffisance de largeur de bande peut exister sur la
bande 2,4 GHz utilisée par le réseau local LAN sans fil.
Faites en sorte que les connexions LAN câblées ne soient
pas routées via un LAN sans fil.
Installez à l’écart d’appareils émettant des ondes
électromagnétiques sur la bande 2,4 GHz (fours à
microondes, consoles de jeu, etc.). SI cette précaution ne
résoud pas le problème, cessez d’utiliser les appareils
émettant des ondes électromagnétiques.
Vérifiez les réglages de pare-feu des composants en réseau.
Vérifiez les réglages de connexion des co mposants en
réseau et, au besoin, adressez-vous à votre fournisseur de
réseau (page 7).
Il se peut que certaines stations radio Internet, présentes
sur la liste des stations de cet appareil ne soient pas
disponibles pour l’écoute.
23
Fr
Page 50

Informations complémentaires10
Réseau LAN sans fil
Problèmes Vérification Solutions
Impossible d’accéder au
réseau via le réseau LAN
sans fil.
Le courant électrique n’est pas fourni
au convertisseur LAN sans fil. (Les
voyants
Power, WPS
convertisseur LAN sans fil ne sont
pas tous allumés.)
Le message
l’afficheur de l’appareil.
Le câble LAN n’est pas bien
raccordé.
Cet appareil et l’unité de base
(routeur LAN sans fil, etc.) sont trop
éloignés ou un obstacle se trouve
entre eux.
Un four à microondes ou un appareil
produisant des ondes
électromagnétiques se trouve dans
l’environnement du réseau LAN sans
fil.
Plusieurs périphériques sans fil
sont raccordés au routeur LAN
sans fil.
Des connexions LAN sans fil ne
peuvent pas être établies entre le
convertisseur LAN sans fil et l’unité
de base (routeur LAN sans fil, etc.).
Error 8
et
Wireless
apparaît sur
du
Assurez vous que le câble USB raccordant le convertisseur
LAN sans fil à la borne
lecteur est correctement branché (page 8).
Un problème existe au niveau de l’alimentation électrique
du convertisseur LAN sans fil. Coupez l’alimentation de
l’appareil, débranchez le câble USB, rebranchez le câble
USB et remettez l’appareil sous tension.
Si le message
plusieurs fois la démarche ci-avant, il existe un problème au
nive au de l’app areil ou d u câble USB. Débranch ez l’appar eil
et contactez une compagnie de service indépendante
agréée par Pioneer.
Raccordez fermement le câble LAN dans la prise (page 7).
Améliorez l’environnement LAN sans fil en rapprochant
l’appareil et l’unité de base, etc.
Utilisez le système dans un endroit à l’écart d’un four à
microondes ou d’un appareil, dégageant des ondes
électromagnétiques.
Evitez autant que possible d’utiliser des appareils
dégageant des ondes électromagnétiques lorsque vous
utilisez le système avec un réseau LAN sans fil.
Si vous connectez plusieurs périphériques sans fil, leur
adresse IP doit être changée.
Le convertisseur LAN sans fil doit être réglé afin de pouvoir
établir les connexions LAN sans fil.
Connexion avec une interface LAN sans fil
DC OUTPUT for WIRELESS LAN
Error 8
reste affiché après avoir répété
Reportez-vous à
à la page 8.
Problèmes Vérification Solutions
Impossible d’accéder au
réseau via le réseau LAN
sans fil.
du
Les réglages d’adresse IP du lecteur
et du convertisseur LAN sans fil ne
correspondent pas à ceux du routeur
LAN sans fil, etc.
Essayez d’effectuer les réglages
avancés du convertisseur LAN sans
fil.
Le point d’accès est réglé pour
cacher le SSID.
Les réglages de sécurité du point
d’accès utilisent une clé de codage
WEP de 152 bits ou une
authentification à clé secrète.
Les connexions de réseau ne peuvent
pas être établies même quand les
mesures ci-avant sont prises.
Vérifiez les réglages d’adresse IP du lecteur et du
convertisseur LAN sans fil (y compris le réglage DHCP).
Si le réglage DHCP du lecteur est en service, mettez
l’appareil hors tension, puis à nouveau sous tension.
Vérifiez que les adresses IP du lecteur et du convertisseur
LAN sans fil correspondent avec les réglages du routeur
LAN sans fil, etc.
Si le réglage DHCP du lecteur est désactivé, réglez une
adresse IP correspondant au réseau de l’unité de base
(routeur LAN sans fil, etc.).
Par exemple, si l’adresse IP du routeur LAN sans fil est
“192.168.1.1”, réglez l’adresse IP du lecteur sur
“192.168.1.XXX” (*1), le masque de sous-réseau sur
“255.255.255.0”, le gateway et DNS sur “192.168.1.1”.
Ensuite, réglez l’adresse IP du convertisseur LAN sans fil
sur “192.168.1.249” (*2).
(*1) Réglez le “XXX” en “192.168.1.XXX” à un nombre
compris entre 2 et 248, qui n’est pas attribué à d’autres
dispositifs.
(*2) Réglez le “249” en “192.168.1.249” à un nombre compris
entre 2 et 249, qui n’est pas attribué à d’autres dispositifs.
Le convertisseur LAN sans fil peut être raccordé à un
ordinateur pour procéder aux réglages avancés LAN sans fil.
Pour plus de détails, consultez le CD-ROM fourni avec le
convertisseur LAN sans fil. Vérifiez les réglages du routeur
LAN sans fil, etc., puis changez les paramètres du
convertisseur LAN sans fil.
Remarquez, toutefois, que ces réglages LAN sans fil
avancés ne vont pas nécessairement améliorer
l’environnement LAN sans fil. Soyez prudent quand vous
modifiez les réglages.
Dans ce cas, il se peut que le SSID ne soit pas affiché sur
l’écran de la liste des points d’accès. Dans la négative,
réglez le SSID, etc, en effectuant manuellement les réglages
LAN sans fil sur le récepteur.
Le lecteur ne prend pas en compte une clé de codage WEP
de 152 bits ou une authentification à clé secrète.
Réinitialisez le convertisseur LAN sans fil. Ensuite, effectu ez
à nouveau les réglages du convertisseur LAN sans fil.
A propos de la réinitialisation
1. Assurez-vous que le convertisseur LAN sans fil est sous
tension.
2. Appuyez pendant au moins 3 secondes sur le bouton de
réinitialisation du convertisseur LAN sans fil.
3. Relâchez le bouton de réinitialisation.
Lorsque le convertisseur LAN sans fil est remis en marche,
la procédure de sa réinitialisation est terminée.
24
Fr
Page 51

Informations complémentaires 10
English
Français Español
Formats de fichiers utilisables
Ce lecteur prend en charge les formats de fichier
suivants.
• Notez que certains formats de fichiers ne sont pas
disponibles pour la lecture bien qu’ils figurent
comme formats de fichiers lisibles.
• Si vous essayez de reproduire des fichiers dont le
format n’est pas pris en charge, le son risque d’être
intermittent ou accompagné de parasites. Dans ce
cas, confirmez que le format de fichier est
compatible avec cet appareil.
• La compatibilité des formats de fichiers dépend du
type de serveur. Assurez-vous auprès de votre
serveur de la compatibilité des formats de fichiers
pris en charge.
• Selon le serveur, certains types de fichiers non pris
en charge par cet appareil peuvent être convertis et
rendus utilisables. Pour plus de détails, consultez
les instructions de fonctionnement du serveur.
• Il se peut que la lecture de radio Internet soit
affectée par l’environnement de communication
Internet ; dans ce cas, il se peut que la lecture ne
soit pas possible même avec les formats de fichiers
de la liste suivante.
Catégorie
MP3
<*1>
Extension
.mp3
Flux
MPEG-1
Audio
Layer-3
Fréquence
d’échantillonnage
Débit
binaire de
quantification
Voie 2 ch
Débit
binaire
VBR/CBR Pris en
32 kHz à
48 kHz
16 bit
8kbps à
320 kbps
charge/Pris
en charge
Catégorie
LPCM
WAV .wav LPCM
WMA .wma
Extension
—
<*2>
Flux
LPCM
WMA2/7/
8/9/10
Fréquence
32 kHz à
d’échantil-
48 kHz
lonnage
(
Internet
Radio
44,1 kHz,
48 kHz,
88,2 kHz,
96 kHz,
192 kHz
(
Digital In
USB
)
Débit
16 bit
binaire de
(
quantification
Voie 2 ch
Fréquence
d’échantillonnage
Débit
binaire de
quantification
Voie 2 ch
Fréquence
d’échantillonnage
Débit
binaire de
quantification
Voie 2 ch
Débit
binaire
VBR/CBR Pris en
Internet
Radio
16 bit,
24 bit, 32 bit
(
Digital In
USB
)
32 kHz à
192 kHz
(
Music
Server
32 kHz à
96 kHz
(
USB
16 bit,
20 bit, 24 bit
32 kHz à
48 kHz
16 bit
5kbps à
320 kbps
charge/Pris
en charge
Catégorie
AAC
FLAC .flac FLAC
)
)
*1 ”Technologie de décodage audio MPEG Layer-3 sous
*2 Seules les données de transmission en continu des
Extension
.m4a
.aac
.3gp
.3g2
licence de Fraunhofer IIS et Thomson multimedia.”
serveurs sont concernées et il n’y a donc pas
d’extension.
Flux
MPEG-4
AAC
MPEG-4
HE AAC
(AAC Plus
v1/2)
Fréquence
32 kHz à
d’échantil-
48 kHz
lonnage
Débit
16 bit
binaire de
quantification
Voie 2 ch
Débit
16 kbps à
binaire
320 kbps
VBR/CBR Pris en
charge/Pris
en charge
Fréquence
32 kHz à
d’échantil-
192 kHz
lonnage
(
Music
Server
32 kHz à
96 kHz
(
USB
Débit
16 bit, 24 bit
binaire de
quantification
Voie 2 ch
)
Endroit d’installation
• Choisissez un endroit stable près du téléviseur ou
de la chaîne stéréo, utilisés avec cet appareil.
• N’installez pas cet appareil sur un téléviseur ou un
moniteur couleur. Installez-le aussi à l’écart de
platines à cassette ou d’appareils facilement
affectés par le magnétisme.
Évitez les endroits suivants :
• Exposés à la lumière directe du soleil
•Humides ou mal aérés
• Extrêmement chauds
•Exposés à des vibrations
• Exposés à une grande quantité de poussière ou à
la fumée de cigarettes
• Exposés à la suie, la vapeur ou la chaleur (par ex.
dans une cuisine, etc.)
Ne posez pas d’objets sur cet appareil
Ne posez pas d’objets sur le dessus de cet appareil.
)
N’obstruez pas les orifices de ventilation.
N’utilisez pas cet appareil sur une couverture, un lit, un
sofa pelucheux, etc., et ne l’enveloppez pas dans un
tissu, etc. De la chaleur ne pourrait pas s’en dégager et
causer des dommages.
N’exposez pas l’appareil à la chaleur.
N’installez pas cet appareil sur un amplificateur ou un
autre appareil produisant de la chaleur. Si vous
l’installez dans un rack, mettez-le sous l’amplificateur ou
l’appareil audio pour éviter qu’il ne soit affecté par leur
chaleur.
• Mettez l’appareil hors tension lorsque vous ne
l’utilisez pas.
• Des rayures peuvent apparaître sur l’écran de
télévision et du bruit peut parasiter le son des
émissions de radio, selon l’état des signaux,
lorsque l’appareil est en service. Dans ce cas,
mettez l’appareil hors tension.
Précautions d’emploi
Lors d’un déplacement de l’appareil
Avant de déplacer l’appareil, veillez à débrancher
d’abord l’iPod/iPhone, la clé de mémoire USB, le câble
LAN ou tout autre équipement raccordé à cet appareil.
Ensuite appuyez sur STANDBY/ON de la
télécommande, puis appuyez /I
appareil et attendez que le voyant STANDBY s’éteigne
sur l’afficheur du panneau avant, et enfin débranchez le
cordon d’alimentation. Si un iPod/USB ou un autre
dispositif est laissé branché pendant le transport, des
dégâts ou un dysfonctionnement risque d’en résulter.
STANDBY/ON de cet
25
Fr
Page 52

Informations complémentaires10
Nettoyage de l’appareil
• Débranchez le cordon d’alimentation de la prise
secteur avant de nettoyer cet appareil.
• Nettoyez l’appareil avec un chiffon doux. Pour
enlever les taches rebelles, imprégnez le chiffon
d’un détergent neutre dilué dans 5 à 6 fois plus
d’eau, tordez bien le chiffon, essuyez la saleté, puis
passez un chiffon sec et doux sur l’appareil.
• L’alcool, le diluant, le benzène, les insecticides, etc.
peuvent abîmer les inscriptions et la peinture de
l’appareil. Évitez aussi de laisser des produits en
caoutchouc ou en vinyle très longtemps au contact
de cet appareil pour ne pas endommager le coffret.
• Lorsque vous utilisez des chiffons traités
chimiquement, etc., lisez attentivement dans la
notice les précautions à prendre.
À propos de la lecture en réseau
La fonction de lecture en réseau, comme la Radio
Internet ou le Serveur de Musique de cet appareil, a
recours aux technologies suivantes :
Windows Media Player
Reportez-vous à Windows Media Player 11/Windows
Media Player 12 en page 17 pour plus d’informations à
ce sujet.
Windows Media DRM
WMDRM (Microsoft Windows Media Digital Rights
Management) est une plateforme protégeant et
fournissant en toute sécurité des contenus, pouvant être
lus sur les ordinateur s, les périph ériques port ables et les
périphériques en réseau. Music Server fonctionne
comme plateforme WMDRM 10 pour les périphériques
en réseau. Les contenus protégés par WMDRM ne
peuvent être lus que sur les serveurs de média, prenant
en compte WMDRM.
Les propriétaires de contenus emploient la technologie
WMDRM pour protéger leur propriété intellectuelle et leurs
droits d’auteur. Cet appareil utilise un logiciel WMDRM
pour accéder aux contenus protégés par WMDRM. Si le
logiciel WMDRM ne parvient pas à protéger les contenus,
les propriétaires de contenus peuvent demander à
Microsoft de révoquer la capacité du logiciel d’employer
WMDRM pour lire ou copier du contenu protégé. La
révocation n’affecte pas les contenus non protégés.
Lorsque vous téléchargez des licences pour du contenu
protégé, vous acceptez que Microsoft puisse inclure une
liste de révocation avec les licences. Les propriétaires de
contenus peuvent vous demander de mettre à jour le
logiciel WMDRM pour accéder à leurs contenus. Si vous
refusez une mise à j our, vous ne pourrez plus accéder aux
contenus, exigeant une mise à jour.
Ce produit est protégé par certains droits de propriété
intellectuelle de Microsoft. L’emploi ou la distribution
d’une telle technologie hors de ce produit sans licence
Microsoft sont interdits.
DLNA
Lecteur audio DLNA CERTIFIED
La DLNA (Digital Living Network Alliance) est une
alliance transindustrielle des sociétés de production
d’appareils électroniques grand public, d’ordinateurs et
de périphériques mobiles. Digital Living permet aux
consommateurs de partager aisément les médias
numériques par leurs réseaux avec ou sans fil.
Le logo DLNA permet de trouver facilement les produits
conformes aux Directives d’interopérabilité DLNA. Cet
appareil est conforme aux Directives d’interopérabilité
DLNA v1.5.
Lorsqu’un ordinateur intégrant un logiciel serveur DLNA
ou un autre périphérique compatible DLNA est relié à ce
lecteur, certains paramètres du logiciel ou du
périphérique devront éventuellement être changés.
Veuillez vous reporter au mode d’emploi du logiciel ou
du périphérique pour plus d’informations à ce sujet.
®
, le logo DLNA et DLNA CERTIFIED® sont des
DLNA
marques commerciales, des marques de service ou des
marques de certification de Digital Living Network
Alliance.
®
Contenus lisibles via un réseau
• Certains fichiers ne pourront pas être lus
correctement bien qu’ils soient en un format
compatible.
• Les fichiers de films ou de photos ne peuvent pas
être lus.
• Dans certains cas, vous ne pourrez pas écouter une
station radio Internet bien que vous l’ayez
sélectionnée dans une liste de stations radio.
• Selon le type de serveur ou la version utilisée,
certaines fonctions ne seront pas prises en
compte.
• Les formats de fichiers pris en compte varient d’un
serveur à l’autre. C’est pourquoi, les fichiers qui ne
sont pas pris en compte par votre serveur
n’apparaissent pas sur cet appareil. Pour plus
d’informations, contactez le constructeur de votre
serveur.
Clause de non-responsabilité pour
contenu de tiers
L’ACCÈS AUX SERVICES DE CONTENU DE TIERS, Y
COMPRIS TOUTES LES CARACTÉRISTIQUES ET
FONCTIONNALITÉS ASSOCIÉES, EST FOURNI
QUEL,
” “
TEL QUE DISPONIBLE” ET AUX RISQUES
PERSONNELS DE L’UTILISATEUR SANS GARANTIE
D’AUCUNE SORTE. PIONEER DÉCLINE TOUTE
GARANTIE, EXPRESSE OU IMPLICITE, EN RELATION
AVEC L’ACCÈS ET L’UTILISATION DES SERVICES DE
CONTENU PAR LE BIAIS DE CET APPAREIL, Y
COMPRIS SANS LIMITE DE GARANTIE OU DE VALEUR
MARCHANDE, DE QUALITÉ SUFFISANTE, D’APTITUDE
POUR UN OBJECTIF DONNÉ, ET DE NON INFRACTION.
PIONEER NE GARANTIT PAS, N’AFFIRME PAS OU NE
JUSTIFIE PAS QUE LES SERVICES DE CONTENU
SERONT EXEMPTS D’ERREURS, INTERRUPTION,
PERTE, CORRUPTION, ATTAQUE, VIRUS,
INTERFÉRENCE, PIRATAGE OU D’AUTRE INTRUSION ;
PIONEER DÉCLINE TOUTE RESPONSABILITÉ EN
RELATION AVEC CE QUI PRÉCÈDE. PIONEER N’EST
PAS RESPON SABLE EN CAS DE PERTE OU DE DÉGÂTS
DÉCOULANT DE L’ACCÈS OU DE L’UTILISATION DES
CONTENUS. AUCUNE INFORMATION OU CONSEIL
ORAL OU ÉCRIT FOURNI PAR PIONEER OU PAR DES
REPRÉSENTANTS DE SES SERVICES CLIENTÈLE NE
JUSTIFIERA UNE TELLE GARANTIE.
EN AUCUN CAS, PIONEER, SES AFFILIÉS OU LEURS
MEMBRES, DIRECTEURS OU EMPLOYÉS NE SERONT
RESPONSABLES EN RAPPORT AVEC L’EMPLOI DES
SERVICES DE CONTENUS DE TI ERS AU MOYEN DE CET
APPAREIL EN CAS DE BLESSURE PERSONNELLE, DE
DÉGÂTS SPÉCIAUX, ACCESSOIRES, INDIRECTS OU
CONSÉCUTIFS, Y COMPRIS SANS LIMITATION DE
DOMMAGES POUR FRAIS D’AVOCATS, PERTE DE
DONNÉES OU PERTE DE PROFITS, QUELLE QUE SOIT
LA THÉORIE DE RESPONSABILITÉ ET QUE CETTE
POSSIBILITÉ AIT OU NON ÉTÉ SIGNALEE. EN AUCUN
CAS, LA RESPONSABILITÉ TOTALE DE PIONEER À
VOTRE ÉGARD POUR DES DÉGÂTS DÉCOULANT DE
L’EMPLOI OU DE L’IMPOSSIBILITÉ D’EMPLOYER DES
SERVICES DE CONTENUS DE TIERS (AUTRES QUE CE
QUI PEUT ÊTRE REQUIS PAR LA LOI DANS LES CAS DE
BLESSURE PERSONNELLE) NE DÉPASSERA $10.00.
LES LIMITATIONS SUSDITES S’APPLIQUERONT MÊME
SI LE REMÈDE CI-DESSUS FAILLIT DANS SON
OBJECTIF ESSENTIEL. SI UNE AUTORITÉ APPLICABLE
“
TEL
MAINTIENT QU’UNE PORTION DE CETTE SECTION EST
INAPPLICABLE, LA RESPONSABILITÉ SERA LIMITÉE À
LA MESURE MAXIMALE AUTORISÉE PAR LA
LEGISLATION APPLICABLE.
Anomalies lors de la lecture en réseau
• La lecture peut se bloquer si vous éteignez
l’ordinateur ou si vous supprimez des fichiers
média de l’ordinateur pendant la lecture de
contenu.
• En cas de problèmes de réseau (trafic intense, etc.),
le contenu risque de ne pas s’afficher ou de ne pas
être lu correctement (la lecture peut être
interrompue ou bloquée). Pour éviter ce type de
problème, il est conseillé de relier le lecteur et
l’ordinateur par un câble 100BASE-TX.
• Si plusieurs clients lisent les mêmes fichiers
simultanément, la lecture peut être interrompue ou
se bloquer.
• Selon le logiciel antivirus installé sur l’ordinateur
raccordé et le réglage de ce logiciel, la connexion
réseau peut se bloquer.
Pioneer n’est pas responsable du mauvais
fonctionnement du lecteur et/ou des fonctions du
Serveur de musique, dû à une erreur ou à un
dysfonctionnement de la communication avec votre
connexion réseau et/ou votre ordinateur, ou un autre
appareil raccordé. Veuillez contacter le fabricant de
votre ordinateur ou votre fournisseur de service Internet.
Windows Media est une marque déposée ou une marque
commerciale de Microsoft Corporation aux États-Unis et/
ou dans d’autres pays.
Ce produit intègre une technologie détenue par Microsoft
Corporation, qui ne peut être utilisée et distribuée que
sous licence de Microsoft Licensing, Inc.
®
Microsoft
Windows
Windows
déposées ou des marques de commerce de Microsoft
Corporation aux Etats-Unis et/ou dans d’autres pays.
, Windows®7, Windows®Vista, Windows®XP,
®
2000, Windows®Edition Millennium ,
®
98, et WindowsNT® sont soit des marques
Autorisation de cet appareil
Pour pouvoir lire avec Music Server, cet appareil doit
être autorisé. L’autorisation est accordée
automatiquement lorsque l’appareil se connecte à
l’ordinateur par le réseau. Si ce n’est pas le cas,
autorisez l’appareil manuellement sur l’ordinateur.
La méthode d’autorisation (ou de permission) d’accès
dépend du type de serveur auquel vous vous connectez.
Pour plus d’informations sur l’autorisation de l’appareil,
reportez-vous au mode d’emploi de votre serveur.
26
Fr
Page 53

Informations complémentaires 10
English
Français Español
aacPlus
Le décodeur AAC utilise la technique aacPlus, mise au
point par Coding Technologies
(www.codingtechnologies.com).
FLAC
Décodeur FLAC
Copyright c 2000, 2001, 2002, 2003, 2004, 2005, 2006, 2007
Josh Coalson
La redistribution et l’emploi sous formes source et
binaire, avec ou sans modification, sont autorisés à
condition que :
• La redistribution du code source retienne l’avis de
copyright ci-dessus, la liste des conditions et l’avis
de non-responsabilité suivant.
• Les redistributions sous forme binaire reproduisent
l’avis de copyright ci-dessus, la liste des conditions
et l’avis de non-responsabilité suivant dans la
documentation et/ou les matériaux qui
accompagnent la distribution.
• Ni le nom de Xiph.org
Foundation ni les noms de ses collaborateurs ne
doivent en au cun cas être utilisés po ur endosser ou
promouvoir des produits dérivés de ce logiciel sans
permission préalable écrite.
CE LOGICIEL EST FOURNI “TEL QUEL” PAR LES
DÉTENTEURS DE DROITS D’AUTEUR ET LEURS
COLLABORATEURS ET TOUTE GARANTIE EXPRESSE
OU IMPLICITE, Y COMPRIS MAIS NON LIMITÉE AUX
GARANTIES IMPLICITES DE QUALITÉ MARCHANDE ET
D’APTITUDE POUR UN OBJECTIF DONNÉ, EST
REJETÉE. EN AUCUN CAS, LA FONDATION OU SES
COLLABORATEURS NE SERONT RESPONSABLES DES
DÉGÂTS DIRECTS, INDIRECTS, INCIDENTS, SPÉCIAUX,
EXEMPLAIRES OU CONSÉCUTIFS (Y COMPRIS MAIS
NON LIMITÉ À LA FOURNITURE DE BIENS OU DE
SERVICES DE REMPLACEMENT, DE PERTE
D’UTILISATION, DE DONNÉES OU DE PROFITS, OU
D’INTERRUPTION D’AFFAIRES) QUELLE QU’EN SOIT
LA CAUSE ET QUELLE QUE SOIT LA THÉORIE DE
RESPONSABILITE, QU’ELLE DÉCOULE D’UN
CONTRAT, DE RESPONSABILITÉ STRICTE OU D’ACTE
DÉLICTUEL (Y COMPRIS NÉGLIGENCE OU AUTRE)
DÉCOULANT DE L’EMPLOI DE CE LOGICIEL, MÊME EN
CAS D’ANNONCE LA POSSIBILITÉ DE TELS DÉGÂTS.
À propos d’iPod/iPhone/iPad
Les accessoires électroniques portant la mention «Made
for iPod», «Made for iPhone» et «Made for iPad» ont été
conçus pour fonctionner respectivement avec un iPod,
un iPhone ou un iPad et ils sont certifiés conformes aux
exigences d’Apple par le fabricant. Apple n’est pas
responsable pour le fonctionnement de cet appareil ou
de sa compatibilité avec les normes réglementaires et de
sécurité. Veuillez noter que l’emploi de cet accessoire
avec un iPod, iPhone ou iPad peut affecter les
performances sans fil.
Apple, AirPlay, le logo AirPlay, iPad, iPhone, iPod, iPod
shuffle, iPod nano, iPod classic, iPod touch, iTunes e t Mac
sont des marques de commerce d’Apple Inc., enregistrées
aux Etats-Unis et dans d’autres pays.
Fiche technique
• Données générales
Système. . . . . . . . . . . . . . . . .Gestion des médias réseau
Alimentation . . . . . . . . . . . . . . . . . . .Secteur 120 V, 60 Hz
Consommation
N-50. . . . . . . . . . . . . . . . . . . . . . . . . . . . . . . . . . . . .34 W
N-30. . . . . . . . . . . . . . . . . . . . . . . . . . . . . . . . . . . . .31 W
Consommation (en mode veille) . . . . . . . . . . . . . . . 0,3 W
Poids (sans emballage)
N-50. . . . . . . . . . . . . . . . . . . . . . . . . . . . . . . . . . . . 7,3 kg
N-30. . . . . . . . . . . . . . . . . . . . . . . . . . . . . . . . . . . . 5,0 kg
Dimensions
N-50. . . . . . . . .435 mm (L) x 99 mm (H) x 330 mm (P)
N-30. . . . . . . 435 mm (L) x 97,5 mm (H) x 330 mm (P)
Température d’exploitation . . . . . . . . . . . +5 °C à +35 °C
Humidité d’exploitation . . . . . . . . . . . . . . . . . .5 % à 85 %
• Réseau
Interface Ethernet. . . . . . . . . . . 10 BASE-T/100 BASE-TX
DLNA . . . . . . . . . . . . . . . . . . . . . . . . . Ver 1.5 (DMP/DMR)
• Sortie audio analogique
Niveau de sortie (pendant sortie audio)
. . . . . . . . . . . . . . . . . . . . . . . . . 2 V efficaces (1 kHz, 0 dB)
Nombre de voies. . . . . . . . . . . . . . . . . . . . . . . . . . . . . . . . 2
Prise. . . . . . . . . . . . . . . . . . . . . . . . . . . . . . . . . . . . . . . RCA
Réponse en fréquence. . . . . . . . . . .4 Hz à 80 kHz, –3 dB
Rapport signal/bruit
1 kHz, 0 dB, fs 192 kHz . . . . . . . . . . . . . . . . . >111 dB
Plage dynamique
1 kHz, 0 dB, fs 192 kHz . . . . . . . . . . . . . . . . . >111 dB
Distorsion harmonique totale
1 kHz, 0 dB, fs 192 kHz . . . . . . . . . . . . . . . . .<0,002 %
Séparation de voies
1 kHz, 0 dB, fs 192 kHz . . . . . . . . . . . . . . . . . >105 dB
• Sortie audio numérique
Sortie numérique coaxiale. . . . . . . . . . . . . . . . Prise RCA
Sortie numérique optique . . . . Prise numérique optique
• Entrée audio numérique (N-50
seulement)
Entrée numérique coaxiale . . . . . . . . . . . . . . . Prise RCA
Entrée numérique optique. . . . Prise numérique optique
USB type-B . . . . . . . . . . . . . . . . . . . . . . . . . . . USB 2.0 HS
• Accessoires
Télécommande . . . . . . . . . . . . . . . . . . . . . . . . . . . . . . . . .1
Piles AAA (R03). . . . . . . . . . . . . . . . . . . . . . . . . . . . . . . . .2
Câble audio RCA (fiches rouges/blanches) . . . . . . . . . .1
Cordon d’alimentation
Mode d’emploi (ce document)
Remarque
• Spécifications et design sujets à des modifications
éventuelles sans préavis suite à des améliorations.
• Ce produit n’est pas conçu en vue d’une utilisation
au Japon.
© 2011 PIONEER CORPORATION.
Tous droits de reproduction et de traduction
réservés.
27
Fr
Page 54

LIMITED WARRANTY
WARRANTY VALID ONLY IN COUNTRY OF PRODUCT PURCHASE
WARRANTY
Pioneer Electronics (USA) Inc. (PUSA), and Pioneer Electronics Of Canada, Inc. (POC), warrant that products distributed by PUSA in the U.S.A., and by POC in Canada that fail to function
properly under normal use due to a manufacturing defect when installed and operated according to the owner’s manual enclosed with the unit will be repaired or replaced with a unit of comparable
value, at the option of PUSA or POC, without charge to you for parts or actual repair work. Parts supplied under this warranty may be new or rebuilt at the option of PUSA or POC.
THIS LIMITED WARRANTY APPLIES TO THE ORIGINAL OR ANY SUBSEQUENT OWNER OF THIS PIONEER PRODUCT DURING THE WARRANTY PERIOD PROVIDED THE
PRODUCT WAS PURCHASED FROM AN AUTHORIZED PIONEER DISTRIBUTOR/DEALER IN THE U.S.A. OR CANADA. YOU WILL BE REQUIRED TO PROVIDE A SALES
RECEIPT OR OTHER VALID PROOF OF PURCHASE SHOWING THE DATE OF ORIGINAL PURCHASE OR, IF RENTED, YOUR RENTAL CONTRACT SHOWING THE PLACE
AND DATE OF FIRST RENTAL. IN THE EVENT SERVICE IS REQUIRED, THE PRODUCT MUST BE DELIVERED WITHIN THE WARRANTY PERIOD, TRANSPORTATION PREPAID,
ONLY FROM WITHIN THE COUNTRY OF PURCHASE AS EXPLAINED IN THIS DOCUMENT. YOU WILL BE RESPONSIBLE FOR REMOVAL AND INSTALLATION OF THE
PRODUCT. PUSA OR POC, AS APPROPRIATE, WILL PAY TO RETURN THE REPAIRED OR REPLACEMENT PRODUCT TO YOU WITHIN THE COUNTRY OF PURCHASE.
PRODUCT WARRANTY PERIOD
Home Audio and Video .........................................................................................................................................................
Microphones, Headphones, Phono Cartridges and Styluses ................................................................................................
Shorter limited warranty periods apply to some models. Please refer to the limited warranty document enclosed with the product for a definitive statement of the warranty period.
The warranty period for retail customers who rent the product commences upon the date product is first put into use (a) during the rental period or (b) retail sale, whichever occurs first.
WHAT IS NOT COVERED
IF THIS PRODUCT WAS PURCHASED FROM AN UNAUTHORIZED DISTRIBUTOR, THERE ARE NO WARRANTIES, EXPRESS OR IMPLIED, INCLUDING THE IMPLIED WARRANTY
OF MERCHANTABILITY AND THE IMPLIED WARRANTY OF FITNESS FOR A PARTICULAR PURPOSE AND THIS PRODUCT IS SOLD STRICTLY “AS IS” AND “WITH ALL FAULTS".
PIONEER SHALL NOT BE LIABLE FOR ANY CONSEQUENTIAL AND/OR INCIDENTAL DAMAGES.
PIONEER DOES NOT WARRANT ANY PRODUCT LISTED ABOVE WHEN IT IS USED IN A TRADE OR BUSINESS OR IN ANY INDUSTRIAL OR COMMERCIAL APPLICATION.
THIS WARRANTY DOES NOT APPLY IF THE PRODUCT HAS BEEN SUBJECTED TO POWER IN EXCESS OF ITS PUBLISHED POWER RATING.
THIS WARRANTY DOES NOT COVER TELEVISION OR DISPLAY SCREENS DAMAGED BY STATIC, NON-MOVING, IMAGES APPLIED FOR LENGTHY PERIODS (BURN-IN).
THIS WARRANTY DOES NOT COVER THE CABINET OR ANY APPEARANCE ITEM, USER ATTACHED ANTENNA, ANY DAMAGE TO RECORDS OR RECORDING TAPES OR DISCS,
ANY
DAMAGE TO THE PRODUCT RESULTING FROM ALTERATIONS, MODIFICATIONS NOT AUTHORIZED IN WRITING BY PIONEER, ACCIDENT, MISUSE OR ABUSE, DAMAGE DUE TO
LIGHTNING OR TO POWER SURGES, SUBSEQUENT DAMAGE FROM LEAKING, DAMAGE FROM INOPERATIVE BATTERIES, OR THE USE OF BATTERIES NOT CONFORMING TO THOSE
SPECIFIED IN THE OWNER’S MANUAL.
THIS WARRANTY DOES NOT COVER THE COST OF PARTS OR LABOR WHICH WOULD BE OTHERWISE PROVIDED WITHOUT CHARGE UNDER THIS WARRANTY OBTAINED FROM
ANY SOURCE OTHER THAN A PIONEER AUTHORIZED SERVICE COMPANY OR OTHER DESIGNATED LOCATION. THIS WARRANTY DOES NOT COVER DEFECTS OR DAMAGE CAUSED
BY THE USE OF UNAUTHORIZED PARTS OR LABOR OR FROM IMPROPER MAINTENANCE.
ALTERED, DEFACED, OR REMOVED SERIAL NUMBERS VOID THIS ENTIRE WARRANTY
NO OTHER WARRANTIES
IN THE U.S.A. - PIONEER LIMITS ITS OBLIGATIONS UNDER ANY IMPLIED WARRANTIES INCLUDING, BUT NOT LIMITED TO, THE IMPLIED WARRANTIES OF
MERCHANTABILITY AND FITNESS FOR A PARTICULAR PURPOSE, TO A PERIOD NOT TO EXCEED THE WARRANTY PERIOD. NO WARRANTIES SHALL APPLY AFTER THE
WARRANTY PERIOD. SOME STATES DO NOT ALLOW LIMITATIONS ON HOW LONG AN IMPLIED WARRANTY LASTS AND SOME STATES DO NOT ALLOW THE EXCLUSIONS
OR LIMITATIONS OF INCIDENTAL OR CONSEQUENTIAL DAMAGES, SO THE ABOVE LIMITATIONS OR EXCLUSIONS MAY NOT APPLY TO YOU. THIS WARRANTY GIVES
YOU SPECIFIC LEGAL RIGHTS AND YOU MAY HAVE OTHER RIGHTS WHICH MAY VARY FROM STATE TO STATE.
IN CANADA - EXCEPT AS EXPRESSLY PROVIDED HEREIN, THERE ARE NO REPRESENTATIONS, WARRANTIES, OBLIGATIONS OR CONDITIONS, IMPLIED, STATUTORY
OR OTHERWISE, APPLICABLE TO THIS PRODUCT.
TO OBTAIN SERVICE
PUSA and POC have appointed a number of Authorized Service Companies throughout the U.S.A. and Canada should your product require service. To receive warranty service
you need to present your sales receipt or, if rented, your rental contract showing place and date of original owner’s transaction. If shipping the unit you will need to package
it carefully and send it, transportation prepaid by a traceable, insured method, to an Authorized Service Company. Package the product using adequate padding material to
prevent damage in transit. The original container is ideal for this purpose. Include your name, address and telephone number where you can be reached during business hours.
On all complaints and concerns in the U.S.A. call Customer Support at 1-800-421-1404, or, in Canada, call Customer Satisfaction at 1-877-283-5901.
DISPUTE RESOLUTION
IN THE U.S.A. - Following our response to any initial request to Customer Support, should a dispute arise between you and Pioneer, Pioneer makes available its Complaint
Resolution Program to resolve the dispute. The Complaint Resolution Program is available to you without charge. You are required to use the Complaint Resolution Program
before you exercise any rights under, or seek any remedies, created by Title I of the Magnuson-Moss Warranty-Federal Trade Commission Improvement Act, 15 U.S.C. 2301 et seq.
To use the Complaint Resolution Program call 1-800-421-1404 and explain to the customer service representative the problem you are experiencing, steps you have taken
to have the product repaired during the warranty period and the name of the authorized Distributor/Dealer from whom the Pioneer product was purchased. After the complaint
has been explained to the representative, a resolution number will be issued. Within 40 days of receiving your complaint, Pioneer will investigate the dispute and will either:
(1) respond to your complaint in writing informing you what action Pioneer will take, and in what time period, to resolve the dispute; or (2) respond to your complaint in writing
informing you why it will not take any action.
IN CANADA - Call the Customer Satisfaction Manager at (905) 946-7446 to discuss your complaint and to obtain a prompt resolution.
PIONEER ELECTRONICS (USA) INC. PIONEER ELECTRONICS OF CANADA, INC.
IN THE U.S.A.
For hook-up and operation of your unit or to locate an
Authorized Service Company, please call or write:
PIONEER ELECTRONICS SERVICE, INC.
P.O. BOX 1760
LONG BEACH, CALIFORNIA 90801
1-800-421-1404
http://www.pioneerelectronics.com
IN CANADA
For additional information on this warranty,
please call or write:
CUSTOMER SATISFACTION GROUP
PIONEER ELECTRONICS OF CANADA, INC.
300 ALLSTATE PARKWAY
MARKHAM, ON L3R 0P2
(905) 479-4411
1-877-283-5901
http://www.pioneerelectronics.ca
RECORD THE PLACE AND DATE OF PURCHASE FOR FUTURE REFERENCE
Model No. ____________________________________________ Serial No. _________________________________________ Purchase Date _______________________
Purchased From _______________________________________________________________________________________________________________________________
KEEP THIS INFORMATION AND YOUR SALES RECEIPT IN A SAFE PLACE
Parts Labor
1 Year 1 Year
90 Days 90 Days
Page 55

GARANTIE LIMITÉE
GARANTIE VALIDE SEULEMENT DANS LE PAYS OU LE PRODUIT A ÉTÉ ACHETÉ
GARANTIE
Pioneer Electronics (USA) Inc. (PUSA) et Pioneer Électronique du Canada, Inc. (POC) garantissent que les produits distribués par PUSA aux États-Unis et par POC au Canada qui,
après avoir été installés et utilisés conformément au manuel de l’utilisateur inclus avec l’unité, ne fonctionnent pas de façon appropriée dans des conditions d’utilisation normales en
raison d’un vice de fabrication, seront réparés ou remplacés par une unité de valeur comparable, au choix de PUSA ou de POC, sans que vous deviez payer pour les pièces ou les
travaux de réparation. Les pièces incluses en vertu de la présente garantie peuvent être neuves ou remises à neuf, au choix de PUSA ou de POC.
LA PRÉSENTE GARANTIE LIMITÉE S’APPLIQUE AU PROPRIÉTAIRE INITIAL AINSI QU’À TOUT PROPRIÉTAIRE SUBSÉQUENT DU PRÉSENT PRODUIT PIONEER PENDANT LA PÉRIODE DE GARANTIE,
À CONDITION QUE LE PRODUIT AIT ÉTÉ ACHETÉ CHEZ UN DISTRIBUTEUR OU DÉTAILLANT PIONEER AUTORISÉ AUX ÉTATS-UNIS OU AU CANADA. VOUS DEVREZ FOURNIR UN RELEVÉ DE
CAISSE OU UNE AUTRE PREUVE D’ACHAT VALIDE INDIQUANT LA DATE DE L’ACHAT INITIAL OU, SI VOUS LOUEZ LE PRODUIT, VOTRE CONTRAT DE LOCATION INDIQUANT L’ENDROIT ET LA DATE
DE LA PREMIÈRE LOCATION. SI JAMAIS UN SERVICE DE RÉPARATION EST REQUIS, LE PRODUIT DOIT ÊTRE EXPÉDIÉ PENDANT LA PÉRIODE DE GARANTIE, EN PORT PRÉPAYÉ, À L’INTÉRIEUR
DU PAYS OÙ L’ACHAT A ÉTÉ EFFECTUÉ SEULEMENT, TEL QU’IL EST EXPLIQUÉ DANS LE PRÉSENT DOCUMENT. VOUS ÊTES RESPONSABLE DU DÉMONTAGE ET DE L’INSTALLATION DU
PRODUIT. PUSA OU POC, LE CAS ÉCHÉANT, PAIERA POUR VOUS RETOURNER LE PRODUIT RÉPARÉ OU REMPLACÉ, À L’INTÉRIEUR DU PAYS OÙ L’ACHAT A ÉTÉ EFFECTUÉ.
PÉRIODE DE GARANTIE DES PRODUITS
Produits audio et vidéo pour la maison .......................................................................................................
Micros, écouteurs, stylets et cartouches phono ......................................................................................................
Durée des garanties réduites pour certains modèles. Veuillez vous référer au document degarantie limitée inclus avec le produit pour confirmer la durée de la garantie.
La période de garantie pour les clients qui louent le produit commence le jour où le produit est utilisé pour la première fois (a) pendant la période de location ou (b) après la vente au détail, selon ce qui se produit en premier.
ÉLÉMENTS NON COUVERTS PAR LA GARANTIE
UN PRODUIT ACHETÉ CHEZ UN DISTRIBUTEUR NON AUTORISÉ N’EST COUVERT PAR AUCUNE GARANTIE EXPRESSE OU IMPLICITE, Y COMPRIS QUELQUE GARANTIE
IMPLICITE DE QUALITÉ MARCHANDE OU D’ADAPTATION À UN USAGE PARTICULIER QUE CE SOIT. DE PLUS, CE PRODUIT EST STRICTEMENT VENDU « TEL QUEL »
ET « AVEC TOUS SES DÉFAUTS ÉVENTUELS ».
PIONEER N’EST PAS RESPONSABLE DE QUELQUE DOMMAGE CONSÉCUTIF ET(OU) INDIRECT QUE CE SOIT.
PIONEER NE GARANTIT PAS LES PRODUITS ÉNUMÉRÉS CI-DESSUS LORSQU’ILS SONT UTILISÉS À DES FINS COMMERCIALES OU PROFESSIONNELLES, OU AU SEIN
DE TOUTE APPLICATION INDUSTRIELLE OU COMMERCIALE QUE CE SOIT.
LA PRÉSENTE GARANTIE NE S’APPLIQUE PAS SI LE PRODUIT A ÉTÉ SOUMIS À UNE PUISSANCE NOMINALE EXCÉDANT CELLE QUI A ÉTÉ ÉTABLIE DANS LES
DOCUMENTS S’Y APPLIQUANT.
LA PRÉSENTE GARANTIE NE COUVRE PAS LES TÉLÉVISEURS OU LES ÉCRANS ENDOMMAGÉS EN RAISON DE L’APPLICATION D’IMAGES STATIQUES ET IMMOBILES
PENDANT DE LONGUES PÉRIODES (IMAGES RÉMANENTES).
LA PRÉSENTE GARANTIE NE COUVRE PAS LE COFFRAGE OU LES ÉLÉMENTS ESTHÉTIQUES, LES ANTENNES INSTALLÉES PAR L’UTILISATEUR, LES DOMMAGES AUX DISQUES
OU AUX RUBANS OU DISQUES D’ENREGISTREMENT, LES DOMMAGES AU PRODUIT DÉCOULANT D’UNE RETOUCHE, D’UNE MODIFICATION NON AUTORISÉE PAR ÉCRIT
PAR PIONEER, D’UN ACCIDENT, D’UN USAGE INAPPROPRIÉ OU D’UN USAGE ABUSIF, LES DOMMAGES PRODUITS PAR LA FOUDRE OU LA SURTENSION, LES DOMMAGES
SUBSÉQUENTS DÉCOULANT DE FUITES, LES DOMMAGES DÉCOULANT DE PILES DÉFECTUEUSES OU DE L’UTILISATION DE PILES NON CONFORMES À CELLES QUI SONT
SPÉCIFIÉES DANS LE MANUEL DE L’UTILISATEUR.
LA PRÉSENTE GARANTIE NE COUVRE PAS LE COÛT DES PIÈCES OU DE LA MAIN-D’ŒUVRE QUI SERAIENT AUTREMENT OFFERTES SANS FRAIS EN VERTU DE LA PRÉSENTE
GARANTIE, SI ELLES SONT OBTENUES AUPRÈS D’UNE SOURCE AUTRE QU’UNE SOCIÉTÉ DE SERVICE OU AUTRE AUTORISÉE OU DÉSIGNÉE PAR PIONEER. LA PRÉSENTE
GARANTIE NE COUVRE PAS LES DÉFECTUOSITÉS OU LES DOMMAGES CAUSÉS PAR L’UTILISATION D’UNE MAIN-D’ŒUVRE OU DE PIÈCES NON AUTORISÉES, NI D’UN
ENTRETIEN INADÉQUAT.
LES NUMÉROS DE SÉRIE MODIFIÉS, OBLITÉRÉS OU ENLEVÉS ANNULENT LA PRÉSENTE GARANTIE DANS SA TOTALITÉ.
INVALADITÉ DE TOUTE AUTRE GARANTIE
AUX ÉTATS-UNIS — PIONEER LIMITE SES OBLIGATIONS EN VERTU DE TOUTE GARANTIE IMPLICITE QUE CE SOIT, Y COMPRIS ENTRE AUTRES LES GARANTIES IMPLICITES DE
QUALITÉ MARCHANDE OU D’ADAPTATION À UN USAGE PARTICULIER, À UNE PÉRIODE N’EXCÉDANT PAS LA PÉRIODE DE GARANTIE. AUCUNE GARANTIE NE S’APPLIQUE APRÈS
LA PÉRIODE DE GARANTIE. CERTAINS ÉTATS NE PERMETTENT PAS LA LIMITATION DE LA DURÉE D’UNE GARANTIE IMPLICITE, ET CERTAINS NE PERMETTENT PAS L’EXCLUSION
OU LA LIMITATION DES DOMMAGES CONSÉCUTIFS OU INDIRECTS. LES LIMITATIONS ET EXCLUSIONS ÉTABLIES CI-DESSUS PEUVENT DONC NE PAS S’APPLIQUER À VOUS.
LA PRÉSENTE GARANTIE VOUS DONNE DES DROITS LÉGAUX SPÉCIFIQUES. VOUS POUVEZ JOUIR D’AUTRES DROITS, QUI PEUVENT VARIER D’UN ÉTAT À L’AUTRE.
AU CANADA — SOUS RÉSERVE DE CE QUI EST EXPRESSÉMENT STIPULÉ DANS LES PRÉSENTES, AUCUNE REPRÉSENTATION, GARANTIE, OBLIGATION OU CONDITION,
QU’ELLE SOIT IMPLICITE, OBLIGATOIRE OU AUTRE, NE S’APPLIQUE À CE PRODUIT.
SERVICE
PUSA et POC ont désigné un certain nombre de sociétés de service autorisées partout aux États-Unis et au Canada si jamais vous avez besoin de services de réparation pour
votre produit. Pour profiter d'un tel service en vertu de la garantie, vous devez présenter votre relevé de caisse ou, si vous louez le produit, votre contrat de location indiquant
l'endroit et la date de la transaction par le premier propriétaire. Si vous expédiez l'unité, vous devez l'emballer soigneusement et l'envoyer à une société de service autorisée, en
port prépayé et selon une méthode de transport pouvant être suivie et assurée. Emballez le produit au moyen de matériaux coussinés adéquats pour éviter les dommages pendant
le transport. La boîte d'origine est idéale à cette fin. Incluez votre nom, votre adresse et un numéro de téléphone où nous pouvons vous rejoindre pendant les heures de bureau.
Pour toutes les plaintes et problèmes aux États-Unis, communiquez avec le service de Soutien à la clientèle au 1-800-421-1404. Au Canada, communiquez avec le groupe de
Satisfaction de la clientèle au 1-877-283-5901.
Pour le raccordement ou le fonctionnement de votre unité, ou pour trouver une société de service autorisée, appelez ou écrivez à :
RÈGLEMENT DES CONFLITS
AUX ÉTATS-UNIS - Si un conflit se produit entre vous et Pioneer après la réponse à une demande initiale faite au service de Soutien à la clientèle, vous pouvez avoir recours au Programme
de résolution des plaintes de Pioneer pour résoudre le conflit. Ce programme vous est offert sans frais. Vous devez avoir recours au Programme de résolution des plaintes avant
de vous prévaloir de vos droits ou de chercher réparation en vertu du Titre I de la loi Magnuson-Moss Warranty-Federal Trade Commission Improvement Act, 15 U.S.C. 2301 et s.s.
Pour avoir recours au Programme de résolution des plaintes, appelez au 1-800-421-1404 et expliquez au représentant du service à la clientèle qui vous répondra le problème auquel
vous faites face et les démarches que vous avez entreprises pour faire réparer le produit pendant la période de garantie, puis donnez-lui le nom du distributeur / détaillant autorisé
auprès duquel vous vous êtes procuré le produit Pioneer. Une fois que votre plainte a été expliquée au représentant, un numéro de résolution vous sera communiqué. Pioneer
étudiera le conflit et, dans un délai de quarante (40) jours après la réception de votre plainte, (1) répondra à votre plainte par écrit pour vous aviser des démarches qu'elle entreprendra
pour résoudre le conflit, et indiquera combien de temps ces démarches prendront ; ou (2) répondra à votre plainte par écrit pour vous indiquer les raisons pour lesquelles elle n'entreprendra
aucune démarche.
AU CANADA - Communiquez avec le directeur de la Satisfaction de la clientèle au (905) 946-7446 pour discuter de votre plainte et résoudre rapidement le problème.
PIONEER ELECTRONICS (USA) INC. PIONEER ELECTRONIQUES DU CANADA, INC.
ENREGISTREZ LE LIEU ET LA DATE D'ACHAT POUR RÉFÉRENCE ULTÉRIEURE
No. du modèle : ___________________________________________________ No. deSérte : _________________________________________________________________
Date d'achat : ____________________________________________________ Acheté de : ___________________________________________________________________
PRENEZ SOIN DE GARDER CETTE INFORMATION ET VOTRE REÇU D'ACHAT DANS UN ENDROIT SÛR POUR RÉFÉRENCE FUTURE
AU CANADA
DÉPARTÉMENT DE SERVICE AU CONSOMMATEUR
PIONEER ÉLECTRONIQUES DU CANADA, INC.
300 ALLSTATE PARKWAY
MARKHAM, ON L3R 0P2
(905) 479-4411
1-877-283-5901
http://www.pioneerelectronics.ca
AUX ÉTATS-UNIS
PIONEER ELECTRONICS SERVICE, INC.
P.O. BOX 1760
LONG BEACH, CALIFORNIA 90801
1-800-421-1404
http://www.pioneerelectronics.com
Pièces Main-d’œuvre
1 an 1 an
90 jours 90 jours
Page 56

To register your product, find the nearest authorized service location, to
purchase replacement parts, operating instructions, or accessories,
please go to one of following URLs :
Pour enregistrer votre produit, trouver le service après-vente agréé le plus
proche et pour acheter des pièces de rechange, des modes d’emploi ou
des accessoires, reportez-vous aux URL suivantes :
In the USA/Aux Etats-Unis
http://www.pioneerelectronics.com
In Canada/Aux Canada
http://www.pioneerelectronics.ca
PIONEER CORPORATION
1-1, Shin-ogura, Saiwai-ku, Kawasaki-shi, Kanagawa 212-0031, Japan
PIONEER ELECTRONICS (USA) INC.
P.O. BOX 1540, Long Beach, California 90801-1540, U.S.A. TEL: (800) 421-1404
PIONEER ELECTRONICS OF CANADA, INC.
340 Ferrier Street, Unit 2, Markham, Ontario L3R 2Z5, Canada TEL: 1-877-283-5901, 905-479-4411
PIONEER EUROPE NV
Haven 1087, Keetberglaan 1, B-9120 Melsele, Belgium TEL: 03/570.05.11
PIONEER ELECTRONICS ASIACENTRE PTE. LTD.
253 Alexandra Road, #04-01, Singapore 159936 TEL: 65-6472-7555
PIONEER ELECTRONICS AUSTRALIA PTY. LTD.
5 Arco Lane, Heatherton, Victoria, 3202, Australia, TEL: (03) 9586-6300
PIONEER ELECTRONICS DE MEXICO S.A. DE C.V.
Blvd.Manuel Avila Camacho 138 10 piso Col.Lomas de Chapultepec, Mexico, D.F. 11000 TEL: 55-9178-4270
K002_B3_En
S018_B1_EnFr
© 2011 PIONEER CORPORATION.
All rights reserved.
<5707-00000-613-1S>
© 2011 PIONEER CORPORATION.
Tous droits de reproduction et de traduction réservés.
Printed in China / Imprimé en Chine
 Loading...