

Page 1

MULTI ENTERTAINMENT PLAYER
DOUBLE LECTEUR MULTI FORMAT
MULTI-ENTERTAINMENT PLAYER
MEP-7000
http://www.prodjnet.com/support/
The Pioneer website listed above provides answers to frequently asked questions, information about
software, and other up-to-date data of assistance to our customers.
http://www.prodjnet.com/support/
Le site Web de Pionner ci-dessus fournit des réponses aux questions souvent posées, des
informations au sujet des logiciels et d’autres données mises à jour afin de venir en aide à notre
clientèle.
http://www.prodjnet.com/support/
Auf der oben angegebenen Pioneer-Website werden unseren Kunden Antworten auf häufig gestellte
Fragen, Informationen über Software und weitere Unterstützung mit neuesten Daten angeboten.
Operating Instructions
Mode d’emploi
Bedienungsanleitung
Page 2
The exclamation point within an equilateral
triangle is intended to alert the user to the
presence of important operating and
maintenance (servicing) instructions in the
literature accompanying the appliance.
The lightning flash with arrowhead symbol,
within an equilateral triangle, is intended to
alert the user to the presence of uninsulated
“dangerous voltage” within the product’s
enclosure that may be of sufficient
magnitude to constitute a risk of electric
shock to persons.
CAUTION:
TO PREVENT THE RISK OF ELECTRIC
SHOCK, DO NOT REMOVE COVER (OR
BACK). NO USER-SERVICEABLE PARTS
INSIDE. REFER SERVICING TO QUALIFIED
SERVICE PERSONNEL.
CAUTION
RISK OF ELECTRIC SHOCK
DO NOT OPEN
IMPORTANT
D3-4-2-1-1_A1_En
Replacement and mounting of an AC plug on the power supply cord of this unit should be performed only by qualified
service personnel.
D3-4-2-1-2-2_B_En
IMPORTANT: THE MOULDED PLUG
This appliance is supplied with a moulded three pin mains plug for your safety and convenience. A 5 amp fuse is fitted in this plug. Should the
fuse need to be replaced, please ensure that the replacement fuse has a rating of 5 amps and that it is approved by ASTA or BSI to BS1362.
Check for the ASTA mark
or the BSI mark on the body of the fuse.
If the plug contains a removable fuse cover, you must ensure that it is refitted when the fuse is replaced. If you lose the fuse cover the plug
must not be used until a replacement cover is obtained. A replacement fuse cover can be obtained from your local dealer.
If the fitted moulded plug is unsuitable for your socket outlet, then the fuse shall be removed and the plug cut off and disposed of
safely. Ther
e is a danger of severe electrical shock if the cut off plug is inserted into any 13 amp socket.
If a new plug is to be fitted, please observe the wiring code as shown below. If in any doubt, please consult a qualified electrician.
IMPORTANT: The wires in this mains lead are coloured in accordance with the following code:
Blue :
Neutral Brown : Live
As the colours of the wires in the mains lead of this appliance may not correspond with the coloured markings identifying the terminals in
your plug, proceed as follows ;
The wire which is coloured BLUE must be connected to the terminal which is marked with the
letter N or coloured BLACK.
The wire
which is coloured BROWN must be connected to the terminal which is marked with the
letter L or coloured RED.
How to replace the fuse: Open the fuse compartment with a screwdriver and replace the fuse.
WARNING
This equipment is not waterproof. To prevent a fire
or shock hazard, do not place any container filled
with liquid near this equipment (such as a vase or
flower pot) or expose it to dripping, splashing, rain
or moisture.
D3-4-2-1-3_B_En
+$!)$)+ !!%$,'(*%%!- '(
$' #)$$*#)'-$'' $#(*')))
%$,'(*%%!-+$!)$)',') (*# )
, !!*(")()'&* '+$!)
$',' ))#$#)''%#!
#
"#%)!'%+%"!"'#!*!
&"(%&&(&'!"!'
$(# !'
!
$!)%)./''%)#/$%.0)%/(&!.0-!/*'!1!.+!
-*0) /$!0)%/"*-1!)/%'/%*)/*%(+-*1!$!/
- %/%*)/'!./(/-!-) (/!$
.% !
'*/.) *+!)%)#.%)/$!%)!/-!+-*1% ! "*-
1!)/%'/%*)/*!).0-!-!'%'!*+!-/%*)*"/$!
+-* 0/) /*+-*/!/%/"-*(*1!-$!/%)#*
+-!1!)/"%-!$4- /$!*+!)%)#..$*0' )!1!-!
'*&! *-*1!-! 2%/$%/!(..0$.)!2.++!-.
/'!'*/$.0-/%).*-3*+!-/%)#/$!
!,0%+(!)/*)/$%&-+!/*-!
)
Operating Environment
Operating environment temperature and humidity:
+5 °C to +35 °C (+41 °F to +95 °F); less than 85 %RH
(cooling vents not blocked)
Do not install this unit in a poorly ventilated area, or in
locations exposed to high humidity or direct sunlight (or
strong artificial light)
D3-4-2-1-7c*_A1_En
If the AC plug of this unit does not match the AC
outlet you want to use, the plug must be removed
and appropriate one fitted. Replacement and
mounting of an AC plug on the power supply cord of
this unit should be performed only by qualified
service personnel. If connected to an AC outlet, the
cut-off plug can cause severe electrical shock. Make
sure it is properly disposed of after removal.
The equipment should be disconnected by removing
the mains plug from the wall socket when left unused
for a long period of time (for example, when on
vacation).
D3-4-2-2-1a_A1_En
CAUTION
# ! # %
! # !
#" "
! %!# !! !
! ##!
! #
%!! !
"& #!
!! ! #
!! $#
"
D3-4-2-2-2a_A_En
POWER-CORD CAUTION
Handle the power cord by the plug. Do not pull out the
plug by tugging the cord and never touch the power
cord when your hands are wet as this could cause a
short circuit or electric shock. Do not place the unit, a
piece of furniture, etc., on the power cord, or pinch the
cord. Never make a knot in the cord or tie it with other
cords. The power cords should be routed such that they
are not likely to be stepped on. A damaged power cord
can cause a fire or give you an electrical shock. Check
the power cord once in a while. When you find it
damaged, ask your nearest PIONEER authorized
service center or your dealer for a replacement.
S002*_En
Thank you for buying this Pioneer product.
Please read through these operating instructions so you will know how to operate your model properly. After you have finished reading the
instructions, put them away in a safe place for future reference.
In some countries or regions, the shape of the power plug and power outlet may sometimes differ from that shown in the explanatory drawings.
However the method of connecting and operating the unit is the same.
K015 En
CAUTION
This product is a class 1 laser product, but this
product contains a laser diode higher than Class 1.
To ensure continued safety, do not remove any covers
or attempt to gain access to the inside of the product.
Refer all servicing to qualified personnel.
The following caution label appears on your unit.
Location: inside of the unit
CLASS 1
LASER PRODUCT
D3-4-2-1-8*_C_En
This product complies with the Low Voltage Directive
2006/95/EC and EMC Directive 2004/108/EC.
2
En
If you want to dispose this product, do not mix it with general household waste. There is a separate collection system for used
electronic products in accordance with legislation that requires proper treatment, recovery and recycling.
Private households in the member states of the EU, in Switzerland and Norway may return their used electronic products free of charge to
designated collection facilities or to a retailer (if you purchase a similar new one).
For countries not mentioned above, please contact your local authorities for the correct method of disposal.
By doing so you will ensure that your disposed product undergoes the necessary treatment, recovery and recycling and thus prevent potential
negative effects on the environment and human health.
D3-4-2-1-9a_A1_En
K058b_A1_En
Page 3

CONTENTS
CONTENTS
FEATURES ....................................................................4
SPECIFICATIONS ..........................................................8
COMFIRM ACCESSORIES.............................................9
REGARDING PLAYABLE DISCS AND FILES ...............10
TYPES OF DISCS PLAYABLE ON THIS UNIT ............................. 10
ABOUT MP3/AAC DISC PLAYBACK .......................................... 11
ABOUT PLAYBACK FROM USB STORAGE DEVICE................. 11
ABOUT MP3 FILES ...................................................................... 12
ABOUT AAC FILES....................................................................... 12
ABOUT WAV FILES...................................................................... 13
ABOUT AIFF FILES....................................................................... 13
INSTALLATION GUIDELINES......................................14
CONNECTIONS...........................................................15
NORMAL STYLE CONNECTIONS ............................................... 15
MANIPULATOR STYLE CONNECTIONS..................................... 18
PARTS AND THEIR FUNCTIONS .................................19
FRONT PANEL ............................................................................. 19
REAR PANEL................................................................................ 22
HANDLING DISCS AND OTHER MEDIA .....................23
LOADING AND REMOVING DISCS ............................................ 23
REGARDING FORCIBLE DISC EJECT ........................................ 23
WRITING MANAGEMENT DATA TO A USB STORAGE
DEVICE.......................................................................................... 24
CONNECTING AND DISCONNECTING USB STORAGE
DEVICES ....................................................................................... 24
START PLAYBACK
(Using normal connections)..................................26
BROWSE SCREEN ...................................................................... 26
FILE BROWSING AND LIBRARY BROWSING........................... 27
SELECT THE TRACK .................................................................... 28
VIEW PROPERTIES OF THE CURRENTLY PLAYING TRACK.... 28
M3U FILE ...................................................................................... 28
USING A KEYWORD TO SEARCH FOR TRACKS ...................... 29
TRACK SELECTION WITH A USB KEYBOARD ......................... 30
USING THE PLAYLIST.................................................................. 32
BASIC CONTROLLER OPERATIONS ............................34
ABOUT THE DISC AUTO PLAY FUNCTION ............................... 34
TO STOP PLAYBACK AND EJECT DISC .................................... 34
TO PAUSE PLAYBACK ................................................................ 34
ABOUT THE DISC RESUME FUNCTION.................................... 34
FAST FORWARD/FAST REVERSE .............................................. 34
TRACK SKIP................................................................................. 35
SWITCHING THE JOG MODE ..................................................... 35
JOG DIAL FUNCTION .................................................................. 35
CHANGING THE PLAY SPEED.................................................... 36
APPLYING A MASTER TEMPO ................................................... 36
SETTING CUE POINTS................................................................. 36
AUTO CUE FUNCTION ................................................................ 37
ADVANCED OPERATIONS SECTION..........................38
LOOP PLAY ................................................................................... 38
CUE POINT/LOOP POINT MEMORY........................................... 38
SCRATCH PLAY............................................................................ 39
SPIN PLAY .................................................................................... 39
JOG BREAK PLAY ........................................................................ 39
EFFECT SCREEN ..........................................................................39
MIX SCREEN ................................................................................ 42
ABOUT FADER START PLAY....................................................... 44
ABOUT DJS SOFTWARE............................................. 45
SOFTWARE END USER LICENSE AGREEMENT ....................... 45
COPYRIGHT WARNING ...............................................................46
SYSTEM REQUIREMENTS (Minimum Operating
Environment) ................................................................................ 46
INSTALLING DJS SOFTWARE..................................................... 47
NOTES REGARDING TRIAL PERIOD AND USER
REGISTRATION ............................................................................ 47
REGARDING ONLINE SUPPORT ................................................48
DISCLAIMER ................................................................................ 48
ABOUT THE DRIVER PROGRAM ................................49
SOFTWARE END USER LICENSE AGREEMENT ....................... 49
DRIVER INSTALLATION............................................................... 49
USING DJ SOFTWARE................................................ 52
PREPARING YOUR DJ SOFTWARE PROGRAM........................ 53
CONTROLLING YOUR COMPUTER USING THE DEDICATED
COMMUNICATIONS PROTOCOL ...............................................53
USING MIDI FOR COMPUTER CONTROL ................................. 55
MIDI MESSAGE TABLE................................................................57
ENJOYING CD-G KARAOKE.......................................59
SELECT CD-G PLAY MODE..........................................................59
TO PLAY A CD-G DISC ................................................................. 59
TO CANCEL CD-G PLAY MODE .................................................. 59
USING THE UTILITY....................................................60
SETTING METHOD ....................................................................... 60
SETTINGS...................................................................................... 60
CREATING LIBRARIES.................................................................62
BACKING UP USER DATA .......................................................... 62
TO PERFORM A FACTORY RESET.............................................. 63
TROUBLESHOOTING ..................................................64
ABOUT THE LCD SCREEN .......................................................... 66
ABOUT OEL (ORGANIC EL) SCREENS ......................................66
ERROR MESSAGE DISPLAY .......................................................67
MEP-7000 UPDATES.................................................................... 67
SOFTWARE LIMITING CONDITIONS ..........................................68
DISCLAIMER..............................................................69
English
En
3
Page 4
FEATURES
TRACK SEARCH
CUE/LOOP
EJECT
TIME
A.CUE
IN/CUE
HOT LOOP
LOOP
RELOOP/EXIT
PITCH BEND
BROWSE MIX EFFECT UTILITY
MT
0
MASTER
TEMPO
TEMPO
6/10/16WIDE
OUT/ADJUST
FWD TEMPOREV
MEMORY CALL
SEARCH
QUE
J
O
G
B
R
E
A
K
S
C
R
A
T
C
H
TRACK SEARCH
CUE/LOOP
EJECT
TIME
A.CUE
IN/CUE
HOT LOOP
LOOP
RELOOP/EXIT
PITCH BEND
MT
0
MASTER
TEMPO
TEMPO
6/10/16WIDE
OUT/ADJUST
FWD TEMPOREV
MEMORY CALL
SEARCH
QUE
J
O
G
B
R
E
A
K
S
C
R
A
T
C
H
A
LOAD
B
MEP-7000
LOAD
MULTI ENTERTAINMENT PLAYER
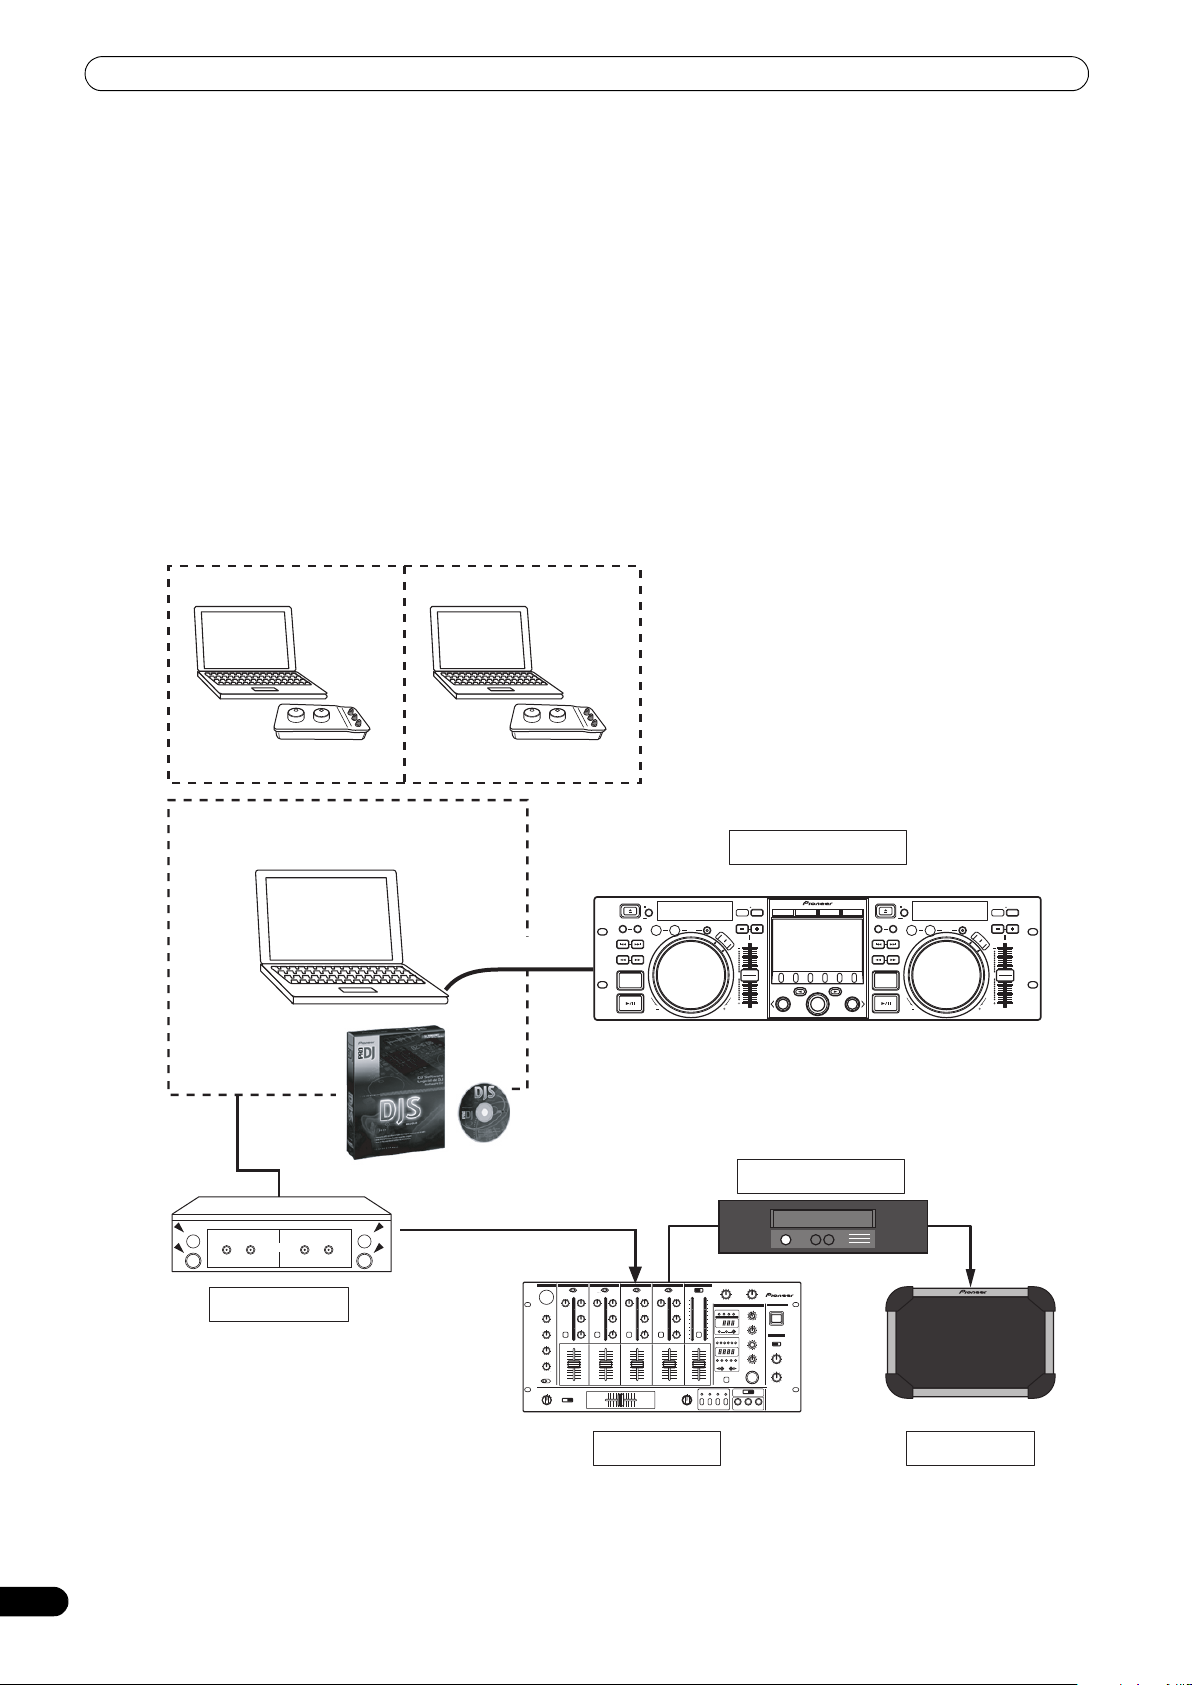
Manipulator style
OUT
Control unit
Speaker
Power amplifier
Mixer
Audio I/F Unit
Special I/F DJ software
PIONEER DJS
USB bus-power
MIDI I/F DJ software
FEATURES
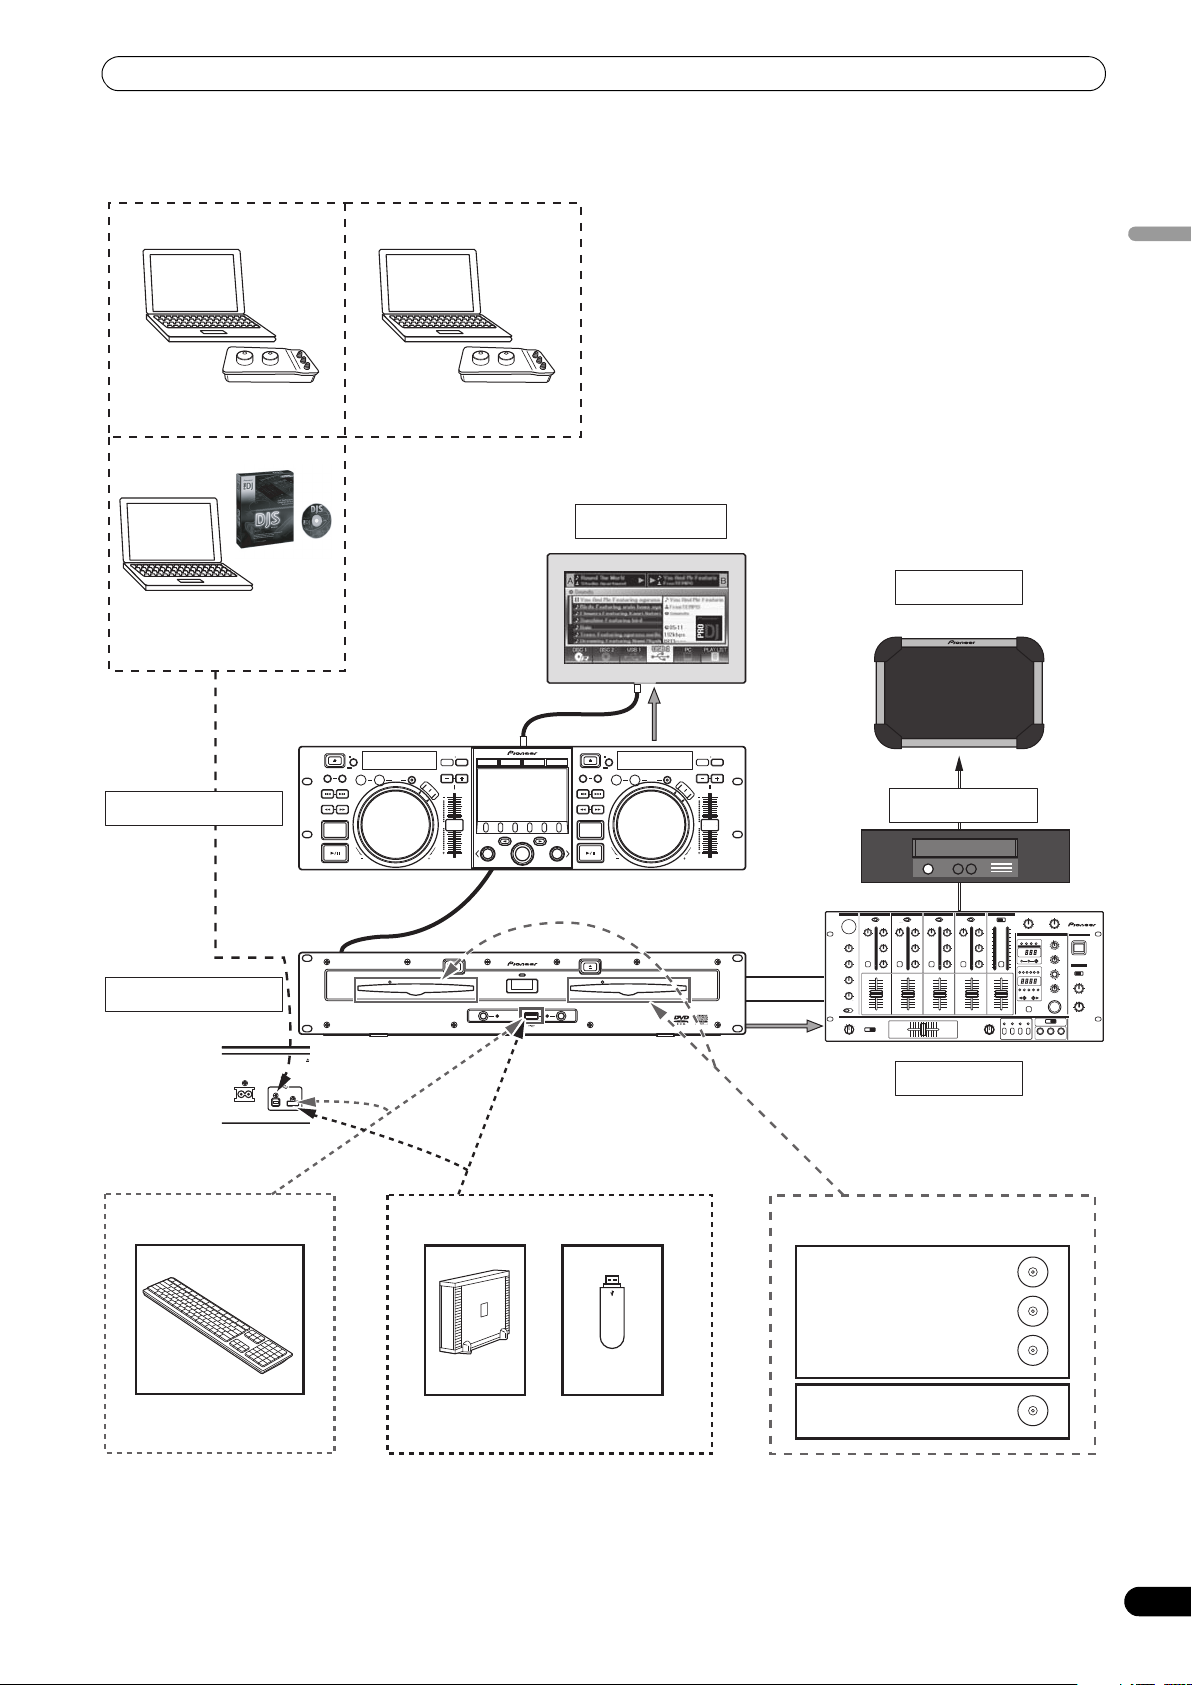
This unit is a multi entertainment player designed with a wide array of performance functions for parties and events, together with superb
operation characteristics, making it ideal for professional mobile DJ use. Allowing both normal type and manipulator type playing, it
represents optimal support for the next generation of DJ performance.
With the normal playing style, DJ play can be performed not only with conventional music CDs (CD-DA), but also with music files (MP3,
AAC, etc.) recorded on USB storage devices such as USB memory and external hard disc drives (HDD), together w
ROM.
Al
so, by c
o
nnecting this player to a computer equipped with the accessory DJS software, this player can be designated by DJS as an audio
output device, making possible seamless DJ play using not only music contained on USB storage devices and disc media, but also music
tracks stored within the computer.
The player also features excellent media-support characteristics, making it unnecessary to worry about specific media types, and is
provided with a high-function GUI in its center display; together, these features facilitate searching for and selecting desired tracks from
large music libraries, and eliminate the need to use the mixer to manually switch between different sources.
On the other hand, the control unit continues the trad
ition of P
ioneer’s CDJ series of players in its panel layout, functions and operations;
by connecting the control unit to your computer (USB bus power), music contained in the accessory DJS software can be played using
genuine DJ “manipulator style,” without the need for mouse or keyboard operations.
ith CD-ROM and DVD-
4
En
Page 5
FEATURES
TRACK SEARCH
CUE/LOOP
EJECT
TIME
A.CUE
IN/CUE
HOT LOOP
LOOP
RELOOP/EXIT
PITCH BEND
BROWSE MIX EFFECT UTILITY
MT
0
MASTER
TEMPO
TEMPO
6/10/16WIDE
OUT/ADJUST
FWD TEMPOREV
MEMORY CALL
SEARCH
QUE
J
O
G
B
R
E
A
K
S
C
R
A
T
C
H
TRACK SEARCH
CUE/LOOP
EJECT
TIME
A.CUE
IN/CUE
HOT LOOP
LOOP
RELOOP/EXIT
PITCH BEND
MT
0
MASTER
TEMPO
TEMPO
6/10/16WIDE
OUT/ADJUST
FWD TEMPOREV
MEMORY CALL
SEARCH
QUE
J
O
G
B
R
E
A
K
S
C
R
A
T
C
H
A
LOAD
B
MEP-7000
LOAD
MULTI ENTERTAINMENT PLAYER
Video
CH A
CH B
Audio
EJECT
POWER
STOP STOPREAR
DISC 1
USB 1 USB 2
DISC 2
EJECT
MEP-7000
MULTI ENTERTAINMENT PLAYER
Normal style
Drive unit
Rear panel
Control unit
Speaker
External Monitor
Mixer
Special I/F DJ software
PIONEER DJS
USB storage device
Music CD / MP3 /AAC
Music CD (CD-DA)
Karaoke (CD-G)
MP3/AAC on CD-ROM
MP3/AAC on DVD-ROM
MP3 / AAC / WAV / AIFF
MIDI I/F DJ software
HDD Flash
USB keyboard
Power amplifier
English
AC IN
USB1PC
5
En
Page 6

FEATURES
DIVERSE MEDIA PLAYBACK SUPPORT
Supports playback of CD-R/-RW discs formatted for music CD
(CD-DA) or CD graphics (CD-G), as well as compressed music files
(MP3/AAC) recorded on CD-R/-RW, DVD-R/-RW, DVD+R/+RW, or
DVD±R dual layer discs (some discs may not play properly due to
unique characteristics of the individual disc, recording
characteristics, and disc conditions such as scratches and
soiling). Playback is also supported for compressed music files
(MP3/AAC/WAV/AIFF) stored on USB storage devices.
DJ SOFTWARE
Sources potentially available on the BROWSE screen include
DJ software, including both the accessory DJS program and
other DJ software, even without the need for a control disc. The
use of MIDI DJ software is also supported. Further, by
designating the MEP-7000 as an audio output device, it can be
also used for audio output, thus eliminating the necessity of
using the mixer to switch between music sources.
MEMO
• Most of the data regarding button and TEMPO adjust slider
operations on this player can be output to external devices
using USB MIDI or dedicated formats. In order to use this unit
to control DJ software, it is necessary to install a driver
program.
• A dedicated ASIO driver is also available for audio output.
•It may not be possible to designate this player as an audio
output device, depending on the type of DJ software used.
• When the control unit is used alone, this player cannot be
designated as an audio output device. DJ software only can be
operated.
JOG BREAK EFFECT
Jog break effect provides original sound performance
Equipped with three types of remix assist function, including [JET],
[ROLL], and [WAH]. By selecting desired functions, you can freely
control effects in response to the rotation of the jog dial, thus
creating a new remix world.
AUTO MIX
Performs automatic continuous playback of tracks on the playlist
using four types of mix. Even when away from the DJ booth, mixed
music can be played automatically just as if a DJ was doing the
work.
JOG DIAL
Furnished with large 80 mm jog dial with scratch function,
allowing operations with the same sense of touch as an analog
turntable.
PITCH BEND
Playback tempo changes in direct relation to the direction and
speed of jog dial rotation.
SUPER FAST PITCH BEND
Rotate the jog dial while depressing the PITCH BEND button to
perform speed changes faster than with normal pitch bend.
FRAME SEARCH
Moves the disc from pause position in frame increments (1/
75 sec.) when the jog dial is rotated in pause mode.
SUPER FAST SEARCH
You can search the disc faster than normal search or tr ack search
by holding down a SEARCH button or TRACK SEARCH button as
you turn the jog dial.
HIGH FUNCTION DISPLAY
Center Display
Features a wide 4.3” color LCD display with high luminance for
easy visibility. The intelligent GUI and rotary selector dial allows for
no-stress track selection. Music libraries also support the use of
jacket photographs.
Controller Display A/B
The elapsed time and tempo display feature top-quality, area-color
full-segment OEL displays with high response and terrific visibility.
In concert with the center display, these displays and indicators
encourage no-stress DJ play in a wide variety of lighting
environments.
PLAYLIST
Desired tracks can be selected from music libraries in USB
storage devices and disc media and recorded on a “playlist,” thus
allowing track selection for DJ play without the need to search for
the tracks.
SCRATCH EFFECT
Equipped with scratch effects for diverse scratch sound
performance
Equipped with three differing scratch sounds, including
[SCRATCH], [TRANS], and [BUBBLE]. These new scratch sound
performances broaden your DJ play potential.
LIBRARY BROWSE
By making a library of large numbers of tracks recorded on USB
storage devices, tracks can be classified into categories by album,
artist, and genre, facilitating smooth track selection and keyword
searching. For even simpler, more convenient library authoring,
library authoring software can be downloaded from the following
website:
http://www.prodjnet.com/support/
MONITOR OUT
By outputting the center display’s BROWSE screen to a larger
external monitor, operations can be performed with greater ease.
Also outputs CD-G karaoke video.
KEYBOARD SUPPORT
Connecting a keyboard via USB port allows speedy track selection
by inputting the initial (leading) character of track and folder
names and using the "jump" function, or by searching for keywords
in the LIBRARY BROWSE function; a keyboard also makes it
possible to edit playlist names.
6
En
Page 7

FEATURES
CD-G KARAOKE
CD-G discs can be played for easy karaoke performances. The
karaoke image can also be output to large external monitors.
TEMPO CONTROL
High-performance 60 mm slider allows free modification of
track speed.
The digital readout in units of 0.02 % (±6 % range only) makes
possible more accurate and simpler tempo synchronization.
TEMPO CONTROL RANGE
Four greater ease of use, the maximum variable range can be set
to four levels, ±6 %, ±10 %, ±16 %, and WIDE (WIDE is limited to
music CD (CD-DA) only).
MASTER TEMPO
Changes music tempo without changing pitch.
CUE
BACK CUE
After storing the Cue point in memory, press the CUE button while
playing the unit to go back to the Cue point and start over.
CUE/LOOP MEMORY
Cue points and loop points can be stored in the internal memory,
and called up as required.
AUTO CUE
Auto cue automatically locates the track’s start p oint even if it
differs from the track’s frame, allowing the player to start instantly
at a press of the play/pause () button.
CUE POINT SAMPLER
The sound from the memorized cue point can be reproduced by
one touch, which can be used as the start point check and the
sampler.
REAL TIME SEAMLESS LOOP
This function simplifies setting and releasing loops. This function
lets you set a loop while you are playing a track. A loop can also be
set at the end of the track so that the track does not stop. In
addition, an ADJUST mode has been added to enable one-touch
adjustment to the Loop-out point and facilitate loop operation.
RELOOP
Allows you to replay a loop any number of times.
Press the RELOOP/EXIT button after releasing loop play to return
to the loop start point. Clever use of on and off in combination with
the rhythm make it possible to create new sound effects.
PLAYING ADDRESS
This bar graph provides a visual representation of track playback
progress that enables you to see current playback position just like
you can on an analog record by checking needle position. The
length of the bar shows current position and a flashing bar
provides advance notice of track end.
SLOT IN
Discs are loaded directly without opening doors or trays, making
track selection that much faster.
FADER START
When connected to a Pioneer DJ Mixer, the mixer's fader control
can be used to perform quick start and back cue operations.
CD-TEXT
When a music CD (CD-DA) is played that supports CD-TEXT, the
title, artist, and album text information recorded on that disc can
be utilized.
LEGATO LINK
Equipped with “Legato Link Conversion” function. When playing
music CDs, this function reproduces the 20 kHz+ treble region
lost in the CD format, thus producing high-fidelity sound
approaching that of analog record turntables.
VIBRATION RESISTANT
Equipped with “shock-proof memory” and the same floating
mechanism featured in Pioneer’s Carrozzeria car audio series, for
superb vibration resistance that withstands sound skips.
English
HOT LOOP
During loop play, pressing the IN/CUE/HOT LOOP button causes
playback to instantly return to the loop-in point and once again
begin playback from that point. By using this function in sync with
the track’s rhythm, a variety of new play scenarios becomes
possible.
En
7
Page 8

SPECIFICATIONS
SPECIFICATIONS
1 General
Model . . . . . . . . . . . . . . . . . . . . . . . . . . . . . . . . . . . . . . . . . MEP-7000
Name . . . . . . . . . . . . . . . . . . . . . . . . . . . Multi entertainment player
Normal style
Power voltage. . . . . . . . . . . . . . .
Power consumption . . . . . . . . . . . . . . . . . . . . . . . . . . . . . . .
Manipulator style
Power voltage. . . . . . . . . . . . . . . . . . . . .D
Current consumption . . . . . . . . . . . . . . . . . . . . . . . . . . . . 600 mA
Power con
Operating temperature . . . . . . . . . . . . . . . . . . . . . . +
Operating humidity . . . . . 5 % to 85 % RH (without condens
Mass (Weight)
Control unit . . . . . . . . . . . . . . . . . . . . . . . . . . . . . . . . . . . . . 1
Drive unit . . . . . . . . . . . . . . . . . . . . . . . . . . . . . . . . . . . . . . . 6.1 kg
Maximum external dimensions
Control unit . . . . .
Drive unit . . . . . . . 482.6 mm (W) x 90.5 mm (H) x 324.6 mm (D)
sumption . . . . . . . . . . . . . . . . . . . . . . . . . . . . . . . .
48
2.6 mm (W) x 133.0 mm (H) x 83.5 mm (D)
2 USB Upstream Section
Connector. . . . . . . . . . . . . . . . . . . USB B-type port (PC connector)
USB Downstream Section
Connector. . . . . . . . . . . . . . . USB A-type ports (USB1/USB2 ports)
Power supply . . . . . . . . . . . . . . . . . . . . 5
3 Analog Audio Output Section
Output connector . . . . . . . . . . . . . . . . . RCA jacks (controller A/B)
Output level . . . . . . . . . . . . . . . . . . . . . . . . . . . . . . .2
Frequency response . . . . .
S/N ratio . . . . . . . . . . . . . . . . . . . . . . . . . . . . 115 dB or more (JEITA)
Distortion
. . . . . . . . . . . . . . . . . . . . . . . . . . . 0.006 % or les
* The above specifications refer to values for music CD (CD-
DA).
4 Digital Audio Output Section
Output connector . . . . . . . . . . . . . . . . . RCA jacks (controller A/B)
Output type. . . . . . . . . . . . . . . . . . . . . . . . . . Coaxial digital (S/PDIF)
Output level
Output format . . . . . . . . . . . . . . . . . . . . . . . . . . . . . . 44.
. . . . . . . . . . . . . . . . . . . . . . . . . . . . . . . . 0.5
5 Video Output Section
Output connector . . . . . . . . . . . . . . . . . . . . . . . . . . . . . . . . RCA jack
Composite output level . . . . . . . . . . . . . . . . . . . . . . . . .1 Vp-p (75 Ω)
6 Center Display Section
Type. . . . . . . . . . . . . . . . . . . . . . . . . . .TFT LCD active matrix display
Size . . . . . . . . . . . . . . . . . . . . . . . . . . . . . . . . . . . . . . . . . . 4.3” (WIDE)
Supported languages
. . . . . . 10 languages including English, Japanese, and Chinese
7 Controller Display A/B Section
Type. . . . . . . . . . . . . . . . . . . . . . . . . OEL (Organic EL) Full segment
8 Other Connectors
Control unit
Remote control connector . . . . . . . . . . . . . . . . . Mini-DIN 10-pin
5 V connec
Driv
e unit
Remot
Control jack . . . . . . . . . . . . . . . . . . . . M
tor. . . . . . . . . . . . . . . . . . . . . . . . . . . . . . . . . . . DC jack
e control connector . . . . . . . . . . . . . . . . . Mini-DIN 10-pin
AC 220 V to 240 V, 50 Hz/60 Hz
C 5 V (USB bus-power)
5 °C to +35 °C
V/500 mA or less (at port)
.0 Vrms (1 kHz)
. . . . . . . . . . . . . . . . . . . . 4 Hz to 20 kHz
Vp-p (75 Ω)
1 kHz/16 bit
ini-jacks (controller A/B)
33 W
3 W
ation)
.7 kg
s (JEITA)
Specifications and appearance are subject to change without
notice.
8
En
Page 9
COMFIRM ACCESSORIES
MEP-7000
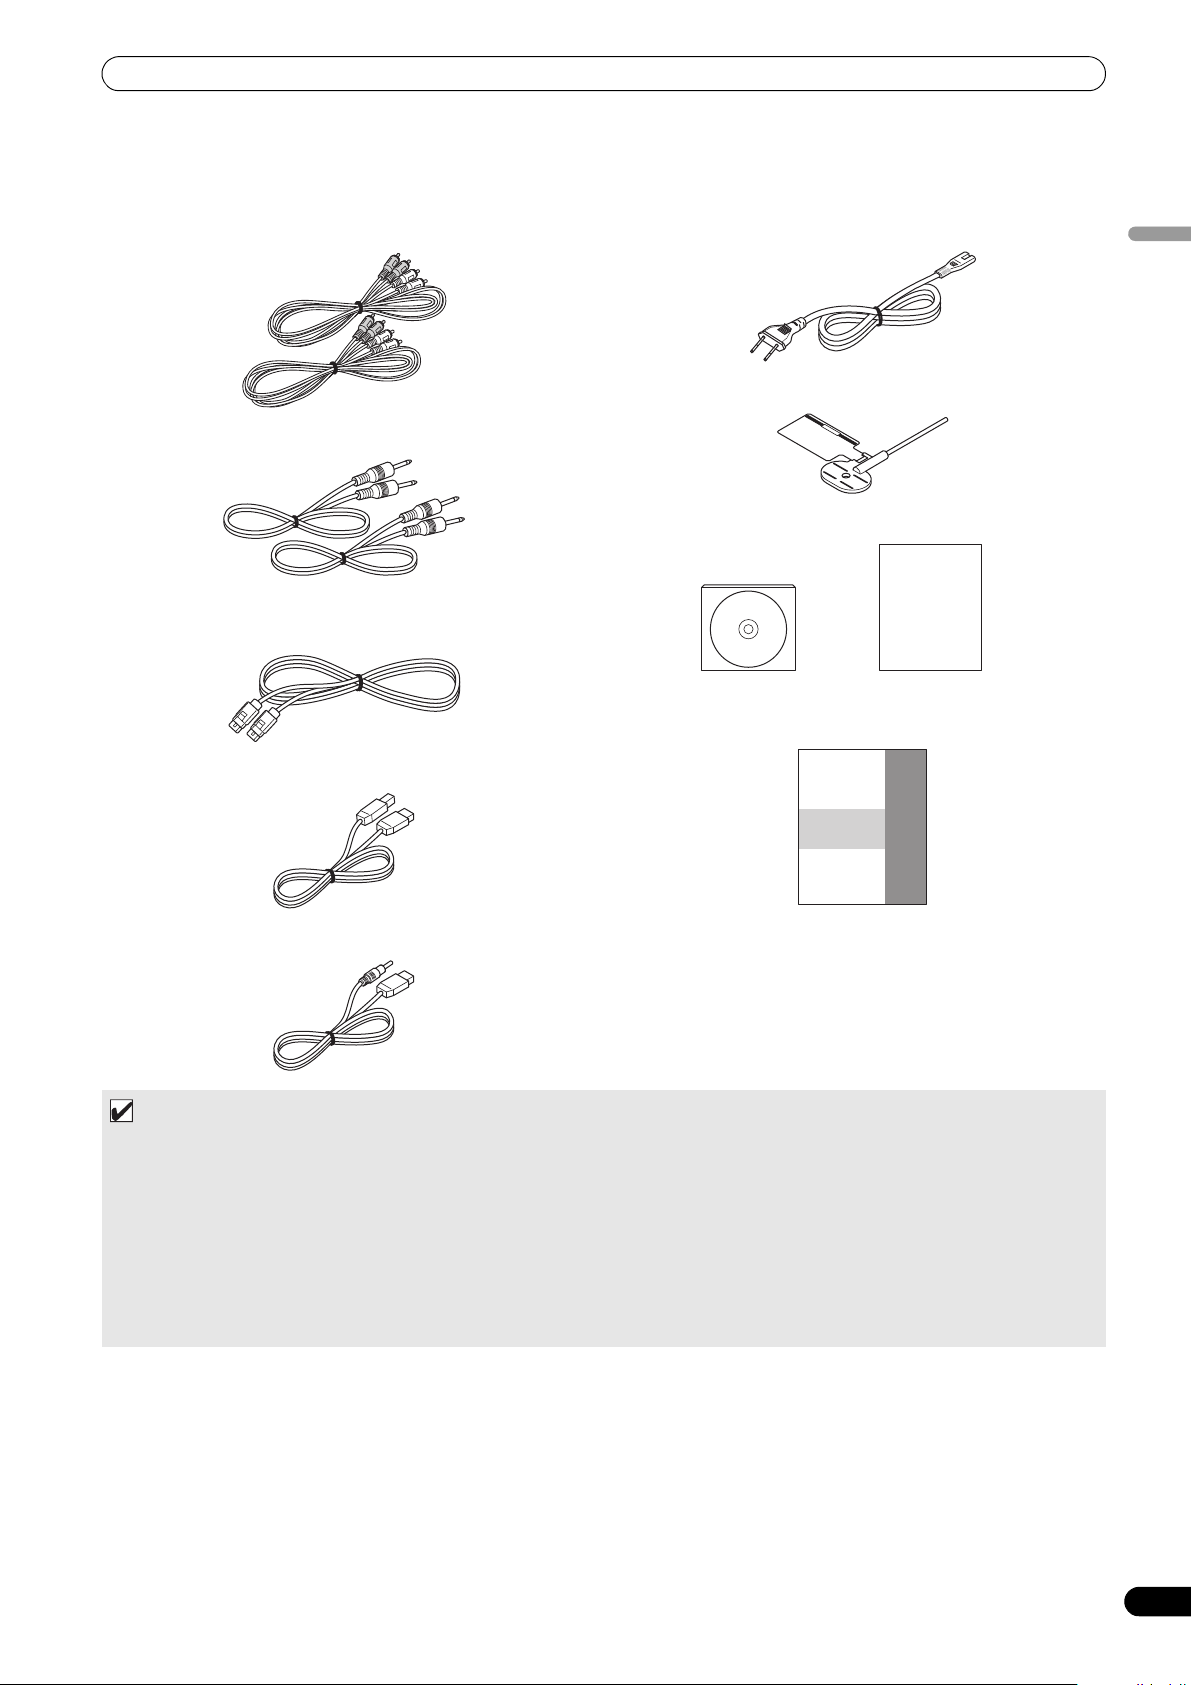
COMFIRM ACCESSORIES
Confirm that all furnished accessories are present.
Audio cables (x 2)
Power cord
Forced ejection pin
English
Control cords (x 2)
Dedicated remote control cable
USB cable
USB auxiliary power cable
CAUTION
DJS: 1 Set
CD-ROM DJS installation key sticker
Operating Instructions (this manual)
Warranty card
MEMO
• MEP-7000 units marketed in China do not include the DJS software set.
•Three instruction manuals are furnished (including the one you are reading). Please study these manuals in accord with your
manner of use:
– MEP-7000 Operating Instructions (this manual)
Read this first.
– MEP-7000 DJS Control Guide (PDF file recorded on accessory CD-ROM)
Basic operation instructions when using DJS together with the MEP-7000.
– DJS User’s Manual (PDF file recorded on accessory CD-ROM)
Full functional explanation and operation manual for DJS software.
9
En
Page 10

REGARDING PLAYABLE DISCS AND FILES
REGARDING PLAYABLE DISCS AND FILES
TYPES OF DISCS PLAYABLE ON THIS UNIT
• Playable discs will display one of the following logo marks on the disc label, packaging, or jacket:
Playable disc types and logos
CD CD-TEXT CD-R CD-RW CD-G DVD-R DVD-RW
About disc playback
This unit can play CD-R/CD-RW discs recorded in music CD (CDDA) or CD graphics (CD-G) format, and CD-R/-RW, DVD-R/-RW,
DVD+R/+RW, and DVD±R dual layer discs recorded in MP3/AAC
file format.
NOTE
• CD-R/-RW, DVD-R/-RW, DVD+R/+RW, and DVD±R dual
layer discs recorded on a standalone recorder or computer
may not play properly on this unit for a variety of reasons,
including individual characteristics of the disc, scratches
or soiling of the disc, or dirt or condensation on the player’s
laser lens.
• Discs recorded on a computer’s disc drive may not play
properly due to variations in the recording software settings
or computer environment. Be sure to record discs in the
proper format (for details, consult the distributor of the
recording software app
•For detailed information regarding the handling and use of
your disc media, consult the precautions and instructions
furnished with the discs.
lication).
About copy-control CDs
This unit is designed to comply with music CD standards. We
cannot guarantee operation or performance when using discs that
do not comply with these standards.
[DualDisc] playback
This unit is designed to comply with music CD standards. We
cannot guarantee operation or performance when using discs that
do not comply with these standards.
About 8 cm single CDs
8 cm single CDs cannot be played on this unit. Also, do not attempt
to attach an 8 cm adapter to a disc and play it in this unit, since the
adapter may become detached during playback, causing damage
to the disc or player.
About CD-TEXT on music CDs
This unit supports CD-TEXT, and displays track titles, album titles,
and artist names recorded in CD-TEXT. Supported character codes
include ASCII, ISO-8859, MS-JIS, and Mandarin Chinese. When
multiple text data are recorded, the first text data is displayed.
is a trademark of
DVD Format/Licensing Logo
Corporation.
The following discs cannot be played on this unit
CDs: DTS-CDs, photo-CDs, video-CDs, and unfinalized CDs
DVDs: DVD video, DVD audio, DVD-RAM, unfinalized DVDs, MPEG
moving picture files
Backup your discs!
Due to structural characteristics of CD-R/-RW, DVD-R/-RW,
DVD+R/+RW, and DVD±R dual layer media , if such discs are left
for extended periods in the pause (or cue standby) mode, they
become unplayable or difficult to play at that point on the disc. The
same symptom may occur if the loop function is used to repeat the
same section of a disc for an extremely large number of times.
When using discs holding important files or tracks, always make
backups first.
10
En
Page 11
REGARDING PLAYABLE DISCS AND FILES
ABOUT MP3/AAC DISC PLAYBACK
This unit can play compressed music files (MP3/AAC) recorded on CD-R/-RW, DVD-R/-RW, DVD+R/+RW, and DVD±R dual layer media.
Folder levels Maximum 8 levels; if more than 8 levels exist, files in the 9th and further levels cannot be played.
Maximum folders 2 000 per disc. If more than 2 000 folders exist, those beyond 2 000 cannot be displayed.
Maximum files 3 000 per disc. If more than 3 000 files exist, those beyond 3 000 cannot be displayed.
Recording format Supports discs recorded using the ISO9660 file system.
When recording is performed using the UDF file system, the disc cannot be played if the ISO9660 file system
is not recorded jointly. For details, consult the author of the application.
•Startup time will increases as the number of folders and files increases.
ABOUT PLAYBACK FROM USB STORAGE DEVICE
By connecting a USB storage device to this unit, MP3/AAC/WAV/AIFF files recorded on the device can be played on this unit.
Folder levels Maximum 8 levels; if more than 8 levels exist, files in the 9th and further levels cannot be played.
Maximum foldersNo specific folder limit is made for a device, but folders exceeding 10 000 in a folder cannot be displayed.
Maxi
mum files No specific file limit is made for a device, but a files exceeding 10 000 in a folder cannot be displayed.
Supported file systems FAT, FAT32, HFS+
MEMO
•USB storage devices supported by this unit are of the class of USB mass storage devices including external hard discs,
portable flash memory devices, and digital audio player.
However, optical disc devices such as external DVD/CD drives cannot be used.
• When connecting a USB storage device containing a large number of folders and files, some time may be required to read in
the device contents.
• When a connected USB storage device contains multiple partitions, only the initial partition can be used.
English
CAUTION
Depending on the device used, proper playback may not be possible with all USB storage devices. Pioneer assumes no responsibility for any loss of data resulting from connecting any given USB device to this unit.
•Proper operation may not be possible when a USB storage device is connected through a USB hub.
• Even if a USB hub is used to connect multiple USB storage devices, the second and later devices cannot be used.
•Operation cannot be guaranteed when using a USB storage device with installed flash card reader.
• When connecting a USB storage device utilizing two USB cables, connect both cables to this unit’s USB ports.
• If an electrical current stronger than the allowable current is applied to the unit’s USB1 port or USB2 port, the unit may stop
supplying power to the USB storage device, thus terminating transmission. In this case, a message will be displayed in the
center display of the unit, and the stop indicators for U
operation, disconnect all USB storage devices connected to the unit, then hold either of the USB STOP buttons depressed for
two seconds or more. Avoid connecting the USB storage device from which the excess current was detected and other USB
storage devices connected through a bus-powered USB hub. If normal operation is not restored through this method, turn the
power of this unit off, and then turn it back on.
SB1 and USB2 will flash red s
imultaneously. To restore normal
11
En
Page 12
REGARDING PLAYABLE DISCS AND FILES
ABOUT MP3 FILES
MP3 files may be found in two types, those with Constant Bit Rate (CBR), and those with Variable Bit Rate (VBR). This player supports
playback and DJ play of both CBR and VBR type files, but VBR files may exhibit slower performance when using search and super fast
search functions, compared to CBR files. When playback performance is preferred, record your files using CBR.
This unit supports MP3 files subject to the following formats:
Supported formats MPEG-1 Supports Audio Layer-3 sampling frequencies 32 kHz, 44.1 kHz, 48 kHz, with bit
MPEG-2 Supports Audio Layer-3 samp ling frequencies 16 kHz, 22.05 kHz, 24 kHz, with bit
Track
data Supports ID3 tag Ver 1.0/1.1/2.2/2.3/2.4.
File extensions .mp3
*1 In order to display characters written in a local code other than Unicode, the UTILITY function must be used to set the language.
*2 Files with original image size larger than 800 x 800 pixels cannot be displayed.
rates of 32 Kbps to 320 Kbps.
rates of 1
Displays title, album name, artist’s name. *1
JPEG images embedded in ID3 tag are displayed as jacket photographs. *2
6 Kbps to 160 Kbps.
ABOUT AAC FILES
AAC is an abbreviation for Advance Audio Coding, a basic format relating the audio compression technology used for MPEG-2 and MPEG-
4.
AAC data differs in file format and extension depending on the application used to create the data file.
The MEP-7000 is capable of playing iTunes
protected files purchased at places like iTunes Music Store cannot be played. Further, some files may not be playable, depending on the
version of iTunes in which they were encoded.
Apple and iTunes are trademarks of Apple Inc., registered in the U.S. and other countries.
This unit supports AAC files subject to the following formats:
Supported formats MPEG-4 AAC LE Sampling frequency 16 kHz, 22.05 kHz 24 kHz, 32 kHz, 44.1 kHz, 48 kHz, with bit
Track data AAC files Supports ID3 tag Ver 1.0/1.1/2.2/2.3/2.4.
Non-AAC files Support metatags (embedded tags).
File extensions .m4a, .aac, .mp4
®
-encoded AAC files with extension .m4a, as well as .aac and .mp4 files. However, copy-
rates of 8 Kbps to 320 Kbps.
Displays title, album name, artist’s name. *1
JPEG images embedded in ID3 tag are displayed as jacket photographs. *2
Displays title, album name, artist’s name. *1
JPEG images embedded in tag are displayed as jacket photographs. *2
*1 In order to display characters written in a local code other than Unicode, the UTILITY function must be used to set the language.
*2 Files with original image size larger than 800 x 800 pixels cannot be displayed.
12
En
Page 13
REGARDING PLAYABLE DISCS AND FILES
ABOUT WAV FILES
This unit supports WAV files subject to the following formats:
Supported formats Supports 16-bit non-compressed PCM, with sampling frequency of 44.1 kHz.
Track data Supports LST chunk.
Displays title, album name, artist’s name. *1
File extension .wav
*1 In order to display characters written in a local code other than Unicode, the UTILITY function must be used to set the language.
MEMO
•WAV files recorded in disc media are not supported.
ABOUT AIFF FILES
This unit supports AIFF files subject to the following formats:
Supported formats Supports 16-bit non-compressed PCM, with sampling frequency of 44.1 kHz.
Displays title, album name, artist’s name. *1
File extension .aif .aiff
*1 In order to display characters written in a local code other than Unicode, the UTILITY function must be used to set the language.
MEMO
• AIFF files recorded in disc media are not supported.
English
13
En
Page 14

INSTALLATION GUIDELINES
Do not allow contact
with vibrating surfaces.
To assure proper
heat-dissipation, be
sure to maintain this
open space.
To assure proper
heat-dissipation, be
sure to maintain this
open space.
To assure proper heat-
dissipation, be sure to
maintain this open space.
INSTALLATION GUIDELINES
• Placing and using the player for long periods on heat-generating
sources such as amplifiers or near spotlights, etc. will affect
product performance. Avoid placing the player on heatgenerating sources.
• Install this player as far as possible away from tuners and TV
sets. A player installed in close proximity to such equipment
may cause noise or degradation of the picture. Noise may be
noticeable when an indoor antenna is used. In such cases,
make use of an outdoor antenna or turn off power to the player.
• When the unit is used in a loud-sound environment, e.g., near a
speaker, so
speaker or reduce the listening volume.
• Place this unit on a level surface and a stable platform.
•Do not place heavy objects on top of the unit.
Be sure the player, including its audio and power supply cords,
does not touch vibrating materials. Any cause of vibration other
than the insulators may cause sound skip.
Take special care when using the player while it is installed in a
carrying case.
und skip may oc
cur. Install the unit away from the
Transporting the unit
Never move the unit during playback.
During playback, discs rotate at very high speeds; never lift or
move the unit during this time to prevent scratches or other
damage to discs.
Transporting the unit
When moving the unit, always remove any discs that have been
loaded, and turn off the power.
Moving the unit with a disc loaded could result in damage to the
disc or unit.
About carrying cases
The jog dial is equipped with a delicate switch. If the unit is placed
in a carrying case, take precautions to prevent any pressure from
being exerted on the surface of the jog dial.
Condensation
When this unit is brought into a warm room from previously cold
surroundings or when the room temperature rises sharply,
condensation may form inside the unit and impair its
performance. In such cases, allow the unit to stand for about an
hour or raise the room temperature gradually.
Installing the MEP-7000 in an EIA rack
The screw holes on the front panel of the MEP-7000 are designed
for use in attaching the unit to a 19-inch EIA rack.
Control unit complies with 3U specifications; drive unit complies
with 2U. Maximum depth of unit is 324.6 mm.
• Attach the unit to the rack using screws of the appropriate size
(screws not provided with the unit).
NOTE
• Do not install the unit immediately above a power amplifier,
since damage may occur from the heat produced by the
amplifier, or humming or other noise may be caused.
• When transporting the unit, remove the unit from its rack.
Attempting to move the rack with the unit installed may
result in damage to the unit.
• If the unit must be moved while still in its rack, take
precautions to protect the unit from vibration and impact.
Cleaning the player
To clean the player wipe with a polishing or a soft, dry cloth. For
stubborn dirt, moisten a soft cloth with a weak solution of neutral
detergent (diluted in five to six parts water), wring the cloth well,
and wipe away the dirt. Use a dry cloth to wipe the surface dry. Do
not use volatile liquids such as benzene or thinner which will
damage to the unit.
CD lens cleaner
If for some reason, the lens becomes soiled and malfunctions,
contact your nearest PIONEER authorized service center. Lens
cleaners for CD players are commercially available, but special
care should be exercised in their use as some may cause damage
to the lens.
Cleaning the Jog Dial
To clean the jog dial wipe with a polishing or a soft, dry cloth. For
stubborn dirt, moisten a soft cloth with a weak solution of neutral
detergent (diluted in five to six parts water), wring the cloth well,
and wipe away the dirt. Use a dry cloth to wipe the surface dry.
Applying alcohol, paint thinner, benzene, insecticides, or other
stringent substances to the jog dial may cause the markings or
finishing of the dial to peel or become discolored, and the use of
any such substances should accordingly be avoided.
14
En
Page 15
CONNECTIONS
Accessory audio cable
Accessory audio cable
Drive unit
Accessory
control cord
Accessory
control cord
DJM-3000
CONNECTIONS
Whenever connecting or disconnecting components, be sure to first turn off the power and disconnect the power cord from its outlet first. Damage to the unit may result if connections are modified while power is supplied.
NORMAL STYLE CONNECTIONS
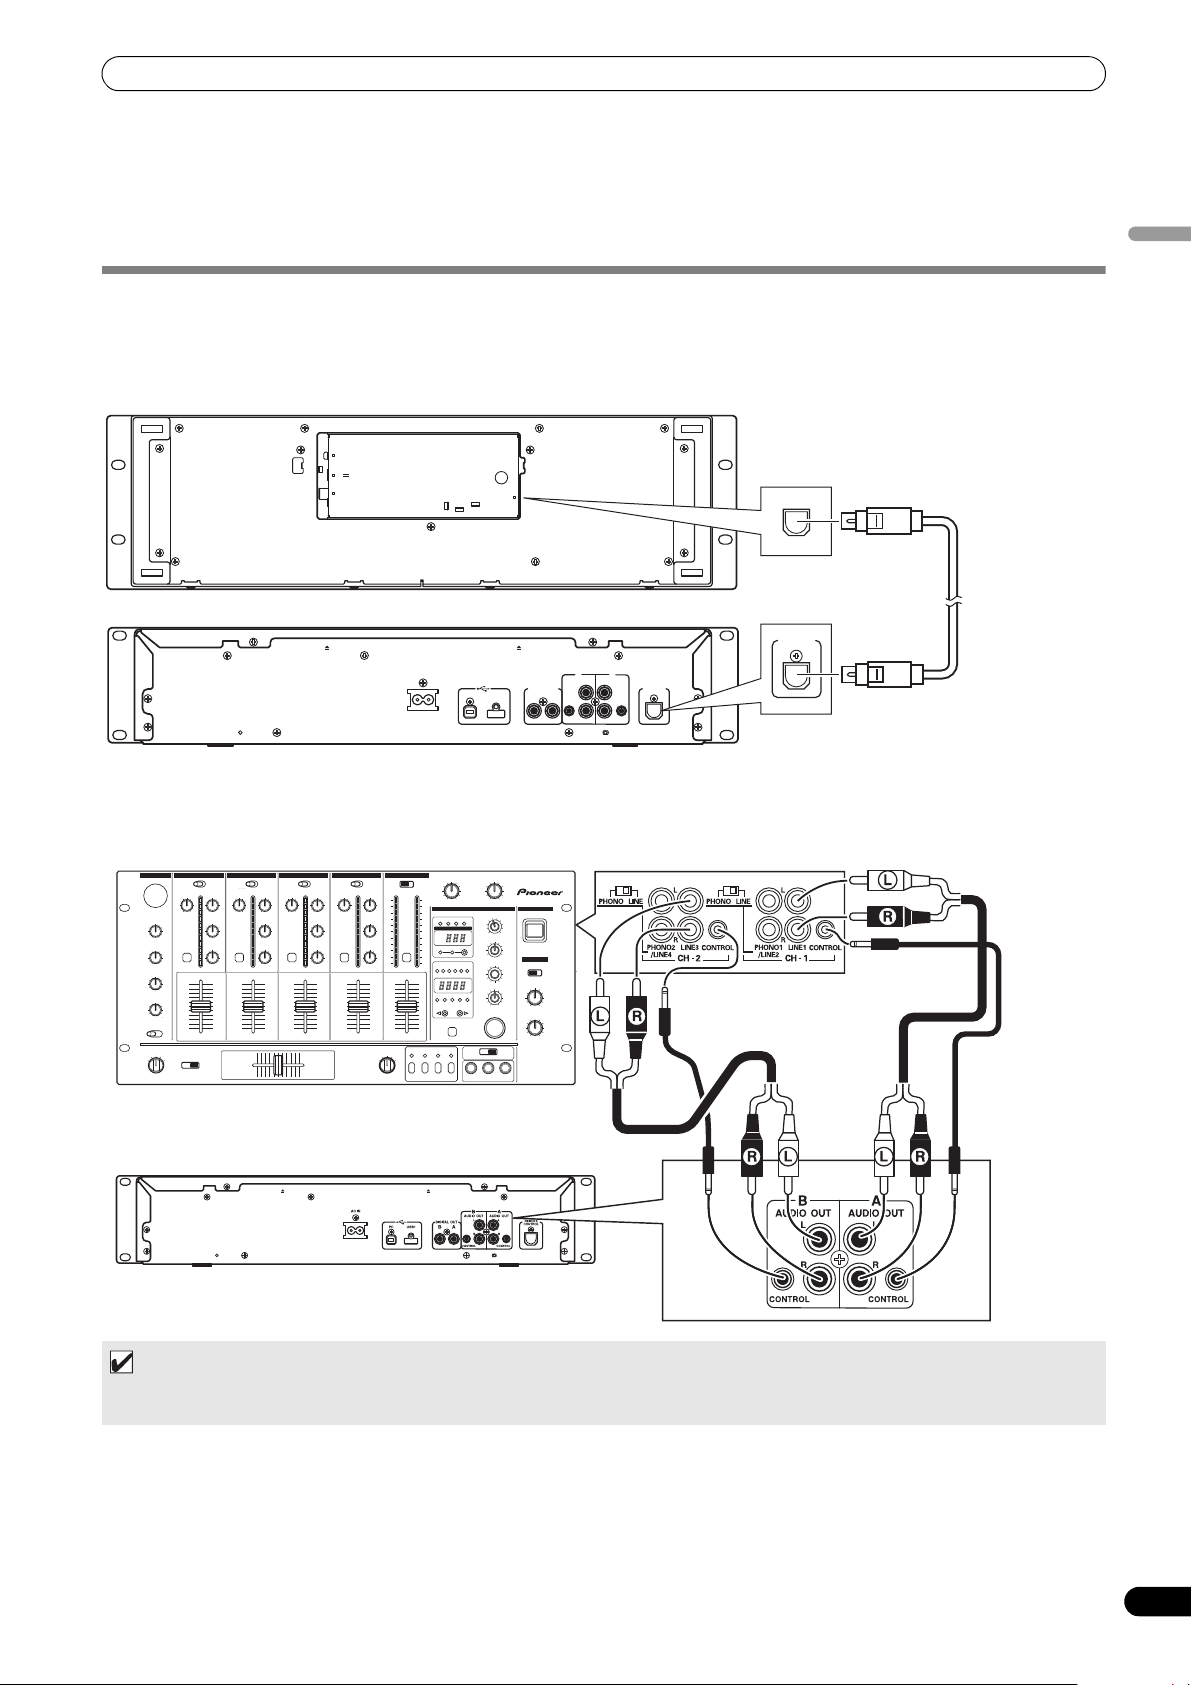
1. System connections
Use the provided dedicated remote control cable to connect the control unit to the drive unit. Insert firmly until you hear a click.
Control unit
PC
5V
MONITOR OUT
Drive unit
AC IN
REMOTE
CONTROL
Accessory
dedicated
REMOTE
CONTROL
AB
AUDIO OUTAUDIO OUT
L
L
DIGITAL OUT
USB1PC
AB
R
CONTROL CONTROL
REMOTE
CONTROL
R
remote control
cable
English
2. Connections to DJ mixer (DJM-3000/DJM-800) (audio output and control connections)
Using the accessory audio cable, connect the white plug to the L (left) channel connector and the red plug to the R (right) channel
connector. By connecting the accessory control cord, this unit can be controlled from a Pioneer DJ-mixer so as to allow fader start
play and back cue operations (except during relay play).
MEMO
• When connecting to the DJM-300, DJM-500 or DJM-600, use the accessory audio cable to connect the CD1 to the drive unit’s
side A output connectors, and CD2 to the drive unit’s side B output connectors as shown in the accompanying illustration.
15
En
Page 16
CONNECTIONS
Drive unit
Accessory audio cable
Connect to CD or AUX IN connectors
(do not connect to PHONO connectors).
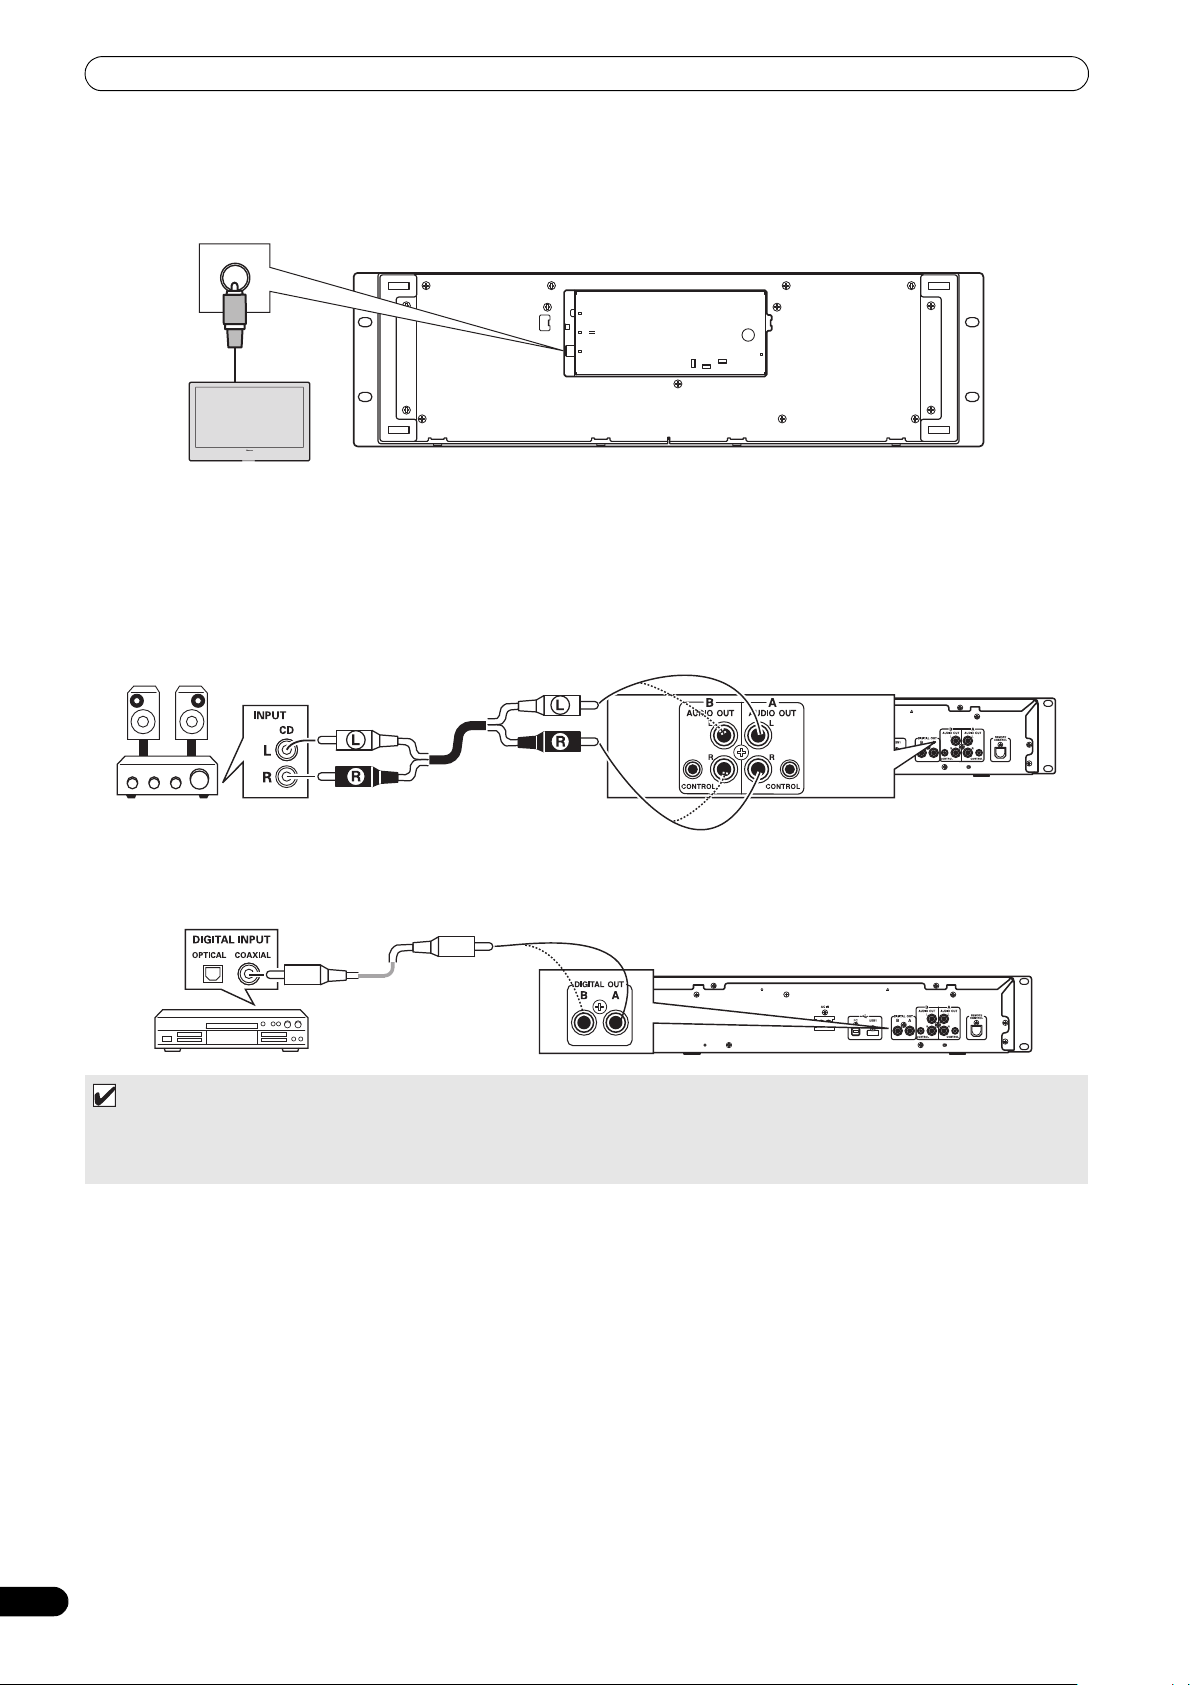
3. Connection to external monitor (pin-jack connector)
Use these connections when you wish to output the center display images to a large screen, or when using CD-G Karaoke. After
connecting this unit to the external monitor, the unit’s settings must be changed (see the item “MONITOR OUT” in the topic “[1]
DISPLAY” under the section “USIN
External monitor
4. Connecting other components
A. Connecting another mixer
Connect this unit’s AUDIO OUT connectors to the mixer’s LINE IN
sound will be distorted and proper playback will not be produced.)
B. Connecting a stereo amplifier (when not using DJ mixer)
G TH
E UTILITY” on P. 60.
Control unit
PC
5V
MONITOR OUT
REMOTE
CONTROL
or AUX connectors. (Do not connect to PHONO connectors, since
C. Connecting a component with digital input connectors
CD recorder, amplifier with
digital inputs, etc.
Drive unit
Digital
signal cable
MEMO
• The digital output connectors produce only audio data without the inclusion of subcodes.
•Depending on the CD recorder or other component, certain features, including CD recording, may be restricted. For details,
consult the operating instructions for the connected component.
16
En
Page 17
CONNECTIONS
Drive unit
Computer
Accessory
USB cable
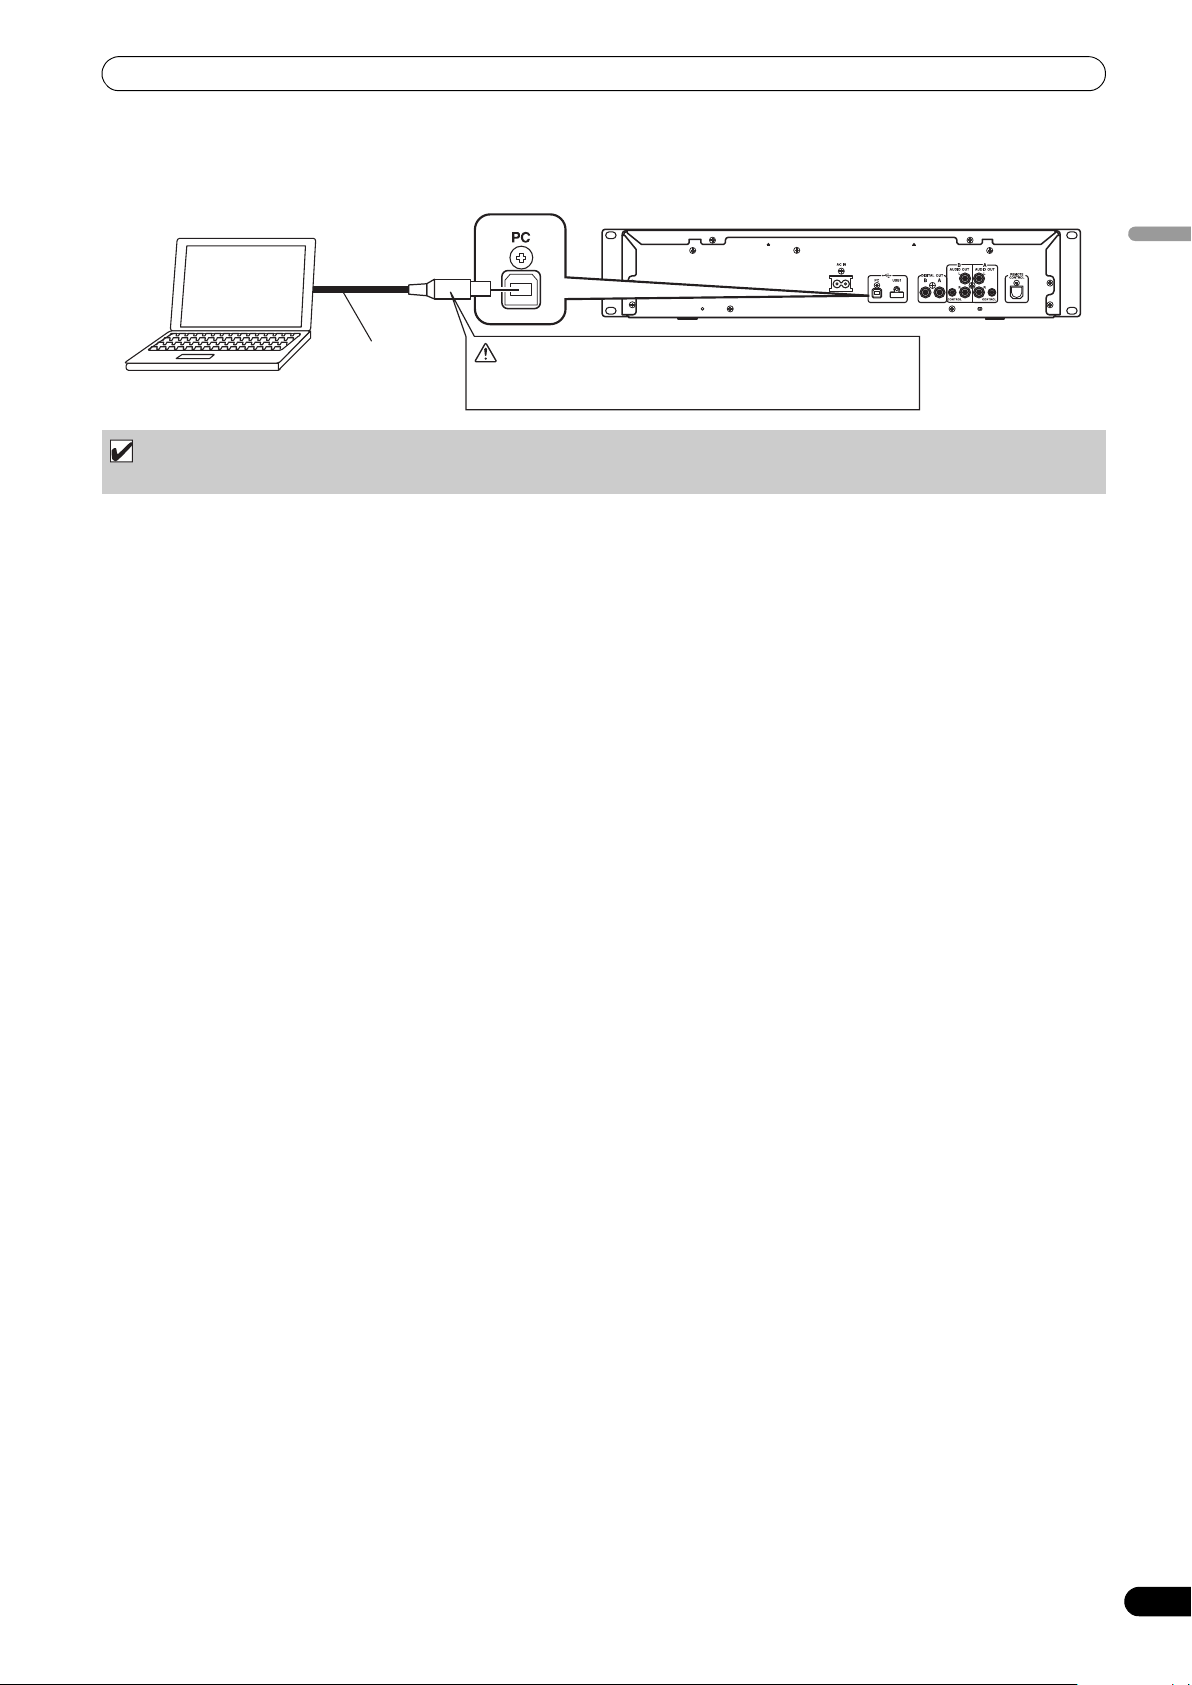
Do not connect until you have installed the required driver
in your computer. See “ABOUT THE DRIVER PROGRAM”
(P.49).
5. Connecting a computer
Make these connections in order to use the accessory DJS or other DJ software program.
NOTE
•Use only the furnished accessory USB cable.
6. Connecting the power cord
When all other connections have been completed, connect one end of the accessory power cord to the AC IN jack on the rear side of
the drive unit, and the other end to a normal AC power outlet, or the auxiliary power outlet of an amplifier.
English
17
En
Page 18
CONNECTIONS
REMOTE
CONTROL
PC
MONITOR OUT
5V
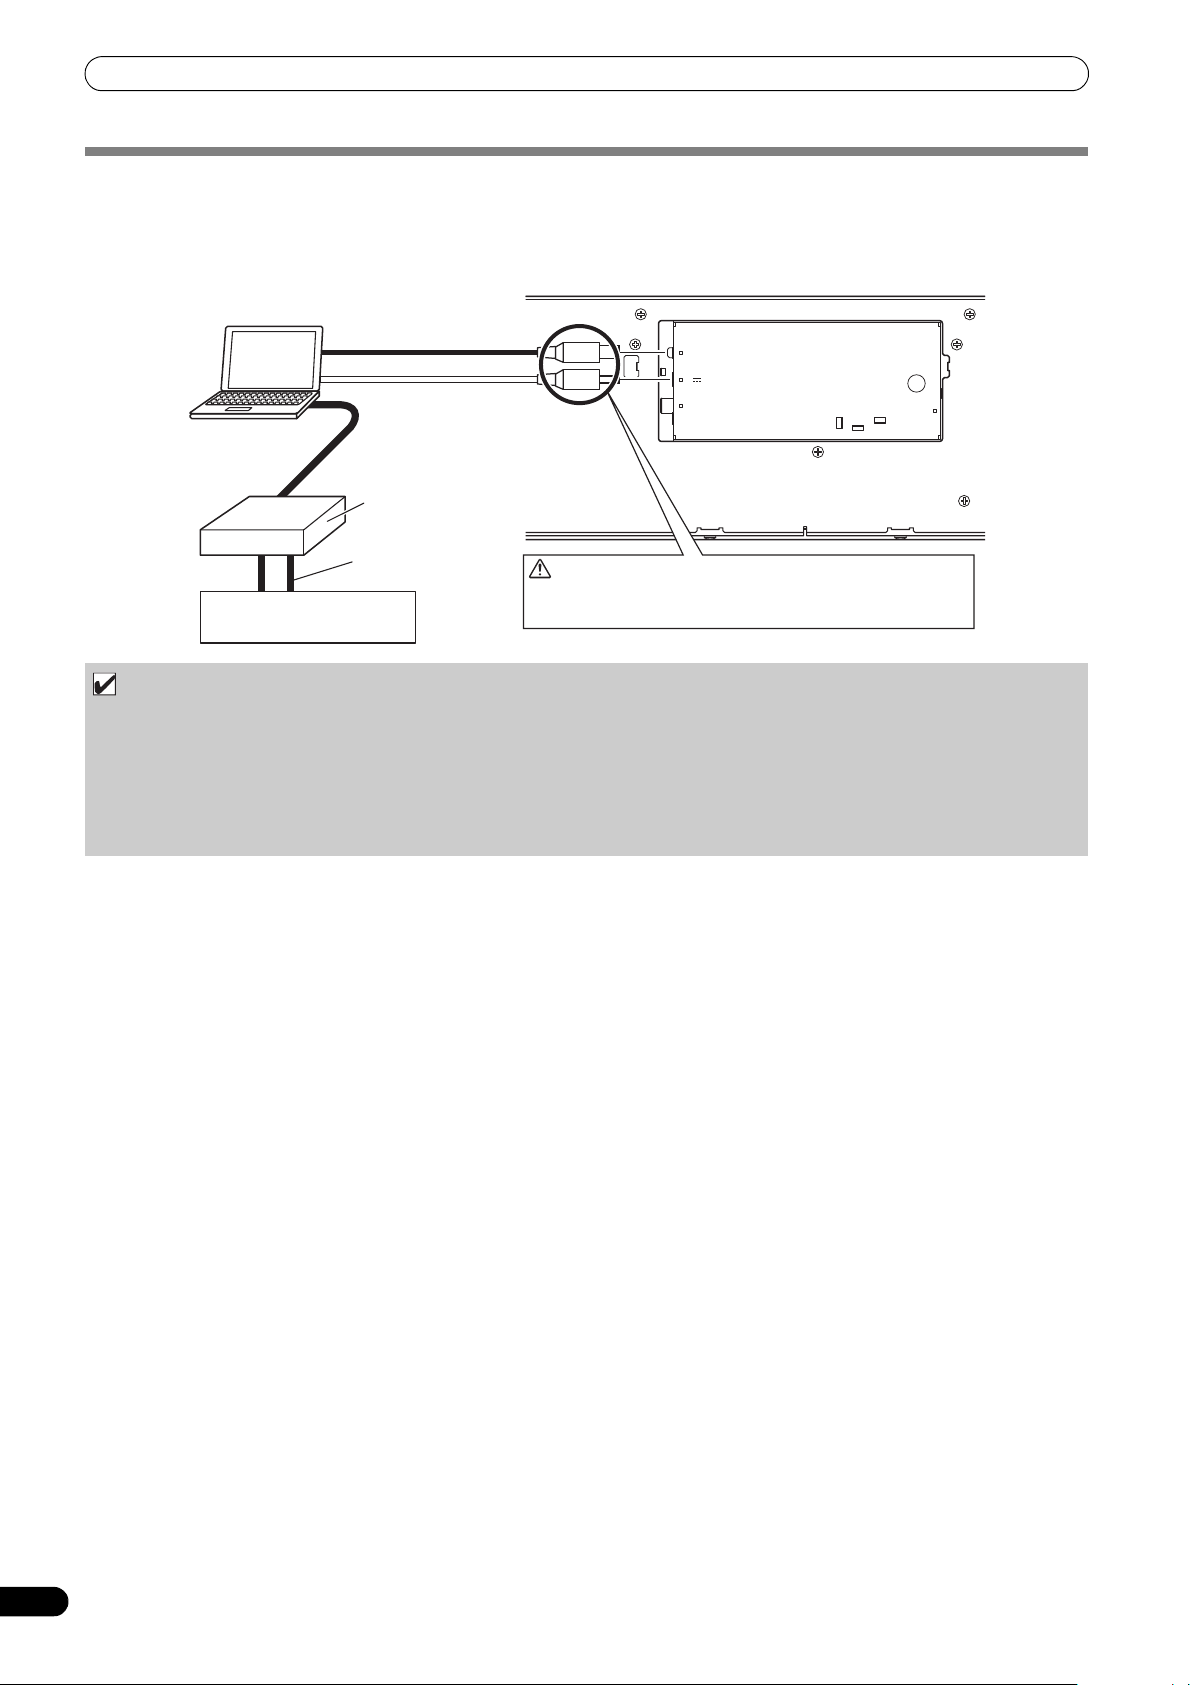
Do not connect until you have installed the required driver
in your computer. See “ABOUT THE DRIVER PROGRAM”
(P.49).
Control unit
Accessory USB cable
Accessory USB auxiliary
power cable.
Computer
Audio interface (sold separately)
Audio cable
Mixer
MANIPULATOR STYLE CONNECTIONS
These connections should be used when you wish to operate the accessory DJS or other DJ software without connecting the drive unit.
Use the accessory USB auxiliary power cable and the normal USB cable to connect the control unit to the computer (connect the USB
auxiliary power cable first).
NOTE
• When making manipulator style connections, do not connect the drive unit, since it will not function correctly.
• Do not connect anything to the 5 V connector other than the accessory USB auxiliary power cable.
• Always use the accessory USB auxiliary power cable and USB cable only.
• Always connect the accessory USB auxiliary power cable and USB cable to one and the same computer.
• Do not connect this unit to a computer through a USB hub.
• Do not connect this unit to a computer through a CardBus-supported USB interface card.
18
En
Page 19
PARTS AND THEIR FUNCTIONS
PARTS AND THEIR FUNCTIONS
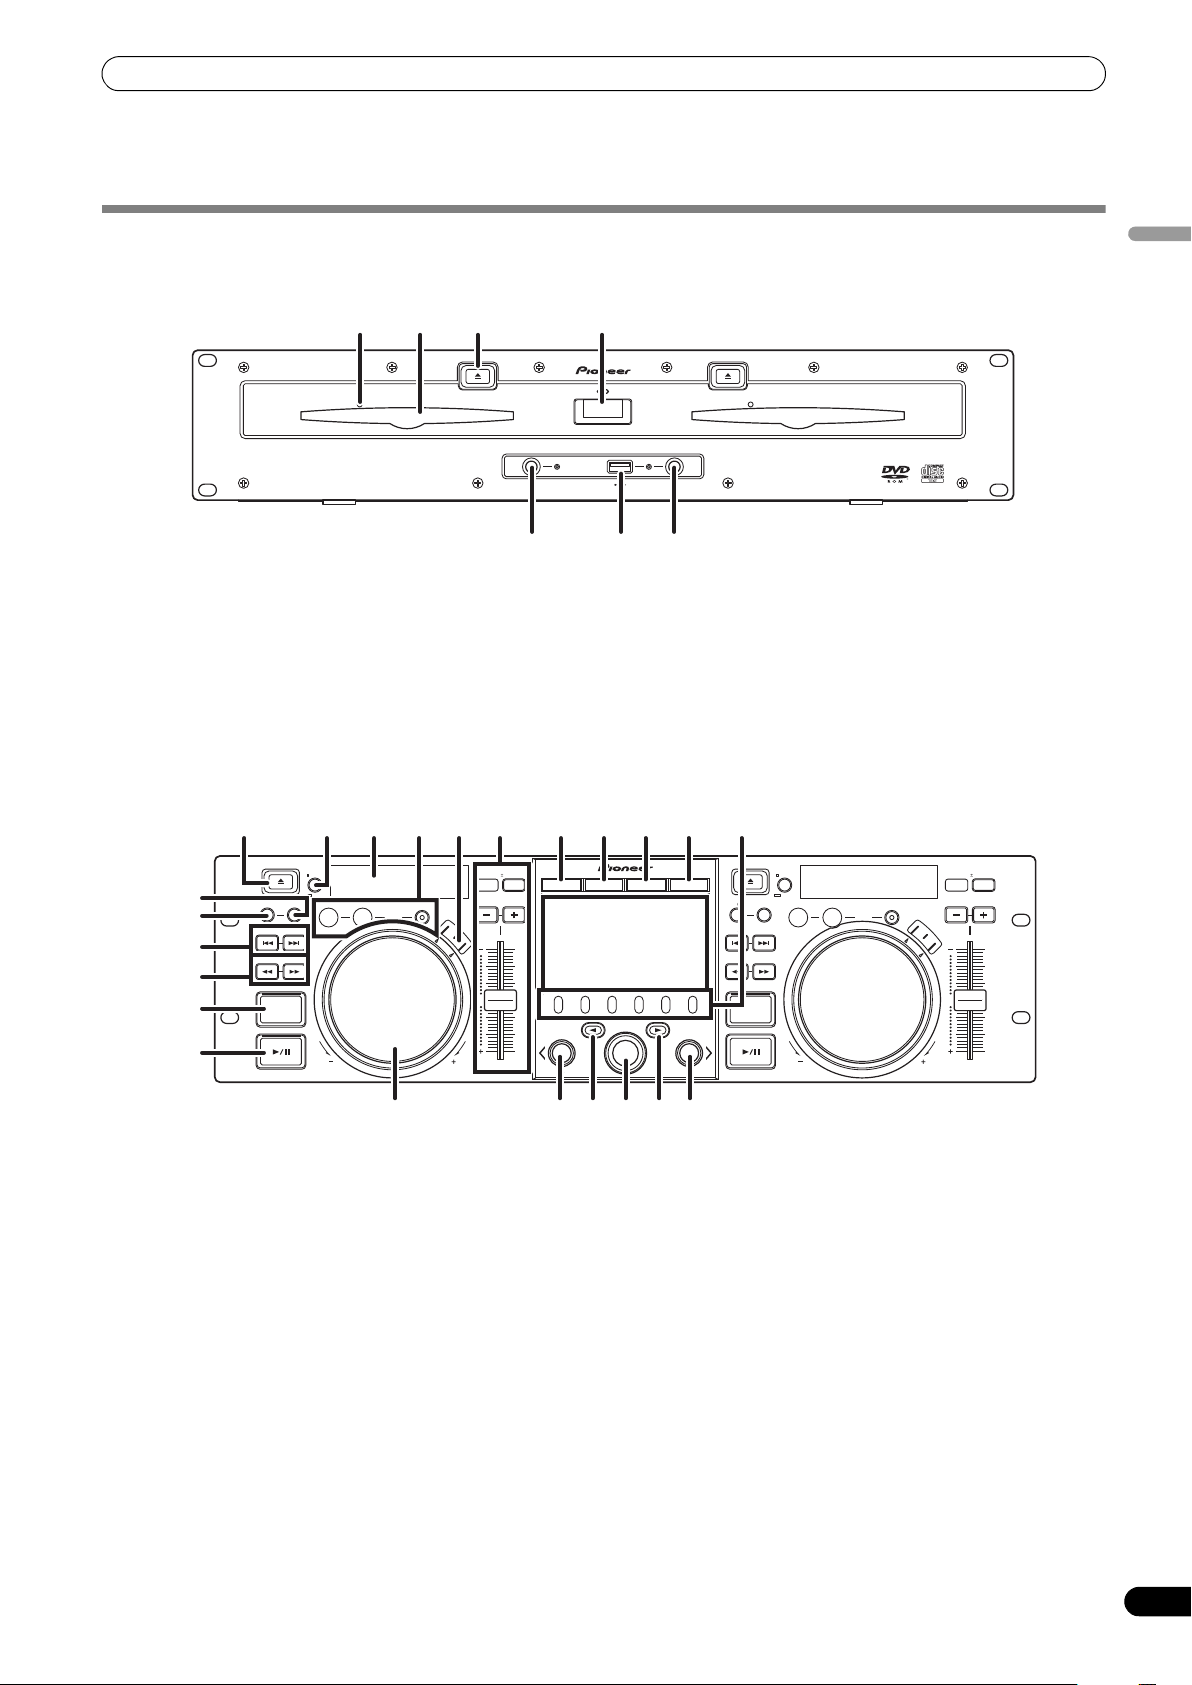
FRONT PANEL
Drive Unit
1 2 3 4
EJECT
STOP STOPREAR
1 Forced eject hole (P. 23) 2 Disc loading slot (P. 23) 3EJECT (
4 POWER switch and indicator
Control Unit
) button
To eject a disc from the disc loading slot, press this button
during the cue standby or pause mode, or when no tracks are
being loaded from the disc.
Turns unit power ON/OFF.
EJECT
POWER
DISC 1
USB 1 USB 2
56
DISC 2
7
5 USB1 STOP button and indicator
Press when removing a USB storage device from USB1 port.
6 USB2 STOP button and indicator
Press when removing a USB storage device from USB2 port.
7 USB2 port (type A)
Use to connect a USB storage device or USB keyboard.
MULTI ENTERTAINMENT PLAYER
English
MEP-7000
16
15
1
MEMORY CALL
5
6
7
8
4 22 2 3 10 11 12 13
EJECT
CUE/LOOP
TRACK SEARCH
SEARCH
QUE
TIME
A.CUE
IN/CUE
HOT LOOP
OUT/ADJUST
RELOOP/EXIT
LOOP
S
C
R
A
T
C
H
TEMPO
MASTER
6/10/16WIDE
TEMPO
MT
PITCH BEND
J
O
G
B
R
E
A
K
0
FWD TEMPOREV
1EJECT () button
To eject a disc from the disc loading slot, press this button
during the cue standby or pause mode, or when no tracks are
being loaded from the disc.
2 LOOP operation buttons (P. 38)
BROWSE MIX EFFECT UTILITY
21
A
LOAD
MULTI ENTERTAINMENT PLAYER
18 14 20
1923
3 TEMPO control section
TEMPO control range button (±6/10/16/WIDE):
Each time the button is pressed, the
TEMPO adjust slider changes.
MASTER TEMPO button and indicator (MT):
Each time the button is press
alternates ON/OFF.
TEMPO adjust slider:
From th
to increase the tempo, and push the slider away from you (–)
to slow down the tempo.
PITCH BEND +/– buttons:
When pressed during
Pressing the “+” button accelerates the pitch bend speed, and
pressing the “–” button decelerates the pitch bend speed.
The speed of the pi
button depressed while rotating the jog dial.
179
EJECT
CUE/LOOP
MEMORY CALL
TRACK SEARCH
SEARCH
QUE
B
LOAD
MEP-7000
18
e center detent posit
TEMPO
TIME
A.CUE
IN/CUE
HOT LOOP
OUT/ADJUST
RELOOP/EXIT
LOOP
MASTER
6/10/16WIDE
TEMPO
MT
PITCH BEND
S
C
R
A
T
C
H
J
O
G
B
R
E
A
K
0
FWD TEMPOREV
variable range of the
master tempo function
ed, the
ion, pull the slider towards you (+)
play, the pitc
change can be modified by holding the
tch
h bend function is enabled.
19
En
Page 20

PARTS AND THEIR FUNCTIONS
4 Time mode/auto cue button (TIME/A.CUE)
TIME:
Each time the button is pressed, the display’s time display
alternates between the current track’s elapsed playing time,
and the remaining time (REMAIN).
A.CUE: (P. 37) 5 TRACK SEARCH (, ) buttons (P. 35) 6SEARCH ( 7 CUE button and indicator
Setting a cue point (P. 36)
Cue point sampler (P. 36)
Back-c
Modifying a cue pin
8 Play/pause () button and indicator (P. 34) 9 SCRATCH/JOG BREAK buttons and indicators
Use to select jog mode, including SCRATCH, JOG BREAK, or
OFF (neither indicator lighted).
10 BROWSE button (P. 26)
Use to select the BROWSE screen.
11 MIX button (P. 42)
Use to select the MIX screen.
12 EFFECT button (P. 39)
Use to select the EFFECT screen.
13 UTILITY button (P. 60)
Use to select the UTILITY screen.
14 Rotary selector dial
Rotate clockwise/counterclockwise for track selection and to
move cursor between setting items. Press to confirm
selection.
15 CUE/LOOP MEMORY button (P. 38)
Use to store cue points and loop points in memory.
Hold the button depressed to cancel a loop poi
16 CUE/LOOP CALL button (P. 38)
Use to call up cue and loop points stored in memory.
,
ue (P. 36)
) buttons (P. 34)
t (P. 36)
nt.
17 Function buttons (F1 to F6, from left)
Switching between the functions allocated to the six function
buttons can be performed by using the menu shown on the
center display.
On BROWSE screen:
“SELECT THE TRACK
On MIX scre
“MIX SCREEN” (P. 42)
On EFFECT screen
“[1] Scratch effect” (P. 39)
“[2] Jog break effect” (P. 41)
On UTILITY screen:
“USING MIDI FOR COMPUTER CONTROL” (P. 55)
“USING THE UTILITY” (P. 60)
18 LOAD A/B buttons
Sets the selected track in the controller A/B.
19 Select up () button
Each time this button is pressed, the display returns to the next
higher menu level.
20 Select down () button
Each time this button is pressed, the display advances to the
next lower menu level.
21 Center display (P. 21) 22 Display A/Display B (P. 21) 23 Jog dial (+FWD/–REV) (P. 35)
en:
” (P. 28)
20
En
Page 21
PARTS AND THEIR FUNCTIONS
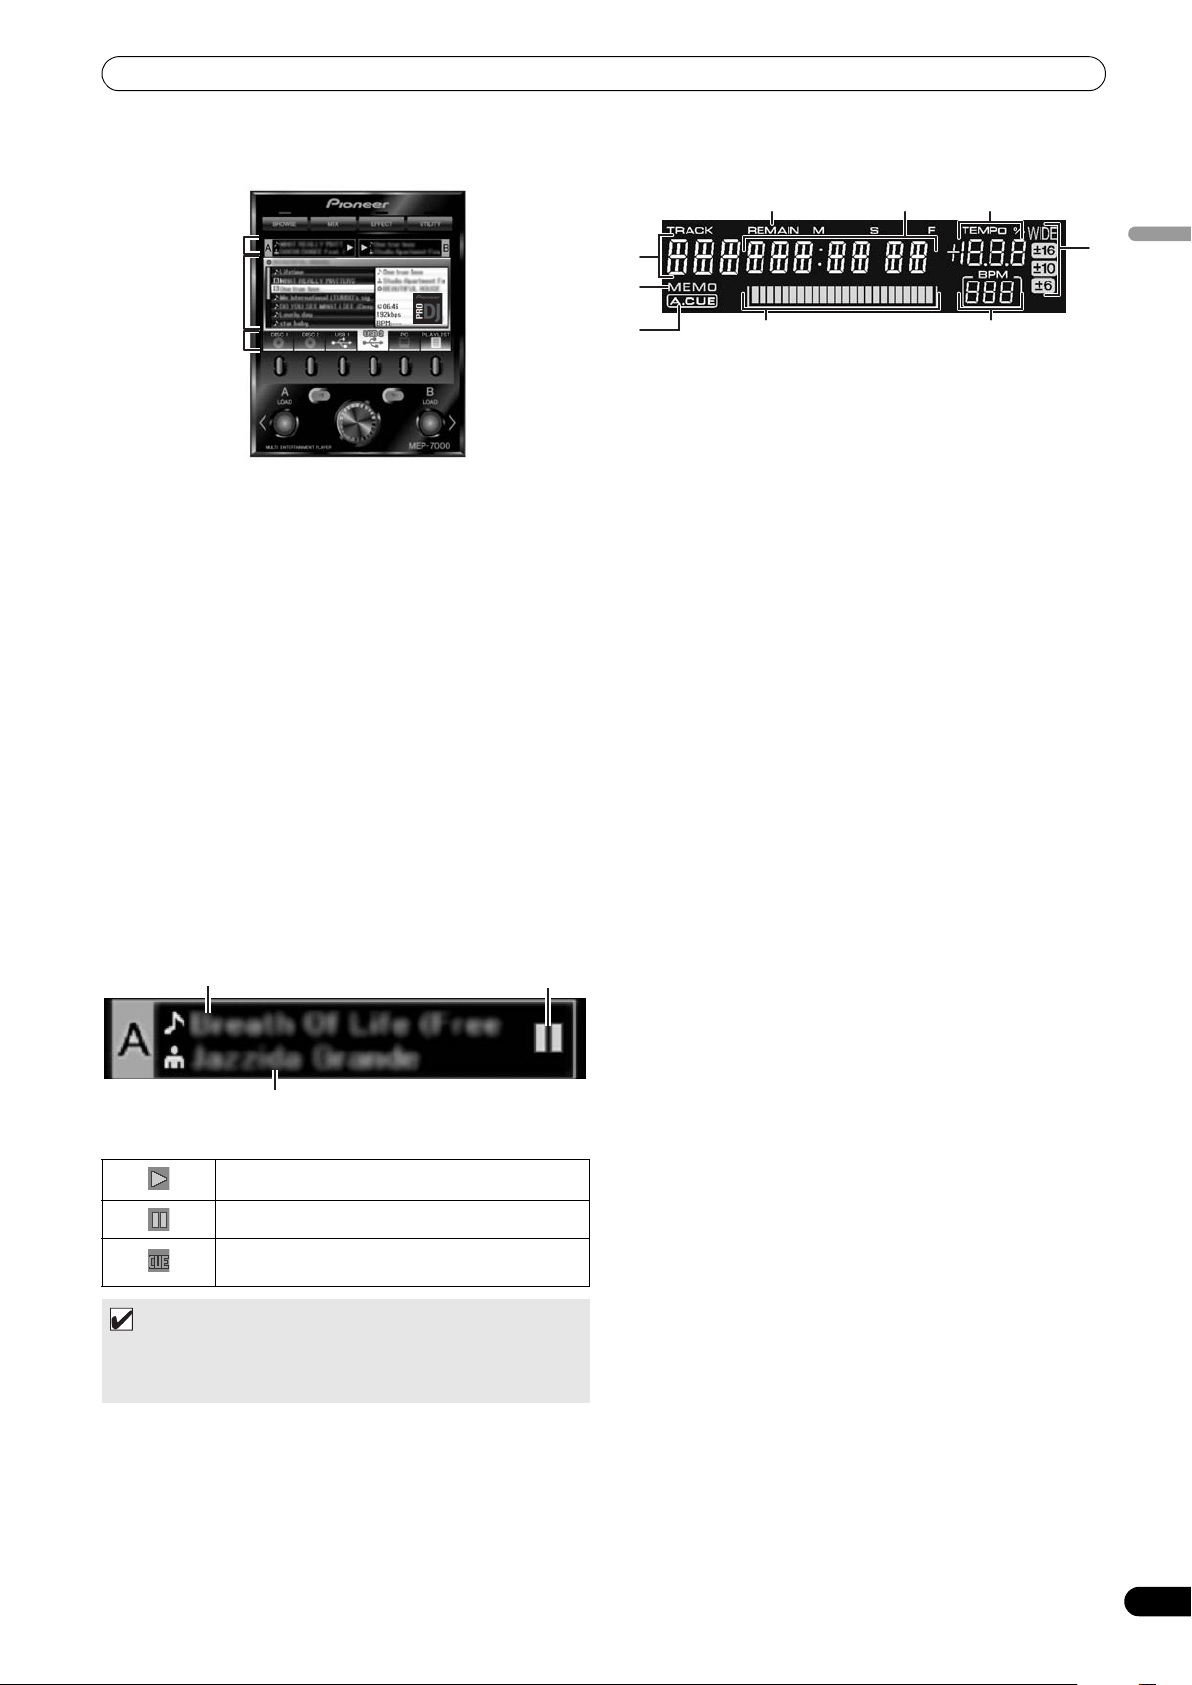
Track name Play status
Artist name
1
8
4
6
2
7
3
5
9
Center Display
3
1
2
1 Main menu display
The center display’s menus are changed by using the
BROWSE button, MIX button, EFFECT button, and UTILITY
button. The function buttons, select up ()/down() buttons,
LOAD A/B buttons, and the rotary selector dial are used to
manipulate the contents of each menu.
BROWSE
Use to select tracks and construct playlists (P. 26).
MIX screen
Use to perform m
playlists (P. 42).
EFFECT
Use to select scratch play and various effects used in jog break
play (P. 39).
UTILITY
Use to make unit settings (P. 60).
2 Function tab
Displays items that can be changed using the six function
buttons. Items displayed differ depending on the contents
shown on the main menu display.
3 A/B track information display
Displays track information and current status for tracks
playing on controller A/B.
screen
screen
screen
ixing operat
ions, including auto mix using
Display A/Display B
1 Track number display
Displays the number of the track currently playing.
2 TEMPO control range display (±6, ±10, ±16, WIDE)
Displays the selected variable range mode of the TEMPO
adjust slider.
3 TEMPO change ratio display
Displays the change in tempo produced by the operation of the
TEMPO adjust slider.
4 A.CUE indicator
Lights when the Auto Cue function is ON.
5Time display
Displays the current track’s elapsed time ([REMAIN] indicator
is off), or remaining time ([REMAIN] indicator is lighted), in
minutes [M], seconds [S], and frames [F].
6 Playing address display
To provide a quick intuitive grasp of the relative progress of a
track’s playback (either elapsed time or remaining time), a bar
graph is used to represent the full length of the track.
splay: Starts with all segments off, then
•Elapsed ti
gradually lights from left to right.
• Remaining time display: Starts
gradually goes off from left to right.
• When 30 seconds of remaining pla
graph begins to flash slowly.
• When 15 seconds of remaining pla
graph begins to flash quickly.
7 BPM display
Shows the currently playing track’s BPM (Beats Per Minute)
8 MEMO indicator
Lights when a cue or loop point has been stored in memory.
9 REMAIN indicator
Lights when the time display is set for remaining time.
me di
with all segments on, then
ying time is reached, the
ying time is reached, the
English
Play status
Indicates track is currently playing.
Indicates track is currently paused.
Indicates track is currently in cue standby
condition (see P. 36 “SETTING CUE POINTS”).
MEMO
•Track name and artist name can be displayed in Western
European languages, Russian, Chinese (simplified
Mandarin), and Japanese.
21
En
Page 22
PARTS AND THEIR FUNCTIONS
AC IN
AB
DIGITAL OUT
REMOTE
CONTROL
AB
AUDIO OUTAUDIO OUT
L
R
CONTROL CONTROL
L
R
USB1PC
1 23 4 76
5
PC
MONITOR OUT
5V
REMOTE
CONTROL
1
2
3
4
REAR PANEL
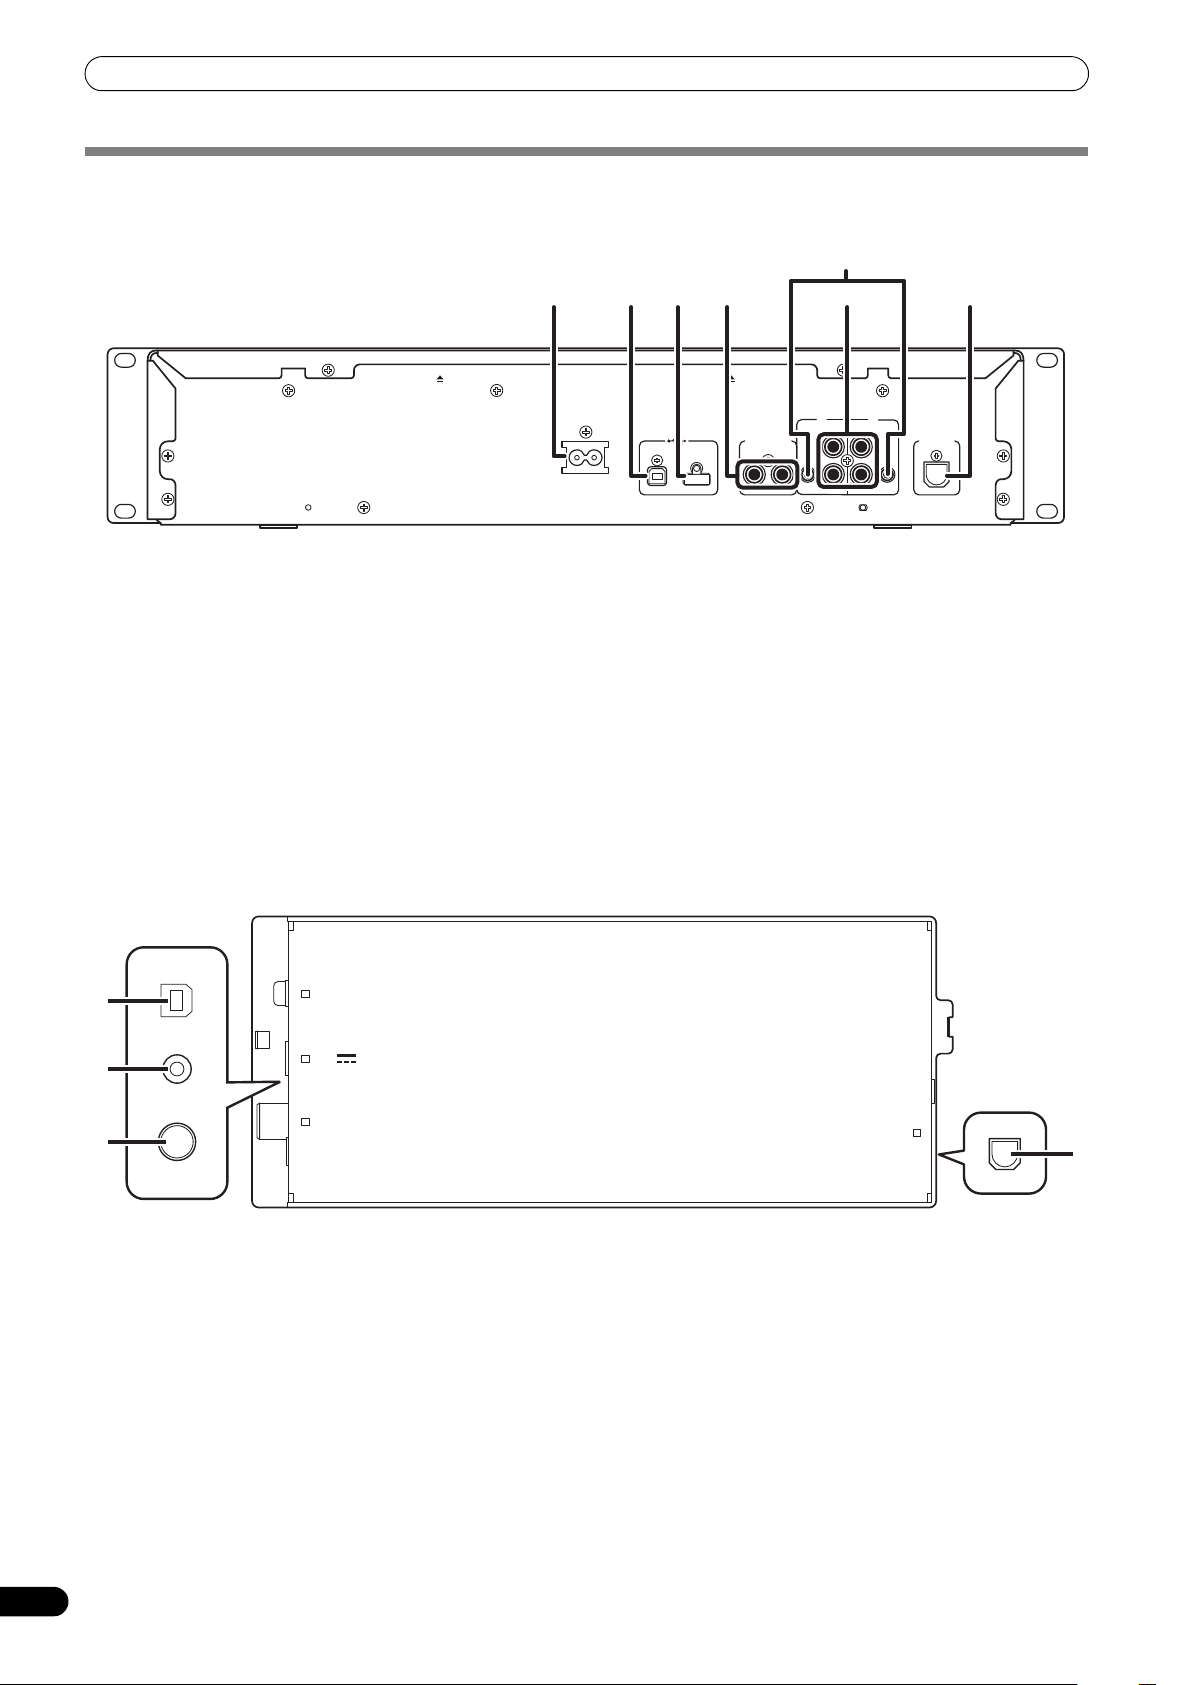
Drive Unit
1 AC inlet (AC IN)
Use the supplied power cord to connect this inlet to a
household AC outlet.
2 PC connector: USB port (type B)
Use the supplied USB cable to connect this port to a computer.
3 USB1 port (type A)
Use to connect a USB storage device or USB keyboard.
4 Digital output connectors (DIGITAL OUT A/B)
RCA-type coaxial digital output connector for connecting a DJ
mixer, AV amplifier, CD recorder or other component
supporting digital input.
The output supports all f
unctions incl
uding DJ function, but
only audio data not including subcodes is output.
Control Unit
5 Control jacks (CONTROL A/B)
When the supplied control cord is used to connect this unit to
a Pioneer DJ mixer, the DJ mixer can be used to control this
unit so as to perform fader start play and back cue operations.
Also, by connecting this jack to another DJ player’s control
jack, automated relay play can be performed.*
*Relay pla
y is disabled during
DJ software track selection.
6 Audio output connectors (AUDIO OUT A/B)
RCA-type analog audio output connectors.
7 Remote control connector (REMOTE CONTROL)
Use the supplied dedicated remote control cable to connect to
the control unit.
1 PC connector: USB port (type B)
Use the accessory USB cable to connect this port to a
computer.
2 5 V connector
Use the accessory USB auxiliary power cable to connect to a
3 Video output connector (MONITOR OUT)
Use a video cable to connect to an external display.
4 Remote control connector (REMOTE CONTROL)
Use the supplied dedicated remote control cable to connect to
the drive unit.
computer.
22
En
Page 23

HANDLING DISCS AND OTHER MEDIA
Forcible eject hole
HANDLING DISCS AND OTHER MEDIA
LOADING AND REMOVING DISCS
Label
surface up
Insert straight
POWER switch
1 Set the drive unit’s front panel POWER switch to ON.
NOTE
• Do not attempt to forcibly insert a disc when the power is
off, since damage may occur to the disc or loading
mechanism.
2 Insert a disc.
•Insert the disc flat with the label surface upright.
• Only one disc can be loaded at a time. Do not attempt to
insert two di
one is already playing.
•When inserti
much pressure that the disc bends. Also, when the
mechanism is pulling in a disc or ejecting a disc, do not
apply opposing pressure so as to defeat the mechanism’s
purpose. Any of these actions may damage the disc or
mechanism.
3 To remove a currently playing disc, first press the play/pause
(
) button to stop the playback, then press the EJECT ()
button. Alternately, when a cue point has been set, during
play press the CUE button (to cause “back cue”) and then
press the EJECT (
Disc rotation will stop and the disc will be ejected from the slot.
scs together, or to insert a second disc when
ng a disc
, do not apply excessive force, or so
) button.
REGARDING FORCIBLE DISC EJECT
If the EJECT () button fails to operate and a disc cannot be
removed, insert the furnished forcible eject pin into the forcible
eject hole on the front panel of the drive unit to allow the disc to be
removed.
When performing forcible eject, always abide by the following
precautions:
1 Turn off the power to the drive unit and wait at least one
minute.
Inserting the forcible eject pin before one minute
has elapsed may occasion the following dangers:
• The disc may be ejected while it is still rotating at high speed,
causing injury to fingers or hands.
•The drive’s disc clamp may rotate in an unstable condition,
causing damage to the disc.
2 Use only the furnished eject pin (do not use other objects)
When the forcible eject pin is inserted fully into the forcible
eject hole, the disc will come out of the slot by about 5 mm to
10 mm, where it can be grasped by the fingers and removed.
English
NOTE
• Do not attempt to reinsert a disc while the eject procedure
is still operating and the [EJECT] indicator is lighted. If a
disc is pressed back in while it is still being ejected (the
[EJECT] indicator is lighted), the mechanism may stop. In
this case, press the EJECT () button once again, and wait
until the [EJECT] indicator has gone out before reinserting
the disc.
23
En
Page 24
HANDLING DISCS AND OTHER MEDIA
USB storage
device
USB2 port
USB storage
device
USB1 port
WRITING MANAGEMENT DATA TO A USB STORAGE DEVICE
When this unit is used with a USB storage device to play music,
various management data files are created within the storage
device. The management data are of the following three types, and
stored within the hidden director y named “PIONEER” (in HFS+
format, named “.PIONEER”). Note that if these data folders and
their files are deleted, cue and other information created by the
unit will be deleted.
CUE folder
Cue data files are created whenever cue point memory is used with
tracks on the USB storage device. Approximately 200 bytes of
space are required for each cue point.
PLAYLIST folder
Playlist data files are created whenever a playlist is created for
tracks on a USB storage device. Approximately 100 Kbytes are
required for each playlist.
LIBRARY folder
This folder is created whenever the UTILITY screen is used to make
a music library. Storage space required per track ranges from
several hundred bytes to about 1 Kbyte.
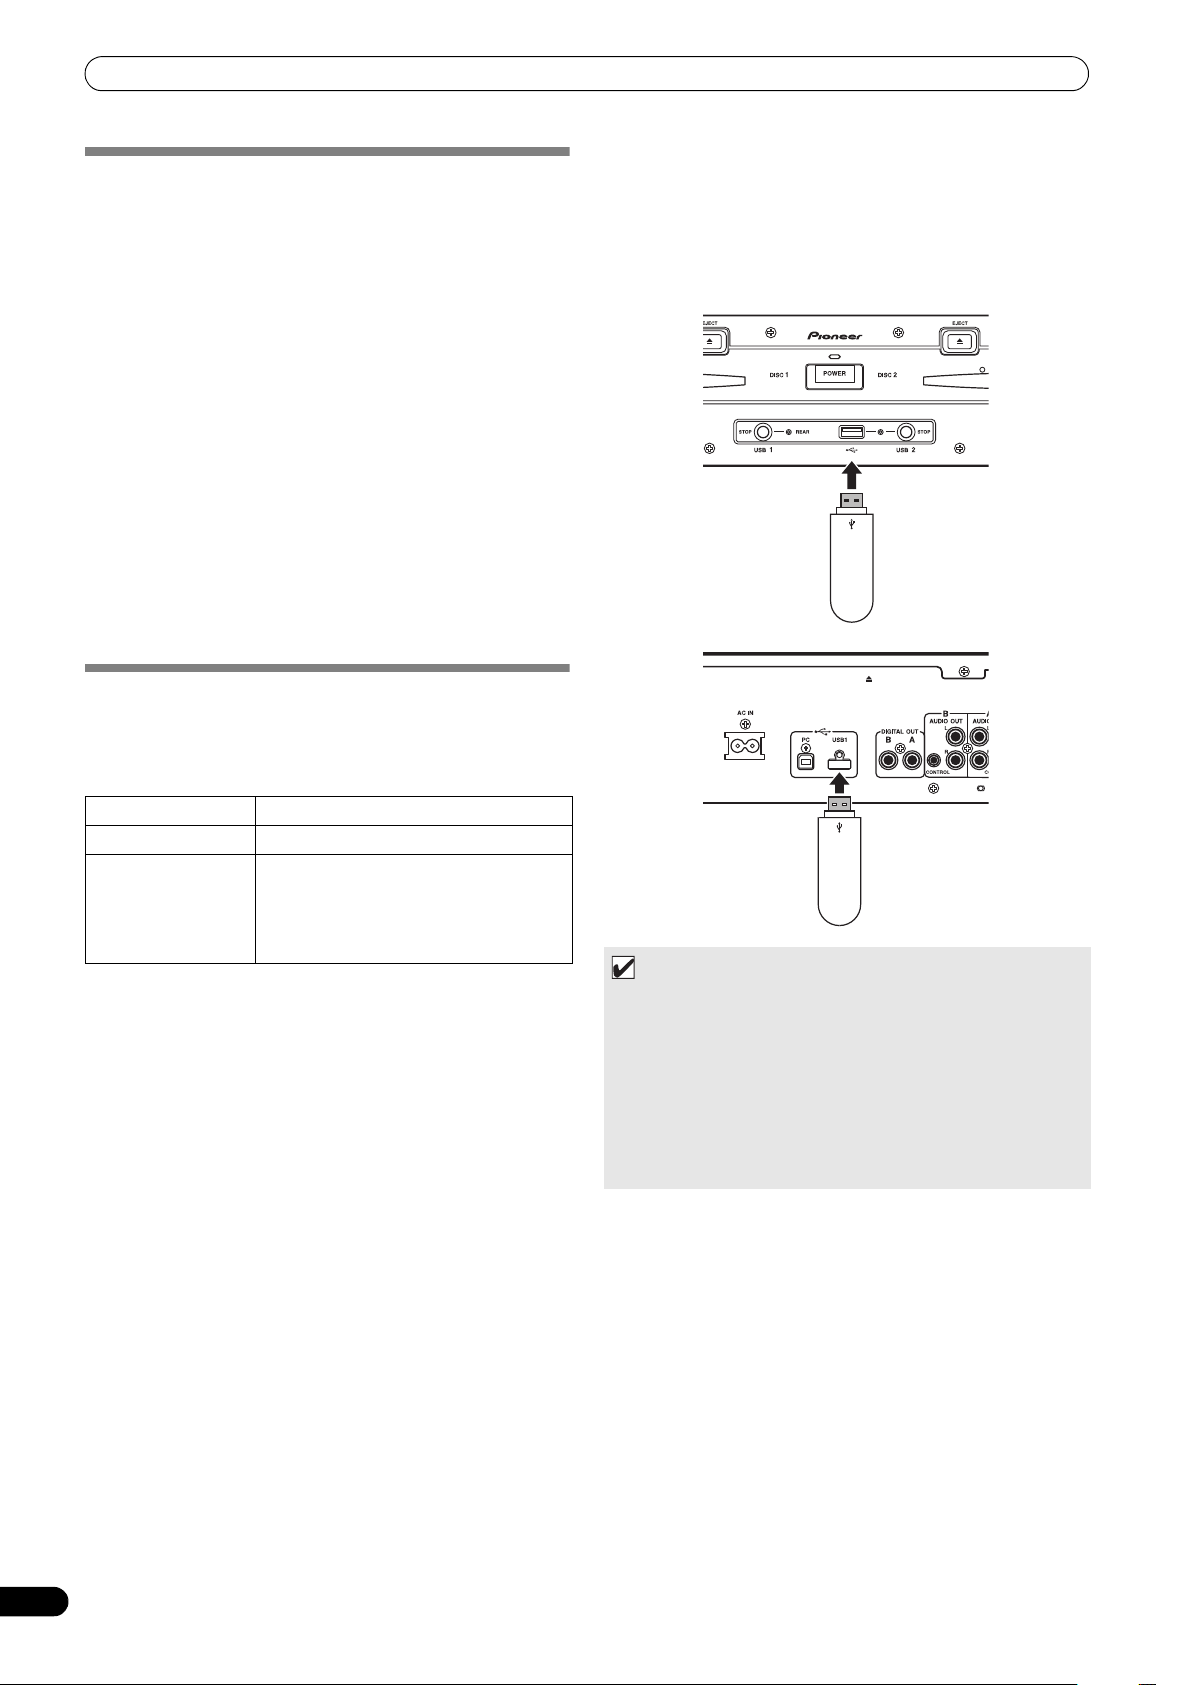
Connecting a USB storage device
By connecting a USB memory or other USB storage device, the
music files on the storage device will be read into this unit.
1 Connect the device to the USB1 or USB2 port. 2 Confirm that the indicator lights red.
Confirm on the front panel that the indicator for the port used
has changed from not lighted to lighted red.
CONNECTING AND DISCONNECTING USB STORAGE DEVICES
Indicator contents
Displays the connection status for the USB storage device.
Not lighted Device not connected
steadily
Lighted
Flashing (two stages) The STOP button has been pressed and
• The communication status between this unit and the USB
storage device can be confirmed by viewing the storage device’s
status lamp.
Device is detected
device is being dismounted.
If the STOP button is released while the
indicator is flashing slowly, the dismount
will be canceled.
MEMO
•USB storage devices supported by this unit are of the class of
USB mass storage devices including external hard discs,
portable flash memory devices, and digital audio player.
However, optical disc devices such as external DVD/CD drives
cannot be used.
• When connecting a USB storage device containing a large
number of folders and files, some time may be required to read
in the device contents.
• When a connected USB storage device contains multiple
partitions, only the initial partition can be used.
24
En
Page 25

HANDLING DISCS AND OTHER MEDIA
CAUTION
Depending on the device used, proper playback may not be possible with all USB storage devices. Pioneer assumes no responsibility for any loss of data resulting from connecting any given USB device to this unit.
•Proper operation may not be possible when a USB storage
device is connected through a USB hub.
• Even if a USB hub is used to connect multiple USB storage
devices, the second and later devices cannot be used.
•Operation cannot be guaranteed when using a USB
storage device with installed flash card reader.
• When connecting a USB storage device utilizing two USB
cables, connect both cables to this unit’s USB ports.
• If an electrical current stronger than the allowable current
is applied to the unit’s USB1 port or USB2 port, the unit may
stop supplying power to the USB storage device, thus
terminating transmission. In this case, a message will be
displayed in the center display of
indicators for USB1 and USB2 will flash red
simultaneously. To restore normal operation, disconnect all
USB storage devices connected to the unit, then hold either
of the USB STOP buttons depressed for two seconds or
more. Avoid connecting the USB storage device from which
the excess current was detected and other USB storage
devices connected through a bus-powered USB hub. If
normal operation is not restored through this method, turn
the power of this unit off, and then turn it back on.
the unit, and the stop
To disconnect a USB storage device
1 Hold the STOP button pressed for two second or more. 2 Confirm that the indicator goes out.
Confirm on the front panel that the red indicator for the
connected port has change from flashing to off.
3 Disconnect the USB storage device.
MEMO
•After the indicator goes out, if the STOP button is held
depressed for two seconds or more, the USB storage device's
connection can be reinitiated without the need to physically
disconnect and reconnect it.
CAUTION
When disconnecting a USB storage device, always be sure to perform the STOP operation first.
If the STOP operation is not completed before disconnection, cue/loop memory and playlist update may not occur properly, resulting in the loss of data. Also, the USB storage device may becomes unreadable, or other substantial damage may occur.
In the case of a HDD device, do not subject it to impact or vibration during use.
Always disconnect the USB storage device before turning off the power to this unit.
English
25
En
Page 26
START PLAYBACK (Using normal connections)
BROWSE
LOAD BLOAD A Rotary selector dial
Select down () button
Select up () button
Function buttons
2
3
5
4
6
1
7
START PLAYBACK
(Using normal connections)
Using the MEP-7000, track selection can be performed on the center display from up to six kinds of music source, including two discs,
two USB storage devices, a personal computer (DJ software), and playlists. The buttons needed for selecting each type of source are
illustrated below.
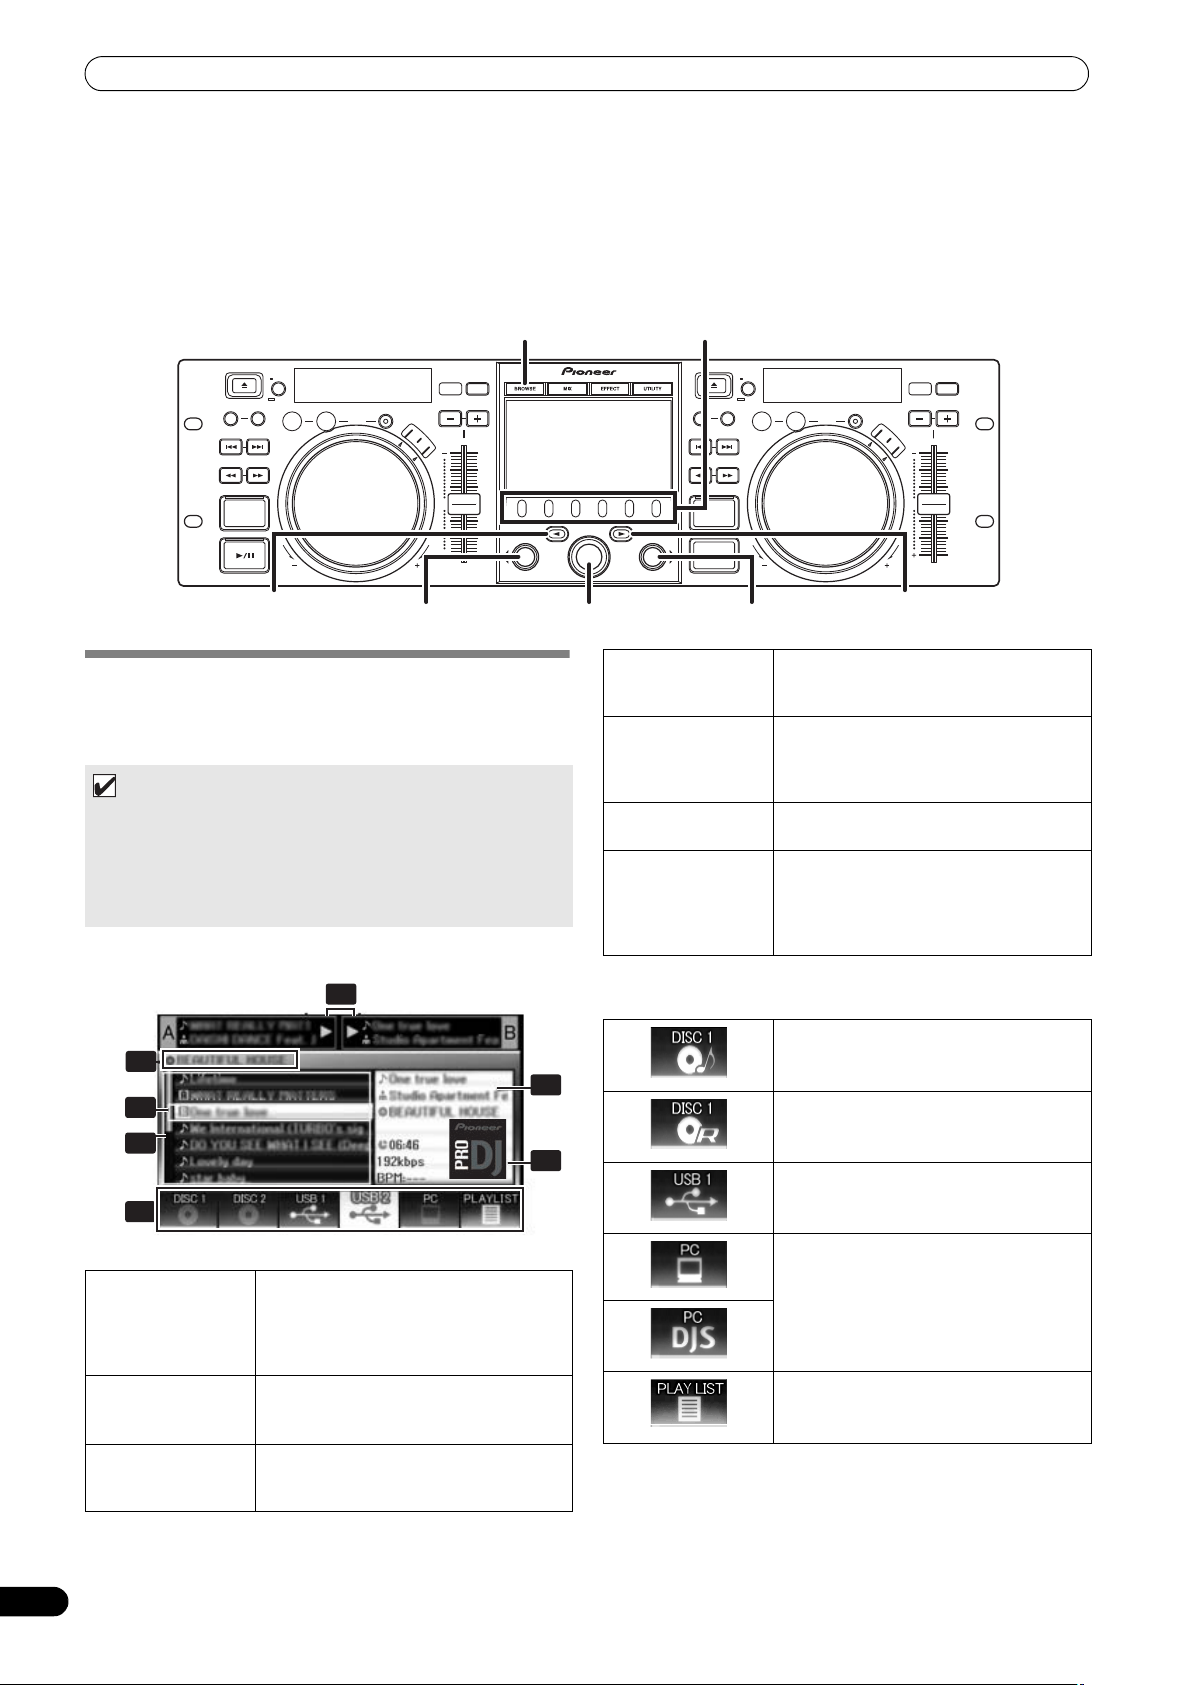
BROWSE SCREEN
When the BROWSE button is pressed, the BROWSE screen shown
below will be displayed, allowing confirmation of all information
necessary for track selection.
MEMO
•Track information, including file/folder names, title, and artist
can be displayed in Western European languages, Russian,
Chinese (simplified Mandarin) and Japanese.
•If characters are not displayed correctly, use the LANGUAGE
item on the UTILITY screen to select the desired language (P.
61).
4 Browse window
5 Higher level
name
6 Source selection
7 Jacket photo
display
Source icons
The following icons are displayed in the source selection section.
Displays the selected source contents.
Displays contents in alphabetical order by
M3U files, folders, and tracks.
Displays the name of the folder or source
at the next higher level of the hierarchy
relative to the item currently shown in the
browse window.
Use the function button to select the
source displayed in the window.
If a JPEG image is attached to the ID3 tag
or present in the folder, when the
selection cursor is used to choose a track,
the associated image will be displayed in
the contents display section.
Music CD (CD-DA) disc. Selecting this
icon displays the disc’s contents.
CD-ROM/DVD-ROM disc. Selecting this
icon displays the disc’s contents.
Selecting this icon displays the contents
of the USB storage device.
1 Contents display
2 A/B track
3 Selection cursor
26
En
information
display
Displays the contents of the line selected
with the cursor. In the case of a folder, the
contents of the folder ar e displayed; in the
case of a track, the track information is
displayed.
Displays title, artist name, and playback
status for track currently set in controller.
Use the rotary selector dial to move this
cursor up/down and select folders and
tracks.
Selecting this icon enables DJ software
control (P. 53).
When DJS is booted, changes to DJS
icon.
Selecting this icon displays the playlist (P.
32).
Page 27

START PLAYBACK (Using normal connections)
Browse icons
These icons indicate the types of items displayed in the browse
window.
Track
Track (with memory cue)
Track (currently playing on Controller A)
Track (currently playing on Controller B)
File Browsing
Displays as-written structure of folders and files in selected
source.
English
Track (currently playing on both
controllers)
Folder
M3u file or playlist
Album
Artist
Genre
FILE BROWSING AND LIBRARY BROWSING
This unit can display the as-written structure of file and folder
contents for discs and USB storage devices, and allow the user to
browse the contents. This manner of display is called “file
browsing.”
Further, in the case of USB storage devices, by constructing a
library within the device based on ID3 tags and other track
information, tracks can be classified by album name, artist name,
and genre, thus facilitating track selection. This kind of display is
called “library browsing” For instructions on how to make libraries,
see P. 62 “CREATING LIBRARIES.”
Library Browsing
Screen menu is displayed as shown below, allowing track
selection based on genre, artist name, album name, or title.
[GENRE]
Allows track selection in order of Genre Artist name Album
name Title.
[ARTIST]
Allows track selection in order of Artist name Album name
Title.
[ALBUM]
Allows track selection in order of Album name Title.
[TRACK]
Allows track selection from the song title.
SEARCH]
Select titles by searching for track titles (P. 29).
[SEARCH]
Select titles by searching for artist names (P. 29).
[ALL]
In the event that multiple folders exist within the selected category
of [GENRE] or [ARTIST], the [ALL] item will appear. By selecting
ll content items existing on the same hierarchy level as tha
[ALL], a
selected will be displayed.
t
MEMO
• In the case of library browsing, even when a device has a
previously created library, the UTILITY setting can be used to
switch to file browsing (P. 61).
•Tracks without genre, artist name or album name will be listed
together as [Unknown] within the respective categories.
• In the event track numbers are written in the track tags, the
tracks within album will be displayed in their track order. In the
case of genre, artist, and album, display will be in alphabetical
order.
27
En
Page 28
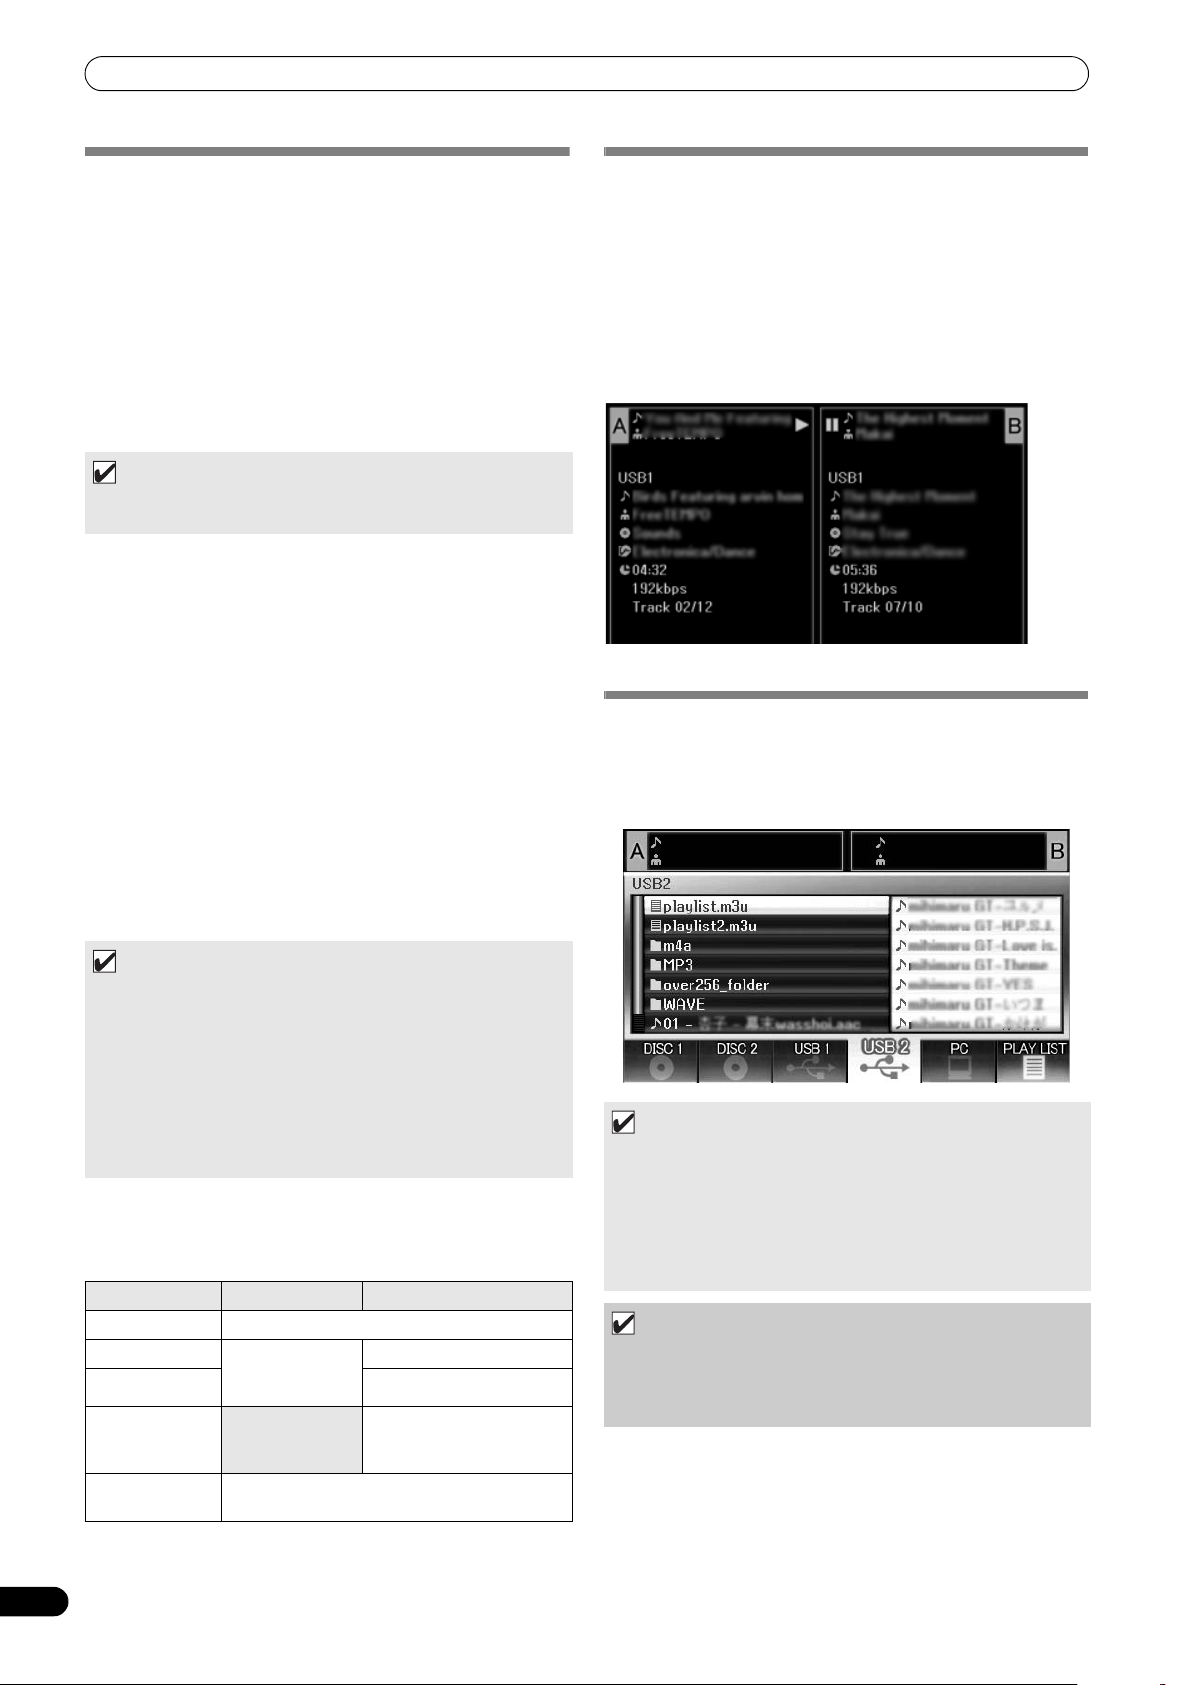
START PLAYBACK (Using normal connections)
SELECT THE TRACK
1 Press the BROWSE button.
The BROWSE screen will appear.
2 Prepare the source you wish to play.
For discs
Load the disc into either Drive 1 or Drive 2.
For USB storage devices
Insert the USB storage device into either port USB1 or USB2.
For DJS
Connect your computer to the drive unit’s PC connector, and start
the DJS software.
MEMO
•For instructions on operating the DJS software, see the section
“USING DJ SOFTWARE” on P. 52.
3 Use the function buttons to select the source you wish to
play.
The contents of the selected source will be displayed in the
window. In the event that a library is present in the USB
storage device, track selection can be performed by the name
of the album or artist.
4 Turn the rotary selector dial.
The selection cursor in the browse window can be moved up/
down. The contents display shows the contents of selected
folders and track information.
5 Use the select up ()/down () buttons to move up/down
the folder hierarchy.
When a folder has been selected, press the button (or press
the rotary selector dial) to enter that folder.
he select up () but
Press t
hierarchy.
6 Press the LOAD A button or LOAD B button.
A track will be loaded in the controller A or B, and the loaded
track will begin playback.
ton to return one level up the folder
VIEW PROPERTIES OF THE CURRENTLY PLAYING TRACK
1 Of the four buttons (BROWSE, MIX, EFFECT, UTILITY), once
again press the one currently selected to turn it OFF.
The display will show track information, including the source
name, title, artist name, album name, genre, total playing time,
bit-rate, and BPM.
he select up () button to
Press t
with the currently playing track on controller A; press the
select down () button to move the menu to the folder with the
currently playing track on controller B (INFORMATION JUMP).
move the menu to the folder
-
M3U FILE
The MEP-7000 supports files in the m3u format.
Files with the extension m3u are treated the same as folders; when
selected with the cursor, the recorded tracks are shown on the
contents display in the form of a playlist.
MEMO
• In the case of music CDs (CD-DA), the disc in Drive 1 is set
in Controller A, and the disc in Drive 2 is set in Controller B.
The controller cannot be optionally designated.
• If LOAD LOCK is ON, loading cannot be performed in the
currently playing controller. In this case, press the play/
pause () button to set the pause mode, or press the
CUE button to perform back cue, and then press the LOAD
button.
• The LOAD LOCK can be set to ON/OFF by means of the
UTILITY screen (P. 61).
Track menu
If the rotary selector dial is pressed when a track is selected, the
contents display will show the track menu and the rotary selector
dial can then be used to execute the menu items:
Music CD Other than music CD
[CANCEL] Leave the track menu.
[LOAD A]Sets drive 1 in
[LOAD B]Set track in Controller B.
[ADD TO
PLAYLIST]
[DELETE MEMO
CUE]
controller A, drive
2 in controller B.
Erase cue/loop point data. See “SETTING CUE
POINTS” (P. 36).
Set track in Controller A.
Record track to playlist.
See “USING THE
PLAYLIST” (P. 32).
MEMO
•Up to 100 m3u files can be displayed per device.
•Up to 300 tracks can be displayed for each m3u file. However,
if a file exceeds 308 000 bytes, tracks loaded past that size
cannot be displayed.
•M3U files are not supported using HFS+ file systems on USB
storage devices.
• In the case of discs, short file name notation is not supported.
NOTE
• When this unit’s library function (P. 62) is used for browsing,
m3u files will not be displayed.
•Since a variety of formats can coexist within an m3u playlist, it
may not operate properly in all cases.
28
En
Page 29
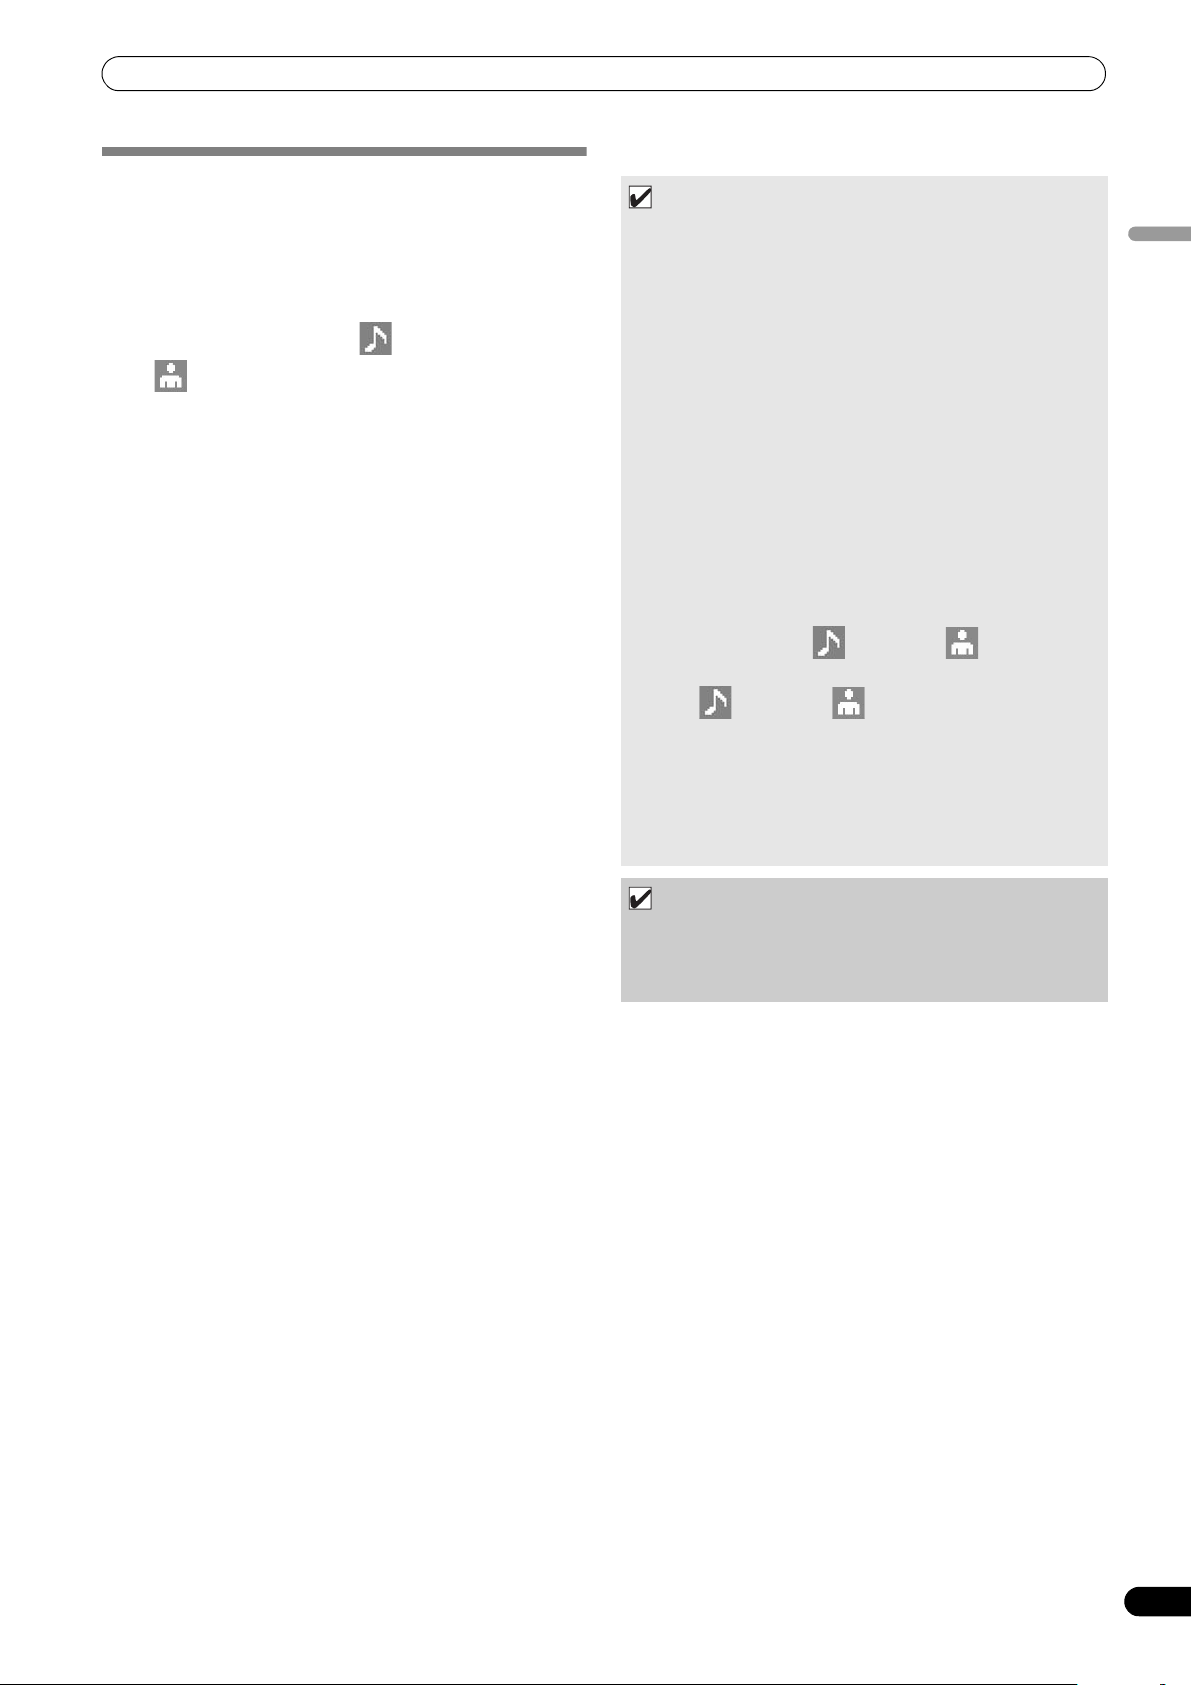
START PLAYBACK (Using normal connections)
USING A KEYWORD TO SEARCH FOR TRACKS
You can search for tracks by inputting the title or name of artist.
use the rotary selector dial or USB keyboard to input the
characters. When using a USB keyboard to perform searches, see
the section “TRACK SELECTION WITH A USB KEYBOARD”(P. 30).
1 Turn the rotary selector dial.
• Select the search category, [ SEARCH] or
[ SEARCH].
2 Press the select down () button or the rotary selector dial.
•The character input mode will be initiated.
3 Operate the rotary selector dial to input characters.
• A maximum of 25 characters can be input.
Select up () button:
erase the immediately precedin
Selec
t down () button:
the same charac
and the cursor will move to the next space.
Rotate rotary selector d
Select type of character, in o
Symbols.
Press rotary s
Confirm search c
search.
4 After completing input of the desired search string, press the
rotary selector dial.
•The number of search hits will flash and search will begin.
•When the search is comple
displayed.
•The number of
the number of searched tracks appears, and the searched
tracks are displayed in a list.
5 Load the searched tracks:
•Use the rotary selector dial to select desired tracks, and then
press either LOAD A button or LOAD B button.
ter as th
ial
elector dial:
acter string, end input mode, and begin
har
search
hits changes to steadily lighted and
g character.
e final input character will be input,
:
rder Upper Case Numerals
ted, the searched track will be
MEMO
•Up to 3 000 tracks can be searched.
•To interrupt the search process midway through, press the
USB function button. The search results to that point will be
displayed.
•The search process will be interrupted if you return to the level
above that currently being searched, or if you change the
selected device.
•After completing a search, the search results will be preserved
until a subsequent search is performed, even if you return to
the level above the current level, or if you switch the selected
device.
•To perform a new search, press the select down () button or
•A keyboard can also be used for searches. For information on
• If a keyboard is connected during the character input mode,
•If the cursor is on the [ SEARCH] or [ SEARCH] items,
•When [ SEARCH] or [ SEARCH] is selected, the jump
•W
•When LOAD is performed from search results, “INFORMATION
• Keyword search cannot be performed if no library has been
• Even if a library has been created, keyword search cannot be
ary selector di
the rot
menu.
using a keyboard for searches, see “Keyboard Input Reference
Table” (P. 30).
operations using the select down () button and rotary
selector dial are disabled.
tracks cannot be recorded to [LOAD] or [PLAYLIST].
function cannot be used to move to the initial characters of
strings (P. 30).
search
hen LOAD is performed from search results, the results are
treated as a single track. When the loaded track ends, “END” is
displayed and play does not advance to the next track.
JUMP” (P. 28) is disabled.
NOTE
created.
performed except in the library browse mode.
English
al and choose [NEW SEARCH] from the
29
En
Page 30
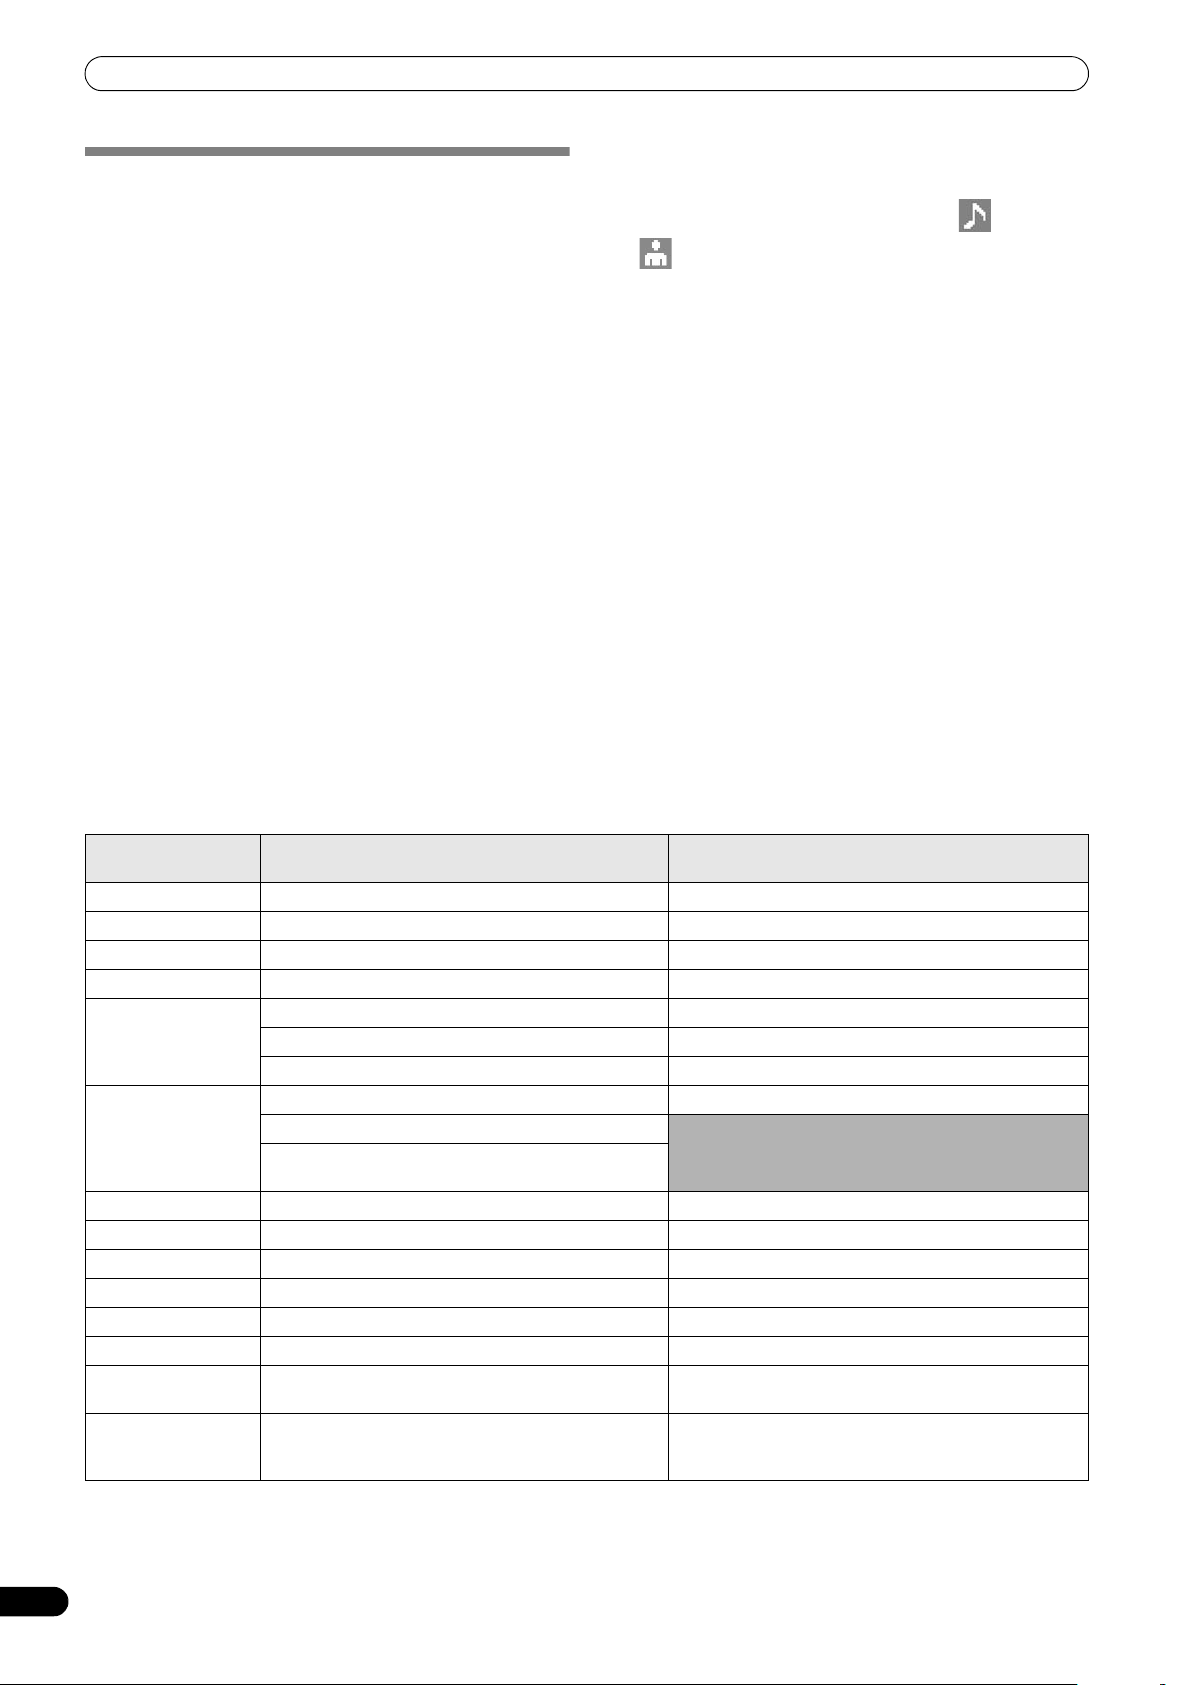
START PLAYBACK (Using normal connections)
Keyword search for title and artist name
TRACK SELECTION WITH A USB KEYBOARD
By attaching a keyboard, track selection can be performed by
inputting the initial characters of the track or folder name (track/
folder jump), keyword search of titles and artist names can be
performed, and playlist names can be edited. Connect the
keyboard to the USB1 or USB2 port.
Track/folder jump
1 Use the TAB key to select the BROWSE screen. 2 Use one of the F1 to F4 or F6 keys to select the source.
Accessory DJS or other DJ software cannot be used for
selection.
possible if the PLAYLIST is at the first hiera
Jump is
(playlist name) or lower in the folder tree.
3 Sequentially input the letters of the track name you wish to
select.
The cursor will move to the first track with the matching string
of characters. If folders exist at that level, the cursor will
likewise jump to matching folder names.
4 When the cursor is on the desired track name, press the
ENTER key to confirm the selection.
The track menu will appear.
5 Press the key to select either [LOAD A] or [LOAD B], and
press the ENTER key.
The track will begin playback.
Keyboard Input Reference Table
rchical level
1 Use the TAB key to select the BROWSE screen.
2 Use the F11 key or F12 key to select either [ SEARCH] or
[ SEARCH] .
3 Input the characters for the name of the title or artist, and
press the ENTER key to confirm.
Titles or artist names including the input character string will
be displayed.
4 Align the cursor with the desired track and press ENTER key.
The track menu will be displayed.
5Use the key to select either [LOAD A] or [LOAD B], and
press the ENTER key.
The track will begin playback.
Editing playlist names
1 Use the TAB key to select the BROWSE screen. 2 Use the F6 key to select the playlist screen. 3Use the 4 Press shift + ENTER key to confirm the selection.
The playlist menu will be displayed.
5Use the key to select [RENAME], then press ENTER key.
The edit mode will be enabled, allowing you to edit the playlist
name.
6 Edit the playlist name.
A playlist name can include up to 32 characters.
7 When editing is completed, press the ENTER key.
The playlist will flash, signaling the completion of editing.
For other keyboard operat
Table”(P. 30).
key to select playlist you wish to edit.
ions, see “Keyboard Input Reference
Input Jump to track name or folder name; keyword
Alphabet [Char input mode] Character input [Char input mode] Character input
Numeral [Char input mode] Character input [Char input mode] Character input
Symbol [Char input mode] Character input [Char input mode] Character input
SPACE Blank space input Blank space input
ENTER Enter level below that of current cursor selection. Confirm edit
Shift+ENTER If cursor is on track name, record track in PLAYLIST. If cursor is on PLAYLIST (first level), open menu screen.
Home Cursor jump to top level of list. —
End Cursor jump to bottom level of list. —
Page Up Turn page of list (7 items above). —
Page Down Turn page of list (7 items below). —
Move cursor up. Move cursor up.
Move cursor down. Move cursor down.
Move cursor to lower level. [Char input mode] Inputs same character as last input,
Move cursor to higher level. [Char input
search
If cursor is on track name, opens menu screen.
During keyword searc
During keyword search mode, begins search.
If cursor is on folder, record folder contents in
PLAYLIST.
h mode, begi
ns search.
Editing playlist
and moves to next input position.
character is present, character is deleted but mode
mode] Deletes last character (if onl
does not change).
y one
30
En
Page 31

START PLAYBACK (Using normal connections)
Back Space [Char input mode] Deletes last character (during
Shift+Back Space [Char input mode]
lete [Char input mode] Delet
De
F1 Selects [DISC 1] icon.
F2 Selects [DISC 2] icon.
F3 Selects [USB 1] icon.
F4 Selects [USB 2] icon.
F5 Selects [PC] icon.
F6 Selects [PLAYLIST] icon.
F7 During library browse, switches to [GENRE] (see P.31 MEMO).
F8 During library browse, switches to [ARTIST] (see P.31 MEMO).
F9 During library browse, switches to [ALBUM] (see P.31 MEMO).
F10 During libra
F11
F12
Esc [Char input mode] Returns to normal mode.
TAB BROWSE/MIX/EFFECT/UTILITY button select (toggles to right direction)
Shift+TAB BROWSE/MIX/EFFECT/UTILITY button select (toggles to left direction)
Ctrl–
Alt –
track/folder name jump, if initial character is deleted,
quits mode).
•During track/folder name jump, deletes last
character (Also, if initial character is deleted, quits
mode).
•During keyword search, deletes all characters.
es last character (during
track/folder name jump, if initial character is deleted,
quits mode).
ry browse, switches to [TRACK] (see P.31 MEMO).
During library browse, switches to [ SEARCH]. Also, during [ SEARCH], performs all-character delete
(see P. 31 MEMO).
During library browse, switches to [ SEARCH]. Also, during [ SEARCH], performs all-character delete
(see P. 31 MEMO).
[Char input mode] Deletes last character (if only one
character is present, character is deleted but mode
does not change).
[Char input mode] Deletes all characters (even though
all characters are deleted, does not leave current
mode).
•[Char input mode] Deletes last character (if only one
character is present, character is deleted but mode
does not change).
•Normally, delete item (tracks in PLAYLIST).
English
MEMO
• Two-byte characters are not supported. Also, character search is disabled in the edit mode.
• In the event character input appears mistaken, use the UTILITY screen to set the KEYBOARD LANGUAGE to an appropriate selection
(see P. 61).
• The USB STOP indicator will not light even when a USB keyboard is connected.
• Function keys F7 ~ F12 do not operate if no library has been created. For instructions on how to make a library, see “CREATING
LIBRARIES” (P. 62).
NOTE
•Proper operation may not be possible depending on the USB keyboard or USB hub used.
31
En
Page 32

START PLAYBACK (Using normal connections)
2
1 3 4
When a track’s original storage device (USB memory, CD-ROM/
USING THE PLAYLIST
This unit allows the user to prerecord desired tracks in a playlist,
thus allowing quick track selection even when using large-
capacity discs and USB storage devices.
Up to 20 playlists can be constructed, and each playlist can record
up to 150 tracks from multiple USB storage devices and CD-ROM/
DVD-ROM discs.
MEMO
• Music CD (CD-DA) tracks and DJ software tracks (including
DJS) cannot be recorded on a playlist.
•Once recorded, a playlist remains in memory even when the
power is turned off, so that it can be reused later.
•When a track is recorded on a playlist from a USB storage
device, the playlist information is written to the storage device
itself.
Playlist display composition
Playlist listing
When the [PLAYLIST] function button is pressed, a listing of
playlists is displayed. By using the rotary selector dial, a desired
playlist can be selected. The playlist indicated by an orange icon
has been selected for mixing (P. 42).
DVD-ROM, etc.) is not currently connected, that track’s name is
grayed out on the display.
1Playlist name 2 Consecutive number 3 Title 4 Artist name
Also, if a track is selected and the rotary selector dial is pressed,
the track menu will appear in the right window.
Also, if a playlist is selected and the rotary selector dial is held
depressed for one second or more, the playlist menu will appear in
the right window.
When a Playlist is Open
Tracks recorded in a playlist are given consecutive numbers and
displayed with title and artist names. When no title is present, the
file name is displayed.
To record tracks in a playlist
1 Use the cursor to select tracks or folders in a USB storage
device or CD-ROM/DVD-ROM disc.
2 Hold the rotary selector dial depressed for one second or
more.
•The cursor will flash, and the track will be recorded in the
currently open playlist.
tracks
• The maximum number of
playlist is 150.
• When entire folders are rec
required.
•The [PLAYL
the playlist. A playlist cannot be opened when the tab is
flashing.
NOTE
IST] icon wi
ll flash during recording of tracks to
recordable in a single
orded ad
ditional time may be
• If the connected USB storage device does not have
sufficient open space, it may be impossible to record the
contents of tracks on the device.
Play a track from the playlist
1 Open playlist. 2 Use the rotary selector dial to select a track, then press the
LOAD A or LOAD B button.
•Tracks will playback in consecutive numerical order.
•New tracks can be registered and edited on the playlist even
while another track is playing from the list.
32
En
Page 33

START PLAYBACK (Using normal connections)
Changing the playlist’s track order
1 Select the track you wish to move from the playlist. 2 Press the rotary selector dial.
• A menu will appear in the right window.
3 Turn the rotary selector dial to select [MOVE TRACK], then
press the rotary selector dial.
• A yellow line will be displayed.
4 Turn the rotary selector dial to the place you wish to move
the track.
5 Press the rotary selector dial.
•The track selected in step 1 wil l be m oved to b efor e the track
selected in step 4, and the display will return to the playlist.
To delete tracks from a playlist
1 Select the track you wish to delete from the playlist. 2 Press the rotary selector dial.
• A menu will appear in the right window.
3 Turn the rotary selector dial to select [DELETE TRACK], then
press the rotary selector dial.
•The track will be deleted from the playlist.
•A track cannot be deleted when it is set in the controller.
To close a playlist
1 When a playlist is open, press the select up () button.
To delete a playlist
All tracks recorded in the playlist will be deleted from the playlist.
1 Select the name of the playlist. 2 Hold the rotary selector dial depressed for one second or
more.
The [CANCEL], [RENAME], [ALL TRACK CLEAR] menu will
appear.
3 Turn the rotary selector dial and select [ALL TRACK CLEAR]. 4 Press the rotary selector dial.
All tracks recorded in the playlist will be deleted from the
playlist (the playlist will be empty).
•A trac
Saving a playlist
Whenever tracks are recorded, erased, or edited in a playlist, the
new playlist is automatically saved (saving occurs about five
seconds after an editing operation is performed, assuming no
further command input).
k set in the controller ca
playlist.
nnot be deleted from the
Editing the name of a playlist
1 Select the desired playlist 2 Hold the rotary selector dial depressed for one second or
more.
• A menu will appear on the right side of the center display.
3 Use the rotary selector dial to select [RENAME], then press
the rotary selector dial.
4 Enters edit mode. Use the rotary selector dial to edit the
name of the playlist.
• A maximum of 32 characters can be input.
Select up () button:
Delete previous charac
Select down () button:
puts same character a
In
position.
Press rotary s
Sa
ve edited contents and leave editing mode.
Rotate rotary selector di
Sel
ect character type: Upper case low
numerals symbols
5 When editing is completed, press the rotary selector dial.
•The playlist will flash, indicating that editing is completed.
MEMO
• Two-byte characters are not supported.
•For information on using a keyboard for editing, see the section
“TRACK SELECTION WITH A USB KEYBOARD” (P. 30).
elector dial:
ter to
cursor.
s last input, and moves to next input
al:
er case
English
NOTE
• If the unit’s power is turned off immediate (within five
seconds) after editing a playlist, the results of the edit may
not be reflected properly.
33
En
Page 34

BASIC CONTROLLER OPERATIONS
TIME/A.CUE SCRATCH/JOG BREAK
TEMPO
Jog dialSEARCH TEMPO adjust sliderPlay/pause
() button
PITCH BENDTRACK SEARCH
BASIC CONTROLLER OPERATIONS
When the center display is used to select a track and the LOAD A button is pressed to load the track, subsequent play op erations are
performed with controller A (if LOAD B button is pressed, the track will be loaded into controller B). When a disc is inserted, Auto Play
will function.
ABOUT THE DISC AUTO PLAY FUNCTION
If a disc is loaded into drive 1, if no track has previously been set in
controller A, a disc track will automatically be set in controller A
and playback will begin automatically.
In the same way, if a disc is loaded into drive 2 its track will be set
in controller B and automatically begin playback. In the case of
music CDs (CD-DA), the first track will be set; in the case of CDROM/DVD-ROM discs, the first track found by the unit will be set.
However, if Auto Cue has been set to ON, the unit will not begin
playback, but enter the cue standby mode (P. 37).
•Auto play is not supported when a USB storage device is
inserted.
TO STOP PLAYBACK AND EJECT DISC
1 During playback, press the play/pause () button, (or, if a
cue point has been set, press the CUE button to perform back
cue), then press the EJECT (
•Disc rotation will stop and the disc will be ejected from the
slot.
•The pla
•The EJECT () button is disabl
yer is not equipped with an
) button.
ordinary “stop” button.
ed during disc playback.
TO PAUSE PLAYBACK
1 During playback, press the play/pause () button.
•The button indicator and CUE button indicator will
flash, and play will stop.
yback,
•To resume pla
once again. The button indicator will light steadily, and
playback will continue.
• If the jog mode is set to something beside
• If no subsequent operatio
he pause mode, intermittent sound will be audible
during t
(called “audible pause”). If you wish for no sound to be
audible, lower the audio mixer’s output level.
minutes from the time the unit is set to the pause mode, it
will automatically stop disc rotation. In this event, press the
play/pause () button to resume playback.
press the play/pause () button
s SCRATCH, even
n is performe
d for a period of 100
ABOUT THE DISC RESUME FUNCTION
After ejecting a disc, if the same disc is once again inserted into
the same drive, the operation condition will return to that in effect
immediately before the prior eject, with the exception that jog
break effect and scratch effect are not resumed.
If the TRACK SEARCH button is pressed before playing the same
disc a second time, playback will begin after performing normal
track search.
•The resume function does not support play on USB storage
devices.
•The resume function is supported only when the EJECT ()
button is used to remove a disc.
• Although the resume function is meant for disc media, when
drive 1 has been ejected only the state of controller A will be
resumed. Likewise, when drive 2
of con
troller B will be resumed. USB storage devices and DJ
software without an eject function will not be resumed.
has been ejected, only the state
FAST FORWARD/FAST REVERSE
Using the SEARCH (, ) buttons
During playback, press one of the SEARCH (, )
buttons.
•Fast forward is performed while the button is
depressed.
•Fast reverse is performed while th
Super fast search
While holding one of the SEARCH (, ) buttons
depressed, rotate the jog dial.
• When the dial is rotated while holding one of the SEARCH
(, ) buttons depressed, the unit enters the super fast
forward or super fast reverse mode.
In the case of VBR type music fi
at normal fast-forward and fast-reverse speeds.
•The search
dial is rotated. The SEARCH button pressed has no effect on
the direction.
• When the jog dial rot
•If the SEARCH button
reverse mode is canceled.
• In cases other than
reverse can be performed only within the same folder.
direction follows th
ation is
is released, the fast forward/fast
musi
c CD (CD-DA), fast forward and fast
e button is depres
les, search will
e direction in which the jog
stopped, playback begins.
be performed
sed.
34
En
Page 35

BASIC CONTROLLER OPERATIONS
TRACK SKIP
Using the TRACK SEARCH (, ) buttons
Press one of the TRACK SEARCH (, ) buttons
• Each time the button is pressed, the player will skip to the
beginning of the next track in the direction indicated by the
button. (To skip to the beginning of the track preceding the
current one, the button must be pressed twice.)
• When the button is held depressed, the pla
o
ntinuously in the direction indicated. When the button is
c
held depressed for two seconds or more, track skip is
performed at higher speed.
s
• If an attempt i
the first track (track No. 1), the track skip will move to the last
track.
• Likewise, if an attempt i
continue the track skip later than the last track, the track
skip will move to the first track (track No. 1).
Super fast track search
While holding one of the TRACK SEARCH (, ) buttons
depressed, rotate the jog dial.
• While holding the button depressed, rotate the jog dial in the
direction you wish to perform the track skip operation, and
high-speed track skip will be performed in proportion to the
amount the jog dial is turned.
•The skip direc
is rotated. The TRACK SEARCH button pressed has no effect
on the direction.
•The skip opera
button is released.
made to c
ti
on f
tion is ca
o
ntinue the track skip earlier than
de to press the button to
s ma
o
llows the direction in which the jog dial
nceled when the TRACK SEARCH
yer mo
ves
SWITCHING THE JOG MODE
Press the SCRATCH or JOG BREAK buttons.
The mode will switch to either the SCRATCH, JOG BREAK, or
OFF mode. When the side with the flashing LED is pressed, the
LED indicator goes out and the Jog mode is turned OFF.
JOG DIAL FUNCTION
1 Rotate during playback (pitch bend: when jog mode is OFF).
•Disc rotation will be accelerated (FWD+) or decelerated
(REV–) in proportion to the degree of jog dial rotation.
• When jog dial rot
to its former speed.
2 Rotate during playback (scratch play: when jog mode is set
to SCRATCH).
See the section “SCRATCH PLAY” (P. 39).
3 Rotate during playback (jog break: when jog mode is set to
JOG BREAK).
See the section “JOG BREAK PLAY” (P. 39).
4 Rotate during pause mode (frame search).
•Search will be performed in one-frame increments.
• When the jog dial is turned in the FWD+
speed, the playback sound (1x speed) will be output.
5 During cue standby, press one of the SEARCH (, )
buttons, then rotate jog dial (cue point search).
If the button is pressed during cue standby, if the jog mode is
set to something besides SCRATCH, the unit will enter
“audible pause” mode, and the jog dial can be rotated to
search for a cue point candidate. Following movement of the
point, pressing the CUE button sets the new cue point.
6 During playback, rotate the jog dial while holding one of the
SEARCH (
While holding the button depressed, rotate the jog dial in the
direction you wish to perform the search. Search will be
performed at accelerated speed, in proportion to the direction.
7 During playback, rotate the jog dial while holding one of the
TRACK SEARCH (
track search).
While holding the button depressed, rotate the jog dial in the
direction you wish to perform the track search. Track search
will be performed at accelerated speed, in proportion to the
direction and amount of dial rotation.
8 Rotate while holding the PITCH BEND (+/–) button depressed
(super fast pitch bend).
While holding the button depressed, rotate the jog dial in the
direction you wish to modify the speed; the speed will change
faster than during normal pitch bend.
,
ation is st
) buttons depressed (super fast search).
,
opped, the disc rotation returns
direction at a stable
) buttons depressed (super fast
English
35
En
Page 36

BASIC CONTROLLER OPERATIONS
CHANGING THE PLAY SPEED
Tempo adjustment
Slide the TEMPO adjust slider forward or back.
When moved toward the front (+), the tempo becomes faster,
and when moved away from you toward the rear (–), the tempo
becomes slower.
• The amount (%) of tempo change i
•The tempo of the piece can be
maintaining the same musical pitch; see “APPLYING A
MASTER TEMPO”.
Pitch bend
Press the PITCH BEND (+) button to increase the playback
speed, and press the (–) button to slow the playback speed.
Selecting a tempo adjust range
Press the TEMPO control range button.
Each time the button is pressed, the variable range of the
TEMPO adjust slider changes (±6 %/±10 %/±16 %/WIDE).
When set to a variable range of ±6 %, the tempo changes in
increments of 0.02 %. When set to ±10 % and ±16 %, the
tempo changes in increments of 0.05 %. When set to WIDE,
the tempo can be changed in increments of 0.5 %.
MEMO
•When playing MP3/AAC/WAV/AIFF files, the variable range is
±6 %/±10 %/±16 % only.
•The tempo range setting is preserved in memory even when
power is turned OFF.
•The variable range setting value is show in the display.
•In the case of a track on DJ software, the temp range will
depend on the software’s specifications.
s shown in the displa
changed even while
y.
APPLYING A MASTER TEMPO
During playback, press the MASTER TEMPO button.
• The button indicator (MT) will light; when the TEMPO adjust
slider is used to adjust the speed (tempo), the pitch of the music
will remain unchanged.
• The sound quality will change due to the digital processing of
the audio.
SETTING CUE POINTS
By setting a cue point in memory, you can set the track to cue
standby instantly merely by pressing the CUE button.
Manual cue
1 During playback, press the play/pause () button and
pause playback around the point you wish to set as cue
point.
2 Find the accurate cue point.
Set the cue point using the frame number.
The cue point can be set in one-frame units (75 frames = one
second).
Use the jog dial or SEARC
frame position. Rotating the jog dial one rotation moves
playback 75 frames, while pressing SEARCH button once
moves the playback one-frame in the designated direction.
H (, ) buttons to adju
Set the cue point while listening to the playback audio.
Rotate the jog dial slowly and return the play to the point just
before the place you wish to begin playback (if the jog mode is
something other than SCRATCH, the cue point will be the
point immediately after the sound heard in audible pause).
3 Once the frame number or audible sound is at the desired
cue point, press the CUE button.
• The sound will be muted, and the CUE button indicator will
light, indicating successful setting of the cue point.
• When a new cue po
cue point will be cleared from memory.
Real time cue
During playback, press the IN/CUE button at the point you wish to mark as a cue point.
This point will be recorded as a new cue point.
To confirm the cue point (cue point sampler)
After setting the cue point, press and hold the CUE button.
The sound at the cue point will be audible so long as the CUE
button is held depressed.
To return to the cue point (back cue)
1 During playback, press the CUE button.
The unit will return to the set cue point and enter cue standby
mode.
2 Press the play/pause () button.
Playback will begin instantly from the cue point.
To modify a cue point (cue point modification)
1 During playback, press the CUE button.
The unit will return to the set cue point and enter cue standby
mode.
2 Press one of the SEARCH (, ) buttons.
•The cue point will be moved in one-frame increments (the
cue point sound will move).
•The cue point ca
SEARCH (, ) buttons and then rotating the jog dial
(the cue point sound will move).
3 Press the CUE button.
The point at which the CUE button is pressed forms the newly
set cue point.
int is set in memory, a
n also be m
oved by pressing one of the
ny previously set
st the
36
En
Page 37

BASIC CONTROLLER OPERATIONS
AUTO CUE FUNCTION
When a track is first loaded or track search is performed, this
function automatically sets a cue point immediately before the
point that music begins, and then sets the player to cue standby at
that point.
Turning Auto Cue ON/OFF
• The auto cue function can be turned ON/OFF by holding the
TIME/A.CUE button depressed for one second or more.
• The auto cue function is ON when the [A.CUE] indicator is
lighted in the display.
• The status of the A.CUE function remains the same even when
power is turned OFF.
• The auto cue level can be changed if desired.
Changing the Auto Cue Level
1 Hold the TIME/A.CUE button depressed for five seconds or
more.
The display will show [–60db] (in default condition).
2 Press the PITCH BEND (+, –) buttons to change the value.
• The level can be set to one of the following values:
–36 dB, –42 dB, –48 dB, –54 dB, –60 dB, –66 dB, –72 dB,
–78 dB.
• To cancel the auto cue adjust mode, either press the TI
A.CUE butt
automatically canceled.
• The selected level is preserved ev
OFF.
• The auto cue level can also be changed from wi
UTILITY screen.
on, or wait 15 seconds, and it will be
en when power is
ME/
turned
thin the
English
37
En
Page 38

ADVANCED OPERATIONS SECTION
ADVANCED OPERATIONS SECTION
LOOP PLAY
Create a loop.
1 Press the play/pause () button to start playback.
2 During playback, press the IN/CUE/HOT LOOP button at the
point you wish to designate as the “loop-in” point.
This step is unnecessary in the event you have a previously
recorded cue point you wish to designate as a loop-in point.
3 During playback, press the OUT/ADJUST button at the point
you wish to designate as the “loop-out” point.
Loop play will begin and continue between the loop-in and
loop-out points.
To cancel loop play
During loop play, press the RELOOP/EXIT button.
Even after playback reaches the loop-out point, play will
continue without returning to the loop-in point.
To change the loop-out point
1 During loop play, press the OUT/ADJUST button.
The time of the out point will show on the display; the OUT/
ADJUST button indicator will flash rapidly, and the IN/CUE/
HOT LOOP button indicator will turn off.
2 Press one of the SEARCH (, ) buttons or rotate the jog
dial.
•The loop-out point will move in one-frame increments.
•Either press the OUT/ADJU
without doing anything and the adjust mode will be
canceled and loop play will return.
During loop play, to return to the loop-in point and begin loop play again (hot loop)
During loop play, press the IN/CUE/HOT LOOP button.
Playback will return to the loop-in point and loop play will begin
again.
To return again to a loop
During playback after canceling loop play, press the RELOOP/EXIT button.
Playback will return to the previously set loop-in point and loop
play will begin again from that point (reloop play).
To store loop play information
During loop play, press the CUE/LOOP MEMORY button, and
the current loop information will be stored in memory.
ST button, or wait for 30 seconds
CUE POINT/LOOP POINT MEMORY
This unit can store cue points and loop points for future use. When
the tracks are on discs, the cue/loop points are stored in the unit’s
internal memory; when the tracks are on external USB storage
devices, the cue/loop points are stored in the external storage
device itself.
One cue point or loop point can be stored for each track.
MEMO
• This unit’s internal memory is capable of storing a maximum of
2 000 discs’ worth of cue/loop points (when each disc has no
more than 10 cue/loop points each). When the internal
memory becomes full, previously stored disc information is
overwritten, beginning from disc information with the lowest
usage frequency.
• If the external USB storage device has insufficient storage
capacity, the cue/loop point information for the tracks on that
device cannot be saved.
•Tracks in DJS and other DJ software cannot be stored in
memory.
Storing a cue point
1 Use the auto cue function or CUE button to input a cue point. 2 Press the CUE/LOOP MEMORY button.
The [MEMO] indicator will light, indicating that the cue point
has been stored.
Storing a loop
1 Input a loop-in and loop-out point, and begin loop play. 2 During loop play, press the CUE/LOOP MEMORY button.
The [MEMO] indicator will light, indicating that the loop-in and
loop-out points have been stored.
In the case of trac
the [ ] icon will change to [ ] on the BROWSE screen.
NOTE
ks for whi
•If a cue point differs from the loaded track, it cannot be
stored.
• If the external USB storage device has insufficient storage
capacity, the cue/loop point information for the tracks on
that device cannot be saved.
To call up a stored cue point or loop
When a cue point or loop has been stored, the [MEMO]
indicator will light.
1 Press the CUE/LOOP CALL button.
When the CUE/LOOP CALL button is pressed, the cue point or
loop is called from memory, and the unit enters the standby
mode at the cue or loop-in point.
2 Press the play/pause () button.
Play or loop play begins.
ch cue or loop points are recorded,
38
En
Page 39

ADVANCED OPERATIONS SECTION
EFFECT
Function buttons
To delete a cue point or loop information from memory
1 Press the CUE/LOOP CALL button.
When the CUE/LOOP CALL button is pressed, the cue point or
loop information is called up, and the unit enters the standby
mode at the cue or loop-in point.
2 At the cue or loop point you wish to delete, hold the CUE/
LOOP MEMORY button depressed for one second or more.
The [MEMO] indicator will go out and the designated cue point
or loop point information will be deleted.
ion c
•The informat
well (P. 28).
SCRATCH PLAY
When the jog mode is set to [SCRATCH], pressing and rotating the
top surface of the jog dial will cause playback to be performed in
proportion to the direction and speed of jog dial rotation.
1 Press the SCRATCH button.
The
SCRATCH
2 During playback, press the surface of the jog dial.
Playback will stop.
3 Rotate the jog dial in the direction and at the speed you wish
for playback to occur.
Playback will begin in the direction and at the speed
corresponding to the jog dial input.
4 Release hand from surface of jog dial.
Playback will return to its original speed.
an be deleted from the BROWSE screen as
indicator will flash blue.
EFFECT SCREEN
When the EFFECT button is pressed, the center display will show
the EFFECT screen, providing graphic expression to assist with
scratch play and jog break play.
English
SPIN PLAY
During playback with the jog mode set to [SCRATCH], either press
the surface of the jog dial or the play/pause () button to set the
pause mode, then rotate the jog dial quickly; playback will proceed
in response to the direction and speed of jog dial rotation, even if
you remove your hand from the dial.
JOG BREAK PLAY
When the jog mode is set to [JOG BREAK], the pressing and
rotating the surface of the jog dial causes effects to be applied to
the sound in proportion to the direction of rotation and rotation
speed.
1 Press the JOG BREAK button.
The JOG BREAK indicator will flash red.
2 During playback, touch and press the surface of the jog dial. 3 Rotate the jog dial. 4 Release hand from surface of jog dial.
The effect will stop and sound will return to its original
condition.
•Jog break play
tracks are loaded.
is not en
abled when DJS or other DJ software
[1] Scratch effect
When the jog mode is set to [SCRATCH], the screen on the
controller side switches to scratch effect mode.
A blue ball will rotate in response to the track playback.
• The ball normally rotates to the right. When playback direction
changes, the ball reverses direction, and when playback stops,
the ball’s rotation also stops.
1 During playback, press one of the function buttons
[SCRATCH/TRANS/BUBBLE].
39
En
Page 40

ADVANCED OPERATIONS SECTION
About SCRATCH
For more information, refer to the item “SCRATCH PLAY”.
MEMO
•When DJS or other DJ software tracks are set, only SCRATCH
is supported as a scratch effect. The display in that case will
appear as shown below. (Depending on the DJ software used,
SCRATCH may not be supported as well. For details, consult
the author of your DJ software.)
About TRANS
This produces an effect like temporarily muting the sound with the
mixer’s cross fader. In linkage with the effect, the ball on the
screen flashes while rotating.
About BUBBLE
This effect simulates the bubble scratch technique. In linkage with
the effect, the ball on the screen undulates to right and left while
rotating.
40
En
Page 41

ADVANCED OPERATIONS SECTION
[2] Jog break effect
When jog mode is set to [JOG BREAK], the screen on the controller
side switches to jog break effect mode.
MEMO
•The jog break effect mode is not supported when DJS or other
DJ software tracks are loaded.
1 During playback, press one of the function buttons [JET/
ROLL/WAH].
• The selected effect is shown in the center display, and the
respective effect is changed in response to the rotation of
the jog dial.
2 Effect HOLD
•Normally, when you remove your hand from the jog dial the
current effect stops and the also returns to its original
status. By pressing the select up () button is pressed on
controller A, or the select down () button on controller B,
even if the hand is removed from the jog dial, the effect
responding to the current position of the jog dial is
maintained (HOLD function). When the button is pressed
again, the function returns to normal.
g HOLD, the JOG BREAK indica
•Durin
the screen’s [HOLD ON] indicator will light.
About JET
Delay time is changed in response to the jog dial rotation and a
short delay is mixed with the playback sound, thus producing
interference between the two sounds and resulting in a jet-like
“SCHWA—” sound effect.
In linkage to the effect the JET image animation is displayed
(WAVE display)
tor will light red, and
About ROLL
In response to the rotation of the jog dial, the pitch and playback
time are changed, and effect applied to the playback sound.
MEMO
•The sound playing at the time the jog dial is touched is
continuously looped and roll is applied.
• When you remove your hand from the jog dial, the playback
returns to the original sound.
• In linkage to the effect, the ROLL image animation will be
displayed (a ball in orbit will appear; the orbit of the ball and its
speed will change in response to the rotation position and
direction of the jog dial.)
English
MEMO
• When you remove your hand from the jog dial, sound will
gradually return to the original sound.
41
En
Page 42
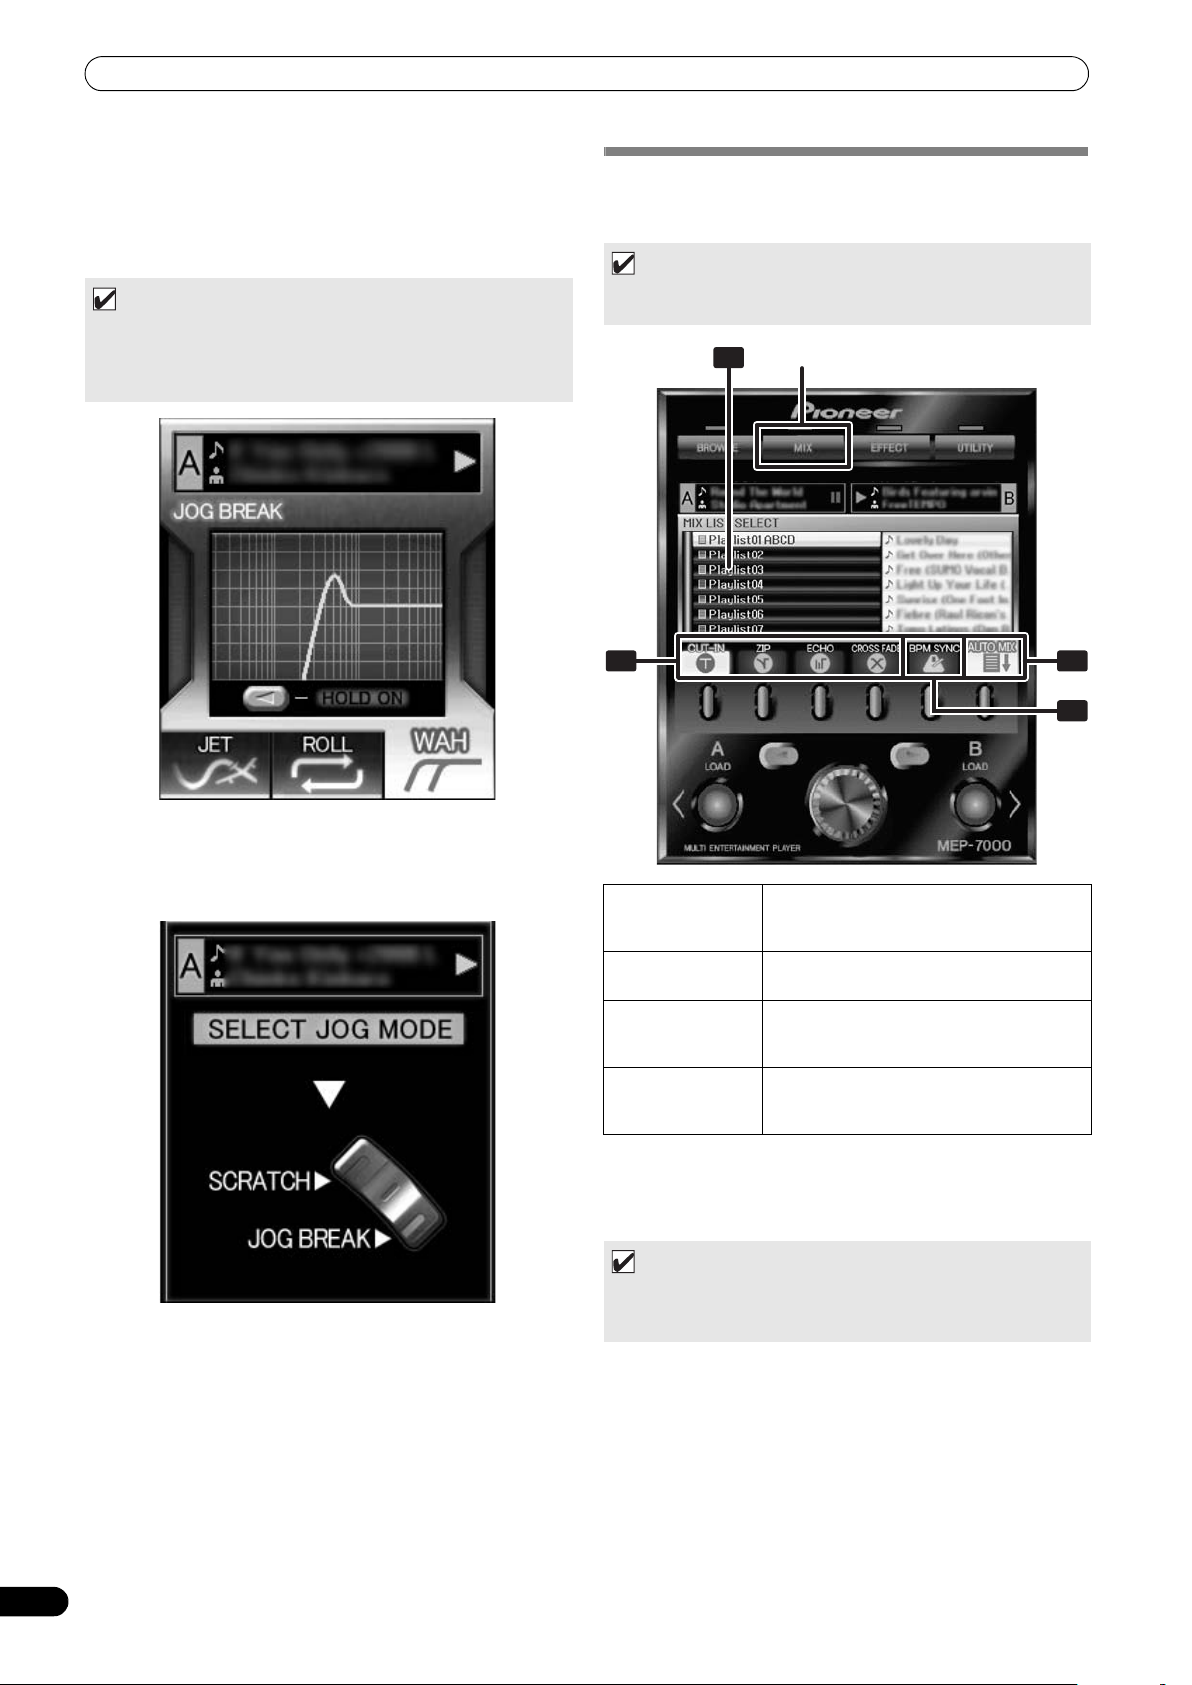
ADVANCED OPERATIONS SECTION
1
2
3
4
MIX
About WAH
This function applies a filter that changes the cutoff frequency in
response to the rotation of the jog dial.
In linkage to the effect, the WAH image animation is displayed (the
line slides right-left in response to the rotation direction of the jog
dial).
MEMO
•When the dial is rotated clockwise, a high-pass filter is applied;
when rotated counter-clockwise, a low-pass filter is applied.
• When you remove your hand from the jog dial, sound will
gradually return to the original sound.
MIX SCREEN
When the MIX button is pressed, the MIX screen appears in the
center display, allowing easy mixing and playback of tracks.
MEMO
• The MIX function is disabled when a DJ software track is set in
the controller.
[3] Effect off
When jog mode is set to OFF (neither of the SCRATCH/JOG
BREAK button indicators is lighted), the effect off mode is enabled.
This mode supports pitch bend (P. 35) and audible pause function.
1 Playlist display
2 MIX mode
select
3 BPM SYNC
4 AUTO MIX
AUTO MIX
Sets the AUTO MIX function ON/OFF.
When AUTO MIX is set to ON, playback of the selected playlist
continues automatically.
MEMO
• When AUTO MIX is turned ON, the auto cue function will also
turn on automatically. While in this state, the auto cue function
cannot be turned off.
The playlist menu is displayed. When a
playlist is selected for mixing, it appears as
a orange icon.
Use function buttons to select MIX mode.
Automatic BPM synchronization when
performing MIX. Use function button to
alternate ON/OFF.
Automatic playback for the selected
playlist. Use function button to alternate
ON/OFF.
42
En
Page 43

ADVANCED OPERATIONS SECTION
BPM SYNC
Sets the BPM SYNC ON/OFF.
When BPM SYNC is set to ON, the tempo of the next track is
automatically adjusted to match the BPM of the currently
playing track.
MEMO
•The tempo will not change if the tempo variable range is
exceeded (music CD [CD-DA] ± 100 %, MP3/AAC/WAV/AIFF:
± 16 %).
MIX mode select
CUT-IN
Playback of the currently playing track stops and switches
instantly to the next track.
ZIP
The pitch of the currently playing track gradually decreases
until it can no longer be heard, at which point playback of the
next track begins.
ECHO
One beat of sound continues repetitively and fades until it can
no longer be heard, at which point playback of the next track
begins.
CROSS FADE
The currently playing track fades out as playback of the next
track fades in; when the fade out / fade in is completed, the
track changes.
Instant Change Function
Using the instant change function, you can switch from the
currently playing track to another desired track at the timing of
your choice.
1 While one track is playing, setup the next track.
Load a track on the controller opposite the one currently
playing, and set to cue standby.
MEMO
•Tracks can be set not only from the BROWSE screen, but from
the MIX screen as well. With a playlist opened on the MIX
screen, rotate the rotary selector dial; the cursor will appear
and both LOAD buttons will flash. In this condition, press the
LOAD button and the track selected by the cursor will be set in
either controller A or B.
2 Press the MIX button.
The MIX screen will appear in the center display.
The LOAD button for the co
3 Select the desired MIX mode.
Press the function button to select the MIX mode.
If none of the MIX modes is selected, one of the four modes will
be select
4 Press the flashing LOAD button.
The playback will switch by the selected MIX mode.
MEMO
• If the flashing LOAD button is pressed again while the tracks
are still changing, the track mixing will be canceled.
ed at random.
ntroller on cue standby will flash.
English
MEMO
• If none of the MIX modes is selected, one of the four (CUT-IN,
ZIP, ECHO, CROSS FADE) will be selected at random.
43
En
Page 44

ADVANCED OPERATIONS SECTION
Automatic Playlist Playback
This function allows previously selected playlist to be selected and
automatic playback to commence in the order by which the tracks
are recorded, alternating between controllers A and B.
1 Press the MIX button.
The MIX screen appears in the center display.
2 Rotate the rotary selector dial to select a playlist, then press
the select down (
The opened playlist will be selected for MIX.
3 Select the desired MIX mode
Use the function buttons to select the MIX mode.
If none of the mix modes is selected, one of the four modes wi
be automatically selected at random.
4 Rotate the rotary selector dial, and load the first track of the
playlist to controller A, the second track to controller B, and
set to cue standby.
The tracks will be loaded in contr ollers A/B, and the unit will
enter the cue standby mode.
MEMO
•If no tracks are set in controllers A/B, they will be set
automatically in step 5.
5 Press the [AUTO MIX] function button to set to ON.
If no track is loaded, the playlist’s first track will be set on
controller A, the second track on controller B, and both set to
cue standby.
6 Press the play/pause () button for controller A.
The track loaded on controller A will begin playback, and AUTO
MIX will begin.
econds before the en
Thirty s
to the track set in controller B, using the selected MIX mode.
) button to open the playlist.
d of playback, playback will switch
ABOUT FADER START PLAY
When the accessory control cord is used to connect this unit’s
CONTROL jack to the CONTROL jack of a Pioneer DJ mixer, when
the DJ mixer’s channel fader lever is raised, the player’s CUE
standby mode is released and playback begins immediately. The
player’s fader start can also be performed by operating the cross
fader lever.
Also, the player can be returned to the cue point (back cue
operation) by returning the fader lever to its original position
(except during auto play).
ll
MEMO
• The instant change function can be used if desired to switch
playback even while a track is still playing.
7 Press the [BPM SYNC] function button to set to ON.
Set BPM SYNC to ON if you wish to synchronize the tempos of
successive tracks.
MEMO
•During auto play, you can interrupt the playback order by using
the BROWSE screen to load a track into the standby controller.
44
En
Page 45

ABOUT DJS SOFTWARE
ABOUT DJS SOFTWARE
Pioneer DJS is a software program that allows the use of MP3 files to control DJ play from a computer. Load the program into your computer from the supplied CD-ROM disc.
MEMO
• DJS is not equipped with functions for recording DJ play.
3 WARRANTY DISCLAIMER
SOFTWARE END USER LICENSE AGREEMENT
This Software End User License Agreement (“Agreement”) is
between you (both the individual installing the Program and any
single legal entity for which the individual is acting) (“You” or
“Your”) and PIONEER CORPORATION (“Pioneer”).
TAKING ANY STEP TO SET UP OR INSTALL THE PROGRAM
MEANS THAT YOU ACCEPT ALL OF THE TERMS OF THIS LICENSE
AGREEMENT. PERMISSION TO DOWNLOAD AND/OR USE THE
PROGRAM IS EXPRESSLY CONDITIONED ON YOUR FOLLOWING
THESE TERMS. WRITTEN OR ELECTRONIC APPROVAL IS NOT
REQUIRED TO MAKE THIS AGREEMENT VALID AND
ENFORCEABLE. IF YOU DO NOT AGREE TO ALL OF THE TERMS
OF THIS AGREEMENT, YOU ARE NOT AUTHORIZED TO USE THE
PROGRAM AND MUST STOP INSTALLING IT OR UNINSTALL IT,
AS APPLICABLE.
1 DEFINITIONS
1.1 “Documentation” means written documentation,
specifications and help content made generally available
by Pioneer to aid in installing and using the Program.
1.2 “Program” means all or any part of Pioneer’s software
licensed to You by Pioneer under this Agreement.
2 PROGRAM LICENSE
2.1 Limited License. Subject to this Agreement’s restrictions,
Pioneer grants to You a limited, non-exclusive, nontransferable, license (without the right to sublicense):
(a) To install a single copy of the Program on the hard
disk drive of Your computer, to use the Program only
for Your personal purpose complying with this
Agreement and the Documentation (“Authorized
Use”);
(b) To use the Documentation in support of Your
Authorized Use; and
(c) To make one copy of the Program solely for backup
purposes, provided that all titles and trademark,
copyright and restricted rights no
on the copy.
2.2 Restrictions. You will not copy or use the Program or
Documentation except as expressly permitted by this
Agreement. You will not transfer, sublicense, rent, lease
or lend the Program, or use it for third-party training,
commercial time-sharing or service bureau use. You will
not Yourself or through any third party modify, reverse
engineer, disassemble or decompile the Program, except
to the ext
then only after You have notified Pioneer in writing of Your
intended activities. You will not use the Program on
multiple processors without Pioneer’s prior written
consent.
2.3 Ownership. Pioneer or its licensor retains all right, title
and interest in and to all patent, copyright, trademark,
trade secret and other intellectual property rights in the
Program and Documentation, and any derivative works
thereof. You do not acquire any other rights, express or
impli
Agreement.
2.4 No Support. Pioneer has no obligation to provide support,
maintenance, upgrades, modifications or new releases
for the Program or Documentation under this Agreement.
ent expres
ed, beyon
sly permitted by applicable law, and
d the limited license set forth in this
tices are reproduced
THE PROGRAM AND DOCUMENTATION ARE PROVIDED “AS
IS” WITHOUT ANY REPRESENTATIONS OR WARRANTIES,
AND YOU AGREE TO USE THEM AT YOUR SOLE RISK. TO THE
FULLEST EXTENT PERMISSIBLE BY LAW, PIONEER
EXPRESSLY DISCLAIMS ALL WARRANTIES OF ANY KIND
WITH RESPECT TO THE PROGRAM AND DOCUMENTATION,
WHETHER EXPRESS, IMPLIED, STATUTORY, OR ARISING
OUT OF COURSE OF PERFORMANCE, COURSE OF DEALING
OR USAGE OF TRADE, INCLUDING ANY WARRANTIES OF
MERCHANTABILITY, FITNESS FOR A PARTICULAR
PURPOSE, SATISFACTORY QUALITY, ACCURACY, TITLE OR
NON-INFRINGEMENT.
4 DAMAGES AND REMEDIES FOR BREACH
You agree that any breach of this Agreement’s restrictions
would cause Pioneer irreparable harm for which money
damages alone would be inadequate. In addition to damages
and any other remedies to which Pioneer may be entitled, You
agree that Pioneer may seek injunctive relief to prevent the
actual, threatened or continued breach of this Agreement.
5 TERMINATION
Pioneer may terminate this Agreement at any time upon Your
breach of any provision. If this Agreement is terminated, You
will stop using the Program, permanently delete it from the
computer where it resides, and destroy all copies of the
Program and Documentation in Your possession, confirming
to Pioneer in writing that You have done so. Sections 2.2, 2.3,
2.4, 3, 4, 5 and 6 will continue in effect after this Agreement’s
termination.
6 GENERAL TERMS
6.1 Limitation of Liability. In no event will Pioneer or its
subsidiaries be liable in connection with this Agreement
or its subject matter, under any theory of liability, for any
indirect, incidental, special, consequential or punitive
damages, or damages for lost profits, revenue, business,
savings, data, use, or cost of substitute procurement,
even if advised of the possibility of such damages or if
such damages are foreseeable. In no event will Pioneer’s
liability for all damages exceed the amounts actually paid
by You to Pioneer or its subsidiaries for the Progr am. The
parties acknowledge that the liability limits and risk
allocation in this Agreement are reflected in the Program
price and are essential elements of the bargain between
the parti
provided the Program
6.2 The limitations or exclusions of warranties and liability
contained in this Agreement do not affect or prejudice
Your statutory rights as consumer and shall apply to You
only to the extent such limitations or exclusions are
permitted under the laws of the jurisdiction where You are
located.
6.3 Severability and Waiver. If any provision of this Agreement
is held to be illegal, invalid or otherwise unenforceable,
that provision will be enforced to the extent possible or, if
incapable of enforcement, deemed to be severed and
deleted from this Agreement, and the remainder will
continue in full force a
of any default or breach of this Agreement will not waive
any other or subsequent default or breach.
es, without which Pioneer would not have
or entered into this Agreement.
nd effect. The waiver by either party
English
45
En
Page 46

ABOUT DJS SOFTWARE
6.4 No Assignment. You may not assign, sell, transfer,
delegate or otherwise dispose of this Agreement or any
rights or obligations under it, whether voluntarily or
involuntarily, by operation of law or otherwise, without
Pioneer’s prior written consent. Any purported
assignment, transfer or delegation by You will be null and
void. Subject to the foregoing, this Agreement will be
binding upon and will inure to the benefit of the parties
and their respective successors and assigns.
6.5 Entire Agreement. This Agreement constitutes the entire
agreement between the parties and supersedes all
or contemporan
whether written or oral, concerning its subject matter.
This Agreement may not be modified or amended without
Pioneer’s prior and express written consent, and no other
act, document, usage or custom will be deemed to amend
or modify this Agreement.
6.6 You agree that this Agreement shall be governed and
construed by and under the laws of Japan.
eous agreements or representations,
COPYRIGHT WARNING
The use of DJS is restricted with regard to the playing and
copying of copy-protected music contents.
•The program may not operate properly if copy-protect encryption
data is embedded in recorded media.
•Ripping, playback, and other operations may stop if copy-protect
encryption data is detected to be embedded in recorded media.
The materials you record are for your own listening enjoyment,
and cannot be used for other purposes without permission from
the copyright owner.
•M
usic recorded from CDs and other media may be protected by
the copyright laws of individual countries as well as by
international convention. You are solely responsible for the
lawful use of the recordings you make.
prior
SYSTEM REQUIREMENTS (Minimum Operating Environment)
Running DJS requires a PC/AT computer with the following
operating environment:
CPU: 1.5 GHz or more Intel
processor.
However, in the case of Windows Vista
1.5 GHz or above Intel Core
Memory:
512 MB or more RAM
However, when running Windows Vista
Hard disc:
250 MB of free HD space (excluding space necessary for storing
MP3 and other music files)
Optical drive:
Disc drive capable of reading CD-ROM, and playing music CD (CD-
DA)
Display:
XGA (1024x768) or above, with HighColor (16-bit) or greater video
adapter and monitor.
Sound:
2-channel or more audio output (internal or external sound card or
audio unit).
Input device:
Keyboard, mouse (or equivalent pointing device)
Internet connection:
Connection speed 56 kbps or above recommended. Microsoft
Internet Explorer 5.5 or above, or other web browser supporting
128-bit SSL.
• When this unit (MEP-7000) is connected to a computer and used
in conjunction with the DJS software, the computer must be
equipped with a USB port complying with USB 1.1 or later. For
details, consult the section “CONNECTIONS” (P. 15).
®
Pentium M® (or compatible)
®
TM
2 Duo (or compatible).
, the processor must be a
®
, 1 GB or more RAM
®
NOTE
• Full functionality is not guaranteed with all computers even
when the above operating environment conditions are
fulfilled.
•Even if your computer is equipped with the memory
capacity specified in the operating environment noted
above, other software and services running in the computer
at the time may cause insufficient memory that can result
in degradation of the program’s functions or performance.
In this case, close any other services or programs running
so as to free up more of your computer’s memory, or
increase the amount of memory installed in yo
•Depending on your computer’s power saving settings and
other factors, it may not be possible for your computer to
achieve its optimum CPU and/or hard-disk processing
capacity. Especially when using a laptop computer, make sure
to utilize external AC power sources to ensure highperformance settings of the computer while using the DJS.
ur computer.
•DJS operation may not function properly when combined
with other software programs installed on your computer.
• The DJS software program is not supported by Macintosh
computers (including those equipped with Intel CPUs).
46
En
Page 47
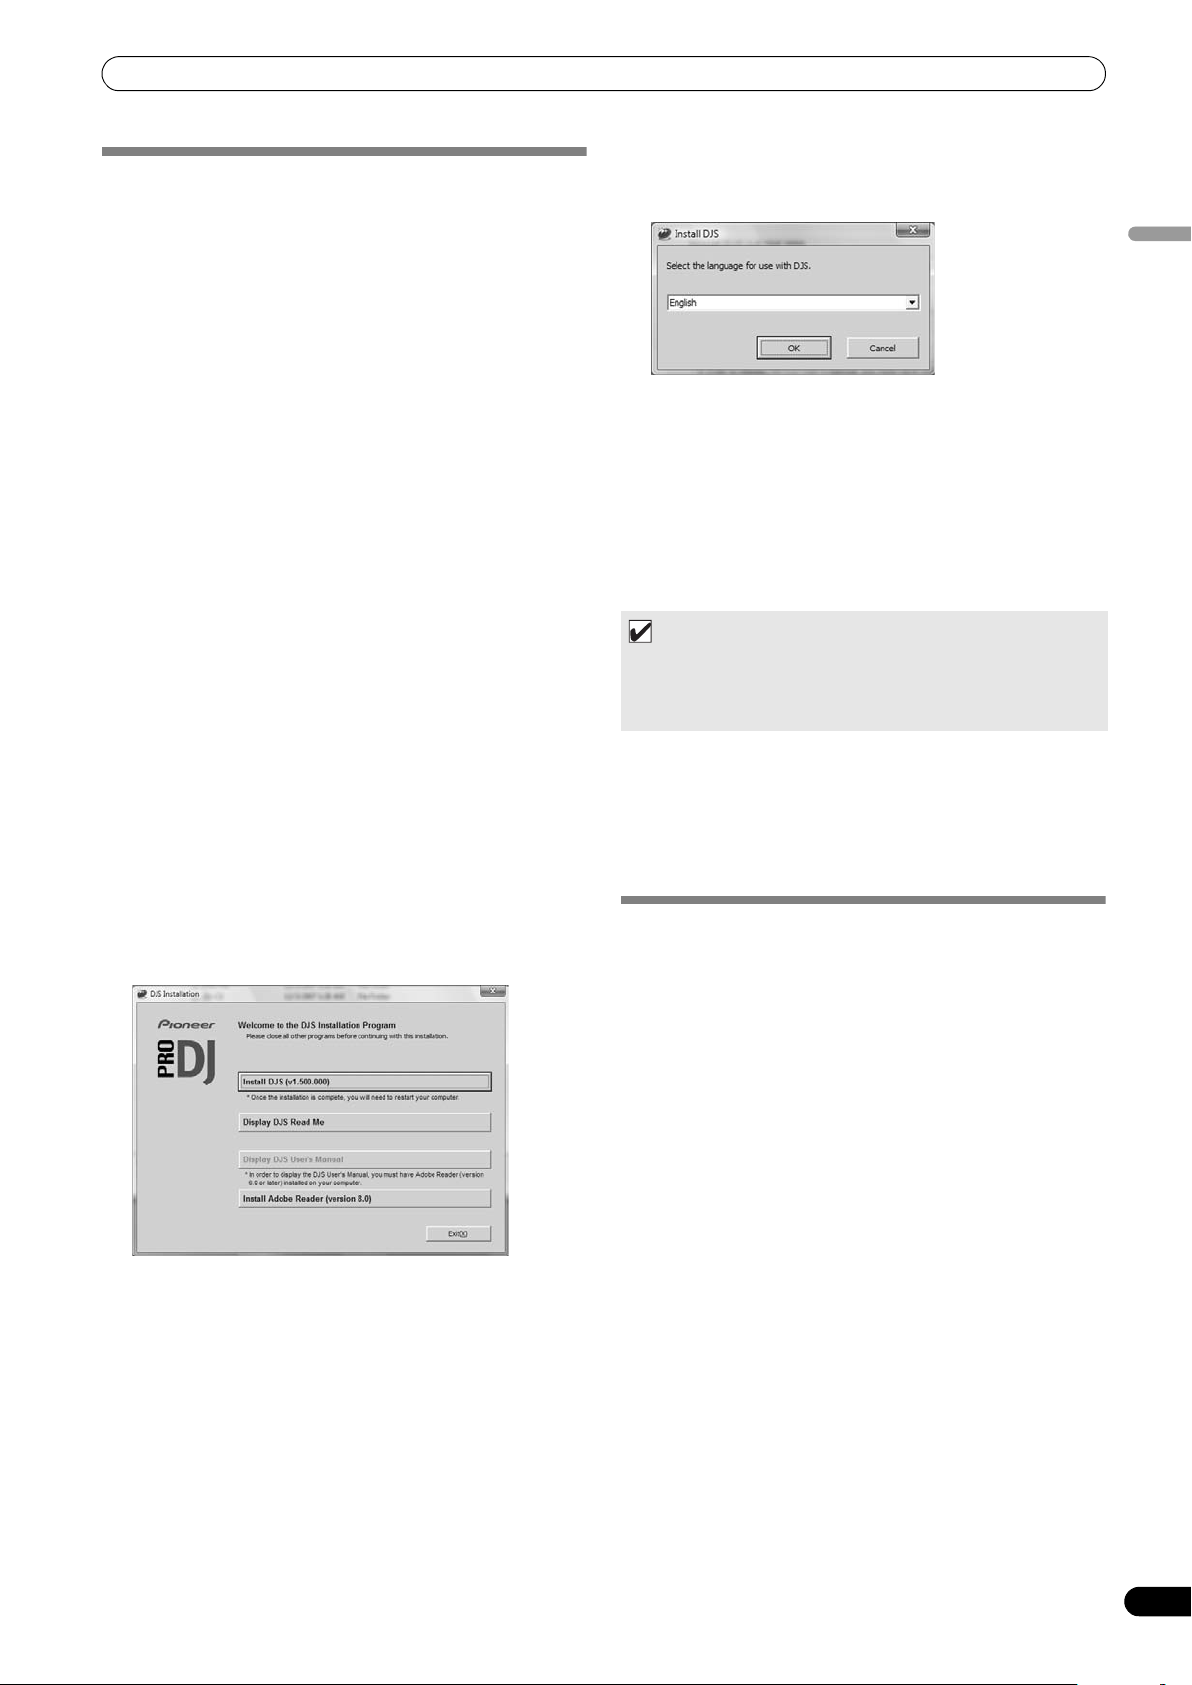
ABOUT DJS SOFTWARE
INSTALLING DJS SOFTWARE
Precautions regarding installation
•Before installing DJS, please read the “SOFTWARE END USER
LICENSE AGREEMENT” and “SYSTEM REQUIREMENTS
(Minimum Operating Environment)”.
•DJS is supported by the following Microsoft
versions:
Windows Vista
Windows Vista
Windows Vista
Windows Vista
Windows
Windows
Windows
•DJS is not supported by Microsof
(Windows
bit editions).
•The accessory CD-ROM includes installation programs and
user’s manuals in the following eight languages: English,
French, German, Italian, Dutch, Spanish, Chinese (simplified
Mandarin), Japanese.
• When using DJS on a computer whose Windows
language is other than one of those listed above, follow the
menu instructions to select [English].
• Installation and uninstallation of DJS require administrator’s
rights on the computer concerned. You must log on as
administrator before installing the software.
Installation Procedure
1 When the accessory CD-ROM installation disc is loaded in
your computer’s DVD/CD drive, the installation menu will
automatically appear. Follow the menu instructions to install
the DJS software.
• If the installation menu does not automatically appear, click
on [START] [My Computer (or Computer)] and select
the optical disc drive, and double click on the [Install] icon.
2 When the installation menu appears, click on the [Install DJS]
button.
•If a trial version of DJS is currently installed on the
computer, in place of the [Install DJS] button, the [Uninstall
DJS trial version of DJS] button will appear. Click on that
button to uninstall the trial version, then once again click on
the [Install DJS] button.
•To displa
User’s Manual] button. Adobe Reader
display the user’s manual.
• To install Adobe Reader
Reader] button. If your computer already has an older
version of Adobe Reader
version of Adobe Reader
Adobe Reader] button.
®
Home Basic
®
Home Premium
®
Ultimate
®
Business
®
XP Home Edition (SP2 or later)
®
XP Professional (SP2 or later)
®
2000 Professional (SP4)
®
XP Professional x64 edition and Windows Vista® 64-
y the user’s manual,
t’s 64-bit operating systems
click on the [Display DJS
®
, click on the [Install Adobe
®
installed, uninstall the older
®
before clicking on the [Install
®
Windows®
®
display
®
is required to
• To close the installation menu, click on the [Exit] button.
3 When the screen for selecting the language appears, select
[English], then click on [OK].
•Depending on your computer operating environment, more
than one language may be available.
utt
• When you click on the [OK] b
DJS...] message will appear.
When preparatio
installation of DJS...] message will appear. Follow the
instructions in the message to complete DJS installation.
• To cancel installation, click on the [Can
4 When DJS installation is completed, reboot the computer in
accord with the instructions that appear on the screen.
MEMO
• When using this unit (MEP-7000) in conjunction with the DJS
software program, the software driver must be installed in the
computer before connecting the computer to the MEP-7000.
For details, see P. 49
DJS User’s Manual (PDF)
When installation of DJS is completed, the user’s manual can be
viewed from the Windows [START] menu if desired. Click on
[START] [View All Programs] [DJS] [User’s Manual].
It is recommended to read the user’s manual in order to gain a
basic understanding of DJS features before actually starting the
program.
ns are completed,
on, the [Preparing to install
the [Commencing
cel] button.
NOTES REGARDING TRIAL PERIOD AND USER REGISTRATION
DJS can be used without registration for a 60-day trial period after
installation.
This period represents the time you can use DJS without officially
registering it. When the trial period is over, DJS can no longer be
used, so be sure to complete user registration before that period
has elapsed.
Online registration can be completed for users connected to the
Internet. For details regarding user registration procedures,
consult the DJS user’s manual contained on the accessory CDROM disc.
The Pioneer Group co
following purposes:
1. To provide after service for the product.
2. To inform users via email of important information and events
regarding the product.
3. To collect survey data from customers and reflect those results
into product development.
•Personal information collected from customers is handled and
managed in accordance with our personal information privacy
policy.
•For more information regarding Pioneer’s personal i
privacy policy, see the following Pioneer website:
http://www.prodjnet.com/privacy.html
Users without Internet connections should enter the necessary
information on the “User registration card” and return it via mail
to Pioneer. After the completed “User registration card” is
received, we will send the “Registration ID” (installation key)
llects personal user informati
on for the
nformati
on
English
47
En
Page 48

ABOUT DJS SOFTWARE
necessary for unlocking the software beyond the trial period. For
detailed instructions regarding the user registration procedure,
please consult the DJS user’s manual included in the accessory
CD-ROM.
NOTE
• An installation key (Registration ID) can be used on the DJS
software installed on a single computer. In the event you
replace your computer or otherwise need to reinstall the
DJS software, a new user’s registration and “Registration
ID” must be issued to unlock the software beyond the trial
period. Also, the initial “Registration ID” issued by Pioneer
will be needed in the event of reregistration or after-service
enquiries, so be sure to store the registration information in
a safe place even after completion of the registration
procedure.
The address on the “User registration card” is as follows. The
address may differ depending on your location of residence,
however, so please be careful to send the card to the correct
location:
<User Registration Card Address>
Europe
PIONEER EUROPE NV
MULTIMEDIA DIVISION
Pioneer House, Hollybush Hill, Stoke Poges, Slough SL2 4QP U.K.
DISCLAIMER
Pioneer shall not be held responsible for reissuing license keys
or registration IDs in the event of loss. Be sure to store your
registration information and passwords safely in a separate
location for future access.
The music CD ripping function of this software program is not
supported for music CD that do not display one of these logo
marks.
REGARDING ONLINE SUPPORT
Before making direct enquiries regarding DJS operating
procedures and other technical matters, please read the DJS
user’s manual furnished on the accessory CD-ROM, together with
the FAQ section on the DJS support website.
See the DJS user’s manual for information regarding how to
access the DJS support website. To access the support site, you
will need the “Login name” and “Password” which you specified
at the time of user registration.
When making an enquiry to the DJS support website regarding
malfunctions, please furnish your name, product name,
registration ID (install key), computer type an
(CPU, installed memory, other connected peripherals, etc.), the
operating system and version used, and concrete information
regarding the symptoms observed.
Support is furnished only to customers who have completed the
user registration process. Please take care to safely preserve the
“Login name” and “Password” you specified during registration,
as well as your “Registration ID.”
If you experience problems with installation or user registration,
please consult the following website:
<Enquiries regarding installation and user registration>
.com/djs/support/
http://www.prod
NOTE
jnet
•For technical information regarding use of this unit with
your computer, peripheral components, or other nonPioneer products, please consult your sales dealer or the
manufacturers of the respective components.
d specific
ations
Further version updates are anticipated to improve the
functionality and performance of DJS.
Officially registering this product allows you to access Pioneer’s
support website, as well as to download updated versions of the
program. We encourage users to take advantage of this update
service to constantly utilize the latest version of the program.
48
En
Page 49
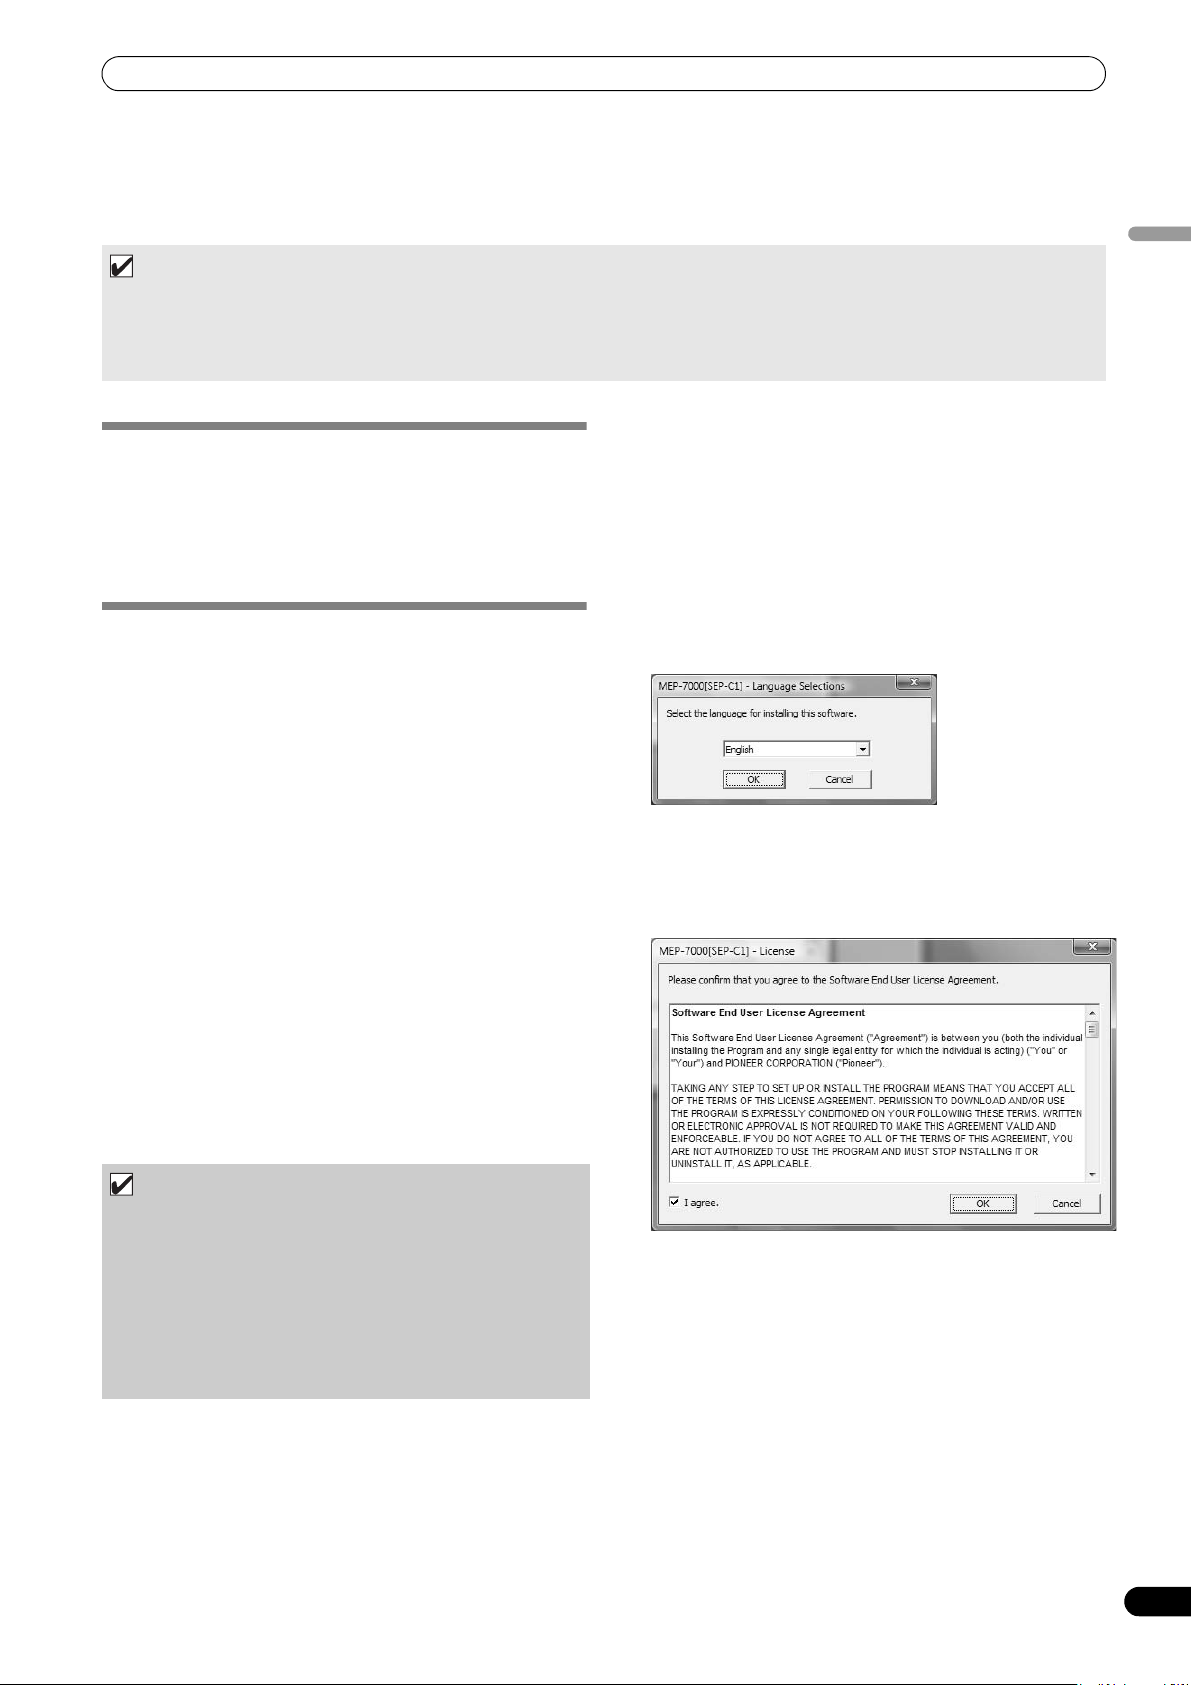
ABOUT THE DRIVER PROGRAM
ABOUT THE DRIVER PROGRAM
This unit is designed to control Pioneer DJS and other DJ software when connected to a computer. When connecting this unit to a
Windows computer for use with DJ software, the software driver program must first be loaded into the computer.
MEMO
• When using a computer with Mac OS installed, download and install the special driver software provided at Pioneer’s website
(listed below).
• Pioneer’s website (listed below) provides up-to-date information on the driver software.
http://www.prodjnet.com/support/
Using the accessory CD-ROM to install the application
SOFTWARE END USER LICENSE
AGREEMENT
When installing or using the driver software, be sure to first read
the “SOFTWARE END USER LICENSE AGREEMENT” (P. 45). By
installing and using the software, you agree to be bound by the
terms of the Agreement.
DRIVER INSTALLATION
Before installing (IMPORTANT)
• Before installing this driver, be sure to read the “SOFTWARE
END USER LICENSE AGREEMENT”.
• This unit can be connected to a computer running one of the
following operating system environments:
Windows Vista
Windows Vista
Windows
Windows
It may be necessary to use the Windows update facility in order
to install the most recent Service Pack.
• The driver software is not supported by Microsoft’s 64-bit
operating systems (Windows
Windows Vista
• The driver installation program is provided in 10 languages
(English, French, German, Italian, Dutch, Spanish, Russian,
Chinese (simplified), Chinese (traditional), and Japanese). If
using a version of Windows in another language, follow the
onscreen instructions to select [English] as the language.
• You must have administrator privileges on your computer in
order to install the driver software. Log on as the user set as the
computer’s administrator before attempting driver installation.
• If any other Windows programs are running, close them before
beginning driver installation.
®
Home Basic, Windows Vista® Home Premium,
®
Ultimate, Windows Vista® Business,
®
XP Home Edition, Windows® XP Professional, or
®
2000 Professional.
®
®
64-bit editions).
XP Professional x64 edition and
1 Boot the computer and log in with administrator’s privileges.
2 Load the accessory CD-ROM in the computer’s CD/DVD drive.
3 Open the computer’s [START]
Computer)] menu, then access the CD-ROM and double-click
on the folder [MEP-7000].
4 After opening the [MEP-7000] folder, double click on the
driver installation program [MEP-7000[SEP-C1]_#.###.exe].
(#.### indicates the driver version.)
5 When the [Language Selections] menu appears, select
[English], then click on [OK].
• To interrupt the installation process, click on the [Cancel]
button.
6 When the [License] screen appears, read the “Software End
User License Agreement”, click on the [I agree.] box, then
click on [OK].
[My Computer (or
English
NOTE
• Before installing the driver software, turn off this unit’s
POWER switch and disconnect any USB cables connecting
this unit to the computer.
• If this unit is connected to a computer without first
installing the driver, errors may occur on the computer,
depending on the computer environment involved.
• In the event the driver installation is interrupted midway
through, follow the procedures below to reinstall the driver
from the beginning.
• If you do not agree with the terms of the “Software End User
License Agreement”, click on the [Cancel] button to
terminate the installation.
49
En
Page 50

ABOUT THE DRIVER PROGRAM
7 Follow the instructions that appear on the screen.
•If the [Windows Security] screen appears during
installation, click on [Install this driver software anyway]
to continue the installation process.
<For Windows XP>
•If the [Hardware Installation] screen appears during
installation, click on [Continue Anyway] to continue the
installation process.
8 When installation is completed, the [Installation is now
complete.] message will appear. Click on the [Finish] button
to complete the process.
Connecting this unit to the computer
1 Use the accessory dedicated remote control cables to
connect the drive unit to the control unit.
NOTE
•Insert firmly until you hear a click.
2 Use USB cable to connect the drive unit to the computer,
then turn the drive unit’s power ON.
When first connecting this unit to the computer, and when
disconnecting and reconnecting the computer USB port, the
computer may display the message [Installing device driver
software]. In this case, wait until the computer displays the
message [Your devices are ready to use].
<For Windows XP>
•During the installation process, if the computer displays the
message [Can Windows connect to Windows Update to
search for software?] select [No, not this time], then click
on the [Next] button to continue the installation process.
<For Windows 2000>
•If the [Digital Signature Not Found] screen appears during
installation, click on the [Yes] button to continue the
installation process.
•During installation, if the computer displays the message
[What do you want the wizard to do?] select [Install the
software automatically (Recommended)], then click on
the [Next] button to continue the installation process.
50
En
Page 51
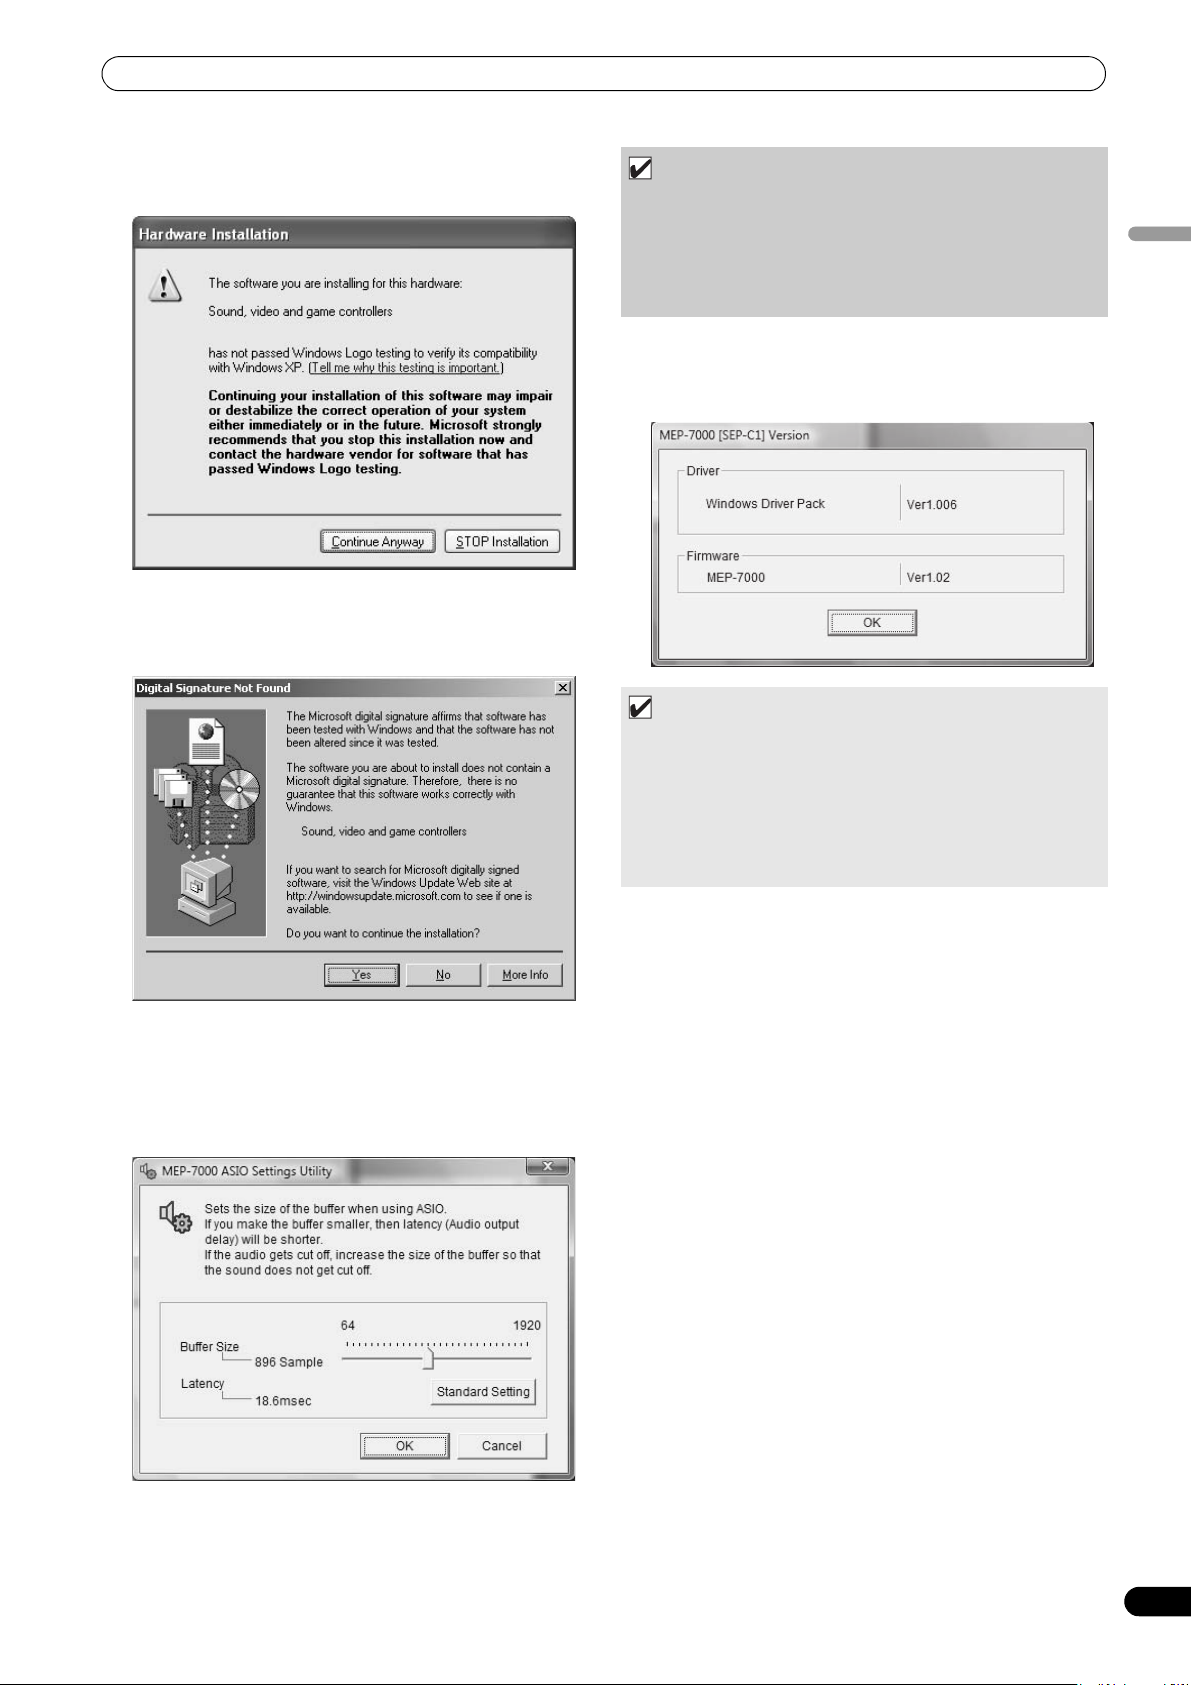
ABOUT THE DRIVER PROGRAM
•If the [Hardware Installation] screen appears during
installation, click on [Continue Anyway] to continue the
installation process.
<For Windows 2000>
•If the [Digital Signature Not Found] screen appears during
installation, click on the [Yes] button to continue the
installation process.
NOTE
• Setting the buffer size to a higher value will help prevent
audio dropouts (interrupted sound), but the resulting audio
data latency may result in increased time lags.
•If the computer is currently running a program (DJ
software, etc.) that uses this unit as a default audio device,
close the program and then adjust the buffer size.
Confirming the driver version
To confirm the version of the loaded driver, click on Windows
[START] [View All Programs] [Pioneer] [MEP-
7000[SEP-C1]] [MEP-7000[SEP-C1] Version Display Utility].
MEMO
• This screen also allows you to confirm the version of the
firmware currently installed in this unit. However, the firmware
version will not be displayed if the unit is not connected to a
computer, or if the computer is not communicating properly
with the unit.
•The firmware version displayed on this screen as the unit’s
firmware will be either the control unit’s firmware or the drive
unit’s firmware, whichever is older.
English
Setting the buffer size
The MEP-7000’s drive unit has been designed as an audio device
compliant with ASIO (Audio Stream Input Output) standards.
To adjust the buffer size of the device, click on Windows [START]
[View All Programs] [Pioneer] [MEP-7000[SEP-C1]]
[MEP-7000 ASIO Settings Utility].
Most recent version of driver
Consult the following website regarding the latest driver versions.
http://www.prodjnet.com/support/
When using this unit to control DJS software
Please read the sections “USING DJ SOFTWARE” (P. 52) and the
“DJS Control Guide” (PDF file) before attempting to actually use
this unit to operate DJS. The “DJS Control Guide” can be found
under the name [manual_MEP-7000_control_en.pdf] in the
[MEP-7000\English] folder of the accessory CD-ROM.
51
En
Page 52

USING DJ SOFTWARE
USING DJ SOFTWARE
By loading the accessory DJS software or another DJ software to a computer connected to this player via USB cable, the player can be used to operate the DJ software program.
Supported DJ softwares
DJS Included as an accessory with the MEP-7000, the all-in-one DJ software program “DJS” allows immediate use of
Communicationsupported DJ
software
MIDI-supported DJ
software
DJ software.
Commercially available DJ softwares supporting the MEP-7000’s dedicated communications protocol can be
operated even without the use of a control disc. For latest informat
consult the following Pioneer website:
http://www.prodjnet.com/support/
The MEP-7000 outputs data regarding button and TEMPO adjust slider status in universal MIDI format, so DJ
softwares with MIDI support can be used to assign the unit’s MIDI messages, thus using the MIDI
communication for control.
ion regarding supp
orted DJ software, please
Two Styles of Play
This player can be connected to a computer using either of the methods shown below.
Normal Style
The playing setup whereby the MEP-7000 operates with the control unit and drive unit as a set is called “normal style.” In normal style play,
when using a DJ software program, the MEP-7000’s drive unit is connected to a computer via a USB cable. The DJ software program is
allocated as a source on the BROWSE screen the same as discs and USB storage devices, and switching between these sources is
performed on the unit’s center display. By designating the MEP-7000 as an audio output device, it becomes unnecessary to use a mixer
to switch between two sound sources, allowing seamless DJ play impossible until now. (Designation of the MEP-7000 as an audio output
device is supported only by DJS and certain other DJ software programs.)
USB cable
Computer
Manipulator Style
The playing setup whereby the MEP-7000’s control unit is made to operate as the DJ software program’s manipulator is called
“manipulator style.” When the MEP-7000 is used as a manipulator, you can control your DJ software without need for either mouse or
keyboard, using the same layout, functions, and ease of operation transmitted from the Pioneer CDJ series.
USB auxiliary power cable
Computer
USB cable
52
En
Page 53

USING DJ SOFTWARE
Step
Normal
Style
Manipulator
Style
DJS
Dedicated
communication-
supported
DJ software
MIDI-supported
DJ software
Confirm computer’s setup and
operating environment.
Turn on computer power.
Install the driver.
Connect the MEP-7000 to your
computer.
See P.15 of this manual (“CONNECTIONS”).
See P.17 for Normal Style connections and P.18 for Manipulator Style connections.
Turn on power to the MEP-7000.
See P.49 of this manual (“ABOUT THE DRIVER PROGRAM”).
See P.45 of this manual (“ABOUT DJS
SOFTWARE”).
Computer operating system support is
limited to Windows Vista, Windows XP or
Windows 2000. DJS supports only the
Microsoft Windows OS.
Adjust the buffer size (ASIO). See P.51 of this manual (“ABOUT THE DRIVER PROGRAM, Setting the buffer size”)
Consult the instruction manual for your DJ
software.
Computer operating system support is limited
to Windows Vista, Windows XP or Windows
2000 (For those using a Mac OS, 10.3.9 or
later).
Consult the instruction manual for your DJ
software.
Confirm “Correct USB
connection to computer?”.
See P.51 of this manual (“ABOUT THE DRIVER PROGRAM, Confirming the driver version”).
Install the DJ software program. See P.45 of this manual (“ABOUT DJS
SOFTWARE”)
Startup the DJ software. See the DJS User’s Manual (PDF file on
accessory CD-ROM).
Set audio output device. See the DJS Control Guide (PDF file on
accessory CD-ROM).
Consult the instruction manual for your DJ
software.
Operate for DJ play. See the DJS Control Guide for basic
operating techniques.
* For information regarding center display
screen’s status and combined play with
other music sources (Normal Style), see
this manual.
PREPARING YOUR DJ SOFTWARE PROGRAM
Before using your DJ software program, you must prepare your computer and the DJ software. Do not connect the MEP-7000 to your computer until you have loaded the software driver!
English
MEMO
•Special driver software must be installed on your computer when using the DJ software. When using a computer with Windows
installed, install the special driver softwar e found on the supplied CD-ROM (When using a computer with Mac OS installed, download
and install the special driver software provided at Pioneer’s website (listed below)).
•Pioneer’s website (listed below) provides up-to-date information on the driver software.
http://www.prodjnet.com/support/
CONTROLLING YOUR COMPUTER USING THE DEDICATED COMMUNICATIONS PROTOCOL
The MEP-7000 can be used to control not only the accessory DJS
2 Start the DJ software program.
The icon will not change.
For DJS:
When communication with DJS begins, the icon will change to
the [PC DJS] icon.
software, but other DJ software programs supporting the MEP7000’s dedicated communications protocol.
Control in “Normal Style”
1 Connect to the computer.
When the USB connection with the computer is properly
established, the BROWSE screen’s [PC] icon will change to
active display.
3 Designate the MEP-7000 as an audio output device in the DJ
software.
In “Normal style,” designating the MEP-7000 as an audio
output device will enable it to output tracks played from the DJ
software. Consult your supported DJ software’s instruction
manual for details regarding how to designate the MEP-7000
as an audio output device.
For DJS:
DJS can be used to designate the MEP-7000 as an audio
output device. Consult the “Normal Style” chapter of the DJS
Control Guide (PDF file on accessory CD-ROM) for details
regarding how to designate the MEP-7000 as an audio output
device.
53
En
Page 54
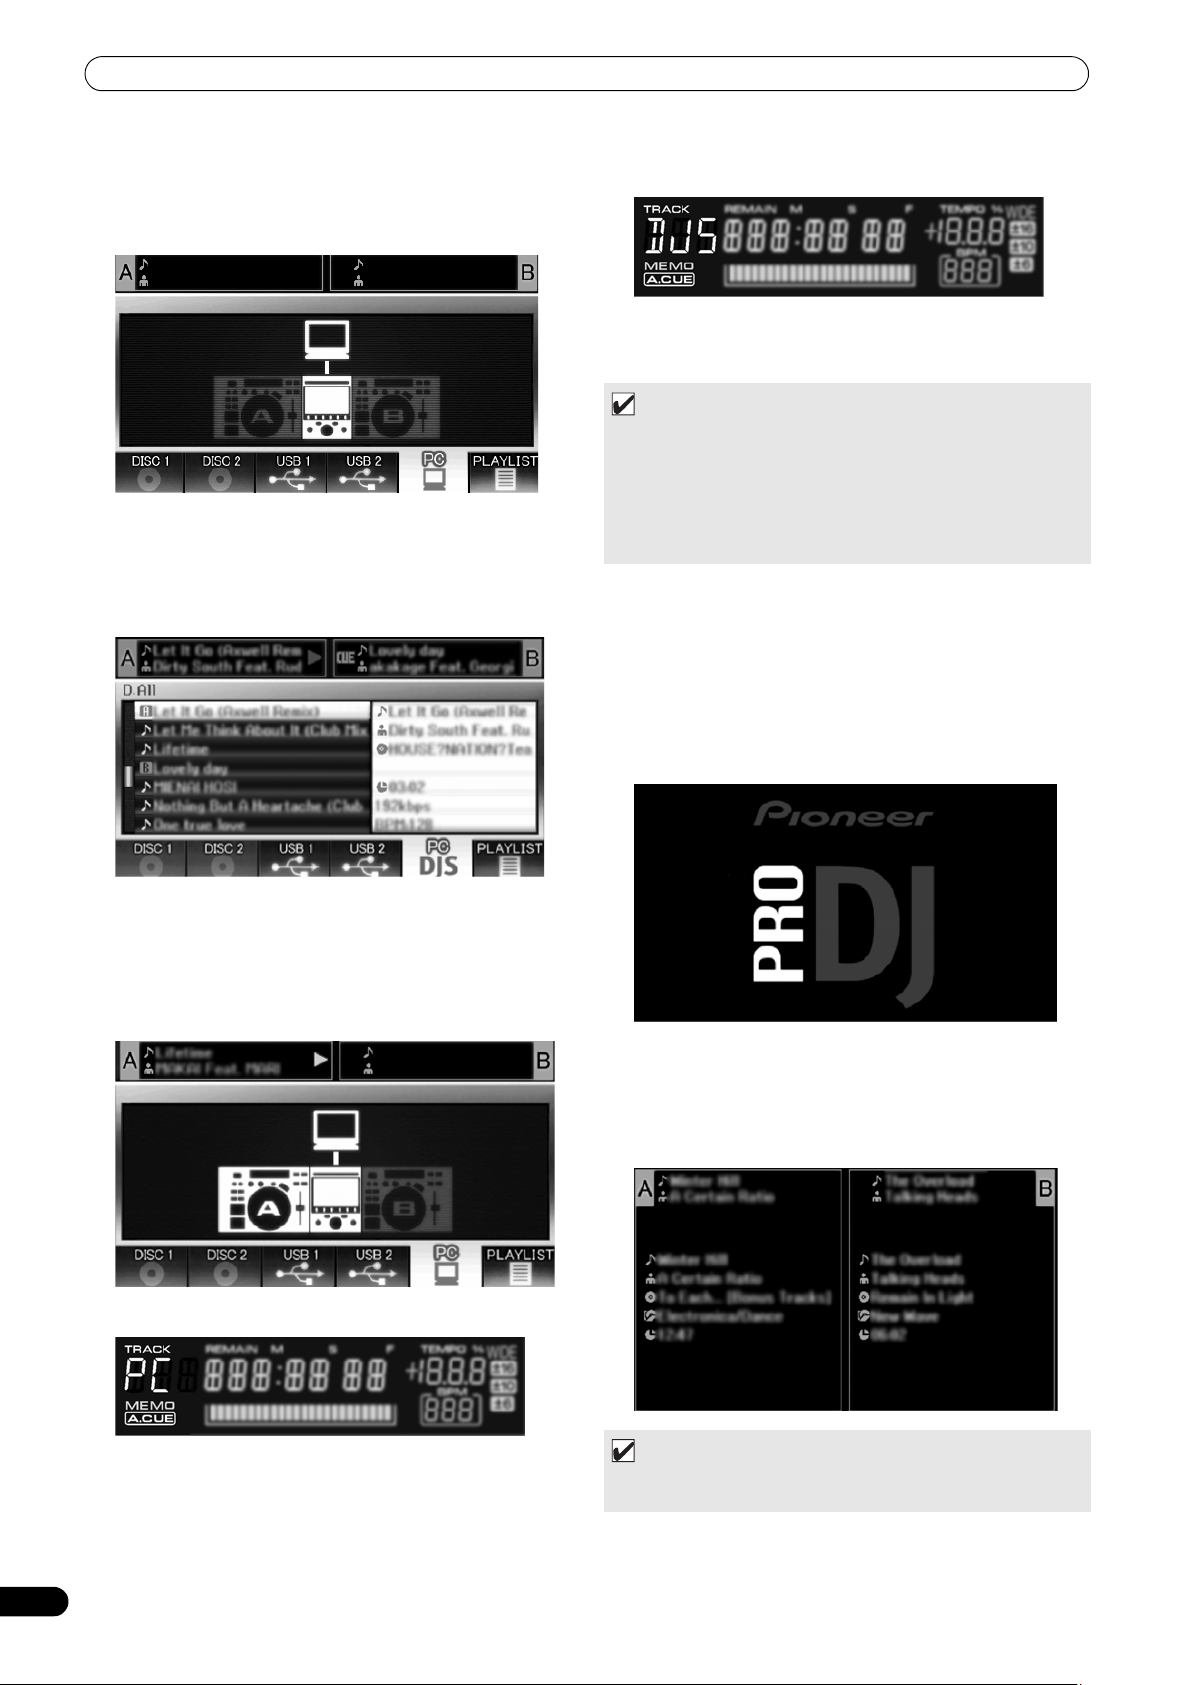
USING DJ SOFTWARE
4 Select [PC] on the BROWSE screen.
Once the DJ software starts, the center display’s BROWSE
screen will show the computer control status, allowing the
rotary selector dial, select up () and down () buttons to be
used to operate the DJ software.
For DJS:
The center display will show the DJS BROWSE screen. For
details of actual operation, consult the section “Selecting DJS
Music Tracks” in the chapter on “Normal Style” operation of
the MEP-7000 DJS Control Guide (PDF file on accessory CDROM).
For DJS:
The display A/B displays “DJS”.
6 Use the controller to operate the DJ software.
Use the various buttons, jog dial, and TEMPO adjust slider to
operate the DJ software.
MEMO
• When using the accessory DJS software and certain other DJ
software programs, the MEP-7000’s center display, and
displays A/B will show the currently playing track’s time data
and title, together with the name of artist.
• By designating the MEP-7000 as an audio output device in the
DJ software, tracks played with the DJ software can be output
from the drive unit.
7 To switch to playback of disc or tracks on USB storage device
While controller A (or B) is controlling the computer, if a track
on disc or USB storage device is selected on the BROWSE
screen and the LOAD A (or LOAD B) button is pressed,
playback and control will switch to the selected track on disc
or USB storage device.
Control using “Manipulator Style”
1 Connect to the computer.
The center display will show the [PRO DJ] logo.
5 Press LOAD A (or B) button.
When the LOAD A (or LOAD B) button is pressed while [PC] is
selected on the BROWSE screen’s source selector, the DJ
software’s track will be set in the controller corresponding to
the LOAD button pressed (A or B). During DJ software
operation, the controller appears highlighted in the BROWSE
screen.
At the same time, the display A/B displays “PC”.
2 Start the DJ software program.
When communication is established with the DJ software, the
buttons, jog dial, and TEMPO adjust slider can be used to
control operation, and the MEP-7000’s center display, and
displays A/B will show the currently playing track’s time data
and title, together with the name of artist.
MEMO
•Some DJ software programs do not support the
aforementioned track information displays.
54
En
Page 55

USING DJ SOFTWARE
For DJS:
Control can be performed while viewing the center display’s
BROWSE, MIX, and EFFECT screens. For details of actual
operation, consult the chapter on “Manipulator Style”
operation of the MEP-7000 DJS Control Guide (PDF file on
accessory CD-ROM).
MEMO
• While the UTILITY screen is being displayed on the center
display, the center display’s buttons and rotary selector dial
cannot be used to control DJ software.
USING MIDI FOR COMPUTER CONTROL
MIDI (Musical Instrument Digital Interface) is a standardized
protocol used to govern data transmission between electronic
musical instruments and computers.
The MEP-7000 uses the MIDI message format to output its
operating data and status to a computer connected by USB cable.
By using a DJ software program with USB MIDI support to assign
the MIDI messages output by the MEP-7000, the MEP-7000 can be
used to control the DJ software.
For more information regarding messages output by the MEP7000, consult the section “MIDI MESSAGE TABLE” (P. 57).
Control in “Normal Style”
1 Connect to the computer.
When the USB connection with the computer is properly
established, the BROWSE screen’s [PC] icon will change to
active display.
2 Start the DJ software program.
The icon will not change.
3 Designate the MEP-7000 as an audio output device in the DJ
software.
In “Normal style”, designating the MEP-7000 as an audio
output device will enable it to output tracks played from the DJ
software. Consult your supported DJ software’s instruction
manual for details regarding how to designate the MEP-7000
as an audio output device.
4 Select [PC] on the BROWSE screen.
When communication is established with the DJ software, the
center display’s BROWSE screen will indicate the computer
control status. While the BROWSE screen is displayed, the
center display outputs MIDI messages that enable operation of
the DJ software by using the rotary selector dial and select up
() and down () buttons.
5 Press LOAD A (or B) button.
When the LOAD A (or LOAD B) button is pressed, controller A
(or B) MI DI m es sag es are output, allowing use of the controller
to operate the DJ software. During DJ software operation, the
controller appears highlighted in the BROWSE screen.
English
55
En
Page 56

USING DJ SOFTWARE
At the same time, the display A/B displays “PC”.
6 Use the controller to operate the DJ software.
Use the various buttons, jog dial, and TEMPO adjust slider to
operate the DJ software.
MEMO
• By designating the MEP-7000 as an audio output device in the
DJ software, tracks played with the DJ program can be output
from the drive unit.
7 To switch to playback of disc or tracks on USB storage device
While controller A (or B) is controlling the computer, if a track
on disc or USB storage device is selected on the BROWSE
screen and the LOAD A (or LOAD B) button is pressed,
playback and control will switch to the selected track on disc
or USB storage device.
Control using “Manipulator Style”
1 Connect to the computer.
The center display will show the [PRO DJ] logo.
Setting a MIDI channel
MIDI channel setting can be performed from the UTILITY screen.
1 Press the UTILITY button. 2 Press the [PC] function button.
The center display will show the MIDI channel setting menu.
•Controller A use
while controller B uses a different channel. (Factory defaults
are for Controller A and center display to be set to Channel
1, and Controller B set to Channel 2).
3 Either press the rotary selector dial, or press the select down
(
) button.
The icon will move to the right.
4 Turn the rotary selector dial to change the value.
Values between 1 and 16 can be set.
5 Press the rotary selector dial to confirm the value selected.
•Press the select up () button to cancel the selection and
return to the UTILITY screen.
s the same channel as the center display,
2 Start the DJ software program.
When communication is established with the DJ program, the
MEP-7000 operates as a MIDI controller, and the status of
controller A/B and center display section’s buttons and
controls are output as MIDI messages.
MEMO
• While the UTILITY screen is being displayed on the center
display, the center display’s MIDI messages are not output.
56
En
Page 57

USING DJ SOFTWARE
MIDI MESSAGE TABLE
Interface Name
JOG DIAL General
TEMPO ADJUST SLIDER VR Bn 1D dd 0 to 127 0 at – side, 127 at + side
PLAY/PAUSE SW 9n 00 dd OFF=0, ON=127
CUE SW 9n 01 dd OFF=0, ON=127
SEARCH FWD SW 9n 02 dd OFF=0, ON=127
SEARCH REV SW 9n 03 dd OFF=0, ON=127
TRACK SEARCH Next SW 9n 04 dd OFF=0, ON=127
TRACK SEARCH Prev SW 9n 05 dd OFF=0, ON=127
IN/CUE SW 9n 06 dd OFF=0, ON=127
OUT/ADJUST SW 9n 07 dd OFF=0, ON=127
RELOOP SW 9n 08 dd OFF=0, ON=127
MEMORY SW 9n 0A dd OFF=0, ON=127
Controller A
CALL SW 9n 0B dd OFF=0, ON=127
TIME/A.CUE SW 9n 0E dd OFF=0, ON=127
TEMPO RANGE SW 9n 10 dd OFF=0, ON=127
MT SW 9n 11 dd OFF=0, ON=127
SCRATCH SW 9n 12 dd OFF=0, ON=127
JOG BREAK SW 9n 13 dd OFF=0, ON=127
PITCH BEND + SW 9n 14 dd OFF=0, ON=127
PITCH BEND – SW 9n 15 dd OFF=0, ON=127
JOG TOUCH SW 9n 20 dd OFF=0, ON=127
JOG DIAL General
TEMPO ADJUST SLIDER VR Bn+1 1D dd 0 to 127 0 at – side, 127 at + side
PLAY/PAUSE SW 9n+1 00 dd OFF=0, ON=127
CUE SW 9n+1 01 dd OFF=0, ON=127
SEARCH FWD SW 9n+1 02 dd OFF=0, ON=127
SEARCH REV SW 9n+1 03 dd OFF=0, ON=127
TRACK SEARCH Next SW 9n+1 04 dd OFF=0, ON=127
TRACK SEARCH Prev SW 9n+1 05 dd OFF=0, ON=127
IN/CUE SW 9n+1 06 dd OFF=0, ON=127
OUT/ADJUST SW 9n+1 07 dd OFF=0, ON=127
RELOOP SW 9n+1 08 dd OFF=0, ON=127
Controller B
MEMORY SW 9n+1 0A dd OFF=0, ON=127
CALL SW 9n+1 0B dd OFF=0, ON=127
TIME/A.CUE SW 9n+1 0E dd OFF=0, ON=127
TEMPO RANGE SW 9n+1 10 dd OFF=0, ON=127
MT SW 9n+1 11 dd OFF=0, ON=127
SCRATCH SW 9n+1 12 dd OFF=0, ON=127
JOG BREAK SW 9n+1 13 dd OFF=0, ON=127
PITCH BEND + SW 9n+1 14 dd OFF=0, ON=127
PITCH BEND – SW 9n+1 15 dd OFF=0, ON=127
JOG TOUCH SW 9n+1 20 dd OFF=0, ON=127
Interface
Type
Purpose
Controller
Purpose
Controller
Message
MSB
Bn 10 dd Linear value with respect to speeds from stop to 4x, 64 at
stop; FWD direction: 65 (0.06x) to 127 (x4); REV direction: 63
(0.06x) to 0 (4x).
Bn+1 10 dd Linear value with respect to speeds from stop to 4x, 64 at
stop; FWD direction: 65 (0.06x) to 127 (x4); REV direction: 63
(0.06x) to 0 (4x).
Comments
English
57
En
Page 58

USING DJ SOFTWARE
Interface Name
ROTARY SELECTOR DIAL General
SELECT DOWN (>) SW 9n 31 dd OFF=0, ON=127
SELECT UP (<) SW 9n 32 dd OFF=0, ON=127
ROTARY SELECTOR DIAL
PUSH
LOAD A SW 9n 34 dd OFF=0, ON=127
LOAD B SW 9n 35 dd OFF=0, ON=127
BROWSE SW 9n 36 dd OFF=0, ON=127
MIX SW 9n 37 dd OFF=0, ON=127
EFFECT SW 9n 38 dd OFF=0, ON=127
F1 SW 9n 39 dd OFF=0, ON=127
Center display section
F2 SW 9n 3A dd OFF=0, ON=127
F3 SW 9n 3B dd OFF=0, ON=127
F4 SW 9n 3C dd OFF=0, ON=127
F5 SW 9n 3D dd OFF=0, ON=127
F6 SW 9n 3E dd OFF=0, ON=127
Interface
Type
Purpose
Controller
SW 9n 33 dd OFF=0, ON=127
Message
MSB
Bn 4F dd 98 to 127, 1 to 30 (± 1 to ± 30), transmits count value
difference from previous time. When ± 30 or more, becomes
± 30.
Comments
• n = channel number
• Messages with gray overlay are output only when unit is connected to computer in manipulator style, with the exception that
they are not output when the UTILITY screen is displayed.
58
En
Page 59

ENJOYING CD-G KARAOKE
ENJOYING CD-G KARAOKE
The MEP-7000 can playback CD-G discs and output images to an external monitor (MONITOR OUT) for Karaoke play.
SELECT CD-G PLAY MODE
To play a CD-G disc, it is necessary to use the UTILITY screen to set
the CD-G play mode.
1 Press the UTILITY button. 2 Press the [CD-G] function button.
The CD-G setting menu will appear.
3 Select [CD-G MODE], and press the select () down button.
4 Use the rotary selector dial to select [ON], then press the
rotary selector dial.
The LOAD A/B buttons will flash blue, and the center display
will show the [CD-G MODE] indicator.
MEMO
•During CD-G play mode, the UTILITY button’s LED will flash
red, and it will not be possible to change to the BROWSE, MIX,
or EFFECT screens. To change to one of those screens you
must first cancel the CD-G play mode.
MEMO
• The CD-G images from the controller being played
corresponding to the lighted LOAD button will be visible on the
display. If a flashing LOAD button is pressed, the controller on
the corresponding side will switch to the CD-G images being
played back.
• If Auto Cue is set to ON when track search is performed,
playback will enter the pause (standby) mode at the beginning
of the searched track.
•If control cords are connected to a Pioneer DJ mixer, the fader
start operation can also be used to switch playback between
controller A and controller B.
Key control
When the PITCH BEND button is pressed, the key (pitch) can be
adjusted. Each half-step can be adjusted in six stages.
Vocal cancel
Vocal audio can be canceled by pressing the MASTER TEMPO
button, thus allowing ordinary music CDs (CD-DA) to be used for
karaoke play.
Audio switching
Each time the TEMPO range button is pressed, the audio output
switches as follows:
L-R: Stereo L: monaural R: monaural
MEMO
• The disc loaded into drive 1 is set for controller A, and the disc
loaded into drive 2 for controller B. Other designation of the
controllers is not supported.
• In the CD-G play mode, playback is disabled from CD-ROM/
DVD-ROM and USB storage device.
• In the CD-G play mode, Scratch and other DJ play operations
are disabled.
•Images can be output to an external monitor during disc play.
No external output is performed when the UTILITY screen is
displayed, however.
• The vocal cancel mode is designed to cancel vocal sounds
coming equally both right and left speakers. The unit may be
unable to cancel vocals that are output from only rig
speake
r alone.
ht or left
English
TO PLAY A CD-G DISC
1 Press the LOAD A or LOAD B button.
The selected controller’s LOAD button will change to lighted
blue.
2 Insert a CD-G disc into the drive corresponding to the lighted
LOAD button, and use the TRACK SEARCH button to select
the desired track.
CD-G disc play will begin, and the image will be output to the
display.
TO CANCEL CD-G PLAY MODE
1 Press the UTILITY button. 2 Press the [CD-G] function button.
The UTILITY CD-G setting menu will be displayed.
3 Select [CD-G MODE] and press the select down () button.
4 Use the rotary selector dial to select [OFF], then press the
rotary selector dial.
The CD-G play mode will be canceled. If a disc is currently
being played, play will simultaneously stop.
59
En
Page 60

USING THE UTILITY
USING THE UTILITY
When the UTILITY button is pressed, the UTILITY screen appears, allowing setting of various device parameters, creation of libraries, and backup of user data.
Function buttons
SETTING METHOD
1 Use the function buttons to select the item you wish to set
[DISPLAY/CD-G/PC/BROWSE/LANGUAGE/GENERAL].
2 Rotate the rotary selector dial to align the cursor with the
desired setting item.
3 Press either the select down (
dial to move the
4 Turn the rotary selector dial to select the desired setting
value.
5 Press the rotary selector dial to confirm the new setting
value.
To cancel before confirming, press the select up () button.
icon to the right side.
) button or the rotary selector
UTILITY
Select down () buttonRotary selector dial
SETTINGS
[1] DISPLAY
Brightness, external output settings, etc.
LCD BRIGHTNESS Sets brightness of center
OEL BRIGHTNESS Sets brightness of displays A/
LED BRIGHTNESS Sets brightness of LED (5
SCREEN SAVE
TV STANDARD Sets signal format for
MONITOR OUT Sets center display aspect
*1 Screen saver operation
•The screensaver operates when
without a track being loaded in either controller.
•The screensa
without any button input when either one or both of the
controllers is in pause mode (including cue standby or END
display).
nsaver operation
•Scree
manipulator style connection.
•The screen sa
software other than DJS.
g operation of th
•Durin
inserting a disc, or performing any other command
operation will cancel the screensaver.
display (5 steps)
B (5 steps)
steps)
*1
After the set time without
user operation, the LCD and
OEL screens are dimmed in
order to preserve the
displays.
monitor output (PAL, NTSC
(7.5 IRE), NTSC (0 IRE)).
ratio to LETTER BOX,
FULL SCALE, or OFF.
five minutes have passed
ver also operat
ver is disabl
es after 100 minutes passes
n be set for either no
ca
ed when a track is set with DJ
e screensaver, pressing a button,
Factory
default setting
5
5
5
ON
PAL
OFF
rmal style or
60
En
[2] CD-G
The CD-G karaoke mode can be selected (P. 59).
[3] PC
The MIDI channel can be set (P. 56).
Page 61
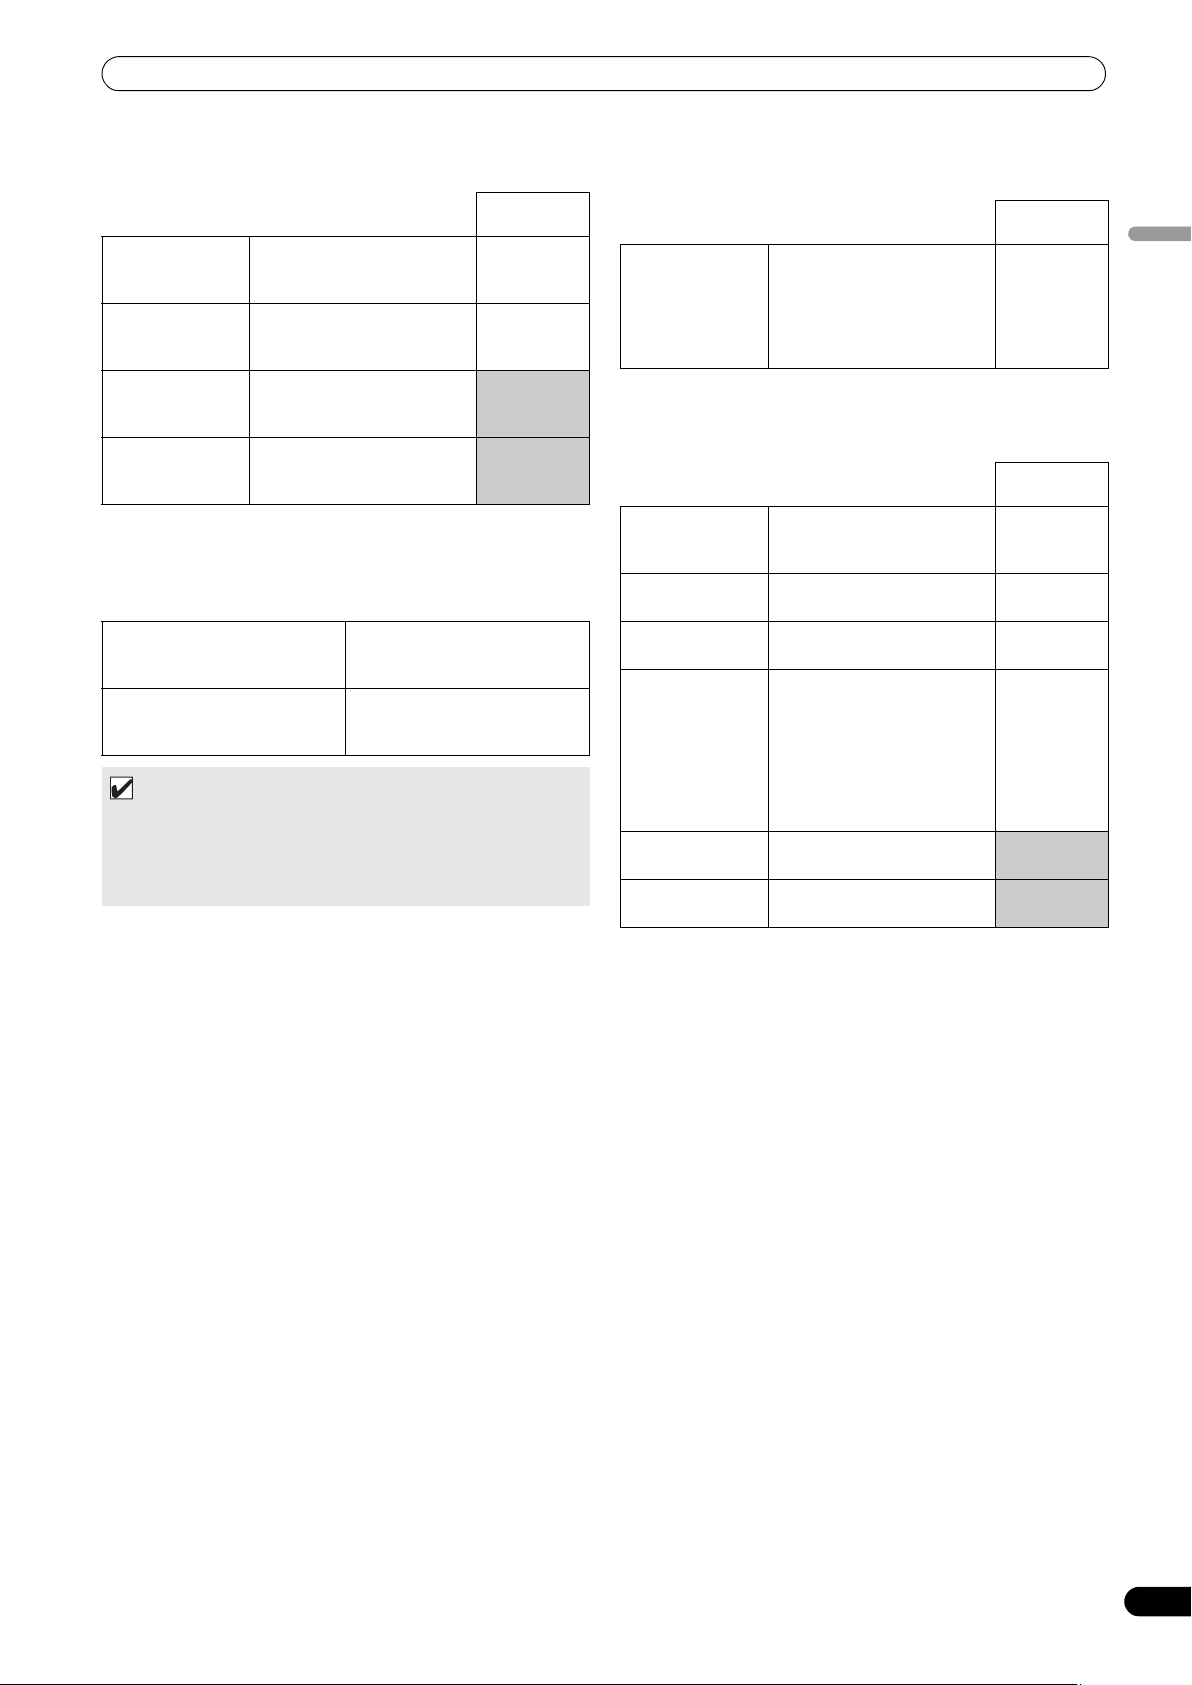
USING THE UTILITY
[4] BROWSE
Allows setting of the browse type and creation of libraries.
Factory
default setting
BROWSE TYPE
(USB1)
BROWSE TYPE
(USB2)
LIBRARY (USB1) Creates a library on the rear-
LIBRARY (USB2) Creates a library on the front-
*2 See P. 62 “CREATING LIBRARIES”.
Setting the browse type
The browse type can be selected, and each USB storage device set
regarding whether to use created libraries.
LIBRARY If a library is found on a USB
NORMAL File browsing is used as the
MEMO
•The browse type setting is applied to any USB device
connected after the setting has been made. To change the
browse mode of a USB storage device already connected.
disconnect and reconnect the USB device after changing the
setting.
Sets the browse type for the
rear-panel USB storage
device.
Sets the browse type for the
front-panel USB storage
device.
panel USB storage device.
(*2)
panel USB storage device.
(*2)
storage device, library browsing
is set.
browse mode, without using
any libraries.
LIBRARY
LIBRARY
[5] LANGUAGE
Set the language to be used.
Factory
default setting
LANGUAGE Select display language from
ten available (English,
French, German, Italian,
Spanish, Dutch, Russian,
Portuguese, Simplified
Chinese, Japanese).
English
[6] GENERAL
Allows making LOAD LOCK and other settings, and backup of user
data.
Factory
default setting
LOAD LOCK
<A>AUTO CUE
LEVEL
<B>AUTO CUE
LEVEL
KEYBOARD
LANGUAGE
BACKUP MODE
*4
VERSION INFO Displays MEP-7000 version
*3
Locks the LOAD button so
that it is disabled during
playback.
Sets the auto cue level for
controller A (8 steps).
Sets the auto cue level for
controller B (8 steps).
Select keyboard input
language from eleven
available (English (US),
English (UK), French,
German, Italian, Spanish,
Dutch, Russian, Portuguese,
Simplified Chinese,
Japanese).
Backup cue points and
playlists.
information.
OFF
–60 dB
–60 dB
English (UK)
English
*3 The LOAD LOCK function is disabled when a track is set with
DJ software other than DJS.
*4 See P. 62 “BACKING UP USER DATA”.
61
En
Page 62
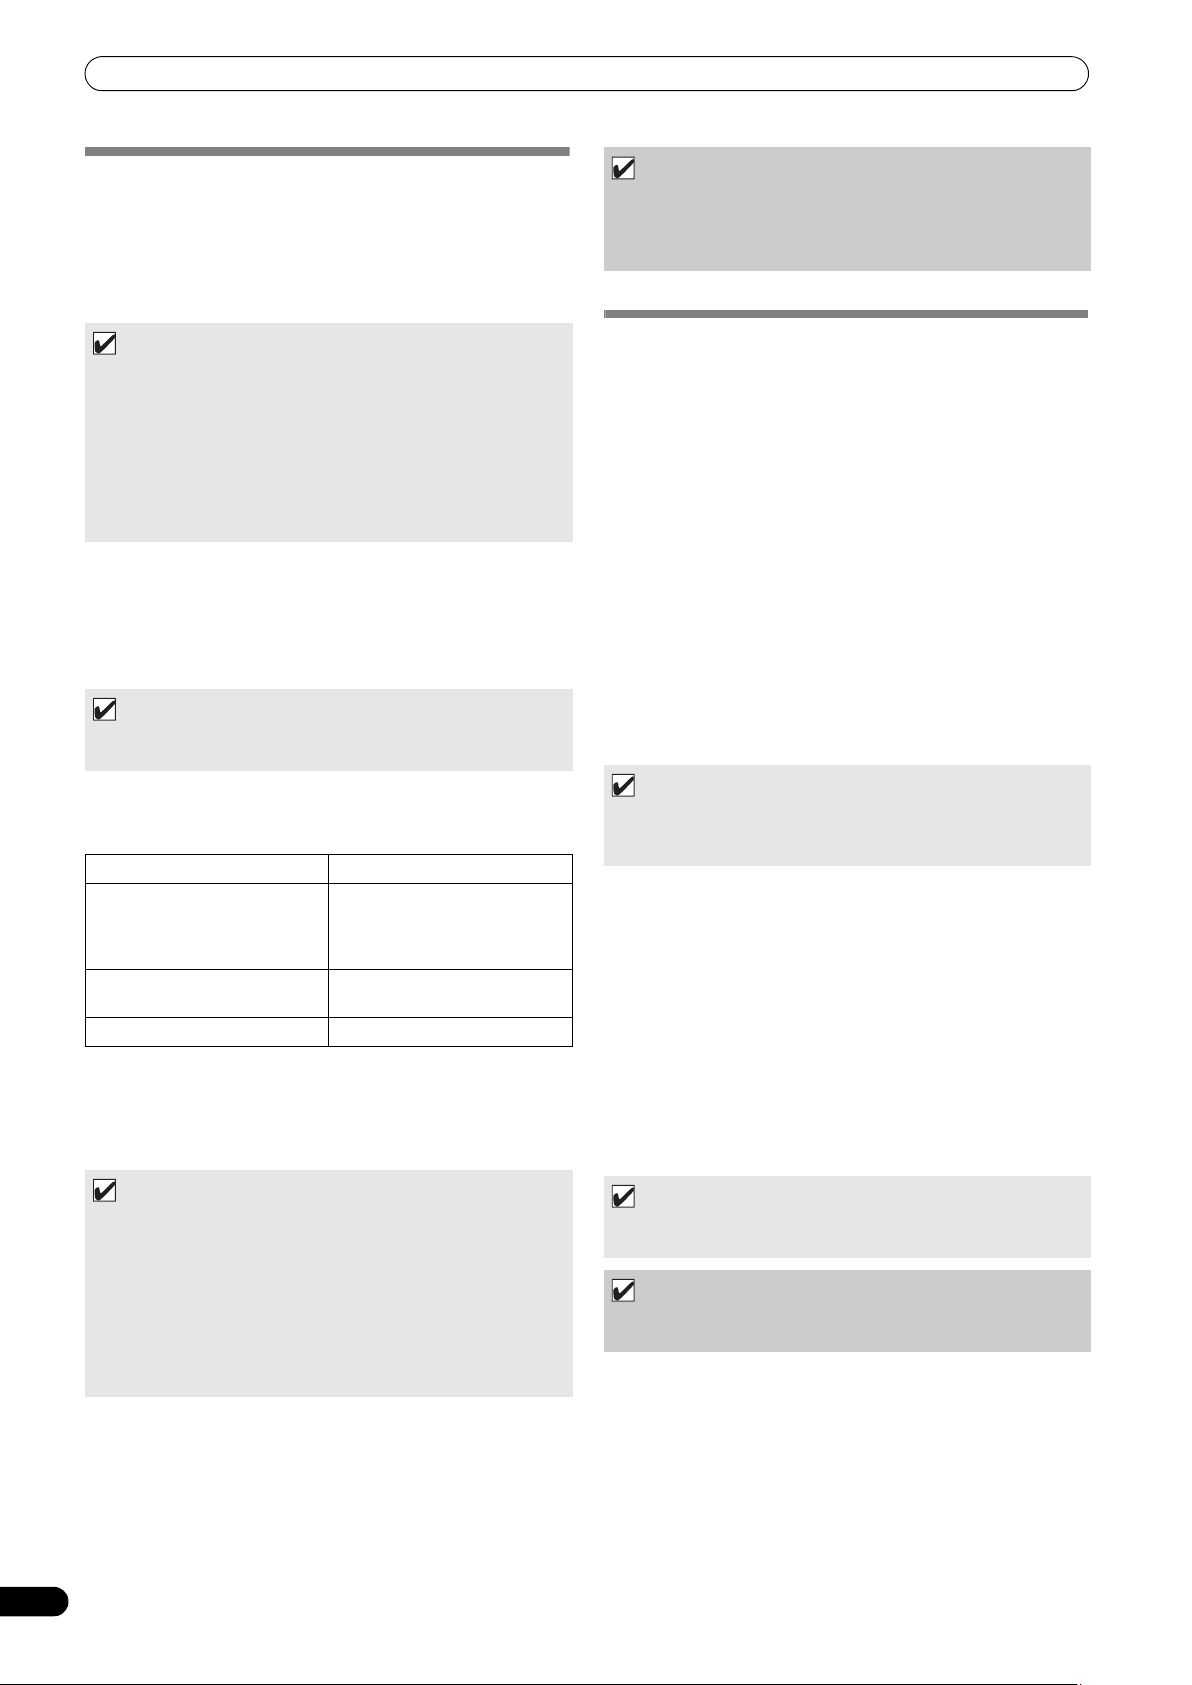
USING THE UTILITY
CREATING LIBRARIES
This unit supports the creation of libraries for large-capacity USB
storage devices, thus allowing categorizing numerous tracks by
album name, artist name, and genre, and facilitating smooth track
selection.
Library creation, updating, and deletion are performed with the
UTILITY screen.
MEMO
•Library creation and updating requires increasing amounts of
time in correspondence to the number of files. (As a general
estimate, creation of a library for 5000 files may take about 30
minutes. Additional time may be required when creating
libraries for a folder containing a large number of sub-folders
and files.)
•By using a computer, you can create libraries even faster.
Library creation programs can be downloaded from the
following website: http://www.prodjnet.com/support/
1 Connect the USB storage device on which you wish to create
a library.
2 On the UTILITY screen, select [BROWSE], then select
[LIBRARY (USB1)] or [LIBRARY (USB2)] in accordance with the
device on which you wish to create the library; finally, press
either the down (
MEMO
•Library creation/updating/deletion cannot be performed when
a track is currently playing.
3 Rotate the rotary selector dial and select the desired
operation [CREATE/UPDATE/DELETE/CANCEL], then press
the rotary selector dial.
CREATE Create a library
UPDATE Perform comparison with
DELETE Delete a library on the USB
CANCEL Return to UTILITY screen.
4 The screen will change as the selected operation begins;
when the operation is finished, the [Done] message will
appear.
When the database management operation is completed,
disconnect and reconnect all USB storage devices.
) button or rotary selector dial.
library existing on USB storage
device, and if a difference is
found, update the library.
storage device.
NOTE
•Creation of a library requires from about several-hundred bytes
to 1 Kbyte of storage space per track.
•Updating a library requires approximately 2 KB of open space
on the device per track.
BACKING UP USER DATA
Information stored in this unit regarding playlists and disc cue/
loop points can be copied to a USB storage device, allowing the
information to be transferred to another MEP-7000.
Begin this operation with no discs loaded or USB storage devices
connected.
Writing data to USB storage device
1 Press the UTILITY button. 2 Press the function [GENERAL] button. 3 Turn the rotary selector dial to select [BACKUP MODE], and
then press the select down (
dial.
4 Turn the rotary selector dial and select [Write to USB], then
press the rotary selector dial.
5 When [Connect a USB storage device to the USB port.] is
displayed, insert the USB storage device to the USB port.
6 The data will begin writing to the USB storage device.
When writing is completed, [Done] will be displayed, and the
screen will change to the UTILITY screen.
MEMO
•A backup file named BACKUP.BIN with size of around 1.5
Mbyte will be created in the root directory of the USB storage
device.
Reading data from a USB storage device
1 Press the UTILITY button. 2 Press the function [GENERAL] button. 3 Turn the rotary selector dial to select [BACKUP MODE], and
then press the select down (
dial.
4 Turn the rotary selector dial and select [Read from USB], then
press the rotary selector dial.
5 When [Connect a USB storage device to the USB port.] is
displayed, insert the USB storage device to the USB port.
6 Data reading begins.
When writing is completed, [Done] will be displayed, and the
screen will change to the UTILITY screen.
) button or the rotary selector
) button or the rotary selector
62
En
MEMO
•To interrupt the management operation midway, hold the
UTILITY button depressed for one second or more.
• A library can be created with up to 150 000 tracks.
•Libraries are created on the USB storage device in folders
named PIONEER (or .PIONEER in the case of HFS+).
•When updating a library, information on deleted or added
tracks is updated. Revised (changed) track information is not
updated. To update (change) track information, use of a library
creation program is required.
MEMO
•Backing up cue point and loop points is supported for disc
media stored in this unit.
NOTE
•Any data stored in this unit will be overwritten, so any
previously stored information will be lost.
Page 63

USING THE UTILITY
TO PERFORM A FACTORY RESET
All unit settings can be restored to their factory default values by
using the UTILITY screen (P. 60). The settings on TIME/REMAIN,
A.CUE, and TEMPO range will also be restored to their factory
default values (REMAIN, OFF, 10%).
1 With the power turned OFF, hold the UTILITY button
depressed while setting power to ON.
The button must be depressed for five seconds or more.
2 Confirm message.
After the boot-up screen appears, a message will be displayed:
[The settings have been reset to factory defaults].
3 Turn power OFF and ON again.
MEMO
•Recorded playlists and cue and loop point data are not deleted
during a factory reset.
English
63
En
Page 64

TROUBLESHOOTING
TROUBLESHOOTING
If you believe your player is failing to work properly, check the following troubleshooting table for tips. Sometimes simple mistakes in setup
or operation may appear like serious problems. There are also times when the problem in question may be caused by something else other
than your player, and at times like these you should check any other electronic devices being used at the same time.
If the problem in question continues to persist even after checking the troubleshooting table below and taking whatever corrective action
is recommended, contact your nearest Pioneer Service Station or contact the store from which you purchased your player for further
st
ance.
assi
Description of problem Possible cause of problem Recommended action
A disc fails to be ejected even
after the EJECT () button has
been pressed.
Playback doesn’t begin even
when a disc is inserted.
Playback comes to a halt
almost immediately after it
begins.
USB storage device not
detected.
A caution message to the
effect that “an excess current
has been detected” will appear
in the center display.
Can’t play MP3 or AAC tracks. • Format not supported. • See P. 10 “REGARDING PLAYABLE DISCS AND
No sound is output. • Audio cable has come loose or has not been
Sound is distorted or full of
noise.
•Power cord has not been plugged in. • Plug in power cord.
•A track is being played back. • Set the player to pause or cue standby mode
• EJECT () button is broken. • See P. 23.
• Auto Cue function is turned ON. • Press the play/pause () button to begin play.
• CD-R/RW, DVD ±R/RW or other media are of
poor quality.
•Format not supported. • See P. 10 “REGARDING PLAYABLE DISCS AND
• Disc has been inserted upside down. • Reinsert with label side facing upward.
• Disc is dirty or covered with condensation. • Wipe disc to remove dust or condensation.
• Device does not comply with USB mass storage
class.
• USB hub in use. • Some USB hubs will not operate properly. Try a
•Format not supported. • Use only FAT, FAT32, or HFS+ formats.
• The connection with this unit has been
terminated because an electrical current
stronger than that allowable was applied to this
unit’s USB1 port or USB2 port.
• Files are copy-protected. • Cannot be used on this unit.
properly plugged in.
•DJ mixer is not working properly. • Check switch and volume settings on DJ mixer.
ack
s or jack plugs are dirty. • Wipe away dust or dirt and reinsert plugs.
•J
•Controller is currently in pause mode. • Press the play/pause () button to begin play.
• Audio cable has not been properly plugged in. • Connect audio cable to line input jack of DJ
•Jacks or jack plugs are dirty. • Wipe away dust or dirt and reinsert plugs.
•Player is subject to noise from a nearby
television set.
before pressing the EJECT () button.
•Hold the TIME/A.CUE button depressed for one
second or more to set the Auto Cue mode to
OFF.
•Replace with other media, or media recorded on
ferent recordi
a dif
FILES” regarding supported formats.
• Use a device complying with USB mass storage
class (some portable audio players included in
the class of image devices are not supported.
Also, some flash card readers cannot be
detected).
different USB hub, or co
device directly to the USB port. Also, if multiple
USB storage devices are connected through a
USB hub, only one of the devices will be
recognized.
•Restore normal operation by following the
directions listed in “Connecting a USB storage
device” (P. 25). The rat
this unit is 500 mA or less per port. Use USB
storage devices that meet these standards. If
you have a USB storage device connected
through a bus-powered USB hub, connect the
USB storage device directly to this unit.
FILES” regarding supported formats.
• Plug in audio cable properly.
mixer. Do not connect to microphone jack.
•Turn off power to television set or move
t
elevision set further away
ng machine.
nnect the storage
ing (all
from player.
owable current) for
64
En
Page 65

TROUBLESHOOTING
Description of problem Possible cause of problem Recommended action
A large amount of noise is
generated when playing back a
certain disc or discs. Playback
halts unexpectedly.
Track won’t load during
playback.
Track searching fails to halt
with Auto Cue function turned
ON.
The jog dial performs a
different function from that
desired.
Back cueing fails to work when
the CUE button is pressed
during playback.
Unable to produce loop
playback by pressing the OUT/
ADJUST button.
Auto cue and other setting are
not stored.
Can’t store cue/lop point data
for tracks on USB storage
device.
Recorded USB storage device
cue and loop points aren’t
displayed.
Playlist tracks appear grayed
out.
Can’t record tracks located on
USB storage device on playlist.
Keyboard input isn’t correct. • KEYBOARD LANGUAGE setting is incorrect. • Use UTILITY screen’s KEYBOARD LANGUAGE
Character data for MP3, AAC
format tracks appears garbled.
Tracks contained in m3u files
won’t load.
• Disc is seriously warped or scratched. • Replace with new disc.
• Disc is unusually dusty or dirty. • Wipe away dust or dirt from disc.
• LOAD LOCK is set to ON. • Use UTILITY screen to set LOAD LOCK to OFF.
•Track searching sometimes takes longer than
expected when the length of silent portions
between tracks is unusually long.
•If a search cannot be performed within 10
seconds, the track's start is set as the cue point.
• The jog mode is incorrect. • Press the SCRATCH/JOG BREAK button to
•No cueing point has been defined. • Specify the desired cueing point. (P. 36)
•No cueing point (i.e., starting point) has been
defined.
•The power was turned off right after a setting
was made.
• Insufficient space on USB storage device. • Delete unnecessary files or other make
•USB storage device was disconnected before
performing proper dismount procedure, or
power was turned off.
•The disc or USB storage device for the recorded
tracks is not loaded/connected.
•The recor ded tracks have been deleted from the
USB storage device.
• The file names for the recorded tracks have been
changed, or the files moved.
•USB storage device was disconnected before
performing proper dis
powe
r was turned off.
• Insufficient space on USB storage device. • Delete unnecessary files or other make
•You are using a keyboard for a langua
than the eleven support
• LANGUAGE setting is incorrect • Go to the UTILITY screen and set LANGUAGE to
•The track information for the music file created
in the DJ software is in a language not
supported by this unit.
•The track information for this unit is in a
language not supported by the DJ software.
• m3u file is not recorded correctly. • Confirm correct recording format for m3u file.
mount procedure, or
ge other
ed by this unit.
•Hold the TIME/A.CUE button depressed for one
second or more to set t
FF.
O
select the desired function.
•Specify the desired cueing point. (P. 36)
• Wait 10 seconds before turn
after a cha
sufficient space on USB storage device.
•Always perform proper dismount procedure
before di
turning off power.
•Load or connect the disc or USB storage device
for the recorded tracks.
• Once again record the changed file names or
changed locations in the playlist.
•Always perform proper dismount procedure
before disconnecting USB storage device or
turning off power.
sufficient space on USB storage device.
setting to select the proper input language.
• Use a keyboard for one of the supported
languages.
the language of your choice.
•Input the file information in a language
supported by this unit. This unit is able to display
European languages, Russian, simplified
Chinese and Japanese.
•For informati
your DJ software, check the instruction manual
for the software you are using.
nge.
sconnecti
on on the languages supported b
he Auto Cue mode to
ing off the power
ng USB storage device or
English
y
65
En
Page 66

TROUBLESHOOTING
Description of problem Possible cause of problem Recommended action
MEP-7000 isn’t detected when
connected to computer
(normal style connections).
MEP-7000 isn’t detected when
connected to computer
(manipulator style
connections).
Television pictures are
distorted or noise appears in
FM broa
Disc is not rotating even
though power has been turned
on.
dcasts.
•Driver software hasn’t been correctly installed in
computer.
If the MEP-7000 is not connected properly and
communicating with the computer, the version
information utility will not display the firmware
version. To check this, see P. 51 of this manual
(“ABOUT THE DRIVER PROGRAM,
Confirming the driver version”).
•Control unit is connected to comp uter . • In Normal Style, connect drive unit to computer.
•Driver software
computer.
If the MEP-7000 is not connected properly and
communicating with the computer, the version
information utility will not display the firmware
version. To check this, see P. 51 of this manual
(“ABOUT THE DRIVER PROGRAM,
Confirming the driver version”).
•USB auxiliary power cable not connected. • Connect to computer in the order (1) USB
erference caused by player.•Turn off the power to the player or move the
•Int
•Disc rotation is automatically halted when no
operation is performed for 100 minutes or longer
when in pause mode.
• When the last track on the disc is over the disc
stops rotating.
hasn’t been correc
tly installed in
• Install the driver correctly. If already installed, try
uninstalling and reinstalling it.
• Install the driver correctly. If already installed, try
uninstalling and reinstalling it.
auxiliary power cable, and (2) USB cable.
player further away from the radio or television
set.
•Press the play/pause () button to begin
playback. Alternatively, press the EJECT ()
bu
tton to
eject the disc.
•There may be times when MEP-7000 fails to operate properly as a result of static electricity or some other form of interference
from an outside source. If any such problem occurs, turn off the power to the MEP-7000, wait for the currently inserted disc to
come to a full stop, and then turn on the power again to see if that fixes the problem in question.
• This unit cannot play “partial” (unfinalized) CD-R/-RW, DVD-R/-RW, DVD+R/+RW, and DVD±R dual layer media.
• Do not attempt to play irregularly shaped or other discs besides normal 12 cm round discs, since malfunction or damage may
result.
• The BPM value measured by MEP-7000 may differ from the BPM value recorded on a CD or from o
ur DJ mixer, but this difference
is a result of differences in the BPM value measurement method; not a result of a fault with the player.
ABOUT THE LCD SCREEN
• Some LCD monitors may display so-called “hot pixels” or “dead pixels” (constantly bright pixels or pixels that are permanently
off). This is a phenomenon characteristic of LCD displays and is not considered a malfunction.
• When used in cold regions, the screen may appear dark for a while after the power is first turned on. As the unit warms up with
time, the screen will return to normal brightness.
• Avoid viewing the LCD screen in direct sunlight, since the light reflected off the screen may make the image difficult to view.
ABOUT OEL (ORGANIC EL) SCREENS
•The two screens (displays A/B) may display slightly different color characteristics, but this is not a malfunction.
66
En
Page 67

TROUBLESHOOTING
ERROR MESSAGE DISPLAY
When MEP-7000 is unable to operate properly, an error code is displayed on the display panel. Check the error code displayed against
the following table and take the recommended action to correct the error. If an error code other than any of the error codes listed in the
table below is displayed or if the same error code is displayed even after corrective action has been taken, contact your nearest Pioneer
Service Station or contact the store from which you purchased your player for assistance.
Error Code Error Type Media Description Possible cause and recommended action
E-6002 AUDIO DSP
E-7201 TOC READ
E-8301 STOP ERROR DVD/CD Cannot stop disc properly. Consult your dealer or the nearest Pioneer
E-8302 PLAYBACK
E-8303 BUFFER WRITE
E-8304 DECODE ERROR DVD/CD/USB Although the compressed
E-8305 FORMAT ERROR DVD/CD/USB Although the extension of the
E-8306
E-9101
DOWNLOAD
ERROR
ERROR
ERROR
ERROR
MUSIC FILE NONE
LOADING
TIMEOUT
DVD/CD TOC data is not being read
DVD/CD Desired addr ess cannot be
DVD/CD/USB Failed to write to music data
USB Although tracks were entered
DVD/CD A mechanical error (timeout)
Programs cannot be written to
the audio DPS when the power
is turned on.
from the disc.
searched.
Address cannot be read.
Focus servo cannot be closed.
Pickup cannot be moved. Consult your dealer or the nearest Pioneer
buffer.
music file (MP3/AAC) is in the
format supported by this unit,
a data error or decode error
occurred.
music file (MP3/AAC/WAV/
AIFF) is correct, the
description within the file is
not in the supported format.
in libraries (database)/playlists
etc., at time of playback the
tracks had been deleted from
the USB storage device.
occurred during the loading or
unloading of a disc.
Consult your dealer or the nearest Pioneer
Service Station.
•If there are cracks in the disc, replace the
disc.
•If the disc is dirty, clean the disc.
•If the unit operates normally with other discs,
there is a problem with the disc.
Service Station.
•If there are cra
disc.
•If the disc is dirty, clean the disc.
•If the unit operates normally with other discs,
there is a problem with the disc.
Service Station.
Consult your dealer or the nearest Pioneer
Service Station.
Consult your dealer or the
Service Sta
Exchange the disc or file to one that meets
format specifications.
Do not delete music files fr om USB storage
devices.
If a foreign object is in the disc loading slot,
remove the object.
cks in the disc, replace th
nearest Pioneer
tion.
e
English
MEP-7000 UPDATES
Software for this unit may be updated to improve operation or functionality. For details consult the following support website:
http://www.prodjnet.com/support/
67
En
Page 68

TROUBLESHOOTING
SOFTWARE LIMITING CONDITIONS
Discs must be recorded in compatibility with ISO9660 file system. When recorded in UDF
file system, the ISO9660 file system must be jointly recorded or the disc will not be
playable. (For details consult the manufacturer of the applicable software.)
Disc media
Supported
devices
USB storage devices
Jacket Photograph
m3u file
MIX
EFFECT
Playlists
Library browsing Title: 63 charac
File browsing Folder names, file names: 63 characters
Maximum
displayable
characters
Cue/loop point memory
Library
CD-TEXT 1 byte ASCII characters, etc.: 92 characters; 2-byte characters, MS-JIS, etc.: 80 characters
Playlists [During recording] Titles: 63 characters; artist names: 47 characters;
ID3 data Titles: 92 characters; album names: 47 characters; artists names: 47 characters; genre:
On a single disc, no more than 2 000 folders and no more than 3 000 files can be
displayed.
Up to 8 levels of folder hierarchy are supported. Any files in folders beyond the eighth level
will not be displayed.
WAV/AIFF files on discs are not supported.
No more than 10 000 folders and no more than 10 000 files can be displayed within a
single folder.
Up to 8 levels of folder hierarchy are supported. Any f
will not be displayed.
Does not support GUID partition-mapped Mac OS standard format.
USB storage devices which have been formatted with the Mac extension format set to
“discriminate upper case and lower case” may not be recognized properly.
Photographs to be displayed as jacket art must be saved in JPEG format. Photographs
larger than 800 x 800 pixels cannot be displayed.
When an image is imbedded in an ID3 tag, or an image file is found within a folder, the
image will be displayed as a jacket photograph together with the ID3 data. In the event
that images are found in both places, the image imbedded in the ID3 tag will be given
precedence.
100 m3u files can be displayed per device.
Up to
Up to 300 tracks ca
000 bytes, those tracks in the portion exceeding 308 000 bytes cannot be displayed.
When browsing using a database you have constructed, m3u files will not be displayed.
In the case of discs, those recorded with short file names are not supported.
In “normal style” operation, DJ software tracks cannot be mixed. In “manipulator style”
operation, whether mixing is possible depends on the DJ software used (the accessory
DJS software supports mixing).
In “normal style” operation, effects cannot be applied to DJ software tracks. In
“manipulator style” operation, whether applyi
software used (the accessory DJS software supports effect functions).
Music (CD-DA) tracks and DJS tracks cannot be added to playlists.
A maximum of 150 tracks can be recorded in a single playlist. When a playlist becomes
full, no further tracks can be added.
If a USB storage device has insufficient capacity remaining, its tracks cannot be added to
a playlist.
When adding tracks to a playlist by designating an entire folder, if no database for the
tracks exists, the tracks will be added by file name, not by the name of artist and album
title.
29 characters
[During playback] Titles: 49 characters; artists names: 29 characters
29 characters
Disc memory
the built-in flash memory. When the built-in flash memory becomes full, information is
overwritten, beginning from that for least-frequently used discs.
If the USB storage device has insufficient capacity remaining, the cue/loop point
information for tracks on that device cannot be saved.
A library can be created with up to 150 000 tracks.
Up to 1 000 genres can be displayed.
Genres for tracks exceeding this limitation will be displayed as [Unknown].
iles in folders beyond the
n be displayed for each m3u file. However, if the file size exceeds 308
ng effect is possible depends on the DJ
ters; album name: 47 characters; artist na
data, max, 2 000 discs (with 10 cue points or less per disc) can be stored in
me: 47 characters; genre name:
eighth level
68
En
Page 69

DISCLAIMER
DISCLAIMER
•Pioneer and DJS are trademarks or registered trademarks of the Pioneer Corporation.
•Microsoft and Windows are registered trademarks of Microsoft Corporation, registered in the U.S. and other countries.
Windows’ official name is “Microsoft Windows Operating System”.
•Pentium is a registered trademark of Intel Corporation, U.S.A.
• Adobe and Reader are registered trademarks or trademarks of Adobe Systems Incorporated, registered in the United States of
America and other countries.
•Apple, Macintosh and Mac OS are trademarks of Apple Inc., registered in the U.S. and other countries.
•ASIO is a registered trademark of Steinberg Media Technologies GmbH.
•All other brand, product and company names are the trademarks or registered trademarks of their respective owners.
Supply of this product only conveys a license for private, non-commercial use and does not convey a license nor imply any right to
use this product in any commercial (i.e. revenue-generating) real
time broadcasting (terrestrial, satellite, cable and/or any other media), broadcasting/streaming via internet, intranets and/or other
networks or in other electronic content distribution systems, such
as pay-audio or audio-on-demand applications. An independent
license for such use is required. For details, please visit
http://www
.mp3licensing.com.
MPEG Layer-3 audio coding technology licensed from Fraunhofer
IIS and Thomson multimedia.
English
NOTE
•When bringing the unit to your dealer or a Pioneer Service Center, bring all components of the system (drive unit, control unit, cables).
• The DJ software program “DJS” not covered by the terms of free repair on the unit Warranty. When installing or using the DJS
program, be sure to read and understand the terms of the End User License Agr eement (P. 45).
Published by Pioneer Corporation.
Copyright © 2008 Pioneer Corporation.
All rights reserved.
69
En
Page 70

Ce produit est conforme à la directive relative à la
basse tension 2006/95/CE et à la directive relative à la
compatibilité électromagnétique 2004/108/CE.
D3-4-2-1-9a_A1_Fr
Milieu de fonctionnement
Température et humidité du milieu de fonctionnement :
De +5 °C à +35 °C (de +41 °F à +95 °F) ; Humidité
relative inférieure à 85 % (orifices de ventilation non
obstrués)
N’installez pas l’appareil dans un endroit mal ventilé ou
un lieu soumis à une forte humidité ou en plein soleil
(ou à une forte lumière artificielle).
D3-4-2-1-7c*_A1_Fr
T
)%%' !#()%(.)#$*'.+ )'!(
' (&*( ## ).'.!)' &*#
%!-%'0(!* *#'. % #)'"%! *)!
&**#+($**#%$)!*'()#!,%$(-%(
2($*))(*(.!$*((*'(!%!*
$*!*" ).
'
AVERTISSEMENT
La tension de l’alimentation électrique disponible
varie selon le pays ou la région. Assurez-vous que
la tension du secteur de la région où l’appareil sera
utilisé correspond à la tension requise (par ex. 230
V ou 120 V), indiquée sur le panneau arrière.
D3-4-2-1-4_A_Fr
Avant de brancher l’appareil pour la première, lisez
attentivement la section suivante.
AVERTISSEMENT
Pour éviter les risques d’incendie, ne placez aucune
flamme nue (telle qu’une bougie allumée) sur
l’appareil.
D3-4-2-1-7a_A_Fr
5
+./"#(&*/0((0&+*"#(,,.#&(2#&((#47(&//#.
1*#/,!#/1$$&/*010+1."#/#/,.+&/"#)*&9.#
7):(&+.#.("&//&,0&+*"#!%(#1.1)+&*/!)
7(..&9.##0!)"#!%-1#!;0:
#/$#*0#/#0+12#.01.#/"1!+$$.#0/+*0,.:21#/
,+1.(2#*0&(0&+*,+1.//1.#.1*$+*!0&+**#)#*0
/0 (#"#(,,.#&(#0,+1.:2&0#.//1.!%1$$#
+1.:2&0#.(#/.&/-1#/"&*!#*"&#*# +1!%#4
'
)&/(#/+12#.01.#/#0*#(#/.#!+12.#4,/
"+ '#0/0#(/-1#'+1.*13*,,#/+1.&"#13#0
*10&(&/#4,/(,,.#&(,+/:/1.1*0,&/:,&/+1
1*(&0
.
Nous vous remercions pour cet achat d’un produit Pioneer.
Nous vous demandons de lire soigneusement ce mode d’emploi; vous serez ainsi à même de
faire fonctionner l’appareil correctement. Après avoir bien lu le mode d’emploi, le ranger dans un
endroit sûr pour pouvoir s’y référer ultérieurement.
Dans certains pays ou certaines régions, la forme de la fiche d’alimentation et de la prise d’
alimentation peut différer de celle qui figure sur les schémas, mais les branchements et le
fonctionnement de l’appareil restent les mêmes.
K015 Fr
ATTENTION
Cet appareil est un produit laser de Classe 1, mais la
diode laser qu’il renferme est supérieure à la Classe 1.
Pour garantir une sécurité constante, ne retirez aucun
des couvercles et n’essayez pas d’avoir accès à
l’intérieur de l’appareil.
Confiez toute réparation à un personnel qualifié.
L’étiquette suivante se trouve sur votre appareil.
Emplacement : A l’intérieur du lecteur
D3-4-2-1-8*_C_Fr
APPAREIL Á LASER
DE CLASSE 1
Si vous souhaitez vous débarrasser de cet appareil, ne le mettez pas à la poubelle avec vos ordures ménagères. Il existe un système de
collecte séparé pour les appareils électroniques usagés, qui doivent être récupérés, traités et recyclés conformément à la législation.
Les habitants des états membres de l’UE, de Suisse et de Norvège peuvent retourner gratuitement leurs appareils électroniques usagés aux
centres de collecte agréés ou à un détaillant (si vous rachetez un appareil similaire neuf).
Dans les pays qui ne sont pas mentionnés ci-dessus, veuillez contacter les autorités locales pour savoir comment vous pouvez vous débarrasser
de vos appareils.
Vous garantirez ainsi que les appareils dont vous vous débarrassez sont correctement récupérés, traités et recyclés et préviendrez de cette façon
les impacts néfastes possibles sur l’environnement et la santé humaine.
K058b_A1_Fr
IMPORTANT
Ce symbole de l’éclair, placé dans un
triangle équilatéral, a pour but d’attirer
l’attention de l’utilisateur sur la présence, à
l’intérieur du coffret de l’appareil, de
“tensions dangereuses” non isolées d’une
grandeur suffisante pour représenter un
risque d’électrocution pour les êtres
humains.
ATTENTION
DANGER D´ELECTROCUTION
NE PAS OUVRIR
ATTENTION :
POUR ÉVITER TOUT RISQUE
D’ÉLECTROCUTION, NE PAS ENLEVER LE
COUVERCLE (NI LE PANNEAU ARRIÈRE).
AUCUNE PIÈCE RÉPARABLE PAR
L’UTILISATEUR NE SE TROUVE À
L’INTÉRIEUR. CONFIER TOUT ENTRETIEN À
UN PERSONNEL QUALIFIÉ UNIQUEMENT.
Ce point d’exclamation, placé dans un
triangle équilatéral, a pour but d’attirer
l’attention de l’utilisateur sur la présence,
dans les documents qui accompagnent
l’appareil, d’explications importantes du
point de vue de l’exploitation ou de
l’entretien.
D3-4-2-1-1_A1_Fr
Si la fiche d’alimentation secteur de cet appareil ne
convient pas à la prise secteur à utiliser, la fiche doit
être remplacée par une appropriée. Ce
remplacement et la fixation d’une fiche secteur sur le
cordon d’alimentation de cet appareil doivent être
effectués par un personnel de service qualifié. En cas
de branchement sur une prise secteur, la fiche de
coupure peut provoquer une sérieuse décharge
électrique. Assurez-vous qu’elle est éliminée
correctement après sa dépose.
L’appareil doit être déconnecté en débranchant sa
fiche secteur au niveau de la prise murale si vous
prévoyez une période prolongée de non utilisation
(par exemple avant un départ en vacances).
D3-4-2-2-1a_A1_Fr
ATTENTION
! ! !
& ! !
(#! !"* ((!
"! !!!
& (! "%
, &!
!* ((
! !(" !
!
((!"! !"!
("$%!((!
#" !( "
2
Fr
D3-4-2-2-2a_A_Fr
NOTE IMPORTANTE SUR LE CABLE
D’ALIMENTATION
enir le câble d’alimentation par la fiche. Ne pas
débrancher la prise en tirant sur le câble et ne pas
toucher le câble avec les mains mouillées. Cela risque
de provoquer un court-circuit ou un choc électrique. Ne
pas poser l’appareil ou un meuble sur le câble. Ne pas
pincer le câble. Ne pas faire de noeud avec le câble ou
l’attacher à d’autres câbles. Les câbles d’alimentation
doivent être posés de façon à ne pas être écrasés. Un
câble abîmé peut provoquer un risque d’incendie ou un
choc électrique. Vérifier le câble d’alimentation de
temps en temps. Contacter le service apr
PIONEER le plus proche ou le revendeur pour un
remplacement.
ès-vente
S002*_Fr
Page 71

CONTENU
CONTENU
CARACTÉRISTIQUES ....................................................4
FICHE TECHNIQUE........................................................8
VÉRIFICATION DES ACCESSOIRES ..............................9
À PROPOS DES DISQUES ET FICHIERS LISIBLES........10
TYPES DE DISQUES LISIBLES SUR CET APPAREIL ................10
À PROPOS DE LA LECTURE DE DISQUES MP3/AAC ............. 11
À PROPOS DE LA LECTURE DE MÉMOIRES USB................... 11
À PROPOS DES FICHIERS MP3 ................................................ 12
À PROPOS DES FICHIERS AAC................................................. 12
À PROPOS DES FICHIERS WAV................................................ 13
À PROPOS DES FICHIERS AIFF................................................. 13
DIRECTIVES D’INSTALLATION...................................14
CONNEXIONS.............................................................15
CONNEXIONS DE STYLE NORMAL ........................................... 15
CONNEXIONS DE STYLE MANIPULATEUR .............................. 17
LES ORGANES ET LEURS FONCTIONS........................18
PANNEAU AVANT ....................................................................... 18
PANNEAU ARRIÈRE ................................................................... 21
MANIEMENT DES DISQUES ET AUTRES SUPPORTS ..22
INSERTION ET RETRAIT DES DISQUES .................................... 22
EJECTION FORCÉE D’UN DISQUE ............................................22
INSCRIPTION DES DONNÉES DE GESTION SUR UN
PÉRIPHÉRIQUE DE STOCKAGE USB........................................ 23
BRANCHEMENT ET DÉBRANCHEMENT DES PÉRIPHÉRIQUES
DE STOCKAGE USB .................................................................... 23
LANCEMENT DE LA LECTURE
(Utilisation des connexions normales) ................25
ÉCRAN BROWSE (NAVIGATION)............................................... 25
NAVIGATION DE FICHIER ET DE BIBLIOTHÈQUE ................... 26
SÉLECTION D’UNE PLAGE ......................................................... 27
APERÇU DES PROPRIÉTÉS DE LA PLAGE EN COURS DE
LECTURE ...................................................................................... 27
FICHIERS M3U............................................................................. 28
UTILISATION D’UN MOT-CLÉ POUR RECHERCHER LES
PLAGES ........................................................................................ 28
SÉLECTION DES PLAGES PAR CLAVIER USB ......................... 29
UTILISATION D’UNE LISTE DE LECTURE.................................. 31
DÉMARCHES DE BASE SUR LE CONTRÔLEUR...........33
À PROPOS DE LA FONCTION DE LECTURE AUTOMATIQUE DU
DISQUE......................................................................................... 33
ARRÊT DE LA LECTURE ET ÉJECTION DU DISQUE................. 33
PAUSE DE LA LECTURE ............................................................. 33
A PROPOS DE LA FONCTION REPRISE DE DISQUE .............. 34
AVANCE RAPIDE / RECUL RAPIDE........................................... 34
SAUT DE PLAGE .......................................................................... 34
COMMUTATION DU MODE JOG................................................ 35
FONCTION DE LA BAGUE JOG .................................................. 35
CHANGEMENT DE LA VITESSE DE LECTURE .......................... 36
APPLICATION D’UN TEMPO PRINCIPAL.................................. 36
POSE DES POINTS DE REPÈRE (CUE POINTS)....................... 36
FONCTION REPÈRE AUTOMATIQUE (AUTO CUE) .................. 37
DÉMARCHES ÉVOLUÉES............................................38
LOOP PLAY (Lecture en boucle) .................................................38
MÉMOIRE DE POINT DE REPÈRE/POINT DE BOUCLE ...........38
LECTURE SCRATCH ....................................................................39
LECTURE SPIN.............................................................................39
LECTURE JOG BREAK................................................................. 39
ÉCRAN D’EFFETS.........................................................................39
MIX SCREEN ................................................................................ 42
À PROPOS DE LA LECTURE À DÉPART EN FONDU ...............44
À PROPOS DU LOGICIEL DJS.....................................45
ACCORD DE LICENCE DU LOGICIEL......................................... 45
AVERTISSEMENT SUR LES COPYRIGHTS.................................46
EXIGENCES DU SYSTÈME (Environnement d’exploitation
minimal)........................................................................................ 46
INSTALLATION DU LOGICIEL DJS ............................................. 47
REMARQUES SUR LA PÉRIODE D’ESSAI ET
L’INSCRIPTION DE L’UTILISATEUR ...........................................47
À PROPOS DE L’AIDE EN LIGNE ...............................................48
DÉCHARGE DE RESPONSABILITÉ ............................................48
À PROPOS DU PROGRAMME PILOTE ........................49
ACCORD DE LICENCE UTILISATEUR FINAL
POUR LOGICIEL ........................................................................... 49
INSTALLATION DU PILOTE .........................................................49
UTILISATION DU LOGICIEL DJ................................... 52
PRÉPARATION DE VOTRE PROGRAMME
INFORMATIQUE DJ .....................................................................53
CONTRÔLE DE VOTRE ORDINATEUR VIA LE PROTOCOLE
DE COMMUNICATIONS SPÉCIALISÉ ........................................53
UTILISATION DE MIDI POUR CONTRÔLER
L’ORDINATEUR............................................................................55
TABLEAU DES MESSAGES MIDI ...............................................57
DISQUES CD-G KARAOKÉ ......................................... 59
SÉLECTION DU MODE DE LECTURE CD-G............................... 59
LECTURE D’UN DISQUE CD-G ...................................................59
ANNULATION DU MODE DE LECTURE CD-G...........................59
UTILISATION DE L’ÉCRAN UTILITY............................ 60
MÉTHODE DE RÉGLAGE............................................................. 60
PARAMÈTRES..............................................................................60
CREATION DE BIBLIOTHEQUES................................................ 62
SAUVEGARDE DES DONNÉES UTILISATEUR ..........................62
RÉINITIALISATION AUX VALEURS PAR DÉFAUT.....................63
GUIDE DE DÉPANNAGE ............................................64
À PROPOS DE L’ÉCRAN LCD (À CRISTAUX LIQUIDES).......... 66
À PROPOS DES ÉCRANS OEL (DIODES
ÉLECTROLUMINESCENTES ORGANIQUES)............................. 67
AFFICHAGE DE MESSAGES D’ERREUR ...................................67
MISES À JOUR DU MEP-7000 ....................................................67
CONDITIONS LIMITANT LE LOGICIEL........................................ 68
DÉCHARGE DE RESPONSABILITÉ.............................. 69
Français
3
Fr
Page 72

CARACTÉRISTIQUES
TRACK SEARCH
CUE/LOOP
EJECT
TIME
A.CUE
IN/CUE
HOT LOOP
LOOP
RELOOP/EXIT
PITCH BEND
BROWSE MIX EFFECT UTILITY
MT
0
MASTER
TEMPO
TEMPO
6/10/16WIDE
OUT/ADJUST
FWD TEMPOREV
MEMORY CALL
SEARCH
QUE
J
O
G
B
R
E
A
K
S
C
R
A
T
C
H
TRACK SEARCH
CUE/LOOP
EJECT
TIME
A.CUE
IN/CUE
HOT LOOP
LOOP
RELOOP/EXIT
PITCH BEND
MT
0
MASTER
TEMPO
TEMPO
6/10/16WIDE
OUT/ADJUST
FWD TEMPOREV
MEMORY CALL
SEARCH
QUE
J
O
G
B
R
E
A
K
S
C
R
A
T
C
H
A
LOAD
B
MEP-7000
LOAD
MULTI ENTERTAINMENT PLAYER
Style Manipulateur
OUT
Contrôleur
Haut-parleur
Amplificateur
de puissance
Table de mixage
Unité I/F Audio
Logiciel I/F DJ Spécial
PIONEER DJS
Bus-alimentation USB
Logiciel MIDI I/F DJ
CARACTÉRISTIQUES
Cet appareil est une console multimédias, disposant d’une large gamme de fonctions pratiques lors des soirées et autres manifestations
; ses caractéristiques de fonctionnement superbes en font l’outil idéal pour les DJ mobiles professionnels. Autorisant une lecture de type
normal et de type manipulateur, cet appareil représente l’apport optimal pour la nouvelle génération de performances DJ.
En style de lecture normale, la lecture DJ est possible non seulement avec des CD (CD-DA) de musique conventionnels, mais tout autant
avec des fichiers musicaux (MP3, AAC, etc.), enregistrés sur des dispositifs de stockage USB, tels qu’une mémoire USB ou des disques
durs externes (HDD), tout comme les CD-ROM et DVD-ROM.
De plus, en raccordant ce lecteur à un ordinateur muni du logiciel DJS disponible comme accessoire, la console peut être désigné par le
DJS comme dispositif de sortie audio, ce qui rend possible une lecture DJ sans à-coups en tirant parti non seulement de la musique,
stockée sur des mémoires USB et des supports-disque, mais aussi de plages musicales, conservées sur l’ordinateur.
Le lecteur dispose aussi d’excellentes caractéristiques en médias pris en compte. Aucun souci à se faire, par conséquent, au sujet de
types de médias particuliers. Il est pourvu d’une interface utilisateur graphique (GUI) à hautes fonctions sur son affichage central. Ces
fonctions facilitent la recherche et la sélection des plages souhaitées sur de vastes musicothèques et elles suppriment le besoin d’avoir
recours à un mixeur pour commuter manuellement entre les diverses sources.
Par ailleurs, l’unité de contrôle préserve la tradition des lecteurs Pioneer de la série CDJ par l’agencement de son panneau, ses fonctions
et son utilisation. En raccordant l’unité de contrôle à votre ordinateur (alimentation bus USB), la musique contenue dans le logiciel DJS
accessoi
re peut ê
tre reproduite en faisant appel au véritable “style manipulateur” DJ, sans avoir à se servir d’une souris ou du clavier.
4
Fr
Page 73

CARACTÉRISTIQUES
TRACK SEARCH
CUE/LOOP
EJECT
TIME
A.CUE
IN/CUE
HOT LOOP
LOOP
RELOOP/EXIT
PITCH BEND
BROWSE MIX EFFECT UTILITY
MT
0
MASTER
TEMPO
TEMPO
6/10/16WIDE
OUT/ADJUST
FWD TEMPOREV
MEMORY CALL
SEARCH
QUE
J
O
G
B
R
E
A
K
S
C
R
A
T
C
H
TRACK SEARCH
CUE/LOOP
EJECT
TIME
A.CUE
IN/CUE
HOT LOOP
LOOP
RELOOP/EXIT
PITCH BEND
MT
0
MASTER
TEMPO
TEMPO
6/10/16WIDE
OUT/ADJUST
FWD TEMPOREV
MEMORY CALL
SEARCH
QUE
J
O
G
B
R
E
A
K
S
C
R
A
T
C
H
A
LOAD
B
MEP-7000
LOAD
MULTI ENTERTAINMENT PLAYER
Vidéo
CH A
CH B
Audio
EJECT
POWER
STOP STOPREAR
DISC 1
USB 1 USB 2
DISC 2
EJECT
MEP-7000
MULTI ENTERTAINMENT PLAYER
Style Normal
Lecteur
Panneau arrière
Contrôleur
Haut-parleur
Moniteur externe
Table de mixage
Logiciel I/F DJ Spécial
PIONEER DJS
Périphériques de stockage USB
CD de musique / MP3 /AAC
CD de musique (CD-DA)
Karaoké (CD-G)
MP3/AAC sur CD-ROM
MP3/AAC sur DVD-ROM
MP3 / AAC / WAV / AIFF
Logiciel MIDI I/F DJ
Disque dur
Mémoire
Flash
Clavier USB
Amplificateur de puissance
Français
AC IN
USB1PC
5
Fr
Page 74

CARACTÉRISTIQUES
PRISE EN COMPTE DE LA LECTURE DE MÉDIAS DIVERS
L’appareil accepte la lecture de disques CD-R/-RW formatés pour
CD musicaux (CD-DA) ou CD graphique (CD-G), ainsi que les
fichiers musicaux comprimés (MP3/AAC), enregistrés sur disques
CD-R/-RW, DVD-R/-RW, DVD+R/+RW ou DVD±R double
couche. (Il se peut que certains disques ne soient pas reproduits
correctement en raison de leurs caractéristiques particulières, des
conditions de l’enregistrement et/ou de griffes ou souillures
présentes sur les disques.) La lecture est également acceptée
pour les fichiers de musique comprimés (MP3/AAC/WAV/
AIFF),stockés sur des périphériques de stockage USB.
LOGICIEL DJ
Les sources éventuellement disponibles sur l’écran BROWSE
comprennent le logiciel DJ, contenant le programme DJS
accessoire et d’autres logiciels DJ, sans avoir besoin d’un
disque de contrôle. L’emploi du logiciel MIDI DJ est accepté,
lui aussi. De plus, en désignant le MEP-7000 comme dispositif
de sortie audio, il peut aussi être utilisé pour la sortie audio, ce
qui élimine le besoin d’employer le mixeur pour passer d’une
source musicale à une autre.
NOTE
•La plupart des données relatives aux opérations des boutons et
curseurs de réglage TEMPO de ce lecteur peuvent être
transmises à des dispositifs externes par MIDI USB ou formats
spécialisés. Pour utiliser cet appareil afin de contrôler le
logiciel DJ, il est nécessaire d’installer un programme pilote.
•Un pilote ASIO spécialisé est disponible également pour la
sortie audio.
•Selon le type de logiciel DJ utilisé, il peut s’avérer impossible
de désigner ce lecteur comme périphérique de sortie audio.
• Quand l’unité de contrôle est utilisée seule, ce lecteur ne peut
pas être désigné comme périphérique de sortie audio. Seul le
logiciel DJ peut être utilisé.
EFFET JOG BREAK
L’effet "Job break" procure une performance sonore
originale.
Équipé de tros types de fonction "remix assist", à savoir [JET],
[ROLL] et [WAH]. En choisissant les fonctions souhaitées, vous
pouvez contrôler librement les effets par la rotation de la bague
Jog, créant ainsi un nouveau monde de remixage.
AUTO MIX
Pour effectuer une lecture automatique et continue de plages sur
une liste de lecture, utilisant quatre types de mix. Même quand le
DJ est éloigné de sa cabine, la musique mixée peut être jouée
automatiquement tout comme si le DJ faisait son travail.
BAGUE JOG
L’appareil est doté d’une grande bague Jog de 80 mm à fonction
scratch, ce qui autorise des opérations avec le même sens du
toucher qu’avec une platine-disque analogique.
PITCH BEND
Le tempo de lecture change en relation directe avec la direction et
la vitesse de rotation de la bague Jog.
PITCH BEND SUPER RAPIDE
Tournez la bague Jog en appuyant sur le bouton PITCH BEND pour
exécuter des changements de la vitesse plus rapides qu’avec le
Pitch Bend normal.
RECHERCHE PAR CADRE
Lorsque la bague Jog est tournée en mode Pause, ceci déplace le
disque à partir de la position Pause par paliers de cadre (1/
75 sec.).
RECHERCHE SUPER RAPIDE
Vous pouvez parcourir le disque plus vite que par la recherche
normale ou la recherche de plage en tenant enfoncé le bouton
SEARCH ou le bouton TRACK SEARCH tandis que vous tournez la
bague Jog.
ÉCRAN TRÈS FONCTIONNEL
Ecran central
Un grand écran LCD couleur 4,3”, d’une luminance élevée pour
améliorer la visibilité. L’interface utilisateur graphique (GUI)
intelligent et le sélecteur rotatif assurent une sélection simplifiée
des plages. Les musicothèques acceptent aussi l’emploi de
photos de pochette.
Écran de contrôleur A/B
Les indications de durée écoulée et de tempo apparaissent sur des
affichages OEL (électroluminescence organique) à segments
couleurs, assurant une excellente réponse et une visibilité
superbe. Tout comme l’écran central, ces affichages et
indicateurs autorisent une lecture DJ sans stress dans une large
gamme de situations d’éclairage.
LISTE DE LECTURE (PLAYLIST)
Il est possible de choisir les plages souhaitées sur des
musicothèques dans dse mémoires USB et des supports-disque et
de les enregistrer sur une “liste de lecture”, ce qui permet, à la
lecture DJ, de sélectionner les plages sans avoir à les rechercher.
EFFET SCRATCH
Vous disposez d’effets "scratch", permettant diverses
interprétations avec cette particularité.
Trois sons scratch différents sont à votre disposition : [SCRATCH],
[TRANS], et [BUBBLE]. Ces nouvelles fonctions à son "scratch"
élargissent votre potentiel en lecture DJ.
NAVIGATION DE MUSICOTHÈQUE
En constituant une musicothèque comprenant un grand nombre
de plages enregistrées sur des périphériques de stockage USB,
ces plages peuvent être classées en catégories par album, artiste
et/ou genre, ce qui facilite la sélection ultérieure des plages et leur
recherche par mot-clé. Pour faciliter encore la création d’une
musicothèque, vous pouvez télécharger un logiciel auteur
approprié à partir du site web suivant :
http://www.prodjnet.com/support/
SORTIE MONITEUR
En transmettant l’écran BROWSE de l’écran central vers un plus
grand moniteur externe, les opérations pourront être accomplies
avec plus de commodité. Autorise aussi la sortie de CD-G vidéo
karaoké.
AIDE PAR CLAVIER
Le branchement d’un clavier sur le port USB permet une sélection
rapide des plages en saisissant la lettre initiale (introduction) des
noms de plage ou de dossier et en utilisant la fonction “saut”, ou
en recherchant des mots-clés par la fonction NAVIGATION DE
BIBLIOTHÈQUE. Un clavier permet aussi d’éditer les noms des
listes de lecture.
6
Fr
Page 75

CARACTÉRISTIQUES
DISQUES CD-G KARAOKÉ
Des disques CD-G (graphique) peuvent être lus pour des
interprétations karaoké. L’Image karaoké peut être présentée sur
de grands écrans externes.
CONTRÔLE DE TEMPO
Un curseur très performant de 60 mm autorise un
changement libre de la vitesse de plage.
La lecture numérique en unités de 0,02 % (plage ±6 % seulement)
rend possible une synchronisation plus précise et plus simple du
tempo.
PLAGE DE CONTRÔLE DU TEMPO
Pour accroître la facilité d’emploi, la plage variable maximale peut
être ajustée à 4 niveaux : ±6 %, ±10 %, ±16 %, et WIDE (WIDE
étant limité aux CD de musique (CD-DA) uniquement).
TEMPO PRINCIPAL
Pour changer le tempo sans modifier la hauteur tonale.
CUE (repère)
BACK CUE (retour au point de repérage)
Après mémorisation d’un Point de repérage, appuyez sur le
bouton CUE pendant la lecture pour repasser au Point de repérage
et y recommencer.
CUE/LOOP MEMORY (mémoire de point/boucle)
Des points de repérage et des points de boucles peuvent être
stockés dans la mémoire interne et rappelés selon les besoins.
AUTO CUE (repérage automatique)
Cette fonction localise automatiquement le point de départ d’une
plage, même s’il diffère du cadre de plage, ce qui permet au
lecteur de commencer instantanément par simple poussée sur le
bouton Lecture/Pause ().
CUE POINT SAMPLER (Échantillonneur de point de repérage)
Le son depuis le point de repérage mémorisé peut être reproduit
par une touche, ce qui est utilisable comme vérification d’un point
initial et échantillonneur.
BOUCLE SANS A-COUP EN TEMPS RÉEL
Cette fonction simplifie la pose et l’annulation des boucles. Elle
vous permet de définir une boucle pendant la lecture d’une plage.
Il est également possible de créer une boucle en fin de plage pour
que celle-ci ne s’arrête pas. En outre, le mode ADJUST a été
ajouté, ce qui vous permet d’effectuer un réglage rapide des points
de sortie de boucle pour que les opérations de commande de
boucle soient plus faciles à exécuter.
RELOOP (rebouclage)
Permet de reproduire une bouche autant de fois que
souhaité.
Appuyez sur le bouton RELOOP/EXIT après avoir libéré la lecture
à boucle pour repasser au point initial de la boucle. Une utilisation
adroite de la marche/arrêt combinée au rythme permet de créer de
nouveaux effets sonores.
VISUALISATION DE LA LECTURE
Ce graphique à barre fournit une visualisation directe de l’avance
de la lecture, tout comme le mouvement de l’aiguille sur un disque
analogique. La longueur de la barre indique la position actuelle,
tandis que le clignotement de cette barre avertit de la proximité de
la fin d’une plage.
SLOT IN (Insertion par fente)
Les disques sont insérés directement, sans avoir à ouvrir un volet
ou un tiroir, ce qui accélère d’autant la sélection des plages.
FADER START (départ en fondu)
Lors d’une connexion à un Mixeur DJ de Pioneer, la commande de
fondu du mixeur permet d’effectuer des départs rapides et des
retours au point de repérage.
CD-TEXT (CD à texte)
Quand un CD musical (CD-DA) prendant en compte CD-TEXT est
reproduit, les informations relatives au titre, à l’artiste et à l’album,
enregistrées sur ce disque, sont utilisables.
LEGATO LINK
Equipé de la fonction “Legato Link Conversion”. À la lecture de CD
de musique, cette fonction restitue la partie des aigus de 20 kHz+
perdue en format CD, ce qui produit des sons de haute fidélité,
approchant ceux des platines-disques analogiques.
RÉSISTANCE AUX VIBRATIONS
L’appareil est doté de la “mémoire antichocs” et du même
mécanisme flottant que ceux, utilisés dans la série audio pour
voiture "Carrozzeria" de Pioneer pour offrir une superbe résistance
aux vibrations, capable d’éviter les pertes du son.
Français
HOT LOOP (boucle instantanée)
Pendant la lecture à boucle, une poussée sur le bouton IN/CUE/
HOT LOOP fait que la lecture retourne à l’instant au point initial de
la boucle et qu’elle recommence à ce point. En utilisant cette
fonction en synchronisation avec le rythme de la plage, toute une
gamme de nouveaux scénarios de lecture devient possible.
7
Fr
Page 76

FICHE TECHNIQUE
FICHE TECHNIQUE
1 Données d’ordre général
Modèle . . . . . . . . . . . . . . . . . . . . . . . . . . . . . . . . . . . . . . . . MEP-7000
Appellation . . . . . . . . . . . . . . . . . . . . . . D
Style normal
Tension . . . . . . . . . . . . . . . . . Secteur 220 V à 240 V, 50 Hz/60 Hz
Consommation électrique . . . . . . . . . . . . . . . . . . . . . . . . . . 33 W
Style manipulateur
Tension . . . . . . . . . . . . . .
Consommation . . . . . . . . . . . . . . . . . . . . . . . . . . . . . . . . . 600 mA
Consommation électrique . . . . . . . . . . . . . . . . . . . . . . . . . . . 3 W
Température de fonctionnement . . . . . . . . . . . .
Humidité de fonctionnement
. . . . . . . . . . . . . . . . . . . . . . . 5 % à 85 % RH (sans condensation)
Masse (Poids)
Unité de contrôle . . . . . . . . . . . . . . . . . . . . . . . . . . . . . . . . . 1,7 kg
Lecteur . . . . . . . . . . . . . . . . . . . . . . . . . . . . . . . . . . . . . . . . . 6,1 kg
Dimensions externes maximales
Unité de contrôle. . 482,6 mm (L) x 133,0 mm (H) x 83,5 mm (P)
Lecteur . . . . . . . . . . 482,6 mm (L) x 90,5 mm (H) x 324,6 mm (P)
. . . . . . CC 5 V (bus-alimentation USB)
2 Section USB Upstream
Connecteur. . . . . . . . . . . . . . . . . Port USB Type B (connecteur PC)
Section USB Downstream
Connecteur. . . . . . . . . . . . . . Port USB Type A (ports USB1/USB2)
Consommation . . . . . . . . . . . . . . . .5 V/500 mA ou moins (au port)
3 Section de sortie audio analogique
Connecteur de sortie . . . . . . . . . . . . .Prises RCA (contrôleur A/B)
Niveau de sortie . . . . . . . . . . . . . . . . . . . . . . . . . . . .2,0 Vrms (1 kHz)
Réponse en fréquence . . . . . . . . . . . . . . . . . . . . . de 4 Hz à 20 kHz
Rappor
t Signal/Bruit . . . . . . . . . . . . . . . . . . 115 dB ou plus (JEITA)
Distorsion . . . . . . . . . . . . . .
. . . . . . . . . . . 0,006 % ou moins (JEITA)
*Les spécifications ci-dessus se réfèrent aux valeurs pour des
CD de musique (CD-DA).
4 Section de sortie audio numérique
Connecteur de sortie . . . . . . . . . . . . .Prises RCA (contrôleur A/B)
Type de sortie . . . . . . . . . . . . . . . . . . . .Coaxial numérique (S/PDIF)
Niveau de sortie . . . . . . . . . . . . . . . . . . . . . . . . . . . . .
Format de sortie. . . . . . . . . . . . . . . . . . . . . . . . . . . . 44,1 kHz/16 bits
5 Section de sortie vidéo
Connecteur de sortie. . . . . . . . . . . . . . . . . . . . . . . . . . . . . Prise RCA
Niveau de sortie composite . . . . . . . . . . . . . . . . . . . . .1 V
6 Section Écran central
Type. . . . . . Affichage matriciel actif TFT à cristaux liquides (LCD)
Taille . . . . . . . . . . . . . . . . . . . . . . . . . . . . . . . . . . . . . . . 4,3” (largeur)
Langues prises en compte
. . . . . . . . . . . 10 langues dont l’anglais, le japonais et le chinois
7 Section Écran de contrôleur A/B
Type. . . . . . . OEL (Electroluminescent organique) Tous segments
8 Autres connecteurs
Unité de contrôle
Connecteur de télécommande. . . . . . . . . . Mini-DIN 10 broches
Connecteur 5 V . . . . . . . . . . . . . . . . . . . . . . . . . . . . . . . . Prise CC
Lecteur
Connecteur de télécommande. . . . . . . . . . Mini-DIN 10 broches
Prise de contrôle . . . . . . . . . . . . . . . Mini-prises (contrôleur A/
ouble lecteur multi format
De +5 °C à +35 °C
0,5 Vp-p (75 Ω)
p-p (75 Ω)
B)
Spécifications et aspect sous réserve de changements sans avis
préalable.
8
Fr
Page 77

VÉRIFICATION DES ACCESSOIRES
CD-ROM Vignette d’installation DJS
MEP-7000
VÉRIFICATION DES ACCESSOIRES
Vérifiez que tous les accessoires fournis sont présents.
Câbles audio (x2)
Câbles de contrôle (x 2)
Câble de télécommande spécialisé
Cordon d’alimentation
Broche d’éjection forcée
DJS: 1 jeu
CAUTION
Français
Mode d’emploi (ce manuel)
Câble USB
Câble d’alimentation auxiliaire USB
NOTE
• Les MEP-7000 destinées au marché chinois ne comprennent pas le logiciel DJS.
• Trois modes d’emploi sont fournis (y compris celui que vous êtes en train de lire). Lisez ces manuels selon votre façon
d’employer l’appareil :
– Mode d’emploi du MEP-7000 (ce manuel)
Lisez ce livret d’abord.
– Guide de contrôle MEP-7000 DJS (Fichier PDF enregistrée sur le CD-ROM fourni)
Mode d’emploi de base à l’emploi du DJS avec le MEP-7000.
– Mode d’emploi du DJS (Fichier PDF enregistrée sur le CD-ROM fourni)
Manuel complet d’explication et de fonctionnement pour Logiciel DJS
Carte de garantie
9
Fr
Page 78
À PROPOS DES DISQUES ET FICHIERS LISIBLES
À PROPOS DES DISQUES ET FICHIERS LISIBLES
TYPES DE DISQUES LISIBLES SUR CET APPAREIL
• Les disques lisibles doiventr porter une des marques suivantes sur leur étiquette, emballage ou pochette.
Types et logos des disques utilisables
CD CD-TEXT CD-R CD-RW CD-G DVD-R DVD-RW
À propos de la lecture des disques
Cet appareil peut lire les disques CD-R/CD-RW, enregistrés en
format CD de musique (CD-DA) et/ou CD graphique (CD-G) et les
disques double couche CD-R/-RW, DVD-R/-RW, DVD+R/+RW, et
DVD±R, enregistrés en format de fichier MP3/AAC.
REMARQUE
•Il se peut que les disques double couche CD-R/-RW, DVDR/-RW, DVD+R/+RW et DVD±R, enregistrés sur un
enregistreur autonome ou sur un ordinateur ne soient pas
lus correctement sur cet appareil pour diverses raisons,
notamment les caractéristiques particulières du disque,
des griffes ou des souillures sur le disque, des saletés ou
une condensation sir l’objectif laser du lecteur.
•Il se peut que des disques enregistrés sur le lecteur d’un
ordinateur ne soient pas lus correctement pour diverses
raisons, et notamment à cause des réglages du logiciel ou
de l’environnement de l’ordinateur. Veillez à enregistrer les
disques selon le format approprié (pour des détails,
consultez le distributeur du logiciel d’enregistrement).
• Pour des informations détaillées sur le maniement et l’emploi
de vos disques, consultez les précautions et les instructions
fournies avec les disques en question.
Les disques suivants ne peuvent pas être lus sur cet
À propos des CD à contrôle de copie
Cet appareil est conçu pour convenir aux normes des CD de
musique. Toutefois, nous ne pouvons pas garantir le
fonctionnement et les performances à l’emploi de disques qui ne
sont pas conformes à ces critères.
Lecture [DualDisc]
Cet appareil est conçu pour convenir aux normes des CD de
musique. Toutefois, nous ne pouvons pas garantir le
fonctionnement et les performances à l’emploi de disques qui ne
sont pas conformes à ces critères.
À propos des CD single de 8 cm
Les CD single de 8 cm ne peuvent pas être lus sur cet appareil. De
plus, n’essayez pas de fixer un adaptateur de 8 cm sur un disque
et de le lire sur cet appareil, car l’adaptateur risque de se détacher
pendant la lecture et d’entraîner des dégâts au disque ou au
lecteure.
À propos du TEXTE sur CD de musique
Cet appareil prend en compte le TEXTE de CD et il affiche les titres
de plage, les titres d’album et le non de l’artiste sur ces
informations sont présentes sur le disque. Les codes
alphanumériques acceptés comprenant ASCII, ISO-8859, MS-JIS
et chinois mandarin. Lorsque de multiples données de texte sont
enregistrées, les premières sont affichées.
appareil.
CDs: DTS-CD, CD photo, CD vidéo, et CD non finalisés
DVDs: DVD vidéo, DVD audio, DVD-RAM, DVD non finalisés,
fichiers à images mobiles MPEG
Faites une copie de vos disques !
En raison des caractéristiques structurelles des supports CD-R/RW, DVD-R/-RW, DVD+R/+RW, et DVD±R double couche, s’ils
sont laissés pendant longtemps en mode Pause (ou attente de
repère), ils deviennent illisibles ou difficiles à lire à ce point précis.
Le même symptôme se produit si la fonction Boucle est utilisée
pour répétée la même section d’un disque un nombre
extrêmement élevé de fois.
Si vous utilisez des disques renfermant des fichiers ou des plages
importants, effectuez toujours auparavant une copie de
sauvegarde.
est une marque de
commerce de DVD Format/
Logo Licensing Corporation.
10
Fr
Page 79
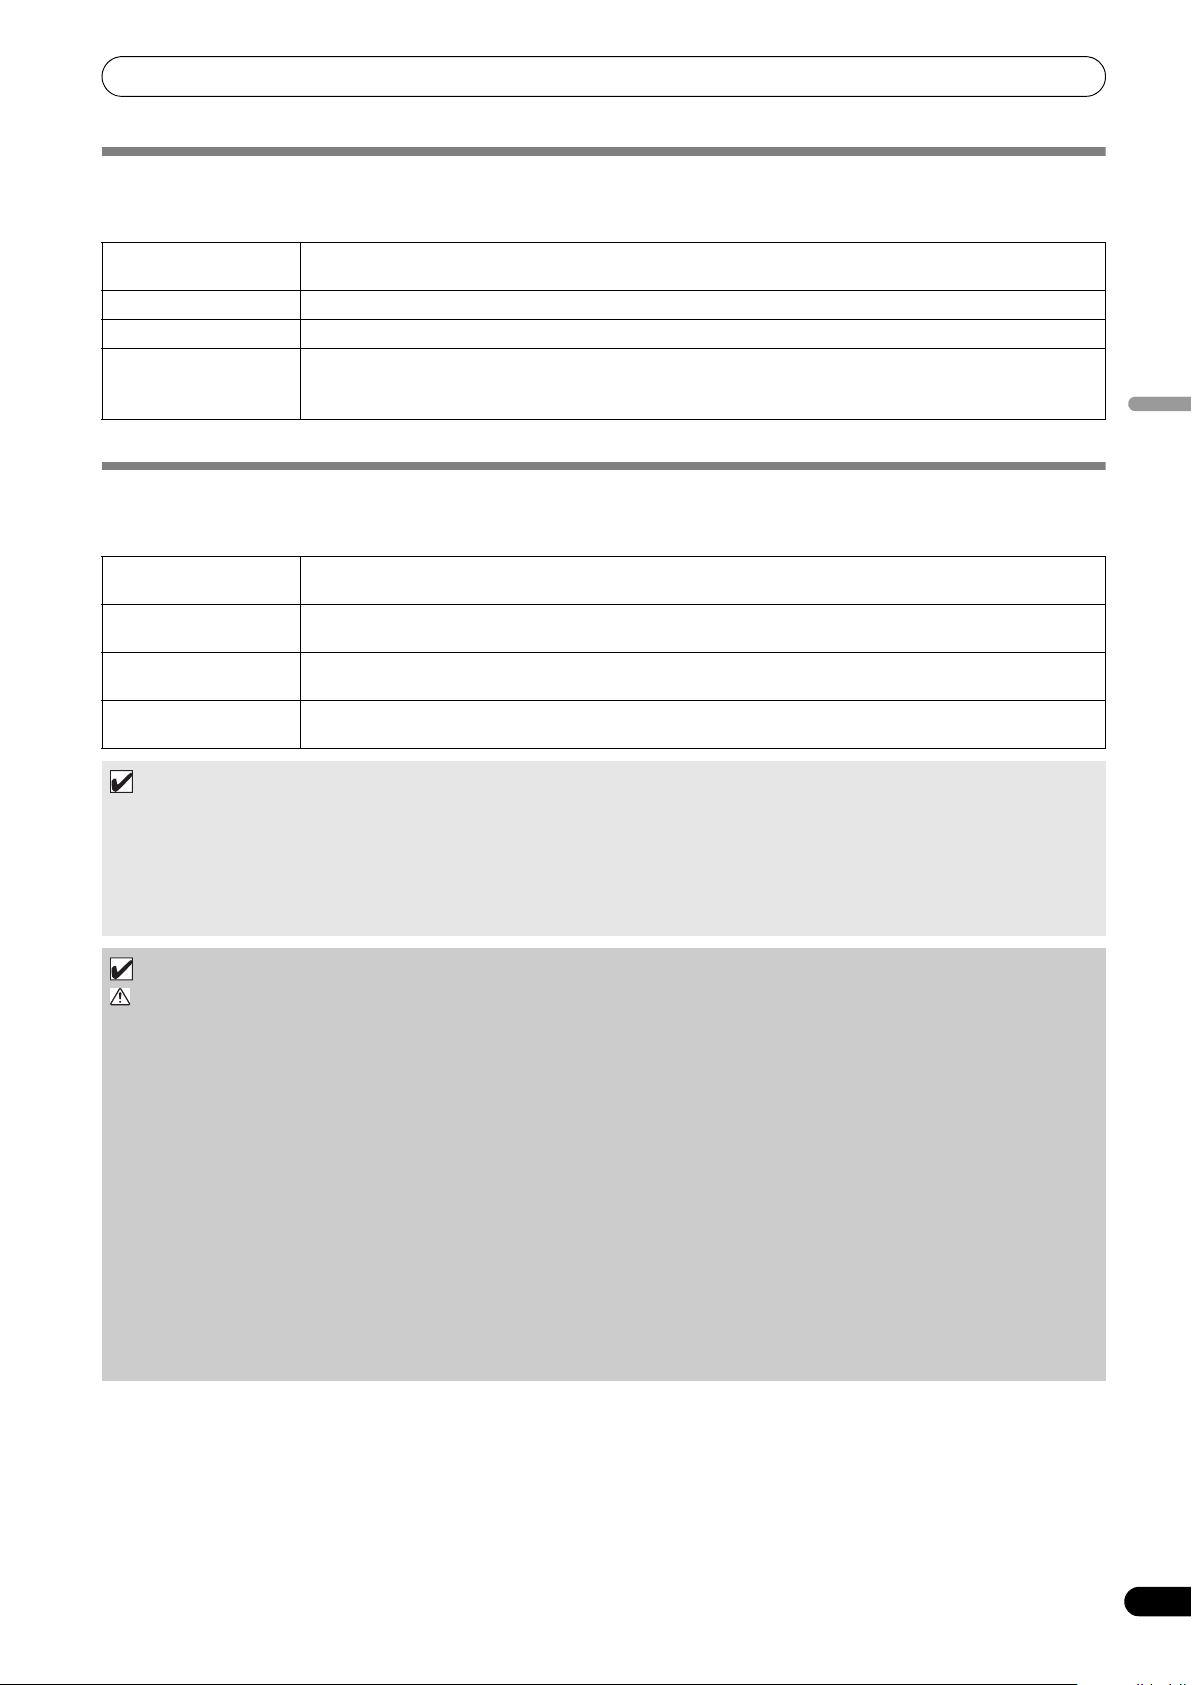
À PROPOS DES DISQUES ET FICHIERS LISIBLES
À PROPOS DE LA LECTURE DE DISQUES MP3/AAC
Cet appareil peut lire les fichiers musicaux comprimés (MP3/AAC), enregistrés sur CD-R/-RW, DVD-R/-RW, DVD+R/+RW, et supports
DVD±R double couche.
Niveaux de dossier Maximum 8 niveaux ; si plus de 8 niveaux existent, les fichiers au 9ème niveau et au-delà ne peuvent pas être
Nombre max. de dossiers 2 000 par disque. Si plus de 2 000 dossiers existent, ceux au-delà de 2 000 ne seront pas affichés.
Nombre max. de fichiers 3 000 par disque. Si plus de 3 000 fichiers existent, ceux au-delà de 3 000 ne seront pas affichés.
Format d’enregistrement Prend en compte les disques enregistrés au moyen de la norme de fichier ISO9660.
•Le temps de démarrage augmente à mesure que le nombre de dossiers et de fichiers augmente.
lus.
Lors d’un enregistrement effectué au moyen de la norme de fichier UDF, le disque ne peut pas être lu si la n orme
de fichier ISO9660 n’est pas enregistrée simultanément. Pour plus de détails, consultez l’auteur de l’application.
À PROPOS DE LA LECTURE DE MÉMOIRES USB
En connectant une mémoire USB sur cet appareil, les fichiers MP3/AAC/WAV/AIFF enregistrés sur la mémoire peuvent être lus par cette
console.
Niveaux de dossier Maximum 8 niveaux ; si plus de 8 niveaux existent, les fichiers au 9ème niveau et au-delà ne peuvent pas être
Nombre max. de dossiers Aucune limite particulière de dossiers n’existe pour une mémoire, mais les dossiers au-delà de 10.000 ne
Nombre max. de fichiers Aucune limite particulière de dossiers n’existe pour une mémoire, mais les fichiers au-delà de 10.000 ne
Systèmes de fichiers pris
en compte
NOTE
•Les périphériques de stockage USB pris en compte par cet appareil sont de la classe des périphériques de stockage USB à
grande capacité, y compris les disques durs externes, les mémoires flash portables et les lecteurs audio numériques.
Cependant, les lecteurs de disques optiques, tels que les lecteurs DVD/CD externes, ne peuvent pas être utilisés.
• Lors du branchement d’un périphérique de stockage USB, contenant un grand nombre de dossiers et de fichiers, un certain
temps sera nécessaire à la lecture de son contenu.
• Si le périphérique de stockage USB connecté contient des partitions multiples, seule la partition initiale sera utilisable.
lus.
pourront pas être affichés.
pourront pas être affichés.
FAT, FAT32, HFS+
Français
ATTENTION
Selon le dispositif utilisé, il se peut qu’une lecture correcte soit impossible avec tous les périphériques de stockage
USB. Pioneer n’assume aucune responsabilité en cas de perte de données, résultant du branchement d’un
périphérique de stockage USB donné sur cet appareil.
• Un fonctionnement correct peut devenir impossible si un périphérique de stockage USB est connecté via un hub USB.
• Même si un hub USB est utilisé pour connecter plusieurs périphériques de stockage USB, le seconde et les suivants ne seront
pas utilisables.
• Le fonctionnement ne peut pas être garanti si vous utilisez un périphérique de stockage USB avec le lecteur de carte mémoire
flash installé.
• Si vous connectez un périphérique de stockage USB utilisant deux câbles USB, connectez les deux câbles sur les ports USB
de cet appareil.
• Si un courant électrique supérieur à la limite admissible est appliqué au port USB1 ou au port USB2 de l’appareil, il se peut
que celui-ci cesse d’alimenter le périphérique de stockage (mémoire) USB, ce qui pourrait interrompre la transmission. Dans
ce cas, un message apparaît sur l’écran central de l’appareil et les voyants d’arrêt pour les ports USB1 et USB2 clignotent
simultanément en rouge. Pour revenir à un fonctionnement normal, débranchez les périphériques de stockage USB connectés
à l’appareil, puis maintenez les boutons USB STOP enfoncés pendant plus de deux secondes. Evitez de connecter le
périphérique de stockage USB pour lequel un courant excessif a
raccordés via un concentrateur USB alimenté par bus. Si un fonctionnement normal n’est pas rétabli par cette méthode,
mettez cet appareil hors tension, puis remettez-le sous tension.
été détecté et d’autres périphériques de stockage USB,
11
Fr
Page 80
À PROPOS DES DISQUES ET FICHIERS LISIBLES
À PROPOS DES FICHIERS MP3
Les fichiers MP3 se présentent en deux types : ceux à Débit Binaire Constant (CBR) et ceux à Débit Binaire Variable (VBR). Ce lecteur
permet la lecture et la lecture DJ des fichiers de type CBR et VBR, mais il se peut que les fichiers VBR présentent des performances plus
lentes à l’emploi des fonctions Recherche et Recherche super rapide, en comparaison des fichiers CBR. Si vous donnez la préférence aux
performances de lecture, enregistrer vos fichiers en mode CBR.
Cet appareil prend en compte les fichiers MP3 des formats suivants :
Formats pris en compte MPEG-1 Supporte les fréquences d’échantillonnage Audio Layer-3 de 32 kHz, 44,1 kHz, 48
MPEG-2 Supporte les fréquences d’échantillonnage Audio Layer-3 de 16 kHz, 22,05 kHz, 24
Données de piste Prend en compte ID3 tag Ver 1.0/1.1/2.2/2.3/2.4.
Extensions de fichier .mp3
*1 Pour afficher les caractères écrits en un code local autre qu’Unicode, la fonction UTILITY doit être utilisée pour définir la langue.
*2 Des fichiers dont la taille d’image originale est supérieure à 800 x 800 pixels ne peuvent pas être affichés.
kHz avec des débits binaires de 32 Kbps à 320 Kbps.
kHz avec des débits binaires de 16 Kbps à 160 Kbps.
Affiche le titre, le nom d’album et le nom d’artiste. *1
Les images JPEG incorporées en ID3 tag sont affichées comme photos de
pochette. *2
À PROPOS DES FICHIERS AAC
AAC est une abréviation de “Advance Audio Coding”, un format de base pour la compression audio, utilisée pour MPEG-2 et MPEG-4.
Les données AAC diffèrent en format et extension de fichier, selon l’application utilisée pour créer le fichier des données.
Le MEP-7000 est capable de lire les fichiers AAC codés iTunes
les fichiers protégés contre la copie, acquis, par exemple, chez iTunes Music Stor, ne pourront pas être lus. En outre, il se peut que
certains fichiers ne soient pas lisibles, selon la version de iTunes, utilisées pour leur codage.
Apple et iTunes sont des marques commerciales de Apple Inc., enregistrees aux Etats-Unis et dans d’autres pays.
Cet appareil prend en compte les fichiers AAC des formats suivants :
Formats pris en compte MPEG-4 AAC LE Fréquences d’échantillonnage 16 kHz, 22,05 kHz 24 kHz, 32 kHz, 44,1 kHz, 48 kHz,
Données de piste Fichiers AAC Prend en compte ID3 tag Ver 1.0/1.1/2.2/2.3/2.4.
Fichiers non AAC Prend en compte les balises Méta (balises incorporées).
Extensions de fichier .m4a, .aac, .mp4
®
, portant l’extension .m4a, ainsi que les fichiers .aac et .mp4. Cependant,
avec taux binaire de 8 Kbps à 320 Kbps.
ffiche le titr
A
Les images JPEG incorporées en ID3 tag sont affichées comme photos de
pochette. *2
Affiche le titre, le nom d’album et le nom d’artiste. *1
Les images JPEG incorporées en balise sont affichées comme photos de pochette.
*2
e, le nom d’album et le nom d’artiste. *1
*1 Pour afficher les caractères écrits en un code local autre qu’Unicode, la fonction UTILITY doit être utilisée pour définir la langue.
*2 Des fichiers dont la taille d’image originale est supérieure à 800 x 800 pixels ne peuvent pas être affichés.
12
Fr
Page 81

À PROPOS DES DISQUES ET FICHIERS LISIBLES
À PROPOS DES FICHIERS WAV
Cet appareil prend en compte les fichiers WAV des formats suivants :
Formats pris en compte Prend en compte le code PCM non comprimé de 16 bits avec fréquence d’échantillonnage de 44,1 kHz.
Données de piste Prend en compte LST chunk.
Affiche le titre, le nom d’album et le nom d’artiste. *1
Extensions de fichier .wav
*1 Pour afficher les caractères écrits en un code local autre qu’Unicode, la fonction UTILITY doit être utilisée pour définir la langue.
NOTE
• Les fichiers WAV enregistrés sur support disque ne sont pas pris en compte.
À PROPOS DES FICHIERS AIFF
Cet appareil prend en compte les fichiers AIFF des formats suivants :
Formats pris en compte Prend en compte le code PCM non comprimé de 16 bits avec fréquence d’échantillonnage de 44,1 kHz.
Affiche le titre, le nom d’album et le nom d’artiste. *1
Extensions de fichier .aif .aiff
*1 Pour afficher les caractères écrits en un code local autre qu’Unicode, la fonction UTILITY doit être utilisée pour définir la langue.
Français
NOTE
• Les fichiers AIFF enregistrés sur support disque ne sont pas pris en compte.
13
Fr
Page 82

DIRECTIVES D’INSTALLATION
Evitez tout contact
avec des surfaces en
vibration.
Pour permettre une
bonne dissipation de
chaleur, maintenez
cet espace dégagé.
Pour permettre une
bonne dissipation de
chaleur, maintenez
cet espace dégagé.
Pour permettre une bonne
dissipation de chaleur,
maintenez cet espace dégagé.
DIRECTIVES D’INSTALLATION
• Placer ou utiliser le lecteur pendant de longues périodes sur un
appareil dégageant de la chaleur, tel qu’un amplificateur ou un
projecteur, etc., peuvent en altérer ses performances. Eviter de
placer le lecteur sur des sources générant de la chaleur.
• Installer ce lecteur de disque compact aussi loin que possible
de syntoniseurs et de téléviseurs. Un lecteur installé à proximité
de tels appareils peut provoquer des parasites ou une
détérioration des images. Ces parasites sont particulièrement
prononcés si une antenne intérieure est installée. Dans ce cas,
utiliser une antenne extérieure ou couper l’alimentation du
lecteur.
• Si vous utilisez cet appareil dans un environnement bruyant, par
exemple à proximité d’enceintes acoustiques, des erreurs de
lecture peuvent survenir. Dans ce cas, éloignez l’appareil des
enceintes ou réduisez le niveau de sortie.
• Placez cet appareil sur une surface plate et stable.
•Ne déposez pas d’objets pesants sur cet appareil.
Assurez-vous que le lecteur, son cordon d’alimentation et ses
cordons de liaison audio, ne sont pas soumis à des vibrations.
Toute cause de vibration, non coupée par les isolateurs, peut
entraîner des pertes de lecture.
Soyez particulièrement vigilant quand vous utilisez l’appareil
installé dans sa valise de transport.
Transport de l’appareil
Ne déplacez jamais l’appareil pendant la lecture d’un
disque.
Pendant la lecture, les disques tournent à très grande vitesse ; ne
soulevez pas et ne déplacez pas l’appareil à ce moment pour éviter
des griffres et d’autres dégâts aux disques.
Transport de l’appareil
Avant de déplacer l’appareil, retirez les disques qui s’y trouvent et
coupez l’alimentation électrique.
Déplacer l’appareil dans lequel se trouve un disque peut
endommager le disque et l’appareil.
À propos des cartons de transport
La bague Jog est munie d’un commutateur délicat. Si l’appareil
est placé dans un emballage, veillez à ce qu’aucune pression ne
soit exercée sur la surface de la bague Jog.
Condensation
Lorsque le lecteur est transporté d’un endroit froid dans une pièce
chaude ou si la température de la pièce augmente brusquement,
de la condensation risque de se former à l’intérieur du lecteur et
d’amoindrir ses performances. Dans ce cas, n’utilisez pas
l’appareil pendant une heure environ ou augmentez
progressivement la température de la pièce.
Installation du MEP-7000 dans un bâti EIA
Les orifices pour vis du panneau avant du MEP-7000 sont réservés
à la fixation de l’appareil dans un bâti EIA de 48 cm (19 pouces).
Le contrôleur est conforme à la norme 3U et le lecteur à la norme
2U. La profondeur maximale de l’unité est de 324,6 mm.
• Fixez l’appareil sur le bâti en utilisant des vis de dimensions
appropriées (ces vis ne sont pas fournies avec l’appareil).
REMARQUE
•N’installez pas l’appareil juste au-dessus d’un ampli de
puissance, car des dégâts pourraient résulter de la chaleur
produite par l’ampli; un ronflement et d’autres parasites
risquent aussi d’être causés.
• Pour transporter l’appareil, retirez-le de son bâti. Vous
risquez d’endommager l’appareil si vous le transportez
installé dans son bâti.
•Si l’appareil doit être déplacé en restant dans son bâti,
veillez à bien le protéger contre les vibrations et les chocs.
Nettoyage du lecteur
Pour nettoyer le lecteur, essuyez-le avec un chiffon doux et sec. Si
elle est très sale, imbibez le chiffon d’une solution de détergent
doux, obtenue en diluant un volume de détergent dans 5 ou 6
volumes d’eau, essorez bien le linge, puis enlevez la saleté. Utilisez
aussi un chiffon sec pour sécher la surface. N’utilisez pas de
produits volatiles comme de la benzine ou du diluant qui peuvent
endommager l’appareil.
Produit de nettoyage de l’optique de CD
Si, pour certaines raisons, le lecteur venait à ne pas fonctionner
correctement en raison d’un encrassement, contactez votre
centre de service autorisé PIONEER le plus proche. Des produits
de nettoyage d’optique pour lecteurs de CD sont disponibles dans
le commerce, mais il utilisez-le avec grands soin car ils risquent
d’endommager l’optique.
Nettoyage de la bague Jog
Pour nettoyer la bague Jog, essuyez-la avec un chiffon doux et sec.
Si elle est très sale, imbibez le chiffon d’une solution de détergent
doux, obtenue en diluant un volume de détergent dans 5 ou 6
volumes d’eau, essorez bien le linge, puis enlevez la saleté. Utilisez
aussi un chiffon sec pour sécher la surface.
Evitez d’utiliser de l’alcool, un diluant pour peinture, du benzène,
des insecticides ou toute autre substance agressive sur la bague
Jog, car vous risqueriez d’endommager ou de décolorer ses
marques ou sa finition.
14
Fr
Page 83
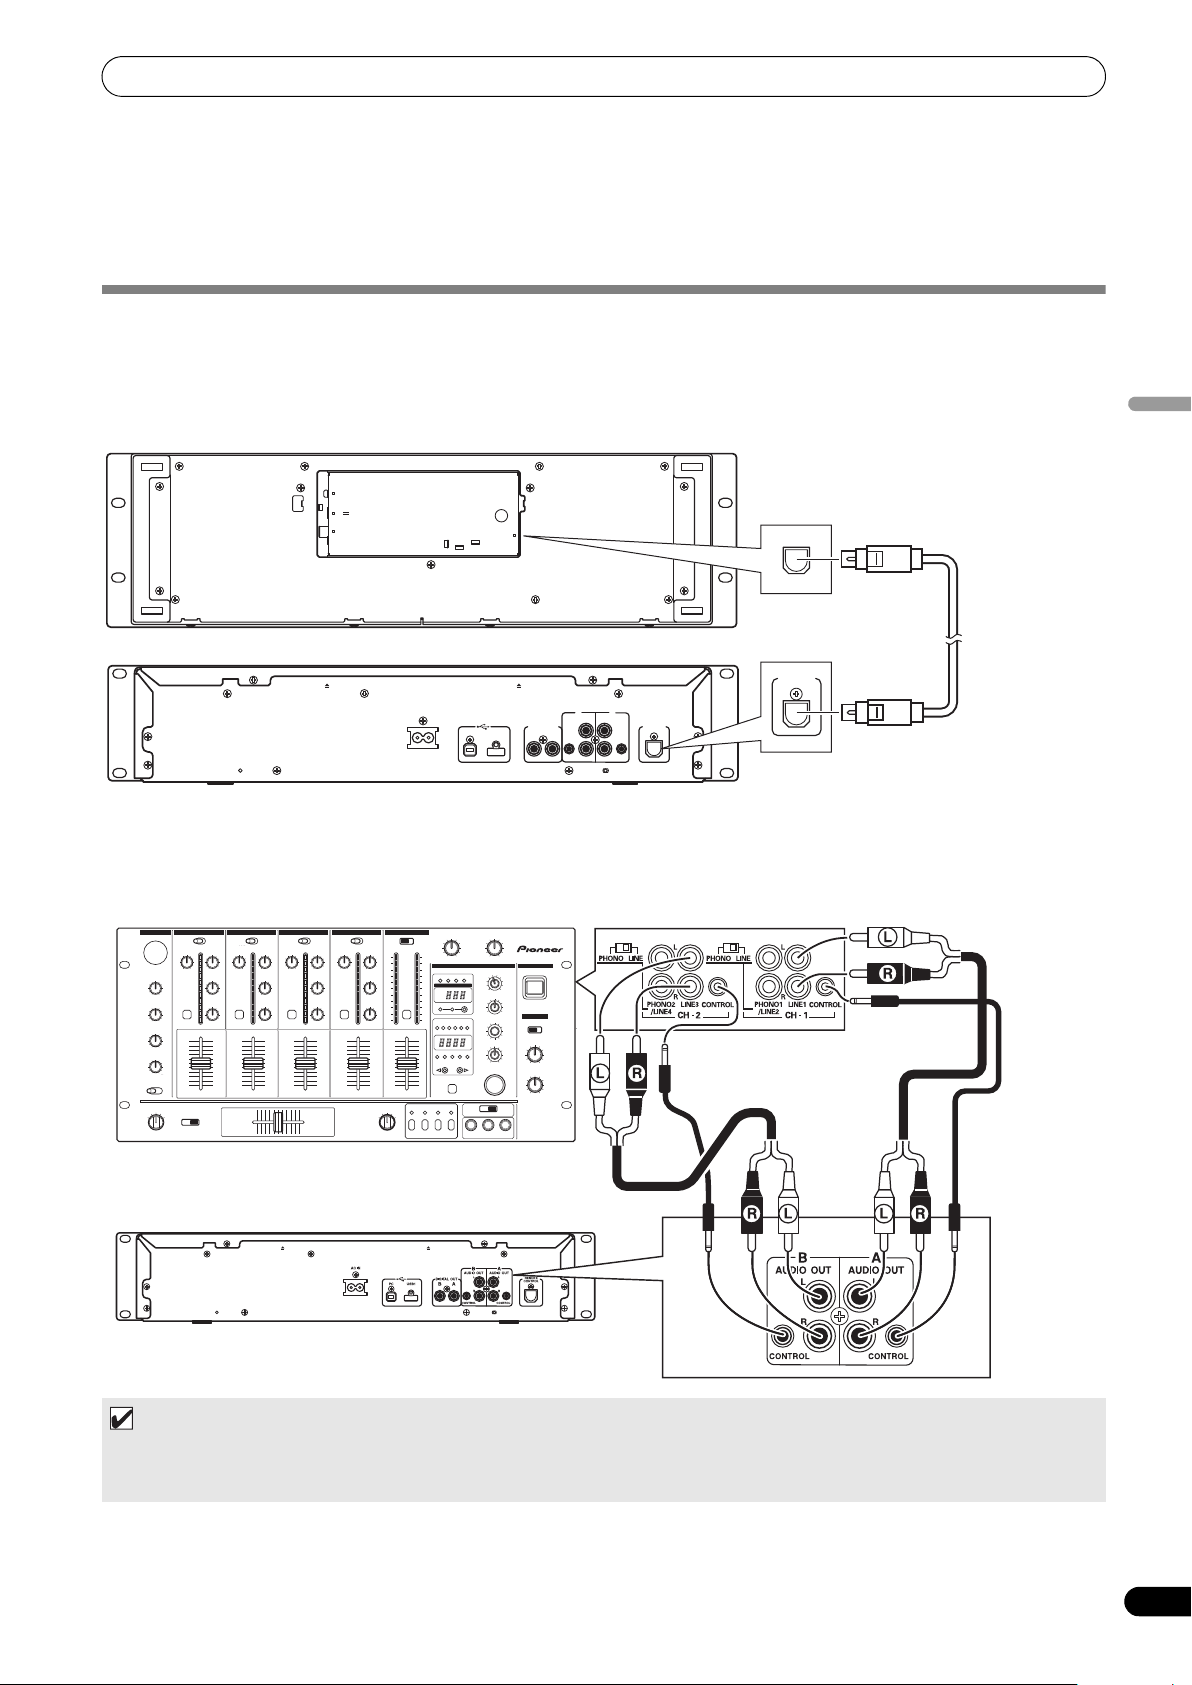
CONNEXIONS
Câble audio fourni
Câble audio fourni
Lecteur
Cordon de
commande
fourni
Cordon de
commande
fourni
DJM-3000
CONNEXIONS
Lors du branchement ou du débranchement des composants, veillez au préalable à couper l’alimentation et à débrancher le cordon
d’alimentation au niveau de la prise secteur. L’appareil pourrait subir des dégâts si les connexions sont modifiées pendant qu’il est
alimenté.
CONNEXIONS DE STYLE NORMAL
1. Connexions du système
Utilisez le câble de télécommande spécialisé fourni pour raccorder le contrôleur au lecteur. Insérez fermement jusqu’à entendre un
déclic.
Contrôleur
PC
5V
MONITOR OUT
Lecteur
AC IN
REMOTE
CONTROL
Câble de
télécommande
REMOTE
CONTROL
AB
AUDIO OUTAUDIO OUT
L
L
DIGITAL OUT
USB1PC
AB
R
CONTROL CONTROL
REMOTE
CONTROL
R
spécialisé
fourni
Français
2. Connexions au mixeur DJ (DJM-3000/DJM-800) (connexions de sortie audio et de contrôle)
Au moyen du câble audio accessoire, raccordez la fiche blanche sur le connecteur de canal L (gauche) et la fiche rouge sur le
connecteur de canal R (droit). En branchant le cordon de contrôle fourni comme accessoire, cet appareil peut être contrôlé depuis
un mixeur DJ de Pioneer, de manière à permettre la lecture à départ en fondu et les opérations Back Cue (sauf pendant la lectuer à
relais).
NOTE
• Lors du branchement de la DJM-300, DJM-500 ou DJM-600, utilisez le câble audio accessoire pour raccorder le CD1 aux
connecteurs de sortie du côté A sur le lecteur, et le CD2 aux connecteurs de sortie du côté B sur le lecteur, indiqués sur
l’illustration.
15
Fr
Page 84

CONNEXIONS
Lecteur
Câble audio fourni
Branchez aux connecteurs CD ou AUX IN
(ne branchez pas aux connecteurs PHONO).
3. Connexion à un moniteur externe (connecteur à broches)
Utilisez ces connexions si vous souhaitez présenter les images de l’écran central sur un large écran ou si vous utilisez des disques
CD-G Karaoké. Après avoir raccordé l’appareil à un moniteur externe, les réglages de l’appareil doivent être changés (cf. la rubrique
“SORTIE MONITEUR” dans l’article “[1] DISPLAY (Écran)” de la section “UTILISATION DE L’ÉCRAN UTILITY” à la page 60.)
Contrôleur
PC
5V
MONITOR OUT
Moniteur externe
4. Connexion d’autres composants
A. Connexion d’un autre mixeur
Raccordez les connecteurs AUDIO OUT de cet appareil sur les connecteurs LINE IN
sur les connecteurs PHONO car le son serait distordu et une bonne lecture ne serait pas possible.)
B. Connexion d’un amplificateur stéréo (en cas de non emploi d’un mixeur DJ)
REMOTE
CONTROL
ou AUX du mixeur. (Ne faites pas la connexion
C. Connexion d’un composant muni de connecteurs d’entrée numérique
Graveur CD, amplificateur munis
d’entrées numériques, etc.
Lecteur
Câble de signal
numérique
NOTE
• Les connecteurs de sortie numérique produisent uniquement les données audio sans inclusion de sous-codes.
• Selon l’enregistreur CD et d’autres composants, certaines fonctions, y compris l’enregistrement CD, risquent d’être
restreintes. Pour des détails, consultez les modes d’emploi des composants raccordés.
16
Fr
Page 85

CONNEXIONS
Lecteur
Ordinateur
Câble USB fourni
Ne connectez pas avant d’avoir installé le pilote requis sur
votre ordinateur. Cf. “À PROPOS DU PROGAMME PILOTE”
(P.49)
REMOTE
CONTROL
PC
MONITOR OUT
5V
Ne connectez pas avant d’avoir installé le pilote requis sur
votre ordinateur. Cf. “À PROPOS DU PROGAMME PILOTE”
(P.49)
Contrôleur
Câble USB fourni
Cordon d’alimentation
auxiliaire USB fourni
Ordinateur
Interface audio (vendue séparément)
Câble audio
Table de mixage
5. Connexion d’un ordinateur
Effectuez ces connexions pour utiliser le logiciel DJS fourni comme accessoire et d’autres logiciels DJ.
REMARQUE
• Utilisez uniquement le câble USB fourni comme accessoire.
6. Connexion du cordon d’alimentation
Lorsque toutes les autres connexions sont terminées, branchez une extrémité du cordon d’alimentation fourni sur la prise AC IN à
l’arrière du lecteur et l’autre extrémité sur une prise secteur ordinaire, ou sur la prise d’alimentation auxiliaire d’un amplificateur.
CONNEXIONS DE STYLE MANIPULATEUR
Ces connexions seront utilisées si vous souhaitez employer le logiciel DJS fourni comme accessoire ou un autre logiciel DJ sans raccorder
le lecteur. Utilisez le câble d’alimentation auxiliaire USB fourni comme accessoire et le câble USB normal pour raccorder le contrôleur à
l’ordinateur (branchez d’abord le câble d’alimentation auxiliaire USB).
Français
REMARQUE
• Quand vous effectuez des connexions de style “manipulateur”, ne branchez pas le lecteur car il ne fonctionnera pas
correctement.
• Sur le connecteur 5 V, ne branchez rien d’autre que le câble d’alimentation auxiliaire USB fourni comme accessoire.
• Utilisez toujours le câble d’alimentation auxiliaire USB fourni comme accessoire et le câble USB uniquement.
• Connectez toujours le câble d’alimentation auxiliaire USB fourni comme accessoire et le câble USB sur un seul et même
ordinateur.
• Ne branchez pas cet appareil sur un ordinateur via un hub USB.
• Ne branchez pas cet appareil sur un ordinateur via une carte d’interface USB acceptant CardBus.
17
Fr
Page 86

LES ORGANES ET LEURS FONCTIONS
EJECT
POWER
STOP STOPREAR
DISC 1
USB 1 USB 2
DISC 2
EJECT
MEP-7000
MULTI ENTERTAINMENT PLAYER
1 2 3 4
56
7
LES ORGANES ET LEURS FONCTIONS
PANNEAU AVANT
Lecteur
1 Orifice d’éjection forcée (page 22)
2 Fente d’insertion du disque (page 22)
3 Bouton EJECT (
)
Pour éjecter un disque de la fente d’insertion, appuyez sur ce
bouton en mode Cue Standby ou Pause, ou quand aucune
plage du disque n’est chargée.
4 Interrupteur et voyant d’alimentation (POWER)
Pour mettre l’appareil sous/hors tension.
Contrôleur
16
15
1
MEMORY CALL
5
6
7
8
4 22 2 3 10 11 12 13
EJECT
CUE/LOOP
TRACK SEARCH
SEARCH
QUE
TIME
A.CUE
IN/CUE
HOT LOOP
OUT/ADJUST
RELOOP/EXIT
LOOP
S
C
R
A
T
C
H
TEMPO
MASTER
6/10/16WIDE
TEMPO
MT
PITCH BEND
J
O
G
B
R
E
A
K
0
FWD TEMPOREV
5 Bouton et voyant USB1 STOP
Appuyez pour retirer un périphérique de stockage USB au
niveau du port USB1.
6 Bouton et voyant USB2 STOP
Appuyez pour retirer un périphérique de stockage USB au
niveau du port USB2.
7 Port USB2 (type A)
Utilisez pour raccorder un périphérique de stockage USB ou
un clavier USB.
BROWSE MIX EFFECT UTILITY
21
A
LOAD
MULTI ENTERTAINMENT PLAYER
18 14 20
1923
B
LOAD
MEP-7000
18
179
EJECT
CUE/LOOP
MEMORY CALL
TRACK SEARCH
SEARCH
QUE
TIME
A.CUE
HOT LOOP
IN/CUE
OUT/ADJUST
TEMPO
MASTER
6/10/16WIDE
TEMPO
MT
RELOOP/EXIT
LOOP
S
C
R
A
PITCH BEND
T
C
H
J
O
G
B
R
E
A
K
0
FWD TEMPOREV
1 Bouton EJECT ()
Pour éjecter un disque de la fente d’insertion, appuyez sur ce
bouton en mode Cue Standby ou Pause, ou quand aucune
plage du disque n’est chargée.
2 Boutons d’exploitation LOOP (page 38)
3 Section de contrôle de TEMPO
Bouton de plage de contrôle du TEMPO (±6/10/16/WIDE):
Chaque poussée su
r le bouton fait changer la plage variable
du curseur de réglage TEMPO.
Bouton et voyant MASTER TEMPO (MT)
À chaque pressio
n sur le bout
principal est alternativement activée et désactivée.
18
Fr
on, la fonction du tempo
Curseur de réglage TEMPO
tir de la positio
À par
n centrale à déclic, tirez le curseur vers
vous (+) pour accroître le tempo ou éloignez le curseur de
vous (–) pour ralentir le tempo.
Boutons PITCH BEND +/– :
Une pressi
on pendant
la lecture active la fonction Pitch Bend
(changement de hauteur tonale). Une poussée sur le bouton
“+” accélère la vitesse Pitch Bend, tandis qu’une poussée sur
le bouton “–” ralentit cette vitesse.
La vitesse de changement de la hauteur tonale peut être
modifiée
en maintenant la
pression sur le bouton et en
tournant la bague Jog.
Page 87

LES ORGANES ET LEURS FONCTIONS
4 Bouton Mode horaire/Auto cue (TIME/A.CUE)
TIME
À chaque poussée sur ce bouton, l’affichage horaire de l’écran
change entre la durée de lecture écoulée sur la plage actuelle
et la durée restante (REMAIN).
A.CUE (page 37)
5 Boutons TRACK SEARCH (, ) (page 34)
6 Boutons SEARCH (
7 Bouton et voyant CUE
Réglage d’un point de repère (page 36)
Échantillonneur de point de repère (page 36)
Back-cue (pa
Modification d’un point de repère (page 36)
8 Bouton et voyant de Lecture/Pause () (page 33)
9 Boutons et voyants SCRATCH/JOG BREAK
Utilisez pour sélectionner le mode Jog, y compris SCRATCH,
JOG BREAK ou OFF (aucun voyant allumé).
10 Bouton BROWSE (page 25) (Naviguer)
Utilisez pour sélectionner l’écran BROWSE.
11 Bouton MIX (page 42)
Utilisez pour sélectionner l’écran MIX.
12 Bouton EFFECT (page 39)
Utilisez pour sélectionner l’écran EFFECT.
13 Bouton UTILITY (page 60)
Utilisez pour sélectionner l’écran UTILITY.
14 Sélecteur rotatif
Tournez dans le sens horaire ou antihoraire pour sélectionner
les plages et déplacer le curseur parmi les rubriques de
réglage. Appuyez pour confirmer votre sélection.
15 Bouton CUE/LOOP MEMORY (page 38)
Utilisez pour placer des points de repère et des points de
boucle en mémoire.
Maintenez le bouton enfoncé po
16 Bouton CUE/LOOP CALL (page 38)
Utilisez pour rappeler des points de repère et des points de
boucle, placés en mémoire.
,
ge 36) (
) (page 34)
retour au point de repère)
ur annuler u
n point de boucle.
17 Boutons de fonction (F1 à F6 à partir de la gauche)
La permutation entre les fonctions allouées aux six boutons de
fonction est possible au moyen du menu affiché sur l’écran
central.
Sur écran BROWSE :
N D’UNE PLAGE” (page 27)
TIO
“SÉLEC
Sur écran MIX :
“MIX SCREEN” (page 42)
Sur écran EFFECT :
“[1] Effet Scratch” (page 39)
“[2] Effet Jog break” (page 41)
Sur écran UTILITY :
“UTILISATION DE MIDI POUR CONTRÔLER L’ORDINATEUR”
(page 55)
“UTILISATION DE L’ÉCRAN UTILITY” (page 60)
18 Boutons LOAD A/B
Définit la plage sélectionnée dans le contrôleur A/B.
19 Bouton de sélection Haut ()
À chaque poussée sur ce bouton, l’affichage passe au
prochain niveau supérieur du menu.
20 Bouton de sélection Bas ()
À chaque poussée sur ce bouton, l’affichage passe au
prochain niveau inférieur du menu.
21 Écran central (page 20)
22 Écran A/Écran B (page 20)
23 Bague Jog (+FWD/–REV) (page 35)
Français
19
Fr
Page 88

LES ORGANES ET LEURS FONCTIONS
1
3
2
Nom de la plage État de lecture
Nom d’Artiste
1
8
4
6
2
7
3
5
9
Écran central
1 Écran de menu principal
Les menus de l’écran central changent au moyen du bouton
BROWSE, du bouton MIX, du bouton EFFECT et du bouton
UTILITY. Les boutons de fonction, les boutons de sélection
Haut ()/Bas (), les boutons LOAD A/B et le sélecteur rotatif
permettent de manipuler le contenu de chaque menu.
Écran BROWSE
Pour sélectionnez les plages et
(page 25).
Écran MIX
Pour effectuer des opér
mix, en utilisant des listes de lecture (page 42).
Écran EFFECT
Pour sélectionner la lecture scratch
re Job Break (page 39).
lectu
Écran
UTILITY
Pour effectuer les réglages sur l’appareil (page 60).
2 Onglet de fonction
Pour afficher les rubriques qui peuvent être changées par les
six boutons de fonction. Les rubriques affichées diffèrent selon
le contenu indiqué sur l’écran de menu principal.
3 Affichage d’information de plage A/B
Pour afficher les informations de plage et l’état actuel des
plages reproduites sur le contrôleur A/B.
Etat de lecture
constitu
ations de
er les listes de lecture
mixage, y compris du Auto
et divers effets utilisés en
Écran A/Écran B
1 Affichage du numéro de plage
Indique le numéro de la plage en cours de lecture.
2 Affichage de la portée du contrôle TEMPO (±6, ±10, ±16,
WIDE)
Affiche la portée variable choisie pour le curseur de réglage
TEMPO.
3 Affichage du taux de changement du TEMPO
Affiche le changement produit sur le Tempo par l’action du
curseur de réglage TEMPO.
4Voyant A.CUE
S’allume quand la fonction Auto Cue est activée (ON).
5 Affichage horaire
Il affiche la durée écoulée (le voyant [REMAIN] est éteint) ou la
durée restante (le voyant [REMAIN] est allumé) sur la plage
actuelle en minutes [M], secondes [S], and cadres [F].
6 Affichage d’adresse de lecture
Pour illustrer de façon rapide et intuitive la progression relative
de la lecture de la page (soit en temps écoulé, soit en temps
restant), une barre graphique représente la longueur totale de
la plage.
• Affichage de durée écoulée : Tous les segments sont éteints
au début et i
vers la droite.
• Affichage de durée restante : Tous les segments sont
allumés au
gauche vers la droite.
• Quand la durée de lecture restante atteint 30 secondes, le
graphique clignote lent
• Quand la durée de lecture restante atteint 15 secondes, le
graphique cligno
7 Affichage BPM
Il indique le BPM (Battements Par Minute) de la plage en
cours de lecture.
8 Voyant MEMO
Il s’allume quand un point de repère ou de boucle a été placé
en mémoire.
9Voyant REMAIN
Il s’allume quand l’affichage horaire est réglé pour la durée
restante.
ls
s’allument progressivement de la gauche
début et ils s’éteingnent progressivement de la
ement.
te rapidement.
Indique la plage en cours de lecture.
Indique la plage actuellement en mode Pause.
Indique la plage actuellement en mode Attente de
top (cf. page 36 “POSE DES POINTS DE REPÈRE
(CUE POINTS)”).
NOTE
• Les informations sur le nom de plage et le nom d’artiste
peuvent être affichées dans les langues d’Europe
occidentales, en russe, en chinois (mandarin simplifié) et
en japonais.
20
Fr
Page 89

LES ORGANES ET LEURS FONCTIONS
AC IN
AB
DIGITAL OUT
REMOTE
CONTROL
AB
AUDIO OUTAUDIO OUT
L
R
CONTROL CONTROL
L
R
USB1PC
1 23 4 76
5
PC
MONITOR OUT
5V
REMOTE
CONTROL
1
2
3
4
PANNEAU ARRIÈRE
Lecteur
Français
1 Prise secteur (AC IN)
Utilisez le cordon d’alimentation fourni pour brancher cette
prise sur une prise secteur.
2 Connecteur PC : Port USB (type B)
Utilisez le câble USB fourni pour raccorder ce port à un
ordinateur.
3 Port USB1 (type A)
Utilisez pour raccorder un périphérique de stockage USB ou
un clavier USB.
4 Connecteurs de sortie numérique (DIGITAL OUT A/B)
Connecteur de sortie numérique coaxial de type RCA pour le
branchement d’un mixeur DJ, d’un ampli audiovisuel, d’un
enregistreur de CD ou d’autres composants, acceptant une
entrée numérique.
d en c
La sortie pren
ompte toutes les fonctions, y compris la
fonction DJ, mais seules les données audio sans les souscodes sont fournies.
Contrôleur
5 Prises de contrôle (CONTROL A/B)
Quand le cordon de contrôle fourni est utilisé pour raccorder
cet appareil à un mixeur DJ de Pioneer, le mixeur DJ peut
servir pour contrôler cet appareil de manière à effectuer des
opérations de Lecture à départ en fondu et de retour au point
de repérage. De plus, en raccordant cette prise à la prise de
contrôle d’un autre lecteur DJ, une lecture à relais
automatique est possible.*
dant la
* La lecture à relais est désactivée pen
sélection de
plage par logiciel DJ.
6 Connecteurs de sortie audio (AUDIO OUT A/B)
Connecteurs de sortie audio analogiques de type RCA
7 Connecteur de télécommande (REMOTE CONTROL)
Utilisez le câble de télécommande spécialisé fourni pour
raccorder au contrôleur.
1 Connecteur PC : Port USB (type B)
Utilisez le câble USB accessoire pour raccorder ce port à un
ordinateur.
2 Connecteur 5 V
Utilisez le câble d’alimentation auxiliaire USB accessoire pour
raccorder ce port à un ordinateur.
3 Connecteur de sortie vidéo (MONITOR OUT)
Utilisez un câble vidéo pour la connexion à un affichage
externe.
4 Connecteur de télécommande (REMOTE CONTROL)
Utilisez le câble de télécommande spécialisé fourni pour la
connexion au lecteur.
21
Fr
Page 90
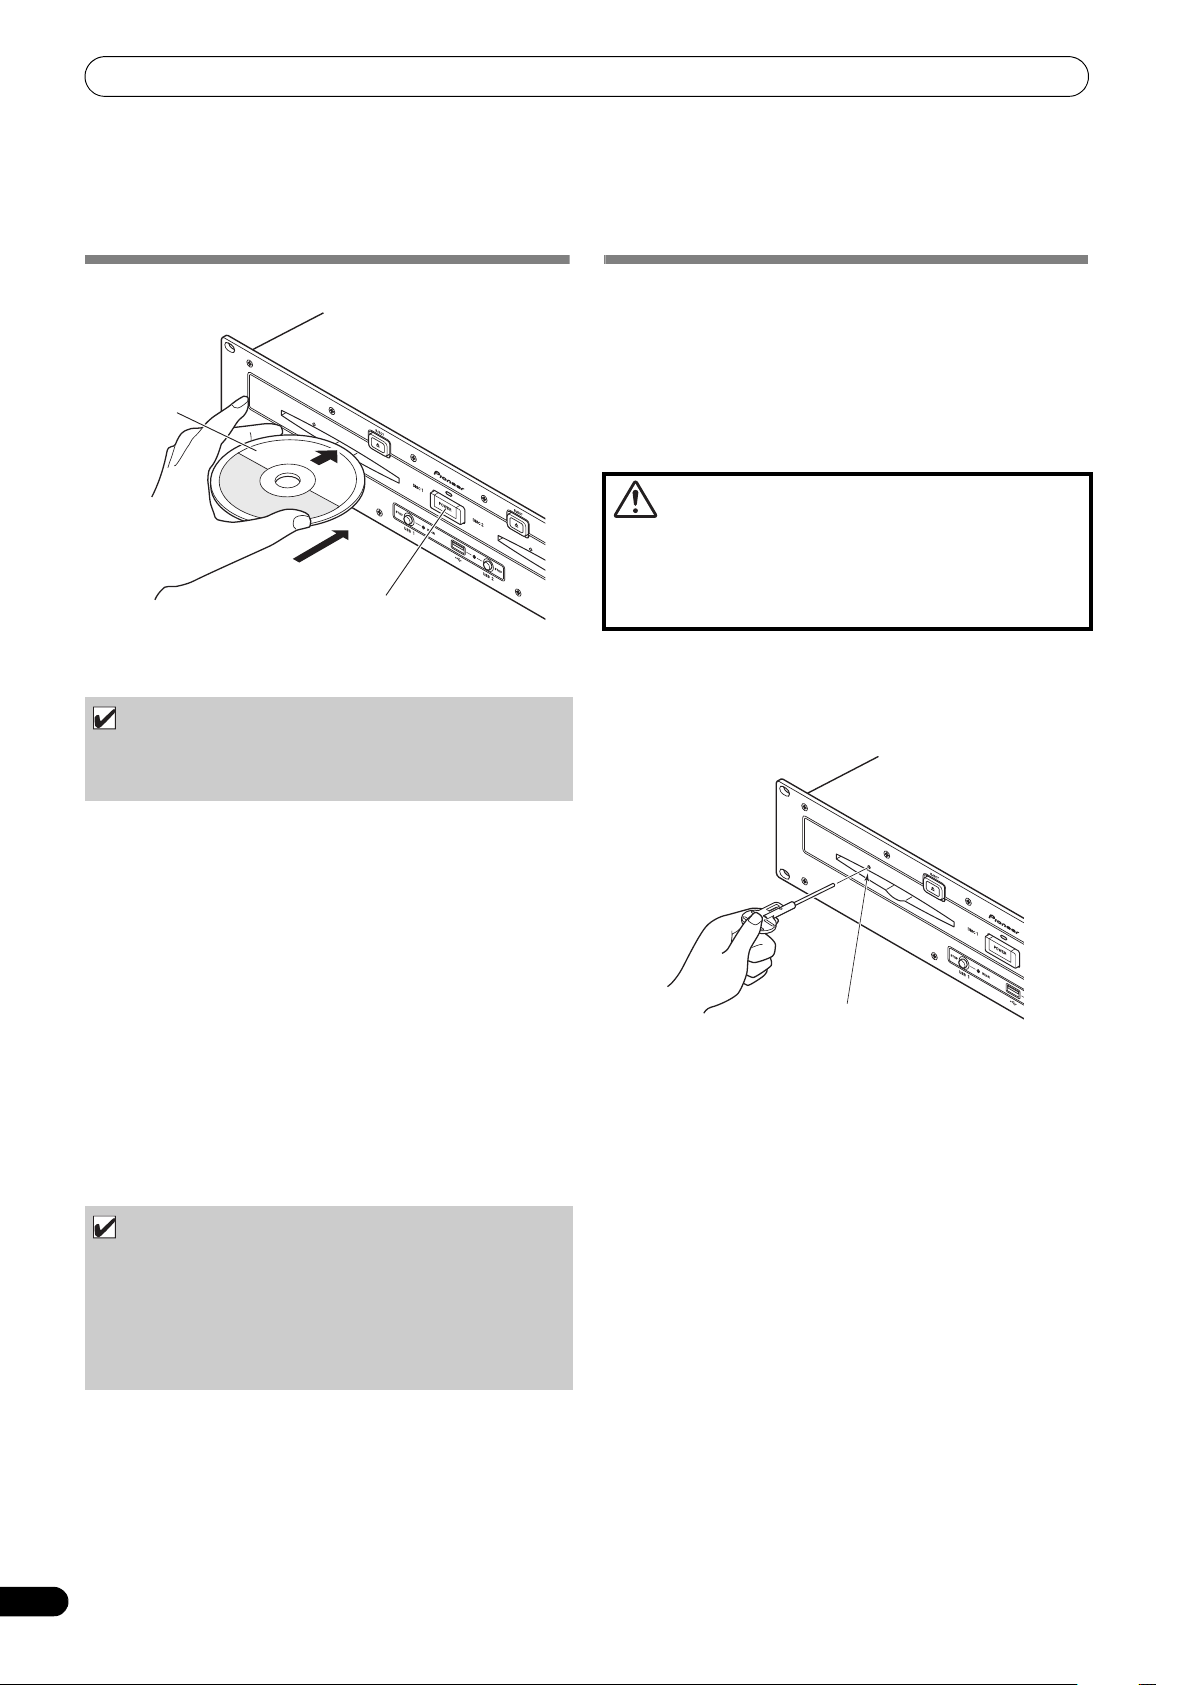
MANIEMENT DES DISQUES ET AUTRES SUPPORTS
Insérez en
ligne droite
Face étiquetée
vers le haut
Interrupteur POWER
Orifice d’éjection forcée
MANIEMENT DES DISQUES ET AUTRES
SUPPORTS
INSERTION ET RETRAIT DES DISQUES
1 Allumer (ON) l’interrupteur POWER du panneau avant du
lecteur.
REMARQUE
• N’essayez pas d’insérer de force un disque quand l’appareil
est hors tension, car ceci pourrait endommager le disque et
le mécanisme de son chargement.
2 Insérez un disque.
• Insérez le disque à plat en dirigeant sa surface étiquetée
vers le haut.
t être
• Un seul disque peu
d’insérer simultanément deux disques ou d’en insérer un
second pendant qu’un est en cours de lecture.
• A l’insertion d’un disque, ne forcez pa
point qu’il en serait plié. De plus, quand le mécanisme attire
ou éjecte un disque, n’essayez pas d’arrêter de force le
mouvement de celui-ci. Ce genre d’action pourrait
endommager le disque et le mécanisme.
3 Pour retitrer le disque en cours de lecture, appuyez d’abord
sur le bouton Lecture/Pause (
puis appuyez sur le bouton EJECT (
repère a été posé, pendant la lecture, appuyez sur le bouton
CUE (pour provoquer un “retour au point de repère”), puis
appuyez sur le bouton EJECT (
La rotation du disque s’arrêtera et le disque sera éjecté par la
fente.
inséré à la fois. N’essayez pas
s son intr
) pour arrêter la lecture,
). Ou bien, si un point de
).
oduction au
EJECTION FORCÉE D’UN DISQUE
Si le bouton EJECT () ne permet pas d’éjecter un disque hors de
l’appareil, insérez la broche d’éjection forcée fournie dans l’orifice
d’éjection sur le panneau avant du lecteur pour faire ressortir le
disque coincé.
Lors d’une éjection forcée d’un disque, respectez toujours les
précautions suivantes :
1 Coupez l’alimentation du lecteur et attendez au moins une
minute.
L’insertion de la broche d’éjection forcée avant
qu’une minute ne se soit écoulée peut entraîner les
dangers suivants :
•Le disque peut être éjecté alors qu’il tourne encore à grande
vitesse, provoquant des blessures à vos doigts ou à vos mains.
• Dans le lecteur, la bride du disque risque de tourner de façon
instable et endommager le disque.
2 Utilisez uniquement la broche d’éjection fournie
(n’employez aucun autre objet).
Quand la broche d’éjection forcée est insérée à fond dans
l’orifice, le disque ressort d’environ 5 mm à 10 mm hors de la
fente ; vous pouvez alors le saisir avec les doigts et le retirer.
• N’essayez pas de réinsérer le disque pendant que
22
Fr
REMARQUE
fonctionne le processus d’éjection et que le voyant [EJECT]
est encore allumé. Si un disque est repoussé à l’intérieur
pendant son éjection (le voyant [EJECT] étant allumé), le
mécanisme risque de s’arrêter. Dans ce cas, appuyez à
nouveau sur le bouton EJECT () et attendez que le voyant
[EJECT] se soit éteint avant d’insérer à nouveau le disque.
Page 91

MANIEMENT DES DISQUES ET AUTRES SUPPORTS
Connexion d’un périphérique de stockage USB
INSCRIPTION DES DONNÉES DE GESTION
SUR UN PÉRIPHÉRIQUE DE STOCKAGE
USB
Quand cet appareil est utilisé avec un périphérique de stockage
USB pour reproduire de la musique, divers fichiers de données de
gestion sont créés dans le périphérique en question. Les données
de gestion sont des trois types suivants et elles sont stockées dans
le répertoire caché, appelé “PIONEER” (en format HFS+, appelé
“.PIONEER”). Notez que si ces dossiers de données et leurs
fichiers sont effacés, les points Cue et autres informations créés
par l’appareil seront effacés également.
Dossier CUE
Des fichiers des données "cue" sont créés quand la mémoire des
points Cue est utilisée avec des plages sur le périphérique de
stockage USB. Un espace d’environ 200 octets est nécessaire pour
chaque point Cue.
Dossier PLAYLIST
Des fichiers de donnes de liste de lecture sont créés lorsqu’une
liste de lecture est créée pour les plages sur un périphérique de
stockage USB. Environ 100 Koctets sont requis pour chaque liste
de lecture.
Dossier LIBRARY
Ce dossier est créé lorsque l’écran UTILITY est utlisé pour faire une
musicothèque. L’espace de stockage requis par plage va de
quelques centaines d’octets à un Kilo-octet environ.
En connectant une mémoire USB ou un auter périphérique de
stockage USB, des fichiers musicaux présents sur le périphérique
seront lus vers cet appareil.
1 Connectez le périphérique sur le port USB1 ou USB2.
2 Confirmez que le voyant est allumé en rouge.
Confirmez sur le panneau avant que le voyant pour le port
utilisé a changé de l’état non allumé à allumé en rouge.
Français
Port USB2
Périphérique de
stockage USB
BRANCHEMENT ET DÉBRANCHEMENT
DES PÉRIPHÉRIQUES DE STOCKAGE USB
Voyant de contenu
Il affiche l’état de connexion du périphérique de stockage USB.
ique no
Eteint Périphér
Allumé de façon
continue
Clignotant (deux
phases)
• L’état de communication entre cet appareil et le périphérique de
stockage USB peut être vérifié en observant la lampe d’état du
périphérique de stockage.
Le périphérique est détecté.
Le bouton STOP a été actionné et le
périphérique est en cours de retrait.
Si le bouton STOP est relâché pendant
que le voyant clignote lentement, le retrait
sera annulé.
n connecté
Port USB1
Périphérique de
stockage USB
NOTE
•Les périphériques de stockage USB pris en compte par cet
appareil sont de la classe des périphériques de stockage USB
à grande capacité, y compris les disques durs externes, les
mémoires flash portables et les lecteurs audio numériques.
Cependant, les lecteurs de disques optiques, tels que les
lecteurs DVD/CD externes, ne peuvent pas être utilisés.
• Lors du branchement d’un périphérique de stockage USB,
contenant un grand nombre de dossiers et de fichiers, un
certain temps sera nécessaire à la lecture de son contenu.
•Si le périphérique de stockage USB connecté contient des
partitions multiples, seule la partition initiale sera utilisable.
23
Fr
Page 92

MANIEMENT DES DISQUES ET AUTRES SUPPORTS
ATTENTION
Selon le dispositif utilisé, il se peut qu’une lecture
correcte soit impossible avec tous les périphériques
de stockage USB. Pioneer n’assume aucune
responsabilité en cas de perte de données, résultant
du branchement d’un périphérique de stockage USB
donné sur cet appareil.
• Un fonctionnement correct peut devenir impossible si un
périphérique de stockage USB est connecté via un hub
USB.
• Même si un hub USB est utilisé pour connecter plusieurs
périphériques de stockage USB, le seconde et les suivants
ne seront pas utilisables.
• Le fonctionnement ne peut pas être garanti si vous utilisez
un périphérique de stockage USB avec le lecteur de carte
mémoire flash installé.
• Si vous connectez un périphérique de stockage USB
utilisant deux câbles USB, connectez les deux câbles sur
les ports USB de cet appareil.
• Si un courant électrique supérieur à la limite admissible est
appliqué au port USB1 ou au port USB2 de l’appareil, il se
peut que celui-ci cesse d’alimenter le périphérique de
stockage (mémoire) USB, ce qui pourrait interrompre la
transmission. Dans ce cas, un message apparaît sur
l’écran central de l’appareil et les voyants d’arrêt pour les
ports USB1 et USB2 clignotent simultanément en rouge.
Pour revenir à un fonctionnement normal, débranchez les
périphériques de stockage USB connectés à l’appareil,
puis maintenez les boutons USB STOP enfoncés pendant
plus
de deux secondes. Evitez de connecter le périphérique
de stockage US
B pour lequel un courant excessif a été
détecté et d’autres périphériques de stockage USB,
raccordés via un concentrateur USB alimenté par bus. Si
un fonctionnement normal n’est pas rétabli par cette
méthode, mettez cet appareil hors tension, puis remettez-le
sous tension.
Pour débrancher un périphérique de stockage USB
1 Maintenez le bouton STOP enfoncé pendant 2 secondes ou
plus.
2 Confirmez que le voyant est éteint.
Confirmez sur le panneau avant que le voyant rouge
correpondant au port connecté qui clignotait s’est éteint.
3 Débranchez le périphérique de stockages USB.
NOTE
•Après que le voyant s’est éteint, si le bouton STOP est
maintenu enfoncé pendant 2 secondes ou plus, la connexion
du périphérique de stockage USB peut être réinitialisé sans
devoir le débrancher physiquement et le reconnecter.
ATTENTION
Avant de déconnecter un périphérique de stockage
USB, effectuez toujours l’opération STOP au
préalable.
Si l’opération STOP n’est pas accomplie avant le
débranchement, la mise à jour de la mémoire Cue/
Loop et de la liste de lecture risque de ne pas
s’effectuer correctement, ce qui résulterait en une
perte de données. De plus, le périphérique de
stockage USB risque de devenir illisible et d’autres
dégâts sérieux peuvent se produire.
Dans le cas d’un lecteur de disque dur, ne le
soumettez pas à chocs ou vibrations pendant son
emploi.
Débranchez toujours le périphérique de stockage USB
avant de couper l’alimentation de cet appareil.
24
Fr
Page 93
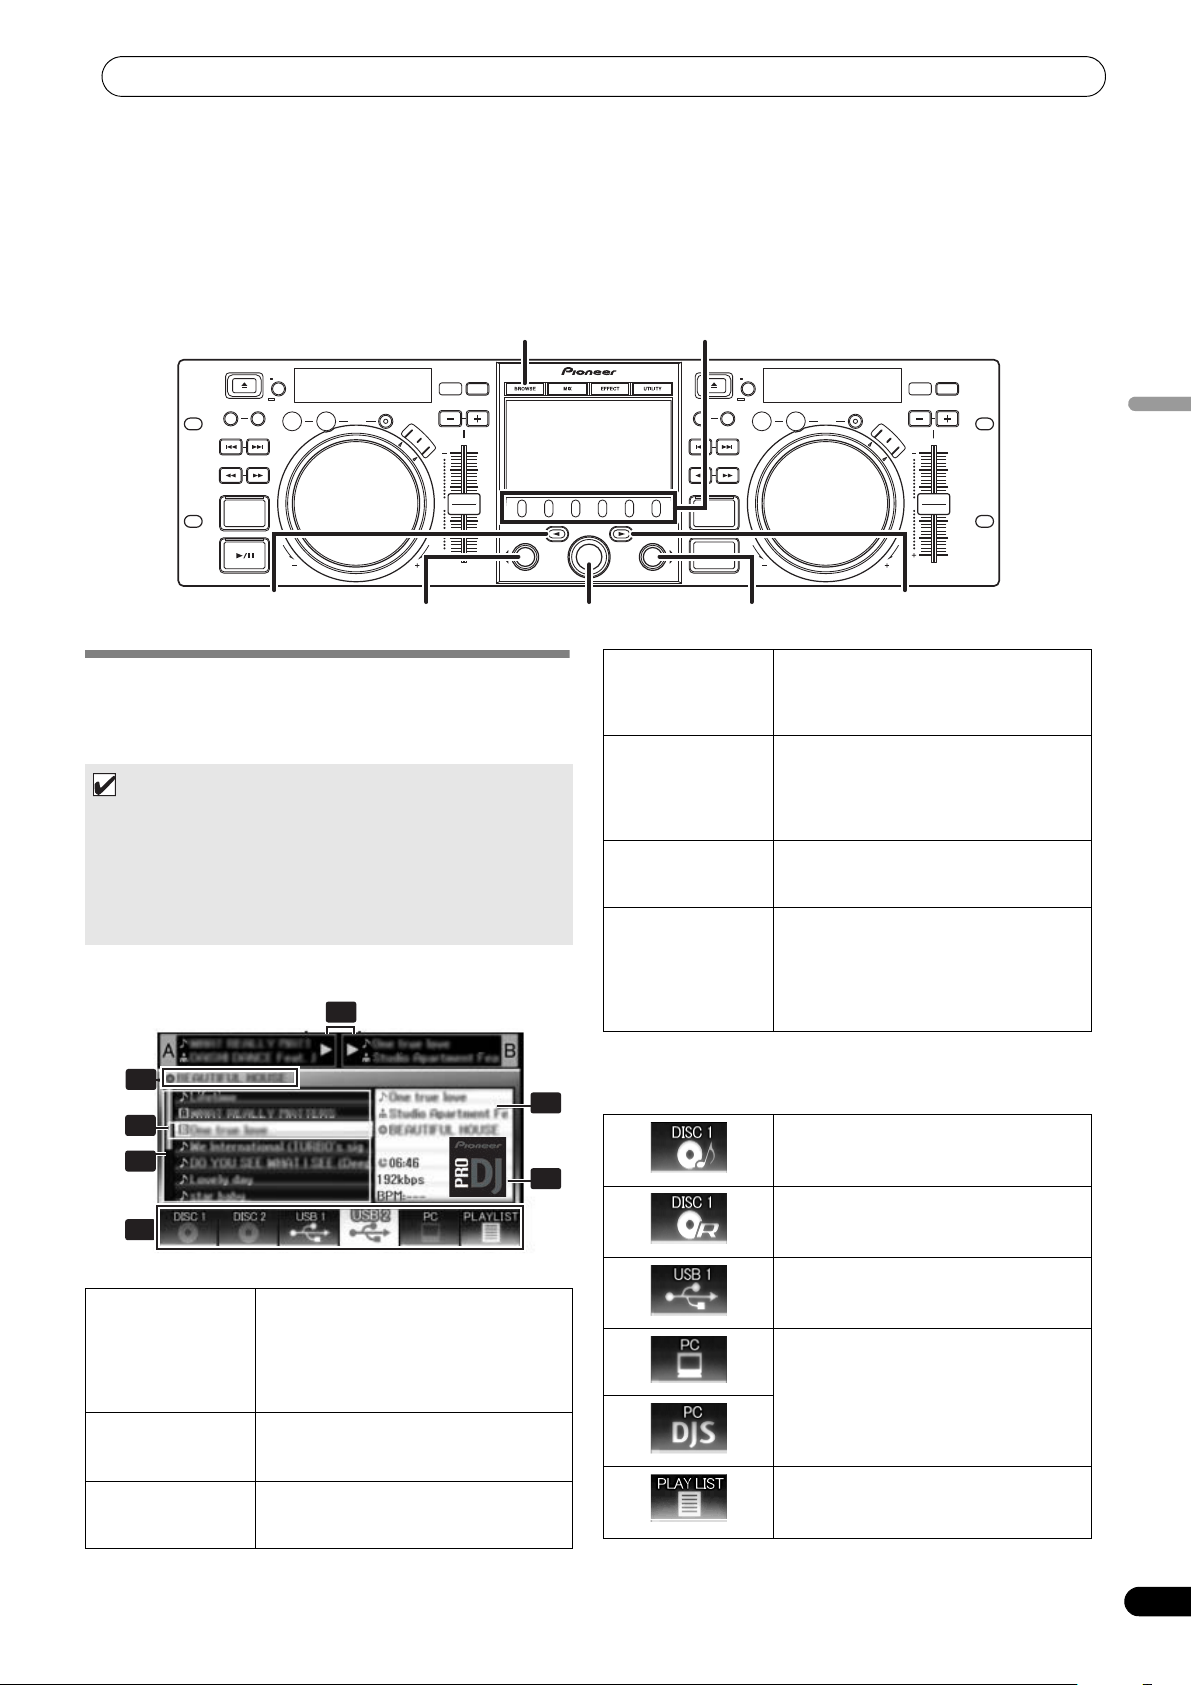
LANCEMENT DE LA LECTURE (Utilisation des connexions normales)
BROWSE
LOAD BLOAD A Sélecteur rotatif
Bouton de
sélection Bas ()
Bouton de sélection
Haut ()
Boutons de fonction
2
3
5
4
6
1
7
LANCEMENT DE LA LECTURE
(Utilisation des connexions normales)
Grâce au MEP-7000, la sélection des plages peut s’accomplir sur l’écran central parmi un maximum de six sortes de sources musicales,
dont deux disques, deux périphériques de stockages USB, un ordinateur personnel (logiciel DJ et des listes de lecture. Les boutons
nécessaires pour la sélection de chaque type de source sont indiqués ci-après.
Français
ÉCRAN BROWSE (NAVIGATION)
Quand le bouton BROWSE est actionné, l’écran BROWSE illustré
ci-dessous apparaît, ce qui vous permet de confirmer toutes les
informations nécessaires à la sélection des plages.
NOTE
• Les informations sur la plage, y compris les noms de fichier/
dossier, et sur l’artiste peuvent être affichées dans les langues
d’Europe occidentale, en russe, en chinois (mandarin
simplifié) et en japonais.
• Si les caractères ne sont pas affichés correctement, utilisez la
rubrique LANGUE sur l’écran UTILITY pour sélectionner la
langue de votre choix (page 61).
1 Affichage de
2 Affichage
3 Curseur de
contenu
d’information de
plage A/B
sélection
Pour afficher le contenu de la ligne
sélectionnée avec le curseur. Dans le cas
d’un dossier, le contenu de celui-ci est
affiché ; dans le cas d’un fichier, les
informations sur les plages sont
affichées.
Pour afficher le nom de titre, le nom
d’artiste et l’état de lecture pour la plage
actuellement gérée par le contrôleur.
Utilisez le sélecteur rotatif pour déplacer
ce curseur vers le haut/bas et
sélectionner les dossiers et les plages.
4 Fenêtre de
navigation
5 Nom du niveau
supérieur
6 Sélection de
source
7 Affichage de
photo de
pochette
Icones de source
Les icones suivantes sont affichées dans la section de sélection de la
source.
Pour afficher le contenu de la source
choisie. Pour afficher le contenu en ordre
alphabétique par fichiers M3U, dossiers
et plages.
Pour afficher le nom du dossier ou de la
source du prochain niveau supérieur
dans la hiérarchie relative à la rubrique
actuellement affichée sur la fenêtre
Navigation.
Utilisez le bouton de fonction pour
sélectionner la source affichée sur la
fenêtre.
Si une image JPEG est attachée à la
balise ID3 ou est présente dans le dossier,
l’image associée sera affichée dans la
section d’affichage du contenu si le
curseur de sélection est utilisé pour
choisir une plage.
Disque de musique CD (CD-DA). La
sélection de cette icone affiche le
contenu du disque.
Disque CD-ROM/DVD-ROM. La sélection
de cette icone affiche le contenu du
disque.
La sélection de cette icone affiche le
contenu du périphérique de stockage
USB.
La sélection de cette icone active le
contrôleur de logiciel DJ (page 53).
Lorsque DJS est lancé, le changement
passe à l’icone DJS.
La sélection de cette icone affiche la liste
de lecture (page 31).
25
Fr
Page 94

LANCEMENT DE LA LECTURE (Utilisation des connexions normales)
Icones de navigation
Ces icones indiquent les types de rubriques affichées sur la fenêtre
Naviguer.
Plage
Plage (avec Cue de mémoire)
Plage (actuellement en cours de lecture
sur le Contrôleur A)
Plage (actuellement en cours de lecture
sur le Contrôleur B)
Navigation de Fichier
Pour afficher la structure telle quelle des dossiers et fichiers dans
la source sélectionnée.
Plage (actuellement en cours de lecture
sur les deux contrôleurs)
Dossier
Fichier M3u ou liste de lecture
Album
Artiste
Genre
NAVIGATION DE FICHIER ET DE
BIBLIOTHÈQUE
Cet appareil peut afficher la structure telle quelle des contenus de
fichier et de dossier pour les disques et les périphériques de
stockage USB et il permet à l’utilisateur d’explorer les contenus.
Ce mode d’affichage est appelé “navigation sur fichier.”
De plus, dans le cas de périphériques de stockage USB, en
édifiant une musicothèque dans le périphérique basée sur des
balises ID3 et d’autres informations de plage, les plages peuvent
être classées par nom d’album, nom d’artiste et genre, ce qui
facilite la sélection ultérieure des plages. Ce type d’affichage est
appelé “navigation bibliothèque” Pour des instructions sur la
façon de réaliser des bibliothèques, cf. page 62 “CREATION DE
BIBLIOTHEQUES”.
Navigation Bibliothèque
Le menu d’écran est affiché comme ci-après, autorisant la
sélection des plages basée sur le genre, le nom d’artiste, le nom
d’album ou le titre.
[GENRE]
Permet la sélection de plage dans l’ordre de GenreNom
d’artiste Nom d’album Titre.
[ARTISTE]
Permet la sélection de plage dans l’ordre de Nom d’artiste Nom
d’album Titre.
[ALBUM]
Permet la sélection de plage dans l’ordre de Nom d’album Title.
[PLAGE]
Permet la sélection par le titre de la chanson.
[ RECHERCHER]
SÈlectionne les titres en recherchant les titres de plage (page 28)
[ RECHERCHER]
SÈlectionne les titres en recherchant les noms díartiste (page 28)
[TOUS]
Si plusieurs dossiers existent dans la catégorie sélectionnée de
[GENRE] ou [ARTISTE], la rubrique [TOUS] apparaîtra. En
sélectionnant [TOUS], toutes les rubriques existant sur le même
niveau hiérarchique que celui sélectionné seront affichées.
26
Fr
NOTE
• Dans le cas de la navigation de bibliothèque, même si un
périphérique a crée une bibliothèque auparavant, le réglage
UTILITY peut servir pour passer à la navigation de fichier (page
61).
•Les plages sans genre, nom d’artiste ou nom d’album seront
classées ensemble comme [Inconnu] dans les catégories
respectives.
• Dans le cas ou des numéros de plage sont écrits dans les
balises de plage, les plages d’un album seront affichée dans
l’ordre des plages. Dans le cas d’un genre, artiste et album,
l’affichage se fera dans l’ordre alphabétique.
Page 95
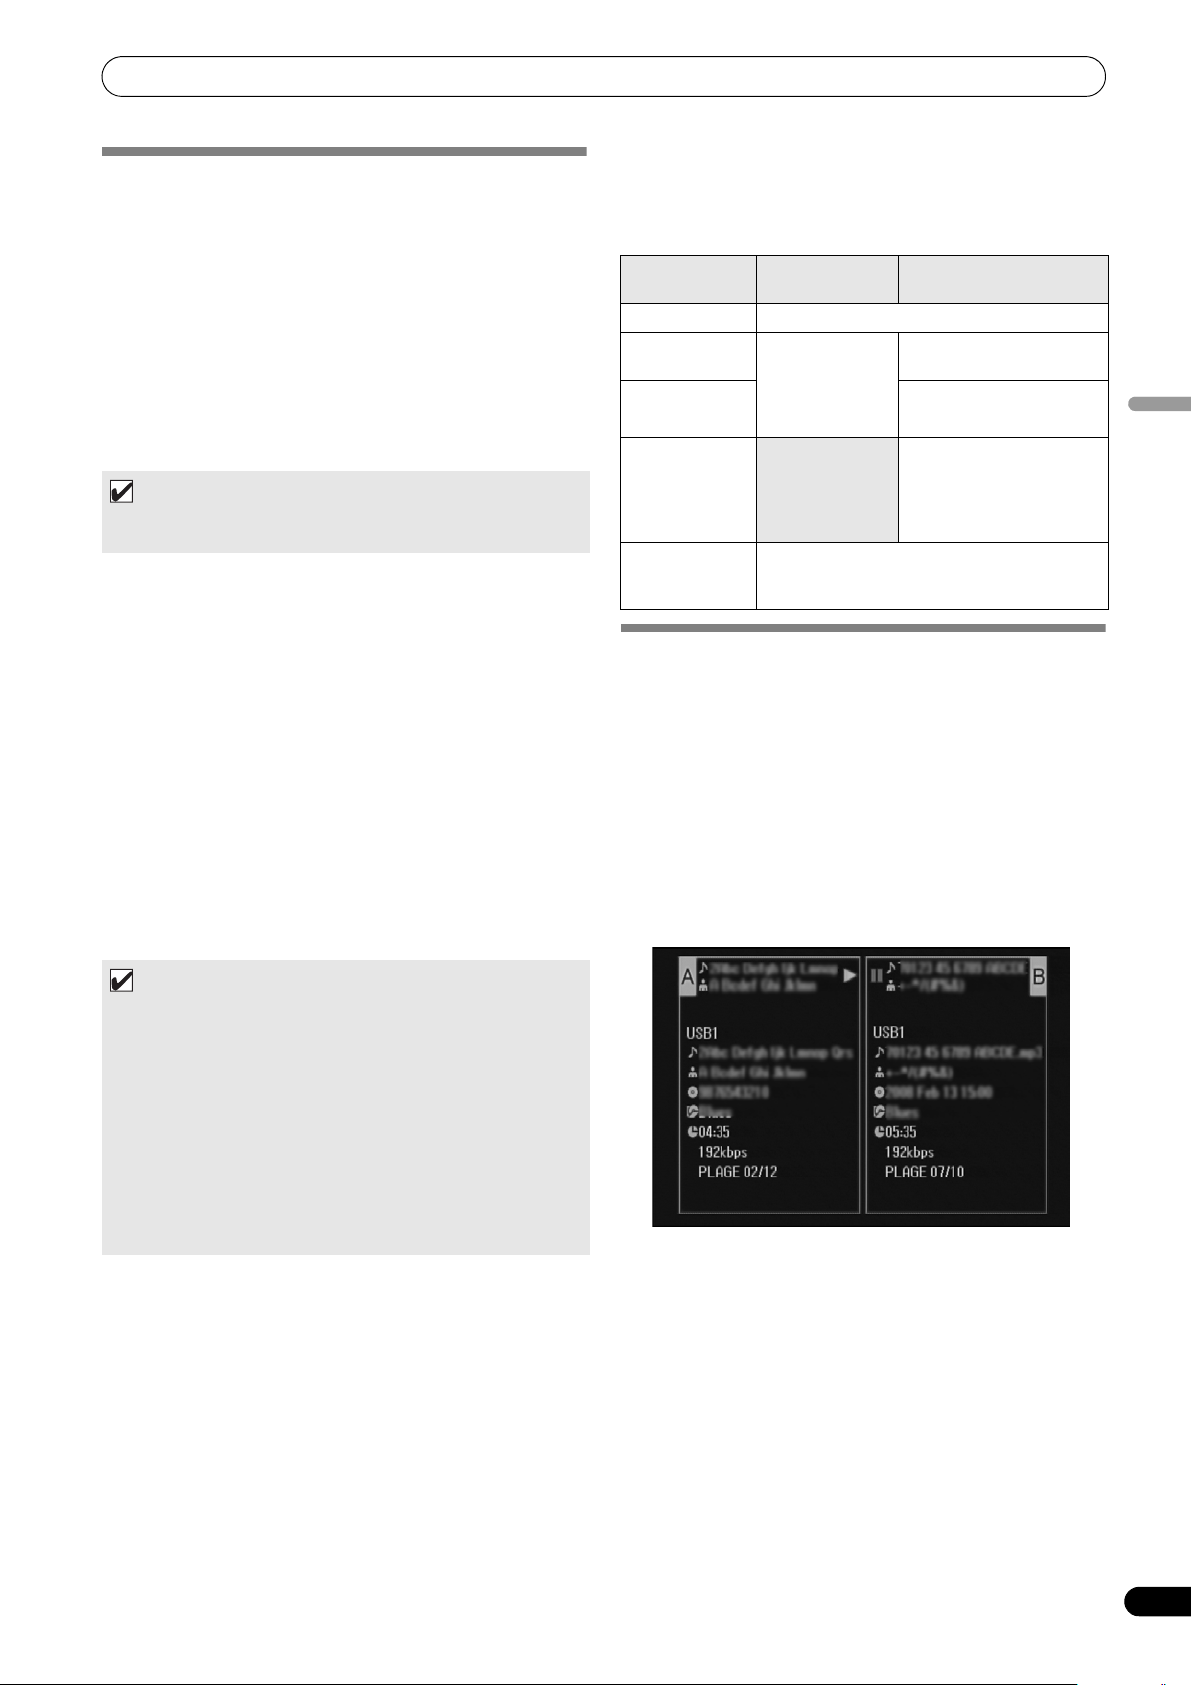
LANCEMENT DE LA LECTURE (Utilisation des connexions normales)
Menu de plage
SÉLECTION D’UNE PLAGE
1 Appuyez sur le bouton BROWSE.
L’écran BROWSE apparaît.
2 Préparez la source que vous voulez écouter.
Pour les disques
Inserez le disque dans le Lecteur 1 ou le Lecteur 2.
Pour les périphériques de stockage USB
Raccordez le périphérique USB souhaité sur le port USB1 ou
USB2.
Pour le logiciel DJS
Connectez votre ordinateur au connecteur PC du lecteur et lancez
le logiciel DJS.
NOTE
•Pour des explications sur l’utilisation du logiciel DJS, cf. la
section “UTILISATION DU LOGICIEL DJ” à la page 52.
3 Servez-vous des boutons de fonction pour sélectionner la
source que vous souhaitez utiliser.
Le contenu de la source sélectionnée apparaîtra sur la fenêtre.
Si une musicothèque est présente sur le périphérique de
stockage USB, la sélection des plages est possible par le nom
d’album ou d’artiste.
4 Tournez le sélecteur rotatif.
Le curseur de sélection peut être déplacer vers le haut/bas sur
la fenêtre de navigation. L’affichage indique le contenu des
dossiers sélectionnés et les informations sur les plages.
5 Servez-vous des boutons de sélection Haut ()/Bas () pour
parcourir la hiérarchie des dossiers vers le haut/bas.
Quand un dossier est sélectionné, appuyez sur le bouton (ou
appuyez sur le sélecteur rotatif) pour accéder à ce dossier.
Appuyez sur
d’un niveau dans la hiérarchie des dossiers.
6 Appuyez sur le bouton LOAD A ou sur le bouton LOAD B.
Une plage sera chargée sur le Contrôleur A ou B et la lecture
de la plage chargée commencera.
le bouto
n de sélection Haut () pour remonter
Si le sélecteur rotatif est actionné alors qu’une plage est
sélectionnée, l’affichage du contenu indique le menu des plages
et le sélecteur rotatif peut alors servir à exécuter les options du
menu :
CD de musique Supports autres que CD de
[ANNULER] Quitter le menu des plages.
[CHARGEMENT
sur A]
[CHARGEMENT
sur B]
[AJOUT À
PLAYLIST]
[EFFACER
REPÈRE
MÉMORISÉ]
Définit le Lecteur
1 dans le
Contrôleur A, et
le Lecteur 2 dans
le Contrôleur B.
Efface les données du point Cue/Loop. Cf.
“POSE DES POINTS DE REPÈRE (CUE
POINTS)” (page 36).
musique
Définit la plage dans le
Contrôleur A.
Définit la plage dans le
Contrôleur B.
Enregistre la plage dans la
liste de lecture. Cf.
“UTILISATION D’UNE
LISTE DE LECTURE” (page
31).
APERÇU DES PROPRIÉTÉS DE LA PLAGE
EN COURS DE LECTURE
1 Parmi les 4 boutons (BROWSE, MIX, EFFECT, UTILITY),
appuyez à nouveau sur celui qui est actuellement
sélectionné pour le désactiver (OFF).
L’écran indique les informations des plages, notamment les
noms de source, de titre, d’artiste, d’album, ainsi que la durée
totale de lecture, le débit binaire et le BPM.
Appuyez sur
menu au dossier ayant la plage en cours de lecture sur le
Contrôleur A; appuyez sur le bouton de sélection Bas () pour
amener le menu au dossier ayant la plage en cours de lecture
sur le Contrôleur B. (SAUT D’INFORMATION).
le bouto
n de sélection Haut () pour amener le
Français
NOTE
• Dans le cas de CD de musique (CD-DA), le disque dans le
Lecteur 1 est placé dans le Contrôleur A et le disque dans
le Lecteur 2 l’est dans le Contrôleur B. Le contrôleur ne peut
pas être désigné de façon optionnelle.
• Si le verrouillage LOAD LOCK est activé, le chargement ne
sera pas possible dans le contrôleur en cours de lecture.
Dans ce cas, appuyez sur le bouton Lecture/Pause ()
pour passer en mode Pause, ou appuyez sur le bouton CUE
pour effectuer un retour au point de repère (back cue) et
appuyez alors sur le bouton LOAD.
•L’option de verrouillage LOAD LOCK peut être activé ou
désactivé sur l’écran UTILITY (page 61).
-
27
Fr
Page 96

LANCEMENT DE LA LECTURE (Utilisation des connexions normales)
FICHIERS M3U
Le MEP-7000 prend en compte les fichiers en format m3u.
Les fichiers portant l’extension m3u sont traités comme des
dossiers ; lorsqu’il sont sélectionnés par le curseur, les plages
enregistrées apparaissent sur l’affichage de contenu sous forme
d’une liste de lecture.
NOTE
• Un maximum de 100 fichiers m3u peuvent être affichés par
périphérique.
• Un maximum de 300 plages peuvent être affichées pour
chaque fichier m3u. Cependant, si un fichier dépasse 308 000
octets, les plages au-delà de cette taille ne pourront pas être
affichées.
• Les fichjier M3U ne sont pas pris en compte avec les systèmes
HFS+ sur des périphériques de stockage USB.
• Dans le cas de disques, la notation par nom de fichier court
n’est pas acceptée.
REMARQUE
• Si la fonction Bibliothèque (page 62) de cet appareil est utilisée
pour la navigation, les fichier m3u ne seront pas affichés.
• Comme toute une gamme de formats peut coexister sur une
liste de lecture m3u, il se peut qu’elle ne fonctionne pas
correctement dans tous les cas.
Sélectionnez le type de caractères dans l’o
Chiffres Symboles.
Appuyez
4 Après avoir terminé la saisie de la chaîne de caractères à
rechercher, appuyez sur le sélecteur rotatif.
• Le nombre d’occurences de recherche clignote et la
• A la fin de la recherche, le plage recher
• Le nombre d’occurences de recherche change à l’état
5 Chargez les plages recherchées :
• Utilisez le sélecteur rotatif pour sélectionner les plages
NOTE
• Un maximum de 3 000 plages peuvent être recherchées.
•Pour interrompre le processus de recherche en cours, appuyez
sur le bouton de fonction USB. Les résultats de la recherche
jusqu’à ce point seront affichés.
•Le processus de recherche sera interrompu si vous revenez à
un niveau au-dessus de celui actuellement en cours de
recherche, ou si vous changez le dispositif sélectionné.
• Une fois qu’une recherche est terminée, ses résultats seront
préservés jusqu’à ce qu’une recherche ultérieure soit
effectuée, même si vous revenez à un niveau au-dessus de
celui actuellement en cours, ou si vous changez le dispositif
sélectionné.
• Pour effectuer une nouvelle recherche, appuyez sur le bouton
de sélection Bas () ou le sélecteur rotatif et choisissez
[NOUVELLE RECHERCHER] sur le menu.
•Vous pouvez également utiliser un clavier pour les recherches.
Pour des informations à ce sujet, reportez-vous à “Tableau de
référence pour saisie par clavier” (page 29)
• Si un clavier est connecté en mode de saisie de caractères, les
opérations utilisant le bouton de sélection Bas () et le
sélecteur rotatif seront désactivées.
sur le sélecteur rotatif :
Pour conf
le mode de saisie et lancez la recherche.
recherche commence.
allumé en co
apparaît; les plages recherchées sont affichées sur une
liste.
souhaitées, puis appuyez sur le bouton LOAD A ou le
bouton LOAD B.
irmer la chaîne de caractères à rechercher, quittez
ntinu et le nombre de plages recherchées
rdre : Majuscules
chée est affich
ée.
UTILISATION D’UN MOT-CLÉ POUR
RECHERCHER LES PLAGES
Vous pouvez effectuer la recherche de plages par saisie du titre ou
du nom de l’artiste. Utilisez le sélecteur rotatif ou le clavier USB
pour saisir les caractères. Si vous utilisez le clavier USB pour
effectuer les recherches, reportez-vous au paragraphe
“SÉLECTION DES PLAGES PAR CLAVIER USB”. (page 29)
1 Tournez le sélecteur rotatif.
• Sélectionnez la catégorie de recherche,
[ RECHERCHER] ou [ RECHERCHER].
2 Appuyez sur le bouton de sélection Bas () ou sur le
sélecteur rotatif.
• Le mode de saisie des caractères sera initié.
3 Actionnez la sélecteur rotatif pour saisir les caractères.
• Un maximum de 25 caractères peuvent être saisis.
Bouton de sélection Haut () :
effacer le caractère immédiatement avant.
pour
28
Fr
Bouton de sélect
le même caractère que le dernier entré sera saisi et le
rseu
r se déplacera à l’espace suivant.
cu
Tournez le sélecteur rotatif :
ion Bas ():
• Si le curseur est sur les rubriques [ RECHERCHER] ou
[ RECHERCHER], des plages ne peuvent pas être
enregistrées sous [
•Quand [ RECHERCHER] ou [ RECHERCHER] est
sélectionné, la fonction Saut n’est pas utilisable pour passer
aux caractères initiaux d’une chaîne de recherche. (page 29)
• Quand le Chargement est effectué à partir des résultats de la
recherche, les résultats sont traités comme une seule plage.
Quand la plage chargée s’achève, “END” est affiché et la
lecture ne passe pas à la plage suivante.
• Quand le Chargement est effectué à partir des résultats de la
recherche, la fonction SAUT D’INFORMATION (page 27) est
désativée.
REMARQUE
• La recherche par mot-clé est impossible si aucune
bibliothèque n’a été créée.
• Même si une bibliothèque existe, la recherche par mot-clé
n’est pas possible, sauf en mode Navigation de bibliothèque.
CHARGEMENT
] ou [PLAYLIST].
Page 97

LANCEMENT DE LA LECTURE (Utilisation des connexions normales)
Recherche par clavier pour nom de titre et d’artiste
SÉLECTION DES PLAGES PAR CLAVIER
USB
En raccordant un clavier, la sélection des plages peut s’accomplir
en saisissant les caractères initiaux du nom de plage ou de dossier
(saut de plage/dossier); il est également possible d’effectuer la
recherche par mot-clé parmi les noms de titre et d’artiste, et les
noms des listes de lecture peuvent être édités. Branchez un clavier
sur le port USB1 ou USB2.
Saut de plage/dossier
1 Utilisez la touche TAB pour sélectionner l’écran BROWSE.
2 Servez-vous d’une des touches F1 à F4 ou F6 pour
sélectionner la source.
Le logiciel DJS fourni en accessoire ou un auter logiciel DJ est
utilisable pour la sélection.
Un saut est possible si la
hiérarchique (nom de liste de lecture) ou plus dans l’arbre des
dossiers.
3 Saisissez dans l’ordre les lettres du nom de plage que vous
voulez sélectionner.
Le curseur se déplace à la première plage, ayant la chaîne de
lettres correspondante. Si des dossiers existent à ce niveau, le
curseur peut aussi sauter à des noms de dossiers
correspondants.
4 Quand le curseur arrive au nom de plage souhaité, appuyez
sur ENTRÉE pour valider la sélection.
Le menu de plage apparaît.
5 Appuyez sur la touche pour sélectionner soit
[CHARGEMENT sur A] soit [CHARGEMENT sur B] et appuyez
sur la touche ENTRÉE.
La lecture de la plage commence.
Tableau de référence pour saisie par clavier
Liste de lecture est au premier niveau
1 Utilisez la touche TAB pour sélectionner l’écran BROWSE.
2 Utilisez la touche F11 ou F12 pour sélectionner soit
[ RECHERCHER]
3 Saisissez les caractères pour le nom du titre ou de l’artiste et
appuyez sur la touche ENTRÉE pour valider.
Les noms de titre et d’artiste comportant la chaîne de
caractères saisie seront affichés.
4 Amenez le curseur à la plage souhaitée et appuyez sur la
touche ENTRÉE.
Le menu de la plage sera affiché.
5 Utilisez la touche pour sélectionner soit [CHARGEMENT sur
A] , soit [CHARGEMENT sur B] et appuyez sur la touche
ENTRÉE.
La lecture de la plage commencera.
Edition du nom des listes de lecture
1 Utilisez la touche TAB pour sélectionner l’écran BROWSE.
2 Utilisez la touche F6 pour sélectionner l’écran de liste de
lecture.
3 Utilisez la touche
éditer.
4 Appuyez sur la touche Maj. + ENTRÉE pour valider votre
sélection.
Le menu de la liste de lecture sera affiché.
5 Servez-vous de la touche pour sélectionner [RENOMMER],
puis appuyez sur ENTRÉE.
Le mode Edition est validé, ce qui vous permet d’éditer le nom
d’une liste de lecture.
6 Editez le nom de la liste de lecture voulue.
Un nom de liste de lecture peut comporter 32 caractères au
maximum.
7 Quand l’édition est terminée, appuyez sur la touche ENTRÉE.
La liste de lecture clignote, signalant que l’édition est
terminée. Pour d’autres utilisations du clavier, consultez le
“Tableau de référence pour saisie par clavier” (pa
, soit
[ RECHERCHER]
pour sélectionner la liste de lecture à
.
ge 29).
Français
Saisie Saut au nom de plage ou nom de dossier;
recherche par mot-clé
Lettres de l’alphabet [Mode saisie caractères] Saisie caractères [Mode saisie caractères] Saisie caractères
Chiffres [Mode saisie caractères] Saisie caractères [Mode saisie caractères] Saisie caractères
Symboles [Mode saisie caractères] Saisie caractères [Mode saisie caractères] Saisie caractères
ESPACEMENT Saisie espace vierge Saisie espace vierge
ENTRÉE Saisir un niveau inférieur à celui de la sélection de
curseur actuelle.
Si le curseur est sur le nom de plage, l’écran de menu
s’ouvre.
En mode de recherche par mot-clé, ceci lance la
recherche.
Maj.+ENTRÉE Si le curseur est sur le nom de plage, placement de la
plage sur la Liste de lecture.
En mode de recherche par mot-clé, ceci lance la
recherche.
Si le curseur est sur un dossier, placement du contenu
du dossier dans la Liste de lecture.
Début Saut du curseur au niveau supérieur de la liste. —
End Saut du curseur au bas de la liste. —
Page précédente Pour tourner une page de liste (7 rubriques vers le
haut).
Page suivante Pour tourner une page de liste (7 rubriques vers le
bas).
Edition de liste de lecture
Validation d’édition
Si le curseur est sur la Liste de lecture (premier niveau),
ouverture de l’écran de menu.
—
—
29
Fr
Page 98
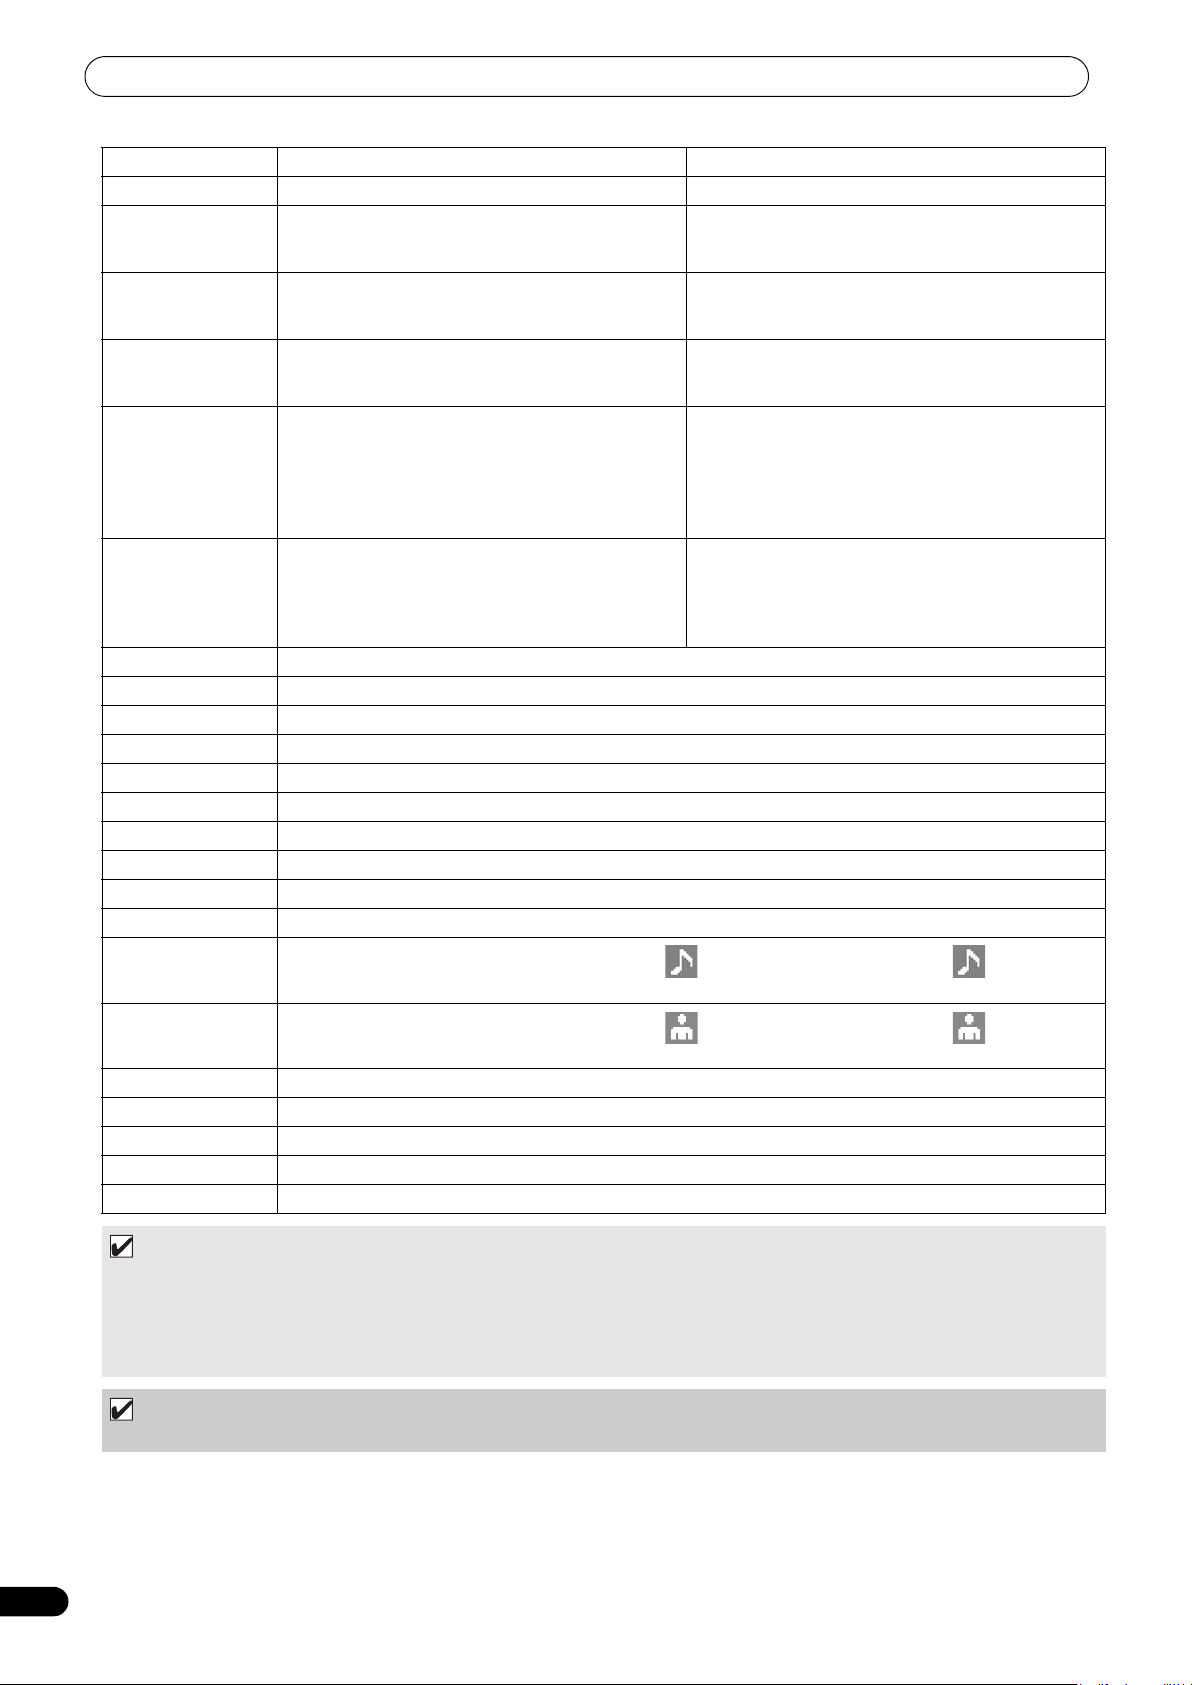
LANCEMENT DE LA LECTURE (Utilisation des connexions normales)
Déplacement du curseur vers le haut. Déplacement du curseur vers le haut.
Déplacement du curseur vers le bas. Déplacement du curseur vers le bas.
Déplacement du curseur vers un niveau inférieur. [Mode saisie caractères] Saisit le même caractère que
Déplacement du curseur vers un niveau supérieur. [Mode saisie caractères] Efface le dernier caractère (si
Espace arrière [Mode saisie caractères] Efface le dernier caractère
Maj.+Espace arrière [Mode saisie caractères]
Effacement [Mode saisie caractères] Efface le dernier caractère
F1 Sélectionne l’icone [DISC 1].
F2 Sélectionne l’icone [DISC 2].
F3 Sélectionne l’icone [USB 1].
F4 Sélectionne l’icone [USB 2].
F5 Sélectionne l’icone [PC].
F6 Sélectionne l’icone [PLAYLIST].
F7 Pendant la navigation de bibliothèque, commute à [GENRE] (cf. NOTE page. 30).
F8 Pendant la navigation de bibliothèque, commute à [ARTISTE] (cf. NOTE page. 30).
F9 Pendant la navigation de bibliothèque, commute à [ALBUM] (cf. NOTE page. 30).
F10 Pendant la navigation de bibliothèque, commute à [PLAGE] (cf. NOTE page. 30).
F11
F12
Échappement [Mode saisie caractères] Fait revenir au mode normal.
TAB Sélecteur BROWSE/MIX/EFFECT/UTILITY (bascule vers la droite)
Maj.+TAB Sélecteur BROWSE/MIX/EFFECT/UTILITY (bascule vers la gauche)
Ctrl –
Alt –
(pendant le saut au nom de plage/dossier, quitte le
mode si le caractère initial est effacé).
• Pendant le saut au nom de plage/dossier, efface le
dernier caractère (De plus, quitte le mode si le
caractère initial est effacé).
• Pendant la recherche par mot-clé, efface tous les
caractères.
(pendant le saut au nom de plage/dossier, quitte le
mode si le caractère initial est effacé).
Pendant la navigation de bibliothèque, commute à [ RECHERCHER]. De plus, pendant [ RECHERCHER]
exécute l’effacement de tous les caractères (cf. NOTE page. 30).
Pendant la navigation de bibliothèque, commute à [ RECHERCHER]. De plus, pendant [ RECHERCHER]
exécute l’effacement de tous les caractères (cf. NOTE page. 30).
la dernière entrée et passe à la position de saisie
suivante.
seulement un caractère est présent, il est effacé, mais
le mode ne change pas).
[Mode saisie caractères] Efface le dernier caractère (si
seulement un caractère est présent, il est effacé, mais
le mode ne change pas).
[Mode saisie caractères] Efface tous les caractères (ne
quitte pas le mode actuel, même si tous les caractères
sont effacés).
• [Mode saisie caractères] Efface le dernier caractère
(si seulement un caractère est présent, il est effacé,
mais le mode ne change pas).
• Normalement, effacement de rubrique (plages en
Liste de lecture).
30
Fr
NOTE
• Les caractères à 2 octets ne sont pas acceptés. De plus, la recherche de caractères est invalidée en mode Edition.
• Si la saisie des caractères semble erronée, passez à l’écran UTILITY pour ajuster la LANGUE CLAVIER correctement (cf. page 61).
• Le voyant USB STOP ne s’allume pas, même si un clavier USB est raccordé.
• Les touches de fonction F7 – F12 n’agissent pas si aucune bibliothèque n’a été créée. Pour des instructions sur la façon d’effectuer
une bibliothèque, reportez-vous à “CREATION DE BIBLIOTHEQUES” (page 62).
REMARQUE
• Selon le clavier USB ou le hub USB utilisé, il se peut qu’un fonctionnement adéquat ne soit pas possible.
Page 99

LANCEMENT DE LA LECTURE (Utilisation des connexions normales)
Si le périphérique de stockage original (mémoire USB, CD-ROM/
UTILISATION D’UNE LISTE DE LECTURE
Cet appareil vous permet de pré-enregistrer une série de plage
dans une liste de lecture, ce qui autorise une sélection rapide des
plages même à l’emploi de disques à grande capacité et de
périphériques de stockage USB.
Vous pouvez construire un maximum de 20 listes de lecture et
chacune d’elles peut comprendre jusqu’à 150 plages, provenant
de plusieurs périphériques de stockage USB et de disques CDROM/DVD-ROM.
NOTE
•Des plages de CD de musique (CD-DA) et de logiciels DJ (y
compris le DJS) ne peuvent pas être enregistrées sur une liste
de lecture.
• Une fois qu’elle est enregistrée, une liste de lecture subsiste en
mémoire, même si l’alimentation est coupée et elle peut donc
être réutilisée plus tard.
• Quand une plage, provenant d’un périphérique de stockage
USB, est enregistrée sur une liste de lecture, l’information de
la liste est écrite sur le périphérique lui-même.
Composition de l’affichage de liste de lecture
Tableau des listes de lecture
Quand le bouton de fonction [PLAYLIST] est actionné, un tableau
des listes de lecture apparaît. Au moyen du sélecteur rotatif, vous
pouvez sélectionner la liste de lecture souhaitée. La liste de lecture
indiquée par une icone orange a été sélectionnée en vue d’un
mixage (page 42).
DVD-ROM, etc.) de la plage n’est pas actuellement raccordé, le
nom de la plage apparaît en gris sur l’affichage.
1 3 4
2
1 Nom de Liste de lecture
2 Numéro successif
3 Titre
4 Nom d’artiste
Si une plage est sélectionnée et que le sélecteur rotatif est
actionné, le menu de plage apparaît sur la fenêtre de droite.
Français
Si une liste de lecture est sélectionnée et que vous maintenez le
sélecteur rotatif enfoncé pendant 1 seconde ou plus, le menu de
liste de lectuer apparaîtra sur la fenêtre de droite.
Quand une Liste de lecture est ouverte
Les plages enregistrées sur la liste de lecture reçoivent des
numéros successifs et elles sont affichées avec les noms du titre
et de l’artiste. Si aucun titre n’est présent, c’est le nom du fichier
qui est affiché.
Inscription de plages sur une Liste de lecture
1 Servez-vous du curseur pour sélectionner les plags ou les
dossiers sur un périphérique de stockage USB ou un disque
CD-ROM/DVD-ROM.
2 Maintenez le sélecteur rotatif enfoncé pendant 1 seconde ou
plus.
• Le curseur clignote et la plage sera inscrite dans la Liste de
lecture actuellement ouverte.
• Un maximum de 150 plag
une même Liste de lecture.
• Si des dossiers entiers sont inscrits, une durée
supplémentaire sera nécessai
• L
’icone [PL
plages sur la Liste de lecture. Une Liste de lecture ne peut
pas être ouverte quand l’onglet clignote.
REMARQUE
AYLIST] clignot
es peuven
era pendant l’inscription des
t être enregistrées sur
re.
• Si le périphérique de stockage USB raccordé n’a plus
d’espace libre suffisant, il peut être impossible d’inscrire le
contenu des plages sur le périphérique.
31
Fr
Page 100

LANCEMENT DE LA LECTURE (Utilisation des connexions normales)
Lecture d’une plage de la Liste de lecture
1 Ouvrez une Liste de lecture.
2 Servez-vous du sélecteur rotatif pour sélectionner une plage,
puis appuyez sur le bouton LOAD A ou LOAD B.
•Les plages seront reproduites dans l’ordre numérique
successif.
• De nouvelles pla
Liste de lecture même pendant la lecture d’une plage de la
liste en question.
Changement de l’ordre des plages d’une Liste de
ges peuvent être inscrites e
t éditées sur la
lecture
1 Sélectionnez la plage que vous souhaitez déplacer sur la
Liste de lecture.
2 Appuyez sur le sélecteur rotatif.
• Un menu apparaîtra sur le fenêtre de droite.
3 Tournez le sélecteur rotatif pour sélectionnez [DÉPLACER
CHANSON], puis appuyez sur le sélecteur rotatif.
• Une ligne jaune est affichée.
4 Tournez le sélecteur rotatif jusqu’à l’endroit ou vous
souhaitez déplacer la plage.
5 Appuyez sur le sélecteur rotatif.
•La plage sélectionnée à l’étape 1 sera déplacée à la ligne
avant la plage sélectionnée à l’étape 4 et l’affichage
repassera à la Liste de lecture.
Pour effacer des plages d’une Liste de lecture
1 Sélectionnez la plage que vous souhaitez effacer de la Liste
de lecture.
2 Appuyez sur le sélecteur rotatif.
• Un menu apparaîtra sur le fenêtre de droite.
3 Tournez le sélecteur rotatif pour sélectionnez [EFFACER
CHANSON], puis appuyez sur le sélecteur rotatif.
•La plage sera supprimée de la Liste de lecture.
•Une plage ne peut pas être effacée quan
dans le contrôleur.
Pour choisir une Liste de lecture
1 Quand une Liste de lecture est ouverte, appuyez sur le
bouton de sélection Haut (
).
d elle est définie
Edition du nom d’une Liste de lecture
1 Sélectionnez la Liste de lecture souhaitée.
2 Maintenez le sélecteur rotatif enfoncé pendant 1 seconde ou
plus.
• Un menu apparaît sur le côté droit de l’écran central.
3 Tournez le sélecteur rotatif pour sélectionnez [RENOMMER],
puis appuyez sur le sélecteur rotatif.
4 Passez en mode Edition. Servez-vous du sélecteur rotataif
pour éditer le nom de la Liste de lecture.
• Un maximum de 32 caractères peuvent être saisis.
Bouton de sélection Haut ()
Pour effacer le caractère avant le curseur.
Bouton de sélection Bas ()
Saisit le même caractère que la dernière entrée et passe à la
de saisie suivante.
sition
po
Appuyez sur
Pour sau
Tournez le sélecteur rotatif.
Sélection du type de caractère : M
Chiffres Symboles
5 Quand l’édition du nom est achevée, appuyez sur le
sélecteur rotatif.
• La Liste de lecture clignotera, signalant que l’édition est
terminée.
NOTE
• Les caractères à 2 octets ne sont pas acceptés.
•Pour plus d’informations sur l’emploi d’un clavier pour
l’édition, cf. la section “SÉLECTION DES PLAGES PAR
CLAVIER USB” (page 29).
le sélecteur rotatif.
vegarder le contenu et quitter l
ajuscul
e mode d’édition.
es Minuscules
Pour effacer une Liste de lecture
Toutes les plages inscrites sur la Liste de lecture en seront
effacées.
1 Sélectionnez le nom de la Liste de lecture voulue.
2 Maintenez le sélecteur rotatif enfoncé pendant 1 seconde ou
plus.
Le menu [ANNULER], [RENOMMER], [SUPPRIMER TOUTES
CHANSONS] apparaîtra.
3 Tournez le sélecteur rotatif et sélectionnez [SUPPRIMER
TOUTES CHANSONS].
4 Appuyez sur le sélecteur rotatif.
Toutes les plages inscrites sur la Liste de lecture en seront
effacées (la Liste sera vide).
•Une pl
Sauvegarde d’une Liste de lecture
Chaque fois que des plages sont inscrites, effacées ou éditées sur
une Liste de lecture, la nouvelle Liste est automatiquement
sauvegardée (la sauvegarde s’accomplit environ 5 secondes après
une édition sur la Liste, pourvu qu’aucune autre action ne soit
effectuée).
age définie dans le contrôleur ne peut pas être
effacée de la Liste de lecture.
REMARQUE
•Si vous coupez l’alimentation électrique immédiatement
(moins de 5 secondes) après une édition effectuée sur une
Liste de lecture, il se peut que les résultats de l’édition
soient ignorés.
32
Fr
 Loading...