

Page 1

Operation Manual
Manual de instruções
Multi-CD control DSP High power MD player with FM/
AM tuner
MD player de alta potência com sintonizador de FM/
AM, DSP e controle de Multi-CD
MEH-P6550
English
Português (B)
Page 2
Contents
Thank you for buying this Pioneer product.
Please read through these operating instructions so you will know how to operate
your model properly. After you have finished reading the instructions, put them away
in a safe place for future reference.
Before You Start
About this manual 4
Precautions 4
Playback of MDs featuring long
recordings 4
Use and care of the remote control 4
Installing the batteries 4
Using the remote control 5
Protecting your unit from theft 5
Removing the front panel 5
Attaching the front panel 6
Whats What
Head unit 7
Remote control 7
Power ON/OFF
Turning the unit on 9
Selecting a source 9
Turning the unit off 9
Tuner
Listening to the radio 10
Introduction of advanced tuner
operation 11
Storing and recalling broadcast
frequencies 11
Tuning in strong signals 11
Storing the strongest broadcast
frequencies 12
Built-in MD Player
Playing a MD 13
Introduction of advanced built-in MD player
operation 14
Repeating play 14
Playing tracks in a random order 14
Scanning tracks of a MD 14
Pausing MD playback 15
Displaying disc titles 15
Scrolling titles in the display 15
Multi-CD Player
Playing a CD 16
50-disc multi-CD player 16
Introduction of advanced multi-CD player
operation 17
Repeating play 17
Playing tracks in a random order 17
Scanning CDs and tracks 18
Pausing CD playback 18
Using ITS playlists 18
Creating a playlist with ITS
programming 18
Playback from your ITS playlist 19
Erasing a track from your ITS
playlist 19
Erasing a CD from your ITS
playlist 19
Using disc title functions 20
Entering disc titles 20
Displaying disc titles 21
Selecting discs from the disc title
list 21
Using CD TEXT functions 21
Displaying titles on CD TEXT
discs 21
Scrolling titles in the display 21
Using compression and bass emphasis 21
Audio Adjustments
Introduction of audio adjustments 23
Using balance adjustment 23
Adjusting loudness 23
Using subwoofer output 24
Adjusting subwoofer (low pass filter)
settings 24
2
En
Page 3

Contents
English
Adjusting low pass filter attenuation
slope 24
Using the high pass filter 24
Adjusting high pass filter attenuation
slope 25
Using non fading output 25
Adjusting non fading output level 25
Adjusting source levels 26
Digital Signal Processor
Using the digital signal processor 27
Using sound field control and BBE
sound 27
Recalling sound field programs 27
Adjusting BBE sound level 28
Using the graphic equalizer 28
Recalling equalizer curves 28
Adjusting equalizer curves 29
Adjusting 9-band graphic
equalizer 29
Using the position selector 29
Using automatic sound levelizer 30
Initial Settings
Adjusting initial settings 31
Setting the clock 31
Setting the FM tuning step 31
Setting the AM tuning step 32
Switching the warning tone 32
Switching the auxiliary setting 32
Switching the dimmer setting 32
Switching the RCA output setting 32
Selecting the digital attenuator 33
Switching the telephone muting/
attenuation 33
Selecting AUX as the source 34
Setting the AUX title 34
Setting the level indicator 34
Additional Information
Understanding built-in MD player error
messages 35
MD player and care 35
Specifications 37
Other Functions
Turning the clock display on or off 34
Using the AUX source 34
En
3
Page 4
Section
01
HHHHHHHHHHHHHH
Before You Start
About this manual
This unit features a number of sophisticated
functions ensuring superior reception and operation. All the functions have been designed
for the easiest possible use, but many are not
self-explanatory. This operation manual will
help you benefit fully from this productspotential and to maximize your listening enjoyment.
We recommend that you familiarize yourself
with the functions and their operation by reading through the manual before you begin
using this unit. It is especially important that
you read and observe precautions on this
page and in other sections.
Precautions
CAUTION:
USE OF CONTROL OR ADJUSTMENT OR
PERFORMANCE OF PROCEDURES
OTHER THAN THOSE SPECIFIED HEREIN
MAY RESULT IN HAZARDOUS RADIATION
EXPOSURE.
CAUTION:
THE USE OF OPTICAL INSTRUMENTS
WITH THIS PRODUCT WILL INCREASE
EYE HAZARD.
Playback of MDs featuring
long recordings
This unit is MDLP compatible, so you can playback MDs featuring long recordings.
! MDLP is a data compression system that
lets you record on regular MDs for 2 or 4
times the length of time previously possible.
Use and care of the remote
control
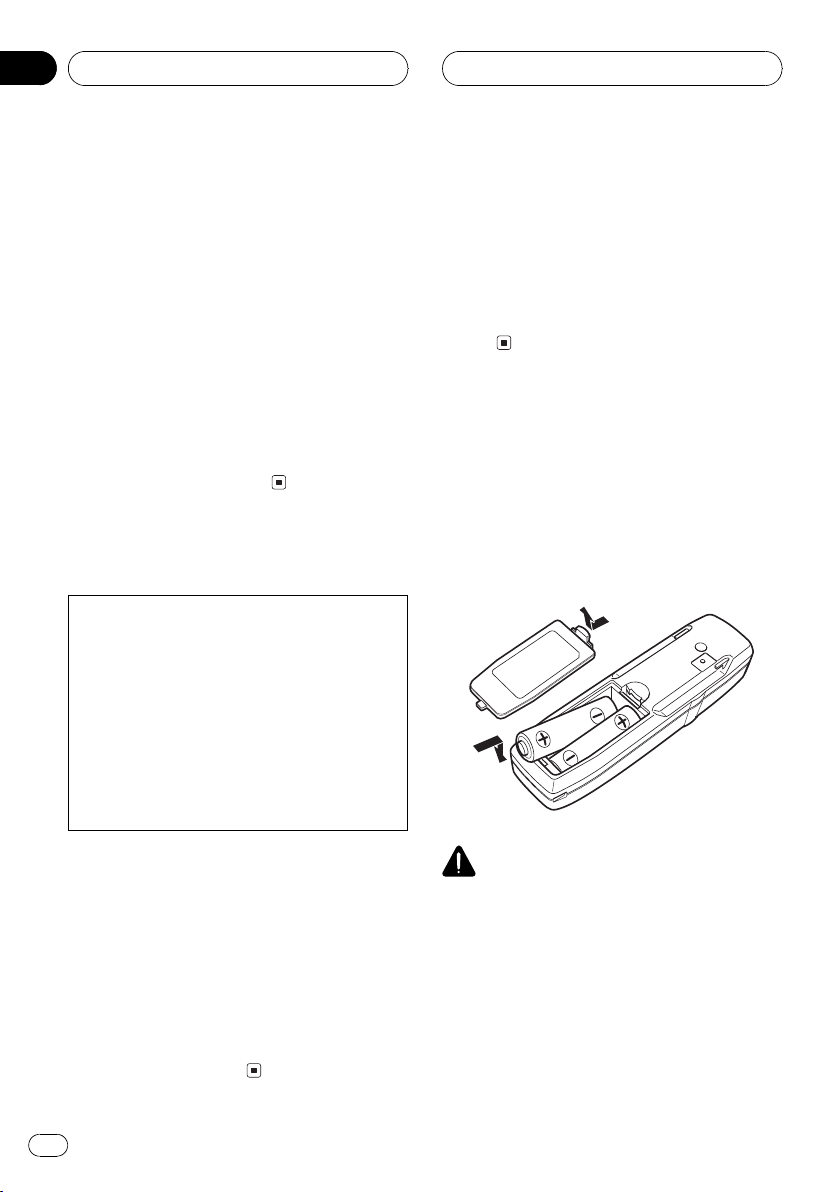
Installing the batteries
Remove the cover on the back of the remote
control and insert the batteries with the plus
(+) and minus () poles pointing in the proper
direction.
! Keep this manual handy as a reference for
operating procedures and precautions.
! Always keep the volume low enough so you
can hear sounds outside of the car.
! Protect this product from moisture.
! If the battery is disconnected or dis-
charged, the preset memory will be erased
and must be reprogrammed.
! If this unit does not operate properly, con-
tact your dealer or nearest authorized Pioneer Service Station.
4
En
CAUTION
! Use only AAA or IEC R03 1.5 V batteries.
! Remove the batteries if the remote control is
not used for a month or longer.
! Do not attempt to recharge the supplied bat-
teries.
! Do not mix new and used batteries.
! If the event of battery leakage, wipe the remote
control completely clean and install new batteries.
Page 5
Before You Start
HHHHHHHHHHHHHH
Section
01
! When disposing of used batteries, please
comply with governmental regulations or environmental public institutions rules that
apply in your country/area.
Using the remote control
Point the remote control in the direction of the
front panel to operate.
Important
! Do not store the remote control in high tem-
peratures or direct sunlight.
! The remote control may not function properly
in direct sunlight.
! Do not let the remote control fall onto the
floor, where it may become jammed under the
brake or accelerator pedal.
! When the remote control is not in use, attach
it firmly to the provided mounting base.
! If you press FUNCTION on the remote control
while pressing BAND at the same time, the remote control will not function properly. To cancel this setting, press AUDIO on the remote
control while pressing BAND at the same
time to return to the previous setting.
Protecting your unit from
theft
The front panel can be detached from the
head unit and stored in the protective case
provided to discourage theft.
! If the front panel is not detached from the
head unit within five seconds of turning off
the ignition, a warning tone will sound.
! You can turn off the warning tone. See
Switching the warning tone on page 32.
Important
! Never use force or grip the display and the
buttons tightly when removing or attaching.
! Avoid subjecting the front panel to excessive
shocks.
! Keep the front panel out of direct sunlight and
high temperatures.
Removing the front panel
1 Press OPEN to open the front panel.
2 Grip the left side of the front panel and
pull it gently outward.
Take care not to grip it tightly or drop it.
English
3 Put the front panel into the protective
case provided for safe keeping.
En
5
Page 6

Section
01
Before You Start
Attaching the front panel
% Replace the front panel by holding it
upright to this unit and clipping it securely
into the mounting hooks.
HHHHHHHHHHHHHH
6
En
Page 7
78
a
Whats What
HHHHHHHHHHHHHH
Section
02
1
c
b
9
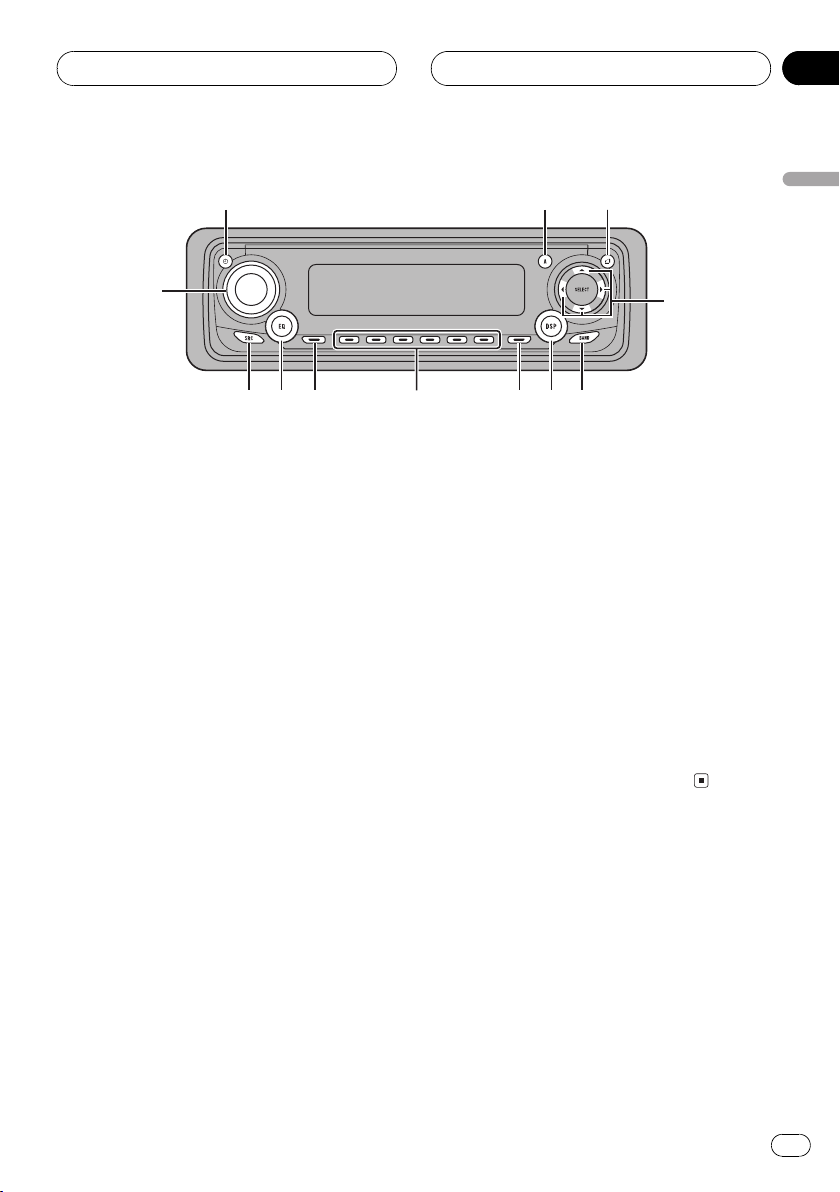
Head unit
1 CLOCK button
Press to change to the clock display.
2 AUDIO button
Press to select various sound quality controls.
3 OPEN button
Press to open the front panel.
4 a/b/c/d buttons
Press to do manual seek tuning, fast forward, reverse and track search controls.
Also used for controlling functions.
2
3
4
5
6
9 DISPLAY button
Press to select different displays.
a EQ button
Press to select various equalizer curves.
b SOURCE button
This unit is turned on by selecting a source.
Press to cycle through all of the available
sources.
c VOLUME
When you press VOLUME, it extends outward so that it becomes easier to turn. To retract VOLUME, press it again. Rotate to
increase or decrease the volume.
English
5 BAND button
Press to select among three FM and one
AM bands and cancel the control mode of
functions.
6 DSP button
Press to select sound field functions.
7 FUNCTION button
Press to select functions.
8 16 buttons
Press for preset tuning and disc number
search when using a multi-CD player.
Remote control
Operation is the same as when using the button on the head unit.
d ATT button
Press to quickly lower the volume level, by
about 90%. Press once more to return to the
original volume level.
e VOLUME button
Press to increase or decrease the volume.
7
En
Page 8

Section
02
f CD button
HHHHHHHHHHHHHH
Whats What
d
e
6
4
5
7
f
g
Press to select the multi-CD player as the
source.
2
h
g MD button
Press to select the built in MD player as the
source.
h TUNER button
Press to select the tuner as the source.
8
En
Page 9
Power ON/OFF
HHHHHHHHHHHHHH
Section
03
Turning the unit on
% Press SOURCE to turn the unit on.
When you select a source the unit is turned
on.
Selecting a source
You can select a source you want to listen to.
To switch to the built-in MD player, load a disc
in this unit (refer to page 13).
% When using the head unit, press
SOURCE to select a source.
Press SOURCE repeatedly to switch between
the following sources:
TunerTelevisionCD playerMulti-CD
playerBuilt-in MD playerExternal unit
1External unit 2AUX
% When using the remote control, press
TUNER, MD or CD to select a source.
Press each button repeatedly to switch between the following sources:
TUNER: TunerTelevisionSources off
MD: Built-in MD playerSources off
CD: CD playerMulti-CD playerSources
off
basic functions by this unit. Two external units
can be controlled by this unit. When two external units are connected, the allocation of
them to external unit 1 or external unit 2 is
automatically set by this unit.
! When this units blue/white lead is connected
to the cars auto-antenna relay control terminal, the cars antenna extends when this
units source is turned on. To retract the antenna, turn the source off.
Turning the unit off
% Press SOURCE and hold until the unit
turns off.
English
Notes
! In the following cases, the sound source will
not change:
When a unit corresponding to each source
is not connected to this unit.
When no disc is set in this unit.
When no magazine is set in the multi-CD
player.
When no disc is set in the CD player.
When the AUX (auxiliary input) is set to off
(refer to page 32).
! External unit refers to a Pioneer product (such
as one available in the future) that, although
incompatible as a source, enables control of
En
9
Page 10

2
Section
04
HHHHHHHHHHHHHH
Tuner
Listening to the radio
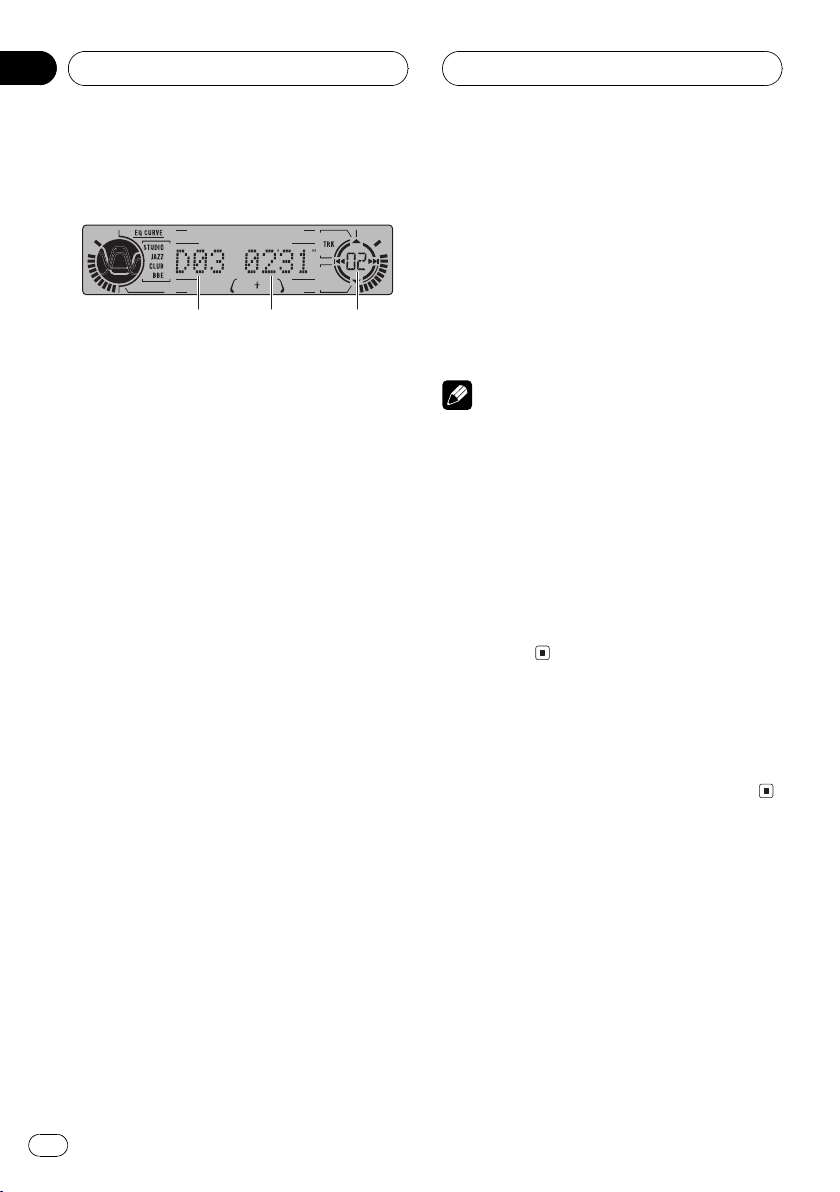
1
3 4
These are the basic steps necessary to operate
the radio. More advanced tuner operation is
explained starting on the next page.
Important
If you are using this unit in North, Central or
South America, reset the AM tuning step (see
Setting the AM tuning step on page 32).
1 Stereo (5) indicator
Shows that the frequency selected is being
broadcast in stereo.
2 Band indicator
Shows which band the radio is tuned to, AM
or FM.
3 Press BAND to select a band.
Press BAND until the desired band is displayed, F1, F2, F3 for FM or AM.
4 To perform manual tuning, press c or
d with quick presses.
The frequencies move up or down step by
step.
5 To perform seek tuning, press and hold
c or d for about one second and release.
The tuner will scan the frequencies until a
broadcast strong enough for good reception is
found.
# You can cancel seek tuning by pressing either
c or d with a quick press.
# If you press and hold c or d you can skip
broadcasting stations. Seek tuning starts as soon
as you release the buttons.
Note
When the frequency selected is being broadcast
in stereo the stereo (5) indicator will light.
3 Frequency indicator
Shows to which frequency the tuner is
tuned.
4 Preset number indicator
Shows what preset has been selected.
1 Press SOURCE to select the tuner.
Press SOURCE until you see TUNER displayed.
2 Use VOLUME to adjust the sound level.
Rotate to increase or decrease the volume.
10
En
Page 11

Tuner
HHHHHHHHHHHHHH
Section
04
Introduction of advanced
tuner operation
1
2
1 LOC indicator
Shows when local seek tuning is on.
2 Function display
Shows the function status.
3 Preset number indicator
Shows what preset has been selected.
% Press FUNCTION to display the function
names.
Press FUNCTION repeatedly to switch between the following functions:
BSM (best stations memory)LOCAL (local
seek tuning)
# To return to the frequency display, press
BAND.
Note
If you do not operate the function within about 30
seconds, the display is automatically returned to
the frequency display.
3
% When you find a frequency that you
want to store in memory press a preset
tuning button 16 and hold until the preset
number stops flashing.
The number you have pressed will flash in the
preset number indicator and then remain lit.
The selected radio station frequency has been
stored in memory.
The next time you press the same preset tuning button 1 6 the radio station frequency is
recalled from memory.
Notes
! Up to 18 FM stations, 6 for each of the three
FM bands, and 6 AM stations can be stored in
memory.
! You can also use a and b to recall radio sta-
tion frequencies assigned to preset tuning
buttons 16.
Tuning in strong signals
Local seek tuning lets you tune in only those
radio stations with sufficiently strong signals
for good reception.
1 Press FUNCTION to select LOCAL.
Press FUNCTION until LOCAL appears in the
display.
2 Press a to turn local seek tuning on.
Local seek sensitivity (e.g., LOCAL 2) appears
in the display.
English
Storing and recalling
broadcast frequencies
If you press any of the preset tuning buttons
16 you can easily store up to six broadcast
frequencies for later recall with the touch of a
button.
3 Press c or d to set the sensitivity.
There are four levels of sensitivity for FM and
two levels for AM:
FM: LOCAL 1LOCAL 2LOCAL 3
LOCAL 4
AM: LOCAL 1LOCAL 2
En
11
Page 12
Section
04
Tuner
The LOCAL 4 setting allows reception of only
the strongest stations, while lower settings let
you receive progressively weaker stations.
4 When you want to return to normal
seek tuning, press b to turn local seek tuning off.
LOCAL:OFF appears in the display.
Storing the strongest
broadcast frequencies
BSM (best stations memory) lets you automatically store the six strongest broadcast frequencies under preset tuning buttons 16 and
once stored there you can tune in to those frequencies with the touch of a button.
1 Press FUNCTION to select BSM.
Press FUNCTION until BSM appears in the
display.
HHHHHHHHHHHHHH
2 Press a to turn BSM on.
BSM begins to flash. While BSM is flashing
the six strongest broadcast frequencies will be
stored under preset tuning buttons 16 in
order of their signal strength. When finished,
BSM stops flashing.
# To cancel the storage process, press b.
Note
Storing broadcast frequencies with BSM may replace broadcast frequencies you have saved
using 16.
12
En
Page 13
2
3
Built-in MD Player
HHHHHHHHHHHHHH
Section
05
Playing a MD
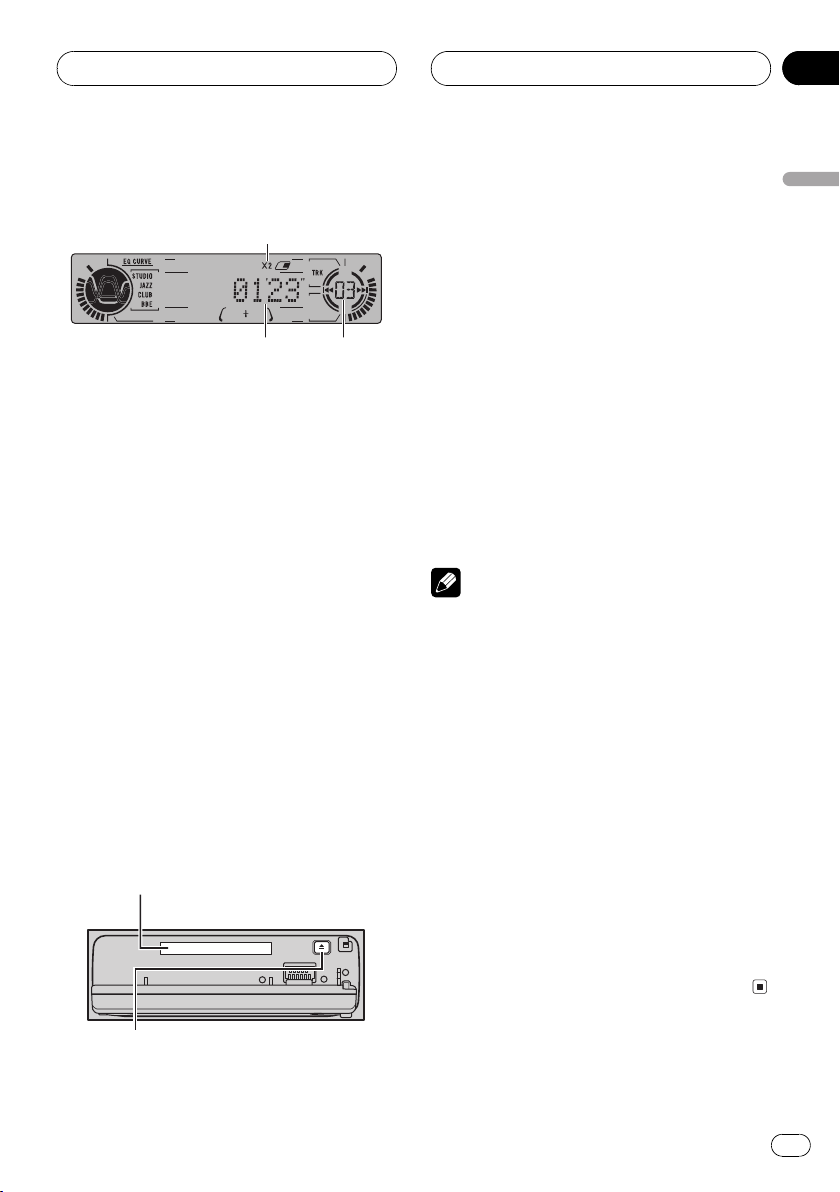
1
These are the basic steps necessary to play a
MD with your built-in MD player. More advanced MD operation is explained starting on
the next page.
1 MDLP indicator (×2 or ×4)
Shows when an MD featuring long recording is playing.
2 Play time indicator
Shows the elapsed playing time of the current track.
3 Track number indicator
Shows the track currently playing.
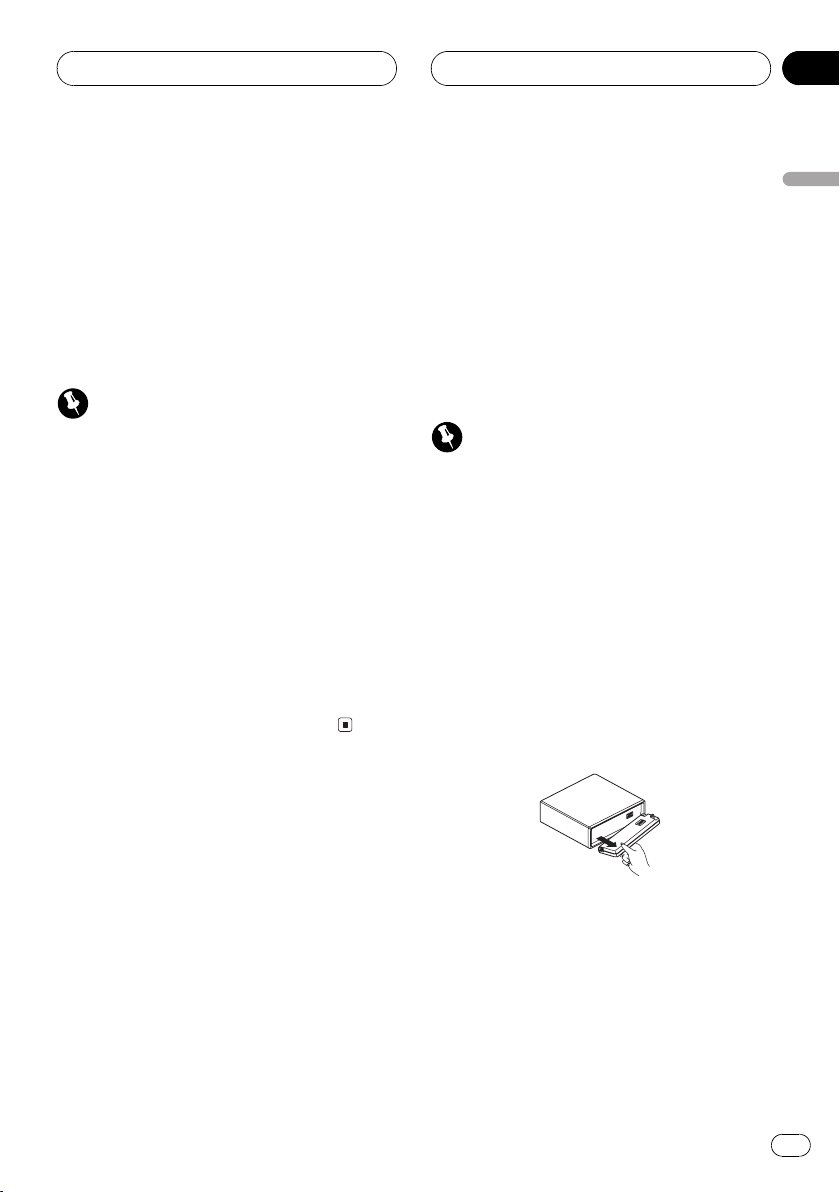
1 Press OPEN to open the front panel.
MD loading slot appears.
# After a MD has been inserted, press SOURCE
to select the built-in MD player.
2 Insert a MD into the MD loading slot.
Playback will automatically start.
MD loading slot
# To avoid a malfunction, make sure that no
metal object comes into contact with the terminals when the front panel is open.
3 Close the front panel.
4 Use VOLUME to adjust the sound level.
Rotate to increase or decrease the volume.
5 To perform fast forward or reverse,
press and hold c or d.
6 To skip back or forward to another
track, press c or d.
Pressing d skips to the start of the next track.
Pressing c once skips to the start of the current track. Pressing again will skip to the previous track.
Notes
! Do not insert anything other than a MD into
the MD loading slot.
! An MD left partially inserted after ejection
may incur damage or fall out.
! Load an MD after confirming the MD shutter
(refer to MD player and care on page 35) is
closed.
! When you load a disc, this unit reads informa-
tion recorded on the disc such as the number
of tracks. While the disc is being read,
TOC Read is indicated in the display.
! If the built-in MD player does not operate
properly, an error message such as ERROR-11
may be displayed. Refer to Understanding
built-in MD player error messages on page 35.
! When you play MDs featuring long record-
ings, ×2 or ×4 indicator is displayed.
! When a MD is inserted, the disc and track ti-
tles begin to scroll to the left automatically.
English
EJECT button
# You can eject a MD by pressing EJECT.
En
13
Page 14
Section
05
HHHHHHHHHHHHHH
Built-in MD Player
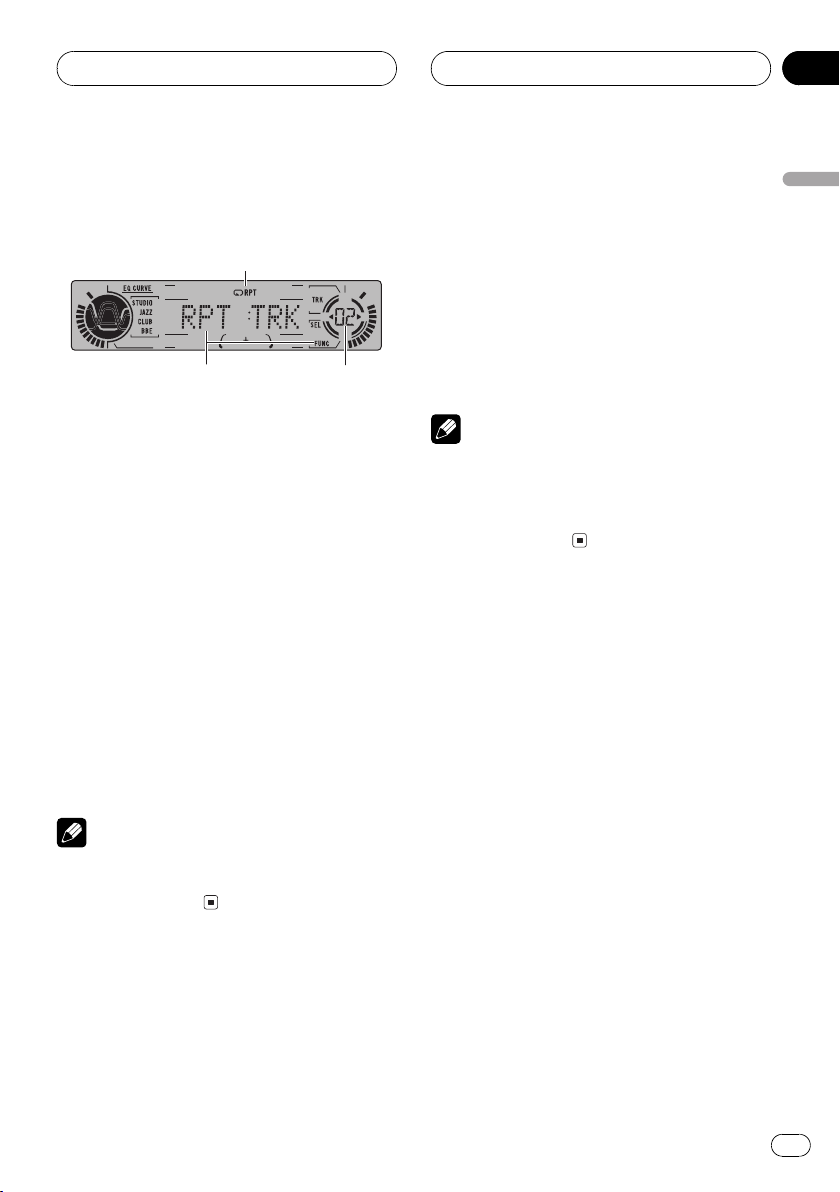
Introduction of advanced
built-in MD player operation
243
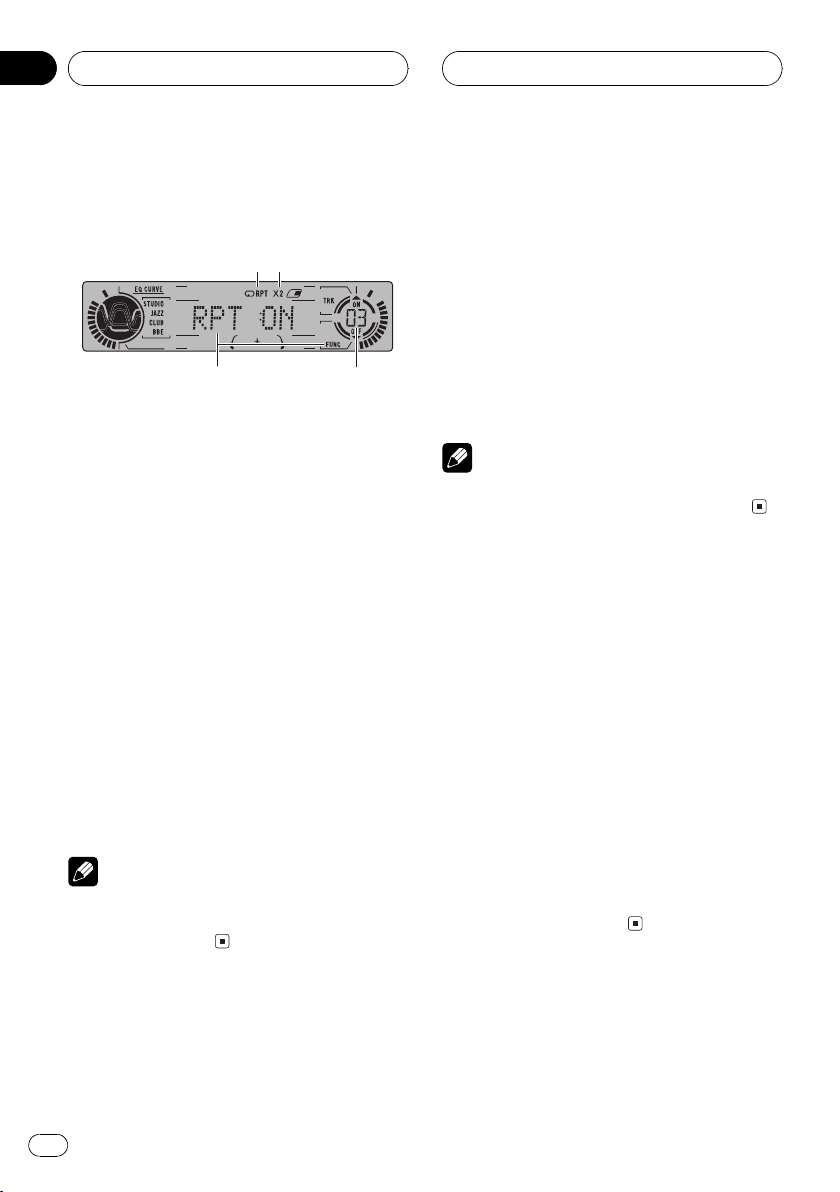
1
1 Function display
Shows the function status.
2 RPT indicator
Shows when repeat play is turned on.
3 MDLP indicator (×2 or ×4)
Shows when an MD featuring long recording is playing.
4 Track number indicator
Shows the track currently playing.
% Press FUNCTION to display the function
names.
Press FUNCTION repeatedly to switch between the following functions:
RPT (repeat play)RDM (random play)Scan
(scan play)PAUSE (pause)
# To return to the playback display, press BAND.
Note
If you do not operate the function within about 30
seconds, the display is automatically returned to
the playback display.
1 Press FUNCTION to select RPT.
Press FUNCTION until RPT appears in the display.
2 Press a to turn repeat play on.
RPT :ON appears in the display. The track cur-
rently playing will play and then repeat.
3 Press b to turn repeat play off.
RPT :OFF appears in the display. The track cur-
rently playing will continue to play and then
play the next track.
Note
If you perform track search or fast forward/reverse, repeat play is automatically cancelled.
Playing tracks in a random
order
Random play lets you play back tracks on the
MD in a random order.
1 Press FUNCTION to select RDM.
Press FUNCTION until RDM appears in the
display.
2 Press a to turn random play on.
RDM :ON appears in the display. Tracks will
play in a random order.
3 Press b to turn random play off.
RDM :OFF appears in the display. Tracks will
continue to play in order.
Repeating play
Repeat play lets you hear the same track over
again.
14
En
Scanning tracks of a MD
Scan play lets you hear the first 10 seconds of
each track on the MD.
Page 15
Built-in MD Player
HHHHHHHHHHHHHH
Section
05
1 Press FUNCTION to select Scan.
Press FUNCTION until Scan appears in the
display.
2 Press a to turn scan play on.
Scan:ON appears in the display. The first 10
seconds of each track is played.
3 When you find the desired track press
b to turn scan play off.
Scan:OFF appears in the display. The track will
continue to play.
# If the display has automatically returned to
the playback display, select Scan again by pressing FUNCTION.
Note
After scanning of a MD is finished, normal playback of the tracks will begin again.
Pausing MD playback
Pause lets you temporarily stop playback of
the MD.
1 Press FUNCTION to select PAUSE.
Press FUNCTION until PAUSE appears in the
display.
Displaying disc titles
When playing an MD, you can switch text display such as disc title and track title.
% Press DISPLAY.
Press DISPLAY repeatedly to switch between
the following settings:
Play timeDISC TTL (disc title)TRK TTL
(track title)
# If no title has been entered for the currently
playing disc, NO DATA is displayed.
Scrolling titles in the display
This unit can display the first 8 letters only of
DISC TTL and TRK TTL. When the recorded information is longer than 8 letters, you can
scroll the text to the left so that the rest of the
title can be seen.
% Press DISPLAY and hold until the title
begins to scroll to the left.
The rest of the title will appear in the display.
English
2 Press a to turn pause on.
PAUSE:ON appears in the display. Play of the
current track pauses.
3 Press b to turn pause off.
PAUSE:OFF appears in the display. Play will re-
sume at the same point that you turned pause
on.
En
15
Page 16
1 2 3
Section
06
HHHHHHHHHHHHHH
Multi-CD Player
Playing a CD
You can use this unit to control a multi-CD
player, which is sold separately.
These are the basic steps necessary to play a
CD with your multi-CD player. More advanced
CD operation is explained starting on the next
page.
1 Disc number indicator
Shows the disc currently playing.
2 Play time indicator
Shows the elapsed playing time of the current track.
3 Track number indicator
Shows the track currently playing.
1 Press SOURCE to select the multi-CD
player.
Press SOURCE until you see Multi-CD displayed.
4 To perform fast forward or reverse,
press and hold c or d.
5 To skip back or forward to another
track, press c or d.
Pressing d skips to the start of the next track.
Pressing c once skips to the start of the current track. Pressing again will skip to the previous track.
Notes
! When the multi-CD player performs the pre-
paratory operations, Ready is displayed.
! If the multi-CD player does not operate prop-
erly, an error message such as ERROR-11
may be displayed. Refer to the multi-CD player
owners manual.
! If there are no discs in the multi-CD player ma-
gazine, No Disc is displayed.
! When you select a CD TEXT disc on a CD TEXT
compatible multi-CD player, the disc and track
titles begin to scroll to the left automatically.
50-disc multi-CD player
Only those functions described in this manual
are supported for 50-disc multi-CD players.
2 Use VOLUME to adjust the sound level.
Rotate to increase or decrease the volume.
3 Select a disc you want to listen to with
the 16 buttons.
For discs located at 1 to 6, press the corresponding number button.
If you want to select a disc located at 7 to 12,
press and hold the corresponding numbers
such as 1 for disc 7, until the disc number appears in the display.
# You can also sequentially select a disc by
pressing a/b.
16
En
Page 17
3
Multi-CD Player
HHHHHHHHHHHHHH
Section
06
Introduction of advanced
multi-CD player operation
2
1
1 RPT indicator
Shows when repeat range is selected to current track.
2 Function display
Shows the function status.
3 Track number indicator
Shows the track currently playing.
% Press FUNCTION to display the function
names.
Press FUNCTION repeatedly to switch between the following functions:
RPT (repeat play)TTL LIST (disc title list)
RDM (random play)Scan (scan play)
ITS.P (ITS play)PAUSE (pause)COMP
(compression and DBE)
# To return to the playback display, press BAND.
Note
If you do not operate the function within about 30
seconds, the display is automatically returned to
the playback display.
Repeating play
There are three repeat play ranges for the
multi-CD player: MCD (multi-CD player repeat), TRK (one-track repeat) and DSC (disc repeat).
1 Press FUNCTION to select RPT.
Press FUNCTION until RPT appears in the display.
2 Press c or d to select the repeat range.
Press c or d until the desired repeat range appears in the display.
! MCD Repeat all discs in the multi-CD
player
! TRK Repeat just the current track
! DSC Repeat the current disc
Notes
! If you select other discs during repeat play,
the repeat play range changes to MCD.
! If you perform track search or fast forward/re-
verse during TRK, the repeat play range
changes to DSC.
Playing tracks in a random
order
Random play lets you play back tracks in a
random order within the repeat range, MCD
and DSC.
1 Select the repeat range.
Refer to Repeating play on this page.
2 Press FUNCTION to select RDM.
Press FUNCTION until RDM appears in the
display.
3 Press a to turn random play on.
RDM :ON appears in the display. Tracks will
play in a random order within the previously
selected MCD or DSC ranges.
4 Press b to turn random play off.
RDM :OFF appears in the display. Tracks will
continue to play in order.
English
En
17
Page 18

Section
06
HHHHHHHHHHHHHH
Multi-CD Player
Note
If you turn random play on during DSC and then
return to the playback display, DRDM appears in
the display.
Scanning CDs and tracks
While you are using DSC, the beginning of
each track on the selected disc plays for about
10 seconds. When you are using MCD, the beginning of the first track of each disc is played
for about 10 seconds.
1 Select the repeat range.
Refer to Repeating play on the previous page.
2 Press FUNCTION to select Scan.
Press FUNCTION until Scan appears in the
display.
3 Press a to turn scan play on.
Scan :ON appears in the display. The first 10
seconds of each track of the current disc (or
the first track of each disc) is played.
4 When you find the desired track (or
disc) press b to turn scan play off.
Scan :OFF appears in the display. The track (or
disc) will continue to play.
# If the display has automatically returned to
the playback display, select Scan again by pressing FUNCTION.
Notes
! After track or disc scanning is finished, nor-
mal playback of the tracks will begin again.
! If you turn scan play on during DSC and then
return to the playback display, DSCN appears
in the display.
Pausing CD playback
Pause lets you temporarily stop playback of
the CD.
1 Press FUNCTION to select PAUSE.
Press FUNCTION until PAUSE appears in the
display.
2 Press a to turn pause on.
PAUSE:ON appears in the display. Play of the
current track pauses.
3 Press b to turn pause off.
PAUSE:OFF appears in the display. Play will re-
sume at the same point that you turned pause
on.
Using ITS playlists
ITS (instant track selection) lets you make a
playlist of favorite tracks from those in the
multi-CD player magazine. After you have
added your favorite tracks to the playlist you
can turn on ITS play and play just those selections.
Creating a playlist with ITS
programming
You can use ITS to enter and playback up to 99
tracks per disc, up to 100 discs (with the disc
title). (With multi-CD players sold before the
CDX-P1250 and CDX-P650, up to 24 tracks can
be stored in the playlist.)
1 Play a CD that you want to program.
Press a or b to select a CD.
2 Press FUNCTION and hold until Title In
appears in the display, then press
FUNCTION to select ITS.
After Title In is displayed, press FUNCTION repeatedly, the following functions appear in the
display:
18
En
Page 19

Multi-CD Player
HHHHHHHHHHHHHH
Section
06
Title In (disc title input)ITS (ITS programming)
# When playing a CD TEXT disc on a CD TEXT
compatible multi-CD player, you cannot switch to
Title In. The disc title will have already been recorded on a CD TEXT disc.
3 Select a desired track by pressing c or
d.
4 Press a to store the currently playing
track in the playlist.
ITS IN is displayed briefly and the currently
playing selection is added to your playlist. The
display then shows ITS again.
5 Press BAND to return to the playback
display.
Note
After data for 100 discs has been stored in memory, data for a new disc will overwrite the oldest
one.
Playback from your ITS playlist
ITS play lets you listen to the tracks that you
have entered into your ITS playlist. When you
turn on ITS play, tracks from your ITS playlist
in the multi-CD player will begin to play.
1 Select the repeat range.
Refer to Repeating play on page 17.
2 Press FUNCTION to select ITS.P.
Press FUNCTION until ITS.P appears in the
display.
3 Press a to turn ITS play on.
ITS.P:ON appears in the display. Playback be-
gins of those tracks from your playlist within
the previously selected MCD or DSC ranges.
# If no tracks in the current range are programmed for ITS play then ITSempty is displayed.
4 Press b to turn ITS play off.
ITS.P:OFF appears in the display. Playback will
continue in normal order from the currently
playing track and CD.
Erasing a track from your ITS
playlist
When you want to delete a track from your ITS
playlist, you can if ITS play is on.
If ITS play is already on, skip to step 2. If ITS
play is not already on, press FUNCTION.
1 Play a CD you want to delete a track
from your ITS playlist, and turn ITS play on.
Refer to Playback from your ITS playlist on this
page.
2 Press FUNCTION and hold until Title In
appears in the display, then press
FUNCTION to select ITS.
After Title In is displayed, press FUNCTION
until ITS appears in the display.
3 Select a desired track by pressing c or
d.
4 Press b to erase a track from your ITS
playlist.
The currently playing selection is erased from
your ITS playlist and playback of the next track
from your ITS playlist begins.
# If there are no tracks from your playlist in the
current range, ITSempty is displayed and normal
play resumes.
5 Press BAND to return to the playback
display.
Erasing a CD from your ITS playlist
When you want to delete all tracks of a CD
from your ITS playlist, you can if ITS play is off.
1 Play a CD that you want to delete.
Press a or b to select a CD.
English
En
19
Page 20
Section
06
HHHHHHHHHHHHHH
Multi-CD Player
2 Press FUNCTION and hold until Title In
appears in the display, then press
FUNCTION to select ITS.
After Title In is displayed, press FUNCTION
until ITS appears in the display.
3 Press b to erase all tracks on the currently playing CD from your ITS playlist.
All tracks on the currently playing CD are
erased from your playlist and ITSclear is displayed.
4 Press BAND to return to the playback
display.
Using disc title functions
You can input CD titles and display the title.
Then you can easily search for and select a desired disc for play.
Entering disc titles
Disc title input lets you input CD titles up to 8
letters long and up to 100 disc titles (with ITS
playlist) into the multi-CD player.
1 Play a CD that you want to enter the
title.
Press a or b to select a CD.
2 Press FUNCTION and hold until Title In
appears in the display.
After Title In is displayed, press FUNCTION repeatedly, the following functions appear in the
display:
Title In (disc title input)ITS (ITS programming)
# When playing a CD TEXT disc on a CD TEXT
compatible multi-CD player, you cannot switch to
Title In. The disc title will have already been recorded on a CD TEXT disc.
3 Press 1 numbered button to select the
desired character type.
Press 1 numbered button repeatedly to switch
between the following character type:
Alphabet (upper case), numbers and symbols
Alphabet (lower case)
# You can select to input numbers and symbols
by pressing 2 numbered button.
4 Press a or b to select a letter of the alphabet.
Each press of a will display a letter of the alphabet in A B C ... X Y Z, numbers and symbols in 1 2 3 ... | } ¯ order. Each press of b will
display a letter in the reverse order, such as Z
Y X ... C B A order.
5 Press d to move the cursor to the next
character position.
When the letter you want is displayed, press d
to move the cursor to the next position and
then select the next letter. Press c to move
backwards in the display.
6 Move the cursor to the last position by
pressing d after entering the title.
When you press d one more time, the entered
title is stored in memory.
7 Press BAND to return to the playback
display.
Notes
! Titles remain in memory, even after the disc
has been removed from the magazine, and
are recalled when the disc is reinserted.
! After data for 100 discs has been stored in
memory, data for a new disc will overwrite the
oldest one.
20
En
Page 21

Multi-CD Player
HHHHHHHHHHHHHH
Section
06
Displaying disc titles
You can display the title of any disc that has
had a disc title entered.
% Press DISPLAY.
Press DISPLAY repeatedly to switch between
the following settings:
Play timeDISC TTL (disc title)
When you select DISC TTL, the title of the currently playing disc is shown in the display.
# If no title has been entered for the currently
playing disc, NO TITLE is displayed.
Selecting discs from the disc
title list
Disc title list lets you see the list of disc titles
that have been entered into the multi-CD
player and select one of them to playback.
1 Press FUNCTION to select TTL LIST.
Press FUNCTION until TTL LIST appears in the
display.
2 Press c or d to scroll through the list of
titles that have been entered.
# If no title has been entered for a disc, title is
not displayed.
3 Press a to play your favorite CD title.
That selection will begin to play.
Using CD TEXT functions
You can use these functions only with a CD
TEXT compatible multi-CD player.
Some discs have certain information encoded
on the disc during manufacture. These discs
may contain such information as the CD title,
track title, artists name and playback time
and are called CD TEXT discs. Only these specially encoded CD TEXT discs support the
functions listed below.
Displaying titles on CD TEXT discs
% Press DISPLAY.
Press DISPLAY repeatedly to switch between
the following settings:
Play timeDISC TTL (disc title)DISC ART
(disc artist name)TRK TTL (track title)
TRK ART (track artist name)
# If specific information has not been recorded
on a CD TEXT disc, NO XXXX will be displayed
(e.g., NO T-TTL).
Scrolling titles in the display
This unit can display the first 8 letters only of
DISC TTL, DISC ART, TRK TTL and TRK ART.
When the recorded information is longer than
8 letters, you can scroll the text to the left so
that the rest of the title can be seen.
% Press DISPLAY and hold until the title
begins to scroll to the left.
The rest of the title will appear in the display.
Using compression and
bass emphasis
You can use these functions only with a multiCD player that supports them.
Using COMP (compression) and DBE (dynamic bass emphasis) functions let you adjust
the sound playback quality of the multi-CD
player. Each of the functions have a two-step
adjustment. The COMP function balances the
output of louder and softer sounds at higher
volumes. DBE boosts bass levels to give playback a fuller sound. Listen to each of the effects as you select through them and use the
one that best enhances the playback of the
track or CD that you are listening to.
English
En
21
Page 22

Section
06
Multi-CD Player
1 Press FUNCTION to select COMP.
Press FUNCTION until COMP appears in the
display.
# If the multi-CD player does not support
COMP/DBE, NO COMP is displayed when you attempt to select it.
2 Press a or b to select your favorite setting.
Press a or b repeatedly to switch between the
following settings:
COMP OFFCOMP 1COMP 2
COMP OFFDBE 1DBE 2
HHHHHHHHHHHHHH
22
En
Page 23
2 3
Audio Adjustments
HHHHHHHHHHHHHH
Section
07
Introduction of audio
adjustments
1
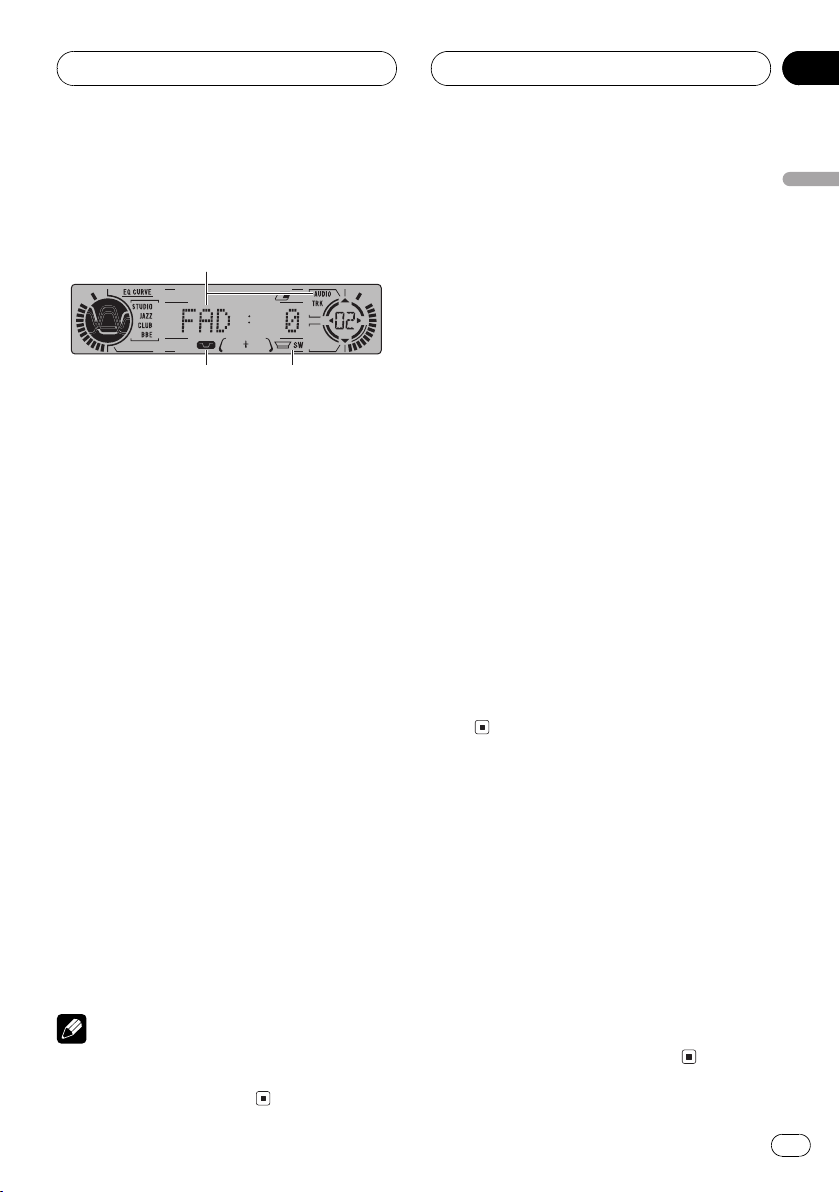
1 Audio display
Shows the audio adjustments status.
2 Loudness indicator
Appears in the display when loudness is
turned on.
3 SW indicator
Shows when the subwoofer output is turned
on.
% Press AUDIO to display the audio function names.
Press AUDIO repeatedly to switch between
the following audio functions:
FAD (balance adjustment)Loud (loudness)
Phase (subwoofer)80 (subwoofer setting)
SLOPE (subwoofer slope)F-HPF (front
high pass filter)R-HPF (rear high pass filter)
# When the RCA output setting is P/O :FUL,
Phase, 80 and SLOPE change to NoFAD (non
fading) function.
# When the front high pass filter is turned on,
you can select F-SLP (front high pass filter slope).
# When the rear high pass filter is turned on,
you can select R-SLP (rear high pass filter slope).
# To return to the display of each source, press
BAND.
Note
If you do not operate the audio function within
about 30 seconds, the display is automatically returned to the source display.
Using balance adjustment
You can select a fader/balance setting that
provides an ideal listening environment in all
occupied seats.
1 Press AUDIO to select FAD.
Press AUDIO until FAD appears in the display.
# If the balance setting has been previously adjusted, BAL will be displayed.
2 Press a or b to adjust front/rear speaker balance.
Each press of a or b moves the front/rear
speaker balance towards the front or the rear.
FAD :F25 FAD :R25 is displayed as the front/
rear speaker balance moves from front to rear.
# FAD : 0 is the proper setting when only two
speakers are used.
3 Press c or d to adjust left/right speaker
balance.
When you press c or d, BAL : 0 is displayed.
Each press of c or d moves the left/right
speaker balance towards the left or the right.
BAL :L25 BAL :R25 is displayed as the left/
right speaker balance moves from left to
right.
Adjusting loudness
Loudness compensates for deficiencies in the
low- and high-sound ranges at low volume.
1 Press AUDIO to select Loud.
Press AUDIO until Loud appears in the display.
2 Press a to turn loudness on.
Loud :ON appears in the display.
3 Press b to turn loudness off.
Loud :OFF appears in the display.
English
En
23
Page 24
Section
07
HHHHHHHHHHHHHH
Audio Adjustments
Using subwoofer output
This unit is equipped with a subwoofer output
which can be turned on or off. When a subwoofer is controlled with this unit, first, switch
the RCA output setting to subwoofer, then
turn the subwoofer output on. For more details, see Switching the RCA output setting on
page 32.
1 Press AUDIO to select Phase.
When the RCA output setting is P/O :S/W,
you can select Phase. Press AUDIO until
Phase appears in the display.
2 Press a to turn subwoofer output on.
Phase:NOR appears in the display. Subwoofer
output is now on.
# To turn subwoofer output off, press b.
3 Press c or d to select the phase of subwoofer output.
Press c to select reverse phase and
Phase:REV is displayed. Press d to select nor-
mal phase and Phase:NOR is displayed.
Adjusting subwoofer (low pass
filter) settings
When the subwoofer output is on, you can adjust the cut-off frequency and the output level
of the subwoofer.
1 Press AUDIO to select the subwoofer
setting.
When the subwoofer output is on, you can select the subwoofer setting. Press AUDIO until
80 appears in the display.
# If the subwoofer setting has been previously
adjusted, the frequency of that previously selected will be displayed instead of 80.
2 Press c or d to select cut-off frequency.
Each press of c or d selects cut-off frequencies in the following order:
506380100125 (Hz)
Only frequencies lower than those in the selected range are output from the subwoofer.
3 Press a or b to adjust the output level
of the subwoofer.
Each press of a or b increases or decreases
the level of the subwoofer (e.g., +6 to 24).
Press a or b until you see the desired value
displayed.
Adjusting low pass filter
attenuation slope
When the subwoofer output is on, you can adjust the continuity of sound between speaker
units.
1 Press AUDIO to select the slope setting.
Press AUDIO until SLOPE appears in the display.
2 Press c or d to select slope.
Press c and 12 is displayed. Press d and 18
is displayed.
Note
When slope of subwoofer and high pass filter are
12, and same cut-off frequency, the phase is reversed 180 degrees at the cut-off frequency. In
this case, reversing the phase assures improved
sound continuity.
Using the high pass filter
When you do not want low sounds from the
subwoofer output frequency range to play
from the front or rear speakers, turn the HPF
(high pass filter) on. Only frequencies higher
than those in the selected range are output
from the front or rear speakers. You can set up
front and rear separately.
24
En
Page 25

Audio Adjustments
HHHHHHHHHHHHHH
Section
07
1 Press AUDIO to select F-HPF or R-HPF.
Press AUDIO until F-HPF or R-HPF appears in
the display.
2 Press a to turn high pass filter on.
F-HPF: 80 or R-HPF: 80 appears in the display.
High pass filter is now on.
# To turn high pass filter off, press b.
3 Press c or d to select cut-off frequency.
Each press of c or d selects cut-off frequencies in the following order:
506380100125 (Hz)
Only frequencies higher than those in the selected range are output from the front or rear
speakers.
Adjusting high pass filter
attenuation slope
When the high pass filter is on, you can adjust
the continuity of sound between speaker
units.
1 Press AUDIO to select the slope setting.
Press AUDIO until F-SLP or R-SLP appears in
the display.
1 Press AUDIO to select NoFAD.
When the RCA output setting is P/O :FUL, you
can select NoFAD. Press AUDIO until NoFAD
appears in the display.
2 Press a to turn non fading output on.
NoFAD:ON appears in the display. Non fading
output is now on.
# To turn non fading output off, press b.
Adjusting non fading output level
When the non fading output is on, you can adjust the level of non fading output.
1 Press AUDIO to select non fading output setting.
Press AUDIO until NoFAD: 0 appears in the
display.
2 Press a or b to adjust the level of the
non fading output.
Each press of a or b increases or decreases
the level of the non fading output (e.g., +6
24).
Press a or b until you see the desired value
displayed.
English
2 Press c or d to select slope.
Press c and 12 is displayed. Press d and 6 is
displayed.
Using non fading output
When the non fading output setting is on, the
audio signal does not pass through this units
low pass filter (for the subwoofer), but is output through the RCA output. For more details,
see Switching the RCA output setting on page
32.
En
25
Page 26

Section
07
Audio Adjustments
Adjusting source levels
SLA (source level adjustment) lets you adjust
the volume level of each source to prevent radical changes in volume when switching between sources.
! Settings are based on the volume level of
the FM tuner, which remains unchanged.
1 Compare the FM tuner volume level
with the level of the source you wish to adjust.
2 Press AUDIO and hold until SLA appears in the display.
# When selecting the FM tuner as the source,
you cannot switch to SLA.
3 Press a or b to adjust the source volume.
Each press of a or b increases or decreases
the source volume.
SLA : +4 SLA : 4 is displayed as the source
volume is increased or decreased.
HHHHHHHHHHHHHH
Notes
! If you do not operate the SLA function within
about 30 seconds, the display is automatically
returned to the source display.
! Since the FM tuner volume is the control, it is
not possible to apply source level adjustments
to the FM tuner.
! The AM tuner volume level can also be ad-
justed with source level adjustments.
! The CD player and the multi-CD player are set
to the same source level adjustment volume
automatically.
! External unit 1 and external unit 2 are set to
the same source level adjustment volume
automatically.
26
En
Page 27

3 4 6
1
HHHHHHHHHHHHHH
Digital Signal Processor
Section
08
Using the digital signal
processor
2
5
The digital signal processor lets you control
many aspects of sound output including
equalization, sound field control and listening
position.
1 Equalizer curve
Shows which equalizer preset is currently
selected.
2 Sound field program indicator
Shows which sound field program is currently selected.
3 CUSTOM indicator
Shows when custom equalizer curve is presently selected.
4 ASL indicator
Shows when the automatic sound levelizer
is turned on.
5 DSP display
Shows the DSP status
6 Position indicator
Shows which listening position is currently
selected.
SFC (sound field control)
PWRFL (POWERFUL) (graphic equalizer)
50 (9-band graphic equalizer)Posi (posi-
tion selector)ASL (automatic sound levelizer)
# To return to the display of each source, press
BAND.
Note
If you do not operate the DSP function within
about 30 seconds, the display is automatically returned to the source display.
Using sound field control
and BBE sound
SFC (sound field control) incorporate three
programs for reproducing typical sound fields
of a studio, jazz club or club. This function
makes it possible to reproduce the realistic
sound fields of the three programs in your car.
With BBE, playback very close to the original
sound can be obtained by correction with a
combination of phase compensation and
high-range boost for the delay of the high-frequency components and the amplitude deviation occurring during playback. This function
makes it possible to reproduce the dynamic
sound field as if you are listening to a live performance.
Note
Manufactured under license from BBE Sound,
Inc. The mark BBE is a trademark of BBE Sound,
Inc.
English
% Press DSP to display the DSP function
names.
Press DSP repeatedly to switch between the
following functions:
Recalling sound field programs
Here is a list of the sound field programs:
En
27
Page 28

Section
08
HHHHHHHHHHHHHH
Digital Signal Processor
Display Effect
STUDIO Studio
JAZZ CLUB Jazz club
CLUB Club
BBE BBE
1 Press DSP to select the sound field control.
Press DSP until SFC appears in the display.
# If the sound field control has been previously
set to a sound field program then the title of that
previously selected sound field program will be
displayed instead of SFC.
2 Press c or d to select a sound field program.
Press c or d until the desired setting appears
in the display.
Adjusting BBE sound level
With BBE sound processing technology, you
can adjust the level of BBE.
1 Recall BBE.
See Recalling sound field programs on the previous page.
2 Press a or b to adjust the level of BBE.
Each press of a or b increases or decreases
the level of BBE.
+4 4 is displayed as the level is increased
or decreased.
Recalling equalizer curves
There are seven stored equalizer curves which
you can easily recall at any time. Here is a list
of the equalizer curves:
Display Equalizer curve
S-Bas (SPR-BASS) Super bass
PWRFL (POWERFUL) Powerful
NTRL (NATURAL) Natural
VOCAL (VOCAL) Vocal
CTM1 (CUSTOM 1) Custom 1
CTM2 (CUSTOM 2) Custom 2
FLAT (FLAT) Flat
! CTM1 (CUSTOM 1) and
CTM2 (CUSTOM 2) are adjusted equalizer
curves that you create. Adjustments can be
made with a 9-band graphic equalizer.
! When FLAT (FLAT) is selected no supple-
ment or correction is made to the sound.
This is useful to check the effect of the
equalizer curves by switching alternatively
between FLAT (FLAT) and a set equalizer
curve.
1 Press DSP to select the graphic equalizer.
Press DSP until PWRFL (POWERFUL) appears
in the display.
# If the graphic equalizer has been previously
set to an equalizer curve other than
PWRFL (POWERFUL) then the title of that previously selected equalizer curve will be displayed
instead of PWRFL (POWERFUL).
Using the graphic equalizer
The graphic equalizer lets you adjust the
equalization to match car interior acoustic
characteristics as desired.
28
En
2 Press c or d to select an equalizer
curve.
Each press of c or d selects equalizer curves
in the following order:
S-Bas (SPR-BASS)PWRFL (POWERFUL)
NTRL (NATURAL)VOCAL (VOCAL)
Page 29

HHHHHHHHHHHHHH
Digital Signal Processor
Section
08
CTM1 (CUSTOM 1)CTM2 (CUSTOM 2)
FLAT (FLAT)
# You can also select an equalizer curve by
pressing EQ.
Adjusting equalizer curves
The factory supplied equalizer curves, with the
exception of FLAT (FLAT), can be adjusted to a
fine degree (nuance control).
1 Recall an equalizer curve.
See Recalling equalizer curves on the previous
page.
2 Press a or b to adjust the equalizer
curve.
Each press of a or b increases or decreases
the equalizer curve respectively.
+6 6 is displayed as the equalizer curve is
increased or decreased.
# The actual range of the adjustments are different depending on which equalizer curve is selected.
# The equalizer curve with all frequencies set to
0 cannot be adjusted.
1 Recall the equalizer curve you want to
adjust.
See Recalling equalizer curves on the previous
page.
2 Press DSP to select 9-band graphic
equalizer.
Press DSP until 50 appears in the display.
# If 9-band graphic equalizer has been previously adjusted, the frequency of that previously
selected will be displayed instead of 50.
3 Press c or d to select the equalizer
band to adjust.
Each press of c or d selects equalizer bands
in the following order:
501002004008001.6 k3.15 k
6.3 k12.5 k (Hz)
4 Press a or b to adjust the level of the
equalizer band.
Each press of a or b increases or decreases
the level of the equalization band.
+6 6 is displayed as the level is increased
or decreased.
# You can then select another band and adjust
the level.
English
Adjusting 9-band graphic equalizer
For CTM1 (CUSTOM 1) and
CTM2 (CUSTOM 2) equalizer curves, you can
adjust the level of each band.
! A separate CTM1 (CUSTOM 1) curve can
be created for each source. If you make adjustments when a curve other than
CTM2 (CUSTOM 2) is selected, the equalizer curve settings will be memorized in
CTM1 (CUSTOM 1).
! A CTM2 (CUSTOM 2) curve can be created
common to all sources. If you make adjustments when the CTM2 (CUSTOM 2) curve
is selected, the CTM2 (CUSTOM 2) curve
will be updated.
Using the position selector
One way to assure a more natural sound is to
clearly position the stereo image, putting you
right in the center of the sound field. The position selector adjusts the volume level of sound
from each speaker to match seat positions
and the number of people in the car and lets
you recall settings at the touch of a button.
Here is a list of the positions:
Button Display Indicator Position
a Front
b All
Front seat
All seats
En
29
Page 30

Section
08
HHHHHHHHHHHHHH
Digital Signal Processor
Button Display Indicator Position
c Front-L
d Front-R
1 Press DSP to select the position selector.
Press DSP until Posi appears in the display.
# If the position selector has been previously set
to a listening position then the title of that previously selected listening position will be displayed instead of Posi.
2 Press c, d, a or b to select a listening
position.
Press one of these, c, d, a or b to select a listening position as listed in the table.
# To cancel the selected listening position,
press the same button again.
Front seat left
Front seat right
Using automatic sound
levelizer
During driving, noise in the car changes according to the driving speed and road conditions. The automatic sound levelizer (ASL)
monitors such varying noise and automatically increases the volume level, if this noise
becomes greater. The sensitivity (variation of
volume level to noise level) of ASL can be set
to one of five levels.
3 Press c or d to select the desired ASL
level.
Each press of c or d selects ASL level in the
following order:
LOW (low)MidL (mid-low)MID (mid)
MidH (mid-high)HIGH (high)
1 Press DSP to select ASL.
Press DSP until ASL appears in the display.
2 Press a to turn ASL on.
ASL:MID appears in the display.
# To turn ASL off, press b.
30
En
Page 31

1
Initial Settings
HHHHHHHHHHHHHH
Section
09
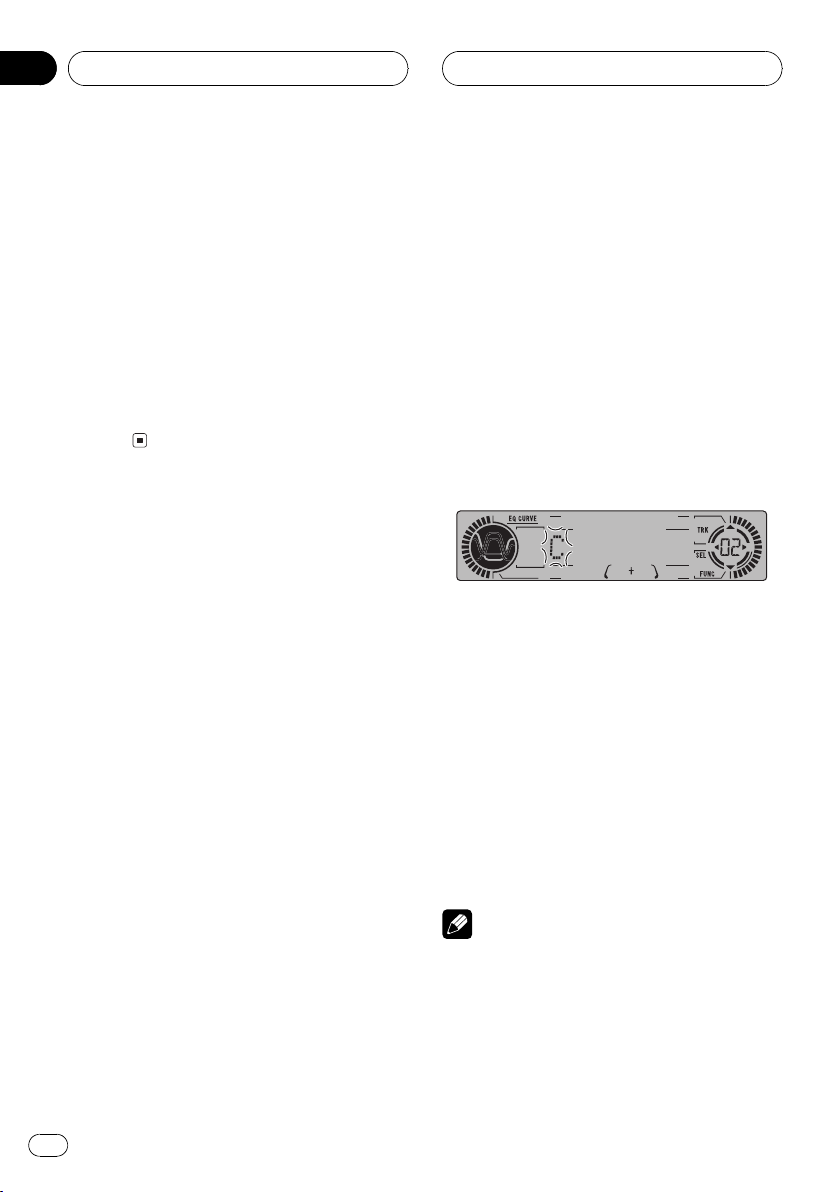
Adjusting initial settings
Initial settings lets you perform initial set up of
different settings for this unit.
1 Function display
Shows the function status.
1 Press SOURCE and hold until the unit
turns off.
2 Press FUNCTION and hold until the
clock appears in the display.
3 Press FUNCTION to select one of the initial settings.
Press FUNCTION repeatedly to switch between the following settings:
ClockFM (FM tuning step)AM (AM tuning
step)WARN (warning tone)AUX (auxiliary
input)Dim (dimmer)P/O (RCA output)
D.ATT (digital attenuator)Mute (tele-
phone muting/attenuation)
Use the following instructions to operate each
particular setting.
# To cancel initial settings, press BAND.
# You can also cancel initial settings by holding
down FUNCTION until the unit turns off.
2 Press c or d to select the segment of
the clock display you wish to set.
Pressing c or d will select one segment of the
clock display:
HourMinute
As you select segments of the clock display
the segment selected will blink.
3 Press a or b to set the clock.
Pressing a will increase the selected hour or
minute. Pressing b will decrease the selected
hour or minute.
Setting the FM tuning step
The FM tuning step employed by seek tuning
can be switched between 100 kHz, the preset
step, and 50 kHz.
1 Press FUNCTION to select FM.
Press FUNCTION repeatedly until FM appears
in the display.
2 Press c or d to select the FM tuning
step.
Pressing c or d will switch the FM tuning
step between 100 kHz and 50 kHz. The selected FM tuning step will appear in the display.
English
Setting the clock
Use these instructions to set the clock.
1 Press FUNCTION to select clock.
Press FUNCTION repeatedly until clock appears in the display.
Note
If seek tuning is performed in 50 kHz steps, stations may be tuned in imprecisely. Tune in the stations with manual tuning or use seek tuning
again.
En
31
Page 32

Section
09
HHHHHHHHHHHHHH
Initial Settings
Setting the AM tuning step
The AM tuning step can be switched between
9 kHz, the preset step, and 10 kHz. When
using the tuner in North, Central or South
America, reset the tuning step from 9 kHz (531
1,602 kHz allowable) to 10 kHz (530 1,640
kHz allowable).
1 Press FUNCTION to select AM.
Press FUNCTION repeatedly until AM appears
in the display.
2 Press c or d to select the AM tuning
step.
Pressing c or d will switch the AM tuning
step between 9 kHz and 10 kHz. The selected
AM tuning step will appear in the display.
Switching the warning tone
If the front panel is not detached from the
head unit within five seconds of turning off the
ignition, a warning tone will sound. You can
turn off the warning tone.
1 Press FUNCTION to select WARN.
Press FUNCTION repeatedly until WARN appears in the display.
2 Press a or b to turn WARN on or off.
Pressing a or b will turn WARN on or off and
that status will be displayed (e.g.,
WARN :ON).
1 Press FUNCTION to select AUX.
Press FUNCTION repeatedly until AUX appears in the display.
2 Press a or b to turn AUX on or off.
Pressing a or b will turn AUX on or off and
that status will be displayed (e.g.,
AUX :ON).
Switching the dimmer setting
To prevent the display from being too bright at
night, the display is automatically dimmed
when the cars headlights are turned on. You
can switch dimmer on or off.
1 Press FUNCTION to select Dim.
Press FUNCTION repeatedly until Dim appears in the display.
2 Press a or b to turn Dim on or off.
Pressing a or b will turn Dim on or off and
that status will be displayed (e.g.,
Dim :ON).
Switching the RCA output
setting
This units RCA output can be used for subwoofer. You can select whether to use the subwoofer control (low pass filter) built-in
P/O :S/W or the auxiliary P/O :FUL.
Switching the auxiliary setting
It is possible to use auxiliary equipment with
this unit. Activate the auxiliary setting when
using auxiliary equipment connected to this
unit.
32
En
1 Press FUNCTION to select P/O.
Press FUNCTION repeatedly until P/O appears
in the display.
Page 33

Initial Settings
HHHHHHHHHHHHHH
Section
09
2 Press c or d to swtch RCA output setting.
Pressing c or d will switch between P/O :S/W
(subwoofer) and P/O :FUL (non fading) and
that status will be displayed.
Selecting the digital
attenuator
When listening to a MD or other source on
which the recording level is high, setting the
equalizer curve level to high may result in distortion. You can switch the digital attenuator
to low to reduce distortion.
! Sound quality is better at the high setting
so this setting is usually used.
1 Press FUNCTION to select D.ATT.
Press FUNCTION repeatedly until D.ATT appears in the display.
2 Press c or d to switch D.ATT high or
low.
Pressing c or d will switch between
D.ATT: HI (high) and D.ATT:LOW (low) and
that status will be displayed.
2 Press c or d to select the desired setting.
Each press of c or d selects settings in the
following order:
Mute (muting) 10dB ATT (attenuation)
20dB ATT (attenuation)
20dB ATT has a stronger effect than
10dB ATT.
Notes
! The sound turns off, MUTE or ATT is displayed
and no audio adjustments, except volume
control, are possible.
! Operation returns to normal when the phone
call is ended.
English
Switching the telephone
muting/attenuation
Sound from this unit is muted or attenuated
automatically when a call is made or received
using a cellular telephone connected to this
unit.
1 Press FUNCTION to select Mute.
Press FUNCTION repeatedly until Mute appears in the display.
En
33
Page 34

Section
10
HHHHHHHHHHHHHH
Other Functions
Turning the clock display
on or off
You can turn the clock display on or off.
% Press CLOCK to turn the clock display
on or off.
Each press of CLOCK turns the clock display
on or off.
# The clock display disappears temporarily
when you perform other operations, but the clock
display appears again after 25 seconds.
Note
Even when the sources are off, the clock display
appears on the display. Pressing CLOCK turns
the clock display on or off.
Using the AUX source
An IP-BUS-RCA Interconnector such as the
CD-RB20/CD-RB10 (sold separately) lets you
connect this unit to auxiliary equipment featuring RCA output. For more details, refer to
the IP-BUS-RCA Interconnector owners manual.
Selecting AUX as the source
% Press SOURCE to select AUX as the
source.
Press SOURCE until AUX appears in the display.
# If the auxiliary setting is not turned on, AUX
cannot be selected. For more details, see Switch-
ing the auxiliary setting on page 32.
Setting the AUX title
The title displayed for the AUX source can be
changed.
1 After you have selected AUX as the
source, press FUNCTION and hold until
Title In appears in the display.
2 Press a or b to select a letter of the alphabet.
Each press of a will display a letter of the alphabet in A B C ... X Y Z, numbers and symbols in 1 2 3 ... | } ¯ order. Each press of b will
display a letter in the reverse order, such as Z
Y X ... C B A order.
3 Press d to move the cursor to the next
character position.
When the letter you want is displayed, press d
to move the cursor to the next position and
then select the next letter. Press c to move
backwards in the display.
4 Move the cursor to the last position by
pressing d after entering the title.
When you press d one more time, the entered
title is stored in memory.
5 Press BAND to return to the playback
display.
Setting the level indicator
These are two stored level indicator to select
from.
% Press EQ and hold to select the level indicator.
Press EQ and hold repeatedly to switch between the following settings:
Level indicator 1Level indicator 2Level indicator fullASL effect levelLevel indicator
off
Note
ASL effect level is diplayed only when the ASL
function (Using automatic sound levelizer on
page 30) is on.
34
En
Page 35

HHHHHHHHHHHHHH
Additional Information
Appendix
Understanding built-in MD
player error messages
When problems occur during MD play an
error message may appear on the display. If
an error message appears on the display refer
to the table below to see what the problem is
and the suggested method of correcting the
problem. If the error cannot be corrected, contact your dealer or your nearest Pioneer Service Center.
Message Cause Action
Blank MD Blank disc is in-
TEMP MD player over-
ERROR-11, 12,
17, 30
ERROR-11, 12,
17, 30
ERROR-01, 11,
12, 17, 30, A0,
A1
ERROR-20, 21 Track information
ERROR-20, 21,24There is some-
ERROR-23 The MD contains
ERROR- MD play not pos-
serted.
heated.
Dirty disc Clean disc.
Scratched disc Replace disc.
Electrical or mechanical
cannot be read.
thing wrong with
the MD.
recorded information other
than music.
sible.
Replace disc.
Discontinue play
until the machine
temperature drops.
Turn the ignition
ON and OFF, or
switch to a different source, then
back to the MD
player.
Reload the MD.
Replace disc.
Replace disc.
Replace disc.
MD player and care
! Use MDs bearing this mark. Using a disc
other than a music MD may result in damage to this unit.
! Do not open the MD shutter by hand. For-
cing it open may result in damage.
Shutter
! Be sure to stick labels supplied with MDs
in the specified location. Failing to do this,
or sticking one label on top of another may
make it impossible for the MD to be removed.
English
En
35
Page 36

Appendix
Additional Information
! Do not use MDs with labels that are not af-
fixed correctly. Labels like this may catch
on something, preventing removal of the
MD. Before using an MD, remove the label
if it is not correctly affixed, and replace it
with a new label.
! Keep MDs out of direct sunlight and high
temperatures.
! If the surface of an MD cartridge is dirty,
wipe it gently with a clean, soft cloth.
! Do not apply benzene, thinner or other vo-
latile liquids to MDs.
! When using an MD cleaning disc, be sure
to read the discs instructions carefully.
Cleaning discs may result in damage to
this unit.
! When its cold, if you start playing an MD
immediately after switching the heater in a
room on, condensation on the optical lens
inside the player or on the MD may prevent
normal play. If this happens, turn off the
player for about an hour to allow the condensation to evaporate, and wipe damp
MD cartridge surfaces with a soft cloth.
HHHHHHHHHHHHHH
36
En
Page 37

HHHHHHHHHHHHHH
Additional Information
Appendix
Specifications
General
Rated power source ............... 14.4 V DC
(allowable voltage range:
12.0 14.4 V DC)
Grounding system ................... Negative type
Max. current consumption
..................................................... 10.0 A
Dimensions (W × H × D):
DIN
Chassis ..................... 178 × 50 × 157 mm
Nose ........................... 188 × 58 × 19 mm
D
Chassis ..................... 178 × 50 × 162 mm
Nose ........................... 170 × 46 × 14 mm
Weight .......................................... 1.2 kg
Audio/DSP
Continuous power output is 22 W per channel minimum
into 4 ohms, both channels driven 50 to 15,000 Hz with
no more than 5% THD.
Maximum power output ....... 50 W × 4
Load impedance ...................... 4 W (4 8 W allowable)
Preout max output level/output impedance
..................................................... 1.8 V/1 kW
Loudness contour ................... +10 dB (100 Hz), +7 dB (10
kHz) (volume: 30 dB)
Equalizer (9-Band Graphic Equalizer):
Frequency ..........................50/100/200/400/800 Hz
1.6/3.15/6.3/12.5 kHz
Equalization range ........ ±12 dB
Network:
HPF (Front/rear):
Frequency ................50/63/80/100/125 Hz
Slope .......................... 6 dB/oct, 12 dB/oct
Subwoofer:
Frequency ................50/63/80/100/125 Hz
Slope .......................... 12 dB/oct, 18 dB/oct
Gain ............................ +6 24 dB
Phase ........................ Normal/Reverse
Signal-to-noise ratio ............... 90 dB (1 kHz) (IEC-A net-
work)
Dynamic range ......................... 90 dB (1 kHz)
Number of channels .............. 2 (stereo)
FM tuner
Frequency range ...................... 87.5 108.0 MHz
Usable sensitivity ..................... 8 dBf (0.7 µV/75 W, mono,
S/N: 30 dB)
50 dB quieting sensitivity .....10 dBf (0.9 µV/75 W, mono)
Signal-to-noise ratio ............... 75 dB (IEC-A network)
Distortion ..................................... 0.3 % (at 65 dBf, 1 kHz,
stereo)
0.1 % (at 65 dBf, 1 kHz,
mono)
Frequency response ............... 30 15,000 Hz (±3 dB)
Stereo separation .................... 45 dB (at 65 dBf, 1 kHz)
AM tuner
Frequency range ...................... 531 1,602 kHz (9 kHz)
530 1,640 kHz (10 kHz)
Usable sensitivity ..................... 18 µV (S/N: 20 dB)
Signal-to-noise ratio ............... 65 dB (IEC-A network)
Infrared remote control
Wavelength ................................. 940 nm ±50 nm
Output ........................................... typ; 12 mw/sr per Infrared
LED
Notes
! US and foreign patents licensed from Dolby
Laboratories.
! Specifications and the design are subject to
possible modifications without notice due to
improvements.
English
MD player
System .......................................... Mini disc digital audio sys-
tem
Usable discs ..............................Mini disc
Signal format:
Sampling frequency ..... 44.1 kHz
Number of quantization bits
........................................... 16; linear
Frequency characteristics ...20 20,000 Hz (±1 dB)
En
37
Page 38

Conteúdo
Agradecemos por você ter adquirido este produto
Pioneer.
Leia as instruções de operação a seguir para saber como operar corretamente o
seu modelo. Ao terminar de ler as instruções, guarde-as em um local seguro para re-
ferência futura.
Antes de utilizar este produto
Sobre este manual 40
Precauções 40
Reprodução de MDs com gravações
longas 40
Utilização e cuidados com o controle
remoto 40
Instalação das baterias 40
Utilização do controle remoto 41
Proteção da sua unidade contra roubo 41
Extração do painel frontal 41
Colocação do painel frontal 42
Introdução aos botões
Unidade principal 43
Controle remoto 43
Ligar e desligar
Como ligar a unidade 45
Seleção de uma fonte 45
Como desligar a unidade 45
Sintonizador
Como escutar o rádio 46
Introdução à operação avançada do
sintonizador 47
Armazenamento e chamada das freqüências
de transmissão da memória 47
Sintonia em sinais fortes 47
Armazenamento das freqüências mais fortes
de transmissão 48
MD player incorporado
Reprodução de um MD 49
Introdução à operação avançada do MD
player incorporado 50
Repetição da reprodução 50
Reprodução de faixas em uma ordem
aleatória 50
Exploração de faixas de um MD 51
Pausa na reprodução do MD 51
Visualização de títulos do disco 51
Rolagem de títulos no display 52
Multi-CD player
Reprodução de um CD 53
Multi-CD player para 50 discos 53
Introdução à operação avançada do Multi-CD
player 54
Repetição da reprodução 54
Reprodução de faixas em uma ordem
aleatória 54
Exploração de CDs e faixas 55
Pausa na reprodução do CD 55
Utilização de listas de reprodução ITS 56
Criação de uma lista de reprodução
com a programação ITS 56
Reprodução da sua lista ITS 56
Exclusão de uma faixa da sua lista de
reprodução ITS 57
Exclusão de um CD da sua lista de
reprodução ITS 57
Utilização das funções de título de disco 58
Introdução de títulos de disco 58
Visualização de títulos do disco 58
Seleção de discos da lista de títulos
de disco 59
Utilização das funções CD TEXT 59
Visualização de títulos em discos com
CD TEXT 59
Rolagem de títulos no display 59
Utilização de compressão (COMP) e ênfase
de graves (DBE) 59
Ajustes de áudio
Introdução aos ajustes de áudio 61
Utilização do ajuste de equilíbrio 61
Ajuste da sonoridade 62
Utilização da saída do alto-falante de graves
secundário 62
38
Ptbr
Page 39

Conteúdo
Ajuste do alto-falante de graves
secundário (filtro de baixa
freqüência) 62
Ajuste da inclinação de atenuação do
filtro de baixa freqüência 63
Utilização do filtro de alta freqüência 63
Ajuste da inclinação de atenuação do
filtro de alta freqüência 63
Utilização da saída sem variação de
volume 64
Ajuste do nível de saída sem variação
de volume 64
Ajuste dos níveis de fonte 64
Processador de sinal digital
Utilização do processador de sinal
digital 66
Utilização do controle do campo de som e do
som BBE 66
Chamada das programações do
campo de som da memória 66
Ajuste do nível de som BBE 67
Utilização do equalizador gráfico 67
Chamada das curvas do equalizador
da memória 67
Ajuste das curvas do equalizador 68
Ajuste do equalizador gráfico de 9
bandas 68
Utilização do seletor de posição 69
Utilização do Nivelador automático de
som 69
Ajustes iniciais
Definição dos ajustes iniciais 70
Ajuste de hora 70
Ajuste do passo de sintonia FM 70
Ajuste do passo de sintonia AM 71
Ativação do som de advertência 71
Ativação do ajuste auxiliar 71
Ativação do ajuste do redutor de luz 71
Ativação do ajuste da saída RCA 72
Seleção do atenuador digital 72
Alternância de emudecimento/atenuação do
telefone 72
Outras funções
Ativação ou desativação da visualização de
hora 73
Utilização da fonte AUX 73
Seleção de AUX como a fonte 73
Ajuste do título AUX 73
Ajuste do indicador de nível 73
Informações adicionais
Compreensão das mensagens de erro do MD
player incorporado 75
Cuidados com o MD player 75
Especificações 77
Português (B)
Ptbr
39
Page 40

Seção
01
HHHHHHHHHHHHHH
Antes de utilizar este
produto
Sobre este manual
Esta unidade vem com diversas funções sofisticadas que garantem recepção e operação
superiores. Todas as funções foram projetadas
para serem utilizadas da forma mais fácil possível, mas muitas delas requerem explicação.
Este manual de instruções tem como objetivo
ajudá-lo a obter total benefício do potencial
deste produto e fazer com que você aproveite
ao máximo o seu áudio.
É recomendável familiarizar-se com as funções e respectivas operações, lendo o manual antes de começar a utilizar esta unidade.
É especialmente importante que você leia e
observe as precauções na esta página e em
outras seções.
Precauções
! Mantenha este manual acessível como re-
ferência para os procedimentos de operação e precauções.
! Deixe sempre o volume baixo para que
possa ouvir os sons do tráfego.
! Proteja este produto contra umidade.
! Se a bateria do carro for desconectada ou
descarregada, a memória programada será
apagada e deverá ser reprogramada.
! Se esta unidade não funcionar correta-
mente, entre em contato com o revendedor
ou a central de serviços autorizados da Pioneer mais próxima.
Reprodução de MDs com
gravações longas
Esta unidade é compatível com MDLP, por
esse motivo você pode reproduzir MDs com
gravações longas.
! MDLP é um sistema de compressão de
dados que permite gravar em MDs convencionais 2 ou 4 vezes a duração anteriormente possível.
Utilização e cuidados com o
controle remoto
Instalação das baterias
Remova a tampa localizada na parte posterior
do controle remoto e insira as baterias com os
pólos mais (+) e menos () apontando para a
direção apropriada.
CUIDADO
! Utilize apenas as baterias AAA ou
IEC R03 1,5 V.
! Remova as baterias se não for utilizar o con-
trole remoto por um mês ou mais.
! Não tente recarregar as baterias fornecidas.
! Não misture baterias novas e utilizadas.
! Em caso de vazamento da bateria, limpe com-
pletamente o controle remoto e instale novas
baterias.
! Ao descartar baterias utilizadas, certifique-se
de estar em conformidade com as regulamentações governamentais ou com as normas
das instituições públicas ambientais que se
aplicam ao seu país/região.
40
Ptbr
Page 41

Antes de utilizar este
produto
HHHHHHHHHHHHHH
Seção
01
Utilização do controle remoto
Aponte o controle remoto para a direção do
painel frontal para operá-lo.
Importante
! Não deixe o controle remoto exposto a tem-
peraturas altas ou à luz direta do sol.
! O controle remoto poderá não funcionar cor-
retamente se ficar exposto à luz direta do sol.
! Não deixe o controle remoto cair no chão,
onde pode ficar preso embaixo do pedal do
freio ou acelerador.
! Quando o controle remoto não estiver sendo
utilizado, encaixe-o firmemente na base de
montagem fornecida.
! Se você pressionar FUNCTION no controle re-
moto e ao mesmo tempo pressionar BAND,
ele não funcionará corretamente. Para cancelar esse ajuste, pressione AUDIO no controle
remoto e BAND ao mesmo tempo para retornar ao ajuste anterior.
Proteção da sua unidade
contra roubo
O painel frontal pode ser extraído da unidade
principal e armazenado em uma caixa protetora, que acompanha a unidade, como uma
medida anti-roubo.
! Se, após desligar a ignição, o painel frontal
não for extraído da unidade principal dentro de cinco segundos, um som de advertência será emitido.
! Você pode desativar o som de advertência.
Consulte Ativação do som de advertência na
página 71.
Importante
! Nunca force nem segure com firmeza o dis-
play e os botões ao extrair ou colocar o painel
frontal.
! Evite sujeitar o painel frontal a impactos ex-
cessivos.
! Mantenha o painel frontal distante da luz dire-
ta do sol e não o exponha a temperaturas
altas.
Extração do painel frontal
1 Pressione OPEN para abrir o painel
frontal.
Português (B)
2 Segure com firmeza o lado esquerdo do
painel frontal e puxe-o cuidadosamente
para fora.
Cuidado para não segurá-lo com muita força
ou deixá-lo cair.
Ptbr
41
Page 42

Seção
01
Antes de utilizar este
produto
3 Coloque o painel frontal na caixa protetora fornecida para mantê-lo em segurança.
Colocação do painel frontal
% Reposicione o painel frontal segurando-o verticalmente diante da unidade em
questão e encaixando-o com firmeza nos
ganchos de fixação.
HHHHHHHHHHHHHH
42
Ptbr
Page 43

78
a
HHHHHHHHHHHHHH
Introdução aos botões
Seção
02
1
c
b
9
Unidade principal
1 Botão CLOCK
Pressione para alterar para a visualização
de hora.
2 Botão AUDIO
Pressione para selecionar vários controles
de qualidade do som.
3 Botão OPEN
Pressione para abrir o painel frontal.
4 Botões a/b/c/d
Pressione para enviar comandos de sintonia
por busca manual, avanço rápido, retrocesso e busca de faixas. Também utilizados
para controlar funções.
5 Botão BAND
Pressione para selecionar entre três bandas
FM e uma banda AM e para cancelar o
modo de controle das funções.
6 Botão DSP
Pressione para selecionar as funções do
campo de som.
7 Botão FUNCTION
Pressione para selecionar as funções.
2
3
4
5
6
8 Botões 16
Pressione para sintonia de emissora programada e busca de número de disco quando
for utilizar um Multi-CD player.
9 Botão DISPLAY
Pressione para selecionar diferentes visualizações.
a Botão EQ
Pressione para selecionar várias curvas do
equalizador.
b Botão SOURCE
Esta unidade é ligada ao selecionar uma
fonte. Pressione para percorrer todas as
fontes disponíveis.
c VOLUME
Ao pressionar VOLUME, ele se estenderá
para fora de modo que fique mais fácil de
girar. Para retrair VOLUME, pressione-o novamente. Gire para aumentar ou diminuir o
volume.
Controle remoto
A operação é a mesma que utilizar os botões
na unidade principal.
Português (B)
43
Ptbr
Page 44

Seção
02
d Botão ATT
HHHHHHHHHHHHHH
Introdução aos botões
d
e
6
4
5
7
f
g
Pressione para diminuir rapidamente o
nível de volume, em aproximadamente 90%.
Pressione mais uma vez para retornar ao
nível original de volume.
2
h
e Botão VOLUME
Pressione para aumentar ou diminuir o volume.
f Botão CD
Pressione para selecionar o Multi-CD player
como a fonte.
g Botão MD
Pressione para selecionar o MD player incorporado como a fonte.
h Botão TUNER
Pressione para selecionar o sintonizador
como a fonte.
44
Ptbr
Page 45

Ligar e desligar
HHHHHHHHHHHHHH
Seção
03
Como ligar a unidade
% Pressione SOURCE para ligar a unidade.
Quando você seleciona uma fonte, a unidade
é ligada.
Seleção de uma fonte
Você pode selecionar uma fonte que deseja
ouvir. Para alternar para o MD player incorporado, carregue um disco nesta unidade (consulte a página 49).
% Ao utilizar a unidade principal, pressione SOURCE para selecionar uma fonte.
Pressione SOURCE várias vezes para alternar
entre as seguintes fontes:
SintonizadorTelevisãoCD player
Multi-CD playerMD player incorporado
Unidade externa 1Unidade externa 2
AUX
% Ao utilizar o controle remoto, pressione
TUNER, MD ou CD para selecionar uma
fonte.
Pressione várias vezes cada botão para alternar entre as seguintes fontes:
TUNER: SintonizadorTelevisãoFontes
desligadas
MD: MD player incorporadoFontes desligadas
CD: CD playerMulti-CD playerFontes
desligadas
Quando nenhuma disqueteira estiver in-
serida no Multi-CD player.
Quando nenhum disco estiver inserido no
CD player.
Quando AUX (Entrada auxiliar) estiver
ajustada a OFF (consulte a página 71).
! Unidade externa refere-se a um produto Pio-
neer (por exemplo, um produto que será disponibilizado futuramente) que, embora seja
incompatível como uma fonte, possibilita o
controle das funções básicas por esta unidade. Duas unidades externas podem ser controladas por esta unidade. Quando duas
unidades externas forem conectadas, a alocação das mesmas à unidade externa 1 ou à
unidade externa 2 será automaticamente ajustada por esta unidade.
! Quando o fio condutor azul/branco desta uni-
dade é conectado ao terminal de controle do
relé da antena automática do veículo, a antena se estende quando a fonte da unidade é
ligada. Para retrair a antena, desligue a
fonte.
Como desligar a unidade
% Pressione SOURCE e segure até desligar
a unidade.
Português (B)
Notas
! Nos seguintes casos, a fonte de som não mu-
dará:
Quando uma unidade correspondente a
cada fonte não estiver conectada a esta
unidade.
Quando nenhum disco estiver inserido
nesta unidade.
Ptbr
45
Page 46

2
Seção
04
HHHHHHHHHHHHHH
Sintonizador
Como escutar o rádio
1
3 4
Estas são as etapas básicas necessárias para
operar o rádio. Operação mais avançada do
sintonizador será explicada a partir da próxima página.
Importante
Se você estiver utilizando esta unidade na América do Norte, Central ou do Sul, reajuste o passo
de sintonia AM (consulte Ajuste do passo de sin-
tonia AM na página 71).
1 Indicador de estéreo (5)
Mostra que a freqüência selecionada está
sendo transmitida em estéreo.
2 Indicador de banda
Mostra em qual banda o rádio está sintonizado, AM ou FM.
3 Pressione BAND para selecionar uma
banda.
Pressione BAND até visualizar a banda desejada, F1, F2, F3 para FM ou AM.
4 Para sintonia manual, pressione c ou d
com toques rápidos.
As freqüências mudam, passo a passo, para
cima ou para baixo.
5 Para sintonia por busca, pressione e segure c ou d por aproximadamente um segundo e solte.
O sintonizador buscará as freqüências até encontrar uma transmissão forte o suficiente
para boa recepção.
# Você pode cancelar a sintonia por busca
pressionando c ou d com um toque rápido.
# Se você pressionar e segurar c ou d, poderá
pular as emissoras. A sintonia por busca começará assim que os botões forem liberados.
Nota
Quando a freqüência selecionada estiver sendo
transmitida em estéreo, o indicador de estéreo
(5) acenderá.
3 Indicador de freqüência
Mostra em qual freqüência o sintonizador
está sintonizado.
4 Indicador de número programado
Mostra qual programação foi selecionada.
1 Pressione SOURCE para selecionar o sintonizador.
Pressione SOURCE até visualizar TUNER.
2 Utilize VOLUME para ajustar o nível de
som.
Gire para aumentar ou diminuir o volume.
46
Ptbr
Page 47

Sintonizador
HHHHHHHHHHHHHH
Seção
04
Introdução à operação
avançada do sintonizador
1
2
1 Indicador LOC
Mostra quando a sintonia por busca local
está ativada.
2 Visualização de função
Mostra o status da função.
3 Indicador de número programado
Mostra qual programação foi selecionada.
% Pressione FUNCTION para visualizar os
nomes das funções.
Pressione FUNCTION várias vezes para alternar entre as seguintes funções:
BSM (Memória das melhores emissoras)
LOCAL (Sintonia por busca local)
# Para retornar à visualização de freqüência,
pressione BAND.
3
derá facilmente armazenar até seis freqüências de transmissão a serem chamadas
posteriormente da memória com o toque de
um botão.
% Ao encontrar uma freqüência que deseja armazenar na memória, pressione um
botão de sintonia de emissora programada
16 e segure até o número programado
parar de piscar.
O número que você pressionou piscará no indicador de número programado e permanecerá aceso. A freqüência da emissora de rádio
selecionada terá sido armazenada na memória.
Na próxima vez que você pressionar o mesmo
botão de sintonia de emissora programada
16, a freqüência da emissora de rádio será
chamada da memória.
Notas
! Até 18 emissoras FM, 6 para cada uma das
três bandas FM, e 6 emissoras AM podem ser
armazenadas na memória.
! Você também pode utilizar a e b para cha-
mar da memória as freqüências de emissoras
de rádio atribuídas aos botões de sintonia de
emissora programada 16.
Português (B)
Nota
Se você não operar a função em aproximadamente 30 segundos, o display retornará automaticamente para a visualização de freqüência.
Armazenamento e
chamada das freqüências
de transmissão da memória
Se você pressionar qualquer um dos botões
de sintonia de emissora programada 16,po-
Sintonia em sinais fortes
A sintonia por busca local permite que você
sintonize apenas as emissoras de rádio com
sinais suficientemente fortes para boa recepção.
1 Pressione FUNCTION para selecionar
LOCAL.
Pressione FUNCTION até visualizar LOCAL no
display.
Ptbr
47
Page 48

Seção
04
HHHHHHHHHHHHHH
Sintonizador
2 Pressione a para ativar a sintonia por
busca local.
A sensibilidade de busca local (por exemplo,
LOCAL 2) será visualizada no display.
3 Pressione c ou d para ajustar a sensibilidade.
Existem quatro níveis de sensibilidade para
FM e dois níveis para AM:
FM: LOCAL 1LOCAL 2LOCAL 3
LOCAL 4
AM: LOCAL 1LOCAL 2
O ajuste LOCAL 4 permite a recepção apenas
das emissoras mais fortes, enquanto os
ajustes inferiores permitem que você receba
progressivamente as emissoras mais fracas.
4 Se quiser retornar à sintonia por busca
normal, pressione b para desativar a sintonia por busca local.
LOCAL:OFF será visualizado no display.
Armazenamento das
freqüências mais fortes de
transmissão
A BSM (Memória das melhores emissoras)
permite que você armazene automaticamente
as seis freqüências mais fortes de transmissão nos botões de sintonia de emissora programada 16 e, uma vez armazenadas, você
poderá sintonizar essas freqüências com o
toque de um botão.
transmissão são armazenadas nos botões de
sintonia de emissora programada 16 na
ordem de intensidade do sinal. Ao terminar,
BSM pára de piscar.
# Para cancelar o processo de armazenamento,
pressione b.
Nota
O armazenamento das freqüências de transmissão com BSM pode substituir as freqüências de
transmissão gravadas utilizando 16.
1 Pressione FUNCTION para selecionar
BSM.
Pressione FUNCTION até visualizar BSM no
display.
2 Pressione a para ativar BSM.
BSM começa a piscar. Enquanto BSM fica pis-
cando, as seis freqüências mais fortes de
48
Ptbr
Page 49

2
3
HHHHHHHHHHHHHH
MD player incorporado
Seção
05
Reprodução de um MD
1
Estas são as etapas básicas necessárias para
reproduzir um MD com o MD player incorporado. Operação mais avançada do MD será explicada a partir da próxima página.
1 Indicador MDLP (×2 ou ×4)
Mostra quando um MD com gravação
longa está sendo reproduzido.
2 Indicador de tempo de reprodução
Mostra o tempo de reprodução decorrido da
faixa atual.
3 Indicador de número da faixa
Mostra a faixa atualmente sendo reproduzida.
1 Pressione OPEN para abrir o painel
frontal.
O slot de carregamento de MD aparece.
# Após um MD ter sido inserido, pressione
SOURCE para selecionar o MD player incorporado.
2 Insira um MD no slot de carregamento
de MD.
A reprodução iniciará automaticamente.
Slot de carregamento de MD
Botão EJECT
# Você pode ejetar um MD pressionando EJECT.
# Para evitar o mau funcionamento, certifique-
se de que nenhum objeto metálico entre em contato com os terminais, enquanto o painel frontal
estiver aberto.
3 Feche o painel frontal.
4 Utilize VOLUME para ajustar o nível de
som.
Gire para aumentar ou diminuir o volume.
5 Para executar um avanço rápido ou retrocesso, pressione e segure c ou d.
6 Para retroceder ou avançar uma faixa,
pressione c ou d.
Pressionar d pulará para o início da próxima
faixa. Pressionar c uma vez pulará para o
início da faixa atual. Pressionar novamente
pulará para a faixa anterior.
Notas
! Não insira nada além de um MD no slot de
carregamento de MD.
! Um MD deixado parcialmente inserido após a
ejeção pode acarretar danos ou cair.
! Carregue um MD após confirmar se seu ob-
turador está fechado (consulte Cuidados com
o MD player na página 75).
! Quando você carrega um disco, esta unidade
lê as informações gravadas nele, como o número de faixas. Durante a leitura do disco,
TOC Read é indicado no display.
! Se o MD player incorporado não funcionar
corretamente, uma mensagem de erro, como
ERROR-11, poderá ser visualizada. Consulte
Compreensão das mensagens de erro do MD
player incorporado na página 75.
! Quando você reproduz MDs com gravações
longas, o indicador ×2 ou ×4 é visualizado.
! Quando um MD é inserido, os títulos do disco
e das faixas começam a rolar automaticamente para a esquerda.
Português (B)
Ptbr
49
Page 50

Seção
05
HHHHHHHHHHHHHH
MD player incorporado
Introdução à operação
avançada do MD player
incorporado
243
1
1 Visualização de função
Mostra o status da função.
2 Indicador RPT
Mostra quando a reprodução com repetição
está ativada.
3 Indicador MDLP (×2 ou ×4)
Mostra quando um MD com gravação
longa está sendo reproduzido.
4 Indicador de número da faixa
Mostra a faixa atualmente sendo reproduzida.
% Pressione FUNCTION para visualizar os
nomes das funções.
Pressione FUNCTION várias vezes para alternar entre as seguintes funções:
RPT (Reprodução com repetição)RDM (Reprodução aleatória)Scan (Reprodução com
exploração)PAUSE (Pausa)
# Para retornar à visualização de reprodução,
pressione BAND.
Nota
Se você não operar a função em aproximadamente 30 segundos, o display retornará automaticamente para a visualização de reprodução.
Repetição da reprodução
A reprodução com repetição permite que você
ouça a mesma faixa novamente.
1 Pressione FUNCTION para selecionar
RPT.
Pressione FUNCTION até visualizar RPT no
display.
2 Pressione a para ativar a reprodução
com repetição.
RPT :ON será visualizado no display. A faixa
atualmente sendo reproduzida tocará e será
repetida.
3 Pressione b para desativar a reprodução com repetição.
RPT :OFF será visualizado no display. A faixa
atualmente sendo reproduzida continuará tocando e seguirá com a próxima.
Nota
Se você executar a busca de faixas ou o avanço
rápido/retrocesso, a reprodução com repetição
será automaticamente cancelada.
Reprodução de faixas em
uma ordem aleatória
A reprodução aleatória permite que você reproduza as faixas do MD em uma ordem aleatória.
1 Pressione FUNCTION para selecionar
RDM.
Pressione FUNCTION até visualizar RDM no
display.
50
Ptbr
Page 51

HHHHHHHHHHHHHH
MD player incorporado
Seção
05
2 Pressione a para ativar a reprodução
aleatória.
RDM :ON será visualizado no display. As
faixas serão reproduzidas em uma ordem aleatória.
3 Pressione b para desativar a reprodução aleatória.
RDM :OFF será visualizado no display. As
faixas continuarão sendo reproduzidas na
ordem normal.
Exploração de faixas de um
MD
A reprodução com exploração permite que
você ouça os primeiros 10 segundos de cada
faixa no MD.
1 Pressione FUNCTION para selecionar
Scan.
Pressione FUNCTION até visualizar Scan no
display.
2 Pressione a para ativar a reprodução
com exploração.
Scan:ON será visualizado no display. Os pri-
meiros 10 segundos de cada faixa serão reproduzidos.
3 Ao encontrar a faixa desejada, pressione b para desativar a reprodução com
exploração.
Scan:OFF será visualizado no display. A faixa
continuará sendo reproduzida.
# Se o display retornou automaticamente para a
visualização de reprodução, selecione Scan mais
uma vez ao pressionar FUNCTION.
Nota
Depois que a exploração de um MD for concluída, a reprodução normal das faixas começará
novamente.
Pausa na reprodução do MD
A pausa permite que você pare temporariamente a reprodução do MD.
1 Pressione FUNCTION para selecionar
PAUSE.
Pressione FUNCTION até visualizar PAUSE no
display.
2 Pressione a para ativar a pausa.
PAUSE:ON será visualizado no display. Ocorre
uma pausa na reprodução da faixa atual.
3 Pressione b para desativar a pausa.
PAUSE:OFF será visualizado no display. A re-
produção será retomada no mesmo ponto em
que a pausa foi ativada.
Visualização de títulos do
disco
Ao reproduzir um MD, você pode ativar a visualização de texto, como título do disco e
título da faixa.
% Pressione DISPLAY.
Pressione DISPLAY várias vezes para alternar
entre os seguintes ajustes:
Tempo de reproduçãoDISC TTL (Título do
disco)TRK TTL (Título da faixa)
# Se nenhum título tiver sido introduzido ao
disco atualmente sendo reproduzido, NO DATA
será visualizado.
Português (B)
Ptbr
51
Page 52

Seção
05
MD player incorporado
Rolagem de títulos no display
Esta unidade pode exibir as 8 primeiras letras
de DISC TTL e TRK TTL apenas. Quando as informações gravadas têm mais do que 8 letras,
você pode rolar o texto à esquerda para que o
restante do título possa ser visto.
% Pressione DISPLAY e segure até o título
começar a rolar para a esquerda.
O restante do título será visualizado no display.
HHHHHHHHHHHHHH
52
Ptbr
Page 53

1 2 3
Multi-CD player
HHHHHHHHHHHHHH
Seção
06
Reprodução de um CD
Você pode utilizar esta unidade para controlar
um Multi-CD player, que é vendido separadamente.
Estas são as etapas básicas necessárias para
reproduzir um CD com o Multi-CD player. Operação mais avançada do CD será explicada a
partir da próxima página.
1 Indicador de número do disco
Mostra o disco atualmente sendo reproduzido.
2 Indicador de tempo de reprodução
Mostra o tempo de reprodução decorrido da
faixa atual.
3 Indicador de número da faixa
Mostra a faixa atualmente sendo reproduzida.
# Também é possível selecionar um disco seqüencialmente ao pressionar a/b.
4 Para executar um avanço rápido ou retrocesso, pressione e segure c ou d.
5 Para retroceder ou avançar uma faixa,
pressione c ou d.
Pressionar d pulará para o início da próxima
faixa. Pressionar c uma vez pulará para o
início da faixa atual. Pressionar novamente
pulará para a faixa anterior.
Notas
! Quando o Multi-CD player executa as op-
erações preparatórias, Ready é visualizado.
! Se o Multi-CD player não funcionar correta-
mente, uma mensagem de erro, como
ERROR-11, poderá ser visualizada. Consulte o
manual do proprietário do Multi-CD player.
! Se não existirem discos na disqueteira do
Multi-CD player, No Disc será visualizado.
! Quando você seleciona um disco com CD
TEXT em um Multi-CD player compatível com
CD TEXT, os títulos dos discos e das faixas começam a rolar automaticamente para a
esquerda.
Português (B)
1 Pressione SOURCE para selecionar o
Multi-CD player.
Pressione SOURCE até visualizar Multi-CD.
2 Utilize VOLUME para ajustar o nível de
som.
Gire para aumentar ou diminuir o volume.
3 Selecione um disco que deseja ouvir
com os botões 16.
Para os discos nos locais de 1 a 6, pressione o
botão com o número correspondente.
Se quiser selecionar um disco nos locais de 7
a 12, pressione e segure os números correspondentes, como 1 para o disco 7, até visualizar o número do disco no display.
Multi-CD player para 50 discos
Apenas as funções descritas neste manual
são suportadas nos Multi-CD players para 50
discos.
Ptbr
53
Page 54

3
Seção
06
HHHHHHHHHHHHHH
Multi-CD player
Introdução à operação
avançada do Multi-CD player
2
1
1 Indicador RPT
Mostra quando a série de repetição está selecionada para a faixa atual.
2 Visualização de função
Mostra o status da função.
3 Indicador de número da faixa
Mostra a faixa atualmente sendo reproduzida.
% Pressione FUNCTION para visualizar os
nomes das funções.
Pressione FUNCTION várias vezes para alternar entre as seguintes funções:
RPT (Reprodução com repetição)TTL LIST
(Lista de títulos do disco)RDM (Reprodução
aleatória)Scan (Reprodução com exploração)ITS.P (Reprodução ITS)PAUSE
(Pausa)COMP (Compressão e DBE)
# Para retornar à visualização de reprodução,
pressione BAND.
Nota
Se você não operar a função em aproximadamente 30 segundos, o display retornará automaticamente para a visualização de reprodução.
Repetição da reprodução
Existem três séries de reprodução com repetição para o Multi-CD player: MCD (Repetição
de Multi-CD player), TRK (Repetição de uma
faixa) e DSC (Repetição de disco).
1 Pressione FUNCTION para selecionar
RPT.
Pressione FUNCTION até visualizar RPT no
display.
2 Pressione c ou d para selecionar a
série de repetição.
Pressione c ou d até visualizar a série de repetição desejada no display.
! MCD Repete todos os discos no Multi-CD
player
! TRK Repete apenas a faixa atual
! DSC Repete o disco atual
Notas
! Se você selecionar outros discos durante a re-
produção com repetição, a série de reprodução com repetição mudará para MCD.
! Se você executar a busca de faixas ou o
avanço rápido/retrocesso durante TRK, a série
de reprodução com repetição mudará para
DSC.
Reprodução de faixas em
uma ordem aleatória
A reprodução aleatória permite que você reproduza as faixas em uma ordem aleatória
dentro da série de repetição, MCD e DSC.
1 Selecione a série de repetição.
Consulte Repetição da reprodução nesta página.
54
Ptbr
Page 55

Multi-CD player
HHHHHHHHHHHHHH
Seção
06
2 Pressione FUNCTION para selecionar
RDM.
Pressione FUNCTION até visualizar RDM no
display.
3 Pressione a para ativar a reprodução
aleatória.
RDM :ON será visualizado no display. As
faixas serão reproduzidas em uma ordem aleatória dentro das séries MCD ou DSC anteriormente selecionadas.
4 Pressione b para desativar a reprodução aleatória.
RDM :OFF será visualizado no display. As
faixas continuarão sendo reproduzidas na
ordem normal.
Nota
Se você ativar a reprodução aleatória durante
DSC e, em seguida, retornar à visualização de reprodução, DRDM será visualizado no display.
Exploração de CDs e faixas
Enquanto estiver utilizando DSC, o início de
cada faixa no disco selecionado será reproduzido por aproximadamente 10 segundos. Enquanto estiver utilizando MCD, o início da
primeira faixa de cada disco será reproduzido
por aproximadamente 10 segundos.
1 Selecione a série de repetição.
Consulte Repetição da reprodução na página
anterior.
2 Pressione FUNCTION para selecionar
Scan.
Pressione FUNCTION até visualizar Scan no
display.
3 Pressione a para ativar a reprodução
com exploração.
Scan :ON será visualizado no display. Os pri-
meiros 10 segundos de cada faixa do disco
atual (ou da primeira faixa de cada disco)
serão reproduzidos.
4 Ao encontrar a faixa desejada (ou
disco), pressione b para desativar a reprodução com exploração.
Scan :OFF será visualizado no display. A faixa
(ou disco) continuará sendo reproduzida.
# Se o display retornou automaticamente para a
visualização de reprodução, selecione Scan mais
uma vez ao pressionar FUNCTION.
Notas
! Depois que a exploração de uma faixa ou
disco for concluída, a reprodução normal das
faixas começará novamente.
! Se você ativar a reprodução com exploração
durante DSC e, em seguida, retornar à visualização de reprodução, DSCN será visualizado
no display.
Pausa na reprodução do CD
A pausa permite que você pare temporariamente a reprodução do CD.
1 Pressione FUNCTION para selecionar
PAUSE.
Pressione FUNCTION até visualizar PAUSE no
display.
2 Pressione a para ativar a pausa.
PAUSE:ON será visualizado no display. Ocorre
uma pausa na reprodução da faixa atual.
Português (B)
Ptbr
55
Page 56

Seção
06
HHHHHHHHHHHHHH
Multi-CD player
3 Pressione b para desativar a pausa.
PAUSE:OFF será visualizado no display. A re-
produção será retomada no mesmo ponto em
que a pausa foi ativada.
Utilização de listas de
reprodução ITS
ITS (Seleção instantânea de faixas) permite
que você crie uma lista de reprodução das
faixas favoritas que estão na disqueteira do
Multi-CD player. Depois de adicionar as suas
faixas favoritas à lista de reprodução, você poderá ativar a reprodução ITS e tocar apenas as
seleções.
Criação de uma lista de reprodução
com a programação ITS
Você pode utilizar ITS para programar e reproduzir até 99 faixas por disco de até 100 discos
(com título de disco). (Em Multi-CD player vendidos antes de CDX-P1250 e CDX-P650, até 24
faixas podem ser armazenadas na lista de reprodução.)
1 Reproduza um CD que deseja programar.
Pressione a ou b para selecionar um CD.
2 Pressione FUNCTION e segure até visualizar Title In no display, em seguida, pressione FUNCTION para selecionar ITS.
Depois de visualizar Title In, pressione
FUNCTION várias vezes; as seguintes funções
serão visualizadas no display:
Title In (Introdução de títulos de disco)ITS
(Programação ITS)
# Ao reproduzir um disco com CD TEXT em um
Multi-CD player compatível com CD TEXT, você
não poderá alternar para Title In. O título do
disco já terá sido gravado em um disco com CD
TEXT.
3 Selecione uma faixa desejada ao pressionar c ou d.
4 Pressione a para armazenar a faixa
atualmente sendo reproduzida na lista de
reprodução.
ITS IN é rapidamente visualizado e a seleção
sendo reproduzida é adicionada à sua lista de
reprodução. O display mostrará ITS novamente.
5 Pressione BAND para retornar à visualização de reprodução.
Nota
Depois que dados para 100 discos forem armazenados na memória, dados para um novo disco
sobregravarão os anteriores.
Reprodução da sua lista ITS
A reprodução ITS permite que você ouça as
faixas programadas na lista de reprodução
ITS. Ao ativar a reprodução ITS, as faixas da
sua lista de reprodução ITS no Multi-CD player
começarão a tocar.
1 Selecione a série de repetição.
Consulte Repetição da reprodução na página
54.
2 Pressione FUNCTION para selecionar
ITS.P.
Pressione FUNCTION até visualizar ITS.P no
display.
3 Pressione a para ativar a reprodução
ITS.
ITS.P:ON será visualizado no display. A repro-
dução começará com as faixas da sua lista de
56
Ptbr
Page 57

Multi-CD player
HHHHHHHHHHHHHH
Seção
06
reprodução dentro das séries MCD ou DSC
anteriormente selecionadas.
# Se nenhuma faixa na série atual estiver programada para reprodução ITS, ITSempty será visualizado.
4 Pressione b para desativar a reprodução ITS.
ITS.P:OFF será visualizado no display. A repro-
dução continuará na ordem normal da faixa e
do CD atualmente sendo reproduzidos.
Exclusão de uma faixa da sua
lista de reprodução ITS
Quando quiser excluir uma faixa da sua lista
de reprodução ITS, isso será possível se a reprodução ITS estiver ativada.
Se a reprodução ITS já estiver ativada, vá para
a Etapa 2. Se a reprodução ITS ainda não estiver ativada, pressione FUNCTION.
1 Reproduza um CD do qual deseja excluir uma faixa da sua lista de reprodução
ITS e ative a reprodução ITS.
Consulte Reprodução da sua lista ITS na página anterior.
2 Pressione FUNCTION e segure até visualizar Title In no display, em seguida, pressione FUNCTION para selecionar ITS.
Depois de visualizar Title In, pressione
FUNCTION até visualizar ITS no display.
# Se não existirem faixas da sua lista de reprodução na série atual, ITSempty será visualizado
e a reprodução normal será retomada.
5 Pressione BAND para retornar à visualização de reprodução.
Exclusão de um CD da sua lista
de reprodução ITS
Quando quiser excluir todas as faixas de um
CD da sua lista de reprodução ITS, isso será
possível se a reprodução ITS estiver desativada.
1 Reproduza um CD que deseja excluir.
Pressione a ou b para selecionar um CD.
2 Pressione FUNCTION e segure até visualizar Title In no display, em seguida, pressione FUNCTION para selecionar ITS.
Depois de visualizar Title In, pressione
FUNCTION até visualizar ITS no display.
3 Pressione b para excluir todas as faixas
no CD atualmente sendo reproduzido da
sua lista de reprodução ITS.
Todas as faixas no CD atualmente sendo reproduzido são excluídas da sua lista de reprodução e ITSclear é visualizado.
4 Pressione BAND para retornar à visualização de reprodução.
Português (B)
3 Selecione uma faixa desejada ao pressionar c ou d.
4 Pressione b para excluir uma faixa da
sua lista de reprodução ITS.
A seleção atualmente sendo reproduzida é excluída da sua lista de reprodução ITS e a reprodução da próxima faixa é iniciada.
Ptbr
57
Page 58

Seção
06
HHHHHHHHHHHHHH
Multi-CD player
Utilização das funções de
título de disco
Você pode introduzir títulos de CD e exibi-los.
Em seguida, pode procurar e selecionar facilmente um disco desejado para reprodução.
Introdução de títulos de disco
A função Introdução de títulos de disco permite que você introduza títulos de CD com até
8 letras e, no máximo, 100 títulos de disco
(com lista de reprodução ITS) no Multi-CD
player.
1 Reproduza um CD ao qual deseja introduzir o título.
Pressione a ou b para selecionar um CD.
2 Pressione FUNCTION e segure até visualizar Title In no display.
Depois de visualizar Title In, pressione
FUNCTION várias vezes; as seguintes funções
serão visualizadas no display:
Title In (Introdução de títulos de disco)ITS
(Programação ITS)
# Ao reproduzir um disco com CD TEXT em um
Multi-CD player compatível com CD TEXT, você
não poderá alternar para Title In. O título do
disco já terá sido gravado em um disco com CD
TEXT.
3 Pressione o botão com o número 1 para
selecionar o tipo de caractere desejado.
Pressione várias vezes o botão com o número
1 para alternar entre os seguintes tipos de caracteres:
Alfabeto (letra maiúscula), números e símbolosAlfabeto (letra minúscula)
# Você pode optar por introduzir números e
símbolos ao pressionar o botão com o número 2.
4 Pressione a ou b para selecionar uma
letra do alfabeto.
Cada vez que pressionar a, uma letra do alfabeto será visualizada na ordem A B C ... X Y Z;
números e símbolos serão visualizados na
ordem 1 2 3 ... | } ¯. Cada vez que pressionar
b, uma letra será visualizada na ordem inversa, como Z Y X ... C B A.
5 Pressione d para mover o cursor para a
próxima posição de caractere.
Quando a letra desejada for visualizada, pressione d para mover o cursor para a próxima
posição e, em seguida, selecione a próxima
letra. Pressione c para voltar no display.
6 Mova o cursor para a última posição
pressionando d depois de introduzir o
título.
Ao pressionar d mais uma vez, o título introduzido será armazenado na memória.
7 Pressione BAND para retornar à visualização de reprodução.
Notas
! Os títulos permanecerão na memória, mesmo
após o disco ter sido removido da disqueteira,
e serão chamados da memória quando o
disco for novamente inserido.
! Depois que dados para 100 discos forem ar-
mazenados na memória, dados para um novo
disco sobregravarão os anteriores.
Visualização de títulos do disco
Você pode visualizar o título de qualquer
disco, ao qual foi introduzido um título de
disco.
58
Ptbr
Page 59

Multi-CD player
HHHHHHHHHHHHHH
Seção
06
% Pressione DISPLAY.
Pressione DISPLAY várias vezes para alternar
entre os seguintes ajustes:
Tempo de reproduçãoDISC TTL (Título do
disco)
Ao selecionar DISC TTL, o título do disco que
está atualmente sendo reproduzido será visualizado no display.
# Se nenhum título tiver sido introduzido ao
disco atualmente sendo reproduzido, NO TITLE
será visualizado.
Seleção de discos da lista de
títulos de disco
A lista de títulos de disco permite que você
veja a lista dos títulos de disco que foram introduzidos no Multi-CD player e selecione um
deles para reprodução.
1 Pressione FUNCTION para selecionar
TTL LIST.
Pressione FUNCTION até visualizar TTL LIST
no display.
2 Pressione c ou d para rolar pela lista
de títulos que foram introduzidos.
# Se nenhum título tiver sido introduzido a um
disco, nenhum título será visualizado.
3 Pressione a para reproduzir o seu título
de CD favorito.
A seleção começará a ser reproduzida.
faixa, o nome do artista e o tempo de reprodução, e são denominados discos com CD
TEXT. Apenas esses discos com CD TEXT especialmente codificados suportam as funções
relacionadas a seguir.
Visualização de títulos em
discos com CD TEXT
% Pressione DISPLAY.
Pressione DISPLAY várias vezes para alternar
entre os seguintes ajustes:
Tempo de reproduçãoDISC TTL (Título do
disco)DISC ART (Nome do artista do disco)
TRK TTL (Título da faixa)TRK ART (Nome
do artista da faixa)
# Se informações específicas não tiverem sido
gravadas em um disco com CD TEXT, NO XXXX
será visualizado (por exemplo, NO T-TTL).
Rolagem de títulos no display
Esta unidade pode exibir as 8 primeiras letras
de DISC TTL, DISC ART, TRK TTL e TRK ART
apenas. Quando as informações gravadas têm
mais do que 8 letras, você pode rolar o texto à
esquerda para que o restante do título possa
ser visto.
% Pressione DISPLAY e segure até o título
começar a rolar para a esquerda.
O restante do título será visualizado no display.
Português (B)
Utilização das funções CD TEXT
Você pode utilizar estas funções apenas com
Multi-CD player compatível com CD TEXT.
Durante a fabricação, determinadas informações sobre o disco são codificadas em alguns deles. Esses discos podem conter
informações, como o título do CD, o título da
Utilização de compressão
(COMP) e ênfase de graves
(DBE)
Você pode utilizar estas funções apenas com
Multi-CD player que as suporte.
Ptbr
59
Page 60

Seção
06
Multi-CD player
A utilização das funções COMP (Compressão)
e DBE (Ênfase dinâmica de graves) permite
ajustar a qualidade sonora do Multi-CD player.
Cada uma das funções tem um ajuste de dois
níveis. A função COMP equilibra a saída dos
sons mais altos e mais baixos em volumes
mais altos. DBE intensifica os níveis de graves
para produzir um som mais forte. Ouça a cada
um dos efeitos ao selecioná-los e utilize
aquele que torna melhor a reprodução da
faixa ou CD que está ouvindo.
1 Pressione FUNCTION para selecionar
COMP.
Pressione FUNCTION até visualizar COMP no
display.
# Se o Multi-CD player não oferecer suporte às
funções COMP/DBE, NO COMP será visualizado
ao tentar selecioná-las.
2 Pressione a ou b para selecionar o seu
ajuste favorito.
Pressione a ou b várias vezes para alternar
entre os seguintes ajustes:
COMP OFFCOMP 1COMP 2
COMP OFFDBE 1DBE 2
HHHHHHHHHHHHHH
60
Ptbr
Page 61

2 3
Ajustes de áudio
HHHHHHHHHHHHHH
Seção
07
Introdução aos ajustes de
áudio
1
1 Visualização de áudio
Mostra o status dos ajustes de áudio.
2 Indicador de sonoridade
Quando a sonoridade é ativada, esse indicador é visualizado no display.
3 Indicador SW
Mostra quando a saída do alto-falante de
graves secundário (subwoofer) está ativada.
% Pressione AUDIO para visualizar os
nomes das funções de áudio.
Pressione AUDIO várias vezes para alternar
entre as seguintes funções de áudio:
FAD (Ajuste do equilíbrio)Loud (Sonori-
dade)Phase (Alto-falante de graves secundário)80 (Ajuste do alto-falante de graves
secundário)SLOPE (Inclinação do alto-falante de graves secundário)F-HPF (Filtro de
alta freqüência dianteiro)R-HPF (Filtro de
alta freqüência traseiro)
# Quando o ajuste da saída RCA for P/O :FUL,
Phase, 80 e SLOPE mudarão para a função
NoFAD (sem variação de volume).
# Quando o filtro de alta freqüência dianteiro estiver ativado, você poderá selecionar F-SLP (inclinação do filtro de alta freqüência dianteiro).
# Quando o filtro de alta freqüência traseiro estiver ativado, você poderá selecionar R-SLP (inclinação do filtro de alta freqüência traseiro).
# Para retornar à visualização de cada fonte,
pressione BAND.
Nota
Se você não operar a função de áudio em aproximadamente 30 segundos, o display retornará
automaticamente para a visualização de fonte.
Português (B)
Utilização do ajuste de
equilíbrio
Você pode selecionar um ajuste de potenciômetro/equilíbrio que forneça um ambiente sonoro ideal para todas as pessoas que
estiverem no veículo.
1 Pressione AUDIO para selecionar FAD.
Pressione AUDIO até visualizar FAD no display.
# Se o ajuste de equilíbrio foi anteriormente definido, BAL será visualizado.
2 Pressione a ou b para ajustar o equilíbrio dos alto-falantes dianteiros/traseiros.
Cada vez que pressionar a ou b, o equilíbrio
dos alto-falantes dianteiros/traseiros será movido para a parte da frente ou para a parte de
trás.
FAD :F25 FAD :R25 será visualizado conforme o equilíbrio dos alto-falantes dianteiros/
traseiros se move da parte da frente para a
parte de trás.
# FAD : 0 é o ajuste apropriado quando apenas
dois alto-falantes são utilizados.
3 Pressione c ou d para ajustar o equilíbrio dos alto-falantes da esquerda/da direita.
Ao pressionar c ou d, BAL : 0 é visualizado.
Cada vez que você pressionar c ou d, o equilíbrio dos alto-falantes da esquerda/da direita
será movido para a esquerda ou para a direita.
Ptbr
61
Page 62

Seção
07
HHHHHHHHHHHHHH
Ajustes de áudio
BAL :L25 BAL :R25 será visualizado conforme o equilíbrio dos alto-falantes da esquerda/da direita se move da esquerda para a
direita.
Ajuste da sonoridade
A sonoridade compensa as deficiências das
faixas de som baixas e altas com volume
baixo.
1 Pressione AUDIO para selecionar Loud.
Pressione AUDIO até visualizar Loud no display.
2 Pressione a para ativar a sonoridade.
Loud :ON será visualizado no display.
3 Pressione b para desativar a sonoridade.
Loud :OFF será visualizado no display.
Utilização da saída do altofalante de graves secundário
Esta unidade está equipada com uma saída
do alto-falante de graves secundário que pode
ser ativada ou desativada. Quando um alto-falante de graves secundário for controlado com
esta unidade, primeiro, alterne o ajuste da
saída RCA para o alto-falante de graves secundário, em seguida, ative a saída do alto-falante
de graves secundário. Para obter mais detalhes, consulte Ativação do ajuste da saída
RCA na página 72.
1 Pressione AUDIO para selecionar Phase.
Quando o ajuste da saída RCA for P/O :S/W,
você poderá selecionar Phase. Pressione
AUDIO até visualizar Phase no display.
2 Pressione a para ativar a saída do altofalante de graves secundário.
Phase:NOR será visualizado no display. A
saída do alto-falante de graves secundário
agora estará ativada.
# Para desativar a saída do alto-falante de
graves secundário, pressione b.
3 Pressione c ou d para selecionar a fase
de saída do alto-falante de graves secundário.
Pressione c para selecionar a fase inversa e
visualizar Phase:REV no display. Pressione d
para selecionar a fase normal e visualizar
Phase:NOR no display.
Ajuste do alto-falante de
graves secundário (filtro de
baixa freqüência)
Quando a saída do alto-falante de graves secundário estiver ativada, você poderá ajustar a
freqüência de corte e o nível de saída do altofalante de graves secundário.
1 Pressione AUDIO para selecionar o
ajuste do alto-falante de graves secundário.
Quando a saída do alto-falante de graves secundário estiver ativada, você poderá selecionar o ajuste do alto-falante de graves
secundário. Pressione AUDIO até visualizar
80 no display.
# Se o ajuste do alto-falante de graves secundário já foi feito, a freqüência do anteriormente
selecionado será visualizada em vez de 80.
2 Pressione c ou d para selecionar a freqüência de corte.
Cada vez que pressionar c ou d, as freqüências de corte serão selecionadas na seguinte
ordem:
506380100125 (Hz)
62
Ptbr
Page 63

Ajustes de áudio
HHHHHHHHHHHHHH
Seção
07
Apenas as freqüências inferiores às que estavam na faixa selecionada serão emitidas no
alto-falante de graves secundário.
3 Pressione a ou b para ajustar o nível
de saída do alto-falante de graves secundário.
Cada vez que pressionar a ou b, o nível de
alto-falante de graves secundário aumentará
ou diminuirá (por exemplo, +6 a 24).
Pressione a ou b até visualizar o valor desejado.
Ajuste da inclinação de atenuação
do filtro de baixa freqüência
Quando a saída do alto-falante de graves secundário estiver ativada, você poderá ajustar a
continuidade do som entre as unidades de
alto-falante.
1 Pressione AUDIO para selecionar o
ajuste de inclinação.
Pressione AUDIO até visualizar SLOPE no display.
2 Pressione c ou d para selecionar a inclinação.
Pressione c e 12 será visualizado. Pressione
d e 18 será visualizado.
Nota
Quando a inclinação do alto-falante de graves secundário e o filtro de alta freqüência forem 12,e
tiverem a mesma freqüência de corte, a fase será
invertida 180 graus na freqüência de corte. Nesse
caso, a inversão da fase garantirá a continuidade
de som aprimorado.
Utilização do filtro de alta
freqüência
Quando você não quiser que sons baixos da
faixa de freqüência de saída do alto-falante de
graves secundário sejam reproduzidos nos
alto-falantes dianteiros e traseiros, ative o HPF
(Filtro de alta freqüência). Apenas as freqüências superiores às que estavam na faixa selecionada serão emitidas nos alto-falantes
dianteiros e traseiros. Você pode ajustar separadamente os alto-falantes dianteiro e traseiro.
1 Pressione AUDIO para selecionar F-HPF
ou R-HPF.
Pressione AUDIO até visualizar F-HPF ou
R-HPF no display.
2 Pressione a para ativar o filtro de alta
freqüência.
F-HPF: 80 ou R-HPF: 80 será visualizado no
display. O filtro de alta freqüência agora estará
ativado.
# Para desativar o filtro de alta freqüência,
pressione b.
3 Pressione c ou d para selecionar a freqüência de corte.
Cada vez que pressionar c ou d, as freqüências de corte serão selecionadas na seguinte
ordem:
506380100125 (Hz)
Apenas as freqüências superiores às que estavam na faixa selecionada serão emitidas nos
alto-falantes dianteiros e traseiros.
Ajuste da inclinação de atenuação
do filtro de alta freqüência
Quando o filtro de alta freqüência estiver ativado, você poderá ajustar a continuidade do
som entre as unidades de alto-falante.
Português (B)
Ptbr
63
Page 64

Seção
07
HHHHHHHHHHHHHH
Ajustes de áudio
1 Pressione AUDIO para selecionar o
ajuste de inclinação.
Pressione AUDIO até visualizar F-SLP ou
R-SLP no display.
2 Pressione c ou d para selecionar a inclinação.
Pressione c e 12 será visualizado. Pressione
d e 6 será visualizado.
Utilização da saída sem
variação de volume
Quando o ajuste da saída sem variação de volume estiver ativado, o sinal de áudio não passará pelo filtro de baixa freqüência desta
unidade (para o alto-falante de graves secundário), mas será emitido pela saída RCA. Para
obter mais detalhes, consulte Ativação do
ajuste da saída RCA na página 72.
1 Pressione AUDIO para selecionar
NoFAD.
Quando o ajuste da saída RCA for P/O :FUL,
você poderá selecionar NoFAD. Pressione
AUDIO até visualizar NoFAD no display.
1 Pressione AUDIO para selecionar o
ajuste da saída sem variação de volume.
Pressione AUDIO até visualizar NoFAD: 0 no
display.
2 Pressione a ou b para ajustar o nível
de saída sem variação de volume.
Cada vez que pressionar a ou b, o nível de
saída sem variação de volume aumentará ou
diminuirá (por exemplo, +6 24).
Pressione a ou b até visualizar o valor
desejado.
Ajuste dos níveis de fonte
SLA (Ajuste do nível de fonte) permite ajustar
o nível de volume de cada fonte para evitar
mudanças radicais de volume ao alternar
entre as fontes.
! Os ajustes são baseados no nível de vo-
lume do sintonizador de FM, que permanece inalterado.
1 Compare o nível de volume do sintonizador de FM com o nível de fonte que deseja ajustar.
2 Pressione a para ativar a saída sem variação de volume.
NoFAD:ON será visualizado no display. A
saída sem variação de volume agora estará
ativada.
# Para desativar a saída sem variação de volume, pressione b.
Ajuste do nível de saída sem
variação de volume
Quando a saída sem variação de volume estiver ativada, você poderá ajustar o nível de
saída sem variação de volume.
64
Ptbr
2 Pressione AUDIO e segure até visualizar
SLA no display.
# Ao selecionar o sintonizador de FM como a
fonte, não será possível alternar para SLA.
3 Pressione a ou b para ajustar o volume
da fonte.
Cada vez que pressionar a ou b, o volume da
fonte aumentará ou diminuirá.
SLA : +4 SLA : 4 é visualizado à medida
que o volume da fonte é aumentado ou diminuído.
Page 65

HHHHHHHHHHHHHH
Ajustes de áudio
Notas
! Se você não operar a função SLA em aproxi-
madamente 30 segundos, o display retornará
automaticamente para a visualização de
fonte.
! Uma vez que o volume do sintonizador de FM
é o controle, não é possível aplicar ajustes de
nível de fonte ao sintonizador de FM.
! O nível de volume do sintonizador de AM tam-
bém pode ser ajustado com os ajustes de
nível de fonte.
! O CD player e o Multi-CD player são automati-
camente definidos ao mesmo volume de
ajuste do nível de fonte.
! A unidade externa 1 e a unidade externa 2 são
automaticamente definidas ao mesmo volume de ajuste do nível de fonte.
Seção
07
Português (B)
Ptbr
65
Page 66

3 4 6
1
Seção
08
HHHHHHHHHHHHHH
Processador de sinal
digital
Utilização do processador
de sinal digital
2
5
O processador de sinal digital permite controlar muitos aspectos da saída de som incluindo
a equalização, o controle do campo de som e
a posição de escuta.
1 Curva do equalizador
Mostra qual programação do equalizador
está selecionada.
2 Indicador de programação do campo de
som
Mostra qual programação do campo de
som está selecionada.
3 Indicador CUSTOM
Mostra quando a curva do equalizador personalizada está selecionada.
4 Indicador ASL
Mostra quando o Nivelador automático de
som está ativado.
5 Visualização de DSP
Mostra o status de DSP
6 Indicador de posição
Mostra qual posição de escuta está selecionada.
% Pressione DSP para visualizar os nomes
das funções DSP.
Pressione DSP várias vezes para alternar entre
as seguintes funções:
SFC (Controle do campo de som)
PWRFL (POWERFUL) (Equalizador gráfico)
50 (Equalizador gráfico de 9 bandas)Posi
(Seletor de posição)ASL (Nivelador automático de som)
# Para retornar à visualização de cada fonte,
pressione BAND.
Nota
Se você não operar a função DSP em aproximadamente 30 segundos, o display retornará automaticamente para a visualização de fonte.
Utilização do controle do
campo de som e do som BBE
O SFC (Controle do campo de som) incorpora
três programações para a reprodução de típicos campos de som de um estúdio, clube de
jazz ou clube. Essa função possibilita a reprodução do campo de som realista das três programações no seu carro.
Com BBE, a reprodução bem próxima ao som
original pode ser obtida pela correção com
uma combinação da compensação de fase e
da intensificação de faixa alta para o atraso
dos componentes de alta freqüência e desvio
de amplitude que ocorre durante a reprodução. Essa função possibilita a reprodução
do campo de som dinâmico como se você estivesse ouvindo uma performance ao vivo.
Nota
Fabricado sob licença da BBE Sound, Inc. BBE é
uma marca comercial da BBE Sound, Inc.
Chamada das programações do
campo de som da memória
A seguir está uma lista das programações do
campo de som:
66
Ptbr
Page 67

Processador de sinal
digital
HHHHHHHHHHHHHH
Seção
08
Display Efeito
STUDIO Estúdio
JAZZ CLUB Clube de jazz
CLUB Clube
BBE BBE
1 Pressione DSP para selecionar o controle do campo de som.
Pressione DSP até visualizar SFC no display.
# Se o controle do campo de som foi anteriormente ajustado a uma programação do campo
de som, o título da programação do campo de
som anteriormente selecionada será visualizado
em vez de SFC.
2 Pressione c ou d para selecionar uma
programação do campo de som.
Pressione c ou d até visualizar o ajuste desejado no display.
Ajuste do nível de som BBE
Com a tecnologia de processamento de som
BBE, você pode ajustar o nível de BBE.
1 Chame BBE da memória.
Consulte Chamada das programações do
campo de som da memória na página anterior.
2 Pressione a ou b para ajustar o nível
de BBE.
Cada vez que pressionar a ou b, o nível de
BBE aumentará ou diminuirá.
+4 4 é visualizado à medida que o nível é
aumentado ou diminuído.
Utilização do equalizador
gráfico
O equalizador gráfico permite que você ajuste
a equalização, de forma que atenda às carac-
terísticas acústicas do interior do veículo, conforme desejado.
Chamada das curvas do
equalizador da memória
Existem sete curvas do equalizador armazenadas que podem ser facilmente chamadas da
memória a qualquer momento. A seguir está
uma lista das curvas do equalizador:
Display Curva do equalizador
S-Bas (SPR-BASS) Ultrabaixo
PWRFL (POWERFUL) Potente
NTRL (NATURAL) Natural
VOCAL (VOCAL) Vocal
CTM1 (CUSTOM 1) Personalizado 1
CTM2 (CUSTOM 2) Personalizado 2
FLAT (FLAT) Plano
! CTM1 (CUSTOM 1) e CTM2 (CUSTOM 2)
correspondem a curvas do equalizador
ajustadas que você cria. Os ajustes podem
ser feitos com um equalizador gráfico de 9
bandas.
! Quando FLAT (FLAT) é selecionado, não é
feito nenhum acréscimo ou correção no
som. Isso é útil para verificar o efeito das
curvas do equalizador ao alternar entre
FLAT (FLAT) e uma curva do equalizador
ajustada.
1 Pressione DSP para selecionar o equalizador gráfico.
Pressione DSP até visualizar
PWRFL (POWERFUL) no display.
# Se o equalizador gráfico foi anteriormente
ajustado a uma curva do equalizador diferente de
PWRFL (POWERFUL), o título da curva do equalizador anteriormente selecionada será visualizado
em vez de PWRFL (POWERFUL).
Português (B)
Ptbr
67
Page 68

Seção
08
HHHHHHHHHHHHHH
Processador de sinal
digital
2 Pressione c ou d para selecionar uma
curva do equalizador.
Cada vez que pressionar c ou d, as curvas do
equalizador serão selecionadas na seguinte
ordem:
S-Bas (SPR-BASS)PWRFL (POWERFUL)
NTRL (NATURAL)VOCAL (VOCAL)
CTM1 (CUSTOM 1)CTM2 (CUSTOM 2)
FLAT (FLAT)
# Também é possível selecionar uma curva do
equalizador ao pressionar EQ.
Ajuste das curvas do equalizador
As curvas do equalizador fornecidas pela fábrica, com exceção de FLAT (FLAT), podem ser
ajustadas a um nível fino (controle de
nuance).
1 Chame uma curva do equalizador da
memória.
Consulte Chamada das curvas do equalizador
da memória na página anterior.
2 Pressione a ou b para ajustar a curva
do equalizador.
Cada vez que pressionar a ou b, a curva do
equalizador aumentará ou diminuirá respectivamente.
+6 6 é visualizado à medida que a curva do
equalizador é aumentada ou diminuída.
# A faixa real dos ajustes será diferente dependendo de qual curva do equalizador foi selecionada.
# A curva do equalizador com todas as freqüências a 0 não poderá ser ajustada.
Ajuste do equalizador gráfico
de 9 bandas
Para as curvas do equalizador
CTM1 (CUSTOM 1) e CTM2 (CUSTOM 2),
você pode ajustar o nível de cada banda.
! Uma curva CTM1 (CUSTOM 1) separada
pode ser criada para cada fonte. Se você
fizer ajustes quando uma curva diferente
de CTM2 (CUSTOM 2) for selecionada, os
ajustes da curva do equalizador serão
memorizados em CTM1 (CUSTOM 1).
! Uma curva CTM2 (CUSTOM 2) pode ser
criada para todas as fontes. Se você fizer
ajustes quando a curva
CTM2 (CUSTOM 2) estiver selecionada, a
curva CTM2 (CUSTOM 2) será atualizada.
1 Chame a curva do equalizador que deseja ajustar da memória.
Consulte Chamada das curvas do equalizador
da memória na página anterior.
2 Pressione DSP para selecionar o equalizador gráfico de 9 bandas.
Pressione DSP até visualizar 50 no display.
# Se o equalizador gráfico de 9 bandas foi anteriormente ajustado, sua freqüência será visualizada em vez de 50.
3 Pressione c ou d para selecionar a
banda do equalizador a ser ajustada.
Cada vez que pressionar c ou d, as bandas
do equalizador serão selecionadas na seguinte ordem:
501002004008001.6 k3.15 k
6.3 k12.5 k (Hz)
4 Pressione a ou b para ajustar o nível
de banda do equalizador.
Cada vez que pressionar a ou b, o nível de
banda do equalizador aumentará ou diminuirá.
+6 6 é visualizado à medida que o nível é
aumentado ou diminuído.
# Você pode então selecionar outra banda e
ajustar o nível.
68
Ptbr
Page 69

Processador de sinal
digital
HHHHHHHHHHHHHH
Seção
08
Utilização do seletor de
posição
Uma maneira de garantir um som mais natural é posicionando claramente a imagem estéreo e posicionando você no centro do campo
de som. O seletor de posição ajusta o nível de
volume do som de cada alto-falante para ajustar-se às posições de assento e ao número de
pessoas no carro, e permite chamar os ajustes
da memória com o toque de um botão. A seguir está uma lista das posições:
Botão Display Indicador Posição
a Front
b All
c Front-L
d Front-R
1 Pressione DSP para selecionar o seletor
de posição.
Pressione DSP até visualizar Posi no display.
# Se o seletor de posição foi anteriormente ajustado a uma posição de escuta, o título da posição
de escuta anteriormente selecionada será visualizado em vez de Posi.
Assento dianteiro
Todos os assentos
Assento dianteiro
esquerdo
Assento dianteiro
direito
das condições da estrada. O Nivelador automático de som (ASL) irá monitorar tal variação
de ruído e automaticamente aumentar o nível
de volume, se esse ruído tornar-se mais alto. A
sensibilidade (variação do nível de volume em
relação ao nível de ruído) do ASL pode ser
ajustada a um de cinco níveis.
1 Pressione DSP para selecionar ASL.
Pressione DSP até visualizar ASL no display.
2 Pressione a para ativar o ASL.
ASL:MID será visualizado no display.
# Para desativar o ASL, pressione b.
3 Pressione c ou d para selecionar o
nível de ASL desejado.
Cada vez que pressionar c ou d, o nível de
ASL será selecionado na seguinte ordem:
LOW (baixo)MidL (médio-baixo)MID
(médio)MidH (médio-alto)HIGH (alto)
Português (B)
2 Pressione c, d, a ou b para selecionar
uma posição de escuta.
Pressione c, d, a ou b para selecionar uma
posição de escuta, conforme relacionadas na
tabela.
# Para cancelar a posição de escuta selecionada, pressione novamente o mesmo botão.
Utilização do Nivelador
automático de som
Ao dirigir, o ruído dentro do automóvel muda
de acordo com a velocidade da condução e
Ptbr
69
Page 70

1
Seção
09
HHHHHHHHHHHHHH
Ajustes iniciais
Definição dos ajustes iniciais
Os ajustes iniciais permitem que você defina
os diferentes ajustes desta unidade.
1 Visualização de função
Mostra o status da função.
1 Pressione SOURCE e segure até desligar
a unidade.
2 Pressione FUNCTION e segure até visualizar a hora no display.
3 Pressione FUNCTION para selecionar
um dos ajustes iniciais.
Pressione FUNCTION várias vezes para alternar entre os seguintes ajustes:
HoraFM (Passo de sintonia FM)AM
(Passo de sintonia AM)WARN (Som de advertência)AUX (Entrada auxiliar)Dim (Redutor de luz)P/O (Saída RCA)D.ATT
(Atenuador digital)Mute (Emudecimento/
atenuação do telefone)
Utilize as instruções a seguir para operar cada
ajuste em particular.
# Para cancelar os ajustes iniciais, pressione
BAND.
# Também é possível cancelar os ajustes iniciais
pressionando FUNCTION até desligar a unidade.
Ajuste de hora
Utilize estas instruções para ajustar a hora.
1 Pressione FUNCTION para selecionar a
hora.
Pressione FUNCTION várias vezes até visualizar a hora no display.
2 Pressione c ou d para selecionar o segmento da hora visualizada que deseja ajustar.
Pressionar c ou d selecionará um segmento
da hora visualizada:
HoraMinuto
Ao selecionar um dos segmentos da hora visualizada, ele piscará.
3 Pressione a ou b para ajustar a hora.
Pressionar a aumentará a hora ou o minuto
selecionado. Pressionar b diminuirá a hora
ou o minuto selecionado.
Ajuste do passo de sintonia
FM
O passo de sintonia FM empregado pela sintonia por busca pode ser alternado entre 100
kHz, o passo predefinido e 50 kHz.
1 Pressione FUNCTION para selecionar
FM.
Pressione FUNCTION várias vezes até visualizar FM no display.
2 Pressione c ou d para selecionar o
passo de sintonia FM.
Pressionar c ou d alternará o passo de sintonia FM entre 100 kHz e 50 kHz. O passo de sintonia FM selecionado será visualizado no
display.
70
Ptbr
Page 71

Ajustes iniciais
HHHHHHHHHHHHHH
Seção
09
Nota
Se a sintonia por busca for executada em passos
de 50 kHz, as estações poderão ser sintonizadas
de forma imprecisa. Sintonize as estações utilizando a sintonia manual ou utilize novamente a
sintonia por busca.
Ajuste do passo de sintonia
AM
O passo de sintonia AM pode ser alternado
entre 9 kHz, o passo predefinido e 10 kHz. Ao
utilizar o sintonizador na América do Norte,
Central ou do Sul, reajuste o passo de sintonia
de 9 kHz (531 1.602 kHz permissível) para 10
kHz (530 1.640 kHz permissível).
1 Pressione FUNCTION para selecionar
AM.
Pressione FUNCTION várias vezes até visualizar AM no display.
2 Pressione c ou d para selecionar o
passo de sintonia AM.
Pressionar c ou d alternará o passo de sintonia AM entre 9 kHz e 10 kHz. O passo de sintonia AM selecionado será visualizado no
display.
1 Pressione FUNCTION para selecionar
WARN.
Pressione FUNCTION várias vezes até visualizar WARN no display.
2 Pressione a ou b para ativar ou desativar WARN.
Pressionar a ou b ativará ou desativará
WARN e esse status será visualizado (por exemplo, WARN :ON).
Ativação do ajuste auxiliar
É possível utilizar o equipamento auxiliar com
esta unidade. Ative o ajuste auxiliar ao utilizar
o equipamento auxiliar conectado a esta unidade.
1 Pressione FUNCTION para selecionar
AUX.
Pressione FUNCTION várias vezes até visualizar AUX no display.
2 Pressione a ou b para ativar ou desativar AUX.
Pressionar a ou b ativará ou desativará AUX
e esse status será visualizado (por exemplo,
AUX :ON).
Português (B)
Ativação do som de
advertência
Se, após desligar a ignição, o painel frontal
não for extraído da unidade principal dentro
de cinco segundos, um som de advertência
será emitido. Você pode desativar o som de
advertência.
Ativação do ajuste do
redutor de luz
Para evitar que o display fique com muito brilho à noite, a luz do display é automaticamente
reduzida quando os faróis do carro são ligados. Você pode ativar ou desativar o redutor
de luz.
1 Pressione FUNCTION para selecionar
Dim.
Pressione FUNCTION várias vezes até visualizar Dim no display.
Ptbr
71
Page 72

Seção
09
HHHHHHHHHHHHHH
Ajustes iniciais
2 Pressione a ou b para ativar ou desativar Dim.
Pressionar a ou b ativará ou desativará Dim
e esse status será visualizado (por exemplo,
Dim :ON).
Ativação do ajuste da saída
RCA
A saída RCA desta unidade pode ser utilizada
para o alto-falante de graves secundário. Você
pode selecionar se deseja utilizar P/O :S/W incorporado (Filtro de baixa freqüência) ou
P/O :FUL auxiliar do controle do alto-falante
de graves secundário.
1 Pressione FUNCTION para selecionar
P/O.
Pressione FUNCTION várias vezes até visualizar P/O no display.
2 Pressione c ou d para alternar o ajuste
da saída RCA.
Pressionar c ou d alternará entre P/O :S/W
(alto-falante de graves secundário) e P/O :FUL
(sem variação de volume), e esse status será
visualizado.
Seleção do atenuador digital
Ao ouvir um MD ou outra fonte, cujo nível de
gravação é alto, o ajuste do nível de curva do
equalizador a alto poderá resultar em distorção. Você pode alternar o atenuador digital
para baixo para reduzir a distorção.
! A qualidade sonora fica melhor com um
ajuste alto, por esse motivo, ele é geralmente utilizado.
1 Pressione FUNCTION para selecionar
D.ATT.
Pressione FUNCTION várias vezes até visualizar D.ATT no display.
2 Pressione c ou d para alternar D.ATT
para alto ou baixo.
Pressionar c ou d alternará entre D.ATT: HI
(alto) e D.ATT:LOW (baixo), e esse status será
visualizado.
Alternância de emudecimento/
atenuação do telefone
O som desta unidade é automaticamente
emudecido ou atenuado quando uma chamada é feita ou recebida utilizando um telefone
celular conectado a ela.
1 Pressione FUNCTION para selecionar
Mute.
Pressione FUNCTION várias vezes até visualizar Mute no display.
2 Pressione c ou d para selecionar o
ajuste desejado.
Cada vez que pressionar c ou d, os ajustes
serão selecionados na seguinte ordem:
Mute (Emudecimento) 10dB ATT (Atenuação) 20dB ATT (Atenuação)
20dB ATT tem um efeito mais forte em
relação a 10dB ATT.
Notas
! O som é desativado, MUTE ou ATT é visualiza-
do e nenhum ajuste de áudio, exceto o controle de volume, é possível.
! A operação volta ao normal quando a chama-
da telefônica é finalizada.
72
Ptbr
Page 73

Outras funções
HHHHHHHHHHHHHH
Seção
10
Ativação ou desativação da
visualização de hora
Você pode ativar ou desativar a visualização
de hora.
% Pressione CLOCK para ativar ou desativar a visualização de hora.
Cada vez que pressionar CLOCK, a visualização de hora será ativada ou desativada.
# A visualização de hora desaparece temporariamente quando se executa outra operação, mas
retorna depois de 25 segundos.
Nota
Mesmo quando as fontes estiverem desligadas, a
hora será visualizada no display. Pressionar
CLOCK ativará ou desativará a visualização de
hora.
Utilização da fonte AUX
Um interconector IP-BUS-RCA, como o CDRB20/CD-RB10 (vendido separadamente) permite a conexão desta unidade ao equipamento auxiliar com uma saída RCA. Para obter
mais detalhes, consulte o manual do proprietário do Interconector IP-BUS-RCA.
Seleção de AUX como a fonte
% Pressione SOURCE para selecionar AUX
como a fonte.
Pressione SOURCE até visualizar AUX no display.
# Se o ajuste auxiliar não for ativado, AUX não
poderá ser selecionado. Para obter mais detalhes,
consulte Ativação do ajuste auxiliar na página 71.
Ajuste do título AUX
O título visualizado para a fonte AUX pode ser
alterado.
1 Depois de selecionar AUX como a
fonte, pressione FUNCTION e segure até visualizar Title In no display.
2 Pressione a ou b para selecionar uma
letra do alfabeto.
Cada vez que pressionar a, uma letra do alfabeto será visualizada na ordem A B C ... X Y Z;
números e símbolos serão visualizados na
ordem 1 2 3 ... | } ¯. Cada vez que pressionar
b, uma letra será visualizada na ordem inversa, como Z Y X ... C B A.
3 Pressione d para mover o cursor para a
próxima posição de caractere.
Quando a letra desejada for visualizada, pressione d para mover o cursor para a próxima
posição e, em seguida, selecione a próxima
letra. Pressione c para voltar no display.
4 Mova o cursor para a última posição
pressionando d depois de introduzir o
título.
Ao pressionar d mais uma vez, o título introduzido será armazenado na memória.
5 Pressione BAND para retornar à visualização de reprodução.
Ajuste do indicador de
nível
Existem dois indicadores de nível armazenados para seleção.
Português (B)
Ptbr
73
Page 74

Seção
10
Outras funções
% Pressione EQ e segure para selecionar o
indicador de nível.
Pressione EQ e segure várias vezes para alternar entre os seguintes ajustes:
Indicador de nível 1Indicador de nível 2Indicador de nível totalNível de efeito ASLIndicador de nível desativado
Nota
O nível de efeito ASL é visualizado apenas quando a função ASL (Utilização do Nivelador automá-
tico de som na página 69) está ativada.
HHHHHHHHHHHHHH
74
Ptbr
Page 75

HHHHHHHHHHHHHH
Informações adicionais
Apêndice
Compreensão das
mensagens de erro do MD
player incorporado
Quando problemas ocorrem durante a reprodução do MD, uma mensagem de erro poderá
ser visualizada no display. Se uma mensagem
de erro for visualizada no display, consulte a
tabela a seguir para identificar o problema e
ver o método sugerido de correção. Se o erro
não puder ser corrigido, entre em contato com
o revendedor ou a Central de Serviços da Pioneer mais próxima.
Mensagem Causa Ação
Blank MD Um disco sem
TEMP Superaqueci-
ERROR-11, 12,
17, 30
ERROR-11, 12,
17, 30
ERROR-01, 11,
12, 17, 30, A0,
A1
ERROR-20, 21 As informações
ERROR-20, 21,24Há algo de erra-
ERROR-23 O MD contém in-
ERROR- A reprodução do
gravação foi inserido.
mento do MD
player.
Disco sujo Limpe o disco.
Disco riscado Substitua o disco.
Problema elétrico ou mecânico
sobre a faixa não
podem ser lidas.
do com o MD.
formações gravadas diferentes de
música.
MD não é possível.
Substitua o disco.
Descontinue a reprodução até a
temperatura da
máquina cair.
Ligue e desligue a
ignição ou alterne
para uma fonte diferente. Em seguida, volte ao MD
player.
Recarregue o MD.
Substitua o disco.
Substitua o disco.
Substitua o disco.
Cuidados com o MD player
! Utilize MDs que contenham esta marca. A
utilização de um disco que não seja um
MD para música pode resultar em danos a
esta unidade.
Português (B)
! Não abra o obturador do MD com a mão.
Forçar sua abertura poderá acarretar
danos.
Obturador
! Certifique-se de colar as etiquetas forneci-
das com os MDs no local especificado. Se
isso não for feito, ou se uma etiqueta for
colada sobre outra, poderá impossibilitar a
remoção do MD.
Ptbr
75
Page 76

Apêndice
Informações adicionais
! Não utilize MDs com etiquetas não afixa-
das corretamente. Tais etiquetas podem
prender-se em algo, impedindo a remoção
do MD. Antes de utilizar um MD, remova a
etiqueta se não estiver corretamente afixada e substitua a mesma por uma nova.
! Mantenha os MDs distantes da luz direta
do sol e não os exponha a temperaturas
altas.
! Se a superfície de um cartucho de MD esti-
ver suja, limpe-a com cuidado utilizando
um tecido macio e limpo.
! Não aplique benzina, tiner ou outro líquido
volátil aos MDs.
! Ao utilizar um disco de limpeza de MD, cer-
tifique-se de ler suas instruções com
atenção. Discos de limpeza podem danificar esta unidade.
! Quando estiver frio, se você começar a re-
produzir um MD imediatamente após ativar
o aquecedor em uma sala, a condensação
nas lentes ópticas dentro do player ou no
MD poderá impedir a reprodução normal.
Se isso ocorrer, desligue o player por aproximadamente uma hora para que a condensação evapore e limpe as superfícies
úmidas do cartucho de MD com um tecido
macio.
HHHHHHHHHHHHHH
76
Ptbr
Page 77

HHHHHHHHHHHHHH
Informações adicionais
Apêndice
Especificações
Generalidades
Fonte de alimentação nominal
..................................................... 14,4 V DC
(faixa de tensão permissível:
12,0 14,4 V DC)
Sistema de aterramento ......Tipo negativo
Consumo máx. de energia
..................................................... 10,0 A
Dimensões (L × A × P):
DIN
Chassi ....................... 178 × 50 × 157 mm
Face ............................ 188 × 58 × 19 mm
D
Chassi ....................... 178 × 50 × 162 mm
Face ............................ 170 × 46 × 14 mm
Peso ............................................... 1,2 kg
Áudio/DSP
A potência de saída contínua é de 22 W por canal,
mínimo a 4 ohms, ambos os canais acionados, 50 a
15.000 Hz com não mais de 5% de THD.
Potência de saída máxima
..................................................... 50 W × 4
Impedância de carga ............. 4 W (4 8 W permissível)
Nível de saída máx. pré-saída/impedância de saída
..................................................... 1,8 V/1 kW
Contorno de sonoridade ...... +10 dB (100 Hz), +7 dB (10
kHz) (volume: 30 dB)
Equalizador (Equalizador gráfico de 9 bandas):
Freqüência ........................ 50/100/200/400/800 Hz
1,6/3,15/6,3/12,5 kHz
Faixa de equalização .... ±12 dB
Rede:
HPF (Dianteiro/traseiro):
Freqüência .............. 50/63/80/100/125 Hz
Inclinação ...............6 dB/oct, 12 dB/oct
Alto-falante de graves secundário:
Freqüência .............. 50/63/80/100/125 Hz
Inclinação ...............12 dB/oct, 18 dB/oct
Ganho .......................+6 24 dB
Fase ............................ Normal/Inversa
Número de bits de quantização
........................................... 16; linear
Características de freqüência
..................................................... 20 20,000 Hz (±1 dB)
Relação do sinal ao ruído .... 90 dB (1 kHz) (rede IEC-A)
Faixa dinâmica .......................... 90 dB (1 kHz)
Número de canais ..................2 (estéreo)
Sintonizador de FM
Faixa de freqüências .............. 87,5 108,0 MHz
Sensibilidade utilizável ......... 8 dBf (0,7 µV/75 W, mono,
Sinal/Ruído: 30 dB)
Sensibilidade de silêncio a 50 dB
..................................................... 10 dBf (0,9 µV/75 W, mono)
Relação do sinal ao ruído .... 75 dB (rede IEC-A)
Distorção ..................................... 0,3 % (a 65 dBf, 1 kHz, estér-
eo)
0,1 % (a 65 dBf, 1 kHz,
mono)
Resposta de freqüência .......30 15.000 Hz (±3 dB)
Separação de estéreo ............ 45 dB (a 65 dBf, 1 kHz)
Sintonizador de AM
Faixa de freqüências .............. 531 1.602 kHz (9 kHz)
530 1.640 kHz (10 kHz)
Sensibilidade utilizável ......... 18 µV (Sinal/Ruído: 20 dB)
Relação do sinal ao ruído .... 65 dB (rede IEC-A)
Notas
! Patentes dos Estados Unidos e estrangeiras li-
cenciadas por Dolby Laboratories.
! As especificações e o design estão sujeitos a
possíveis modificações sem prévio aviso devido aos avanços.
Português (B)
MD player
Sistema ........................................ Sistema de áudio de mini-
disco digital
Discos utilizáveis ..................... Minidisco
Formato do sinal:
Freqüência de amostragem
........................................... 44,1 kHz
Ptbr
77
Page 78

HHHHHHHHHHHHHH
78
Ptbr
Page 79

HHHHHHHHHHHHHH
Português (B)
Ptbr
79
Page 80

PIONEER CORPORATION
4-1, MEGURO 1-CHOME, MEGURO-KU, TOKYO 153-8654, JAPAN
PIONEER ELECTRONICS (USA) INC.
P.O. Box 1540, Long Beach, California 90801-1540, U.S.A.
TEL: (800) 421-1404
PIONEER EUROPE NV
Haven 1087, Keetberglaan 1, B-9120 Melsele, Belgium
TEL: (0) 3/570.05.11
PIONEER ELECTRONICS ASIACENTRE PTE. LTD.
253 Alexandra Road, #04-01, Singapore 159936
TEL: 65-6472-1111
PIONEER ELECTRONICS AUSTRALIA PTY. LTD.
178-184 Boundary Road, Braeside, Victoria 3195, Australia
TEL: (03) 9586-6300
PIONEER ELECTRONICS OF CANADA, INC.
300 Allstate Parkway, Markham, Ontario L3R OP2, Canada
TEL: (905) 479-4411
PIONEER ELECTRONICS DE MEXICO, S.A. de C.V.
Blvd.Manuel Avila Camacho 138 10 piso
Col.Lomas de Chapultepec, Mexico, D.F. 11000
TEL: 55-9178-4270
<KSNZF/02K00001>
Published by Pioneer Corporation.
Copyright © 2002 by Pioneer Corporation.
All rights reserved.
Publicado pela Pioneer Corporation.
Copyright © 2002 por Pioneer
Corporation. Todos os direitos
reservados.
Printed in Japan
Impresso no Japão
<CRD3740-A> ES
 Loading...