

Pioneer DDJ-SR2 Operation Manual
DJ Controller
DDJ-SR2
pioneerdj.com/support/
http://serato.com/
For FAQs and other support information for this product, visit the above site.
Operating Instructions
Contents
How to read this manual
! Thank you for purchasing this Pioneer DJ product.
Be sure to read this manual and the “Operating Instructions (Quick
Start Guide)” included with the unit. Both documents include
important information that you should understand before using this
product.
! In this manual, buttons, terminals, names of screens and menus
displayed on the product and computer screen, etc., are enclosed
in square brackets ([ ]). (e.g.: [CUE] button, [Files] panel, [MIC]
terminal)
! Screens, external appearance, and software and hardware specifica-
tions described in this manual are based on the product that is still
under development and may differ from the final specifications.
! Depending on your operating system, the web browser settings,
etc., the procedures described in this manual may differ from actual
operations.
This manual mainly describes the hardware of this unit. For the
instructions on the Serato DJ software, see the manual provided for
the Serato DJ software.
! The Serato DJ software manual can be downloaded from “Serato.
com”. For details, see Downloading the Serato DJ software manual
(p. 30 ).
! The latest version of Operating Instructions (this document) can
be downloaded from the Pioneer DJ support site. For details, see
“Acquiring the manual” in “Quick Start Guide”.
Before start
Features ....................................................................................................... 3
Accessories ................................................................................................. 4
Installing the software ................................................................................ 4
Connections and part names
Connections ................................................................................................ 6
Part names and functions ......................................................................... 9
Basic Operation
Connections .............................................................................................. 14
Starting the system ................................................................................... 15
Turning off the system .............................................................................. 17
Advanced Operation
Using the performance pads ................................................................... 18
Pitch play mode ........................................................................................ 20
Using slip mode
Using the fader start function.................................................................. 21
Analyzing tracks ........................................................................................ 22
Using effects ............................................................................................. 22
........................................................................................ 20
Changing the settings
Launching utilities mode ......................................................................... 25
Utilities modes
Setting utility software .............................................................................. 26
.......................................................................................... 25
Additional information
Troubleshooting ........................................................................................ 28
Acquiring the manual .............................................................................. 30
Using as a controller for other DJ software ............................................ 30
Trademarks and registered trademarks ................................................. 31
Cautions on copyrights ............................................................................ 31
En
2
Before start
Before start
Features
This unit is a dedicated controller equipped with interfaces for the intuitive operation of various functions of Serato DJ software Serato DJ.
Its operation interfaces such as “BIG JOG,” “PERFORMANCE PADS,”
“2-CHANNEL MIXER,” and “KEY SHIFT,” which embody the design philosophy of Pioneer DJ professional equipment, are positioned with room
to spare over a large body so that DJs can perform various types of DJ
performances as they wish.
In addition, the unit is equipped with dedicated buttons for each of “KEY
SYNC,” “KEY SHIFT,” and “KEY RESET” to enable the quick arrangement
of tracks using key control.
Furthermore, the many input and output terminals support various DJ
styles. The high quality design of the aluminum top panel suits various
scenes such as nightclubs and home parties.
BIG JOG and ON JOG INDICATOR
The unit is equipped with a “BIG JOG” that is of the optimum size and
operation load for performing fast-forward and fast-rewind operations
manually and playing scratch performances. This facilitates scratch performances with operation that feels even more like operation with analog
records. Furthermore, the “ON JOG INDICATOR” positioned at the center
of the jog dial allows the DJ to instantly know the deck performance
state and mode selection state by the lighting colors.
MULTI-COLOR PERFORMANCE PADS
“MULTI-COLOR PERFORMANCE PADS,” large rubber pads used to operate functions such as HOT CUE, ROLL, and SAMPLER, are positioned at
the front of the unit.
You can arrange music with dynamic actions such as beating and
rolling.
The built-in multi-color illumination on each pad shows you various information on your performance by the color and lighting of the pad.
Serato DJ support
This unit supports Serato DJ, DJ software providing a great number
of the functions required for DJ performances. All of the buttons and
controls of this unit are preset to work together with the software, so DJ
performances using Serato DJ can be performed immediately, simply by
connecting this unit to a computer.
PITCH ’N TIME DJ
The Pitch ’n Time DJ expansion pack of time stretch and key control
algorithms for Serato DJ is bundled with this unit. Using Pitch ’n Time
DJ improves play quality when the tempo has been significantly changed
and allows you to use the “KEY SYNC,” “KEY SHIFT,” and “KEY RESET”
functions.
Key Sync/Shift
Dedicated interfaces are provided to instantly access the “KEY SHIFT”
function which allows controlling the key of tracks, the “KEY SYNC”
function which automatically corrects the key to match the tracks you
wish to mix, and the “KEY RESET” function which allows reverting from
the state with the key changed to the original track key. This facilitates
the arrangement of tracks by changing the key, and smooth mixing that
matches the key of any two tracks.
Professional quality design
The aluminum top panel and jog plate provide a sense of high class.
This unit will be essential for providing a sense of high quality in DJ
performances in clubs and home parties.
High sound quality
The low-jitter clock and high performance DAC adopted to the audio
output circuitry faithfully reproduce the original sound to achieve clear
club sound. Furthermore, the sound quality technology developed in the
Pioneer DJ professional series is adopted to achieve the highest sound
level for a DJ controller.
Multiple connections
This unit is equipped with two external input systems and a MIC input
system that can be used for connecting DJ players, analog players, etc.
The audio of external equipment can also be mixed. In addition, two
MASTER OUT systems (XLR/RCA) and one BOOTH OUT system (TRS)
are provided to also enable connections to various PA devices.
Needle search
You can easily move a playback point by touching the pad.This function
enables intuitive and speedy point search with the sense of touching the
music directly.
En
3
Accessories
! AC adapter x1
! Power cord x1
! USB cable x1
! Warranty (for some regions)
! Operating Instructions (Quick Start Guide) x1
! Serato DJ EXPANSION PACK VOUCHER
1
2
1 Products for Europe only. (The corresponding information is pro-
vided on the back cover of the “Operating Instructions (Quick Start
Guide)” for Japan, and on the last page of both the English and
French versions of the “Operating Instructions (Quick Start Guide)”
for the North American region.)
2
Note that the Serato DJ EXPANSION PACK VOUCHER cannot be
reissued. You will need to use the voucher code to activate the expansion pack. Keep the voucher code in a safe place so as not to lose it.
Installing the software
Before installing the software
For the latest version of the Serato DJ software, access Serato.com
and download the software from there.
! For details, refer to Installation (Windows) or Installation (Mac).
! Prepare a computer, network devices, etc., that are required to
access the internet.
Driver software
Dedicated driver software is required for outputting audio signals from
a computer.
First read the Software end user license agreement on page 30
!
carefully.
Checking the latest information on the driver software
For detailed information on this unit’s dedicated driver software, see the
following Pioneer DJ support site.
pioneerdj.com/support/
Obtaining the driver software
1 Access the Pioneer DJ site.
pioneerdj.com
2 Click [Support].
3 Click [Software & firmware updates].
4 Click [DDJ-SR2] in the [DJ CONTROLLER] category.
5 Click [Drivers].
6 Click [Download link] and save the file.
Serato DJ software
Serato DJ is DJ software developed by Serato. You can give DJ performances by connecting a computer installed with the software to this
unit.
Required operating environment
Supported operating systems CPU and required memory
Mac: macOS Sierra 10.12,
OS X 10.11/10.10/10.9 (latest update)
32-bit
Windows® 10/
Windows® 8.1/Windows® 7
(latest service pack)
version
64-bit
version
Others
USB port
Display resolution 1280 x 720 or higher
Internet connection
!
For the latest information on the required operating environment, the compat-
ibility, and information on how to obtain the latest operating system, refer to
“Software Info” for“DDJ-SR2” on the following Pioneer DJ support site.
pioneerdj.com/support/
! The Operating System support assumes that the latest version is used.
! Operation on all computers is not guaranteed even if the computers meet the
required operating environment.
The CPU and hard disc may not provide sufficient processing capabilities
!
depending on the power-saving setting, etc. on the computer. Confirm that the
computer meets conditions to provide constant high-performance (for example,
connecting the computer to a power outlet to maintain a stable power supply)
especially when using Serato DJ on a laptop.
!
A separate contract with an internet service provider and payment of the utiliza-
tion fee are required to access the internet.
A USB 2.0 port is required to connect a computer to
this unit.
Access to the internet is required for registering the
“Serato.com” user account and downloading the
software.
®
Intel
processor, Core™ i5 and i7
1.07 GHz or higher
4 GB or more of RAM
®
processor, Core™ i5 and i7
Intel
1.07 GHz or higher
4 GB or more of RAM
®
Intel
processor, Core™ i5 and i7
1.07 GHz or higher
4 GB or more of RAM
Obtaining the Serato DJ software
1 Access the Serato site.
http://serato.com/
2 Click [Serato DJ] for [DJ PRODUCTS].
The Serato DJ download page appears.
! The download page is subject to change without notice.
3 Click [DOWNLOAD SERATO DJ] .
4 Create an account on “Serato.com”.
! If you have already registered a user account on “Serato.com”,
proceed to step 6.
! Register a user account by following the procedure below.
— Input your e-mail address, set a password and select a region
by following the instructions on the screen.
— If you place a check mark on [E-mail me Serato newslet-
ters], , newsletters providing the latest information on Serato
products will be sent to you from Serato.
— When the user account registration is completed, an e-mail
will be sent to the registered e-mail address. Check the contents of the e-mail sent from “Serato.com”.
! Make sure not to forget the e-mail address and password you
have registered.
! The personal information registered to the user account may be
collected, processed and used according to the privacy policy on
the Serato website.
5 Click the link in the e-mail sent from “Serato.com”.
You can access the Serato DJ download page by clicking the link.
Proceed to step 7.
6 Log in to the site.
Input the e-mail address and password that you registered.
7 Download the Serato DJ software from the download
page.
En
4
Installation (Windows)
Do not connect this unit and the computer until the installation is
completed.
First read the Software end user license agreement on page 30
!
carefully.
! Log in to the computer as the administrator before installation.
! Close all the applications running on the computer before
installation.
1 Extract the downloaded driver software (DDJSR2XXXXexe.zip).
2 Double-click [DDJ-SR2_X.XXX.exe].
3 Complete the installation by following the
instructions on the screen.
If [Windows Security] appears on the screen while the installation is in
progress, click [Install this driver software anyway] to continue the
installation.
When the installation is completed, a completion message appears.
After installing the driver software, perform the installation of the Serato
DJ software.
4 Unzip the downloaded Serato DJ software file.
5 Double-click the Serato DJ software to launch the
installer.
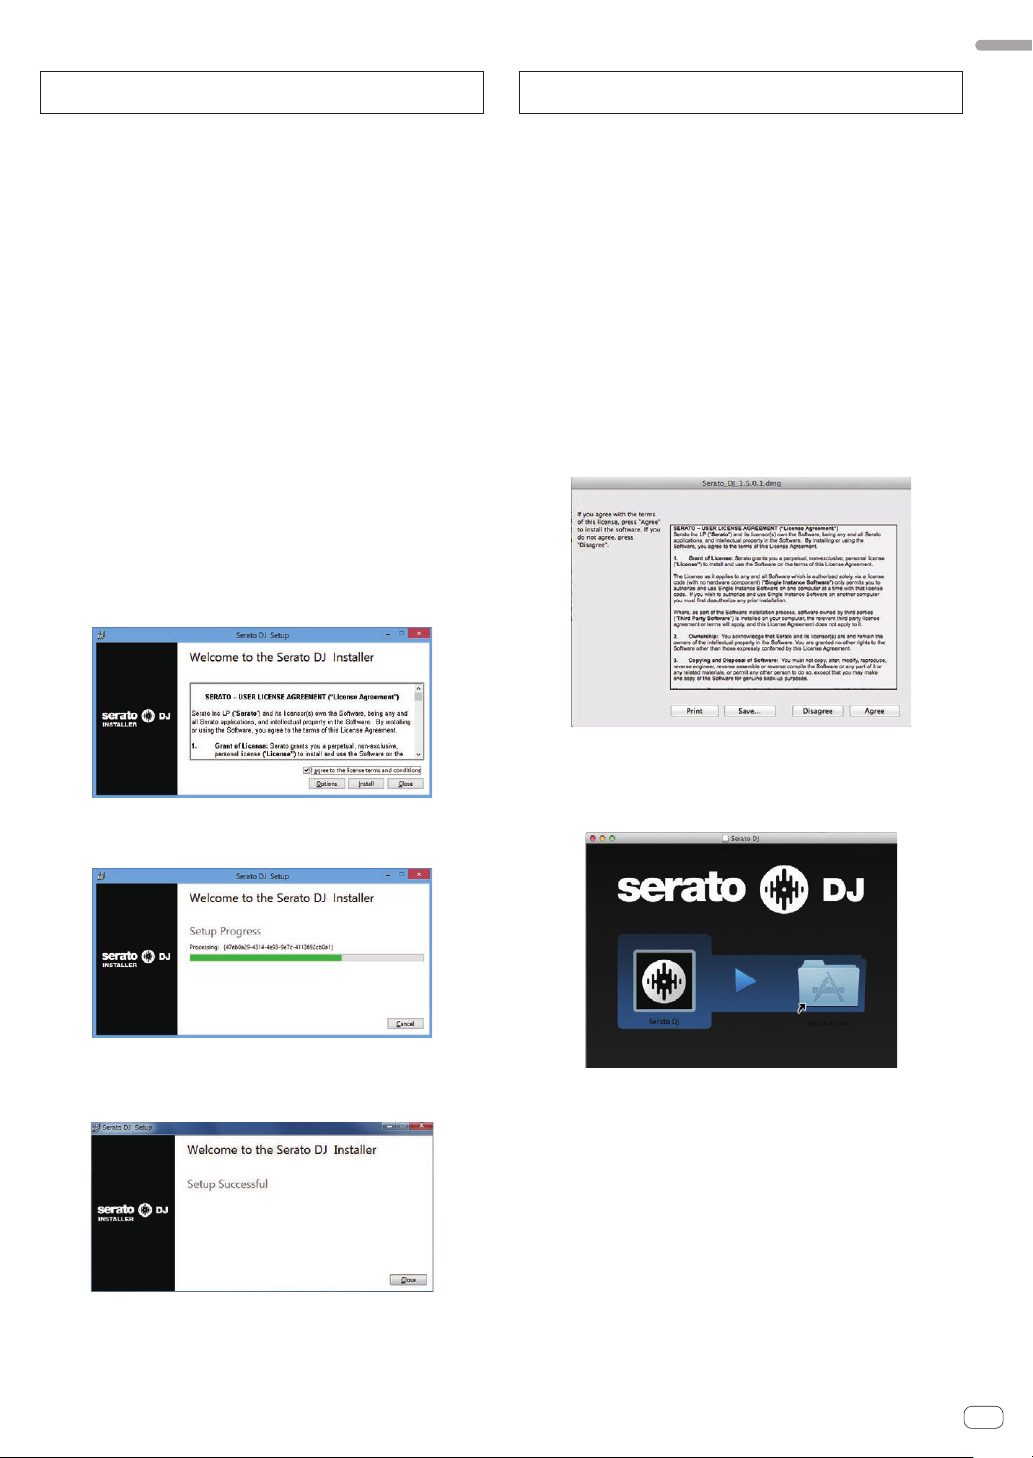
6 Read the license agreement, select [I agree to the
license terms and conditions] if you agree to the terms,
and click [Install] to execute the installation.
Installation (Mac)
Do not connect this unit and the computer until the installation is
completed.
Close all the applications running on the computer before
!
installation.
1 Extract the downloaded driver software (DDJSR2XXXdmg.zip).
2 Double-click [DDJ-SR2_M_X.X.X.dmg].
3 Double-click [DDJ-SR2_AudioDriver.pkg].
4 Complete the installation by following the
instructions on the screen.
5 Unzip the downloaded Serato DJ software file.
6 Double-click the Serato DJ software to launch the
installer.
7 Read the license agreement, select [Agree] if you
agree to the terms.
Before start
! If you do not agree to the license agreement, click [Close] to
cancel the installation.
Installation begins.
When the installation is completed, an installation successful message
appears.
7 Click [Close] to close the Serato DJ installer.
! If you do not agree to the usage agreement, click [Disagree] to
cancel the installation.
8 If the following screen appears, drag and drop the
[Serato DJ] icon on the [Applications] folder icon.
En
5
Connections and part names
3 9 c
6
7 a2 41
5
8
5
b
Connections
! Connect the power cord to a power outlet after all the connections are completed.
Turn off this unit and disconnect the power cord from the power outlet before connecting components or changing the connections.
Refer to the operating instructions for the components to be connected.
! Be sure to use the supplied power cord.
! Be sure to use the USB cable included with this product or the one that conforms to USB 2.0.
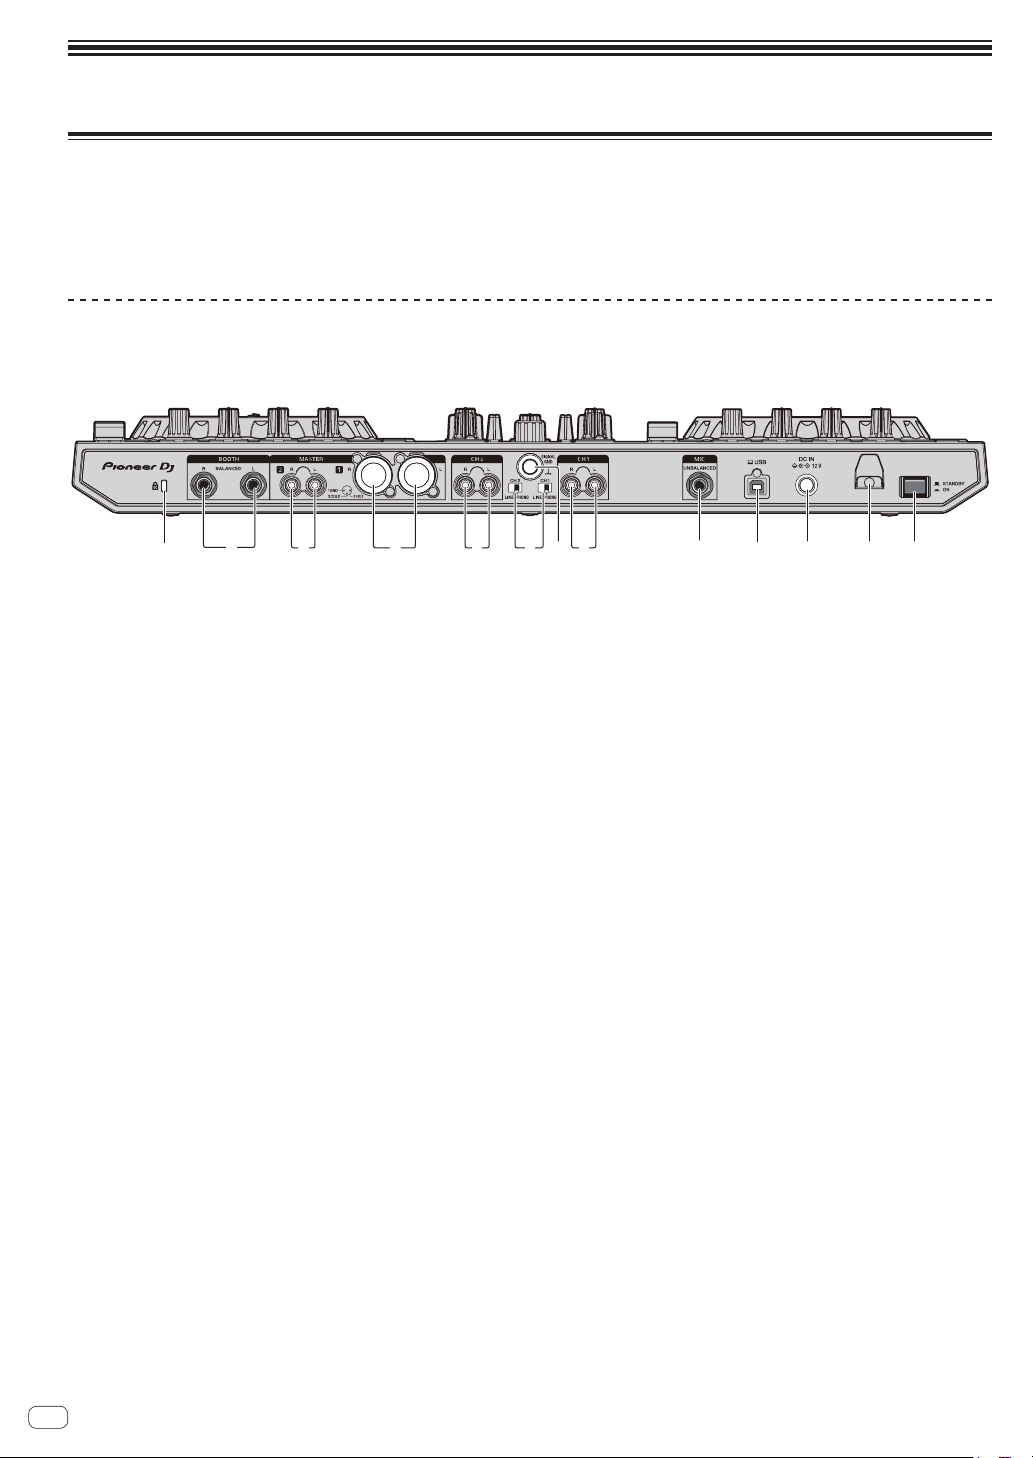
Part names
Rear panel
1 Kensington security slot
2 BOOTH terminals
These are the output terminals for a booth monitor. Compatible with
balanced or unbalanced output for 1/4” TRS connectors.
The master channel sound can be output from the [BOOTH] output
terminals regardless of the audio level set for the master channel.
The volume level can be adjusted with the [BOOTH MONITOR]
control.
! The sound will be distorted if the level is raised too high when
using unbalanced outputs.
3 MASTER 2 terminals
Connect to a power amplifier, etc.
! Compatible with RCA pin-jack type unbalanced outputs.
4 MASTER 1 terminals
Connect powered speakers, etc., here.
! Compatible with XLR connector type balanced outputs.
! Be careful not to accidentally insert the power cord of
another unit to [MASTER 1] terminal.
! Do not connect the terminal that can supply phantom
power to the [MASTER 1] terminal.
5 PHONO/LINE input terminals
Connect a phono level (for MM cartridges) output device (analog
player, etc.) or a line level output device (DJ player, etc.). Switch
the input source according to the connected device using the
[PHONO/LINE] switch on this unit’s rear panel.
6 PHONO/LINE switches
Selects the input source for each channel from the components
connected to this unit.
— [PHONO]: Select this to use a phono level (for MM cartridges)
output device (analog player, etc.) connected to the [PHONO/
LINE] input terminals.
— [LINE]: Select this to use a line level output device (DJ player,
etc.) connected to the [PHONO/LINE] input terminals.
7 SIGNAL GND terminal
Connect a ground wire of an analog player to reduce noise that
occurs when an analog player is connected.
8 MIC terminal
Connect a microphone.
! Compatible with a 1/4” TS jack.
9 USB port
Connect to a computer.
! Connect this unit and the computer directly using the included
USB cable.
! A USB hub cannot be used.
a DC IN terminal
Connect to a power outlet using the included AC adapter (with the
included power cord connected).
b Cord hook
Catch the AC adapter’s power cord and USB cable on this hook
when using this unit.
c STANDBY/ON switch
This switches this unit’s power between on and standby.
En
6
Front panel
1
2 3
DJ player
DJ player
Connections and part names
1 PHONES jacks
Connect headphones.
Compatible with a 1/4” TRS jack and 3.5 mm stereo mini jack.
!
There are two input jacks, a 1/4” TRS jack and a 3.5 mm stereo
mini jack, but do not use both of them simultaneously. If both are
used simultaneously, when one is disconnected or connected,
the volume of the other may increase or decrease suddenly.
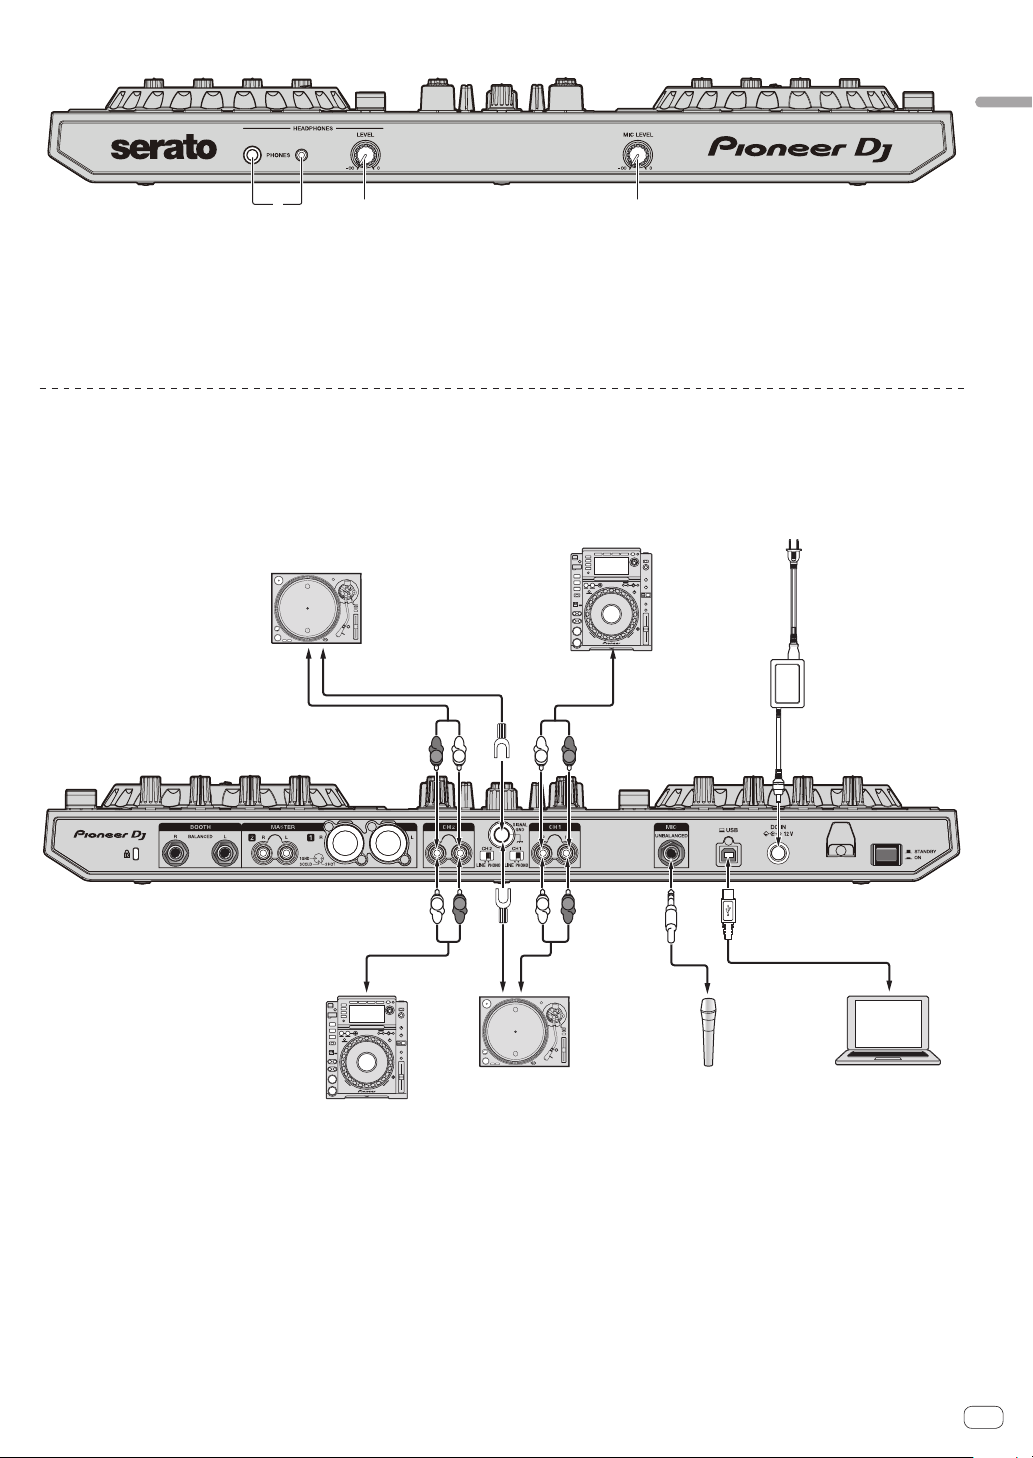
Connecting input/output terminals
Connecting input terminals
Rear panel
Analog player
2 HEADPHONES LEVEL control
Adjusts the level of sound output from the headphones.
3 MIC LEVEL control
Adjusts the level of sound input to the [MIC] input terminals.
To power outlet
AC adapter
(included)
L
R
L
R
R
L
L
Analog player
R
Microphone
Computer
En
7
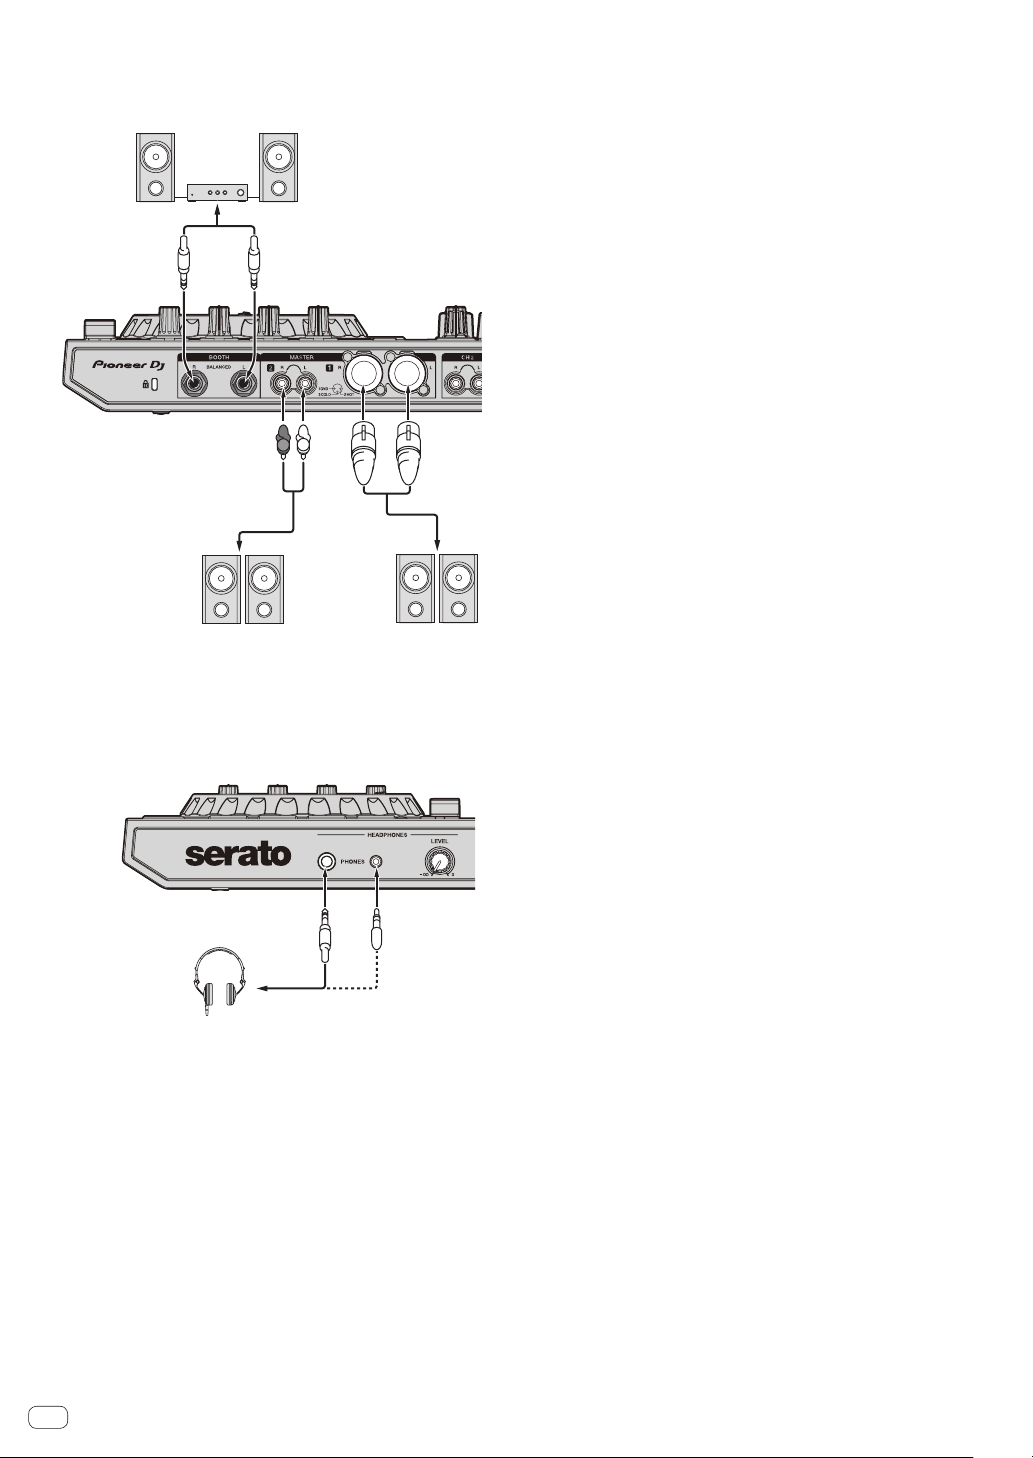
Connecting output terminals
Component, amplifier, powered speaker, etc.
powered speakers, etc.
1
powered speakers, etc.
Headphones
Rear panel
R
L
Power amplifier (for booth monitor),
1 Be careful not to accidentally insert the power cord of another
unit to [MASTER 1] terminal.
Do not connect the terminal that can supply phantom power to
the [MASTER 1] terminal.
Power amplifier,
Front panel
En
8
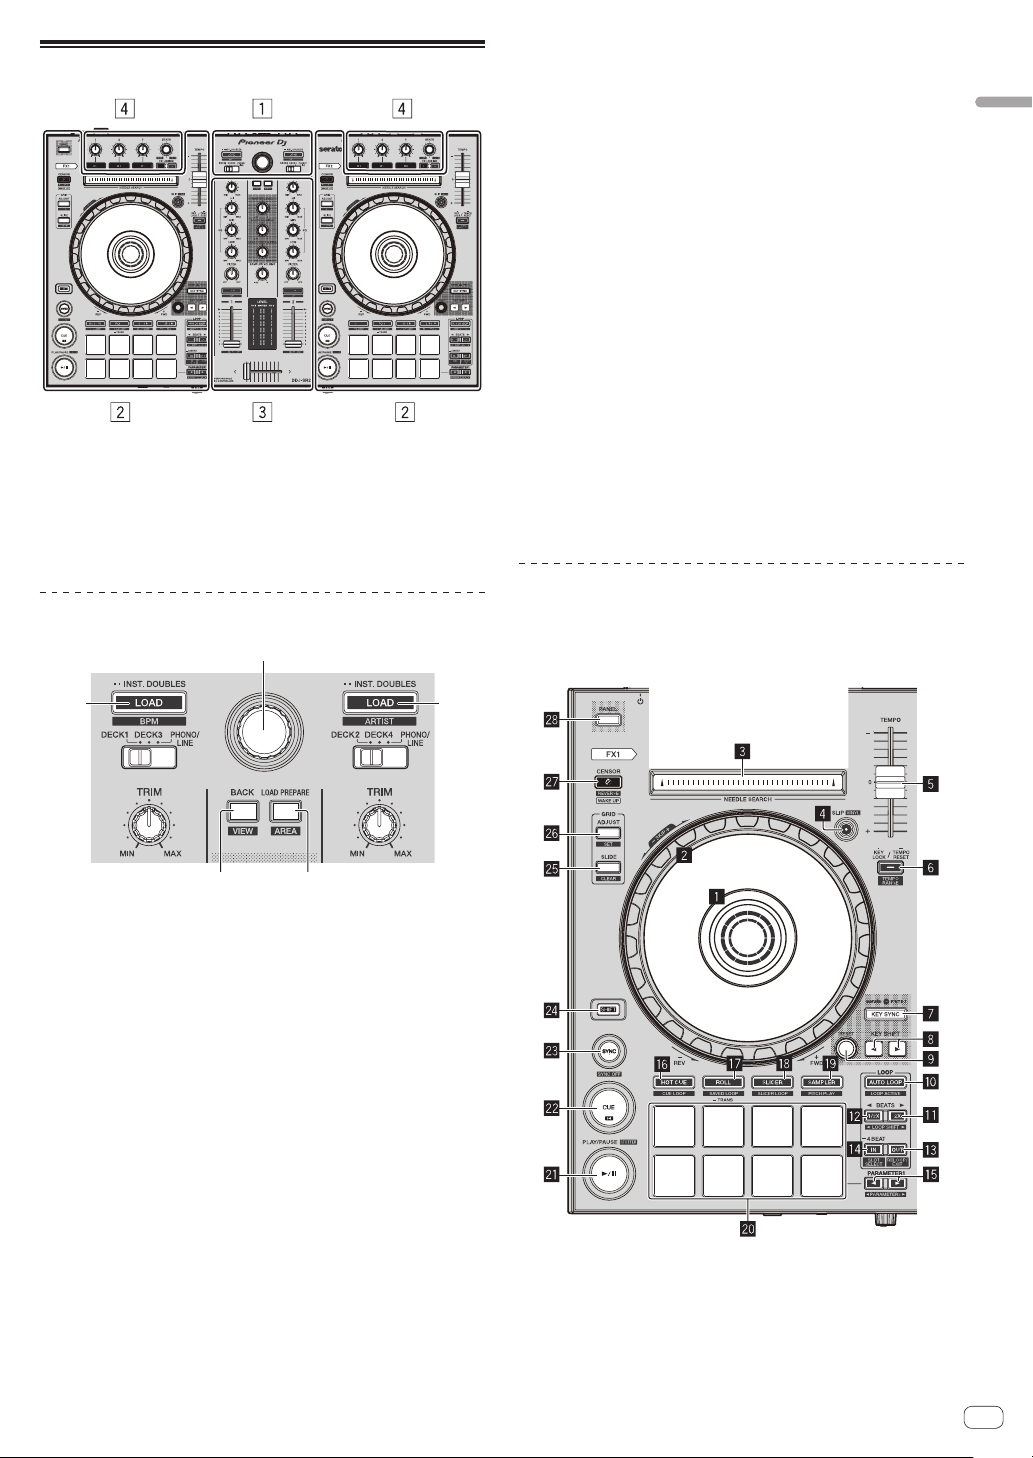
Part names and functions
1
4 5
2 3
1 Browser section
2 Deck sections
3 Mixer section
4 Effect section
Browser section
3 LOAD (ARTIST) button
Press:
The selected tracks are loaded to the respective decks.
! When the [LOAD (ARTIST)] button is pressed twice, the tracks
loaded in the selected deck on the opposite side are loaded into
the deck whose [LOAD (ARTIST)] button was pressed. When this
is done while a track is playing, the track is played from the same
position. (Instant Double)
[SHIFT] + Press this button:
The library’s track list is sorted when one of the [LOAD (ARTIST)]
buttons is pressed.
4 BACK (VIEW) button
Press:
The cursor moves between the [CRATES] panel and library each time
the button is pressed.
[SHIFT] + Press this button:
Switches the Serato DJ layout.
5 LOAD PREPARE (AREA) button
Press:
Loads tracks to the [Prepare] panel.
[SHIFT] + Press this button:
Selects and opens the [Files] panel, [Browse] panel, [Prepare] panel
or [History] panel.
Deck sections
The deck sections are used to control the four decks. The buttons and
controls for operating decks 1 and 3 are located on the left side of the
controller, and those for operating decks 2 and 4 are located on the right
side of the controller.
Connections and part names
1 Rotary selector
Turn:
The cursor in the library or on the [CRATES] panel moves up and
down.
Press:
The cursor moves between the [CRATES] panel and library each time
the rotary selector is pressed.
2 LOAD (BPM) button
Press:
The selected tracks are loaded to the respective decks.
! When the [LOAD (BPM)] button is pressed twice, the tracks
loaded in the selected deck on the opposite side are loaded into
the deck whose [LOAD (BPM)] button was pressed. When this is
done while a track is playing, the track is played from the same
position. (Instant Double)
[SHIFT] + Press this button:
The library’s track list is sorted when one of the [LOAD (BPM)] buttons is pressed.
1 Jog dial display section
= Jog dial display section (p. 13 )
En
9

2 Jog dial
[
±8 %
][
±16 %
][
±50 %
]
Turn top section:
When vinyl mode is on, scratching operation is possible.
When vinyl mode is off, pitch bending operation (adjustment of the
playing speed) is possible.
Turn outer section:
Pitch bending (adjustment of the playing speed) is possible.
[SHIFT] + Press turn top section:
The playback position skips in sync with the beat. (Skip mode)
! Skip mode cannot be used with tracks for which no beatgrid is
set. For details on setting beatgrids, see the Serato DJ software
manual.
! To use skip mode, [SYNC PREFERENCES] in the Serato DJ
[SETUP] menu must be switched to [Smart Sync].
3 NEEDLE SEARCH pad
By touching the pad, you can jump to the desired position in the
track loaded in the deck.
4 SLIP (VINYL) button
Turns slip mode on and off.
= Using slip mode (p. 20 )
[SHIFT] + Press this button:
Turns vinyl mode on and off.
5 TEMPO slider
Adjusts the track playing speed.
When the deck is switched, if the value controlled by Serato DJ and
the position of this unit’s [TEMPO] slider are different, you cannot
operate the [TEMPO] slider unless it is moved to the position controlled by Serato DJ.
! The default setting of the [TEMPO] slider of deck 3 and 4 of
Serato DJ is ±0.0 %.
6 KEY LOCK button
Press:
Turns the key lock function on and off.
When the key lock function is on, the key does not change even when
the playing speed is changed with the [TEMPO] slider.
The sound is digitally processed, so the sound quality decreases.
[SHIFT] + Press this button:
Switches the [TEMPO] slider’s range of variation each time the button is pressed.
Press for over 1 second:
Sets the tempo (BPM) of the track currently playing back to its original tempo.
7 KEY SYNC button
Press:
Matches the key to that of the other deck.
8 KEY SHIFTc button, KEY SHIFTd button
Press:
Raises and lowers the key.
9 RESET button
Press the [RESET] button to return to the original key.
The 7 to 9 buttons support the Pitch ’n Time DJ function. This
function needs to be activated before it can be used. For details, see
“Pitch ’n Time DJ Activation Manual” from “Software Info” on the
Pioneer DJ support site below.
pioneerdj.com/support/
a AUTO LOOP button
Press:
Turns the auto loop function on and off.
! During loop playback, this operation cancels looping.
[SHIFT] + Press this button:
Switches looping between active and non-active. (Loop Active)
! Even if looping is active, if there is no playback position in that
loop, loop playback is not performed.
! When the playback position enters the active loop, loop playback
starts.
! During loop playback, this operation cancels looping.
b LOOP 2X button
Press:
Selects the auto loop beat.
During loop playback, the length of loop playback is doubled each
time this button is pressed.
[SHIFT] + Press this button:
During loop playback, moves the loop to the right by the amount
equal to its length. (Loop Shift)
c LOOP 1/2X button
Press:
Selects the auto loop beat.
Halves the loop playback length.
[SHIFT] + Press this button:
During loop playback, moves the loop to the left by the amount equal
to its length. (Loop Shift)
d LOOP OUT button
Press:
The loop out point is set, and loop playback starts.
When this button is pressed during loop playback, the loop out point
can be fine-adjusted using the jog dial.
[SHIFT] + Press this button:
Cancels loop playback. (Loop Exit)
When this operation is performed after loop playback is canceled,
playback returns to the previously set loop-in point and loop playback
resumes. (Reloop)
e LOOP IN button
Press:
Sets the loop-in point.
When this button is pressed during loop playback, the loop-in point
can be fine-adjusted using the jog dial.
[SHIFT] + Press this button:
Switches the loop slot.
When loops are stored in loop slots ahead of time, they can be called
out later.
! Up to eight loops can be set in the loop slots.
! When you select the number of the loop slot to which you want
to store the loop and then set a loop, the loop is automatically
stored.
! When a new loop is set after a loop has been stored, the loop is
overwritten and the loop stored in the slot is updated.
! When the number of the loop slot whose loop you want to call out
is selected and the [LOOP OUT] button is pressed while pressing
the [SHIFT] button (reloop), playback of the stored loop starts.
Press for over 1 second:
Turns the auto 4-beat loop on.
f PARAMETER1 (PARAMETER2) c button, d button
Sets the various parameters for using the performance pads.
= Using the performance pads (p. 18 )
10
En
 Loading...