

Page 1

DJ Controller
Contrôleur pour DJ
DDJ-SR
DJ Controller
DJ Controller
DJ Controller
http://pioneerdj.com/support/
http://serato.com/
The Pioneer DJ support site shown above offers FAQs, information on software and various other types of
information and services to allow you to use your product in greater comfort.
The contents of the warranty for the United States and Canada are provided on the last pages of the
instructions in English and French.
For the latest version of the Serato DJ software, access Serato.com and download the software from there.
Le site de support DJ de Pioneer indiqué ci-dessus propose une FAQ, des informations sur le logiciel et divers
types d’informations et de services qui permettent une utilisation plus confortable de ce produit.
Le contenu de la garantie pour les États-Unis et le Canada se trouvent aux dernières pages des
modes d’emploi anglais et français.
Pour la toute dernière version du logiciel Serato DJ, accédez à Serato.com et téléchargez le logiciel de ce site.
Die oben gezeigte Pioneer DJ-Support-Website enthält häufig gestellte Fragen, Informationen über Software
und andere wichtige Informationen und Dienste, die Ihnen helfen, Ihr Produkt optimal zu verwenden.
Für die neueste Version der Serato DJ-Software gehen Sie zu Serato.com und laden die Software von dort
herunter.
Il sito di supporto DJ Pioneer indicato qui sopra offre una sezione FAQ, informazioni sul software ed
informazioni e servizi di vario tipo, per permettere un uso più confortevole dei nostri prodotti.
Per ottenere la più recente versione di Serato DJ, raggiungere Serato.com e scaricare il software di lì.
De bovengenoemde Pioneer DJ ondersteuningswebsite biedt een overzicht van de vaak gestelde vragen,
informatie over software en allerlei andere soorten informatie en diensten die u in staat stellen dit product met
meer gemak te gebruiken.
Ga voor de nieuwste versie van de Serato DJ-software naar Serato.com en download de software van deze site.
Français Deutsch ItalianoEnglish Nederlands
Read Before Use (Important)/Quick Start Guide
A lire avant l’utilisation (Important)/Guide de démarrage rapide
Vor Gebrauch lesen (wichtig)/Kurzanleitung
Da leggere prima dell’uso (Importante)/Guida di avvio veloce
Lees dit voor gebruik (Belangrijk)/Snelstartgids
Page 2
WARNING
This equipment is not waterproof. To prevent a fire or
shock hazard, do not place any container filled with
liquid near this equipment (such as a vase or flower
pot) or expose it to dripping, splashing, rain or
moisture.
D3-4-2-1-3_A1_En
This product is for general household purposes. Any
failure due to use for other than household purposes
(such as long-term use for business purposes in a
restaurant or use in a car or ship) and which requires
repair will be charged for even during the warranty
period.
K041_A1_En
WARNING
To prevent a fire hazard, do not place any naked flame
sources (such as a lighted candle) on the equipment.
D3-4-2-1-7a_A1_En
When using this product, confirm the safety
information shown on the bottom of the unit.
D3-4-2-2-4_B1_En
Operating Environment
Operating environment temperature and humidity:
+5 °C to +35 °C (+41 °F to +95 °F); less than 85 %RH
(cooling vents not blocked)
Do not install this unit in a poorly ventilated area, or in
locations exposed to high humidity or direct sunlight (or
strong artificial light).
D3-4-2-1-7c*_A2_En
For Europe
If you want to dispose this product, do not mix it with general household waste. There is a separate collection system for used
electronic products in accordance with legislation that requires proper treatment, recovery and recycling.
Private households in the member states of the EU, in Switzerland and Norway may return their used electronic products free of charge to
designated collection facilities or to a retailer (if you purchase a similar new one).
For countries not mentioned above, please contact your local authorities for the correct method of disposal.
By doing so you will ensure that your disposed product undergoes the necessary treatment, recovery and recycling and thus prevent potential
negative effects on the environment and human health.
K058b_A1_En
For U.S.A. and Canada
The Safety of Your Ears is in Your Hands
Get the most out of your equipment by playing it at a safe level – a level that lets the sound come through clearly without
annoying blaring or distortion and, most importantly, without affecting your sensitive hearing. Sound can be deceiving.
Over time, your hearing “comfort level” adapts to higher volumes of sound, so what sounds “normal” can actually be
loud and harmful to your hearing. Guard against this by setting your equipment at a safe level BEFORE your hearing
adapts.
ESTABLISH A SAFE LEVEL:
> Set your volume control at a low setting.
> Slowly increase the sound until you can hear it comfortably and clearly, without distortion.
> Once you have established a comfortable sound level, set the dial and leave it there.
BE SURE TO OBSERVE THE FOLLOWING GUIDELINES:
> Do not turn up the volume so high that you can’t hear what’s around you.
> Use caution or temporarily discontinue use in potentially hazardous situations.
> Do not use headphones while operating a motorized vehicle; the use of headphones may create a traffic hazard and
is illegal in many areas.
S001a_A1_En
En
2
Page 3
For U.S.A.
Read these instructions.
1)
Keep these instructions.
2)
Heed all warnings.
3)
Follow all instructions.
4)
Do not use this apparatus near water.
5)
Clean only with dry cloth.
6)
Do not block any ventilation openings. Install in
7)
accordance with the manufacturer’s
instructions.
Do not install near any heat sources such as
8)
radiators, heat registers, stoves, or other
apparatus (including amplifiers) that produce
heat.
Do not defeat the safety purpose of the polarized
9)
or grounding-type plug. A polarized plug has two
blades with one wider than the other. A
grounding type plug has two blades and a third
grounding prong. The wide blade or the third
prong are provided for your safety. If the provided
plug does not fit into your outlet, consult an
electrician for replacement of the obsolete outlet.
Protect the power cord from being walked on or
10)
pinched particularly at plugs, convenience
receptacles, and the point where they exit from
the apparatus.
11)
Only use attachments/accessories specified by
the manufacturer.
12)
Use only with the cart, stand, tripod, bracket, or
table specified by the manufacturer, or sold with
the apparatus. When a cart is used, use caution
when moving the cart/apparatus combination to
avoid injury from tip-over.
13)
Unplug this apparatus during lightning storms
or when unused for long periods of time.
14)
Refer all servicing to qualified service personnel.
Servicing is required when the apparatus has
been damaged in any way, such as power-supply
cord or plug is damaged, liquid has been spilled
or objects have fallen into the apparatus, the
apparatus has been exposed to rain or moisture,
does not operate normally, or has been dropped.
D3-7-13-69_En
English
WARNING: Handling the cord on this product or
cords associated with accessories sold with the
product may expose you to chemicals listed on
proposition 65 known to the State of California and
other governmental entities to cause cancer and
birth defect or other reproductive harm.
D36-P5_B1_En
IMPORTANT NOTICE
THE MODEL NUMBER AND SERIAL NUMBER OF
THIS EQUIPMENT ARE ON THE REAR OR BOTTOM.
RECORD THESE NUMBERS ON PAGE 16 FOR
FUTURE REFERENCE.
D36-AP9-3*_A1_En
Information to User
Alterations or modifications carried out without
appropriate authorization may invalidate the user’s
right to operate the equipment.
D8-10-2_A1_En
FEDERAL COMMUNICATIONS COMMISSION DECLARATION OF CONFORMITY
This device complies with part 15 of the FCC Rules. Operation is subject to the following two conditions: (1) This
device may not cause harmful interference, and (2) this device must accept any interference received, including
interference that may cause undesired operation.
Product Name: DJ controller
Model Number: DDJ-SR
Responsible Party Name: PIONEER ELECTRONICS (USA) INC.
SERVICE SUPPORT DIVISION
Address: 1925 E. DOMINGUEZ ST. LONG BEACH, CA 90810-1003, U.S.A.
Phone: 1-800-421-1404
URL: http://www.pioneerelectronics.com
D8-10-4*_C1_En
En
3
Page 4
NOTE:
This equipment has been tested and found to comply with the limits for a Class B digital device, pursuant to Part 15
of the FCC Rules. These limits are designed to provide reasonable protection against harmful interference in a
residential installation. This equipment generates, uses, and can radiate radio frequency energy and, if not installed
and used in accordance with the instructions, may cause harmful interference to radio communications. However,
there is no guarantee that interference will not occur in a particular installation. If this equipment does cause
harmful interference to radio or television reception, which can be determined by turning the equipment off and on,
the user is encouraged to try to correct the interference by one or more of the following measures:
— Reorient or relocate the receiving antenna.
— Increase the separation between the equipment and receiver.
— Connect the equipment into an outlet on a circuit different from that to which the receiver is connected.
— Consult the dealer or an experienced radio/TV technician for help.
D8-10-1-2_A1_En
For other areas
Information to User
Alterations or modifications carried out without appropriate authorization may invalidate the user’s right to operate
the equipment.
FEDERAL COMMUNICATIONS COMMISSION DECLARATION OF CONFORMITY
This device complies with part 15 of the FCC Rules. Operation is subject to the following two conditions: (1) This
device may not cause harmful interference, and (2) this device must accept any interference received, including
interference that may cause undesired operation.
Product Name: DJ controller
Model Number: DDJ-SR
Responsible Party Name: PIONEER ELECTRONICS (USA) INC.
SERVICE SUPPORT DIVISION
Address: 1925 E. DOMINGUEZ ST. LONG BEACH, CA 90810-1003, U.S.A.
Phone: 1-800-421-1404
URL: http://www.pioneerelectronics.com
D8-10-2_A1_En
D8-10-4*_C1_En
NOTE:
This equipment has been tested and found to comply with the limits for a Class B digital device, pursuant to Part 15
of the FCC Rules. These limits are designed to provide reasonable protection against harmful interference in a
residential installation. This equipment generates, uses, and can radiate radio frequency energy and, if not installed
and used in accordance with the instructions, may cause harmful interference to radio communications. However,
there is no guarantee that interference will not occur in a particular installation. If this equipment does cause
harmful interference to radio or television reception, which can be determined by turning the equipment off and on,
the user is encouraged to try to correct the interference by one or more of the following measures:
— Reorient or relocate the receiving antenna.
— Increase the separation between the equipment and receiver.
— Connect the equipment into an outlet on a circuit different from that to which the receiver is connected.
— Consult the dealer or an experienced radio/TV technician for help.
D8-10-1-2_A1_En
En
4
Page 5
Before start
English
How to read this manual
Thank you for buying this Pioneer product.
Be sure to read both this leaflet and the operating instructions! Both
documents include important information that you must understand
before using this product.
After you have finished reading the instructions, put them away in a
safe place for future reference.
— For instructions on acquiring the operating instructions, see
Acquiring the manual (p. 14).
In this manual, names of screens and menus displayed on the prod-
uct and on the computer screen, as well as names of buttons and
terminals, etc., are indicated within brackets. (e.g.: [CUE] button,
[Files] panel, [MIC] terminal)
Please note that the screens and specifications of the software
described in this manual as well as the external appearance and
specifications of the hardware are currently under development and
may differ from the final specifications.
Please note that depending on the operating system version, web
browser settings, etc., operation may differ from the procedures
described in this manual.
What’s in the box
CD-ROM (Installation Disc)
USB cable
Warranty (for some regions)
Read Before Use (Important)/Quick Start Guide (this document)
1 The included warranty is for the European region.
For the North American region, the corresponding information is
provided on the last page of both the English and French versions
of the “Read Before Use (Important)/Quick Start Guide”.
For the Japanese region, the corresponding information is
provided on the last page of the Japanese version of the “Read
Before Use (Important)/Quick Start Guide”.
1
About the Serato DJ software
Serato DJ is a DJ software application by Serato. DJ performances are
possible by connecting the computer on which this software is installed
to this unit.
Minimum operating environment
Supported operating systems
Mac OS X: 10.8, 10.7 and 10.6
Windows: Windows 7
Others
Optical drive Optical disc drive on which the CD-ROM can be read
USB port
Display resolution Resolution of 1 280 x 720 or greater
Internet connection
For the latest information on the required operating environment and compat-
ibility as well as to acquire the latest operating system, refer to “Software Info”
under “DDJ-SR” on the Pioneer DJ support site below.
http://pioneerdj.com/support/
Operating System support assumes you are using the latest point release for
that version.
Operation is not guaranteed on all computers, even if all the required operating
environment conditions indicated here are fulfilled.
Depending on the computer’s power-saving settings, etc., the CPU and hard
disk may not provide sufficient processing capabilities. For notebook comput-
ers in particular, make sure the computer is in the proper conditions to provide
constant high performance (for example by keeping the AC power connected)
when using Serato DJ.
Use of the Internet requires a separate contract with a provider offering Internet
services and payment of provider fees.
A USB 2.0 port is required to connect the computer
with this unit.
An Internet connection is required for registering
the “Serato.com” user account and downloading the
software.
Installing the software
Before installing the software
For the latest version of the Serato DJ software, access Serato.com
and download the software from there.
For details, refer to Installation Procedure (Windows) or Installation
procedure (Mac OS X).
The user is responsible for preparing the computer, network
devices and other elements of the Internet usage environment
required for a connection to the Internet.
About the driver software (Windows)
This driver software is an exclusive ASIO driver for outputting audio
signals from the computer.
There is no need to install the driver software when using Mac OS X.
Checking the latest information on the driver software
For detailed information on this unit’s designated driver software, see
the Pioneer DJ support site below.
http://pioneerdj.com/support/
About the installation procedure
The installation procedure depends on the operating system (OS) on the
computer you are using.
For Windows
After installing the driver software, install the Serato DJ software.
For Mac OS X
Only install the Serato DJ software.
Installation Procedure (Windows)
Do not connect this unit and the computer until installation is
completed.
Log on as the user which was set as the computer’s administrator
before installing.
If any other programs are running on the computer, quit them.
1 Insert the CD-ROM into the computer’s optical drive.
The CD-ROM menu is displayed.
If the CD-ROM menu does not appear when the CD-ROM is inserted,
open the optical drive from [Computer (or My Computer)] in the
[Start] menu, then double-click the [CD_menu.exe] icon.
2 When the CD-ROM menu appears, select [Install
Driver Software (Pioneer_DDJ_SR_Driver_x.xxx.exe)],
then click [Start].
To close the CD-ROM menu, click [Exit].
En
5
Page 6
3 Proceed with installation according to the instructions
on the screen.
If [Windows Security] appears on the screen while the installation is
in progress, click [Install this driver software anyway] and continue
with the installation.
When the installation program is completed, a completion message
appears.
After installing the driver software, install the Serato DJ software.
4 Select [Download Serato DJ Software] from the
CD-ROM’s menu, then click [Start].
5 “An internet environment is required to access the
site. Connected to the internet?” is displayed. Click [Yes].
The web browser is launched and the Pioneer DJ support site is
displayed.
6 Click [Software Info] under [DDJ-SR] on the Pioneer DJ
support site.
[Serato DJ Support Information] is displayed.
7 Click the link to the Serato DJ download page.
The Serato DJ download page is displayed.
8 Log in to your “Serato.com” user account.
If you have already registered a user account on “Serato.com”,
proceed to step 10.
If you have not completed registering your user account, do so
following the procedure below.
— Following the instructions on the screen, input your e-mail
address and the password you want to set, then select the
region in which you live.
— If you check [E-mail me Serato newsletters], newsletters
providing the latest information on Serato products will be
sent from Serato.
— Once user account registration is completed, you will receive
an e-mail at the e-mail address you have input. Check the
contents of the e-mail sent from “Serato.com”.
Be careful not to forget the e-mail address and password speci-
fied when you performed user registration. They will be required
for updating the software.
The personal information input when registering a new user
account may be collected, processed and used based on the
privacy policy on the Serato website.
9 Click the link in the e-mail message sent from “Serato.
com”.
This takes you to the Serato DJ download page. Proceed to step 11.
10 Log in.
Input the e-mail address and password you have registered to log in to
“Serato.com”.
11 Download the Serato DJ software from the download
page.
Unzip the downloaded file, then double-click the unzipped file to launch
the installer.
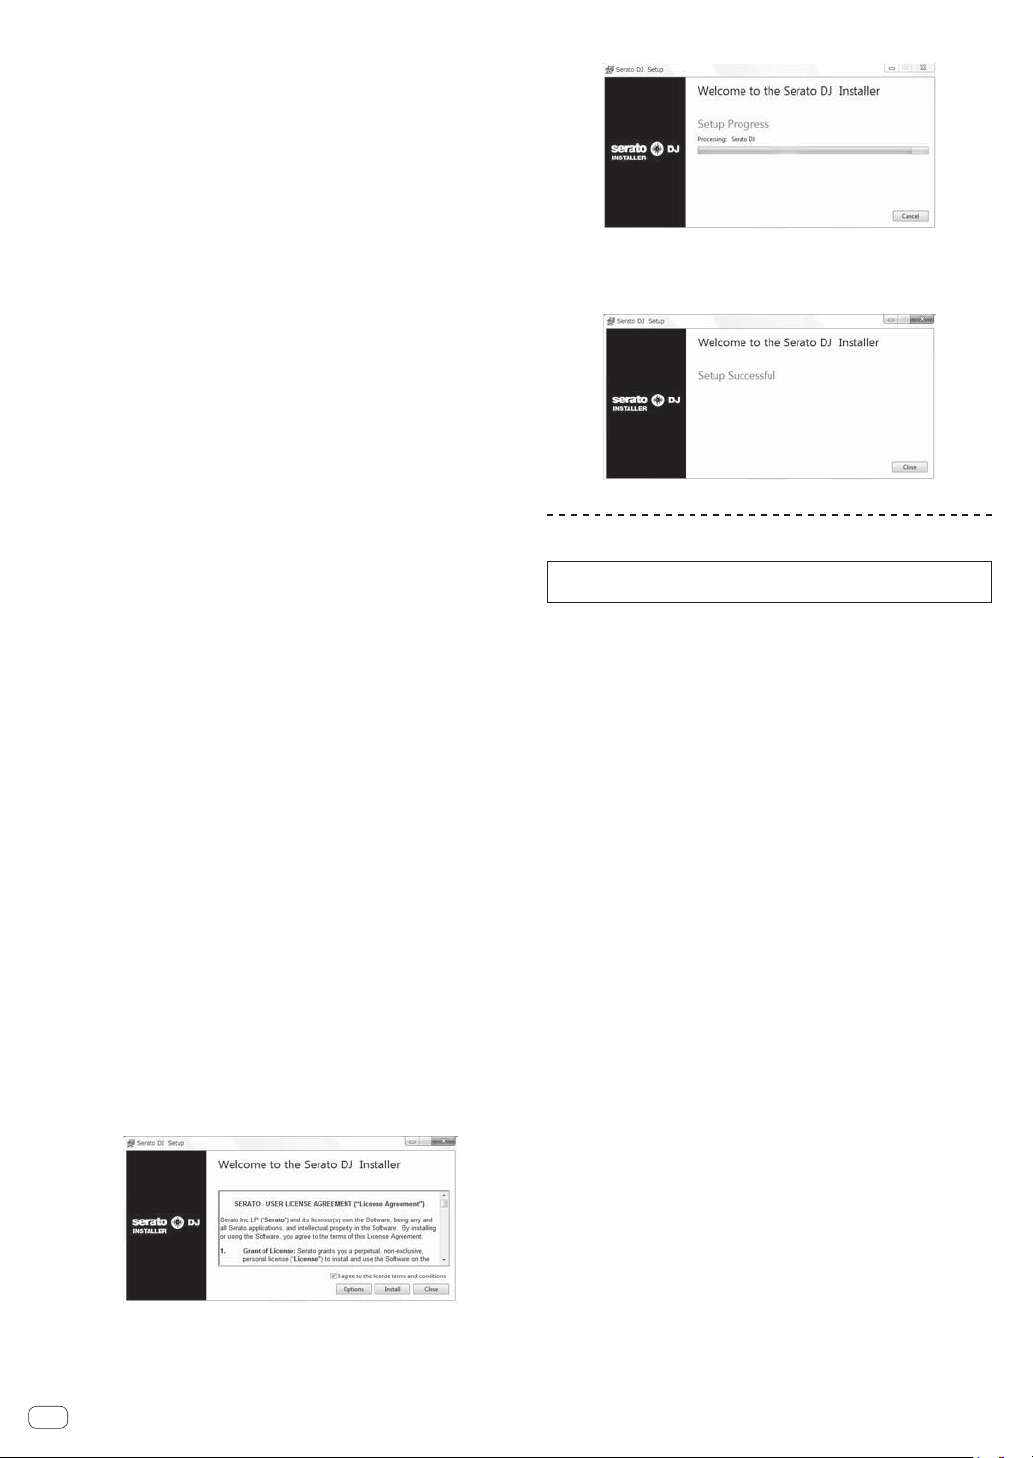
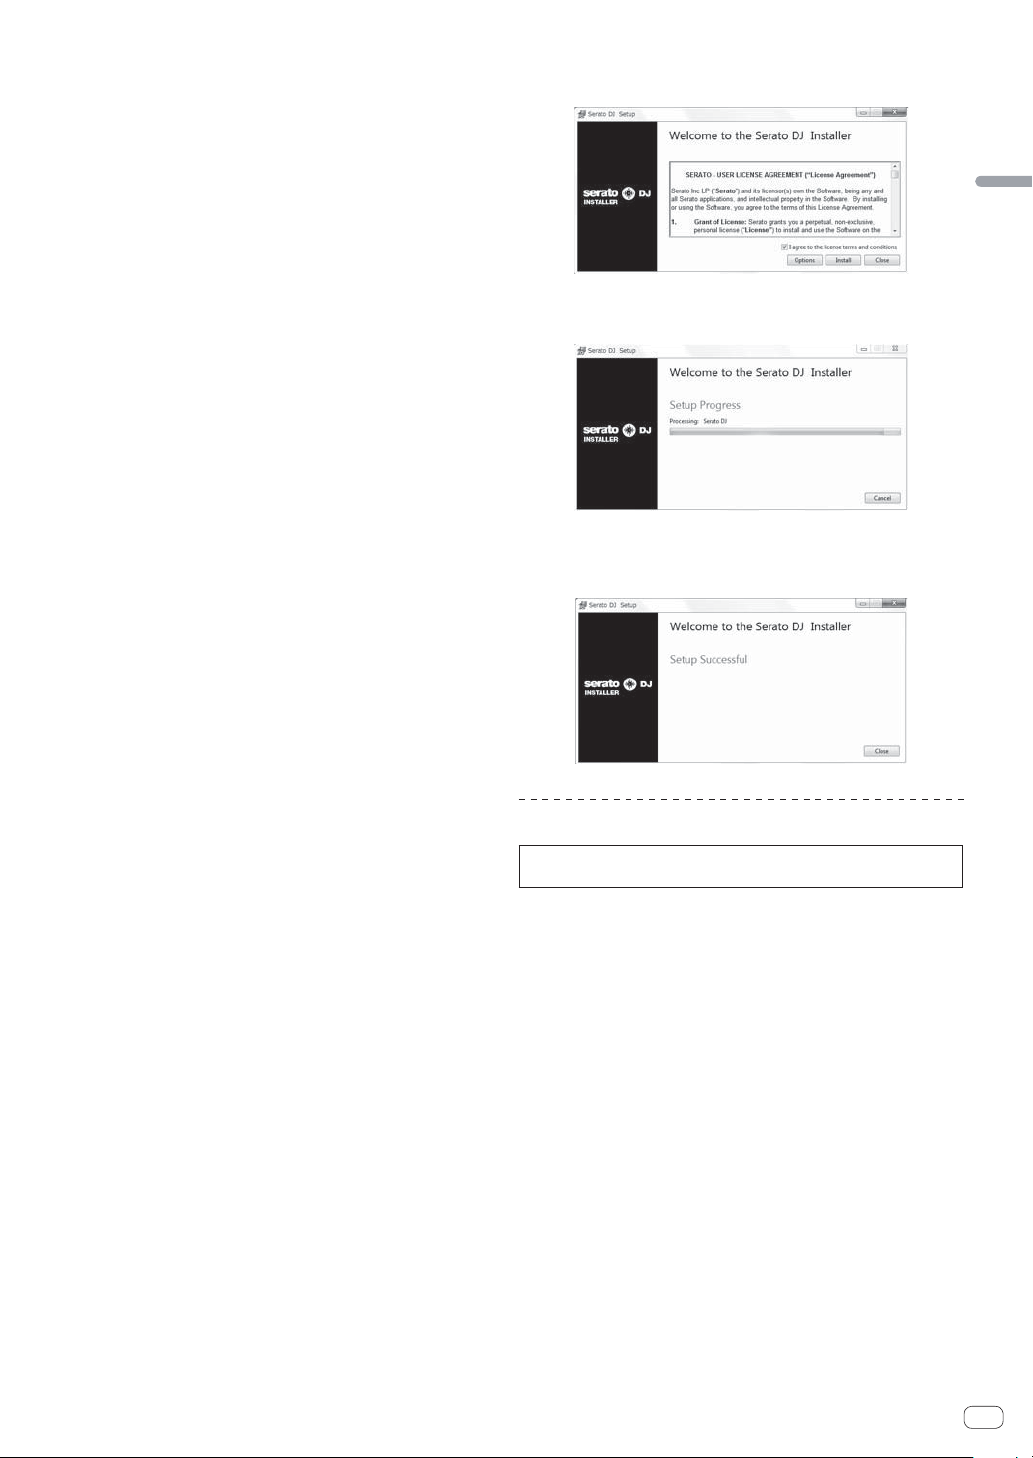
12 Read the terms of the license agreement carefully,
and if you agree, select [I agree to the license terms and
conditions], then click [Install].
If you do not agree to the contents of the license agreement, click
[Close] to cancel installation.
Installation begins.
The message of successful installation appears once installation is
completed.
13 Click [Close] to quit the Serato DJ installer.
Installation procedure (Mac OS X)
Do not connect this unit and the computer until installation is
completed.
If any other programs are running on the computer, quit them.
1 Insert the CD-ROM into the computer’s optical drive.
The CD-ROM menu is displayed.
If the CD-ROM menu does not appear on the screen when the
CD-ROM is inserted, open the optical driver from Finder, then double-click the [CD_menu.app] icon.
2 Select [Download Serato DJ Software] from the
CD-ROM’s menu, then click [Start].
3 “An internet environment is required to access the
site. Connected to the internet?” is displayed. Click [Yes].
The web browser is launched and the Pioneer DJ support site is
displayed.
4 Click [Software Info] under [DDJ-SR] on the Pioneer DJ
support site.
[Serato DJ Support Information] is displayed.
5 Click the link to the Serato DJ download page.
The Serato DJ download page is displayed.
6 Log in to your “Serato.com” user account.
If you have already registered a user account on “Serato.com”,
proceed to step 8.
If you have not completed registering your user account, do so
following the procedure below.
— Following the instructions on the screen, input your e-mail
address and the password you want to set, then select the
region in which you live.
— If you check [E-mail me Serato newsletters], newsletters
providing the latest information on Serato products will be
sent from Serato.
— Once user account registration is completed, you will receive
an e-mail at the e-mail address you have input. Check the
contents of the e-mail sent from “Serato.com”.
Be careful not to forget the e-mail address and password speci-
fied when you performed user registration. They will be required
for updating the software.
The personal information input when registering a new user
account may be collected, processed and used based on the
privacy policy on the Serato website.
En
6
Page 7
7 Click the link in the e-mail message sent from “Serato.
com”.
This takes you to the Serato DJ download page. Proceed to step 9.
8 Log in.
Input the e-mail address and password you have registered to log in to
“Serato.com”.
9 Download the Serato DJ software from the download
page.
Unzip the downloaded file, then double-click the unzipped file to launch
the installer.
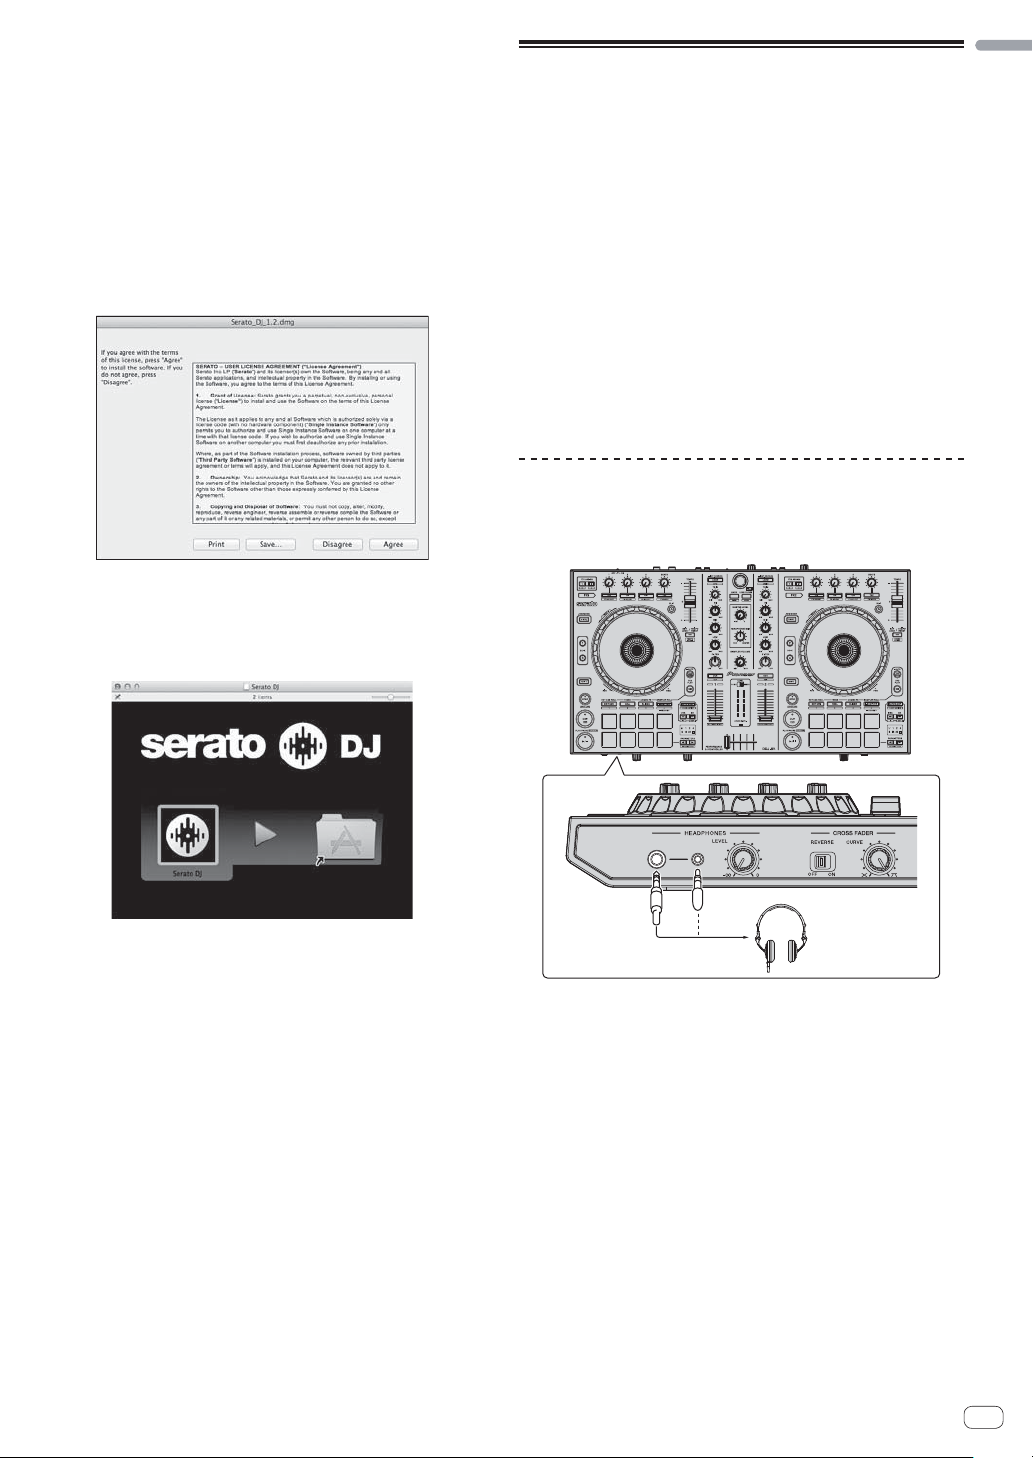
10 Read the terms of the license agreement carefully,
and if you agree, click [Agree].
If you do not agree to the contents of the usage agreement, click
[Disagree] to cancel installation.
11 If the following screen appears, drag and drop the
[Serato DJ] icon on the [Applications] folder icon.
Operation
English
Be sure the power is off when connecting equipment and changing
connections.
Be sure to use the USB cable included with this product.
Refer to the operating instructions for the component to be connected.
With this unit, the power is supplied by USB bus power. The unit can be
used simply by connecting it to a computer using the USB cable.
Connect the computer to which this unit is to be connected to an AC
power supply.
A USB hub cannot be used.
In cases like the ones below, the power may be insufficient and this
unit may not operate on USB bus power.
— When the computer’s USB power supply capacity is insufficient.
— When other USB devices are connected to the computer.
— When headphones with an impedance of less than 32 : are
connected.
— When headphones are simultaneously connected to the stereo
phone jack and the stereo mini-phone jack.
— When a monaural jack is connected to the [HEADPHONES]
terminal.
Connections
1 Connect headphones to one of the [HEADPHONES]
terminals.
En
7
Page 8
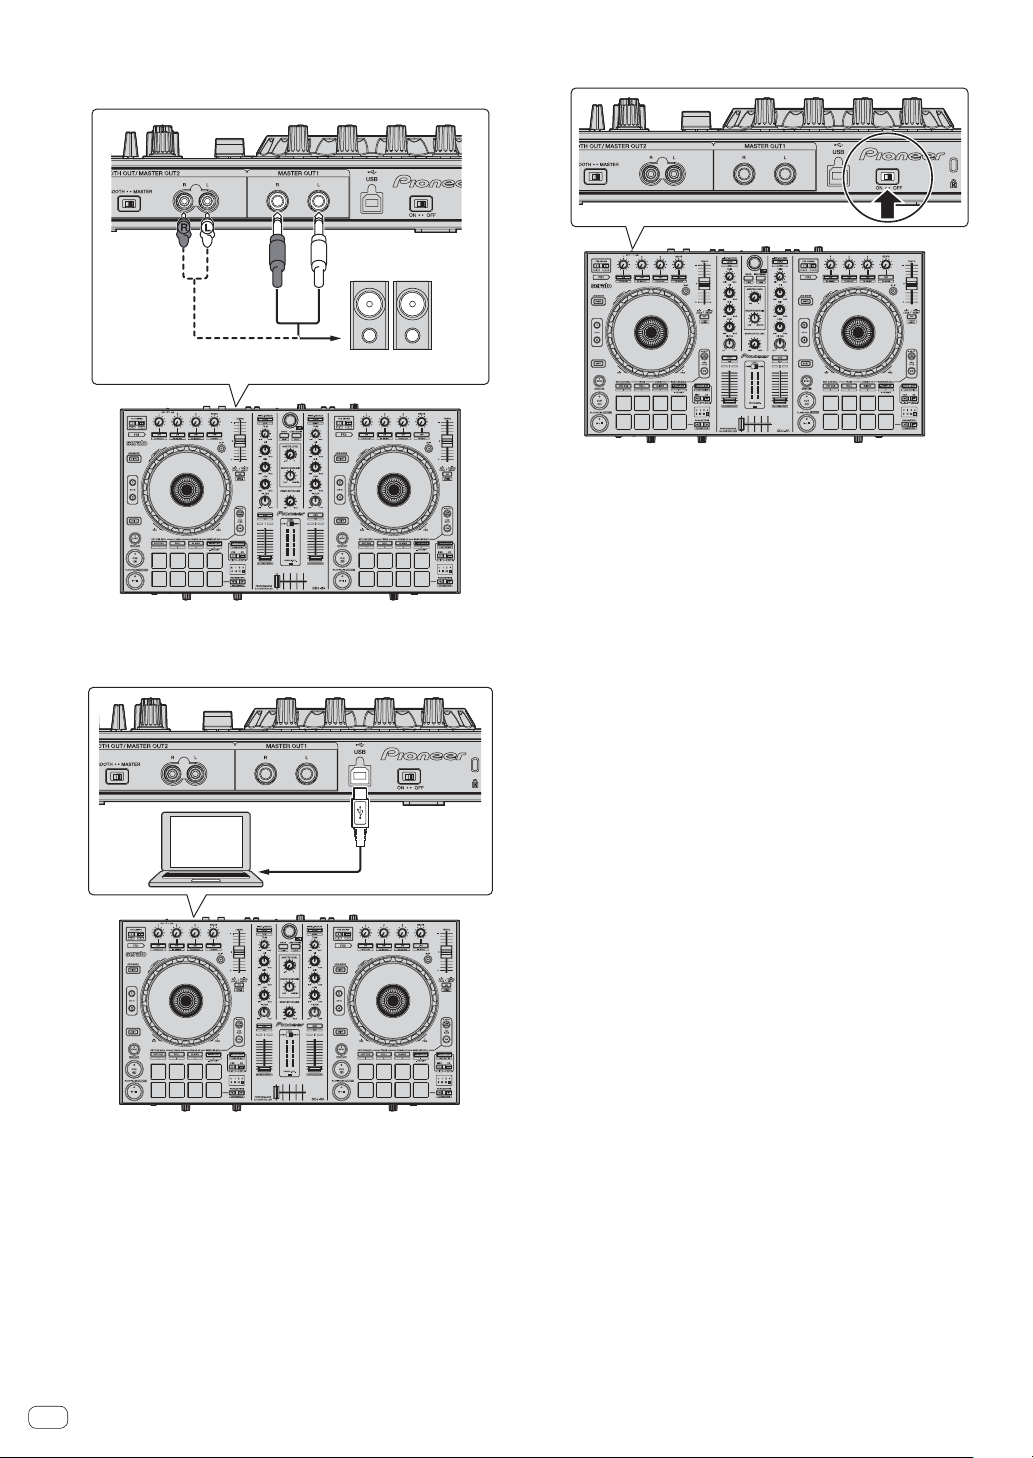
2 Connect powered speakers, a power amplifier,
components, etc., to the [MASTER OUT1] or [BOOTH
OUT/MASTER OUT2] terminals.
Powered speaker, etc
For details on connecting the input/output terminals, see the
Operating Instructions.
3 Connect this unit to your computer via a USB cable.
5 Switch the [ON/OFF] switch on this unit’s rear panel
to the [ON] side to turn this unit’s power on.
Turn on the power of this unit.
For Windows users
The message [Installing device driver software] may appear
when this unit is first connected to the computer or when it is
connected to a different USB port on the computer. Wait a while
until the message [Your devices are ready for use] appears.
6 Turn on the power of the devices connected to the
output terminals (powered speakers, power amplifier,
components, etc.).
When a microphone, DJ player or other external device is con-
nected to input terminals, the power of that device also turns on.
4 Turn on the computer’s power.
En
8
Page 9
Starting the system
䢢 Launching Serato DJ
For Windows
From the Windows [Start] menu, click the [Serato DJ] icon under [All Programs] > [Serato] > [Serato DJ].
For Mac OS X
In Finder, open the [Applications] folder, then click the [Serato DJ] icon.
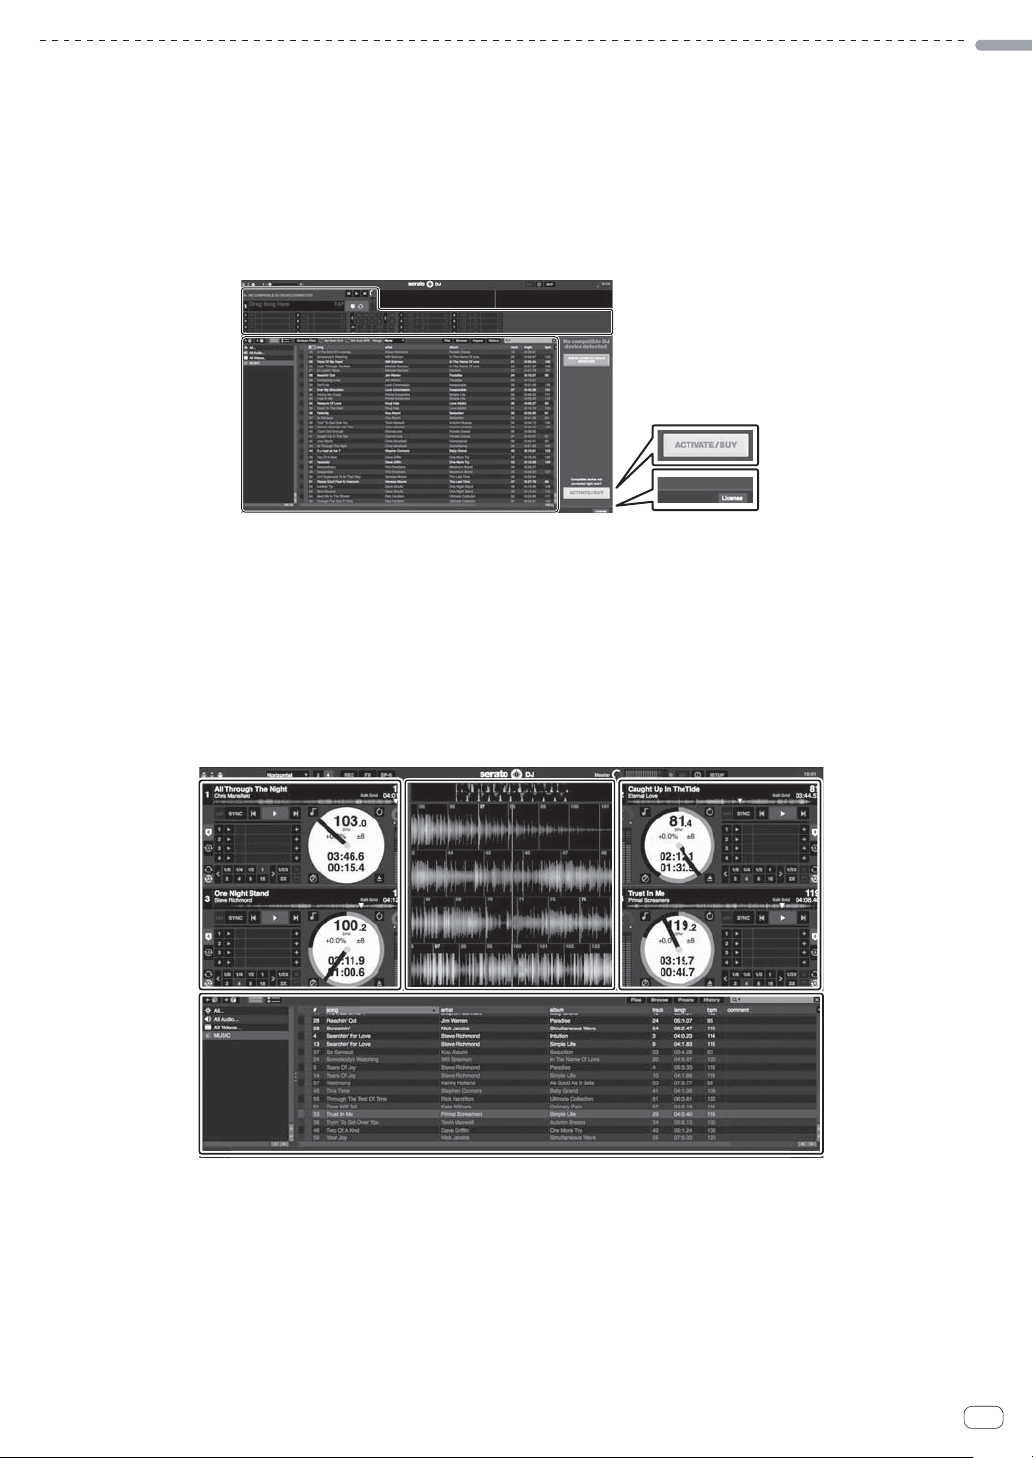
Computer screen directly after the Serato DJ software is launched
A
English
C
1
2
1 The [ACTIVATE/BUY] icon may appear on the right side of the screen that is displayed when Serato DJ is launched the first time, but there is no
need to activate or purchase a license for those using DDJ-SR.
2 Check [DO NOT SHOW AGAIN] at the bottom right of the screen, then click [License] and continue to use Serato DJ as such.
To operate the beat grid
With Serato DJ, [SYNC PREFERENCE] is set to [Simple sync] by default, but this must be switched to [Smart sync] in order to perform beat grid
operations.
SETUP–DJ Preference-SYNC PREFERENCE
For instructions on displaying the settings screen and details on the beat grid, see the Serato DJ manual.
Computer screen when a track is loaded in the Serato DJ software
Click [Library] at the upper left of the computer screen, then select [Vertical] or [Horizontal] from the pull-down menu to switch the Serato DJ screen.
AA
B
C
A Deck section
The track information (the name of the loaded track, artist name, BPM, etc.), the overall waveform and other information is displayed here.
B Waveform display
The loaded track’s waveform is displayed here.
C Browser section
Crates in which tracks in the library or sets of multiple tracks are stored are displayed here.
This manual consists mainly of explanations of functions of this unit as hardware. For detailed instructions on operating the Serato DJ software, see
the Serato DJ software manual.
En
9
Page 10
䢢 Importing tracks
The following describes the typical procedure for importing tracks.
There are various ways to import tracks with the Serato DJ software. For details, see the Serato DJ software manual.
If you are already using Serato DJ software (Scratch Live, ITCH or Serato DJ Intro) and have already created track libraries, the track libraries you
have previously created can be used as such.
If you are using Serato DJ Intro and have already created track libraries, you may have to reanalyze the tracks.
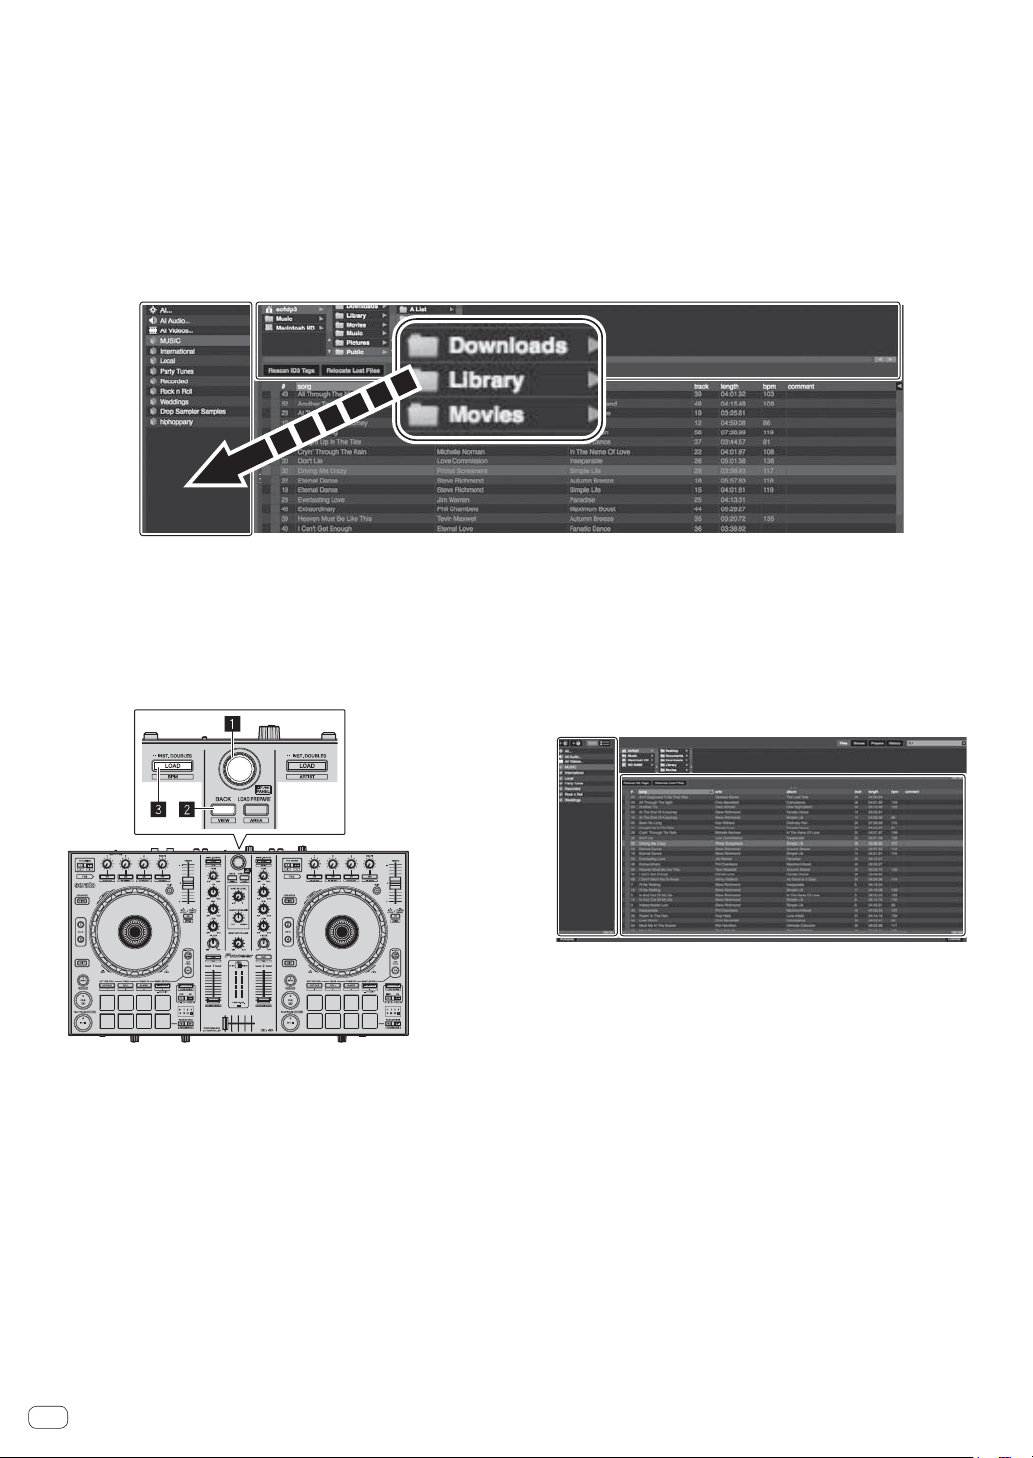
1 Click the [Files] key on the Serato DJ software screen to open the [Files] panel.
The contents of your computer or the peripheral connected to the computer are displayed in the [Files] panel.
2 Click the folder on the [Files] panel containing the tracks you want to add to the library to select it.
3 On the Serato DJ software screen, drag and drop the selected folder to the crates panel.
A crate is created and the tracks are added to the library.
a
b
a [Files] panel
b Crates panel
䢢 Loading tracks and playing them
The following describes the procedure for loading tracks into deck [1] as
an example.
1 Rotary selector
2 BACK (VIEW) button
3 LOAD button
1 Press this unit’s [BACK (VIEW)] button, move the
cursor to the crates panel on the computer’s screen, then
turn the rotary selector to select the crate, etc.
2 Press the rotary selector, move the cursor to the
library on the computer’s screen, then turn the rotary
selector and select the track.
a
b
a Library
b Crates panel
3 Press the [LOAD] button to load the selected track
onto the deck.
10
En
Page 11
䢢 Playing tracks and outputting the sound
e
The following describes the procedure for outputting the channel 1
sound as an example.
Set the volume of the devices (power amplifier, powered speakers,
etc.) connected to the [MASTER OUT1] and [BOOTH OUT/MASTER
OUT2] terminals to an appropriate level. Note that loud sound will be
output if the volume is set too high.
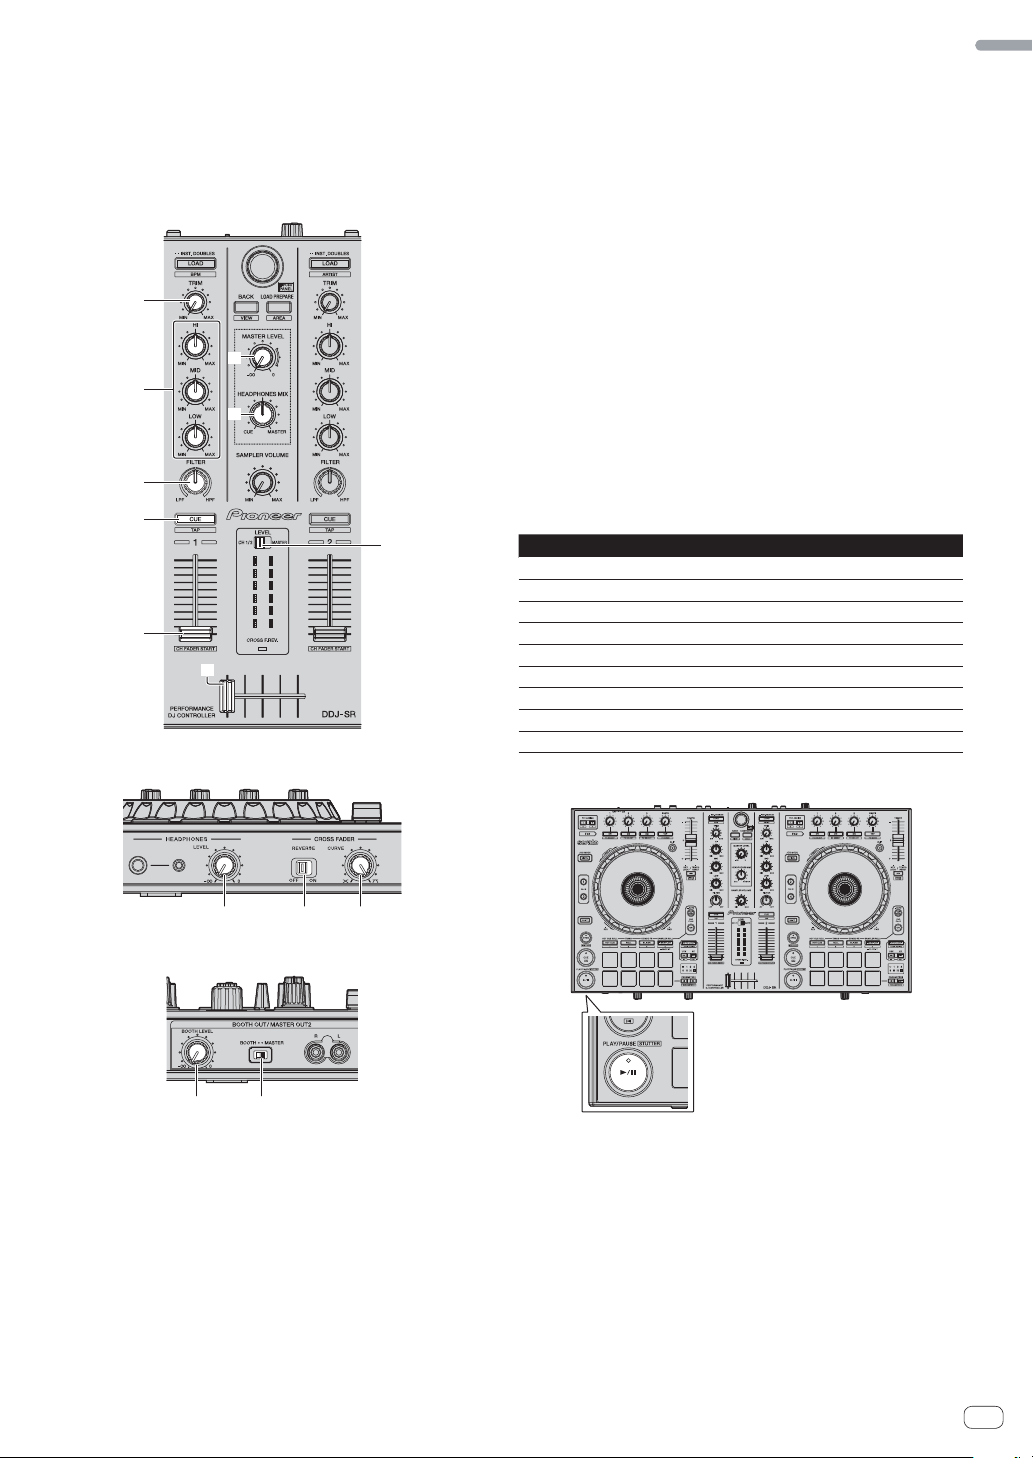
Mixer section
4
9
5
a
6
7
b
8
c
Front panel
4 TRIM control
5 EQ (HI, MID, LOW) controls
6 FILTER control
7 Headphones CUE/TAP button
8 Channel fader
9 MASTER LEVEL control
a HEADPHONES MIX control
b Level indicator switch
c Crossfader
d HEADPHONES LEVEL control
e CROSS FADER REVERSE switch
f CROSS FADER CURVE control
g BOOTH LEVEL control
h BOOTH/MASTER selector switch
1
Set the positions of the controls, etc., as shown
below.
Names of controls, etc. Position
MASTER LEVEL control Turned fully counterclockwise
TRIM control Turned fully counterclockwise
EQ (HI, MID, LOW) controls Center
FILTER control Center
Level indicator switch [CH1/2] position
Channel fader Moved forward
CROSS FADER REVERSE switch [OFF] position
BOOTH/MASTER selector switch [MASTER] position
BOOTH LEVEL control Turned fully counterclockwise
2 Press the ["] button to play the track.
English
Rear panel
g
d
h
f
3 Move the channel fader away from you.
4 Turn the [TRIM] control.
Adjust [TRIM] so that the orange indicator on the channel level indicator
lights at the peak level.
5 Turn the [MASTER LEVEL] control to adjust the audio
level of the speakers.
Adjust the sound level output from the [MASTER OUT1] and [BOOTH
OUT/MASTER OUT2] terminals to an appropriate level.
When the [BOOTH/MASTER] selector switch is set to the [BOOTH]
position, the [BOOTH LEVEL] control can be used to adjust only the
audio level output from the [BOOTH OUT/MASTER OUT2] terminal to
an appropriate volume.
En
11
Page 12

䢢 Monitoring sound with headphones
Set the positions of the controls, etc., as shown below.
Names of controls, etc. Position
HEADPHONES MIX control Center
HEADPHONES LEVEL control Turned fully counterclockwise
Browser section
1 2 1
1 Press the headphones [CUE/TAP] button for the
channel 1.
2 Turn the [HEADPHONES LEVEL] control.
Adjust the sound level output from the headphones to an appropriate
level.
Note
This unit and the Serato DJ software include a variety of functions
enabling individualistic DJ performances. For details on the respective
functions, see the operating instructions and the Serato DJ software
manual.
This unit’s operating instructions can be downloaded from the
Pioneer DJ support site. For details, see Downloading this unit’s oper-
ating instructions (p. 14).
The Serato DJ software manual can be downloaded from Serato.
com. For details, see Downloading the Serato DJ software manual (p.
14).
Quitting the system
1 Quit Serato DJ.
When the software is closed, a message for confirming that you want to
close it appears on the computer’s screen. Click [Yes] to close.
2 Switch the [ON/OFF] switch on this unit’s rear panel
to the [OFF] side to turn this unit’s power off.
3 Disconnect the USB cable from your computer.
3 4
1 LOAD button
2 Rotary selector
3 BACK (VIEW) button
4 LOAD PREPARE (AREA) button
Deck section
This section is used to control the four decks. The buttons and controls for
operating decks 1 and 3 are located on the left side of the controller, those
for operating decks 2 and 4 are located on the right side of the controller.
Names of Parts
1 Browser section
2 Deck section
3 Mixer section
4 Effect section
1 VINYL button
2 Jog dial
3 DECK 1 button
The deck on the right side has a [DECK 2] button.
4 DECK 3 button
The deck on the right side has a [DECK 4] button.
5 SHIFT button
6 SYNC button
7 CUE button
8 PLAY/PAUSE " button
9 HOT CUE mode button
a ROLL mode button
b SLICER mode button
c SAMPLER mode button
d Performance pads
e PARAMETER button, PARAMETER button
f Beat indicator
g 1/2X (IN) button
h 2X (OUT) button
i AUTO LOOP button
j PAD PLUS ON button
k PAD PLUS TAP button
l KEY LOCK button
m SLIP button
n TEMPO slider
12
En
Page 13
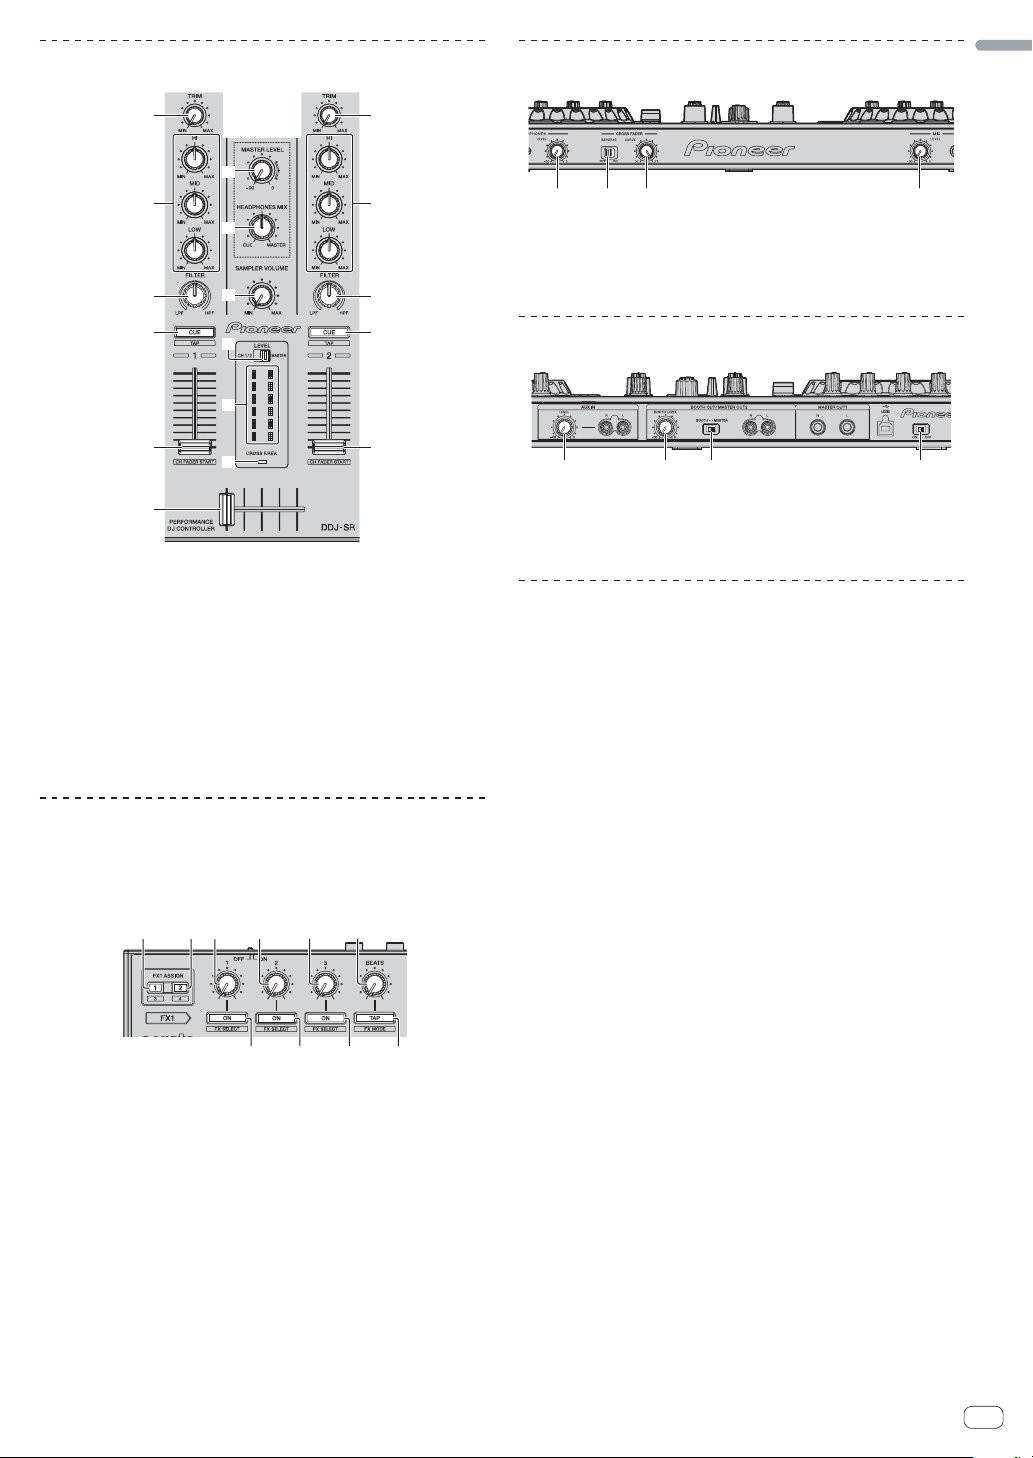
Mixer section
Front panel
English
1
1
a
2
2
b
3
4
c
6
3
4
7
5
9
5
8
1 TRIM control
2 EQ (HI, MID, LOW) controls
3 FILTER control
4 Headphones CUE/TAP button
5 Channel fader
6 Level indicator switch
7 Level indicator
8 Crossfader
9 CROSS FADER REVERSE indicator
a MASTER LEVEL control
b HEADPHONES MIX control
c SAMPLER VOLUME control
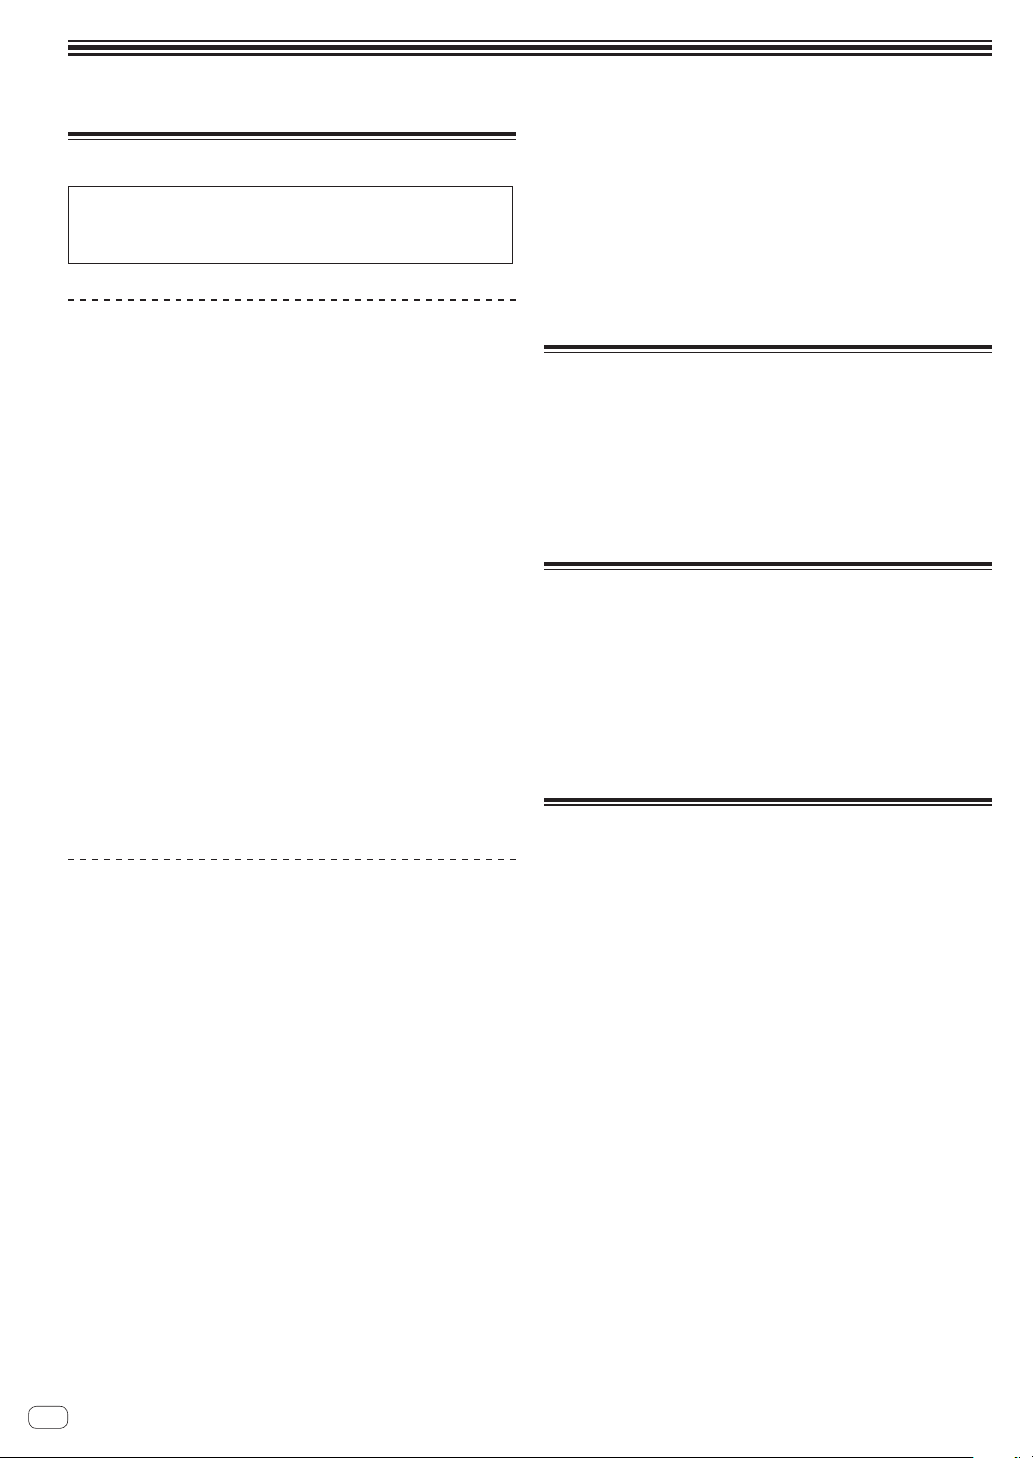
Effect section
This section is used to control the two effect units (FX1 and FX2).
Controls and buttons to operate the FX1 unit are located on the left side
of the controller, those to operate the FX2 unit are located on the right
side of the controller.
1 2 3 4 5 6
13 42
1 HEADPHONES LEVEL control
2 CROSS FADER REVERSE switch
3 CROSS FADER CURVE control
4 MIC LEVEL control
Rear panel
1
1 AUX IN LEVEL control
2 BOOTH LEVEL control
3 BOOTH/MASTER selector switch
4 ON/OFF switch
3 4
2
About the controls’ setting values
The setting values of the controls, etc., below are controlled individually
for the respective decks in the Serato DJ software.
TRIM control
EQ (HI, MID, LOW) controls
FILTER control
Channel fader
TEMPO slider
If the values controlled by Serato DJ when the decks are switched differ
from the positions of this unit’s controls, faders, etc., the controls, faders, etc., must be moved to the positions corresponding to the values
controlled by Serato DJ before they will operate.
The default values for decks 3 and 4 in Serato DJ are the center
position for the [TRIM] controls, [EQ (HI, MID and LOW)] controls
and [FILTER] controls, ±0.0% for [TEMPO] sliders, and the frontmost
position for the channel faders.
1 FX ASSIGN 1 buttons
2 FX ASSIGN 2 buttons
3 Effect parameter 1 control
4 Effect parameter 2 control
5 Effect parameter 3 control
6 FX BEATS control
7 Effect parameter 1 button
8 Effect parameter 2 button
9 Effect parameter 3 button
a TAP (FX MODE) button
7 8 9 a
En
13
Page 14
Additional information
Acquiring the manual
The operating instructions may be in a file in PDF format. Adobe®
Reader® must be installed to read files in PDF format. If you do not
have Adobe Reader, please install it from the download link on the
CD-ROM’s menu screen.
Downloading this unit’s operating
instructions
1 Insert the CD-ROM into the computer’s optical drive.
The CD-ROM menu is displayed.
If the CD-ROM’s menu does not appear when the CD-ROM is inserted,
perform the operations below.
For Windows
Open the optical drive from [Computer (or My Computer)] in the
[Start] menu, then double-click the [CD_menu.exe] icon.
For Mac OS X
In Finder, double-click the [CD_menu.app] icon directly.
2 When the CD-ROM’s menu is displayed, select [DDJSR: Download the Operating Instructions (PDF file)], then
click [Start].
3 “An internet environment is required to access the
site. Connected to the internet?” is displayed. Click [Yes].
The web browser is launched and the Pioneer DJ support site is
displayed.
4 On the Pioneer DJ support site, click “Manuals” under
“DDJ-SR”.
5 Click on the required language on the download
page.
Downloading of the operating instructions begins.
Downloading the Serato DJ software
manual
1 Insert the CD-ROM into the computer’s optical drive.
The CD-ROM menu is displayed.
If the CD-ROM’s menu does not appear when the CD-ROM is inserted,
perform the operations below.
For Windows
Open the optical drive from [Computer (or My Computer)] in the
[Start] menu, then double-click the [CD_menu.exe] icon.
For Mac OS X
In Finder, double-click the [CD_menu.app] icon directly.
2 When the CD-ROM’s menu is displayed, select [Serato
DJ: Download the Software Manual (PDF file)], then click
[Start].
3 “An internet environment is required to access the
site. Connected to the internet?” is displayed. Click [Yes].
The web browser is launched and the Pioneer DJ support site is
displayed.
To close the CD-ROM menu, click [Exit].
4 Click [Software Info] under [DDJ-SR] on the Pioneer DJ
support site.
[Serato DJ Support Information] is displayed.
5 Click the link to the Serato DJ download page.
The Serato DJ download page is displayed.
6 Log in to your “Serato.com” user account.
Input the e-mail address and password you have registered to log in to
“Serato.com”.
7 From “More Downloads” on the right side of the
download page, click “Serato DJ x.x Software Manual”.
Downloading of the Serato DJ software manual starts.
About installation locations
Do not place this unit on objects radiating heat, such as an amplifier,
or expose it to a spotlight for an extended period of time, as this may
damage this unit.
Install this unit away from a tuner or a TV. Otherwise, image distor-
tion or noise may result. Also, image distortion or noise can easily
occur if an indoor antenna is used. In such cases, use an outdoor
antenna or disconnect the USB cable from this unit and turn off the
power.
Cleaning the product
Under normal circumstances, wipe it with a dry cloth. For hard-to-remove
stains, soak a soft cloth in a neutral detergent diluted with 5 to 6 times of
water, wring it thoroughly, wipe off the stains, and wipe the surface with
a dry cloth again. Do not use alcohol, thinner, benzene, or insecticide,
as these may peel off the printed label or the coated film. Avoid leaving
rubber or vinyl products in contact for an extended period of time, as
this may also damage the surface of the cabinet. When using chemicalimpregnated wipes, etc., read the cautions carefully.
Unplug the USB cable from this unit before cleaning.
Troubleshooting
Incorrect operation is often mistaken for trouble or malfunction. If
you think that there is something wrong with this component, check
the items in the “Troubleshooting” section of this unit’s operating
instructions and the [FAQ] for the [DDJ-SR] on the Pioneer DJ sup-
port site.
http://pioneerdj.com/support/
Sometimes the problem may lie in another component. Inspect the
other components and electrical appliances being used. If the prob-
lem cannot be rectified, ask your nearest Pioneer authorized service
center or your dealer to carry out repair work.
This unit may not operate properly due to static electricity or other
external influences. In this case, proper operation may be restored by
turning the power off, waiting 1 minute, then turning the power back
on.
14
En
Page 15

About trademarks and registered
trademarks
Pioneer is a registered trademark of PIONEER CORPORATION.
The names of companies and products mentioned herein are the trademarks of their respective owners.
Cautions on copyrights
Recordings you have made are for your personal enjoyment and according to copyright laws may not be used without the consent of the copyright holder.
Music recorded from CDs, etc., is protected by the copyright laws of
individual countries and by international treaties. It is the full responsibility of the person who has recorded the music to ensure that it is
used legally.
When handling music downloaded from the Internet, etc., it is the
full responsibility of the person who has downloaded the music to
ensure that it is used in accordance with the contract concluded
with the download site.
Specifications
General – Main Unit
Power supply ........................................................................................DC 5 V
Rated current .....................................................................................500 mA
Main unit weight .......................................................................4.5 kg (9.9 lb)
Max. dimensions ................ 553.6 mm (W) × 65.3 mm (H) × 319.1 mm (D)
(21.8 in. (W) × 2.6 in. (H) × 12.6 in. (D))
Tolerable operating temperature ........................................+5 °C to +35 °C
Tolerable operating humidity ......................5 % to 85 % (no condensation)
Audio Section
Rated output level
MASTER OUT1 .......................................................................... 4.2 Vrms
MASTER OUT 2 ......................................................................... 2.1 Vrms
BOOTH ....................................................................................... 2.1 Vrms
Total harmonic distortion
MASTER OUT ...............................................................................0.006 %
Frequency characteristic
USB, AUX, MIC ............................................................... 20 Hz to 20 kHz
S/N ratio (when playing on computer)
MASTER OUT ................................................................................101 dB
Input impedance
AUX ................................................................................................. 47 k:
MIC .................................................................................................. 10 k:
Output impedance
MASTER OUT ................................................................................... 1 k:
PHONES ............................................................................................ 32 :
USB AUDIO ......................................................................24 bit/Fs : 44.1 kHz
Input / Output terminals
AUX IN input terminal
RCA pin jacks ....................................................................................1 set
MIC terminal
Phone jack (Ø 6.3 mm) ..................................................................... 1 set
BOOTH OUT/MASTER OUT2 output terminal
RCA pin jacks ....................................................................................1 set
MASTER OUT1 output terminal
Phone jack (Ø 6.3 mm) ..................................................................... 1 set
PHONES output terminal
Stereo phone jack (Ø 6.3 mm) .........................................................1 set
Stereo mini phone jack (Ø 3.5 mm) ................................................. 1 set
USB terminal
B type .................................................................................................1 set
English
For improvement purposes, specifications and design of this unit
and the included software are subject to change without notice.
© 2013 PIONEER CORPORATION. All rights reserved.
En
15
Page 16
PIONEER ELECTRONICS (USA) INC.
WARRANTY VALID ONLY IN THE U.S.A. AND CANADA
WARRANTY
Pioneer Electronics (USA) Inc. (PUSA) warrants that products distributed by PUSA in the U.S.A. and Canada that fail to function properly under normal use due to a manufacturing
defect when installed and operated according to the owner’s manual enclosed with the unit will be repaired or replaced with a unit of comparable value, at the option of PUSA,
without charge to you for parts or actual repair work. Parts supplied under this warranty may be new or rebuilt at the option of PUSA.
THIS LIMITED WARRANTY APPLIES TO THE ORIGINAL OR ANY SUBSEQUENT OWNER OF THIS PIONEER PRODUCT DURING THE WARRANTY PERIOD PROVIDED THE
PRODUCT WAS PURCHASED FROM AN AUTHORIZED PIONEER DISTRIBUTOR/DEALER IN THE U.S.A. OR CANADA. YOU WILL BE REQUIRED TO PROVIDE A SALES
RECEIPT OR OTHER VALID PROOF OF PURCHASE SHOWING THE DATE OF ORIGINAL PURCHASE OR, IF RENTED, YOUR RENTAL CONTRACT SHOWING THE PLACE
AND DATE OF FIRST RENTAL. IN THE EVENT SERVICE IS REQUIRED, THE PRODUCT MUST BE DELIVERED WITHIN THE WARRANTY PERIOD, TRANSPORTATION
PREPAID, ONLY FROM WITHIN THE U.S.A. AS EXPLAINED IN THIS DOCUMENT. YOU WILL BE RESPONSIBLE FOR REMOVAL AND INSTALLATION OF THE PRODUCT .
PUSA WILL PAY TO RETURN THE REPAIRED OR REPLACEMENT PRODUCT TO YOU WITHIN THE U.S.A.
PRODUCT WARRANTY PERIOD
DJ Audio and Video ................................................................................................................................................................................... 1 Year 1 Year
The warranty period for retail customers who rent the product commences upon the date product is first put into use (a) during the rental period or (b) retail sale, whichever occurs first.
WHAT IS NOT COVERED
IF THIS PRODUCT WAS PURCHASED FROM AN UNAUTHORIZED DISTRIBUTOR, THERE ARE NO WARRANTIES, EXPRESS OR IMPLIED, INCLUDING THE IMPLIED WARRANTY
OF MERCHANTABILITY AND THE IMPLIED WARRANTY OF FITNESS FOR A PARTICULAR PURPOSE AND THIS PRODUCT IS SOLD STRICTLY “AS IS” AND “WITH ALL FAULTS".
PIONEER SHALL NOT BE LIABLE FOR ANY CONSEQUENTIAL AND/OR INCIDENTAL DAMAGES.
THIS WARRANTY DOES NOT APPLY IF THE PRODUCT HAS BEEN SUBJECTED TO POWER IN EXCESS OF ITS PUBLISHED POWER RATING.
THIS WARRANTY DOES NOT COVER THE CABINET OR ANY APPEARANCE ITEM, USER ATTACHED ANTENNA, ANY DAMAGE TO RECORDS OR RECORDING TAPES OR DISCS, ANY
DAMAGE TO THE PRODUCT RESULTING FROM ALTERATIONS, MODIFICATIONS NOT AUTHORIZED IN WRITING BY PIONEER, ACCIDENT, MISUSE OR ABUSE, DAMAGE DUE TO
LIGHTNING OR TO POWER SURGES, SUBSEQUENT DAMAGE FROM LEAKING, DAMAGE FROM INOPERATIVE BATTERIES, OR THE USE OF BATTERIES NOT CONFORMING TO THOSE
SPECIFIED IN THE OWNER’S MANUAL.
THIS WARRANTY DOES NOT COVER THE COST OF PARTS OR LABOR WHICH WOULD BE OTHERWISE PROVIDED WITHOUT CHARGE UNDER THIS WARRANTY OBTAINED FROM
ANY SOURCE OTHER THAN A PIONEER AUTHORIZED SERVICE COMPANY OR OTHER DESIGNATED LOCATION. THIS WARRANTY DOES NOT COVER DEFECTS OR DAMAGE CAUSED
BY THE USE OF UNAUTHORIZED PARTS OR LABOR OR FROM IMPROPER MAINTENANCE.
ALTERED, DEFACED, OR REMOVED SERIAL NUMBERS VOID THIS ENTIRE WARRANTY
NO OTHER WARRANTIES
PIONEER LIMITS ITS OBLIGATIONS UNDER ANY IMPLIED WARRANTIES INCLUDING, BUT NOT LIMITED TO, THE IMPLIED WARRANTIES OF MERCHANTABILITY AND
FITNESS FOR A PARTICULAR PURPOSE, TO A PERIOD NOT TO EXCEED THE WARRANTY PERIOD. NO WARRANTIES SHALL APPLY AFTER THE WARRANTY PERIOD.
SOME STATES DO NOT ALLOW LIMITATIONS ON HOW LONG AN IMPLIED WARRANTY LASTS AND SOME STATES DO NOT ALLOW THE EXCLUSIONS OR LIMITATIONS
OF INCIDENTAL OR CONSEQUENTIAL DAMAGES, SO THE ABOVE LIMITATIONS OR EXCLUSIONS MAY NOT APPLY TO YOU. THIS WARRANTY GIVES YOU SPECIFIC LEGAL
RIGHTS AND YOU MAY HAVE OTHER RIGHTS WHICH MAY VARY FROM STATE TO STATE.
TO OBTAIN SERVICE
PUSA has appointed a number of Authorized Service Companies throughout the U.S.A. and Canada should your product require service. To receive warranty service you
need to present your sales receipt or, if rented, your rental contract showing place and date of original owner’s transaction. If shipping the unit you will need to package it
carefully and send it, transportation prepaid by a traceable, insured method, to an Authorized Service Company. Package the product using adequate padding material to
prevent damage in transit. The original container is ideal for this purpose. Include your name, address and telephone number where you can be reached during business
hours.
On all complaints and concerns in the U.S.A. and Canada call Customer Support at 1-800-872-4159.
LIMITED WARRANTY
Parts Labor
For hook-up and operation of your unit or to locate an
Authorized Service Company, please call or write:
DISPUTE RESOLUTION
Following our response to any initial request to Customer Support, should a dispute arise between you and Pioneer, Pioneer makes available its Complaint Resolution Program
to resolve the dispute. The Complaint Resolution Program is available to you without charge. You are required to use the Complaint Resolution Program before you exercise
any rights under, or seek any remedies, created by Title I of the Magnuson-Moss Warranty-Federal Trade Commission Improvement Act, 15 U.S.C. 2301 et seq.
To use the Complaint Resolution Program call 1-800-872-4159 and explain to the customer service representative the problem you are experiencing, steps you have taken
to have the product repaired during the warranty period and the name of the authorized Distributor/Dealer from whom the Pioneer product was purchased. After the complaint
has been explained to the representative, a resolution number will be issued. Within 40 days of receiving your complaint, Pioneer will investigate the dispute and will either:
(1) respond to your complaint in writing informing you what action Pioneer will take, and in what time period, to resolve the dispute; or (2) respond to your complaint in writing
informing you why it will not take any action.
CUSTOMER SUPPORT
PIONEER ELECTRONICS (USA) INC.
LONG BEACH, CALIFORNIA 90801
P.O. BOX 1720
1-800-872-4159
http://www.pioneerelectronics.com
RECORD THE PLACE AND DATE OF PURCHASE FOR FUTURE REFERENCE
Model No. ____________________________________________ Serial No. _________________________________________ Purchase Date ______________________
Purchased From ____________________________________________________________________________________________________________________________
KEEP THIS INFORMATION AND YOUR SALES RECEIPT IN A SAFE PLACE
UCP0212
_
16
En
Page 17

Page 18
Pour l’Europe
Si vous souhaitez vous débarrasser de cet appareil, ne le mettez pas à la poubelle avec vos ordures ménagères. Il existe un système de
collecte séparé pour les appareils électroniques usagés, qui doivent être récupérés, traités et recyclés conformément à la législation.
Les habitants des états membres de l’UE, de Suisse et de Norvège peuvent retourner gratuitement leurs appareils électroniques usagés aux
centres de collecte agréés ou à un détaillant (si vous rachetez un appareil similaire neuf).
Dans les pays qui ne sont pas mentionnés ci-dessus, veuillez contacter les autorités locales pour savoir comment vous pouvez vous débarrasser
de vos appareils.
Vous garantirez ainsi que les appareils dont vous vous débarrassez sont correctement récupérés, traités et recyclés et préviendrez de cette façon
les impacts néfastes possibles sur l’environnement et la santé humaine.
K058b_A1_Fr
AVERTISSEMENT
Cet appareil n’est pas étanche. Pour éviter les risques
d’incendie et de décharge électrique, ne placez près de
lui un récipient rempli d’eau, tel qu’un vase ou un pot
de fleurs, et ne l’exposez pas à des gouttes d’eau, des
éclaboussures, de la pluie ou de l’humidité.
D3-4-2-1-3_A1_Fr
AVERTISSEMENT
Pour éviter les risques d’incendie, ne placez aucune
flamme nue (telle qu’une bougie allumée) sur
l’appareil.
D3-4-2-1-7a_A1_Fr
Milieu de fonctionnement
Température et humidité du milieu de fonctionnement :
De +5 °C à +35 °C (de +41 °F à +95 °F) ; Humidité
relative inférieure à 85 % (orifices de ventilation non
obstrués)
N’installez pas l’appareil dans un endroit mal ventilé ou
un lieu soumis à une forte humidité ou en plein soleil
(ou à une forte lumière artificielle).
D3-4-2-1-7c*_A1_Fr
Pour les États-Unis
REMARQUE IMPORTANTE
LE NUMÉRO DE MODÈLE ET LE NUMÉRO DE SÉRIE
SE TROUVENT À L’ARRIÈRE OU SUR LE FOND DE
CET APPAREIL. NOTEZ CES NUMÉROS À LA PAGE
15 POUR VOUS Y RÉFÉRER ULTÉRIEUREMENT.
D36-AP9-3*_A1_Fr
Lorsque vous utilisez ce produit, vérifiez les
informations concernant la sécurité sous l’appareil.
D3-4-2-2-4_B1_Fr
Ce produit est destiné à une utilisation domestique
générale. Toute panne due à une utilisation autre qu'à
des fins privées (comme une utilisation à des fins
commerciales dans un restaurant, dans un autocar
ou sur un bateau) et qui nécessite une réparation
sera aux frais du client, même pendant la période de
garantie.
K041_A1_Fr
Fr
2
Page 19
Pour les États-Unis et le Canada
AVERTISSEMENT
Cet appareil n’est pas étanche. Pour éviter les risques
d’incendie et de décharge électrique, ne placez près de
lui un récipient rempli d’eau, tel qu’un vase ou un pot
de fleurs, et ne l’exposez pas à des gouttes d’eau, des
éclaboussures, de la pluie ou de l’humidité.
D3-4-2-1-3_A1_Fr
AVERTISSEMENT
Pour éviter les risques d’incendie, ne placez aucune
flamme nue (telle qu’une bougie allumée) sur
l’appareil.
D3-4-2-1-7a_A1_Fr
Milieu de fonctionnement
Température et humidité du milieu de fonctionnement :
De +5 °C à +35 °C (de +41 °F à +95 °F) ; Humidité
relative inférieure à 85 % (orifices de ventilation non
obstrués)
N’installez pas l’appareil dans un endroit mal ventilé ou
un lieu soumis à une forte humidité ou en plein soleil
(ou à une forte lumière artificielle).
D3-4-2-1-7c*_A1_Fr
Lorsque vous utilisez ce produit, vérifiez les
informations concernant la sécurité sous l’appareil.
D3-4-2-2-4_B1_Fr
La protection de votre ouïe est entre vos
mains
Pour assurer le rendement optimal de votre matériel
et – plus important encore – la protection de votre ouïe,
réglez le volume à un niveau raisonnable. Pour ne pas
altérer votre sens de la perception, le son doit être clair
mais ne produire aucun vacarme et être exempt de
toute distorsion. Votre ouïe peut vous jouer des tours.
Avec le temps, votre système auditif peut en effet
s’adapter à des volumes supérieurs, et ce qui vous
semble un « niveau de confort normal » pourrait au
contraire être excessif et contribuer à endommager
votre ouïe de façon permanente. Le réglage de votre
matériel à un volume sécuritaire AVANT que votre ouïe
s’adapte vous permettra de mieux vous protéger.
CHOISISSEZ UN VOLUME SÉCURITAIRE:
9 Réglez d’abord le volume à un niveau inférieur.
9 Montez progressivement le volume jusqu’à un niveau
d’écoute confortable ; le son doit être clair et exempt
de distorsions.
9 Une fois que le son est à un niveau confortable, ne
touchez plus au bouton du volume.
N’OUBLIEZ PAS DE RESPECTER LES
DIRECTIVES SUIVANTES:
9 Lorsque vous montez le volume, assurez-vous de
pouvoir quand même entendre ce qui se passe
autour de vous.
9 Faites très attention ou cessez temporairement
l’utilisation dans les situations pouvant s’avérer
dangereuses.
9 N’utilisez pas des écouteurs ou un casque d’écoute
lorsque vous opérez un véhicule motorisé ; une telle
utilisation peut créer des dangers sur la route et est
illégale à de nombreux endroits.
S001a_A1_Fr
Français
Fr
3
Page 20
Informations préliminaires
Comment lire ce manuel
Merci pour l’achat de ce produit Pioneer.
Prière de lire cette brochure et le mode d’emploi ! Les deux docu-
ments contiennent des informations importantes qui doivent être
comprises avant d’utiliser ce produit.
Cela fait, conservez le mode d’emploi de façon à pouvoir vous y
référer en cas de nécessité.
— Pour les instructions sur l’acquisition du mode d’emploi, repor-
tez-vous à Obtention du manuel (p. 13).
Dans ce manuel, les noms d’écrans et de menus s’affichant sur
le produit et sur l’écran de l’ordinateur, de même que les noms de
touches et de prises, etc. sont indiqués entre parenthèses. (Ex. :
Touche [CUE], panneau [Files], prise [MIC])
Veuillez noter que les écrans et les caractéristiques techniques
du logiciel décrit dans ce manuel, ainsi que l’aspect externe et les
caractéristiques techniques du matériel sont en cours de développement de sorte que les caractéristiques finales peuvent être
différentes.
Veuillez noter que selon la version du système d’exploitation, les
réglages du navigateur web, etc., le fonctionnement peut être différent des marches à suivre indiquées dans ce mode d’emploi.
Contenu du carton d’emballage
CD-ROM (Disque d’installation)
Câble USB
Garantie (pour certaines régions)
A lire avant l’utilisation (Important)/Guide de démarrage rapide (ce
document)
1 La garantie incluse est destinée à la région européenne.
Pour la région nord-américaine, les informations correspon-
dantes se trouvent à la dernière page des versions anglaises et
françaises des “A lire avant l’utilisation (Important)/Guide de
démarrage rapide”.
Pour la région japonaise, les informations correspondantes se
trouvent à la dernière page de la version japonaise des “A lire
avant l’utilisation (Important)/Guide de démarrage rapide”.
1
Installation du logiciel
Avant d’installer le pilote
Pour la toute dernière version du logiciel Serato DJ, accédez à Serato.
com et téléchargez le logiciel de ce site.
Pour le détail, reportez-vous à Marche à suivre (Windows) ou
Marche à suivre (Mac OS X).
Les préparatifs concernant l’ordinateur, les dispositifs réseau et
l’environnement Internet nécessaires à la connexion Internet sont
du ressort de l’utilisateur.
À propos du pilote (Windows)
Ce logiciel est un pilote ASIO prévu exclusivement pour transmettre des
signaux audio de l’ordinateur.
Il n’est pas nécessaire d’installer le pilote dans le cas de Mac OS X.
Vérification des toutes dernières informations
concernant le pilote
Pour de plus amples informations sur le pilote prévu pour cet appareil,
reportez-vous au site de support DJ de Pioneer ci-dessous.
http://pioneerdj.com/support/
À propos du logiciel Serato DJ
Serato DJ est une application logicielle DJ de Serato. En reliant l’ordinateur sur lequel ce logiciel est installé à cet appareil, il est possible
d’effectuer des performances DJ.
Environnement fonctionnel minimal
Systèmes d’exploitation pris en charge
Mac OS X : 10.8, 10.7 et 10.6
Windows : Windows 7
Divers
Lecteur optique Lecteur de disque optique pouvant lire le CD-ROM
Port USB
Résolution de l’écran Résolution de 1 280 x 720 ou plus
Connexion Internet
Pour les toutes dernières informations sur l’environnement opérationnel et la
compatibilité ainsi que pour acquérir le tout dernier système d’exploitation,
reportez-vous à “Software Info” dans “DDJ-SR” sur le site de support DJ de
Pioneer ci-dessous :
http://pioneerdj.com/support/
L’assistance pour le système d’exploitation présuppose que vous utilisez la toute
dernière édition de cette version.
Le fonctionnement sur tous les ordinateurs n’est pas garanti, même lorsque les
conditions de fonctionnement mentionnées ci-dessus sont remplies.
Selon les réglages d’économie d’énergie de l’ordinateur, etc. la capacité de
traitement du processeur et du disque dur peut être insuffisante. Lorsque vous
utilisez Serato DJ, assurez-vous que l’ordinateur est en état de fournir sa perfor-
mance optimale (par exemple en laissant le cordon d’alimentation raccordé),
surtout s’il s’agit d’un ordinateur portable.
L’emploi d’Internet exige la signature d’un contrat séparé avec un fournisseur de
services Internet et le paiement de droits.
Un port USB 2.0 est indispensable pour raccorder cet
ordinateur à cet appareil.
Une connexion Internet est nécessaire pour l’enregistrement du compte utilisateur sur “Serato.com” et pour
le téléchargement du logiciel.
À propos de l’installation
La marche à suivre pour l’installation dépend du système d’exploitation
(OS) de l’ordinateur utilisé.
Pour Windows
Après avoir installé le pilote, installez le logiciel Serato DJ.
Pour Mac OS X
Installez seulement le logiciel Serato DJ.
Marche à suivre (Windows)
Ne raccordez cet appareil et l’ordinateur que lorsque l’installation est
terminée.
Connectez-vous sous le nom de l’utilisateur spécifié comme admi-
nistrateur de l’ordinateur avant l’installation.
Si des programmes sont ouverts sur l’ordinateur, fermez-les.
1 Insérez le CD-ROM dans le lecteur optique de
l’ordinateur.
Le menu du CD-ROM apparaît.
Si le menu du CD-ROM n’apparaît pas après l’insertion du CD-ROM,
ouvrez le lecteur optique dans [Ordinateur (ou Poste de travail)]
à partir du menu [Démarrer], puis double-cliquez sur l’icône
[CD_menu.exe].
2 Lorsque le menu du CD-ROM apparaît, sélectionnez
[Installer le Logiciel de pilotage (Pioneer_DDJ_SR_
Driver_x.xxx.exe)], puis cliquez sur [Demarrer].
Pour fermer le menu du CD-ROM, cliquez sur [Quitter].
Fr
4
Page 21
3 Procédez à l’installation en suivant les instructions qui
apparaissent à l’écran.
Si [Sécurité de Windows] apparaît à l’écran au cours de l’installation,
cliquez sur [Installer ce pilote quand même] et continuez l’installation.
Lorsque le programme d’installation est terminé, le message Installation
terminée apparaît.
Après avoir installé le pilote, installez le logiciel Serato DJ.
4 Sélectionnez [Télécharger le logiciel Serato DJ] dans le
menu du CD-ROM, puis cliquez sur [Demarrer].
5 “Une connexion internet est nécessaire pour pouvoir
accéder au site. Connecté à internet ?” apparaît. Cliquez
sur [Oui].
Le navigateur web démarre et le site de support DJ de Pioneer apparaît.
6 Cliquez sur [Software Info] dans [DDJ-SR] sur le site
de support DJ de Pioneer.
[Serato DJ Support Information] apparaît.
7 Cliquez sur le lien vers la page de téléchargement de
Serato DJ.
La page de téléchargement de [Serato DJ] apparaît.
8 Connectez-vous à votre compte utilisateur sur
“Serato.com”.
Si vous possédez déjà un compte utilisateur sur “Serato.com”,
passez au point 10.
Si vous ne possédez pas déjà un compte utilisateur, procédez de
la façon suivante.
— Suivez les instructions à l’écran, saisissez votre adresse de
messagerie et le mot de passe souhaité, puis sélectionnez
votre région de résidence.
— Si vous cochez [E-mail me Serato newsletters], Serato vous
enverra des newsletters avec les toutes dernières informations sur les produits Serato.
— Lorsque l’enregistrement du compte utilisateur est terminé,
vous recevrez un message à l’adresse de messagerie indiquée. Vérifiez le contenu du message envoyé par “Serato.
com”.
Veillez à ne pas oublier l’adresse de messagerie et le mot de
passe spécifiés lors de votre enregistrement. Ils seront nécessaires pour la mise à jour du logiciel.
Les informations personnelles entrées lors de l’enregistrement
d’un nouveau compte utilisateur peuvent être collectées, traitées
et utilisées selon les règles de la politique de confidentialité
consultables sur le site Serato.
9 Cliquez sur le lien dans le message envoyé par
“Serato.com”.
Ceci vous conduit à la page de téléchargement de Serato DJ. Passez au
point 11.
10 Connectez-vous.
Saisissez l’adresse de messagerie et le mot de passe enregistrés pour la
connexion à “Serato.com”.
11 Téléchargez le logiciel Serato DJ de la page de
téléchargement.
Décompressez le fichier téléchargé, puis double-cliquez sur le fichier
décompressé pour démarrer l’installateur.
12 Lisez attentivement les termes du contrat de licence
et, si vous acceptez, sélectionnez [I agree to the license
terms and conditions] puis cliquez sur [Install].
Français
Si vous n’acceptez pas le contenu du contrat d’utilisation, cliquez
sur [Close] pour annuler l’installation.
L’installation commence.
Lorsqu’elle est terminée, le message d’installation réussie apparaît.
13 Cliquez sur [Close] pour fermer l’installateur Serato
DJ.
Marche à suivre (Mac OS X)
Ne raccordez cet appareil et l’ordinateur que lorsque l’installation est
terminée.
Si des programmes sont ouverts sur l’ordinateur, fermez-les.
1 Insérez le CD-ROM dans le lecteur optique de
l’ordinateur.
Le menu du CD-ROM apparaît.
Si le menu du CD-ROM n’apparaît pas sur l’écran lorsque le
CD-ROM est inséré, ouvrez le lecteur optique par le Finder, puis
double-cliquez sur l’icône [CD_menu.app].
2 Sélectionnez [Télécharger le logiciel Serato DJ] dans le
menu du CD-ROM, puis cliquez sur [Demarrer].
3 “Une connexion internet est nécessaire pour pouvoir
accéder au site. Connecté à internet ?” apparaît. Cliquez
sur [Oui].
Le navigateur web démarre et le site de support DJ de Pioneer apparaît.
4 Cliquez sur [Software Info] dans [DDJ-SR] sur le site
de support DJ de Pioneer.
[Serato DJ Support Information] apparaît.
5 Cliquez sur le lien vers la page de téléchargement de
Serato DJ.
La page de téléchargement de [Serato DJ] apparaît.
Fr
5
Page 22

6 Connectez-vous à votre compte utilisateur sur
“Serato.com”.
Si vous possédez déjà un compte utilisateur sur “Serato.com”,
passez au point 8.
Si vous ne possédez pas déjà un compte utilisateur, procédez de
la façon suivante.
— Suivez les instructions à l’écran, saisissez votre adresse de
messagerie et le mot de passe souhaité, puis sélectionnez
votre région de résidence.
— Si vous cochez [E-mail me Serato newsletters], Serato vous
enverra des newsletters avec les toutes dernières informations sur les produits Serato.
— Lorsque l’enregistrement du compte utilisateur est terminé,
vous recevrez un message à l’adresse de messagerie indiquée.
Vérifiez le contenu du message envoyé par “Serato.com”.
Veillez à ne pas oublier l’adresse de messagerie et le mot de
passe spécifiés lors de votre enregistrement. Ils seront nécessaires pour la mise à jour du logiciel.
Les informations personnelles entrées lors de l’enregistrement
d’un nouveau compte utilisateur peuvent être collectées, traitées
et utilisées selon les règles de la politique de confidentialité
consultables sur le site Serato.
7 Cliquez sur le lien dans le message envoyé par
“Serato.com”.
Ceci vous conduit à la page de téléchargement de Serato DJ. Passez au
point 9.
8 Connectez-vous.
Saisissez l’adresse de messagerie et le mot de passe enregistrés pour la
connexion à “Serato.com”.
9 Téléchargez le logiciel Serato DJ de la page de
téléchargement.
Décompressez le fichier téléchargé, puis double-cliquez sur le fichier
décompressé pour démarrer l’installateur.
10 Lisez attentivement les termes du contrat de licence
et, si vous acceptez, cliquez sur [Agree].
Fonctionnement
Les appareils doivent être hors tension lors du raccordement ou du
changement de câbles.
Seul le câble USB fourni avec ce produit doit être utilisé.
Reportez-vous au mode d’emploi de l’appareil devant être raccordé.
L’alimentation de cet appareil est fournie par le bus USB. Cet appareil
peut être utilisé simplement après l’avoir raccordé à un ordinateur par
le câble USB.
Raccordez l’ordinateur auquel cet appareil doit être raccordé à une
source d’alimentation secteur.
Un concentrateur USB ne peut pas être utilisé.
Dans les cas suivants, l’alimentation peut être insuffisante et cet
appareil ne pas fonctionner bien qu’alimenté par le bus USB.
— L’alimentation fournie par le bus USB de l’ordinateur est
insuffisante.
— D’autres appareils USB sont raccordés à l’ordinateur.
— L’impédance du casque d’écoute raccordé est inférieure à 32 :.
— Des casques d’écoute sont raccordés simultanément au jack
stéréo et au mini-jack stéréo.
— Un jack mono est branché sur la prise [HEADPHONES].
Raccordements
1 Raccordez un casque à l’une des prises
[HEADPHONES].
Si vous n’acceptez pas le contenu du contrat d’utilisation, cliquez
sur [Disagree] pour annuler l’installation.
11 Si l’écran suivant apparaît, tirez et déposez l’icône
[Serato DJ] dans l’icône de dossier [Applications].
Fr
6
Page 23

2 Raccordez des enceintes amplifiées, un amplificateur
de puissance, des composants, etc. aux prises [MASTER
OUT1] ou [BOOTH OUT/MASTER OUT2].
Enceintes alimentées, etc.
Pour le détail sur le raccordement aux prises d’entrée/sortie,
reportez-vous au mode d’emploi.
3 Raccordez cet appareil à votre ordinateur avec un
câble USB.
5 Mettez le commutateur [ON/OFF] sur le panneau
arrière en position [ON] pour allumer l’appareil.
Français
Allumez cet appareil.
Pour les utilisateurs de Windows
Le message [Installation du pilote logiciel de périphérique]
peut apparaître la première fois que cet appareil est raccordé
à l’ordinateur ou lorsqu’il est raccordé à un autre port USB de
l’ordinateur. Attendez un instant que le message [Vos périphé-
riques sont prêts à être utilisés] apparaisse.
6 Allumez les appareils raccordés aux prises de sortie
(enceintes amplifiées, amplificateur de puissance,
composants, etc.).
Lorsqu’un microphone, un lecteur DJ ou autre dispositif externe
est raccordé aux prises d’entrée, ce dispositif s’allume aussi.
4 Allumez l’ordinateur.
Fr
7
Page 24

Ouverture du système
䢢 Lancement de Serato DJ
Pour Windows
Depuis le menu [Démarrer] de Windows, cliquez sur l’icône [Serato DJ] dans [Tous les programmes] > [Serato] > [Serato DJ].
Pour Mac OS X
Dans le Finder, ouvrez le dossier [Application], puis cliquez sur l’icône [Serato DJ].
Écran de l’ordinateur directement après le lancement du logiciel Serato DJ
A
C
1
2
1 L’icône [ACTIVATE/BUY] peut apparaître sur le côté droit de l’écran affiché la première fois que Serato DJ est lancé, mais il n’est pas nécessaire
de l’activer ou d’acheter une licence pour les personnes qui utilisent DDJ-SR.
2 Cochez [DO NOT SHOW AGAIN] sur le côté inférieur droit de l’écran, puis cliquez sur [License] et continuez d’utiliser Serato DJ.
Pour utiliser de la grille rythmique
Avec Serato DJ, [SYNC PREFERENCE] est réglé sur [Simple sync] par défaut, mais il faut le régler sur [Smart sync] pour pouvoir effectuer des opérations avec la grille rythmique.
SETUP–DJ Preference-SYNC PREFERENCE
Pour les instructions sur l’affichage de l’écran des paramètres et les détails sur la grille rythmique, reportez-vous au manuel de Serato DJ.
Écran de l’ordinateur quand un morceau est chargé dans le logiciel Serato DJ
Cliquez sur [Library] dans le coin supérieur gauche de l’écran de l’ordinateur, puis sélectionnez [Vertical] ou [Horizontal] sur le menu déroulant pour
passer à l’écran Serato DJ.
AA
B
C
A Section Platines
Les informations d’un morceau (le nom du morceau chargé, le nom de l’artiste, le BPM, etc.) l’ensemble de l’onde et d’autres informations apparaissent ici.
B Affichage de la forme d’onde
La forme d’onde du morceau chargé apparaît ici.
C Section d’exploration
Les crates où des morceaux de la bibliothèque ou des ensembles de plusieurs morceaux sont stockés apparaissent ici.
Ce manuel contient essentiellement les explications des fonctions de l’appareil proprement dit. Pour les instructions détaillées sur le fonctionnement
du logiciel Serato DJ, reportez-vous au manuel du logiciel Serato DJ.
Fr
8
Page 25

䢢 Importation de morceaux
La marche à suivre pour l’importation de morceaux est la suivante.
Il existe différentes manières d’importer des morceaux avec le logiciel Serato DJ. Pour le détail, reportez-vous au manuel du logiciel Serato DJ.
Si vous utilisez déjà un logiciel Serato DJ (Scratch Live, ITCH ou Serato DJ Intro) et avez déjà créé des bibliothèques de morceaux, ces biblio-
thèques pourront être utilisées en l’état.
Si vous utilisez Serato DJ Intro et avez déjà créé des bibliothèques de morceaux, vous avez peut-être réanalysé les morceaux.
1 Cliquez sur la touche [Files] sur l’écran du logiciel Serato DJ pour ouvrir le panneau [Files].
Le contenu de votre ordinateur ou du périphérique raccordé à l’ordinateur apparaît dans le panneau [Files].
2 Cliquez sur le dossier contenant les morceaux que vous voulez ajouter à la bibliothèque dans le panneau [Files]
pour le sélectionner.
3 Sur l’écran du logiciel Serato DJ, tirez et déposez le dossier sélectionné dans le panneau de crates.
Un crate est créé et les morceaux sont ajoutés à la bibliothèque.
a
b
a Panneau [Files]
b Panneau de crates
Français
䢢 Chargement et lecture de morceaux
L’importation de morceaux dans la platine [1] par exemple s’effectue de
la façon suivante.
1 Sélecteur rotatif
2 Touche BACK (VIEW)
3 Touche LOAD
1 Appuyez sur la touche [BACK (VIEW)] de cet appareil,
amenez le curseur sur le panneau de crates sur l’écran
de l’ordinateur, puis tournez le sélecteur rotatif pour
sélectionner le crate, etc.
2 Appuyez sur le sélecteur rotatif, amenez le curseur
dans la bibliothèque sur l’écran de l’ordinateur, puis
tournez le sélecteur rotatif et sélectionnez le morceau.
a
b
a Bibliothèque
b Panneau de crates
3 Pression sur la touche [LOAD] pour charger le
morceau sélectionné sur la platine.
Fr
9
Page 26

䢢 Lecture de morceaux et restitution du son
e
La restitution du son du canal 1 par exemple s’effectue de la façon
suivante.
Réglez le volume des dispositifs (amplificateurs de puissance,
enceintes amplifiées, etc.) raccordés aux prises [MASTER OUT1] et
[BOOTH OUT/MASTER OUT2] au niveau approprié. Notez que le
son sera très fort si le niveau sonore est réglé trop haut.
Section Mixeur
4
9
5
a
6
7
b
8
c
Face avant
4 Commande TRIM
5 Commandes EQ (HI, MID, LOW)
6 Commande FILTER
7 Touche CUE/TAP de casque
8 Fader de canal
9 Commande MASTER LEVEL
a Commande HEADPHONES MIX
b Commutateur d’indicateur de niveau
c Crossfader
d Commande HEADPHONES LEVEL
e Commutateur CROSS FADER REVERSE
f Commande CROSS FADER CURVE
g Commande BOOTH LEVEL
h Sélecteur BOOTH/MASTER
1
Réglez les positions des commandes, etc. de la façon
suivante.
Noms des commandes, etc. Position
Commande MASTER LEVEL
Commande TRIM
Commandes EQ (HI, MID, LOW)Centre
Commande FILTER Centre
Commutateur d’indicateur de niveau Position [CH1/2]
Fader de canal Déplacé vers l’avant
Commutateur CROSS FADER REVERSE Position [OFF]
Sélecteur BOOTH/MASTER Position [MASTER]
Commande BOOTH LEVEL
Tournée entièrement dans le
sens antihoraire
Tournée entièrement dans le
sens antihoraire
Tournée entièrement dans le
sens antihoraire
2 Pression sur la touche ["] pour jouer le morceau.
Panneau arrière
Fr
10
g
d
f
h
3 Poussez le fader de canal loin de vous.
4 Tournez la commande [TRIM].
Réglez [TRIM] de sorte que l’indicateur orange sur l’indicateur de niveau
de canal s’allume au niveau des crêtes.
5 Tournez la commande [MASTER LEVEL] pour régler le
niveau sonore des enceintes.
Réglez le niveau du son restitué par les prises [MASTER OUT1] et
[BOOTH OUT/MASTER OUT2] au niveau approprié.
Lorsque le sélecteur [BOOTH/MASTER] est en position [BOOTH], la
commande [BOOTH LEVEL] peut être utilisée pour régler le volume
du son provenant de la prise [BOOTH OUT/MASTER OUT2] au niveau
approprié.
Page 27

䢢 Contrôle du son par un casque
Réglez les positions des commandes, etc. de la façon suivante.
Noms des commandes, etc. Position
Commande HEADPHONES MIX Centre
Commande HEADPHONES LEVEL
Tournée entièrement dans le
sens antihoraire
1 Appuyez sur la touche [CUE/TAP] de casque pour le
canal 1.
2 Tournez la commande [HEADPHONES LEVEL].
Réglez le niveau du son restitué par le casque d’écoute au niveau
approprié.
Remarque
Cet appareil et le logiciel Serato DJ présentent diverses fonctions facilitant la réalisation de prestations DJ originales. Pour le détail sur ces
fonctions, reportez-vous au mode d’emploi de l’appareil et au manuel du
logiciel Serato DJ.
Le mode d’emploi de cet appareil peut être téléchargé du site de sup-
port DJ de Pioneer. Pour le détail, reportez-vous à Téléchargement de
ce mode d’emploi (p. 13).
Le manuel du logiciel Serato DJ peut être téléchargé de Serato.com.
Pour le détail, reportez-vous à Téléchargement du manuel du logiciel
Serato DJ (p. 13).
Fermeture du système
1 Quittez Serato DJ.
Lorsque le logiciel est fermé, un message vous demandant de confirmer
la fermeture apparaît sur l’écran de l’ordinateur. Cliquez sur [Yes] pour
confirmer.
2 Mettez le commutateur [ON/OFF] sur le panneau
arrière en position [OFF] pour éteindre l’appareil.
3 Débranchez le câble USB de l’ordinateur.
Section d’exploration
1 2 1
3 4
1 Touche LOAD
2 Sélecteur rotatif
3 Touche BACK (VIEW)
4 Touche LOAD PREPARE (AREA)
Section Platines
Cette section permet de contrôler les quatre platines. Les touches et
commandes utilisées pour l’exploitation des platines 1 et 3 se trouvent
sur le côté gauche de la console, celles pour l’exploitation des platines 2
et 4 se trouvent sur le côté droit de la console.
Français
Noms des éléments
1 Section d’exploration
2 Section Platines
3 Section Mixeur
4 Section des effets
1 Touche VINYL
2 Molette jog
3 Touche DECK 1
La platine sur le côté droit présente une touche [DECK 2].
4 Touche DECK 3
La platine sur le côté droit présente une touche [DECK 4].
5 Touche SHIFT
6 Touche SYNC
7 Touche CUE
8 Touche PLAY/PAUSE "
9 Touche de mode HOT CUE
a Touche de mode ROLL
b Touche de mode SLICER
c Touche de mode SAMPLER
d Pads performance
e Touche PARAMETER, touche PARAMETER
f Indicateur de temps
g Touche 1/2X (IN)
h Touche 2X (OUT)
i Touche AUTO LOOP
j Touche PAD PLUS ON
k Touche PAD PLUS TAP
l Touche KEY LOCK
m Touche SLIP
n Curseur TEMPO
Fr
11
Page 28

Section Mixeur
Face avant
1
1
a
2
2
b
3
4
c
6
3
4
7
5
9
5
8
1 Commande TRIM
2 Commandes EQ (HI, MID, LOW)
3 Commande FILTER
4 Touche CUE/TAP de casque
5 Fader de canal
6 Commutateur d’indicateur de niveau
7 Indicateur de niveau
8 Crossfader
9 Indicateur CROSS FADER REVERSE
a Commande MASTER LEVEL
b Commande HEADPHONES MIX
c Commande SAMPLER VOLUME
Section des effets
Cette section est utilisée pour contrôler les deux générateurs d’effets
(FX1 et FX2). Les commandes et touches utilisées pour l’exploitation
du générateur FX1 se trouvent sur le côté gauche du contrôleur, celles
pour l’exploitation du générateur FX2 se trouvent sur le côté droit du
contrôleur.
1 2 3 4 5 6
13 42
1 Commande HEADPHONES LEVEL
2 Commutateur CROSS FADER REVERSE
3 Commande CROSS FADER CURVE
4 Commande MIC LEVEL
Panneau arrière
1
1 Commande AUX IN LEVEL
2 Commande BOOTH LEVEL
3 Sélecteur BOOTH/MASTER
4 Commutateur ON/OFF
3 4
2
À propos des valeurs de réglage des
commandes
Les valeurs de réglage des commandes, etc. suivantes sont définies
individuellement pour chaque platine dans le logiciel Serato DJ.
Commande TRIM
Commandes EQ (HI, MID, LOW)
Commande FILTER
Fader de canal
Curseur TEMPO
Si les valeurs définies par Serato DJ lors du changement de platine
diffèrent des positions des commandes, des faders, etc. de l’appareil, les
commandes, faders, etc. doivent être réglés aux positions correspondant
aux valeurs définies par Serato DJ pour qu’elles puissent opérer.
Les valeurs par défaut pour les platines 3 et 4 dans Serato DJ sont
à la position centrale pour les commandes [TRIM], [EQ (HI, MID
et LOW)] et [FILTER], ±0,0% pour les curseurs [TEMPO] et tout à
l’avant pour les faders de canaux.
1 Touches FX ASSIGN 1
2 Touches FX ASSIGN 2
3 Commande de paramétrage des effets 1
4 Commande de paramétrage des effets 2
5 Commande de paramétrage des effets 3
6 Commande FX BEATS
7 Touche de paramétrage des effets 1
8 Touche de paramétrage des effets 2
9 Touche de paramétrage des effets 3
a Touche TAP (FX MODE)
Fr
12
7 8 9 a
Page 29

Informations supplémentaires
Obtention du manuel
Le mode d’emploi peut se trouver sous forme de fichier PDF. Adobe®
Reader® doit être installé pour pouvoir lire les fichiers de format PDF.
Si vous ne possédez pas Adobe Reader, veuillez l’installer en utilisant
le lien de téléchargement sur le menu du CD-ROM.
Téléchargement de ce mode d’emploi
1 Insérez le CD-ROM dans le lecteur optique de
l’ordinateur.
Le menu du CD-ROM apparaît.
Si le menu du CD-ROM n’apparaît pas lorsque le CD-ROM est inséré,
procédez de la façon suivante.
Pour Windows
Ouvrez le lecteur optique depuis [Ordinateur (ou Poste de tra-
vail)] dans le menu [Démarrer], puis double-cliquez sur l’icône
[CD_menu.exe].
Pour Mac OS X
Dans le Finder, double-cliquez directement sur l’icône
[CD_menu.app].
2 Lorsque le menu du CD-ROM apparaît, sélectionnez
[DDJ-SR: Télécharger le Mode d’emploi (fichier PDF) ],
puis cliquez sur [Demarrer].
3 “Une connexion internet est nécessaire pour pouvoir
accéder au site. Connecté à internet ?” apparaît. Cliquez
sur [Oui].
Le navigateur web démarre et le site de support DJ de Pioneer apparaît.
4 Sur le site de support DJ de Pioneer, cliquez sur
“Manuals” dans “DDJ-SR”.
5 Cliquez sur la langue souhaitée sur la page de
téléchargement.
Le téléchargement du mode d’emploi commence.
Téléchargement du manuel du logiciel
Serato DJ
4 Cliquez sur [Software Info] dans [DDJ-SR] sur le site de
support DJ de Pioneer.
[Serato DJ Support Information] apparaît.
5 Cliquez sur le lien vers la page de téléchargement de
Serato DJ.
La page de téléchargement de [Serato DJ] apparaît.
6 Connectez-vous à votre compte utilisateur sur
“Serato.com”.
Saisissez l’adresse de messagerie et le mot de passe enregistrés pour la
connexion à “Serato.com”.
7 Depuis “More Downloads” sur le côté droit de la page
de téléchargement, cliquez sur “Serato DJ x.x Software
Manual”.
Le téléchargement du manuel du logiciel Serato DJ commence.
À propos des lieux d’installation
Ne pas placer cet appareil sur des objets dégageant de la chaleur,
par exemple sur un amplificateur, et ne pas l’exposer trop longtempas à un projecteur, sous peine de l’endommager.
Installer cet appareil à l’écart d’un tuner ou d’un téléviseur. Sinon,
l’image présentera de la distorsion ou des parasites. De la distorsion
ou des parasites se produisent facilement lorsqu’une antenne intérieure est utilisée. Le cas échéant, utiliser une antenne extérieure ou
débrancher le câble USB de cet appareil et éteindre cet appareil.
Nettoyage du produit
En règle général, essuyer cet appareil avec un chiffon sec. Mais s’il
est très sale, tremper un chiffon doux dans un détergent neutre dilué
dans 5 à 6 fois plus d’eau, essorez-le bien, enlevez la saleté et essuyez
de nouveau la surface avec un chiffon sec. Ne pas utiliser d’alcool, de
diluant, de benzène ni insecticite, qui risquent de détacher l’étiquette
imprimée ou la pellicule de protection. Éviter de laisser des produits en
caoutchouc ou vinyle très longtemps au contact de cet appareil sous
peine d’endommager la surface du coffret. Si des lavettes imprégnées de
produit chimique, etc. sont utilisées, lire attentivement les précautions
à prendre.
Débranchez le câble USB de cet appareil avant de le nettoyer.
Français
1 Insérez le CD-ROM dans le lecteur optique de
l’ordinateur.
Le menu du CD-ROM apparaît.
Si le menu du CD-ROM n’apparaît pas lorsque le CD-ROM est inséré,
procédez de la façon suivante.
Pour Windows
Ouvrez le lecteur optique depuis [Ordinateur (ou Poste de tra-
vail)] dans le menu [Démarrer], puis double-cliquez sur l’icône
[CD_menu.exe].
Pour Mac OS X
Dans le Finder, double-cliquez directement sur l’icône
[CD_menu.app].
2 Lorsque le menu du CD-ROM apparaît, sélectionnez
[Serato DJ: Télécharger le Manuel du logiciel (fichier PDF)
], puis cliquez sur [Demarrer].
3 “Une connexion internet est nécessaire pour pouvoir
accéder au site. Connecté à internet ?” apparaît. Cliquez
sur [Oui].
Le navigateur web démarre et le site de support DJ de Pioneer apparaît.
Pour fermer le menu du CD-ROM, cliquez sur [Quitter].
En cas de panne
Une erreur de commande est souvent prise pour une anomalie de
fonctionnement ou une panne. S’il vous semble que quelque chose
est anormal avec cet appareil, vérifiez les différents points dans la
section “En cas de panne” dans le mode d’emploi de cet appareil et
les [FAQ] du [DDJ-SR] sur le site de support DJ de Pioneer.
http://pioneerdj.com/support/
Parfois, le problème peut provenir d’un autre composant. Examinez
les autres composants et les appareils électriques utilisés. Si le
problème ne peut pas être résolu, contactez votre service après-vente
agréé Pioneer ou votre revendeur pour une réparation.
De l’électricité statique ou des influences externes ont peut être déré-
glé cet appareil. Dans ce cas, il est possible de faire fonctionner à
nouveau l’appareil en l’éteignant, puis rallumant 1 minute plus tard.
Fr
13
Page 30

À propos des marques commerciales
et des marques déposées
Pioneer est une marque déposée de PIONEER CORPORATION.
Les noms de sociétés et de produits mentionnés ici sont des marques
commerciales de leurs détenteurs respectifs.
Précautions concernant les droits
d’auteur
Les enregistrements effectués sont destinés à votre usage personnel et,
conformément aux lois sur les droits d’auteur, il se peut que leur utilisation soit soumise au consentement du détenteur des droits.
La musique enregistrée à partir de CD, etc. est protégée par les lois
sur les droits d’auteur de divers pays et par des traités internationaux. La personne qui effectue des enregistrements de musique est
responsable de leur utilisation légale.
Lorsque de la musique est téléchargée d’Internet, etc., la personne
qui a effectué le téléchargement est responsable de l’utilisation
de cette musique conformément à l’accord conclus avec le site de
téléchargement.
Spécifications
Caractéristiques générales – Appareil principal
Alimentation .........................................................................................CC 5 V
Courant nominal ................................................................................500 mA
Poids de l’appareil principal ................................................................. 4,5 kg
Dimensions maximales ....... 553,6 mm (L) × 65,3 mm (H) × 319,1 mm (P)
Température de fonctionnement tolérée ............................. +5 °C à +35 °C
Humidité de fonctionnement tolérée .......5 % à 85 % (sans condensation)
Section audio
Niveau de sortie nominale
MASTER OUT1 .......................................................................... 4,2 Vrms
MASTER OUT 2 ......................................................................... 2,1 Vrms
BOOTH ....................................................................................... 2,1 Vrms
Distorsion harmonique totale
MASTER OUT ...............................................................................0,006 %
Caractéristiques des fréquences
USB, AUX, MIC ................................................................ 20 Hz à 20 kHz
Rapport S/B (lors de la lecture sur ordinateur)
MASTER OUT ................................................................................101 dB
Impédance d’entrée
AUX ................................................................................................. 47 k:
MIC .................................................................................................. 10 k:
Impédance de sortie
MASTER OUT ................................................................................... 1 k:
PHONES ............................................................................................ 32 :
USB AUDIO ....................................................................24 bits/Fs : 44,1 kHz
Prises d’entrée/sortie
Prise d’entrée AUX IN
Prises RCA ........................................................................................1 jeu
Prise MIC
Jack (Ø 6,3 mm) ................................................................................1 jeu
Prise de sortie BOOTH OUT/MASTER OUT2
Prises RCA ........................................................................................1 jeu
Prise de sortie MASTER OUT1
Jack (Ø 6,3 mm) ................................................................................1 jeu
Prise de sortie PHONES
Jack stéréo (Ø 6,3 mm) .....................................................................1 jeu
Minijack stéréo (Ø 3,5 mm) ..............................................................1 jeu
Prise USB
Type B ...............................................................................................1 jeu
En vue de l’amélioration du produit, les caractéristiques et la confi-
guration de cet appareil ainsi que le logiciel inclus sont susceptibles
d’être modifiés sans avis préalable.
© 2013 PIONEER CORPORATION. Tous droits de reproduction et de
traduction réservés.
Fr
14
Page 31

PIONEER ELECTRONICS (USA) INC.
GARANTIE
Pioneer Electronics (USA) Inc. (PUSA) garantie que les produits distribués par PUSA aux États-Unis ou au Canada qui, bien qu’étant installés et utilisés conformément au Manuel
de l’utilisateur fourni avec le produit, ne fonctionneraient pas correctement dans le cadre d’une utilisation normale en raison d’un défaut de fabrication seront réparés ou remplacés
par un produit de valeur équivalente, au choix de PUSA, sans frais à votre charge pour les pièces et/ou la main d’œuvre de réparation. Les pièces incluses en vertu de la présente
garantie peuvent être neuves ou remises à neuf, au choix de PUSA.
LA PRÉSENTE GARANTIE LIMITÉE S’APPLIQUE AU PROPRIÉTAIRE ORIGINAL AINSI QU’À TOUT PROPRIÉTAIRE SUCCESSIF DE CE PRODUIT PIONEER PENDANT LA
PÉRIODE DE GARANTIE À CONDITION QUE LE PRODUIT AIT ÉTÉ ACHETÉ AUPRÈS D’UN DISTRIBUTEUR/DÉTAILLANT PIONEER AGRÉÉ AUX ÉTATS-UNIS OU AU CANADA.
VOUS DEVREZ FOURNIR UN RELEVÉ DE CAISSE OU UNE AUTRE PREUVE D’ACHAT VALIDE INDIQUANT LA DATE DE L’ACHAT INITIAL OU, SI VOUS LOUEZ LE
PRODUIT, VOTRE CONTRAT DE LOCATION INDIQUANT L’ENDROIT ET LA DATE DE LA PREMIÈRE LOCATION. EN CAS DE BESOIN DE RÉPARATION, LE PRODUIT
DOIT ÊTRE RENVOYÉ ET LIVRÉ AU COURS DE LA PÉRIODE DE GARANTIE, FRAIS DE PORT PAYÉS ET UNIQUEMENT DEPUIS L’INTÉRIEUR DES ÉTATS-UNIS. COMME
EXPLIQUÉ DANS LE PRÉSENT DOCUMENT. VOUS ÊTES RESPONSABLE DU DÉMONTAGE ET DE L’INSTALLATION DU PRODUIT. PUSA PREND À SA CHARGE LES
FRAIS D’EXPÉDITION DU PRODUIT RÉPARÉ OU REMPLACÉ JUSQU’À VOTRE ADRESSE À L’INTÉRIEUR DES ÉTATS-UNIS.
PÉRIODE DE GARANTIE DES PRODUITS
DJ Audio et Vidéo ............................................................................................................................................................................... 1 an 1 an
La période de garantie pour les clients qui louent le produit commence le jour où le produit est utilisé pour la première fois (a) pendant la période de location ou (b) après la
vente au détail, selon ce qui se produit en premier.
ÉLÉMENTS NON COUVERTS PAR LA GARANTIE
UN PRODUIT ACHETÉ CHEZ UN DISTRIBUTEUR NON AUTORISÉ N’EST COUVERT PAR AUCUNE GARANTIE EXPRESSE OU IMPLICITE, Y COMPRIS QUELQUE GARANTIE
IMPLICITE DE QUALITÉ MARCHANDE OU D’ADAPTATION À UN USAGE PARTICULIER QUE CE SOIT. DE PLUS, CE PRODUIT EST STRICTEMENT VENDU « TEL QUEL » ET
« AVEC TOUS SES DÉFAUTS ÉVENTUELS ».
PIONEER NE PEUT PAS ÊTRE TENU RESPONSABLE DES DOMMAGES INDIRECTS ET/OU ACCESSOIRES ÉVENTUELS.
LA PRÉSENTE GARANTIE NE S’APPLIQUE PAS SI LE PRODUIT A ÉTÉ SOUMIS À UNE PUISSANCE NOMINALE EXCÉDANT LA PUISSANCE INDIQUÉE DANS LES
SPÉCIFICATIONS FOURNIES.
LA PRÉSENTE GARANTIE NE COUVRE PAS LE BOÎTIER OU LES ÉLÉMENTS ESTHÉTIQUES, LES ANTENNES INSTALLÉES PAR L’UTILISATEUR, LES DOMMAGES AUX DISQUES
OU AUX RUBANS OU DISQUES D’ENREGISTREMENT, LES DOMMAGES AU PRODUIT DÉCOULANT D’UNE RETOUCHE, D’UNE MODIFICATION NON AUTORISÉE PAR ÉCRIT
PAR PIONEER, D’UN ACCIDENT, D’UN USAGE INAPPROPRIÉ OU D’UN USAGE ABUSIF, LES DOMMAGES PRODUITS PAR LA FOUDRE OU LA SURTENSION, LES DOMMAGES
SUBSÉQUENTS DÉCOULANT DE FUITES, LES DOMMAGES DÉCOULANT DE PILES DÉFECTUEUSES OU DE L’UTILISATION DE PILES NON CONFORMES À CELLES QUI SONT
SPÉCIFIÉES DANS LE MANUEL DE L’UTILISATEUR.
LA PRÉSENTE GARANTIE NE COUVRE PAS LE COÛT DES PIÈCES OU DE LA MAIN-D’OEUVRE QUI SERAIENT AUTREMENT OFFERTES SANS FRAIS EN VERTU DE LA
PRÉSENTE GARANTIE, SI ELLES SONT OBTENUES AUPRÈS D’UNE SOURCE AUTRE QU’UNE SOCIÉTÉ DE SERVICE OU AUTRE AUTORISÉE OU DÉSIGNÉE PAR PIONEER.
LA PRÉSENTE GARANTIE NE COUVRE PAS LES DÉFECTUOSITÉS OU LES DOMMAGES CAUSÉS PAR L’UTILISATION D’UNE MAIN-D’OEUVRE OU DE PIÈCES NON AUTORISÉES, ET/
OU D’UN ENTRETIEN INADÉQUAT.
LES NUMÉROS DE SÉRIE MODIFIÉS, OBLITÉRÉS OU ENLEVÉS ANNULENT LA PRÉSENTE GARANTIE DANS SA TOTALITÉ.
EXCLUSION DE TOUTE AUTRE GARANTIE
PIONEER LIMITE SES OBLIGATIONS EN VERTU DE TOUTE GARANTIE IMPLICITE QUE CE SOIT, Y COMPRIS ENTRE AUTRES LES GARANTIES IMPLICITES DE QUALITÉ
MARCHANDE OU D’ADAPTATION À UN USAGE PARTICULIER, À UNE PÉRIODE N’EXCÉDANT PAS LA PÉRIODE DE GARANTIE. AUCUNE GARANTIE NE S’APPLIQUE APRÈS LA
PÉRIODE DE GARANTIE. CERTAINS ÉTATS NE PERMETTENT PAS LA LIMITATION DE LA DURÉE D’UNE GARANTIE IMPLICITE, ET CERTAINS NE PERMETTENT PAS L’EXCLUSION
OU LA LIMITATION DES DOMMAGES CONSÉCUTIFS OU INDIRECTS. LES LIMITATIONS ET EXCLUSIONS ÉTABLIES CI-DESSUS PEUVENT DONC NE PAS S’APPLIQUER À VOUS.
LA PRÉSENTE GARANTIE VOUS DONNE DES DROITS LÉGAUX SPÉCIFIQUES. VOUS POUVEZ JOUIR D’AUTRES DROITS, QUI PEUVENT VARIER D’UN ÉTAT À L’AUTRE.
SERVICE APRÈS-VENTE
PUSA a autorisé un certain nombre de sociétés de service après-vente agréées à travers les États-Unis et le Canada pour le cas où votre produit
aurait besoin d’être réparé. Pour profiter d’un tel service en vertu de la garantie, vous devez présenter votre ticket de caisse ou, si vous louez
le produit, votre contrat de location indiquant l’endroit et la date de la transaction par le premier propriétaire. Si vous expédiez le produit, vous
devez l’emballer soigneusement et l’envoyer à une société de service autorisée, en port prépayé et selon une méthode de transport incluant un
suivi et une assurance. Emballez le produit au moyen de matériaux de rembourrage appropriés pour éviter tout dommage pendant le transport.
L’emballage d’origine est idéal pour cela. Indiquez votre nom, votre adresse et un numéro de téléphone où nous pouvons vous joindre pendant les heures de bureau.
Pour toute réclamation et/ou question à l’intérieur des États-Unis ou du Canada, appelez le Service Consommateurs au 1-800-872-4159.
GARANTIE VALABLE UNIQUEMENT AUX ÉTATS-UNIS ET AU CANADA
GARANTIE LIMITÉE
Pièces Main-d’oeuvre
Français
Pour toute question concernant la mise en service ou l’utilisation de votre produit,
ou pour trouver une société de service autorisée, appelez ou écrivez à :
RÉSOLUTION DES LITIGES
Si un litige se produit entre vous et Pioneer après la réponse à une demande initiale faite au Service Consommateurs, vous pouvez avoir recours au Programme de résolution des
plaintes de Pioneer pour résoudre le litige. Le Programme de résolution des plaintes vous est offert gratuitement. Vous devez avoir recours au Programme de résolution des plaintes
avant de vous prévaloir de vos droits ou de chercher réparation en vertu du Titre I de la loi Magnuson-Moss Warranty-Federal Trade Commission Improvement Act, 15 U.S.C. 2301 et seq.
Pour utiliser le Programme de résolution des plaintes, appelez le 1-800-872-4159 et expliquez au représentant du Service Consommateurs
le problème que vous rencontrez ainsi que les démarches que vous avez effectuées pour faire réparer le produit pendant la période
de garantie, puis communiquez-lui le nom du distributeur /détaillant autorisé auprès duquel vous avez acheté le produit Pioneer.
Une fois que votre plainte a été expliquée au représentant, un numéro de résolution vous sera communiqué. Pioneer étudiera votre plainte et, dans un délai de quarante (40) jours
après la réception de votre plainte, (1) répondra à votre plainte par écrit pour vous aviser des démarches qui seront entreprises pour résoudre le conflit, et indiquera combien de
temps ces démarches prendront ; ou (2) répondra à votre plainte par écrit pour vous indiquer les raisons pour lesquelles aucune démarche ne sera entreprise.
CUSTOMER SUPPORT
PIONEER ELECTRONICS (USA) INC.
LONG BEACH, CALIFORNIA 90801
P.O. BOX 1720
1-800-872-4159
http://www.pioneerelectronics.com
NOTEZ ET CONSERVER LE LIEU ET LA DATE D’ACHAT POUR RÉFÉRENCE ULTÉRIEURE
N° de modèle : _______________________________________ N° de Série : ________________________________________________________________________
Date d’achat : ________________________________________ Nom du distributeur/détaillant ___________________________________________________________
PRENEZ SOIN DE CONSERVER CES INFORMATIONS ET VOTRE REÇU D’ACHAT EN LIEU SÛR POUR RÉFÉRENCE ULTÉRIEURE
UCP0212
Fr
15
Page 32

Mischen Sie dieses Produkt, wenn Sie es entsorgen wollen, nicht mit gewöhnlichen Haushaltsabfällen. Es gibt ein getrenntes
Sammelsystem für gebrauchte elektronische Produkte, über das die richtige Behandlung, Rückgewinnung und Wiederverwertung
gemäß der bestehenden Gesetzgebung gewährleistet wird.
Privathaushalte in den Mitgliedsstaaten der EU, in der Schweiz und in Norwegen können ihre gebrauchten elektronischen Produkte an
vorgesehenen Sammeleinrichtungen kostenfrei zurückgeben oder aber an einen Händler zurückgeben (wenn sie ein ähnliches neues Produkt
kaufen).
Bitte wenden Sie sich in den Ländern, die oben nicht aufgeführt sind, hinsichtlich der korrekten Verfahrensweise der Entsorgung an die örtliche
Kommunalverwaltung.
Auf diese Weise stellen Sie sicher, dass das zu entsorgende Produkt der notwendigen Behandlung, Rückgewinnung und Wiederverwertung
unterzogen wird, und so mögliche negative Einflüsse auf die Umwelt und die menschliche Gesundheit vermieden werden.
K058b_A1_De
WARNUNG
Dieses Gerät ist nicht wasserdicht. Zur Vermeidung der
Gefahr von Brand und Stromschlag keine Behälter mit
Flüssigkeiten (z.B. Blumenvasen und -töpfe) in die
Nähe des Gerätes bringen und dieses vor Tropfwasser,
Spritzwasser, Regen und Nässe schützen.
D3-4-2-1-3_A1_De
WARNUNG
Keine Quellen offener Flammen (z.B. eine brennende
Kerze) auf dieses Gerät stellen.
D3-4-2-1-7a_A1_De
Betriebsumgebung
Betriebstemperatur und Betriebsluftfeuchtigkeit:
+5 °C bis +35 °C, 85 % rel. Feuchte max.
(Ventilationsschlitze nicht blockiert)
Eine Aufstellung dieses Gerät an einem unzureichend
belüfteten, sehr feuchten oder heißen Ort ist zu
vermeiden, und das Gerät darf weder direkter
Sonneneinstrahlung noch starken Kunstlichtquellen
ausgesetzt werden.
D3-4-2-1-7c*_A1_De
Dieses Gerät ist für den Heimgebrauch vorgesehen.
Falls bei Einsatz zu einem anderem Zweck (z.B.
Langzeitgebrauch zu gewerblichen Zwecken in einem
Restaurant oder Betrieb in einem Fahrzeug bzw.
Schiff) eine Funktionsstörung auftritt, die eine
Reparatur des Gerätes erforderlich macht, werden
die Reparaturkosten dem Kunden selbst dann in
Rechnung gestellt, wenn die Garantiefrist noch nicht
abgelaufen ist.
K041_A1_De
Bei Verwendung dieses Produktes machen Sie sich
bitte mit der Sicherheitsinformationen auf der
Unterseite des Gerätes vertraut.
D3-4-2-2-4_B1_De
De
2
Page 33

Vor der Inbetriebnahme
Zum Lesen dieser Anleitung
Vielen Dank, dass Sie sich für dieses Pioneer-Produkt entschieden
haben.
Lesen Sie immer sowohl dieses Infoblatt als auch die
Bedienungsanleitung! Beide Dokumente enthalten wichtige
Informationen, mit denen Sie sich vor dem Gebrauch dieses
Produktes vertraut machen müssen.
Nachdem Sie die Bedienungsanleitung gelesen haben, legen Sie sie
griffbereit zum Nachschlagen ab.
— Anweisungen zur Erhalten der Bedienungsanleitung siehe
Übernehmen der Anleitung (S. 12).
In dieser Anleitung werden die Namen von auf dem Produkt und auf
dem Computerbildschirm angezeigten Bildschirmen und Menüs,
ebenso wie die Namen von Tasten und Buchsen usw. in Klammern
angegeben. (Beispiel: [CUE]-Taste, [Files]-Feld, [MIC]-Buchse)
Bitte beachten Sie, dass die Bildschirme und Spezifikationen der
in dieser Anleitung beschriebenen Software ebenso wie die äußere
Erscheinung und die Spezifikationen der Hardware aktuell in der
Entwicklung sind und sich von den endgültigen Spezifikationen
unterscheiden können.
Bitte beachten Sie, dass je nach der Version des Betriebssystems,
den Webbrowser-Einstellungen usw. die Bedienung sich von den
in dieser Anleitung beschriebenen Verfahren leicht unterscheiden
kann.
Lieferumfang
CD-ROM (Installation Disc)
USB-Kabel
Garantie (für bestimmte Regionen)
Vor Gebrauch lesen (wichtig)/Kurzanleitung (dieses Dokument)
1 Die mitgelieferte Garantie gilt für die Region Europa.
Für die Region Nordamerika sind die entsprechenden
Informationen auf der letzten Seite sowohl der englischen als
auch der französischen Versionen der „Vor Gebrauch lesen
(wichtig)/Kurzanleitung“ enthalten.
Für die Region Japan sind die entsprechenden Informationen
auf der letzten Seite der japanischen Version der „Vor Gebrauch
lesen (wichtig)/Kurzanleitung“ enthalten.
1
Installieren der Software
Vor dem Installieren der Software
Über die Serato DJ-Software
Serato DJ ist eine DJ-Software-Anwendung von Serato. DJ-Auftritte sind
möglich, indem ein Computer an dieses Gerät angeschlossen wird, auf
dem diese Software installiert ist.
Minimale Betriebsumgebung
Unterstützte Betriebssysteme
Mac OS X: 10.8, 10.7 und 10.6
Windows: Windows 7
Sonstiges
Optisches Laufwerk
USB-Anschluss
Display-Auflösung Auflösung von 1 280 x 720 oder höher
Internet-Verbindung
Für die neuesten Informationen über die erforderliche Betriebsumgebung und
Kompatibilität ebenso wie zum Erhalten des neuesten Betriebssystems siehe
„Software Info“ unter „DDJ-SR“ auf der Pioneer DJ-Support-Website unten.
http://pioneerdj.com/support/
Der Betriebssystem-Support nimmt an, dass Sie die neueste Unterversion der
betreffenden Version verwenden.
Die richtige Funktion kann nicht auf allen Computern garantiert werden, auch
wenn diese mit den hier beschriebenen Betriebsbedingungen übereinstimmen.
Je nach den Energieeinstellungen des Computers, usw. kann die CPU und
Festplatten nicht ausreichende Verarbeitungs-Kapazität bieten. Besonders bei
Notebook-Computern müssen Sie sicherstellen, dass der Computer im richtigen
Zustand ist, um konstante hohe Leistung zu bieten (zum Beispiel indem die
Netzstromversorgung angeschlossen bleibt), wenn Sie Serato DJ verwenden.
Die Verwendung des Internets erfordert einen separaten Vertrag mit einem
Internet-Provider und Bezahlung der Provider-Gebühren.
Optisches Disc-Laufwerk, auf dem die CD-ROM gelesen werden kann
Ein USB 2.0-Port ist zum Anschluss des Computers an
dieses Gerät erforderlich.
Eine Internetverbindung ist für die Registrierung des
„Serato.com“-Benutzerkontos und zum Herunterladen
der Software erforderlich.
Hinweise zum Installationsverfahren
Das Installationsverfahren hängt von dem Betriebssystem (OS) des
verwendeten Computers ab.
Bei Windows
Nach dem Installieren der Treiber-Software installieren Sie die Serato
DJ-Software.
Für Mac OS X
Installieren Sie nur die Serato DJ-Software.
Deutsch
Für die neueste Version der Serato DJ-Software gehen Sie zu Serato.
com und laden die Software von dort herunter.
Weitere Informationen finden Sie unter Installationsverfahren
(Windows) oder Installationsverfahren (Mac OS X).
Der Benutzer ist für die Vorbereitung des Computers,
Netzwerkgeräte und andere Elemente der
Internetverwendungsumgebung verantwortlich, die für die
Verbindung zum Internet erforderlich sind.
Über die Treibersoftware (Windows)
Diese Treiber-Software ist ein exklusiver ASIO-Treiber für die Ausgabe
von Audio-Signalen vom Computer.
Bei Verwendung von Mac OS X ist es nicht nötig, die Treiber-
Software zu installieren.
Prüfen der neuesten Informationen über die
Treibersoftware
Detaillierte Informationen über die spezielle Treibersoftware finden Sie
auf der Pioneer DJ-Support-Website unten.
http://pioneerdj.com/support/
Installationsverfahren (Windows)
Verbinden Sie dieses Gerät und den Computer nicht, bevor die
Installation abgeschlossen ist.
Melden Sie sich vor der Installation als der als Benutzer an, der als
Administrator des Computers registriert war.
Falls andere Programme auf dem Computer laufen, beenden Sie
diese.
1 Setzen Sie die mitgelieferte CD-ROM in das optische
Laufwerk Ihres Computers ein.
Die CD-ROM-Menü wird angezeigt.
Wenn das CD-ROM-Menü nicht angezeigt wird, wenn die CD-ROM
eingesetzt wird, öffnen Sie das optische Laufwerk von [Computer
(oder Arbeitsplatz)] im Menü [Start], und doppelklicken Sie auf das
[CD_menu.exe]-Icon.
De
3
Page 34

2 Wenn das CD-ROM-Menü erscheint, wählen Sie
[Treiber-Software (Pioneer_DDJ_SR_Driver_x.xxx.exe)
installieren ] und klicken dann auf [Start].
Zum Schließen des CD-ROM-Menüs klicken Sie auf [Verlassen].
3 Fahren Sie mit der Installation entsprechend den
Anweisungen auf dem Bildschirm fort.
Wenn während der Installation [Windows-Sicherheit] auf dem
Bildschirm erscheint, klicken Sie auf [Diese Treibersoftware trotzdem
installieren] und fahren mit der Installation fort.
Wenn das Installationsprogramm fertiggestellt wird, erscheint eine
Fertigstellungsmeldung.
Nach dem Installieren der Treiber-Software installieren Sie die Serato
DJ-Software.
4 Wählen Sie [Laden Sie die Serato DJ-Software
herunter] aus dem CD-ROM-Menü, und klicken Sie dann
auf [Start].
5 „Eine Internet-Umgebung ist zum Zugriff auf die Site
erforderlich. Internetverbindung vorhanden?“ wird
angezeigt. Klicken Sie auf [Ja].
Der Webbrowser wird gestartet, und die globale Pioneer DJ-SupportWebsite wird angezeigt.
6 Klicken Sie auf [Software Info] unter [DDJ-SR] auf der
Pioneer DJ-Support-Website.
[Serato DJ Support Information] wird angezeigt.
7 Klicken Sie auf den Link zur Serato
DJ-Download-Seite.
Die Serato DJ-Download-Seite wird angezeigt.
8 Melden Sie sich bei Ihrem „Serato.com“Benutzerkonto an.
Wenn Sie bereits ein Benutzerkonto bei „Serato.com“ registriert
haben, gehen Sie zu Schritt 10 weiter.
Wenn Sie die Registrierung Ihres Benutzerkontos nicht abge-
schlossen haben, tun Sie dies auf unten beschriebene Weise.
— Folgen Sie den Anweisungen auf dem Bildschirm und geben
Sie Ihre E-Mail-Adresse und das gewünschte Passwort ein,
und wählen Sie dann Ihre Region.
— Wenn Sie [E-mail me Serato newsletters] markieren, wer-
den Rundschreiben mit den neuesten Informationen über
Serato-Produkte von Serato gesendet.
— Wenn die Kontoregistrierung fertig ist, erhalten Sie eine
E-Mail bei der E-Mail-Adresse, die Sie eingegeben haben.
Prüfen Sie die Inhalte der von „Serato.com“ gesendeten
E-Mail.
Achten Sie auch darauf, dass Sie nicht die bei der
Benutzer-Registrierung eingegebene E-Mail-Adresse und das
Passwort vergessen. Diese sind zum Aktualisieren der Software
erforderlich.
Die persönliche Information, die beim Registrieren eines neuen
Benutzerkontos eingegeben wird, kann entsprechend den auf
der Website von Serato angegebenen Datenschutzregeln gesammelt, verarbeitet und verwendet werden.
9 Klicken Sie auf den Link in der von „Serato.com“
gesendeten E-Mail.
Dies bringt Sie zur Serato DJ-Download-Seite. Gehen Sie zu Schritt 11
weiter.
10 Melden Sie sich an.
Geben Sie die registrierte E-Mail-Adresse und das Passwort ein, um sich
bei „Serato.com“ anzumelden.
11 Laden Sie die Serato DJ-Software von der DownloadSeite herunter.
Entpacken Sie die heruntergeladene Datei, und doppelklicken Sie dann
auf die entpackte Datei, um das Installationsprogramm zu starten.
12 Lesen Sie die Bedingungen der Lizenzvereinbarung
sorgfältig durch, und wenn Sie zustimmen markieren Sie
[I agree to the license terms and conditions] und klicken
dann auf [Install].
Wenn Sie den Bedingungen der Benutzungsvereinbarung nicht
zustimmen, klicken Sie auf [Close], um die Installation abzubrechen.
Die Installation beginnt.
Die Meldung über die erfolgreiche Installation erscheint, wenn die
Installation fertig gestellt ist.
13 Klicken Sie auf [Close], um das Installationsprogramm
Serato DJ zu beenden.
Installationsverfahren (Mac OS X)
Verbinden Sie dieses Gerät und den Computer nicht, bevor die
Installation abgeschlossen ist.
Falls andere Programme auf dem Computer laufen, beenden Sie diese.
1 Setzen Sie die mitgelieferte CD-ROM in das optische
Laufwerk Ihres Computers ein.
Die CD-ROM-Menü wird angezeigt.
Wenn das CD-ROM-Menü nicht auf dem Bildschirm angezeigt wird,
wenn die CD-ROM eingesetzt wird, öffnen Sie das optische Laufwerk
vom Finder, und doppelklicken Sie auf das [CD_menu.app]-Icon.
2 Wählen Sie [Laden Sie die Serato DJ-Software
herunter] aus dem CD-ROM-Menü, und klicken Sie dann
auf [Start].
3 „Eine Internet-Umgebung ist zum Zugriff auf die Site
erforderlich. Internetverbindung vorhanden?“ wird
angezeigt. Klicken Sie auf [Ja].
Der Webbrowser wird gestartet, und die globale Pioneer DJ-SupportWebsite wird angezeigt.
4 Klicken Sie auf [Software Info] unter [DDJ-SR] auf der
Pioneer DJ-Support-Website.
[Serato DJ Support Information] wird angezeigt.
5 Klicken Sie auf den Link zur Serato DJ-Download-Seite.
Die Serato DJ-Download-Seite wird angezeigt.
De
4
Page 35

6 Melden Sie sich bei Ihrem „Serato.com“Benutzerkonto an.
Wenn Sie bereits ein Benutzerkonto bei „Serato.com“ registriert
haben, gehen Sie zu Schritt 8 weiter.
Wenn Sie die Registrierung Ihres Benutzerkontos nicht abge-
schlossen haben, tun Sie dies auf unten beschriebene Weise.
— Folgen Sie den Anweisungen auf dem Bildschirm und geben
Sie Ihre E-Mail-Adresse und das gewünschte Passwort ein,
und wählen Sie dann Ihre Region.
— Wenn Sie [E-mail me Serato newsletters] markieren, wer-
den Rundschreiben mit den neuesten Informationen über
Serato-Produkte von Serato gesendet.
— Wenn die Kontoregistrierung fertig ist, erhalten Sie eine E-Mail
bei der E-Mail-Adresse, die Sie eingegeben haben. Prüfen Sie
die Inhalte der von „Serato.com“ gesendeten E-Mail.
Achten Sie auch darauf, dass Sie nicht die bei der
Benutzer-Registrierung eingegebene E-Mail-Adresse und das Passwort
vergessen. Diese sind zum Aktualisieren der Software erforderlich.
Die persönliche Information, die beim Registrieren eines neuen
Benutzerkontos eingegeben wird, kann entsprechend den auf
der Website von Serato angegebenen Datenschutzregeln gesammelt, verarbeitet und verwendet werden.
7 Klicken Sie auf den Link in der von „Serato.com“
gesendeten E-Mail.
Dies bringt Sie zur Serato DJ-Download-Seite. Gehen Sie zu Schritt 9 weiter.
8 Melden Sie sich an.
Geben Sie die registrierte E-Mail-Adresse und das Passwort ein, um sich
bei „Serato.com“ anzumelden.
9 Laden Sie die Serato DJ-Software von der DownloadSeite herunter.
Entpacken Sie die heruntergeladene Datei, und doppelklicken Sie dann
auf die entpackte Datei, um das Installationsprogramm zu starten.
10 Lesen Sie die Bedingungen der Lizenzvereinbarung
sorgfältig durch, und wenn Sie zustimmen, klicken auf
[Agree].
Bedienung
Stellen Sie sicher, dass das Gerät ausgeschaltet ist, wenn Geräte angeschlossen und Verbindungen hergestellt werden.
Verwenden Sie immer das mit diesem Produkt mitgelieferte USB-Kabel.
Beachten Sie die Bedienungsanleitung der angeschlossenen
Komponente.
Bei diesem Gerät wird der Betriebsstrom über USB-Bus zugeführt. Das
Gerät kann durch einfaches Anschließen an einen Computer über das
USB-Kabel verwendet werden.
Schließen Sie den Computer, an den dieses Gerät angeschlossen
wird, an eine Netzstromversorgung an.
Ein USB-Hub kann nicht verwendet werden.
In Fällen wie den unten beschriebenen kann die Stromversorgung
unzureichend sein, und dieses Gerät arbeitet möglicherweise nicht
mit USB-Busstrom.
— Wenn die USB-Stromversorgungskapazität des Computers unzu-
reichend ist.
— Wenn andere USB-Geräte am Computer angeschlossen sind.
— Wenn Kopfhörer mit einer Impedanz von weniger als 32 : ange-
schlossen sind.
— Wenn Kopfhörer gleichzeitig an die Stereo-Klinkenbuchse als
auch Stereo-Mini-Klinkenbuchse angeschlossen sind.
— Wenn eine Mono-Buchse mit der [HEADPHONES]-Buchse ver-
bunden ist.
Anschlüsse
1 Schließen Sie Kopfhörer an eine der Buchsen
[HEADPHONES] an.
Deutsch
Wenn Sie den Bedingungen der Benutzungsvereinbarung nicht
zustimmen, klicken Sie auf [Disagree], um die Installation
abzubrechen.
11 Wenn der folgende Bildschirm erscheint, bringen Sie
das Icon [Serato DJ] mit Ziehen und Ablegen auf das Icon
des [Applications]-Ordners.
De
5
Page 36

2 Schließen Sie die Aktivlautsprecher, einen
Endstufenverstärker, Komponenten usw. an die
[MASTER OUT1]- oder [BOOTH OUT/MASTER OUT2]Buchsen an.
Aktive Lautsprecher usw.
Einzelheiten zum Verbinden der Eingangs-/Ausgangsbuchsen
finden Sie in der Bedienungsanleitung.
3 Schließen Sie dieses Gerät über ein USB-Kabel an
Ihren Computer an.
5 Stellen Sie den [ON/OFF]-Schalter an der Rückseite
dieser Einheit zur Seite [ON], um diese Einheit
einzuschalten.
Schalten Sie die Stromversorgung dieses Geräts ein.
Für Windows-Anwender
Die Meldung [Installieren von Gerätetreibersoftware] kann
erscheinen, wenn Sie dieses Gerät zuerst an dem Computer
anschließen oder wenn Sie die Verbindung zu einem anderen
USB-Anschluss am Computer herstellen. Warten Sie kurz, bis
die Meldung [Die Geräte können jetzt verwendet werden]
erscheint.
6 Schalten Sie die an die Ausgangsbuchsen
angeschlossenen Geräte ein (Aktivlautsprecher,
Endstufenverstärker, Komponenten usw.).
Wenn ein Mikrofon, DJ-Player oder anderes externes Gerät
an die Eingangsbuchsen angeschlossen ist, schaltet die
Stromversorgung des betreffenden Geräts ebenfalls ein.
4 Schalten Sie den Computer ein.
De
6
Page 37

Starten des Systems
䢢 Starten von Serato DJ
Bei Windows
Klicken Sie aus dem Windows [Start]-Menü auf das Icon [Serato DJ] unter [Alle Programme] > [Serato] > [Serato DJ].
Für Mac OS X
Im Finder öffnen Sie den Ordner [Anwendung], und klicken Sie dann auf das Icon [Serato DJ].
Computerbildschirm direkt nach dem Starten der Serato DJ-Software
A
C
1
2
1 Das [ACTIVATE/BUY]-Icon erscheint möglicherweise an der rechten Seite des Bildschirms, der erscheint, wenn Serato DJ zum ersten Mal gestar-
tet wird, aber ist nicht nötig, eine Aktivierung auszuführen oder eine Lizenz zur Verwendung von DDJ-SR zu erwerben.
2 Markieren Sie [DO NOT SHOW AGAIN] unten rechts im Bildschirm, und klicken Sie dann auf [License], um Serato DJ weiter zu verwenden.
Zum Bedienen des Beatgrid
Wenn bei Serato DJ [SYNC PREFERENCE] standardmäßig auf [Simple sync] gestellt ist, muss dies auf [Smart sync] umgeschaltet werden, um
Beatgrid-Bedienungen auszuführen.
SETUP–DJ Preference-SYNC PREFERENCE
Anweisungen zur Anzeige des Einstellungen-Bildschirms und Einzelheiten zum Beatgrid siehe Serato DJ-Bedienungsanleitung.
Computerbildschirm wenn ein Track in der Serato DJ-Software geladen ist
Klicken Sie auf [Library] oben links im Computerbildschirm, und wählen Sie dann [Vertical] oder [Horizontal] aus dem from the Pulldown-Menü, um
den Serato DJ-Bildschirm umzuschalten.
AA
B
Deutsch
C
A Deck-Sektion
Die Track-Informationen (der Name des geladenen Tracks, der Interpretenname, BPM usw.), die gesamte Wellenform und andere Informationen
werden hier angezeigt.
B Wellenform-Anzeige
Die Wellenform des geladenen Tracks wird hier angezeigt.
C Browser-Sektion
Crates, in denen Tracks in der Bibliothek oder Sätze mehrerer Tracks gespeichert sind, werden hier angezeigt.
Diese Anleitung besteht im Wesentlichen aus Erklärungen der Funktionen dieses Geräts als Hardware. Für detaillierte Anweisungen zur Bedienung
der Serato DJ-Software siehe Anleitung für die Serato DJ-Software.
De
7
Page 38

䢢 Importieren von Tracks
Im Folgenden wird das typische Verfahren zum Importieren von Tracks beschrieben.
Es gibt verschiedene Möglichkeiten zum Importieren von Tracks mit der Serato DJ-Software. Einzelheiten siehe Anleitung für die Serato
DJ-Software.
Wenn Sie bereits Serato-DJ-Software (Scratch Live, ITCH oder Serato DJ Intro) verwenden und bereits Track-Bibliotheken angelegt haben können
die vorher erstellten Bibliotheken wie vorhanden verwendet werden.
Wenn Sie Serato DJ Intro verwenden und bereits Track-Bibliotheken angelegt haben, müssen sie möglicherweise die Tracks erneut analysieren.
1 Klicken Sie auf die Taste [Files] auf dem Serato DJ-Software-Bildschirm, um auf das Feld [Files] zu öffnen.
Die Inhalte Ihres Computers oder am Computer angeschlossenen Peripheriegeräts werden im Feld [Files] angezeigt.
2 Klicken Sie zum Wählen auf den Ordner im Feld [Files], das die Tracks enthält, die der Bibliothek hinzugefügt
werden sollen.
3 Bringen Sie auf dem Serato DJ-Software-Bildschirm den gewählten Ordner mit Ziehen und Ablegen mit der
Computermaus zu dem Crates-Feld.
Ein Crate wird angelegt, und die Tracks werden zu der Bibliothek hinzugefügt.
a
b
a [Files]-Feld
b Crates-Feld
䢢 Laden und Abspielen von Tracks
Das folgende Beispiel beschreibt das Verfahren zum Laden von Tracks
in das Deck [1].
1 Drehregler
2 BACK (VIEW)-Taste
3 LOAD-Taste
1 Drücken Sie die Taste [BACK (VIEW)] am Gerät,
bewegen Sie den Cursor zum Computerbildschirm und
drehen Sie dann den Drehregler zum Wählen des Crate
usw.
2 Drücken Sie den Drehregler, bewegen Sie den Cursor
zur Bibliothek im Computerbildschirm und drehen Sie
dann den Drehregler und wählen Sie den Track.
a
b
a Bibliothek
b Crates-Feld
3 Drücken Sie die Taste [LOAD] zum Laden des
gewählten Tracks in das Deck.
De
8
Page 39

䢢 Abspielen von Tracks und Ausgabe des Sounds
h
Das folgende Beispiel beschreibt das Verfahren zum Ausgaben des
Sounds von Kanal 1 als Beispiel.
Stellen Sie die Lautstärke von Geräten (Endstufenverstärker,
Aktivlautsprecher usw.), die an die [MASTER OUT1]- und [BOOTH
OUT/MASTER OUT2]-Buchsen angeschlossen sind, auf einen
geeigneten Pegel ein. Beachten Sie, dass sehr lauter Ton ausgege-
ben wird, wenn die Lautstärke zu hoch gestellt ist.
Mixer-Sektion
4
9
5
a
6
7
b
8
c
4 TRIM Regler
5 EQ (HI, MID, LOW)-Regler
6 FILTER Regler
7 CUE/TAP-Kopfhörertaste
8 Kanalfader
9 MASTER LEVEL Regler
a HEADPHONES MIX Regler
b Pegelanzeige-Schalter
c Crossfader
d HEADPHONES LEVEL Regler
e CROSS FADER REVERSE Schalter
f CROSS FADER CURVE-Regler
g BOOTH LEVEL-Regler
h BOOTH/MASTER-Wahlschalter
1 Stellen Sie Die Positionen der Regler usw ein, wie
unten gezeigt.
Bezeichnungen von Reglern usw. Position
MASTER LEVEL Regler Voll gegen den Uhrzeigersinn gedreht
TRIM Regler Voll gegen den Uhrzeigersinn gedreht
EQ (HI, MID, LOW)-Regler Mitte
FILTER Regler Mitte
Pegelanzeige-Schalter [CH1/2]-Position
Kanalfader Vorwärts bewegen
CROSS FADER REVERSE Schalter [OFF]-Position
BOOTH/MASTER-Wahlschalter [MASTER]-Position
BOOTH LEVEL-Regler Voll gegen den Uhrzeigersinn gedreht
Deutsch
Frontplatte
Rückseite
g
d
e
2 Drücken Sie die Taste ["] zum Abspielen des Tracks.
f
3 Bewegen Sie den Kanal-Fader von Ihnen weg.
4 Drehen Sie den Regler [TRIM].
Stellen Sie [TRIM] so ein, dass die orangefarbene Anzeige an der
Kanalpegel-Anzeige beim Spitzenpegel aufleuchtet.
5 Drehen Sie Regler [MASTER LEVEL] zum Einstellen des
Audiopegels der Lautsprecher.
Stellen Sie den Soundpegel-Ausgang von den Buchsen [MASTER OUT1]
und [BOOTH OUT/MASTER OUT2] auf einen geeigneten Pegel ein.
Wenn der [BOOTH/MASTER]-Wahlschalter auf [BOOTH]-Position
gestellt ist, kann der [BOOTH LEVEL]-Regler verwendet werden, um nur
die Audiopegelausgabe von der [BOOTH OUT/MASTER OUT2]-Buchse
auf eine geeignete Lautstärke einzustellen.
De
9
Page 40

䢢 Mithören von Ton mit Kopfhörern
Stellen Sie Die Positionen der Regler usw ein, wie unten gezeigt.
Bezeichnungen von Reglern usw. Position
HEADPHONES MIX Regler Mitte
HEADPHONES LEVEL Regler
Voll gegen den Uhrzeigersinn
gedreht
1 Drücken Sie die [CUE/TAP]-Kopfhörertaste für den
Kanal 1.
2 Drehen Sie den Regler [HEADPHONES LEVEL].
Stellen Sie den Soundpegel-Ausgang von den Kopfhörern auf einen
geeigneten Pegel ein.
Hinweis
Dieses Gerät und die Serato DJ-Software enthalten eine Vielfalt
von Funktionen für hoch individualisierte DJ-Auftritte. Detaillierte
Anweisungen zu den einzelnen Funktionen finden Sie in der
Bedienungsanleitung und der Serato DJ-Software-Anleitung.
Die Bedienungsanleitung dieses Geräts kann von der Pioneer
DJ-Support-Website heruntergeladen werden. Einzelheiten siehe Die
Bedienungsanleitung dieses Geräts wird heruntergeladen (S. 12).
Das Handbuch der Serato DJ-Software kann von Serato.com herun-
tergeladen werden. Einzelheiten siehe Herunterladen des Serato DJ
Software-Handbuchs (S. 12).
Beenden des Systems
1 Beenden Sie Serato DJ.
Wenn die Software beendet wird, erscheint eine Meldung auf dem
Computerbildschirm und fordert zur Bestätigung auf, ob die Software
wirklich beendet werden soll. Klicken Sie auf [Yes] zum Beenden.
2 Stellen Sie den [ON/OFF]-Schalter an der Rückseite
dieser Einheit zur Seite [OFF], um diese Einheit
auszuschalten.
3 Trennen Sie das USB-Kabel von Ihrem Computer ab.
Browser-Sektion
1 2 1
3 4
1 LOAD-Taste
2 Drehregler
3 BACK (VIEW)-Taste
4 LOAD PREPARE (AREA)-Taste
Deck-Sektion
Diese Sektion dient zum Steuern der vier Decks. Die Tasten und Regler
zur Bedienung von Deck 1 und 3 befinden sich an der linken Seite des
Controllers, und die zur Bedienung von Deck 2 und 4 befinden sich an
der rechten Seite des Controllers.
Bezeichnungen der Teile
1 Browser-Sektion
2 Deck-Sektion
3 Mixer-Sektion
4 Effekt-Sektion
De
10
1 VINYL-Taste
2 Jog-Scheibe
3 DECK 1-Taste
Das Deck an der rechten Seite hat eine [DECK 2]-Taste.
4 DECK 3-Taste
Das Deck an der rechten Seite hat eine [DECK 4]-Taste.
5 SHIFT-Taste
6 SYNC-Taste
7 CUE-Taste
8 PLAY/PAUSE "-Taste
9 HOT CUE-Modus-Taste
a ROLL-Modus-Taste
b SLICER-Modus-Taste
c SAMPLER-Modus-Taste
d Auftritt-Pads
e PARAMETER-Taste, PARAMETER -Taste
f Beat-Anzeige
g 1/2X (IN)-Taste
h 2X (OUT)-Taste
i AUTO LOOP-Taste
j PAD PLUS ON-Taste
k PAD PLUS TAP-Taste
l KEY LOCK-Taste
m SLIP-Taste
n TEMPO-Schieber
Page 41

Mixer-Sektion
Frontplatte
1
1
a
2
2
b
3
4
c
6
3
4
7
5
9
5
8
1 TRIM Regler
2 EQ (HI, MID, LOW)-Regler
3 FILTER Regler
4 CUE/TAP-Kopfhörertaste
5 Kanalfader
6 Pegelanzeige-Schalter
7 Pegelanzeige
8 Crossfader
9 CROSS FADER REVERSE-Anzeige
a MASTER LEVEL Regler
b HEADPHONES MIX Regler
c SAMPLER VOLUME-Regler
Effekt-Sektion
Dieser Abschnitt dient zur Steuerung der beiden Effekteinheiten (FX1
und FX2). Die Tasten und Regler zur Bedienung der FX1-Einheit befinden
sich an der linken Seite des Controllers, und die zur Bedienung der FX2Einheit befinden sich an der rechten Seite des Controllers.
1 2 3 4 5 6
13 42
1 HEADPHONES LEVEL Regler
2 CROSS FADER REVERSE Schalter
3 CROSS FADER CURVE-Regler
4 MIC LEVEL Regler
Rückseite
1
1 AUX IN LEVEL-Regler
2 BOOTH LEVEL-Regler
3 BOOTH/MASTER-Wahlschalter
4 ON/OFF Schalter
3 4
2
Über die Einstellwerte der Regler
Die Einstellwerte der Regler usw. unten werden einzeln für die betreffenden Decks in der Serato DJ-Software geregelt.
TRIM Regler
EQ (HI, MID, LOW)-Regler
FILTER Regler
Kanalfader
TEMPO-Schieber
Wenn die von Serato DJ gesteuerten Werte beim Ausschalten der
Decks sich von den Positionen der Regler, Fader usw. dieser Einheit
unterscheiden, müssen die Regler, Fader usw. in die Positionen bewegt
werden, die den von Serato DJ gesteuerten Werten entsprechen, bevor
sie bedienbar sind.
Die Standardwerte für Decks 3 und 4 in Serato DJ sind die
Mittenpositionen für die [TRIM]-Regler [EQ (HI, MID und
LOW)]-Regler und [FILTER]-Regler, ±0,0 % für [TEMPO]-Schieber
und die vorderste Position für die Kanalfader.
Deutsch
1 FX ASSIGN 1 Tasten
2 FX ASSIGN 2 Tasten
3 Effektparameter-1-Regler
4 Effektparameter-2-Regler
5 Effektparameter-3-Regler
6 FX BEATS Regler
7 Effektparameter-1-Taste
8 Effektparameter-2-Taste
9 Effektparameter-3-Taste
a TAP (FX MODE)-Taste
7 8 9 a
De
11
Page 42

Zusätzliche Informationen
Übernehmen der Anleitung
Die Bedienungsanleitung kann in Form einer PDF-Datei vorliegen.
Adobe® Reader® muss installiert sein, um Dateien im PDF-Format
zu lesen. Wenn Sie Adobe Reader nicht haben, installieren Sie die
Software bitte vom Download-Link im Menübildschirm der CD-ROM.
Die Bedienungsanleitung dieses Geräts
wird heruntergeladen
1 Setzen Sie die mitgelieferte CD-ROM in das optische
Laufwerk Ihres Computers ein.
Die CD-ROM-Menü wird angezeigt.
Wenn das Menü der CD-ROM nicht erscheint, wenn die CD-ROM eingesetzt wird, führen Sie die folgenden Schritte aus.
Bei Windows
Öffnen Sie das optische Laufwerk von [Computer (oder
Arbeitsplatz)] im Menü [Start], und doppelklicken Sie auf das
[CD_menu.exe]-Icon.
Für Mac OS X
Im Finder doppelklicken Sie direkt auf das [CD_menu.app]-Icon.
2 Wenn das CD-ROM-Menü angezeigt wird, wählen Sie
[DDJ-SR: Laden Sie die Bedienungsanleitung herunter
(PDF-Datei)] und klicken dann auf [Start].
3 „Eine Internet-Umgebung ist zum Zugriff auf die Site
erforderlich. Internetverbindung vorhanden?“ wird
angezeigt. Klicken Sie auf [Ja].
Der Webbrowser wird gestartet, und die globale Pioneer DJ-SupportWebsite wird angezeigt.
4 Auf der Pioneer DJ-Support-Website klicken Sie auf
„Manuals“ unter „DDJ-SR“.
5 Klicken Sie auf die erforderliche Sprache auf der
Download-Seite.
Der Download der Bedienungsanleitung beginnt.
Herunterladen des Serato DJ
Software-Handbuchs
1 Setzen Sie die mitgelieferte CD-ROM in das optische
Laufwerk Ihres Computers ein.
Die CD-ROM-Menü wird angezeigt.
Wenn das Menü der CD-ROM nicht erscheint, wenn die CD-ROM eingesetzt wird, führen Sie die folgenden Schritte aus.
Bei Windows
Öffnen Sie das optische Laufwerk von [Computer (oder
Arbeitsplatz)] im Menü [Start], und doppelklicken Sie auf das
[CD_menu.exe]-Icon.
Für Mac OS X
Im Finder doppelklicken Sie direkt auf das [CD_menu.app]-Icon.
2 Wenn das CD-ROM-Menü angezeigt wird, wählen
Sie [Serato DJ: Laden Sie die Anleitung für die Software
herunter (PDF-Datei)] und klicken dann auf [Start].
3 „Eine Internet-Umgebung ist zum Zugriff auf die Site
erforderlich. Internetverbindung vorhanden?“ wird
angezeigt. Klicken Sie auf [Ja].
Der Webbrowser wird gestartet, und die globale Pioneer DJ-SupportWebsite wird angezeigt.
Zum Schließen des CD-ROM-Menüs klicken Sie auf [Verlassen].
De
12
4 Klicken Sie auf [Software Info] unter [DDJ-SR] auf der
Pioneer DJ-Support-Website.
[Serato DJ Support Information] wird angezeigt.
5 Klicken Sie auf den Link zur Serato
DJ-Download-Seite.
Die Serato DJ-Download-Seite wird angezeigt.
6 Melden Sie sich bei Ihrem „Serato.com“Benutzerkonto an.
Geben Sie die registrierte E-Mail-Adresse und das Passwort ein, um sich
bei „Serato.com“ anzumelden.
7 Von „More Downloads“ auf der rechten Seite der
Download-Seite klicken Sie auf „Serato DJ x.x Software
Manual“.
Der Download des Serato DJ Software-Handbuchs beginnt.
Über Aufstellungsorte
Stellen Sie dieses Gerät nicht auf Gegenständen auf, die Hitze
erzeugen, wie etwa Verstärkern, und setzen Sie es nicht längere Zeit
einem Spotlight aus, da es dadurch beschädigt werden kann.
Stellen Sie dieses Gerät von einem Tuner oder Fernseher entfernt
auf. Andernfalls können Bild- oder Tonverzerrungen auftreten.
Außerdem können Bildverzerrungen oder Rauschen leicht auftreten,
wenn eine Innenantenne verwendet wird. In solchen Fällen verwenden Sie eine Außenantenne oder trennen Sie das USB-Kabel von
dieser Einheit ab und schalten Sie die Stromversorgung aus.
Reinigen des Produkts
Unter normalen Umständen mit einem trockenen Lappen abwischen.
Tragen Sie bei hartnäckigen Verschmutzungen ein wenig in 5 bis 6
Teilen Wasser verdünnten Neutralreiniger auf ein weiches Tuch auf.
Wringen Sie das Tuch sorgfältig aus, wischen Sie den Schmutz ab,
und wischen Sie mit einem trockenen Tuch nach. Verwenden Sie nicht
Alkohol, Verdünner, Benzin oder Insektizide, da dies dazu führen kann,
dass sich Beschriftungen und Beschichtungen ablösen. Vermeiden
Sie, dass Gummi- oder Vinylprodukte längere Zeit in Kontakt mit dem
Gerät geraten, da dies das Gehäuse beschädigen könnte. Wenn Sie
chemisch imprägnierte Wischtücher usw. verwenden, lesen Sie sich die
Vorsichtshinweise zu den Produkten sorgfältig durch.
Ziehen Sie das USB-Kabel vor der Reinigung von diesem Gerät ab.
Störungssuche
Bedienungsfehler werden oft irrtümlich für Störungen oder Ausfälle
gehalten. Wenn Sie den Eindruck haben, dass diese Komponente
nicht ordnungsgemäß funktioniert, überprüfen Sie bitte die Punkte
im Abschnitt „Störungssuche“ in der Bedienungsanleitung dieser
Einheit und [FAQ] für [DDJ-SR] auf der Pioneer DJ-Support-Website.
http://pioneerdj.com/support/
Manchmal wird das Problem auch durch ein externes Gerät verur-
sacht. Überprüfen Sie die anderen verwendeten Komponenten und
elektrischen Geräte. Wenn Sie das Problem nicht beheben können,
wenden Sie sich an die nächste Pioneer-Kundendienststelle oder an
Ihren Händler zum Ausführen der Reparaturarbeit.
Dieses Gerät kann möglicherweise aufgrund von statischer
Elektrizität oder anderen externen Faktoren nicht richtig arbeiten. In
diesem Fall kann richtiger Betrieb durch Ausschalten, mindestens
1 Minute Warten und dann erneutes Einschalten wieder hergestellt
werden.
Page 43

Über Markenzeichen und
eingetragene Markenzeichen
Pioneer ist ein eingetragenes Markenzeichen der PIONEER
CORPORATION.
Die hier erwähnten Produkt- oder Firmennamen sind Markenzeichen der
jeweiligen Eigentümer.
Hinweise zum Urheberrechte
Aufnahmen, die Sie vornehmen, sind für persönlichen Genuss gedacht
und dürfen nach dem Urheberrecht nicht ohne Zustimmung des
Urheberrechtsinhabers anderweitig verwendet werden.
Musik, die von CDs, usw. aufgenommen wurde, ist durch die
Urheberrechtsgesetze der einzelnen Länder sowie durch internatio-
nale Abkommen geschützt. Es liegt in der vollen Verantwortung der
Person, die die Musik aufgenommen hat, sicherzustellen, dass die
Aufnehmen nicht gesetzwidrig verwendet werden.
Beim Umgang mit Musik, die aus dem Internet heruntergeladen
wurde usw., liegt es in der vollen Verantwortung der Person, die
den Musik-Download ausgeführt hat, sicherzustellen, dass die
aufgenommenen Inhalte entsprechend den Vorschriften auf der
Download-Site verwendet werden.
Technische Daten
Allgemein – Haupteinheit
Stromversorgung ................................................................. Gleichstrom 5 V
Nennstrom ......................................................................................... 500 mA
Gewicht des Hauptgeräts ..................................................................... 4,5 kg
Max. Abmessungen ............. 553,6 mm (B) × 65,3 mm (H) × 319,1 mm (T)
Betriebstemperatur ........................................................... +5 °C bis +35 °C
Betriebsluftfeuchtigkeit ........................ 5 % bis 85 % (keine Kondensation)
Audio-Sektion
Nenn-Ausgangspegel
MASTER OUT1 .............................................................................4,2 Veff
MASTER OUT 2 ............................................................................2,1 Veff
BOOTH ..........................................................................................2,1 Veff
Gesamtklirrfaktor
MASTER OUT ...............................................................................0,006 %
Frequenzeigenschaften
USB, AUX, MIC ..............................................................20 Hz bis 20 kHz
Signalrauschabstand (bei Spielen auf Computer)
MASTER OUT ................................................................................101 dB
Eingangsimpedanz
AUX ................................................................................................. 47 k:
MIC .................................................................................................. 10 k:
Ausgangsimpedanz
MASTER OUT ................................................................................... 1 k:
PHONES ............................................................................................ 32 :
USB AUDIO ..................................................................... 24 Bit/Fs : 44,1 kHz
Eingangs- / Ausgangsbuchsen
AUX IN Eingangsbuchse
Cinch-Buchsen ...............................................................................1 Satz
MIC-Buchse
Klinkenbuchse (Ø 6,3 mm) ............................................................1 Satz
BOOTH OUT/MASTER OUT2 Ausgangsbuchse
Cinch-Buchsen ...............................................................................1 Satz
MASTER OUT1 Ausgangsbuchse
Klinkenbuchse (Ø 6,3 mm) ............................................................1 Satz
PHONES Ausgangsbuchse
Stereo-Klinkenbuchse (Ø 6,3 mm) ................................................1 Satz
Stereo-Miniklinkenbuchse (Ø 3,5 mm) .......................................... 1 Satz
USB-Buchse
B-Typ ................................................................................................1 Satz
Deutsch
Änderungen der technischen Daten und des Designs dieses
Geräts sowie der mitgelieferten Software im Sinne der technischen
Verbesserung ohne vorherige Ankündigung bleiben vorbehalten.
© 2013 PIONEER CORPORATION. Alle Rechte vorbehalten.
De
13
Page 44

Se si vuole eliminare questo prodotto, non gettarlo insieme ai rifiuti domestici. Esiste un sistema di raccolta differenziata in conformità
alle leggi che richiedono appositi trattamenti, recupero e riciclo.
I privati cittadini dei paesi membri dell’UE, di Svizzera e Norvegia, possono restituire senza alcun costo i loro prodotti elettronici usati ad appositi
servizi di raccolta o a un rivenditore (se si desidera acquistarne uno simile).
Per i paesi non citati qui sopra, si prega di prendere contatto con le autorità locali per il corretto metodo di smaltimento.
In questo modo, si è sicuri che il proprio prodotto eliminato subirà il trattamento, il recupero e il riciclo necessari per prevenire gli effetti
potenzialmente negativi sull’ambiente e sulla vita dell’uomo.
K058b_A1_It
ATTENZIONE
Questo apparecchio non è impermeabile. Per prevenire
pericoli di incendi o folgorazioni, non posizionare nelle
vicinanze di questo apparecchio contenitori pieni di
liquidi (quali vasi da fiori, o simili), e non esporre
l’apparecchio a sgocciolii, schizzi, pioggia o umidità.
D3-4-2-1-3_A1_It
ATTENZIONE
Per evitare il pericolo di incendi, non posizionare
sull’apparecchio dispositivi con fiamme vive (ad
esempio una candela accesa, o simili).
D3-4-2-1-7a_A1_It
Condizioni ambientali di funzionamento
Gamma ideale della temperatura ed umidità
dell’ambiente di funzionamento:
da +5 °C a +35 °C, umidità relativa inferiore all‘85 %
(fessure di ventilazione non bloccate)
Non installare l’apparecchio in luoghi poco ventilati, o
in luoghi esposti ad alte umidità o alla diretta luce del
sole (o a sorgenti di luce artificiale molto forti).
D3-4-2-1-7c*_A1_It
Questo prodotto è destinato esclusivamente all'uso
domestico. Eventuali disfunzioni dovute ad usi diversi
(quali uso prolungato a scopi commerciali, in
ristoranti, o uso in auto o su navi) e che richiedano
particolari riparazioni, saranno a carico dell'utente,
anche se nel corso del periodo di garanzia.
K041_A1_It
Prima di usare il prodotto, controllare le norme sulla
sicurezza stampate sul suo fondo.
D3-4-2-2-4_B1_It
It
2
Page 45

Prima di cominciare
Come leggere questo manuale
Vi ringraziamo per avere acquistato questo prodotto Pioneer.
Non mancare di leggere sia questo volantino, sia le istruzioni per
l’uso! I due documenti includono informazioni importanti che devono
venire comprese prima di usare questo prodotto.
Dopo aver letto queste istruzioni, riporle in un luogo sicuro per
poterle consultare di nuovo al momento del bisogno.
— Per sapere come ottenere le istruzioni per l’uso, vedere
Acquisizione del manuale (p. 12).
In questo manuale, il nome delle schermate e dei menu visualizzati
dal prodotto e da un computer, oltre ai nomi dei pulsanti e terminali
e così via, sono fra parentesi. (Ad es.: Pulsante [CUE], pannello
[Files], terminale [MIC])
Tenere presente che le schermate e la caratteristiche del software
descritto in questo manuale, oltre all’aspetto esterno e alle caratte-
ristiche del software, sono in fase di sviluppo e possono differire da
quelle finali.
Tenere presente che le procedure di uso possono differire da quanto
descritto in questo manuale a seconda del sistema operativo, delle
impostazioni del browser, ecc.
Contenuto della confezione
CD-ROM (disco d’installazione)
Cavo USB
Garanzia (per alcune regioni)
Da leggere prima dell’uso (Importante)/Guida di avvio veloce (questo
documento)
1 La garanzia acclusa vale per l’Europa.
Le informazioni corrispondenti per l’America Settentrionale sono
fornite nell’ultima pagina delle versioni inglese e francese di “Da
leggere prima dell’uso (Importante)/Guida di avvio veloce”.
Le informazioni corrispondenti per il Giappone sono fornite
nell’ultima pagina della versione giapponese delle “Da leggere
prima dell’uso (Importante)/Guida di avvio veloce”.
1
Installazione del software
Prima di installare il software
Per ottenere la più recente versione di Serato DJ, raggiungere Serato.
com e scaricare il software di lì.
Per dettagli, vedere Procedura di installazione (Windows) o
Procedura di installazione (Mac OS X).
L’utente deve eseguire da sé l’impostazione del computer, dei
dispositivi di rete e di altri elementi dell’ambiente di uso di Internet
richiesti dal collegamento alla rete.
Informazioni sul driver (Windows)
Questo software è un esclusivo driver ASIO per la produzione di segnali
audio da parte del computer.
Non è necessario installare un driver se si usa Mac OS X.
Controllo dell’ultima versione del driver
Per dettagli sul driver apposito di questa unità, consultare il sito di supporto DJ Pioneer riportato di seguito.
http://pioneerdj.com/support/
Il software Serato DJ
Serato DJ è un software DJ di Serato. Le prestazioni DJ sono possibili
collegando il computer che contiene questo software a questa unità.
Ambiente operativo minimo richiesto
Sistemi operativi supportati
Mac OS X: 10.8, 10.7 e 10.6
Windows: Windows 7
Altri
Unità disco ottica
Porta USB
Risoluzione del display Risoluzione da 1 280 x 720 pixel o più
Collegamento Internet
Per ottenere informazioni recenti sull’ambiente operativo e sulla compatibilità
ed ottenere il sistema operativo più recente, vedere “Software Info” in “DDJ-SR”
del sito di supporto DJ Pioneer riportato di seguito.
http://pioneerdj.com/support/
Il sistema operativo supportato assume che stiate usando l’ultima point release
di tale versione.
Non si garantisce il funzionamento su tutti i computer, anche se soddisfano le
condizioni di ambiente operativo minime qui indicate.
Con certe impostazioni di risparmio energetico del computer, ecc., la capacità
di elaborazione della CPU e del disco fisso potrebbe essere insufficiente. In
particolare con i notebook, controllare che siano in grado di fornire prestazioni
sufficienti e costanti (ad esempio tenendoli collegati ad una presa di corrente)
durante l’uso di Serato DJ.
L’uso di Internet richiede un contratto separato con un operatore che offra
servizi di Internet ed il pagamento delle relative tariffe.
Unità disco ottica sulla quale è possibile la lettura del
CD-ROM
Il collegamento del computer a questa unità richiede
una porta USB 2.0.
La registrazione dell’account utente di “Serato.com” ed
il download del software richiedono un collegamento
Internet.
Procedura di installazione
La procedura di installazione dipende dal sistema operativo (OS) del
computer che usate.
In Windows
Installato il driver, installare anche Serato DJ.
In Mac OS X
Installare solo Serato DJ.
Procedura di installazione (Windows)
Non collegare questa unità ed il computer se non ad installazione
terminata.
Prima dell’installazione, eseguire il log on come l’utente amministra-
tore del computer.
Se altri programmi sono avviati nel computer, chiuderli.
1 Inserire il CD-ROM nel lettore ottico del computer.
Viene visualizzato il menu del CD-ROM.
Se il menu del CD-ROM non appare quando viene inserito il
CD-ROM, aprire il lettore ottico da [Computer (o Risorse del
computer)] nel menu [Start] e quindi fare clic due volte sull’icona
[CD_menu.exe].
2 Quando viene visualizzato il menu del CD-ROM,
selezionare [Installare il driver (Pioneer_DDJ_SR_
Driver_x.xxx.exe)] e quindi fare clic su [Avvio].
Per chiudere il menu del CD-ROM fare clic su [Esci].
Italiano
It
3
Page 46

3 Procedere con l’installazione seguendo le istruzioni
sullo schermo.
Se [Protezione di Windows] appare sullo schermo durante l’installazione, far clic su [Installa il software del driver] e continuare
l’installazione.
Ad installazione completa, appare un messaggio di conferma.
Installato il driver, installare anche Serato DJ.
4 Scegliere [Scarica il software Serato DJ.] dal menu del
CD-ROM, poi fare clic su [Avvio].
5 Viene visualizzato “L’accesso al sito richiede una
connessione a Internet. Siete collegati a Internet?”. Fare
clic su [Si].
Il Web browser si apre ed il sito di supporto DJ Pioneer appare.
6 Fare clic su [Software Info] in [DDJ-SR] del sito di
supporto DJ Pioneer.
[Serato DJ Support Information] viene visualizzato.
7 Fare clic sul link della pagina di download di Serato DJ.
Viene visualizzata la pagina di download di Serato DJ.
8 Accedere al proprio account utente di “Serato.com”.
Se si è già registrato un account utente per “Serato.com”, pas-
sare alla fase 10.
Se non si possiede ancora un account utente, farlo nel modo
seguente.
— Seguendo le istruzioni sullo schermo, digitare il proprio
indirizzo di mail ed il password desiderato, quindi scegliere la
propria regione di residenza.
— Spuntando [E-mail me Serato newsletters], mail informativi
riguardanti le ultime informazioni su prodotti legati a Serato
vi verranno inviati da Serato.
— Completata la propria iscrizione come utente, si riceverà un
mail all’indirizzo fornito. Leggere il mail ricevuto da “Serato.
com”.
Fare attenzione a non dimenticare l’indirizzo mail ed il password
specificati al momento della registrazione. Saranno poi necessari
per aggiornare il software.
Le informazioni date durante la registrazione del nuovo account
possono venire raccolte, elaborate ed usate sulla base della
politica di privacy del sito Web di Serato.
9 Fare clic sul collegamento contenuto nel mail ricevuto
da “Serato.com”.
Esso vi porterà alla pagina di download di Serato DJ. Procedere con la
fase 11.
10 Registrarsi.
Digitare l’indirizzo mail ed il password precedentemente registrati per
accedere a “Serato.com”.
11 Scaricare Serato DJ dalla pagina di download.
Decomprimere il file scaricato e fare doppio clic sul file che ne risulta
per iniziare l’installazione.
12 Leggere attentamente i termini dell’accordo di licenza
e, se li si accettano, scegliere [I agree to the license terms
and conditions] e poi fare clic su [Install].
Se non si è d’accordo con l’accordo di licenza d’uso, fare clic su
[Close] e fermare l’installazione.
It
4
L’installazione ha inizio.
Il messaggio di installazione avvenuta appare una volta che questa è
terminata.
13 Fare clic su [Close] per chiudere l’installatore di
Serato DJ.
Procedura di installazione (Mac OS X)
Non collegare questa unità ed il computer se non ad installazione
terminata.
Se altri programmi sono avviati nel computer, chiuderli.
1 Inserire il CD-ROM nel lettore ottico del computer.
Viene visualizzato il menu del CD-ROM.
Se il menu del CD-ROM non appare sullo schermo quando il
CD-ROM stesso viene inserito, usare l’icona del Finder per aprire il
disco e quindi cliccare due volte sull’icona [CD_menu.app].
2 Scegliere [Scarica il software Serato DJ.] dal menu del
CD-ROM, poi fare clic su [Avvio].
3 Viene visualizzato “L’accesso al sito richiede una
connessione a Internet. Siete collegati a Internet?”. Fare
clic su [Si].
Il Web browser si apre ed il sito di supporto DJ Pioneer appare.
4 Fare clic su [Software Info] in [DDJ-SR] del sito di
supporto DJ Pioneer.
[Serato DJ Support Information] viene visualizzato.
5 Fare clic sul link della pagina di download di Serato DJ.
Viene visualizzata la pagina di download di Serato DJ.
6 Accedere al proprio account utente di “Serato.com”.
Se si è già registrato un account utente per “Serato.com”, pas-
sare alla fase 8.
Se non si possiede ancora un account utente, farlo nel modo
seguente.
— Seguendo le istruzioni sullo schermo, digitare il proprio
indirizzo di mail ed il password desiderato, quindi scegliere la
propria regione di residenza.
— Spuntando [E-mail me Serato newsletters], mail informativi
riguardanti le ultime informazioni su prodotti legati a Serato
vi verranno inviati da Serato.
— Completata la propria iscrizione come utente, si riceverà un
mail all’indirizzo fornito. Leggere il mail ricevuto da “Serato.
com”.
Fare attenzione a non dimenticare l’indirizzo mail ed il password
specificati al momento della registrazione. Saranno poi necessari
per aggiornare il software.
Le informazioni date durante la registrazione del nuovo account
possono venire raccolte, elaborate ed usate sulla base della
politica di privacy del sito Web di Serato.
Page 47

7 Fare clic sul collegamento contenuto nel mail ricevuto
da “Serato.com”.
Esso vi porterà alla pagina di download di Serato DJ. Procedere con la
fase 9.
8 Registrarsi.
Digitare l’indirizzo mail ed il password precedentemente registrati per
accedere a “Serato.com”.
9 Scaricare Serato DJ dalla pagina di download.
Decomprimere il file scaricato e fare doppio clic sul file che ne risulta
per iniziare l’installazione.
10 Leggere attentamente i termini dell’accordo di licenza
e, se li si accettano, fare clic su [Agree].
Se non si è d’accordo con l’accordo di licenza d’uso, fare clic su
[Disagree] e fermare l’installazione.
11 Se apparisse la seguente schermata, trascinare
l’icona [Serato DJ] e farla cadere sull’icona della cartella
[Applications].
Impiego
Prima di collegare componenti e modificare i collegamenti, controllare
che l’alimentazione sia interrotta.
Usare solo il cavo USB accluso a questo prodotto.
Consultare le istruzioni per l’uso del componente da collegare.
Questa unità viene alimentata dal bus USB. Questa unità è pronta per
l’uso semplicemente collegandola col cavo USB ad un computer.
Il computer cui va collegata questa unità deve essere collegato ad
una presa di CA.
Gli hub USB non possono essere utilizzati.
In casi come quelli che seguono, la potenza erogata può essere
insufficiente e questa unità può non funzionare se alimentata dal
bus USB.
— Se la capacità di erogazione del bus USB è insufficiente.
— Se altri dispositivi USB sono collegati al computer.
— Se si usa una cuffia con una impedenza da meno di 32 :.
— Se si collegano cuffie simultaneamente alla presa fono stereo ed
alla mini presa fono stereo.
— Se uno spinotto mono viene collegato al terminale
[HEADPHONES].
Italiano
Collegamenti
1 Collegare la cuffia ad uno dei terminali
[HEADPHONES].
It
5
Page 48

2 Collegare diffusori autoalimentati, amplificatori di
potenza ed altri componenti ai terminali [MASTER OUT1]
o [BOOTH OUT/MASTER OUT2].
Diffusori autoalimentati, ecc.
Per dettagli sul collegamento dei terminali di ingresso/uscita,
vedere le Istruzioni per l’uso.
3 Collegare questa unità al computer via cavi USB.
5 Per accendere questa unità, portare l’interruttore
[ON/OFF] del pannello posteriore di questa sul lato [ON].
Accendere questa unità.
Per utenti Windows
Quando questa unità viene collegata la prima volta al computer
oppure quando viene collegata ad una porta USB diversa del
computer potrebbe apparire il messaggio [Installazione driver
di dispositivo in corso]. Attendere che il messaggio [È ora
possibile utilizzare i dispositivi] appaia.
6 Accendere i dispositivi collegati ai terminali di uscita
(diffusori autoalimentati, amplificatori di potenza,
componenti, ecc).
Se ai terminali di ingresso viene collegato un microfono, lettore
DJ o altro dispositivo esterno, tale dispositivo si accende.
4 Accendere il computer.
It
6
Page 49

Avvio del sistema
䢢 Avvio di Serato DJ
In Windows
Dal menu [Start] di Windows, fare clic sull’icona [Serato DJ] in [Tutti i programmi] > [Serato] > [Serato DJ].
In Mac OS X
Nel Finder, aprire la cartella [Applicativo], poi fare clic sull’icona [Serato DJ].
Schermata del computer subito dopo il lancio di Serato DJ
A
C
1
2
1 L’icona [ACTIVATE/BUY] può apparire sulla destra della schermata che appare al primo lancio di Serato DJ, ma chi usa DDJ-SR non ha bisogno di
attivare o acquistare licenze.
2 Controllare [DO NOT SHOW AGAIN] in basso a destra sullo schermo, poi fare clic su [License] e continuare ad usare Serato DJ come tale.
Uso della beatgrid
In Serato DJ, [SYNC PREFERENCE] è regolato su [Simple sync] per default, ma deve essere regolato su [Smart sync] perché sia possibile fare uso della
beatgrid.
SETUP–DJ Preference-SYNC PREFERENCE
Per istruzioni sulla visualizzazione della schermata delle impostazioni e dettagli sulla beatgrid, vedere il manuale di Serato DJ.
Schermata del computer quando un brano viene caricato in Serato DJ
Fare clic su [Library] nell’angolo superiore sinistro dello schermo del computer, poi scegliere [Vertical] o [Horizontal] dal menu a tendina per passare
alla schermata di Serato DJ.
AA
B
Italiano
C
A Sezione deck
Le informazioni sui brani (nome del brano caricato, nome dell’artista, BPM, ecc.), la forma d’onda complessiva ed altri dati vengono visualizzati qui.
B Display delle forme d’onda
La forma d’onda del brano caricato viene visualizzata qui.
C Sezione browser
I crate in cui dei brani della libreria o dei set di più brani vengono memorizzati sono visualizzati qui.
Questo manuale consiste principalmente della spiegazione delle funzioni dell’hardware di questa unità. Per istruzioni dettagliate sull’uso di Serato DJ,
leggerne le istruzioni per l’uso.
It
7
Page 50

䢢 Importazione dei brani
La seguente è la procedura normale di importazione di brani.
Serato DJ consente di importare brani in vari modi. Per dettagli, vedere le istruzioni per l’uso di Serato DJ.
Se si sta già usando il software per DJ Serato (Scratch Live, ITCH o Serato DJ Intro) e si sono già create library di brani, esse possono venire usate
come sono.
Se si fa uso di Serato DJ Intro e si sono già create librerie di brani, questi potrebbero dovere venire reinizializzati.
1 Fare clic sul pulsante [Files] della schermata di Serato DJ per fare aprire il pannello [Files].
Il contenuto del computer o della periferica ad esso collegata vengono riprodotti nel pannello [Files].
2 Fare clic sulla cartella del pannello [Files] contenente il brano da aggiungere alla library, scegliendolo.
3 Nella schermata di Serato DJ, trascinare la cartella scelta e farla cadere nel pannello dei crate.
Viene creato un nuovo crate ed i brani vengono aggiunti alla library.
a
b
a Pannello [Files]
b Pannello dei crate
䢢 Per caricare e riprodurre brani
Di seguito viene descritta come esempio la procedura di caricamento di
brani nel deck [1].
1 Manopola selettrice
2 Pulsante BACK (VIEW)
3 Pulsante LOAD
1 Premere il pulsante [BACK (VIEW)] di questa unità,
portare il cursore nel pannello dei crate sullo schermo
del computer, quindi girare la manopola selettrice per
scegliere il crate, ecc.
2 Premere la manopola selettrice, portare il cursore
sulla library dello schermo del computer, quindi girare la
manopola selettrice e scegliere il brano.
a
b
a Library
b Pannello dei crate
3 Premere il pulsante [LOAD] per caricare il brano scelto
nel deck.
It
8
Page 51

䢢 RIproduzione di brani e del relativo audio
h
Di seguito viene descritta come esempio la procedura di riproduzione
del canale 1.
Impostare il volume dei dispositivi (amplificatori di potenza, diffu-
sori autoalimentati, ecc.) collegati ai terminali [MASTER OUT1] e
[BOOTH OUT/MASTER OUT2] su di un livello appropriato. Tenere
presente che, se il volume è eccessivo, vengono prodotti suoni molto
potenti.
Sezione mixer
4
9
5
a
6
7
b
8
c
Pannello anteriore
4 Controllo TRIM
5 Controlli EQ (HI, MID, LOW)
6 Controllo FILTER
7 Pulsante della cuffia CUE/TAP
8 Fader canali
9 Controllo MASTER LEVEL
a Controllo HEADPHONES MIX
b Interruttore dell’indicatore del livello
c Crossfader
d Controllo HEADPHONES LEVEL
e Interruttore CROSS FADER REVERSE
f Controllo CROSS FADER CURVE
g Controllo BOOTH LEVEL
h Selettore BOOTH/MASTER
1 Impostare i comandi, ecc. nel modo seguente.
Nome dei comandi, ecc. Posizione
Controllo MASTER LEVEL
Controllo TRIM
Controlli EQ (HI, MID, LOW)Centrale
Controllo FILTER Centrale
Interruttore dell’indicatore del livello Posizione [CH1/2]
Fader canali Spostato in avanti
Interruttore CROSS FADER REVERSE Posizione [OFF]
Selettore BOOTH/MASTER Posizione [MASTER]
Controllo BOOTH LEVEL
Girata del tutto in senso
antiorario
Girata del tutto in senso
antiorario
Girata del tutto in senso
antiorario
2 Premere il pulsante ["] per riprodurre il brano.
Italiano
Pannello posteriore
g
d
e
f
3 Allontanare da sé il fader del canale.
4 Girare il controllo [TRIM].
Regolare [TRIM] in modo che l’indicatore arancione dell’indicatore di
livello del canale si illumini al livello di picco.
5 Per regolare il livello audio dei diffusori, girare il
comando [MASTER LEVEL].
Regolare il livello di ingresso audio del terminale [MASTER OUT1] e
[BOOTH OUT/MASTER OUT2] su un valore corretto.
Se il selettore [BOOTH/MASTER] si trova sulla posizione [BOOTH], il
controllo [BOOTH LEVEL] è utlizzabile solo per regolare il livello di uscita
audio dal terminale [BOOTH OUT/MASTER OUT2] su di un volume
adeguato.
It
9
Page 52

䢢 Monitoraggio audio in cuffia
Impostare i comandi, ecc. nel modo seguente.
Nome dei comandi, ecc. Posizione
Controllo HEADPHONES MIX Centrale
Controllo HEADPHONES LEVEL
Girata del tutto in senso
antiorario
1 Premere il pulsante [CUE/TAP] delle cuffie per il
canale 1.
2 Girare il controllo [HEADPHONES LEVEL].
Regolare il livello di ingresso audio in cuffia su un valore corretto.
Sezione browser
1 2 1
3 4
1 Pulsante LOAD
2 Manopola selettrice
3 Pulsante BACK (VIEW)
4 Pulsante LOAD PREPARE (AREA)
Nota
Questa unità e Serato DJ possiedono varie funzioni che permettono
performance DJ personalizzate. Per dettagli sulle varie funzioni, vedere
le Istruzioni per l’uso di questa unità e di Serato DJ.
Le Istruzioni per l’uso di questa unità possono venire scaricate dal
sito di supporto DJ Pioneer. Per dettagli, vedere Download delle
Istruzioni per l’uso di questa unità (p. 12).
Le Istruzioni per l’uso di Serato DJ possono venire scaricate presso
Serato.com. Per dettagli, vedere Come scaricare le istruzioni per l’uso
di Serato DJ (p. 12).
Spegnimento del sistema
1 Chiudere Serato DJ.
Chiuso l’applicativo, sullo schermo del computer appare una richiesta di
conferma di tale operazione. Fare clic su [Yes] per procedere.
2 Per spegnere questa unità, portare l’interruttore
[ON/OFF] del pannello posteriore di questa sul lato [OFF].
3 Scollegare il cavo USB dal computer.
Nome delle varie parti
Sezione deck
Questa sezione viene usata per controllare i quattro deck. I pulsanti e
comandi di controllo dei deck 1 e 3 si trovano sulla sinistra del controller,
quelli dei deck 2 e 4 sulla destra.
1 Sezione browser
2 Sezione deck
3 Sezione mixer
4 Sezione effetti
It
10
1 Pulsante VINYL
2 Jog dial
3 Pulsante DECK 1
Il deck sul lato destro ha un pulsante [DECK 2].
4 Pulsante DECK 3
Il deck sul lato destro ha un pulsante [DECK 4].
5 Pulsante SHIFT
6 Pulsante SYNC
7 Pulsante CUE
8 Pulsante PLAY/PAUSE "
9 Pulsante della modalità HOT CUE
a Pulsante della modalità ROLL
b Pulsante della modalità SLICER
c Pulsante della modalità SAMPLER
d Performance pad
e Pulsante PARAMETER, pulsante PARAMETER
f Indicatore delle battute
g Pulsante 1/2X (IN)
h Pulsante 2X (OUT)
i Pulsante AUTO LOOP
j Pulsante PAD PLUS ON
k Pulsante PAD PLUS TAP
l Pulsante KEY LOCK
m Pulsante SLIP
n Cursore TEMPO
Page 53

Sezione mixer
Pannello anteriore
1
1
a
2
2
b
3
4
c
6
3
4
7
5
9
5
8
1 Controllo TRIM
2 Controlli EQ (HI, MID, LOW)
3 Controllo FILTER
4 Pulsante della cuffia CUE/TAP
5 Fader canali
6 Interruttore dell’indicatore del livello
7 Indicatore del livello
8 Crossfader
9 Indicatore CROSS FADER REVERSE
a Controllo MASTER LEVEL
b Controllo HEADPHONES MIX
c Controllo SAMPLER VOLUME
Sezione effetti
Questa sezione viene usata per controllare le due unità effetto (FX1 e
FX2). I controlli e pulsanti di controllo dell’unità FX1 si trovano sulla
sinistra del controller, quelli dell’unità FX2 sulla destra.
1 2 3 4 5 6
13 42
1 Controllo HEADPHONES LEVEL
2 Interruttore CROSS FADER REVERSE
3 Controllo CROSS FADER CURVE
4 Controllo MIC LEVEL
Pannello posteriore
1
1 Controllo AUX IN LEVEL
2 Controllo BOOTH LEVEL
3 Selettore BOOTH/MASTER
4 Interruttore ON/OFF
3 4
2
Valori predefiniti dei controlli
I valori predefiniti dei controlli, ecc. che seguono possono essere impostati individualmente per i rispettivi deck usando Serato DJ.
Controllo TRIM
Controlli EQ (HI, MID, LOW)
Controllo FILTER
Fader canali
Cursore TEMPO
Se i valori impostati con Serato DJ quando i deck vengono cambiati
differiscono dalle posizioni dei controlli, fader, ecc., questi ultimi devono
venire portati nelle posizioni corrispondenti ai valori impostati con
Serato DJ prima di funzionare.
I valori predefiniti dei deck 3 e 4 in Serato DJ sono la posizione cen-
trale dei controlli [TRIM], di quelli [EQ (HI, MID e LOW)] e [FILTER],
±0,0% per i cursori [TEMPO] e la posizione più in avanti per i fader
dei canali.
Italiano
7 8 9 a
1 Pulsanti FX ASSIGN 1
2 Pulsanti FX ASSIGN 2
3 Controllo del parametro di effetto 1
4 Controllo del parametro di effetto 2
5 Controllo del parametro di effetto 3
6 Controllo FX BEATS
7 Pulsante del parametro di effetto 1
8 Pulsante del parametro di effetto 2
9 Pulsante del parametro di effetto 3
a Pulsante TAP (FX MODE)
It
11
Page 54

Informazioni aggiuntive
Acquisizione del manuale
Le Istruzioni per l’uso possono assumere la forma di file PDF. La lettura di file PDF richiedere l’installazione di Adobe® Reader®. Se non si
possiede Adobe Reader, scaricarlo dal collegamento della schermata
del menu del CD-ROM ed installarlo.
Download delle Istruzioni per l’uso di
questa unità
1 Inserire il CD-ROM nel lettore ottico del computer.
Viene visualizzato il menu del CD-ROM.
Se il menu del CD-ROM non appare quando questo viene inserito, fare
quanto segue.
In Windows
Aprire l’unità disco da [Computer (o Risorse del computer)] nel
menu [Start] e fare doppio clic sull’icona [CD_menu.exe].
In Mac OS X
Dal Finder, fare doppio clic sull’icona [CD_menu.app].
2 Quando viene visualizzato il menu del CD-ROM,
selezionare [DDJ-SR: Scarica le istruzioni per l’uso (file
PDF)] e quindi fare clic su [Avvio].
3 Viene visualizzato “L’accesso al sito richiede una
connessione a Internet. Siete collegati a Internet?”. Fare
clic su [Si].
Il Web browser si apre ed il sito di supporto DJ Pioneer appare.
4 Nel sito di supporto DJ Pioneer, fare clic su “Manuals”
in “DDJ-SR”.
5 Nella pagina di download, fare clic sulla lingua
desiderata.
Il download delle istruzioni per l’uso inizia.
Come scaricare le istruzioni per l’uso di
Serato DJ
1 Inserire il CD-ROM nel lettore ottico del computer.
Viene visualizzato il menu del CD-ROM.
Se il menu del CD-ROM non appare quando questo viene inserito, fare
quanto segue.
In Windows
Aprire l’unità disco da [Computer (o Risorse del computer)] nel
menu [Start] e fare doppio clic sull’icona [CD_menu.exe].
In Mac OS X
Dal Finder, fare doppio clic sull’icona [CD_menu.app].
2 Quando viene visualizzato il menu del CD-ROM,
selezionare [Serato DJ: Scarica il manuale del software
(file PDF)] e quindi fare clic su [Avvio].
3 Viene visualizzato “L’accesso al sito richiede una
connessione a Internet. Siete collegati a Internet?”. Fare
clic su [Si].
Il Web browser si apre ed il sito di supporto DJ Pioneer appare.
Per chiudere il menu del CD-ROM fare clic su [Esci].
4 Fare clic su [Software Info] in [DDJ-SR] del sito di
supporto DJ Pioneer.
[Serato DJ Support Information] viene visualizzato.
5 Fare clic sul link della pagina di download di Serato DJ.
Viene visualizzata la pagina di download di Serato DJ.
6 Accedere al proprio account utente di “Serato.com”.
Digitare l’indirizzo mail ed il password precedentemente registrati per
accedere a “Serato.com”.
7 Da “More Downloads” sul lato destro della pagina di
download, fare clic su “Serato DJ x.x Software Manual”.
Il download delle istruzioni per l’uso di Serato DJ inizia.
Le posizioni di installazione
Non installare questa unità su oggetti che irradiano calore, ad esem-
pio amplificatori, e non esporla a luci artificiali intense per molto
tempo, dato che questo potrebbe danneggiare quest’unità.
Installare quest’unità lontano da un sintonizzatore o televisore. Si
potrebbero altrimenti avere distorsioni dell’immagine e altri disturbi.
Le distorsioni dell’immagine ed il rumore si possono verificare anche
nel caso si usi un’antenna interna. In tal caso, usare un’antenna
esterna o scollegare il cavo USB da questa unità o spegnere questa
unità.
Pulizia del prodotto
In circostanze normali, passare con un panno pulito e asciutto. Per
sporco tenace, inumidire un panno morbido in detergente neutro diluito
di 5 o 6 volte in acqua, strizzarlo bene, togliere lo sporco e ripassare con
un panno pulito. Non usare alcool, diluente, benzene o insetticida, dato
che possono far staccare le etichette o le finiture. Evitare di lasciare prodotti in gomma o vinile in contatto per periodi prolungati con il prodotto,
dato che danneggiano la superficie del cabinet. Se si usano panni trattati
chimicamente o altri prodotti simili, leggerne attentamente le istruzioni.
Prima della pulizia, scollegare il cavo USB da questa unità.
Diagnostica
L’uso scorretto dell’apparecchio viene spesso scambiato per un
guasto. Se si ritiene il componente sia guasto, controllare la voci
della sezione “Diagnostica” delle istruzioni per l’uso di questa unità e
le [FAQ] del [DDJ-SR] del sito di supporto per DJ di Pioneer.
http://pioneerdj.com/support/
A volte il problema risiede in un altro componente. Controllare tutti i
componenti ed apparecchi elettronici usati. Se il problema non può
venire eliminato, chiedere assistenza tecnica al più vicino centro
assistenza o rivenditore autorizzato Pioneer.
Questa unità può non funzionare a causa di elettricità statica o altre
influenze esterne. In questo caso, il funzionamento corretto dovrebbe
tornare spegnendo questa unità, attendendo un minuto e riaccende.
12
It
Page 55

A proposito del marchi di fabbrica o
marchi di fabbrica depositati
Pioneer è un marchio di fabbrica depositato della PIONEER
CORPORATION.
I nomi delle aziende e dei prodotti menzionati sono marchi di fabbrica
dei rispettivi proprietari.
Precauzioni sui copyright
Le registrazioni eseguite sono per il godimento personale e secondo le
leggi sul copyright non possono essere utilizzate senza il consenso di chi
detiene il copyright.
La musica registrata da CD, ecc., è protetta da leggi sul copyright
di paesi individuali e da trattati internazionali. La piena responsa-
bilità per un utilizzo legale ricade sula persona che ha registrato la
musica.
Quando si tratta con musica scaricata da Internet, ecc., la piena
responsabilità che essa venga utilizzata secondo le modalità del con-
tratto col sito di scaricamento ricade sulla persona che ha scaricato
tale musica.
Dati tecnici
Dati generali – Unità principale
Alimentazione ......................................................................................DC 5 V
Corrente dichiarata ............................................................................ 500 mA
Peso unità principale ............................................................................ 4,5 kg
Dimensioni massime ........... 553,6 mm (L) × 65,3 mm (A) × 319,1 mm (P)
Temperature di funzionamento tollerabili ......................Da +5 °C a +35 °C
Umidità di funzionamento tollerabile ......Da 5 % a 85 % (senza condensa)
Sezione audio
Livello di uscita dichiarato
MASTER OUT1 .......................................................................... 4,2 Vrms
MASTER OUT 2 ......................................................................... 2,1 Vrms
BOOTH ....................................................................................... 2,1 Vrms
Distorsione armonica totale
MASTER OUT ...............................................................................0,006 %
Caratteristiche di frequenza
USB, AUX, MIC ...........................................................Da 20 Hz a 20 kHz
Rapporto S/R (durante la riproduzione con il computer)
MASTER OUT ................................................................................101 dB
Impedenza di ingresso
AUX ................................................................................................. 47 k:
MIC .................................................................................................. 10 k:
Impedenza di uscita
MASTER OUT ................................................................................... 1 k:
PHONES ............................................................................................ 32 :
USB AUDIO ......................................................................24 bit/Fs : 44,1 kHz
Terminali di ingresso/uscita
Terminale di ingresso AUX IN
Prese a spinotto RCA........................................................................1 set
Terminale MIC
Presa fono (Ø 6,3 mm) ......................................................................1 set
Terminale di uscita BOOTH OUT/MASTER OUT2
Prese a spinotto RCA........................................................................1 set
Terminale di uscita MASTER OUT1
Presa fono (Ø 6,3 mm) ......................................................................1 set
Terminale di uscita PHONES
Presa fono stereo (Ø 6,3 mm) ..........................................................1 set
Presa fono stereo mini (Ø 3,5 mm) ..................................................1 set
Terminale USB
Tipo B .................................................................................................1 set
Italiano
A cause dei continui miglioramenti, i dati tecnici ed il design di
questa unità e del software che la accompagna sono soggetti a
modifiche senza preavviso.
© 2013 PIONEER CORPORATION. Tutti i diritti riservati.
It
13
Page 56

Deponeer dit product niet bij het gewone huishoudelijk afval wanneer u het wilt verwijderen. Er bestaat een speciaal wettelijk
voorgeschreven verzamelsysteem voor de juiste behandeling, het opnieuw bruikbaar maken en de recycling van gebruikte
elektronische producten.
In de lidstaten van de EU, Zwitserland en Noorwegen kunnen particulieren hun gebruikte elektronische producten gratis bij de daarvoor
bestemde verzamelplaatsen of een verkooppunt (indien u aldaar een gelijkwaardig nieuw product koopt) inleveren.
Indien u zich in een ander dan bovengenoemd land bevindt kunt u contact opnemen met de plaatselijke overheid voor informatie over de juiste
verwijdering van het product.
Zodoende zorgt u ervoor dat het verwijderde product op de juiste wijze wordt behandeld, opnieuw bruikbaar wordt gemaakt, t gerecycleerd en het
niet schadelijk is voor de gezondheid en het milieu.
K058b_A1_Nl
WAARSCHUWING
Dit apparaat is niet waterdicht. Om brand of een
elektrische schok te voorkomen, mag u geen voorwerp
dat vloeistof bevat in de buurt van het apparaat zetten
(bijvoorbeeld een bloemenvaas) of het apparaat op
andere wijze blootstellen aan waterdruppels,
opspattend water, regen of vocht.
D3-4-2-1-3_A1_Nl
WAARSCHUWING
Om brand te voorkomen, mag u geen open vuur (zoals
een brandende kaars) op de apparatuur zetten.
D3-4-2-1-7a_A1_Nl
Gebruiksomgeving
Temperatuur en vochtigheidsgraad op de plaats van
gebruik:
+5 °C tot +35 °C, minder dan 85 % RH
(ventilatieopeningen niet afgedekt)
Zet het apparaat niet op een slecht geventileerde plaats
en stel het apparaat ook niet bloot aan hoge
vochtigheid of direct zonlicht (of sterke kunstmatige
verlichting).
D3-4-2-1-7c*_A1_Nl
Dit apparaat is bestemd voor normaal huishoudelijk
gebruik. Indien het apparaat voor andere doeleinden
of op andere plaatsen wordt gebruikt (bijvoorbeeld
langdurig gebruik in een restaurant voor zakelijke
doeleinden, of gebruik in een auto of boot) en als
gevolg hiervan defect zou raken, zullen de reparaties
in rekening gebracht worden, ook als het apparaat
nog in de garantieperiode is.
K041_A1_Nl
Controleer voor gebruik van het product de
veiligheidsinformatie aan de onderkant van het
apparaat.
D3-4-2-2-4_B1_Nl
Nl
2
Page 57

Alvorens te beginnen
Opmerkingen over deze handleiding
Hartelijk dank voor uw aankoop van dit Pioneer product.
U moet zowel dit document als de handleiding lezen! Beide docu-
menten bevatten belangrijke informatie die u moet begrijpen voor u
dit product gaat gebruiken.
Na het doorlezen van de gebruiksaanwijzing dient u deze te bewaren
op een veilige plaats, voor latere naslag.
— Zie Verkrijgen van de handleiding (blz. 12) voor instructies over
hoe u de handleiding kunt verkrijgen.
In deze handleiding worden de namen van schermen en menu’s op
het product zelf en op het computerscherm, en de namen van toet-
sen en aansluitingen enz. aangegeven tussen haakjes. (Bijv.: [CUE]-
toets, [Files]-paneel, [MIC]-aansluiting)
Wij wijzen u erop dat de schermen en de specificaties van de in deze
handleiding beschreven software en het uiterlijk en de specificaties
van de hardware op moment van schrijven nog onder ontwikkeling
zijn en derhalve kunnen afwijken van de uiteindelijke specificaties.
Let op, want afhankelijk van de versie van uw besturingssysteem,
instellingen van uw webbrowser enz. kan de bediening afwijken van
de procedures zoals beschreven in deze handleiding.
Inhoud van de doos
CD-ROM (Installatiedisc)
USB-kabel
Garantie (voor bepaalde regio’s)
Lees dit voor gebruik (Belangrijk)/Snelstartgids (dit document)
1 De meegeleverde garantie is geldig voor de Europese regio.
Voor de Noord-Amerikaanse regio wordt de corresponderende
informatie geleverd op de laatste bladzijde van zowel de Engelse
als de Franse versie van het boekje “Lees dit voor gebruik
(Belangrijk)/Snelstartgids”.
Voor de Japanse regio wordt de corresponderende informatie
geleverd op de laatste bladzijde van de Japanse versie van het
boekje “Lees dit voor gebruik (Belangrijk)/Snelstartgids”.
1
Installeren van de software
Voor het installeren van de software
Ga voor de nieuwste versie van de Serato DJ-software naar Serato.com
en download de software van deze site.
Zie voor details Installatieprocedure (Windows) of
Installatieprocedure (Mac OS X).
De gebruiker is verantwoordelijk voor het correct voorbereiden
van de computer, netwerkapparatuur en andere elementen van de
internet-gebruiksomgeving die vereist zijn voor verbinding met het
Internet.
Omtrent het stuurprogramma (Windows)
Dit stuurprogramma is een exclusief ASIO-stuurprogramma voor het
weergeven van geluidssignalen via de computer.
Het installeren van een stuurprogramma is niet nodig wanneer u
Mac OS X gebruikt.
Controleren van de meest recente informatie over het
stuurprogramma
Voor meer gedetailleerde informatie over de voor dit toestel bedoelde
stuurprogrammatuur (driver), verwijzen we u naar de Pioneer
DJ-ondersteuningssite hieronder.
http://pioneerdj.com/support/
Over de Serato DJ-software
Serato DJ is een DJ-applicatie van Serato. DJ-optredens zijn mogelijk
door de computer waarop deze software is geïnstalleerd te verbinden
met dit toestel.
Minimum eisen gebruiksomgeving
Geschikte besturingssystemen
Mac OS X: 10.8, 10.7 en 10.6
Windows: Windows 7
Overige
Optisch station
USB-aansluiting
Schermresolutie Resolutie van 1 280 x 720 of meer
Internetverbinding
Voor de nieuwste informatie over de vereiste gebruiksomgeving en compatibili-
teit met de nieuwste besturingssystemen verwijzen we u naar “Software Info”
onder “DDJ-SR” op de Pioneer DJ-ondersteuningssite hieronder.
http://pioneerdj.com/support/
De ondersteuning van besturingssystemen gaat ervan uit dat u de nieuwste
point-release (tussentijdse bijwerking) gebruikt voor de genoemde versie.
De werking kan niet worden gegarandeerd op alle computers, ook niet als aan
alle hier aangegeven eisen wat betreft de gebruiksomgeving wordt voldaan.
Afhankelijk van de instellingen voor stroombesparing e.d. van de computer
bestaat de kans dat de CPU en de vaste schijf niet volledig toereikend zijn.
Vooral bij laptops moet u ervoor zorgen dat de computer in de juiste toestand
verkeert om doorlopend hoge prestaties te kunnen leveren (door bijvoorbeeld de
netstroomadapter aangesloten te houden) wanneer u Serato DJ gebruikt.
Gebruik van het Internet vereist een aparte overeenkomst met een aanbieder van
Internetdiensten en betaling van de daaraan verbonden kosten.
Optisch disc-station waarop de CD-ROM gelezen kan
worden
Er is een USB 2.0-aansluiting vereist om dit toestel aan
te kunnen sluiten op de computer.
Er is verbinding met het Internet vereist om uw “Serato.
com” gebruikersaccount te kunnen registreren en de
software te downloaden.
Omtrent de installatieprocedure
De installatieprocedure hangt af van het besturingssysteem (OS) van de
gebruikte computer.
Voor Windows
Nadat u de stuurprogrammatuur (driver) hebt geïnstalleerd, moet u de
Serato DJ-software installeren.
Voor Mac OS X
Installeer alleen de Serato DJ-software.
Installatieprocedure (Windows)
Sluit dit toestel niet op de computer aan voor de installatie voltooid is.
Meld u aan als gebruiker met de rechten van computerbeheerder
voordat u met installeren begint.
Als er andere programma’s geopend zijn op de computer, sluit u die
dan.
1 Plaats de CD-ROM in het optische schijfstation van de
computer.
Dan verschijnt het menu van de CD-ROM.
Als na het laden van de CD-ROM het menu van de CD-ROM niet
verschijnt, opent u het optische schijfstation via [Computer (of Deze
computer)] in het [Starten]-menu, en dubbelklikt u vervolgens op
het [CD_menu.exe]-pictogram.
2 Wanneer het CD-ROM-menu verschijnt, kiest u
[Stuurprogramma installeren (Pioneer_DDJ_SR_Driver_x.
xxx.exe)] en klikt u op [Beginnen].
Om het menu van de CD-ROM te sluiten, klikt u op [Afsluiten].
Nederlands
Nl
3
Page 58

3 Volg voor de installatieprocedure de aanwijzingen
die op uw scherm verschijnen.
Als er [Windows-beveiliging] op het scherm verschijnt tijdens het
installationproces, klikt u op [Dit stuurprogramma toch installeren]
om door te gaan met installeren.
Wanneer het installatieproces voltooid is, verschijnt er een mededeling
ter afsluiting.
Nadat u de stuurprogrammatuur (driver) hebt geïnstalleerd, moet u de
Serato DJ-software installeren.
4 Selecteer [Download de Serato DJ-software] van het
menu van de CD-ROM en klik op [Beginnen].
5 “Er is een werkende internetomgeving vereist
om toegang te kunnen krijgen tot de site. Heeft u
verbinding met het internet?” verschijnt. Klik op [Ja].
De webbrowser wordt opgestart en de Pioneer DJ-ondersteuningssite zal
worden geopend.
6 Klik op [Software Info] onder [DDJ-SR] op de Pioneer
DJ-ondersteuningssite.
[Serato DJ Support Information] verschijnt.
7 Klik op de koppeling naar de downloadpagina voor
Serato DJ.
De downloadpagina voor [Serato DJ] verschijnt.
8 Meld uzelf aan op uw gebruikersaccount voor
“Serato.com”.
Als u al een geregistreerde gebruikersaccount hebt op “Serato.
com”, kunt u doorgaan naar stap 10.
Als u de registratie van uw gebruikersaccount niet voltooid hebt,
moet u dat alsnog doen via de procedure hieronder.
— Volg de instructies op uw scherm, voer uw e-mailadres in en
het wachtwoord dat u wilt gebruiken en selecteer vervolgens
de regio waar u woont.
— Als u [E-mail me Serato newsletters] aanvinkt, krijgt u
nieuwsbrieven met alle nieuwtjes over Serato producten
toegestuurd van Serato.
— Wanneer de registratie van uw gebruikersaccount voltooid
is, zult u een e-mail ontvangen op het e-mailadres dat u hebt
ingevoerd. Controleer de inhoud van de e-mail die u heeft
ontvangen van “Serato.com”.
Wees voorzichtig dat u het e-mailadres en het wachtwoord dat u
gebruikt hebt bij de gebruikersregistratie niet vergeet. Deze hebt
u weer nodig voor het updaten van de software.
De persoonlijke gegevens die u heeft ingevoerd voor het registre-
ren van uw nieuwe gebruikersaccount mogen worden verzameld,
verwerkt en gebruikt op basis van het privacybeleid zoals uiteengezet op de Serato website.
9 Klik op de koppeling in de e-mail die u heeft
ontvangen van “Serato.com”.
U zult nu naar de downloadpagina voor Serato DJ worden gebracht. Ga
door naar stap 11.
10 Meld uzelf aan.
Voer het e-mailadres en het wachtwoord in dat u hebt geregistreerd om
uzelf aan te melden op “Serato.com”.
11 Download de Serato DJ-software van de
downloadpagina.
Pak het bestand dat u gedownload hebt uit en dubbelklik het uitgepakte
bestand om het installatieprogramma op te starten.
12 Lees de voorwaarden van de licentie-overeenkomst
zorgvuldig door, klik op [I agree to the license terms and
conditions] als u daarmee akkoord gaat en klik dan op
[Install].
Als u niet akkoord gaat met de eindgebruikersovereenkomst, klikt
u op [Close] om de installatie te annuleren.
De installatie zal nu beginnen.
Wanneer de installatie met succes is voltooid, zal er een melding van die
strekking verschijnen.
13 Klik op [Close] om het Serato DJ installatieprogramma
af te sluiten.
Installatieprocedure (Mac OS X)
Sluit dit toestel niet op de computer aan voor de installatie voltooid is.
Als er andere programma’s geopend zijn op de computer, sluit u die
dan.
1 Plaats de CD-ROM in het optische schijfstation van de
computer.
Dan verschijnt het menu van de CD-ROM.
Als na het laden van de CD-ROM het CD-ROM menu niet op het
scherm verschijnt, gebruikt u dan de Vinder om het CD-station te
openen en dubbelklikt u dan op het [CD_menu.app]-pictogram.
2 Selecteer [Download de Serato DJ-software] van het
menu van de CD-ROM en klik op [Beginnen].
3 “Er is een werkende internetomgeving vereist
om toegang te kunnen krijgen tot de site. Heeft u
verbinding met het internet?” verschijnt. Klik op [Ja].
De webbrowser wordt opgestart en de Pioneer DJ-ondersteuningssite zal
worden geopend.
4 Klik op [Software Info] onder [DDJ-SR] op de Pioneer
DJ-ondersteuningssite.
[Serato DJ Support Information] verschijnt.
5 Klik op de koppeling naar de downloadpagina voor
Serato DJ.
De downloadpagina voor [Serato DJ] verschijnt.
Nl
4
Page 59

6 Meld uzelf aan op uw gebruikersaccount voor
“Serato.com”.
Als u al een geregistreerde gebruikersaccount hebt op “Serato.
com”, kunt u doorgaan naar stap 8.
Als u de registratie van uw gebruikersaccount niet voltooid hebt,
moet u dat alsnog doen via de procedure hieronder.
— Volg de instructies op uw scherm, voer uw e-mailadres in en
het wachtwoord dat u wilt gebruiken en selecteer vervolgens
de regio waar u woont.
— Als u [E-mail me Serato newsletters] aanvinkt, krijgt u
nieuwsbrieven met alle nieuwtjes over Serato producten
toegestuurd van Serato.
— Wanneer de registratie van uw gebruikersaccount voltooid
is, zult u een e-mail ontvangen op het e-mailadres dat u hebt
ingevoerd. Controleer de inhoud van de e-mail die u heeft
ontvangen van “Serato.com”.
Wees voorzichtig dat u het e-mailadres en het wachtwoord dat u
gebruikt hebt bij de gebruikersregistratie niet vergeet. Deze hebt
u weer nodig voor het updaten van de software.
De persoonlijke gegevens die u heeft ingevoerd voor het registre-
ren van uw nieuwe gebruikersaccount mogen worden verzameld,
verwerkt en gebruikt op basis van het privacybeleid zoals uiteengezet op de Serato website.
7 Klik op de koppeling in de e-mail die u heeft
ontvangen van “Serato.com”.
U zult nu naar de downloadpagina voor Serato DJ worden gebracht. Ga
door naar stap 9.
8 Meld uzelf aan.
Voer het e-mailadres en het wachtwoord in dat u hebt geregistreerd om
uzelf aan te melden op “Serato.com”.
9 Download de Serato DJ-software van de
downloadpagina.
Pak het bestand dat u gedownload hebt uit en dubbelklik het uitgepakte
bestand om het installatieprogramma op te starten.
10 Lees de voorwaarden van de licentie-overeenkomst
zorgvuldig door en klik op [Agree] als u daarmee
akkoord gaat.
Bediening
De stroom moet uitgeschakeld zijn wanneer er apparatuur wordt aangesloten of verbindingen worden veranderd.
Gebruik uitsluitend de USB-kabel die wordt meegeleverd met dit
product.
Zie tevens de gebruiksaanwijzingen van de aan te sluiten apparatuur.
Dit toestel wordt van stroom voorzien via de USB-aansluiting. Het toestel
kan gewoon worden gebruikt door het met de USB-kabel aan te sluiten
op een computer.
Sluit de computer waarmee dit toestel is verbonden aan op
netstroom.
Een USB-verdeelstekker (hub) kan niet worden gebruikt.
In gevallen zoals hieronder beschreven kan de stroomvoorziening
tekortschieten en kan dit toestel geen gebruik maken van de USB-
aansluiting voor de stroomvoorziening.
— Wanneer de stroomcapaciteit van de USB-aansluiting van de
computer ontoereikend is.
— Wanneer er andere USB-apparatuur is aangesloten op de
computer.
— Wanneer er een hoofdtelefoon met een impedantie van minder
dan 32 : is aangesloten.
— Wanneer er tegelijkertijd hoofdtelefoons zijn aangeslo-
ten op de stereo hoofdtelefoonaansluiting en de stereo
mini-hoofdtelefoonaansluiting.
— Wanneer er een mono-stekker in de [HEADPHONES]-aansluiting
zit.
Aansluitingen
1 Sluit een hoofdtelefoon aan op één van de
[HEADPHONES]-aansluitingen.
Nederlands
Als u niet akkoord gaat met de eindgebruikersovereenkomst, klikt
u op [Disagree] om de installatie te annuleren.
11 Als het volgende scherm verschijnt, kunt u het [Serato
DJ]-pictogram naar het [Applications]-mappictogram slepen.
Nl
5
Page 60

2 Sluit luidsprekers met eigen stroomvoorziening, een
eindversterker, componenten enz. aan op de [MASTER
OUT1] of [BOOTH OUT/MASTER OUT2]-aansluitingen.
Luidsprekers met eigen
stroomvoorziening enz.
Zie de Handleiding voor de verbindingen met de in-/
uitgangsaansluitingen.
3 Sluit dit apparaat aan op uw computer via een
USB-kabel.
5 Zet de [ON/OFF]-schakelaar op het achterpaneel van
dit toestel op [ON] om het toestel in te schakelen.
Schakel dit apparaat in.
Voor Windows gebruikers
De melding [Apparaatstuurprogramma installeren] kan ver-
schijnen wanneer dit toestel voor het eerst op de computer wordt
aangesloten of wanneer het wordt aangesloten op een andere
USB-poort van de computer. Wacht eventjes tot de mededeling
[De apparaten zijn gereed voor gebruik] verschijnt.
6 Zet de apparatuur die is verbonden met de
uitgangsaansluitingen (luidsprekers met eigen
stroomvoorziening, eindversterker, componenten enz.)
aan.
Wanneer er een microfoon, DJ-speler of andere externe appara-
tuur is verbonden met de ingangsaansluitingen, zal die apparatuur ook aan gaan.
4 Zet de computer aan.
Nl
6
Page 61

Opstarten van het systeem
䢢 Starten van de Serato DJ
Voor Windows
Klik op het Windows [Starten]-menu op het [Serato DJ]-pictogram onder [Alle programma's] > [Serato] > [Serato DJ].
Voor Mac OS X
Ga naar het bestandsbeheer, open eerst the [Applicatie] map en klik dan op [Serato DJ].
Computerscherm direct na het opstarten van de Serato DJ-software
A
C
1
2
1 Het [ACTIVATE/BUY]-pictogram kan verschijnen aan de rechterkant van het scherm dat verschijnt wanneer Serato DJ voor het eerst wordt opge-
start, maar voor diegenen die DDJ-SR gebruiken is het niet nodig om te activeren of een licentie aan te schaffen.
2 Vink [DO NOT SHOW AGAIN] aan rechts onderaan het scherm, klik vervolgens op [License] en u kunt Serato DJ verder gewoon gebruiken.
Bedienen van het beatpatroon
Bij Serato DJ, is [SYNC PREFERENCE] standaard ingesteld op [Simple sync], maar dit moet worden overgeschakeld naar [Smart sync] om handelingen met het beatpatroon uit te voeren.
SETUP–DJ Preference-SYNC PREFERENCE
Zie de Serato DJ-handleiding voor instructies over het weergeven van het instelscherm en de details op het beatpatroon.
Computerscherm wanneer er een muziekstuk is geladen in de Serato DJ-software
Klik op [Library] links bovenaan het computerscherm en selecteer dan [Vertical] of [Horizontal] van het afrolmenu om het Serato DJ-scherm om te
schakelen.
AA
B
Nederlands
C
A Deckgedeelte
De informatie voor het muziekstuk (de naam van het geladen muziekstuk, naam van de artiest, BPM enz.), de algemene golfvorm en andere informatie worden hier getoond.
B Golfvormaanduiding
De golfvorm voor het geladen muziekstuk wordt hier getoond.
C Bladergedeelte
Crates waarin muziekstukken uit de bibliotheek of sets van meerdere muziekstukken zijn opgeslagen worden hier getoond.
Deze handleiding bestaat hoofdzakelijk uit met betrekking tot de hardware van dit toestel. Voor gedetailleerde aanwijzingen voor de bediening van de
Serato DJ-software, verwijzen we u naar de handleiding van Serato DJ.
Nl
7
Page 62

䢢 Muziekstukken importeren
Hier volgt een beschrijving van de typische procedure voor het importeren van muziekstukken.
Er zijn verschillende manieren om muziekstukken te importeren met de Serato DJ-software. Zie de software handleiding van Serato DJ voor verdere
informatie.
Als u reeds DJ-software van Serato (Scratch Live, ITCH of Serato DJ Intro) gebruikt en al bibliotheken met muziekstukken heeft gecreëerd, kunnen
deze als zodanig worden gebruikt.
Als u Serato DJ Intro gebruikt en al muziekstukbibliotheken heeft gemaakt, dan is het mogelijk dat u de muziekstukken opnieuw zult moeten laten
analyseren.
1 Klik op de [Files]-knop op het scherm van Serato DJ om het [Files]-paneel te openen.
De inhoud van uw computer of de randapparatuur die is aangesloten op de computer wordt getoond in het[Files]-paneel.
2 Klik op het [Files]-paneel op de map met de muziekstukken die u wilt toevoegen aan de bibliotheek om deze te
selecteren.
3 Sleep op het scherm van de Serato DJ-software de geselecteerde map naar het crates-paneel.
Er wordt een crate gecreëerd en de muziekstukken worden toegevoegd aan de bibliotheek.
a
b
a [Files]-paneel
b Crates-paneel
䢢 Muziekstukken laden en afspelen
Hieronder volgt een beschrijving van de procedure voor het laden van
muziekstukken in deck [1] als voorbeeld.
1 Draaiknop
2 BACK (VIEW)-toets
3 LOAD knop
1 Druk op de [BACK (VIEW)]-toets van dit toestel, breng
de cursor naar het crates-paneel op het computerscherm
en gebruik vervolgens de draaiknop om de crate, enz. te
selecteren.
2 Druk de draaiknop in, verplaats de cursor naar de
bibliotheek op het computerscherm en draai vervolgens
aan de draaiknop om het muziekstuk te selecteren.
a
b
a Bibliotheek
b Crates-paneel
3 Druk op de [LOAD]-toets om het geselecteerde
muziekstuk in het deck te laden.
Nl
8
Page 63

䢢 Afspelen van muziekstukken en produceren van
het geluid
Hieronder volgt een beschrijving van de procedure voor het produceren
van het geluid via kanaal 1 als voorbeeld.
Stel het volume van de apparatuur (eindversterker, luidsprekers met
eigen stroomvoorziening enz.) aangesloten op de [MASTER OUT1]
en [BOOTH OUT/MASTER OUT2]-aansluitingen in op een geschikt
niveau. Als u het volume te hoog instelt, zullen er erg harde geluiden
klinken.
Mengpaneel-gedeelte
4
9
5
a
6
7
b
8
c
4 TRIM instelling
5 EQ (HI, MID, LOW) instellingen
6 FILTER-instelling
7 Hoofdtelefoon CUE/TAP-toets
8 Kanaal-fader
9 MASTER LEVEL instelling
a HEADPHONES MIX instelling
b Niveau-indicatorschakelaar
c Crossfader-regelaar
d HEADPHONES LEVEL instelling
e CROSS FADER REVERSE-schakelaar
f CROSS FADER CURVE-instelling
g BOOTH LEVEL-instelling
h BOOTH/MASTER-keuzeschakelaar
1 Stel de instellingen enz. in zoals u hieronder kunt zien.
Namen van instellingen enz. Stand
MASTER LEVEL instelling Helemaal tegen de klok in gedraaid
TRIM instelling Helemaal tegen de klok in gedraaid
EQ (HI, MID, LOW) instellingen Midden
FILTER-instelling Midden
Niveau-indicatorschakelaar [CH1/2]
Kanaal-fader Naar voren verplaatst
CROSS FADER REVERSE-schakelaar [OFF]
BOOTH/MASTER-keuzeschakelaar [MASTER]-positie
BOOTH LEVEL-instelling Helemaal tegen de klok in gedraaid
Nederlands
Voorpaneel
Achterpaneel
g
d
h
e
2 Druk op de ["]-toets om het muziekstuk af te spelen.
f
3 Beweeg de kanaalfader van u af.
4 Draai aan de [TRIM] knop.
Verstel [TRIM] zo dat de oranje indicator in de kanaalniveau-aanduiding
alleen bij het piekniveau oplicht.
5 Draai aan de [MASTER LEVEL]-instelling om het
audioniveau van de luidsprekers in te stellen.
Stel het geluidsniveau dat geproduceerd wordt via de [MASTER OUT1]
en [BOOTH OUT/MASTER OUT2]-aansluitingen in op een geschikt
niveau.
Wanneer de [BOOTH/MASTER]-keuzeschakelaar op [BOOTH] wordt
gezet, kan de [BOOTH LEVEL]-instelling worden gebruikt om alleen het
audioniveau dat wordt geproduceerd via de [BOOTH OUT/MASTER
OUT2]-aansluiting aan te passen tot een geschikt volume.
Nl
9
Page 64

䢢 Meeluisteren via een hoofdtelefoon
Stel de instellingen enz. in zoals u hieronder kunt zien.
Namen van instellingen enz. Stand
HEADPHONES MIX instelling Midden
HEADPHONES LEVEL instelling
Helemaal tegen de klok in
gedraaid
1 Druk op de hoofdtelefoon [CUE/TAP]-toets voor
kanaal 1.
2 Draai aan de [HEADPHONES LEVEL] instelling.
Stel het geluidsniveau dat geproduceerd wordt via de hoofdtelefoon in
op een geschikt niveau.
Opmerking
Dit toestel en de Serato DJ-software bevatten allerlei functies waarmee
dj’s zelf kunnen experimenteren. Voor meer informatie over deze functies
raadpleegt u de handleiding en de Serato DJ-softwarehandleiding.
U kunt de handleiding van dit toestel downloaden via de Pioneer
DJ-ondersteuningssite. Zie De handleiding van dit toestel downloaden
(blz. 12) voor details.
De softwarehandleiding voor Serato DJ kan worden gedownload van
Serato.com. Zie Downloaden van de Serato DJ-softwarehandleiding
(blz. 12) voor details.
Afsluiten van het systeem
1 Sluit Serato DJ af.
Wanneer de software wordt afgesloten, zal er een melding op het computerscherm verschijnen om te bevestigen dat u inderdaad wilt stoppen.
Klik op [Yes] om af te sluiten.
2 Zet de [ON/OFF]-schakelaar op het achterpaneel van
dit toestel op [OFF] om het toestel uit te schakelen.
3 Koppel de USB-kabel los van uw computer.
Bladergedeelte
1 2 1
3 4
1 LOAD knop
2 Draaiknop
3 BACK (VIEW)-toets
4 LOAD PREPARE (AREA)-toets
Deckgedeelte
Met dit gedeelte worden de vier decks bediend. De toetsen en instellingen voor het bedienen van deck 1 en 3 bevinden zich aan de linkerzijde
van de controller, en die voor het bedienen van deck 2 en 4 aan de rechterzijde van de controller.
Benaming van de onderdelen
1 Bladergedeelte
2 Deckgedeelte
3 Mengpaneel-gedeelte
4 Effect-gedeelte
1 VINYL-toets
2 Jog-draaiknop
3 DECK 1-toets
Het deck aan de rechterkant heeft een [DECK 2]-toets.
4 DECK 3-toets
Het deck aan de rechterkant heeft een [DECK 4]-toets.
5 SHIFT-toets
6 SYNC knop
7 CUE knop
8 PLAY/PAUSE " knop
9 HOT CUE-standtoets
a ROLL-standtoets
b SLICER-standtoets
c SAMPLER-standtoets
d Uitvoeringsvlakken
e PARAMETER-toets, PARAMETER -toets
f Beatindicator
g 1/2X (IN)-toets
h 2X (OUT)-toets
i AUTO LOOP-toets
j PAD PLUS ON-toets
k PAD PLUS TAP-toets
l KEY LOCK-toets
m SLIP-toets
n TEMPO schuifregelaar
10
Nl
Page 65

Mengpaneel-gedeelte
Voorpaneel
1
1
a
2
2
b
3
4
c
6
3
4
7
5
9
5
8
1 TRIM instelling
2 EQ (HI, MID, LOW) instellingen
3 FILTER-instelling
4 Hoofdtelefoon CUE/TAP-toets
5 Kanaal-fader
6 Niveau-indicatorschakelaar
7 Niveau-indicator
8 Crossfader-regelaar
9 CROSS FADER REVERSE-indicator
a MASTER LEVEL instelling
b HEADPHONES MIX instelling
c SAMPLER VOLUME-instelling
Effect-gedeelte
Dit gedeelte wordt gebruikt voor het bedienen van de twee effectgeneratoren (FX1 en FX2). De toetsen en instellingen voor het bedienen van FX1
bevinden zich aan de linkerzijde van de controller, die voor het bedienen
van FX2 bevinden zich aan de rechterzijde van de controller.
1 2 3 4 5 6
13 42
1 HEADPHONES LEVEL instelling
2 CROSS FADER REVERSE-schakelaar
3 CROSS FADER CURVE-instelling
4 MIC LEVEL-instelling
Achterpaneel
1
1 AUX IN LEVEL-instelling
2 BOOTH LEVEL-instelling
3 BOOTH/MASTER-keuzeschakelaar
4 ON/OFF-schakelaar
3 4
2
Over de ingestelde waarden van de
instellingen
De ingestelde waarden van de instellingen enz. hieronder worden individueel bediend voor de respectievelijke decks in de Serato DJ-software.
TRIM instelling
EQ (HI, MID, LOW) instellingen
FILTER-instelling
Kanaal-fader
TEMPO schuifregelaar
Als de waarden die worden bepaald door Serato DJ wanneer de decks
worden omgeschakeld verschillen van de posities van de instellingen,
faders enz. van dit toestel, dan moeten de instellingen, faders, enz. op
de posities worden gezet die corresponderen met de door Serato DJ
bepaalde waarden voor ze gebruikt kunnen worden.
De standaardwaarden voor de decks 3 en 4 in Serato DJ zijn: de
middenpositie voor de [TRIM]-instellingen, [EQ (HI, MID en LOW)]
instellingen en de [FILTER]-instellingen, ±0,0% voor de [TEMPO]-
schuifregelaars en de voorste positie voor de kanaalfaders.
Nederlands
1 FX ASSIGN 1-toetsen
2 FX ASSIGN 2-toetsen
3 Effectparameter 1-instelling
4 Effectparameter 2-instelling
5 Effectparameter 3-instelling
6 FX BEATS-instelling
7 Effectparameter 1-toets
8 Effectparameter 2-toets
9 Effectparameter 3-toets
a TAP (FX MODE)-toets
7 8 9 a
Nl
11
Page 66

Aanvullende informatie
Verkrijgen van de handleiding
De handleiding kan in een bestand in PDF-formaat geleverd worden.
Adobe® Reader® moet zijn geïnstalleerd om bestanden in PDF-formaat
te kunnen lezen. Als u Adobe Reader niet heeft, moet u dit installeren
via de downloadkoppeling op het menuscherm van de CD-ROM.
De handleiding van dit toestel
downloaden
1 Plaats de CD-ROM in het optische schijfstation van de
computer.
Dan verschijnt het menu van de CD-ROM.
Als het menu van de CD-ROM niet verschijnt wanneer de CD-ROM wordt
ingebracht, moet u de handelingen hieronder uitvoeren.
Voor Windows
Open het optische schijfstation via [Computer (of Deze com-
puter)] in het [Starten] menu en dubbelklik vervolgens op het
[CD_menu.exe]-pictogram.
Voor Mac OS X
Dubbelklik in het bestandsbeheer direct op het
[CD_menu.app]-pictogram.
2 Wanneer het menu van de CD-ROM verschijnt,
selecteert u [DDJ-SR: Download de Handleiding (PDFbestand)] en klikt u op [Beginnen].
3 “Er is een werkende internetomgeving vereist
om toegang te kunnen krijgen tot de site. Heeft u
verbinding met het internet?” verschijnt. Klik op [Ja].
De webbrowser wordt opgestart en de Pioneer DJ-ondersteuningssite zal
worden geopend.
4 Klik op de Pioneer DJ-ondersteuningssite op
“Manuals” onder “DDJ-SR”.
5 Klik op de downloadpagina op de gewenste taal.
Het downloaden van de handleiding zal nu beginnen.
Downloaden van de Serato
DJ-softwarehandleiding
1 Plaats de CD-ROM in het optische schijfstation van de
computer.
Dan verschijnt het menu van de CD-ROM.
Als het menu van de CD-ROM niet verschijnt wanneer de CD-ROM wordt
ingebracht, moet u de handelingen hieronder uitvoeren.
Voor Windows
Open het optische schijfstation via [Computer (of Deze com-
puter)] in het [Starten] menu en dubbelklik vervolgens op het
[CD_menu.exe]-pictogram.
Voor Mac OS X
Dubbelklik in het bestandsbeheer direct op het
[CD_menu.app]-pictogram.
2 Wanneer het menu van de CD-ROM
verschijnt, selecteert u [Serato DJ: Download de
Softwarehandleiding (PDF-bestand)] en klikt u op
[Beginnen].
Nl
12
3 “Er is een werkende internetomgeving vereist
om toegang te kunnen krijgen tot de site. Heeft u
verbinding met het internet?” verschijnt. Klik op [Ja].
De webbrowser wordt opgestart en de Pioneer DJ-ondersteuningssite zal
worden geopend.
Om het menu van de CD-ROM te sluiten, klikt u op [Afsluiten].
4 Klik op [Software Info] onder [DDJ-SR] op de Pioneer
DJ-ondersteuningssite.
[Serato DJ Support Information] verschijnt.
5 Klik op de koppeling naar de downloadpagina voor
Serato DJ.
De downloadpagina voor [Serato DJ] verschijnt.
6 Meld uzelf aan op uw gebruikersaccount voor
“Serato.com”.
Voer het e-mailadres en het wachtwoord in dat u hebt geregistreerd om
uzelf aan te melden op “Serato.com”.
7 Klik bij “More Downloads” aan de rechterkant van de
downloadpagina op “Serato DJ x.x Software Manual”.
Het downloaden van de Serato DJ-softwarehandleiding zal nu beginnen.
Plaats voor opstelling
Plaats dit apparaat niet bovenop toestellen die warmte produceren,
zoals een versterker, en zorg dat het niet lang achtereen onder een
spotlight staat, want daardoor kan het beschadigd raken.
Plaats dit apparaat niet te dicht bij een tuner of tv-toestel. Dat zou
storing in beeld of geluid kunnen veroorzaken. Bovendien kan er
storing in beeld of geluid zijn als u een binnenantenne gebruikt. In
dat geval sluit u een buitenantenne aan of koppelt u de USB-kabel
los en schakelt u dit apparaat uit.
Reinigen van dit toestel
Gewoonlijk kunt u het apparaat schoonvegen met een zachte droge
doek. Voor hardnekkig vuil maakt u een zachte doek nat met wat neutraal wasmiddel in 5 tot 6 delen water, wringt u de doek grondig uit,
veegt u het vuil weg en dan droogt u het oppervlak zorgvuldig na met een
droge doek. Gebruik geen alcohol, thinner, benzeen of insektenspray,
aangezien dergelijk middelen de labels of de beschermlaag kunnen
doen loslaten. Laat geen rubber of plastic voorwerpen langdurig in
contact komen met het apparaat, want ook dat kan de afwerking van het
apparaat aantasten. Bij gebruik van een chemisch reinigingsdoekje e.d.
dient u de voorzorgsmaatregelen daarvan zorgvuldig te lezen.
Koppel de USB-kabel los van dit toestel voor u het gaat schoonmaken.
Verhelpen van storingen
Verkeerde bediening kan vaak de oorzaak zijn van een schijnbare
storing of foutieve werking. Als u denkt dat er iets mis is met deze
apparatuur, moet u de punten in het hoofdstuk “Verhelpen van
storingen” in de handleiding van dit toestel controleren en de [FAQ]
voor de [DDJ-SR] op de Pioneer DJ-ondersteuningssite.
http://pioneerdj.com/support/
Soms ligt de oorzaak van het probleem bij een ander apparaat.
Controleer daarom ook de andere componenten en elektrische
apparatuur die gebruikt wordt. Als u het probleem niet kunt verhel-
pen, verzoekt u dan uw dichtstbijzijnde officiële Pioneer onderhouds-
dienst of uw vakhandelaar om het apparaat te laten repareren.
Dit apparaat kan soms niet goed werken vanwege statische elektrici-
teit of andere externe invloeden. In dat geval kunt u de juiste werking
herstellen door de stroom uit te schakelen, 1 minuut te wachten en
dan de stroom weer in te schakelen.
Page 67

Over handelsmerken en
gedeponeerde handelsmerken
Pioneer is een gedeponeerd handelsmerk van PIONEER
CORPORATION.
De hierin vermelde namen van bedrijven en hun producten zijn de handelsmerken van hun respectieve eigenaars.
Waarschuwingen betreffende
auteursrechten
Opnemen die u hebt gemaakt kunnen slechts dienen voor uw eigen luisterplezier en kunnen onder de auteursrechtwetten niet voor andere doeleinden worden gebruikt zonder toestemming van de auteursrechthouder.
Muziek die is opgenomen vanaf CD’s e.d. wordt beschermd door de
auteursrechtwetten van de meeste landen en door internationale
verdragen. Het valt onder de verantwoordelijkheid van de persoon
die de muziek heeft opgenomen er op toe te zien dat de opnamen op
legale wijze worden gebruikt.
Bij het behandelen van muziek die door downloaden van Internet e.d.
is verkregen, is het de volledige verantwoordelijkheid van de persoon
die het downloaden heeft verricht er op toe te zien dat de muziek
wordt gebruikt in overeenstemming met de voorwaarden van het
download-contract.
Specificaties
Algemeen – Hoofdtoestel
Stroomvoorziening ...............................................................5 V gelijkstroom
Opgegeven stroomsterkte .................................................................500 mA
Gewicht hoofdapparaat .......................................................................4,5 kg
Buitenafmetingen ............... 553,6 mm (B) × 65,3 mm (H) × 319,1 mm (D)
Toegestane bedrijfstemperatuur........................................+5 °C tot +35 °C
Toegestane luchtvochtigheid ................ 5 % tot 85 % (zonder condensatie)
Audiogedeelte
Opgegeven uitgangsniveau
MASTER OUT1 .......................................................................... 4,2 Vrms
MASTER OUT 2 ......................................................................... 2,1 Vrms
BOOTH ....................................................................................... 2,1 Vrms
Totale harmonische vervorming
MASTER OUT ...............................................................................0,006 %
Frequentiekarakteristiek
USB, AUX, MIC .............................................................20 Hz t/m 20 kHz
S/r verhouding (bij weergave via computer)
MASTER OUT ................................................................................101 dB
Ingangsimpedantie
AUX ................................................................................................. 47 k:
MIC .................................................................................................. 10 k:
Uitgangsimpedantie
MASTER OUT ................................................................................... 1 k:
PHONES ............................................................................................ 32 :
USB AUDIO ......................................................................24 bit/Fs : 44,1 kHz
In / uitgangsaansluitingen
AUX IN ingangsaansluiting
Tulpstekkerbussen .............................................................................1 st.
MIC-aansluiting
Klinkstekkerbus (Ø 6,3 mm) ..............................................................1 st.
BOOTH OUT/MASTER OUT2 uitgangsaansluiting
Tulpstekkerbussen .............................................................................1 st.
MASTER OUT1 uitgangsaansluiting
Klinkstekkerbus (Ø 6,3 mm) ..............................................................1 st.
PHONES-uitgangsaansluiting
Stereo-klinkstekkerbus (Ø 6,3 mm) ..................................................1 st.
Stereo-miniklinkstekkerbus (Ø 3,5 mm) ........................................... 1 st.
USB-aansluiting
B type ..................................................................................................1 st.
Nederlands
Met het oog op verbeteringen kunnen specificaties en ontwerp van
dit toestel en de meegeleverde software zonder kennisgeving gewij-
zigd worden.
© 2013 PIONEER CORPORATION. Alle rechten voorbehouden.
Nl
13
Page 68

To register your product, find the nearest authorized service location, to
purchase replacement parts, operating instructions, or accessories,
please go to one of following URLs :
Pour enregistrer votre produit, trouver le service après-vente agréé le plus
proche et pour acheter des pièces de rechange, des modes d’emploi ou
des accessoires, reportez-vous aux URL suivantes :
In the USA & Canada/Aux Etats-Unis & Canada
http://www.pioneerelectronics.com
S018_B1_EnFr_PSV
PIONEER CORPORATION
1-1, Shin-ogura, Saiwai-ku, Kawasaki-shi, Kanagawa 212-0031, Japan
〒212-0031神奈川県川崎市幸区新小倉1番1号
Корпорация Пайонир
1-1, Син-Огура, Сайвай-ку, г. Кавасаки, префектура Канагава, 212-0031, Япония
Импортер: ООО "ПИОНЕР РУС"
125040, Россия, г. Москва, ул. Правды, д.26 Тел.: +7(495) 956-89-01
PIONEER EUROPE NV
Haven 1087, Keetberglaan 1, B-9120 Melsele, Belgium TEL: 03/570.05.11
PIONEER ELECTRONICS (USA) INC.
P.O. BOX 1720, Long Beach, California 90801-1720, U.S.A. TEL: (800) 421-1404
PIONEER ELECTRONICS ASIACENTRE PTE. LTD.
253 Alexandra Road, #04-01, Singapore 159936 TEL: 65-6472-7555
PIONEER ELECTRONICS AUSTRALIA PTY. LTD.
5 Arco Lane, Heatherton, Victoria, 3202, Australia, TEL: (03) 9586-6300
PIONEER ELECTRONICS (THAILAND) CO., LTD.
17th Fl., KPN Tower, 719 Rama 9 Road, Bangkapi, Huaykwang, Bangkok 10310 TEL: 66-2-717-0777
PIONEER TECHNOLOGY (MALAYSIA) SDN. BHD
16th Floor, Menara Uni. Asia 1008 Jalan Sultan Ismail 50250 Kuala Lumpur TEL: 60-3-2697-2920
© 2013 PIONEER CORPORATION.
Tous droits de reproduction et de traduction réservés.
ӒᎣӌԥϵѨ
ѯᢋѯіҀϲୣ࿆ӏ ĵıĸ ဵ Ĺ ዃ
ӒᎣႬφȞ෬ȟԥϵѨ
෬Οᓹߞؔᢋၿ ĺıĺġဵ Ķġዃ
PIONEER GULF FZE
Lob 11-017, Jebel Ali Free Zone P.O. Box 61226, Jebel Ali Dubai TEL: 971-4-8815756
PIONEER ELECTRONICS DE MEXICO S.A. DE C.V.
Blvd.Manuel Avila Camacho 138 10 piso Col.Lomas de Chapultepec,
Mexico, D.F. 11000 TEL: 55-9178-4270
PIONEER INTERNATIONAL LATIN AMERICA S.A.
Plaza Credicorp Bank, 14th Floor, Calle 50, No.120 Panama City
0816-01361 Republic of Panama TEL: 507-300-3900
© 2013 PIONEER CORPORATION.
TEL: 886-(0)2-2657-3588
TEL: 852-2848-6488
All rights reserved.
PIONEER KOREA CORPORATION (PKC)
㎶⠞⛎፲◮⿾ᩖ◮+⦦,#4540353#⇆❢㍣ᵮ⎆#ᩲ㒖ถ#ඟᒃ#
438054<#⢿㛾Ỷᗓ###
Printed in China / Imprimé en Chine
TEL: 02-777-8005
<DRH1233-B>
<502-DDJSRA-3325A>
 Loading...