

Page 1
Blu-ray 3D™ PLAYER
LECTEUR Blu-ray 3D™
REPRODUCTOR de Blu-ray 3D™
BDP-88FD
BDP-85FD
Register your product at:
http://www.pioneerelectronics.com (US)
http://www.pioneerelectronics.ca (Canada)
•
Protect your new investment
The details of your purchase will be on file for reference in the event of an insurance claim such as loss or theft.
•
Receive free tips, updates and service bulletins on your new product
• Improve product development
Your input helps us continue to design products that meet your needs.
• Receive a free Pioneer newsletter
Registered customers can opt in to receive a monthly newsletter.
http://www.pioneerelectronics.com (États-Unis)
http://www.pioneerelectronics.ca (Canada)
Operating Instructions
Mode d’emploi
Manual de instrucciones
Page 2
Thank you for buying this Pioneer product. Please read through these operating instructions so you will
know how to operate your model properly. After you have finished reading the instructions, put them
away in a safe place for future reference.
IMPORTANT
CAUTION
RISK OF ELECTRIC SHOCK
DO NOT OPEN
The lightning flash with arrowhead symbol,
within an equilateral triangle, is intended to
alert the user to the presence of uninsulated
“dangerous voltage” within the product’s
enclosure that may be of sufficient
magnitude to constitute a risk of electric
shock to persons.
CAUTION:
TO PREVENT THE RISK OF ELECTRIC
SHOCK, DO NOT REMOVE COVER (OR
BACK). NO USER-SERVICEABLE PARTS
INSIDE. REFER SERVICING TO QUALIFIED
SERVICE PERSONNEL.
CAUTION
This product is a class 1 laser product classified
under the Safety of laser products, IEC 60825-1:2007,
but this product contains a laser diode higher than
Class 1. To ensure continued safety, do not remove
any covers or attempt to gain access to the inside of
the product.
Refer all servicing to qualified personnel.
CLASS 1 LASER PRODUCT
The following caution label appears on your unit.
Location: inside of the unit
The exclamation point within an equilateral
triangle is intended to alert the user to the
presence of important operating and
maintenance (servicing) instructions in the
literature accompanying the appliance.
D3-4-2-1-1b_A1_En
WARNING
To prevent a fire hazard, do not place any naked flame
sources (such as a lighted candle) on the equipment.
D3-4-2-1-7a_A1_En
VENTILATION CAUTION
When installing this unit, make sure to leave space
around the unit for ventilation to improve heat radiation
(at least 10 cm at top, 10 cm at rear, and 10 cm at each
side).
WARNING
Slots and openings in the cabinet are provided for
ventilation to ensure reliable operation of the product,
and to protect it from overheating. To prevent fire
hazard, the openings should never be blocked or
covered with items (such as newspapers, table-cloths,
curtains) or by operating the equipment on thick carpet
or a bed.
D3-4-2-1-7b*_A1_En
D58-5-2-2b*_B1_En
WARNING
This equipment is not waterproof. To prevent a fire or
shock hazard, do not place any container filled with
liquid near this equipment (such as a vase or flower
pot) or expose it to dripping, splashing, rain or
moisture.
D3-4-2-1-3_A1_En
Operating Environment
Operating environment temperature and humidity:
+5 °C to +35 °C (+41 °F to +95 °F); less than 85 %RH
(cooling vents not blocked)
Do not install this unit in a poorly ventilated area, or in
locations exposed to high humidity or direct sunlight (or
strong artificial light)
D3-4-2-1-7c*_A1_En
CAUTION
STANDBY/ON switch on this unit will not
The
completely shut off all power from the AC outlet.
Since the power cord serves as the main disconnect
device for the unit, you will need to unplug it from the
AC outlet to shut down all power. Therefore, make
sure the unit has been installed so that the power
cord can be easily unplugged from the AC outlet in
case of an accident. To avoid fire hazard, the power
cord should also be unplugged from the AC outlet
when left unused for a long period of time (for
example, when on vacation).
D3-4-2-2-2a*_A1_En
This product is for general household purposes. Any
failure due to use for other than household purposes
(such as long-term use for business purposes in a
restaurant or use in a car or ship) and which requires
repair will be charged for even during the warranty
period.
K041_A1_En
Page 3
Read these instructions.
1)
Keep these instructions.
2)
Heed all warnings.
3)
Follow all instructions.
4)
Do not use this apparatus near water.
5)
Clean only with dry cloth.
6)
Do not block any ventilation openings. Install in
7)
accordance with the manufacturer’s
instructions.
Do not install near any heat sources such as
8)
radiators, heat registers, stoves, or other
apparatus (including amplifiers) that produce
heat.
Do not defeat the safety purpose of the polarized
9)
or grounding-type plug. A polarized plug has two
blades with one wider than the other. A
grounding type plug has two blades and a third
grounding prong. The wide blade or the third
prong are provided for your safety. If the provided
plug does not fit into your outlet, consult an
electrician for replacement of the obsolete outlet.
Protect the power cord from being walked on or
10)
pinched particularly at plugs, convenience
receptacles, and the point where they exit from
the apparatus.
11)
Only use attachments/accessories specified by
the manufacturer.
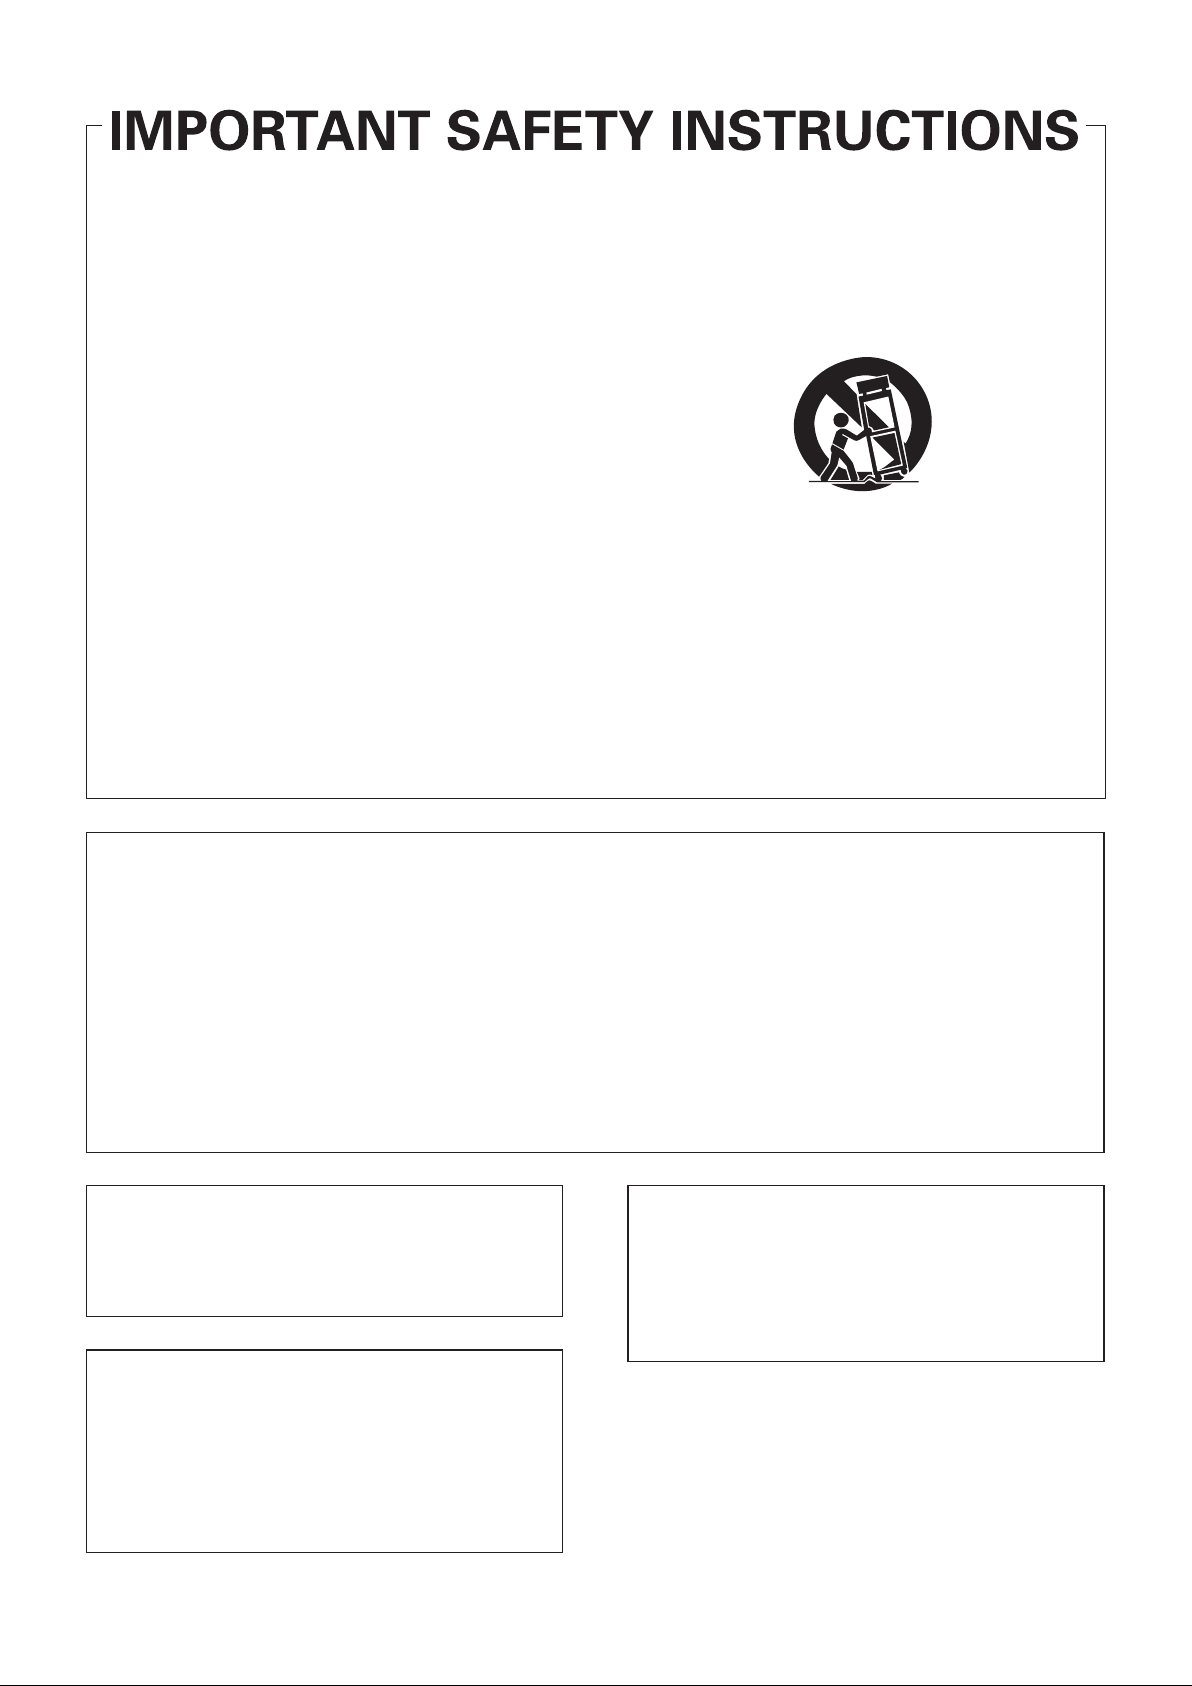
12)
Use only with the cart, stand, tripod, bracket, or
table specified by the manufacturer, or sold with
the apparatus. When a cart is used, use caution
when moving the cart/apparatus combination to
avoid injury from tip-over.
13)
Unplug this apparatus during lightning storms
or when unused for long periods of time.
14)
Refer all servicing to qualified service personnel.
Servicing is required when the apparatus has
been damaged in any way, such as power-supply
cord or plug is damaged, liquid has been spilled
or objects have fallen into the apparatus, the
apparatus has been exposed to rain or moisture,
does not operate normally, or has been dropped.
D3-7-13-69_En
NOTE:
This equipment has been tested and found to comply with the limits for a Class B digital device, pursuant to Part 15
of the FCC Rules. These limits are designed to provide reasonable protection against harmful interference in a
residential installation. This equipment generates, uses, and can radiate radio frequency energy and, if not installed
and used in accordance with the instructions, may cause harmful interference to radio communications. However,
there is no guarantee that interference will not occur in a particular installation. If this equipment does cause
harmful interference to radio or television reception, which can be determined by turning the equipment off and on,
the user is encouraged to try to correct the interference by one or more of the following measures:
— Reorient or relocate the receiving antenna.
— Increase the separation between the equipment and receiver.
— Connect the equipment into an outlet on a circuit different from that to which the receiver is connected.
— Consult the dealer or an experienced radio/TV technician for help.
D8-10-1-2_A1_En
Information to User
Alterations or modifications carried out without
appropriate authorization may invalidate the user’s
right to operate the equipment.
D8-10-2_A1_En
IMPORTANT NOTICE
THE MODEL NUMBER AND SERIAL NUMBER OF
THIS EQUIPMENT ARE ON THE REAR OR BOTTOM.
RECORD THESE NUMBERS ON YOUR ENCLOSED
WARRANTY CARD AND KEEP IN A SAFE PLACE
FOR FUTURE REFERENCE.
D36-AP9-1_A1_En
CAUTION
This product satisfies FCC regulations when shielded
cables and connectors are used to connect the unit
to other equipment. To prevent electromagnetic
interference with electric appliances such as radios
and televisions, use shielded cables and connectors
for connections.
D8-10-3a_A1_En
This product contains mercury. Disposal of this
material may be regulated due to environmental
considerations. For disposal or recycling information,
please contact your local authorities or the Electronics
Industries Alliance : www.eiae.org.
K057_A1_En
Page 4
The Safety of Your Ears is in Your Hands
Get the most out of your equipment by playing it at a
safe level – a level that lets the sound come through
clearly without annoying blaring or distortion and, most
importantly, without affecting your sensitive hearing.
Sound can be deceiving. Over time, your hearing
“comfort level” adapts to higher volumes of sound, so
what sounds “normal” can actually be loud and
harmful to your hearing. Guard against this by setting
your equipment at a safe level BEFORE your hearing
adapts.
ESTABLISH A SAFE LEVEL:
• Set your volume control at a low setting.
• Slowly increase the sound until you can hear it
comfortably and clearly, without distortion.
• Once you have established a comfortable sound
level, set the dial and leave it there.
BE SURE TO OBSERVE THE FOLLOWING
GUIDELINES:
• Do not turn up the volume so high that you can’t
hear what’s around you.
• Use caution or temporarily discontinue use in
potentially hazardous situations.
• Do not use headphones while operating a motorized
vehicle; the use of headphones may create a traffic
hazard and is illegal in many areas.
S001a_A1_En
WARNING: This product contains chemicals known
to the State of California and other governmental
entities to cause cancer and birth defects or other
reproductive harm.
D36-P5_C1_En
POWER-CORD CAUTION
Handle the power cord by the plug. Do not pull out the
plug by tugging the cord and never touch the power
cord when your hands are wet as this could cause a
short circuit or electric shock. Do not place the unit, a
piece of furniture, etc., on the power cord, or pinch the
cord. Never make a knot in the cord or tie it with other
cords. The power cords should be routed such that they
are not likely to be stepped on. A damaged power cord
can cause a fire or give you an electrical shock. Check
the power cord once in a while. When you find it
damaged, ask your nearest PIONEER authorized
service center or your dealer for a replacement.
S002*_A1_En
Condensation
If the player is moved suddenly from a cold place into a
warm room (in winter, for example) or if the
temperature in the room in which the player is installed
rises suddenly due to a heater, etc., water droplets
(condensation) may form inside (on operating parts and
the lens). When condensation is present, the player will
not operate properly and playback is not possible. Let
the player stand at room temperature for 1 or 2 hours
with the power turned on (the time depends on the
extent of condensation). The water droplets will
dissipate and playback will become possible.
Condensation can also occur in the summer if the
player is exposed to the direct wind from an
air-conditioner. If this happens, move the player to a
different place.
S005_A1_En
(Symbol examples for batteries)
These symbols are only valid
in the European Union.
Pb
K058c_A1_En
Cautions on 3D Viewing
• If you should experience any fatigue or discomfort while viewing 3D images, stop viewing them.
• Children, particularly those under 6, may be more prone to sensitivity, so guardians should watch for
any signs of fatigue or discomfort.
• When viewing 3D images, rest periodically.
Extended viewing of 3D images without rest periods could cause fatigue or discomfort.
Page 5

Contents
01 Before you start
What’s in the box . . . . . . . . . . . . . . . . . . . . . . . . . . . . . . . . . . . 6
Putting the batteries in the remote control . . . . . . . . . . . . . 6
Software Update . . . . . . . . . . . . . . . . . . . . . . . . . . . . . . . . . . . . 7
About operation of this player from a mobile device
(iPod, iPhone, iPad etc.). . . . . . . . . . . . . . . . . . . . . . . . . . . . . . 7
Types of discs/files that can be played . . . . . . . . . . . . . . . . . . 8
Playable discs . . . . . . . . . . . . . . . . . . . . . . . . . . . . . . . . . . . . 8
Playable files . . . . . . . . . . . . . . . . . . . . . . . . . . . . . . . . . . . . 11
Part Names and Functions . . . . . . . . . . . . . . . . . . . . . . . . . . 14
Remote Control . . . . . . . . . . . . . . . . . . . . . . . . . . . . . . . . . . 14
Front Panel . . . . . . . . . . . . . . . . . . . . . . . . . . . . . . . . . . . . . . 15
Rear Panel . . . . . . . . . . . . . . . . . . . . . . . . . . . . . . . . . . . . . . 16
02 Connecting up
Connecting using an HDMI cable. . . . . . . . . . . . . . . . . . . . . 17
About HDMI . . . . . . . . . . . . . . . . . . . . . . . . . . . . . . . . . . . . . 17
About Control Function with HDMI . . . . . . . . . . . . . . . . . . 18
Connecting a TV. . . . . . . . . . . . . . . . . . . . . . . . . . . . . . . . . . 19
Connecting an AV receiver or amplifier. . . . . . . . . . . . . . . 20
Connecting audio cables . . . . . . . . . . . . . . . . . . . . . . . . . . . . 21
Connecting an AV receiver or amplifier using an
coaxial digital audio cable. . . . . . . . . . . . . . . . . . . . . . . . . . 21
Connecting an AV receiver or amplifier using an
optical digital audio cable (BDP-88FD only) . . . . . . . . . . . 21
Connecting the Pre-main amplifier using a balanced
cable (BDP-88FD only) . . . . . . . . . . . . . . . . . . . . . . . . . . . . 21
Input device is connected with the ZERO SIGNAL
terminal. . . . . . . . . . . . . . . . . . . . . . . . . . . . . . . . . . . . . . . . . . 22
Connecting components to the USB port . . . . . . . . . . . . . . 22
About USB devices . . . . . . . . . . . . . . . . . . . . . . . . . . . . . . . 22
Connecting the USB device . . . . . . . . . . . . . . . . . . . . . . . . 22
Connecting to the network through LAN interface . . . . . . . 23
Connecting with a LAN cable (wired LAN) . . . . . . . . . . . . 23
Connecting the power cord . . . . . . . . . . . . . . . . . . . . . . . . . . 23
03 Getting Started
Making settings using the Setup Navigator menu . . . . . . . 24
Operating the TV with the player’s remote control . . . . . . . 25
TV Preset code list . . . . . . . . . . . . . . . . . . . . . . . . . . . . . . . . 25
Switching the output video resolution . . . . . . . . . . . . . . . . . 26
04 Playback
Playing discs or files. . . . . . . . . . . . . . . . . . . . . . . . . . . . . . . . 27
Quick view (Quick view with audio) . . . . . . . . . . . . . . . . . . 27
Forward and reverse scanning . . . . . . . . . . . . . . . . . . . . . . 27
Playing specific chapters, tracks or files . . . . . . . . . . . . . . 28
Skipping content . . . . . . . . . . . . . . . . . . . . . . . . . . . . . . . . . 28
To return to a position a short while ago . . . . . . . . . . . . . . 28
To advance to a position slightly ahead. . . . . . . . . . . . . . . 28
Playing in slow motion . . . . . . . . . . . . . . . . . . . . . . . . . . . . 28
Step forward/Step reverse. . . . . . . . . . . . . . . . . . . . . . . . . . 28
Playing a specific section within a title or track
repeatedly (A-B Repeat) . . . . . . . . . . . . . . . . . . . . . . . . . . . 28
Playing repeatedly
(Repeat Play) . . . . . . . . . . . . . . . . . . . . . . . . . . . . . . . . . . . . 28
Playing in the desired order (Programmed Play) . . . . . . . 29
Making bookmarks . . . . . . . . . . . . . . . . . . . . . . . . . . . . . . . 29
Zoom . . . . . . . . . . . . . . . . . . . . . . . . . . . . . . . . . . . . . . . . . . . 29
Playing photos as slideshows. . . . . . . . . . . . . . . . . . . . . . . 29
Switching the camera angles. . . . . . . . . . . . . . . . . . . . . . . 29
Switching the subtitles . . . . . . . . . . . . . . . . . . . . . . . . . . . . 30
Using the DIRECT function. . . . . . . . . . . . . . . . . . . . . . . . . 30
Moving subtitles. . . . . . . . . . . . . . . . . . . . . . . . . . . . . . . . . . 30
Switching the audio. . . . . . . . . . . . . . . . . . . . . . . . . . . . . . . 30
Switching the CD/SACD playback area. . . . . . . . . . . . . . . 30
Displaying the disc information . . . . . . . . . . . . . . . . . . . . . 31
Enjoying BONUSVIEW or
BD-LIVE. . . . . . . . . . . . . . . . . . . . . . . . . . . . . . . . . . . . . . . . . 31
Playback functions . . . . . . . . . . . . . . . . . . . . . . . . . . . . . . . 32
Using the FUNCTION menu . . . . . . . . . . . . . . . . . . . . . . . . . 33
Playing from a specific time (Time Search) . . . . . . . . . . . 34
Playing a specific title, chapter, track or file (Search) . . . 34
Playing specified range of discs, titles or chapter
(track/file) in random order . . . . . . . . . . . . . . . . . . . . . . . . 34
Continuing playback from a specified position
(Continued Viewing Playback) . . . . . . . . . . . . . . . . . . . . . . . 34
05 Playback from Source function
About Source function. . . . . . . . . . . . . . . . . . . . . . . . . . . . . . 35
About network playback . . . . . . . . . . . . . . . . . . . . . . . . . . . 35
Playback file on the network . . . . . . . . . . . . . . . . . . . . . . . . . 36
Disc/USB playback . . . . . . . . . . . . . . . . . . . . . . . . . . . . . . . . 36
Playing back image files . . . . . . . . . . . . . . . . . . . . . . . . . . . 37
Playing in the desired order (Playlist). . . . . . . . . . . . . . . . . . 37
Adding tracks/files . . . . . . . . . . . . . . . . . . . . . . . . . . . . . . . 37
Playing the Playlist . . . . . . . . . . . . . . . . . . . . . . . . . . . . . . . 37
Deleting tracks/files from the Playlist . . . . . . . . . . . . . . . . 37
06 Playing the web contents
Available web contents . . . . . . . . . . . . . . . . . . . . . . . . . . . . . 38
Playing the items . . . . . . . . . . . . . . . . . . . . . . . . . . . . . . . . . . 38
07 Setting the Audio/Video options
Changing the Audio options . . . . . . . . . . . . . . . . . . . . . . . . . 39
Operating the Audio Parameter screen . . . . . . . . . . . . . . 39
Changing the Video options . . . . . . . . . . . . . . . . . . . . . . . . . 40
Operating the Video Parameter screen. . . . . . . . . . . . . . . 40
08 Advanced settings
Changing the settings . . . . . . . . . . . . . . . . . . . . . . . . . . . . . . 42
Operating the Initial Setup screen. . . . . . . . . . . . . . . . . . . 42
Software updating . . . . . . . . . . . . . . . . . . . . . . . . . . . . . . . . 49
Restoring all the settings to the factory default
settings. . . . . . . . . . . . . . . . . . . . . . . . . . . . . . . . . . . . . . . . . 49
Setting the remote control backlight mode . . . . . . . . . . . 50
About how digital audio formats are output . . . . . . . . . . . . 51
Language Code Table and Country/Area Code Table . . . . . 52
Language Code Table . . . . . . . . . . . . . . . . . . . . . . . . . . . . . 52
Country/Area Code Table . . . . . . . . . . . . . . . . . . . . . . . . . . 52
09 Additional information
Cautions on use . . . . . . . . . . . . . . . . . . . . . . . . . . . . . . . . . . . 53
Moving the player . . . . . . . . . . . . . . . . . . . . . . . . . . . . . . . . 53
Place of installation. . . . . . . . . . . . . . . . . . . . . . . . . . . . . . . 53
Turn the power off when not using the player . . . . . . . . . 53
Condensation. . . . . . . . . . . . . . . . . . . . . . . . . . . . . . . . . . . . 53
Cleaning the player . . . . . . . . . . . . . . . . . . . . . . . . . . . . . . . 53
Caution for when the unit is installed in a rack with a
glass door. . . . . . . . . . . . . . . . . . . . . . . . . . . . . . . . . . . . . . . 53
Cleaning the pickup lens . . . . . . . . . . . . . . . . . . . . . . . . . . 54
Handling discs. . . . . . . . . . . . . . . . . . . . . . . . . . . . . . . . . . . 54
Troubleshooting . . . . . . . . . . . . . . . . . . . . . . . . . . . . . . . . . . . 55
Playback. . . . . . . . . . . . . . . . . . . . . . . . . . . . . . . . . . . . . . . . 55
Control function. . . . . . . . . . . . . . . . . . . . . . . . . . . . . . . . . . 58
Network . . . . . . . . . . . . . . . . . . . . . . . . . . . . . . . . . . . . . . . . 59
Others. . . . . . . . . . . . . . . . . . . . . . . . . . . . . . . . . . . . . . . . . . 61
Glossary. . . . . . . . . . . . . . . . . . . . . . . . . . . . . . . . . . . . . . . . . . 62
Software license notice . . . . . . . . . . . . . . . . . . . . . . . . . . . . . 63
About Apple Lossless Audio Codec. . . . . . . . . . . . . . . . . . 63
About FLAC . . . . . . . . . . . . . . . . . . . . . . . . . . . . . . . . . . . . . 63
Specifications. . . . . . . . . . . . . . . . . . . . . . . . . . . . . . . . . . . . . 64
5
En
Page 6
01
Chapter 1
Before you start
What’s in the box
• Remote control x 1
• AAA 700 size manganese batteries x 2
•Power cord
•Warranty card
• Software license notice
• Operating instructions (this document)
Putting the batteries in the
remote control
The batteries included with the player have been provided
to allow you to check product operation and may not last
long. We recommend using alkaline batteries that have a
longer life.
WARNING
• Do not use or store batteries in direct sunlight or
other excessively hot place, such as inside a car or
near a heater. This can cause batteries to leak,
overheat, explode or catch fire. It can also reduce the
life or performance of batteries.
• To prevent leakage of battery fluid, remove the
batteries if you do not plan to use the remote control
for a long period of time (1 month or more). If the fluid
should leak, wipe it carefully off the inside of the case,
then insert new batteries. If a battery should leak and
the fluid should get on your skin, flush it off with large
quantities of water.
• When disposing of used batteries, please comply with
governmental regulations or environmental public
institution’s rules that apply in your country/area.
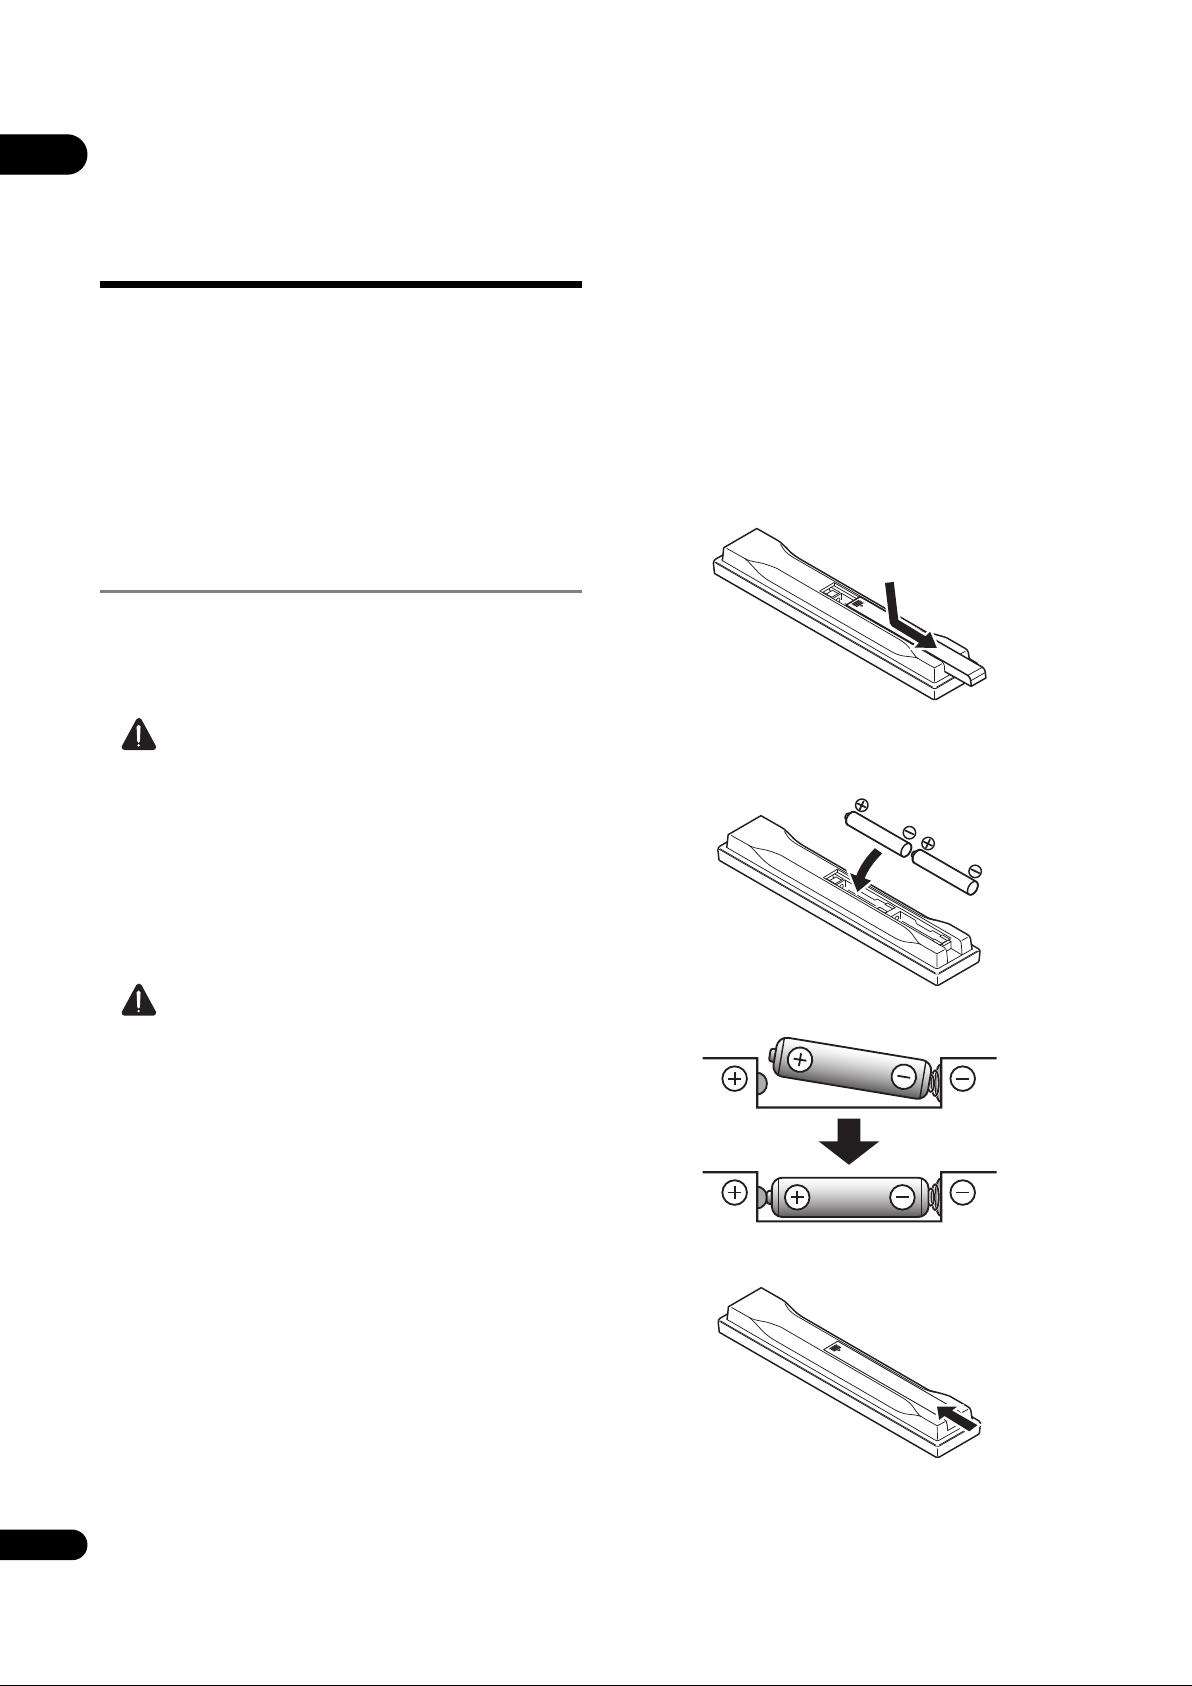
1 Open the rear cover.
2 Insert (2 x AAA 700 size) batteries that are
supplied.
• Store small parts out of the reach of children and
infants. If accidentally swallowed, contact a doctor
immediately.
Caution
• The remote control setting may be restored to the
default after the batteries are replaced. If this
happens, reset it (pages 25 and 50).
• Do not use a new battery together with an old one.
• When loading the batteries into the remote control,
set them in the proper direction, as indicated by the
polarity marks ( and ).
• When inserting the batteries, make sure not to
damage the springs on the battery’s terminals.
This can cause batteries to leak or overheat.
• Do not heat batteries, disassemble them, or throw
them into flames or water.
• Batteries may have different voltages, even if they look
similar. Do not use different kinds of batteries
together.
Insert first from the side.
3 Close the rear cover.
6
En
Close securely (a click should be heard).
Page 7

Software Update
About operation of
01
Product information on this player is provided on the
Pioneer website. Check this website for update and
service information on your Blu-ray disc player.
http://www.pioneerelectronics.com
this player from a
mobile device (iPod,
iPhone, iPad etc.)
The player can be controlled from a mobile device by
installing the special application onto the mobile device.
For details, see the product information on the Pioneer
website.
This special application may be changed or discontinued
without notice.
Apple, iPad, iPhone, iPod, iPod nano, and iPod touch are
trademarks of Apple Inc., registered in the U.S. and other
countries.
English Français Español
En
7
Page 8
01
Types of discs/files that can be played
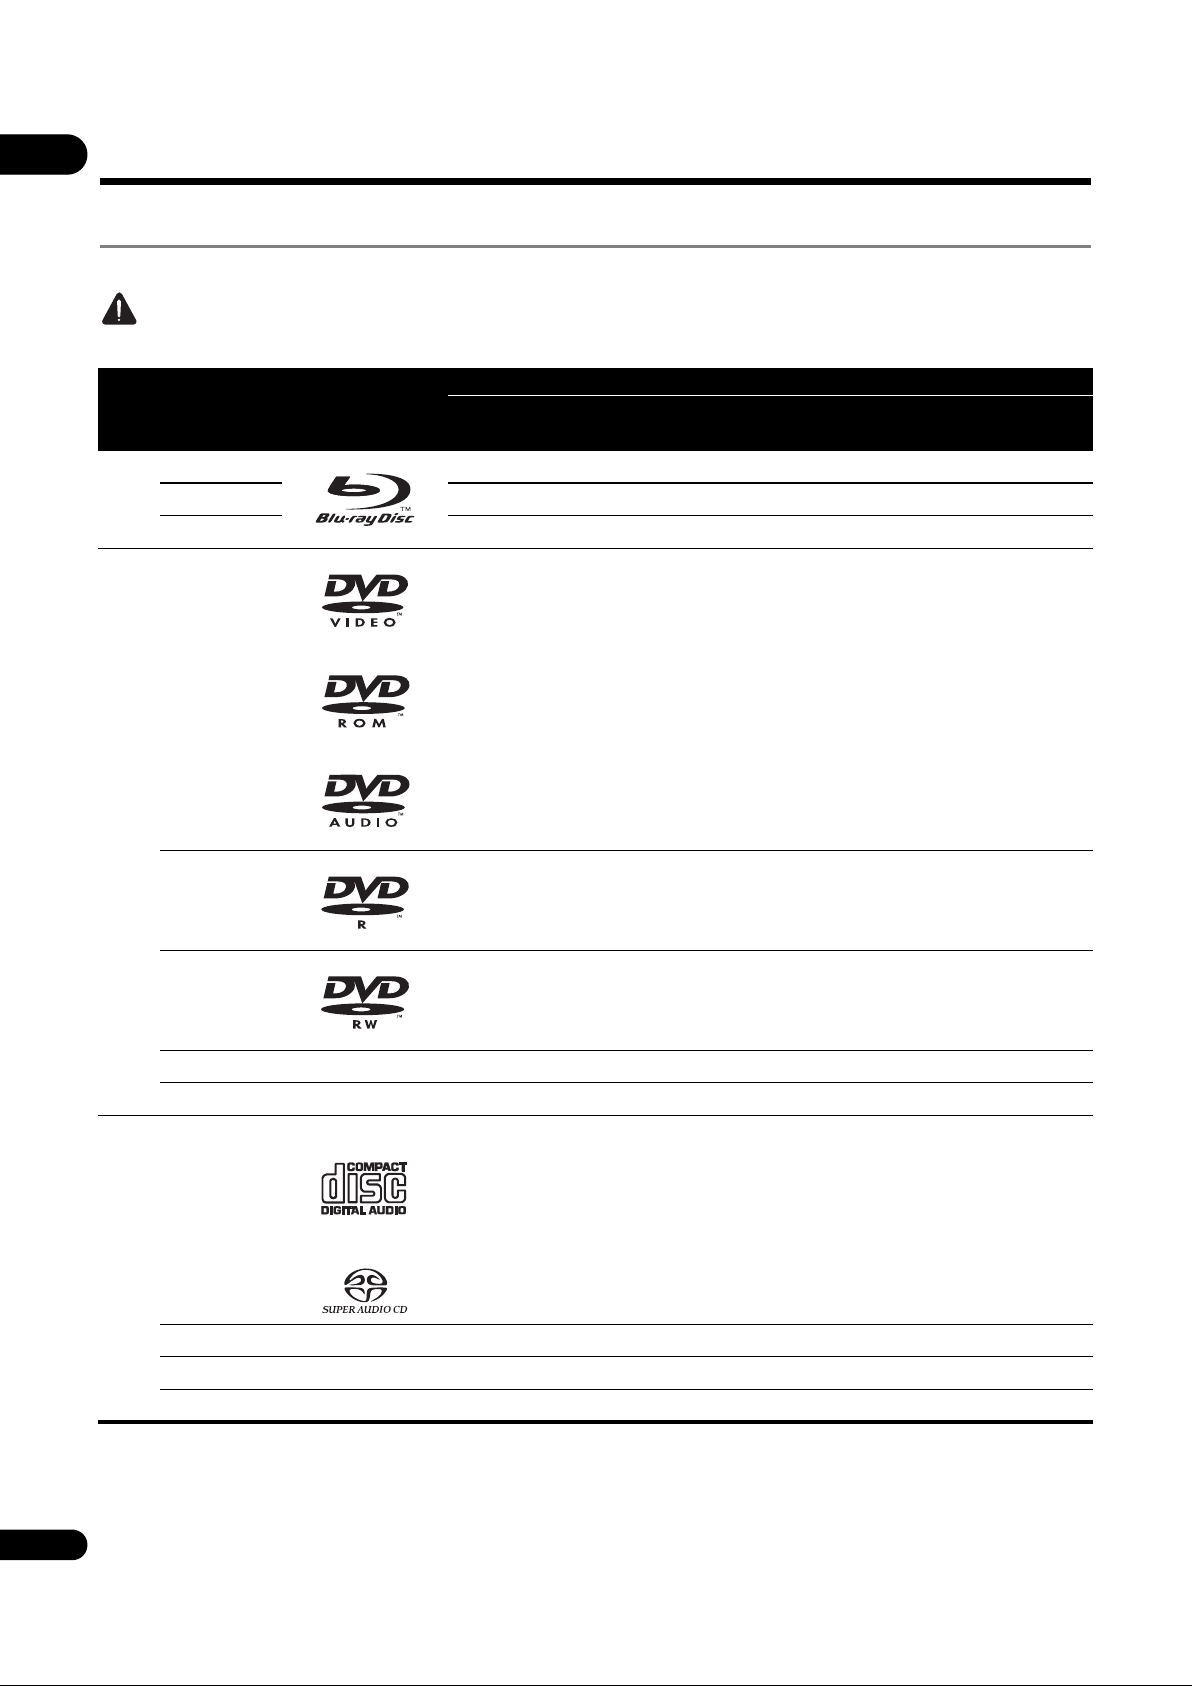
Playable discs
Discs with the logo marks below indicated on the disc label, package or jacket can be played.
Caution
• Only the discs that have been finalized can be played.
Application format
Disc type Logo
BD-ROM
2
BD
BD-R
BD-RE
DVD-ROM
BDMV BDAV
DVD-
Video
DVD-
Audio
DVD VR
CD-DA
DTS-CD
DATA-
DISC
1
DVD
CD
2,3,4
DVD-R
DVD-RW
DVD+R
DVD+RW
(Audio CD)
3,7
2,3
3
CD-DA
CD-R
CD-RW
CD-ROM
8
3
3
5
5
6
6
1. Discs on which video, image or audio files are recorded.
2. Including dual-layered discs.
3. Finalize them before playing them on this player.
4. DVD-R for Authoring discs (3.95 GB and 4.7 GB) cannot be played.
5. Including the AVCHD format.
6. Including the AVCREC format.
8
7. Version 1.0 DVD-RW discs cannot be played.
8. Including Video CDs.
En
Page 9
• “Blu-ray Disc”, “Blu-ray” and “Blu-ray Disc” logo are
trademarks of Blu-ray Disc Association.
• DTS-HD High Resolution Audio
• DTS Digital Surround
01
• is a trademark of DVD Format/Logo Licensing
Corporation.
Discs that cannot be played
• HD DVDs
•DVD-RAM discs
It is possible that some discs other than the ones listed
above may not be playable either.
Note
• Some discs cannot be played, even if one of the logo
marks on the previous page is indicated.
• To play 8 cm discs, set the disc in the 8 cm disc
depression in the center of the disc tray. No adapter
is necessary. 8 cm BD-ROMs cannot be played.
About playback of unauthorized
copies
Cinavia Notice
This product uses Cinavia technology to limit the use of
unauthorized copies of some commercially-produced
film and videos and their soundtracks. When a prohibited
use of an unauthorized copy is detected, a message will
be displayed and playback or copying will be interrupted.
More information about Cinavia technology is provided at
the Cinavia Online Consumer Information Center at
http://www.cinavia.com. To request additional
information about Cinavia by mail, send a postcard with
your mailing address to: Cinavia Consumer Information
Center, P.O. Box 86851, San Diego, CA, 92138, USA.
Copyright 2004-2010 Verance Corporation. Cinavia™ is a
Verance Corporation trademark. Protected by U.S. Patent
7,369,677 and worldwide patents issued and pending
under license from Verance Corporation. All rights reserved.
About copyright protection
Copyright protection technology is used for some Blu-ray
TM
Discs
other networks. Copyright protection technology restricts
playback and analog output. Due to updates in copyright
protection provisions, the restrictions may differ
depending on the date this product was purchased.
Furthermore, the restrictions may be updated when the
software is updated after purchase.
, DVDs and contents played over the Internet or
About audio formats
The following audio formats are supported on this player:
•MPEG audio (AAC)
•Linear PCM
To enjoy the surround sound of Dolby TrueHD, Dolby
Digital Plus, DSD, DTS-HD Master Audio and DTS-HD
High Resolution Audio, it is recommended to connect the
player to an AV receiver or amplifier compatible with
these audio formats using an HDMI cable. After loading
a BD containing sound in one of these audio formats,
select the audio format on the menu screen.
Manufactured under license from Dolby Laboratories.
”Dolby” and the double-D symbol are trademarks of Dolby
Laboratories.
For DTS patents, see http://patents.dts.com. Manufactured
under license from DTS Licensing Limited. DTS, DTS-HD,
the Symbol, & DTS and the Symbol together are registered
trademarks, and DTS-HD Master Audio | Essential is a
trademark of DTS, Inc. © DTS, Inc. All Rights Reserved.
Playing BDs
• BDs (BDMV) compatible with the formats below can
be played.
– Blu-ray Disc Read-Only (ROM) Format Version 2
– Blu-ray Disc Recordable (R) Format Version 2
– Blu-ray Disc Rewritable (RE) Format Version 3
This player supports BD-ROM Profile 5.
“Blu-ray 3D” and “Blu-ray 3D” logo are trademarks of
Blu-ray Disc Association.
BONUSVIEW functions such as playback of
secondary video (Picture-in-Picture) and secondary
audio can be used. The data used with the
BONUSVIEW functions (the secondary video
(Picture-in-Picture) and secondary audio data) may
be stored in the storage. For details on secondary
video and secondary audio playback, refer to the
disc’s instructions.
“BONUSVIEW” is trademark of Blu-ray Disc
Association.
English Français Español
•Dolby TrueHD
•Dolby Digital Plus
•Dolby Digital
•DSD
•DTS-HD Master Audio
9
En
Page 10

01
BD-LIVE functions such as downloading movie
trailers or additional audio and subtitle languages
and playing on-line games can be enjoyed over the
Internet. The data downloaded with the BD-LIVE
function (trailers, etc.) is stored in the storage. Refer
to the disc’s instructions for details about BD-LIVE
functions.
About region numbers
Blu-ray Disc Player and BD-ROM or DVD-Video discs are
assigned region numbers according to the region in
which they are sold.
This player’s region numbers are:
•BD-ROM: A
•DVD-Video: 1
Discs not including these numbers cannot be played.
Discs playable on this player are as shown below.
• BDs: A (including A) and ALL
“BD-LIVE” logo is trademark of Blu-ray Disc
Association.
With BD-ROMs, it is possible to use BD-J (Java)
applications to create highly interactive titles, for
example including games.
Oracle and Java are registered trademarks of Oracle
and/or its affiliates. Other names may be trademarks of
their respective owners.
• BDs (BDAV) compatible with the formats below can
be played.
– Blu-ray Disc Recordable (R) Format Version 1
– Blu-ray Disc Rewritable (RE) Format Version 2
Playing DVDs
This label indicates playback compatibility with DVD-RW
discs recorded in VR format (Video Recording format).
However, for discs recorded with a record-only-once
encrypted program, playback can only be achieved using a
CPRM compatible device.
The AVCHD is a high definition (HD) digital video camera
recorder format recording high-definition onto certain
media by using highly efficient codec technologies.
• DVDs: 1 (including 1) and ALL
Playing CDs
Regarding copy protected CDs: This player is designed to
conform to the specifications of the Audio CD format.
This player does not support the playback or function of
discs that do not conform to these specifications.
DualDisc playback
A DualDisc is a two-sided disc, one side of which
contains DVD content — video, audio, etc. — while the
other side contains non-DVD content such as digital
audio material.
The DVD side of a DualDisc can be played on this player.
The non-DVD, audio side of the disc is not compatible
with this player.
It is possible that when loading or ejecting a DualDisc,
the opposite side to that being played will be scratched.
Scratched discs may not be playable.
For more detailed information on the DualDisc
specification, please refer to the disc manufacturer or
disc retailer.
Playing discs created on computers
or BD/DVD recorders
• It may not be possible to play discs recorded using a
computer due to the application settings or
computer’s environment settings. Record discs in a
format playable on this player. For details, contact the
dealer.
• It may not be possible to play discs recorded using a
computer or a BD/DVD recorder, if burn quality is not
good due to characteristics of the disc, scratches, dirt
on the disc, dirt on the recorder’s lens, etc.
“AVCHD” and the “AVCHD” logo are trademarks of
Panasonic Corporation and Sony Corporation.
10
En
Page 11
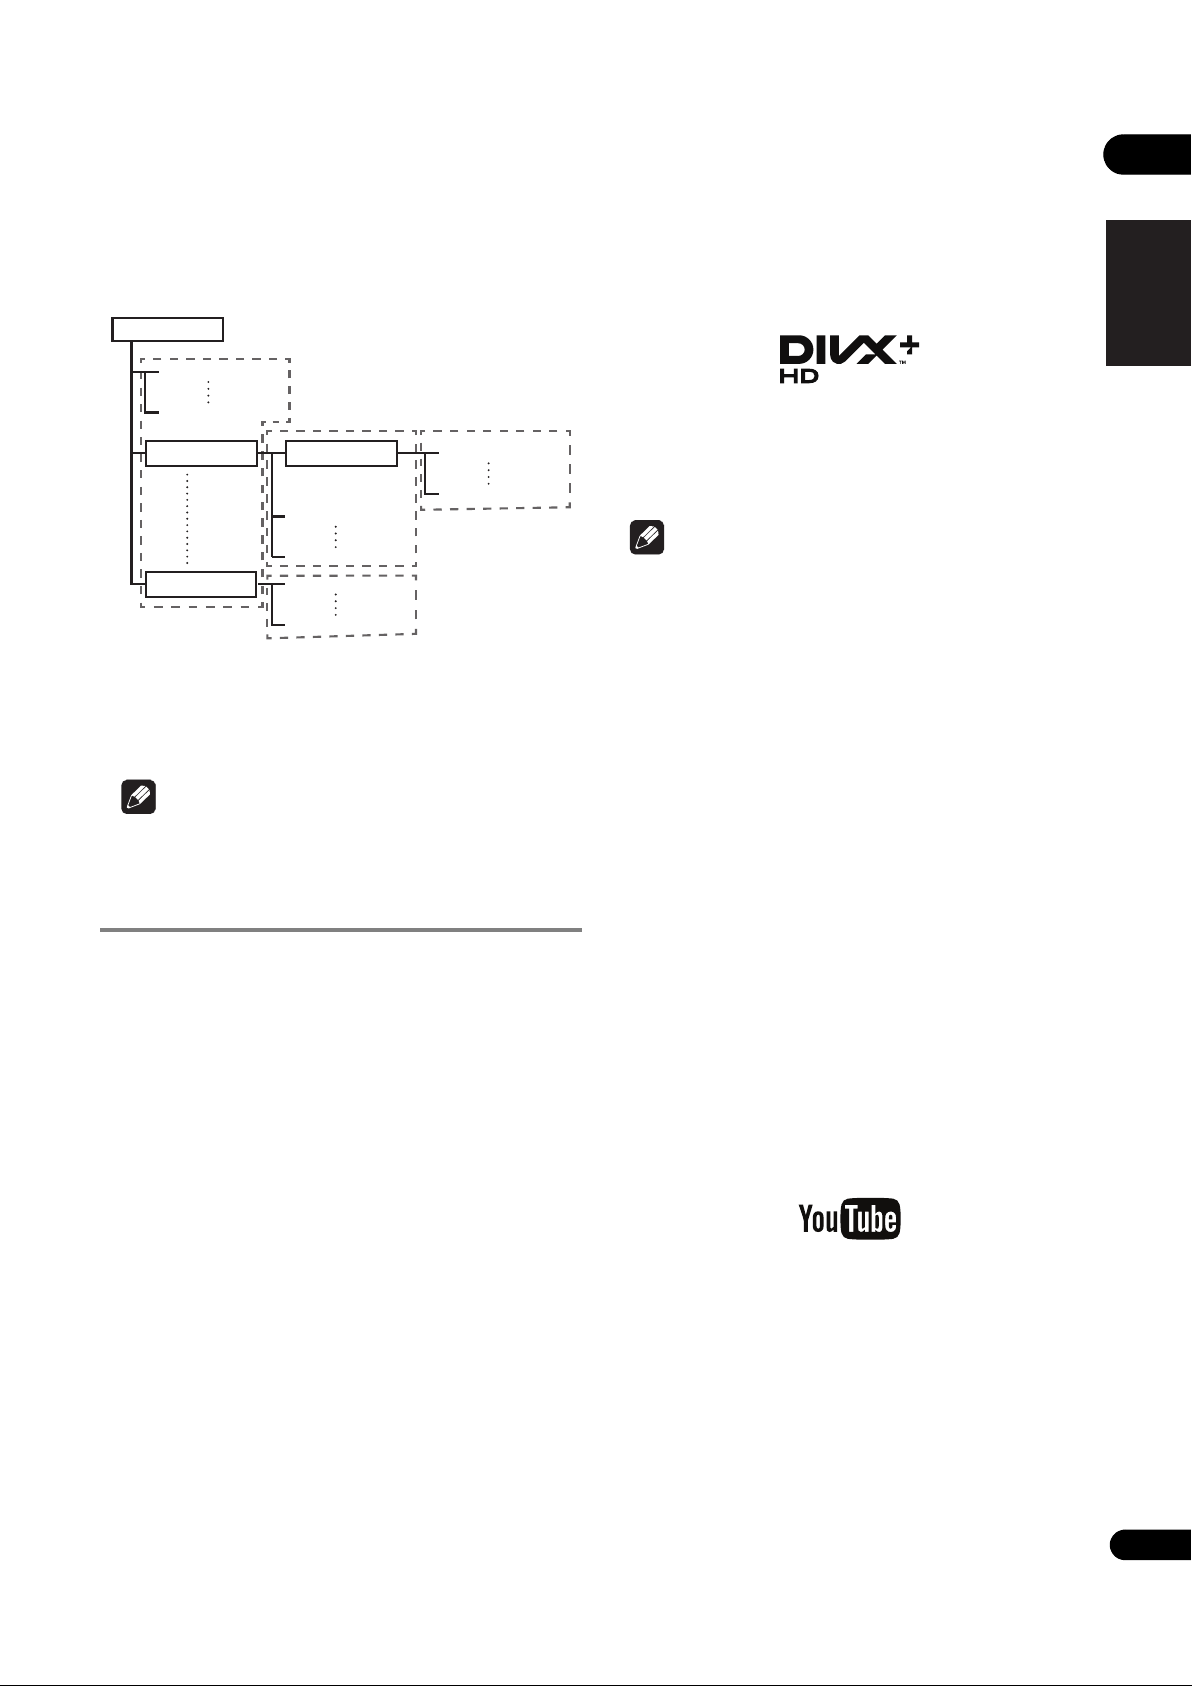
About video, audio, and image files
Root
01 Folder
XX Folder
Folder
001.jpg/001.mp3
xxx.jpg/xxx.mp3
001.jpg/001.mp3
xxx.jpg/xxx.mp3
001.jpg/001.mp3
xxx.jpg/xxx.mp3
001.jpg/001.mp3
xxx.jpg/xxx.mp3
and folders
Audio and image files can be played on this player when
the folders on the disc or USB device are created as
described below.
Example of folder structure:
*
ABOUT DIVX VIDEO-ON-DEMAND: This DivX
Certified
®
device must be registered in order to play
purchased DivX Video-on-Demand (VOD) movies. To
obtain your registration code, locate the DivX VOD
section in your device setup menu. Go to
vod.divx.com for more information on how to
complete your registration.
01
English Français Español
*
*
*
* The number of folders and files within a single folder
(including the root directory) is limited to a maximum of
256. Also, keep the number of folder layers to a maximum
of 5.
Note
• The file and folder names displayed on this player may
differ from those displayed on a computer.
Playable files
Video, image and audio files recorded on BDs, DVDs, CDs
or USB devices can be played.
Supported video file formats
• DivX Plus HD
DivX Certified
(H.264/MKV) video up to 1080p HD including
premium content.
ABOUT DIVX VIDEO: DivX
created by DivX, LLC, a subsidiary of Rovi Corporation.
This is an official DivX Certified
DivX video. Visit divx.com for more information and
software tools to convert your files into DivX videos.
®
to play DivX® and DivX PlusTM HD
®
is a digital video format
®
device that plays
DivX®, DivX Certified®, DivX Plus
TM
HD and
associated logos are trademarks of Rovi Corporation or
its subsidiaries and are used under license.
Note
•This DivX
®
Certified device must be registered in
order to play DivX Video-on-Demand (VOD) content.
First generate the DivX VOD registration code for your
device and submit it during the registration process.
Important: DivX VOD content is protected by a DivX
DRM (Digital Rights Management) system that
restricts playback to registered DivX Certified devices.
If you try to play DivX VOD content not authorized for
your device, the message Authorization Error will be
displayed and your content will not be played. Learn
more at www.divx.com/vod.
– This player’s DivX VOD registration code can be
checked at HOME MENU Initial Setup
Playback DivX
®
VOD DRM Registration
Code (page 45).
– The number of views is restricted for some DivX
VOD files. When such files are played on this
player, the remaining number of views is displayed.
Files for which the remaining number of views has
reached 0 cannot be played (This DivX rental has
expired is displayed). Files for which the number of
views is not restricted can be played as many times
as you like (the remaining number of views is not
displayed).
• YouTube
YouTube
TM
is a trademark of Google inc.
11
En
Page 12

01
12
En
Table of Playable Files
Playable files
(Extensions)
MP3
(.mp3)
2
WMA
(.wma)
AAC
(.m4a)
MPEG2 AAC
(.aac)
WAV
(.wav)
FLAC
(.flac)
Monkey’s Audio
(.ape)
DSD
(.dff/.dsf)
AIFF
(.aif/.aiff)
ALAC
(.m4a)
JPEG
(.jpg/.jpeg)
MPO
(.mpo)
PNG
(.png)
GIF
(.gif)
DivX
(.avi/.divx/.mkv)
BD-R/RE/-R DL/
RE DL/-R LTH,
DVD-R/RW/-R DL/
+R/+RW/+R DL,
CD-R/RW
Maximum resolution: 4 000 x 3 000 pixels
3D photo image
Playable media
USB devices
1
Network
File specifications
Sampling frequencies: Up to 48 kHz
Bit rate: Up to 320 kbps
Audio type: MPEG-1 Audio Layer 3
Sampling frequencies: Up to 48 kHz
Bit rate: Up to 192 kbps
Audio type: WMA version 9
Sampling frequencies: Up to 96 kHz
Bit rate: Up to 320 kbps
Audio type: MPEG4-AAC
Sampling frequencies: Up to 48 kHz
Bit rate: Up to 320 kbps
Audio type: MPEG2-AAC
Sampling frequencies: Up to 192 kHz
Quantization bitrate: 16 bit, 24 bit
Channel: 2ch/Multi (7.1 ch)
(PCM codec)
Sampling frequencies: Up to 192 kHz
Quantization bitrate: 16 bit, 24 bit
Channel: 2ch/Multi (5.1 ch)
Sampling frequencies:
Extra-high support up to 48 kHz
High support up to 96 kHz
Quantization bitrate: 16 bit, 24 bit
Channel: 2ch
2.8 MHz
Channel: 2ch/Multi (5.1 ch)
Sampling frequencies: Up to 192 kHz
Quantization bitrate: 16 bit, 24 bit
Channel: 2ch
(PCM codec)
Sampling frequencies: Up to 192 kHz
Quantization bitrate: 16 bit, 24 bit
Channel: 2ch
Maximum resolution: 2 048 x 1 024 pixel
Animated PNG files are not supported.
Maximum resolution: 2 048 x 1 024 pixel
Animated GIF files are not supported.
Rotate is not supported.
Supported versions: Through DivX
Maximum resolution:
Up to 1 920 x 1 080 (DivX
Up to 1 280 x 720 (MKV)
®
®
PLUS HD)
PLUS HD
Page 13
Playable media
Playable files
(Extensions)
MP4
(.mp4)
WMV
(.wmv)
AVI
(.avi)
3GP
(.3gp)
FLV
(.flv)
1. This unit supports FAT16, FAT32 and NTFS file systems.
2. WMA Pro, Lossless and Voice are not supported.
BD-R/RE/-R DL/
RE DL/-R LTH,
DVD-R/RW/-R DL/
+R/+RW/+R DL,
CD-R/RW
USB devices
01
1
Network
File specifications
English Français Español
Maximum resolution: Up to 1 920 x 1 080
Video: MPEG4, MPEG-4 AVC (level 4.1)
Audio: AAC, MP3
Maximum resolution: Up to 1 920 x 1 080
Video: WMV9, WMV9AP (VC-1)
Audio: WMA
Maximum resolution: Up to 1 920 x 1 080
Video: MPEG4
Audio: MP3, AAC
Video: H.263, MPEG4, H.264
Audio: MPEG-4 AAC
Video: Sorenson H.263 (FLV1), VP6 (FLV4),
H.264
Audio: MP3, AAC
Note
• Depending on the file structure, the server capacity and the network environment, it may not be possible to play
certain files, even for files indicated on the table of playable files above.
• Files protected by DRM (Digital Rights Management) cannot be played (not including DivX VOD files).
• AVCHD contents cannot be played via LAN.
13
En
Page 14
01
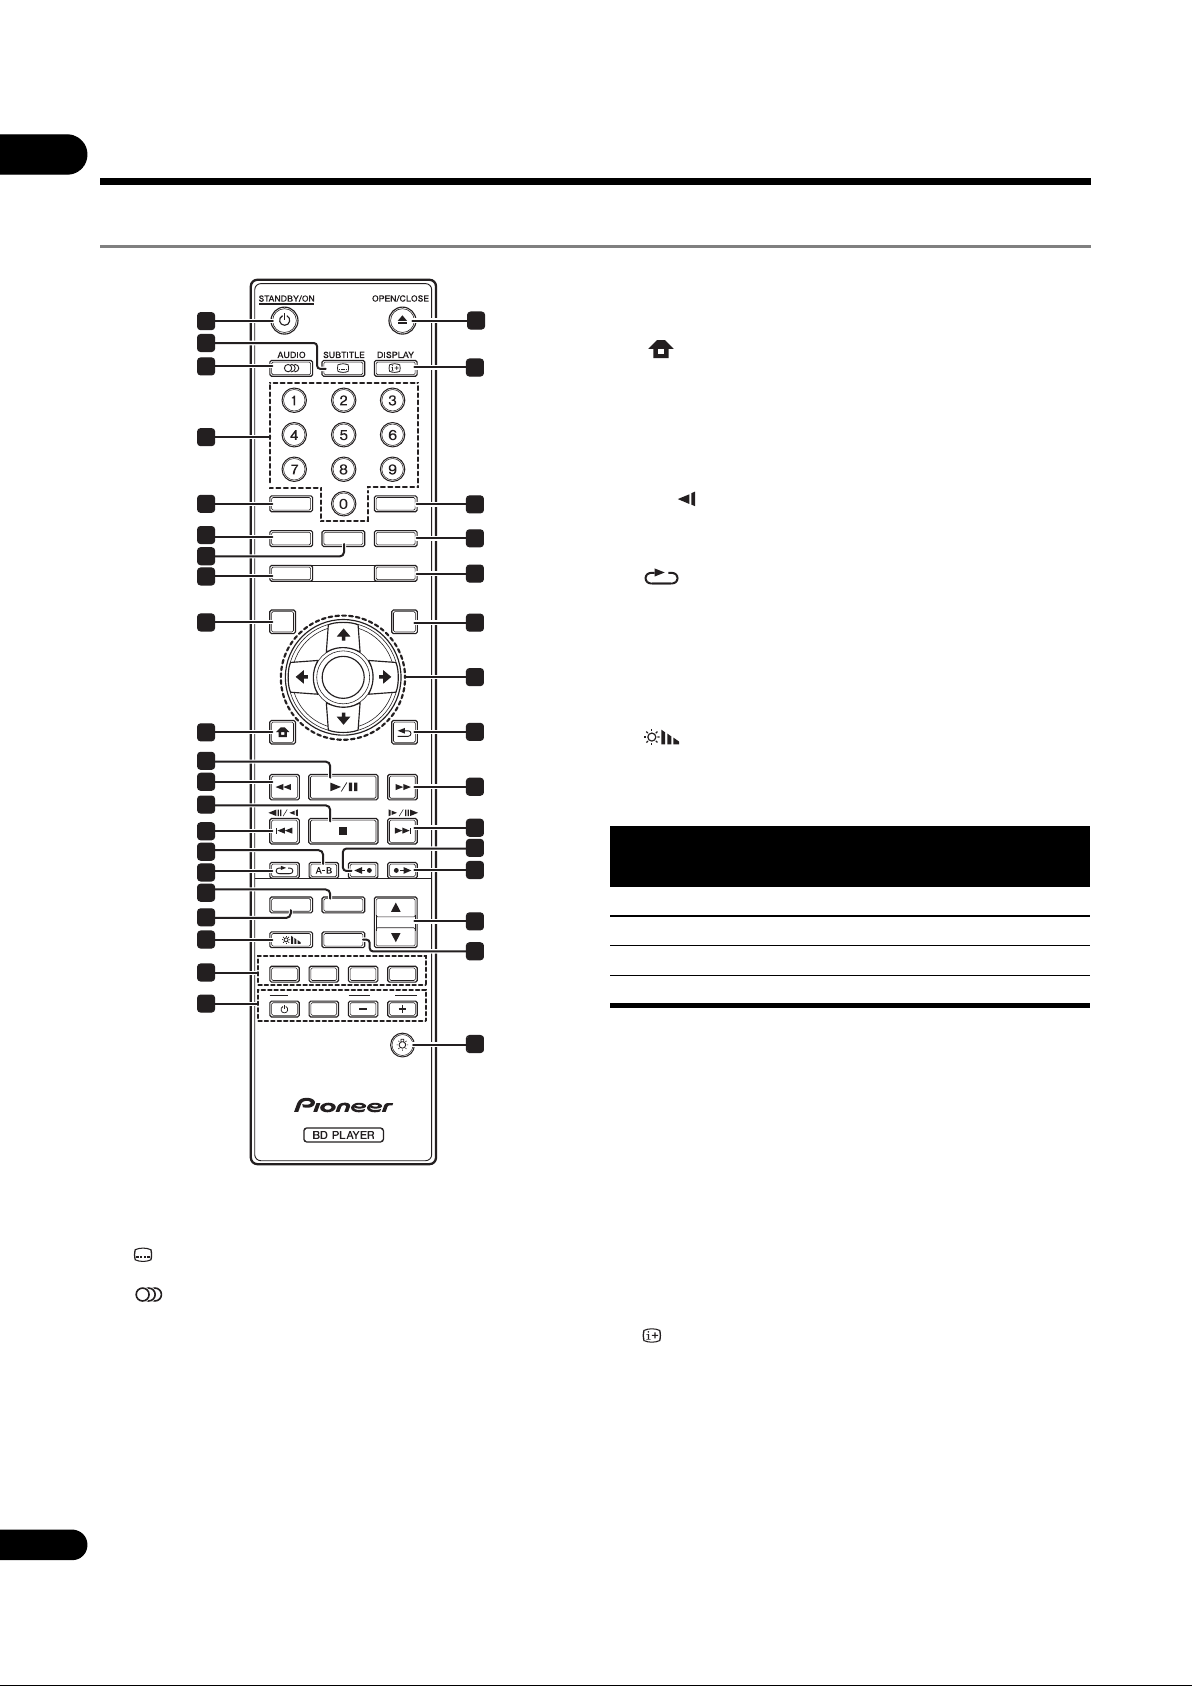
Part Names and Functions
Remote Control
9TOP MENU – Press to display the top menu of the
1
2
3
22
23
BD-ROM or DVD-Video.
10 HOME MENU – (page 42)
11 – (page 27)
10
11
12
13
14
15
16
17
18
19
20
21
4
5
6
7
8
9
CLEAR
AUDIO P.
YouTube
TOP MENU POPUP MENU
TOP
HOME MENU RETURN
REPEAT
DIRECT
DIMMER
PROGRAM
RG YB
TV CONTROL VOL
VIDEO P.
ENTER
HDMI
CD/SACD
BOOKMARK
INPUT
FUNCTION
CONTINUED
SOURCE
POP
UP
SHORT SKIPREPLAY
RESOLUTION
ZOOM INDEX
LIGHT
24
25
26
27
28
29
30
31
32
33
34
35
36
12 – (page 27)
13 – (page 27)
14 / / – (page 28)
15 A-B – (page 28)
16 REPEAT – (page 28)
17 HDMI – The HDMI Mode switches each time this is
pressed (pages 18 and 44).
18 DIRECT – Press to switch on/off the DIRECT function
(page 30).
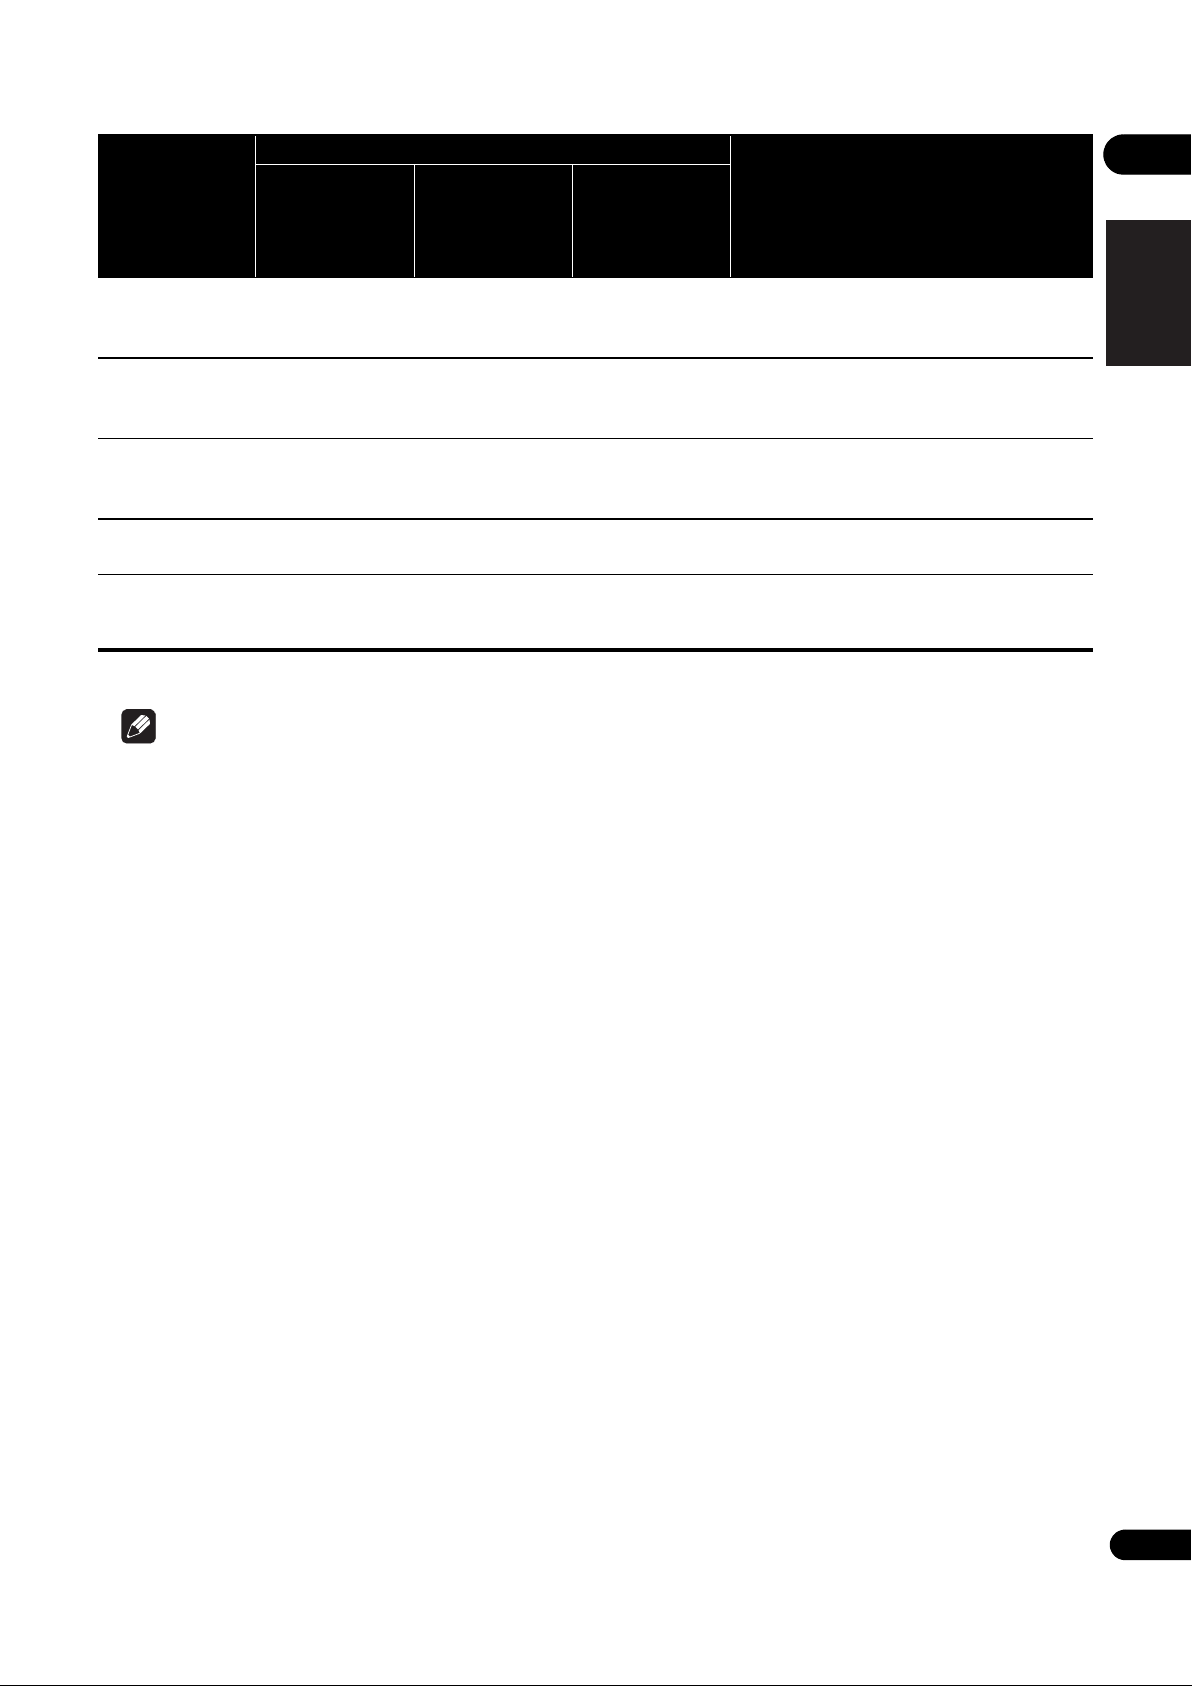
19 DIMMER – Each time this is pressed, the
brightness of the front panel display changes and/or the
lighting status of the indicators on the front panel
switches as shown in the table below.
Front panel display
Bright Off
Middle Off
Dark Off
Off Lights
Indicator
FL OFF
20 Color buttons – Use these to navigate BD-ROM
menus.
1 STANDBY/ON – Press to turn the power on and
off.
2 SUBTITLE – (page 30)
3 AUDIO – (page 30)
4 Number buttons – Use these to select and play the
title/chapter/track you want to view or listen to and to
select items from menus.
5CLEAR – Press to clear the numeric number, etc.
6 AUDIO P. – Use to access the audio options.
(page 39)
7VIDEO P. – Use to access the video options. (page 40)
14
8 YouTube – Use to play the video on YouTube.
En
(page 38)
PROGRAM – (page 29)
BOOK MARK – (page 29)
ZOOM – (page 29)
INDEX – (page 29)
21 TV CONTROL – (page 25)
22 OPEN/CLOSE – Press to open and close the disc
tray.
23 DISPLAY – (page 31)
24 FUNCTION – (page 33)
25 CONTINUED – Use to continue playback from a
specified position. (page 34)
26 SOURCE – (page 35)
27 POPUP MENU/POPUP – Press to display the
BD-ROM or DVD-Video menus.
Page 15
28 /// – Use to select items, change settings
and move the cursor.
ENTER – Press to execute the selected item or enter a
setting that has been changed, etc.
29 RETURN – Press to return to the previous
screen.
30 – (page 27)
31 / / – (page 28)
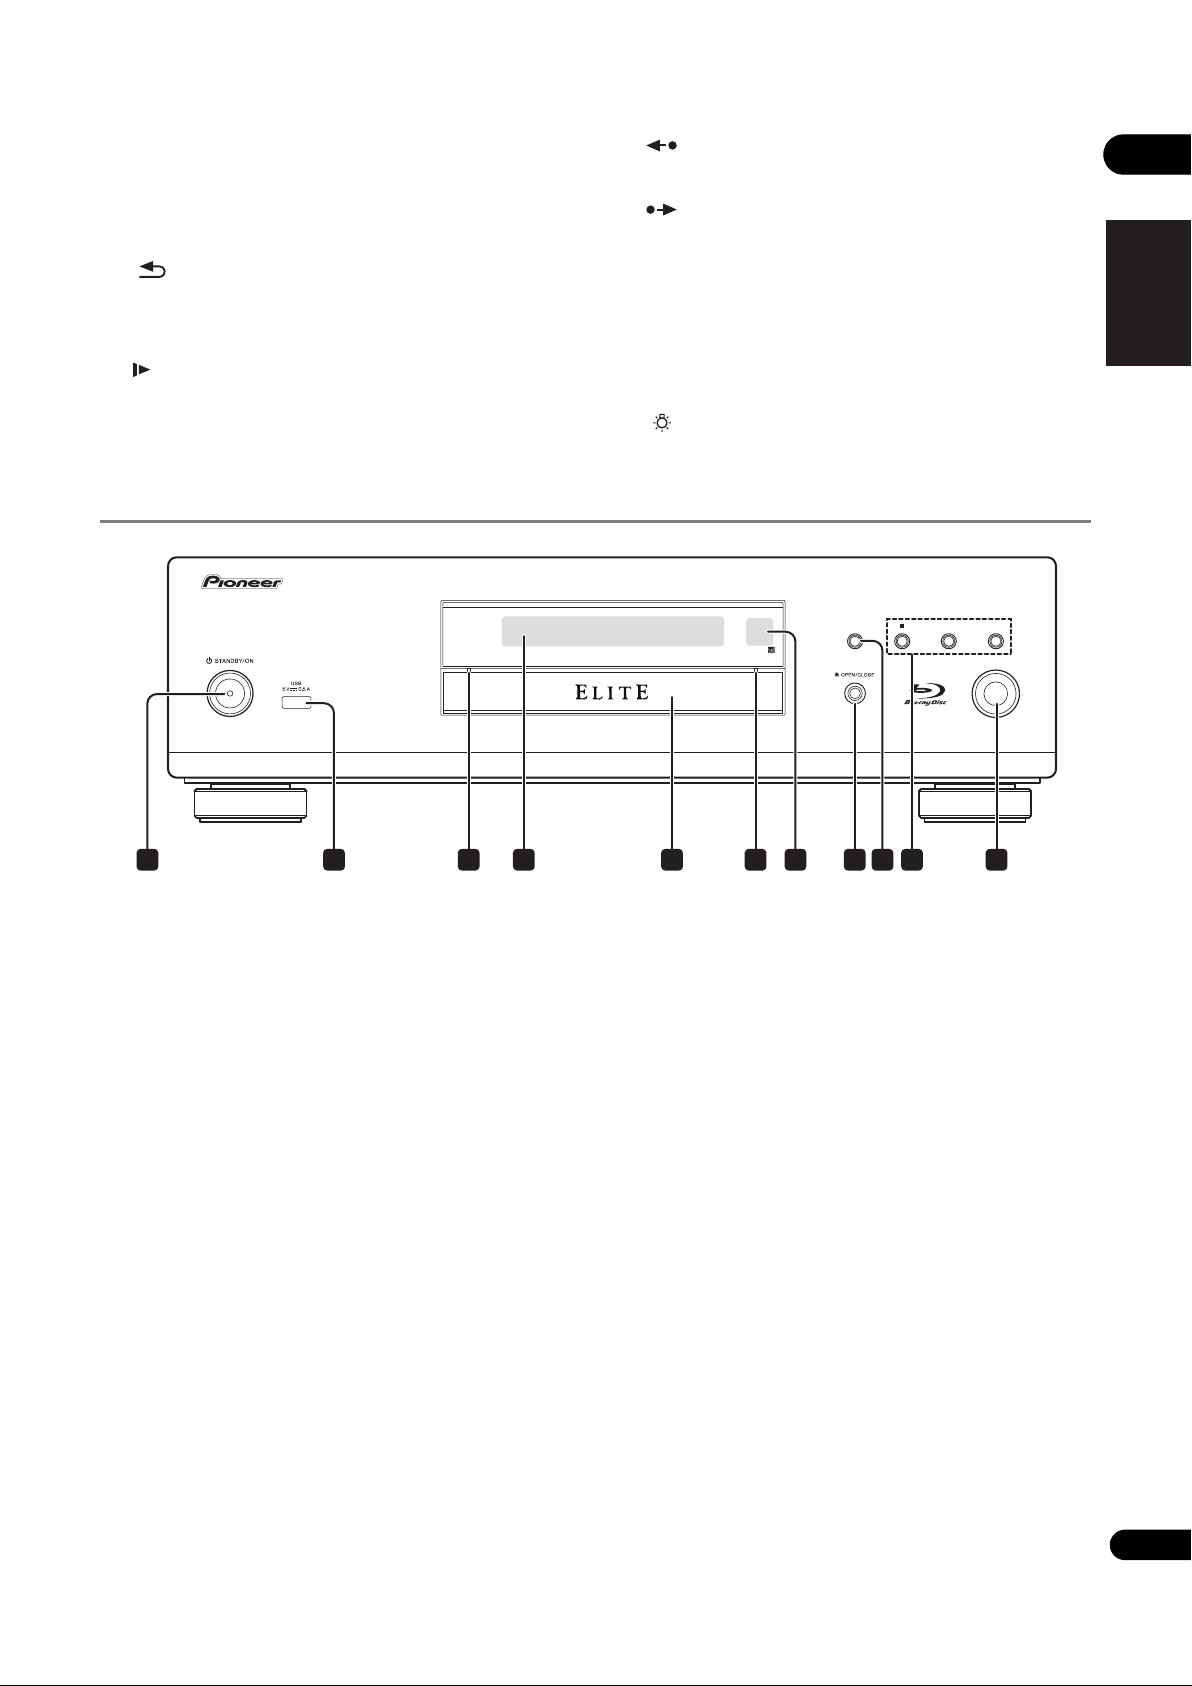
Front Panel
FL OFF DIRECT
32 REPLAY – Press during playback to return to a
position 10 seconds earlier. (page 28)
33 SHORT SKIP – Press during playback to forward
to a position 30 seconds later. (page 28)
34 / RESOLUTION – Use these to switch the output
video resolution from the HDMI OUT terminals.
(page 26)
35 CD/SACD – For hybrid discs, press to switch between
the CD and SACD layers. (page 30)
36 LIGHT – Turns on/off the button lights.
DIRECT
01
English Français Español
1 2 7 93 6 8
1 STANDBY/ON – Press to turn the power on and
off.
2 USB port – (page 22)
3 FL OFF indicator – (page 14)
4 Front panel display
5Disc tray
6 DIRECT indicator – (page 30)
7 Remote control sensor – Point the remote control to
54
8 OPEN/CLOSE – Press to open and close the disc
tray.
9 DIRECT – Press to switch on/off the DIRECT function
(page 30).
10 – Press to stop playback (page 27).
– (page 28)
– (page 28)
11 – Press to start/pause playback (page 27).
this, then operate it within approximately 7 m (23 ft.).
The player may have trouble capturing remote control
signals if there is a fluorescent light nearby. If this
happens, move the player away from the fluorescent
light.
10
11
15
En
Page 16
01
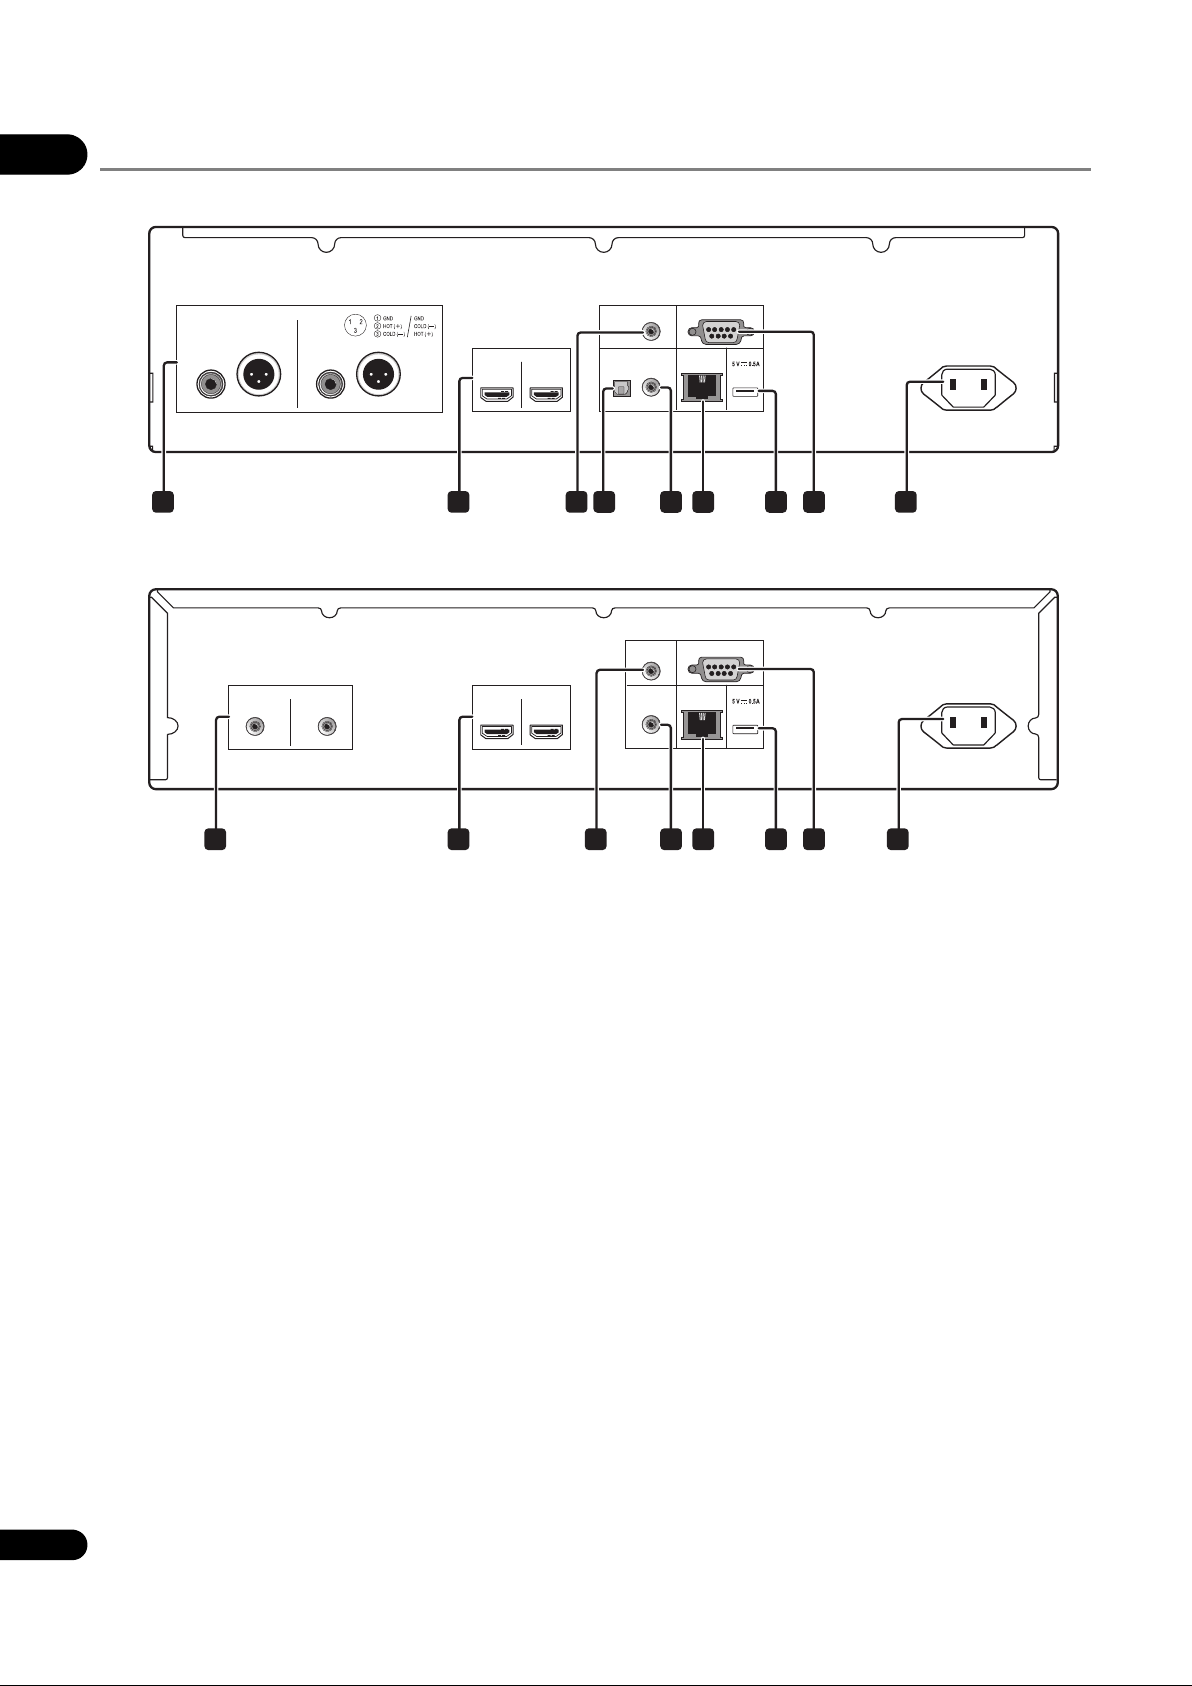
Rear Panel
BDP-88FD
RL
ANALOG AUDIO OUT
NORMAL
INVERSION
HDMI OUT
RS-232CZERO SIGNAL
MAINSUB
DIGITAL AUDIO OUT
OPTICAL
COAXIAL
LAN
(10/100)
USB
AC IN
1 92 3
BDP-85FD
RL
1 92 3
1 ANALOG AUDIO OUT terminals – (page 21)
2 HDMI OUT terminals – (page 17)
3 ZERO SIGNAL terminal – (page 22)
4 DIGITAL AUDIO OUT (OPTICAL) terminal
(BDP-88FD only) – (page 21)
4 5 7 86
ZERO
SIGNAL
HDMI OUTANALOG AUDIO OUT
MAINSUB
DIGITAL OUT
COAXIAL
LAN
RS-232C
(10/100)
USB
AC IN
5 7 86
6 LAN (10/100) terminal – (page 23)
7 USB port – (page 22)
8 RS-232C terminal – This terminal is not used.
9AC IN – (page 23)
5 DIGITAL AUDIO OUT (COAXIAL) terminal –
(page 21)
About the HDMI terminals on the BDP-88FD/85FD
MAIN – Connect with an HDMI-compatible TV or/and AV receiver or amplifier. This is the terminal that is used mainly.
SUB – Connect with an HDMI compatible AV receiver or amplifier.
16
En
Page 17
Chapter 2
Connecting up
Be sure to turn off the power and unplug the power cord
from the power outlet whenever making or changing
connections.
After connecting, make the settings at the Setup
Navigator or Initial Setup menu according to the type of
cable connected (page 24).
Also refer to the operating instructions for the device
being connected.
Note
• The illustrations used here are mainly of the BDP88FD.
Connecting using an
HDMI cable
The audio and video signals can be transferred to HDMIcompatible devices as digital signals with no loss of
sound or video quality.
Note
• Make the HDMI Mode setting at the Initial Setup
menu according to the connection of the devices to
the player (
• Make the settings at the Setup Navigator menu
according to the connected HDMI-compatible device
(page 24).
• 1080p and 4K video signals may not be output,
depending on the HDMI cable being used.
About HDMI
This player incorporates the High-Definition Multimedia
Interface (HDMI
pages 18 and 44).
®
) technology.
This product is compatible with “x.v.Color” that have the
capability to realize a wide-gamut color space based on
the xvYCC specifications.
Playing video signals conforming to “xvYCC” standards
on this player when this player is connected to an
“x.v.Color”-compatible TV, etc., expands color
reproduction capabilities, allowing natural colors to be
reproduced more faithfully than ever.
“x.v.Color” is a promotion name given to the products that
have the capability to realize a wide-gamut color space
based on the international standard specifications
defined as xvYCC.
“x.v.Color” and are trademarks of Sony
Corporation.
Playable audio signals through the
HDMI OUT terminal
•Dolby TrueHD
• Dolby Digital Plus
• Dolby Digital
• DTS-HD Master Audio
• DTS-HD High Resolution Audio
• DTS Digital Surround
•Linear PCM
Linear PCM audio signals meeting the following
conditions can be output:
– Sampling frequency: 32 kHz to 192 kHz
– Number of channels: Up to 8 (up to 6 for a 192 kHz
sampling frequency)
• DSD audio
• AAC
02
English Français Español
The terms HDMI and HDMI High-Definition Multimedia
Interface, and the HDMI Logo are trademarks or registered
trademarks of HDMI Licensing, LLC in the United States
and other countries.
The player supports Deep Color.
The conventional players can transmit a video signal with
8 bit color depth in the YCbCr 4:4:4 or RGB format; the
players supporting Deep Color can transmit a video
signal with a color bit depth of greater than 8 bits per
color component. Subtle color gradations can be
reproduced when this player is connected to a TV that
supports Deep Color.
When connected to a DVI device
• It is not possible to connect DVI devices
(computer displays, for example) that are not
compatible with HDCP. HDCP is a specification to
protect audiovisual content across the DVI/HDMI
interface.
• No audio signals are output.
• This player is designed for connection with HDMIcompatible devices. When connected to a DVI device,
it may not operate properly depending on the DVI
device.
17
En
Page 18

02
About Control Function with
HDMI
The functions work when a control function with HDMIcompatible Pioneer TV or AV system (AV receiver or
amplifier, etc.) is connected to the player using an HDMI
cable.
Also refer to the operating instructions for the TV and AV
system (AV receiver or amplifier, etc.).
To use the control function with
HDMI
• The control function with HDMI operates when
control function with HDMI is set to On for all devices
connected with HDMI cables.
• Once the connections and the settings of all the
devices are finished, be sure to check that the player’s
picture is output to the TV. (Also check after changing
the connected devices and reconnecting HDMI
cables.) The control function with HDMI may not
operate properly if the player’s picture is not properly
output to the TV.
• Use High Speed HDMI
control function with HDMI. The control function with
HDMI may not operate properly if other HDMI cables
are used.
• For some models, the control function with HDMI
may be referred to as “KURO LINK” or “HDMI
Control”.
• The control function with HDMI does not work with
devices of other brands, even if this player is
connected with an HDMI cable.
What the control function with
HDMI can do
• Operating the player with the TV’s remote
control.
Such player operations as starting and stopping
playback and displaying the menus can be performed
from the TV.
• The player’s playback picture is displayed on the
TV’s screen. (Auto-select function)
The input switches automatically on the TV and AV
system (AV receiver or amplifier, etc.) when playback
is started on the player or the HOME MENU is
displayed. When the input is switched, the playback
picture, the HOME MENU appears on the TV.
• The power of the TV and the player turns on and
off automatically. (Simultaneous power function)
When playback on the player is started or the HOME
MENU is displayed, if the TV’s power was off, its
power turns on automatically. When the TV’s power is
turned off, the player’s power automatically turns off.
®/TM
Cables when using the
Setting the HDMI Mode
The BDP-85FD/88FD has two HDMI OUT (MAIN, SUB)
terminals. See page 16 for the details on these terminals.
To make the setting, press HOME MENU to display the
Home Menu, select Initial Setup HDMI HDMI
Mode.
The HDMI Mode can be changed with the HDMI button
on the remote control. The mode shown on the table
below changes each time the button is pressed.
See the table below and set up the HDMI Mode
according to your connection style.
HDMI
Mode
Dual
Separate
Pure
Audio
Single
Caution
•When the HDMI Mode is set to Dual and the output
is delivered from both the HDMI OUT (MAIN)
terminal and the HDMI OUT (SUB) terminal, then the
video and audio that can be output from both
terminals will be output.
HDMI OUT MAIN HDMI OUT SUB
Video Audio Control Video Audio Control
Sound Retriever Link
About Sound Retriever Link
Sound Retriever Link is a sound quality correction control
technology that automatically adjusts the compressed
sound quality for the connected AV receiver using HDMI
control function.
Sound Retriever Link function allows you to enjoy higher
quality audio by setting the connected AV receiver’s
Sound Retriever function automatically.
Sound Retriever Link function on this player works
exclusively with the following situations.
• When playing via a network or playing PC contents
stored on a USB device.
• The Pioneer AV receiver compatible with Sound
Retriever Link function is connected to this player
through an HDMI cable and the player’s setting is set
as shown below (page 44).
Control: On
• Also refer to the instructions of the AV receiver.
• See Pioneer website about AV receivers compatible
with Sound Retriever Link function.
Caution
• Connect the player directly to the Pioneer AV receiver
compatible with Sound Retriever Link function.
Interrupting a direct connection with an amplifier or
AV converter (such as an HDMI switch) can cause
malfunction.
18
En
Page 19
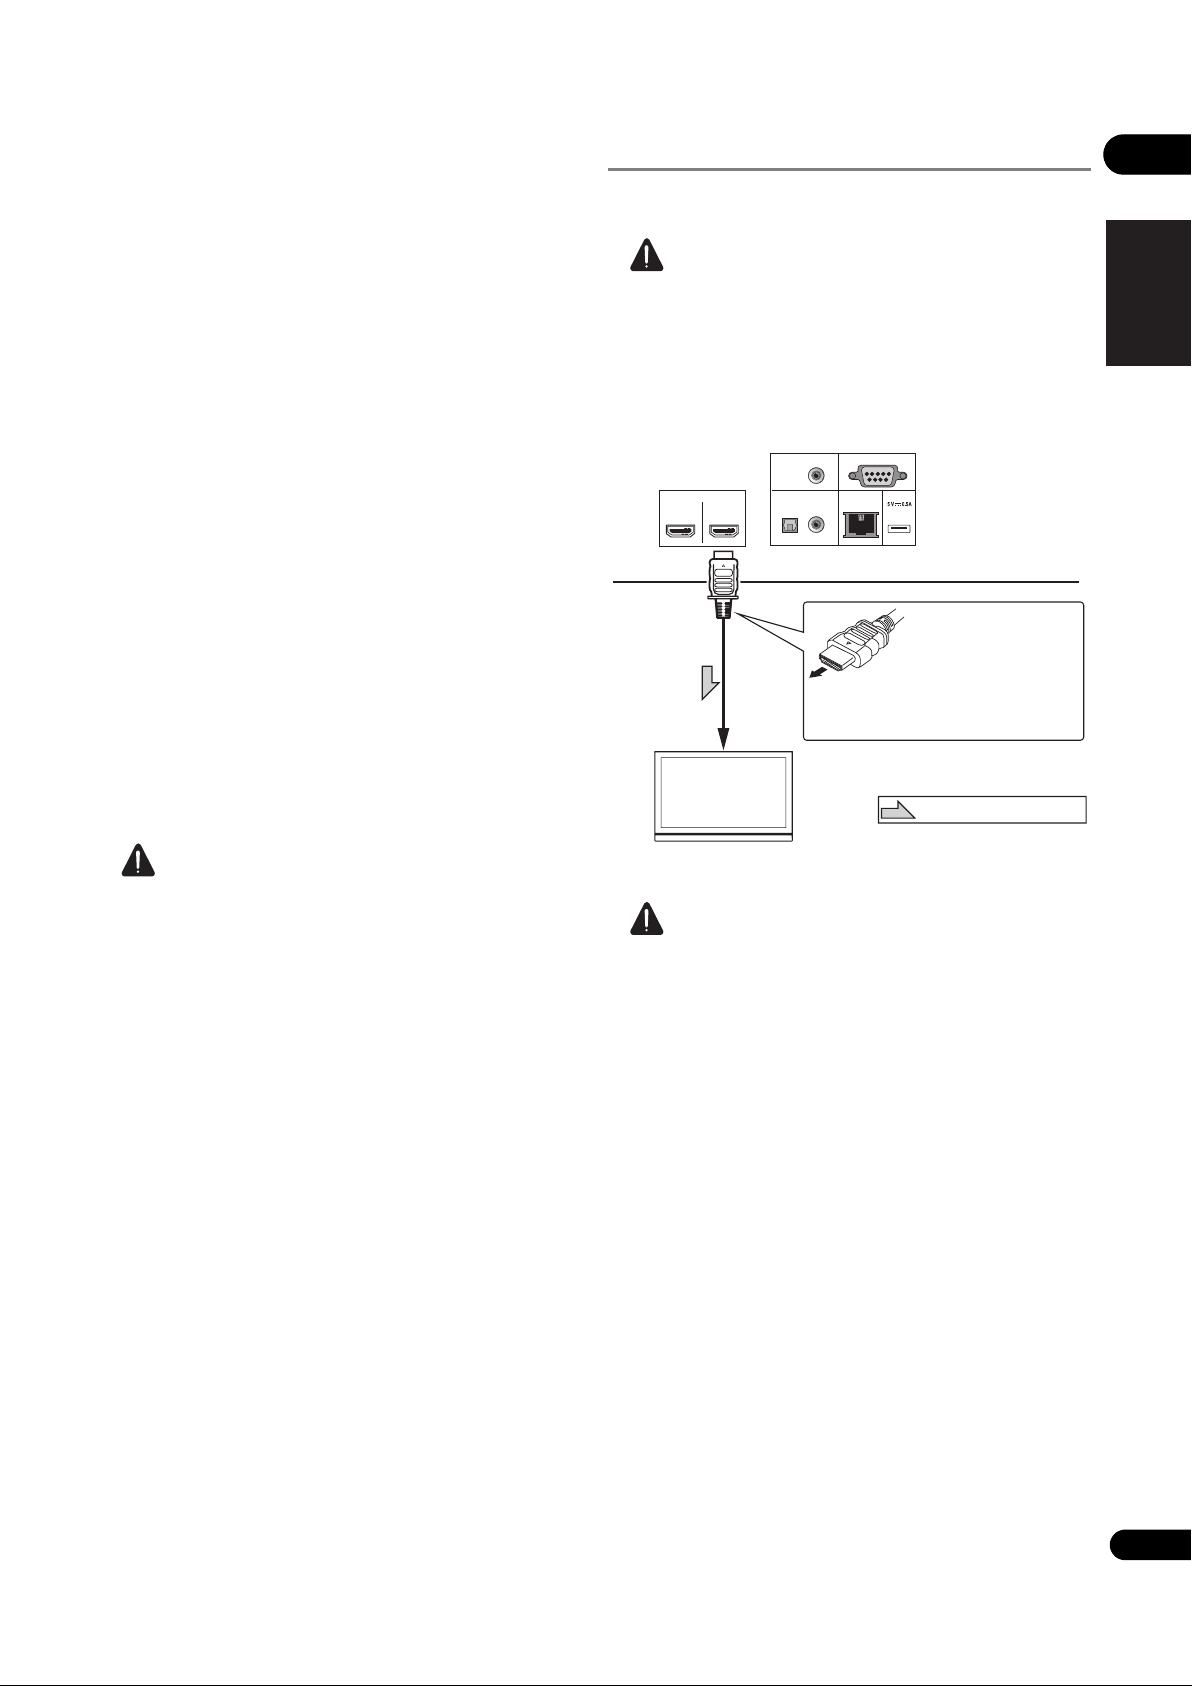
About the PQLS function
TV
Match the direction of
the plug to the terminal
and insert straight.
To HDMI
input terminal
HDMI cable
(commercially
available)
It is also possible to connect to an
AV receiver or amplifier using an
HDMI cable.
Direction of signal flow
BDP-88FD’s rear panel
PQLS (Precision Quartz Lock System) is a digital audio
transfer control technology using the HDMI control
function. The player’s output signals are controlled from
the AV receiver to achieve high sound quality playback
using the receiver’s quartz oscillator. This eliminates the
influence of the jitter generated during signal transfer
which can adversely affect the sound quality.
• This player supports the functions below.
– The “PQLS 2ch Audio” function that is activated
when playing music CDs (CD-DAs)
– The “PQLS Multi Surround” function that is
activated when playing all discs (BDs, DVDs, etc.)
with linear PCM audio output
– The “PQLS Bitstream” function that is activated
when playing with bitstream audio output
• The various PQLS functions are activated when a
Pioneer AV receiver supporting the PQLS functions is
connected directly to the HDMI OUT terminal with an
HDMI cable and the player’s settings are set as
shown below (page 44).
Control: On
Precision Audio: AUTO or HDMI (PQLS) (BDP-88FD
only)
• Also refer to the AV receiver’s operating instructions.
• See the Pioneer website for AV receivers supporting
the PQLS function.
Connecting a TV
See Connecting an AV receiver or amplifier on page 20 to
connect an AV receiver or amplifier using an HDMI cable.
Caution
• Hold the plug when connecting and disconnecting
the cable.
• Placing a load on the plug could result in faulty
contact and no video signals being output.
Connect a TV to the HDMI OUT (MAIN) terminal.
HDMI OUT
ZERO SIGNAL
DIGITAL AUDIO OUT
MAINSUB
OPTICAL
COAXIAL
LAN
RS-232C
(10/100)
USB
02
English Français Español
Caution
• The PQLS function may stop working when the video
output resolution is switched. The PQLS function will
start working again once playback is stopped then
restarted.
Caution
• Make sure to set HDMI Mode to Dual or Single
(page 44).
• Turn on the power of the AV receiver connected to the
HDMI OUT terminal, then start playback of the disc.
19
En
Page 20
02
BDP-88FD’s rear panel
HDMI cable
(commercially
available)
AV receiver
or amplifier
To HDMI input
terminal
TV
Match the
direction of the
plug to the
terminal and
insert straight.
Direction of signal flow
To HDMI input
terminal
AV receiver
or amplifier
HDMI cable
(commercially
available)
AV receiver
or amplifier
TV
Match the
direction of the
plug to the
terminal and
insert straight.
Direction of signal flow
To HDMI input
terminal
HDMI cable
(commercially
available)
BDP-88FD’s rear panel
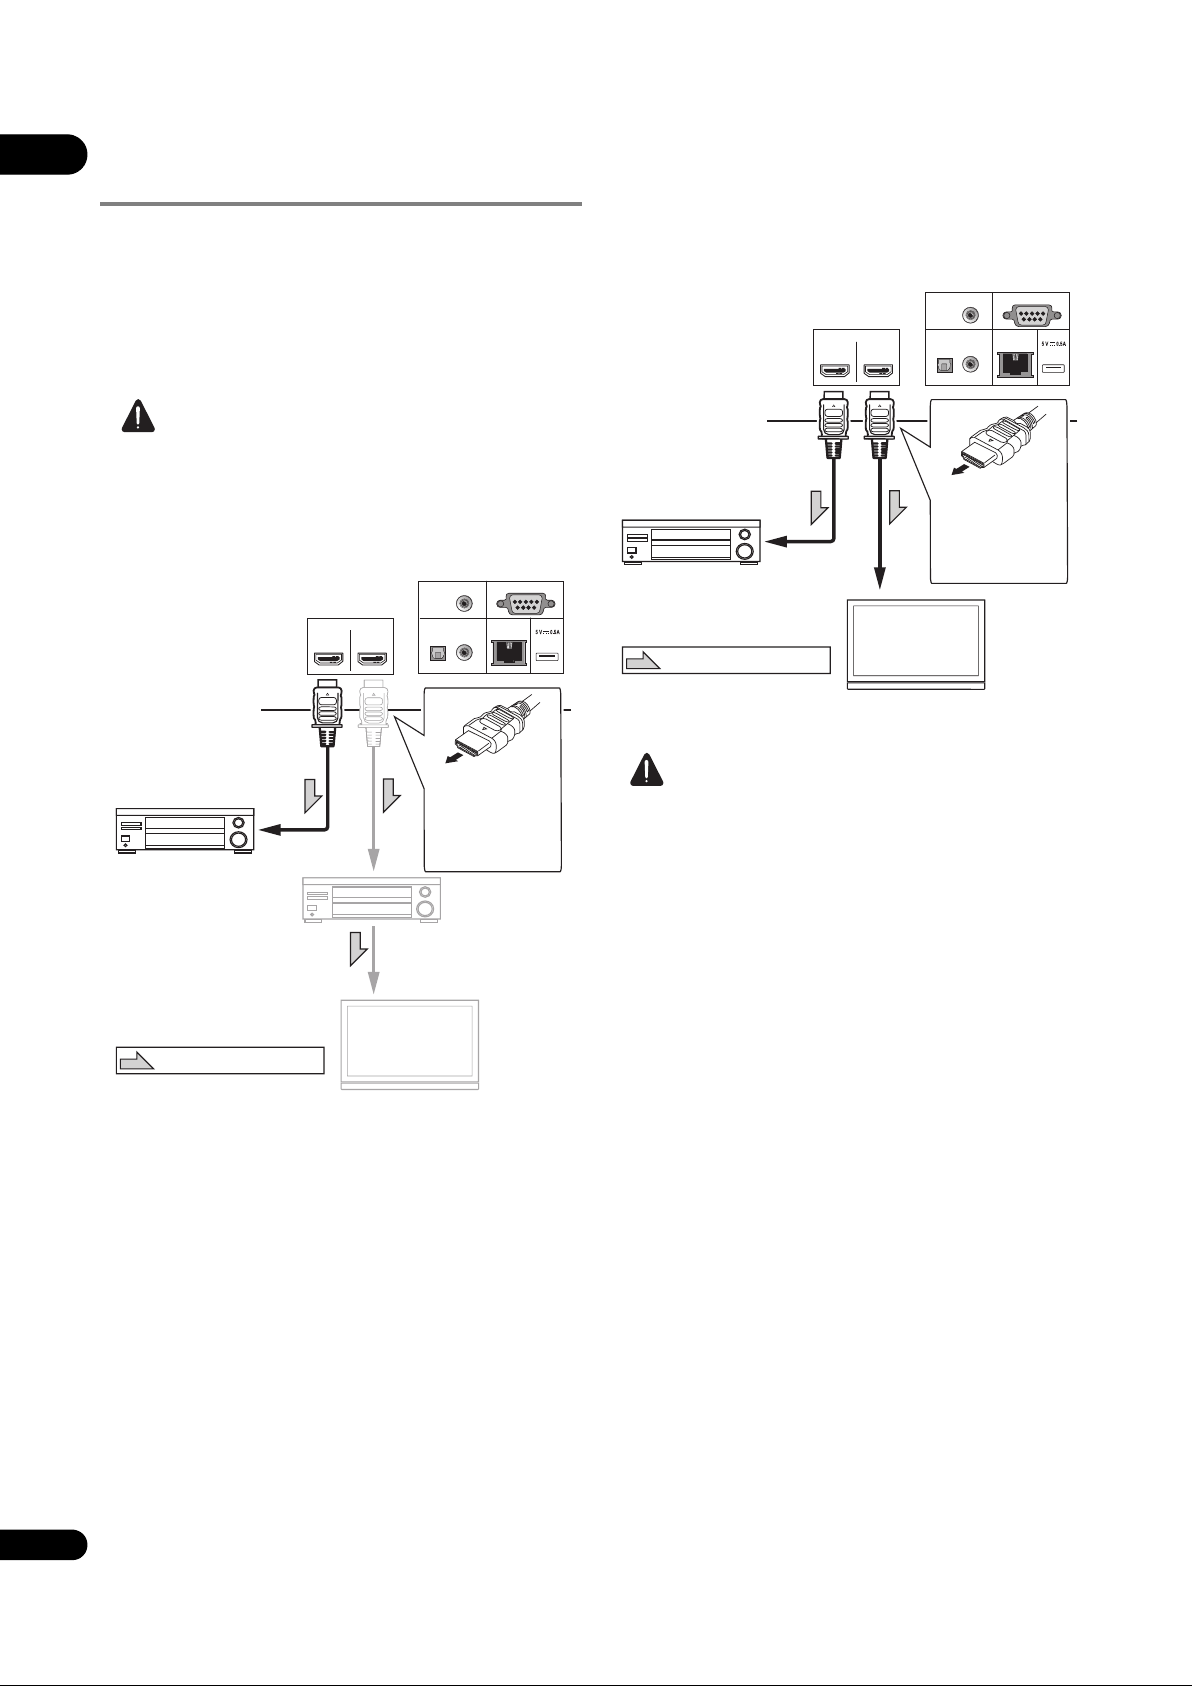
Connecting an AV receiver or
amplifier
Connect to an AV receiver or amplifier in order to enjoy
the surround sound of Dolby TrueHD, Dolby Digital Plus,
Dolby Digital, DTS-HD Master Audio, DTS-HD High
Resolution Audio, DTS Digital Surround, LPCM, AAC or
DSD. For instructions on connecting the TV and speakers
to the AV receiver or amplifier, refer to the operating
instructions for AV receiver or amplifier.
Caution
• Hold the plug when connecting and disconnecting
the cable.
• Placing a load on the plug could result in faulty
contact and no video signals being output.
Achieving better video and sound quality
When connecting one TV (or projector) and AV amplifier
to the player, connect in such a way that the video and
audio signals are transferred separately in order to
achieve higher quality video and sound.
HDMI OUT
ZERO SIGNAL
DIGITAL AUDIO OUT
MAINSUB
OPTICAL
COAXIAL
LAN
RS-232C
(10/100)
USB
HDMI OUT
ZERO SIGNAL
DIGITAL AUDIO OUT
MAINSUB
OPTICAL
COAXIAL
LAN
RS-232C
(10/100)
USB
Caution
• Make sure to set HDMI Mode to Separate (page 44).
• If the AV amplifier connected to the HDMI OUT (SUB)
terminal is also connected to a TV, the TV’s input may
switch automatically. If this happens, turn off the
control function with HDMI on the TV.
20
En
Page 21
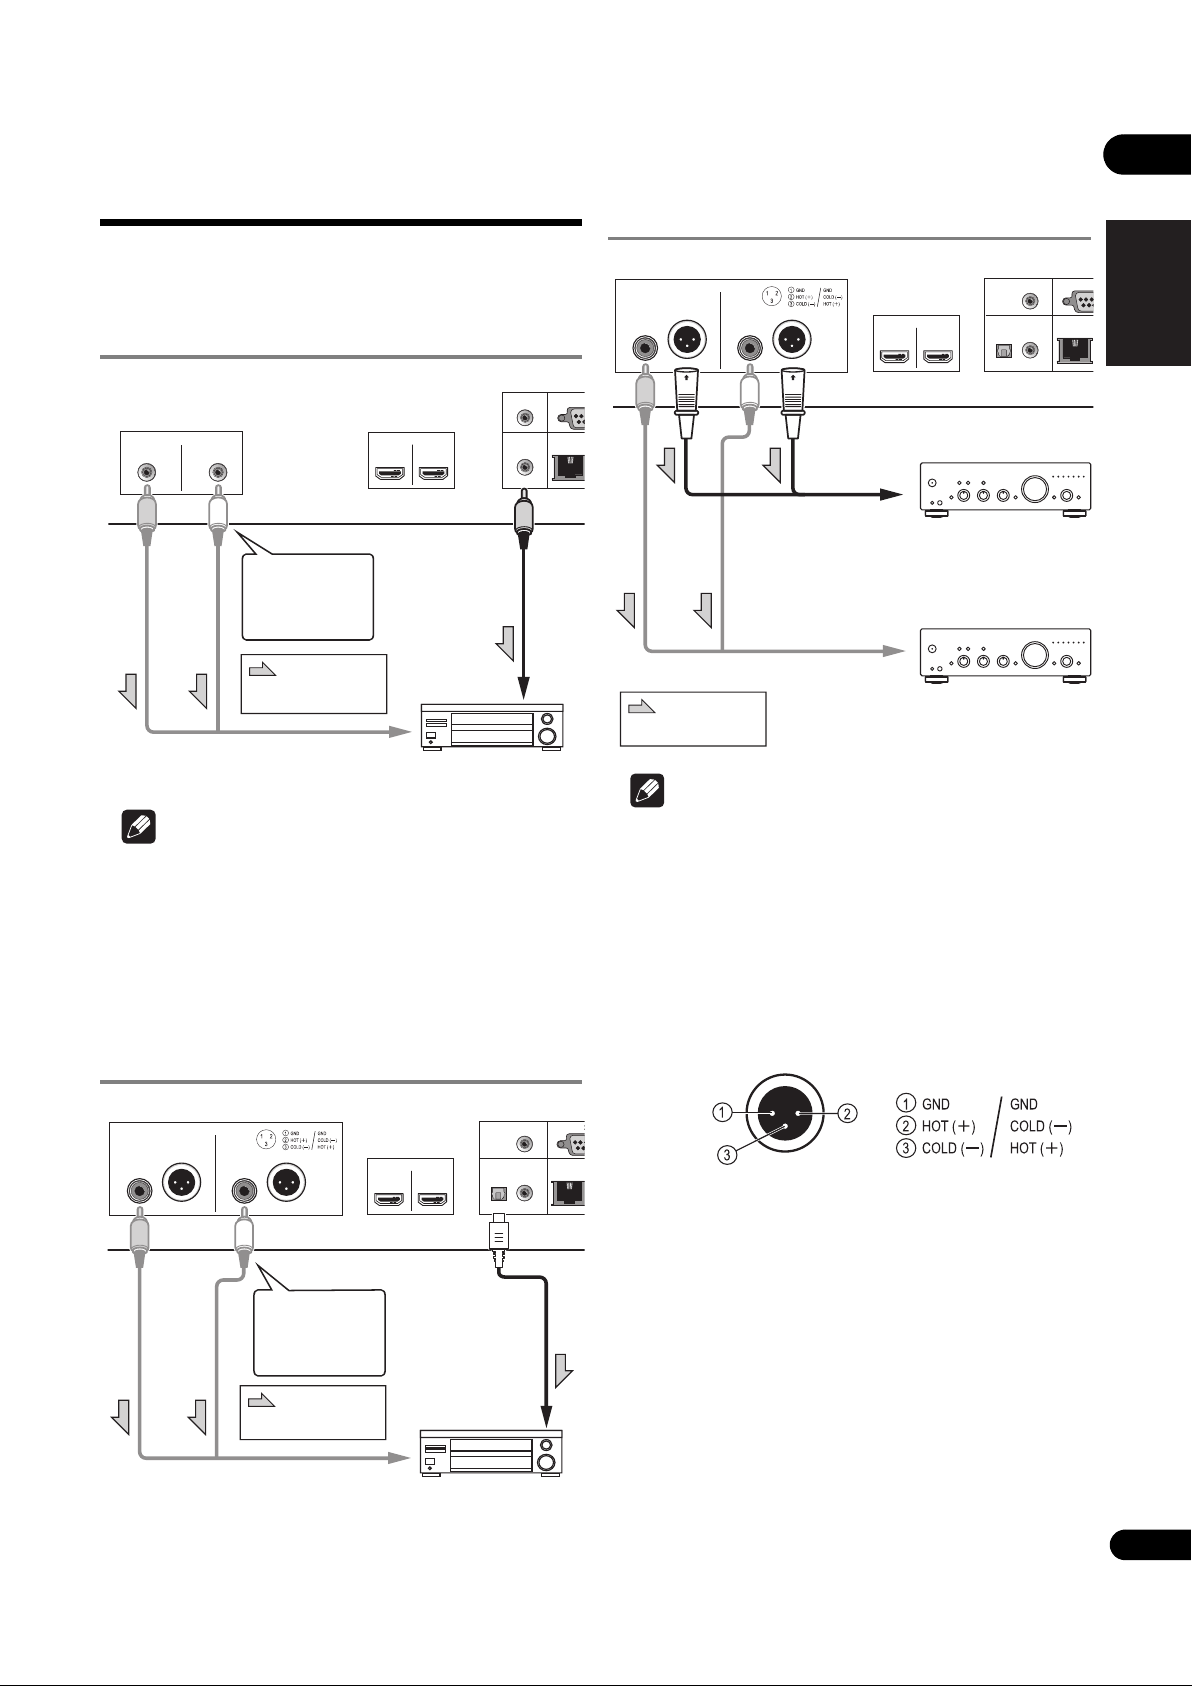
Connecting audio
HDMI OUT
MAINSUB
ANALOG AUDIO OUT
RL
RS-
LAN
(10/100)
DIGITAL OUT
COAXIAL
ZERO
SIGNAL
UT
AV receiver or amplifier
BDP-85FD’s rear panel
Direction of
signal flow
White
Red
To audio input
terminals
Audio cable
(commercially
available)
Coaxial digital
audio cable
(commercially
available)
To coaxial
digital audio
input terminal
2-channel
analog audio
can also be
connected.
RS-2
DIGITAL AUDIO OUT
LAN
(10/100)
HDMI OUT
OPTICAL
MAINSUB
COAXIAL
ANALOG AUDIO OUT
R
L
NORMAL
INVERSION
ZERO SIGNAL
UT
AV receiver or amplifier
BDP-88FD’s rear panel
Direction of
signal flow
White
Red
To audio input
terminals
Optical digital
audio cable
(commercially
available)
To optical
digital audio
input terminal
2-channel
analog audio
can also be
connected.
Audio cable
(commercially
available)
RS-2
DIGITAL AUDIO OUT
LAN
(10/100)
HDMI OUT
OPTICAL
MAINSUB
COAXIAL
ANALOG AUDIO OUT
RL
NORMAL
INVERSION
ZERO SIGNAL
UT
BDP-88FD’s rear panel
Direction of
signal flow
To audio (RCA)
input terminals
Balanced cable
(commercially
available)
Pre-main amplifier,
etc., furnished with
balanced-type input
connectors
Audio cable
(commercially available)
To balanced-type
input terminals
Pre-main amplifier
with RCA (pin plug)
input connectors
cables
Connecting an AV receiver or
amplifier using an coaxial
digital audio cable
Connecting the Pre-main
amplifier using a balanced
cable (BDP-88FD only)
02
English Français Español
Note
• The volume of analog output audio may be low
depending on the setting of this device and contents
being played.
Connecting an AV receiver or
amplifier using an optical
digital audio cable (BDP88FD only)
Note
• The volume of analog output audio may be low
depending on the setting of this device and contents
being played.
Balanced output connector
(appearance on unit side; equivalent
to XLR-3-31)
The settings of the balance output terminal can be
changed. Refer to the XLR Terminal Polarity on page 43 for
details.
NORMAL
INVERSION
21
En
Page 22
02
Audio or Video
cable
(commercially
available)
AV receiver or TV etc.
To audio or video
input terminals
USB flash drive
BDP-88FD’s front panel
Hard disk, etc.
USB cable
(commercially
available)
RS-232C
DIGITAL AUDIO OUT
LAN
(10/100)
USB
OUT
OPTICAL
MAIN
COAXIAL
ZERO SIGNAL
USB flash drive
BDP-88FD’s rear panel
Hard disk, etc.
USB cable
(commercially
available)
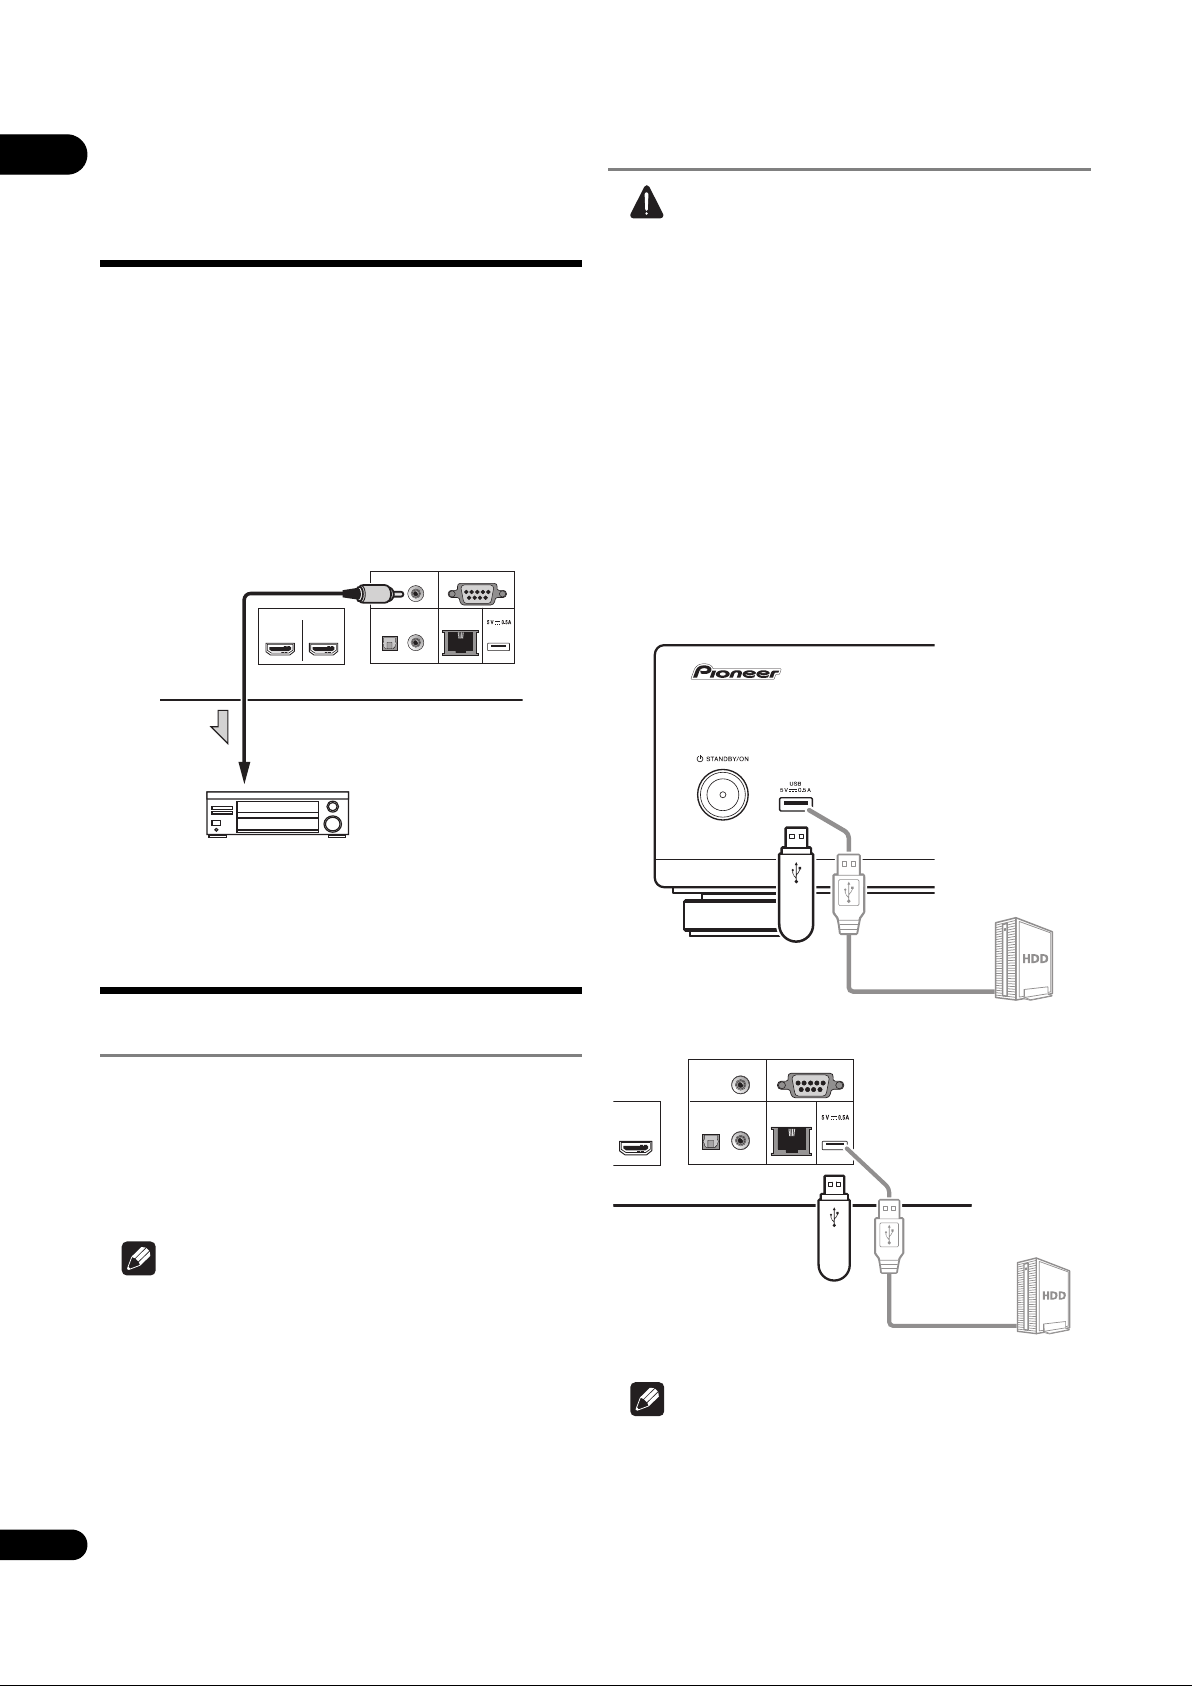
Input device is
Connecting the USB device
connected with the
ZERO SIGNAL terminal.
The Zero Signal is the reference (GND) for video and audio
signals. If you connect the ZERO SIGNAL terminal of the
equipment to the audio input terminal of another device
connected to this equipment, with a pin cord, the device
becomes compatible to the audio standard of this
equipment, and the signal integrity improves.
On the other hand, if you connect the video input terminal
of the device, it will become compatible to the video
standard of this equipment and the signal integrity will
improve.
HDMI OUT
ZERO SIGNAL
DIGITAL AUDIO OUT
MAINSUB
OPTICAL
COAXIAL
LAN
RS-232C
(10/100)
USB
Caution
• Be sure to turn the player’s power off before
connecting or disconnecting USB devices.
• When using an external hard disk as the external
storage device, be sure to turn on the hard disk’s
power before turning on the player’s power.
• If the USB device is write-protected, be sure to disable
the write-protection.
• When connecting the USB cable, hold onto the plug,
set the plug in the proper direction for the port and
insert it horizontally.
• Placing excessive loads on the plug may result in
poor contact, making it impossible to write data on
the USB device.
• When a USB device is connected and the player’s
power is turned on, do not unplug the power cord.
Connecting components
to the USB port
About USB devices
The USB devices that can be connected to the player are
as shown below.
• USB 2.0-compatible USB flash drive (capacity of 1 GB
or greater, 2 GB or greater recommended) or HDD
(capacity 2 TB or less)
• File system: FAT16, FAT32 or NTFS
Note
• Devices formatted with a file system other than the
above cannot be used.
• USB devices may not be recognized if they contain
multiple partitions.
• Some USB devices may not operate with this player.
• Operation of USB devices is not guaranteed.
Note
• Devices may not work if connected to the USB port via
a memory card reader or USB hub.
• Use a USB cable with a length of 2 meters or less.
22
En
Page 23
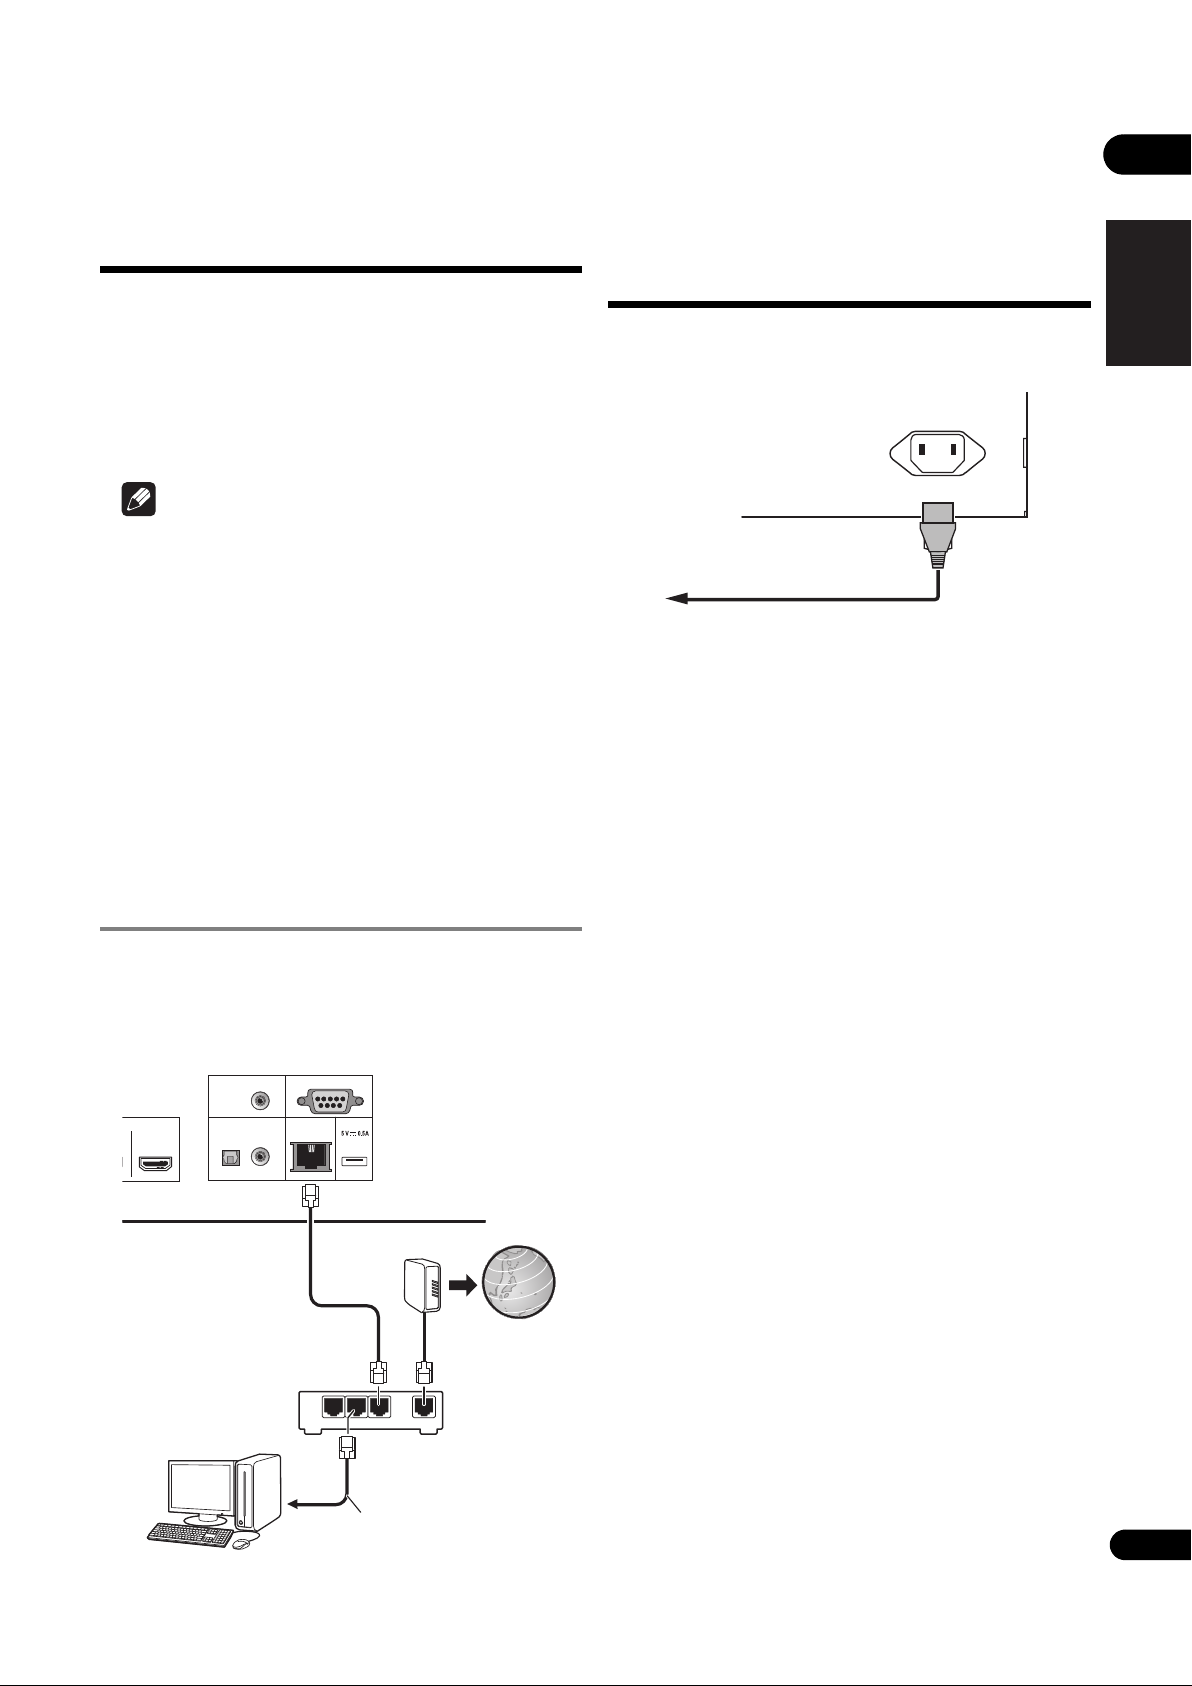
Connecting to the
RS-232C
DIGITAL AUDIO OUT
LAN
(10/100)
USB
OPTICAL
MAIN
COAXIAL
ZERO SIGNAL
WAN
321
LAN
LAN cable
(commercially available)
Router
Internet
Modem
LAN cable
(commercially
available)
Computer
BDP-88FD’s rear panel
BDP-88FD’s rear panel
Power cord
(included)
To wall outlet
network through LAN
LAN terminal specifications
LAN terminal: Ethernet jack (10BASE-T/100BASE-TX)
02
interface
By connecting this player to the network via the LAN
terminal, you can play image, audio and video files stored
on the components on the network, including your
computer, using Source inputs.
Turn on the DHCP server function of your router. In case
your router does not have the built-in DHCP server
function, it is necessary to set up the network manually.
For details, see Setting the IP address on page 47 .
Note
• Refer to the operation manual of the equipment you
have as the connected equipment and connection
method may differ depending on your Internet
environment.
• When using a broadband Internet connection, a
contract with an Internet service provider is required.
For more details, contact your nearest Internet
service provider.
• Please note that Pioneer will accept no responsibility
whatsoever for communications errors or problems
related to the user's network connection environment
or connected devices. Contact your provider or the
manufacturer of your connected devices.
Connecting the power
cord
Connect the power cord after all the connections between
devices have been completed.
AC IN
English Français Español
Connecting with a LAN cable
(wired LAN)
Connect the LAN terminal on this receiver to the LAN
terminal on your router (with or without the built-in DHCP
server function) with a straight LAN cable (CAT 5 or
higher).
23
En
Page 24

03
Chapter 3
Getting Started
Making settings using
the Setup Navigator
menu
Be sure to perform these settings when using the player
in the following situations.
• When you use the player for the first time.
•After Initial Setup format.
Caution
• Before turning on the power, check that the
connections between the player and other devices are
correct. Also, turn on the power of the devices
connected to the player before turning on the player’s
power.
• When using a Pioneer TV or front projector
compatible with the Control function, set Control to
On on the connected device before turning on the
player’s power.
TOP MENU POPUP MENU
TOP
POP
UP
If the Setup Navigator menu is not
displayed
Press HOME MENU to display the Home
Menu, select Initial Setup Setup Navigator
Start, then press ENTER.
3 Start Setup Navigator.
Press ENTER.
• Setup Navigator starts.
4 Select the OSD language.
Use / to select, then press ENTER.
5 Select the appropriate output resolution for the
connected TV.
Use / to select, then press ENTER.
6 Select the appropriate aspect ratio for the
connected TV.
Use / to select, then press ENTER.
7 Close the Setup Navigator menu.
Press ENTER.
• Setup Navigator finishes and the setting is stored.
• Press RETURN to go back to the previous
screen.
ENTER
HOME MENU RETURN
1 Turn on the TV’s power and switch the input.
See the TV’s operating instructions for the details of
operating the TV.
2 Turn on the player’s power.
Press STANDBY/ON.
Check that the Setup Navigator menu is displayed.
24
En
Page 25
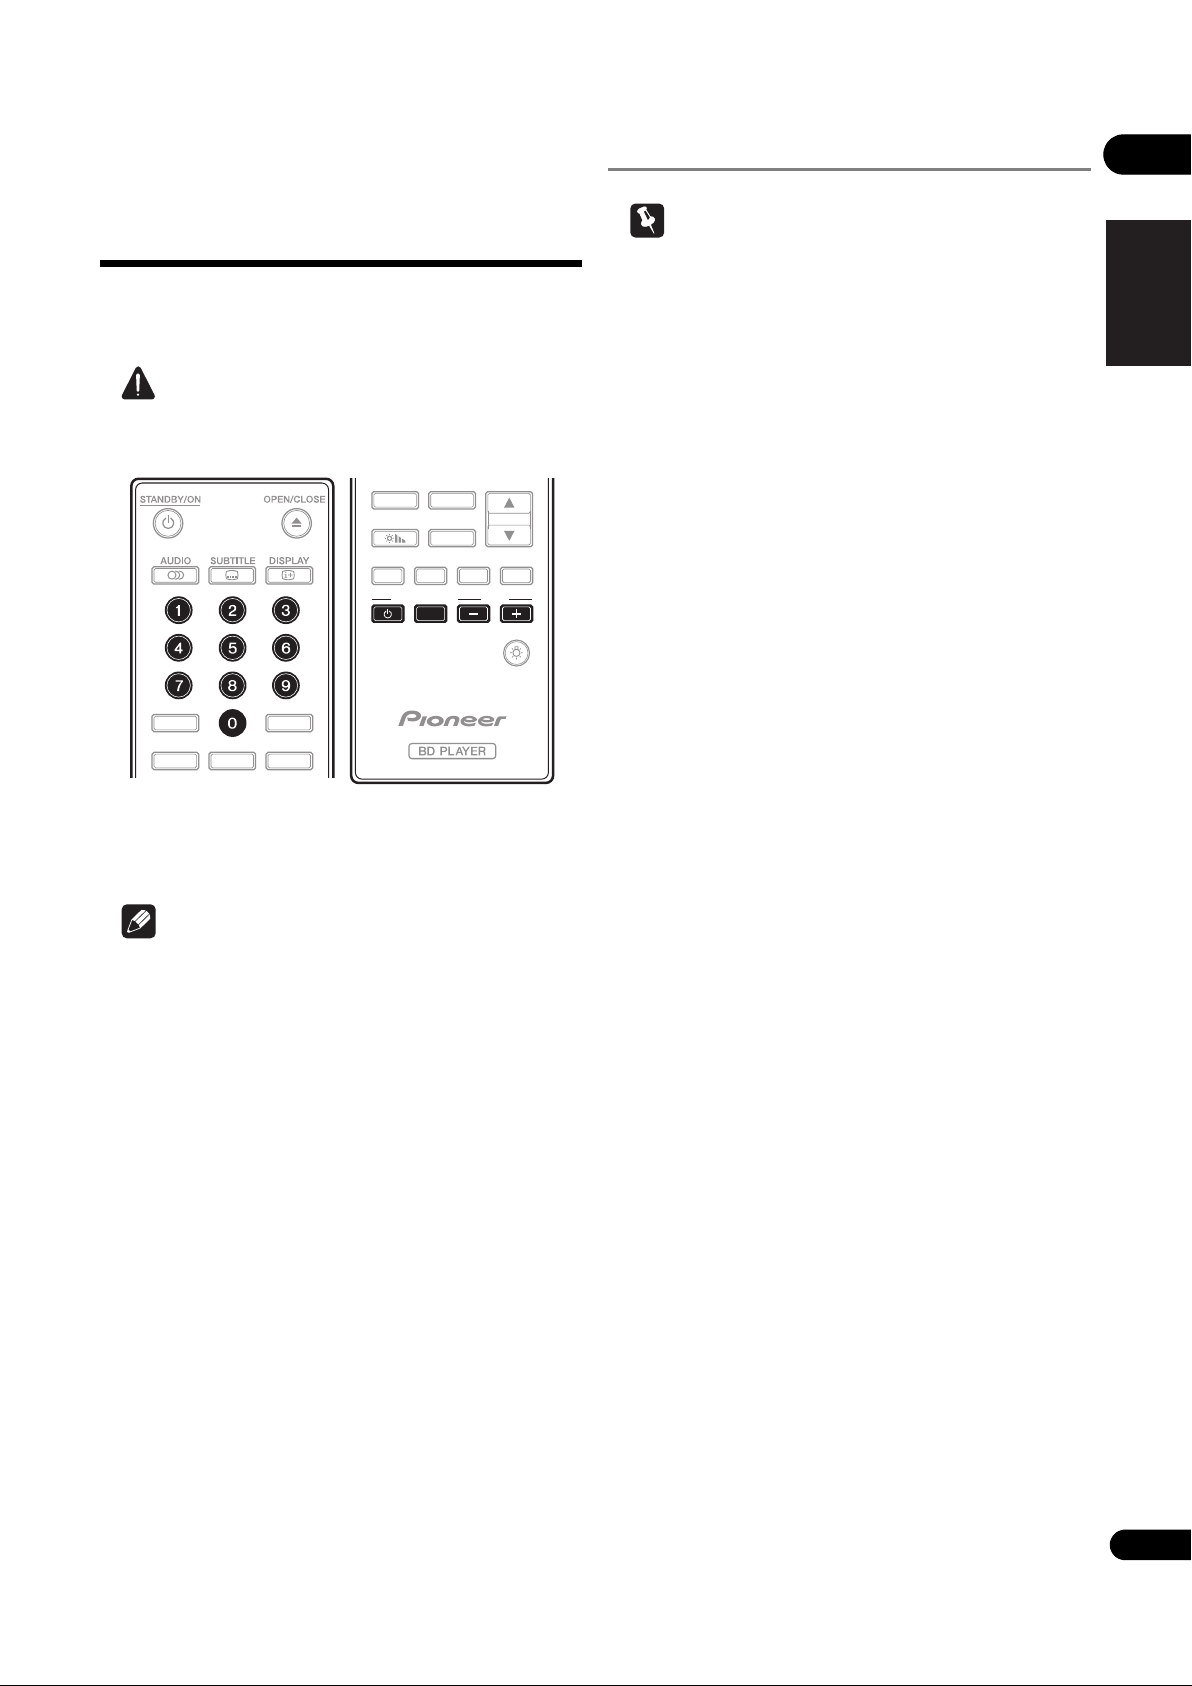
Operating the TV with
the player’s remote
control
When the manufacturer code for your brand of TV is set
on the player’s remote control, the TV can be operated
using the player’s remote control.
TV Preset code list
Important
• We do not guarantee the operations of all the
manufacturers and devices listed. Operation may not
be possible even if a preset code is entered.
Manufacturer Code(s)
03
English Français Español
Caution
• The setting may be restored to the default after the
batteries are replaced. If this happens, reset it.
CD/SACD
INPUT
HDMI
ZOOM INDEX
LIGHT
RESOLUTION
CLEAR
AUDIO P. VIDEO P.
FUNCTION
CONTINUED
DIRECT
DIMMER
PROGRAM
BOOKMARK
RG YB
TV CONTROL VOL
1 Input the 2-digit manufacturer code.
Press the number buttons (0 to 9) to input the code while
pressing TV CONTROL .
Note
• The factory default setting is 01 (PIONEER).
• If you make a mistake when inputting the code,
release TV CONTROL then start over from the
beginning.
• When there are multiple codes for a manufacturer, try
inputting them in the indicated order until the TV can
be operated.
PIONEER 01
ALBA 07, 24, 27
BUSH 07, 24, 27
CHANGHONG 05, 22
CONIA 28
DSE 29
FUNAI 14
GRUNDIG 16
HAIER 15
HISENCE 12
HITACHI 19
JVC 17
KONKA 21
LG ELECTRIC 08, 10
LOEWE 07, 24, 27
METZ 23
MITSUBISHI 06
NEC 25
ORION 20
PANASONIC 02
PHILIPS 07, 24, 27
SAMSUNG 09
SANYO 18
SHARP 04, 26
SKYWORTH 11
SONY 03
TCL 13
TOSHIBA 05
VICTOR 17
VIZIO 08, 10
2 Check that the TV can be operated.
Operate the TV using TV CONTROL.
– Press to turn the TV’s power on and off.
INPUT – Press to switch the TV’s input.
VOL +/– – Press to adjust the volume.
25
En
Page 26

03
26
En
Switching the output
video resolution
Use the procedure below to switch the output video
resolution from the various video output terminals.
Press RESOLUTION /.
DIRECT
DIMMER
PROGRAM
BOOKMARK
RG YB
TV CONTROL VOL
INPUT
• The current output video resolution setting is
displayed on the player’s front panel display.
To switch the output video resolution, press
RESOLUTION / again.
• The output video resolution setting can also be
switched by selecting Resolution from the Initial
Setup menu (page 42).
If high definition videos of 4K etc.
are not visible
Change the settings by the following procedure.
1 Press the HDMI button on the remote control for
5 seconds or more.
2 If “4K 4:4:4” is displayed on the product screen,
use / button to change it to “4K 4:2:0”.
If the video improves after changing the setting, continue
using this setting.
To revert the setting to the original value, do the operation
described above again and change the setting to “4K
4:4:4”.
Caution
• On some devices (TV, AV receiver or amplifier, etc.),
the video or audio may not be output properly when
the resolution is switched. If this happens, use
RESOLUTION to set a resolution at which the video
and audio are properly output.
• When video signals are being output with a resolution
of 4K/24p, 4K, 1080/50i, 1080/50p, 720/50p, 1080/24p,
1080/60i, 1080/60p or 720/60p from the HDMI OUT
terminals, the picture may be output with an aspect
ratio of 16:9, even if the TV Aspect Ratio is set to 4:3
(Standard).
• The picture may not be displayed for a while when the
resolution is switched.
HDMI
CD/SACD
RESOLUTION
ZOOM INDEX
LIGHT
• When the connected device supports 3D and if a 3D
Disc is played back, the 3D output is prioritized for
output, regardless of the resolution settings. Also,
switching of resolution may not be possible while the
3D contents are playing.
•When Auto is selected, the picture is output at 60
frames/second if your TV is not compatible with 1080/
24p signals.
•When 4K, 4K/24p, 1080/24p or Source Direct is
selected, the signals are output as such, even if your
TV is not compatible with 4K, 4K/24p or 1080/24p
signals. If the picture is not displayed properly, use
RESOLUTION / to set an output video resolution
at which the video and audio signals are properly
output.
•When the Resolution is set to Auto and if the
television set in use supports 4K or 4K/24p output,
then the output is made in 4K or 4K/24p. If the
connected television set does not support 4K or 4K/
24p, then the output is made with a recommended
resolution other than 4K.
• The pictures are output with the preferred output
resolution of the device (TV, AV receiver or amplifier,
etc.) connected to the selected video output terminal.
However, if devices are connected to both HDMI
MAIN and HDMI SUB, the pictures are output with a
resolution which both devices support. If the
resolution supported by the devices connected to the
HDMI MAIN and HDMI SUB terminals vary, then
either turn off the power of the device that is not in
use, or connect the device that will be used to the
HDMI MAIN terminal and set the HDMI Mode
setting to Single in ord
er to deliver output on the
device used for viewing video with optimum
resolution.
•When the HDMI Mode is set to Dual and if only one
of the devices that is connected to the HDMI MAIN
and the HDMI SUB supports 3D, then a 3D disc may
not be played back. In such cases, either only connect
the device that supports 3D or connect the device that
supports 3D to the HDMI MAIN terminal and set the
HDMI Mode to Single to play back the disc.
•When the Resolution is set to Auto, 1080p, 4K or 4K/
24p and if the resolution of output from the HDMI is
1080p, 4K or 4K/24p, then output may not occur
depending on the HDMI cable in use.
• There are resolutions that cannot be output
depending on the television set in use.
•When the HDMI Mode is set to Pure Audio, the
1080p60, 4K/60p or 4K/24p, output will not occur even
if the resolution is set to Auto or 1080p, 4K or 4K/
24p. The output will be delivered with a resolution of
1080/60i, 1080/24p or the like, depending on the
resolution of the source and the connected television
set.
Page 27

Chapter 4
Playback
04
Playing discs or files
This section describes the player’s main operations.
For the types of discs and files that can be played, see
page 8. Video, image and audio files recorded on discs
are played with the Source function (page 35).
1Press STANDBY/ON to turn on the power.
Turn the TV’s power on and switch its input beforehand.
2Press OPEN/CLOSE to open the disc tray and
load the disc.
Note
• Load the disc with the printed side facing up.
• Several dozen seconds are required to read the disc.
Once reading is completed, the type of disc is
displayed on the player’s front panel display.
• When a BD with usage restrictions set by a BD
recorder is loaded, the PIN code input screen
appears. In this case, input your PIN code.
3Press to play the disc.
• To pause, press during playback.
•To stop, press during playback.
Note
English Français Español
• The resume playback function is canceled
automatically in the following cases:
– When the disc tray is opened.
– When the file list window is switched.
– When the power is turned off. (For BDs and DVDs
this does not cancel the resume playback
function.)
• When you want to continue playback from a position
you specify to be played next time, see Continuing
playback from a specified position (Continued Viewing
Playback) on page 34.
• The resume playback function cannot be used for
some discs.
Quick view (Quick view with
audio)
Audio is being output while the video images are played
back at about 1.5 times the normal speed.
Press while playing back BD or DVD.
•If is pressed during quick view, it will switch to
fast forward.
Note
• Some discs start playing automatically when the disc
tray is closed.
• BD-ROM/DVD-Video discs have parental lock
features. Input the password registered in the player’s
settings to unlock the parental lock. For details, see
page 48.
• Some BD-R/-RE discs have playback protection. To
cancel the protection, input the password set for the
disc.
• If the picture and sound are not properly output,
Troubleshooting on page 55.
If the disc menu is displayed
For some discs, the disc menu is displayed automatically
when playback starts. The contents of the disc menu and
the way to operate depend on the disc.
Resuming playback from where it
was stopped (resume playback
function)
•When is pressed during playback, the point at
which the disc stopped is stored in the memory.
When is pressed after that, playback resumes
from that point.
• To cancel the resume playback function, press
while playback is stopped.
To return to normal playback
• Press .
Note
• You cannot pause during quick view. Please pause
after returning to normal playback.
• As for the tone during quick view, the output comes
via PCM regardless of the configuration of the main
body of the device.
• It is not possible to switch the audio during quick
view.
• Depending on the audio format, such as Dolby TreHD
and DTS-HD Master Audio,there might be no sound
output during fast-forward.
• For the output conditions of each voice, please refer
to About how digital audio formats are output on
page 51.
Forward and reverse
scanning
During playback or quick view, press or .
• The scanning speed switches each time the button is
pressed. The speed steps depend on the disc or file
(the speed is displayed on the TV screen).
27
En
Page 28

04
To resume normal playback
Press .
Playing specific chapters,
tracks or files
During playback, input the number of the
chapter/track/file you want to select.
• Use the number buttons (0 to 9) to input the number,
then press ENTER.
• Press CLEAR to clear the values you have input.
Step forward/Step reverse
While playback is paused, press / or /.
• The picture moves a step forward or step reverse each
time the button is pressed.
• Each time the / button is pressed, a frame is
advanced.
• Each time the / button is pressed, a frame is
reversed.
To resume normal playback
• Press .
Skipping content
During playback, press or .
•When is pressed, the playback skips ahead to the
beginning of the next chapter/track/file.
•When is pressed while a video or audio file is
playing, the playback skips back to the beginning of
the currently playing chapter/track/file. Press twice to
skip back to the beginning of the previous chapter/
track/file.
•When is pressed while an image file is playing,
playback returns to the previous file.
To return to a position a
short while ago
Press during playback to return to a position 10 seconds
earlier.
During playback, press REPLAY.
To advance to a position
slightly ahead
Playing a specific section
within a title or track
repeatedly (A-B Repeat)
Use this procedure to play a specific section within a title
or track repeatedly.
1 During playback, press A-B to select the starting
point.
• [A-] is displayed on the TV screen.
2 During playback, press A-B to select the ending
point.
• A-B Repeat playback starts.
To cancel A-B Repeat play
• Press A-B during the A-B Repeat play.
Note
• A-B Repeat play is canceled in the following cases:
– When you search outside of the repeat range.
– When you start other Repeat Play or Random Play.
Press during playback to forward to a position 30 seconds
later.
During playback, press SHORT SKIP.
Playing in slow motion
While playback is paused, press and hold /
or /.
• The speed switches each time the button is pressed
(the speed is displayed on the TV screen).
• Keeping the / button pressed initiates slow
motion play back.
• Keeping the / button pressed initiates reverse
slow motion play back.
To resume normal playback
• Press .
28
En
Playing repeatedly
(Repeat Play)
Use this procedure to play the currently playing disc, title,
chapter, track or file repeatedly.
During playback, press REPEAT.
• Each time you press REPEAT the type of repeat
modes changes as shown below.
BD
Current chapter Current title
DVD
Current chapter Current title All titles
CD/Video file/Audio file/Image file
Current track/file All tracks/All files in folder
Page 29
To cancel Repeat Play
• Press REPEAT several times during Repeat Play.
Note
• Repeat Play is canceled in the following cases:
– When you search outside the repeat range.
– When you start other Repeat Play or Random Play.
Playing in the desired order
(Programmed Play)
Deleting the bookmark
Select the bookmark you want to delete, then
press CLEAR.
• Bookmarks may not be allowed to make for some
discs.
• Bookmarks are canceled in the following cases:
– When the player’s power turned off.
– When the disc tray is opened.
Zoom
04
English Français Español
1 During playback, press PROGRAM.
• The program screen is displayed.
2 Select the program number.
Use / to select, then press ENTER.
3 Select the track/title/chapter you want to play.
Use /// to select, then press ENTER.
4Press .
• Playback starts.
Editing the program
1 Select the program number you want to edit,
then press ENTER.
2 Select title/chapter, then press ENTER.
Deleting the program
Select the program number you want to delete,
then press CLEAR.
• To delete all the programs, press RETURN.
Note
• When you use audio CDs for Programmed Play, enter
the track number in step 3.
• This function does not work with BDs.
Making bookmarks
During playback, press ZOOM.
• Each time you press ZOOM, the zoom level changes
as shown below.
[Zoom 2x] [Zoom 3x] [Zoom 4x] [Zoom 1/2]
[Zoom 1/3] [Zoom 1/4] Normal (not
displayed)
Note
• This function does not work with some discs.
Playing photos as slideshows
This function plays the photos, switching them
automatically.
During playback, press INDEX.
• Display the thumbnail of image files. The maximum
number is 12 at once.
• If you select one of the image and press ENTER,
slideshow will start from the image you selected.
Rotating/inverting photos
When a slideshow is playing or paused, the display
switches as shown below when the /// buttons
are pressed.
button: Rotates 90° clockwise
button: Rotates 90° counterclockwise
button: Flips horizontally
button: Flips vertically
You can make bookmarks on the video currently playing
and play back the scene later.
During playback, press BOOKMARK.
•The bookmark is made.
• Maximum number of bookmarks are 12.
Playing the bookmarked scene
1 Press and hold BOOKMARK for a few seconds.
• The list of bookmarks is displayed.
2 Select the bookmark you want to play.
Use / to select, then press ENTER.
Switching the camera angles
For BD-ROM and DVD-Video discs on which multiple
angles are recorded, the angles can be switched during
playback.
1 During playback, press FUNCTION.
2 Select Angle from the FUNCTION menu.
• The current angle and total number of recorded
angles are displayed on the TV screen.
• If the angles are not switched, switch them from the
disc menu screen.
Note
• Some discs cannot switch angles.
29
En
Page 30

04
Switching the subtitles
For discs or files on which multiple subtitles are recorded,
the subtitles can be switched during playback.
Caution
• The subtitles cannot be switched for discs recorded
by a DVD or BD recorder. Also refer to the operating
instructions for the device used for recording.
During playback, press SUBTITLE.
• The current subtitle and total number of recorded
subtitles are displayed on the TV screen.
To switch the subtitle, press SUBTITLE again.
• The subtitles can also be switched by selecting
Subtitle from the FUNCTION menu.
• If the subtitles are not switched when SUBTITLE is
pressed, switch them from the disc menu screen.
Turning the subtitles off
Press SUBTITLE several times or select Subtitle
from the FUNCTION menu to switch the setting to
Off.
About displaying external subtitle
files while playing DivX media files
In addition to the subtitles recorded in DivX media files,
this player also supports the display of external subtitle
files. If a file has the same name as that of a DivX media
file aside from the file extension and the extension is one
of the extensions listed below, the file is treated as an
external subtitle file. Note that DivX media files and
external subtitle files must be located in the same folder.
Only one external subtitle file can be displayed on this
player. Use a computer, etc., to delete any external
subtitle files you do not want to display from the disc.
Text files with the extensions “.smi”, “.srt”, “.sub” and “.txt”
are supported.
Note
• Depending on the file, the external subtitles may not
be displayed properly.
Note
• When you turn on the DIRECT function and play, the
output volume may be low depending on the settings
of this device and contents being played.
• Depending on disk or file, DIRECT function will not
work in some cases if playback is not stopped
(resume playback function is in cancelled state). To
cancel the resume playback function, press while
playback is stopped.
Moving subtitles
The position of the subtitles displayed while playing BDROMs or DVDs can be moved.
1 Play the BD-ROM or DVD video and display the
subtitles on the TV screen.
2 Press and hold the SUBTITLE button for at least 2
seconds.
•The
Subtitle shift mode is set.
• [Subtitle shift mode] is displayed on the TV screen.
3Use the / buttons to move the position of the
subtitles.
•Use the / buttons to move the position of the
subtitles.
• Once the setting is complete, press ENTER.
4Cancel the
Press the ENTER button.
Subtitle shift mode.
Switching the audio
For discs or files on which multiple audio streams/
channels are recorded, audio streams/channels can be
switched during playback.
During playback, press AUDIO.
• The current audio and total number of recorded audio
streams are displayed on the TV screen.
To switch the audio, press AUDIO again.
• The audio can also be switched by selecting Audio
from the FUNCTION menu.
• If the audio is not switched when AUDIO is pressed,
switch it from the disc menu screen.
Using the DIRECT function
When the DIRECT function is turned on, the digital audio
output and video output are blocked and analog audio is
played back with high quality. This function is turned Off
upon shipping.
Press DIRECT.
• Each time the button is pressed, the setting switches
between On and Off.
• When the DIRECT function is turned on, the DIRECT
indicator on the main unit turns on.
30
En
Switching the CD/SACD
playback area
1 Select the area you want to play.
In the stop mode, press CD/SACD. The playback area
switches on the front panel display window each time the
button is pressed.
[CD AREA] [SACD 2CH] [SACD MCH] (back to
beginning)
• During playback, press twice to cancel continuous
play before selecting the playback area.
Page 31

Displaying the disc
information
Press DISPLAY.
The disc information appears on the TV screen. To switch
off the information display, press DISPLAY again.
The information display differs between during playback
and when playback is stopped.
Enjoying BONUSVIEW or
BD-LIVE
This player is compatible with BD-Video BONUSVIEW
and BD-LIVE.
When using BD-Video discs compatible with
BONUSVIEW, you can enjoy such functions as secondary
video (picture in picture) (page 33) and secondary audio
(page 33). With BD-Video discs supporting BD-LIVE,
special video images and other data can be downloaded
from the Internet.
Data recorded on BD video and downloaded from BDLIVE is stored on the USB flash drive (external memory).
To enjoy these functions, connect a USB flash drive
(minimum 1 GB capacity, 2 GB or greater recommended)
supporting USB 2.0 High Speed (480 Mbit/s) to the USB
port.
• When you insert or remove a USB flash drive, be sure
to turn the player’s power off.
• To recall data stored in the USB flash drive, first insert
the disc media that was being used at the time the
data was downloaded (if a different disc is loaded, the
data stored on the USB flash drive cannot be played).
• If a USB flash drive containing other data (previously
recorded) is used, the video and audio may not play
back properly.
• Do not disconnect the USB flash drive while playback
is in progress.
• Some time may be required for the data to load (read/
write).
Note
• Operation of USB flash drives is not guaranteed.
• Playback of BD-LIVE function data differs depending
on the disc used. For details, consult the user
instructions supplied with the disc.
• To enjoy the BD-LIVE function, a network connection
and settings are required (pages
• BD-LIVE is a function that provides for connection to
the Internet. Discs supporting the BD-LIVE function
may send ID codes identifying this player and the disc
to the contents provider via the Internet.
23 and 47).
04
English Français Español
Caution
• It may not be possible to use the BONUSVIEW and
BD-LIVE functions if there is insufficient space on the
USB flash drive. In this case, refer to Erasing data that
has been added to BDs and application data on
page 47 for erasing the Virtual Package data and the
BD-LIVE data in the USB flash drive.
31
En
Page 32

04
Playback functions
The functions that can be used differ according to the type of disc and file. In some cases, some of the functions cannot
be used. Check the usable functions on the table below.
Disc/file type
Function
Quick view
Forward and reverse
scanning
1
2
BD-
ROM
BD-R
/-RE
DVD-
Video
DVD-
Audio
3
3
3
Short Skip/Replay
Playing specific titles,
chapters or tracks
Skipping content
Slow motion play
5
Step forward and step
7
reverse
A-B Repeat play
7
Repeat Play
Zoom
Angle
Subtitle
Audio
9
10
11
Disc information
DVD-R
/-RW
(VR
format)
4
AVCREC AVCHD
3
3
Video
file
3
Image
file
3
6
8
Audio
file
Audio
CD
4
4
1. Some functions may not work for some discs or files, even if indicated [] on the table.
2. Depending on the audio format, such as Dolby TreHD and DTS-HD Master Audio, there might be no sound output during fast-forward.
3. Sound is not produced during forward and reverse scanning.
4. Sound is produced during forward and reverse scanning.
5. No sound is output during slow motion playback.
6. Reverse slow motion playback is not possible.
7. If a chapter is switched, some discs will cause an automatic return to normal playback.
8. Reverse step playback is not possible.
9. Angle mark is displayed for scenes at which multiple angles are recorded if Angle Mark is set to On (page 45).
10. • The types of recorded subtitles depend on the disc and file.
• In some cases, the subtitle may switch or the switching screen provided on the disc may be displayed immediately, without the current
subtitle or the total number of subtitles recorded on the disc being displayed.
11. The types of recorded audio streams depend on the disc and file.
32
En
Page 33

Using the FUNCTION
menu
Various functions can be called out according to the
player’s operating status.
1 Display the FUNCTION menu.
Press FUNCTION during playback.
2 Select and set the item.
Use / to select, then press ENTER.
Item Description
Slide Show Switch the playback speed while playing
the picture slide show.
Transition Change the style of the slide show while
playing the picture slide show.
1. One of these types of information is displayed, depending on the
type of disc.
2. Secondary video mark is displayed for scenes at which secondary
video is recorded if PIP Mark is set to On (page 45).
3. Secondary audio mark is displayed for scenes at which secondary
audio is recorded if Secondary Audio Mark is set to On
(page 45).
04
English Français Español
Note
• Items that cannot be changed are displayed in gray.
The items that can be selected depend on the player’s
status.
To change the setting of the
selected item
Use / to change.
To close the FUNCTION menu
Press FUNCTION.
FUNCTION menu item list
Item Description
Title (track)
Chapter Display the information for the currently
File Display current file information.
Time Display the elapsed or remaining time.
Mode Switch the play mode (page 34).
Audio Switch the audio.
Angle Switch the BD-ROM/DVD-Video disc’s
Subtitle Switch the subtitle language.
Code Page Switch the subtitle code page.
Secondary Video
Secondary Audio
Bitrate Display the bitrate of the audio/video/
Still off Switch off the BD-ROM’s still picture.
Short Skip Forward to a position 30 seconds later.
Replay Return to a position 10 seconds earlier.
1
Display the title information for the
currently playing disc and total number
of titles on the disc. Also select the title
you want to play. (See the following
description.)
playing chapter (track/file) and total
number of chapters in the disc. Also
select the chapter (track/file) you want to
play. (See the following description.)
Select your favorite file.
Also enter the time from which you want
to start playback. (See the following
description.)
camera angle.
2
Switch the BD-ROM’s secondary video
(Picture-in-Picture).
3
Switch the BD-ROM’s secondary audio.
secondary video/secondary audio.
Note
• Selectable items depend on the type of disc.
• The types of recorded secondary audio streams
depend on the disc and file.
• Some discs do not include secondary audio/
secondary video.
• In some cases, the secondary audio/secondary video
may switch or the switching screen provided on the
disc may be displayed immediately, without the
current secondary audio/secondary video or the total
number of secondary audio/secondary video streams
recorded on the disc being displayed.
33
En
Page 34

04
Playing from a specific time
(Time Search)
Continuing playback
from a specified
1 Select Time.
Use / to select, then press ENTER.
2 Input the time.
Use the number buttons (0 to 9) to input the time.
• To play from 45 minutes, input 0, 0, 4, 5, 0 and 0, then
press ENTER.
• To play from 1 hour 20 minutes, input 0, 1, 2, 0, 0 and
0, then press ENTER.
• Press CLEAR to clear the values you have input.
3 Starting playback from the specified time.
Press ENTER.
Playing a specific title,
chapter, track or file (Search)
1 Select Title or Chapter (track/file).
Use / to select, then press ENTER.
2 Input the Title or Chapter (track/file) number.
Use the number buttons (0 to 9) or / to input the
number.
• To search for title 32, input 3 and 2, then press
ENTER.
• Press CLEAR to clear the values you have input.
3 Starting playback from the specified title, chapter
or track.
Press ENTER.
Playing specified range of
discs, titles or chapter (track/
file) in random order
You can select from two types of random playback.
1 Select Mode.
Use / to select, then press ENTER.
2 Select the playing mode.
Use / to select, then press ENTER.
position (Continued
Viewing Playback)
This function allows you to continue playback from a
position you specify to be played next time, even after
turning the power off.
Setting
During playback, press CONTINUED at the
position from which you want to start continued
viewing playback.
The elapsed playing time at the specified position is
displayed on the TV screen.
Playing
1Press to play the title for which you have set
continued viewing playback.
The continued viewing playback confirmation screen
appears.
• In the cases below, the continued viewing playback
confirmation screen is displayed.
For BD videos
The screen is displayed after the main featured has
been played.
For recorded discs
The screen is displayed after the folder is selected and
the title set for continued viewing playback has been
played.
2Use / to select Yes, then press ENTER.
Playback starts from the specified position.
Note
• The continued viewing playback setting is canceled
when OPEN/CLOSE is pressed.
• Continued viewing playback may not work properly
with some discs.
Random play
The specified range of discs, titles or chapter (track/file) is
played in random order. The same item may be played
consecutively.
Shuffle play
The specified range of discs, titles or chapter (track/file) is
played in random order. Each item is played once.
34
En
Page 35

Chapter 5
Playback from Source function
05
YouTube
TOP MENU POPUP MENU
TOP
HOME MENU RETURN
ENTER
SOURCE
POP
UP
About Source function
This player’s Source function allows you to display a list
of input sources and start playback. This chapter
describes setup and playback procedures required to
enjoy these features. When you play the files stored on
your computer or the components on the network, it is
advisory that you also refer to the operation manual
supplied with your network component.
The input sources that can be played from Source
function are as shown below.
• BD-R/RE (BDAV format) discs
•DVD-R/RW (VR format) discs
• Audio CDs (CD-DA, SACD and DTS CDs)
• DVD/CDs on which only data files of video, image or
audio files, etc. are recorded.
• USB device
• Files on the network servers (on the PCs or
components connected to the player via LAN
interface.)
Note
•The Source function allows you to play files on media
servers connected on an identical Local Area Network
(LAN) as the receiver.
• The following files are allowed to be played from
Source function:
– PCs running Microsoft Windows Vista with
Windows Media Player 11 installed
– PCs running Microsoft Windows 7 with Windows
Media Player 12 installed
– DLNA-compatible digital media servers (on PCs or
other components)
Files stored in a PC or DMS (Digital Media Server) as
described above can be played by Digital Media
Player (DMP). The player supports the use of such
DMP.
Files stored in a PC or DMS (Digital Media Server) as
described above can be played via command from an
external Digital Media Controller (DMC). Devices
controlled by this DMC to play files are called DMRs
(Digital Media Renderers). This player supports this
DMR function. When in the DMR mode, such
operations as playing and stopping files can be
performed from the external controller.
• To play back audio files stored on components on the
network, you must turn on the DHCP server function
of your router. In case your router does not have the
built-in DHCP server function, it is necessary to set up
the network manually. Otherwise, you cannot play
back files stored on components on the network. See
“Setting the IP address” on page 47.
About network playback
The network playback function of this unit uses the
following technologies:
Windows Media Player
See Windows Media Player 11/Windows Media Player 12
above for more on this.
DLNA
DLNA CERTIFIED® Audio Player
The Digital Living Network Alliance (DLNA) is a cross-
industry organization of consumer electronics,
computing industry and mobile device companies.
Digital Living provides consumers with easy sharing of
digital media through a wired or wireless network in the
home.
The DLNA certification logo makes it easy to find
products that comply with the DLNA Interoperability
Guidelines. This unit complies with DLNA Interoperability
Guidelines v1.5. When a PC running DLNA server
software or a DLNA compatible device is connected to
this player, some setting changes of software or other
devices may be required. Please refer to the operating
instructions for the software or device for more
information.
®
DLNA
trademarks, service marks, or certification marks of the
Digital Living Network Alliance.
Content playable over a network
, the DLNA Logo and DLNA CERTIFIED® are
• Even when encoded in a compatible format, some
files may not play correctly.
English Français Español
35
En
Page 36

05
• Some functions may not be supported depending on
the server type or version used.
•Supported file formats vary by server. As such, files
not supported by your server are not displayed on this
unit. For more information check with the
manufacturer of your server.
Disclaimer for Third Party Content
Access to content provided by third parties requires a
high speed Internet connection and may also require
account registration and a paid subscription.
Third party content services may be changed, suspended,
interrupted, or discontinued at any time without notice,
and Pioneer disclaims any liability in connection with
such occurrences.
Pioneer does not represent or warrant that content
services will continue to be provided or available for a
particular period of time, and any such warranty, express
or implied, is disclaimed.
Playback file on the
network
1 Press SOURCE to display the Source function.
The Source function can also be displayed by selecting
Source from Home Menu, then pressing ENTER.
2 Select the server which contains the file you want
to play.
3 Select the file you want to play.
Use / to select, then press ENTER.
To end Source function
Press SOURCE.
Disc/USB playback
About playback behavior over a
network
• Playback may stall when the PC is switched off or any
media files stored on it are deleted while playing
content.
• If there are problems within the network environment
(heavy network traffic, etc.) content may not be
displayed or played properly (playback may be
interrupted or stalled). For best performance, a
10BASE-T/100BASE-TX connection between the
player and the PC is recommended.
• If several clients are playing simultaneously, as the
case may be, playback is interrupted or stalled.
• Depending on the security software installed on a
connected PC and the setting of such software,
network connection may be blocked.
Pioneer is not responsible for any malfunction of the
player and/or the Source function features due to
communication errors/malfunctions associated with
your network connection and/or your PC, or other
connected equipment. Please contact your PC
manufacturer or Internet service provider.
Windows Media is either a registered trademark or
trademark of Microsoft Corporation in the United States
and/or other countries.
This product includes technology owned by Microsoft
Corporation and cannot be used or distributed without a
license from Microsoft Licensing, Inc.
Microsoft®, Windows®7, Windows®Vista, Windows®XP,
Windows®2000, Windows®Millennium Edition,
Windows®98, and WindowsNT® are either registered
trademarks or trademarks of Microsoft Corporation in the
United States and/or other countries.
1 Press SOURCE to display the Source function.
The Source function can also be displayed by selecting
Source from Home Menu, then pressing ENTER.
2 Select Disc or USB.
Use / to select, then press ENTER.
3 Select Photo/Music/Video/AVCHD.
Use / to select, then press ENTER.
• This step is not for the discs that have been recorded
with BDAV/VR/AVCREC format.
• To play files in AVCHD format on a USB device, create
a folder named “AVCHD” on the USB device, then
copy the “BDMV” folder containing which the files to
be played into the “AVCHD” folder.
4 Select the title/track or file you want to play.
Use / to select, then press ENTER.
Playback starts from the selected title/track or file.
• If the file you want to play is in the folder, select the
folder that contains the file first.
36
En
Page 37

Playing back image files
Playing the Playlist
05
About Slideshow
A display of the files in the folder switches automatically.
Note
• Some BD-R/-RE discs have playback protection. To
cancel the protection, input the password set for the
disc.
• It may take a few seconds before playback starts. This
is normal.
• It may not be possible to play some files properly.
• The number of views may be restricted.
• Depending on the connected devices and conditions,
some time may be required for playback to start and
for the image to switch.
Playing in the desired
order (Playlist)
The discs that can add tracks and files to the Playlist are
as shown below.
• DVDs/CDs/USB devices on which audio files are
recorded
Adding tracks/files
Use this procedure to add tracks and files, and create the
Playlist.
1 Press SOURCE to display the Source function.
The Source function can also be displayed by selecting
Source from Home Menu, then pressing ENTER.
2 Select Playlist.
Use / to select, then press ENTER.
3 Select the track/file to be played.
Use / to select, then press ENTER.
Playback starts from the selected track/file and continues
until the end of the list is reached. Use / to play
the previous or next track/file. The Now Playing screen is
displayed.
Deleting tracks/files from
the Playlist
1 Select the track/file to be deleted, then press POP
UP MENU to display the POP UP MENU menu.
2Use / to select Remove from Playlist, then
press ENTER.
Note
• In the following cases, all information in the playlist
will be deleted.
– When you open the disc tray.
– When you turn off the power.
English Français Español
1 Press SOURCE to display the Source function.
The Source function can also be displayed by selecting
Source from Home Menu, then pressing ENTER.
2 Select Disc or USB.
Load the disc beforehand.
Use / to select, then press ENTER.
3 Select the track/file to be added.
Use to select.
4 Press POP UP MENU to display the POP UP MENU
menu.
5 Select Add to Playlist to add to Playlist.
Use / to select, then press ENTER.
The track or file selected in step 3 is added to the Playlist.
• To add more tracks or files, repeat steps 3 to 5.
37
En
Page 38

06
Chapter 6
Playing the web contents
You can enjoy some streaming contents on the Internet
with the player.
Available web
contents
About the function for restricting
access to harmful information on the
Internet
• This unit is equipped with a function for restricting
viewing of web contents, etc., you do not want your
children or others to see.
•YouTube
•Picasa
Note
About YouTube
• This player supports the YouTube Leanback service.
• YouTube videos for mobile phones cannot be played.
• Some YouTube videos cannot be played.
About Picasa
• Picasa is available only in English. Refer to
instructions at http://picasa.google.com/support/ for
details.
– Register your user name and password on the PC
before you use Picasa Web Albums.
– When you access Picasa from this player for the
first time, select the New User icon and enter your
registered user name and password.
• Depending on the Internet connection environment,
it may not be possible to play web contents properly.
• To access to web contents, this player requires a
broadband Internet connection. A contract with an
Internet provider is required for a broadband Internet
connection.
• Access to content provided by third parties requires a
high speed Internet connection and may also require
account registration and a paid subscription.
Third party content services may be changed,
suspended, interrupted, or discontinued at any time
without notice, and Pioneer disclaims any liability in
connection with such occurrences.
Pioneer does not represent or warrant that content
services will continue to be provided or available for a
particular period of time, and any such warranty,
express or implied, is disclaimed.
• Disc playback and this function cannot be used at the
same time.
• To use this restriction function, change the Internet
settings (page 45).
Playing the items
ENTER
SOURCE
POP
UP
YouTube
TOP MENU POPUP MENU
TOP
HOME MENU RETURN
Caution
• You must connect the player to the Internet
beforehand. See Connecting to the network through
LAN interface on page 23 for the details.
1 Display the selection screen.
The selection screen can be selected by pressing
HOME MENU then selecting Web Contents
Desired web content.
2 Select the type of web contents.
Use / to select, then press ENTER.
3Press /// to select the item you want to
play, then press ENTER.
Press to stop playback.
Enjoying YouTube
1 Display the YouTube screen.
Press YouTube.
• For Playback/Stop/End, please refer to Playing the
items above.
38
En
Page 39

Chapter 7
Setting the Audio/Video options
07
Changing the Audio options
There are a number of additional sound settings you can
make using the Audio Parameter menu.
AUDI O P. VIDEO P.
YouTube
TOP MENU POPUP MENU
TOP
HOME MENU RETURN
ENTER
CONTINUED
SOURCE
POP
UP
Note
• It is not possible to open the Audio Parameter screen when any of the Home Menu (Source, Web Contents,
Initial Setup), Video Parameter, Function Menu, Disc Menu, YouTube or Picasa is being displayed.
• It is not possible to open the Audio Parameter screen while 3D contents are being played back.
• When DIRECT function is On, the Audio Parameter setting will not work.
• In Options, the factory default settings are indicated in bold.
Setting Options Explanation
Audio Scaler
(BDP-88FD only)
Hi-bit32
(BDP-88FD only)
Up Sampling
(BDP-88FD only)
Digital Filter
(BDP-88FD only)
Auto Sound Retriever
(BDP-88FD only)
Audio Sync
Audio Delay
1
1, 2
1, 2, 3
1, 2
4
5
Manual The Hi-bit32, Up Sampling and Digital Filter can be configured to the desired
settings.
Auto When Auto is selected, Hi-bit32, Up Sampling and Digital Filter are
automatically set to the optimum settings according to the 2-channel audio
source’s sampling frequency and bit rate to achieve high quality playback
sound.
On Creates a wider dynamic range with digital sources like CDs, DVDs or BDs. 16Off
x1 (Off) The 2-channel audio source’s sampling frequency is increased to the set
x2
x4
Slow Switches the AUDIO DAC (Digital Audio Converter) digital filter type. One of two
Sharp
Off With the Auto Sound Retriever function, DSP processing is used to compensate
On
Auto The player automatically adjusts the timing of the video and audio when
Manual Adjust manually.
0 to 200 (ms) Some monitors have a slight delay when showing video, so the soundtrack will
, 20- and 24-bit PCM as well as compressed audio is requantized to 32 bits, and
the high frequency component is interpolated upon data processing to enable
smoother, more subtle musical expression.
multiple to achieve high quality playback sound.
settings can be selected: Slow (soft and warm), Sharp (solid and tight).
for the loss of audio data upon compression, improving the sound’s sense of
density and modulation.
Link function is connected to the receiver by HDMI, by setting this to On, the
bitrate information of the compressed audio file being played on the player is
acquired using the Control with HDMI function, and the sound is optimized
based on this information (Sound Retriever Link).
connected to a device equipped with the HDMI Audio Sync Correction feature
using an HDMI cable.
be slightly out of sync with the picture. By adding a bit of delay, you can adjust
the sound to match the presentation of the video.
Operating the Audio
Parameter screen
1 Press AUDIO P. to display the Audio Parameter
screen.
2Use / to select the setting you want to adjust,
then press ENTER.
3Use / to set as necessary, then press ENTER.
Closing the Audio Parameter screen
Press AUDIO P. or RETURN.
1
Also, when a player supporting the Sound Retriever
English Français Español
39
En
Page 40

07
1 This is effective only on audio output from ANALOG AUDIO OUT terminals.
2• This can be set when Manual is selected for Audio Scaler.
• This function does not work when the sampling frequency is 32 kHz.
3 • This setting only affects 2-channel audio sources.
• This function does not work when the Auto Sound Retriever setting is On.
4 The sound may be interrupted while setting the delay.
5This is the Audio Sync setting which you can set only when Auto is selected. The set value is reflected after you stop or pause playing and
play again.
Changing the Video options
There are a number of additional picture settings you can
make using the Video Parameter menu.
Operating the Video
Parameter screen
AUDI O P. VIDEO P.
YouTube
TOP MENU POPUP MENU
TOP
HOME MENU RETURN
Note
• It is not possible to open the Video Parameter screen when any of the Home Menu (Source, Web Contents, Initial
Setup), Audio Parameter, Function Menu, Disc Menu, YouTube or Picasa is being displayed.
• It is not possible to open the Video Parameter screen while 3D contents are being played back.
• Video Parameter options do not affect Blu-ray 3D pictures.
• The Video Parameter option is not effective when the HDMI Mode is set to Pure Audio.
• In Options, the factory default settings are indicated in bold.
Setting Options Explanation
Video Adjust PJ Digital Cinema Selections are made to suit the audio visual equipment in use and the material
Progressive Motion
Pure Cinema
Stream Smoother Off Use the image quality of the built-in circuit, make the image quality correction
Film Grain
2
1
CONTINUED
1 Press VIDEO P. to display the Video Parameter
ENTER
SOURCE
POP
UP
screen.
2Use / to select the setting you want to adjust,
then press ENTER.
3Use / to set as necessary, then press ENTER.
Closing the Video Parameter screen
Press VIDEO P. or RETURN.
PJ Film Cinema
PJ Live
FPD Digital Cinema
FPD Film Cinema
FPD Live
Reference
Memory 1 to 3 If you want to adjust the picture quality settings to your personal tastes, select
–4 to +4 (Default 0) Adjusts the motion and still picture quality when video output is set to
Auto This setting optimizes the operation of the progressive scanning circuit for
On
Off
On
0 to +8 (Default 0) Adds small particles of noise to give the effect of a movie film. The greater the
to be viewed and heard.
Select either the PJ mode for viewing with a projector or the FPD mode for
viewing with a flat panel television set. Select Digital Cinema when viewing the
latest movies with CGIs and digital processing, Film Cinema when viewing
conventional analog movies on film, and Live when viewing concert video.
The Reference mode is a setting that inhibits video signal processing. This
mode is selected when viewing the source as it is.
Memory 1 to Memory 3 (see Adjusting the video on page 41).
progressive.
playing film materials. Normally set it to Auto. If the picture seems unnatural,
switch this to On or Off.
reduce block noise and mosquito noise, and improved sharpness feeling. This
is effective for playing online or low bit rate video contents.
number, the higher the granular quality.
1• Progressive Motion is disabled when Pure Cinema is set to On.
• This setting have the effect only for pictures recorded in the interlaced scan format (480i/576i or 1080i signals).
2 The Film Grain function is effective on all videos, including on the Home menu screen.
40
En
Page 41

Adjusting the video
1 Select and set Video Adjust Memory 1 or 2, 3.
Use / to select, then press ENTER.
07
2 Select Settings.
Use / to select, then press ENTER.
3 Select the item and change the setting.
Use / to select the item, then use / to change the
setting. Once the setting is completed, press
RETURN to close the settings screen.
List of setting items
Item Description
YNR Reduces noise in the luminance (Y)
signal.
CNR Reduces noise in the chroma (C) signal.
BNR Reduces the block noise (block-shaped
distortion generated upon MPEG
compression).
MNR Reduces the mosquito noise (distortion
along the contours of the picture
generated upon MPEG compression).
Detail Adjust the clarity of the details of the
picture.
Brightness Select this to adjust the TV screen’s
brightness.
Contrast Select this to adjust the TV screen’s
contrast.
Hue Select this to adjust the color (green and
red) balance of the TV screen.
Chroma Level Adjusts the density of the colors.
S.Resolution
(Super Resolution)
1
Detailed feel of materials and accurate
outlines are reproduced. Setting is made
by selecting one of 0 (Off), 1, 2 or 3 and
sharper images are delivered with
greater values.
English Français Español
1 This setting is effective only when video is output at 4K.
41
En
Page 42

08
Chapter 8
Advanced settings
Changing the settings
Operating the Initial Setup
2 Select and set Initial Setup.
Use / to select, then press ENTER.
screen
3 Select the item and change the setting.
1 When playback is stopped, display the Home
Menu screen.
Press HOME MENU.
Note
• The items that can be selected depend on the player’s status.
• In Options, the factory default settings are indicated in bold.
Setting Options Explanation
Display Setting
TV Screen 16:9 Full Select this when connecting to a wide (16:9) TV.
16:9 Normal Select this when connected to a wide (16:9) TV. 4:3 pictures are displayed
with vertical black bars along the sides.
4:3 Pan&Scan Select this when connecting to a 4:3 screen TV and playing a 16:9 video. The
video will be played with the left and right sides of the image cut off to display
on the 4:3 screen. (This function works if the disc is labeled for 4:3PS.)
4:3 Letterbox Select this when connecting to a 4:3 screen TV and playing a 16:9 video. The
video will be played with black bands at the top and bottom.
Resolution Auto Select this to choose the resolution of the video signals output from the
480p Output the video signals from the HDMI OUT terminal with the selected
720p
1080i
1080p
1080/24p
4K
4K/24p
Source Direct Output is made with the resolution that matches the resolution of the
• When 1080/24p or 4K/24p is selected, the movement may be unnatural or the picture unclear, depending on the contents
being played back. In such cases, set the resolution to something other than 1080/24p or 4K/24p.
HDMI OUT terminal automatically.
resolution.
The resolution can be changed by pressing RESOLUTION /.
The resolution switches each time RESOLUTION / is pressed.
contents.
Use /// to select, then press ENTER.
Closing the Initial Setup screen
Press HOME MENU or RETURN.
42
En
Page 43

Setting Options Explanation
Audio Output
Digital Output Bitstream Select this to output digital audio signals directly.
PCM Select this to output digital audio signals converted to 2-channel audio
signals.
Re-encode When a BD containing secondary audio and interactive audio is played, the
two audio signals are mixed and converted to Dolby Digital audio or DTS
audio for output.
Off Select this to output audio signals other than digital audio signals.
Downmix Stereo Surround audio signals converted to linear PCM audio signals are converted
into 2-channel (stereo) signals for output.
Lt/Rt Surround for output (when the connected AV receiver or amplifier, etc., is
compatible with Dolby Pro Logic, the AV receiver or amplifier outputs the
linear PCM audio signals as surround audio signals).
Max Sampling Frequency 48k Outputs audio signals that are limited to a sampling frequency below the set
96k
192k
• When playing back a sampling frequency file or a disk having a lower than or equal setting compared to the present setting,
you can output it at the unchanged sampling frequency.
• Sources with sampling frequencies of over 192 kHz cannot be played.
• When playing copyright-protected discs or files, the signals are output with the sampling frequency limited to 48 kHz or below,
regardless of this setting.
DRC (Dynamic Range
Control)
• This affects such audio signals as Dolby Digital, Dolby TrueHD, and Dolby Digital Plus.
• DRC affects audio signals output from the following audio output terminals:
– Analog audio signals output from the AUDIO OUT terminals
– Linear PCM audio signals output from the DIGITAL OUT or HDMI OUT terminals
• Depending on the disc, the effect may be weak.
• The effect may differ depending on the speakers, the AV amplifier settings, etc.
Precision Audio
(BDP-88FD only)
XLR Terminal Polarity
(BDP-88FD only)
Off Select this to output audio signals without using the DRC function.
On Select this to adjust the range between the loudest and softest sounds
Auto Select to switch the DRC setting On/Off automatically according to the input
Auto Precision Audio is a function and technology for high quality sound playback
HDMI(PQLS) Select the HDMI (PQLS) mode when operating the unit for HDMI output. The
Analog Select Analog mode when operating the unit for analog audio output from
Off Select the Off mode when not using the Precision Audio function.
Normal Set Pin 2 on the XLR terminal to normal phase (Hot) and Pin 3 to the reverse
Inversion Set Pin 2 on the XLR terminal to reverse phase (Cold) and Pin 3 to the normal
sampling frequency from the DIGITAL OUT terminal. Select according to the
performance of the connected device.
(dynamic range) for playback at average volume. Use this when it is hard to
hear dialog or when watching movies at midnight.
audio signal from the disc. This only affects Dolby TrueHD signals.
used according to the channel used for audio playback. Jitters, which
detrimentally affect sound quality, occur when the transmission or
processing of digital signals is performed. The effects of such jitters can be
eliminated by processing signals with reference to a crystal oscillator, which
is optimally suited to act as a standard for audio signals.
Select Auto mode when automatically operating the unit according to the
status of connected devices.
PQLS function will operate in such cases.
the main unit. The signal processing for audio signals made with reference
to the highly accurate crystal oscillator is performed inside the main unit.
phase (Cold).
phase (Hot).
08
English Français Español
43
En
Page 44

08
Setting Options Explanation
HDMI
HDMI Mode Dual Video and audio are output simultaneously from the two HDMI OUT
terminals. Select this when you want to output video and audio to two TV sets
simultaneously.
Separate Select this when you want to output the video and audio separately, the video
from the HDMI OUT (MAIN) terminal, the audio from the HDMI OUT (SUB)
terminal.
Pure Audio Select this to enjoy music only with a better sound quality when devices are
connected to both HDMI output terminals. With this setting, music is output
from the HDMI OUT (SUB) terminal only, and video signals are only output
from the HDMI OUT (MAIN) terminal when DISPLAY is pressed.
Single This is selected when connecting a device for use with the HDMI OUT
(MAIN) terminal only.
Also refer to Setting the HDMI Mode on page 18.
Color Space RGB Select this to output the video signals as RGB signals. Choose this if the
YCbCr Select this to output the video signals as YCbCr 4:4:4 signals.
YCbCr 422 Select this to output the video signals as YCbCr 4:2:2 signals.
Full RGB Select this to output the video signals as RGB signals. Choose this if the colors
HDMI Audio Out Bitstream Select this to output HDMI audio signals directly.
PCM Select this to output HDMI audio signals converted to PCM audio signals.
Reencode When a BD containing secondary audio and interactive audio is played, the
Control On Select this to control the player with the remote control of the connected AV
Off Select this when you do not want to control the player with the remote control
To use Sound Retriever Link and PQLS function (pages 18), Control must be set to On.
HDMI Deep Color 30bits Select this when outputting the video signals with 30-bit color.
36bits Select this when outputting the video signals with 36-bit color.
Off Select this when outputting the video signals with normal 24-bit color.
When [30bits] or [36bits] is selected, set the color space (page 44) to a setting other than YCbCr 422.
HDMI 3D Auto With 3D discs, the disc is played with 3D images.
Off 3D images are not played.
3D Notice Yes This sets whether or not to display the 3D notice when playing 3D images.
Network
IP Address Setting Select this to set the IP address of the player and DNS server (page 47).
Proxy Server Only set the proxy server if so instructed by your Internet service provider (page 47).
Information Displays the values of the MAC address, IP address, subnet mask, default gateway, DNS server
Connection Test Select this to test the network connection (page 47).
BD-Live Connection Permitted All discs are allowed to connect to BD-LIVE.
DLNA Enable Select this when connecting to DLNA server.
No
(primary) and DNS server (secondary).
Partial Permitted Only discs whose safety has been confirmed are allowed to connect to BD-LIVE.
Prohibited No disc is allowed to connect to BD-LIVE.
Disable Select this when not connecting to DLNA server.
colors seem too faint and the black seems too bright.
seem too dense and all the dark colors are displayed in a uniform black.
two audio signals are mixed and converted to Dolby Digital audio or DTS
audio for output.
device using an HDMI cable. Also refer to page 18.
of the connected AV device using an HDMI cable.
44
En
Page 45

Setting Options Explanation
Language
OSD available languages Choose a language for the on-screen displays from the listed languages.
Audio
* For some discs, it may not
be possible to change to the
selected language.
If a language not recorded on the BD/DVD is set, one of the recorded languages is automatically selected for playback.
Subtitle
* For some discs, it may not
be possible to change to the
selected language.
If a language not recorded on the BD/DVD is set, one of the recorded languages is automatically selected for playback.
Menu
* For some discs, it may not
be possible to change to the
selected language.
If a language not recorded on the BD/DVD is set, one of the recorded languages is automatically selected for playback.
Playback
Angle Mark On Select this to display the angle mark on the TV screen (page 29).
PIP Mark On Select this to display the PIP mark on the TV screen.
Secondary Audio Mark On Select this to display the secondary audio mark on the TV screen (page 33).
®
DivX
VOD DRM
DVD Playback
* This setting is for DVD-
Audio disc playback.
Internet Setting Permitted Web contents can be watched without entering the password.
To restrict the viewing of web contents, etc., by children or others, select [Partial Permitted] or [Prohibited].
Disc Auto Playback On Discs are played automatically after they are loaded.
Last Memory On Select this to save the point at which you last stopped playback, even after the
Use of a disk that does not support the function is not possible.
PBC (Play Back Control) On Select this to play Video-CDs (version 2.0) compatible with PBC using the
Setup Navigator Start making the settings using the Setup Navigator menu. For details, see page 24.
Security
Change Password Register (change) the password for parental lock settings or for unlocking to play DVD-Videos with
Parental Control Change the player’s parental lock level (page 48).
Country Code Change the Country/Area code (page 48).
available languages Choose a language from the listed languages to set the default audio
language for BD-ROM and DVD-Video playback.
available languages Choose a language from the listed languages to set the default subtitle
language for BD-ROM and DVD-Video playback.
available languages Choose a language from the listed languages to set the default language for
BD-ROM and DVD-Video menus.
Off Select this if you do not want to display the angle mark on the TV screen.
Off Select this if you do not want to display the PIP mark on the TV screen.
Off Select this if you do not want to display the secondary audio mark on the TV
screen.
Registration Code Displays the player’s registration code required to play DivX VOD files
(page 11).
DVD Audio
DVD Video Select this to play only the video part on the DVD-Audio disc.
Partial Permitted The password must be entered to watch web contents.
Prohibited No web contents can be watched.
Off Loaded discs do not start playing automatically.
Off Select this when you want to use only Continue Viewing Play (page 34).
Off Select this to play Video-CDs (version 2.0) compatible with PBC without using
the parental lock feature (page 48). The default password is "0000".
Select this to play only the audio part on the DVD-Audio disc.
disc tray is opened or you switch to the standby mode.
disc menu.
the disc menu.
08
English Français Español
45
En
Page 46

08
Setting Options Explanation
Options
Screen Saver Off The screen saver is not activated.
1 min
2 min
3 min
Auto Power Off Off Select this if you do not want the power to turn off automatically.
15 min The power will be automatically turned off if no operation has been performed
30 min
Network Standby On Select this if you want to input power from a mobile device using a dedicated
Off Select this if you do not want to use the Network Standby function (described
Update USB Storage Select the method of software updating (page 49).
Network
Load Default Restore the settings to the factory default.
System Information Check the system version number.
BUDA BUDA Information Display and set up the BUDA data on the connected USB device (page 47).
BUDA Setup
・The screen saver will be activated if no operation has been performed for
more than one minute/two minutes/three minutes.
・During operation of the screen saver, [SCREENSAVER] is displayed on the
front panel display.
・Operating the remote control can deactivate the screen saver.
for more than 15 minutes or 30 minutes.
application (page 7).
above).
46
En
Page 47

Setting the IP address
1 Select and set Network IP Address Setting
Next Screen.
Use / to select, then press ENTER.
2 Set IP address.
Use /// to set the IP address of the player or DNS
server, then press ENTER.
• Auto Set IP Address
On – The player’s IP address is obtained
automatically. Select this when using a broadband
router or broadband modem that has a DHCP
(Dynamic Host Configuration Protocol) server
function. This player’s IP address will automatically
be allocated from the DHCP server.
Off – The player’s IP address must be set manually.
Use the number buttons (0 to 9) to input the IP
address, subnet mask and default gateway.
Caution
• Some time is required for the IP address setting.
Note
• Once the IP address is set, select [Connection Test] to
check that the unit is properly connected.
• For information on the DHCP server function, refer to
the operating instructions for the network device.
• You may need to contact your Internet service
provider or network administrator when inputting the
IP address manually.
Setting the proxy server
Only set the proxy server if so instructed by your Internet
service provider.
1 Select and set Network Proxy Server Next
Screen.
Use / to select, then press ENTER.
5 Input Port Number.
Press , then use the number buttons (0 to 9) to input
the number.
6 Press ENTER to set.
Displaying the network settings
Select and set Network Information Next
Screen.
Use / to select, then press ENTER.
The MAC address, IP address, subnet mask, default
gateway and DNS server (primary and secondary)
settings are displayed.
When Auto Set IP Address is set to On, the values
obtained automatically are displayed.
Note
• “0.0.0.0” is displayed when each IP address has not
been set.
Testing the network connection
Select and set Network Connection Test
Start.
Use / to select, then press ENTER.
“Network is OK.” is displayed once the test is completed.
If any other message is displayed, check the connections
and/or settings (pages 23 and page 47).
Changing to other language at
language setting
1 Select and set Language.
Use / to select, then press ENTER.
2 Select and set OSD, Audio, Subtitle or Menu.
Use / to select, then press ENTER.
3 Select and set the desired language.
Use / to select, then press ENTER.
08
English Français Español
2 Select and set Use or Not use at Proxy Server.
Use / to change, then press .
• Use – Select this when using a proxy server.
• Not use – Select this when not using a proxy server.
If you have selected Use, proceed to step 3.
3 Select and set Server Select Method.
Use / to change, then press .
• IP Address – Input the IP address.
• Server Name – Input the server name.
4 Input IP Address or Server Name.
Use the number buttons (0 to 9) to input the number if you
select IP address in step 3. Use / to move the cursor.
When Server Name is selected in step 3, use the number
buttons (0 to 9) to launch the software keyboard. Now use
/// to select characters and items, then press
ENTER to input.
Note
• If a language not recorded on the BD/DVD is set, one
of the recorded languages is automatically selected
and played.
Erasing data that has been added to
BDs and application data
Use this procedure to erase data that has been added to
BDs (data downloaded with the BD-LIVE function and
data used with the BONUSVIEW function) and
application data.
Caution
• Some time is required to erase the data.
• Do not unplug the power cord while data is being
erased.
47
En
Page 48

08
1 Select and set Options BUDA BUDA Setup.
Use / to select, then press ENTER.
2 Select and set Fmt buda.
Press ENTER.
Note
• The level can be set to Off or between Level1 and
Level8. When set to Off, viewing is not restricted.
Registering or Changing the
password
Use this procedure to register or change the code
number required for the Parental Lock settings.
About default password of this unit
The default password is “0000”.
• This unit might ask you to enter a password when you
change the password.
• If you reset this unit, your password is simultaneously
changed to the default setting.
1 Select and set Security Change Password
Next Screen.
Use / to select, then press ENTER.
2 Input the password.
Use the number buttons (0 to 9) to input the number, then
press ENTER to set.
Use / to move the cursor.
3 Re-input the password.
Use the number buttons (0 to 9) to input the number, then
press ENTER to set.
Use / to move the cursor.
• To change the password, input the previously
registered password, then input the new password.
Changing the Country/Area code
1 Select and set Security Country Code Next
Screen.
Use / to select, then press ENTER.
2 Input the password.
Use the number buttons (0 to 9) to input the number, then
press ENTER to set.
Use / to move the cursor.
3 Change the country/area code.
Use / to change, then press ENTER to set. Refer to
page 52.
Note
• We recommend making a note of the password.
• If you have forgotten the password, reset the player to
the factory default setting, then register the password
again (page 49).
Changing the Parental Lock level for
viewing DVDs/BD-ROMs
Some DVD-Video discs containing scenes of violence, for
example, have Parental Lock levels (check the indications
on the disc’s jacket or elsewhere). To restrict viewing
these discs, set the player’s level to the level lower than
the discs.
1 Select and set Security Parental Control
Next Screen.
Use / to select, then press ENTER.
2 Input the password.
Use the number buttons (0 to 9) to input the number, then
press ENTER to set.
Use / to move the cursor.
3 Change the level.
Use / to change, then press ENTER to set.
48
En
Page 49

Software updating
The player’s software can be updated using one of the
methods shown below.
• Connecting to the Internet.
• Using a USB flash drive.
Product information on this player is provided on the
Pioneer website. Check the website shown on page 7 for
update and service information on your Blu-ray disc
player.
Caution
• Do not perform the actions below while the software
is being updated. Doing so will interrupt updating and
could lead to malfunction.
– Disconnecting a USB memory device
– Unplugging the power cord
– Pressing the STANDBY/ON button.
• There are two processes for software updating,
downloading and updating. Both processes may take
a certain period of time.
• Other operations are defeated during software
updating. Furthermore, updating process cannot be
canceled.
Updating connecting to the Internet
1 Connect to the Internet.
2 When playback is stopped, display the Home
Menu screen.
Press HOME MENU.
3 Select and set Initial Setup.
Use / to select, then press ENTER.
4 Select and set Options Update Network
Start.
Use / to select, then press ENTER.
5 Updating starts.
Press ENTER.
• Software updating may take a certain period of time.
• When updating is completed, the unit restarts
automatically.
Updating using a USB flash drive
• This unit supports USB flash drives formatted in
FAT32, FAT16 or NTFS. When formatting a USB flash
drive on your computer, do so with the settings below.
– File system: FAT32
– Allocation unit size: Default allocation size
• Only store the most recent update file on the USB
flash drive.
• Do not use a USB extension cable to connect a USB
flash drive to the player. Using a USB extension cable
may prevent the player from performing correctly.
1 Plug in the USB flash drive on which the update
file is stored.
2 When playback is stopped, display the Home
Menu screen.
Press HOME MENU.
3 Select and set Initial Setup.
Use / to select, then press ENTER.
4 Select and set Options Update USB Storage
Start.
Use / to select, then press ENTER.
5 Updating starts.
Press ENTER.
• Software updating may take a certain period of time.
• When updating is completed, the unit restarts
automatically.
Restoring all the settings to
the factory default settings
1 Check that the player’s power is turned on.
2 When playback is stopped, display the Home
Menu screen.
Press HOME MENU.
3 Select and set Initial Setup.
Use / to select, then press ENTER.
4 Select and set Options Load Default Next
Screen.
Use / to select, then press ENTER.
5 Select and set OK.
Use / to select, then press ENTER.
08
English Français Español
Note
• When an update file is provided on the Pioneer
website, use your computer to download it onto a
USB flash drive. Carefully read the instructions on
downloading update files provided on the Pioneer
website.
• Store the update file in the root directory of the USB
flash drive. Do not store it within a folder.
• Do not put any files other than the update file on the
USB flash drive.
Note
• After restoring all the settings to the factory default
settings, use Setup Navigator to reset the player
(page 24).
• When disposing of the product, we recommend you
reset it to the factory default setting to delete the data.
49
En
Page 50

08
Setting the remote control
backlight mode
• Default setting : 01 (normal mode)
The backlight lighting pattern can be selected from
among four modes, in consideration of convenience and
battery service life.
Caution
• The setting may be restored to the default after the
batteries are replaced. If this happens, reset it.
Input the 2-digit code you want to set.
Press the number buttons (0 to 9) to input the code while
pressing LIGHT.
• 01 (normal mode) : The backlight is turned on and off
with the light button. After it lights, it turns off automatically if no operation is performed for 10 seconds.
• 02 (frequent lighting mode) : The backlight turns on
when any button on the remote control is pressed. It
is turned off with the light button. After it lights, it
turns off automatically if no operation is performed
for 20 seconds.
• 03 (eco mode) : The backlight is turned on and off
with the light button. After it lights, it turns off
automatically if no operation is performed for 5
seconds.
• 04 (off mode) : The backlight does not turn on even
when the light button is pressed.
If the backlight LED lights for three seconds and
continues to flash, the setting has been successfully
completed.
If the backlight LED flashes, the setting has failed.
50
En
Page 51

About how digital audio formats are output
Setting Bitstream PCM Re-encode
Only the primary audio (the
main sound for movies, etc.) is
Method of
conversion
Output
terminal(s)
Audio type
Dolby Digital Dolby Digital Dolby Digital PCM 5.1ch
Dolby Digital
Plus
Dolby TrueHD
DTS Digital
Surround
DTS-HD High
Resolution
3
Audio
DTS-HD
Master Audio
PCM PCM 7.1ch
AAC AAC AAC PCM 5.1ch AAC AAC
SACD (DSD)
output. The secondary audio
and interactive audio are not
output.
HDMI OUT
terminal
Dolby Digital
Plus
3
Dolby TrueHD Dolby Digital PCM 7.1ch
DTS Digital
Surround
DTS-HD High
Resolution
Audio
3
3
DTS-HD
Master Audio
DSD
5
DIGITAL OUT
terminal
Dolby Digital PCM 7.1ch
DTS Digital
Surround
DTS Digital
Surround
DTS Digital
Surround
PCM 2 ch
PCM 2 ch
The primary audio, secondary
audio and interactive audio are
converted into PCM audio and
output simultaneously.
HDMI OUT
terminal
PCM 5.1ch
PCM 7.1ch
PCM 7.1ch
4
PCM 7.1ch Dolby Digital Dolby Digital
6
PCM 5.1ch
1
DIGITAL OUT
terminal
PCM 2 ch
PCM 2 ch
The primary audio, secondary
audio and interactive audio are
converted into PCM audio then
converted again into Dolby
Digital audio or DTS audio and
output simultaneously.
HDMI OUT
terminal
Dolby Digital Dolby Digital
4
DTS Digital
Surround
6
PCM 5.1ch
2
DIGITAL OUT
terminal
DTS Digital
Surround
PCM 2 ch
6
AUDIO
OUTPUT
terminal
2 ch
2 ch
08
English Français Español
4
6
1. In case of Quick View (Quick view with audio), the audio output will be equal to the PCM setting regardless of any other settings. The LFE
channel, however, is not output (5.1 5.0, 7.1 7.0).
2. If there is no secondary audio or interactive audio, depending on the disc the signals may be output without being re-encoded.
3. Quick View (Quick view with audio) function cannot be performed.
4. For multi-channel audio, the sound is converted into 2-channel audio for output.
5. When Resolution is set to 480P, or even when it is set to Auto, if the connected device does not support 480i/480p, the DSD multi-channel
audio of SACDs is output in two channels, front left and front right (page 42).
6. • When HDMI Audio Out is set to Bitstream, sound may not be produced in some cases (page 44).
• Depending on the settings, for DSD multi-channel audio, 2 channels are output on the front left and right.
Note
• Depending on the disc, the number of channels may differ.
• Depending on the connected HDMI device, the HDMI output audio and number of channels may differ.
• The HDMI output audio and number of channels may differ when Resolution is set to 480P, as well as when set
to Auto if the connected device only supports 480i/480p.
• Three types of audio are recorded on BD video discs.
– Primary audio: The main sound.
– Secondary audio: Additional sound added supplementarily, such as comments by directors, actors, etc.
– Interactive audio: Sounds such as clicks heard when operations are performed. The interactive audio differs from
disc to disc.
51
En
Page 52

08
Abkhazian, ab/abk, 0102
Afar, aa/aar, 0101
Afrikaans, af/afr, 0106
Albanian, sq/sqi, 1917
Amharic, am/amh, 0113
Arabic, ar/ara, 0118
Armenian, hy/hye, 0825
Assamese, as/asm, 0119
Aymara, ay/aym, 0125
Azerbaijani, az/aze, 0126
Bashkir, ba/bak, 0201
Basque, eu/eus, 0521
Belarusian, be/bel, 0205
Bengali, bn/ben, 0214
Bihari, bh/bih, 0208
Bislama, bi/bis, 0209
Breton, br/bre, 0218
Bulgarian, bg/bul, 0207
Burmese, my/mya, 1325
Catalan, ca/cat, 0301
Central Khmer, km/khm, 1113
Chinese, zh/zho, 2608
Corsican, co/cos, 0315
Croatian, hr/hrv, 0818
Czech, cs/ces, 0319
Danish, da/dan, 0401
Dutch, nl/nld, 1412
Dzongkha, dz/dzo, 0426
English, en/eng, 0514
Esperanto, eo/epo, 0515
Estonian, et/est, 0520
Finnish, fi/fin, 0609
Fijian, fj/fij, 0610
Faroese, fo/fao, 0615
French, fr/fra, 0618
Galician, gl/glg, 0712
Georgian, ka/kat, 1101
German, de/deu, 0405
Greek, el/ell, 0512
Guarani, gn/grn, 0714
Gujarati, gu/guj, 0721
Hausa, ha/hau, 0801
Hebrew, iw/heb, 0923
Hindi, hi/hin, 0809
Hungarian, hu/hun, 0821
Icelandic, is/isl, 0919
Indonesian, in/ind, 0914
Interlingua, ia/ina, 0901
Interlingue, ie/ile, 0905
Inupiaq, ik/ipk, 0911
Irish,
ga/gle, 0701
It
alian, it/ita, 0920
Japanese, ja/jpn, 1001
Javanese, jw/jav, 1023
Kalaallisut, kl/kal, 1112
Kannada, kn/kan, 1114
Kashmiri, ks/kas, 1119
Kazakh, kk/kaz, 1111
Kinyarwanda, rw/kin, 1823
Kirghiz, ky/kir, 1125
Korean, ko/kor, 1115
Kurdish, ku/kur, 1121
Lao, lo/lao, 1215
Latin, la/lat, 1201
Latvian, lv/lav, 1222
Lingala, ln/lin, 1214
Lithuanian, lt/lit, 1220
Macedonian, mk/mkd, 1311
Malagasy, mg/mlg, 1307
Malay, ms/msa, 1319
Malayalam, ml/mal, 1312
Maltese, mt/mlt, 1320
Maori, mi/mri, 1309
Marathi, mr/mar, 1318
Mongolian, mn/mon, 1314
Moldavian, mo/mol, 1315
Nauru, na/nau, 1401
Nepali, ne/nep, 1405
Norwegian, no/nor, 1415
Occitan, oc/oci, 1503
Oriya, or/ori, 1518
Oromo, om/orm, 1513
Panjabi, pa/pan, 1601
Persian, fa/fas, 0601
Polish, pl/pol, 1612
Portuguese, pt/por, 1620
Pushto, ps/pus, 1619
Quechua, qu/que, 1721
Romanian, ro/ron, 1815
Romansch, rm/roh, 1813
Rundi, rn/run, 1814
Russian, ru/rus, 1821
Samoan, sm/smo, 1913
Sango, sg/sag, 1907
Sanskrit, sa/san, 1901
Scottish Gaelic, gd/gla, 0704
Serbian, sr/srp, 1918
Serbo-Croatian, sh/---, 1908
Shona, sn/sna, 1914
Sindhi, sd/snd, 1904
Sinhalese, si/sin, 1909
Slovak, s
k/slk, 1911
Slovenian, sl/slv, 1912
Somali, so/som, 1915
Sotho, Southern, st/sot, 1920
Spanish, es/spa, 0519
Sundanese, su/sun, 1921
Swahili, sw/swa, 1923
Swati, ss/ssw, 1919
Swedish, sv/swe, 1922
Tagalog, tl/tgl, 2012
Tajik, tg/tgk, 2007
Tamil, ta/tam, 2001
Tatar, tt/tat, 2020
Telugu, te/tel, 2005
Thai, th/tha, 2008
Tibetan, bo/bod, 0215
Tigrinya,
ti/tir, 2009
Tonga (Tonga Islands),
to/ton, 2015
Tsonga, ts/tso, 2019
Tswana, tn/tsn, 2014
Turkmen, tk/tuk, 2011
Turkish, tr/tur, 2018
Twi, tw/twi, 2023
Ukrainian, uk/ukr, 2111
Urdu, ur/urd, 2118
Uzbek, uz/uzb, 2126
Vietnamese, vi/vie, 2209
Volapük, vo/vol, 2215
Welsh, cy/cym, 0325
Western Frisian, fy/fry, 0625
Wolof, wo/wol, 2315
Xhosa, xh/xho, 2408
Yiddish, ji/yid, 1009
Yoruba, yo/yor, 2515
Zulu, zu/zul, 2621
Anguilla, ai, 0109
Antigua and Barbuda, ag, 0107
Argentina, ar, 0118
Armenia, am, 0113
Australia, au, 0121
Austria, at, 0120
Azerbaijan, az, 0126
Bahamas, bs, 0219
Barbados, bb, 0202
Belarus, by, 0225
Belgium, be, 0205
Belize, bz, 0226
Bermuda, bm, 0213
Brazil, br, 0218
Bulgaria, bg, 0207
Canada, ca, 0301
Cayman Islands, ky, 1125
Chile, cl, 0312
China, cn, 0314
Colombia, co, 0315
Croatia, hr, 0818
Cyprus, cy, 0325
Czech Republic, cz, 0326
Denmark, dk, 0411
Dominica, dm, 0413
Dominican Republic, do, 0415
Estonia, ee, 0505
Finland, fi, 0609
France, fr, 0618
Georgia, ge, 0705
Germany, de, 0405
Greece, gr, 0718
Greenland, gl, 0712
Grenada, gd, 0704
Guyana, gy, 0725
Haiti, ht, 0820
Hong Kong, hk, 0811
Hungary, hu, 0821
Iceland, is, 0919
India, in, 0914
Indonesia, id, 0904
Ireland, ie, 0905
Israel, il, 0912
Italy, it, 0920
Jamaica, jm, 1013
Japan, jp, 1016
Kazakhstan, kz, 1126
Korea, Republic of, kr, 1118
Kyrgyzstan, kg, 1107
Latvia, lv, 1222
Liechtenstein,
li, 1209
Lithuania, lt,
1220
Luxembourg, lu, 1221
Macedonia, the Former Yugoslav
Republic of, mk, 1311
Malaysia, my, 1325
Malta, mt, 1320
Mexico, mx, 1324
Moldova, Republic of, md, 1304
Monaco, mc, 1303
Montserrat, ms, 1319
Netherlands, nl, 1412
New Zealand, nz, 1426
Norway, no, 1415
Pakistan, pk, 1611
Peru, pe, 1605
Philippines, ph, 1608
Poland, pl, 1612
Portugal, pt, 1620
Puerto Rico, pr, 1618
Romania, ro, 1815
Russian Federation, ru, 1821
Saint Kitts and Nevis, kn, 1114
Saint Lucia, lc, 1203
Saint Vincent and the
Grenadines, vc, 2203
San Marino, sm, 1913
Singapore, sg, 1907
Slovakia, sk, 1911
Slovenia, si, 1909
Spain, es, 0519
Suriname, sr, 1918
Sweden, se, 1905
Switzerland, ch, 0308
Taiwan, Province of China,
tw, 2023
Tajikistan, tj, 2010
Thailand, th, 2008
Trinidad and Tobago, tt, 2020
Tunisia, tn, 2014
Turkey, tr, 2018
Turkmenistan, tm, 2013
Turks and Caicos Islands,
tc, 2003
Ukraine, ua, 2101
United Kingdom, gb, 0702
United States, us, 2119
Uruguay, uy, 2125
Uzbekistan, uz, 2126
Venezuela, ve, 2205
Virgin Islands, British, vg, 2207
Language Code Table and Country/Area Code
Table
Language Code Table
Language name, language code, input code
Country/Area Code Table
Country/Area name, Country/Area code, input code
52
En
Page 53

Chapter 9
Additional information
09
Cautions on use
Moving the player
If you need to move this unit, first remove the disc if
there’s one loaded, and close the disc tray. Next, press
STANDBY/ON to switch the power to standby,
checking that the POWER OFF indication on the front
panel display goes off. Wait at least 10 seconds. Lastly,
disconnect the power cord.
Never lift or move the unit during playback — discs rotate
at a high speed and may be damaged.
Place of installation
Select a stable place near the TV and AV system to which
the unit is connected.
Do not place the player on top of a TV or color monitor.
Keep it away from cassette decks or other components
easily affected by magnetism.
Avoid the following types of places:
• Places exposed to direct sunlight
• Humid or poorly ventilated places
• Extremely hot or cold places
• Places subject to vibration
• Places in which there is much dust or cigarette
smoke
• Places exposed to soot, steam or heat (in kitchens,
etc.)
Do not place objects on top
Do not place objects on top of the player.
Do not obstruct the ventilation
holes
Do not use the player on a shaggy rug, bed, or sofa, and
do not cover the player with a cloth, etc. Doing so will
prevent heat dissipation and could lead to damage.
Keep away from heat
Do not place the player on top of an amplifier or other
device generating heat. When installing in a rack, to avoid
the heat generated by the amplifier and other devices,
place it on a shelf below the amplifier whenever possible.
Turn the power off when not
using the player
Depending on the conditions of the TV broadcast signals,
striped patterns may appear on the screen when the TV is
turned on while the player’s power is turned on. This is not
a malfunction with the player or TV. If this happens, turn
the player’s power off. In the same way, noise may be
heard in the sound of a radio.
Condensation
If the player is moved suddenly from a cold place into a
warm room (in winter, for example) or if the temperature
in the room in which the player is installed rises suddenly
due to a heater, etc., water droplets (condensation) may
form inside (on operating parts and the lens). When
condensation is present, the player will not operate
properly and playback is not possible. Let the player stand
at room temperature for 1 or 2 hours with the power
turned on (the time depends on the extent of
condensation). The water droplets will dissipate and
playback will become possible.
Condensation can also occur in the summer if the player
is exposed to the direct wind from an air-conditioner. If
this happens, move the player to a different place.
Cleaning the player
Normally, wipe the player with a soft cloth. For tough dirt,
apply some neutral detergent diluted in 5 to 6 parts water
to a soft cloth, wring out thoroughly, wipe off the dirt, then
wipe again with a dry cloth.
Note that getting alcohol, thinner, benzene or insecticide
on the player could cause the print and coating to peel off.
Also, avoid leaving rubber or vinyl products in contact
with the player for long periods of time, as this could
damage the cabinet.
When using chemical-impregnated wipes, etc., read the
wipe’s cautions carefully.
Unplug the power cord from the power outlet when
cleaning the player.
Caution for when the unit is
installed in a rack with a glass
door
Do not press the OPEN/CLOSE on the remote control
to open the disc tray while the glass door is closed. The
door will hamper the movement of the disc tray, and the
unit could be damaged.
English Français Español
53
En
Page 54

09
Cleaning the pickup lens
The player’s lens should not become dirty in normal use,
but if for some reason it should malfunction due to dust
or dirt, consult your nearest Pioneer authorized service
center. Although lens cleaners for players are
commercially available, we advise against using them
since some may damage the lens.
Handling discs
Do not use damaged (cracked or warped) discs.
Do not scratch the disc’s signal surface or let it get dirty.
Do not load more than one disc into the player at a time.
Do not glue paper or put stickers onto the disc, or use a
pencil, ball-point pen or other sharp-tipped writing
instrument. These could all damage the disc.
Storing discs
Always store discs in their cases, and place the cases
vertically, avoiding places exposed to high temperatures
or humidity, direct sunlight or extremely low
temperatures.
Be sure to read the cautions included with the disc.
Condensation on discs
If the disc is moved suddenly from a cold place into a
warm room (in winter, for example), water droplets
(condensation) may form on the disc surface. Discs will
not play properly if there is condensation on them.
Carefully wipe off the water droplets from the disc surface
before using the disc.
Cleaning discs
It may not be possible to play the disc if there are
fingerprints or dust on it. In this case, using a cleaning
cloth, etc., to wipe the disc gently from the center toward
the outer edge. Do not use a dirty cleaning cloth.
Do not use benzene, thinner or other volatile chemicals.
Also do not use record spray or antistatic agents.
For tough dirt, apply some water to a soft cloth, wring out
thoroughly, wipe off the dirt, then wipe off the moisture
with a dry cloth.
Specially shaped discs
Specially shaped discs (heart-shaped, hexagonal, etc.)
cannot be used on this player. Never use such discs, as
they will damage the player.
54
En
Page 55

Troubleshooting
Incorrect operation is often mistaken for trouble or malfunction. If you think that there is something wrong with this
component, check the points below. Sometimes the trouble may lie in another component. Inspect the other
components and electrical appliances being used. If the trouble cannot be rectified even after checking the points
below, ask your nearest Pioneer authorized service center or your dealer to carry out repair work.
Playback
Problem Check Remedy
• Disc does not play.
• Disc tray opens
automatically.
No picture is displayed or the
picture is not displayed
properly.
Is the disc one that is
playable on this player?
Is the file one that is playable
on this player?
Is the disc scratched? It may not be possible to play scratched discs.
Is the disc dirty? Clean the disc (page 54).
Is there a piece of paper or
sticker attached to the disc?
Is the disc properly set in the
disc tray?
Is the region number correct? See page 10 for the region numbers of discs that can be played on this
Is the HDMI cable properly
connected?
Is the HDMI cable damaged? If the cable is damaged, replace it with a new one.
Is the input setting on the
connected TV or AV receiver
or amplifier right?
Is the output video resolution
properly set?
Is the player connected with
an HDMI cable other than a
High Speed HDMI
(with a Standard HDMI
cable)?
Is a DVI device connected? The picture may not be displayed properly if a DVI device is connected.
Is Color Space properly set? Change the Color Space setting (page 44).
Is the HDMI Mode set
appropriately?
Is the DIRECT function set to
ON?
®/TM
• Check whether the disc is one that can be played on this player
(page 8).
• Discs that have not been finalized cannot be played.
• Check whether the file is one that can be played on this player
(page 11).
• Check whether or not the file is damaged.
The disc may be warped and unplayable.
• Set the disc with the printed side facing up.
• Set the disc properly in the depression in the disc tray.
player.
• Eliminate any condensation inside the unit (page 53).
• Depending on how the disc was recorded, the status of the pickup
and compatibility between the disc being used and this unit, it may not
be possible to play the disc properly.
• If the recorded time is short, it may not be possible to play the disc
properly.
• BD-RE/-R discs recorded in formats other than BDMV or BDAV
cannot be played.
• Connect the cable properly according to the connected devices
(page 17).
• Disconnect the cable, then reinsert it firmly and all the way in.
• TV or any other device which outputs video signals must be
connected to the HDMI OUT (MAIN) terminal (page 17).
Read the operating instructions for the connected components and
switch to the proper input.
Switch the resolution at which the video and audio are output by
pressing RESOLUTION /.
Connect the player to the TV using a High Speed HDMI
cable
®/TM
Set the HDMI Mode to something other than Pure Audio (page 44).
Video output does not occur if the DIRECT function is set to On. Turn
the DIRECT function off to display video (page 30).
®/TM
cable.
09
English Français Español
55
En
Page 56

09
Problem Check Remedy
No picture is displayed or the
picture is not displayed
properly.
Playback stops. • Playback may stop if the unit is subject to shocks or set in an unstable
Picture freezes and the front
panel and remote control
buttons stop working.
• Picture is stretched.
• Picture is cropped.
• Aspect ratio cannot be
switched.
Picture is interrupted. The picture may be interrupted when the resolution of the recorded
There is square noise
(pixelation) on the screen.
The subtitles cannot be
switched.
If high definition videos of 4K
etc. are not visible.
Is the TV’s aspect ratio
properly set?
Is TV Screen properly set? Set TV Screen properly (page 42).
Change the settings by the following procedure.
1. Press the HDMI button on the remote control for 5 seconds or more.
2. If “4K 4:4:4” is displayed on the product screen, use
change it to “4K 4:2:0”.
If the video improves after changing the setting, continue using this
setting.
To revert the setting to the original value, do the operation described
above again and change the setting to “4K 4:4:4”.
place.
• Playback may stop when a USB device is connected or disconnected
during playback. Do not connect or disconnect USB devices during
playback.
• Press STOP to stop playback, then restart playback.
• If the playback cannot be stopped, press STANDBY/ON on the
player’s front panel to turn off the power, then turn the power back on.
• If the power cannot be turned off (to standby), reset the unit. Press
and hold STANDBY/ON on the main unit’s front panel for over 5
seconds. The unit restarts and can now be operated.
• It may not be possible to play scratched discs.
Read the operating instructions for the TV and set the TV’s aspect ratio
properly.
When video signals with a resolution of 4K60p, 4K50p, 4K24p, 1080/50i,
1080/50p, 720/50p, 1080/24p, 1080/60i, 1080/60p or 720/60p are being
output from the
ratio of 16:9 even if
video signal switches. Set Resolution to something other than Auto
(page 42).
Due to the characteristics of digital image compression technology,
block-shaped images may stand out, for example in scenes where there
is fast movement.
The subtitles cannot be switched for discs recorded on a DVD or BD
recorder.
HDMI OUT
terminal, they may be output with an aspect
TV Screen
is set to
4:3 Pan&Scan
/ button to
(page 42).
56
En
Page 57

Problem Check Remedy
• No sound is output.
• Sound is not output
properly.
Left/right audio channels are
inverted or only one side is
produced.
Multi-channel sound is not
output.
Noise can be heard when
outputting DTS Digital Audio
signals from the DIGITAL
OUT terminal.
192 kHz or 96 kHz digital
audio signals cannot be
output from the DIGITAL
OUT terminal.
Secondary audio or
interactive audio is not
output.
Is the volume set to the
minimum?
Is the disc played back in
slow motion?
Is the disc played back in fast
forward or fast reverse?
Are the audio cables properly
connected?
Is the audio cable damaged? If the cable is damaged, replace it with a new one.
Is Audio Output properly
set?
Are the connected
components (AV receiver or
amplifier, etc.) properly set?
Is HDMI Audio Out properly
set?
Is the output video resolution
properly set?
Is a DVI device connected? The sound will not be output from the HDMI OUT terminal if a DVI
Is the HDMI Mode set
appropriately?
Is the DIRECT function set to
ON?
Are the audio cables properly
connected?
Is the audio output of the
connected AV receiver or
amplifier, etc., properly set?
Is multi-channel sound
selected?
Is the connected AV receiver
or amplifier compatible with
DTS Digital Surround?
Is HDMI Audio Out properly
set?
Are Digital Output properly
set?
If the volume of the TV or AV amplifier is set to the minimum, raise it.
No sound is output during slow motion play and forward and reverse
scanning.
• Connect the cable properly according to the connected devices
(page 17).
• Insert the cable firmly and all the way in.
• If the connection plug or terminal is dirty, wipe it clean.
Set Audio Output properly, according to the connected device
(page 43).
Read the operating instructions for the connected components and
check the volume, input, speaker settings, etc.
Set HDMI Audio Out to Re-encode or PCM. (page 44).
Switch the resolution at which the video and audio are output by
pressing RESOLUTION /.
device is connected. Connect the device to a DIGITAL OUT terminal or
the AUDIO OUT terminals (page 21).
• For some BDs, audio signals are only output from DIGITAL OUT
terminal or the HDMI OUT terminal.
• The sound may not be output for discs containing sound other than
audio signals or non-standard sound.
• When copy-protected discs are played, the picture or sound may not
be properly output. This is not a malfunction.
Set the HDMI Mode properly, according to the connected device
(page 44).
Audio output does not occur from the HDMI or DIGITAL AUDIO OUT
terminals if the DIRECT function is set to On. Turn the DIRECT function
off to output audio from the HDMI or DIGIT
(page 30).
Check whether the audio cables for the left and right channels are
inverted or whether the cable for one side is disconnected (page 21).
Read the operating instructions for the connected AV receiver or
amplifier and check the audio output settings of the AV receiver or
amplifier.
Use the menu screen or AUDIO to switch the disc’s sound to multichannel.
If an AV receiver or amplifier that is not compatible with DTS Digital
Surround is connected to the DIGITAL OUT terminal, set Digital
Output to PCM (page 43).
• Copyright-protected audio is converted to 48 kHz or less before
output.
• Set Max Sampling Frequency to 96KHz or 192KHz (page 43).
When listening to the sound from an HDMI OUT terminal, set HDMI
Audio Out to PCM (page 44).
When listening to the sound from an DIGITAL OUT terminal, set
Digital Output to Re-encode or PCM (page 43).
09
English Français Español
AL AUDIO OUT terminals
57
En
Page 58

09
Problem Check Remedy
Sound is fast or slow. When an HDMI cable is
connected, are audio signals
being output from devices
connected with cables other
than HDMI cables?
After a disc is inserted,
Loading stays displayed and
playback does not start.
is displayed in file names,
etc.
A message indicating low
memory appears while
playing a BD-ROM disc.
Are there too many files
recorded on the disc?
When a Pioneer AV receiver or amplifier compatible with the PQLS
function is connected directly to the player’s HDMI OUT terminal using
an HDMI cable, the PQLS function is activated when playing an audio
CD (CD-DA). Because of this, the sound output from components other
than the ones connected by an HDMI cable may be fast or slow. If this
happens, set Control to Off (page 44).
When a disc on which files are recorded is inserted, depending on the
number of files recorded on the disc, loading may take several dozen
minutes.
The characters that cannot be displayed on this player are displayed in
.
• Connect a USB device (page 22).
• Erase the data stored on the connected USB device from BUDA
Setup (page 46).
Control function
Problem Check Remedy
Control function does not
work.
Is the HDMI cable properly
connected?
Is the HDMI cable you are
using a High Speed HDMI
TM
Cable?
Is this player connected to
the TV using an HDMI cable
to watch the picture?
Is the HDMI Mode set
appropriately?
Is Control set to On on the
player?
Does the connected device
support the Control function?
Is Control set to On on the
connected device?
Are multiple players
connected?
®
To use the Control function, connect the TV and AV system (AV receiver
or amplifier, etc.) to the HDMI OUT terminal (page 17).
Use a High Speed HDMI
/
properly if an HDMI cable other than a High Speed HDMI
used.
If video signals are being output from a terminal other than the HDMI
OUT terminal, the Control function does not work. Connect to the TV
using an HDMI cable (page 17).
• When connecting a device supporting the control function to the
HDMI OUT (MAIN) terminal, set the HDMI Mode to Dual or Single.
• When connecting a device supporting the control function to the
HDMI OUT (SUB) terminal, set the HDMI Mode to Separate or Pure
Audio (page 44).
Set Control to On on the player (page 44).
• The Control function will not work with devices of other brands that
do not support the Control function, even when connected using an
HDMI cable.
• The Control function will not work if devices that do not support the
Control function are connected between the Control-compatible device
and the player. See page 18.
• Even when connected to a Pioneer product compatible with the
Control function, some of the functions may not work.
Also refer to the operating instructions for the connected device.
Set Control to On on the connected device. The Control function
operates when Control is set to On for all devices connected to the
HDMI OUT terminal.
Once connections and settings of all the devices are finished, be sure
to check that the player’s picture is output to the TV. (Also, check after
changing the connected devices and connecting and/or disconnecting
HDMI cables.) If the player’s picture is not being output to the TV, the
Control function may not work properly.
For details, refer to the operating instructions of the connected device.
The Control function may not work if 4 or more players, including this
player, are connected by an HDMI cable.
Depending on the connected device, the function may not work.
®/TM
Cable. The Control function may not work
®/TM
Cable is
58
En
Page 59

Network
Problem Check Remedy
Cannot connect to network. • Insert the LAN cable securely as far as it goes (page 23).
• Do not connect using a modular cable. Use a LAN cable for the LAN
(10/100) terminal.
• Check that the power of the Ethernet hub (router with hub function)
or the modem is turned on.
• Check that the Ethernet hub (router with hub function) or the modem
is properly connected.
• Check the network settings.
BD-LIVE function
(connection to the Internet)
cannot be used.
Software updating is slow. Depending on the Internet connection and other conditions, some time
A message other than
“Networks is OK.” is
displayed when Connection
Test is performed.
Is “Network is FAILED.”
displayed?
Is the Ethernet hub (or router
with a hub functionality)
operating properly?
• Check the network connections and settings.
• Connect a USB memory device.
• Delete data from the USB memory device.
• Check that the BD-ROM supports the BD-LIVE function.
• Test the connections (page 47). If "Network is OK" is displayed, check
the proxy server settings at [Initial Setup] -> [Network] -> [Proxy
Server] -> [Next Screen] (page 44). There may also be a problem with
the Internet connection. Contact your provider.
may be required to update the software.
• Check that this player and the Ethernet hub (or router with a hub
functionality) are properly connected.
• If the IP address is obtained using the DHCP server function, check
the setting is correct at the Information (page 44). For details on the
DHCP server function, see the operating instructions for the Ethernet
hub (or router with a hub functionality).
• Set the IP address manually.
• Check the operation and settings of the DHCP server function of the
Ethernet hub (or router with hub functionality). For details on the DHCP
server function, see the operating instructions for the Ethernet hub (or
router with a hub functionality).
• If this player has been set manually, reset the IP address of this player
or other components.
• Check the settings and operation the Ethernet hub (or router with a
hub functionality). For details, see the operating instructions for the
Ethernet hub.
• Reboot the Ethernet hub (or router with a hub functionality).
09
English Français Español
59
En
Page 60

09
Problem Check Remedy
The audio files stored on
components on the network,
such as a computer, cannot
be played back.
The audio files stored on
components on the network,
such as a computer, cannot
be played back.
Playback does not start. The component is currently
The computer is not properly
operated.
Cannot access Windows
Media Player 11 or Windows
Media Player 12.
Video and audio playback are
undesirably stopped or
disturbed.
The audio component on the
network which has been
switched off is switched on.
Audio files recorded in
MPEG-4 or AAC are being
played back on Windows
Media Player 11 or Windows
Media Player 12.
The folder stored on the
omponent connected to the
network has been deleted or
damaged.
disconnected from this unit
or the power supply.
The corresponding IP
address is not properly set.
You are currently logged onto
the domain through your
computer with Windows 7
installed.
The LAN cable is currently
disconnected.
There is heavy traffic on the
network with the Internet
being accessed on the same
network.
There are cases where a component with Internet security software
installed cannot be accessed.
Switch on the audio component on the network before switching on
this unit.
If the client is automatically authorized, you need to enter the
corresponding information again. Check whether the connection
status is set to “Do not authorize”.
Check the audio files stored on the component connected to the
network.
Install Windows Media Player 11 or Windows Media Player 12 on your
computer.
Play back audio files recorded in MP3, WAV (LPCM only), MPEG-4 AAC,
or WMA. Note that some audio files recorded in these formats may not
be played back on this unit.
Audio files recorded in MPEG-4 AAC cannot be played back on
Windows Media Player 11 or Windows Media Player 12. Try using
another server. Refer to the operation manual supplied with your
server.
Check whether the component is affected by special circumstances or
is in the sleep mode. Try rebooting the component if necessary.
Try changing the settings for the component connected to the network.
Check the folder stored on the component connected to the network.
Check the computer’s network settings, security settings, etc.
Check whether the component is properly connected to this unit or the
power supply.
Switch on the built-in DHCP server function of your router, or set up the
network manually according to your network environment.
The automatic configuration process takes time. Please wait.
Instead of logging onto the domain, log onto the local machine.
Check whether the audio file was recorded in a format supported by
this unit.
Even audio files listed as playable on this unit may sometimes not be
played back or displayed.
Check whether the folder has been damaged or corrupted.
Connect the LAN cable properly.
Use 100BASE-TX to access the components on the network.
60
En
Page 61

Others
Problem Check Remedy
Power does not turn on. Is the power cord properly
connected?
The player’s power turns off
automatically.
The player’s power turns on
automatically.
This unit cannot be operated. • Use within the specified usage temperature range (page 64).
The player cannot be
operated with the remote
control.
Unit heats up during use. Depending on the usage environment, the temperature of the unit's
Input of the connected TV
and AV system switches
automatically.
Settings I have made have
been cleared.
USB (external storage) device
does not work with this player
properly.
Is Auto Power Off set to 15
min or 30 min?
Is Control set to On? The player’s power may turn on together with the power of the TV
Are you operating the remote
control from a point too far
away from the player?
Are the batteries dead? Replace the batteries (page 6).
Is Control set to On? The input of the TV and AV system (AV receiver or amplifier, etc.)
• Have you disconnected the
power cord while the player’s
power was on?
• Has there been a power
failure?
Is the USB device properly
connected?
Is the USB device connected
via an extension cable?
Is the external storage device
connected to the USB port via
a memory card reader or USB
hub?
Does the external storage
device contain multiple
partitions?
Is the external storage device
write-protected?
Is the USB device’s file
system FAT32, FAT16 or
NTFS?
• Plug the power cord securely into the power outlet (page 23).
• Unplug the power cord, wait several seconds, then plug the power
cord back in.
If Auto Power Off is set to 15 min or 30 min, the player’s power
automatically turns off if no operation is performed for the set amount
of time (page 46).
connected to the HDMI OUT terminal. If you do not want the player’s
power to turn on when the TV’s power is turned on, set Control to Off
(page 44).
• If the power cannot be turned off (to standby), reset the unit. Press
and hold STANDBY/ON on the main unit’s front panel for over 5
seconds. The unit restarts and can now be operated.
Operate from within 7 m (23 ft.) of the remote control sensor.
cabinet may increase somewhat during use, but this is not a
malfunction and there is no need to worry.
connected to the HDMI OUT terminal may automatically switch to the
player when playback starts on the player or the menu screen (Source
function, etc.) is displayed. If you do not want the inputs of the
connected TV and AV system (AV receiver or amplifier, etc.) to switch
automatically, set Control to Off (page 44).
Always press STANDBY/ON on the player’s front panel or
STANDBY/ON on
has turned off from the player’s front panel display before
disconnecting the power cord. Be particularly careful when the power
cord is connected to the AC outlet on another device because the
player turns off in conjunction with the device.
• Turn the player’s power off, then turn the power back on.
• Turn the player’s power off, then reconnect the external storage
device (page 22).
Do not use an extension cable. The player may not work properly with it.
External storage device may not work if connected to the USB port via
a memory card reader or USB hub.
External storage devices may not be recognized if they contain multiple
partitions.
Turn the player’s power off, then disable the write-protection.
USB devices formatted in the FAT32, FAT16 or NTFS file system can be
used.
Some external storage devices may not operate.
the remote control and check that POWER OFF
09
English Français Español
61
En
Page 62

09
Glossary
Angle (Multi angle)
Up to 9 camera angles can be recorded simultaneously on BDROM or DVD-Video discs, letting you view the same scene from
different angles.
AVCHD (Advanced Video Codec High
Definition)
See page 10.
BDAV
Of the BD format, the Audio Visual Format Specifications for HD
digital broadcast recording is referred to as BDAV on this player
and in these operating instructions.
BD-J
See page 10.
BD-LIVE
See page 10.
BDMV
Of the BD format, the Audio Visual Format Specifications designed
for pre-packaged high definition (HD) movie contents is referred to
as BDMV on this player and in these operating instructions.
BONUSVIEW
See page 9.
Deep Color
See page 17.
Default Gateway
A default gateway is a communication device such as a router which
passes data between networks. It is used to direct data to networks
on which the destination gateway is not explicitly specified.
DHCP (Dynamic Host Configuration
Protocol)
This protocol provides configuration parameters (IP address,
etc.) for computers and other devices connected to the network.
DivX
See page 11.
DNS (Domain Name System)
This is a system for associating Internet host names with IP
addresses.
Dolby Digital
Dolby Digital is an audio format to record the sound in up to 5.1
channels with a fraction of the amount of data as compared to
linear PCM audio signals.
Dolby Digital Plus
Dolby Digital Plus is an audio format for high-definition media.
Built on Dolby Digital, it combines the efficiency and flexibility to
provide high quality multi-channel audio. With BD-ROMs, up to
7.1 channels of digital sound can be recorded.
Dolby TrueHD
Dolby TrueHD is an audio format using lossless coding. With BD-
62
ROMs, up to 8 channels can be recorded at 96 kHz/24 bits, or up
to 6 channels at 192 kHz/24 bits.
En
DRM
A technology for protecting copyrighted digital data. Digitized
videos, images and audio retain the same quality even when they
are copied or transferred repeatedly. DRM is a technology for
restricting the distribution or playback of such digital data
without the authorization of the copyright holder.
DSD (Direct Stream Digital)
The Digital Audio encoding system found on SACDs, that
expresses the audio signals by the pulse density of one bit data.
DTS Digital Surround
DTS Digital Surround is an audio format to record 48 kHz/24 bits
audio signals in 5.1 channels.
DTS-HD High Resolution Audio
DTS-HD High Resolution Audio is an audio format using lossy
coding. It can record 7.1 channels at 96 kHz/24 bits.
DTS-HD Master Audio
DTS-HD Master Audio is an audio format using lossless coding.
With BD-ROMs, 7.1 channels can be recorded at 96 kHz/24 bits,
or 5.1 channels at 192 kHz/24 bits.
Ethernet
A standard for local area networks (LANs) used to connect
multiple computers, etc. in the same location. This player
supports 100BASE-TX.
Frames and fields
A frame is the unit for one of the still pictures which compose
motion pictures. One frame consists of a picture of odd lines and
a picture of even lines called fields in video signal with interlaced
scan method (576i, 1080i, etc.).
HDMI (High-Definition Multimedia
Interface)
See page 17.
Interactive audio
The audio signals recorded in the titles of BD-ROMs. They include
for example the clicking sound made when the menu screen is
operated.
Interlaced scan
With this method, one picture is displayed by scanning it twice.
The odd lines are displayed in the first pass, the even lines are
displayed in the second, to form a single picture (frame).
Interlaced scan is indicated in this player and operating
instructions by an “i” after the resolution value (for example, 576i).
IP address
An address that identifies a computer or other device connected
to the Internet or local area network. It is represented a number
in four sections.
Linear PCM
This is referred as the audio signals that are not compressed.
MAC (Media Access Control) address
A hardware identification number assigned specifically to the
network device (LAN card, etc.).
Page 63

MPEG (Moving Picture Experts Group)
The name of a family of standards used to encode video and
audio signals in a digital compressed format. The video encoding
standards include MPEG-1 Video, MPEG-2 Video, MPEG-4 Visual,
MPEG-4 AVC, etc. The audio encoding standards include MPEG1 Audio, MPEG-2 Audio, MPEG-2 AAC, etc.
Multi-session
Multi-session/multi-border recording is a method of recording two
or more sessions/borders on a single disc. When recording data
on a disc, the unit comprising the data from the beginning to the
end of that instance of recording is called a session or border.
Parental Lock
See page 48.
Software license
notice
About Apple Lossless Audio
Codec
Copyright © 2011 Apple Inc. All rights reserved.
Licensed under the Apache License, Version 2.0. You may
obtain a copy of the License at
http://www.apache.org/licenses/LICENSE-2.0
09
English Français Español
Picture-in-Picture (P-in-P)
This is a function for superimposing a sub video on the main
video. Some BD-ROMs include secondary video, which can be
superimposed on the primary video.
Port number
This is a sub-address provided below the IP address for
simultaneously connecting to multiple parties during Internet
communications.
Progressive scan
With this method, one picture is consisted of a single picture,
without dividing it in two pictures. Progressive scan provides
clear pictures with no flicker, in particular for still pictures that
contain much text, graphics, or horizontal lines. Progressive scan
is indicated in this player and operating instructions by a “p” after
the resolution value (for example, 576p).
Proxy server
This is a relay server for ensuring fast access and safe
communications when connecting to the Internet from an
internal network.
Region number
See page 10.
Secondary audio
Some BD-ROMs include sub audio streams mixed with the main
audio stream. These sub audio streams are called “secondary
audio”. On some discs this secondary audio is recorded as the
audio for the secondary video.
Secondary video
Some BD-ROMs include sub videos superimposed on the main
videos using the Picture-in-Picture function. These sub videos are
called “secondary video”.
Subnet mask
This is used to identify which part of the IP address corresponds
to the subnet (a separately managed network). The subnet mask
is expressed as ‘255.255.255.0’.
USB (Universal Serial Bus)
USB is the industry standard for connecting peripherals to PCs.
About FLAC
FLAC Decoder
Copyright © 2000, 2001, 2002, 2003, 2004, 2005, 2006,
2007, 2008, 2009
Josh Coalson
Redistribution and use in source and binary forms, with
or without modification, are permitted provided that the
following conditions are met:
• Redistributions of source code must retain the above
copyright notice, this list of conditions and the
following disclaimer.
• Redistributions in binary form must reproduce the
above copyright notice, this list of conditions and the
following disclaimer in the documentation and/or
other materials provided with the distribution.
• Neither the name of the Xiph.org Foundation nor the
names of its contributors may be used to endorse or
promote products derived from this software without
specific prior written permission.
THIS SOFTWARE IS PROVIDED BY THE COPYRIGHT
HOLDERS AND CONTRIBUTORS “AS IS” AND ANY
EXPRESS OR IMPLIED WARRANTIES, INCLUDING, BUT
NOT LIMITED TO, THE IMPLIED WARRANTIES OF
MERCHANTABILITY AND FITNESS FOR A PARTICULAR
PURPOSE ARE DISCLAIMED. IN NO EVENT SHALL THE
FOUNDATION OR CONTRIBUTORS BE LIABLE FOR ANY
DIRECT, INDIRECT, INCIDENTAL, SPECIAL,
EXEMPLARY, OR CONSEQUENTIAL DAMAGES
(INCLUDING, BUT NOT LIMITED TO, PROCUREMENT OF
SUBSTITUTE GOODS OR SERVICES; LOSS OF USE,
DATA, OR PROFITS; OR BUSINESS INTERRUPTION)
HOWEVER CAUSED AND ON ANY THEORY OF
LIABILITY, WHETHER IN CONTRACT, STRICT LIABILITY,
OR TORT (INCLUDING NEGLIGENCE OR OTHERWISE)
ARISING IN ANY WAY OUT OF THE USE OF THIS
SOFTWARE, EVEN IF ADVISED OF THE POSSIBILITY OF
SUCH DAMAGE.
VC-1
A video codec developed by Microsoft and standardized by the
Society of Motion Picture and Television Engineers (SMPTE).
Some BDs include videos encoded in this codec.
x.v.Color
See page 17.
63
En
Page 64

09
Specifications
Model BDP-88FD
BDP-85FD
Type
Rated voltage
Rated frequency 50 Hz/60 Hz
Power consumption BDP-88FD : 40 W
Power consumption (standby) BDP-88FD : 0.3 W
Power consumption (Network Standby on) BDP-88FD : 5 W
Weight BDP-88FD : 13.4 kg (29.5 lb)
External dimensions (including projecting parts) BDP-88FD :
Tolerable operating temperature +5 °C to +35 °C
Tolerable operating humidity 5 % to 85 % (no condensation)
Output terminals
HDMI 2 set, 19-pin: 5 V, 250 mA
Audio outputs 2-channel (left/right) 1 set, RCA jacks
Audio output level RCA : 200 mVrms (1 kHz, –20 dB)
Frequency response 4 Hz to 88 kHz (192 kHz sampling)
Digital audio outputs Coaxial 1 set, RCA jacks
Optical (BDP-88FD only) 1 set, Optical digital jack
LAN 1 set, Ethernet jack (10BASE-T/100BASE-TX)
USB 2 set, Type A
Blu-ray 3D
AC 120 V
BDP-85FD : 27 W
BDP-85FD : 0.3 W
BDP-85FD : 5 W
BDP-85FD : 9.9 kg (21.8 lb)
435 mm (W) x 130 mm (H) x 339 mm (D)
17.1 in. (W) x 5.1 in. (H) x 13.3 in. (D)
BDP-85FD :
435 mm (W) x 118 mm (H) x 338 mm (D)
17.1 in. (W) x 4.6 in. (H) x 13.3 in. (D)
1 set, XLR jacks (BDP-88FD only)
XLR : 400 mVrms (1 kHz, –20 dB) (BDP-88FD only)
TM
PLAYER
64
En
Note
• The specifications and design of this product are subject to change without notice.
• This item incorporates copy protection technology that is protected by U.S. patents and other intellectual property
rights of Rovi Corporation. Reverse engineering and disassembly are prohibited.
• Corporation and product names mentioned herein are trademarks or registered trademarks of the respective
corporations.
© 2014 PIONEER HOME ELECTRONICS CORPORATION.
All rights reserved.
Page 65

09
English Français Español
65
En
Page 66

Nous vous remercions pour cet achat d’un produit Pioneer.
Nous vous demandons de lire soigneusement ce mode d’emploi ; vous serez ainsi à même de faire
fonctionner l’appareil correctement. Après avoir bien lu le mode d’emploi, le ranger dans un endroit sûr
pour pouvoir s’y référer ultérieurement.
IMPORTANT
ATTENTION
DANGER D´ELECTROCUTION
NE PAS OUVRIR
Ce symbole de l’éclair, placé dans un
triangle équilatéral, a pour but d’attirer
l’attention de l’utilisateur sur la présence, à
l’intérieur du coffret de l’appareil, de
“tensions dangereuses” non isolées d’une
grandeur suffisante pour représenter un
risque d’électrocution pour les êtres
humains.
ATTENTION :
POUR ÉVITER TOUT RISQUE
D’ÉLECTROCUTION, NE PAS ENLEVER LE
COUVERCLE (NI LE PANNEAU ARRIÈRE).
AUCUNE PIÈCE RÉPARABLE PAR
L’UTILISATEUR NE SE TROUVE À
L’INTÉRIEUR. CONFIER TOUT ENTRETIEN À
UN PERSONNEL QUALIFIÉ UNIQUEMENT.
ATTENTION
Cet appareil est un produit laser de Classe 1, classé
selon l’article IEC 60825-1:2007 relatif à la Sécurité
des produits laser, mais la diode laser qu’il renferme
est supérieure à la Classe 1. Pour garantir une
sécurité constante, ne retirez aucun des couvercles
et n’essayez pas d’avoir accès à l’intérieur de
l’appareil.
Confiez toute réparation à un personnel qualifié.
APPAREIL À LASER DE CLASSE 1
L’étiquette suivante se trouve sur votre appareil.
Emplacement : à l’intérieur de l’appareil
Ce point d’exclamation, placé dans un
triangle équilatéral, a pour but d’attirer
l’attention de l’utilisateur sur la présence,
dans les documents qui accompagnent
l’appareil, d’explications importantes du
point de vue de l’exploitation ou de
l’entretien.
D3-4-2-1-1b_A1_Fr
AVERTISSEMENT
Pour éviter les risques d’incendie, ne placez aucune
flamme nue (telle qu’une bougie allumée) sur
l’appareil.
D3-4-2-1-7a_A1_Fr
PRÉCAUTION DE VENTILATION
Lors de l’installation de l’appareil, veillez à laisser un
espace suffisant autour de ses parois de manière à
améliorer la dissipation de chaleur (au moins 10 cm sur
le dessus, 10 cm à l’arrière et 10 cm de chaque côté).
AVERTISSEMENT
Les fentes et ouvertures du coffret sont prévues pour la
ventilation, pour assurer un fonctionnement stable de
l’appareil et pour éviter sa surchauffe. Pour éviter les
risques d’incendie, ne bouchez jamais les ouvertures et
ne les recouvrez pas d’objets, tels que journaux, nappes
ou rideaux, et n’utilisez pas l’appareil posé sur un tapis
épais ou un lit.
D3-4-2-1-7b*_A1_Fr
D58-5-2-2b*_B1_Fr
AVERTISSEMENT
Cet appareil n’est pas étanche. Pour éviter les risques
d’incendie et de décharge électrique, ne placez près de
lui un récipient rempli d’eau, tel qu’un vase ou un pot
de fleurs, et ne l’exposez pas à des gouttes d’eau, des
éclaboussures, de la pluie ou de l’humidité.
D3-4-2-1-3_A1_Fr
Ce produit est destiné à une utilisation domestique
générale. Toute panne due à une utilisation autre qu'à
des fins privées (comme une utilisation à des fins
commerciales dans un restaurant, dans un autocar
ou sur un bateau) et qui nécessite une réparation
sera aux frais du client, même pendant la période de
garantie.
K041_A1_Fr
Milieu de fonctionnement
Température et humidité du milieu de fonctionnement :
De +5 °C à +35 °C (de +41 °F à +95 °F) ; Humidité
relative inférieure à 85 % (orifices de ventilation non
obstrués)
N’installez pas l’appareil dans un endroit mal ventilé ou
un lieu soumis à une forte humidité ou en plein soleil
(ou à une forte lumière artificielle).
D3-4-2-1-7c*_A1_Fr
Page 67

ATTENTION
L’interrupteur
STANDBY/ON de cet appareil ne
coupe pas complètement celui-ci de sa prise secteur.
Comme le cordon d’alimentation fait office de
dispositif de déconnexion du secteur, il devra être
débranché au niveau de la prise secteur pour que
l’appareil soit complètement hors tension. Par
conséquent, veillez à installer l’appareil de telle
manière que son cordon d’alimentation puisse être
facilement débranché de la prise secteur en cas
d’accident. Pour éviter tout risque d’incendie, le
cordon d’alimentation sera débranché au niveau de
la prise secteur si vous prévoyez une période
prolongée de non utilisation (par exemple avant un
départ en vacances).
D3-4-2-2-2a*_A1_Fr
NOTE IMPORTANTE SUR LE CABLE
D’ALIMENTATION
Tenir le câble d’alimentation par la fiche. Ne pas
débrancher la prise en tirant sur le câble et ne pas
toucher le câble avec les mains mouillées. Cela risque
de provoquer un court-circuit ou un choc électrique. Ne
pas poser l’appareil ou un meuble sur le câble. Ne pas
pincer le câble. Ne pas faire de noeud avec le câble ou
l’attacher à d’autres câbles. Les câbles d’alimentation
doivent être posés de façon à ne pas être écrasés. Un
câble abîmé peut provoquer un risque d’incendie ou un
choc électrique. Vérifier le câble d’alimentation de
temps en temps. Contacter le service après-vente
PIONEER le plus proche ou le revendeur pour un
remplacement.
S002*_A1_Fr
Condensation
Si vous transportez sans transition le lecteur d’un
endroit froid dans un pièce chaude (en hiver, par
exemple), ou si la température de la pièce où se trouve
le lecteur augmente rapidement, des gouttelettes d’eau
(condensation) peuvent se former à l’intérieur du
lecteur (sur les pièces et la lentille). En cas de
condensation, le lecteur ne fonctionne pas
correctement et la lecture n’est pas possible. Laissez le
lecteur en service pendant 1 ou 2 heures à la
température ambiante (pour que l’humidité ait le temps
de s’évaporer). Les gouttelettes d’eau se dissiperont et
la lecture sera de nouveau possible.
De la condensation peut aussi se former en été si le
lecteur est exposé à l’air d’un climatiseur. Dans ce cas,
éloignez le lecteur du climatiseur.
S005_A1_Fr
La protection de votre ouïe est entre vos
mains
Pour assurer le rendement optimal de votre matériel
et – plus important encore – la protection de votre ouïe,
réglez le volume à un niveau raisonnable. Pour ne pas
altérer votre sens de la perception, le son doit être clair
mais ne produire aucun vacarme et être exempt de
toute distorsion. Votre ouïe peut vous jouer des tours.
Avec le temps, votre système auditif peut en effet
s’adapter à des volumes supérieurs, et ce qui vous
semble un « niveau de confort normal » pourrait au
contraire être excessif et contribuer à endommager
votre ouïe de façon permanente. Le réglage de votre
matériel à un volume sécuritaire AVANT que votre ouïe
s’adapte vous permettra de mieux vous protéger.
CHOISISSEZ UN VOLUME SÉCURITAIRE:
• Réglez d’abord le volume à un niveau inférieur.
• Montez progressivement le volume jusqu’à un niveau
d’écoute confortable ; le son doit être clair et exempt
de distorsions.
• Une fois que le son est à un niveau confortable, ne
touchez plus au bouton du volume.
N’OUBLIEZ PAS DE RESPECTER LES
DIRECTIVES SUIVANTES:
• Lorsque vous montez le volume, assurez-vous de
pouvoir quand même entendre ce qui se passe
autour de vous.
• Faites très attention ou cessez temporairement
l’utilisation dans les situations pouvant s’avérer
dangereuses.
• N’utilisez pas des écouteurs ou un casque d’écoute
lorsque vous opérez un véhicule motorisé ; une telle
utilisation peut créer des dangers sur la route et est
illégale à de nombreux endroits.
(Exemples de marquage pour les batteries)
Ces symboles ne sont
valables que dans les pays
de l’Union Européenne.
Pb
S001a_A1_Fr
K058c_A1_Fr
Précautions concernant le visionnage en 3D
• Si vous ressentez une fatigue ou une gêne pendant le visionnage d’images en 3D, cessez de les
regarder.
• Les enfants, en particulier ceux de moins de 6 ans, sont plus sensibles à la fatigue et les personnes en
charge doivent surveiller tout signe de fatigue ou de gêne.
• Pendant le visionnage d’images en 3D, faites régulièrement des pauses.
Le visionnage prolongé d’images en 3D sans pause peut causer de la fatigue et un inconfort.
Page 68

Contenu
01 Avant de commencer
Contenu du carton d’emballage . . . . . . . . . . . . . . . . . . . . . . . 5
Mise en place des piles dans la télécommande. . . . . . . . . 5
Mise à jour du logiciel . . . . . . . . . . . . . . . . . . . . . . . . . . . . . . . 6
À propos du fonctionnement de ce lecteur avec un
dispositif mobile (iPod, iPhone, iPad, etc.) . . . . . . . . . . . . . . 6
Types de disques/fichiers lisibles . . . . . . . . . . . . . . . . . . . . . . 7
Disques lisibles . . . . . . . . . . . . . . . . . . . . . . . . . . . . . . . . . . . 7
Fichiers lisibles. . . . . . . . . . . . . . . . . . . . . . . . . . . . . . . . . . . 10
Noms et fonctions des éléments. . . . . . . . . . . . . . . . . . . . . . 13
Télécommande. . . . . . . . . . . . . . . . . . . . . . . . . . . . . . . . . . . 13
Face avant. . . . . . . . . . . . . . . . . . . . . . . . . . . . . . . . . . . . . . . 14
Panneau arrière . . . . . . . . . . . . . . . . . . . . . . . . . . . . . . . . . . 15
02 Raccordements
Quand un câble HDMI est utilisé . . . . . . . . . . . . . . . . . . . . . 16
À propos de HDMI . . . . . . . . . . . . . . . . . . . . . . . . . . . . . . . . 16
À propos du contrôle par l’HDMI . . . . . . . . . . . . . . . . . . . . 17
Raccorder un téléviseur . . . . . . . . . . . . . . . . . . . . . . . . . . . 18
Raccorder un récepteur ou un amplificateur AV . . . . . . . 19
Raccordement des câbles audio. . . . . . . . . . . . . . . . . . . . . . 20
Raccordement d’un récepteur ou amplificateur
AV avec un câble audio numérique coaxial . . . . . . . . . . . 20
Raccorder un récepteur ou un amplificateur AV avec un
câble audio numérique optique
(BDP-88FD uniquement). . . . . . . . . . . . . . . . . . . . . . . . . . . 20
Raccorder le pré-amplificateur principal avec un câble
symétrique (BDP-88FD uniquement). . . . . . . . . . . . . . . . . 20
Le périphérique en entrée est raccordé à la borne
ZERO SIGNAL . . . . . . . . . . . . . . . . . . . . . . . . . . . . . . . . . . . . . 21
Raccordement d’un appareil au port USB. . . . . . . . . . . . . . 21
À propos des dispositifs USB . . . . . . . . . . . . . . . . . . . . . . . 21
Raccordement du dispositif USB. . . . . . . . . . . . . . . . . . . . 21
Raccordement au réseau par l’interface LAN . . . . . . . . . . . 22
Raccordement avec un câble LAN
(réseau LAN filaire) . . . . . . . . . . . . . . . . . . . . . . . . . . . . . . . 22
Raccordement du cordon d’alimentation . . . . . . . . . . . . . . 22
03 Pour commencer
Paramétrage à l’aide du menu Setup Navigator . . . . . . . . . 23
Utiliser le téléviseur avec la télécommande du
lecteur . . . . . . . . . . . . . . . . . . . . . . . . . . . . . . . . . . . . . . . . . . . 24
Liste des codes préréglés pour les téléviseurs . . . . . . . . . 24
Changer la résolution vidéo en sortie . . . . . . . . . . . . . . . . . . 25
04 Lecture
Lecture de disques ou de fichiers . . . . . . . . . . . . . . . . . . . . . 26
Quick View (Quick View avec audio) . . . . . . . . . . . . . . . . . 26
Recherche avant et arrière . . . . . . . . . . . . . . . . . . . . . . . . . 27
Lecture de chapitres, de plages ou de
fichiers particuliers . . . . . . . . . . . . . . . . . . . . . . . . . . . . . . . 27
Saut de contenu. . . . . . . . . . . . . . . . . . . . . . . . . . . . . . . . . . 27
Pour revenir à une position peu de temps
auparavant . . . . . . . . . . . . . . . . . . . . . . . . . . . . . . . . . . . . . . 27
Pour avancer à une position légèrement en avant . . . . . . 27
Lecture au ralenti. . . . . . . . . . . . . . . . . . . . . . . . . . . . . . . . . 27
Lecture avant et arrière pas à pas . . . . . . . . . . . . . . . . . . . 27
Lecture répétée d’un passage précis d’un titre ou d’une
plage (Répétition A-B) . . . . . . . . . . . . . . . . . . . . . . . . . . . . . 27
Répétition de la lecture (Lecture répétée) . . . . . . . . . . . . . 27
Lecture dans l’ordre souhaité
(Lecture programmée). . . . . . . . . . . . . . . . . . . . . . . . . . . . . 28
Pose de signets . . . . . . . . . . . . . . . . . . . . . . . . . . . . . . . . . . 28
Zoom . . . . . . . . . . . . . . . . . . . . . . . . . . . . . . . . . . . . . . . . . . . 28
Lecture de photos en diaporama . . . . . . . . . . . . . . . . . . . . 28
Changement de l’angle de prise de vues. . . . . . . . . . . . . . 28
Changement des sous-titres. . . . . . . . . . . . . . . . . . . . . . . . 29
Avec la fonction DIRECT . . . . . . . . . . . . . . . . . . . . . . . . . . . 29
Sous-titres mobiles . . . . . . . . . . . . . . . . . . . . . . . . . . . . . . . 29
4
Fr
Changement du son . . . . . . . . . . . . . . . . . . . . . . . . . . . . . . 29
Commutation de la zone de lecture CD/SACD . . . . . . . . . 30
Affichage des informations du disque . . . . . . . . . . . . . . . 30
Utilisation de BONUSVIEW ou de BD-LIVE. . . . . . . . . . . . 30
Fonctions de lecture . . . . . . . . . . . . . . . . . . . . . . . . . . . . . . 31
Utilisation du menu FUNCTION . . . . . . . . . . . . . . . . . . . . . . 32
Lecture à partir d’un temps précis
(Recherche temporelle) . . . . . . . . . . . . . . . . . . . . . . . . . . . 33
Lecture d’un titre, d’un chapitre, d’une plage ou d’un
fichier particulier (Recherche) . . . . . . . . . . . . . . . . . . . . . . 33
Lecture d’une plage particulière de disques,
de titres ou d’un chapitre (plage/fichier) dans
un ordre aléatoire . . . . . . . . . . . . . . . . . . . . . . . . . . . . . . . . 33
Continuation de la lecture à partir de la position spécifiée
(Poursuite du visionnage) . . . . . . . . . . . . . . . . . . . . . . . . . . . 33
05 Lecture depuis la fonction Source
À propos de la fonction Source . . . . . . . . . . . . . . . . . . . . . . 34
À propos de la lecture en réseau . . . . . . . . . . . . . . . . . . . . 34
Lecture de fichiers sur le réseau . . . . . . . . . . . . . . . . . . . . . 35
Lecture de disque/USB . . . . . . . . . . . . . . . . . . . . . . . . . . . . . 35
Lecture de fichiers photo . . . . . . . . . . . . . . . . . . . . . . . . . . 36
Lire dans l’ordre souhaité (Liste de lecture) . . . . . . . . . . . . 36
Ajout de plages ou de fichiers . . . . . . . . . . . . . . . . . . . . . . 36
Lecture de la Playlist . . . . . . . . . . . . . . . . . . . . . . . . . . . . . . 36
Suppression de plages ou fichiers de la Playlist . . . . . . . 36
06 Lecture de contenus web
Contenus web disponibles . . . . . . . . . . . . . . . . . . . . . . . . . . 37
Lecture de contenus . . . . . . . . . . . . . . . . . . . . . . . . . . . . . . . 37
07 Définir les options Audio/Vidéo
Changer les options Audio . . . . . . . . . . . . . . . . . . . . . . . . . . 38
Utiliser l’écran Paramètre Audio . . . . . . . . . . . . . . . . . . . . 38
Changer les options Vidéo. . . . . . . . . . . . . . . . . . . . . . . . . . . 39
Utiliser l’écran Paramètre Vidéo . . . . . . . . . . . . . . . . . . . . 39
08 Réglages détaillés
Changement des réglages . . . . . . . . . . . . . . . . . . . . . . . . . . 41
Utilisation de la page Configuration initiale . . . . . . . . . . . 41
Mise à jour du logiciel. . . . . . . . . . . . . . . . . . . . . . . . . . . . . 48
Rétablissement des réglages par défaut du
lecteur. . . . . . . . . . . . . . . . . . . . . . . . . . . . . . . . . . . . . . . . . . 48
Réglage du mode de rétroéclairage de la
télécommande. . . . . . . . . . . . . . . . . . . . . . . . . . . . . . . . . . . 49
À propos des formats audio numériques restitués. . . . . . . 50
Tableau des codes de langues et Tableau des codes de
pays et régions . . . . . . . . . . . . . . . . . . . . . . . . . . . . . . . . . . . . 51
Tableau des codes de langues. . . . . . . . . . . . . . . . . . . . . . 51
Tableau des codes de pays et régions. . . . . . . . . . . . . . . . 51
09 Informations supplémentaires
Précautions d’emploi. . . . . . . . . . . . . . . . . . . . . . . . . . . . . . . 52
Déplacement du lecteur . . . . . . . . . . . . . . . . . . . . . . . . . . . 52
Emplacement du lecteur . . . . . . . . . . . . . . . . . . . . . . . . . . 52
Éteignez le lecteur lorsque vous ne l’utilisez pas . . . . . . . 52
Condensation. . . . . . . . . . . . . . . . . . . . . . . . . . . . . . . . . . . . 52
Nettoyage du lecteur. . . . . . . . . . . . . . . . . . . . . . . . . . . . . . 52
Attention si lecteur est installé dans un meuble avec
une porte en verre . . . . . . . . . . . . . . . . . . . . . . . . . . . . . . . . 52
Nettoyage de la lentille du capteur . . . . . . . . . . . . . . . . . . 53
Manipulation des disques . . . . . . . . . . . . . . . . . . . . . . . . . 53
En cas de panne. . . . . . . . . . . . . . . . . . . . . . . . . . . . . . . . . . . 54
Lecture . . . . . . . . . . . . . . . . . . . . . . . . . . . . . . . . . . . . . . . . . 54
Contrôle . . . . . . . . . . . . . . . . . . . . . . . . . . . . . . . . . . . . . . . . 57
Réseau . . . . . . . . . . . . . . . . . . . . . . . . . . . . . . . . . . . . . . . . . 58
Divers . . . . . . . . . . . . . . . . . . . . . . . . . . . . . . . . . . . . . . . . . . 60
Glossaire . . . . . . . . . . . . . . . . . . . . . . . . . . . . . . . . . . . . . . . . . 61
Avis relatif à la licence du logiciel . . . . . . . . . . . . . . . . . . . . 62
À propos d’Apple Lossless Audio Codec. . . . . . . . . . . . . . 62
À propos de FLAC . . . . . . . . . . . . . . . . . . . . . . . . . . . . . . . . 62
Spécifications. . . . . . . . . . . . . . . . . . . . . . . . . . . . . . . . . . . . . 63
Page 69

Chapitre 1
Avant de commencer
01
Contenu du carton
d’emballage
• Télécommande x 1
• AAA 700 au manganèse x 2
• Cordon d’alimentation
• Carte de garantie
• Notice de la licence du logiciel
• Mode d’emploi (ce manuel)
Mise en place des piles dans
la télécommande
Les piles fournies avec le lecteur servent avant tout à
s’assurer du bon fonctionnement de ce produit et
peuvent ne pas durer très longtemps. Il est conseillé
d’utiliser des piles alcalines qui ont une meilleure
autonomie.
AVERTISSEMENT
• N’utilisez pas ou ne rangez pas les piles en plein soleil
ou à un endroit très chaud, comme dans une voiture
ou près d’un appareil de chauffage. Les piles
risqueraient de fuir, de surchauffer, d’exploser ou de
s’enflammer. Ceci pourrait également réduire leur
durée de vie ou leur performance.
• Rangez les petites pièces hors de portée des enfants.
Si elles sont avalées accidentellement, contactez
immédiatement un médecin.
• Lorsque vous mettez des piles usées au rebut, veuillez
vous conformer à la réglementation
gouvernementale ou environnementale en vigueur
dans votre pays ou région.
1 Ouvrez le couvercle arrière.
2 Insérez les 2 piles AAA 700 fournies.
Insérez-les d’abord du côté .
English Français Español
Attention
• Le réglage peut être réinitialisé aux valeurs par défaut
après le remplacement des piles. Si cela se produit,
redéfinissez-le (pages 24 et 49).
• N’utilisez pas non plus une pile neuve avec une pile
usée.
• Insérez les piles dans la télécommande en les
orientant correctement, comme indiqué par les
symboles de polarité ( et ).
• Lorsque vous insérez les piles, faites attention de ne
pas endommager les ressorts sur les bornes de
piles. Les piles pourraient fuir ou chauffer.
• N’exposez pas les piles à la chaleur, ne les ouvrez pas
ou ne les jetez pas au feu ou dans l’eau.
• La tension des piles peut être différente, même si les
piles semblent identiques. N’utilisez pas différents
types de piles.
• Pour éviter toute fuite d’électrolyte, retirez les piles si
vous prévoyez de ne pas utiliser la télécommande
pendant un certain temps (1 mois ou plus). Si une pile
devait fuir, essuyez soigneusement l’intérieur du
logement puis insérez des piles neuves. Si le liquide
d’une pile devait fuir et se répandre sur votre peau,
lavez-le immédiatement avec une grande quantité
d’eau.
3 Fermez le couvercle arrière.
Fermez bien le couvercle (vous devez entendre un clic).
5
Fr
Page 70

01
Mise à jour du logiciel
À propos du
Vous trouverez plus d’informations au sujet de ce lecteur
sur le site Pioneer. Consultez ce site pour toute
information sur la mise à jour et les services relatifs à
votre lecteur Blu-ray disc.
http://www.pioneerelectronics.com
fonctionnement de ce
lecteur avec un
dispositif mobile
(iPod, iPhone, iPad,
etc.)
L’installation de l’application appropriée sur un dispositif
mobile permet d’agir sur le lecteur depuis le dispositif
mobile.
Pour le détail, reportez-vous aux informations produit sur
le site Pioneer.
Cette application spéciale peut être changée ou arrêtée
sans avis préalable.
Apple, iPad, iPhone, iPod, iPod nano, et iPod touch sont
des marques commerciales d’Apple Inc., déposées aux
États-Unis et dans d’autres pays.
6
Fr
Page 71

Types de disques/fichiers lisibles
01
Disques lisibles
Les disques portant les logos suivants sur l’étiquette, le carton ou la jaquette peuvent être lus.
Attention
• Attention seuls les disques finalisés peuvent être lus.
Format de l’application
Type de disque Logo
BD-ROM
2
BD
BD-R
BD-RE
DVD-ROM
BDMV BDAV
DVD-
Vidéo
DVD-
Audio
DVD VR
CD-DA
DTS-CD
DATA-
DISC
English Français Español
1
DVD
CD
2,3,4
DVD-R
DVD-RW
DVD+R
DVD+RW
(CD audio)
3,7
2,3
3
CD-DA
CD-RW
CD-ROM
CD-R
8
3
3
5
5
6
6
1. Disques sur lesquels des fichiers vidéo, photo ou audio sont enregistrés.
2. Disques double couche compris.
3. Les finaliser avant de les lire sur ce lecteur.
4. Les disques DVD-R pour création (3,95 Go et 4,7 Go) ne peuvent pas être lus.
5. Format AVCHD compris.
6. Format AVCREC compris.
7. Les disques DVD-RW Version 1.0 ne peuvent pas être lus.
8. CD vidéo compris.
7
Fr
Page 72

01
8
Fr
•
«Blu-ray Disc», «Blu-ray» et le logo «Blu-ray Disc»
sont des marques commerciales de la Blu-ray Disc
Association.
•
est une marque commerciale de DVD
Format/Logo Licensing Corporation.
Disques illisibles
• HD DVD
•Disques DVD-RAM
Il est possible que certains disques ne figurant pas dans
la liste ci-dessus ne puissent pas non plus être lus.
Remarque
• Certains disques ne pourront pas être lus bien qu’ils
portent un des logos de la page précédente.
• Pour lire un disque de 8 cm, posez le disque dans le
renfoncement destiné aux disques de 8 cm au centre
du tiroir à disque. Aucun adaptateur n’est nécessaire.
Les BD-ROM de 8 cm ne peuvent pas être lus.
À propos de la lecture de copies non
autorisées
Avis de Cinavia
Ce produit utilise la technologie Cinavia pour limiter la
copie non autorisée de certains films et certaines vidéos
du commerce ainsi que de leurs pistes son. Lorsque
l’emploi prohibé d’une copie non autorisée est détecté,
un message s’affiche et la lecture ou la copie est
interrompue.
Vous trouverez plus d’informations sur la technologie
Cinavia auprès du Cinavia Online Consumer Information
Center sur le site http://www.cinavia.com. Pour obtenir
plus d’informations sur Cinavia par courrier, envoyez une
carte postale avec votre adresse postale à : Cinavia
Consumer Information Center, P.O. Box 86851, San
Diego, CA, 92138, USA.
Copyright 2004-2010 Verance Corporation. Cinavia™ est
une marque commerciale de Verance Corporation.
Protégé par le brevet U.S. N° 7,369,677 et des brevets
mondiaux, homologués et en attente d’homologation,
sous licence de Verance Corporation. Tous droits de
reproduction et de traduction réservés.
À propos de la protection des droits
d’auteur
Certains Blu-ray DiscsTM, DVD et contenus diffusés par
Internet ou d’autres réseaux sont protégés contre le
piratage. La technologie antipiratage restreint la lecture
et la sortie analogique. En raison des mises à jour des
dispositions relatives à la protection des droits d’auteurs,
les restrictions peuvent être différentes selon la date
d’achat de ce produit. D’autre part, les restrictions
peuvent être réactualisées lors de la mise à jour du
logiciel après l’achat.
À propos des formats audio
Les formats audio suivants sont pris en charge par ce
lecteur :
•Dolby TrueHD
•Dolby Digital Plus
•Dolby Digital
•DSD
• DTS-HD Master Audio
• DTS-HD High Resolution Audio
• DTS Digital Surround
•MPEG audio (AAC)
•PCM linéaire
Pour bénéficier du son ambiophonique des formats
Dolby TrueHD, Dolby Digital Plus, DSD, DTS-HD Master
Audio et DTS-HD High Resolution Audio, il est conseillé
de raccorder le lecteur à un récepteur ou à un
amplificateur AV compatible avec ces formats audio à
l’aide d’un câble HDMI. Après avoir inséré un BD
contenant des pistes son dans un de ces formats audio,
sélectionnez le format audio sur le menu.
Fabriqué sous licence de Dolby Laboratories. ”Dolby” et le
symbole double-D sont des marques déposées de Dolby
Laboratories.
Pour les brevets DTS, consultez http://patents.dts.com.
Fabriqué sous licence de DTS Licensing Limited. DTS,
DTS-HD, le Symbole ainsi que DTS et le Symbole
ensemble sont des marques déposées et DTS-HD Master
|
Audio
Inc.
Essential est une marque commerciale de DTS,
©
DTS, Inc. Tous droits réservés.
Lecture de BD
• Les BD (BDMV) compatibles avec les formats
suivants peuvent être lus.
– Disque Blu-ray Lecture seule (ROM) Format
Version 2
– Disque Blu-ray Enregistrable (R) Format Version 2
– Disque Blu-ray Réenregistrable (RE) Format
Version 3
Ce lecteur prend en charge les BD-ROM Profil 5.
“Blu-ray 3D” et le logo “Blu-ray 3D” sont des marques
commerciales de la Blu-ray Disc Association.
Les fonctions BONUSVIEW, comme la lecture d’une
image secondaire (Image dans l’image) et d’un son
secondaire, peuvent être utilisées. Les données
utilisées avec les fonctions BONUSVIEW (les
données de l’image secondaire (Image dans l’image)
et du son secondaire) peuvent être sauvegardées
dans la mémoire. Pour le détail sur la lecture d’une
image secondaire et d’un son secondaire, reportezvous à la notice du disque.
«BONUSVIEW» est une marque commerciale de Bluray Disc Association.
Vous pouvez utiliser les fonctions BD-LIVE, qui
permettent de télécharger des bandes-annonces ou
d’autres langues pour les dialogues et les sous-titres,
et de jouer des jeux vidéo en ligne, via Internet. Les
Page 73

données téléchargées grâce à la fonction BD-LIVE
(bandes-annonces, etc.) sont sauvegardées dans la
mémoire. Reportez-vous aux instructions du disque
pour le détail sur les fonctions BD-LIVE.
Le logo «BD-LIVE» est une marque commerciale de
Blu-ray Disc Association.
Avec les BD-ROM, il est possible d’utiliser les
applications BD-J (Java) pour créer des titres
hautement interactifs, jeux compris.
Oracle et Java sont des marques déposées d’Oracle
Corporation et/ou de ses affiliés. Tout autre nom
mentionné peut correspondre à des marques
appartenant à d’autres propriétaires qu’Oracle.
• Les BD (BDAV) compatibles avec les formats suivants
peuvent être lus.
– Disque Blu-ray Enregistrable (R) Format Version 1
– Disque Blu-ray Réenregistrable (RE) Format
Version 2
Lecture de DVD
Cette étiquette indique que les disques DVD-RW
enregistrés dans le format VR (format d’enregistrement
vidéo) peuvent être lus. Toutefois, dans le cas de disques
enregistrés avec un programme crypté pour un
enregistrement unique, la lecture n’est possible qu’à
l’aide d’un dispositif compatible avec le CPRM.
L’AVCHD est un format haute définition (HD) pour
caméscope numérique permettant d’enregistrer sur
certains supports en haute définition grâce à des
technologies de compression extrêmement
performantes.
À propos des codes régionaux
Des codes régionaux sont attribués aux lecteurs de
disques Blu-ray et aux disques BD-ROM ou DVD-Vidéo en
fonction de la région où ils sont commercialisés.
Les codes régionaux de ce lecteur sont les suivants :
•BD-ROM : A
•DVD-Vidéo : 1
Les disques ne contenant pas ces codes ne peuvent pas
être lus. Les disques suivants peuvent être lus sur ce
lecteur.
• BD : A (A compris) et ALL
• DVD : 1 (1 compris) et ALL
Lecture de CD
Au sujet de la copie de CD protégés : Ce lecteur se
conforme aux spécifications du format CD audio. Il ne
prend pas en charge la lecture ou les fonctions des
disques non conformes à ces spécifications.
Lecture de DualDisc
Un DualDisc est un disque à deux faces dont une face
renferme les données du DVD — vidéo, audio, etc. — et
l’autre face les données non DVD, par exemple des
matériaux audionumériques.
La face DVD d’un DualDisc peut être lue sur ce lecteur.
La f ace aud io, non DVD du di sque ne p eut pas être lu e par
ce lecteur.
Il est possible que lors du chargement ou de l’éjection
d’un DualDisc, la face opposée à la face de lecture soit
rayée. La lecture d’un disque rayé n’est pas possible.
Pour tout complément d’informations sur les
spécifications du DualDisc, consultez le fabricant du
disque ou le magasin d’achat.
Lecture de disques créés sur un
ordinateur ou un enregistreur de
BD/DVD
• Du fait des réglages de l’application ou de
l’environnement de l’ordinateur, la lecture de disques
enregistrés sur un ordinateur peut être impossible.
Enregistrez vos disques dans un format lisible sur ce
lecteur. Pour le détail, contactez votre revendeur.
• La lecture de disques enregistrés sur un ordinateur
ou un enregistreur BD/DVD ne sera pas impossible,
si les caractéristiques du disque, des éraflures, de la
saleté sur le disque, de la saleté sur la lentille de
l’enregistreur, etc. n’ont pas permis d’effectuer une
gravure de qualité.
01
English Français Español
«AVCHD» et le logo «AVCHD» sont des marques
commerciales de Panasonic Corporation et de Sony
Corporation.
9
Fr
Page 74

01
À propos des dossiers et des fichiers
vidéo, audio et photo
Les fichiers audio et photo peuvent être lus sur ce lecteur
si les dossiers du disque ou du dispositif USB sont créés
de la façon suivante.
Exemple de la structure de dossiers :
Dossier
À PROPOS DE LA VIDÉO DIVX À LA DEMANDE : Cet
appareil certifié DivX
®
doit être enregistré afin de
pouvoir lire des vidéos DivX à la demande (VOD). Pour
obtenir votre code d’enregistrement, localisez la
section VOD DivX dans utilisation des menus. Allez
sur le site vod.divx.com pour savoir comment
terminer votre enregistrement.
001.jpg/001.mp3
xxx.jpg/xxx.mp3
Dossier 01
Dossier XX
*
Dossier
001.jpg/001.mp3
xxx.jpg/xxx.mp3
001.jpg/001.mp3
xxx.jpg/xxx.mp3
*
001.jpg/001.mp3
xxx.jpg/xxx.mp3
*
*
* Le nombre de dossiers et de fichiers dans un seul
dossier (dossier principal compris) se limite à 256. Ne
créez pas plus de 5 niveaux de dossiers.
Remarque
• Les noms de fichiers et dossiers s’affichant sur ce
lecteur peuvent être différents de ceux qui s’affichent
sur l’ordinateur.
Fichiers lisibles
Les fichiers vidéo, photo et audio enregistrés sur des BD,
DVD, CD ou des dispositifs USB peuvent être lus.
Formats de fichiers vidéo pris en
charge
• DivX Plus HD
®
DivX Certified
DivX Plus
1080p HD, contenu facturé compris.
À PROPOS DE LA VIDÉO DIVX : DivX
vidéo numérique créé par DivX, LLC, qui est une filiale
de Rovi Corporation. Ceci est un appareil DivX
Certified
divx.com pour plus d’informations sur les outils
logiciels permettant de convertir vos fichiers en
vidéos DivX.
pour la lecture de vidéos DivX® et
TM
HD (H.264/MKV) d’un maximum de
®
est un format
®
officiel qui lit la vidéo DivX. Visitez le site
DivX®, DivX Certified®, DivX Plus
TM
HD et les logos
associés sont des marques commerciales de Rovi
Corporation ou de ses filiales et sont utilisés sous
licence.
Remarque
•Cet appareil DivX
®
Certified doit être enregistré pour
pouvoir lire des vidéos à la demande DivX (VOD).
Obtenez d’abord le code d’enregistrement VOD DivX
de votre appareil et spécifiez-le lors de votre
enregistrement. Important : Les vidéos VOD DivX sont
protégées par un système DivX DRM (Gestion
numérique des droits) qui restreint la lecture aux
appareils certifiés DivX immatriculés. Si vous essayez
de lire une vidéo VOD DivX non autorisée pour votre
appareil, le message Erreur d’autorisation
apparaîtra et la vidéo ne pourra pas être vue.
Consultez le site www.divx.com/vod pour plus
d’informations.
– Le code d’enregistrement DivX VOD de ce lecteur
peut être vérifié dans HOME MENU
Configuration initiale Lecture DivX
®
DRM Code d’enregistrement (page 44).
– Le nombre de visionnages est limité pour certains
fichiers VOD DivX. Lorsque vous regardez ces
fichiers sur votre lecteur, le nombre restant de
visionnages est indiqué. Les fichiers pour lesquels
le nombre de visionnages restants indique 0 ne
peuvent pas être lus (Cette location Divx a expiré
s’affiche). Les fichiers pour lesquels le nombre de
visionnage n’est pas limité peuvent être visionnés à
volonté (le nombre restant de visionnages
n’apparaît pas).
• YouTube
YouTube
TM
est une marque commerciale de Google
Inc.
VOD
10
Fr
Page 75
Tableau de fichiers lisibles
Supports lisibles
Fichiers lisibles
(Extensions)
MP3
(.mp3)
2
WMA
(.wma)
AAC
(.m4a)
MPEG2 AAC
(.aac)
WAV
(.wav)
FLAC
(.flac)
Monkey’s Audio
(.ape)
DSD
(.dff/.dsf)
AIFF
(.aif/.aiff)
ALAC
(.m4a)
JPEG
(.jpg/.jpeg)
MPO
(.mpo)
BD-R/RE/-R DL/
RE DL/-R LTH,
DVD-R/RW/-R DL/
+R/+RW/+R DL,
CD-R/RW
Résolution maximale : 4 000 x 3 000 pixels
Photo 3D
Dispositifs USB
01
1
Network
Fréquences d’échantillonnage : Jusqu’à 48 kHz
Débit binaire : Jusqu’à 320 kbps
Type audio : MPEG-1 Audio Layer 3
Fréquences d’échantillonnage : Jusqu’à 48 kHz
Débit binaire : Jusqu’à 192 kbps
Type audio : WMA version 9
Fréquences d’échantillonnage : Jusqu’à 96 kHz
Débit binaire : Jusqu’à 320 kbps
Type audio : MPEG4-AAC
Fréquences d’échantillonnage : Jusqu’à 48 kHz
Débit binaire : Jusqu’à 320 kbps
Type audio : MPEG2-AAC
Fréquences d’échantillonnage : Jusqu’à
192 kHz
Débit binaire de la quantification : 16 bits,
24 bits
Voie : 2 voies/mult-canaux (7,1 canaux)
(Codec PCM)
Fréquences d’échantillonnage : Jusqu’à
192 kHz
Débit binaire de la quantification : 16 bits,
24 bits
Voie : 2 voies/mult-canaux (5,1 canaux)
Fréquences d’échantillonnage :
Prise en charge très élevée jusqu’à 48 kHz
Prise en charge élevée jusqu’à 96 kHz
Débit binaire de la quantification : 16 bits,
24 bits
Voie : 2 voies
2,8 MHz
Voie : 2 canaux/mult-canaux (5,1 canaux)
Fréquences d’échantillonnage : Jusqu’à
192 kHz
Débit binaire de la quantification : 16 bits,
24 bits
Voie : 2 voies
(Codec PCM)
Fréquences d’échantillonnage : Jusqu’à
192 kHz
Débit binaire de la quantification : 16 bits,
24 bits
Voie : 2 voies
Spécifications des fichiers
English Français Español
11
Fr
Page 76

01
Fichiers lisibles
(Extensions)
PNG
(.png)
GIF
(.gif)
DivX
(.avi/.divx/.mkv)
MP4
(.mp4)
WMV
(.wmv)
AVI
(.avi)
3GP
(.3gp)
FLV
(.flv)
BD-R/RE/-R DL/
RE DL/-R LTH,
DVD-R/RW/-R DL/
+R/+RW/+R DL,
CD-R/RW
Supports lisibles
Dispositifs USB
1
Network
Résolution maximale : 2 048 x 1 024 pixels
Les fichiers PNG animés ne sont pas pris en
charge.
Résolution maximale : 2 048 x 1 024 pixels
Les fichiers GIF animés ne sont pas pris en
charge.
La rotation n’est pas prise en charge.
Versions prises en charge : Jusqu’à DivX
PLUS HD
Résolution maximale :
Jusqu’à 1 920 x 1 080 (DivX
Jusqu’à 1 280 x 720 (MKV)
Résolution maximale : Jusqu’à 1 920 x 1 080
Vidéo : MPEG4, MPEG-4 AVC (niveau 4.1)
Audio : AAC, MP3
Résolution maximale : Jusqu’à 1 920 x 1 080
Vidéo : WMV9, WMV9AP (VC-1)
Audio : WMA
Résolution maximale : Jusqu’à 1 920 x 1 080
Vidéo : MPEG4
Audio : MP3, AAC
Vidéo : H.263, MPEG4, H.264
Audio : MPEG-4 AAC
Vidéo : Sorenson H.263 (FLV1), VP6 (FLV4),
H.264
Audio : MP3, AAC
Spécifications des fichiers
®
PLUS HD)
®
1. Cet appareil prend en charge les systèmes de fichiers FAT16, FAT32 et NTFS.
2. WMA Pro, Lossless and Voice ne sont pas pris en charge.
Remarque
• Selon la structure des fichiers, la capacité du serveur et la configuration du réseau, il peut être impossible de lire
certains fichiers, même s’ils sont mentionnés dans le tableau des fichiers lisibles ci-dessus.
• Les fichiers protégés par le DRM (Digital Rights Management) ne peuvent pas être lus (fichiers DivX VOD non
compris).
• Les contenus AVCHD ne peuvent pas être lus par le réseau.
12
Fr
Page 77

Noms et fonctions des éléments
01
Télécommande
1
2
3
4
5
6
7
8
9
10
11
12
13
14
15
16
17
18
19
20
21
CLEAR
AUDIO P.
VIDEO P.
YouTube
TOP MENU POPUP MENU
TOP
ENTER
HOME MENU RETURN
REPEAT
DIRECT
HDMI
DIMMER
CD/SACD
PROGRAM
BOOKMARK
RG YB
TV CONTROL VOL
INPUT
FUNCTION
CONTINUED
SOURCE
POP
UP
SHORT SKIPREPLAY
RESOLUTION
ZOOM INDEX
LIGHT
22
23
24
25
26
27
28
29
30
31
32
33
34
35
36
9TOP MENU – Pour afficher la premièr e p age du menu
d’un BD-ROM ou DVD-Vidéo.
10 HOME MENU – (page 41)
11 – (page 26)
12 – (page 27)
13 – (page 26)
14 / / – (page 27)
15 A-B – (page 27)
16 REPEAT – (page 27)
17 HDMI – Le HDMI Mode bascule à chaque appui
(pages 17 et 43).
18 DIRECT – Appuyez pour activer/désactiver la fonction
DIRECT (page 29).
19 DIMMER – À chaque appui, la luminosité de
l’afficheur de la face avant change et/ou le type
d’éclairage des indicateurs du panneau avant bascule
comme indiqué dans le tableau ci-dessous.
Afficheur de la face avant
Lumineux Désactivé
Intermédiaire Désactivé
Sombre Désactivé
Désactivé Éclairé
Indicateur
FL OFF
20 Touches couleur – Pour naviguer sur les menus du
BD-ROM.
English Français Español
1 STANDBY/ON – Pour allumer et éteindre.
2 SUBTITLE – (page 29)
3 AUDIO – (page 29)
4 Touches numériques – Pour sélectionner et lire le
titre/le chapitre/la plage que vous voulez voir ou
écouter ainsi que les éléments des menus.
5CLEAR – Pour effacer un nombre, etc.
6 AUDIO P. – Utilisé pour accéder aux options audio.
(page 38)
7VIDEO P. – Utilisé pour accéder aux options vidéo.
(page 39)
8 YouTube – Pour voir des vidéos sur YouTube.
(page 37)
PROGRAM – (page 28)
BOOK MARK – (page 28)
ZOOM – (page 28)
INDEX – (page 28)
21 TV CONTROL – (page 24)
22 OPEN/CLOSE – Pour ouvrir et fermer le tiroir à
disque.
23 DISPLAY – (page 30)
24 FUNCTION – (page 32)
25 CONTINUED – Utilisé pour continuer la lecture à
partir d’une position spécifiée. (page 33)
26 SOURCE – (page 34)
27 POPUP MENU/POPUP – Pour afficher les menus
BD-ROM ou DVD-Vidéo.
13
Fr
Page 78

01
28 /// – Pour sélectionner des éléments,
changer des réglages et déplacer le curseur.
ENTER – Pour exécuter l’élément sélectionné ou
valider un réglage qui a été changé, etc.
29 RETURN – Pour revenir à la page précédente.
30 – (page 27)
31 / / – (page 27)
32 REPLAY– Appuyez pendant la lecture pour
revenir à une position 10 secondes avant. (page 27)
Face avant
FL OFF DIRECT
33 SHORT SKIP – Appuyez pendant la lecture pour
avancer à une position 30 secondes après. (page 27)
34 / RESOLUTION – À utiliser pour changer la
résolution vidéo en sortie des bornes HDMI OUT.
(page 25)
35 CD/SACD – Pour les disques hybrides, pour basculer
entre les couches CD et SACD. (page 30)
36 LIGHT – Active/désactive l’éclairage des
touches.
DIRECT
1 2 7 93 6 8
1 STANDBY/ON – Pour allumer et éteindre le
lecteur.
2 Port USB – (page 21)
3 FL OFF Indicateur – (page 13)
4 Afficheur de la face avant
5 Tiroir à disque
6 DIRECT Indicateur – (page 29)
7 Capteur de télécommande – Orientez la
54
8 OPEN/CLOSE – Pour ouvrir et fermer le tiroir à
disque.
9 DIRECT – Appuyez pour activer/désactiver la fonction
DIRECT (page 29).
10 – Pour arrêter la lecture (page 26).
– (page 27)
– (page 27)
11 – Pour démarrer la lecture (page 26).
télécommande vers le capteur, puis utilisez-la à
moins de 7 m. Le lecteur ne parviendra pas à capter
les signaux de la télécommande si une lumière
fluorescente se trouve à proximité. Dans ce cas,
éloignez le lecteur de la lumière fluorescente.
10
11
14
Fr
Page 79

Panneau arrière
BDP-88FD
ANALOG AUDIO OUT
RL
NORMAL
INVERSION
HDMI OUT
01
English Français Español
RS-232CZERO SIGNAL
MAINSUB
DIGITAL AUDIO OUT
OPTICAL
COAXIAL
LAN
(10/100)
USB
AC IN
1 92 3
BDP-85FD
RL
1 92 3
1 Bornes ANALOG AUDIO OUT – (page 20)
2 Bornes HDMI OUT – (page 16)
3 Borne ZERO SIGNAL – (page 21)
4 Borne DIGITAL AUDIO OUT (COAXIAL)
(BDP-88FD uniquement) – (page 20)
4 5 7 86
ZERO
SIGNAL
HDMI OUTANALOG AUDIO OUT
MAINSUB
DIGITAL OUT
COAXIAL
LAN
RS-232C
(10/100)
USB
AC IN
5 7 86
6 Borne LAN (10/100) – (page 22)
7 Port USB – (page 21)
8 Borne RS-232C – Cette borne n’est pas utilisée.
9AC IN – (page 22)
5 Prise DIGITAL AUDIO OUT (COAXIAL) – (page 20)
À propos des bornes HDMI sur le BDP-88FD/85FD
MAIN – À raccorder avec un téléviseur compatible HDMI ou/et un récepteur ou un amplificateur AV. Il s’agit de la
borne principalement utilisée.
SUB – À raccorder avec un récepteur ou un amplificateur AV compatible HDMI.
15
Fr
Page 80

02
Chapitre 2
Raccordements
Veillez à toujours éteindre les appareils et à débrancher le
cordon d’alimentation de la prise secteur avant de
raccorder un appareil ou de changer les liaisons.
Après le raccordement, effectuez les réglages dans le
menu Guide de Configuration ou Configuration
initiale selon le type de câble raccordé (page 23).
Reportez-vous aussi au mode d’emploi de l’appareil
raccordé.
Remarque
• Les illustrations présentées ici correspondent
principalement au BDP-88FD.
Quand un câble HDMI
est utilisé
Les signaux audio et vidéo peuvent être transmis aux
appareils compatibles HDMI sous forme de signaux
numériques sans perte de la qualité sonore ou vidéo.
8 bits pour chaque composante couleur. Il est donc
possible d’obtenir des dégradés de couleur plus subtils
lorsque ce lecteur est raccordé à un téléviseur
compatible Deep Color est raccordé.
Ce produit est compatible avec le “x.v.Color” qui donne un
spectre de couleurs plus étendu répondant aux
spécifications xvYCC.
Le spectre des couleurs étendu permet de restituer des
couleurs naturelles et plus fidèles que jamais lors de la
lecture de signaux vidéo conformes aux normes “xvYCC”,
quand le lecteur est raccordé à un téléviseur “x.v.Color”,
etc.
“x.v.Color” est le nom promotionnel donné aux produits
capables de restituer un spectre de couleurs plus étendu,
répondant aux spécifications des standards
internationaux définis comme xvYCC.
Remarque
• Effectuez le réglage du HDMI Mode dans le menu
Configuration initiale conformément au
raccordement des périphériques au lecteur (pages 17
et 43).
• Effectuez les réglages dans le menu Guide de
Configuration selon l’appareil compatible HDMI
raccordé (page 23).
• Selon le câble HDMI utilisé, les signaux vidéo 1080p
et 4K peuvent ne pas être fournis.
À propos de HDMI
Ce lecteur intègre l’interface multimédia haute définition
®
(HDMI
Les termes HDMI et HDMI High-Definition Multimedia
Interface ainsi que le logo HDMI sont des marques
commerciales ou des marques déposées de HDMI
Licensing LLC aux États-Unis et dans d’autres pays.
Le lecteur prend en charge le format Deep Color.
Les lecteurs classiques peuvent transmettre un signal
vidéo avec une profondeur de couleur de 8 bits dans les
formats YCbCr 4:4:4 ou RGB ; les lecteurs prenant en
charge le format Deep Color peuvent transmettre un
signal vidéo avec une profondeur de couleur supérieure à
16
Fr
).
“x.v.Color” et sont des marques
commerciales de Sony Corporation.
Signaux audio lisibles par la prise
HDMI OUT
• Dolby TrueHD
• Dolby Digital Plus
• Dolby Digital
• DTS-HD Master Audio
• DTS-HD High Resolution Audio
• DTS Digital Surround
•PCM linéaire
Des signaux audio PCM linéaires peuvent être
transmis s’ils remplissent les conditions suivantes :
– Fréquence d’échantillonnage : 32 kHz à 192 kHz
– Nombre de voies : 8 au maximum (6 au maximum
pour une fréquence d’échantillonnage de 192 kHz)
• DSD audio
• AAC
Lorsqu’un appareil DVI est raccordé
• Il n’est pas possible de raccorder des appareils
DVI (écrans d’ordinateur, par exemple) s’ils ne
sont pas compatibles avec l’HDCP. L’HDCP est une
norme visant à protéger les contenus audiovisuels via
l’interface DVI/HDMI.
• Aucun signal audio n’est restitué.
• Ce lecteur peut être raccordé à des appareils
compatibles HDMI. Lorsqu’il est raccordé à un
appareil DVI, et selon l’appareil DVI, il se peut qu’il ne
fonctionne pas correctement.
Page 81

À propos du contrôle par
l’HDMI
Les fonctions sont opérantes lorsqu’un téléviseur ou un
système AV Pioneer (récepteur ou amplificateur AV, etc.),
compatible avec l’HDMI, est raccordé au lecteur à l’aide
d’un câble HDMI.
Reportez-vous aussi au mode d’emploi du téléviseur et du
système AV (récepteur ou amplificateur AV, etc.).
Pour utiliser le contrôle par l’HDMI
• Le contrôle par l’HDMI fonctionne dans la mesure où
il est réglé sur Activé sur tous les appareils raccordés
à l’aide de câbles HDMI.
• Lorsque vous avez relié et réglé tous les appareils,
assurez-vous que l’image du lecteur apparaît bien sur
le téléviseur. (Ceci est également nécessaire lorsque
vous changez les appareils raccordés et rebranchez
les câbles HDMI.) Le contrôle par l’HDMI n’agit peutêtre pas correctement si l’image du lecteur ne
s’affiche pas correctement sur le téléviseur.
• Utilisez des câbles HDMI
voulez utiliser le contrôle par l’HDMI. Le contrôle par
l’HDMI peut ne pas agir correctement si vous utilisez
d’autres câbles HDMI.
• Sur certains modèles, le contrôle par l’HDMI est
appelé “KURO LINK” ou “HDMI Control”.
• Le contrôle par l’HDMI n’opère pas avec les appareils
d’autres marques, même si ce lecteur est raccordé
par un câble HDMI.
Que permet le contrôle par l’HDMI
• Permet d’agir sur le lecteur avec la télécommande
du téléviseur.
Certaines fonctions du lecteur, comme la marche et
l’arrêt de la lecture et l’affichage des menus, peuvent
être exécutées depuis le téléviseur.
• Afficher l’image du lecteur sur l’écran du
téléviseur. (Sélection automatique)
L’entrée change automatiquement sur le téléviseur et
le système AV (récepteur ou amplificateur AV, etc.)
lorsque la lecture démarre sur le lecteur ou lorsque la
page HOME MENU est affichée. Lorsque l’entrée
change, l’image de lecture ou la page HOME MENU
s’affiche sur le téléviseur.
• Allumer et éteindre le téléviseur et le lecteur.
(Mise en service simultanée)
Si le téléviseur est éteint lorsque vous démarrez la
lecture sur le lecteur ou affichez la page HOME
MENU, il s’allumera automatiquement. Lorsque vous
éteignez le téléviseur, le lecteur s’éteint
automatiquement.
®/TM
haute vitesse si vous
Régler le HDMI Mode
Le BDP-85FD/88FD a deux bornes HDMI OUT (MAIN,
SUB) Voir page 15 pour des informations détaillées sur
ces bornes.
Pour procéder au réglage, appuyez sur HOME MENU
pour afficher le Menu d’accueil, sélectionnez
Configuration initiale HDMI HDMI Mode.
Le HDMI Mode peut être modifié avec le bouton HDMI
de la télécommande. Le mode présenté dans le tableau
ci-dessous change à chaque fois que le bouton est
actionné.
Consultez le tableau ci-dessous et configurez-le HDMI
Mode en fonction de votre style de connexion.
HDMI
Mode
Dual
Separate
Pure
Audio
Single
Attention
• Si le HDMI Mode est réglé sur Dual et si la sortie est
générée depuis la borne HDMI OUT (MAIN) et la
borne HDMI OUT (SUB), la vidéo et le son pouvant
être générés depuis les deux bornes seront générés.
HDMI OUT MAIN HDMI OUT SUB
Vidéo Audio Control Vidéo Audio Control
Sound Retriever Link
À propos de la fonction Sound Retriever Link
La fonction Sound Retriever Link est une technologie
visant à contrôler par l’HDMI la correction de la qualité
des signaux audio compressés devant être restitués par
le récepteur AV raccordé.
Cette fonction permet de restituer un son de plus grande
qualité en activant automatiquement la correction sonore
du récepteur AV raccordé.
La fonction Sound Retriever Link de ce lecteur agit
essentiellement dans les situations suivantes.
• Lors de la lecture via un réseau ou lors de la lecture
de contenus PC enregistrés sur un dispositif USB.
• Le récepteur AV Pioneer compatible avec la fonction
Sound Retriever Link est raccordé à ce lecteur par un
câble HDMI et le lecteur est réglé de la façon suivante
(page 43).
Control: Activé
• Reportez-vous aussi aux instructions du récepteur
AV.
• Consultez le site Pioneer pour les récepteurs AV
compatibles avec la fonction Sound Retriever Link.
02
English Français Español
17
Fr
Page 82

02
Attention
• Raccordez directement le lecteur au récepteur AV
Pioneer compatible avec la fonction Sound Retriever
Link. L’interruption d’une liaison directe avec un
amplificateur ou un convertisseur AV (par exemple
une coupure de l’HDMI) peut causer un
dysfonctionnement.
À propos de la fonction PQLS
PQLS (Precision Quartz Lock System) est une
technologie de contrôle de transfert audio numérique
utilisant la fonction de contrôle par HDMI. Les signaux de
sortie du lecteur sont contrôlés à partir du récepteur AV
pour obtenir une lecture avec une qualité sonore élevée
grâce à l’oscillateur à quartz du récepteur. Ceci élimine
l’influence de la fluctuation générée pendant le transfert
du signal, ce qui peut avoir un effet défavorable sur la
qualité du son.
• Ce lecteur prend en charge les fonctions ci-dessous.
– La fonction “PQLS 2ch Audio” qui est activée lors
de la lecture de CD musicaux (CD-DA)
– La fonction “PQLS Multi Surround” qui est activée
lors de la lecture de tous les disques (BD, DVD,
etc.) avec une sortie audio PCM linéaire
– La fonction “PQLS Bitstream” qui est activée lors de
la lecture avec une sortie audio bitstream
• Les différentes fonctions PQLS sont activées quand
un récepteur AV Pioneer prenant en charge les
fonctions PQLS est raccordé directement à la borne
HDMI OUT avec un câble HDMI et les réglages du
lecteur sont définis comme indiqué ci-dessous
(page 43).
Control: Activé
Precision Audio: AUTO ou HDMI (PQLS) (BDP-88FD
uniquement)
• Consultez également le mode d’emploi du récepteur
AV.
• Consultez le site Web Pioneer pour connaître les
récepteurs AV prenant en charge la fonction PQLS.
Raccorder un téléviseur
Reportez-vous à
amplificateur AV
récepteur ou d’un amplificateur AV à l’aide d’un câble
HDMI.
Attention
• Pour brancher et débrancher le câble, saisissez-le par
la fiche.
• N’exercez pas de force sur la fiche qui puisse créer de
faux contacts ou empêcher la sortie des signaux
vidéo.
Raccordez un téléviseur à la borne HDMI OUT (MAIN).
HDMI OUT
Câble HDMI
commerce)
(disponible
dans le
À la prise
d’entrée HDMI
Attention
• Assurez-vous de régler HDMI Mode sur Dual ou
Single (page 43).
Raccorder un récepteur ou un
à la page 19 pour le raccordement d’un
Face arrière du BDP-88FD
MAINSUB
Téléviseur
ZERO SIGNAL
DIGITAL AUDIO OUT
OPTICAL
RS-232C
LAN
(10/100)
USB
COAXIAL
Orientez correctement
la fiche par rapport à la
prise et insérez-la tout
Un récepteur ou un amplificateur
AV peut aussi être raccordé à l’aide
d’un câble HDMI.
droit.
Sens du signal
18
Fr
Attention
• La fonction PQLS peut s’arrêter de fonctionner en cas
de changement de la résolution de la sortie vidéo. La
fonction PQLS recommencera à fonctionner une fois
que la lecture aura été arrêtée puis redémarrée.
• Mettez en marche le récepteur AV raccordé à la borne
HDMI OUT puis démarrez la lecture du disque.
Page 83

Raccorder un récepteur ou
un amplificateur AV
Raccordez un récepteur ou un amplificateur AV pour
bénéficier du son ambiophonique des formats Dolby
TrueHD, Dolby Digital Plus, Dolby Digital, DTS-HD Master
Audio, DTS-HD High Resolution Audio, DTS Digital
Surround, LPCM, AAC ou DSD. Pour le détail sur le
raccordement du téléviseur et des enceintes au récepteur
ou à l’amplificateur AV, reportez-vous au mode d’emploi
du récepteur ou de l’amplificateur AV.
Attention
• Pour brancher et débrancher le câble, saisissez-le par
la fiche.
• N’exercez pas de force sur la fiche qui puisse créer de
faux contacts ou empêcher la sortie des signaux
vidéo.
Face arrière du BDP-88FD
ZERO SIGNAL
RS-232C
Obtenir une meilleure qualité vidéo et sonore
Lors du raccordement d’un téléviseur (ou d’un
projecteur) et d’un amplificateur AV au lecteur,
raccordez-le de manière à ce que les signaux vidéo et
audio soient transférés séparément afin d’obtenir une
vidéo et un son de qualité plus élevée.
Face arrière du BDP-88FD
Câble HDMI
(en vente dans
le commerce)
Récepteur ou
amplificateur AV
HDMI OUT
MAINSUB
Vers borne
d’entrée HDMI
ZERO SIGNAL
DIGITAL AUDIO OUT
OPTICAL
Orientez
correctement la
fiche par rapport à
la prise et insérezla tout droit.
COAXIAL
LAN
RS-232C
(10/100)
USB
02
English Français Español
Câble HDMI
(en vente dans
le commerce)
Récepteur ou
amplificateur AV
Sens du signal
Câble HDMI
(en vente dans
le commerce)
HDMI OUT
Vers borne
d’entrée HDMI
DIGITAL AUDIO OUT
MAINSUB
OPTICAL
Orientez
correctement la
fiche par rapport à
la prise et insérezla tout droit.
À la prise
d’entrée HDMI
Téléviseur
LAN
(10/100)
USB
COAXIAL
Récepteur ou
amplificateur AV
Sens du signal
Téléviseur
Attention
• Assurez-vous de régler HDMI Mode sur Separate
(page 43).
• Si l’amplificateur AV raccordé à la borne HDMI OUT
(SUB) est également raccordé à un téléviseur,
l’entrée du téléviseur peut basculer
automatiquement. Si cela se produit, désactivez la
fonction de contrôle par HDMI sur le téléviseur.
19
Fr
Page 84

02
-
)
2
p
Raccordement des
câbles audio
Raccorder le préamplificateur principal avec
un câble symétrique
Raccordement d’un
récepteur ou amplificateur
AV avec un câble audio
numérique coaxial
Face arrière du BDP-85FD
ANALOG AUDIO OUT
RL
UT
Rouge
le commerce)
(en vente dans
Câble audio
Blanc
Un signal
analogique à 2
voies peut aussi
être raccordé.
HDMI OUT
MAINSUB
Câble audio
numérique
coaxial (en
vente dans le
commerce)
À la prise
Sens du
signal
Aux prises
d’entrée audio
d’entrée audio
numérique
coaxiale
Récepteur ou
amplificateur AV
Remarque
• Le volume de la sortie audio analogique peut être
faible, selon le réglage de l’appareil et le contenu
joué.
ZERO
SIGNAL
DIGITAL OUT
COAXIAL
LAN
Raccorder un récepteur ou
un amplificateur AV avec un
câble audio numérique
optique (BDP-88FD
uniquement)
(BDP-88FD uniquement)
Face arrière du BDP-88FD
NORMAL
ANALOG AUDIO OUT
RL
UT
RS
(10/100
INVERSION
HDMI OUT
Câble
symétrique
(disponible dans
le commerce)
Vers les bornes
d’entrée de type
symétrique
Câble audio
(en vente dans le
commerce)
Vers les bornes
Sens du
signal
d’entrée audio
(RCA)
Pré-amplificateur principal
avec connecteurs d’entrée
RCA (fiche à broches)
Remarque
• Le volume de la sortie audio analogique peut être
faible, selon le réglage de l’appareil et le contenu
joué.
Connecteur de sortie symétrique
(apparaît sur le côté de l’appareil.
Équivalent à XLR-3-31)
Les réglages de la borne de sortie de la balance peuvent
être modifiés. Consultez le
page 42 pour des informations détaillées.
Polarité terminal XLR
NORMAL
INVERSION
ZERO SIGNAL
DIGITAL AUDIO OUT
MAINSUB
Pré-amplificateur
principal, etc., doté de
connecteurs d’entrée
de type symétrique
OPTICAL
COAXIAL
à la
LAN
RS-2
(10/100)
20
Fr
R
Rouge
(en vente dans
le commerce)
ANALOG AUDIO OUT
Câble audio
Face arrière du BDP-88FD
NORMAL
INVERSION
L
UT
Blanc
Un signal
analogique à
2 voies peut aussi
être raccordé.
Sens du
signal
Aux prises
d’entrée audio
ZERO SIGNAL
HDMI OUT
Câble audio
numérique
DIGITAL AUDIO OUT
MAINSUB
OPTICAL
optique
(disponible dans
le commerce)
Vers la borne
d’entrée audio
numérique optique
Récepteur ou
lificateur AV
am
COAXIAL
LAN
RS-
(10/100)
Page 85

Le périphérique en
entrée est raccordé à
Raccordement du dispositif
USB
02
la borne ZERO SIGNAL
Le signal zéro est la référence (GND) pour les signaux
vidéo et audio. Si vous raccordez la borne ZERO SIGNAL
de l’équipement à la borne d’entrée audio d’un autre
appareil connecté à cet équipement, avec un cordon à
broches, l’appareil devient compatible avec la norme
audio de cet équipement et l’intégrité du signal est
améliorée.
D’autre part, si vous raccordez la borne d’entrée vidéo de
l’appareil, il devient compatible avec la norme vidéo de
cet équipement et l’intégrité du signal est améliorée.
(disponible dans le
Câble audio ou
commerce)
vidéo
HDMI OUT
Vers les bornes
d’entrée audio ou
vidéo
ZERO SIGNAL
DIGITAL AUDIO OUT
MAINSUB
OPTICAL
COAXIAL
LAN
RS-232C
(10/100)
USB
Attention
• Assurez-vous d’éteindre le lecteur avant de raccorder
ou de débrancher des périphériques USB.
• Si un disque dur externe est utilisé comme dispositif
de stockage externe, veillez à allumer le disque dur
avant d’allumer le lecteur.
• Si le dispositif USB est protégée, veillez à désactiver
la protection.
• Pour raccorder le câble USB, tenez la fiche en
l’orientant dans le bon sens et insérez-la tout droit
dans le port.
• Une pression excessive sur la fiche peut causer un
mauvais contact et empêcher les données de
s’inscrire sur le dispositif USB.
• Lorsqu’un dispositif USB est raccordé et le lecteur
allumé, ne débranchez pas le cordon d’alimentation.
Face arrière du BDP-88FD
English Français Español
Récepteur AV ou téléviseur etc.
Raccordement d’un
appareil au port USB
À propos des dispositifs USB
Les dispositifs USB suivants peuvent être raccordés au
lecteur.
• Mémoires flash USB compatibles USB 2.0 (capacité
de 1 Go ou plus, 2 Go ou plus recommandés) ou
disque dur (capacité 2 To ou plus)
• Format de fichier : FAT16, FAT32 ou NTFS
Remarque
• Les dispositifs formatés pour un autre système de
fichiers ne pourront pas être utilisés.
• Les dispositifs USB contenant plusieurs partitions
risquent de ne pas être reconnus.
• Certains dispositifs USB ne fonctionneront pas avec
ce lecteur.
• Le fonctionnement des dispositifs USB n’est pas
garanti.
Disque dur, etc.
Câble USB
(en vente dans
le commerce)
USB
Disque dur, etc.
OUT
MAIN
Mémoire flash
Face arrière du BDP-88FD
ZERO SIGNAL
DIGITAL AUDIO OUT
OPTICAL
COAXIAL
Mémoire flash
RS-232C
LAN
(10/100)
Câble USB
(en vente dans
le commerce)
Remarque
• Le dispositif risque de ne pas fonctionner s’il est
raccordé au port USB via un lecteur de carte mémoire
ou un concentrateur USB.
• Utilisez un câble USB de 2 mètres au maximum.
21
Fr
Page 86

02
Raccordement au
réseau par l’interface
Spécifications de la prise LAN
Prise LAN : Prise Ethernet (10BASE-T/100BASE-TX)
LAN
En raccordant ce lecteur au réseau via la borne LAN, vous
pouvez lire des fichiers images, audio et vidéo stockés sur
les composants sur le réseau, tels que votre ordinateur, à
l’aide des entrées Source.
Mettez le serveur DHCP de votre routeur en service. Si
votre routeur ne présente pas cette fonction, vous devrez
paramétrer le réseau manuellement. Pour le détail,
reportez-vous à
Remarque
• Reportez-vous au mode d’emploi de l’appareil utilisé,
car les appareils raccordés et les méthodes de
raccordement peuvent être différents selon
l’environnement Internet.
• Pour utiliser une connexion Internet à haut débit, il
faut être abonné à un fournisseur de service Internet.
Pour le détail, contactez votre fournisseur de service
Internet le plus proche.
• Veuillez noter que Pioneer décline toute
responsabilité quant aux erreurs de communication
ou problèmes liés à la connexion au réseau de
l’utilisateur ou aux dispositifs connectés. Contactez
votre fournisseur ou le fabricant des dispositifs
connectés.
Réglage de l’adresse IP
à la page 46.
Raccordement du
cordon d’alimentation
Lorsque tous les appareils ont été raccordés, vous pouvez
brancher le cordon d’alimentation.
Face arrière du BDP-88FD
AC IN
À la prise murale
Cordon
d’alimentation
(inclus)
Raccordement avec un câble
LAN (réseau LAN filaire)
Raccordez la prise LAN de ce récepteur à la prise LAN de
votre routeur (avec ou sans fonction de serveur DHCP)
avec un câble LAN direct (CAT 5 ou supérieur).
Face arrière du BDP-88FD
MI OUT
MAIN
Ordinateur
ZERO SIGNAL
DIGITAL AUDIO OUT
OPTICAL
COAXIAL
Câble LAN
(en vente dans
le commerce)
LAN
LAN
RS-232C
(10/100)
321
USB
Modem
Internet
WAN
Routeur
22
Fr
Câble LAN
(en vente dans le
commerce)
Page 87

Chapitre 3
Pour commencer
03
Paramétrage à l’aide
du menu Setup
Navigator
Veillez à bien régler ces paramètres lorsque vous utilisez
le lecteur dans les situations suivantes.
• La première fois que vous utilisez le lecteur.
• Après le formatage avec Configuration initiale.
Attention
• Assurez-vous que le lecteur et les autres appareils
sont reliés correctement avant de les mettre en
service. Allumez aussi les appareils raccordés au
lecteur avant d’allumer le lecteur.
• Si vous utilisez un téléviseur ou un vidéoprojecteur
Pioneer compatible avec la fonction de contrôle,
activez le contrôle sur l’appareil raccordé avant
d’allumer le lecteur.
TOP MENU POPUP MENU
TOP
ENTER
POP
UP
Si le menu Setup Navigator ne
s’affiche pas
Appuyez sur HOME MENU pour afficher la
page Home Menu, sélectionnez Configuration
initiale Guide de Configuration Démarrer, puis
appuyez sur ENTER.
3 Lancez le Guide de Configuration.
Appuyez sur ENTER.
•Le Guide de Configuration s’ouvre.
4 Sélectionnez la langue des menus.
Utilisez / pour effectuer un choix, puis appuyez sur
ENTER.
5 Sélectionnez la résolution appropriée pour le
téléviseur raccordé.
Utilisez / pour effectuer un choix, puis appuyez sur
ENTER.
6 Sélectionnez le rapport d’aspect approprié pour
le téléviseur raccordé.
Utilisez / pour effectuer un choix, puis appuyez sur
ENTER.
7 Fermez le menu Guide de Configuration.
Appuyez sur ENTER.
• Guide de Configuration se ferme et les réglages
sont sauvegardés.
English Français Español
HOME MENU RETURN
1 Allumez le téléviseur et sélectionnez l’entrée.
Reportez-vous au mode d’emploi du téléviseur pour le
détail sur son fonctionnement.
2 Allumez le lecteur.
Appuyez sur STANDBY/ON.
Assurez-vous que le menu Guide de Configuration
s’affiche.
• Appuyez sur RETURN pour revenir à l’écran
précédent.
23
Fr
Page 88

03
Utiliser le téléviseur
avec la télécommande
Liste des codes préréglés
pour les téléviseurs
du lecteur
Si le code fabricant de la marque de votre téléviseur est
défini sur la télécommande du lecteur, le téléviseur peut
être utilisé avec la télécommande du lecteur.
Attention
• Le réglage peut être réinitialisé aux valeurs par défaut
après le remplacement des piles. Si cela se produit,
redéfinissez-le.
CD/SACD
INPUT
HDMI
ZOOM INDEX
LIGHT
RESOLUTION
CLEAR
AUDIO P. VIDEO P.
FUNCTION
CONTINUED
DIRECT
DIMMER
PROGRAM
BOOKMARK
RG YB
TV CONTROL VOL
Important
• Nous ne garantissons pas le fonctionnement pour
tous les fabricants et appareils répertoriés. Le
fonctionnement peut être impossible même en
saisissant un code préréglé.
Code(s) Fabricant
PIONEER 01
ALBA 07, 24, 27
BUSH 07, 24, 27
CHANGHONG 05, 22
CONIA 28
DSE 29
FUNAI 14
GRUNDIG 16
HAIER 15
HISENCE 12
HITACHI 19
JVC 17
KONKA 21
LG ELECTRIC 08, 10
LOEWE 07, 24, 27
METZ 23
MITSUBISHI 06
NEC 25
ORION 20
PANASONIC 02
PHILIPS 07, 24, 27
SAMSUNG 09
SANYO 18
SHARP 04, 26
SKYWORTH 11
SONY 03
TCL 13
TOSHIBA 05
VICTOR 17
VIZIO 08, 10
1 Saisissez le code fabricant à 2 chiffres.
Utilisez les touches numériques (0 à 9) pour saisir le code
en appuyant sur TV CONTROL .
Remarque
• Le réglage usine par défaut est 01 (PIONEER).
• Si vous commettez une erreur en saisissant le code,
relâchez TV CONTROL puis recommencez depuis
le début.
• S’il y a plusieurs codes pour un fabricant, essayez de
les saisir dans l’ordre indiqué jusqu’à ce que le
téléviseur puisse être commandé.
2 Vérifiez que le téléviseur peut être commandé.
Utilisez la télévision avec TV CONTROL.
– Pour allumer et éteindre le téléviseur.
INPUT – Appuyez pour changer l’entrée du téléviseur.
VOL +/– – Appuyez pour régler le volume.
24
Fr
Page 89

Changer la résolution
vidéo en sortie
Utilisez la procédure ci-dessous pour changer la
résolution vidéo en sortie à partir à partir des différentes
bornes de sortie vidéo.
Appuyez sur RESOLUTION /.
DIRECT
DIMMER
PROGRAM
BOOKMARK
RG YB
TV CONTROL VOL
INPUT
• Le réglage en cours de la résolution vidéo en sortie est
affiché sur l’écran de la face avant du lecteur.
Pour changer la résolution vidéo en sortie, appuyez à
nouveau sur RESOLUTION /.
• Le réglage de la résolution vidéo en sortie peut
également être changé en sélectionnant Résolution
dans le menu Configuration initiale (page 41).
Si les vidéos haute définition de 4K
etc. ne sont pas visibles
Modifiez les réglages avec la procédure suivante.
1 Appuyez sur le bouton HDMI de la télécommande
pendant 5 secondes ou plus.
2 Si “4K 4:4:4” s’affiche sur l’écran du produit,
utilisez le bouton / pour le passer à “4K 4:2:0”.
Si la vidéo s’améliore après avoir modifié le réglage,
continuez à utiliser ce réglage.
Pour repasser le réglage à la valeur d’origine, effectuez à
nouveau l’opération décrite ci-dessus et passez le réglage
à “4K 4:4:4”.
Attention
• Sur certains appareils (téléviseur, récepteur ou
amplificateur AV, etc.), la vidéo ou l’audio peuvent ne
pas être générés correctement si la résolution est
changée. Si cela se produit, utilisez RESOLUTION
pour définir une résolution à laquelle la vidéo et
l’audio sont correctement générés.
• Lorsque les signaux vidéo restitués par la prise HDMI
OUT ont une résolution de 4K/24p, 4K, 1080/50i,
1080/50p, 720/50p, 1080/24p, 1080/60i, 1080/60p ou
720/60p, l’image peut être restituée avec un rapport
d’aspect de 16:9, même si TV Aspect Ratio est réglé
sur 4:3 (Standard).
HDMI
CD/SACD
RESOLUTION
ZOOM INDEX
LIGHT
• L’image peut ne pas être affichée pendant un certain
temps si la résolution est changée.
• Si l’appareil raccordé prend en charge la 3D et si un
disque 3D est lu, la sortie 3D bénéficie de la priorité
pour la sortie, quels que soient les réglages de la
résolution. Il n’est pas possible de changer la
résolution lorsque du contenu en 3D est affiché.
•Si Auto est sélectionné, l’image est générée à 60
trames/seconde si votre téléviseur n’est pas
compatible avec les signaux 1080/24p.
•Si 4K, 4K/24p, 1080/24p ou Source Direct est
sélectionné, les signaux sont générés en
conséquence, même si votre téléviseur n’est pas
compatible avec les signaux 4K, 4K/24p ou 1080/24p.
Si l’image n’est pas affichée correctement, utilisez
RESOLUTION / pour définir une résolution vidéo
en sortie à laquelle les signaux vidéo et audio sont
générés correctement.
•Si le Résolution est réglé sur Auto et si la télévision
définie en utilisation prend en charge une sortie 4K
ou 4K/24p, la sortie est générée en 4K ou 4K/24p. Si
la télévision raccordée définie ne prend pas en
charge 4K ou 4K/24p, la sortie est générée avec une
résolution recommandée différente de 4K.
• Les images sont générées avec la résolution de sortie
préférée de l’appareil (téléviseur, récepteur ou
amplificateur AV, etc.) raccordé à la borne de sortie
vidéo sélectionnée. Cependant, si les appareils sont
raccordés à HDMI MAIN et à HDMI SUB, les images
sont générées avec une résolution que les deux
appareils prennent en charge. Si la résolution prise
en charge par les appareils raccordés aux bornes
HDMI MAIN et HDM
I SUB varie, mettez hors tension
l’appareil qui n’est pas utilisé ou raccordez l’appareil
qui va être utilisé à la borne HDMI MAIN et définissez
le réglage de HDMI Mode sur Single afin de fournir
la sortie à l’appareil utilisé pour afficher la vidéo avec
une résolution optimale.
• Si le HDMI Mode est réglé sur Dual et si seulement
un des appareils raccordés au HDMI MAIN et au
HDMI SUB prend en charge la 3D, un disque 3D ne
peut pas être lu. Dans un tel cas, raccordez
uniquement lappareil qui prend en charge la 3D à la
borne HDMI MAIN et réglez le HDMI Mode sur
Single pour lire le disque.
•Si le Résolution est réglé sur Auto, 1080p, 4K ou 4K/
24p et si la résolution de la sortie provenant du HDMI
est 1080p, 4K ou 4K/24p, la sortie peut ne pas être
générée en fonction du câble HDMI utilisé.
• Certaines résolutions ne peuvent pas être générées
en fonction de la télévision utilisée.
• Si le HDMI Mode est réglé sur Pure Audio, la sortie
1080p60, 4K/60p ou 4K/24p ne sera pas générée
même si la résolution est réglée sur Auto ou 1080p,
4K ou 4K/24p. La sortie sera générée avec une
résolution de 1080/60i, 1080/24p ou autre, en fonction
de la résolution de la source et de la télévision
raccordée.
03
English Français Español
25
Fr
Page 90

04
Chapitre 4
Lecture
Lecture de disques ou
de fichiers
Le fonctionnement de base du lecteur est décrit dans
cette section.
Pour les types de disques et de fichiers pouvant être lus,
reportez-vous à page 7. Les fichiers vidéo, image et audio
enregistrés sur des disques sont lus avec la fonction
Source (page 34).
1 Appuyez sur STANDBY/ON pour allumer le
lecteur.
Allumez le téléviseur et sélectionnez tout d’abord l’entrée.
2 Appuyez sur OPEN/CLOSE pour ouvrir le tiroir
à disque et insérez le disque.
Remarque
• Insérez le disque en orientant sa face imprimée vers
le haut.
• Il faut plusieurs douzaines de secondes au lecteur
pour lire les informations du disque. Lorsque les
informations ont été lues, le type du disque est
indiqué sur l’afficheur de la face avant du lecteur.
• Si des restrictions d’emploi ont été posées par un
enregistreur BD sur le BD inséré, l’écran de saisie du
code PIN apparaît. Dans ce cas, saisissez votre code
PIN.
3 Appuyez sur pour lire le disque.
• Pour mettre en pause, appuyez sur pendant la
lecture.
• Pour arrêter la lecture, appuyez sur .
Remarque
• La lecture commence automatiquement pour
certains disques lorsque le tiroir à disque est fermé.
• Certains disques BD-ROM/DVD-Vidéo disposent d’un
contrôle parental. Saisissez le mot de passe
enregistré dans les paramètres du lecteur pour
annuler le contrôle parental. Pour le détail, reportezvous à page 47.
• Certains disques BD-R/-RE ont une protection
interdisant la lecture. Pour annuler la protection,
précisez le mot de passe spécifié pour le disque.
• Si l’image et le son ne sont pas correctement
transmis,
En cas de panne
Si le menu du disque s’affiche
Pour certains disques, le menu du disque s’affiche
automatiquement au début de la lecture. Le contenu du
menu du disque et le fonctionnement du menu
dépendent du disque.
26
Fr
à la page 54.
Reprise de la lecture au point où elle
a été arrêtée (fonction de reprise de la
lecture)
• Si vous appuyez sur pendant la lecture, le point où
le disque a été arrêté est enregistré dans la mémoire.
Ensuite, lorsque vous appuyez sur , la lecture se
poursuit à partir de ce point.
• Pour annuler la reprise de la lecture, appuyez sur
pendant l’arrêt de la lecture.
Remarque
• La reprise de la lecture est automatiquement annulée
dans les cas suivants :
– Lorsque le tiroir à disque est ouvert.
– Lorsque vous changez de liste de fichiers.
– Lorsque vous mettez le lecteur hors service. (La
reprise de la lecture n’est pas annulée dans le cas
des BD et des DVD.)
• Si vous voulez continuer la lecture à une position
spécifiée au préalable, reportez-vous à
de la lecture à partir de la position spécifiée
(Poursuite du visionnage)
• La reprise de la lecture ne peut pas être utilisée pour
certains disques.
à la page 33.
Continuation
Quick View (Quick View avec
audio)
Le son est restitué pendant que les images vidéo sont
lues à environ 1,5 fois la vitesse normale.
Appuyez sur lors de la lecture dun disque
Blu-ray ou dun DVD.
•Un appui sur pendant l’affichage rapide fait
passer en avance rapide.
Pour revenir à la lecture normale
• Appuyez sur .
Remarque
• Vous ne pouvez pas mettre en pause pendant un
affichage rapide. Veuillez mettre en pause après être
repassé à la lecture normale.
• Comme le son pendant l’affichage rapide, la sortie
passe par PCM quelle que soit la configuration de
l’élément principal de l’appareil.
• Il n’est pas possible de commuter le son pendant
l’affichage rapide.
• Selon le format audio, tel que Dolby TrueHD et DTSHD Master Au dio, il peut ne pas y avoir de s or tie audio
pendant l’avance rapide.
• Pour connaître les conditions de sortie de chaque
voix, veuillez consulter
numériques restitués
À propos des formats audio
à la page 50.
Page 91

Recherche avant et arrière
Pendant la lecture ou l’affichage rapide, appuyez
sur ou .
• La vitesse de la recherche change chaque fois que
vous appuyez sur la touche. La variation de vitesse
dépend du disque ou du fichier (la vitesse est
indiquée sur l’écran du téléviseur).
Pour revenir à la lecture normale
Appuyez sur .
Lecture de chapitres, de plages
ou de fichiers particuliers
Pendant la lecture, précisez le numéro du chapitre,
de la plage ou du fichier que vous voulez lire.
• Utilisez les touches numériques (0 à 9) pour préciser
le numéro, puis appuyez sur ENTER.
• Appuyez sur CLEAR pour effacer les valeurs saisies.
Saut de contenu
Pour revenir à la lecture normale
• Appuyez sur .
Lecture avant et arrière pas à
pas
Pendant la pause de la lecture, appuyez (sur)
// ou /.
• Chaque fois que vous appuyez sur la touche, la
lecture avance ou recule d’une image à la fois.
• À chaque fois que le bouton / est actionné, une
avance d’une image est effectuée.
• À chaque fois que le bouton / est actionné, un
recule d’une image est effectuée.
Pour revenir à la lecture normale
• Appuyez sur .
Lecture répétée d’un
passage précis d’un titre ou
d’une plage (Répétition A-B)
04
English Français Español
Pendant la lecture, appuyez sur ou .
•Si vous appuyez sur , la lecture saute au début du
chapitre, de la plage ou du fichier suivant.
• Si vous appuyez sur pendant la lecture d’un
fichier vidéo ou audio, la lecture revient au début du
chapitre, de la plage ou du fichier en cours de lecture.
Appuyez deux fois sur la touche pour localiser le
début du chapitre, de la plage ou du fichier
précédent.
• Si vous appuyez sur pendant la lecture d’un
fichier photo, la lecture revient au fichier précédent.
Pour revenir à une position
peu de temps auparavant
Appuyez pendant la lecture pour revenir à une position
10 secondes avant.
Pendant la lecture, appuyez sur REPLAY.
Pour avancer à une position
légèrement en avant
Appuyez pendant la lecture pour avancer à une position
30 secondes après.
Pendant la lecture, appuyez sur SHORT SKIP.
Lecture au ralenti
Pendant la pause de la lecture, maintenez
enfoncé / ou /.
• La vitesse change chaque fois que vous appuyez sur
la touche (la vitesse est indiquée sur l’écran du
téléviseur).
• Maintenir le bouton / enfoncé lance la lecture
au ralenti.
• Maintenir le bouton / enfoncé lance la lecture
au ralenti en arrière.
Procédez de la façon suivante pour répéter un passage
précis d’un titre ou d’une plage.
1 Pendant la lecture, appuyez sur A-B pour
sélectionner le début du passage.
• [A-] apparaît sur l’écran du téléviseur.
2 Pendant la lecture, appuyez sur A-B pour
sélectionner la fin du passage.
• La lecture du passage A-B commence.
Pour annuler la lecture du passage
A-B
• Appuyez sur A-B pendant la lecture répétée du
passage A-B.
Remarque
• La lecture répétée du passage A-B est annulée dans
les cas suivants :
– Si vous effectuez une recherche hors de la plage
spécifiée pour la répétition.
– Si vous démarrez une autre lecture répétée ou
lecture aléatoire.
Répétition de la lecture
(Lecture répétée)
Procédez de la façon suivante pour répéter le disque, le
titre, le chapitre, la plage ou le fichier actuel.
Pendant la lecture, appuyez sur REPEAT.
• À chaque pression sur REPEAT le mode de répétition
change de la façon suivante.
BD
Chapitre actuel Titre actuel
DVD
Chapitre actuel Titre actuel Tous les titres
27
Fr
Page 92

04
CD/Fichier vidéo/Fichier audio/Fichier photo
Plage/fichier actuel Toutes les plages/Tous les
fichiers du dossier
Pour annuler la lecture répétée
• Appuyez plusieurs fois sur REPEAT pendant la lecture
répétée.
Remarque
• La lecture répétée est annulée dans les cas suivants :
– Si vous effectuez une recherche hors de la plage
spécifiée pour la répétition.
– Si vous démarrez une autre lecture répétée ou
lecture aléatoire.
Lecture dans l’ordre souhaité
(Lecture programmée)
Lecture d’une scène marquée
1 Appuyez sur la touche BOOKMARK et maintenezla quelques secondes enfoncée.
• La liste de signets apparaît.
2 Sélectionnez le signet que vous souhaitez lire.
Utilisez / pour effectuer un choix, puis appuyez sur
ENTER.
Suppression d’un signet
Sélectionnez le signet que vous voulez
supprimer, puis appuyez sur CLEAR.
• Pour certains disques il ne sera pas possible de poser
de signets.
• Les signets sont annulés dans les cas suivants :
– Lorsque le lecteur est éteint.
– Lorsque le tiroir à disque est ouvert.
1 Pendant la lecture, appuyez sur PROGRAM.
• L’écran de programmation s’affiche.
2 Sélectionnez le numéro de programmation.
Utilisez / pour effectuer un choix, puis appuyez sur
ENTER.
3 Sélectionnez le morceau/titre/chapitre que vous
souhaitez lire.
Utilisez /// pour effectuer un choix, puis appuyez
sur ENTER.
4 Appuyez sur .
• La lecture commence.
Modification de la programmation
1 Sélectionnez le numéro de la programmation que
vous voulez modifier, puis appuyez sur ENTER.
2 Sélectionnez le titre/chapitre, puis appuyez sur
ENTER.
Suppression d’une programmation
Sélectionnez le numéro de la programmation que
vous voulez supprimer, puis appuyez sur CLEAR.
• Pour supprimer toutes les programmations, appuyez
sur RETURN.
Remarque
• Si vous utilisez des CD audio pour la lecture
programmée, indiquez le numéro de plage au point 3.
• Cette fonction n’agit pas avec les BD.
Pose de signets
Vous pouvez poser des signets sur la vidéo en cours de
lecture pour revenir plus tard à la scène marquée.
Pendant la lecture, appuyez sur BOOKMARK.
• Un signet est posé.
28
Fr
• Le nombre de signets pouvant être posés est limité à
12.
Zoom
Pendant la lecture, appuyez sur ZOOM.
• À chaque pression sur ZOOM, le niveau de zoom
change de la façon suivante.
[Zoom 2x] [Zoom 3x] [Zoom 4x] [Zoom 1/2]
[Zoom 1/3] [Zoom 1/4] Normal (pas
d’indication)
Remarque
• Cette fonction n’agit pas avec certains disques.
Lecture de photos en
diaporama
Cette fonction permet un changement automatique des
photos.
Pendant la lecture, appuyez sur INDEX.
• Affichez les miniatures des fichiers d’images. Le
nombre de miniatures pouvant être affichées à la fois
se limite à 12.
• Si vous sélectionnez une miniature et appuyez sur
ENTER, le diaporama démarrera par l’image
sélectionnée.
Rotation/renversement de photos
Pendant un diaporama ou la pause du diaporama,
l’image change d’orientation de la façon suivante lorsque
vous appuyez sur les touches ///.
Touche : Rotation de 90° dans le sens horaire
Touche : Rotation de 90° dans le sens antihoraire
Touche : Renversement horizontal
Touche : Renversement vertical
Changement de l’angle de
prise de vues
Pour les disques BD-ROM et DVD-Vidéo enregistrés sous
différents angles de prise de vues, les angles peuvent être
changés au cours de la lecture.
Page 93

1 Pendant la lecture, appuyez sur FUNCTION.
2 Sélectionner Angle dans le menu FUNCTION.
• L’angle actuel et le nombre total d’angles enregistrés
sont indiqués à l’écran du téléviseur.
• Si les angles ne sont pas changés, changez-les
depuis l’écran de menu du disque.
Remarque
• Certains disques ne peuvent pas changer les angles.
Changement des sous-titres
Pour les disques ou les fichiers sur lesquels différents
sous-titres ont été enregistrés, les sous-titres peuvent être
changés au cours de la lecture.
Attention
• Les sous-titres ne peuvent pas être changés dans le
cas de disques enregistrés par un enregistreur DVD
ou BD. Reportez-vous aussi au mode d’emploi de
l’appareil utilisé pour l’enregistrement.
Pendant la lecture, appuyez sur SUBTITLE.
• Les sous-titres actuels et le nombre total de
sous-titres enregistrés sont indiqués à l’écran du
téléviseur.
Pour changer de sous-titres, appuyez une nouvelle
fois sur SUBTITLE.
• Les sous-titres peuvent aussi être changés en
sélectionnant Sous-titres sur le menu FUNCTION.
• Si les sous-titres ne changent pas lorsque vous
appuyez sur SUBTITLE, changez-les par le menu du
disque.
Masquage des sous-titres
Appuyez plusieurs fois sur SUBTITLE ou
sélectionnez Sous-titres dans le menu FUNCTION
pour régler ce paramètre sur Off.
À propos de l’affichage de soustitres externes pendant la lecture des
fichiers DivX
Outre les sous-titres enregistrés sur les fichiers DivX, ce
lecteur peut aussi afficher des sous-titres externes. Si un
fichier a le même nom qu’un fichier DivX à part
l’extension, et si l’extension est une des extensions
suivantes, le fichier sera traité comme fichier de
sous-titres externes. Notez bien que les fichiers DivX et
les fichiers de sous-titres externes doivent se trouver dans
le même dossier.
Un seul fichier de sous-titres externes peut être utilisé sur
ce lecteur. Utilisez un ordinateur, etc. pour supprimer les
fichiers des sous-titres externes dont vous n’avez pas
besoin pour un disque.
Les fichiers texte ayant les extensions “.smi”, “.srt”, “.sub”
et “.txt” ne sont pas pris en charge.
Avec la fonction DIRECT
Si la fonction DIRECT est activée, les sorties audio et
vidéo numériques sont bloquée et l’audio analogique est
lu avec une qualité élevée. Cette fonction est désactivée
lors de l’expédition.
Appuyez sur DIRECT.
• À chaque fois que le bouton est actionné, le réglage
bascule entre Activé et Désactivé.
• Quand la fonction DIRECT est activée, l’indicateur
DIRECT sur l’unité principale s’allume.
Remarque
• Lorsque vous activez la fonction DIRECT et lisez, le
volume de sortie peut être faible en fonction des
paramètres de l’appareil et du contenu lu.
• Selon le disque ou le fichier, la fonction DIRECT ne
marchera pas dans certains cas si la lecture n’est pas
arrêtée (la fonction continuer la lecture est en état
annulé). Pour annuler la reprise de la lecture,
appuyez sur pendant l’arrêt de la lecture.
Sous-titres mobiles
La position des sous-titres apparaissant pendant la
lecture de BD-ROM ou DVD peut être changée.
1 Lisez le BD-ROM ou le DVD-Vidéo et affichez les
sous-titres sur l’écran du téléviseur.
2 Appuyez au moins 2 secondes sur la touche
SUBTITLE.
• Le Mode de décalage du titre est spécifié.
• [Mode de décalage du titre] apparaît sur l’écran du
téléviseur.
3 Utilisez les touches / pour changer la position
des sous-titres.
• Utilisez les touches / pour changer la position
des sous-titres.
• Une fois que le paramétrage est terminé, appuyez sur
ENTER.
4 Annulez le Mode de décalage du titre.
Appuyez sur la touche ENTER.
Changement du son
Pour les disques ou les fichiers sur lesquels différents
flux/voies audio ont été enregistrés, les flux/voies audio
peuvent être commutés au cours de la lecture.
Pendant la lecture, appuyez sur AUDIO.
• Le son actuel et le nombre total de flux audio
enregistrés sont indiqués à l’écran du téléviseur.
Pour changer de son, appuyez une nouvelle fois sur
AUDIO.
• Le son peut aussi être changé en sélectionnant
Audio sur le menu FUNCTION.
•Si AUDIO ne permet pas de changer le son, changez-
le par le menu du disque.
04
English Français Español
Remarque
• Avec certains fichiers, les sous-titres externes ne
pourront pas être affichés correctement.
29
Fr
Page 94

04
Commutation de la zone de
lecture CD/SACD
1 Sélectionnez la zone que vous souhaitez lire.
En mode d’arrêt, appuyez sur CD/SACD. La zone de
lecture change sur l’afficheur de la face avant à chaque
pression sur la touche.
[CD AREA] [SACD 2CH] [SACD MCH] (retour
au début)
• Pendant la lecture, appuyez deux fois sur pour
annuler la lecture continue avant de sélectionner la
zone de lecture.
Affichage des informations
du disque
Appuyez sur DISPLAY.
Les informations du disque apparaissent sur l’écran du
téléviseur. Pour masquer les informations, appuyez une
nouvelle fois sur DISPLAY.
Les informations affichées sont différentes pendant la
lecture et pendant la pause de la lecture.
Utilisation de BONUSVIEW ou
Attention
• Si l’espace disponible sur la mémoire flash USB n’est
pas suffisant, il peut être impossible d’utiliser les
fonctions BONUSVIEW et BD-LIVE. Dans ce cas,
reportez-vous à
BD et des données des applications
effacer les données du Paquet Virtuel et les données
BD-LIVE sur la mémoire flash USB.
Remarque
• Le fonctionnement des mémoires flash USB n’est pas
garanti.
• La lecture des données de la fonction BD-LIVE varie
selon la mémoire utilisée. Pour le détail, consultez la
notice fournie avec la mémoire.
• Pour bénéficier de la fonction BD-LIVE, une
connexion réseau et des réglages sont nécessaires
(pages 22 et 46).
• BD-LIVE est une fonction assurant une connexion à
Internet. Les disques disposant de la fonction
BD-LIVE peuvent envoyer les codes d’identification de
ce lecteur et du disque au fournisseur de contenus
par Internet.
Effacement des données ajoutées aux
à la page 47 pour
de BD-LIVE
Ce lecteur est compatible avec les BD-Vidéo
BONUSVIEW et BD-LIVE.
Lorsque vous utilisez des BD-Vidéo compatibles avec
BONUSVIEW, vous bénéficiez de certaines fonctions
comme l’image secondaire (image dans l’image)
(page 32) et le son secondaire (page 32). Avec les BDVidéo offrant BD-LIVE, des images vidéo spéciales ainsi
que d’autres données peuvent être téléchargées
d’Internet.
Les données enregistrées sur un BD-Vidéo et
téléchargées de BD-LIVE se stockent sur une mémoire
flash USB (mémoire externe). Pour bénéficier de ces
fonctions, raccordez une mémoire flash USB (capacité
minimale 1 Go, 2 Go ou plus sont recommandés) de type
USB 2.0 High Speed (480 Mbits/s) au port USB.
• Veillez à éteindre le lecteur avant d’insérer ou de
retirer la mémoire flash USB.
• Pour rappeler les données sauvegardées sur la
mémoire flash USB, insérez d’abord la mémoire
utilisée lors du téléchargement des données (si une
autre mémoire est insérée, les données enregistrées
sur la mémoire flash USB ne seront pas lues).
• Si la mémoire flash USB utilisée contient d’autres
données (enregistrées antérieurement), l’image et le
son ne seront pas lus correctement.
• Ne retirez pas la mémoire flash USB pendant la
lecture.
• Le chargement des données (lecture/écriture)
nécessite un certain temps.
30
Fr
Page 95

Fonctions de lecture
Les fonctions pouvant être utilisées dépendent du type de disque et de fichier. Dans certains cas, certaines fonctions
ne peuvent pas être utilisées. Les fonctions disponibles sont indiquées dans le tableau suivant.
Type de disque/fichier
Fonction
Affichage rapide
Recherche avant et
arrière
1
2
BD-
ROM
BD-R/-REDVD-
Vidéo
DVD-
Audio
3
3
3
Short Skip/Replay
Lecture de titres, de
chapitres ou de plages
particuliers
Saut de contenu
Lecture au ralenti
Lecture avant et arrière
pas à pas
7
Lecture répétée A-B
5
7
Lecture répétée
Zoom
9
Angle
Sous-titres
11
Son
10
Informations du disque
DVD-R/
-RW
(Format
VR)
4
AVCREC AVCHD
3
3
Fichier
vidéo
3
Fichier
photo
3
6
8
Fichier
audio
CD
audio
4
4
04
English Français Español
1. Certaines fonctions peuvent ne pas être disponibles pour certains disques ou fichiers, même si [] est indiqué dans le tableau.
2. Selon le format audio, tel que Dolby TrueHD et DTS-HD Master Audio, il peut ne pas y avoir de sortie audio pendant lavance rapide.
3. Pendant la recherche avant et arrière, le son n’est pas audible.
4. Pendant la recherche avant et arrière, le son est audible.
5. Pendant la lecture au ralenti le son n’est pas audible.
6. La lecture arrière au ralenti n’est pas disponible.
7. Si un chapitre est commuté, certains disques provoquent un retour automatique à la lecture normale.
8. La lecture arrière pas à pas n’est pas disponible.
9. La marque d’angle apparaît pour les scènes enregistrées sous divers angles si Indicateur Angle est réglé sur Activé (page 44).
10. • Les types de sous-titres enregistrés dépendent du disque et du fichier.
• Dans certains cas, les sous-titres peuvent changer ou l’écran de commutation du disque peut s’afficher immédiatement, sans que les
sous-titres actuels ni le nombre total de sous-titres enregistrés sur le disque ne soient indiqués.
11. Les types de sons secondaires enregistrés dépendent du disque et du fichier.
31
Fr
Page 96

04
Utilisation du menu
FUNCTION
Les fonctions pouvant être rappelées dépendent du mode
de fonctionnement du lecteur.
1 Affichez le menu FUNCTION.
Appuyez sur FUNCTION pendant la lecture.
2 Sélectionnez et réglez le paramètre.
Utilisez / pour effectuer un choix, puis appuyez sur
ENTER.
Paramètre Description
Bitrate Affichage du débit binaire du son/de
l’image/de l’image/du son secondaire.
Statisme off Arrêt de l’image fixe d’un BD-ROM.
Short Skip Avancer à une position 30 secondes
après.
Replay Revenir à une position 10 secondes
avant.
Diaporama Changement de vitesse du diaporama
pendant un diaporama.
Transition Changement de style du diaporama
pendant un diaporama.
Remarque
• Les paramètres ne pouvant pas être changés
apparaissent en gris. Les paramètres pouvant être
sélectionnés dépendent de l’état du lecteur.
Pour changer le réglage du
paramètre sélectionné
Utilisez / pour le changer.
Pour fermer le menu FUNCTION
Appuyez sur FUNCTION.
Liste des paramètres du menu
FUNCTION
Paramètre Description
Titre (plage)
Chapitre Affichage des informations concernant
Fichier Affichez les informations du fichier
Heure Affichage du temps écoulé ou restant.
Mode Changement du mode de lecture
Audio Changement du son.
Angle Changement de l’angle de prise de vue
Sous-titres Changement de la langue des sous-
Page Code Changement de page des codes de sous-
Vidéo secondaire
Audio secondaire
1
32
Fr
Affichage des informations concernant
le titre du disque en cours de lecture et
du nombre total de titres sur le disque.
Également sélection du titre devant être
lu. (Voir la description suivante.)
le chapitre en cours de lecture (plage/
titre) et du nombre total de chapitres sur
le disque. Également sélection du
chapitre (plage/titre) devant être lu. (Voir
la description suivante.)
actuel.
Sélectionnez votre fichier favori.
Également spécification du temps où la
lecture doit commencer. (Voir la
description suivante.)
(page 33).
d’un BD-ROM/DVD-Vidéo.
titres.
titres.
2
Sélection de l’image secondaire d’un
BD-ROM (Image dans l’image).
3
Sélection du son secondaire d’un BDROM.
1. Une de ces informations apparaît selon le type de disque.
2. La marque d’image secondaire apparaît pour les scènes
enregistrées avec une image secondaire si Indictateur PIP est
réglé sur Activé (page 44).
3. La marque de son secondaire apparaît pour les scènes
enregistrées avec un son secondaire si Indicateur second audio
est réglé sur Activé (page 44).
Remarque
• Les paramètres pouvant être sélectionnés dépendent
du type de disque.
• Les types de flux audio secondaires enregistrés
dépendent du disque et du fichier.
• Certains disques n’ont pas de son secondaire ou
d’image secondaire.
• Dans certains cas, le son secondaire ou l’image
secondaire peut changer ou l’écran de commutation
peut s’afficher immédiatement, sans que le son
secondaire ou l’image secondaire ou le nombre total
de sons secondaires ou d’images secondaires
enregistrés sur le disque ne soit indiqué.
Page 97

Lecture à partir d’un temps
précis (Recherche
temporelle)
1 Sélectionnez Heure.
Utilisez / pour effectuer un choix, puis appuyez sur
ENTER.
2 Précisez le temps.
Utilisez les touches numériques (0 à 9) pour préciser le
temps.
• Pour lire à partir de 45 minutes, précisez 0, 0, 4, 5, 0
et 0, puis appuyez sur ENTER.
• Pour lire à partir de 1 heure 20 minutes, précisez 0, 1,
2, 0, 0 et 0, puis appuyez sur ENTER.
• Appuyez sur CLEAR pour effacer les valeurs saisies.
3 Démarrez la lecture au temps précisé.
Appuyez sur ENTER.
Shuffle play
La plage de disques, de titres ou le chapitre (plage/
fichier) spécifié est lu dans un ordre aléatoire. Chaque
élément n’est lu qu’une seule fois.
Continuation de la
lecture à partir de la
position spécifiée
(Poursuite du
visionnage)
Cette fonction permet de poursuivre la lecture à une
position spécifiée au préalable, même après l’extinction
du lecteur.
Réglage
04
English Français Español
Lecture d’un titre, d’un
chapitre, d’une plage ou
d’un fichier particulier
(Recherche)
1 Sélectionnez Titre ou Chapitre (plage/fichier).
Utilisez / pour effectuer un choix, puis appuyez sur
ENTER.
2 Précisez le numéro du titre ou du chapitre (plage/
fichier).
Utilisez les touches numériques (0 à 9) ou / pour
préciser le numéro.
• Pour rechercher par exemple le titre 32, précisez 3 et
2, puis appuyez sur ENTER.
• Appuyez sur CLEAR pour effacer les valeurs saisies.
3 Démarrez la lecture à partir du titre, du chapitre
ou de la plage précisé.
Appuyez sur ENTER.
Lecture d’une plage
particulière de disques, de
titres ou d’un chapitre
(plage/fichier) dans un ordre
aléatoire
Vous avez le choix entre 2 types de lecture aléatoire.
Pendant la lecture, appuyez sur CONTINUED à la
position où vous voulez poursuivre le visionnage.
Le temps écoulé jusqu’à la position spécifiée est indiqué
à l’écran du téléviseur.
Lecture
1 Appuyez sur pour lire le titre pour lequel
vous avez spécifié une position.
L’écran de confirmation de la poursuite de la lecture
apparaît.
• Dans les cas suivants, l’écran de confirmation de
poursuite du visionnage s’affiche.
Pour le BD vidéos
L’écran s’affiche après la lecture de la fonction
principale.
Pour les disques enregistrés
L’écran s’affiche après la sélection du dossier et la
lecture du titre pour lequel la poursuite de la lecture a
été spécifiée.
2 Utilisez / pour sélectionner Yes, puis
appuyez sur ENTER.
Démarrez la lecture au temps précisé.
Remarque
• Le temps spécifié pour la poursuite de la lecture est
annulé lorsque OPEN/CLOSE est pressé.
• La poursuite de la lecture à un temps spécifié peut ne
pas fonctionner correctement avec certains disques.
1 Sélectionnez Mode.
Utilisez / pour effectuer un choix, puis appuyez sur
ENTER.
2 Sélectionnez le mode de lecture.
Utilisez / pour effectuer un choix, puis appuyez sur
ENTER.
Random play
La plage de disques, de titres ou le chapitre (plage/
fichier) spécifié est lu dans un ordre aléatoire. Le même
élément peut être lu de manière consécutive.
33
Fr
Page 98

05
Chapitre 5
Lecture depuis la fonction Source
Les fichiers enregistrés sur un ordinateur ou un DMS
YouTube
TOP MENU POPUP MENU
TOP
HOME MENU RETURN
À propos de la
fonction Source
La fonction Source de ce lecteur vous permet d’afficher
une liste de sources en entrée et de démarrer la lecture.
Ce chapitre décrit comment configurer le lecteur et
comment effectuer la lecture pour bénéficier de ces
fonctions. Si vous lisez des fichiers enregistrés sur votre
ordinateur ou un autre appareil connecté au réseau, nous
vous conseillons de vous reporter aussi au mode
d’emploi fourni avec cet appareil.
Les sources d’entrée pouvant être lues à partir de la
fonction Source sont indiquées ci-dessous.
•Disques BD-R/RE (format BDAV)
• Disques DVD-R/RW (format VR)
• CD audio (CD-DA, SACD et DTS-CD)
• DVD/CD sur lesquels des fichiers vidéo, photo ou
audio, etc. sont enregistrés.
•Dispositif USB
• Fichiers sur les serveurs (sur des ordinateurs ou
appareils connectés au lecteur par une interface
LAN.)
ENTER
SOURCE
POP
UP
(Serveur multimédia numérique), comme mentionné
ci-dessus, peuvent être lus par le lecteur multimédia
numérique (DMP). Le lecteur permet d’utiliser un
DMP.
Les fichiers enregistrés sur un ordinateur ou un DMS
(Serveur multimédia numérique), comme mentionné
ci-dessus, peuvent être lus par un contrôleur
multimédia numérique externe (DMC). Les dispositifs
contrôlés par ce DMC pour la lecture de fichiers sont
appelés DMR (Digital Media Renderers). Ce lecteur
prend en charge la fonction DMR. Lorsqu’il est en
mode DMR, la lecture et l’arrêt de fichiers, entre
autre, peuvent être activés depuis le contrôleur
externe.
• Pour lire les fichiers audio enregistrés sur des
appareils en réseau, la fonction de serveur DHCP de
votre routeur doit être mise en service. Si votre
routeur ne présente pas cette fonction, vous devrez
paramétrer le réseau manuellement. Sinon, les
fichiers enregistrés sur les appareils en réseau ne
pourront pas être lus. Voir “Réglage de l’adresse IP”
page 46.
À propos de la lecture en
réseau
Cet appareil utilise les technologies suivantes pour la
lecture en réseau :
Windows Media Player
Reportez-vous à Windows Media Player 11/Windows
Media Player 12 ci-dessus pour plus d’informations à ce
sujet.
DLNA
34
Fr
Remarque
•La fonction Source vous permet de lire des fichiers
sur des serveurs multimédia connectés au même
réseau local (LAN) que le récepteur.
•Les fichiers suivants peuvent être lus avec la fonction
Source:
– Ordinateurs fonctionnant sous Microsoft Windows
Vista avec Windows Media Player 11 installé
– Ordinateurs fonctionnant sous Microsoft Windows
7 avec Windows Media Player 12 installé
– Les serveurs multimédia numériques compatibles
avec la norme DLNA (sur les ordinateurs ou
d’autres appareils)
Lecteur audio DLNA CERTIFIED
La DLNA (Digital Living Network Alliance) est une alliance
transindustrielle des sociétés de production d’appareils
électroniques grand public, d’ordinateurs et de
périphériques mobiles. Digital Living permet aux
consommateurs de partager aisément les médias
numériques par leurs réseaux avec ou sans fil.
Le logo DLNA permet de trouver facilement les produits
conformes aux Directives d’interopérabilité DLNA. Cet
appareil est conforme aux Directives d’interopérabilité
DLNA v1.5. Lorsqu’un ordinateur intégrant un logiciel
serveur DLNA ou un autre périphérique compatible DLNA
est relié à ce lecteur, certains paramètres du logiciel ou
du périphérique devront éventuellement être changés.
Veuillez vous reporter au mode d’emploi du logiciel ou du
périphérique pour plus d’informations à ce sujet.
®
Page 99

DLNA®, le logo DLNA et DLNA CERTIFIED® sont des
marques commerciales, des marques de service ou des
marques de certification de la Digital Living Network
Alliance.
Contenus lisibles via un réseau
• Certains fichiers ne pourront pas être lus
correctement bien qu’ils soient dans un format
compatible.
• Selon le type de serveur ou la version utilisé, certaines
fonctions ne seront pas prises en charge.
• Les formats de fichiers pris en charge varient d’un
serveur à l’autre. C’est pourquoi, les fichiers qui ne
sont pas pris en charge par votre serveur
n’apparaissent pas sur cet appareil. Pour plus
d’informations, contactez le constructeur de votre
serveur.
Avis de non responsabilité
concernant les contenus diffusés par
un tiers
L’accès aux contenus fournis par des tiers exige une
connexion Internet haut débit et peut aussi exiger la
création d’un compte et des droits de souscription.
Les services de contenus de tiers peuvent être changés,
suspendus ou interrompus à tout moment sans préavis,
et Pioneer décline toute responsabilité quant à ces
changements.
Pioneer ne certifie ou garantit pas que les services de
contenus continueront d’être fournis ou seront
disponibles pendant une période précise et décline toute
garantie explicite ou implicite de ce type.
Anomalies lors de lecture en réseau
• La lecture peut se bloquer si vous éteignez
l’ordinateur ou supprimez des fichiers multimédia de
l’ordinateur pendant la lecture de contenu.
• En cas de problèmes de réseau (trafic intense, etc.) le
contenu risque de ne pas s’afficher ou de ne pas être
lu correctement (la lecture peut être interrompue ou
bloquée). Pour éviter ce type de problème, il est
conseillé de relier le lecteur et l’ordinateur par un
câble 10BASE-T/100BASE-TX.
• Si plusieurs clients lisent les mêmes fichiers
simultanément, la lecture peut être interrompue ou
se bloquer.
• Selon le logiciel antivirus installé sur l’ordinateur
raccordé et le réglage de ce logiciel, la connexion
réseau peut se bloquer.
Pioneer n’est pas responsable du mauvais
fonctionnement du lecteur et/ou des caractéristiques de
la fonction Source en raison d’erreurs ou de
dysfonctionnements de communication associés à votre
connexion réseau et/ou votre ordinateur ou un autre
appareil raccordé. Veuillez contacter le fabricant de votre
ordinateur ou votre fournisseur de service Internet.
Windows Media est une marque déposée ou une marque
commerciale de Microsoft Corporation aux États-Unis et/
ou dans d’autres pays.
Ce produit intègre une technologie détenue par Microsoft
Corporation, qui ne peut être utilisée et distribuée que
sous licence de Microsoft Licensing, Inc.
Microsoft
Windows
Edition, Windows
®
, Windows®7, Windows®Vista,
®
XP, Windows®2000, Windows®Millennium
®
98 et WindowsNT® sont des marques
déposées ou des marques commerciales de Microsoft
Corporation aux états-Unis d’Amérique et/ou dans
d’autres pays.
Lecture de fichiers sur
le réseau
1 Appuyez sur SOURCE pour afficher la fonction
Source.
La fonction Source peut également être affichée en
sélectionnant Source à partir du menu d’accueil puis en
appuyant sur ENTER.
2 Sélectionnez le serveur contenant le fichier que
vous voulez lire.
3 Sélectionnez le fichier que vous voulez lire.
Utilisez / pour effectuer un choix, puis appuyez sur
ENTER.
Pour arrêter la fonction Source
Appuyez sur SOURCE.
Lecture de disque/USB
1 Appuyez sur SOURCE pour afficher la fonction
Source.
La fonction Source peut également être affichée en
sélectionnant Source à partir du menu d’accueil puis en
appuyant sur ENTER.
2 Sélectionnez Disc ou USB.
Utilisez / pour effectuer un choix, puis appuyez sur
ENTER.
3 Sélectionnez Photo/Music/Video/AVCHD.
Utilisez / pour effectuer un choix, puis appuyez sur
ENTER.
• Ce point n’est pas pour les disques enregistrés dans
le format BDAV/VR/AVCREC.
• Pour lire des fichiers dans le formant AVCHD sur un
dispositif USB, créez un dossier intitulé “AVCHD” sur
le dispositif USB, puis copiez le dossier “BDMV”
contenant les fichiers à lire dans le dossier “AVCHD”.
4 Sélectionnez le titre/la plage ou le fichier que
vous voulez lire.
Utilisez / pour effectuer un choix, puis appuyez sur
ENTER.
Démarrez la lecture à partir du titre/de la plage ou fichier
sélectionné.
• Si le fichier que vous voulez lire se trouve dans un
dossier, sélectionnez d’abord le dossier contenant le
fichier.
05
English Français Español
35
Fr
Page 100

05
Lecture de fichiers photo
Lecture de la Playlist
À propos du diaporama
Les photos du dossier s’affichent et changent
automatiquement.
Remarque
• Certains disques BD-R/-RE ont une protection
interdisant la lecture. Pour annuler la protection,
précisez le mot de passe spécifié pour le disque.
• Il faudra peut-être attendre quelques secondes avant
que la lecture démarre. C’est normal.
• Certains fichiers ne pourront pas être lus
correctement.
• Le nombre de vues peut être limité.
• Selon les dispositifs raccordés et la situation, il faut
attendre quelque temps avant que la lecture ne
commence et l’image change.
Lire dans l’ordre
souhaité (Liste de
lecture)
Les disques permettant d’ajouter des plages et des
fichiers à la Liste de Lecture sont les suivants.
• DVD/CD/Dispositifs USB sur lesquels des fichiers
audio sont enregistrés
Ajout de plages ou de
fichiers
Procédez de la façon suivante pour ajouter des plages et
des fichiers, et créer la Liste de lecture.
1 Appuyez sur SOURCE pour afficher la fonction
Source.
La fonction Source peut également être affichée en
sélectionnant Source à partir du menu d’accueil puis en
appuyant sur ENTER.
2 Sélectionnez la Playlist.
Utilisez / pour effectuer un choix, puis appuyez sur
ENTER.
3 Sélectionnez la plage ou le fichier devant être lu.
Utilisez / pour effectuer un choix, puis appuyez sur
ENTER.
La lecture commence par la plage ou le fichier
sélectionné et se poursuit jusqu’au dernier de la liste.
Utilisez / pour lire la plage ou le fichier précédent
ou suivant. L’écran Now Playing s’affiche.
Suppression de plages ou
fichiers de la Playlist
1 Sélectionnez la plage ou le fichier devant être
supprimé, puis appuyez sur POP UP MENU pour
afficher le menu POP UP MENU.
2 Utilisez / pour sélectionner Supprimer de la
liste de lecture, puis appuyez sur ENTER.
Remarque
• Dans les cas suivants, toutes les informations de la
liste de lecture seront supprimées.
– Quand vous ouvrez le tiroir du disque.
– Quand vous coupez l’alimentation.
1 Appuyez sur SOURCE pour afficher la fonction
Source.
La fonction Source peut également être affichée en
sélectionnant Source à partir du menu d’accueil puis en
appuyant sur ENTER.
2 Sélectionnez Disc ou USB.
Insérez d’abord le disque.
Utilisez / pour effectuer un choix, puis appuyez sur
ENTER.
3 Sélectionnez la plage ou le fichier devant être
ajouté.
Utilisez pour le valider.
4 Appuyez sur POP UP MENU pour afficher le menu
POP UP MENU.
5 Sélectionnez Ajouter à la liste de lecture pour
ajouter à la Playlist.
Utilisez / pour effectuer un choix, puis appuyez sur
ENTER.
La piste ou le fichier sélectionné à létape 3 est ajouté au
Liste de lecture.
• Pour ajouter d’autres plages ou fichiers, répétez les
36
Fr
points 3 à 5.
 Loading...