

Pioneer BDP-62FD Owners Manual
BDP-62FD
Blu-ray 3D™ PLAYER
LECTEUR Blu-ray 3D™
Register your product at:
http://www.pioneerelectronics.com (US)
http://www.pioneerelectronics.ca (Canada)
• Protect your new investment
The deta ls of your purchase wll be on file for reference n the event of an insurance cla m such as loss or theft
• Receive free tips, updates and service bulletins on your new product
• Improve product development
Your input helps us continue to design products that meet your needs
• Receive a free Pioneer newsletter
Registered customers can opt in to receive a monthly newsletter
http://www.pioneerelectronics.com (États-Unis)
http://www.pioneerelectronics.ca (Canada)
Operating Instructions
Mode d’emploi
Cautions on 3D Viewing
• If you should experience any fatigue or discomfort while viewing 3D images, stop viewing them.
• Children, particularly those under 6, may be more prone to sensitivity, so guardians should watch for
any signs of fatigue or discomfort.
• When viewing 3D images, rest periodically.
Extended viewing of 3D images without rest periods could cause fatigue or discomfort.
Read these instructions.
Keep these instructions.
Heed all warnings.
Follow all instructions.
Do not use this apparatus near water.
Clean only with dry cloth.
Do not block any ventilation openings. Install in
accordance with the manufacturer’s
instructions.
Do not install near any heat sources such as
radiators, heat registers, stoves, or other
apparatus (including amplifiers) that produce
heat.
Do not defeat the safety purpose of the polarized
or grounding-type plug. A polarized plug has two
blades with one wider than the other. A
grounding type plug has two blades and a third
grounding prong. The wide blade or the third
prong are provided for your safety. If the provided
plug does not fit into your outlet, consult an
electrician for replacement of the obsolete outlet.
Protect the power cord from being walked on or
pinched particularly at plugs, convenience
receptacles, and the point where they exit from
the apparatus.
1)
2)
3)
4)
5)
6)
7)
8)
9)
10)
Only use attachments/accessories specified by
the manufacturer.
Use only with the cart, stand, tripod, bracket, or
table specified by the manufacturer, or sold with
the apparatus. When a cart is used, use caution
when moving the cart/apparatus combination to
avoid injury from tip-over.
Unplug this apparatus during lightning storms
or when unused for long periods of time.
Refer all servicing to qualified service personnel.
Servicing is required when the apparatus has
been damaged in any way, such as power-supply
cord or plug is damaged, liquid has been spilled
or objects have fallen into the apparatus, the
apparatus has been exposed to rain or moisture,
does not operate normally, or has been dropped.
D3 7 13 69_En
11)
12)
13)
14)
NOTE:
This equipment has been tested and found to comply with the limits for a Class B digital device, pursuant to Part 15
of the FCC Rules. These limits are designed to provide reasonable protection against harmful interference in a
residential installation. This equipment generates, uses, and can radiate radio frequency energy and, if not installed
and used in accordance with the instructions, may cause harmful interference to radio communications. However,
there is no guarantee that interference will not occur in a particular installation. If this equipment does cause
harmful interference to radio or television reception, which can be determined by turning the equipment off and on,
the user is encouraged to try to correct the interference by one or more of the following measures:
Reorient or relocate the receiving antenna.
Increase the separation between the equipment and receiver.
Connect the equipment into an outlet on a circuit different from that to which the receiver is connected.
Consult the dealer or an experienced radio/TV technician for help.
D8 10 1 2_A1_En
Thank you for buying this Pioneer product.
Please read through these operating instructions so you will know how to operate your model properly.
After you have finished reading the instructions, put them away in a safe place for future reference.
The exclamation point within an equilateral
triangle is intended to alert the user to the
presence of important operating and
maintenance (servicing) instructions in the
literature accompanying the appliance.
The lightning flash with arrowhead symbol,
within an equilateral triangle, is intended to
alert the user to the presence of uninsulated
“dangerous voltage” within the product’s
enclosure that may be of sufficient
magnitude to constitute a risk of electric
shock to persons.
CAUTION:
TO PREVENT THE RISK OF ELECTRIC
SHOCK, DO NOT REMOVE COVER (OR
BACK). NO USER-SERVICEABLE PARTS
INSIDE. REFER SERVICING TO QUALIFIED
SERVICE PERSONNEL.
CAUTION
RISK OF ELECTRIC SHOCK
DO NOT OPEN
IMPORTANT
D3 4 2 1 1_A1_En
CAUTION
This product is a class 1 laser product classified
under the Safety of laser products, IEC 60825 1:2007.
CLASS 1 LASER PRODUCT
D58 5 2 2a_A1_En
Operating Environment
Operating environment temperature and humidity:
+5 °C to +35 °C (+41 °F to +95 °F); less than 85 %RH
(cooling vents not blocked)
Do not install this unit in a poorly ventilated area, or in
locations exposed to high humidity or direct sunlight (or
strong artificial light)
D3 4 2 1 7c*_A1_En
If the AC plug of this unit does not match the AC
outlet you want to use, the plug must be removed
and appropriate one fitted. Replacement and
mounting of an AC plug on the power supply cord of
this unit should be performed only by qualified
service personnel. If connected to an AC outlet, the
cut off plug can cause severe electrical shock. Make
sure it is properly disposed of after removal.
The equipment should be disconnected by removing
the mains plug from the wall socket when left unused
for a long period of time (for example, when on
vacation).
D3 4 2 2 1a_A1_En
WARNING
This equipment is not waterproof. To prevent a fire or
shock hazard, do not place any container filled with
liquid near this equipment (such as a vase or flower
pot) or expose it to dripping, splashing, rain or
moisture.
D3 4 2 1 3_A1_En
WARNING
Before plugging in for the first time, read the following
section carefully.
The voltage of the available power supply differs
according to country or region. Be sure that the
power supply voltage of the area where this unit
will be used meets the required voltage (e.g., 230 V
or 120 V) written on the rear panel.
D3 4 2 1 4*_A1_En
VENTILATION CAUTION
When installing this unit, make sure to leave space
around the unit for ventilation to improve heat radiation
(at least 10 cm at top, 10 cm at rear, and 10 cm at each
side).
WARNING
Slots and openings in the cabinet are provided for
ventilation to ensure reliable operation of the product,
and to protect it from overheating. To prevent fire
hazard, the openings should never be blocked or
covered with items (such as newspapers, table cloths,
curtains) or by operating the equipment on thick carpet
or a bed.
D3 4 2 1 7b*_A1_En
CAUTION
The
STANDBY/ON switch on this unit will not
completely shut off all power from the AC outlet.
Since the power cord serves as the main disconnect
device for the unit, you will need to unplug it from the
AC outlet to shut down all power. Therefore, make
sure the unit has been installed so that the power
cord can be easily unplugged from the AC outlet in
case of an accident. To avoid fire hazard, the power
cord should also be unplugged from the AC outlet
when left unused for a long period of time (for
example, when on vacation).
D3 4 2 2 2a*_A1_En
This product is for general household purposes. Any
failure due to use for other than household purposes
(such as long term use for business purposes in a
restaurant or use in a car or ship) and which requires
repair will be charged for even during the warranty
period.
K041_A1_En

POWER-CORD CAUTION
Handle the power cord by the plug. Do not pull out the
plug by tugging the cord and never touch the power
cord when your hands are wet as this could cause a
short circuit or electric shock. Do not place the unit, a
piece of furniture, etc., on the power cord, or pinch the
cord. Never make a knot in the cord or tie it with other
cords. The power cords should be routed such that they
are not likely to be stepped on. A damaged power cord
can cause a fire or give you an electrical shock. Check
the power cord once in a while. When you find it
damaged, ask your nearest PIONEER authorized
service center or your dealer for a replacement.
S002*_A1_En
WARNING
To prevent a fire hazard, do not place any naked flame
sources (such as a lighted candle) on the equipment.
D3 4 2 1 7a_A1_En
WARNING: Handling the cord on this product or
cords associated with accessories sold with the
product may expose you to chemicals listed on
proposition 65 known to the State of California and
other governmental entities to cause cancer and
birth defect or other reproductive harm.
D36 P5_B1_En
This product contains mercury. Disposal of this
material may be regulated due to environmental
considerations. For disposal or recycling information,
please contact your local authorities or the Electronics
Industries Alliance : www.eiae.org.
K057_A1_En
IMPORTANT NOTICE
THE MODEL NUMBER AND SERIAL NUMBER OF
THIS EQUIPMENT ARE ON THE REAR OR BOTTOM.
RECORD THESE NUMBERS ON YOUR ENCLOSED
WARRANTY CARD AND KEEP IN A SAFE PLACE
FOR FUTURE REFERENCE.
D36 AP9 1_A1_En
Information to User
Alterations or modifications carried out without
appropriate authorization may invalidate the user’s
right to operate the equipment.
D8 10 2_A1_En
This Class B digital apparatus complies with
Canadian ICES 003.
D8 10 1 3_A1_En
CAUTION
This product satisfies FCC regulations when shielded
cables and connectors are used to connect the unit
to other equipment. To prevent electromagnetic
interference with electric appliances such as radios
and televisions, use shielded cables and connectors
for connections.
D8 10 3a_A1_En
The Safety of Your Ears is in Your Hands
Get the most out of your equipment by playing it at a
safe level a level that lets the sound come through
clearly without annoying blaring or distortion and, most
importantly, without affecting your sensitive hearing.
Sound can be deceiving. Over time, your hearing
“comfort level” adapts to higher volumes of sound, so
what sounds “normal” can actually be loud and
harmful to your hearing. Guard against this by setting
your equipment at a safe level BEFORE your hearing
adapts.
ESTABLISH A SAFE LEVEL:
• Set your volume control at a low setting.
• Slowly increase the sound until you can hear it
comfortably and clearly, without distortion.
• Once you have established a comfortable sound
level, set the dial and leave it there.
BE SURE TO OBSERVE THE FOLLOWING
GUIDELINES:
• Do not turn up the volume so high that you can’t
hear what’s around you.
• Use caution or temporarily discontinue use in
potentially hazardous situations.
• Do not use headphones while operating a motorized
vehicle; the use of headphones may create a traffic
hazard and is illegal in many areas.
S001a_A1_En

Contents
01 Before you start
What’s in the box . . . . . . . . . . . . . . . . . . . . . . . . . . . . . . . . 6
Putting the batteries in the remote control. . . . . . . . . . 6
Software Update . . . . . . . . . . . . . . . . . . . . . . . . . . . . . . . . 6
About operation of this player from a mobile device
(iPod, iPhone, iPad etc.) . . . . . . . . . . . . . . . . . . . . . . . . . . 6
Types of discs/files that can be played. . . . . . . . . . . . . . . 7
Playable discs . . . . . . . . . . . . . . . . . . . . . . . . . . . . . . . . . 7
Playable files . . . . . . . . . . . . . . . . . . . . . . . . . . . . . . . . . 10
Part Names and Functions . . . . . . . . . . . . . . . . . . . . . . . 12
Remote Control . . . . . . . . . . . . . . . . . . . . . . . . . . . . . . . 12
Front Panel. . . . . . . . . . . . . . . . . . . . . . . . . . . . . . . . . . . 14
Front Panel Display. . . . . . . . . . . . . . . . . . . . . . . . . . . . 14
Rear Panel . . . . . . . . . . . . . . . . . . . . . . . . . . . . . . . . . . . 15
02 Connecting up
Connecting using an HDMI cable . . . . . . . . . . . . . . . . . 16
About HDMI. . . . . . . . . . . . . . . . . . . . . . . . . . . . . . . . . . 16
About Control Function with HDMI . . . . . . . . . . . . . . . 16
Connecting a TV . . . . . . . . . . . . . . . . . . . . . . . . . . . . . . 18
Connecting an AV receiver or amplifier . . . . . . . . . . . 19
Connecting an AV receiver or amplifier using an coaxial
digital audio cable . . . . . . . . . . . . . . . . . . . . . . . . . . . . . . 20
Connecting components to the USB port . . . . . . . . . . . 20
About USB devices . . . . . . . . . . . . . . . . . . . . . . . . . . . . 20
Connecting the USB device . . . . . . . . . . . . . . . . . . . . . 20
Connecting to the network through LAN interface. . . . 21
Connecting to a wireless LAN . . . . . . . . . . . . . . . . . . . 21
Connecting the power cord. . . . . . . . . . . . . . . . . . . . . . . 21
03 Getting Started
Making settings using the Setup Navigator menu . . . . 22
Operating the TV with the player’s remote control . . . . 23
TV Preset code list. . . . . . . . . . . . . . . . . . . . . . . . . . . . . 23
04 Playback
Playing discs or files . . . . . . . . . . . . . . . . . . . . . . . . . . . . 25
Forward and reverse scanning. . . . . . . . . . . . . . . . . . . 25
Playing specific chapters, tracks or files. . . . . . . . . . . 25
Skipping content . . . . . . . . . . . . . . . . . . . . . . . . . . . . . . 25
Playing in slow motion . . . . . . . . . . . . . . . . . . . . . . . . . 26
Step forward and step reverse . . . . . . . . . . . . . . . . . . . 26
Playing a specific section within a title or track
repeatedly (A-B Repeat) . . . . . . . . . . . . . . . . . . . . . . . . 26
Playing repeatedly (Repeat Play). . . . . . . . . . . . . . . . . 26
Playing in the desired order (Programmed Play). . . . 26
Making bookmarks . . . . . . . . . . . . . . . . . . . . . . . . . . . . 27
Zoom. . . . . . . . . . . . . . . . . . . . . . . . . . . . . . . . . . . . . . . . 27
Playing photos as slideshows . . . . . . . . . . . . . . . . . . . 27
Switching the camera angles . . . . . . . . . . . . . . . . . . . 27
Switching the subtitles . . . . . . . . . . . . . . . . . . . . . . . . . 27
Switching the audio . . . . . . . . . . . . . . . . . . . . . . . . . . . 28
Switching the secondary audio . . . . . . . . . . . . . . . . . . 28
Switching the secondary video . . . . . . . . . . . . . . . . . . 28
Switching the CD/SACD playback area . . . . . . . . . . . 28
Displaying the disc information . . . . . . . . . . . . . . . . . . 29
Enjoying BONUSVIEW or BD-LIVE . . . . . . . . . . . . . . . 29
Playback functions . . . . . . . . . . . . . . . . . . . . . . . . . . . . 30
Using the FUNCTION menu . . . . . . . . . . . . . . . . . . . . . . 31
Playing from a
Playing a specific title, chapter, track or file
(Search) . . . . . . . . . . . . . . . . . . . . . . . . . . . . . . . . . . . . . 32
Continuing playback from a specified position
(Continued Viewing Playback) . . . . . . . . . . . . . . . . . . . 32
Playing specified range of discs, titles or chapter
(track/file) in random order . . . . . . . . . . . . . . . . . . . . . 32
specific ti
me (Time Search) . . . . . . . . 32
05 Playback from Home Media Gallery
About Home Media Gallery. . . . . . . . . . . . . . . . . . . . . . . 33
About network playback . . . . . . . . . . . . . . . . . . . . . . . . 33
Playback file on the network. . . . . . . . . . . . . . . . . . . . . . 34
Disc/USB playback . . . . . . . . . . . . . . . . . . . . . . . . . . . . . 34
Playing back image files . . . . . . . . . . . . . . . . . . . . . . . . 35
Playing in the desired order (Playlist) . . . . . . . . . . . . . . 35
Adding tracks/files . . . . . . . . . . . . . . . . . . . . . . . . . . . . 35
Playing the Playlist . . . . . . . . . . . . . . . . . . . . . . . . . . . . 35
Deleting tracks/files from the Playlist . . . . . . . . . . . . . 35
06 Playing the web contents
Available web contents . . . . . . . . . . . . . . . . . . . . . . . . . . 36
Playing the items . . . . . . . . . . . . . . . . . . . . . . . . . . . . . . . 36
07 Advanced settings
Changing the settings . . . . . . . . . . . . . . . . . . . . . . . . . . . 38
Operating the Initial Setup screen. . . . . . . . . . . . . . . . 38
Software updating. . . . . . . . . . . . . . . . . . . . . . . . . . . . . 44
Restoring all the settings to the factory default
settings. . . . . . . . . . . . . . . . . . . . . . . . . . . . . . . . . . . . . . 45
About how digital audio formats are output . . . . . . . . . 46
Language Code Table and Country/Area Code Table. . 47
Language Code Table . . . . . . . . . . . . . . . . . . . . . . . . . . 47
Country/Area Code Table . . . . . . . . . . . . . . . . . . . . . . . 47
08 Additional information
Disclaimer for third party content . . . . . . . . . . . . . . . . . 48
Cautions on use . . . . . . . . . . . . . . . . . . . . . . . . . . . . . . . . 48
Moving the player . . . . . . . . . . . . . . . . . . . . . . . . . . . . . 48
Place of installation. . . . . . . . . . . . . . . . . . . . . . . . . . . . 48
Turn the power off when not using the player . . . . . . 49
Condensation . . . . . . . . . . . . . . . . . . . . . . . . . . . . . . . . 49
Cleaning the player . . . . . . . . . . . . . . . . . . . . . . . . . . . . 49
Caution for when the unit is installed in a rack with a
glass door. . . . . . . . . . . . . . . . . . . . . . . . . . . . . . . . . . . . 49
Cleaning the pickup lens . . . . . . . . . . . . . . . . . . . . . . . 49
Handling discs. . . . . . . . . . . . . . . . . . . . . . . . . . . . . . . . 49
Troubleshooting . . . . . . . . . . . . . . . . . . . . . . . . . . . . . . . . 50
Playback. . . . . . . . . . . . . . . . . . . . . . . . . . . . . . . . . . . . . 50
Control function. . . . . . . . . . . . . . . . . . . . . . . . . . . . . . . 53
Network . . . . . . . . . . . . . . . . . . . . . . . . . . . . . . . . . . . . . 53
Others. . . . . . . . . . . . . . . . . . . . . . . . . . . . . . . . . . . . . . . 54
Glossary . . . . . . . . . . . . . . . . . . . . . . . . . . . . . . . . . . . . . . 55
Specifications. . . . . . . . . . . . . . . . . . . . . . . . . . . . . . . . . . 57
5
En
Chapter 1
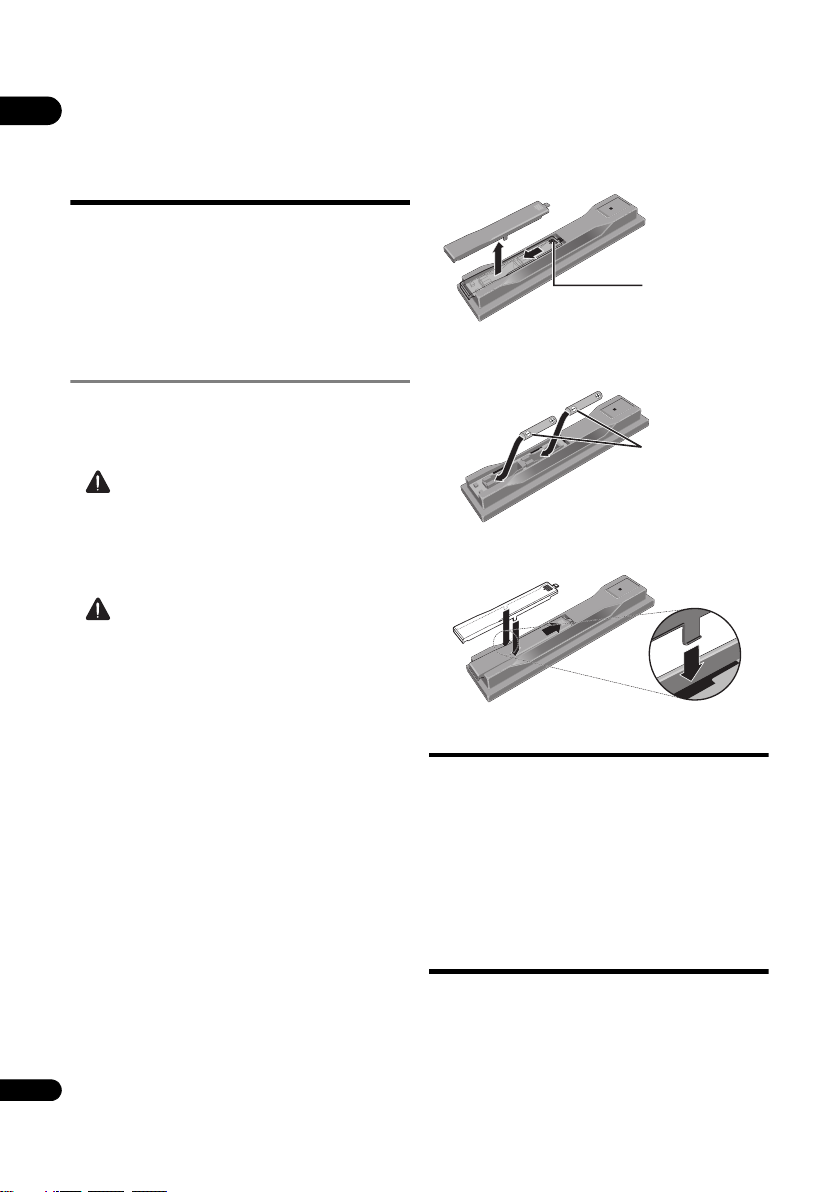
Press lightly on this
part and slide into
the direction of the
arrow.
Insert the negative
() side first.
01
Before you start
What’s in the box
•Remote control x 1
•AAA/R03 dry cell batteries x 2
•Warranty card
•Power cord
•Operating instructions (this document)
Putting the batteries in the
remote control
The batteries included with the player have been provided
to allow you to check product operation and may not last
long. We recommend using alkaline batteries that have a
longer life.
WARNING
•Do not use or store batteries in direct sunlight or
other excessively hot place, such as inside a car or
near a heater. This can cause batteries to leak,
overheat, explode or catch fire. It can also reduce the
life or performance of batteries.
Caution
• Do not use any batteries other than the ones
specified. Also, do not use a new battery together with
an old one.
• When loading the batteries into the remote control,
set them in the proper dire
polarity marks ( and ).
•When inserting the batteries, make sure not to
damage the springs on the battery’s terminals.
This can cause batteries to leak or overheat.
• Do not heat batteries, disassemble them, or throw
them into flames or water.
•Batteries may have different voltages, even if they look
similar. Do not use different kinds of batteries
together.
•To prevent leakage of battery fluid, remove the
batteries if you do not plan to use the remote control
for a long period of time (1 month or more). If the fluid
should leak, wipe it carefully off the inside of the case,
then insert new batteries. If a battery should leak and
th
e fluid should get on your skin, flush it off with large
quantities of water.
•When disposing of used batteries, please comply with
governmental regulations or environmental public
institution’s rules that apply in your country/area.
6
En
ction, as indicated by the
1 Open the rear cover.
2 Insert the batteries (AAA/R03 x 2).
Insert as indicated by the / marks into the battery
compartment.
3 Close the rear cover.
Close securely (a click should be heard).
Software Update
Product information on this player is provided on the
Pioneer website. Check this website for update and
service information on your Blu-ray disc player.
http://www.pioneerelectronics.com
About operation of
this player from a
mobile device (iPod,
iPhone, iPad etc.)
The player can be controlled from a mobile device by
installing the special application onto the mobile device.
For details, see the product information on the Pioneer
website.
This special application may be changed or discontinued
without notice.
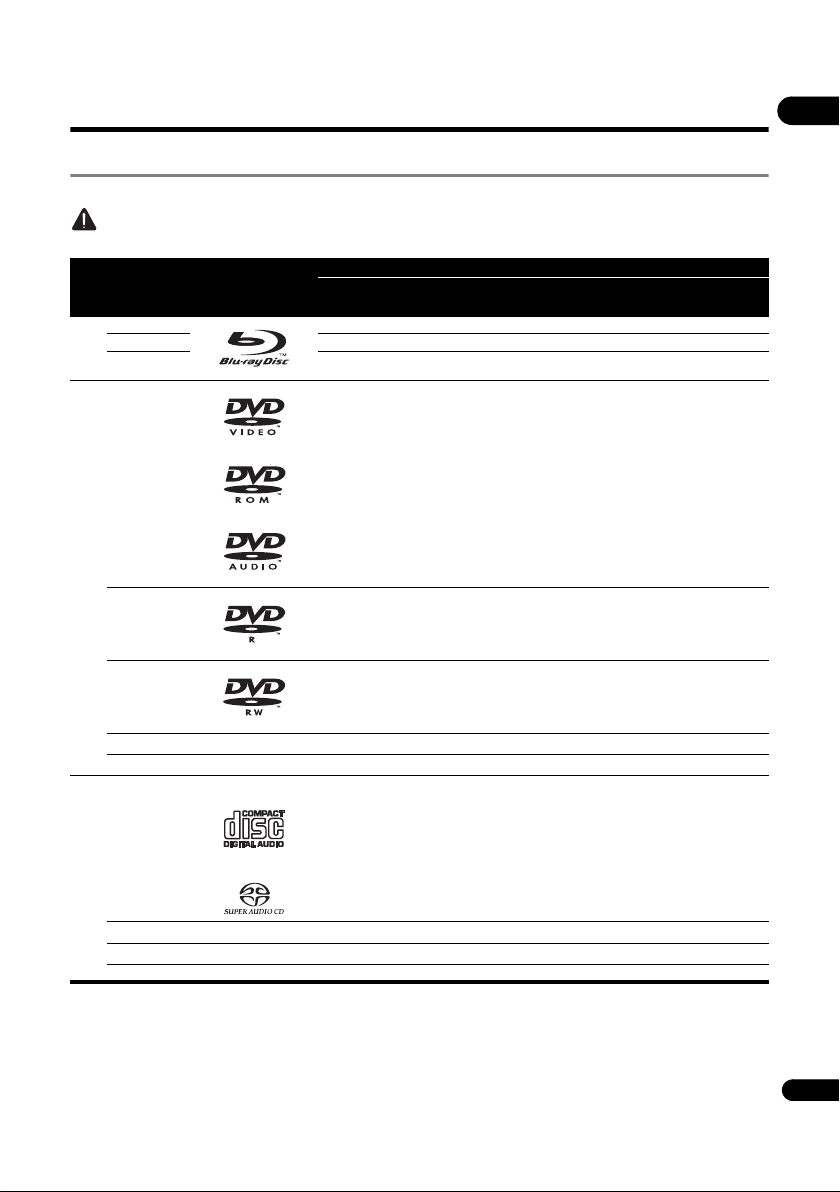
Types of discs/files that can be played
Playable discs
Discs with the logo marks below indicated on the disc label, package or jacket can be played.
Caution
• Only the discs that have been finalized can be played.
Disc type Logo
BD-ROM
BD-R
2
BD
BD-RE
DVD-ROM
DVD
BDMV BDAV
Application format
DVD-
Video
DVD-
Audio
DVD VR
CD-DA
DTS-CD
DATA-
DISC
01
1
2,3,4
DVD-R
3,7
DVD-RW
2,3
DVD+R
3
DVD+RW
CD-DA
8
(Audio CD)
CD
3
CD-R
3
CD-RW
CD-ROM
1. Discs on which video, image or audio files are recorded. This player does not support multisession discs or multiborder recording.
2. Including dual-layered discs.
3. Finalize them before playing them on this player.
4. DVD-R for Authoring discs (3.95 and 4.7 GB) cannot be played.
5. Including the AVCHD format.
6. Including the AVCREC format.
7. Version 1.0 DVD-RW discs cannot be played.
8. Including Video CDs.
5
5
6
6
7
En
• “Blu-ray Disc”, “Blu-ray” and “Blu-ray Disc” logo are
01
trademarks of Blu-ray Disc Association.
• is a trademark of DVD Format/Logo Licensing
Corporation.
Discs that cannot be played
• HD DVDs
•DVD-RAM discs
It is possible that some discs other than the ones listed
above may not be playable either.
Note
• Some discs cannot be played, even if one of the logo
marks on the previous page is indicated.
•To play 8 cm discs, set the disc in the 8 cm disc
depression in the center of the disc tray. No adapter
is necessary. 8 cm BD-ROMs cannot be played.
About playback of unauthorized
copies
Cinavia Notice
This product uses Cinavia technology to limit the use of
unauthorized copies of some commercially-produced
film and videos and th eir soundtracks. When a prohibited
use of an unauthorized copy is detected, a message will
be displayed and playback or copying will be interrupted.
More information about Cinavia technology is provided at
the Cinavia Online Consumer Information Center at http:/
/www.cinavia.com. To request additional information
about Cinavia by mail, send a postcard with your mailing
address to: Cinavia Consumer Information Center, P.O.
Box 86851, San Diego, CA, 92138, USA.
Copyright 2004-2010 Verance Corporation. Cinavia
Verance Corporation trademark. Protected by U.S. Patent
7,369,677 and worldwide patents issued and pending
under license from Verance Corporation. All rights reserved.
About audio formats
The following audio formats are supported on this player:
•Dolby TrueHD
• Dolby Digital Plus
• Dolby Digital
•DTS-HD Master Audio
• DTS-HD High Resolution Audio
•DTS Digital Surround
•MPEG audio (AAC)
•Linear PCM
To enjoy the surround sound of Dolby TrueHD, Dolby
Digital Plus, DTS-HD Master Audio and DTS-HD High
Resolution Audio, it is recommended to connect the
player to an AV receiver or amplifier compatible with
these audio formats using an HDMI cable. After loading
a BD containing sound in one of these audio formats,
select the audio format on the menu screen.
8
En
™ is a
Manufactured under license from Dolby Laboratories.
”Dolby” and the double-D symbol are trademarks of Dolby
Laboratories.
Manufactured under license under U.S. Patent Nos:
5,956,674; 5,974,380; 6,226,616; 6,487,535; 7,392,195;
7,272,567; 7,333,929; 7,212,872 & other U.S. and worldwide
patents issued & pending. DTS-HD, the Symbol, & DTS-HD
and the Symbol together are registered trademarks & DTSHD Master Audio | Essential is a trademark of DTS, Inc.
Product includes software. © DTS, Inc. All Rights Reserved.
Playing BDs
• BDs (BDMV) compatible with the formats below can
be played.
–Blu-ray Disc Read-Only (ROM) Format Version 2
–Blu-ray Disc Recordable (R) Format Version 2
–Blu-ray Disc Rewritable (RE) Format Version 3
This player supports BD-ROM Profile 5.
“Blu-ray 3D” and “Blu-ray 3D” logo are trademarks of
Blu-ray Disc Association.
BONUSVIEW functions such as playback of
secondary video (Picture-in-Picture) and secondary
audio can be used. The data used with the
BONUSVIEW functions (the secondary video
(Picture-in-Picture) and secondary audio data) may
be stored in the storage. For details on secondary
video and secondary audio playback, refer to the
disc’s instructions.
“BONUSVIEW” is trademark of Blu-ray Disc
Association.
BD-LIVE functions such as downloading movie
trailers or additional audio and subtitle languages
and playing on-line games can be enjoyed over th
Internet. Th
function (trailers, etc.) is stored in the storage. Refer
to the disc’s instructions for details about BD-LIVE
functions.
“BD-LIVE” logo is trademark of Blu-ray Disc
Association.
e data downloaded with the BD-LIVE
e
With BD-ROMs, it is possible to use BD-J (Java)
Root
01 Folder
XX Folder
Folder
001.jpg/001.mp3
xxx.jpg/xxx.mp3
001.jpg/001.mp3
xxx.jpg/xxx.mp3
001.jpg/001.mp3
xxx.jpg/xxx.mp3
001.jpg/001.mp3
xxx.jpg/xxx.mp3
applications to create highly interactive titles, for
example including games.
Oracle and Java are registered trademarks of Oracle
and/or its affiliates. Other names may be trademarks of
their respective owners.
• BDs (BDAV) compatible with the formats below can
be played.
–Blu-ray Disc Recordable (R) Format Version 1
–Blu-ray Disc Rewritable (RE) Format Version 2
Playing DVDs
This label indicates playback compatibility with DVD-RW
discs recorded in VR format (Video Recording format).
However, for discs recorded with a record-only-once
encrypted program, playback can only be achieved using a
CPRM compatible device.
The AVCHD is a high definition (HD) digital video camera
recorder format recording high-definition onto certain
media by using highly efficient codec technologies.
DualDisc playback
A DualDisc is a two-sided disc, one side of which
contains DVD content — video, audio, etc. — while the
other side contains non-DVD content such as digital
audio material.
The DVD side of a DualDisc can be played on this player.
The non-DVD, audio side of the disc is not compatible
with this player.
It is possible that when loading or ejecting a DualDisc,
the opposite side to that being played will be scratched.
Scratched discs may not be playable.
For more detailed information on the DualDisc
specification, please refer to the disc manufacturer or
disc retailer.
Playing discs created on computers
or BD/DVD recorders
• It may not be possible to play discs recorded using a
computer due to the application settings or
computer’s environment settings. Record discs in a
format playable on this player. For details, contact the
dealer.
• It may not be possible to play discs recorded using a
computer or a BD/DVD recorder, if burn quality is not
good due to characteristics of the disc, scratches, dirt
on the disc, dirt on the recorder’s lens, etc.
About video, audio, and image files
and folders
Audio and image files can be played on this player when
the folders on the disc or USB device are created as
described below.
Example of folder structure:
01
“AVCHD” and the “AVCHD” logo are trademarks of
Panasonic Corporation and Sony Corporation.
About region numbers
Blu-ray Disc Player and BD-ROM or DVD-Video discs are
assigned region numbers according to the region in
which they are sold.
This player’s region numbers are:
•BD-ROM: A
•DVD-Video: 1
Discs not including these numbers cannot be played.
Discs playable on this player are as shown below.
• BDs: A (including A) and ALL
• DVDs: 1 (including 1) and ALL
Playing CDs
Regarding copy protected CDs: This player is designed to
conform to the specifications of the Audio CD format.
This player does not support the playback or function of
discs that do not conform to these specifications.
*
*
*
*
* The number of folders and files within a single folder
(including the root directory) is limited to a maximum of
256. Also, keep the number of folder layers to a maximum
of 5.
Note
• The file and folder names displayed on this player may
differ from those displayed on a computer.
9
En
Playable files
01
Video, image and audio files recorded on BDs, DVDs, CDs
or USB devices can be played.
Supported video file formats
• DivX Plus HD
DivX Certified
(H.264/MKV) video up to 1080p HD including
premium content.
ABOUT DIVX VIDEO: DivX
created by DivX, LLC, a subsidiary of Rovi Corporation.
This is an official DivX Certified
DivX video. Visit divx.com for more information and
software tools to convert your files into DivX videos.
ABOUT DIVX VIDEO-ON-DEMAND: This DivX
Certified
purchased DivX Video-on-Demand (VOD) movies. To
obtain your registration code, locate the DivX VOD
section in your device setup menu. Go to
vod.divx.com for more information on how to
complete your registration.
DivX
logos are trademarks of Rovi Corporation or its
subsidiaries and are used under license.
Note
•This DivX
order to play DivX Video-on-Demand (VOD) content.
First generate the DivX VOD registration code for your
device and submit it during the registration process.
Important: DivX VOD content is protected by a DivX
DRM (Digital Rights Management) system that
restricts playback to registered DivX Certified devices.
If you try to play DivX VOD content not authorized for
your device, the message Authorization Error will be
displayed and your content will not be played. Learn
more at www.divx.com/vod.
–This player’s DivX VOD registration code can be
checked at HOME MENU Initial Setup
Playback DivX
Code (page 41).
– The number of views is restricted for some DivX
VOD files. When such files are played on this
player, the remaining number of views is displayed.
Files for which the remaining number of views has
reached 0 cannot be played (This DivX rental has
expired is displayed). Files for which the number of
views is not restricted can be played as many times
as you like (the remaining number of views is not
displayed).
10
En
®
to play DivX® and DivX PlusTM HD
®
is a digital video format
®
device that plays
®
device must be registered in order to play
®
, DivX Certified®, DivX PlusTM HD and associated
®
Certified device must be registered in
(R) VOD DRM Registration
Table of Playable Files
Playable media
Playable files
(Extensions)
MP3
(.mp3)
WMA
(.wma)
LPCM
(.wav)
FLAC
(.flac)
JPEG
(.jpg/.jpeg)
DivX
(.avi/.divx/.mkv)
MP4
(.mp4)
WMV
(.wmv)
AVI
(.avi)
3GP
(.3gp)
FLV
(.flv)
1. This unit supports FAT16, FAT32 and NTFS file systems.
BD-R/RE/-R DL/
RE DL/-R LTH,
DVD-R/RW/-R DL/
+R/+RW/+R DL,
CD-R/RW
USB devices
01
1
Network
Sampling frequencies: Up to 48 kHz
Bit rate: Up to 320 kbps
Audio type: MPEG-1 Audio Layer 3
Sampling frequencies: Up to 48 kHz
Bit rate: Up to 192 kbps
Audio type: WMA version 9
Sampling frequencies: Up to 192 kHz
Quantization bitrate: 16 bit
Channel: 2ch
Sampling frequencies: Up to 192 kHz
Quantization bitrate: 16 bit, 24 bit
Channel: 2ch
Maximum resolution: 4 000 x 3 000 pixels
Supported versions: Through DivX
Maximum resolution:
Up to 1 920 x 1 080 (DivX
Up to 1 280 x 720 (MKV)
Maximum resolution: Up to 1 920 x 1 080
Video: MPEG4, MPEG-4 AVC (level 4.1)
Audio: AAC, MP3
Maximum resolution: Up to 1 280 x 720
Video: WMV9, WMV9AP (VC-1)
Audio: WMA
Maximum resolution: Up to 1 920 x 1 080
Video: MPEG4
Audio: MP3, AAC, AC-3
Maximum resolution: Up to 1 920 x 1 08 0, up to
8 Mbps
Video: H.263, MPEG4, H.264
Audio: MPEG-4 AAC
Video: Sorenson H.263 (FLV1), On2 VP6 (FL V4),
Screen video, H.264
Audio: MP3, ADPCM, Linear PCM, Nellymoser,
Speex, AAC, HE-AAC
File specifications
®
PLUS HD)
®
PLUS HD
Note
• Depending on the file structure and server capacity, it may not be possible to play certain files, even for files
indicated on the table of playable files above.
• Files protected by DRM (Digital Rights Management) cannot be played.
• AVCHD contents cannot be played via LAN.
11
En
Part Names and
1
12
20
26
23
24
25
37
29
36
35
38
27
22
19
3
4
5
13
14
18
17
16
30
34
31
6
10
28
7
8
9
11
32
33
21
2
15
01
Functions
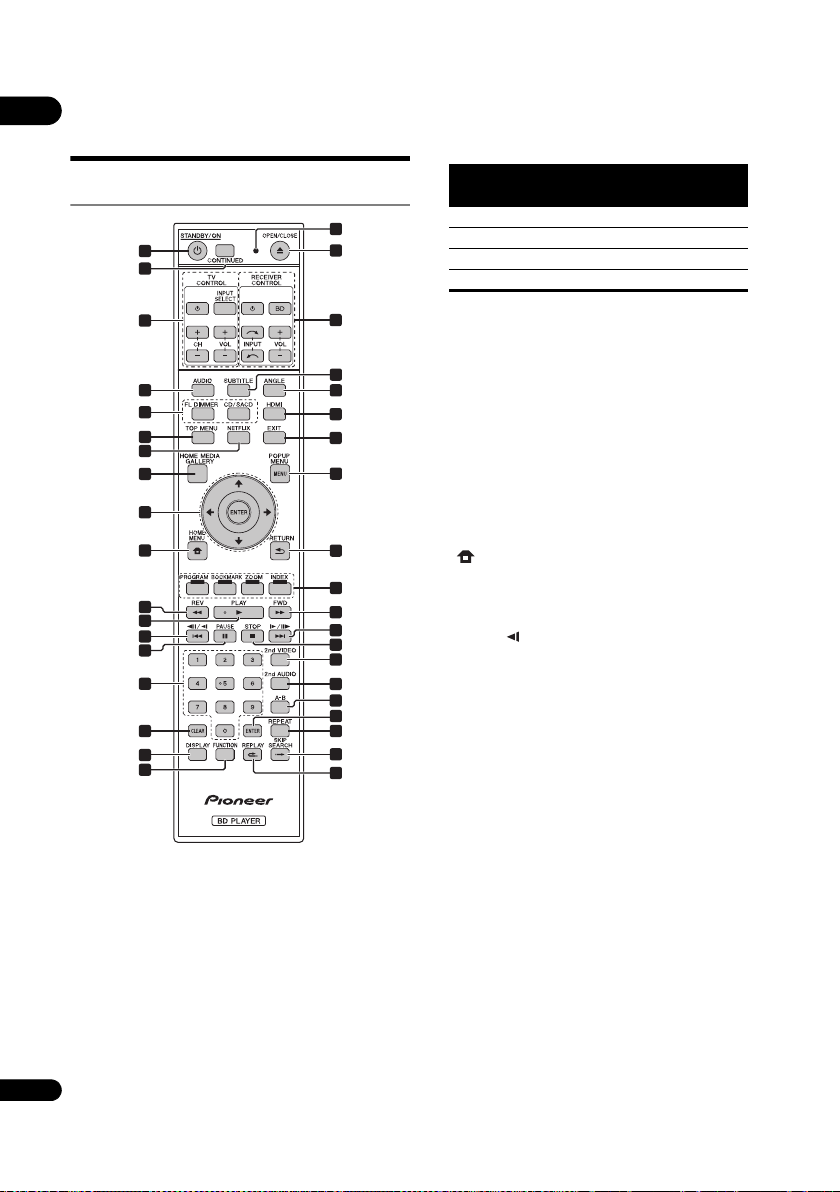
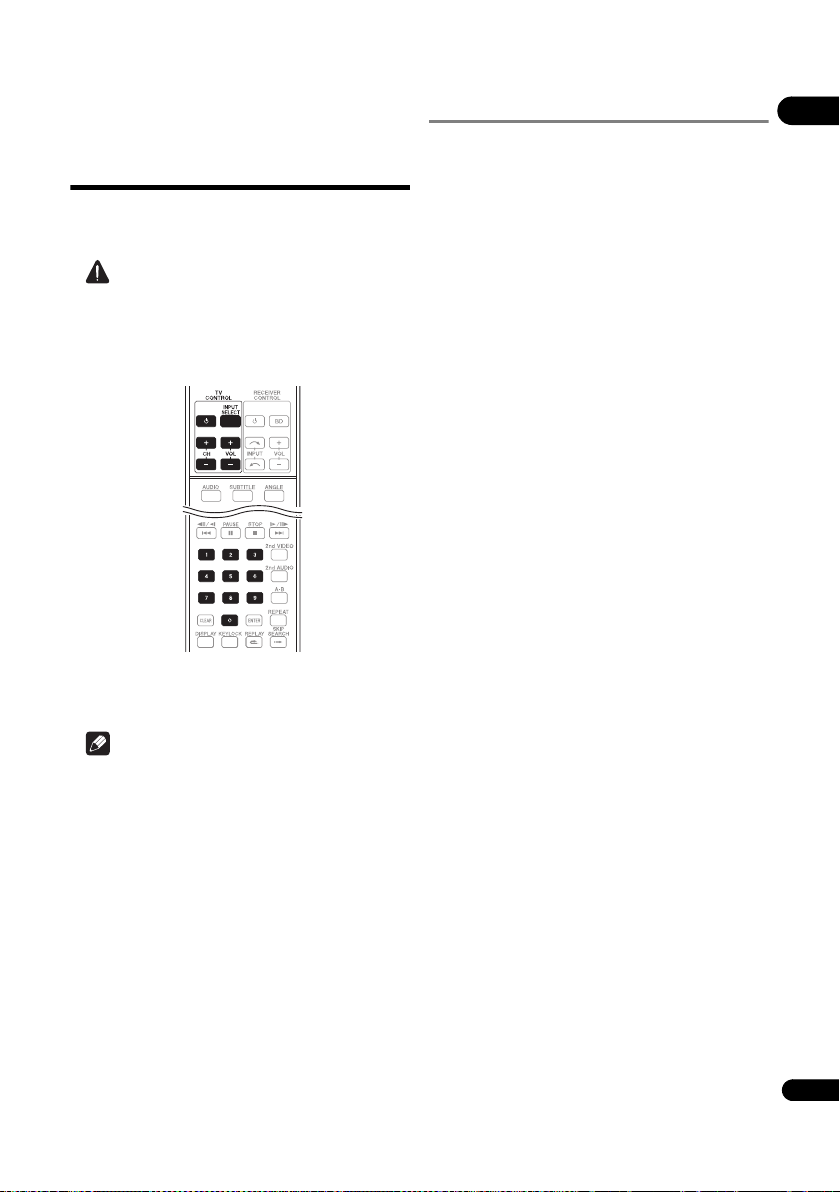
Remote Control
5 FL DIMMER – Each time this is pressed, the
brightness of the front panel display changes and/or
the lighting status of the indicators on the front panel
switches as shown in the table below.
Front panel display
Bright Lights Off
Middle Lights Off
DarkLightsOff
Off Off Lights
Indicators
PQLS FL OFF
CD/SACD
For hybrid discs, press to switch between the CD and
SACD layers (page 28).
6TOP MENU – Press to display the top menu of the BD-
ROM or DVD-Video.
7 NETFLIX – (page 36)
8 HOME MEDIA GALLERY – (page 33)
9 ///
Use to select items, change settings and move the
cursor.
ENTER – Press to execute the selected item or enter a
setting that has been changed, etc.
10 HOME MENU – (page 38)
11 REV – (page 25)
12 PLAY – (page 25)
13 // – (pages 25 and 26)
14 PAUSE – (page 25)
15 Number buttons – Use these to select and play the
title/chapter/track you want to view or listen to and to
select items from menus.
16 CLEAR – Press to clear the numeric number, etc.
17 DISPLAY – (page 29)
18 FUNCTION – (page 31)
19 Remote control LED – Lights when a command is
sent from the remote control. Flashes while the TV
1 STANDBY/ON – Press to turn the power on and
off.
2 CONTINUED – Use to continue playback from a
specified position. (page 32)
3 TV CONTROL – (page 23)
4 AUDIO – (page 28)
12
En
band code is being set.
20 OPEN/CLOSE – Press to open and close the disc
tray.
21 RECEIVER CONTROL
22 SUBTITLE – (page 27)
23 ANGLE – (page 27)
24 HDMI – The HDMI Mode switches each time this is
pressed (pages 17 and 39). When pressed and held
for over 2 seconds, resolution of the video output from
the HDMI OUT
EXIT – (pa
25
terminal switches (page 39).
ge 36)
26 POP UP MENU/MENU – Press to display the
BD-ROM or DVD-Video menus.
27 RETURN – Press to return to the previous
screen.
28 Color buttons – Use these to navigate BD-ROM
menus.
PROGRAM – (page 26)
BOOK MARK – (page 27)
ZOOM – (page 27)
INDEX – (page 27)
29 FWD – (page 25)
30 // – (pages 25 and 26)
31 STOP – (page 25)
32 2nd VIDEO – (page 28)
33 2nd AUDIO – (page 28)
34 A-B – (page 26)
35 ENTER – Press to execute the selected item or enter a
setting that has been changed, etc.
36 REPEAT – (page 26)
37 SKIP SEARCH – Press to skip 30 seconds ahead
when SKIP SEARCH is pressed during playback.
38 REPLAY – Press to jump back 10 seconds when
REPLAY is pressed during playback.
Note
•To operate an AV receiver equipped with a remote
control mode setting using the RECEIVER CONTROL
buttons, set the AV receiver’s remote control mode to
“1”. For details, see the AV receiver’s operating
instructions.
•This remote control unit is equipped with two ENTER
buttons (9 and 35 list
ed above).
01
13
En
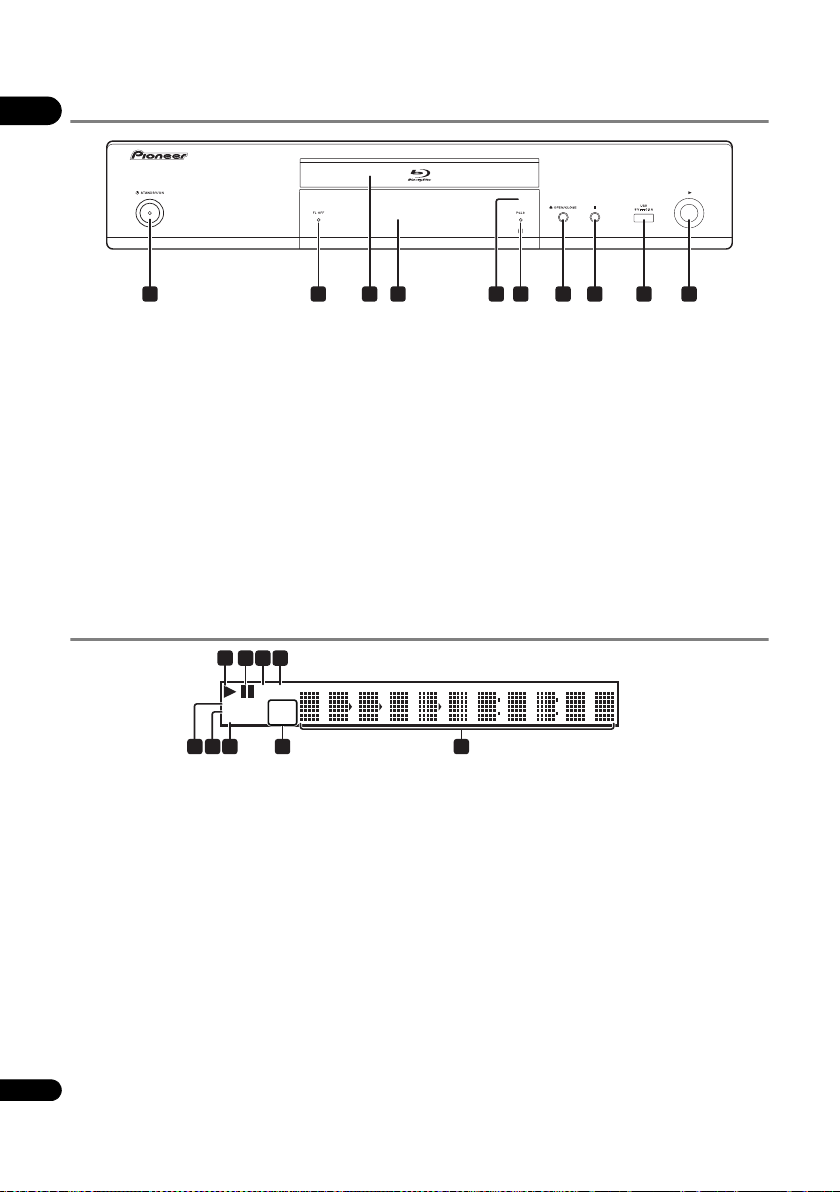
Front Panel
1 2 3 4 5 6 7 8 9
10
LANHD
24HZ
50HZ
60HZ
HDMI 1 2
CONTROL
EXT
1
56789
2
43
01
1 STANDBY/ON – Press to turn the power on and
off.
•If the power cannot be turned off (to standby), press
and hold the button for over 5seconds. The unit
restarts and can now be operated.
2 FL OFF indicator – (page 12)
3 Disc tray
4 Front panel display
5 Remote control sensor – Point the remote control to
this, then operate it within approximately 23 feet
(7 m).
The player may have trouble capturing remote control
signals if there is a fluorescent light nearby. If this
happens, move the player away from the fluorescent
light.
Front Panel Display
1 – This lights during playback.
2 – This lights when pausing.
3HD – This lights when an HDMI cable is connected
and video signals are being output with a resolution of
1080/50i, 1080/50p, 720/50p, 1080/24p, 1080/60i,
1080/60p or 720/60p.
4LAN – This lights when connected to a network.
5 Character display – Displays the title/chapter/track
number, elapsed time, etc.
6PQLS indicator – (page 18)
7 OPEN/CLOSE – Press to open and close the disc
tray.
8 – Press to stop pla
yback
.
9 USB port – (page 20)
10 – Press to start playback.
6 24HZ/50HZ/60HZ – The frequency of the video frame
or field being output lights.
7EXT – This lights when a USB device is connected.
8CONTROL – This lights when the Control setting is
turned on.
9 HDMI 1 2 – This lights when an HDMI device is
connected. [1] lights when the device is connected to
the HDMI OUT (MAIN) terminal, [2] lights when the
device is connected to the HDMI OUT (SUB)
terminal.
14
En
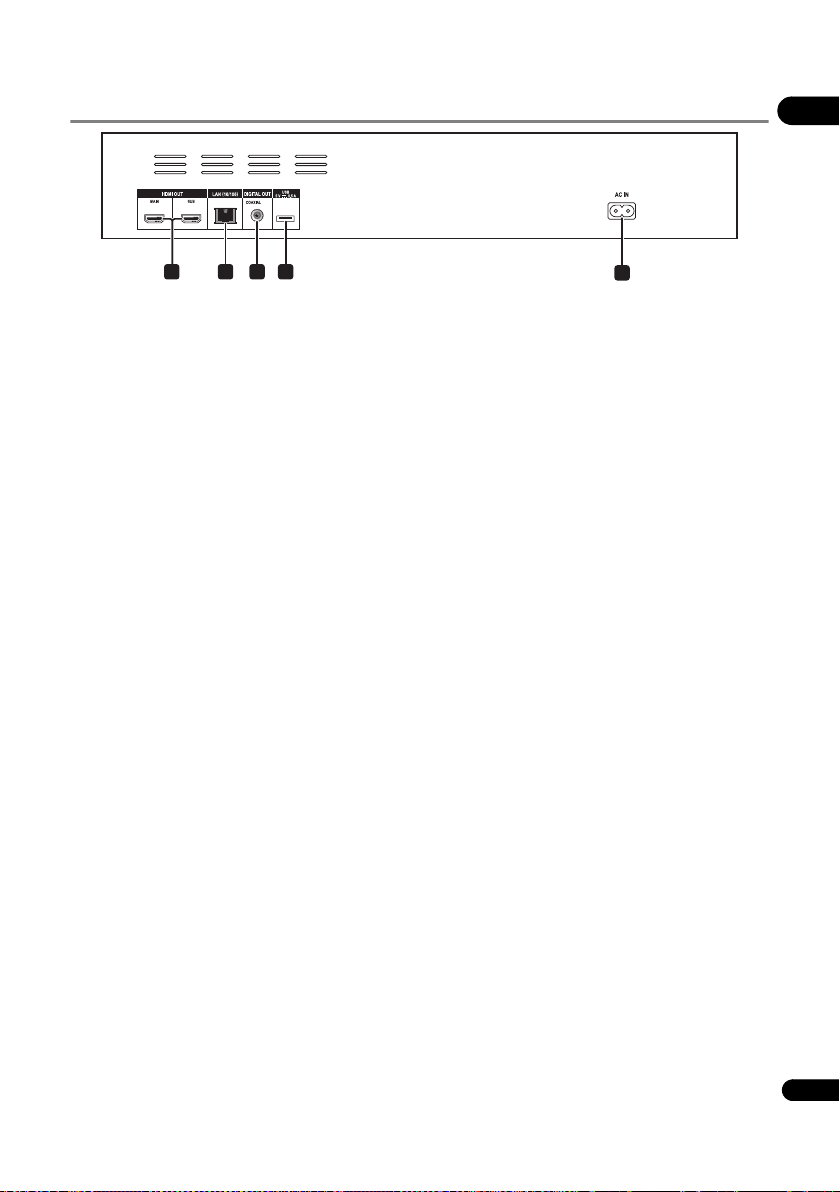
Rear Panel
01
1 2 43
1 HDMI OUT terminal – (page 16)
2 LAN (10/100) terminal – (page 21)
3 DIGITAL OUT (COAXIAL) terminal – (page 20)
4 USB port – (page 20)
5AC IN – (page 21)
5
About the HDMI terminals on the BDP-62FD
MAIN – Connect with an HDMI-compatible TV or/and AV receiver or amplifier. This is the terminal that is used mainly.
SUB – Connect with an HDMI compatible AV receiver or amplifier.
15
En
Chapter 2
02
Connecting up
Be sure to turn off the power and unplug the power cord
from the power outlet whenever making or changing
connections.
After connecting, make the settings at the Setup
Navigator or Initial Setup menu according to the type of
cable connected (page 22).
Also refer to the operating instructions for the device
being connected.
Connecting using an
HDMI cable
The audio and video signals can be transferred to HDMIcompatible devices as digital signals with no loss of
sound or video quality.
Note
• Make the settings at the Setup Navigator menu
according to the connected HDMI-compatible device
(page 22). Make the HDMI Mode setting at the Initial
Setup menu according to the connection of the
devices to the player (pages 17 and 39).
• 1080p video signals may not be output, depending on
the HDMI cable being used.
About HDMI
This player incorporates the High-Definition Multimedia
Interface (HDMI
The terms HDMI and HDMI High-Definition Multimedia
Interface, and the HDMI Logo are trademarks or registered
trademarks of HDMI Licensing, LLC in the United States
and other countries.
The player supports Deep Color.
The conventional players can transmit a video signal with
8 bit color depth in the YCbCr 4:4:4 or RGB format; the
players supporting Deep Color can transmit a video
signal with a color bit depth of greater than 8 bits per
color component. Subtle color gradations can be
reproduced when this player is connected to a TV that
supports Deep Color.
This product is compatible with “x.v.Color” that have the
capability to realize a wide-gamut color space
the xvYCC specifications.
ng video signals conforming to “xvYCC” standards
Playi
on this player when this player is connected to an
16
“x.v.Color”-compatible TV, etc., expands color
En
®
) technology.
based on
reproduction capabilities, allowing natural colors to be
reproduced more faithfully than ever.
“x.v.Color” is a promotion name given to the products that
have the capability to realize a wide-gamut color space
based on the international standard specifications
defined as xvYCC.
“x.v.Color” and
Corporation.
are trademarks of Sony
Playable audio signals through the
HDMI OUT terminal
•Dolby TrueHD
• Dolby Digital Plus
• Dolby Digital
•DTS-HD Master Audio
•DTS-HD High Resolution Audio
•DTS Digital Surround
•Linear PCM
Linear PCM audio signals meeting the following
conditions can be output:
–Sampling frequency: 32 kHz to 192 kHz
–Number of channels: Up to 8 (up to 6 for a 192 kHz
sampling frequency)
•DSD audio
When connected to a DVI device
• It is not possible to connect DVI devices
(computer displays, for example) that are not
compatible with HDCP. HDCP is a specification to
protect audiovisual content across the DVI/HDMI
interface.
• No audio signals are output.
•This player is designed for connection with HDMI-
compatible devices. When connected to a DVI device,
it may not operate properly depending on the DVI
device.
About Control Function with
HDMI
The functions work when a control function with HDMIcompatible Pioneer Flat Screen TV or AV system (AV
receiver o r amplifier, etc.) is connected to the player using
an HDMI cable.
Also refer to the operating instructions for the Flat Screen
TV and AV system (AV receiver or amplifier, etc.).
To use the control function with
HDMI
• The control function with HDMI operates when
control function with HDMI is set to On for all devices
connected with HDMI cables.
• Once the connections and the settings of all the
devices are finished, be sure to check that the player’s
picture is output to the Flat Screen TV. (Also check
after changing the connected devices and
reconnecting HDMI cables.) The control function with
HDMI may not operate properly if the player’s picture
is not properly output to the Flat Screen TV.
•Use High Speed HDMI
control function with HDMI. The control function with
HDMI may not operate properly if other HDMI cables
are used.
•For some models, the control function with HDMI
may be referred to as “KURO LINK” or “HDMI
Control”.
• The control function with HDMI does not work with
devices of other brands, even if this player is
connected with an HDMI cable.
®/TM
Cables when using the
What the control function with
HDMI can do
• Outputting the optimum picture quality to a Flat
Screen TV compatible with the control function
with HDMI.
When the control function with HDMI is enabled,
video signals with the optimum picture quality for
control function with HDMI are output from the
player’s HDMI terminal.
• Operating the player with the Flat Screen TV’s
remote control.
Such player operations as starting and stopping
playback and displaying the menus can be performed
from the Flat Screen TV.
• The player’s playback picture is displayed on the
Flat Screen TV’s screen. (Auto-select function)
The input switches automatically on the Flat Screen
TV and AV system (AV receiver o r amplifier, etc.) when
playback is started on the player or the HOME MENU
is displayed. When the input is sw itched, the playback
picture, the HOME MENU appears on the Flat Screen
TV.
• The power of the
turns on and off automatically. (Simultaneous
power function)
When playback on the player is started or the HOME
MENU is displayed, if the Flat Screen TV’s power was
off, its power turns on automatically. When the Flat
Screen TV’s power is turned off, the player’s power
automatically turns off.
Flat Screen TV and the player
Setting the HDMI Mode
The BDP-62FD has two HDMI OUT (MAIN, SUB)
terminals. See page 15 for the details on these terminals.
The HDMI Mode needs to be selected before playback to
use the control function appropriately.
To make the setting, press HOME MENU to display the
Home Menu, select Initial Setup Audio Output
HDMI Mode.
See the table below and set up the HDMI Mode
according to your connection style.
HDMI
Mode
Dual
Separate
Pure
Audio
• When signals are being output simultaneously from
HDMI OUT MAIN HDMI OUT SUB
Video Audio Control Video Audio Control
Caution
the HDMI OUT (MAIN) and HDMI OUT (SUB)
terminals, the video is output with the optimum
picture quality for the TV connected to the HDMI OUT
(MAIN). Depending on the combination of TVs being
used, it may not be possible to output video signals
from the HDMI OUT (SUB) terminal. The audio is
output
in an audio format that can
both the HDMI OUT (MAIN) and HDMI OUT (SUB)
terminals.
be output from
Sound Retriever Link
About Sound Retriever Link
Sound Retriever Link is a sound quality correction control
technology that automatically adjusts the compressed
sound quality for the connected AV receiver using HDMI
control function.
Sound Retriever Link function allows you to enjoy higher
quality audio by setting the connected AV receiver’s
Sound Retriever function automatically.
Sound Retriever Link function on this player works
exclusively with the following situations.
• When playing via a network or playing PC contents
stored on a USB device.
•The Pioneer AV receiver compatible with Sound
Retriever Link function is connected to this player
through an HDMI cable and the player’s setting is set
as shown below (page 40).
Control: On
•Also refer to the instructions of the AV receiver.
•
See Pioneer web
with Sound Retriever Link function.
Caution
•Connect the player directly to the Pioneer AV receiver
compatible with Sound Retriever Link function.
Interrupting a direct connection with an amplifier or
AV converter (such as an HDMI switch) can cause
malfunction.
site about AV receivers compatible
02
17
En
Stream Smoother
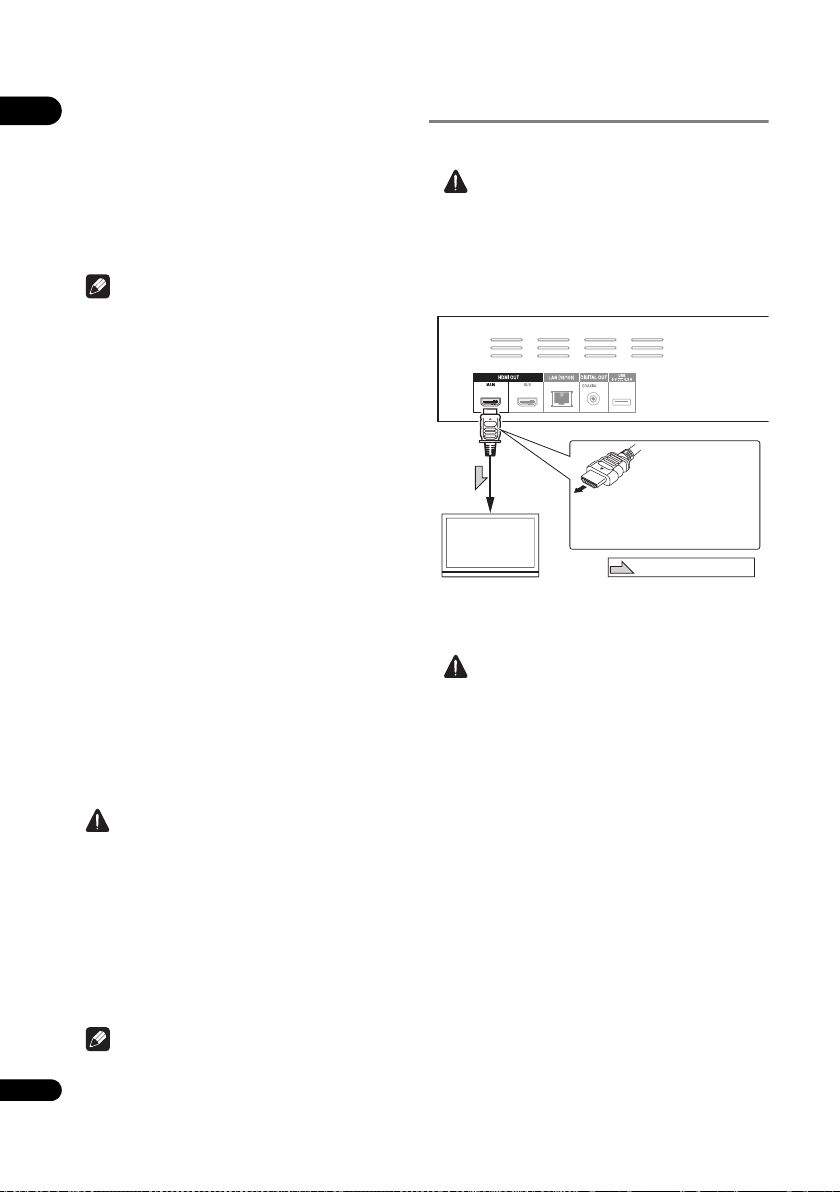
Match the direction of
the plug to the terminal
and insert straight.
HDMI cable
(commercially
available)
TV
Direction of signal flow
Player’s rear panel
It is also possible to connect to an
AV receiver or amplifier using an
HDMI cable (page 19).
To HDMI
input terminal
02
Stream Smoother is a function that automatically
improves picture quality when playing network video
contents by using a built-in high picture quality circuit to
reduce mosquito noise, block noise, etc.
Stream Smoother function on this player works
exclusively with the following situations.
•When playing a video distribution service on a
network or PC contents stored on a medium.
Note
• This function is activated even when no AV receiver is
connected.
About the PQLS function
PQLS (Precision Quartz Lock System) is a digital audio
transfer control technology using the HDMI control
function. The player’s output signals are controlled from
the AV receiver to achieve high sound quality playback
using the receiver’s quartz oscillator. This eliminates the
influence of the jitter generated during signal transfer
which can adversely affect the sound quality.
•This player supports the functions below.
– The “PQLS 2ch Audio” function that is activated
when playing music CDs (CD-DAs)
– The “PQLS Multi Surround” function that is
activated when playing all discs (BDs, DVDs, etc.)
with linear PCM audio output
–The “PQLS Bitstream” function that is activated
when playing with bitstream audio output
•The various PQLS functions are activated when a
Pioneer AV receiver supporti
connecte
d directly to the HDMI OUT terminal with an
HDMI cable and the player’s settings are set as
shown below (page 40).
Control: On
•Also refer to the AV receiver’s operating instructions.
• See the Pioneer website for AV receivers supporting
the PQLS function.
ng the PQLS functions is
Connecting a TV
See Connecting an AV receiver or amplifier on page 19 to
connect an AV receiver or amplifier using an HDMI cable.
Caution
•Hold the plug when connecting and disconnecting
the cable.
• Placing a load on the plug could result in faulty
contact and no video signals being output.
Connect a TV to the HDMI OUT (MAIN) terminal.
It is also possible to connect a TV via AV reciever or
amplifier to HDMI OUT (MAIN) terminal. See Connecting
an AV receiver or amplifier on page 19.
Caution
•Make sure to set HDMI Mode to Dual (page 39).
Caution
• The PQLS function may stop working when the video
output resolution is switched. The PQLS function will
start working again once playback is stopped then
restarted.
• When the PQLS 2ch function is activated, the output
from the player’s VIDEO OUTPUT jacks may not have
the proper colors. If this happens, connect the TV and
AV rec
eiver’s HDMI termi
nals to view the picture.
•Turn on the power of the AV receiver connected to the
HDMI OUT terminal, then start playback of the disc.
18
En
Note
•PQLS indicator on the player’s front panel display
lights when the PQLS function is activated (page 14).
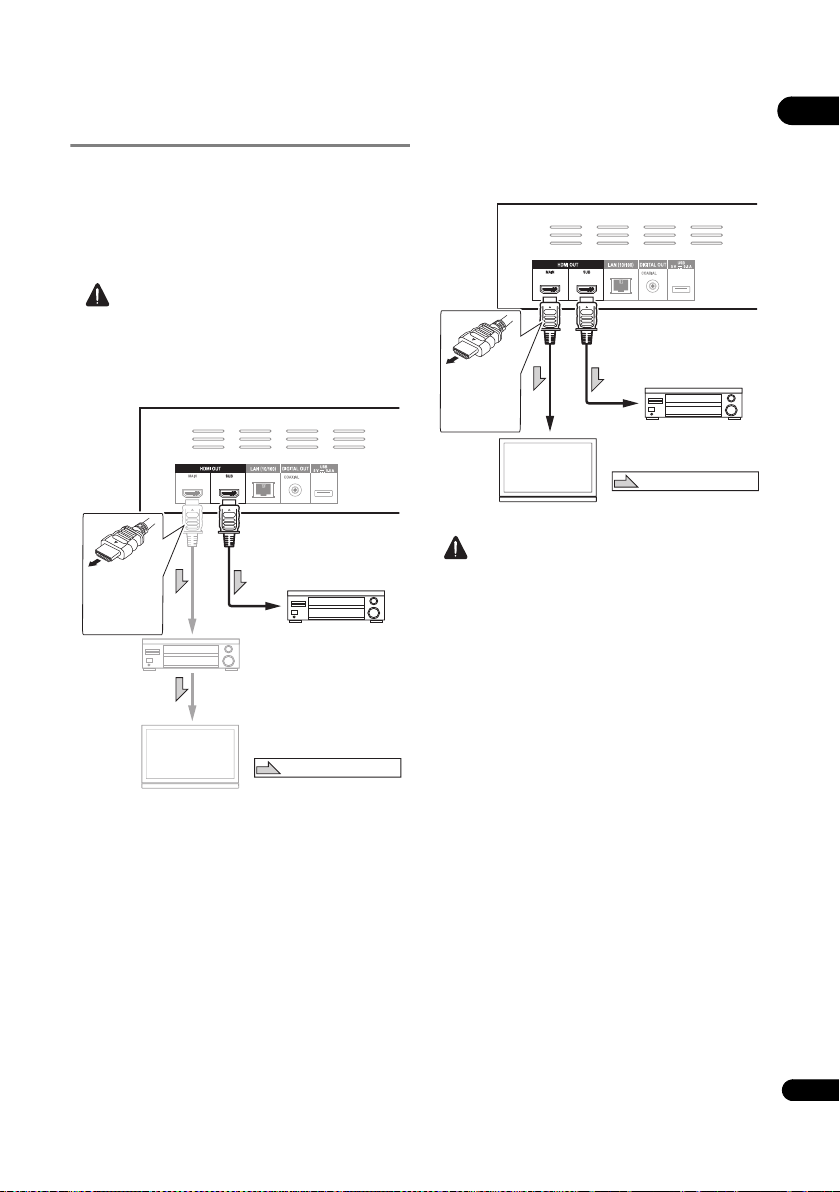
Connecting an AV receiver or
Match the
direction of the
plug to the
terminal and
insert straight.
Player’s rear panel
HDMI cable
(commercially available)
AV receiver
or amplifier
AV receiver
or amplifier
AV receiver
or amplifier
AV receiver
or amplifier
TV
Direction of signal flow
To HDMI input
terminal
HDMI cable
(commercially
available)
From HDMI output
terminal to HDMI input
terminal
Player’s rear panel
Match the
direction of the
plug to the
terminal and
insert straight.
HDMI cable
(commercially available)
AV receiver
or amplifier
TV
To HDMI input
terminal
Direction of signal flow
amplifier
Connect to an AV receiver or amplifier in order to enjoy
the surround sound of Dolby TrueHD, Dolby Digital Plus,
Dolby Digital, DTS-HD Master Audio, DTS-HD High
Resolution Audio or DTS Digital Surround. For
instructions on connecting the TV and speakers to the AV
receiver or amplifier, refer to the operating instructions
for AV receiver or amplifier.
Caution
•Hold the plug when connecting and disconnecting
the cable.
• Placing a load on the plug could result in faulty
contact and no video signals being output.
Achieving better video and sound quality
When connecting one TV (or projector) and AV amplifier
to the player, connect in such a way that the video and
audio signals are transferred
separately i
n order to
achieve higher quality video and sound.
Caution
•Make sure to set HDMI Mode to Separate (page 39).
•If the AV amplifier connected to the HDMI OUT (SUB)
terminal is also connected to a TV, the TV’s input may
switch automatically. If this happens, turn off the
control function with HDMI on the TV.
02
19
En
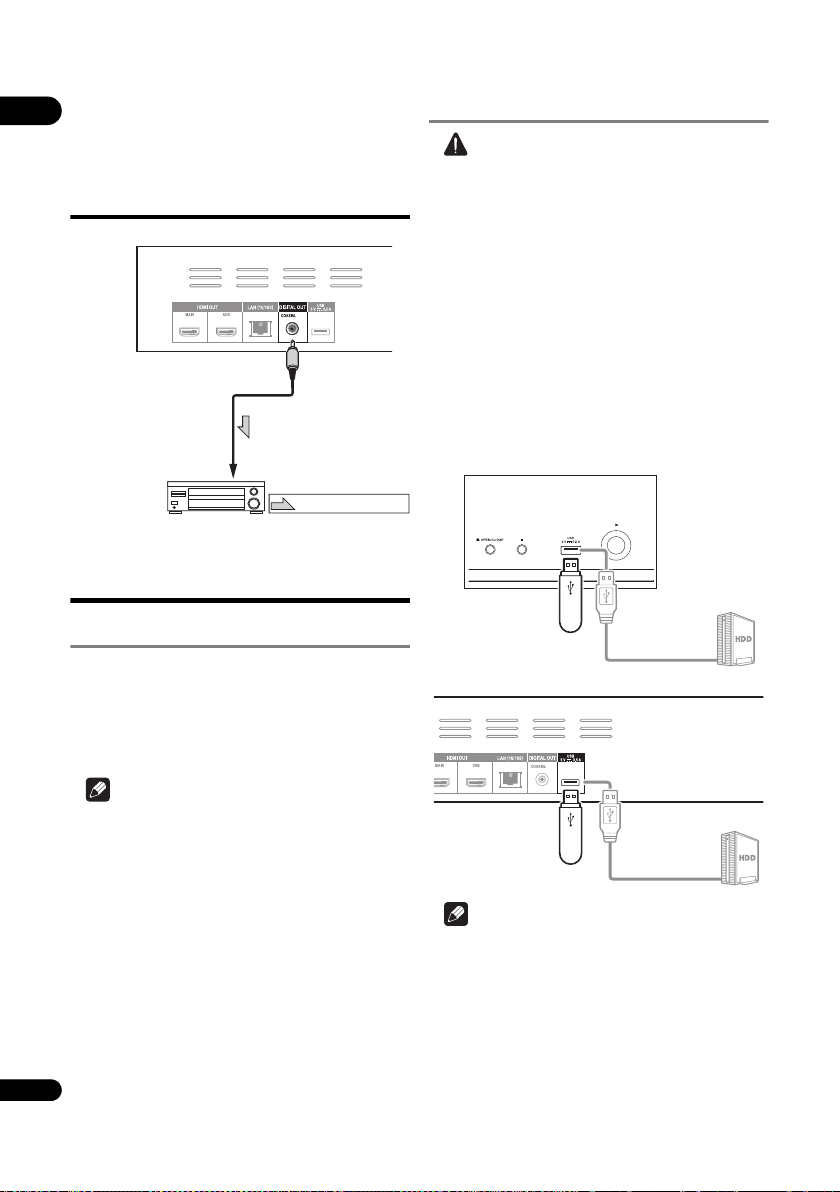
Connecting an AV
Player’s rear panel
AV receiver or
amplifier
Direction of signal flow
To coaxial digital
audio input terminal
Coaxial digital audio
cable (commercially
available)
USB flash drive
Player’s front panel
Hard disk, etc.
USB cable
(commercially
available)
USB flash drive
Player’s rear panel
Hard disk, etc.
USB cable
(commercially
available)
02
receiver or amplifier
using an coaxial
digital audio cable
Connecting components
to the USB port
About USB devices
The USB devices that can be connected to the player are
as shown below.
•USB 2.0-compatible USB flash drive (capacity of 1 GB
or greater, 2 GB or greater recommended) or HDD
(capacity 2 TB or less)
• File system: FAT16, FAT32 or NTFS
Connecting the USB device
Caution
•Be sure to turn the player’s power off before
connecting or disconnecting USB devices.
•Use empty USB devices (on which nothing is stored).
• When using an external hard disk as the external
storage device, be sure to turn on the hard disk’s
power before turning on the player’s power.
• If the USB device is write-protected, be sure to disable
the write-protection.
• When connecting the USB cable, hold onto the plug,
set the plug in the proper direction for the port and
insert it horizontally.
• Placing excessive loads on the plug may result in
poor contact, making it impossi
the USB device.
• When a USB device is connected and the player’s
power is turned on, do not unplug the power cord.
ble to write da
ta on
Note
• Devices formatted with a file system other than the
above cannot be used.
• USB devices may not be recognized if they contain
multiple partitions.
• Some USB devices may not operate with this player.
•Operation of USB devices is not guaranteed.
20
En
Note
•Devices may not work if connected to the USB port via
a memory card reader or USB hub.
• Use a USB cable with a length of 2 meters or less.
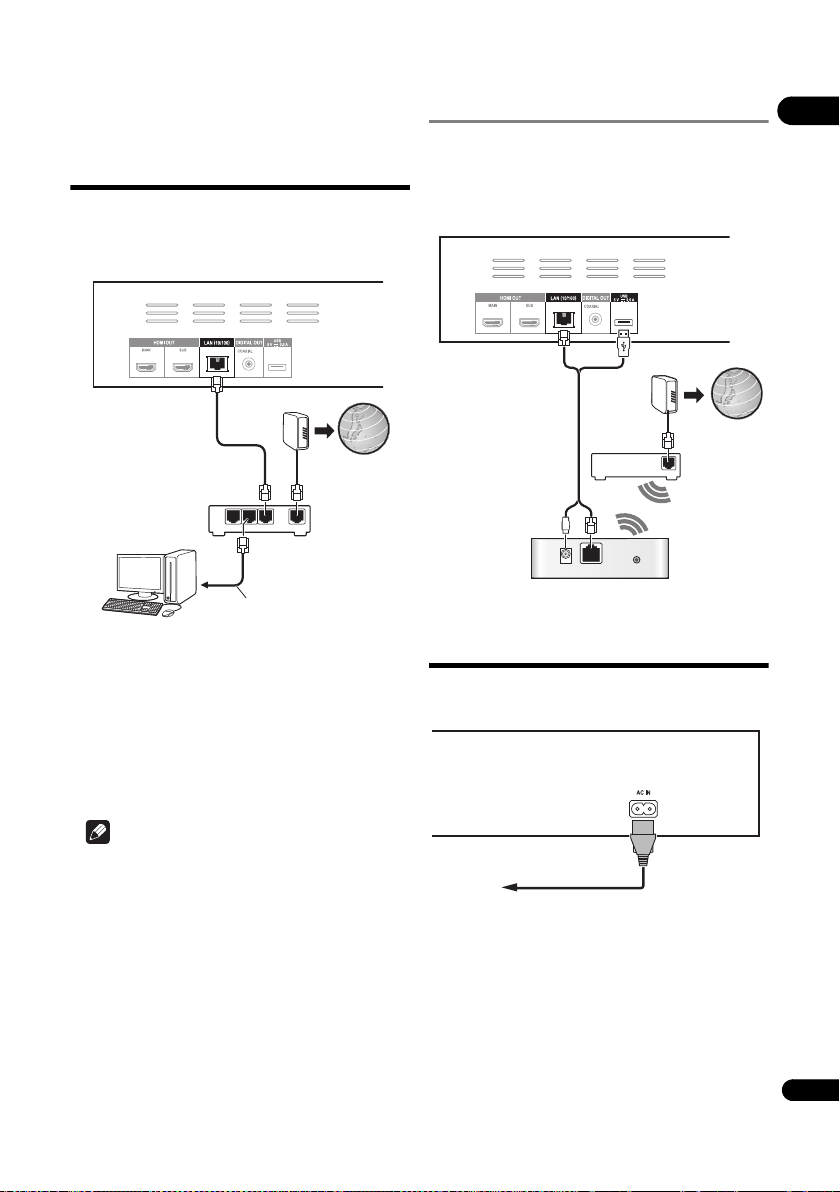
Connecting to the
LAN cable
(commercially available)
Router
Internet
ModemLAN cable
(commercially
available)
PC
Player’s rear panel
WAN
DC 5V WPS
Ethernet
Router
Internet
Modem
Wireless LAN
converter
(AS-WL300)
Player’s rear panel
LAN/USB feeder cable
(included with the ASWL300)
Player’s rear panel
Power cord
(included)
To wall outlet
network through LAN
interface
By connecting this player to the network via the LAN
terminal, you can play audio files stored on the
components on the network, including your computer,
using HOME MEDIA GALLERY inputs.
LAN
321
WAN
Connecting to a wireless LAN
Wireless connection to the network is possible through a
wireless LAN connection. Use the separately sold
AS
-WL300 for connection.
•Refer to the operating instructions of AS-WL300 for
the setting details.
02
Connect the LAN terminal on this receiver to the LAN
terminal on your router (with or without the built-in DHCP
server function) with a straight LAN cable (CAT 5 or
higher).
Turn on the DHCP server function of your router. In case
your router does not have the built-in DHCP server
function, it is necessary to set up the network manually.
For details, see Setting the IP address on page 42 .
LAN terminal specifications
LAN terminal: Ethernet jack (10BASE-T/100BASE-TX)
Note
•Refer to the operation manual of the equipment you
have as the connected equipment and connection
method may differ depending on your Internet
environment.
• When using a broadband Internet connection, a
contract with an Internet service provider is required.
For more details, contact your nearest Internet
service provider.
Connecting the power
cord
Connect the power cord after all the connections between
devices have been completed.
21
En
Chapter 3
03
Getting Started
Making settings using
the Setup Navigator
menu
Be sure to perform these settings when using the player
in the following situations.
• When you use the player for the first time.
•After Initial Setup format.
•After updating the player’s software.
Caution
•Before turning on the power, check that the
connections between the player and other devices are
correct. Also, turn on the power of the devices
connected to the player before turning on the player’s
power.
• When using a Pioneer Flat Screen TV or front
projector compatible with the Control
Control to On o
on the player’s power.
1 Turn on the TV’s power and switch the input.
See the TV’s operating instructions for the details of
operating the TV.
2 Turn on the player’s power.
Press STANDBY/ON.
Check that the Setup Navigator menu is displayed.
n the connected device before turning
function, set
If the Setup Navigator menu is not
displayed
Press HOME MENU to display the Home
Menu, select Initial Setup Setup Navigator
Start, then press ENTER.
3 Start Setup Navigator.
Press ENTER.
• Setup Navigator starts.
4 Select the OSD language.
Use / to select, then press ENTER.
When a Pioneer Flat Screen TV that is compatible with
Control function is connected to this player’s HDMI OUT
terminal, language settings are imported from the
Pioneer Flat Screen TV’s language settings before Setup
Navigator begins.
5 Select the appropriate output resolution for the
connected TV.
Use / to select, then press ENTER.
6 Select the appropriate aspect for the connected
TV.
Use / to select, then press ENTER.
7 Close the Setup Navigator menu.
Press ENTER.
• Setup Navigator finishes and the setting is stored.
•Press RETURN to go back to the prev
screen.
ious
22
En
Operating the TV with
the player’s remote
control
When the manufacturer code for your brand of TV is set
on the player’s remote control, the TV can be operated
using the player’s remote control.
Caution
•For some models it may not be possible to operate the
TV with the player’s remote control, even for TVs of
brands listed on the manufacturer code list.
• The setting may be restored to the default after the
batteries are replaced. If this happens, reset it.
1 Input the 2-digit manufacturer code.
Press the number buttons (0 to 9) to input the code while
pressing TV CONTROL .
Note
•The factory default setting is 00 (PIONEER).
• If you make a mistake when inputting the code,
relea
se TV CONTROL then start over from the
be
ginning.
•When there are multiple codes for a ma nufacturer, try
inputting them in the indicated order until the TV can
be operated.
2 Check that the TV can be operated.
Operate the TV using TV CONTROL.
– Press to turn the TV’s power on and off.
INPUT SELECT – Press to switch the TV’s input.
CH +/– – Press to select the TV channel.
VOL +/– – Press to adjust the volume.
TV Preset code list
Manufacturer Code(s)
PIONEER 00, 31, 32, 07, 36, 42, 51,
22
ACURA 44
ADMIRAL 31
AIWA 60
AKAI 32, 35, 42
AKURA 41
ALBA 07, 39, 41, 44
AMSTRAD 42, 44, 47
ANITECH 44
ASA 45
ASUKA 41
AUDIOGONIC 07, 36
BASIC LINE 41, 44
BAUR 31, 07, 42
BEKO 38
BEON 07
BLAUPUNKT 31
BLUE SKY 41
BLUE STAR 18
BPL 18
BRANDT 36
BTC 41
BUSH 07, 41, 42, 44, 47, 56
CASCADE 44
CATHAY 07
CENTURION 07
CGB 42
CIMLINE 44
CLARIVOX 07
CLATRONIC 38
CONDOR 38
CONTEC 44
CROSLEY 32
CROWN 38, 44
CRYSTAL 42
CYBERTRON 41
DAEWOO 07, 44, 56
DAINICHI 41
DANSAI 07
DAYTON 44
DECCA 07, 48
DIXI 07, 44
DUMONT 53
ELIN 07
ELITE 41
ELTA 44
EMERSON 42
ERRES 07
FERGUSON 07, 36, 51
FINLANDIA 35, 43, 54
FINLUX 32, 07, 45, 48, 53, 54
STLINE 40, 44
FIR
ER 32, 35, 38, 45
FISH
FORMENTI 32, 07, 42
FRONTECH 31, 42, 46
FRONTECH/PROTECH 32
FUJITSU 48
FUNAI 40, 46, 58
GBC 32, 42
GE 00, 01, 08, 07, 10, 11, 17, 02,
28, 18
GEC 07, 34, 48
GELOSO 32, 44
GENERAL 29
GENEXXA 31, 41
GOLDSTAR 10, 23, 21, 02, 07, 50
GOODMANS 07, 39, 47, 48, 56
GORENJE 38
GPM 41
GRAETZ 31, 42
GRANADA 07, 35, 42, 43, 48
GRADIENTE 30, 57
GRANDIN 18
GRUNDIG 31, 53
HANSEATIC 07, 42
HCM 18, 44
HINARI 07, 41, 44
HISAWA 18
HITACHI 31, 33, 34, 36, 42, 43, 54,
06, 10, 24, 25, 18
HUANYU 56
HYPSON 07, 18, 46
ICE 46, 47
IMPERIAL 38, 42
INDIANA 07
INGELEN 31
INTERFUNK 31, 32, 07, 42
INTERVISION 46, 49
ISUKAI 41
ITC 42
ITT 31, 32, 42
JEC 05
JVC 13, 23
KAISUI 18, 41, 44
KAPSCH 31
KENDO 42
KENNEDY 32, 42
KORPEL 07
KOYODA 44
LEYCO 07, 40, 46, 48
LIESENK&TTER 07
LOEWE 07
LUXOR 32,
M-ELECTR
07, 36, 51
MAGNADYNE 32, 49
MAGNAFON 49
MAGNAVOX 07, 10, 03, 12, 29
MANESTH 39, 46
MARANTZ 07
MARK 07
MATSUI 07, 39, 40, 42, 44, 47, 48
MCMICHAEL 34
MEDIATOR 07
MEMOREX 44
METZ 31
MINERVA 31, 53
MITSUBISHI 09, 10, 02, 21, 31
MULTITECH 44, 49
NEC 59
NECKERMANN 31, 07
NEI 07, 42
NIKKAI 05, 07, 41, 46, 48
NOBLIKO 49
NOKIA 32, 42, 52
NORDMENDE 32, 36, 51, 52
OCEANIC 31, 32, 42
ORION 32, 07, 39, 40
OSAKI 41, 46, 48
OSO 41
OSUME 48
OTTO VERSAND 31, 32, 07, 42
PALLADIUM 38
PANAMA 46
PANASONIC 31, 07, 08, 42, 22
PATHO CINEMA 42
PAUSA 44
42, 43
ONIC 31, 44, 45, 54, 56,
03
23
En

PHILCO 32, 42
03
PHILIPS 31, 07, 34, 56, 68
PHOENIX 32
PHONOLA 07
PROFEX 42, 44
PROTECH 07, 42, 44, 46, 49
QUELLE 31, 32, 07, 42, 45, 53
R-LINE 07
RADIOLA 07
RADIOSHACK 10, 23, 21, 02
RBM 53
RCA 01, 10, 15, 16, 17, 18, 61, 62,
09
REDIFFUSION 32, 42
REX 31, 46
ROADSTAR 41, 44, 46
SABA 31, 36, 42, 51
SAISHO 39, 44, 46
SALORA 31, 32, 42, 43
SAMBERS 49
SAMSUNG 07, 38, 44, 46, 69, 70
SANYO 35, 45, 48, 21, 14, 91
SBR 07, 34
SCHAUB LORENZ 42
SCHNEIDER 07, 41, 47
SEG 42, 46
SEI 32, 40, 49
SELECO 31, 42
SHARP 02, 19, 27, 67, 90
SIAREM 32, 49
SIEMENS 31
SINUDYNE 32, 39, 40, 49
SKANTIC 43
SOLAVOX 31
SONOKO 07, 44
SONOLOR 31, 35
SONTEC 07
SONY 04
SOUNDWAVE 07
STANDARD 41, 44
STERN 31
SUSUMU 41
SYSLINE 07
TANDY 31, 41, 48
TASHIKO 34
TATUNG 07, 48
TEC 42
TELEAVIA 36
TELEFUNKEN 36, 37, 52
TELETECH 44
TENSAI 40, 41
THOMSON 36, 51, 52,
THORN 31, 07, 42, 45, 48
TOM
ASHI 18
TOSHIBA 05, 02, 26, 21, 53
TOWADA 42
ULTRAVOX 32, 42, 49
UNIDEN 92
UNIVERSUM 31, 07, 38, 42, 45,
46, 54
VESTEL 07
VICTOR 13
VOXSON 31
WALTHAM 43
WATSON 07
WATT RADIO 32, 42, 49
WHITE WESTINGHOUSE 07
YOKO 07, 42, 46
ZENITH 03, 20
63
24
En

Chapter 4
Playback
04
Playing discs or files
This section describes the player’s main operations.
For the types of discs and files that can be played, see
page 7. Video, image and audio files recorded on discs
are played with the Home Media Gallery (page 33).
1 Press STANDBY/ON to turn on the power.
Turn the TV’s power on and switch its input beforehand.
2 Press OPEN/CLOSE to open the disc tray and
load the disc.
Note
• Load the disc with the printed side facing up.
•Several dozen seconds are required to read the disc.
Once reading is completed, the type of disc is
displayed on the player’s front panel display.
• When a BD with usage restrictions set by a BD
recorder is loaded, the PIN code input scree
appears. In th
3 Press PLAY to play the disc.
•To pause, press PAUSE during playback.
•To stop, press STOP during playback.
Note
• Some discs start playing automatically when the disc
tray is closed.
• DVD-Video discs have parental lock features. Input
the password registered in the player’s settings to
unlock the parental lock. For details, see page 43.
is case, input your PIN code.
If the disc menu is displayed
For some discs, the disc menu is displayed automatically
when playback starts. The contents of the disc menu and
the way to operate depend on the disc.
Resuming playback from where it
was stopped (resume playback
function)
•When STOP is pressed during playback, the point
at which the disc stopped is stored in the memory.
When PLAY is pressed after that, playback
resumes from that point.
•To cancel the resume playback function, press
STOP while playback is stopped.
n
Note
•The resume playback function is canceled
automatically in the following cases:
–When the disc tray is opened.
– When the file list window is switched.
–When the power is turned off. (For BDs and DVDs
this does not cancel the resume playback
function.)
• When you want to continue playback from a position
you specify to be played next time, see Continuing
playback from a specified position (Continued Viewing
Playback) on page 32.
•The resume playback function cannot be used for
some discs.
Forward and reverse
scanning
During playback, press REV or FWD.
• The scanning speed switches each time the button is
pressed. The speed steps depend on the disc or file
(the speed is displayed on the TV screen).
To resume normal playback
Press PLAY.
Playing specific chapters,
tracks or files
During playback, input the number of the
chapter/track/file you want to select.
• Use the number buttons (0 to 9) to input the number,
then press ENTER.
•Press CLEAR to clear the values you have input.
Skipping content
During playback, press or .
• When is pressed, the playback skips ahead to the
beginning of the next chapter/track/file.
• When is pressed while a video or audio file is
playing, the playback skips back to the beginning of
the currently playing chapter/track/file. Press twice to
skip back to the beginning of the previous chapter/
track/file.
• When is pressed while an image file is playing,
playback returns to the previous file.
25
En

Playing in slow motion
04
While playback is paused, press and hold /
or /.
•The speed switches each time the button is pressed
(the speed is displayed on the TV screen).
To resume normal playback
Press PLAY.
Step forward and step
reverse
While playback is paused, press / or /.
•The picture moves a step forward or reverse each time
the button is pressed.
To resume normal playback
Press PLAY.
Playing a specific section
within a title or track
repeatedly (A-B Repeat)
Use this procedure to play a specific section within a title
or track repeatedly.
1 During playback, press A-B to select the starting
point.
• A- is displayed on the TV screen.
2 During playback, press A-B to select the ending
point.
•A-B Repeat playback starts.
To cancel A-B Repeat play
•Press A-B during the A-B Repeat play.
Note
•A-B Repeat play is canceled in the following cases:
– When you search outside of the repeat range.
– When you start other Repeat Play or Random Play.
– When you have searched using the FUNCTION
menu.
Playing repeatedly
(Repeat Play)
Use this procedure to play the currently playing disc, title,
chapter, track or file repeatedly.
During playback, press REPEAT.
•Each time you press REPEAT the type of repeat
modes changes as shown below.
BD
Current chapter Current title
DVD
Current chapter Current title All titles
CD/Video file/Audio file/Image file
Current track/file All tracks/All files in folder
To cancel Repeat Play
•Press REPEAT several times during Repeat Play.
Note
•Repeat Play is canceled in the following cases:
– When you search outside the repeat range.
– When you start other Repeat Play or Random Play.
– When you have searched using the FUNCTION
menu.
Playing in the desired order
(Programmed Play)
1 During playback, press PROGRAM.
•The program screen is displayed.
2 Select the program number.
Use / to select, then press ENTER.
3 Select the title you want to play.
Use / to select, then press .
4 Select the chapter you want to play.
Use / to select, then press ENTER.
5 Press PLAY.
•Playback starts.
Editing the program
1 Select the program number you want to edit,
then press ENTER.
2 Select title/chapter, then press ENTER.
Deleting the program
Select the program number you want to delete,
then press CLEAR.
• To delete all the programs, press RETURN.
26
En
Note
• When you use audio CDs for Programmed Play, enter
the track number in step 3.
• This function does not work with BDs.
Making bookmarks
You can make bookmarks on the video currently playing
and play back the scene later.
During playback, press BOOKMARK.
• The bookmark is made.
• Maximum number of bookmarks are 12.
Playing the bookmarked scene
1 Press and hold BOOKMARK for a few seconds.
• The list of bookmarks is displayed.
2 Select the bookmark you want to play.
Use / to select, then press ENTER.
Deleting the bookmark
Select the bookmark you want to delete, then
press CLEAR.
• Bookmarks may not be allowed to make for some
discs.
• Bookmarks are canceled in the following cases:
– When the player’s power turned off.
– When the disc tray is opened.
Zoom
During playback, press ZOOM.
•Each time you press ZOOM, the zoom level changes
as shown below.
[Zoom 2x] [Zoom 3x] [Zoom 4x] [Zoom 1/2]
[Zoom 1/3] [Zoom 1/4] Normal (not
displayed)
Note
• This function does not work with some discs.
Playing photos as slideshows
This function plays the photos, switching them
automatically.
During playback, press INDEX.
•Display the thumbnail of image files. The maximum
number is 12 at once.
• If you select one of the image and press ENTER,
slideshow will start from the image you selected.
Rotating/inverting photos
When a slideshow is playing or paused, the display
switches as shown below when the /// buttons
are pressed.
button: Rotates 90° clockwise
button: Rotates 90° counterclockwise
button: Flips horizontally
button: Flips vertically
Switching the camera angles
For BD-ROM and DVD-Video discs on which multiple
angles are recorded, the angles can be switched during
playback.
During playback, press ANGLE.
•The current angle and total number of recorded
angles are displayed on the TV screen.
To switch the angles, press
• The angles can also be switched by selecting Angle
from the FUNCTION menu.
• If the angles are not switched when ANGLE is
pressed, switch them from the disc menu screen.
ANGLE again.
Switching the subtitles
For discs or files on which m ultiple subtitles are recorded,
the subtitles can be switched during playback.
Caution
• The subtitles cannot be switched for discs recorded
by a DVD or BD recorder. Also refer to the operating
instructions for the device used for recording.
During playback, press SUBTITLE.
•The current subtitle and total number of recorded
subtitles are displayed on the TV screen.
To switch the subtitle, press SUBTITLE again.
• The subtitles can also be switched by selecting
Subtitle from the FUNCTION menu.
• If the subtitles are not switched when SUBTITLE is
pressed, switch them from the disc menu screen.
Turning the subtitles off
Press SUBTITLE several times or select Subtitle
from the FUNCTION menu to switch the setting to
Off.
04
27
En
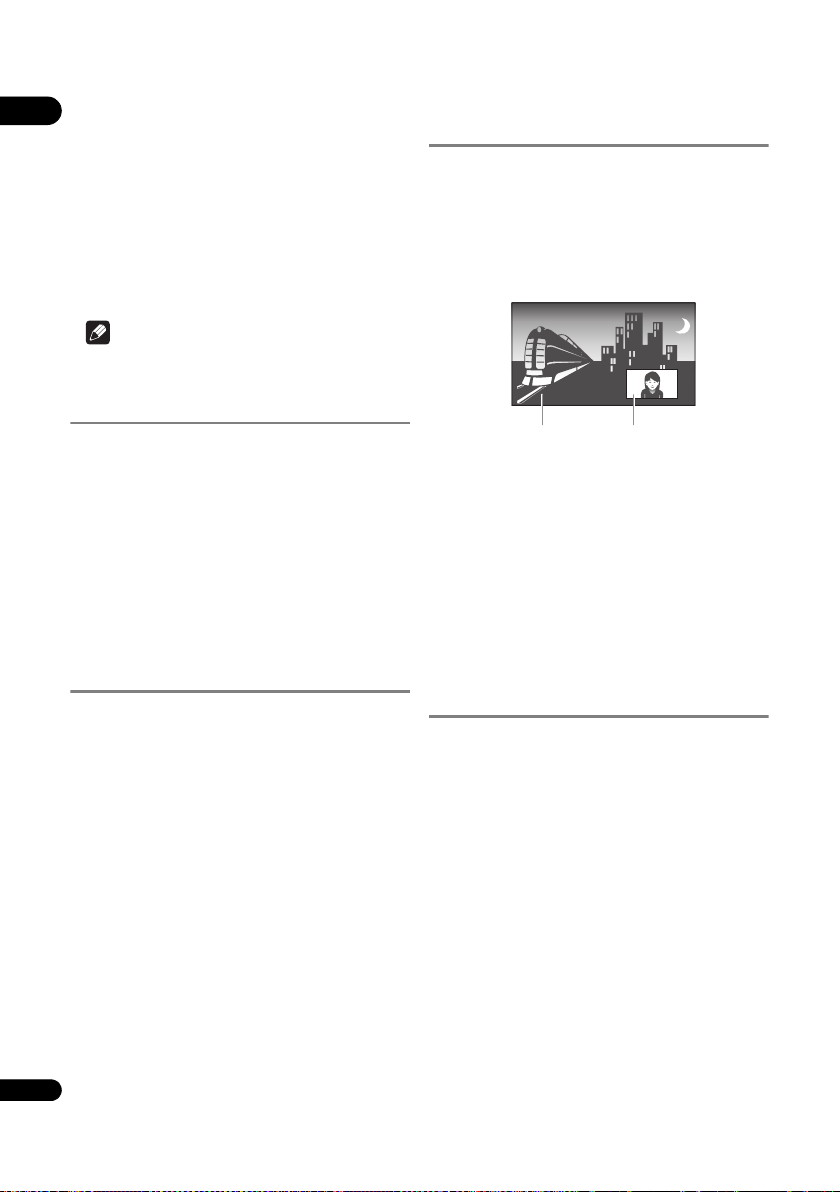
About displaying external subtitle
Secondary audio/video
Primary audio/video
04
files while playing DivX media files
In addition to the subtitles recorded in DivX media files,
this player also supports the display of external subtitle
files. If a file has the same name as that of a DivX media
file aside from the file extension and the extension is one
of the extensions listed below, the file is treated as an
external subtitle file. Note that DivX media files and
external subtitle files must be located in the same folder.
Only one external subtitle file can be displayed on this
player. Use a computer, etc., to delete any external
subtitle files you do not want to display from the disc.
Note
•Depending on the file, the external subtitles may not
be displayed properly.
Switching the audio
For discs or files on which multiple audio streams/
channels are recorded, audio streams/channels can be
switched during playback.
During playback, press AUDIO.
•The current audio and total number of recorded audio
streams are displayed on the TV screen.
To switch the audio, press AUDIO again.
• The audio can also be switched by selecting Audio
from the FUNCTION menu.
• If the audio is not switched when AUDIO is pressed,
switch it from the disc menu screen.
Switching the secondary
audio
Use this procedure to switch the secondary audio for BDROMs on which secondary audio is recorded.
During playback, press 2nd AUDIO.
•The current audio and total number of recorded audio
streams are displayed on the TV screen.
To switch the audio, press 2nd AUDIO again.
• The secondary audio can also be switched by
selecting Secondary Audio from the FUNCTION
menu.
•If the secondary audio is not switched when
2nd AUDIO is pressed, switch it from the disc menu
screen.
Turning the Secondary Audio off
Press 2nd AUDIO several times or select
Secondary Audio from the FUNCTION menu to
switch the setting to Off.
Switching the secondary
video
Use the procedure below to switch the secondary video
(Picture-in-Picture) recorded on the BD-ROM.
During playback, press 2nd VIDEO.
•The current secondary video and total number of
recorded secondary video streams are displayed on
the TV screen.
To switch the secondary video, press 2nd VIDEO
again.
• The secondary video can also be switched by
selecting Secondary Video from the FUNCTION
menu.
•If the secondary video is not switched when
2nd VIDEO is pressed, switch it from the disc menu
screen.
Turning the Secondary Video off
Press 2nd VIDEO several times or select
Secondary Video from the FUNCTION menu to switch
the setting to Off.
Switching the CD/SACD
playback area
1 Select the area you want to play.
In the stop mode, press CD/SACD. The playback area
switches on the front panel display window each time the
button is pressed.
[CD AREA] [SACD 2CH] [SACD MCH] (back to
beginning)
•During playback, press STOP twice to cancel
continuous play before selecting the playback area.
28
En

Displaying the disc
information
Press DISPLAY.
The disc information appears on the TV screen. To switch
off the information display, press DISPLAY again.
The information display differs between during playback
and when playback is stopped.
Enjoying BONUSVIEW or
BD-LIVE
This player is compatible with BD-Video BONUSVIEW
and BD-LIVE.
When using BD-Video discs compatible with
BONUSVIEW, you can enjoy such functions as secondary
video (picture in picture) (page 28) and secondary audio
(page 28). With BD-Video discs supporting BD-LIVE,
special video images and other data can be downloaded
from the Internet.
Data recorded on BD video and downloaded from BDLIVE is stored on the USB flash drive (external memory).
To enjoy these functions, connect a USB flash drive
(minimum 1 GB capacity, 2 GB or g reater recommended)
supporting USB 2.0 High Speed (480 Mbit/s) to the USB
port.
• When you insert or remove a USB flash drive, be sure
to turn the player’s power of
•To recall d
• If a USB flash drive containing other data (previously
• Do not disconnect the USB flash drive while playback
• Some time may be required for the data to load (read/
ata stored in the USB flash drive, first insert
the disc media that was being used at the time the
data was downloaded (if a different disc is loaded, the
data stored on the USB flash drive cannot be played).
recorded) is used, the video and audio may not play
back properly.
is in progress.
write).
f.
Note
•Operat
ion of USB flash d
• Playback of BD-LIVE function data differs depending
on the disc used. For details, consult the user
instructions supplied with the disc.
• To enjoy the BD-LIVE function, a network connection
and settings are required (pages 21 and 42).
• BD-LIVE is a function that provides for connection to
the Internet. Discs supporting the BD-LIVE function
may send ID codes identifying this player and the disc
to the contents provider via the Internet.
rives is not guaranteed.
04
Caution
•It may not be possible to use the BONUSVIEW and
BD-LIVE functions if there is insufficient space on the
USB flash drive . In this case , refer to Erasing data that
has been added to BDs and application data on
page 43 for erasing the Virtual Package data and the
BD-LIVE data in the USB flash drive.
29
En

Playback functions
04
The functions that can be used differ according to the type of disc and file. In some cases, some of the functions cannot
be used. Check the usable functions on the table below.
Disc/file type
1
Function
Forward and reverse
2
scanning
Playing specific titles,
chapters or tracks
BD-
BD-R
/-RE
3
DVD-
Video
3
ROM
3
Skipping content
Slow motion play
Step forward and step
reverse
A-B Repeat play
2, 5
2
2
Repeat Play
Zoom
8
Angle
9
Subtitle
10
Audio
Secondary audio
Secondary video
11
13
12
14
Disc information
1. Some functions may not work for some discs or files, even if indicated [] on the table.
2. For some discs, normal playback resumes automatically when the chapter switches.
3. No sound is produced during forward and reverse scanning.
4. Sound is produced during forward and reverse scanning.
5. • No sound is output during slow motion playback.
• It is not possible to switch the speed during reverse slow motion playback.
6. Reverse slow motion playback is not possible.
7. Reverse step playback is not possible.
8. Angle mark is displayed for scenes at which multiple angles are recorded if Angle Mark is set to On (page 41).
9. • The types of recorded subtitles depend on the disc and file.
• In some cases, the subtitle may switch or the switching screen provided on the disc may be displayed immediately, without the current
subtitle or the total number of subtitles recorded on the disc being displayed.
10. The types of recorded audio streams depend on the disc and file.
11. • The types of recorded secondary audio streams depend on the disc and file.
• In some cases, the secondary audio may switch or the switching scr een provided on the disc may be displayed immediately, without the
current secondary audio or the total number of secondary audio streams recorded on the disc being displayed.
• Secondary audio mark is displayed for scenes at which secondary audio is recorded if Secondary Audio Mark is set to On (page 41).
12. Some discs do not include secondary audio.
13. • In some cases, the secondary video may switch or the switching screen provided on the disc may be displayed immediately, without the
current secondary video or the total number of secondary video streams recorded on the disc being displayed.
• Secondary video mark is displayed for scenes at which secondary video is recorded if PIP Mark is set to On (page 41).
14. Some discs do not include secondary video.
DVD-
Audio
DVD-R
/-RW
AVCREC AVCHD
(VR
format)
4
3
3
Video
Image
file
file
3
3
6
7
Audio
file
4
Audio
CD
4
30
En
 Loading...