

Page 1

Blu-ray Disc PLAYER
BDP-320
Register Your Product on
www.pioneerelectronics.com
www.pioneerelectronics.ca
Operating Instructions
(US)
(Canada)
Page 2

Thank you for buying this Pioneer product.
Please read through these operating instructions so you will know how to operate your model properly.
After you have finished reading the instructions, put them away in a safe place for future reference.
IMPORTANT
CAUTION
RISK OF ELECTRIC SHOCK
DO NOT OPEN
The lightning flash with arrowhead symbol,
within an equilateral triangle, is intended to
alert the user to the presence of uninsulated
“dangerous voltage” within the product’s
enclosure that may be of sufficient
magnitude to constitute a risk of electric
shock to persons.
CAUTION:
TO PREVENT THE RISK OF ELECTRIC
SHOCK, DO NOT REMOVE COVER (OR
BACK). NO USER-SERVICEABLE PARTS
INSIDE. REFER SERVICING TO QUALIFIED
SERVICE PERSONNEL.
IMPORTANT NOTICE
THE SERIAL NUMBER FOR THIS EQUIPMENT IS LOCATED IN THE REAR.
PLEASE WRITE THIS SERIAL NUMBER ON YOUR ENCLOSED WARRANTY CARD AND KEEP IN A SECURE AREA.
THIS IS FOR YOUR SECURITY.
NOTE:
This equipment has been tested and found to comply with the limits for a Class B digital device, pursuant to Part 15
of the FCC Rules. These limits are designed to provide reasonable protection against harmful interference in a
residential installation. This equipment generates, uses, and can radiate radio frequency energy and, if not installed
and used in accordance with the instructions, may cause harmful interference to radio communications. However,
there is no guarantee that interference will not occur in a particular installation. If this equipment does cause
harmful interference to radio or television reception, which can be determined by turning the equipment off and on,
the user is encouraged to try to correct the interference by one or more of the following measures:
— Reorient or relocate the receiving antenna.
— Increase the separation between the equipment and receiver.
— Connect the equipment into an outlet on a circuit different from that to which the receiver is connected.
— Consult the dealer or an experienced radio/TV technician for help.
The exclamation point within an equilateral
triangle is intended to alert the user to the
presence of important operating and
maintenance (servicing) instructions in the
literature accompanying the appliance.
D3-4-2-1-1_A1_En
D1-4-2-6-1*_A1_En
D8-10-1-2_A1_En
Information to User
Alterations or modifications carried out without appropriate authorization may invalidate the user’s right to operate
the equipment.
CAUTION
This product satisfies FCC regulations when shielded cables and connectors are used to connect the unit to other
equipment. To prevent electromagnetic interference with electric appliances such as radios and televisions, use
shielded cables and connectors for connections.
CAUTION : USE OF CONTROLS OR ADJUSTMENTS OR PERFORMANCE OF PROCEDURES OTHER THAN THOSE
SPECIFIED HEREIN MAY RESULT IN HAZARDOUS RADIATION EXPOSURE.
CAUTION : THE USE OF OPTICAL INSTRUMENTS WITH THIS PRODUCT WILL INCREASE EYE HAZARD.
This Class B digital apparatus complies with
2
Canadian ICES-003.
En
D8-10-1-3_A1_En
"#%)!'%+%"!"'#!*!
&"(%&&(&'!"!'
$(# !'
D8-10-2_A1_En
D8-10-3a_A1_En
D6-8-2-1_En
!
Page 3

Read these instructions.
1)
Keep these instructions.
2)
Heed all warnings.
3)
Follow all instructions.
4)
Do not use this apparatus near water.
5)
Clean only with dry cloth.
6)
Do not block any ventilation openings. Install in
7)
accordance with the manufacturer’s instructions.
Do not install near any heat sources such as
8)
radiators, heat registers, stoves, or other apparatus
(including amplifiers) that produce heat.
Do not defeat the safety purpose of the polarized or
9)
grounding-type plug. A polarized plug has two
blades with one wider than the other. A grounding
type plug has two blades and a third grounding
prong. The wide blade or the third prong are
provided for your safety. If the provided plug does
not fit into your outlet, consult an electrician for
replacement of the obsolete outlet.
Protect the power cord from being walked on or
10)
pinched particularly at plugs, convenience
receptacles, and the point where they exit from the
apparatus.
CAUTION
This product is a class 1 laser product, but this
product contains a laser diode higher than Class 1.
To ensure continued safety, do not remove any covers
or attempt to gain access to the inside of the product.
Refer all servicing to qualified personnel.
The following caution label appears on your unit.
Location: inside of the unit
Only use attachments/accessories specified by the
11)
manufacturer.
Use only with the cart, stand, tripod, bracket, or
12)
table specified by the manufacturer, or sold with the
apparatus. When a cart is used, use caution when
moving the cart/apparatus combination to avoid
injury from tip-over.
Unplug this apparatus during lightning storms or
13)
when unused for long periods of time.
Refer all servicing to qualified service personnel.
14)
Servicing is required when the apparatus has been
damaged in any way, such as power-supply cord or
plug is damaged, liquid has been spilled or objects
have fallen into the apparatus, the apparatus has
been exposed to rain or moisture, does not operate
normally, or has been dropped.
P1-4-2-2_En
VENTILATION CAUTION
When installing this unit, make sure to leave space
around the unit for ventilation to improve heat
radiation (at least 10 cm at top, 10 cm at rear, and
10 cm at each side).
WARNING
Slots and openings in the cabinet are provided for
ventilation to ensure reliable operation of the
product, and to protect it from overheating. To
prevent fire hazard, the openings should never be
blocked or covered with items (such as newspapers,
table-cloths, curtains) or by operating the
equipment on thick carpet or a bed.
D3-4-2-1-7b_A_En
&$(# !'&!"'*'%#%"""#%)!'%
"%&"-%"!"'#!,"!'!%
*'$(!%'&$(# !'&(&)&"%
"*%#"'"%+#"&''"%##!&#&!%!
"% "&'(%
!
D3-4-2-1-8*_C_En
Operating Environment
Operating environment temperature and humidity:
+5 °C to +35 °C (+41 °F to +95 °F); less than 85 %RH
(cooling vents not blocked)
Do not install this unit in a poorly ventilated area, or in
locations exposed to high humidity or direct sunlight (or
strong artificial light)
D3-4-2-1-7c*_A1_En
WARNING
Before plugging in for the first time, read the following
section carefully.
The voltage of the available power supply differs
according to country or region. Be sure that the
power supply voltage of the area where this unit
will be used meets the required voltage (e.g., 230 V
or 120 V) written on the rear panel.
D3-4-2-1-4_A_En
3
En
Page 4

$ " !
" $
$$
!
!
$!
$!
""
#"
!
CAUTION
The STANDBY/ON switch on this unit will not
completely shut off all power from the AC outlet.
Since the power cord serves as the main disconnect
device for the unit, you will need to unplug it from
the AC outlet to shut down all power. Therefore,
make sure the unit has been installed so that the
power cord can be easily unplugged from the AC
outlet in case of an accident. To avoid fire hazard,
the power cord should also be unplugged from the
AC outlet when left unused for a long period of time
(for example, when on vacation).
D3-4-2-2-2a_A_En
Wash hands after handling
This product is for general household purposes. Any
failure due to use for other than household purposes
(such as long-term use for business purposes in a
restaurant or use in a car or ship) and which
requires repair will be charged for even during the
warranty period.
K041_En
POWER-CORD CAUTION
Handle the power cord by the plug. Do not pull out the
plug by tugging the cord and never touch the power
cord when your hands are wet as this could cause a
short circuit or electric shock. Do not place the unit, a
piece of furniture, etc., on the power cord, or pinch the
cord. Never make a knot in the cord or tie it with other
cords. The power cords should be routed such that they
are not likely to be stepped on. A damaged power cord
can cause a fire or give you an electrical shock. Check
the power cord once in a while. If you find it damaged,
contact the Pioneer service center on the back cover, or
your dealer for a replacement.
This product incorporates copyright protection
technology that is protected by method claims of
certain U.S. patents and other intellectual property
rights owned by Macrovision Corporation and other
rights owners.Use of this copyright protection
technology must be authorized by Macrovision
Corporation, and is intended for home and other
limited viewing uses only unless otherwise authorized
by Macrovision Corporation. Reverse engineering or
disassembly is prohibited.
4
En
Page 5

Selecting fine audio equipment such as the unit
you’ve just purchased is only the start of your
musical enjoyment. Now it’s time to consider how
you can maximize the fun and excitement your
equipment offers. This manufacturer and the
Electronic Industries Association’s Consumer
Electronics Group want you to get the most out of
your equipment by playing it at a safe level. One that
lets the sound come through loud and clear without
annoying blaring or distortion-and, most importantly,
without affecting your sensitive hearing.
Sound can be deceiving. Over time your hearing
“comfort level” adapts to higher volumes of sound.
So what sounds “normal” can actually be loud and
harmful to your hearing. Guard against this by
setting your equipment at a safe level BEFORE your
hearing adapts.
To establish a safe level:
@Start your volume control at a low setting.
@Slowly increase the sound until you can hear it
comfortably and clearly, and without distortion.
Once you have established a comfortable sound
level:
@Set the dial and leave it there.
We Want You Listening For A Lifetime
Since hearing damage from loud noise is often
undetectable until it is too late, this manufacturer
and the Electronic Industries Association’s
Consumer Electronics Group recommend you avoid
prolonged exposure to excessive noise. This list of
sound levels is included for your protection.
Decibel
Level Example
30 Quiet library, soft whispers
40
Living room, refrigerator, bedroom away from traffic
50 Light traffic, normal conversation, quiet office
60 Air conditioner at 20 feet, sewing machine
70 Vacuum cleaner, hair dryer, noisy restaurant
80
Average city traffic, garbage disposals, alarm clock
at two feet.
THE FOLLOWING NOISES CAN BE DANGEROUS
UNDER CONSTANT EXPOSURE
90
Subway, motorcycle, truck traffic, lawn mower
100 Garbage truck, chain saw, pneumatic drill
120 Rock band concert in front of speakers,
thunderclap
140 Gunshot blast, jet plane
180 Rocket launching pad
Information courtesy of the Deafness Research Foundation.
Taking a minute to do this now will help to prevent
hearing damage or loss in the future. After all, we
want you listening for a lifetime.
S001_En
En
5
Page 6

Contents
01 Before you start
What’s in the box . . . . . . . . . . . . . . . . . . . . . . . . . . . . . . . . 7
Putting the batteries in the remote control. . . . . . . . . . 7
Software updating . . . . . . . . . . . . . . . . . . . . . . . . . . . . . . . 7
Types of discs/files that can be played. . . . . . . . . . . . . . . 8
Playable discs . . . . . . . . . . . . . . . . . . . . . . . . . . . . . . . . . 8
Playable files . . . . . . . . . . . . . . . . . . . . . . . . . . . . . . . . . 10
Part Names and Functions . . . . . . . . . . . . . . . . . . . . . . . 11
Remote Control . . . . . . . . . . . . . . . . . . . . . . . . . . . . . . . 11
Front Panel. . . . . . . . . . . . . . . . . . . . . . . . . . . . . . . . . . . 12
Front Panel Display. . . . . . . . . . . . . . . . . . . . . . . . . . . . 12
Rear Panel . . . . . . . . . . . . . . . . . . . . . . . . . . . . . . . . . . . 13
02 Connecting up
Connecting using an HDMI cable . . . . . . . . . . . . . . . . . 14
About HDMI. . . . . . . . . . . . . . . . . . . . . . . . . . . . . . . . . . 14
About KURO LINK function . . . . . . . . . . . . . . . . . . . . . 15
Connecting a TV . . . . . . . . . . . . . . . . . . . . . . . . . . . . . . 16
Connecting an AV receiver or amplifier . . . . . . . . . . . 16
Connecting video and audio cables . . . . . . . . . . . . . . . . 16
Connecting a TV using a video/audio cable . . . . . . . . 16
Connecting an AV receiver or amplifier using audio
cables . . . . . . . . . . . . . . . . . . . . . . . . . . . . . . . . . . . . . . . 17
Connecting components to the USB port . . . . . . . . . . . 17
About USB (external storage) devices. . . . . . . . . . . . . 17
Connecting the USB (external storage) device. . . . . . 18
Network connection . . . . . . . . . . . . . . . . . . . . . . . . . . . . 18
Connecting via an Ethernet hub . . . . . . . . . . . . . . . . . 18
Connecting the power cord. . . . . . . . . . . . . . . . . . . . . . . 18
03 Getting Started
Making settings using the Setup Navigator menu . . . . 19
Operating the TV with the player’s remote control . . . . 20
TV Preset code list. . . . . . . . . . . . . . . . . . . . . . . . . . . . . 21
Using the TOOLS menu. . . . . . . . . . . . . . . . . . . . . . . . . . 21
Switching the video output terminal to be viewed . . . . 22
Switching the output video resolution . . . . . . . . . . . . . . 22
04 Playback
Playing discs or files . . . . . . . . . . . . . . . . . . . . . . . . . . . . 24
Forward and reverse scanning. . . . . . . . . . . . . . . . . . . 25
Playing specific titles, chapters or tracks . . . . . . . . . . 25
Skipping content . . . . . . . . . . . . . . . . . . . . . . . . . . . . . . 25
Playing in slow motion . . . . . . . . . . . . . . . . . . . . . . . . . 25
Step forward and step reverse . . . . . . . . . . . . . . . . . . . 25
Switching the camera angles . . . . . . . . . . . . . . . . . . . 25
Switching the subtitles . . . . . . . . . . . . . . . . . . . . . . . . . 25
Switching the audio and secondary audio . . . . . . . . . 26
Switching the secondary video . . . . . . . . . . . . . . . . . . 26
Displaying the disc information. . . . . . . . . . . . . . . . . . 26
Playback functions . . . . . . . . . . . . . . . . . . . . . . . . . . . . 27
Using the Play Mode functions . . . . . . . . . . . . . . . . . . . 28
Playing from a specific time (Time Search) . . . . . . . . 28
Playing a specific title, chapter or track (Search) . . . 28
Playing a specific section within a title or track
repeatedly (A-B Repeat) . . . . . . . . . . . . . . . . . . . . . . . . 28
Playing repeatedly (Repeat Play) . . . . . . . . . . . . . . . . . 29
Playing in random order
6
Abou
En
t P
lay Mode types . . . . . . . . . . . . . . . . . . . . . . . . . 30
(Random Play). . . . . . . . . . . 29
Playing from the Home Media Gallery . . . . . . . . . . . . . . 31
Playing discs . . . . . . . . . . . . . . . . . . . . . . . . . . . . . . . . . 31
Playing image files . . . . . . . . . . . . . . . . . . . . . . . . . . . . 31
Playing audio files . . . . . . . . . . . . . . . . . . . . . . . . . . . . . 32
Playing in the desired order (HMG Playlist) . . . . . . . . 32
05 Adjusting audio and video
Adjusting the video . . . . . . . . . . . . . . . . . . . . . . . . . . . . . 34
Adjusting the audio . . . . . . . . . . . . . . . . . . . . . . . . . . . . . 35
Adjusting the Audio DRC . . . . . . . . . . . . . . . . . . . . . . . 35
Adjusting the output level of the different speakers
during BD/DVD playback (Channel Level) . . . . . . . . . 35
Adjusting the audio delay (Lip Sync). . . . . . . . . . . . . . 36
06 Advanced settings
Changing the settings . . . . . . . . . . . . . . . . . . . . . . . . . . . 37
Operating the Initial Setup screen. . . . . . . . . . . . . . . . 37
Software updating. . . . . . . . . . . . . . . . . . . . . . . . . . . . . 46
Restoring all the settings to the factory default
settings. . . . . . . . . . . . . . . . . . . . . . . . . . . . . . . . . . . . . . 46
About the audio output settings . . . . . . . . . . . . . . . . . 47
Language Code Table and Country/Area Code
Table . . . . . . . . . . . . . . . . . . . . . . . . . . . . . . . . . . . . . . . . 49
07 Additional information
Licenses . . . . . . . . . . . . . . . . . . . . . . . . . . . . . . . . . . . . . . 50
Cautions on use . . . . . . . . . . . . . . . . . . . . . . . . . . . . . . . . 56
Moving the player . . . . . . . . . . . . . . . . . . . . . . . . . . . . . 56
Place of installation. . . . . . . . . . . . . . . . . . . . . . . . . . . . 56
Turn the power off when not using the player . . . . . . 56
Condensation . . . . . . . . . . . . . . . . . . . . . . . . . . . . . . . . 56
Cleaning the player . . . . . . . . . . . . . . . . . . . . . . . . . . . . 56
Caution for when the unit is installed in a rack with a
glass door. . . . . . . . . . . . . . . . . . . . . . . . . . . . . . . . . . . . 56
Cleaning the pickup lens . . . . . . . . . . . . . . . . . . . . . . . 56
Handling discs. . . . . . . . . . . . . . . . . . . . . . . . . . . . . . . . 56
Troubleshooting . . . . . . . . . . . . . . . . . . . . . . . . . . . . . . . . 57
Playback. . . . . . . . . . . . . . . . . . . . . . . . . . . . . . . . . . . . . 57
KURO LINK . . . . . . . . . . . . . . . . . . . . . . . . . . . . . . . . . . 61
Network . . . . . . . . . . . . . . . . . . . . . . . . . . . . . . . . . . . . . 61
Others. . . . . . . . . . . . . . . . . . . . . . . . . . . . . . . . . . . . . . . 62
Glossary . . . . . . . . . . . . . . . . . . . . . . . . . . . . . . . . . . . . . . 63
Specifications. . . . . . . . . . . . . . . . . . . . . . . . . . . . . . . . . . 65
Page 7
Chapter 1
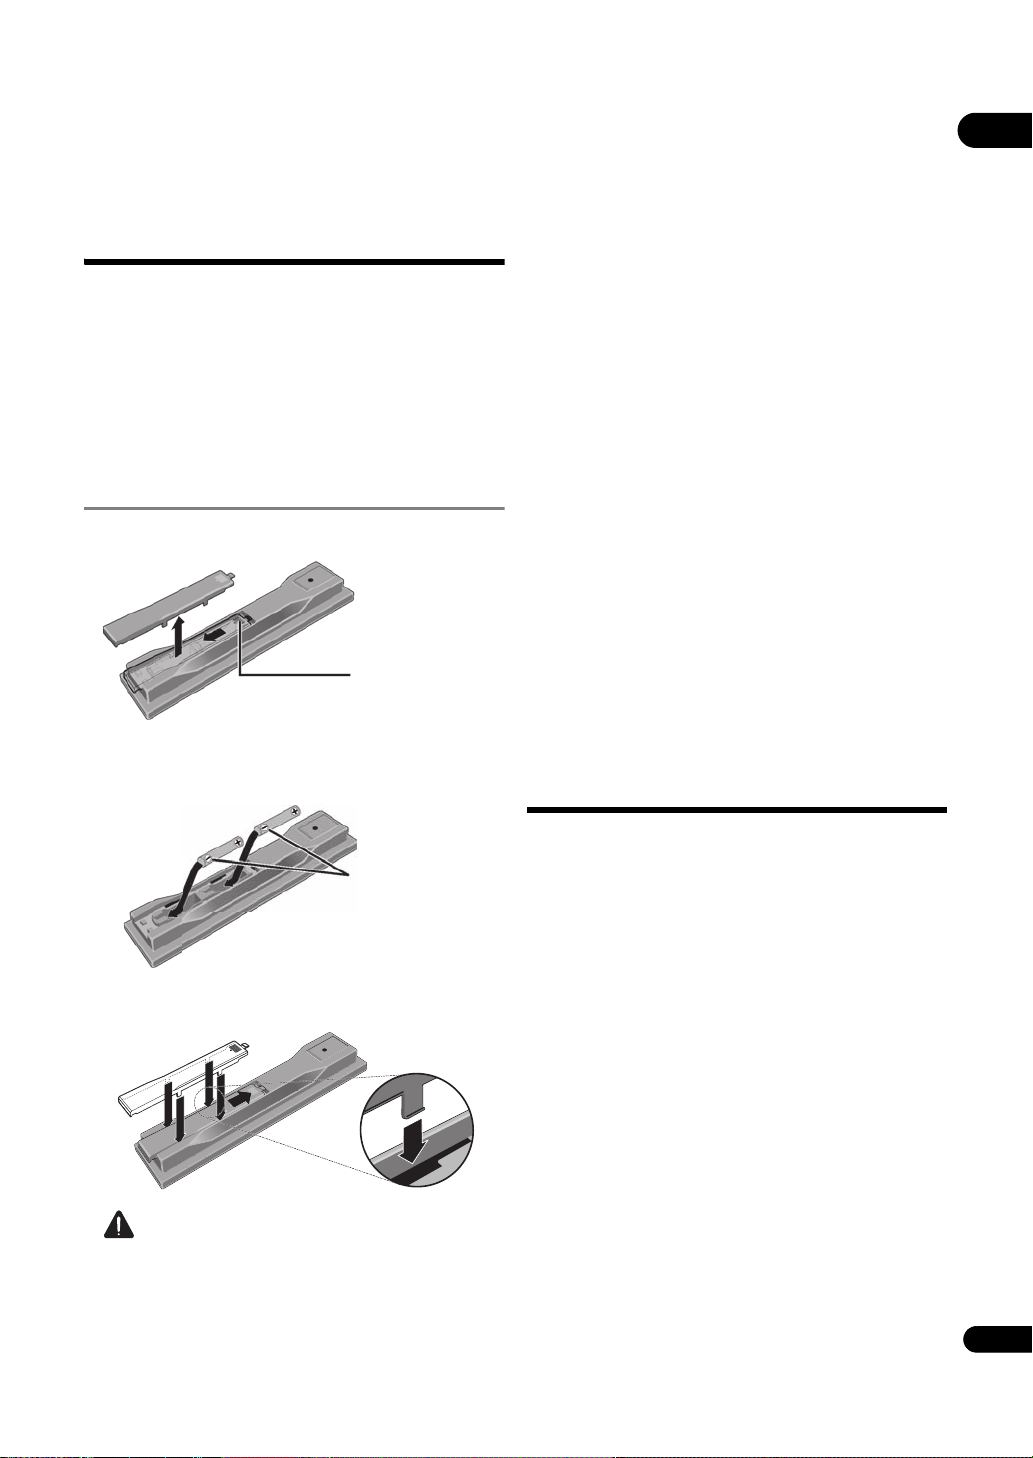
Press lightly on this
part and slide into
the direction of the
arrow.
Insert the negative
() side first.
Before you start
01
What’s in the box
•Remote control x 1
• Video/audio cable (yellow/white/red plugs) x 1
• AA/R6 dry cell batteries x 2
•Power cord x 1
•Warranty card
•Operating instructions (this document)
Putting the batteries in the remote control
1 Open the rear cover.
2 Insert the batteries (AA/R6 x 2).
Insert as indicated by the / marks into the battery
compartment.
• When loading the batteries into the remote control,
set them in the proper direction, as indicated by the
polarity marks ( and ).
• Do not heat batteries, disassemble them, or throw
them into flames or water.
• Batteries may have different voltages, even if they look
similar. Do not use different kinds of batteries
together.
•To prevent leakage of battery fluid, remove the
batteries if you do not pla
for a long period of time (1 month or more). If the fluid
should leak, wipe it carefully off the inside of the case,
then insert new batteries. If a battery should leak and
the fluid should get on your skin, flush it off with large
quantities of water.
• When disposing of used batteries, please comply with
governmental regulations or environmental public
instruction’s rules that apply in your country/area.
• WARNING
Do not use or store batteries in direct sunlight or
other excessively hot place, such as inside a car or
near a heater. This can cause batteries to leak,
overheat, explo
life or performance of batteries.
D3-4-2-3-3_En
de or ca
n to use the remo
tch fire. It can also reduce the
te control
Software updating
3 Close the rear cover.
Close securely (a click should be heard).
Caution
• Do not use any batteries other than the ones
specified. Also, do not use a new battery together with
an old one.
Please refer to our website for information regarding
software updates.
IN THE U.S.A.: http://www.pioneerblu-ray.com
IN CANADA: http://www.pioneerblu-ray.ca
7
En
Page 8

Types of discs/files that can be played
01
Playable discs
Discs with the logo marks below indicated on the disc label, package or jacket can be played.
Application format
Disc type Logo
BD-ROM
BD
3
4
BD-R
BD-RE
DVD-ROM
1
BDMV
BDAV DVD-Video DVD VR
CD-DA
DTS-CD
DATA-DISC
2
DVD
CD
1. Including the AVCHD format.
2. Discs on which image or audio files are recorded.
3. Including dual-layered discs.
4. Finalize (close) them before playing them on this player.
5. DVD-R for Authoring discs (3.95 and 4.7 GB) cannot be played.
6. Version 1.0 DVD-RW discs cannot be played.
3,4,5
DVD-R
4,6
DVD-RW
3,4
DVD+R
DVD+RW
(Audio CD)
4
CD-DA
4
CD-R
4
CD-RW
CD-ROM
“Blu-ray Disc” and are trademarks.
is a trademark of DVD Format/Logo Licensing Corporation.
8
En
Page 9
Discs that cannot be played
• HD DVDs
•DVD Audio discs
•DVD-RAM discs
•SACDs
•Video CDs
•SVCDs
It is possible that some discs other than the ones listed
above may not be playable either.
This player conforms to NTSC standards. Discs for which
“NTSC” is indicated on the disc label, package or jacket
can be played.
–Blu-ray Disc Read-Only (ROM) Format Version 2
–Blu-ray Disc Recordable (R) Format Version 2
–Blu-ray Disc Rewritable (RE) Format Version 3
This player supports BD-ROM Profile 2.
BONUSVIEW functions such as playback of
secondary video (Picture-in-Picture) and secondary
audio can be used. The data used with the
BONUSVIEW functions (the secondary video
(Picture-in-Picture) and secondary audio data) may
be stored in the storage. For details on secondary
video and secondary audio playback, refer to the
disc’s instructions.
01
Note
• Some discs cannot be played, even if one of the logo
marks on the previous page is indicated.
•To play 8 cm discs, set the disc in the 8 cm disc
depression in the center of the disc tray. No adapter
is necessary. 8 cm BD-ROMs cannot be played.
About audio formats
The following audio formats are supported on this player:
•Dolby TrueHD
•Dolby Digital Plus
•Dolby Digital
•DTS-HD Master Audio
•DTS-HD High Resolution Audio
• DTS Digital Surround
•MPEG
• MPEG-2 AAC
•Linear PCM
To enjoy the surround sound of Dolby TrueHD, Dolby
Digital Plus, DTS-HD Master Audio and DTS-HD High
Resolution Audio, it is recommended to connect the
player to an AV receiver or amplifier compatible with
these audio formats using an HDMI cable. After loading
a BD containing sound in one of these audio formats,
select the audio format on the menu screen.
See About the audio output settings on page 47 for the
output conditions of the different formats.
Manufactured under license from Dolby Laboratories.
Dolby and the double-D symbol are trademarks of Dolby
Laboratories.
Manufactured under license under U.S. Patent #’s:
5,451,942; 5,956,674; 5,974,380; 5,978,762; 6,226,616;
6,487,535; 7,392,195; 7,272,567; 7,333,929; 7,212,872 &
other U.S. and worldwide patents issued & pending. DTS is
a registered trademark and the DTS logos, Symbol, DTS-HD
and DTS-HD Master Audio | Essential are trademarks of
DTS, Inc. © 1996-2008 DTS, Inc. All Rights Reserved.
Playing BDs
• BDs (BDMV) compatible with the formats below can
be played.
“BONUSVIEW” is trademark of Blu-ray Disc
Association.
BD-LIVE functions such as downloading movie
trailers or additional audio and subtitle languages
and playing on-line games can be enjoyed over th
Inte
rnet. The data downloaded with the BD-LIVE
function (trailers, etc.) is stored in the storage. Refer
to the disc’s instructions for details about BD-LIVE
functions.
“BD-LIVE” logo is trademark of Blu-ray Disc
Association.
With BD-ROMs, it is possible to use BD-J (Java)
applications to create highly interactive titles, for
example including games.
Java and all Java-based trademarks and logos are
trademarks or registered trademarks of Sun
Microsystems, Inc. in the U.S. and other countries.
The player’s internal storage has a maximum capacity
of roughly 1 GB. Use an external storage connected to
the USB port if you want to store large quantities of
data (page 17). If a message saying there is not
enough storage space appears, erase any
unnecessary data (page 44).
• BDs (BDAV) compatible with the formats below can
be played.
–B
u-ray Disc Recordable (R) Format Version 1
l
–Blu-ray Disc Rewritable (RE) Format Version 2
e
9
En
Page 10

Playing DVDs
01
This label indicates playback compatibility with DVD-RW
discs recorded in VR format (Video Recording format).
However, for discs recorded with a record-only-once
encrypted program, playback can only be achieved using a
CPRM compatible device.
The AVCHD is a high definition (HD) digital video camera
recorder format recording high-definition onto certain
media by using highly efficient codec technologies.
“AVCHD” and the “AVCHD” logo are trademarks of
Panasonic Corporation and Sony Corporation.
About region numbers
Blu-ray Disc Player and BD-ROM or DVD-Video discs are
assigned region numbers according to the region in
which they are sold.
This player’s region numbers are:
•BD-ROM: A
•DVD-Video: 1
Discs not including these numbers cannot be played.
Discs playable on this player are as shown below.
• BDs: A (including A) and ALL
• DVDs: 1 (including 1) and ALL
Playing CDs
Regarding copy protected CDs: This player is designed to
conform to the specifications of the Audio CD format.
This player does not support the playback or function of
discs that do not conform to these specifications.
DualDisc playback
A DualDisc is a new two-sided disc, one side of which
contains DVD content — video, audio, etc. — while the
other side contains non-DVD content such as digital
audio material.
The DVD side of a DualDisc can be played on this player
(excluding any DVD-Audio content).
The non-DVD, audio side of the disc is not compatible
with this player.
It is possible that when loading or ejecting a DualDisc,
the opposite side to that being played will be scratched.
Scratched discs may not be playable.
For more detailed information on the DualDisc
specification, please refer to the disc manufacturer or
disc retailer.
Playing discs created on computers
or BD/DVD recorders
•It may not be possible to play discs recorded using a
computer due to the application settings or
computer’s environment settings. Record discs in a
format playable on this player. For details, contact the
dealer.
•It may not be possible to play discs recorded using a
computer or a BD/DVD recorder, if burn quality is not
good due to characteristics of the disc, scratches, dirt
on the disc, dirt on the recorder’s lens, etc.
Playable files
Image and audio files recorded on DVDs and CDs can be
played.
Caution
• In DVD, only the one recorded by the ISO 9660 file
system can be played.
• Some files may not be playable.
•For some files, it may not be possible to use certain
functions during playback.
• It may not be possible to play some files, even if they
have the extension of a file playable on this player.
•Files protected by DRM (Digital Rights Management)
cannot be played.
Supported image file formats
• JPEG
File format: JFIF Ver. 1.02/Exif Ver. 2.2
Resolution: Up to 4096 x 4096 pixels
Only baseline JPEG files are supported.
Supported audio file formats
• Windows Media™ Audio 9 (WMA9)
Bit rate: Up to 192 kbps
Sampling frequencies: 22.05 kHz, 32 kHz, 44.1 kHz
and 48 kHz
Windows Media is either a registered trademark or
trademark of Microsoft Corporation in the United States
and/or other countries.
This product includes technology owned by Microsoft
Corporation and cannot be used or distributed without
a license from Microsoft Licensing, Inc.
• MPEG-1 Audio Layer 3 (MP3)
Bit rate: Up to 320 kbps
Sampling frequencies: 8 kHz, 11.025 kHz, 12 kHz,
16 kHz, 22.05 kHz, 24 kHz, 32 kHz, 44.1 kHz and 48 kHz
Playable file extensions
• Image files
.jpg and .jpeg
• Audio files
.wma and .mp3
10
En
Page 11
Part Names and
10
7
8
4
12
13
1
2
3
5
6
9
11
14
18
20
17
19
21
15
16
22
23
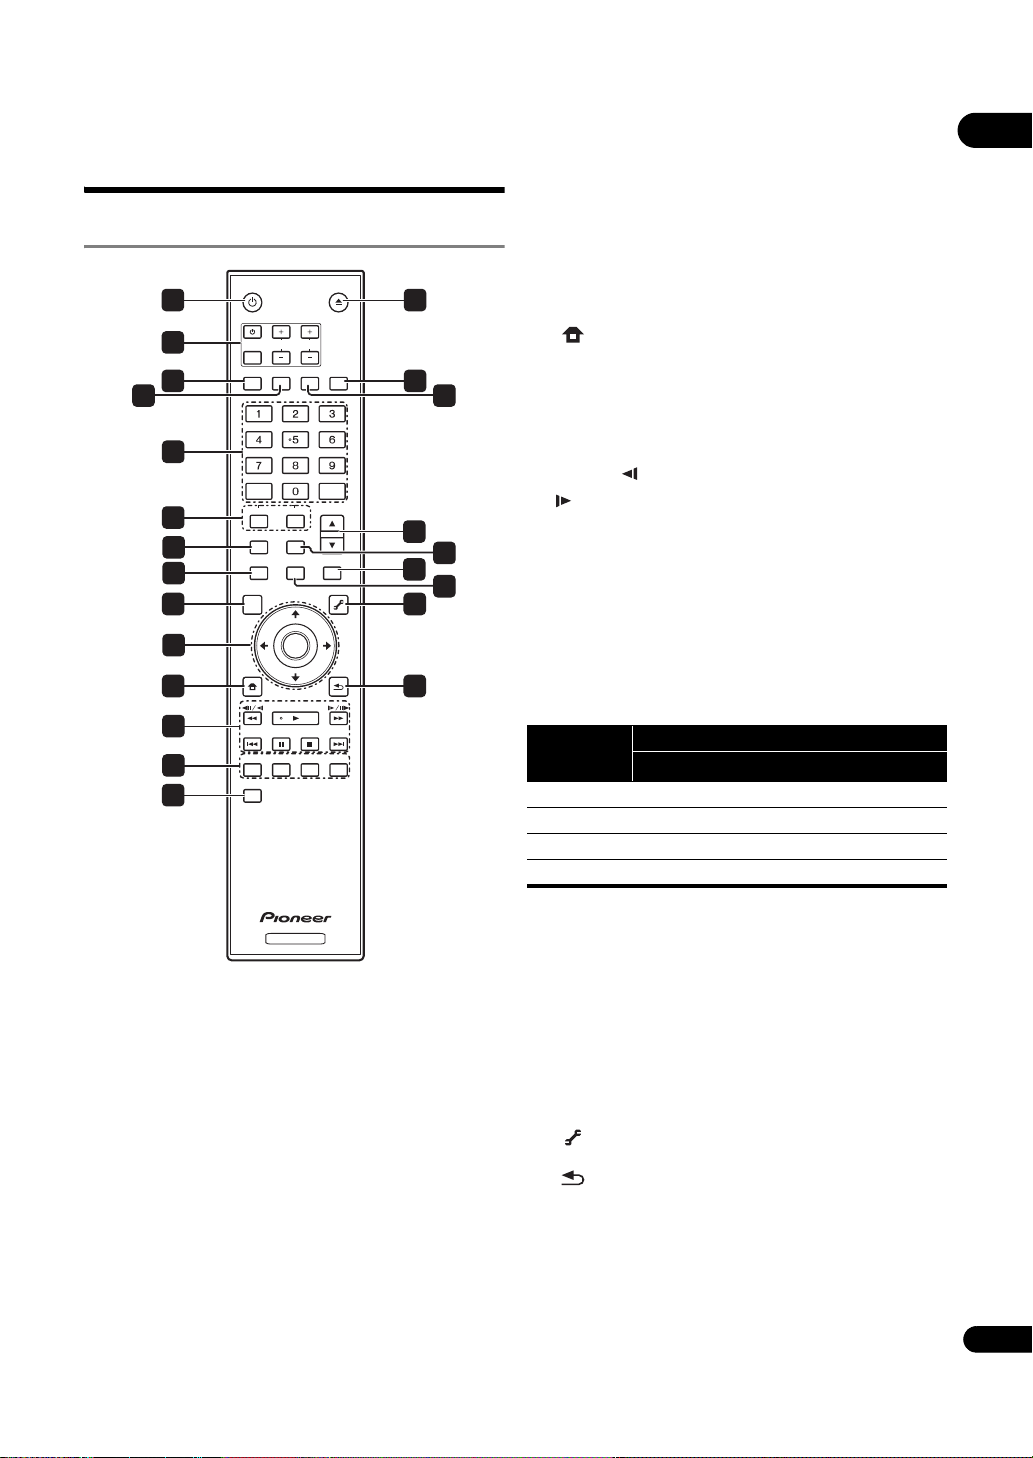
7 VIDEO SELECT – (page 22)
01
8 HOME MEDIA GALLERY – (page 31)
Functions
9TOP MENU – Press to display the top menu of the BD-
ROM or DVD-Video.
Remote Control
10 /// – Use to select items, change settings
and move the cursor.
execute the selected item or enter a
STANDBY/ON
INPUT
SELECT
AUDIO
TV CONTROL
CH
SUBTITLE
OPEN/CLOSE
VOL
FL DIMMER
ANGLE
ENTER – Press to
setting that has been changed, etc.
11 HOME MENU – (page 37)
12 PLAY – (page 24)
PAUSE – (page 24)
STOP – (page 24)
PREV/ NEXT – (page 25)
CLEAR
AUDIO
VIDEO SELECT
HOME MEDIA
GALLERY
TOP MENU
SECONDARY
PLAY MODE
DISPLAY POPUP MENU
ENTER
OUTPUT
RESOLUTION
VIDEO
MENU
TOOLS
// – (page 25)
// – (page 25)
13 RED/GREEN/BLUE/YELLOW – Use these to navigate
BD-ROM menus.
14 VIDEO ADJUST – (page 34)
15 OPEN/CLOSE – Press to open and close the disc
ENTER
HOME
MENU
PREV
RED
VIDEO ADJUST
PAUSE
GREEN
PLAY
RETURN
STOP
BLUE YELLOW
NEXT
1 STANDBY/ON – Press to turn the power on and
off.
2 TV CONTROL – (page 20)
3 AUDIO – (page 26)
4 SUBTITLE – (page 25)
5 Number buttons – Use these to select and play the
title/chapter/track you want to view or listen to and to
select items from menus.
CLEAR – Press to clear the numeric number, etc.
ENTER – Press to execute the selected item or enter a
BD PLAYER
tray.
16 FL DIMMER – When pressed, the brightness of the
player’s front panel display and the status of the
indicators on the player’s front panel changes.
Front panel
display
Blu-ray FL OFF
Bright Bright Off Lit
Medium Bright Off Lit
DarkDarkOff Lit
Off Off Lit Off
1. This lights when an HDMI-compatible device is connected to an
HDMI OUT terminal (page 14).
Indicators
HDMI
1
17 ANGLE – (page 25)
18 OUTPUT RESOLUTION – (page 22)
PLAY MODE – (page 28)
19
20 POP UP MENU/MENU – Press to display the BD-
ROM or DVD-Video menus.
21 DISPLAY – (p age 26)
22 TOOLS – (page 21)
23 RETURN – Press to return to the previous
screen.
setting that has been changed, etc.
6 SECONDARY AUDIO – (page 26)
SECONDARY VIDEO – (page 26)
11
En
Page 12
Front Panel
01
1
542 7 86 93
10
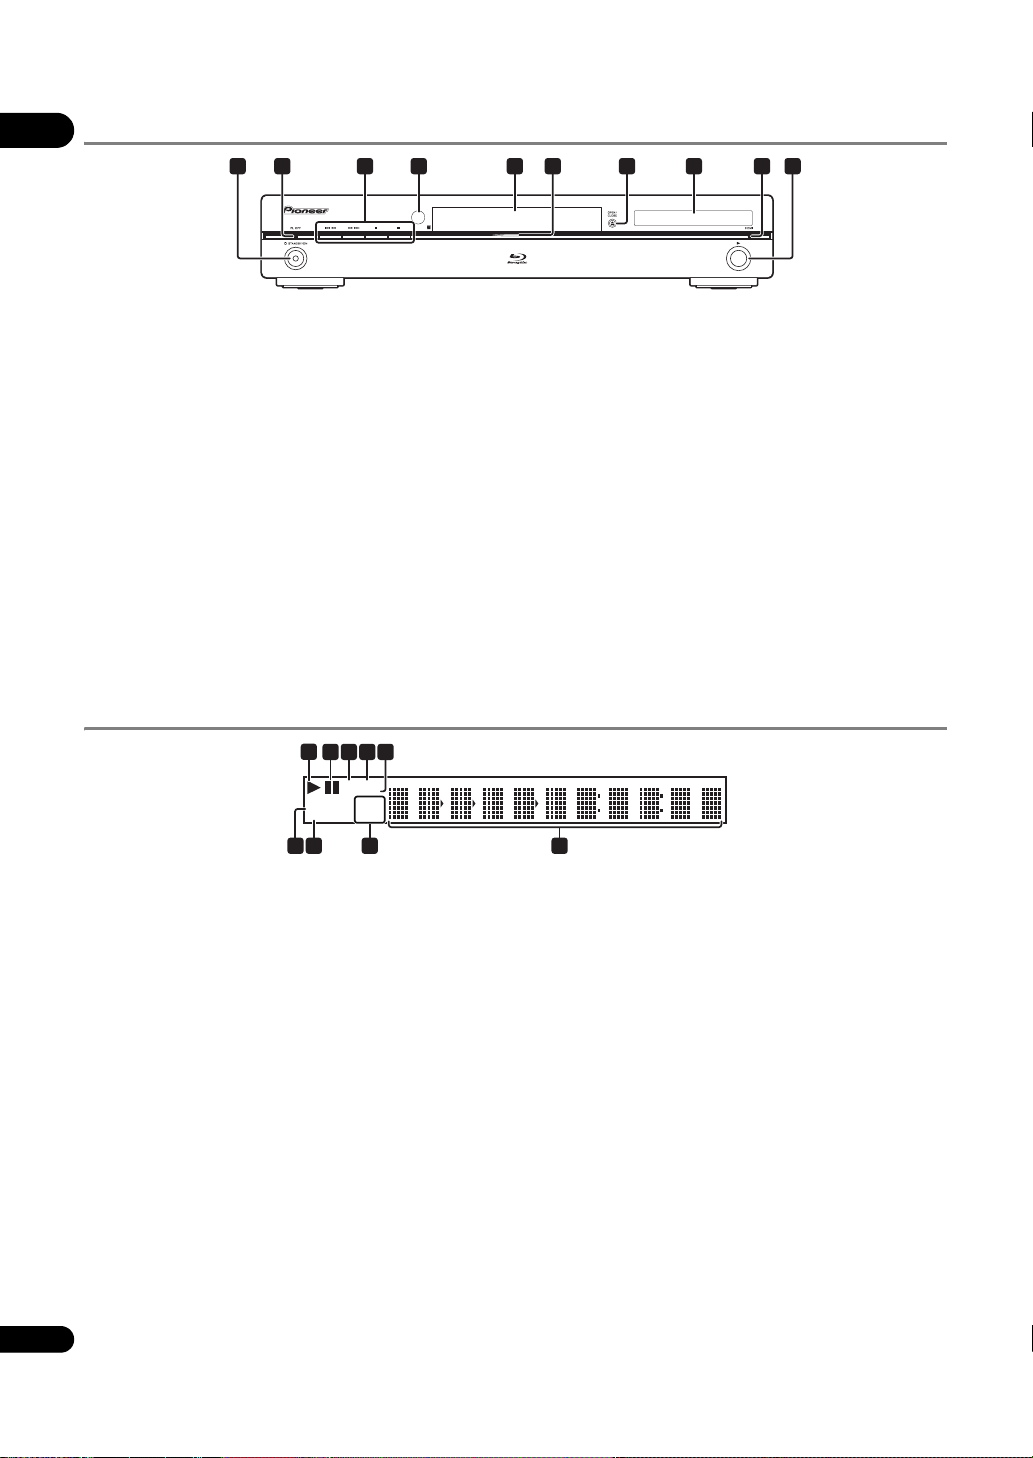
1 STANDBY/ON – Press to turn the power on and
off.
2 FL OFF indicator – Lights when the player’s front
panel display is turned off pressing FL DIMMER.
3 / – Press to skip to the beginning of the
previous title/chapter/track/file. Press and hold to
start reverse scanning (page 25).
/ – Press to skip to the beginning of the next
title/chapter/track/file. Press and hold to start forward
scanning (page 25).
– Press during playback to pause. Press again to
restart pla
– P
yback.
ress to stop playback.
Front Panel Display
LANHD
PQLS
24HZ
50HZ
60HZ
5243
1
CONTROL
EXT
1 – (page 24)
2 – (page 24)
3HD – This lights when an HDMI cable is connected
and video signals are being output with a resolution of
1080/24p, 1080/60i, 1080/60p or 720/60p. It also lights
when a component video cable is connected and
video signals are being output with a resolution of
1080/60i or 720/60p.
4LAN – (page 18)
5PQLS – (page 15)
6Character display – Displays the title/chapter/track
number, elapsed time, etc.
7 24HZ/50HZ/60HZ – The frequency of the video frame
or field being output lights.
8EXT – (page 17)
9 CONTROL – (page 15)
4 Remote control sensor – Point the remote control to
this, then operate it within approximately 23 feet
(7 m).
The player may have trouble capturing remote control
signals if there is a fluorescent light nearby. If this
happens, move the player away from the fluorescent
light.
5 Disc tray
6 Blu-ray indicator – Lights when the power is turned
on.
7 OPEN/CLOSE – Press to open and close the disc
tray.
8 Front panel display
9 HDMI indicator – (page 14)
10 – Press to start playback.
6789
12
En
Page 13
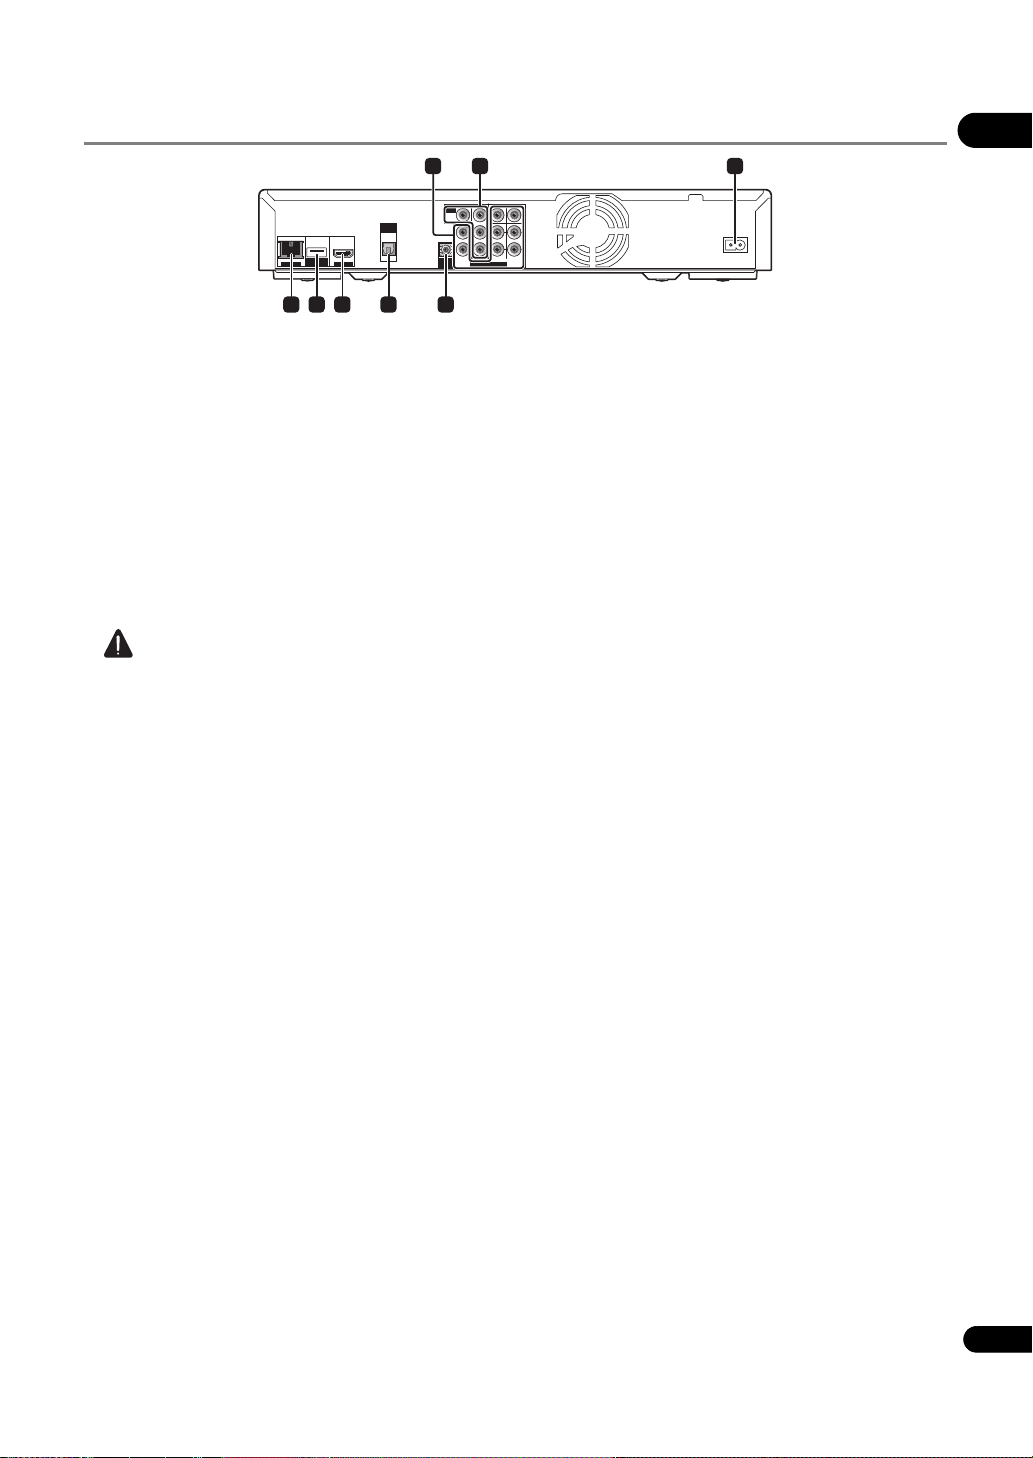
Rear Panel
(BD STORAGE)
LAN(100) USB
LAN(100)
01
1
COMPONENT VIDEO
COMPONENT VIDEO
VIDEO
VIDEO
CENTER
SUB WOOFER
CENTER
SUB WOOFER
Y
Y
OUT
OUT
VIDEO
VIDEO
P
P
B
B
L
DIGITAL
DIGITAL
OUT
OUT
OPTICAL
HDMI OUT
HDMI OUT
OPTICAL
USB
L
FRONT SURROUND SURROUND
FRONT SURROUND SURROUND
CONTROL
CONTROL
IN
IN
PRR
PRR
AUDIO OUT(7.1 ch)
AUDIO OUT(7.1 ch)
L
L
R
R
BACK
BACK
32
AC IN
AC IN
8 7 6 5
4
1 AUDIO OUT (7.1 ch) terminals – (page 16)
2 VIDEO OUT terminals
VIDEO – (page 16)
COMPONENT VIDEO – (page 16)
3AC IN – (page 18)
4 CONTROL IN terminal – Use to control this player
from the remote sensor of another Pioneer
component with a CONTROL OUT terminal and
bearing the mark. Connect the CONTROL OUT
terminal of the other component to CONTROL IN on
this player using a mini-plug cord (commercially
available).
Caution
•Be sure to connect cables for outputting the audio
and video signals.
• When connected via System Control, point the
remote control toward the connected component
(such as an AV receiver or ampli
The remote will
fier).
not work correctly when pointed at this player.
• You cannot use System Control with components that
do not have a System Control terminal or with
components manufactured by companies other than
Pioneer.
5 DIGITAL OUT (OPTICAL) terminal – (page 17)
6 HDMI OUT terminal – (page 16)
7USB (BD STORAGE) port – (page 17)
8 LAN (100) terminal – (page 18)
13
En
Page 14

Chapter 2
02
Connecting up
Be sure to turn off the power and unplug the power cord
from the power outlet whenever making or changing
connections.
After connecting, make the settings at the Setup
Navigator menu according to the type of cable
connected (page 19).
Also refer to the operating instructions of the device
being connected.
Connecting using an HDMI cable
The audio and video signals can be transferred to HDMIcompatible devices as digital signals with no loss of
sound or video quality.
Note
• Make the settings at the Setup Navigator menu
according to connected HDMI-compatible device
(page 19).
•The HDMI indicator on the player’s front panel lights
when an HDMI-compatible device is connected to an
HDMI OUT terminal (page 12).
• 1080p video signals may not be output, depending on
the HDMI cable being used.
About HDMI
This player incorporates High-Definition Multimedia
Interface (HDMI™) technology.
capabilities, allowing natural colors to be reproduced
more faithfully than ever.
“x.v.Color” is a promotion name given to the products that
have the capability to realize a wide-gamut color space
based on the international standard specifications
defined as xvYCC.
“x.v.Color” and are trademarks of Sony
Corporation.
Audio signals that can be
transferred with the player’s HDMI
OUT terminal
•Dolby TrueHD
•Dolby Digital Plus
•Dolby Digital
•DTS-HD Master Audio
• DTS-HD High Resolution Audio
• DTS Digital Surround
• MPEG-2 AAC
•Linear PCM
Linear PCM audio signals meeting the following
conditions can be output:
–Sampling frequency: 32 kHz to 192 kHz
–Number of channels: Up to 8 (up to 6 for a 192 kHz
sampling frequency)
For details, see About the audio output settings on
page 47.
HDMI, the HDMI Logo and High-Definition Multimedia
Interface are trademarks or registered trademarks of HDMI
Licensing, LLC.
The player supports Deep Color.
The conventional players can transmit a video signal with
8 bit color depth in the YCbCr 4:4:4 or RGB formats, the
players supporting Deep Color can transmit a video
signal with a color bit depth of greater than 8 bits per
color component. Subtle color gradations can be
reproduced when connected to a TV that supports Deep
Color.
This product is compatible with “x.v.Color”
ility to realize a wide-gamut color space based on
capab
the xvYCC specifications.
Playing video signals conforming to “xvYCC” standards
on this player when connected to an “x.v.Color”-
14
compatible TV, etc., expands color reproduction
En
that have the
About the HDMI High Speed
Transmission
This player outputs 1080/60p and Deep Color video
signals. If your TV supports 1080/60p or Deep Color
signals, use a High Speed HDMI™ cable in order to take
advantage of the maximum performance the player and
TV can offer. Also set HDMI High Speed Transmission to
On (page 39).
High Speed HDMI™ cables are tested to carry signals up
to 1080p. 1080/24p, 1080/60i, 1080/60p and 720/60p video
signals that are capable of Deep Color can also be
carried.
Note
•Set HDMI High Speed Transmission to Off when
using an HDMI cable other than a High Speed
HDMI™ cable (a Standard HDMI™ cable).
Page 15

• The following restrictions apply when HDMI High
Speed Transmission is set to Off:
–Deep Color signals are not output.
–If the output video resolution is set to Auto, the
signals are output with a resolution of 1080/60i
when TV’s preferred resolution is 1080/60p.
– When the output video resolution is set to 480i or
480p, Dolby TrueHD and DTS-HD Master Audio
audio signals are output as Dolby Digital, DTS
Digital Surround or linear PCM signals. 96 kHz or
192 kHz multi-channel audio signals are output as
linear PCM 2-channel audio signals (page 47).
• When an HDMI cable with a built-in equalizer is
connected, it may not operate properly.
When connected to a DVI device
• It is not possible to connect DVI devices
(computer displays, for example) that are not
compatible with HDCP. HDCP is a specification to
protect audiovisual content across the DVI/HDMI
interface.
• No audio signals are output. Connect using an audio
cable, etc.
•This player is designed for connection with HDMI-
compatible devices. When connected to a DVI device,
it may not operate properly depending on the DVI
device.
About KURO LINK function
The functions listed below work when a Pioneer KURO
LINK-compatible Flat Panel TV or AV system (AV receiver
or amplifier, etc.) is connected to the player using an
HDMI cable.
Functions operated from the TV
Such player operations as starting and stopping playback
and displaying the menus can be performed from the Flat
Panel TV.
Auto-select function
The input switches automatically on the Flat Panel TV and
AV system (AV receiver or amplifier, etc.) when playback
is started on the player or the Home Menu or Home Media
Gallery is displayed. When the input is switched, the
playback picture, the Home Menu or Home Media Gallery
appears o
Simu
When playback on the player is started or the Home Menu
or Home Media Gallery is displayed, if the Flat Panel TV’s
power was off, its power turns on automatically. When the
Flat Panel TV’s power is turned off, the player’s power
automatically turns off.
Unified language function
When the language information from a connected Flat
Panel TV is received, you can have the player’s on-screen
display language change automatically to that of the Flat
Panel TV. This function is available only when playback is
stopped and the menu screen is not displayed.
n the Flat Panel TV.
ltaneous power function
Caution
•Also refer to the operating instructions of the Flat
Panel TV and AV system (AV receiver or amplifier,
etc.).
Note
• CO
ROL on the player’s front panel display lights
NT
when the KURO LINK function is activated (page 12).
To use the KURO LINK function
• The KURO LINK function only works when outputting
video signals from the HDMI OUT terminal.
• The KURO LINK function works when KURO LINK is
set to On on the player (page 39).
• The KURO LINK function operates when KURO LINK
is set to On for all devices connected with HDMI
cables. Once connections and the settings of all the
devices are finished, be sure to check that the player’s
picture is output to the Flat Panel TV. (Also check after
changing the connected devices and reconnecting
HDMI cables.) The KURO LINK function may not
operate properly if the player’s picture is not properly
output to the Flat Panel TV.
•Use High Speed HDMI™ cables when using the
KURO LINK function. The KURO LINK function may
not operate properly if other HDMI cables are used.
•F
or
some models, the KURO LINK function may be
referred to as “HDMI Control”.
•The Simultaneous power function is activated when
the player is set as follows (page 39):
Display Power On: On
Display Power Off: On
About PQLS function
The PQLS (Precision Quartz Lock System) is a transfer
control technology using the KURO LINK function. The
player’s output signals are controlled from the AV
receiver or amplifier to achieve high quality sound
playback using the quartz oscillator of AV receiver or
amplifier. This eliminates the influence of the jitter
generated upon transfer which can adversely affect the
sound quality.
•This player supports the “PQLS 2ch Audio” that is only
activated when playing an audio CD (CD-DA).
• The PQLS function is only activated when a Pioneer
AV receiver or amplifier compatible with the “PQLS
2ch Audio” function is connected directly to the
player’s HDMI OUT termin
•
The PQLS function is activated when the player is set
as follows (page 39):
KURO LINK: On
PQLS: Auto
•Also refer to the operating instructions of AV receiver
or amplifier.
• Please see the Pioneer website for AV receivers or
amplifiers that support the PQLS function.
al using an HDMI cable.
02
15
En
Page 16

02
AUDIO OUT(7.1 ch)
CONTROL
IN
VIDEO
OUT
VIDEO
FRONT SURROUND SURROUND
BACK
COMPONENT VIDEO
CENTER
SUB WOOFER
L
Y
P
B
PRR
L
R
LAN(100) USB
HDMI OUT
DIGITAL
OUT
OPTICAL
LAN(100)
USB
(BD STORAGE)
HDMI OUT
DIGITAL
OUT
OPTICAL
AUDIO OUT(7.1 ch)
CONTROL
IN
VIDEO
OUT
VIDEO
FRONT SURROUND SURROUND
BACK
COMPONENT VIDEO
CENTER
SUB WOOFER
L
Y
P
B
PRR
L
R
Player’s rear panel
TV
Match the direction of
the plug to the terminal
and insert straight.
To HDMI
input terminal
HDMI cable
(commercially
available)
It is also possible to connect to an
AV receiver or amplifier using an
HDMI cable (below).
Direction of signal flow
Player’s rear panel
To HDMI
input terminal
From HDMI
output
terminal
AV receiver
or amplifier
To HDMI input
terminal
TV
HDMI cable
(commercially
available)
Match the direction
of the plug to the
terminal and insert
straight.
Direction of signal flow
HDMI cable
(commercially
available)
Caution
•If the output video resolution is switched when
playing an audio CD (CD-DA), the PQLS function does
not work. This function will work again after playback
stops and restarts.
Note
• PQLS on the player’s front panel display lights when
the PQLS function is activated (page 12).
Connecting an AV receiver or amplifier
Connect to an AV receiver or amplifier in order to enjoy
the surround sound of Dolby TrueHD, Dolby Digital Plus,
Dolby Digital, DTS-HD Master Audio, DTS-HD High
Resolution Audio or DTS Digital Surround. For
instructions on connecting the TV and speakers to the AV
receiver or amplifier, refer to the operating instructions of
AV receiver or amplifier.
About connections to components
of other makes supporting the KURO
LINK function
The functions listed below work when a TV or AV system
(AV receiver or amplifier, etc.) supporting the player’s
KURO LINK function is connected to the player using an
HDMI cable. (Depending on your TV or AV system (AV
receiver or amplifier, etc.), it could happen that not all of
the functions will work.)
• Functions operated from the TV
• Auto-select function
• Simultaneous power function
• Unified language function
Please see the Pioneer website for the latest information
on brands and model numbers of other brands that
support the KURO LINK function.
Connecting a TV
See Connecting an AV receiver or amplifier below to
connect an AV receiver or amplifier using an HDMI cable.
Caution
•Hold the plug when connecting and disconnecting
the cable.
• Placing a load on the plug could result in faulty
contact and no video signals being output.
Caution
•Hold the plug when connecting and disconnecting
the cable.
•Placing a load on the plug could result in faulty
contact and no video signals being output.
COMPONENT VIDEO
COMPONENT VIDEO
VIDEO
VIDEO
CENTER
SUB WOOFER
CENTER
SUB WOOFER
Y
Y
OUT
OUT
VIDEO
VIDEO
P
P
B
B
L
L
FRONT SURROUND SURROUND
FRONT SURROUND SURROUND
CONTROL
CONTROL
AUDIO OUT(7.1 ch)
AUDIO OUT(7.1 ch)
IN
IN
L
L
PRR
PRR
R
R
BACK
BACK
(BD STORAGE)
LAN(100) USB
LAN(100)
DIGITAL
DIGITAL
OUT
OUT
OPTICAL
HDMI OUT
HDMI OUT
OPTICAL
USB
Connecting video and audio cables
Note
• Make the settings in the Setup Navigator menu
according to the type of cable connected (page 19).
•To output video signals from this player, connect
using one of the following (not including when
connected using an HDMI cable): a component video
cable or a video cable.
16
En
Connecting a TV using a video/audio cable
Caution
• Connect the player’s video output directly to
your TV.
This player supports analog copy protection
technology. Therefore the picture may not be
displayed properly if connected to a TV via a DVD
recorder/video deck or when playing the player’s
output material that is recorded by a DVD recorder/
Page 17
video deck. Furthermore, the picture may not be
TV
Player’s rear panel
To component
video input terminals
A component
cable or three
commercially
available video
cables can be
used instead of
the video cable
(yellow plug) of
the included
video/audio cable
for connection.
Direction of signal flow
Red
White
It is also possible to connect to
an AV receiver or amplifier.
Connect the audio signals
using audio cables (7.1
channels) or an optical digital
audio cable (below).
To video/audio
input terminals
Video/audio cable (included)
Yellow
Player’s rear panel
To multi-channel audio
input terminals
AV receiver or
amplifier
Video/audio
cable (included)
Red
White
Audio cable
(commercially
available)
Direction of signal flow
An optical digital audio
cable (commercially
available) can also be
used for connection.
To optical digital
audio input
terminal
Audio cable
(commercially
available)
Audio cable
(commercially
available)
displayed properly due to the copy protection when
the player is connected to a TV with a built-in video
deck. For details, contact the manufacturer of your
TV.
COMPONENT VIDEO
COMPONENT VIDEO
VIDEO
VIDEO
CENTER
SUB WOOFER
CENTER
SUB WOOFER
Y
Y
OUT
OUT
VIDEO
VIDEO
P
P
B
B
L
L
FRONT SURROUND SURROUND
FRONT SURROUND SURROUND
CONTROL
CONTROL
IN
IN
PRR
PRR
AUDIO OUT(7.1 ch)
AUDIO OUT(7.1 ch)
L
L
R
R
BACK
BACK
COMPONENT VIDEO
VIDEO
CENTER
SUB WOOFER
Y
OUT
VIDEO
P
B
DIGITAL
OUT
OPTICAL
L
FRONT SURROUND SURROUND
CONTROL
IN
PRR
AUDIO OUT(7.1 ch)
L
R
BACK
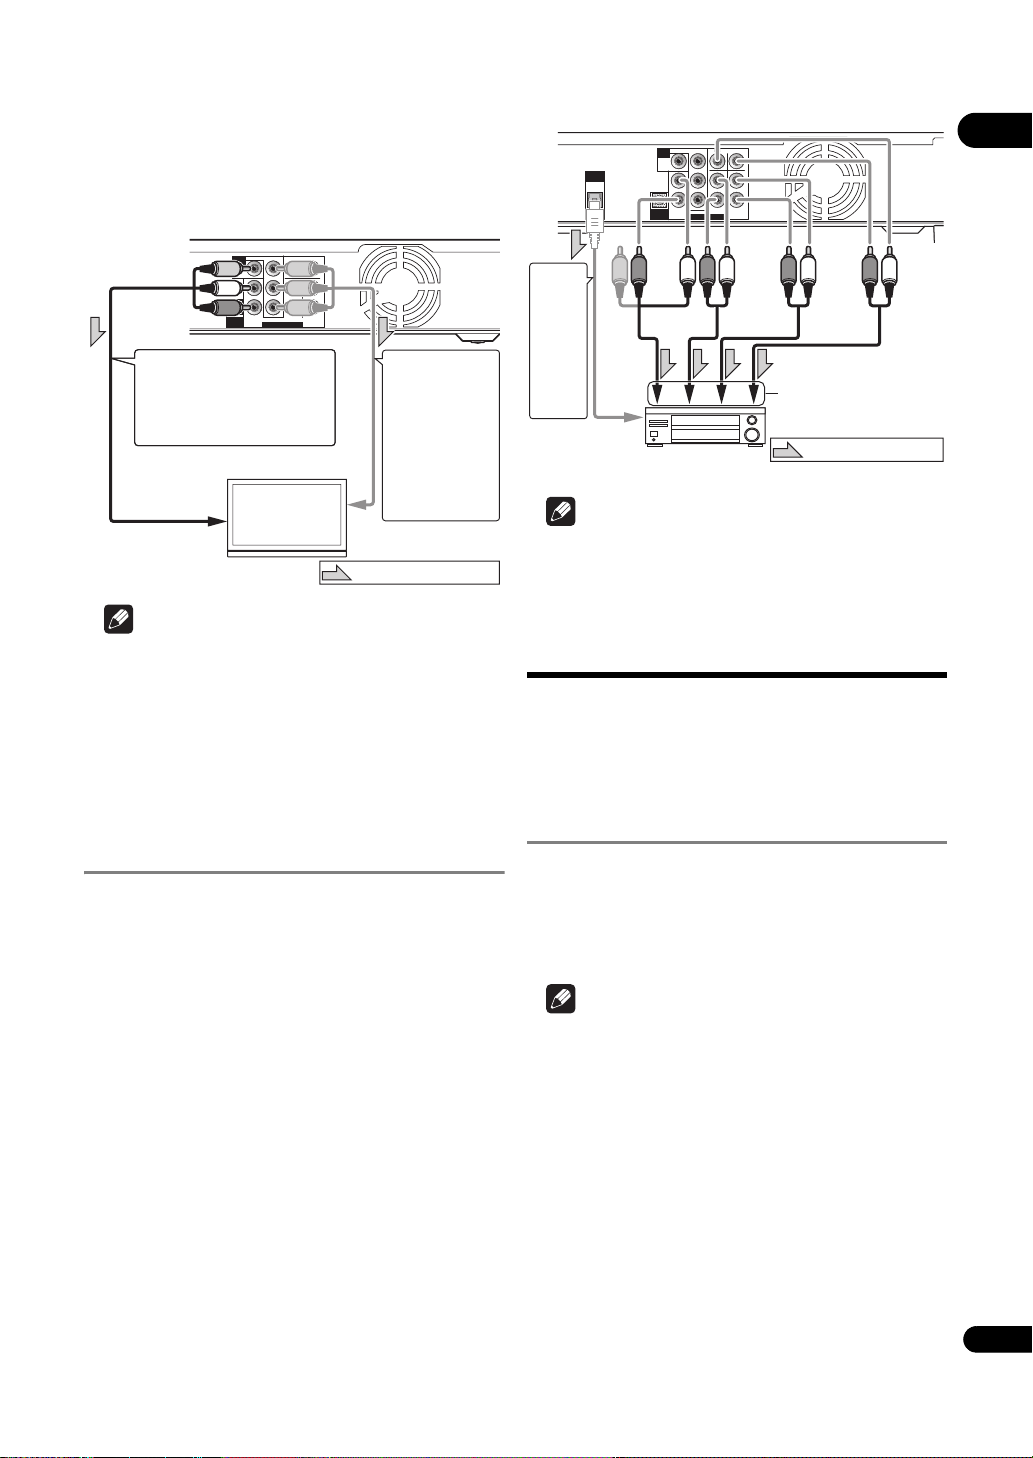
Note
• To connect to the 2-channel audio input terminals on
a TV, etc., connect to FRONT (L/R).
02
•Video signals are output with a resolution of 480/60i
when connected using a video cable.
• When connected to the TV using a component video
cable, video signals are not output with a resolution of
1080/24p or 1080/60p.
•Depending on the output video resolution setting, the
picture may not be output (page 22).
Connecting an AV receiver or amplifier using audio cables
When connecting to a 7.1-channel compatible AV
receiver or amplifier – Connect using 4 audio cables
(diagram below).
When connecting to a 5.1-channel compatible AV
receiver or amplifier – Connect using 3 audio cables (do
not connect to the surround back left and right
terminals).
• To switch the video from the AV receiver or amplifier,
also connect the video output terminals.
•After connecting, set Audio Output Mode to Multi-
channel (page 38).
Note
Connecting components to the USB port
The data downloaded with the BD-LIVE function and the
data used with the BONUSVIEW function when playing
BD-ROMs can be stored on a device connected to the
USB port (external storage).
About USB (external storage) devices
The USB (external storage) devices that can be
connected to the player are as shown below.
•USB 2.0-compatible memory devices or hard disks
• FAT16 or FAT32 file system, minimum 1 GB capacity
(2 GB or more recommended)
Note
• Devices formatted with a file system other than the
above cannot be used. Such devices may however be
usable if they are formatted from the player.
•External storage devices may not be recognized if
they contain multiple partitions.
• Some external storage devices may not operate with
this player.
•Operation of external storage devices (USB memory
devices, external hard disks, etc.) is not guaranteed.
17
En
Page 18
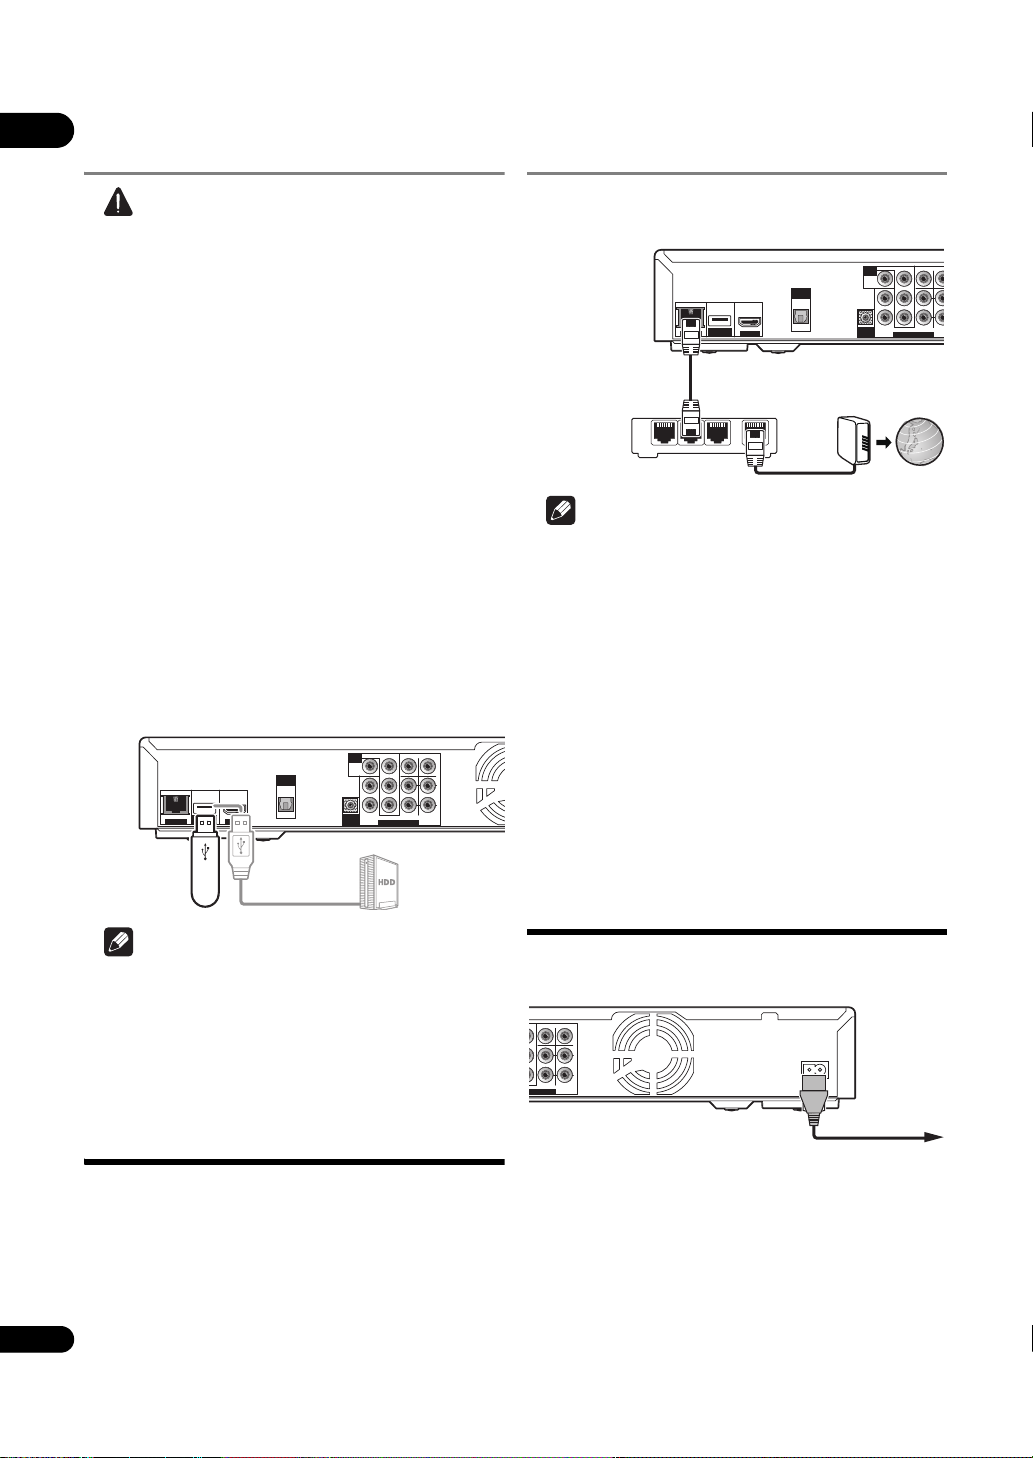
Connecting the USB
AUDIO OUT(7.1 ch)
CONTROL
IN
VIDEO
OUT
VIDEO
FRONT SURROUND SURROUND
BACK
COMPONENT VIDEO
CENTER
SUB WOOFER
L
Y
P
B
PRR
L
R
LAN(100) USB
HDMI OUT
DIGITAL
OUT
OPTICAL
LAN(100)
USB
(BD STORAGE)
HDMI OUT
DIGITAL
OUT
OPTICAL
AUDIO OUT(7.1 ch)
CONTROL
IN
VIDEO
OUT
VIDEO
FRONT SURROUND SURROUND
BACK
COMPONENT VIDEO
CENTER
SUB WOOFER
L
Y
P
B
PRR
L
R
USB memory
device, etc.
USB cable
(commercially
available)
Hard disk, etc.
Player’s rear panel
AUDIO OUT(7.1 ch)
CONTROL
IN
VIDEO
OUT
VIDEO
FRONT SURROUND SURR
COMPONENT VIDEO
CENTER
SUB W
L
Y
P
B
PRR
LAN(100) USB
HDMI OUT
DIGITAL
OUT
OPTICAL
LAN(100)
USB
(BD STORAGE)
HDMI OUT
DIGITAL
OUT
OPTICAL
AUDIO OUT(7.1 ch)
CONTROL
IN
VIDEO
OUT
VIDEO
FRONT SURROUND SURR
COMPONENT VIDEO
CENTER
SUB W
L
Y
P
B
PRR
LAN cable
(commercially
available)
Ethernet hub
(router with hub
functionality)
Modem
Internet
Player’s rear panel
Player’s rear panel
Power cord (included)
To wall outlet
02
(external storage) device
Connecting via an Ethernet hub
Caution
•Be sure to turn the player’s power off before
connecting or disconnecting external storage
devices.
•Use empty external storage devices (on which
nothing is stored).
• When using an external hard disk as the external
storage device, be sure to turn on the hard disk’s
power before turning on the player’s power.
•If the external storage device is write-protected, be
sure to disable the write-protection.
• When connecting the USB cable, hold onto the plug,
set the plug in the proper direction for the port and
ins
ert i
t horizontally.
• Placing excessive loads on the plug may result in
poor contact, making it impossible to write data on
the external storage device.
•The player is equipped with an internal storage. This
internal storage cannot be used when an external
storage device is connected.
•When a USB memory device or external hard disk is
connected and the player’s power is turned on, do not
unplug the power cord.
The player can be connected to an Ethernet hub using a
LAN cable.
LAN
1
23
WAN
Note
• LAN on the player’s front panel display lights when
there is an active local area network (LAN) connection
(page 12).
•If there is an available DHCP server in your local area
network, the IP address is obtained automatically.
Otherwise, set IP address manually (page 43).
•For some Internet service providers, you may have to
set the individual network configuration manually. In
this case, see page 43.
•Pioneer is not responsible for any malfunction of the
player due to communication error/malfunctions
associated with your network connection and/or your
connected equipment. Please con
act your Internet
t
service provider or network device manufacturer.
Network connection
BD-LIVE functions such as downloading movie trailers or
additional audio and subtitle languages and playing
on-line games can be enjoyed over the Internet. The
player’s software can also be updated over the Internet
(page 46). Connect an Ethernet hub (or a router with hub
functionality) that is connected to the Internet to the
player.
Be sure to use a 100BASE-TX compatible Ethernet hub or
18
router.
En
Note
•The EXT indicator on the player’s front panel display
lights when data can be stored on the external
storage (page 12).
• Devices may not work i
a me
mory card reader or USB hub.
f connected to the USB port via
• Use a USB cable with a length of 2 meters or less.
Connecting the power cord
Connect the power cord after all the connections between
devices have been completed.
O
O
CENTER
SUB WOOFER
CENTER
SUB WOOFER
Y
Y
P
P
B
B
L
P
P
R
R
SURROUND SURROUND
SURROUND SURROUND
OUT(7.1 ch)
OUT(7.1 ch)
L
R
R
BACK
BACK
AC IN
AC IN
Page 19
Chapter 3
Getting Started
03
Making settings using the Setup Navigator menu
Be sure to perform these settings when using the player
for the first time.
Caution
•Before turning on the power, check that the
connections between the player and other devices are
correct. Also, turn on the power of the devices
connected to the player before turning on the player’s
power.
• When using a Pioneer Flat Panel TV or front projector
compatible with the KURO LINK function, set KURO
LINK to On on the connected device before turning on
the player’s power.
•The screen in step 10 and test tones are output
simultaneously accord
7. Lo
wer the volume of the devices connected with the
player.
Note
•When a Pioneer Flat Panel TV or front projector
compatible with the KURO LINK function is
connected to the player using an HDMI cable, the
player is automatically set to the optimum picture
quality for the connected device.
ing to the settings in steps 4 to
TOP MENU
TOOLS
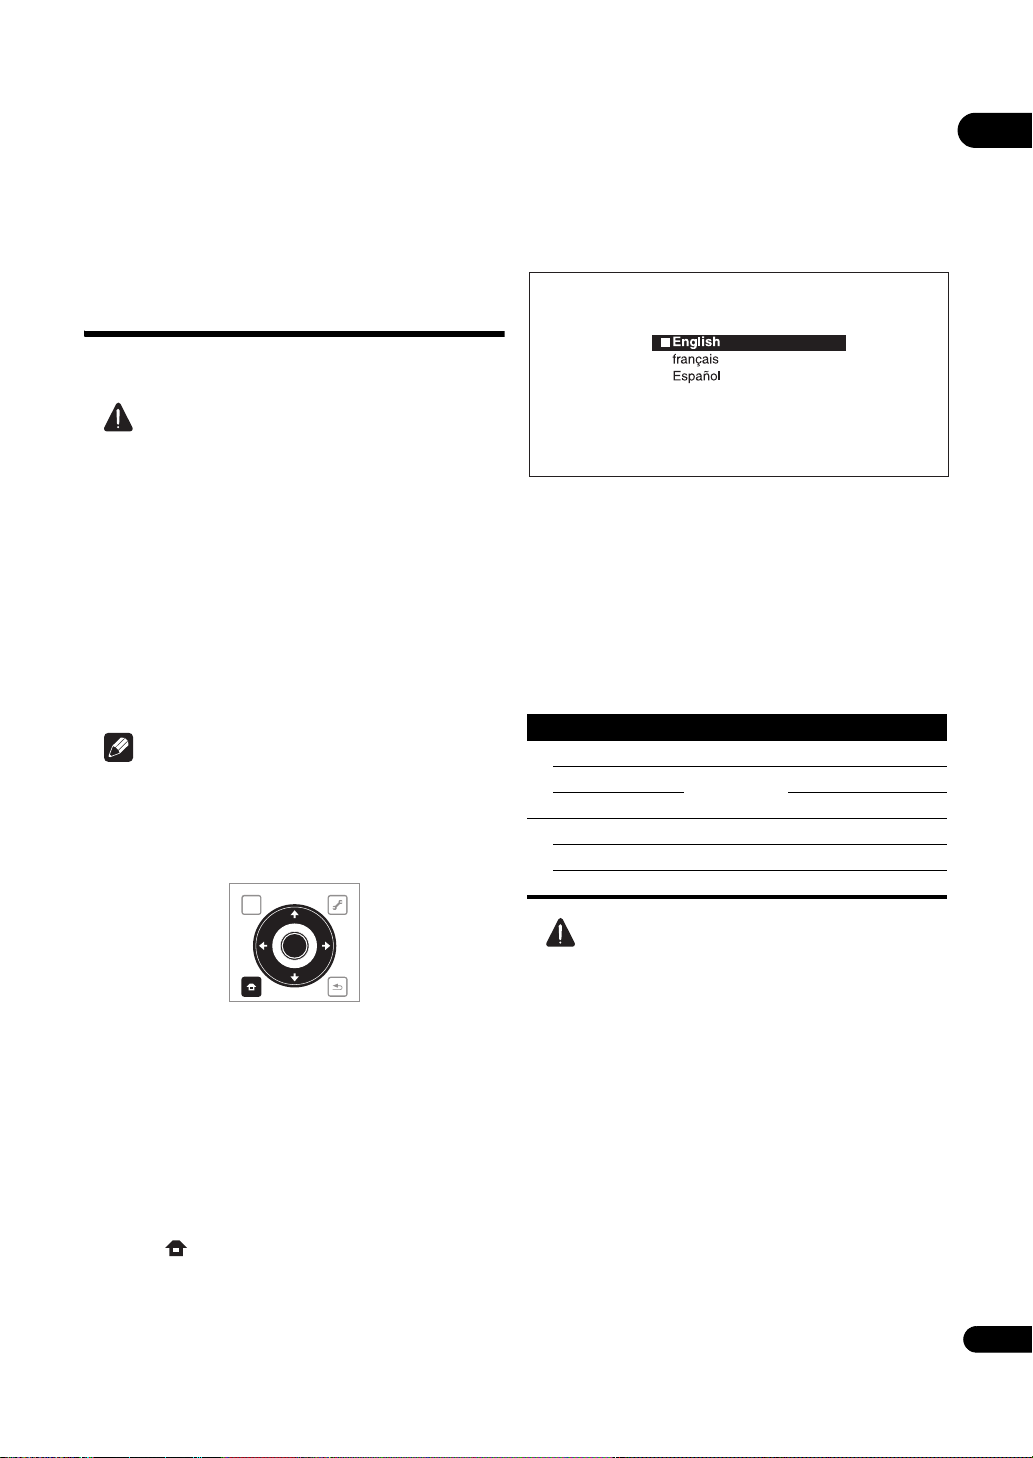
3 Select the OSD language.
Use / to select, then press ENTER.
Setup Navigator
Please select the on-screen display language.
Audio, subtitle and BDMV/DVD-Video menu
When a Pioneer Flat Panel TV that is compatible with
KURO LINK is connected to this player’s HDMI OUT
terminal, language settings are imported from the
Pioneer Flat Panel TV’s language settings before Setup
Navigator begins.
4 Select and set the video and audio output
terminals.
Select the actually connected video and audio output
terminals.
Use /// to select, then press ENTER.
Setting item Output terminal name
Video
HDMI HDMI OUT
COMPONENT VIDEO OUT COMPONENT VIDEO
VIDEO VIDEO
Audio
HDMI HDMI OUT
DIGITAL AUDIO DIGITAL OUT
ANALOG AUDIO AUDIO OUT
BD PLAYER
language will also be set.
ENTER
HOME
MENU
1 Turn on the TV’s power and switch the input.
See the TV’s operating instructions for instructions on
operating the TV.
2 Turn on the player’s power.
Press STANDBY/ON.
Check that the Setup Navigator menu is displayed.
RETURN
If the Setup Navigator menu is not
displayed
Press HOME MENU to display the Home
Menu, select Initial Setup Setup Navigator
Start, then press ENTER.
Caution
• When HDMI is selected for Video, no video signals
are output from the COMPONENT VIDEO or VIDEO
output terminals.
• When COMPONENT or VIDEO is selected at Vi
no
video signals are output from the HDMI OUT
terminal.
• The video and audio signals output from the set
output terminals are output synchronously (lip
synchronization).
• When COMPONENT or VIDEO is selected at Video,
no sound is output if HDMI is selected at Audio.
Follow the procedure below to redo the connections,
then select the proper connection at the setup
screen.
– When connecting using component video cables
or a video cable to watch the picture, connect to an
AV receiver or amplifier, or a TV using either analog
audio cables (7.1 channels or 2 channels), an
optical digital audio cable (page
17).
deo,
19
En
Page 20
03
– To listen to audio with the player connected to an
AV receiver or amplifier with an HDMI cable,
connect the TV to the AV receiver or amplifier using
an HDMI cable (page 16).
•When HDMI or DIGITAL AUDIO is selected at Audio,
linear PCM audio signals (2 channels) are output
from all terminals other than the ones selected at
Audio.
•When ANALOG AUDIO is selected at Audio, no
audio signals are output from the HDMI OUT or
DIGITAL OUT terminals.
For steps 5 to 7, the step to which you should
proceed depends on the combination of the Video
and Audio settings.
5 Select and set the HDMI High Speed Transmission
setting for the HDMI OUT terminal.
Use / to select, then press ENTER.
When HDMI High Speed Transmission for the HDMI
OUT terminal is set to On, use a High Speed HDMI
cable. The pict
ure and sound may not be output properly
if any other HDMI cable (for example a standard HDMI™
cable) or an HDMI cable with built-in equalizer is used.
6 Select the output video resolution from the
COMPONENT VIDEO output terminals.
Use / to select, then press ENTER.
For details on the resolution settings, see Switching the
output video resolution on page 22.
7 Select the aspect ratio of your TV.
Use / to select, then press ENTER.
8 Check the settings.
Select Proceed, then press ENTER.
9 Output test tones.
Use / to select Yes, then press ENTER.
10 Finish the Setup Navigator menu.
Use / to select Finish, then press ENTER.
To redo the settings from the start, select Go Back.
Depen
ding on th
e output terminal setting of step 4 or the
HDMI cable being used, it may happen that no picture
and/or sound is output. If this happens, the setup returns
to step 4 if there is no operation for over 30 seconds. Once
the setup returns to step 4, redo the settings according to
the connected devices and the HDMI cable being used.
11 Checking the picture quality settings or setting
the picture quality
If a Pioneer Flat Panel TV or projector is connected to the
player and HDMI is selected for Video in step 4, the
player sets the picture quality automatically. The
automatic picture quality setting screen appears. Press
ENTER.
W
hen the automatic picture quality setting screen does
not appear, the manual picture quality setting screen
appears. Use / to select the connected component,
then press ENTER.
20
En
™
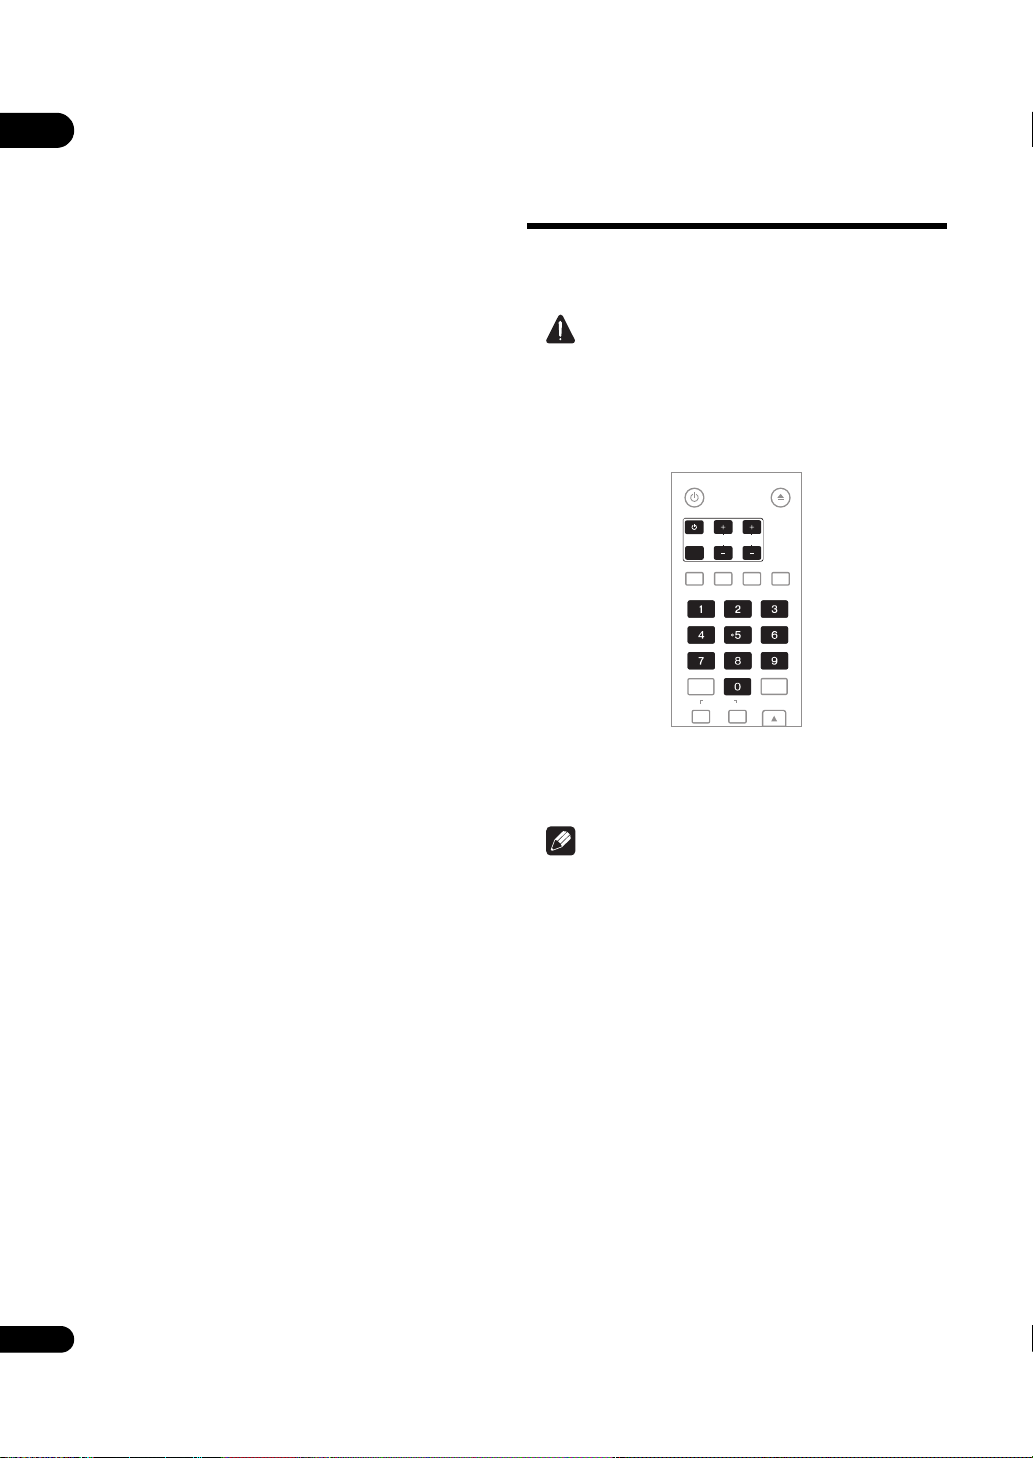
Operating the TV with the player’s remote control
When the manufacturer code for your brand of TV is set
on the player’s remote control, the TV can be operated
using the player’s remote control.
Caution
•For some models it may not be possible to operate the
TV with the player’s remote control, even for TVs of
brands listed on the manufacturer code list.
•The setting may be restored to the default after the
batteries are replaced. If this happens, reset it.
STANDBY/ON
TV CONTROL
INPUT
SELECT
AUDIO
CLEAR
AUDIO
1 Input the 2-digit manufacturer code.
Press the number buttons (0 to 9) to input the code while
pressing TV CONTROL .
Note
•The factory setting is 00 (PIONEER).
• If you make a mistake when inputting the code,
release T
V CONTROL then st
beginning.
• When there are multiple codes for a manufacturer, try
inputting them in the indicated order until the TV can
be operated.
2 Check that the TV can be operated.
Operate the TV using TV CONTROL.
– Press to turn the TV’s power on and off.
INPUT SELECT – Press to switch the TV’s input.
CH +/– – Press to select the TV channel.
VOL +/– – Press to adjust the volume.
SUBTITLE
OPEN/CLOSE
CH
VOL
FL DIMMER
ANGLE
ENTER
OUTPUT
RESOLUTION
VIDEO
art over from the
Page 21

TOP MENU
TOOLS
HOME
MENU
RETURN
ENTER
TV Preset code list
Manufacturer Code(s)
PIONEER 00, 31, 32, 07, 36, 42, 51,
22
ACURA 44
ADMIRAL 31
AIWA 60
AKAI 32, 35, 42
AKURA 41
ALBA 07, 39, 41, 44
AMSTRAD 42, 44, 47
ANITECH 44
ASA 45
ASUKA 41
AUDIOGONIC 07, 36
BASIC LINE 41, 44
BAUR 31, 07, 42
BEKO 38
BEON 07
BLAUPUNKT 31
BLUE SKY 41
BLUE STAR 18
BPL 18
BRANDT 36
BTC 41
BUSH 07, 41, 42, 44, 47, 56
CASCADE 44
CATHAY 07
CENTURION 07
CGB 42
CIMLINE 44
CLARIVOX 07
CLATRONIC 38
CONDOR 38
CONTEC 44
CROSLEY 32
CROWN 38, 44
CRYSTAL 42
CYBERTRON 41
DAEWOO 07, 44, 56
DAINICHI 41
DANSAI 07
DAYTON 44
DECCA 07, 48
DIXI 07, 44
DUMONT 53
ELIN 07
ELITE 41
ELTA 44
EMERSON 42
ERRES 07
FERGUSON 07
FINLANDIA 35, 43, 54
FINLUX 32, 07, 45, 48, 53, 54
FIRSTLINE 40, 44
FISHER 32, 35, 38, 45
FORMENTI 32, 07, 42
FRONTECH 31, 42, 46
FRONTECH/PROTECH 32
FUJITSU 48
FUNAI 40, 46, 58
GBC 32, 42
GE 00, 01, 08, 07, 10, 11, 17, 02,
28, 18
GEC 07, 34, 48
GELOSO 32, 44
GENERAL 29
GENEXXA 31, 41
GOLDSTAR 10, 23, 21, 02, 07, 50
GOODMANS 07, 39, 47, 48, 56
GORENJE 38
, 36
, 51
GPM 41
GRAETZ 31, 42
GRANADA 07, 35, 42, 43, 48
GRADIENTE 30, 57
GRANDIN 18
GRUNDIG 31, 53
HANSEATIC 07, 42
HCM 18, 44
HINARI 07, 41, 44
HISAWA 18
HITACHI 31, 33, 34, 36, 42, 43, 54,
06, 10, 24, 25, 18
HUANYU 56
HYPSON 07, 18, 46
ICE 46, 47
IMPERIAL 38, 42
INDIANA 07
INGELEN 31
INTERFUNK 31, 32, 07, 42
INTERVISION 46, 49
ISUKAI 41
ITC 42
ITT 31, 32, 42
JEC 05
JVC 13, 23
KAISUI 18, 41, 44
KAPSCH 31
KENDO 42
KENNEDY 32, 42
KORPEL 07
KOYODA 44
LEYCO 07
ESENK&TTER 07
LI
LOEWE 07
LUXOR 32, 42, 43
M-ELECTRONIC 31, 44, 45, 54, 56 ,
07, 36, 51
MAGNADYNE 32, 49
MAGNAFON 49
MAGNAVOX 07, 10, 03, 12, 29
MANESTH 39, 46
MARANTZ 07
MARK 07
MATSUI 07, 39, 40, 42, 44, 47, 48
MCMICHAEL 34
MEDIATOR 07
MEMOREX 44
METZ 31
MINERVA 31, 53
MITSUBISHI 09, 10, 02, 21, 31
MULTITECH 44, 49
NEC 59
NECKERMANN 31, 07
NEI 07, 42
NIKKAI 05, 07, 41, 46, 48
NOBLIKO 49
NOKIA 32, 42, 52
NORDMENDE 32, 36, 51, 52
OCEANIC 31, 32, 42
ORION 32, 07, 39, 40
OSAKI 41, 46, 48
OSO 41
OSUME 48
OTTO VERSAND 31, 32, 07, 42
PALLADIUM 38
PANAMA 46
PANASONIC 31, 07, 08, 42, 22
PATHO CINEMA 42
PAUSA 44
, 40, 46, 48
PHILCO 32, 42
PHILIPS 31, 07, 34, 56, 68
PHOENIX 32
PHONOLA 07
PROFEX 42, 44
PROTECH 07, 42, 44, 46, 49
QUELLE 31, 32, 07, 42, 45, 53
R-LINE 07
RADIOLA 07
RADIOSHACK 10, 23, 21, 02
RBM 53
, 10, 15, 16, 17, 18, 61, 62,
RCA 01
09
REDIFFUSION 32, 42
REX 31, 46
ROADSTAR 41, 44, 46
SABA 31, 36, 42, 51
SAISHO 39, 44, 46
SALORA 31, 32, 42, 43
SAMBERS 49
SAMSUNG 07, 38, 44, 46, 69, 70
SANYO 35, 45, 48, 21, 14, 91
SBR 07, 34
SCHAUB LORENZ 42
SCHNEIDER 07, 41, 47
SEG 42, 46
SEI 32, 40, 49
SELECO 31, 42
SHARP 02, 19, 27, 67, 90
SIAREM 32, 49
SIEMENS 31
SINUDYNE 32, 39, 40, 49
SKANTIC 43
SOLAVOX 31
SONOKO 07, 44
SONOLOR 31, 35
SONTEC 07
SONY 04
SOUNDWAVE 07
STANDARD 41, 44
STERN 31
SUSUMU 41
SYSLINE 07
TANDY 31, 41, 48
TASHIKO 34
TATUNG 07, 48
TEC 42
TELEAVIA 36
TELEFUNKEN 36, 37, 52
TELETECH 44
TENSAI 40, 41
THOMSON 36, 51, 52, 63
THORN 31, 07, 42, 45, 48
TOMASHI 18
TOSHIBA 05, 02, 26, 21, 53
TOWADA 42
ULTRAVOX 32, 42, 49
UNIDEN 92
UNIVERSUM 31, 07, 38, 42, 45,
46, 54
TEL 07
VES
VI
CTOR 13
VOXSON 31
WALTHAM 43
WATSON 07
WATT RADIO 32, 42, 49
WHITE WESTINGHOUSE 07
YOKO 07, 42, 46
ZENITH 03, 20
Using the TOOLS menu
Various functions can be called out according to the
player’s operating status.
1 Display the TOOLS menu.
Press TOOLS.
BD PLAYER
TOOLS
2 Select and set the item.
Use / to select, then press ENTER.
Note
• Items that cannot be changed are displayed in gray.
The items that can be selected depend on the player’s
status.
Angle
Audio
Subtitle
Audio Adjust
Video Adjust
03
21
En
Page 22

03
O
Output video resolution setting of
selected video output terminal
Example:
22
En
To change the setting of the
selected item
Use / to change.
To close the TOOLS menu
Press TOOLS or RETURN.
TOOLS menu item list
Item Description
Play from Beginning Play the selected title, track or file from
the start.
Slideshow Play a slideshow of the image files on the
selected disc or folder.
Play Mode Display the Play Mode screen (page 28).
Video Adjust Display the picture quality adjustment
screen (page 34).
Secondary Video Switch the BD-ROM’s secondary video
(Picture-in-Picture) (page 26).
Subtitle Switch the subtitles (page 25).
Angle Switch the BD-ROM/DVD-Video disc’s
camera angles (page 25).
Rotate Rotate the image while playing a
slideshow (page 32).
Audio Adjust Display the audio adjustment menu
(page 35).
Audio Switch the audio (page 26).
Secondary Audio Switch the BD-ROM’s secondary audio
(page 26).
Now Playing Display the playback screen of the
currently playing track or file.
Original/Play List Switch the DVD-R/-RW’s (VR format) list
screen between the original list and the
playlist.
Add to HMG Playlist Add the selected track or file to the HMG
Playlist (page 32).
Delete from HMG
Playlist
Output Video
Resolution
Delete the selected track or file from the
HMG Playlist (page 33).
Switch the output video resolution from
the various output terminals (page 22).
Switching the video output terminal to be viewed
Use the procedure below to switch the video output signal
to be viewed between the
analog output terminal (
output terminals).
Caution
•The picture may not be displayed for a while when the
video output terminal is switched.
HDMI OUT
terminal and an
COMPONENT VIDEO
or
VIDEO
• When the HDMI OUT terminal is selected, no video
signals are output from the other video output
terminals.
• When a video output terminal other than the HDMI
OUT terminal is selected, no audio and video signals
are output from the HDMI OUT terminal.
VIDEO
PLAY MODE
DISPLAY
UTPUT
RESOLUTION
POPUP MENU
MENU
TOOLS
AUDIO
VIDEO SELECT
HOME MEDIA
GALLERY
TOP MENU
SECONDARY
Press VIDEO SELECT.
•The current video output terminal is displayed on the
TV screen and on the player’s front panel display.
To switch the video output terminals, press /.
Video Output Terminal
HDMI (Source Direct)
•The video output terminal setting can also be
switched by pressing / on
player’s front panel.
Switching the output video resolution
Use the procedure below to switch the output video
resolution from the various video output terminals.
Caution
• On some devices (TV, AV receiver or amplifier, etc.),
the video or audio may not be output properly when
the resolution is switched. If this happens, use
OUTPUT RESOLUTION to set a resolution at which
the video and audio are properly output.
• When video signals are being output with a resolution
of 1080/24p, 1080/60i, 1080/60p or 720/60p from the
HDMI OUT terminal or COMPONENT VIDEO output
terminals, the picture may be output with an aspect
ratio of 16:9, even if the TV Aspect Ratio
(Standard).
•The picture may not be displayed for a while when the
resolution is switched.
VIDEO
PLAY MODE
DISPLAY
ENTER
OUTPUT
RESOLUTION
POPUP MENU
MENU
CLEAR
SECONDARY
AUDIO
VIDEO SELECT
HOME MEDIA
GALLERY
Press OUTPUT RESOLUTION.
•The current output video resolution setting is
displayed on the TV screen and on the player’s front
panel display.
To switch the output video resolution, press OUTPUT
RESOLUTION again or press /.
th
e
is
set to 4:3
Page 23

•The output video resolution depends on the video
Auto
Output Video Resolution
Source : 1080/60i
Current Output : 1080/60i
Video resolution of the
currently playing disc
Output video resolution
from the player
Example:
output terminal below.
To output film material
To output 1080/24p film material from HDMI OUT
terminal, set the output video resolution to either Auto or
Source Direct.
Caution
• 1080/24p signals can only be output from the HDMI
OUT terminal. They cannot be output from other
video terminals.
•The output video resolution setting can also be
switched by selecting Output Video Resolution
from the TOOLS menu.
About Film material
The film material is a video signal with a frame rate of 24
frames/second. For example, these materials include
1080/24p, 720/24p, etc.
• When Auto is selected, the picture is output at 60
frames/second if your TV is not compatible with 1080/
24p signals.
• When Source Direct is selected, the signals are
output as such, even if your TV is not compatible with
1080/24p signals. If the picture is not displayed
properly, use OUTPUT RESOLUTION to set an output
video resolution at which the video and audio signals
are properly o
tput.
u
• Even if Auto or Source Direct is selected, 720/24p
video signals are output at 60 frames/second.
About the output video resolution
The output video resolution setting and the resolution of the picture that is actually output differ for the different
terminals. See the table below.
Output video
resolution
setting
3
Auto
480i 480/60i 480/60i 480/60i
480p 480/60p 480/60p
1080i 1080/60i
3
1080p
Source Direct Resolution recorded on
1. The video output terminal set at Video in the Setup Navigator (page 19) or the video output terminal selected with VIDEO SELECT (page 22).
2. Depending on the BD, the pictures may not be output.
3. This cannot be selected when the video output terminal is set to COMPONENT/VIDEO.
4. The pictures are output with the preferred output resolution of the device (TV, AV receiver or amplifier, etc.) connected to HDMI OUT
terminal.
5. For details on the output of film material (1080/24p or 720/24p video signals), see To output film material above.
6. Sources with a resolution of 720/60p and 720/24p are output at 1080/60i even if the TV's recommended resolution is 1080/60p.
7. DVD-Video or DVD-R/-RW (VR format) may be output at 480/60p.
8. BD-ROM or BD-R/-RE may be output at 480/60p.
9. Depending on the connected HDMI cable, the video signals may not be output.
10. Sources with a resolution of 720/60p and 720/24p are output at 1080/60i.
11. Depending on the connected TV, the video signals may not be output.
12. 720/24p film material is output at 720/60p.
13. 1080/24p film material is output at 1080/60i.
HDMI OUT terminal COMPONENT VIDEO/
Resolution preferred by
4,5,6
TV
9,10
1080/60p
5,11,12
disc
1
HDMI
VIDEO output
terminals
No video signals are
output
COMPONENT/VIDEO
HDMI OUT terminal COMPONENT VIDEO
output terminals
No video signals are
output
——
7,8
1080/60i
——
Resolution recorded on
8,11,12,13
disc
1
2
VIDEO output
terminal
480/60i
2
03
23
En
Page 24

Chapter 4
04
Playback
Playing discs or files
This section describes the player’s main operations.
For the types of discs that can be played, see Playable
discs on page 8. For the types of files that can be played,
see Playable files on page 10. Image and audio files
recorded on discs are played with the Home Media
Gallery (page 31).
STANDBY/ON
INPUT
SELECT
AUDIO
CLEAR
SECONDARY
AUDIO
VIDEO SELECT
HOME MEDIA
GALLERY
TOP MENU
HOME
MENU
PREV
RED
1 Press STANDBY/ON to turn on the power.
Turn the TV’s power on and switch its input beforehand.
2 Press OPEN/CLOSE to open the disc tray and
load the disc.
Note
• Load the disc with the printed side facing
up.
• Several dozen seconds are required to read
the disc. Once reading is completed, the
type of disc is displayed on the player’s front
panel displa
Press PLAY to play the disc.
3
y.
on the player’s front panel display lights during
playback.
•To pause, press PAUSE during playback. on the
player’s front panel display lights when playback is
24
En
paused.
•To stop, press STOP during playback.
TV CONTROL
CH
SUBTITLE
PLAY MODE
PAUSE
GREEN YELLOWBLUE
VIDEO
DISPLAY
ENTER
PLAY
OPEN/CLOSE
VOL
FL DIMMER
ANGLE
ENTER
OUTPUT
RESOLUTION
POPUP MENU
STOP NEXT
MENU
TOOLS
RETURN
Note
• Some discs start playing automatically when the disc
tray is closed.
• DVD-Video discs have parental lock features. Input
the password registered in the player’s settings to
unlock the parental lock. For details, see page 45.
•F
or some BD-R
/-RE, playback protection is set for the
disc or titles. Input the code number set for the disc
to unlock the protection.
•Check Troubleshooting on page 57 if video or audio
signals are not being output properly.
If the disc menu is displayed
For some discs, the disc menu is displayed automatically
when playback starts. The contents of the disc menu and
the way to operate differ from disc to disc.
Resuming playback from where it
was stopped (resume playback
function)
• When STOP is pressed during playback, the point
at which the disc stopped is stored in the memory.
When PLAY is pressed, playback resumes from
that point.
•For audio CDs and audio files, playback starts from
the beginning of the track/file that was playing.
•If the stop mode was set while playing a slideshow of
image files, playback starts from the image file last
displayed.
• To cancel the resume playback function, press
STOP while playback is stopped.
Note
•The resume playback function is canceled
automatically in the following cases:
–When the disc tray is opened.
– When the file list window is switched.
–When the power is turned off. (For BDs and DVDs
this does not cancel the resu
function.)
•The resume playback function cannot be used for
some discs.
me pla
yback
Page 25

Forward and reverse
1/4
Angle
Example:
Current angle/Total number of
recorded angles
Example:
Current subtitle/Total number of
recorded subtitles
scanning
During playback, press or .
• The scanning speed switches each time the button is
pressed. The speed steps depend on the disc or file
(the speed is displayed on the TV screen).
•Forward or reverse scanning is also possible by
holding the button down. Normal playback resumes
when the button is released.
To resume normal playback
Press PLAY.
Playing specific titles, chapters or tracks
Input the number of the title, chapter or track you
want to play.
• Use the number buttons (0 to 9) to input the number,
then press ENTER.
•Press CLEAR to clear the values you have input.
Skipping content
Press PREV or NEXT.
•When NEXT is pressed, the playback skips
ahead to the beginning of the next title/chapter/track/
file.
•When PREV is pressed, the playback skips back
to the beginning of the currently playing title/chapter/
track/file. Press twice to skip back to the beginning of
the previous title/chapter/track/file.
Playing in slow motion
While playback is paused, press and hold /
or /.
•The speed switches each time the button is pressed
(the speed is displayed on the TV screen). The speed
steps depend on the disc or file.
To resume normal playback
Press PLAY.
Step forward and step reverse
While playback is paused, press / or /.
•The picture moves a step forward or reverse each time
the button is pressed.
Switching the camera angles
For BD-ROM and DVD-Video discs on which multiple
angles are recorded, the angles can be switched during
playback.
During playback, press ANGLE.
•The current angle and total number of recorded
angles are displayed on the TV screen and on the
player’s front panel display.
To switch the angles, press
.
• The angles can also be switched by selecting Angle
from the TOOLS menu.
•If the angles are not switched when ANGLE is
pressed, switch them from the menu screen.
ANGLE again or press
/
Switching the subtitles
For discs on which multiple subtitles are recorded, the
subtitles can be switched during playback.
Caution
• The subtitles cannot be switched for discs recorded
on a DVD or BD recorder. Also refer to the operating
instructions of the device used for recording.
During playback, press SUBTITLE.
•The current subtitle and total number of recorded
subtitles are displayed on the TV screen and on the
player’s front panel display.
To switch the subtitle, press SUBTITLE again or press
/.
Subtitle
• The subtitles can also be switched by selecting
Subtitle from the TOOLS menu.
• If the subtitles are not switched when SUBTITLE is
pre
ssed, switch them from the menu screen.
Turning the subtitles off
Press SUBTITLE, then press CLEAR.
1/2 English
04
To resume normal playback
Press PLAY.
25
En
Page 26

Switching the audio and
2/2 English
Dolby True HD 96kHz 7.1ch L C R Ls Rs Lb Rb LFE
Audio
Current audio/Total number of
recorded audio streams
Example:
Audio type
Number of
channels
Channels recorded
on disc
1/4
Secondary Video
Example:
Current secondary video/Total number of
recorded secondary video streams
04
secondary audio
Turning the Secondary Video off
Press SECONDARY VIDEO, then press CLEAR.
For discs or files on which multiple audio streams/
channels are recorded, audio streams/channels can be
switched during playback. Also use this procedure to
switch the secondary audio for BD-ROMs on which
secondary audio is recorded.
During playback, press AUDIO.
•The current audio and total number of recorded audio
streams are displayed on the TV screen and on the
player’s front panel display.
To switch the audio, press AUDIO again or press /
.
• To switch the secondary audio, press SECONDARY
AUDIO.
•The audio/secondary audio can also be switched by
selecting Audio or Secondary Audio from the
TO
OL
S menu.
•If the audio/secondary audio is not switched when
AUDIO/SECONDARY AUDIO is pressed, switch it
from the menu screen.
Displaying the disc information
Press DISPLAY.
The disc information appears on the TV screen. The
information switches each time the button is pressed.
The information display differs during playback and when
playback is stopped.
Turning the Secondary Audio off
Press SECONDARY AUDIO, then press CLEAR.
Switching the secondary video
Use the procedure below to switch the secondary video
(Picture-in-Picture) recorded on the BD-ROM.
During playback, press SECONDARY VIDEO.
•The current secondary video and total number of
recorded secondary video streams are displayed on
the TV screen and on the player’s front panel display.
To switch the secondary video, press SECONDARY
VIDEO again or press /.
•The secondary video can also be switched by
selecting Secondary Video from the TOOLS menu.
•If the secondary video is not switched when
SECONDARY VIDEO is pressed, switch it from the
menu screen.
26
En
Page 27

Playback functions
The functions that can be used differ according to the type of disc and file. In some cases, some of the functions cannot
be used. Check the usable functions on the table below.
Disc/file type
1
Function
Forward and reverse scanning
2
BD-
ROM
BD-R
/-RE
Video
3
3
Playing specific titles, chapters or tracks
Skipping content
Playing in slow motion
2,5
Step forward and step reverse
Switching the camera angles
Switching the subtitles
Switching the audio
7
8
Switching the secondary audio
Switching the secondary video
2
6
9
11
10
12
Displaying the disc information
1. Some functions may not work for some discs or files, even if indicated [] on the table.
2. For some discs, normal playback resumes automatically when the chapter switches.
3. No sound is produced during forward and reverse scanning.
4. Sound is produced during forward and reverse scanning.
5. • No sound is output during slow motion playback.
• It is not possible to switch the speed during reverse slow motion playback.
6. Angle mark is displayed for scenes at which multiple angles are recorded if Angle/Secondary Indicator is set to On (page 41).
7. • The types of recorded subtitles depend on the disc and file.
• In some cases the subtitle may switch or the switching screen provided on the disc may be displayed immediately, without the current
subtitle or the total number of subtitles recorded on the disc being displayed.
8. The types of recorded audio streams depend on the disc and file.
9. • The types of recorded secondary audio streams depend on the disc and file.
• In some cases the secondary audio may switch or the switching screen provided on the disc may be displayed immediately, without the
current secondary audio or the total number of secondary audio streams recorded on the disc being displayed.
• Secondary audio mark is displayed for scenes at which secondary audio is recorded if Angle/Secondary Indicator is set to On
(page 41).
10. Some discs do not include secondary audio.
11. • In some cases the secondary video may switch or the switching screen provided on the disc may be displayed immediately, without the
current secondary video or the total number of secondary video streams recorded on the disc being displayed.
• Secondary video mark is displayed for scenes at which secondary video is recorded if Angle/Secondary Indicator is set to On
(page 41).
12. Some discs do not include secondary video.
DVD-
DVD-R
/-RW
AVCHD
(VR
format)
3
3
Image
3
file
Audio
file
4
Audio
CD
4
04
27
En
Page 28

Using the Play Mode
Time Search 1 2:45:00 Search
A-B Repeat A (Start) B (End)
Off
04
functions
PAUSE
VIDEO
PLAY MODE
DISPLAY
ENTER
PLAY
STOP
ENTER
OUTPUT
RESOLUTION
POPUP MENU
MENU
RETURN
TOOLS
NEXT
CLEAR
AUDIO
VIDEO SELECT
HOME MEDIA
GALLERY
TOP MENU
HOME
MENU
PREV
SECONDARY
Playing a specific title, chapter or track (Search)
1 Press PLAY MODE to display the Play Mode
screen.
The Play Mode screen can also be displayed by selecting
Play Mode from the TOOLS menu.
2 Select the type of search.
Use / to select, then press ENTER.
See the table on page 30 for the search types.
3 Input the number.
Use the number buttons (0 to 9) or / to input the
number.
Use / to move the cursor.
•To search for title 32, input 0, 3 and 2, then press
ENTER.
•Press CLEAR to clear the values you have input.
Title Search 0 32
Title
Search
Playing from a specific time (Time Search)
1 During playback, press PLAY MODE to display the
Play Mode screen.
The Play Mode screen can also be displayed by selecting
Play Mode from the TOOLS menu.
2 Select Time Search.
Use / to select, then press ENTER.
3 Input the time.
Use the number buttons (0 to 9) or / to input the time.
Use / to move the cursor.
•To play from 45 minutes, input 0, 0, 4, 5, 0 and 0, then
press ENTER.
•To play from 1 hour 20 minutes, input 0, 1, 2, 0, 0 and
0, then press ENTER.
•Press CLEAR to clear the values you have input.
4 Starting playback from the specified time.
Use / to
Closing the Play Mode screen
Press PLAY MODE or HOME MENU.
s
elect Search, then press ENTER.
4 Starting playback from the specified title, chapter
or track.
Use / to select Search, then press ENTER.
Playing a specific section within a title or track repeatedly (A-B Repeat)
Use this procedure to play a specific section within a title
or track repeatedly.
1 During playback, press PLAY MODE to display the
Play Mode screen.
The Play Mode screen can also be displayed by selecting
Play Mode from the TOOLS menu.
2 Select A-B Repeat.
Use / to select, then press ENTER.
3 Select the starting point for A-B Repeat.
Use / to select A (Start), then press ENTER.
4 Select the end point for A-B Repeat.
Use / to select B (End), then press ENTER.
A-B Repeat playback starts.
To cancel A-B Repeat play
•Select Off from the Repeat/Random screen, then
press ENTER.
•During playback, press STOP or CLEAR.
28
En
Page 29

Note
•A-B Repeat play is canceled in the following cases:
– When the angle is switched (for BD-ROM and DVD-
Video discs only).
– When you search outside the repeat range.
– When you start other Repeat Play or Random Play.
Playing repeatedly (Repeat Play)
Use this procedure to play the currently playing disc, title,
chapter, track or file repeatedly.
1 During playback, press PLAY MODE to display the
Play Mode screen.
The Play Mode screen can also be displayed by selecting
Play Mode from the TOOLS menu.
2 Select Repeat/Random.
Use / to select, then press ENTER.
3 Select the type of Repeat Play.
Use / to select, then press ENTER.
See the table on page 30 for the types of Repeat Play.
To cancel Repeat Play
• Select Off from the Repeat/Random screen, then
press ENTER.
•During playback, press STOP or CLEAR.
•During playback, press STOP or CLEAR.
Note
• Random Play is canceled in the following cases:
– When you use the search function.
– When you start Repeat Play.
04
Note
•The type of repeat modes depends on the disc and file
being played. See the table on page 30.
•Repeat Play is canceled in the following cases:
– When the angle is switched (for BD-ROM and DVD-
Video discs only).
– When you search outside the repeat range.
– When you start other Repeat Play or Random Play.
Playing in random order (Random Play)
Use this procedure to play the tracks or files in random
order.
1 During playback, press PLAY MODE to display the
Play Mode screen.
The Play Mode screen can also be displayed by selecting
Play Mode from the TOOLS menu.
2 Select Repeat/Random.
Use / to select, then press ENTER.
3 Select the Random Play.
Use / to select, then press ENTER.
To cancel Random Play
• Select Off from the Repeat/Random screen, then
press ENTER.
29
En
Page 30

About Play Mode types
04
The functions that can be used differ according to the type of disc and file. In some cases, some of the functions cannot
be used. Check the usable functions on the table below.
Disc/file type
Play Mode type
Repeat Play
Playing a specific section within a title
or track repeatedly (A-B Repeat)
Playing a title repeatedly (Title Repeat)
Playing a chapter repeatedly (Chapter
Repeat)
Playing a track or file repeatedly (Track
Repeat)
Playing all the titles, tracks or files on
the disc repeatedly (All Repeat)
Random Play
Playing the tracks or files in random
Mark
1
BD-
ROM
BD-R
2
/-RE
DVD-
Video
order (Random Track/File)
Search
Playing from a specific time (Time
Search)
Playing a specific title
(Title Search)
Playing a specific chapter
(Chapter Search)
Playing a specific track
(Track Search)
1. The type of Play Mode is indicated by the mark.
2. For BD-ROM and DVD-Video discs, some of the functions cannot be used with some titles.
3. The original titles are played repeatedly. However, the playlist titles cannot be played repeatedly.
4. The files in the folder are played repeatedly.
5. The files in the folder or HMG Playlist are played repeatedly.
6. The tracks in the disc or HMG Playlist are played repeatedly.
—
—
—
—
2
DVD-R
/-RW
(VR
format)
3
AVCHD
Image
file
4
Audio
file
5
Audio
CD
6
30
En
Page 31

Playing from the
HOME MEDIA
GALLERY
MENU
DISPLAY
POPUP MENU
TOP MENU
TOOLS
HOME
MENU
RETURN
ENTER
TV CONTROL
AUDIO
SUBTITLE
ANGLE
FL DIMMER
INPUT
SELECT
CH
VOL
BD-R BDAV
My Favorite TV Program
1
2
3
4
5
6
7
8
10 items
Morning serial drama
News at noon
Evening movie
Midnight variety show
Playback protection
World heritage
Drama: Blank time
Music and us
Home Media Gallery
The Home Media Gallery lets you display a list of the titles,
tracks or files recorded on the disc. The discs that can be
played from the Home Media Gallery are as shown below
(see also page 8).
•BD-R/-RE discs
• DVD-R/-RW (VR format) discs
• Audio CDs (CD-DAs and DTS-CDs)
• DVDs/CDs on which only data files of image or audio
files, etc. are recorded
PLAY
PREV
PAUSE
STOP
NEXT
Playing discs
1 Press HOME MEDIA GALLERY to display the
Home Media Gallery.
The Home Media Gallery can also be displayed by
selecting Home Media Gallery from the Home Menu
then pressing ENTER.
2 Select the disc.
Use / to select, then press ENTER.
3 Select the title or track to be played.
Use / to select, then press ENTER.
Note
• When playing an audio CD (CD-DA or DTS-CD), the
Now Playing screen is displayed.
• Some BD-R/-RE discs have playback protection. To
cancel the protection, input the password set for the
disc.
•To play DVD-R/-RW (VR format) playlists, switch to the
playlist using the Original/Play List command on the
TOOLS menu (page 21).
Playing image files
1 Press HOME MEDIA GALLERY to display the
Home Media Gallery.
The Home Media Gallery can also be displayed by
selecting Home Media Gallery from the Home Menu
then pressing ENTER.
2 Select the disc.
Use / to select, then press ENTER.
3 Select Photos.
Use / to select Photos, then press ENTER.
4 Select Folders or All Photos.
Use / to select, then press ENTER.
• Folders – The files in the selected folder are
displayed.
• All Photos – All the recorded files are displayed.
If you have selected All Photos, proceed to step 6.
5 Select the folder containing the file you want to
play.
Use /// to select, then press ENTER.
A list of the files and folders in the selected folder is
displayed.
6 Select and set the file you want to play.
Use /// to
s
elect, then press ENTER.
My Folder
DVD-RW/Photos/Folders
04
Playback starts.
Closing the Home Media Gallery
Press HOME MEDIA GALLERY or HOME MENU.
99 items
A slideshow starts from the selected file, and continues
until the end of the list is reached. Use / to display
the previous or next file.
About Slideshow
A display of the files on the disc or in the folder that
switches automatically.
31
En
Page 32

Rotating images
Music 001.mp3
DATA DISC
0.05.340.02.33
Play
Currently playing
file
Total file playing
time
Elapsed time
04
Press ANGLE while playing a slideshow.
• The image rotates each time the button is pressed
(90° 180° 270° 0° ... ).
The image can also be rotated by selecting Rotate from
the TOOLS menu.
Playing audio files
1 Press HOME MEDIA GALLERY to display the
Home Media Gallery.
The Home Media Gallery can also be displayed by
selecting Home Media Gallery from the Home Menu
then pressing ENTER.
2 Select the disc.
Use / to select, then press ENTER.
3 Select Music.
Use / to select Music, then press ENTER.
4 Select Folders or All Songs.
Use / to select, then press ENTER.
• Folders – The files in the selected folder are
displayed.
• All Songs – All the recorded files are displayed.
If you have selected All Songs, proceed to step 6.
5 Select the folder containing the file you want to
play.
Use / to select, then press ENTER.
A list of the files and folders in the selected folder is
displayed.
6 Select and set the file you want to play.
Use / to select, then press ENTE
Pl
ayback starts from the selected file, and continues until
the end of the list is reached. Use / to play the
previous or next file. The Now Playing screen (shown
below) is displayed.
R.
Adding tracks/files
Use this procedure to add tracks and files, and create the
HMG Playlist.
1 Press HOME MEDIA GALLERY to display the
Home Media Gallery.
The Home Media Gallery can also be displayed by
selecting Home Media Gallery from the Home Menu
pressing ENTER.
2 Select the disc.
Load the disc beforehand.
Use / to select, then press ENTER.
3 Select the track/file to be added.
Use / to select.
4 Press TOOLS to display the TOOLS menu.
5 Select Add to HMG Playlist.
Use / to select, then press ENTER.
Folders
CD-ROM/Music
Play from Beginning
Add to HMG Playlist
Now Playing
BD PLAYER
TOOLS
15Items
Music001.mp3
Music002.mp3
Music003.mp3
Music004.mp3
Music005.mp3
Music006.mp3
Music007.mp3
Music008.mp3
The track or file selected in step 3 is added to the HMG Playlist.
To add more tracks or files, repeat steps 3 to 5.
To add the currently playing track/
file to the HMG Playlist
1 While the track/file is playing, press TOOLS
to display the TOOLS menu.
2Use / to select Add to HMG Playlist, then
press ENTER.
32
En
Playing in the desired order (HMG Playlist)
The discs that can add tracks and files to the HMG (Home
Media Gallery) Playlist are as shown below.
• Audio CDs (CD-DAs and DTS-CDs)
• DVDs/CDs on which audio files are recorded
Note
• A maximum of 24 tracks/files can be added to the
HMG Playlist.
•The HMG Playlist is cleared in the following cases:
–When the power is turned off.
–When the disc tray is opened.
Page 33

Playing the HMG Playlist
Music 001.mp3
DATA DISC
0.05.340.02.33
Play
HMG
Currently playing
track/file
Total track/file
playing time
Elapsed time
1 Press HOME MEDIA GALLERY to display the
Home Media Gallery.
The Home Media Gallery can also be displayed by
selecting Home Media Gallery from the Home Menu
pressing ENTER.
2 Select HMG Playlist.
Use / to select, then press ENTER.
3 Select the track/file to be played.
Use / to select, then press ENTER.
Playback starts from the selected track/file, and
continues until the end of the list is reached. Use /
to play the previous or next track/file. The Now
Playing screen (shown below) is displayed.
Deleting tracks/files from the HMG
Playlist
04
1 Select the track/file to be deleted, then press
TOOLS to display the TOOLS menu.
2Use / to select Delete from HMG Playlist, then
press ENTER.
33
En
Page 34

Chapter 5
Adjustments
Video Adjust
PDP
05
Adjusting audio and video
Adjusting the video
The quality of the playback picture can be adjusted
according to the TV you are using.
TOP MENU
HOME
MENU
PREV
RED
VIDEO ADJUST
1 During playback, press VIDEO ADJUST to display
the Video Adjust screen.
The Video Adjust screen can also be displayed by
selecting Video Adjust from the TOOLS menu.
2 Select a preset.
Select using / according to the TV being used.
• Pioneer PDP – Select this when connected to a
Pioneer plasma TV.
• Pioneer LCD – Select this when connected to a
Pioneer liquid crystal display TV.
• Pioneer Projector – Select this when connected to a
Pioneer front projector.
• PDP – Select this when connected to a plasma TV of
another brand.
• LCD – Select this when connected to a liquid crystal
display of another brand.
• Projector – Select this when connected to a front
projector of another brand.
• Professional – With this setting, video signal
processi
is restrained. Select this when connected
ng
to a professional monitor.
• Memory1 to 3 – Picture quality settings with
adjusted parameters can be stored in the memory.
For a description of the parameters, see When
Memory1, 2 or 3 is selected below.
TOOLS
ENTER
RETURN
PLAY
PAUSE
STOP
NEXT
GREEN
YELLOWBLUE
2 Select the item to be adjusted.
Use / to select.
Prog. Motion
Pure Cinema
YNR
CNR
BNR
MNR
Detail
White Level
Video Adjust [ Memory1 ]
Motion
Auto1
Off Max
Off Max
Off Max
Off Max
Soft Fine
Min Max
Still
3 Adjust the picture quality.
When / are pressed, the adjustments can be made
viewing the picture. The detailed settings screen
reappears when ENTER is pressed.
Prog. Motion
Motion Still
• Prog.Motion – Adjust according to the type of image
(moving or still image). This is effective mainly when
outputting video materials as progressive images.
• Pure Cinema – This setting optimizes the operation of
the progressive scanning circuit for playing film
materials. Normally set it to Auto1. If the picture
seems unnatura
l, switch this to Auto 2, On o
r Off
(page 35).
• YNR – Reduces noise in the luminance (Y) signal.
• CNR – Reduces noise in the chroma (C) signal.
• BNR – Reduces the block noise (block-shaped
distortion generated upon MPEG compression).
• MNR – Reduces the mosquito noise (distortion along
the contours of the picture generated upon MPEG
compression).
• Detail – Adjusts the picture’s contours.
• White Level – Adjusts the level of the white portions.
• Black Level – Adjusts the level of the black portions.
• Black Setup – Select the black level as the setup level.
Normally select 7.5 IRE. If the black level is too bright
due to the combination with the connected TV, select
0 IRE.
• Gamma Correction – Adjusts how the dark portions
of the pic
ture loo
k.
• Hue – Adjusts the balance between green and red.
• Chroma Level – Adjusts the density of the colors.
When Memory1, 2 or 3 is selected
1 Select Adjustments.
Use to select Adjustments, then press ENTER.
A detailed settings screen appears.
34
En
Note
• Prog.Motion and Pure Cinema have the effect only
for pictures recorded in the interlaced scan format
(480i or 1080i signals).
Page 35

• Prog.Motion is disabled when Pure Cinema is set to
On.
• Black Setup has the effect only for pictures output
from the VIDEO output terminals.
• YNR, CNR, BNR and MNR have no effect on 1080/24p
video signals output from the HDMI OUT terminal.
Closing the Video Adjust screen
Press HOME MENU.
About Pure Cinema
There are two types of video signals:
• Video material – Video signals recorded at 30
frames/second
• Film material – Video signals recorded at 24 frames/
second
“Pure Cinema” uses signal processing suited for “film
material” when converting 480i or 1080i interlaced video
signals into progressive video signals, resulting in clear
picture reproduction without losing the quality of the
material.
is displayed on the disc information screen when
playing the “film material” pictures of BD-ROM, BD-R/-RE
and DVD-Video discs (page 26).
Adjusting the audio
TOP MENU
HOME
MENU
Adjusting the Audio DRC
Audio DRC (Dynamic Range Control) has the effect of
playing loud sounds softly and soft sounds loudly. Adjust
the setting for example when viewing movies late at night
and the dialogs are difficult to hear.
1 During playback, display the TOOLS menu.
Press TOOLS.
2 Select and set Audio Adjust.
Use / to select, then press ENTER.
3 Select and set Audio DRC.
Use / to select, then press ENTER.
4 Adjust the setting.
Use / to switch between Off, Low, Medium, High
and Auto.
Closing the Audio DRC screen
Press ENTER or HOME MENU.
TOOLS
ENTER
RETURN
Note
• This only affects the Dolby TrueHD, Dolby Digital Plus
and Dolby Digital audio signals of BDs and DVDs.
• When Auto is selected, the setting has the same
effect as High or Off for Dolby TrueHD signals,
depending on the content. For Dolby Digital Plus and
Dolby Digital, the setting has the same effect as Off.
• Audio DRC affects the audio signals output from the
following audio output terminals:
– Analog audio signals output from the AUDIO OUT
terminals.
–Linear PCM audio signals output from the DIGITAL
OUT terminal or HDMI OUT terminal.
• The effect may be weak for some discs.
Adjusting the output level of the different speakers during BD/DVD playback (Channel Level)
Caution
• Channel Level of the speakers set to None or No at
Speaker Setup cannot be adjusted (page 42).
1 During playback, display the TOOLS menu.
Press TOOLS.
2 Select and set Audio Adjust.
Use / to select, then press ENTER.
3 Select and set Channel Level.
Use / to select, then press ENTER.
4 Adjust the output level.
Use / to select, / to adjust.
The output levels of the L, C, R, SL, SR, SBL, SBR and SW
speakers can be adjusted within the range of –6.0 dB to
+6.0 dB.
L
C
R
SR
SBR
SBL
SL
SW
5 Press ENTER to set.
Note
•The adjustment of Channel Level is only applicable to
the sound output from AUDIO OUT.
• This cannot be adjusted when in the following cases:
– Output Terminal is set to HDMI or DI
AUDIO (pa
ge 46).
– Audio Output Mode is set to 2 Channel
(page 38).
0.0 dB
0.0 dB
0.0 dB
0.0 dB
0.0 dB
0.0 dB
0.0 dB
0.0 dB
GITAL
05
35
En
Page 36

05
Lip Sync
Manual
100 ms
0 50 150100 200 250
– Channel Level is set to Fix (page 38).
Closing the Channel Level screen
Press HOME MENU.
Adjusting the audio delay (Lip Sync)
Adjust the audio delay for the selected video output
terminal if the video and audio are not synchronized.
1 During playback, display the TOOLS menu.
Press TOOLS.
2 Select and set Audio Adjust.
Use / to select, then press ENTER.
3 Select and set Lip Sync.
Use / to select, then press ENTER.
4 Select Auto or Manual.
Use / to select.
•Auto – The player automatically adjusts the timing of
the video and audio when connected to a device
equipped with the HDMI Auto Lipsync Correction
feature using an HDMI cable.
•Manual – Adjust manually while viewing the video.
If you have selected Manual, proceed to step 5.
5 Adjusting the amount of audio delay.
Press , then use / to adjust.
The audio delay can be adjusted from 0 to 250 ms in steps
of 5 ms.
Note
•The Lip Sync adjustment is only applicable to the
output terminal set at Output Terminal (page 46).
• The sound may be interrupt
ed while setting the delay.
Closing the Lip Sync screen
Press ENTER or HOME MENU.
36
En
Page 37

Chapter 6
Advanced settings
06
Changing the settings
Operating the Initial Setup screen
1 When playback is stopped, display the Home
Menu screen.
Press HOME MENU.
2 Select and set Initial Setup.
Use / to select, then press ENTER.
3 Select the item and change the setting.
Use /// to select, then press ENTER.
Initial Setup
BD PLAYER
Video Out
Audio Out
Speakers
HDMI
Network
Language
Data Management
Setup Navigator
TV Aspect Ratio
4:3 Video Out
DVD 16:9 Video Out
16:9 (Widescreen)
Full
Letter Box
Closing the Initial Setup screen
Press HOME MENU.
PAUSE
VIDEO
PLAY MODE
DISPLAY
ENTER
PLAY
STOP
ENTER
OUTPUT
RESOLUTION
POPUP MENU
MENU
RETURN
TOOLS
NEXT
CLEAR
AUDIO
VIDEO SELECT
HOME MEDIA
GALLERY
TOP MENU
HOME
MENU
PREV
SECONDARY
Note
• Items that cannot be changed are indicated in gray. The items that can be selected depend on the player’s status.
• In Options, the factory default settings are indicated in bold.
Setting Options Explanation
Video Out
TV Aspect Ratio 16:9 (Widescreen) Select this when connected to a wide (16:9) TV.
4:3 (Standard) Select this when connected to a conventional TV.
4:3 Video Out Full 4:3 pictures are displayed over the entire screen.
Normal 4:3 pictures are displayed with vertical black bars along the sides. Select this
4:3 Video Out is only valid when TV Aspect Ratio is set to16:9 (Widescreen).
DVD 16:9 Video Out Letter Box 16:9 pictures are displayed with black bars at the top and bottom when
Pan & Scan The picture is displayed over the entire screen, with the left and right sides of
• DVD 16:9 Video Out is only valid when TV Aspect Ratio is set to 4:3 (Standard).
• DVD 16:9 Video Out is only valid when playing 16:9 pictures of DVD-Video or DVD-R/-RW (VR format) discs. When other 16:9
pictures are played, they are output in the Letter Box mode.
when you cannot switch the aspect ratio to 4:3 on the TV.
viewing on a 4:3 screen.
the 16:9 picture cropped. Select this to view 4:3 pictures over the entire
screen. For some discs, the picture will be displayed in the Letter Box mode
even if Pan & Scan is set.
37
En
Page 38

06
Setting Options Explanation
Audio Out
Dolby Digital Out
* Only valid for the DIGITAL
OUT terminal.
DTS Out
* Only valid for the DIGITAL
OUT terminal.
AAC Out
* Only valid for the DIGITAL
OUT terminal.
DTS Downmix Stereo DTS-HD Master Audio signals, DTS-HD High Resolution Audio signals or
Speakers
Audio Output Mode
* Only valid for the AUDIO
OUT terminals.
Speaker Setup
* Only valid for the AUDIO
OUT terminals.
Speaker Distance
* Only valid for the AUDIO
OUT terminals.
Channel Level
* Only valid for the AUDIO
OUT terminals.
Dolby Digital 1 Dolby Digital audio signals are output. With BD-ROMs, the secondary audio
Dolby Digital 2 Dolby Digital audio signals are output. With BD-ROMs, the signals are output
Dolby Digital
PCM
DTS 1 DTS Digital Surround audio signals are output. With BD-ROMs, the
DTS 2 DTS Digital Surround audio signals are output. With BD-ROMs, the signals
DTS PCM Select this when the connected AV receiver or amplifier, etc., is not
AAC Select this when the connected AV receiver or amplifier, etc., is compatible
AAC PCM Select this when the connected AV receiver or amplifier, etc., is not
Lt/Rt DTS-HD Master Audio signals, DTS-HD High Resolution Audio signals or
2 Channel Select this when the TV’s analog 2-channel (stereo) audio input terminals are
Multi-channel Select this when the multi-channel audio input terminals of an AV receiver or
When an AV receiver or amplifier, etc., is connected to the player’s AUDIO OUT terminals, set
whether or not speakers are connected to an AV receiver or amplifier, etc., their size and their
crossover frequency. For details, see Changing the speaker setup on page 42.
Specify the distance of your speakers from your listening position (page 42).
Fix The output for the various speakers is set to the maximum.
Variable The output level of the various speakers is set within the range of –6.0 dB to
and interactive audio are mixed for output.
without mixing the secondary audio and interactive audio signals.
Select this when the connected AV receiver or amplifier, etc., is not
compatible with Dolby Digital audio signals. The Dolby Digital audio signals
are converted into linear PCM audio signals for output.
secondary audio and interactive audio are mixed for output.
are output without mixing the secondary audio and interactive audio signals.
compatible with DTS Digital Surround audio signals. The DTS Digital
Surround audio signals are converted into linear PCM audio signals for
output.
with AAC audio signals. The AAC audio signals are output.
compatible with AAC audio signals. The AAC audio signals are converted into
linear PCM audio signals for output.
DTS Digital Surround audio signals converted to linear PCM audio signals
are converted into 2-channel (stereo) signals for output.
DTS Digital Surround audio signals converted to linear PCM audio signals
are converted into 2-channel signals compatible with Dolby Surround for
output (when the connected AV receiver or amplifier, etc., is compatible with
Dolby Pro Logic, the AV receiver or amplifier outputs the linear PCM audio
signals as surround audio signals).
connected to the player’s AUDIO OUT terminals.
amplifier, etc., are connected to the player’s AUDIO OUT terminals.
+6.0 dB (in 0.5 dB steps) (page 42).
38
En
Page 39

Setting Options Explanation
HDMI
HDMI High Speed
Transmission
The player’s setting screen is closed if the output video resolution is switched by changing the HDMI High Speed Transmission
setting.
HDMI Color Space Auto Select this to automatically switch the video output between YCbCr and RGB
Normally it is recommended to set this to Auto. When set to Auto, the optimum video signals for your TV are output.
HDMI Audio Out Auto The signals are output with as many audio channels as possible. In cases
KURO LINK On Select this to control the player with the remote control of the AV device
Display Power On
* Only valid when KURO
LINK is set to On.
Display Power Off
* Only valid when KURO
LINK is set to On.
PQLS
* Only valid when KURO
LINK is set to On.
Network
IP Address Select this to set the IP address of the player and DNS server (page 43).
Proxy Server
Display Network
Configuration
Connection Test Select this to test the network connection (page 44).
On Select this when connected with a High Speed HDMI™ cable (page 14).
Off Select this when connected with a Standard HDMI™ cable (page 14).
signals according to the connected equipment.
YCbCr 4:4:4 Select this to output the video signals as YCbCr 4:4:4 signals.
YCbCr 4:2:2 Select this to output the video signals as YCbCr 4:2:2 signals.
RGB (16 to 235) Select this to output the video signals as RGB signals. Choose this if the
RGB (0 to 255) Select this to output the video signals as RGB signals. Choose this if the
PCM Select this when you want the secondary audio and interactive audio signals
Off Select this when you do not want to output the audio from the HDMI output
Off Select this when you do not want to control the player with the remote control
On Select this when you want the TV to turn on each time playback is started or
Off Select this when you do not want the TV to turn on each time playback is
On Select this when you want the player’s power to turn off together with the TV’s
Off Select this when you do not want the player’s power to turn o
Auto Enables PQLS function (page 15).
Off Disables PQLS function (page 15).
Only set the proxy server if so instructed by your Internet service provider (page 43).
Select this to display a list of the network settings (page 44).
colors seem too dense and all the dark colors are displayed in a uniform black
when RGB (0 to 255) is selected.
colors seem too faint and the black seems too bright when RGB (16 to 235)
is selected.
when the number of channels does not decrease when the signals are output
as such without converting them to linear PCM, they are output as such
(page 47).
to be mixed for output or when you want to output prioritizing sampling
frequency over the number of channels (page 47).
terminal.
connected using an HDMI cable. Also refer to About KURO LINK function on
page 15.
of the AV device connected using an HDMI cable.
the Home Menu or Home Media Gallery is displayed on the player.
started or the Home Menu or Home Media Gallery is displayed on the player.
power.
ff together with
the TV’s power.
06
39
En
Page 40

06
Setting Options Explanation
Language
OSD Language English Select this to set the language of the on-screen displays to English.
available languages Choose a language for the on-screen displays from the listed languages.
Audio Language
* For some discs, it may not
be possible to change to the
selected language.
If a language not recorded on the BD/DVD is set, one of the recorded languages is automatically selected and played.
Subtitle Language
* For some discs, it may not
be possible to change to the
selected language.
If a language not recorded on the BD/DVD is set, one of the recorded languages is automatically selected and played.
BDMV/DVD-Video Menu
Lang.
* For some discs, it may not
be possible to change to the
selected language.
If a language not recorded on the BD/DVD is set, one of the recorded languages is automatically selected and played.
Subtitle Display On Select this to display the subtitles.
Data Management
Individual/Shared Data
Erase
Remove the disc from the disc tray when changing the setting.
Application Data Erase Use this to erase bookmarks, high scores of games and other data (page 44).
Remove the disc from the disc tray when changing the setting.
Storage Format Select this to format the storage device on which the data used by the BD-LIVE and BONUSVIEW
Remove the disc from the disc tray when changing the setting.
Setup Navigator Start making the settings using the Setup Navigator menu. For details, see Making settings using
English Select this to set both the BD-ROM and DVD-Video default audio language to
available languages Choose a language from the listed languages to set the default audio
Other Continue to the next screen to set the default audio language for BD-ROM
English Select this to set the default subtitle language for BD-ROM and DVD-Video
available languages Choose a language from the listed languages to set the default subtitle
Other Continue to the next screen to set the default subtitle language for BD-ROM
w/Subtitle
Language
available languages Choose a language from the listed languages to set the default language for
Other Continue to the next screen to set the default menu language for BD-ROM
Off Select this if you do not want to display the subtitles. Note that on some discs
Use this to display the list of data used for the BD-LIVE and BONUSVIEW functions and to erase the
data (page 44).
functions is stored (page 44).
the Setup Navigator menu on page 19.
English.
language for BD-ROM and DVD-Video playback.
and DVD-Video playback. You can select the language name or enter the
code number (see on page 49 for the code table).
playback to English.
language for BD-ROM and DVD-Video playback.
and DVD-Video playback. You can select the language name or enter the
code number (see on page 49 for the code table).
Sets the language of BD-ROM and DVD-Video menus to the same as that set
for the subtitle language.
BD-ROM and DVD-Video menus.
and DVD-Video menus. You can select the language name or enter the code
number (see on page 49 for the code table).
the subtitles are displayed by force.
40
En
Page 41

Setting Options Explanation
Playback
Still Picture Field This eliminates instability of the picture when playback is paused.
Frame This makes pictures clear when playback is paused, but instability may be
Auto Field or Frame is switched automatically according to the disc or file being
Angle/Secondary Indicator On Select this to display the angle mark, secondary video mark and secondary
Off Select this if you do not want to display the angle mark, secondary video mark
Hybrid Disc Playback BD The BD layer of hybrid discs with two or more layers (BD and DVD or CD) is
DVD The DVD layer of hybrid discs with two or more layers (BD and DVD) is played.
CD The CD layer of hybrid discs with two or more layers (BD and CD) is played. If
Remove the disc from the disc tray when changing the setting.
BDMV/BDAV Playback
Priority
Remove the disc from the disc tray when changing the setting.
Parental Lock
Set Password (Change
Password)
DVD-Video Parental Lock Change the player’s parental lock level (page 45).
BDMV Parental Lock Change the restricted age (page 45).
Country Code Change the Country/Area code (page 45).
Options
Output Terminal Set the terminals from which the player’s video and audio signals are to be outp ut (page 46).
On Screen Display On Select this to display the operation indicators (Play, Stop, etc.) on the TV
Screen Saver On The screen saver is automatically activated if there is no operation for over 1
Auto Power Off On Select this to turn the power off automatically (the power turns off
Software Update The Software Update function can check for and download updated system software from the
BDMV Select this to play the BDMV format on BD-R/-RE discs containing both
BDAV Select this to play the BDAV format on BD-R/-RE discs containing both
Register (change) the password for parental lock settings or for unlocking to play DVD-Video with
parental lock feature (page 45).
Off Select this if you do not want to disp lay the operation indicators (Play, Stop,
Off The screen saver is not activated.
Off Select this if you do not want the power to turn off automatically.
network server (page 46).
observed.
played.
audio mark on the TV screen (pages 25 and 26).
and secondary audio mark on the TV screen.
played.
If there is no DVD layer, the BD layer is played.
there is no CD layer, the BD layer is played.
BDMV and BDAV formats.
BDMV and BDAV formats.
screen.
etc.) on the TV screen.
minute after playback is stopped or paused.
The screen saver is automatically activated if there is no operation for over 1
minute after the Home Menu or Home Media Gallery is displayed while
playing a BD or DVD.
With audio CDs and audio files, the screen saver is automatically activated if
no button is operated for over 1 minute, even while the audio CD or audio file
is playing.
The screen saver turns off when an operation is performed on the player or
remote control.
automatically if no operation is performed for over 30 minutes).
06
41
En
Page 42

Changing the speaker setup
L/R
C
SL/SR
SBL/SBR
SW
Large
Large
Large
Large
Yes
Crossover
Bypass
Speaker Setup
BD PLAYER
06
Set whether or not speakers are connected to an AV
receiver or amplifier, etc., their size and their crossover
frequency. This setting is only valid for the AUDIO OUT
terminals.
When there are no speakers whose speaker size is set to
Small, select Bypass for the crossover frequency.
When there are speakers whose speaker size is set to
Small, select the crossover frequency (Bypass cannot be
selected).
Caution
•The Speaker Setup cannot be selected when Audio
Output Mode is set to 2 Channel. Change the
setting to Multi-channel (page 38).
1
elect and set Speakers Speaker Setup Next
S
Screen.
Use / to select, then press ENTER.
2 Select the speaker and change the setting.
Use / to select, then use / to change the setting.
Adjusting the distance of the
different speakers
Adjust the distance between you and the different
speakers. This setting is only valid for
terminals
.
Caution
• This cannot be selected when Audio Output Mode
is set to 2 Channel. Change the setting to Multi-
channel (page 38).
• Speaker Distance of the speakers set to None or No
at Speaker Setup cannot be adjusted (above).
1 Select and set Speakers Speaker Distance
Next Screen.
Use / to select, then press ENTER.
2 Select the speaker and adjust the distance.
Use / to select, then use / to adjust.
Speaker Distance
BD PLAYER
L
C
R
SR
SBR
SBL
SL
SW
10’00”
10’00”
10’00”
10’00”
10’00”
10’00”
10’00”
10’00”
the AUDIO OUT
42
En
• L/R (front left and right speakers): Large/Small
• C (center speaker): Large/Small/None
• SL/SR (left and right surround speakers): Large/
Small/None
• SBL/SBR (left and right surround back speakers):
Large/Small/None
• SW (subwoofer): Yes/No
• Crossover: Bypass/50 Hz/80 Hz/10
0 Hz/15
0 Hz
Note
•Depending on the combination of settings of the
different speakers, the settings of speakers other than
the one you have changed may also change
automatically.
•When a subwoofer with a filter bypass function is
connected and there is no speaker whose speaker
size is set to Small, if the subwoofer’s filter is set to be
bypassed, the player’s high precision digital filter is
used. In this case, set the crossover frequency to
something other than Bypass.
•Upon purchase, the crossover frequency is set to
Bypass.
• The distance of all the speakers can be set to between
1 inch and 45 feet, in units of 1 inch.
Adjusting the output level of the
different speakers (Channel Level)
Adjust each output level of the different speakers by using
test tones.
terminals.
• This cannot be selected when Audio Output Mode
• Channel Level of the speakers set to None or No at
• Test tones are output. Lower the volume of the device
1 Select and set Speakers Channel Level, then
Fix or Variable.
Use / to select, then press ENTER.
• Fix – The output level of all the speakers is set to the
• Variable – The output level of all the speakers is set
If you have selected Variable, proceed to step 2.
This setting is only valid for the AUDIO OUT
Caution
is set to 2 Channel. Change the setting to Multichannel (page 38).
Speaker Setup cannot be adjusted (above).
connected to the player.
maximum.
6.0 dB lower than when Fix is selected. From this
point, the output levels of the L, C, R, SL, SR, SBL, SB
d SW speakers can be adjusted within the range of
an
–6.0 dB to +6.0 dB.
R
Page 43

2 Select and set the method for switching the
L
C
R
SR
SBR
SBL
SL
SW
0.0 dB
0.0 dB
0.0 dB
0.0 dB
0.0 dB
0.0 dB
0.0 dB
0.0 dB
Channel Level
BD PLAYER
IP Address
Auto Set IP Address
IP Address
Subnet Mask
Default Gateway
Auto Set DNS Server Address
DNS Server (Primary)
DNS Server (Secondary)
Off
Network
BD PLAYER
Off
speaker to be adjusted.
Use / to select, then press ENTER.
• Auto – Switch the speaker to be adjusted
automatically.
• Manual – Switch the speaker to be adjusted
manually.
3 Adjust the output level.
Use / to select, / to adjust.
Note
• You can also adjust while listening to the sound being
played (page 35).
• The volume of the test tones output from the
subwoofer may seem lower than the tones output
from the other channels. Adjust the subwoofer based
on the sound during playback (page 35).
•When Auto is selected, the speaker cannot be
selected with
/. In this case, test tones are not output from the
subwoofer.
Setting the IP address
1 Select and set Network IP Address Next
Screen.
Use / to select, then press ENTER.
2 Set IP address.
Use /// to set the IP address of the player or DNS
server, then press ENTER.
• Auto Set IP Address
On – The player’s IP address is obtained
automatically. Select this when using a broadband
router or broadband modem that has a DHCP
(Dynamic Host Configuration Protocol) server
function. This player’s IP address will automatically
be allocated from the DHCP server.
Off – The player’s IP address must be set manually.
Use the number buttons (0 to 9) to input the IP
address, subnet mask and default gateway.
• Auto Set DNS
Server
Address
On – The DNS server’s IP address is obtained
automatically.
Off – The DNS server’s IP address must be set
manually. Use the number buttons (0 t o 9 ) t o i nput the
DNS server’s IP address stipulated by your Internet
service provider.
Note
• When Auto Set IP Address is set to Off, Auto Set
DNS Server Address is also set to Off.
•For information on DHCP server function, refer to the
network device’s operating instructions.
• You may need to contact your Internet service
provider or network administrator when inputting the
IP address manually.
Setting the proxy server
Only set the proxy server if so instructed by your Internet
service provider.
1 Select and set Network Proxy Server Next
Screen.
Use / to select, then press ENTER.
2 Select and set Use or Not use at Proxy Server.
Use / to change, then press .
Network
BD PLAYER
Proxy Server
Proxy Server
Server Select Method
Server Name
Port Number
• Use – Select this when using a proxy server.
• Not use – Select this when not using a proxy server.
If you have selected Use, proceed to step 3.
3 Select and set Server Select Method.
Use / to change, then press .
• IP Address – Input the IP address.
• Server Name – Input the server name.
4 Input IP Address or Server Name.
Use the number buttons (0 to 9) to input the number if
lect IP address by step 3. Use / to move the cursor.
se
Use the number buttons (0 to 9) to input characters if you
select Server Name by step 3.
The characters that can be input for the server name are
listed on the table below. Pressing a button repeatedly
cycles through the characters shown.
Use
Server Name
you
06
43
En
Page 44

06
• If you want to enter two characters in succession that
are both on the same button (for example a P and an
R), press after inputting the first character then
input the second character.
•Use CLEAR to delete the last character.
•Use / to move the displayed characters when all
the input characters cannot be displayed.
Key Characters Key Characters
1
2
3
4
5
1 . –
a b c 2
d e f 3
g h i 4
j k l 5
6
7
8
9
0
5 Input Port Number.
Press , use the number buttons (0 to 9) to input the
number.
6 Press ENTER to set.
Displaying the network settings
Select and set Network Display Network
Configuration Next Screen.
Use / to select, then press ENTER.
The MAC address, IP address, subnet mask, default
gateway and DNS server (primary and secondary)
settings are displayed.
When Auto Set IP Address is set to On, the values
obtained automatically are displayed.
Note
• “0.0.0.0” is displayed when each IP address has not
been set.
Testing the network connection
Select and set Network Connection Test
Start.
Use / to select, then press ENTER.
“Network connection test completed successfully.” is
displayed once the test is completed. If any other
message is displayed, check the connections and/or
settings (pages 18 and 43).
Changing to other language at
language setting
1 Select and set Language.
Use / to select, then press ENTER.
2 Select and set Audio Language, Subtitle
Language or BDMV/DVD-Video Menu Lang.
Use / to select, then press ENTER.
3 Select and set Other.
Use / to select, then press ENTER.
44
En
m n o 6
p q r s 7
t u v 8
w x y z 9
0
4 Change the language.
Use / to change, then press ENTER.
Initial Setup
BD PLAYER
Video Out
Audio Out
Speakers
HDMI
Network
Language
Data Management
Setup Navigator
Audio Language
Language
Number
English
0514
• The language can also be changed using the number
buttons. Use / to move the cursor to Number,
use the number buttons (0 to 9) to input the number,
then press ENTER. Refer to Language Code Table and
Country/Area Code Table on page 49.
Note
• If a language not recorded on the BD/DVD is set, one
of the recorded languages is automatically selected
and played.
Erasing data that has been added to
BDs and application data
Use this procedure to erase data that has been added to
BDs (data downloaded with the BD-LIVE function and
data used with the BONUSVIEW function) and
application data.
Caution
•Some time is required to erase the data.
• Do not unplug the power cord while data is being
erased.
•This operation does not work when a disc is loaded.
1 Select and set Data Management.
Use / to select, then press ENTER.
2 Select and set the erase menu.
Use / to select, then press ENTER.
• Individual/Shared Data Erase
Use this procedure to select and erase data
downloaded with the BD-LIVE function and data used
with the BONUSVIEW function (page 9).
Select Next Screen, then press ENTER. The list
screen appears.
Individual/Shared Data Erase
BD PLAYER
15 items
Shared Data
Disc Name 1
Disc Name 2
Disc Name 3
Disc Name 4
Disc Name 5
Disc Name 6
Disc Name 7
Page 45

When a disc name is selected, the data downloaded
with the BD-LIVE function and data used with the
BONUSVIEW is erased.
When Shared Data is selected, all the data
downloaded with the BD-LIVE function and not
associated to discs is erased.
Use / to select the data to be erased, then press
ENTER.
• Application Data Erase
Use this procedure to erase BD-ROM application data
(high scores of games, bookmarks data, etc.).
Select Start, then press ENTER.
• Storage Format
Use this procedure to format the storage in which the
data downloaded with the BD-LIVE function and data
used with the BONUSVIEW function is stored
(page 9).
When this is done, all the data on the external
storage device is erased.
Select Start, then press ENTER.
3 Select Yes, then press ENTER.
Use / to select, then press ENTER.
Registering or Changing the
password
Use this procedure to register or change the code
number required for the Parental Lock settings.
1 Select and set Parental Lock Set Password
Next Screen.
Use / to select, then press ENTER.
2 Input the password.
Use the number buttons (0 to 9) or / to input the
number, then press ENTER to set.
Use / to move the cursor.
3 Re-input the password.
Use the number buttons (0 to 9) or / to input the
number, then press ENTER to set.
Use / to move the cursor.
•To change the password, input the previously
registered pass
Note
•We recommend making a note of the password.
• If you forget the password, reset the player to the
factory default setting, then register the password
again (page 46).
w
ord, then input the new password.
Changing the Parental Lock level for
viewing DVDs
Some DVD-Video discs containing scenes of violence, for
example, have Parental Lock levels (check the indications
on the disc’s jacket or elsewhere). To restrict viewing
these discs, set the player’s level to the level lower than
the discs.
1 Select and set Parental Lock DVD-Video
Parental Lock Next Screen.
Use / to select, then press ENTER.
2 Input the password.
Use the number buttons (0 to 9) or / to input the
number, then press ENTER to set.
Use / to move the cursor.
3 Change the level.
Use / to change, then press ENTER to set.
Note
• The level can be set to Off or between Level1 and
Level8. When set to Off, viewing is not restricted.
Changing the Age Restriction for
viewing BD-ROMs
For BD-ROMs containing scenes of violence, for example,
viewing can be restricted by setting an age restriction for
the BD-ROMs.
1 Select and set Parental Lock BDMV Parental
Lock Next Screen.
Use / to select, then press ENTER.
2 Input the password.
Use the number buttons (0 to 9) or / to input the
number, then press ENTER to set.
Use / to move the cursor.
3 Change the age.
Use the number buttons (0 to 9) or / to input the
number, then press ENTER to set.
Use / to move the cursor.
Note
• When Age Restriction is set to 255, viewing is not
restricted.
Changing the Country/Area code
1 Select and set Parental Lock Country Code
Next Screen.
Use / to select, then press ENTER.
2 Input the password.
Use the number buttons (0 to 9) or / to input the
number, then press ENTER to set.
Use / to move the cursor.
3 Change the country/area code.
Use / to change, then press ENTER to set.
• The the country/area code can also be changed using
the number buttons. Use / to move the cursor to
Number, use the number buttons (0 to 9) to input the
number, then press ENTER. Refer to Language Code
Table and Country/Area Code Table on page 49.
06
45
En
Page 46

Setting the output terminals
06
Set the terminals from which the player’s video and audio
signals are to be output.
1 Select and set Options Output Terminal
Next Screen.
Use / to select, then press ENTER.
2 Select and set the video and audio output
terminals.
Select the actually connected video and audio output
terminals.
Use /// to select, then press ENTER.
For details on the settings, refer to step 4 on page 19.
When COMPONENT or VIDEO is selected for Video, no
sound is output from the HDMI OUT terminal (a warning
message is displayed).
Software updating
The software of the player can be updated by connecting
it to the Internet using a LAN cable.
Before updating the software, make sure that you have
connected the player to the network and made the
necessary settings (pages 18 and 43).
Caution
•Do not unplug the power cord during software
updating. Otherwise, the updating will be aborted and
malfunction may occur with the player.
•There are two processes for software updating,
downloading and updating. Both processes may take
a certain period of time.
•Depending on the Internet connection conditions,
downloading may take a long time.
•Other operations are defea
updating. Furthermore updating process cannot be
canceled.
•When the front panel display is off, turn it on with FL
DIMMER. When updating the player’s software with
the front panel display off, do not unplug the power
cord until the FL OFF indicator turns off.
Note
•Steps 1 to
(they are intended to download the software from the
Internet).
•Steps 5 to
(automatically) by the player (they are intended to
update the software).
1 When playback is stopped, display the Home
Menu screen.
Press HOME MENU.
2 Select and set Initial Setup.
Use / to select, then press ENTER.
4 are the operations performed by the user
7 are the operations performed
46
En
ted duri
ng software
3 Select and set Options Software Update
Start.
Use / to select, then press ENTER.
•If the player is already running the latest software, the
message “The player’s software is up to date and does
not need updating.” is displayed.
4 Select and set Yes.
Use / to select Yes, then press ENTER.
•The help menu is displayed if the player ca
nnect to the Internet. Check the connections and
co
settings (pages 18 and 43).
5 Downloading of the software start.
The software download status is displayed on the screen.
•Depending on the Internet connection conditions,
software downloading may take a certain period of
time.
6 Updating starts.
The front panel display shows messages such as
“DATA CHECK”, “WRT SYS1”, “WRT DRV” and “WRT
FLC”.
• Software updating may take a certain period of time.
7 Updating completes.
The front panel display shows “DOWNLOAD OK” and
the player turns off automatically.
nnot
Restoring all the settings to the factory default settings
1 Check that the player’s power is turned on.
2 When a disc is playing, press to stop playback.
Eject the disc from the player.
3 While pressing , press STANDBY/ON.
Operate using the buttons on the player’s front panel.
Note
•After restoring all the settings to the factory default
settings, use Setup Navigator to reset the player
(page 19).
• When all the settings are restored to the factory
defaults, all the data for the secondary video (Picture-
in-Picture), secondary audio, bookmarks, etc., is
erased.
Page 47

About the audio output settings
The audio signals that are output differ according to the audio format recorded on the disc and the player’s settings.
Check on the table below.
Caution
•When ANALOG AUDIO is selected at Output Terminal, no audio signals are output from the HDMI OUT terminal
or DIGITAL OUT terminal (pages 19 and 46).
•When HDMI or DIGITAL AUDIO is selected at Output Terminal, linear PCM audio signals (2 channels) are output
from all terminals other than the ones selected at Output Terminal (pages 19 and 46).
• The output from all terminals other than the ones selected for Audio does not sound as intended by the content
provider.
AUDIO OUT terminals DIGITAL OUT terminal HDMI OUT terminal
Audio format
2ch
1
Multi-channel
Converted to
1
linear PCM
audio
BD-
Dolby Digital
ROM
5.1-channel
audio
Dolby Digital
Plus
Dolby TrueHD 7.1-channel
DTS Digital
Surround
Converted to 2-
channel audio
7.1-channel
audio
7.1-channel
audio
Converted to 2-
channel audio
DTS-HD High
Resolution
Audio
DTS-HD Master
Audio
7.1-channel
audio
Linear PCM Converted to 2-
BD-R/
Dolby Digital
-RE
MPEG-2 AAC MPEG-2 AAC MPEG-2 AAC
Converted to 2-
channel audio
5.1-channel
audio
Converted to 2-
channel audio
MPEG
Linear PCM
DVDVideo
Dolby Digital
DTS Digital
Surround
Converted to 2-
channel audio
5.1-channel
audio
Converted to 2-
channel audio
MPEG
Linear PCM
DVD-R/
Dolby Digital Converted to 2-
-RW
(VR
MPEG
format)
channel audio
5.1-channel
audio
Converted to 2-
channel audio
Linear PCM
1. When Audio Output Mode is set to 2 Channel or Multi-channel (page 38).
2. When Dolby Digital Out is set to Dolby Digital PCM, DTS Out is set to DTS PCM, or AAC Out is set to AAC PCM (page 38).
3. When Dolby Digital Out is set to Dolby Digital 1/Dolby Digital 2, DTS Out is set to DTS 1/DTS 2 or AAC Out is set to AAC (page 38).
4. When HDMI Audio Out is set to PCM or Auto (page 39).
5. When outputting Dolby Digital or DTS Digital Surround bitstream with Dolby Digital Out set to Dolby Digital 2 and DTS Out set to DTS
2, the secondary audio and interactive audio signals are not mixed for output.
6. When outputting the bitstream of Dolby TrueHD, Dolby Digital Plus, Dolby Digital, DTS-HD Master Audio, DTS-HD High Resolution Audio
or DTS Digital Surround, the secondary audio and interactive audio signals are not mixed for output.
7. If the connected HDMI device is not compatible with Dolby TrueHD or Dolby Digital Plus bitstream, the signals are output in linear PCM (7.1
channels) or Dolby Digital bitstream.
If the connected HDMI device is not compatible with Dolby Digital bitstream, the signals are output in linear PCM (2 channels).
8. When the output video resolution is set to 480i or 480p, the signals may be output in linear PCM (2 channels), depending on HDMI High
Speed Transmission setting and/or the connected HDMI device (page 14).
Not converted
to linear PCM
2
audio
Dolby Digital
DTS Digital
Surround
channel audio
Dolby Digital
2-channel audio
Dolby Digital
DTS Digital
Surround
2-channel audio
Dolby Digital
2-channel audio
3
5
5
4
PCM
5.1-channel
audio
7.1-channel
audio
8
audio
7.1-channel
audio
7.1-channel
8
audio
7.1-channel audio
5.1-channel
audio
5.1-channel
audio
5.1-channel
audio
4
Auto
Plus
Dolby
6,7
6,7
6,7,9
6,10
Dolby Digital
Dolby Digital
TrueHD
DTS Digital
Surround
DTS-HD High
Resolution
6,8,10
Audio
DTS-HD Master
6,10,11
Audio
8
Dolby Digital
Dolby Digital
DTS Digital
Surround
Dolby Digital
7
7
10
7
06
47
En
Page 48

9. When the output video resolution is set to 480i or 480p, the signals may be output in linear PCM (2 channels) or Dolby Digital bitstream,
06
depending on HDMI High Speed Transmission setting and/or the connected HDMI device (page 14).
10. If the connected HDMI device is not compatible with DTS-HD Master Audio or DTS-HD High Resolution Audio, the signals are output in
linear PCM (7.1 channels) or DTS Digital Surround bitstream.
If the connected HDMI device is not compatible with DTS Digital Surround bitstream, the signals are output in linear PCM (2 channels).
11. When the output video resolution is set to 480i or 480p, the signals may be output in linear PCM (2 channels) or DTS Digital Surround,
depending on HDMI High Speed Transmission setting and/or the connected HDMI device.
Note
•Only compatible with 7.1-channel surround back. 6.1-channel surround back is output in 7.1 channels. In other
cases, output as audio signals of 5.1-channels or less.
•When outputting linear PCM audio signals, if the number of compatible channels of the connected HDMI device
is lower, the signals are output with the number of channels for which the device is compatible.
• The audio signals output from the
DIGITAL OUT
terminal have a sampling frequency of 48 kHz (44.1 kHz for audio
CDs).
48
En
Page 49

Language Code Table and Country/Area Code Table
Abkhazian, ab/abk, 0102
Afar, aa/aar, 0101
Afrikaans, af/afr, 0106
Albanian, sq/sqi, 1917
Amharic, am/amh, 0113
Arabic, ar/ara, 0118
Armenian, hy/hye, 0825
Assamese, as/asm, 0119
Aymara, ay/aym, 0125
Azerbaijani, az/aze, 0126
Bashkir, ba/bak, 0201
Basque, eu/eus, 0521
Belarusian, be/bel, 0205
Bengali, bn/ben, 0214
Bihari, bh/bih, 0208
Bislama, bi/bis, 0209
Breton, br/bre, 0218
Bulgarian, bg/bul, 0207
Burmese, my/mya, 1325
Catalan, ca/cat, 0301
Central Khmer, km/khm, 1113
Chinese, zh/zho, 2608
Corsican, co/cos, 0315
Croatian, hr/hrv, 0818
Czech, cs/ces, 0319
Danish, da/dan, 0401
Dutch, nl/nld, 1412
Dzongkha, dz/dzo, 0426
English, en/eng, 0514
Esperanto, eo/epo, 0515
Estonian, et/est, 0520
Finnish, fi/fin, 0609
Fijia
n, fj
/fij, 0610
Faroese, fo/fao, 0615
French, fr/fra, 0618
Galician, gl/glg, 0712
Georgian, ka/kat, 1101
German, de/deu, 0405
Greek, el/ell, 0512
Guarani, gn/grn, 0714
Gujarati, gu/guj, 0721
Hausa, ha/hau, 0801
Hebrew, iw/heb, 0923
Hindi, hi/hin, 0809
Hungarian, hu/hun, 0821
Icelandic, is/isl, 0919
Indonesian, in/ind, 0914
Interlingua, ia/ina, 0901
Interlingue, ie/ile, 0905
Inupiaq, ik/ipk, 0911
Irish, ga/gle, 0701
Italian, it/ita, 0920
Japanese, ja/jpn, 1001
Javanese, jw/jav, 1023
Kalaallisut, kl/kal, 1112
Kannada, kn/kan, 1114
Kashmiri, ks/kas, 1119
Kazakh, kk/kaz, 1111
Kinyarwanda, rw/kin, 1823
Kirghiz, ky/kir, 1125
Korean, ko/kor, 1115
Kurdish, ku/kur, 1121
Lao, lo/lao, 1215
Latin, la/
lat, 1201
Latvia
n, lv/lav, 1222
Lingala, ln/lin, 1214
Lithuanian, lt/lit, 1220
Macedonian, mk/mkd, 1311
Malagasy, mg/mlg, 1307
Malay, ms/msa, 1319
Malayalam, ml/mal, 1312
Maltese, mt/mlt, 1320
Maori, mi/mri, 1309
Marathi, mr/mar, 1318
Mongolian, mn/mon, 1314
Moldavian, mo/mol, 1315
Nauru, na/nau, 1401
Nepali, ne/nep, 1405
Norwegian, no/nor, 1415
Occitan, oc/oci, 1503
Oriya, or/ori, 1518
Oromo, om/orm, 1513
Panjabi, pa/pan, 1601
Persian, fa/fas, 0601
Polish, pl/pol, 1612
Portuguese, pt/por, 1620
Pushto, ps/pus, 1619
Quechua, qu/que, 1721
Romanian, ro/ron, 1815
Romansch, rm/roh, 1813
Rundi, rn/run, 1814
Russian, ru/rus, 1821
Samoan, sm/smo, 1913
Sango, sg/sag, 1907
Sanskrit, sa/san, 1901
Scottish Gaelic, gd/gla, 0704
Serbian, sr/srp, 1918
Serbo-Croatian, sh/---, 1908
Shona, sn/sna, 1914
Sindhi, sd/snd, 1904
Sinhalese,
si/sin, 1909
Sl
o
vak, sk/slk, 1911
Slovenian, sl/slv, 1912
Somali, so/som, 1915
Sotho, Southern, st/sot, 1920
Spanish, es/spa, 0519
Sundanese, su/sun, 1921
Swahili, sw/swa, 1923
Swati, ss/ssw, 1919
Swedish, sv/swe, 1922
Tagalog, tl/tgl, 2012
Tajik, tg/tgk, 2007
Tamil, ta/tam, 2001
Tatar, tt/tat, 2020
Telugu, te/tel, 2005
Thai, th/tha, 2008
Tibetan, bo/bod, 0215
Tigrinya, ti/tir, 2009
Tonga (Tonga Islands),
to/ton, 2015
Tsonga, ts/tso, 2019
Tswana, tn/tsn, 2014
Turkmen, tk/tuk, 2011
Turkish, tr/tur, 2018
Twi, tw/twi, 2023
Ukrainian, uk/ukr, 2111
Urdu, ur/urd, 2118
Uzbek, uz/uzb, 2126
Vietnamese, vi/vie, 2209
Volapük, vo/vol, 2215
Welsh, cy/cym, 0325
Western Frisian, fy/fry, 0625
Wolof, wo/wol, 2315
Xhosa, xh/xho, 2408
Yiddish, ji/yid, 1009
Yoruba, yo/yor, 2515
Zulu, zu/zul, 2621
Anguilla, ai, 0109
Antigua and Barbuda, ag, 0107
Argentina, ar, 0118
Armenia, am, 0113
Australia, au, 0121
Austria, at, 0120
Azerbaijan, az, 0126
Bahamas, bs, 0219
Barbados, bb, 0202
Belarus, by, 0225
Belgium, be, 0205
Belize, bz, 0226
Bermuda, bm, 0213
Brazil, br, 0218
Bulgaria, bg, 0207
Canada, ca, 0301
Cayman Islands, ky, 1125
Chile, cl, 0312
China, cn, 0314
Colombia, co, 0315
Croatia, hr, 0818
Cyprus, cy, 0325
Czech Republic, cz, 0326
Denmark, dk, 0411
Dominica, dm, 0413
Dominican Republic, do, 0415
Estonia, ee, 0505
Finland, fi, 0609
France, fr, 0618
Georgia, ge, 0705
Germany, de, 0405
Greec
e, g
r, 0718
Greenland, gl, 0712
Grenada, gd, 0704
Guyana, gy, 0725
Haiti, ht, 0820
Hong Kong, hk, 0811
Hungary, hu, 0821
Iceland, is, 0919
India, in, 0914
Indonesia, id, 0904
Ireland, ie, 0905
Israel, il, 0912
Italy, it, 0920
Jamaica, jm, 1013
Japan, jp, 1016
Kazakhstan, kz, 1126
Korea, Republic of, kr, 1118
Kyrgyzstan, kg, 1107
Latvia, lv, 1222
Liechtenstein, li, 1209
Lithuania, lt, 1220
Luxembourg, lu, 1221
Macedonia, the Former Yugoslav
Republic of, mk, 1311
Malaysia, my, 1325
Malta, mt, 1320
Mexico, mx, 1324
Moldova, Republic of, md, 1304
Monaco, mc, 1303
Montserrat, ms, 1319
Netherlands, nl, 1412
New Zealand, nz, 1426
Norway, no, 1415
Pakistan, pk, 1611
Peru, p
e
, 1605
Philippines, ph, 1608
Poland, pl, 1612
Portugal, pt, 1620
Puerto Rico, pr, 1618
Romania, ro, 1815
Russian Federation, ru, 1821
Saint Kitts and Nevis, kn, 1114
Saint Lucia, lc, 1203
Saint Vincent and the
Grenadines, vc, 2203
San Marino, sm, 1913
Singapore, sg, 1907
Slovakia, sk, 1911
Slovenia, si, 1909
Spain, es, 0519
Suriname, sr, 1918
Sweden, se, 1905
Switzerland, ch, 0308
Taiwan, Province of China,
tw, 2023
Tajikistan, tj, 2010
Thailand, th, 2008
Trinidad and Tobago, tt, 2020
Tunisia, tn, 2014
Turkey, tr, 2018
Turkmenistan, tm, 2013
Turks and Caicos Islands,
tc, 2003
Ukraine, ua, 2101
United Kingdom, gb, 0702
United States, us, 2119
Uruguay, uy, 2125
Uzbekistan, uz, 2126
Venezuela, ve, 2205
Virgin Islands, British, vg, 2207
Language Code Table
Language name, language code, input code
06
Country/Area Code Table
Country/Area name, Country/Area code, input code
49
En
Page 50

Chapter 7
07
Additional information
Licenses
The licenses for the software used on
this player are shown below.
libxml2
The MIT License
Copyright © <year> <copyright holders>
Permission is hereby granted, free of charge, to any person
obtaining a copy of this software and associated
documentation files (the “Software”), to deal in the
Software without restriction, including without limitation
the rights to use, copy, modify, merge, publish, distribute,
sublicense, and/or sell copies of the Software, and to
permit persons to whom the Software is furnished to do so,
subject to the following conditions:
The above copyright notice and this permission notice shall
be included in all copies or substantial portions of the
Software.
THE SOFTWARE IS PROVIDED “AS IS”, WITHOUT
WARRANTY OF ANY KIND, EXPRESS OR IMPLIED,
INCLUDING BUT NOT LIMITED TO THE WARRANTIES OF
MERCHANTABILITY, FITNESS FOR A PARTICULAR
PURPOSE AND NONINFRINGEMENT. IN NO EVENT
SHALL THE AUTHORS OR COPYRIGHT HOLDERS BE
LIABLE FOR ANY CLAIM, DAMAGES OR OTHER LIABILITY,
WHETHER IN AN ACTION OF CONTRACT, TORT OR
T
HERWISE, ARISING FROM, OUT OF OR IN
O
CONNECTION WITH THE SOFTWARE OR THE USE OR
OTHER DEALINGS IN THE SOFTWARE.
OpenSSL
The OpenSSL toolkit stays under a dual license, i.e. both the
conditions of the OpenSSL License and the original SSLeay
license apply to the toolkit.
See below for the actual license texts. Actually both
licenses are BSD-style Open Source licenses. In case of any
license issues related to OpenSSL please contact openssl-
core@openssl.org.
OpenSSL License
Copyright © 1998-2007 The OpenSSL Project. All rights
reserved.
Redistribution and use in source and binary forms, with or
without modification, are permitted pr ovided that the
following conditions are met:
1. Redistributions of source code must retain the above
copyright notice, this list of conditions and the following
disclaimer.
2. Redistributions in binary form must reproduc
t notice, this list of conditions and the following
copyrigh
disclaimer in the documentation and/or other materials
provided with the distribution.
3. All advertising materials mentioning features or use of
this software must display the following
acknowledgment: “This product includes software
developed by the OpenSSL Project for use in the
OpenSSL Toolkit. (http://www.openssl.org/)”
4. The names “OpenSSL Toolkit” and “OpenSSL Project”
must not be used to endor se or promote products
derived from this software without prior written
permission. For written permission, please contact
opens
5. Products derived from this software may not be called
“OpenSSL” nor may “OpenSSL” appear in their names
without prior written permission of the OpenSSL Project.
6. Redistributions of any form whatsoever must retain the
following acknowledgment: “This product includes
software developed by the OpenSSL Project for use in the
OpenSSL Toolkit (http://www.openssl.org/)”
THIS SOFTWARE IS PROVIDED BY THE OpenSSL
PROJECT “AS IS” AND ANY EXPRESSED OR IMPLIED
WARRANTIES, INCLUDING, BUT NOT LIMITED TO, THE
IMPLIED WARRANTIES OF MERCHANTABILITY AND
FITNESS FOR A PARTICULAR PURPOSE ARE
DISCLAIMED. IN NO EVENT SHALL THE OpenSSL
PROJECT OR ITS CONTRIBUTORS BE LIABLE FOR ANY
DIRECT, INDIRECT, INCIDENTAL, SPECIAL, EXEMPLARY,
OR CONSEQUENTIAL DAMAGES (INCLUDING, BUT NOT
LIMITED TO, PROCUREMENT OF SUBSTITUTE GOODS OR
SERVICES; LOSS OF USE, DATA, OR PROFITS; OR
BUSINESS INTERRUPTION) HOWEVER CAUSED AND ON
ANY THEORY OF LIABILITY, WHETHER IN CONTRACT,
STRICT LIABILITY, OR TORT (INCLUDING NEGLIGENCE OR
OTHERWISE) ARISING IN ANY WAY OUT OF THE USE OF
THIS SOFTWARE, EVEN IF ADVISED OF THE POSSIBILITY
50
OF SUCH DAMAGE.
En
sl-core@
openssl.org.
e the above
This product includes cryptographi
Eric Young (eay@cryptsoft.com).This product includes
software written by Tim Hudson (tjh@cryptsoft.com).
Original SSLeay License
Copyright © 1995-1998 Eric Young (eay@cryptsoft.com)
All rights reserved.
This package is an SSL implementation written by Eric
Young (eay@cryptsoft.com). The implementation was
written so as to conform with Netscapes SSL.
This library is free for commercial and non-commercial use
as long as the following conditions are aheared to. The
following conditions apply to all code found in this
distribution, be it the RC4, RSA, lhash, DES, etc., code; not
just the SSL code. The SSL documentation included with
this distribution is covered by the same copyright terms
ex
cept that the holder is Tim Hudson (tjh@cryptsoft.com).
Copyright remains Eric Young’s, and as such any Copyright
notices in the code are not to be removed. If this package is
used in a product, Eric Young should be given attribution as
the author of the parts of the library used. This can be in the
form of a textual message at program startup or in
documentation (online or textual) provided with the
package.
Redistribution and use in source and binary forms, with or
without modification, are permitted provided that the
following conditions are met:
1. Redistributions of source code must retain the copyrigh
otice, this list of conditions and the following
n
disclaimer.
2. Redistributions in binary form must reproduce the above
copyright notice, this list of conditions and the following
disclaimer in the documentation and/or other materials
provided with the distribution.
3. All advertising materials mentioning features or use of
this software must display the following
acknowledgement: “This product includes cryptographic
software written by Eric Young (eay@cryptsoft.com)”
The word ‘cryptographic’ can be left out if the rouines
from the library being used are not cryptographic rel
).
:-
4. If you include any Windows specific code (or a derivative
thereof) from the apps directory (application code) you
must include an acknowledgement: “This product
includes software written by Tim Hudson
(tjh@cryptsoft.com)”
THIS SOFTWARE IS PROVIDED BY ERIC YOUNG “AS IS”
AND ANY EXPRESS OR IMPLIED WARRANTIES,
INCLUDING, BUT NOT LIMITED TO, THE IMPLIED
WARRANTIES OF MERCHANTABILITY AND FITNESS FOR
A PARTICULAR PURPOSE ARE DISCLAIMED. IN NO
EVENT SHALL THE AUTHOR OR CONTRIBUTORS BE
LIABLE FOR ANY DIRECT, INDIRECT, INCIDENTAL,
SPECIAL, EXEMPLARY, OR CONSEQUENTIAL DAMAGES
(INCLUDING, BUT NOT LIMITED TO, PROCUREMENT OF
SUBSTITUTE GOODS OR SERVICES; LOSS OF USE, DATA,
OR PROFITS; OR BUSINESS INTERRUPTION) HOWEVER
CAUSED AND ON ANY THEORY OF LIABILITY, WHETHER
IN CONTRACT, STRICT LIABILITY, OR TORT (INCLUDING
NEGLIGENCE OR OTHERWISE) ARISING IN ANY WAY OUT
OF THE USE OF THIS SOFTWARE, EVEN IF ADVISED OF
THE POSSIBILITY OF SUCH DAMAGE.
The licence and distribution terms for any publically
available version or derivative of this code cannot be
changed. i.e. this code cannot simply be copied and put
under another distribution licence [including the GNU
Public Licence.]
c software writte
n by
ated
zlib
This software is based in part on zlib see http://www.zlib.net
for information.
FreeType2
The FreeType Project LICENSE
2006-Jan-27 Copyright 1996-2002, 2006 by David Turner,
Robert Wilhelm, and Werner Lemberg
Introduction
The FreeType Project is distributed in several archive
packages; some of them may contain, in addition to the
FreeType font engine, various tools and contributions
which rely on, or relate to, the Fr ee Type Project.
This license applies to all files found in such packages, and
which do not fall under their own explicit license. The
license affects thus the FreeType font engine, the test
programs, documentation and makefiles, at the very least.
This license was inspired by the BSD, Artistic, and IJG
(Independent JPEG Group) licenses, which all encourage
inclusion and use of free software i
freeware products alike. As a consequence, its main points
are that:
n
commercial and
•We don’t promise that this software works. However, we
will be interested in any kind of bug reports.(‘as is’
distribution)
•You can use this software fo r whatever you want, in parts
or full form, without having to pay us.(‘royalty-free’
usage)
•You may not pretend that you wrote this software. If you
use it, or only parts of it, in a program, you must
acknowledge somewhere in your documentation that
you have used the FreeType code.(‘credits’)
We specifically permit and encourage the inclusion of this
with or with
software,
products. We disclaim all warranties covering The FreeType
Project and assume no liability related to The FreeType
Project.
Finally, many people asked us for a preferred form for a
credit/disclaimer to use in compliance with this license.
We thus encourage you to use the following text:
Portions of this software are copyright © <year> The
FreeType Project (www.freetype.org). All rights reserved.
Please replace <year> with the value from the FreeType
version you actually use.
Legal Terms
initions
f
0. De
Throughout this license, the terms ‘package’, ‘FreeType
Project’, and ‘FreeType archive’ refer to the set of files
t
originally distributed by the authors (David Turner,
Robert Wilhelm, and Werner Lemberg) as the ‘FreeType
Project’, be they named as alpha, beta or final release.
‘You’ refers to the licensee, or person using the project,
where ‘using’ is a generic term including compiling the
project’s source code as well as linking it to form a
‘program’ or ‘executable’. This program is referred t
‘a program
This license applies to all files distributed in the original
FreeType Project, including all source code, binaries and
documentation, unless otherwise stated in the file in its
original, unmodified form as distributed in the original
archive. If you are unsure whether or not a particular file
is covered by this license, you must contact us to verify
this.
The FreeType Project is copyright (C) 1996-2000 by David
Turner, Robert Wilhelm, and Werner Lemberg. All rights
reserved except as specified below.
1. No Warranty
THE FREETYPE PROJECT IS PROVIDED ‘AS IS’
THOUT WARRANTY OF AN Y KIND, EITHER EXPRESS
I
W
OR IMPLIED, INCLUDING, BUT NOT LIMITED TO,
WARRANTIES OF MERCHANTABILITY AND FITNESS
FOR A PARTICULAR PURPOSE. IN NO EVENT WILL ANY
OF THE AUTHORS OR COPYRIGHT HOLDERS BE
LIABLE FOR ANY DAMAGES CAUSED BY THE USE OR
THE INABILITY TO USE, OF THE FREETYPE PROJECT.
2. Redistribution
This license grants a worldwide, royalty-free, perpetual
and irrevocable right and license to use, execute,
perform, compile, display, copy, create derivative works
of, distribute and sublicense the FreeType Project (in
both source and object code forms) and derivative works
thereof for any purpose; and to authorize others to
exercise some or all of the rights granted herein, subject
to the following conditions:
•Redistribution of source code must retain this license
file (‘FTL.TXT’) unaltered; any additions, deletions or
changes to the origin
in accompanying documentation. The copyright
notices of the unaltered, original files must be
preserved in all copies of source files.
•Redistribution in binary form must provide a
disclaimer that states that the software is based in part
of the work of the FreeType Team, in the distribution
documentation. We also encourage you to put an URL
to the FreeType web page in your documentation,
though this isn’t mandatory.
These conditions apply to any software derived from or
based on the FreeType Project, not just the unmodified
files. If you use our work, you must acknowledge us.
However, no fee need be paid to us.
3. Advertising
Neither th
shall use the name of the other for commercial,
advertising, or promotional purposes without specific
prior written permission.
We suggest, but do not require, that you use one or more
of the following phrases to refer to this software in your
documentation or advertising materials: ‘FreeType
Project’, ‘FreeType Engine’, ‘FreeType library’, or
‘FreeType Distribution’.
As you have not signed this license, you are n
to accept it. However, as the FreeType Project is
out modifications, in commercial
using the FreeType engine’.
al
files must be clearly indicated
e Free
Type authors and contributors nor you
o
t required
o as
Page 51

copyrighted material, only this license, or another one
contracted with the authors, grants you the right to use,
distribute, and modify it. Therefore, by using,
distributing, or modifying the FreeType Project, you
indicate that you understand and accept all the terms of
this license.
4. Contacts
There are two mailing lists related to FreeType:
•freetype@nongnu.org
Discusses general use and applications of FreeType,
as well as future and wanted additions to the library
and distribution. If you are looking for support, start in
this list if you haven’t found anything to help you in the
documentation.
-devel@nongnu.org
•freetype
D
iscusses bugs, as well as engine internals, design
issues, specific licenses, porting, etc.
Our home page can be found at
http://www.freetype.org
libpng
COPYRIGHT NOTICE, DISCLAIMER, and LICENSE:
If you modify libpng you may insert additional notices
immediately following this sentence.
libpng versions 1.2.6, August 15, 2004, through 1.2.26, April
2, 2008, are Copyright © 2004, 2006-2008 Glenn Randers-
Pehrson, and are distributed according to the same
disclaimer and license as libpng-1.2.5 with the following
individual added to the list of Contributing Authors
Cosmin Truta
libpng versions 1.0.7, July 1, 2000, through 1.2.5 - October
3, 2002, are Copyright © 2000-2002 Glenn Randers-
Pehrson, and are distributed according to the same
disclaimer and license as libpng-1.0.6 with the following
individuals added to the list of Contributing Authors
Simon-Pierre Cadieux
Eric S. Raymond
Gilles Vollant
and with the following additions to the disclaimer:
There is no warranty against interferenc
oyment of the library or against infringement. There is
enj
no warranty that our efforts or the library will fulfill any of
your particular purposes or needs. This library is provided
with all faults, and the entire risk of satisfactory quality,
performance, accuracy, and effort is with the user.
libpng versions 0.97, January 1998, through 1.0.6, Mar ch
20, 2000, are Copyright © 1998, 1999 Glenn Randers-
Pehrson, and are distributed according to the same
disclaimer and license as libpng-0.96, with the following
divid
uals added to the list of Contributing Authors:
in
Tom Lane
Glenn Randers-Pehrson
Willem van Schaik
libpng versions 0.89, June 1996, through 0.96, May 1997,
are Copyright © 1996, 1997 Andreas Dilger Distributed
according to the same disclaimer and license as libpng-
0.88, with the following individuals added to the list of
Contributing Authors:
John Bowler
Kevin Bracey
Sam Bushell
Magnus Holmgren
Greg Roelofs
Tom Tanner
libpng versions 0.5, May 1995, through 0.88, January 1996,
are Copyright © 1995, 1996 Guy Eric Schalnat, Group 42,
Inc.
For the purposes of this copyright and license,
“Contributing Authors” is defined as the following set of
individuals:
Andreas Dilger
e Martindale
v
Da
Guy Eric Schalnat
Paul Schmidt
Tim Wegner
The PNG Reference Library is supplied “AS IS”. The
Contributing Authors and Group 42, Inc. disclaim all
warranties, expressed or implied, including, without
limitation, the warranties of merchantability and of fitness
for any purpose. The Contributing Authors and Group 42,
Inc. assume no liability for direct, indirect, incidental,
special, exemplary, or consequential damages, which may
result from the use of the PNG Reference Library, even if
advised of the possibility of such damage.
Permission is hereby granted to use, copy, modify, and
distribute this source code, or portio
purpose, without fee, subject to the following restrictions:
1. The origin of this source code must not be misrepresented.
2. Altered versions must be plainly marked as such and
must not be misrepresented as being the original source.
3. This Copyright notice ma y not be removed or altered from
any source or altered source distribution.
The Contributing Authors and Group 42, Inc. specifically
permit, without fee, and encourage the use of this source
code as a component to supporting the PNG file format in
commercial products. If you use this source code in a
e with your
ns hereof
, for any
product, acknowledgment is not required but would be
appreciated.
A “png_get_copyright” function is available, for convenient
use in “about” boxes and the like:
printf(“%s”,png_get_copyrig
(i
n PNG format, of course) is supplied in the files
“pngbar.png” and “pngbar.jpg (88x31) and “pngnow.png”
(98x31).
Libpng is OSI Certified Open Source Software. OSI Certified
Open Source is a certification mark of the Open Source
Initiative.
Glenn Randers-Pehrson
glennrp at users.sourceforge.net
2-Apr-08
ht(NULL));Also, the PNG logo
libjpg
The Independent JPEG Group’s JPEG software
README for release 6b of 27-Mar-1998
This distribution contains the sixth public release of the
Independent JPEG Group’s free JPEG software. You are
welcome to redistribute this software and to use it for any
purpose, subject to the conditions under LEGAL ISSUES,
below.
Serious users of this software (particularly those
incorporating it into larger programs) should contact IJG at
jpeg-info@uunet.uu.net to be added to our electronic
mailing list. Mailing list members are notified of updates
and have a chance to participate in technical discussions,
etc.
This software is t
Boucher, Lee Crocker, Julian Minguillon, Luis Ortiz, George
Phillips, Davide Rossi, Guido Vollbeding, Ge’ Weijers, and
other members of the Independent JPEG Group.
IJG is not affiliated with the official ISO JPEG standards
committee.
DOCUMENTATION ROADMAP
This file contains the following sections:
OVERVIEW General description of JPEG and
LEGAL ISSUES Copyright, lack of warranty, terms
REFERENCES Where to learn more about JPEG.
ARCHIVE LOCATIONS Where to find newer versions of
RELATED SOFTWARE Other stuff you should get.
FILE FORMAT WARS Software *not* to get.
TO DO Plans for future IJG releases.
Other documentation files in the distribution are:
User documentation:
install.doc How to configure an
usage.doc Usage instructions for cjpeg, djpeg,
*.1 Unix-style man pages for programs (same info as
usage.doc).
wizard.doc Advanced usage instructions for JPEG
change.log Version-to-version change highlights.
Programmer and internal documentation:
libjpeg.doc How to use the JPEG library in your own
example.c Sample code for calling the JPEG library.
structure.doc Overview of the JPEG library’s internal
e
list.doc Road map of IJG files.
fil
coderules.doc Coding style rules --- please read if you
Please read at least the files install.doc and usage.doc.
Useful information can also be found in the JPEG FAQ
(Frequently Asked Questions) article. See ARCHIVE
LOCATIONS below to find out where to obtain the FAQ
article.
If you want to understand how the JPEG code works, we
suggest reading one or more of the REFERENCES, then
looking at the documentation files (in roughly the order
listed) before diving into the code.
OVERVIEW
This package contains C software to implement JPEG
image compression and decompression. JPEG
(pronounced “jay-peg”) is a standardized compression
method for full-color and gray-scale images. JPEG is
intended for compressing real-world scenes; line drawings,
cartoons and other non-reali
suit. JPEG is lossy, meaning that the output image is not
exactly identical to the input image. Hence you must not
use JPEG if you have to have identical output bits. However,
on typical photographic images, very good compression
levels can be obtained with no visible change, and
remarkably high compression levels are possible if you can
tolerate a low-quality image. For more details, see the
references, or just experiment with various compression
settings.
This software implements JPEG baseline, extendedsequential, and progressive compression processes.
Provision is made for supporting all variants of these
processes, although some uncommon parameter settings
of Tom Lane, Philip Gladstone, Jim
he work
the IJG software.
of distribution.
this software.
sof
tware.
jpegtran, rdjpgcom, and wrjpgcom.
wizards only.
programs.
structure.
contribute code.
d install the IJG
stic images are n
ot its strong
aren’t implemented yet. For legal re
distributing code for the arithmetic-coding variants of
JPEG; see LEGAL ISSUES. We have made no provision for
supporting the hierarchical or lossless processes defined
in the standard.
We provide a set of library routines for reading and writing
JPEG image files, plus two sample applications “cjpeg” and
“djpeg”, which use the library to perform conversion
between JPEG and some other popular image file formats.
The library is intended to be reused in other applications.
In order to support file co
have included considerable functionality beyond the bare
JPEG coding/decoding capability; for example, the color
quantization modules are not strictly part of JPEG
decoding, but they are essential for output to colormapped
file formats or colormapped displays. These extra functions
can be compiled out of the library if not required for a
particular application. We have also included jpegtran, a
utility for lossless transcoding between different JPEG
processes, and “rdjpgcom” and “wrjpgcom”, two simple
applications for in
in JFIF files.
The emphasis in designing this software has been on
achieving portability and flexibility, while also making it fast
enough to be useful. In particular, the software is not
intended to be read as a tutorial on JPEG. (See the
REFERENCES section for introductory material.) Rather, it
is intended to be reliable, portable, industrial-strength
code. We do not claim to have achieved that goal in every
aspect of the software, but we strive for it.
We welcome the use of this software as a component of
commercial products. No royalty is required, but we do ask
for an acknowledgement in product documentation, as
described under LEGAL ISSUES.
LEGAL ISSUES
In plain English:
1. We don’t promise that this software works. (But if you
nd any bugs, please let us know!)
i
f
2. You can use this software for whatever you want. You
don’t have to pay us.
3. You may not pretend that you wrote this software. If you
use it in a program, you must acknowledge somewhere
in your documentation th at you’ve used the IJG code.
In legalese:
The authors make NO WARRANTY or representation, either
express or implied, with respect to this software, its quality,
accuracy, merchantability, or fitness for a particular
purpose. This software is provided “AS IS”, and you, its
user, assume the entire risk as to its quality and accuracy.
This software is copyright © 1991-1998, Thomas G. Lane. All
Rights Reserved except as specified below.
Perm
distribute this software (or portions thereof) for any
purpose, without fee, subject to these conditions:
(1)If any part of the source code for this software is
distributed, then this README file must be included,
with this copyright and no-warranty notice unaltered;
and any additions, deletions, or changes to the original
files must be clearly indicated in accompanying
documentation.
(2)If only executable code is distributed, then the
accompanying documentation must state that “this
software is based in part on the work of the Independent
JPEG Group”.
(3)Permission for use of thi s software is granted only if the
user accepts full responsibility for an
consequences; the authors accept NO LIABILITY for
damages of any kind.
These conditions apply to any software derived from or
based on the IJG code, not just to the unmodified library. If
you use our work, you ought to acknowledge us.
Permission is NOT granted for the use of any IJG author’s
name or company name in advertising or publicity relating
to this software or products derived from it. This software
may be referred to only as “the Independent JPEG Group’s
software”.
We specifically permit and encourage the use of this
software as the basis of commercial products, provided
that all warran
product vendor.
ansi2knr.c is included in this distribution by permission of
L. Peter Deutsch, sole proprietor of its copyright holder,
Aladdin Enterprises of Menlo Park, CA. ansi2knr.c is NOT
covered by the above copyright and conditions, but instead
by the usual distribution terms of the Free Software
Foundation; principally, that you must include source code
if you redistribute it. (See the file ansi2knr.c for full details.)
However, since ansi2knr.c is not needed as part of any
program generated from the IJG code, this does not limit
you more than the foregoing paragraphs do.
e Un
Th
with GNU Autoconf. It is copyright by the Free Software
Foundation but is freely distributable. The same holds for its
supporting scripts (config.guess, config.sub, ltconfig,
ltmain.sh). Another support script, install-sh, is copyright
by M.I.T. but is also freely distributable.
serti
ng and extracting textual comments
ission is hereby
ix configuration script “configure” was produced
granted to use, copy, modify, and
y or liability claims are assumed by the
t
asons, we are not
n
version and viewing software, we
y u
ndesirable
07
51
En
Page 52

It appears that the arithmetic coding option of the JPEG
spec is covered by patents owned by IBM, AT&T, and
07
Mitsubishi. Hence arithmetic coding cannot legally be
used without obtaining one or more licenses. For this
reason, support for arithmetic coding has been removed
from the free JPEG software. (Since arithmetic coding
provides only a marginal gain over the unpatented Huffman
mode, it is unlikely that very many implementations will
support it.) So far as we are aware, there are no patent
restrictions on the remaining code.
The IJG distribution formerly included code to read and
write GIF files. To avoid entanglement with the Unisys LZW
patent, GIF reading support
and the GIF writer has been simplified to produce
uncompressed GIFs. This technique does not use the LZW
algorithm; the resulting GIF files are larger than usual, but
are readable by all standard GIF decoders.
We are required to state that
“The Graphics Interchange Format(c) is the Copyright
property of CompuServe Incorporated. GIF(sm) is a
Service Mark property of CompuServe Incorporated.”
REFERENCES
We highly recommend reading one or more of these
ces before trying to understand the innards of the
eren
ref
JPEG software.
The best short technical introduction to the JPEG
compression algorithm is
Wallace, Gregory K. “The JPEG Still Picture Compression
Standard”,
Communications of the ACM, April 1991 (vol. 34 no. 4),
pp. 30-44.
(Adjacent articles in that issue discuss MPEG motion
picture compression, applications of JPEG, and related
topics.) If you don’t have the CACM issue handy, a
PostScript file containing a revised version of Wallace’s
article is available at ftp://ftp.uu.net/graphics/jpeg/
wallace.ps.gz. The file (actually a preprint for an article that
appeared in IEEE Trans. Consumer Electronics) omits the
images that appeared in CACM, but it includes
sample
corrections and some added material. Note: the Wallace
article is copyright ACM and IEEE, and it may not be used
for commercial purposes.
A somewhat less technical, more leisurely introduction to
JPEG can be found in The Data Compression Book by Mark
Nelson and Jean-loup Gailly, published by M&T Books (Ne w
York), 2nd ed. 1996, ISBN 1-55851-434-1. This book provides
good explanations and example C code for a multitude of
compression methods including JPEG. It is an excellent
source if you are comfortable reading C code but don’t
know much about data compression in general. The book’s
JPEG sample code is far from industrial-strength, but when
you are ready to look at a full implementation, you’ve got
one here...
The best full description of JPEG is the textbook “JPEG Still
Image Data Compressio
Pennebaker and Joan L. Mitchell, published by Van
Nostrand Reinhold, 1993, ISBN 0-442-01272-1. Price
US$59.95, 638 pp. The book includes the complete text of
the ISO JPEG standards (DIS 10918-1 and draft DIS 10918-
2). This is by far the most complete exposition of JPEG in
existence, and we highly recommend it.
The JPEG standard itself is not available electronically; you
must order a paper copy through ISO or ITU. (Unless you
feel a need to own a certified official copy, we recommend
buying the Pennebaker and Mitchell book instead; it’s
much cheaper and includes a great deal of useful
explanatory material.) In the USA, copies of the standard
may be ordered from ANSI Sales at (212) 642-4900, o r from
Global Engineering Documents at (800) 854-7179. (ANSI
doesn’t take credit card orders
cheap: as of 1992, ANSI was charging $95 for Part 1 and $47
for Part 2, plus 7% shipping/handling. The standard is
divided into two parts, Part 1 being the actual specification,
while Part 2 covers compliance testing methods. Part 1 is
titled “Digital Compression and Coding of Continuous-tone
Still Images, Part 1: Requirements and guide lines” and has
document numbers ISO/IEC IS 10918-1, ITU-T T.81. Part 2 is
titled “Digital Compression and Coding of Continuous-tone
Still Images, Part 2: Compliance testing” and has
document numbers ISO/IEC IS 10918-2, ITU-T T.83.
Some extensions to the original JPEG standard are defined
in JPEG Part 3, a newer ISO standard numbered ISO/IEC IS
10918-3 and ITU-T T.84. IJG currently does not support any
Part 3 extensions.
The JPEG standard does not specify all details of an
hangeable file forma
interc
follow the “JFIF” conventions, revision 1.02. A copy of the
JFIF spec is available from:
Literature Department
C-Cube Microsystems, Inc.
1778 McCarthy Blvd.
Milpitas, CA 95035
phone (408) 944-6300, fax (408) 944-6314
A PostScript version of this document is available by FTP at
ftp://ftp.uu.net/graphics/jpeg/jfif.ps.gz. There is also a plain
52
has been rem
Standard” by William B.
n
,
but Global does.) It’s not
t. For the omitted details we
En
oved altogether,
text version at ftp://ftp.uu.net/graphics/jpeg/jfif.txt.gz, but it
is missing the figures.
The TIFF 6.0 file format specification can be obtained by FTP
from ftp://ftp.sgi.com/graphics/tiff/TIFF6.ps.gz. The JPEG
incorporation scheme found in the TIFF 6.0 spec of 3-June92 has a number of
recommend use of the TIFF 6.0 design (TIFF Compression
tag 6). Instead, we recommend the JPEG design proposed
by TIFF Technical Note #2 (Compr ession tag 7). Copies of
this Note can be obtained from ftp.sgi.com or from ftp://
ftp.uu.net/graphics/jpeg/. It is expected that the next
revision of the TIFF spec will replace the 6.0 JPEG design
with the Note’s design. Although IJG’s own code does not
support TIFF/JPEG, the free libtiff library uses our library to
implement TIFF/JPEG per the Note. libtiff is available from
ftp://ftp.sgi.com/graphics/tiff/.
ARCHIVE LOCATIONS
The “official” archive site for this software is ftp.uu.net
(Internet addre
version can always be found there in directory graphics/
jpeg. This particular version will be archived as ftp://
ftp.uu.net/graphics/jpeg/jpegsrc.v6b.tar.gz. If you don’t
have direct Internet access, UUNET’s archives are also
available via UUCP; contact help@uunet.uu.net for
information on retrieving files that way.
Numerous Internet sites maintain copies of the UUNET
files. However, only ftp.uu.net is guaranteed to have the
latest official version.
You can also obtain this software in DOS-compatible “zip”
archive format from the SimTel arch
ftp.simtel.net/pub/simtelnet/msdos/graphics/), or on
CompuServe in the Graphics Support forum (GO
CIS:GRAPHSUP), library 12 JPEG Tools. Again, these
versions may sometimes lag behind the ftp.uu.net release.
The JPEG FAQ (Frequently Asked Questions) article is a
useful source of general information about JPEG. It is
updated constantly and therefore is not included in this
distribution. The FAQ is posted every two weeks to Usenet
newsgroups comp.graphics.misc, news.answers, and
other groups. It is available on the World Wide Web at http:/
/www.faqs.org/faqs/jpeg-faq/ and other news.answers
e sites, including the official news.answers archive at
v
archi
rtfm.mit.edu: ftp://rtfm.mit.edu/pub/usenet/news.answers/
jpeg-faq/. If you don’t have Web or FTP access, send e-mail
to mail-server@rtfm.mit.edu with body
send usenet/news.answers/jpeg-faq/part1
send usenet/news.answers/jpeg-faq/part2
RELATED SOFTWARE
Numerous viewing and image manipulation programs now
support JPEG. (Quite a few of them use this library to do so.)
The JPEG FAQ described above lists some of the more
popular free and shareware viewers, and tells where to
obtain them on Internet.
If you are on a Unix machine, we highly recommend Jef
Poskanzer’s free PBMPLUS software,
useful operations on PPM-format image files. In particular,
it can convert PPM images to and from a wide range of
other formats, thus making cjpeg/djpeg considerably more
useful. The latest version is distributed by the NetPBM
group, and is available from numerous sites, notably ftp://
wuarchive.wustl.edu/gr aphics/graphics/packages/
NetPBM/. Unfortunately PBMPLUS/NETPBM is not nearly
as portable as the IJG software is; you are likely to have
difficulty making it work on any non-Unix machine.
A different free JPEG implementation, written by the PVRG
group at Stanford, is available from ftp://
efun.stanford.edu/pub/jpeg/. This program is designed
v
ha
for research and experimentation rather than production
use; it is slower, harder to use, and less portable than the
IJG code, but it is easier to read and modify. Also, the PVRG
code supports lossless JPEG, which we do not. (On the
other hand, it doesn’t do progressive JPEG.)
FILE FORMAT WARS
Some JPEG programs produce files that are not compatible
with our library. The root of the problem is that the ISO
JPEG committee failed to specify a concrete file format.
Some vendors “filled in the blanks” on their own, creating
proprietary forma
example, none of the early commercial JPEG
implementations for the Macintosh were able to exchange
compressed files.)
The file format we have adopted is called JFIF (see
REFERENCES). This format has been agreed to by a
number of major commercial JPEG vendors, and it has
become the de facto standard. JFIF is a minimal or “low
end” representation. We recommend the use of TIFF/JPEG
(TIFF revision 6.0 as modified by T IFF Technical Note #2) for
“high end” applications that need to record a lot of
additional data about an image. TIFF/JPEG is fairly new and
not yet widely supported, unfortunately.
The upcoming JPEG Part 3 standard defines a file format
called SPIFF. SPIFF is interoperable with JFIF, in the sense
that most JFIF decoders should be able to read the most
common variant of SPIFF. SPIFF has some technical
advantages over
that it is an official standard rather than an informal one. At
seriou
s problems. IJG does not
ss 192.48.96.9). The most rec
ves (ftp://
i
which prov
ts that no one else could rea
JFIF, but its major
claim to fame is simply
ent released
ides many
d. (For
this point it is unclear whether SPIFF will supersede JFIF or
whether JFIF will remain the de-facto standard. IJG inten ds
to support SPIFF once the standard is frozen, but we have
not decided whether it should become our default output
format or not. (In any case, our decoder will remain capable
of reading JFIF indefinitely.)
Various proprietary file formats incorporating JPEG
compression also exist. We have little or no sympathy for
the existence of these formats. Indeed, one of the original
reasons for developing this free
convergence on common, open format standards for JPEG
files. Don’t use a proprietary file format!
TO DO
The major thrust for v7 will probably be improvement of
visual quality. The current method for scaling the
quantization tables is known not to be very good at low Q
values. We also intend to investigate block boundary
smoothing, “poor man’s variable quantization”, and other
means of improving quality-vs-file-size performance
without sacrificing compatibility.
In future versions, we are considering supporting some of
the upcoming JPEG Part 3 extensions --- principally,
variable quantization and the SPIFF file format.
, speeding things up is of great interest.
s
As alway
Please send bug reports, offers of help, etc. to jpeg-
info@uunet.uu.net.
so
ftware was to help force
libupnp
Copyright (c) 2000-2003 Intel Corporation
All rights reserved.
Redistribution and use in source and binary forms, with or
without modification, are permitted provided that the
following conditions are met:
*Redistributions of source code must retain the above
copyright notice, this list of conditions and the following
disclaimer.
*Redistributions in binary form must reproduce the above
copyright notice, this list of conditions and the following
disclaimer in the documentation and/or other materials
provided with the distribution.
*Neither name of Intel Corporation nor the names of its
contributors may be used to endorse or prom
cts derived from this software without specific
produ
prior written permission.
THIS SOFTWARE IS PROVIDED BY THE COPYRIGHT
HOLDERS AND CONTRIBUTORS
“AS IS” AND ANY EXPRESS OR IMPLIED WARRANTIES,
INCLUDING, BUT NOT LIMITED TO, THE IMPLIED
WARRANTIES OF MERCHANTABILITY AND FITNESS FOR
A PARTICULAR PURPOSE ARE DISCLAIMED. IN NO
EVENT SHALL INTEL OR CONTRIBUTORS BE LIABLE FOR
ANY DIRECT, INDIRECT, INCIDENTAL, SPECIAL,
EXEMPLARY, OR CONSEQUENTIAL DAMAGES
(INCLUDING, BUT NOT LIMITED TO, PROCUREMENT OF
SUBSTITUTE GOODS OR SERVICES; LOSS OF USE, DATA,
OR PROFITS; OR BUSINESS INTERRUPTION) HOWEVER
CAUSED AND ON ANY THEORY OF LIABILITY, WHETHER
IN CONTRACT, STRICT LIABILITY, OR TORT (INCLUDING
NEGLIGENCE OR OTHER WISE) ARISING IN ANY WAY OUT
OF THE USE OF THIS SOFTWARE, EVEN IF ADVISED OF
THE POSSIBILITY OF SUCH DAMAGE.
ote
AVC/H.264
THIS PRODUCT IS LICENSED UNDER THE AVC PATENT
PORTFOLIO LICENSE FOR THE PERSONAL AND NONCOMMERCIAL USE OF A CONSUMER TO (i) ENCODE
VIDEO IN COMPLIANCE WITH THE AVC STANDARD (”AVC
VIDEO”) AND/OR (ii) DECODE AVC VIDEO THAT WAS
ENCODED BY A CONSUMER ENGAGED IN A PERSONAL
AND NON-COMMERCIAL ACTIVITY AND/OR WAS
OBTAINED FROM A VIDEO PROVIDER LICENSED TO
PROVIDE AVC VIDEO. No LICENSE IS GRANTED OR
SHALL BE IMPLIED FOR ANY OTHER USE. ADDITIONAL
INFORMATION MAY BE OBTAINED FROM MPEG LA, L.L.C.
SEE HTTP://MPEGLA.COM.
GNU GENERAL PUBLIC LICENSE
Version 2, June 1991
Copyright © 1989, 1991 Free Software Foundation, Inc., 51
Franklin Street, Fifth Floor, Boston, MA 02110-1301 USA
Everyone is permitted to copy and distribute verbatim
copies of this license document, but changing it is not
allowed.
Preamble
The licenses for most software are designed to take away
your freedom to share and change it. By contrast, the GNU
General Public License is intended to guarantee your
freedom to share and change free software - to make sure
the software is free for all its users. This General Public
License applies to most of the Free Softwa re Foundation’s
software and to any other program whose authors commit
to using it. (Some other Free
is covered by the GNU Lesser General Public License
instead.) You can apply it to your programs, too.
When we speak of free software, we are referring to
freedom, not price. Our General Public Licenses are
Software Fo
undation software
Page 53

designed to make sure that you have the freedom to
distribute copies of free software (and charge for this
service if you wish), that you receive source code or can get
it if you want it, that you can change the software or use
pieces of it in new free programs; and that you know you
can do these things.
To protect your rights, we need to make restrictions that
forbid anyone to deny you these rights or to ask you to
surrender the rights. These restrictions translate to certain
responsibilities for you if you distribute copies of the
software, or if you modify it.
For example, if you distribute copies of such a program,
whether gratis or for a
the rights that you have. You must make sure that they, too,
receive or can get the source code. And you must show
them these terms so they know their rights.
We protect your rights with two steps: (1) copyright the
software, and (2) offer you this license which gives you legal
permission to copy, distribute and/or modify the software.
Also, for each author’s protection and ours, we want to
make certain that everyone understands that there is no
warranty for this free software. If the software is modified by
someone else and passed on, we want its recipients to
know that what they have is not the o riginal, so that any
problems introdu
original authors’ reputations.
Finally, any free program is threatened constantly by
software patents. We wish to avoid the danger that
redistributors of a free program will individually obtain
patent licenses, in effect making the program proprietary.
To prevent this, we have made it clear that any patent must
be licensed for everyone’s free use or not licensed at all.
The precise terms and conditions for copying, distribution
and modification follow.
TERMS AND CONDITIONS FOR COPYING,
DISTRIBUTION AND MODIFICATION
0. This License applies to any program or other work which
contains a notice placed by the copyrig
may be distributed under the terms of this General Public
License. The “Program”, below, refers to any such
program or work, and a “work based on the Program”
means either the Program or any derivative work under
copyright law: that is to say, a work containing the
Program or a portion of it, either verbatim or with
modifications and/or translated into another language.
(Hereinafter, translation is included without limitation in
the term “modification”.) Each licensee is addressed as
“you”.
Activities other than copying, distribu
modification are not covered by this License; they are
outside its scope. The act of running the Program is not
restricted, and the output from the Program is covered
only if its contents constitute a work based on the
Program (independent of having been made by running
the Program). Whether that is true depends on what the
Program does.
1. You may copy and distribute verbatim copies of the
Program’s source code as you receive it, in any medium,
provided that you conspicuously and appropriately
publish on each copy an appropriate copyright notice
and disclaimer of warran
that refer to this License and to the absence of any
warranty; and give any other recipients of the Program a
copy of this License along with the Program.
You may charge a fee for the physical act of transferring
a copy, and you may at your option offer warranty
protection in exchange for a fee.
2. You may modify your copy or copies of the Program or
any portion of it, thus forming a work based on the
Program, and copy and distribute such modifications or
work under the terms of Section 1 above, provided that
you also meet all of these conditions:
a) You must cause the modified files to carry promin
notices stating that you changed the files and the date
of any change.
b) You must cause any work that you distribute or
publish, that in whole or in part contains or is derived
from the Program or any part thereof, to be licensed as
a whole at no charge to all third parties under the
terms of this License.
c) If the modified program normally reads commands
interactively when run, you must cause it, when
started running for such interactive use in the most
ordinary way, to print or display an announcement
including an appropriate copyright notice and a notice
that there is no warran
provide a warranty) and that users may redistribute the
program under these conditions, and telling the user
how to view a copy of this License. (Exception: if the
Program itself is interactive but does not normally
print such an announcement, your work based on the
Program is not required to print an announcement.)
These requirements apply to the modified work as a
whole. If identifiable sections of that work are not derived
from the Program, and can be reasonably considered
independent and separate works in themselves, then this
ee, you must give the recipients all
f
ed by others will not reflect on the
c
ht holder sa
ion and
t
ntact all the notices
ty; keep i
, saying that you
ty (or else
ying it
en
License, and its terms, do not apply to those sections
when you distribute them as separate works. Bu
you distribute the same sections as part of a whole which
is a work based on the Program, the distribution of the
whole must be on the terms of this License, whose
permissions for other licensees extend to the entire
whole, and thus to each and every part regardless of who
wrote it.
Thus, it is not the intent of this section to claim rights or
contest your rights to work written entirely by you; rather,
the intent is to exercise the right to control the
distribution of derivative or collective works based on the
Program.
In addition, mere aggregation of another work not based
on the Program with the Program (
on the Program) on a volume of a storage or distribution
medium does not bring the other work under the scope
of this License.
3. You may copy and distribute the Program (or a work
based on it, under Section 2) in object code or executable
form under the terms of Sections 1 and 2 above provided
that you also do one of the following:
a) Accompany it with the complete corresponding
machine-readable source code, which must be
distributed under the terms of Sections 1 and 2 above
on a medium customarily used for software
interchange; or,
b) Accompany it with a written offer, valid for at least
years,
to give any third party, for a charge no
three
more than your cost of physically performing source
distribution, a complete machine-readable copy of the
corresponding source code, to be distributed under
the terms of Sections 1 and 2 above on a medium
customarily used for software interchange; or,
c) Accompany it with the information you received as to
the offer to distribute corresponding source code.
(This alternative is allowed only for noncommercial
distribution and only if you received the program in
object code or executable form
accord with Subsection b above.)
The source code for a work means the preferred form of
the work for making modifications to it. For an executable
work, complete source code means all the source code
for all modules it contains, plus any associated interface
definition files, plus the scripts used to control
compilation and installation of the executable. However,
as a special exception, the source code distributed need
not include anything that is normally distributed (in
either source or binary form) with the major components
(compiler, kernel, and so on) of the operating system on
which the executable runs, unless that component itself
ac
If distribution of executable or object code is made by
offering access to copy from a designated place, then
offering equivalent access to copy the source code from
the same pla ce co un ts as di stribution of the source c ode,
even though third parties are not compelled to copy the
source along with the object code.
4. You may not copy, modify, sublicense, or distribute the
Program except as expressly provided under this
License. Any attempt otherwise to copy, modify,
sublicense or distribute the Program is void, and will
automatically terminate your rights under this License.
However, parties who have rec
from you under this License will not have their licenses
terminated so long as such parties remain in full
compliance.
5. You are not required to accept this License, since you
have not signed it. However, nothing else grants you
permission to modify or distribute the Program or its
derivative works. These actions are prohibited by law if
you do not accept this License. Therefore, by modifying
t
or distributing the Program (or any work based on the
Program), you indicate your acceptance of this License
to do so, and all its terms and conditions for copying,
distribu
it.
6. Each time you redistribute the Program (or any work
based on the Program), the recipient automatically
receives a license from the original licensor to copy,
distribute or modify the Program subject to these terms
and conditions. You may not impose any further
restrictions on the recipients’ exercise of the rights
granted herein.
You are not responsible for enforcing compliance by
third parties to this License.
7. If, as a consequence of a court
patent infringement or for any other reason (not limited
to patent issues), conditions are imposed on you
(whether by court order, agreement or otherwise) that
contradict the conditions of this License, they do not
excuse you from the conditions of this License. If you
cannot distribute so as to satisfy simultaneously your
obligations under this License and any other pertinent
obligations, then as a consequence you may not
distribute the Program at all. For example, if a patent
s the executable.
companie
modifying the Program or works based on
ting or
or with
with such an offer, i
ed copies, or rights,
eiv
dgment or allegation of
ju
t when
a work based
license would not permit royalty-free redistribution of th e
Program by all those who receive copies directly or
indirectly thro
satisfy both it and this License would be to refrain entirely
from distribution of the Program.
If any portion of this section is held invalid or
unenforceable under any particular circumstance, the
balance of the section is intended to apply and the
section as a whole is intended to apply in other
circumstances.
It is not the purpose of this section to induce you to
infringe any patents or other property right claims or to
contest validity of any such claims; this section has the
sole purpose of protecting the integrity of the free
software distribution system, which is implemented by
public license practices. Many people have made
generou
distributed through that sys tem in reliance on consistent
application of that system; it is up to the author/donor to
decide if he or she is willing to distribute software
through any other system and a licensee cannot impose
that choice.
This section is intended to make thoroughly clear what is
believed to be a consequence of the rest of this License.
8. If the distribution and/or use of the Program is restricted
in certain countries either by patents or by copyrighted
interfaces, the original copyright holder who places the
Program under this License may add an explicit
geographical distribu
countries, so that distribution is permitted only in or
among countries not thus excluded. In such case, this
License incorporates the limitation as if written in the
body of this License.
9. The Free Software Foundation may publish revised and/
or new versions of the General Public License from time
to time. Such new versions will be similar in spirit to the
present version, but may differ in detail to address new
problems or concerns.
n
Each version is given a distinguishing version number. If
the Program specifies a version number of this License
which applies to it and “any later version”, you have the
option of following the terms and conditions either of
that version or of
Software Foundation. If the Program does not specify a
version number of this License, you may choose any
version ever published by the Free Software Foundation.
10.If you wish to incorporate parts of the Prog ram into other
free programs whose distribution conditions are
different, write to the author to ask for permission. For
software which is copyrighted by the Free Software
Foundation, write to the Free Software Foundation; we
sometimes make exceptions for this. Our decision will be
guided by the two goals of pres
derivatives of our free software and of promoting the
sharing and reuse of software generally.
NO WARRANTY
11.BECAUSE THE PROGRAM IS LICENSED FREE OF
CHARGE, THERE IS NO WARRANTY FOR THE
PROGRAM, TO THE EXTENT PERMITTED BY
APPLICABLE LAW. EXCEPT WHEN OTHERWISE
STATED IN WRITING THE COPYRIGHT HOLDERS AND/
OR OTHER PARTIES PROVIDE THE PROGRAM “AS IS”
WITHOUT WARRANTY OF ANY KIND, EITHER
EXPRESSED OR IMPLIED, INCLUDING, BUT NOT
LIMITED TO, THE IMPLIED WARRANTIES OF
MERCHANTABILITY AND FITNESS FOR A PARTICULAR
PURPOSE. THE ENTIRE RISK AS TO THE QUALITY AND
PERFORMANCE OF THE PROGRAM IS WITH YOU.
SHOULD THE PROGRAM PROVE DEFECTIVE, YOU
ASSUME THE COST OF ALL NECESSARY SERVICING,
REPAIR OR CORRECTION.
12.IN NO EVENT UNLESS REQUIRED BY APPLICABLE
LAW OR AGREED TO IN WRITING WILL ANY COPYRIGHT
HOLDER, OR ANY OTHER PARTY WHO MAY MODIFY
AND/OR REDISTRIBUTE THE PROGRAM AS
PERMITTED ABOVE, BE LIABLE TO YOU FOR
DAMAGES, INCLUDING ANY GENERAL, SPECIAL,
INCIDENTAL OR CONSEQUENTIAL DAMAGES ARISING
OUT OF THE USE OR INABILITY TO USE THE PROGRAM
(INCLUDING BUT NOT LIMITED TO LOSS OF DATA OR
DATA BEING RENDERED INACCURATE OR LOSSES
SUSTAINED BY YOU OR THIRD PARTIES OR A FAILURE
OF THE PROGRAM TO OPERATE WITH ANY OTHER
PROGRAMS), EVEN IF SUCH HOLDER OR OTHER
PARTY HAS BEEN ADVISED OF THE POSSIBILITY OF
SUCH DAMAGES.
END OF TERMS AND CONDITIONS
How to Apply These Terms to Your New Programs
If you develop a new program, and you want it to be of the
greatest possible use to the public, the best way to achieve
this is to make it free software which everyone can
redistribute and change under these terms.
To do so, attach the following notices to the program. It is
safest to attach them to the start of each source file to most
effectively convey the exclusion of warranty; and each file
ugh you, then the only way you could
s contribu
tions to the wide range of software
ion limitation excluding those
t
any later version
published by the Free
e
rving the free status of all
07
53
En
Page 54

should have at least the “copyright” line and a pointer to
where the full notice is found.
07
<one line to give the program’s name and a brief idea of
what it does.>
Copyright © <year> <name of author>
This program is free software; you can redistribute it and/
or modify it under the terms of the GNU General Public
License as published by the Free Software Foundation;
either version 2 of the License, or (at your option) any
later version.
This program is distributed in the hope that it will be
useful, but WITHOUT ANY WARRANTY; without e ven the
implied warranty of MERCHANTABILITY or FITNESS FOR
A PARTICULAR PURPOSE. See the GNU General Public
License for more details.
You should have received a copy
Public License along with this program; if not, write to
the Free Software Foundation, Inc., 51 Franklin Street,
Fifth Floor, Boston, MA 02110-1301 USA.
Also add information on how to contact you by electronic
and paper mail.
If the program is interactive, make it output a short notice
like this when it starts in an interactive mode:
Gnomovision version 69, Copyright © year name of
author
Gnomovision comes with ABSOLUTELY NO WARRANTY;
for details type ‘show w’. This is free software, and you
are welcome to redistribute it under certain conditions;
type ‘show c’ for details.
The hypothetical commands ‘show w’ and ‘show c’ should
show the appropriate parts of the General Public License.
, the commands you use may be called
Of course
thing other than ‘show w’ and ‘show c’; they could
some
even be mouse-clicks or menu items - whatever suits your
program.
You should also get your employer (if you work as a
programmer) or your school, if any, to sign a “copyright
disclaimer” for the program, if necessary. Here is a sample;
alter the names:
Yoyodyne, Inc., hereby disclaims all copyright interest in
the program ‘Gnomovision’ (which makes passes at
compilers) written by James Hacker.
<signature of Ty Coon>, 1 April 1989
Ty Coon, President of Vice
This General Public License does not permit incorporating
your program
a subroutine library, you may consider it mor e useful to
permit linking proprietary applications with the library. If
this is what you want to do, use the GNU Lesser General
Public License instead of this License.
to proprietary programs. If your program is
in
GNU LESSER GENERAL PUBLIC LICENSE
Version 2.1, February 1999
Copyright © 1991, 1999 Free Software Foundation, Inc.
51 Franklin Street, Fifth Floor, Boston, MA 02110-1301 USA
Everyone is permitted to copy and distribute verbatim
copies of this license document, but changing it is not
allowed.
[This is the first released version of the Lesser GPL. It also
counts as the successor of the GNU Library Public License,
version 2, hence the version number 2.1.]
Preamble
The licenses for most software are designed to take away
your freedom to share and change it. By contrast, the GNU
General Public Licenses are intended to guarantee your
freedom to share and change free software - to make sure
the software i
General Public License, applies to some specially
designated software packages - typically libraries - of the
Free Software Foundation and other authors who decide to
use it. You can use it too, but we suggest you first think
carefully about whether this license or the ordinary General
Public License is the better strategy to use in any particular
case, based on the explanations below.
When we speak of free software, we are referring to
freedom of use, not price. O ur General Public Licenses are
designed to make sure that you have the freedom to
distribute copies of free
service if you wish); that you receive s ource code or can get
it if you want it; that you can change the software and use
pieces of it in new free programs; and that you are informed
that you can do these things.
To protect your rights, we need to make restrictions that
forbid distributors to deny you these rights or to ask you to
surrender these rights. These restrictions translate to
certain responsibilities for you if you distribute copies of the
library or if you modify it.
For example, if you distribute copies of the library, whether
gratis or for
that we gave you. You must make sure that they, too,
receive or can get the source code. If you link other code
with the library, you must provide complete object files to
the recipients, so that they can relink them with the library
54
after making changes to the library and recompiling it. And
you must show them these terms so they kn ow thei r rights.
En
s free
for all its users. This license, the Lesser
software (a
a
fee, you must give the recipie nts all the rights
of the GNU General
nd charge for this
We protect your rights with a two-step method: (1) we
copyright the library, and (2) we offer you this license,
which gives you legal permission to copy, distribute and/or
modify the library.
ect each distribu
To prot
that there is no warranty for the free library. Also, if the
library is modified by someone else and passed on, the
recipients should know that what they have is not the
original version, so that the original author’s reputation will
not be affected by problems that might be introduced by
others.
Finally, software patents pose a constant threat to the
existence of any free program. We wish to make sure that a
company cannot effectively restrict the users of a free
program by obtaining a restrictive license from a patent
holder. Therefore
for a version of the library must be consistent with the full
freedom of use specified in this license.
Most GNU software, including some libraries, is covered by
the ordinary GNU General Public License. This license, the
GNU Lesser General Public License, applies to certain
designated libraries, and is quite different from the ordinary
General Public License. We use this license for certain
libraries in order to permit linking those libraries into nonfree programs.
When a program is linked with a library, whether statically
or using a shared
legally speaking a combined work, a derivative of the
original library. The ordinary General Public License
therefore permits such linking only if the entire
combination fits its criteria of freedom. The Lesser General
Public License permits more lax criteria for linking other
code with the library.
We call this license the “Lesser” General Public License
because it does Less to protect the user’s freedom than the
ordinary General Publ ic License. It als o provides other free
software developers Less of an advantage over co
non-free programs. These disadvantages are the reason we
use the ordinary General Public License for many libraries.
However, the Lesser license provides advanta ges in certain
special circumstances.
For example, on rare occasions, there may be a special
need to encourage the widest possible use of a certain
library, so that it becomes a de-facto standard. To achieve
this, non-free programs must be allowed to use the library.
A more frequent case is that a free library does the same
job as widely used non-free libraries. In this case, there is
little to gain by limiting the free
so we use the Lesser General Public License.
In other cases, permission to use a p articular library in nonfree programs enables a greater number of people to use a
large body of free software. For example, permission to use
the GNU C Library in non-free programs enables many
more people to use the whole GNU operating system, as
well as its variant, the GNU Linux operating system.
Although the Lesser General Public License is Less
protective of the users’ free
user of a program that is linked with the Library has the
freedom and the wherewithal to run that program using a
modified version of the Library.
The precise terms and conditions for copying, distribution
and modification follow. Pay close attention to the
difference between a “work based on the library” and a
“work that uses the library”. The former contains code
derived from the library, whereas the latter must be
combined with the library in order to run.
TERMS AND CONDITIONS FOR COPYING,
DISTRIBUTION AND MODIFICATION
0. This License Agreement applies to any software library or
r program which contains a notice placed by the
he
ot
copyright holder or other authorized party saying it may
be distributed under the terms of this Lesser General
Public License (also called “this License”). Each licensee
is addressed as “you”.
A “library” means a collection of software functions and/
or data prepared so as to be conveniently linked with
application programs (which use some of those
functions and data) to form executables.
The “Library”, below, refers to any such software library or
work which has been distributed under these terms. A
“work based on the Library” means either th
any derivative work under copyright law: that is to say, a
work containing the Library or a portion of it, either
verbatim or with modifications and/or translated
straightforwardly into another language. (Hereinafter,
translation is included without limitation in the term
“modification”.)
“Source code” for a work means the preferred form of the
work for making modifications to it. For a library,
complete source code means all the source code for all
modules it contains, plus any associated interface
definition files, plu
compilation and installation of the library.
Activities other than copying, distribution and
modification are not covered by this License; they are
outside its scope. The act of running a program using the
tor, we want to make it very clear
, w e i ns is t th at an y pat
ibrary, the combination of the two is
l
the scripts used to control
s
ent license obtained
free software only,
library to
dom, it does ensure
mpet
that the
ibrary or
e L
Library is not restricted, and output from such a program
is covered only if its contents constitute a work based on
the Library (independent of the use of the Library in a tool
for writing it). Whether that is true depends on what the
Library does and what the program that uses the Library
does.
1. You may copy and distribute verbatim copies
Library’s complete source code as you receive it, in any
medium, provided that you conspicuously and
appropriately publish on each copy an appropriate
copyright notice and disclaimer of warranty; keep intact
all the notices that refer to this License and to the
absence of any warranty; and distribute a copy of this
License along with the Library.
You may charge a fee for the physical act of transferring
a copy, and you may at your option offer warranty
protection in exchange for a fee.
2. You may modify your copy or co pies of the Library or an
n of it, thus forming a work based on the Library,
portio
and copy and distribute such modifications or work
under the terms of Section 1 above, provided that you
also meet all of these conditions:
a) The modified work must itself be a software library.
b) You must cause the files modified to carry prominent
notices stating that you changed the files and the date
of any change.
c) You must cause the whole of the work to be licensed at
no charge to all third parties under the terms of this
License.
d) If a facility in the modified Library refers to a function
or a table of data to be supplied by an application
program that uses the facility, other than as an
argument passed when the facility is invoked, then you
must make a good faith effort to ensure that, in the
event an application does not supply such function or
ble, the facility still operates, a nd performs whatever
a
ing
t
part of its purpose remains meaningful. (For example,
a function in a library to compute square roots has a
purpose that is entirely well-defined independent of
the application. Therefore, Subsection 2d requires that
any application-supplied function or table used by this
function must be optional: if the application does not
supply it, the square root function must still compute
square roots.)
These requirements apply to the modified work as a
whole. If identifiable sections of that work are not derived
e Library, and can be reasonably considered
h
from t
independent and separate works in themselves, then this
License, and its terms, do not apply to those sections
when you distribute them as separate works. But when
you distribute the same sections as part of a whole which
is a work based on the Library, the distribution of the
whole must be on the terms of this License, whose
permissions for other licensees extend to the entire
whole, and thus to each and every part regardless of who
wrote it.
Thus, it is not the intent of this section to claim rights or
contest your rights to work written entirely by you; rather,
the intent is to exercise the ri
distribution of derivative or collective works based on the
Library.
In addition, mere aggregation of another work not based
on the Library with the Library (or with a work based on
the Library) on a volume of a storage or distribution
medium does not bring the other work under the scope
of this License.
3. You may opt to apply the terms of the ordinary GNU
General Public License instead of this License to a given
copy of the Library. To do this, you must alter all the
notices that refer to this License, so that they refer to the
ordinary GNU General Public Licen se, versi
of t o th is L ice nse. (If a ne wer version than version 2 of the
ordinary GNU General Public License has appeared, then
you can specify that version instead if you wish.) Do not
make any other change in these notices.
Once this change is made in a given copy, it is
irreversible for that copy, so the ordinary GNU General
Public License applies to all subsequent copies and
derivative works made from that copy. This option is
useful when you wish to copy part of the code of the
Library into a program that is not a library.
4. You may copy and distribute the Library (or a portion or
ative of it, under
deriv
executable form under the terms of Sections 1 and 2
above provided that you accompany it with the complete
corresponding machine-readable source code, which
must be distributed under the terms of Sections 1 and 2
above on a medium customarily used for software
interchange.
If distribution of object code is made by offering access
to copy from a designated place, then offering equivalent
access to copy the source code from the same place
satisfies the requirement to distribute the source code,
even though third parties are not compelled to copy the
source along with the object code.
ght to control t
Section 2) in object code or
he
on 2
of
the
, instead
y
Page 55

5. A program that contains no derivative of any portion of
the Library, but is designed to work with the Library by
being compiled or linked with it, is called a “work that
uses the Library”. Such a work, in isolation, is not a
derivative work of the Library, and therefore falls outside
the scope of this License.
However, linking a “work that uses the Library” with the
Library creates an executable that is a derivative of the
Library (because it contains portions of the Library),
rather than a “work that uses the library”. The executable
is therefore covered by this License. Section 6 states
terms
When a “work that uses the Library” uses material from a
header file that is part of the Library, the object code for
the work may be a derivative work of the Library even
though the source code is not. Whether this is true is
especially significant if the work can be linked without
the Library, or if the work is itself a library. The threshold
for this to be true is not precisely defined by law.
If such an object file uses only numerical parameters,
data structure layouts and accessors, and small macros
and small inline functions (ten lines or less in length),
then the use of the object file is unrestricted, regardle
of w
containing this object code plus portions of the Library
will still fall under Section 6.)
Otherwise, if the work is a derivative of the Library, you
may distribute the object code for the work under the
terms of Section 6. Any executables containing that work
also fall under Section 6, whether or not they are linked
directly with the Library itself.
6. As an exception to the Sections above, you may also
combine or link a “work that uses the Library” with the
Library to produce a work containing portions of the
Library, and distribute that work under terms
cho
the work for the customer’s own use and reverse
engineering for debugging such modifications.
You must give prominent notice with each copy of the
work that the Library is used in it and that the Library and
its use are covered by this License. You must supply a
copy o f t hi s L ice ns e. If th e w ork during execution displays
copyright notices, you must include the copyright notice
for the Library among them, as well as a reference
directing the user to the copy of this License. Also, you
must do one of these things:
a) Accompany the work with the complete
b) Use a suitable shared library mechanism for linking
c) Accompany the work with a written offer, valid for at
d) If distribution of the work is made by offering access to
e) Verify that the user has already received a copy of
For an executable, the required form of the “work that
uses the Library” must include any data and utility
programs needed for reproducing the executable from it.
However, as a special exception, the materials to be
distributed need not include anything that is normally
distributed (in either source or binary form) with the
major compon
operating system on which the executable runs, unless
that component itself accompanies the executable.
It may happen that this requirement contradicts the
license restrictions of other proprietary libraries that do
not normally accompany the operating system. Such a
contradiction means you cannot use both them and the
Library together in an executable that you distribute.
7. You may place library facilities that are a work based on
the Library side-by-side in a single library together with
other library facilities not covered by this License, and
tribution of such executables.
for dis
hether it is legally a derivative work. (Executables
ice, provided that the terms permit modification of
corresponding machine-readable
Library including whatever changes were used in the
work (which must be distributed under Sections 1 and
2 above); and, if the work is an executable linked with
the Library, with the complete machine-readable “work
that uses the Library”, as object code and/or source
code, so that the user can modify the Library and then
relink to produce a modified executable contain ing the
modified Library. (It is understood that the user who
changes the contents of definitions files in the Library
will not necessarily be able to recompile the
application to use the modified definitions.)
with the Library. A suitable mechanism is one that (1)
uses at run time a copy of the library alrea
on the user’s computer system, rather than copying
library functions into the executable, and (2) will
operate properly with a modifie d version of the library,
if the user installs one, as long as the modified version
is interface-compatible with the version that the work
was made with.
least three years, to give the same user the materials
specified in Subsection 6a, above, for a charge no
more than the cost of performing this distributio n.
a designated place, offer equivalent access
m
copy fro
to copy the above specified materials from the same
place.
these materials or that you have already sent this user
a copy.
ents (compiler, kernel
of your
urce code for the
so
dy prese
, and so on) of the
distribute such a combined library, pro
separate distribution of the work based on the Library
and of the other library facilities is otherwise permitted,
and provided that you do these two things:
a) Accompany the combined library with a copy of the
same work based on the Library, uncombined with any
other library facilities. This must be distributed under
the terms of the Sections above.
b) Give prominent notice with the combined library of the
fact that part of it is a work based on the Library, and
explaining where to find the accompanying
uncombined form of the same work.
8. You may not copy, modify, sublicense, link with, or
te the Library e
distribu
this License. Any attempt otherwise to copy, modify,
sublicense, link with, or distribute the Library is void, and
will automatically terminate your rights under this
License. However, parties who have received copies, or
rights, from you under this License will not have their
licenses terminated so long as such p arties remain in full
compliance.
9. You are not required to accept this License, since you
ss
have not signed it. However, nothing else grants you
permission to modify or distribute the Library or its
ative works.
deriv
you do not accept this License. Therefore, by modifying
or distributing the Library (or any work based on the
Library), you indicate your acceptance of this License to
do so, and all its terms and conditions for copying,
distributing or modifying the Library or works based on it.
10.Each time you redistribute the Library (or any work based
on the Library), the recipient automatically receives a
license from the original licensor to copy, distribute, link
with or modify the Library subject to these terms and
o
nditions. You may not impose any further restrictions
c
on the recipients’ exercise of the rights granted herein.
You are not responsible for enforcing compliance by
third parties with this License.
11.If, as a consequence of a court judgment or allegation of
patent infringement or for any other reason (not limited
to patent issues), conditions are imposed on you
(whether by court order, agreement or otherwise) that
contradict the conditions of this License, they do not
excuse you from the conditions of this License. If you
cannot distribute so as to satisfy simultaneously your
obligations under this License and any other perti
igations, then as a consequence you may not
obl
distribute the Library at all. For example, if a patent
license would not permit royalty-free redistribution of the
Library by all those who receive copies directly or
indirectly through you, then the only way you could
satisfy both it and this License would be to refrain entirely
from distribution of the Library. If any portion of this
section is held invalid or unenforceable under any
particular circumstance, the balance of the section is
intended to apply, and the section as a whole is intended
to apply in other circumstances.
It is not the purpose of this section to induce you to
infringe any paten
contest validity of any such claims; this section has the
sole purpose of protecting the integrity of the free
nt
software distribution system which is implemented by
public license practices. Many people have made
generous contributions to the wide range of software
distributed through that system in reliance on consistent
application of that system; it is up to the author donor to
decide if he or she is willing to distribute software
through any other system and a licensee cannot impose
that choice.
This section is intended to make thoroughly clear what is
believed to be a consequence of the rest of this License.
12.If the distribution and/or use of the Library is restric
certain countries either by patents or by copyrighted
in
interfaces, the original copyright holder who places the
Library under this License may add an explicit
geographical distribution limitation excluding those
countries, so that distribution is permitted only in or
among countries not thus excluded. In such case, this
License incorporates the limitation as if written in the
body of this License.
13.The Free Software Foundation may publish revised and/
or new versions of the Lesser General Public License
from time to time. Such new versions will be similar in
spirit to the present versio
address new problems or concerns.
Each version is given a distinguishing version number. If
the Library specifies a version number of this License
which applies to it and “any later version”, you have the
option of following the terms and conditions either of
that version or of any later version published by the Free
Software Foundation. If the Library does not specify a
license version number, you may choose any version ever
published by the Free Softwar e Foundation.
14.If you wish to incorporate parts of the Library into other
free program
incompatible with these, write to the author to ask for
xcept as expressly provided under
These actions are prohibited by law if
her property right claims or to
ts or ot
n, but may differ
s whose distri
bution conditions are
v
ided that the
in detail to
permission. For software which is copyrighted by the
Free Software Foundation, write to the Free Software
Foundation; we sometimes make exceptions for this. Our
decision will be guided by the two goals of preserving the
free status of all derivatives of our free software and of
promoting the sharing and reuse of software generally.
NO WARRANTY
15.BECAUSE THE LIBRARY IS LICENSED FREE OF
CHARGE, THERE IS NO WARRANTY FOR THE LIBRARY,
TO THE EXTENT PERMITTED BY APPLICABLE LAW.
EXCEPT WHEN OTHERWISE STATED IN WRITING THE
COPYRIGHT HOLDERS AND/OR OTHER PARTIES
PROVIDE THE LIBRARY “AS IS” WITHOUT WARRANTY
OF ANY KIND, EITHER EXPRESSED OR IMPLIED,
INCLUDING, BUT NOT LIMITED TO, THE IMPLIED
WARRANTIES OF MERCHANTABILITY AND FITNESS
FOR A PARTICULAR PURPOSE. THE ENTIRE RISK AS
TO THE QUALITY AND PERFORMANCE OF THE LIBRARY
IS WITH YOU. SHOULD THE LIBRARY PROVE
DEFECTIVE, YOU ASSUME THE COST OF ALL
NECESSARY SERVICING, REPAIR OR CORRECTION.
16.IN NO EVENT UNLESS REQUIRED BY APPLICABLE
LAW OR AGREED TO IN WRITING WILL ANY COPYRIGHT
HOLDER, OR ANY OTHER PARTY WHO MAY MODIFY
AND/OR REDISTRIBUTE THE LIBRARY AS PERMITTED
ABOVE, BE LIABLE TO YOU FOR DAMAGES,
INCLUDING ANY GENERAL, SPECIAL, INCIDENTAL OR
CONSEQUENTIAL DAMAGES ARISING OUT OF THE
USE OR INABILITY TO USE THE LIBRARY (INCLUDING
BUT NOT LIMITED TO LOSS OF DATA OR DATA BEING
RENDERED INACCURATE OR LOSSES SUSTAINED BY
YOU OR THIRD PARTIES OR A FAILURE OF THE
LIBRARY TO OPERATE WITH ANY OTHER SOFTWARE),
EVEN IF SUCH HOLDER OR OTHER PARTY HAS BEEN
ADVISED OF THE POSSIBILITY OF SUCH DAMAGES.
END OF TERMS AND CONDITIONS
How to Apply These Terms to Your New Libraries
If you develop a new library,
est possible use to the public, we recommend making
great
it free software that everyone can redistribute and change.
You can do so by permitting redistribution under these
terms (or, alternatively, under the terms of the ordinary
General Public License).
To apply these terms, attach the following notices to the
library. It is safest to attach them to the start of each source
nent
file to most effectively convey the exclusion of warranty; and
each file should have at least the “copyright” line and a
pointer to where the full notice is found.
<one line to give the library’s name and a brief idea of
what it does.>
Copyright © <year> <name of author>
This library is free software;
modify it under the terms of the GNU Lesser General Public
License as published by the Free Software Foundation;
either version 2.1 of the License, or (at your option) any later
version.
This library is distributed in the hope that it will be useful,
but WITHOUT ANY WARRANTY; without even the implied
warranty of MERCHANTABILITY or FITNESS FOR A
PARTICULAR PURPOSE. See the GNU Lesser General
Public License for more details.
You should have received a copy of the GNU Lesser General
Public License along with this library; if not, write to the
Free Software Foundation, Inc., 51 Franklin Street, Fifth
Floor, Boston, MA 02110-1301 USA
Also add information on how to contact you by electronic
and paper mail.
You should als
programmer) or your school, if any, to sign a “copyright
disclaimer” for the library, if necessary. Here is a sample;
alter the names:
ted
That’s all there is to it!
o
Yoyodyne, Inc., hereby disclaims all copyright interest in
the library ‘Frob’ (a library for tweaking knobs) written by
James Random Hacker.
<signature of Ty Coon>, 1 April 1990
Ty Coon, President of Vice
and you want it to be of the
y
ou can redistribute it and/or
get your employer (if you work as a
[Notice on GNU General Public License]
This product include the software licensed for use under
the terms of a GNU General Public License. A copy of the
corresponding source code can be obtained by being
charged the fee for distribution.
To obtain a copy, contact your local Pioneer Customer
Support Center.
See the GNU website (http://www.gnu.org) for details of the
GNU General Public License.
07
55
En
Page 56

Cautions on use
07
Moving the player
If you need to move this unit, first remove the disc if
there’s one loaded, and close the disc tray. Next, press
STANDBY/ON to switch the power to standby,
checking that the POWER OFF indication on the front
panel display goes off. Wait at least 10 seconds. Lastly,
disconnect the power cord.
Never lift or move the unit during playback — discs rotate
at a high speed and may be damaged.
Place of installation
Select a stable place near the TV and AV system to which
the unit is connected.
Do not place the player on top of a TV or color monitor.
Keep it away from cassette decks or other components
easily affected by magnetism.
Avoid the following types of places:
•Places exposed to direct sunlight
•Humid or poorly ventilated places
•Extremely hot or cold places
• Places subject to vibr ation
•Dusty places
•Places exposed to soot, steam or heat (in kitchens,
etc.)
Do not place objects on top
Do not place objects on top of the player.
Do not obstruct the ventilation
holes
Do not use the player on a shaggy rug, bed, or sofa, and
do not cover the player with a cloth, etc. Doing so will
prevent heat dissipation and could lead to damage.
Keep away from heat
Do not place the player on top of an amplifier or other
device generating heat. When installing in a rack, to avoid
the heat generated by the amplifier and other devices,
place it on a shelf below the amplifier whenever possible.
Turn the power off when not using the player
Depending on the conditions of the TV broadcast signals,
striped patterns may appear on the screen when the TV is
turned on while the player’s power is turned on. This is not
a malfunction with the player or TV. If this happens, turn
the player’s power off. In the same way, noise may be
heard in the sound of a radio.
Condensation
If the player is moved suddenly from a cold place into a
warm room (in winter, for example) or if the temperature
in the room in which the player is installed rises suddenly
due to a heater, etc., water droplets (condensation) may
form inside (on operating parts and the lens). When
condensation is present, the player will not operate
properly and playback is not possible. Let the player stand
at room temperature for 1 or 2 hours with the power
turned on (t
condensation). The water droplets will dissipate and
playback will become possible.
Condensation can also occur in the summer if the player
is exposed to the direct wind from an air-conditioner. If
this happens, move the player to a different place.
ime depends on the extent of
he t
Cleaning the player
Normally, wipe the player with a soft cloth. For tough dirt,
apply some neutral detergent diluted in 5 to 6 parts water
to a soft cloth, wring out thoroughly, wipe off the dirt, then
wipe again with a dry cloth.
Note that getting alcohol, thinner, benzene or insecticide
on the player could cause the print and coating to peel off.
Also, avoid leaving rubber or vinyl products in contact
with the player for long periods of time, as this could
damage the cabinet.
When using chemical-impregnated wipes, etc., r ead the
wipe’s cautions carefully.
Unplug the power cord from the power outlet when
cleaning the player.
Caution for when the unit is installed in a rack with a glass door
Do not press the OPEN/CLOSE on the remote control
to open the disc tray while the glass door is closed. The
door will hamper the movement of the disc tray, and the
unit could be damaged.
Cleaning the pickup lens
The player’s lens should not become dirty in normal use,
but if for some reason it should malfunction due to dust
or dirt, consult your nearest Pioneer authorized service
center. Although lens cleaners for players are
commercially available, we advise against using them
since some may damage the lens.
Handling discs
Do not use damaged (cracked or warped) discs.
Do not scratch the disc’s signal surface or let it get dirty.
Do not load more than one disc into the player at a time.
56
En
Page 57

Do not glue paper or put stickers onto the disc, or use a
pencil, ball-point pen or other sharp-tipped writing
instrument. These could all damage the disc.
Storing discs
Always store discs in their cases, and place the cases
vertically, avoiding places exposed to high temperature or
humidity, direct sunlight or extremely low temperatures.
Be sure to read the cautions included with the disc.
Cleaning discs
It may not be possible to play the disc if there are
fingerprints or dust on it. In this case, using a cleaning
cloth, etc., to wipe the disc gently from the center toward
the outer edge. Do not use a dirty cleaning cloth.
Troubleshooting
Do not use benzene, thinner or other volatile chemicals.
Also do not use record spray or antistatic agents.
For tough dirt, apply some water to a soft cloth, wr ing out
thoroughly, wipe off the dirt, then wipe off the moisture
with a dry cloth.
Specially shaped discs
Specially shaped discs (heart-shaped, hexagonal, etc.)
cannot be used on this player. Never use such discs, as
they will damage the player.
Condensation on discs
If the disc is moved suddenly from a cold place into a
warm room (in winter, for example), water droplets
(condensation) may form on the disc surface. Discs will
not play properly if there is condensation on them.
Carefully wipe off the water d roplets from the disc surface
before using the disc.
07
Incorrect operation is often mistaken for trouble or malfunction. If you think that there is something wrong with this
component, check the points below. Sometimes the trouble may lie in another component. Inspect the other
components and electrical appliances being used. If the trouble cannot be rectified after checking the items below,
please contact customer services. In the US, call Toll Free (800) 421-1404. (Telephone lines are open Monday through
Friday 6:00 AM to 4:30 PM (Pacific Time).) In Canada, call Local (905) 479-4411, or Long distance +1(877) 283-5901.
(Telephone lines are open Monday through Friday 9:00 AM to 5:30 PM (EST).)
Playback
Problem Check Remedy
• Disc does not play.
• Disc tray opens
automatically.
Is the disc one that is
playable on this player?
Is the file one that is playable
on this player?
Is the disc scratched? It may not be possible to play scratched discs.
Is the disc dirty? Clean the disc (above).
Is there a piece of paper or
sticker attached to the disc?
Is the disc properly set in the
disc tray?
Is the region number correct? See About region numbers on page 10 for the region numbers of discs
Check whether the disc is one that can be played on this player
(page 8).
• Check whether the file is one that can be played on this player
(page 10).
• Check whether or not the file is damaged.
The disc may be warped and unplayable.
• Set the disc with the printed side facing up.
• Set the disc properly in the depression in the disc tray.
that can be played on this player.
57
En
Page 58

07
58
En
Problem Check Remedy
No picture is displayed or the
picture is not displayed
properly.
Picture freezes and the front
panel and remote control
buttons stop working.
Motion is unnatural or
picture is not clear.
No picture is displayed or
picture is not output in high
definition when playing BDs.
• Picture is disturbed during
playback.
• Picture is dark.
• Picture is stretched.
• Picture is cropped.
• Aspect ratio cannot be
d.
switche
Picture is interrupted. The picture may be interrupted when the resolution of the recorded
The subtitles cannot be
switched.
Is the video cable properly
connected?
Is the video cable damaged? If the cable is damaged, replace it with a new one.
Is the input setting on the
connected TV or AV receiver
or amplifier right?
Are you viewing the picture
from the video output
terminal selected with VIDEO
SELECT?
Is the output video resolution
properly set?
• Is the player connected
with an HDMI cable other
than a High Speed HDMI™
cable (with a Standard
HDMI™ cable)?
• Are you using an HDMI
cable with built-in equalizer?
Is a DVI device connected? The picture may not be displayed properly if a DVI device is connected.
Is HDMI Color Space
properly set?
Is the TV’s aspect ratio
properly set?
Is TV Aspect Ratio properly
set?
Is 4:3 Video Out properly
set?
Is DVD 16:9 Video Out
properly set?
• Connect the cable properly according to the connected devices
(page 14).
• Insert the cable firmly and all the way in.
Read the operating instructions of the connected components and
switch to the proper input.
Press VIDEO SELECT to switch the video output terminal to be viewed
(page 22).
Use OUTPUT RESOLUTION to switc h to a resolution at which the video
and audio signals are output (page 22).
1080p or Deep Color video signals may not be output properly,
depending on the HDMI cable being used or the player’s settings.
Press while pressing on the player’s front panel to restore the
video outputs to the factory default settings. After this, if you wish to
output the video signals with 1080p or Deep Color, connect the TV
using a High Speed HDMI™ cable without built-in equalizer, then reset
the player using the Setup Navigator (page 19).
Change the HDMI Color Space setting (page 39).
• Press STOP to stop playback, then restart playback.
• If the playback cannot be stopped, press STANDBY/ON on the
player’s front panel to turn off the power, then turn the power back on.
• If the power cannot be turned off, press and hold STANDBY/ON
on the player’s front panel for over 5 seconds. The power will turn off.
Change the Pure Cinema setting (page 34).
With some discs, it may not be possible to output the video signals from
the
VIDEO
terminals. In this case, connect using an HDMI cable (page 14).
• This player supports Macrovision analog copy protection technology.
With some TVs (such as with built-in video deck), the picture will not be
displayed properly when the copy protected DVD title is played. This is
not a malfunction.
• If the player and TV are connected via a DVD recorder/video deck,
etc., the picture will not be displayed properly due to analog copy
protection. Connect the player and TV directly.
Read the TV’s operating instructions and set the TV’s aspect ratio
properly.
Set TV Aspect Ratio properly (page 37).
Set 4:3 Video Out properly (page 37).
Set DVD 16:9 Video Out properly (page 37).
When video signals with a resolution of 1080/24p, 1080/60i, 1080/60p or
720/60p are being output from the
COMPONENT VIDEO
aspect ratio of 16:9 even if
(page 37).
video signal switches. Press OUTPUT RESOLUTION to select a setting
other than Auto or Source Direct (page 22).
The subtitles cannot be switched for discs recorded on a DVD or BD
recorder.
output terminal or the
output terminals, they may be output with an
COMPONENT VIDEO
HDMI OUT
TV Aspect Ratio
terminal or the
is set to
4:3 (Standard)
output
Page 59

Problem Check Remedy
Sound and picture are not
synchronized.
• No sound is output.
• Sound is not output
properly.
Multi-channel sound is not
output.
Noise can be heard when
outputting DTS Digital
Surround signals from the
DIGITAL OUT terminal.
Is Output Terminal properly
set?
Is Lip Sync properly set? Adjust the amount of audio delay with the Lip Sync setting (page 36).
Is the disc played back in
slow motion?
Is the disc played back in fast
forward or fast reverse?
Are the audio cables properly
connected?
Is the audio cable damaged? If the cable is damaged, replace it with a new one.
Are the connected
components (AV receiver or
amplifier, etc.) properly set?
Are you trying to listen to the
sound of the HDMI OUT
terminal while watching the
picture from the
COMPONENT VIDEO or
VIDEO
output
terminals?
Is HDMI Audio Out properly
set?
Is Output Terminal properly
set?
Is the output video resolution
properly set?
Is the AV receiver or
amplifier, etc., connected to
the AUDIO OUT terminals?
Are the speakers properly
set?
Is a DVI device connected?
Are you playing a DTS-CD? To output the sound of DTS-CDs from the HDMI OUT terminal, set
Is Output Terminal properly
set?
Is the audio output of the
connected AV receiver or
amplifier, etc., properly set?
Is multi-channel sound
selected?
Is the AV receiver or
amplifier, etc., connected to
the AUDIO OUT terminals?
Is the connected AV receiver
or amplifier compatible with
DTS Digital Surround?
Set Output Terminal properly (pages 19 and 46).
No sound is output during slow motion play and forward and reverse
scanning.
• Connect the cable properly according to the connected devices
(page 14).
• Insert the cable firmly and all the way in.
Read the operating instructions of the connected components and
check the volume, input, speaker settings, etc.
Audio signals are not output from the HDMI OUT terminal when video
signals are being output from the COMPONENT VIDEO or VIDEO
output
VIDEO or VIDEO
cable or regular audio cables to listen to the sound (page 16). Once
connections are completed, use Setup Navigator to make the player’s
settings (page 19).
Set HDMI Audio Out to Auto or PCM. (page 39).
When ANALOG AUDIO is selected at Output Terminal, no audio
signals are output from the HDMI OUT or DIGITAL OUT terminal
(page 46).
Use OUTPUT RESOLUTION to switch to the resolution at which the
video and audio signals are output (page 22).
To listen to 2-channel analog audio, connect to FRONT (L/R) of the
AUDIO OUT terminals (page 13) and set Audio Output Mode to 2
Channel (page 38).
When the AV receiver or amplifier, etc., is connected to the AUDIO
OUT terminals and Audio Output Mode is set to Multi-channel, set
Speaker Setup properly (page 42).
The sound will not be output from the
device is connected. Connect the device to a
the
AUDIO OUT
HDMI Audio Out to PCM (page 39).
For some BDs, audio signals are only output from DIGITAL OUT
terminal or the HDMI OUT terminal.
Linear PCM (2-channel) audio signals are output from output terminals
other than the one set at Output Terminal under Audio Out. Set
Output Terminal properly (page 46).
Read the operating instructions of the connected AV receiver or
amplifier and check the audio output settings of AV receiver or
amplifier.
Use the menu screen or AUDIO to switch the disc’s sound to multi-
channel.
When the AV receiver or amplifier, etc., is connected to the AUDIO
OUT terminals, set Audio Output Mode to Multi-channel (page 38).
Also, set Speaker Setup properly (page 42).
If an AV receiver or amplifier that is not compatible with DTS Digital
Surround is connected to the DIGITAL OUT terminal, set DTS Out to
DTS PCM (page 38).
terminals. When watching the picture of the COMPONENT
output
terminals, connect an optical digital audio
HDMI OUT
terminals (page 16).
DIGITAL OUT
terminal if a DVI
terminal or
07
59
En
Page 60

07
Problem Check Remedy
192 kHz or 96 kHz digital
audio signals cannot be
output from the DIGITAL
OUT terminal.
Secondary audio or
interactive audio is not
output.
Sound is fast or slow. When an HDMI cable is
After a disc is inserted,
Loading stays displayed and
playback does not start.
is displayed in file names,
etc.
A message indicating low
memory appears while
playing a BD-ROM disc.
The DVD layer of BD and DVD
hybrid discs cannot be
played.
The CD layer of BD and CD
hybrid discs cannot be
played.
The BDMV format on BD-R/
-RE discs cannot be played.
Is HDMI Audio Out properly
set?
Are Dolby Digital Out and
DTS Out properly set?
connected, are audio signals
being output from devices
connected with cables other
than HDMI cables?
Are there too many files
recorded on the disc?
Is Hybrid Disc Playback
properly set?
Is Hybrid Disc Playback
properly set?
It is not possible to output 192 kHz or 96 kHz digital audio signals from
this player’s DIGITAL OUT terminal. The signals are automatically
converted to 48 kHz or less for output.
When listening to the sound from an HDMI OUT terminal, set HDMI
Audio Out to PCM (page 39).
When listening to the sound from an DIGITAL OUT terminal, set Dolby
Digital Out to Dolby Digital 1, DTS Out to DTS 1 (page 38).
When a Pioneer AV receiver or amplifier compatible with the PQLS
function is connected directly to the player’s HDMI OUT termi nal using
an HDMI cable, the PQLS function is activated when p laying an audio
CD (CD-DA). Because of this, the sound output from components other
than the ones connected by HDMI cable may be fast or slow. If this
happens, set PQLS to Off (page 39).
When a disc on which files are recorded is inserted, depending on the
number of files recorded on the disc, loading may take several dozen
minutes.
The characters that cannot be displayed on this player are displayed in
.
• Perform Individual/Shared Data Erase or Storage Format
(page 44).
• Perform Application Data Erase (page 44).
Set Hybrid Disc Playback to DVD (page 41).
Set Hybrid Disc Playback to CD (page 41).
To play the BDMV format on BD-R/-RE discs containing both BDMV
and BDAV formats, set BDMV/BDAV Playback Priority to BDMV
(page 41).
60
En
Page 61

KURO LINK
Problem Check Remedy
KURO LINK function does
not work.
The input does not switch
automatically on the Flat
Panel TV and AV system (AV
receiver or amplifier, etc.)
when playback is started on
the player or the Home Menu
me Media Gallery is
or Ho
displayed.
Is the HDMI cable properly
connected?
Is the HDMI cable you are
using a High Speed HDMI™
cable?
Are you connected to the TV
using an HDMI cable to
watch the picture?
Is KURO LINK set to On on
the player?
Does the connected device
support the KURO LINK
function?
Is KURO LINK set to On on
the connected device?
Are multiple players
connected?
Is Display Power On set to
Off on the player?
To use the KURO LINK function, connect the Flat Panel TV and AV
system (AV receiver or amplifier, etc.) to the HDMI OUT terminal
(page 16).
Use a High Speed HDMI™ cable. The KURO LINK function may not
work properly if HDMI cable other than a High Speed HDMI™ cable is
used.
If video signals are being output from a terminal other than the HDMI
OUT terminal, the KURO LINK function does not work. Connect to the
TV using an HDMI cable and press VIDEO SELECT to switch to the
HDMI OUT terminal (pages 16 and 22).
Set KU
• The KURO LINK function will not work with devices of other brands
that do not support the KURO LINK function, even when connected
using an HDMI cable.
• The KURO LINK function will not work if devices that do not support
the KURO LINK function are connected between the KURO LINKcompatible device and the player.
• See About connections to components of other makes supporting the
KURO LINK function on page 16.
• Even when connected to a Pioneer product compatible with the
KURO LINK function, some of the functions may not work.
Also refer to the operating instructions of the connected device.
Set KURO LINK to On on the connected device. The KURO LINK
function operates when KURO LINK is set to On for all devices
connected to the HDMI OUT terminal.
Once connections and settings of all the devices are finished, be sure
to check that the player’s pict
check after changing the connected devices and connecting and/or
disconnecting HDMI cables.) If the player’s picture is not being output
to the Flat Panel TV, the KURO LINK function may not work properly.
For details, refer to the operating instructions of the connected device.
The KURO LINK function may not work if three or more players,
including this player, are connected by HDMI cable.
Set Display Power On to On (page 39).
07
RO LINK to On on the player (page 39).
ure is output to the Flat Panel TV. (Also
Network
Problem Check Remedy
• BD-LIVE function
(connection to the Internet)
cannot be used.
• “Connection to the software
updating server failed” is
displayed when you try to
update the software.
“OK to grant network access
to BD applications?” is
displayed when a BD-LIVE
compatible disc is read.
Perform Connection Test (page 44). If “Network connection test
completed successfully.” is displayed, check the proxy server settings
(page 43). Also there may be a problem with the Internet connection.
Contact your Internet service provider.
This is displayed if the BD-ROM does not have valid BD-LIVE network
access approval. Select No if you do not want to autho rize access to the
network.
61
En
Page 62

07
Problem Check Remedy
Software updating is slow. Depending on the Internet connection and other conditions, some time
• “WRT NG ****” is displayed
on the front panel display
during software updating.
(**** meaning any
characters)
• “WRT FAILED” is displayed
on the front panel display
during software updating.
A message other than
“Network connection test
completed successfully” is
displayed when Connection
Test is performed.
Is “LAN cable not connected”
displayed?
• Is “IP address cannot be
obtained.” displayed?
• Is “No response from the
gateway.” displayed?
Is “IP address is overlapped.”
displayed?
Is the Ethernet hub (or router
with hub functionality)
operating properly?
may be required to update the software.
The message is displayed when software updating has failed. Check
again whether it can be updated properly.
Check that this player and Ethernet hub (or router with hub
functionality) are properly connected.
• If the IP address is obtained using the DHCP server function, check
the setting is correct at the Display Network Configuration
(page 44). For details on the DHCP server function, see the operating
instructions of the Ethernet hub (or router with hub functionality).
• Set the IP address manually.
• Check the operation and settings of the DHCP server function of the
Ethernet hub (or router with hub functionality). For details on the DHCP
server function, see the operating instructions of the Ethernet hub (or
router with hub functionality).
• If this player’s has been set manually, reset the IP address of this
player or other components.
• Check the settings and operation the Ethernet hub (or router with hub
functionality). For details, see the operating instructions of the Ethernet
hub.
• Reboot the Ethernet hub (or router with hub functionality).
Others
Problem Check Remedy
The player’s power turns off
automatically.
player’s power turns on
The
automatically.
Player cannot be operated
with remote control.
Input of connected TV and AV
system switches
automatically.
“Processing failed.” is
displayed.
62
En
Is Auto Power Off set to
On?
Is Display Power Off set to
On?
Is KURO LINK set to On?The player’s power may turn on together with the power of the TV
Is an AV receiver or amplifier
connected to the CONTROL
IN terminal on the player’s
rear panel?
Are you operating the remote
control from a point too far
away from the player?
Are the batteries dead? Replace the batteries (page 7).
Is KURO LINK set to On?The input of the TV and AV system (AV receiver or amplifier, etc.)
If Auto Power Off is set to On, the player’s power turns off
automatically if no operation is performed for over 30 minutes
(page 41).
The player’s power may turn off together with the power of the TV
connected to the HDMI OUT terminal. If you do not want the player’s
power to turn off when the TV’s power is turned off, set Display Power
Off to Off (page 39).
connected to the HDMI OUT terminal. If you do not want the player’s
power to turn on when the TV’s power is turned on, set KURO LINK to
Off (page 39).
Operate with the remo
CONTROL IN terminal.
Operate from within 23 feet (7 m) of the remote control sensor.
connected to the HDMI OUT terminal may automatically switch to the
player when playback starts on the player or the menu screen (Home
Media Gallery, etc.) is displayed. If you do not want the inputs of the
connected TV and AV system (AV receiver or amplifier, etc.) to switch
automatically, set KURO LINK to Off (page 39).
If the message appears repeatedly, please ask your nearest Pioneer
authorized service center or your dealer to carry out repair work.
te control of the device connected to the
Page 63

Problem Check Remedy
Settings you have made have
been cleared.
EXT does not light on the
player’s front panel display
when a USB (external
storage) device is connected.
EXT flashes on the player’s
front panel display when a
USB (external storage) device
is connected.
• Have you disconnected the
power cord while the player’s
power was on?
• Has there been a power
failure?
Is the external storage device
properly connected?
Are you using a USB cable
that is longer than 2 meters?
Is the power of the external
hard disk turned on?
Is the external storage device
connected to the USB p ort via
a memory card reader or USB
hub?
Does the external storage
device contain multiple
partitions?
Is the external storage device
write-protected?
Is the external storage
device’s file system FAT16 or
FAT32?
Always press STANDBY/ON on the player’s front panel or
STANDBY/ON on the remote control and check that POWER OFF
has turned off from the player’s front panel display before
disconnecting the power cord. Be particularly careful when the power
cord
is connected to the AC outlet on another device because the
player turns off in conjunction with the device.
• Turn the player’s power off, then turn the power back on.
• Turn the player’s power off, then reconnect the external storage
device (page 17).
Use a USB cable with a length of 2 meters or less.
Turn the player’s power off, then turn the external hard disk’s power on.
External storage device may not work if connected to the USB port via
a memory card reader or USB hub.
External storage devices may not be recognized if they contain multiple
partitions.
Some external storage devices may not operate.
Turn the player’s power off, then disable the write-protection.
Only external storage devices with a FAT16 or FAT32 file system can be
used. They may be usable if they are formatted from the player
(page 44).
Turn the player’s power off, then turn the power back on.
07
Glossary
Angle (Multi angle)
Up to 9 camera angles can be recorded simultaneously on BDROM or DVD-Video discs, letting you view the same scene from
different angles.
AVCHD (Advanced Video Codec High Definition)
See Playing DVDs on page 10.
BDAV
Of the BD format, the Audio Visual Format Specifications for HD
digital broadcast recording is referred to as BDAV on this player
and in this operating instructions.
BD-J
See Playing BDs on page 9.
BD-LIVE
See Playing BDs on page 9.
BDMV
Of the BD format, the Audio Visual Format Specifications
designed for pre-packaged high definition (HD) movie contents is
referred to as BDMV on this player and in this operating
instructions.
BONUSVIEW
See Playing BDs on page 9.
Component video output
This video output terminal provides clearer pictures when
connected to a TV equipped with component inputs. Component
video signals consist of three signals, Y, PB and PR.
Deep Color
See About HDMI on page 14.
Default Gateway
A default gateway is a communication device such as a router
which passes data between networks. It is used to direct data to
networks on which the destination gateway is not explicitly
specified.
DHCP (Dynamic Host Configuration Protocol)
This protocol provides configuration parameters (IP address,
etc.) for computers and other devices connected to the network.
DNS (Domain Name System)
This is a system for associating Internet host names with IP
addresses.
Dolby Digital
Dolby Digital is an audio format to record the sound in up to 5.1
channels with a fraction of the amount of data as compared to
linear PCM audio signals.
Dolby Digital Plus
Dolby Digital Plus is an audio format for high-definition media.
Built on Dolby Digital, it combines the efficiency and flexibility to
provide high quality multi-channel audio. With BD-ROMs, up to
7.1 channels of digital sound can be recorded.
63
En
Page 64

Dolby TrueHD
07
Dolby TrueHD is an audio format using lossless coding. With BDROMs, up to 8 channels can be recorded at 96 kHz/24 bits, or up
to 6 channels at 192 kHz/24 bits.
DRM
A technology for protecting copyrighted digital data. Digitized
videos, images and audio retain the same quality even when they
are copied or transferred repeatedly. DRM is a technology for
restricting the distribution or playback of such digital data
without the authorization of the copyright holder.
DTS Digital Surround
DTS Digital Surround is an audio format to record 48 kHz/24 bits
audio signals in 5.1 channels.
MPEG (Moving Picture Experts Group)
The name of a family of standards used to encode video and
audio signals in a digital compressed format. The video encoding
standards include MPEG-1 Video, MPEG-2 Video, MPEG-4 Visual,
MPEG-4 AVC, etc. The audio encoding standards include MPEG1 Audio, MPEG-2 Audio, MPEG-2 AAC, etc.
Parental Lock
See Changing the Parental Lock level for viewing DVDs and
Changing the Age Restriction for viewing BD-ROMs on page 45.
Picture-in-Picture (P-in-P)
This is a function for superimposing a sub video on the main
video. Some BD-ROMs include secondary video, which can be
superimposed on the primary video.
DTS-HD High Resolution Audio
DTS-HD High Resolution Audio is an audio format using lossy
coding. It can record 7.1 channels at 96 kHz/24 bits.
DTS-HD Master Audio
DTS-HD Master Audio is an audio format using lossless coding.
With BD-ROMs, 7.1 channels can be recorded at 96 kHz/24 bits,
or 5.1 channels at 192 kHz/24 bits.
Ethernet
A standard for local area networks (LANs) used to connect
multiple computers, etc. in the same location. This player
supports 100BASE-TX.
Frames and fields
A frame is the unit for one of the still pictures which compose
motion pictures. One frame consists of a picture of odd lines and
a picture of even lines called fields in video signal with interlaced
scan method (480i, 1080i, etc.).
HDMI (High-Definition Multimedia Interface)
See About HDMI on page 14.
Interactive audio
The audio signals recorded in the titles of BD-ROMs. They include
for example the clicking sound made when the menu screen is
operated.
Interlaced scan
With this method, one picture is displayed by scanning it twice.
The odd lines are displayed in the first pass, the even lines are
displayed in the second, to form a single picture (frame).
Interlaced scan is indicated in this player and operating
instructions by an “i” after the resolution value (for example, 480i).
IP address
An address that identifies a computer or other device connected
to the Internet or local area network. It is represented a number
in four sections.
Linear PCM
This is referred as the audio signals that are not compressed.
MAC (Media Access Control) address
A hardware identification number assigned specifically to the
network device (LAN card, etc.).
Port number
This is a sub-address provided below the IP address for
simultaneously connecting to multiple parties during Internet
communications.
Progressive scan
With this method, one picture is consisted of a single picture,
without dividing it in two pictures. Progressive scan provides
clear pictures with no flicker, in particular for still pictures that
contain much text , graphics, or horizontal lines. Progressive scan
is indicated in this player and operating instructions by a “p” after
the resolution value (for example, 480p).
Proxy server
This is a relay server for ensuring fast access and safe
communications when connecting to the Internet from an
internal network.
Region number
See About region numbers on page 10.
Secondary audio
Some BD-ROMs include sub audio streams mixed with the main
audio stream. These sub audio streams are called “secondary
audio”. On some discs this secondary audio is recorded as the
audio for the secondary video.
Secondary video
Some BD-ROMs include sub videos superimposed on the main
videos using the Picture-in-Picture function. These sub videos are
called “secondary video”.
Subnet mask
This is used to identify which part of the IP address corresponds
to the subnet (a separately managed network). The subnet mask
is expressed as ‘255.255.255.0’.
USB(Universal Serial Bus)
USB is the industry standard for connecting peripherals to PCs.
VC-1
A video codec developed by Microsoft and standardized by the
Society of Motion Picture and Television Engineers (SMPTE).
Some BDs include videos encoded in this codec.
x.v.Color
See About HDMI on page 14.
64
En
Page 65

Specifications
Model BDP-320
Type Blu-ray Disc PLAYER
Rated voltage AC 120 V
Rated frequency 60 Hz
Power consumption 32 W
Power consumption (standby) 0.3 W
Weight 7 lb 12 oz (3.5 kg)
External dimensions (including projecting parts)
Tolerable operating temperature +41 °F to +95 °F (+5 °C to +35 °C)
Tolerable operating humidity 5 % to 85 % (no condensation)
Output terminals
HDMI 1 set, 19-pin: 5 V, 250 mA
Video outputs Video 1 set, RCA jack: 1.0 Vp-p (75 Ω)
Component video 1 set, RCA jacks:
Audio outputs 7.1-channel (multi-channel: front left/
Digital audio outputs Optical 1 set, Optical digital jack
LAN 1 set, Ethernet jack (100BASE-TX)
Control Input 1 set, Minijack (3.5 ø)
USB 1 set, Type A
right, surround left/right, center,
surround back left/right, subwoofer)
Audio output level 200 mVrms (1 kHz, –20 dB)
Frequency response 4 Hz to 88 kHz (192 kHz sampling)
16 9/16 in. (W) x 3 in. (H) x 11 5/16 in. (D)
(420 mm (W) x 75 mm (H) x 287 mm (D))
Y: 1.0 Vp-p (75 Ω)
PB, PR: 0.7 Vp-p (75 Ω)
1 set, Number of channels: 8, RCA jacks
07
Note
•The specifications and design of this product are subject to change without notice.
•This product includes FontAvenue
®
fonts licenced by NEC Corporation. FontAvenue is a registered trademark of
NEC Corporation.
65
En
Page 66

Should this product require service in the U.S.A. and you wish to locate the nearest Pioneer
Authorized Independent Service Company, or if you wish to purchase replacement parts,
operating instructions, service manuals, or accessories, please call the number shown
below.
1 – 8 0 0 – 4 2 1 – 1 4 0 4
Please do not ship your product to Pioneer without first calling the Customer Support at the
above listed number for assistance.
Pioneer Electronics Service, Inc.
P.O. BOX 1760, Long Beach,
CA 90801-1760, U.S.A.
For warranty information please see the Limited Warranty sheet included with your product.
Should this product require service in Canada, please contact a Pionee
Authorized Dealer to locate the nearest Pioneer Authorized Service Company in Canada.
Alternatively, please contact the Customer Satisfaction Department at the following address:
Pioneer Electronics of Canada, Inc.
Customer Satisfaction Department
300 Allstate Parkway, Markham, Ontario L3R 0P2
1-877-283-5901
905-479-4411
For warranty information please see the Limited Warranty sheet included with your product.
Si ce produit doit être réparé au Canada, veuillez vous adresser à un distributeur autorisé
Pioneer du Canada pour obtenir le nom du Centre de Service Autorisé Pionee
de chez-vous. Vous pouvez aussi contacter le Service à la clientèle de Pioneer:
Pioneer Électroniques du Canada, Inc.
Service Clientèle
300, Allstate Parkway, Markham, Ontario L3R 0P2
1-877-283-5901
905-479-4411
Pour obtenir des renseignements sur la garantie, veuillez vous reporter au feuillet sur la
garantie restreinte qui accompagne le produit.
r Canadian
r le plus près
S018_C_EF
Published by Pioneer Corporation.
Copyright © 2009 Pioneer Corporation.
All rights reserved.
PIONEER CORPORATION
4-1, Meguro 1-Chome, Meguro-ku, Tokyo 153-8654, Japan
PIONEER ELECTRONICS (USA) INC.
P.O. BOX 1540, Long Beach, California 90801-1540, U.S.A. TEL: (800) 421-1404
PIONEER ELECTRONICS OF CANADA, INC.
300 Allstate Parkway, Markham, Ontario L3R 0P2, Canada TEL: 1-877-283-5901, 905-479-4411
PIONEER EUROPE NV
Haven 1087, Keetberglaan 1, B-9120 Melsele, Belgium TEL: 03/570.05.11
PIONEER ELECTRONICS ASIACENTRE PTE. LTD.
253 Alexandra Road, #04-01, Singapore 159936 TEL: 65-6472-7555
PIONEER ELECTRONICS AUSTRALIA PTY. LTD.
178-184 Boundary Road, Braeside, Victoria 3195, Australia, TEL: (03) 9586-6300
PIONEER ELECTRONICS DE MEXICO S.A. DE C.V.
Blvd.Manuel Avila Camacho 138 10 piso Col.Lomas de Chapultepec, Mexico,D.F. 11000 TEL: 55-9178-4270
K002_B_En
<VRB1519-B>
Printed in
 Loading...