

Page 1

Operating Instructions | Mode d’emploi
Blu-ray Disc PLAYER
LECTEUR Blu-ray Disc
BDP-33FD
BDP-
31FD
Page 2
OPERATING INSTRUCTIONS
BDP-33FD/BDP-31FD
ENGLISH
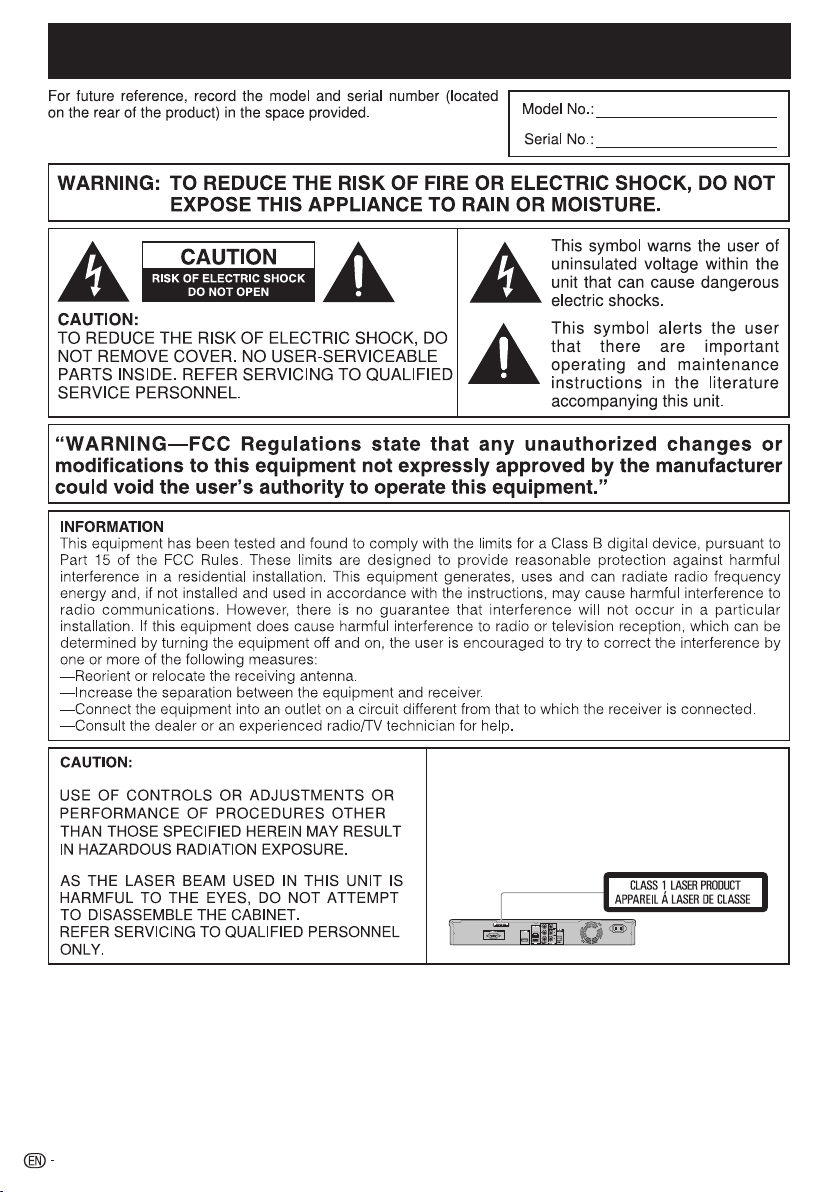
• This Player is classified as a CLASS 1 LASER product.
• The CLASS 1 LASER PRODUCT label is located on
the rear cover.
• This product contains a low power laser device. To
ensure continued safety do not remove any cover or
attempt to gain access to the inside of the product.
Refer all servicing to qualified personnel.
AC IN
USB
2
Page 3

Contents
Introduction
DEAR Pioneer CUSTOMER .........................................4
IMPORTANT SAFETY INSTRUCTIONS ...................4-5
Important Notice...........................................................6
The Icons Used in This Operating Instructions ..........6
Copyright .................................................................6
About Discs .............................................................7-10
Types of Discs that Can Be Used with This Player ....7
Discs that Cannot Be Used with This Player ...........8
BD Video ..................................................................9
Title, Chapter and Track ...........................................9
Icons Used on DVD Video Disc Cases ......................9
Disc Precautions ....................................................10
About Files ..................................................................11
About Playing Audio Files .......................................11
About Playing Image Files .......................................11
About Audio Files, Image Files and Folders .............11
Checking the Accessories .........................................12
Names and Functions of Parts ............................13-15
Main Unit (Front) .....................................................13
Front Panel Display .................................................13
Main Unit (Rear) ......................................................14
Remote Control Unit ...............................................15
Connections
Connections .......................................................... 16-21
Connecting to the HDMI Terminal ...........................17
Selecting the priority video output when connecting
HDMI and Component video ................................17
Connecting to the Component Jacks .....................18
Connecting to the Video Jack .................................19
Connecting to the Digital Audio Terminal or Audio
Jacks ...................................................................20
Connecting to the LAN (10/100) terminal ................21
Playback
Before Starting Playback ..................................... 22-27
Loading the Batteries in the Remote Control ..........22
Approximate operating range of remote control ....22
Connecting the Power Cord ...................................22
Turning the Power On .............................................23
Turning the power off ........................................... 23
Language Setting ...................................................23
Changing the on-screen display language ............23
Operating the TV with the Player’s Remote
Control .................................................................24
Table of Manufacturer Codes ...............................24
Turning Off the Front Panel Display and Indications 25
Operate using the remote control unit .................25
HOME MENU operation ....................................... 25
About Control Function with HDMI ........................26
To use the control function with HDMI ..................26
What the control function with HDMI can do ........26
About the PQLS function .....................................26
RSS Reader Function .............................................27
Displaying text information ...................................27
Playback ................................................................ 28-38
Loading a Disc .......................................................28
BD/DVD Video Playback ........................................28
Displaying the disc information .............................28
Playing BD-/DVD-Video Discs from the Menu .........29
Using the top menu .............................................. 29
Using the disc menu ............................................29
Using the pop-up menu .......................................29
Enjoying BONUSVIEW or BD-LIVE .........................30
Secondary video playback ...................................30
BD-RE/-R, DVD-RW/-R Playback ...........................31
Playback by selecting a title .................................31
Playback by selecting a chapter ...........................32
Sorting the titles ................................................... 32
Playback by selecting a Playlist ............................32
Playing back the title you stopped while being
played ...............................................................32
Audio CD Playback ................................................33
Playback from the beginning ................................ 33
Playback by selecting a track ............................... 33
Operation procedure for the “Functions” menu .....33
Playing Audio Files .................................................34
Selecting and playing a different file during playback
Cueing during playback ........................................ 34
Playing JPEG files ...................................................35
Playing back Slide Show ...................................... 35
Setting slide show speed/repeat playback ...........36
Playing YouTube Videos .........................................36
Playing Netflix Streaming Content ...........................37
Settings for watching Netflix content on your TV ....37
Adding content to the Instant Queue ....................38
Playing back content in the Instant Queue on
your TV ..............................................................38
Fast Forward/Reverse ..........................................38
Playback Functions .............................................. 39-41
Fast Forward/Reverse (Search) ...............................39
Skipping to the Next or the Start of the Current
Chapter (Track) ....................................................39
Pause .....................................................................39
Frame Advance Playback .......................................39
Slow Playback ........................................................39
Skip Search ............................................................39
Replay ....................................................................39
Repeat Playback of a Title or Chapter (Repeat
Playback) .............................................................39
Partial Repeat Playback (Repeat Playback of a
Specified Part) ...................................................40
Switching the Audio Mode ......................................41
Switching Subtitles .................................................41
Switching the Angle ................................................41
Displaying the Angle Mark ....................................41
Settings During Playback ....................................42-43
Function Control .....................................................42
Function control operation procedure ................... 42
Functions which can be set ..................................43
Settings
Settings .................................................................44-55
Common Operations ..............................................44
Basic Operation for Playback Setting ......................44
Audio Video Settings ..............................................45
Quick Start .............................................................46
Auto Power Off .......................................................46
Control ...................................................................46
Playback Setting ....................................................47
Front Panel Display/LED .........................................47
Version ...................................................................47
System Reset .........................................................48
Communication Setup ............................................48
Selecting the connection method .........................48
Changing the communications settings ................48
The operation procedure for inputting characters
manually ............................................................50
USB Memory Management ....................................51
Software Update ....................................................52
Updating automatically using the network ............52
Updating manually using the network ...................53
Updating manually using a USB memory device .... 53
Appendix
Troubleshooting .................................................... 56-59
To Reset this Player ................................................59
Messages Relating to BD disc and DVD disc ..........59
Glossary ................................................................60-61
Specifications .............................................................62
OSS Licenses ..............................................................62
Disclaimer for Third Party Content ...........................63
The illustrations and on-screen displays in this operating *
instructions are for explanation purposes and may vary
slightly from the actual operations.
.... 34
ENGLISH
3
Page 4

DEAR Pioneer CUSTOMER
Thank you for buying this Pioneer product.
Please read through these operating instructions so you will know how to operate your model properly.
After you have finished reading the instructions, put them away in a safe place for future reference.
IMPORTANT SAFETY INSTRUCTIONS
Electricity is used to perform many useful functions, but it can also cause personal injuries and property damage if
improperly handled. This product has been engineered and manufactured with the highest priority on safety. However,
improper use can result in electric shock and/or fire. In order to prevent potential danger, please observe the following
instructions when installing, operating and cleaning the product. To ensure your safety and prolong the service life of your
Blu-ray Disc Player, please read the following precautions carefully before using the product.
1)
Read these instructions.
2)
Keep these instructions.
3)
Heed all warnings.
4)
Follow all instructions.
5)
Do not use this apparatus near water.
6)
Clean only with dry cloth.
7)
Do not block any ventilation openings. Install in accordance with the manufacturer’s instructions.
8)
Do not install near any heat sources such as radiators, heat registers, stoves, or other apparatus (including amplifiers)
that produce heat.
9)
Do not defeat the safety purpose of the polarized or grounding-type plug. A polarized plug has two blades with one
wider than the other. A grounding type plug has two blades and a third grounding prong. The wide blade or the
third prong are provided for your safety. If the provided plug does not fit into your outlet, consult an electrician for
replacement of the obsolete outlet.
10)
Protect the power cord from being walked on or pinched particularly at plugs, convenience receptacles, and the point
where they exit from the apparatus.
11)
Only use attachments/accessories specified by the manufacturer.
12)
Use only with the cart, stand, tripod, bracket, or table specified by the manufacturer, or sold with the apparatus.
When a cart is used, use caution when moving the cart/apparatus combination to avoid injury from tip-over.
13)
Unplug this apparatus during lightning storms or when unused for long periods of time.
14)
Refer all servicing to qualified service personnel. Servicing is required when the apparatus has been
damaged in any way, such as power-supply cord or plug is damaged, liquid has been spilled or objects
have fallen into the apparatus, the apparatus has been exposed to rain or moisture, does not operate
normally, or has been dropped.
Additional Safety Information
Power Sources—This product should be operated only from the type of power source indicated on the marking label.
15)
If you are not sure of the type of power supply to your home, consult your product dealer or local power company.
For products intended to operate from battery power, or other sources, refer to the operating instructions.
Overloading—Do not overload wall outlets, extension cords, or integral convenience receptacles as this can result in
16)
a risk of fire or electric shock.
Object and Liquid Entry—Never push objects of any kind into this product through openings as they may touch
17)
dangerous voltage points or short-out parts that could result in a fire or electric shock. Never spill liquid of any kind on
the product.
Damage Requiring Service—Unplug this product from the wall outlet and refer servicing to qualified service personnel
18)
under the following conditions:
When the AC cord or plug is damaged,
a)
If liquid has been spilled, or objects have fallen into the product,
b)
If the product has been exposed to rain or water,
c)
If the product does not operate normally by following the operating instructions.
d)
Adjust only those controls that are covered by the operating instructions as an improper adjustment of other
controls may result in damage and will often require extensive work by a qualified technician to restore the
product to its normal operation,
If the product has been dropped or damaged in any way, and
e)
When the product exhibits a distinct change in performance – this indicates a need for service.
f)
Replacement Parts—When replacement parts are required, be sure the service technician has used replacement
19)
parts specified by the manufacturer or have the same characteristics as the original part. Unauthorized substitutions
may result in fire, electric shock, or other hazards.
Safety Check—Upon completion of any service or repairs to this product, ask the service technician to perform safety
20)
checks to determine that the product is in proper operating condition.
Wall or ceiling mounting—When mounting the product on a wall or ceiling, be sure to install the product according to
21)
the method recommended by the manufacturer.
The main AC plug is used as disconnect device and shall always remain readily operable.
22)
4
Page 5

IMPORTANT SAFETY INSTRUCTIONS
Water and Moisture — Do not use this product near water – for example, near a bath tub, wash bowl, kitchen sink, or
•
laundry tub; in a wet basement; or near a swimming pool; and the like.
Stand — Do not place the product on an unstable cart, stand, tripod or table. Placing the product on an unstable base
•
can cause the product to fall, resulting in serious personal injuries as well as damage to the product. Use only a cart,
stand, tripod, bracket or table recommended by the manufacturer or sold with the product. When mounting the product
on a wall, be sure to follow the manufacturer’s instructions. Use only the mounting hardware recommended by the
manufacturer.
Selecting the location — Select a place with no direct sunlight and good ventilation.
•
Ventilation — The vents and other openings in the cabinet are designed for ventilation. Do not cover or block these
•
vents and openings since insufficient ventilation can cause overheating and/or shorten the life of the product. Do not
place the product on a bed, sofa, rug or other similar surface, since they can block ventilation openings. This product is
not designed for built-in installation; do not place the product in an enclosed place such as a bookcase or rack, unless
proper ventilation is provided or the manufacturer’s instructions are followed.
Heat — The product should be situated away from heat sources such as radiators, heat registers, stoves, or other
•
products (including amplifiers) that produce heat.
Lightning — For added protection for this product during a lightning storm, or when it is left unattended and unused for
•
long periods of time, unplug it from the wall outlet. This will prevent damage to the product due to lightning and powerline surges.
To prevent fire, never place any type of candle or flames on the top or near the product.
•
To prevent fire or shock hazard, do not expose this product to dripping or splashing.
•
No objects filled with liquids, such as vases, should be placed on the product.
To prevent fire or shock hazard, do not place the AC cord under the product or other heavy items.
•
Turn off the main power and unplug the AC cord from the wall outlet before handling.
•
To clean the outer cabinet, periodically wipe it with a soft cloth.
•
Do not use chemicals for cleaning. It may damage the cabinet finish.
•
Introduction
CAUTION
The STANDBY/ON switch on this unit will not
completely shut off all power from the AC outlet.
Since the power cord serves as the main disconnect
device for the unit, you will need to unplug it from the
AC outlet to shut down all power. Therefore, make
sure the unit has been installed so that the power
cord can be easily unplugged from the AC outlet in
case of an accident. To avoid fire hazard, the power
cord should also be unplugged from the AC outlet
when left unused for a long period of time (for
example, when on vacation).
D3-4-2-2-2a*_A1_En
When disposing of used batteries, please comply
with governmental regulations or environmental
public institution’s rules that apply in your
country/area.
D3-4-2-3-1_B1_En
WARNING: Handling the cord on this product or
cords associated with accessories sold with the
product may expose you to chemicals listed on
proposition 65 known to the State of California and
other governmental entities to cause cancer and
birth defect or other reproductive harm.
Wash hands after handling.
D36-P5_B1_En
5
Page 6
Important Notice
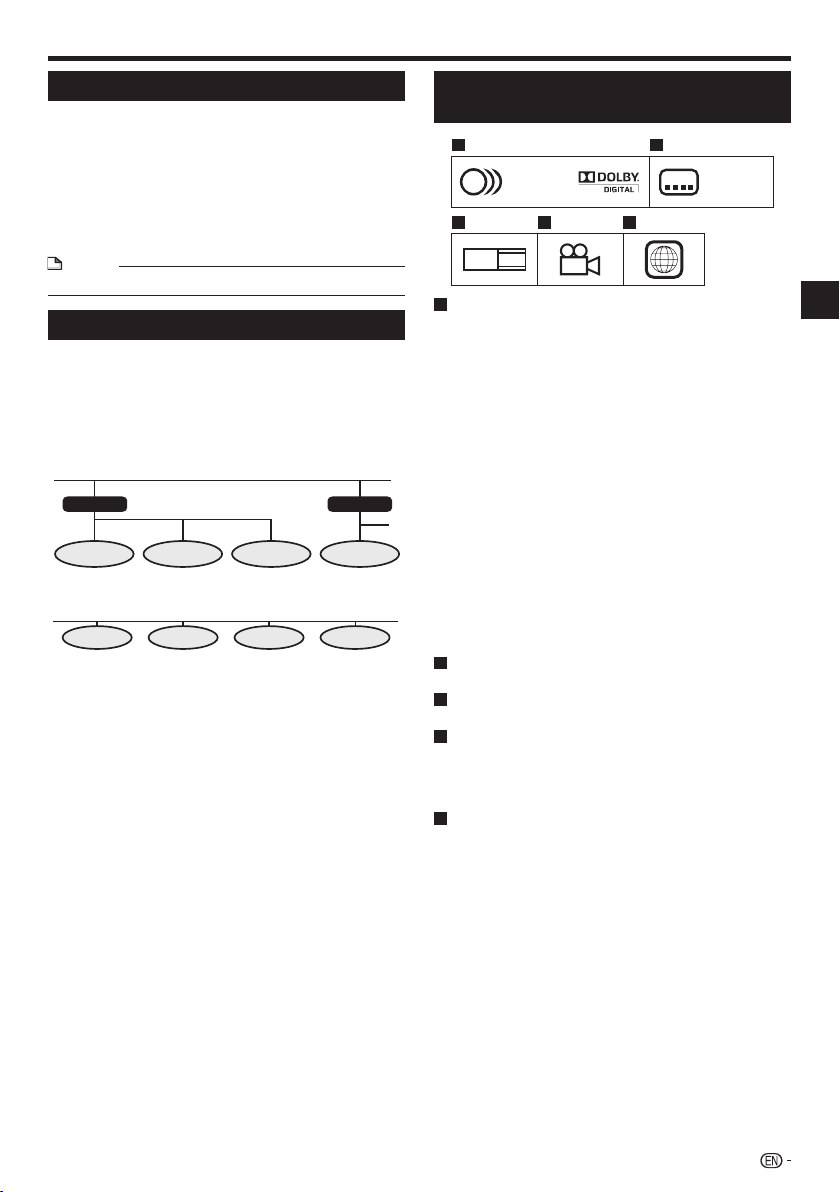
The Icons Used in This Operating
Instructions
.......... Indicates the functions that can be
BD VIDEO
BD-RE
BD-R
DVD VIDEO
DVD-RW
DVD-R
AVCHD
AUDIO CD
CD-RW
CD-R
USB
Copyright
Audio-visual material may consist of copyrighted works
•
which must not be recorded without the authority of the
owner of the copyright. Refer to relevant laws in your
country.
This product incorporates copyright protection technology
•
that is protected by U.S. patents and other intellectual
property rights. Use of this copyright protection technology
must be authorized by Rovi Corporation, and is intended
for home and other limited viewing uses only unless
otherwise authorized by Rovi Corporation. Reverse
engineering or disassembly is prohibited.
Manufactured under license from Dolby Laboratories.
•
“Dolby” and the double-D symbol are trademarks of Dolby
Laboratories.
Manufactured under license under U.S. Patent #’s:
•
5,451,942; 5,956,674; 5,974,380; 5,978,762; 6,226,616;
6,487,535; 7,392,195; 7,272,567; 7,333,929; 7,212,872 &
other U.S. and worldwide patents issued & pending. DTS
and the Symbol are registered trademarks, & DTS-HD,
DTS-HD Master Audio | Essential and the DTS logos are
trademarks of DTS, Inc. Product includes software. © DTS,
Inc. All Rights Reserved.
“Blu-ray Disc”, “Blu-ray” and “Blu-ray Disc” logo are
•
trademarks of Blu-ray Disc Association.
“BD-LIVE” logo is trademark of Blu-ray Disc Association.
•
•
Corporation.
performed for BD Video discs.
.......... Indicates the functions that can be
performed for BD-RE discs.
.......... Indicates the functions that can be
performed for BD-R discs.
......Indicates the functions that can be
performed for DVD Video discs.
.......... Indicates the functions that can be
performed for DVD-RW discs.
...........Indicates the functions that can be
performed for DVD-R discs.
.......... Indicates the functions that can be
performed for DVD discs in AVCHD format.
.......... Indicates the functions that can be
performed for Audio CDs.
..........Indicates the functions that can be
performed for CD-RW discs.
.........Indicates the functions that can be
performed for CD-R discs.
........Indicates functions that can be used when
playing USB memory devices.
is a trademark of DVD Format/Logo Licensing
•
HDMI, the HDMI Logo and High-Definition Multimedia
Interface are trademarks or registered trademarks of HDMI
Licensing, LLC in the United States and other countries.
•
“x.v.Color” and are trademarks of Sony
Corporation.
•
Java and all Java-based trademarks and logos are
trademarks or registered trademarks of Sun Microsystems,
Inc. in the U.S. and other countries.
•
“BONUSVIEW” is trademark of Blu-ray Disc Association.
•
This label indicates playback compatibility with DVD-RW
discs recorded in VR format (Video Recording format).
However, for discs recorded with a record-only-once
encrypted program, playback can only be achieved using a
CPRM compatible device.
•
“AVCHD” and the “AVCHD” logo are trademarks of
Panasonic Corporation and Sony Corporation.
This product incorporates the LC Font (duplication
inhibited) that has been designed by Sharp
Corporation in considering the ease of viewing and
reading on the display.
The “LC Font”, “LC FONT” and the “LC” logo mark
are trademarks of Sharp Corporation.
Also note that the product partially uses fonts other
than the LC Font.
6
Page 7
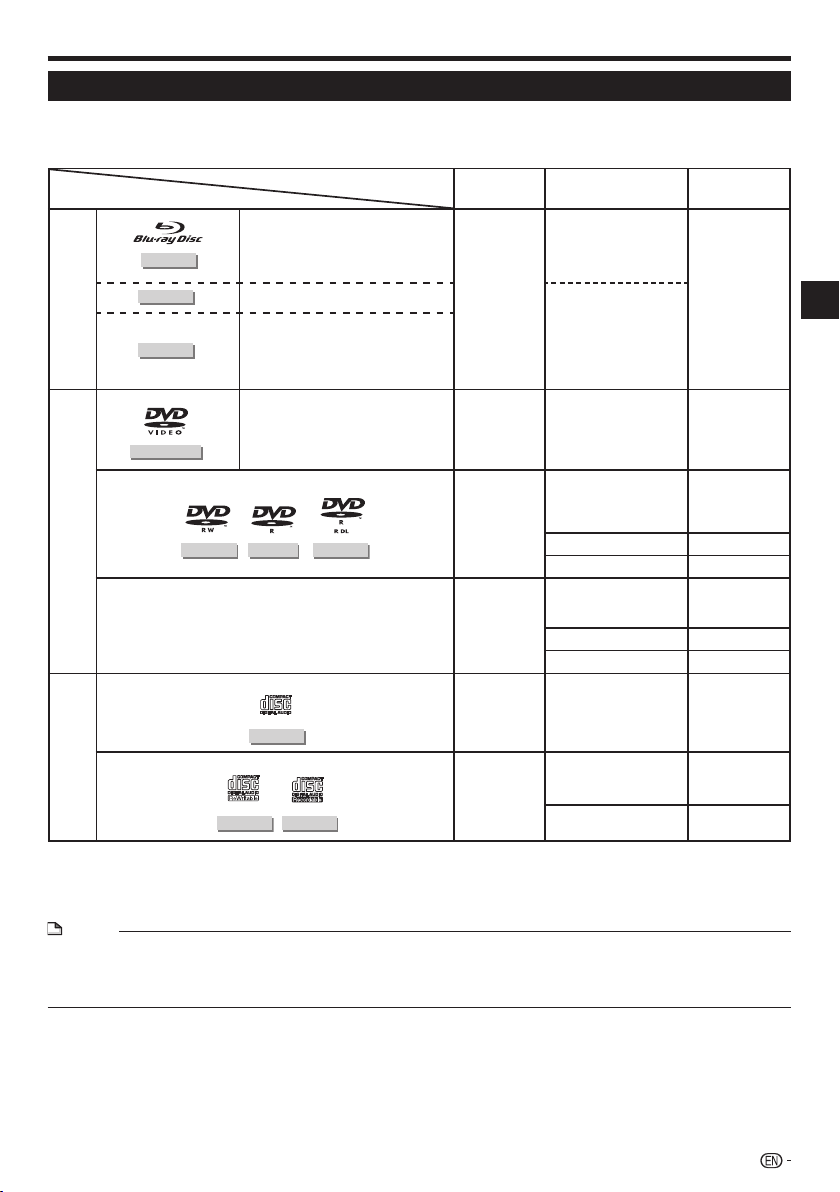
About Discs
Types of Discs that Can Be Used with This Player
Use discs that conform to compatible standards as indicated by the presence of official logos on the disc label.
Playback of discs not complying with these standards is not guaranteed. In addition, the image quality or sound
quality is not guaranteed even if the discs can be played back.
Disc Type
BD
DVD
CD
BD VIDEO
BD-RE
BD-R
DVD VIDEO
DVD-RW
Conditions for playback
Discs whose region code is “A” or “All
Region”
1
*
Ver. 2.1, SL (single layer)/DL (dual layer)
Ver. 1.1, SL (single layer)/DL (dual layer)
Ver. 1.2, SL (single layer)/DL (dual layer)
1
*
Ver. 1.2, LTH TYPE
Ver. 1.3, SL (single layer)/DL (dual layer)
Ver. 1.3, LTH TYPE
Discs whose region code includes “1”
or “ALL”
3
*
DVD-R
DVD+RW, DVD+R, DVD+R DL
DVD-R DL
AUDIO CD
Disc size Recording format
BDMV format
12 cm
BDAV format *
BDMV format
12 cm a
8 cm *
12 cm a
8 cm *
12 cm a
8 cm *
12 cm a
8 cm *
4
4
4
4
Video format
VR format
Video format
(finalized disc)
AVCHD format
MP3 file Audio
JPEG file Still picture
Video format
(finalized disc)
AVCHD format
MP3 file Audio
JPEG file Still picture
Music CD format Audio
2
Playable
contents
Audio + video
(movie)
Audio + video
(movie)
Audio + video
(movie)
Audio + video
(movie)
Introduction
Music CD format
12 cm a
4
8 cm *
CD-RW
*1 BD-RE/BD-R discs containing both the BDMV and BDAV formats cannot be played.
2
*
Extended play (H.264 format) discs recorded on Pioneer BD recorders can also be played.
3
*
96 kHz linear PCM audio is converted into 48 kHz linear PCM audio for output.
4
*
When playing a 8 cm disc, set the disc in the disc tray’s 8 cm disc ring. No adapter is necessary.
CD-R
MP3 file
JPEG file Still picture
Audio
NOTE
Operation and functions of BD/DVD-Video discs may differ from the explanations in this manual. Furthermore, some functions
•
may not be usable, at the disc manufacturer’s discretion.
“Finalize” refers to a recorder processing a recorded disc so that it will play in other players/recorders as well as this player.
•
Only finalized discs will play back in this player. (This player does not have a function to finalize discs.)
7
Page 8
About Discs
Discs that Cannot Be Used with This Player
In the cases below, even discs that can normally be played on this Player may not play at all or may not play normally.•
Discs other than those whose region code is “A (including A)” or “ALL” cannot be played.
•
BD VIDEO
BD-RE
BD-R
DVD VIDEO
DVD-RW
DVD-R
DVD+RW
DVD+R
CD-RW
CD-R
AUDIO CD
Video CD
DTS CD
Discs on which the region code is not indicated can sometimes be played, if they are recorded in NTSC format.
Discs in PAL or SECAM format
•
BD-RE Ver.1.0 discs cannot be played on this Player.
•
Cartridge type discs cannot be played.
•
Discs whose region code does not include “1” or “ALL” (discs not of offi cial sales regions)
•
Discs in PAL or SECAM format
•
Unauthorized discs (pirated discs)
•
Professional-use discs
•
Discs on which no data is recorded
•
Discs recorded in AVCREC format
•
Some discs may not be playable, depending on the recorder used for recording them.
•
Discs that have not been fi nalized
•
In some cases it may not be possible to play discs containing both music/video fi les and still pictures (JPEG fi les).
•
Also, some discs are not playable under any circumstances.
It may not be possible to play the following discs.
DVD-R (VR format) discs
•
DVD-R DL (dual layer) discs
•
DVD+R DL (dual layer) discs
•
Discs on which no data is recorded
•
Discs that have not been fi nalized
•
Multisession discs
•
In some cases it may not be possible to play discs recorded in formats other than music CD, JPEG and MP3, or discs
•
containing both music/video fi les and still pictures (JPEG fi les).
Also, some discs are not playable under any circumstances.
Discs may not be playable due to the disc’s recording conditions or the conditions of the disc itself.
•
Discs may not be playable for reasons of compatibility with this Player or due to the recorder used for recording them.
•
In some cases, CDs containing signals designed to protect copyrights (copy control signals) may not be playable.
•
In some cases, discs containing both DTS and linear PCM audio may not be playable.
•
This product is designed on the premise of playing music CDs that comply with CD (Compact Disc) standards.
Video CDs cannot be played on this Player.•
Some discs, such as discs containing linear PCM audio tracks in addition to other tracks, may not play normally.•
Discs other than the above that cannot be played
1
• CDG
*
• Photo-CD
• CD-ROM
• CD-TEXT
• CD-EXTRA*
1
*
1
• SACD
• PD
• CDV
• CVD
• SVCD
• DVD-RAM
• DVD-Audio
• HD DVD
• CD-WMA
*1 Only the audio can be played.
8
About discs with unusual shapes
Discs with unusual shapes (heart-shaped, hexagonal,
etc.), cannot be played on this Player. Attempting to
play such discs may damage the player. Do not use
such discs.
Page 9
About Discs
BD Video
Enjoy BD-specific functions including BONUSVIEW (BD-ROM
Profile 1 Version 1.1), such as picture-in-picture, and BD-LIVE
(page 30).
For the BD video discs compatible with BONUSVIEW/BDLIVE, you can enjoy additional contents by copying the data
from the discs or downloading it via the internet. For instance,
this function is capable of playing the original movie as the
primary video while playing video commentary from the film
director on a small screen as a secondary video.
NOTE
The available functions differ depending on the disc.•
Title, Chapter and Track
Blu-ray discs and DVDs are divided into “Titles” and
•
“Chapters”. If the disc has more than one movie on it, each
movie would be a separate “Title”. “Chapters”, on the other
hand, are subdivisions of titles. (See Example 1.)
Audio CDs are divided into “Tracks”. You can think of a
•
“Track” as one tune on an Audio CD. (See Example 2.)
Example 1: Blu-ray disc or DVD
Title 1
Chapter 1 Chapter 2 Chapter 3 Chapter 1
Example 2: Audio CD
Track 1 Track 2 Track 3 Track 4
Title 2
Icons Used on DVD Video Disc
Cases
1 2
1. English
2
2. Chinese
3 4 5
LB
16:9
1
Audio tracks and audio formats
DVD discs can contain up to 8 separate tracks with
a different language on each. The first in the list is the
original track.
This section also details the audio format of each
soundtrack — Dolby Digital, DTS, MPEG etc.
Dolby Digital
A sound system developed by Dolby Laboratories Inc.
that gives movie theater ambience to audio output when
the Player is connected to a Dolby Digital processor or
amplifier.
DTS
DTS is a digital sound system developed by DTS, Inc. for
use in cinemas.
Linear PCM
Linear PCM is a signal recording format used for Audio
CDs and on some DVD and Blu-ray discs. The sound
on Audio CDs is recorded at 44.1 kHz with 16 bits.
(Sound is recorded between 48 kHz with 16 bits and 96
kHz with 24 bits on DVD video discs and between 48
kHz with 16 bits and 192 kHz with 24 bits on BD video
discs.)
2
Subtitle languages
This indicates the kind of subtitles.
3
Screen aspect ratio
Movies are shot in a variety of screen modes.
4
Camera angle
Recorded onto some DVD discs are scenes which have
been simultaneously shot from up to 9 different angles
(the same scene is shot from the front, from the left side,
from the right side, etc.).
5
Region code
This indicates the region code (playable region code).
2
213
546
2
1. English
2. Chinese
Introduction
9
Page 10
About Discs
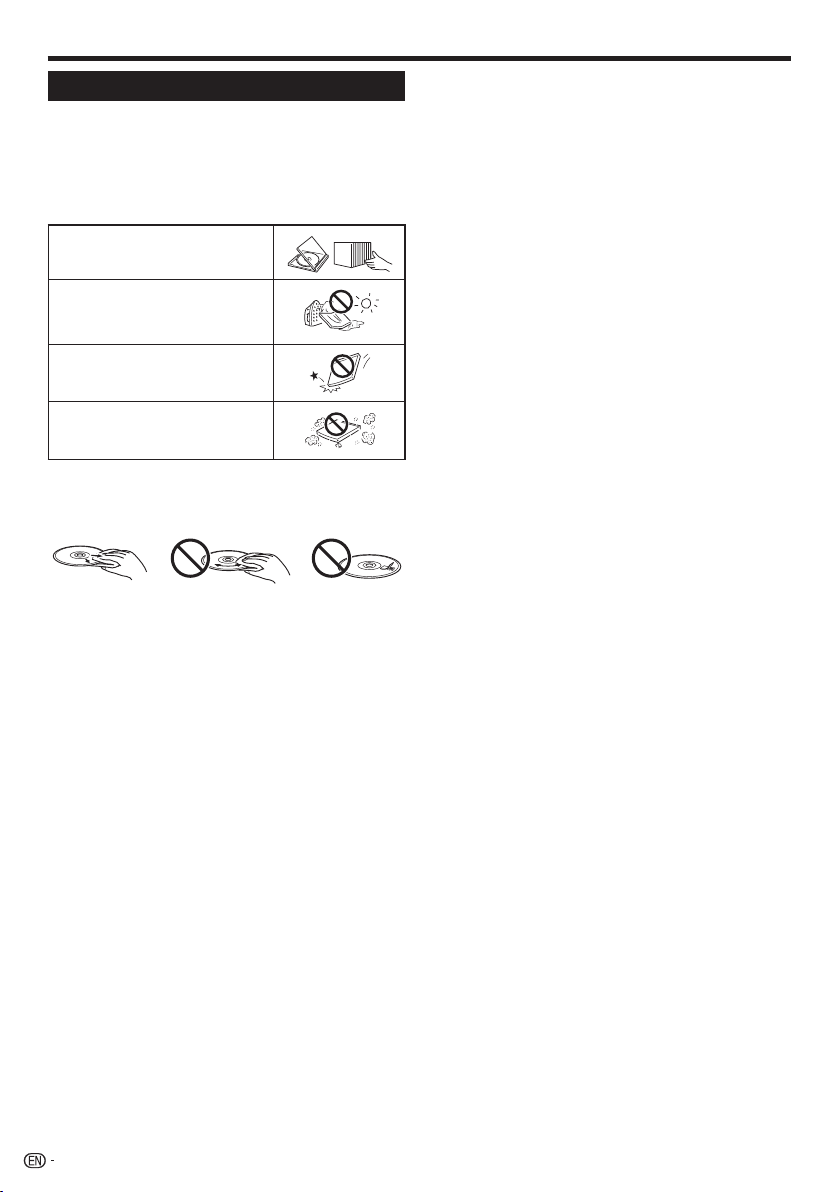
Disc Precautions
Be Careful of Scratches and Dust
•
BD, DVD and CD discs are sensitive to dust, fingerprints
and especially scratches. A scratched disc may not be able
to be played back. Handle discs with care and store them
in a safe place.
Proper Disc Storage
Place the disc in the center of the
disc case and store the case and
disc upright.
Avoid storing discs in locations
subject to direct sunlight, close to
heating appliances or in locations of
high humidity.
Do not drop discs or subject them to
strong vibrations or impacts.
Avoid storing discs in locations
where there are large amounts of
dust or moisture.
Handling Precautions
•
If the surface is soiled, wipe gently with a soft, damp (water
only) cloth. When wiping discs, always move the cloth from
the center hole toward the outer edge.
Do not use record cleaning sprays, benzene, thinner, static
•
electricity prevention liquids or any other solvent.
Do not touch the surface.
•
Do not stick paper or adhesive labels to the disc.
•
If the playing surface of a disc is soiled or scratched, the
•
Player may decide that the disc is incompatible and eject
the disc tray, or it may fail to play the disc correctly.
Cleaning the Pick Up Lens
Never use commercially available cleaning discs. The use
•
of these discs can damage the lens.
Request the nearest service center approved by Pioneer to
•
clean the lens.
Warnings about dew formation
Condensation may form on pick up lens or disc in the
•
following conditions:
Immediately after a heater has been turned on.
−
In a steamy or very humid room.
−
When the Player is suddenly moved from a cold
−
environment to a warm one.
When condensation forms:
It becomes difficult for the Player to read the signals
•
on the disc and prevents the Player from operating
properly.
To remove condensation:
Take out the disc and leave the Player with the power
•
off until the condensation disappears. Using the Player
when there is condensation may cause malfunction.
10
Page 11

About Files
DVD-RW
DVD-R
CD-RW
CD-R
USB
About Playing Audio Files
MP3 files can be played.
Files recorded with the sampling frequencies below are
•
supported.
8 kHz, 11.025 kHz, 12 kHz, 16 kHz, 22.05 kHz, 24 kHz,
32 kHz, 44.1 kHz, 48 kHz
Only files with the extensions “.mp3” or “.MP3” can be
•
played.
For the sound quality, we recommend recording with a bit
•
rate of 128 kbps or greater.
The maximum size of files that can be played is 200 MB.
•
Audio files other than MP3 files (WMA, etc.) cannot be
•
played.
Some MP3 files cannot be played.
•
MP3 files are not played in the order in which they were
•
recorded.
When recording MP3 files on discs, we recommend doing
•
so at low speed. Recording at high speed can cause noise
and make the disc/file unplayable.
Some time is required for loading when there are many
•
folders on the disc.
Depending on the folder structure, it may take some time
•
to load MP3 files.
When playing audio files, the elapsed time may not be
•
displayed properly.
About Playing Image Files
JPEG files can be played.
The files that can be played are as follows:
•
Conforming to baseline JPEG and Exif 2.2 standards
−
Extension: “.jpg” or “.JPG”
−
Resolution: 32 x 32 to 7680 x 4320 pixels
−
File size: 20 MB or less
−
JPEG HD is supported. The images are output with a high
•
resolution of 720p or 1080i.
The picture may be displayed with black vertical or
•
horizontal bands when JPEG files with a different aspect
ratio are played.
Image files other than JPEG files (TIFF, etc.) cannot be
•
played.
Some JPEG files cannot be played.
•
Progressive JPEG files cannot be played.
•
Motion JPEG files cannot be played.
•
In some cases, JPEG files processed with image
•
processing software may not be playable.
It may not be possible to play JPEG files downloaded from
•
the Internet or e-mail.
Depending on the number of folders or files and their size,
•
some JPEG files may require some time to play.
EXIF data is not displayed.
•
About Audio Files, Image Files and
Folders
Audio and image files can be played on this Player
when the folders on the disc or USB memory device
are created as described below.
Example of folder structure:
Root
001.jpg/001.mp3
xxx.jpg/xxx.mp3
01 Folder Folder 001.jpg/001.mp3
XX Folder 001.jpg/001.mp3
*: The number of folders and files within a single folder
(including the root directory) is limited to a maximum of 256.
Also, keep the number of folder layers to a maximum of 5.
NOTE
The file and folder names displayed on this Player may
•
differ from those displayed on a computer.
*
001.jpg/001.mp3
xxx.jpg/xxx.mp3
xxx.jpg/xxx.mp3
*
xxx.jpg/xxx.mp3
*
*
Introduction
11
Page 12
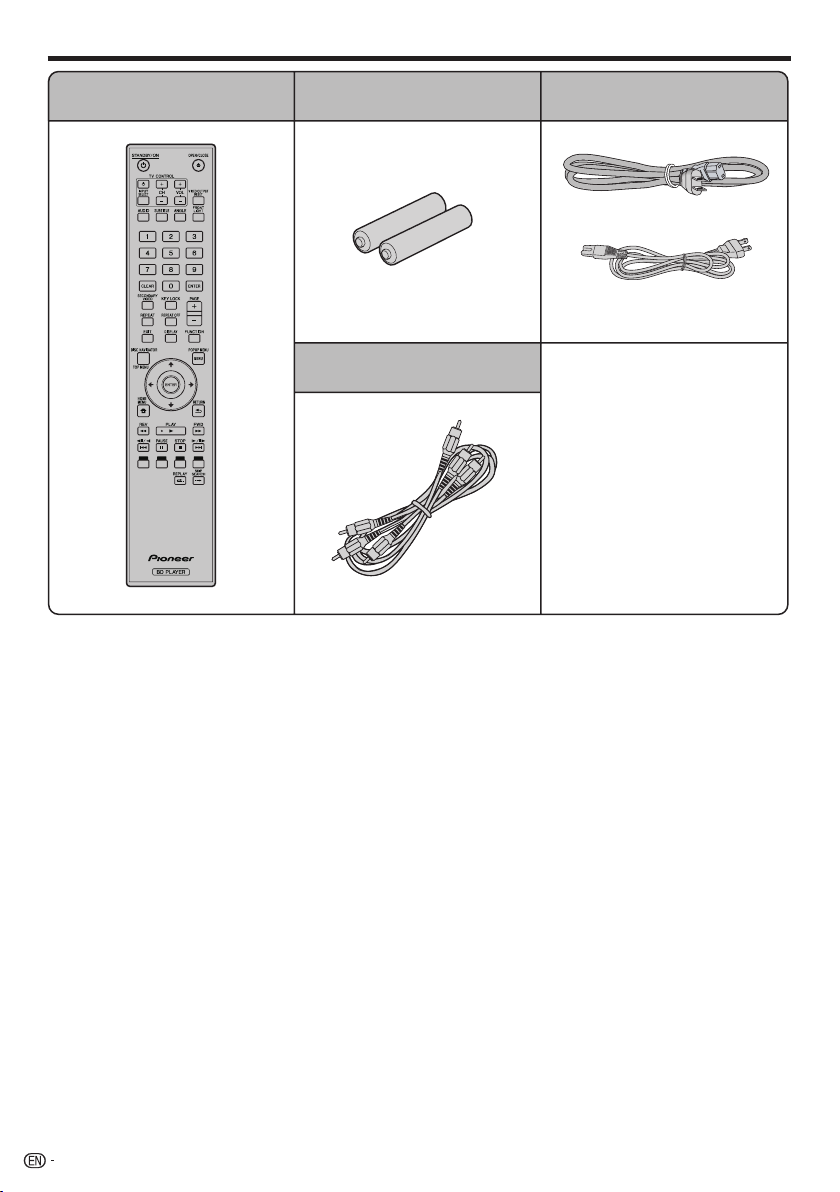
Checking the Accessories
Remote control unit
“AA/R6” size battery (2)
Video/audio cable Warranty card
•
Operating instructions
•
(this document)
AC cord
or
(BDP-33FD)
(BDP-31FD)
12
Page 13
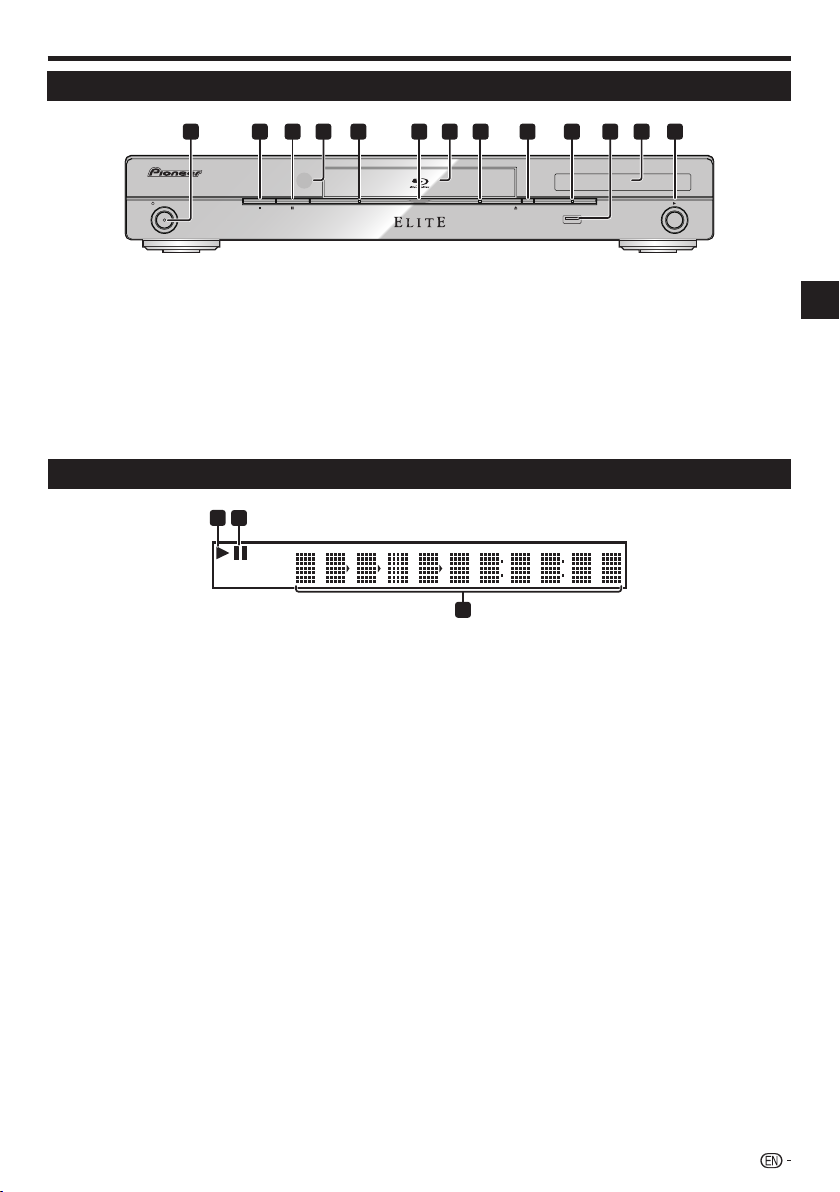
Names and Functions of Parts
Main Unit (Front)
STANDBY/ON
1
STANDBY/ON(page 23)
2
(STOP) (page 28)
3
(PAUSE) (page 39)
4
Remote control sensor (page 22)
5
PQLS indicator (page 26)
6
Blu-ray indicator
Lights when the power is on.
7
Disc tray (page 28)
8
HDMI indicator (page 26)
Front Panel Display
1
1
Lights during playback.
2
Lights when in the pause mode.
4 6
3 7 821 9
PQLS
2
1151210 13
FL OFFHDMI OPEN/CLOSE
USB
9
OPEN/CLOSE (page 28)
10
FL OFF indicator (page 25)
11
USB port (pages 21 and 51)
12
Front panel display (See below.)
13
(PLAY) (page 28)
36
Counter display
3
Displays the title, chapter, track number,
elapsed time, etc.
Introduction
13
Page 14
Names and Functions of Parts
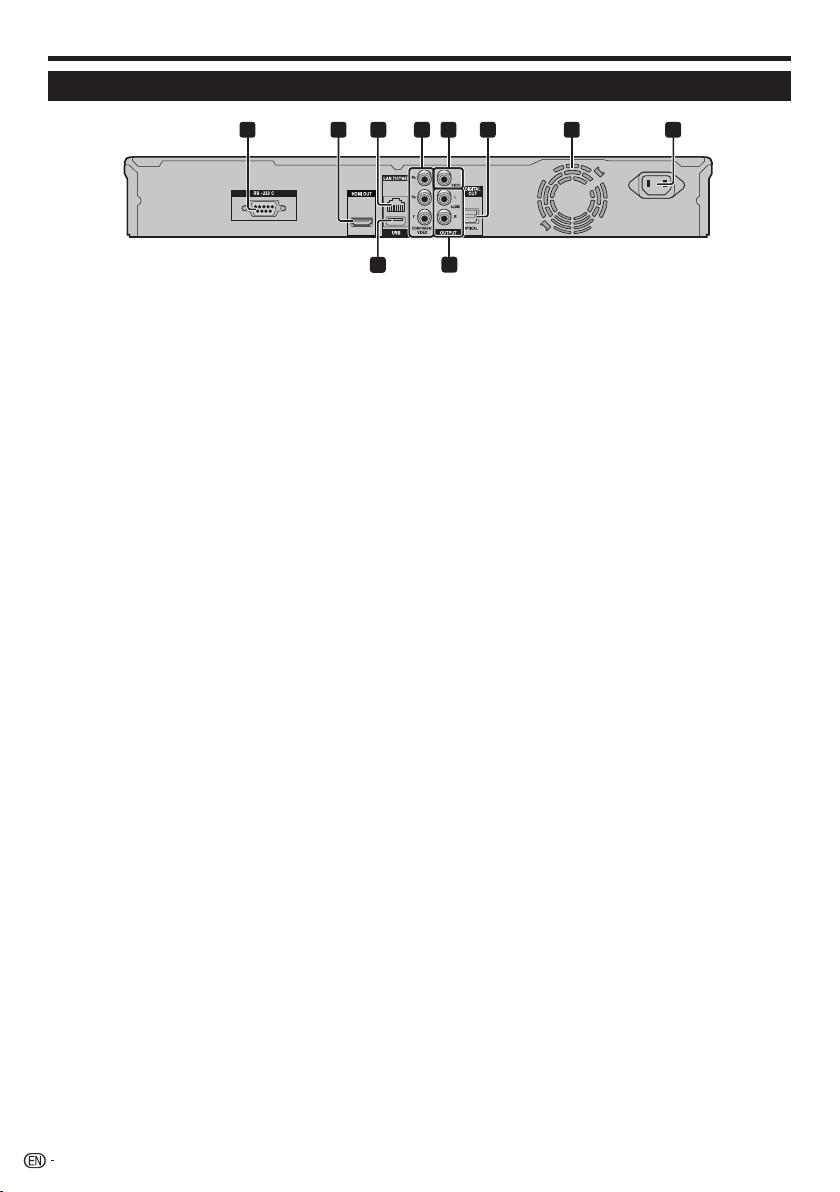
Main Unit (Rear)
1 2
6
5 8
4
3
7
AC IN
1
RS-232C terminal
The terminal is not used.
2
HDMI OUT terminal (page 17)
3
LAN (10/100) terminal (page 21)
4
COMPONENT VIDEO OUTPUT jacks
(page 18)
5
VIDEO OUTPUT jack (page 19)
10
USB
BDP-33FD
9
6
DIGITAL OUT OPTICAL terminal (page 20)
7
Cooling fan
The cooling fan operates while the power to
the Player is on.
8
AC IN terminal (page 22)
9
AUDIO OUTPUT jacks (page 20)
10
USB port (pages 21 and 51)
14
Page 15
Names and Functions of Parts
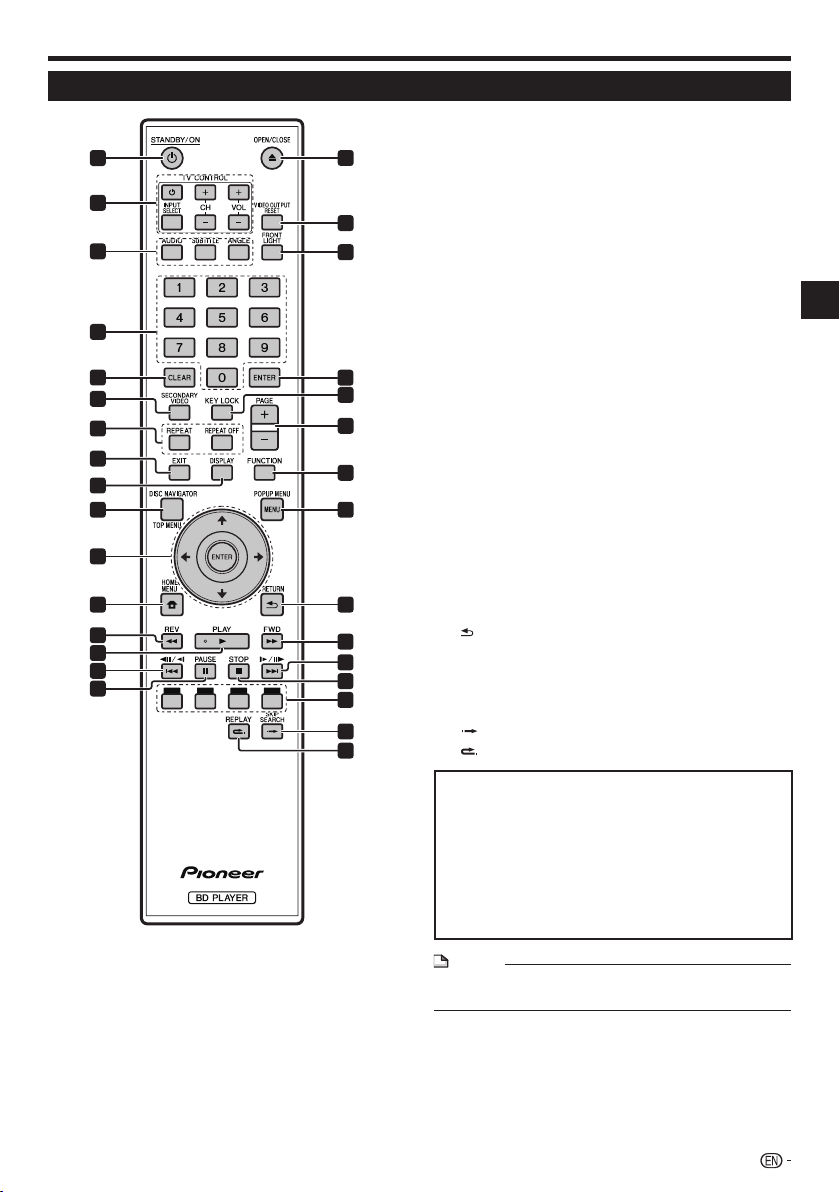
Remote Control Unit
1
2
3
4
5
6
7
8
9
10 24
11
12
13
14
15
16
17
18
19
20
21
22
23
25
26
27
28
29
30
31
1
STANDBY/ON (page 23)
2
TV CONTROL buttons (page 24)
3
AUDIO (page 41), SUBTITLE (page 41), ANGLE (page
41)
4
Number buttons (page 43)
5
CLEAR (page 43)
6
SECONDARY VIDEO (page 30)
7
REPEAT (pages 39 and 40), REPEAT OFF (pages 39
and 40)
8
EXIT (page 44)
9
DISPLAY (pages 28 and 40)
10
TOP MENU/DISC NAVIGATOR (pages 29 and 31)
11
Cursor buttons (), ENTER (pages 23 and 44)
12
HOME MENU (pages 23 and 44)
13
REV (page 39)
14
PLAY (page 28)
15
(page 39)
16
PAUSE (page 39)
17
OPEN/CLOSE (page 28)
18
VIDEO OUTPUT RESET (page 45)
19
FRONT LIGHT (page 25)
20
ENTER (pages 23 and 44)
21
KEY LOCK (See below.)
22
PAGE +/– (page 31)
23
FUNCTION (page 42)
24
POPUP MENU/MENU (page 29)
25
RETURN (page 44)
26
FWD (page 39)
27
(page 39)
28
STOP (page 28)
29
RED, GREEN, BLUE, YELLOW (page 31)
30
SKIP SEARCH (page 39)
REPLAY (page 39)
31
Introduction
Keylock function
You can set the keylock to prevent accidental operations.
This function allows TVs compatible with control function
with HDMI to also perform a Key Lock on the player.
Press and hold KEY LOCK for more than 5 seconds.
Each time you perform this operation, the function is
•
activated or deactivated.
If you try to operate the Player while the keylock function
•
is set, “HOLD” lights on the front panel display to
indicate that the keylock function is set.
NOTE
This remote control unit is equipped with two ENTER
•
buttons (11 and 20 listed above).
15
Page 16
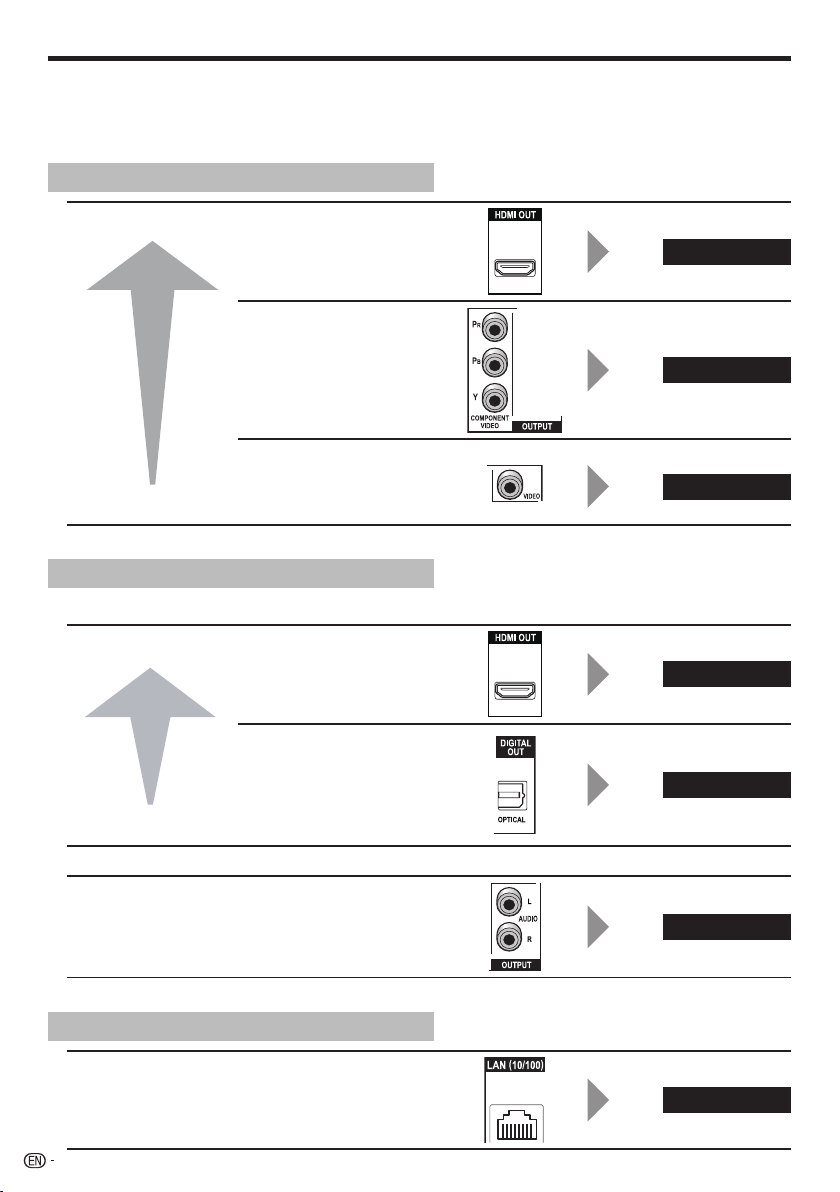
Connections
Be sure to turn off the power and unplug the power cord from the power outlet whenever making or changing
connections.
This Player is equipped with the terminals/jacks listed below. Find the corresponding terminal/jack on your video
equipment. Using the supplied cable or commercially available cables, connect the video first. Then connect the
audio.
Video terminals/jacks on this Player
Higher Quality
Standard Quality
HDMI OUT terminal
COMPONENT VIDEO
OUTPUT jacks
VIDEO OUTPUT jack
Audio terminals/jacks on this Player
Digital audio connection
Higher Quality
HDMI OUT terminal
DIGITAL OUT OPTICAL
terminal
Page 17
Page 18
Page 19
Page 17
Page 20
Standard Quality
Analog audio connection
Standard Quality
AUDIO OUTPUT jacks
Broadband Internet connection
LAN (10/100) terminal
16
Page 20
Page 21
Page 17
Connections
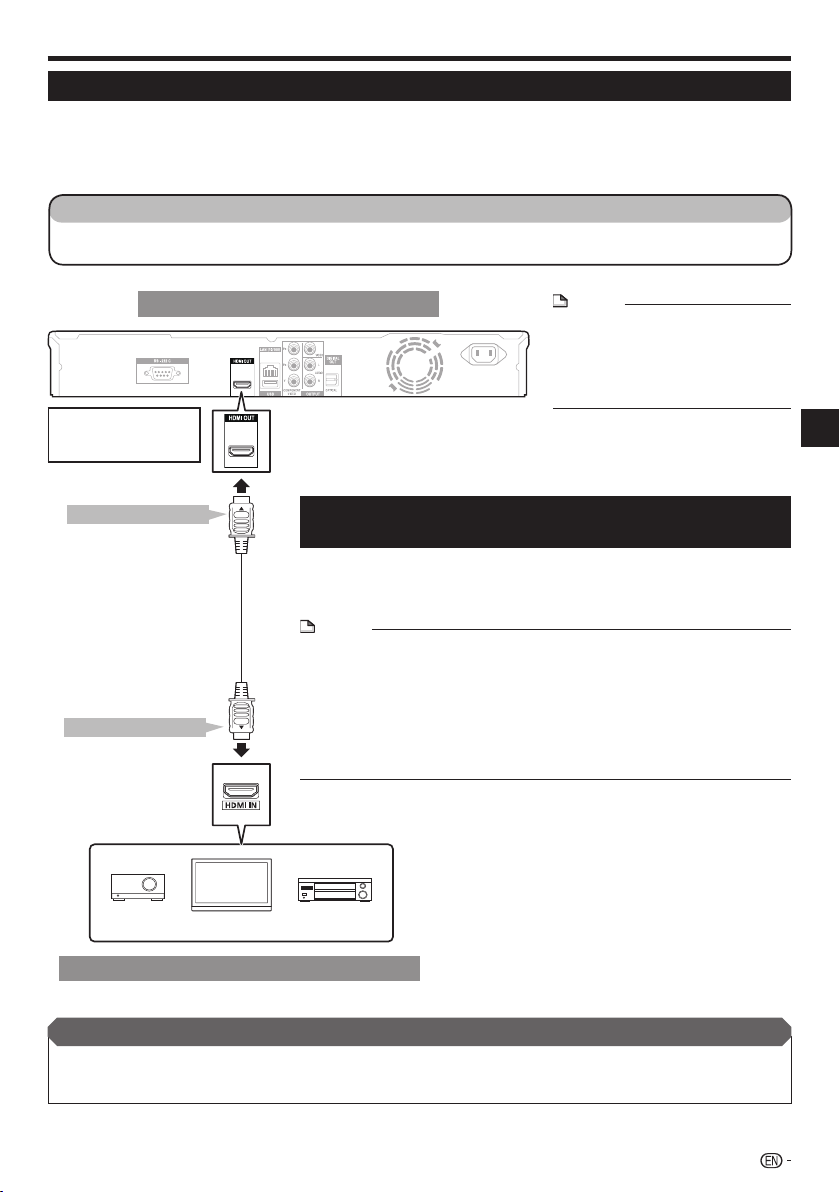
Connecting to the HDMI Terminal
You can enjoy high quality digital picture and sound through the HDMI terminal.
•
See page 55 for information on the output of next generation audio formats.
•
Use High Speed HDMI
•
not operate properly if other HDMI cables are used.
STEPS
Be sure to turn off this Player and the equipment before making any connections.
1
Firmly connect an HDMI cable (commercially available) to the HDMI terminals ( and ).
2
®
Cables when using the control function with HDMI. The control function with HDMI may
When using an HDMI
•
output, 7.1 ch Digital
Output is available.
To HDMI OUT terminal
(commercially available)
To HDMI IN terminal
Rear panel of this Player
USB
USB
Selecting the priority video output when connecting
HDMI and Component video
When you connect both an HDMI cable and a component cable to this
player, you need to select the priority video output in “Settings” – “Audio
HDMI cable
Video Settings” – “Video Out Select”. (See page 45.)
•
•
•
NOTE
Audio transmitted in DTS-HD High
•
AC IN
BDP-33FD
NOTE
When you connect the player to a Pioneer TV with an HDMI cable only and the TV
is turned on, the video output switches to HDMI automatically. (The above setting
is unnecessary.)
When you connect the player to a TV with an HDMI cable, “HDMI Video Out” is set
to “Auto”. If you don’t get a stable image, select the desired resolution.
When you set “HDMI Video Out” to a setting other than “Auto”, you can only
select resolutions that are compatible with the connected TV.
Refer to “HDMI Video Out” on page 45 regarding the resolutions of the HDMI
video output.
Resolution Audio and DTS-HD Master
Audio formats is output from the
HDMI terminal as Bitstream. Connect
an amplifier with a built-in decoder to
enjoy the fine sound quality.
Connection
TVProjector AV receiver
Equipment with an HDMI terminal
After connecting
If desired, connect audio equipment. (Page 20)
•
Load a disc and start playback. (Page 28)
•
Refer to control function with HDMI. (Pages 26 and 46)
•
17
Page 18
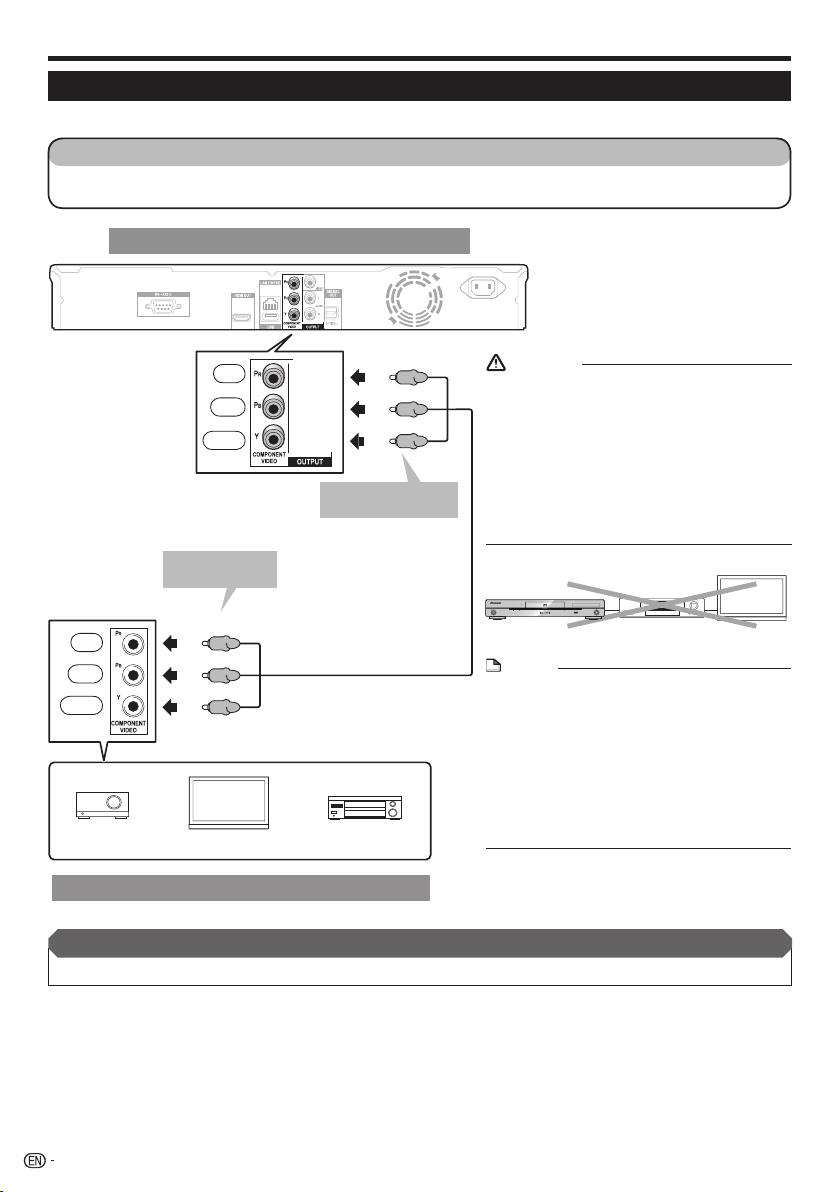
Connections
Connecting to the Component Jacks
You can enjoy accurate color reproduction and high quality images through the component jacks.
STEPS
Be sure to turn off this Player and the equipment before making any connections.
1
Firmly connect a component video cable (commercially available) to the component jacks ( and ).
2
Rear panel of this Player
AC IN
USB
Red
Blue
Green
Projector
(CR)
)
(C
B
Red
Blue
Green
To COMPONENT
VIDEO input jacks
(Red)
(Blue)
(Green)
TV
USB
To COMPONENT
VIDEO OUTPUT jacks
Component video cable
(commercially available)
AV receiver
(Red)
(Blue)
(Green)
BDP-33FD
CAUTION
You need to select the priority video output in
•
“Settings” – “Audio Video Settings” – “Video Out
Select”. (See page 45.)
When the priority video output is set to “HDMI” in
•
“Video Out Select”, the video resolution which is
output from the COMPONENT VIDEO OUTPUT
jacks is the one set in “HDMI Video Out”. (See
page 45.)
When the output from the COMPONENT VIDEO
•
OUTPUT jacks is prioritized, set the priority video
to “Component”.
STANDBY/ON
PQLS
FL OFFHDMI OPEN/CLOSE
USB
VCRThis Player TV
NOTE
Connect the Blu-ray disc player to TV
•
directly.
When you record the program where copyright
•
is protected, the copy guard function is activated
automatically; the program can not be recorded
correctly. Also, the playback image via VCR may
deteriorate due to this function. However, this is
not a malfunction. When you watch the program
where copyright is protected, we recommend
that the Blu-ray disc player be connected to TV
directly.
Video equipment with component jacks
After connecting
Connect audio equipment or the audio terminals of the TV. (Page 20)•
18
Page 19
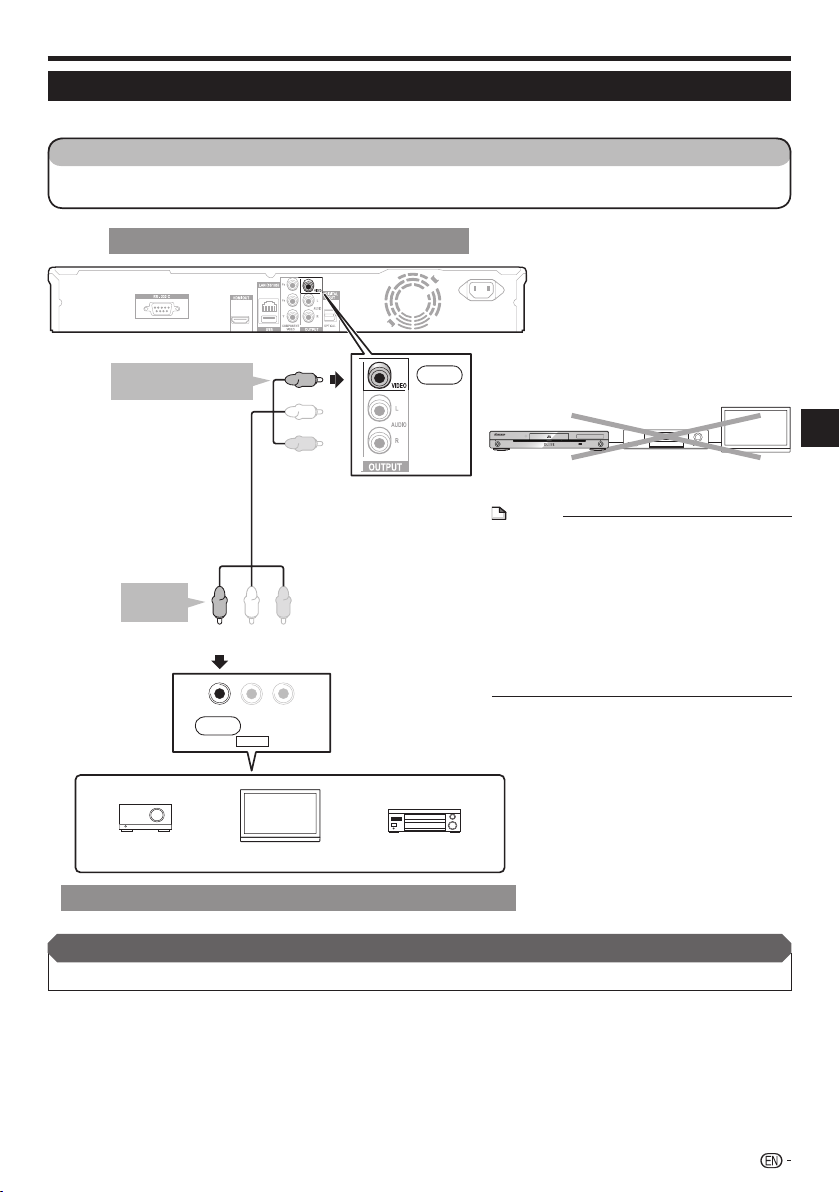
Connections
Connecting to the Video Jack
You can enjoy the images through the VIDEO OUTPUT jack.
STEPS
Be sure to turn off this Player and the equipment before making any connections.
1
Firmly connect an AV cable (supplied) to the video jacks ( and ).
2
Rear panel of this Player
AC IN
USB
To VIDEO OUTPUT
jack
USB
(Yellow)
BDP-33FD
Yellow
STANDBY/ON
This Player
PQLS
FL OFFHDMI OPEN/CLOSE
USB
VCR
Connection
TV
AV cable (supplied)
To VIDEO
input jack
Projector
Video equipment with a video jack
After connecting
Connect audio equipment or the audio terminals of the TV. (Page 20)•
(Yellow)
VIDEO L - AUDIO -R
Yellow
AV INPUT
TV
AV receiver
NOTE
Connect the Blu-ray disc player to TV
•
directly.
When you record the program where copyright
•
is protected, the copy guard function is activated
automatically; the program can not be recorded
correctly. Also, the playback image via VCR may
deteriorate due to this function. However, this is
not a malfunction. When you watch the program
where copyright is protected, we recommend
that the Blu-ray disc player be connected to TV
directly.
19
Page 20
Connections
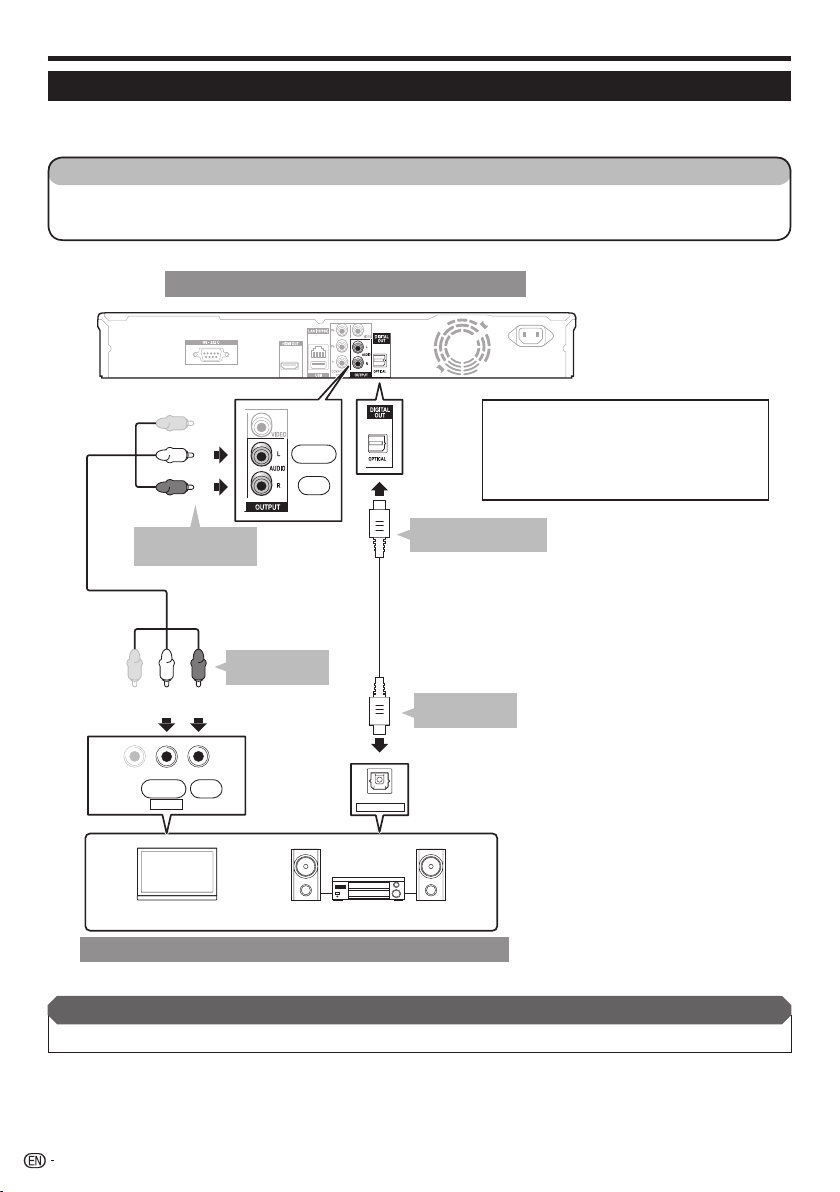
Connecting to the Digital Audio Terminal or Audio Jacks
You can connect audio equipment or the TV to the DIGITAL OUT OPTICAL terminal or AUDIO OUTPUT jacks.
•
See page 55 for information on the output of next generation audio formats.
•
STEPS
Be sure to turn off this Player and the equipment before making any connections.
1
Firmly connect an optical digital cable (commercially available) or AV cable (supplied) to the optical digital
2
audio terminals or audio jacks ( and , or and ).
Rear panel of this Player
AC IN
USB
(White)
(Red)
USB
White
Red
BDP-33FD
•
When using OPTICAL output,
5.1 ch Digital Output is available.
7.1 ch Digital Output is not available.
NOTE:
7.1 ch Audio is available via the HDMI terminal.
To AUDIO OUTPUT
jacks
Video/audio cable
(supplied)
To DIGITAL OUT
OPTICAL terminal
Optical digital cable
(commercially available)
To AUDIO input
jacks
(White) (Red)
VIDEO L - AUDIO -R
AV INPUT
TV
RedWhite
DIGITAL AUDIO IN
Amplifier
Audio equipment with a digital audio input terminal
After connecting
Load a disc and start playback. (Page 28)•
OPTICAL
To OPTICAL
input terminal
20
Page 21
Connections
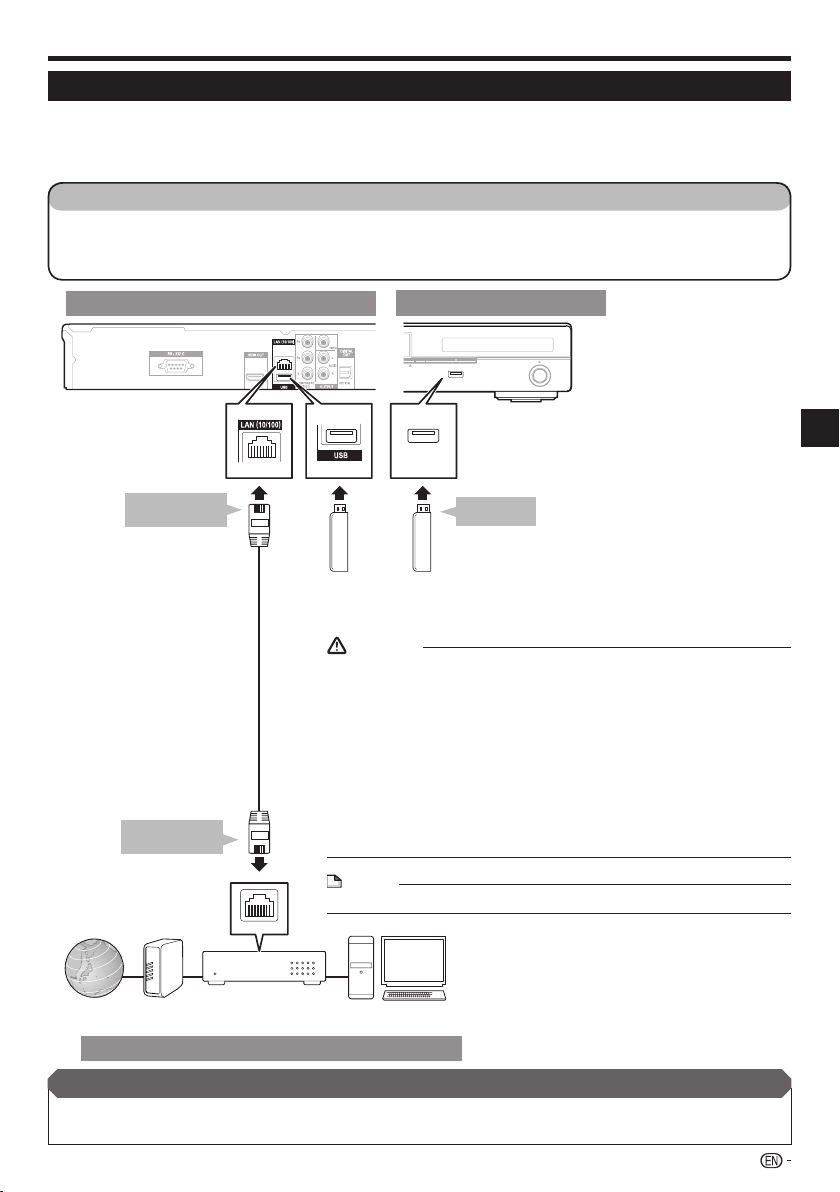
Connecting to the LAN (10/100) terminal
You can enjoy BD-LIVE functions and YouTube videos as well as update this Player’s software by connecting to
•
the Internet.
When using the Internet, a broadband internet connection as shown below is required.
•
A separate contract with/payment to an Internet service provider is required to use the Internet.
•
STEPS
Be sure to turn off this Player and the equipment before making any connections.
1
Either securely connect a LAN cable (commercially available) to the LAN (10/100) terminal ( and ) or insert
2
a USB Wireless LAN Adaptor AS-WL100 (sold separately as an option) into the USB port on this Player’s front or
rear panel ().
Rear panel of this Player
BDP-33FD
To LAN (10/100)
terminal
(commercially available)
To LAN terminal
LAN cable
Front panel of this Player
USB
USB
USB
USB
USB Wireless LAN Adaptor AS-WL100
(sold separately as an option)
or USB memory device
(commercially available)
CAUTION
Use the Pioneer-designated USB Wireless LAN Adaptor sold separately as an
•
option. Operation is not guaranteed with other wireless LAN adaptors.
Do not disconnect the USB Wireless LAN Adaptor while the player is
•
operating.
When using a broadband internet connection, a contract with an internet
•
service provider is required. For more details, contact your nearest internet
service provider.
Refer to the operation manual of the equipment you have as the connected
•
equipment and connection method may differ depending on your internet
environment.
Do not use a USB extension cable when connecting a USB memory device
•
to the USB terminal of the player. Using a USB extension cable may prevent
the player from performing correctly.
NOTE
Use an Ethernet hub/router supporting 10BASE-T/100BASE-TX.•
LAN
USB
FL OFFOPEN/CLOSE
USB
USB
To USB port
Enjoying BONUSVIEW or
BD-LIVE
Requires the USB memory device
•
(commercially available).
The memory device purchased
should comply with USB
specification 2.0 and have
minimum capacity of 1 GB, with
2 GB or more recommended.
Connection
Internet Modem
Ethernet hub
(router with hub function)
PC
Example of a Broadband Internet Connection
After connecting
Perform the communication setting. (Page 48)
•
Load a BD-LIVE compatible disc and play back the contents. (Page 30)
•
21
Page 22
Before Starting Playback
Loading the Batteries in the
Remote Control
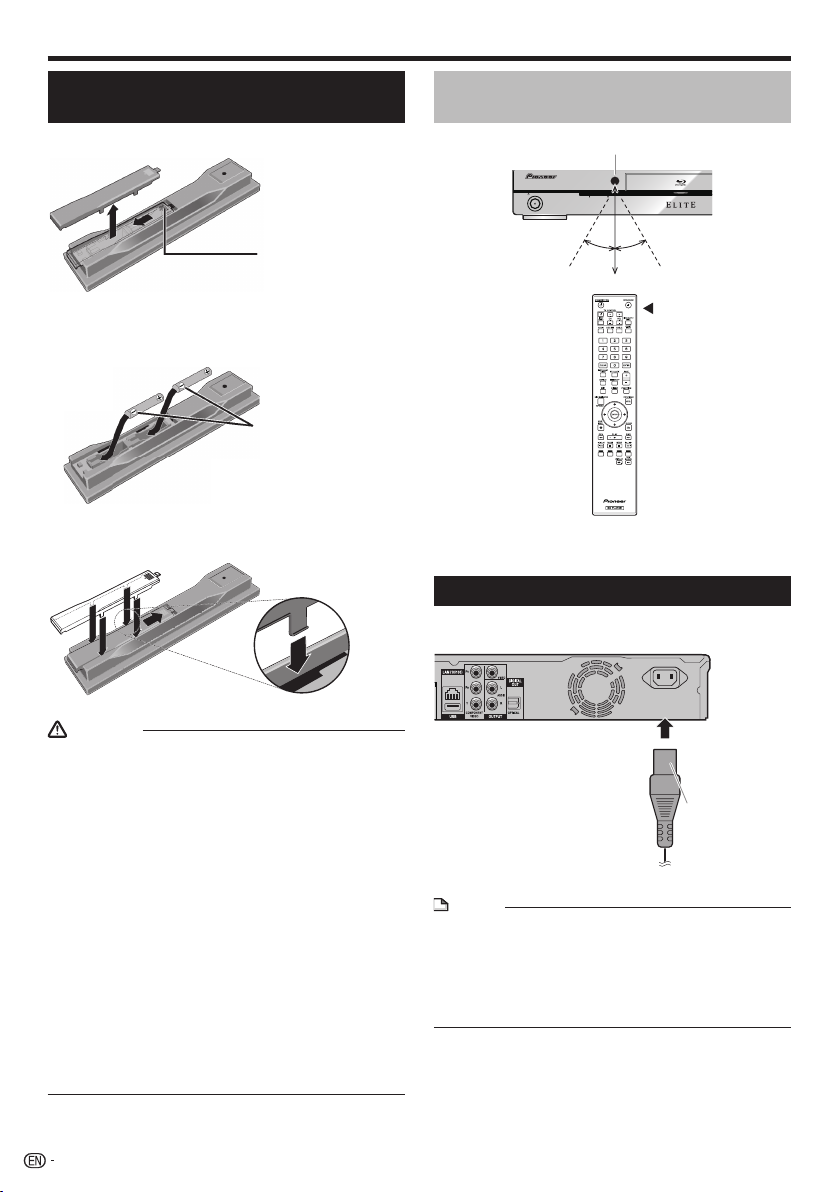
Open the rear cover.
1
Press lightly on this
part and slide into the
direction of the arrow.
2
Insert the batteries (AA/R6 x 2).
Insert as indicated by the / marks into the
battery compartment.
Insert the negative ()
side first.
Close the rear cover.
3
Close securely (a click should be heard).
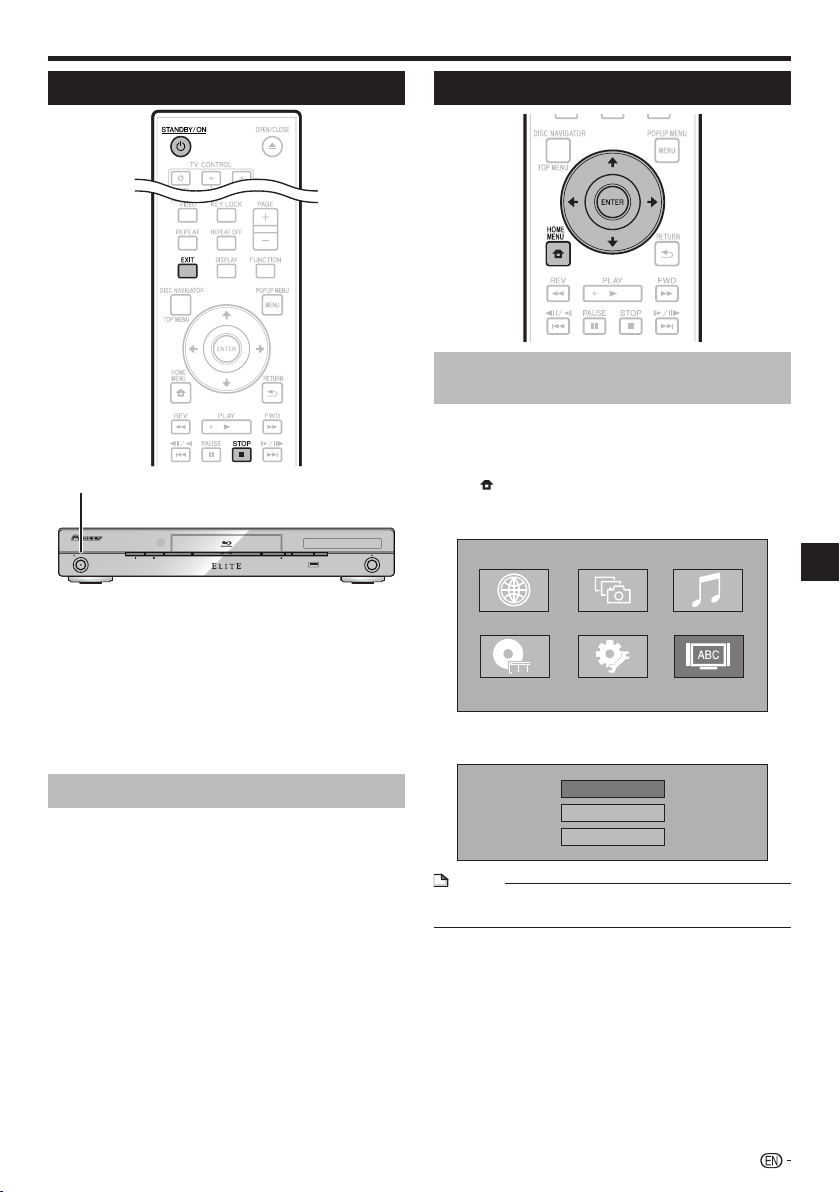
Approximate operating range of
remote control
Remote control sensor
STANDBY/ON
30º 30º
PQLS
23 ft
Remote control unit
Connecting the Power Cord
Only connect the power cord once all equipment
connections are completed.
AC IN
CAUTION
Do not use any batteries other than the ones specified.
•
Also, do not use a new battery together with an old one.
When loading the batteries into the remote control, set
•
them in the proper direction, as indicated by the polarity
marks ( and ).
Do not heat batteries, disassemble them, or throw them
•
into flames or water.
Batteries may have different voltages, even if they look
•
similar. Do not use different kinds of batteries together.
To prevent leakage of battery fluid, remove the batteries
•
if you do not plan to use the remote control for a long
period of time (1 month or more). If the fluid should leak,
wipe it carefully off the inside of the case, then insert new
batteries. If a battery should leak and the fluid should get
on your skin, flush it off with large quantities of water.
When disposing of used batteries, please comply
•
with governmental regulations or environmental public
institution’s rules that apply in your country/area.
Do not use or store batteries in direct sunlight or other
•
excessively hot place, such as inside a car or near a heater.
This can cause batteries to leak, overheat, explode or
catch fire. It can also reduce the life or performance of
batteries.
22
USB
BDP-33FD
To AC IN terminal
To AC outlet
NOTE
Place the Player close to the AC outlet, and keep the
•
power plug within reach.
TO PREVENT RISK OF ELECTRIC SHOCK, DO NOT
•
TOUCH THE UN-INSULATED PARTS OF ANY CABLES
WHILE THE AC CORD IS CONNECTED.
If you are not going to use this Player for a long period of
•
time, be sure to remove the AC cord from the AC outlet.
Page 23
Before Starting Playback
Turning the Power On
STANDBY/ON
STANDBY/ON
PQLS
FL OFFHDMI OPEN/CLOSE
USB
Press STANDBY/ON.
•
Operate using the buttons on either the remote control or
main unit.
•
“POWER ON” appears on the front panel display.
•
When the power is turned on with no disc loaded, the
Pioneer logo screen (wallpaper) is displayed.
•
When the power is turned on with the disc loaded, a menu
screen may be displayed automatically, depending on the
disc.
When STOP or EXIT is pressed, the disc’s menu screen
turns off and the wallpaper is displayed.
Turning the power off
Press STANDBY/ON again.
Operate using the buttons on either the remote control or
•
main unit.
“POWER OFF” appears on the front panel display.
•
If you press STANDBY/ON again immediately after
•
entering standby, the Player may not turn on. If this
happens, wait for 10 seconds or more and then turn on the
STANDBY/ON again.
Language Setting
Changing the on-screen display
language
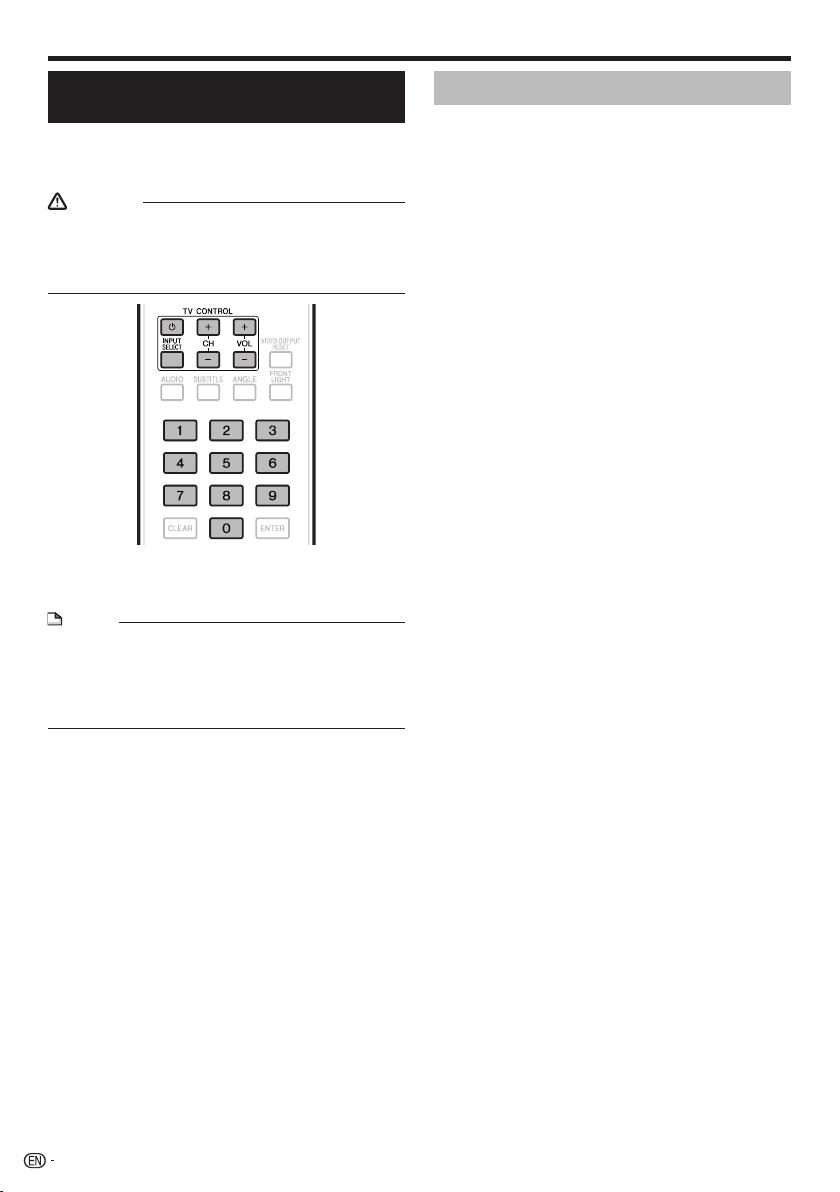
Press the HOME MENU to display the HOME
1
MENU.
When the wallpaper is displayed, the HOME MENU
•
can also be displayed by selecting the menu icon
( ) with then pressing ENTER.
Press to select “On Screen
2
Language”, then press ENTER.
Web Content Photos
Disc Navigator
Press to select the language you want to
3
display on the screen, then press ENTER.
English
Español
Français
NOTE
To select the DVD disc language, such as subtitle
•
language, etc., see page 29.
Music
On Screen LanguageSettings
Playback
23
Page 24
Before Starting Playback
Operating the TV with the Player’s
Remote Control
When the manufacturer code for your brand of TV
is set on the player’s remote control, the TV can be
operated using the player’s remote control.
CAUTION
For some models it may not be possible to operate the TV
•
with the player’s remote control, even for TVs of brands
listed on the manufacturer code list.
The setting may be restored to the default after the
•
batteries are replaced. If this happens, reset it.
Input the 2-digit manufacturer code.
1
Press the number buttons (0 to 9) to input the code
•
while pressing TV CONTROL .
NOTE
The factory setting is 00 (PIONEER).
•
If you make a mistake when inputting the code, release TV
•
CONTROL then start over from the beginning.
When there are multiple codes for a manufacturer, try
•
inputting them in the indicated order until the TV can be
operated.
Check that the TV can be operated.
2
Operate the TV using TV CONTROL.
•
– Press to turn the TV’s power on and off.
INPUT SELECT – Press to switch the TV’s input.
CH +/– – Press to select the TV channel.
VOL +/– – Press to adjust the volume.
Table of Manufacturer Codes
Manufacturer Code(s)
PIONEER 00, 31, 32, 07, 36, 42,
51
ACURA 44
ADMIRAL 31
AIWA 60
AKAI 32, 35, 42
AKURA 41
ALBA 07, 39, 41, 44
AMSTRAD 42, 44, 47
ANITECH 44
ASA 45
ASUKA 41
AUDIOGONIC 07, 36
BASIC LINE 41, 44
BAUR 31, 07, 42
BEKO 38
CONTEC 44
CROSLEY 32
CROWN 38, 44
CRYSTAL 42
CYBERTRON 41
DAEWOO 07, 44, 56
DAINICHI 41
DANSAI 07
DAYTON 44
DECCA 07, 48
DIXI 07, 44
DUMONT 53
ELIN 07
ELITE 41
ELTA 44
EMERSON 42
ERRES 07
FERGUSON 07, 36, 51
FINLANDIA 35, 43, 54
FINLUX 32, 07, 45, 48, 53, 54
FIRSTLINE 40, 44
FISHER 32, 35, 38, 45
FORMENTI 32, 07, 42
FRONTECH 31, 42, 46
FRONTECH/PROTECH 32
FUJITSU 48
FUNAI 40, 46, 58
GBC 32, 42
GE 00, 01, 08, 07, 10, 11, 17,
02, 28, 18
GEC 07, 34, 48
GELOSO 32, 44
GENERAL 29
GENEXXA 31, 41
GOLDSTAR 10, 23, 21, 02, 07,
50
GOODMANS 07, 39, 47, 48, 56
GORENJE 38
GPM 41
GRAETZ 31, 42
GRANADA 07, 35, 42, 43, 48
GRADIENTE 30, 57
GRANDIN 18
GRUNDIG 31, 53
TIC
HANSEA
HCM 18, 44
HINARI 07, 41, 44
HISAWA 18
HITACHI 31, 33, 34, 36, 42, 43,
54, 06, 10, 24, 25, 18
HUANYU 56
HYPSON 07, 18, 46
ICE 46, 47
IMPERIAL 38, 42
INDIANA 07
INGELEN 31
INTERFUNK 31, 32, 07, 42
INTERVISION 46, 49
07, 42
BEON 07
BLAUPUNKT 31
BLUE SKY 41
BLUE STAR 18
BPL 18
BRANDT 36
BTC 41
BUSH 07, 41, 42, 44, 47, 56
CASCADE 44
CATHAY 07
CENTURION 07
CGB 42
CIMLINE 44
CLARIVOX 07
CLATRONIC 38
CONDOR 38
MARK 07
MATSUI 07, 39, 40, 42, 44, 47,
48
MCMICHAEL 34
MEDIATOR 07
MEMOREX 44
METZ 31
MINERVA 31, 53
MITSUBISHI 09, 10, 02, 21, 31
MULTITECH 44, 49
NEC 59
NECKERMANN 31, 07
NEI 07, 42
NIKKAI 05, 07, 41, 46, 48
NOBLIKO 49
NOKIA 32, 42, 52
NORDMENDE 32, 36, 51, 52
OCEANIC 31, 32, 42
ORION 32, 07, 39, 40
OSAKI 41, 46, 48
OSO 41
OSUME 48
OTTO VERSAND 31, 32, 07, 42
ALLADIUM
P
PANAMA 46
PANASONIC 31, 07, 08, 42, 22
PATHO CINEMA 42
PAUSA 44
PHILCO 32, 42
PHILIPS 31, 07, 34, 56, 68
PHOENIX 32
PHONOLA 07
PROFEX 42, 44
PROTECH 07, 42, 44, 46, 49
QUELLE 31, 32, 07, 42, 45, 53
R-LINE 07
RADIOLA 07
RADIOSHACK 10, 23, 21, 02
RBM 53
RCA 01, 10, 15, 16, 17, 18, 61,
62, 09
REDIFFUSION 32, 42
REX 31, 46
ROADSTAR 41, 44, 46
SABA 31, 36, 42, 51
SAISHO 39, 44, 46
SALORA 31, 32, 42, 43
SAMBERS 49
SAMSUNG 07, 38, 44, 46, 69, 70
SANYO 35, 45, 48, 21, 14, 91
SBR 07, 34
SCHAUB LORENZ 42
SCHNEIDER 07, 41, 47
SEG 42, 46
SEI 32, 40, 49
SELECO 31, 42
SHARP 02, 19, 27, 67, 90
SIAREM 32, 49
38
24
Page 25
Before Starting Playback
ISUKAI 41
ITC 42
ITT 31, 32, 42
JEC 05
JVC 13, 23
KAISUI 18, 41, 44
KAPSCH 31
KENDO 42
KENNEDY 32, 42
KORPEL 07
KOYODA 44
LEYCO 07, 40, 46, 48
LIESENK&TTER 07
LOEWE 07
LUXOR 32, 42, 43
M-ELECTRONIC 31, 44, 45, 54,
56, 07, 36, 51
MAGNADYNE 32, 49
MAGNAFON 49
MAGNAVOX 07, 10, 03, 12, 29
MANESTH 39, 46
MARANTZ 07
SIEMENS 31
SINUDYNE 32, 39, 40, 49
SKANTIC 43
SOLAVOX 31
SONOKO 07, 44
SONOLOR 31, 35
SONTEC 07
SONY 04
SOUNDWAVE 07
STANDARD 41, 44
STERN 31
SUSUMU 41
SYSLINE 07
TANDY 31, 41, 48
TASHIKO 34
TATUNG 07, 48
TEC 42
TELEAVIA 36
TELEFUNKEN 36, 37, 52
TELETECH 44
TENSAI 40, 41
THOMSON 36, 51, 52, 63
THORN 31, 07, 42, 45, 48
TOMASHI 18
TOSHIBA 05, 02, 26, 21, 53
TOWADA 42
ULTRAVOX 32, 42, 49
UNIDEN 92
UNIVERSUM 31, 07, 38, 42, 45,
46, 54
VESTEL 07
VICTOR 13
VOXSON 31
AL
THAM 43
W
WATSON 07
WATT RADIO 32, 42, 49
WHITE WESTINGHOUSE 07
YOKO 07, 42, 46
ZENITH 03, 20
Turning Off the Front Panel Display
and Indications
If you feel that the indicators on the Player are too bright
when watching movies, you can turn them off except for the
FL OFF indicator.
Operate using the remote control
unit
Press FRONT LIGHT.
The front panel display and indicators turn on and off each
time this is pressed. When off, only the FL OFF indicator is lit.
Playback
HOME MENU operation
Press HOME MENU to display the HOME
1
MENU screen.
Press to select “Settings”, then
2
press ENTER.
Press to select “Front Panel Display/LED”,
3
then press ENTER.
Audio Video Settings
Quick Start
Auto Power Off
Control
Playback Setting
Communication Setup
Front Panel Display/LED
Version
USB Memory Management
Software Update
System Reset
Press to select “On” or “Off”, then press
4
ENTER.
Press HOME MENU or EXIT to exit.
5
25
Page 26
Before Starting Playback
About Control Function with HDMI
The functions work when a control function with HDMIcompatible Pioneer Flat Panel TV or AV system (AV receiver
or amplifier, etc.) is connected to the player using an HDMI
cable.
Also refer to the operating instructions of the Flat Panel TV
and AV system (AV receiver or amplifier, etc.).
To use the control function with
HDMI
The control function with HDMI operates when control
•
function with HDMI is set to On for all devices connected
with HDMI cables.
Once connections and the settings of all the devices
•
are finished, be sure to check that the player’s picture is
output to the Flat Panel TV. (Also check after changing the
connected devices and reconnecting HDMI cables.) The
control function with HDMI may not operate properly if the
player’s picture is not properly output to the Flat Panel TV.
Use High Speed HDMI® Cables when using the control
•
function with HDMI. The control function with HDMI may
not operate properly if other HDMI cables are used.
For some models, the control function with HDMI may be
•
referred to as “KURO LINK” or “HDMI Control”.
The control function with HDMI does not work with devices
•
of other brands, even if connected with an HDMI cable.
What the control function with HDMI
can do
Outputting the optimum picture quality to a Flat
•
Panel TV compatible with the control function with
HDMI.
When the control function with HDMI is enabled, video
signals with the optimum picture quality for control function
with HDMI are output from the player’s HDMI terminal.
The HDMI indicator on the player lights.
Operating the player with the Flat Panel TV’s remote
•
control.
Such player operations as starting and stopping playback
and displaying the menus can be performed from the Flat
Panel TV.
The player’s playback picture is displayed on the Flat
•
Panel TV’s screen. (Auto-select function)
The input switches automatically on the Flat Panel TV and
AV system (AV receiver or amplifier, etc.) when playback
is started on the player or the HOME MENU or Disc
Navigator is displayed. When the input is switched, the
playback picture, the HOME MENU or Disc Navigator
appears on the Flat Panel TV.
The power of the Flat Panel TV and the player turns
•
on and off automatically.
(Simultaneous power function)
When playback on the player is started or the HOME
MENU or Disc Navigator is displayed, if the Flat Panel
TV’s power was off, its power turns on automatically.
When the Flat Panel TV’s power is turned off, the player’s
power automatically turns off. (The power does not turn off
automatically if a disc or file is playing on the player or the
player’s operation screen is displayed on the Flat Panel TV.)
26
HDMI indicator
PQLS
FL OFFHDMI OPEN/CLOSE
USB
•
The player’s on-screen display language switches
automatically. (Unified language function)
When the language information from a connected Flat
Panel TV is received, you can have the player’s on-screen
display language change automatically to that of the Flat
Panel TV. This function is available only when playback is
stopped and the menu screen is not displayed.
About the PQLS function
PQLS (Precision Quartz Lock System) is a digital audio
transfer control technology using the HDMI control function.
The player’s output signals are controlled from the AV
amplifier to achieve high sound quality playback using the
amplifier’s quartz oscillator. This eliminates the influence of
the jitter generated during signal transfer which can adversely
affect the sound quality.
This player supports the functions below.
•
The “PQLS 2ch Audio” function that is only activated
−
when playing music CDs (CD-DAs)
The “PQLS Multi Surround” function that is activated
−
when playing all discs (BDs, DVDs, etc.) with linear PCM
audio output
The “PQLS Bitstream” function that is activated when
−
playing with bitstream audio output
The various PQLS functions are activated when a Pioneer
•
AV amplifier supporting the PQLS functions is connected
directly to the “HDMI OUT” terminal with an HDMI cable and
the main unit settings are set as shown below (page 46).
Control function with HDMI: On
HDMI audio output: PCM (PQLS multi-surround only)
Also refer to the AV amplifier’s operating instructions.
•
See the Pioneer website for AV amplifiers supporting the
•
PQLS function.
CAUTION
The PQLS function may stop working when the video
•
output resolution is switched. The PQLS function will start
working again once playback is stopped then restarted.
When the PQLS 2ch function is activated, the output from
•
the player’s VIDEO OUTPUT jacks may not have the proper
colors. If this happens, connect the TV and AV amplifier’s
HDMI terminals or the TV and player’s COMPONENT
VIDEO OUTPUT jacks to view the picture.
NOTE
The PQLS indicator on the player’s front panel lights when
•
the PQLS function is activated (page 13).
Page 27
Before Starting Playback
RSS Reader Function
With the RSS function, text information (news, etc.)
is acquired from the Internet and scrolled on the
display. To use this function, you must make network
connections (page 21) and communications settings
(pages 48 to 50) then make the settings below.
NOTE
The displayed information is updated periodically, but in
•
some cases the updating interval may not be regular.
Depending on the player’s status, it may not be possible to
•
display text information.
Text information is not displayed when a disc is playing or a
•
menu screen is displayed.
Text information may not be displayed when a disc is
•
loading.
Pioneer accepts no responsibility whatsoever for the text
•
information that is displayed.
See “Disclaimer for Third Party Content” on page 63
•
regarding the contents that are displayed.
Displaying text information
Press HOME MENU to display the HOME
1
MENU.
Press to select “Web Content”, then
2
press ENTER.
Press to select “RSS”, then press
3
ENTER.
Press to select “On”, then press ENTER.
4
If “Off” is selected, the text information is not
•
displayed.
Press to select the desired channel.
5
The text information for the selected channel (news,
etc.) scrolls from right to left on the display.
NOTE
To change the channel whose text information is displayed,
•
when the wallpaper is displayed, press to select the
RSS icon, then press to select the desired channel.
To turn the text display off, stop playback of the disc or
•
USB memory device, then perform the above procedure
from step 1.
Playback
27
Page 28
Playback
This section explains playback of commercially
available BD-/DVD-Video discs (movies, etc.), CDs,
and video or audio recorded on BD-RE/-R and DVDRW/-R discs as well as USB memory devices.
Loading a Disc
PQLS
OPEN/CLOSE
FL OFFHDMI OPEN/CLOSE
USB
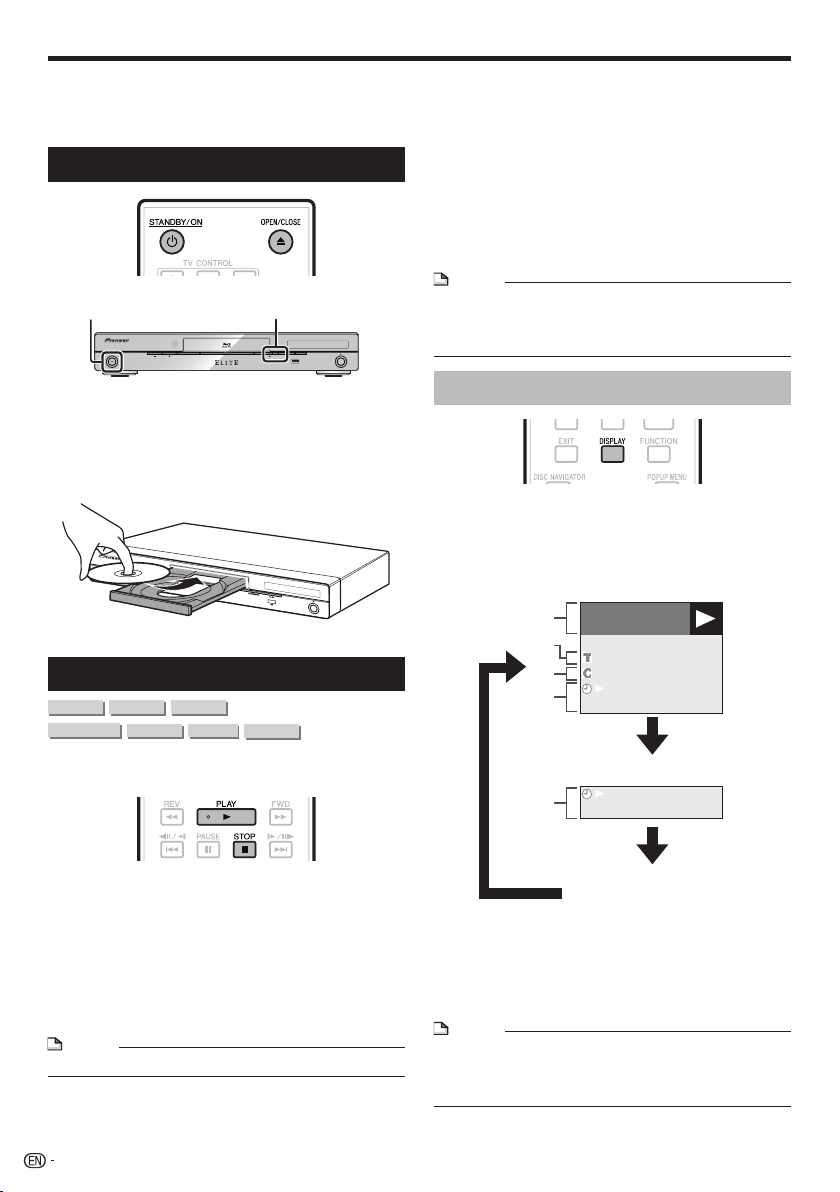
STANDBY/ON
STANDBY/ON
Press STANDBY/ON to turn on the power.
1
Press OPEN/CLOSE to open the disc tray.
2
Load a disc on the disc tray.
3
Insert the disc with the label face up.
•
In case of disc recorded on both sides, face down the
•
side to play back.
Press OPEN/CLOSE to close the disc tray.
4
BD/DVD Video Playback
DVD VIDEO
DVD VIDEO
BD-RE
BD-RE
DVD-RW
BD-RBD VIDEO
BD-RBD VIDEO
DVD-R
AVCHD
To stop playback
Press STOP.
Resume playback function
•
When PLAY is pressed during playback, the position at
which playback stopped is stored in the memory. When
PLAY is pressed, playback resumes from the point at
which it stopped.
•
To playback from the beginning, cancel resume mode by
pressing STOP, then press PLAY. (This may not work
depending on the type of disc. In this case, open the disc
tray or enter standby.)
NOTE
Resume playback may not function with some discs (for
•
example BD-Video discs including BD-J applications (page
60)). To find out whether or not the disc includes BD-J
applications, contact the disc’s manufacturer.
Displaying the disc information
Press DISPLAY during playback.
Each time you press DISPLAY, the display switches
•
as follows.
Disc Information Screen A
BD-VIDEO
1/1
10/1 1
00 :00 :12
03/ : 12:28
This player supports DVD upscaling during DVD
playback.
Load a disc.
1
Playback may begin automatically, depending on the
•
disc.
Playback begins from the first title.
•
The menu may be displayed first, depending on the
•
disc. Perform playback operation by following the
directions on the screen.
Press PLAY if playback does not begin
2
automatically or playback is stopped.
NOTE
The disc load time may vary depending on the disc.•
28
Disc Information Screen B
00 :00 :12
03/ : 12:28
No Display
Type of disc
Title number being played/Total number of Titles
Chapter number being played/Total number of
Chapters
Elapsed playback time/Total playback time for the
Title
NOTE
Disc Information Screen A disappears after about 1 minute
•
elapses without performing any operations.
For some commercially-released BD VIDEO discs, the total
•
playback time display for the Chapter/Title may not appear.
Page 29
Playback
Playing BD-/DVD-Video Discs from
the Menu
This section explains how to play back a BD/DVD
•
video disc with a top menu, disc menu or pop-up
menu.
The menu names, content and operations differ from
•
disc to disc. Operate as instructed on the disc’s
instructions or menu.
The titles listed in the top menu and a disc guide (for
•
options like subtitles and audio languages) are given
in the disc menu.
DISC NAVIGATOR/TOP MENU and POPUP
•
MENU/MENU will not function if there is no menu
on the disc.
Using the top menu
BD VIDEO
1
2
DVD VIDEO
Press DISC NAVIGATOR/TOP MENU.
TOP MENU
1
Jazz
3
Classic
Press to select the title, then press
ENTER.
The selected title is played back.
•
2
4
Latin
Rock
Using the disc menu
DVD VIDEO
Example: Select “SUBTITLE LANGUAGE”.
Press DISC NAVIGATOR/TOP MENU.
1
Press to select “SUBTITLE LANGUAGE”,
2
then press ENTER.
The screen for selecting the subtitle language is
•
displayed.
MENU
1 AUDIO LANGUAGE
2 SUBTITLE LANGUAGE
3 AUDIO
Press to select the subtitle language, then
3
press ENTER.
Press DISC NAVIGATOR/TOP MENU to exit.
4
Using the pop-up menu
BD VIDEO
Press POPUP MENU/MENU during playback.
1
Pop-up menu
Previous page
Next page
Press to select the desired item,
2
then press ENTER.
Press POPUP MENU/MENU to exit.
3
The pop-up menu will automatically disappear for
•
some discs.
Playback
29
Page 30
Playback
Enjoying BONUSVIEW or BD-LIVE
BD VIDEO
This Player is compatible with BD-Video BONUSVIEW
and BD-LIVE.
When using BD-Video discs compatible with
BONUSVIEW, you can enjoy such functions as
secondary video (picture in picture) and secondary
audio. With BD-Video discs supporting BD-LIVE,
special video images and other data can be
downloaded from the Internet.
Data recorded on BD video and downloaded from BDLIVE is stored on the USB memory device (external
memory). To enjoy these functions, connect a USB
memory device (minimum 1 GB capacity (2 GB or
more recommended)) supporting USB 2.0 High Speed
(480 Mbit/s) to the USB port (page 21) on this player.
To recall data stored in the USB memory device, first insert
•
the disc media that was being used at the time the data
was downloaded (if a different disc is loaded, the data
stored on the USB memory device cannot be played).
If a USB memory device containing other data (previously
•
recorded) is used, the video and audio may not play back
properly.
If the USB memory device is disconnected from this player
•
during playback, playback of the disc will stop. Do not
disconnect the USB memory device while playback is in
progress.
Some time may be required for the data to load (read/
•
write).
CAUTION
It may not be possible to use the BONUSVIEW and
•
BD-LIVE functions if there is insufficient space on the
USB memory device. In this case, refer to “USB Memory
Management” on page 51 for erasing the Virtual Package
data and the BD-LIVE data in the USB memory device.
Secondary video playback
BD-Video that includes secondary audio and video
compatible with Picture in Picture can be played back
with secondary audio and video simultaneously as a
small video in the corner.
Press SECONDARY VIDEO during playback to
1
show the 2-picture screen.
Primary
audio/video
2
To remove the secondary video, press
SECONDARY VIDEO again.
NOTE
To listen to secondary audio, make sure that “Secondary
•
Audio” is set to “On”. (See page 45.)
The secondary audio and video for Picture In Picture may
•
automatically play back and be removed depending on the
content. Also, playable areas may be restricted.
Secondary
audio/video
NOTE
Operation of USB memory devices is not guaranteed.
•
Playback of BD-LIVE function data differs depending on
•
the disc used. For details, consult the user instructions
supplied with the disc.
To enjoy the BD-LIVE function, a network connection and
•
settings are required (pages 21 and 48).
For conditions and restrictions regarding Internet
•
connections using the BD-LIVE function, see the section
“BD Internet Access” (page 47).
BD-LIVE is a function that provides for automatic
•
connection to the Internet. Discs supporting the BD-LIVE
function may send ID codes identifying this player and the
disc to the contents provider via the Internet.
The unit can be set to prevent automatic connection to the
•
Internet. For instructions on this setting, see the section
“BD Internet Access” (page 47).
When USB memory devices are connected to both the
•
USB ports on the player’s front and rear panels, the device
that was connected first is used for the BONUSVIEW and
BD-LIVE functions, while the device that was connected
last is used for file playback and software updating.
30
Page 31

Playback
BD-RE/-R, DVD-RW/-R Playback
BD-RE BD-R
DVD-RW
You can play back a recorded disc.
NOTE
“Finalize” refers to a recorder processing a recorded disc
•
so that it will play in other DVD players/recorders as well as
this player. Only finalized DVD-RW/-R discs will play back in
this player. (This player does not have a function to finalize
discs.)
DVD-R
Playback by selecting a title
NOTE
The Disc Navigator screen also can be displayed by
•
pressing DISC NAVIGATOR/TOP MENU when playback
is stopped or by pressing ENTER after choosing “Disc
Navigator” in HOME MENU when playback is stopped.
Switching the disc navigator display
The Disc Navigator can be displayed in two types,
•
Thumbnail and Title Name.
Each time you press RED, the screen changes between
•
Thumbnail and Title Name.
Thumbnail
5/21 Thu 9:30 AM 110 Min.
Program
Program
A
Title Name
Program 1
1
4
Program
2
Program
5
B C D
By Chapter
Program
3
Program
6
Playlist Functions
Title Name
Program 1
5/21 Thu 9:30 AM
110 Min.
1 Program1 5/ 2 Thu 110 Min.
2 Program2 6/15 Mon 110 Min.
3 Program3 7/ 3 Fri 56 Min.
4 Program4 9/18 Fri 40 Min.
Playback
Load a recorded disc.
1
The Disc Navigator screen is displayed.
•
Program
1
Program
4
•
When loading a BD disc with usage restrictions placed
by a BD recorder, the password input screen appears.
Then, input your password.
If you input a wrong password three times, the disc
tray will open. Close the disc tray, and then input a
correct password.
•
If the Disc Navigator screen is not displayed, press
DISC NAVIGATOR/TOP MENU.
Press to select the desired title, then
2
press ENTER.
When seven or more titles are displayed, switch pages
•
by pressing PAGE +/–. The same operation can be
performed by pressing or.
Playback of the selected title will begin.
•
You can playback by pressing PLAY instead of
pressing ENTER.
Press STOP to stop playback.
3
Program
2
Program
5
Program
3
Program
6
A B C D
Thumbnail
Information of selected title
Title Name
Recording Date
Recording Duration
Caption for RED, GREEN, BLUE, YELLOW
When seven or more titles are displayed, switch pages
•
by pressing PAGE +/–. The same operation can be
performed by pressing or.
NOTE
The recording date is the date stored for the recorded title,
•
and depending on the device used for recording may differ
from the actual date the recording (copy) was made.
Sorting Playlist Functions
31
Page 32

Playback
Playback by selecting a chapter
Press GREEN while the Thumbnail screen is
1
displayed.
The chapter screen is displayed.
•
Chapter
CHAPTER
1
Chapter
4
•
When seven or more chapters are displayed, switch
pages by pressing PAGE +/–. The same operation
can be performed by pressing or
.
•
To return to the Thumbnail screen, press GREEN.
Press to select the desired chapter,
2
then press ENTER.
Playback of the selected chapter will begin.
•
You can playback by pressing PLAY instead of
pressing ENTER.
Press STOP to stop playback.
3
Chapter
CHAPTER CHAPTER
2
Chapter
5
Chapter
3
Chapter
CHAPTERCHAPTERCHAPTER
6
Sorting the titles
Each time you press GREEN, while the Title Name
screen is displayed, the Title Name display changes
between displaying the newest title first and the oldest
title first.
Playback by selecting a Playlist
Press BLUE while the Thumbnail screen is
1
displayed.
The Playlist screen is displayed.
•
5/21 Thu 9:30 AM
Program 1
110 Min.
1 Program1 5/ 2 Thu 110 Min.
2 Program2 6/15 Mon 110 Min.
Playing back the title you stopped
while being played
Press YELLOW while the Disc Navigator screen
1
is displayed.
Playback
Select “From Beginning” or “From Continued”
2
using , then press ENTER.
Playback of the title will begin.
•
Press STOP to stop playback.
3
Playback this title.
From Beginning
From Continued
C D
Original Functions
Press to select the title, then press
2
ENTER.
Playback of the selected title will begin.
•
Press STOP to stop playback.
3
32
Page 33

Playback
Audio CD Playback
AUDIO CD
Playback from the beginning
Load an audio CD.
1
The CD screen is displayed.
•
(The CD screen is displayed only when a compact
disc recorded in the CD-DA format is inserted.)
Playback may begin automatically, depending on the
•
disc.
n
o
s
c
n
u
F
t
T
0
c
1
k
a
r
0
0
0
:
1
T
0
5
c
1
1
k
a
r
2
c
a
T
r
3
a
T
c
r
4
a
T
c
r
5
a
T
c
r
6
a
T
c
r
Select Enter
Press PLAY if playback does not begin
2
6
:
0
5
2
1
k
0
:
0
5
3
2
k
3
:
0
5
4
0
k
3
:
0
4
5
4
k
4
:
0
5
6
0
k
8
:
automatically or playback is stopped.
Press STOP to stop playback.
3
Resume playback function
When PLAY is pressed during playback, the position at
•
which playback stopped is stored in the memory. When
PLAY is pressed, playback resumes from the point at
which it stopped.
To playback from the beginning, cancel resume mode by
•
pressing STOP, then press PLAY. (This may not work
depending on the type of disc. In this case, open the disc
tray or enter standby.)
NOTE
Resume playback may not function depending on the disc.•
i
1
2
1
/
0
0
1
0
0
1
:
:
+
R
L
3
5
1
6
:
O
f
f
1
2
1
/
D
Functions
Playback by selecting a track
Press to select the track, then press
1
ENTER during playback or when playback is
stopped.
Playback of the selected track will begin.
•
When seven or more tracks are displayed, switch
•
pages by pressing PAGE +/–.
n
c
n
o
u
F
s
t
T
a
0
c
3
k
r
0
0
0
:
1
T
a
0
5
c
1
k
r
2
T
0
5
c
2
k
a
r
0
3
T
r
4
T
r
5
T
r
6
T
r
Select Enter
Press STOP to stop playback.
2
5
c
3
k
a
0
5
4
k
a
c
0
4
c
5
k
a
a
0
5
c
6
k
1
6
:
1
0
:
2
3
:
0
3
:
4
4
:
0
8
:
i
3
2
1
/
0
0
0
:
3
5
2
3
:
O
f
f
D
Functions
Operation procedure for the
“Functions” menu
1
Press YELLOW (Functions) when the CD
screen is displayed.
The “Functions” menu is activated.
•
n
c
n
o
u
F
s
t
0
c
3
k
a
T
r
0
0
0
:
1
a
T
0
5
c
1
1
k
r
2
T
c
k
a
r
3
a
T
c
k
r
4
T
c
k
a
r
5
a
T
c
k
r
6
c
k
a
T
r
Press to select the desired setting, then
2
press ENTER.
When playback is stopped, only “Track” can be
•
selected.
For a description of each setting, see “Functions
•
which can be set” (Page 43).
Press to set, then press ENTER.
3
Operations vary depending on the setting. Follow the
•
operation instructions on the screen.
Press RETURN or YELLOW to exit the
4
6
:
0
5
2
1
0
:
0
5
3
2
3
:
5
4
0
3
0
:
0
4
5
4
4
:
0
5
6
0
8
:
“Functions” menu.
NOTE
The displayed items vary depending on the disc.•
i
3
2
1
/
0
0
0
:
3
5
2
3
:
O
f
f
ReturnSelect Enter
D
Track select
0
1
1
:
+
R
L
3
2
1
/
Playback
0
1
1
:
+
R
L
2
1
3
/
33
Page 34

Playback
Playing Audio Files
CD-R
DVD-RW
•
•
•
1
DVD-R
NOTE
Do not disconnect the USB memory device while it is
playing.
For details on the audio signals that can be played, see
“Types of Discs that Can Be Used with This Player” (page
7).
When USB memory devices are connected to both the
USB ports on the player’s front and rear panels, only the
sound recorded on the device that was connected last is
played.
Load the disc or USB memory device on which
the audio is recorded, then press HOME MENU
to display the HOME MENU.
Press to select “Music” then press
2
ENTER.
Press to select “DVD/CD” or “USB”, then
3
press ENTER.
Select the file or folder.
4
Use to select the file.
•
Use to select the folder, then press ENTER. The
•
files in the folder are displayed.
Press ENTER to start playing the file.
5
When PAUSE is pressed during playback, playback
•
pauses. When PAUSE is pressed again or PLAY
is pressed, playback resumes.
Music03.mp3
0
0
0
:
Music01.mp3
1
2
Music02.mp3
Music03.mp3
3
Music04.mp3
4
5
Music05.mp3
Music06.mp3
6
SelectEnter
CD-RW
3
2
5
:
Functions
1
3
/
0
0
3
6
1
5
:
0
1
5
:
3
2
5
:
3
0
5
:
4
4
4
:
8
0
5
:
USB
2
1
1
0
0
:
:
+
R
L
1
2
3
/
Selecting and playing a different
file during playback
Press to select the file.
1
Press ENTER to start playing the file.
2
The selected file is played.
•
Cueing during playback
Press
When is pressed, playback moves to
•
the beginning of the file.
When is pressed, playback moves to
•
the end of the file.
NOTE
Fast-forwarding and reversing are not possible.
•
The repeat function cannot be used.
•
The function control cannot be used during playback
•
(page 42).
or
.
Press STOPto stop playback.
6
34
Page 35

Playback
Playing JPEG files
CD-R
DVD-RW
•
•
•
•
1
DVD-R
NOTE
Do not disconnect the USB memory device while it is
playing.
For details on the image files that can be played, see
“About playing image files” (page 11).
During “Normal play”, still images are played one by one
while during “Slide show”, they are automatically replaced
one after another.
When USB memory devices are connected to both the
USB ports on the player’s front and rear panels, only the
image files recorded on the device that was connected last
are played.
Load the disc or USB memory device on which
the image files are recorded, then press HOME
MENU to display the HOME MENU.
Press to select “Photo”, then press
2
ENTER.
Press to select “DVD/CD” or “USB”, then
3
press ENTER.
Select the file or folder.
4
Use to select the file.
•
Use to select the folder, then press ENTER. The
•
files in the folder are displayed.
CD-RW
USB
Use to select the folder whose still
5
images are to be played, then press ENTER.
8/15
6
Press or to replace one
image with another.
The same operation can be performed by pressing
•
or REV/ FWD.
Press RETURN if you wish to return to the folder
•
selection screen.
To stop the still image playback at any time,
7
press STOP.
Playing back Slide Show
Load the disc or USB memory device on which
1
the image files are recorded, then press HOME
MENU to display the HOME MENU.
Press to select “Photo”, then press
2
ENTER.
Press to select “DVD/CD” or “USB”, then
3
press ENTER.
Press to select the folder, then press
4
PLAY to play.
A slide show of the images in the selected folder is
•
played.
Press PAUSE to pause the slide show. Press
•
PLAY to resume playback from where it stopped.
Press STOP to stop the play at any time.
5
Press RETURN to play a slide show of still images
•
in another folder.
Playback
35
Page 36

Playback
Setting slide show speed/repeat
playback
Press YELLOW (Slide Show Menu) during the
1
folder selection screen.
The setting screen for “Slide Show Speed”/“Repeat
•
Mode Setting” appears.
Press to select “Slide Show Speed”, then
2
press ENTER.
Slide Show Speed
Repeat Mode Setting
Normal
The slide show speed may be selected from “Fast”,
•
“Normal”, “Slow1” and “Slow2”.
Press to select the desired speed, then
3
press ENTER.
Press to select “Repeat Mode Setting”,
4
then press ENTER.
Slide Show Speed
Repeat Mode Setting
Yes
No
Press to select the desired item, then
5
press ENTER.
Press EXIT to exit.
6
Playing YouTube Videos
With this player, you can connect to the Internet and play
YouTube videos (MPEG4 AVC H.264).
NOTE
YouTube videos of the following sizes can be played.
•
Standard quality (400 x 226 pixels, 200 kbps)
−
Medium quality (480 x 360 pixels, 512 kbps)
−
High quality (854 x 480 pixels, 900 kbps)
−
HD (720p) (1280 x 720 pixels, 2 Mbps)
−
HD (1080p) (1920 x 1080 pixels, 4 Mbps)
−
YouTube videos for mobile phones cannot be played.
•
Some YouTube videos cannot be played.
•
Depending on the Internet connection environment, it may
•
not be possible to play YouTube videos properly.
See “Disclaimer for Third Party Content” on page 63
•
regarding the contents that are played.
Display the selection screen.
1
When the wallpaper is displayed, use to
select the YouTube icon, then press ENTER.
The selection screen can also be selected by pressing
•
HOME MENU then selecting “Home Menu” “Web
Contents” “YouTube”.
Press to select the YouTube video,
2
then press ENTER to play.
Press EXIT to stop playback of the YouTube
3
video.
36
Page 37

Playback
Playing Netflix Streaming Content
Please check that the most current software is
loaded on this player by selecting auto update on
the player menu screen (See page 52) or by visiting
http://www.pioneerblu-ray.com to check for a
download of the newest software version.
This function allows you to enjoy Netflix service through the
Internet. Netflix is an online DVD and Blu-ray Disc rental
service, offering rental-by mail and online streaming to
customers.
To enjoy this function, make a broadband internet
•
connection to both your PC and this player (See page 21),
and then set communication settings (See page 48), then
perform the following operation.
NOTE
Netflix service is not available when a proxy server is used
•
for an internet connection.
As the registration process takes time, we recommend
•
setting “Auto Power Off” to “No” before starting the
registration. (See page 46.)
Video quality of the Netflix contents (SD or HD) depends
•
on the network speed and original bit rate of the Netflix
contents.
For more information on the Netflix Instant Streaming
•
service visit http://www.netflix.com/help/ or login to your
Netflix account and click “Help” at the top of the page.
The Netflix service cannot be used in any country except
•
for the United States.
Illustrations are examples and may differ from the actual
•
Netflix screens.
See “Disclaimer for Third Party Content” on page 63
•
regarding the contents that are played.
See page 47 to check Netflix ESN.
•
See page 48 to deactivate your Netflix information.
•
Read the Disclaimer displayed on the screen.
4
If you agree, press on the last page to select
“Agree”, then press ENTER. (If you do not
agree, this service cannot be used.)
Obtain the Netflix activation code.
5
If you don’t have a Netflix account
Press to select “no-start my FREE trial”,
then press ENTER.
The screen of this player shown on the TV
Subscribe by visiting http://www.netflix.com/
Pioneer from your PC.
Press to select “I’m now a member”, then
press ENTER.
The screen of this player shown on the TV
Playback
Settings for watching Netflix
content on your TV
Press HOME MENU to display the HOME
1
MENU.
When the Pioneer logo screen is displayed, the Home
•
Menu can also be displayed by selecting the menu
icon, then pressing ENTER.
Press to select “Web Content”, then
2
press PLAY or ENTER.
Press to select “Netflix”, then press
3
PLAY or ENTER.
If you have a Netflix account
Press to select “yes-activate instant streaming
from Netflix”, then press ENTER.
The screen of this player shown on the TV
37
Page 38

Playback
You will see the following window.
6
The activation code is displayed.
•
The screen of this player shown on the TV
Using your PC, visit http://www.netflix.com/
7
activate, and then enter the activation code
displayed in step 6.
The screen of the PC
After a period of time, the player will be activated, and
•
the Empty Instant Queue screen will be displayed on
your TV from the player.
Adding content to the Instant Queue
To add a movie to the Instant Queue list of this
8
player, select the “Add to Instant” button on Netflix
“Watch Instantly” web page using your PC.
After a period of time, the Instant Queue list registered
•
using your PC will appear on your TV screen.
Playing back content in the Instant
Queue on your TV
Press to select the desired movie, then
9
press ENTER.
Once this function is set and the registration is
•
completed, the next time this service is used Instant
Queue list screens such as the following can be
displayed directly by pressing ENTER after selecting
the NETFLIX icon on the Pioneer logo screen.
The screen of this player shown on the TV
The movie you selected is displayed.
10
To return to the step 9, press .
•
Press to select “play”, then press ENTER or
PLAY to start playback.
The screen of this player shown on the TV
The screen of this player shown on the TV
After a period of time, playback of the movie begins.
•
To pause the playback at any time, press
11
PAUSE.
Press PAUSE or PLAY to return to playback.
•
To stop the playback or go to step 10, press
12
or STOP.
Fast Forward/Reverse
The Fast Forward/Reverse function is enabled when
REV or FWD is pressed during playback.
38
Page 39

Playback Functions
BD VIDEO BD-RBD-RE
DVD VIDEO
AUDIO CD
DVD-RW
DVD-R
AVCHD
NOTE
Some operations in the following playback functions
•
cannot be performed depending on the specifications of
the disc.
Fast Forward/Reverse (Search)
Fast Forward/Reverse functions when REV or
FWD is pressed during playback.
Example: When FWD is pressed
The search speed will change each time you press the
•
button.
It is not possible to fast-forward or reverse to adjacent
•
titles. When the beginning or end of the title is reached,
fast-forwarding/reversing is canceled and normal playback
resumes.
Subtitles are not displayed when fast-forwarding/reversing
•
BD-/DVD-Video discs.
Skipping to the Next or the Start of
the Current Chapter (Track)
Skipping (to the beginning of a chapter or track)
functions when
or
is pressed
during playback.
Pause
Pause functions when PAUSE is pressed during
playback.
Frame Advance Playback
Frame Advance Playback functions when
is pressed during Pause.
NOTE
Frame advance playback is not possible with audio CDs.
•
Frame Advance Playback may not function properly with
•
discs other than DVD-RW (VR format).
Some BD/DVD Video discs are not compatible with Frame
•
Advance Playback.
Frame Reverse Playback can be performed for DVD discs
•
by pressing during pause (Frame Reverse
Playback cannot be performed for BD video discs).
Slow Playback
Slow Playback functions when
is pressed for more than 2 seconds during
pause.
Press PLAY to return to normal playback.
•
Slow playback onto adjacent titles is not possible. When
•
the beginning or end of the title is reached, slow playback
is canceled and normal playback resumes.
NOTE
This doesn’t work for audio CDs.
•
Reverse Slow Playback cannot be performed for BD video
•
and DVD discs in AVCHD format.
or
Skip Search
Playback skips 30 seconds ahead when SKIP
SEARCH is pressed during playback.
Replay
Playback jumps back 10 seconds when REPLAY
is pressed during playback.
Repeat Playback of a Title or
Chapter (Repeat Playback)
Play back the title or chapter you want to repeat.
1
2
Press REPEAT.
3
Press to select the type of Repeat
Playback.
Playback Title: Repeats the title currently being played
•
back.
Playback Chapter: Repeats the chapter currently
•
being played back.
Scene Selection: Repeats the specified scene of title
•
or chapter.
Playback Title
Playback Chapter
Scene Selection
Press RETURN to cancel without setting the type
•
of Repeat Playback.
For Audio CD, you can select “Playing Disc”, “Playing
•
Track” and “Specify The Part” as Repeat Playback
options.
Playback
39
Page 40

Playback Functions
Press ENTER.
4
Example: Repeat playback of a title
BD-VIDEO
1/3
C
55/2
00 :20 :30
2 English
1
1
5.1ch
On Title Repeat
On Title Repeat
Press REPEAT OFF or REPEAT to return to
5
normal playback.
Partial Repeat Playback (Repeat
Playback of a Specified Part)
DVD VIDEO
AUDIO CD
1
2
DVD-RW
Press REPEAT during playback.
Press to select “Scene Selection”, then
press ENTER.
“Set Start Point” displays.
•
DVD-R
Playback Title
Playback Chapter
Scene Selection
Set Start Point
NOTE
Press , the Repeat Playback is cancelled and
•
the next chapter (track) being play back.
Press once, the Repeat Playback is cancelled
•
and the player returns to the start of current chapter (track).
If you press again (within about 5 seconds)
•
the player will skip to the beginning of the previous chapter
(track).
For Partial Repeat Playback, set the start and end points
•
within the same title.
Repeat Playback may be forbidden depending on the disc.
•
During BD video, the same scene cannot be played
•
repeatedly.
Partial Repeat Playback may not work in multi-angle
•
scenes.
If you press DISPLAY, you can confirm the Repeat
•
Playback status (except for Audio CDs).
Press ENTER at the scene where you want to
3
set the start point.
“Set End Point” displays.
•
Press ENTER at the scene where you want to
4
set the end point.
You can press FWD to fast forward to the scene
•
where you want to set the end point. When you reach
the desired scene, simply press PLAY and then
ENTER to set the end point.
To cancel Repeat Playback, press REPEAT OFF or
•
REPEAT.
40
Page 41

Playback Functions
Switching the Audio Mode
Press AUDIO.
The displayed content differs from disc to disc.
BD VIDEO
The audio track currently being played back will be
displayed.
When multiple audio tracks are recorded on the disc,
the audio track switches each time AUDIO is pressed.
DVD-RW
The mode switches as shown below each time
AUDIO is pressed.
In the event bilingual (multiplex) broadcasts are
recorded:
When a recorded broadcast with stereo or monaural
audio is played back:
•
•
•
•
DVD VIDEO
DVD-R
•
The display will show “MAIN”, “SUB” or “MAIN SUB”
“Stereo” is displayed. (Audio cannot be switched.)
•
NOTE
When you play a program recorded in stereo or monaural,
and if you are listening to the Bitstream sound via the digital
output jack, you cannot select the audio channel. Set
“Audio Out” to “PCM” (Page 46), or if you want to change
the audio channel, listen via the analog output jacks.
Settings for audio can be changed also in Function Control
Screen (Page 42).
Some discs allow changing of the audio channel via a
menu. For details, see the manual for the disc.
The display for audio automatically disappears after 5
seconds.
BD-RBD-RE
Switching Subtitles
If subtitles are provided in multiple languages, you can
switch between them.
Press SUBTITLE during playback.
•
The display indicates the subtitle number currently being
played back, and the subtitles appear.
•
Each time SUBTITLE is pressed, the subtitles change.
•
“–” is displayed if a disc has no subtitles.
•
You can also select “Off”.
NOTE
Settings for subtitles can be changed also in Function
•
Control Screen (Page 42).
Some discs allow changing of the subtitles channel via a
•
menu. For details, see the manual for the disc.
•
The display for subtitles automatically disappears after 5
seconds.
Switching the Angle
If multiple angles are recorded, you can switch
between them.
Press ANGLE during playback.
1
The display indicates the angle number currently being
•
played back. Each time you press ANGLE, the angle
switches.
“–” is displayed if a disc is recorded with only one
•
angle.
1
To return to the previous angle, press ANGLE to cycle
through the angles until you return to the original angle.
Playback
Displaying the Angle Mark
You can change settings so that Angle Mark appears
in the right bottom part of the screen when multiple
angles are recorded. (The Angle Mark is displayed
for BD/DVD video.) The settings can be changed in
“Settings” – “Playback Setting” – “Angle Mark Display”
(Page 47).
NOTE
Settings for angles can be changed also in Function
•
Control Screen (Page 42).
Some discs allow changing of the angles channel via a
•
menu. For details, see the manual for the disc.
The display for angles automatically disappears after 5
•
seconds.
41
Page 42

Settings During Playback
Function Control
This allows you to adjust various settings at once,
like subtitles, audio and angle settings and the title
selection for Direct Playback. The operations are the
same for BD and DVD.
Function control screen
BD-VIDEO
1/3
C
55/2
00 :20 :30
2 English
1
1
5.1ch
Off
ENTER
Select Enter
Playback status display
Shows the operation status and the disc type.
Setting items
Selects a title (or track) or chapter for playback, or performs
subtitles, audio and angle settings.
Title/Track Number (Direct Title/Track Skip)
•
Chapter Number (Direct Chapter Skip)
•
Playback Elapsed Time (Direct Time Skip)
•
Subtitle Language
•
Angle Number
•
Audio
•
Repeat
•
Operation guide display
Provides help on remote control button operations.
Return
Function control operation
procedure
Press FUNCTION during playback.
1
The Function Control screen is displayed on the TV.
•
Press to select the desired setting, then
2
press ENTER.
For a description of each setting, see “Functions
•
which can be set” (Page 43).
BD-VIDEO
1/3
C
55/2
00 :20 :30
2 English
1
1
5.1ch
Off
Press to set, then press ENTER.
3
Operations vary depending on the setting. Follow the
•
operation instructions on the screen.
Press RETURN or FUNCTION to close the
4
Function Control screen.
NOTE
If “– –” is displayed for an option like title number or
•
subtitles, the disc has no titles or subtitles which can be
selected.
The displayed items vary depending on the disc.
•
If you access the Function Control screen, it may be
•
impossible to operate the BD/DVD video playback. In
cases like this, close the Function Control screen.
42
Page 43

Settings During Playback
Functions which can be set
Title/Track Number (Direct Title/Track Skip)
Shows the title number being played back (or track number when playing back an audio
•
CD). You can skip to the start of the title (or track).
To skip to the start of a selected title (or track), press the number buttons (0 to 9) to
•
enter the title (or track) number when this option is highlighted.
Chapter Number (Direct Chapter Skip)
Shows the chapter number being played back. You can skip to the start of the chapter.
•
•
To skip to the start of a selected chapter, press the number buttons (0 to 9) to enter the
chapter number when this option is highlighted.
Playback Elapsed Time (Direct Time Skip)
Shows the time elapsed from the beginning of the current disc title (or track). This lets
•
you skip to a specific time.
Press to select the Hour, Minute or Second, then press or the number
•
buttons (0 to 9) to set the time. Press ENTER to start playback at the set time.
NOTE
ENTER: Enters the input number.
•
CLEAR: Clears the input number.
•
Subtitle Language
•
Shows the currently selected subtitle language. If subtitles are provided in other
languages, you can switch to your preferred language.
Angle Number
•
Shows the currently selected angle number. If the video is recorded with multiple angles,
you can switch the angle.
Playback
Audio
Shows the currently selected type of audio. You can select the desired type of audio.
•
Repeat
•
The current Title (or Chapter) or partial segments can be repeatedly played back. Repeat
Playback is also possible with REPEAT on the remote control.
NOTE
These functions may not work with all discs.•
43
Page 44

Settings
Common Operations
The “Menu” enables various audio/visual settings and adjustments on the functions using the remote control
unit. You need to call up the OSD to perform settings for this player. The following is the explanation for the basic
operations of the “Menu”.
Example: Setting “Front Panel Display/LED”
1
Web Content Photos
Disc Navigator
3
Select the next item
Press to select the desired item,
then press ENTER.
On
RETURN to return to the
Press
previous “Menu” page.
Display the Menu screen
Press HOME MENU to
display the HOME MENU
screen.
Press to select
“Settings”, then press
Music
On Screen LanguageSettings
Off
ENTER.
When the wallpaper is
displayed, the home menu
can also be displayed by
selecting the menu icon
( ) with then
pressing ENTER.
Basic Operation for Playback
Setting
Example: Setting “Parental Control” under “Playback Setting”
Press HOME MENU to display the HOME
1
MENU screen.
Press to select “Settings”, then
2
press ENTER.
Press to select “Playback Setting”, then
3
press ENTER.
Press to select “Parental Control”, then
4
press ENTER.
When you operate this Player for the first time, the
•
password setting screen will be displayed. See “When
setting the password for the first time” below.
Press the number buttons (0 to 9) to enter your
5
4-digit password.
You cannot move to the next setting screen until you
•
can input the correct password.
Enter 4-digit password
2
4
Select a menu item
Press to select “Front Panel
Display/LED”, then press ENTER.
Audio Video Settings
Quick Start
Auto Power Off
Control
Playback Setting
Communication Setup
Front Panel Display/LED
Version
USB Memory Management
Software Update
System Reset
Exit the Menu screen
Press HOME MENU or EXIT to exit.
When setting the password for the first time
To set the password for the first time, press
to select “Yes” to enter the password setting
menu, then press ENTER.
Press the number buttons (0 to 9) to enter a
4-digit number for the password, then the same
4-digit number for confirmation.
Press ENTER to complete the password setting
procedure and move to the next setting screen.
Press to select the parental control level
6
for DVD-VIDEO, BD-ROM, and then select the
country code. Press ENTER after making each
selection.
Parental Control
Disc Language
Angle Mark Display
Password Setting
BD Internet Access
Press HOME MENU or EXIT to exit.
7
Set parental control level for DVD-VIDEO.
Set parental control level for BD-ROM.
Set the country code.
Level 3
0
USA
44
Page 45

Settings
NOTE
Characters in bold type are the default settings at time of
•
purchase.
Audio Video Settings
TV Aspect Ratio
You can set the screen aspect ratio of the connected
TV, and adjust the video output.
If you switch your TV (i.e. because you have bought a
new one) and the screen aspect ratio of the connected
TV changes, you will have to change the “TV Aspect
Ratio” setting.
Item
Wide 16:9: Select this when connecting to a TV with a
Normal 4:3: Select this when connecting to a TV with a
Item
Letter Box: If you connect to a TV with a screen aspect
Pan Scan: If you connect to a TV with a screen aspect
Component Video Out
This sets the resolution of the component video
output.
Some TV are not fully compatible with the Blu-ray disc
player, which may cause the image distortion. In this
case, press VIDEO OUTPUT RESET on the remote
control for five seconds. “Component Video Out” will
be reset to “480i” (factory preset value).
Item
1080i, 720p, 480p, 480i
16:9 screen aspect ratio.
4:3 screen aspect ratio.
<When selecting Normal 4:3>
ratio of 4:3 and playback a DVD with 16:9
video, the video will be played back with
black bands at the top and bottom while
maintaining the 16:9 ratio.
ratio of 4:3 and playback a DVD with 16:9
video, the video will be played back with
the left and right sides of the image cut off
to display in 4:3 screen aspect ratio. (This
function works if the disc is labelled for
4:3PS.)
HDMI Video Out
This sets the resolution of the HDMI video output.
Some TV are not fully compatible with the Blu-ray disc
player, which may cause the image distortion. In this
case, press VIDEO OUTPUT RESET on the remote
control for five seconds. “HDMI Video Out” will be reset
to “Auto” (factory preset value).
Item
Auto, 1080p, 1080i, 720p, 480p
NOTE
When the BD player is connected to a 1080p 24 Hz
•
compatible TV and the “HDMI Video Out” is set to “Auto”,
1080p 24 Hz will automatically be displayed when
compatible discs are played back.
At 1080p 24 Hz/1080p 60 Hz, there is no output from the
COMPONENT VIDEO OUTPUT jacks and VIDEO OUTPUT
jack.
Video Out Select
This function allows you to select the priority video
output when you connect video equipment such
as a TV to both the HDMI OUT terminal and the
COMPONENT VIDEO OUTPUT jacks.
Item
HDMI, Component
•
When the priority video output is selected, video is output
from the other video terminal with the resolution of the
selected video output.
•
There is no output from the COMPONENT VIDEO OUTPUT
jacks and VIDEO OUTPUT jack when video is output at
1080p resolution and the priority video output is selected
to “HDMI”.
•
If the video equipment connected to each of the terminals
is not compatible with the resolution of the priority video
output, abnormalities in images on the screen may appear.
Secondary Audio
This toggles the clicking sound on the menu and audio
with secondary video in picture in picture mode for
BD-Video.
•
Select “Off” when enjoying the high quality sounds
of BD-Video.
Output”.)
Item
On*1, Off
1
*
: When set to “On”
Audio in 6.1ch or greater format will be output as 5.1ch
•
audio.
“HDMI Output” is set on “PCM”.
•
(“Bitstream” can be selected with “HDMI
Settings
45
Page 46

Settings
Audio Out
You can set the audio output when connecting to
SURROUND equipment.
This sets the audio output connected to
1
SURROUND equipment.
Item
HDMI Output: Select this when you connect using
Digital Output: Select this when you connect using
2ch Audio Output: Select this when you do not use
You can set the audio output mode for each
2
output terminal.
This sets the audio output mode for HDMI OUT
terminal when selecting “HDMI Output”.
NOTE
When the secondary audio is set to “On”, PCM is
•
automatically selected as the audio output mode.
Upon purchase, “Secondary Audio” is set to “On”, so
•
“HDMI Output” is fixed to “PCM”.
Item
Bitstream:
PCM (Surround):
This sets the audio output mode for DIGITAL
OUT OPTICAL terminal when selecting “Digital
Output”.
Item
Bitstream:
PCM:
NOTE
See page 55 for information on output of next generation
•
audio formats.
HDMI OUT terminal.
DIGITAL OUT OPTICAL terminal.
SURROUND sound equipment.
Select this when connecting to
•
HDMI equipment with a built-in
decoder for DOLBY DIGITAL, etc.
Setting to Bitstream will output
•
each audio signal by Bitstream.
Select this when connecting to
•
multi-channel HDMI equipment.
Setting to PCM (Surround) will
•
output by LINEAR PCM by
decoding audio signals recorded in
each audio output mode such as
DOLBY DIGITAL, DTS.
Select this when connecting to
•
SURROUND equipment with
a built-in decoder for DOLBY
DIGITAL, etc.
Setting to Bitstream will output
•
each audio signal by Bitstream.
Select this when connecting to 2
•
channel stereo audio equipment.
Setting to PCM will output by
•
converting each audio signal into
PCM 2 channel audio signal.
Dynamic Range Control
This lets you adjust the range between the loudest
and softest sounds (dynamic range) for playback
at average volume. Use this when it is hard to hear
dialog.
Item
Normal: The same audio output range is played as the
Shift*: When Dolby Digital audio is played back, the
Auto: When you play back audio in the Dolby
*: Lower the audio volume before setting. If you do not do so,
the speakers may emit a loud sound or excessive output may
be applied to the speakers.
original recorded audio output range.
dynamic range of the audio is adjusted so
that the dialog portion can be heard easily. (If
the audio sounds abnormal, set to “Normal”.)
TrueHD format, the dynamic range is
automatically adjusted.
Quick Start
This turns the Quick Start function on and off.
When the Quick Start function is on:
The startup time of the Player is reduced.
•
However, the standby power consumption when the power
•
is off will increase (about 7 W).
When the Quick Start function is off:
The player will enter the low power consumption mode
•
when in standby condition.
Item
Yes, No
NOTE
When "Quick Start" is set to "Yes", the Player requires
•
some time to turn off each time.
Auto Power Off
This sets the Player so that power is automatically shut
off if playback is stopped for about 10 minutes.
Item
Yes, No
Control
This sets the Player to be controlled from the Flat
Panel TV via the HDMI cable.
Item
Yes : Select this to operate this player with the
No: Select this when you do not want to use the
remote control unit of a Flat Panel TV
connected by cable. This also turns on the
PQLS function.
control function.
46
NOTE
For details, refer to “About control function with HDMI ” on
•
page 26.
Page 47

Settings
Playback Setting
Parental Control
This lets you set the Parental Control depending on the
disc content. The available Parental Control Levels are
shown below.
The 4-digit password number needs to be entered
before the Parental Control Levels and the Country
Code are set. The Parental Control Levels and the
Country Code cannot be set if a password has not
been created or the password is not entered.
DVD-Video setting items
Setting item Description of setting
1 Discs for children can be played. Adult and
2-3 General audience discs (excluding R-rated discs)
4-7 General audience discs (including R-rated discs)
8 All discs can be played without restriction.
Off
BD-Video setting items
Setting item Description of setting
No Limit
0-99 year(s)
Item (Country code)
Sets the country code. Refer to the Country Code List
(page 55) because the ratings differ according to the
country.
NOTE
Refer to “Basic Operation for Playback Setting” on page 44
•
for details.
Disc Language (Disc Priority Language)
This lets you select the language for subtitles, audio
and menus displayed on the screen.
Item (Subtitle)
Refer to the Language List. (Page 55)
Item (Audio)
Refer to the Language List. (Page 55)
Item (Menu)
Refer to the Language List and Language Code List.
(Page 55)
general audience discs (including R-rated discs)
cannot be played.
and discs for children can be played. Adult and
restricted viewing (R-rated) discs cannot be
played.
and discs for children can be played. Adult discs
cannot be played.
Parental control is turned off.
All BD-video can be played.
Prohibits play of BD-video with
corresponding ratings recorded on them.
Angle Mark Display
This lets you turn the Angle Mark Display on or off
when BD/DVD video recorded with multiple angles is
played back. (The Angle Mark is displayed in the lower
right screen.)
Item
Yes, No
Password Setting
This sets the password for setting or changing the
Parental Control Level.
Item
Yes: Enter the 4-digit number.
No
NOTE
When you forget the password, you can reset the current
•
password using “System Reset” under “Settings”. (See
page 48.)
You can also set the new password if desired.
•
BD Internet Access
This allows you to set access restriction to BD-LIVE
contents.
Setting item Description of setting
Permit Allow all BD-LIVE discs.
Limit
Prohibit Prohibit all BD-LIVE discs.
NOTE
The available functions differ depending on the disc.
•
Regarding playback method of BD-LIVE contents, etc.,
•
perform the operations in accordance with the instructions
in the BD disc manual.
To enjoy BD-LIVE functions, perform the broadband
•
internet connection (page 21) and communication settings
(pages 48 to 50).
Allow only discs with owner certification.
Front Panel Display/LED
If you feel that the indicators on the Player are too
bright when watching movies, you can turn them off
except for the FL OFF indicator.
Item
On, Off
Version
When you select “Version”, the system software
version and Netflix ESN are displayed.
Please refer to our website for information regarding
the system software updates.
http://www.pioneerblu-ray.com
Settings
47
Page 48

Settings
System Reset
You can reset all settings to the factory presets.
Item
Reset, Not Reset
Netflix Deactivate
When you select “Netflix Deactivation”, you can
deactivate your Netflix information on the player by
selecting “Yes”.
Communication Setup
By connecting to the Internet, you can enjoy BD-LIVE
functions, YouTube videos and text information using
the RSS reader function, as well as update this player’s
software. This section describes the procedure for
making network settings. You can connect to the
Internet either by using a LAN cable or by connecting
a USB Wireless LAN Adaptor to one of the USB ports.
NOTE
Check that LAN cable or USB Wireless LAN Adaptor is
•
properly connected (page 21).
When USB Wireless LAN Adaptors are connected to both
•
the USB ports on the player’s front and rear panels, the
USB Wireless LAN Adaptor last connected is used.
Check the following information about the wireless LAN
•
access point beforehand:
Type of encryption and encryption key
−
SSID (network name)
−
For manually performing the setting, the following
•
information of the connected router or modem is required.
Confirm the information prior to the setting.
IP address, netmask, gateway, DNS IP address
−
If specified by the provider, check the IP address and proxy
•
server settings beforehand.
48
Selecting the connection method
Press HOME MENU to display the HOME
1
MENU screen.
Press to select “Settings”, then
2
press ENTER.
Press to select “Communication Setup”,
3
then press ENTER.
Press to select “Cable/Wireless Select”,
4
then press ENTER.
Press to select the connection type, then
5
press ENTER.
Cable: Select this to connect to the network using a
•
LAN cable.
Wireless: Select this to connect to the network using a
•
USB Wireless LAN Adaptor.
Changing the communications
settings
Press HOME MENU to display the HOME
1
MENU screen.
Press to select “Settings”, then
2
press ENTER.
Press to select “Communication Setup”,
3
then press ENTER.
Press to select the connection method you
4
want to set, then press ENTER.
Ethernet Setup(Cable): Change the settings for
•
connecting to the network using a LAN cable.
Ethernet Setup(Wireless): Change the settings for
•
connecting to the network using a USB Wireless LAN
Adaptor.
Press to select “Change”, then press
5
ENTER.
Current Ethernet setup info.
IP Address : Auto Setup
Netmask : Auto Setup
Gateway : Auto Setup
DNS : Auto Setup
Proxy : Not Use
Change
Initialize
For initializing the current setting, select “Initialize”,
•
then press ENTER.
When “Ethernet Setup(Cable)” was selected at step 4,
•
proceed to step 10.
Press to select the access point, then
6
press ENTER.
Press to set the type of encryption, then
7
press ENTER.
When “OPEN” is selected, proceed to step 9.
•
When “WEP”, “WPA” or “WPA2” is selected, input
•
the encryption key. Select “security key”, then press
ENTER. For instructions on inputting characters, see
page 50.
Press to select “Next”, then press
8
ENTER.
Press ENTER to test the connection.
9
Page 49

Settings
10
For setting the IP address, press to select
“Yes” or “No”, then press ENTER.
Do you obtain the IP address
automatically?
IP Address
Netmask
Gateway
If selecting “Yes”: The IP address is automatically
•
obtained.
If selecting “No”: The IP address, netmask, gateway
•
and primary and secondary DNS IP addresses are
manually entered using the screen for inputting
characters. (See page 50.)
Press to select “Next”, then press
11
ENTER.
For setting the proxy server, press to
12
select “Yes” or “No”, then press ENTER.
Do you use the proxy server?
Address
Port
If selecting “Yes”: The IP address or proxy server
•
name and port number for the proxy server specified
from your internet service provider are entered using
the screen for inputting characters. (See page 50.)
If selecting “No”: Go to the next step.
•
Press to select “Next”, then press ENTER.
13
If “Ethernet Setup(Wireless)” was selected at step 4,
•
proceed to step 17.
For setting the Ethernet connections speeds,
14
press to select “Yes” or “No”, then press
ENTER.
Normally select “No”, then press ENTER. Proceed to
•
step 17
When the Ethernet connection speeds can be set,
•
select “Yes” then press ENTER.
Yes
Yes
No
Next
No
Next
Press to select the Ethernet connection
15
speeds, then press ENTER.
As automatic detection is made (factory preset
•
mode), this setting is not normally necessary. If a
situation occurs in which the Ethernet connection fails,
etc., change the setting and confirm if the Ethernet
connection successfully works. When the connection
speed is set, select “Next”, then press ENTER.
Option
Ethernet Connection Speeds
Press to select “Next”, then press ENTER.
16
For testing the connection to the internet, after
17
Auto-Detection
10M Half Duplex
100M Half Duplex
10M Full Duplex
100M Full Duplex
Next
confirming the settings, press to select
“Test”, then press ENTER.
“Test” is available only when setting to obtain the IP
•
address automatically. “Test” cannot be selected if the
IP address has not been obtained automatically.
Confirm the current setting.
IP Address
Netmask
Gateway
DNS Address
MAC Address
Te st
•
As a result of the test, if the internet connection fails,
enter the setup values manually.
Press to select “Complete”, then press
18
: xxx xxx xxx xxx
: xxx xxx xxx xxx
: xxx xxx xxx xxx
: xxx xxx xxx xxx
: xx:xx:xx:xx:xx:xx
Complete
ENTER.
Settings
49
Page 50

Settings
The operation procedure for
inputting characters manually
Numeric characters such as IP address can be
entered on the input screen using the number buttons
(0 to 9) or and ENTER on the remote control.
IP Address
Netmask
Gateway
1
Press ENTER at the boxes in which characters
are to be entered, and the input screen will
appear.
Numeric
Edit
Selected by
pressing
Press to select the desired input mode.
2
Press the number buttons (0 to 9) or to
3
select a number/character, then press ENTER.
123
1 234567890
Selected by
pressing
Repeat the step 3 to display all of the desired
4
characters/numbers in the input field.
Example: The screen for inputting numeric characters
123
Numeric
Edit
123 4567890
NOTE
Press RETURN (Del.Char.) to delete a number/
•
character you have input.
To change a number/character you have input, press
•
GREEN (Left) or BLUE (Right) to select the number/
character you want to change, and press RETURN
(Del.Char.). Then, press to select a new number/
character you want to input, and press ENTER.
Press YELLOW (Complete) to fix the numbers
5
which have been input.
IP Address
Netmask
Gateway
Repeat step 1 to 5 to finish inputting all the
6
123
required characters.
Input character list
Numeric
Edit
*
50
1 2 3 4 5 6 7 8 9 0
Cancel Left Right Complete Del.Char.
The same operation as RED, GREEN, BLUE, YELLOW and
selecting each of the items and pressing ENTER.
“Del.Char.” stands for deleting characters.
RETURN can be performed by
Page 51

Settings
USB Memory Management
The following instructions explain how to delete data
downloaded from BD-LIVE and recorded on the USB
memory device.
Before using the USB memory device
CAUTION:
•
Do not remove the USB memory device or unplug
the AC cord while the operations for “USB Memory
Management ” or “Software Update” are being
performed.
•
Do not use a USB extension cable to connect a USB
memory device to one of the player’s USB ports. Using
a USB extension cable may prevent the player from
performing correctly.
NOTE:
Operation of USB memory devices is not guaranteed.
•
The player supports USB memory devices formatted in
•
FAT32/16. When formatting a USB memory device on
your computer, do so with the settings below.
File system: FAT32
Allocation unit size: Default allocation size
Connect the USB memory device.
1
Connect the USB memory device to the USB port on
•
the player’s front or rear panel.
If USB memory devices are connected to both the
•
USB ports on the player’s front and rear panels, the
data is only deleted on the USB memory device that
was connected first.
Press HOME MENU to display the HOME
2
MENU screen.
Press to select “Settings”, then
3
press ENTER.
Press to select “USB Memory
4
Management”, then press ENTER.
“No USB Memory” appears when no USB memory is
•
inserted.
Press , select “Erase” or “Format”, then
5
press ENTER.
Erase: Deletes only BD-VIDEO data contents.
Format: Deletes all contents.
To delete only an update file after updating the
•
software, do so on your computer.
Erase BD-VIDEO data on USB memory.
Erase
Format
NOTE
Data which has been saved to the player’s internal memory
•
(game score, etc.) will also be deleted.
Erase all contents on USB memory
including protected contents.
Press , select “Yes”, and press ENTER.
6
Yes
No
The deleting screen is displayed. Once deleting is
•
completed, the screen below appears.
Complete
OK
Press ENTER.
7
Settings
51
Page 52

Settings
Software Update
The software can be updated in one of the ways
described below.
Updating automatically using the network
•
Updating manually using the network
•
Updating manually using a USB memory device
•
The settings below must be made in advance to
update the software using the network.
Product information on this player is provided on the
Pioneer website. Check this website for update and
service information on your Blu-ray disc player.
http://www.pioneerblu-ray.com
NOTE
Check that the LAN cable, USB Wireless LAN Adaptor or
•
USB memory device is properly connected (page 21).
Properly set the “Communication Setup” (page 48).
•
Depending on the network connection conditions and
•
other factors, some time may be required to download the
update file.
CAUTION
Do not disconnect the LAN cable, USB Wireless LAN
•
Adaptor or USB memory device or unplug the power cord
while the update file is being downloaded or the software is
being updated.
Do not perform other operations while the software is being
•
updated. Also note that updating cannot be canceled once
it is started.
If you have turned off the front panel display, use FRONT
•
LIGHT to turn it on. When updating the software with the
front panel display turned off, do not unplug the power
cord until the FL OFF indicator turns off.
Updating automatically using the
network
When the player’s power is turned on, the player
automatically connects to the network and updates
the software when new software is available.
Setting
Press HOME MENU to display the HOME
1
MENU.
Press to select “Settings”, then
2
press ENTER.
Press to select “Software Update”, then
3
press ENTER.
Press to select “Auto Update Setting”,
4
then press ENTER.
Press to select “Yes”, then press ENTER.
5
The player automatically connects to the network
•
each time the power is turned on.
Updating
Press STANDBY/ONto turn the power on.
1
The player automatically connects to the network.
•
“Accessing” flashes on the screen. When new
software is detected, the player’s current software
version and the new software version are displayed.
The automatic connection to the network is not
•
performed if a disc is already loaded in the player.
If the software has already been updated to the latest
•
version, nothing is displayed on the screen.
Press to select “Yes”, then press ENTER.
2
Software updating begins.
•
Once software updating is completed, the updating
•
completed screen appears.
If software updating fails, an error message is
•
displayed. Check that the LAN cable or USB Wireless
LAN Adaptor is properly connected and check the
communications settings, then update the software
again.
Press STANDBY/ON to turn the power off.
3
The new software becomes effective the next time the
•
power is turned on.
52
Page 53

Settings
Updating manually using the
network
Use this procedure to connect to the network manually
to check whether new software is available.
Press HOME MENU to display the HOME
1
MENU.
Press to select “Settings”, then
2
press ENTER.
Press to select “Software Update”, then
3
press ENTER.
Press to select “Manual Update”, then
4
press ENTER.
Press to select “Network”, then press
5
ENTER.
“Accessing” flashes on the screen. If new software is
•
detected, the player’s current software version and the
new software version are displayed.
If the software has already been updated to the latest
•
version, the version is displayed.
Press to select “Yes”, then press ENTER.
6
Software updating begins.
•
Once software updating is completed, the updating
•
completed screen appears.
If software updating fails, an error message is
•
displayed. Check that the LAN cable or USB Wireless
LAN Adaptor is properly connected and check the
communications settings, then update the software
again.
Press STANDBY/ON to turn the power off.
7
The new software becomes effective the next time the
•
power is turned on.
Updating manually using a USB
memory device
Use this procedure to update the player’s software
from a USB memory device containing the update file
connected to the USB port on the player’s front or rear
panel.
NOTE
When an update file is provided on the Pioneer website,
•
use your computer to download it onto a USB memory
device. Carefully read the instructions on downloading
update files provided on the Pioneer website.
The player supports USB memory devices formatted in
•
FAT32/16. When formatting a USB memory device on your
computer, do so with the settings below.
File system: FAT32
Allocation unit size: Default allocation size
Store the update file in the USB memory device’s root
•
directory. Do not store it within a folder.
Do not put any files other than the update file on the USB
•
memory device.
Only store the most recent update file on the USB memory
•
device.
Do not use a USB extension cable to connect a USB
•
memory device to the player. Using a USB extension cable
may prevent the player from performing correctly.
Remove any disc from the disc tray when updating the
•
software.
Connect the USB memory device.
1
Be sure to connect the USB memory device to the
•
USB port on the player’s front panel. If USB memory
devices are connected to both the USB ports on the
player’s front and rear panels, disconnect the USB
memory device on the front panel and connect it
again.
Press HOME MENU to display the HOME
2
MENU.
Press to select “Settings”, then
3
press ENTER.
Press to select “Software Update”, then
4
press ENTER.
Press to select “Manual Update”, then
5
press ENTER.
Press to select “USB Memory”, then press
6
ENTER.
If no password is set, proceed to step 8.
•
Input the 4-digit password.
7
Use the number buttons (0 to 9).
•
Settings
Enter 4-digit password
53
Page 54

Settings
Press ENTER to check the data on the USB
8
memory device.
Insert USB memory device containing
the software update file.
OK
The screen message is displayed while the USB
•
memory device is being checked.
The player’s software version and the version of the
•
update file stored on the USB memory device are
displayed. To update the player’s software, select
“Start” then press ENTER.
Software update file is detected in the USB memory
Start update?
device.
Current Ver. :
Update Ver. :
An error message is displayed if the USB memory
•
device could not properly recognized or if no update
file was found on the USB memory device. Check the
file on the USB memory device, then reconnect the
USB memory device properly.
Software update file is not detected in the USB memory device.
Confirm that you have transferred the file
to the USB memory device and retry software update.
Confirm that you have inserted the USB memory device
into the correct device.
**1234567
**2345678
OK
Yes
Press ENTER to update the software.
9
The screen becomes dark for several seconds. Wait
•
until the update screen appears. Do not unplug the
power cord.
The picture will temporarily go dark until
the software update display appears.
Wait several minutes and do not unplug the AC cord.
OK
Now updating
Do not unplug AC cord.
*
Update Version
Check on the screen that updating has been
No
10
completed properly.
If updating fails, check the file on the USB memory
•
device, then start over from step 1.
Press STANDBY/ON to turn the power off.
11
Disconnect the USB memory device.
12
**2345678
30%
54
Page 55

Settings
Country/Area Code List
USA / CANADA / JAPAN / GERMANY / FRANCE / UK / ITALY / SPAIN / SWISS / SWEDEN / HOLLAND / NORWAY /
DENMARK / FINLAND / BELGIUM / HONG KONG / SINGAPORE / THAILAND / MALAYSIA / INDONESIA / TAIWAN /
PHILIPPINE / AUSTRALIA / RUSSIA / CHINA
Language List
English / Français / Deutsch / Italiano / Español / Japanese / Svenska / Nederlands
Language Code List
AA Afar / AB Abkhazian / AF Afrikaans / AM Ameharic / AR Arabic / AS Assamese / AY Aymara / AZ Azerbaijani / BA Bashkir /
BE Byelorussian / BG Bulgarian / BH Bihari / BI Bislama / BN Bengali, Bangla / BO Tibetan / BR Breton / CA Catalan /
CO Corsican / CS Czech / CY Welsh / DA Danish / DE German / DZ Bhutani / EL Greek / EN English / EO Esperanto /
ES Spanish / ET Estonian / EU Basque / FA Persian / FI Finnish / FJ Fiji / FO Faroese / FR French / FY Frisian / GA Irish /
GD Scots Gaelic / GL Galician / GN Guarani / GU Gujarati / HA Hausa / HI Hindi / HR Croatian / HU Hungarian / HY Armenian /
IA Interlingua / IE Interlingue / IK Inupiak / IN Indonesian / IS Icelandic/ IT Italian / IW Hebrew /
JW Javanese / KA Georgian / KK Kazakh / KL Greenlandic / KM Cambodian / KN Kannada / KO Korean / KS Kashmiri /
KU Kurdish / KY Kirghiz / LA Latin / LN Lingala / LO Laothian / LT Lithuanian / LV Latvian, Lettish / MG Malagasy / MI Maori /
MK Macedonian / ML Malayalam / MN Mongolian / MO Moldavian / MR Marathi / MS Malay / MT Maltese / MY Burmese /
NA Nauru / NE Nepali / NL Dutch / NO Norwegian / OC Occitan / OM Afan (Oromo) / OR Oriya / PA Panjabi / PL Polish /
PS Pashto, Pushto / PT Portuguese/ QU Quechua / RM Rhaeto-Romance / RN Kirundi / RO Romanian / RU Russian /
RW Kinyarwanda / SA Sanskrit / SD Sindhi / SG Sangho / SH Serbo-Croatian / SI Singhalese / SK Slovak / SL Slovenian /
SM Samoan / SN Shona / SO Somali / SQ Albanian / SR Serbian / SS Siswat / ST Sesotho / SU Sundanese / SV Swedish /
SW Swahili / TA Tamil / TE Telugu / TG Tajik / TH Thai / TI Tigrinya / TK Turkmen / TL Tagalog / TN Setswana / TO Tonga /
TR Turkish / TS Tsonga / TT Tatar / TW Twi / UK Ukrainian / UR Urdu / UZ Uzbek / VI Vietnamese / VO Volapük / WO Wolof /
XH Xhosa / YO Yoruba / ZH Chinese / ZU Zulu
JA Japanese / JI Yiddish /
About Output of Next Generation Audio Formats
Next generation
audio formats
Maximum number of
channels
Dolby TrueHD 7.1ch (48 kHz/96 kHz) 7.1ch *
5.1ch (192 kHz) 5.1ch *
Dolby Digital PLUS 7.1ch (48 kHz) 7.1ch *
DTS-HD Master Audio 7.1ch (48 kHz/96 kHz) 7.1ch *
5.1ch (192 kHz) 5.1ch *1/*
DTS-HD High Resolution Audio 7.1ch (48 kHz/96 kHz) 7.1ch *
LPCM 7.1ch (48 kHz/96 kHz) 7.1ch *
5.1ch (192 kHz) 5.1ch *
1
*
When “Secondary Audio” is set to “On”, the audio is output as 48 kHz.
2
*
When “Secondary Audio” is set to “On”, the audio is output as LPCM.
3
*
When “Video Output” is set to “Component” and “Component Output Setting” is set to “480i”, only core stream is output.
4
*
Down mixed
5
*
Core stream only
6
*
When 5.1ch (192 kHz), the audio output is downsampled to 96 kHz.
When 2ch, the audio is output as 192 kHz.
HDMI DIGITAL OUT
PCM Bitstream PCM Bitstream
1
1
1
1
6
1
1
1
3
7.1ch *2/*
3
5.1ch *2/*
2
7.1ch *
3
7.1ch *2/*
3
5.1ch *2/*
2
7.1ch *
— 2ch *
— 2ch *
2ch *
2ch *
2ch *
2ch *
2ch *
2ch *
4
5.1ch *1/*
4
5.1ch *1/*
4
5.1ch *1/*
4
5.1ch *1/*
4
5.1ch *1/*
4
5.1ch *1/*
4
4
—
—
5
5
5
5
5
5
Settings
55
Page 56

Troubleshooting
The following problems do not always suggest a defect or malfunction of this Player.
Refer to the problems and lists of possible solutions below before calling for service.
Power
Problem Possible causes and solutions
The Player power cannot be turned
on.
The Player power is turned on
automatically.
The Player power is turned off
automatically.
Basic Operation
Problem Possible causes and solutions
The remote control does not work. Operate the remote control from within a distance of 23 ft from the remote control
Cannot operate the Player. Are you operating the Player within the specified operating temperature range?
Disc Playback
Problem Possible causes and solutions
The Player cannot play a disc. Take out the disc and clean it. (Page 10)
The disc is automatically ejected
after closing the disc tray.
Video stops. Has the Player been subjected to shock or impact? Are you using it in an unstable
The Player makes a snapping sound
when starting playback or loading
a disc.
Plug the power cord securely into the power outlet. (Page 22)
•
When the power cord is plugged into an AC outlet, press and hold STANDBY/
•
ON on the Player. Then, turn on the power again.
When “Settings” – “Control” is set to “Yes” on the player, the player’s power may
•
turn on when the connected TV is operated. (Page 46)
Is “Auto Power Off” set to “Yes”? When “Auto Power Off” is set to “Yes”, the
•
power will be automatically turned off after 10 continuous minutes of inactivity (no
playback). (Page 46)
When “Settings” – “Control” is set to “Yes” on the player, the player’s power may
•
turn off when the power of the connected TV is turned off. (Page 46)
•
sensor. (Page 22)
Replace the batteries. (Page 22)
•
•
(Page 62)
•
Make sure that the disc is loaded properly (aligned in disc tray and label-side up).
•
(Page 28)
Make sure that region code on the disc matches that of this Player. (Page 7)
•
Allow any condensation in or near the Player to dry. (Page 10)
•
The Player cannot play back video which was not recorded normally.
•
Proper playback may be impossible due to the state of the disc recording, a
•
scratched, warped or dirty disc, the state of the pick-up, or compatibility issues
between this Player and the disc being used.
When the recorded time of a disc is unusually short, playback may not be possible.
•
BD-RE/-R discs recorded in a format other than BDMV/BDAV cannot be played
•
back.
Make sure that the disc is loaded properly (aligned in disc tray and label-side up).
•
(Page 28)
Take out the disc and clean it. (Page 10)
•
Make sure that region code on the disc matches that of this Player. (Page 7)
•
Make sure that the disc is playable. (Page 7)
•
•
location? The Player will stop if it senses shock or vibration.
The player may sometimes make a snapping sound when starting playback if it has
•
not been operated in a while. These sounds are not malfunctions of the player but
are normal operating conditions.
56
Page 57

Troubleshooting
Picture
Problem Possible causes and solutions
No picture. Make sure that the cables are connected correctly. (Pages 17 to 19)
Screen freezes and operation
buttons do not work.
There is just audio with no video. Is the connection cable for video output connected properly? (Pages 17 to 19)•
Picture is stretched.
•
Picture is cut.
•
Aspect ratio cannot be switched.
•
Square noise (mosaic) appears on
the screen.
Picture is disturbed during
•
playback.
Picture is dark.
•
Audio is not output, or images are
not played back properly.
•
Make sure that the connected TV or the AV receiver is set to the correct input.
•
(Pages 17 to 19)
Take out the disc and clean it. (Page 10)
•
Make sure that region code on the disc matches that of this Player. (Page 7)
•
There is no picture from the HDMI output.
•
Are the settings performed correctly? Please check the settings. (Page 45)
−
There is no picture from the component video output.
•
Are the settings performed correctly? Please check the settings. (Page 45)
−
•
Press STOP, then restart playback.
•
Turn off the power and turn on the power again.
•
If the power cannot be turned off, press and hold
front panel for at least 5 seconds to turn the power off.
Is the disc damaged or dirty? Check the condition of the disc.
•
Refer to the TV’s operating instructions and set the TV’s aspect ratio properly.
•
Is “TV Aspect Ratio” set to match the connected TV? Set “TV Aspect Ratio”
•
properly. (Page 45)
Blocks in images may be visible in scenes with rapid movement due to the
•
characteristics of digital image compression technology.
This player complies with analog copy protection technology of the Rovi
•
Corporation. Depending on the TV (TV with built-in video deck, etc.), the picture
may not display properly when copy-protected discs are played. This is not a
malfunction.
When this player and the TV are connected via a DVD recorder, video deck, etc.,
•
the analog copy protection may prevent the picture from being displayed properly.
Connect the player and TV directly. (Pages 18 to 19)
The audio may not be output or the images may not be played back properly for
•
some discs in which copyright-protected contents are recorded.
STANDBY/ON on the player’s
Sound
Problem Possible causes and solutions
No sound, or sound is distorted. If the volume of the TV or amplifier is set to minimum, turn the volume up.
Left and right channels of audio are
reversed, or sound comes out of
only one side.
Audio is not output, or images are
not played back properly.
•
There is no sound during still mode, slow motion playback, fast forward and fast
•
reverse. (Page 39)
DVD audio recorded in DTS is only output from the DIGITAL OUT OPTICAL
•
terminal. Connect a DTS compatible digital amplifier or decoder to the DIGITAL OUT
OPTICAL terminal on this Player. (Page 20)
Check that the audio cable is connected correctly. (Page 20)
•
Check that the cable plugs are clean.
•
Take out the disc and clean it. (Page 10)
•
Audio may not be output depending on the audio recording status, such as when
•
audio other than an audio signal or non-standard audio is recorded for the audio
content of the disc.
Are left and right audio cables connected to the opposite terminal, or is one side
•
disconnected? (Page 20)
The audio may not be output or the images may not be played back properly for
•
some discs in which copyright-protected contents are recorded.
Appendix
57
Page 58

Troubleshooting
Network
Problem Possible causes and solutions
Cannot connect to the Internet. Connect the LAN cable securely, pressing it all the way in. (Page 21)
Cannot download BD-LIVE contents. Is the LAN cable connected properly? (Page 21)
•
Do not connect with a modular cable. Use a LAN cable with the LAN (10/100)
•
terminal.
Is the power for the connected equipment, such as broadband router or modem
•
turned on?
Is the broadband router and/or modem properly connected?
•
Is the proper value(s) set in the network setting? Check “Communication Setup”.
•
(Pages 48 to 50)
•
Is the USB memory device properly connected? Check that the USB memory
•
device is connected to the USB port of this Player. (Page 21)
Check if the BD disc supports BD-LIVE.
•
Check the setting for “BD Internet Access”. (Page 47)
•
Control function with HDMI
Problem Possible causes and solutions
Control function with HDMI does not
work.
HDMI indicator does not light. Connect to a control function with HDMI-compatible Pioneer Flat Panel TV using an
Connect the HDMI cable properly. (Page 17)
•
Use High Speed HDMI
•
control function with HDMI may not operate properly if other HDMI cables are used.
Set “Settings” – “Control” on the player to “Yes”. (Page 46)
•
The control function with HDMI does not work with devices of other brands, even if
•
connected using an HDMI cable.
The control function with HDMI will not work if devices that do not support the
control function with HDMI or devices of other brands are connected between the
control function with HDMI-compatible device and the player.
It may also not work with certain Flat Panel TVs.
Set control function with HDMI to On on the connected device.
•
The control function with HDMI works when control function with HDMI is set to On
for all devices connected by HDMI cable. Once connections and the settings of all
the devices are finished, be sure to check that the player’s picture is output to the
Flat Panel TV. (Also check after changing the connected devices and reconnecting
HDMI cables.) The control function with HDMI may not operate properly if the
player’s picture is not properly output to the Flat Panel TV.
The control function with HDMI may not work if three or more players, including this
•
player, are connected.
Also refer to the operating instructions of the connected device.
•
•
HDMI cable.
Set control function with HDMI to On on the Flat Panel TV.
•
Set “Settings” – “Control” on the player to “Yes”. (Page 46)
•
Check that the player’s picture is being output to the Flat Panel TV.
•
®
Cables when using the control function with HDMI. The
Other
Problem Possible causes and solutions
The TV operates incorrectly. Some TVs with wireless remote control capability may operate incorrectly when
The Player heats up during use. When using this Player, the console cabinet may heat up depending on the usage
Input of connected TV and AV
system switches automatically.
Software cannot be updated. Remove any disc from the disc tray when updating the software.•
The front panel display shows
“HOLD”, and operations are
disabled.
58
•
using the remote control of this Player. Use such TVs away from this Player.
•
environment. This is not a malfunction.
When “Settings” – “Control” is set to “Yes” on the player, the input on the connected TV
•
or AV system (AV receiver or amplifier, etc.) may switch automatically. (Page 46)
KEY LOCK is in effect. (Page 15) Depress the remote control unit’s KEY LOCK for
•
five seconds or more to cancel the KEY LOCK function.
Page 59

Troubleshooting
To Reset this Player
If the player displays the following symptoms, press and hold in STANDBY/ON on the player’s front panel to reset the
•
player.
– Operation buttons do not work
– Noise is output
– Power does not turn off
When “RESET” appears on the front panel display, the player is reset and the power turns off. Turn the player’s power back
on.
When the power is turned on, it may take several minutes for system checking to be completed.
•
Since all settings including the language setting stored in memory are also reset when a reset has been performed, they must
•
be set again.
When the problem persists even after performing a reset, unplug the AC cord and plug it in again. If this does not solve the
•
problem, contact the nearest service center approved by Pioneer.
Messages Relating to BD disc and DVD disc
The following messages appear on the TV screen in case the disc you tried to playback is not appropriate or the
operation is not correct.
Error message Possible Error Suggested Solution
Cannot play. The disc cannot be played back with
Incompatible disc. A disc that cannot be played is loaded
Cannot operate. Occurs if an operation is incorrect.•
This USB memory is not formatted
properly. Please format the memory in
USB memory management.
The Connected USB Memory cannot
be used. It should be compliant with
USB 2.0.
• Check the disc, and load it correctly.•
this Player.
•
in the player.
The disc is scratched or dirty.
•
The disc is loaded with the printed
•
side facing down (the disc tray opens
automatically).
Occurs if the loaded disc cannot be
• Remove the disc.•
played because it is a non-standard disc
or scratched, etc.
—
Occurs if there is a formatting error.• Format the USB memory again.•
Occurs if USB memory not compliant
• Connect USB 2.0 High Speed (480
with USB 2.0 High Speed (480 Mbit/s) is
used (i.e. USB 1.0/USB 1.1).
•
Mbit/s) compliant USB memory.
Appendix
59
Page 60

Glossary
AVCHD (Advanced Video Codec High
Definition)
The AVCHD is a high definition (HD) digital video camera
recorder format recording high-definition onto certain media
by using highly efficient codec technologies.
BDAV (Page 7)
BDAV (Blu-ray Disc Audio/Visual, BD-AV) refers to one of the
application formats used for writable Blu-ray discs such as
BD-R, BD-RE, etc. BDAV is a recording format equivalent to
DVD-VR (VR mode) of the DVD specifications.
BD-J application
The BD-ROM format supports Java for interactive functions.
“BD-J” offers content providers almost unlimited functionality
when creating interactive BD-ROM titles.
BD-LIVE (page 30)
A variety of interactive content is available from BD-LIVE
compatible Blu-ray discs via the internet.
BDMV (page 7)
BDMV (Blu-ray Disc Movie, BD-MV) refers to one of the
application formats used for BD-ROM which is one of the
Blu-ray Disc specifications. BDMV is a recording format
equivalent to DVD-video of the DVD specification.
BD-R (page 7)
A BD-R (Blu-ray Disc Recordable) is a recordable, write-once
Blu-ray Disc. Since contents can be recorded and cannot be
overwritten, a BD-R can be used to archive data or for storing
and distributing video material.
BD-RE (page 7)
A BD-RE (Blu-ray Disc Rewritable) is a recordable and
rewritable Blu-ray Disc.
BD-ROM
BD-ROMs (Blu-ray Disc Read-Only Memory) are commercially
produced discs. Other than conventional movie and video
contents, these discs have enhanced features such as
interactive content, menu operations using pop-up menus,
selection of subtitle display, and slide shows. Although a
BD-ROM may contain any form of data, most BD-ROM discs
will contain movies in High Definition format for playback on
Blu-ray Disc players.
Blu-ray Disc (BD) (page 7)
A disc format developed for recording/playing high-definition
(HD) video (for HDTV, etc.), and for storing large amounts of
data. A single layer Blu-ray Disc holds up to 25 GB, and a
dual-layer Blu-ray Disc holds up to 50 GB of data.
Chapter number (pages 42, 43)
Sections of a movie or a music feature that are smaller than
titles. A title is composed of several chapters. Some discs
may only be comprised of a single chapter.
Copy guard
This function prevents copying. You cannot copy discs
marked by the copyright holder with a signal which prevents
copying.
Disc menu (page 29)
This lets you select things like the subtitle language or audio
format using a menu stored on the DVD video disc.
Dolby Digital
A sound system developed by Dolby Laboratories Inc. that
gives movie theater ambience to audio output when the
product is connected to a Dolby Digital processor or amplifier.
60
Dolby Digital Plus
A sound system developed as an extension to Dolby Digital.
This audio coding technology supports 7.1 multi-channel
surround sound.
Dolby TrueHD
Dolby TrueHD is a lossless coding technology that supports
up to 8 channels of multi-channel surround sound for the next
generation optical discs. The reproduced sound is true to the
original source bit-for-bit.
DTS
This is a digital sound system developed by DTS, Inc. for use
in cinemas.
DTS-HD High Resolution Audio
DTS-HD High Resolution Audio is a new technology
developed for the next generation high definition optical disc
format.
DTS-HD Master Audio
DTS-HD Master Audio is a lossless audio compression
technology developed for the next generation high definition
optical disc format.
DTS-HD Master Audio | Essential
DTS-HD Master Audio | Essential is a lossless audio
compression technology developed for the next generation
high definition optical disc format.
DVD upscaling (page 28)
Upscaling (upconverting) refers to a function of various
players and devices that enlarge the image size to fit the size
of the screen of video equipments such as a TV.
DVD video (page 7)
A disc format that contains up to eight hours of moving
pictures on a disc the same diameter as a CD. A single-layer
single sided DVD holds up to 4.7 GB; a double layer singlesided DVD, 8.5 GB; a single layer double-sided DVD, 9.4
GB; double-layer double-sided DVD, 17 GB. The MPEG 2
format was adopted for efficient video data compression. It is
a variable rate technology that encodes the data to according
to the status of the video for reproducing high-quality images.
Audio information is recorded in a multi-channel format such
as Dolby Digital, allowing for a realistic audio presence.
DVD-R/+R (page 7)
A DVD+/-R is a recordable, write-once DVD. Since contents
can be recorded and cannot be overwritten, a DVD+/-R can
be used to archive data or for storing and distributing video
material. The DVD+/-R has two different formats: VR format
and Video format. DVDs created in Video format have the
same format as a DVD video, while discs created in VR (Video
Recording) format allow the contents to be programed or
edited.
DVD-RW/+RW (page 7)
A DVD+/-RW is a recordable and rewritable DVD. The rerecordable feature makes editing possible. The DVD+/-RW
has two different formats: VR format and Video format. DVDs
created in Video format have the same format as a DVD
video, while discs created in VR (Video Recording) format
allow the contents to be programed or edited.
Page 61

Glossary
HDMI (page 17)
HDMI (High-Definition Multimedia Interface) is an interface
that supports both video and audio on a single digital
connection. The HDMI connection carries standard to high
definition video signals and multi-channel audio signals to
AV components such as HDMI equipped TVs, in digital form
without degradation.
Interlace format
Interlace format shows every other line of an image as a
single “field” and is the standard method for displaying
images on television. The even numbered field shows the
even numbered lines of an image, and the odd numbered
field shows the odd numbered lines of an image.
JPEG (pages 11, 35)
JPEG (Joint Photographic Experts Group) is a still image data
compression format and is used in most of digital cameras.
Letter Box (LB 4:3) (page 45)
A screen size with black bars on the top and bottom of the
image to allow viewing of wide-screen (16:9) material on a
connected 4:3 TV.
Linear PCM Sound
Linear PCM is a signal recording format used for Audio CDs
and on some DVD and Blu-ray discs. The sound on Audio
CDs is recorded at 44.1 kHz with 16 bits. (Sound is recorded
between 48 kHz with 16 bits and 96 kHz with 24 bits on DVD
video discs and between 48 kHz with 16 bits and 192 kHz
with 24 bits on BD video discs.)
MPEG-2
MPEG-2 (Moving Picture Experts Group phase 2) is one of
the video data compression schemes, which is adopted for
DVD videos and digital broadcasts worldwide. Some Blu-ray
Discs also use high bitrate MPEG-2.
Multi Angle (pages 41, 42, 43)
This is a feature of DVD and BD video discs. In some discs,
the same scene is shot from different angles, and these are
stored in a single disc so you can enjoy playback from each
angle. (This function can be enjoyed if the disc is recorded
with multiple angles.)
Multi Audio
This is a feature of DVD and BD video discs. This function
makes it possible to record different audio tracks for the same
video, so you can enhance your enjoyment by switching the
audio. (You can enjoy this function with discs recorded with
multiple audio tracks.)
Pan Scan (PS 4:3) (page 45)
A screen size that cuts off the sides of the image to allow
viewing of wide-screen (16:9) material on a connected 4:3 TV.
Parental control
In some digital broadcasts and BD/DVD video discs, a
control level for disc viewing is set depending on the age of
the viewer. With this Player, you can set the control level for
viewing such broadcasts and discs.
Pop-up menu (page 29)
An enhanced menu operation available on BD video discs.
The pop-up menu appears when POPUP MENU/MENU
is pressed during playback, and can be operated while
playback is in progress.
Progressive format
Compared to the Interlace format that alternately shows
every other line of an image (field) to create one frame, the
Progressive format shows the entire image at once as a single
frame. This means that while the Interlace format can show
30 frames/60 fields in one second, the Progressive format
can show 60 frames in one second. The overall picture quality
increases and still images, text, and horizontal lines appear
sharper.
Region code
Code identifying a geographic region of compatibility for a
BD/DVD.
Resume playback (page 28)
If you stop playback while it is in progress, the Player stores
the stop position in memory, and this function lets you
playback from that point.
Skip (page 39)
This returns to the start of the chapter (or track) being played,
or skips to the next chapter (or track).
Subtitles (pages 41, 42, 43)
These are the lines of text appearing at the bottom of the
screen which translate or transcribe the dialog. They are
recorded on many DVD and BD video discs.
Time number
This indicates the play time which has elapsed from the start
of a disc or a title. It can be used to find a specific scene
quickly. (It may not work with some discs.)
Title number
These numbers are recorded on DVD and Blu-ray discs.
When a disc contains two or more movies, these movies are
numbered as title 1, title 2, etc.
Top menu (page 29)
In a BD/DVD video, this is the menu for selecting things like
the chapter to be played back and the subtitle language. In
some DVD videos, the top menu may be called the “Title
Menu”.
Track number (pages 42, 43)
These numbers are assigned to the tracks which are
recorded on audio CDs. They enable specific tracks to be
located quickly.
x.v.Color
x.v.Color reproduces a greater range of color than before,
showing almost all of the colors that the human eye can
detect. (Applicable for JPEG files only with this system)
Appendix
61
Page 62

Specifications
General
Power requirements AC 120 V, 60 Hz
Power consumption (Normal) 23 W
Power consumption (Standby) 0.5 W (When “Quick Start” is set to “No”)
Dimensions
Weight BDP-33FD: Approx. 7 lb 5 oz (3.3 kg)
Operating temperature 41 °F to 95 °F (5 °C to 35 °C)
Storage temperature –4 °F to 131 °F (–20 °C to 55 °C)
Operating humidity 10 % to 80 % (no condensation)
TV systems NTSC system
BDP-33FD: Approx. 16
Approx. 420 mm 72.5 mm 228 mm (W H D)
BDP-31FD: Approx. 16 9/16 2 11/16 9 inch (W H D)
Approx. 420 mm 68 mm 228 mm (W H D)
BDP-31FD: Approx. 5 lb 9 oz (2.5 kg)
Playback
Playable discs BD-ROM, BD-RE Dual Layer, BD-R Dual Layer,
DVD Video, DVD-RW/-R/+RW/+R Dual Layer (Video/VR/AVCHD format),
Audio CD (CD-DA), CD-RW/-R (CD-DA, MP3, JPEG file format)
Input/Output
HDMI OUT HDMI 19-pin standard connector (5 V, 250 mA)
COMPONENT VIDEO OUTPUT Output level:
VIDEO OUTPUT Output level: 1 Vp-p (75 ohms)
DIGITAL OUT OPTICAL Terminal: Square Optical terminal
AUDIO OUTPUT Output level: 2 V rms (Output impedance: 1 k ohms)
USB Two sets (1 front, 1 rear), USB 2.0 High Speed (480 Mbit/s) correspondence
LAN (10/100) 10BASE-T/100BASE-TX
Y: 1 Vp-p (75 ohms)
, PR: 0.7 Vp-p (75 ohms)
P
B
Jacks: RCA jack
Jack: RCA jack
Jacks: RCA jack
9
/16 2 14/16 9 inch (W H D)
The specifications and design of this product are subject to change without notice.
OSS Licenses
The licenses for the open source software used on this player can be found at the end of this document.
62
Page 63

Disclaimer for Third Party Content
ACCESS TO THIRD PARTY CONTENT SERVICES, INCLUDING ALL ASSOCIATED FEATURES AND
FUNCTIONALITIES, IS PROVIDED “AS IS,” “AS AVAILABLE” AND AT THE USER’S OWN RISK, WITHOUT
WARRANTY OF ANY KIND. PIONEER DISCLAIMS ALL WARRANTIES, EXPRESS OR IMPLIED, IN CONNECTION
WITH ACCESS TO AND USE OF CONTENT SERVICES THROUGH THIS DEVICE, INCLUDING WITHOUT
LIMITATION WARRANTIES OF MERCHANTABILITY, SATISFACTORY QUALITY, FITNESS FOR A PARTICULAR
PURPOSE, AND NON-INFRINGEMENT. PIONEER DOES NOT GUARANTEE, REPRESENT, OR WARRANT
THAT CONTENT SERVICES WILL BE FREE FROM ERRORS, INTERRUPTION, LOSS, CORRUPTION, ATTACK,
VIRUSES, INTERFERENCE, HACKING, OR OTHER SECURITY INTRUSION, AND PIONEER DISCLAIMS ANY
LIABILITY IN CONNECTION WITH THE FOREGOING. PIONEER IS NOT LIABLE OR RESPONSIBLE FOR
ANY LOSS OR DAMAGE ARISING FROM ACCESS TO OR USE OF CONTENT. NO ORAL OR WRITTEN
INFORMATION OR ADVICE GIVEN BY PIONEER OR ITS CUSTOMER SERVICES REPRESENTATIVES WILL
CREATE ANY SUCH WARRANTY.
IN NO EVENT WILL PIONEER, ITS AFFILIATES, OR THEIR RESPECTIVE OFFICERS, DIRECTORS, OR
EMPLOYEES BE LIABLE IN CONNECTION WITH YOUR USE OF THIRD PARTY CONTENT SERVICES
THROUGH THIS DEVICE FOR PERSONAL INJURY OR SPECIAL, INCIDENTAL, INDIRECT OR CONSEQUENTIAL
DAMAGES OF ANY KIND, INCLUDING WITHOUT LIMITATION DAMAGES FOR ATTORNEY’S FEES, LOST
DATA OR LOST PROFITS, REGARDLESS OF THE THEORY OF LIABILITY AND WHETHER OR NOT ADVISED
OF THE POSSIBILITY OF SUCH DAMAGES. IN NO EVENT WILL PIONEER’S TOTAL LIABILITY TO YOU FOR
ALL DAMAGES ARISING FROM THE USE OR INABILITY TO USE THIRD PARTY CONTENT SERVICES (OTHER
THAN AS MAY BE REQUIRED BY LAW IN CASES INVOLVING PERSONAL INJURY) EXCEED $10.00. THE
FOREGOING LIMITATIONS WILL APPLY EVEN IF THE ABOVE REMEDY FAILS OF ITS ESSENTIAL PURPOSE.
IF ANY APPLICABLE AUTHORITY HOLDS ANY PORTION OF THIS SECTION TO BE UNENFORCEABLE, THEN
LIABILITY WILL BE LIMITED TO THE MAXIMUM EXTENT PERMITTED BY APPLICABLE LAW.
Published by Pioneer Corporation.
Copyright © 2010 Pioneer Corporation.
All rights reserved.
Appendix
63
Page 64

MODE D’EMPLOI
FRANÇAIS
Afin de pouvoir s’y référer facilement à l’avenir, noter le
numéro de série (situé sur l’arriére de l’appareil) dans
l’espace prévu à cet effet.
AVERTISSEMENT:
AFIN DE RÉDUIRE LES RISQUES D’INCENDIE ET D’ÉLECTROCUTION,
No du modèle:
No de série:
BDP-33FD/BDP-31FD
NE PAS PLACER CET APPAREIL DANS UN ENDROIT HUMIDE.
ATTENTION: POUR ÉVITER LES CHOCS ÉLECTRIQUES, INTRODUIRE LA LAME LA PLUS LARGE
DE LA FICHE DANS LA BORNE CORRESPONDANTE DE LA PRISE ET POUSSER JUSQU’AU FOND.
ATTENTION
RISQUE DE CHOC
ÉLECTRIQUE NE PAS OUVRIR
ATTENTION:
AFIN DE RÉDUIRE LE RISQUE DE CHOC
ÉLECTRIQUE, NE PAS RETIRER LE COUVERCLE.
AUCUN ORGANE INTERNE NE PEUT ÊTRE
RÉPARÉ PAR L’UTILISATEUR. CONFIER
L’APPAREIL À UN TECHNICIEN QUALIFIÉ.
INFORMATION
Cet appareil, après test, s’avère observer les normes d’un équipement digital de Classe B, selon la partie 15 des
lois FCC. Ces normes sont ètablies pour fournir une protection raisonnable contre des interférences nuisibles
avec une intallation ménagerè. Cet appareil gèneré, utilise et peut émettre des ondes radio enérgétiques, qui
peuvent provoquer des interferénces nuisibles avec les ondes de télécommunication, si l’appareil n’est pas
installé selon les instructions. Cependant, il n’y a aucune garantie qu’uneinteraction se produise avec une
installation particulière. Si cet appareil provoque des interférences nuisibles avec la réception des ondes radio ou
télé, qui peuvent être déterminées en allumant ou éteignant l’appareil, l’utilisateur est encouragé à essayer de
corriger ces interférences par une ou plusieurs des mesures suivantes:
—Déplacer ou régler l’antenne réceptrice.
—Augmenter l’espace entre l’appareil et la réception.
—Brancher l’appareil dans une prise d’un circuit different de celui de la réception.
—Consulter le fournisseur ou un technicien spécialisé en radio/TV pour de l’aide.
Ce symbole signale à l’utilisateur la
présence d’une tension non isolée
à l’intérieur de l’appareil qui peut
être la cause de dangereux chocs
electriques.
Ce symbole avertit l’utilisateur que
des instructions importantes
relatives à l’utilisation et a
l’entretien se trouvent dans le
manuel accompagnant l’appareil.
SEULEMENT U. S. A.
ATTENTION:
L’UTILISATION DE COMMANDES, DE RÉGLAGES
OU PROCESSUS AUTRES QUE CEUX QUI SONT
SPÉCIFIÉS DANS CE MANUEL RISQUE DE
PROVOQUER UNE EXPOSITION À DES RADIATIONS DANGEREUSES.
ÉTANT DONNÉ QUE LE FAISCEAU LASER UTILISÉ
DANS CET APPAREIL EST NOCIF POUR LES
YEUX, NE PAS ESSAYER DE DÉMONTER LE
BOÎTIER.
NE CONFIER LES TRAVAUX D’ENTRETIEN QU’ À
UN PERSONNEL QUALIFIÉ.
2
• Ce lecteur entre dans la classification des produits LASER
DE CLASSE 1.
• L’étiquette PRODUIT LASER DE CLASSE 1 est située sur
le cache arrière.
• Ce produit contient un appareil laser de faible puissance.
Afin de garantir en permanence la sécurité, ne retirez pas les
caches ni n’essayez d’accéder à l’intérieur du produit.
Confiez toute réparation à un technicien qualifié.
AC IN
USB
Page 65

Table des matières
Introduction
CHER CLIENT Pioneer ...................................................... 4
CONSIGNES DE SÉCURITÉ IMPORTANTES ................4-5
Informations importantes ................................................. 6
Icônes utilisées dans ce mode d’emploi ........................ 6
Droits d’auteur .............................................................. 6
À propos des disques ..................................................7-10
Types de disques pouvant être lus sur ce lecteur ..........7
Disques ne pouvant pas être lus sur ce lecteur ....................8
BD vidéo ....................................................................... 9
Titre, chapitre et plage ..................................................9
Icônes imprimées sur les boîtiers des disques DVD
vidéo .......................................................................... 9
Précautions à prendre avec les disques ...................... 10
À propos des fichiers ...................................................... 11
À propos de la lecture de fichiers audio ....................... 11
À propos de la lecture de fichiers photo ...................... 11
À propos des fichiers audio, des fichiers photo et des
dossiers ................................................................... 11
Vérification des accessoires ..........................................12
Noms et fonctions des éléments ..............................13-15
Appareil (Avant) ........................................................... 13
Afficheur de la face avant ............................................ 13
Appareil (Arrière) .......................................................... 14
Télécommande ........................................................... 15
Raccordement
Raccordements ..........................................................16-21
Raccordement à la prise HDMI ...................................17
Sélection de la sortie vidéo prioritaire lors de liaisons
HDMI et Vidéo composantes .................................... 17
Raccordement aux connecteurs à composantes ........18
Raccordement au connecteur vidéo............................19
Raccordement à la prise audio numérique ou aux
connecteurs audio .................................................... 20
Raccordement à la prise LAN (10/100)........................21
Lecture
Avant la lecture ...........................................................22-27
Insertion des piles dans la télécommande ................... 22
Portée approximative de la télécommande .........................22
Raccordement du cordon d’alimentation ....................22
Mise sous tension ....................................................... 23
Mise hors tension ...............................................................23
Réglage de la langue................................................... 23
Changement de la langue de l’affichage sur écran .............23
Commande du téléviseur avec la télécommande du
lecteur ...................................................................... 24
Liste des codes des divers fabricants .................................24
Extinction de l’afficheur et des voyants sur la face
avant ........................................................................ 25
Extinction par la télécommande ........................................25
Extinction par HOME MENU ..............................................25
À propos de la commande par l’HDMI ....................... 26
Utilisation de la commande par l’HDMI ...............................26
Ce que vous apporte la commande par l’HDMI ..................26
À propos de la fonction PQLS ............................................26
Lecteur RSS ...............................................................27
Affichage d’infos texte ........................................................27
Lecture ........................................................................28-36
Chargement d’un disque ............................................28
Lecture de BD vidéo et DVD vidéo .............................. 28
Affichage des informations du disque .................................28
Lecture de disques BD vidéo et DVD vidéo par le
menu ........................................................................ 29
Utilisation du menu principal ...............................................29
Utilisation du menu du disque ............................................29
Utilisation du menu contextuel ...........................................29
Utilisation de BONUSVIEW ou BD-LIVE ......................30
Lecture d’une image secondaire ........................................30
Lecture de BD-RE/-R,DVD-RW/-R ..............................31
Lecture par la sélection d’un titre .......................................31
Lecture par la sélection d’un chapitre .................................32
Tri des titres ....................................................................... 32
Lecture par la sélection d’une liste de lecture ..................... 32
Lecture du titre arrêté en cours de lecture ..........................32
Lecture de CD audio ................................................... 33
Lecture depuis le début......................................................33
Lecture par la sélection d’une plage ...................................33
Fonctionnement du menu « Functions » .............................33
Lecture de fichiers audio ............................................. 34
Sélection et lecture d’un autre fichier pendant la lecture .....34
Localisation d’un point pendant la lecture ..........................34
Lecture des fichiers JPEG ........................................... 35
Lecture en diaporama ........................................................ 35
Réglage de la vitesse du diaporama/lecture en boucle ....... 36
Lecture de vidéos YouTube ......................................... 36
Visionnage de contenu en ligne Netflix ........................37
Réglages pour le visionnage de films Netflix sur votre téléviseur
Ajout de films à la file d’attente ...........................................38
Visionnage d’un film de la liste d’attente sur votre téléviseur
Recherche rapide avant/arrière ..........................................38
Fonctions de lecture ..................................................39-41
Recherche rapide avant/arrière ...................................39
Localisation du chapitre (plage) suivant ou du début du
chapitre (plage) actuel ..............................................39
Pause ......................................................................... 39
Lecture image par image ............................................39
Lecture au ralenti ........................................................39
Recherche par saut ..................................................... 39
Relecture .................................................................... 39
Lecture répétée d’un titre ou d’un chapitre (Lecture en
boucle) ..................................................................... 39
Lecture répétée partielle (Lecture répétée d’un passage
précis) .............................................................................40
Commutation du mode audio .....................................41
Changement de sous-titres ......................................... 41
Changement d’angle................................................... 41
Affichage de l’index d’angle ...............................................41
Réglages pendant la lecture ......................................42-43
Commande des fonctions ........................................... 42
Comment utiliser la commande des fonctions .................... 42
Fonctions réglables ............................................................ 43
....37
......38
Réglages
Réglages .....................................................................44-55
Opérations courantes.................................................. 44
Fonctionnement de base de Réglages De Lecture ...... 44
Audio Video Settings ...................................................45
Quick Start .................................................................. 46
Auto Power Off ........................................................... 46
Control ........................................................................ 46
Playback Setting ......................................................... 47
Front Panel Display/LED .............................................47
Version ........................................................................ 47
System Reset .............................................................48
Communication Setup ................................................48
Sélection du type de connexion .........................................48
Changement des réglages de communication ...................48
Marche à suivre pour saisir manuellement des caractères ....50
USB Memory Management ......................................... 51
Software Update ......................................................... 52
Mise à jour automatique par le réseau ................................52
Mise à jour manuelle par le réseau .....................................53
Mise à jour manuelle par la clé USB ...................................53
Annexe
En cas de panne .........................................................56-59
Pour réinitialiser le lecteur ............................................ 59
Messages relatifs aux disques BD et DVD ....................59
Glossaire .....................................................................60-61
Spécifications .................................................................. 62
Licences OSS ...................................................................62
Les illustrations et affichages à l’écran dans ce mode *
d’emploi sont fournis à titre explicatif et peuvent être
légèrement différents des opérations réelles.
FRANÇAIS
3
Page 66

CHER CLIENT Pioneer
Nous vous remercions pour l’achat de ce produit Pioneer.
Veuillez lire attentivement ce mode d’emploi afin de connaître la manière d’utiliser l’appareil comme il convient.
Cela fait, conservez le mode d’emploi de façon à pouvoir vous y référer en cas de nécessité.
CONSIGNES DE SÉCURITÉ IMPORTANTES
L’électricité remplit de nombreuses fonctions utiles, mais si on l’utilise mal, elle peut occasionner des blessures et des dégâts
matériels. Bien que la conception et la fabrication de ce produit aient été axées sur la sécurité, une mauvaise utilisation de
l’appareil peut faire courir un risque d’électrocution et/ou d’incendie. Pour ne pas vous exposer à de tels dangers, respectez
les consignes suivantes lorsque vous installez, utilisez ou nettoyez l’appareil. Par mesure de sécurité et pour prolonger la durée
de service de votre lecteur de disques Blu-ray, veuillez lire attentivement les précautions suivantes avant de l’utiliser.
1)
Lisez ces instructions.
2)
Conservez ces instructions.
3)
Respectez les mises en garde.
4)
Suivez toutes les instructions.
5)
N’utilisez pas cet appareil à proximité de l’eau.
6)
Nettoyez uniquement avec un chiffon sec.
7)
Ne bloquez pas les ouvertures de ventilation. Installez l’appareil en respectant les instructions du fabricant.
8)
N’installez pas l’appareil à proximité de sources de chaleur comme des radiateurs, des chauffages, des cuisinières ou
d’autres appareils (y compris les amplificateurs) produisant de la chaleur.
9)
Ne passez pas outre la caractéristique de sécurité de la fiche polarisée ou avec mise à la terre. Une fiche polarisée
comprend deux lames dont une plus large que l’autre. Une fiche avec mise à la terre comprend deux lames et une
troisième broche de terre. La lame la plus large ou la troisième broche est une mesure de sécurité. Si la fiche fournie
ne rentre pas dans votre prise secteur, consultez un électricien pour remplacer la prise obsolète.
10)
Assurez-vous que le cordon secteur ne puisse être piétiné ou pincé tout particulièrement au niveau des fiches, des
prises de courant et aux points où il sort de l’appareil.
11)
N’utilisez que des accessoires/fixations recommandés par le fabricant.
12)
Placez l’appareil uniquement sur un chariot, un socle, un trépied, un support ou une table recommandé par le
fabricant ou vendu avec l’appareil. Si vous utilisez un chariot, manœuvrez avec précaution l’ensemble chariot/appareil
afin d’empêcher toute blessure suite à un renversement.
13)
Débranchez cet appareil pendant un orage ou lorsqu’il doit rester longtemps inutilisé.
14)
Faites appel à un technicien qualifié pour tout dépannage. Un dépannage est requis lorsque l’appareil a été
endommagé d’une façon ou d’une autre, comme lorsque le cordon secteur ou la fiche est endommagé, du
liquide a été renversé sur l’appareil ou des objets sont tombés dans l’appareil, l’appareil a été exposé à la
pluie ou à l’humidité, l’appareil ne fonctionne pas normalement ou l’appareil est tombé.
Informations complémentaires sur la sécurité
15)
Alimentation électrique — Cet appareil ne doit être utilisé qu’avec l’alimentation spécifiée sur l’étiquette signalétique.
En cas de doute sur le type de courant de votre domicile, consultez votre revendeur ou la compagnie d’électricité
locale. Pour les appareils fonctionnant sur batteries ou sur tout autre type d’alimentation, consultez le mode d’emploi.
16)
Surcharge électrique — Ne dépassez pas la capacité électrique des prises murales, des rallonges ou des prises de
courant intégrales, ceci risquant de provoquer un incendie ou une électrocution.
17)
Pénétration d’objets et de liquides — N’introduisez jamais d’objets par les orifices de cet appareil. Ils pourraient
toucher des points sous tension et court-circuiter des pièces et provoquer ainsi un incendie ou une électrocution.
Veillez également à ne jamais renverser de liquide dans l’appareil.
18)
Dommages nécessitant une réparation — Dans les situations ci-dessous, débranchez l’appareil de la prise murale et
faites appel à un technicien qualifié pour les réparations :
a)
si le cordon secteur ou la fiche est endommagée ;
b)
si du liquide a été renversé sur l’appareil ou si des objets sont tombés à l’intérieur ;
c)
si l’appareil a été exposé à la pluie ou à l’eau ;
d)
si l’appareil ne fonctionne pas normalement en suivant le mode d’emploi.
Ne touchez qu’aux commandes indiquées dans le mode d’emploi. Un réglage incorrect d’autres commandes
peut causer des dommages qui demanderont par la suite un travail intensif à un technicien qualifié.
e)
si l’appareil est tombé ou a été endommagé ;
f)
si l’appareil présente des changements visibles de performances - Ceci indique la nécessité d’une inspection
19)
20)
21)
22)
d’entretien.
Pièces de rechange — Si des pièces sont à remplacer, assurez-vous que le technicien utilise bien les pièces de
rechange prescrites par le fabricant ou ayant les mêmes caractéristiques que les pièces d’origine. L’utilisation de
pièces non autorisées peut occasionner un incendie, une électrocution et d’autres dangers.
Vérification de sécurité — Après un travail d’entretien ou de réparation, demandez au technicien d’effectuer les
vérifications de sécurité nécessaires pour s’assurer que l’appareil est en bon état de fonctionnement.
Montage au plafond ou au mur — Si vous montez l’appareil au mur ou au plafond, observez la procédure
d’installation recommandée par le fabricant.
La fiche secteur principale sert à débrancher l’appareil et doit toujours être aisément accessible.
4
Page 67

CONSIGNES DE SÉCURITÉ IMPORTANTES
Eau et humidité — N’utilisez pas l’appareil à proximité de l’eau, près d’une baignoire, d’un lavabo, d’un évier, d’une
•
machine à laver, par exemple, ni dans un sous-sol humide ou à proximité d’une piscine.
Support — Ne placez pas l’appareil sur un chariot, un support, un trépied ou une table instable. S’il est sur une base
•
instable, l’appareil peut tomber et provoquer des blessures corporelles graves ou être endommagé. Utilisez uniquement
un chariot, un support, un trépied ou une table recommandés par le fabricant ou vendus avec l’appareil. Pour monter
l’appareil sur un mur, suivez les instructions du fabricant. N’utilisez que du matériel recommandé par ce dernier.
Sélection de l’emplacement — Sélectionnez un emplacement bien aéré et éloigné de la lumière directe du soleil.
•
Ventilation — Les évents et autres ouvertures du coffret sont destinés à la ventilation. Ne les recouvrez pas et ne les
•
bloquez pas car une ventilation insuffisante risque de provoquer une surchauffe et/ou de réduire la durée de vie de
l’appareil. Ne placez pas l’appareil sur un lit, un sofa, un tapis ou une autre surface similaire risquant de bloquer les
ouvertures de ventilation. Ce produit n’est pas conçu pour être encastré ; ne le placez pas dans des endroits clos
comme une bibliothèque ou une étagère, sauf si une ventilation adéquate est prévue ou si les instructions du fabricant
sont respectées.
Sources de chaleur — Éloignez l’appareil des sources de chaleur comme les radiateurs, les chauffages et les autres
•
appareils produisant de la chaleur (y compris les amplificateurs).
Foudre — Pour mieux protéger cet appareil pendant un orage ou lorsqu’il doit rester longtemps sans surveillance et
•
inutilisé, débranchez-le de la prise murale et déconnectez l’antenne. Ceci l’empêchera d’être endommagé par la foudre
ou les surtensions de la ligne électrique.
Ne placez pas de bougies ni de flammes nues sur l’appareil ou à sa proximité, afin d’éviter les incendies.
•
Pour éviter les incendies ou les électrocutions, veillez à ne pas éclabousser ni faire tomber de l’eau sur cet appareil.
•
Ne placez jamais d’objets remplis de liquide, comme des vases, sur l’appareil.
Afin d’empêcher tout incendie ou électrocution, ne placez pas le cordon d’alimentation sous l’appareil ou autres objets
•
volumineux.
Mettez l’alimentation principale hors tension et débranchez le cordon secteur de la prise murale avant la manipulation.
•
Pour nettoyer le coffret extérieur, essuyez régulièrement l’appareil avec un chiffon doux.
•
N’utilisez pas de produits chimiques pour le nettoyer. Ils pourraient endommager la finition du coffret.
•
Introduction
ATTENTION
L’interrupteur STANDBY/ON de cet appareil ne
coupe pas complètement celui-ci de sa prise secteur.
Comme le cordon d’alimentation fait office de
dispositif de déconnexion du secteur, il devra être
débranché au niveau de la prise secteur pour que
l’appareil soit complètement hors tension. Par
conséquent, veillez à installer l’appareil de telle
manière que son cordon d’alimentation puisse être
facilement débranché de la prise secteur en cas
d’accident. Pour éviter tout risque d’incendie, le
cordon d’alimentation sera débranché au niveau de
la prise secteur si vous prévoyez une période
prolongée de non utilisation (par exemple avant un
départ en vacances).
D3-4-2-2-2a*_A1_Fr
Lorsque vous éliminez des piles / batteries usées,
veuillez vous conformer aux normes
gouvernementales ou aux règles des institutions
publiques environnementales en vigueur dans votre
pays ou région.
D3-4-2-3-1_B1_Fr
5
Page 68

Informations importantes
Icônes utilisées dans ce mode
d’emploi
........... Indique les fonctions réalisables sur les
BD VIDEO
BD-RE
BD-R
DVD VIDEO
DVD-RW
DVD-R
AVCHD
AUDIO CD
CD-RW
CD-R
USB
Droits d’auteur
Un support audio-visuel peut être composé d’œuvres
•
soumises à des droits d’auteur qui ne peuvent être
enregistrées sans l’autorisation du détenteur du droit
d’auteur. Consultez les lois applicables dans votre pays.
Ce produit fait appel à des principes technologiques
•
destinés à interdire la piraterie des œuvres protégées
par des droits d’auteurs, principes qui sont eux-mêmes
couverts aux États-Unis par des brevets et d’autres formes
de propriété intellectuelle. L’utilisation de ces principes
technologiques visant à la protection des droits d’auteur
doit être autorisée par Rovi Corporation et doit être
limité à des fins domestiques, ou similaires, sauf accord
préalable de Rovi Corporation. La rétro-technique ou le
désassemblage sont proscrits.
Fabriqué sous licence de Dolby Laboratories. Le
•
terme « Dolby » et le sigle double D sont des marques
commerciales de Dolby Laboratories.
Fabriqué sous licence sous couvert des brevets U.S. N° :
•
5,451,942 ; 5,956,674 ; 5,974,380 ; 5,978,762; 6,226,616 ;
6,487,535 ; 7,392,195 ; 7,272,567; 7,333,929 ; 7,212,872
et d’autres brevets U.S. et mondiaux, émis et en cours
d’enregistrement. DTS et le symbole sont des marques
déposées, et DTS-HD, DTS-HD Master Audio | Essential
et les logos DTS sont des marques commerciales de DTS,
Inc. Logiciel inclus dans ce produit. © DTS, Inc. Tous droits
réservés.
« Blu-ray Disc », « Blu-ray » et le logo « Blu-ray Disc » sont
•
des marques commerciales de Blu-ray Disc Association.
Le logo « BD-LIVE » est une marque commerciale de Blu-
•
ray Disc Association.
•
Logo Licensing Corporation.
disques BD vidéo.
........... Indique les fonctions réalisables sur les
disques BD-RE.
........... Indique les fonctions réalisables sur les
disques BD-R.
.......Indique les fonctions réalisables sur les
disques DVD vidéo.
........... Indique les fonctions réalisables sur les
disques DVD-RW.
............Indique les fonctions réalisables sur les
disques DVD-R.
........... Indique les fonctions réalisables
sur les disques DVD de format AVCHD.
........... Indique les fonctions réalisables sur les
disques CD audio.
..........Indique les fonctions réalisables sur les
disques CD-RW.
.........Indique les fonctions réalisables sur les
disques CD-R.
.........Indique les fonctions pouvant être utilisées
lors de la lecture d’une clé USB.
est une marque de commerce de DVD Format/
HDMI, le logo HDMI et High-Definition Multimedia Interface
•
sont des marques commerciales ou des marques
déposées de HDMI Licensing, LLC aux États-Unis et dans
d’autres pays.
« x.v.Color » et sont des marques
•
commerciales de Sony Corporation.
Java et toutes les marques et tous les logos contenant
•
le terme Java sont des marques commerciales ou des
marques déposées de Sun Microsystems, Inc. aux ÉtatsUnis et dans d’autres pays.
•
« BONUSVIEW » est une marque commerciale de Blu-ray
Disc Association.
Cette étiquette indique la compatibilité lors de la lecture
•
avec les disques DVD-RW enregistrés dans le format VR
(format d’enregistrement vidéo). Toutefois, dans le cas de
disques enregistrés avec un programme crypté pour un
enregistrement unique, la lecture n’est possible qu’à l’aide
d’un dispositif compatible avec le CPRM.
« AVCHD » et le logo « AVCHD » sont des marques
•
commerciales de Panasonic Corporation et de Sony
Corporation.
Ce produit intègre la police LC (copie interdite)
conçue par Sharp Corporation pour faciliter le
visionnage et la lecture de l’affichage.
Les logos « LC Font », « LC FONT » et « LC » sont des
marques commerciales de Sharp Corporation.
Notez aussi que ce produit utilise partiellement
d’autres polices que la police LC.
6
Page 69

À propos des disques
Types de disques pouvant être lus sur ce lecteur
Utilisez des disques conformes aux standards indiqués par les logos officiels sur l’étiquette du disque. La lecture
de disques non conformes à ces standards n’est pas garantie. Le fait de pouvoir lire ces disques ne garantit pas la
qualité d’image ou la qualité sonore.
Type de disque
BD
DVD
CD
BD VIDEO
BD-RE
BD-R
DVD VIDEO
DVD-RW
Conditions requises pour la lecture
Disque dont le code régional est « A »
ou « All Region ».
1
Ver. 2.1, SL (couche unique)/DL (double
*
couche)
Ver. 1.1, SL (couche unique)/DL (double
couche)
Ver. 1.2, SL (couche unique)/DL (double
1
couche)
*
Ver. 1.2, LTH TYPE
Ver. 1.3, SL (couche unique)/DL (double
couche)
Ver. 1.3, LTH TYPE
Disques dont le code région est « 1 »
ou « ALL ».
3
*
DVD-R
DVD+RW, DVD+R, DVD+R DL
DVD-R DL
AUDIO CD
Taille du disque Format d’enregistrement Contenu lisible
Format BDMV
2
Audio + vidéo
(film)
Audio + vidéo
(film)
Audio + vidéo
(film)
Audio + vidéo
(film)
12 cm
12 cm a
8 cm *
12 cm a
8 cm *
12 cm a
8 cm *
12 cm a
8 cm *
Format BDAV *
Format BDMV
4
4
4
4
Format vidéo
Format VR
Format vidéo
(disque finalisé)
Format AVCHD
Fichier MP3 Audio
Fichier JPEG Photos
Format vidéo
(disque finalisé)
Format AVCHD
Fichier MP3 Audio
Fichier JPEG Photos
Format CD musique Audio
Introduction
Format CD musique
12 cm a
4
8 cm *
CD-RW
*1 Les disques BD-RE/BD-R contenant à la fois le format BDMV et le format BDAV ne peuvent pas être lus.
2
*
Les disques à vitesse lente (format H.264) enregistrés sur des enregistreurs BD Pioneer peuvent également être
lus.
3
*
Le son PCM linéaire de 96 kHz est converti en son PCM linéaire de 48 kHz à sa sortie.
4
*
Les disques de 8 cm doivent être posés sur l’anneau du plateau de disque prévu pour les disques de 8 cm.
CD-R
Fichier MP3
Fichier JPEG Photos
Audio
Aucun adaptateur n’est nécessaire.
REMARQUE
Le fonctionnement et les fonctions des disques BD/DVD-vidéo peuvent différer des explications données dans ce manuel. De
•
plus, selon le fabricant des disques, certaines fonctions ne seront pas utilisables.
« Finalize » désigne l’opération effectuée à la fin d’un enregistrement qui permet de lire le disque enregistré à la fois sur
•
ce lecteur et sur d’autres lecteurs/ enregistreurs. Seuls les disques finalisés peuvent être lus sur ce lecteur. (Ce lecteur ne
possède pas de fonction pour finaliser les disques.)
7
Page 70

À propos des disques
Disques ne pouvant pas être lus sur ce lecteur
Les disques suivants ne pourront pas être lus ou ne seront pas lus correctement sur ce lecteur.•
Les disques ne comportant pas le code régional « A » ou « ALL ».
•
BD VIDEO
BD-RE
BD-R
DVD VIDEO
DVD-RW
DVD-R
DVD+RW
DVD+R
CD-RW
CD-R
AUDIO CD
CD vidéo
DTS-CD
Les disques sans indication de code régional peuvent parfois être lus, s’ils sont enregistrés dans le format NTSC.
Disques de format PAL ou SECAM
•
Les disques BD-RE Ver.1.0 ne peuvent pas être lus sur ce lecteur.
•
Les disques avec cartouche ne peuvent pas être lus.
•
Les disques ne comportant pas le code régional « 1 » ou « ALL » (disques vendus en dehors de la région de commercialisation
•
autorisée).
Disques de format PAL ou SECAM
•
Disques non autorisés (disques piratés)
•
Disques à usage professionnel
•
Les disques ne comportant aucune donnée
•
Disques enregistrés dans le format AVCREC
•
Selon l’enregistreur utilisé pour les graver, certains disques ne pourront pas être lus.
•
Disques non fi nalisés
•
Dans certains cas, il peut être impossible de lire des disques contenant à la fois des fi chiers musique/vidéo et des photos
•
(fi chiers JPEG).
Par ailleurs, certains disques ne peuvent pas être lus dans certaines situations.
Il peut être impossible de lire les disques suivants.
Disques DVD-R (format VR format)
•
Disques DVD-R DL (double couche)
•
Disques DVD+R DL (double couche)
•
Les disques ne comportant aucune donnée
•
Disques non fi nalisés
•
Disques multissession
•
Dans certains cas, il peut être impossible de lire des disques enregistrés dans d’autres formats que le format CD musique,
•
JPEG et MP3, ou les disques contenant à la fois des fi chiers musique/vidéo et des photos (fi chiers JPEG).
Par ailleurs, certains disques ne peuvent pas être lus dans certaines situations.
Certains disques ne pourront pas être lus à cause des conditions d’enregistrement ou de l’état du disque proprement dit.
•
Certains disques ne pourront pas être lus parce qu’ils ne sont pas compatibles avec ce lecteur ou à cause de l’enregistreur
•
utilisé pour les graver.
Dans certains cas, des CD contenant des signaux antipiratage (signaux de contrôle de la copie) ne pourront pas être lus.
•
Dans certains cas, des disques contenant à la fois du son DTS et du son PCM linéaire ne pourront pas être lus.
•
Ce lecteur a été conçu pour lire des CD musique conformes à la norme CD (Compact Disc).
Les CD vidéo ne peuvent pas être lus sur ce lecteur.•
Certains disques, par exemple les disques contenant des pistes audio PCM linéaire à côté d’autres pistes, ne seront pas lus
•
normalement.
Disques non mentionnés ci-dessus ne pouvant pas
être lus
1
• CDG*
• CD-Photos
• CD-ROM
• CD-TEXT*
• CD-EXTRA*
1
1
• SACD
• PD
• CDV
• CVD
• SVCD
• DVD-RAM
• DVD-Audio
• HD DVD
• CD-WMA
*1 Seul le son peut être lu.
8
À propos des disques de formes
particulières
Les disques de forme particulière (disques en forme de
cœur, disques hexagonaux, etc.) ne peuvent pas être
lus sur ce lecteur. Le lecteur peut être endommagé par
de tels disques. N’utilisez pas ces disques.
Page 71

À propos des disques
BD vidéo
Les BD offrent des fonctions caractéristiques, notamment
BONUSVIEW (BD-ROM Profile 1 Version 1.1), l’image dans
l’image et BD-LIVE (page 30).
Les disques BD vidéo compatibles avec BONUSVIEW/
BD-LIVE permettent d’accéder à d’autres contenus en
copiant les données des disques ou en les téléchargeant
d’Internet. Par exemple, cette fonction permet de lire le
film original comme image principale tout en lisant les
commentaires vidéo du réalisateur sur un petit écran incrusté.
REMARQUE
Les fonctions disponibles dépendent du disque.•
Titre, chapitre et plage
Les disques Blu-ray et les DVD se divisent en « Titles »
•
et en « Chapters ». Si le disque comporte plus d’un
film, chaque film a son propre « Title ». Les « Chapters »
correspondent eux à une sous-division des titres.
(Voir l’exemple 1.)
Les CD audio se divisent en « Tracks ». Une « Track »
•
correspond à un morceau d’un CD audio. (Voir l’exemple 2.)
Exemple 1 : Disque Blu-ray ou DVD
Titre 1
Chapitre 1 Chapitre 2 Chapitre 3 Chapitre 1
Exemple 2 : CD audio
Plage 1 Plage 2 Plage 3 Plage 4
Titre 2
Icônes imprimées sur les boîtiers
des disques DVD vidéo
1 2
1. English
2
2. Chinese
3 4 5
LB
16:9
1
Pistes audio et formats audio
Les disques DVD peuvent contenir jusqu’à 8 pistes
séparées avec une langue différente sur chacune d’elles.
La première dans la liste est la bande son originale.
Le format audio de chaque bande son est expliqué en
détail dans cette section — Dolby Digital, DTS, MPEG
etc.
Dolby Digital
Un système sonore mis au point par Dolby Laboratories
Inc. recréant l’ambiance d’une salle de cinéma lorsque le
lecteur est raccordé à un processeur ou un amplificateur
Dolby Digital.
DTS
DTS est un système sonore numérique mis au point par
DTS, Inc. pour les cinémas.
PCM linéaire
Le PCM linéaire est un format d’enregistrement des
signaux utilisé pour les CD audio et certains disques
DVD et Blu-ray. Le son sur un CD audio est enregistré à
44,1 kHz avec 16 bits. (Le son est enregistré entre
48 kHz avec 16 bits et 96 kHz avec 24 bits sur les
disques DVD vidéo et entre 48 kHz avec 16 bits et
192 kHz avec 24 bits sur les disques BD vidéo.)
2
Langues de sous-titres
Indique le type de sous-titres.
3
Format de l’écran
Format dans lequel un film est réalisé. Il existe différents
modes.
4
Angle de la caméra
Certains DVD contiennent des scènes prises sous 9
angles différents (la même scène peut-être prise de
l’avant, du côté gauche, du côté droit, etc.) et ces
scènes peuvent être vues sous différents angles.
5
Code régional
Indique le code régional (code régional lisible).
2
213
546
2
1. English
2. Chinese
Introduction
9
Page 72

À propos des disques
Précautions à prendre avec les
disques
Attention aux éraflures et à la poussière
Les disques BD, DVD et CD sont sensibles à la poussière,
•
aux empreintes digitales et surtout aux éraflures. Un
disque rayé risque de ne pas pouvoir être lu sur ce lecteur.
Manipulez les disques avec soin et rangez-les en lieu sûr.
Rangement correct des disques
Posez le disque au centre de son
boîtier et rangez le boîtier et le disque
à la verticale.
Évitez de ranger les disques à des
endroits exposés aux rayons directs
du soleil, à proximité d’appareil
de chauffage ou exposés à une
humidité élevée.
Ne faites pas tomber les disques et
ne les soumettez à des vibrations ou
chocs violents.
Évitez de ranger les disques à des
endroits très poussiéreux ou très
humides.
Précautions relative à la manipulation des
disques
Si la surface du disque est très sale, essuyez-la
•
délicatement avec un chiffon doux et humide (à l’eau
uniquement). Lorsque vous essuyez un disque, déplacez
toujours le chiffon du centre vers les bords.
Avertissements sur la condensation
De la condensation peut se former sur la lentille du capteur
•
optique ou sur le disque dans les situations suivantes :
Juste après avoir allumé un chauffage.
−
Dans une pièce embuée ou très humide.
−
Lorsque le lecteur est déplacé sans transition d’une
−
pièce froide vers une pièce chaude.
En cas de condensation :
Le lecteur ne parvient pas à lire les signaux sur le
•
disque et ne fonctionne pas correctement.
Pour éliminer la condensation :
Retirez le disque et laissez le lecteur éteint jusqu’à
•
ce que la condensation disparaisse. L’utilisation du
lecteur en cas de condensation peut causer une
panne.
N’utilisez pas de nettoyants en atomiseur pour disque,
•
du benzène, du diluant, des liquides contre l’électricité
statique ou tout autre solvant.
Ne touchez pas la surface du disque.
•
Ne collez pas de papier ou des étiquettes adhésives sur les
•
disques.
Si la surface de lecture d’un disque est très sale ou rayée,
•
le lecteur peut considérer que le disque est incompatible et
éjecter le plateau de disque, ou bien le disque ne sera pas
lu correctement.
Nettoyage de la lentille du capteur optique
N’utilisez jamais de disques de nettoyage en vente dans le
•
commerce. L’utilisation de ces disques peut endommager
la lentille.
Confiez le nettoyage de la lentille au SAV autorisé par
•
Pioneer le plus proche.
10
Page 73

À propos des fichiers
DVD-RW
DVD-R
CD-RW
CD-R
USB
À propos de la lecture de fichiers
audio
Les fichiers MP3 peuvent être lus.
Les fichiers enregistrés aux fréquences d’échantillonnage
•
suivantes sont pris en charge.
8 kHz, 11,025 kHz, 12 kHz, 16 kHz, 22,05 kHz, 24 kHz,
32 kHz, 44,1 kHz, 48 kHz
Seuls les fichiers pourvus de l’extension « .mp3 » ou
•
« .MP3 » peuvent être lus.
Pour obtenir un son de meilleure qualité, il est conseillé
•
d’enregistrer à un débit binaire d’au moins 128 kbps.
Les fichiers de 200 Mo maximum peuvent être lus.
•
Les fichiers audio qui ne sont pas de format MP3 (WMA,
•
etc.) ne peuvent pas être lus.
Certains fichiers MP3 ne peuvent pas être lus.
•
Les fichiers MP3 ne sont pas lus dans l’ordre de leur
•
enregistrement.
Les fichiers MP3 à enregistrer devraient l’être à une vitesse
•
lente. L’enregistrement rapide peut induire du bruit et
rendre le disque/le fichier illisible.
Si le disque contient de nombreux dossiers, il faudra un
•
certain temps pour les charger.
Selon la structure des dossiers, il faudra plus ou moins de
•
temps pour charger les fichiers MP3.
Pendant la lecture de fichiers audio, le temps écoulé peut
•
ne pas être indiqué correctement.
À propos de la lecture de fichiers
photo
Les fichiers JPEG peuvent être lus.
Les fichiers suivants peuvent être lus :
•
Fichiers conformes aux standards JPEG et Exif 2.2
−
baseline
Fichiers à extension : « .jpg » ou « .JPG »
−
Résolution : 32 x 32 à 7680 x 4320 pixels
−
Taille du fichier : 20 Mo ou moins
−
Le JPEG HD est pris en charge. Les images sont à la sortie
•
en haute définition 720p ou 1080i.
L’image peut apparaître avec des bandes verticale et
•
horizontale lorsque des fichiers JPEG d’un autre format
sont lus.
Les fichiers photo qui ne sont pas de format JPEG (TIFF,
•
etc.) ne peuvent pas être lus.
Certains fichiers JPEG ne peuvent pas être lus.
•
Les fichiers JPEG progressifs ne peuvent pas être lus.
•
Les fichiers JPEG animés ne peuvent pas être lus.
•
Dans certains cas, les fichiers JPEG traités avec un logiciel
•
de traitement de l’image ne seront pas lus.
Il peut être impossible de lire certains fichiers JPEG
•
téléchargés d’Internet ou joint à un message.
Selon le nombre de dossiers ou de fichiers, et selon leur
•
taille, certains fichiers JPEG peuvent être longs à lire.
Les données EXIF n’apparaissent pas.
•
À propos des fichiers audio, des
fichiers photo et des dossiers
Les fichiers audio et photos peuvent être lus sur ce
lecteur si les dossiers du disque ou de la clé USB sont
créés de la façon suivante.
Exemple de structure des dossiers :
Racine
001.jpg/001.mp3
xxx.jpg/xxx.mp3
01 Dossier Dossier 001.jpg/001.mp3
XX Dossier 001.jpg/001.mp3
* : Le nombre de dossiers et de fichiers dans un seul dossier
(y compris le répertoire racine) est limité à 256. Le nombre
maximal de dossiers imbriqués ne doit pas non plus être
supérieur à 5.
REMARQUE
Les noms de fichiers et de dossiers sur ce lecteur peuvent
•
être différents de ceux qui apparaissent sur l’ordinateur.
*
001.jpg/001.mp3
xxx.jpg/xxx.mp3
xxx.jpg/xxx.mp3
*
xxx.jpg/xxx.mp3
*
*
Introduction
11
Page 74

Vérification des accessoires
Télécommande
Pile de format « AA/R6 » (2)
Câble vidéo/audio Carte de garantie
•
Mode d’emploi
•
(ce manuel)
Cordon d’alimentation
(BDP-33FD)
ou
(BDP-31FD)
12
Page 75

Noms et fonctions des éléments
Appareil (Avant)
STANDBY/ON
1
STANDBY/ON(page 23)
2
(STOP) (page 28)
3
(PAUSE) (page 39)
4
Capteur de signaux de la télécommande
(page 22)
5
Voyant PQLS (page 26)
6
Voyant Blu-ray
S’éclaire à la mise sous tension du lecteur.
7
Plateau de disque (page 28)
Afficheur de la face avant
2
1
1
S’éclaire pendant la lecture.
2
S’éclaire pendant la pause.
4 6
3 7 821 9
PQLS
8
Voyant HDMI (page 26)
9
OPEN/CLOSE (page 28)
10
Voyant FL OFF (page 25)
11
Port USB (pages 21 et 51)
12
Afficheur de la face avant (Voir ci-dessous.)
13
(PLAY) (page 28)
36
Affichage alphanumérique
3
Indique le titre, le chapitre, le numéro de
plage, le temps écoulé, etc.
1151210 13
FL OFFHDMI OPEN/CLOSE
USB
Introduction
13
Page 76

Noms et fonctions des éléments
Appareil (Arrière)
1 2
6
5 8
4
3
7
AC IN
1
Prise RS-232C
Cette prise n’est pas utilisée.
2
Prise HDMI OUT (page 17)
3
Prise LAN (10/100) (page 21)
4
Connecteurs COMPONENT VIDEO
OUTPUT (page 18)
5
Connecteur VIDEO OUTPUT (page 19)
10
USB
BDP-33FD
9
6
Prise DIGITAL OUT OPTICAL (page 20)
7
Ventilateur
Le ventilateur opère lorsque le lecteur est
sous tension.
8
Prise AC IN (page 22)
9
Connecteurs AUDIO OUTPUT (page 20)
10
Port USB (pages 21 et 51)
14
Page 77

Noms et fonctions des éléments
Télécommande
1
2
3
4
5
6
7
8
9
10 24
11
12
13
14
15
16
17
18
19
20
21
22
23
25
26
27
28
29
30
31
1
STANDBY/ON (page 23)
2
Touches TV CONTROL (page 24)
3
AUDIO (page 41), SUBTITLE (page 41), ANGLE (page 41)
4
Touches numériques (page 43)
5
CLEAR (page 43)
6
SECONDARY VIDEO (page 30)
7
REPEAT (pages 39 et 40), REPEAT OFF (pages 39 et 40)
8
EXIT (page 44)
9
DISPLAY (pages 28 et 40)
10
TOP MENU/DISC NAVIGATOR (pages 29 et 31)
11
Touches directionnelles (), ENTER (pages
23 et 44)
12
HOME MENU (pages 23 et 44)
13
REV (page 39)
14
PLAY (page 28)
15
(page 39)
16
PAUSE (page 39)
17
OPEN/CLOSE (page 28)
18
VIDEO OUTPUT RESET (page 45)
19
FRONT LIGHT (page 25)
20
ENTER (pages 23 et 44)
21
KEY LOCK (Voir ci-dessous.)
22
PAGE +/– (page 31)
23
FUNCTION (page 42)
24
POPUP MENU/MENU (page 29)
25
RETURN (page 44)
26
FWD (page 39)
27
(page 39)
28
STOP (page 28)
29
ROUGE, VERT, BLEU, JAUNE (page 31)
30
SKIP SEARCH (page 39)
REPLAY (page 39)
31
Verrouillage des touches
Les touches peuvent être verrouillées pour ne pas être
pressées accidentellement.
Cette fonction permet aussi aux téléviseurs compatibles
avec la commande par l’HDMI de verrouiller les touches
sur le lecteur.
Appuyez plus de 5 secondes sur KEY LOCK.
Chaque fois que vous effectuez cette opération, la
•
fonction est activée ou désactivée.
Si vous tentez de mettre en marche le lecteur alors que
•
les touches sont verrouillées, « HOLD » s’allumera sur
l’afficheur de la face avant pour indiquer que la fonction
est activée.
Introduction
REMARQUE
Cette télécommande est dotée de deux touches ENTER
•
(11 et 20 ci-dessus).
15
Page 78

Raccordements
Veillez à toujours éteindre les appareils et à débrancher le cordon d’alimentation de la prise secteur avant de
raccorder un appareil ou de changer les liaisons.
Ce lecteur est pourvu des prise/connecteurs suivants. Repérez les prise/connecteur correspondant sur votre appareil
vidéo. Branchez d’abord le câble vidéo fourni ou un câble vidéo du commerce. Branchez ensuite le câble audio.
Prises/connecteurs vidéo du lecteur
Qualité supérieure
Qualité standard
Prise HDMI OUT
Connecteurs
COMPONENT VIDEO
OUTPUT
Connecteur VIDEO
OUTPUT
Prises/connecteurs audio du lecteur
Liaison audio numérique
Qualité supérieure
Prise HDMI OUT
Prise DIGITAL OUT
OPTICAL
Page 17
Page 18
Page 19
Page 17
Page 20
Qualité standard
Liaison audio analogique
Qualité standard
Connecteurs AUDIO
OUTPUT
Connexion Internet haut débit
Prise LAN (10/100)
16
Page 20
Page 21
Page 79

Raccordements
Raccordement à la prise HDMI
La prise HDMI permet d’obtenir une image et d’un son numériques de grande qualité.
•
Voir page 55 pour en savoir plus sur les signaux de sortie des formats audio les plus récents.
•
Raccordez des Câble HDMI haute vitesse lorsque vous utilisez la commande par l’HDMI. La commande par
•
l’HDMI peut ne pas fonctionner correctement si vous utilisez d’autres câbles HDMI.
ÉTAPES
Veillez à éteindre ce lecteur et l’autre appareil avant de les relier.
1
Insérez à fond le câble HDMI (en vente dans le commerce) dans les prises HDMI ( et ).
2
Panneau arrière de ce lecteur
Lorsque la sortie
•
HDMI est utilisée, la
sortie numérique 7.1
canaux est disponible.
Vers la prise HDMI OUT
(en vente dans le commerce)
Câble HDMI
Vers la prise HDMI IN
REMARQUE
Le son transmis dans les formats
•
AC IN
USB
USB
BDP-33FD
DTS-HD High Resolution Audio et
DTS-HD Master Audio ressort par la
prise HDMI en Bitstream. Raccordez
un amplificateur avec décodeur
intégré pour bénéficier d’une qualité
sonore extra-fine.
Sélection de la sortie vidéo prioritaire lors de liaisons
HDMI et Vidéo composantes
Lorsque vous raccordez à la fois un câble HDMI et un câble à
composantes à ce lecteur, vous devez sélectionner la sortie vidéo prioritaire
dans « Settings » – « Audio Video Settings » – « Video Out Select ». (Voir
page 45.)
REMARQUE
Lorsque vous raccordez ce lecteur à un téléviseur Pioneer uniquement avec
•
un câble HDMI et que le téléviseur est sous tension, la sortie vidéo se règle
automatiquement sur l’HDMI. (Le réglage ci-dessus n’est pas nécessaire.)
Lorsque vous raccordez le lecteur au téléviseur avec un câble HDMI, la « HDMI
•
Video Out » se règle sur « Auto ». Si vous n’obtenez pas une image stable,
sélectionnez la résolution souhaitée.
Lorsque vous réglez la « HDMI Video Out » sur un autre réglage que « Auto »,
vous ne pouvez sélectionner que des résolutions compatibles avec le téléviseur
raccordé.
Reportez-vous à « HDMI Video Out » à la page 45 pour les résolutions de la sortie
•
vidéo HDMI.
Raccordement
TéléviseurProjecteur Récepteur AV
Appareil pourvu d’une prise HDMI
Après le raccordement
Si nécessaire, raccordez un appareil audio. (Page 20)
•
Insérez un disque et lancez la lecture. (Page 28)
•
Reportez-vous à la commande par l’HDMI. (Pages 26 et 46)
•
17
Page 80

Raccordements
Raccordement aux connecteurs à composantes
Les connecteurs à composantes permettent d’obtenir des images de qualité élevée et une reproduction fidèle des
couleurs.
ÉTAPES
Veillez à éteindre ce lecteur et l’autre appareil avant de les relier.
1
Insérez à fond le câble vidéo à composantes (en vente dans le commerce) dans les connecteurs à
2
composantes ( et ).
Panneau arrière de ce lecteur
AC IN
USB
Rouge
Bleu
Vert
Projecteur
Vers les prises d’entrée
COMPONENT VIDEO
(CR)
)
(C
B
Rouge
Bleu
Vert
(Rouge)
(Bleu)
(Vert)
Téléviseur
USB
(Rouge)
(Bleu)
(Vert)
Vers les connecteurs
COMPONENT VIDEO OUTPUT
Câble vidéo à composantes
(en vente dans le commerce)
Récepteur AV
BDP-33FD
ATTENTION
Vous devez sélectionner la sortie vidéo prioritaire
•
dans « Settings » – « Audio Video Settings »
– « Video Out Select ». (Voir page 45.)
Lorsque la sortie vidéo prioritaire est réglée sur
•
« HDMI » dans « Video Out Select », la résolution
vidéo à la sortie des connecteurs COMPONENT
VIDEO OUTPUT est celle qui a été spécifiée pour
la « HDMI Video Out ». (Voir page 45.)
Lorsque le signal provenant des connecteurs
•
COMPONENT VIDEO OUTPUT est
prioritaire, réglez le signal vidéo prioritaire sur
« Component ».
STANDBY/ON
PQLS
FL OFFHDMI OPEN/CLOSE
USB
MagnétoscopeCe lecteur Téléviseur
REMARQUE
Raccordez le lecteur de disque Blu-ray
•
directement au téléviseur.
Lorsque vous enregistrez un programme protégé
•
contre le piratage, la protection contre la copie
s’active automatiquement et le programme ne
peut pas être enregistré correctement. De plus,
à cause de cette fonction, l’image sera déformée
si le disque est lu via un magnétoscope. Il ne
s’agit pas d’une défaillance. Pour regarder un
programme protégé contre le piratage, il est
conseillé de raccorder le lecteur de disque Blu-ray
Disc directement au téléviseur.
Appareil vidéo pourvu de connecteurs à composantes
Après le raccordement
Raccordez à l’appareil audio ou aux prises audio du téléviseur. (Page 20)•
18
Page 81

Raccordements
Raccordement au connecteur vidéo
Le connecteur VIDEO OUTPUT permet de visionner les images.
ÉTAPES
Veillez à éteindre ce lecteur et l’autre appareil avant de les relier.
1
Insérez à fond le câble AV (fourni) dans les connecteurs vidéo ( et ).
2
Panneau arrière de ce lecteur
USB
USB
Vers le connecteur
VIDEO OUTPUT
(Jaune)
Jaune
AC IN
BDP-33FD
STANDBY/ON
PQLS
Ce lecteur
FL OFFHDMI OPEN/CLOSE
USB
Magnétoscope
Raccordement
Téléviseur
Câble AV (fourni)
Vers le connecteur
d’entrée VIDEO
(Jaune)
VIDEO L - AUDIO -R
Jaune
AV INPUT
Projecteur
Appareil vidéo pourvu d’un connecteur vidéo
Après le raccordement
Raccordez à l’appareil audio ou aux prises audio du téléviseur. (Page 20)•
Téléviseur
Récepteur AV
REMARQUE
Raccordez le lecteur de disque Blu-ray
•
directement au téléviseur.
Lorsque vous enregistrez un programme protégé
•
contre le piratage, la protection contre la copie
s’active automatiquement et le programme ne
peut pas être enregistré correctement. De plus,
à cause de cette fonction, l’image sera déformée
si le disque est lu via un magnétoscope. Il ne
s’agit pas d’une défaillance. Pour regarder un
programme protégé contre le piratage, il est
conseillé de raccorder le lecteur de disque
Blu-ray Disc directement au téléviseur.
19
Page 82

Raccordements
Raccordement à la prise audio numérique ou aux connecteurs audio
Un appareil audio ou le téléviseur peut être raccordé à la prise DIGITAL OUT OPTICAL ou aux connecteurs
•
AUDIO OUT.
Voir page 55 pour en savoir plus sur les signaux de sortie des formats audio les plus récents.
•
ÉTAPES
Veillez à éteindre ce lecteur et l’autre appareil avant de les relier.
1
Insérez à fond le câble numérique optique (disponible dans le commerce) ou le câble AV (fourni) aux prises
2
audio numériques optiques ou aux connecteurs audio ( et , ou et ).
Panneau arrière de ce lecteur
AC IN
USB
(Blanc)
(Rouge)
USB
Blanc
Rouge
•
REMARQUE :
Le son 7.1 canaux est disponible via la prise HDMI.
BDP-33FD
Lorsqu’une sortie OPTICAL est utilisée,
la sortie numérique 5.1 canaux est disponible.
la sortie numérique 7.1 canaux n’est pas disponible.
Vers les connecteurs
AUDIO OUTPUT
Câble vidéo/audio
(fourni)
Vers le prise DIGITAL
OUT OPTICAL
Câble numérique optique
(en vente dans le commerce)
Vers les connecteurs
d’entrée AUDIO
(Blanc)(Rouge)
VIDEO L - AUDIO -R
RougeBlanc
AV INPUT
Téléviseur
DIGITAL AUDIO IN
Amplificateur
Appareil audio avec prise d’entrée audio numérique
Après le raccordement
Insérez un disque et lancez la lecture. (Page 28)•
OPTICAL
Vers la prise
d’entrée OPTICAL
20
Page 83

Raccordements
Raccordement à la prise LAN (10/100)
La connexion à Internet permet de profiter des fonctions BD-LIVE et des vidéos de YouTube et de mettre à jour
•
le logiciel du lecteur.
Une connexion Internet haut débit, telle qu’illustrée ci-dessous, est nécessaire.
•
Une connexion Internet haut débit nécessite un abonnement auprès d’un fournisseur d’accès à Internet.
•
ÉTAPES
Veillez à éteindre ce lecteur et l’autre appareil avant de les relier.
1
Raccordez bien à fond un câble LAN (en vente dans le commerce) à la prise LAN (10/100) ( et ) ou un adaptateur LAN
2
sans fil USB AS-WL100 (vendu séparément en option) au port USB sur la face avant ou le panneau arrière de ce lecteur ().
Panneau arrière de ce lecteur
BDP-33FD
Vers la prise
LAN (10/100)
(en vente dans le commerce)
Câble LAN
Vers la prise
LAN
USB
USB
USB
USB
Clé adaptateur LAN sans fil USB
AS-WL100 (vendue séparément
en option) ou clé USB (en vente
dans le commerce)
ATTENTION
Utilisez l’adaptateur LAN sans fil USB préconisé par Pioneer et vendu séparément
•
en option. Le fonctionnement n’est pas garanti avec d’autres clés électroniques
LAN sans fil.
Ne débranchez pas l’adaptateur LAN sans fil USB quand le lecteur fonctionne.
•
Une connexion Internet haut débit nécessite un abonnement auprès d’un
•
fournisseur d’accès à Internet. Adressez-vous au fournisseur d’accès à Internet le
plus proche pour en savoir plus.
Reportez-vous au mode d’emploi de votre appareil car la méthode de connexion
•
et l’appareil raccordé peuvent varier selon l’environnement Internet.
N’utilisez pas de rallonge USB pour raccorder une clé USB à la prise USB du
•
lecteur. L’utilisation d’une rallonge USB peut empêcher le lecteur de fonctionner
correctement.
REMARQUE
Utilisez un concentrateur/routeur Ethernet 10BASE-T/100BASE-TX.•
LAN
Face avant de ce lecteur
FL OFFOPEN/CLOSE
USB
USB
USB
Vers le port
USB
Utilisation de BONUSVIEW
ou BD-LIVE
•
Une clé USB (en vente dans le
commerce) est indispensable.
La clé utilisée doit être conforme
aux spécifications USB 2.0 et
avoir une capacité minimale
de 1 Go, 2 Go ou plus étant
recommandés.
Raccordement
Internet Modem
Concentrateur
Ethernet
(routeur avec fonction
concentrateur)
Ordinateur
Exemple de connexion Internet haut débit
Après le raccordement
Effectuez le réglage nécessaire pour la communication. (Page 48)
•
Insérez un disque compatible BD-LIVE et lancez la lecture. (Page 30)
•
21
Page 84

Avant la lecture
Insertion des piles dans la
télécommande
Ouvrez le couvercle arrière.
1
Appuyez légèrement
sur cette partie et faites
glisser dans le sens de
la flèche.
2
Insérez les piles (AA/R6 x 2).
Insérez les piles en tenant compte des repères
/ dans le logement de piles.
Insérez d’abord le côté
négatif ().
Fermez le couvercle arrière.
3
Fermez bien le couvercle (vous devez entendre un clic).
ATTENTION
N’utilisez que les piles spécifiées à l’exclusion de toute autre.
•
N’utilisez pas non plus une pile neuve avec une pile usée.
Lorsque vous mettez les piles dans la télécommande, veillez
•
à les orienter correctement, tel qu’indiqué par les marques
de polarité ( et ).
N’exposez pas les piles à la chaleur, ne les ouvrez pas ou ne
•
les jetez pas au feu ou dans l’eau.
La tension des piles peut être différente, même si les piles
•
semblent identiques. N’utilisez pas différents types de piles.
Pour éviter toute fuite d’électrolyte, retirez les piles si vous
•
prévoyez de ne pas utiliser la télécommande pendant
un certain temps (1 mois ou plus). Si une pile devait fuir,
essuyez soigneusement l’intérieur du logement puis insérez
des piles neuves. Si le liquide d’une pile devait fuir et se
répandre sur votre peau, lavez-le immédiatement avec une
grande quantité d’eau.
Lorsque vous éliminez des piles / batteries usées, veuillez
•
vous conformer aux normes gouvernementales ou aux
règles des institutions publiques environnementales en
vigueur dans votre pays ou région.
N’utilisez, ni ne conservez vos piles à la lumière directe du
•
soleil ou dans un endroit fortement exposé à la chaleur,
comme une voiture ou à proximité d’un appareil de
chauffage. Les piles risqueraient de suinter, surchauffer,
exploser ou s’enflammer. La durée de vie et la performance
des piles peuvent également être réduites.
Portée approximative de la
télécommande
Capteur de signaux de la télécommande
STANDBY/ON
PQLS
30º 30º
7 m
Télécommande
Raccordement du cordon
d’alimentation
Ne branchez le cordon d’alimentation que lorsque
toutes les appareils sont raccordés.
AC IN
USB
BDP-33FD
Vers la prise AC IN
Vers une prise secteur
REMARQUE
Placez le lecteur près de la prise secteur et gardez la fiche
•
du cordon d’alimentation à proximité.
AFIN DE RÉDUIRE LE RISQUE D’ÉLECTROCUTION, NE
•
TOUCHEZ PAS LES PIÈCES NON ISOLÉES DES CÂBLES
LORSQUE LE CORDON D’ALIMENTATION EST BRANCHÉ.
Si vous prévoyez de ne pas utiliser le lecteur pendant une
•
période prolongée, veillez à retirer le cordon secteur de la
prise secteur.
22
Page 85

Avant la lecture
Mise sous tension
STANDBY/ON
STANDBY/ON
PQLS
FL OFFHDMI OPEN/CLOSE
USB
Appuyez sur STANDBY/ON.
•
Vous pouvez utiliser le touches de la télécommande ou de
l’appareil.
•
« POWER ON » apparaît sur l’afficheur de la face avant.
•
Si aucun disque n’est inséré lorsque vous mettez l’appareil
sous tension, l’écran du logo Pioneer (papier peint)
apparaît.
•
Si le disque est inséré lorsque vous mettez l’appareil sous
tension, un menu peut s’afficher automatiquement pour
certains disques.
Il suffit alors d’appuyer sur STOP ou EXIT pour dégager
l’écran de menu du disque et afficher le papier peint.
Mise hors tension
Appuyez une nouvelle fois sur STANDBY/ON.
Vous pouvez utiliser le touches de la télécommande ou de
•
l’appareil.
« POWER OFF » apparaît sur l’afficheur de l’appareil.
•
Si vous appuyez à nouveau sur STANDBY/ON juste
•
après la mise en veille, le lecteur peut ne pas s’allumer.
Dans ce cas, attendez 10 secondes ou plus, puis rallumez
le voyant STANDBY/ON.
Réglage de la langue
Changement de la langue de
l’affichage sur écran
Appuyez sur HOME MENU pour afficher la page
1
HOME MENU.
Lorsque le papier peint est affiché, la page HOME
•
MENU peut aussi être affichée en sélectionnant l’icône
de menu ( ) avec puis appuyant sur ENTER.
Appuyez sur pour sélectionner « On
2
Screen Language », puis appuyez sur ENTER.
Web Content Photos
Disc Navigator
Appuyez sur pour sélectionner la langue
3
d’affichage souhaitée, puis appuyez sur ENTER.
English
Español
Français
REMARQUE
Pour sélectionner la langue d’un disque DVD, par exemple
•
la langue des sous-titres, etc. reportez-vous à la page 29.
Music
On Screen LanguageSettings
Lecture
23
Page 86

Avant la lecture
Commande du téléviseur avec la
télécommande du lecteur
Si le code fabricant de votre marque de téléviseur a
été enregistré sur la télécommande du lecteur, celle-ci
pourra être utilisée également pour la commande du
téléviseur.
ATTENTION
Il ne sera peut-être pas possible de faire fonctionner
•
certains modèles de téléviseur avec la télécommande du
lecteur, bien que ces modèles figurent dans la liste des
codes des fabricants.
La télécommande peut revenir à ses réglages par défaut
•
lors du remplacement des piles. Dans ce cas, reprécisez
le code.
Spécifiez le code fabricant à 2 chiffres.
1
Appuyez sur les touches numériques (0 à 9) pour
•
saisir le code tout en appuyant sur TV CONTROL .
REMARQUE
Le réglage usine est 00 (PIONEER).
•
Si vous commettez une erreur lors de la saisie du code,
•
relâchez TV CONTROL et recommencez depuis le
début.
S’il existe plusieurs codes pour le même fabricant, essayez
•
chacun dans l’ordre indiqué jusqu’à ce que le téléviseur
fonctionne.
Assurez-vous que le téléviseur fonctionne.
2
Commande du téléviseur avec TV CONTROL
•
– Sert à allumer ou éteindre le TV.
INPUT SELECT – Sert à changer l’entrée du téléviseur.
CH +/– – Sert à sélectionner la chaîne de télévision.
VOL +/– – Sert à régler le volume.
24
Liste des codes des divers
fabricants
Fabricants Code(s)
PIONEER 00, 31, 32, 07, 36, 42,
51
ACURA 44
ADMIRAL 31
AIWA 60
AKAI 32, 35, 42
AKURA 41
ALBA 07, 39, 41, 44
AMSTRAD 42, 44, 47
ANITECH 44
ASA 45
ASUKA 41
AUDIOGONIC 07, 36
BASIC LINE 41, 44
BAUR 31, 07, 42
BEKO 38
CONTEC 44
CROSLEY 32
CROWN 38, 44
CRYSTAL 42
CYBERTRON 41
DAEWOO 07, 44, 56
DAINICHI 41
DANSAI 07
DAYTON 44
DECCA 07, 48
DIXI 07, 44
DUMONT 53
ELIN 07
ELITE 41
ELTA 44
EMERSON 42
ERRES 07
FERGUSON 07, 36, 51
FINLANDIA 35, 43, 54
FINLUX 32, 07, 45, 48, 53, 54
FIRSTLINE 40, 44
FISHER 32, 35, 38, 45
FORMENTI 32, 07, 42
FRONTECH 31, 42, 46
FRONTECH/PROTECH 32
FUJITSU 48
FUNAI 40, 46, 58
GBC 32, 42
GE 00, 01, 08, 07, 10, 11, 17,
02, 28, 18
GEC 07, 34, 48
GELOSO 32, 44
GENERAL 29
GENEXXA 31, 41
GOLDSTAR 10, 23, 21, 02, 07,
50
GOODMANS 07, 39, 47, 48, 56
GORENJE 38
GPM 41
GRAETZ 31, 42
GRANADA 07, 35, 42, 43, 48
GRADIENTE 30, 57
GRANDIN 18
GRUNDIG 31, 53
TIC
HANSEA
HCM 18, 44
HINARI 07, 41, 44
HISAWA 18
HITACHI 31, 33, 34, 36, 42, 43,
54, 06, 10, 24, 25, 18
HUANYU 56
HYPSON 07, 18, 46
ICE 46, 47
IMPERIAL 38, 42
INDIANA 07
INGELEN 31
INTERFUNK 31, 32, 07, 42
INTERVISION 46, 49
07, 42
BEON 07
BLAUPUNKT 31
BLUE SKY 41
BLUE STAR 18
BPL 18
BRANDT 36
BTC 41
BUSH 07, 41, 42, 44, 47, 56
CASCADE 44
CATHAY 07
CENTURION 07
CGB 42
CIMLINE 44
CLARIVOX 07
CLATRONIC 38
CONDOR 38
MARK 07
MATSUI 07, 39, 40, 42, 44, 47,
48
MCMICHAEL 34
MEDIATOR 07
MEMOREX 44
METZ 31
MINERVA 31, 53
MITSUBISHI 09, 10, 02, 21, 31
MULTITECH 44, 49
NEC 59
NECKERMANN 31, 07
NEI 07, 42
NIKKAI 05, 07, 41, 46, 48
NOBLIKO 49
NOKIA 32, 42, 52
NORDMENDE 32, 36, 51, 52
OCEANIC 31, 32, 42
ORION 32, 07, 39, 40
OSAKI 41, 46, 48
OSO 41
OSUME 48
OTTO VERSAND 31, 32, 07, 42
ALLADIUM
P
PANAMA 46
PANASONIC 31, 07, 08, 42, 22
PATHO CINEMA 42
PAUSA 44
PHILCO 32, 42
PHILIPS 31, 07, 34, 56, 68
PHOENIX 32
PHONOLA 07
PROFEX 42, 44
PROTECH 07, 42, 44, 46, 49
QUELLE 31, 32, 07, 42, 45, 53
R-LINE 07
RADIOLA 07
RADIOSHACK 10, 23, 21, 02
RBM 53
RCA 01, 10, 15, 16, 17, 18, 61,
62, 09
REDIFFUSION 32, 42
REX 31, 46
ROADSTAR 41, 44, 46
SABA 31, 36, 42, 51
SAISHO 39, 44, 46
SALORA 31, 32, 42, 43
SAMBERS 49
SAMSUNG 07, 38, 44, 46, 69, 70
SANYO 35, 45, 48, 21, 14, 91
SBR 07, 34
SCHAUB LORENZ 42
SCHNEIDER 07, 41, 47
SEG 42, 46
SEI 32, 40, 49
SELECO 31, 42
SHARP 02, 19, 27, 67, 90
SIAREM 32, 49
38
Page 87

Avant la lecture
ISUKAI 41
ITC 42
ITT 31, 32, 42
JEC 05
JVC 13, 23
KAISUI 18, 41, 44
KAPSCH 31
KENDO 42
KENNEDY 32, 42
KORPEL 07
KOYODA 44
LEYCO 07, 40, 46, 48
LIESENK&TTER 07
LOEWE 07
LUXOR 32, 42, 43
M-ELECTRONIC 31, 44, 45, 54,
56, 07, 36, 51
MAGNADYNE 32, 49
MAGNAFON 49
MAGNAVOX 07, 10, 03, 12, 29
MANESTH 39, 46
MARANTZ 07
SIEMENS 31
SINUDYNE 32, 39, 40, 49
SKANTIC 43
SOLAVOX 31
SONOKO 07, 44
SONOLOR 31, 35
SONTEC 07
SONY 04
SOUNDWAVE 07
STANDARD 41, 44
STERN 31
SUSUMU 41
SYSLINE 07
TANDY 31, 41, 48
TASHIKO 34
TATUNG 07, 48
TEC 42
TELEAVIA 36
TELEFUNKEN 36, 37, 52
TELETECH 44
TENSAI 40, 41
THOMSON 36, 51, 52, 63
THORN 31, 07, 42, 45, 48
TOMASHI 18
TOSHIBA 05, 02, 26, 21, 53
TOWADA 42
ULTRAVOX 32, 42, 49
UNIDEN 92
UNIVERSUM 31, 07, 38, 42, 45,
46, 54
VESTEL 07
VICTOR 13
VOXSON 31
AL
THAM 43
W
WATSON 07
WATT RADIO 32, 42, 49
WHITE WESTINGHOUSE 07
YOKO 07, 42, 46
ZENITH 03, 20
Extinction de l’afficheur et des
voyants sur la face avant
Si vous trouvez que les voyants du lecteur sont trop vifs
lorsque vous regardez des films, vous pouvez les éteindre à
l’exception du voyant FL OFF.
Extinction par la télécommande
Appuyez sur FRONT LIGHT.
L’afficheur et les voyants sur la face avant s’éclairent et
s’éteignent à chaque pression sur cette touche. Lorsqu’ils
sont éteints, seul le voyant FL OFF reste éclairé.
Lecture
Extinction par HOME MENU
Appuyez sur HOME MENU pour afficher la page
1
HOME MENU.
Appuyez sur pour sélectionner
2
« Settings », puis appuyez sur ENTER.
Appuyez sur pour sélectionner « Front
3
Panel Display/LED », puis appuyez sur ENTER.
Audio Video Settings
Quick Start
Auto Power Off
Control
Playback Setting
Communication Setup
Front Panel Display/LED
Version
USB Memory Management
Software Update
System Reset
Appuyez sur pour sélectionner « On » ou
4
« Off », puis appuyez sur ENTER.
Appuyez sur HOME MENU ou EXIT pour sortir
5
de la page.
25
Page 88

Avant la lecture
À propos de la commande par
l’HDMI
Cette fonction agit lorsqu’un Téléviseur à Panneau Plat ou
un système audiovisuel (récepteur ou amplificateur AV, etc.)
Pioneer compatible avec l'HDMI est raccordé au lecteur avec
un câble HDMI.
Reportez-vous aussi au mode d’emploi de votre Téléviseur à
Écran Plat et du système AV (récepteur ou amplificateur AV,
etc.).
Utilisation de la commande par
l’HDMI
La commande par l’HDMI agit uniquement quand cette
•
fonction est en service sur tous les appareils raccordés
avec des câbles HDMI.
Lorsque vous avez relié et réglé tous les appareils, assurez-
•
vous que l’image du lecteur apparaît bien sur le Téléviseur
à Panneau Plat. (Ceci est également nécessaire lorsque
vous changez les appareils raccordés et rebranchez les
câbles HDMI.) La commande par l’HDMI n’agit peut-être
pas correctement si l’image du lecteur ne s’affiche pas
correctement sur le Téléviseur à Panneau Plat.
Raccordez des Câble HDMI haute vitesse lorsque vous
•
utilisez la commande par l’HDMI. La commande par l’HDMI
peut ne pas fonctionner correctement si vous utilisez
d’autres câbles HDMI.
Pour certains modèles, la commande par l’HDMI peut être
•
appelée « KURO LINK » ou « HDMI Control ».
La commande par l’HDMI n’agit pas avec les appareils
•
d’autres fabricants, même s’ils sont raccordés avec un
câble HDMI.
Ce que vous apporte la commande
par l’HDMI
Une qualité d’image optimale sur le Téléviseur à
•
Panneau Plat compatible avec la commande par
l’HDMI.
Quand la commande par l’HDMI est en service, des
signaux vidéo d’une qualité d’image optimale sont transmis
par la prise HDMI du lecteur lors de la commande par
l’HDMI.
Le voyant HDMI s’éclaire sur le lecteur.
Utilisation du lecteur avec la télécommande du
•
Téléviseur à Panneau Plat.
Certaines fonctions du lecteur, comme la mise en marche
et à l’arrêt de la lecture et l’affichage des menus, peuvent
être activées depuis le Téléviseur à Panneau Plat.
L’image du lecteur s’affiche sur le Téléviseur à
•
Panneau Plat. (Fonction d’auto-sélection)
L’entrée change automatiquement sur le Téléviseur à
Panneau Plat et la chaîne AV (récepteur ou amplificateur
AV, etc.) lorsque la lecture est activée sur le lecteur ou
lorsque la page HOME MENU ou Navigateur de Disque
est affichée. Lorsque l’entrée change, l’image de lecture, la
page HOME MENU ou Navigateur de disque s’affiche sur
le Téléviseur à Panneau Plat.
Voyant HDMI
PQLS
FL OFFHDMI OPEN/CLOSE
USB
•
Le Téléviseur à Panneau Plat et le lecteur s’allument
et s’éteignent automatiquement.
(Mise sous tension simultanée)
Lorsque vous lancez la lecture sur le lecteur ou affichez la
page HOME MENU ou Navigateur de Disque, le Téléviseur
à Panneau Plat s’allume automatiquement s’il était
éteint. Lorsque le Téléviseur à Panneau Plat est éteint,
le lecteur s’éteint également. (Le lecteur ne s’éteint pas
automatiquement si un disque ou un fichier est en cours de
lecture sur le lecteur ou si l’écran d’exploitation du lecteur
est affiché sur le Téléviseur à Panneau Plat.)
•
La langue d’affichage sur écran du lecteur change
automatiquement. (Unification des langues)
Lorsque le Téléviseur à Panneau Plat reçoit des
informations dans une langue précise, l’affichage sur
écran du lecteur sera dans la même langue que celle du
Téléviseur à Panneau Plat raccordé, si vous le spécifiez.
Cette fonction est disponible seulement pendant l’arrêt de
la lecture et à condition que le menu ne soit pas affiché.
À propos de la fonction PQLS
PQLS (Precision Quartz Lock System) est une technologie
visant à adapter la vitesse du transfert du son numérique
avec la commande par l’HDMI. Les signaux transmis
par le lecteur sont contrôlés par l’oscillateur à quartz de
l’amplificateur AV ce qui permet d’obtenir un son de très
grande qualité. L’effet de jitter se produisant lors du transfert
du signal et affectant parfois la qualité sonore est ainsi
éliminé.
Ce lecteur présente les fonctions suivantes.
•
La fonction « PQLS 2ch Audio » qui ne s’active qu’à la
−
lecture de CD musique (CD-DA)
La fonction « PQLS Multi Surround » qui s’active à la
−
lecture de tous les disques (BD, DVD, etc.) avec sortie
audio PCM linéaire
La fonction « PQLS Bitstream » qui s’active lors de la
−
lecture d’un signal audio bitstream
Les différentes fonctions PQLS s’activent lorsqu’un
•
amplificateur AV Pioneer prenant en charge les fonctions
PQLS est raccordé directement à la prise « HDMI OUT »
avec un câble HDMI et que l’appareil est réglé comme
indiqué ci-dessous (page 46).
Commande par l’HDMI : On
Sortie audio HDMI : PCM (PQLS multi-surround
uniquement)
Reportez-vous aussi au mode d’emploi de l’amplificateur
•
AV.
Consultez le site Pioneer pour les amplificateurs AV prenant
•
en charge la fonction PQLS.
ATTENTION
La fonction PQLS peut cesser de fonctionner lorsque la
•
résolution de la sortie vidéo est changée. La fonction PQLS
agit de nouveau lorsque la lecture est arrêtée puis relancée.
Lorsque la fonction PQLS 2 canaux est activée, la couleur
•
des signaux transmis par les connecteurs VIDEO OUTPUT
du lecteur peut être mauvaise. Dans ce cas, raccordez les
prises HDMI du téléviseur et de l’amplificateur AV ou les
connecteurs COMPONENT VIDEO OUTPUT du téléviseur
et lecteur pour obtenir une image de qualité.
REMARQUE
Le voyant PQLS s’éclaire sur la face avant du lecteur
•
lorsque la fonction PQLS est activée (page 13).
26
Page 89

Avant la lecture
Lecteur RSS
La fonction RSS permet d’acquérir des infos d’Internet
sous forme de texte (actualités, etc.) et de les faire
défiler sur l’écran. Pour utiliser cette fonction, vous
devez vous connecter au réseau (page 21) et régler les
paramètres de la communication (pages 48 à 50) et
effectuer les réglages suivants.
REMARQUE
Les infos affichées se renouvellent en principe
•
régulièrement, mais dans certains cas l’intervalle de mise à
jour sera irrégulier.
Les infos ne peuvent pas s’afficher dans certaines
•
situations.
Les infos ne s’affichent pas pendant la lecture d’un disque
•
ou l’affichage d’un menu.
Les infos peuvent ne pas s’afficher pendant le chargement
•
d’un disque.
Pioneer décline toute responsabilité quant aux infos
•
affichées.
L'accès à du contenu Web requiert un accès internet haut
•
débit et peut aussi nécessiter l'enregistrement de vos
coordonnées et le paiement d'un abonnement sur un site.
Le contenu du site peut être changé, suspendu,
interrompu sans aucun avertissement, Pionner déclinant
toute responsabilité quant à d'éventuels changements.
Pioneer décline toute responsabilité quant au contenu, à sa
disponibilité et quant à la continuité du service.
Lecture
Affichage d’infos texte
Appuyez sur HOME MENU pour afficher la page
1
HOME MENU.
Appuyez sur pour sélectionner
2
« Web Content », puis appuyez sur ENTER.
Appuyez sur pour sélectionner « RSS »,
3
puis appuyez sur ENTER.
Appuyez sur pour sélectionner « On », puis
4
appuyez sur ENTER.
Si « Off » est sélectionné, les infos ne s’afficheront
•
pas.
Appuyez sur pour sélectionner le canal
5
souhaité.
Les infos du canal sélectionné (actualités, etc.) défilent
de droite à gauche sur l’écran.
REMARQUE
Pour changer le canal retransmettant les infos lorsque
•
le papier peint est affiché, appuyez sur pour
sélectionner l’icône RSS, puis appuyez sur pour
sélectionner le canal souhaité.
Pour dégager les infos, arrêtez la lecture du disque ou de
•
la clé USB, puis effectuez les opérations précédentes en
commençant par l’étape 1.
27
Page 90

Lecture
Cette section explique comment lire des disques
BD vidéo et DVD vidéo (films, etc.) en vente dans le
commerce, des CD, des BD-RE/-R et DVD-RW/-R
enregistrés (vidéo et audio) ainsi que des mémoires
USB.
Chargement d’un disque
PQLS
OPEN/CLOSE
FL OFFHDMI OPEN/CLOSE
USB
STANDBY/ON
STANDBY/ON
Appuyez sur STANDBY/ON pour allumer le
1
lecteur.
Appuyez sur OPEN/CLOSE pour ouvrir le
2
plateau de disque.
Placez un disque sur le plateau de disque.
3
Insérez le disque avec la face imprimée vers le haut.
•
Dans le cas d’un disque enregistré des deux côtés,
•
orientez vers le bas la face à lire.
Appuyez sur OPEN/CLOSE pour fermer le
4
plateau de disque.
Lecture de BD vidéo et DVD vidéo
DVD-RW
BD-RBD VIDEO
DVD-R
AVCHD
BD-RE
DVD VIDEO
Ce lecteur est capable de redimensionner l’image lors
de la lecture de DVD.
Pour arrêter la lecture
Appuyez sur STOP.
Reprise de lecture
Lorsque PLAY est pressée pendant la lecture, la
•
position à laquelle la lecture s’arrête est mémorisée. Pour
poursuivre la lecture à cette position, il suffit d’appuyer une
nouvelle fois sur PLAY.
Pour revenir au début du disque, annulez le mode de
•
reprise en appuyant sur STOP, puis appuyez sur
PLAY. (Ceci peut être impossible avec certains disques.
Le cas échéant, ouvrez le plateau de disque ou passez en
veille.)
REMARQUE
La reprise de lecture peut être inopérante avec certains
•
disques (par exemple les disques BD vidéo et les applications
BD-J (page 60)). Pour savoir si le disque contient des
applications BD-J, contactez le fabricant du disque.
Affichage des informations du
disque
Appuyez sur DISPLAY pendant la lecture.
Chaque fois que vous appuyez sur DISPLAY,
•
l’affichage change comme suit.
Écran d’informations A du disque
BD-VIDEO
Écran d’informations B du disque
1/1
10/1 1
00 :00 :12
03/ : 12:28
00 :00 :12
03/ : 12:28
1
Posez un disque.
La lecture commence automatiquement avec certains
•
disques.
La lecture commence par le premier titre.
•
Avec certains disques, le menu apparaît d’abord.
•
Procédez à la lecture en suivant les indications à l’écran.
Appuyez sur PLAY si la lecture ne commence
2
pas automatiquement ou si elle s’arrête.
REMARQUE
La durée de chargement du disque peut varier selon le
•
disque.
28
Pas d’affichage
Type de disque
Numéro du titre en cours de lecture/Nombre total
de titres
Numéro du chapitre en cours de lecture/Nombre
total de chapitres
Temps de lecture écoulé/Temps total de lecture du
titre
REMARQUE
L’écran d’informations A du disque disparaît en l’espace
•
d’une minute si vous n’effectuez aucune opération.
Le temps total de lecture du chapitre/titre peut ne pas
•
s’afficher pour certains disques BD vidéo commercialisés.
Page 91

Lecture
Lecture de disques BD vidéo et
DVD vidéo par le menu
Cette section explique comment lire un disque BD
•
vidéo ou DVD vidéo disposant d’un menu principal,
d’un menu de disque ou d’un menu contextuel.
Le nom, le contenu et le fonctionnement des menus
•
varient d’un disque à l’autre. Suivez les instructions
sur le disque ou dans le menu.
Les titres figurant dans le menu principal et un guide
•
du disque (pour les options comme les sous-titres
et les langues audio) se trouvent dans le menu de
disque.
DISC NAVIGATOR/TOP MENU et POPUP
•
MENU/MENU ne fonctionnent pas si le disque ne
contient pas de menu.
Utilisation du menu principal
BD VIDEO
1
DVD VIDEO
Appuyez sur DISC NAVIGATOR/TOP MENU.
TOP MENU
1
Jazz
3
Classic
2
4
Latin
Rock
Utilisation du menu du disque
DVD VIDEO
Exemple : Sélectionnez « SUBTITLE LANGUAGE ».
Appuyez sur DISC NAVIGATOR/TOP MENU.
1
Appuyez sur pour sélectionner « SUBTITLE
2
LANGUAGE », puis appuyez sur ENTER.
L’écran permettant de sélectionner la langue des
•
sous-titres s’affiche.
MENU
1 AUDIO LANGUAGE
2 SUBTITLE LANGUAGE
3 AUDIO
Appuyez sur pour sélectionner la langue
3
des sous-titres, puis appuyez sur ENTER.
Appuyez sur DISC NAVIGATOR/TOP MENU
4
pour sortir du menu.
Utilisation du menu contextuel
BD VIDEO
Appuyez sur POPUP MENU/MENU pendant la
1
lecture.
Pop-up menu
Previous page
Next page
Lecture
2
Appuyez sur pour sélectionner le
titre, puis appuyez sur ENTER.
Le titre sélectionné est lu.
•
Appuyez sur pour sélectionner le
2
titre souhaité, puis appuyez sur ENTER.
Appuyez sur POPUP MENU/MENU pour sortir
3
du menu.
Le menu contextuel disparaît automatiquement pour
•
certains disques.
29
Page 92

Lecture
Utilisation de BONUSVIEW ou BDLIVE
BD VIDEO
Ce lecteur est compatible avec les fonctions
BONUSVIEW et BD-LIVE des BD vidéo.
L’emploi de disques BD vidéo avec BONUSVIEW
donne accès à de nouvelles fonctions comme une
seconde vidéo (image dans l’image) et un second son.
Les disques BD vidéo prenant en charge le BD-LIVE
permettent aussi de se connecter à Internet pour
télécharger des images vidéo et d’autres données.
Les données enregistrées sur les BD vidéo et
téléchargées de BD-LIVE sont stockées sur la clé
USB (mémoire externe). Pour utiliser ces fonctions,
raccordez une clé USB (capacité minimale 1 Go
(2 Go ou plus recommandés)) compatible avec la
norme USB 2.0 High Speed (480 Mbit/s) au port
USB (page 21) de ce lecteur.
•
Pour rappeler les données stockées sur la clé USB,
insérez d’abord le disque qui était utilisé au moment du
téléchargement (si un disque différent est chargé, les données
stockées sur la clé USB ne pourront pas être restituées).
•
Si une clé USB contenant d’autres données (enregistrées
précédemment) est utilisée, il se peut que la vidéo et
l’audio ne soient pas lus correctement.
Si la clé USB est débranchée de ce lecteur pendant la
•
lecture, la lecture s’arrêtera. Ne débranchez pas la clé USB
pendant la lecture.
Le chargement des données peut prendre un certain
•
temps (lecture/écriture).
ATTENTION
Les fonctions BONUSVIEW et BD-LIVE ne pourront pas
•
être utilisées si l’espace sur la clé USB est insuffisant. Dans
ce cas, reportez-vous à « USB Memory Management » à
la page 51 pour supprimer les données Virtual Package et
BD-LIVE, présentes sur la clé USB.
Lecture d’une image secondaire
Les BD vidéo comprenant une seconde piste audio et
vidéo compatible avec la fonction Image dans l’image
peuvent afficher cette seconde piste audio et vidéo
sous forme de petite vidéo dans l’angle.
Appuyez sur SECONDARY VIDEO pendant la
1
lecture pour afficher l’écran à 2 images.
Audio/vidéo
primaire
2
Pour dégager l’image secondaire, appuyez à
nouveau sur SECONDARY VIDEO.
REMARQUE
Pour écouter le son secondaire, il est nécessaire de régler
•
« Secondary Audio » sur « On ». (Voir page 45.)
Selon le contenu, le son et l’image secondaires de
•
la fonction Image dans l’image peuvent apparaître et
disparaître automatiquement. Les zones affichables
peuvent également être restreintes.
Audio/vidéo
secondaire
REMARQUE
Le fonctionnement des mémoires USB n’est pas garanti.
•
Les contenus pouvant être lus avec la fonction BD-LIVE
•
dépendent du disque utilisé. Pour le détail, consultez les
instructions fournies avec le disque.
Pour bénéficier de la fonction BD-LIVE, une connexion au
•
réseau et quelques réglages sont nécessaires
(pages 21 et 48).
Pour le détail sur les conditions et restrictions relatives
•
aux connexions Internet à l’emploi de la fonction BD-LIVE,
reportez-vous à la section « BD Internet Access » (page 47).
BD-LIVE est une fonction qui fournit une connexion
•
automatique à Internet. Les disques prenant en charge la
fonction BD-LIVE peuvent transmettre des codes ID identifiant
ce lecteur et le disque au fournisseur de contenu par Internet.
Cet appareil peut être réglé pour éviter une connexion
•
automatique à Internet. Pour les instructions sur ce
réglage, reportez-vous à la section « BD Internet Access »
(page 47).
Lorsque des mémoires USB sont raccordées aux ports
•
USB de la face avant et du panneau arrière du lecteur, la
première mémoire raccordée est utilisée pour les fonctions
BONUSVIEW et BD-LIVE, tandis que la dernière raccordée
est utilisée pour la lecture de fichiers et la mise à jour du
logiciel.
30
Page 93

Lecture
Lecture de BD-RE/-R,DVD-RW/-R
BD-RE BD-R
DVD-RW
Vous pouvez lire un disque enregistré.
REMARQUE
« Finalize » désigne l’opération effectuée à la fin d’un
•
enregistrement qui permet de lire le disque enregistré à la fois sur
ce lecteur et sur d’autres lecteurs/ enregistreurs DVD. Seuls des
disques DVD-RW/-R finalisés peuvent être lus sur ce lecteur.
(Ce lecteur ne possède pas de fonction pour finaliser les
disques.)
DVD-R
Lecture par la sélection d’un titre
Posez un disque enregistré.
1
La page Navigateur de Disque apparaît.
•
REMARQUE
La page Navigateur de Disque peut également être
•
affichée par une pression sur DISC NAVIGATOR/TOP
MENU quand la lecture est arrêtée ou sur ENTER après la
sélection de « Disc Navigator » sur la page
HOME MENU quand la lecture est arrêtée.
Commutation de l’affichage du
Navigateur de Disque
Le Navigateur de Disque peut s’afficher de deux façons,
•
sous la forme de vignettes ou sous la forme de noms de
titres.
À chaque pression sur ROUGE, l’affichage bascule entre
•
Aperçu (vignettes) et Nom Du Titre.
Aperçu
5/21 Thu 9:30 AM 110 Min.
Program
Program
A
Title Name
Nom du Titre
5/21 Thu 9:30 AM
Program 1
1
4
Program
2
Program
5
B C D
By Chapter
Program 1
1 Program1 5/ 2 Thu 110 Min.
2 Program2 6/15 Mon 110 Min.
3 Program3 7/ 3 Fri 56 Min.
4 Program4 9/18 Fri 40 Min.
Playlist Functions
110 Min.
Program
3
Program
6
Lecture
Program
1
Program
4
Lorsqu’un disque BD contenant des restrictions
•
d’emploi imposées par un enregistreur BD est utilisé,
l’écran de saisie du mot de passe apparaît.
Saisissez à ce moment votre mot de passe.
Si vous saisissez trois fois de suite un mot de passe
erroné, le plateau de disque s’ouvrira. Fermez-le, puis
saisissez le mot de passe correct.
Si la page Navigateur de Disque n’apparaît pas,
•
appuyez sur DISC NAVIGATOR/TOP MENU.
Appuyez sur pour sélectionner le
2
titre souhaité, puis appuyez sur ENTER.
Lorsque sept titres ou plus sont affichés, vous pouvez
•
changer de page en appuyant sur PAGE +/–. Vous
pouvez aussi appuyer sur ou.
La lecture du titre sélectionné commence.
•
Vous pouvez lancer la lecture en appuyant sur
PLAY au lieu de ENTER.
Appuyez sur STOP pour arrêter la lecture.
3
Program
2
Program
5
Program
Program
A B C D
3
6
Thumbnail
Information sur le titre sélectionné
Nom du Titre
Date d’enregistrement
Durée d’enregistrement
Légende pour ROUGE, VERT, BLEU, JAUNE
Lorsque sept titres ou plus sont affichés, vous pouvez
•
changer de page en appuyant sur PAGE +/–. Vous
pouvez aussi appuyer sur ou .
REMARQUE
La date d’enregistrement est la date sauvegardée
•
pour le titre enregistré et, selon l’appareil utilisé pour
l’enregistrement, elle peut être différente de la date réelle
où l’enregistrement (la copie) a été effectué.
Sorting Playlist Functions
31
Page 94

Lecture
Lecture par la sélection d’un
chapitre
Appuyez sur VERT pendant que la page Aperçu
1
est affichée.
La page des chapitres s’affiche.
•
Chapter
CHAPTER
1
Chapter
4
•
Lorsque sept chapitres ou plus sont affichés, vous
pouvez changer de page en appuyant sur PAGE
+/–. Vous pouvez aussi appuyer sur ou
.
•
Pour revenir à la page Aperçu, appuyez sur VERT.
Appuyez sur pour sélectionner le
2
chapitre souhaité, puis appuyez sur ENTER.
La lecture du chapitre sélectionné commence.
•
Vous pouvez lancer la lecture en appuyant sur
PLAY au lieu de ENTER.
Appuyez sur STOP pour arrêter la lecture.
3
Chapter
CHAPTER CHAPTER
2
Chapter
5
Chapter
3
Chapter
CHAPTERCHAPTERCHAPTER
6
Tri des titres
Lorsque la page Nom Du Titre est affichée, VERT
permet de changer l’ordre d’affichage des titres dans
le sens du plus récent ou du plus ancien.
Lecture par la sélection d’une liste
de lecture
1
Appuyez sur BLEU pendant que la page Aperçu
est affichée.
La page Playlist s’affiche.
•
5/21 Thu 9:30 AM
Program 1
110 Min.
1 Program1 5/ 2 Thu 110 Min.
2 Program2 6/15 Mon 110 Min.
Lecture du titre arrêté en cours de
lecture
Appuyez sur JAUNE pendant que la page
1
Navigateur de Disque est affichée.
Playback
Sélectionnez « From Beginning » ou « From
2
Continued » avec , puis appuyez sur
ENTER.
La lecture du titre commence.
•
Appuyez sur STOP pour arrêter la lecture.
3
Playback this title.
From Beginning
From Continued
C D
Original Functions
Appuyez sur pour sélectionner le titre, puis
2
appuyez sur ENTER.
La lecture du titre sélectionné commence.
•
Appuyez sur STOP pour arrêter la lecture.
3
32
Page 95

Lecture
Lecture de CD audio
AUDIO CD
Lecture depuis le début
Insérez un CD audio.
1
La page CD apparaît.
•
(La page CD apparaît uniquement si le disque
compact inséré est enregistré dans le format CD-DA.)
La lecture commence automatiquement avec certains
•
disques.
n
o
s
c
n
u
F
t
T
0
c
1
k
a
r
0
0
0
:
1
T
0
5
c
1
1
k
a
r
2
c
a
T
r
3
a
T
c
r
4
a
T
c
r
5
a
T
c
r
6
a
T
c
r
Select Enter
Appuyez sur PLAY si la lecture ne commence
2
6
:
0
5
2
1
k
0
:
0
5
3
2
k
3
:
0
5
4
0
k
3
:
0
4
5
4
k
4
:
0
5
6
0
k
8
:
pas automatiquement ou si elle s’arrête.
Appuyez sur STOP pour arrêter la lecture.
3
Reprise de lecture
Lorsque PLAY est pressée pendant la lecture, la
•
position à laquelle la lecture s’arrête est mémorisée. Pour
poursuivre la lecture à cette position, il suffit d’appuyer une
nouvelle fois sur PLAY.
Pour revenir au début du disque, annulez le mode de reprise
•
en appuyant sur STOP, puis appuyez sur PLAY. (Ceci
peut être impossible avec certains disques. Le cas échéant,
ouvrez le plateau de disque ou passez en veille.)
REMARQUE
La reprise de lecture peut être inopérante avec certains
•
disques.
i
1
2
1
/
0
0
1
0
0
1
:
:
+
R
L
3
5
1
6
:
O
f
f
1
2
1
/
D
Functions
Lecture par la sélection d’une
plage
Appuyez sur pour sélectionner la plage,
1
puis appuyez sur ENTER pendant la lecture ou
à l’arrêt.
La lecture de la plage sélectionnée commence.
•
Lorsque sept plages ou plus sont affichées, vous
•
pouvez changer de page en appuyant sur PAGE +/–.
n
c
n
o
u
F
s
t
T
a
0
c
3
k
r
0
0
0
:
1
T
a
0
5
c
1
1
k
r
2
T
c
k
a
r
3
c
k
a
T
r
4
k
a
T
c
r
5
c
k
a
T
r
6
T
a
c
k
r
Select Enter
Appuyez sur STOP pour arrêter la lecture.
2
6
:
0
5
2
1
0
:
0
5
3
2
3
:
0
5
4
0
3
:
0
4
5
4
4
:
0
5
6
0
8
:
i
3
2
1
/
0
0
0
0
1
:
:
+
L
3
5
2
3
:
O
f
f
D
Functions
Fonctionnement du menu
« Functions »
1
Appuyez sur JAUNE (Fonctions) pendant
l’affichage de la page CD.
Le menu « Functions » s’ouvre.
•
n
c
n
o
u
F
s
t
0
c
3
k
a
T
r
0
0
0
:
1
a
T
0
5
c
1
1
k
r
2
T
c
k
a
r
3
a
T
c
k
r
4
T
c
k
a
r
5
a
T
c
k
r
6
c
k
a
T
r
Appuyez sur pour sélectionner le réglage
2
souhaité, puis appuyez sur ENTER.
Lorsque la lecture est arrêtée, seul « Track » peut être
•
sélectionné.
Reportez-vous à « Fonctions réglables » pour une
•
description de chaque réglage (Page 43).
Appuyez sur pour effectuer le
3
réglage, puis appuyez sur ENTER.
Les opérations à effectuer dépendent de chaque
•
réglage. Suivez les instructions à l’écran.
Appuyez sur RETURN ou JAUNE pour sortir
4
6
:
0
5
2
1
0
:
0
5
3
2
3
:
5
4
0
3
0
:
0
4
5
4
4
:
0
5
6
0
8
:
du menu « Functions ».
REMARQUE
Les éléments affichés diffèrent selon le disque.•
i
3
2
1
/
0
0
0
0
1
:
:
+
L
3
5
2
3
:
O
f
f
ReturnSelect Enter
D
Track select
1
R
3
2
1
/
Lecture
1
R
2
1
3
/
33
Page 96

Lecture
Lecture de fichiers audio
CD-R
DVD-RW
•
•
•
1
DVD-R
REMARQUE
Ne débranchez pas la clé USB pendant la lecture.
Pour le détail sur les signaux audio pouvant être lus,
reportez-vous à « Types de disques pouvant être lus sur ce
lecteur » (page 7).
Lorsque des mémoires USB sont raccordées aux ports
USB de la face avant et du panneau arrière du lecteur, seul
le son enregistré sur la dernière mémoire raccordée est lu.
Insérez le disque ou la clé USB sur lequel le son
est enregistré, puis appuyez sur HOME MENU
pour afficher la page HOME MENU.
Appuyez sur pour sélectionner
2
« Music », puis appuyez sur ENTER.
Appuyez sur pour sélectionner « DVD/
3
CD » ou « USB », puis appuyez sur ENTER.
Sélectionnez le fichier ou le dossier.
4
Utilisez pour sélectionner le fichier.
•
Utilisez pour sélectionner le dossier, puis
•
appuyez sur ENTER. Les fichiers se trouvant dans le
dossier s’affichent.
Appuyez sur ENTER pour lire le fichier.
5
Une pression sur PAUSE pendant la lecture
•
interrompt la lecture. Une nouvelle pression sur
PAUSE ou une pression sur PLAY rétablit la
lecture.
Music03.mp3
0
0
0
:
Music01.mp3
1
2
Music02.mp3
Music03.mp3
3
Music04.mp3
4
5
Music05.mp3
Music06.mp3
6
SelectEnter
CD-RW
3
2
5
:
Functions
1
3
/
0
0
3
6
1
5
:
0
1
5
:
3
2
5
:
3
0
5
:
4
4
4
:
8
0
5
:
USB
2
1
1
0
0
:
:
+
R
L
1
2
3
/
Sélection et lecture d’un autre
fichier pendant la lecture
Appuyez sur pour sélectionner le fichier.
1
Appuyez sur ENTER pour lire le fichier.
2
Le fichier sélectionné est lu.
•
Localisation d’un point pendant la
lecture
Appuyez sur
permet de localiser le début du fichier
•
pendant la lecture.
permet de localiser la fin du fichier
•
pendant la lecture.
REMARQUE
La recherche rapide avant et la recherche rapide arrière ne
•
sont pas possibles.
La fonction de répétition ne peut pas être utilisée.
•
La commande des fonctions ne peut pas être utilisée
•
pendant la lecture (page 42).
ou
.
Appuyez sur STOPpour arrêter la lecture.
6
34
Page 97

Lecture
Lecture des fichiers JPEG
CD-R
DVD-RW
•
•
•
•
1
DVD-R
REMARQUE
Ne débranchez pas la clé USB pendant la lecture.
Pour le détail sur les fichiers d’image pouvant être lus,
reportez-vous à « À propos de la lecture de fichiers photo »
(page 11).
Pendant la « Normal play », les photos sont lues une à
une tandis que pendant un « Slide show » elles défilent
automatiquement.
Lorsque des mémoires USB sont raccordées aux ports
USB de la face avant et du panneau arrière du lecteur,
seuls les fichiers photo enregistrés sur la dernière mémoire
raccordée sont lus.
Insérez le disque ou la clé USB sur lequel les
fichiers photo sont enregistrés, puis appuyez
sur HOME MENU pour afficher la page HOME
MENU.
Appuyez sur pour sélectionner
2
« Photo », puis appuyez sur ENTER.
Appuyez sur pour sélectionner « DVD/
3
CD » ou « USB », puis appuyez sur ENTER.
Sélectionnez le fichier ou le dossier.
4
Utilisez pour sélectionner le fichier.
•
Utilisez pour sélectionner le dossier, puis appuyez
•
sur ENTER. Les fichiers présents dans le dossier
apparaissent.
CD-RW
USB
Utilisez pour sélectionner le dossier
5
contenant les photos que vous voulez voir, puis
appuyez sur ENTER.
8/15
Appuyez sur ou pour
6
changer de photo.
Vous pouvez aussi appuyer sur ou REV/
•
FWD.
Appuyez sur RETURN pour revenir à la page de
•
sélection de dossier.
Pour arrêter la lecture de photos à n’importe
7
quel moment, appuyez sur STOP.
Lecture en diaporama
Insérez le disque ou la clé USB sur lequel les
1
fichiers photo sont enregistrés, puis appuyez
sur HOME MENU pour afficher la page HOME
MENU.
Appuyez sur pour sélectionner
2
« Photo », puis appuyez sur ENTER.
Appuyez sur pour sélectionner « DVD/CD »
3
ou « USB », puis appuyez sur ENTER.
Appuyez sur pour sélectionner le
4
dossier, puis appuyez sur PLAY pour voir les
photos.
Les photos du dossier sélectionné sont lues en
•
diaporama.
Appuyez sur PAUSE pour interrompre le
•
diaporama. Appuyez sur PLAY pour continuer le
diaporama à l’endroit où il a été arrêté.
Appuyez sur STOP pour arrêter le diaporama
5
à n’importe quel moment.
Appuyez sur RETURN pour voir les photos d’un
•
autre dossier en diaporama.
Lecture
35
Page 98

Lecture
Réglage de la vitesse du
diaporama/lecture en boucle
Appuyez sur JAUNE (Menu Diaporama)
1
lorsque la page de sélection de dossier est
affichée.
La page de réglage de la « Slide Show Speed »/
•
« Repeat Mode Setting » apparaît.
Appuyez sur pour sélectionner « Slide
2
Show Speed », puis appuyez sur ENTER.
Slide Show Speed
Repeat Mode Setting
Normal
Vous avez le choix entre les vitesses de diaporama
•
« Fast », « Normal », « Slow1 » et « Slow2 ».
Appuyez sur pour sélectionner la vitesse
3
souhaitée, puis appuyez sur ENTER.
Appuyez sur pour sélectionner « Repeat
4
Mode Setting », puis appuyez sur ENTER.
Slide Show Speed
Repeat Mode Setting
Yes
No
Appuyez sur pour sélectionner le réglage
5
souhaité, puis appuyez sur ENTER.
Appuyez sur EXIT pour sortir du menu.
6
Lecture de vidéos YouTube
Avec ce lecteur, vous pouvez vous connecter à Internet et lire
des vidéos YouTube (MPEG4 AVC H.264).
REMARQUE
Les vidéos YouTube des tailles suivantes peuvent être lues.
•
Qualité standard (400 x 226 pixels, 200 kbps)
−
Qualité moyenne (480 x 360 pixels, 512 kbps)
−
Qualité élevée (854 x 480 pixels, 900 kbps)
−
HD (720p) (1280 x 720 pixels, 2 Mbps)
−
HD (1080p) (1920 x 1080 pixels, 4 Mbps)
−
Les vidéos YouTube pour téléphones portables ne peuvent
•
pas être lues.
Certaines vidéos YouTube ne pourront pas être lues.
•
Selon la qualité de la connexion Internet, les vidéos
•
YouTube seront lues plus ou moins correctement.
L'accès à du contenu Web requiert un accès internet haut
•
débit et peut aussi nécessiter l'enregistrement de vos
coordonnées et le paiement d'un abonnement sur un site .
Le contenu du site peut être changé, suspendu,
interrompu sans aucun avertissement, Pionner déclinant
toute responsabilité quant à d'éventuels changements.
Pioneer décline toute responsabilité quant au contenu, à sa
disponibilité et quant à la continuité du service.
Affichez l’écran de sélection.
1
Lorsque le papier peint est affiché, utilisez
pour sélectionner l’icône YouTube, puis appuyez
sur ENTER.
L’écran de sélection peut aussi être sélectionné en
•
appuyant HOME MENU puis sélectionnant « Home
Menu » « Web Content » « YouTube ».
Appuyez sur pour sélectionner la
2
vidéo YouTube, puis appuyez sur ENTER pour
la regarder.
Appuyez sur EXIT pour arrêter la vidéo YouTube.
3
36
Page 99

Lecture
Visionnage de contenu en ligne Netflix
Veillez à toujours mettre à jour le logiciel de ce lecteur
en sélectionnant la mise à jour automatique sur le
menu du lecteur (Voir page 52) ou en consultant la
page http://www.pioneerblu-ray.com pour voir si une
mise à jour plus récente est disponible.
Cette fonction permet de bénéficier du service Netflix par
Internet. Netflix est un vidéo club qui livre des DVD et Blu-ray
Disc pouvant être loués par Internet et visionnés en ligne.
•
Pour pouvoir utiliser cette fonction, vous devez avoir une
connexion à haut débit pour l’ordinateur et ce lecteur (Voir
page 21) et régler les paramètres de communication (Voir
page 48), puis effectuer les opérations suivantes.
REMARQUE
Le service Netflix n’est pas disponible lorsqu’un fournisseur
•
proxy est utilisé pour la connexion à Internet.
Comme l’immatriculation prend un certain temps, il est
•
conseillé de régler « Auto Power Off » sur « No » avant de
s’immatriculer. (Voir page 46.)
La qualité de l’image des films Netflix (SD ou HD) dépend
•
de la vitesse du réseau et du débit original du film Netflix.
Pour plus d’informations sur le service Netflix Instant
•
Streaming consultez le site http://www.netflix.com/help/
ou connectez-vous sur votre compte Netflix et cliquez sur
« Help » en haut de page.
Le service Netflix ne peut être utilisé qu’aux États-Unis
•
actuellement.
Les illustrations ne sont que des exemples et peuvent être
•
différentes des pages Netflix proprement dites.
L’accès à du contenu Web requiert un accès internet haut
•
débit et peut aussi nécessiter l’enregistrement de vos
coordonnées et le paiement d’un abonnement sur un site.
Le contenu du site peut être changé, suspendu,
interrompu sans aucun avertissement, Pionner déclinant
toute responsabilité quant à d’éventuels changements.
Pioneer décline toute responsabilité quant au contenu, à sa
disponibilité et quant à la continuité du service.
Voir page 47 pour vérifier l’ESN Netflix.
•
Voir page 48 pour désactiver vos informations Netflix.
•
Appuyez sur pour sélectionner
2
« Web Content », puis appuyez sur PLAY ou
ENTER.
Appuyez sur pour sélectionner « Netflix »,
3
puis appuyez sur PLAY ou ENTER.
Lisez l’Avis de non-responsabilité qui apparaît.
4
Si vous l’acceptez, appuyez sur sur la
dernière page pour sélectionner « Agree », puis
appuyez sur ENTER. (Si vous ne l’acceptez pas,
ce service ne pourra pas être utilisé.)
Obtenez le code d’activation de Netflix.
5
Si vous n’avez pas de compte Netflix
Appuyez sur pour sélectionner « no-start
my FREE trial », puis appuyez sur ENTER.
La page de ce lecteur apparaît sur le téléviseur
Abonnez-vous auprès de http://www.netflix.
com/Pioneer par votre ordinateur.
Appuyez sur pour sélectionner « I’m now a
member », puis appuyez sur ENTER.
La page de ce lecteur apparaît sur le téléviseur
Lecture
Réglages pour le visionnage de
films Netflix sur votre téléviseur
Appuyez sur HOME MENU pour afficher la page
1
HOME MENU.
Quand l’écran du logo Pioneer est affiché, le menu
•
principal peut aussi être affiché en sélectionnant
l’icône du menu, puis en appuyant sur ENTER.
Si vous avez un compte Netflix
Appuyez sur pour sélectionner « yes-activate instant
streaming from Netflix », puis appuyez sur ENTER.
La page de ce lecteur apparaît sur le téléviseur
37
Page 100

Lecture
La fenêtre suivante apparaît.
6
Le code d’activation apparaît.
•
La page de ce lecteur apparaît sur le téléviseur
Depuis votre ordinateur, allez à la page http://
7
www.netflix.com/activate et saisissez le code
d’activation indiqué à l’étape 6.
Écran de l’ordinateur
Un peu après, le lecteur est activé et la page de File
•
d’attente vide du lecteur apparaît sur le téléviseur.
Ajout de films à la file d’attente
Pour ajouter un film à la file d’attente de ce
8
lecteur, sélectionnez, sur votre ordinateur, le
bouton « Add to Instant » sur la page « Watch
Instantly » de Netflix.
Un peu après, la liste de films en attente enregistrée à
•
l’aide de votre ordinateur apparaît sur l’écran du téléviseur.
Visionnage d’un film de la liste
d’attente sur votre téléviseur
Appuyez sur pour sélectionner le film
9
souhaité, puis appuyez sur ENTER.
Lorsque cette fonction est spécifiée et
•
l’immatriculation terminée, la prochaine fois que ce
service sera utilisé, les pages de la file d’attente,
comme la suivante, s’afficheront directement par une
pression sur ENTER après la sélection de l’icône
NETFLIX sur l’écran du logo Pioneer.
La page de ce lecteur apparaît sur le téléviseur
Le film sélectionné apparaît.
10
Pour revenir à l’étape 9, appuyez sur .
•
Appuyez sur pour sélectionner « play », puis
appuyez sur ENTER ou PLAY pour voir le film.
La page de ce lecteur apparaît sur le téléviseur
La page de ce lecteur apparaît sur le téléviseur
Un peu après, la lecture du film commence.
•
Pour interrompre la lecture à n’importe quel
11
moment, appuyez sur PAUSE.
Appuyez sur PAUSE ou PLAY pour revenir à la
•
lecture.
Pour arrêter la lecture ou passer à l’étape 10,
12
appuyez sur ou STOP.
Recherche rapide avant/arrière
La recherche rapide arrière/avant s’active par une
pression sur REV ou FWD pendant la
lecture.
38
 Loading...