

Page 1
Blu-ray 3D™ PLAYER
LECTEUR Blu-ray 3D™
REPRODUCTOR de Blu-ray 3D™
BDP-150
Register your product at:
http://www.pioneerelectronics.com (US)
http://www.pioneerelectronics.ca (Canada)
• Protect your new investment
The details of your purchase will be on file for reference in the event of an insurance claim such as loss or theft.
• Receive free tips, updates and service bulletins on your new product
• Improve product development
Your input helps us continue to design products that meet your needs.
• Receive a free Pioneer newsletter
Registered customers can opt in to receive a monthly newsletter.
http://www.pioneerelectronics.com (États-Unis)
http://www.pioneerelectronics.ca (Canada)
Operating Instructions
Mode d’emploi
Manual de instrucciones
Page 2
Thank you for buying this Pioneer product.
Please read through these operating instructions so you will know how to operate your model properly.
After you have finished reading the instructions, put them away in a safe place for future reference.
The exclamation point within an equilateral
triangle is intended to alert the user to the
presence of important operating and
maintenance (servicing) instructions in the
literature accompanying the appliance.
The lightning flash with arrowhead symbol,
within an equilateral triangle, is intended to
alert the user to the presence of uninsulated
“dangerous voltage” within the product’s
enclosure that may be of sufficient
magnitude to constitute a risk of electric
shock to persons.
CAUTION:
TO PREVENT THE RISK OF ELECTRIC
SHOCK, DO NOT REMOVE COVER (OR
BACK). NO USER-SERVICEABLE PARTS
INSIDE. REFER SERVICING TO QUALIFIED
SERVICE PERSONNEL.
CAUTION
RISK OF ELECTRIC SHOCK
DO NOT OPEN
IMPORTANT
D3-4-2-1-1_A1_En
CAUTION
This product is a class 1 laser product classified
under the Safety of laser products, IEC 60825-1:2007.
CLASS 1 LASER PRODUCT
D58-5-2-2a_A1_En
Operating Environment
Operating environment temperature and humidity:
+5 °C to +35 °C (+41 °F to +95 °F); less than 85 %RH
(cooling vents not blocked)
Do not install this unit in a poorly ventilated area, or in
locations exposed to high humidity or direct sunlight (or
strong artificial light)
D3-4-2-1-7c*_A1_En
If the AC plug of this unit does not match the AC
outlet you want to use, the plug must be removed
and appropriate one fitted. Replacement and
mounting of an AC plug on the power supply cord of
this unit should be performed only by qualified
service personnel. If connected to an AC outlet, the
cut-off plug can cause severe electrical shock. Make
sure it is properly disposed of after removal.
The equipment should be disconnected by removing
the mains plug from the wall socket when left unused
for a long period of time (for example, when on
vacation).
D3-4-2-2-1a_A1_En
WARNING
This equipment is not waterproof. To prevent a fire or
shock hazard, do not place any container filled with
liquid near this equipment (such as a vase or flower
pot) or expose it to dripping, splashing, rain or
moisture.
D3-4-2-1-3_A1_En
WARNING
Before plugging in for the first time, read the following
section carefully.
The voltage of the available power supply differs
according to country or region. Be sure that the
power supply voltage of the area where this unit
will be used meets the required voltage (e.g., 230 V
or 120 V) written on the rear panel.
D3-4-2-1-4*_A1_En
VENTILATION CAUTION
When installing this unit, make sure to leave space
around the unit for ventilation to improve heat radiation
(at least 10 cm at top, 10 cm at rear, and 10 cm at each
side).
WARNING
Slots and openings in the cabinet are provided for
ventilation to ensure reliable operation of the product,
and to protect it from overheating. To prevent fire
hazard, the openings should never be blocked or
covered with items (such as newspapers, table-cloths,
curtains) or by operating the equipment on thick carpet
or a bed.
D3-4-2-1-7b*_A1_En
CAUTION
The
STANDBY/ON switch on this unit will not
completely shut off all power from the AC outlet.
Since the power cord serves as the main disconnect
device for the unit, you will need to unplug it from the
AC outlet to shut down all power. Therefore, make
sure the unit has been installed so that the power
cord can be easily unplugged from the AC outlet in
case of an accident. To avoid fire hazard, the power
cord should also be unplugged from the AC outlet
when left unused for a long period of time (for
example, when on vacation).
D3-4-2-2-2a*_A1_En
This product is for general household purposes. Any
failure due to use for other than household purposes
(such as long-term use for business purposes in a
restaurant or use in a car or ship) and which requires
repair will be charged for even during the warranty
period.
K041_A1_En
Page 3

POWER-CORD CAUTION
Handle the power cord by the plug. Do not pull out the
plug by tugging the cord and never touch the power
cord when your hands are wet as this could cause a
short circuit or electric shock. Do not place the unit, a
piece of furniture, etc., on the power cord, or pinch the
cord. Never make a knot in the cord or tie it with other
cords. The power cords should be routed such that they
are not likely to be stepped on. A damaged power cord
can cause a fire or give you an electrical shock. Check
the power cord once in a while. When you find it
damaged, ask your nearest PIONEER authorized
service center or your dealer for a replacement.
S002*_A1_En
WARNING
To prevent a fire hazard, do not place any naked flame
sources (such as a lighted candle) on the equipment.
D3-4-2-1-7a_A1_En
WARNING: Handling the cord on this product or
cords associated with accessories sold with the
product may expose you to chemicals listed on
proposition 65 known to the State of California and
other governmental entities to cause cancer and
birth defect or other reproductive harm.
D36-P5_B1_En
This product contains mercury. Disposal of this
material may be regulated due to environmental
considerations. For disposal or recycling information,
please contact your local authorities or the Electronics
Industries Alliance : www.eiae.org.
K057_A1_En
IMPORTANT NOTICE
THE MODEL NUMBER AND SERIAL NUMBER OF
THIS EQUIPMENT ARE ON THE REAR OR BOTTOM.
RECORD THESE NUMBERS ON YOUR ENCLOSED
WARRANTY CARD AND KEEP IN A SAFE PLACE
FOR FUTURE REFERENCE.
D36-AP9-1_A1_En
Information to User
Alterations or modifications carried out without
appropriate authorization may invalidate the user’s
right to operate the equipment.
D8-10-2_A1_En
This Class B digital apparatus complies with
Canadian ICES-003.
D8-10-1-3_A1_En
CAUTION
This product satisfies FCC regulations when shielded
cables and connectors are used to connect the unit
to other equipment. To prevent electromagnetic
interference with electric appliances such as radios
and televisions, use shielded cables and connectors
for connections.
D8-10-3a_A1_En
The Safety of Your Ears is in Your Hands
Get the most out of your equipment by playing it at a
safe level – a level that lets the sound come through
clearly without annoying blaring or distortion and, most
importantly, without affecting your sensitive hearing.
Sound can be deceiving. Over time, your hearing
“comfort level” adapts to higher volumes of sound, so
what sounds “normal” can actually be loud and
harmful to your hearing. Guard against this by setting
your equipment at a safe level BEFORE your hearing
adapts.
ESTABLISH A SAFE LEVEL:
• Set your volume control at a low setting.
• Slowly increase the sound until you can hear it
comfortably and clearly, without distortion.
• Once you have established a comfortable sound
level, set the dial and leave it there.
BE SURE TO OBSERVE THE FOLLOWING
GUIDELINES:
• Do not turn up the volume so high that you can’t
hear what’s around you.
• Use caution or temporarily discontinue use in
potentially hazardous situations.
• Do not use headphones while operating a motorized
vehicle; the use of headphones may create a traffic
hazard and is illegal in many areas.
S001a_A1_En
Page 4
Cautions on 3D Viewing
• If you should experience any fatigue or discomfort while viewing 3D images, stop viewing them.
• Children, particularly those under 6, may be more prone to sensitivity, so guardians should watch for
any signs of fatigue or discomfort.
• When viewing 3D images, rest periodically.
Extended viewing of 3D images without rest periods could cause fatigue or discomfort.
Read these instructions.
Keep these instructions.
Heed all warnings.
Follow all instructions.
Do not use this apparatus near water.
Clean only with dry cloth.
Do not block any ventilation openings. Install in
accordance with the manufacturer’s
instructions.
Do not install near any heat sources such as
radiators, heat registers, stoves, or other
apparatus (including amplifiers) that produce
heat.
Do not defeat the safety purpose of the polarized
or grounding-type plug. A polarized plug has two
blades with one wider than the other. A
grounding type plug has two blades and a third
grounding prong. The wide blade or the third
prong are provided for your safety. If the provided
plug does not fit into your outlet, consult an
electrician for replacement of the obsolete outlet.
Protect the power cord from being walked on or
pinched particularly at plugs, convenience
receptacles, and the point where they exit from
the apparatus.
1)
2)
3)
4)
5)
6)
7)
8)
9)
10)
Only use attachments/accessories specified by
the manufacturer.
Use only with the cart, stand, tripod, bracket, or
table specified by the manufacturer, or sold with
the apparatus. When a cart is used, use caution
when moving the cart/apparatus combination to
avoid injury from tip-over.
Unplug this apparatus during lightning storms
or when unused for long periods of time.
Refer all servicing to qualified service personnel.
Servicing is required when the apparatus has
been damaged in any way, such as power-supply
cord or plug is damaged, liquid has been spilled
or objects have fallen into the apparatus, the
apparatus has been exposed to rain or moisture,
does not operate normally, or has been dropped.
D3-7-13-69_En
11)
12)
13)
14)
NOTE:
This equipment has been tested and found to comply with the limits for a Class B digital device, pursuant to Part 15
of the FCC Rules. These limits are designed to provide reasonable protection against harmful interference in a
residential installation. This equipment generates, uses, and can radiate radio frequency energy and, if not installed
and used in accordance with the instructions, may cause harmful interference to radio communications. However,
there is no guarantee that interference will not occur in a particular installation. If this equipment does cause
harmful interference to radio or television reception, which can be determined by turning the equipment off and on,
the user is encouraged to try to correct the interference by one or more of the following measures:
— Reorient or relocate the receiving antenna.
— Increase the separation between the equipment and receiver.
— Connect the equipment into an outlet on a circuit different from that to which the receiver is connected.
— Consult the dealer or an experienced radio/TV technician for help.
D8-10-1-2_A1_En
Page 5

Contents
01 Before you start
What’s in the box . . . . . . . . . . . . . . . . . . . . . . . . . . . . . . . . 6
Putting the batteries in the remote control. . . . . . . . . . 6
Software Update . . . . . . . . . . . . . . . . . . . . . . . . . . . . . . . . 6
About operation of this player from a mobile device
(iPod, iPhone, iPad etc.) . . . . . . . . . . . . . . . . . . . . . . . . . . 6
Types of discs/files that can be played. . . . . . . . . . . . . . . 7
Playable discs . . . . . . . . . . . . . . . . . . . . . . . . . . . . . . . . . 7
Playable files . . . . . . . . . . . . . . . . . . . . . . . . . . . . . . . . . 10
Part Names and Functions . . . . . . . . . . . . . . . . . . . . . . . 12
Remote Control . . . . . . . . . . . . . . . . . . . . . . . . . . . . . . . 12
Front Panel. . . . . . . . . . . . . . . . . . . . . . . . . . . . . . . . . . . 13
Rear Panel . . . . . . . . . . . . . . . . . . . . . . . . . . . . . . . . . . . 13
02 Connecting up
Connecting using an HDMI cable . . . . . . . . . . . . . . . . . 14
About HDMI. . . . . . . . . . . . . . . . . . . . . . . . . . . . . . . . . . 14
About Control Function with HDMI . . . . . . . . . . . . . . . 14
Connecting a TV . . . . . . . . . . . . . . . . . . . . . . . . . . . . . . 16
Connecting an AV receiver or amplifier . . . . . . . . . . . 16
Connecting video and audio cables . . . . . . . . . . . . . . . . 17
Connecting a TV using a video/audio cable . . . . . . . . 17
Connecting an AV receiver or amplifier using
an coaxial digital audio cable. . . . . . . . . . . . . . . . . . . . 17
Connecting components to the USB port . . . . . . . . . . . 17
About USB devices . . . . . . . . . . . . . . . . . . . . . . . . . . . . 17
Connecting the USB device . . . . . . . . . . . . . . . . . . . . . 18
Connecting to the network through LAN interface. . . . 18
Connecting to a wireless LAN . . . . . . . . . . . . . . . . . . . 19
Connecting the power cord. . . . . . . . . . . . . . . . . . . . . . . 19
03 Getting Started
Making settings using the Setup Navigator menu . . . . 20
04 Playback
Playing discs or files . . . . . . . . . . . . . . . . . . . . . . . . . . . . 21
Forward and reverse scanning. . . . . . . . . . . . . . . . . . . 21
Playing specific chapters, tracks or files. . . . . . . . . . . 22
Skipping content . . . . . . . . . . . . . . . . . . . . . . . . . . . . . . 22
Playing in slow motion . . . . . . . . . . . . . . . . . . . . . . . . . 22
Step forward and step reverse . . . . . . . . . . . . . . . . . . . 22
Playing a specific section within a title or track
repeatedly (A-B Repeat) . . . . . . . . . . . . . . . . . . . . . . . . 22
Playing repeatedly (Repeat Play). . . . . . . . . . . . . . . . . 22
Playing in the desired order (Programmed Play). . . . 22
Making bookmarks . . . . . . . . . . . . . . . . . . . . . . . . . . . . 23
Zoom. . . . . . . . . . . . . . . . . . . . . . . . . . . . . . . . . . . . . . . . 23
Playing photos as slideshows . . . . . . . . . . . . . . . . . . . 23
Switching the camera angles . . . . . . . . . . . . . . . . . . . 23
Switching the subtitles . . . . . . . . . . . . . . . . . . . . . . . . . 23
Switching the audio . . . . . . . . . . . . . . . . . . . . . . . . . . . 24
Switching the CD/SACD playback area . . . . . . . . . . . 24
Displaying the disc information . . . . . . . . . . . . . . . . . . 24
Enjoying BONUSVIEW or BD-LIVE . . . . . . . . . . . . . . . 24
Playback functions . . . . . . . . . . . . . . . . . . . . . . . . . . . . 25
Using the FUNCTION menu . . . . . . . . . . . . . . . . . . . . . . 26
Playing from a specific time (Time Search) . . . . . . . . 26
Playing a specif
(Search) . . . . . . . . . . . . . . . . . . . . . . . . . . . . . . . . . . . . . 26
Playing specified range of discs, titles or chapter
(track/file) in random order . . . . . . . . . . . . . . . . . . . . . 27
Continuing playback from a specified position
(Continued Viewing Playback) . . . . . . . . . . . . . . . . . . . 27
ic title, chapter, track or file
05 Playback from Home Media Gallery
About Home Media Gallery. . . . . . . . . . . . . . . . . . . . . . . 28
About network playback . . . . . . . . . . . . . . . . . . . . . . . . 28
DLNA Search . . . . . . . . . . . . . . . . . . . . . . . . . . . . . . . . . . 29
Disc/USB playback . . . . . . . . . . . . . . . . . . . . . . . . . . . . . 29
Playing back image files . . . . . . . . . . . . . . . . . . . . . . . . 30
Playing in the desired order (Playlist) . . . . . . . . . . . . . . 30
Adding tracks/files . . . . . . . . . . . . . . . . . . . . . . . . . . . . 30
Playing the Playlist . . . . . . . . . . . . . . . . . . . . . . . . . . . . 30
Deleting tracks/files from the Playlist . . . . . . . . . . . . . 30
06 Playing the web contents
Available web contents . . . . . . . . . . . . . . . . . . . . . . . . . . 31
Playing the items . . . . . . . . . . . . . . . . . . . . . . . . . . . . . . . 31
07 Advanced settings
Changing the settings . . . . . . . . . . . . . . . . . . . . . . . . . . . 33
Operating the Initial Setup screen. . . . . . . . . . . . . . . . 33
Software updating. . . . . . . . . . . . . . . . . . . . . . . . . . . . . 39
Restoring all the settings to the factory default
settings. . . . . . . . . . . . . . . . . . . . . . . . . . . . . . . . . . . . . . 40
About how digital audio formats are output . . . . . . . . . 41
Language Code Table and Country/Area Code Table. . 42
Language Code Table . . . . . . . . . . . . . . . . . . . . . . . . . . 42
Country/Area Code Table . . . . . . . . . . . . . . . . . . . . . . . 42
08 Additional information
Disclaimer for third party content . . . . . . . . . . . . . . . . . 43
Cautions on use . . . . . . . . . . . . . . . . . . . . . . . . . . . . . . . . 43
Moving the player . . . . . . . . . . . . . . . . . . . . . . . . . . . . . 43
Place of installation. . . . . . . . . . . . . . . . . . . . . . . . . . . . 43
Turn the power off when not using the player . . . . . . 44
Condensation . . . . . . . . . . . . . . . . . . . . . . . . . . . . . . . . 44
Cleaning the player . . . . . . . . . . . . . . . . . . . . . . . . . . . . 44
Caution for when the unit is installed in a rack
with a glass door . . . . . . . . . . . . . . . . . . . . . . . . . . . . . . 44
Cleaning the pickup lens . . . . . . . . . . . . . . . . . . . . . . . 44
Handling discs. . . . . . . . . . . . . . . . . . . . . . . . . . . . . . . . 44
Troubleshooting . . . . . . . . . . . . . . . . . . . . . . . . . . . . . . . . 45
Playback. . . . . . . . . . . . . . . . . . . . . . . . . . . . . . . . . . . . . 45
Control function. . . . . . . . . . . . . . . . . . . . . . . . . . . . . . . 47
Network . . . . . . . . . . . . . . . . . . . . . . . . . . . . . . . . . . . . . 47
Others. . . . . . . . . . . . . . . . . . . . . . . . . . . . . . . . . . . . . . . 48
Glossary . . . . . . . . . . . . . . . . . . . . . . . . . . . . . . . . . . . . . . 49
Specifications. . . . . . . . . . . . . . . . . . . . . . . . . . . . . . . . . . 51
01
5
En
Page 6
Chapter 1
01
Before you start
What’s in the box
•Remote control x 1
• Video/audio cable (yellow/white/red plugs) x 1
•AAA/R03 dry cell batteries x 2
•Warranty card
•Power cord
•Operating instructions (this document)
•To prevent leakage of battery fluid, remove the
batteries if you do not plan to use the remote control
for a long period of time (1 month or more). If the fluid
should leak, wipe it carefully off the inside of the case,
then insert new batteries. If a battery
the fluid should get on your skin, flush it off with large
quantities of water.
• When disposing of used batteries, please comply with
governmental regulations or environmental public
institution’s rules that apply in your country/area.
should leak and
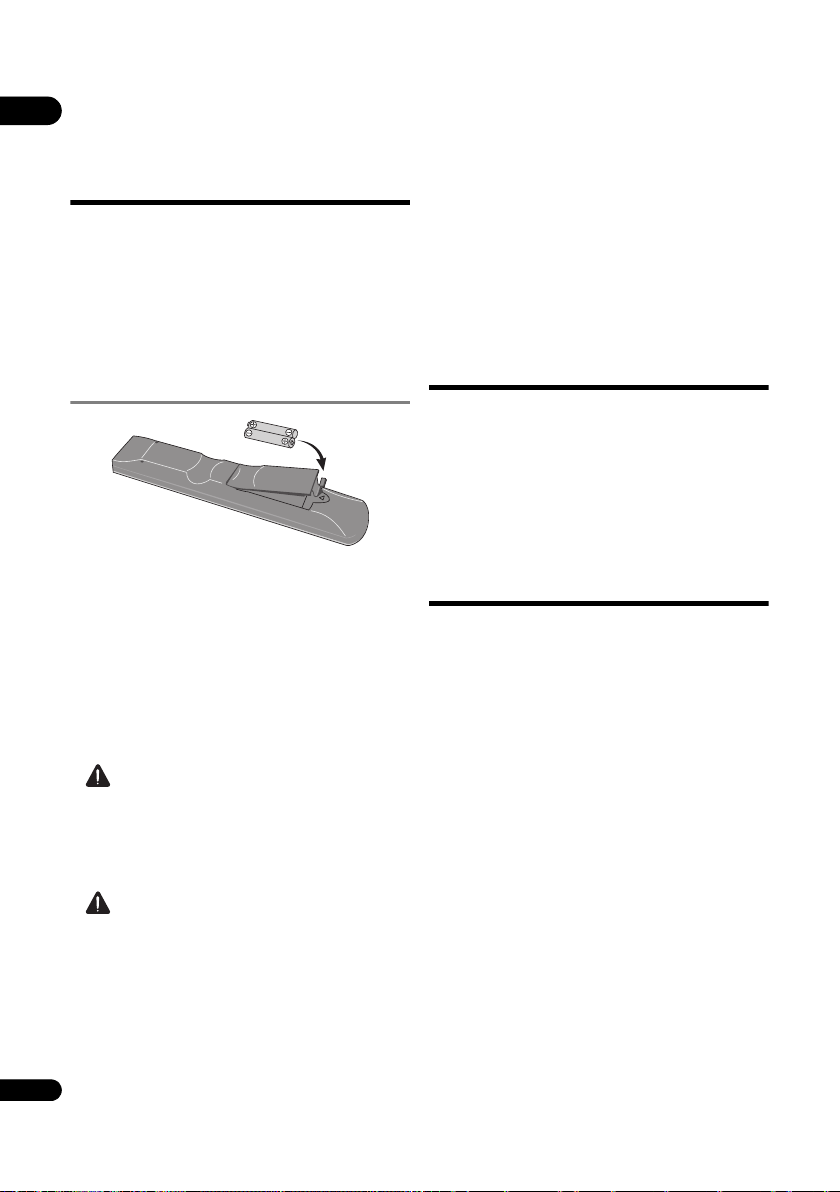
Putting the batteries in the
remote control
1 Open the rear cover.
2 Insert the batteries (AAA/R03 x 2).
Insert as indicated by the / marks into the battery
compartment.
3 Close the rear cover.
Close securely (a click should be heard).
The batteries included with the player have been provided
to allow you to check product operation and may not last
long. We recommend using alkaline batteries that have a
longer life.
WARNING
•Do not use or store batteries in direct sunlight or
other excessively hot place, such as inside a car or
near a heater. This can cause batteries to leak,
overheat, explode or catch fire. It can also reduce the
life or performance of batteries.
Caution
• Do not use any batteries other th
specified. Also, do not use a new battery together with
an old one.
• When loading the batteries into the remote control,
set them in the proper direction, as indicated by the
polarity marks ( and ).
• Do not heat batteries, disassemble them, or throw
them into flames or water.
•Batteries may have different voltages, even if they look
similar. Do not use different kinds of batteries
6
together.
En
an the ones
Software Update
Product information on this player is provided on the
Pioneer website. Check this website for update and
service information on your Blu-ray disc player.
http://www.pioneerelectronics.com
About operation of
this player from a
mobile device (iPod,
iPhone, iPad etc.)
The player can be controlled from a mobile device by
installing the special application onto the mobile device.
For details, see the product information on the Pioneer
website.
This special application may be changed or discontinued
without notice.
Page 7
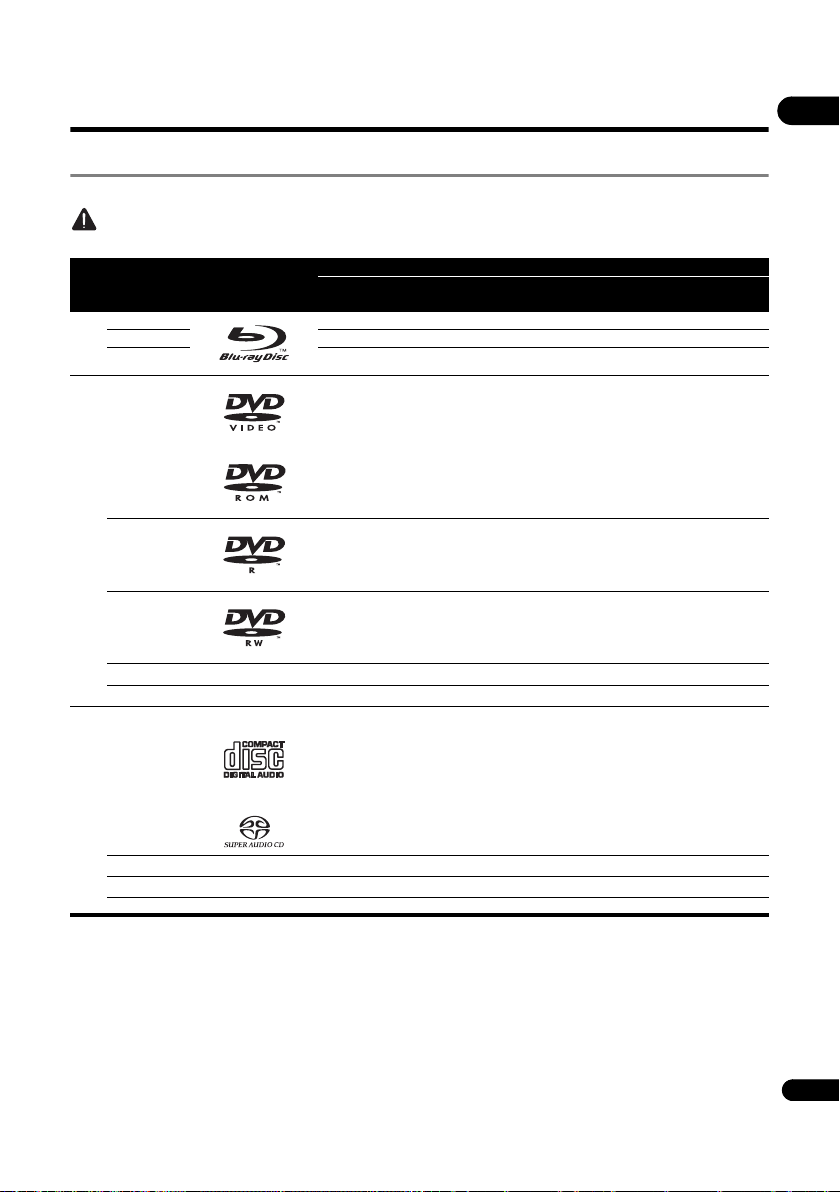
Types of discs/files that can be played
Playable discs
Discs with the logo marks below indicated on the disc label, package or jacket can be played.
Caution
• Only the discs that have been finalized can be played.
Disc type Logo
BD-ROM
BD-R
2
BD
BD-RE
DVD-ROM
BDMV BDAV DVD-Video DVD VR
Application format
CD-DA
DTS-CD
DATA-
DISC
01
1
DVD
CD
1. Discs on which video, image or audio files are recorded. This player does not support multisession discs or multiborder recording.
2. Including dual-layered discs.
3. Finalize them before playing them on this player.
4. DVD-R for Authoring discs (3.95 and 4.7 GB) cannot be played.
5. Including the AVCHD format.
6. Including the AVCREC format.
7. Version 1.0 DVD-RW discs cannot be played.
8. Including Video CDs.
2,3,4
DVD-R
3,7
DVD-RW
2,3
DVD+R
3
DVD+RW
CD-DA
8
(Audio CD)
3
CD-R
3
CD-RW
CD-ROM
5
5
6
6
7
En
Page 8

• “Blu-ray Disc”, “Blu-ray” and “Blu-ray Disc” logo are
01
trademarks of Blu-ray Disc Association.
• is a trademark of DVD Format/Logo Licensing
Corporation.
Discs that cannot be played
• HD DVDs
•DVD-RAM discs
It is possible that some discs other than the ones listed
above may not be playable either.
Note
• Some discs cannot be played, even if one of the logo
marks on the previous page is indicated.
•To play 8 cm discs, set the disc in the 8 cm disc
depression in the center of the disc tray. No adapter
is necessary. 8 cm BD-ROMs cannot be played.
About playback of unauthorized
copies
Cinavia Notice
This product uses Cinavia technology to limit the use of
unauthorized copies of some commercially-produced
film and videos and th eir soundtracks. When a prohibited
use of an unauthorized copy is detected, a message will
be displayed and playback or copying will be interrupted.
More information about Cinavia technology is provided at
the Cinavia Online Consumer Information Center at http:/
/www.cinavia.com. To request additional information
about Cinavia by mail, send a postcard with your mailing
address to: Cinavia Consumer Information Center, P.O.
Box 86851, San Diego, CA, 92138, USA.
Copyright 2004-2010 Verance Corporation. Cinavia
Verance Corporation trademark. Protected by U.S. Patent
7,369,677 and worldwide patents issued and pending
under license from Verance Corporation. All rights reserved.
About audio formats
The following audio formats are supported on this player:
•Dolby TrueHD
• Dolby Digital Plus
• Dolby Digital
•DTS-HD Master Audio
• DTS-HD High Resolution Audio
•DTS Digital Surround
•MPEG audio (AAC)
•Linear PCM
To enjoy the surround sound of Dolby TrueHD, Dolby
Digital Plus, DTS-HD Master Audio and DTS-HD High
Resolution Audio, it is recommended to connect the
player to an AV receiver or amplifier compatible with
these audio formats using an HDMI cable. After loading
a BD containing sound in one of these audio formats,
select the audio format on the menu screen.
8
En
™ is a
Manufactured under license from Dolby Laboratories.
”Dolby” and the double-D symbol are trademarks of Dolby
Laboratories.
Manufactured under license under U.S. Patent Nos:
5,956,674; 5,974,380; 6,226,616; 6,487,535; 7,392,195;
7,272,567; 7,333,929; 7,212,872 & other U.S. and worldwide
patents issued & pending. DTS-HD, the Symbol, & DTS-HD
and the Symbol together are registered trademarks & DTSHD Master Audio | Essential is a trademark of DTS, Inc.
Product includes software. © DTS, Inc. All Rights Reserved.
Playing BDs
• BDs (BDMV) compatible with the formats below can
be played.
–Blu-ray Disc Read-Only (ROM) Format Version 2
–Blu-ray Disc Recordable (R) Format Version 2
–Blu-ray Disc Rewritable (RE) Format Version 3
This player supports BD-ROM Profile 5.
“Blu-ray 3D” and “Blu-ray 3D” logo are trademarks of
Blu-ray Disc Association.
BONUSVIEW functions such as playback of
secondary video (Picture-in-Picture) and secondary
audio can be used. The data used with the
BONUSVIEW functions (the secondary video
(Picture-in-Picture) and secondary audio data) may
be stored in the storage. For details on secondary
video and secondary audio playback, refer to the
disc’s instructions.
“BONUSVIEW” is trademark of Blu-ray Disc
Association.
BD-LIVE functions such as downloading movie
trailers or additional audio and subtitle languages
and playing on-line games can be enjoyed over th
Internet. The data downloaded with the BD-LIVE
function (trailers, etc.) is stored in the storage. Refer
to the disc’s instructions for details about BD-LIVE
functions.
“BD-LIVE” logo is trademark of Blu-ray Disc
Association.
e
Page 9
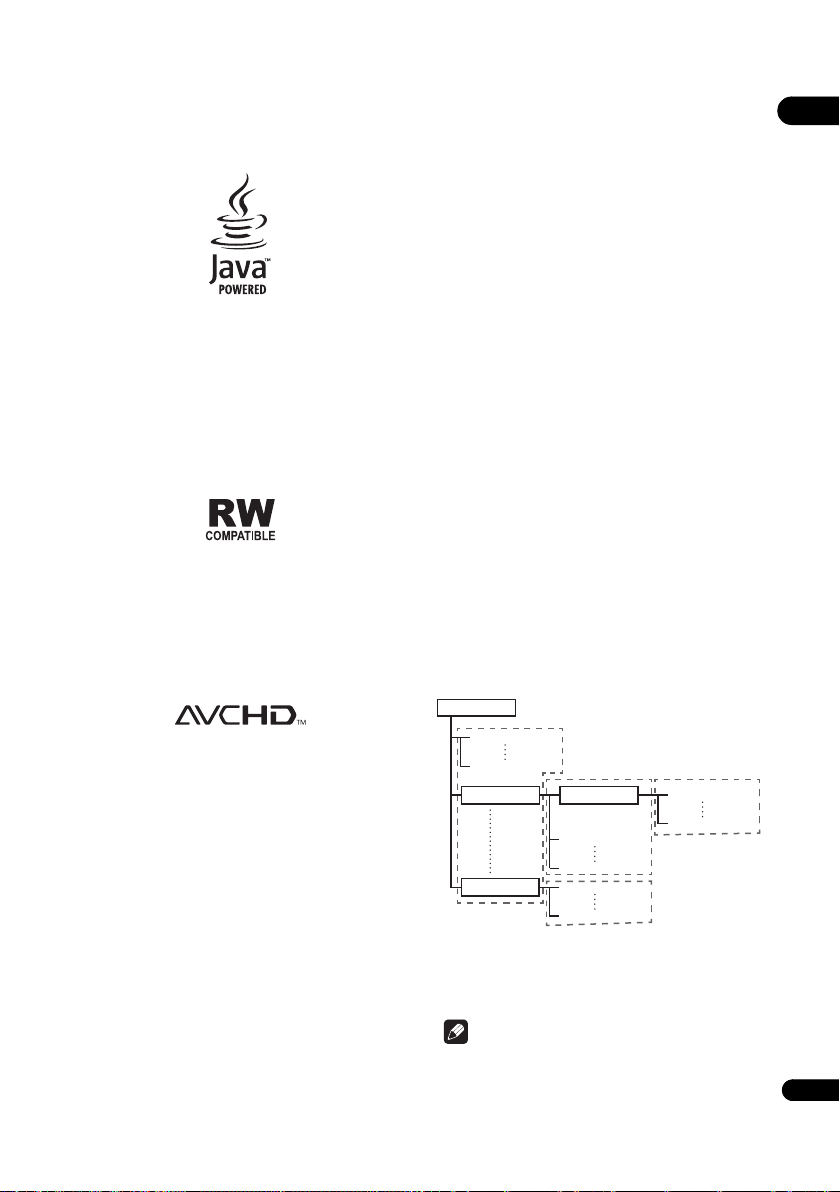
With BD-ROMs, it is possible to use BD-J (Java)
Root
01 Folder
XX Folder
Folder
001.jpg/001.mp3
xxx.jpg/xxx.mp3
001.jpg/001.mp3
xxx.jpg/xxx.mp3
001.jpg/001.mp3
xxx.jpg/xxx.mp3
001.jpg/001.mp3
xxx.jpg/xxx.mp3
applications to create highly interactive titles, for
example including games.
Oracle and Java are registered trademarks of Oracle
and/or its affiliates. Other names may be trademarks of
their respective owners.
• BDs (BDAV) compatible with the formats below can
be played.
–Blu-ray Disc Recordable (R) Format Version 1
–Blu-ray Disc Rewritable (RE) Format Version 2
Playing DVDs
This label indicates playback compatibility with DVD-RW
discs recorded in VR format (Video Recording format).
However, for discs recorded with a record-only-once
encrypted program, playback can only be achieved using a
CPRM compatible device.
The AVCHD is a high definition (HD) digital video camera
recorder format recording high-definition onto certain
media by using highly efficient codec technologies.
DualDisc playback
A DualDisc is a two-sided disc, one side of which
contains DVD content — video, audio, etc. — while the
other side contains non-DVD content such as digital
audio material.
The DVD side of a DualDisc can be played on this player.
The non-DVD, audio side of the disc is not compatible
with this player.
It is possible that when loading or ejecting a DualDisc,
the opposite side to that being played will be scratched.
Scratched discs may not be playable.
For more detailed information on the DualDisc
specification, please refer to the disc manufacturer or
disc retailer.
Playing discs created on computers
or BD/DVD recorders
• It may not be possible to play discs recorded using a
computer due to the application settings or
computer’s environment settings. Record discs in a
format playable on this player. For details, contact the
dealer.
• It may not be possible to play discs recorded using a
computer or a BD/DVD recorder, if burn quality is not
good due to characteristics of the disc, scratches, dirt
on the disc, dirt on the recorder’s lens, etc.
About video, audio, and image files
and folders
Audio and image files can be played on this player when
the folders on the disc or USB device are created as
described below.
Example of folder structure:
01
“AVCHD” and the “AVCHD” logo are trademarks of
Panasonic Corporation and Sony Corporation.
About region numbers
Blu-ray Disc Player and BD-ROM or DVD-Video discs are
assigned region numbers according to the region in
which they are sold.
This player’s region numbers are:
•BD-ROM: A
•DVD-Video: 1
Discs not including these numbers cannot be played.
Discs playable on this player are as shown below.
• BDs: A (including A) and ALL
• DVDs: 1 (including 1) and ALL
Playing CDs
Regarding copy protected CDs: This player is designed to
conform to the specifications of the Audio CD format.
This player does not support the playback or function of
discs that do not conform to these specifications.
*
*
*
*
* The number of folders and files within a single folder
(including the root directory) is limited to a maximum of
256. Also, keep the number of folder layers to a maximum
of 5.
Note
• The file and folder names displayed on this player may
differ from those displayed on a computer.
9
En
Page 10
Playable files
01
Video, image and audio files recorded on BDs, DVDs, CDs
or USB devices can be played.
Caution
• In DVD, only the one recorded by the ISO 9660 file
system can be played.
•Some files may not be playable.
•For some files, it may not be possible to use certain
functions during playback.
•It may not be possible to play some files, even if they
have the extension of a file playable on this player.
•Files protected by DRM (Digital Rights Management)
cannot be played (not including DivX VOD files).
Supported video file formats
• DivX Plus HD
®
DivX Certified
(H.264/MKV) video up to 1080p HD including
premium content.
ABOUT DIVX VIDEO: DivX
created by DivX, LLC, a subsidiary of Rovi Corporation.
This is an official DivX Certified
DivX video. Visit divx.com for more information and
software tools to convert your files into DivX videos.
ABOUT DIVX VIDEO-ON-DEMAND: This DivX
Certified
purchased DivX Video-on-Demand (VOD) movies. To
obtain your registration code, locate the DivX VOD
section in your device setup menu. Go to
vod.divx.com for more information on how to
complete your registration.
to play DivX® and DivX PlusTM HD
®
is a digital video format
®
device that plays
®
device must be registered in order to play
–This player’s DivX VOD registration code can be
checked at HOME MENU Initial Setup
Playback D
Code (page 36).
–The number of views is restricted for some DivX
VOD files. When such files are played on this
player, the remaining number o f vi ews is d isplayed.
Files for which the remaining number of views has
reached 0 cannot be played (This DivX rental has
expired is displayed). Files for which the number of
views is not restricted can be played as many times
as you like (the remaining number of views is not
displayed).
ivX(R) VOD DRM Registration
®
DivX
, DivX Certified®, DivX PlusTM HD and associated
logos are trademarks of Rovi Corporation or its
subsidiaries and are used under license.
Note
•This DivX
®
order to play DivX Video-on-Demand (VOD) content.
First generate the DivX VOD registration code for your
device and submit it during the registration process.
Important: DivX VOD content is protected by a DivX
DRM (Digital Rights Management) system that
restricts playback to registered DivX Certified devices.
If you try to play DivX VOD content not authorized for
your device, the message Authorization Error will be
displayed and your content will not be played. Learn
more at www.divx.com/vod.
Certified device must be registered in
10
En
Page 11
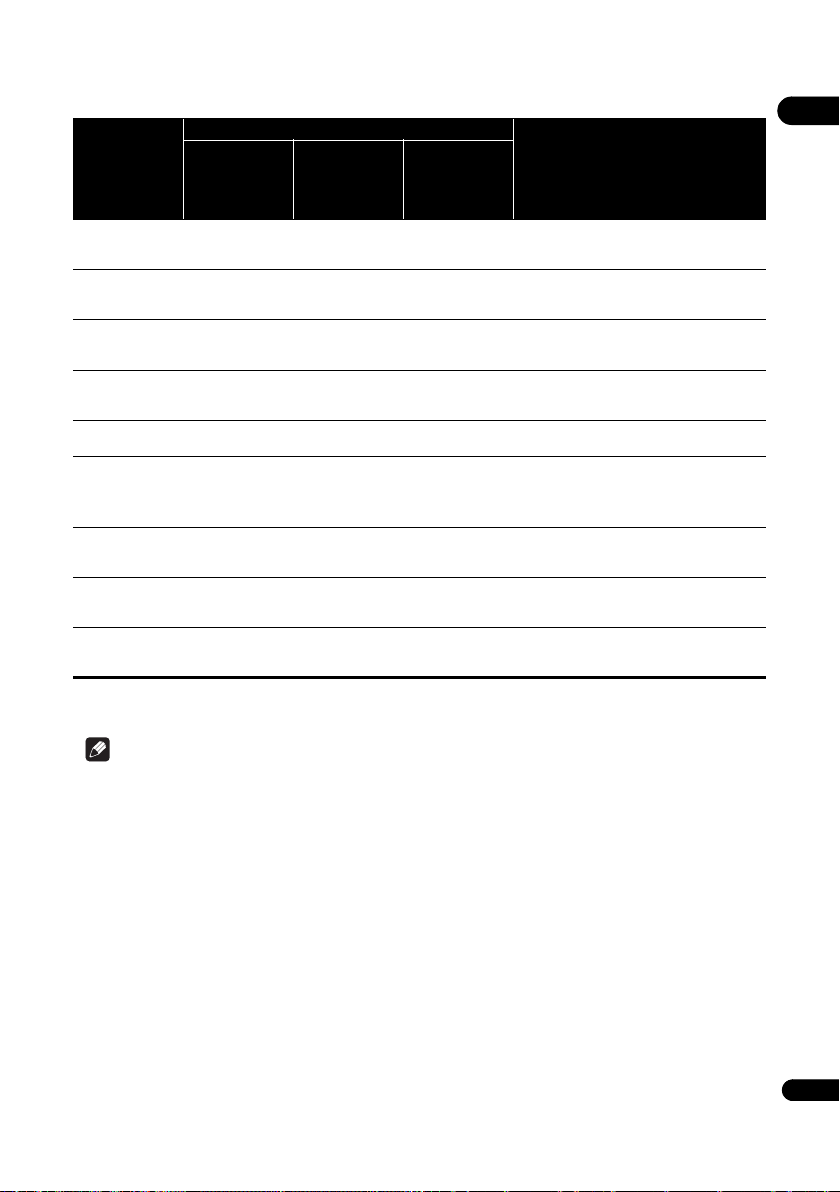
Table of Playable Files
Playable media
Playable files
(Extensions)
MP3
(.mp3)
WMA
(.wma)
LPCM
(.wav)
FLAC
(.flac)
JPEG
(.jpg/.jpeg)
DivX
(.avi/.divx/.mkv)
MP4
(.mp4)
WMV
(.wmv)
AVI
(.avi)
1. This unit supports FAT16, FAT32 and NTFS file systems.
2. A requirement for playing files as a DMP. For details, see page 28.
BD-R/RE/-R DL/
RE DL/-R LTH,
DVD-R/RW/-R DL/
+R/+RW/+R DL,
CD-R/RW
USB devices
1
Network
2
Sampling frequencies: Up to 48 kHz
Bit rate: Up to 320 kbps
Audio type: MPEG-1 Audio Layer 3
Sampling frequencies: Up to 48 kHz
Bit rate: Up to 192 kbps
Audio type: WMA version 9
Sampling frequencies: Up to 192 kHz
Quantization bitrate: 16 bit
Channel: 2ch
Sampling frequencies: Up to 192 kHz
Quantization bitrate: 16 bit, 24 bit
Channel: 2ch
Maximum resolution: 4 000 x 3 000 pixels
Supporte
Maximum resolution:
Up to 1 920 x 1 080 (DivX
Up to 1 280 x 720 (MKV)
Maximum resolution: Up to 1 920 x 1 080
Video: MPEG4, MPEG-4 AVC (level 4.1)
Audio: AAC, MP3
Maximum resolution: Up to 1 280 x 720
Video: WMV9, WMV9AP (VC-1)
Audio: WMA
Maximum resolution: Up to 1 920 x 1 080
Video: MPEG4
Audio: MP3, AAC, AC-3
File specifications
d versions: Through DivX
®
PLUS HD)
®
PLUS HD
01
Note
•Depending on the file structure and server capacity, it may not be possible to play certain files, even for files
indicated on the table of playable files above.
•Copyright-protected files and contents recorded from digital broadcasts (satellite, cable or digital terrestrial)
cannot be played via LAN.
•Files protected by DRM (Digital Rights Management) cannot be played.
• AVCHD contents cannot be played via LAN.
11
En
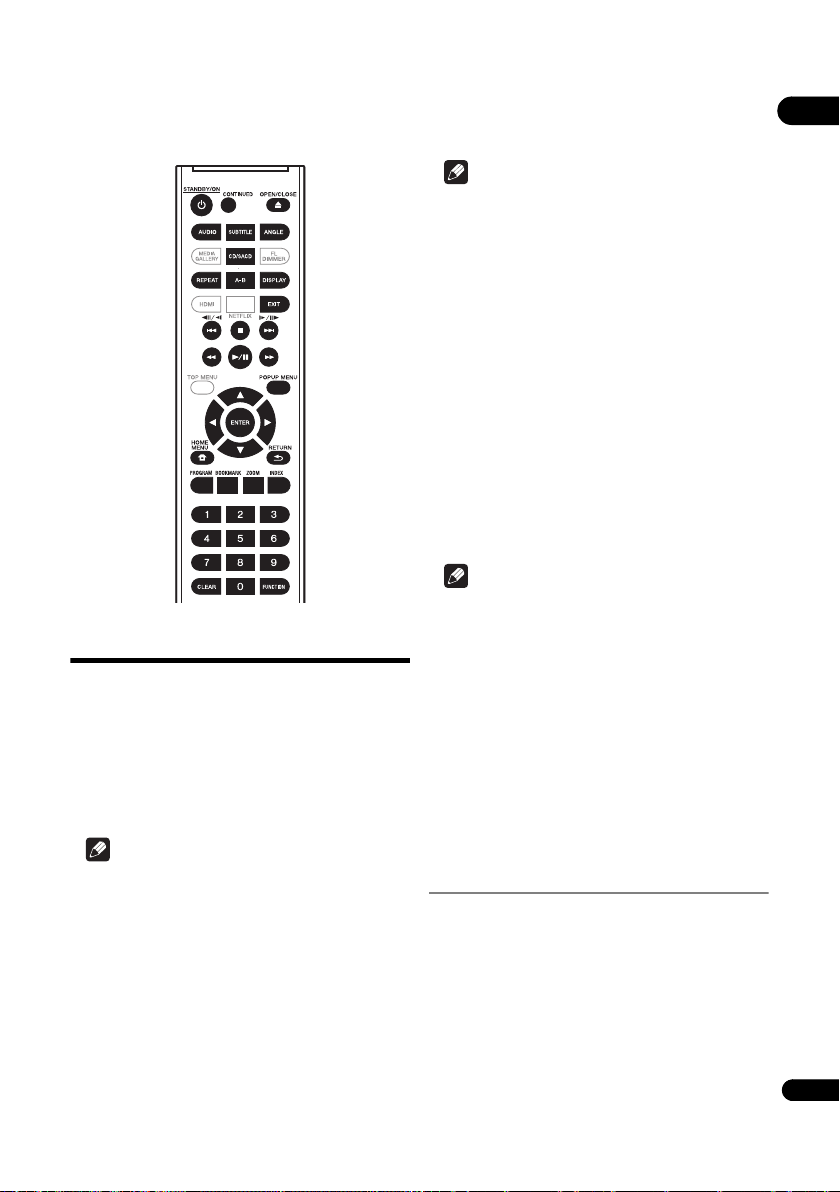
Page 12
Part Names and
10
7
8
3
12
13
1
2
4
5
6
9
11
14
15
16
17
19
21
23
25
18
20
22
24
01
Functions
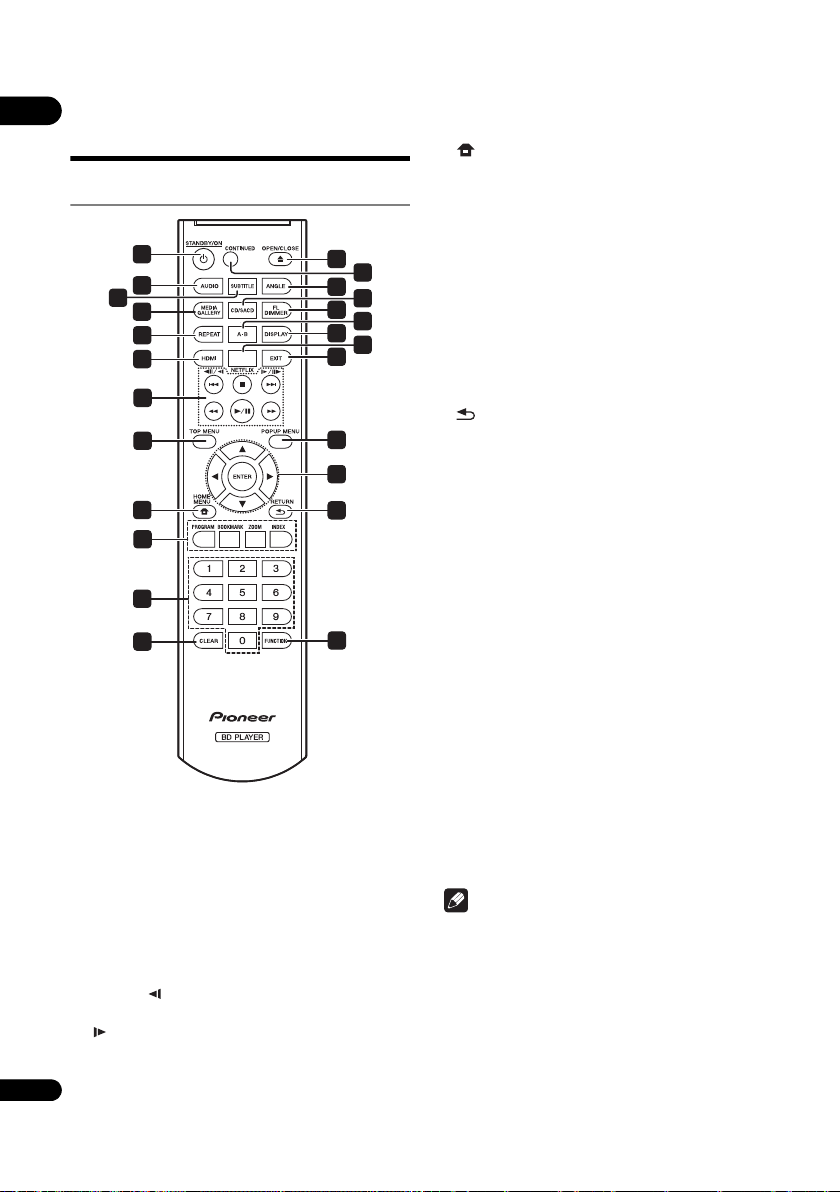
Remote Control
1STANDBY/ON
2 AUDIO – (page 24)
3SUBTITLE – (page 23)
4 MEDIA GALLERY – (page 28)
5 REPEAT – (page 22)
6 HDMI – Use to switch the resolution of the video
signals output from the HDMI OUT terminal
(page 35).
7 // – (page 22)
– (page 21)
// – (page 22)
– (page 21)
– (page 21)
12
– (page 21)
En
– Press to turn the power on and off.
8TOP MENU – Press to display the top menu of the BD-
ROM or DVD-Video.
9HOME MENU – (page 33)
10 Color buttons – Use these to navigate BD-ROM
menus.
PROGRAM – (page 22)
BOOK MARK – (page 23)
ZOOM – (page 23)
INDEX – (page 23)
11 Number buttons – Use these to select and play the
title/chapter/track y
select items from menus.
12 CLEAR – Press to clear the numeric number, etc.
13 FUNCTION – (page 26)
14 RETURN – Press to return to the previous
screen.
15 /// – Use to select items, change settings and
move the cursor.
ENTER – Press to execute the selected item or enter a
setting that has been changed, etc.
16 POP UP MENU/MENU – Press to display the
BD-ROM or DVD-Video menus.
17 EXIT – (page 31)
18 NETFLIX – (page 31)
19 DISPLAY – (page 24)
20 A-B – (page 22)
21 FL DIMMER – Each time this is pressed, the
brightness of the front panel display switches (in 4
levels).
22 CD/SACD – For hy
the CD and SACD layers (page 24).
23 ANGLE – (page 23)
24 CONTINUED – Use to continue playback from a
specified position (page 27).
25 OPEN/CLOSE – Press to open and close the disc
tray.
Note
•To operate an AV receiver equipped with a remote
control mode setting using the RECEIVER CONTROL
buttons, set the AV receiver’s remote control mode to
“1”. For details, see the AV receiver’s operating
instructions.
ou want to view or listen to and to
brid discs, press to switch between
Page 13
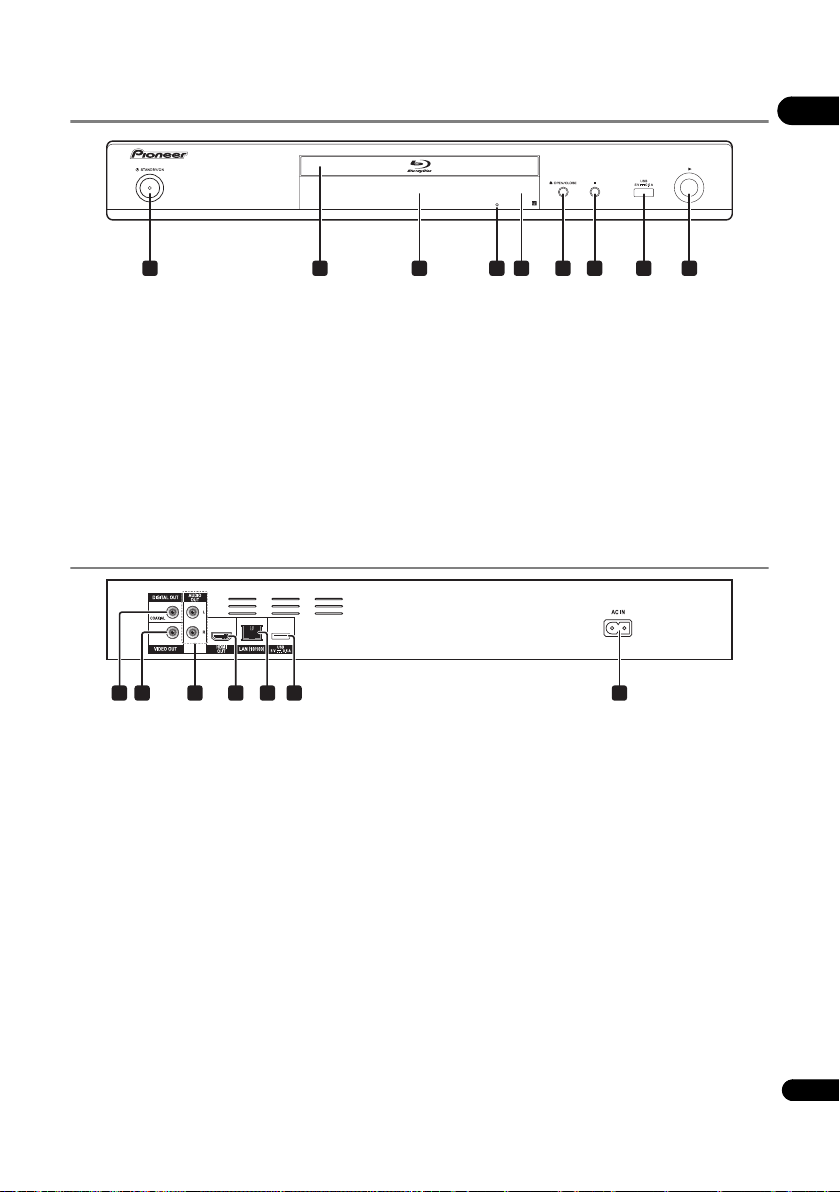
Front Panel
1 2 3 54 6 7 8
9
321 5 6 74
01
1 STANDBY/ON – Press to turn the power on and
off.
2 Disc tray
3 Front panel display
4 Reset button – If the power cannot be turned off (set
to standby), use a thin rod to press this button. The
unit restarts, at which point it is again operable.
Rear Panel
1 DIGITAL OUT (COAXIAL) terminal – (page 17)
2 VIDEO OUT terminal – (page 17)
3 AUDIO OUT terminals – (page 17)
4 HDMI OUT terminal – (page 14)
5 Remote control sensor – Point the remote control to
this, then operate it within approximately 7 m.
The player may have trouble capturing remote control
signals if there is a fluorescent light nearby. If this
happens, move the player away from the fluorescent
light.
6 OPEN/CLOSE – Press to open and close the disc
tray.
7 – Press to stop pla
8 USB port – (page 17)
9 – Press to start playback.
5 LAN (10/100) terminal – (page 18)
6 USB port – (page 17)
7AC IN – (page 19)
yback.
13
En
Page 14

Chapter 2
02
Connecting up
Be sure to turn off the power and unplug the power cord
from the power outlet whenever making or changing
connections.
After connecting, make the settings at the Setup
Navigator or Initial Setup menu according to the type of
cable connected (page 20).
Also refer to the operating instructions for the device
being connected.
“x.v.Color” is a promotion name given to the products that
have the capability to realize a wide-gamut color space
based on the international standard specifications
defined as xvYCC.
Connecting using an
HDMI cable
The audio and video signals can be transferred to HDMIcompatible devices as digital signals with no loss of
sound or video quality.
Note
• Make the settings at the Setup Navigator menu
according to the connected HDMI-compatible device
(page 20).
• 1080p video signals may not be output, depending on
the HDMI cable being used.
About HDMI
This player incorporates the High-Definition Multimedia
Interface (HDMI
The terms HDMI and HDMI High-Definition Multimedia
Interface, and the HDMI Logo are trademarks or registered
trademarks of HDMI Licensing, LLC in the United States
and other countries.
The player supports Deep Color.
The conventional players can transmit a video signal with
8 bit color depth in the YCbCr 4:4:4 or RGB format; the
players supporting Deep Color can transmit a video
signal with a color bit depth of greater than 8 bits per
color component. Subtle color gradations can be
reproduced when this player is connected to a TV that
supports Deep Color.
This product is compatible with “x.v.Color” that have the
capability to realize a wide-gamut color space
the xvYCC specifications.
Playing video signals conforming to “xvYCC” standards
on this player when this player is connected to an
“x.v.Color”-compatible TV, etc., expands color
reproduction capabilities, allowing natural colors to be
14
reproduced more faithfully than ever.
En
®
) technology.
based on
“x.v.Color” and
Corporation.
are trademarks of Sony
Playable audio signals through the
HDMI OUT terminal
•Dolby TrueHD
• Dolby Digital Plus
• Dolby Digital
•DTS-HD Master Audio
•DTS-HD High Resolution Audio
•DTS Digital Surround
•Linear PCM
Linear PCM audio signals meeting the following
conditions can be output:
–Sampling frequency: 32 kHz to 192 kHz
–Number of channels: Up to 8 (up to 6 for a 192 kHz
sampling frequency)
•DSD audio
When connected to a DVI device
• It is not possible to connect DVI devices
(computer displays, for example) that are not
compatible with HDCP. HDCP is a specification to
protect audiovisual content across the DVI/HDMI
interface.
• No audio signals are output. Connect using an audio
cable, etc.
•This player is designed for connection with HDMI-
compatible devices. When connected to a DVI device,
it may not operate properly depending on the DVI
device.
About Control Function with
HDMI
The functions work when a control function with HDMIcompatible Pioneer Flat Screen TV or AV system (AV
receiver o r amplifier, etc.) is connected to the player using
an HDMI cable.
Also refer to the operating instructions for the Flat Screen
TV and AV system (AV receiver or amplifier, etc.).
Page 15
To use the control function with
HDMI
• The control function with HDMI operates when
control function with HDMI is set to On for all devices
connected with HDMI cables.
• Once the connections and the settings of all the
devices are finished, be sure to check that the player’s
picture is output to the Flat Screen TV. (Also check
after changing the connected devices and
reconnecting HDMI cables.) The control function with
HDMI may not operate properly if the player’s picture
is not properly output to the Flat Screen TV.
•Use High Speed HDMI
control function with HDMI. The control function with
HDMI may not operate properly if other HDMI cables
are used.
•For some models, the control function with HDMI
may be referred to as “KURO LINK” or “HDMI
Control”.
• The control function with HDMI does not work with
devices of other brands, even if this player is
connected with an HDMI cable.
®/TM
Cables when using the
What the control function with
HDMI can do
• Outputting the optimum picture quality to a Flat
Screen TV compatible with the control function
with HDMI.
When the control function with HDMI is enabled,
video signals with the optimum picture quality for
control function with HDMI are output from the
player’s HDMI terminal.
• Operating the player with the Flat Screen TV’s
remote control.
Such player operations as starting and stopping
playback and displaying the menus can be performed
from the Flat Screen TV.
• The player’s playback picture is displayed on the
Flat Screen TV’s screen. (Auto-select function)
The input switches automatically on the Flat Screen
TV and AV system (AV receiver o r amplifier, etc.) when
playback is started on the player or the HOME MENU
is displayed. When the input is sw itched, the playback
picture, the HOME MENU appears on the Flat Screen
TV.
• The power of the Flat Screen TV and the player
turns on and off automatically. (Simultaneous
power function)
When playback on the player is started or the HOME
MENU is displayed, if the Flat Screen TV’s power was
off, its power turns on automatically. When the Flat
Screen TV’s power is turned off, the player’s power
automatically turns off.
Sound Retriever Link
About Sound Retriever Link
Sound Retriever Link is a sound quality correction control
technology that automatically adjusts the compressed
sound quality for the connected AV receiver using HDMI
control function.
Sound Retriever Link function allows you to enjoy higher
quality audio by setting the connected AV receiver’s
Sound Retriever function automatically.
Sound Retriever Link function on this player works
exclusively with the following situations.
• PC Audio Stream that is played by USB devices or via
network.
•The Pioneer AV receiver compatible with Sound
Retriever Link function is connected to this player
through an HDMI cable and the player’s setting is set
as shown below (page 35).
Control: On
•Also refer to the instructions of the AV receiver.
•
See Pioneer website about AV receivers compatible
with Sound Retriever Link function.
Caution
•Connect the player directly to the Pioneer AV receiver
compatible with Sound Retriever Link function.
Interrupting a direct connection with an amplifier or
AV converter (such as an HDMI switch) can cause
malfunction.
Stream Smoother Link
About Stream Smoother Link
Stream Smoother Link is a function that improves picture
quality of network video contents using the control
function with HDMI. Stream Smoother Link function
allows you to enjoy a high quality picture with less noise
by setting the connected AV receiver’s Stream Smoother
function automatically.
Stream Smoother Link function on this player works
exclusively with the following situations.
•Playback of PC contents stored on discs and USB
devices.
•The Pioneer AV receiver with Stream Smoother Link
function is connected to this player through an HDMI
cable and the player’s setting is set as shown below
(page 35). Also refer to the instructions for the AV
receiver.
Control: On
See Pioneer website about AV receivers compatible with
Stre
am Smoother Link function.
Caution
•Connect the player directly to the Pioneer AV receiver
compatible with Stream smoother Link function.
Interrupting a direct connection with an amplifier or
AV converter (such as HDMI switch) can cause
malfunction.
02
15
En
Page 16
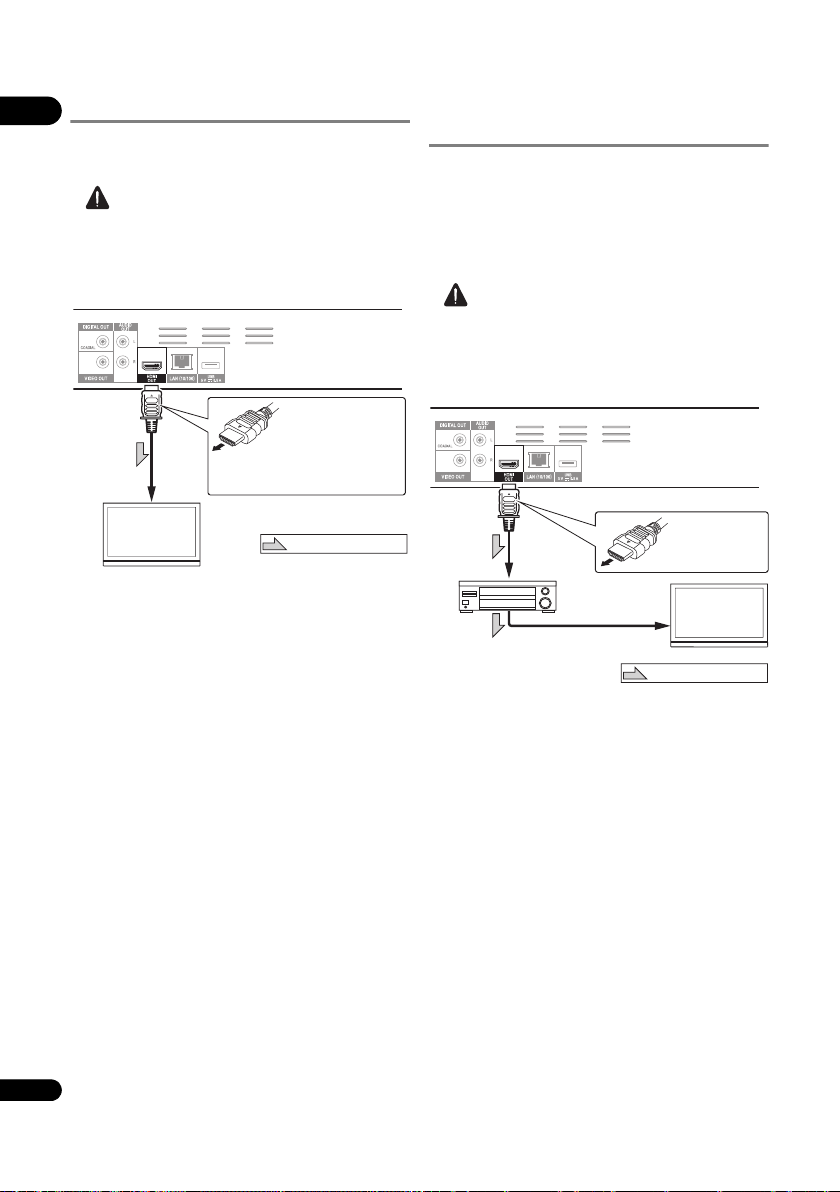
Connecting a TV
Player’s rear panel
TV
Match the direction of
the plug to the terminal
and insert straight.
To HDMI
input terminal
HDMI cable
(commercially
available)
It is also possible to connect to an
AV receiver or amplifier using an
HDMI cable (on the right column).
Direction of signal flow
Player’s rear panel
To HDMI
input terminal
From HDMI
output
terminal
AV receiver
or amplifier
To HDMI input
terminal
TV
HDMI cable
(commercially
available)
Match the direction
of the plug to the
terminal and insert
straight.
Direction of signal flow
HDMI cable
(commercially
available)
02
See Connecting an AV receiver or amplifier on the right
column to connect an AV receiver or amplifier using an
HDMI cable.
Caution
•Hold the plug when connecting and disconnecting
the cable.
• Placing a load on the plug could result in faulty
contact and no video signals being output.
Connecting an AV receiver or
amplifier
Connect to an AV receiver or amplifier in order to enjoy
the surround sound of Dolby TrueHD, Dolby Digital Plus,
Dolby Digital, DTS-HD Master Audio, DTS-HD High
Resolution Audio or DTS Digital Surround. For
instructions on connecting the TV and speakers to the AV
receiver or amplifier, refer to the operating instructions
for AV receiver or amplifier.
Caution
•Hold the plug when connecting and disconnecting
the cable.
• Placing a load on the plug could result in faulty
contact and no video signals being output.
16
En
Page 17
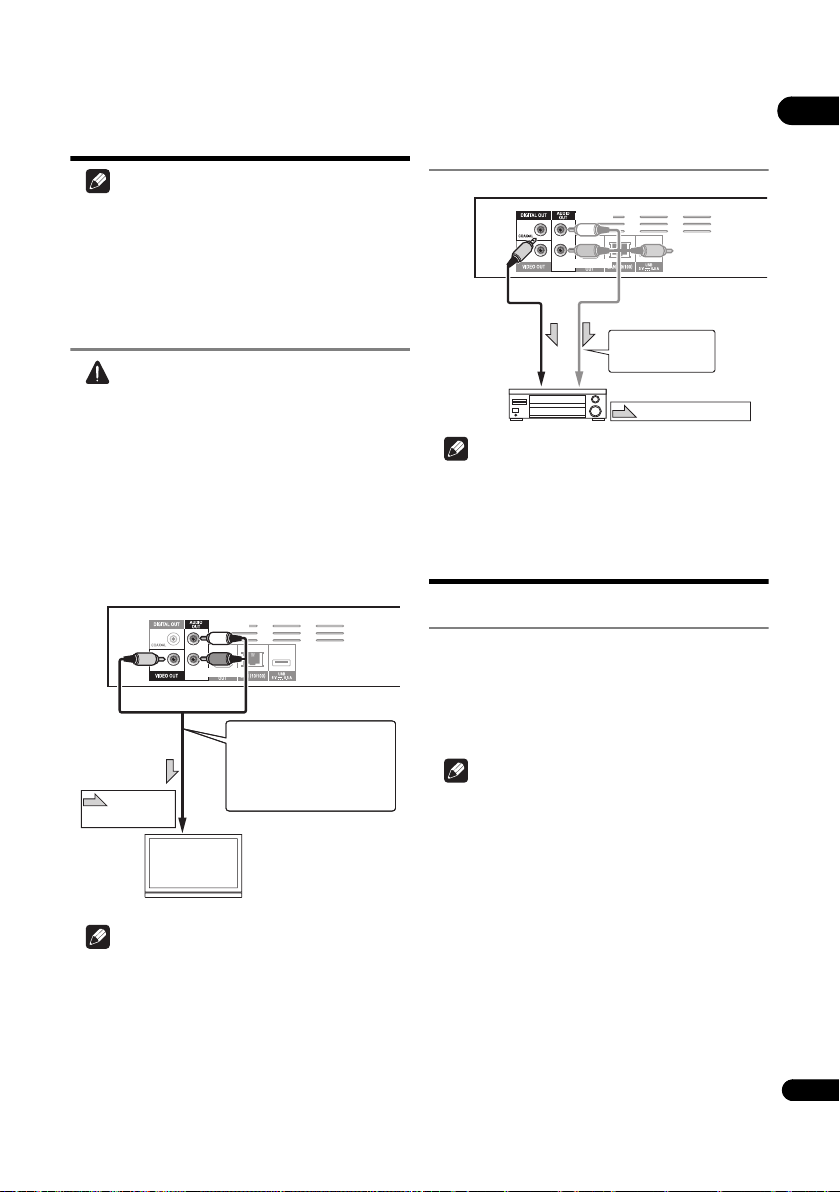
Connecting video and
TV
Player’s rear panel
Direction of
signal flow
White
Red
It is also possible to connect to
an AV receiver or amplifier.
Connect the audio signals using
an coaxial digital audio cable or
an audio cable (2 channels) (on
the right column).
To video/audio input terminals
Video/audio
cable (included)
Yellow
Player’s rear panel
To audio input terminals
AV receiver or
amplifier
Direction of signal flow
2-channel analog
audio can also be
connected.
To coaxial digital
audio input terminal
Coaxial digital audio
cable (commercially
available)
White
Red
Video/audio cable
(included)
audio cables
Note
• Make the settings in the Setup Navigator menu
according to the type of cable connected (page 20).
• To output video signals from this player, connect
using a video cable (not including when connected
using an HDMI cable).
Connecting a TV using a
video/audio cable
Caution
• Connect the player’s video output directly to
your TV.
This player supports the analog copy protection
technology. Therefore, the picture may not be
displayed properly if this player is connected to a TV
via a DVD recorder/video deck or when playing the
player’s output material that is recorded by a DVD
recorder/video deck. Furthermore, the picture may
not be displayed properly due to the copy protection
when the player is connected to a TV with a built-in
video deck. For details, contact the manufacturer of
your TV.
Connecting an AV receiver or
amplifier using an coaxial
digital audio cable
Note
• To switch the video from the AV receiver or amplifier,
also connect the video output terminals.
Connecting components
to the USB port
About USB devices
The USB devices that can be connected to the player are
as shown below.
• USB 2.0-compatible USB flash drive (capacity of 1 GB
or greater, 2 GB or greater recommended) or HDD
(capacity 2 TB or less)
• File system: FAT16, FAT32 or NTFS
02
•
•Depending on the output video resolution setting, the
Note
Video signals are output with a resolution of 480/576I
or 480/576P when this player is connected using a
video cable.
picture may not be output.
Note
•Devices formatted with a file system other than the
above cannot be used. Such devices may however be
usable if they are formatted from the player.
• USB devices may not be recognized if they contain
multiple partitions.
• Some USB devices may not operate with this player.
•Operation of USB devices is not guaranteed.
17
En
Page 18
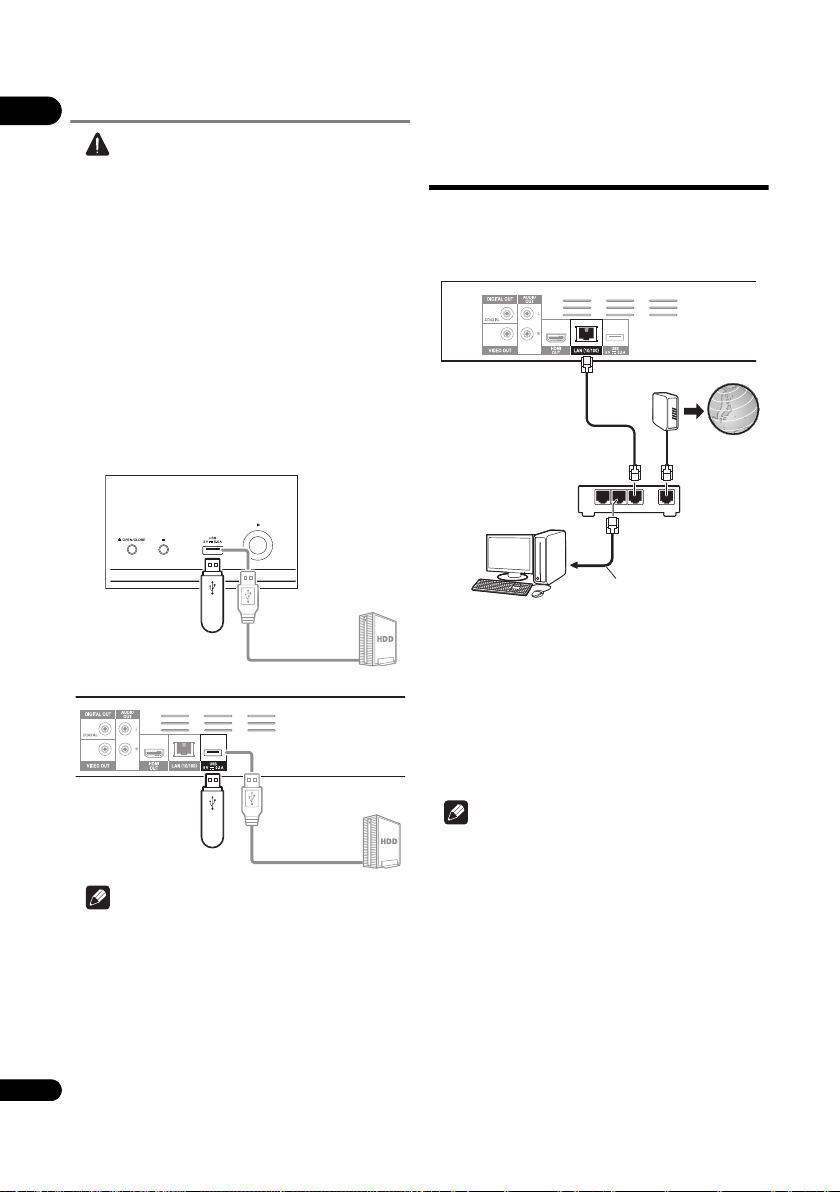
Connecting the USB device
USB flash drive
Player’s front panel
Hard disk, etc.
USB cable
(commercially
available)
USB flash drive
Player’s rear panel
Hard disk, etc.
USB cable
(commercially
available)
LAN cable
(commercially available)
Router
Internet
Modem
LAN cable
(commercially
available)
PC
Player’s rear panel
02
Caution
•Be sure to turn the player’s power off before
connecting or disconnecting USB devices.
•Use empty USB devices (on which nothing is stored).
• When using an external hard disk as the external
storage device, be sure to turn on the hard disk's
power before turning on the player's power.
• If the USB device is write-protected, be sure to disable
the write-protection.
• When connecting the USB cable, hold onto the plug,
set the plug in the proper direction for the port and
insert it horizontally.
• Placing excessive loads on the plug may result in
poor contact, making it impos
sible to write data on
the USB device.
• When a USB device is connected and the player’s
power is turned on, do not unplug the power cord.
Note
• Devices may not work if connected to the USB port via
a memory card reader or USB hub.
• Use a USB cable with a length of 2 meters or less.
Connecting to the
network through LAN
interface
By connecting this player to the network via the LAN
terminal, you can play audio files stored on the
components on the network, including your computer,
using HOME MEDIA GALLERY inputs.
LAN
LAN
321
WAN
321
WAN
Connect the LAN terminal on this receiver to the LAN
terminal on your router (with or without the built-in DHCP
server function) with a straight LAN cable (CAT 5 or
higher).
Turn on the DHCP server function of your router. In case
your router does not have the built-in DHCP server
function, it is necessary to set up the network manually.
For details, see Setting the IP address on page 37 .
LAN terminal specifications
LAN terminal: Ethernet jack (10BASE-T/100BASE-TX)
Note
•Refer to the operation manual of the equipment you
have as the connected equipment and connection
method may differ depending on your Internet
environment.
• When using a broadband Internet connection, a
contract with an Internet service provider is required.
For more details, contact your nearest Internet
service provider.
18
En
Page 19

Connecting to a wireless LAN
Router
Internet
Modem
Wireless LAN
converter (AS-WL300)
Player’s rear panel
LAN/USB feeder cable
(included with the ASWL300)
Player’s rear panel
Power cord (included)
To wall
outlet
Wireless connection to the network is possible through a
wireless LAN connection. Use the separately sold
AS
-WL300 for connection.
•Refer to the operating instructions of AS-WL300 for
the setting details.
WAN
DC 5V WPS
Ethernet
Connecting the power
cord
Connect the power cord after all the connections between
devices have been completed.
02
19
En
Page 20
Chapter 3
03
Getting Started
Making settings using
the Setup Navigator
menu
Be sure to perform these settings when using the player
in the following situations.
• When you use the player for the first time.
•After Initial Setup format.
•After updating the player’s software.
Caution
•Before turning on the power, check that the
connections between the player and other devices are
correct. Also, turn on the power of the devices
connected to the player before turning on the player’s
power.
• When using a Pioneer Flat Screen TV or front
projector compatible with the Control
Control to On on the connected device before turning
on the player’s power.
Note
•When a Pioneer Flat Screen TV or front projector
compatible with the Control function is connected to
the player using an HDMI cable, the player is
automatically set to the optimum picture quality for
the connected device.
function, set
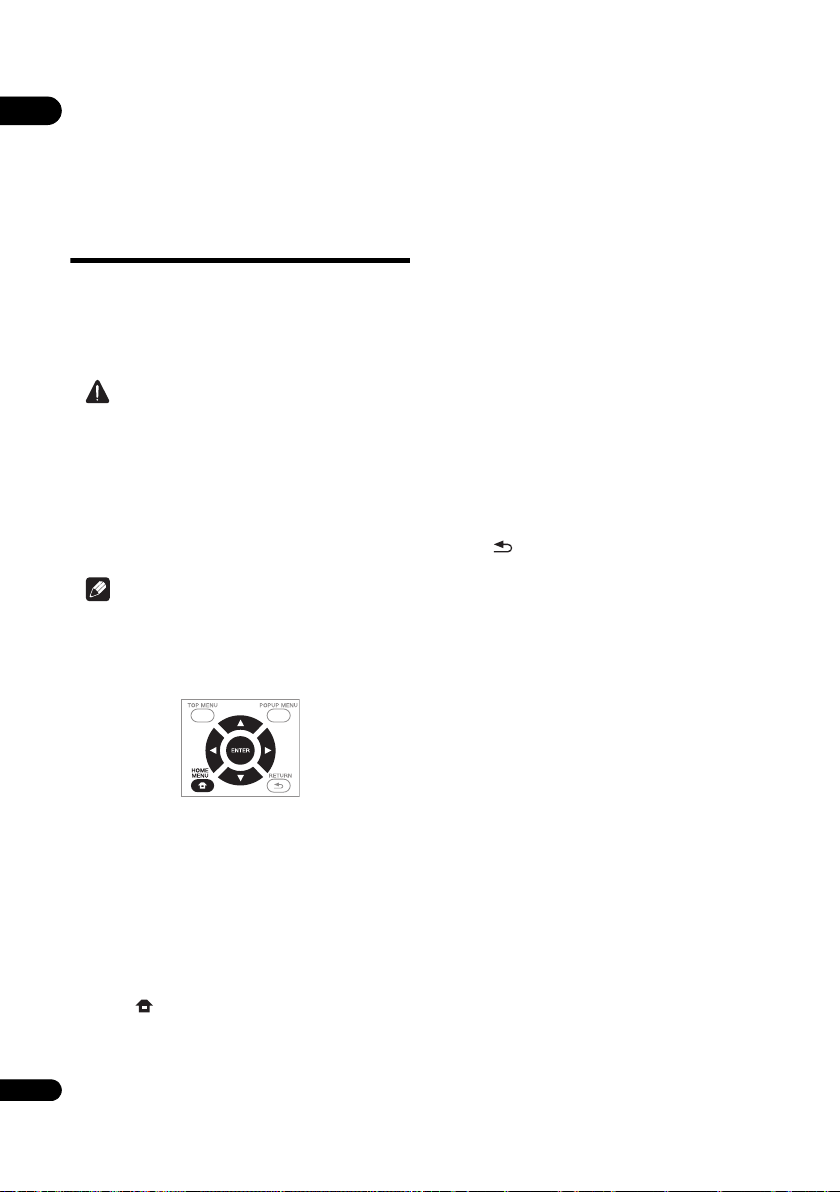
3 Start Setup Navigator.
Press ENTER.
• Setup Navigator starts.
4 Select the OSD language.
Use / to select, then press ENTER.
When a Pioneer Flat Screen TV that is compatible with
Control function is connected to this player’s HDMI OUT
terminal, language settings are imported from the
Pioneer Flat Screen TV’s language settings before Setup
Navigator begins.
5 Select the appropriate output resolution for the
connected TV.
Use / to select, then press ENTER.
6 Select the appropriate aspect for the connected
TV.
Use / to select, then press ENTER.
7 Close the Setup Navigator menu.
Press ENTER.
• Setup Navigator finishes and the setting is stored.
•Press RETURN to go back to the prev
screen.
ious
1 Turn on the TV’s power and switch the input.
See the TV’s operating instructions for the details of
operating the TV.
2 Turn on the player’s power.
Press STANDBY/ON.
Check that the Setup Navigator menu is displayed.
If the Setup Navigator menu is not
displayed
Press HOME MENU to display the Home
Menu, select Initial Setup Setup Navigator
Start, then press ENTER.
20
En
Page 21
Chapter 4
Playback
Playing discs or files
This section describes the player’s main operations.
For the types of discs and files that can be played, see
page 7. Video, image and audio files recorded on discs
are played with the Home Media Gallery (page 28).
1 Press STANDBY/ON to turn on the power.
Turn the TV’s power on and switch its input beforehand.
2 Press OPEN/CLOSE to open the disc tray and
load the disc.
Note
• Load the disc with the printed side facing up.
•Several dozen seconds are required to read the disc.
Once reading is completed, the type of disc is
displayed on the player’s front panel display.
• When a BD with usage restrictions set by a BD
recorder is loaded, the PIN code input scree
appears. In this case, input your PIN code.
3 Press to play the disc.
•To pause, press during playback.
•To stop, press during playback.
n
04
Note
• Some discs start playing automatically when the disc
tray is closed.
• DVD-Video discs have parental lock features. Input
the password registered in the player’s settings to
unlock the parental lock. For details, see page 39.
If the disc menu is displayed
For some discs, the disc menu is displayed automatically
when playback starts. The contents of the disc menu and
the way to operate depend on the disc.
Resuming playback from where it
was stopped (resume playback
function)
• When is pressed during playback, the point at
which the disc stopped is stored in the memory.
When is pressed after that, playback resumes
from that point.
•To cancel the resume playback function, press
while playback is stopped.
Note
•The resume playback function is canceled
automatically in the following cases:
–When the disc tray is opened.
– When the file list window is switched.
–When the power is turned off. (For BDs and DVDs
this does not cancel the resume playback
function.)
• When you want to continue playback from a position
you specify to be played next time, see Continuing
playback from a specified position (Continued Viewing
Playback) on page 27.
•The resume playback function cannot be used for
some discs.
Forward and reverse
scanning
During playback, press or .
• The scanning speed switches each time the button is
pressed. The speed steps depend on the disc or file
(the speed is displayed on the TV screen).
To resume normal playback
Press .
21
En
Page 22

Playing specific chapters,
04
tracks or files
To cancel A-B Repeat play
•Press A-B during the A-B Repeat play.
During playback, input the number of the
chapter/track/file you want to select.
• Use the number buttons (0 to 9) to input the number,
then press ENTER.
•Press CLEAR to clear the values you have input.
Skipping content
During playback, press or .
•When is pressed, the playback skips ahead to the
beginning of the next chapter/track/file.
•When is pressed while a video or audio file is
playing, the playback skips back to the beginning of
the currently playing chapter/track/file. Press twice to
skip back to the beginning of the previous chapter/
track/file.
•When is pressed while an image file is playing,
playback returns to the previous file.
Playing in slow motion
While playback is paused, press and hold /
or /.
•The speed switches each time the button is pressed
(the speed is displayed on the TV screen).
To resume normal playback
Press .
Step forward and step
reverse
While playback is paused, press / or /.
•The picture moves a step forward or reverse each time
the button is pressed.
To resume normal playback
Press .
Playing a specific section
within a title or track
repeatedly (A-B Repeat)
Use this procedure to play a specific section within a title
or track repeatedly.
1 During playback, press A-B to select the starting
point.
• A- is displayed on the TV screen.
2 During playback, press A-B to select the ending
point.
22
•A-B Repeat playback starts.
En
Note
•A-B Repeat play is canceled in the following cases:
– When you search outside of the repeat range.
– When you start other Repeat Play or Random Play.
Playing repeatedly
(Repeat Play)
Use this procedure to play the currently playing disc, title,
chapter, track or file repeatedly.
During playback, press REPEAT.
•Each time you press REPEAT the type of repeat
modes changes as shown below.
BD
Current chapter Current title
DVD
Current chapter Current title All titles
CD/Video file/Audio file/Image file
Current track/file All tracks/All files in folder
To cancel Repeat Play
•Press REPEAT several times during Repeat Play.
Note
•Repeat Play is canceled in the following cases:
– When you search outside the repeat range.
– When you start other Repeat Play or Random Play.
Playing in the desired order
(Programmed Play)
1 During playback, press PROGRAM.
•The program screen is displayed.
2 Select the program number.
Use / to select, then press ENTER.
3 Select the title you want to play.
Use / to select, then press .
4 Select the chapter you want to play.
Use / to select, then press ENTER.
5 Press .
•Playback starts.
Editing the program
1 Select the program number you want to edit,
then press ENTER.
2 Select title/chapter, then press ENTER.
Page 23

Deleting the program
Select the program number you want to delete,
then press CLEAR.
• To delete all the programs, press RETURN.
Note
• When you use audio CDs for Programmed Play, enter
the track number in step 3.
• This function does not work with BDs.
Making bookmarks
You can make bookmarks on the video currently playing
and play back the scene later.
During playback, press BOOKMARK.
• The bookmark is made.
• Maximum number of bookmarks are 12.
Playing the bookmarked scene
1 Press and hold BOOKMARK for a few seconds.
• The list of bookmarks is displayed.
2 Select the bookmark you want to play.
Use / to select, then press ENTER.
Deleting the bookmark
Select the bookmark you want to delete, then
press CLEAR.
• Bookmarks may not be allowed to make for some
discs.
• Bookmarks are canceled in the following cases:
– When the player’s power turned off.
– When the disc tray is opened.
Zoom
During playback, press ZOOM.
•Each time you press ZOOM, the zoom level changes
as shown below.
[Zoom 2x] [Zoom 3x] [Zoom 4x] [Zoom 1/2]
[Zoom 1/3] [Zoom 1/4] Normal (not
displayed)
Note
• This function does not work with some discs.
Playing photos as slideshows
This function plays the photos, switching them
automatically.
During playback, press INDEX.
•Display the thumbnail of image files. The maximum
number is 12 at once.
• If you select one of the image and press ENTER,
slideshow will start from the image you selected.
Rotating/inverting photos
When a slideshow is playing or paused, the display
switches as shown below when the /// buttons are
pressed.
button: Rotates 90° clockwise
button: Rotates 90° counterclockwise
button: Flips horizontally
button: Flips vertically
Switching the camera angles
For BD-ROM and DVD-Video discs on which multiple
angles are recorded, the angles can be switched during
playback.
During playback, press ANGLE.
•The current angle and total number of recorded
angles are displayed on the TV screen.
To switch the angles, press
• The angles can also be switched by selecting Angle
from the FUNCTION menu.
• If the angles are not switched when ANGLE is
pressed, switch them from the disc menu screen.
ANGLE again.
Switching the subtitles
For discs or files on which m ultiple subtitles are recorded,
the subtitles can be switched during playback.
Caution
• The subtitles cannot be switched for discs recorded
by a DVD or BD recorder. Also refer to the operating
instructions for the device used for recording.
During playback, press SUBTITLE.
•The current subtitle and total number of recorded
subtitles are displayed on the TV screen.
To switch the subtitle, press SUBTITLE again.
• The subtitles can also be switched by selecting
Subtitle from the FUNCTION menu.
• If the subtitles are not switched when SUBTITLE is
pressed, switch them from the disc menu screen.
Turning the subtitles off
Press SUBTITLE several times or select Subtitle
from the FUNCTION menu to switch the setting to
Off.
04
23
En
Page 24

About displaying external subtitle
04
files while playing DivX media files
In addition to the subtitles recorded in DivX media files,
this player also supports the display of external subtitle
files. If a file has the same name as that of a DivX media
file aside from the file extension and the extension is one
of the extensions listed below, the file is treated as an
external subtitle file. Note that DivX media files and
external subtitle files must be located in the same folder.
Only one external subtitle file can be displayed on this
player. Use a computer, etc., to delete any external
subtitle files you do not want to display from the disc.
Note
•Depending on the file, the external subtitles may not
be displayed properly.
Switching the audio
For discs or files on which multiple audio streams/
channels are recorded, audio streams/channels can be
switched during playback.
During playback, press AUDIO.
•The current audio and total number of recorded audio
streams are displayed on the TV screen.
To switch the audio, press AUDIO again.
• The audio can also be switched by selecting Audio
from the FUNCTION menu.
• If the audio is not switched when AUDIO is pressed,
switch it from the disc menu screen.
Enjoying BONUSVIEW or
BD-LIVE
This player is compatible with BD-Video BONUSVIEW
and BD-LIVE.
When using BD-Video discs compatible with
BONUSVIEW, you can enjoy such functions as secondary
video (picture in picture) (page 26) and secondary audio
(page 26). With BD-Video discs supporting BD-LIVE,
special video images and other data can be downloaded
from the Internet.
Data recorded on BD video and downloaded from BDLIVE is stored on the USB flash drive (external memory).
To enjoy these functions, connect a USB flash drive
(minimum 1 GB capacity, 2 GB or greater recommended)
supporting USB 2.0 High Speed (480 Mbit/s) to the USB
port.
• When you insert or remove a USB flash drive, be sure
to turn the player’s power off
•To recall data stored in the USB flash drive, first insert
the disc media that was being used at the time the
data was downloaded (if a different disc is loaded, the
data stored on the USB flash drive cannot be played).
• If a USB flash drive containing other data (previously
recorded) is used, the video and audio may not play
back properly.
• Do not disconnect the USB flash drive while playback
is in progress.
• Some time may be required for the data to load (read/
write).
.
Switching the CD/SACD
playback area
1 Select the area you want to play.
In the stop mode, press CD/SACD. The playback area
switches on the front panel display window each time the
button is pressed.
[CD AREA] [SACD 2CH] [SACD MCH] (back to
beginning)
•During playback, press twice to cancel continuous
play before selecting the playback area.
2 Open the disc tray.
Press the OPEN/CLOSE button.
3 Close the disc tray.
Press the OPEN/CLOSE button. Once the disc is
loaded, the playback area switches.
Displaying the disc
information
Press DISPLAY.
The disc information appears on the TV screen. To switch
off the information display, press DISPLAY again.
The information display differs between during playback
24
and when playback is stopped.
En
Caution
•It may not be possible to use the BONUSVIEW and
BD-LIVE functions if there is insufficient space on the
USB flash drive. In this case, refer to Erasing data that
has been added to BDs and application data on
page 38 for erasing the Virtual Package data and the
BD-LIVE data in the USB flash drive.
Note
•Operat
ion of USB flash drives is not guaranteed.
• Playback of BD-LIVE function data differs depending
on the disc used. For details, consult the user
instructions supplied with the disc.
• To enjoy the BD-LIVE function, a network connection
and settings are required (pages 18 and 37).
• BD-LIVE is a function that provides for connection to
the Internet. Discs supporting the BD-LIVE function
may send ID codes identifying this player and the disc
to the contents provider via the Internet.
Page 25

Playback functions
The functions that can be used differ according to the type of disc and file. In some cases, some of the functions cannot
be used. Check the usable functions on the table below.
Disc/file type
1
Function
Forward and reverse
2
scanning
Playing specific titles,
chapters or tracks
BD-ROM
BD-R
/-RE
3
3
Skipping content
Slow motion play
Step forward and step
reverse
A-B Repeat play
2,5
2
2
Repeat Play
Zoom
Angle
Subtitle
Audio
8
9
10
Disc information
1. Some functions may not work for some discs or files, even if indicated [] on the table.
2. For some discs, normal playback resumes automatically when the chapter switches.
3. No sound is produced during forward and reverse scanning.
4. Sound is produced during forward and reverse scanning.
5. • No sound is output during slow motion playback.
• It is not possible to switch the speed during reverse slow motion playback.
6. Reverse slow motion playback is not possible.
7. Reverse step playback is not possible.
8. Angle mark is displayed for scenes at which multiple angles are recorded if Angle Mark is set to On (page 36).
9. • The types of recorded subtitles depend on the disc and file.
• In some cases, the subtitle may switch or the switching screen provided on the disc may be displayed immediately, without the current
subtitle or the total number of subtitles recorded on the disc being displayed.
10. The types of recorded audio streams depend on the disc and file.
DVD-
Video
DVD-R
/-RW
AVCREC AVCHD
(VR
format)
3
3
3
Video
Image
Audio
file
file
3
3
6
7
file
Audio
CD
4
4
04
25
En
Page 26

Using the FUNCTION
04
menu
Various functions can be called out according to the
player’s operating status.
1 Display the FUNCTION menu.
Press FUNCTION during playback.
2 Select and set the item.
Use / to select, then press ENTER.
Note
• Items that cannot be changed are displayed in gray.
The items that can be selected depend on the player’s
status.
To change the setting of the
selected item
Use / to change.
To close the FUNCTION menu
Press FUNCTION.
FUNCTION menu item list
Item Description
Title Display the title information for the
Chapter (track/file)
Time Display the elapsed or remaining time.
Mode Switch the play mode (page 27).
Audio Switch the audio.
Angle Switch the BD-ROM/DVD-Video disc’s
Subtitle Switch the subtitle language.
Code Page Switch the subtitle code page.
Secondary Video
Secondary Audio
Bitrate Display the bitrate of the audio/video/
Still off Switch off the BD-ROM’s still picture.
Ins Search Skip forward 30 seconds.
Ins Replay Skip backward 10 seconds.
Slide Show Switch the playback speed while playing
26
En
currently playing disc and total number
of titles on the disc. Also select the title
you want to play. (See the following
description.)
1
Display the information for the currently
playing chapter (track/file) and total
number of chapters in the disc. Also
select the chapter (track/file) you want to
play. (See the following description.)
Also enter the time from which you want
to start playback. (See the following
description.)
camera angle.
2
Switch the BD-ROM’s secondary video
(Picture-in-Picture).
3
Switch the BD-ROM’s secondary audio.
secondary video/secondary audio.
the picture slide show.
Item Description
Transition Change the style of the slide show while
1. One of these types of information is displayed, depending on the
type of disc.
2. Secondary video mark is displayed for scenes at which secondary
video is recorded if PIP Mark is set to On (page 36).
3. Secondary audio mark is displayed for scenes at which secondary
audio is recorded if Secondary Audio Mark is set to On
(page 36).
playing the picture slide show.
Note
• Selectable items depend on the type of disc.
•The types of recorded secondary audio streams
depend on the disc and file.
• Some discs do not include secondary audio/
secondary video.
• In some cases, the secondary audio/secondary video
may switch or the switching screen provided on the
disc may be displayed immediately, without the
current secondary audio/secondary video or the total
number of secondary audio/secondary video streams
recorded on the disc being displayed.
Playing from a specific time
(Time Search)
1 Select Time.
Use / to select, then press ENTER.
2 Input the time.
Use the number buttons (0 to 9) to input the time.
•To play from 45 minutes, input 0, 0, 4, 5, 0 and 0, then
press ENTER.
•To play from 1 hour 20 minutes, input 0, 1, 2, 0, 0 and
0, then press ENTER.
•Press CLEAR to clear the values you have input.
3 Starting playback from the specified time.
Press ENTER.
Playing a specific title,
chapter, track or file (Search)
1 Select Title or Chapter (track/file).
Use / to select, then press ENTER.
2 Input the Title or Chapter (track/file) number.
Use the number buttons (0 to 9) or / to input the
number.
•To search for title 32, input 3 and 2, then press
ENTER.
•Press CLEAR to clear the values you have input.
3 Starting playback from the specified title, chapter
or track.
Press ENTER.
Page 27

Playing specified range of
discs, titles or chapter (track/
file) in random order
You can select from two types of random playback.
1 Select Mode.
Use / to select, then press ENTER.
2 Select the playing mode.
Use / to select, then press ENTER.
Random play
The specified range of discs, titles or chapter (track/file) is
played in random order. The same item may be played
consecutively.
Shuffle play
The specified range of discs, titles or chapter (track/file) is
played in random order. Each item is played once.
Continuing playback from a
specified position
(Continued Viewing
Playback)
This function allows you to continue playback from a
position you specify to be played next time, even after
turning the power off.
Setting
During playback, press CONTINUED at the
position from which you want to start continued
viewing playback.
The elapsed playing time at the specified position is
displayed on the TV screen.
Playing
1 Press PLAY to play the title for which you have
set continued viewing playback.
The continued viewing playback confirmation screen
appears.
2Use / to select Yes, then press ENTER.
Playback starts from the specified position.
04
Note
• The continued viewing playback setting is canceled
when OPEN/CLOSE is pressed.
• Continued viewing playback may not work properly
with some discs.
27
En
Page 28
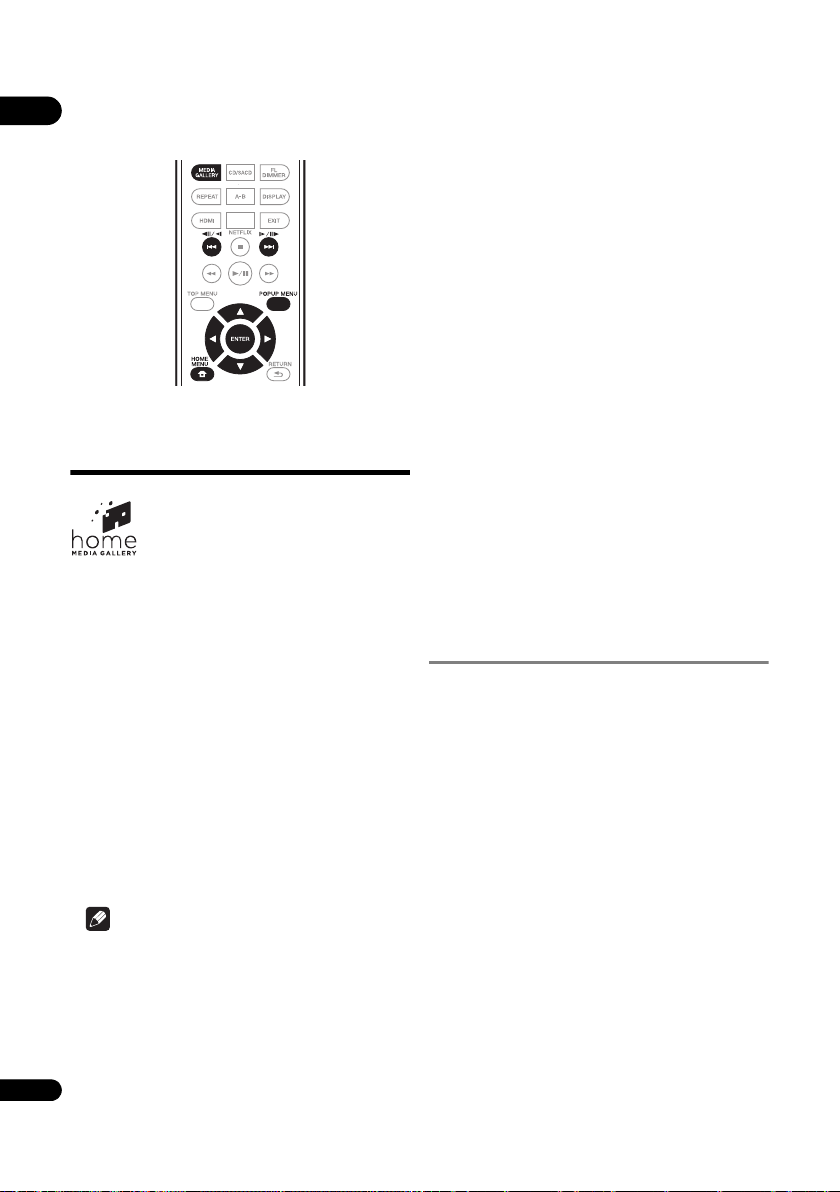
Chapter 5
05
Playback from Home Media Gallery
• The following files are allowed to be played from
Home Media Gallery:
–PCs running Microsoft Windows Vista or XP with
Windows Media Player 11 installed
–PCs running Microsoft Windows 7 with Windows
Media Player 12 installed
–DLNA-compatible digital media servers (on PCs or
other components)
Files stored in a PC or DMS (Digital Media Server) as
About Home Media
Gallery
This player’s Home Media Gallery function allows you to
display a list of input sources and start playback. This
chapter describes setup and playback procedures
required to enjoy these features. When you play the files
stored on your computer or the components on the
network, it is advisory that you also refer to the operation
manual supplied with your network component.
The input sources that can be played from Home Media
Gallery are as shown below.
• BD-R/RE (BDAV format) discs
•DVD-R/RW (VR format) discs
• Audio CDs (CD-DA, SACD and DTS CDs)
• DVD/CDs on which only data files of video, image or
audio files, etc. are rec
•USB device
• Files on the network servers (on the PCs or
components connected to the player via LAN
interface.)
orded.
described above can be play
Player (DMP). The player supports the use of such
DMP.
Files stored in a PC or DMS (Digital Media Server) as
described above can be played via command from an
external Digital Media Controller (DMC). Devices
controlled by this DMC to play files are called DMRs
(Digital Media Renderers). This player supports this
DMR function. When in the DMR mode, such
operations as playing and stopping files can be
performed from the external controller.
•To play back audio files stored on components on the
network, you must turn on the DHCP server function
of your router. I
built-in DHCP server function, it is necessary to set up
the network manually. Otherwise, you cannot play
back files stored on components on the network. See
page 37.
n case your router does not have the
About network playback
The network playback function of this unit uses the
following technologies:
Windows Media Player
See Windows Media Player 11/Windows Media Player 12
above for more on this.
ed by Digital Media
Note
•The Home Media Gallery allows you to play files on
media servers connected on an identical Local Area
Network (LAN) as the receiver.
28
En
Page 29

DLNA
DLNA CERTIFIED® Audio Player
The Digital Living Network Alliance (DLNA) is a cross-
industry organization of consumer electronics,
computing industry and mobile device companies.
Digital Living provides consumers with easy sharing of
digital media through a wired or wireless network in the
home.
The DLNA certification logo makes it easy to find
products that comply with the DLNA Interop erability
Guidelines. This unit complies with DLNA Interoperability
Guidelines v1.5. When a PC running DLNA server
software or a DLNA compatible device is connected to
this player, some setting changes of software or other
devices may be required. Please refer to the operating
instruct
ions for the software or device for more
information.
DLNA®, the DLNA Logo and DLNA CERTIFIED® are
trademarks, service marks, or certification marks of the
Digital Living Network Alliance.
Content playable over a network
• Even when encoded in a compatible format, some
files may not play correctly.
• Some functions may not be supported depending on
the server type or version used.
•Supported file formats vary by server. As such, files
not supported by your server are not displayed on this
unit. For more information check with the
manufacturer of your server.
•See Disclaimer for third party content on page 43
regarding the contents that are played.
About playback behavior over a
network
• Playback may stall when the PC is switched off or any
media files stored on it are deleted while playing
content.
•If there are problems within the network environment
(heavy network traffic, etc.) content may not be
displayed or played properly (playback may be
interrupted or stalled). For best performance, a
10BASE-T/100BASE-TX connection between the
player and the PC is recommended.
•If several clients are playing simultaneously, as the
case may be, playback is interrupted or stalled.
•Depending on the security software installed on a
connected PC and the setting of such software,
network connection may be blocked.
Pioneer is not responsible for any malfunction of the
pla
yer and/or the Home Media Gallery features due to
communication errors/malfunctions associated with
your network connection and/or your PC, or other
connected equipment. Please contact your PC
manufacturer or Internet service provider.
Windows Media is either a registered trademark or
trademark of Microsoft Corporation in the United States
and/or other countries.
This product includes technology owned by Microsoft
Corporation and cannot be used or distributed without a
license from Microsoft Licensing, Inc.
®
Microsoft
Windows
Windows
trademarks or trademarks of Microsoft Corporation in the
United States and/or other countries.
, Windows®7, Windows®Vista, Windows®XP,
®
2000, Windows®Millennium Edition,
®
98, and WindowsNT® are either registered
DLNA Search
Playing back the files stored on the components
connected to the player via network.
1 Press HOME MEDIA GALLERY to display the
Home Media Gallery.
The Home Media Gallery can also be displayed by
selecting Home Media Gallery from Home Menu, then
pressing ENTER.
2 Select DLNA Search.
Use / to select, then press ENTER.
3 Select the server which contains the file you want
to play.
4 Select the file you want to play.
Use / to select, then press ENTER.
Note
•This player does not support DTCP-IP.
Recorded files and contents that are protected by
digital copyright protection cannot be played via LAN
interface.
Disc/USB playback
1 Press HOME MEDIA GALLERY to display the
Home Media Gallery.
The Home Media Gallery can also be displayed by
selecting Home Media Gallery from Home Menu, then
pressing ENTER.
2 Select Disc or USB.
Use / to select, then press ENTER.
3 Select Photo/Music/Video/AVCHD.
Use / to select, then press ENTER.
• This step is not for the discs that have been recorded
with BDAV/VR/AVCREC format.
05
29
En
Page 30

•To play files in AVCHD format on a USB device, create
05
a folder named “AVCHD” on the USB device, then
copy the “BDMV” folder containing which the files to
be played into the “AVCHD” folder.
4 Select the title/track or file you want to play.
Use / to select, then press ENTER.
Playback starts from the selected title/track or file.
• If the file you want to play is in the folder, select the
folder that contains the file first.
Playing back image files
About Slideshow
A display of the files on the disc or in the folder switches
automatically.
Note
•When playing an audio CD (CD-DA/SACD/DTS-CD),
the Now Playing screen is displayed.
• Some BD-R/-RE discs have playback protection. To
cancel the protection, input the password set for the
disc.
• It may take a few seconds before playback starts. This
is normal.
•It may not be possible to play some files properly.
• The number of views may be restricted.
•Depending on the connected devices and conditions,
some time may be required for playback to start and
for the image to switch.
Playing in the desired
order (Playlist)
4 Press POP UP MENU to display the POP UP MENU
menu.
5 Select Add to Playlist to add to Playlist.
Use / to select, then press ENTER.
The track or file selected in step 3 is added to the Playlist.
•To add more tracks or files, repeat steps 3 to 5.
Playing the Playlist
1 Press HOME MEDIA GALLERY to display the
Home Media Gallery.
The Home Media Gallery can also be displayed by
selecting Home Media Gallery from Home Menu, then
pressing ENTER.
2 Select Playlist.
Use / to select, then press ENTER.
3 Select the track/file to be played.
Use / to select, then press ENTER.
Playback starts from the selected track/file and continues
until the end of the list is reached. Use / to play
the previous or next track/file. The Now Playing screen is
displayed.
Deleting tracks/files from
the Playlist
1 Select the track/file to be deleted, then press POP
UP MENU to display the POP UP MENU menu.
2Use / to select Remove from Playlist, then
press ENTER.
The discs that can add tracks and files to the Playlist are
as shown below.
• DVDs/CDs/USB devices on which audio files are
recorded
Adding tracks/files
Use this procedure to add tracks and files, and create the
Playlist.
1 Press HOME MEDIA GALLERY to display the
Home Media Gallery.
The Home Media Gallery can also be displayed by
selecting Home Media Gallery from Home Menu, then
pressing ENTER.
2 Select Disc or USB.
Load the disc beforehand.
Use / to select, then press ENTER.
3 Select the track/file to be added.
Use to select.
30
En
Page 31

Chapter 6
Playing the web contents
You can enjoy some streaming contents on the Internet
with the player.
Available web
contents
• YouTube (MPEG4 AVC H.264)
•Picasa
•Netflix
•Pandora radio
Note
About YouTube
• YouTube videos of the following sizes can be played.
–Standard quality (400 x 226 pixels, 200 kbps)
– Medium quality (480 x 360 pixels, 512 kbps)
– High quality (854 x 480 pixels, 900 kbps)
–HD (720p) (1280 x 720 pixels, 2 Mbps)
–HD (1080p) (1920 x 1080 pixels, 4 Mbps)
•This player supports the YouTube Leanback service.
The YouTube Leanback service is only available in
English for now.
Refer to YouTube Help at http://www.google.com/
support/youtube/ for further information.
• YouTube videos for mobile phones cannot be played.
• Some YouTube videos cannot be played.
About Picasa
• Picasa is available only in English. Refer to
instructions at http://picasa.google.com/support/ for
details.
–Register your user name and password on the PC
before you use Picasa Web Albums.
– When you access Picasa from this player for the
first time, select the New User icon and enter your
registered user name and password.
•Depending on the Internet connection environment,
it may not be possible to play web contents properly.
• To access to web contents, this player requires a
broadband Internet connection. A contract with an
Internet provider is required
connection.
•See Disclaimer for third party content on page 43
regarding the contents that are played.
•Disc playback and this function cannot be used at the
same time.
for a broadband Internet
Playing the items
Caution
You must connect the player to the Internet beforehand.
See Connecting to the network through LAN interface on
page 18 for the details.
1 Display the selection screen.
The selection scr een can be selected by pressing
HOME MENU then selecting Web Contents
Desired web content.
2 Select the type of web contents.
Use / to select, then press ENTER.
3 Press / to select the item you want to play,
then press ENTER.
To stop playback, press EXIT. Playback of the video stops
and the Home Menu screen reappears.
Enjoying Netflix
Netflix offers instant streaming to Netflix members with
an unlimited streaming account. This function allows you
to enjoy Netflix service through the Internet. For more
information on Netflix visit http://www.netflix.com/
help/ or login to your Netflix account and click “Help” at
the top of the page.
Note
• Netflix is only available in the United States, Canada
and the U.K.
• To check Netflix ESN, select Initial Setup Playback
Netflix Information.
• To deactivate your Netflix information, select Initial
Setup Playback Netflix Information Next
Screen Yes.
06
31
En
Page 32

1 Display the Netflix screen.
06
Press Netflix.
•Or press HOME MENU and select Web Contents
Netflix.
• Once you access Netflix, on-screen messages will
guide you.
2 Read the Disclaimer displayed on the screen. If
you agree, select Agree on the last page. (If you do
not agree, this service cannot be used.)
3 Follow the instructions on the screen and select
the desired item.
4 After starting playback, you can control playback
using ////.
5 Press EXIT to close the Netflix screen.
Enjoying Pandora radio
You can instantly listen to personalized radio stations,
streamed over the Internet, from Pandora via this player.
For questions regarding the Pandora service, please visit
http://www.pandora.com/help or e-mail: pandorasupport@pandora.com.
Note
•Pandora Radio is only available in the US.
•To deactivate Pandora on your player, reset your
player. (See Restoring all the settings to the factory
default settings on page 40.)
1 Display the Pandora screen. Press HOME MENU,
then select Web Contents Pandora.
2 Read the Disclaimer displayed on the screen. If
you agree, select Agree on the last page. (If you do
not agree, this service cannot be used.)
3 Follow the instructions on the screen and select
the desired item.
4 Press EXIT to close the Pandora screen.
32
En
Page 33

Chapter 7
Advanced settings
07
Changing the settings
Operating the Initial Setup
screen
1 When playback is stopped, display the Home
Menu screen.
Press HOME MENU.
2 Select and set Initial Setup.
Use / to select, then press ENTER.
3 Select the item and change the setting.
Use /// to select, then press ENTER.
Closing the Initial Setup screen
Press HOME MENU or RETURN.
Note
• The items that can be selected depend on the player’s status.
• In Options, the factory default settings are indicated in bold.
Setting Options Explanation
Display Setting
TV Screen 16:9 Full Select this when connecting to a wide (16:9) TV.
Video Adjust The quality of the playback picture can be adjusted according to the TV you are using (page 37).
Sharpness High Choose the level of sharpness.
Video Mode Standard Choose the video output mode.
• CTI (Color Transient Improvement): Provides images with clearer color contours.
Noise Reduction 0 Choose the level of noise reduction.
16:9 Normal Select this when connected to a wide (16:9) TV. 4:3 pictures are displayed
4:3 Pan&Scan Select this when connecting to a 4:3 screen TV and playing a 16:9 video. The
4:3 Letterbox Select this when connecting to a 4:3 screen TV and playing a 16:9 video. The
Middle
Low
Vivid
Cinema
Custom
1
2
3
with vertical black bars along the sides.
video will be played with the left and right sides of the image cut off to display
on the 4:3 screen. (This function works if the disc is labeled for 4:3PS.)
video will be played with black bands at the top and bottom.
33
En
Page 34

07
Setting Options Explanation
Audio Output
Digital Output Bitstream Select this to output digital audio signals directly.
DTS Downmix Stereo DTS-HD Master Audio signals, DTS-HD High Resolution Audio signals or
Downsampling 48k Select this when playing a disc recorded with a sampling frequency of 48 kHz.
DRC (Dynamic Range
Control)
• This affects such audio signals as Dolby Digital, Dolby TrueHD, and Dolby Digital Plus.
• DRC affects audio signals output from the
– Analog audio signals output from the AUDIO OUT terminals
–Linear PCM audio signals output from the DIGITAL OUT or HDMI OUT terminals
• Depending on the disc, the effect may be weak.
• The effect may differ depending on the speakers, the AV amplifier settings, etc.
PCM Select this to output digital audio signals converted to PCM audio signals.
Reencode When a BD containing secondary audio and interactive audio is played, the
Off Select this to output audio signals other than digital audio signals.
Lt/Rt DTS-HD Master Audio signals, DTS-HD High Resolution Audio signals or
96k Select this when playing a disc recorded with a sampling frequency of 96 kHz.
192k Select this when playing a disc recorded with a sampling frequency of 192
Off Select this to output audio signals without using the DRC function.
On Select this to adjust the range between the loudest and softest sounds
Auto Select to switch the DRC setting On/Off automatically according to the input
two audio signals are mixed and converted to Dolby Digital audio or DTS
audio for output.
DTS Digital Surround audio signals converted to linear PCM audio signals
are converted into 2-channel (stereo) signals for output.
DTS Digital Surround audio signals converted to linear PCM audio signals
are converted into 2-channel signals compatible with Dolby Surround for
output (when the connected AV receiver o r amplifier, etc., is compatible with
Pro Logic, the AV receiver or amplifier outputs the linear PCM audio
Dolby
signals as surround audio signals).
kHz.
(dynamic range) for playback at average volume. Use this when it is hard to
hear dialog or when watching movies at midnight.
audio signal from the disc. This only affects Dolby TrueHD signals.
following audio output terminals:
34
En
Page 35

Setting Options Explanation
HDMI
Color Space RGB Select this to output the video signals as RGB signals. Choose this if the
YCbCr Select this to output the video signals as YCbCr 4:4:4 signals.
YCbCr 422 Select this to output the video signals as YCbCr 4:2:2 signals.
Full R GB Select this to output the video signals as RGB signals. Choose this if the colors
Resolution Auto Select this to choose the resolution of the video signals output from the
480I/576I Output the video signals from the HDMI OUT terminal with the selected
480P/576P
720P
1080I
HDMI Audio Out Bitstream Select this to output HDMI audio signals directly.
Control On Select this to control the player with the remote control of the connected AV
To use Sound Retriever Link and Stream Smoother Link (page 15), Control must be set to On.
HDMI Deep Color 30bits Select this when outputting the video signals with 30-bit color.
HDMI 1080P 24Hz On Select this when Resolution is set to Auto or 1080P and outputting 1080p/24
HDMI 3D Auto With 3D discs, the disc is played with 3D images.
3D Notice Yes This sets whether or not to display the 3D notice when playing 3D images.
Network
IP Setting Select this to set the IP address of the player and DNS server (page 37).
Proxy Server Only set the proxy server if so instructed by your Internet service provider (page 38).
Information Displays the values of the MAC address, IP address, subnet mask, default gateway, DNS server
Connection Test Select this to test the network connection (page 38).
Internet Connection
BD-Live Connection Permitted All discs are allowed to connect to BD-LIVE.
DLNA Enable Select this when connecting to DLNA server.
1080P
PCM Select this to output HDMI audio signals converted to 2-channel audio signals.
Reencode When a BD containing secondary audio and interactive audio is played, the
Off Select this when you do not want to output the audio signal from the HDMI
Off Select this when you do not want to control the player with the remote control
36bits Select this when outputting the video signals with 36-bit color.
Off Select this when outputting the video signals with normal 24-bit color.
Off Select this when Resolution is set to 1080P and outputting 1080p/60 video
Off 3D images are not played.
No
(primary) and DNS server (secondary).
Enable
Disable Select this when not connecting to the Internet.
Partial Permitted Only discs whose safety has been confirmed are allowed to connect to BD-LIVE.
Prohibited No disc is allowed to connect to BD-LIVE.
Disable Select this when not connecting to DLNA server.
colors seem too faint and the black seems too bright.
seem too dense and all the dark colors are displayed in a uniform black.
HDMI OUT terminal automatically.
resolution.
The resolution can be changed by pressing HDMI, but Auto cannot be
selected.
two audio signals are mixed and converted to Dolb
audio for output.
output terminal.
device using an HDMI cable. Also refer to page 14.
of the connected AV device using an HDMI cable.
deo signals to a TV compatible with 1080p/24.
vi
signals to a TV compatible with 1080p/60.
Select this when connecting to the Internet.
y Digital audio or DTS
07
35
En
Page 36

07
Setting Options Explanation
Language
OSD available languages Choose a language for the on-screen displays from the listed languages.
Audio
* For some discs, it may not
be possible to change to the
selected language.
If a language not recorded on the BD/DVD is set, one of the recorded languages is automatically selected for playback.
Subtitle
* For some discs, it may not
be possible to change to the
selected language.
If a language not recorded on the BD/DVD is set, one of the recorded languages is automatically selected for playback.
Menu
* For some discs, it may not
be possible to change to the
selected language.
If a language not recorded on the BD/DVD is set, one of the recorded languages is automatically selected for playback.
Playback
Angle Mark On Select this to display the angle mark on the TV screen (page 23).
PIP Mark On Select this to display the PIP mark on the TV screen.
Secondary Audio Mark On Select this to display the secondary audio mark on the TV screen (page 26).
Netflix Information Activate and deactivate your Netflix information. Also check your Netflix ESN.
DivX(R) VOD DRM Registration Code Displays the player’s registration code required to play DivX VOD files
Internet Setting Permitted Web contents can be watched without enterin
Disc Auto Playback On Discs are played automatically after they are loaded.
Last Memory On Select this to save the point at which you last stopped playback, even after the
PBC (Play Back Control) On Select this to play Video-CDs (version 2.0) compatible with PBC using the
Setup Navigator Start making the settings using the Setup Navigator menu. For details, see page 20.
Security
Change PasswordRegister (change) the password for parental lock settings or for unlocking to play DVD-Videos with
Parental Control Change the player’s parental lock level (page 39).
Country Code Change the Country/Area code (page 39).
available languages Choose a language from the listed languages to set the default audio
available languages Choose a language from the listed languages to set the default subtitle
available languages Choose a language from the listed languages to set the default language for
Off Select this if you do not want to display the angle mark on the TV screen.
Off Select this if you do not want to display the PIP mark on the TV screen.
Off Select this if you do not want to display the secondary audio mark on the TV
Partial Permitted The password must be entered to watch web contents.
Prohibited No web contents can be watched.
Off Loaded discs do not start playing automatically.
Off Select this when you want to use only Continue Viewing Play (page 27).
Off Select this to play Video-CDs (version 2.0) compatible with PBC without using
the parental lock feature (page 38).
language for BD-ROM and DVD-Video playback.
language for BD-ROM and DVD-Video playback.
BD-ROM and DVD-Video menus.
screen.
(page 10).
disc tray is opened or you switch to the standby mode.
disc menu.
the disc menu.
g the password.
36
En
Page 37

Setting Options Explanation
Options
Screen Saver Off The screen saver is not activated.
Auto Power Off Off Select this if you do not want the power to turn off automatically.
Quick Start On Select to shorten the required time to boot up.
Update Disc Select the method of software updating. (page 39)
Load Default Restore the settings to the factory default.
System Information Check the system version number.
Disc Auto Update On Display the software update screen when the disc with the player’s update
BUDA BUDA Information Display and set up the BUDA data on the connected USB device.
1 min The screen saver will be activated if no operation has been performed for
2 min
3 min
10 min The power will be automatically turned off if no operation has been performed
20 min
30 min
Off Select to perform normal
USB Storage
Network
Off The software update screen must be displayed manually. (page 39)
BUDA Setup
more than one minute/two minutes/three minutes. Operating the remote
control can deactivate the screen saver.
for more than 10 minutes/20 minutes/30 minutes.
bootup.
file is loaded.
07
Adjusting the video
1 Select and set Display Setting Video Adjust
Next Screen.
Use / to select, then press ENTER.
2 Select the item and change the setting.
Use / to select the item, then use / to change the
setting. Once the setting is completed, press
RETURN to close the settings screen.
Item Description
Brightness Select this to adjust the TV screen’s
Contrast Select this to adjust the TV screen’s
Hue Select this to adjust the color (green and
Saturation Select this to adjust the TV screen’s
brightness.
contrast.
red) balance of the TV screen.
saturation.
Setting the IP address
1 Select and set Network IP Setting Next
Screen.
Use / to select, then press ENTER.
2 Set IP address.
Use /// to set the IP address of the player or DNS
server, then press ENTER.
• Auto Set IP Address
On – The player’s IP address is obtained
automatically. Select this when using a broadband
router or broadband modem that has a DHCP
(Dynamic Host Configuration Protocol) server
function. This player’s IP address will automatically
be allocated from the DHCP server.
Off – The player’s IP address must be set manually.
Use the number buttons (0 to 9) to input the IP
address, subnet mask and default gateway.
Note
•F
or information on the DHCP server function, refer to
the operating instructions for the network device.
• You may need to contact your Internet service
provider or network administrator when inputting the
IP address manually.
37
En
Page 38

Setting the proxy server
07
Only set the proxy server if so instructed by your Internet
service provider.
1 Select and set Network Proxy Server Next
Screen.
Use / to select, then press ENTER.
2 Select and set Use or Not use at Proxy Server.
Use / to change, then press .
• Use – Select this when using a proxy server.
• Not use – Select this when not using a proxy server.
If you have selected Use, proceed to step 3.
3 Select and set Server Select Method.
Use / to change, then press .
• IP Address – Input the IP address.
• Server Name – Input the server name.
4 Input IP Address or Server Name.
Use the number buttons (0 to 9) to input the number if
select IP address in step 3. Use / to move the cursor.
When Server Name is selected in step 3, use the number
buttons (0 to 9) to launch the software keyboard. Now use
/// to select characters and items, then press
ENTER to input.
5 Input Port Number.
Press , then use the number buttons (0 to 9) to input
the number.
6 Press ENTER to set.
Displaying the network settings
Select and set Network Information Next
Screen.
Use / to select, then press ENTER.
The MAC address, IP address, subnet mask, default
gateway and DNS server (primary and secondary)
settings are displayed.
When Auto Set IP Address is set to On, the values
obtained automatically are displayed.
Note
• “0.0.0.0” is displayed when each IP address has not
been set.
Testing the network connection
Select and set Network Connection Test
Start.
Use / to select, then press ENTER.
“Network is OK.” is displayed once the test is completed.
If any other message is displayed, check the connections
and/or settings (pages 18 and 37).
Changing to other language at
language setting
1 Select and set Language.
Use / to select, then press ENTER.
2 Select and set OSD, Audio, Subtitle or Menu.
Use / to select, then press ENTER.
3 Select and set the desired language.
Use / to select, then press ENTER.
Note
• If a language not recorded on the BD/DVD is set, one
of the recorded languages is automatically selected
and played.
Erasing data that has been added to
BDs and application data
Use this procedure to erase data that has been added to
you
BDs (data downloaded with the BD-LIVE function and
data used with the BONUSVIEW function) and
application data.
Caution
•Some time is required to erase the data.
• Do not unplug the power cord while data is being
erased.
1 Select and set BUDA BUDA Setup.
Use / to select, then press ENTER.
2 Select and set Fmt buda.
Press ENTER.
Registering or Changing the
password
Use this procedure to register or change the code
number required for the Parental Lock settings.
About default password of this unit
The default password is “0000”.
• This unit might ask you to enter a password when you
change the password.
•If you reset this unit, your password is simultaneously
changed to the default setting.
1 Select and set Security Change Password
Next Screen.
Use / to select, then press ENTER.
2 Input the password.
Use the number bu tto ns (0 t o 9 ) to in put the number, then
press ENTER to set.
Use / to move the cursor.
38
En
Page 39

3 Re-input the password.
Use the number bu tto ns (0 t o 9 ) to in put the number, then
press ENTER to set.
Use / to move the cursor.
•To change the password, input the previously
registered password, then input the new password.
Note
•We recommend making a note of the password.
• If you have forgotten the password, reset the player to
the factory default setting, then register the password
again (page 40).
Changing the Parental Lock level for
viewing DVDs/BD-ROMs
Some DVD-Video discs containing scenes of violence, for
example, have Parental Lock levels (check the indications
on the disc’s jacket or elsewhere). To restrict viewing
these discs, set the player’s level to the level lower than
the discs.
1 Select and set Security Parental Control
Next Screen.
Use / to select, then press ENTER.
2 Input the password.
Use the number bu tto ns (0 t o 9 ) to in put the number, then
press ENTER to set.
Use / to move the cursor.
3 Change the level.
Use / to change, then press ENTER to set.
Note
• The level can be set to Off or between Level1 and
Level8. When set to Off, viewing is not restricted.
Changing the Country/Area code
1 Select and set Security Country Code Next
Screen.
Use / to select, then press ENTER.
2 Input the password.
Use the number bu tto ns (0 t o 9 ) to in put the number, then
press ENTER to set.
Use / to move the cursor.
3 Change the country/area code.
Use / to change, then press ENTER to set. Refer to
page 42.
Software updating
The player’s software can be updated using one of the
methods shown below.
• Connecting to the Internet.
• Using a disc.
• Using a USB flash drive.
Product information on this player is provided on the
Pioneer website. Check the website shown on page 6 for
update and service information on your Blu-ray disc
player.
Caution
• Do not unplug the power cord or remove the USB
flash drive/disc during software updating. Also, do
not press the reset button during updating.
Otherwise, the updating will be aborted and
malfunction may occur with the player.
•There are two processes for sof
downloading and updating. Both processes may take
a certain period of time.
•Other operations are defeated during software
updating. Furthermore, updating process cannot be
canceled.
Updating connecting to the Internet
Note
•Depending on the Internet connection conditions,
downloading may take a long time.
•Steps 1 to
(they are intended to download the software from the
Internet).
•Steps 6 to
(automatically) by the player (they are intended to
update the software).
1 Connect to the Internet.
2 When playback is stopped, display the Home
Menu screen.
Press HOME MENU.
3 Select and set Initial Setup.
Use / to select, then press ENTER.
4 Select and set Options Update Network
Start.
Use / to select, then press ENTER.
5 are the operations performed by the user
8 are the operations performed
tware updating,
07
39
En
Page 40

5 Select and set Start.
07
Press ENTER.
6 Downloading of the software start.
The software download status is displayed on the screen.
•Depending on the Internet connection conditions,
software downloading may take a certain period of
time.
7 Updating starts.
•Software updating may take a certain period of time.
8 Updating completes.
This unit automatically restarts.
Updating using a USB flash drive/
disc
Note
•When an update file is provided on the Pioneer
website, use your computer to download it onto a
USB flash drive or disc. Carefully read the
instructions on downloading update files provided on
the Pioneer website.
•Store the update file in the root directory of the USB
flash drive or disc. Do not store it within a folder.
•Do not put any files other than the update file on the
USB flash drive or disc.
•To update using a disc, use a CD-R or CD-RW disc.
•The player supports USB flash drives formatted in
FAT32/16. When formatting a USB flash drive on your
computer, do so with the settings below.
– File system: FAT32
– Allocation unit size: Default allocation size
•Only store the most rec
flash drive or disc.
• Do not use a USB extension cable to connect a USB
flash drive to the player. Using a USB extension cable
may prevent the player from performing correctly.
•Steps 1 to
•Steps 6 to
(automatically) by the player (they are intended to
update the software).
1 Plug in the USB flash drive or load the disc on
which the update file is stored.
2 When playback is stopped, display the Home
Menu screen.
Press HOME MENU.
3 Select and set Initial Setup.
Use / to select, then press ENTER.
5 are the operations performed by the user.
7 are the operations performed
ent update file on the USB
4 Select and set Options Update Disc or USB
Storage Start.
Use / to select, then press ENTER.
5 Select and set Yes.
Use /// to select Yes, then press ENTER.
6 Updating starts.
•Software updating may take a certain period of time.
7 Updating completes.
Restoring all the settings to
the factory default settings
1 Check that the player’s power is turned on.
2 When playback is stopped, display the Home
Menu screen.
Press HOME MENU.
3 Select and set Initial Setup.
Use / to select, then press ENTER.
4 Select and set Options Load Default Next
Screen.
Use / to select, then press ENTER.
5 Select and set OK.
Use / to select, then press ENTER.
Note
•After restoring all the settings to the factory default
settings, use Setup Navigator to reset the player
(page 20).
40
En
Page 41

About how digital audio formats are output
Setting Bitstream PCM Re-encode
Only the primary audio (the
main sound for movies, etc.) is
Method of
conversion
terminal(s)
Audio type
Dolby Digital Dolby Digital Dolby Digital PCM 5.1ch
Dolby Digital
Plus
Dolby TrueHD Dolby TrueHD Dolby Digital PCM 7.1ch
DTS Digital
Surround
DTS-HD High
Resolution Audio
DTS-HD
Master Audio
PCM PCM 7.1ch
SACD
1. If there is no secondary audio or interactive audio, depending on the disc the signals ma y be output without being re-encoded.
2. For multi-channel audio, the sound is converted into 2-channel audio for output.
3. When Resolution is set to 480I or 480P, or even when it is set to Auto, if the connected device does not support 480i/480p, the DSD audio
of SACDs is output in two channels, front left and front right (page 35).
4. When HDMI Audio Out is set to Bitstream, the sound is not output (page 35).
output. The secondary audio
and interactive audio are not
output.
Output
HDMI OUT
terminal
Dolby Digital
Plus
DTS Digital
Surround
DTS-HD High
Resolution
Audio
DTS-HD
Master Audio
DSD 5.1ch
DIGITAL OUT
terminal
Dolby Digital PCM 7.1ch
DTS Digital
Surround
DTS ES 6.1 ch PCM 7.1ch
DTS ES 6.1 ch PCM 7.1ch
PCM 2 ch
3
PCM 2 ch
The primary audio, secondary
audio and interactive audio are
converted into PCM audio and
output simultaneously.
HDMI OUT
terminal
PCM 5.1ch
2
PCM 7.1ch Dolby Digital Dolby Digital
4
PCM 5.1ch
DIGITAL OUT
terminal
PCM 2 ch
PCM 2 ch
The primary audio, secondary
audio and interactive audio are
converted into PCM audio then
converted again into Dolby
Digital audio or DTS audio and
output simultaneously.
HDMI OUT
terminal
Dolby Digital Dolby Digital
2
DTS 5.1ch DTS 5.1ch
4
PCM 5.1ch
1
DIGITAL OUT
terminal
4
PCM 2 ch
AUDIO
OUTPUT
terminal
PCM 2 ch
PCM 2 ch
07
2
4
Note
• Depending on the disc, the number of channels may differ.
• Depending on the connected HDMI device, the HDMI output audio and number of channels may differ.
• Three types of audio are recorded on BD video discs.
– Primary audio: The main sound.
– Secondary audio: Additional sound added supplementarily, such as comments by directors, actors, etc.
– Interactive audio: Sounds such as clicks heard when operations are performed. The interactive audio differs
from disc to disc.
41
En
Page 42

Language Code Table and Country/Area Code
Abkhazian, ab/abk, 0102
Afar, aa/aar, 0101
Afrikaans, af/afr, 0106
Albanian, sq/sqi, 1917
Amharic, am/amh, 0113
Arabic, ar/ara, 0118
Armenian, hy/hye, 0825
Assamese, as/asm, 0119
Aymara, ay/aym, 0125
Azerbaijani, az/aze, 0126
Bashkir, ba/bak, 0201
Basque, eu/eus, 0521
Belarusian, be/bel, 0205
Bengali, bn/ben, 0214
Bihari, bh/bih, 0208
Bislama, bi/bis, 0209
Breton, br/bre, 0218
Bulgarian, bg/bul, 0207
Burmese, my/mya, 1325
Catalan, ca/cat, 0301
Central Khmer, km/khm, 1113
Chinese, zh/zho, 2608
Corsican, co/cos, 0315
Croatian, hr/hrv, 0818
Czech, cs/ces, 0319
Danish, da/dan, 0401
Dutch, nl/nld, 1412
Dzongkha, dz/dzo, 0426
English, en/eng, 0514
Esperanto, eo/epo, 0515
Estonian, et/est, 0520
Finnish,
fi/fin, 0609
Fi
jian, fj/fij, 0610
Faroese, fo/fao, 0615
French, fr/fra, 0618
Galician, gl/glg, 0712
Georgian, ka/kat, 1101
German, de/deu, 0405
Greek, el/ell, 0512
Guarani, gn/grn, 0714
Gujarati, gu/guj, 0721
Hausa, ha/hau, 0801
Hebrew, iw/heb, 0923
Hindi, hi/hin, 0809
Hungarian, hu/hun, 0821
Icelandic, is/isl, 0919
Indonesian, in/ind, 0914
Interlingua, ia/ina, 0901
Interlingue, ie/ile, 0905
Inupiaq, ik/ipk, 0911
Irish, ga/gle, 0701
Italian, it/ita, 0920
Japanese, ja/jpn, 1001
Javanese, jw/jav, 1023
Kalaallisut, kl/kal, 1112
Kannada, kn/kan, 1114
Kashmiri, ks/kas, 1119
Kazakh, kk/kaz, 1111
Kinyarwanda, rw/kin, 1823
Kirghiz, ky/kir, 1125
Korean, ko/kor, 1115
Kurdish, ku/kur, 1121
Lao, lo/lao, 1215
Latin, la
/lat, 1201
Latvian, lv/lav, 1222
Lingala, ln/lin, 1214
Lithuanian, lt/lit, 1220
Macedonian, mk/mkd, 1311
Malagasy, mg/mlg, 1307
Malay, ms/msa, 1319
Malayalam, ml/mal, 1312
Maltese, mt/mlt, 1320
Maori, mi/mri, 1309
Marathi, mr/mar, 1318
Mongolian, mn/mon, 1314
Moldavian, mo/mol, 1315
Nauru, na/nau, 1401
Nepali, ne/nep, 1405
Norwegian, no/nor, 1415
Occitan, oc/oci, 1503
Oriya, or/ori, 1518
Oromo, om/orm, 1513
Panjabi, pa/pan, 1601
Persian, fa/fas, 0601
Polish, pl/pol, 1612
Portuguese, pt/por, 1620
Pushto, ps/pus, 1619
Quechua, qu/que, 1721
Romanian, ro/ron, 1815
Romansch, rm/roh, 1813
Rundi, rn/run, 1814
Russian, ru/rus, 1821
Samoan, sm/smo, 1913
Sango, sg/sag, 1907
Sanskrit, sa/san, 1901
Scottish Gaelic, gd/gla, 0704
Serbian, sr/srp, 1918
Serbo-Croatian, sh/---, 1908
Shona, sn/sna, 1914
Sindhi, sd/snd, 1904
Sinhalese,
si/sin, 1909
Sl
ovak, sk/slk, 1911
Slovenian, sl/slv, 1912
Somali, so/som, 1915
Sotho, Southern, st/sot, 1920
Spanish, es/spa, 0519
Sundanese, su/sun, 1921
Swahili, sw/swa, 1923
Swati, ss/ssw, 1919
Swedish, sv/swe, 1922
Tagalog, tl/tgl, 2012
Tajik, tg/tgk, 2007
Tamil, ta/tam, 2001
Tatar, tt/tat, 2020
Telugu, te/tel, 2005
Thai, th/tha, 2008
Tibetan, bo/bod, 0215
Tigrinya,
ti/tir, 2009
Tonga (Tonga Islands),
to/ton, 2015
Tsonga, ts/tso, 2019
Tswana, tn/tsn, 2014
Turkmen, tk/tuk, 2011
Turkish, tr/tur, 2018
Twi, tw/twi, 2023
Ukrainian, uk/ukr, 2111
Urdu, ur/urd, 2118
Uzbek, uz/uzb, 2126
Vietnamese, vi/vie, 2209
Volapük, vo/vol, 2215
Welsh, cy/cym, 0325
Western Frisian, fy/fry, 0625
Wolof, wo/wol, 2315
Xhosa, xh/xho, 2408
Yiddish, ji/yid, 1009
Yoruba, yo/yor, 2515
Zulu, zu/zul, 2621
Anguilla, ai, 0109
Antigua and Barbuda, ag, 0107
Argentina, ar, 0118
Armenia, am, 0113
Australia, au, 0121
Austria, at, 0120
Azerbaijan, az, 0126
Bahamas, bs, 0219
Barbados, bb, 0202
Belarus, by, 0225
Belgium, be, 0205
Belize, bz, 0226
Bermuda, bm, 0213
Brazil, br, 0218
Bulgaria, bg, 0207
Canada, ca, 0301
Cayman Islands, ky, 1125
Chile, cl, 0312
China, cn, 0314
Colombia, co, 0315
Croatia, hr, 0818
Cyprus, cy, 0325
Czech Republic, cz, 0326
Denmark, dk, 0411
Dominica, dm, 0413
Dominican Republic, do, 0415
Estonia, ee, 0505
Finland, fi, 0609
France, fr, 0618
Georgia, ge, 0705
Germany, de, 0405
G
ree
ce, gr, 0718
Greenland, gl, 0712
Grenada, gd, 0704
Guyana, gy, 0725
Haiti, ht, 0820
Hong Kong, hk, 0811
Hungary, hu, 0821
Iceland, is, 0919
India, in, 0914
Indonesia, id, 0904
Ireland, ie, 0905
Israel, il, 0912
Italy, it, 0920
Jamaica, jm, 1013
Japan, jp, 1016
Kazakhstan, kz, 1126
Korea, Republic of, kr, 1118
Kyrgyzstan, kg, 1107
Latvia, lv, 1222
Liechtenstein, li, 1209
Lithuania, lt, 1220
Luxembourg, lu, 1221
Macedonia, the Former Yugoslav
Republic of, mk, 1311
Malaysia, my, 1325
Malta, mt, 1320
Mexico, mx, 1324
Moldova, Republic of, md, 1304
Monaco, mc, 1303
Montserrat, ms, 1319
Netherlands, nl, 1412
New Zealand, nz, 1426
Norway, no, 1415
Pakistan,
pk, 1611
Peru, p
e, 1605
Philippines, ph, 1608
Poland, pl, 1612
Portugal, pt, 1620
Puerto Rico, pr, 1618
Romania, ro, 1815
Russian Federation, ru, 1821
Saint Kitts and Nevis, kn, 1114
Saint Lucia, lc, 1203
Saint Vincent and the
Grenadines, vc, 2203
San Marino, sm, 1913
Singapore, sg, 1907
Slovakia, sk, 1911
Slovenia, si, 1909
Spain, es, 0519
Suriname, sr, 1918
Sweden, se, 1905
Switzerland, ch, 0308
Taiwan, Province of China,
tw, 2023
Tajikistan, tj, 2010
Thailand, th, 2008
Trinidad and Tobago, tt, 2020
Tunisia, tn, 2014
Turkey, tr, 2018
Turkmenistan, tm, 2013
Turks and Caicos Islands,
tc, 2003
Ukraine, ua, 2101
United Kingdom, gb, 0702
United States, us, 2119
Uruguay, uy, 2125
Uzbekistan, uz, 2126
Venezuela, ve, 2205
Virgin Islands, British, vg, 2207
07
Table
Language Code Table
Language name, language code, input code
Country/Area Code Table
Country/Area name, Country/Area code, input code
42
En
Page 43

Chapter 8
Additional information
08
Disclaimer for third
party content
ACCESS TO THIRD PARTY CONTENT SERVICES,
INCLUDING ALL ASSOCIATED FEATURES AND
FUNCTIONALITIES, IS PROVIDED “AS IS,” “AS
AVAILABLE” AND AT THE USER’S OWN RISK, WITHOUT
WARRANTY OF ANY KIND. PIONEER DISCLAIMS ALL
WARRANTIES, EXPRESS OR IMPLIED, IN CONNECTION
WITH ACCESS TO AND USE OF CONTENT SERVICES
THROUGH THIS DEVICE, INCLUDING WITHOUT
LIMITATION WARRANTIES OF MERCHANTABILITY,
SATSFACTORY QUALITY, FITNESS FOR A PARTICULAR
PURPOSE, AND NON-INFRINGEMENT. PIONEER DOES
NOT GUARANTEE, REPRESENT, OR WARRANT THAT
CONTENT SERVICES WILL BE FREE FROM ERRORS,
INTERRUPTION, LOSS, CORRUPTION, ATTACK,
VIRUSES, INTERFERENCE, HACKING, OR OTHER
SECURITY INTRUSION, AND PIONEER DISCLAIMS ANY
LIABILITY IN CONNECTION WITH THE FOREGOING.
PIONEER IS NOT LIABLE OR RESPONSIBLE FOR ANY
LOSS OR DAMAGE ARISING FROM ACCESS TO OR USE
OF CONTENT. NO ORAL OR WRITTEN INFORMATION OR
ADVICE GIVEN BY PIONEER OR ITS CUSTOMER
SERVICES REPRESENTATIVES WILL CREATE ANY SUCH
WARRANTY. IN NO EVENT WILL PIONEER, ITS
AFFILIATES, OR THEIR RESPECTIVE OFFICERS,
DIRECTORS, OR EMPLOYEES BE LIABLE IN
CONNECTION WITH YOUR USE OF THIRD PARTY
CONTENT SERVICES THROUGH THIS DEVICE FOR
PERSONAL INJURY OR SPECIAL, INCIDENTAL,
INDIRECT OR CONSEQUENTIAL DAMAGES OF ANY
KIND, INCLUDING WITHOUT LIMITATION DAMAGES
FOR ATTORNEY’S FEES, LOST DATA OR LOST PROFITS,
REGARDLESS OF THE THEORY OF LIABILITY AND
WHETHER OR NOT ADVISED OF THE POSSIBILITY OF
SUCH DAMAGES. IN NO EVENT WILL PIONEER’S TOTAL
LIABILITY TO YOU FOR ALL DAMAGES ARISING FROM
THE USE OR INABILITY TO USE THIRD PARTY CONTENT
SERVICES (OTHER THAN AS MAY BE REQUIRED BY
LAW IN CASES INVOLVING PERSONAL INJURY)
EXCEED $10.00. THE FOREGOING LIMITATIONS WILL
APPLY EVEN IF THE ABOVE REMEDY FAILS OF ITS
ESSENTIAL PURPOSE. IF ANY APPLICABLE AUTHORITY
HOLDS ANY PORTION OF THIS SECTION TO BE
UNENFORCEABLE, THEN LIABILITY WILL BE LIMITED TO
THE MAXIMUM EXTENT PERMITTED BY APPLICABLE
LAW.
Cautions on use
Moving the player
If you need to move this unit, first remove the disc if
there’s one loaded, and close the disc tray. Next, press
STANDBY/ON to switch the power to standby,
checking that the POWER OFF indication on the front
panel display goes off. Wait at least 10 seconds. Lastly,
disconnect the power cord.
Never lift or mo ve th e un it du ring playback — discs rotate
at a high speed and may be damaged.
Place of installation
Select a stable place near the TV and AV system to which
the unit is connected.
Do not place the player on top of a TV or color monitor.
Keep it away from cassette decks or other components
easily affected by magnetism.
Avoid the following types of places:
•Places exposed to direct sunlight
•Humid or poorly ventilated places
•Extremely hot or cold places
• Places subject to vibration
• Places in which there is much dust or cigarette
smoke
•Places exposed to soot, steam or heat (in kitchens,
etc.)
Do not place objects on top
Do not place objects on top of the player.
Do not obstruct the ventilation
holes
Do not use the player on a shaggy rug, bed, or sofa, and
do not cover the player with a cloth, etc. Doing so will
prevent heat dissipation and could lead to damage.
Keep away from heat
Do not place the player on top of an amplifier or other
device generating heat. When installing in a rack, to avoid
the heat generated by the amplifier and other devices,
place it on a shelf below the amplifier whenever possible.
43
En
Page 44

Turn the power off when not
08
using the player
Depending on the conditions of the TV broadcast signals,
striped patterns may appear on the screen when the TV is
turned on while the player’s power is turned on. This is not
a malfunction with the player or TV. If this happens, turn
the player’s power off. In the same way, noise may be
heard in the sound of a radio.
Condensation
If the player is moved suddenly from a cold place into a
warm room (in winter, for example) or if the temperature
in the room in which the player is installed rises suddenly
due to a heater, etc., water droplets (condensation) may
form inside (on operating parts and the lens). When
condensation is present, the player will not operate
properly and playback is not possible. Let the player stand
at room temperature for 1 or 2 hours with the power
turne
d on (the time depends on the extent of
condensation). The water droplets will dissipate and
playback will become possible.
Condensation can also occur in the summer if the player
is exposed to the direct wind from an air-conditioner. If
this happens, move the player to a different place.
Cleaning the player
Normally, wipe the player wit h a soft cloth. For tough dirt,
apply some neutral detergent diluted in 5 to 6 parts water
to a so ft c lot h, w ring out thoroughly, wipe off the dirt, then
wipe again with a dry cloth.
Note that getting alcohol, thinner, benzene or insecticide
on the player could cause the print and coating to peel off.
Also, avoid leaving rubber or vinyl products in contact
with the player for long periods of time, as this could
damage the cabinet.
When using chemical-impregnated wipes, etc., read the
wipe’s cautions carefully.
Unplug the power cord from the power outlet when
c
leaning the player.
Caution for when the unit is
installed in a rack with a glass
door
Do not press the OPEN/CLOSE on the remote control
to open the disc tray while the glass door is closed. The
door will hamper the movement of the disc tray, and the
unit could be damaged.
Cleaning the pickup lens
The player’s lens should not become dirty in normal use,
but if for some reason it should malfunction due to dust
or dirt, consult your nearest Pioneer authorized service
center. Although lens cleaners for players are
commercially available, we advise against using them
44
since some may damage the lens.
En
Handling discs
Do not use damaged (cracked or warped) discs.
Do not scratch the disc’s signal surface or let it get dirty.
Do not load more than one disc into the player at a time.
Do not glue paper or put stickers onto the disc, or use a
pencil, ball-point pen or other sharp-tipped writing
instrument. These could all damage the disc.
Storing discs
Always store discs in their cases, and place the cases
vertically, avoiding places exposed to high temperatures
or humidity, direct sunlight or extremely low
temperatures.
Be sure to read the cautions included with the disc.
Cleaning discs
It may not be possible to play the disc if there are
fingerprints or dust on it. In this case, using a cleaning
cloth, etc., to wipe the disc gently from the center toward
the outer edge. Do not use a dirty cleaning cloth.
Do not use benzene, thinner or other volatile chemicals.
Also do not use record spray or antistatic agents.
For tough dirt, apply some water to a s oft clo th, wring out
thoroughly, wipe off the dirt, then wipe off the moisture
with a dry cloth.
Specially shaped discs
Specially shaped discs (heart-shaped, hexagonal, etc.)
cannot be used on this player. Never use such discs, as
they will damage the player.
Condensation on discs
If the disc is moved suddenly from a cold place into a
warm room (in winter, for example), water droplets
(condensation) may form on the disc surface. Discs will
not play properly if there is condensation on them.
Carefully wipe off the water d roplets from the disc surface
before using the disc.
Page 45

Troubleshooting
Incorrect operation is often mistaken for trouble or malfunction. If you think that there is something wrong with this
component, check the points below. Sometimes the trouble may lie in another component. Inspect the other
components and electrical appliances being used. If the trouble cannot be rectified even after checking the points
below, ask your nearest Pioneer authorized service center or your dealer to carry out repair work.
Playback
Problem Check Remedy
• Disc does not play.
• Disc tray opens
automatically.
No picture is displayed or the
picture is not displayed
properly.
Playback stops. • Playback may stop if the unit is subject to shocks or set in an unstable
Picture freezes and the front
panel and remote control
buttons stop working.
No picture is displayed or
picture is not output in high
definition when playing BDs.
Is the disc one that is
playable on this player?
Is the file one that is playable
on this player?
Is the disc scratched? It may not be possible to play scratched discs.
Is the disc dirty? Clean the disc (page 44).
Is there a piece of paper or
sticker attached to the disc?
Is the disc properly set in the
disc tray?
Is the region number correct? See page 9 for the region number s of discs that can be played on this
Is the video cable properly
connected?
Is the video cable damaged? If the cable is damaged, replace it with a new one.
Is the input setting on the
connected TV or AV receiver
ier right?
or amplif
Is the output video resolution
properly set?
• Is the player connected
with an HDMI cable other
than a High Speed HDMI
TM
cable (with a Standard
®/TM
HDMI
cable)?
• Are you using an HDMI
cable with a built-in
equalizer?
Is a DVI device connected? The picture may not be displayed properly if a DVI device is connected.
Is Color Space properly set? Change the Color Space setting (page 35).
Check whether the disc is one that can be played on this player
(page 7).
• Check whether the file is one that can be played on this player
(page 10).
• Check whether or not the file is damaged.
The disc may be warped and unplayable.
• Set the disc with the printed side facing up.
Set the disc properly in the depression in the disc tray.
•
player.
• Connect the cable properly according to the connected devices
(page 14).
• Disconnect the cable (video/audio cable or HDMI cable), then
reinsert it firmly and all the way in.
Read the operating instructions for the connected components and
switch to the proper input.
• Press HDMI to switch the video resolution output from the HDMI
OUT terminal (page 12).
1080p or Deep Color video signals may not be output properly,
depending on the HDMI cable being used or the player’s settings. If you
®
wish to output the video signals with 1080p or Deep Color, connect the
/
TV using a High Speed HDMI
then reset the player using the Setup Navigator (page 20).
place.
• Playback may stop whe n a USB devi ce is conn ected or disconnected
during playback. Do not connect or disconnect USB devices during
playback.
• Press STOP to stop playback, then restart playback.
• If the playback cannot be stopped
player’s front panel to turn off the power, then turn the power back on.
• If the power cannot be turned off (set to standby), use a thin rod to
press the reset button on the main unit’s front panel. The unit restarts,
at which point it is again operable.
With some discs, it may not be possible to output the video signals from
VIDEO
output terminal. In this case, connect using an HDMI cable
the
(page 14).
®/TM
cable without a built-in equalizer,
, press STANDBY/ON on the
08
45
En
Page 46

Problem Check Remedy
08
• Picture is disturbed during
playback.
• Picture is dark.
Is
• Picture is stretched.
• Picture is cropped.
• Aspect ratio cannot be
switched.
Picture is interrupted. The picture may be interrupted when the resolution of the recorded
The subtitles cannot be
switched.
• No sound is output.
• Sound is not output
properly.
Multi-channel sound is not
output.
Noise can be heard when
outputting DTS Digital Audio
signals from the DIGITAL
OUT terminal.
192 kHz or 96 kHz digital
audio signals cannot be
output from the DIGITAL
OUT terminal.
the TV’s aspect ratio
properly set?
Is TV Screen properly set? Set TV Screen properly (page 33).
Is the disc played back in
slow motion?
Is the disc played back in fast
forward or fast reverse?
Are the audio cables properly
connected?
Is the audio cable damaged? If the cable is damaged, replace it with a new one.
Is Audio Output properly
set?
Are the connected
components (AV receiver or
amplifier, etc.) properly set?
Are you trying to listen to the
sound of the HDMI OUT
terminal
while watching the
picture from the VIDEO
output
terminals?
Is HDMI Audio Out properly
set?
Is a DVI device connected? The sound will not be output from the HDMI OUT terminal if a DVI
Is the audio output of the
connected AV receiver or
ampli
fier, etc., properly set?
Is multi-channel sound
selected?
Is the connected AV receiver
or amplifier compatible with
DTS Digital Surround?
• This player supports Rovi analog copy protection technology. With
some TVs (such as with built-in video deck), the picture will not be
displayed properly when the copy protected DVD title is played. This is
not a malfunction.
• If the player and TV are connected via a DVD recorder/video deck,
etc., the picture will not be displayed properly due to analog copy
protection. Connect the player and TV directly.
Read the operating instructions for the TV and set the TV’s aspect ratio
properly.
When video signals with a resolution of 1080/50i, 1080/50p, 720/50p,
1080/24p, 1080/60i, 1080/60p or 720/60p are being output from the
HDMI OUT
even if
video signal switches. Press HDMI to select a setting other than Auto
(page 35).
The subtitles cannot be switched for discs recorded on a DVD or BD
recorder.
No sound is output during slow motion play and forward and reverse
scanning.
• Connect the cable properly according to the connected devices
(page 14).
• Insert the cable firmly and all the way in.
Set Audio Output properly, according to the connected device
(page 34).
Read the operating instructions for the connected components and
check the volume, input, speaker settings, etc.
Audio signals are not output from the HDMI OUT terminal when video
signals are being output from the VIDEO
watching the picture of the VIDEO
digital audio cable or regular audio cables to listen to the sound
(page 17). Once connections are completed, use Setup Navigator to
make the player’s settings (page 20).
Set HDMI Audio Out to Re-encode or PCM. (page 35).
device is connected. Connect the device to a DIGITAL OUT terminal or
the AUDIO OUT terminals (page 17).
For some BDs, audio signals are only output from DIGITAL OUT
terminal or the HDMI OUT terminal.
Read the operating instructions for the connected AV receiver or
amplifier and check the audio output settings of the AV receiver or
amplifier.
Use the menu screen or AUDIO to switch the disc’s sound to multi-
channel.
If an AV receiver or amplifier that is not compatible with DTS Digital
Surro
Output to PCM (page 34).
It is not possible to output 192 kHz or 96 kHz digital audio signals from
this player’s DIGITAL OUT terminal. The signals are automatically
converted to 48 kHz or less for output.
terminal, they may be output with an aspect ratio of 16:9
TV Screen
is set to
4:3 Pan&Scan
und is connected to the DIGITAL OUT terminal, set Digital
(page 33).
output
output
terminals, connect an coaxial
46
En
terminals. When
Page 47

Problem Check Remedy
Secondary audio or
interactive audio is not
output.
After a disc is inserted,
Loading stays displayed and
playback does not start.
is displayed in file names,
etc.
A message indicating low
memory appears while
playing a BD-ROM disc.
Is HDMI Audio Out properly
set?
Are Digital Output properly
set?
Are there too many files
recorded on the disc?
When listening to the sound from an HDMI OUT terminal, set HDMI
Audio Out to PCM (page 35).
When listening to the sound from an DIGITAL OUT terminal, set
Digital Output to Re-encode or PCM (page 34).
When a disc on which files are recorded is inserted, depending on the
number of files recorded
minutes.
The characters that cannot be displayed on this player are display ed in
.
• Connect a USB device (page 17).
• Erase the data stored on the connected USB device from BUDA
Setup (page 38).
Control function
Problem Check Remedy
Control function does not
work.
Is the HDMI cable properly
connected?
Is the HDMI cable you are
using a High Speed HDMI
TM
Cable?
Is this player connected to
the TV using an HDMI cable
to watch the picture?
Is Control set to On on the
player?
Does the connected device
support the Control function?
Is Control set to On on the
connected device?
Are multiple players
connected?
®
To use the Control function, connect the Flat Screen TV and AV system
(AV receiver or amplifier, etc.) to the HDMI OUT terminal (page 14).
Use a High Speed HDMI
/
properly if an HDMI cable other th an a High Speed HDMI
used.
If video signals are being output from a terminal other than the HDMI
OUT terminal, the Control function does not work. Connect to the TV
using an HDMI cable (page 14).
Set Control to On on the player (page 35).
• The Control function will not work with devices of other brands that
do not support the Control function, even when connected using an
HDMI cable.
• The Control function will not work if devices that do not support the
Control function are connected between the Control-compatible device
and the player.
• See
• Even when connected to a Pioneer product compatible with the
Control function, some of the functions may not work.
Also refer to the operating instructions for the connected device.
Set Control to On on the connected device. The Control function
operates when Control is set to On for all devices connected to the
HDMI OUT terminal.
Once connections and settings of all the devices are finished, be sure
to check that the player’s picture is output to the Flat Screen TV. (Also,
check after changing the connected devices and connecting and/or
disconnecting HDMI cables.) If the player’s picture is not being output
to the Flat Screen TV, the Control function may not work properly.
For de
The Control function may not work if three or more players, including
this player, are connected by an HDMI cable.
on the disc, loading may take several dozen
®/TM
Cable. The Control function may not work
page 14.
tails, refer to the operating instructions of the connected device.
®/TM
Cable is
08
Network
Problem Check Remedy
• BD-LIVE function
(connection to the Internet)
cannot be used.
• “No valid id file found!” is
displayed when I try to update
the software.
Perform Connection Test (page 38). If “Networks is OK.” is displayed,
check the proxy server settings (page 38). Also, there may be a problem
with the Internet connection. Contact your Internet service provider.
47
En
Page 48

Problem Check Remedy
08
Software updating is slow. Depending on the Internet connection and other conditions, some time
A message other than
“Networks is OK.” is
displayed when Connection
Test is performed.
Is “Network is FAILED.”
displayed?
Is the Ethernet hub (or router
with a hub functionality)
operating properly?
may be required to update the software.
• Check that this player and the Ethernet hub (or router with a hub
functionality) are properly connected.
• If the IP address is obtained using the DHCP server function, check
the setting is correct at the Information (page 35). For details on the
DHCP server function, see the operating instructions for the Ethernet
hub (or router with a hub functi
• Set the IP address manually.
• Check the operation and settings of the DHCP server function of the
Ethernet hub (or router with hub functionality). For details on the DHCP
server function, see the operating instructions for the Ethernet hub (or
router with a hub functionality).
• If this player has been set manually, reset the IP address of this player
or other components.
• Check the settings and operation the Ethernet hub (or router with a
hub functionality). For det
Ethernet hub.
• Reboot the Ethernet hub (or router with a hub functionality).
onality).
ails, see the operating instructions for the
Others
Problem Check Remedy
Power does not turn on. Is the power cord properly
The player’s power turns off
automatically.
The player’s power turns on
automatically.
This unit cannot be operated. • Use within the specified usage temperature range (page 51).
The player cannot be
operated with the remote
control.
Input of the connected TV
and AV system switches
automatically.
Settings I have made have
been cleared.
connected?
Is Auto Power Off set to 10
min/20 min/30 min?
Is Control set to On?The player’s power may turn on together with the power of the TV
Are you operating the remote
control from a point too far
away from the player?
Are the batteries dead? Replace the batteries (page 6).
Is Control set to On?The input of the TV and AV system (AV receiver or amplifier, e
• Have you disconnected the
power cord while the player’s
power was on?
• Has there been a power
failure?
• Plug the power cord securely into the power outlet (page 19).
• Unplug the power cord, wait several seconds, then plug the power
cord back in.
If Auto Power Off is set to 10 min/20 min/30 min, the player’s power
turns off automatically if no operation is performe
(page 37).
connected to the HDMI OUT terminal. If you do not want the player’s
power to turn on when the TV’s power is turned on, set Control to Off
(page 35).
• If the power cannot be turned off (set to standby), use a thin rod to
press the res
at which point it is again operable.
Operate from within 7 m of the remote control sensor.
connected to the HDMI OUT terminal may automatically switch to the
player when playback starts on the player or the menu screen (Home
Media Gallery, etc.) is displayed. If you do not want the inputs of the
connected TV and AV system (AV receiver or amplifier, etc.) to switch
automatically, set Control to Off (page 35).
Always press STANDBY/ON on the player’s front panel or
STANDBY/ON on the remote control and check that POWER OFF
has turne
disconnecting the power cord. Be particularly careful when the power
cord is connected to the AC outlet on another device because the
player turns off in conjunction with the device.
et button on the main unit’s front panel. The unit restarts,
d off from the player’s front panel display before
d for over 30 minutes
tc.)
48
En
Page 49

Problem Check Remedy
USB (external storage) device
does not work with this player
properly.
Is the USB device properly
connected?
Is the USB device connected
via an extension cable?
Is the external storage device
connected to the USB port via
a memory card reader or USB
hub?
Does the external storage
device contain multiple
partitions?
Is the external storage device
write-protected?
Is the external storage
device’s file system FAT16 or
FAT32?
• Turn the player’s power off, then turn the power back on.
• Turn the player’s power off, then rec
device (page 17).
Do not use an extension cable. The player may not work properly with it.
External storage device may not work if connected to the USB port via
a memory card reader or USB hub.
External storage devices may not be recognized if they contain multiple
partitions.
Some external storage
Turn the player’s power off, then disable the write-protection.
Only external storage devices with a FAT16 or FAT32 file system can be
used.
Turn the player’s power off, then turn the power back on.
08
onnect the external storage
devices may not operate.
Glossary
Angle (Multi angle)
Up to 9 camera angles can be recorded simultaneously on BDROM or DVD-Video discs, letting you view the same scene from
different angles.
AVCHD (Advanced Video Codec High
Definition)
See page 9.
AVCREC
See page 7.
BDAV
Of the BD format, the Audio Visual Format Specifications for HD
digital broadcast recording is referred to as BDAV on this player
and in these operating instructions.
BD-J
See page 9.
BD-LIVE
See page 8.
BDMV
Of the BD format, the Audio Visual Format Specifications
designed for pre-packaged high definition (HD) movie contents is
referred to as BDMV on this player and in these operating
instructions.
BONUSVIEW
See page 8.
Deep Color
See page 14.
Default Gateway
A default gateway is a communication device such as a router
which passes data between networks. It is used to direct data to
networks on which the destination gateway is not explicitly
specified.
DHCP (Dynamic Host Configuration
Protocol)
This protocol provides configuration parameters (IP address,
etc.) for computers and other devices connected to the network.
DivX
See page 10.
DNS (Domain Name System)
This is a system for associating Internet host names with IP
addresses.
Dolby Digital
Dolby Digital is an audio format to record the sound in up to 5.1
channels with a fraction of the amount of data as compared to
linear PCM audio signals.
Dolby Digital Plus
Dolby Digital Plus is an audio format for high-definition media.
Built on Dolby Digital, it combines the efficiency and flexibility to
provide high quality multi-channel audio. With BD-ROMs, up to
7.1 channels of digital sound can be recorded.
Dolby TrueHD
Dolby TrueH D is an a udio f ormat using lossless coding. With BDROMs, up to 8 channels can be recorded at 96 kHz/24 bits, or up
to 6 channels at 192 kHz/24 bits.
DRM
A technology for protecting copyrighted digital data. Digitized
videos, images and audio retain the same quality even when they
are copied or transferred repeatedly. DRM is a technology for
restricting the distribution or playback of such digital data
without the authorization of the copyright holder.
49
En
Page 50

DSD (Direct Stream Digital)
08
The Digital Audio encoding system found on SACDs, that
expresses the audio signals by the pulse density of one bit data.
DTS Digital Surround
DTS Digital Surround is an audio format to record 48 kHz/24 bits
audio signals in 5.1 channels.
DTS-HD High Resolution Audio
DTS-HD High Resolution Audio is an audio format using lossy
coding. It can record 7.1 channels at 96 kHz/24 bits.
DTS-HD Master Audio
DTS-HD Master Audio is an audio format using lossless coding.
With BD-ROMs, 7.1 channels can be recorded at 96 kHz/24 bits,
or 5.1 channels at 192 kHz/24 bits.
Ethernet
A standard for local area networks (LANs) used to connect
multiple computers, etc. in the same location. This player
supports 100BASE-TX.
Frames and fields
A frame is the unit for one of the still pictures which compose
motion pictures. One frame consists of a picture of odd lines and
a picture of even lines called fields in video signal with interlaced
scan method (576i, 1080i, etc.).
HDMI (High-Definition Multimedia
Interface)
See page 14.
Interactive audio
The audio signals recorded in the titles of BD-ROMs. They include
for example the clicking sound made when the menu screen is
operated.
Interlaced scan
With this method, one picture is displayed by scanning it twice.
The odd lines are displayed in the first pass, the even lines are
displayed in the second, to form a single picture (frame).
Interlaced scan is indicated in this player and operating
instructions by an “i” after the resolution value (for example, 576i).
IP address
An address that identifies a computer or other device connected
to the Internet or local area network. It is represented a number
in four sections.
Linear PCM
This is referred as the audio signals that are not compressed.
MAC (Media Access Control) address
A hardware identification number assigned specifically to the
network device (LAN card, etc.).
MPEG (Moving Picture Experts Group)
The name of a family of standards used to encode video and
audio signals in a digital compressed format. The video encoding
standards i nclu de MP EG-1 V ideo , MPE G-2 Vi deo, MPEG -4 Vis ual,
MPEG-4 AVC, etc. The audio encoding standards include MPEG1 Audio, MPEG-2 Audio, MPEG-2 AAC, etc.
Parental Lock
See page 39.
50
En
Picture-in-Picture (P-in-P)
This is a function for superimposing a sub video on the main
video. Some BD-ROMs include secondary video, which can be
superimposed on the primary video.
Port number
This is a sub-address provided below the IP address for
simultaneously connecting to multiple parties during Internet
communications.
Progressive scan
With this method, one picture is consisted of a single picture,
without dividing it in two pictures. Progressive scan provides
clear pictures with no flicker, in particular for still pictures that
contain much text, graphics, or horizontal lines. Progressive scan
is indicated in this player and operating instructions by a “p” after
the resolution value (for example, 576p).
Proxy server
This is a relay server for ensuring fast access and safe
communications when connecting to the Internet from an
internal network.
Region number
See page 9.
Secondary audio
Some BD-ROMs include sub audio streams mixed with the main
audio stream. These sub audio streams are called “secondary
audio”. On some discs this secondary audio is recorded as the
audio for the secondary video.
Secondary video
Some BD-ROMs include sub videos superimposed on the main
videos using the Picture-in-Picture function. These sub videos are
called “secondary video”.
Subnet mask
This is used to identify which part of the IP address corresponds
to the subnet (a separately managed network). The subnet mask
is expressed as ‘255.255.255.0’.
USB (Universal Serial Bus)
USB is the industry standard for connecting peripherals to PCs.
VC-1
A video codec developed by Microsoft and standardized by the
Society of Motion Picture and Television Engineers (SMPTE).
Some BDs include videos encoded in this codec.
x.v.Color
See page 14.
Page 51

Specifications
08
Model BDP-150
Type
Rated voltage
Rated frequency 50 Hz/60 Hz
Power consumption 20 W
Power consumption (standby) 0.3 W
Weight 2.1 kg
External dimensions (including projecting parts) 435 mm (W) x 58 mm (H) x 250 mm (D)
Tolerable operating temperature +5 °C to +35 °C
Tolerable operating humidity 5 % to 85 % (no condensation)
Output terminals
HDMI 1 set, 19-pin: 5 V, 250 mA
Video outputs 1 set, RCA jack: 1.0 Vp-p (75 Ω)
Audio outputs 2-channel (left/right) 1 set, RCA jacks
Audio output level 200 mVrms (1 kHz, –20 dB)
Frequency response 4 Hz to 88 kHz (192 kHz sampling)
Digital audio outputs Coaxial 1 set, RCA jacks
LAN 1 set, Ethernet jack (10BASE-T/100BASE-TX)
USB 2 set, Type A
TM
Blu-ray 3D
AC 110 V to 240 V
PLAYER
Note
•The specifications and design of this product are subject to change without notice.
•This item incorporates copy protection technology that is protected by U.S. patents and other intellectual property
rights of Rovi Corporation. Reverse engineering and disassembly are prohibited.
•Corporation and product names mentioned herein are trademarks or registered trademarks of the respective
corporations.
• © 2012 PIONEER CORPORATION. All rights reserved.
51
En
Page 52

Nous vous remercions pour cet achat d’un produit Pioneer.
Nous vous demandons de lire soigneusement ce mode d’emploi ; vous serez ainsi à même de faire
fonctionner l’appareil correctement. Après avoir bien lu le mode d’emploi, le ranger dans un endroit sûr
pour pouvoir s’y référer ultérieurement.
IMPORTANT
ATTENTION
DANGER D´ELECTROCUTION
NE PAS OUVRIR
Ce symbole de l’éclair, placé dans un
triangle équilatéral, a pour but d’attirer
l’attention de l’utilisateur sur la présence, à
l’intérieur du coffret de l’appareil, de
“tensions dangereuses” non isolées d’une
grandeur suffisante pour représenter un
risque d’électrocution pour les êtres
humains.
ATTENTION :
POUR ÉVITER TOUT RISQUE
D’ÉLECTROCUTION, NE PAS ENLEVER LE
COUVERCLE (NI LE PANNEAU ARRIÈRE).
AUCUNE PIÈCE RÉPARABLE PAR
L’UTILISATEUR NE SE TROUVE À
L’INTÉRIEUR. CONFIER TOUT ENTRETIEN À
UN PERSONNEL QUALIFIÉ UNIQUEMENT.
Ce point d’exclamation, placé dans un
triangle équilatéral, a pour but d’attirer
l’attention de l’utilisateur sur la présence,
dans les documents qui accompagnent
l’appareil, d’explications importantes du
point de vue de l’exploitation ou de
l’entretien.
D3-4-2-1-1_A1_Fr
ATTENTION
Cet appareil est un produit laser de Classe 1, classé
selon l’article IEC 60825-1:2007 relatif à la Sécurité
des produits laser.
APPAREIL À LASER DE CLASSE 1
D58-5-2-2a_A2_Fr
AVERTISSEMENT
Cet appareil n’est pas étanche. Pour éviter les risques
d’incendie et de décharge électrique, ne placez près de
lui un récipient rempli d’eau, tel qu’un vase ou un pot
de fleurs, et ne l’exposez pas à des gouttes d’eau, des
éclaboussures, de la pluie ou de l’humidité.
AVERTISSEMENT
Avant de brancher l’appareil pour la première, lisez
attentivement la section suivante.
La tension de l’alimentation électrique disponible
varie selon le pays ou la région. Assurez-vous que
la tension du secteur de la région où l’appareil sera
utilisé correspond à la tension requise (par ex. 230
V ou 120 V), indiquée sur le panneau arrière.
PRÉCAUTION DE VENTILATION
Lors de l’installation de l’appareil, veillez à laisser un
espace suffisant autour de ses parois de manière à
améliorer la dissipation de chaleur (au moins 10 cm sur
le dessus, 10 cm à l’arrière et 10 cm de chaque côté).
AVERTISSEMENT
Les fentes et ouvertures du coffret sont prévues pour la
ventilation, pour assurer un fonctionnement stable de
l’appareil et pour éviter sa surchauffe. Pour éviter les
risques d’incendie, ne bouchez jamais les ouvertures et
ne les recouvrez pas d’objets, tels que journaux, nappes
ou rideaux, et n’utilisez pas l’appareil posé sur un tapis
épais ou un lit.
D3-4-2-1-3_A1_Fr
D3-4-2-1-4*_A1_Fr
D3-4-2-1-7b*_A1_Fr
Milieu de fonctionnement
Température et humidité du milieu de fonctionnement :
De +5 °C à +35 °C (de +41 °F à +95 °F) ; Humidité
relative inférieure à 85 % (orifices de ventilation non
obstrués)
N’installez pas l’appareil dans un endroit mal ventilé ou
un lieu soumis à une forte humidité ou en plein soleil
(ou à une forte lumière artificielle).
Si la fiche d’alimentation secteur de cet appareil ne
convient pas à la prise secteur à utiliser, la fiche doit
être remplacée par une appropriée. Ce
remplacement et la fixation d’une fiche secteur sur le
cordon d’alimentation de cet appareil doivent être
effectués par un personnel de service qualifié. En cas
de branchement sur une prise secteur, la fiche de
coupure peut provoquer une sérieuse décharge
électrique. Assurez-vous qu’elle est éliminée
correctement après sa dépose.
L’appareil doit être déconnecté en débranchant sa
fiche secteur au niveau de la prise murale si vous
prévoyez une période prolongée de non utilisation
(par exemple avant un départ en vacances).
ATTENTION
L’interrupteur
STANDBY/ON de cet appareil ne
coupe pas complètement celui-ci de sa prise secteur.
Comme le cordon d’alimentation fait office de
dispositif de déconnexion du secteur, il devra être
débranché au niveau de la prise secteur pour que
l’appareil soit complètement hors tension. Par
conséquent, veillez à installer l’appareil de telle
manière que son cordon d’alimentation puisse être
facilement débranché de la prise secteur en cas
d’accident. Pour éviter tout risque d’incendie, le
cordon d’alimentation sera débranché au niveau de
la prise secteur si vous prévoyez une période
prolongée de non utilisation (par exemple avant un
départ en vacances).
D3-4-2-1-7c*_A1_Fr
D3-4-2-2-1a_A1_Fr
D3-4-2-2-2a*_A1_Fr
Page 53

NOTE IMPORTANTE SUR LE CABLE
D’ALIMENTATION
Tenir le câble d’alimentation par la fiche. Ne pas
débrancher la prise en tirant sur le câble et ne pas
toucher le câble avec les mains mouillées. Cela risque
de provoquer un court-circuit ou un choc électrique. Ne
pas poser l’appareil ou un meuble sur le câble. Ne pas
pincer le câble. Ne pas faire de noeud avec le câble ou
l’attacher à d’autres câbles. Les câbles d’alimentation
doivent être posés de façon à ne pas être écrasés. Un
câble abîmé peut provoquer un risque d’incendie ou un
choc électrique. Vérifier le câble d’alimentation de
temps en temps. Contacter le service après-vente
PIONEER le plus proche ou le revendeur pour un
remplacement.
S002*_A1_Fr
AVERTISSEMENT
Pour éviter les risques d’incendie, ne placez aucune
flamme nue (telle qu’une bougie allumée) sur
l’appareil.
Ce produit est destiné à une utilisation domestique
générale. Toute panne due à une utilisation autre qu'à
des fins privées (comme une utilisation à des fins
commerciales dans un restaurant, dans un autocar
ou sur un bateau) et qui nécessite une réparation
sera aux frais du client, même pendant la période de
garantie.
Cet appareil numérique de la Classe B est conforme
à la norme NMB-003 du Canada.
D3-4-2-1-7a_A1_Fr
K041_A1_Fr
D8-10-1-3_A1_Fr
La protection de votre ouïe est entre vos
mains
Pour assurer le rendement optimal de votre matériel
et – plus important encore – la protection de votre ouïe,
réglez le volume à un niveau raisonnable. Pour ne pas
altérer votre sens de la perception, le son doit être clair
mais ne produire aucun vacarme et être exempt de
toute distorsion. Votre ouïe peut vous jouer des tours.
Avec le temps, votre système auditif peut en effet
s’adapter à des volumes supérieurs, et ce qui vous
semble un « niveau de confort normal » pourrait au
contraire être excessif et contribuer à endommager
votre ouïe de façon permanente. Le réglage de votre
matériel à un volume sécuritaire AVANT que votre ouïe
s’adapte vous permettra de mieux vous protéger.
CHOISISSEZ UN VOLUME SÉCURITAIRE:
• Réglez d’abord le volume à un niveau inférieur.
• Montez progressivement le volume jusqu’à un niveau
d’écoute confortable ; le son doit être clair et exempt
de distorsions.
• Une fois que le son est à un niveau confortable, ne
touchez plus au bouton du volume.
N’OUBLIEZ PAS DE RESPECTER LES
DIRECTIVES SUIVANTES:
• Lorsque vous montez le volume, assurez-vous de
pouvoir quand même entendre ce qui se passe
autour de vous.
• Faites très attention ou cessez temporairement
l’utilisation dans les situations pouvant s’avérer
dangereuses.
• N’utilisez pas des écouteurs ou un casque d’écoute
lorsque vous opérez un véhicule motorisé ; une telle
utilisation peut créer des dangers sur la route et est
illégale à de nombreux endroits.
S001a_A1_Fr
Page 54

P1-4-2-2_Fr
Précautions concernant le visionnage en 3D
• Si vous ressentez une fatigue ou une gêne pendant le visionnage d’images en 3D, cessez de les
regarder.
• Les enfants, en particulier ceux de moins de 6 ans, sont plus sensibles à la fatigue et les personnes en
charge doivent surveiller tout signe de fatigue ou de gêne.
• Pendant le visionnage d’images en 3D, faites régulièrement des pauses.
Le visionnage prolongé d’images en 3D sans pause peut causer de la fatigue et un inconfort.
Page 55

Sommaire
01 Avant de commencer
Contenu de l’emballage . . . . . . . . . . . . . . . . . . . . . . . . . . 6
Mise en place des piles dans la télécommande . . . . . 6
Mise à jour du logiciel . . . . . . . . . . . . . . . . . . . . . . . . . . . . 6
À propos du fonctionnement de ce lecteur avec un
dispositif mobile (iPod, iPhone, iPad, etc.) . . . . . . . . . . . 6
Types de disques/fichiers lisibles. . . . . . . . . . . . . . . . . . . 7
Disques lisibles . . . . . . . . . . . . . . . . . . . . . . . . . . . . . . . . 7
Fichiers lisibles . . . . . . . . . . . . . . . . . . . . . . . . . . . . . . . 10
Noms et fonctions des éléments . . . . . . . . . . . . . . . . . . 12
Télécommande . . . . . . . . . . . . . . . . . . . . . . . . . . . . . . . 12
Face avant . . . . . . . . . . . . . . . . . . . . . . . . . . . . . . . . . . . 13
Panneau arrière. . . . . . . . . . . . . . . . . . . . . . . . . . . . . . . 13
02 Raccordements
Quand un câble HDMI est utilisé . . . . . . . . . . . . . . . . . . 14
À propos de l’HDMI. . . . . . . . . . . . . . . . . . . . . . . . . . . . 14
À propos du Contrôle par l’HDMI . . . . . . . . . . . . . . . . 14
Raccordement d’un téléviseur. . . . . . . . . . . . . . . . . . . 16
Raccordement d’un récepteur ou
amplificateur AV . . . . . . . . . . . . . . . . . . . . . . . . . . . . . . 16
Raccordement des câbles vidéo et audio . . . . . . . . . . . 17
Raccordement d’un téléviseur avec un câble
vidéo/audio. . . . . . . . . . . . . . . . . . . . . . . . . . . . . . . . . . . 17
Raccordement d’un récepteur ou amplificateur
AV avec un câble audio numérique coaxial . . . . . . . . 17
Raccordement d’un appareil au port USB . . . . . . . . . . 17
À propos des dispositifs USB. . . . . . . . . . . . . . . . . . . . 17
Raccordement du dispositif USB . . . . . . . . . . . . . . . . 18
Raccordement au réseau par l’interface LAN. . . . . . . . 18
Connexion à un réseau LAN sans fil . . . . . . . . . . . . . . 19
Raccordement du cordon d’alimentation . . . . . . . . . . . 19
03 Pour commencer
Paramétrage à l’aide du menu Setup Navigator. . . . . . 20
04 Lecture
Lecture de disques ou de fichiers . . . . . . . . . . . . . . . . . 21
Recherche avant et arrière. . . . . . . . . . . . . . . . . . . . . . 21
Lecture de chapitres, de plages ou de fichiers
particuliers. . . . . . . . . . . . . . . . . . . . . . . . . . . . . . . . . . . 22
Saut de contenu . . . . . . . . . . . . . . . . . . . . . . . . . . . . . . 22
Lecture au ralenti . . . . . . . . . . . . . . . . . . . . . . . . . . . . . 22
Lecture avant et arrière pas à pas . . . . . . . . . . . . . . . . 22
Lecture répétée d’un passage précis d’un titre
ou d’une plage (Répétition A-B). . . . . . . . . . . . . . . . . . 22
Répétition de la lecture (Lecture répétée). . . . . . . . . . 22
Lecture dans l’ordre souhaité
(Lecture programmée) . . . . . . . . . . . . . . . . . . . . . . . . . 22
Pose de signets . . . . . . . . . . . . . . . . . . . . . . . . . . . . . . . 23
Zoom. . . . . . . . . . . . . . . . . . . . . . . . . . . . . . . . . . . . . . . . 23
Lecture de photos en diaporama . . . . . . . . . . . . . . . . . 23
Changement de l’angle de prise de vues . . . . . . . . . . 23
Changement des sous-titres
Changement du son . . . . . . . . . . . . . . . . . . . . . . . . . . . 24
Commutation de la zone de lecture CD/SACD. . . . . . 24
Affichage des informations du disque . . . . . . . . . . . . 24
Utilisation de BONUSVIEW ou BD-LIVE . . . . . . . . . . . 24
Fonctions de lecture . . . . . . . . . . . . . . . . . . . . . . . . . . . 25
. . . . . . . . . . . . . . . . . . . . 23
Utilisation du menu FUNCTION . . . . . . . . . . . . . . . . . . . 26
Lecture à partir d’un temps précis
(Recherche temporelle) . . . . . . . . . . . . . . . . . . . . . . . . 26
Lecture d’un titre, d’un chapitre, d’une plage
ou d’un fichier particulier (Recherche) . . . . . . . . . . . . 26
Lecture d’une plage particulière de disques, de
titres ou d’un chapitre (plage/fichier) dans un
ordre aléatoire . . . . . . . . . . . . . . . . . . . . . . . . . . . . . . . . 27
Continuation de la lecture à partir de la position
spécifiée (Poursuite du visionnage) . . . . . . . . . . . . . . 27
05 Lecture avec Home Media Gallery
À propos de Home Media Gallery. . . . . . . . . . . . . . . . . . 28
À propos de la lecture en réseau . . . . . . . . . . . . . . . . . 28
DLNA Search . . . . . . . . . . . . . . . . . . . . . . . . . . . . . . . . . . 30
Lecture de disque/USB . . . . . . . . . . . . . . . . . . . . . . . . . . 30
Lecture de fichiers photo . . . . . . . . . . . . . . . . . . . . . . . 30
Lecture dans l’ordre souhaité (Playlist) . . . . . . . . . . . . . 30
Ajout de plages ou de fichiers . . . . . . . . . . . . . . . . . . . 30
Lecture de la Playlist . . . . . . . . . . . . . . . . . . . . . . . . . . . 31
Suppression de plages ou fichiers de la Playlist . . . . 31
06 Lecture de contenus web
Contenus web disponibles . . . . . . . . . . . . . . . . . . . . . . . 32
Lecture de contenus . . . . . . . . . . . . . . . . . . . . . . . . . . . . 32
07 Réglages détaillés
Changement des réglages . . . . . . . . . . . . . . . . . . . . . . . 34
Utilisation de la page Initial Setup. . . . . . . . . . . . . . . . 34
Mise à jour du logiciel. . . . . . . . . . . . . . . . . . . . . . . . . . 40
Rétablissement des réglages par défaut du
lecteur . . . . . . . . . . . . . . . . . . . . . . . . . . . . . . . . . . . . . . 41
À propos des formats audio numériques
restitués . . . . . . . . . . . . . . . . . . . . . . . . . . . . . . . . . . . . . . 42
Tableau des codes de langues et Tableau des codes
de pays et régions . . . . . . . . . . . . . . . . . . . . . . . . . . . . . . 43
Tableau des codes de langues . . . . . . . . . . . . . . . . . . . 43
Tableau des codes de pays et régions. . . . . . . . . . . . . 43
08 Informations supplémentaires
Avis relatif à la licence du logiciel . . . . . . . . . . . . . . . . . 44
Précautions d’emploi . . . . . . . . . . . . . . . . . . . . . . . . . . . 49
Déplacement du lecteur . . . . . . . . . . . . . . . . . . . . . . . . 49
Emplacement du lecteur . . . . . . . . . . . . . . . . . . . . . . . 49
Éteignez le lecteur lorsque vous ne l’utilisez pas. . . . 49
Condensation . . . . . . . . . . . . . . . . . . . . . . . . . . . . . . . . 49
Nettoyage du lecteur. . . . . . . . . . . . . . . . . . . . . . . . . . . 49
Attention si lecteur est installé dans un meuble
avec une porte en verre . . . . . . . . . . . . . . . . . . . . . . . . 49
Nettoyage de la lentille du capteur . . . . . . . . . . . . . . . 49
Manipulation des disques . . . . . . . . . . . . . . . . . . . . . . 49
En cas de panne . . . . . . . . . . . . . . . . . . . . . . . . . . . . . . . 51
Lecture . . . . . . . . . . . . . . . . . . . . . . . . . . . . . . . . . . . . . . 51
Contrôle . . . . . . . . . . . . . . . . . . . . . . . . . . . . . . . . . . . . . 53
Réseau . . . . . . . . . . . . . . . . . . . . . . . . . . . . . . . . . . . . . . 53
Divers . . . . . . . . . . . . . . . . . . . . . . . . . . . . . . . . . . . . . . . 54
Glossaire. . . . . . . . . . . . . . . . . . . . . . . . . . . . . . . . . . . . . . 55
Spécifications. . . . . . . . . . . . . . . . . . . . . . . . . . . . . . . . . . 57
5
Fr
Page 56

Chapitre 1
01
Avant de commencer
Contenu de
l’emballage
• Télécommande x 1
• Câble vidéo/audio (fiches jaune/blanche/rouge) x 1
• Piles sèches AAA/R03 x 2
•Carte de garantie
•Cordon d’alimentation
•Mode d’emploi (ce manuel)
Mise en place des piles dans
la télécommande
• La tension des piles peut être différente, même si les
pil
es semblent identiques. N’utilisez pas différents
types de piles.
•Pour éviter toute fuite d’électrolyte, retirez les piles si
vous prévoyez de ne pas utiliser la télécommande
pendant un certain temps (1 mois ou plus). Si une pile
devait fuir, essuyez soigneusement l’intérieur du
logement puis insérez des piles neuves. Si le liquide
d’une pile devait fuir et se répandre sur votre peau,
lavez-le immédiatement avec une grande quantité
d’eau.
•Lorsque vous mettez des piles usées au rebut, veuillez
vous conformer à la réglementation
gouvernementale ou environnementale en vigueur
dans votre pays ou rég
ion.
Mise à jour du logiciel
Vous trouverez plus d’informations au sujet de ce lecteur
sur le site Pioneer. Consultez ce site pour toute
information sur la mise à jour et les services relatifs à
votre lecteur Blu-ray disc.
http://www.pioneerelectronics.com
1 Ouvrez le couvercle arrière.
2 Insérez les piles (AAA/R03 x 2).
Insérez les piles en tenant compte des repères / dans
le logement de piles.
3 Fermez le couvercle arrière.
Fermez bien le couvercle (vous devez entendre un clic).
Les piles fournies avec le lecteur servent avant tout à
s’assurer du bon fonctionnement de ce produit et
peuvent ne pas durer très longtemps. Il est conseillé
d’utiliser des piles alcalines dont l’autonomie est
supérieure.
AVERTISSEMENT
•N’utilisez pas ou ne rangez pas les piles en plein soleil
ou à un endroit très chaud, comme dans une voiture
ou près d’un appareil de chauffage. Les piles
risqueraient de fuir, d
s’enflammer. Ceci pourrait également réduire leur
durée de vie ou leur performance.
Attention
• N’utilisez que les piles spécifiées à l’exclusion de
toute autre. N’utilisez pas non plus une pile neuve
avec une pile usée.
•Insérez les piles dans la télécommande en les
orientant correctement, comme indiqué par les
symboles de polarité ( et ).
•N’exposez pas les piles à la chaleur, ne les ouvrez pas
ou ne les jetez pas au feu ou dans l’eau.
6
Fr
e surchauffer, d’exploser ou de
À propos du
fonctionnement de ce
lecteur avec un
dispositif mobile
(iPod, iPhone, iPad,
etc.)
L’installation de l’application appropriée sur un dispositif
mobile permet d’agir sur le lecteur depuis le dispositif
mobile.
Pour le détail, reportez-vous aux informations produit sur
le site Pioneer.
Cette application spéciale peut être changée ou arrêtée
sans avis préalable.
Page 57

Types de disques/fichiers lisibles
Disques lisibles
Les disques portant les logos suivants sur l’étiquette, le carton ou la jaquette peuvent être lus.
Attention
• Attention seuls les disques finalisés peuvent être lus.
Type de disque Logo
BD-ROM
BD-R
2
BD
BD-RE
DVD-ROM
BDMV BDAV DVD-Vidéo DVD VR
Format de l’application
CD-DA
DTS-CD
DATA-
DISC
01
1
DVD
CD
1. Disques sur lesquels des fichiers vidéo, photo ou audio sont enregistrés. Ce lecteur ne permet pas les enregistrements multi-border ou de
disques multi-session.
2. Disques double couche compris.
3. Les finaliser avant de les lire sur ce lecteur.
4. Les disques DVD-R pour création (3,95 et 4,7 Go) ne peuvent pas être lus.
5. Format AVCHD compris.
6. Format AVCREC compris.
7. Les disques DVD-RW Version 1.0 ne peuvent pas être lus.
8. CD vidéo compris.
2,3,4
DVD-R
3,7
DVD-RW
2,3
DVD+R
3
DVD+RW
CD-DA
8
(CD audio)
3
CD-R
3
CD-RW
CD-ROM
5
5
6
6
7
Fr
Page 58

• “Blu-ray Disc”, “Blu-ray” et le logo “Blu-ray Disc” sont
01
des marques commerciales de la Blu-ray Disc
Association.
• est une marque de commerce de DVD
Format/Logo Licensing Corporation.
Disques illisibles
• HD DVD
• Disques DVD-RAM
Il est possible que certains disques ne figurant pas dans
la liste ci-dessus ne puissent pas non plus être lus.
Remarque
•Certains disques ne pourront pas être lus bien qu’ils
portent un des logos de la page précédente.
•Pour lire un disque de 8 cm, posez le disque dans le
renfoncement destiné aux disques de 8 cm au centre
du tiroir à disque. Aucun adaptateur n’est nécessaire.
Les BD-ROM de 8 cm ne peuvent pas être lus.
À propos de la lecture de copies non
autorisées
Avis de Cinavia
Ce produit utilise la technologie Cinavia pour limiter la
copie non autorisée de certains films et certaines vidéos
du commerce ainsi que de leurs pistes son. Lorsque
l’emploi prohibé d’une copie non autorisée est détecté, un
message s’affiche et la lecture ou la copie est interrompue.
Vous trouverez plus d’informations sur la technologie
Cinavia auprès du Cinavia Online Consumer Information
Center sur le site http://www.cinavia.com. Cinavia
Consumer Information Center, P.O. Box 86851, San
Diego, CA, 92138, USA.
Copyright 2004-2010 Verance Corporation. Cinavia
une marque commerciale de Verance Corporation. Protégé
par le brevet U.S. N° 7,369,677 et des brevets mondiaux,
homologués et en attente d’homologation, sous licence de
Verance Corporation. Tous droits réservés.
À propos des formats audio
Les formats audio suivants sont pris en charge par ce
lecteur :
•Dolby TrueHD
• Dolby Digital Plus
• Dolby Digital
•DTS-HD Master Audio
• DTS-HD High Resolution Audio
•DTS Digital Surround
•MPEG audio (AAC)
• PCM linéaire
Pour bénéficier du son ambiophonique des formats
Dolby TrueHD, Dolby Digital Plus, DTS-HD Master Audio
et DTS-HD High Resolution Audio, il est conseillé de
raccorder le lecteur à un récepteur ou à un amplificateur
AV compatible avec ces formats audio à l’aide d’un câble
HDMI. Après avoir inséré un BD contenant des pistes son
8
Fr
™ est
dans un de ces formats audio, sélectionnez le format
audio sur le menu.
Fabriqué sous licence de Dolby Laboratories. Le terme
« Dolby » et le sigle double D sont des marques
commerciales de Dolby Laboratories.
Fabriqué sous licence sous couvert des brevets U.S. N° :
5,956,674; 5,974,380; 6,226,616; 6,487,535; 7,392,195;
7,272,567; 7,333,929; 7,212,872 et d’autres brevets U.S. et
mondiaux, homologués et en attente d’homologation.
DTS-HD, le Symbole et DTS-HD et le Symbole sont
ensemble des marques déposées et DTS-HD Master Audio
| Essential est une marque commerciale de DTS, Inc.
Logiciel inclus dans ce produit. © DTS, Inc. Tous droits
réservés.
Lecture de BD
•Les BD (BDMV) compatibles avec les formats
suivants peuvent être lus.
–Disque Blu-ray Lecture seule (ROM) Format
Version 2
–Disque Blu-ray Enregistrable (R) Format Version 2
–Disque Blu-ray Réenregistrable (RE) Format
Version 3
Ce lecteur prend en charge les BD-ROM Profil 5.
Le logo “Blu-ray 3D” et “Blu-ray 3D” sont des marques
commerciales de Blu-ray Disc Association.
Les fonctions BONUSVIEW, comme la lecture d’une
seconde image (Image dans l’image) et d’un second
son, peuvent être utilisées. Les données utilisées avec
les fonctions BONUSVIEW (les données de la
seconde image (Image dans l’image) et du second
son) peuvent être sauvegardées dans la mémoire.
Pour le détail sur la lecture d’une seconde image et
d’un second son, reportez-vous à la notice du disque.
« BONUSVIEW » est une marque commerciale de Bluray Disc Association.
Vous pouvez utiliser les fonctions BD-LIVE, qui
permettent de télécharger des bande
d’autres langues pour les dialogues et les sous-titres,
et de jouer des jeux vidéo en ligne, via Internet. Les
données téléchargées grâce à la fonction BD-LIVE
(bandes-annonces, etc.) sont sauvegardées dans la
mémoire. Reportez-vous aux instructions du disque
pour le détail sur les fonctions BD-LIVE.
Le logo « BD-LIVE » est une marque commerciale de
Blu-ray Disc Association.
s-annonces ou
Page 59

Avec les BD-ROM, il est possible d’utiliser les
applications BD-J (Java) pour créer des titres
hautement interactifs, jeux compris.
Oracle et Java sont des marques déposées d’Oracle
Corporation et/ou de ses affiliés. Tout autre nom
mentionné peut correspondre à des marques
appartenant à d’autres propriétaires qu’Oracle.
•Les BD (BDAV) compatibles avec les formats suivants
peuvent être lus.
–Disque Blu-ray Enregistrable (R) Format Version 1
–Disque Blu-ray Réenregistrable (RE) Format
Version 2
Lecture de DVD
Cette étiquette indique que les disques DVD-RW
enregistrés dans le format VR (format d’enregistrement
vidéo) peuvent être lus. Toutefois, dans le cas de disques
enregistrés avec un programme crypté pour un
enregistrement unique, la lecture n’est possible qu’à l’aide
d’un dispositif compatible avec le CPRM.
L’AVCHD est un format haute définition (HD) pour
caméscope numérique permettant d’enregistrer sur
certains supports en haute définition grâce à des
technologies de compression extrêmement performantes.
“AVCHD” et le logo “AVCHD” sont des marques commerciales
de Panasonic Corporation et de Sony Corporation.
À propos des codes régionaux
Des codes régionaux sont attribués aux lecteurs de
disques Blu-ray et aux disques BD-ROM ou DVD-Vidéo en
fonction de la région où ils sont commercialisés.
Les codes régionaux de ce lecteur sont les suivants :
•BD-ROM : A
•DVD-Vidéo : 1
Les disques ne contenant pas ces codes ne peuvent pas
être lus. Les disques suivants peuvent être lus sur ce
lecteur.
•BD : A (A compris) et ALL
• DVD : 1 (1 compris) et ALL
Lecture de CD
Au sujet de la copie de CD protégés : Ce lecteur se
conforme aux spécifications du format CD audio. Il ne
prend pas en charge la lecture ou les fonctions des
disques non conformes à ces spécifications.
Lecture de DualDisc
Un DualDisc est un disque à deux faces dont une face
renferme les données du DVD — données vidéo, données
audio, etc. — et l’autre face les données non DVD, par
exemple les matériaux audionumériques.
La face DVD d’un DualDisc peut être lue sur ce lecteur.
La face audio, non DVD du disque ne peut pas être lue par
ce lecteur.
Il est possible que lors du chargement ou de l’éjection
d’un DualDisc, la face opposée à la face de lecture soit
rayée. La lecture d’un disque rayé n’est pas possible.
Pour tout complément d’informations sur les
spécifications du DualDisc, consultez le fabricant du
disque ou le magasin d’achat.
Lecture de disques créés sur un
ordinateur ou un enregistreur de BD/
DVD
•Du fait des réglages de l’application ou de
l’environnement de l’ordinateur, la lecture de disques
enregistrés sur un ordinateur peut être impossible.
Enregistrez vos disques dans un format lisible sur ce
lecteur. Pour le détail, contactez votre revendeur.
•La lecture de disques enregistrés sur un ordinateur
ou un enregistreur BD/DVD ne sera pas impossible,
si les caractéristiques du disque, des éraflures, de la
saleté sur le disque, de la saleté sur la lentille de
l’enregistreur, etc. n’ont pas permi
s d’effectuer une
gravure de qualité.
À propos des dossiers et des fichiers
vidéo, audio et photo
Les fichiers audio et photo peuvent être lus sur ce lecteur
si les dossiers du disque ou du dispositif USB sont créés
de la façon suivante.
Exemple de la structure de dossiers :
Dossier principal
001.jpg/001.mp3
xxx.jpg/xxx.mp3
Dossier 01
Dossier XX
* Le nombre de dossiers et de fichiers dans un seul
dossier (dossier principal compris) se limite à 256. Ne
créez pas plus de 5 niveaux de dossiers.
Remarque
•Les noms de fichiers et dossiers s’affichant sur ce
lecteur peuvent être différents de ce ux qui s’af fichent
sur l’ordinateur.
*
Dossier
001.jpg/001.mp3
xxx.jpg/xxx.mp3
001.jpg/001.mp3
xxx.jpg/xxx.mp3
*
001.jpg/001.mp3
xxx.jpg/xxx.mp3
*
*
01
9
Fr
Page 60

Fichiers lisibles
01
Les fichiers vidéo, photo et audio enregistrés sur des BD,
DVD, CD ou des dispositifs USB peuvent être lus.
Attention
•Parmi les DVD, seuls ceux qui sont enregistrés avec
le système de fichiers ISO 9660 peuvent être lus.
•Certains fichiers ne pourront pas être lus.
•Avec certains fichiers, il peut être impossible
d’utiliser certaines fonctions lors de la lecture.
•Certains fichiers ne pourront pas être lus bien qu’ils
aient l’extension d’un fichier lisible sur ce lecteur.
•Les fichiers protégés par le DRM (Gestion numérique
des droits) ne peu
non compris).
vent pas être lus (fichiers VOD DivX
Formats de fichiers vidéo pris en
charge
• DivX Plus HD
®
DivX Certified
DivX Plus
1080p HD, contenu facturé compris.
À PROPOS DE LA VIDÉO DIVX : DivX
vidéo numérique créé par DivX, LLC, qui est une filiale
de Rovi Corporation. Ceci est un appareil DivX
Certified
divx.com pour plus d’informations sur les outils
logiciels permettant de convertir vos fichiers en
vidéos DivX.
À PROPOS DE LA VIDÉO DIVX À LA DEMANDE : Cet
appareil certifié DivX
pouvoir lire des vidéos DivX à la demande (VOD). Pour
obtenir votre code d’enregistrement, localisez la
section VOD DivX dans utilisation des menus. Allez
sur le site vod.divx.com pour savoir comment
terminer votre enregistrement.
pour la lecture de vidéos DivX® et
TM
HD (H.264/MKV) d’un maximum de
®
officiel qui lit la vidéo DivX. Visitez le site
®
doit être enregistré afin de
®
est un format
Remarque
•Cet appareil DivX
pour pouvoir lire des vidéos à la demande DivX (VOD).
Obtenez d’abord le numéro d’immatriculation VOD
DivX de votre appareil et spécifiez-le lors de
l’immatriculation. Important : Les vidéos VOD DivX
sont protégées par un système DivX DRM (Gestion
numérique des droits) qui restreint la lecture aux
appareils certifiés DivX immatriculés. Si vous essayez
de lire une vidéo VOD DivX non autorisée pour votre
appareil, le message Authorization Error a pparaîtra
et la vidéo ne pourra pas être vue. Consultez le site
www.
divx.com/vod pour plus d’informations.
–Le numéro d’immatriculation VOD DivX de ce
lecteur peut être vérifié dans HOME MENU
Initial Setup Playback DivX(R) VOD DRM
Registration Code (page 37).
–Le nombre de visionnages est limité pour certains
fichiers VOD DivX. Lorsque vous regardez ces
fichiers sur votre lecteur, le nombre restant de
visionnages est indiqué. Les fichiers pour lesquels
le nombre de visionnage indiquent 0 ne peuvent
pas être lus (This DivX rental has expired
s’affiche). Les fichiers pour lesquels le nombre de
vi
sionnage n’est pas limité peuvent être visionnés à
volonté (le nombre restant de visionnages
n’apparaît pas).
®
Certified doit être immatriculé
DivX®, DivX Certified
®
, DivX PlusTM HD
associés sont des marques commerciales de Rovi
Corporation ou de ses filiales et sont utilisés sous
licence.
10
Fr
et les logos
Page 61

Tableau de fichiers lisibles
Supports lisibles
Fichiers lisibles
(Extensions)
MP3
(.mp3)
WMA
(.wma)
LPCM
(.wav)
FLAC
(.flac)
JPEG
(.jpg/.jpeg)
DivX
(.avi/.divx/.mkv)
MP4
(.mp4)
WMV
(.wmv)
AVI
(.avi)
1. Cet appareil prend en charge les systèmes de fichiers FAT16, FAT32 et NTFS.
2. Une exigence pour la lecture de fichiers comme DMP. Pour le détail, voir page 28.
BD-R/RE/-R DL/
RE DL/-R LTH,
DVD-R/RW/-R DL/
+R/+RW/+R DL,
CD-R/RW
Dispositifs USB
1
Réseau
2
Spécifications des fichiers
Fréquences d’échantillonnage : jusqu’à 48 kHz
Débit binaire : Jusqu’à 320 kbps
Type audio : MPEG-1 Audio Layer 3 (MP3)
Fréquences d’échantillonnage : jusqu’à 48 kHz
Débit binaire : Jusqu’à 192 kbps
Type audio : WMA version 9
Fréquences d’échantillonnage : jusqu’à 192
kHz
Débit binaire de la quantification : 16 bits
Voie : 2 voies
Fréquences d’échantillonnage : jusqu’à 192
kHz
Débit binaire de la quantification : 16 bits, 24
bits
Voie : 2 voies
Résolution maximale : 4 000 x 3 000 pixels
®
Versions prises en charge : Jusqu’à DivX
PLUS HD
Résolution maximale :
Jusqu’à 1 920 x 1 080 (DivX
Jusqu’à 1 280 x 720 (MKV)
Résolution maximale : Jusqu’à 1 920 x 1 080
Vidéo : MPEG4, MPEG-4 AVC (niveau 4.1)
Audio : AAC, MP3
Résolution maximale : Jusqu’à 1 280 x 720
Vidéo : WMV9, WMV9AP (VC-1)
Audio : WMA
Résolution maximale : Jusqu’à 1 920 x 1 080
Vidéo : MPEG4
Audio : MP3, AAC, AC-3
®
PLUS HD)
01
Remarque
•Selon la structure des fichiers et la capacité du serveur, il peut être impossible de lire certains fichiers, bien qu’ils
soient indiqués sur le tableau des fichiers lisibles ci-dessus.
•Les fichiers et contenus protégés, enregistrés depuis des émissions numériques (satellite, câble ou terrestre
numérique), ne peuvent pas être lus par LAN.
•Les fichiers protégés par DRM (Digital Rights Management, Gestion numérique des droits) ne peuvent pas être
lus.
• Les contenus AVCHD ne peuvent pas être lus par le réseau.
11
Fr
Page 62

Noms et fonctions des
01
éléments
Télécommande
1
2
3
4
5
6
7
8
9
10
11
12
1
STANDBY/ON
tension.
2 AUDIO – (page 24)
3SUBTITLE – (page 23)
4 MEDIA GALLERY – (page 28)
5 REPEAT – (page 22)
6 HDMI – Pour changer la résolution des signaux vidéo
sortant de la prise HDMI OUT (page 36).
7 // – (page 22)
– (page 21)
// – (page 22)
– (page 21)
– (page 21)
– (page 21)
– Pour mettre le lecteur sous et hors
25
23
21
19
17
16
15
14
13
24
22
20
18
8TOP MENU – Pour afficher la première page du menu
d’un BD-ROM ou DVD-Vidéo.
9HOME MENU – (page 34)
10 Touches de couleur – Pour naviguer sur les menus
du BD-ROM.
PROGRAM – (page 22)
BOOK MARK – (page 23)
ZOOM – (page 23)
(page 23)
INDEX –
11 Touches numériques – Pour sélectionner et lire le
titre/le chapitre/la plage que vous voulez voir ou
écouter ainsi que les éléments des menus.
12 CLEAR – Pour effacer un nombre saisi, etc.
13 FUNCTION – (page 26)
14 RETURN – Pour revenir à la page précédente.
15 /// – Pour sélectionner des éléments, changer
des réglages et déplacer le curseur.
ENTER – Pour exécuter l’élément sélectionné ou à
valider un réglage qui a été changé, etc.
16 POP UP MENU/MENU – Pour afficher les menus
d’un BD-ROM ou DVD-Vidéo.
17 EXIT – (page 32)
18 NETFLIX – (page 32)
DISPLAY – (page 24)
19
20 A-B – (page 22)
21 FL DIMMER – À chaque pression sur cette touche, la
luminosité de la face avant change (4 niveaux).
22 CD/SACD – Avec les disques hybrides, pour basculer
entre les couches CD et SACD (page 24).
23 ANGLE – (page 23)
24 CONTINUED– Pour continuer la lecture à partir d’un
point précis (page 27).
25 OPEN/CLOSE – Pour ouvrir et fermer le tiroir à
disque.
Remarque
•Pour utiliser un récepteur AV pourvu d’un réglage du
mode de commande à distance à l’aide des touches
RECEIVER CONTROL, réglez le mode de commande
à distance du récepteur sur “1
reportez-vous au mode d’emploi du récepteur AV.
”. Pour le détail,
12
Fr
Page 63

Face avant
01
1 2 3 54 6 7 8
1 STANDBY/ON – Pour mettre le lecteur sous et
hors tension.
2 Tiroir à disque
3 Afficheur de la face avant
4 Bouton de réinitialisation – Si l’alimentation ne
peut pas être coupée (en attente), utilisez une tige
fine pour appuyer sur ce bouton. L’appareil est
réinitialisé et peut de nouveau fonctionner.
Panneau arrière
321 5 6 74
1 Prise DIGITAL OUT (COAXIAL) – (page 17)
2 Prise VIDEO OUT – (page 17)
3 Prises AUDIO OUT – (page 17)
4 Prise HDMI OUT – (page 14)
9
5 Capteur de télécommande – Orientez la
télécommande vers le capteur, puis utilisez-la à
moins de 7 m.
Le lecteur ne parviendra pas à capter les signaux de
la télécommande si une lumière fluorescente se
trouve à prox imi té. Dan s ce cas , él oig nez le l ect eur de
la lumière fluorescente.
6 OPEN/CLOSE – Pour ouvrir et fermer le tiroir à
disque
.
7 – Pour arrêter la lecture.
8 Port USB – (page 17)
9 – Pour démarrer la lecture.
5 Prise LAN (10/100) – (page 18)
6 Port USB – (page 17)
7AC IN – (page 19)
13
Fr
Page 64

Chapitre 2
02
Raccordements
Veillez à toujours éteindre les appareils et à débrancher le
cordon d’alimentation de la prise secteur avant de
raccorder un appareil ou de changer les liaisons.
Après le raccordement, effectuez les réglages dans le
menu Setup Navigator ou Initial Setup selon le type de
câble raccordé (page 20).
Reportez-vous aussi au mode d’emploi de l’appareil
raccordé.
“x.v.Color” est le nom promotionnel donné aux produits
capables de restituer un spectre de couleurs plus étendu,
répond
ant aux spécifications des standards
internationaux définis comme xvYCC.
Quand un câble HDMI
est utilisé
Les signaux audio et vidéo peuvent être transmis aux
appareils compatibles HDMI sous forme de signaux
numériques sans perte de la qualité sonore ou vidéo.
Remarque
• Effectuez les réglages dans le menu Setup
Navigator selon l’appareil compatible HDMI
raccordé (page 20).
• Selon le câble HDMI utilisé, les signaux vidéo 1080p
peuvent ne pas être fournis.
À propos de l’HDMI
Ce lecteur intègre l’interface multimédia haute définition
®
(HDMI
).
Les termes HDMI et HDMI High-Definition Multimedia
Interface ainsi que le logo HDMI sont des marques
commerciales ou des marques déposées de HDMI
Licensing LLC aux États-Unis et dans d’autres pays.
Le lecteur prend en charge le format Deep Color.
Les lecteurs classiques peuvent transmettre un signal
vidéo avec une profondeur de couleur de 8 bits dans les
formats YCbCr 4:4:4 ou RGB ; les lecteurs prenant en
charge le format Deep Color peuvent transmettre un
signal vidéo avec une profondeur de couleur supérieure à
8 bits pour chaque composante couleur. Il est donc
possible d’obtenir des dégradés de couleur plus subtils
lorsque ce lecteur est raccordé à un téléviseur
compat
ible Deep Color est raccordé.
Ce produit est compatible avec le “x.v.Color” qui donne un
spectre de couleurs plus étendu répondant aux
spécifications xvYCC.
Le spectre des couleurs étendu permet de restituer des
couleurs naturelles et plus fidèles que jamais lors de la
lecture de signaux vidéo conformes aux normes “xvYCC”,
quand le lecteur est raccordé à un téléviseur “x.v.Color”,
etc.
14
Fr
“x.v.Color” et
commerciales de Sony Corporation.
sont des marques
Signaux audio lisibles par la prise
HDMI OUT
•Dolby TrueHD
• Dolby Digital Plus
• Dolby Digital
•DTS-HD Master Audio
•DTS-HD High Resolution Audio
•DTS Digital Surround
• PCM linéaire
Des signaux audio PCM linéaires peuvent être
transmis s’ils remplissent les conditions suivantes :
–Fréquence d’échantillonnage : 32 kHz à 192 kHz
– Nombre de voies : 8 au maximum (6 au maximum
pour une fréquence d’échantillonnage de 192 kHz)
•DSD audio
Lorsqu’un appareil DVI est raccordé
• Il n’est pas possible de raccorder des appareils
DVI (écrans d’ordinateur, par exemple) s’ils ne
sont pas compatibles avec l’HDCP. L’HDCP est une
norme visant à protéger les contenus audiovisuels via
l’interface DVI/HDMI.
• Aucun signal audio n’est restitué. Utilisez un câble
audio, etc. pour le raccordement.
•Ce lecteur peut être raccordé à des appareils
compatibles HDMI. Lorsqu’il est raccordé à un
appareil DVI, et selon l’appareil DVI, il se peut qu’il ne
fonctionne pas correctement.
À propos du Contrôle par
l’HDMI
Les fonctions sont opérantes lorsqu’un Téléviseur à
Écran Plat ou un système AV Pioneer (récepteur ou
amplificateur AV, etc.), compatible avec le Contrôle par
l’HDMI, est raccordé au lecteur à l’aide d’un câble HDMI.
Reportez-vous aussi au mode d’emploi du Téléviseur à
Écran Plat et du système AV (récepteur ou amplificateur
AV, etc.).
Page 65

Pour utiliser le Contrôle par l’HDMI
•Le Contrôle par l’HDMI fonctionne dans la mesure où
il est réglé sur Activé sur tous les appareils raccordés
à l’aide de câbles HDMI.
•Lorsque vous avez relié et réglé tous les appareils,
assurez-vous que l’image du lecteu r apparaît bien sur
le Téléviseur à Écran Plat. (Ceci est également
nécessaire lorsque vous changez les appareils
raccordés et rebranchez les câbles HDMI.) Le
Contrôle par l’HDMI n’agit peut-être pas
correctement si l’image du lecteur ne s’affiche pas
correctement sur le Téléviseur à Écran Plat.
• Utilisez des Câble HDMI
voulez utiliser le Contrôle par l’HDMI. Le Contrôle par
l’HDMI peut ne pas agir correctement si vous utilisez
d’autres câbles HDMI.
•Sur certains modèles, le Contrôle par l’HDMI est
appelé “KURO LINK” ou “HDMI Control”.
• Le Contrôle par l’HDMI n’opère pas avec les appareils
d’autres marques, même si ce lecteur est raccordé
par un câble HDMI.
®
/™ haute vitesse si vous
Que peut faire le Contrôle par
l’HDMI
• Transmettre une image de qualité optimale au
Téléviseur à Écran Plat compatible avec le
Contrôle par l’HDMI.
Lorsque le Contrôle par l’HDMI est activé, les signaux
vidéo d’une qualité vidéo optimale pour le Contrôle
par l’HDMI sortent de la prise HDMI du lecteur.
• Permet d’agir sur le lecteur avec la télécommande
du Téléviseur à Écran Plat.
Certaines fonctions du lecteur, comme la marche et
l’arrêt de la lecture et l’affichage des menus, peuvent
être exécutées depuis le Téléviseur à Écran Plat.
• Afficher l’image du lecteur sur l’écran du
Téléviseur à Écran Plat. (Sélection automatique)
L’entrée change automatiquement sur le Téléviseur à
Écran Plat et le système AV (récepteur ou
amplificateur AV, etc.) lorsque la lecture démarre sur
le lecteur ou lorsque la page HOME MENU est
affichée. Lorsque l’entrée change, l’image de lecture
ou la pa
ge HOME MENU s’affiche sur le Téléviseur à
Écran Plat.
• Allumer et éteindre le Téléviseur à Écran Plat et le
lecteur. (Mise en service simultanée)
Si le Téléviseur à Écran Plat est éteint lorsque vous
procédez à la lecture sur le lecteur ou affichez la page
HOME MENU, il s’allumera automatiquement.
Lorsque vous éteignez le Téléviseur à Écran Plat, le
lecteur s’éteint automatiquement.
Sound Retriever Link
À propos de la fonction Sound Retriever Link
La fonction Sound Retriever Link est une technologie
visant à contrôler par l’HDMI la correction de la qualité
des signaux audio compressés devant être restitués par
le récepteur AV raccordé.
Cette fonction permet de restituer un son de plus grande
qualité en activant automatiquement la c orrection sonore
du récepteur AV raccordé.
La fonction Sound Retriever Link de ce lecteur agit
essentiellement dans les situations suivantes.
•Le flux audio PC est lu par des dispositifs USB ou via
un réseau.
•Le récepteur AV Pioneer compatible avec la fonction
Sound Retriever Li
câble HDMI et le lecteur est réglé de la façon suivante
(page 36).
Control : On
•Reportez-vous aussi aux instructions du récepteur
AV.
• Consultez le site Pioneer pour les récepteurs AV
compatibles avec la fonction Sound Retriever Link.
Attention
•Raccordez directement le lecteur au récepteur AV
Pioneer compatible avec la fonction Sound Retriever
Link. L’interruption d’une liaison directe avec un
amplificateur ou un convertisseur AV (par exemple
une coupure de
dysfonctionnement.
nk est raccordé à ce lecteur par un
l’HDMI) peut causer un
Stream Smoother Link
À propos de la fonction Stream Smoother Link
La fonction Stream Smoother Link est une technologie
visant à améliorer par l’HDMI la qualité de l’image des
vidéos téléchargées d’un réseau. Cette fonction permet
de bénéficier d’images de plus grande qualité, moins
parasitées, en activant automatiquement la correction du
flux du récepteur AV.
La fonction Stream Smoother Link de ce lecteur agit
essentiellement dans les situations suivantes.
•Lecture de contenus PC enregistrés sur des disques
ou dispositifs USB.
•Le récepteur AV Pioneer compatible avec la fonction
Stream Smoother Link est raccordé à ce lecteur par
un câble HDMI et le lecteur est réglé de la façon
suivante (page 36). Reportezinstructions du récepteur AV.
Control : On
Consultez le site Pioneer pour les récepteurs AV
compatibles avec la fonction Stream Smoother Link.
Attention
•Raccordez directement le lecteur au récepteur AV
Pioneer compatible avec la fonction Stream
Smoother Link. L’interruption d’une liaison directe
avec un amplificateur ou un convertisseur AV (par
exemple une coupure de l’HDMI) peut causer un
dysfonctionnement.
vous aussi aux
02
15
Fr
Page 66

Raccordement d’un
02
téléviseur
Reportez-vous à Raccordement d’un récepteur ou
amplificateur AV dans la colonne de droite pour le
raccordement d’un récepteur ou d’un amplificateur AV à
l’aide d’un câble HDMI.
Attention
•Pour brancher et débrancher le câble, saisissez-le par
la fiche.
•N’exercez pas de force sur la fiche qui puisse créer de
faux contacts ou empêcher la sortie des signaux
vidéo.
Panneau arrière du lecteur
Câble HDMI
(en vente dans
le commerce)
À la prise
d’entrée HDMI
Téléviseur
Un récepteur ou un amplificateur AV
peut aussi être raccordé à l’aide d’un
câble HDMI (dans la colonne de droite).
Orientez correctement
la fiche par rapport à la
prise et insérez-la tout
droit.
Sens du signal
Raccordement d’un
récepteur ou amplificateur
AV
Raccordez ce lecteur à un récepteur ou amplificateur AV
pour bénéficier du son ambiophonique des formats Dolby
TrueHD, Dolby Digital Plus, Dolby Digital, DTS-HD Master
Audio, DTS-HD High Resolution Audio ou DTS Digital
Surround. Pour le détail sur le raccordement du
téléviseur et des enceintes au récepteur ou à
l’amplificateur AV, reportez-vous au mode d’emploi du
récepteur ou de l’amplificateur AV.
Attention
•Pour brancher et débrancher le câble, saisissez-le par
la fiche.
•N’exercez pas de force sur la fiche qui puisse créer de
faux contacts ou empêcher la sortie des signaux
vidéo.
Panneau arrière du lecteur
Câble HDMI
(en vente dans
le commerce)
Orientez
correctement la fiche
À la prise
par rapport à la prise
et insérez-la tout droit.
Téléviseur
Sens du signal
À la prise
d’entrée HDMI
Récepteur ou
De la prise
de sortie
HDMI
amplificateur AV
d’entrée HDMI
Câble HDMI
(en vente dans
le commerce)
16
Fr
Page 67

Raccordement des
câbles vidéo et audio
Remarque
• Effectuez les réglages nécessaires dans le menu
Setup Navigator selon le type de câble raccordé
(page 20).
•Pour que ce lecteur restitue les signaux vidéo,
raccordez un câble vidéo (inutile lors d’une liaison par
un câble HDMI).
Raccordement d’un téléviseur
avec un câble vidéo/audio
Attention
• Raccordez la sortie vidéo du lecteur directement
à votre téléviseur.
Ce lecteur intègre une technologie anticopie
protégeant contre la copie analogique. C’est
pourquoi l’image peut ne pas s’afficher correctement
si le lecteur est raccordé à un téléviseur via un
enregistreur de DVD ou un magnétoscope, ou bien
lors de la lecture de gravures effectuées sur un
enregistreur de DVD ou un magnétoscope. De même,
l’image peut ne pas s’afficher correctement à cause
du système anticopie lorsque le lecteur est raccordé
à un téléviseur combiné à un magnétoscope. Pour le
détail, contactez le fabricant du téléviseur.
Panneau arrière du lecteur
Blanc
Jaune
Rouge
Un récepteur ou un amplificateur
Câble vidéo/
audio (inclus)
AV peut aussi être raccordé.
Reliez les signaux audio avec un
câble audio numérique coaxiale
ou un câble audio (2 voies) (
Sens du
signal
Téléviseur
Remarque
•Lorsque le lecteur est
la résolution des signaux vidéo est de 480/576I ou
480/576P à la sortie.
•Selon le réglage de résolution du signal vidéo de
sortie, l’image peut ne pas être apparaître.
la colonne de droite
Aux prises d’entrée vidéo/audio
raccordé avec un câble vidéo,
dans
).
Raccordement d’un
récepteur ou amplificateur
AV avec un câble audio
numérique coaxial
Panneau arrière du lecteur
Blanc
Rouge
Câble vidéo/audio
Câble audio numérique
coaxial (en vente dans
le commerce)
À la prise d’entrée audio
numérique coaxiale
Récepteur ou
amplificateur AV
Remarque
•Pour changer le signal vidéo depuis le récepteur ou
l’amplificateur AV, reliez aussi les prises de sortie
vidéo.
(inclus)
Une liaison audio
analogique à 2 voies es t
également possible.
Aux prises d’entrée audio
Sens du signal
Raccordement d’un
appareil au port USB
À propos des dispositifs USB
Les dispositifs USB suivants peuvent être raccordés au
lecteur.
• Disques à mémoire flash USB compatibles USB 2.0
(capacité de 1 Go ou plus, 2 Go ou plus
recommandés) ou disque dur (capacité 2 To ou plus)
•Format de fichier : FAT16, FAT32 ou NTFS
Remarque
•Les dispositifs formatés pour un autre système de
fichiers ne pourront pas être utilisés. Elles pourront
cependant être utilisées après avoir été formatées sur
le lecteur.
•Les dispositifs USB contenant plusieurs partitions
risquent de ne pas être reconnus.
•Certai
ns dispositifs USB ne fonctionneront pas avec
ce lecteur.
• Le fonctionnement des dispositifs USB n’est pas
garanti.
02
17
Fr
Page 68

Raccordement du dispositif
02
USB
Attention
• Veillez à éteindre le lecteur avant de brancher ou de
débrancher un dispositif USB.
• Utilisez des dispositifs USB vides (sur lesquels rien
n’est enregistré).
• Si un disque dur externe est utilisé comme dispositif
de stockage externe, veillez à allumer le disque dur
avant d’allumer le lecteur.
• Si le dispositif USB est protégée, veillez à désactiver
la protection.
•Pour raccorder le câble USB, tenez la fiche en
l’orientant dans le bon sens et insérez-la tout droit
dans le port.
•Une pression excessive sur la fiche peut causer un
mauvais contact et empêcher les données de
s’inscrire sur le dispositif USB.
•L
orsqu’un dispositif USB est raccordé et le lecteur
allumé, ne débranchez pas le cordon d’alimentation.
Face avant du lecteur
Disque à
mémoire flash
USB
Panneau arrière du lecteur
Disque à
mémoire flash
USB
Remarque
•Le dispositif risque de ne pas fonctionner s’il est
raccordé au port USB via un lecteur de carte mémoire
ou un concentrateur USB.
• Utilisez un câble USB de 2 mètres au maximum.
Câble USB (en
vente dans le
commerce)
Câble USB (en
vente dans le
commerce)
Disque dur, etc
Disque dur, etc.
Raccordement au
réseau par l’interface
LAN
En connectant ce lecteur au réseau par la prise LAN, les
fichiers audio enregistrés sur les composants en réseau,
y compris votre ordinateur, peuvent être lus via les
entrées de HOME MEDIA GALLERY.
Panneau arrière du lecteur
Câble LAN
(en vente dans
le commerce)
Ordinateur
LAN
LAN
Modem
321
321
Câble LAN (en vente dans
le commerce)
Raccordez la prise LAN de ce récepteur à la prise LAN de
votre routeur (avec ou sans fonction de serveur DHCP)
avec un câble LAN direct (CAT 5 ou supérieur).
Mettez le serveur DHCP de votre routeur en service. Si
votre routeur ne présente pas cette fonction, vous devrez
paramé
trer le réseau manuellement. Pour le détail,
reportez-vous à Réglage de l’adresse IP la page 38.
Spécifications de la prise LAN
Prise LAN : Prise Ethernet (10BASE-T/100BASE-TX)
Remarque
•Reportez-vous au mode d’emploi de l’appareil utilisé,
car les appareils raccordés et les méthodes de
raccordement peuvent être différents selon
l’environnement Internet.
•Pour utiliser une connexion Internet à haut débit, il
faut être abonné à un fournisseur de service Internet.
Pour le détail, contactez votre fournisseur de service
Internet le plus proche.
Internet
Routeur
WAN
WAN
18
Fr
Page 69

Connexion à un réseau LAN
sans fil
La connexion sans fil au réseau s’effectue par une
connexion LAN sans fil. Utilisez l’AS
séparément pour cette connexion.
•Reportez-vous à la notice de l’AS-W L300 pour le détail
des réglages.
Panneau arrière du lecteur
-WL300 vendu
02
Internet
Routeur
WAN
Convertisseur LAN
sans fil (AS-WL300)
Câble d’alimentation
LAN/USB
(inclus avec l’AS-WL300)
DC 5V WPS
Ethernet
Modem
Raccordement du
cordon d’alimentation
Lorsque tous les appareils ont été raccordés, vous pouvez
brancher le cordon d’alimentation.
Panneau arrière du lecteur
À la prise
murale
Cordon d’alimentation
(inclus)
19
Fr
Page 70

Chapitre 3
03
Pour commencer
Paramétrage à l’aide
du menu Setup
Navigator
Veillez à bien régler ces paramètres lorsque vous utilisez
le lecteur dans les situations suivantes.
•La première fois que vous utilisez le lecteur.
•Après le formatage avec Initial Setup.
•Après la mise à jour du logiciel du lecteur.
Attention
• Assurez-vous que le lecteur et les autres appareils
sont reliés correctement avant de les mettre en
service. Allumez aussi les appareils raccordés au
lecteur avant d’allumer le lecteur.
• Si vous utilisez un Téléviseur à Écran Plat Pioneer ou
un vidéoprojecteur compatible avec la fonction de
contrôle, activez le Contrôle sur l’appareil raccordé
av
ant d’allumer le lecteur.
Remarque
•Lorsqu’un Téléviseur à Écran Plat Pioneer ou un
vidéoprojecteur compatible avec le Contrôle par
l’HDMI est raccordé au lecteur par un câble HDMI, la
qualité d’image optimale de l’appareil raccordé est
automatiquement sélectionnée sur le lecteur.
3 Lancez le Setup Navigator.
Appuyez sur ENTER.
•Le Setup Navigator s’ouvre.
4 Sélectionnez la langue des menus.
Utilisez / pour effectuer un choix, puis appuyez sur
ENTER.
Lorsqu’un Téléviseur à Écran Plat Pioneer, compatible
avec la fonction de contrôle est raccordé à la prise HDMI
OUT de ce lecteur, les réglages de langue du Téléviseur à
Écran Plat Pioneer sont importés sur le lecteur avant que
le Setup Navigator ne s’ouvre.
5 Sélectionnez la résolution appropriée pour le
téléviseur raccordé.
Utilisez / pour effectuer un choix, puis appuye
ENTER.
6 Sélectionnez le format approprié pour le
téléviseur raccordé.
Utilisez / pour effectuer un choix, puis appuyez sur
ENTER.
7 Fermez le menu Setup Navigator.
Appuyez sur ENTER.
• Setup Navigator se ferme et les réglages sont
sauvegardés.
•Appuyez sur RETURN pour revenir à l’écran
précédent.
z sur
1 Allumez le téléviseur et sélectionnez l’entrée.
Reportez-vous au mode d’emploi du téléviseur pour le
détail sur son fonctionnement.
2 Allumez le lecteur.
Appuyez sur STANDBY/ON.
Assurez-vous que le menu Setup Navigator s’affiche.
Si le menu Setup Navigator ne
s’affiche pas
Appuyez sur HOME MENU pour afficher la
page Home Menu, sélectionnez Initial Setup Setup
Navigator Start, puis appuyez sur ENTER.
20
Fr
Page 71

Chapitre 4
Lecture
04
Remarque
•La lecture commence automatiquement pour
certains disques lorsque le tiroir à disque est fermé.
•Certains disques DVD-Vidéo disposent des fonctions
de contrôle parental. Saisissez le mot de passe
enregistré dans les paramètres du lecteur pour
annuler le contrôle parental. Pour le détail, reportezvous à page 40.
Si le menu du disque s’affiche
Pour certains disques, le menu du disque s’affiche
automatiquement au début de la lecture. Le contenu du
menu du disque et le fonctionnement du menu
dépendent du disque.
Reprise de la lecture au point où elle
a été arrêtée (fonction de reprise de la
lecture)
•Si vous appuyez sur pendant la lecture, le point où
le disque a été arrêté est enregistré dans la mémoire.
Ensuite, lorsque vous appuyez sur , la lecture se
poursuit à partir de ce point.
•Pour annuler la reprise de la lecture, appuyez sur
pendant l’arrêt de la lecture.
Lecture de disques ou
de fichiers
Le fonctionnement de base du lecteur est décrit dans
cette section.
Pour les types de disques et de fichiers pouvant être lus,
reportez-vous à page 7. Les fichiers vidéo, photo et audio
enregistrés sur des disques sont lus avec Home Media
Gallery (page 28).
1 Appuyez sur STANDBY/ON pour allumer le lecteur.
Allumez le téléviseur et sélectionnez tout d’abord l’entrée.
2 Appuyez sur OPEN/CLOSE pour ouvrir le tiroir
à disque et insérez le disque.
Remarque
•Insérez le disque en orientant sa face imprimée vers
le haut.
•Il faut plusieurs douzaines de secondes au lecteur
pour lire les informations du disque. Lorsque les
informations ont été lues, le type du disque est
indiqué sur l’afficheur de la face avant du lecteur.
•Si des restrictions d’emploi ont été posées par un
enregistreur BD sur le BD inséré, l’écran de saisie du
code PIN apparaît. Dans ce cas, saisissez votre code PIN.
3 Appuyez sur pour lire le disque.
•Pour mettre en pause, appuyez sur pendant la lecture.
•Pour arrêter la lecture, appuyez sur .
Remarque
•La reprise de la lecture est automatiquement annulée
dans les cas suivants :
–Lorsque le tiroir à disque est ouvert.
–Lorsque vous changez de liste de fichiers.
–Lorsque vous mettez le lecteur hors service. (La
repri
se de la lecture n’est pas annulée dans le cas
des BD et des DVD.)
• Si vous voulez continuer la lecture à une position
spécifiée au préalable, reportez-vous à Continuation
de la lecture à partir de la position spécifiée (Poursuite
du visionnage) la page 27.
•La reprise de la lecture ne peut pas être utilisée pour
certains disques.
Recherche avant et arrière
Pendant la lecture, appuyez sur ou .
• La vitesse de la recherche change chaque fois que
vous appuyez sur la touche. La variation de vitesse
dépend du disque ou du fichier (la vitesse est
indiquée sur l’écran du téléviseur).
Pour revenir à la lecture normale
Appuyez sur .
21
Fr
Page 72

Lecture de chapitres, de
04
plages ou de fichiers
particuliers
Pendant la lecture, précisez le numéro du chapitre,
de la plage ou du fichier que vous voulez lire.
• Utilisez les touches numériques (0 à 9) pour préciser
le numéro, puis appuyez sur ENTER.
•Appuyez sur CLEAR pour effacer les valeurs saisies.
Saut de contenu
Pendant la lecture, appuyez sur ou .
•Si vous appuyez sur , la lecture saute au début du
chapitre, de la plage ou du fichier suivant.
•Si vous appuyez sur pendant la lecture d’un fichier
vidéo ou audio, la lecture revient au début du chapitre,
de la plage ou du fichier en cours de lecture. Appuyez
deux fois sur la touche pour localiser le début du
chapitre, de la plage ou du fichier précédent.
•Si vous appuyez sur pendant la lecture d’un
fichier photo, la lecture revient au fichier précédent.
Lecture au ralenti
Pendant la pause de la lecture, appuyez sur /
ou / et maintenez la pression.
• La vitesse change chaque fois que vous appuyez sur
la touche (la vitesse est indiquée sur l’écran du
téléviseur).
Pour revenir à la lecture normale
Appuyez sur .
Lecture avant et arrière pas à
pas
Pendant la pause de la lecture, appuyez sur /
ou /.
• Chaque fois que vous appuyez sur la touche, la
lecture avance ou recule d’une image à la fois.
Pour revenir à la lecture normale
Appuyez sur .
Lecture répétée d’un
passage précis d’un titre ou
d’une plage (Répétition A-B)
Procédez de la façon suivante pour répéter un passage
précis d’un titre ou d’une plage.
1 Pendant la lecture, appuyez sur A-B pour
sélectionner le début du passage.
• A- apparaît sur l’écran du téléviseur.
2 Pendant la lecture, appuyez sur A-B pour
sélectionner la fin du passage.
22
•La lecture du passage A-B commence.
Fr
Pour annuler la lecture du passage A-B
•Appuyez sur A-B pendant la lecture répétée du
passage A-B.
Remarque
•La lecture répétée du passage A-B est annulée dans
les cas suivants :
– Si vous effectuez une recherche hors de la plage
spécifiée pour la répétition.
–Si vous démarrez une autre lecture répétée ou
lecture aléatoire.
Répétition de la lecture
(Lecture répétée)
Procédez de la façon suivante pour répéter le disque, le
titre, le chapitre, la plage ou le fichier actuel.
Pendant la lecture, appuyez sur REPEAT.
•À chaque pression sur REPEAT le mode d e répétition
change de la façon suivante.
BD
Chapitre actuel Titre actuel
DVD
Chapitre actuel Titre actuel Tous les titres
CD/Fichier vidéo/Fichier audio/Fichier photo
Plage/fichier actuel Toutes les plages/Tous les
fichiers du dossier
Pour annuler la lecture répétée
•Appuyez plusieurs fois sur REPEAT pendant la lecture
répétée.
Remarque
•La lecture répétée est annulée dans les cas suivants :
– Si vous effectuez une recherche hors de la plage
spécifiée pour la répétition.
–Si vous démarrez une autre lecture répétée ou
lecture aléatoire.
Lecture dans l’ordre souhaité
(Lecture programmée)
1 Pendant la lecture, appuyez sur PROGRAM.
•L’écran de programmation s’affiche.
2 Sélectionnez le numéro de programmation.
Utilisez / pour effectuer un choix, puis appuyez sur
3 Sélectionnez le titre que vous souhaitez lire.
Utilisez / pour effectuer un choix, puis appuyez sur .
4 Sélectionnez le chapitre que vous souhaitez lire.
Utilisez / pour effectuer un choix, puis appuyez sur
5 Appuyez sur .
•La lecture commence.
Modification de la programmation
1 Sélectionnez le numéro de la programmation que
vous voulez modifier, puis appuyez sur ENTER.
2 Sélectionnez le titre ou chapitre, puis appuyez sur
ENTER.
ENTER
ENTER
.
.
Page 73

Suppression d’une programmation
Sélectionnez le numéro de la programmation que
vous voulez supprimer, puis appuyez sur CLEAR.
•Pour supprimer toutes les programmations, appuyez
sur RETURN.
Remarque
• Si vous utilisez des CD audio pour la lecture
programmée, indiquez le numéro de plage au point 3.
• Cette fonction n’agit pas avec les BD.
Pose de signets
Vous pouvez poser des signets sur la vidéo en cours de
lecture pour revenir plus tard à la scène marquée.
Pendant la lecture, appuyez sur BOOKMARK.
• Un signet est posé.
•Le nombre de signets pouvant être posés est limité à 12.
Lecture d’une scène marquée
1 Appuyez sur la touche BOOKMARK et maintenezla quelques secondes enfoncée.
• La liste de signets apparaît.
2 Sélectionnez le signet que vous souhaitez lire.
Utilisez / pour effectuer un choix, puis appuyez sur
ENTER
Suppression d’un signet
Sélectionnez le signet que vous voulez
supprimer, puis appuyez sur CLEAR.
•Pour certains disques il ne sera pas possible de poser
de signets.
• Les signets sont annulés dans les cas suivants :
–Lorsque le lecteur est éteint.
–Lorsque le tiroir à disque est ouvert.
Zoom
Pendant la lecture, appuyez sur ZOOM.
•À chaque pression sur ZOOM, le niveau de zoom
change de la façon suivante.
[Zoom 2x] [Zoom 3x] [Zoom 4x] [Zoom 1/2]
[Zoom 1/3] [Zoom 1/4] Normal (pas
d’indication)
Remarque
• Cette fonction n’agit pas avec certains disques.
Lecture de photos en
diaporama
Cette fonction permet un changement automatique des
photos.
Pendant la lecture, appuyez sur INDEX.
• Affichez les miniatures des fichiers d’images. Le
nombre de miniatures pouvant être affichées à la fois
se limite à 12.
• Si vous sélectionnez une miniature et appuyez sur
le diaporama démarrera par l’image sélectionnée.
Rotation/renversement de photos
Pendant un diaporama ou la pause du diaporama,
l’image change d’orientation de la façon suivante lorsque
vous appuyez sur les touches ///.
Touche : Rotation de 90° dans le sens horaire
Touche : Rotation de 90° dans le sens antihoraire
Touche : Renversement horizontal
Touche : Renversement vertical
Changement de l’angle de
prise de vues
Pour les disques BD-ROM et DVD-Vidéo enregistrés sous
différents angles de prise de vues, les angles peuvent être
changés au cours de la lecture.
Pendant la lecture, appuyez sur ANGLE.
• L’angle actuel et le nombre total d’angles enregistrés
sont indiqués à l’écran du téléviseur.
Pour changer d’angles, appuyez une nouvelle fois sur
ANGLE
.
•Les angles peuvent aussi être changés en
sélectionnant Angle sur le menu FUNCTION.
• Si les angles ne changent pas lorsque vous appuyez
sur ANGLE, changez-les par le menu du disque.
.
Changement des sous-titres
Pour les disques ou les fichiers sur lesquels différents
sous-titres ont été enregistrés, les sous-titres peuvent être
changés au cours de la lecture.
Attention
•Les sous-titres ne peuvent pas être changés dans le
cas de disques enregistrés par un enregistreur DVD
ou BD. Reportez-vous aussi au mode d’emploi de
l’appareil utilisé pour l’enregistrement.
Pendant la lecture, appuyez sur SUBTITLE.
Les sous-titres actuels et le nombre total de sous-titres
•
enregistrés sont indiqués à l’écran du téléviseur.
Pour changer de sous-titres, appuyez une nouvelle
fois sur SUBTITLE.
•Les sous-titres peuvent aussi être changés en
sélectionnant Subtitle sur le menu FUNCTION.
• Si les sous-titres ne changent pas lo rsque vous appuyez
SUBTITLE
sur
Masquage des sous-titres
Appuyez plusieurs fois sur SUBTITLE ou
sélectionnez Subtitle dans le menu FUNCTION pour
régler ce paramètre sur Off.
À propos de l’affichage de soustitres externes pendant la lecture des
fichiers DivX
Outre les sous-titres enregistrés sur les fichiers DivX, ce
lecteur peut aussi afficher des sous-titres externes. Si un
fichier a le même nom qu’un fichier DivX à part
l’extension, et si l’extension est une des extensions
, changez-les par le menu du disque.
ENTER
,
04
23
Fr
Page 74

suivantes, le fichier sera traité comme fichier de sous-
04
titres externes. Notez bien que les fichiers DivX et les
fichiers de sous-titres externes doivent se trouver dans le
même dossier.
Un seul fichier de sous-titres externes peut être utilisé sur
ce lecteur. Utilisez un ordinateur, etc. pour supprimer les
fichiers des sous-titres externes dont vous n’avez pas
besoin pour un disque.
Remarque
Avec certains fichiers, les sous-titres externes ne
pourront pas être affichés correctement.
Changement du son
Pour les disques ou les fichiers sur lesquels différents
flux/voies audio ont été enregistrés, les flux/voies audio
peuvent être commutés au cours de la lecture.
Pendant la lecture, appuyez sur AUDIO.
• Le son actuel et le nombre total de flux audio
enregistrés sont indiqués à l’écran du téléviseur.
Pour changer de son, appuyez une nouvelle fois sur
AUDIO.
•Le son peut aussi être changé en sélectionnant
Audio sur le menu FUNCTION.
•Si AUDIO ne permet pas de changer le son, changez-
le par le menu du disque.
Commutation de la zone de
lecture CD/SACD
1 Sélectionnez la zone que vous souhaitez lire.
En mode d’arrêt, appuyez sur CD/SACD. La zone de
lecture change sur l’afficheur de la face avant à chaque
pression sur la touche.
[CD AREA] [SACD 2CH] [SACD MCH] (retour
au début)
• Pendant la lecture, appuyez deux fois sur pour
annuler la lecture continue avant de sélectionner la
zone de lecture.
2 Ouvrez le tiroir à disque.
Appuyez sur la touche OPEN/CLOSE.
3 Fermez le tiroir à disque.
Appuyez sur la touche OPEN/CLOSE. Lorsque le
disque est inséré, la zone de lecture change.
Affichage des informations
du disque
Appuyez sur DISPLAY.
Les informations du disque apparaissent sur l’écran du
téléviseur. Pour masquer les informations, appuyez une
nouvelle fois sur DISPLAY.
Les informations affichées sont différentes pendant la
lecture et pendant la pause de la lecture.
Utilisation de BONUSVIEW ou
BD-LIVE
Ce lecteur est compatible avec les BD-Vidéo
BONUSVIEW et BD-LIVE.
Lorsque vous utilisez des BD-Vidéo compatibles avec
BONUSVIEW, vous bénéficiez de certaines fonctions
comme la seconde image (image dans l’image) (page 26)
et le second son (page 26). Avec les BD-Vidéo offrant BDLIVE, des images vidéo spéciales ainsi que d’autres
données peuvent être téléchargées d’Internet.
Les données enregistrées sur un BD-Vidéo et téléchargées
de BD-LIVE se stockent sur un disque à mémoire flash
USB (mémoire externe). Pour bénéficier de ces fonctions,
raccordez un disque à mémoire flash USB (capacité
minimale 1 Go, 2 Go ou plus sont recommandés) de type
USB 2.0 High Speed (480 Mbits/s) au port USB.
• Veillez à éteindre le lecteur avant d’insérer ou de
retirer le disque à mémoire flash USB.
•Pour rappeler les données sauvegardées sur le disque
à mémoire flash USB, insérez d’abord le disque utilisé
lors du téléchargement des données (si un autre
disque est inséré, les données enregistrées sur le
disque à mémoire flash USB ne seront pas lues).
• Si le disque à mémoire flash USB utilisé contient
d’autres données (enregistrées antérieurement),
l’image et le son ne seront pas lus correctement.
•Ne retirez pas le disque à mémoire flash USB
pendant la lecture.
•Le chargement des données (lecture/écriture)
nécessite un certain temps.
Attention
• Si l’espace disponible sur le disque à mémoire flash
USB n’est pas suffisant, il peut être impossible
d’utiliser les fonctions BONUSVIEW et BD-LIVE. Dans
ce cas, reportez-vous à Effacement des données
ajoutées aux BD et des données des applications la
page 39 pour effacer les données du Paquet Virtuel et
les données BD-LIVE sur le disque à mémoire flash
USB.
Remarque
• Le fonctionnement des disques à mémoire flash USB
n’est pas garant
•La lecture des données de la fonction BD-LIVE varie
selon le disque utilisé. Pour le détail, consultez la
notice fournie avec le disque.
•Pour bénéficier de la fonction BD-LIVE, une
connexion réseau et des réglages sont nécessaires
(pages 18 et 38).
• BD-LIVE est une fonction assurant une connexion à
Internet. Les disques disposant de la fonction BDLIVE peuvent envoyer les codes d’identification de ce
lecteur et du disque au fournisseur de contenus par
Internet.
i.
24
Fr
Page 75

Fonctions de lecture
Les fonctions pouvant être utilisées dépendent du type de disque et de fichier. Dans certains cas, certaines fonctions
ne peuvent pas être utilisées. Les fonctions disponibles sont indiquées dans le tableau suivant.
Type de disque/fichier
1
Fonction
Recherche avant et
2
arrière
Lecture de titres, de
chapitres ou de plages
particuliers
BD-ROM
BD-R/
-RE
3
3
Saut de contenu
Lecture au ralenti
Lecture avant et arrière
pas à pas
2,5
2
Lecture répétée A-B
2
Lecture répétée
Zoom
8
Angle
Sous-titres
10
Son
9
Informations du disque
1. Certaines fonctions peuvent ne pas être disponibles pour certains disques ou fichiers, même si [] est indiqué dans le tableau.
2. Pour certains disques, la lecture redevient d’elle-même normale au changement de chapitre.
3. Pendant la recherche avant et arrière, le son n’est pas audible.
4. Pendant la recherche avant et arrière, le son est audible.
5. • Pendant la lecture au ralenti le son n’est pas audible.
• Il n’est pas possible de changer de vitesse pendant la lecture arrière au ralenti.
6. La lecture arrière au ralenti n’est pas disponible.
7. La lecture arrière pas à pas n’est pas disponible.
8. La marque d’angle apparaît pour les scènes enregistrées sous divers angles si Angle Mark est réglé sur On (page 37).
9. • Les types de sous-titres enregistrés dépendent du disque et du fichier.
• Dans certains cas, les sous-titres peuvent changer ou l’écran de commutation du disque peut s’afficher immédiatement, sans que les
sous-titres actuel ou le nombre total de sous-titres enregistrés sur le disque n’apparaissent.
10. Les types de flux audio enregistrés dépendent du disque et du fichier.
DVD-
Vidéo
DVD-R/
-RW
AVCREC AVCHD
(VR
format)
3
3
3
Fichier
Fichier
vidéo
3
3
6
7
Fichier
photo
audio
CD
audio
4
4
04
25
Fr
Page 76

Utilisation du menu
04
FUNCTION
Les fonctions pouvant être rappelées dépendent du mode
de fonctionnement du lecteur.
1 Affichez le menu FUNCTION.
Appuyez sur FUNCTION pendant la lecture.
2 Sélectionnez et réglez le paramètre.
Utilisez / pour effectuer un choix, puis appuyez sur
Paramètre Description
Slide Show Changement de vitesse du diaporama
Transition Changement de style du diaporama
1. Une de ces informations apparaît selon le type de disque.
2. La marque de seconde image apparaît pour les scènes
enregistrées avec une seconde image si PIP Mark est réglé sur On
(page 37).
3. La marque de second son apparaît pour les scènes enregistrées
ENTER
avec un second son si Secondary Audio Mark est réglé sur On
.
(page 37).
pendant un diaporama.
pendant un diaporama.
Remarque
•Les paramètres ne pouvant pas être changés
apparaissent en gris. Les paramètres pouvant être
sélectionnés dépendent de l’état du lecteur.
Pour changer le réglage du
paramètre sélectionné
Utilisez / pour le changer.
Pour fermer le menu FUNCTION
Appuyez sur FUNCTION.
Liste des paramètres du menu
FUNCTION
Paramètre Description
Title Affichage des informations concernant
Chapter (track/file)
Time Affichage du temps écoulé ou restant.
Mode Changement du mode de lecture
Audio Changement du son.
Angle Changement de l’angle de prise de vue
Subtitle
Code Page Changement de page des codes de sous-
Secondary Video
Secondary Audio
Bitrate Affichage du débit binaire du son/de
Still off Arrêt de l’image fixe d’un BD-ROM.
Ins Search Saut avant de 30 secondes.
26
Ins Replay Retour arrière de 10 secondes.
Fr
le titre du disque en cours de lecture et
du nombre total de titres sur le disque.
Également sélection du titre devant être
lu. (Voir la description suivante.)
1
Affichage des informations concernant
le chapitre en cours de lecture (plage/
titre) et du nombre total de chapitres sur
le disque. Également sélection du
chapitre (plage/titre) devant être lu. (Voir
la description suivante.)
Également spécification du temps où la
lecture doit commencer. (Voir la
description suivante.)
(page 27).
d’un BD-ROM/DVD-Vidéo.
Changement de la langue des sous-titres.
titres.
2
Sélection de la seconde image d’un BDROM (Image dans l’image).
3
Sélection du second son d’un BD-ROM.
l’image/de la seconde image/du second
son.
Remarque
•Les paramètres pouvant être sélectionnés dépendent
du type de disque.
•Les types de flux audio secondaires enregistrés
dépendent du disque et du fichier.
•Certains disques n’ont pas de second son ou seconde
image.
•Dans certains cas, le second son ou la seconde
image peut changer ou l’écran de commutation peut
s’afficher immédiatement, sans que le second son ou
la seconde image ou le nombre total de flux du
second son ou de la seconde image enregistrés sur le
disque ne soit indiqué.
Lecture à partir d’un temps
précis (Recherche temporelle)
1 Sélectionnez Time.
Utilisez / pour effectuer un choix, puis appuyez sur
2 Précisez le temps.
Utilisez les touches numériques (0 à 9) pour préciser le
temps.
•Pour lire à partir de 45 minutes, précisez 0, 0, 4, 5, 0
et 0, puis appuyez sur ENTER.
•Pour lire à partir de 1 heure 20 minutes, précisez 0, 1,
2, 0, 0 et 0, puis appuyez sur ENTER.
•Appuyez sur CLEAR pour effacer les valeurs saisies.
3 Démarrez la lecture au temps précisé.
Appuy
ez sur ENTER.
ENTER
Lecture d’un titre, d’un
chapitre, d’une plage ou d’un
fichier particulier (Recherche)
1 Sélectionnez Title ou Chapter (track/file).
Utilisez / pour effectuer un choix, puis appuyez sur
2 Précisez le numéro du titre ou du chapitre (plage/
fichier).
Utilisez les touches numériques (0 à 9) ou / pour
préciser le numéro.
•Pour rechercher par exemple le titre 32, précisez 3 et
2, puis appuyez sur ENTER.
•Appuyez sur CLEAR pour effacer les valeurs saisies.
3 Démarrez la lecture à partir du titre, du chapitre
ou de la plage précisé.
Appuyez sur ENTER.
ENTER
.
.
Page 77

Lecture d’une plage
particulière de disques, de
titres ou d’un chapitre
(plage/fichier) dans un ordre
aléatoire
Vous avez le choix entre 2 types de lecture aléatoire.
1 Sélectionnez Mode.
Utilisez / pour effectuer un choix, puis appuyez sur
ENTER.
2 Sélectionnez le mode de lecture.
Utilisez / pour effectuer un choix, puis appuyez sur
ENTER.
Random play
La plage de disques, de titres ou d’ un cha pitre (morceau/
fichier) spécifiée est lue dans un ordre aléatoire. Le même
élément peut être lu de manière consécutive.
Shuffle play
La plage de disques, de titres ou d’ un cha pitre (morceau/
fichier) spécifiée est lue dans un ordre aléatoire. Chaque
élément n’est lu qu’une seule fois.
Continuation de la lecture à
partir de la position spécifiée
(Poursuite du visionnage)
Cette fonction permet de poursuivre la lecture à une
position spécifiée au préalable, même après l’extinction
du lecteur.
Réglage
Pendant la lecture, appuyez sur CONTINUED à la
position où vous voulez poursuivre le visionnage.
Le temps écoulé jusqu’à la position spécifiée est indiquée
à l’écran du téléviseur.
Lecture
1 Appuyez sur pour lire le titre pour lequel
vous avez spécifié une position.
L’écran de confirmation de la poursuite de la lecture
apparaît.
2Utilisez / pour sélectionner Yes, puis appuyez
sur ENTER.
Démarrez la lecture au temps précisé.
04
Remarque
•Le temps spécifié pour la poursuite de la lecture est
annulé lorsque OPEN/CLOSE est pressé.
•La poursuite de la lecture à un temps spécifié peut ne
pas fonctionner correctement avec certains disques.
27
Fr
Page 78

Chapitre 5
05
Lecture avec Home Media Gallery
•Les fichiers suivants peuvent être lus avec Home
Media Gallery :
–Les ordinateurs fonctionnant sous Microsoft
Windows Vista ou XP avec Windows Media Player
11 installé
–Ordi
nateurs fonctionnant sous Microsoft Windows
7 avec Windows Media Player 12 installé
–Les serveurs multimédia numériques compatibles
avec la norme DLNA (sur les ordinateurs ou
d’autres appareils)
Les fichiers enregistrés sur un ordinateur ou un DMS
(Serveur multimédia numérique), comme mentionné
ci-dessus, peuvent être lus par le lecteur multimédia
numérique (DMP). Le lecteur permet d’utiliser un
À propos de Home
Media Gallery
La fonction Home Media Gallery de ce lecteur permet
d’afficher une liste des sources d’entrée et de démarrer la
lecture. Ce chapitre décrit comment configurer le lecteur
et comment effectuer la lecture p our bénéficier de ces
fonctions. Si vous lisez des fichiers enregistrés sur votre
ordinateur ou un autre appareil connecté au réseau, nous
vous conseillons de vous reporter aussi au mode
d’emploi fourni avec cet appareil.
Les sources d’entrée peuvent être lues avec Home Media
Gallery de la façon suivante.
•Disques BD-R/RE (forma
• Disques DVD-R/-RW (format VR)
• CD audio (CD-DA, SACD et DTS-CD)
•DVD/CD sur lesquels des fichiers vidéo, photo ou
audio, etc. sont enregistrés.
•Dispositif USB
•Fichiers sur les serveurs (sur des ordinateurs ou
appareils connectés au lecteur par une interface
LAN.)
t BDAV)
DMP.
Les fichiers enregistrés sur un ordinateur ou un DMS
(Serveur multimédia numérique), comme mentionné
ci-dessus, peuvent être lus par un contrôleur
multimédia numérique externe (DMC). Les dispositifs
contrôlés par ce DMC pour la lecture de fichiers sont
appelés DMR (Digital Media Renderers). Ce lecteur
prend en charge la fonction DMR. Lorsqu’il est en
mode DMR, la lecture et l’arrêt de fichiers, entre autre,
peuvent être activés depuis le contrôleur externe.
•Pour lire les fichiers audio enregistrés sur des
appareils en réseau, la fonction de serveur DHCP de
votre routeur doit être mise en service. Si votre
routeur ne présente pas cette fonction, vous devrez
paramétrer le réseau manuellement. Sinon, les
fichiers enregistrés sur les appareils en réseau ne
pourront pas être lus. Reportez-vous à page 38.
À propos de la lecture en
réseau
Cet appareil utilise les technologies suivantes pour la
lecture en réseau :
Windows Media Player
Reportez-vous à Windows Media Player 11/Windows
Media Player 12 ci-dessus pour plus d’informations à ce
sujet.
Remarque
•La fonction Home Media Gallery permet de lire des
fichiers disponibles sur les serveurs multimédia
connectés au même réseau local (LAN) que le
lecteur.
28
Fr
Page 79

DLNA
Lecteur audio DLNA CERTIFIED
La D LN A ( Di gi t al Li vi ng N et wo rk Alliance) est une alliance
transindustrielle des sociétés de production d’appareils
électroniques grand public, d’ordinateurs et de
périphériques mobiles. Digital Living permet aux
consommateurs de partager aisément les médias
numériques par leurs réseaux avec ou sans fil.
Le logo DLNA permet de trouver facilement les produits
conformes aux Directives d’interopérabilité DLNA. Cet
appareil est conforme aux Directives d’interopérabilité
DLNA v1.5. Lorsqu’un ordinateur intégra
serveur DLNA ou un autre périphérique compatible DLNA
est relié à ce lecteur, certains paramètres du logiciel ou
du périphérique devront éventuellement être changés.
Veuillez vous reporter au mode d’emploi du logiciel ou du
périphérique pour plus d’informations à ce sujet.
®
DLNA
, le logo DLNA et DLNA CERTIFIED® sont des
marques commerciales, des marques de service ou des
marques de certification de la Digital Living Network
Alliance.
®
nt un logiciel
Contenus lisibles via un réseau
•Certains fichiers ne pourront pas être lus
correctement bien qu’ils soient dans un format
compatible.
•Selon le type de serveur ou la version utilisé, certaines
fonctions ne seront pas prises en charge.
•Les formats de fichiers pris en charge varient d’un
serveur à l’autre. C’est pourquoi, les fichiers qui ne
sont pas pris en charge par votre serveur
n’apparaissent pas sur cet appareil. Pour plus
d’informations, contactez le construc
serveur.
•Voir Avis de non responsabilité concernant les
contenus diffusés par un tiers dans la colonne de
droite pour les contenus lus.
teur de votre
Avis de non responsabilité
concernant les contenus diffusés par
un tiers
L’accès aux contenus fournis par des tiers exige une
connexion Internet haut débit et peut aussi exiger la
création d’un compte et des droits de souscription.
Les services de contenus de tiers peuvent être changés,
suspendus ou interrompus à tout moment sans préavis,
et Pioneer décline toute responsabilité quant à ces
changements.
Pioneer ne certifie ou garantit que les services de
contenus continueront d’être fournis ou disponibles
pendant une période précise et décline toute garantie
explicite ou implicite de ce type.
Anomalies lors de lecture en réseau
•La lecture peut se bloquer si vous éteignez
l’ordinateur ou supprimez des fichiers multimédia de
l’ordinateur pendant la lecture de contenu.
•En cas de problèmes de réseau (trafic intense, etc.) le
contenu risque de ne pas s’afficher ou de ne pas être
lu correctement (la lecture peut être interrompue ou
bloquée). Pour éviter ce type de problème, il est
conseillé de relier le lecteur et l’ordinateur par un
câble 10BASE-T/100BASE-TX.
•Si plusieurs clients lisent les mêmes fichiers
simultanément, la lecture peut être interrompue ou
se bloquer.
•
Selon le logiciel antivirus installé sur l’ordinateur
raccordé et le réglage de ce logiciel, la connexion
réseau peut se bloquer.
Pioneer n’est pas responsable du mauvais
fonctionnement du lecteur et/ou des fonctions Home
Media Gallery dû à des erreurs ou dysfonctionnements de
la communication avec votre connexion réseau et/ou
votre ordinateur, ou un autre appareil raccordé. Veuillez
contacter le fabricant de votre ordinateur ou votre
fournisseur de service Internet.
Windows Media est une marque déposée ou une marque
commerciale de Microsoft Corporation aux États-Unis et/
ou dans d’autres pays.
Ce produit intègre une technologie détenue par Microsoft
Corporation, qui ne peut être utilisée et distribu ée que sous
licence de Microsoft Licensing, Inc.
®
Microsoft
Windows
Windows
commerciales ou des marques déposées de Microsoft
Corporation aux États-Unis et/ou dans d’autres pays.
, Windows®7, Windows®Vista, Windows®XP,
®
2000, Windows®Millennium Edition,
®
98 et WindowsNT® sont des marques
05
29
Fr
Page 80

DLNA Search
05
Cette fonction permet de lire les fichiers enregistrés sur
des appareils reliés au lecteur via le réseau.
1 Appuyez sur HOME MEDIA GALLERY pour
afficher la page Home Media Gallery.
La page Home Media Gallery peut aussi être affichée en
sélectionnant Home Media Gallery sur la page Home
Menu puis en appuyant sur ENTER.
2 Sélectionnez DLNA Search.
Utilisez / pour effectuer un choix, puis appuyez sur
ENTER.
3 Sélectionnez le serveur contenant le fichier que
vous voulez lire.
4 Sélectionnez le fichier que vous voulez lire.
Utilisez / pour effectuer un choix, puis appuyez sur
ENTER.
Remarque
•Ce lecteur ne prend pas en charge
Les fichiers et contenus enregistrés et protégés par
un système anticopie numérique ne peuvent pas être
lus par l’interface LAN.
le DTCP-IP.
Lecture de disque/USB
1 Appuyez sur HOME MEDIA GALLERY pour
afficher la page Home Media Gallery.
La page Home Media Gallery peut aussi être affichée en
sélectionnant Home Media Gallery sur la page Home
Menu puis en appuyant sur ENTER.
2 Sélectionnez Disc ou USB.
Utilisez / pour effectuer un choix, puis appuyez sur
ENTER.
3 Sélectionnez Photo/Music/Video/AVCHD.
Utilisez / pour effectuer un choix, puis appuyez sur
ENTER.
•Ce point n’est pas pour les disques enregistrés dans
le format BDAV/VR/AVCREC.
•Pour lire des fichiers dans le formant AVCHD sur un
dispositif USB, créez un dossier intitulé “AVCHD” sur
le d
ispositif USB, puis copiez le dossier “BDMV”
contenant les fichiers à lire dans le dossier “AVCHD”.
4 Sélectionnez le titre/la plage ou le fichier que
vous voulez lire.
Utilisez / pour effectuer un choix, puis appuyez sur
ENTER.
Démarrez la lecture à partir du titre/de la plage ou fichier
sélectionné.
• Si le fichier que vous voulez lire se trouve dans un
dossier, sélectionnez d’abord le dossier contenant le
fichier.
30
Fr
Lecture de fichiers photo
À propos du diaporama
Un diaporama permet d’afficher automatiquement les
fichiers enregistrés sur un disque ou dans un dossier.
Remarque
•Pendant la lecture d’un CD audio (CD-DA/SACD/DTS-
CD), la page Now Playing s’affiche.
•Certains disques BD-R/-RE ont une protection
interdisant la lecture. Pour annuler la protection,
précisez le mot de passe spécifié pour le disque.
•Il faudra peut-être attendre quelques secondes avant
que la lecture démarre. C’est normal.
•Certains fichiers ne pourront pas être lus
correctement.
•Le nombre de vues peut être limité.
•Selon les dispositifs raccordés et la situation, il faut
attendre
quelque temps avant que la lecture ne
commence et l’image change.
Lecture dans l’ordre
souhaité (Playlist)
Les disques permettant d’ajouter des plages et des
fichiers à la Playlist sont les suivants.
• DVD/CD/Dispositifs USB sur lesquels des fichiers
audio sont enregistrés
Ajout de plages ou de fichiers
Procédez de la façon suivante pour ajouter des plages et
des fichiers, et créer la Playlist.
1 Appuyez sur HOME MEDIA GALLERY pour
afficher la page Home Media Gallery.
La page Home Media Gallery peut aussi être affichée en
sélectionnant Home Media Gallery sur la page Home
Menu puis en appuyant sur ENTER.
2 Sélectionnez Disc ou USB.
Insérez d’abord le disque.
Utilisez / pour effectuer un choix, puis appuyez sur
ENTER.
3 Sélectionnez la plage ou le fichier devant être
ajouté.
Utilisez pour effectuer un choix.
4 Appuyez sur POP UP MENU pour afficher le menu
POP UP MENU.
5 Sélectionnez Add to Playlist pour ajouter à la
Playlist.
Utilisez / pour effectuer un choix, puis appuyez sur
ENTER.
La pl
age ou le fichier sélectionné au point 3 est ajouté à
la Playlist.
•Pour ajouter d’autres plages ou fichiers, répétez les
points 3 à 5.
Page 81

Lecture de la Playlist
1 Appuyez sur HOME MEDIA GALLERY pour
afficher la page Home Media Gallery.
La page Home Media Gallery peut aussi être affichée en
sélectionnant Home Media Gallery sur la page Home
Menu puis en appuyant sur ENTER.
2 Sélectionnez la Playlist.
Utilisez / pour effectuer un choix, puis appuyez sur
ENTER.
3 Sélectionnez la plage ou le fichier devant être lu.
Utilisez / pour effectuer un choix, puis appuyez sur
ENTER.
La lecture commence par la plage ou le fichier
sélectionné et se poursuit jusqu’au dernier de la liste.
Utilisez / pour lire la plage ou le fichier préc
ou suivant. L’écran Now Playing s’affiche.
édent
Suppression de plages ou
fichiers de la Playlist
1 Sélectionnez la plage ou le fichier devant être
supprimé, puis appuyez sur POP UP MENU pour
afficher le menu POP UP MENU.
2Utilisez / pour sélectionner Remove from
Playlist, puis appuyez sur ENTER.
05
31
Fr
Page 82

Chapitre 6
06
Lecture de contenus web
Vous pouvez lire des contenus obtenus d’Internet via le
lecteur.
Contenus web
disponibles
• YouTube (MPEG4 AVC H.264)
•Picasa
•Netflix
•Pandora radio
Remarque
À propos de YouTube
• Les vidéos YouTube des tailles suivantes peuvent être
lues.
–Qualité standard (400 x 226 pixels, 200 kbps)
– Qualité moyenne (480 x 360 pixels, 512 kbps)
– Haute qualité (854 x 480 pixels, 900 kbps)
–HD (720p) (1280 x 720 pixels, 2 Mbps)
–HD (1080p) (1920 x 1080 pixels, 4 Mbps)
•Ce lecteur prend en charge le service YouTube
Leanback. Le service YouTube Leanback n’est
disponible qu’en anglais actuellement.
Reportez-vous à YouTube Help à l’adresse http://
www.google.com/support/youtube/ pour plus
d’informations.
• Les vidéos YouTube pour téléphones portables ne
peuvent pas être lues.
•Certaines vidéos YouTube ne peuvent pas être lue
À propos de Picasa
• Picasa n’est disponible qu’en anglais. Reportez-vous
au mode d’emploi à l’adresse http://
picasa.google.com/support/ pour le détail.
–Enregistrez votre nom d’utilisateur et votre mot de
passe sur l’ordinateur avant d’utiliser Picasa Web
Albums.
–La première fois que vous accédez à Picasa depuis
ce lecteur, sélectionnez l’icône New User et
indiquez votre nom d’utilisateur et mot de passe.
• Selon l’environnement de la connexion Internet, il est
possible que le contenu du site ne puisse pas être lu
correctement.
•Pour acccéder au contenu du site, ce lecteur doit
disposer d’une connexion à haut débit. Pour utiliser
une connexion Internet à haut débit, il faut être
abonné
à un fournisseur de service Internet.
•Voir Avis de non responsabilité concernant les
contenus diffusés par un tiers la page 29 pour les
contenus lus.
•La lecture de disque et cette fonction ne peuvent pas
être utilisées en même temps.
32
Fr
Lecture de contenus
Le lecteur doit être raccordé à Internet au préalable.
Reportez-vous à Raccordement au réseau par l’interface
LAN la page 18 pour le détail.
1 Affichez l’écran de sélection.
Il est également possible d’afficher l’écran de sélection
en appuyant sur HOME MENU puis en
sélectionnant Web ContentsContenu Web souhaité.
2 Sélectionnez le type de contenu Web.
Utilisez / pour effectuer un choix, puis appuyez sur
ENTER.
3 Appuyez sur / pour sélectionner le contenu
que vous voulez lire, puis appuyez ENTER.
Pour arrêter la lecture, appuyez sur EXIT. La lecture de la
s.
vidéo s’arrête et l’écran Home Menu réapparaît.
Utilisation de Netflix
Netflix offre un visionnage instantané aux membres
Netflix avec un accès illimité. Cette fonction vous permet
de bénéficier du service Netflix par Internet. Pour plus
d’informations sur Netflix, consultez le site http://
www.netflix.com/help/ ou connectez-vous à votre
compte Netflix et cliquez sur “Help” au haut de la page.
•Netflix n’est disponible qu’aux États-Unis, au Canada
et au Royaume-Uni.
•Pour vérifier le numéro Netflix, sélectionnez Initial
Setup Playback Netflix Information.
•Pour désactiver vos informations Netflix, sélectionnez
Initial Setup Playback Netflix Information
Next Screen Yes.
Attention
Remarque
Page 83

1 Affichez l’écran Netflix.
Appuyez sur Netflix.
•Ou bien appuyez sur HOME MENU et sélectionnez
Web Contents Netflix.
•Lorsque vous avez accédé à Netflix, des messages
vous guident.
2 Lisez l’Avis de non-responsabilité qui s’affiche à
l’écran. Si vous acceptez, sélectionnez Agree sur la
dernière page. (Si vous n’acceptez pas, ce service ne
pourra pas être utilisé.)
3 Suivez les instructions qui apparaissent à l’écran
et sélectionnez l’élément souhaité.
4 Lorsque la lecture a commencé, vous pouvez la
contrôler avec ////.
5 Appuyez sur EXIT pour fermer l’écran Netflix.
Pandora radio
Vous pouvez écouter des stations radio personnalisées,
diffusées par Internet par Pandora via ce lecteur. Pour
toutes questions concernant le service Pandora, veuillez
consulter le site http://www.pandora.com/help ou
envoyer un message à :
pandora-support@pandora.com.
Remarque
•Pandora Radio n’est disponible qu’aux États-Unis.
•Pour désactiver Pandora sur votre lecteur,
réinitialisez votre lecteur. (Voir Rétablissement des
réglages par défaut du lecteur la page 41.)
1 Affichez l’écran Pandora. Appuyez sur HOME
MENU, puis sélectionnez Web Contents Pandora.
2 Lisez l’Avis de non-responsabilité qui apparaît. Si
vous l’acceptez, sélectionnez “Agree” sur la dernière
page. (Si vous ne l’acceptez pas, ce service ne pourra
pas être utilisé.)
3 Suivez les instructions qui apparaissent et
sélectionnez l’élément souhaité.
4 Appuyez sur EXIT pour fermer l’écran Pandora.
06
33
Fr
Page 84

Chapitre 7
07
Réglages détaillés
Changement des
réglages
Utilisation de la page Initial
Setup
1 Lorsque la lecture est arrêtée, affichez la page
Home Menu.
Appuyez sur HOME MENU.
2 Sélectionnez et validez Initial Setup.
Utilisez / pour effectuer un choix, puis appuyez sur
ENTER.
3 Sélectionnez le paramètre et changez son
réglage.
Utilisez /// pour effectuer un choix, puis appuyez
sur ENTER.
Fermeture de la page Initial Setup
Appuyez sur HOME MENU ou RETURN.
Remarque
•Les paramètres pouvant être sélectionnés dépendent de l’état du lecteur.
•Dans Options, les réglages usine des paramètres sont indiqués en caractères gras.
Réglage Options Explication
Display Setting
TV Screen 16:9 Full Sélectionnez cette option si un téléviseur grand écran (16:9) est raccordé.
Video Adjust La qualité de l’image peut être ajustée selon le téléviseur que vous utilisez (page
Sharpness High Choisissez le niveau de netteté.
Video Mode Standard Choisissez le mode de sortie vidéo.
• CTI (Color Transient Improvement) : Permet d’obtenir des couleurs aux contours mieux définis.
Noise Reduction 0 Choisissez le niveau de réduction du bruit.
16:9 Normal Sélectionnez cette option si un téléviseur g rand écran (16:9) est raccordé. Les
4:3 Pan&Scan Sélectionnez cette option si un téléviseur 4:3 est raccordé et les vidéos lues
4:3 Letterbox Sélectionnez cette option si un téléviseur 4:3 est raccordé et les vidéos lues
Middle
Low
Vivid
Cinema
Custom
1
2
3
images en 4:3 apparaissent avec des bandes verticales sur les côtés.
sont en 16:9. Les côtés gauche et droit de l’image seront tronqués pour que
la vidéo puisse être vue sur l’écran 4:3. (Cette fonction agit si le disque porte
la marque 4:3PS.)
sont en 16:9. Des bandes noires apparaîtront au haut et bas de l’image.
38).
34
Fr
Page 85

Réglage Options Explication
Audio Output
Digital Output Bitstream Sélectionnez cette option pour transmettre directement les signaux audio
PCM Sélectionnez cette option pour transmettre des signaux audio numériques
Reencode Lors de la lecture d’un BD contenant un second son et un son interactif, les
Off Sélectionnez cette option pour transmettre des signaux audio qui ne sont pas
DTS Downmix Stereo Les signaux DTS-HD Master Audio, les signaux DTS-HD High Resolution
Lt/Rt Les signaux DTS-HD Master Audio, les signaux DTS-HD High Resolution
Downsampling 48k Sélectionnez cette option pour lire un disque enregistré avec une fréquence
96k Sélectionnez cette option pour lire un disque enregistré avec une fréquence
192k Sélectionnez cette option pour lire un disque enregistré avec une fréquence
DRC (Dynamic Range
Control)
• Ceci agit sur les signaux audio comme les signaux Dolby Digital, Dolby TrueHD et Dolby Digital Plus.
• Le DRC agit sur les signaux audio provenant des prises de sortie suivantes :
–Prises AUDIO OUT pour les signaux analogiques
–Prises DIGITAL OUT ou HDMI OUT pour le
• Selon le disque, l’effet peut être faible.
• L’effet peut être différent selon les enceintes, les réglages de l’amplificateur AV, etc.
Off Sélectionnez cette option pour trans
On Sélectionnez cette option pour régler la plage entre sons forts et sons fa ibles
Auto Sélectionnez cette option pour que le DRC s’active/désactive
numériques.
convertis en signaux audio PCM.
deux signaux audio sont mixés et convertis en son Dolby Digital ou DTS avant
leur sortie.
des signaux audio numériques.
Audio ou les signaux audio DTS Digital Surround convertis en signaux audio
PCM linéaires sont remixés sur 2 voies (stéréo) avant leur sortie.
Audio ou les signaux audio DTS Digital Surround convertis en signaux audio
PCM linéaires sont remi
Surround avant leur sortie (si le récepteur ou l’amplificateur AV, etc., est
compatible avec le Dolby Pro Logic, il restituera les signaux audio PCM
linéaires sous forme de signaux audio surround).
d’échantillonnage de 48 kHz.
d’échantillonnage de 96 kHz.
d’échantillonnage de 192 kHz.
contrôle de la plage dynamique.
(plage dynamique) lors de la lecture à volume modéré. Cette option permet
de faire ressortir les dialogues et de regarder des films à faible volume la nuit.
automatiquement en fonction du signal audio du disque. Ceci n’agit que sur
les signaux Dolby TrueHD.
s signaux audio PCM linéaires
xés en signaux à 2 voies compatibles avec le Dolby
mettre des signaux audio sans utiliser le
07
35
Fr
Page 86

07
Réglage Options Explication
HDMI
Color Space RGB Sélectionnez cette option pour restituer les signaux vidéo sous forme de
YCbCr Sélectionnez cette option pour restituer les signaux sous forme de signaux
YCbCr 422 Sélectionnez cette option pour restituer les signaux sous forme de signaux
Full RGB Sélectionnez cette option pour restituer les signaux vidéo sous forme de
Resolution Auto Sélectionnez cette option pour que
480I/576I Les signaux vidéo à la sortie de la prise HDMI OUT ont la résolution
480P/576P
720P
1080I
HDMI Audio Out Bitstream
Control On Sélectionnez cette option pour activer la commande du lecteur via la
Pour utiliser les Sound Retrie
HDMI Deep Color 30bits Sélectionnez cette option pour restituer les signaux vidéo en couleur 30 bits.
HDMI 1080P 24Hz On Sélectionnez cette option lorsque la résolution est réglée sur Auto ou 1080P
HDMI 3D Auto Les disques 3D sont lus avec des images en 3D.
3D Notice Yes Précise si l’avis 3D doit être affiché ou non lors de la lecture d’images 3D.
Network
IP Setting Sélectionnez cette option pour spécifier l’adresse IP du lecteur et du serveur DNS (page 38).
Proxy Server Ne réglez le serveur proxy que si votre fournisseur de service Internet vous le demande (page 39).
Information Indique les réglages de l’adresse MAC, l’adresse IP, le masque de sous-réseau, la passerelle par
Connection Test Sélectionnez cette option pour tester la connexion au réseau (page 39).
Internet Connection
BD-Live Connection Permitted Tous les disques peuvent se connecter à BD-LIVE.
DLNA Enable Sélectionnez cette option lorsque vous vous connectez à un serveur DLNA.
36
Fr
1080P
PCM Sélectionnez cette option pour transmettre des signaux audio HDMI convertis
Reencode Lors de la lecture d’un BD contenant un second son et un son interactif, les
Off Sélectionnez cette option si vous ne voulez pas que les signaux audio soient
Off Sélectionnez cette option pour désactiver la commande du lecteur via la
ver Link et Stream Smoother Link (page 15), Control doit être réglé sur On.
36bits Sélectionnez cette option pour restituer les signaux vidéo en couleur 36 bits.
Off Sélectionnez cette option pour restituer les signaux vidéo en couleur normale
Off Sélectionnez cette option lorsque la résolution est rég
Off Les images 3D ne sont pas lues.
No
défaut, le serveur DNS (primaire) et le serveur DNS (secondaire).
Enable
Disable Sélectionnez cette option lorsque vous ne vous connectez pas Internet.
Partial Permitted Seuls les disques dont la sécurité a été confirmée peuvent se connecter à BD-
Prohibited Aucun disque ne peut se connecter à BD-LIVE.
Disable Sélectionnez cette option lorsque vous ne vous connectez pas à un serveur
signaux RVB. Choisissez cette option si les couleurs semblent faibles et le
noir trop puissant.
YCbCr 4:4:4.
YCbCr 4:2:2.
signaux RVB. Choisissez cette option si les couleurs semblent trop denses et
tous les dégradés de noir sont d’un noir uniforme.
de la prise HDMI OUT soit automatiquement sélectionnée.
sélectionnée.
La résolution peut être changée en appuyant sur HDMI, mais Auto ne peut
pas être sélectionné.
Sélectionnez cette option pour transmettre directement les signaux audio HDMI.
en signaux audio à 2 voies.
deux signaux audio sont mixés et convertis en son Dolby Digital ou DTS avant
leur sortie.
transmis par la prise de sortie HDMI.
télécommande de l’appareil AV raccordé à l’aide d’un câble HDMI. Reportez-
vous aussi à page 14.
télécommande de l’appareil AV raccordé à l’aide d’un câble HDMI.
24 bits.
et des signaux vidéo 1080p/24 sont transmis à un téléviseur compatible avec
le 1080p/24.
signaux vidéo 1080p/60 sont transmis à un téléviseur compatible avec le
1080p/60.
Sélectionnez cette option lorsque vous vous connectez à Internet.
LIVE.
DLNA.
la résolution des signaux vidéo à la sortie
lée sur 1080P et des
Page 87

Réglage Options Explication
Language
OSD langues disponibles Choisissez une des langues indiquées pour l’affichage des pages.
Audio
* Pour certains disques, il
peut être impossible de
passer à la langue
sélectionnée.
Si vous précisez une langue non enregistrée sur le BD ou le DVD, une des langues enregistrées sera automatiquement
sélectionnée et utilisée.
Subtitle
* Pour certains disques, il
peut être impossible de
passer à la langue
sélectionnée.
cisez une langue non enregistrée sur le BD ou le DVD, une des langues enregistrées sera automatiquement
Si vous pré
sélectionnée et utilisée.
Menu
* Pour certains disques, il
peut être impossible de
passer à la langue
sélectionnée.
Si vous précisez une langue non enregistrée sur le BD ou le DVD, une des langues enregistrées sera automatiquement
sélectionnée et utilisée.
Playback
Angle Mark On Sélectionnez cette option pour afficher la marque d’angle sur l’écran du
PIP Mark On Sélectionnez cette option pour afficher la marque PIP sur l’écran du
Secondary Audio Mark On Sélectionnez cette option pour afficher la marque
Informations Netflix Activez et désactivez vos informations Netflix. Vérifiez aussi votre numéro Netflix.
DivX(R) VOD DRM Registration Code Indique le code d’enregistrement du lecteur requis pour la lecture de fichiers
Internet Setting Permitted Les contenus web peuvent être regardés sans avoir à saisir un mot de passe.
Disc Auto Playback On Les disques sont lus automatiquement après avoir été insérés.
Last Memory On Sélectionnez cette option pour sauvegarder le point où la lecture a été
PBC (Play Back Control) On Sélectionnez cette option pour lire les CD-vidéo (version 2.0) compatibles
Setup Navigator Pour effectuer le paramétrage à partir du menu Setup Navigator. Pour le détail, reportez-vous à
Security
Change PasswordEnregistrez (changez) le mot de passe pour utiliser le contrôle parental ou l’annuler lors de la
Parental Control Changez le niveau du contrôle parental du lecteur (page 40).
Country Code Changez le code de pays/région (page 40).
langues disponibles Choisissez une des langues indiquées pour préciser la langue par défaut des
langues disponibles Choisissez une des langues indiquées pour préciser la langue par défaut des
langues disponibles Choisissez une des langues indiquées pour préciser la langue par défaut des
Off Sélectionnez cette option si la marque d’angle ne doit pas apparaître sur
Off Sélectionnez cette option si la marque PIP ne doit pas apparaître sur l’écran
Off Sélectionnez cette option si la marque de son secondaire ne doit pas
Partial Permitted Le mot de passe doit être saisi pour pouvoir regarder des
Prohibited Aucun contenu web ne peut être r egardé.
Off Les disques insérés ne sont pas automatiquement lus.
Off Sélectionnez cette option si vous voulez utiliser la poursuite du visionnage
Off Sélectionnez cette option pour lire le
page 20.
lecture de DVD-Vidéo pourvus d’un contrôle parental (page 39).
dialogues lors de la lecture de BD-ROM et de DVD-Vidéo.
sous-titres lors de la lecture de BD-ROM et de DVD-Vidéo.
menus des BD-ROM et DVD-Vidéo.
téléviseur (page 23).
l’écran du téléviseur.
téléviseur.
du téléviseur.
l’écran du téléviseur (page 26).
apparaître sur l’écran du téléviseur.
DivX VOD (page 10).
arrêtée, même après l’ouverture du tiroir à disque ou la mise en attente.
(page 27).
avec la fonction PBC en utilisant le menu du disque.
avec la fonction PBC sans utiliser le menu du disque.
s CD-vidéo (version 2.0) compatibles
de son secondaire sur
contenus web.
07
37
Fr
Page 88

07
Réglage Options Explication
Options
Screen Saver Off L’économiseur d’écran ne s’active pas.
Auto Power Off Off Sél ectionnez cette option si vous ne voulez pas que le lecteur s’éteigne de lui-
Quick Start On Sélectionnez cette option pour réduire le temps de mise en route.
Update Disc Sélectionnez cette option pour ch
Load Default Pour rétablir les réglages usine.
System Information Pour vérifier le numéro de version du système.
Disc Auto Update On Pour afficher l’écran d e mise à jour du logiciel quand le disque contenant le
BUDA BUDA Information Pour afficher et configurer les données BUDA sur le dispositif USB raccordé.
1 min L’économiseur d’écran s’activera si aucune opération n’est effectuée
2 min
3 min
10 min L’alimentation est automatiquement coupée si aucune opération n’est
20 min
30 min
Off Sélectionnez cette option pour une mise en route normale.
USB Storage
Network
Off L’écran de mise à jour doit être affiché manuellement. (page 40)
BUDA Setup
pendant plus d’une minute/deux minutes/trois minutes. L’emploi de la
télécommande peut désactiver l’économiseur d’écran.
même.
effectuée pendant plus de 10 minutes/20 minutes/30 minutes.
(page 40)
fichier de mise à jour du lecteur est inséré.
oisir la méthode de mise à jour du logiciel.
Réglage de l’image
1 Sélectionnez et validez Display Setting Video
Adjust Next Screen.
Utilisez / pour effectuer un choix, puis appuyez sur
ENTER.
2 Sélectionnez le paramètre et changez son
réglage.
Utilisez / pour sélectionnez le paramètre puis utilisez
/ pour changer son réglage. Lorsque le réglage est
terminé, appuyez sur RETURN pour dégager l’écran
de réglage.
Paramètre Description
Brightness Sélectionnez cette option pour régler la
Contrast Sélectionnez cette option pour régler le
Hue Sélectionnez cette option pour régler
Saturation Sélectionnez cette option pour régler la
luminosité de l’écran du téléviseur.
contraste de l’écran du téléviseur.
l’équilibre des couleurs (vert et rouge) de
l’écran du téléviseur.
saturation de l’écran du téléviseur.
Réglage de l’adresse IP
1 Sélectionnez et validez Network IP Setting
Next Screen.
Utilisez / pour effectuer un choix, puis appuyez sur
ENTER.
2 Spécifiez l’adresse IP.
Utilisez /// pour spécifier l’adresse IP du lecteur
ou du serveur DNS, puis appuyez sur ENTER.
• Auto Set IP Address
On – L’adresse IP du lecteur est obtenue
automatiquement. Sélectionnez cette option
lorsqu’un routeur ou un modem à large bande pourvu
de la fonction DHCP (Protocole de configuration
automatique) est utilisé. L’adresse IP de ce lecteur est
automatiquement allouée par le serveur DHCP.
Of
f – L’adresse IP du lecteur doit être spécifiée
manuellement. Utilisez les touches numériques (0 à
9) pour saisir l’adresse IP, le masque de sous-réseau
et la passerelle par défaut.
Remarque
•Pour de plus amples informations sur la fonction de
serveur DHCP, reportez-vous au mode d’emploi du
dispositif réseau.
•Si devrez éventuellement contacter votre fournisseur
de service Internet ou votre administrateur réseau
lors d’une saisie manuelle de l’adresse IP.
38
Fr
Page 89

Réglage du serveur proxy
Ne réglez le serveur proxy que si votre fournisseur de
service Internet vous le demande.
1 Sélectionnez et validez Network Proxy Server
Next Screen.
Utilisez / pour effectuer un choix, puis appuyez sur
ENTER.
2 Sélectionnez et validez Use ou Not use dans
Proxy Server.
Utilisez / pour effectuer un choix, puis appuyez sur .
• Use – Sélectionnez cette option lorsque vous utilisez
un serveur proxy.
• Not use – Sélectionnez cette option lorsque vous
n’utilisez pas un serveur proxy.
Si vous avez sélectionné Use, passez à l’étape 3.
3 Sélectionnez et validez Server Select Method.
Ut
ilisez / pour effectuer un choix, puis appuyez sur .
• IP Address – Précisez l’adresse IP.
• Server Name – Précisez le nom du serveur.
4 Précisez IP Address ou Server Name.
Utilisez les touches numériques (0 à 9) pour saisir le
numéro si vous sélectionnez une adresse IP au point 3.
Utilisez / pour déplacer le curseur.
Lorsque le nom du serveur est sélectionné au point 3,
utilisez les touches numériques (0 à 9) pour afficher le
clavier. Maintenant utilisez /// pour sélec
les caractères et les paramètres, puis appuyez sur ENTER
pour valider.
5 Entrée Port Number.
Appuyez sur , puis utilisez les touches numériques
(0 à 9) pour préciser le nombre.
6 Appuyez sur ENTER pour valider.
tionner
Affichage des réglages du réseau
Sélectionnez et validez Network Information
Next Screen.
Utilisez / pour effectuer un choix, puis appuyez sur
ENTER.
Les réglages de l’adresse MAC, l’adresse IP, le masque
de sous-réseau, la passerelle par défaut et le serveur DNS
(primaire et secondaire) s’affichent.
Lorsque Auto Set IP Address est réglé sur On, les
valeurs obtenues s’affichent automatiquement.
Remarque
• “0.0.0.0” s’affiche si aucune adresse IP n’a été
spécifiée.
Test de la connexion au réseau
Sélectionnez et validez Network Connection
Test Start.
Utilisez / pour effectuer un choix, puis appuyez sur
ENTER.
“Network is OK.” s’affiche lorsque le test est terminé. Si
un autre message s’affiche, vérifiez les raccordements et/
ou les réglages (pages 18 et 38).
Changement de langue sous le
paramètre Langue
1 Sélectionnez et validez Language.
Utilisez / pour effectuer un choix, puis appuyez sur
ENTER.
2 Sélectionnez et validez OSD, Audio, Subtitle ou
Menu.
Utilisez / pour effectuer un choix, puis appuyez sur
ENTER.
3 Sélectionnez et validez la langue souhaitée.
Utilisez / pour effectuer un choix, puis appuyez sur
ENTER.
Remarque
•Si vous précisez une langue non enregistrée sur le BD
ou le DVD, une des langues enregistrées sera
automatiquement sélectionnée et utilisée.
Effacement des données ajoutées
aux BD et des données des
applications
Procédez de la façon suivante pour effacer les données
qui ont été ajoutées aux BD (données téléchargées avec
la fonction BD-LIVE et données utilisées avec la fonction
BONUSVIEW) et les données des applications.
Attention
• L’effacement des données prend un certain temps.
•Ne débranchez pas le cordon d’alimentation pendant
l’effacement des données.
1 Sélectionnez et validez BUDA BUDA Setup.
Utilisez / pour effectuer un choix, puis appuyez sur
ENTER.
2 Sélectionnez et validez Fmt buda.
Appuyez sur ENTER.
Enregistrement ou changement du
mot de passe
Procédez de la façon suivante pour enregistrer ou
changer le code exigé pour le paramètre Parental Lock.
À propos du mot de passe par défaut de ce lecteur.
Le mot de passe par défaut est “0000”.
• Le lecteur peut vous demander de saisir un mot de
passe lorsque vous changez de mot de passe.
•Si vous réinitialisez le lecteur, votre mot de passe
reviendra au réglage par défaut.
1 Sélectionnez et validez Security Change
Password Next Screen.
Utilisez / pour effectuer un choix, puis appuyez sur
ENTER.
2 Précisez le mot de passe.
Utilisez les touches numériques (0 à 9) pour préc
numéro, puis appuyez sur ENTER pour le valider.
Utilisez / pour déplacer le curseur.
iser le
07
39
Fr
Page 90

3 Ressaisissez le mot de passe.
07
Utilisez les touches numériques (0 à 9) pour préciser le
numéro, puis appuyez sur ENTER pour le valider.
Utilisez / pour déplacer le curseur.
•Pour changer le mot de passe, saisissez d’abord le
mot de passe enregistré, puis saisissez le nouveau
mot de passe.
Remarque
• Il est conseillé d’inscrir e quelque part son mot de
passe.
• Si vous avez oublié votre mot de passe, rétablissez les
réglages par défaut du lecteur, puis enregistrez de
nouveau votre m
ot de passe (page 41).
Changement du niveau de contrôle
parental pour le visionnage de DVD/
BD-ROM
Certains DVD-Vidéo contenant, par exemple, des scènes
de violence présentent différents niveaux de contrôle
parental (vérifiez les indications sur la pochette du
disque, etc.). Pour interdire le visionnage de ces disques
aux enfants d’un certain âge, limitez le niveau du lecteur
à un niveau inférieur à celui des disques.
1 Sélectionnez et validez Security Parental
Control Next Screen.
Utilisez / pour effectuer un choix, puis appuyez sur
ENTER.
2 Précisez le mot de passe.
Utilisez les touches numériques (0 à 9) pour préciser le
numéro, puis appuyez sur ENTER pour le valider.
Utilisez / pour déplacer le curseur.
3
Changez le niveau.
Utilisez / pour effectuer un choix, puis appuyez sur
ENTER.
Remarque
•Le niveau peut être réglé sur Off ou entre Level1 et
Level8. Lorsque Off est spécifié, le visionnage n’est
pas limité.
Changement du code de pays/
région
1 Sélectionnez et validez Security Country Code
Next Screen.
Utilisez / pour effectuer un choix, puis appuyez sur
ENTER.
2 Précisez le mot de passe.
Utilisez les touches numériques (0 à 9) pour préciser le
numéro, puis appuyez sur ENTER pour le valider.
Utilisez / pour déplacer le curseur.
3 Changez le code de pays/région.
Utilisez / pour effectuer un choix, puis appuyez sur
ENTER. Reportez-vous à page 43.
40
Fr
Mise à jour du logiciel
Le logiciel du lecteur peut être mis à jour d’une des
façons suivantes.
• En se connectant à Internet.
• En utilisant un disque.
• Utilisation d’un disque à mémoire flash USB.
Vous trouverez plus d’informations au sujet de ce lecteur
sur le site Pioneer. Consultez ce site à page 6 pour toute
information sur la mise à jour et les services relatifs à
votre lecteur de disque Blu-ray.
Attention
•Ne débranchez pas le cordon d’alimentation et ne
retirez pas le disque à mémoire flash USB pendant la
mise à jour du logiciel. N’appuyez pas non plus sur le
bouton de réinitialisation pendant la mise à jour.
Sinon, la mise à jour sera interrompue et un probl
peut se produire au niveau du lecteur.
•La mise à jour consiste en deux processus, d’abord le
téléchargement puis la mise à jour proprement dite.
Ces deux processus prennent un certain temps.
• Toutes les autres opérations sont désactivées
pendant la mise à jour. En outre, la mise à jour ne
peut pas être annulée.
Mise à jour par la connexion à
Internet
Remarque
•Le téléchargement peut aussi être très long si la
connexion Internet n’est pas optimale.
•Les points 1 à
le téléchargement du logiciel par Internet).
•Les points 6 à
par le lecteur (c’est la mise à jour du logiciel
proprement dite).
1 Connectez-vous à Internet.
2 Lorsque la lecture est arrêtée, affichez la page
Home Menu.
Appuyez sur HOME MENU.
3 Sélectionnez et validez Initial Setup.
Utilisez / pour effectuer un choix, puis appuyez sur
ENTER.
4 Sélectionnez et validez Options Update
Network Start.
Utilisez / pour effectuer un choix, puis appuyez sur
ENTER.
5 Sélectionnez et validez Start.
Appuyez sur ENTER.
6 Le téléchargement du logiciel commence.
L’état du téléchargement est indiqué à l’écran.
•Le téléchargement du logiciel peut durer un certain
temps si la connexion Internet n’est pas opti
5 sont effectués par l’utilisateur (c’est
8 sont effectués (automatiquement)
ème
male.
Page 91

7 La mise à jour commence.
• La mise à jour du logiciel prend un certain temps.
8 La mise à jour est terminée.
Le lecteur se remet automatiquement en marche.
Mise à jour par un disque à mémoire
flash USB/un disque
Remarque
•Lorsqu’un nouveau fichier de mise à jour est mis sur
le site Pioneer, téléchargez-le sur un disque à
mémoire flash USB ou un disque par votre
ordinateur. Lisez attentivement les instructions sur le
téléchargement des fichiers de mise à jour présentes
sur le site Pioneer.
•Sauvegardez le fichier de mise à jour dans le dossier
principal du disque à mémoire flash USB ou du
disque. Ne le mettez pas dans un autre dossier.
• Ne mettez que le s fichiers de mise à jour sur le disque
à mémoire flash USB ou le disque.
•Pour faire la mise à jour avec un disque, utilisez un
CD-R ou CD-RW.
• Le lecteur prend en charge les disques à mémoire
flash USB formatés en FAT32/16. Lorsque
formatez un disque à mémoire flash USB sur votre
ordinateur, faites les réglages suivants.
–Format de fichier : FAT32
– Taille de l’unité d’allocation : Taille d’allocation par
défaut
•Ne sauvegardez que le fichier de mise à jour le plus
récent sur le disque à mémoire flash USB ou le
disque.
•N’utilisez pas un câble d’extension USB pour
raccorder le disque à mémoire flash USB au lecteur.
Le câble d’extension USB peut empêcher le lecteur
de fonctionner correctement.
•Les points 1 à
•Les points 6 à
par le lecteur (c’est la mise à jour du logiciel
proprement dite).
1 Insérez le disque à mémoire flash USB ou le
disque sur lequel le fichier de mise à jour doit être
sauvegardé.
2 Lorsque la lecture est arrêtée, affichez la page
Home Menu.
Appuyez sur HOME MENU.
3 Sélectionnez et validez Initial Setup.
Utilisez / pour effectuer un choix, puis appuyez sur
ENTER.
5 doivent être effectués par l’utilisateur.
7 sont effectués (automatiquement)
vous
4 Sélectionnez et validez Options Update
Disc ou USB Storage Start.
Utilisez / pour effectuer un choix, puis appuyez sur
ENTER.
5 Sélectionnez et validez Yes.
Utilisez /// pour sélectionner Yes, puis appuyez
sur ENTER.
6 La mise à jour commence.
• La mise à jour du logiciel pre
7 La mise à jour est terminée.
nd un certain temps.
Rétablissement des réglages
par défaut du lecteur
1 Assurez-vous que le lecteur est en service.
2 Lorsque la lecture est arrêtée, affichez la page
Home Menu.
Appuyez sur HOME MENU.
3 Sélectionnez et spécifiez Initial Setup.
Utilisez / pour effectuer un choix, puis appuyez sur
ENTER.
4 Sélectionnez et validez Options Load Default
Next Screen.
Utilisez / pour effectuer un choix, puis appuyez sur
ENTER.
5 Sélectionnez et validez OK.
Utilisez / pour effectuer un choix, puis appuyez sur
ENTER.
Remarque
•Après avoir rétabli tous les réglages par défaut du
lecteur, utilisez la page Setup Navigator pour
réinitialiser le lecteur (page
20).
07
41
Fr
Page 92

À propos des formats audio numériques
07
restitués
Réglage Bitstream PCM Re-encode
Seul le son primaire (le son
principal des films, etc.) est
Méthode de
conversion
Prise(s) de
Type audio
Dolby Digital Dolby Digital Dolby Digital PCM 5.1ch
Dolby Digital
Plus
Dolby TrueHD Dolby TrueHD Dolby Digital PCM 7.1ch
DTS Digital
Surround
DTS-HD High
Resolution Audio
DTS-HD Master
Audio
PCM PCM 7.1ch
SACD
1. S’il n’y a pas de second son ou de son interactif, et selon le disque, les signaux peuvent être restitués sans être recodés.
2. Dans le cas du son multivoies, le son est converti en son à 2 voies avant la sortie.
3. Lorsque Resolution est réglé sur 480I ou 480P, ou même s’il est réglé sur Auto, le son DSD des SACD sera restitué sur deux
voies, avant gauche et avant droite (page 36), si le dispositif raccordé ne prend pas en charge la définition 480i/480p.
4. Lorsque HDMI Audio Out est réglé sur Bitstream, le son n’est pas restitué (page 36).
restitué. Le second son et le son
interactif ne sont pas restitués.
sortie
Prise HDMI
OUT
Dolby Digital
Plus
DTS Digital
Surround
DTS-HD High
Resolution
Audio
DTS-HD
Master Audio
3
DSD 5.1ch
Prise DIGITAL
OUT
Dolby Digital PCM 7.1ch
DTS Digital
Surround
DTS ES 6.1 ch PCM 7.1ch
DTS ES 6.1 ch PCM 7.1ch
PCM 2 ch
PCM 2 ch
Le son primaire, le second son
et le son interactif sont
convertis en signaux audio PCM
et restitués simultanément.
Prise HDMI
OUT
PCM 5.1ch
2
PCM 7.1ch Dolby Digital Dolby Digital
4
PCM 5.1ch
Prise DIGITAL
PCM 2 ch
PCM 2 ch
Le son primaire, le second son
et le son interactif sont
convertis en son PCM puis
reconvertis en son Dolby Digital
ou DTS et restitués
simultanément.
OUT
Prise HDMI
OUT
Dolby Digital Dolby Digital
2
DTS 5.1ch DTS 5.1ch
4
PCM 5.1ch
1
Prise DIGITAL
OUT
PCM 2 ch
4
Prise
AUDIO
OUTPUT
PCM 2 ch
PCM 2 ch
2
4
Remarque
• Selon le disque, le nombre de voies diffère.
•Selon le dispositif HDMI raccordé, le son de la sortie HDMI et le nombre de voies peuvent différer.
•Trois types de son sont enregistrés sur les disques vidéo BD.
–Son primaire : Le son principal.
– Second son : Le son ajouté en supplément, comme les commentaires des réalisateurs, des acteurs, etc.
–Le son interactif : Comme les clics audibles lorsque des opérations sont effectuées. Les sons interactifs diffèrent
d’un disque à l’autre.
42
Fr
Page 93

Tableau des codes de langues et Tableau des
codes de pays et régions
Tableau des codes de langues
Nom de la langue, code de la langue, code numérique
Abkhazian, ab/abk, 0102
Afar, aa/aar, 0101
Afrikaans, af/afr, 0106
Albanian, sq/sqi, 1917
Amharic, am/amh, 0113
Arabic, ar/ara, 0118
Armenian, hy/hye, 0825
Assamese, as/asm, 0119
Aymara, ay/aym, 0125
Azerbaijani, az/aze, 0126
Bashkir, ba/bak, 0201
Basque, eu/eus, 0521
Belarusian, be/bel, 0205
Bengali, bn/ben, 0214
Bihari, bh/bih, 0208
Bislama, bi/bis, 0209
Breton, br/bre, 0218
Bulgarian, bg/bul, 0207
Burmese, my/mya, 1325
Catalan, ca/cat, 0301
Central Khmer, km/khm, 1113
Chinese, zh/zho, 2608
Corsican, co/cos, 0315
Croatian, hr/hrv, 0818
Czech, cs/ces, 0319
Danish, da/dan, 0401
Dutch, nl/nld, 1412
Dzongkha, dz/dzo, 0426
English, en/eng, 0514
ra
Espe
nto, eo/epo, 0515
Estonian, et/est, 0520
Finnish, fi/fin, 0609
Fijian, fj/fij, 0610
Faroese, fo/fao, 0615
French, fr/fra, 0618
Galician, gl/glg, 0712
Georgian, ka/kat, 1101
German, de/deu, 0405
Greek, el/ell, 0512
Guarani, gn/grn, 0714
Gujarati, gu/guj, 0721
Hausa, ha/hau, 0801
Hebrew, iw/heb, 0923
Hindi, hi/hin, 0809
Hungarian, hu/hun, 0821
Icelandic, is/isl, 0919
Indonesian, in/ind, 0914
Interlingua, ia/ina, 0901
Interlingue, ie/ile, 0905
Inupiaq, ik/ipk, 0911
Irish, ga/gle, 0701
Italian, it/ita, 0920
Japanese, ja/jpn, 1001
Javanese, jw/jav, 1023
Kalaallisut, kl/kal, 1112
Kannada, kn/kan, 1114
Kashmiri, ks/kas, 1119
Kazakh, kk/kaz, 1111
Kinyarwanda, rw/kin, 1823
Kirghiz, ky/kir, 1125
Korean, ko/kor, 1115
Kurdi
sh, ku/kur, 1121
Lao, lo/lao, 1215
Latin, la/lat, 1201
Latvian, lv/lav, 1222
Lingala, ln/lin, 1214
Lithuanian, lt/lit, 1220
Macedonian, mk/mkd, 1311
Tableau des codes de pays et régions
Nom de pays/région, Code de pays/région, code numérique
Anguilla, ai, 0109
Antigue-et-Barbude, ag, 0107
Argentine, ar, 0118
Arménie, am, 0113
Australie, au, 0121
Autriche, at, 0120
Azerbaïdjan, az, 0126
Bahamas, bs, 0219
Barbade, bb, 0202
Biélorussie, by, 0225
Belgique, be, 0205
Belize, bz, 0226
Bermudes, bm, 0213
Brésil, br, 0218
bg, 0207
Bulgarie,
Ca
nada, ca, 0301
Îles Caïmans, ky, 1125
Chili, cl, 0312
Chine, cn, 0314
Colombie, co, 0315
Croatie, hr, 0818
Chypre, cy, 0325
République tchèque, cz, 0326
Danemark, dk, 0411
Dominique, dm, 0413
Dominicaine, République, do,
0415
Estonie, ee, 0505
Finlande, fi, 0609
France, fr, 0618
Georgie, ge, 0705
Allemagne, de, 0405
Grèce, gr, 0718
Groenland, gl, 0712
Grenade, gd, 0704
Guyane, gy, 0725
Haïti, ht, 0820
Hong-Kong, hk, 0811
Hongrie, hu, 0821
Islande, is, 0919
Inde, in, 0914
Indonésie, id, 0904
Irlande, ie, 0905
Israël, il, 0912
Italie, it, 0920
Jamaïque, jm, 1013
Japon, jp, 1016
Kazakhstan, kz, 1126
Corée, République de, kr, 1118
rghizta
Ky
n, kg, 1107
Lettonie, lv, 1222
Liechtenstein, li, 1209
Lituanie, lt, 1220
Luxembourg, lu, 1221
Malagasy, mg/mlg, 1307
Malay, ms/msa, 1319
Malayalam, ml/mal, 1312
Maltese, mt/mlt, 1320
Maori, mi/mri, 1309
Marathi, mr/mar, 1318
Mongolian, mn/mon, 1314
Moldavian, mo/mol, 1315
Nauru, na/nau, 1401
Nepali, ne/nep, 1405
Norwegian, no/nor, 1415
Occitan, oc/oci, 1503
Oriya, or/ori, 1518
Oromo, om/orm, 1513
Panjabi, pa/pan, 1601
Persian, fa/fas, 0601
Polish, pl/pol, 1612
Portuguese, pt/por, 1620
Pushto, ps/pus, 1619
Quechua, qu/que, 1721
Romanian, ro/ron, 1815
Romansch, rm/roh, 1813
Rundi, rn/run, 1814
Russian, ru/rus, 1821
Samoan, sm/smo, 1913
Sango, sg/sag, 1907
Sanskrit, sa/san, 1901
Scottish Gaelic, gd/gla, 0704
Serbian, sr/srp, 1918
Serbo-Croatian,
Shona, s
Sindhi, sd/snd, 1904
Sinhalese, si/sin, 1909
Slovak, sk/slk, 1911
Macédoine, ancienne
République de Yougoslavie,
mk, 1311
Malaisie, my, 1325
Malte, mt, 1320
Mexique, mx, 1324
Moldavie, République de, md,
1304
Monaco, mc, 1303
Montserrat, ms, 1319
Pays-bas, nl, 1412
Nouvelle-Zélande, nz, 1426
Norvège, no, 1415
Pakistan, pk, 1611
Pérou, pe, 1605
Philippines, ph, 1608
Pologne, pl, 1612
Portugal, pt, 1620
Puerto Rico, pr, 1618
Roumanie, ro, 1815
Fédération russe, ru, 1821
Saint Kitts et Nevis, kn, 1114
Sainte Lucie, lc, 1203
Saint Vincent et les Grenadines,
vc, 2203
Saint-Marin, sm, 1913
Singapour, sg, 1907
sh/---, 1908
n/sna, 1914
Slovenian, sl/slv, 1912
Somali, so/som, 1915
Sotho, Southern, st/sot, 1920
Spanish, es/spa, 0519
Sundanese, su/sun, 1921
Swahili, sw/swa, 1923
Swati, ss/ssw, 1919
Swedish, sv/swe, 1922
Tagalog, tl/tgl, 2012
Tajik, tg/tgk, 2007
Tamil, ta/tam, 2001
Tatar, tt/tat, 2020
Telugu, te/tel, 2005
Thai, th/tha, 2008
Tibetan, bo/bod, 0215
Tigrinya,
ti/tir, 2009
Tonga (Tonga Islands),
Tsonga, ts/tso, 2019
Tswana, tn/tsn, 2014
Turkmen, tk/tuk, 2011
Turkish, tr/tur, 2018
Twi, tw/twi, 2023
Ukrainian, uk/ukr, 2111
Urdu, ur/urd, 2118
Uzbek, uz/uzb, 2126
Vietnamese, vi/vie, 2209
Volapük, vo/vol, 2215
Welsh, cy/cym, 0325
Western Frisian, fy/fry, 0625
Wolof, wo/wol, 2315
Xhosa, xh/xho, 2408
Yiddish, ji/yid, 1009
Yoruba, yo/yor, 2515
Zulu, zu/zul, 2621
Slovaquie, sk, 1911
Slovénie, si, 1909
Espagne, es, 0519
Surinam, sr, 1918
Suède, se
Suisse, ch, 0308
Taiwan, Province de Chine,
2023
Tajikistan, tj, 2010
Thaïlande, th, 2008
Trinité et Tobago, tt, 2020
Tunisie, tn, 2014
Turquie, tr, 2018
Turkménistan, tm, 2013
Turques et Caïques, Îles,
Ukraine, ua, 2101
Royaume-uni, gb, 0702
États-Unis, us, 2119
Uruguay, uy, 2125
Ouzbékistan, uz, 2126
Venezuela, ve, 2205
Vierges, Îles, Britanniques, vg,
2207
to/ton, 2015
, 1905
tw,
tc, 2003
07
43
Fr
Page 94

Chapitre 8
08
Informations supplémentaires
Avis relatif à la
licence du
logiciel
Nous fournissons à titre de référence
des traductions des licences des
logiciels utilisés dans cet appareil.
Ces traductions ne sont pas des textes
officiels. Le texte original (en anglais)
se trouve sur la feuille volante.
curl
AVIS DE COPYRIGHT E T AUTORISATION
Copyright © 1996 - 2007, Daniel Stenberg,
<daniel@haxx.se>. Tous droits réservés.
Le présent document autorise à utiliser, copier, modifier et
distribuer ce logiciel sans restriction à titre gratuit ou non à
condition que l’avis de copyright et autorisation
susmentionné apparaisse sur toutes les copies.
LE LOGICIEL EST FOURNI "EN L’ÉTAT" SANS GARANTIE
D’AUCUNE SORTE, EXPRESSE OU IMPLICITE, Y
COMPRIS, MAIS S’Y LIMITER, LES GARANTIES DE
QUALITÉ MARCHANDE, D’ADÉQUATION À UN USAGE
PARTICULIER ET DE NON-VIOLATION DES DROITS DE
TIERCES PARTIES. LES AUTEURS OU DÉTENTEURS DU
COPYRIGHT NE SAURAIENT EN AUCUN CAS ÊTRE TENUS
RESPONSABLES DE TOUTE RÉCLAMATION OU
DOMMAGE, QUE CE SOIT DANS LE CADRE D’UN
CONTRAT, D’UNE NÉGLIGENCE OU D’UNE AUTRE
ACTION PRÉJUDICIABLE, DÛ OU LIÉ À L’UTILISATION OU
AUX PERFORMANCES DE CE LOGICIEL.
Sous réserve des dispositions du présent avis, le nom d’un
détenteur du copyright ne doit pas être utilisé pour
annoncer ou promouvoir la vente, l’utilisation o u toute
autre activité liée au Logiciel sans l’autorisation écrite
pré
alable dudit détenteur.
expat
Copyright (c) 1998, 1999, 2000 Thai Open Source Software
Center Ltd
Le présent document autorise toute personne obtenant
une copie de ce logiciel et des scripts associés (le
"Logiciel") à négocier le Logiciel sans restriction, et en
particulier à utiliser, copier, modifier, fusionner, publier,
distribuer, accorder sous licence et/ou vendre des copies
de ce Logiciel sans restriction, et permet à toute personne
à laquelle le Logiciel est fourni de le faire à condition que
les mentions suivantes soient incluses :
L’avis de copyright et l’avis d’autorisation susmentionnés
doivent apparaître s
substantielles du Logiciel.
LE LOGICIEL EST FOURNI "EN L’ÉTAT" SANS GARANTIE
D’AUCUNE SORTE, EXPRESSE OU IMPLICITE, Y
COM PRIS , MAI S SAN S QUE CEL A NE S OIT L IMIT ATI F, LE S
GARANTIES DE QUALITÉ MARCHANDE, D’ADÉQUATION
À UN USAGE PARTICULIER ET DE NON-VIOLATION DES
DROITS DE TIERCES PARTIES.
LES AUTEURS OU DÉTENTEURS DU COPYRIGHT NE
SAURAIENT EN AUCUN CAS ÊTRE TENUS
RESPONSABLES DE TOUTE RÉCLAMATION OU
DOMMAGE, QUE CE SOIT DANS LE CADRE D’UN
CONTRAT, D’UNE NÉGLIGENCE OU D’UNE AUTRE
ACTION PRÉJUDICIABLE, DÛ OU LIÉ À L’UTILISATION OU
AUX PERFORMANCES DE CE LOGICIEL.
freetype
Ce logiciel est partiellement basé sur la bibliothèque
Freetype. Voir http://www.freetype.org pour plus
d’informations.
Composants internationaux pour
Unicode
Licence ICU - ICU 1.8.1 et ultérieure
AVIS DE COPYRIGHT ET AUTORISATION
Copyright (c) 1995-2010 International Business Machines
Corporation et autres
Tous droits réservés.
Le présent document autorise toute personne obtenant
une copie de ce logiciel et des scripts associés (le
"Logiciel") à négocier le Logiciel sans restriction, et en
particulier à utiliser, copier, modifier, fusionner, publier,
distribuer et/ou vendre des copies de ce Logiciel sans
restriction, et permet à toute personne à laquelle le Logiciel
44
est fourni de le faire à condition que l’(les) avis de copyright
Fr
ur toutes les copies ou parties
ci-dessus et que le pré
toutes les copies du Logiciel et que l’(les) avis de copyright
susmentionné(s) ainsi que la présente autorisation
apparaissent dans la documentation annexe.
LE LOGICIEL EST FOURNI "EN L’ÉTAT" SANS GARANTIE
D’AUCUNE SORTE, EXPRESSE OU IMPLICITE, Y
COMPRIS, MAIS SANS QUE CELA NE SOIT LIMITATIF, LES
GARANTIES DE QUALITÉ MARCHANDE, D’ADÉQUATION
À UN USAGE PARTICULIER ET DE NON-VIOLATION DES
DROITS DE TIERCES PARTIES. LE OU LES DÉTENTEURS
DU COPYRIGHT MENTIONN ÉS DANS CET AVIS NE
SAURAIENT EN AUCUN CAS ÊTRE TENUS
RESPONSABLES DE TOUTE RÉCLAMATION OU
DOMMAGE INDIRECT OU CONSÉCUTIF OU DE TOUT
AUTRE DOMMAGE LIÉ À LA PERTE D’UTILISATION, DE
DONNÉES OU DE BÉNÉFICES, QUE CE SOIT DANS LE
CADRE D’UN CONTRAT, D’UNE NÉGLIGENCE OU D’UNE
AUTRE ACTION PRÉJUDICIABLE, DUS OU LIÉS À
L’UTILISATION OU AUX PERFORMANCES DE CE
LOGICIEL.
Sous réserve des dispositions du présent avis, le nom d’un
détenteur du copyright ne doit pas être utilisé pour
annoncer ou promouvoir la vente, l’utilisation ou toute
autre activité liée au Logiciel sans l’autorisation écrite
préalable dudit détenteur.
jpeg
Ce logiciel est partiellement basé sur les travaux de
l’Independent JPEG Group.
openssl
L’OpenSSL Toolkit demeure sous double licence, c’est-àdire que les conditions de la Licence Open SS L et la l ic enc e
originale SSLeay s’appliquent au Toolkit.
Voir ci-dessous les textes de la licence. Les deux licences
sont des licences Open Source de style BSD. Pour tout
problème de licence lié à OpenSSL, veuillez contacter
openssl-core@openssl.org.
Licence OpenSSL
Copyright (c) 1998-2008 Le Projet OpenSSL. Tous droits
réservés.
La redistribution et l’emploi sous formes source et binaire,
avec ou sans modification, sont autorisés à condition que :
1. La redistribution du code source retienne l’avis de
copyright ci-dessus, la liste des conditions et l’avis de
non-responsabilité suivant.
2. Les redistribution s sous forme binaire reprodu
l’avis de copyright ci-dessus, la liste des conditions et
l’avis de non-responsabilité s uivant dans la
documentation et/ou les maté riaux qui accompagnent
la distribution.
3. Tous les matériaux de promotion mentionnant les
caractéristiques ou l’emploi de ce logiciel doivent
reproduire l’avis suivant :
"Ce produit comprend un logiciel développé par le
Projet OpenSSL à utiliser dans OpenSSL Toolkit. (http:/
/www.openssl.org/)"
4. L’utilisation des noms "OpenSSL Toolkit" et "OpenSSL
Project" à des fins de promotion ou de valorisation de
produits dérivés de ce logiciel est interdite sans
autorisation écrite préalable. Pour toute autorisation
écrite, veuillez contacter openssl-core@open
5. Les produits dérivés de ce logiciel ne doivent pas être
appelés "OpenSSL" et "OpenSSL" ne doit pas figurer
dans leurs noms sans autorisat ion préalable de
l’OpenSSL Project.
6. Les redistribution s sous quelque forme que ce soit
doivent reproduire l’avis suivant :
"Ce produit comprend un logiciel développé par le
Projet OpenSSL à utiliser dans OpenSSL Toolkit (http://
www.openssl.org/)".
CE LOGICIEL EST FOURNI "EN L’ÉTAT" PAR OpenSSL
PROJECT QUI NE DONNE AUCUNE GARANTIE, EXPLICITE
OU IMPLICITE, NOTAMMENT, MAIS SANS QUE CELA NE
SOIT LIMITATIF, QUANT À SA QUALITE MARCHANDE OU
À SON ADEQUATION À UN BUT PARTICULIER.
L’OpenSSL PROJECT OU SES PARTENAIRES NE
POURRONT ÊTRE EN AUCUN CAS TENUS POUR
RESPONSABLES DES PRÉJUDICES DIRECTS,
INDIRECTS, SPÉCIAUX, INCIDENTS OU PUNITIFS
(NO TAM ME NT, MAI S SA NS Q UE C EL A NE SOI T LI MIT ATI F,
DES PRÉJUDICES LIÉS A L’ACHAT DE PRODUITS OU DE
SERVICES DE REMPLACEMENT, A UNE PERTE
D’UTILISATION, UNE PERTE DES DONNÉES OU AUX
INTERRUPTIONS D’ACTIVITÉ) QUELLE QU’EN SOIT LA
CAUSE ET QU’ILS SOIENT LIÉS À UNE RESPONSABILITE,
UNE ACTION CONTRACTUELLE, DE RESPONSABILITÉ
DIRECTE OU EXTRA-CONTRACTUELLE (Y COMPRIS POUR
NÉGLIGENCE OU AUTRE), EN RELATION AVEC TOUTE
UTILISATION DU PRÉSENT LOGICIEL, ET CE,
INDÉPENDAMMENT DU CARACTÈRE PRÉVISIBLE OU
NON DE CES PRÉJUDICES.
sent avis d’autorisation figurent dans
Ce produit compre
Eric Young (eay@cryptsoft.com). Ce produit comprend un
logiciel écrit par Tim Hudson (tjh@cryptsoft.com) .
Licence SSLeay originale
Copyright (C) 1995-1998 Eric Young (eay@cryptsoft.com)
Tous droits réservés.
Ce prologiciel est une implantation SSL écrite par Eric
Young (eay@cryptsoft.com).
L’écriture de l’implantation se conforme à Netscapes SSL.
Cette bibliothèque est un logiciel libre qui peut être utilisé
à titre commercial ou non sous réserve des conditions
su
ivantes. Les conditions suivantes s’appliquent à tout
code trouvé dans cette distri but io n, qu e c e so it le co de RC4 ,
RSA, lhash, DES, etc., pas seulement le code SSL. La
documentation SSL inclus e avec cette distribution est
couverte par les mêmes termes de copyright mais le
détenteur en est Tim Hudson (tjh@cryptsoft.com).
Le copyright demeure la propriété d’Eric Young, et par
conséquent aucune mention de copyrigh t figurant dans le
code ne doit être supprimée. Si ce progiciel est intégré à un
produit, les droits d’auteur des éléments de la bibliothèque
utilisée doivent être attribués à Eric Young. Cette
reconnaissance peut se faire sous forme de message
textuel apparaissant au lancement du programme ou dans
la documentation (en ligne ou textuelle) fournie avec le
prol
ogiciel.
La redistribution et l’emploi sous formes source et binaire,
avec ou sans modification , sont autorisés à condition que :
1. La redistribution du code source retienne l’avis de
copyright, la liste des conditions e t l’avis de non-
responsabilité suivant.
2. Les redistributions sous forme binaire reproduisent
l’avis de copyright ci-dessus, la liste des conditions et
l’avis de non-responsabilité suivant dans la
documentation et/ou les matériaux qui accompagnent
la distribution.
3. Tous les matériaux de promotion mentionnant les
caractéristiques ou l’emploi de ce logiciel doivent
reproduire l’avis suivant :
"Ce produit comprend un logiciel cryptographique écrit
par Eri
"cryptographique" peut être omis si les sous-
programmes de la bibliothèque utilisée ne sont de type
cryptographique :-).
4. Si vous insérez un code spécifique à Windows (ou un de
ses dérivés) à partir du répertoire apps (code
isent
ssl.org.
d’application), vous devez inclure la mention :
"Ce produit comprend un logiciel créé * par Tim Hudson
(tjh@cryptsoft.com)".
CE LOGICIEL EST FOURNI "EN L’ÉTAT" PAR ERIC YOUNG
QUI NE DONNE AUCUNE GARANTIE, EXPLICITE OU
IMPLICITE, NOTAMMENT, MAIS SANS QUE CELA NE SOIT
LIMITATIF, QUANT À SA QUALITE MARCHANDE OU À
SON ADEQUATION À UN BUT PARTICULIER. EN AUCUN
CAS L’AUTEUR OU SES PARTENAIRES NE POURRONT
ÊTRE EN AUCUN CAS TENUS POUR RESPONSABLES
DES PRÉJUDICES DIRECTS, INDIRECTS, SPÉCIAUX,
INCIDENTS OU PUNITIFS (NOTAMMENT, MAIS SANS QUE
CELA NE SOIT LIMITATIF, DES PRÉJUDICES LIÉS A
L’ACHAT DE PRODUITS OU DE SERVICES DE
REMPLACEMENT, A UNE PERTE D’UTILISATION, UNE
PERTE DES DONNÉES OU AUX INTERRUPTIONS
D’ACTIVITÉ) QUELLE QU’EN SOIT LA CAUSE ET QU’ILS
SOIENT LIÉS À UNE RESPONSABILITE, UNE ACTION
CONTRACTUELLE, DE RESPONSABILITÉ DIRECTE OU
EXTRA-CONTRACTUELLE (Y COMPRIS POUR
NÉGLIGENCE OU AUTRE), EN RELATION AVEC TOUTE
UTILISATION DU PRÉSENT LOGICIEL, ET CE,
INDÉPENDAMMENT DU CARACTÈRE PRÉVISIBLE OU
NON DE CES PRÉJUDICES.
Les conditions de licence et de distribution pour toutes les
versi
ons disponibles au public ou pour les dérivés de ce
code ne peuvent pas être modifiées. En d’autres termes, ce
code ne peut pas être simplement copié et affecté à une
autre licence de distribution [licence publique GNU
incluse].
zlib
Ce logiciel est partiellement basé sur la bibliothèque zlib.
Voir http://www.zlib.net pour plus d’informations.
Licence Publique Générale GNU et
Licence Publique Générale Limitée
GNU
Ce produit comprend le logiciel suivant accordé sous
licence pour être utilisé selon les termes de la Licence
Générale Publique GNU v2, la Licence Général Publique
GNU Limitée v2.1.
– linux kernel 2.6. Copyright (C) 1991 Linus Torvalds. Sous
licence GPLv2.0
– BusyBox v1.17.1 multi-call binary. Copyright (C) 1998-
2009 Erik Andersen, Rob Landley, D enys Vlasenko et
autres. Sous licence GPLv2.0
nd un logiciel cryptographique écrit par
c Young (eay@cryptsoft.com)". Le terme
Page 95

–SquashFS Copyright : (C) 2002-2009 Phillip Lougher
sous licence GPL v2.0
–Das U-Boot Copyright : (C) 2000-2005 Wolfang Denk,
DENX Software Engineering, wd@denx.de. Sous
licence GPL v2.0
– LIRC 0.8.5 Copyright (C) 1996 Ralph Metzler
<rjkm@thp.uni-koeln.de> Copyright (C) 1998-2008
Christoph Bartelmus <lirc@bartelmus.de> Sous
licence GPL v2.0
–glibc 2.9 Copyright (C) 1992-2006, 2007 Free Software
Foundation, Inc. Sous licence LGPL v2.1.
Vous pouvez vous procurer le co de so urce correspondant à
l’adresse suivante.
http://www.oss-pioneer.com/homeav/blu-ray
Veuillez vous reporter à l’adresse suivante pour plu
d’informations sur la Version 2 de la Licence Publique
Générale GNU.
http://www.gnu.org/licenses/gpl-2.0.html
Veuillez vous reporter à l’adresse suivante pour plus
d’informations sur la Version 2.1 de la Licence Publique
Générale GNU pour les bibliothèques.
http://www.gnu.org/licenses/old-licens es/lgpl-2.1.html
Licence Publique Générale GNU
Benjamin Drieu, APRIL (bdrieu@april.org), Mélanie
Clément-Fontaine (me lanie@amberlab.net), Arnaud
Fontaine (arnaud@crao.net), Loïc Dachary (loic@gnu.org),
Frédéric Couchet (fcouchet@fsffrance.org).
This is an unofficial translation of the GNU General Public
License into French. It was not published by the Free
Software Foundation, and does not legally state the
distribution terms for software that uses the GNU GPL--only
the original English text of the GNU GPL does that. However,
we hope that this translation will help French speakers
understand the GNU GPL better.
Ceci est une traduction non officielle de la GNU General
Public License en français. Elle n'a pas été publiée par la Free
Software Foundation, et ne détermine pas les termes de
distribution pour les logiciels qui utilisent la GNU GPL, seul
le texte anglais original de la GNU GPL déterminent ces
termes. Cependant, nous espérons que cette traduction
aidera les francophones à mieux comprendre la GNU GPL.
Li
cence Publique Générale GNU
Les licences de la plupart des logiciels sont conçues pour
vous enlever toute liberté de les partager et de les modifier.
A contrario, la Licence Publique Générale est destinée à
garantir votre liberté de partager et de modifier les logiciels
libres, et à assurer que ces logiciels soient libres pour tous
leurs utilisateurs.
La présente Licence Publique Générale s'applique à la
plupart des logiciels de la Free Software Foundation, ainsi
qu'à tout autre programme pour lequel ses auteurs
s'engagent à l'utiliser.
(Certai
ns autres logiciels de la Free Software Foundation
sont couverts par la GNU Lesser General Public License à
la place.)
Vous pouvez aussi l'appliquer aux programmes qui sont les
vôtres.
Quand nous parlons de logiciels libres, nous parlons de
liberté, non de prix.
Nos licences publiques générales sont conçues pour vous
donner l'assurance d'être libres de distribuer des copies
des logiciels libres (et de facturer ce service, si vous le
souhaitez), de recevoir le code source ou de pouvoir
l'obtenir si vous le souhaitez, de pouvoir mo
logiciels ou en utiliser des éléments dans de nouveaux
programmes libres et de savoir que vous pouvez le faire.
Pour protéger vos droits, il nous est nécessaire d'imposer
des limitations qui interdisent à quiconque de vous refuser
ces droits ou de vous demander d'y renoncer.
Certaines responsabilités vous incombent en raison de ces
limitations si vous distribuez des copies de ce s logiciels, ou
si vous les modifiez.
Par exemple, si vous distribuez des copies d'un tel
programme, à titre gratuit ou contre une rémunération,
vous devez accorder aux destinataires tous les droits dont
vous disposez.
Vous devez vous assurer qu
disposer du code source.
Et vous devez leur montrer les présentes conditions afin
qu'ils aient connaissance de leurs droits.
Nous protégeons vos droits en deux étapes : (1) nous
sommes titulaires des droits d'auteur du logiciel, et (2) nous
vous délivrons cette licence, qui vous donne l'autorisation
légale de copier, distribuer et/ou modifier le logiciel.
En outre, pour la protection de chaque auteur ainsi que la
nôtre, nous voulons nous assurer que chacun comprenne
que ce logiciel libre ne fait l'objet d'aucune garantie.
Si le logiciel est modifié par quelqu'un d'autre puis transmis
à des tiers, nous voulons que les destin ataires soient mis
au courant que
d'origine, de sorte que tout problème introduit par d'autres
ne puisse entacher la réputation de l'auteur originel.
En définitive, un programme libre restera à la merci des
brevets de logiciels.
Nous souhaitons éviter le risque que les redistributeurs
d'un programme libre fassent des demandes individuelles
de licence de brevet, ceci ayant pour effet de rendre le
programme propriétaire.
Pour éviter cela, nous établissons clai rement que toute
licence de brevet doit être concédée de façon à ce que
'eux aussi reçoivent ou puissent
ce qu'ils ont reçu n'est pas le logiciel
s
difier les
l'
usage en soit libre pour tous ou bien qu'aucune licence ne
soit concédée.
Les termes exacts et les conditions de copie, distribution et
modification sont les sui vants:
Conditions de copie, distribution et modification de l a
Licence Publique Générale GNU.
0. La présente Licence s'applique à tout programme ou
tout autre ouvrage contenant un avis, apposé par le
titulaire des droits d'auteur, stipulant qu'il peut être
distribué au titre des conditions de la présente Licence
Publique Générale.
Ci-après, le "Programme" désigne l'un quelconque de
ces programmes ou ouvrages, et un "ouvrage fondé sur
le Programme" désigne soit le Programme, soit un
ouvrage qui en dérive au titre des lois sur le droit
d'auteur : en d'autres
Programme ou une partie de ce dernier, soit à
l'identique, soit avec de s modifications et/ou traduit
dans un autre langage.
(Ci-après, le terme "modification" implique, sans s'y
réduire, le terme traduction)
Chaque concessionaire sera désigné par "vous".
Les activités autres que la copie, la distribution et la
modification ne sont pas couvertes par la présente
Licence ; elles sont hors de son champ d'application.
L'opération consistant à exécute r le Programme n'est
soumise à aucune limitation et les sorties du
programme ne sont couvertes que si leur contenu
constitue un ouvrage fondé sur le Program
(indépendamment du fait qu'il ait été réalisé par
l'exécution du Programme).
La validité de ce qui précède dépend de ce que fait le
Programme.
1. Vous pouvez copier et distribuer des copies à l'identique
du code source du Programme tel que vous l'avez reçu,
sur n'importe quel support, du moment que vous
apposiez sur chaque copie, de manière ad hoc et
parfaitement visible, l'avis de droit d'auteur adéquat et
une exonération de garantie ; que vous gardiez intacts
tous les avis faisant référence à la présente Licence et à
l'absence de toute garantie ; et que vous fournissiez à
tout destinataire du Program
un exemplaire de la présente Licence en même temps
que le Programme.
Vous pouvez faire payer l'acte physique de transmission
d'une copie, et vous pouvez, à votre discrétion, proposer
une garantie contre rémunération.
2. Vous pouvez modifier votre copie ou des copies du
Programme ou n'importe quelle partie de celui-ci,
créant ainsi un ouvrage fondé sur le Programme, et
copier et distribuer de telles modifications ou ouvrage
se
lon les termes de l'Article 1 ci-dessus, à condition de
vous conformer également à chacune des obligations
suivantes :
a) Vous devez munir les fichiers modifiés d'avis bien
visibles stipulants que vous avez modifié ces fichiers,
ainsi que la date de chaque modification ;
b) Vous devez prendre les dispositio ns nécessaires pour
que tout ouvrage que vous distribuez ou publiez, et
qui, en totalité ou en partie, contient ou est fondé sur
le Programme - ou une partie quelconque de ce
dernier - soit concédé comme un tout, à titre gratuit,
à n'importe quel tiers, au titre des conditions de la
présente Licence.
c) Si le programme modifié lit habituellement des
instructions de façon interactive lorsqu'on l'exécute,
vous devez, quand il commence son exécution pour
ladite utilisation interactive de la manière la plus
us
uelle, faire en sorte qu'il imprime ou affiche une
annonce comprenant un avis de droit d'auteur ad
hoc, et un avis stipulant qu'il n'y a pas de garantie (ou
bien indiquant que c'est vous qui fournissez la
garantie), et que les utilisa teurs peuvent redistribuer
le programme en respectant les présentes
obligations, et expliquant à l'utilisateur comment voir
une copie de la présente Licence.
(Exception : si le Programme est lui-même interactif
mais n'imprime pas habituellement une telle
annonce, votre ouvrage fondé sur le Programme n'est
pas obligé d'imprimer une annonce ).
Ces obligations s'appliquent à l'ouvrage modifié pris
comme un tout.
Si des éléments identifiables de cet ouvra
fondés sur le Programme et peuvent raisonnablement être
considérés comme des ouvrages indépendants distincts
en eux mêmes, alors la présente Licence et ses conditions
ne s'appliquent pas à ces éléments lorsque vous les
distribuez en tant qu'ouvrages distincts.
Mais lorsque vous distribuez ces mêmes éléments comme
partie d'un tout, lequel constitue un ouvrage fondé sur le
Programme, la distribution de ce tout doit être soumise aux
conditions de la présente Licence, et les autorisations
qu'elle octroie aux autres concessionnaires s'étendent à
l'ensemble de l'ouvrage et par conséquent à chaque et
toute partie indifférement de qui l'a écrite.
Par conséquent, l'objet du présent article n'est pas de
revendiquer de
ouvrage entièrement écrit par vous; son objet est plutôt
d'exercer le droit de contrôler la distribution d'ouvrages
dérivés ou d'ouvrages collectifs fondés sur le Programme.
termes, un ouvrage cont enant le
me
me autre que vous-même
ge ne sont pas
s droits ou de contester vos droits sur un
De plus, la simple proximité du Programme avec un autre
ouvrage qui n'est pas fondé sur le Programme (ou un
ouvrage fondé sur le Programme) sur une partition d'un
espace de stockage ou un support de distribution ne place
uvrage dans le champ d'application de la
pas cet autre o
présente Licence.
3. Vous pouvez copier et distribuer le Programme (ou un
ouvrage fondé sur lui, selon l'Article 2) sous forme de
code objet ou d'exécutable, selon les termes des
Articles 1 et 2 ci-dessus, à condition que vous
accomplissiez l'un des points suivants :
a) L'accompagner de l'intégralité du code source
correspondant, sous une forme lisible par un
ordinateur, lequel doit être distribué au titre des
termes des Articles 1 et 2 ci-dessus, sur un support
habituellement utilisé pour l'échange de logiciels; ou,
b) L'accompagner d'une proposition écrit
pendant au moins trois ans, de fournir à tout tiers, à
un tarif qui ne soit pas supérieur à ce que vous coûte
l'acte physique de réaliser une distribution source,
une copie intégrale du code source correspondant
sous une forme lisible par un ordinateur, qui sera
distribuée au titre des termes des Articles 1 et 2 cidessus, sur un support habituellement utilisé pour
l'échange de logiciels; ou,
c) L'accompagner des informations reçues par vous
concernant la proposition de distribution du code
so
urce correspondant. (Cette solution n'est autorisée
que dans le cas d'une distribution non c ommerciale
et seulement si vous avez reçu le programme sous
forme de code objet ou d'exécutable accompagné
d'une telle proposition - en conformité avec le sous-
Article b ci-dessus.)
Le code source d'un ouvrage désigne la forme favorite pour
travailler à des modifications de cet ouvrage. Pour un
ouvrage exécutable, le code source intégral désigne la
totalité du code source de la totalité des modules qu'il
contient, ainsi que les éventuels fichiers de définition des
interfaces qui y sont associés, ainsi que les scripts utilisés
pour contrôler la compilation et l'installa tion de
l'exécutable. Cependant, par exception spéciale, le code
source
distribué n'est pas censé inclure quoi que ce soit de
normalement distribué (que ce soit sous forme source ou
binaire) avec les composants principaux (compilateur,
noyau, et autre) du système d'exploitation sur lequel
l'exécutable tourne, à moins que ce composant lui-même
n'accompagne l'exécutable.
Si distribuer un exécutable ou un code objet consiste à
offrir un accès permettant leur copie depuis un endroit
particulier, alors l'offre d'un accès équivalent pour copier le
code source depuis le même endroit compte comme une
distribution du code source - même si les tiers ne sont pas
contraints de copier le source en même temps que le code
objet.
4. Vous ne pouvez copier, modifier, concéder en sous-
licence, ou distribuer le Programme, sauf tel
qu'expressément prévu par la présente Licence. Toute
tentative de copier, modifier, concéder en sous-licence,
ou distribuer le Programme d'une autre manière est
réputée non valable, et met immédiatement fin à vos
droits au titre de la présente Licence. Toutefois, les tiers
ayant reçu de vous des copies, ou des droits, au titre de
la présente Licence ne verront pas leurs autorisations
résiliées aussi longtemps que
pleinement à elle.
5. Vous n'êtes pas obligé d'accepter la présente Licence
étant donné que vous ne l'avez pas signée. Cependant,
rien d'autre ne vous accorde l'autorisation de modifier
ou distribuer le Programme ou les ouvrages fondés sur
lui. Ces actions sont interdites par la loi si vous
n'acceptez pas la présente Licence. En conséquence,
en modifiant ou distribuant le Programme (ou un
ouvrage quelconque fondé sur le Programme), vous
signifiez votre acceptation de la présente Licence en le
faisant, et de toutes ses condi tions concernant la copie,
la distribution ou la modificat ion du Programme ou
d'ouvrages fondés sur lui.
6. Chaque fois que vous redistrib
n'importe quel ouvrage fondé sur le Programme), une
licence est automatiquement concédée au destinataire
par le concédant originel de la licence, l'autorisant à
copier, distribuer ou modifier le Programme, sous
réserve des présentes conditions. Vous ne pouvez
imposer une quelconque limi tation supplémentaire à
l'exercice des droits octroyés au titre des présentes par
le destinataire. Vous n'avez pas la responsabilité
d'imposer le respect de la présente Licence à des tiers.
7. Si, conséquement à une décision de justice ou
l'allégation d'une tran
autre raison (non limitée à un probleme de brevet), des
obligations vous sont imposées (que ce soit par
jugement, conciliation ou autre) qui contredisent les
conditions de la présente Licence, elles ne vous
excusent pas des conditions de la présente Licence. Si
vous ne pouvez distribuer de manière à satisfaire
simultanément vos obligations au titre de la présente
Licence et toute autre obligation pertinente, alors il en
découle que vous ne pouvez pas du tout distribuer le
Programme. Par exemple, si une licence de brevet ne
permettait pas une redistribution sans redevance du
Programme par t
sgression de brevet ou pour toute
ous ceux qui reçoivent une copie
e, valable
ledits tiers se conforment
uez le Programme (ou
08
45
Fr
Page 96

directement ou indirectement par votre intermédiaire,
alors la seule façon pour vous de satisfaire à la fois à la
08
licence du brevet et à la prés ente Licence serait de vous
abstenir totalement de toute distribution du
Programme.
Si une partie quelconque de cet article est tenue pour
nulle ou inopposable dans une circonstance
particulière quelconque, l'intention est que le reste de
l'article s'applique. La totalité de la section s'appliquera
dans toutes les autres circonstances.
Cet article n'a pas pour but de vous induire à
transgresser un quelconque brevet ou d'autres
reve
ndications à un droit de propriété ou à contester la
validité de la moindre de ces revendications ; cet article
a pour seul objectif de protéger l'intégrité du système de
distribution du logiciel libre, qui est mis en oeuvre par
la pratique des licenses publiques. De nombreuses
personnes ont fait de généreuses contribut ions au
large spectre de logiciels distribués par ce système en
se fiant à l'application cohérente de ce système ; il
appartient à chaque auteur/donateur de décider si il ou
elle veut distribuer du logiciel par l'intermédiaire d'un
quelconque autre système et un concessionaire ne
peu
t imposer ce choix.
Cet article a pour but de rendre totalement limpide ce
que l'on pense être une conséquence du reste de la
présente Licence.
8. Si la distribution et/ou l'utilisation du Programme est
limitée dans certains pays que ce soit par des brevets
ou par des interfaces soumises au droit d'auteur, le
titulaire originel des droits d'auteur qui décide de
couvrir le Programme par la présente Licence peut
ajouter une limitation géographique de distribut ion
explicite qui exclue ces pays afin que la distribution soit
perm
ise seulement dans ou entre les pays qui ne sont
pas ainsi exclus. Dans ce cas, la présente Licence
incorpore la limitation comme si elle était écrite dans le
corps de la présente Licence.
9. La Free Software Foundation peut, de temps à autre,
publier des versions révisées et/ou nouvelles de la
Licence Publique Générale. De telles nouvelles versions
seront similaires à la présente version dans l'esprit mais
pourront différer dans le détail pour prendre en compte
de nouvelles problématiques ou inquiétudes.
Chaque version possède un numéro de version la
distinguant. Si le Programme précise le numéro de
version de la présente Licence qui s'y appl
version ultérieure quelconque", vous avez le choix de
suivre les conditions de la présent e version ou de toute
autre version ultérieure publiée par la Free Sof tware
Foundation. Si le Prog ramme ne spécifie aucun
numéro de version de la présente Licence, vous pouvez
choisir une version quelconque publiée par la Free
Software Foundation à quelque moment que ce so it.
10. Si vous souhaitez incorporer des parties du Programme
dans d'autres programmes libres dont les conditions de
distribution sont différentes, écrivez à l'auteur pour lu
en demander l'autorisation. Pour les logiciels dont la
Free Software Foundation est titulaire des droits
d'auteur, écrivez à la Free Software Foundation ; nous
faisons parfois des exceptions dans ce sens. Notre
décision sera guidée par le double objectif de préserver
le statut libre de tous les dérivés de nos logiciels l ibres
et de promouvoir le partage et la réutilisation des
logiciels en général.
11. COMME LA LICENCE DU PROGRAMME EST
CONCEDEE A TITRE GRATUIT, AUCUNE GARANTIE NE
S'APPLIQUE AU PROGRAMME, DANS LES LIMITES
AUTORISEES PAR LA LOI APPLICABLE. SAUF
MENTION CONTRAIRE ECRITE, LES TITULAIRES DU
DROIT D'AUTEUR ET/OU LES AUTRES PARTIES
FOURNISSENT LE PROGRAMME "EN L'ETAT", SANS
AUCUNE GARANTIE DE QUELQUE NATURE QUE CE
SOIT, EXPRESSE OU IMPLICITE, Y COMPRIS, MAIS
SANS Y ETRE LIMITE, LES GARANTIES IMPLICITES DE
COMMERCIABILITE ET DE LA CONFORMITE A UNE
UTILISATION PARTICULIERE. VOUS ASSUMEZ LA
TOTALITE DES RISQUES LIES A LA QUALITE ET AUX
PERFORMANCES DU PROGRAMME. SI LE
PROGRAMME SE REVELAIT DEFECTUEUX, LE COUT
DE L'ENTRETIEN, DES REPARATIONS OU DES
CORRECTIONS NECESSAIRES VOUS INCOMBENT
INTEGRALEMENT.
12. EN AUCUN CAS, SAUF LORSQUE LA LOI APPLICABLE
OU UNE CONVENTION ECRITE L'EXIGE, UN TITULAIRE
DE DROIT D'AUTEUR QUEL QU'IL SOIT, OU TOUTE
PARTIE QUI POURRAIT MODIFIER ET/OU
REDISTRIBUER LE PROGRAMME COMME PERMIS CIDESSUS, NE POURRAIT ETRE TENU POUR
RESPONSABLE A VOTRE EGARD DES DOMMAGES,
INCLUANT LES DOMMAGES GENERIQUES,
SPECIFIQUES, SECONDAIRES OU CONSECUTIFS,
RESULTANT DE L'UTILISATION OU DE L'INCAPACITE
D'UTILISER LE PROGRAMME (Y COMPRIS, MAIS SANS
Y ETRE LIMITE, LA PERTE DE DONNEES, OU LE FAIT
QUE DES DONNEES SOIENT RENDUES IMPRECISES,
OU LES PERTES EPROUVEES PAR VOUS OU PAR DES
TIERS, OU LE FAIT QUE LE PROGRAMME ECHOUE A
46
INTEROPERER AVEC UN AUTRE PROGRAMME QUEL
QU'IL SOIT) MEME SI LE DIT TITULAIRE DU DROIT
Fr
ique et "une
ABSENCE DE GARANTIE
D'AUTEUR OU LE PARTIE CONCERNEE A ETE AVERTI
DE L'EVENTUALITE DE TELS DOMMAGES.
Comment appliquer ces conditions à vos nouveaux
Si vous développez un nouveau programme, et si vous
voulez qu'il soit de la plus grande utilité possible pour le
public, le meilleur moyen d'y parvenir est d'en faire un
logiciel libre que chacun peut redistribuer et modifier au
titre des présentes conditions.
Pour ce faire, munissez le programme des avis qui suivent.
Le plus sûr est de les ajouter au début de chaque fichier
source pour véhiculer le plus efficacement possible
l'absence de toute garantie ; chaque fichier devrait aussi
contenir au moins la ligne "copyright" et une indication de
l'endroit où se trouve l'avis complet.
[
Une ligne donnant le nom du programme et une courte
idée de ce qu'il fait.] Copyright (C) [année] [nom de
l'auteur] Ce programme est un logiciel libre ; vous
pouvez le redistribuer et/ou le modifier au titre des
clauses de la Licence Publique Générale GNU, telle que
publiée par la Free Software Foundation ; soit la version
2 de la Licence, ou (à votre discrétion) une version
ultérieure quelconque. Ce programme est distribué
dans l'espoir qu'il sera utile, mais SANS AUCUNE
GARANTIE ; sans même une garantie implicite de
COMMERCIABILITE ou DE CONFORMITE A UNE
UTILISATION PARTICULIERE. Voir la Licence Publique
Générale GNU pour plus de détails. Vous devriez avoir
reçu un exemplaire de la Licence Publique Générale
GNU avec ce program me ; si ce n'es t pas le cas, écrivez
à la Free Software Foundation Inc., 51 Franklin Street,
Fifth Floor, Boston, MA 02110-1301, USA.
Ajoutez aussi des informations sur la manière de vous
contacter par courrier électronique et courrier postal.
Si le programme est interactif, faites en sorte qu'il affiche
un court avis tel que celui-ci lorsqu'il démarre en mode
interactif :
Gnomovision version 69, Copyright (C) année nom de
l'auteur Gnomovision n'est accompagné
d'ABSOLUMENT AUCUNE GARANTIE ; pour plus de
détails tapez "show w". Ceci est un logiciel libre et vous
êtes invité à le redistribuer en respec
obligations ; pour plus de détails tapez "show c".
Les instructions hypothétiques "show w" et "show c" sont
supposées montrer les parties ad hoc de la Licence
Publique Générale. Bien entendu, les instructions que vous
utilisez peuvent porter d'autres noms que "show w" et "show
c" ; elles peuvent même être des clics de souris ou des
éléments d'un menu ou tout c e qui convient à votre
programme.
Vous devriez aussi obtenir de votre employeur (si vous
travaillez en tant que développeur) ou de votre école, si c'est
le cas, qu'il (ou elle) signe une "renonciation aux droits
d'auteur" concernant le programme, si nécessaire. Voici un
exemple (changez les noms) :
Yoyodyne, Inc., déclare par la prés
i
prétention sur les droits d'auteur du programme
"Gnomovision" (qui fait des avances aux compilateurs)
écrit par James Hacker. [signature de Ty Coon], 1er avril
1989 Ty Coon, Président du Vice
La présente Licence Publique Générale n'autorise pas
l'incorporation de votre programme dans des programmes
propriétaires. Si votre programme est une bibliothèque de
sous-programmes, vous pouvez considérer plus utile
d'autoriser l'édition de liens d'applications proprié
avec la bibliothèque. Si c'est ce que vous voulez faire,
utilisez la GNU Lesser General Public License au lieu de la
présente Licence.
LICENCE PUBLIQUE GÉNÉRALE GNU LIMITÉE
Copyright (C) 1991, 1999 Free Software Foundation, Inc.
51 Franklin Street, Fifth Floor, Boston, MA 02110-1301 USA
La copie et la distribution de copies exactes de ce
document sont autorisées, m ais aucune modification n’est
permise.
[Ceci est la première version de la GPL Limitée. Elle
succède à la version 2 de la Licence Publique GNU pour les
bibliothèques, d’où le numéro de version 2.1.
Les licences de la plupart des logici els sont conçues pour
vous enlever toute liberté de les partager et de les modifier.
A contrario
, les Licences Publiques Générales GNU sont
destinées à garantir votre liberté de partager et de modifier
les logiciels libres, et à assurer que ces logiciels soient
libres pour tous leurs utilisateurs.
La présente Licence Publique Générale s’applique à la
plupart des logiciels de la Free Software Foundation, ainsi
qu’à tout autre programme pour lequel ses auteurs
s’engagent à l’utiliser. Vous pouve z aussi l’appliquer aux
programmes qui sont les vôtres mais nous vous
conseillons de réfléchir attentivement au fait que la Licence
Publique Générale o rdinaire peut être mi
certains cas, compte tenu des considérations suivantes.
Quand nous parlons de logic iels libres, nous parlons de
liberté, non de prix. Nos licences publiques générales sont
conçues pour vous donner l’assurance d’être libres de
distribuer des copies des logiciels libres (et de facturer ce
service, si vous le souhaitez), de recevoir le code source ou
de pouvoir l’obtenir si vo us le s ou ha it ez, de pouvoir modifier
FIN DES CONDITIONS
tant certaines
ente renoncer à toute
Version 2.1, Février 1999
eux adaptée dans
ra
prog
taires
Préambule
les logiciels ou en utiliser des éléments dans de nouveaux
programmes libres et de savoir que vous pouvez le faire.
Pour protéger vos dro
des limitations qui interdisent à quiconque de vous refuser
ces droits ou de vous demander d’y renoncer. Certaines
mmes
responsabilités vous incombent en raison de ces
limitations si vous distribuez des copies de cette
bibliothèque, ou si vous les modifiez.
Par exemple, si vous distribuez des copies d’une telle
bibliothèque, à titre gratuit ou contre une rémunération,
vous devez accorder aux destinataires tous les droits dont
vous disposez. Vous devez vous assurer qu’eux aussi
reçoivent ou puissent disposer du code source. Si vous
reliez un autre code au logiciel, vous devrez fournir les
fichiers complets aux destinataires, pour qu
relier à la bibliothèque après l’avoir modifiée ou
recompilée. Et vous devez leur montrer les présentes
conditions afin qu’ils aient connaissance de leurs droits.
Nous protégeons vos droits en deux étapes : (1) nous
sommes titulaires des droits d’auteur du logiciel, et (2)
nous vous délivrons cette licence, qui vous donne
l’autorisation légale de copier, distribuer et/ou modifier la
bibliothèque.
En outre, pour la protection de chaque auteur ainsi que la
nôtre, nous voulons nous assurer que chacun comprenne
que cette bibliothèque libre ne fait l’objet d’aucune
garantie. Si cette bibliothèque est modifiés par quelqu’un
d’autre puis transmise à des tiers, nous voulons que les
destinataire
n’est pas le logiciel d’origin e, de sorte que tout problème
introduit par d’autres ne puisse entache r la réputation de
l’auteur originel.
En définitive, un programme libre restera à la merci des
brevets de logiciels. Nous souhaitons éviter le risque que
les redistributeurs d’un programme libre fasse nt des
demandes individuelles de licence de brevet, ceci ayant
pour effet de rendre le programme propriétaire. Pour éviter
cela, nous établissons clairement que toute licence de
brevet doit être c
libre pour tous ou bien qu’aucune licence ne soit
concédée.
La plupart des logiciels GNU, bibliothèques com prises,
sont couvert par la Licence Publiq ue Générale GNU
ordinaire. Cette licence, la Licence Publique Générale
Limitée GNU, concerne un certain nombre de
bibliothèques et diffère beaucoup de la Licence Publique
Générale ordinaire. No us couv rons par la présente licence
certaines bibliothèques afin de permettre à des
programmes non libres d’être liés avec ces dernières.
Quand un programme est lié à une bibliothèque, que ce
soit de manière statique ou par l’utilisation d’une
bibliothèque partagée, l’ensemble forme légalement
parla
nt un travail combiné, dérivé de la bibliothèque
originale. C’est pourquoi la Licence Publique Générale
ordinaire n’autorise une telle édition de liens que si
l’ensemble qui en résulte satisfait ses critères de liberté. .
La Licence Publique G énérale Limitée est permissive quant
aux critères que doit remplir un code lié avec la
bibliothèque en question.
Nous qualifions cette licence de «Limitée» ca r les garanties
de liberté qu’elle apporte à l’utilisateur sont limitées par
rapport à celles de la Licence Publique Générale ordinaire.
Elle limite également les avantages que peuvent acquérir
d’autres développeurs de logiciels libres dans la
concurrence avec les progra
cause de ces limitations que nous utilisons la Licence
Publique Générale ordinaire pour de nombreuses
bibliothèques. Cependant, la Licence Limitée est
avantageuse dans certaines circonstances particulières.
Par exemple, on observe (rarement) un besoin particulier
d’encourager autant que possible l’utilisation d’une
certaine bibliothèque, de telle sorte qu’elle devienne un
standard de fait. Pour atteindre un tel but, il faut autoriser
des programmes non libres à utiliser cette bibliothèque.
Un cas plus fréquemment rencontré est celui où une
bibliothèque libre remplit la même fonction que des
bibliothèques non libres et très répa
à gagner à limiter la bibliothèque libre aux logiciels libres,
et on utilisera la Licence Publique Générale Limitée.
Dans d’autres cas, autoriser des programmes non libres à
utiliser une bibliothèque particulière autorise plus de
monde à utiliser une grande quantité de logiciels libres.
Par exemple, la permission d’utiliser la bibliothèque GNU
pour le langage C dans des programmes non libres permet
à beaucoup plus de gens d’utiliser l’ensemble du système
d’exploitation GNU, ainsi que sa variante GNU/Linux.
Bien que la Licence Publique Générale Limitée limite la
liberté des utilisateurs, elle assure q
programme lié avec la Bibliothèque a la liberté et la
possibilité d’exécuter ce programme en utilisant une
version modifiée de la Bibliothèque.
Les termes et conditions précis selon lesquels on peut
copier, distribuer, et modifier une telle bibliothèque
suivent. Accordez une attention toute particulière à la
différence entre un «travail fondé sur la bibliothèque» et un
«travail qui utilise la biblio thèque». Celui-là renferme du
code dérivé de la bibliothèque, alors que celui- ci doit être
combiné à la bibliothèque pour être ex écuté.
STIPULATIONS ET CONDITIONS RELATIVES À LA COPIE,
LA DISTRIBUTION ET LA MODIFICATION
its, il nous est nécessai re d’imposer
s soient mis au courant que ce qu’ils ont reçu
oncédée de façon à ce que l’usage en soit
mmes non libres. C’est à
LICENCE PUBLIQUE GÉNÉRALE GNU LIMITÉE
’ils puissent les
ndues. Il y a alors peu
ue l’utilisateur d’un
Page 97

0. Le présent Accord de Licence s’applique à toute
bibliothèque logicielle ou tout autre programme où
figure une note, placée par le détenteur des droits ou un
tiers autorisé à ce faire, stipulant que ladite
bibliothèque ou programme peut être distribuée selon
les termes de la présente Licence Publique Générale
Limitée (également appelée «cette licence»). Chaque
personne concernée par la Licence Publique Générale
Limitée sera désignée par le terme Vous.
Une "bibliothèque" signifie une collection de fonctions
et/ou de données logicielles préparées de manière à
être convenablement liées avec des programmes
d’application (qui utilisent certaines des fonctions et
des données) dans le but de former de
Ci-dessous, le terme "Bibliothèque" se rapporte à toute
bibliothèque ou œuvre logicielle distribuée selon les
présents termes. Un "travail fondé sur la Bibliothèque"
signifie aussi bien la Bibliothèque elle-même que tout
travail qui en est dérivé selon la loi, c’est-à-dire tout
ouvrage reproduisant la Bibliothèque ou un e partie de
cette dernière, à l’identique ou bien modifiée, et/ou
traduit dans une autre langue (la traduction est
considérée comme une "modification").
Le "code source" d’un travail désigne la forme de cet
ouvrage sous laquelle les modifications sont les plus
aisées. Sont ainsi désignés la totalité du code source
de tous les modules composant une bibliothèque
logicielle, de même que tout fichier de définition
associé, ainsi que les scripts utilisés pour effectuer la
compilation et l’installation de la bibliothèque.
Les activités autres que copie, distribution et
mo
dification ne sont pas couvertes par la présente
Licence et sortent de son cadre. Rien ne restreint
l’utilisation de la Bibliothèque, et les données issues de
celle-ci ne sont couvertes que si leur contenu constitue
un travail fondé sur la Bibliothèque (indépendamm ent
du fait d’avoir été réalisé en utilisant la Bibliothèque).
Tout dépend de ce que la Bibliothèque et le programme
qui y fait appel sont censés produire.
1. Vous pouvez copier et distribuer des copies conformes
et complètes du code source de la Bibliothèque, tel que
Vous l’avez reçue, sur n’importe quel support, à
condition de placer sur chaque copie un copyright
approprié et
une restriction de garantie, de ne pas
modifier ou omettre toutes les stipulations se référant à
la présente Licence et à la limitation de garantie, et de
fournir avec toute copie de la Bibliothèque un
exemplaire de la Licence.
Vous pouvez demander une rétribution financière pour
la réalisation de la copie et demeurez libre de proposer
une garantie assurée par vos soins, moyennant
finances.
2. Vous pouvez modifier votre copie ou vos copies de la
Bibliothèque ou partie de celle-ci, ou d’un travail fondé
sur cette Bibliothèque, et copier et d
modifications selon les termes de l’article 1, à condition
de Vous conformer également aux conditions suivantes
:
a) Le travail dérivé doit être lui-même une bibliothèque
logicielle.
b) Ajouter aux fichiers modifiés l’indication très claire
des modifications effectuées, ainsi que la date de
chaque changement.
c) Distribuer sous les termes de la présente Licence
l’ensemble de la réalisation, à tous, et sans frais.
d) Si une fonctionnalité de la Bibliothèque modifiée se
réfère à une fonction ou à des données fournies par
le programme d’application qui utilise la
fonctionnalité en question sans pour cela utiliser
d’argument lors de l’appel de cette dernière, vous
devez agir au mieux pour assurer que la
fonctionnalité se comporte correctement et rempli
ceux de ses buts qui ont encore un sens lorsqu’une
application ne fournit pas la fonction ou les données
auxquelles la Bibliothèqu e se réfère.
(Par exemple, si une fonction d’une bibliothèque
calcule des racines carrées, elle a un but absolument
bien défini, indépendamment de l’application. Par
conséquent, la clause 2d exi ge que toute fonction ou
toutes données fournies par l’application et
utilisation cette fonction soient optionnelles : si
l’application ne les propose pas, la fonction de calcul
de racines carrées doit encore calculer des racines
carrées.)
Toutes ces conditions s’appliquent à l’ensemble des
modifications. Si des éléments identifiables de ce
travail ne sont pas dérivés de la Bibliothèque et peuvent
être raisonnablement considérés comme
indépendants, la présente Licence ne s’applique pas
ces éléments lorsque Vous les distribuez seuls. Mais,
si Vous distribuez ces mêmes éléments comme partie
d’un ensemble cohérent dont le reste est fondé sur une
Bibliothèque soumise à la Licence, ils lui sont
également soumis, et la Licence s’étend ainsi à
l’ensemble du produit, quel qu’en soit l’auteur.
Cet article n’a pas pour but de s’approprier ou de
contester vos droits sur un travail entièrement réalisé
par Vous, mais plutôt d’ouvrir droit à un contrôle de la
libre distribution de tout travail dérivé ou collectif fondé
sur la Bibliothèque.
s exécutables.
istribuer ces
En outre, toute fusion d’un autre travail, non fondé sur
la Bibliothèque, avec l a Bibliothèque (ou avec un travail
dérivé de cette dernière), effectuée sur un support de
stockage ou de distribution, ne fait pas tomber cet autre
travail sous le contrôle de la Licence.
3. Vous pouvez opter pour la Licence Publique Générale
GNU ordinaire pour protéger une copie donnée de la
Bibliothèque. Pour cela, il vous faudra modifier toutes
les notes se référant à la présente Licence, pour qu’elles
se réfèrent plutôt à la Licence Publique Générale GNU
ordinaire, version 2 (si une version plus récente de la
Licence Publique Générale GNU a vu le jour, vous
pouvez alors spécifier cet autre n
est votre désir). Ne vous livrez à aucune autre
modification dans ces notes.
Une fois que ce changement a été effectué dans une
copie donnée, il est irréversible pour cette copie, aussi
la Licence Publique Générale ordinaire s’appliquera à
toutes les copies et tous les travaux dérivés qui en
seront extraits.
Cette option vous servira lorsque vous souhaiterez
copier une portion du code de la Bibliothèque dans un
programme qui n’est pas lui-même une bibliothèque.
4. Vous pouvez copier et distribuer la Bibliothèque (ou tout
travail dérivé selon les conditions é noncées dans
l’article 2) sous forme de code objet ou exécutable,
selon les termes des art
fournir le code source complet de la Bibliothèque, sous
une forme lisible par un ordinateur et selon les termes
des articles 1 et 2, sur un support habituellement utilisé
pour l’échange de données.
Si la distribution du code objet consiste à offrir un accès
permettant de copier la Bibliothèque depuis un endroit
particulier, l’offre d’un accès équivalent pour se
procurer le code source au même endroit satisfait
l’obligation de distribution de ce code source, même si
l’utilisateur choisit de ne pas profiter de cette offre.
5. On appelle «travail qui utilise la Bibliothèqu e» tout
program
me qui n’est dérivé d’aucune portion de la
Bibliothèque, mais qui est conçu dans le but de
fonctionner avec cette dernière en l’incluant à la
compilation ou à l’édition de liens. Isolée, une telle
œuvre n’est pas un travail dérivé de la Bibliothèque, et
sort donc du cadre de cette License.
Cependant, lier un «travail qui utilise la Bibliothèque» à
cette dernière produit un exécutable qui est dérivé de la
Bibliothèque (en ce qu’il en contient des portions), et
non plus un «travail qui utilise la Bibliothèque». Cet
exécutable est donc couvert par la présente License.
C’est l’article 6 qui énonce les conditions de
distribution de tels exécu tables.
Dans le cas où un «travail qui utilise la Bibliothèque»
utilise des portions d’un fichier d’en-têtes inclus dans
cette dernière, le code objet qui en résulte peut fort bien
être un travail dériv
même ce n’est pas le cas du code source. Cette
précision prend toute son importance si on peut lier ce
travail sans la Bibliothèque, ou si le travail est lui-même
une bibliothèque. Le seuil à partir duquel cela prend
effet n’est pas exactement défini par la loi.
Si un tel fichier objet n’ut ilise que des paramètres
numériques, les représentations des structures de
données et ce par quoi elles sont lues ou modifiées,
ainsi que de petites instructions macros ou fonctions
embarquées (de moins de dix lignes de longueur), alors
on pourra utiliser le fichier objet de la manière que l’on
souhaite, qu’il soit ou non, légalement parlant, un
travail dérivé (mais les exécutables renferma
objet et des portions de la Bibliothèque continuent à
être soumis à l’article 6).
Sinon, si le travail est dérivé de la Bibliothèque, vous
pouvez distribuer le code objet de ce travail selon les
t
conditions de l’article 6. Tout exécutable renfermant ce
travail est lui aussi soumis à l’article 6, qu’il soit ou non
directement lié avec la Bibliothèque à proprement
parler.
6. Le précédent article fait exception aux précédents. Vous
pouvez également combiner ou lier un «travail qui
utilise la Bibliothèque» avec cette dernière pour
produire un travail contenant des portions de la
Bibliothèque, et distribuer ce dernier sous les
conditions qui vous siéront, pourv
autorisent la modification de ce travail pour utilisation
personnelle, ainsi que l’ingénierie à revers afin de
déboguer ces modifications.
Vous devez fournir avec chaque copie du travail une
note très claire expliquant que la Bibliothèque fut
utilisée dans sa conception, et que la Bibliothèque et
son utilisation sont couvertes par la présente Licence.
à
Vous devez également fournir une copie de la présente
Licence . Si le travail, lors de son exécution, affiche des
copyrights, vous devez inclure parmi ces derniers le
copyright de la Bibliothèque, ainsi qu’une référence
expliquant à l’utilisateur où il pourra trouver un
de la présente Licence. Vous devez aussi vous
conformer à l’un des points suivants :
a) Accompagner le travail avec l’intégralité du code
source pour la Bibliothèque, sous une forme lisible
par un ordinateur, ainsi que les éventuelles
modifications que vous lui avez apportées pour
réaliser ce travail (lequel doit être distribué selon les
uméro de version si tel
icles 1 et 2, à condition de
é de la Bibliothèque, quand bi en
u que ces conditions
termes des articles 1 et 2). Si le travail est un
exécutable lié avec la Bibliothèque, il vous faut
proposer également, sous une forme lisible par un
ordinateur, l’ensemble du «travail qui utilise la
Bibliothèque», sous forme de code source ou objet,
de telle sorte que l’utilisateur puisse modifier la
Bibliothèque et effectuer de
liens, afin de produire un exécutable modifié,
renfermant une version modifiée de la Bibliothèque
(il est entendu que l’utilis ateur qui modifie le contenu
des fichiers de définitions de la Bibliothèque ne sera
pas forcément capable de recompiler l’application
afin d’utiliser la version modi fiée de ces définitions).
b) Utiliser un mécanisme de partage de bibliothèques
convenable pour l’édition de liens avec la
Bibliothèque. Un mécanisme convenable est un
mécanisme qui: (1) utilise une copie de la
bibliothèque déjà présente sur le système de
l’utilisateur, plutôt que de copier des fonctions de la
bibliothèque au sein de l’exécutable, et (2)
fonctionnera correctement avec une version
modifiée de la bibliothèque, si l’utilisateur en installe
une, tant que la version modifiée sera compatible
avec la version qui a servi à la réalisation du travail.
c) Faire une offre écrite, valable pen
ans, proposant de distribuer à cet utilisateur les
éléments spécifiés dans l’article 6a, ci -dessus, pour
un tarif n’excédant pas le coût de la copie.
d) Si le travail est distribué en proposant un accès à une
copie située à un endroit désigné, proposer de
manière équivalente, depuis ce même endroit, un
accès aux objets spécifiés ci-dessus.
e) Vérifier que l’utilisateur a déjà reçu une copie de ces
objets, ou que vous la lui av ez déjà envoyée.
Pour un programme exécutable, la forme requise du
«travail qui utilise la Bibl iothèque» doit comprendre
toute donnée et tout utilitaire nécessaires pour pou
reconstruire l’exécutable. Toutefois, l’environnement
standard de développement du système d’exploitation
mis en œuvre (source ou binaire) -- compilateurs,
bibliothèques, noyau, etc. -- constitue une exception,
sauf si ces éléments sont diffusés en même temps que
le programme exécutable.
Il est possible que cette clause soit en contradiction
avec les restrictions apportées par les licences d’autres
bibliothèques propriétaires qui habituellement
n’accompagnent pas le système d’exploitation. Une
telle contradiction signifie qu’il Vous est impossible
d’utiliser ces dernières en conjonction avec la
Bibliothèque au sein d’un exécutable distribué par
Vous.
7. Vous pouvez incorporer a
bibliothèque des fonctionnalités fondées sur la
Bibliothèque, qui forment un travail fondé sur cette
dernière, avec des fonctionnalités issues d’autres
bibliothèques, non couvertes par la présente Licence, et
distribuer la bibliothèque résultante, si tant est qu’il est
autorisé par ailleurs de distribuer séparément le travail
fondé sur la Bibliothèque et les autres fonctionnalités,
et pourvu que vous vous acquittiez des deux obligations
suivantes :
a) Accompagner la bibliothèque résultante d’une copie
du travail fondé sur la Bibliothèque, sans le combiner
aux autres fonctionnalités de bibliothèques. Cet
ensemble doit être distribué selon les conditions des
articles ci-dessus.
b) Ajouter à la bibliothèque mixte l’indication très claire
nt ce code
e copie
du fait qu’une porti
fondé sur la Bibliothèque, et en expliquant où trouver
la version non mélangée du même travail.
8. Vous ne pouvez pas copier, modifier, céder, déposer ou
distribuer la Bibliothèque d’une autre ma nière que
l’autorise la présente Licence. Toute tentative de ce
type annule immédiatement vos droits d’utilisation de
la Bibliothèque sous cette Licence. Toutefois, les tiers
ayant reçu de Vous des copies de la Bibliothèque ou le
droit d’utiliser ces copies continueront à bénéficier de
leur droit d’utilisation tant qu ’ils respecteront
pleinement les conditions de la présente Licence.
9. Ne l’ayant pas signée, Vous n’êtes pas obligé
d’accepter la présente Licence. Cepen
d’autre ne Vous autorise à modif ier ou distribuer la
Bibliothèque ou quelques travaux dérivés : la loi
l’interdit tant que Vous n’acceptez pas les termes de la
présente Licence. En conséquence, en modifiant ou en
distribuant la Bibliothèque (ou tout travail fondé sur
elle), Vous acceptez implicitement tous les termes et
conditions de la présente Licence.
10. La diffusion d’une Bibliothèque (ou de tout travail
dérivé) suppose l’envoi simultané d’une licence
autorisant la copie, la distribut ion, l’édition de liens
avec, ou la modification de la Bibliothèque, aux termes
et conditions de la Licence. Vous n’avez pas le droit
d’imposer de restrictions supplémentaires aux droits
transmis au destinataire. Vous n’êtes pas responsable
du respec
11. Si, à la suite d’une décision de Justice, d’une plainte en
contrefaçon ou pour toute autre raison (liée ou non à la
contrefaçon), des conditions Vous sont imposées (que
ce soit par ordonnance, accord amiable ou autre) qui se
révèlent incompatibles avec les termes de la présente
on de la bibliothèque est un travail
t de la Licence par un tiers.
08
nouveau l’édition de
dant au moins trois
voir
u sein d’une même
dant, rien
47
Fr
Page 98

Licence, Vous n’êtes pas pour autant dégagé des
obligations liées à celle-ci : si Vous ne pouvez concilier
08
vos obligations légales ou autres avec les condition s de
cette Licence, Vous ne deve z pas distribuer la
Bibliothèque. Par exemple, si une licence ne permettait
pas la redistribution de redevance de la Bibliothèque
par tous ceux à qui des copies ont été données
directement ou indirectement, la seule façon de
satisfaire aux deux, serait de ne pas distribuer du t out la
Bibliothèque.
Si une partie quelconque de cet article est invalidée ou
inapplicable pour quelque raison que ce soit, le reste de
l’article continue de s’appliquer et l’intégralité de
l’article s’appliquera en toute autre circonst ance.
Le prése
nt article n’a pas pour but de Vous pousser à
enfreindre des droits ou des dispositions légales ni en
contester la validité; son seul objectif est de protéger
l’intégrité du système de distribution du Logiciel Libre.
De nombreuses personnes ont généreusement
contribué à la large gamme de logiciels distribuée de
cette façon en toute confi ance; il appartient à chaque
auteur/donateur de décider de diffuser ses logiciels
selon les critères de son choix.
Cette section a pour but de mettre en évidence ce qui
est supposé être une conséquence du reste de cette
licence.
12. Si la distribution et/ou l’util isation de la Bibliothèque est
limitée dans certains pays par des brevets ou des droi
sur des interfaces, le détenteur original des droits qui
place la Bibliothèque sous la Licence Publique
Générale peut ajouter explicitement une clause de
limitation géographique excluant ces pays. Dans ce
cas, cette clause devient une partie intégrante de la
Licence.
13. La Free Software Foundation se réserve le droit de
publier périodiquement des mises à jour ou de
nouvelles versions de la Licence. Rédigées dans le
même esprit que la présente version, elles seront
cependant susceptibles d’en modifier certains détails à
mesure que de nouveaux problèmes se font jour.
Chaque version possède un numéro distinct. Si la
Bibliothèque précise un numéro de version de cette
L
icence et «toute version ultérieure», V ous a vez l e cho ix
de suivre les termes et conditions de cette version ou de
toute autre version plus récente publiée par la Free
Software Foundation. Si la Bibliothèque ne spécifie
aucun numéro de version, Vous pouvez alors choisir
l’une quelconque des versions publiées par la Free
Software Foundation.
14. Si Vous désirez incorporer des éléments de la
Bibliothèque dans d’autres programmes libres dont les
conditions de distribution diffèrent, Vous devez écrire à
l’auteur pour lui en demander la permission. Pour ce
qui est des programmes directement déposés par la
Free Software Foundation, écrivez-nous: une exception
est toujours envisageable. Notre décision sera basée
sur notre volonté de préserver la liberté de notre
Programme ou de ses dérivés et celle de promouvoir le
partage et la réutilisation du logiciel en général.
15. PARCE QUE L’UTILISATION DE LA BIBLIOTHÈQUE EST
LIBRE ET GRATUITE, AUCUNE GARANTIE N’EST
FOURNIE, COMME LE PERMET LA LOI. SAUF
MENTION ÉCRITE, LES DÉTENTEURS DU COPYRIGHT
ET/OU LES TIERS FOURNISSENT LA BIBLIOTHÈQUE
EN L’ÉTAT, SANS AUCUNE SORTE DE GARANTIE
EXPLICITE OU IMPLICITE, Y COMPRIS LES GARANTIES
DE COMMERCIALISATION OU D’ADAPTATION DANS
UN BUT PARTICULIER. VOUS ASSUMEZ TOUS LES
RISQUES QUANT À LA QUALITÉ ET AUX EFFETS DE LA
BIBLIOTHÈQUE. SI LA BIBLIOTHÈQUE EST
DÉFECTUEUSE, VOUS ASSUMEZ LE COÛT DE TOUS
LES SERVICES, CORRECTIONS OU RÉPARATIONS
NÉCESSAIRES.
16. SAUF LORSQU’EXPLICITEMENT PRÉVU PAR LA LOI
OU ACCEPTÉ PAR ÉCRIT, NI LE DÉTENTEUR DES
DROITS, NI QUICONQUE AUTORISÉ À MODIFIER ET/
OU REDISTRIBUER LA BIBLIOTHÈQUE COMME IL EST
PERMIS CI-DESSUS NE POURRA ÊTRE TENU POUR
RESPONSABLE DE TOUT DOMMAGE DIRECT,
INDIRECT, SECONDAIRE OU ACCESSOIRE (PERTES
DE DONNÉES OU DONNÉES DEVENUES INEXACTES
OU PERTES SUBIES PAR VOU S OU UN TIERS OU
IMPOSIBILITÉ D’UTILISER LA BIBLIOTHÈQUE AVEC
UN AUTRE LOGICIEL) DÉCOULANT DE L’UTILISATION
DE LA BIBLIOTHÈQUE OU DE L’IMPOSSIBILITÉ
D’UTILISER CELLE-CI) ET CE, INDÉPENDAMMENT DU
CARACTÈRE PRÉVISIBLE OU NON DE CES
PRÉJUDICES.
Comment appliquer ces directives à vos nouvelles
Si vous développez une nouvelle bibliothèque et désirez en
faire bénéficier
d’en faire un Logiciel Libre que tout le monde pourra
redistribuer et modifier. Vous pouvez atteindre ce but en
autorisant la redistribution selon les présentes clauses (ou,
c’est une autres solution, selon les termes de l a Licence
Publique Générale ordinaire).
48
Pour cela, insérez les indications suivantes dans votre
bibliothèque. Il est préférable et plus sûr de les faire figurer
Fr
FIN DES TERMES ET CONDITIONS
tout un chacun, la meilleure mé
LIMITATION DE GARANTIE
bibliothèques
thode est
au début de chaque fichier source; dans tous les cas,
chaque module source devra comporter au minimum la
ligne de «copyright» et indiquer où résident toutes les
autres indications.
<une ligne pour donner le nom de la bibliothèque et
don
ner une idée de sa finalité.>
Copyright (C) <année> <nom de l’auteur>
Cette bibliothèque est libre, vous pouvez la redistribuer
et/ou la modifier selon les termes de la Licence
Publique Générale GNU
Limitée publiée par la Free Software Foundation
(version 2.1 ou bien toute autre version ultérieure
choisie par vous).
Cette bibliothèque est distribuée car potentiellement
utile, mais SANS AUCUNE GARANTIE, ni explicite ni
implicite, y compris les garanties de
COMMERCIALISATION OU D’ADAPTATION DANS UN
BUT SPÉCIFIQUE. Reportez-vous à la Licence Publique
Générale GNU Limitée pour plus de détails.
Vous devez avoir reçu une copie de la Licence Publ ique
Générale GNU Limitée en même temps que cette
bibliothèque; si ce n’est pas
Software
Foundation, Inc., 51 Franklin Street, Fifth Floor, Boston,
MA 02110-1301 USA.
Ajoutez également votre adresse électronique, le cas
échéant, ainsi que votre adresse postale.
Si v ous of fic iez en t ant que programmeur, n’omettez pas de
ts
demander à votre employeur, votre établissement scolaire
ou autres de signer une décharge stipulant leur
renoncement aux droits qu’ils pourraient avoir sur la
bibliothèque : Voici un exemple (changez les noms :)
"Employeur, école" déclare par la présente ne pas
revendiquer de droits sur la bibliothèque ("Nom de la
bib
liothèque") réalisée par "Nom de l’auteur".
<signature du responsable >, 1 April 1990
Nom et Qualité du responsable.
C’est tout !
le cas, écrivez à la Free
Page 99

Précautions d’emploi
Déplacement du lecteur
Si vous devez transporter ce lecteur, retirez le disque, s’il
en contient un, et refermez le tiroir à disque. Cela fait,
appuyez sur STANDBY/ON pour mettre l’appareil en
veille et assurez-vous que le témoin POWER OFF s’éteint
sur l’afficheur de la face avant. Attendez au moins 10
secondes. Enfin, débranchez le cordon d’alimentation.
Ne soulevez pas et ne déplacez pas le lecteur pendant la
lecture — le disque tourne à vitesse élevée et risquerait
d’être endommagé.
Emplacement du lecteur
Choisissez une surface stable près du téléviseur et de la
chaîne AV auxquels le lecteur doit être raccordé.
N’installez pas le lecteur sur un téléviseur ou un moniteur
couleur. Installez le lecteur à l’écart de platines à
cassettes ou d’appareils facilement affectés par le
magnétisme.
Évitez les endroits suivants :
•Exposés à la lumière directe du soleil
• Humides ou mal aérés
•Extrêmement chauds ou froids
•Exposés à des vibrations
•Exposés à une poussière ou une fumée de cigarettes
intense
•Exposés à la suie, la vapeur ou la chaleur (par
exemple dans un cuisine)
Ne pas poser d’objets sur le lecteur
Ne posez pas d’objets sur le lecteur.
Ne pas obstruer les orifices de
ventilation
N’utilisez pas le lecteur sur une couverture à longs poils,
un lit ou un sofa, et ne recouvrez pas le lecteur d’un tissu,
etc. La chaleur ne pourrait pas se dissiper et le lecteur
pourrait être endommagé.
Tenir à l’écart de la chaleur
N’installez pas le lecteur sur un amplificateur ou un autre
appareil produisant de la chaleur. Si le lecteur doit être
installé dans un meuble, mettez-le si possible en dessous
de l’amplificateur pour qu’il ne soit pas exposé à la
chaleur de l’amplificateur ou des autres appareils.
Éteignez le lecteur lorsque
vous ne l’utilisez pas
Des rayures peuvent apparaître sur l’écran du téléviseur,
selon les signaux TV, si le lecteur est en service lorsque
vous regardez la télévision. Il ne s’agit pas d’une
défectuosité du lecteur ou du téléviseur. Dans ce cas,
éteignez le lecteur. De même, le son de la radio peut être
parasité.
Condensation
Si vous transportez sans transition le lecteur d’un endroit
froid dans une pièce chaude (en hiver, par exemple), ou si
la température de la pièce où se trouve le lecteur
augmente rapidement, des gouttelettes d’eau
(condensation) peuvent se former à l’intérieur du lecteur
(sur les pièces et la lentille). En cas de condensation, le
lecteur ne fonctionne pas correctement et la lecture n’est
pas possible. Laissez le lecteur en service pendant 1 ou 2
heures à la température ambiante (pour que l’humidité
ait le temps de s’évaporer). Les
dissiperont et la lecture sera de nouveau possible.
De la condensation peut aussi se former en été si le
lecteur est exposé à l’air d’un climatiseur. Dans ce cas,
éloignez le lecteur du climatiseur.
gouttelettes d’eau se
Nettoyage du lecteur
Normalement, essuyez le lecteur avec un chiffon doux.
Pour enlever les taches rebelles, imprégnez le chiffon
d’un détergent neutre dilué dans 5 à 6 fois plus d’eau,
tordez bien le chiffon, essuyez la saleté, puis passez un
chiffon sec sur lecteur.
Notez que les inscriptions et le revêtement du lecteur
peuvent être endommagés par l’alcool, les diluants, le
benzène et les insecticides. Évitez aussi de laisser des
produits en caoutchouc ou en vinyle très longtemps au
contact du lecteur, car ils pourraient endommager le
coffret.
Lorsque vous utilisez des lavettes imprégnées de produit
chimique, etc. lisez attentivement les précautions à
prendre.
Débranchez le cordon d’alimentation de la prise secteur
avant de nettoyer le lecteur.
Attention si lecteur est
installé dans un meuble avec
une porte en verre
N’appuyez pas sur OPEN/CLOSE de la télécommande
pour ouvrir le tiroir à disque lorsque la porte de verre est
fermée. La porte gênerait l’ouverture du tiroir à disque et
le lecteur pourrait être endommagé.
Nettoyage de la lentille du
capteur
La lentille de ce lecteur ne devrait pas se salir
normalement mais si, pour une raison quelconque, de la
poussière ou de la saleté causait un problème, consultez
un service après-vente agréé Pioneer. Bien que divers
produits de nettoyage pour lentille de lecteur soient en
vente dans le commerce, nous déconseillons leur
utilisation, car certains d’entre eux risquent, en fait,
d’endommager la lentille.
Manipulation des disques
N’utilisez pas de disques endommagés (fendus ou
déformés).
Ne rayez pas la face enregistrée du disque et ne la
salissez pas.
08
49
Fr
Page 100

N’introduisez pas plus d’un disque dans le lecteur.
08
Ne collez pas de papier ni d’autocollant sur le disque,
n’utilisez pas de crayon, stylo à bille ou un instrument à
bout pointu. Ils risquent d’endommager le disque.
Stockage des disques
Rangez toujours vos disques dans leurs pochettes, et
rangez les pochettes à la verticale, en évitant de les
exposer à une température ou à une humidité élevée, à
une température basse ou à la lumière directe du soleil.
Veillez à lire les précautions fournies avec le disque.
Nettoyage des disques
Les traces de doigts ou la saleté sur les disques peuvent
empêcher la lecture. Si le cas se présente, essuyez
doucement le disque avec un tissu de nettoyage, etc. en
allant du centre vers la périphérie du disque. N’utilisez
pas de tissu de nettoyage sale.
N’utilisez pas de benzène, diluant ni d’autres produits
chimiques volatils. N’utilisez pas non plus de
vaporisateur pour microsillons ni de produits
antistatiques.
Pour enlever les taches rebelles, imprégnez d’eau un
chiffon doux, tordez bien le chiffon, essuyez la saleté, puis
passez un chiffon sec sur le disque.
Disques à forme spéciale
Les disques à forme spéciale (en coeur, hexagonaux, etc.)
ne peuvent pas être utilisés sur ce lecteur. N’utilisez
jamais de tels disques car ils endommageraient le
lecteur.
Condensation sur les disques
Si vous portez sans transition un disque d’un endroit froid
dans une pièce chaude (par exemple en hiver), des
gouttelettes d’eau (condensation) peuvent se former à la
surface du disque. Les disques ne peuvent pas être lus
correctement s’il y a de la condensation dessus. Essuyez
avec précaution les gouttelettes d’eau de la surface du
disque avant de l’utiliser.
50
Fr
 Loading...