

Page 1

BDP-120
Blu-ray Disc PLAYER
Operating Instructions
Page 2

Page 3
OPERATING INSTRUCTIONS
Thank you for buying this Pioneer product.
Please read through these operating instructions so you will know how to operate your model properly.
After you have finished reading the instructions, put them away in a safe place for future reference.
IMPORTANT
CAUTION
RISK OF ELECTRIC SHOCK
DO NOT OPEN
The lightning flash with arrowhead symbol,
within an equilateral triangle, is intended to
alert the user to the presence of uninsulated
“dangerous voltage” within the product’s
enclosure that may be of sufficient
magnitude to constitute a risk of electric
shock to persons.
CAUTION:
TO PREVENT THE RISK OF ELECTRIC
SHOCK, DO NOT REMOVE COVER (OR
BACK). NO USER-SERVICEABLE PARTS
INSIDE. REFER SERVICING TO QUALIFIED
SERVICE PERSONNEL.
CAUTION
This product is a class 1 laser product, but this
product contains a laser diode higher than Class 1.
To ensure continued safety, do not remove any covers
or attempt to gain access to the inside of the product.
Refer all servicing to qualified personnel.
The following caution label appears on your unit.
Location: inside of the unit
SA172WJ
VARNING: KLASS 2 SYNLIG OCH OSYNLIG LASERSTRÅLNING NÄR DENNA
DEL ÄR ÖPPNAD. TITTA INTE IN I STRÅLEN.
HUOMIO:
LUOKAN 2 LASERSÄTEILYLLE
ADVARSEL: KLASSE 2 SYNLIG OG USYNLIG LASERSTRÅLING HVIS DENNE
DELEN ÅPNES. STIRR IKKE INN I STRÅLEN.
ADVARSEL: KLASSE 2 SYNLIG OG USYNLIG LASERSTRÅLING VED ÅBNING.
KIG IKKE IND I STRÅLEN.
The exclamation point within an equilateral
triangle is intended to alert the user to the
presence of important operating and
maintenance (servicing) instructions in the
literature accompanying the appliance.
D3-4-2-1-1_A1_En
CAUTION: CLASS 2 VISIBLE AND INVISIBLE LASER
RADIATION WHEN OPEN. DO NOT STARE INTO THE BEAM.
ACHTUNG: BEI GEÖFFNETER ABDECKUNG IST SICHTBARE UND
UNSICHTBARE LASERSTRAHLUNG DER KLASSE 2 IM
GERÄTEINNEREN VORHANDEN. NICHT IN DEN STRAHL SEHEN.
ATTENTION : RADIATIONS LASER VISIBLES ET INVISIBLES
DE CLASSE 2 OUAND OUVERT. NE PAS REGARDER
FIXEMENT LE FAISCEAU.
AVATTAESSA OLET ALTTIINA NÄKYVÄLLE JA NÄKYMÄTTÖMÄLLE
. ÄLÄ KATSO SÄTEESEEN.
D3-4-2-1-8*_C_En
1
Page 4

DEAR Pioneer CUSTOMER
WARNING
To prevent a fire hazard, do not place any naked
flame sources (such as a lighted candle) on the
equipment.
D3-4-2-1-7a_A_En
VENTILATION CAUTION
When installing this unit, make sure to leave space
around the unit for ventilation to improve heat
radiation (at least 10 cm at top, 10 cm at rear, and
10 cm at each side).
WARNING
Slots and openings in the cabinet are provided for
ventilation to ensure reliable operation of the
product, and to protect it from overheating. To
prevent fire hazard, the openings should never be
blocked or covered with items (such as newspapers,
table-cloths, curtains) or by operating the
equipment on thick carpet or a bed.
If the AC plug of this unit does not match the AC
outlet you want to use, the plug must be removed
and appropriate one fitted. Replacement and
mounting of an AC plug on the power supply cord of
this unit should be performed only by qualified
service personnel. If connected to an AC outlet, the
cut-off plug can cause severe electrical shock. Make
sure it is properly disposed of after removal.
The equipment should be disconnected by removing
the mains plug from the wall socket when left
unused for a long period of time (for example, when
on vacation).
CAUTION
The STANDBY/ON switch on this unit will not
completely shut off all power from the AC outlet.
Since the power cord serves as the main disconnect
device for the unit, you will need to unplug it from
the AC outlet to shut down all power. Therefore,
make sure the unit has been installed so that the
power cord can be easily unplugged from the AC
outlet in case of an accident. To avoid fire hazard,
the power cord should also be unplugged from the
AC outlet when left unused for a long period of time
(for example, when on vacation).
D3-4-2-1-7b_A_En
D3-4-2-2-1a_A_En
D3-4-2-2-2a_A_En
WARNING
This equipment is not waterproof. To prevent a fire
or shock hazard, do not place any container filled
with liquid near this equipment (such as a vase or
flower pot) or expose it to dripping, splashing, rain
or moisture.
D3-4-2-1-3_B_En
Before plugging in for the first time, read the following
section carefully.
Operating Environment
Operating environment temperature and humidity:
+5 °C to +35 °C (+41 °F to +95 °F); less than 80 %RH
(cooling vents not blocked)
Do not install this unit in a poorly ventilated area, or in
locations exposed to high humidity or direct sunlight (or
strong artificial light)
D3-4-2-1-7c*_A1_En
2
Page 5

DEAR Pioneer CUSTOMER
POWER-CORD CAUTION
Handle the power cord by the plug. Do not pull out the
plug by tugging the cord and never touch the power
cord when your hands are wet as this could cause a
short circuit or electric shock. Do not place the unit, a
piece of furniture, etc., on the power cord, or pinch the
cord. Never make a knot in the cord or tie it with other
cords. The power cords should be routed such that they
are not likely to be stepped on. A damaged power cord
can cause a fire or give you an electrical shock. Check
the power cord once in a while. When you find it
damaged, ask your nearest PIONEER authorized
service center or your dealer for a replacement. S002*_En
This product incorporates copyright protection
technology that is protected by method claims of
certain U.S. patents and other intellectual property
rights owned by Macrovision Corporation and other
rights owners. Use of this copyright protection
technology must be authorized by Macrovision
Corporation, and is intended for home and other
limited viewing uses only unless otherwise authorized
by Macrovision Corporation. Reverse engineering or
disassembly is prohibited.
3
Page 6

Contents
Introduction
What would you like to do with this Player? ................... 5
About Discs .....................................................................6-7
Blu-ray Disc .................................................................. 6
Types of Discs that Can Be Used with This Player ......... 6
Discs that Cannot Be Used with This Player ...............6-7
About Disc Contents ......................................................... 8
BD Video ......................................................................8
Title, Chapter and Track ................................................ 8
Icons Used on DVD Video Disc Cases ..........................8
The Icons Used in This Operating Instructions ............... 8
Important Information ....................................................... 9
Disc Precautions ........................................................... 9
Copyright ...................................................................... 9
Getting Started ................................................................10
Major Components .....................................................11-12
Main Unit (Front) ..........................................................11
Main Unit (Rear) ..........................................................11
HDMI cable holder on the rear of the main unit ......11
Remote Control Unit ...................................................12
Connection
Introduction to Connections ..........................................13
Video Connections .....................................................14-16
Connecting to the HDMI Terminal ................................ 14
Selecting the priority video output when connecting
HDMI and Component video .................................... 14
Connecting to the Component Jacks .......................... 15
Connecting to the Video Jack ..................................... 16
Audio Connections .......................................................... 17
Connecting to the Digital Audio Terminal or Audio Jacks
Broadband Internet Connection ....................................18
Connecting to the LAN terminal ..................................18
Disc Playback
Before Starting Playback ...........................................19-23
Loading the Batteries in the Remonte Contorol ........... 19
Approximate operating range of remote control ..... 19
Connecting the Power Cord ........................................ 19
Turning the Power On ................................................. 20
Turning the power on ............................................. 20
Entering standby .................................................... 20
Indicators on the Player ......................................... 20
Language Setting ........................................................ 21
Changing the on-screen display language .............. 21
Operating the TV with the player’s remote control .......21
TV Preset code list ............................................21-22
Turning Off the LCD Backlight and Indications ............. 23
Operate using the remote control unit .................... 23
HOME MENU operation ......................................... 23
About KURO LINK function ......................................... 23
To use the KURO LINK function ............................. 23
What the KURO LINK function can do ...................23
BD/DVD/CD Playback ................................................24-29
Loading a Disc ............................................................ 24
BD/DVD Video Playback ............................................. 24
Displaying the disc information ............................... 24
BD/DVD Menus ..........................................................25
Start playback by selecting a title from the top menu
Using the disc menu .............................................. 25
Using the pop-up menu ......................................... 25
Enjoying BONUSVIEW or BD-LIVE .............................. 26
Secondary video playback ..................................... 26
Virtual Package ...................................................... 26
BD-LIVE ................................................................. 26
4
... 17
... 25
DVD-RW/-R/BD-RE/-R Playback ........................... 27-28
Playback by selecting a title ................................... 27
Playback by selecting a chapter ............................. 28
Sorting the titles ..................................................... 28
Playback by selecting a Playlist .............................. 28
Playing back the title you stopped while being played
Audio CD Playback ..................................................... 29
Playback from the beginning .................................. 29
Playback by selecting a track ................................. 29
Operation procedure for the “Functions” menu ......29
Playback Functions ....................................................30-32
Fast Forward/Reverse (Search) ................................... 30
Skipping to the Next or the Start of the Current
Chapter (Track) ......................................................... 30
Pause/Frame Advance Playback ................................. 30
Slow Playback ............................................................30
Skip Search ................................................................ 30
Replay ........................................................................ 30
Repeat Playback of a Title or Chapter
(Repeat Playback) .................................................... 30
Partial Repeat Playback
(Repeat Playback of a Specified Part) ....................... 31
Displaying the Audio Information ................................. 31
Displaying the Angle Mark ........................................... 32
Switching Subtitles...................................................... 32
Switching the Angle ....................................................32
JPEG File Playback .........................................................33
Playing back still images in sequence .......................... 33
Playing back still images in a selected folder ...............33
Playing back Slide Show ............................................. 33
Setting slide show speed/repeat playback ..................33
Settings During Playback ..........................................34-35
Function Control .........................................................34
Function control operation procedure ....................34
Functions which can be set ................................... 35
.. 28
Settings
SETTINGS ....................................................................36-45
Common operations ................................................... 36
Basic Operation for Playback Setting .......................... 36
Audio Video Settings ..............................................37-38
Quick Start .................................................................. 38
Auto Power Off ........................................................... 38
KURO LINK ................................................................ 38
Playback Setting ......................................................... 39
Front Display/LED ....................................................... 39
Version ........................................................................ 39
System Reset .............................................................39
Communication Setup ...........................................40-42
The operation procedure for inputting characters
manually .............................................................. 42
USB Memory Management ......................................... 43
Software Update ......................................................... 44
Appendix
Troubleshooting ..........................................................46-48
To Reset this Player..................................................... 48
On-screen Error Messages ............................................49
Glossary ......................................................................50-51
Specifications .................................................................. 52
Licenses ........................................................................... 53
The illustrations and on-screen displays in this operating
*
instructions are for explanation purposes and may vary
slightly from the actual operations.
Page 7

Introduction
What would you like to do with this Player?
Watching high quality movies on Bluray discs
This Player offers full high-definition Blu-ray disc
playback.
BD/DVD/CD Playback (p. 24)
What to do first:
Refer to “Getting Started” (p. 10) to prepare
for watching your discs.
Enjoying different kinds of discs and
contents
Use this Player to enjoy various types of optical
discs such as DVDs and CDs that contain various
multimedia content.
About Discs (pp. 6–7)
BD/DVD/CD Playback (p. 24)
Simple connection and operation
through HDMI
This Player is equipped with an HDMI terminal. You
can connect it to the TV using HDMI and no other
cable will be needed to enjoy movies. If your TV is
compatible with KURO LINK, you can control both
the TV and this Player with simple operations.
Introduction to Connections (p. 13)
Video Connections (p. 14)
Enjoying BD-LIVE functions through
the internet
This Player is compatible with BD-LIVE. You can
enjoy bonus content such as movie trailers through
the internet when playing back BD-Video discs
compatible with BD-LIVE.
Enjoying BONUSVIEW or BD-LIVE
(p. 26)
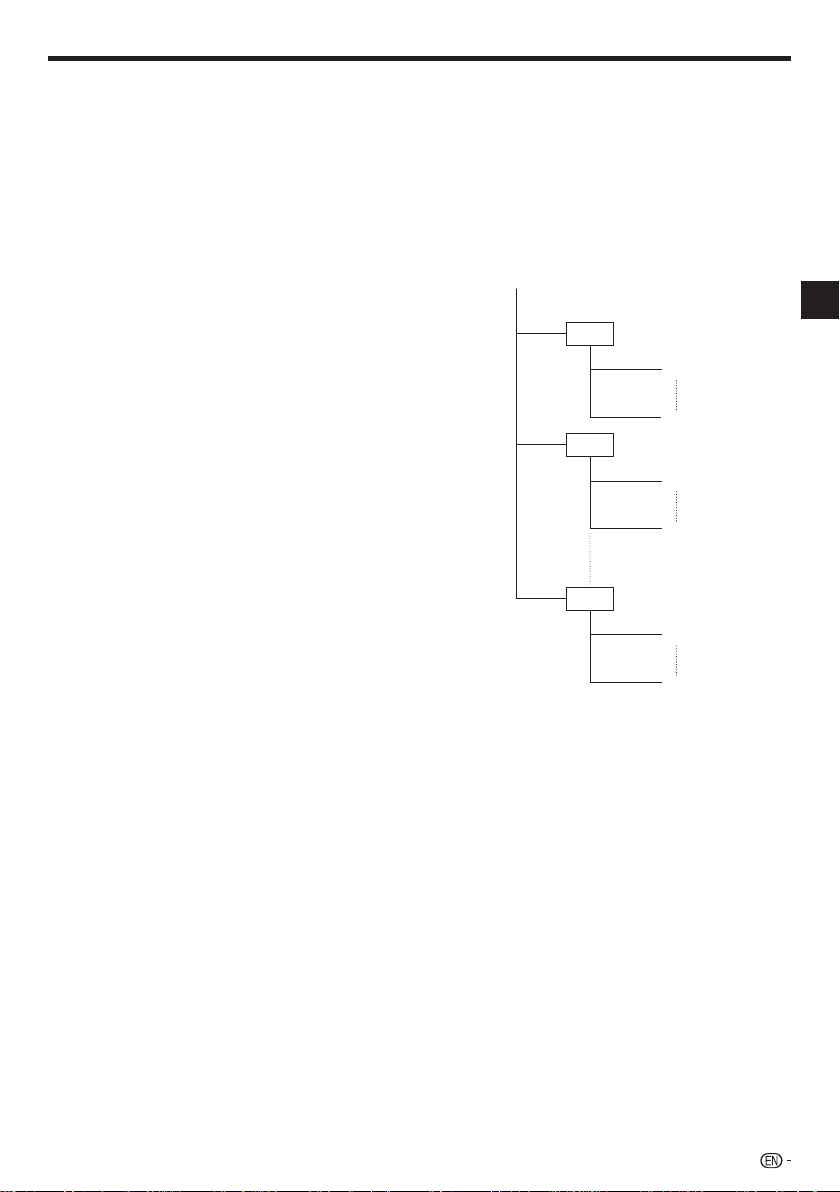
Introduction (pp. 5–12)
Explains the important operation information.
Connection (pp. 13–18)
Shows the connecting options provided by
this Player.
Disc Playback (pp. 19–35)
Shows simple playback and useful functions.
Settings (pp. 36–45)
Gives you more options to suit your
circumstances.
Appendix (pp. 46–56)
Provides troubleshooting tips and more
information.
5
Page 8
About Discs
Blu-ray Disc
Blu-ray Disc is the ultimate next generation optical
media format, offering the following key features:
Largest capacity (25 GB single layer – 50 GB dual layer)
•
– with over 5 times the amount of content possible with
current DVDs, particularly well suited for high definition
feature films with extended levels of interactive features
Pristine picture quality with the capability for full high
•
definition 1920 x 1080p resolution
Best audio possible with uncompressed surround sound
•
Hardware products will be backward compatible with
•
DVDs, allowing continued enjoyment of existing DVD
libraries.
Disc Durability – new breakthroughs in hard coating
•
technologies gives Blu-ray Discs the strongest resistance
to scratches and finger prints.
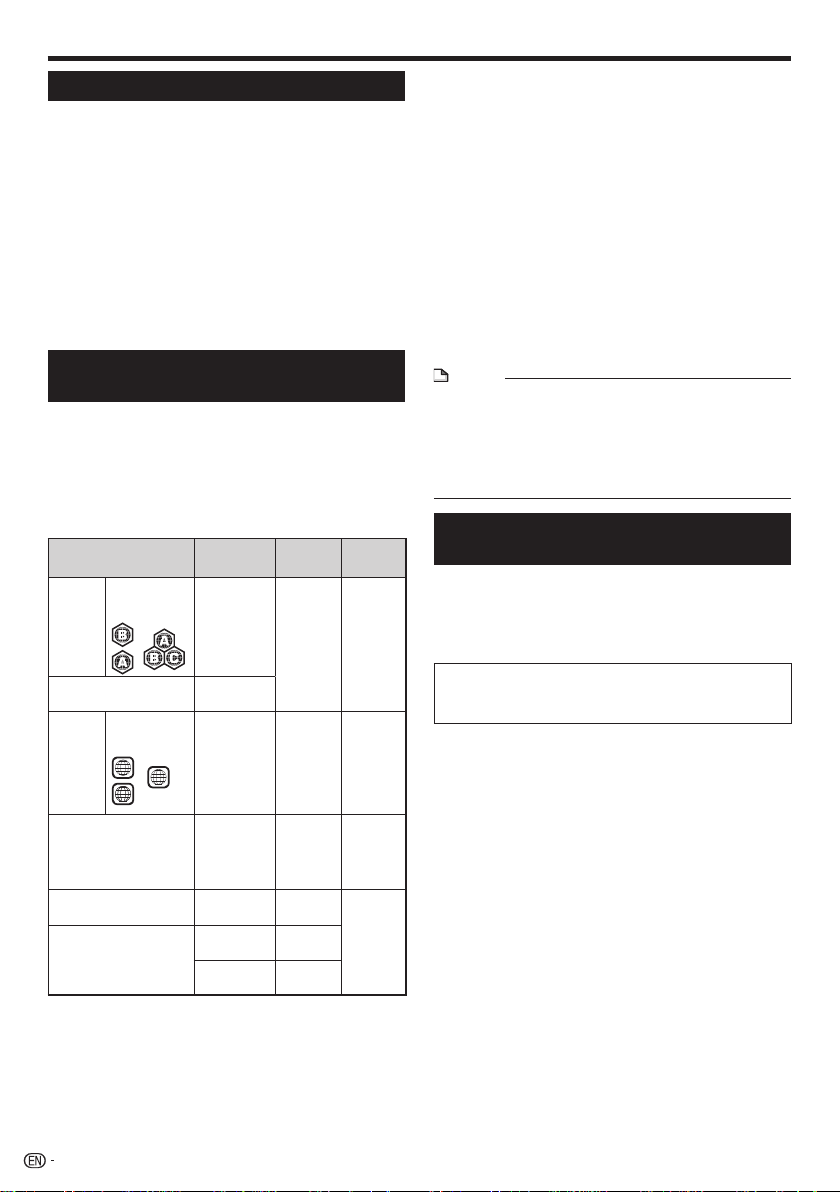
Types of Discs that Can Be Used
with This Player
•
The following discs can be played back in this Player. Do
not use an 8 cm (3”) to 12 cm (5”) adapter.
•
Use discs that conform to compatible standards as
indicated by the presence of official logos on the disc label.
Playback of discs not complying with these standards is
not guaranteed. In addition, the image quality or sound
quality is not guaranteed even if the discs can be played
back.
1
2
1
2
ALL
Recording
Format
— Audio
BDMV/BDAV
format
Video format Audio
Video/VR/
AVCHD
format
(finalized disc
only)
Audio CD
(CD-DA)
(CD-DA)
JPEG*
Contents
+ Video
(Movie)
+ Video
(Movie)
Audio
+ Video
(Movie)
Audio
Audio
4
Still image
(JPEG file)
Disc Type
BD
Region code
video
B/ALL*
A/ALL*
1
*
2
*
BD-RE DL
BD-R DL
DVD
Region code
Video
4/ALL*
3/ALL*
1
*
4
2
*
3
DVD+RW/DVD+R
DVD-R DL
DVD+R DL
DVD-RW/DVD-R
3
Audio CD*
CD-RW/CD-R Audio CD
1
Australia and New Zealand models
*
2
Ohters
*
3
This Player has been designed on the premise of playing
*
back Audio CDs that comply with CD (Compact Disc)
standards. CDs containing a signal for the purpose of
protecting copyrights (copy control signal) may not be able
to be played back with this Player.
6
Disc
Size
12 cm (5”)
12 cm (5”)
8 cm (3”)
12 cm (5”)
8 cm (3”)
12 cm (5”)
8 cm (3”)
(Australia and New Zealand models)
•
BD/DVD video players and discs have region codes,
−
which dictate the regions in which a disc can be played.
This Player's region code is B for BD and 4 for DVD.
(Discs marked ALL will play in any player.)
(Others)
•
BD/DVD video players and discs have region codes,
−
which dictate the regions in which a disc can be played.
This Player's region code is A for BD and 3 for DVD.
(Discs marked ALL will play in any player.)
BD/DVD Video operations and functions may be different
•
from the explanations in this manual and some operations
may be prohibited due to disc manufacturer's settings.
If a menu screen or operating instructions are displayed
•
during playback of a disc, follow the operating procedure
displayed.
The audio component of a DVD video recorded at 96
•
kHz (Linear PCM) will be output as 48 kHz audio during
playback.
NOTE
Playback for some of the discs in the left side column
•
tables may not be possible depending on the disc.
“Finalize” refers to a recorder processing a recorded disc
•
so that it will play in other DVD players/recorders as well
as this player. Only finalized DVD discs will play back in
this player. (This player does not have a function to finalize
discs.)
Discs that Cannot Be Used with
This Player
The following discs cannot be played back or will
not play back properly on this Player. If such a
disc is mistakenly played back, speaker damage
may occur. Never attempt to play back these
discs.
CDG, Video CD, Photo CD, CD-ROM, CD-TEXT, SVCD,
SACD, PD, CDV, CVD, DVD-RAM, DVD-Audio, BD-RE
with the cartridge, CD-MP3, CD-WMA
Discs with unusual shapes cannot be played.
Discs with unusual shapes (heart-shaped or hexagonal
•
discs, etc.) cannot be used. The use of such discs will
cause malfunction.
The following BD/DVD video discs cannot be
played.
A disc is loaded from a region not compatible with those
•
listed in the "Types of Discs that Can Be Used with This
Player" table.
Discs produced illegally.
•
Discs recorded for commercial use.
•
The following BD-RE/-R, DVD-RW/-R and
DVD+RW/+R discs cannot be played.
Discs on which data has not been recorded cannot be
•
played back.
Pioneer cannot guarantee playback compatibility for all
•
self-recorded BD-discs because Blu-ray is a new and
evolving format. The playback compatibility will be affected
by your choice of BD-recorder, BD-disc and BD-burning
software. Please always ensure you are using the latest
software versions on all units and contact the individual
manufacturers for further help if required. To avoid
inconveniences, please check the playback compatibility of
your self-recorded disc before you purchase this BD-player.
For maximum playback compatibility of self-recorded
BD-discs Pioneer recommends that the BDMV/BDAV
Page 9
About Discs
standards are used. If a playback issue occurs after
purchase, please download the latest software version for
your BD-player from the Pioneer internet page or ask your
Pioneer-Dealer. This BD-player uses the latest technology
available at the time of development and cannot guarantee
support for future enhancements or changes to the
standard.
The following Audio CD discs cannot be played.
Discs containing a signal for the purpose of protecting
•
copyrights (copy control signal) may not be played back
with this Player.
This Player has been designed on the premise of playing
•
back Audio CDs that comply with CD (Compact Disc)
standards.The following CD-RW/-R discs cannot be
played.
The following CD-RW/-R discs cannot be played.
•
Discs on which data has not been recorded cannot be
played back.
•
Disc that has not been finalized.
•
Discs recorded in a format other than an Audio CD and
JPEG file format*4 cannot be played back.
•
Discs may not be played back depending on their
recording status or the status of the disc itself.
•
Discs may not be played back depending on their
compatibility with this Player.
*4
About the JPEG file format
JPEG is a type of file format for storing still-image files
(photos, illustrations, etc.). The Player lets you play JPEG
format still-image files.
File formats that are not compatible.
•
Still images in formats other than JPEG (such as TIFF)
cannot be played.
•
There may be some files that cannot be played even if they
are in JPEG format.
•
Progressive JPEG files cannot be played.
•
Moving image files and audio files as well as Motion JPEG
format files cannot be played, even though they are JPEG
files.
Other files that cannot be played back.
•
You may not be able to play some still images which you
have created, touched up, copied or otherwise edited on
your computer.
You may experience one or more of the following
symptoms when playing files.
•
It may take some time to play files depending on the
number of folders, number of files and volume of data
involved.
•
EXIF information will not be displayed. EXIF stands for
Exchangeable Image File Format, and is a standard for
storing interchange information in image files, especially
those using JPEG compression. (Refer to http://exif.org for
more information.)
When using the unit to play a CD-RW/-R disc
with still images stored (recorded).
•
Discs that are not formatted in music CD format, or discs
containing mixed media (for example, music, videos, and
still photos in jpeg format) may not be playable. You may
not be able to play some of these discs at all.
•
Multi-session discs cannot be played.
•
You may not be able to play some still images you have
processed (rotated or saved by overwriting other images)
using image processing software or some still images you
have imported from the Internet or e-mail.
The discs which this Player can play back (recognize) are
•
limited to the following properties:
Contains EXIF format files
Picture resolution: Between 32g32 and 7680g4320
pixels
Maximum number of folders: 256
Maximum number of files in each folder: 256
File size: 20 MB or less
Structure of still images (JPEG) folders
You can play still images (JPEG) with this unit by making
folder on disc as shown below.
Root
01 Folder
001.jpg
256.jpg
02 Folder
001.jpg
256.jpg
256 Folder
001.jpg
256.jpg
Introduction
7
Page 10

About Disc Contents
BD Video
Enjoy BD-specific functions including BONUSVIEW (BD-ROM
Profile 1 Version 1.1), such as picture-in-picture, and BD-LIVE
(page 26).
For the BD video discs compatible with BONUSVIEW/BDLIVE, you can enjoy additional contents by copying the data
from the discs or downloading it via the internet. For instance,
this function is capable of playing the original movie as the
primary video while playing video commentary from the film
director on a small screen as a secondary video.
NOTE
The available functions differ depending on the disc.•
Title, Chapter and Track
•
Blu-ray discs and DVDs are divided into “Titles” and
“Chapters”. If the disc has more than one movie on it, each
movie would be a separate “Title”. “Chapters”, on the other
hand, are subdivisions of titles. (See Example 1.)
•
Audio CDs are divided into “Tracks”. You can think of a
“Track” as one tune on an Audio CD. (See Example 2.)
Example 1: Blu-ray disc or DVD
Title 1
Chapter 1 Chapter 2 Chapter 3 Chapter 1
Title 2
Example 2: Audio CD
Track 1 Track 2 Track 3 Track 4
Icons Used on DVD Video Disc Cases
The back of the case of a DVD that is commercially
available usually contains various information about the
contents of the disc.
1 2
1. English
2
2. Chinese
3 4 5
LB
16:9
2
213
546
2
1. English
2. Chinese
DTS
DTS is a digital sound system developed by DTS, Inc. for
use in cinemas.
Linear PCM
Linear PCM is a signal recording format used for Audio
CDs and on some DVD and Blu-ray discs. The sound
on Audio CDs is recorded at 44.1 kHz with 16 bits.
(Sound is recorded between 48 kHz with 16 bits and 96
kHz with 24 bits on DVD video discs and between 48
kHz with 16 bits and 192 kHz with 24 bits on BD video
discs.)
2
Subtitle languages
This indicates the kind of subtitles.
3
Screen aspect ratio
Movies are shot in a variety of screen modes.
4
Camera angle
Recorded onto some DVD discs are scenes which have
been simultaneously shot from a number of different
angles (the same scene is shot from the front, from the
left side, from the right side, etc.).
5
Region code
This indicates the region code (playable region code).
The Icons Used in This Operating
Instructions
........... Indicates the functions that can be
BD VIDEO
BD-RE
BD-R
DVD VIDEO
DVD-RW
DVD-R
AUDIO CD
CD-R
JPEG
CD-RW
JPEG
AVCHD
performed for BD Video discs.
........... Indicates the functions that can be
performed for BD-RE discs.
........... Indicates the functions that can be
performed for BD-R discs.
....... Indicates the functions that can be
performed for DVD Video discs.
......... Indicates the functions that can be
performed for DVD-RW discs.
.......... Indicates the functions that can be
performed for DVD-R discs.
........... Indicates the functions that can be
performed for Audio CDs.
........Indicates the functions that can be
performed for CD-R discs in JPEG format.
......... Indicates the functions that can be
performed for CD-RW discs in JPEG format.
......... Indicates the functions that can be
performed for DVD discs in AVCHD format.
1
Audio tracks and audio formats
DVD discs can contain up to 8 separate tracks with
a different language on each. The first in the list is the
original track.
This section also details the audio format of each
soundtrack — Dolby Digital, DTS, MPEG etc.
Dolby Digital
A sound system developed by Dolby Laboratories Inc.
that gives movie theater ambience to audio output when
the Player is connected to a Dolby Digital processor or
amplifier.
8
Page 11

Important Information
Disc Precautions
Be Careful of Scratches and Dust
•
BD, DVD and CD discs are sensitive to dust, fingerprints
and especially scratches. A scratched disc may not be able
to be played back. Handle discs with care and store them
in a safe place.
Proper Disc Storage
Place the disc in the center of the
disc case and store the case and
disc upright.
Avoid storing discs in locations
subject to direct sunlight, close to
heating appliances or in locations of
high humidity.
Do not drop discs or subject them to
strong vibrations or impacts.
Avoid storing discs in locations
where there are large amounts of
dust or moisture.
Handling Precautions
•
If the surface is soiled, wipe gently with a soft, damp (water
only) cloth. When wiping discs, always move the cloth from
the center hole toward the outer edge.
Do not use record cleaning sprays, benzene, thinner, static
•
electricity prevention liquids or any other solvent.
Do not touch the surface.
•
Do not stick paper or adhesive labels to the disc.
•
If the playing surface of a disc is soiled or scratched, the
•
Player may decide that the disc is incompatible and eject
the disc tray, or it may fail to play the disc correctly. Wipe
any dirt off the playing surface with a soft cloth.
Cleaning the Pick Up Lens
Never use commercially available cleaning discs. The use
•
of these discs can damage the lens.
Request the nearest service center approved by Pioneer to
•
clean the lens.
Warnings about dew formation
Condensation may form on pick up lens or disc in the
•
following conditions:
Immediately after a heater has been turned on.
−
In a steamy or very humid room.
−
When the Player is suddenly moved from a cold
−
environment to a warm one.
When condensation forms:
It becomes difficult for the Player to read the signals
•
on the disc and prevents the Player from operating
properly.
To remove condensation:
Take out the disc and leave the Player with the power
•
off until the condensation disappears. Using the Player
when there is condensation may cause malfunction.
Copyright
Audio-visual material may consist of copyrighted works
•
which must not be recorded without the authority of the
owner of the copyright. Refer to relevant laws in your
country.
•
This product incorporates copyright protection technology
that is protected by method claims of certain U.S.
patents and other intellectual property rights owned by
Macrovision Corporation and other rights owners. Use of
this copyright protection technology must be authorized
by Macrovision Corporation, and is intended for home and
other limited viewing uses only unless otherwise authorized
by Macrovision Corporation. Reverse engineering or
disassembly is prohibited.
U.S. Patent Nos. 6,836,549; 6,381,747; 7,050,698;
6,516,132; and 5,583,936
•
Manufactured under license from Dolby Laboratories.
“Dolby” and the double-D symbol are trademarks of Dolby
Laboratories.
•
Manufactured under license under U.S. Patent #’s:
5,451,942; 5,956,674; 5,974,380; 5,978,762; 6,226,616;
6,487,535; 7,392,195; 7,272,567; 7,333,929; 7,212,872 &
other U.S. and worldwide patents issued & pending. DTS is
a registered trademark and the DTS logos, Symbol, DTSHD and DTS-HD Master Audio | Essential are trademarks
of DTS, Inc. © 1996-2008 DTS, Inc. All Rights Reserved.
•
“Blu-ray Disc” and
•
“BD-LIVE” logo is trademark of Blu-ray Disc Association.
•
Corporation.
•
HDMI, the HDMI Logo and High-Definition Multimedia Interface
are trademarks or registered trademarks of HDMI Licensing,
LLC.
•
“x.v.Color” , and are
trademarks of Sony Corporation.
•
Java and all Java-based trademarks and logos are
trademarks or registered trademarks of Sun Microsystems,
Inc. in the U.S. and other countries.
•
“BONUSVIEW” is trademark of Blu-ray Disc Association.
•
This label indicates playback compatibility with DVD-RW
discs recorded in VR format (Video Recording format).
However, for discs recorded with a record-only-once
encrypted program, playback can only be achieved using a
CPRM compatible device.
“AVCHD” and the “AVCHD” logo are trademarks of
•
Panasonic Corporation and Sony Corporation.
is a trademark of DVD Format/Logo Licensing
are trademarks.
Introduction
9
Page 12
Getting Started
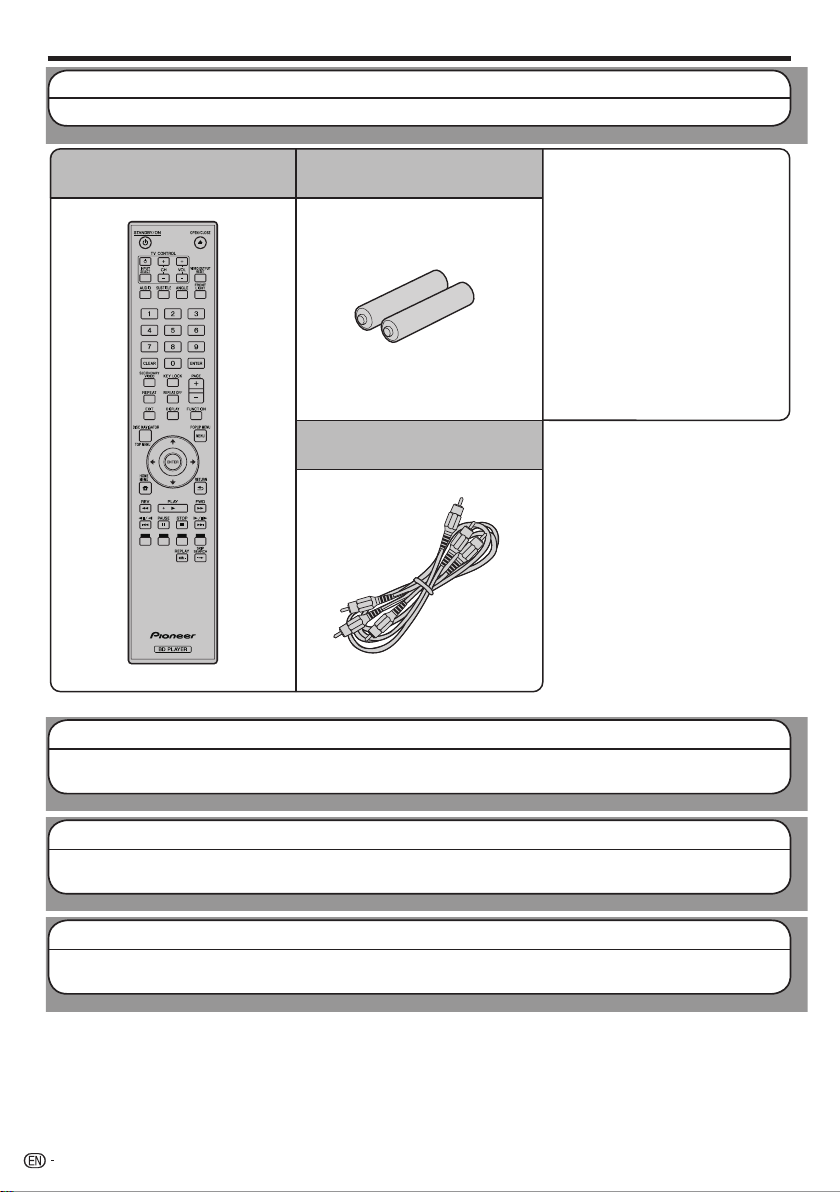
Step 1: Unpacking
Make sure the following accessories are provided with the product.
Remote control unit
“AA/R6” size battery (g2)
AV cable
AC cord
•
Operating instructions
•
(this document)
Step 2: Selecting equipment to connect
Connection varies with the equipment used. Refer to Connection. (Pages 13–18)
Turn off the devices before connecting.
Step 3: Playing back discs
Play back a Blu-ray disc after connecting the Player to your favorite equipment.
Refer to Disc Playback. (Pages 19–35)
Step 4: Adjust settings
Adjust settings to enjoy various features and other functions for playing discs.
Refer to Settings. (Pages 36–45)
10
Page 13
Major Components
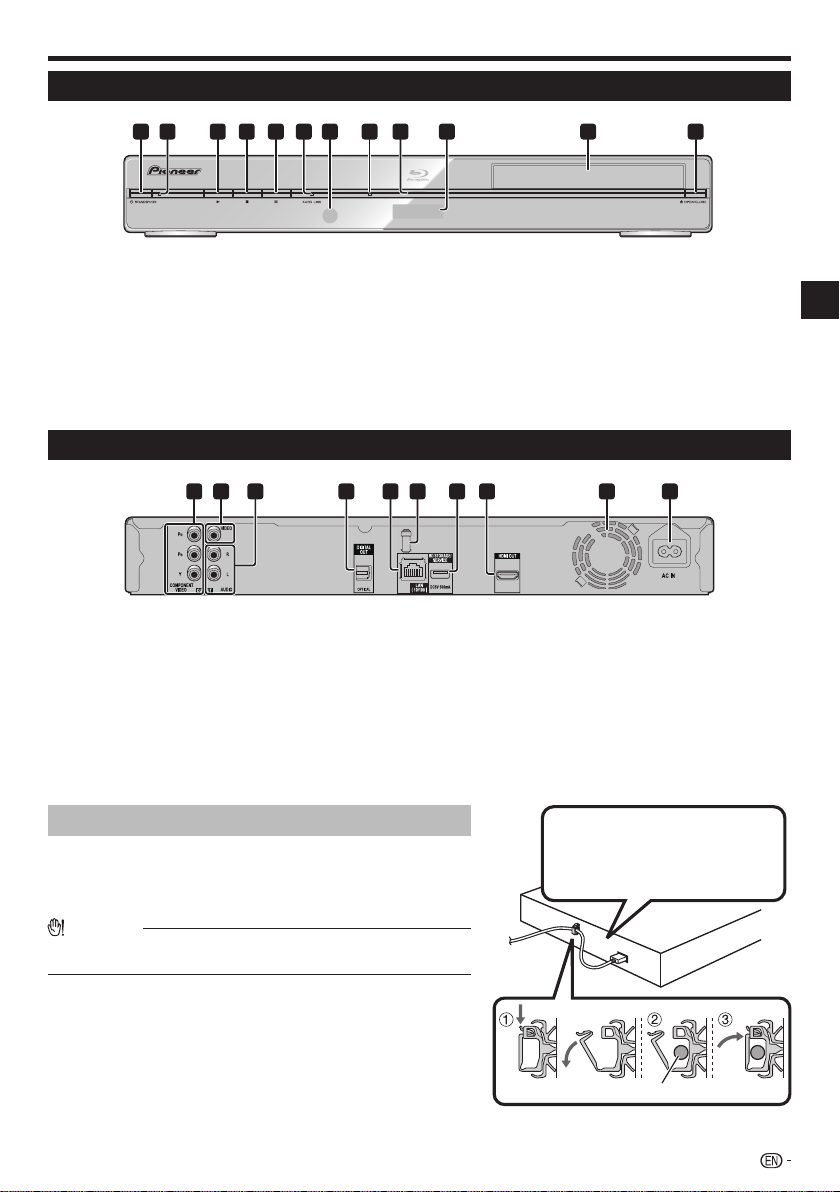
Main Unit (Front)
1
1
STANDBY/ON (p. 20)
2
STANDBY/ON indicator (p. 20)
3
d PLAY (p. 24)
4
H STOP (p. 24)
5
F PAUSE (p. 30)
6
KURO LINK indicator (pp. 20, 23)
Main Unit (Rear)
1 2
1
COMPONENT VIDEO OUTPUT jacks
(p. 15)
2
VIDEO OUTPUT jack (p. 16)
3
AUDIO OUTPUT jacks (p. 17)
4
DIGITAL OUT OPTICAL terminal (p. 17)
5
LAN terminal (p. 18)
6
HDMI cable holder (See below.)
5 8 9
4
32 6
3
7
4
10
7
Remote control sensor (p. 19)
8
BD/DVD/CD disc indicator (p. 20)
9
Playback indicator (p. 20)
10
Front panel display (p. 20)
11
Disc tray (p. 24)
12
OPEN/CLOSE (p. 24)
11
76 95 8
7
BD STORAGE/SERVICE terminal
BD STORAGE (pp. 26, 43)
SERVICE for software (p. 44)
8
HDMI OUT terminal (p. 14)
9
Cooling fan
The cooling fan operates while the power
to the Player is on.
10
AC IN terminal (p. 19)
12
Introduction
10
HDMI cable holder on the rear of the main unit
This Player comes with a dedicated cable holder so that the
HDMI cable does not place direct weight and stress on the
terminal. When connecting the HDMI cable, be sure to pass the
cable through the cable holder and secure it.
CAUTION
Do not pull on the HDMI cable when it is connected to the terminal, as
•
this can damage the terminal or cause a poor connection.
Press down on the tab and pull it towards you.
1
Pass the HDMI cable (commercially available) through the
2
cable holder.
Press in on the tab until it clicks into position.
3
Connect the HDMI cable to
the rear of the main unit while
providing some slack.
HDMI cable
11
Page 14
Major Components
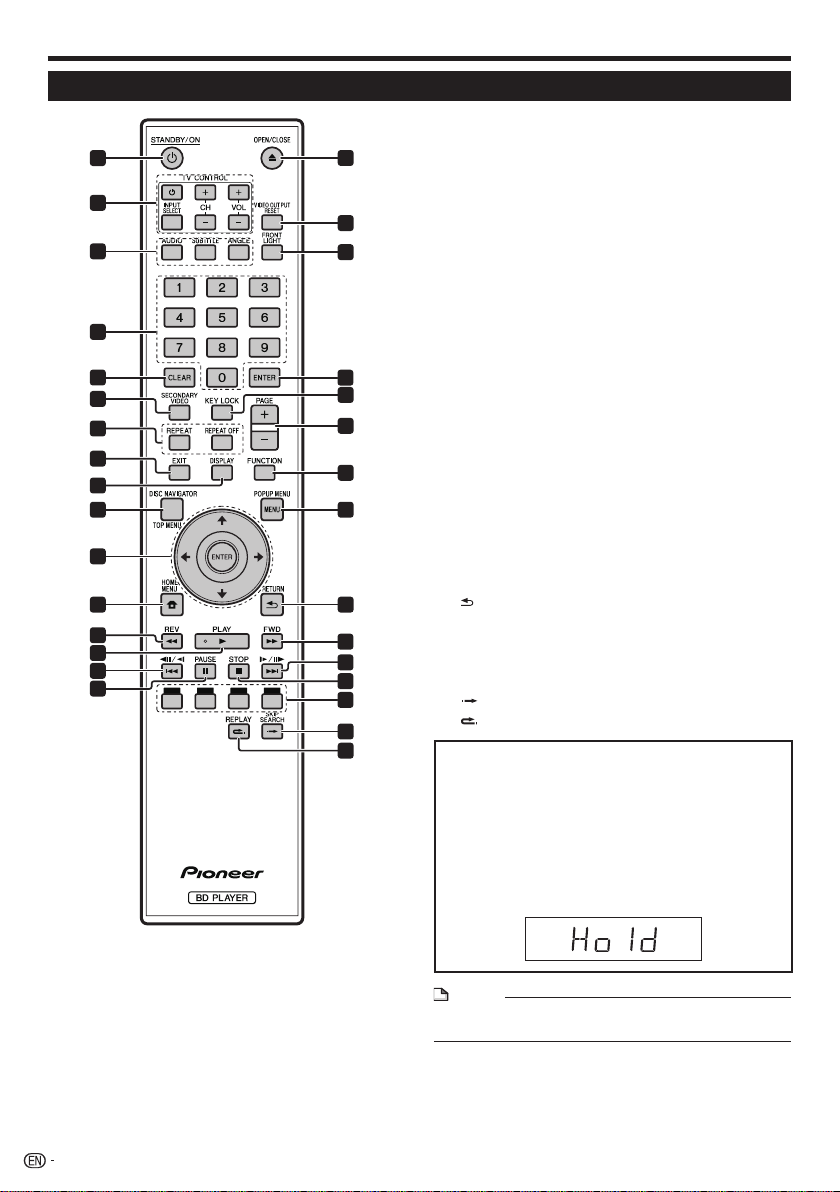
Remote Control Unit
1
2
3
4
5
6
7
8
9
10 24
11
12
13
14
15
16
17
18
19
20
21
22
23
25
26
27
28
29
30
31
1
STANDBY/ON (p. 20)
2
TV CONTROL buttons (p. 21)
3
AUDIO (p. 31), SUBTITLE (p. 31), ANGLE (p. 32)
4
Number buttons (p. 35)
5
CLEAR (p. 35)
6
SECONDARY VIDEO (p. 26)
7
REPEAT (pp. 30, 31), REPEAT OFF (pp. 30, 31)
8
EXIT (pp. 20, 36)
9
DISPLAY (pp. 24, 31)
10
TOP MENU/DISC NAVIGATOR (pp. 25, 27)
11
Cursor buttons (), ENTER (pp. 21, 36)
12
HOME MENU (pp. 21, 36)
13
REV (p. 30)
14
PLAY (p. 24)
15
//k (pp. 27, 30)
16
PAUSE (p. 30)
17
OPEN/CLOSE (p. 24)
18
VIDEO OUTPUT RESET (p. 37)
19
FRONT LIGHT (p. 23)
20
ENTER (pp. 21, 36)
21
KEY LOCK (See below.)
22
PAGE +/
-
23
FUNCTION (p. 34)
24
POPUP MENU/MENU (p. 25)
25
26
FWD (p. 30)
27
//l (pp. 27, 30)
28
STOP (p. 24)
29
RED, GREEN, YELLOW, BLUE (pp. 27, 33)
30
31
Keylock function
You can set the keylock to prevent accidental operations.
This function allows TVs compatible with KURO LINK to
also perform a Key Lock on the player.
Press and hold KEY LOCK for more than 5 seconds.
Each time you perform this operation, the function is
•
activated or deactivated.
•
If you try to operate the Player while the keylock function
is set, “Hold” blinks on the front display panel to indicate
that the keylock function is set.
(p. 27)
RETURN (p. 30)
SKIP SEARCH (p. 30)
REPLAY (p. 30)
12
NOTE
This remote control unit is equipped with two ENTER
•
buttons (11 and 20 listed above).
Page 15
Connection
Introduction to Connections
Be sure to turn off the power and unplug the power cord from the power outlet whenever making or changing
connections.
your video equipment. Using the supplied cable or commercially available cables, connect the video first. Then
connect the audio.
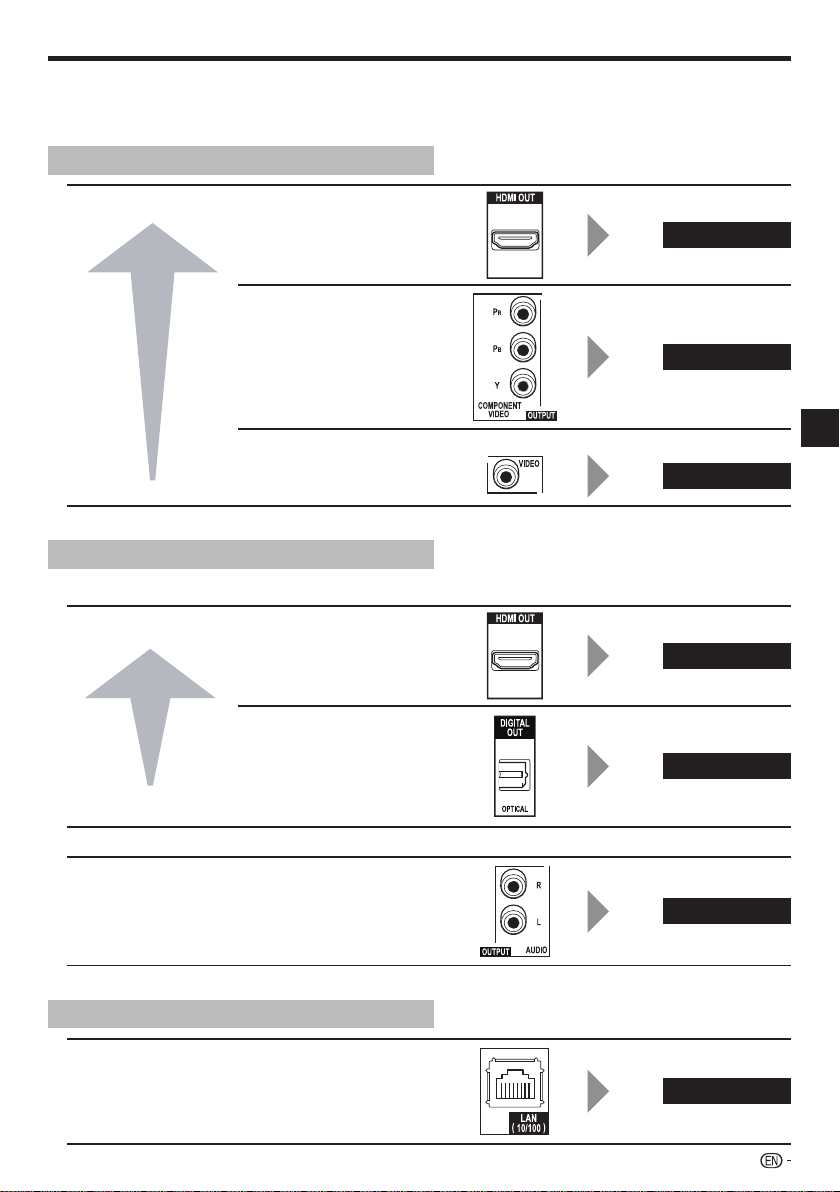
Video terminals/jacks on this Player
This Player is equipped with the terminals/jacks listed below. Find the corresponding terminal/jack on
Higher Quality
Standard Quality
HDMI OUT terminal1
COMPONENT VIDEO
2
OUTPUT jacks
VIDEO OUTPUT jack3
Audio terminals/jacks on this Player
Digital audio connection
Higher Quality
HDMI OUT terminal1
DIGITAL OUT OPTICAL
2
terminal
Page 14
Page 15
Connection
Page 16
Page 14
Page 17
Standard Quality
Analog audio connection
Standard Quality
AUDIO OUTPUT jacks
Broadband Internet connection
LAN terminal
Page 17
Page 18
13
Page 16
Video Connections
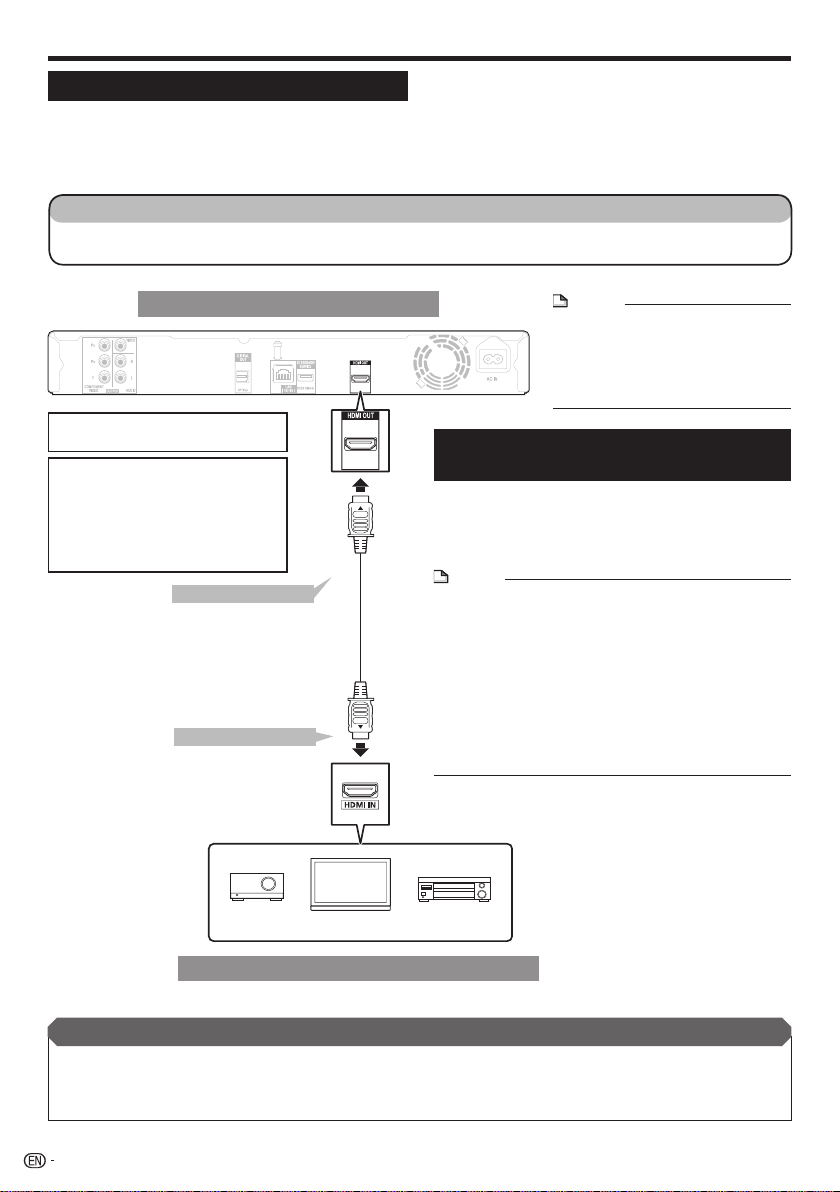
Connecting to the HDMI Terminal
You can enjoy high quality digital picture and sound through the HDMI terminal.
•
See page 45 for information on the output of next generation audio formats.
•
Use High Speed HDMI™ cables when using the KURO LINK function. The KURO LINK function may not
•
operate properly if other HDMI cables are used.
STEPS
Be sure to turn off this Player and the equipment before making any connections.
1
Firmly connect an HDMI cable (commercially available) to the HDMI terminals (1 and 2).
2
When using an HDMI output, 7.1 ch
•
Digital Output is available.
Video signal outputs:
1080p 24 Hz 720p 50/60 Hz
1080p 50/60 Hz 576p 50 Hz
1080i 50/60 Hz 480p 60 Hz
For example;
1080p: 1080 progressive scan
1080i: 1080 interlace scan
To HDMI OUT terminal
1
(commercially available)
To HDMI IN terminal
2
This Player
HDMI cable
NOTE
Audio transmitted in DTS-HD High
•
Resolution Audio and DTS-HD Master
Audio formats is output from the
HDMI terminal as Bitstream. Connect
an amplifier with a built-in decoder to
enjoy the fine sound quality.
Selecting the priority video output when
connecting HDMI and Component video
When you connect both an HDMI cable and a
component cable to this player, you need to select
the priority video output in “Settings” – “Audio Video
Settings” – “Video Out Select”. (See page 37.)
NOTE
When you connect the player to a Pioneer TV with an
•
HDMI cable only and the TV is turned on, the video output
switches to HDMI automatically. (The above setting is
unnecessary.)
When you connect the player to a TV with an HDMI cable,
•
“HDMI Video Out” is set to “Auto”. If you don’t get a stable
image, select the desired resolution*.
When you set “HDMI Video Out” to a setting other than
“Auto”, you can only select resolutions* that are compatible
with the connected TV.
Refer to “HDMI Video Out” on page 37 regarding the
*
resolutions of the HDMI video output.
TVProjector AV receiver
Equipment with an HDMI terminal
After connecting
Secure the HDMI cable to the HDMI cable holder, passing it through the holder. (Page 11)
•
If desired, connect audio equipment. (Page 17)
•
Load a disc and start playback. (Pages 24–29)
•
Refer to KURO LINK function. (Pages 23 and 38)
•
14
Page 17
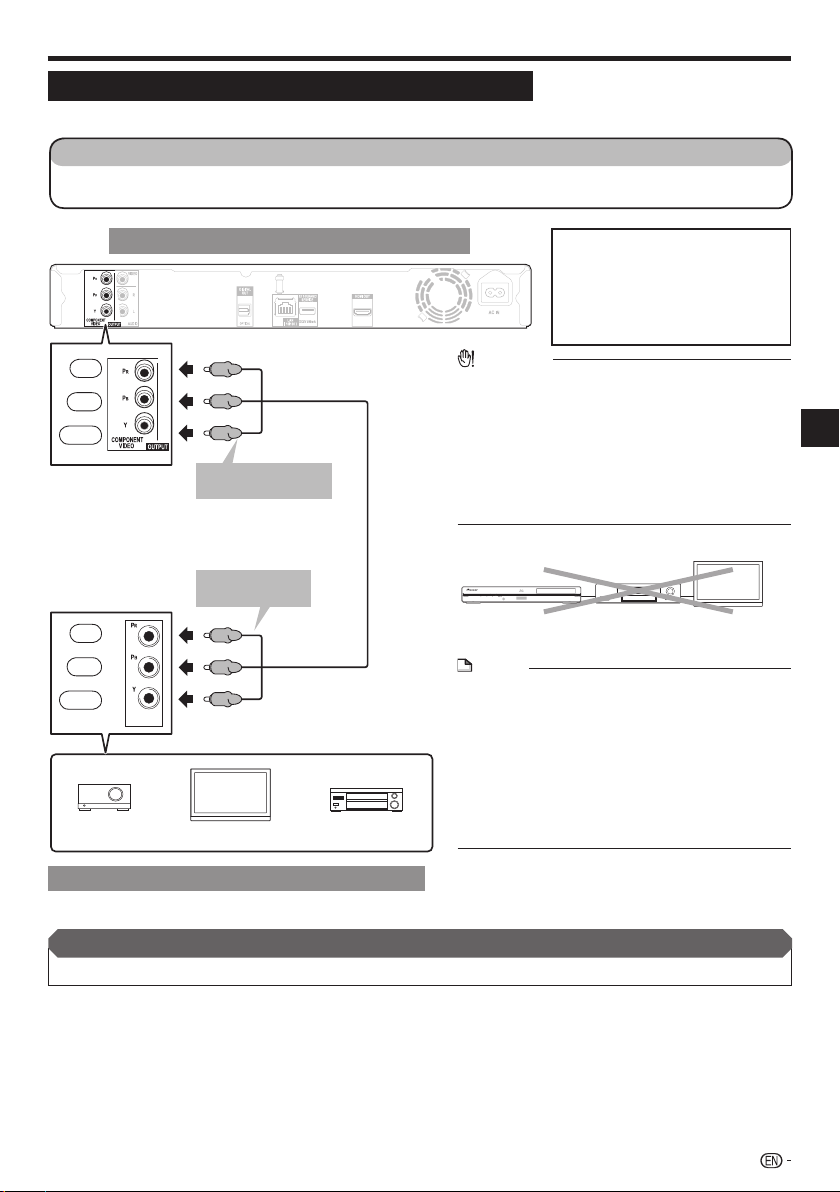
Video Connections
Connecting to the Component Jacks
You can enjoy accurate color reproduction and high quality images through the component jacks.
STEPS
Be sure to turn off this Player and the equipment before making any connections.
1
Firmly connect a component video cable (commercially available) to the component jacks (1 and 2).
2
Red
Blue
Green
Red
Blue
Green
Projector
(C
)
R
)
(C
B
COMPONENT
IN
(Red)
(Blue)
(Green)
To COMPONENT
1
VIDEO OUTPUT jacks
Component video cable
(commercially available)
To COMPONENT
2
IN jacks
(Red)
(Blue)
(Green)
TV
This Player
AV receiver
Video signal outputs:
1080i 50/60 Hz 576i 50 Hz
720p 50/60 Hz 480p 60 Hz
576p 50 Hz 480i 60 Hz
For example;
480p: 480 progressive scan
480i: 480 interlace scan
CAUTION
You need to select the priority video output in
•
“Settings” – “Audio Video Settings” – “Video Out
Select”. (See page 37.)
When the priority video output is set to “HDMI” in
•
“Video Out Select”, the video resolution which is output
from the COMPONENT VIDEO OUTPUT jacks is the
one set in “HDMI Video Out”. (See page 37.)
When the output from the COMPONENT VIDEO
•
OUTPUT jacks is prioritized, set the priority video
output to “Component”.
Player
NOTE
Connect the Blu-ray disc player to TV directly. If
•
you playback the image via VCR, the image may
deteriorate due to the copy guard function.
•
When you record the program where copyright
is protected, the copy guard function is activated
automatically; the program can not be recorded
correctly. Also, the playback image via VCR may
deteriorate due to this function. However, this is not
a malfunction. When you watch the program where
copyright is protected, we recommend that the Blu-ray
disc player be connected to TV directly.
VCRBlu-ray Disc
TV
Connection
Video equipment with component jacks
After connecting
Connect audio equipment or the audio terminals of the TV. (Page 17)•
15
Page 18
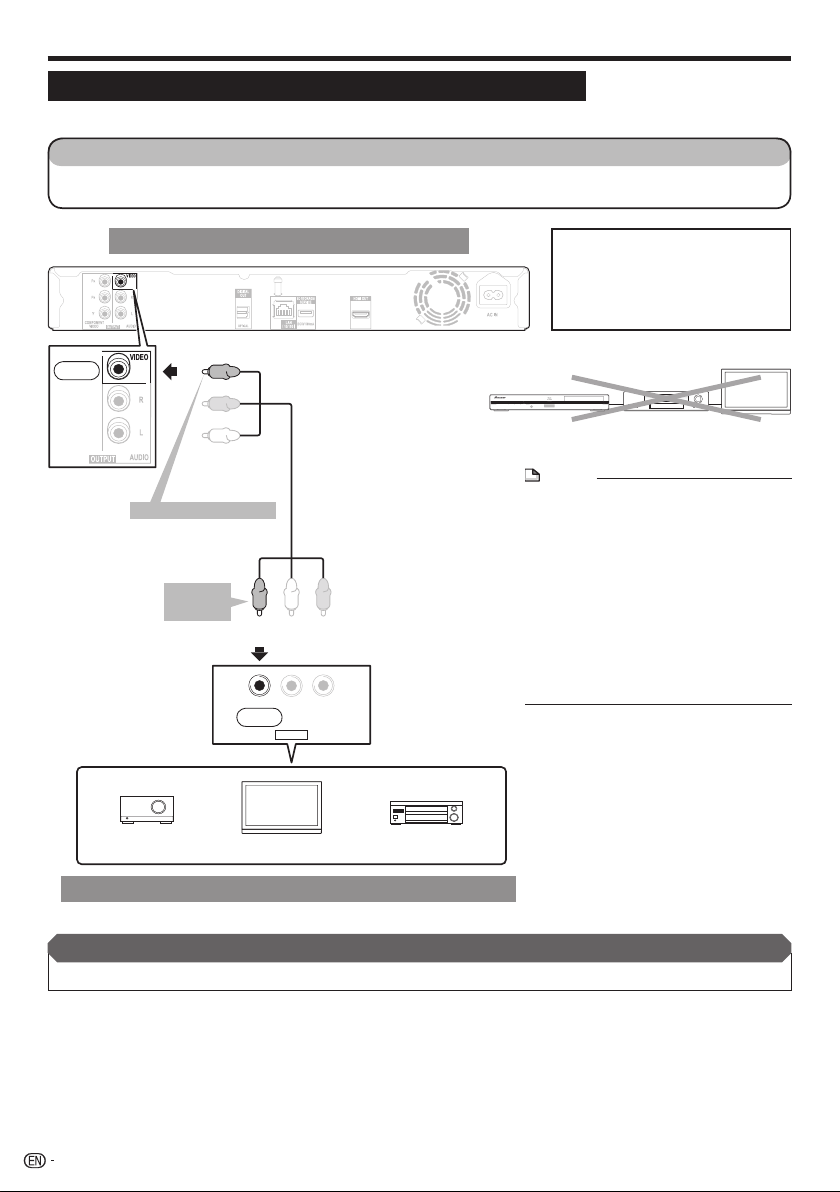
Video Connections
Connecting to the Video Jack
You can enjoy the images through the video jack.
STEPS
Be sure to turn off this Player and the equipment before making any connections.
1
Firmly connect an AV cable (supplied) to the video jacks (1 and 2).
2
Yellow
To VIDEO OUTPUT jack
1
AV cable (supplied)
To VIDEO
2
input jack
(Yellow)
This Player
(Yellow)
VIDEO L - AUDIO -R
Yellow
AV INPUT
Video signal outputs:
576i 50 Hz
480i 60 Hz
576i: 576 interlace scan
480i: 480 interlace scan
Player
NOTE
Connect the Blu-ray disc player to TV
•
directly. If you playback the image via VCR,
the image may deteriorate due to the copy
guard function.
When you record the program where
•
copyright is protected, the copy guard
function is activated automatically; the
program can not be recorded correctly.
Also, the playback image via VCR may
deteriorate due to this function. However,
this is not a malfunction. When you watch
the program where copyright is protected,
we recommend that the Blu-ray disc player
be connected to TV directly.
VCRBlu-ray Disc
TV
Projector
Video equipment with a video jack
After connecting
Connect audio equipment or the audio terminals of the TV. (Page 17)•
16
TV
AV receiver
Page 19

Audio Connections
Connecting to the Digital Audio Terminal or Audio Jacks
You can connect audio equipment or the TV to the DIGITAL OUT OPTICAL terminal or AUDIO OUTPUT jacks.
•
See page 45 for information on the output of next generation audio formats.
•
STEPS
Be sure to turn off this Player and the equipment before making any connections.
1
Firmly connect an optical digital cable (commercially available) or AV cable (supplied) to the optical digital audio
2
terminals or audio jacks (1 and 2, or 3 and 4).
This Player
•
When using OPTICAL output,
5.1 ch Digital Output is available.
(Red)
(White)
Red
White
7.1 ch Digital Output is not available.
NOTE:
7.1 ch Audio is available via the HDMI terminal.
Connection
To AUDIO OUT
3
jacks
AV cable (supplied)
To AUDIO input
4
jacks
After connecting
Load a disc and start playback. (Pages 24–29)•
To DIGITAL OUT OPTICAL
terminal
Optical digital cable
(commercially available)
(White) (Red)
VIDEO L - AUDIO -R
AV INPUT
TV
RedWhite
OPTICAL
DIGITAL AUDIO IN
To OPTICAL
input terminal
Amplifier
2
Audio equipment with a digital audio input terminal
1
17
Page 20

Broadband Internet Connection
Connecting to the LAN terminal
You can enjoy a variety of contents with interactive functions by connecting to the internet when playing BD-
•
LIVE compatible discs. Refer to pages 26 and 39 regarding further information on BD-LIVE functions.
When using the internet, a broadband internet connection as shown below is required.
•
STEPS
Be sure to turn off this Player and the equipment before making any connections.
1
Firmly connect a LAN cable (commercially available) to the LAN terminal (1 and 2).
2
This Player
To BD STRAGE/SERVICE
Terminal
To LAN terminal
1
LAN cable
(commercially available)
To LAN terminal
2
USB memory device
Enjoying BONUSVIEW or BD-LIVE
Requires standard USB memory device.
The memory device purchased should comply with
USB specification 2.0 and have minimum capacity
of 1 GB, with 2 GB or more recommended.
CAUTION
Do not use a USB extension cable when
•
connecting a USB memory device to the BD
STORAGE/SERVICE terminal of the player. Using a
USB extension cable may prevent the player from
performing correctly.
When using a broadband internet connection,
•
a contract with an internet service provider is
required. For more details, contact your nearest
internet service provider.
Refer to the operation manual of the equipment
•
you have as the connected equipment and
connection method may differ depending on your
internet environment.
NOTE
Use a LAN cable/router supporting 10BASE-
•
LAN
Internet Modem Hub or broadband router
T/100BASE-TX.
Example of a Broadband Internet Connection
After connecting
Perform the communication setting. (Pages 40–42)
•
Load a BD-LIVE compatible disc and play back the contents. (Pages 24 and 26)
•
18
PC
Page 21

Disc Playback
Before Starting Playback
Loading the Batteries in the
Remote Control
Open the rear cover.
1
Press lightly on this
part and slide into the
direction of the arrow.
2
Insert the batteries (AA/R6 x 2).
Insert as indicated by the / marks into the
battery compartment.
Insert the negative ()
side first.
Close the rear cover.
3
Close securely (a click should be heard).
Approximate operating range of
remote control
Remote control sensor
30º 30º
7 m
Remote control unit
Connecting the Power Cord
Plug the supplied AC cord into the AC IN terminal on
the rear of the Player. Then plug into AC outlet.
Disc Playback
CAUTION
Do not use any batteries other than the ones specified.
•
Also, do not use a new battery together with an old one.
When loading the batteries into the remote control, set
•
them in the proper direction, as indicated by the polarity
marks ( and ).
Do not heat batteries, disassemble them, or throw them
•
into flames or water.
Batteries may have different voltages, even if they look
•
similar. Do not use different kinds of batteries together.
To prevent leakage of battery fluid, remove the batteries
•
if you do not plan to use the remote control for a long
period of time (1 month or more). If the fluid should leak,
wipe it carefully off the inside of the case, then insert new
batteries. If a battery should leak and the fluid should get
on your skin, flush it off with large quantities of water.
When disposing of used batteries, please comply
•
with governmental regulations or environmental public
institution’s rules that apply in your country/area.
WARNING
•
Do not use or store batteries in direct sunlight or other
excessively hot place, such as inside a car or near a heater.
This can cause batteries to leak, overheat, explode or
catch fire. It can also reduce the life or performance of
batteries.
To AC IN terminal
NOTE
Place the Player close to the AC outlet, and keep the
•
power plug within reach.
TO PREVENT RISK OF ELECTRIC SHOCK, DO NOT
•
TOUCH THE UN-INSULATED PARTS OF ANY CABLES
WHILE THE AC CORD IS CONNECTED.
The STANDBY/ON indicator blinks while the Player is
•
preparing for starting up. You cannot turn the Player on
until the STANDBY/ON indicator stops blinking.
If you are not going to use this Player for a long period of
•
time, be sure to remove the AC cord from the AC outlet.
To AC outlet
19
Page 22

Before Starting Playback
Turning the Power On
STANDBY/ON
BD/DVD/CD disc indicator
KURO LINK indicator
STANDBY/ON indicator
Front panel
display
Playback indicator
Indicators on the Player
STANDBY/ON indicator
Blue on Power on
Red blinks Preparing for standby
Red on Standby
KURO LINK indicator
Red on Output the optimum picture
BD/DVD/CD disc indicator
Off No disc
White on Disc stopped
White blinks Loading a disc
Playback indicator
Blue on Playing back
When you turn on the power, the Menu screen
•
automatically displays for a while.
Press EXIT to erase the display.
quality for “KURO”
(See page 23.)
Turning the power on
Press STANDBY/ON on the remote control or on
the Player to turn on the power of the Player.
Entering standby
Press STANDBY/ON on the remote control or on
the Player to enter standby.
•
If you press STANDBY/ON again immediately after
entering standby, the Player may not turn on. If this
happens, wait for 10 seconds or more and then turn on the
power again.
NOTE
When the STANDBY/ON indicator is blinking (may take
•
some time), the Player cannot be turned on.
20
Page 23

Before Starting Playback
Language Setting
Changing the on-screen display
language
Press HOME MENU to display the Home Menu
1
screen.
2
Press to select “On Screen
Language”, then press ENTER.
Disc Navigator Settings
On Screen Language Photos
3
Press to select the language you want to
display on the screen, then press ENTER.
English
Operating the TV with the player’s
remote control
When the manufacturer code for your brand of TV
is set on the player’s remote control, the TV can be
operated using the player’s remote control.
CAUTION
For some models it may not be possible to operate the TV
•
with the player’s remote control, even for TVs of brands
listed on the manufacturer code list.
The setting may be restored to the default after the
•
batteries are replaced. If this happens, reset it.
Input the 2-digit manufacturer code.
1
Press the number buttons (0 to 9) to input the code
•
while pressing TV CONTROL .
NOTE
The factory setting is 00 (PIONEER).
•
If you make a mistake when inputting the code, release TV
•
CONTROL then start over from the beginning.
When there are multiple codes for a manufacturer, try
•
inputting them in the indicated order until the TV can be
operated.
Check that the TV can be operated.
2
Operate the TV using TV CONTROL.
•
– Press to turn the TV’s power on and off.
INPUT SELECT – Press to switch the TV’s input.
–
– Press to select the TV channel.
CH +/
–
– Press to adjust the volume.
VOL +/
Disc Playback
English Nederlands
Deutsch Svenska Magyar
Français Dansk Slovensky
Italiano Norsk
Español Suomi
Português Polski
NOTE
To select the DVD disc language, such as subtitle
•
language, etc., see page 25.
Česky
Slovenščina
TV Preset code list
Manufacturer Code(s)
PIONEER 00, 31, 32, 07, 36, 42,
51
ACURA 44
ADMIRAL 31
AIWA 60
AKAI 32, 35, 42
AKURA 41
ALBA 07, 39, 41, 44
AMSTRAD 42, 44, 47
ANITECH 44
ASA 45
ASUKA 41
AUDIOGONIC 07, 36
BASIC LINE 41, 44
BAUR 31, 07, 42
BEKO 38
BEON 07
BLAUPUNKT 31
BLUE SKY 41
BLUE STAR 18
BPL 18
BRANDT 36
BTC 41
BUSH 07, 41, 42, 44, 47, 56
CASCADE 44
CATHAY 07
CENTURION 07
CGB 42
CIMLINE 44
CLARIVOX 07
CLATRONIC 38
CONDOR 38
(Continued on the next page)
21
Page 24

Before Starting Playback
CONTEC 44
CROSLEY 32
CROWN 38, 44
CRYSTAL 42
CYBERTRON 41
DAEWOO 07, 44, 56
DAINICHI 41
DANSAI 07
DAYTON 44
DECCA 07, 48
DIXI 07, 44
DUMONT 53
ELIN 07
ELITE 41
ELTA 44
EMERSON 42
ERRES 07
FERGUSON 07, 36, 51
FINLANDIA 35, 43, 54
FINLUX 32, 07, 45, 48, 53, 54
FIRSTLINE 40, 44
FISHER 32, 35, 38, 45
FORMENTI 32, 07, 42
FRONTECH 31, 42, 46
FRONTECH/PROTECH 32
FUJITSU 48
FUNAI 40, 46, 58
GBC 32, 42
GE 00, 01, 08, 07, 10, 11, 17,
02, 28, 18
GEC 07, 34, 48
GELOSO 32, 44
GENERAL 29
GENEXXA 31, 41
GOLDSTAR 10, 23, 21, 02, 07, 50
GOODMANS 07, 39, 47, 48, 56
GORENJE 38
GPM 41
GRAETZ 31, 42
GRANADA 07, 35, 42, 43, 48
GRADIENTE 30, 57
GRANDIN 18
GRUNDIG 31, 53
HANSEATIC 07, 42
HCM 18, 44
HINARI 07, 41, 44
HISAWA 18
HITACHI 31, 33, 34, 36, 42, 43,
54, 06, 10, 24, 25, 18
HUANYU 56
HYPSON 07, 18, 46
ICE 46, 47
38, 42
IMPERIAL
INDIANA 07
INGELEN 31
INTERFUNK 31, 32, 07, 42
INTER
ISUKAI 41
ITC 42
ITT 31, 32, 42
JEC 05
JVC 13, 23
KAISUI 18, 41, 44
KAPSCH 31
KENDO 42
KENNEDY 32, 42
KORPEL 07
KOYODA 44
LEYCO 07, 40, 46, 48
LIESENK&TTER 07
LOEWE 07
LUXOR 32, 42, 43
M-ELECTRONIC 31, 44, 45, 54,
56, 07, 36, 51
MAGNADYNE 32, 49
MAGNAFON 49
MAGNAVOX 07, 10, 03, 12, 29
MANESTH 39, 46
MARANTZ 07
VISION
46, 49
22
MARK 07
MATSUI 07, 39, 40, 42, 44, 47, 48
MCMICHAEL 34
MEDIATOR 07
MEMOREX 44
METZ 31
MINERVA 31, 53
MITSUBISHI 09, 10, 02, 21, 31
MULTITECH 44, 49
NEC 59
NECKERMANN 31, 07
NEI 07, 42
NIKKAI 05, 07, 41, 46, 48
NOBLIKO 49
NOKIA 32, 42, 52
NORDMENDE 32, 36, 51, 52
OCEANIC 31, 32, 42
ORION 32, 07, 39, 40
OSAKI 41, 46, 48
OSO 41
OSUME 48
OTTO VERSAND 31, 32, 07, 42
PALLADIUM 38
PANAMA 46
PANASONIC 31, 07, 08, 42, 22
PATHO CINEMA 42
44
AUSA
P
PHILCO 32, 42
PHILIPS 31, 07, 34, 56, 68
PHOENIX 32
PHONOLA 07
PROFEX 42, 44
PROTECH 07, 42, 44, 46, 49
QUELLE 31, 32, 07, 42, 45, 53
R-LINE 07
RADIOLA 07
RADIOSHACK 10, 23, 21, 02
RBM 53
RCA 01, 10, 15, 16, 17, 18, 61,
62, 09
REDIFFUSION 32, 42
REX 31, 46
ROADSTAR 41, 44, 46
SABA 31, 36, 42, 51
SAISHO 39, 44, 46
SALORA 31, 32, 42, 43
SAMBERS 49
SAMSUNG 07, 38, 44, 46, 69, 70
SANYO 35, 45, 48, 21, 14, 91
SBR 07, 34
SCHAUB LORENZ 42
SCHNEIDER 07, 41, 47
SEG 42, 46
SEI 32, 40, 49
SELECO 31, 42
SHARP 02, 19, 27, 67, 90
SIAREM 32, 49
SIEMENS 31
SINUDYNE 32, 39, 40, 49
SKANTIC 43
SOLAVOX 31
SONOKO 07, 44
SONOLOR 31, 35
SONTEC 07
SONY 04
SOUNDWAVE 07
STANDARD 41, 44
STERN 31
SUSUMU 41
SYSLINE 07
TANDY 31, 41, 48
TASHIKO 34
TATUNG 07, 48
TEC 42
TELEAVIA 36
TELEFUNKEN 36, 37, 52
TELETECH
TENSAI 40, 41
THOMSON 36, 51, 52, 63
44
THORN 31, 07, 42, 45, 48
TOMASHI 18
TOSHIBA 05, 02, 26, 21, 53
42
ADA
TOW
ULTRAVOX 32, 42, 49
UNIDEN 92
UNIVERSUM 31, 07, 38, 42, 45,
46, 54
VESTEL 07
VICTOR 13
VOXSON 31
WALTHAM 43
WATSON 07
WATT RADIO 32, 42, 49
WHITE WESTINGHOUSE 07
YOKO 07, 42, 46
ZENITH 03, 20
Page 25

Before Starting Playback
Turning Off the LCD Backlight and
Indications
If you feel that the indicators on the Player are too
bright when watching movies, you can turn them off
except for the STANDBY/ON indicator.
Operate using the remote control
unit
Press FRONT LIGHT to turn the LCD backlight
on or off.
About KURO LINK function
The functions work when a Pioneer KURO LINK-compatible
Flat Screen TV or AV system (AV receiver or amplifier, etc.)
is connected to the player using an HDMI cable. Also refer
to the operating instructions of the Flat Screen TV and AV
system(AV receiver or amplifier, etc.).
To use the KURO LINK function
•
The KURO LINK function operates only when “Video Out
Select” is set to “HDMI”.
•
The KURO LINK function operates when KURO LINK is set
to On for all devices connected with HDMI cables.
•
Once connections and the settings of all the devices
are finished, be sure to check that the player’s picture is
output to the Flat Screen TV. (Also check after changing
the connected devices and reconnecting HDMI cables.)
The KURO LINK function may not operate properly if the
player’s picture is not properly output to the Flat Screen TV.
•
Use High Speed HDMI™ cables when using the KURO
LINK function. The KURO LINK function may not operate
properly if other HDMI cables are used.
•
For some models, the KURO LINK function may be
referred to as “HDMI Control”.
•
The KURO LINK function does not work with devices of
other brands, even if connected with an HDMI cable.
What the KURO LINK function can do
Outputting the optimum picture quality for “KURO”
•
from the player.
When the KURO LINK function is enabled, video signals
with the optimum picture quality for “KURO” are output
from the player’s HDMI terminal.
The KURO LINK indicator on the player lights red.
KURO LINK indicator
Disc Playback
HOME MENU operation
Press HOME MENU to display the Home Menu
1
screen.
Press
2
3
4
5
press ENTER.
Press
press ENTER.
Audio Video Settings
Quick Start
Auto Power Off
KURO LINK
Playback Setting
Communication Setup
Front Display/LED
Version
USB Memory Management
Software Update
System Reset
Press
ENTER.
Press HOME MENU or EXIT to exit.
to select “Settings”, then
to select “Front Display/LED”, then
to select “On” or “Off”, then press
Operating the player with the Flat Screen TV’s remote
•
control.
Such player operations as starting and stopping playback
and displaying the menus can be performed from the Flat
Screen TV.
The player’s playback picture is displayed on the Flat
•
Screen TV’s screen. (Auto-select function)
The input switches automatically on the Flat Screen TV and
AV system (AV receiver or amplifier, etc.) when playback is
started on the player or the Home Menu or Disc Navigator
is displayed. When the input is switched, the playback
picture, the Home Menu or Disc Navigator appears on the
Flat Screen TV.
The power of the Flat Screen TV and the player turns
•
on and off automatically.
(Simultaneous power function)
When playback on the player is started or the Home Menu
or Disc Navigator is displayed, if the Flat Screen TV’s
power was off, its power turns on automatically. When the
Flat Screen TV’s power is turned off, the player’s power
automatically turns off.
The player’s on-screen display language switches
•
automatically. (Unified language function)
When the language information from a connected Flat
Screen TV is received, you can have the player’s on-screen
display language change automatically to that of the Flat
Screen TV. This function is available only when playback is
stopped and the menu screen is not displayed.
23
Page 26

BD/DVD/CD Playback
This section explains playback of commercially
available BD Video and DVD Video discs (like movies),
CDs, and recorded BD-RE/-R, DVD-RW/-R discs.
Loading a Disc
STANDBY/ON
Press STANDBY/ON to turn on the power.
1
Press OPEN/CLOSE to open the disc tray.
2
Load a disc on the disc tray.
3
Insert the disc with the label face up.
•
In case of disc recorded on both sides, face down the
•
side to play back.
Press OPEN/CLOSE to close the disc tray.
4
OPEN/CLOSE
BD/DVD Video Playback
DVD-RW
BD-RBD VIDEO
DVD-R
AVCHD
BD-RE
DVD VIDEO
This player supports DVD upscaling during DVD
playback.
To stop playback
Press H STOP.
Resume playback function
•
If you press d PLAY next, playback will resume from
the point where the Player was previously stopped. To
playback from the beginning, cancel resume mode by
pressing H STOP, then press d PLAY. (This may not
work depending on the type of disc. In this case, open the
disc tray or enter standby.)
NOTE
Resume playback may not function depending on the disc.•
Displaying the disc information
Press DISPLAY during playback.
Each time you press DISPLAY, the display switches
•
as follows.
Disc Information Screen A
BD-VIDEO
Disc Information Screen B
1/1
10/1 1
00 :00 :12
03/ : 12: 28
00 :00 :12
03/ : 12: 28
Load a disc.
1
Playback may begin automatically, depending on the
•
disc.
Playback begins from the first title.
•
The menu may be displayed first, depending on the
•
disc. Perform playback operation by following the
directions on the screen.
Press d PLAY if playback does not begin
2
automatically or playback is stopped.
NOTE
The disc load time may vary depending on the disc.•
24
No Display
1
Type of disc
2
Title number being played/Total number of Titles
3
Chapter number being played/Total number of
Chapters
4
Elapsed playback time/Total playback time for the
Title
NOTE
Disc Information Screen A disappears after about 1 minute
•
elapses without performing any operations.
For some commercially-released BD VIDEO discs, the total
•
playback time display for the Chapter/Title may not appear.
Page 27

BD/DVD/CD Playback
BD/DVD Menus
This section explains how to play back a BD/DVD
•
video disc with a top menu, disc menu or pop-up
menu.
The titles listed in the top menu and a disc guide (for
•
options like subtitles and audio languages) are given
in the disc menu.
Start playback by selecting a title
from the top menu
BD VIDEO
1
2
•
Top menu
•
•
DVD VIDEO
Press TOP MENU/DISC NAVIGATOR.
The top menu screen is displayed if present on the
•
BD/DVD video disc.
TOP MENU
1
Jazz
3
Classic
2
4
Latin
Rock
Press to select the title, then press
ENTER.
The selected title is played back.
•
NOTE
The procedure explained on this page is the basic
operation procedure. Procedures vary depending on
the BD/DVD video disc, so you may need to follow the
instructions in the BD/DVD video disc manual or the
instructions displayed on the screen.
With some BD/DVD discs, the top menu may be referred to
as the “Title Menu”. Use TOP MENU/DISC NAVIGATOR
on the remote control when the instructions refer to “Title
Menu”.
If no top menu is available, the TOP MENU/DISC
NAVIGATOR button will have no effect.
Using the disc menu
DVD VIDEO
Example: Select “SUBTITLE LANGUAGE”.
Press TOP MENU/DISC NAVIGATOR.
1
The disc menu screen is displayed if present on the
•
DVD video disc.
Press to select “SUBTITLE LANGUAGE”,
2
then press ENTER.
The screen for selecting the subtitle language is
•
displayed.
MENU
1 AUDIO LANGUAGE
2 SUBTITLE LANGUAGE
3 AUDIO
Press to select the subtitle language, then
3
press ENTER.
Press TOP MENU/DISC NAVIGATOR to exit.
4
Using the pop-up menu
BD VIDEO
Press POPUP MENU/MENU during playback.
1
The pop up menu screen is displayed.
•
The menu contents displayed vary depending on the
•
disc. For details on how to see and operate the popup menu, refer to the manual for the disc.
Pop-up menu
Previous page
Next page
Press to select the desired item,
2
then press ENTER.
Press POPUP MENU/MENU to exit.
3
The pop-up menu will automatically disappear for
•
some discs.
Disc Playback
25
Page 28

BD/DVD/CD Playback
Enjoying BONUSVIEW or BD-LIVE
BD VIDEO
This Player is compatible with additional functions of
BD-Video, BONUSVIEW (BD-ROM Profile 1 Version
1.1) and BD-LIVE.
When using BD-Video discs compatible with
BONUSVIEW, you can enjoy such functions as
secondary video (picture in picture) and secondary
audio, as well as subtitles and previews.
When playing discs supporting BD-LIVE, special video
images and other data can be downloaded from the
Internet.
Data recorded on BD video and downloaded from BDLIVE is stored on the USB memory device (external
memory). To enjoy these functions, connect a USB
memory device (minimum 1 GB capacity (2 GB or
more recommended)) supporting USB 2.0 High Speed
(480 Mbit/s) to the BD STORAGE/SERVICE terminal
(page 11) on the back of this player.
To recall data stored in the USB memory device, first insert
•
the disc media that was being used at the time the data
was downloaded (if a different disc is loaded, the data
stored on the USB memory device cannot be played).
If a USB memory device containing other data (previously
•
recorded) is used, the video and audio may not play back
properly.
If the USB memory device is disconnected from this player
•
during playback, playback of the disc will stop. Do not
disconnect the USB memory device while playback is in
progress.
Some time may be required for the data to load (read/
•
write).
CAUTION
It may not be possible to use the BD-LIVE functions if
•
there is insufficient space on the USB memory device.
In this case, refer to “USB Memory Management” on
page 43 for erasing the Virtual Package data and the
BD-LIVE data in the USB memory device.
Secondary video playback
BD-Video that includes secondary audio and video
compatible with Picture in Picture can be played back
with secondary audio and video simultaneously as a
small video in the corner.
Press SECONDARY VIDEO during playback to
1
show the 2-picture screen.
Primary
audio/video
To remove the secondary video, press
2
Secondary
audio/video
SECONDARY VIDEO again.
NOTE
To listen to secondary audio, make sure that “Secondary
•
Audio” is set to “On”. (See page 37.)
The secondary audio and video for Picture In Picture may
•
automatically play back and be removed depending on the
content. Also, playable areas may be restricted.
Virtual Package
For BD-Video discs compatible with Virtual Package,
data is copied from the discs or internet to local
storage. It is automatically copied to the local storage
prior to playback. You can enjoy a variety of additional
functions including secondary video, secondary audio,
subtitles, movie trailers, etc.
The playback methods vary depending on the disc. For
•
details, refer to the disc manual.
NOTE
Operation of USB memory devices is not guaranteed.
•
Playback of BD-LIVE function data differs depending on
•
the disc used. For details, consult the user instructions
supplied with the disc. (pages 18 and 40.)
To enjoy the BD-LIVE function, a network connection
•
and settings are required (pages 19 and 40).
For conditions and restrictions regarding Internet
•
connections using the BD-LIVE function, see the
section “BD Internet Access” (page 39).
BD-LIVE is a function that provides for automatic
•
connection to the Internet. Discs supporting the BDLIVE function may send ID codes identifying this player
and the disc to the contents provider via the Internet.
The unit can be set to prevent automatic connection
•
to the Internet. For instructions on this setting, see the
section “BD Internet Access” (page 39).
26
BD-LIVE
In this Player, a variety of contents with interactive
functions are available through BD-LIVE compatible
Blu-ray discs by connecting to the internet. You
can enjoy the download of bonus features such
as latest movie trailers to the USB memory device,
communication compatible BD-J interactive games,
etc.
•
The available functions differ depending on the disc.
NOTE
Regarding playback method of BD-LIVE contents, etc.,
•
perform the operations in accordance with the instructions
in the BD disc manual.
To enjoy BD-LIVE functions, perform the broadband
•
internet connection (page 18) and communication settings
(pages 40–42).
Refer to page 39 regarding the setup to restrict access to
•
BD-LIVE contents.
Page 29

BD/DVD/CD Playback
BD-RE/-R/DVD-RW/-R Playback
BD-RE BD-R
DVD-RW
You can play back a recorded disc (DVD: VR format
finalized disc only / BD: BDAV format disc only).
NOTE
“Finalize” refers to a recorder processing a recorded disc
•
so that it will play in other DVD players/recorders as well as
this player. Only finalized DVD-RW/-R discs will play back in
this player. (This player does not have a function to finalize
discs.)
DVD-R
NOTE
The Disc Navigator screen also can be displayed by
•
pressing TOP MENU/DISC NAVIGATOR when playback
is stopped or by pressing ENTER after choosing “Disc
Navigator” in Home Menu when playback is stopped.
About Disc Navigator
The Disc Navigator can be displayed in two types,
•
Thumbnail and Title Name.
Each time you press RED, the screen changes between
•
Thumbnail and Title Name.
Thumbnail
5/21 Thu 9:30 AM 110 Min.
Program
Program
A
Title Name
Program 1
1
4
Program
2
Program
5
B C D
By Chapter
Program
3
Program
6
Playlist Functions
Title Name
5/21
Thu 9:30 AM
[From Old]
1 Program 1 5/21 Thu 110 Min.
2 Program 2 6/15 Mon 110 Min.
3 Program 3 7/3 Fri 56 Min.
4 Program 4 9/18 Fri 40 Min.
Program 1
110 Min.
1
3
1
Disc Playback
2
Playback by selecting a title
Load a recorded disc.
1
The Disc Navigator screen is displayed.
•
Program
1
Program
4
•
When loading a BD disc with usage restrictions placed
by a BD recorder, the PIN code input screen appears.
Then, input your PIN code.
If you input a wrong PIN code three times, the disc
tray will open. Close the disc tray, and then input a
correct PIN code.
•
If the Disc Navigator screen is not displayed, press
TOP MENU/DISC NAVIGATOR.
Press to select the desired title, then
2
press ENTER.
When seven or more titles are displayed, switch pages
•
by pressing PAGE +/
performed by pressing k orl.
•
Playback of the selected title will begin.
You can playback by pressing d PLAY instead of
pressing ENTER.
Press H STOP to stop playback.
3
Program
2
Program
5
-
.The same operation can be
Program
3
Program
6
A B C D
Thumbnail
Information of selected title
1
Title Name
2
Recording Date
Recording Duration
Caption for RED, GREEN, YELLOW, BLUE
3
buttons
When seven or more titles are displayed, switch pages
•
by pressing PAGE +/-.The same operation can be
performed by pressing k orl.
Sorting Playlist Functions
3
27
Page 30

BD/DVD/CD Playback
Playback by selecting a chapter
Press GREEN while the Thumbnail screen is
1
displayed.
The chapter screen is displayed.
•
Chapter
CHAPTER
1
Chapter
4
•
When seven or more chapters are displayed, switch
pages by pressing PAGE +/-.The same operation
can be performed by pressing k or
l.
•
To return to the Thumbnail screen, press GREEN.
Press to select the desired chapter,
2
then press ENTER.
Playback of the selected chapter will begin.
•
You can playback by pressing d PLAY instead of
pressing ENTER.
Press H STOP to stop playback.
3
Chapter
CHAPTER CHAPTER
2
Chapter
CHAPTERCHAPTERCHAPTER
5
Chapter
3
Chapter
6
Sorting the titles
Each time you press GREEN, while the Title Name
screen is displayed, the Title Name display changes
between displaying the newest title first and the oldest
title first.
Playback by selecting a Playlist
Press YELLOW while the Thumbnail screen is
1
displayed.
The Playlist screen is displayed.
•
5/21 Thu 9:30 AM
1 Program 1 5/21 Thu 110 Min.
2 Program 2 6/15 Mon 110 Min.
Program 1
110 Min.
Playing back the title you stopped
while being played
Press BLUE while the Disc Navigator screen is
1
displayed.
Playback
From Beginning
2
Press to select the type of Playback, then
press ENTER.
Playback of the title will begin.
•
Press H STOP to stop playback.
3
From Continued
C D
Original Functions
Press to select the title, then press
2
ENTER.
Playback of the selected title will begin.
•
Press H STOP to stop playback.
3
28
Page 31

BD/DVD/CD Playback
Audio CD Playback
AUDIO CD
Playback from the beginning
Load an audio CD.
1
The CD screen is displayed.
•
(The CD screen is displayed only when a compact
disc recorded in the CD-DA format is inserted.)
Playback may begin automatically, depending on the
•
disc.
n
o
s
c
n
u
F
t
T
0
c
1
k
a
r
0
0
0
:
1
T
0
5
c
1
1
k
a
r
2
c
a
T
r
3
a
T
c
r
4
a
T
c
r
5
a
T
c
r
6
a
T
c
r
Select Enter
Press d PLAY if playback does not begin
2
6
:
0
5
2
1
k
0
:
0
5
3
2
k
3
:
0
5
4
0
k
3
:
0
4
5
4
k
4
:
0
5
6
0
k
8
:
automatically or playback is stopped.
Press H STOP to stop playback.
3
Resume playback function
If you press d PLAY next, playback will resume from
•
the point where the Player was previously stopped. To
playback from the beginning, cancel resume mode by
pressing H STOP, then press d PLAY. (This may not
work depending on the type of disc. In this case, open the
disc tray or enter standby.)
NOTE
Resume playback may not function depending on the disc.•
i
1
2
1
/
0
0
1
0
0
1
:
:
+
R
L
3
5
1
6
:
O
f
f
1
2
1
/
D
Functions
Playback by selecting a track
Press to select the track, then press
1
ENTER during playback or when playback is
stopped.
Playback of the selected track will begin.
•
When seven or more tracks are displayed, switch
•
pages by pressing PAGE +/-.
n
c
n
o
u
F
s
t
T
a
0
c
3
k
r
0
0
0
:
1
T
a
0
5
c
1
1
k
r
2
T
a
r
3
a
T
r
4
a
T
r
5
a
T
r
6
T
a
r
Select Enter
Press H STOP to stop playback.
2
:
0
5
c
2
1
k
:
0
5
c
3
2
k
:
0
5
4
0
k
c
:
0
4
c
5
4
k
:
0
5
c
6
0
k
:
6
0
3
3
4
8
i
3
2
1
/
0
0
0
0
:
:
+
L
3
5
2
3
:
O
f
f
D
Functions
Operation procedure for the
“Functions” menu
1
Press BLUE (Functions) when the CD screen is
displayed.
•
The “Functions” menu is activated.
n
c
n
o
u
F
s
t
0
c
3
k
a
T
r
0
0
0
:
1
a
T
0
5
c
1
1
k
r
2
T
c
k
a
r
3
a
T
c
k
r
4
T
c
k
a
r
5
a
T
c
k
r
6
c
k
a
T
r
Press to select the desired setting, then
2
press ENTER.
When playback is stopped, only “Track” can be
•
selected.
For a description of each setting, see “Functions
•
which can be set” (Page 35).
Press to set, then press ENTER.
3
Operations vary depending on the setting. Follow the
•
operation instructions on the screen.
Press RETURN or BLUE to exit the
4
6
:
0
5
2
1
0
:
0
5
3
2
3
:
5
4
0
3
0
:
0
4
5
4
4
:
0
5
6
0
8
:
“Functions” menu.
NOTE
The displayed items vary depending on the disc.•
i
3
2
1
/
0
0
0
0
:
:
+
L
3
5
2
3
:
O
f
f
ReturnSelect Enter
D
Track select
1
1
R
3
2
1
/
Disc Playback
1
1
R
2
1
3
/
29
Page 32

Playback Functions
BD VIDEO BD-R
DVD VIDEO
AUDIO CD
•
BD-RE
DVD-RW
NOTE
Some operations in the following playback functions cannot
be performed depending on the specifications of the disc.
DVD-R
AVCHD
Fast Forward/Reverse (Search)
Fast Forward/Reverse functions when G REV or
FWD is pressed during playback.
J
Example: When J FWD is pressed
The search speed will change each time you press the
•
button.
Skipping to the Next or the Start of
the Current Chapter (Track)
Skipping (to the beginning of a chapter or track)
functions when
k
or
l
is pressed
during playback.
Pause/Frame Advance Playback
Pause functions when F PAUSE is pressed during
playback. (If you are playing back an audio CD, the CD
will also pause.)
Frame Advance Playback functions when
pressed during Pause.
•
Frame Advance Playback may not function properly with
discs other than DVD-RW (VR format).
NOTE
Some BD/DVD Video discs are not compatible with Pause/
•
Frame Advance Playback.
Frame Advance/Reverse Playback can be performed for
•
DVD discs by pressing l or k during
pause (Frame Reverse Playback cannot be performed BD
video discs).
l
30
is
Slow Playback
Slow Playback functions when
is pressed for more than 2 seconds during pause.
k
Press d PLAY to return to normal playback.
•
l
NOTE
This doesn't work for audio CDs.
•
•
Reverse Slow Playback cannot be performed for BD video
and DVD discs in AVCHD format.
or
Skip Search
Playback skips 30 seconds ahead when SKIP
SEARCH is pressed during playback.
Replay
Playback jumps back 10 seconds when REPLAY
is pressed during playback.
Repeat Playback of a Title or
Chapter (Repeat Playback)
Play back the title or chapter you want to repeat.
1
Press REPEAT.
2
3
Press to select the type of Repeat
Playback.
Playback Title: Repeats the title currently being played
•
back.
Playback Chapter: Repeats the chapter currently
•
being played back.
Scene Selection: Repeats the specified scene of title
•
or chapter.
Playback Title
•
Press RETURN to cancel without setting the type
of Repeat Playback.
•
For Audio CD, you can select “Playing Disc”, “Playing
Track” and “Specify The Part” as Repeat Playback
options.
Press ENTER.
4
Example: Repeat playback of a title (TITLE)
Press REPEAT OFF or REPEAT to return to
5
normal playback.
Playback Chapter Scene Selection
BD-VIDEO
C
On Title Repeat
1/3
55/2
00 :20 :30
2 English
1
1
5.1ch
On Title Repeat
Page 33

Playback Functions
Partial Repeat Playback (Repeat
Playback of a Specified Part)
DVD VIDEO
AUDIO CD
NOTE
Some operations in the following playback function cannot
•
be performed depending on the specifications of the disc.
1
2
3
4
DVD-RW
Press REPEAT during playback.
Press to select “Scene Selection”, then
press ENTER.
“Set Start Point” displays.
•
Playback Title Playback Chapter Scene Selection
Press ENTER at the scene where you want to
set the start point.
“Set End Point” displays.
•
Press ENTER at the scene where you want to
set the end point.
You can press V FWD to fast forward to the scene
•
where you want to set the end point. When you
reach the desired scene, simply press I PLAY and
then ENTER to set the end point. To cancel Repeat
Playback, press REPEAT OFF or REPEAT.
DVD-R
Set Start Point
NOTE
Press l, the Repeat Playback is cancelled and
•
the next chapter (track) being play back.
Press k once, the Repeat Playback is cancelled
•
and the player returns to the start of current chapter (track).
If you press k again (within about 5 seconds) the
•
player will skip to the beginning of the previous chapter
(track).
For Partial Repeat Playback, set the start and end points
•
within the same title.
Repeat Playback may be forbidden depending on the disc.
•
During BD video, the same scene cannot be played
•
repeatedly.
Partial Repeat Playback may not work in multi-angle
•
scenes.
If you press DISPLAY, you can confirm the Repeat
•
Playback status.
Displaying the Audio Information
You can display the audio information on the disc
currently being played back by pressing AUDIO.
The displayed contents vary depending on the disc.
•
NOTE
DVD VIDEO
DVD-RW
DVD-R
BD VIDEO
The audio track currently being played back will be
displayed.
If multiple audio channels are recorded, you can switch
the audio channel by pressing AUDIO.
BD-RE BD-R
In the event bilingual (multiplex) broadcasts are
recorded:
The display will show “MAIN”, “SUB” or “MAIN
•
SUB”
When a recorded broadcast with stereo or
monaural audio is played back:
“Stereo” is displayed. (Audio cannot be switched.)
•
AUDIO CD
Each time AUDIO is pressed, the audio change as
below.
“ L ” “ R ” “ L+R ” “ L ”
•
When you play a program recorded in stereo or monaural,
•
and if you are listening to the Bitstream sound via the digital
output jack, you cannot select the audio channel. Set
“Audio Out” to “PCM” (Page 38), or if you want to change
the audio channel, listen via the analog output jacks.
Settig for audio can be changed also in Function Control
•
Screen (Page 34).
Some discs allow changing of the audio channel via a
•
menu. For details, see the manual for the disc.
The display for audio automatiocally disappear after 5
•
seconds.
Disc Playback
31
Page 34

Playback Functions
Switching Subtitles
If subtitles are provided in multiple languages, you can
switch between them.
Press SUBTITLE during playback.
The display indicates the subtitle number currently being
•
played back, and the subtitles appear.
Each time SUBTITLE is pressed, the subtitles change.
•
“–” is displayed if a disc has no subtitles.
•
You can also select “Off”.
•
NOTE
Settig for subtitles can be changed also in Function Control
•
Screen (Page 34).
Some discs allow changing of the subtitles channel via a
•
menu. For details, see the manual for the disc.
•
The display for subtitles automatiocally disappear after 5
seconds.
Switching the Angle
If multiple angles are recorded, you can switch
between them.
Press ANGLE during playback.
1
The display indicates the angle number currently being
•
played back. Each time you press ANGLE, the angle
switches.
“–” is displayed if a disc is recorded with only one
•
angle.
Displaying the Angle Mark
You can change settings so that Angle Mark appears
in the right bottom part of the screen when multiple
angles are recorded. (The Angle Mark is displayed
for BD/DVD video.) The settings can be changed in
“Settings” - “Playback Setting” - “Angle Mark Display”
(Page 39).
NOTE
Settig for angles can be changed also in Function Control
•
Screen (Page 34).
Some discs allow changing of the angle channel via a
•
menu. For details, see the manual for the disc.
The display for angles automatiocally disappear after 5
•
seconds.
1
To return to the previous angle, press ANGLE to cycle
through the angles until you return to the original angle.
32
Page 35

JPEG File Playback
JPEG
CD-R
JPEG
CD-RW
NOTE
This Player can play still images (JPEG files) that have
•
been recorded on CD-RW/-R discs. For details on the still
images that you can play using this player, refer to “About
the JPEG file format” on page 7.
During “Normal play”, still images are played one by one
•
while during “Slide show”, they are automatically replaced
one after another.
JPEG files cannot be played back from a USB memory
•
device with this player.
Playing back still images in sequence
Load the disc containing the still images, and
1
press d PLAY.
The first still image appears on the screen.
•
Pressk orl to proceed to the
•
next or previous still image.
The same operation can be performed by pressing
or S REV/V FWD.
To stop the still image playback at any time,
2
press H STOP.
Playing back still images in a
selected folder
Load the disc containing still images, then press
1
HOME MENU.
Press to select “Photos”, then press
2
ENTER.
Use to select the folder whose still
3
images are to be played, then press ENTER.
8/15
can be performed by pressing k or
l.
Pressk orl to replace one
4
image with another.
The same operation can be performed by pressing
•
or S REV/V FWD.
Press
•
To stop the still image playback at any time,
5
press H STOP.
RETURN if you wish to return to the folder
selection screen.
Playing back Slide Show
In Step 2 of the left side “Playing back still
1
images in a selected folder”, press d PLAY
(Slide Show).
The still images inside the selected folder are played
•
as a slide show.
To pause the playback at any time, press
2
F PAU SE.
Press d PLAY to resume playback.
•
To stop the play at any time, press H STOP.
3
Press RETURN to play a slide show of still images
•
in another folder.
Setting slide show speed/repeat
playback
1
Press YELLOW (Slide Show Menu) during the
folder selection screen.
•
The setting screen for “Slide Show Speed”/“Repeat
Mode Setting” appears.
Press to select “Slide Show Speed”, then
2
press ENTER.
Slide Show Speed
Repeat Mode Setting
Normal
The slide show speed may be selected from “Fast”,
•
“Normal”, “Slow1” and “Slow2”.
Press to select the desired speed, then
3
press ENTER.
Press to select “Repeat Mode Setting”,
4
then press ENTER.
Slide Show Speed
Repeat Mode Setting
Yes
Press to select the desired item, then
5
press ENTER.
Press EXIT to exit.
6
No
Disc Playback
When seven or more folders are displayed, switch
•
pages by pressing PAGE +/-.The same operation
33
Page 36

Settings During Playback
Function Control
This allows you to adjust various settings at once,
like subtitles, audio and angle settings and the title
selection for Direct Playback. The operations are the
same for BD and DVD.
Function control screen
BD-VIDEO
1/3
C
55/2
00 :20 :30
2 English
1
1
5.1ch
Off
ENTER
Select Enter
3
Playback status display
1
Shows the operation status and the disc type.
Setting items
2
Selects a title (or track) or chapter for playback, or performs
subtitile, audio and angle settings.
Title/Track Number (Direct Title/Track Skip)
•
Chapter Number (Direct Chapter Skip)
•
Playback Elapsed Time (Direct Time Skip)
•
Subtitle Language
•
Angle Number
•
Audio
•
Repeat
•
Operation guide display
3
Provides help on remote control button operations.
1
2
Return
Function control operation
procedure
Press FUNCTION during playback.
1
The Function Control screen is displayed on the TV.
•
Press
2
press ENTER.
For a description of each setting, see “Functions
•
which can be set” (Page 35).
Press
3
Operations vary depending on the setting. Follow the
•
operation instructions on the screen.
Press RETURN or FUNCTION to close the
4
Function Control screen.
NOTE
If “– –” is displayed for an option like title number or
•
subtitles, the disc has no titles or subtitles which can be
selected.
The displayed items vary depending on the disc.
•
If you access the Function Control screen, it may be
•
impossible to operate the BD/DVD video playback. In
cases like this, close the Function Control screen.
to select the desired setting, then
BD-VIDEO
1/3
C
55/2
00 :20 :30
2 English
1
1
5.1ch
Off
to set, then press ENTER.
34
Page 37

Settings During Playback
Functions which can be set
Title/Track Number (Direct Title/Track Skip)
Shows the title number being played back (or track number when playing back an audio
•
CD). You can skip to the start of the title (or track).
To skip to the start of a selected title (or track), press the number buttons (0 to 9) to
•
enter the title (or track) number when this option is highlighted.
Chapter Number (Direct Chapter Skip)
Shows the chapter number being played back. You can skip to the start of the chapter.
•
•
To skip to the start of a selected chapter, press the number buttons (0 to 9) to enter the
chapter number when this option is highlighted.
Playback Elapsed Time (Direct Time Skip)
Shows the time elapsed from the beginning of the current disc title (or track). This lets
•
you skip to a specific time.
Press to select the Hour, Minute or Second, then press or the number
•
buttons (0 to 9) to set the time. Press ENTER to start playback at the set time.
NOTE
ENTER button: Enters the input number.
•
CLEAR button: Clears the input number.
•
Subtitle Language
•
Shows the currently selected subtitle language. If subtitles are provided in other
languages, you can switch to your preferred language.
Angle Number
•
Shows the currently selected angle number. If the video is recorded with multiple angles,
you can switch the angle.
Disc Playback
Audio
Shows the currently selected type of audio. You can select the desired type of audio.
•
Repeat
•
The current Title (or Chapter) or partial segments can be repeatedly played back. Repeat
Playback is also possible with the REPEAT button on the remote control.
NOTE
These functions may not work with all discs.•
35
Page 38

Settings
SETTINGS
Common operations
The “Menu” enables various audio/visual settings and adjustments on the functions using the remote control
unit. You need to call up the OSD to perform settings for this player. The following is the explanation for the basic
operations of the “Menu”.
Example: Setting “Front Display/LED”
1
Disc Navigator Settings
On Screen Language Photos
3
Select the next item
Press to select the desired item,
then press ENTER.
On
RETURN to return to the
Press
previous “Menu” page.
Display the Menu screen
Press HOME MENU to
display the Home Menu
screen.
Press to
select “Settings”, then
press ENTER.
Off
Basic Operation for Playback
Setting
Example: Setting “Parental Control” under “Playback Setting”
Press HOME MENU to display the Home Menu
1
screen.
Press to select “Settings”, then
2
press ENTER.
Press to select “Playback Setting”, then
3
press ENTER.
Press to select “Parental Control”, then
4
press ENTER.
When you operate this Player for the first time, the
•
PIN code setting screen will be displayed. See “When
setting the PIN code for the first time” below.
Press the number buttons (0 to 9) to enter your
5
4-digit PIN code.
You cannot move to the next setting screen until you
•
can input the correct PIN code.
Enter your PIN code
2
4
When setting the PIN code for the first time
1
To set the PIN code for the first time, press
to select “Yes” to enter the PIN code setting
menu, then press ENTER.
2
Press the numbber buttons (0 to 9) to enter a
4-digit number for the PIN code, then the same
4-digit number for confirmation.
3
Press ENTER to complete the PIN code setting
procedure and move to the next setting screen.
Press to select the parental control level
6
for DVD VIDEO, BD-ROM, and then select the
country code. Press ENTER after making each
selection.
Parental Control
Disc Language
Angle Mark Display
PIN Code Setting
BD Internet Access
Select a menu item
Press to select “Front Display/
LED”, then press ENTER.
Audio Video Settings
Quick Start
Auto Power Off
KURO LINK
Playback Setting
Communication Setup
Front Display/LED
Version
USB Memory Management
Software Update
System Reset
Exit the Menu screen
Press HOME MENU or EXIT to exit.
Level 3
0
USA
36
Press HOME MENU or EXIT to exit.
7
Page 39

SETTINGS
Audio Video Settings
NOTE
Characters in bold type are the default settings at time of
•
purchase.
TV Aspect Ratio
You can set the screen aspect ratio of the connected
TV, and adjust the video output.
If you switch your TV (i.e. because you have bought a
new one) and the screen aspect ratio of the connected
TV changes, you will have to change the “TV Aspect
Ratio” setting.
Item
Wide 16:9 : Select this when connecting to a TV with a
Normal 4:3 : Select this when connecting to a TV with a
Item
Letter Box : If you connect to a TV with a screen aspect
Pan Scan : If you connect to a TV with a screen aspect
Component Video Out
This sets the resolution of the component video
output.
Some TV are not fully compatible with the Blu-ray disc
player, which may cause the image distortion. In this
case, press VIDEO OUTPUT RESET on the remote
control for five seconds. “Component Video Out” will
be reset to “576/480i” (factory preset value).
Item
1080i, 720p, 576/480p, 576/480i
HDMI Video Out
This sets the resolution of the HDMI video output.
Some TV are not fully compatible with the Blu-ray disc
player, which may cause the image distortion. In this
case, press VIDEO OUTPUT RESET on the remote
control for five seconds. “HDMI Video Out” will be reset
to “Auto” (factory preset value).
Item
Auto, 1080p, 1080i, 720p, 576/480p
16:9 screen aspect ratio.
4:3 screen aspect ratio.
<When selecting Normal 4:3>
ratio of 4:3 and playback a DVD with 16:9
video, the video will be played back with
black bands at the top and bottom while
maintaining the 16:9 ratio.
ratio of 4:3 and playback a DVD with 16:9
video, the video will be played back with
the left and right sides of the image cut off
to display in 4:3 screen aspect ratio. (This
function works if the disc is labelled for
4:3PS.)
NOTE
When the BD player is connected to a 1080p 24 Hz
•
compatible TV and the “HDMI Video Out” is set to “Auto”,
1080p 24 Hz will automatically be displayed when
compatible discs are played back.
At 1080p 24 Hz/1080p 50 Hz/1080p 60 Hz, there is no
output from the COMPONENT VIDEO OUTPUT jacks and
VIDEO OUTPUT jack.
Video Out Select
Dual video output is possible simultaneously from the
COMPONENT VIDEO OUTPUT jacks and the HDMI
OUT terminal with the following settings. Select the
video output which you want to have priority according
to the following chart.
NOTE
1080p and KURO LINK are only available in HDMI.•
Video Out
Select
HDMI
Component
Dual
Output
1
Yes*
No 1080p No
Yes 1080i 1080i
Yes 720p 720p
Yes 576/480p 576/480p
*1 Depends on TV specifications and source signal.
1080p is not supported.
Dual Output
Yes 1080i 1080i
Yes 720p 720p
Yes 576/480p 576/480p
Yes 576/480i 576/480i
HDMI
Video Out
Auto *1
Component
Video Out
Component
Out
Resolution in
Dual Mode
HDMI Out
Resolution in
Dual Mode
Item
HDMI, Component
•
When the priority video output is selected, video is output
from the other video terminal with the resolution of the
selected video output.
•
There is no output from the COMPONENT VIDEO OUTPUT
jacks and VIDEO OUTPUT jack when video is output at
1080p resolution and the priority video output is selected
to “HDMI”.
•
If the video equipment connected to each of the terminals
is not compatible with the resolution of the priority video
output, abnormalities in images on the screen may appear.
Secondary Audio
This toggles the clicking sound on the menu and audio
with secondary video in picture in picture mode for
BD-Video.
Select “Off” when enjoying the high quality sounds of
•
BD-Video. (Bitstream can be selected with HDMI output.)
Item
On*1, Off
*1 When set to “On”
Audio in 6.1ch or greater format will be output as 5.1ch audio.
•
“HDMI Output” is set on “PCM”.
•
Settings
37
Page 40

SETTINGS
Audio Out
You can set the audio output when connecting to
SURROUND equipment.
This sets the audio output connected to
1
SURROUND equipment.
Item
HDMI Output: Select this when you connect using
Digital Output: Select this when you connect using
2ch Audio Output: Select this when you do not use
You can set the audio output mode for each
2
output terminal.
This sets the audio output mode for HDMI OUT
1
terminal when selecting “HDMI Output”.
NOTE
When the secondary audio is set to “On”, PCM is
•
automatically selected as the audio output mode.
Item
Bitstream:
PCM (Surround):
This sets the audio output mode for DIGITAL
2
OUT OPTICAL terminal when selecting “Digital
Output”.
Item
Bitstream:
PCM:
NOTE
See page 45 for information on output of next generation
•
audio formats.
MPEG Audio is only output as PCM (Stereo) 48 kHz.
•
HDMI OUT terminal.
DIGITAL OUT OPTICAL terminal.
SURROUND sound equipment.
Select this when connecting to
•
HDMI equipment with a built-in
decoder for DOLBY DIGITAL, etc.
Setting to Bitstream will output
•
each audio signal by Bitstream.
Select this when connecting to
•
multi-channel HDMI equipment.
Setting to PCM (Surround) will
•
output by LINEAR PCM by
decoding audio signals recorded in
each audio output mode such as
DOLBY DIGITAL, DTS.
Select this when connecting to
•
SURROUND equipment with
a built-in decoder for DOLBY
DIGITAL, etc.
Setting to Bitstream will output
•
each audio signal by Bitstream.
Select this when connecting to 2
•
channel stereo audio equipment.
Setting to PCM will output by
•
converting each audio signal into
PCM 2 channel audio signal.
Dynamic Range Control
This lets you adjust the range between the loudest
and softest sounds (dynamic range) for playback
at average volume. Use this when it is hard to hear
dialog.
Item
Normal: The same audio output range is played as the
original recorded audio output range.
Shift*: When Dolby Digital audio is played back, the
dynamic range of the audio is adjusted so that
the dialog portion can be heard easily. (If the
audio sounds abnormal, set to “Normal”.)
Auto: When you play back audio in the Dolby TrueHD
format, the dynamic range is automatically
adjusted.
Lower the audio volume before setting. If you do not do so,
*
the speakers may emit a loud sound or excessive output
may be applied to the speakers.
Quick Start
This turns the Quick Start function on and off.
When the Quick Start function is on:
•
The startup time of the Player is reduced.
•
However, power consumption will increase to about 11 W.
When the Quick Start function is off:
The player will enter the low power consumption mode
•
when in standby condition.
Item
Yes, No
NOTE
When “Quick Start” is set to “Yes”, the Player requires
•
some time to turn off.
Auto Power Off
This sets the Player so that power is automatically shut
off if playback is stopped for about 10 minutes.
Item
Yes, No
KURO LINK
This sets the Player to be controlled from the Flat
Screen TV via the HDMI cable.
Item
Yes , No
NOTE
For details, refer to “About KURO LINK function” on page
•
23.
If “Component” is selected from the “Video Out Select”
•
menu, KURO LINK is not available. Select “HDMI” if you
want to use KURO LINK features.
38
Page 41

SETTINGS
Playback Setting
Parental Control
This lets you set the Parental Control depending on the
disc content. The available Parental Control Levels are
shown below.
The 4-digit PIN code number needs to be entered
before the Parental Control Levels and the Country
Code are set. The Parental Control Levels and the
Country Code cannot be set if a PIN code has not
been created or the PIN code is not entered.
Item (For DVD-VIDEO)
8 and Off: All DVD-video can be played.
1-7: Prohibits play of DVD-video with
Item (For BD-ROM)
No Limit: All BD-video can be played.
0-99 year(s): Prohibits play of BD-video with
Item (Country code)
Sets the country code. Refer to the Country Code List
(page 45) because the ratings differ according to the
country.
NOTE
Refer to “Basic Operation for Playback Setting” on page 36
•
for details.
Disc Language (Disc Priority Language)
This lets you select the language for subtitles, audio
and menus displayed on the screen.
Item (Subtitle)
Refer to the Language List. (Page 45)
Item (Audio)
Refer to the Language List. (Page 45)
Item (Menu)
Refer to the Language List and Language Code List.
(Page 45)
Angle Mark Display
This lets you turn the Angle Mark Display on or off
when BD/DVD video recorded with multiple angles is
played back. (The Angle Mark is displayed in the lower
right screen.)
Item
Yes , No
corresponding ratings recorded on them.
corresponding ratings recorded on them.
PIN Code Setting
This sets the PIN code for setting or changing the
Parental Control Level.
Item
Yes: Enter the 4-digit number.
No
NOTE
When you forget PIN code, you can reset the current PIN
•
code using “System Reset” under “Settings”. (See this
page.)
You can also set the new PIN code if desired.
•
BD Internet Access
This allows you to set access restriction to BD-LIVE
contents.
Item
Permit: Allow all BD-LIVE discs.
Limit: Allow only discs with owner certification.
Prohibit: Prohibit all BD-LIVE discs.
NOTE
The available functions differ depending on the disc.
•
Regarding playback method of BD-LIVE contents, etc.,
•
perform the operations in accordance with the instructions
in the BD disc manual.
To enjoy BD-LIVE functions, perform the broadband internet
•
connection (page 18) and communication settings (pages
40–42).
Front Display/LED
If you feel that the indicators on the Player are too
bright when watching movies, you can turn them off
except for the STANDBY/ON indicator.
Item
On, Off
Version
When you select “Version”, the system software
version is displayed.
Please refer to our website for information regarding
software updates.
IN Australia and New Zealand:
http://www.pioneer.com.au/
IN Hong Kong:
http://www.pioneerhongkong.com.hk/
IN Singapore:
http://www.pioneer.com.sg/firmwaredownload
System Reset
You can reset all settings to the factory presets.
Item
Reset, Not Reset
Settings
39
Page 42

SETTINGS
Communication Setup
This allows you to perform and/or change the
communication setting. This setting is required to use
BD-LIVE functions that connect to the internet.
NOTE
Make sure that the LAN cable is connected to this Player.
•
(See page 18.)
For manually performing the setting, the following
•
information of the connected router or modem is required.
Confirm the information prior to the setting.
IP address, netmask, gateway, DNS IP address
−
Besides, if specifying a proxy server, the following
•
information specified from your internet service provider is
also required. Confirm the information prior to the setting.
IP address and port number of the proxy server
−
For setting the IP address, press to select
5
“Yes” or “No”, then press ENTER.
Do you obtain the IP address
automatically?
IP Address
Netmask
Gateway
If selecting “Yes”: The IP address is automatically
•
obtained.
If selecting “No”: The IP address, netmask and
•
gateway are manually entered using the screen for
inputting characters. (See page 42.)
Regarding each of the setup values, confirm the
specifications of your broadband router.
Select “Next”, then press ENTER.
6
For setting the DNS IP address, press to
7
Yes
No
Next
select “Yes” or “No”, then press ENTER.
Do you obtain the DNS IP address
automatically?
Primary
Secondary
Yes
No
Next
Press HOME MENU to display the Home Menu
1
screen.
Press to select “Settings”, then
2
press ENTER.
Press to select “Communication Setup”,
3
then press ENTER.
Press to select “Change”, then press
4
ENTER.
Setting the info. of the Ethernet
[Current Setup]
IP Address
Netmask
Gateway
DNS
Proxy
Change
For initializing the current setting, select “Initialize”,
•
then press ENTER.
: Auto Setup
: Auto Setup
: Auto Setup
: Auto Setup
: Not Use
Initialize
40
If selecting “Yes”: The DNS IP address is automatically
•
obtained. (The DHCP server function of the router or
modem is used for the automatic acquisition.)
If selecting “No”: The primary and secondary IP
•
addresses are entered using the screen for inputting
characters. (See page 42.)
Regarding each of the setup values, confirm the
specifications of your broadband router.
Select “Next”, then press ENTER.
8
For setting the proxy server, press to
9
select “Yes” or “No”, then press ENTER.
Do you use the proxy server?
Yes
Address
Port
If selecting “Yes”: The IP address or proxy server
•
name and port number for the proxy server specified
from your internet service provider are entered using
the screen for inputting characters. (See page 42.)
If selecting “No”: Go to the next step.
•
No
Next
Page 43

SETTINGS
10
Select “Next”, then press ENTER.
For the advanced setting (the setting of the
11
Ethernet connection speeds), press to
select “Yes” or “No”, then press ENTER.
Normally select “No”, then press ENTER.
•
The Ethernet connection speeds can be set when you
•
select “Yes”, then press ENTER.
As automatic detection is made (factory preset
•
mode), this setting is not normally necessary. If a
situation occurs in which the Ethernet connection fails,
etc., change the setting and confirm if the Ethernet
connection successfully works.
When the connection speed is set, select “Next”, then
press ENTER.
Option
Ethernet Connection Speeds
For testing the connection to the internet, after
12
confirming the settings, press to select
“Test”, then press ENTER.
“Test” is available only when setting to obtain the IP
•
address automatically. “Test” cannot be selected if the
IP address has not been obtained automatically.
Yes
Auto-Detection
10M Half Duplex
100M Half Duplex
Next
Confirm the current setting.
IP Address
Netmask
Gateway
DNS Address
MAC Address
Test
: xxx xxx xxx xxx
: xxx xxx xxx xxx
: xxx xxx xxx xxx
: xxx xxx xxx xxx
: xx:xx:xx:xx:xx:xx
No
10M Full Duplex
100M Full Duplex
Complete
Settings
•
As a result of the test, if the internet connection fails,
enter the setup values manually.
Press to select “Complete”, then press
13
ENTER.
41
Page 44

SETTINGS
The operation procedure for
inputting characters manually
NOTE
Numeric characters such as IP address can be entered
•
on the input screen using the number buttons (0 to 9) or
and ENTER on the remote control.
IP Address
Netmask
Gateway
Press ENTER at the boxes in which characters
1
are to be entered, and the input screen will
appear.
Numeric
Edit
123
1 234567890
Press the number buttons (0 to 9) or to
3
select a number/character, then press ENTER.
Repeat the step 3 to display all of the desired
4
characters/numbers in the input field.
Example: The screen for inputting numeric characters
123
Numeric
Edit
123 4567890
NOTE
Press RETURN (Del.Char.) to delete a number/
•
character you have input.
To change a number/character you have input, press
•
GREEN (Left) or YELLOW (Right) to select the number/
character you want to change, and press RETURN
(Del.Char.). Then, press to select a new number/
character you want to input, and press ENTER.
Press BLUE (Complete) to fix the numbers
5
which have been input.
Selected by
pressing
Press to select the desired input mode.
2
Selected by
pressing
Input character list
Numeric
Edit
*
1 2 3 4 5 6 7 8 9 0
Cancel Left Right Complete Del.Char.
The same operation as the RED, GREEN, YELLOW, BLUE buttons and
performed by selecting each of the items and pressing ENTER.
“Del.Char.” stands for deleting characters.
IP Address
Netmask
Gateway
Repeat step 1 to 5 to finish inputting all the
6
123
required characters.
RETURN can be
42
Page 45

SETTINGS
Yes
No
USB Memory Management
The following instructions explain how to delete data
downloaded from BD-LIVE and recorded on the USB
memory device.
Before using the USB memory device
CAUTION:
Do not remove the USB memory device or unplug
•
the AC cord while the operations for “USB Memory
Management ” or “Software Update” are being
performed.
Do not use a USB extension cable when connecting
•
a USB memory device to the BD STORAGE/SERVICE
terminal of the player.
Using a USB extension cable may prevent the player
−
from performing correctly.
NOTE:
Operation of USB memory devices is not guaranteed.
•
1
Insert the USB memory device into the BD
STORAGE/SERVICE terminal on rear of this
player.
2
Press HOME MENU to display the Home Menu
screen.
Press to select “Settings”, then
3
press ENTER.
Press to select “USB Memory
4
Management”, then press ENTER.
“No USB Memory” appears when no USB memory is
•
inserted.
Press , select “Erase” or “Format”, then
5
press ENTER.
Erase: Deletes only BD-VIDEO data written on the USB
memory device such as BD-LIVE data.
Format: Be aware that all data including BD-VIDEO data
will be deleted.
Erases BD-VIDEO data on USB memory.
Erase
Erase all contents on USB memory
Format
including protected contents.
NOTE
Data which has been saved to the player’s internal memory
•
(game score, etc.) will also be deleted.
6
Press , select “Yes”, and press ENTER.
7
Start the process.
The screen for the current operation will display.
•
Complete
Settings
OK
Press ENTER.
8
43
Page 46

SETTINGS
Software Update
This function allows software updates by inserting a
USB memory device with the update file into the BD
STORAGE/SERVICE terminal on this player. (To update
software, use a USB memory device complying with
USB specification 2.0.)
To check for the availability of a software update,
visit below.
IN Australia and New Zealand:
http://www.pioneer.com.au/
IN Hong Kong:
http://www.pioneerhongkong.com.hk/
IN Singapore:
http://www.pioneer.com.sg/firmwaredownload
Insert the USB memory device with the update
1
file into the BD STORAGE/SERVICE terminal on
rear of this player.
Press HOME MENU to display the Home Menu
2
screen.
Press to select “Settings”, then
3
press ENTER.
Press to select “Software Update”, then
4
ENTER.
If you have not yet set the PIN code, go to step 6.
•
Enter the 4-digit number using 0-9.
5
Enter 4-digit PIN code
•
If the USB memory device is not properly installed or
the correct update file cannot be found on the USB
memory device, an error message is displayed.
Check the file on the USB memory device, and then
reinsert the USB memory device correctly.
Software update file is not detected in the USB memory device.
Confirm that you have transferred the file
to the USB memory device and retry software update.
Confirm that you have inserted the USB memory device
into the correct device.
OK
There is more than one software file
in the USB memory device.
Confirm that only the software update file is
in the USB memory device.
OK
Press ENTER to start updating.
7
The screen becomes dark for a while until the update
•
screen can be displayed. Please wait for the update
screen to appear. Do not unplug the AC cord.
The picture will temporarily go dark until
the software update display appears.
Wait several minutes and do not unplug the AC cord.
OK
6
Press ENTER to start checking data in the USB
memory device.
Insert USB memory device containing
the software update file.
OK
The screen message appears during data checking.
•
The current version of this unit software and the
•
version of the update file on the USB memory device
are displayed. To update this player software with
update file, select “Yes”, and press ENTER.
Software update file is detected in the USB memory device.
Start update?
Current Ver. :
Update Ver. :
Yes
**1234567
**2345678
No
44
Now updating
Do not unplug AC cord.
*
Update Version
When the software is successfully updated, a
8
**2345678
30%
screen is displayed indicating that the update
process is completed.
If the update has failed, check the file in the USB
•
device and try Software Update again.
Press STANDBY/ON to turn off the player.
9
Remove the USB memory device.
10
NOTE
When updating software, remove any disc loaded in the
•
disc tray.
The USB memory device used for updating the software
•
should contain no files other than those necessary for the
software update.
The USB memory device should contain only a single
•
version (the most recent) of the update software.
Page 47

SETTINGS
Country Code List
USA / CANADA / JAPAN / GERMANY / FRANCE / UK / ITALY / SPAIN / SWISS / SWEDEN / HOLLAND / NORWAY /
DENMARK / FINLAND / BELGIUM / HONG KONG / SINGAPORE / THAILAND / MALAYSIA / INDONESIA / TAIWAN /
PHILIPPINE / AUSTRALIA / RUSSIA / CHINA
Language List
English / Français / Deutsch / Italiano / Español / Japanese / Svenska / Nederlands
Language Code List
AA Afar / AB Abkhazian / AF Afrikaans / AM Ameharic / AR Arabic / AS Assamese / AY Aymara / AZ Azerbaijani / BA Bashkir /
BE Byelorussian / BG Bulgarian / BH Bihari / BI Bislama / BN Bengali, Bangla / BO Tibetan / BR Breton / CA Catalan /
CO Corsican / CS Czech / CY Welsh / DA Danish / DE German / DZ Bhutani / EL Greek / EN English / EO Esperanto /
ES Spanish / ET Estonian / EU Basque / FA Persian / FI Finnish / FJ Fiji / FO Faroese / FR French / FY Frisian / GA Irish /
GD Scots Gaelic / GL Galician / GN Guarani / GU Gujarati / HA Hausa / HI Hindi / HR Croatian / HU Hungarian / HY Armenian /
IA Interlingua / IE Interlingue / IK Inupiak / IN Indonesian / IS Icelandic/ IT Italian / IW Hebrew / JA Japanese / JI Yiddish /
JW Javanese / KA Georgian / KK Kazakh / KL Greenlandic / KM Cambodian / KN Kannada / KO Korean / KS Kashmiri /
KU Kurdish / KY Kirghiz / LA Latin / LN Lingala / LO Laothian / LT Lithuanian / LV Latvian, Lettish / MG Malagasy / MI Maori /
MK Macedonian / ML Malayalam / MN Mongolian / MO Moldavian / MR Marathi / MS Malay / MT Maltese / MY Burmese /
NA Nauru / NE Nepali / NL Dutch / NO Norwegian / OC Occitan / OM Afan (Oromo) / OR Oriya / PA Panjabi / PL Polish /
PS Pashto, Pushto / PT Portuguese/ QU Quechua / RM Rhaeto-Romance / RN Kirundi / RO Romanian / RU Russian /
RW Kinyarwanda / SA Sanskrit / SD Sindhi / SG Sangho / SH Serbo-Croatian / SI Singhalese / SK Slovak / SL Slovenian /
SM
Samoan / SN Shona / SO Somali / SQ Albanian / SR Serbian / SS Siswat / ST Sesotho / SU Sundanese / SV Swedish /
SW Swahili / TA Tamil / TE Telugu / TG Tajik / TH Thai / TI Tigrinya / TK Turkmen / TL Tagalog / TN Setswana / TO Tonga /
TR Turkish / TS Tsonga / TT Tatar / TW Twi / UK Ukrainian / UR Urdu / UZ Uzbek / VI Vietnamese / VO Volapük / WO Wolof /
XH Xhosa / YO Yoruba / ZH Chinese / ZU Zulu
About Output of Next Generation Audio Formats
Next generation
audio formats
Maximum number of
channels
Dolby TrueHD 7.1ch (48 kHz/96 kHz) 7.1ch *
5.1ch (192 kHz) 5.1ch *
Dolby Digital PLUS 7.1ch (48 kHz) 7.1ch *
DTS-HD Master Audio 7.1ch (48 kHz/96 kHz) 7.1ch *
5.1ch (192 kHz) 5.1ch *3/*
DTS-HD High Resolution Audio 7.1ch (48 kHz/96 kHz) 7.1ch *
LPCM 7.1ch (48 kHz/96 kHz) 7.1ch *
5.1ch (192 kHz) 5.1ch *
1
Core only
*
2
*
Down mixed
3
*
When “Secondary Audio” is set to “On”, the audio is output as 48 kHz.
4
*
When “Secondary Audio” is set to “On”, the audio is output as PCM.
5
*
When 5.1ch (192 kHz), the audio output is downsampled to 96 kHz.
When 2ch, the audio is output as 192 kHz.
HDMI DIGITAL OUT
PCM Bitstream PCM Bitstream
3
3
3
3
5
3
3
3
4
7.1ch *
4
5.1ch *
4
7.1ch *
4
7.1ch *
4
5.1ch *
4
7.1ch *
— 2ch *
— 2ch *
2ch *
2ch *
2ch *
2ch *
2ch *
2ch *
2
5.1ch *1/*
2
5.1ch *1/*
2
5.1ch *1/*
2
5.1ch *1/*
2
5.1ch *1/*
2
5.1ch *1/*
2
2
—
—
3
3
3
3
3
3
Settings
45
Page 48

Appendix
Troubleshooting
The following problems do not always suggest a defect or malfunction of this Player.
Refer to the problems and lists of possible solutions below before calling for service.
Power
Problem Possible causes and solutions
The Player power cannot be turned
on.
The Player power is turned on
automatically.
The Player power is turned off
automatically.
Basic Operation
Problem Possible causes and solutions
The remote control does not work. Use the remote control within its operating range. (Page 19)
Cannot operate the Player. Are you operating the Player within the specified operating temperature range?
Disc Playback
Problem Possible causes and solutions
The Player cannot play a disc. Take out the disc and clean it. (Page 9)
The disc is automatically ejected
after closing the disc tray.
Video stops. Has the Player been subjected to shock or impact? Are you using it in an unstable
The Player makes a snapping sound
when starting playback or loading
a disc.
Is the power cord firmly plugged into the AC outlet? (Page 19)
•
When the power cord is plugged into an AC outlet, press and hold STANDBY/
•
ON on the Player until “
the STANDBY/ON indicator is lit, turn on the power. (Page 48)
Press STANDBY/ON after the STANDBY/ON indicator turns on. (Page 20)
•
When “Settings” – “KURO LINK” is set to “Yes” on the player, the player’s power
•
may turn on when the connected TV is operated. (Page 38)
Is “Auto Power Off” set to “Yes”? When “Auto Power Off” is set to “Yes”, the
•
power will be automatically turned off after 10 continuous minutes of inactivity (no
playback). (Page 38)
When “Settings” – “KURO LINK” is set to “Yes” on the player, the player’s power
•
may turn off when the power of the connected TV is turned off. (Page 38)
•
Replace the batteries. (Page 19)
•
•
(Page 52)
•
Make sure that the disc is loaded properly (aligned in disc tray and label-side up).
•
(Page 24)
Make sure that region code on the disc matches that of this Player. (Page 6)
•
Allow any condensation in or near the Player to dry. (Page 9)
•
Check that the disc is recorded in the compatible TV system (PAL or NTSC).
•
The Player cannot play back video which was not recorded normally. (Page 6)
•
Proper playback may be impossible due to the state of the disc recording, a
•
scratched, warped or dirty disc, the state of the pick-up, or compatibility issues
between this Player and the disc being used. (Pages 6, 9)
When the recorded time of a disc is unusually short, playback may not be possible.
•
BD-RE/-R discs recorded in a format other than BDMV/AVCHD cannot be played
•
back. (Page 6)
Make sure that the disc is loaded properly (aligned in disc tray and label-side up).
•
(Page 24)
Take out the disc and clean it. (Page 9)
•
Make sure that region code on the disc matches that of this Player. (Page 6)
•
Make sure that the disc is playable. (Page 6)
•
•
location? The Player will stop if it senses shock or vibration.
The player may sometimes make a snapping sound when starting playback if it has
•
not been operated in a while. These sounds are not malfunctions of the player but
are normal operating conditions.
” appears on the front panel display. Then, after
46
Page 49

Troubleshooting
Picture
Problem Possible causes and solutions
No picture. Make sure that the cables are connected correctly. (Pages 14–16)
Screen freezes and operation
buttons do not work.
There is just audio with no video. Is the connection cable for video output connected properly? (Pages 14–16)•
Widescreen video appears vertically
stretched, or black bands appear at
the top and bottom of the screen.
Square noise (mosaic) appears on
the screen.
The playback screen will be
disturbed if DVD video is recorded
to a VCR, or played back through a
VCR.
Audio is not output, or images are
not played back properly.
•
Make sure that the connected TV or the AV receiver is set to the correct input.
•
(Pages 14–16)
Take out the disc and clean it. (Page 9)
•
Make sure that region code on the disc matches that of this Player. (Page 6)
•
There is no picture from the HDMI output.
•
Are the settings performed correctly? Please check the settings. (Page 37)
−
There is no picture from the component video output.
•
Are the settings performed correctly? Please check the settings. (Page 37)
−
Press H STOP, then restart playback.
•
Turn off the power and turn on the power again.
•
If the power is not turned off, perform a reset. (Page 48)
•
Is the disc damaged or dirty? Check the condition of the disc. (Page 9)
•
Is “TV Aspect Ratio” set to match the connected TV? (Page 37)
•
If you are using a widescreen TV, is the “TV Aspect Ratio” set to “Wide”? (Page 37)
•
Blocks in images may be visible in scenes with rapid movement due to the
•
characteristics of digital image compression technology.
This Player complies with analog copy protection. Some discs contain a copy
•
prohibiting signal. If you try to play back such discs through a VCR, or record to a
VCR and play back the signal, the copy protection will prevent normal playback.
(Pages 15–16)
The audio may not be output or the images may not be played back properly for
•
some discs in which copyright-protected contents are recorded.
Sound
Problem Possible causes and solutions
No sound, or sound is distorted. If the volume of the TV or amplifier is set to minimum, turn the volume up.
Left and right channels of audio are
reversed, or sound comes out of
only one side.
Audio is not output, or images are
not played back properly.
•
There is no sound during still mode, slow motion playback, fast forward and fast
•
reverse. (Page 30)
DVD audio recorded in DTS is only output from the DIGITAL OUT OPTICAL
•
terminal. Connect a DTS compatible digital amplifier or decoder to the DIGITAL OUT
OPTICAL terminal on this Player. (Page 17)
Check that the audio cable is connected correctly. (Page 17)
•
Check that the cable plugs are clean.
•
Take out the disc and clean it. (Page 9)
•
Audio may not be output depending on the audio recording status, such as when
•
audio other than an audio signal or non-standard audio is recorded for the audio
content of the disc. (Page 6)
Are left and right audio cables connected to the opposite terminal, or is one side
•
disconnected? (Page 17)
The audio may not be output or the images may not be played back properly for
•
some discs in which copyright-protected contents are recorded.
Appendix
Network
Problem Possible causes and solutions
Cannot connect to the Internet. Is the LAN cable connected properly?
•
•
Is the wrong cable such as a modular cable used? Connect a LAN cable to the LAN
terminal. (Page 18)
•
Is the power for the connected equipment, such as broadband router or modem turned on?
Is the broadband router and/or modem properly connected?
•
Is the proper value(s) set in the network setting? Check “Communication Setup”.
•
(Pages 40–42)
47
Page 50

Troubleshooting
Network (Continued)
Problem Possible causes and solutions
Cannot download BD-LIVE contents. Is the LAN cable connected properly? (Page 18)
•
Is the USB memory device properly connected? Check that the USB memory
•
device is connected to the BD STORAGE/SERVICE terminal of this Player. (Page 18)
Check if the BD disc supports BD-LIVE.
•
Check the setting for “BD Internet Access”. (Page 39)
•
KURO LINK
Problem Possible causes and solutions
KURO LINK function does not work. Connect the HDMI cable properly. (Page 14)
KURO LINK indicator does not light. Connect to a KURO LINK-compatible Pioneer Flat Screen TV using an HDMI cable.
•
Use High Speed HDMI™ cables when using the KURO LINK function. The KURO
•
LINK function may not operate properly if other HDMI cables are used.
Set “Settings” – “KURO LINK” on the player to “Yes”. (Page 38)
•
The KURO LINK function does not work with devices of other brands, even if
•
connected using an HDMI cable.
The KURO LINK function will not work if devices that do not support the KURO
LINK function or devices of other brands are connected between the KURO LINKcompatible device and the player.
It may also not work with certain Flat Screen TVs.
Set KURO LINK to On on the connected device.
•
The KURO LINK function works when KURO LINK is set to On for all devices
connected by HDMI cable. Once connections and the settings of all the devices are
finished, be sure to check that the player’s picture is output to the Flat Screen TV.
(Also check after changing the connected devices and reconnecting HDMI cables.)
The KURO LINK function may not operate properly if the player’s picture is not
properly output to the Flat Screen TV.
The KURO LINK function may not work if three or more players, including this player,
•
are connected.
Also refer to the operating instructions of the connected device.
•
•
Set KURO LINK to On on the Flat Screen TV.
•
Set “Settings” – “KURO LINK” on the player to “Yes”. (Page 38)
•
Check that the player’s picture is being output to the Flat Screen TV.
•
Other
Problem Possible causes and solutions
The TV operates incorrectly. Some TVs with wireless remote control capability may operate incorrectly when
The Player heats up during use. When using this Player, the console cabinet may heat up depending on the usage
Input of connected TV and AV
system switches automatically.
STANDBY/ON indicator will remain
lit.
The display panel shows “ ”,
and operations are disabled.
To Reset this Player
If this Player receives strong interference from a source such as excessive static electricity, strong external noise, malfunction
•
of power supply, or voltage caused by lightning during use or a wrong operation is sent to the Player, errors like the Player not
accepting an operation may occur. Press and hold STANDBY/ON on the Player until “ ” appears on the front panel
display when the Player does not operate properly even after the power has been turned off. Then, after the STANDBY/ON
indicator is lit, turn on the power.
When a reset is performed while the power is on, the Player will turn off. Turn the power on again. At this point, it may take
•
a few moments for the system processing to finish before the Player is ready for use. During the system processing, the
BD/DVD/CD disc indicator on the front panel display of the Player will blink. Once the system processing has finished, the
indicators will finish blinking and then light up normally. You can operate the Player when the BD/DVD/CD disc indicator is lit.
Since all settings including the language setting stored in memory are also reset when a reset has been performed, they must
•
be set again.
When the problem persists even after performing a reset, unplug the AC cord and plug it in again. If this does not solve the
•
problem, contact the nearest service center approved by Pioneer.
48
•
using the remote control of this Player. Use such TVs away from this Player.
•
environment. This is not a malfunction.
When “Settings” – “KURO LINK” is set to “Yes” on the player, the input on
•
the connected TV and AV system (AV receiver or amplifier, etc.) may switch
automatically. (Page 38)
When the AC cord is removed from the outlet, the STANDBY/ON indicator will
•
remain lit for a short period. This is normal and is not a malfunction.
KEY LOCK is in effect. Depress the remote control unit's KEY LOCK button for five
•
seconds or more to cancel the KEY LOCK function.
Page 51

On-screen Error Messages
Messages Relating to BD disc and DVD disc
The following messages appear on the TV screen in case the disc you tried to playback is not appropriate or the
•
operation is not correct.
Error message Possible Error Suggested Solution
Cannot play. The disc cannot be played back with
Incompatible disc. If you load a disc which cannot be
Cannot operate. Occurs if an operation is incorrect.•
This USB memory is not formatted
properly. Please format the memory in
USB memory management.
The Connected USB Memory cannot
be used. It should be compliant with
USB 2.0.
• Check the disc, and load it correctly.•
this Player.
•
played with this Player (i.e. a scratched
disc), or if you load a disc upside down,
this message will appear, and the disc
tray will automatically pop out.
Occurs if the loaded disc cannot be
• Remove the disc.•
played because it is a non-standard disc
or scratched, etc.
—
Occurs if there is a formatting error.• Format the USB memory again.•
Occurs if USB memory not compliant
• Connect USB 2.0 High Speed
with USB 2.0 High Speed (480Mbit/s) is
used (i.e. USB 1.0/USB 1.1).
•
(480Mbit/s) compliant USB memory.
Appendix
49
Page 52

Glossary
AVCHD (Advanced Video Codec High
Definition)
The AVCHD is a high definition (HD) digital video camera
recorder format recording high-definition onto certain media
by using highly efficient codec technologies.
BDAV (Page 6)
BDAV (Blu-ray Disc Audio/Visual, BD-AV) refers to one of the
application formats used for writable Blu-ray discs such as
BD-R, BD-RE, etc. BDAV is a recording format equivalent to
DVD-VR (VR mode) of the DVD specifications.
BD-J application
The BD-ROM format supports Java for interactive functions.
“BD-J” offers content providers almost unlimited functionality
when creating interactive BD-ROM titles.
BD-LIVE (page 26)
A variety of interactive content is available from BD-LIVE
compatible Blu-ray discs via the internet.
BDMV (page 6)
BDMV (Blu-ray Disc Movie, BD-MV) refers to one of the
application formats used for BD-ROM which is one of the
Blu-ray Disc specifications. BDMV is a recording format
equivalent to DVD-video of the DVD specification.
BD-R (pages 6, 24)
A BD-R (Blu-ray Disc Recordable) is a recordable, write-once
Blu-ray Disc. Since contents can be recorded and cannot be
overwritten, a BD-R can be used to archive data or for storing
and distributing video material.
BD-RE (pages 6, 24)
A BD-RE (Blu-ray Disc Rewritable) is a recordable and
rewritable Blu-ray Disc.
BD-ROM
BD-ROMs (Blu-ray Disc Read-Only Memory) are commercially
produced discs. Other than conventional movie and video
contents, these discs have enhanced features such as
interactive content, menu operations using pop-up menus,
selection of subtitle display, and slide shows. Although a
BD-ROM may contain any form of data, most BD-ROM discs
will contain movies in High Definition format for playback on
Blu-ray Disc players.
Blu-ray Disc (BD) (page 6)
A disc format developed for recording/playing high-definition
(HD) video (for HDTV, etc.), and for storing large amounts of
data. A single layer Blu-ray Disc holds up to 25 GB, and a
dual-layer Blu-ray Disc holds up to 50 GB of data.
Chapter number (pages 34, 35)
Sections of a movie or a music feature that are smaller than
titles. A title is composed of several chapters. Some discs
may only be comprised of a single chapter.
Copy guard
This function prevents copying. You cannot copy discs
marked by the copyright holder with a signal which prevents
copying.
Disc menu (page 25)
This lets you select things like the subtitle language or audio
format using a menu stored on the DVD video disc.
Dolby Digital
A sound system developed by Dolby Laboratories Inc. that
gives movie theater ambience to audio output when the
product is connected to a Dolby Digital processor or amplifier.
50
Dolby Digital Plus
A sound system developed as an extension to Dolby Digital.
This audio coding technology supports 7.1 multi-channel
surround sound.
Dolby TrueHD
Dolby TrueHD is a lossless coding technology that supports
up to 8 channels of multi-channel surround sound for the next
generation optical discs. The reproduced sound is true to the
original source bit-for-bit.
DTS
This is a digital sound system developed by DTS, Inc. for use
in cinemas.
DTS-HD High Resolution Audio
DTS-HD High Resolution Audio is a new technology
developed for the next generation high definition optical disc
format.
DTS-HD Master Audio
DTS-HD Master Audio is a lossless audio compression
technology developed for the next generation high definition
optical disc format.
DTS-HD Master Audio | Essential
DTS-HD Master Audio | Essential is a lossless audio
compression technology developed for the next generation
high definition optical disc format.
DVD upscaling (page 24)
Upscaling (upconverting) refers to a function of various
players and devices that enlarge the image size to fit the size
of the screen of video equipments such as a TV.
DVD video (pages 6, 24)
A disc format that contains up to eight hours of moving
pictures on a disc the same diameter as a CD. A single-layer
single sided DVD holds up to 4.7 GB; a double layer singlesided DVD, 8.5 GB; a single layer double-sided DVD, 9.4
GB; double-layer double-sided DVD, 17 GB. The MPEG 2
format was adopted for efficient video data compression. It is
a variable rate technology that encodes the data to according
to the status of the video for reproducing high-quality images.
Audio information is recorded in a multi-channel format such
as Dolby Digital, allowing for a realistic audio presence.
DVD+/-R (pages 6, 24)
A DVD+/-R is a recordable, write-once DVD. Since contents
can be recorded and cannot be overwritten, a DVD+/-R can
be used to archive data or for storing and distributing video
material. The DVD+/-R has two different formats: VR format
and Video format. DVDs created in Video format have the
same format as a DVD video, while discs created in VR (Video
Recording) format allow the contents to be programed or
edited.
DVD+/-RW (pages 6, 24)
A DVD+/-RW is a recordable and rewritable DVD. The rerecordable feature makes editing possible. The DVD+/-RW
has two different formats: VR format and Video format. DVDs
created in Video format have the same format as a DVD
video, while discs created in VR (Video Recording) format
allow the contents to be programed or edited.
Page 53

Glossary
HDMI (page 14)
HDMI (High-Definition Multimedia Interface) is an interface
that supports both video and audio on a single digital
connection. The HDMI connection carries standard to high
definition video signals and multi-channel audio signals to
AV components such as HDMI equipped TVs, in digital form
without degradation.
Interlace format
Interlace format shows every other line of an image as a
single “field” and is the standard method for displaying
images on television. The even numbered field shows the
even numbered lines of an image, and the odd numbered
field shows the odd numbered lines of an image.
JPEG (pages 6, 7, 33)
JPEG (Joint Photographic Experts Group) is a still image data
compression format and is used in most of digital cameras.
Letter Box (LB 4:3) (page 37)
A screen size with black bars on the top and bottom of the
image to allow viewing of wide-screen (16:9) material on a
connected 4:3 TV.
Linear PCM Sound
Linear PCM is a signal recording format used for Audio CDs
and on some DVD and Blu-ray discs. The sound on Audio
CDs is recorded at 44.1 kHz with 16 bits. (Sound is recorded
between 48 kHz with 16 bits and 96 kHz with 24 bits on DVD
video discs and between 48 kHz with 16 bits and 192 kHz
with 24 bits on BD video discs.)
MPEG-2
MPEG-2 (Moving Picture Experts Group phase 2) is one of
the video data compression schemes, which is adopted for
DVD videos and digital broadcasts worldwide. Some Blu-ray
Discs also use high bitrate MPEG-2.
Multi Angle (pages 32, 34, 35)
This is a feature of DVD and BD video discs. In some discs,
the same scene is shot from different angles, and these are
stored in a single disc so you can enjoy playback from each
angle. (This function can be enjoyed if the disc is recorded
with multiple angles.)
Multi Audio
This is a feature of DVD and BD video discs. This function
makes it possible to record different audio tracks for the same
video, so you can enhance your enjoyment by switching the
audio. (You can enjoy this function with discs recorded with
multiple audio tracks.)
Pan Scan (PS 4:3) (page 37)
A screen size that cuts off the sides of the image to allow
viewing of wide-screen (16:9) material on a connected 4:3 TV.
Parental control (page 39)
In some digital broadcasts and BD/DVD video discs, a
control level for disc viewing is set depending on the age of
the viewer. With this Player, you can set the control level for
viewing such broadcasts and discs.
Pop-up menu (page 25)
An enhanced menu operation available on BD video discs.
The pop-up menu appears when POPUP MENU/MENU
is pressed during playback, and can be operated while
playback is in progress.
Progressive format
Compared to the Interlace format that alternately shows
every other line of an image (field) to create one frame, the
Progressive format shows the entire image at once as a single
frame. This means that while the Interlace format can show
30 frames/60 fields in one second, the Progressive format
can show 60 frames in one second. The overall picture quality
increases and still images, text, and horizontal lines appear
sharper.
Region code (page 6)
Code identifying a geographic region of compatibility for a
BD/DVD.
Resume playback (pages 24, 29)
If you stop playback while it is in progress, the Player stores
the stop position in memory, and this function lets you
playback from that point.
Skip (page 30)
This returns to the start of the chapter (or track) being played,
or skips to the next chapter (or track).
Subtitles (pages 31, 34, 35)
These are the lines of text appearing at the bottom of the
screen which translate or transcribe the dialog. They are
recorded on many DVD and BD video discs.
Time number
This indicates the play time which has elapsed from the start
of a disc or a title. It can be used to find a specific scene
quickly. (It may not work with some discs.)
Title number (pages 34, 35)
These numbers are recorded on DVD and Blu-ray discs.
When a disc contains two or more movies, these movies are
numbered as title 1, title 2, etc.
Top menu (page 25)
In a BD/DVD video, this is the menu for selecting things like
the chapter to be played back and the subtitle language. In
some DVD videos, the top menu may be called the “Title
Menu”.
Track number (pages 34, 35)
These numbers are assigned to the tracks which are
recorded on audio CDs. They enable specific tracks to be
located quickly.
x.v.Color
x.v.Color reproduces a greater range of color than before,
showing almost all of the colors that the human eye can
detect. (Applicable for JPEG files only with this system)
Appendix
51
Page 54

Specifications
General
Power supply AC 100–240 V, 50/60 Hz
Power consumption (Normal) 20 W
Power consumption (Standby) 0.6 W (When “Quick Start” is set to “No”)
Dimensions
Weight 2.7 kg
Operating temperature 5 °C to 35 °C
Storage temperature –20 °C to 55 °C
Operating humidity 10 % to 80 % (no condensation)
TV systems PAL system/NTSC system
Playback
Playable discs BD-ROM, BD-RE Dual Layer, BD-R Dual Layer,
Region code Australia and New Zealand models: B or ALL for BD, 4 or ALL for DVD
Input/Output
HDMI OUT HDMI 19-pin standard connector (1080 p 24 Hz output)
COMPONENT VIDEO OUTPUT Output level:
VIDEO OUTPUT Output level: 1 Vp-p (75 ohms)
DIGITAL OUT OPTICAL Terminal: Square Optical terminal
AUDIO OUTPUT Output level: 2 V rms (Output impedance: 1 k ohms)
BD STORAGE/SERVICE USB 2.0 High Speed (480 Mbit/s) correspondence (for Local storage/Software
LAN 10BASE-T/100BASE-TX
Power is automatically shut off if playback is stopped for about 10 minutes. (When
“Auto Power Off” is set to “Yes”)
11 W (When “Quick Start” is set to “Yes”)
420 mm g 58 mm g 268 mm (W g H g D)
(The system recorded on the disc is output.)
DVD Video, DVD+RW/+R/-RW/-R Dual Layer (Video/VR/AVCHD format),
Audio CD (CD-DA), CD-RW/-R (CD-DA, JPEG file format)
Others: A or All for BD, 3 or ALL for DVD
HDMI™ (V.1.3 with Deep Color, x.v.Color™, Dolby TrueHD,
DTS-HD Master Audio)
Y: 1 Vp-p (75 ohms)
P
Jacks: RCA jack
Jack: RCA-pin jack
Jacks: RCA jack
update)
, PR : 0.7 Vp-p (75 ohms)
B
Specifications are subject to change without notice.
52
Page 55

Licenses
The licenses for the software used on this player are shown below.
OpenSSL
•
The OpenSSL toolkit stays under a dual license, i.e.
both the conditions of the OpenSSL License and the
original SSLeay license apply to the toolkit.
See below for the actual license texts. Actually both
licenses are BSD-style Open Source licenses. In case
of any license issues related to OpenSSL please
contact opensslcore@ openssl.org.
OpenSSL License
Copyright © 1998-2007 The OpenSSL Project. All
rights reserved.
Redistribution and use in source and binary forms,
with or without modification, are permitted provided
that the following conditions are met:
1. Redistributions of source code must retain the
above copyright notice, this list of conditions and
the following disclaimer.
2. Redistributions in binary form must reproduce the
above copyright notice, this list of conditions and
the following disclaimer in the documentation and/or
other materials provided with the distribution.
3. All advertising materials mentioning features or
use of this software must display the following
acknowledgment: “This product includes software
developed by the OpenSSL Project for use in the
OpenSSL Toolkit. (http://www.openssl.org/)”
4. The names “OpenSSL Toolkit” and “OpenSSL
Project” must not be used to endorse or promote
products derived from this software without prior
written permission. For written permission, please
contact openssl-core@openssl.org.
5. Products derived from this software may not be
called “OpenSSL” nor may “OpenSSL” appear in
their names without prior written permission of the
OpenSSL Project.
6. Redistributions of any form whatsoever must retain
the following acknowledgment: “This product
includes software developed by the OpenSSL
Project for use in the OpenSSL Toolkit (http://www.
openssl.org/)”
THIS SOFTWARE IS PROVIDED BY THE OpenSSL
PROJECT “AS IS” AND ANY EXPRESSED OR IMPLIED
WARRANTIES, INCLUDING, BUT NOT LIMITED TO,
THE IMPLIED WARRANTIES OF MERCHANTABILITY
AND FITNESS FOR A PARTICULAR PURPOSE ARE
DISCLAIMED. IN NO EVENT SHALL THE OpenSSL
PROJECT OR ITS CONTRIBUTORS BE LIABLE FOR
ANY DIRECT, INDIRECT, INCIDENTAL, SPECIAL,
EXEMPLARY, OR CONSEQUENTIAL DAMAGES
(INCLUDING, BUT NOT LIMITED TO, PROCUREMENT
OF SUBSTITUTE GOODS OR SERVICES; LOSS
OF USE, DATA, OR PROFITS; OR BUSINESS
INTERRUPTION) HOWEVER CAUSED AND ON ANY
THEORY OF LIABILITY, WHETHER IN CONTRACT,
STRICT LIABILITY, OR TORT (INCLUDING
NEGLIGENCE OR OTHERWISE) ARISING IN ANY
WAY OUT OF THE USE OF THIS SOFTWARE, EVEN IF
ADVISED OF THE POSSIBILITY OF SUCH DAMAGE.
This product includes cryptographic software written
by Eric Young (eay@cryptsoft.com).This product
includes software written by Tim Hudson (tjh@
cryptsoft.com).
Original SSLeay License
Copyright © 1995-1998 Eric Young (eay@cryptsoft.
com) All rights reserved.
This package is an SSL implementation written by Eric
Young (eay@cryptsoft.com). The implementation was
written so as to conform with Netscapes SSL.
This library is free for commercial and non-commercial
use as long as the following conditions are aheared
to. The following conditions apply to all code found in
this distribution, be it the RC4, RSA, lhash, DES, etc.,
code; not just the SSL code. The SSL documentation
included with this distribution is covered by the same
copyright terms except that the holder is Tim Hudson
(tjh@cryptsoft.com).
Copyright remains Eric Young’s, and as such any
Copyright notices in the code are not to be removed.
If this package is used in a product, Eric Young
should be given attribution as the author of the parts
of the library used. This can be in the form of a textual
message at program startup or in documentation
(online or textual) provided with the package.
Redistribution and use in source and binary forms,
with or without modification, are permitted provided
that the following conditions are met:
1. Redistributions of source code must retain the
copyright notice, this list of conditions and the
following disclaimer.
2. Redistributions in binary form must reproduce the
above copyright notice, this list of conditions and
the following disclaimer in the documentation and/or
other materials provided with the distribution.
3. All advertising materials mentioning features or
use of this software must display the following
acknowledgement: “This product includes
cryptographic software written by Eric Young (eay@
cryptsoft.com)”
The word ‘cryptographic’ can be left out if the
rouines from the library being used are not
cryptographic related :-).
4. If you include any Windows specific code (or
a derivative thereof) from the apps directory
(application code) you must include an
acknowledgement: “This product includes software
written by Tim Hudson (tjh@cryptsoft.com)”
THIS SOFTWARE IS PROVIDED BY ERIC YOUNG “AS
IS” AND ANY EXPRESS OR IMPLIED WARRANTIES,
INCLUDING, BUT NOT LIMITED TO, THE IMPLIED
WARRANTIES OF MERCHANTABILITY AND
FITNESS FOR A PARTICULAR PURPOSE ARE
DISCLAIMED. IN NO EVENT SHALL THE AUTHOR
OR CONTRIBUTORS BE LIABLE FOR ANY DIRECT,
INDIRECT, INCIDENTAL, SPECIAL, EXEMPLARY, OR
CONSEQUENTIAL DAMAGES (INCLUDING, BUT
NOT LIMITED TO, PROCUREMENT OF SUBSTITUTE
GOODS OR SERVICES; LOSS OF USE, DATA, OR
PROFITS; OR BUSINESS INTERRUPTION) HOWEVER
CAUSED AND ON ANY THEORY OF LIABILITY,
WHETHER IN CONTRACT, STRICT LIABILITY, OR
TORT (INCLUDING NEGLIGENCE OR OTHERWISE)
ARISING IN ANY WAY OUT OF THE USE OF THIS
SOFTWARE, EVEN IF ADVISED OF THE POSSIBILITY
OF SUCH DAMAGE.
The licence and distribution terms for any publically
available version or derivative of this code cannot be
changed. i.e. this code cannot simply be copied and
put under another distribution licence [including the
GNU Public Licence.]
zlib
•
This software is based in part on zlib see http://www.
zlib.net for information.
GNU GENERAL PUBLIC LICENSE
•
Version 2, June 1991
Copyright © 1989, 1991 Free Software Foundation,
Inc.,
51 Franklin Street, Fifth Floor, Boston, MA 02110-1301
USA
Everyone is permitted to copy and distribute verbatim
copies of this license document, but changing it is
not allowed.
Preamble
The licenses for most software are designed to
take away your freedom to share and change it. By
contrast, the GNU General Public License is intended
to guarantee your freedom to share and change free
software - to make sure the software is free for all its
users. This General Public License applies to most
of the Free Software Foundation’s software and to
any other program whose authors commit to using
it. (Some other Free Software Foundation software is
covered by the GNU Lesser General Public License
instead.) You can apply it to your programs, too.
When we speak of free software, we are referring to
freedom, not price. Our General Public Licenses are
designed to make sure that you have the freedom
to distribute copies of free software (and charge for
this service if you wish), that you receive source code
or can get it if you want it, that you can change the
software or use pieces of it in new free programs; and
that you know you can do these things.
To protect your rights, we need to make restrictions
that forbid anyone to deny you these rights or to ask
you to surrender the rights. These restrictions translate
to certain responsibilities for you if you distribute
copies of the software, or if you modify it.
For example, if you distribute copies of such a
program, whether gratis or for a fee, you must give the
recipients all the rights that you have. You must make
sure that they, too, receive or can get the source code.
And you must show them these terms so they know
their rights.
We protect your rights with two steps: (1) copyright
the software, and (2) offer you this license which gives
you legal permission to copy, distribute and/or modify
the software.
Also, for each author’s protection and ours, we want
to make certain that everyone understands that there
is no warranty for this free software. If the software is
modified by someone else and passed on, we want
its recipients to know that what they have is not the
original, so that any problems introduced by others will
not reflect on the original authors’ reputations.
Finally, any free program is threatened constantly
by software patents. We wish to avoid the danger
that redistributors of a free program will individually
obtain patent licenses, in effect making the program
proprietary.
To prevent this, we have made it clear that any patent
must be licensed for everyone’s free use or not
licensed at all.
The precise terms and conditions for copying,
distribution and modification follow.
TERMS AND CONDITIONS FOR COPYING,
DISTRIBUTION AND MODIFICATION
0. This License applies to any program or other work
which contains a notice placed by the copyright
holder saying it may be distributed under the terms
of this General Public License. The “Program”,
below, refers to any such program or work, and
a “work based on the Program” means either the
Program or any derivative work under copyright
law: that is to say, a work containing the Program or
a portion of it, either verbatim or with modifications
and/or translated into another language.(Hereinafter,
translation is included without limitation in the term
“modification”.) Each licensee is addressed as
“you”.
Activities other than copying, distribution and
modification are not covered by this License;
they are outside its scope. The act of running the
Program is not restricted, and the output from the
Program is covered only if its contents constitute a
work based on the Program (independent of having
been made by running the Program). Whether that
is true depends on what the Program does.
1. You may copy and distribute verbatim copies of
the Program’s source code as you receive it, in
any medium, provided that you conspicuously and
appropriately publish on each copy an appropriate
copyright notice and disclaimer of warranty; keep
intact all the notices that refer to this License and
to the absence of any warranty; and give any other
recipients of the Program a copy of this License
along with the Program.
You may charge a fee for the physical act of
transferring a copy, and you may at your option offer
warranty protection in exchange for a fee.
2. You may modify your copy or copies of the Program
or any portion of it, thus forming a work based
on the Program, and copy and distribute such
modifications or work under the terms of Section
1 above, provided that you also meet all of these
conditions:
a) You must cause the modified files to carry
prominent notices stating that you changed the
files and the date of any change.
b) You must cause any work that you distribute or
publish, that in whole or in part contains or is
derived from the Program or any part thereof, to
be licensed as a whole at no charge to all third
parties under the terms of this License.
c) If the modified program normally reads
commands interactively when run, you must
cause it, when started running for such interactive
use in the most ordinary way, to print or display an
announcement including an appropriate copyright
notice and a notice that there is no warranty (or
else, saying that you provide a warranty) and that
users may redistribute the program under these
conditions, and telling the user how to view a copy
of this License. (Exception: if the Program itself
is interactive but does not normally print such an
announcement, your work based on the Program
is not required to print an announcement.)
These requirements apply to the modified work as
a whole. If identifiable sections of that work are not
derived from the Program, and can be reasonably
considered independent and separate works in
themselves, then this License, and its terms, do not
apply to those sections when you distribute them as
separate works. But when you distribute the same
sections as part of a whole which is a work based
on the Program, the distribution of the whole must
be on the terms of this License, whose permissions
for other licensees extend to the entire whole, and
thus to each and every part regardless of who wrote
Appendix
53
Page 56

Licenses
it.
Thus, it is not the intent of this section to claim rights
or contest your rights to work written entirely by you;
rather, the intent is to exercise the right to control the
distribution of derivative or collective works based
on the Program.
In addition, mere aggregation of another work not
based on the Program with the Program (or with
a work based on the Program) on a volume of a
storage or distribution medium does not bring the
other work under the scope of this License.
3. You may copy and distribute the Program (or a
work based on it, under Section 2) in object code
or executable form under the terms of Sections 1
and 2 above provided that you also do one of the
following:
a) Accompany it with the complete corresponding
machine-readable source code, which must be
distributed under the terms of Sections 1 and 2
above on a medium customarily used for software
interchange; or,
b) Accompany it with a written offer, valid for at least
three years, to give any third party, for a charge
no more than your cost of physically performing
source distribution, a complete machine-readable
copy of the corresponding source code, to be
distributed under the terms of Sections 1 and 2
above on a medium customarily used for software
interchange; or,
c) Accompany it with the infor mation you received
as to the offer to distribute corresponding
source code. (This alternative is allowed only
for noncommercial distribution and only if
you received the program in object code or
executable form with such an offer, in accord with
Subsection b above.)
The source code for a work means the preferred
form of the work for making modifications to it. For
an executable work, complete source code means
all the source code for all modules it contains, plus
any associated interface definition files, plus the
scripts used to control compilation and installation
of the executable. However, as a special exception,
the source code distributed need not include
anything that is normally distributed (in either
source or binary form) with the major components
(compiler, kernel, and so on) of the operating
system on which the executable runs, unless that
component itself accompanies the executable.
If distribution of executable or object code is made
by offering access to copy from a designated place,
then offering equivalent access to copy the source
code from the same place counts as distribution of
the source code, even though third parties are not
compelled to copy the source along with the object
code.
4. You may not copy, modify, sublicense, or distribute
the Program except as expressly provided under
this License. Any attempt otherwise to copy, modify,
sublicense or distribute the Program is void, and
will automatically terminate your rights under this
License. However, parties who have received
copies, or rights, from you under this License will
not have their licenses terminated so long as such
parties remain in full compliance.
5. You are not required to accept this License, since
you have not signed it. However, nothing else
grants you permission to modify or distribute the
Program or its derivative works. These actions are
prohibited by law if you do not accept this License.
Therefore, by modifying or distributing the Program
(or any work based on the Program), you indicate
your acceptance of this License to do so, and all
its terms and conditions for copying, distributing or
modifying the Program or works based on it.
6. Each time you redistribute the Program (or any work
based on the Program), the recipient automatically
receives a license from the original licensor to copy,
distribute or modify the Program subject to these
terms and conditions. You may not impose any
further restrictions on the recipients’ exercise of the
rights granted herein.
You are not responsible for enforcing compliance by
third parties to this License.
7. If, as a consequence of a court judgment or
allegation of patent infringement or for any other
reason (not limited to patent issues), conditions are
imposed on you (whether by court order, agreement
or otherwise) that contradict the conditions of this
License, they do not excuse you from the conditions
of this License. If you cannot distribute so as to
54
satisfy simultaneously your obligations under this
License and any other pertinent obligations, then as
a consequence you may not distribute the Program
at all. For example, if a patent license would not
permit royalty-free redistribution of the Program by
all those who receive copies directly or indirectly
through you, then the only way you could satisfy
both it and this License would be to refrain entirely
from distribution of the Program.
If any portion of this section is held invalid or
unenforceable under any particular circumstance,
the balance of the section is intended to apply and
the section as a whole is intended to apply in other
circumstances.
It is not the purpose of this section to induce you to
infringe any patents or other property right claims
or to contest validity of any such claims; this section
has the sole purpose of protecting the integrity
of the free software distribution system, which is
implemented by public license practices. Many
people have made generous contributions to the
wide range of software distributed through that
system in reliance on consistent application of that
system; it is up to the author/donor to decide if he or
she is willing to distribute software through any other
system and a licensee cannot impose that choice.
This section is intended to make thoroughly clear
what is believed to be a consequence of the rest of
this License.
8. If the distribution and/or use of the Program is
restricted in certain countries either by patents or by
copyrighted interfaces, the original copyright holder
who places the Program under this License may
add an explicit geographical distribution limitation
excluding those countries, so that distribution
is permitted only in or among countries not thus
excluded. In such case, this License incorporates
the limitation as if written in the body of this License.
9. The Free Software Foundation may publish revised
and/ or new versions of the General Public License
from time to time. Such new versions will be similar
in spirit to the present version, but may differ in
detail to address new problems or concerns.
Each version is given a distinguishing version
number. If the Program specifies a version number
of this License which applies to it and “any later
version”, you have the option of following the terms
and conditions either of that version or of any later
version published by the Free Software Foundation.
If the Program does not specify a version number
of this License, you may choose any version ever
published by the Free Software Foundation.
10. If you wish to incorporate parts of the Program
into other free programs whose distribution
conditions are different, write to the author to ask
for permission. For software which is copyrighted
by the Free Software Foundation, write to the
Free Software Foundation; we sometimes make
exceptions for this. Our decision will be guided by
the two goals of preserving the free status of all
derivatives of our free software and of promoting the
sharing and reuse of software generally.
NO WARRANTY
11. BECAUSE THE PROGRAM IS LICENSED FREE
OF CHARGE, THERE IS NO WARRANTY FOR
THE PROGRAM, TO THE EXTENT PERMITTED BY
APPLICABLE LAW. EXCEPT WHEN OTHERWISE
STATED IN WRITING THE COPYRIGHT HOLDERS
AND/ OR OTHER PARTIES PROVIDE THE
PROGRAM “AS IS” WITHOUT WARRANTY OF
ANY KIND, EITHER EXPRESSED OR IMPLIED,
INCLUDING, BUT NOT LIMITED TO, THE
IMPLIED WARRANTIES OF MERCHANTABILITY
AND FITNESS FOR A PARTICULAR PURPOSE.
THE ENTIRE RISK AS TO THE QUALITY AND
PERFORMANCE OF THE PROGRAM IS WITH YOU.
SHOULD THE PROGRAM PROVE DEFECTIVE,
YOU ASSUME THE COST OF ALL NECESSARY
SERVICING, REPAIR OR CORRECTION.
12.IN NO EVENT UNLESS REQUIRED BY
APPLICABLE LAW OR AGREED TO IN WRITING
WILL ANY COPYRIGHT HOLDER, OR ANY OTHER
PARTY WHO MAY MODIFY AND/OR REDISTRIBUTE
THE PROGRAM AS PERMITTED ABOVE, BE
LIABLE TO YOU FOR DAMAGES, INCLUDING
ANY GENERAL, SPECIAL, INCIDENTAL OR
CONSEQUENTIAL DAMAGES ARISING OUT OF
THE USE OR INABILITY TO USE THE PROGRAM
(INCLUDING BUT NOT LIMITED TO LOSS OF DATA
OR DATA BEING RENDERED INACCURATE OR
LOSSES SUSTAINED BY YOU OR THIRD PARTIES
OR A FAILURE OF THE PROGRAM TO OPERATE
WITH ANY OTHER PROGRAMS), EVEN IF SUCH
HOLDER OR OTHER PARTY HAS BEEN ADVISED
OF THE POSSIBILITY OF SUCH DAMAGES.
END OF TERMS AND CONDITIONS
How to Apply These Terms to Your New Programs
If you develop a new program, and you want it to be of
the greatest possible use to the public, the best way to
achieve this is to make it free software which everyone
can redistribute and change under these terms.
To do so, attach the following notices to the program. It
is safest to attach them to the start of each source file
to most effectively convey the exclusion of warranty;
and each file should have at least the “copyright” line
and a pointer to where the full notice is found.
<one line to give the program’s name and a brief
idea of what it does.>
Copyright © <year> <name of author>
This program is free software; you can redistribute
it and/ or modify it under the terms of the GNU
General Public License as published by the Free
Software Foundation; either version 2 of the License,
or (at your option) any later version.
This program is distributed in the hope that it will
be useful, but WITHOUT ANY WARRANTY; without
even the implied warranty of MERCHANTABILITY or
FITNESS FOR A PARTICULAR PURPOSE. See the
GNU General Public License for more details.
You should have received a copy of the GNU
General Public License along with this program; if
not, write to the Free Software Foundation, Inc., 51
Franklin Street, Fifth Floor, Boston, MA 02110-1301
USA.
Also add information on how to contact you by
electronic and paper mail.
If the program is interactive, make it output a short
notice like this when it starts in an interactive mode:
Gnomovision version 69, Copyright © year name of
author
Gnomovision comes with ABSOLUTELY NO
WARRANTY; for details type ‘show w’. This is free
software, and you are welcome to redistribute it
under certain conditions; type ‘show c’ for details.
The hypothetical commands ‘show w’ and ‘show c’
should show the appropriate parts of the General
Public License. Of course, the commands you use
may be called something other than ‘show w’ and
‘show c’; they could even be mouse-clicks or menu
items - whatever suits your program.
You should also get your employer (if you work
as a programmer) or your school, if any, to sign a
“copyright disclaimer” for the program, if necessary.
Here is a sample; alter the names:
Yoyodyne, Inc., hereby disclaims all copyright
interest in the program ‘Gnomovision’ (which makes
passes at compilers) written by James Hacker.
<signature of Ty Coon>, 1 April 1989
Ty Coon, President of Vice
This General Public License does not permit
incorporating your program into proprietary programs.
If your program is a subroutine library, you may
consider it more useful to permit linking proprietary
applications with the library. If this is what you want
to do, use the GNU Lesser General Public License
instead of this License.
GNU LESSER GENERAL PUBLIC
•
LICENSE
Version 2.1, February 1999
Copyright © 1991, 1999 Free Software Foundation,
Inc.
51 Franklin Street, Fifth Floor, Boston, MA 02110-1301
USA
Everyone is permitted to copy and distribute verbatim
copies of this license document, but changing it is
not allowed.
[This is the first released version of the Lesser GPL.
It also counts as the successor of the GNU Library
Public License, version 2, hence the version number
2.1.]
Preamble
The licenses for most software are designed to
take away your freedom to share and change it.
By contrast, the GNU General Public Licenses are
intended to guarantee your freedom to share and
change free software - to make sure the software is
free for all its users. This license, the Lesser General
Public License, applies to some specially designated
software packages - typically libraries - of the Free
Software Foundation and other authors who decide to
Page 57

Licenses
use it. You can use it too, but we suggest you first think
carefully about whether this license or the ordinary
General Public License is the better strategy to use in
any particular case, based on the explanations below.
When we speak of free software, we are referring
to freedom of use, not price. Our General Public
Licenses are designed to make sure that you have
the freedom to distribute copies of free software (and
charge for this service if you wish); that you receive
source code or can get it if you want it; that you can
change the software and use pieces of it in new free
programs; and that you are informed that you can do
these things.
To protect your rights, we need to make restrictions
that forbid distributors to deny you these rights or to
ask you to surrender these rights. These restrictions
translate to certain responsibilities for you if you
distribute copies of the library or if you modify it.
For example, if you distribute copies of the library,
whether gratis or for a fee, you must give the
recipients all the rights that we gave you. You must
make sure that they, too, receive or can get the source
code. If you link other code with the library, you must
provide complete object files to the recipients, so
that they can relink them with the library after making
changes to the library and recompiling it. And you
must show them these terms so they know their rights.
We protect your rights with a two-step method: (1) we
copyright the library, and (2) we offer you this license,
which gives you legal permission to copy, distribute
and/or modify the library.
To protect each distributor, we want to make it very
clear that there is no warranty for the free library. Also,
if the library is modified by someone else and passed
on, the recipients should know that what they have is
not the original version, so that the original author’s
reputation will not be affected by problems that might
be introduced by others.
Finally, software patents pose a constant threat to the
existence of any free program. We wish to make sure
that a company cannot effectively restrict the users of
a free program by obtaining a restrictive license from
a patent holder. Therefore, we insist that any patent
license obtained for a version of the library must be
consistent with the full freedom of use specified in
this license.
Most GNU software, including some libraries, is
covered by the ordinary GNU General Public License.
This license, the GNU Lesser General Public License,
applies to certain designated libraries, and is quite
different from the ordinary General Public License. We
use this license for certain libraries in order to permit
linking those libraries into nonfree programs.
When a program is linked with a library, whether
statically or using a shared library, the combination
of the two is legally speaking a combined work, a
derivative of the original library. The ordinary General
Public License therefore permits such linking only
if the entire combination fits its criteria of freedom.
The Lesser General Public License permits more lax
criteria for linking other code with the library.
We call this license the “Lesser” General Public
License because it does Less to protect the user’s
freedom than the ordinary General Public License.
It also provides other free software developers Less
of an advantage over competing non-free programs.
These disadvantages are the reason we use the
ordinary General Public License for many libraries.
However, the Lesser license provides advantages in
certain special circumstances.
For example, on rare occasions, there may be a
special need to encourage the widest possible use
of a certain library, so that it becomes a de-facto
standard. To achieve this, non-free programs must be
allowed to use the library.
A more frequent case is that a free library does the
same job as widely used non-free libraries. In this
case, there is little to gain by limiting the free library
to free software only, so we use the Lesser General
Public License.
In other cases, permission to use a particular library in
nonfree programs enables a greater number of people
to use a large body of free software. For example,
permission to use the GNU C Library in non-free
programs enables many more people to use the whole
GNU operating system, as well as its variant, the GNU
Linux operating system.
Although the Lesser General Public License is Less
protective of the users’ freedom, it does ensure that
the user of a program that is linked with the Library
has the freedom and the wherewithal to run that
program using a modified version of the Library.
The precise terms and conditions for copying,
distribution and modification follow. Pay close attention
to the difference between a “work based on the
library” and a “work that uses the library”. The former
contains code derived from the library, whereas the
latter must be combined with the library in order to
run.
TERMS AND CONDITIONS FOR COPYING,
DISTRIBUTION AND MODIFICATION
0. This License Agreement applies to any software
library or other program which contains a notice
placed by the copyright holder or other authorized
party saying it may be distributed under the terms of
this Lesser General Public License (also called “this
License”). Each licensee is addressed as “you”.
A “library” means a collection of software functions
and/ or data prepared so as to be conveniently
linked with application programs (which use some of
those functions and data) to form executables.
The “Library”, below, refers to any such software
library or work which has been distributed under
these terms. A “work based on the Library” means
either the Library or any derivative work under
copyright law: that is to say, a work containing the
Library or a portion of it, either verbatim or with
modifications and/or translated straightforwardly
into another language. (Hereinafter, translation
is included without limitation in the term
“modification”.)
“Source code” for a work means the preferred form
of the work for making modifications to it. For a
library, complete source code means all the source
code for all modules it contains, plus any associated
interface definition files, plus the scripts used to
control compilation and installation of the library.
Activities other than copying, distribution and
modification are not covered by this License; they
are outside its scope. The act of running a program
using the Library is not restricted, and output from
such a program is covered only if its contents
constitute a work based on the Library (independent
of the use of the Library in a tool for writing it).
Whether that is true depends on what the Library
does and what the program that uses the Library
does.
1. You may copy and distribute verbatim copies of the
Library’s complete source code as you receive it, in
any medium, provided that you conspicuously and
appropriately publish on each copy an appropriate
copyright notice and disclaimer of warranty; keep
intact all the notices that refer to this License and to
the absence of any warranty; and distribute a copy
of this License along with the Library.
You may charge a fee for the physical act of
transferring a copy, and you may at your option offer
warranty protection in exchange for a fee.
2. You may modify your copy or copies of the Library
or any portion of it, thus forming a work based
on the Library, and copy and distribute such
modifications or work under the terms of Section
1 above, provided that you also meet all of these
conditions:
a) The modified work must itself be a software
library.
b) You must cause the files modified to carry
prominent notices stating that you changed the
files and the date of any change.
c) You must cause the whole of the work to be
licensed at no charge to all third parties under the
terms of this License.
d) If a facility in the modified Library refers to a
function or a table of data to be supplied by an
application program that uses the facility, other
than as an argument passed when the facility is
invoked, then you must make a good faith effort
to ensure that, in the event an application does
not supply such function or table, the facility
still operates, and performs whatever part of its
purpose remains meaningful. (For example, a
function in a library to compute square roots has a
purpose that is entirely well-defined independent
of the application. Therefore, Subsection 2d
requires that any application-supplied function
or table used by this function must be optional: if
the application does not supply it, the square root
function must still compute square roots.)
These requirements apply to the modified work as
a whole. If identifiable sections of that work are not
derived from the Library, and can be reasonably
considered independent and separate works in
themselves, then this License, and its terms, do not
apply to those sections when you distribute them as
separate works. But when you distribute the same
sections as part of a whole which is a work based
on the Library, the distribution of the whole must be
on the terms of this License, whose permissions for
other licensees extend to the entire whole, and thus
to each and every part regardless of who wrote it.
Thus, it is not the intent of this section to claim rights
or contest your rights to work written entirely by you;
rather, the intent is to exercise the right to control the
distribution of derivative or collective works based
on the Library.
In addition, mere aggregation of another work not
based on the Library with the Library (or with a work
based on the Library) on a volume of a storage or
distribution medium does not bring the other work
under the scope of this License.
3. You may opt to apply the terms of the ordinary GNU
General Public License instead of this License to a
given copy of the Library. To do this, you must alter
all the notices that refer to this License, so that they
refer to the ordinary GNU General Public License,
version 2, instead of to this License. (If a newer
version than version 2 of the ordinary GNU General
Public License has appeared, then you can specify
that version instead if you wish.) Do not make any
other change in these notices.
Once this change is made in a given copy, it is
irreversible for that copy, so the ordinary GNU
General Public License applies to all subsequent
copies and derivative works made from that copy.
This option is useful when you wish to copy part of
the code of the Library into a program that is not a
library.
4. You may copy and distribute the Library (or a
portion or derivative of it, under Section 2) in
object code or executable form under the terms
of Sections 1 and 2 above provided that you
accompany it with the complete corresponding
machine-readable source code, which must be
distributed under the terms of Sections 1 and 2
above on a medium customarily used for software
interchange.
If distribution of object code is made by offering
access to copy from a designated place, then
offering equivalent access to copy the source code
from the same place satisfies the requirement to
distribute the source code, even though third parties
are not compelled to copy the source along with the
object code.
5. A program that contains no derivative of any portion
of the Library, but is designed to work with the
Library by being compiled or linked with it, is called
a “work that uses the Library”. Such a work, in
isolation, is not a derivative work of the Library, and
therefore falls outside the scope of this License.
However, linking a “work that uses the Library” with
the Library creates an executable that is a derivative
of the Library (because it contains portions of the
Library), rather than a “work that uses the library”.
The executable is therefore covered by this License.
Section 6 states terms for distribution of such
executables.
When a “work that uses the Library” uses material
from a header file that is part of the Library, the
object code for the work may be a derivative work
of the Library even though the source code is not.
Whether this is true is especially significant if the
work can be linked without the Library, or if the work
is itself a library. The threshold for this to be true is
not precisely defined by law.
If such an object file uses only numerical
parameters, data structure layouts and accessors,
and small macros and small inline functions (ten
lines or less in length), then the use of the object file
is unrestricted, regardless of whether it is legally a
derivative work. (Executables containing this object
code plus portions of the Library will still fall under
Section 6.)
Otherwise, if the work is a derivative of the Library,
you may distribute the object code for the work
under the terms of Section 6. Any executables
containing that work also fall under Section 6,
whether or not they are linked directly with the
Library itself.
6. As an exception to the Sections above, you may
also combine or link a “work that uses the Library”
with the Library to produce a work containing
portions of the Library, and distribute that work
under terms of your choice, provided that the terms
Appendix
55
Page 58

Licenses
permit modification of the work for the customer’s
own use and reverse engineering for debugging
such modifications.
You must give prominent notice with each copy of
the work that the Library is used in it and that the
Library and its use are covered by this License.
You must supply a copy of this License. If the work
during execution displays copyright notices, you
must include the copyright notice for the Library
among them, as well as a reference directing the
user to the copy of this License. Also, you must do
one of these things:
a) Accompany the work with the complete
corresponding machine-readable source code
for the Library including whatever changes were
used in the work (which must be distributed
under Sections 1 and 2 above); and, if the work
is an executable linked with the Library, with the
complete machine-readable “work that uses the
Library”, as object code and/or source code,
so that the user can modify the Library and
then relink to produce a modified executable
containing the modified Library. (It is understood
that the user who changes the contents of
definitions files in the Library will not necessarily
be able to recompile the application to use the
modified definitions.)
b) Use a suitable shared library mechanism for
linking with the Library. A suitable mechanism is
one that (1) uses at run time a copy of the library
already present on the user’s computer system,
rather than copying library functions into the
executable, and (2) will operate properly with a
modified version of the library, if the user installs
one, as long as the modified version is interfacecompatible with the version that the work was
made with.
c) Accompany the work with a written offer, valid
for at least three years, to give the same user the
materials specified in Subsection 6a, above, for a
charge no more than the cost of performing this
distribution.
d) If distribution of the work is made by offering
access to copy from a designated place, offer
equivalent access to copy the above specified
materials from the same place.
e) Verify that the user has already received a copy of
these materials or that you have already sent this
user a copy.
For an executable, the required form of the “work
that uses the Library” must include any data
and utility programs needed for reproducing the
executable from it.
However, as a special exception, the materials to
be distributed need not include anything that is
normally distributed (in either source or binary form)
with the major components (compiler, kernel, and so
on) of the operating system on which the executable
runs, unless that component itself accompanies the
executable. It may happen that this requirement
contradicts the license restrictions of other
proprietary libraries that do not normally accompany
the operating system. Such a contradiction means
you cannot use both them and the Library together
in an executable that you distribute.
7. You may place library facilities that are a work
based on the Library side-by-side in a single library
together with other library facilities not covered
by this License, and distribute such a combined
library, provided that the separate distribution of the
work based on the Library and of the other library
facilities is otherwise permitted, and provided that
you do these two things:distribute such a combined
library, provided that the separate distribution of the
work based on the Library and of the other library
facilities is otherwise permitted, and provided that
you do these two things:
a) Accompany the combined librar y with a copy of
the same work based on the Library, uncombined
with any other library facilities. This must be
distributed under the terms of the Sections above.
b) Give prominent notice with the combined library
of the fact that part of it is a work based on
the Library, and explaining where to find the
accompanying uncombined form of the same
work.
8. You may not copy, modify, sublicense, link with, or
distribute the Library except as expressly provided
under this License. Any attempt otherwise to copy,
modify, sublicense, link with, or distribute the Library
is void, and will automatically terminate your rights
56
under this License. However, parties who have
received copies, or rights, from you under this
License will not have their licenses terminated so
long as such parties remain in full compliance.
9. You are not required to accept this License, since
you have not signed it. However, nothing else grants
you permission to modify or distribute the Library
or its derivative works. These actions are prohibited
by law if you do not accept this License. Therefore,
by modifying or distributing the Library (or any work
based on the Library), you indicate your acceptance
of this License to do so, and all its terms and
conditions for copying, distributing or modifying the
Library or works based on it.
10. Each time you redistribute the Library (or any work
based on the Library), the recipient automatically
receives a license from the original licensor to copy,
distribute, link with or modify the Library subject to
these terms and conditions. You may not impose
any further restrictions on the recipients’ exercise of
the rights granted herein.
You are not responsible for enforcing compliance by
third parties with this License.
11. If, as a consequence of a court judgment or
allegation of patent infringement or for any other
reason (not limited to patent issues), conditions are
imposed on you (whether by court order, agreement
or otherwise) that contradict the conditions of this
License, they do not excuse you from the conditions
of this License. If you cannot distribute so as to
satisfy simultaneously your obligations under this
License and any other pertinent obligations, then as
a consequence you may not distribute the Library
at all. For example, if a patent license would not
permit royalty-free redistribution of the Library by
all those who receive copies directly or indirectly
through you, then the only way you could satisfy
both it and this License would be to refrain entirely
from distribution of the Library. If any portion of this
section is held invalid or unenforceable under any
particular circumstance, the balance of the section
is intended to apply, and the section as a whole is
intended to apply in other circumstances.
It is not the purpose of this section to induce you to
infringe any patents or other property right claims
or to contest validity of any such claims; this section
has the sole purpose of protecting the integrity
of the free software distribution system which is
implemented by public license practices. Many
people have made generous contributions to the
wide range of software distributed through that
system in reliance on consistent application of that
system; it is up to the author donor to decide if he or
she is willing to distribute software through any other
system and a licensee cannot impose that choice.
This section is intended to make thoroughly clear
what is believed to be a consequence of the rest of
this License.
12. If the distribution and/or use of the Library is
restricted in certain countries either by patents or by
copyrighted interfaces, the original copyright holder
who places the Library under this License may
add an explicit geographical distribution limitation
excluding those countries, so that distribution
is permitted only in or among countries not thus
excluded. In such case, this License incorporates
the limitation as if written in the body of this License.
13. The Free Software Foundation may publish revised
and/ or new versions of the Lesser General Public
License from time to time. Such new versions will be
similar in spirit to the present version, but may differ
in detail to address new problems or concerns.
Each version is given a distinguishing version
number. If the Library specifies a version number
of this License which applies to it and “any later
version”, you have the option of following the
terms and conditions either of that version or of
any later version published by the Free Software
Foundation. If the Library does not specify a license
version number, you may choose any version ever
published by the Free Software Foundation.
14. If you wish to incorporate parts of the Library into
other free programs whose distribution conditions
are incompatible with these, write to the author
to ask for permission. For software which is
copyrighted by the Free Software Foundation, write
to the Free Software Foundation; we sometimes
make exceptions for this. Our decision will be
guided by the two goals of preserving the free
status of all derivatives of our free software and
of promoting the sharing and reuse of software
generally.
NO WARRANTY
15. BECAUSE THE LIBRARY IS LICENSED FREE
OF CHARGE, THERE IS NO WARRANTY FOR
THE LIBRARY, TO THE EXTENT PERMITTED BY
APPLICABLE LAW. EXCEPT WHEN OTHERWISE
STATED IN WRITING THE COPYRIGHT HOLDERS
AND/OR OTHER PARTIES PROVIDE THE LIBRARY
“AS IS” WITHOUT WARRANTY OF ANY KIND,
EITHER EXPRESSED OR IMPLIED, INCLUDING,
BUT NOT LIMITED TO, THE IMPLIED WARRANTIES
OF MERCHANTABILITY AND FITNESS FOR A
PARTICULAR PURPOSE. THE ENTIRE RISK AS
TO THE QUALITY AND PERFORMANCE OF THE
LIBRARY IS WITH YOU. SHOULD THE LIBRARY
PROVE DEFECTIVE, YOU ASSUME THE COST
OF ALL NECESSARY SERVICING, REPAIR OR
CORRECTION.
16. IN NO EVENT UNLESS REQUIRED BY
APPLICABLE LAW OR AGREED TO IN WRITING
WILL ANY COPYRIGHT HOLDER, OR ANY OTHER
PARTY WHO MAY MODIFY AND/OR REDISTRIBUTE
THE LIBRARY AS PERMITTED ABOVE, BE
LIABLE TO YOU FOR DAMAGES, INCLUDING
ANY GENERAL, SPECIAL, INCIDENTAL OR
CONSEQUENTIAL DAMAGES ARISING OUT OF
THE USE OR INABILITY TO USE THE LIBRARY
(INCLUDING BUT NOT LIMITED TO LOSS OF DATA
OR DATA BEING RENDERED INACCURATE OR
LOSSES SUSTAINED BY YOU OR THIRD PARTIES
OR A FAILURE OF THE LIBRARY TO OPERATE
WITH ANY OTHER SOFTWARE), EVEN IF SUCH
HOLDER OR OTHER PARTY HAS BEEN ADVISED
OF THE POSSIBILITY OF SUCH DAMAGES.
END OF TERMS AND CONDITIONS
How to Apply These Terms to Your New Libraries
If you develop a new library, and you want it to
be of the greatest possible use to the public, we
recommend making it free software that everyone can
redistribute and change. You can do so by permitting
redistribution under these terms (or, alternatively,
under the terms of the ordinary General Public
License).
To apply these terms, attach the following notices
to the library. It is safest to attach them to the start
of each source file to most effectively convey the
exclusion of warranty; and each file should have at
least the “copyright” line and a pointer to where the full
notice is found.
<one line to give the library’s name and a brief idea
of what it does.>
Copyright © <year> <name of author>
This library is free software; you can redistribute it
and/or modify it under the terms of the GNU Lesser
General Public License as published by the Free
Software Foundation; either version 2.1 of the License,
or (at your option) any later version.
This library is distributed in the hope that it will be
useful, but WITHOUT ANY WARRANTY; without
even the implied warranty of MERCHANTABILITY or
FITNESS FOR A PARTICULAR PURPOSE. See the
GNU Lesser General Public License for more details.
You should have received a copy of the GNU Lesser
General Public License along with this library; if not,
write to the Free Software Foundation, Inc., 51 Franklin
Street, Fifth Floor, Boston, MA 02110-1301 USA
Also add information on how to contact you by
electronic and paper mail.
You should also get your employer (if you work
as a programmer) or your school, if any, to sign a
“copyright disclaimer” for the library, if necessary.
Here is a sample; alter the names:
Yoyodyne, Inc., hereby disclaims all copyright
interest in the library ‘Frob’ (a library for tweaking
knobs) written by James Random Hacker.
<signature of Ty Coon>, 1 April 1990
Ty Coon, President of Vice
That’s all there is to it!
[Notice on GNU General Public
•
License]
This product include the software licensed for use
under the terms of a GNU General Public License.
A copy of the corresponding source code can be
obtained by being charged the fee for distribution.
To obtain a copy, contact your local Pioneer Customer
Support Center.
See the GNU website (http://www.gnu.org) for details
of the GNU General Public License.
Page 59

Australia, New Zealand and other Oceania area
Pioneer Electronics Australia Pty Ltd
2211 Princes Highway, Mulgrave, VIC 3170, Australia
1800 988 268
http://www.pioneer.com.au
Hong Kong
Pioneer (HK) Limited - Customer Service Center
Unit 2, 17/F, Vanta Industrial Centre, 21-33 Tai Lin Pai Road, Kwai Chung, Hong Kong
(852) 3583 3288
http://www.pioneerhongkong.com.hk
Singapore
Pioneer Electronics AsiaCentre Pte Ltd
253 Alexandra Road (Komoco Building)#04-01, Lobby 2 Singapore 159936
(65) 6472-7555
http://www.pioneer.com.sg/firmwaredownload
Published by Pioneer Corporation.
Copyright © 2009 Pioneer Corporation.
All rights reserved.
PIONEER CORPORATION
4-1, Meguro 1-Chome, Meguro-ku, Tokyo 153-8654, Japan
PIONEER ELECTRONICS (USA) INC.
P.O. BOX 1540, Long Beach, California 90801-1540, U.S.A. TEL: (800) 421-1404
PIONEER ELECTRONICS OF CANADA, INC.
300 Allstate Parkway, Markham, Ontario L3R 0P2, Canada TEL: 1-877-283-5901, 905-479-4411
PIONEER EUROPE NV
Haven 1087, Keetberglaan 1, B-9120 Melsele, Belgium TEL: 03/570.05.11
PIONEER ELECTRONICS ASIACENTRE PTE. LTD.
253 Alexandra Road, #04-01, Singapore 159936 TEL: 65-6472-7555
PIONEER ELECTRONICS AUSTRALIA PTY. LTD.
178-184 Boundary Road, Braeside, Victoria 3195, Australia, TEL: (03) 9586-6300
PIONEER ELECTRONICS DE MEXICO S.A. DE C.V.
Blvd.Manuel Avila Camacho 138 10 piso Col.Lomas de Chapultepec, Mexico,D.F. 11000 TEL: 55-9178-4270
<VRB1524-A>
K002_B_En
Printed in China
 Loading...