

Page 1

Operation Manual
Multi-channel processor controller unit
AXM-P7050
English Español
Page 2
Contents
Thank you for buying this Pioneer product.
Please read through these operating instructions so you will know how to operate
your model properly. After you have finished reading the instructions, put them away
in a safe place for future reference.
Before You Start
About this manual 4
About this unit 4
About digital and analog source 4
Precautions 5
Use and care of the remote control 5
Switching the remote control operation mode
switch 5
Reverse mode 6
Dolby Digital/DTS compatibility 6
Whats What
Display unit 7
Remote control 7
Basic Operations
Turning the unit on 10
Selecting a source 10
Adjusting the volume 10
Turning the unit off 10
DVD Player
Function menu switching 11
Repeating play 11
Playing tracks in a random order 11
Scanning tracks of a CD 11
Pausing playback 11
TV tuner
Using the TV tuner 12
Storing and recalling broadcast stations 12
Storing the strongest broadcast stations
sequentially 12
Multi-CD Player
Playing a CD 13
50-disc multi-CD player 13
Introduction of advanced multi-CD player
operation 14
Repeating play 14
Playing tracks in a random order 14
Scanning CDs and tracks 15
Pausing CD playback 15
Using ITS playlists 15
Using disc title functions 17
Using CD TEXT functions 17
Using compression and bass emphasis 18
Digital Signal Processor
Introduction of DSP adjustments 19
Using the sound field control 20
Using the position selector 20
Using balance adjustment 21
Adjusting source levels 21
Using the dynamic range control 21
Using the dual mono mode 22
Using the direct control 22
Using the Dolby Pro Logic 22
Setting the speaker setting 22
Selecting a cut-off frequency 24
Adjusting the speaker output levels 24
Adjusting the speaker output levels using a
test tone 24
Adjusting the time alignment 25
Using the equalizer 25
Initial Settings
Adjusting initial settings 28
Setting the clock 28
Switching the dimmer setting 28
Adjusting the brightness 29
Correcting distorted sound 29
Switching the telephone muting/
attenuation 29
Switching the auxiliary setting 29
Switching the digital source setting 30
Switching the analog input setting 30
2
En
Page 3

Contents
Other Functions
Turning the clock display on or off 31
Using different entertainment displays 31
Setting the digital source title 31
Setting the analog source title 31
Using the AUX source 31
Setting remote control code type 32
Title input 32
Additional Information
Troubleshooting 33
Error messages 33
Specifications 35
English
En
3
Page 4
Section
01
Before You Start
About this manual
This unit features a number of sophisticated
functions ensuring superior reception and operation. All the functions have been designed
for the easiest possible use, but many are not
self-explanatory. This operation manual will
help you benefit fully from this productspotential and to maximize your listening enjoyment.
We recommend that you familiarize yourself
with the functions and their operation by reading through the manual before you begin
using this unit. It is especially important that
you read and observe precautions on the next
page and in other sections.
About this unit
This unit can control separately sold Pioneer
multi-channel processor (DEQ-P7050). Also,
supplied remote control can control the functions of separately sold Pioneer DVD player
(e.g. XDV-P9), Pioneer multi-CD player, Pioneer
television and the part of functions of Pioneer
head units.
Also, this unit has universal connector for
your car-stereo or other equipment, allowing
you to connect to this unit and to enjoy the
high quality sound of DEQ-P7050. If you want
to connect them, use either the speaker input
connector or the RCA input connector. You
can connect six sources at a time for speaker
input connector and RCA input connector as
analog source. You can change the setting of
each analog source between speaker input or
RCA input. (Refer to Switching the analog
input setting on page 30.)
About digital and analog
source
This unit features two digital sources and six
analog sources.
By connecting a Pioneer DVD player to this
unit with IP-BUS cable, you can use it as the
digital source.
Digital1 and Digital2 are automatically occupied by the Pioneer DVD player when it is connected to this unit. And each digital source is
assigned according to the media which is
playing on Pioneer DVD player, such as DVD,
Video CD and CD.
Devices which are connected to this unit with
speaker input connector or RCA input connector can be used as analog sources. For example, when Pioneer head unit with tuner and
cassette player is connected to this unit, you
can use Analog1 for tuner and Analog2 for
cassette player as independent source.
Furthermore, audio function of DEQ-P7050
can be used independently for each analog
source, if each analog source is used properly.
The title displayed for digital sources and analog sources can be changed. This is useful
when you use such sources. To input the titles,
refer to Title input on page 32.
Notes
! If equipment which is connected to this unit
as analog source has multiple sources, be
sure to change sources both for this unit and
the connected equipment. Also, this unit cannot control equipment which is connected as
analog source.
! When the volume level of the equipment
which is connected to this unit as analog
source is too high, sound may be produced incorrectly. Also, sound controls (e.g. loudness,
equalizer and so on) should be off to prevent
incorrect sound.
4
En
Page 5
Before You Start
Section
01
Precautions
! Keep this manual handy as a reference for
operating procedures and precautions.
! Always keep the volume low enough so you
can hear sounds outside of the car.
! Protect this product from moisture.
! If the battery is disconnected or dis-
charged, the preset memory will be erased
and must be reprogrammed.
! Should this product fail to operate properly,
contact your dealer or nearest authorized
Pioneer Service Station.
Use and care of the remote
control
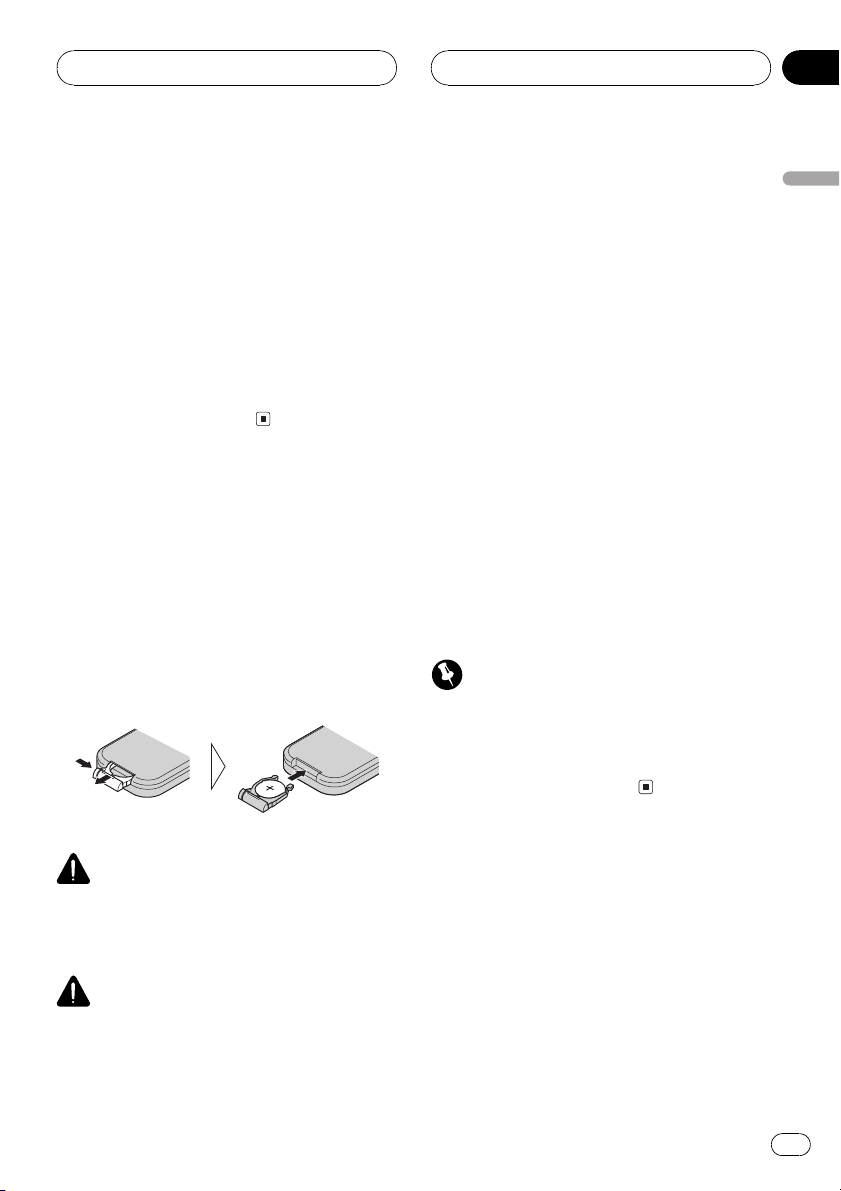
Installing the battery
Slide the tray out on the back of the remote
control and insert the battery with the plus (+)
and minus () poles pointing in the proper direction.
! When using for the first time, pull out the
film protruding from the tray.
! Do not recharge, disassemble, heat or dispose
of the battery in fire.
! Do not handle the battery with metallic tools.
! Do not store the battery with metallic materi-
als.
! In the event of battery leakage, wipe the re-
mote control completely clean and install a
new battery.
! When disposing of used batteries, please
comply with governmental regulations or environmental public institutions rules that
apply in your country/area.
! Always check carefully that you are loading
the battery with its plus (+) and minus ()
poles facing in the proper directions.
Using the remote control
Point the remote control in the direction of the
front panel to operate.
! The remote control may not function prop-
erly in direct sunlight.
Important
! Do not store the remote control in high tem-
peratures or direct sunlight.
! Do not let the remote control fall onto the
floor, where it may become jammed under the
brake or accelerator pedal.
English
WARNING
Keep the battery out of the reach of children.
Should the battery be swallowed, immediately
consult a doctor.
CAUTION
! Use only one CR2025 (3 V) lithium battery.
! Remove the battery if the remote control is not
used for a month or longer.
Switching the remote control
operation mode switch
There are three remote control operation
modes on the remote control. In order to control every function of connected equipment
properly, be sure to change settings as follows:
En
5
Page 6
Section
01
Before You Start
! DVD mode This mode can control Pio-
neer DVD player. Every function of Pioneer
DVD player can be controlled by this remote control. Although some operations
may differ slightly from your DVD players
remote control, use corresponding buttons
to control them properly.
! DEQ mode This mode controls Pioneer
multi-channel processor (DEQ-P7050).
Every function of DEQ-P7050 can be controlled by this remote control. Also, some
functions for connected sources can be
controlled. If Pioneer multi-CD player or television is connected to this unit, you can
control their functions by using supplied
remote control.
! AUDIO mode This mode can control Pio-
neer head unit. Although not every function
of Pioneer head unit can be controlled by
this remote control, most of the basic functions can be controlled. If you connect Pioneer head unit to this unit, supplied remote
control can operate it.
Note
Supplied remote control cannot control equipment connected to speaker input connector and
RCA input connector. To control them, use the appropriate buttons on the equipment.
Dolby Digital/DTS
compatibility
When using this unit with a Pioneer multichannel processor, you can enjoy the atmosphere and excitement provided by DVD movie
and music software featuring 5.1 channel recordings.
! Manufactured under license from Dolby La-
boratories. Dolby and the double-D symbol are trademarks of Dolby Laboratories.
! DTS is a registered trademark of Digital
Theater Systems, Inc.
Note
This product incorporates copyright protection
technology that is protected by method claims of
certain U.S. patents and other intellectual property rights owned by Macrovision Corporation
and other rights owners. Use of this copyright
protection technology must be authorized by
Macrovision Corporation, and is intended for
home and other limited viewing uses only unless
otherwise authorized by Macrovision Corporation.
Reverse engineering or disassembly is
prohibited.
Reverse mode
If you do not perform an operation within
about 30 seconds, screen indications start to
reverse, and then continue reversing every 10
seconds. Pressing 5 numbered button when
power to this unit is turned off while the ignition switch is set to ACC or ON cancels the reverse mode. Pressing 5 numbered button
again to start the reverse mode.
6
En
Page 7
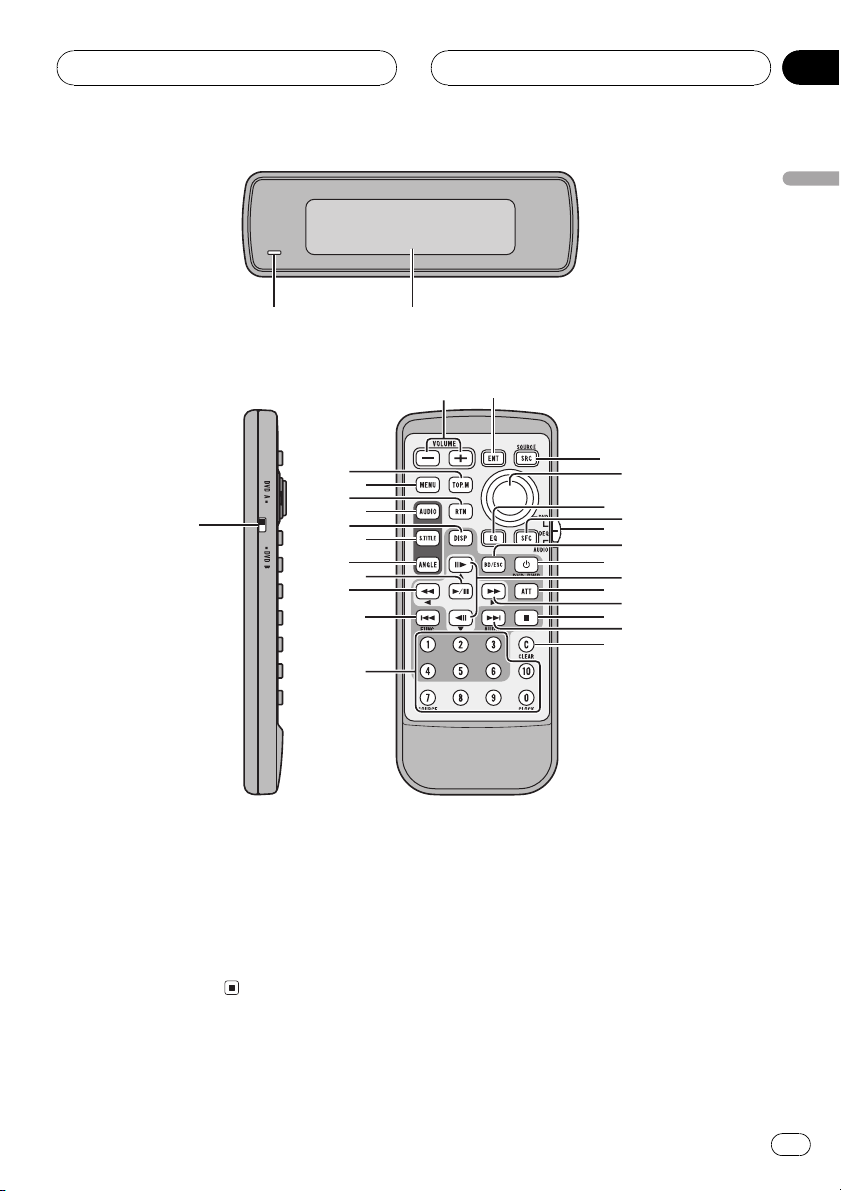
Whats What
12
e
2
Section
02
English
3
5
1
7
9
b
Display unit
1 Power indicator
It lights up when power is on.
2 Information display
Displaying information for each connected
source and settings.
f
4
6
8
a
c
d
g
h
i
j
k
l
m
n
o
p
q
r
Remote control
1 Remote control selection switch
! DVD mode Switch to change the set-
ting of the remote control. For details,
refer to Setting remote control code type
on page 32.
! DEQ mode Not used.
! AUDIO mode Not used.
2 VOLUME button
Press to increase or decrease the volume.
En
7
Page 8

Section
02
Whats What
3 TOP MENU button
! DVD mode Press to return to the top
menu during DVD playback.
! DEQ mode Press to select the video
source when you connect a Pioneer televison to this unit.
! AUDIO mode Press to select the video
source when you connect a Pioneer television to this unit.
4 MENU button
This is effective only when controlling Pioneer DVD player.
Press to display the DVD menu during DVD
playback.
5 RETURN button
This is effective only when controlling Pioneer DVD player.
Press to return to the previous display when
the SET-UP MENU is displayed.
6 AUDIO button
This is effective only when controlling Pioneer DVD player.
Press to change the audio language during
DVD playback.
7 DISP button
! DVD mode Press to change the infor-
mation display on the separately sold display while the DVD player is playing as
the source.
! DEQ mode Press to display information
on the information display.
! AUDIO mode Press to display informa-
tion on the information display.
8 SUBTITLE button
This is effective only when controlling Pioneer DVD player.
Press to change the subtitle language during DVD playback.
9 ANGLE button
This is effective only when controlling Pioneer DVD player.
Press to change the viewing angle during
DVD playback.
a PLAY/PAUSE (f) button
! DVD mode Press to switch sequentially
between play and pause.
! DEQ mode Not used.
! AUDIO mode Not used.
b REVERSE (m) button
! DVD mode Press to perform fast re-
verse.
! DEQ mode Press to control functions.
! AUDIO mode Press to control func-
tions.
c PREVIOUS (o) button
! DVD mode Press to return to the pre-
vious track (chapter).
! DEQ mode Press to select functions.
! AUDIO mode Press to select functions.
d NUMBER buttons
! DVD mode Press to directly select the
desired track, chapter and disc.
! DEQ mode
16 buttons Press to operate disc num-
ber search for the multi-CD player when
you connect a Pioneer multi-CD player to
this unit.
7 button Press to select a source when
controlling Pioneer head unit.
0 button Press to change the informa-
tion display to the clock display .
! AUDIO mode
16 buttons Not used.
7 button Press to select a source when
controlling Pioneer head unit.
0 button Press to change the informa-
tion display to the clock display .
8
En
Page 9

Whats What
Section
02
e ENTERTAINMENT button
Press to change to the entertainment display.
f SOURCE button
This unit is turned on by selecting a source.
Press to cycle through all of the available
sources.
g Joystick
This is effective only when controlling Pioneer DVD player.
! DVD mode Move to select the setting.
Click to set the setting or select on or off.
! DEQ mode Move to select the setting.
Click to set the setting or select on or off.
! AUDIO mode Not used.
h EQ button
Press to select various equalizer curves.
i SFC button
Press to select a sound field control.
j Remote control operation mode switch
Switches the operation mode between DVD
mode, DEQ mode and AUDIO mode. (Refer
to Switching the remote control operation
mode switch on page 5.)
k BAND button
! DVD mode Not used.
! DEQ mode Press to cancel the control
mode of functions.
! AUDIO mode Press to cancel the con-
trol mode of functions.
l DVD PWR button
! DVD mode When a Pioneer DVD player
is connected to this unit, press to turn
on or off independently.
! DEQ mode Not used.
! AUDIO mode Not used.
m STEP (r/q) button
! DVD mode Press to move ahead one
frame at a time during DVD/Video CD
playback. Press and hold for one second
to activate slow playback.
! DEQ mode Press to control functions.
! AUDIO mode Press to control func-
tions.
n ATT button
Press to quickly lower the volume level, by
about 90%. Press once more to return to the
original volume level.
o FORWARD (n) button
! DVD mode Press to perform fast for-
ward.
! DEQ mode Press to control functions.
! AUDIO mode Press to control func-
tions.
p STOP (g) button
! DVD mode Press to stop playback.
! DEQ mode Not used.
! AUDIO mode Not used.
q NEXT (p) button
! DVD mode Press to skip to the next
track (chapter).
! DEQ mode Press to select various
sound quality controls.
! AUDIO mode Press to select various
sound quality controls.
r CLEAR button
! DVD mode Press to cancel the input
number while NUMBER are used.
! DEQ mode Not used.
! AUDIO mode Not used.
English
En
9
Page 10
Section
03
Basic Operations
Turning the unit on
% Press SOURCE to turn the unit on.
When you select a source the unit is turned
on.
When the DVD player is
operated from rear seats
% Press DVD PWR to turn the DVD playback on.
Notes
! Even if the source selected with this unit is
not DVD, if you switch power to this unit on
with DVD PWR, you can watch the DVD picture from this unit on the rear display.
! Regardless of whether this unit is switched on
or off, you can watch the DVD video on the
rear display.
Selecting a source
% Press SOURCE to select a source.
Press SOURCE repeatedly to switch between
the following sources:
Digital1 (digital source 1)Digital2 (digital
source 2)TV (television)DVD (DVD player/
multi-DVD player)Multi-CD (multi-CD
player)AUX (AUX)Analog1 (analog
source 1)Analog2 (analog source 2)
Analog3 (analog source 3)Analog4 (ana-
log source 4)Analog5 (analog source 5)
Analog6 (analog source 6)
Otherwise, digital sources (Digital1 and
Digital2) can be used.
! When no source is connected, short beep will
sound when you try to select a source.
! In the following cases, the sound source will
not change:
When a unit corresponding to each source
is not connected to this unit.
When no magazine is set in the multi-CD
player.
When no magazine is set in the multi-DVD
player.
When no disc is set in the DVD player.
When the AUX (auxiliary input) is set to off
(refer to page 29).
When the analog sources are set to off
(refer to page 30).
Adjusting the volume
% Use VOLUME to adjust the sound level.
Press to increase or decrease the volume.
Turning the unit off
% Press SOURCE and hold until the unit
turns off.
When the DVD player is
operated from rear seats
% Press DVD PWR to turn the DVD playback off.
Notes
! You cannot use digital sources (Digital1 and
Digital2) and DVD simultaneously. When
you connected Pioneer DVD player with IPBUS cable, you can only use DVD source.
10
En
Page 11
DVD Player
Section
04
You can use this unit with a separately sold
DVD player or multi-DVD player.
For details concerning operation, refer to the
DVD players or multi-DVD player s operation
manuals. This section provides information on
DVD operations with this unit which differs
from that described in the DVD playersor
multi-DVD players operation manual.
Important
You can use the following functions only when
the remote control is set to DEQ mode.
Function menu switching
% During DVD playback, press o to dis-
play the function names.
Press o repeatedly to switch between the
following functions:
Repeat (repeat play)Pause (pause)
% During Video CD playback, press o to
display the function names.
Press o repeatedly to switch between the
following functions:
Repeat (repeat play)Pause (pause)
Playing tracks in a random
order
1 Press o to select Random.
2 Press r to turn random play on.
# Press q to turn random play off.
Scanning tracks of a CD
1 Press o to select Track Scan.
2 Press r to turn scan play on.
# When you find the desired track press q to
turn scan play off.
# If the display has automatically returned to
the playback display, select Track Scan again by
pressing o.
Pausing playback
1 Press o to select Pause.
2 Press r to turn pause on.
# Press q to turn pause off.
English
% During CD playback, press o to dis-
play the function names.
Press o repeatedly to switch between the
following functions:
Repeat (repeat play)Random (random play)
Track Scan (scan play)Pause (pause)
Repeating play
% Press o to select Repeat.
! During DVD playback, press m or n to
select the repeat range.
! During Video CD or CD playback, press r
or q to turn repeat play on or off.
En
11
Page 12
Section
05
TV tuner
You can use this unit with a separately sold TV
tuner.
For details concerning operation, refer to the
TV tuners operation manuals. This section
provides information on TV operations with
this unit which differs from that described in
the TV tuners operation manual.
Important
You can use the following functions only when
the remote control is set to DEQ mode.
Using the TV tuner
1 Press SOURCE to select the Television.
2 Use VOLUME to adjust the sound level.
3 Press BAND to select a band.
4 To perform manual tuning, press m or
n with quick presses.
5 To perform seek tuning, press and hold
m or n for about one second and release.
Storing and recalling
broadcast stations
% When you find a station that you want
to store in memory press a preset tuning
button 16 and hold until the preset number stops flashing.
The number you have pressed will flash in the
preset number indicator and then remain lit.
The selected station has been stored in memory.
The next time you press the same preset tuning button 16 the station is recalled from
memory.
Notes
! Up to 12 stations, 6 for each of two TV bands
can be stored in memory.
! You can also recall station assigned to preset
tuning buttons 16 by pressing r or q.
Storing the strongest
broadcast stations
sequentially
1 Press o to select BSSM.
Press o until BSSM appears in the display.
2 Press r to turn BSSM on.
BSSM begins to flash. While BSSM is flashing
the 12 strongest broadcast stations will be
stored in order from the lowest channel up.
When finished, BSSM stops flashing.
# To cancel the storage process, press q.
Note
Storing broadcast frequencies with BSSM may
replace broadcast frequencies you have saved
using 16.
12
En
Page 13

Multi-CD Player
Section
06
Playing a CD
132
You can use this unit to control a multi-CD
player, which is sold separately.
These are the basic steps necessary to play a
CD with your multi-CD player. More advanced
CD operation is explained starting on the next
page.
Important
You can use the following functions only when
the remote control is set to DEQ mode.
1 Disc number indicator
Shows the disc currently playing.
2 Track number indicator
Shows the track currently playing.
3 Play time indicator
Shows the elapsed playing time of the current track.
such as 1 for disc 7, until the disc number appears in the display.
# You can also sequentially select a disc by
pressing r or q.
3 To perform fast forward or reverse,
press and hold m or n.
4 To skip back or forward to another
track, press m or n.
Pressing n skips to the start of the next
track. Pressing m once skips to the start of
the current track. Pressing again will skip to
the previous track.
Notes
! When the multi-CD player performs the pre-
paratory operations, Ready is displayed.
! If the multi-CD player does not operate prop-
erly, an error message such as ERROR-11
may be displayed. Refer to the multi-CD player
owners manual.
! If there are no discs in the multi-CD player ma-
gazine, NO DISC is displayed.
50-disc multi-CD player
Only those functions described in this manual
are supported for 50-disc multi-CD players.
English
1 Press SOURCE to select the multi-CD
player.
Press SOURCE until you see Multi-CD displayed.
2 Select a disc you want to listen to with
the 16 buttons.
For discs located at 1 to 6, press the corresponding number button.
If you want to select a disc located at 7 to 12,
press and hold the corresponding numbers
En
13
Page 14

Section
06
Multi-CD Player
Introduction of advanced
multi-CD player operation
1
1 Function display
Shows the function status.
Important
You can use the following functions only when
the remote control is set to DEQ mode.
% Press o to display the function
names.
Press o repeatedly to switch between the
following functions:
Repeat (repeat play)Disc title listRandom
(random play)Scan (scan play)ITS Play
(ITS play)Pause (pause)Comp (compression and DBE)
# To return to the playback display, press BAND.
2 Press m or n to select the repeat
range.
Press m or n until the desired repeat
range appears in the display.
! MCD Repeat all discs in the multi-CD
player
! TRK Repeat just the current track
! DISC Repeat the current disc
Notes
! If you select other discs during repeat play,
the repeat play range changes to MCD.
! If you perform track search or fast forward/re-
verse during TRK, the repeat play range
changes to DISC.
Playing tracks in a random
order
Random play lets you play back tracks in a
random order within the repeat range, MCD
and DISC.
1 Select the repeat range.
Refer to Repeating play on this page.
Note
If you do not operate the function within about 30
seconds, the display is automatically returned to
the playback display.
Repeating play
There are three repeat play ranges for the
multi-CD player: MCD (multi-CD player repeat), TRK (one-track repeat) and DISC (disc
repeat).
1 Press o to select Repeat.
Press o until Repeat appears in the display.
14
En
2 Press o to select Random.
Press o until Random appears in the display.
3 Press r to turn random play on.
Random :ON appears in the display. Tracks
will play in a random order within the previously selected MCD or DISC ranges.
4 Press q to turn random play off.
Random :OFF appears in the display. Tracks
will continue to play in order.
Page 15
Multi-CD Player
Section
06
Note
If you turn random play on during DISC and then
return to the playback display, D.RANDOM appears in the display.
Scanning CDs and tracks
While you are using DISC, the beginning of
each track on the selected disc plays for about
10 seconds. When you are using MCD, the beginning of the first track of each disc is played
for about 10 seconds.
1 Select the repeat range.
Refer to Repeating play on the previous page.
2 Press o to select Scan.
Press o until Scan appears in the display.
3 Press r to turn scan play on.
Scan :ON appears in the display. The first 10
seconds of each track of the current disc (or
the first track of each disc) is played.
4 When you find the desired track (or
disc) press q to turn scan play off.
Scan :OFF appears in the display. The track (or
disc) will continue to play.
# If the display has automatically returned to
the playback display, select Scan again by pressing o.
Notes
! After track or disc scanning is finished, nor-
mal playback of the tracks will begin again.
! If you turn scan play on during DISC and then
return to the playback display, T.SCAN ap-
pears in the display.
Pausing CD playback
Pause lets you temporarily stop disc playback.
1 Press o to select Pause.
Press o until Pause appears in the display.
2 Press r to turn pause on.
Pause :ON appears in the display. Play of the
current track pauses.
3 Press q to turn pause off.
Pause :OFF appears in the display. Play will re-
sume at the same point that you turned pause
on.
Using ITS playlists
ITS (instant track selection) lets you make a
playlist of favorite tracks from those in the
multi-CD player magazine. After you have
added your favorite tracks to the playlist you
can turn on ITS play and play just those selections.
Creating a playlist with ITS
programming
You can use ITS to enter and playback up to 99
tracks per disc, up to 100 discs (with the disc
title). (With multi-CD players sold before the
CDX-P1250 and CDX-P650, up to 24 tracks can
be stored in the playlist.)
1 Play a CD that you want to program.
Press r or q to select a CD.
2 Press o and hold until TITLE appears
in the display, then press o to select ITS.
After TITLE is displayed, press o repeatedly,
the following functions appear in the display:
TITLE (disc title input)ITS (ITS programming)
English
En
15
Page 16

Section
06
Multi-CD Player
3 Select a desired track by pressing m
or n.
4 Press r to store the currently playing
track in the playlist.
ITS Input is displayed briefly and the currently
playing selection is added to your playlist. The
display then shows ITS again.
5 Press BAND to return to the playback
display.
Note
After data for 100 discs has been stored in memory, data for a new disc will overwrite the oldest
one.
Playback from your ITS playlist
ITS play lets you listen to the tracks that you
have entered into your ITS playlist. When you
turn on ITS play, tracks from your ITS playlist
in the multi-CD player will begin to play.
1 Select the repeat range.
Refer to Repeating play on page 14.
2 Press o to select ITS Play.
Press o until ITS Play appears in the display.
3 Press r to turn ITS play on.
ITS Play :ON appears in the display. Playback
begins of those tracks from your playlist within
the previously selected MCD or DISC ranges.
# If no tracks in the current range are programmed for ITS play then ITS Empty is displayed.
4 Press q to turn ITS play off.
ITS Play :OFF appears in the display. Playback
will continue in normal order from the currently playing track and CD.
Erasing a track from your ITS
playlist
To delete a track from your ITS playlist, make
sure ITS play is on.
If ITS play is already on, skip to step 2.
1 Play the CD that contains the track you
want to delete from your ITS playlist and
turn ITS play on.
Refer to Playback from your ITS playlist on this
page.
2 Press o and hold until TITLE appears
in the display, then press o to select ITS.
After TITLE is displayed, press o until ITS
appears in the display.
3 Select a desired track by pressing m
or n.
4 Press q to erase the track from your
ITS playlist.
The currently playing selection is erased from
your ITS playlist and playback of the next track
from your ITS playlist begins.
# If there are no tracks from your playlist in the
current range, ITS Empty is displayed and normal play resumes.
5 Press BAND to return to the playback
display.
Erasing a CD from your ITS playlist
To delete all tracks of a CD from your ITS playlist, make sure ITS play is off.
1 Play the CD that you want to delete.
Press r or q to select a CD.
2 Press o and hold until TITLE appears
in the display, then press o to select ITS.
After TITLE is displayed, press o until ITS
appears in the display.
16
En
Page 17
Multi-CD Player
Section
06
3 Press q to erase all tracks on the currently playing CD from your ITS playlist.
All tracks on the currently playing CD are
erased from your playlist and ITS Clear is displayed.
4 Press BAND to return to the playback
display.
Using disc title functions
You can input CD titles and display the title.
Then you can easily search for and select a desired disc for play.
Entering disc titles
Disc title input lets you input CD titles up to 10
letters long and up to 100 disc titles (with ITS
playlist) into the multi-CD player.
1 Play the CD with the title you want to
enter.
Press r or q to select a CD.
2 Input the title.
To input the titles, refer to Title input on page
32.
Notes
! Titles remain in memory, even after the disc
has been removed from the magazine, and
are recalled when the disc is reinserted.
! After data for 100 discs has been stored in
memory, data for a new disc will overwrite the
oldest one.
! When playing a CD TEXT disc on a CD TEXT
compatible multi-CD player, you cannot
switch to TITLE. The disc title will have already
been recorded on a CD TEXT disc.
Displaying disc titles
You can display the title of any disc that has
had a disc title entered.
% Press DISPLAY.
Press DISPLAY repeatedly to switch between
the following settings:
Play timeDisc Title (disc title)
When you select Disc Title, the title of the currently playing disc is shown in the display.
# If no title has been entered for the currently
playing disc, No Title is displayed.
Selecting discs from the disc
title list
Disc title list lets you see the list of disc titles
that have been entered into the multi-CD
player and lets you select one for playback.
1 Press o to select T.LIST.
Press o until T.LIST appears in the display.
2 Press m or n to scroll through the
list of titles that have been entered.
# If no title has been entered for a disc, title is
not displayed.
3 Press r to play your favorite CD title.
That selection will begin to play.
Using CD TEXT functions
You can use these functions only with a CD
TEXT compatible multi-CD player.
Some discs have certain information encoded
on the disc during manufacture. These discs
may contain such information as the CD title,
track title, artists name and playback time
and are called CD TEXT discs. Only these specially encoded CD TEXT discs support the
functions listed below.
English
En
17
Page 18
Section
06
Multi-CD Player
Displaying titles on CD TEXT discs
% Press DISPLAY.
Press DISPLAY repeatedly to switch between
the following settings:
Play timeDisc Title (disc title)
DiscArtist Name (disc artist name)
Track Title (track title)TrackArtist Name
(track artist name)
# If specific information has not been recorded
on a CD TEXT disc, NO XXXX will be displayed
(e.g., NO Disc Title).
Scrolling titles in the display
This unit can display the first 16 letters only of
Disc Title, DiscArtist Name, Track Title and
TrackArtist Name. When the recorded infor-
mation is longer than 16 letters, you can scroll
the text to the left so that the rest of the title
can be seen.
% Press DISPLAY and hold until the title
begins to scroll to the left.
The rest of the title will appear in the display.
1 Press o to select Comp.
Press o until Comp appears in the display.
# If the multi-CD player does not support
COMP/DBE, No Comp is displayed when you attempt to select it.
2 Press r or q to select your favorite
setting.
Press r or q repeatedly to switch between
the following settings:
Comp OFFComp 1Comp 2Comp OFF
DBE 1DBE 2
Using compression and
bass emphasis
You can use these functions only with a multiCD player that supports them.
Using COMP (compression) and DBE (dynamic bass emphasis) functions let you adjust
the sound playback quality of the multi-CD
player. Each of the functions have a two-step
adjustment. The COMP function balances the
output of louder and softer sounds at higher
volumes. DBE boosts bass levels to give playback a fuller sound. Listen to each of the effects as you select through them and use the
one that best enhances the playback of the
track or CD that you are listening to.
18
En
Page 19
Digital Signal Processor
Section
07
Introduction of DSP
adjustments
Important
! You can use the following functions only when
the remote control is set to DEQ mode.
! Following functions are effective only when
you connected a Pioneer multi-channel processor (DEQ-P7050) to this unit.
By carrying out the following settings/adjustments in order, you can create a finely-tuned
sound field effortlessly.
1 Setting the speaker setting
2 Using the position selector
3 Adjusting the time alignment
4 Adjusting the speaker output levels using a
test tone
5 Selecting a cut-off frequency
6 Adjusting the speaker output levels
7 Adjusting 3-band parametric equalizer
Operating the DSP menu
# When playing other than the DVD disc on a
Pioneer DVD player connected with IP-BUS
cable, you cannot switch to DRC or D.MONO.
# To return to the display of each source, press
BAND.
Note
If you do not operate the DSP function within
about 30 seconds, the display is automatically returned to the source display.
Operating the DSP details menu
123
456
1 Front left speaker
2 Center speaker
3 Front right speaker
English
1
1 DSP display
Shows the DSP status.
% Press p to display the DSP function
names.
Press p repeatedly to switch between the
following DSP functions:
Posi (position selector)Fad (balance adjustment)SLA (source level adjustment)DRC
(dynamic range control)D.MONO (dual
monaural)DIRECT (direct)Dolby PL
(Dolby Pro Logic)
4 Rear left speaker
5 Subwoofer
6 Rear right speaker
% Press p and hold until SP Set appears
in the display, then press p to display the
DSP function names.
After SP Set is displayed, press p repeatedly, the following DSP functions appear in
the display:
En
19
Page 20

Section
07
Digital Signal Processor
SP Set (speaker setting)CutOff (cut-off frequency)SP Lev (speaker output level)
T Tone (test tone)Time A (time alignment)PEQ (3-band parametric equalizer)
# When neither F/L nor F/R is selected in Posi,
you cannot switch to Time A.
# When neither CUSTOM1 nor CUSTOM2 is se-
lected as an equalizer curve, you cannot switch
to PEQ.
# To return to the display of each source, press
BAND.
Using the sound field control
The SFC function creates the sensation of a
live performance.
! The acoustics of different performance en-
vironments are not the same and depend
on the extent and contour of space through
which sound waves move and on how
sounds bounce off the stage, walls, floors
and ceilings. At a live performance you
hear music in three stages: direct sound,
early reflections, and late reflections, or reverberations. Those factors are programed
into the SFC circuitry to recreate the acoustics of various performance settings.
% Press SFC to select the desired SFC
mode.
Press SFC repeatedly to switch between the
following mode:
Musical (musical)Drama (drama)Action
(action)Jazz (jazz)Hall (hall)Club (club)
OFF (off)
other hand, when selecting SFC effects that are
intended for use with 2-channel audio (i.e., Jazz,
Hall or Club), we recommend turning Dolby Pro
Logic off.
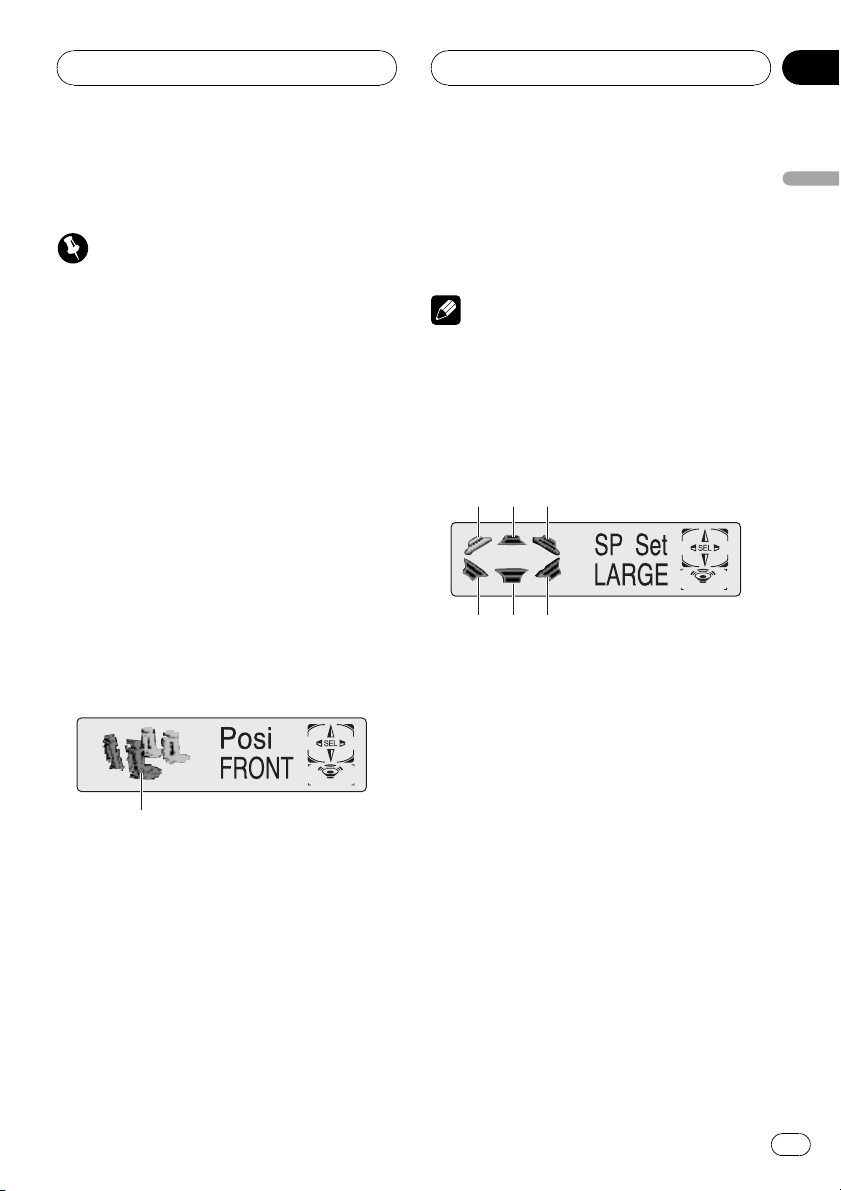
Using the position selector
One way to assure a more natural sound is to
accurately position the stereo image, putting
you right in the center of the sound field. The
position selector function lets you automatically adjust the speaker output levels and inserts a delay time to match the number and
position of occupied seats. When used in conjunction with the SFC, the feature will make
the sound image more natural and offer a panoramic sound that envelops you.
1 Press p to select Posi.
Press p until Posi appears in the display.
2 Press m/n/r/q to select a listening position.
Press one of these, m/n/r/q, to select
a listening position as listed in the table.
Button Display Position
m F/L Front seat left
n F/R Front seat right
r FRONT Front seats
q ALL All seats
# To cancel the selected listening position,
press the same button again.
Note
If the source is a 2-channel LPCM audio or a 2channel Dolby Digital audio and you select SFC
effects that are most applicable for 5.1-channel
audio (i.e., Musical, Drama or Action), we re-
commend turning Dolby Pro Logic on. On the
20
En
Note
When you make adjustments for listening position, the speakers are automatically set for appropriate output levels. You can tailor them if you
want as discussed under the heading of Adjust-
ing the speaker output levels using a test tone or
Adjusting the speaker output levels.
Page 21
Digital Signal Processor
Section
07
Using balance adjustment
You can select a fader/balance setting that
provides an ideal listening environment in all
occupied seats.
1 Press p to select Fad.
Press p until Fad appears in the display.
# If the balance setting has been previously adjusted, Bal will be displayed.
2 Press r or q to adjust front/rear
speaker balance.
Each press of r or q moves the front/rear
speaker balance towards the front or the rear.
Fad :F25 Fad :R25 is displayed as the front/
rear speaker balance moves from front to rear.
# Fad : 0 is the proper setting when only two
speakers are used.
3 Press m or n to adjust left/right
speaker balance.
When you press m or n, Bal : 0 is displayed. Each press of m or n moves the
left/right speaker balance towards the left or
the right.
Bal :L25 Bal :R25 is displayed as the left/
right speaker balance moves from left to
right.
Adjusting source levels
SLA (source level adjustment) lets you adjust
the volume level of each source to prevent radical changes in volume when switching between sources.
SLA +4 SLA 4 is displayed as the source volume is increased or decreased.
Notes
! Video CD and CD are set to the same source
level adjustment volume automatically.
! Analog4, Analog5 and Analog6 are set to
the same source level adjustment volume
automatically.
Using the dynamic range
control
The dynamic range refers to the difference between the largest and softest sounds. The dynamic range control compresses this
difference so that you can clearly hear sounds
even at low volume levels.
! The dynamic range control is effective only
on Dolby Digital sounds.
1 Press p to select DRC.
Press p until DRC appears in the display.
# When playing other than the DVD disc, you
cannot switch this mode.
2 Press r to turn the dynamic range
control on.
DRC ON appears in the display. Dynamic
range control is now on.
# To turn dynamic range control off, press
q.
English
1 Press p to select SLA.
Press p until SLA appears in the display.
2 Press r or q to adjust the source volume.
Each press of r or q increases or decreases the source volume.
En
21
Page 22
Section
07
Digital Signal Processor
Using the dual mono mode
When playing a disc recorded on a dual mono
mode, you can select the channel to output.
! This function is effective only on dual mono
mode sound.
1 Press p to select D.MONO.
Press p until D.MONO appears in the display.
# When playing other than the DVD disc, you
cannot switch this mode.
2 Press m or n to select the desired
output setting.
Each press of m or n selects output setting in the following order:
L&R (left and right channels)L ch (left channel)Rch(right channel)
Using the direct control
You can override audio settings to check for effectiveness of your audio settings.
1 Press p to select DIRECT.
Press p until DIRECT appears in the display.
2 Press r to turn the direct control on.
DIRECT ON appears in the display. Direct con-
trol is now on.
# To turn direct control off, press q.
Notes
! All audio functions are locked out during
DIRECT ON except VOLUME.
! If the source is a 2-channel LPCM audio or a
2-channel Dolby Digital audio and you select
DIRECT ON, audio is heared only over front
left/right speakers.
Using the Dolby Pro Logic
Dolby Pro Logic gives enhanced spatial and directional effects, creating theater-like sense of
presence and ambience.
! If the source is a 2-channel LPCM audio or
a 2-channel Dolby Digital audio and you select SFC effects that are most applicable
for 5.1-channel audio (i.e., Musical, Drama
or Action), we recommend turning Dolby
Pro Logic on. On the other hand, when selecting SFC effects that are intended for
use with 2-channel audio (i.e., Jazz, Hall or
Club), we recommend turning Dolby Pro
Logic off.
1 Press p to select Dolby PL.
Press p until Dolby PL appears in the display.
2 Press r to turn the Dolby Pro Logic
on.
Dolby PL ON appears in the display. Dolby
Pro Logic is now on.
# To turn Dolby Pro Logic off, press q.
Note
When playing a 2-channel mono source with Pro
Logic turned on, there may be occasions when
the following will occur:
! No audio is output if the center speaker set-
ting is SMALL or LARGE and no center speaker is installed.
! Audio is heard only over the center speaker if
installed and the center speaker setting is
SMALL or LARGE.
Setting the speaker setting
You need to make with/without (or yes/no) and
size (bass reproducing capacity) selection/adjustments depending on the installed speakers. The size needs to be set to LARGE (large)
22
En
Page 23
Digital Signal Processor
Section
07
if the speaker is capable of reproducing
sounds of about 100 Hz or below. Otherwise
select SMALL (small).
! Low frequency range is not output if the
subwoofer is set to OFF and the front and
rear speakers set to SMALL or OFF.
! It is imperative that non-installed speakers
be set to OFF.
! Set the front or rear speaker to LARGE if
the speaker is capable of reproducing bass
content, or if no subwoofer is installed.
1 Press p and hold until SP Set appears
in the display.
2 Press m or n to select the speaker
to be adjusted.
Each press of m or n selects the speaker
in the following order:
Front speakersCenter speakerRear speakersSubwooferS.W (subwoofer setting)
# You can switch to S.W only when the subwoo-
fer has been set to ON.
3 Press r or q to select the correct size
for the selected speaker.
Each press of r or q selects the size in the
following order:
LARGE (large)SMALL (small)OFF (off)
# You cannot select OFF, when FRONT (front
speakers) have been selected.
# You can select ON or OFF, when SUB.W (sub-
woofer) has been selected.
# You can switch Rev. (reverse phase) or
Normal (normal phase), when S.W (subwoofer
setting) has been selected.
4 Press BAND to return to the playback
display.
Correcting the subwoofers phase
If trying to boost the bass output of the subwoofer doesnt do much or rather makes you
feel that the bass gets more murky, this may
indicate that the subwoofers output and bass
content you hear over other speakers cancel
each other out. To remove this problem, try
changing the phase setting for the subwoofer.
1 Press p and hold until SP Set appears
in the display.
2 Press m or n to select the subwoofer.
Each press of m or n selects the speaker
in the following order:
Front speakersCenter speakerRear speakersSubwooferS.W (subwoofer setting)
3 Press r to turn the subwoofer output
on.
4 Press n to select S.W (subwoofer setting).
5 Press q or r to select the subwoofer
output phase.
Press r to select Normal (normal phase).
Press q to select Rev. (reverse phase).
6 Press BAND to return to the playback
display.
Note
When playing a 2-channel mono source with Pro
Logic turned on, there may be occasions when
the following will occur:
! No audio is output if the center speaker set-
ting is SMALL or LARGE and no center speaker is installed.
! Audio is heard only over the center speaker if
installed and the center speaker setting is
SMALL or LARGE.
English
En
23
Page 24
Section
07
Digital Signal Processor
Selecting a cut-off frequency
You can select a frequency, under which
sounds are reproduced through the subwoofer. If the installed speakers include one whose
size has been set to SMALL, you can select a
frequency, under which sounds are reproduced through a LARGE speaker or subwoofer.
1 Press p and hold until SP Set appears
in the display, then press p to select
CutOff.
After SP Set is displayed, press p until
CutOff appears in the display.
2 Press m or n to select cut-off frequency.
Each press of m or n selects cut-off frequencies in the following order:
6380100125160200 (Hz)
3 Press BAND to return to the playback
display.
Note
Selecting a cut-off frequency is to set a cut-off frequency of the subwoofers L.P.F. (low-pass filter)
and that of the SMALL speaker H.P.F. (high-pass
filter). The cut-off frequency setting has no effect
if the subwoofer is set to OFF and other speakers
are set to LARGE or OFF.
1 Press p and hold until SP Set appears
in the display, then press p to select
SP Lev.
After SP Set is displayed, press p until
SP Lev appears in the display.
2 Press m or n to select the speaker
to be adjusted.
Each press of m or n selects the speaker
in the following order:
Front speaker leftCenter speakerFront
speaker rightRear speaker rightRear
speaker leftSubwoofer
# You cannot select speakers whose size is set
OFF.
3 Press r or q to adjust the speaker
output level.
Each press of r or q increases or decreases the speaker output level. +10 10 is
displayed as the level is increased or decreased.
4 Press BAND to return to the playback
display.
Note
To adjust the speaker output levels at this mode is
the same as making the speaker output levels at
T Tone. Both provide the same results.
Adjusting the speaker
output levels
You can readjust the speaker output levels
using a test tone while listening to music.
24
En
Adjusting the speaker output
levels using a test tone
A convenient test tone allows you to easily get
the overall balance right among the speakers.
1 Press p and hold until SP Set appears
in the display, then press p to select
T Tone.
After SP Set is displayed, press p until
T Tone appears in the display.
Page 25
Digital Signal Processor
Section
07
2 Press n to start the test tone output.
The test tone is output. It rotates from speaker
to speaker in the following sequence at intervals of about two seconds. The current settings for the speaker over which you hear the
test tone are shown in the display.
Front speaker leftCenter speakerFront
speaker rightRear speaker rightRear
speaker leftSubwoofer
# Check each speaker output level. If no adjustments are needed, perform step 4 to stop the test
tone.
# The settings do not appear for speakers
whose size is set OFF.
3 Press r or q to adjust the speaker
output level.
Each press of r or q increases or decreases the speaker output level. +10 10 is
displayed as the level is increased or decreased.
# The test tone rotates to the next speaker after
about two seconds from the last operation.
4 Press m to stop the test tone output.
5 Press BAND to return to the playback
display.
Notes
! If needed, select speakers and adjust their ab-
solute output levels. (Refer to Adjusting the
speaker output levels on the previous page.)
! To adjust the speaker output levels at this
mode is the same as making the speaker output levels at SP Lev. Both provide the same results.
Adjusting the time alignment
By adjusting the distance between each
speaker and a selected listening position, you
can insert delay times into the speaker output
to obtain a correct sound image and overall
level balance. Although this is automatically
achieved when you set the listening position,
the time alignment feature provides a fine adjustment.
1 Press p and hold until SP Set appears
in the display, then press p to select
Time A.
After SP Set is displayed, press p until
Time A appears in the display.
# You cannot select Time A when neither F/L
nor F/R is selected in Posi.
2 Press m or n to select the speaker
to be adjusted.
Each press of m or n selects the speaker
in the following order:
Front speaker leftCenter speakerFront
speaker rightRear speaker rightRear
speaker leftSubwoofer
# You cannot select speakers whose size is set
OFF.
3 Press r or q to adjust the distance
between the selected speaker and the listening position.
Each press of r or q increases or decreases the distance. 500.0 (cm) 0.0 (cm) is
displayed as the distance is increased or decreased.
4 Press BAND to return to the playback
display.
Using the equalizer
The equalizer lets you adjust the equalization
to match car interior acoustic characteristics
as desired.
English
En
25
Page 26
Section
07
Digital Signal Processor
Recalling equalizer curves
There are seven stored equalizer curves which
you can easily recall at any time. Here is a list
of the equalizer curves:
Display Equalizer curve
SUPER BASS Super bass
POWERFUL Powerful
NATURAL Natural
VOCAL Vocal
FLAT Flat
CUSTOM1 Custom 1
CUSTOM2 Custom 2
! CUSTOM1 and CUSTOM2 are adjusted
equalizer curves.
! When FLAT is selected no supplement or
correction is made to the sound. This is
useful to check the effect of the equalizer
curves by switching alternatively between
FLAT and a set equalizer curve.
% Press EQ to select the equalizer.
Press EQ repeatedly to switch between the following equalizers:
SUPER BASSPOWERFULNATURAL
VOCALFLATCUSTOM1CUSTOM2
Adjusting 3-band parametric
equalizer
For CUSTOM1 and CUSTOM2 equalizer
curves, you can adjust the front, rear and center equalizer curves separately by selecting a
center frequency, an equalizer level and a Q
factor for each band.
! A separate CUSTOM1 curve can be cre-
ated for each source.
! A CUSTOM2 curve can be created com-
mon to all sources.
! The center speaker largely determines the
sound image and getting the balance right
isnt easy. We recommend reproducing a 2ch. audio (a CD for example) and getting
the balance right among the speakers except for the center, and then reproducing a
5.1-ch. audio (Dolby Digital or DTS) and adjusting the center speaker output to the
balance you have already got among the
other speakers.
1 Press p and hold until SP Set appears
in the display, then press p to select PEQ.
After SP Set is displayed, press p until PEQ
appears in the display.
# You cannot select PEQ when neither
CUSTOM1 nor CUSTOM2 equalizer curve is se-
lected.
2 Press m or n to select the desired
item.
Each press of m or n selects the item in
the following order:
FRONT (speakers)Low (bands)Low (center frequency)L (equalizer level)Q.WIDE
(Q factor)
3 Press r or q to select the speaker to
be adjusted.
Each press of r or q selects the speaker in
the following order:
FRONT (front speakers)CENTER (center
speaker)REAR (rear speakers)
# You cannot select speakers whose size is set
OFF.
4 Press n and then press r or q to
select the equalizer band to be adjusted.
Each press of r or q selects equalizer
bands in the following order:
Low (low)Mid (mid)High (high)
5 Press n and then press r or q to
select the center frequency of selected
band.
Each press of r or q selects the frequency
in the following order:
26
En
Page 27
Digital Signal Processor
Section
07
100125160200250315400
5006308001k1.25k1.6k2k
2.5k3.15k4k5k6.3k8k (Hz)
6 Press n and then press r or q to
adjust the equalizer level.
Each press of r or q increases or decreases the equalizer level. +6 6 is displayed as the level is increased or decreased.
7 Press n and then press r or q to
select the desired Q factor.
Each press r or q switches between the
following Q factor:
Q.WIDE (wide)Q.NAR (narrow)
# You can adjust parameters for each band of
the other speakers in the same way.
8 Press BAND to return to the playback
display.
Note
You can select a center frequency from among 20
frequencies for each band. You can change the
center frequency in 1/3-octave steps, but you cannot select frequencies that have intervals shorter
than 1 octave among the center frequencies of
the three bands.
English
En
27
Page 28

Section
08
Initial Settings
Adjusting initial settings
1
Initial settings lets you perform initial set up of
different settings for this unit.
Important
You can use the following functions only when
the remote control is set to DEQ mode.
1 Function display
Shows the function status.
1 Press SOURCE and hold until the unit
turns off.
2 Press o and hold until the clock appears in the display.
3 Press o to select one of the initial settings.
Press o repeatedly to switch between the
following settings:
ClockDimmer (dimmer)Brightness
(brightness)Digital ATT (digital attenuation)
Telephone (telephone muting/attenuation)
AUX (auxiliary setting)Digital1 (digital
source 1)Digital2 (digital source 2)
Analog1 (analog source 1)Analog2 (ana-
log source 2)Analog3 (analog source 3)
Analog4 (analog source 4)Analog5 (ana-
log source 5)Analog6 (analog source 6)
# When a Pioneer DVD player is connected to
this unit with IP-BUS cable, you cannot switch to
Digital1 and Digital2.
# To cancel initial settings, press BAND.
# You can also cancel initial settings by holding
down o until the unit turns off.
Setting the clock
Use these instructions to set the clock.
1 Press o to select clock.
Press o repeatedly until clock appears in
the display.
2 Press m or n to select the segment
of the clock display you wish to set.
Pressing m or n will select one segment
of the clock display:
HourMinute
As you select segments of the clock display
the segment selected will blink.
3 Press r or q to set the clock.
Pressing r will increase the selected hour or
minute. Pressing q will decrease the selected hour or minute.
Switching the dimmer setting
To prevent the display from being too bright at
night, the display is automatically dimmed
when the cars headlights are turned on. You
can switch dimmer on or off.
1 Press o to select Dimmer.
Press o repeatedly until Dimmer appears in
the display.
2 Press r to turn dimmer on.
Dimmer :ON appears in the display.
# To turn dimmer off, press q.
28
En
Page 29
Initial Settings
Section
08
Adjusting the brightness
You can adjust the display brightness. Initially
this mode is set to 12.
1 Press o to select Brightness.
Press o repeatedly until Brightness appears in the display.
2 Press m or n to adjust the brightness level.
Each press of m or n increases or decreases the brightness level. 0 15 is displayed as the level is increased or
decreased.
Correcting distorted sound
You can minimize distortion likely caused by
the equalizer curve settings.
! Setting an equalizer level high can cause
distortion. If high sound is crippled or distorted, try switching to Low. Normally,
leave the setting at High to ensure quality
sound.
1 Press o to select Digital ATT.
Press o repeatedly until Digital ATT appears in the display.
2 Press m or n to select Low or High.
Pressing m or n will switch between High
(high) and Low (low) and that status will be
displayed.
1 Press o to select Telephone.
Press o repeatedly until Telephone appears
in the display.
2 Press m or n to switch the telephone muting/attenuation.
Press m or n until the desired setting appears in the display.
! Telephone :MUTE Muting
! Telephone :ATT2 Attenuation
(Telephone :ATT2 has a stronger effect
than Telephone :ATT1)
! Telephone :ATT1 Attenuation
Notes
! The sound is turned off, MUTE or AT T is dis-
played and no audio adjustment is possible.
! Operation returns to normal when the phone
connection is ended.
Switching the auxiliary setting
It is possible to use auxiliary equipment with
this unit. Activate the auxiliary setting when
using auxiliary equipment connected to this
unit.
1 Press o to select AUX.
Press o repeatedly until AUX appears in
the display.
2 Press r to turn auxiliary setting on.
AUX :ON appears in the display.
# To turn auxiliary setting off, press q.
English
Switching the telephone
muting/attenuation
Sound from this system is muted or attenuated automatically when a call is made or received using a cellular telephone connected to
this unit.
En
29
Page 30
Section
08
Initial Settings
Switching the digital
source setting
It is possible to connect DVD player to this
unit. Activate the digital source when using
DVD player connected to this unit.
Initially, both Digital1 and Digital2 are set to
off.
! When a Pioneer DVD player is connected
to this unit with IP-BUS cable, you cannot
switch to the digital source setting.
1 Press o to select Digital.
Press o until Digital (e.g., Digital1) appears in the display.
2 Press r to turn digital setting on.
# To turn digital setting off, press q.
Switching the analog input
setting
It is possible to connect various equipment to
this units speaker input or RCA input. Activate the analog setting when using such
equipment connected to this unit, and select
the input according to the connecting method.
1 Press o to select Analog.
Press o until Analog (e.g., Analog1) appears in the display.
2 Press r to turn analog setting on.
Connection method (e.g., SP) appears in the
display.
3 Press m or n to select a desired connection method.
Pressing m or n will switch between SP
and RCA and that status will be displayed.
# To turn analog input setting off, press q.
30
En
Page 31

Other Functions
Section
09
Turning the clock display
on or off
You can turn the clock display on or off.
% Press 0 to turn the clock display on or
off.
Each press of 0 turns the clock display on or
off.
# The clock display disappears temporarily
when you perform other operations, but the clock
display appears again after 25 seconds.
Note
Even when the sources are off, the clock display
appears on the display. Pressing 0 turns the clock
display on or off.
Using different
entertainment displays
You can enjoy entertainment displays while listening to each sound source.
! These are different ways of displaying the
spectrum and do not affect sound output.
% Press ENTERTAINMENT.
Each time you press ENTERTAINMENT the
display changes in the following order:
Source icon displayBack ground visual 1
Back ground visual 2Back ground visual 3
Back ground visual 4Movie screen 1
Movie screen 2Entertainment clockdisplay off
Setting the digital source title
The title displayed for the digital sources (e.g.,
Digital1) can be changed.
1 After you have selected digital sources
as the source, press o and hold until
TITLE appears in the display.
2 Input the title.
To input the titles, refer to Title input on the
next page.
Setting the analog source title
The title displayed for the analog sources (e.g.,
Analog1) can be changed.
1 After you have selected analog sources
as the source, press o and hold until
TITLE appears in the display.
2 Input the title.
To input the titles, refer to Title input on the
next page.
Using the AUX source
An IP-BUS-RCA Interconnector such as the
CD-RB20/CD-RB10 (sold separately) lets you
connect this unit to auxiliary equipment featuring RCA output. For more details, refer to
the IP-BUS-RCA Interconnector owners manual.
Selecting AUX as the source
% Press SOURCE to select AUX as the
source.
Press SOURCE until AUX appears in the display.
# If the auxiliary setting is not turned on, AUX
cannot be selected. For more details, see Switch-
ing the auxiliary setting on page 29.
English
En
31
Page 32

Section
09
Other Functions
Setting the AUX title
The title displayed for the AUX source can be
changed.
1 After you have selected AUX as the
source, press o and hold until TITLE appears in the display.
2 Input the title.
To input the titles, refer to Title input on this
page.
Setting remote control
code type
When the remote control operation switch is
set to DVD, changing the remote control code
type enables you to operate the Pioneer DVD
player by the supplied remote control. There
are two remote codes, code type DVD A and
code type DVD B. When using this unit with a
multi-DVD player (e.g. XDV-P9), select code
DVD A.
% Set the remote control selection switch
on the left side of the remote control to
the appropriate position with a pen tip or
other pointed instrument .
1 Press o and hold until TITLE appears
in the display.
2 Press 1 numbered button to select the
desired character type.
Press 1 numbered button repeatedly to switch
between the following character type:
Alphabet (upper case), numbers and symbols
Alphabet (lower case)
# You can select to input numbers and symbols
by pressing 2 numbered button.
3 Press r or q to select a letter of the
alphabet.
Each press of r will display a letter of the alphabet in A B C ... X Y Z, numbers and symbols in 1 2 3 ... | } ¯ order. Each press of q will
display a letter in the reverse order, such as Z
Y X ... C B A order.
4 Press n to move the cursor to the
next character position.
When the desired letter is displayed, press
n to move the cursor to the next position
and then select the next letter. Press m to
move backwards in the display.
Title input
You can input titles for discs, digital sources,
analog sources and AUX sources. Refer to the
following procedure and input your desired titles.
Important
You can use this function only when the remote
control is set to DEQ mode.
32
En
5 Move the cursor to the last position by
pressing n after entering the title.
When you press n one more time, the entered title is stored in memory.
6 Press BAND to return to the playback
display.
Page 33

Additional Information
Appendix
Troubleshooting
Common
Symptom Cause Action (See)
Power doesnt turn on.
The unit doesnt operate.
Operation with the remote control isnt possible.
The unit does not operate correctly even when the appropriate
remote control buttons are
pressed.
No sounds are heard.
The volume level will not rise.
Theres no sound.
Volume level is low.
Leads and connectors are incorrectly connected.
The fuse is blown. Rectify the reason for the fuse blowing, then
Noise and other factors are causing
the built-in microprocessor to operate incorrectly.
The remote control operation mode
is incorrect.
The remote control code is incorrect.
Battery power is low. Load new battery. (Page 5)
Cables are not connected correctly. Connect the cables correctly.
The volume level is low. Adjust the volume level.
The attenuator is on. Turn the attenuator off.
Confirm once more that all connections are
correct.
replace the fuse. Be very sure to install the
correct fuse with the same rate.
Turn the unit off and then on.
Switch to the correct remote control mode.
(Page 5)
Make sure the remote control selection
switch setting and code type setting are the
same. (Page 32)
Error messages
When problems occur with disc playback, an error message appears on the display. Refer to the
table below to identify the problem, then take the suggested corrective action. If the error persists,
contact your dealer or your nearest PIONEER Service Center.
English
Error messages
Message Cause Action (See)
ERROR-02 Dirty disc Clean disc.
Scratched disc Replace disc.
TEMP The temperature of this unit is out-
side of the normal operating range
ERROR-10 The disc does not have the same re-
gion number as this unit
NON PLAY This type of disc cannot be played
by this unit
The disc is loaded upside down Check that the disc is loaded correctly.
Wait until the units temperature returns to
within normal operating limits.
Replace the DVD video with one bearing the
correct region number.
Replace the disc with one this unit can play.
En
33
Page 34

Appendix
Additional Information
Message Cause Action (See)
ERROR-05 Electrical or mechanical Turn the ignition ON and OFF, or switch to a
different source, then back to the DVD player.
34
En
Page 35

Additional Information
Appendix
Specifications
General
Power source ............................. 14. 4 V D C (10.8 15.1 V al-
lowable)
Grounding system ................... Negative type
Max. current consumption
..................................................... 0.2 5 A
Display unit:
Dimensions (W × H × D)
........................................... 119 × 37 × 20 mm
Weight ................................ 0. 1 kg
Hideaway unit:
Dimensions (W × H × D)
........................................... 100 × 28 × 13 6 mm
Weight ................................ 0. 3 kg
Infrared remote control
Wavelength ................................. 940 nm ± 50 n m
Out put ........................................... ty p; 1 2 mw /sr pe r In frared
LED
Note
Specifications and the design are subject to possible modifications without notice due to improvements.
English
En
35
Page 36

Contenido
Gracias por haber comprado este producto Pioneer.
Lea con detenimiento estas instrucciones sobre el funcionamiento del aparato,
para que pueda darle el mejor uso posible. Una vez que las haya leído, consérvelas
en un lugar seguro para consultarlas en el futuro.
Antes de comenzar
Acerca de este manual 38
Acerca de esta unidad 38
Acerca de las fuentes digitales y
analógicas 38
Precauciones 39
Uso y cuidado del mando a distancia 39
Cambio del conmutador de modo de
funcionamiento del mando a
distancia 40
Modo inverso 40
Compatibilidad Dolby Digital/DTS 40
Qué es cada cosa
Display 41
Mando a distancia 41
Funciones básicas
Encendido de la unidad 45
Selección de una fuente 45
Ajuste del volumen 45
Apagado de la unidad 45
Reproductor de DVD
Cambio del menú de funciones 46
Repetición de reproducción 46
Reproducción de las pistas en un orden
aleatorio 46
Exploración de las pistas de un CD 46
Pausa de la reproducción 46
Sintonizador de TV
Uso del sintonizador de TV 47
Almacenamiento y llamada de emisoras 47
Almacenamiento consecutivo de las
emisoras más fuertes 47
Reproductor de CD múltiple
Reproducción de un CD 48
Reproductor de CD múltiple de 50
discos 48
Introducción a las funciones avanzadas del
reproductor de CD múltiple 49
Repetición de reproducción 49
Reproducción de las pistas en un orden
aleatorio 49
Exploración de CD y pistas 50
Pausa de la reproducción de un CD 50
Uso de listas de reproducción ITS 51
Uso de las funciones de títulos de discos 52
Uso de las funciones CD TEXT 53
Uso de la compresión y del enfatizador de
graves 54
Procesador de señal digital
Introducción a los ajustes del DSP 55
Uso del control de campo sonoro 56
Uso del selector de posición 56
Uso del ajuste del balance 57
Ajuste de los niveles de la fuente 57
Uso del control de gama dinámica 58
Uso del modo dual mono 58
Uso del control directo 58
Uso de Dolby Pro Logic 58
Ajustes de los altavoces 59
Selección de una frecuencia de corte 60
Ajuste de los niveles de salida de los
altavoces 61
Ajuste de los niveles de salida de los
altavoces con un tono de prueba 61
Ajuste de la alineación temporal 62
Uso del ecualizador 62
Ajustes iniciales
Configuración de los ajustes iniciales 65
Ajuste del reloj 65
Cambio del ajuste del atenuador de luz 66
Ajuste del brillo 66
36
Es
Page 37

Contenido
Corrección de distorsiones del sonido 66
Cambio del silenciamiento/atenuación de
teléfono 66
Cambio del ajuste de un equipo auxiliar 67
Cambio del ajuste de la fuente digital 67
Cambio del ajuste de la entrada
analógica 67
Otras funciones
Activación y desactivación de la visualización
del reloj 68
Uso de diferentes visualizaciones de
entretenimiento 68
Ajuste del título de las fuentes digitales 68
Ajuste del título de las fuentes
analógicas 68
Uso de la fuente AUX 68
Ajuste del tipo de código del mando a
distancia 69
Ingreso de títulos 69
Español
Información adicional
Solución de problemas 70
Mensajes de error 70
Especificaciones 72
37
Es
Page 38

Sección
01
Antes de comenzar
Acerca de este manual
Esta unidad viene con diversas funciones sofisticadas que garantizan una recepción y un
funcionamiento de calidad superior. Por sus
características de diseño, todas las funciones
se pueden usar con gran facilidad; sin embargo, muchas de ellas necesitan una explicación. Este manual le ayudará a aprovechar
todo el potencial que ofrece este producto y a
disfrutar al máximo del placer de escuchar.
Le recomendamos que se familiarice con las
funciones y su operación leyendo el manual
antes de utilizar esta unidad. Es muy importante que lea y observe las precauciones que
se indican en la página siguiente y en otras
secciones.
Acerca de esta unidad
Esta unidad puede controlar el procesador
multicanal de Pioneer (DEQ-P7050), que se
vende por separado. Además, el mando a distancia provisto puede controlar las funciones
del reproductor de DVD (p. ej., XDV-P9), el reproductor de CD múltiple y el televisor de Pioneer, que se venden por separado, así como la
parte de las funciones de las unidades principales de Pioneer.
Asimismo, esta unidad cuenta con un conector universal para el autoestéreo u otros equipos, lo que le permite conectarlos a esta
unidad y disfrutar del sonido de alta calidad
del procesador DEQ-P7050. Si desea conectarlos, utilice el conector de entrada de altavoces
o el conector de entrada RCA. Puede conectar
seis fuentes a la vez en el conector de entrada
de altavoces y el RCA como fuentes analógicas. Puede cambiar el ajuste de cada fuente
analógica entre la entrada de altavoces y la entrada RCA. (Consulte Cambio del ajuste de la
entrada analógica en la página 67.)
Acerca de las fuentes
digitales y analógicas
Esta unidad viene con dos fuentes digitales y
seis fuentes analógicas.
Al conectar un reproductor de DVD de Pioneer
a esta unidad con el cable IP-BUS, puede utilizarlo como fuente digital.
El reproductor de DVD de Pioneer ocupa automáticamente las fuentes Digital1 y Digital2
cuando se lo conecta a esta unidad. Se asigna
cada fuente digital de acuerdo con el medio
que se esté reproduciendo en el reproductor
de DVD, como por ejemplo, un DVD, un vídeo
CD o un CD.
Los dispositivos que se conectan a esta unidad con el conector de entrada de altavoces o
el RCA se pueden utilizar como fuentes analógicas. Por ejemplo, cuando la unidad principal
de Pioneer con el sintonizador y el reproductor
de cassette se conecta a esta unidad, se
puede usar Analog1 para el sintonizador y
Analog2 para el reproductor de cassette
como fuentes independientes. Además, la función de audio del procesador DEQ-P7050 se
puede usar de manera independiente con
cada fuente analógica, si cada fuente se utiliza correctamente.
Se puede cambiar el título que se visualiza
para las fuentes digitales y analógicas. Esta
función es útil cuando se usan las fuentes
mencionadas. Para ingresar los títulos, consulte Ingreso de títulos en la página 69.
Notas
! Si el equipo conectado a esta unidad como
fuente analógica tiene varias fuentes, asegúrese de cambiar las fuentes para esta unidad
y el equipo conectado. Esta unidad no puede
controlar los equipos conectados como fuentes analógicas.
! Cuando el nivel de volumen del equipo conec-
tado a esta unidad como fuente analógica es
demasiado alto, la emisión del sonido puede
38
Es
Page 39

Antes de comenzar
Sección
01
ser incorrecta. También deben desactivarse
los controles de sonido (p. ej., sonoridad,
ecualización, etc.) para evitar que se emita el
sonido de manera inadecuada.
Precauciones
! Conserve este manual a mano para que
pueda consultar los procedimientos de
operación y las precauciones cuando sea
necesario.
! Mantenga siempre el volumen lo suficien-
temente bajo como para que pueda escuchar los sonidos fuera del automóvil.
! Proteja este producto de la humedad.
! Si se desconecta o se descarga la batería,
la memoria preajustada se borrará y se
debe reprogramarla.
! En caso de que este producto no funcione
correctamente, póngase en contacto con
su concesionario o el servicio técnico oficial de Pioneer más próximo a su
domicilio.
Uso y cuidado del mando a
distancia
Instalación de la batería
Deslice y extraiga la bandeja de la parte posterior del mando a distancia y coloque la batería
con los polos positivo (+) y negativo ()enla
dirección correcta.
! Al utilizar el mando a distancia por primera
vez, extraiga la película que sobresale de la
bandeja.
ADVERTENCIA
Mantenga la batería fuera del alcance de los
niños. En caso de ingestión accidental, consulte
a un médico de inmediato.
PRECAUCIÓN
! Utilice una sola batería de litio CR2025 (3 V).
! Extraiga la batería si no piensa utilizar el
mando a distancia durante un mes o más
tiempo.
! No recargue, desarme ni caliente la batería.
No la arroje al fuego.
! No manipule la batería con herramientas me-
tálicas.
! No guarde la batería con materiales metáli-
cos.
! En el caso de que se produzca una fuga de
fluido de la batería, limpie todo el mando a
distancia e instale una batería nueva.
! Al descartar las baterías usadas, cumpla con
los reglamentos gubernamentales o las normas de la institución pública ambiental pertinente, aplicables en su país/zona.
! Siempre cuide de colocar la batería con los
polos positivo (+) y negativo () en la dirección correcta.
Uso del mando a distancia
Apunte el mando a distancia hacia la carátula
para utilizarlo.
! Es posible que el mando a distancia no
funcione correctamente si lo expone a la
luz solar directa.
Importante
! No guarde el mando a distancia en lugares ex-
puestos a altas temperaturas o a la luz solar
directa.
! No deje caer el mando a distancia al piso, ya
que puede quedar atascado debajo del freno
o del acelerador.
Español
39
Es
Page 40

Sección
01
Antes de comenzar
Cambio del conmutador de
modo de funcionamiento
del mando a distancia
Hay tres modos de funcionamiento del mando
a distancia. Para controlar correctamente
todas las funciones del equipo conectado,
asegúrese de cambiar los ajustes de la siguiente manera:
! Modo DVD Este modo puede controlar el
reproductor de DVD de Pioneer. Este
mando a distancia puede controlar todas
las funciones del reproductor de DVD de
Pioneer. Si bien algunas funciones pueden
ser ligeramente diferentes de las del
mando a distancia del reproductor de DVD,
utilice los botones correspondientes para
controlarlas de manera adecuada.
! Modo DEQ Este modo controla el proce-
sador multicanal de Pioneer (DEQ-P7050).
Este mando a distancia puede controlar
todas las funciones del procesador DEQP7050. También se pueden controlar algunas funciones de las fuentes conectadas.
Si se conecta el reproductor de CD múltiple
o el televisor Pioneer a esta unidad, se pueden controlar sus funciones con el mando
a distancia provisto.
! Modo AUDIO Este modo puede controlar
la unidad principal de Pioneer. Si bien este
mando a distancia no puede controlar
todas las funciones de la unidad principal
de Pioneer, puede controlar la mayoría de
las funciones básicas. Si se conecta la unidad principal de Pioneer a esta unidad, se
puede utilizar el mando a distancia provisto.
Nota
El mando a distancia provisto no puede controlar
los equipos conectados al conector de entrada
de altavoces y al RCA. Para controlarlos, utilice
los botones correspondientes de los equipos.
Modo inverso
Si no se realiza ninguna operación en unos 30
segundos, las indicaciones de la pantalla comienzan a invertirse y siguen haciéndolo cada
10 segundos. Al presionar el botón número 5
cuando se apaga la unidad mientras la llave
de encendido está en ACC u ON, se cancelará
el modo inverso. Al volver a presionar el botón
número 5, se activará el modo inverso.
Compatibilidad Dolby
Digital/DTS
Al utilizar esta unidad con un procesador multicanal de Pioneer, podrá disfrutar de la atmósfera y del placer que ofrece el software para
música y películas en DVD con grabaciones
de 5.1 canales.
! Fabricado bajo licencia de Dolby Laborato-
ries. Dolby y el símbolo de la doble D son
marcas comerciales de Dolby Laboratories.
! DTS es una marca registrada de Digital
Theater Systems, Inc.
Nota
Este producto incorpora tecnología de protección
de derechos de autor amparada por las reivindicaciones de métodos de determinadas patentes
de los EE.UU. y otros derechos de propiedad intelectual de Macrovision Corporation y otros titulares. Esta tecnología se debe utilizar con la
autorización de Macrovision Corporation y sólo
está concebida para su uso doméstico y para
otros usos limitados de visualización, salvo que
Macrovision Corporation autorice lo contrario.
Queda prohibido el desmontaje o la ingeniería
inversa.
40
Es
Page 41

Qué es cada cosa
12
e
2
Sección
02
Español
3
5
1
7
9
b
Display
1 Indicador de encendido
Se ilumina cuando se enciende la unidad.
2 Visualización de información
Muestra información de cada fuente conectada y sus ajustes.
f
4
6
8
a
c
d
g
h
i
j
k
l
m
n
o
p
q
r
Mando a distancia
1 Selector del mando a distancia
! Modo DVD Utilice el selector para
cambiar el ajuste del mando a distancia.
Para obtener información, consulte Ajus-
te del tipo de código del mando a
distancia en la página 69.
! Modo DEQ No se utiliza.
! Modo AUDIO No se utiliza.
41
Es
Page 42

Sección
02
Qué es cada cosa
2 Botón VOLUME
Presione este botón para aumentar o disminuir el volumen.
3 Botón TOP MENU
! Modo DVD Presione este botón para
volver al menú superior durante la reproducción de un DVD.
! Modo DEQ Presione este botón para
seleccionar la fuente de vídeo cuando
conecte un televisor de Pioneer a esta
unidad.
! Modo AUDIO Presione este botón para
seleccionar la fuente de vídeo cuando
conecte un televisor de Pioneer a esta
unidad.
4 Botón MENU
Este botón sólo funciona cuando se controla el reproductor de DVD de Pioneer.
Presione este botón para visualizar el menú
de DVD durante la reproducción de un
DVD.
5 Botón RETURN
Este botón sólo funciona cuando se controla el reproductor de DVD de Pioneer.
Presione este botón para volver a la visualización anterior cuando se visualiza
SET-UP MENU.
6 Botón AUDIO
Este botón sólo funciona cuando se controla el reproductor de DVD de Pioneer.
Presione este botón para cambiar el idioma
del audio durante la reproducción de un
DVD.
7 Botón DISP
! Modo DVD Presione este botón para
cambiar la visualización de información
en el display que se vende por separado
mientras se utiliza el reproductor de DVD
como la fuente.
! Modo DEQ Presione este botón para vi-
sualizar información en el display.
! Modo AUDIO Presione este botón para
visualizar información en el display.
8 Botón SUBTITLE
Este botón sólo funciona cuando se controla el reproductor de DVD de Pioneer.
Presione este botón para cambiar el idioma
de los subtítulos durante la reproducción de
un DVD.
9 Botón ANGLE
Este botón sólo funciona cuando se controla el reproductor de DVD de Pioneer.
Presione este botón para cambiar el ángulo
de visión durante la reproducción de un
DVD.
a Botón PLAY/PAUSE (f)
! Modo DVD Presione este botón para
cambiar consecutivamente entre la reproducción y la pausa.
! Modo DEQ No se utiliza.
! Modo AUDIO No se utiliza.
b Botón REVERSE (m)
! Modo DVD Presione este botón para
utilizar el retroceso rápido.
! Modo DEQ Presione este botón para
controlar las funciones.
! Modo AUDIO Presione este botón para
controlar las funciones.
c Botón PREVIOUS (o)
! Modo DVD Presione este botón para
volver a la pista (capítulo) anterior.
! Modo DEQ Presione este botón para
seleccionar las funciones.
! Modo AUDIO Presione este botón para
seleccionar las funciones.
42
Es
Page 43

Qué es cada cosa
Sección
02
d Botones NUMBER
! Modo DVD Presione estos botones
para seleccionar directamente la pista, el
capítulo y el disco deseados.
! Modo DEQ
Botones 16 Presione estos botones
para realizar la búsqueda por número de
disco en el reproductor de CD múltiple
cuando lo conecta a esta unidad.
Botón 7 Presione este botón para seleccionar una fuente al controlar la unidad principal de Pioneer.
Botón 0 Presione este botón para cambiar la visualización de información a la
visualización del reloj.
! Modo AUDIO
Botones 16 No se utilizan.
Botón 7 Presione este botón para seleccionar una fuente al controlar la unidad principal de Pioneer.
Botón 0 Presione este botón para cambiar la visualización de información a la
visualización del reloj.
e Botón ENTERTAINMENT
Presione este botón para cambiar a la visualización de entretenimiento.
f Botón SOURCE
Esta unidad se enciende al seleccionar una
fuente. Presione este botón para visualizar
todas las fuentes disponibles.
g Joystick
Este botón sólo funciona cuando se controla el reproductor de DVD de Pioneer.
! Modo DVD Mueva el joystick para se-
leccionar el ajuste. Haga clic para definir
el ajuste o seleccionar su activación o
desactivación.
! Modo DEQ Mueva el joystick para se-
leccionar el ajuste. Haga clic para definir
el ajuste o seleccionar su activación o
desactivación.
! Modo AUDIO No se utiliza.
h Botón EQ
Presione este botón para seleccionar las diversas curvas de ecualización.
i Botón SFC
Presione este botón para seleccionar un
control de campo sonoro.
j Conmutador de modo de funcionamiento del mando a distancia
Cambia el funcionamiento entre los modos
DVD, DEQ y AUDIO. (Consulte Cambio del
conmutador de modo de funcionamiento del
mando a distancia en la página 40.)
k Botón BAND
! Modo DVD No se utiliza.
! Modo DEQ Presione este botón para
cancelar el modo de control de funciones.
! Modo AUDIO Presione este botón para
cancelar el modo de control de funciones.
l Botón DVD PWR
! Modo DVD Cuando conecta un repro-
ductor de DVD de Pioneer a esta unidad,
presione este botón para encenderlo o
apagarlo de manera independiente.
! Modo DEQ No se utiliza.
! Modo AUDIO No se utiliza.
m Botón STEP (r/q)
! Modo DVD Presione este botón para
hacer avanzar un cuadro por vez durante
la reproducción de un DVD/vídeo CD.
Presiónelo y manténgalo presionado un
segundo para activar la reproducción
lenta.
! Modo DEQ Presione este botón para
controlar las funciones.
! Modo AUDIO Presione este botón para
controlar las funciones.
Español
43
Es
Page 44

Sección
02
Qué es cada cosa
n Botón ATT
Presione este botón para disminuir rápidamente el nivel de volumen alrededor del
90%. Presiónelo una vez más para volver al
nivel de volumen original.
o Botón FORWARD (n)
! Modo DVD Presione este botón para
utilizar el avance rápido.
! Modo DEQ Presione este botón para
controlar las funciones.
! Modo AUDIO Presione este botón para
controlar las funciones.
p Botón STOP (g)
! Modo DVD Presione este botón para
detener la reproducción.
! Modo DEQ No se utiliza.
! Modo AUDIO No se utiliza.
q Botón NEXT (p)
! Modo DVD Presione este botón para
saltar a la siguiente pista (capítulo).
! Modo DEQ Presione este botón para
seleccionar los diversos controles de calidad del sonido.
! Modo AUDIO Presione este botón para
seleccionar los diversos controles de calidad del sonido.
r Botón CLEAR
! Modo DVD Presione este botón para
cancelar el número ingresado mientras
se utilizan los botones NUMBER.
! Modo DEQ No se utiliza.
! Modo AUDIO No se utiliza.
44
Es
Page 45

Funciones básicas
Sección
03
Encendido de la unidad
% Presione SOURCE para encender la unidad.
Cuando se selecciona una fuente, la unidad
se enciende.
Cuando se utiliza el reproductor de
DVD desde los asientos traseros
% Presione DVD PWR para activar la reproducción de DVD.
Notas
! Aunque la fuente seleccionada con esta uni-
dad no sea DVD, si enciende esta unidad con
DVD PWR, podrá ver una película en DVD reproducida por esta unidad en el display trasero.
! Se puede ver un DVD vídeo en el display trase-
ro, al margen de que se active o desactive
esta unidad.
Selección de una fuente
% Presione SOURCE para seleccionar una
fuente.
Presione SOURCE repetidamente para cambiar entre las siguientes fuentes:
Digital1 (fuente digital 1)Digital2 (fuente digital 2)TV (televisor)DVD (reproductor de
DVD/reproductor de DVD múltiple)
Multi-CD (reproductor de CD múltiple)
AUX (AUX)Analog1 (fuente analógica 1)
Analog2 (fuente analógica 2) Analog3
(fuente analógica 3)Analog4 (fuente analógica 4)Analog5 (fuente analógica 5)
Analog6 (fuente analógica 6)
Notas
! No se pueden utilizar simultáneamente las
fuentes digitales (Digital1 y Digital2)yDVD.
Si se conectó el reproductor de DVD de Pioneer con el cable IP-BUS, sólo se podrá utili-
zar la fuente DVD. De lo contrario, se pueden
usar las fuentes digitales (Digital1 y
Digital2).
! Si no hay ninguna fuente conectada, se emiti-
rá un tono corto cuando intente seleccionar
una fuente.
! En los siguientes casos, la fuente sonora no
cambiará:
Cuando el equipo correspondiente a cada
fuente no está conectado a esta unidad.
Cuando no hay un cargador preparado en
el reproductor de CD múltiple.
Cuando no hay un cargador preparado en
el reproductor de DVD múltiple.
Cuando no hay un disco cargado en el re-
productor de DVD.
Cuando AUX (entrada auxiliar) está desac-
tivada (consulte la página 67).
Cuando las fuentes analógicas están de-
sactivadas (consulte la página 67).
Ajuste del volumen
% Utilice VOLUME para ajustar el nivel de
sonido.
Presione este botón para aumentar o disminuir el volumen.
Apagado de la unidad
% Presione SOURCE y mantenga presionado hasta que se apague la unidad.
Cuando se utiliza el reproductor de
DVD desde los asientos traseros
% Presione DVD PWR para desactivar la
reproducción de DVD.
Español
45
Es
Page 46

Sección
04
Reproductor de DVD
Se puede utilizar esta unidad con un reproductor de DVD o uno de DVD múltiple, que se venden por separado.
Para obtener más información, consulte el
manual de instrucciones del reproductor de
DVD o de DVD múltiple. En esta sección se
ofrece información sobre las funciones del reproductor de DVD y esta unidad que son diferentes de las que se describen en el manual
de instrucciones del reproductor de DVD o de
DVD múltiple.
Importante
Se podrán utilizar las siguientes funciones sólo si
el mando a distancia está ajustado en el modo
DEQ.
Cambio del menú de funciones
% Durante la reproducción de un DVD,
presione o para visualizar los nombres
de las funciones.
Presione o repetidamente para cambiar
entre las siguientes funciones:
Repeat (repetición de reproducción)Pause
(pausa)
% Durante la reproducción de un vídeo
CD, presione o para visualizar los nombres de las funciones.
Presione o repetidamente para cambiar
entre las siguientes funciones:
Repeat (repetición de reproducción)Pause
(pausa)
% Durante la reproducción de un CD, presione o para visualizar los nombres de
las funciones.
Presione o repetidamente para cambiar
entre las siguientes funciones:
Repeat (repetición de reproducción)
Random (reproducción aleatoria)
Track Scan (reproducción con exploración)
Pause (pausa)
Repetición de reproducción
% Presione o para seleccionar Repeat.
! Durante la reproducción de un DVD, presio-
ne m o n para seleccionar la gama de
repetición.
! Durante la reproducción de un vídeo CD o
un CD, presione r o q para activar o desactivar la repetición de reproducción.
Reproducción de las pistas
en un orden aleatorio
1 Presione o para seleccionar Random.
2 Presione r para activar la reproducción aleatoria.
# Presione q para desactivar la reproducción
aleatoria.
Exploración de las pistas de
un CD
1 Presione o para seleccionar
Track Scan.
2 Presione r para activar la reproducción con exploración.
# Cuando encuentre la pista deseada, presione
q para desactivar la reproducción con exploración.
# Si el display vuelve automáticamente a la visualización de reproducción, seleccione
Track Scan de nuevo presionando o.
Pausa de la reproducción
1 Presione o para seleccionar Pause.
2 Presione r para activar la pausa.
# Presione q para desactivar la pausa.
46
Es
Page 47

Sintonizador de TV
Sección
05
Se puede utilizar esta unidad con un sintonizador de TV, que se vende por separado.
Para obtener más información, consulte el
manual de instrucciones del sintonizador de
TV. En esta sección se ofrece información
sobre las funciones del TV y esta unidad que
son diferentes de las que se describen en el
manual de instrucciones del sintonizador de
TV.
Importante
Se podrán utilizar las siguientes funciones sólo si
el mando a distancia está ajustado en el modo
DEQ.
Uso del sintonizador de TV
1 Presione SOURCE para seleccionar
Television.
2 Utilice VOLUME para ajustar el nivel de
sonido.
3 Presione BAND para seleccionar una
banda.
4 Para utilizar la sintonización manual,
presione rápidamente m o n.
5 Para utilizar la sintonización por búsqueda, presione m o n y mantenga presionado durante un segundo y libere el
botón.
Almacenamiento y llamada
de emisoras
% Cuando encuentre una emisora que
desea almacenar en la memoria, presione
un botón de ajuste de presintonías 16y
manténgalo presionado hasta que el número de presintonía deje de destellar.
El número seleccionado destellará en el indicador del número de presintonía y quedará ilu-
minado. Se ha almacenado en la memoria la
emisora seleccionada.
La próxima vez que presione el mismo botón
de ajuste de presintonías 16, la emisora se
llamará de la memoria.
Notas
! Se pueden almacenar en la memoria hasta 12
emisoras, 6 por cada una de las dos bandas
de TV.
! También se pueden llamar las emisoras asig-
nadas a los botones de ajuste de presintonías
16 presionando r o q.
Almacenamiento consecutivo
de las emisoras más fuertes
1 Presione o para seleccionar BSSM.
Presione o hasta que BSSM aparezca en el
display.
2 Presione r para activar la función
BSSM.
BSSM comienza a destellar. Mientras BSSM
está destellando, las 12 emisoras más fuertes
se almacenarán en orden ascendente desde el
canal más bajo. Una vez finalizada la operación, BSSM deja de destellar.
# Para cancelar el proceso de almacenamiento,
presione q.
Nota
Al almacenar frecuencias con la función BSSM,
se pueden reemplazar las frecuencias que se almacenaron con los botones 16.
Español
47
Es
Page 48

Sección
06
Reproductor de CD
múltiple
Reproducción de un CD
132
Se puede usar esta unidad para controlar un reproductor de CD múltiple, que se vende por separado.
A continuación se indican los pasos básicos
necesarios para reproducir un CD con el reproductor de CD múltiple. En la página siguiente se explican las funciones más
avanzadas del reproductor y cómo utilizarlas.
Importante
Se podrán utilizar las siguientes funciones sólo si
el mando a distancia está ajustado en el modo
DEQ.
1 Indicador de número de disco
Muestra el disco que se está reproduciendo
actualmente.
2 Indicador de número de pista
Muestra la pista que se está reproduciendo
actualmente.
3 Indicador de tiempo de reproducción
Muestra el tiempo transcurrido de reproducción de la pista actual.
2 Seleccione el disco que desea escuchar
con los botones 16.
Para los discos ubicados en 1 a 6, presione el
botón numérico correspondiente.
Si desea seleccionar un disco ubicado en 7 a
12, presione el número correspondiente, como
por ejemplo, 1 para 7, y mantenga presionado
hasta que el número del disco aparezca en el
display.
# También se puede seleccionar un disco consecutivamente presionando r o q.
3 Para realizar el avance rápido o retroceso, presione m o n y mantenga presionado.
4 Para saltar y retroceder o avanzar hasta
otra pista, presione m o n.
Al presionar n se salta al comienzo de la siguiente pista. Al presionar una vez el botón
m, se salta al comienzo de la pista actual. Si
se vuelve a presionar este botón, se saltará a
la pista anterior.
Notas
! Cuando el reproductor de CD múltiple realiza
las funciones preparatorias, se visualiza
Ready.
! Si el reproductor de CD múltiple no funciona
correctamente, puede aparecer un mensaje
de error tal como ERROR-11. Consulte el manual de instrucciones del reproductor de CD
múltiple.
! Si no hay discos en el cargador de CD del re-
productor de CD múltiple, se visualiza
NO DISC.
1 Presione SOURCE para seleccionar el reproductor de CD múltiple.
Presione SOURCE hasta que visualice
Multi-CD.
48
Es
Reproductor de CD
múltiple de 50 discos
Sólo las funciones descritas en este manual
son compatibles con los reproductores de CD
múltiple de 50 discos.
Page 49

Reproductor de CD
múltiple
Sección
06
Introducción a las
funciones avanzadas del
reproductor de CD múltiple
1
1 Visualización de función
Muestra el estado de la función.
Importante
Se podrán utilizar las siguientes funciones sólo si
el mando a distancia está ajustado en el modo
DEQ.
% Presione o para visualizar los nom-
bres de las funciones.
Presione o repetidamente para cambiar
entre las siguientes funciones:
Repeat (repetición de reproducción)Lista de
títulos de los discosRandom (reproducción
aleatoria)Scan (reproducción con exploración)ITS Play (reproducción ITS)Pause
(pausa)Comp (compresión y DBE)
# Para volver a la visualización de reproducción,
presione BAND.
Nota
Si no se utiliza la función en unos 30 segundos,
el display volverá automáticamente a la visualización de reproducción.
Repetición de reproducción
Hay tres gamas de repetición en el reproductor de CD múltiple: MCD (repetición de todos
los discos en el reproductor de CD múltiple),
TRK (repetición de una sola pista) y DISC (repetición de disco).
1 Presione o para seleccionar Repeat.
Presione o hasta que Repeat aparezca en
el display.
2 Presione m o n para seleccionar la
gama de repetición.
Presione m o n hasta que la gama de repetición deseada aparezca en el display.
! MCD Repite todos los discos en el repro-
ductor de CD múltiple
! TRK Sólo repite la pista actual
! DISC Repite el disco actual
Notas
! Si se seleccionan otros discos durante la repe-
tición de reproducción, la gama de repetición
cambia a MCD.
! Si se realiza una búsqueda de pistas o el avan-
ce rápido/retroceso durante la repetición TRK,
la gama de repetición cambia a DISC.
Reproducción de las pistas
en un orden aleatorio
La reproducción aleatoria le permite reproducir las pistas en un orden aleatorio dentro de
la gama de repetición MCD y DISC.
Español
1 Seleccione la gama de repetición.
Consulte Repetición de reproducción en esta
página.
2 Presione o para seleccionar Random.
Presione o hasta que Random aparezca en
el display.
Es
49
Page 50

Sección
06
Reproductor de CD
múltiple
3 Presione r para activar la reproducción aleatoria.
Random :ON aparece en el display. Las pistas
se reproducirán en un orden aleatorio en la
gama de repetición MCD o DISC seleccionada
con anterioridad.
4 Presione q para desactivar la reproducción aleatoria.
Random :OFF aparece en el display. La repro-
ducción de las pistas continuará en el orden
normal.
Nota
Si se activa la reproducción aleatoria en DISC y
se vuelve a la visualización de reproducción,
D.RANDOM aparecerá en el display.
Exploración de CD y pistas
Mientras utiliza la gama de repetición DISC,el
comienzo de cada pista del disco seleccionado se reproduce durante unos 10 segundos.
En cambio, cuando utiliza la gama MCD,el
comienzo de la primera pista de cada disco se
reproduce durante unos 10 segundos.
4 Cuando encuentre la pista (o el disco)
deseada(o), presione q para desactivar la
reproducción con exploración.
Scan :OFF aparece en el display. La pista (o el
disco) se continuará reproduciendo.
# Si el display vuelve automáticamente a la visualización de reproducción, seleccione Scan de
nuevo presionando o.
Notas
! Una vez finalizada la exploración de pistas o
discos, volverá a comenzar la reproducción
normal de las pistas.
! Si se activa la reproducción con exploración
en DISC y se vuelve a la visualización de reproducción, T.SCAN aparecerá en el display.
Pausa de la reproducción
de un CD
La pausa le permite detener temporalmente la
reproducción del disco.
1 Presione o para seleccionar Pause.
Presione o hasta que Pause aparezca en el
display.
1 Seleccione la gama de repetición.
Consulte Repetición de reproducción en la página anterior.
2 Presione o para seleccionar Scan.
Presione o hasta que Scan aparezca en el
display.
3 Presione r para activar la reproducción con exploración.
Scan :ON aparece en el display. Se reproduci-
rán los primeros 10 segundos de cada pista
del disco actual (o la primera pista de cada
disco).
50
Es
2 Presione r para activar la pausa.
Pause :ON aparece en el display. Se detiene
temporalmente la reproducción de la pista actual.
3 Presione q para desactivar la pausa.
Pause :OFF aparece en el display. La reproduc-
ción se reanudará desde el mismo lugar
donde se activó la pausa.
Page 51

Reproductor de CD
múltiple
Sección
06
Uso de listas de
reproducción ITS
La función ITS (selección instantánea de
pista) le permite crear una lista de reproducción de sus pistas favoritas de los discos que
se encuentran en el cargador del reproductor
de CD múltiple. Después de añadir sus pistas
favoritas a la lista de reproducción, puede activar la reproducción ITS y reproducir sólo las
pistas seleccionadas.
Creación de una lista de
reproducción con la
programación ITS
Se puede utilizar la función ITS para ingresar y
reproducir hasta 99 pistas por disco y hasta
100 discos (con el título del disco). (Con los reproductores de CD múltiple anteriores a los
modelos CDX-P1250 y CDX-P650, se pueden
almacenar hasta 24 pistas en la lista de reproducción.)
1 Reproduzca el CD que desea programar.
Presione r o q para seleccionar un CD.
4 Presione r para almacenar la pista
que se está reproduciendo actualmente en
la lista de reproducción.
Se visualiza ITS Input brevemente y la pista
actual seleccionada se añade a la lista de reproducción. Se vuelve a visualizar ITS en el
display.
5 Presione BAND para volver a la visualización de reproducción.
Nota
Después que los datos para 100 discos han sido
almacenados en la memoria, los datos para un
nuevo disco se sobreponen a los datos más antiguos.
Reproducción de la lista de
reproducción ITS
La reproducción ITS le permite escuchar las
pistas que ha ingresado en su lista de reproducción ITS. Cuando activa la reproducción
ITS, se comenzarán a reproducir las pistas de
la lista de reproducción ITS en el reproductor
de CD múltiple.
Español
2 Presione o y mantenga presionado
hasta que TITLE aparezca en el display. Presione o para seleccionar ITS.
Una vez que se visualiza TITLE, presione o
repetidamente. Las siguientes funciones aparecerán en el display:
TITLE (ingreso de títulos de discos)ITS (programación ITS)
3 Seleccione la pista deseada presionando m o n.
1 Seleccione la gama de repetición.
Consulte Repetición de reproducción en la página 49.
2 Presione o para seleccionar ITS Play.
Presione o hasta que ITS Play aparezca en
el display.
3 Presione r para activar la reproducción ITS.
ITS Play :ON aparece en el display. La repro-
ducción de las pistas de la lista comienza en
la gama de repetición MCD o DISC seleccionada con anterioridad.
# Si no hay pistas programadas en la gama de
repetición actual, se visualiza ITS Empty.
Es
51
Page 52

Sección
06
Reproductor de CD
múltiple
4 Presione q para desactivar la reproducción ITS.
ITS Play :OFF aparece en el display. La repro-
ducción continuará en el orden normal a partir de la pista y del CD que se está
reproduciendo.
Borrado de una pista de la lista
de reproducción ITS
Para borrar una pista de la lista de reproducción ITS, asegúrese de que la función de reproducción ITS está activada.
Si la reproducción ITS ya está activada, vaya
directamente al paso 2.
1 Reproduzca el CD que contiene la pista
que desea borrar de la lista de reproducción ITS y active la reproducción ITS.
Consulte Reproducción de la lista de reproducción ITS en la página anterior.
2 Presione o y mantenga presionado
hasta que TITLE aparezca en el display. Presione o para seleccionar ITS.
Una vez que se visualiza TITLE, presione o
hasta que ITS aparezca en el display.
3 Seleccione la pista deseada presionando m o n.
4 Presione q para borrar la pista de la
lista de reproducción ITS.
La pista que se está reproduciendo se borra
de la lista de reproducción ITS y comienza la
reproducción de la próxima pista de la lista.
# Si no hay pistas de la lista de reproducción en
la gama actual, se visualiza ITS Empty y se reanuda la reproducción normal.
5 Presione BAND para volver a la visualización de reproducción.
Borrado de un CD de la lista de
reproducción ITS
Para borrar todas las pistas de un CD de la
lista de reproducción ITS, asegúrese de que la
función de reproducción ITS está desactivada.
1 Reproduzca el CD que desea borrar.
Presione r o q para seleccionar un CD.
2 Presione o y mantenga presionado
hasta que TITLE aparezca en el display. Presione o para seleccionar ITS.
Una vez que se visualiza TITLE, presione o
hasta que ITS aparezca en el display.
3 Presione q para borrar todas las pistas
del CD que se está reproduciendo de la
lista de reproducción ITS.
Todas las pistas del CD que se está reproduciendo se borran de la lista de reproducción y
se visualiza ITS Clear.
4 Presione BAND para volver a la visualización de reproducción.
Uso de las funciones de
títulos de discos
Se pueden ingresar títulos de CD y visualizarlos. De esta manera, se puede buscar y seleccionar con facilidad el disco que se desea
reproducir.
Ingreso de títulos de discos
Esta función le permite ingresar títulos de
hasta 10 letras y hasta 100 títulos de discos
(con la lista de reproducción ITS) en el reproductor de CD múltiple.
52
Es
Page 53

Reproductor de CD
múltiple
Sección
06
1 Reproduzca el CD cuyo título desea ingresar.
Presione r o q para seleccionar un CD.
2 Ingrese el título.
Para ingresar los títulos, consulte Ingreso de
títulos en la página 69.
Notas
! Los títulos se conservan en la memoria, aun
después de que se quitan los discos del cargador y se llaman cuando se vuelven a colocar los discos correspondientes.
! Después que los datos para 100 discos han
sido almacenados en la memoria, los datos
para un nuevo disco se sobreponen a los
datos más antiguos.
! Al reproducir un disco CD TEXT en un repro-
ductor de CD múltiple compatible con este
tipo de disco, no podrá cambiar a TITLE.El
título del disco ya estará grabado en el disco
CD TEXT.
Visualización de los títulos
Se puede visualizar el título de cualquier disco
que se haya ingresado.
% Presione DISPLAY.
Presione DISPLAY repetidamente para cam-
biar entre los siguientes ajustes:
Tiempo de reproducciónDisc Title (título del
disco)
Cuando se selecciona Disc Title, se visualiza
en el display el título del disco que se está reproduciendo actualmente.
# Si no se ha ingresado ningún título para el
disco, se visualizará No Title.
Selección de discos de la lista
de títulos de los discos
Esta función le permite ver la lista de títulos
de los discos que se han ingresado en el reproductor de CD múltiple y seleccionar uno de
ellos para su reproducción.
1 Presione o para seleccionar T.LIST.
Presione o hasta que T.LIST aparezca en el
display.
2 Presione m o n para desplazarse
por la lista de los títulos ingresados.
# Si no se ha ingresado un título para un disco,
no se visualizará ningún título.
3 Presione r para reproducir el título de
su CD favorito.
Comienza la reproducción del título
seleccionado.
Uso de las funciones CD TEXT
Estas funciones sólo se pueden usar con un reproductor de CD múltiple compatible con CD
TEXT.
Algunos discos contienen información que
viene codificada de fábrica. Estos discos pueden contener información tal como el título
del CD, el título de la pista, el nombre del artista y el tiempo de reproducción, y se denominan discos CD TEXT. Sólo estos discos
especialmente codificados son compatibles
con las funciones que se indican a continuación.
Visualización de títulos de
discos CD TEXT
% Presione DISPLAY.
Presione DISPLAY repetidamente para cam-
biar entre los siguientes ajustes:
Español
53
Es
Page 54

Sección
06
Reproductor de CD
múltiple
Tiempo de reproducciónDisc Title (título del
disco)DiscArtist Name (nombre del artista
del disco)Track Title (título de la pista)
TrackArtist Name (nombre del artista de la
pista)
# Si determinada información no se grabó en
un disco CD TEXT, se visualizará NO XXXX (p. ej.,
NO Disc Title).
Desplazamiento de títulos en el
display
Esta unidad sólo puede mostrar las primeras
16 letras de Disc Title, DiscArtist Name,
Track Title y TrackArtist Name. Cuando la información grabada tiene más de 16 letras, se
podrá desplazar el texto hacia la izquierda
para que se pueda ver el resto del título.
% Presione DISPLAY y mantenga presionado hasta que el título comience a desplazarse hacia la izquierda.
El resto del título aparecerá en el display.
Uso de la compresión y del
enfatizador de graves
Estas funciones sólo se pueden usar con un reproductor de CD múltiple compatible con ellas.
El uso de las funciones COMP (compresión) y
DBE (enfatizador dinámico de graves) le permite ajustar la calidad sonora que ofrece el reproductor de CD múltiple. Cada una de las
funciones tiene un ajuste de dos pasos. La
función COMP equilibra la salida de los sonidos más fuertes y más suaves a volúmenes
altos. La función DBE intensifica los niveles
de graves para proporcionar un sonido de reproducción más completo. Escuche cada uno
de los efectos a medida que los selecciona y
utilice la función que realce mejor la reproduc-
ción de la pista o del CD que está escuchando.
1 Presione o para seleccionar Comp.
Presione o hasta que Comp aparezca en el
display.
# Si el reproductor de CD múltiple no es compatible con la función COMP/DBE, se visualiza
No Comp cuando se intenta seleccionar la función.
2 Presione r o q para seleccionar el
ajuste favorito.
Presione r o q repetidamente para cambiar entre los siguientes ajustes:
Comp OFFComp 1Comp 2Comp OFF
DBE 1DBE 2
54
Es
Page 55

Procesador de señal digital
Sección
07
Introducción a los ajustes
del DSP
Importante
! Se podrán utilizar las siguientes funciones
sólo si el mando a distancia está ajustado en
el modo DEQ.
! Se podrán utilizar las siguientes funciones
sólo si se conectó un procesador multicanal
de Pioneer (DEQ-P7050) a esta unidad.
Al realizar los siguientes ajustes en orden, se
puede crear con facilidad un campo sonoro
definido con precisión.
1 Ajustes de los altavoces
2 Uso del selector de posición
3 Ajuste de la alineación temporal
4 Ajuste de los niveles de salida de los altavoces
con un tono de prueba
5 Selección de una frecuencia de corte
6 Ajuste de los niveles de salida de los altavoces
7 Ajuste del ecualizador paramétrico de 3 bandas
Uso del menú del DSP
D.MONO (dual monocanal)DIRECT (di-
recto)Dolby PL (Dolby Pro Logic)
# Cuando se reproduzca un disco distinto a un
DVD en un reproductor de DVD de Pioneer conectado con el cable IP-BUS, no se podrá cambiar a DRC o D.MONO.
# Para volver a la visualización de cada fuente,
presione BAND.
Español
Nota
Si no se utiliza la función DSP en unos 30 segundos, el display volverá automáticamente a la visualización de la fuente.
Uso del menú de elementos del
DSP
123
456
1
1 Visualización del DSP
Muestra el estado del DSP.
% Presione p para visualizar los nom-
bres de las funciones del DSP.
Presione p repetidamente para cambiar
entre las siguientes funciones del DSP:
Posi (selector de posición)Fad (ajuste del
balance)SLA (ajuste del nivel de fuente)
DRC (control de la gama dinámica)
1 Altavoz delantero izquierdo
2 Altavoz central
3 Altavoz delantero derecho
4 Altavoz trasero izquierdo
5 Altavoz de subgraves
6 Altavoz trasero derecho
55
Es
Page 56

Sección
07
Procesador de señal digital
% Presione p y mantenga presionado
hasta que SP Set aparezca en el display.
Presione p para visualizar los nombres
de las funciones del DSP.
Una vez que se visualiza SP Set, presione p
repetidamente. Las siguientes funciones del
DSP aparecerán en el display:
SP Set (ajuste de altavoces)CutOff (frecuencia de corte)SP Lev (nivel de salida de
altavoces)T Tone (tono de prueba)Time A
(alineación temporal)PEQ (ecualizador paramétrico de 3 bandas)
# Cuando no se seleccione F/L ni F/R en Posi,
no se puede cambiar a Time A.
# Cuando no se seleccione CUSTOM1 ni
CUSTOM2 como la curva de ecualización, no se
puede cambiar a PEQ.
# Para volver a la visualización de cada fuente,
presione BAND.
Uso del control de campo
sonoro
La función SFC genera la sensación de una
presentación en vivo.
! La acústica de los distintos ambientes no
es la misma y depende del alcance y contorno del espacio a través del cual se propagan las ondas sonoras y de la manera en
que los sonidos se reflejan en el escenario,
las paredes, el piso y el techo. En un espectáculo en vivo usted oye la música en tres
etapas: sonido directo, reflejos iniciales y
reflejos finales o reverberaciones. Estos
factores se programan en los circuitos
SFC, a fin de recrear la acústica que ofrecen los distintos entornos de los espectáculos.
% Presione SFC para seleccionar el modo
SFC deseado.
Presione SFC repetidamente para cambiar
entre los siguientes modos:
Musical (musical)Drama (drama)Action
(acción)Jazz (jazz)Hall (hall)Club (club)
OFF (desactivado)
Nota
En el caso de tratarse de una fuente de audio
LPCM de dos canales o Dolby Digital de dos canales y de seleccionarse los efectos SFC que son
más adecuados para una fuente de audio de 5.1
canales (es decir, Musical, Drama o Action), se
recomienda activar la función Dolby Pro Logic.
En cambio, al seleccionar los efectos SFC que
son ideales para usarse con audio de dos canales
(es decir, Jazz, Hall o Club), se recomienda desactivar la función Dolby Pro Logic.
Uso del selector de posición
Una manera de garantizar un sonido más natural consiste en posicionar con precisión la
imagen estéreo, colocándola en el centro propiamente dicho del campo sonoro. El selector
de posición le permite ajustar automáticamente los niveles de salida de los altavoces e introduce un retardo a fin de armonizar la cantidad
y la posición de los asientos ocupados. Al utilizarlo con la función SFC, se obtendrá una imagen sonora más natural y se ofrecerá un
sonido panorámico que envuelve al oyente.
1 Presione p para seleccionar Posi.
Presione p hasta que Posi aparezca en el
display.
2 Presione m/n/r/q para seleccionar una posición del oyente.
Presione uno de estos botones m/n/r/
q para seleccionar una de las posiciones
que se indican en la siguiente tabla.
56
Es
Page 57

Procesador de señal digital
Sección
07
Botón Display Posición
m F/L Asiento delantero izquierdo
n F/R Asiento delantero derecho
r FRONT Asientos delanteros
q ALL Todos los asientos
# Para cancelar la posición seleccionada, vuelva
a presionar el mismo botón.
Nota
Cuando se realizan ajustes de la posición del
oyente, los altavoces se ajustan automáticamente
en los niveles de salida adecuados. Se los puede
adaptar específicamente si así lo desea, según se
explica en la sección Ajuste de los niveles de sali-
da de los altavoces con un tono de prueba o Ajuste
de los niveles de salida de los altavoces.
Uso del ajuste del balance
Se puede seleccionar el ajuste de fader/balance que proporciona un entorno de audio ideal
en todos los asientos ocupados.
1 Presione p para seleccionar Fad.
Presione p hasta que Fad aparezca en el
display.
# Si se seleccionó anteriormente el ajuste del
balance, se visualizará Bal.
3 Presione m o n para ajustar el balance entre los altavoces izquierdos/derechos.
Al presionar m o n, se visualiza Bal : 0.
Cada vez que se presiona m o n,se
mueve el balance entre los altavoces izquierdos/derechos hacia la izquierda o hacia la derecha.
Se visualiza Bal :L25 Bal :R25 mientras se
mueve el balance entre los altavoces izquierdos/derechos desde la izquierda hacia la
derecha.
Ajuste de los niveles de la
fuente
La función SLA (ajuste del nivel de fuente) le
permite ajustar el nivel de volumen de cada
fuente para evitar cambios radicales en el volumen cuando se cambia entre las fuentes.
1 Presione p para seleccionar SLA.
Presione p hasta que SLA aparezca en el
display.
2 Presione r o q para ajustar el volumen de la fuente.
Cada vez que se presiona r o q, se aumenta o disminuye el volumen de la fuente.
Se visualiza SLA +4 SLA 4 mientras se aumenta o disminuye el volumen de la fuente.
Español
2 Presione r o q para ajustar el balance entre los altavoces delanteros/traseros.
Cada vez que se presiona r o q, se mueve
el balance entre los altavoces delanteros/traseros hacia adelante o hacia atrás.
Se visualiza Fad :F25 Fad :R25 mientras el
balance entre los altavoces delanteros/traseros se mueve desde adelante hacia atrás.
# Fad : 0 es el ajuste apropiado cuando se usan
sólo dos altavoces.
Notas
! La unidad de vídeo CD y la de CD se definen
automáticamente con el mismo ajuste del
nivel de fuente.
! Las fuentes Analog4, Analog5 y Analog6 se
definen automáticamente con el mismo ajuste del nivel de fuente.
Es
57
Page 58

Sección
07
Procesador de señal digital
Uso del control de gama
dinámica
La gama dinámica es la diferencia de intensidades entre los sonidos más fuertes y los más
débiles. El control de gama dinámica comprime esta diferencia y permite oír con claridad
los sonidos, incluso a niveles de volumen
bajo.
! El control de gama dinámica sólo funciona
con sonidos Dolby Digital.
1 Presione p para seleccionar DRC.
Presione p hasta que DRC aparezca en el
display.
# Cuando se reproduzca un disco distinto a un
DVD, no se puede cambiar este modo.
2 Presione r para activar el control de
gama dinámica.
DRC ON aparece en el display. Ahora el con-
trol de gama dinámica está activado.
# Presione q para desactivar el control de
gama dinámica.
Uso del modo dual mono
Al reproducir un disco grabado en modo dual
mono, se puede seleccionar el canal de salida.
! Esta función sólo se puede utilizar con so-
nido en modo dual mono.
1 Presione p para seleccionar D.MONO.
Presione p hasta que D.MONO aparezca
en el display.
# Cuando se reproduzca un disco distinto a un
DVD, no se puede cambiar este modo.
2 Presione m o n para seleccionar el
ajuste de salida deseado.
Cada vez que se presiona m o n, se selecciona el ajuste de salida en el siguiente orden:
L&R (canales izquierdo y derecho)L ch
(canal izquierdo)Rch(canal derecho)
Uso del control directo
Se pueden anular los ajustes de audio para
comprobar su eficacia.
1 Presione p para seleccionar DIRECT.
Presione p hasta que DIRECT aparezca en
el display.
2 Presione r para activar el control directo.
DIRECT ON aparece en el display. Ahora el
control directo está activado.
# Para desactivar el control directo, presione
q.
Notas
! Mientras el control directo está activado
DIRECT ON, se bloquean todas las funciones
de audio, con la excepción de VOLUME.
! En el caso de tratarse de una fuente de audio
LPCM de dos canales o Dolby Digital de dos
canales y de seleccionarse DIRECT ON, el sonido sólo se oirá por los altavoces delanteros
izquierdo/derecho.
Uso de Dolby Pro Logic
Dolby Pro Logic ofrece efectos de dirección y
espacio de calidad superior, lo que genera la
sensación de presencia y ambiente con características similares a las del teatro.
! En el caso de tratarse de una fuente de
audio LPCM de dos canales o Dolby Digital
de dos canales y de seleccionarse los efectos SFC que son más adecuados para una
fuente de audio de 5.1 canales (es decir,
Musical, Drama o Action), se recomienda
activar la función Dolby Pro Logic. En cambio, al seleccionar los efectos SFC que son
ideales para usarse con audio de dos canales (es decir, Jazz, Hall o Club), se recomienda desactivar la función Dolby Pro
Logic.
58
Es
Page 59

Procesador de señal digital
Sección
07
1 Presione p para seleccionar Dolby PL.
Presione p hasta que Dolby PL aparezca
en el display.
2 Presione r para activar la función
Dolby Pro Logic.
Dolby PL ON aparece en el display. Ahora la
función Dolby Pro Logic está activada.
# Para desactivar la función Dolby Pro Logic,
presione q.
Nota
Al reproducir una fuente mono de dos canales
con la función Pro Logic activada, en algunas
ocasiones se puede producir lo siguiente:
! No habrá salida de audio si el ajuste del alta-
voz central es SMALL o LARGE y no hay instalado un altavoz central.
! El audio se oye sólo por el altavoz central de
estar instalado y el ajuste del altavoz central
es SMALL o LARGE.
Ajustes de los altavoces
Se deberán habilitar/deshabilitar (o activar/desactivar) las unidades y seleccionar/ajustar su
tamaño (capacidad de reproducción de graves) de acuerdo con los altavoces que estén
instalados. Se deberá ajustar el tamaño en
LARGE (grande) si el altavoz tiene capacidad
para reproducir sonidos en el orden de los 100
Hz o menos. De lo contrario, se deberá seleccionar SMALL (pequeño).
! No se generará la gama de frecuencias si
el altavoz de subgraves se ajusta en OFF y
los altavoces delanteros y traseros se ajustan en SMALL o OFF.
! Es imprescindible que los altavoces no ins-
talados se ajusten en OFF.
! Ajuste el altavoz delantero o trasero en
LARGE si el altavoz tiene capacidad para
reproducir graves o si no hay un altavoz de
subgraves instalado.
1 Presione p y mantenga presionado
hasta que SP Set aparezca en el display.
2 Presione m o n para seleccionar el
altavoz a ajustar.
Cada vez que se presiona m o n, se selecciona el altavoz en el siguiente orden:
Altavoces delanterosAltavoz centralAltavoces traserosAltavoz de subgravesS.W
(ajuste de subgraves)
# Se puede cambiar a S.W sólo si el altavoz de
subgraves se ha ajustado en ON.
3 Presione r o q para escoger el tamaño correcto del altavoz seleccionado.
Cada vez que se presiona r o q, se selecciona el tamaño en el siguiente orden:
LARGE (grande)SMALL (pequeño) OFF
(desactivado)
# No se puede seleccionar OFF, si se ha selec-
cionado FRONT (altavoces delanteros).
# Se puede seleccionar ON o OFF, si se ha se-
leccionado SUB.W (altavoz de subgraves).
# Se puede cambiar a Rev. (fase inversa) o
Normal (fase normal), si se ha seleccionado S.W
(ajuste de subgraves).
4 Presione BAND para volver a la visualización de reproducción.
Español
59
Es
Page 60

Sección
07
Procesador de señal digital
Corrección de la fase del
altavoz de subgraves
Si al tratar de intensificar la salida de graves
del altavoz de subgraves no logra buenos resultados o considera que los graves resultan
más lúgubres, estos fenómenos pueden indicar que la salida del altavoz de subgraves y el
contenido de graves que oye por los otros altavoces se cancelan recíprocamente. Para eliminar este problema, trate de cambiar el ajuste
de la fase del altavoz de subgraves.
1 Presione p y mantenga presionado
hasta que SP Set aparezca en el display.
2 Presione m o n para seleccionar el
altavoz de subgraves.
Cada vez que se presiona m o n, se selecciona el altavoz en el siguiente orden:
Altavoces delanterosAltavoz centralAltavoces traserosAltavoz de subgravesS.W
(ajuste de subgraves)
3 Presione r para activar la salida de
subgraves.
4 Presione n para seleccionar S.W (ajuste de subgraves).
5 Presione q o r para seleccionar la
fase de la salida de subgraves.
Presione r para seleccionar Normal (fase
normal). Presione q para seleccionar Rev.
(fase inversa).
! No habrá salida de audio si el ajuste del alta-
voz central es SMALL o LARGE y no hay instalado un altavoz central.
! El audio se oye sólo por el altavoz central de
estar instalado y el ajuste del altavoz central
es SMALL o LARGE.
Selección de una frecuencia
de corte
Se puede seleccionar una frecuencia, bajo la
cual se reproducen los sonidos por el altavoz
de subgraves. Si entre los altavoces instalados
hay uno cuyo tamaño está ajustado en
SMALL, se puede seleccionar una frecuencia,
bajo la cual se reproducen los sonidos por un
altavoz LARGE o un altavoz de subgraves.
1 Presione p y mantenga presionado
hasta que SP Set aparezca en el display.
Presione p para seleccionar CutOff.
Una vez que se visualiza SP Set, presione p
hasta que CutOff aparezca en el display.
2 Presione m o n para seleccionar la
frecuencia de corte.
Cada vez que se presiona m o n, se selecciona la frecuencia de corte en el siguiente
orden:
6380100125160200 (Hz)
3 Presione BAND para volver a la visualización de reproducción.
6 Presione BAND para volver a la visualización de reproducción.
Nota
Al reproducir una fuente mono de dos canales
con la función Pro Logic activada, en algunas
ocasiones se puede producir lo siguiente:
60
Es
Nota
La selección de una frecuencia de corte consiste
en ajustar la frecuencia de corte del L.P.F. (filtro
de paso bajo) del altavoz de subgraves y la frecuencia del corte del H.P.F. (filtro de paso alto) del
altavoz SMALL. El ajuste de la frecuencia de
corte no tendrá efecto si el altavoz de subgraves
Page 61

Procesador de señal digital
Sección
07
se ajusta en OFF y los demás altavoces se ajustan en LARGE o OFF.
Ajuste de los niveles de
salida de los altavoces
Se pueden reajustar los niveles de salida de
los altavoces utilizando un tono de prueba
mientras se escucha música.
1 Presione p y mantenga presionado
hasta que SP Set aparezca en el display.
Presione p para seleccionar SP Lev.
Una vez que se visualiza SP Set, presione p
hasta que SP Lev aparezca en el display.
2 Presione m o n para seleccionar el
altavoz a ajustar.
Cada vez que se presiona m o n, se selecciona el altavoz en el siguiente orden:
Altavoz delantero izquierdoAltavoz central
Altavoz delantero derechoAltavoz trasero derechoAltavoz trasero izquierdoAltavoz de
subgraves
# No se pueden seleccionar los altavoces si el
ajuste del tamaño es OFF.
3 Presione r o q para ajustar el nivel
de salida de los altavoces.
Cada vez que se presiona r o q, se aumenta o disminuye el nivel de salida de los altavoces. Se visualiza +10 10 mientras se
aumenta o disminuye el nivel.
4 Presione BAND para volver a la visualización de reproducción.
Nota
Este procedimiento de ajuste de los niveles de salida de los altavoces es igual al que utiliza
T Tone. Los dos procedimientos ofrecen los mismos resultados.
Ajuste de los niveles de
salida de los altavoces con
un tono de prueba
Un conveniente tono de prueba le permite obtener con facilidad el balance general correcto
entre los altavoces.
1 Presione p y mantenga presionado
hasta que SP Set aparezca en el display.
Presione p para seleccionar T Tone.
Una vez que se visualiza SP Set, presione p
hasta que T Tone aparezca en el display.
2 Presione n para iniciar la salida del
tono de prueba.
Se genera el tono de prueba. Pasa de un altavoz a otro en la siguiente secuencia a un intervalo de alrededor de dos segundos. Se
visualizan en el display los ajustes actuales
del altavoz por el cual escucha el tono de
prueba.
Altavoz delantero izquierdoAltavoz central
Altavoz delantero derechoAltavoz trasero derechoAltavoz trasero izquierdoAltavoz de
subgraves
# Controle cada nivel de salida de los altavoces.
Si no se necesitan ajustes, realice la operación
indicada en el paso 4 para detener el tono de
prueba.
# No se visualizarán los ajustes de los altavoces
cuyo tamaño está ajustado en OFF.
3 Presione r o q para ajustar el nivel
de salida de los altavoces.
Cada vez que se presiona r o q, se aumenta o disminuye el nivel de salida de los altavoces. Se visualiza +10 10 mientras se
aumenta o disminuye el nivel.
# El tono de prueba pasa al siguiente altavoz
después de alrededor de dos segundos a partir
de la última operación.
Español
61
Es
Page 62

Sección
07
Procesador de señal digital
4 Presione m para detener la salida del
tono de prueba.
5 Presione BAND para volver a la visualización de reproducción.
Notas
! De ser necesario, seleccione los altavoces y
ajuste sus niveles de salida absolutos. (Consulte Ajuste de los niveles de salida de los
altavoces en la página anterior.)
! Este procedimiento de ajuste de los niveles de
salida de los altavoces es igual al que utiliza
SP Lev. Los dos procedimientos ofrecen los
mismos resultados.
Ajuste de la alineación
temporal
Al ajustar la distancia que existe entre cada altavoz y la posición del oyente seleccionada, se
pueden introducir retardos en la salida de los
altavoces a fin de obtener una imagen sonora
correcta y un balance general uniforme. Si
bien esto se logra automáticamente cuando
se define la posición del oyente, la función de
alineación temporal ofrece un ajuste de precisión.
Altavoz delantero izquierdoAltavoz central
Altavoz delantero derechoAltavoz trasero derechoAltavoz trasero izquierdoAltavoz de
subgraves
# No se pueden seleccionar los altavoces si el
ajuste del tamaño es OFF.
3 Presione r o q para ajustar la distancia entre el altavoz seleccionado y la posición del oyente.
Cada vez que se presiona r o q, se aumenta o disminuye la distancia. Se visualiza 500.0
(cm) 0.0 (cm) mientras se aumenta o disminuye la distancia.
4 Presione BAND para volver a la visualización de reproducción.
Uso del ecualizador
El ecualizador le permite ajustar la ecualización de acuerdo con las características acústicas del interior del automóvil.
1 Presione p y mantenga presionado
hasta que SP Set aparezca en el display.
Presione p para seleccionar Time A.
Una vez que se visualiza SP Set, presione p
hasta que Time A aparezca en el display.
# No se puede seleccionar Time A cuando no
se selecciona F/L o F/R en Posi.
2 Presione m o n para seleccionar el
altavoz a ajustar.
Cada vez que se presiona m o n, se selecciona el altavoz en el siguiente orden:
62
Es
Page 63

Procesador de señal digital
Sección
07
Llamada de las curvas de
ecualización
Hay siete curvas de ecualización almacenadas
que se pueden llamar con facilidad en cualquier momento. A continuación se ofrece una
lista de las curvas de ecualización:
Display Curva de ecualización
SUPER BASS Supergraves
POWERFUL Potente
NATURAL Natural
VOCAL Vocal
FLAT Plana
CUSTOM1 Personalizada 1
CUSTOM2 Personalizada 2
! CUSTOM1 y CUSTOM2 son curvas de
ecualización ajustadas.
! Cuando se selecciona FLAT, no se introdu-
ce ningún suplemento o corrección al sonido. Esto es útil para verificar el efecto de
las curvas de ecualización cambiándose alternativamente entre FLAT y otra curva de
ecualización definida.
% Presione EQ para seleccionar el ecualizador.
Presione EQ repetidamente para cambiar
entre las siguientes opciones:
SUPER BASSPOWERFULNATURAL
VOCALFLATCUSTOM1CUSTOM2
Ajuste del ecualizador
paramétrico de 3 bandas
Cuando se trata de las curvas de ecualización
CUSTOM1 y CUSTOM2, se pueden ajustar las
curvas frontales, posteriores y central por separado seleccionando una frecuencia central,
un nivel de ecualización y un factor Q para
cada banda.
! Se puede crear una curva CUSTOM1 sepa-
rada por cada fuente.
! Se puede crear una curva CUSTOM2
común a todas las fuentes.
! El altavoz central determina en gran medi-
da la imagen sonora y no resulta fácil obtener el balance adecuado. Se recomienda
reproducir audio de dos canales (por ejemplo, un CD) y obtener el balance adecuado
entre los altavoces con la excepción del
central, y luego reproducir audio de 5.1 canales (Dolby Digital o DTS) y ajustar la salida del altavoz central con el balance
logrado entre los demás altavoces.
1 Presione p y mantenga presionado
hasta que SP Set aparezca en el display.
Presione p para seleccionar PEQ.
Una vez que se visualiza SP Set, presione p
hasta que PEQ aparezca en el display.
# No se puede seleccionar PEQ cuando no se
selecciona la curva de ecualización CUSTOM1 ni
CUSTOM2.
2 Presione m o n para seleccionar el
elemento deseado.
Cada vez que se presiona m o n, se selecciona el elemento en el siguiente orden:
FRONT (altavoces)Low (bandas) Low (frecuencia central)L (nivel de ecualización)
Q.WIDE (factor Q)
3 Presione r o q para seleccionar el altavoz a ajustar.
Cada vez que se presiona r o q, se selecciona el altavoz en el siguiente orden:
FRONT (altavoces delanteros)CENTER (altavoz central)REAR (altavoces traseros)
# No se pueden seleccionar los altavoces si el
ajuste del tamaño es OFF.
Español
63
Es
Page 64

Sección
07
Procesador de señal digital
4 Presione n y luego, r o q para seleccionar la banda de ecualización a
ajustar.
Cada vez que se presiona r o q, se seleccionan las bandas de ecualización en el siguiente orden:
Low (bajo)Mid (medio)High (alto)
5 Presione n y luego, r o q para seleccionar la frecuencia central de la banda
seleccionada.
Cada vez que se presiona r o q, se selecciona la frecuencia en el siguiente orden:
100125160200250315400
5006308001k1,25k1,6k2k
2,5k3,15k4k5k6,3k8k (Hz)
6 Presione n y luego, r o q para
ajustar el nivel de ecualización.
Cada vez que se presiona r o q, se aumenta o disminuye el nivel de ecualización. Se visualiza +6 6 mientras se aumenta o
disminuye el nivel.
7 Presione n y luego, r o q para seleccionar el factor Q deseado.
Cada vez que se presiona r o q, se cambia
entre los siguientes factores Q:
Q.WIDE (ancho)Q.NAR (corto)
# Se pueden ajustar de la misma manera los parámetros de cada banda de los demás altavoces.
8 Presione BAND para volver a la visualización de reproducción.
Nota
Se puede seleccionar una frecuencia central de
entre 20 frecuencias por cada banda. Asimismo,
la puede cambiar en pasos de 1/3 de octava, pero
no se pueden seleccionar las frecuencias que tienen intervalos inferiores a 1 octava entre las frecuencias centrales de las tres bandas.
64
Es
Page 65

Ajustes iniciales
Sección
08
Configuración de los
ajustes iniciales
1
Se puede realizar la configuración inicial de
los diferentes ajustes de esta unidad.
Importante
Se podrán utilizar las siguientes funciones sólo si
el mando a distancia está ajustado en el modo
DEQ.
1 Visualización de función
Muestra el estado de la función.
1 Presione SOURCE y mantenga presionado hasta que se apague la unidad.
2 Presione o y mantenga presionado
hasta que el reloj aparezca en el display.
BUS, no se puede cambiar ni a Digital1 ni a
Digital2.
# Para cancelar los ajustes iniciales, presione
BAND.
# También se pueden cancelar los ajustes iniciales presionando o hasta que se apague la
unidad.
Español
Ajuste del reloj
Siga estas instrucciones para ajustar el reloj.
1 Presione o para seleccionar el reloj.
Presione o repetidamente hasta que el reloj
aparezca en el display.
2 Presione m o n para seleccionar el
segmento de la visualización del reloj que
desea ajustar.
Al presionar m o n se seleccionará un
solo segmento de la visualización del reloj:
HorasMinutos
Al seleccionar las horas o los minutos de la visualización del reloj, los dígitos seleccionados
destellarán.
3 Presione o para seleccionar uno de
los ajustes iniciales.
Presione o repetidamente para cambiar
entre los siguientes ajustes:
RelojDimmer (atenuador de luz)
Brightness (brillo)Digital ATT (atenuador
digital)Telephone (silenciamiento/atenua-
ción de teléfono)AUX (ajuste de la fuente
auxiliar)Digital1 (fuente digital 1)Digital2
(fuente digital 2)Analog1 (fuente analógica
1)Analog2 (fuente analógica 2)Analog3
(fuente analógica 3)Analog4 (fuente analógica 4)Analog5 (fuente analógica 5)
Analog6 (fuente analógica 6)
# Cuando un reproductor de DVD de Pioneer
está conectado a esta unidad con el cable IP-
3 Presione r o q para ajustar el reloj.
Al presionar r se aumentarán los dígitos de
las horas o los minutos seleccionados. Al presionar q se disminuirán los dígitos de las
horas o los minutos seleccionados.
Es
65
Page 66

Sección
08
Ajustes iniciales
Cambio del ajuste del
atenuador de luz
Para evitar que el display quede muy brillante
durante la noche, se atenúa automáticamente
cuando se encienden las luces del automóvil.
Se puede activar y desactivar el atenuador de
luz.
1 Presione o para seleccionar Dimmer.
Presione o repetidamente hasta que
Dimmer aparezca en el display.
2 Presione r para activar el atenuador
de luz.
Dimmer :ON aparece en el display.
# Para desactivar el atenuador de luz, presione
q.
Ajuste del brillo
Se puede ajustar el brillo del display. El ajuste
inicial de este modo es el valor 12.
1 Presione o para seleccionar
Brightness.
Presione o repetidamente hasta que
Brightness aparezca en el display.
2 Presione m o n para ajustar el nivel
de brillo.
Cada vez que se presiona m o n, se aumenta o disminuye el nivel de brillo. Se visualiza 0 15 mientras se aumenta o disminuye el
nivel.
Corrección de distorsiones
del sonido
Se puede reducir al mínimo la distorsión que
hipotéticamente puedan causar los ajustes de
las curvas de ecualización.
! Si se ajusta un nivel de ecualización alto,
se puede causar distorsión. Si se altera o
distorsiona el sonido alto, trate de cambiar
a Low. Normalmente, deje el ajuste en
High para garantizar un sonido de calidad.
1 Presione o para seleccionar
Digital ATT.
Presione o repetidamente hasta que
Digital ATT aparezca en el display.
2 Presione m o n para seleccionar
Low o High.
Al presionar m o n se cambiará entre
High (alto) y Low (bajo), y se visualizará en el
display el estado correspondiente.
Cambio del silenciamiento/
atenuación de teléfono
El sonido del sistema se silencia o atenúa
automáticamente cuando se hace o se recibe
una llamada con un teléfono celular conectado a esta unidad.
1 Presione o para seleccionar
Telephone.
Presione o repetidamente hasta que
Telephone aparezca en el display.
2 Presione m o n para cambiar el
modo de silenciamiento/atenuación de teléfono.
Presione m o n hasta que el ajuste deseado aparezca en el display.
! Telephone :MUTE Silenciamiento
! Telephone :ATT2 Atenuación
(Telephone :ATT2 tiene un efecto más po-
tente que Telephone :ATT1)
! Telephone :ATT1 Atenuación
66
Es
Page 67

Ajustes iniciales
Sección
08
Notas
! El sonido se desactiva, se visualiza MUTE o
ATT y no se puede ajustar el audio.
! La operación vuelve a su estado normal cuan-
do se termina la llamada telefónica.
Cambio del ajuste de un
equipo auxiliar
Se puede utilizar un equipo auxiliar con esta
unidad. Active el ajuste auxiliar al utilizar un
equipo auxiliar conectado a esta unidad.
1 Presione o para seleccionar AUX.
Presione o repetidamente hasta que AUX
aparezca en el display.
2 Presione r para activar el ajuste de la
fuente auxiliar.
AUX :ON aparece en el display.
# Para desactivar el ajuste de la fuente auxiliar,
presione q.
Cambio del ajuste de la
fuente digital
Se puede conectar un reproductor de DVD a
esta unidad. Active la fuente digital al utilizar
un reproductor de DVD conectado a esta unidad.
El ajuste inicial de Digital1 y Digital2 es de-
sactivado.
! Cuando un reproductor de DVD de Pioneer
está conectado a esta unidad con el cable
IP-BUS, no se puede cambiar al ajuste de
la fuente digital.
2 Presione r para activar el ajuste de la
fuente digital.
# Para desactivar el ajuste de la fuente digital,
presione q.
Cambio del ajuste de la
entrada analógica
Se pueden conectar diversos equipos a la entrada de altavoces o a la entrada RCA de esta
unidad. Active el ajuste de la entrada analógica al utilizar estos equipos conectados a esta
unidad y seleccione la entrada correspondiente de acuerdo con el método de conexión empleado.
1 Presione o para seleccionar Analog.
Presione o hasta que Analog (p. ej.,
Analog1) aparezca en el display.
2 Presione r para activar el ajuste de la
entrada analógica.
El método de conexión (p. ej., SP) aparece en
el display.
3 Presione m o n para seleccionar el
método de conexión deseado.
Al presionar m o n se cambiará entre SP y
RCA, y se visualizará en el display el estado co-
rrespondiente.
# Para desactivar el ajuste de la entrada analógica, presione q.
Español
1 Presione o para seleccionar Digital.
Presione o hasta que Digital (p. ej.,
Digital1) aparezca en el display.
67
Es
Page 68

Sección
09
Otras funciones
Activación y desactivación
de la visualización del reloj
Se puede activar y desactivar la visualización
del reloj.
% Presione 0 para activar o desactivar la
visualización del reloj.
Cada vez que se presiona 0, se activa o desactiva la visualización del reloj.
# La visualización del reloj desaparece momentáneamente cuando se utilizan otras funciones,
pero vuelve a aparecer después de 25 segundos.
Nota
Aunque las fuentes estén desactivadas, el reloj
se visualizará en el display. Al presionar 0 se activa o desactiva la visualización del reloj.
Uso de diferentes
visualizaciones de
entretenimiento
Se puede disfrutar de distintas visualizaciones
de entretenimiento mientras se escucha cada
fuente.
! Se trata de distintas maneras de visualizar
el espectro y no afectan la salida sonora.
% Presione ENTERTAINMENT.
Cada vez que presiona ENTERTAINMENT la visualización cambia en el siguiente orden:
Visualización del icono de fuentePresentación visual de fondo 1Presentación visual
de fondo 2Presentación visual de fondo 3
Presentación visual de fondo 4Pantalla de
películas 1Pantalla de películas 2Reloj de
entretenimientovisualización desactivada
Ajuste del título de las
fuentes digitales
Se puede cambiar el título que se visualiza
para las fuentes digitales (p. ej., Digital1).
1 Después de seleccionar las fuentes digitales como la fuente, presione o y mantenga presionado hasta que TITLE aparezca
en el display.
2 Ingrese el título.
Para ingresar los títulos, consulte Ingreso de
títulos en la página siguiente.
Ajuste del título de las
fuentes analógicas
Se puede cambiar el título que se visualiza
para las fuentes analógicas (p. ej., Analog1).
1 Después de seleccionar las fuentes
analógicas como la fuente, presione o y
mantenga presionado hasta que TITLE aparezca en el display.
2 Ingrese el título.
Para ingresar los títulos, consulte Ingreso de
títulos en la página siguiente.
Uso de la fuente AUX
Un interconector IP-BUS-RCA tal como el CDRB20/CD-RB10 (que se vende por separado) le
permite conectar esta unidad a un equipo auxiliar con salida RCA. Si desea obtener información más detallada, consulte el manual de
instrucciones del interconector IP-BUS-RCA.
Selección de AUX como la fuente
% Presione SOURCE para seleccionar AUX
como la fuente.
Presione SOURCE hasta que AUX aparezca
en el display.
# Si no se activa el ajuste de la fuente auxiliar,
no se podrá seleccionar AUX. Para obtener más
información, consulte Cambio del ajuste de un
equipo auxiliar en la página anterior.
68
Es
Page 69

Otras funciones
Sección
09
Ajuste del título del equipo
auxiliar
Se puede cambiar el título que se visualiza
para la fuente AUX.
1 Después de seleccionar AUX como la
fuente, presione o y mantenga presionado hasta que TITLE aparezca en el display.
2 Ingrese el título.
Para ingresar los títulos, consulte Ingreso de
títulos en esta página.
Ajuste del tipo de código
del mando a distancia
Cuando el conmutador de funcionamiento del
mando a distancia está ajustado en DVD,si
se cambia el tipo de código del mando a distancia se podrá hacer funcionar el reproductor
de DVD Pioneer con el mando a distancia provisto. Hay dos códigos: tipo DVD A y tipo
DVD B. Al utilizar esta unidad con un reproductor de DVD múltiple (p. ej. XDV-P9), seleccione el código DVD A.
% Coloque el selector ubicado en el lado
izquierdo del mando a distancia en la posición adecuada utilizando la punta de un lapicero u otro instrumento con punta.
Ingreso de títulos
Se pueden ingresar los títulos de discos, fuentes digitales, fuentes analógicas y fuentes auxiliares. Consulte el siguiente procedimiento
para ingresar los títulos deseados.
2 Presione el botón número 1 para seleccionar el tipo de carácter deseado.
Presione el botón número 1 repetidamente
para cambiar entre los siguientes tipos de caracteres:
Alfabeto (mayúsculas), números y símbolos
Alfabeto (minúsculas)
# Se puede seleccionar el ingreso de números y
símbolos presionando el botón número 2.
3 Presione r o q para seleccionar una
letra del alfabeto.
Cada vez que se presiona r, se visualizará
una letra del alfabeto en orden ascendente A
B C ... X Y Z, y los números y símbolos en el
orden de 1 2 3 ... | } ¯. Cada vez que se presiona q, se visualizará una letra en el orden inverso, tal como Z Y X ... C B A.
4 Presione n para mover el cursor a la
próxima posición de carácter.
Cuando se visualice la letra deseada, presione
n para mover el cursor a la próxima posición y seleccione la próxima letra. Presione
m para mover el cursor hacia atrás en el display.
5 Mueva el cursor a la última posición
presionando n después de ingresar el
título.
Al presionar n una vez más, el título ingresado se almacena en la memoria.
6 Presione BAND para volver a la visualización de reproducción.
Español
Importante
Se podrá utilizar esta función sólo si el mando a
distancia está ajustado en el modo DEQ.
1 Presione o y mantenga presionado
hasta que TITLE aparezca en el display.
69
Es
Page 70

Apéndice
Información adicional
Solución de problemas
Comunes
Síntoma Causa Acción (Consulte)
La unidad no se enciende.
La unidad no funciona.
No se puede hacer funcionar la
unidad con el mando a distancia.
La unidad no funciona correctamente aunque se presionen los
botones adecuados del mando
a distancia.
No se escucha el sonido.
El nivel del volumen no aumenta.
No se emite sonido.
El nivel del volumen es bajo.
Los cables y conectores están conectados incorrectamente.
El fusible está fundido. Corrija el problema por el cual se fundió el fu-
El microprocesador incorporado
funciona de manera incorrecta debido al ruido y a otros factores.
El modo de funcionamiento del
mando a distancia es el incorrecto.
El código del mando a distancia es
el incorrecto.
La batería tiene poca energía. Coloque una batería nueva. (Página 39)
Los cables no está conectados correctamente.
El nivel del volumen es bajo. Ajuste el nivel del volumen.
El atenuador está activado. Desactive el atenuador.
Confirme una vez más que todas las conexiones son las correctas.
sible y cámbielo. Asegúrese de instalar el fusible correcto con la misma capacidad.
Apague la unidad y vuelva a encenderla.
Cambie al modo correcto del mando a distancia. (Página 40)
Asegúrese de que el ajuste del selector del
mando a distancia y el ajuste del tipo de
código sean los mismos. (Página 69)
Conecte los cables correctamente.
Mensajes de error
Cuando se presentan problemas durante la reproducción de un disco, aparece un mensaje de
error en el display. Consulte la tabla que se ofrece a continuación para identificar el problema y
adoptar la acción correctiva sugerida. En caso de que el error persista, póngase en contacto con
su concesionario o el servicio técnico oficial de PIONEER más próximo a su domicilio.
Mensajes de error
Mensaje Causa Acción (Consulte)
ERROR-02 Disco sucio Limpie el disco.
Disco rayado Reemplace el disco.
TEMP La temperatura de esta unidad está
ERROR-10 El disco no tiene el mismo número
70
Es
fuera de la gama normal de funcionamiento
de región que esta unidad
Espere hasta que la temperatura de la unidad
se encuentre nuevamente dentro de los límites normales de funcionamiento.
Cambie el DVD vídeo por uno que tenga el
número de región correcto.
Page 71

Información adicional
Mensaje Causa Acción (Consulte)
NON PLAY Esta unidad no puede reproducir
este tipo de disco
El disco está colocado al revés Compruebe que el disco esté colocado co-
ERROR-05 Problema eléctrico o mecánico Cambie la llave de encendido del automóvil
Cambie el disco por uno que pueda reproducir esta unidad.
rrectamente.
entre las posiciones de activación y desactivación, o cambie a una fuente diferente, y después vuelva a activar el reproductor de DVD.
Apéndice
Español
71
Es
Page 72

Apéndice
Información adicional
Especificaciones
Generales
Fuente de a lime ntación ........ 14,4 V CC ( 10,8 15,1 V per-
Sistema de conexión a tierra
..................................................... Tip o ne gativo
Consumo máximo de corriente
..................................................... 0,2 5 A
Display:
Dimensiones (An × Al × Pr)
........................................... 119 × 37 × 20 mm
Pes o ..................................... 0, 1 kg
Unidad ocultable:
Dimensiones (An × Al × Pr)
........................................... 100 × 28 × 13 6 mm
Pes o ..................................... 0, 3 kg
Nota
Las especificaciones y el diseño están sujetos a
posibles modificaciones sin previo aviso.
misible)
72
Es
Page 73

Español
73
Es
Page 74

目錄
感謝惠
請通讀本使用說明書,以了解本機的正確操作方法。閱
考。
購先鋒產品。
開始使用之前
關於本說明書 4
關於本機 4
關於數碼播放源和模擬播放源 4
注意事項 5
遙控器的使用和保養 5
切換遙控器操作模式切換功能 5
快退模式 6
杜比數碼/DTS兼容性 6
按鈕功能
顯示裝置 7
遙控器 7
基本操作
打開本機 10
選擇一個播放源 10
調節音量 10
關閉本機 10
DVD 播放機
功能菜單切換 11
重複播放 11
以隨機順序播放曲目 11
掃描CD曲目 11
暫停播放 11
電視調諧器
使用電視調諧器 12
保存和調用廣播電視台 12
按順序保存信號最強的廣播電視台 12
多碟CD播放機
播放CD 13
50碟多碟CD播放機 13
多碟CD播放機高級功能使用說明 14
重複播放 14
以隨機順序播放曲目 14
掃描CD和曲目 15
暫停CD播放 15
使用ITS播放列表 15
使用碟片標題功能 17
使用CD TEXT功能 18
使用壓縮和低音增強功能 18
數碼信號處理器
DSP調節功能使用說明 19
使用聲場控制 20
使用位置選擇器 20
使用平衡調節 21
調節音源級 21
使用動態範圍控制 21
使用雙重單聲道模式 22
使用直接控制 22
使用杜比專業邏輯 22
設置揚聲器設定 22
選擇截止頻率 24
調節揚聲器輸出音壓 24
使用測試音調節揚聲器輸出音壓 24
調節時間校準 25
使用等化器 25
讀完畢后,請妥善保存,以備日后參
ChH
2
Page 75

目錄
初始設定
調節初始設定 28
設定時鐘 28
切換減光器設定 28
調節亮度 29
校正失真的聲音 29
切換通話靜音/衰減 29
切換輔助設定 29
切換數碼播放源設定 30
切換模擬輸入設定 30
其它功能
打開或者關閉時鐘顯示 31
使用不同的娛樂顯示 31
設定數碼播放源標題 31
設定模擬播放源標題 31
使用AUX播放源 31
設置遙控器代碼類型 32
標題輸入 32
中文
附加資訊
故障排除 33
錯誤訊息 33
規格 35
ChH
3
Page 76

部分
部分
01
01
注意事項
開始使用之前
關於本說明書
本機擁有一系列高級功能,確保高效的接收
和操作。所有這些功能都是為簡化操作而設
計的,但是大多數功能未自帶說明。本操作
說明書將幫助您全面和充分地發揮本產品的
最佳性能,讓您獲得最大的聽覺享受。
我們建議您在開始使用本機之前先通讀本說
明書,以熟悉產品的功能以及相關操作。而
且尤為重要的是要閱讀並遵循本頁以及其他
章節中所列的注意事項。
關於本機
本機可控制另售的先鋒多聲道處理器(DEQP7050)。同時,附帶的遙控器可對另售的先
鋒DVD播放機(如 XDV-P9),先鋒多碟CD播放
機,先鋒電視機的各功能以及先鋒主機各部
件的功能進行控制。
同時,本機帶有汽車立體聲或其它設備的通
用連接器,可將其連接至本機從而享受到
DEQ-P7050的高質量聲音。如果您要將它們連
接起來,則請使用揚聲器輸入連接器或RCA
輸入連接器。您每次可為揚聲器輸入連接器
和RCA輸入連接器連接6個播放源以用作模擬
播放源。還可以改變揚聲器輸入端或RCA輸入
端之間的各個模擬播放源的設定。(請參見
第30頁上的
“切換模擬輸入設定”
。)
關於數碼播放源和模擬播放源
本機具有兩個數碼播放源和六個模擬播放
源。
用IP-BUS電纜將先鋒DVD播放機連接至本機,
您就可以將其作為數碼播放源使用。
當將其連接至本機時,Digital1和Digital2會
自動由先鋒DVD播放機佔用。各數碼播放源根
據先鋒DVD播放機中播放的DVD,VCD和CD等媒
體而進行分配。
當設備被連接至帶有揚聲器輸入連接器或
RCA輸入連接器的本機時,該設備可用作模擬
播放源。例如,當將帶有調諧器和盒式磁帶
播放機的先鋒主機連接至本機時,您可將調
諧器的Analog1和盒式磁帶播放機的Analog2
用作獨立的播放源。
而且,如果正確使用各模擬播放源,則DEQP7050的音頻功能可獨立用於模擬播放源。數
碼播放源和模擬播放源的顯示標題可進行改
變。當使用這些播放源時,該功能十分有
用。要輸入標題,請參見第32頁上的“
輸入
”。
注意
÷
如果連接到本機上用作模擬播放源的設備
具有多個播放源,請務必對用於本機和連
接設備的播放源進行改變。同時,本機無
法控制用作模擬播放源的接入設備。
÷
當連接至本機作為模擬播放源設備的音量
級過高時,可能會發出不正確的聲音。同
時,應關閉聲音控制(例如,響度,等化
器等)以防發出不正確的聲音。
標題
ChH
4
ChH
4
Page 77

開始使用之前
開始使用之前
注意事項
÷
請將本說明書保存於隨手可取之處,以備
操作步驟以及注意事項之參考。
÷
請務必保持較低的音量,以便聽見車外的
聲響。
÷
請不要使本產品受潮。
÷
如果電池未接通或者電量用完,預設記憶
將被抹去,需重新編製。
÷
如果無法正常操作本產品,請與經銷商或
者鄰近的先鋒特約服務中心聯繫。
遙控器的使用和保養
安裝電池
將遙控器背面的電池盤向外滑出,並將電池
的正(+)負(-)極按正確方向插入。
÷
當本機第一次使用時,請拉出電池盤上突
起的薄膜。
÷
如果電池發生漏液,應將遙控器完全擦拭
乾淨並裝入新電池。
÷
處理廢舊電池時,請遵守貴國/地區的政
府法規或環境部門的有關法令。
÷
請仔細檢查,確保將電池的正(+)負
(-)極按正確方向裝入。
使用遙控器
請將遙控器對準前面板進行操作。
÷
在直射陽光下,遙控器可能無法正常工
作。
重要
÷
請勿將遙控器置於高溫或者陽光直射場
所。
÷
請勿使遙控器跌落在地板上,否則可能卡
住剎車或者油門踏板。
部分
部分
01
01
中文
警告
請將電池置於兒童無法獲取之處。如果誤食
電池,請立即就診。
小心
÷
僅可使用一枚 CR2025(3V)鋰電池。
÷
如果一個月以上不使用遙控器,請卸下電
池。
÷
請不要對電池進行充電,拆解,加熱或者
將其置於火中。
÷
請不要使用金屬工具處理電池。
÷
請不要將電池同金屬材料存於一處。
切換遙控器操作模式切換功能
遙控器共有三種遙控操作模式。為能正確控
制連接設備的每個功能,請務必按以下步驟
改變設定:
÷
DVD模式-該模式可控制先鋒DVD播放
機。先鋒DVD播放機的各功能可由該遙控
器進行控制。儘管有些操作步驟與您的
DVD播放機遙控器操作略有不同,仍請使
用相應的按鈕進行正確控制。
ChH
ChH
5
Page 78

部分
部分
01
01
注意事項
開始使用之前
÷
DEQ 模式-該模式控制先鋒多聲道處理器
(DEQ-P7050)。DEQ-P7050的每個功能均
可由該遙控器控制。同時,還可對所連接
的播放源的某些功能進行控制。如果將先
鋒碟式CD播放機或電視機連接至本機,您
即可通過附帶的遙控器控制它們的功能。
÷
AUDIO 模式-該模式可控制先鋒主機。儘
管並非先鋒主機的每個功能均可由該遙控
器控制,但該遙控器可控制大部分基本功
能。如果您將先鋒主機連接至本機,則附
帶的遙控器可對其進行操作。
注意
附帶的遙控器無法控制接入揚聲器輸入連接
器和RCA輸入連接器的設備。要對其進行控
制,請使用設備上的正確按鈕。
快退模式
如果您在約30秒之內不進行操作,則屏幕顯
示開始快退,然後以每隔10秒的速度繼續快
退。當點火開關設定為ACC或ON時,若本機電
源關閉,按數字5按鈕則取消快退模式。再按
一次數字5按鈕可啟用快退模式。
÷
“DTS”是Digital Theater Systems,Inc.
(數碼影院系統公司)的註冊商標。
注意
本產品含有版權保護技術,它受特定美國專
利的方法聲明以及Macrovision Corporation和其它產權所有者的知識產權的保護。
使用該版權保護技術必須經過Macrovision
Corporation的授權,並且僅可用於家用或
者其它有限的觀看用途,除非得到
Macrovision Corporation的另外授權。本
機嚴禁逆向設計或拆解。
杜比數碼/DTS兼容性
如果將本機和先鋒多聲道處理器一同使用,
您可以享受DVD電影以及具5.1聲道錄音內容
的音樂軟體所帶來的音響氛圍和震撼效果。
÷
由Dolby Laboratories 授權製造。「杜
比」、「Dolby」與雙D標誌是Dolby Laboratories 的商標。
ChH
6
ChH
6
Page 79

部分
按鈕功能
02
12
e
2
中文
3
4
5
1
6
7
8
9
a
b
c
d
f
g
h
i
j
k
l
m
n
o
p
q
r
顯示裝置
1 電源指示標誌
電源打開時該指示標誌點亮。
2 資訊顯示
顯示各個連接的播放源和設定的資訊。
遙控器
1 遙控器選擇開關
÷
DVD 模式-切換改變遙控器的設定。
有關操作的詳情,請參見第32頁上的
“
設定遙控器代碼類型
÷
DEQ 模式-不使用。
÷
AUDIO 模式-不使用。
2 VOLUME按鈕
按該按鈕增大或者減小音量。
”。
ChH
7
Page 80

部分
02
按鈕功能
3 TOP MENU按鈕
÷
÷
÷
4 MENU按鈕
僅當控制先鋒DVD播放機時,按該按鈕才
有效。
在DVD播放時,按該按鈕可顯示DVD菜單。
5 RETURN按鈕
僅當控制先鋒DVD播放機時,按該按鈕才
有效。
在SET-UP MENU顯示時,按該按鈕可返回
至前一顯示。
6 AUDIO按鈕
僅當控制先鋒DVD播放機時,按該按鈕才
有效。
在DVD播放時,按該按鈕可改變伴音語
言。
7 DISP按鈕
÷
÷
÷
8 SUBTITLE按鈕
僅當控制先鋒DVD播放機時,按該按鈕才
有效。
在DVD播放時按該按鈕可改變字幕語言。
9 ANGLE按鈕
僅當控制先鋒DVD播放機時,按該按鈕時
才有效。
ChH
8
DVD 模式-在DVD播放時,按該按鈕可
返回至頂層菜單。
DEQ 模式-當將先鋒電視機連接至本
機時,按該按鈕可選擇視頻播放源。
AUDIO 模式-當將先鋒電視機連接至
本機時,按該按鈕可選擇視頻播放源。
DVD 模式-當DVD播放機作為播放源播
放時,按該按鈕可改變另售顯示屏上的
資訊顯示。
DEQ 模式-按該按鈕可顯示資訊顯示
屏上的資訊。
AUDIO 模式-按該按鈕可顯示資訊顯
示屏上的資訊。
在DVD播放時按該按鈕可改變觀賞視角。
p PLAY/PAUSE(6)按鈕
÷
DVD 模式-連續按該按鈕可在播放和
暫停之間進行切換。
÷
DEQ 模式-不使用。
÷
AUDIO 模式-不使用。
q REVERSE(1)按鈕
÷
DVD 模式-按該按鈕可執行快退操
作。
÷
DEQ 模式-按該按鈕可控制各功能。
÷
AUDIO 模式-按該按鈕可控制各功
能。
w PREVIOUS(4)按鈕
÷
DVD 模式-按該按鈕可返回至前一曲
目(章)。
÷
DEQ 模式-按該按鈕可選擇各功能。
÷
AUDIO 模式-按該按鈕可選擇各功
能。
e NUMBER按鈕
÷
DVD 模式-按這些按鈕可直接選擇所
需的曲目,章以及碟片。
÷
DEQ 模式
1-6 按鈕-將先鋒多碟播放機連接至本
機時,按該按鈕可對多碟播放機進行碟
片號碼搜索。
7 按鈕-在控制先鋒主機時,按該按鈕
可選擇播放源。
0 按鈕-按該按鈕可將資訊顯示改變為
時鐘顯示。
÷
AUDIO 模式
1-6 按鈕-不使用。
7 按鈕-在控制先鋒主機時,按該按鈕
可選擇播放源。
0 按鈕-按該按鈕可將資訊顯示改變為
時鐘顯示。
Page 81

部分
按鈕功能
r ENTERTAINMENT按鈕
按該按鈕可改變為娛樂顯示。
t SOURCE按鈕
選擇播放源後本機即被打開。按該按鈕可
在所有可選的播放源中循環切換。
y 操縱桿
僅當控制先鋒DVD播放機時按該按鈕才有
效。
÷
DVD 模式-移動該桿可選擇設定。
按動該桿可對該設定進行設置或者
對開關操作進行選擇。
÷
DEQ 模式-移動該桿可選擇設定。按
動該桿可對該設定進行設置或者對開關
操作進行選擇。
÷
AUDIO 模式-不使用。
u EQ按鈕
按該按鈕可選擇不同的等化器曲線。
i SFC按鈕
按該按鈕可選擇聲場控制。
s STEP(E/e)按鈕
÷
DVD 模式-在DVD/VCD播放時,按該按
鈕可逐幀前進。按住該按鈕1秒鐘可啟
用慢速播放。
÷
DEQ 模式-按該按鈕可控制各功能。
÷
AUDIO 模式-按該按鈕可控制各功
能。
d AT T按鈕
按該按鈕可快速減小約90%的音量級。再
按一次可返回至初始音量級。
f FORWARD(¡)按鈕
÷
DVD 模式-按該按鈕可進行快進操
作。
÷
DEQ 模式-按該按鈕可控制各功能。
÷
AUDIO 模式-按該按鈕可控制各功
能。
g STOP(7)按鈕
÷
DVD 模式-按該按鈕可停止播放。
÷
DEQ 模式-不使用。
÷
AUDIO 模式-不使用。
02
中文
o 遙控器操作模式開關
在DVD模式,DEQ模式以及AUDIO模式之
間進行切換。(請參見第5頁上的
遙控器操作模式切換開關”
。)
; BAND按鈕
÷
DVD 模式-不使用。
÷
DEQ 模式-按該按鈕可取消各功能的
控制模式。
÷
AUDIO 模式-按該按鈕可取消各功能
的控制模式。
a DVD PWR 按鈕
÷
DVD 模式
-當將先鋒DVD播放機連接至
本機時,按該按鈕可獨立進行開關操
作。
÷
DEQ 模式-不使用。
÷
AUDIO 模式-不使用。
“切換
h NEXT(¢)按鈕
÷
DVD 模式-按該按鈕可跳至下一曲目
(章)。
÷
DEQ 模式-按該按鈕可選擇不同的音
質控制。
÷
AUDIO 模式-按該按鈕可選擇不同的
音質控制。
j CLEAR按鈕
÷
DVD 模式-在NUMBER使用期間按該
按鈕可取消所輸入的數字。
÷
DEQ 模式-不使用。
÷
AUDIO 模式-不使用。
ChH
9
Page 82

部分
03
基本操作
打開本機
÷
請按SOURCE打開本機。
打開本機時選擇一個播放源。
自後座操作DVD播放機時
÷
請按DVD PWR打開DVD播放機。
注意
÷
即使未將DVD選為本機的播放源,但如果
用DVD PWR打開本機電源,您仍可以在本
機的後部顯示屏上觀看DVD圖片。
÷
無論本機是否處於打開或關閉狀態,您仍
可以在後部顯示屏上觀看DVD影碟。
選擇一個播放源
÷
請按SOURCE選擇一個播放源。
反覆按SOURCE,在以下播放源之間進行切
換:
Digital1(數碼播放源1)-Digital2(數碼播
放源2)-TV(電視)-DVD(DVD播放
機∕多碟DVD播放機)-Multi-CD(多碟CD播
放機)-AUX(輔助輸入)-Analog1(模擬
播放源1)-Analog2(模擬播放源2)-
Analog3(模擬播放源3)-Analog4(模擬
播放源4)-Analog5(模擬播放源5)-
Analog6(模擬播放源6)
注意
÷
您無法同時使用數碼播放源Digital1,
Digital2和DVD。在通過IP-BUS電纜連接的
先鋒DVD播放機時,您僅可使用DVD播放
源。否則,您可使用數碼播放源Digital1
和Digital2。
÷
在未能選擇任何播放源時,當您試圖選擇
一個播放源時會聽到短促的嗶音。
÷
在以下情況中,播放源將不改變:
- 當與各播放源相關的設備沒有接到本機
時。
- 當沒有碟片艙放入多碟CD播放機時。
- 當沒有碟片艙放入多碟DVD播放機時。
- 當沒有碟片放入DVD播放機時。
- 當AUX(輔助輸入)設定為關閉時(請
參見第29頁)。
- 當模擬播放源設定為關閉時(請參見第
30頁)。
調節音量
÷
請使用VOLUME對聲級進行調節。
按該按鈕可增大或者減小音量。
關閉本機
÷
請按住SOURCE直到本機關閉。
自後座操作DVD播放機時
÷
請按DVD PWR關閉DVD播放機。
10
ChH
Page 83

部分
DVD 播放機
您可以同另售的DVD播放機或多碟DVD播放機
一起使用本機。
有關操作的詳情,請參見DVD播放機或多碟
DVD播放機的使用說明書。本章節中有關通過
本機操作DVD的資訊和DVD播放機或多碟DVD
播放機使用說明書的內容有所不同。
重要
僅當遙控器設定為DEQ模式時,您才可以使
用以下功能。
功能菜單切換
÷
在DVD播放期間,按4 以顯示功能名
稱。
反覆按4,在以下功能之間進行切換:
Repeat(重複播放)-Pause(暫停)
÷
在VCD播放期間,按4以顯示功能名
稱。
反覆按4,在以下功能之間進行切換:
Repeat(重複播放)-Pause(暫停)
以隨機順序播放曲目
1 按4以選擇
2 按E以打開隨機播放。
7
按e以關閉隨機播放。
Random
(隨機播放)。
掃描CD曲目
1 按4以選擇
2 按E以打開掃描播放。
7
當您找到所需曲目時,按e以關閉掃描
播放。
7
如果顯示屏自動返回至播放顯示,請按
4再次選擇
Track Scan
Track Scan
(掃描播放)。
(掃描播放)。
暫停播放
1 按4以選擇Pause(暫停播放)。
2 按E以打開暫停播放。
7
按e以關閉暫停播放。
04
中文
÷
在CD播放期間,按4以顯示功能名稱。
反覆按4,在以下功能之間進行切換:
Repeat(重複播放)-Random(隨機播放)
-Track Scan(掃描播放)-Pause(暫停)
重複播放
÷
按4以選擇
÷
在DVD播放期間,按1或¡以選擇重
複播放範圍。
÷
在VCD或CD播放期間,按E或e以打
開或關閉重複播放。
Repeat
(重複播放)。
ChH
11
Page 84

部分
05
電視調諧器
您可以同另售的電視調諧器一起使用本機。
有關操作詳情,請參見電視調諧器的使用說
明書。本章節中有關通過本機操作電視機的
資訊和電視調諧器使用說明書中的內容有所
不同。
重要
僅當遙控器設定為DEQ模式時,您才可以使
用以下功能。
使用電視調諧器
1 按SOURCE以選擇電視機。
2 用VOLUME調節聲級。
3 按BAND以選擇波段。
4 要執行手動調諧,請快速按1或¡。
當您下次按同一預設調諧按鈕1-6 時,電視
台將從記憶體中調出。
注意
÷
記憶體中最多可保存12個電視台,兩個電
視波段各6個電視台。
÷
您還可以按E或e來調用分配給預設調
諧按鈕1-6的電視台。
按順序保存信號最強的廣播電視台
1 按4以選擇BSSM。
按4直到顯示屏中出現BSSM。
2 按E以打開BSSM。
BSSM開始閃爍。當BSSM 閃爍時,12個信號
最強的廣播電視台將從其中最低的信號頻道
開始按順序保存。保存完畢後,BSSM停止閃
爍。
7
要取消保存過程,請按e。
5 要進行搜索調諧,請按住1或¡約1秒
鐘,然後放開。
保存和調用廣播電視台
÷
當您找到要保存在記憶體中的電視台時,
按某個預設調諧按鈕1-6,直到預設號碼停止
閃爍。
您所按下的數字將在預設號碼指示標誌中閃
動,然後再一直點亮。所選中的電視台則被
保存在記憶體中。
ChH
12
注意
使用BSSM保存的廣播頻率會取代您用1-6保存
的廣播頻率。
Page 85

部分
多碟 CD 播放機
播放CD
132
您可以使用本機來控制另售的多碟CD播放
機。
以下是使用您的多碟CD播放機來播放CD所必
需的基本步驟。更高級的CD操作將自下一頁
起開始介紹。
重要
僅當遙控器設定為DEQ模式時,您才可以使
用以下功能。
7
您也可以按E或e按順序選擇碟片。
3 要執行快進或快退,請按住1或¡。
4 要跳回或跳進至另一曲目,請按1或
¡。
按¡將跳至下一曲目的開始處。按1一次
將跳至當前曲目的開始處。再按一次將跳至
前一曲目。
注意
÷
當多碟CD播放機執行預備操作時,顯示
Ready。
÷
如果多碟CD播放機無法正常工作,則可能
顯示ERROR-11等錯誤訊息。請參見多碟
CD播放機的用戶手冊。
÷
如果沒有碟片放入多碟CD播放機的碟片艙
中時,則顯示NO DISC。
06
中文
1 碟片號碼指示標誌
顯示正在播放的碟片。
2 曲目號碼指示標誌
顯示正在播放的曲目。
3 播放時間指示標誌
顯示當前曲目的已播放時間。
1 按SOURCE以選擇多碟CD播放機。
按SOURCE直到出現Multi-CD顯示。
2 用1-6按鈕選擇您要收聽的碟片。
對於1至6間的碟片,請按相應的數字按鈕。
如果您要選擇一張7至12間的碟片,請按住相
應的數字(例如碟片7就按數字1)直到顯示
屏上出現碟片號碼。
50碟多碟CD播放機
50碟多碟CD播放機僅支持本說明書介紹的功
能。
ChH
13
Page 86

部分
06
多碟 CD 播放機
多碟CD播放機高級功能使用說明
1
1 功能顯示
顯示功能狀態。
重要
僅當遙控器設定為DEQ模式時,您才可以使
用以下功能。
÷
按4以顯示功能名稱。
反覆按4,在以下功能之間進行切換:
Repeat(重複播放)-碟片標題列表-Random(隨機播放)-Scan(掃描播放)-ITS
Play(ITS播放)-Pause(暫停)-Comp
(壓縮和DBE)
7
要返回至播放顯示,請按BAND。
2 按1或¡以選擇重複範圍。
按1或¡直到顯示屏上出現所需重複的範
圍。
÷
MCD-重複播放多碟CD播放機中的所
有碟片
÷
TRK-僅重複播放當前曲目
÷
DISC-重複播放當前碟片
注意
÷
如果您在重複播放期間選擇了其它碟片,
重複播放範圍將改變至MCD。
÷
如果您在TRK期間執行了曲目搜索或者快
進/快退,重複播放範圍將改變至DISC。
以隨機順序播放曲目
隨機播放讓您可在MCD和DISC重複範圍內以
隨機順序播放曲目。
1 選擇重複播放範圍。
請參見本頁的“
重複播放
”。
注意
如果您在約30秒內未進行功能操作,顯示屏
將自動返回至播放顯示。
重複播放
多碟CD播放機有三種重複播放範圍:MCD
(多碟CD播放機重複),TRK(單曲重複)
以及DISC(碟片重複)。
1 按4以選擇Repeat。
按4直到顯示屏上出現Repeat。
ChH
14
2 按4以選擇Random。
按4直到顯示屏上出現Random。
3 按E以打開隨機播放。
顯示屏上出現Random :ON。在先前所選擇的
MCD或DISC範圍內的曲目將以隨機順序播
放。
4 按e以關閉隨機播放。
顯示屏上出現Random :OFF。曲目將繼續按
順序播放。
Page 87

部分
多碟 CD 播放機
注意
如果您在DISC期間打開隨機播放,然後返回
至播放顯示,顯示屏上出現D.RANDOM。
掃描CD和曲目
當您使用DISC時,將播放所選碟片上各曲目
約前10秒鐘的內容。如果您使用MCD,則將
播放各碟片上第一首曲目的前10秒鐘內容。
1 選擇重複範圍。
請參見前頁的“
2 按4以選擇Scan。
按4直到顯示屏上出現Scan。
3 按E以打開掃描播放。
顯示屏上出現Scan :ON。播放當前碟片上各
曲目(或者各碟片上的第一首曲目)的前10
秒鐘內容。
重複播放
”。
暫停CD播放
暫停功能讓您能暫時停止碟片的播放。
1 按4以選擇Pause。
按4直到顯示屏上出現Pause。
2 按E以打開暫停功能。
顯示屏上出現Pause :ON。當前曲目暫停播放。
3 按e以關閉暫停功能。
顯示屏上出現Pause :OFF。在您打開暫停功能
的同一位置將恢復播放。
使用 ITS 播放列表
ITS(即時曲目選擇)讓您能從多碟CD播放機
碟片艙中為最喜愛曲目創建一份播放列表。
當您將最喜愛的曲目添加至播放列表後,您
可以打開ITS播放功能,僅播放所選的曲目。
06
中文
4 當您找到所需曲目(或碟片)時,按e
以關閉掃描播放。
顯示屏上出現Scan :OFF。曲目(或碟片)將
繼續播放。
7
如果顯示屏已自動返回至播放顯示,請按
4再次選擇Scan。
注意
÷
曲目或碟片掃描完成後,將再次開始正常
的曲目播放。
÷
如果您在DISC期間打開掃描播放,然後返
回至播放顯示,顯示屏上出現 T.SCAN。
使用ITS編序功能創建播放列表
您可以使用ITS對每張碟片輸入並播放多達99
首曲目,碟片數量最多可達100張(包括碟片
標題)。(在CDX-P1250和CDX-P650之前售出
的多碟CD播放機最多可在播放列表中記憶24
首曲目。)
1 播放您要編序的CD。
按E或e以選擇CD。
2 按住4直到顯示屏上出現TITLE,然後按
4以選擇ITS。
顯示TITLE後,反覆按4,顯示屏上將出現
以下功能:
ChH
15
Page 88

部分
06
多碟 CD 播放機
TITLE(碟片標題輸入)-ITS(ITS編序)
3 按1或¡以選擇所需曲目。
4 按E以在播放列表中保存當前播放的曲
目。
ITS Input 顯示短暫時間,所選的當前播放曲
目添加到您的播放列表中。然後顯示屏再次
顯示ITS。
5 按BAND以返回至播放顯示。
注意
在記憶體中保存了100張碟片的資料後,新碟
片的資料將覆蓋最早的碟片資料。
通過ITS播放列表進行播放
ITS播放功能使您可欣賞輸入ITS播放列表的
曲目。當您打開ITS功能後,多碟CD播放機的
ITS播放列表中的曲目將開始播放。
1 選擇重複範圍。
請參見第14頁上的
2 按4以選擇ITS Play。
按4直到顯示屏上出現ITS Play。
“重複播放”
。
4 按e以關閉ITS播放。
顯示屏上出現ITS Play :OFF。將以正常順序從
當前播放曲目和CD繼續播放。
從ITS播放列表中刪除曲目
要從ITS播放列表中刪除一首曲目,請務必打
開ITS播放功能。
如果ITS播放功能已經打開,請跳至第2步。
1 播放要從ITS播放列表中刪除曲目所在的
CD,並打開ITS播放功能。
請參見本頁的
目”。
2 按住4直到顯示屏上出現TITLE,然後按
4以選擇ITS。
顯示TITLE後,請按4直到顯示屏上出現
ITS。
3 按1或¡以選擇所需曲目。
4 按e以刪除ITS播放列表中的曲目。
當前播放所選曲目將從ITS播放列表中刪除,
然後開始播放ITS播放列表中的下一曲目。
7
如果在當前範圍內沒有播放列表中的曲
目,將顯示ITS Empty並恢復正常播放。
5 按BAND以返回至播放顯示。
“從ITS播放列表中播放曲
3 按E以打開ITS播放功能。
顯示屏上出現ITS Play :ON。將在先前選擇的
MCD或DISC範圍內開始播放您的播放列表中
的曲目。
7
如果當前範圍內沒有曲目編入ITS播放列
表,將顯示ITS Empty。
ChH
16
從ITS播放列表中刪除CD
要從ITS播放列表中刪除CD中的所有曲目,請
務必關閉ITS播放功能。
Page 89

部分
多碟 CD 播放機
1 播放您要刪除的CD。
按E或e以選擇CD。
2 按住4直到顯示屏上出現TITLE,然後按
4以選擇ITS。
顯示TITLE後,請按4直到顯示屏上出現
ITS。
3 按e 以從ITS播放列表中刪除當前播放
CD的所有曲目。
當前播放CD的所有曲目從播放列表中刪除,
並顯示ITS Clear。
4 按BAND以返回至播放顯示。
使用碟片標題功能
您可以輸入CD標題並加以顯示。這樣,您即
可方便地進行搜索並選擇您所需的碟片進行
播放。
輸入碟片標題
碟片標題輸入功能讓您可在多碟CD播放機中
輸入最多100張碟片的標題(帶ITS播放列
表),每個標題最多可有10個字母。
1 播放一張您要輸入標題的CD。
按E或e以選擇CD。
2 輸入標題。
要輸入標題,請參見第32頁上的
。
入”
注意
÷
即使碟片已經從碟片艙中取出,標題也將
保存在記憶體中,並在該碟片再次插入時
調用。
“標題輸
÷
記憶體中保存了100張碟片的資料後,新
碟片的資料將覆蓋最早的碟片資料。
÷
當在CD TEXT兼容的多碟CD播放機上播放
TITLE
CD TEXT碟片時,您無法切換至
片標題應已被錄製到CD TEXT碟片之中。
。碟
顯示碟片標題
您可使任何輸入了碟片標題的碟片顯示標
題。
÷
按DISPLAY。
反覆按DISPLAY,在以下設定之間進行切換:
播放時間-Disc Title(碟片標題)
當您選擇Disc Title 時,顯示屏中將顯示當前
播放碟片的標題。
7
如果當前播放的碟片沒有輸入過標題,將
顯示No Title。
從碟片標題列表中選擇碟片
碟片標題列表功能讓您能看到已輸入到多碟
CD播放機中的碟片標題列表並選擇一個標題
進行播放。
1 按4以選擇LIST。
按4直到顯示屏上出現LIST。
2 按1或¡滾動已輸入標題的列表。
7
如果碟片中沒有輸入過標題,將不顯示標
題。
3 按E以播放您最喜愛的CD標題。
選擇的CD標題開始播放。
06
中文
ChH
17
Page 90

部分
06
多碟 CD 播放機
使用CD TEXT功能
您僅可以在CD TEXT兼容的多碟CD播放機上使
用這些功能。
某些碟片在製作時已編入了某些特定資訊。
這些碟片可能包含諸如CD標題,曲目標題,
作者姓名和播放時間之類的資訊並被稱為CD
TEXT碟片。只有這些經特殊編碼的CD TEXT碟
片才支持以下功能。
在CD TEXT碟片中顯示標題
÷
按DISPLAY。
反覆按DISPLAY,在以下設定之間進行切
換:
播放時間-Disc Title(碟片標題)
-DiscArtist Name(碟片作者姓名)
-Track Title(曲目標題)
-TrackArtist Name(曲目作者姓名)
7
如果CD TEXT碟片中沒有錄製特別資訊,將
顯示NO XXXX(例如,NO Disc Title)。
在顯示屏中滾動標題
本機僅可顯示Disc Title,DiscArtist Name,
Track Title以及TrackArtist Name的前16個字
母。當所錄製的資訊超過16個字母時,您可
以向左滾動文本,這樣即可看見標題的剩餘
部分。
使用壓縮和低音增強功能
您僅可在支持此功能的多碟CD播放機上使用
這些功能。
使用COMP(壓縮)和DBE(動態低音增強)功
能可讓您調節多碟CD播放機的播放音質。每
一種功能都包含一個兩步的調節過程。COMP
功能在音量較高的狀態下平衡較響和較柔和
的聲音輸出。DBE可增加低音音壓,從而使播
放出的聲音更圓潤豐滿。每當選擇這些功能
時,都請收聽其效果,以選擇其中最能增強
您在所收聽CD或曲目播放效果的設定。
1 按4以選擇Comp。
按4直到顯示屏上出現Comp。
7
如果多碟CD播放機不支持COMP/DBE,則當
您試圖選擇該功能時將顯示 No Comp。
2 按E或e以選擇您最喜愛的設定。
反覆按E或e ,在以下設定之間進行切
換:
Comp OFF-Comp1-Comp2-Comp OFF
-DBE1-DBE2
÷
按住DISPLAY直到標題開始向左滾動。
顯示屏上將出現標題的剩餘內容。
ChH
18
Page 91

部分
數碼信號處理器
DSP調節功能使用說明
重要
÷
僅當遙控器設置為DEQ模式,您才可以使
用以下功能。
÷
僅當您將先鋒多頻道處理器(DEQP7050)連接至本機,以下功能才有效。
按順序執行以下設定/調節,您即可輕而易舉
地獲得精調過的聲場。
1
設置揚聲器設定
2
使用位置選擇器
3
調節時間校準
4
使用測試音調節揚聲器輸出音壓
5
選擇截止頻率
6
調節揚聲器輸出音壓
7
調節3頻帶參量等化器
操作DSP菜單
7
在通過IP-BUS電纜連接的先鋒DVD播放機
上播放DVD碟片以外的碟片時,您將無法切換
至DRC或D.MONO。
7
要返回至各播放源顯示,請按BAND。
注意
如果您在約30秒之內未進行DSP功能操作,顯
示屏將自動返回至播放源顯示。
操作DSP細目菜單
123
456
1 前置左揚聲器
2 中置揚聲器
07
中文
1
1 DSP顯示
顯示DSP功能狀態。
÷
按¢以顯 DSP功能名稱。
反覆按¢,在以下DSP功能之間進行切換:
Posi(位置選擇器)-Fad(平衡調節)-
SLA(音源級調節)-DRC(動態範圍控制)
-D.MONO(雙重單聲道)-DIRECT(直
接)-Dolby PL(杜比專業邏輯)
3 前置右揚聲器
4 後置左揚聲器
5 超低音揚聲器
6 後置右揚聲器
÷
按住¢直到顯示屏上出現SP Set,然後
按¢以顯示DSP功能名稱。
顯示SP Set後,反覆按¢,顯示屏上將出現
DSP的以下功能:
ChH
19
Page 92

部分
07
數碼信號處理器
SP Set(揚聲器設定)-CutOff(截止頻
率)-SP Lev(揚聲器輸出音壓)-T Tone
(測試音)-Time A(時間校準)-PEQ(3
頻帶參量等化器)
7
如果在Posi中沒有選擇F/L 和 F/R,您將無
法切換至Time A。
7
如果沒有選擇CUSTOM1和CUSTOM2作為
等化器曲線時,您將無法切換至PEQ。
7
要返回至各播放源顯示,請按BAND。
使用聲場控制
SFC功能可營造出現場演奏的氣氛。
÷
不同演奏環境的聲效並不一樣,這取決於
聲波穿過的空間範圍和形狀,也取決於聲
音從舞台、牆壁、地板以及天花板的反射
情況。在現場演奏中,您可以聽到三個層
次的音樂:直接聲音、早期反射聲以及晚
期反射聲,或者混響。這些因素均編入了
SFC回路以再現各種演奏設定的聲場。
÷
按SFC以選擇所需的SFC模式。
反覆按SFC,在以下模式之間進行切換:
Musical(音樂)-Drama(戲劇)-Action
(動作)-Jazz(爵士)-Hall(大廳)-
Club(俱樂部)-OFF(關閉)
注意
如果播放源為雙聲道LPCM音頻或者雙聲道杜
比數碼音頻,並且您選擇了最適於5.1聲道音
頻的SFC效果(即Musical,Drama或者
Action),則我們建議您打開杜比專業邏
輯。另一方面,若選擇了適用於雙聲道音頻
的SFC效果(即 Jazz,Hall 或者 Club),則我
們建議您關閉杜比專業邏輯。
使用位置選擇器
要確保聲音更自然的方法之一是準確定位立
體聲聲像,讓您處於聲場的中心。位置選擇
器功能讓您可自動調節揚聲器輸出音壓並插
入一個延遲時間以適於在座乘客的數量和位
置。如果該功能和SFC功能共同使用,則可使
聲像更為自然,並讓您體驗到環繞您周圍的
全景聲音。
1 按¢以選擇Posi。
按¢直到顯示屏上出現Posi。
2 按1/¡/E/e以選擇收聽位置。
按1/¡/E/e中之一個,以選擇表格
中所列的收聽位置。
按鈕 顯示 位置
1 F/L 左側前座
¡ F/R 右側前座
E FRONT 前座
e ALL 所有座位
7
要取消所選擇的收聽位置,請再次按同一
按鈕。
注意
當您對收聽位置進行調節時,揚聲器將自動
設定為合適的輸出音壓。如果您希望,可以
“使用測試音調節揚聲器輸出音壓”
按照
“調節揚聲器輸出音壓”
者
中的說明進行調
節。
或
20
ChH
Page 93

部分
數碼信號處理器
使用平衡調節
您可以選擇一個衰減器/平衡設定,由該設定
提供各乘客座位的理想收聽環境。
1 按¢以選擇Fad 。
按¢直到顯示屏上出現Fad 。
7
如果原先已調節好平衡設定,將顯示Bal。
2 按E 或e 以調節前置/後置揚聲器平
衡。
每次您按E或e時,前置/後置揚聲器平衡
將向前或者向後移動。當前置/後置揚聲器平
衡從前向後移動時,將顯示Fad :F25-Fad :
R25。
7
當僅使用兩個揚聲器時,Fad : 0為最佳設
定。
3 按1或 ¡ 以調節左置/右置揚聲器平
衡。
當您按1或¡時,將顯示Bal : 0。每次您
按1或¡時,左置/右置揚聲器平衡將向
左或者向右移動。
當左置/右置揚聲器平衡從左向右移動時,將
顯示 Bal :L25 – Bal :R25。
調節音源級
SLA(音源級調節)讓您可調節各播放源的音
量級,以避免切換播放源時音量發生極大變
化。
2 按E或e以調節播放源音量。
每次您按E或e時,播放源音量將增大或
者減小。
當播放源音量增大或者減小時,將顯示
SLA+4 – SLA-4。
注意
÷
VCD和CD將自動設定為相同的音源級調節
音量。
÷
Analog4,Analog5 和Analog6 將自動設定
為相同的音源級調節音量。
使用動態範圍控制
動態範圍指最響聲音和最柔和聲音之間的差
值。動態範圍控制將壓縮該差值,以使您即
使處於低音量級時仍可以聽到清晰的聲音。
÷
動態範圍控制僅對杜比數碼聲音有效。
1 按¢以選擇DRC。
按住¢直到顯示屏上出現DRC。
7
當播放DVD碟片以外的其它碟片時,您無
法切換本模式。
2 按E以打開動態範圍控制。
顯示屏上出現DRC ON。此時,動態範圍控
制打開。
7
要關閉動態範圍控制,請按e。
07
中文
1 按¢以選擇SLA。
按住¢直到顯示屏上出現SLA。
ChH
21
Page 94

部分
07
數碼信號處理器
使用雙重單聲道模式
當播放一張錄有雙重單聲道的碟片時,您可
以選擇輸出的聲道。
÷
本功能僅對雙重單聲道模式聲音有效。
1 按¢以選擇D.MONO。
按住¢,直到顯示屏上出現D.MONO。
÷
當播放DVD碟片以外的其它碟片時,您無
法切換本模式。
2 按1或¡以選擇所需的輸出設定。
每次您按1或¡時,將按照以下順序對輸
出設定進行選擇:
L&R(左聲道和右聲道)-L ch(左聲道)-
R ch(右聲道)
使用直接控制
您可以忽略音頻設定以檢查您的音頻設定是
否有效。
1 按¢以選擇DIRECT。
按住¢,直到顯示屏上出現DIRECT。
2 按E以打開直接控制。
顯示屏上出現DIRECT ON。此時,直接控制
打開。
÷
要關閉直接控制,請按e。
注意
÷
除VOLUME外,所有音頻功能在DIRECT
ON(直接控制)時都被鎖住。
÷
如果播放源為雙聲道LPCM音頻或者雙聲道
杜比數碼音頻,並且您選擇了DIRECT
ON,則音頻僅從前置左/右揚聲器中輸
出。
使用杜比專業邏輯
杜比專業邏輯可以增強空間和方位效果,還
可以營造影院級氛圍。
÷
如果播放源為雙聲道LPCM音頻或者雙聲道
杜比數碼音頻,並且您選擇了最適於5.1
聲道音頻的SFC效果(即 Musical,Drama
或者 Action),我們建議您打開杜比專業
邏輯。另一方面,若選擇了適用於雙聲道
音頻的SFC效果(即Jazz, Hall或者
Club),我們建議您關閉杜比專業邏輯。
1 按¢以選擇Dolby PL。
按住¢,直到顯示屏上出現Dolby PL。
2 按E以打開杜比專業邏輯。
顯示屏上出現Dolby PL ON。此時,杜比專業
邏輯打開。
7
要關閉杜比專業邏輯,請按e。
注意
當打開杜比專業邏輯後播放雙聲道的單聲道
播放源時,可能出現以下情況:
÷
如果中置揚聲器設定為SMALL或LARGE且
沒有安裝中置揚聲器時,將不輸出音頻。
÷
如果安裝有中置揚聲器且中置揚聲器設定
為SMALL或者LARGE,音頻僅從中置揚聲
器中輸出。
設置揚聲器設定
您需要根據所安裝的揚聲器進行有/沒有(或
者是/否)以及尺寸(低音再現能力)的選
擇/調節。
22
ChH
Page 95

部分
數碼信號處理器
如果揚聲器能夠再現100Hz或以下的低音,則
需要將尺寸設定為LARGE(大),否則請選
擇SMALL(小)。
÷
如果超低音揚聲器設定為OFF且前置和後
置揚聲器設定為SMALL或者OFF,則將不
輸出低頻範圍的聲音。
÷
必須將沒有安裝的揚聲器設定為OFF。
÷
如果揚聲器能夠再現低音,或者沒有安裝
超低音揚聲器,請將前置或者後置揚聲器
設定為LARGE。
1 按住¢直到顯示屏上出現SP Set。
2 按1或者¡以選擇所需調節的揚聲器。
每次您按1或¡時,將按照以下順序對揚
聲器進行選擇:
前置揚聲器-中置揚聲器-後置揚聲器-超
低音揚聲器-S.W(超低音揚聲器設定)
7
僅當超低音揚聲器設定為 ON 時,您才可
以切換至 S.W。
校正超低音揚聲器相位
如果對超低音揚聲器低音輸出的加強並不理
想,或者甚至讓您感到低音更為沉悶,這可
能是因為超低音揚聲器的輸出和您從其它揚
聲器聽到的低音互相抵消的緣故。為了解決
這個問題,請嘗試改變超低音揚聲器的相位
設定。
1 按住¢直到顯示屏上出現SP Set。
2 按1或者¡以選擇超低音揚聲器。
當您按1或者¡時,可按照以下順序對揚
聲器進行選擇:
前置揚聲器-中置揚聲器-後置揚聲器-超
低音揚聲器-S.W(超低音揚聲器設定)
3 按E以打開超低音揚聲器輸出。
4 按 ¡ 以選擇S.W(超低音揚聲器設
定)。
07
中文
3 按E或e以對所選擇的揚聲器選擇正確
尺寸。
每次您按E或e時,將按照以下順序對尺
寸進行選擇:
LARGE(大)-SMALL(小)-OFF(關閉)
7
當選擇了FRONT(前置揚聲器)時,您將
無法選擇OFF。
7
當選擇了SUB.W(超低音揚聲器)時,您
可以選擇ON或者OFF。
7
當選擇了S.W(超低音揚聲器設定)時,
您可以切換Rev.(倒相)或者Normal(正常
相位)。
4 按BAND返回播放顯示。
5 按E 或e 以選擇超低音揚聲器輸出相
位。
按E,選擇Normal(正常相位)。
按e,選擇Rev.(倒相)。
6 按BAND返回至播放顯示。
注意
當打開杜比專業邏輯後,播放雙聲道的單聲
道播放源時,可能出現以下情況:
÷
如果中置揚聲器設定為SMALL或者LARGE
且沒有安裝中置揚聲器時,將不輸出音
頻。
÷
如果安裝有中置揚聲器且中置揚聲器設定
為SMALL或者LARGE,音頻僅從中置揚聲
器中輸出。
ChH
23
Page 96

部分
07
數碼信號處理器
選擇截止頻率
您可以選擇一個頻率,使低於該頻率的聲音
通過超低音揚聲器進行再現。如果所安裝的
揚聲器中包括一個尺寸設定為SMALL的揚聲
器,則您可以選擇一個頻率,使低於該頻率
的聲音通過設定為LARGE的揚聲器或者超低
音揚聲器再現。
1 按住¢直到顯示屏上出現SP Set,然後
按¢以選擇CutOff。
顯示SP Set後,按¢直到顯示屏上出現
CutOff。
2 按1或¡以選擇截止頻率。
每次您按1或¡時,將按照以下順序對截
止頻率進行選擇:
63-80-10 0 -12 5 -16 0 -200(Hz)
1 按住¢直到顯示屏上出現SP Set,然後
按¢以選擇SP Lev。
顯示SP Set後,按¢直到顯示屏上出現SP
Lev。
2 按1或¡以選擇要調節的揚聲器。
每次您按1或¡時,將按照以下順序對揚
聲器進行選擇:
前置左揚聲器-中置揚聲器-前置右揚聲器
-後置右揚聲器-後置左揚聲器-超低音揚
聲器
7
您無法選擇尺寸設定為OFF的揚聲器。
3 按E或e以調節揚聲器輸出音壓。
每次您按E或e時,揚聲器輸出音壓將增
大或者減小。當音壓增大或者減小時,顯示
+10-–10。
3 按BAND以返回至播放顯示。
注意
選擇截止頻率即是設定超低音揚聲器的L.P.
F.(低通濾波器)以及SMALL揚聲器的H.P.
F.(高通濾波器)的截止頻率。如果超低音
揚聲器設定為OFF且其它揚聲器設定為
LARGE或者OFF,截止頻率設定將無效。
調節揚聲器輸出音壓
當您正在收聽音樂時,可以使用測試音對揚
聲器輸出音樂進行再調節。
ChH
24
4 按BAND以返回至播放顯示。
注意
在本模式下調節揚聲器輸出音壓與在T Tone
下設定揚聲器輸出音壓相同。兩者將獲得同
樣的效果。
使用測試音調節揚聲器輸出音壓
方便易用的測試音功能讓您可輕鬆自如地在
各揚聲器中獲得總體平衡。
1 按住¢直到顯示屏上出現SP Set,然後
按¢以選擇T Tone。
顯示SP Set後,按住¢直到顯示屏上出現T
Tone。
Page 97

部分
數碼信號處理器
2 按¡以開始測試音輸出。
所輸出的測試音按以下順序在各揚聲器中逐
個輸出,間隔約2秒鐘。顯示屏中將顯示輸出
測試音的揚聲器的當前設定。
前置左揚聲器-中置揚聲器-前置右揚聲器
-後置右揚聲器-後置左揚聲器-超低音揚
聲器
7
請檢查各個揚聲器的輸出音壓。如果無需
調節,請執行第4步以停止測試音。
7
對於尺寸設定為OFF的揚聲器,將不出現
其設定。
3 按E或e以調節揚聲器輸出音壓。
每次您按E或e時,可增大或者減小揚聲
器輸出音壓。當音壓增大或減小時,將顯示
+10-–10。
7
測試音從一個揚聲器輸出約 2 秒鐘後轉至
下一個揚聲器。
以獲得準確的聲像和整體音壓平衡。雖然這
些設置在您設定收聽位置時已經自動進行調
節,但您仍可以通過時間校準進行精調。
1 按住¢直到顯示屏上出現SP Set,然後
按¢以選擇Time A。
顯示SP Set後,按¢直到顯示屏上出現Time
A。
7
如果Posi中沒有選擇F/L或者F/R,您將無
法選擇Time A。
2 按1或¡以選擇要調節的揚聲器。
每次您按1或¡時,將按照以下順序對揚
聲器進行選擇:
前置左揚聲器-中置揚聲器-前右揚聲器-
後置右揚聲器-後置左揚聲器-超低音揚聲
器
7
您無法選擇尺寸設定為OFF的揚聲器。
07
中文
4 按1以停止測試音輸出。
5 按BAND以返回至播放顯示。
注意
÷
如有必要,請選擇揚聲器並調節其“絕
對”輸出音壓(請參見前頁上的
聲器輸出音壓”
÷
在本模式下調節揚聲器輸出音壓與在SP
)。
“調節揚
Lev下設定揚聲器輸出音壓相同。兩者將
取得同樣的效果。
調節時間校準
通過調節各揚聲器之間的距離以及所選收聽
位置,您可以在揚聲器輸出中插入延遲時間
3 按E或e以調節所選揚聲器之間的距離
和收聽位置。
每次您按E或e時,揚聲器之間的距離增
大或者減小。當揚聲器之間的距離增大或者
減小時,顯示500.0(cm)-0.0(cm)。
4 按BAND以返回至播放顯示。
使用等化器
等化器讓您可按需調節等化性以與汽車內部
的音響特性相匹配。
ChH
25
Page 98

部分
07
數碼信號處理器
調用等化器曲線
本機存有七條等化器曲線,您可隨時進行調
用。以下是等化器曲線列表。
顯示 等化器曲線
SUPER BASS 重低音
POWERFUL 強勁
NATURAL 自然
VOCAL 唱聲
FLAT 無特殊效果
CUSTOM1 定制 1
CUSTOM2 定制 2
÷
CUSTOM1和CUSTOM2是經調節的等化器
曲線。
÷
當選擇了FLAT時,系統不會對聲音進行任
何補償和校正。您可交替切換FLAT和一條
已設定的等化器曲線,這在確認等化器曲
線的校正效果時十分有用。
外的揚聲器中取得平衡,然後再現5.1聲
道音頻(杜比數碼或者DTS)並調節中置
揚聲器輸出,達到已在其它揚聲器之間取
得的平衡水平。
1 按住¢直到顯示屏中出現SP Set,然後
按¢以選擇PEQ。
顯示SP Set後,按¢直到顯示屏上出現
PEQ。
7
如果沒有選擇CUSTOM1和CUSTOM2等化
器曲線,您將無法選擇PEQ。
2 按1或¡以選擇所需項目。
每次您按1或¡時,將按照以下順序在項
目中進行選擇:
FRONT(揚聲器)-Low(頻帶)-Low(中
心頻率)-L(等化器聲強)-Q.WIDE(Q
因子)
÷
按EQ以選擇等化器。
反覆按EQ,以在以下等化器之間進行切換:
SUPER BASS—POWERFUL—NATURAL—
VOCAL—FLAT—CUSTOM1—CUSTOM2
調節3頻帶參量等化器
對於CUSTOM1和CUSTOM2等化器曲線,您
可以通過對各頻帶選擇中心頻率,等化器聲
強以及Q因子來分別調節前置,後置以及中置
揚聲器的等化器曲線。
÷
對於各播放源可以創建單獨的CUSTOM1
曲線。
÷
對於所有播放源可以創建共用的CUSTOM2
曲線。
÷
中置揚聲器主要對聲像進行確定,要取得
真正的平衡並不容易。我們建議您再現雙
聲道音頻(例如CD),在除中置揚聲器之
ChH
26
3 按E或e以選擇要調節的揚聲器。
每次您按E或e時,將按照以下順序對揚
聲器進行選擇:
FRONT(前置揚聲器)-CENTER(中置揚
聲器)-REAR(後置揚聲器)
7
您無法選擇尺寸為OFF的揚聲器。
4 按¡,然後按E或e以選擇要調節的
等化器頻帶。
每次您按E或e時,將按照以下順序在等
化器頻帶中進行選擇:
Low(低)-Mid(中)-High(高)
5 按¡,然後按E或e以選擇所選頻帶
的中心頻率。
每次您按E或e時,將按照以下順序對頻
率進行選擇:
Page 99

部分
數碼信號處理器
10 0-12 5 -16 0 -200-250 -315 -400-
500-630-800-1k-1.25k-1.6k-2k-
2.5k-3.15k-4k-5k-6.3k-8k(Hz)
6 按¡,然後按E或e以調節等化器頻
帶的聲強。
每次您按E或e時,等化器頻帶的聲強增
大或者減小。當聲強增大或者減小時,顯示
+6-–6。
7 按¡,然後按E或e以選擇所需Q因
子。
每次您按E或e時,將在以下Q因子之間進
行切換:
Q.WIDE(寬)-Q.NAR(窄)
7
您可以用相同方式對其它揚聲器的各頻帶
參數進行調節。
07
中文
8 按BAND以返回至播放顯示。
注意
您可以從20種頻率中選擇各頻帶的中心頻
率。您可以1/3倍頻程的間隔改變中心頻率,
但您無法在三個頻帶的中心頻率中選擇間隔
短於一個倍頻程的頻率。
ChH
27
Page 100

部分
08
初始設定
調節初始設定
1
初始設定讓您可對本機的各種設定進行初始
設置。
重要
僅當遙控器設置為DEQ模式時,才可使用以
下功能。
1 功能顯示
顯示功能狀況。
1 按住SOURCE直到關閉本機。
2 按住4直到顯示屏上出現時鐘。
7
您也可以按住4直到本機關閉來取消初
始設定。
設定時鐘
請按照這些指示來設定時鐘。
1 按4以選擇時鐘。
反覆按4,直到顯示屏上出現時鐘。
2 按1或¡以選擇您要設定的時鐘顯示部
分。
按1或¡,將在時鐘顯示部分之間進行選
擇:
小時-分鐘
當您選擇了某個時鐘顯示部分時,所選部分
將閃爍。
3 按4以選擇初始設定中的一個。
反覆按4,在以下設定之間進行切換:
時鐘-Dimmer(減光器)-Brightness(亮
度)-Digital ATT(數碼衰減)-Telephone
(通話靜音/衰減)-AUX(輔助設定)-
Digital1(數碼播放源1)-Digital2(數碼播
放源2)-Analog1(模擬播放源1)-
Analog2(模擬播放源2)-Analog3(模擬
播放源3)-Analog4(模擬播放源4)-
Analog5(模擬播放源5)-Analog6(模擬
播放源6)
7
當先鋒DVD播放機通過IP-BUS電纜連接至
本機時,您將無法切換至Digital1和
Digital2。
7
要取消初始設定,請按BAND。
ChH
28
3 按E或e以設定時鐘。
按E將增大所選擇的小時數或者分鐘數。按
e將減小所選擇的小時數或者分鐘數。
切換減光器設定
為了防止夜間顯示屏過亮,汽車的車頭燈打
開時顯示屏會自動變暗。您可切換減光器打
開或者關閉。
1 按4以選擇Dimmer。
反覆按4,直到顯示屏上出現Dimmer。
 Loading...