

Page 1

DVD
RECEPTEUR
RADIO
RDS
AV
AV
RECEIVER
AN
RDS
RDS
CON
DVD
DVD
AVH-3400NEX
Quick start guide
Guide de demarrage rapide
Gufa
de inicio rapido
<
QRD3557-A>
Page 2
English
This
guide
is
intended
For details, please refer
http://www.pioneerelectronics.com/PUSA/Car
Fran~ais
Ce
guide est destine
Pour les.details, veuillez
http://www.pioneerelectronics.com/PUSA/Car
Espariol
Esta
gufa tiene
Para
obtener
sitio web.
mas
http://www.pioneerelectronics.com/PUSA/Car
to
guide
you
to
the
Operation manual stored on
5.~
~
a
vous
guider
vous reporter au
(!]
II
como
fin explicar
informacion, consulte
through
dans
..
las
funciones basicas de esta unidad.
the basic functions
the
les
fonctions de base de cet appareil.
Mode
d'emploi
el
manual de operaciones que
disponible sur
of
this unit.
website.
le
site Web.
se
encuentra en
el
(!]
.
.
II
Page 3
.
b
[
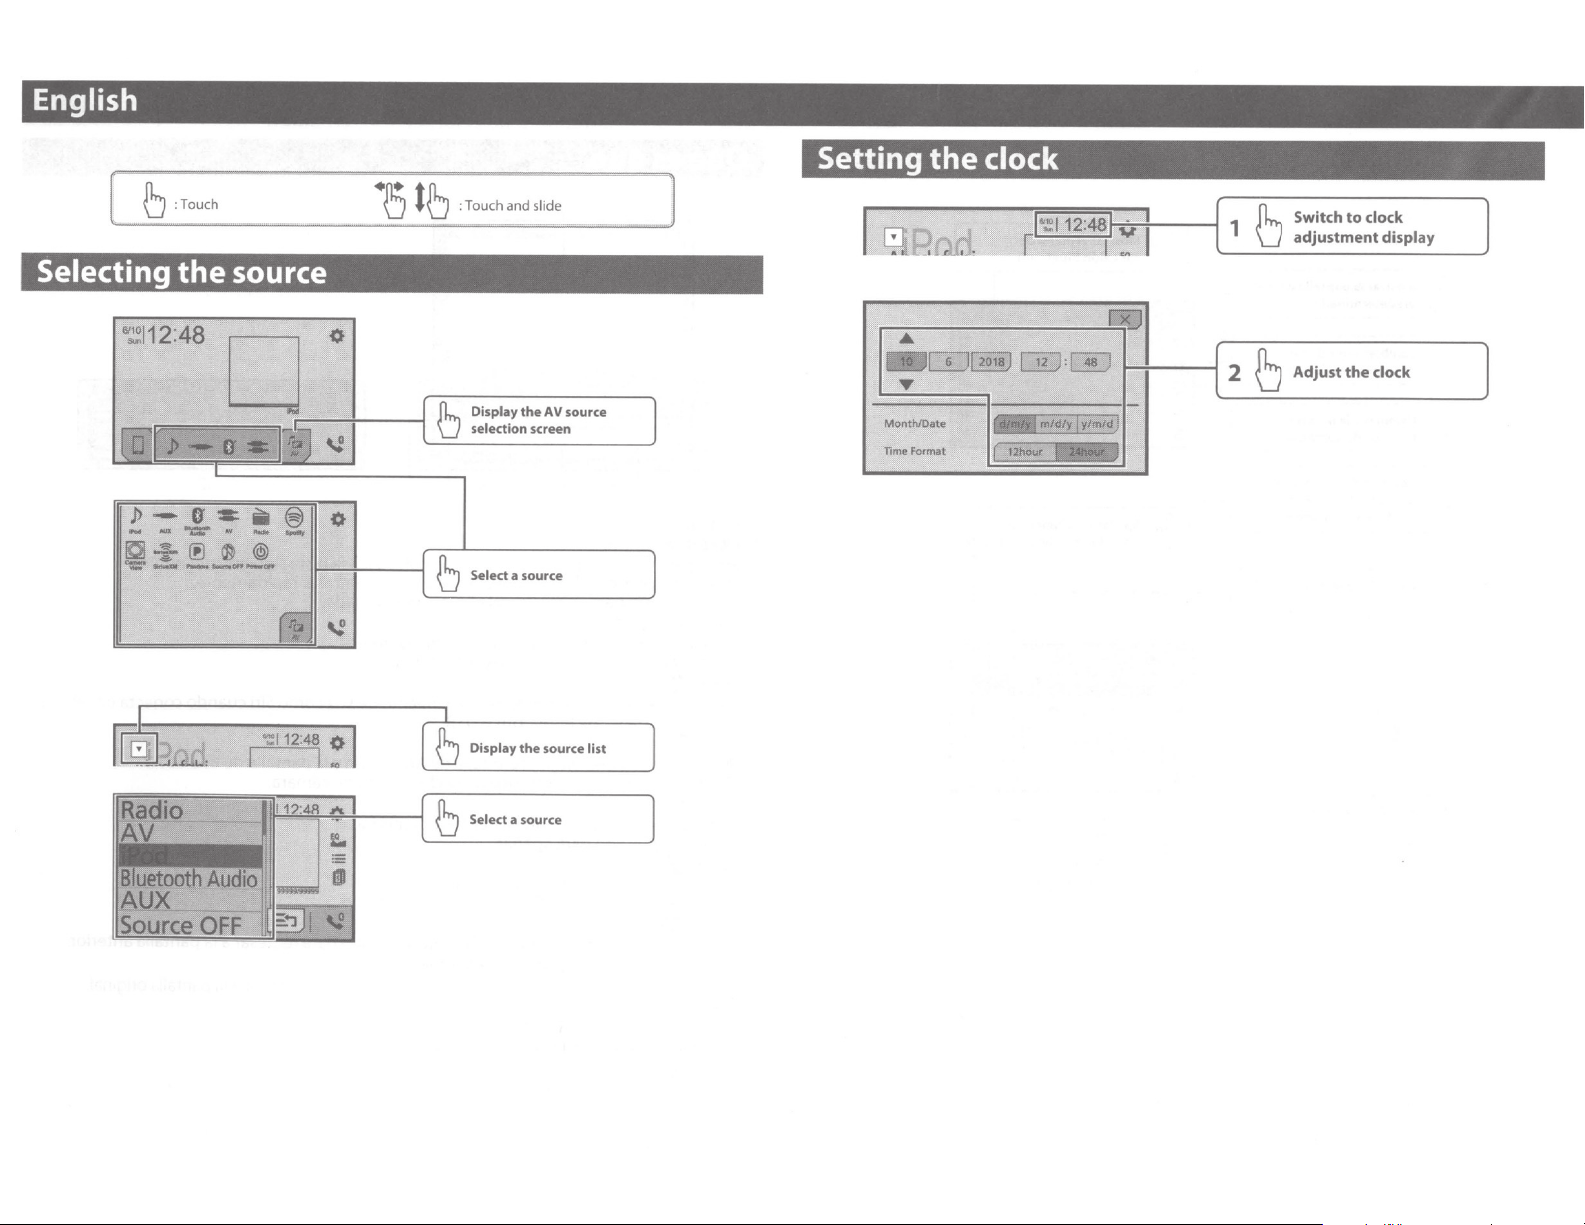
Selectin
~.:11.2:48
:Touch
the source
•5
tb
:To
uchandslide
Settin
•mtaouJ
Month/Date
11me
...
...
Format
the
clock
o'X
· .>==
[JD:w
-1'11/d/y
I
12hCiur
•
jylmld)
Switch
to
the
clock
display
clock
l
adjustment
;j
r2
l
Adjust
c
6
Display
the
source
list
Page 4
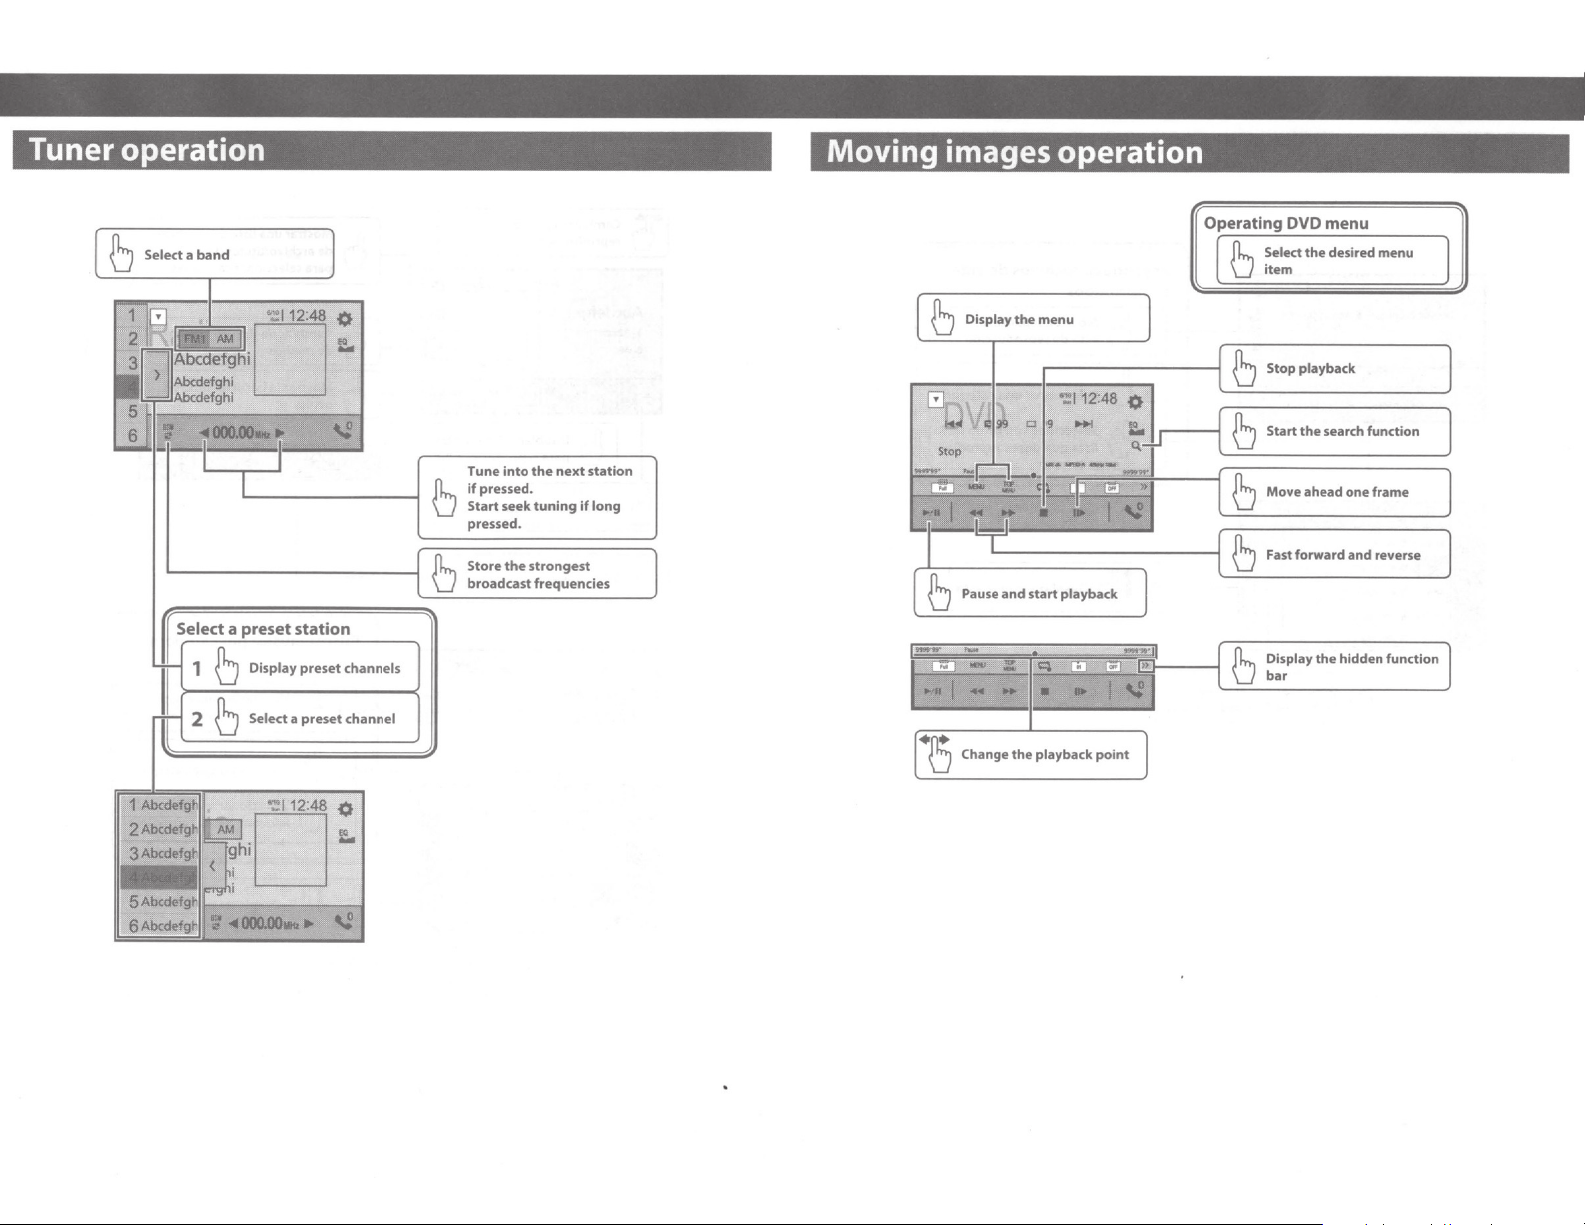
Tuner operation
Moving images operation
a
Select
a
band
Display
Select
station
preset
a
preset
channels
channel
Tune
into
if
pressed.
Start
seek
pressed.
Store
the
broadcast
the
next
tuning
if
strongest
frequencies
station
long
a
B
•f)!
\_]
Display
Change
the
the
menu
-.:112:4a
g
~
playback
point
Operating DVD
fl.
\.J
Select
item
Stop
menu
the
desired
playback
menu
o
~--~[~_Q
____
st_a_rt_t_h_e_se_a_r_ch--fu_n_ct_i_on
Move
ahead
one
a
a
Fast forward
Display
bar
frame
and
reverse
the
hidden function
__
_J
Page 5
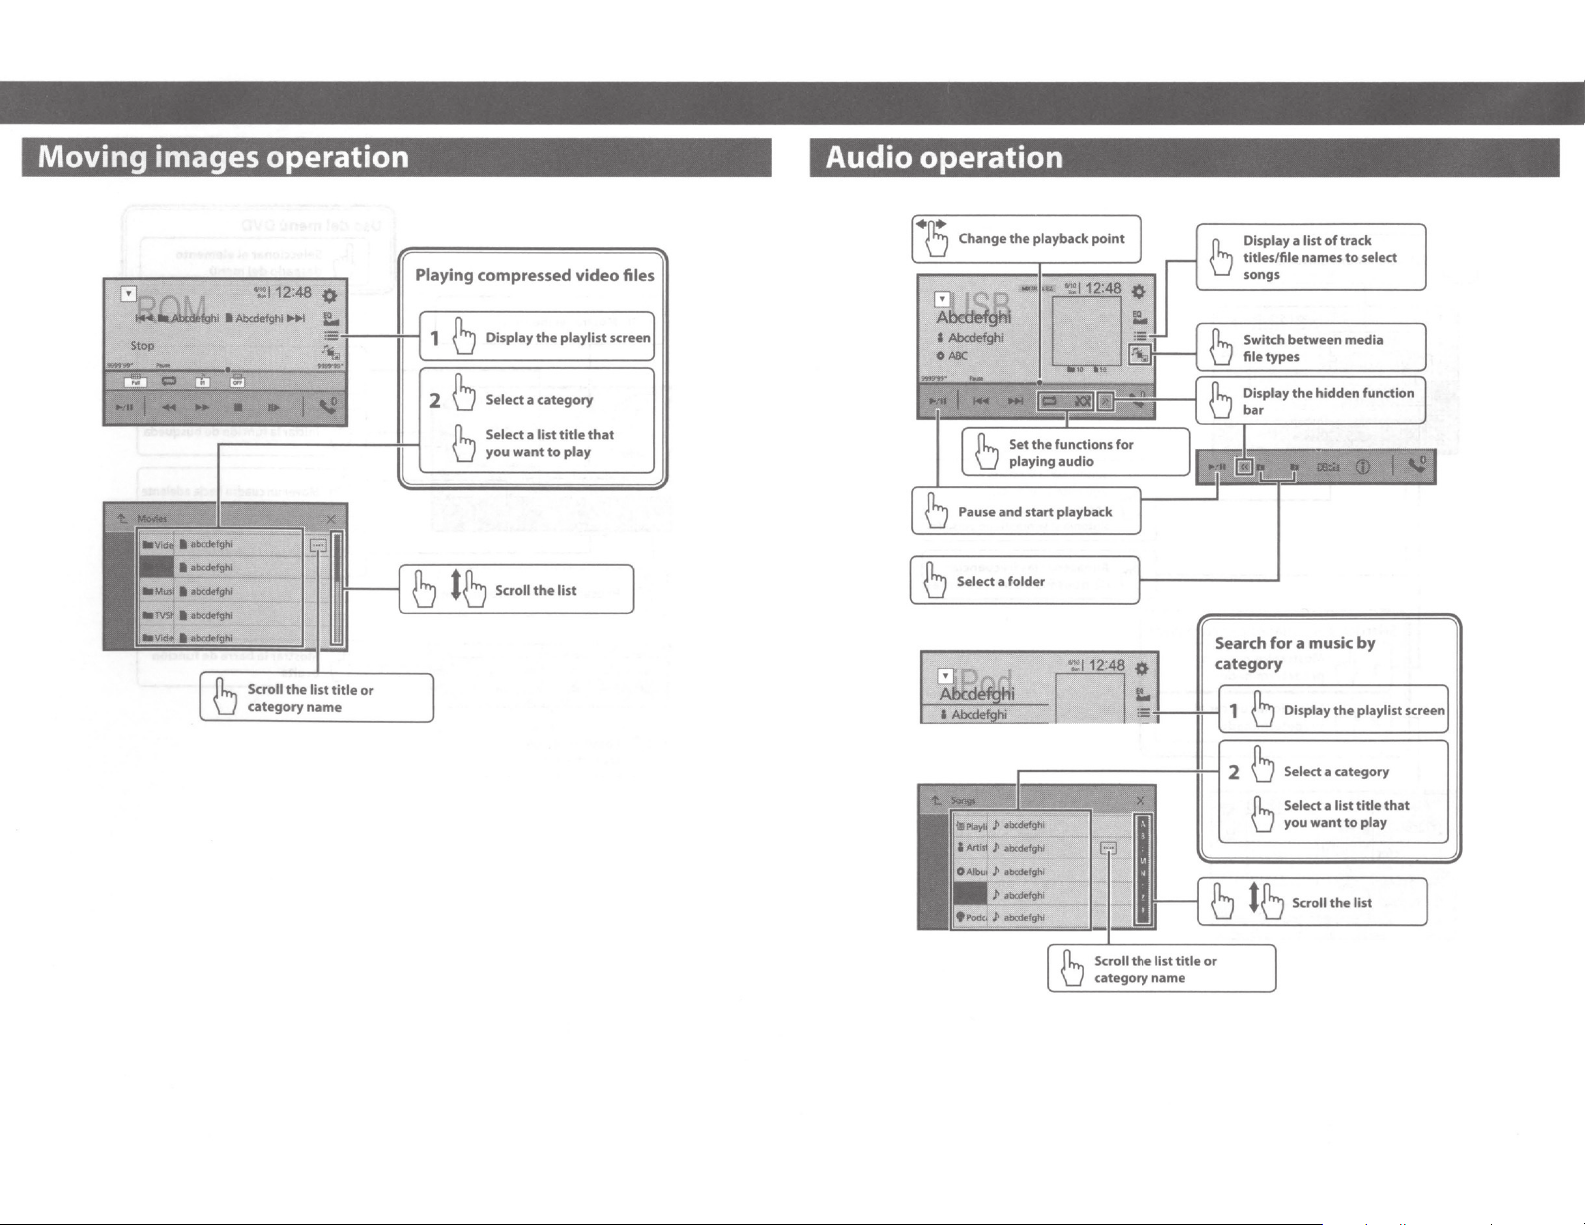
Moving images operation
Audio operation
Scroll
the
category
list title
name
or
Playing
compressed
Display
the
category
Select a
Select a list
you
want
title
to
video
playlist
that
play
files
Pause
and
start
b Select a folder
r-----i+-1
playback
Display a list
titles/file names
songs
Switch
file
types
Display
bar
Search for a music
category
+-----!H--1 1 b
::============~
2 b
b
of
track
to
select
between
media
the
hidden
function
by
Display
the
playlist
Select a category
Select a list title
you
wantto
play
that
category
name
b
tb
Scroll
the
list
Page 6
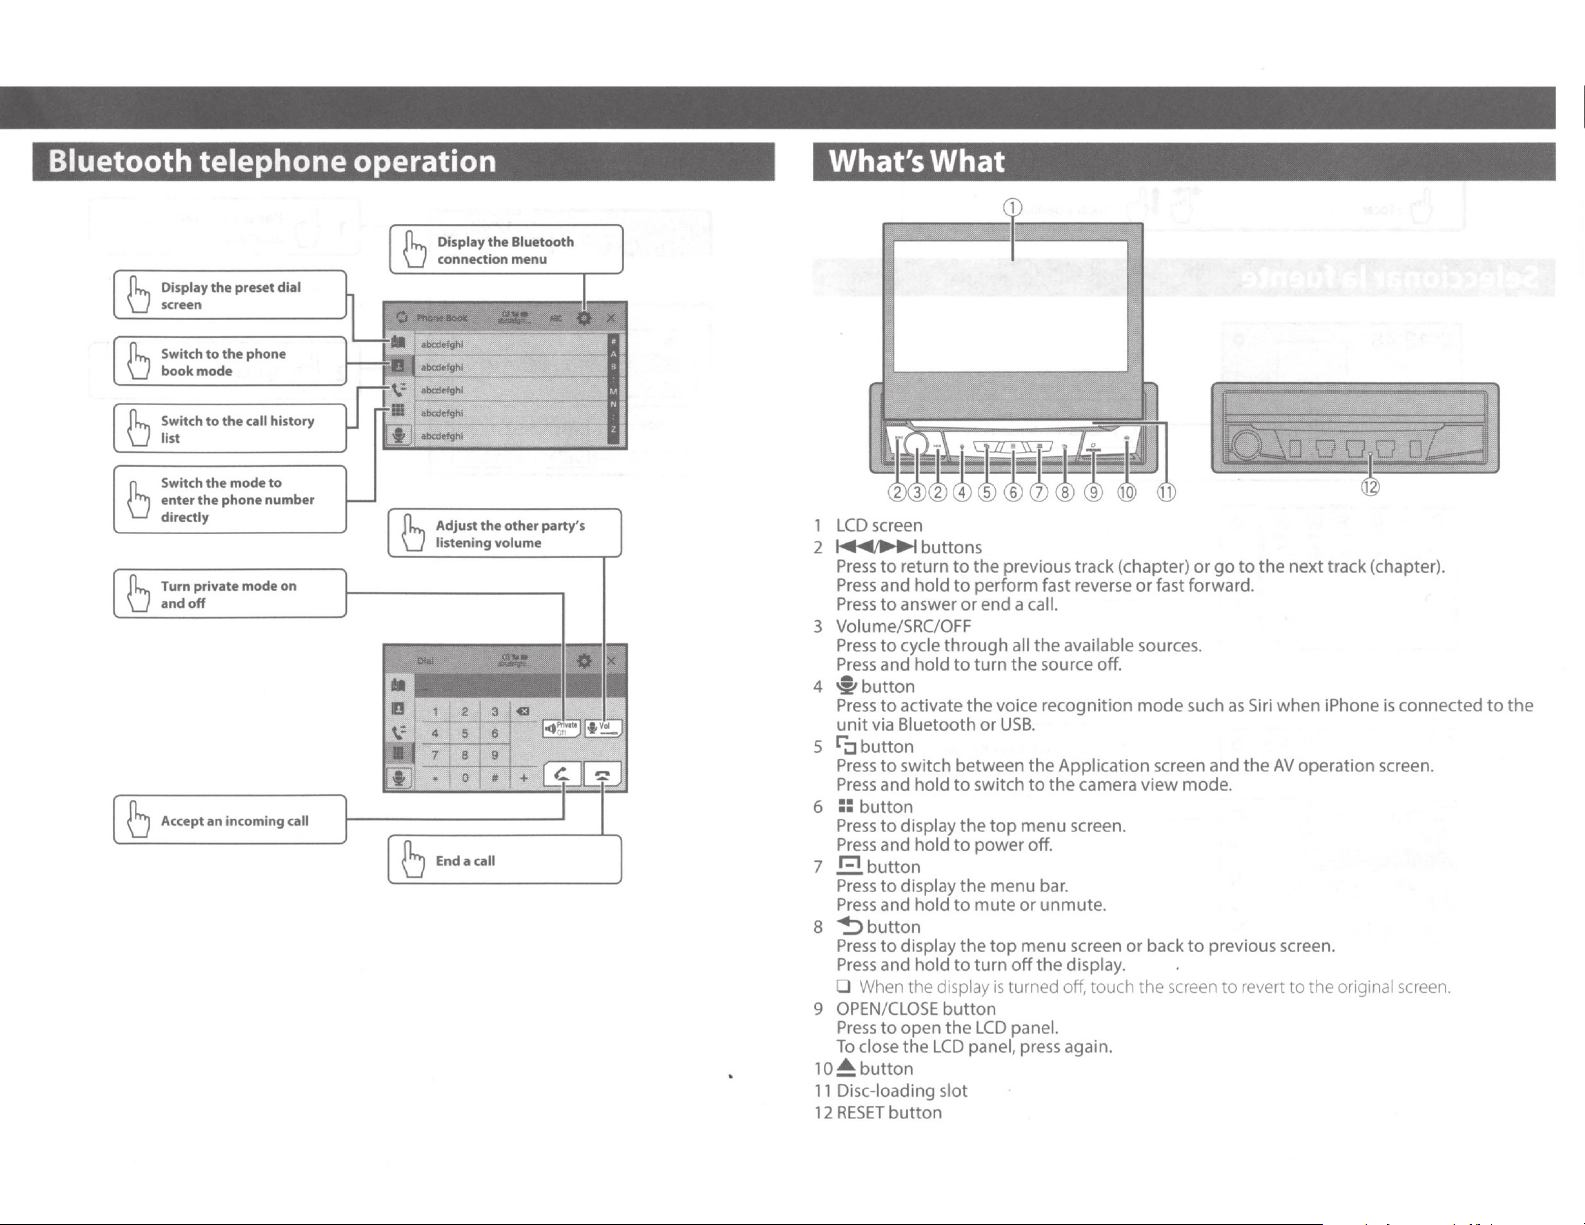
Bluetooth telephone operation
Display
the
connection
6
Display
the
preset
screen
6
Switch
book
6
Switch
list
6
Switch
enter
6
directly
Turn private
and
6
off
6 Accept
to
mode
to
the
the
an
dial
the
phone
the
call history
mode
to
phone
number
mode
on
incoming call
Adjust
listening volume
6
6
Endacall
the
Bluetooth
menu
other
party's
What's What
1
LCD
screen
2
~buttons
Press
to
return
Press
and hold
Press
to
Volume/
3
Press
to
Press
and hold
~button
4
Press
to
unit
via Bluetooth
ri:J
button
5
Press
to
Press
and hold
6
::button
Press
to
Press
and hold
7
r:1
button
Press
to
Press
and hold
8
'!::>
button
Press
to
Press
and hold
0 When
9
OPEN/CLOSE
Press
to
To
close
10~button
11
Disc-load ing
12
RESET
button
to
to
answer
or
SRC/OFF
cycle
through
to
activate
switch between
display
display
display
open
the
tre
the
to
the
to
the
to
the
to
d1splay
button
the
LCD
slot
the
previous track (chapter)
perform
end a call.
turn
or
switch
power
mute
turn
LCD
panel, press again.
fast reverse
all
the
available sources.
the
source off.
voice r
ecognition
USB.
the
Application screen and
to
the
camera
top
menu
screen.
off
.
menu
bar.
or
unmute.
top
menu
the
screen
display.
off
is turned off, touch
panel.
or
fast forward.
mode
view
mode
or
back
the
screen
or
go
to
the
next
track (chapter).
such
as
Siri
when
iPhone
the
AV
.
to
previous screen.
to
operation screen.
revert to the onginal screen.
0~
3]
is
connected
to
the
Page 7

AVH-3400NEX
-
DVD
RECEPTEUR
RADIO
RDS
AV
AV
AN
RDS
RECEIVER
RDS
DVD
CON
DVD
-
-
Installation Manual
Manuel d'installation
Manual de instalaci6n
Page 8

m porta nt safety
I
information
wARNING
A
visibility
Rear
are required in certain
U.S.
the
began
1,
May
require
or
on
systems (backup cameras)
Canada.
and
according
and
2016,
all
that
May
after
U.S.
two
a
to
both
such vehicles
2018
1,
vehicles sold in
new
regulations
year phase-in
and
U.S.
the
manufactured
have rear
on
Canada
visibility
I Connection
Precautions
operate
not
Do
•
applications,
(if
option
your
divert
operation
safe
observe safe
existing
experience
product,
safe
before
adjustments.
Do
•
(i)
(ii)
traffic
location
making
install this
not
obstruct
impair
this
the
or
purchased)
attention
your
of
driving
regulations.
difficulty
over,
pull
apply
and
the
product
driver's vision,
the
performance
the
product,
rear
rules and
in
park
necessary
any
camera
view
will
so
doing
if
from
way
any
in
vehicle. Always
follow
you
If
operating
your
the
this
vehicle in a
parking
it
where
any
of
brake
may
the
of
the
all
systems.
with
should
a way
If
a rear
Canadian regulations, please
vehicle
Pioneer does
install this
designed
We
Pioneer service personnel,
special
electronics, set
NEVER
Installing
connecting
Owners
compliant
not
that
are unsure
you
visibility
manufacturer
vehicle's
features,
buttons,
impair
(iii)
operate
In some cases,
this
install
or
type
rear
install
alters
system subject
operating
including
or
driver's
the
vehicle.
the
it
product
shape
the
Important
wARNING
A
not
product
professional installation only.
for
recommend
training
SERVICE
and experience in
up
THIS
servicing this
or
cables
vehicles
of
visibility systems
or use this product in
disables
or
whether
systems
airbags, hazard
may
because
of
equipped
that
vehicle has
your
to
contact
dealer.
or
of
to
ability
be possible
not
of
vehicle interior.
the
system.
the
safety
safely
the
safeguards
you
authorized
who
this
install
product
expose
that
product
have
mobile
product.
YOURSELF.
and its
you
recommend
yourself. This
only
that
and
PRODUCT
may
or
U.S.
the
lamp
to
vehicle
the
to
become
electric shock
of
risk
can cause
covered
not
damage
by
or
this
to
warranty.
product
that
is
hazards, and
other
Precautions before
connecting the system
wARNING
A
or
tamper
to
steps
any
take
not
Do
parking
the
disable
place
in
is
which
Tampering
brake
serious
A
Secure
•
electrical tape.
wiring
Do
•
this
lead
engine
the
the
compartment
compartment.
insulation
metal
resulting
It
•
to
column
this
in such so
is
hinder
Make sure
•
not
any
especially
parking
or
Do
•
exposed
with
interlock
injury
CAUTION
wiring
all
remain exposed.
to
directly
not
product
directly
is
vibration
insulation
passes
wire
parts,
in considerable danger.
extremely
is
become
or
product,
driving.
interfere
the
of
brake, sliding seat tracks, doors,
the
of
any
route
not
to
brake
your
for
disabling
or
could
system
death.
or
cable clamps
with
allow
not
Do
connect
vehicle battery.
the
to
connected
eventually
may
the
at
fail
to
the
from
engine
the
into
yellow
the
If
a result
as
tears
short-circuiting
dangerous
around
wound
shift lever.
its cables, and
that
that
with
vehicle's
the
vehicle's controls.
wires
high
Be
will
they
cables and wires
the
become
or
moving
steering wheel, shift lever,
where
temperatures.
with
interlock
protection.
parking
the
result in
any bare
yellow
the
battery,
the
to
cause
where
point
passenger
lead's
contact
of
can occur,
allow
to
steering
the
install
to
sure
wiring
obstruct
not
caught
parts,
will
they
If
system
or
lead
the
If
with
cables
away
or
will
in
be
the
of
insulation
damaged,
malfunction
the
Do
•
protection
resistor
properly.
Never feed
•
products
power
tapping
capacity
causing overheating.
Before
product
Use
•
negative
may
To
•
be
cable
To
A
When speaker
•
channels,
(Maximum
to
0
to
0
When rear speaker
•
of
(Maximum
*Please refer
connection
The black cable
•
installing this
separately), make sure
ground
wire
of
heats up, wires
resulting in a
permanent
and
product.
circuit
filter, etc.)
or
power
cutting
by
the
into
the
of
any leads.
(fuse holder, fuse
lead
lead. The
lead
not
shorten
supply
installing this
with
unit
this
grounding
result in a fire
avoid shorts in
disconnect
to
sure
installation.
before
prevent damage
wARNING
output
use speakers
power)
input
(impedance value). Do
0
8
speakers
0
3
subwoofer, use speakers over
power).
input
connection
to
method.
is
unit
first. Ensure
wire
properly
is
car's body. The
the
connected
may
circuit
short
damage
you
If
to
fail
may
electronic
other
to
insulation
the
product
this
of
current
be exceeded,
will
battery
12-volt
a
only. Failure
malfunction.
or
electrical system,
the
battery
the(-)
used
is
50 W
over
between
and
unit.
this
for
used
is
output
for
ground.
or
When
power
connect
to
that
ground
amp
the
to
or
to
the
do,
work
the
of
and
and
so
do
to
4
by
4
use 1
not
0
2
by
W
70
a
(sold
the
ground
metal parts
the
of
wire
2
En
Page 9

power
device must
other
any
car separately
the
for
screw
the
it
,
out
falls
or
smoke
of
Ground wire
connected
be
different screws.
with
ground
the
result in fire generation
could
malfunction.
wire loosens
POWER
to
If
or
AMP
~Ivnr;
L
Other
(Anotherelectronic body
device in the
~1
• When replacing the fuse,
use a fuse
product.
• This product cannot
vehicle
on
l-6
devices
car)
Non supplied for this
rating prescribed
the
of
ACC
switch.
the
without
ignition
\-
6
of
parts
Metal
unit
to
sure
be
on
installed
be
(accessory) position
in
car's
only
this
a
Notice for
white
When
•
(ACC
through
an external
control terminal,
control terminal,
power control terminal (max.
DC).
V
through
audio source
lead
ignition
the
, a control signal
ON)
blue/white
the
power
The control signal is
blue/white
the
switched off.
is
This product
blue/
the
turned on
is
switch
output
is
Connect
lead.
's system remote
amp
auto-antenna
the
the antenna booster
or
300
output
even
lead,
or
unit
this
of
one
the
and
amp
relay
mA
if
to
12
the
SiriusXM Connect
9~
the instruction manual
to
Refer
SiriusXM Connect
separately).
(STD)
output
Front
!10
(NW)
(STD)
output
Rear
11
.
(NW)
Subwoofer
2-
1
output
output
(NW)
Power cord
Vehicle
/Middle range
Tuner
Tuner
Vehicle
/High range
(STD)/Low range
output
for
(sold
output
voltage changes when
the
REVERSE
in the
is
connection enables
whether
backward.
Yellow/black
8.
If
function, wire this lead
Mute lead
keep the Audio
connections.
Blue/white
9
Connect
the
Light
10
Used to detect
parking brake. This
connected
the
Power
1V
1.
Parking
12.
Ground side
13
the
you use an
to
power
green
parking brake switch.
supply side
brake switch
(R)
car is moving forward
pment
i
equ
equipment.
that
on
Mute
system control terminal
(max.
amp
ON/
the
power
the
to
Speaker leads
gear
the
position. This
to
unit
the
Mute
with
Audio
the
to
If
of
free
lead
12
mA
300
status
OFF
must be
lead
supply side
shift
sense
or
not
any
DC).
V
of
,
of
the
of
position
ACC
with
lead
power
product
No
insulating tape.
insulate
to
leh
if
or
amp
to
be connected.
to
placed on
==
the
position
ACC
avoid short-circuiting, cover the
To
•
disconnected
especially
is
unused speaker leads, which
uncovered may cause a short circuit.
For connecting a
•
devices
manual
The graphical symbol
•
product
the
important
this product, refer
to
the
for
means direct current.
all
other
It
Pioneer
1
Contact your dealer
the
RGB
c2.
system)
Microphone
.
.3
This
4
Antenna jack
s
Power supply
.6.
Fuse
)
Wired remote
.8
navigation system
about
inquire
to
.
connectable navigation
3m
input
with
h.
(9
separately).
cable (supplied
product
A)
(10
Hard-wired remote control adapter can
be connected (sold
unit
Navigation
/8
10-1
in. )
power supply
To
1
cord
Power
2
Yellow
3
terminal supplied
To
ignition
regardless
Red
4
electric terminal
To
igni
Orange/white
s·
To
Black
6
vehicle (metal)
To
Violet/white
7
the
Of
back
of
switch (12
tion
lighting switch terminal.
(ground)
lead
two
connect
lamp,
power
with
switch position.
ON
)
one
by
OFF
/
in which
controlled
DC
V
body.
wires connected
the
to
the
D
3.
~
6
~~-
Perform
subwoofer
these connections
·J·1·..
~--
without
m
~
®
~
@
_..,__3-r1
l}
i
~--
·-~
·
·
-·
the
when
optional amplifier.
·
using a
• :
·
3
En
Page 10

1
To
power
supply
2 Power cord
3 Left
4. Right
5.
Front speaker (
speaker (NW)
6
Rear
speaker
speaker (NW)
J
White
·a
White
/black
9 Gray
:19
Gray/black
1
.1
Green
@ Green/black
ilJViolet
J4
Violet/black
15 Subwoofer (4
Jg When using a subwoofer
to
connect
and
violet/black
not
connect anything
green/black leads.
17"
Not
used.
)S Subwoofer (4
l~[eliiJ
• When a subwoofer
product
the
rear
output
setting. The subwoofer
product
For details, refer
• With a two-speaker system,
connect
that
are
not
STD)
(STD)
0)
the
0)
instead
setting
is
monaural.
anything
connected
or
high range
or
middle
subwoofer
leads
of
to
x 2
is
connected
of
a rear speaker, change
in
the
output
to
the
Operation Manual.
to
the speaker leads
to
range
of
2
0,
be sure
to
the
violet
this unit. Do
the green and
to
this
initial
of
this
do
not
speakers.
Power amp (sold
separately)
I Without internal
!)
Important
The speaker leads are
connection
is
I With internal
!T
Important
Front speaker and
(STD)
or
middle
range speaker signals (NW) are
from
the
speaker leads
connection is
(j) )
Ef)
&;;Jli]~·
® ®
ld
1 System remote control
amp
Rear
output
middle
to
with
range
Connect
~
2
Power
,3 Connect
separately)
4.
To
To
amp
not
used
in
use.
amp
Rear
speaker signals
range speaker and
when
in
use.
Ef)
e
Blue/
white
cable.
(sold separately)
RCA
cable (sold
(STD)
output
(NW)
when
output
this
this
high
"
I
I
5.
Rear speaker
Middle
~"
To-Front
To
high range
) Front speaker
High range speaker (NW)
J
To
subwoofer
To
low
9:
Subwoofer (
Low range speaker (NW)
(STD)
range speaker (NW)
output
(STD)
output
(NW)
(STD)
output
(STD)
range
output
(NW)
STD
)
lmml
Select
the
appropriate speaker
between standard
network
the
mode
(NW). For details, refer
Operation Manual.
mode (STD)
mode
and
to
iPod/iPhone and
smartphone
l¢t•liJ11
• For details
device using a separately sold cable, refer
to
the
• For details concerning
operations
refer
• For details concerning
and
the
on
how
to
manual
to
operations
Operation Manual.
for
the cable.
and
compatibility
the
Operation Manual.
of
smartphone, refer
connect
the
connection,
the
connecti
an external
of
iPhone,
on
to
iPod/iPhone with
Lightning connector
I Connecting via
I f
Ji
1
USB port
2
USB
cable 1.5 m (
3
USB
interface cable
IU52) (sold separately)
4 iPhone wi
th
the
w
4ft.
for
Lightning
USB
port
2_
11
in.)
iPod/iPhone (CD-
connector
iPhone with 30-pin
connector
I Connecting via
1
USB
port
2.
USB
cable 1.5 m (
3.
USB
interface cable
IU51
) (sold separately)
' 4 iPhone
with
30-
the
USB
4ft.
11 in.)
for
iPod/iPhone (CD-
pin
connector
port
I
.,{-'
j
I
4En
Page 11

IN•uif
A
Smartphone (Android™
device)
I
Connecting
via
the
USB
port
I
~~IJL.on~·
~
~
1
USB
port
•2
USB
cable
•3
USB- micro
micro
USB
(sold separately))
USB
Type-C cable
(supplied
separately))
4 Smartphone
[!E)-L.~--.
1.5
m
USB
B)
(supplied
with
1
(4ft.
11
cable
(Type
(Type
CD-CUSO
in.)
with
USB
(sold
J
USB
A-
CD-MU200
A-
USB
C)
wARNING
USE
INPUT
ONLY
FOR
REVERSE
IMAGE
REAR
VIEW
CAMERA.
MAY
RESULT
A
CAUTION
•
The screen image may appear reversed.
•
With
an eye
parking spot. Do
entertainment
• Objects
more distant
•
The image area
displayed
rear
IN
INJURY
the
rear view camera
on
trailers,
in
rear
view
than
while
of
the
vehicle may
or
back
not
use
purposes.
may appear closer
in
reality.
of
full-screen images
backing
OR
DAMAGE.
into
for
or
differ
OR
MIRROR
OTHER
you
can keep
a
tight
checking
slightly.
USE
or
the
..
• Connect
REAR
any
•
Some appropriate settings are required
to
to
only
VIEW CAMERA
other
equipment.
use rear view cameras. For
the
Operation
External
component
display
mmll
The
length
ofType
cable
cannot
Type
USB
A-
ft.
1 in.) according
standard. When using a
the
above conditions,
function
may
Camera
About
rear
When you use
rear
view
image
from
the
video by
REVERSE
allows you
while
(R).
to
driving.
USB
A-
micro
exceed 2 m
USB
C
not
operate
view
the
is
Camera
check
(6ft.
cannot
exceed
to
the
USB
cable
the
main
properly.
camera
rear
view
camera,
automatically switched
moving
View
what
the
mode
is
behind
USB
6
in.)
and
4
m (13
cable
other
than
unit
the
shift lever
also
you
B
~
1
This
product
2.
Power
supply
3
Power
cord
4
to
Violet/white
INPUT
Refer
s Rear
view
separately)
6 To video
1
RCA
cable (supplied
8.
Brown
(REVERSE-GEAR
)
to
Power
camera
output
(REAR
VIEW CAMERA IN)
cord
on
page
(ND-BCB) (so ld
with
ND-BC8)
SIGNAL
3.
1 Rear
display
2
To video
.3
RCA
4 This
5
Yellow
6
AUX
input
cables (sold separately)
product
(REAR
input
the
rear
Manual.
video
and
with
RCA
MONITOR
view
IN
.
Do
the
input
OUTPUT)
camera
not
connect
details,
jacks
to
refer
7J
Mini-jack
separately)
8)
Yellow
9J
Red,
10
Red,
11
Yellow
1Z
IToYellow
13.
To
14
To video
15
•
To audio
16
External
separately)
wh
white
Red,
AV
cable (CD-RM10) (sold
ite
(
AUDIO
(VIDEO
white
output
outputs
video
INPUn
component
mmll
The appropriate setting
the
external
refer
A
wARNING
NEVER
location
the
video source
This product's rear
connection
passengers
video source.
video
to
the Operation
install
the
that
enables
of
a
in
the
component.
rear
while
video
display
rear seats
INPUT
,
LIN
(sold
is
required
Manual.
display in a
the
driver
driving.
output
to
enable
to
watch
)
to
use
For details,
to
watch
is
for
the
En
5
Page 12

Installation
I
Precautions before
installation
CAUTION
A
places
Never install
a
in
or
• Could
the
May interfere
•
the
of
the
of
steering
ensure proper
To
•
use
specified.
with
the
part
dealer.
compatible
damage
they
may become detached.
Do
•
obstruct
(i)
impair
(ii)
vehicle's
features,
buttons
(iii)
operate
Never
•
next
pillar
or
airbags
vehicle's
the
airbags.
this product
manner
vehicle stops suddenly.
the
this
manner specified after you have
compatibility
may
not
impair
to
deployment
that:
the
injure
with
vehicle,
driver
such
's seat,
or
wheel
supplied parts
any parts are
If
product, use
other
parts
If
ones are used,
internal parts
loose
work
this
install
driver's vision,
the
performance
the
operating systems
including
or
driver's
the
vehicle.
the
install this product in
place
the
which one
from
deploy. Please
would
's manual
owner
in
passengers
or
driver
the driver's operation
floor
the
on
as
the
to
close
or
lever.
shift
the manner
in
supplied
not
by
supplied
they
this
of
the
where
of
or
to
ability
front
your
of
refer
reference
for
frontal
the
be sure
your
product
product
any
safety
installation,
compatible
checked
than
and
product
airbags, hazard
in the dashboard, door,
of
area
where,
if
front
in
to
parts
the
or
may
or
may
it
the
of
lamp
safely
or
of
vehicle's
your
to
in
to
Before installing
your nearest
• Consult
installation
other
Before making a
•
product,
to
correct and
Installation
Do
•
subject
humidity
-Places close
- Places
- Places
• Install
surface
(within
Improper
surface
increases
vehicle's location display,
otherwise cause reduced
performance.
•
with
modifications
temporarily
confirm
install
not
to
, such
conditioner.
exposed
top
on
as
that
close
as
such
vehicle's
this product
within
5 degrees
tilted
installing,
When
dispersal
sure you
when
leave ample
requires drilling holes
the
of
final installation
connect
connections are
the
that
system works
the
notes
product
this
temperatures or
high
as:
a heater, vent
to
direct
to
the dashboard.
of
may be exposed
door
the
to
floor
horizontally
degrees
30
to
0
left
the
to
the
installation
the
of
more than these tolerances
potential
for
ensure proper heat
to
using this product, make
space behind
if
dealer
or
vehicle.
this
of
wiring
the
properly.
places
in
air
or
sunlight, such
rain,
to
the
on
or
a
on
tolerance
right).
or
with
unit
the
in
errors
might
and
display
the
the
rear panel and
they are
• The cords
shown
necessary
radiate
1
Make sure you
•
between
panel
opened and
with
1
2
3
not
.
the
in
freely.
cover this area.
not
Do
the
this
of
the dashboard.
Dashboard
Leave gap
panel
LCD
any
wrap
blocking
cover
not
must
below.
figure
the
allow
to
enough gap
leave
dashboard and
the
so
unit
without
closed
loose cables
vents .
the
the
up
This
amplifiers
the
panel
LCD
contacting
area
is
to
LCD
can
so
(
I
be
DIN front/rear-mount
can
unit
This
front
either
installation.
when
parts
Front-mount
DIN
I
Decide
1
brackets.
installing
When
change
(small).
Side bracket
1
'2 Flush
the
Install
2
the
Insert
dashboard. And
mounting
bend
to
properly installed
be
or rear-
mount
commercially available
Use
installing.
shallow
a
in
of
(small)
the
into
then
tabs
of
side brackets
sleeve
secure
position
the
position
the
surface screw (5
unit
mounting
sleeve by using a screwdriver
metal
the
using
mount
side
the
space,
6
x
mm
dashboard.
into
the
into
°)
(90
mm
the
place.
I
)
Page 13

depending
the
bracket.
in
on
the
shape
of
screw holes
·2~
Screw (2
.3
Trim ring
mm
x 3
mm)
1 Dashboard
2.
Mounting
sleeve
:3. Side bracket
4. Screw (2
mm
x 3
mm)
I DIN Rear-mount I
1
Determine
where
the
When installing
the
the
holes
side
of
the
following
the
appropriate
on
the
unit
match.
in
a shallow space, use
screw holes.
position
bracket
and
1 Screw
2 Dashboard
~
.
Factory radio
or
mim
In some
occur
dashboard.
supplied frame
I Removing
Extend
outwards
then
remove
• When reattaching
trim
the
the
types
between
If
this
top
and
to
remove
loosen
the
the
mounting
ring
onto
trim
ring is attached
trim
ring
of
vehicles, discrepancy
the
to
the
bottom
screws (2
the
will
console
mounting
unit
and
the
happens, use
fill
the
gap.
unit
of
the
the
trim
mm
sleeve.
the
trim
ring, push
unit
until
upside
not
fit
properly.)
bracket
the
trim
ring.
And
x 3
mm)
it
clicks. (If
down,
ring
may
to
the
I
Installing
the
microphone
• Install
•
•
the
microphone
its
direction
make
voice.
Be
sure
before
Depending
microphone
short
on
the
microphone
and
distance
it
easiest
to
pick
to
turn
off
(ACC
connecting
on
the
cable
length
when
you
mount
sun visor. In such cases, install
on
the
Mounting on
visor
1
Fit
the
microphone
groove.
1.
2
2:
Attach
visor.
Microphone
Groove
the
lead
microphone
in
a place
from
the
up
the
driver's
OFF)
the
the
microphone.
vehicle model,
may
be
the
microphone
steering
the
lead
column.
sun
into
clip
the
to
where
driver
product
the
too
the
the
sun
1
Microphone
2. Clamps
Use separately sold clamps
the
lead
vehicle.
the
Install
when
it
recognise
visor is in
clip
where
microphone
is
in
the
up
the
driver's voice
the
down
necessary inside
on
the
position.
position.
Installation on the
steering column
1
Detach
the
microphone
microphone
tab.
microphone
clip
base
by
while
base
sliding
pressing
to
sun visor
It
cannot
if
the
from
the
-
secure
the
sun
the
the
(II Use
binding
only.
2
Tighten
Use
mm), binding
flush surface screws (5
any
two
of
binding
screws
screws (5
screws (4
on
screws (4
mm
mm
x 3
each side.
mm
mm
x 6
mm)
x 6
mm).
mm)
x 3
or
1
Mounting
sleeve
'1' Tab
'2'
2
Mount
steering
Microphone
the
microphone
column.
base
on
the
En
7
Page 14

1
Double-sided
2 Clamps
Use
separately sold clamps
the
lead
vehicle.
tape
where necessary inside the
llmml
Keeping
it
away
from
Adjusting the
the
steering
to
secure
wheel.
microphone
8
En
angle
Page 15

PIONEER CORPORATION
28-8, Honkomagome 2-chome, Bunkyo-ku,
Tokyo 113-0021, Japan
PIONEER ELECTRONICS (USA) INC.
P.O.
Box 1540, Long Beach, California 90801-1540, U.S.A.
TEL: (800) 421-1404
PIONEER EUROPE NV
1,
Haven 1087, Keetberglaan
TEL: (0) 3/570.05.11
PIONEER ELECTRONICS ASIACENTRE PTE. LTD.
2 Jalan Kilang Barat,
TEL: 65-6378-7888
PIONEER ELECTRONICS
5 Arco Lane, Heatherton, Victoria, 3202 Australia
TEL: (03) 9586-6300
PIONEER ELECTRONICS DE MEXICO S.A. DE C.V.
Blvd. Manuel Avila Camacho 138, 10 piso
Coi.Lomas de Chapultepec, Mexico,
Tel:
52-55-9178-4270, Fax: 52-55-5202-3714
$t
.H9:ffifi
1S~trtJpq)MJ~Ifffi7e~!4o7~m8~
~~~:
st-~~
~~n~~~~~;~rngog~m5~
~~~
~R11
886-(0)2-2657-3588
(
~5~)
: 852-2848-6488
#07-01
iil
fi~!{1}ii)
B-9120 Melsele, Belgium/Belgique
, Singapore 159346
AUSTRALIA
PTY. LTD.
D.F.
11000
© 2017
© 2017
PIONEER
PIONEER
CORPORATION. All
CORPORATION. Tous
rights
droits
reserved.
de
reproduction
et
de
traduction
reserves.
<QRD3566-A>
UC
Page 16

P1oneer
PIONEER ELECTRONICS (USA) INC.
GARANTIE LIMITEE
GARANTIE
GARANTIE VALIDE UNIQUEMENT DANS
Pioneer Electronics (USA)
distribues par Pioneer aux Etats-Unis et
fonctionnent pas correctement dans des conditions normales d'utilisation
de valeur comparable,
garantie peuvent etre neufs ourem
Cette garantie limitee
reserve que le
preuve
frais de
I' installation
PERIODE
Appareils electroniques, haut-parleurs
d'achat
port
prepayes,
du
DE
produit
valide
produit. Pioneer paiera les frais de
GARANTIE
ELEMENTS NON COUVERTS PAR
Cette garantie limitee s'applique aux produits Pioneer achetes d'un detaillant Pioneer auto rise. Sl
IL N'Y A
IMPLICITES D'ADAPTATION
SERA RESPONSABLE D' AUCUN DOMMAGE CONSECUTIF
limitation des dommages consecutifs ou indirects, par consequent,
Pioneer
application
indiquee
defectuosites
abusifs
ou Ia
PAS
DE
ne
garantit
industrielle
dans
resultant
; I'
utilisation
surtension
GARANTIES, EXPLICITES
les
; les
a celles specifiees dans le manuel de l'utilisateur. Cette garantie ne
offertes sans frais en vertu de
obliteres ou enleves
l.nc.
(ci-apres « Pioneer») garantit que les appareils electroniques, haut-parleurs et produis accessoires automobiles Pioneer®
a
Ia
discretion de Pioneer, sans frais
s'applique
ait
ete achete
indiquant
uniquement
DU
PRODUIT
au
Canada, s'ils sont installes et utilises conformement
is
a neuf, a
au proprietaire initial ou a
d'un
Ia
date de
l'achat
depuis
{La
et
LA
A
UN
USAGE PARTICULIER,
aucun
des
ou
documents
de retouches ou
non
dommages
annulent
produits
commerciale. Cette garantie ne
s'y
appliquant.
autorisee de pieces ou de
decoulant
Ia
presente garantie,
cette garantie.
de
pieces
ou
Ia
discretion
detaillant Pioneer autorise
le pays de l'achat,
de
Pioneer.
initial. Si une reparation s'avere necessaire, le
retour
du
de reparation. Les appareils de
tout
proprietaire
aux
et
tel
qu'explique
produit
repare ou de rem placement, a
garantie prend effet a compter
produits
accessoires
automobiles
GARANTIE
OU
IMPLICITES, Y COMPRIS LES GARANTIES IMPLICITES
enumeres
Cette
modifications
de
fuites
ET
CE
PRODUIT
ET/OU
ACCESSOIRE. Certains Etats et certaines provinces n'autorisent pas !'exclusion ou
ci-dessus
garantie
main-d'muvre;
; les
si
elles
s'ils
s'applique
ne
non
autorisees
dommages
sont
obtenues au pres
Ia
limitation ou !'exclusion indiquee plus haut peut
sont
couvre
!'installation
couvre
INVALIDITE DE TOUTES AUTRES GARANTIES
DANS TOUTE
REPRESENTATION ET N'OFFRE AUCUNE GARANTIE,
OBLIGATIONS
CONDITIONS, EXPRESSES
PAS
LA
certaines provinces n'autorisent pas les limitations
ou exclusions precitees ne s'appliquent pas
Cette garantie
provinces. Dans
elle sera sans effet
LA
EN
PERIODE
vous
MESURE AUTORISEE PAR
VERTU
DE
Ia
mesure ou toute disposition de cette garantie limitee est consideree com me invalide ou inexecutable en vertu du
sur
DE
TOUTES GARANTIES ET CONDITIONS IMPLICITES, Y COMPRIS, MAIS SANS
OU
GARANTIE. AUCUNE GARANTIE
confere des
les autres dispositions, qui resteront pleinement en vigueur.
IMPLICITES,
droits
LA
LOI, SAUF DISPOSITION CONTRAIRE DANS LE PRESENT DOCUMENT, PIONEER
DE
a vous.
specifiques legaux, mais
Nl
N'ACCEPTE AUCUNE CONDITION CONCERNANT
COMMERCIALITE ET D'ADAPTATION A
OU
sur
CONDITION
Ia
duree
d'une
vous
DEMANDE DE SERVICE
Aux Etats-Unis et
Pour
toute
Votre detaillant Pioneer autorise - Votre detaillant Pioneer peut reparer
services Pioneer autorisee. Vous devriez trouver les coordonnees (numero de telephone, numero de telecopieur, adresse de courriel, etc.) de votre
detaillant sur votre
Support
nous
Canada), cliquez
Votre entreprise de services Pioneer autorisee - peut effectuer des reparations pour
et des produits accessoires et peut vous conseiller sur
puis selectionnez « Trouver un Centre de
Expedition de
RETOUR. VEUILLEZ
numero d'autorisation de retour, veuillez emballer
assurable,
pendant
a
au
Pour toute question concernant
Customer
au
Canada,
demande de service, veuillez
re<;:u
Ia
clientele Pioneer - peut vous conseiller sur le choix de
1-800-421-1404
sur«
votre
a une societe de services Pioneer autorisee
le
transport. lncluez votre nom, votre adresse et
Support,
pour recevoir
de caisse.
ou
visitez notre site Web a www.pioneerelectronics.com (pour les Etats-Unis)
Soutien
appareil
NE
»,
aux
PAS
ENVOYER VOTRE PRODUIT SANS AVOIR D'ABORD CONTACTE
Pioneer
un
service
de
contacter
puis selectionnez « Contactez-nous
service».
fins
de service - VOUS DEVEZ D'ABORD CONTACTER PIONEER POUR OBTENIR UNE AUTORISATION
votre
produit,
Electronics
garantie
:
le
le
produit soigneusement et l'envoyer, frais de port prepayes avec
ou
un
veuillez contacter
(USA) Inc.,
vous
devez presenter votre
I'
option de service optimal pour votre modele et votre region geographique. Appelez-
».
choix d'autres options, selon le cas. Visitez
a Pioneer. Utilisez des materiaux d'emballage coussines adequats pour eviter les dommages
numero de telephone
le
soutien a
P.O.
Box
REGLEMENT DES CONFLITS
Dans le cas d'un conflit entre. vous et Pioneer apres notre reponse a votre demande initiale adressee service a
met
a
votr~
frais. Aux Etats-Unis, vous etes tenu de recourir
Ia
loi sur
par le Programme de resolution des plaintes. Pour avoir recours
representant
Ia
periode de garantie, et donnez-lui
plainte a ete expliquee
jours apres
conflit, et indiquera combien de temps ces demarches prendront ;
Pioneer n'entreprendra aucune demarche.
disposition son Programme de resolution des plaintes pour resoudre
Ia
garantie « Magnuson-Moss Warranty
du
service a
Ia
reception de votre plainte, (1) repondra a votre plainte par ecrit pour vous aviser des demarches qu'elle entreprendra pour resoudre
Ia
clientele
au
representant,
le
probleme que vous rencontrez et les demarches que vous avez entreprises pour faire reparer
le
nom
au
Programme de reglement des plaintes avant d'exercer vos droits
Act»,
mais vous etes
du
detaillant Pioneer autorise aupres duquel vous vous etes procure le produit Pioneer. Une fois que votre
un
numero de resolution vous sera communique. Pioneer etudiera
au
Programme de resolution des plaintes, composez le 1-800-421-1404 et decrivez
ou
(2) repondra a votre plainte par ecrit pour vous indiquer les raisons pour lesquelles
LE
PAYS
D'ACHAT
en
raison d'un defaut de fabrication, seront repares
ulterieur
Etats-Unis ou au Canada. Vous devrez
de
Ia
premiere vente
.......................................................................... .
EST
VENDU
utilises a des
pas
si
pas les
par
ecrit
decoulant
pas le
NE
S' APPLIQUERA APRES
garantie implicite. Par consequent, il se pourrait que certaines des limitations
pouvez beneficier d'autres
ou
remplacer votre appareil
Ia
1720,
Long
le
en
droit d'engager une action
de ce
dans le present document. Vous serez responsable
«TEL
le
produit
rayures
par
Pioneer ; les accidents,
ou Ia maintenance inadequate; les dommages causes
de piles defectueuses ; ou
coat
des pieces ou de
d'une
source
UN
re<;:u
Ia
plupart des produits electroniques automobiles, des haut-parleurs
ou
nous pouvons vous joindre pendant les heures de bureau.
clientele Pioneer
Beach,
conflit.
Le
DU
PRODUIT
au
manuel de l'utilisateur qui accompagne l'appareil et
rem
placement et/ou pieces fournies
produit
Pioneer pendant Ia periode de garantie,
produit
doit
itre
expedie dans Ia peri ode de garantie,
l'interieurdu
au
detail)
CE
PRODUIT AETEACHETE
QUEL »
fins
a ete
ou
de
ET
«AVEC
commerciales
soumis
tout
autre
autre que Pioneer. Les numeros de serie modifies,
USAGE PARTICULIER, A UNE PERIODE N'EXCEDANT
LA
droits
caisse indiquant
ou
vous mettre
ou
le
site Web de Pioneer, cliquez
LE
SERVICE A LA CLIENTELE.
comme
California
Programme de resolution des plaintes est disponible sans
en
justice
pays d'achat.
DE
QUALITE MARCHANDE
TOUS
ou
a une
puissance
element
collisions,
!'utilisation
Ia
main-d'muvre
CE
PERIODE
qui peuvent varier selon les Etats ou les
le
lieu
http://www.pioneerelectronics.ca (pour
decrit ci-dessus
90801 U.S.A.
Ia
clientele (Customer Support), Pioneer
en
le
conflit et, dans
ou
rem
places par
fournir
un
re~u
~
1 an 1 an
DE
TOUTEAUTRE
SES
DEFAUTS
ne
pas s'appliquer a vous.
professionnelles,
S'Y
en
un
vertu des lois de I'Etat sans passer
nominale
esthetique
PRODUIT. PIONEER LIMITE SES
LIMITER LES GARANTIES ET
DE
GARANTIE. Certains etats
et
Ia
date
contact avec une entreprise de
service d'expedition
ou
d'exiger reparation
; les
usages
de piles non
qui seraient autrement
de
Ia
transaction d'origine.
ou
ecrivez-nous a :
un
delai de quarante (40)
un
appareil
en
vertu de cette
de caisse ou autre
du
ET
».PIONEER
ou
excedant
dommages
inappropries
NE
FAIT AUCUNE
droit
sur«
Si
vous avez
le
produit pendant
sous
retrait
et
Main-d'wuvre
SOURCE,
GARANTIES
dans
toute
celle
par
Ia
foudre
conformes
applicable,
Soutien
tra<;:able
en
vertu de
ne
de
NE
ou
ou
DE
un
au
Ia
et
le
»,
et
le
ENREGISTREZ
N°
de modele
Achetede
UCC1017
___________________________________________________________________________
LE
LIEU ET LA
DATE
D'ACHAT. VEUILLEZ GARDER CES INFORMATIONS ET VOTRE RECU
N°
de serie Date d'achat
DE
CAISSE DANS
UN
ENDROIT SUR
_______
_
_
<QRY3001-C>
Page 17

P1oneer
PIONEER ELECTRONICS (USA) INC.
LIMITED
WARRANTY
VALID ONLY
WARRANTY
Pioneer Electronics
Canada that fail to function properly under normal use due to a manufacturing defect when
with the unit
units and/or parts supplied under this warranty may be new or rebuilt at Pioneer's option.
This Limited
purchased
showing
prepaid,
Pioneer
the
only
will
PRODUCT
Car
Electronics, Speakers,
WHAT
This
AND THE
FAULTS". PIONEER
the
Pioneer does
does
any
misuse
leaking; damage
cover
Altered, defaced,
IS
NOT COVERED
Limited
FROM
ANY OTHER SOURCE,
IMPLIED
exclusion
not
apply
other
appearance item; damage
or
abuse;
the
cost
(USA) Inc.
will
be repaired or replaced with a unit of comparable value, at Pioneer's option, without charge
Warranty
from
an
authorized
date
of
original
from
within
pay
to
return
WARRANTY
Warranty
WARRANTY
SHALL
or
limitation
not
warrant
if
the
product
the
use
from
of
parts
or
removed serial
(Pioneer) warrants that Pioneer® Car Electronics, Speaker, and Accessory Products distributed by Pioneer
applies
to
the
original
Pioneer
purchase.
the
country
the
repaired
PERIOD
and
Accessories
applies
inoperative batteries;
or
to
Pioneer
THERE ARE
OF FITNESS FOR
NOT
BE
of
any
has been
of
unauthorized parts
labor
LIABLE FOR
incidental
product
or
that
would
numbers
or
any
dealer
In
the
of
purchase
or
replacement
(Runs
products
NO WARRANTIES, EXPRESS OR IMPLIED, INCLUDING
or
consequential
listed
subjected
defects
otherwise
subsequent
in
the
U.S.A.
or
event
service
as explained
from
the
................................................................................................................................
that
A
ANY
above
when
to
power
resulting
or
labor;
or
the
use
void
be
this
Canada. You
is
required, the
productto
PARTICULAR PURPOSE
CONSEQUENTIAL AND/OR INCIDENTAL
of
warranty.
in
date
of
are
purchased
damages,
it
is
used
in
excess
from
alterations
improper
batteries
provided
NO OTHER WARRANTIES
TO THE FULLEST EXTENT PERMITTED
RESPECT
AND
AND
APPLY AFTER THE WARRANTY
limitations
This warranty
any
provisions,
TO THIS
CONDITIONS INCLUDING, BUT
FITNESS
or
provision
PRODUCT EXCEPT
FORA
PARTICULAR PURPOSE, TO A
exclusions
gives
you
ofthis
which
limited
will
continue
may
not
specific
warranty
in
BY
LAW,
AS STATED
NOT LIMITED TO, WARRANTIES
PERIOD. Some
apply
to
legal
rights, and
is
deemed
full
force
PIONEER MAKES NO REPRESENTATIONS OR WARRANTIES
IN
THIS DOCUMENT.
PERIOD NOT TO
states and
you.
you
may
invalid
and effect.
also
or
unenforceable
provinces
have
TO OBTAIN SERVICE
In
the U.S.A.
Please
Your
receipt should list the contact information (phone number, fax, email, etc.) for your Dealer.
Pioneer Customer
www.pioneerelectronics.com
Your
applicable. Please visit Pioneer's website, click
Shipping
PRODUCT WITHOUT CONTACTING CUSTOMER SUPPORT. If
send it transportation prepaid by a traceable, insured method to
prevent damage
For questions about your product,
or Canada, to receive warranty service, you need to present your sales receipt showing place and date
contact
Authorized Pioneer Dealer -
Authorized Pioneer
Your
one
Support-
Unit
in
transit.
of
the
following
Can advise the optimal service option for your model and geographic location. Please
Service
for
Service
Include your name, address and a telephone number where you can be reached during business hours.
to
obtain
Your
Pioneer Dealer may repair or replace your unit or refer you to
(for
USA)
Company - Can perform repairs for most Car Electronics,
-YOU
please
service:
or
http://www.pioneerelectronics.ca
on
"Support,"
MUST FIRST CONTACT PIONEER
and select
an
contact Pioneer Customer Support as described above or write to us at:
Customer
Pioneer
Long
Beach,
DISPUTE RESOLUTION
Following
Resolution Program to resolve the dispute. The Complaint Resolution Program
Complaint Resolution Program before you exercise any rights under,
to file suit under state law without using the Complaint Resolution Program.
customer service representative the problem you are experiencing, steps you have taken to have the product repaired during the warranty period, and the name
of the authorized Pioneer Dealer from which the Pioneer product was purchased. After the complaint has been explained to the representative, a resolution
number
writing informing you what action Pioneer
Pioneer
our response to any initial request to Customer Support, should a dispute arise between you and Pioneer, Pioneer makes available its Complaint
will
be issued. Within forty
will
not take any action.
(40)
days
of
receiving your complaint, Pioneer
will
take, and
in
what time period, to resolve the dispute; or (2) respond to your complaint
WARRANTY
IN
COUNTRY OF PRODUCT PURCHASE
in
the
installed
owner
of
this
Pioneer
will
this
you
within
first
so
in
a trade
of
installation
not
without
AND
EXCEED THE WARRANTY
other
you have a return authorization number, please package the product carefully
Authorized Pioneer
product
document.
the
retail sale)
from
an authorized Pioneer dealer. IF THIS
the
above
or
its
business
published
or
modifications
or
conforming
charge
PIONEER LIMITS ITS OBLIGATIONS
CONDITIONS,
do
not
allow
rights
under
applicable
(for Canada),
"Find
a Service Center."
TO
product
be required
must
You
will
country
AND
THIS
limitation
power
maintenance;
to
those
under
limitations
which
GET RETURN
Service
and operated according to the owner's manual
to
you for parts or actual repair work. Replacement
during
the
to
provide
be delivered
be
responsible
of
purchase.
warranty
a sales
within
for
period
receipt
the
removal
provided
or
other
warranty
and
installation
valid
period,
fJ.!D.
..
1 Year
THE
PRODUCT
or
exclusion
or
in
any
rating. This
not
specified
this
warranty
WHETHER
vary
from
law,
such
click
Speaker
Company or Pioneer. Use adequate padding material to
IMPLIED WARRANTY
IS SOLD STRICTLY
DAMAGES.
industrial
authorized
lightning
PERIOD. NO WARRANTIES OR CONDITIONS SHALL
on
how
state
determination
an
on
"Support,"
and Accessory products and advise other options as
AUTHORIZATION. PLEASE DO NOT SEND
Some
may
not
or
warranty
in
writing
or
power
in
the
owner's
obtained
EXPRESS OR IMPLIED, OF MERCHANTABILITY
long
an
to
state
Authorized Pioneer
PRODUCT
states and
apply
to
commercial
does
ORACCEPTSANY
UNDER ANY
or
you.
not
cover
by
Pioneer; accident,
surges;
manual.
from
any
implied
warranty
province
will
have
of
original owner's transaction.
Service
call
us at 1-800-421-1404
then select
WAS
OF MERCHANTABILITY
"AS
IS"
provinces
application.
cosmetic
subsequent
This
source
other
CONDITIONS WITH
IMPLIED WARRANTIES
lasts,
to
province. To
no
effect
Company.
"Contact
U.S.A.
enclosed
the
product
proof
of
purchase
transportation
ofthe
product.
.LJJw:
1 Year
PURCHASED
AND
"WITH
do
not
This
warranty
scratches
collisions,
damage
warranty
does
than
so
the
the
on
the remaining
Your
Us."
IN
Pioneer.
Support
Electronics
P.O.
Box
California
or
seek any remedies, created by the Magnuson-Moss Warranty Act but may be entitled
To
(USA)
Inc.
1720
90801
U.S.A.
is
available to you without charge.
use the Complaint Resolution Program,
will
investigate the dispute and
In
will
the
U.S.A.,
you are required to use the
call1-800-421-1404
either: (1) respond to your complaint
in
and explain
writing informing you why
and
was
ALL
allow
or
from
not
above
extent
sales
or visit
YOUR
and
to
the
in
RECORD
Model No.
Purchased From
UCC1017
THE PLACE AND DATE
__________
OF PURCHASE.
Serial
KEEP THIS INFORMATION
No. Purchase Date
AND YOUR SALES RECEIPT
IN
A
SAFE
PLACE
_____________
_
~-------------------------------------------------------------------------
<QRY3001-C>
 Loading...