

Pilz PSEN op67-69K-060/1, PSEN op67-69K-075/1, PSEN op67-69K-015/1, PSEN op67-69K-030/1, PSEN op67-69K-090/1 Series Manual
...Page 1

1002401-2EN-01
PSEN op67-69K
Bedienungsanleitung
DE
Allgemeines
Beim Zubehör PSEN op67-69K handelt es sich um eine PMMAAcrylröhre, die zum Schützen und Abdichten der
Sicherheitslichtvorhänge der Serien PSEN opxx-s-xx-xxx/1 und
PSEN opxB-x-xxx verwendet wird. Dank des Zubehörs
PSEN op67-69K kann die Schutzart des Sicherheitslichtvorhangs
auf bis zu IP67 und IP69K erhöht werden.
Die in die Endkappen integrierte Gore-Tex-Membrane verhindert die
Kondensatbildung im Innern ohne dass Wasser und Schmutz von
außen eindringt Die Dichtigkeit über das elektrische Anschlusskabel
wird durch eine M16-Kabelverschraubung gewährleistet.
Übersicht
Typische Anwendungsbereiche
2 drehbare Halter aus Edelstahl, die an den Endkappen des
Produkts zu montieren sind, sind im Lieferumfang enthalten und
garantieren eine schnelle und einfache Installation.
Merkmale
Schutzart IP67, IP68 und IP69K
PMMA-Acrylröhre
Profil mit unterschiedlichen Längen, geeignet für alle
einstellbaren Höhen (150 bis 1.800 mm) und
Mehrstrahllichtschranken für 2, 3 und 4 Lichtstrahle
keine Beeinträchtigung der Leistungsfähigkeit des Lichtvorhangs
hinsichtlich Ausrichtung
keine Veränderung des EAA-Werts
PSEN op67-69K ist besonders dort geeignet, wo hohe
Luftfeuchtigkeit und Temperaturen vorherrschen und Maschinen
und Anlagen oft mit Heißwasser (bis 80 °C) bei Hochdruck (bis 100
bar) und/oder mit Reinigungsmittel gereinigt werden.
PSEN op67-69K ist besonders für Anwendungen in der
LEBENSMITTELINDUSTRIE geeignet: Getränkeherstellung,
Schlachtung, Wurstherstellung, Molkereiindustrie usw.
Pilz GmbH & Co. KG, Felix-Wankel-Straße 2, 73760 Ostfildern, Deutschland 1
Telefon: +49 711 3409-0, Telefax: +49 711 3409-133, E-Mail: pilz.gmbh@pilz.de Originaldokument
Page 2

1002401-2EN-01
PSEN op67-69K
Bedienungsanleitung
DE
Lieferumfang
Im Paket sind folgende Teile enthalten:
transparente PMMA-Röhre (1 St.)
untere Halterung (1 St.)
obere Halterung (1 St.)
Endkappe mit Silikonverbindung OR (2 St.)
INOX drehbare Halter (2 St.)
Schrauben und Muttern:
− Vierkantmutter M5 (4 St.)
− Schraube TE M5x6 UNI 5739 (4 St.)
− elastische Metallscheibe UNI 8842 J5 (4 St.)
− Schraube INOX TCEI M4x8 UNI 593 (6 St.)
− Metallscheibe A4 UNI 8840 ZB (6 St.)
− Schraube INOX TCEI M4x18 UNI 5931 (8 St.)
Unterbaugruppen b-d und c-d sind vorinstalliert und in die PMMARöhre a eingebaut, um die Stabilität des Pakets zu steigern.
2 Pilz GmbH & Co. KG, Felix-Wankel-Straße 2, 73760 Ostfildern, Deutschland
Telefon: +49 711 3409-0, Telefax: +49 711 3409-133, E-Mail: pilz.gmbh@pilz.de Originaldokument
Page 3
1002401-2EN-01
PSEN op67-69K
Bedienungsanleitung
DE
Montage
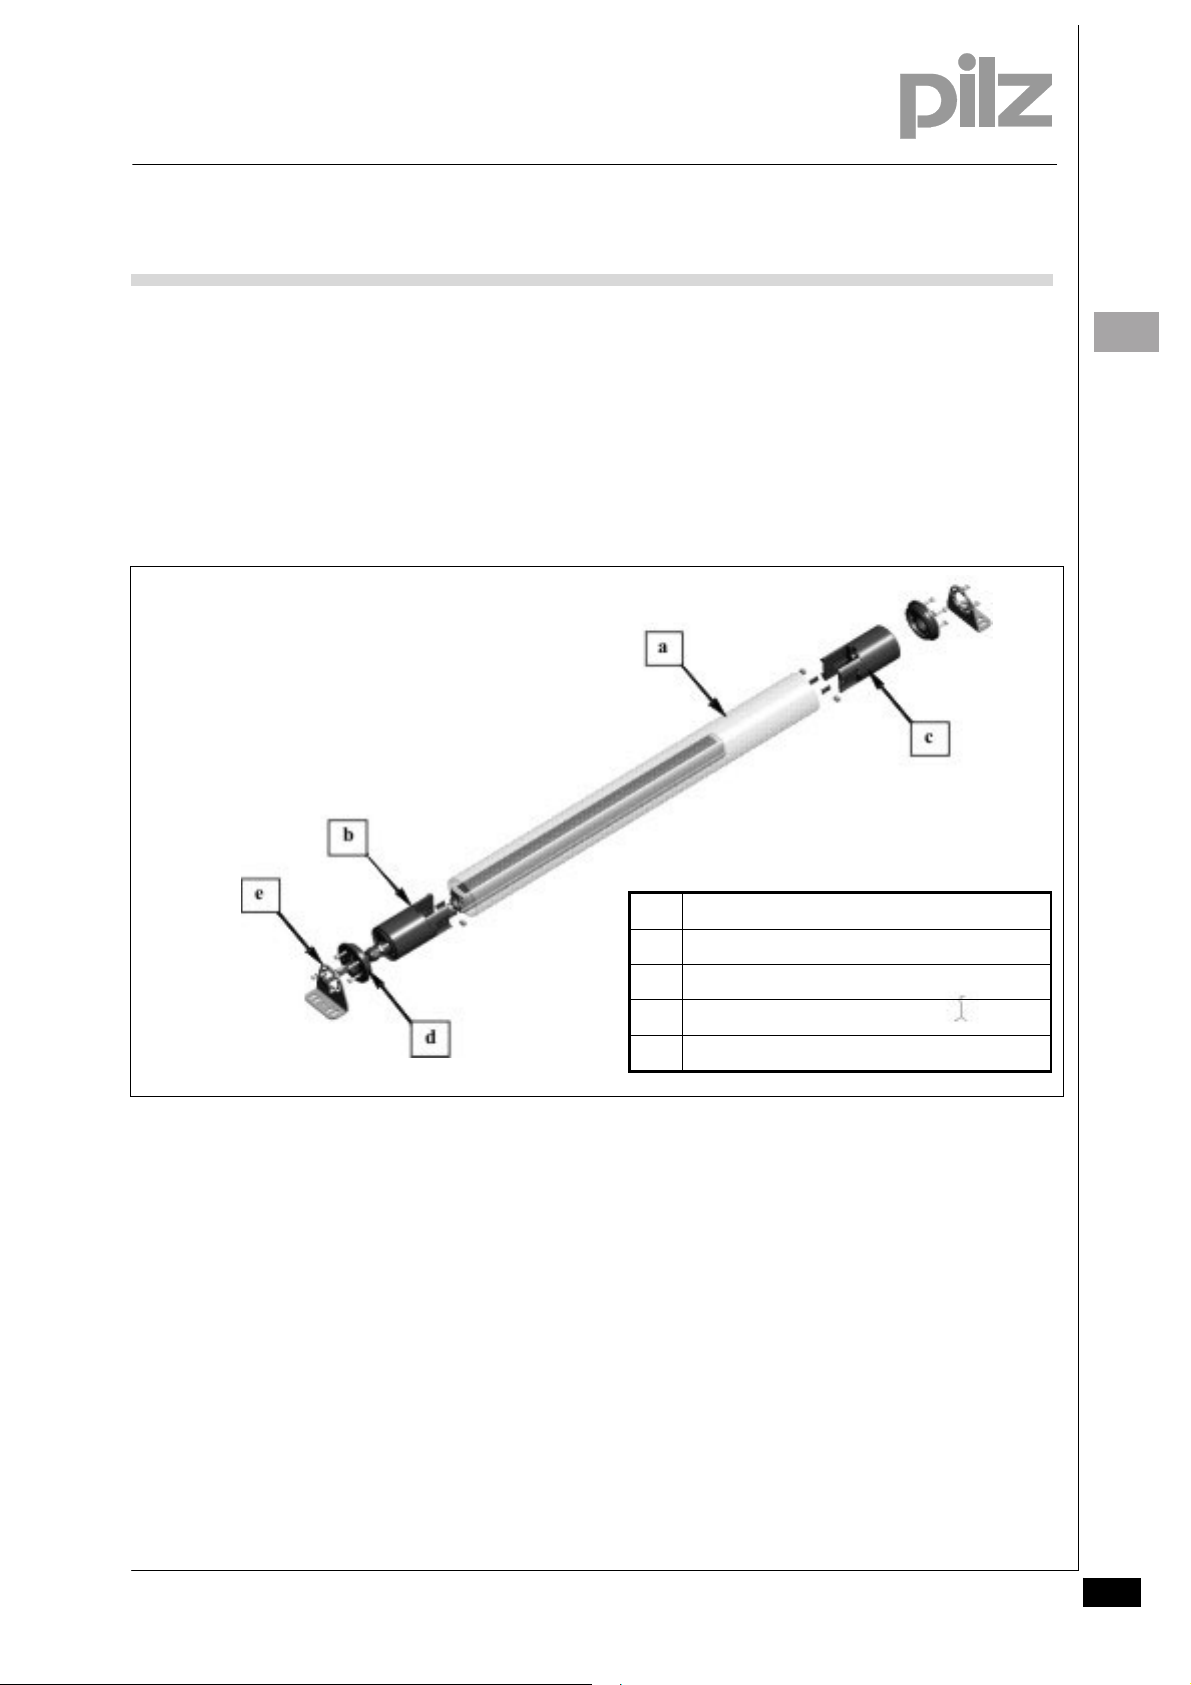
Zuerst Endkappen d von Unterbaugruppen b und c und danach die
genannten Unterbaugruppen b und c von Röhre a entfernen. Nach
diesen Arbeitsschritten ergibt sich der in Abb. 1 dargestellte
Zustand.
a Transparente PMMA-Röhre
b Untere Halterung
c Obere Halterung
d Endkappe mit OR
e INOX drehbare Halter
Abb. 1
Vierkantmuttern M5 an der Innenseite der Halterungsflügel
fluchtend mit den Löchern ansetzen und mit Schrauben TE M5x6
UNI 5739 (und Spezial-Unterlegscheiben) anschrauben, aber nicht
festziehen, so dass Bewegungsspielraum bleibt
(Abb. 2 und Abb. 3).
Pilz GmbH & Co. KG, Felix-Wankel-Straße 2, 73760 Ostfildern, Deutschland 3
Telefon: +49 711 3409-0, Telefax: +49 711 3409-133, E-Mail: pilz.gmbh@pilz.de Originaldokument
Page 4
1002401-2EN-01
g
PSEN op67-69K
Bedienungsanleitung
DE
Vierkantmutter M5
Elastische
Unterle
Schraube TE M5x6 UNI 5739
Abb. 2 Abb. 3
scheibe
Danach die Zwischenstücke in die seitlichen Nuten des PILZ
Sicherheitslichtvorhangs bis zur Rückseite einschieben (Abb. 4) und
die Schrauben zur Befestigung des Lichtvorhangs mit c anziehen.
Den gleichen Arbeitsschritt auch für Teil b wiederholen; darauf
achten, dass das Kabel des Sicherheitslichtvorhangs (das vor
diesem Montagevorgang an den Vorhang anzuschließen ist) durch
das entsprechende Loch der Kabelführung M16 verlegt ist, bevor
die Schrauben angezogen werden (Abb. 5).
Kabelführung M16 mit Ringmutter
im unbefestigten Zustand
Abb. 4 Abb. 5
Sind beide Teile b und c komplett mit dem Vorhang installiert, die
Mutter zur Befestigung des Kabels festziehen. Noch einmal
Schrauben M5x6 UNI TE 5739 auf Festsitz prüfen.
Sieht das System aus, wie in Abb. 6 gezeigt, kann es in die
transparente Röhre eingesetzt werden (Abb. 7).
4 Pilz GmbH & Co. KG, Felix-Wankel-Straße 2, 73760 Ostfildern, Deutschland
Telefon: +49 711 3409-0, Telefax: +49 711 3409-133, E-Mail: pilz.gmbh@pilz.de Originaldokument
Page 5
1002401-2EN-01
PSEN op67-69K
Bedienungsanleitung
Abb. 6 Abb. 7
Jetzt die beiden Endkappen mit der entsprechenden OR-Dichtung,
wie in Abb. 8 gezeigt, vorbereiten und auf die Ober- und
Unterseiten der PMMA-Röhre anbringen.
DE
Abb. 8 Abb. 9
Schraube INOX TCEI
M4x18 UNI 5931
Die Montage durch Festziehen der 4 Schrauben INOX TCEI M4x18
UNI 5931 auf beiden Seiten fertigstellen, sodass die OR-Dichtung
komplett gegen die Innenfläche der Röhre gedrückt wird (Abb. 9).
Zur Montage der Halter diese auf beide Endkappen fluchtend mit
dem mittleren Loch des jeweiligen Halters positionieren und diese in
der gewünschten Schräglage mit 3 Schrauben INOX TCEI M4x8
UNI 5931 (Abb. 10) festschrauben.
Pilz GmbH & Co. KG, Felix-Wankel-Straße 2, 73760 Ostfildern, Deutschland 5
Telefon: +49 711 3409-0, Telefax: +49 711 3409-133, E-Mail: pilz.gmbh@pilz.de Originaldokument
Page 6
1002401-2EN-01
PSEN op67-69K
Bedienungsanleitung
DE
Der Halter ist so ausgelegt, dass er alle „Hauptstellungen“ zulässt,
mit einem mittleren Winkelverstellbereich von 20 bis 30 Grad, je
nach gewünschter Position (Abb. 11 und Abb. 12).
Abb. 10 Abb. 11
Abb. 12
6 Pilz GmbH & Co. KG, Felix-Wankel-Straße 2, 73760 Ostfildern, Deutschland
Telefon: +49 711 3409-0, Telefax: +49 711 3409-133, E-Mail: pilz.gmbh@pilz.de Originaldokument
Page 7
1002401-2EN-01
PSEN op67-69K
Bedienungsanleitung
DE
Technische Daten
Technische Daten PSEN op67-68K
OPTISCHE DATEN
Nutzbare Reichweite/Reduktionsfaktor: 10 % pro Einheit
Abweichung EAA (Effektiver Abstrahlwinkel) keine
MECHANISCHE DATEN
Gehäusematerial: Weep-Spin-Dry Policril PMMA (Polymethylmethacrylat,
Acrylglas)
Dicke 4 mm
Schutzart IP67, IP68 und IP69K
Verfügbare Modelle
MODELL
PSEN op67-69K-015/1 PSEN opxx-s-xx-015/1 630930
PSEN op67-69K-030/1 PSEN opxx-s-xx-030/1 630931
PSEN op67-69K-045/1 PSEN opxx-s-xx-045/1 630932
PSEN op67-69K-060/1 PSEN opxx-s-xx-060/1 630933
PSEN op67-69K-075/1 PSEN opxx-s-xx-075/1 630934
PSEN op67-69K-090/1 PSEN opxx-s-xx-090/1 630935
PSEN op67-69K-105/1 PSEN opxx-s-xx-105/1 630936
PSEN op67-69K-120/1 PSEN opxx-s-xx-120/1 630937
PSEN op67-69K-135/1 PSEN opxx-s-xx-135/1 630938
PSEN op67-69K-150/1 PSEN opxx-s-xx-150/1 630939
PSEN op67-69K-165/1 PSEN opxx-s-xx-165/1 630940
PSEN op67-69K-180/1 PSEN opxx-s-xx-180/1 630941
PSEN op67-69K-2-050 PSEN opxB-2-050 630942
PSEN op67-69K-3-080 PSEN opxB-3-080 630943
PSEN op67-69K-4-090 PSEN opxB-4-090 630944
PSEN op67-69K-4-120 PSEN opxB-4-120 630945
Zugehörige
Sicherheitslichtvorhänge
Bestell-Nr.
Pilz GmbH & Co. KG, Felix-Wankel-Straße 2, 73760 Ostfildern, Deutschland 7
Telefon: +49 711 3409-0, Telefax: +49 711 3409-133, E-Mail: pilz.gmbh@pilz.de Originaldokument
Page 8
1002401-2EN-01
PSEN op67-69K
Bedienungsanleitung
DE
Abmessungen
Abb. 13
MODELL L (mm)
PSEN op67-69K-015/1 373,5
PSEN op67-69K-030/1 520,7
PSEN op67-69K-045/1 670,8
PSEN op67-69K-060/1 820,7
PSEN op67-69K-075/1 970,8
PSEN op67-69K-090/1 1120,7
PSEN op67-69K-105/1 1270,7
PSEN op67-69K-120/1 1420,8
PSEN op67-69K-135/1 1570,7
PSEN op67-69K-150/1 1720,8
PSEN op67-69K-165/1 1870,8
PSEN op67-69K-180/1 2020,8
PSEN op67-69K-2-050 793,5
PSEN op67-69K-3-080 1093,5
PSEN op67-69K-4-090 1193,5
PSEN op67-69K-4-120 1493,5
8 Pilz GmbH & Co. KG, Felix-Wankel-Straße 2, 73760 Ostfildern, Deutschland
Telefon: +49 711 3409-0, Telefax: +49 711 3409-133, E-Mail: pilz.gmbh@pilz.de Originaldokument
Page 9

1002401-2EN-01
PSEN op67-69K
Bedienungsanleitung
DE
Chemische Beständigkeit
Legende:
FR: full resistance
MR: medium resistance
NR: no resistance
Pilz GmbH & Co. KG, Felix-Wankel-Straße 2, 73760 Ostfildern, Deutschland 9
Telefon: +49 711 3409-0, Telefax: +49 711 3409-133, E-Mail: pilz.gmbh@pilz.de Originaldokument
Page 10

1002401-2EN-01
PSEN op67-69K
Bedienungsanleitung
DE
10 Pilz GmbH & Co. KG, Felix-Wankel-Straße 2, 73760 Ostfildern, Deutschland
Telefon: +49 711 3409-0, Telefax: +49 711 3409-133, E-Mail: pilz.gmbh@pilz.de Originaldokument
Page 11

1002401-2EN-01
PSEN op67-69K
Bedienungsanleitung
DE
Pilz GmbH & Co. KG, Felix-Wankel-Straße 2, 73760 Ostfildern, Deutschland 11
Telefon: +49 711 3409-0, Telefax: +49 711 3409-133, E-Mail: pilz.gmbh@pilz.de Originaldokument
Page 12

1002401-2EN-01
PSEN op67-69K
Bedienungsanleitung
DE
12 Pilz GmbH & Co. KG, Felix-Wankel-Straße 2, 73760 Ostfildern, Deutschland
Telefon: +49 711 3409-0, Telefax: +49 711 3409-133, E-Mail: pilz.gmbh@pilz.de Originaldokument
Page 13

1002401-2EN-01
PSEN op67-69K
Operating instructions
EN
General
The accessory PSEN op67-69K is a PMMA acrylic tube, which is
used to protect and seal safety light curtains in the series PSEN
opxx-s-xx-xxx/1 and PSEN opxB-x-xxx. Thanks to the accessory
PSEN op67-69K, the protection type of the safety light curtain can
be increased to up to IP67 and IP69K.
A Gore-Tex membrane is integrated into the end cap, stopping
condensation from forming inside and preventing the ingress of
water and dirt. Seal tightness across the electrical connection cable
is guaranteed by an M16 cable screw connection.
2 rotating, stainless steel brackets are supplied with the unit and
are to be mounted on the product’s end caps to guarantee simple,
fast installation.
Overview
Typical application areas
Features
Protection type IP67, IP68 and IP69K
PMMA acrylic tube
Profile in a range of lengths, suitable for all selectable heights
(150 to 1,800 mm) as well as multi-beam light beam devices for
2, 3 and 4 light beams
Does not adversely affect the performance of the light curtain in
terms of alignment
Does not change the EAA value
PSEN op67-69K is particularly suitable where high humidity and
temperatures prevail and where plant and machinery are regularly
cleaned using hot water (up to 80 °C), at high pressure (up to 100
bar) and/or using detergents.
PSEN op67-69K is particularly suitable for applications in the FOOD
INDUSTRY: Manufacture of beverages, slaughtering, meat
processing, dairy industry etc.
Pilz GmbH & Co. KG, Felix-Wankel-Straße 2, 73760 Ostfildern, Germany 1
Telephone: +49 711 3409-0, Telefax: +49 711 3409-133, E-Mail: pilz.gmbh@pilz.de Original document
Page 14

1002401-2EN-01
PSEN op67-69K
Operating instructions
EN
Scope of supply
The package contains the following components:
Transparent PMMA tube (1 piece)
Lower bracket (1 piece)
Upper bracket (1 piece)
End cap with silicon compound OR (2 pieces)
INOX rotating bracket (2 pieces)
Screws and nuts:
− M5 square nut (4 pieces)
− TE M5x6 UNI 5739 screw (4 pieces)
− UNI 8842 J5 metallic elastic washer (4 pieces)
− INOX TCEI M4x8 UNI 593 screw (6 pieces)
− A4 UNI 8840 ZB metallic washer (6 pieces)
− INOX TCEI M4x18 UNI 5931 screw (8 pieces)
Subassemblies b-d and c-d are pre-installed and built into the
PMMA tube, to increase the stability of the package.
2 Pilz GmbH & Co. KG, Felix-Wankel-Straße 2, 73760 Ostfildern, Germany
Telephone: +49 711 3409-0, Telefax: +49 711 3409-133, E-Mail: pilz.gmbh@pilz.de Original document
Page 15

1002401-2EN-01
PSEN op67-69K
Operating instructions
EN
Assembly
First of all, remove end caps d from subassemblies b und c and
then remove subassemblies b and c from tube a. Having taken
these steps, the unit should be in the condition illustrated in Fig. 1.
a
Transparent PMMA tube
b
Fig. 1
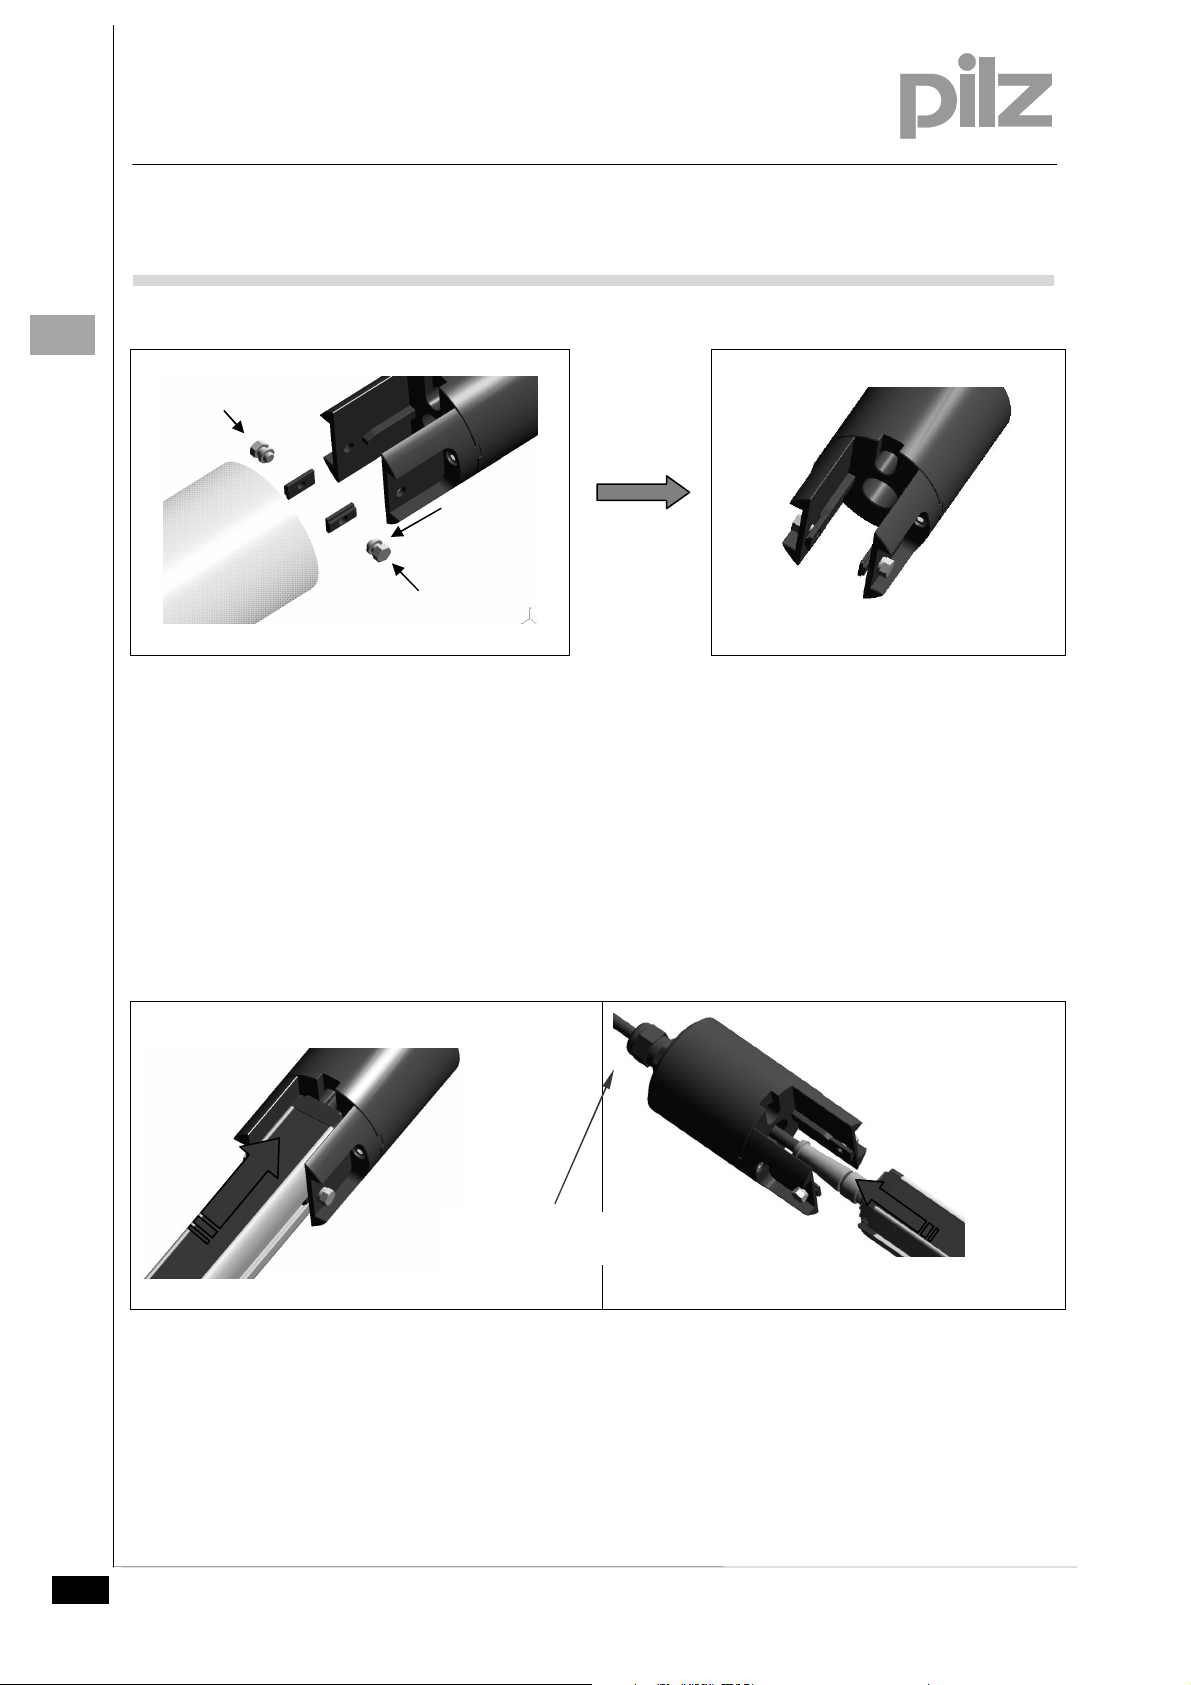
Position the M5 square nuts on the inside of the bracket blade,
aligned with the holes, and affix the screws TE M5x6 UNI 5739 (and
special washers), but do not tighten them, leaving room for
manoeuvre (Fig. 2 and Fig. 3).
Lower bracket
c
Upper bracket
d
End cap with OR
e
INOX rotating bracket
Pilz GmbH & Co. KG, Felix-Wankel-Straße 2, 73760 Ostfildern, Germany 3
Telephone: +49 711 3409-0, Telefax: +49 711 3409-133, E-Mail: pilz.gmbh@pilz.de Original document
Page 16

1002401-2EN-01
r
PSEN op67-69K
Operating instructions
EN
M5 square nut
Elastic
washe
TE M5x6 UNI 5739 screw
Fig. 2 Fig. 3
Then insert the spacers into the lateral grooves of the PILZ safety
light curtain as far as the end (Fig. 4) and tighten the screws to
attach the light curtain to c. Repeat the same step for part b; make
sure that the safety light curtain cable (which must be connected
before starting the light curtain assembly) is guided through the
relevant hole of the M16 cable conduit before tightening the screws
(Fig. 5).
M16 cable conduit with ring nut,
untightened
Fig. 4 Fig. 5
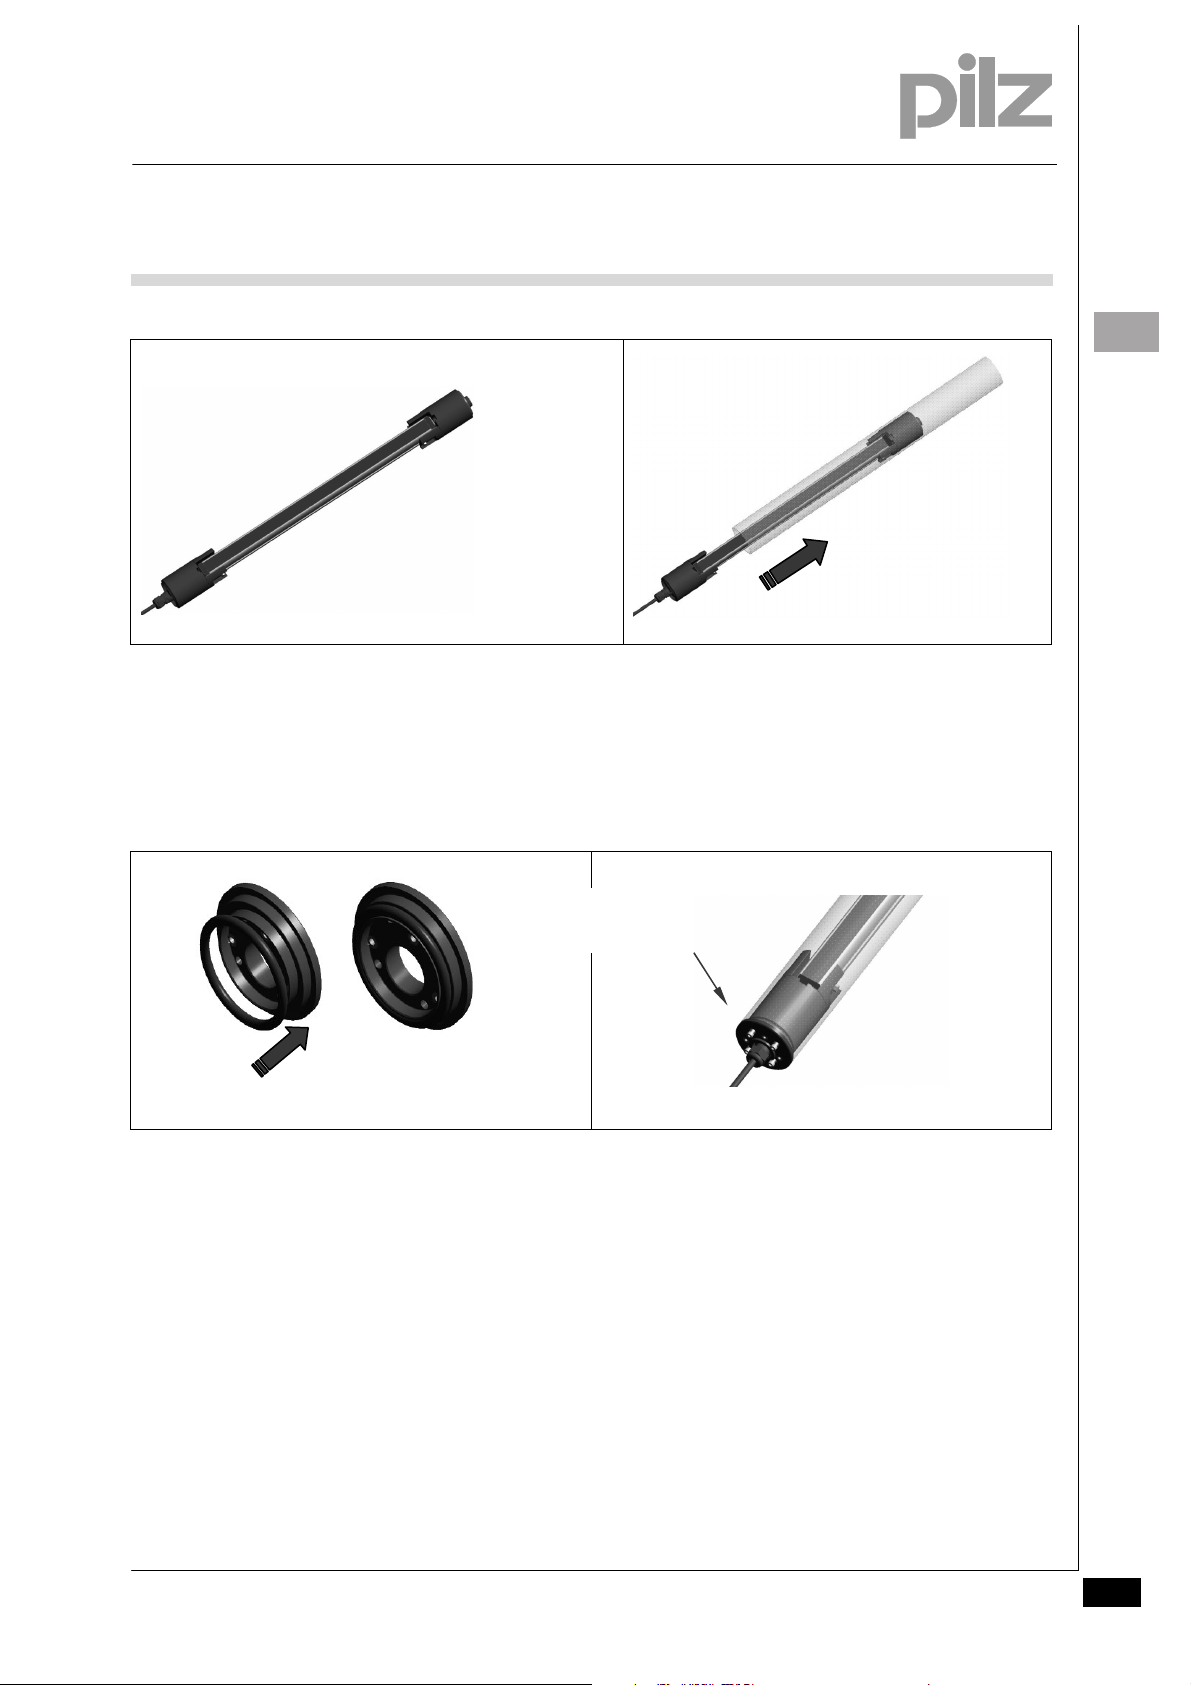
When both parts b and c are fully installed on the light curtain,
tighten the nut to secure the cable. Check again that the M5x6 UNI
TE 5739 screws are firmly seated.
If the system looks like the illustration in Fig. 6, it can be placed
inside the transparent tube (Fig. 7).
4 Pilz GmbH & Co. KG, Felix-Wankel-Straße 2, 73760 Ostfildern, Germany
Telephone: +49 711 3409-0, Telefax: +49 711 3409-133, E-Mail: pilz.gmbh@pilz.de Original document
Page 17

1002401-2EN-01
PSEN op67-69K
Operating instructions
Fig. 6 Fig. 7
Now prepare the two end caps with the relevant OR gasket, as
illustrated in Fig. 8, and attach to the top and bottom of the PMMA
tube.
INOX TCEI screw
M4x18 UNI 5931
EN
Fig. 8 Fig. 9
Complete the assembly by tightening the 4 screws INOX TCEI
M4x18 UNI 5931 on both sides, so that the OR gasket is completely
pressed against the inside of the tube (Fig. 9).
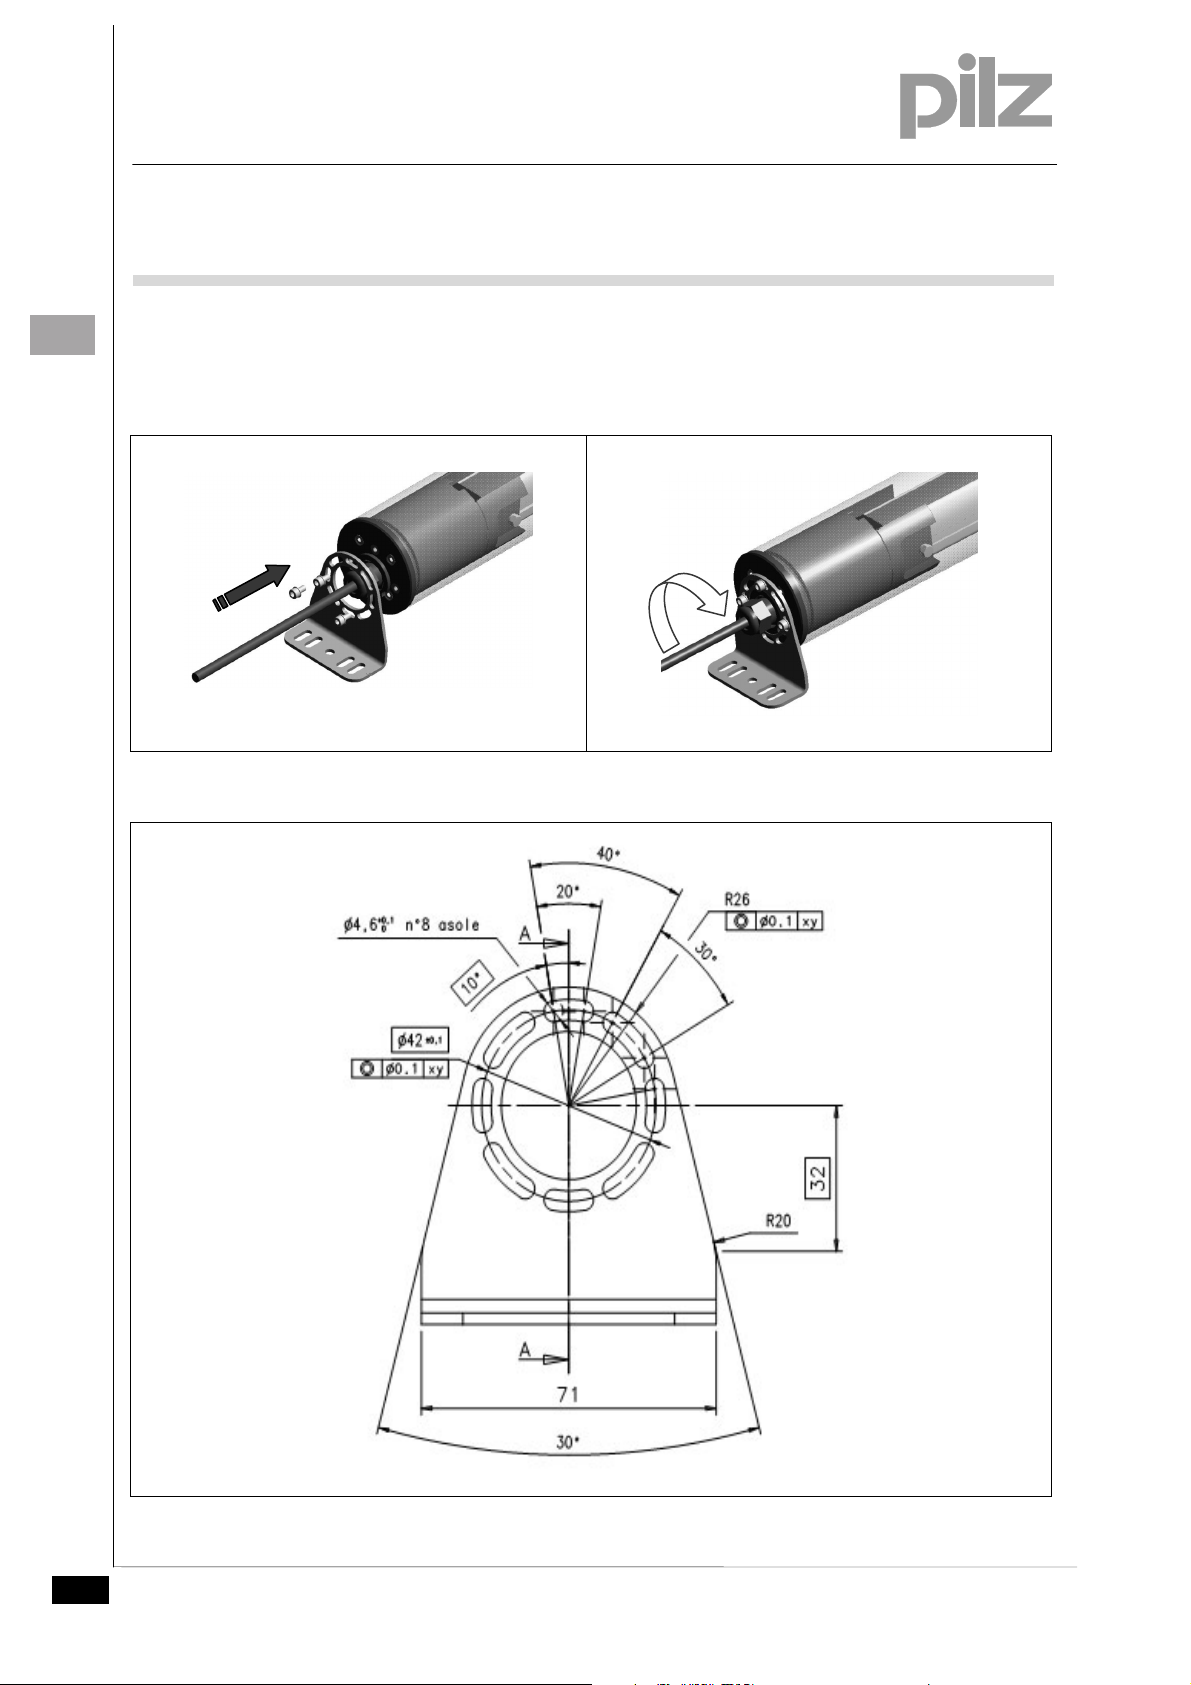
To install the brackets, position them on both end caps, aligned
with the middle hole of the respective bracket, and tighten them in
the required angular position using the 3 screws INOX TCEI M4x8
UNI 5931 (Fig. 10).
Pilz GmbH & Co. KG, Felix-Wankel-Straße 2, 73760 Ostfildern, Germany 5
Telephone: +49 711 3409-0, Telefax: +49 711 3409-133, E-Mail: pilz.gmbh@pilz.de Original document
Page 18

1002401-2EN-01
PSEN op67-69K
Operating instructions
EN
The bracket is designed so as to allow all the “main positions”, with
an average angle adjustment range of 20 to 30 degrees, depending
on the required position (Fig. 11 and Fig. 12).
Fig. 10 Fig. 11
Fig. 12
6 Pilz GmbH & Co. KG, Felix-Wankel-Straße 2, 73760 Ostfildern, Germany
Telephone: +49 711 3409-0, Telefax: +49 711 3409-133, E-Mail: pilz.gmbh@pilz.de Original document
Page 19

1002401-2EN-01
PSEN op67-69K
Operating instructions
EN
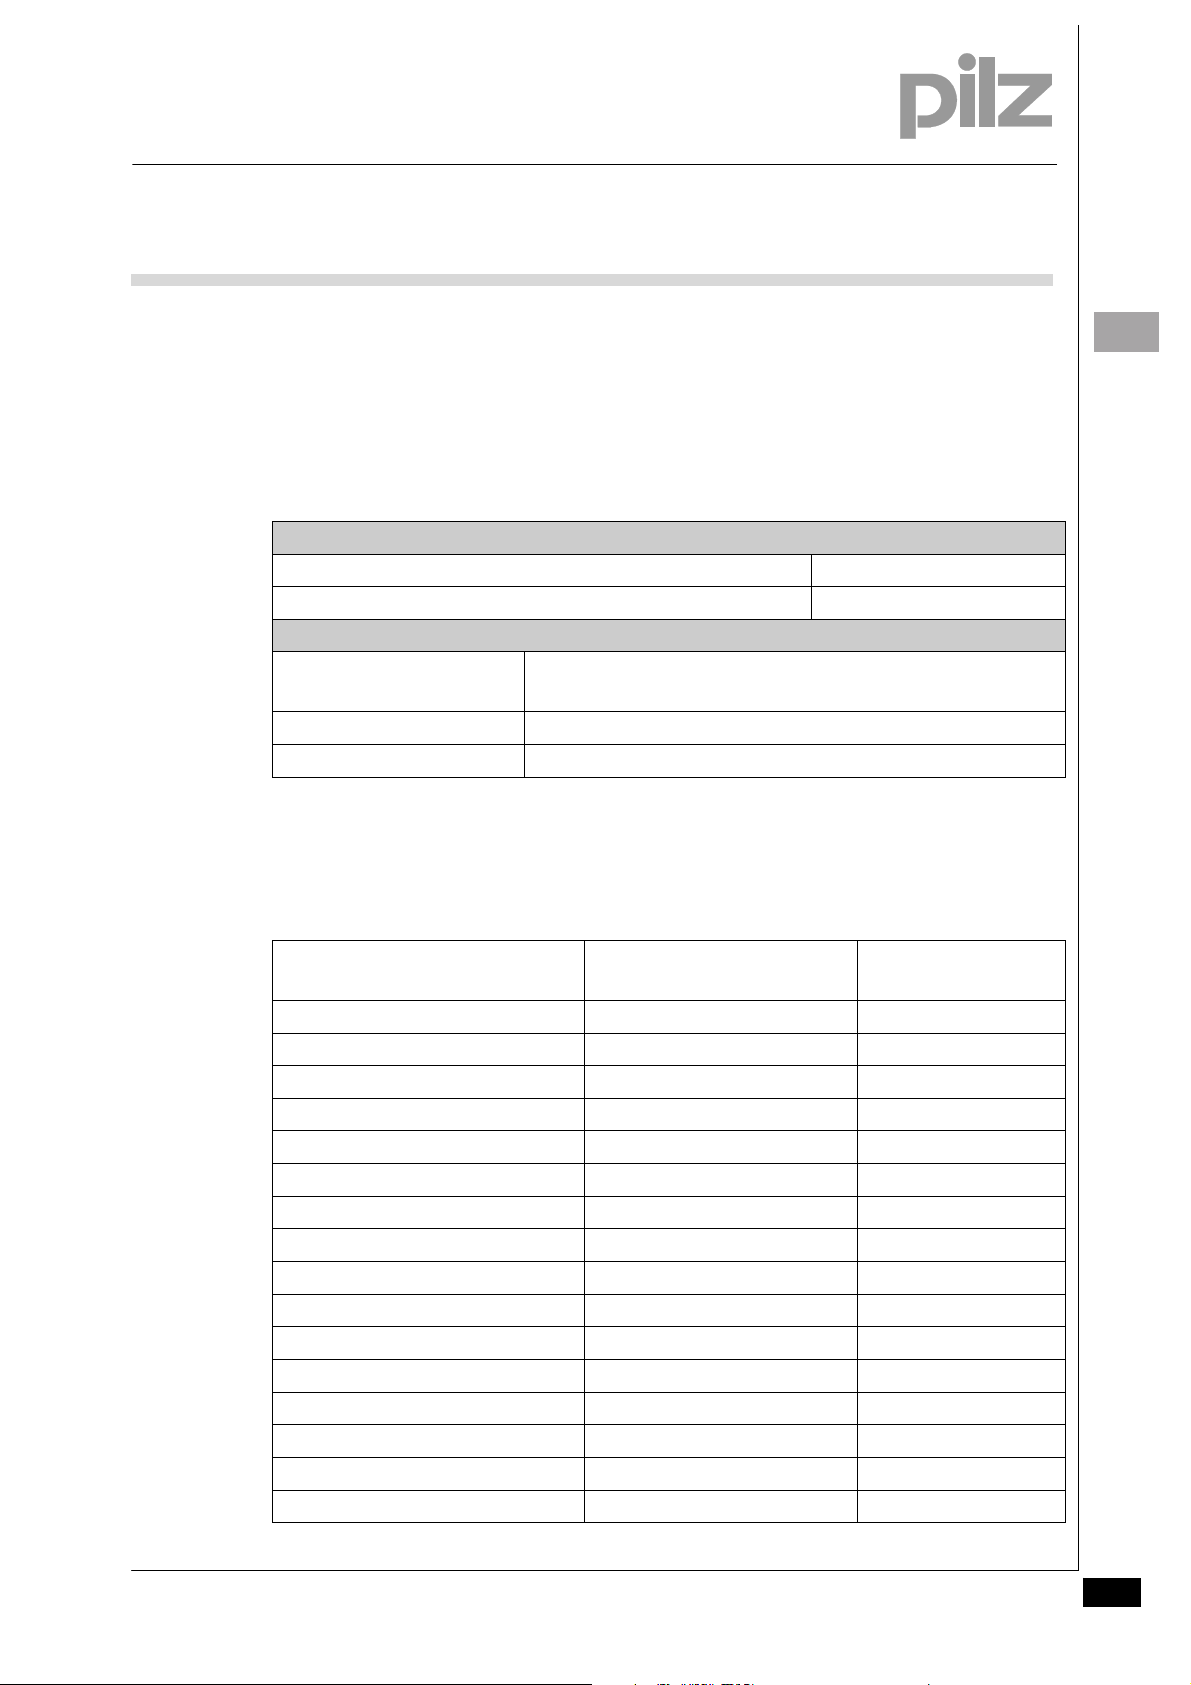
Technical details
Technical details PSEN op67-68K
OPTICAL DATA
Usable operating range/reduction factor: 10 % per unit
EAA deviation (effective aperture angle) None
MECHANICAL DATA
Housing material: Weep-spin-dry policril PMMA (polymethyl methacrylate,
acrylic glass)
Thickness 4 mm
Protection type IP67, IP68 and IP69K
Available models
MODEL
PSEN op67-69K-015/1 PSEN opxx-s-xx-015/1 630930
PSEN op67-69K-030/1 PSEN opxx-s-xx-030/1 630931
PSEN op67-69K-045/1 PSEN opxx-s-xx-045/1 630932
PSEN op67-69K-060/1 PSEN opxx-s-xx-060/1 630933
PSEN op67-69K-075/1 PSEN opxx-s-xx-075/1 630934
PSEN op67-69K-090/1 PSEN opxx-s-xx-090/1 630935
PSEN op67-69K-105/1 PSEN opxx-s-xx-105/1 630936
PSEN op67-69K-120/1 PSEN opxx-s-xx-120/1 630937
PSEN op67-69K-135/1 PSEN opxx-s-xx-135/1 630938
PSEN op67-69K-150/1 PSEN opxx-s-xx-150/1 630939
PSEN op67-69K-165/1 PSEN opxx-s-xx-165/1 630940
PSEN op67-69K-180/1 PSEN opxx-s-xx-180/1 630941
PSEN op67-69K-2-050 PSEN opxB-2-050 630942
PSEN op67-69K-3-080 PSEN opxB-3-080 630943
PSEN op67-69K-4-090 PSEN opxB-4-090 630944
PSEN op67-69K-4-120 PSEN opxB-4-120 630945
Corresponding safety light
curtains
Order no.
Pilz GmbH & Co. KG, Felix-Wankel-Straße 2, 73760 Ostfildern, Germany 7
Telephone: +49 711 3409-0, Telefax: +49 711 3409-133, E-Mail: pilz.gmbh@pilz.de Original document
Page 20

1002401-2EN-01
PSEN op67-69K
Operating instructions
EN
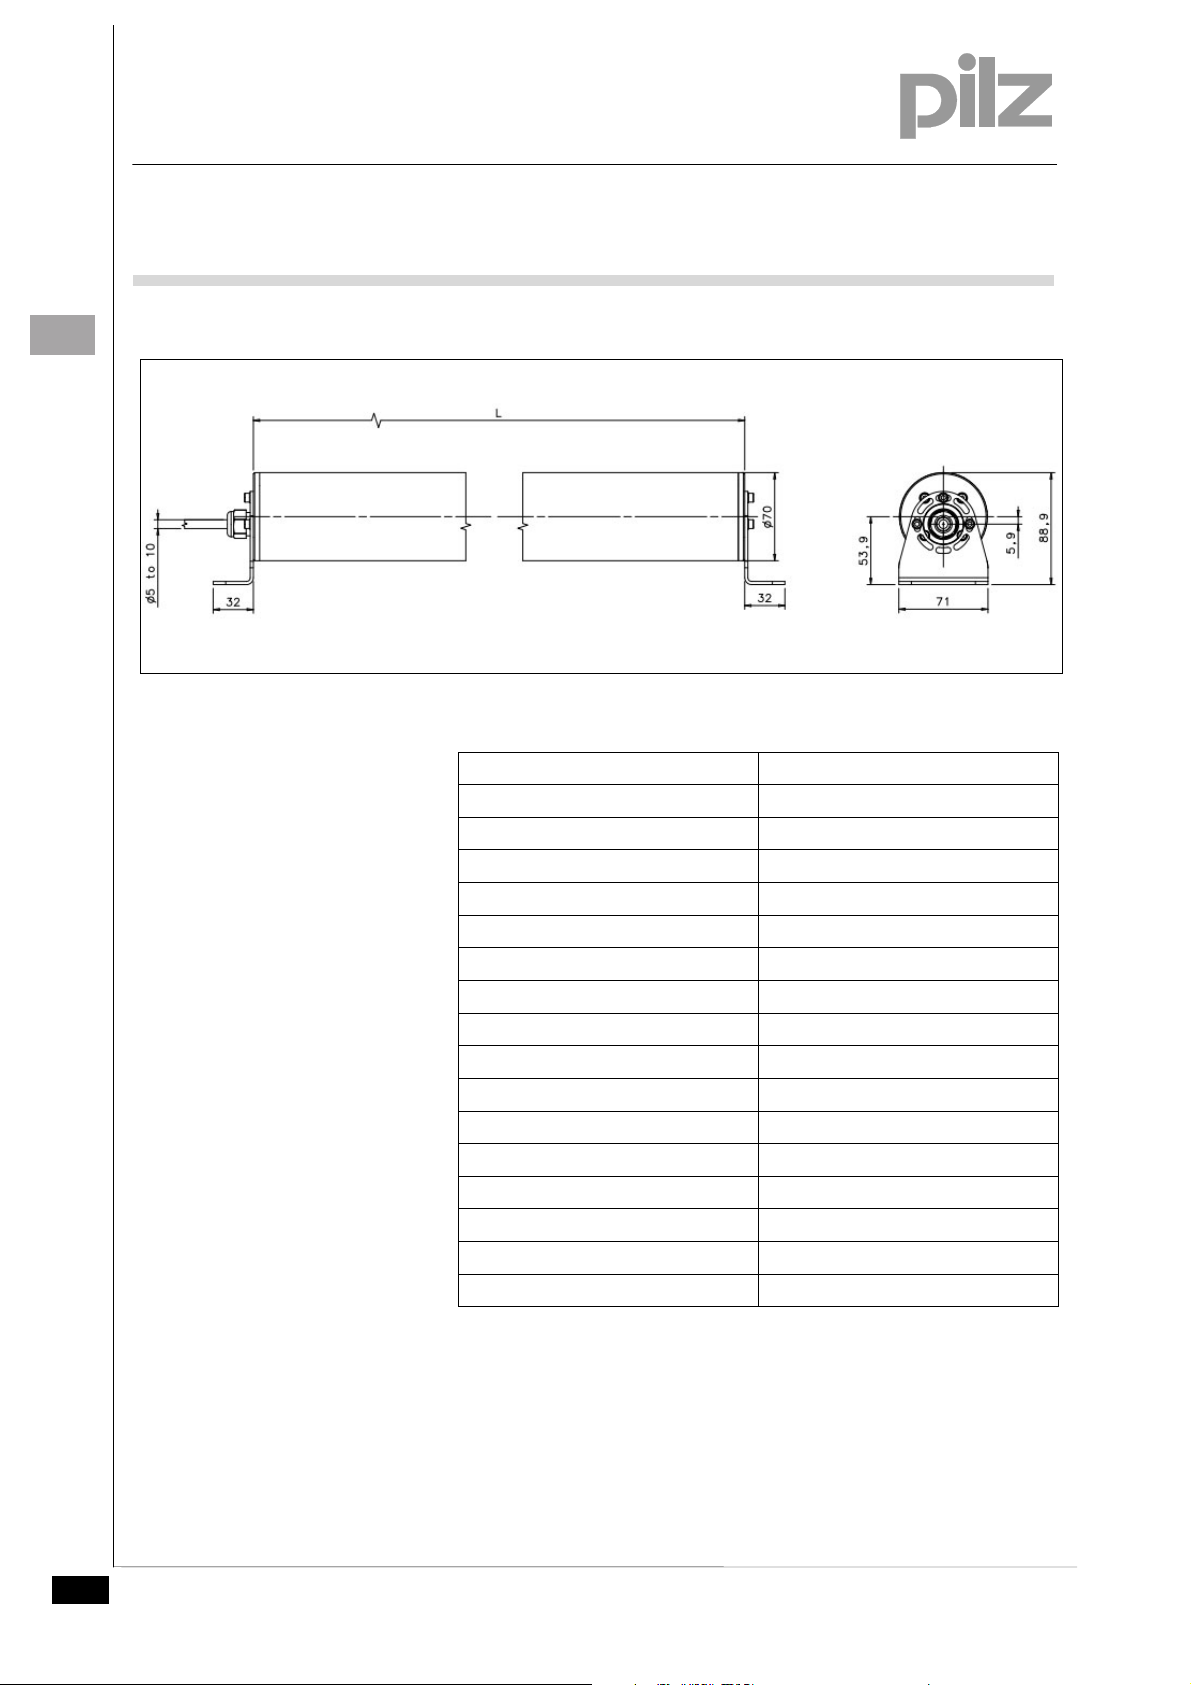
Dimensions
Fig. 13
MODEL L (mm)
PSEN op67-69K-015/1 373.5
PSEN op67-69K-030/1 520.7
PSEN op67-69K-045/1 670.8
PSEN op67-69K-060/1 820.7
PSEN op67-69K-075/1 970.8
PSEN op67-69K-090/1 1120.7
PSEN op67-69K-105/1 1270.7
PSEN op67-69K-120/1 1420.8
PSEN op67-69K-135/1 1570.7
PSEN op67-69K-150/1 1720.8
PSEN op67-69K-165/1 1870.8
PSEN op67-69K-180/1 2020.8
PSEN op67-69K-2-050 793.5
PSEN op67-69K-3-080 1093.5
PSEN op67-69K-4-090 1193.5
PSEN op67-69K-4-120 1493.5
8 Pilz GmbH & Co. KG, Felix-Wankel-Straße 2, 73760 Ostfildern, Germany
Telephone: +49 711 3409-0, Telefax: +49 711 3409-133, E-Mail: pilz.gmbh@pilz.de Original document
Page 21

1002401-2EN-01
PSEN op67-69K
Operating instructions
EN
Chemical resistance
Legend:
FR: full resistance
MR: medium resistance
NR: no resistance
Pilz GmbH & Co. KG, Felix-Wankel-Straße 2, 73760 Ostfildern, Germany 9
Telephone: +49 711 3409-0, Telefax: +49 711 3409-133, E-Mail: pilz.gmbh@pilz.de Original document
Page 22

1002401-2EN-01
PSEN op67-69K
Operating instructions
EN
10 Pilz GmbH & Co. KG, Felix-Wankel-Straße 2, 73760 Ostfildern, Germany
Telephone: +49 711 3409-0, Telefax: +49 711 3409-133, E-Mail: pilz.gmbh@pilz.de Original document
Page 23

1002401-2EN-01
PSEN op67-69K
Operating instructions
EN
Pilz GmbH & Co. KG, Felix-Wankel-Straße 2, 73760 Ostfildern, Germany 11
Telephone: +49 711 3409-0, Telefax: +49 711 3409-133, E-Mail: pilz.gmbh@pilz.de Original document
Page 24

1002401-2EN-01
PSEN op67-69K
Operating instructions
EN
12 Pilz GmbH & Co. KG, Felix-Wankel-Straße 2, 73760 Ostfildern, Germany
Telephone: +49 711 3409-0, Telefax: +49 711 3409-133, E-Mail: pilz.gmbh@pilz.de Original document
 Loading...