


En
EN
Phottix Strato TTL
INSTRUCTION MANUAL 2
INSTRUCTION MANUAL
for Nikon
De
Fr
Es
It
Pl
Ru
Cn
Cn
Simp
Trad
BENUTZERHANDBUCH 21
MANUEL D’UTILISATION 40
MANUAL DE INSTRUCCIONES 59
ISTRUZIONI D’USO 77
INSTRUKCJA OBSŁUGI 95
РУКОВОДСТВО ПОЛЬЗОВАТЕЛЯ 113
说明书 131
說明書 146
1

Parts
Transmitter
1. Power Switch
2. Test Button
3. USB Port
4. Shutter Button
5. Status LED
6. Lanyard Slot
7. LCD
8. EV -/+ Adjustment Buttons
9. Channel Selection Button
10. AF-ILL button
11. Battery Compartment
12. Hot Shoe Connector
13. Locking Ring
2
12
6
11
2
3
8
13
5
4
1
7
10
9

Receiver
1. Power Switch
2. Channel Selection Switch
3. Test Button
4. USB Port
5. Shutter Button
6. Status LED
7. Lanyard Slot
8. Hot Shoe Port
9. Sync Cable Port
10. Shutter Cable Port
11. DC 5V Power Port
12. Battery Compartment
13. Cold Shoe / 1/4 x20 mount
14. Locking Ring
EN
INSTRUCTION MANUAL
13
7
12
2
3
4
9
14
6
5
1
8
10
11
3

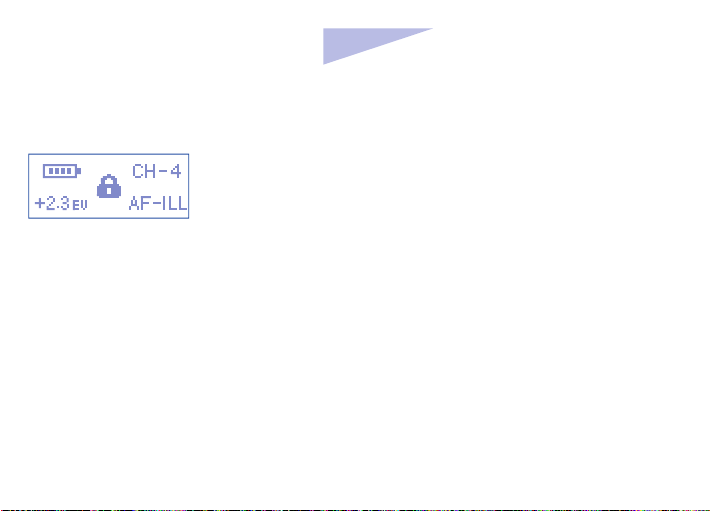
The Transmitter LCD
Battery Level Indicator
EV Adjustment Level
Channel
AF-ILL
Key Lock Mode
Tip: Turn off all devices – flashes/strobes,
cameras, and Phottix Strato TTL transmitters
and receivers - when connecting and
disconnecting devices.
4
Compatibility
The Strato TTL Transmitter is compatible with
other Phottix triggers in the following manner:
1. The Strato TTL Transmitter will trigger
Strato and Strato II Receivers and Atlas II
Transceivers (in RX mode) set to the same
channel.
2. The Strato TTL Transmitter will trigger
Strato II receivers set to any group. All Strato
II Receiver groups will fire if set to the same
channel as the Strato TTL transmitter.
3. The Strato TTL Transmitter will not trigger
Phottix Odin or Ares.
4. Phottix Odin TCU or Atlas II (in Tx mode) or
Ares Transmitter will not trigger Strato TTL
Receivers.

EN
INSTRUCTION MANUAL
5. Using the Strato TTL Transmitter in HSS
mode may cause issues with ash sync when
using Strato and Strato II Multi receivers or
Atlas II Transceivers (in RX mode).
Inserting batteries
1. Press the battery cover in while pushing
it away from the Strato TTL transmitter or
receiver. The battery cover will snap open and
slide away from the device.
2. Remove the battery cover from the Strato
TTL.
3. Insert AA batteries.
4. Replace the battery cover and push back
into the locked position.
Battery Level Indicator
When the battery voltage is higher than
2.4V, the battery level indicator icon will
display four bars . As power in the
batteries is depleted the bars displayed in
the battery level indicator icon will disappear
- an approximate indication of how much
power remains in the batteries. Use this as a
rough guide to know when a battery change
is needed. When the batteries are exhausted
the battery level indicator will display an
empty with battery icon .
LCD Backlight on the transmitter
Pressing any button on the transmitter
will illuminate the LCD Backlight for
5

approximately 10 seconds. If no buttons on
the transmitter are pressed, the backlight will
go o.
unlock the transmitter and the lock icon
will disappear.
Auto-idle function
The transmitter will enter Auto Idle Mode with
“IDLE” displaying on the LCD after 10 minutes
of inactivity.
Key Lock Mode
1. Pressing and holding the AF-ILL button
for 2 seconds will display a lock icon .
Transmitter Buttons will be locked, pressing
buttons will not make changes.
2. While in Key Lock Mode, pressing and
holding the AF-ILL button for 2 seconds will
6
Turning transmitter and receiver on/
o
1. To turn on the Phottix Strato TTL
transmitter or receiver– move the power
switch to the “ON” position.
2. To turn off the Phottix Strato TTL
transmitter or receiver - move the power
switch to the “OFF” position.
Test Button
1. The Test Button will test re ashes/strobes.
2. To Test: Press the transmitter Test Button.

EN
INSTRUCTION MANUAL
Flashes connected to Phottix Strato TTL
receivers on the same channel will re when
the transmitter test button is pressed.
3. Pressing the receiver Test Button will test
fire flashes or strobes connected to that
receiver.
For Wireless Shutter Release: See Using the
Strato TTL as a wireless shutter release below
.
Status LED
1. The Status LED on the Strato TTL transmitter
will flash green once every 2 seconds while
the power is on and turn solid green upon a
half-press of the shutter button (on camera
or the Strato TTL transmitter being used as
a wireless shutter release). The LED will turn
red when sending a signal or taking a photo.
When idle, the Status LED will go out.
2. The Status LED on the Strato TTL receiver
will flash green once every 2 seconds while
the power is on and in standby. The LED
will turn red when a signal is received from
the transmitter and the connected flash or
camera is red.
3. When the battery level is low,the Status
LED on the receiver will ash red once every 2
seconds.
Channels
1. The Strato TTL System has 4 transmission
channels: 1, 2, 3, 4.
7

2. Channels can be set on both the
transmitter and receiver.
Setting Channels on the Transmitter
1. Press the Channel Selection Button on the
transmitter.
2. Each press of the button will cycle through
channels 1, 2, 3, 4.
3. Make sure the transmitter channel is the
same as the receivers.
4. Channels are visible on the transmitter LCD.
Setting Channels on the Receiver
1. Move the Channel Selection Switch to
8
settings 1, 2, 3, or 4.
2. Make sure the receiver is set to the same
channel as the transmitter.
Connecting Strato TTL transmitter to
the camera hot shoe
1. Turn off the camera and Strato TTL
transmitter.
2. Slide the Strato TTL transmitter into the
camera’s hot shoe mount.
3. Turn the Strato TTL locking ring until tight.
4. Turn on the Strato TTL transmitter.
5. Turn on the camera and set the shooting
mode.

EN
INSTRUCTION MANUAL
Connecting a ash to the Strato TTL
receiver hot shoe
1. Turn off the flash and the Strato TTL
Receiver.
2. Slide the ash into the receiver’s hot shoe
mount.
3. Lock the flash with the flash’s locking
mechanism.
4. Turn on the flash and the Strato TTL
receiver.
5. Set the ash to TTL mode.
Please Note:
It is not unusual for the flash to discharge
once after turning on the Strato TTL.
Using the Strato TTL to trigger
ashes
1. Half-press the camera shutter button
while the Strato TTL transmitter is connected
to the camera hot shoe and powered on.
When AF-ILL Function is enabled, and it is
dicult for the camera to achieve focus, the
AF assist light of ashes connected to Strato
TTL receivers on the same channel as the
transmitter will illuminate. The Status LEDs on
the transmitter and receiver will turn green.
2. A full-press of the camera shutter button
will fire flashes connected to Strato TTL
receivers on the same channel as the
transmitter. Status LEDs on the Transmitter
and Receiver will turn red.
9

Please Note:
-Pressing the Shutter Button on the Strato TTL
transmitter – flashes connected to receivers
on the same channel will not re.
-Pressing the Test Button on the Strato TTL
transmitter – flashes connected to receivers
on the same channel will re.
To adjust EV levels
1. Press the EV -/+ Adjustment Buttons on
the Strato TTL Transmitter. Changes will be
displayed on the transmitter.
2. Shoot and make additional changes as
needed.
Adjusting EV Levels
The Strato TTL Flash Trigger System will fire
remote flashes by wireless radio signal. EV
Adjustments can be made to remote ashes
using the EV -/+ Adjustment Buttons on the
transmitter.
10
Using Auto-Focus Assist Illuminating
(AF-ILL) Function
Pressing the AF-ILL button to enable or
disable Auto-focus assist function.
1. When this function is enabled: Half pressing
the camera shutter button will illuminate the
AF assist light of ashes.
2. When this function is disabled: Half

EN
INSTRUCTION MANUAL
pressing the camera shutter button will not
illuminate the AF assist light of ashes.
Please Note:
AF-ILL functions can be set on or off in the
ash custom functions menu. (Please refer to
your ash manual for setting details.
Auto FP High Speed Sync
High Speed Sync functions, with a maximum
shutter speed up to 1/8000 sec., are support
by the Phottix Strato TTL when used with
cameras and ashes oering this function.
1. Auto FP High Speed Sync cannot be set on
the Strato TTL Transmitter.
2. Auto FP needs to be set on the camera
– consult your camera manual for specific
menu settings.
Supported Camera and Flash
Settings
The Phottix Strato TTL Trigger supports
functions that can be set in camera menus.
See your camera and flash manuals for full
details. Functions not available on a camera
body or ash cannot be used with the Strato
TTL system.
1. Depth-of Field Preview Button
(Modeling Flash): Pressing the Depth of Field
Preview Button on the camera (If available)
will causes ashes connected to receivers on
the same channel (with the function enabled)
11

to ash. This is useful for previewing lighting
set-ups.
2. Autofocus Assist Light: If AF-ILL functions
on the Strato TTL and in the flash custom
functions menu are both enabled, the AF
Assist Light of the flash connected to a
Strato TTL Receiver on the same channel as
a transmitter will illuminate when needed to
assist with focus (if the function is enabled).
3. Sync Mode: The Strato TTL supports Sync
Mode settings for the flash through camera
function control button or camera menu. First
Curtain Sync, Second Curtain Sync and Auto
FP can be enabled on the camera (if these
functions are supported by the camera).
4. Exposure Lock (FEL): The flash exposure
can be manually tested and locked by
12
pressing the AE-L/AF-L button on the camera.
5. Exposure Compensation: The Strato TTL
system supports exposure compensation
setting for the ash through camera function
control button.
6. Zoom: If the focal length of a camera
zoom lens is changed, the zoom of a flash
connected to a Strato TTL Receiver on the
same channel as a transmitter will change
dynamically (when a flash is set to "Auto"
zoom mode, not manual zoom. See your ash
manual for further details).
Connecting the Strato TTL receiver to
ashes or studio lights by sync cable
1. Turn off the flash/studio light and the

EN
INSTRUCTION MANUAL
Strato TTL receiver.
2. Connect a cable to the receiver’s 3.5 mm
Sync Port.
3. Connect the opposite end of the cable to
a ash or studio strobe (A 6.3 mm adapter is
included for studio strobes with larger ports).
4. Turn on the flash/strobe and the Phottix
Strato TTL receiver. Set the flash/strobe to
Manual mode (if applicable).
5. Press the Shutter Button of the camera
connected to the transmitter -- flashes
connected to the receivers on the same
channel will re.
Please note:
- It is not unusual for the flash to discharge
once after turning on the Phottix Strato TTL.
- Flashes connect to Strato TTL receivers
by cable will have no TTL, Auto FP or SCS
functions, only simple triggering.
Using the Strato TTL as a wireless
shutter release*
1. Turn o the camera and the Phottix Strato
TTL receiver.
2. Attach the correct Phottix Accessory Cable
for your camera make and model to the 2.5
mm Accessory Port on the Strato TTL receiver
3. Attach the other end of the cable to the
camera’s remote port.
4. Turn on the camera and Phottix Strato TTL
receiver. Consult your camera manual for
13

specic settings for remote use.
5. Using the Phottix Strato TTL transmitter
will allow for remote wireless shutter release
functions. The Strato TTL shutter button
functions the same as a camera shutter
button: A half-press of the shutter button will
autofocus, a full press will take a photo.
Please Note:
When using the transmitter as a wireless
shutter release, pressing the shutter button
on the transmitter will only trigger cameras
connected to receivers on the same channel.
It will not fire the flashes connected to the
receivers on the same channel.
*On compatible cameras
14
Using the Strato TTL as a wired
shutter release*
1. Turn off the camera and the Strato TTL
receiver.
2. Attach the correct Phottix Accessory Cable
for your camera make and model to the 2.5
mm Accessory Port on the Strato TTL receiver
3. Attach the other end of the cable to the
camera’s remote port.
4. Turn on the camera and Strato TTL
receiver**.
5. Consult your camera manual for specific
settings for remote use.
6. The Strato TTL receiver will function as a
wired shutter release. The shutter button

EN
INSTRUCTION MANUAL
functions the same as a camera shutter
button: A half-press of the shutter button will
autofocus, a full press will take a photo.
*On compatible cameras
**Wired Shutter Release function can be used
without turning on the Strato TTL receiver,
and will function without batteries in the
receiver.
Warnings
- This product is a precise electronic
instrument. Do not expose to damp
environments or dust.
- Do not drop or crush.
- Do not use harsh chemical(s) or solvents to
clean the body. Use a soft cloth or lens paper.
- Interference: The Phottix Strato TTL
transmits and receives radio signals at 2.4
GHz. Its performance can be affected by
electrical current, magnetic fields, radio
signals, wireless routers, cellular phones,
and other electronic devices. Environmental
objects, such as large buildings or walls, trees,
fences, or cars can also aect performance. If
your Strato TTL receiver will not trigger move
its location slightly.
15

Technical Specications
Transmitting power : ≤10dBm
Distance: 100m+
Frequency: 2.4GHz
Channel: 4 channels
Input voltage:2.1V-3.2V
Flash port voltage handling: Transmitter 6V;
Receiver ≤300V
Batteries: 2xAA alkaline batteries or
rechargeable batteries (Transmitter and
Receiver); 5V DC on Receiver (external power
port)
Max sync speed: 1/8000s
Output: hot shoe, 3.5mm (Receiver)
Input: USB port (transmitter and Receiver)
16
:
Attachment: 1/4” tripod lug, cold shoe
(Receiver)
Weight: Transmitter 74.6g; Receiver 74.2g---without batteries
Body dimension:
H 45.5 mm; Receiver L 93.3 * W 46.7 * H 45.4 mm
Antenna:Built-in PCB antenna
Operating temperature: 0℃~ +50
Operating humidity: 35%~95%RH
Transmitter L 92.5 * W 47.8 *
℃

EN
INSTRUCTION MANUAL
EC Declaration of Conformity
We Phottix (HK) Ltd.
Of 10/F Block A, Yip Fat Factory Building,
Phase 1, 77 Hoi Yuen Rd, Kwun Tong, Kln,
Hongkong
The European Authorized Representative
Phottix Europe Sp. z o.o.
Piotrkowska 66
90-105 Lodz, Poland
KRS 0000327336
declare herewith that the product designated
below:
Product: Phottix Strato TTL Flash Trigger
Transmitter; Phottix Strato TTL Flash
Trigger Receiver
Model Number: Strato TTL Transmitter;
Strato TTL Receiver
complies with the relevant fundamental
requirements as per R&TTE Directive 1999/5/
EC,insofar as the product is used correctly,
and the following standards or other
normative documents
EN 62479:2010-09
ETSI EN 300 440-1 V1.6.1(2010-08)
ETSI EN 300 440-2 V1.4.1(2010-08)
ETSI EN 301 489-1 V1.9.2/2011-09
ETSI EN 301 489-3 V1.4.1/2002-08
17

Signed by:
Paul Czernik
CEO/Prezes Zarządu
Phottix Europe Sp. z o.o.
Lodz, October 2013
18

EN
INSTRUCTION MANUAL
FCC Compliance Information
For Transmitter
Company: Phottix (HK) Ltd.
Name: Phottix Strato TTL Flash Trigger
Transmitter
Model Number: Strato TTL Transmitter
FCC ID: P9M-STRATOTTL
This device complies with Part 15 of the FCC
Rules. Operation is subject to the following
two conditions: (1) this device may not cause
harmful interference, and (2) this device must
accept any interference received, including
interference that may cause undesired
operation.
Changes or modifications not expressly
approved by the party responsible for
compliance could void the user’s authority to
operate the equipment.
NOTE: This equipment has been tested and
found to comply with the limits for a Class B
digital device, pursuant to Part 15 of the FCC
Rules. These limits are designed to provide
reasonable protection against harmful
interference in a residential installation.
This equipment generates, uses and can
radiate radio frequency energy and, if not
installed and used in accordance with the
instructions, may cause harmful interference
to radio communications.
However, there is no guarantee that
interference will not occur in a particular
installation. If this equipment does cause
19

harmful interference to radio or television
reception, which can be determined by
turning the equipment o and on, the user is
encouraged to try to correct the interference
by one or more of the following measures:
--Reorient or relocate the receiving antenna.
--Increase the separation between the
equipment and receiver.
--Connect the equipment into an outlet on
a circuit different from that to which the
receiver is connected.
--Consult the dealer or an experienced radio/
TV technician for help.
20
For Receiver
This device complies with Part 15 of the FCC
Rules. Operation is subject to the following
two conditions: (1) this device may not cause
harmful interference, and (2) this device must
accept any interference received, including
interference that may cause undesired
operation.

Umfang
Sender
1. Netzschalter
2. Testblitzschalter
3. USB Buchse
4. Auslöseknopf
5. Status LED
6. Schlaufenhalter
7. LCD
8. EV - / + Korrekturschalter
9. Kanal Wahltaste
10. AF-ILL Taste
11. Batteriefach
12. Blitzschuhanschluss (hot)
13. Befestigungsring
De
BENUTZERHANDBUCH
12
6
11
2
3
8
13
5
4
1
7
10
9
21

Empfänger
1. Netzschalter
2. Kanal Wahltaste
3. Testblitzschalter
4. USB Buchse
5. Auslöseknopf
6. Status LED
7. Schlaufenhalter
8. Blitzschuh
9. Syncro-Kabelbuchse
10. Fernauslösebuchse
11. DC 5V Buchse
12. Batteriefach
13. Blitzschuhanschluß (cold)
mit 1/4" Gewinde
14. Befestigungsring
22
13
7
12
2
3
4
9
14
6
5
1
8
10
11

De
BENUTZERHANDBUCH
Sender LCD
Batterieanzeige
EV-Anpassung
Kanal
AF-ILL
Tastensperre
Tipp: Schalten Sie beim Anschließen und
Trennen von Geräten (wie Blitzgerät,
Kamera sowie Phottix Strato TTL Sender und
Empfänger) diese vorher aus.
Kompatibilität
Die Strato TTL Sender ist kompatibel mit
anderen Phottix Funkblitzauslösern in der
folgenden Art und Weise:
1. Der Strato TTL Sender löst Strato, Strato IIEmpfänger und Atlas II-Transceiver (im RXModus) auf dem gleichen Kanal aus.
2. Der Strato TTL Sender löst Strato IIEmpfängern auf jeder Gruppe aus. Alle Strato
II Empfänger-Gruppen werden ausgelöst,
wenn sie auf den gleichen Kanal wie der
Strato TTL Sender eingestellt sind.
3. Der Strato TTL Sender löst keine Phottix
Odin oder Ares Empfänger aus.
4. Phottix Odin Sender oder Atlas II (im TXModus) oder Ares Sender lösen keine Strato
23

TTL-Empfänger aus.
5. Mit dem Strato TTL Transmitter im
Highspeed HSS-Modus kann es zu Problemen
mit der Blitzsynchronzeit kommen, bei der
Verwendung von Strato und Strato II MultiEmpfängern oder Atlas II-Transceivern (im RXModus).
Einlegen der Batterien
1. Drücken und schieben Sie den BatteriefachDeckel des Strato TTL Transmitters oder des
Receivers vom Gerät weg, um das Batteriefach
zu önen.
2. Entfernen Sie den Batteriefach-Deckel vom
Strato TTL.
3. Setzen Sie die AA/Mignon Akkus/Batterien
24
ein (auf korrekte Polarität achten).
4. Verschließen Sie das Batteriefach mit dem
Batteriefach-Deckel bis er einrastet.
Batterieanzeige
Wenn die Batteriespannung mehr als
2,4V beträgt, zeigt die Batterieanzeige
das Symbol mit vier Streifen an.
Wenn die Kapazität sich in den Batterien
erschöpft, werden die Streifen im Symbol
der Batterieanzeige verschwinden. Dies ist
eine ungefähre Angabe wie viel Energie in
den Batterien verbleibt. Verwenden Sie diese
als Anhaltspunkt um zu wissen wann ein
Batteriewechsel erforderlich ist. Wenn die
Batterien endgültig erschöpft sind, zeigt die

De
BENUTZERHANDBUCH
Batterieanzeige eine leere Batterie mit dem
Symbol .
LCD-Hintergrundbeleuchtung am
Sender
Durch drücken einer beliebigen
Taste des Senders wird die LCDHintergrundbeleuchtung für ca. 10 Sekunden
angeschaltet. Wenn keine weiteren Tasten
mehr am Sender gedrückt werden, schaltet
sich die Hintergrundbeleuchtung nach dieser
Zeit aus.
Auto-Idle-Funktion
Der Sender schaltet nach 10 Minuten
Inaktivität in den Standby-Modus. Das
Symbol "IDLE" erscheint auf dem LCD.
Tastensperre
1. Drücken und halten Sie die AFF-ILL Taste
für 2 Sekunden bis das Schloss-Symbol
erscheint. Die Tasten des Senders sind nun
gesperrt. Drücken der Tasten bewirkt keine
Änderungen.
2. Im Tastensperre-Modus: Drücken und
halten Sie die die AFF-ILL Taste für 2 Sekunden
bis das Schloss-Symbol verschwindet.
Der Sender ist nun endsperrt und das
Schloss-Symbol wird ausgeblendet.
25

An- und Ausschalten des Senders
und Empfängers
1. Um den Phottix Strato TTL Sender oder
Empfänger einzuschalten, stellen Sie den
Netzschalter auf die Position "ON".
2. Um den Phottix Strato TTL Sender oder
Empfänger auszuschalten, stellen Sie den
Netzschalter auf die Position "OFF".
den gleichen Kanal eingestellt sind, werden
ausgelöst.
3. Durch drücken der Test-Taste am
Empfänger, werden nur Blitzgeräte ausgelöst,
die auf diesem montiert sind.
Für die kabellose Fernauslösung, sehen Sie sich
die "Benutzung des Strato TTL als Fernauslöser"
Beschreibung weiter unten an.
Test-Taste
1. Die Test-Taste löst Testblitze des Blitzgerätes
aus.
2. Zum testen: Drücken Sie die Test-Taste
am Sender. Blitzgeräte, die mit dem Strato
TTL Empfänger verbunden sind und auf
26
Status-LED
1. Die Statusanzeige der LED am Strato TTL
Sender blinkt einmal alle 2 Sekunden lang
grün, während das Gerät eingeschaltet ist
und leuchtet permanent grün wenn der
Auslöser halb durchgedrückt wird (auf der
Kamera montiert oder wenn der Strato TTL

De
BENUTZERHANDBUCH
Sender als drahtloser Auslöser verwendet
wird). Die LED wird rot, wenn ein Signal
gesendet oder ein Foto aufgenommen wird.
Im Ruhezustand erlischt die LED.
2. Die LED Statusanzeige am Strato TTL
Empfänger blinkt einmal alle 2 Sekunden
lang grün, während das Gerät eingeschaltet
ist und im Standby-Modus. Die LED leuchtet
rot, wenn ein Signal vom Sender empfangen
wird und der angeschlossene Blitz oder die
Kamera ausgelöst wird.
3. Wenn die Batteriekapazität schwach ist,
blinkt die Status-LED am Empfänger rot
einmal alle 2 Sekunden.
Kanäle
1. Das Strato TTL-System verfügt über 4
Übertragungskanäle: 1, 2, 3, 4.
2. Kanäle können zugleich am Sender und
Empfänger eingestellt werden.
Einstellen von Kanälen am Sender
1. Drücken Sie die Kanal-Wahltaste des
Senders.
2. Bei jedem Tastendruck schaltet der Sender
durch die Kanäle 1, 2, 3, 4.
3. Stellen Sie sicher, dass der Kanal des
Senders der gleiche wie der des Empfängers
ist.
27

4. Die Kanäle sind sichtbar auf dem Sender
LCD.
Einstellen von Kanälen auf dem
Empfänger
1. Stellen Sie den Kanal-Wahlschalter auf den
Kanal 1, 2, 3 oder 4.
2. Stellen Sie sicher, dass der Empfänger den
gleichen Kanal wie der Sender eingestellt ist.
Anschließen des Strato TTL Senders
am Blitzschuh
1. Schalten Sie die Kamera und den Strato TTL
Sender aus.
28
2. Schieben Sie den Strato TTL Sender in den
Kamera-Blitzschuh.
3. Drehen Sie den Strato TTL Sicherungsring
bis nach unten.
4. Schalten Sie den Strato TTL Sender ein.
5. Schalten Sie die Kamera ein und wählen Sie
einen Aufnahmemodus.
Anschließen eines Blitzgerätes auf
dem Strato TTL Empfängerblitzschuh
1. Schalten Sie das Blitzgerät und den Strato
TTL Empfänger aus.
2. Schieben Sie den Blitz in den EmpfängerBlitzschuh.
3. Verriegeln Sie den Blitz mit dessen

De
BENUTZERHANDBUCH
Verriegelungsmechanismus.
4. Schalten Sie den Blitz und den Strato TTL
Empfänger ein.
5. Stellen Sie den Blitz auf TTL-Modus.
Bitte beachten Sie:
Es ist nicht unüblich, dass das Blitzgerät sich
einmal entlädt, nach dem Einschalten des
Strato TTL.
Blitzgeräte auslösen mit dem Strato
TTL
1. Drücken Sie den Kameraauslöser halb
durch, während der Strato TTL Sender
am Blitzschuh der Kamera angeschlossen
und eingeschaltet ist. Wenn die AF-ILL
Funktion eingeschaltet ist und die Kamera
Schwierigkeiten hat zu fokussieren, schaltet
sich das AF-Hilfslicht der Blitzgeräte ein, die
mit Strato TTL Empfängern auf dem gleichen
Kanal wie der Sender eingestellt sind. Die
Status-LEDs am Sender und Empfänger
werden grün.
2. Ein durchdrücken des Kameraauslösers löst
alle Strato TTL Empfänger aus, die auf dem
gleichen Kanal wie der Sender eingestellt
sind. Die Status-LED auf dem Sender und
Empfänger wird rot.
Bitte beachten Sie:
-Betätigen des Auslöseknopfes auf dem Strato
TTL Sender löst keine Blitzgeräte aus, welche
auf dem Strato TTL Empfänger montiert und
die auf dem gleichen Kanal eingestellt sind.
29

-Betätigen der Test-Taste am Strato TTL
Sender - löst Blitzgeräte aus, welche auf dem
Strato TTL Empfänger montiert und auf dem
gleichen Kanal eingestellt sind.
auf dem Sender angezeigt.
2. Photographieren und nehmen Sie weitere
Änderungen wie wie benötigt vor.
Einstellen der Belichtungskorrektur
in EV-Stufen
Der Strato TTL Funkblitzauslöser sendet
Testblitze per drahtloser Funkübertragung.
EV Belichtungskorrekturen können
vorgenommen werden mit Hilfe der -/+
Einstelltasten am Sender.
EV Stufen verstellen
1. Drücken Sie die - / + EV Tasten auf dem
Strato TTL Transmitter. Korrekturen werden
30
Autofocus Hilfsbeleuchtungsfunktion
(AF-ILL)
Drücken der AF-ILL Taste aktiviert oder
deaktiviert die Autofocus Hilfsbeleuchtungs
funktion.
1. Wenn diese Funktion aktiviert ist: Durch
halbes durchdrücken des Auslösers der
Kamera leuchtet das AF-Hilfslicht der Blitze.
2. Wenn diese Funktion deaktiviert ist: Durch
halbes durchdrücken des Auslösers der
Kamera leuchtet das AF-Hilfslicht der Blitze
nicht.

De
BENUTZERHANDBUCH
Bitte beachten Sie:
Die AF-ILL Funktion kann ein- oder
ausgestellt werden, in dem Menü der
Individualfunktionen des Blitzgerätes.
(Bitte schauen Sie in Ihre BlitzgerätBedienungsanleitung zum einstellen dieser
Funktion.)
Auto FP High Speed Synchronisation
High-Speed-Synchronisations-Funktionen,
mit einer maximalen Verschlusszeit von bis zu
1/8000 sek., werden durch den Phottix Strato
TTL unterstützt, wenn die benutzten Kameras
und Blitzgeräte diese Funktion bieten.
1. Die Auto FP High Speed Synchronisation
kann nicht auf dem Strato TTL Sender
eingestellt werden.
2. Die Auto FP Funktion muss an der Kamera
eingestellt werden – bitte schauen Sie in Ihr
Kamera-Handbuch für die jeweiligen MenüEinstellungen.
Unterstützte Kamera- und
Blitzfunktionen
Der Phottix Strato TTL-Sender unterstützt
Funktionen, die auch im Menü der Kamera
eingestellt werden können. Schauen Sie dazu
in die Bedienungsanleitung ihrer Kamera und
ihres Blitzgerätes für weitere Informationen.
Funktionen, die nicht am Kameragehäuse
oder Blitzgerät eingestellt werden, können
auch nicht mit dem Strato TTL-System
verstellt werden.
31

1. Tiefenschärfe Vorschau (Modeling
Blitz): Drücken der Abblendtaste an der
Kamera (wenn vorhanden), löst Blitzgeräte
mit Empfängern auf demselben Kanal wie
der Sender aus. Dies ist nützlich für die
Beurteilung von Beleuchtungsaufbauten.
2. Autofokus-Hilfslicht: Wenn die AF-ILL
Funktion am Strato TTL und am Blitzgerät
eingeschaltet ist, leuchtet das AF-Hilfslicht
des Blitzgerätes, welches verbunden ist
mit einem Strato TTL Empfänger auf dem
gleichen Kanal wie der Sender, wenn es
benötigt wird auf um die Fokussierung zu
unterstützen.
3. Syncro-Modus: Der Strato TTL
unterstützt Sync-Modus-Einstellungen für
das Blitzgerät über die Kamerafunktionen
32
per Kamerabedienknopf oder über das
Kamera-Menü. Erster Verschlußvorhang
Syncronisation, zweiter Verschlußvorhang
Synchronisation und Auto FP kann an der
Kamera (falls diese Funktionen von der
Kamera unterstützt wird) aktiviert werden.
4. Belichtungssperre (FEL): Die Blitzleistung
kann manuell geprüft und verriegelt werden,
indem Sie die AE-L/AF-L Taste an der Kamera
betätigen.
5. Belichtungskorrektur: Das Strato TTL
System unterstützt Belichtungskorrekturen
für den Blitz durch den Kamerabedienknopf.
6. Zoom: Wenn die Brennweite des
Zoomobjektives an der Kamera geändert
wird, wird der Blitzkopf-Leuchtwinkel des
mit einem Strato TTL Empfänger verbunden

De
BENUTZERHANDBUCH
und auf dem gleichen Kanal des Senders
eingestellten Blitzgerätes dynamisch
angepasst (wenn ein Blitzgerät auf "Auto"
Zoom-Modus und nicht manueller Zoom
eingestellt wurde. Schauen Sie in das
Bedienhandbuch Ihres Blitzgerätes für
weitere Details.)
Anschließen des Strato TTL Empfänger
an Blitz- oder Studioblitzgeräte
mittels Synkrokabel
1. Schalten Sie die Blitz- bzw.
Studioblitzgeräte und die Strato TTL
Empfänger aus.
2. Schließen Sie das 3,5mm Syncro-Kabel an
den Empfänger an.
3. Schließen Sie das andere Ende des Kabels
mit einem Blitz- oder Studioblitzgerät (Ein
6,3 mm Adapter für Studioblitze mit größerer
Buchse ist im Lieferumfang enthalten).
4. Schalten Sie das Blitz- bzw. Studioblitzgerät
und den Phottix Strato TTL Empfänger ein.
Stellen Sie das Blitz- bzw. Studioblitzgerät auf
den manuellen Modus ein (falls vorhanden).
5. Drücken des Auslösers der Kamera,
welcher mit dem Sender verbunden ist, löst
Empfänger aus die auf den selben Kanal
eingestellt sind.
Bitte beachten Sie:
- Es ist nicht unüblich, dass das Blitzgerät sich
einmal entlädt, nach dem Einschalten des
Strato TTL.
33

- Blitzgeräte die mittels Syncrokabel mit dem
Strato TTL Empfänger verbunden sind, haben
keine TTL, Auto FP oder SCS-Funktionen
mehr, nur einfache Auslösung ist möglich.
Benutzung des Strato TTL als
Fernauslöser *
1. Schalten Sie die Kamera und den Phottix
Strato TTL Empfänger aus.
2. Stecken Sie das richtige Phottix
Zubehörkabel mit der 2,5mm Klinke in die
Zubehörbuchse am Strato TTL Empfänger.
3. Befestigen Sie das andere Ende des Kabels
in der Kamerabuchse.
4. Schalten Sie die Kamera und den Phottix
Strato TTL Empfänger ein. Schauen Sie in
34
das Handbuch ihrer Kamera für spezifische
Einstellungen der Fernauslöse-Funktion.
5. Die Phottix Strato TTL Senderauslösetaste
ermöglicht drahtlose Fernauslösung. Der
Strato TTL Auslöser funktioniert genau wie
eine Kameraauslöser. Bei halbgedrückten
Auslöser wird der Autofokus aktiviert,
eine vollständiges Durchdrücken löst eine
Aufnahme aus.
Bitte beachten Sie:
Wenn Sie den Sender als drahtlosen
Fernbedienung verwenden werden nur
Empfänger und Kameras ausgelöst die auf
dem selben Kanal eingestellt sind wie der
Sender.
Es werden keine Blitze ausgelöst, die auf

De
BENUTZERHANDBUCH
Empfängern mit dem selben Kanal montiert
sind.
* mit kompatiblen Kameras
Benutzung des Strato TTL als
drahtgebundener Auslöser *
1. Schalten Sie die Kamera und den Phottix
Strato TTL Empfänger aus.
2. Stecken Sie das richtige Phottix
Zubehörkabel mit der 2,5mm Klinke in die
Zubehörbuchse am Strato TTL Empfänger.
3. Befestigen Sie das andere Ende des Kabels
in der Kamerabuchse.
4. Schalten Sie die Kamera und den Phottix
Strato TTL Empfänger ein.
5. Schauen Sie in das Handbuch ihrer Kamera
für spezische Einstellungen der FernauslöseFunktion.
6.
Die Phottix Strato TTL Empfängerauslösetaste
ermöglicht kabelgebundene Fernauslösung.
Der Strato TTL Auslöser funktioniert genau
wie eine Kameraauslöser. Bei halbgedrückten
Auslöser wird der Autofokus aktiviert.
Ein vollständiges Durchdrücken löst eine
Aufnahme aus.
* mit kompatiblen Kameras
** kabelgebunden Fernauslösung kann auch
bei ausgeschalteten Strato TTL Empfänger
erfolgen und funktioniert auch ohne
eingelegte Batterien.
35

Warnhinweise
- Das Phottix Odin TTL System ist ein präzises
elektronisches Gerät. Setzen Sie es nicht in
staubiger oder feuchter Umgebungen ein.
- Nicht fallen lassen oder zerlegen.
- Verwenden Sie keine ätzenden Chemikalien
oder Lösungsmittel, um die Geräte zu
reinigen. Verwenden Sie ein weiches Tuch
oder Reinigungspapier.
- Interferenzen: Der Phottix Odin sendet
und empfängt Funksignale mit 2,4GHz.
Die Leistung kann durch elektrischen
Strom, Magnetfelder, Funk, WLAN-Router,
Mobiltelefone und andere elektronische
Geräte beeinträchtigt werden. Große
Gebäude, Mauern, Bäume, Zäune oder
Autos können sich negativ auf die Leistung
36
auswirken. Wenn ihr Strato TTL Empfänger
nicht auslöst, verändern Sie dessen Position.

Technische Daten:
Sendeleistung: ≤ 10 dBm
Reichweiter: 100m +
Frequenz: 2.4 GHz
Kanäle: 4
Eingangsspannung: 2.1V-3.2V
Blitzgerät Spannung: Sender 6V; Empfänger
≤ 300V
Batterien: 2 x AA Alkali-Batterien oder
Akkus (Sender und Empfänger); 5V DC am
Empfänger (externer Stromanschluss)
Max Blitzsynchronzeit: 1/8000s
Output: Blitzschuh (hot), 3,5 mm (Empfänger)
Input: USB-Anschluss (Sender und
Empfänger)
De
Anschlüsse: 1/4" Stativgewinde, Standard
Blitzschuh Empfänger (cold)
Gewicht: Sender 74.6g; Empfänger 74.2g
(ohne Batterien)
Dimensionen: Sender L 92,5 * B 47,8 * H 45,5
mm; Empfänger L 93,3 * B 46,7 * H 45,4 mm
Antenne: innenliegende PCB-Antenne
Betriebstemperatur: 0° ~ +50°
Luftfeuchtigkeit bei Betrieb: 35% ~ 95% RH
BENUTZERHANDBUCH
37

Konformitätserklärung "CE"
Wir: Phottix (HK) Ltd.
Adresse: 10/F Block A, Yip Fat Factory
Building, Phase 1, 77 Hoi Yuen Rd, Kwun Tong,
Kln, Hongkong
Europäischer Bevollmächtigter:
Phottix Europe Sp. z o.o.
Piotrkowska 66
90-105 Lodz, Polen
KRS 0000327336
erklären hiermit, dass das unten aufgeführte
Produkt:
38
Produktname: Phottix Strato TTL Flash
Trigger Transmitter; Phottix Strato TTL
Flash Trigger Receiver
Modellnummer: Strato TTL Transmitter;
Strato TTL Receiver
die grundlegenden Anforderungen der
Richtlinie R&TTE 1999/5/EC erfüllt,wenn das
Produkt richtig verwendet wird, sowie die
folgenden Bestimmungen, Normen und
normative Dokumente
EN 62479:2010-09
ETSI EN 300 440-1 V1.6.1(2010-08)
ETSI EN 300 440-2 V1.4.1(2010-08)
ETSI EN 301 489-1 V1.9.2/2011-09
ETSI EN 301 489-3 V1.4.1/2002-08

Unterzeichnet von:
Paul Czernik
CEO/Chief Executive Ocer
Phottix Europe Sp. z o.o.
Lodz, Oktober 2013
De
BENUTZERHANDBUCH
39

Composants
Émetteur
1. Interrupteur d'alimentation
2. Bouton Test
3. Port USB
4. Déclencheur
5. LED
6. Œillet de sangle
7. Écran LCD
8. Boutons d'ajustement EV -/+
9. Bouton de Sélection du Canal
10. Bouton AF-ILL (Illuminateur
d'assistance AF)
11. Compartiment pour piles
12. Grie ash
13. Bague de verrouillage
40
12
6
11
2
3
8
13
5
4
1
7
10
9

Récepteur
1. Interrupteur d'alimentation
2. Sélecteur de canal
3. Bouton Test
4. Port USB
5. Déclencheur
6. LED
7. Œillet de sangle
8. Grie ash
9. Prise de synchronisation
10. Prise pour télécommande
11. Port d'alimentation 5V DC
12. Compartiment pour piles
13. Grie sans contact /
monture 1/4 x20
14. Bague de verrouillage
Fr
12
MANUEL D’UTILISATION
13
7
2
3
4
9
14
6
5
1
8
10
11
41

Écran LCD de l'émetteur
-Indicateur de niveau de pile
-Valeur d'exposition du ash
-Canal
-Illuminateur d'assistance AF
-Mode de verrouillage
Conseil: Avant toute connexion ou
déconnexion, éteignez tout le matériel – les
flashes cobra/de studio, les appareils photo
et le système Phottix Strato TTL (émetteurs et
récepteurs).
42
Compatibilité
L'émetteur Strato TTL est compatible avec
d'autres déclencheurs Phottix de la manière
suivante:
1. L'émetteur Strato TTL déclenchera les
récepteurs Strato et Strato II ainsi que les
émetteur-récepteurs Atlas II (en mode RX)
réglés au même canal.
2. L'émetteur Strato TTL déclenchera les
récepteurs Strato II réglés à n'importe quel
groupe. Tous les groupes du récepteur Strato
II se déclencheront s'ils sont réglés sur le
même canal que l'émetteur Strato TTL.
3. L'émetteur Strato TTL ne déclenchera pas le
Phottix Odin ni Ares.
4. Ni l'émetteur Phottix Odin ni l'émetteur

Fr
MANUEL D’UTILISATION
Atlas II (en mode Tx) ni l'émetteur Ares ne
déclencheront des récepteurs Strato TTL.
5. L'utilisation de l'émetteur Strato TTL en
mode HSS peut poser des problèmes avec la
synchronisation entre les récepteurs Strato
et Strato II Multi ou les émetteur-récepteurs
Atlas II (en mode RX).
Insertion des piles
1. Appuyez sur le couvercle des piles et faitesle glisser vers l'arrière de l'émetteur ou du
récepteur Strato TTL. Le couvercle s'ouvrira .
2. Retirez le couvercle des piles du Strato TTL.
3. Insérez des piles AA.
4. Replacez le couvercle des piles et faites-le
glisser vers l'avant pour le fermer.
Indicateur de niveau de pile
Si la tension de la batterie est supérieure
à 2.4V, l'icône de l'indicateur de niveau de
pile affiche quatre barres . Au fur et
à mesure que les piles se déchargent, les
barres affichées dans l'icône de l'indicateur
de niveau de pile disparaissent - c'est une
évaluation donnée à titre indicatif que
vous pouvez prendre en compte quand le
remplacement des piles est nécessaire.Quand
les piles sont épuisées, l'icône de batterie vide
s'achera .
43

Rétroéclairage LCD de l'émetteur
Appuyez sur n'importe quel bouton sur
l'émetteur pour allumer le rétroéclairage pour
environ 10 secondes. Si aucun autre bouton
sur l'émetteur n'est appuyé, le rétroéclairage
s'éteindra.
Fonction veille automatique
Le mode de veille automatique sera activé et
”IDLE” sera aché sur l'écran de l'émetteur au
bout de 10 minutes s'il n'est pas utilisé.
Mode de verrouillage
1. Appuyez et maintenez pendant 2 secondes
le bouton AF-ILL jusque à ce que l'icône de
44
verrouillage s'affiche. Les boutons de
l'émetteur seront verrouillés et une pression
sur ces boutons ne fait aucun changement.
2. Pour déverrouiller les boutons, appuyez et
maintenez pendant 2 secondes le bouton AFILL jusque à ce que l'icône de verrouillage
disparaisse.
Allumer/Éteindre l'émetteur et le
récepteur
1. Pour allumer l'émetteur ou le récepteur
Phottix Strato TTL, mettez l'interrupteur
d'alimentation en position “ON”.
2. Pour éteindre l'émetteur ou le récepteur
Phottix Strato TTL, mettez l'interrupteur

Fr
MANUEL D’UTILISATION
d'alimentation en position “OFF”.
Bouton Test
1. Le bouton Test permet de tester des éclairs
des ashes cobra / des ashes de studio.
2. Pour tester: appuyez sur le bouton Test
sur l'émetteur. Les flashes connectés aux
récepteurs Phottix Strato TTL et reglés sur le
même canal seront déclenchés si le bouton
test de l'émetteur est appuyé.
3. Si vous appuyez sur le bouton Test
du récepteur, seul le flash connecté à ce
récepteur sera déclenché.
Pour déclenchement sans fil: Voir l'Utilisation
du Strato TTL comme un déclencheur sans l ci
desouss.
LED
1. La diode LED sur l'émetteur de Strato TTL
clignote en vert toutes les deux secondes
quand l'émetteur est allumé et elle s'allume
en vert lorsque vous appuyez à moitié le
déclencheur (sur l'appareil ou sur l'émetteur
Strato TTL quand celui-ci est utilisé comme
une télécommande sans fil). La diode LED
s'allumera en rouge lors de la transmission du
signal ou bien lors de la prise d'une photo. En
mode veille, la LED s'éteindra.
2. La LED sur le récepteur Strato TTL clignote
en vert toutes les deux secondes quand il est
allumé et en mode veille. La LED s'allumera
en rouge quand un signal provenant de
l'émetteur sera bien réçu et quand le ash ou
l'appareil connecté se déclenche.
45

3. Lorsque le niveau de la batterie est bas, la
LED sur le récepteur clignote en rouge toutes
les 2 secondes.
Canaux
1. Le Strato TTL est équipé de 4 canaux de
transmission: 1, 2, 3, 4.
2. Les canaux peuvent être réglés sur le
récepteur ainsi que sur l'émetteur.
Réglage des canaux sur l'émetteur
1. Appuyez le bouton de Sélection du Canal
sur l'émetteur.
2. Chaque pression sur le bouton permet de
46
changer les canaux 1, 2, 3, 4.
3. Assurez-vous que le canal de l'émetteur est
le même que le canal des récepteurs.
4. Les canaux sont visibles sur l'écran LCD de
l'émetteur.
Réglage des canaux sur le récepteur
1. À l'aide du sélecteur de canal choisissez un
canal: 1, 2, 3, ou 4.
2. Assurez-vous que le récepteur est réglé sur
le même canal que l'émetteur.
Connexion de l'émetteur Strato TTL
à la grie de l'appareil

Fr
MANUEL D’UTILISATION
1. Éteignez l'appareil photo et l'émetteur
Strato TTL.
2. Faites glisser l'émetteur Strato TTL sur la
grie de l'appareil photo.
3. Serrez le Strato TTL avec l'anneau de
verrouillage.
4. Allumez l'émetteur Strato TTL.
5. Allumez l'appareil photo et choisissez le
mode souhaité.
Connexion d'un flash à la griffe du
récepteur Strato TTL
1. Éteignez le ash et le récepteur Strato TTL.
2. Faites glisser le flash sur la griffe du
récepteur.
3. Serrez le flash avec un anneau de
verrouillage du ash.
4. Allumez le ash et le récepteur Strato TTL.
5. Réglez le ash en mode TTL.
Veuillez noter:
Après avoir allumé le Strato TTL, le ash peut
se déclencher spontanément.
Utilisation du Strato TTL pour
déclencher les ashes
1. Appuyez à moitié sur le déclencheur de
l'appareil photo quand l'émetteur Strato TTL
est allumé et connecté à la grie de l'appareil.
47

Quand la fonction AF-ILL est activée et qu'il
est dicile pour l'appareil d'eectuer la mise
au point, l'illuminateur d'assistance AF des
flashes connectés aux récepteurs Strato TTL
réglés sur le même canal que l'émetteur
s'allumera. Les LED sur l'émetteur et sur le
récepteur s'allumeront en vert.
2. Appuyez à fond sur le déclencheur de
l'appareil photo pour déclencher les flashes
connectés aux récepteurs Strato TTL sur
le même canal que l'émetteur. Les LED sur
l'émetteur et sur le récepteur s'allumeront en
rouge.
Veuillez noter:
- Après avoir appuyé le déclencheur sur
l'émetteur Strato TTL, les flashes connectés
aux récepteurs sur le même canal ne se
48
déclencheront pas.
- Après avoir appuyé le bouton Test sur
l'émetteur Strato TTL, les flashes connectés
aux récepteurs sur le même canal se
déclencheront.
Réglage des valeurs d'exposition EV
Le système Strato TTL va déclencher à
distance les flashes par signal radio. Les
valeurs EV peuvent être réglées aux flashes
en utilisant les boutons d'ajustement EV -/+
sur l'émetteur.
Pour régler les valeurs EV
1. Appuyez sur les boutons d'ajustement

Fr
MANUEL D’UTILISATION
EV -/+ sur l'émetteur Strato TTL. Les
modications seront achées sur l'émetteur.
2. Prenez une photo et faites des
modications supplémentaires si besoin.
Utilisation de la fonction
Illuminateur d'assistance AF
Appuyez sur le bouton AF-ILL pour activer
ou désactiver la fonction Illuminateur
d'assistance AF.
1. Quand cette fonction est activée: appuyez
à moitié sur le déclencheur de l'appareil pour
allumer l'illuminateur d'assistance AF des
ashes.
2. Quand cette fonction est désactivée:
l'illuminateur d'assistance AF des flashes
ne se déclenche pas quand vous appuyez à
moitié sur le déclencheur de l'appareil.
Veuillez noter:
Les fonctions de l'Illuminateur d'assistance
AF peuvent être activées et désactivées dans
le menu des fonctions personalisées du ash
(Consultez le manuel de votre ash pour plus
de détails.)
Synchronisation flash ultra-rapide
Auto FP
On peut utiliser les fonctions de
synchronisation à haute vitesse, avec des
vitesses d'obturation jusqu'à 1/8000 de
seconde, si le Strato TTL est utilisé avec des
49

appareils et des flashes qui proposent ces
fonctions.
1. La synchronisation ash ultra-rapide Auto
FP ne peut pas être réglée sur l'émetteur
Strato TTL.
2. Cette fonction doit être réglée sur l'appareil
photo - consultez le manuel de votre appareil
photo pour plus de détails.
Paramètres de l'appareil et du flash
pris en charge
Le déclencheur Phottix Strato TTL supporte
les fonctions qui peuvent être réglées dans
le menu de l'appareil. Consultez les manuels
de votre appareil et de votre ash pour plus
de détails. Les fonctions non disponibles
sur l'appareil ou le ash ne peuvent pas être
50
utilisées avec le système Strato TTL.
1. Bouton d'aperçu de profondeur de
champ (lampe pilote): Lorsque vous
appuyez sur le bouton test de profondeur
de champ sur l'appareil (s'il est disponible),
les flashes connectés aux récepteurs sur
le même canal (avec la fonction active)
se déclencheront. C'est utile pour vérifier
l'éclairage.
2. Illuminateur d'assistance AF: Si la
fonction de l''illuminateur d'assistance AF est
activée sur l'émetteur Strato TTL et dans les
fonctions personalisées du ash, l'illuminateur
d'assistance AF du flash connecté au
récepteur Strato TTL sur le même canal que
l'émetteur s'allume quand c'est nécessaire
pour aider la mise au point (Si la fonction est
activée).

Fr
MANUEL D’UTILISATION
3. Mode de synchronisation: Le Strato
TTL supporte les réglages des modes de
synchronisation du flash par le bouton de
contrôle des fonctions ou depuis le menu
de l'appareil. Synchronisation sur le 1er
rideau, Synchronisation sur le 2ième rideau
et Synchronisation flash ultra-rapide Auto
FP peuvent être activées sur l'appareil (si
ces fonctions sont disponibles sur l'appareil
photo).
4. Mémorisation d'exposition (FEL):
L'exposition au flash peut être testée
manuellement et mémorisée en appuyant sur
le bouton AE-L/AF-L sur l'appareil.
5. Compensation de l'exposition: Le
système Strato TTL supporte les réglages
de la compensation de l'exposition du flash
par le bouton de contrôle de fonction de
l'appareil.
6. Zoom: Si la longueur focale du zoom
d'un appareil est modifiée, le zoom du flash
connecté au récepteur Strato TTL sur le
même canal que l'émetteur sera modifiée
dynamiquement (quand le ash est réglé en
mode du zoom "Auto", non en zoom manuel.
Consultez le manuel de votre ash pour plus
de détails.)
Connexion du récepteur Strato TTL
au ash externe/de studio à l'aide du
câble de PC synch
1. Éteignez le flash cobra/de studio et le
récepteur Strato TTL.
51

2. Connectez le câble à la prise de
synchronisation 3.5mm du récepteur.
3. Connectez l'autre extrémité du câble au
flash (un adaptateur de 6,3mm pour les
flashes de studio munis d'une prise jack
6,3mm est aussi inclus).
4. Allumez le flash externe/de studio et le
récepteur Strato TTL. Réglez le ash en mode
Manuel (s'il est disponible).
5. Appuyez sur le déclencheur de l'appareil
photo connecté à l'émetteur – les flashes
connectés aux récepteurs sur le même canal
se déclencheront.
Veuillez noter:
- Après avoir allumé le Strato TTL, le ash peut
se déclencher spontanément.
52
- Les ashes connectés aux récepteurs Strato
TTL par le câble n'auront pas de fonctions
TTL, Auto FP ou SCS. En utilisant le câble, on
ne peut que déclencher les ashes.
Utilisation du Strato TTL en fonction
d'une télécommande sans l*
1. Éteignez l'appareil photo et le récepteur
Strato TTL.
2. Connectez le Câble Accessoire approprié
au modèle de votre appareil photo à la prise
pour télécommande 2.5mm sur le récepteur
Strato TTL.
3. Connectez l'autre extrémité du câble à la
prise pour télécommande de l'appareil photo.

Fr
MANUEL D’UTILISATION
4. Allumez l'appareil photo et le récepteur
Phottix Strato TTL. Voir le manuel de l'appareil
pour toute information supplémentaire
concernant l'utilisation d'une télécommande.
5. L'utilisation de l'émetteur Phottix Strato TTL
permet un déclenchement à distance sans
fil. Le déclencheur du Strato TTL fonctionne
de la même façon que le déclencheur de l'
appareil photo: appuyé à moitié - la mise au
point, appuyé à fond - la prise de vue.
Veuillez noter:
Quand vous utilisez l'émetteur en mode
télécommande sans fil, la pression sur le
bouton de déclencheur de l'émetteur ne
déclenchera que les appareils connectés
aux récepteurs sur le même canal. Cela ne
déclenchera pas de flashes connectés aux
récepteurs sur le même canal.
*Avec les appareils compatibles
Utilisation du Strato TTL en fonction
d'une télécommande laire*
1. Éteignez l'appareil photo et le récepteur
Strato TTL.
2. Connectez le Câble Accessoire approprié
au modèle de votre appareil photo à la prise
pour télécommande 2,5mm sur le récepteur
Strato TTL.
3. Connectez l'autre extrémité du câble à la
prise pour télécommande de l'appareil photo.
4. Allumez l'appareil photo et le récepteur
Phottix Strato TTL**.
53

5. Voir le manuel de l'appareil pour toute
information supplémentaire concernant
l'utilisation d'une télécommande.
6. Le récepteur Strato TTL fonctionnera
comme une télécommande filaire. Le
déclencheur du récepteur Strato TTL
fonctionnera comme un déclencheur de
l'appareil photo: appuyé à moitié- la mise au
point, appuyé à fond- la prise de vue.
*Avec les appareils compatibles
**La fonction d'une télécommande filaire
peut être utilisée sans avoir allumé le
récepteur Strato TTL et va fonctionner sans
batteries dans le récepteur.
54
Avertissements
1. C'est un système électronique. Ne
manipulez pas le produit avec les mains
mouillées, ne l’immergez pas et ne l’exposez
pas à l’eau, à la pluie ou à la poussière.
2. Ne laissez pas votre appareil tomber.
L’appareil photo risque de mal fonctionner s’il
est soumis à de violents chocs ou à de fortes
vibrations.
3. Ne pas utiliser de produits chimiques
agressifs ni de solvents pour nettoyer le
produit. Nettoyez-le avec un chion doux ou
avec du papier optique.
4. Interférence: Le Phottix Strato TTL utilise
la fréquence 2.4 GHz pour transmettre
et recevoir les signaux radio. Le bon

Fr
fonctionnement peut être affecté par un
courant électrique, des champs magnétiques,
des signaux radio, des routeurs sans fil, des
téléphones cellulaires et d'autres dispositifs
électroniques. Des objets tels que de grands
bâtiments, des murs, des arbres, des clôtures
ou des voitures peuvent également aecter le
fonctionnement et la portée de ce dispositif.
Si votre récepteur Strato TTL ne se déclenche
pas, déplacez-le légèrement.
MANUEL D’UTILISATION
55

Caractéristiques techniques
Puissance de transmission: ≤10dBm
Portée: 100m+
Fréquence: 2.4GHz
Canaux: 4 canaux
Tension d'entrée: 2.1V-3.2V
Tension de déclenchement maximale:
émetteur 6V; récepteur ≤300V
Batteries: 2x piles AA alcalines ou
rechargeables (émetteur et récepteur); 5V
DC sur le récepteur (le port d'alimentation
externe)
Vitesse de synchronisation maximale:
1/8000s
Porte sortie: grie ash, 3.5mm (récepteur)
56
:
Porte prise: port USB (émetteur et récepteur)
Fixation: filétage trépied 1/4”, griffe sans
contact (récepteur)
Poids: émetteur 74.6g; récepteur 74.2g----
sans piles
Dimensions:
mm; récepteur L 93.3 * W 46.7 * H 45.4 mm
Antenne: antenne PCB intégrée
Température d'opération: 0℃ +50
Humidité d'opération : 35﹪~95﹪RH
émetteur L 92.5 * W 47.8 * H 45.5
℃

Fr
MANUEL D’UTILISATION
Déclaration de conformité «CE»
Nous: Phottix (HK) Ltd.
Adresse: 10/F Block A, Yip Fat Factory
Building, Phase 1, 77 Hoi Yuen Rd, Kwun Tong,
Kln, Hongkong
Représentant européen agréé:
Phottix Europe Sp. z o.o.
Piotrkowska 66
90-105 Lodz, Pologne
KRS 0000327336
déclarons que le produit indiqué ci-dessous:
nom du produit: Phottix Strato TTL Flash
Trigger Transmitter; Phottix Strato TTL
Flash Trigger Receiver
numéro de modèle: Strato TTL Transmitter;
Strato TTL Receiver
est conforme aux exigences fondamentales
de la Directive R&TTE 1999/5/EC,si le produit
est utilisé correctement, et aux autres
dispositions, normes et documents normatifs
EN 62479:2010-09
ETSI EN 300 440-1 V1.6.1(2010-08)
ETSI EN 300 440-2 V1.4.1(2010-08)
ETSI EN 301 489-1 V1.9.2/2011-09
ETSI EN 301 489-3 V1.4.1/2002-08
57

Signé par:
Paul Czernik
CEO/Chef de la direction
Phottix Europe Sp. z o.o.
Lodz, octobre 2013
58

Componentes
Transmisor
1.Interruptor
2.Botón de Test
3.Puerto USB
4.Botón disparador
5.LED de status
6.Ranura para correa
7.LCD
8.Botones de ajuste EV -/+
9.Botón de selección de canal
10.Botón AF-ILL
11.Compartimiento para
baterías
12.Zapata
13.Anillo de bloqueo
ES
MANUAL DE INSTRUCCIONES
12
6
11
2
3
8
13
5
4
1
7
10
9
59

Receptor
1.Interruptor
2.Selección de canal
3.Botón de Test
4.Puerto USB
5.Botón disparador
6.LED de status
7.Ranura para correa
8.Zapata
9.Conexión de cable sincro
10.Puerto del cable disparador
11.Conector corriente DC 5V
12.Compartimiento para baterías
13.Zapata fría / montura 1/4 x20
14.Anillo de bloqueo
60
13
7
12
2
3
4
9
14
6
5
1
8
10
11
ES
MANUAL DE INSTRUCCIONES
LCD del transmisor
Indicador del nivel de batería
Ajuste de nivel de EV
Canal
AF-ILL
Modo teclas bloqueadas
Consejo: desconecte todos los dispositivos –
ashes, cámaras, y los transmisores y receptores
Phottix Strato TTL – al conectar y desconectar
los equipos.
Compatibilidad
El transmisor Strato TTL es compatible con
otros disparadores de flash Phottix en las
siguientes condiciones:
1. El transmisor Strato TTL disparará
receptores Strato y Strato II y transceptores
Atlas II (en modo RX) ajustados al mismo
canal.
2. El transmisor Strato TTL disparará
receptores Strato II ajustados en cualquier
grupo. Todos los grupos de receptores Strato
II dispararán si se ajustan al mismo canal que
el transmisor Strato TTL.
3. El transmisor Strato TTL no disparará
receptores Phottix Odin o Ares.
4. Los Phottix Odin TCU (unidad central
61

transmisora) o Atlas II (en modo Tx) o
transmisores Ares no dispararán los
receptores Strato TTL.
5. Al usar los transmisores Strato TTL en
modo HSS puede causar problemas con la
sincronización de flash al usar receptores
Strato y Strato II Multi o transceptores Atlas II
(en modo RX).
Insertando las baterías
1. Presione la cubierta del compartimiento de
las baterías mientras la desliza del transmisor
o receptor Strato TTL. La cubierta se abrirá y
deslizará fuera del dispositivo.
2. Extraiga la cubierta del compartimiento de
las baterías del Strato TTL.
62
3. Inserte baterías AA.
4. Vuelva a colocar la cubierta de las baterías y
sitúela en posición de bloqueo perfectamente
cerrada.
Indicador de voltaje de la batería
Cuando el voltaje de la batería es superior
a 2,4V, el icono indicador del nivel de las
baterías mostrará cuatro barras .
Irán desapareciendo barras en el indicador
de nivel de las baterías conforme las
baterías pierdan potencia – una indicación
aproximada de cuándo es necesario un
cambio de baterías. Cuando las baterías estén
agotadas el indicador de nivel mostrará un
icono de nivel de batería vacío .

ES
MANUAL DE INSTRUCCIONES
Retroiluminación del LCD del transmisor
Al pulsar cualquier botón del transmisor se
conectará la retroiluminación del LCD durante
aproximadamente 10 segundos. Si no se
pulsa ningún más botón en el transmisor, la
retroiluminación se apagará.
Función de suspensión
El transmisor entrará en modo automático
de suspensión (Auto Idle), mostrando en
la pantalla LCD “IDLE” tras 10 minutos de
inactividad.
Modo de bloqueo de teclas
1. Al pulsar el botón AF-ILL y manteniéndolo
pulsado durante 2 segundos se mostrará
un icono de bloqueo . Los botones del
transmisor se bloquearán, y al pulsarlos no se
realizarán cambios.
2. Mientras se encuentre en Modo de bloqueo
de teclas (Key Lock Mode), al pulsar el botón
AF-ILL y manteniéndolo pulsado durante 2
segundos, se desbloqueará el transmisor y el
icono de bloqueo desaparecerá.
Conectando y desconectando el
transmisor y el receptor
1. Para conectar el transmisor o el receptor
Phottix Strato TTL – desplazar el interruptor a
la posición “ON”.
63

2. Para desconectar el transmisor o receptor
Phottix Strato TTL – desplazar el interruptor a
la posición “OFF”.
Botón de Test
1. El botón de Test Button realizará un disparo
de prueba de los ashes.
2. Para realizar el test: Pulse el botón Test
del transmisor. Los flashes conectados a los
receptores Phottix Strato TTL en el mismo
canal dispararán un destello.
3. Al pulsar el botón Test del receptor
disparará el ash conectado a dicho receptor.
Para disparo inalámbrico de cámara: Ver la
sección Usando el Strato TTL con mando a
distancia de cámara inalámbrico más adelante
64
LED de status
1. El LED de status del transmisor Strato TTL
parpadeará en verde cada dos segundos al
conectar la unidad y se iluminará en verde
tras pulsar el disparador hasta la mitad (en la
cámara o en el Strato TTL usar como mando
a distancia inalámbrico de cámara). El LED
se iluminará en rojo al enviar una señal o al
tomar una foto. En estado de suspensión, el
LED de status se apagará.
2. El LED de Status de los receptores Strato
TTL se iluminará de forma intermitente cada
2 segundos mientras esté conectado y a la
espera. El LED se iluminará en rojo cuando
reciba una señal del transmisor y el flash o
cámara conectada se dispare.
3. Cuando el nivel de las baterías sea bajo, el

ES
MANUAL DE INSTRUCCIONES
LED de Status LED del receptor se iluminará
intermitentemente en rojo cada 2 segundos.
Canales
1. El sistema Strato TTL posee 4 canales de
transmisión: 1, 2, 3, 4.
2. Los canales se pueden ajustar tanto en el
transmisor como en el receptor.
Ajustando canales en el transmisor
1. Pulse el botón de selección de canales en el
transmisor.
2. A cada pulsación cambiará el número de
canal 1, 2, 3, 4.
3. Asegúrese que el canal del transmisor es el
mismo que el de los receptores .
4. Los canales son visibles en la pantalla LCD
del transmisor.
Ajustado los canales en el receptor
1. Desplace el interruptor de selección de
canales a los ajustes 1, 2, 3, o 4.
2. Asegúrese de que el receptor está ajustado
al mismo canal que el transmisor.
Conectando el transmisor Strato TTL
a la zapata de la cámara
1. Desconecte la cámara y el transmisor Strato
TTL.
65

2. Coloque el transmisor Strato TTL en la
zapata de la cámara.
3. Asegure firmemente el anillo de bloqueo
Strato TTL.
4. Conecte el transmisor Strato TTL.
5. Conecte la cámara y ajuste el modo de
disparo.
Conectando un ash a la zapata del
receptor Strato TTL
1. Desconecte el ash y el receptor Strato TTL.
2. Coloque el ash en la zapata del receptor.
3. Asegure el flash con el mecanismo de
bloqueo de este.
66
4. Conecte el ash y el receptor Strato TTL.
5. Ajuste el ash a modo TTL.
Nota:
No es inusual que el flash se descargue una
vez conectado en el Strato TTL.
Usando el Strato TTL para disparar
ashes
1. Pulse hasta la mitad el botón disparador
de la cámara mientras el transmisor Strato
TTL esté conectado a la zapata de la cámara
y en funcionamiento. Cuando la función
AF-ILL está activada, y sea difícil para la
cámara enfocar, se iluminarán las luces de
asistencia al AF de los flashes conectados a

ES
MANUAL DE INSTRUCCIONES
los receptores Strato TTL en el mismo canal
que el transmisor. Los LEDs de Status tanto
del transmisor como de los receptores se
iluminarán en verde.
2. Al pulsar por completo el botón disparador
de la cámara se dispararán los flashes
conectados a los receptores Strato TTL
que estén ajustados al mismo canal que el
transmisor. Los LEDs de status del transmisor
y los receptores se iluminarán en rojo.
Por favor, tenga en cuenta:
-Al pulsar el botón disparador en el
transmisor Strato TTL – los ashes conectados
a receptores en el mismo canal no dispararan.
-Al pulsar el botón de Test en el transmisor
Strato TTL – los flashes conectados a
receptores en el mismo canal dispararán.
Ajustando los niveles de EV
El sistema disparador de flash Strato TTL
dispara unidades de flash de forma remota
mediante señal de radio inalámbrica. Los
ajustes de EV se pueden realizar a los ashes
remotos mediante los botones de ajuste EV
-/+ en el transmisor.
Para ajustar los niveles EV
1. Pulse los botones de ajuste EV -/+ en
el transmisor Strato TTL. Los cambios se
visualizarán en el transmisor.
67

2. Dispare y realice cambios adicionales si fuera
necesario.
de la cámara no se iluminarán las luces de
asistencia AF de los ashes.
Uso de la función Auto-Focus Assist
Illuminating (AF-ILL) – iluminador de
ayuda al AF
Al pulsar el botón AF-ILL se activa o desactiva
la función de la asistencia al sistema Autofocus.
1. Cuando la función está activada: al pulsar el
botón disparador de la cámara hasta la mitad
se iluminarán las luces de asistencia al AF de
los ashes.
2. Cuando la función esté desactivada: al
pulsar hasta la mitad el botón disparador
68
Nota:
Las funciones AF-ILL se pueden activar
o desactivar en el menú de funciones
personalizadas del flash. (Por favor consulte
el manual de su flash para detalles de los
ajustes.
Sincronización de alta velocidad
Auto FP High Speed
El Phottix Strato TTL soporte funciones de
sincronización a alta velocidad (High Speed
Sync) hasta una velocidad de obturación
máxima de 1/8000 seg., al usarlo con cámara
y ashes que ofrezcan dicha función.

ES
MANUAL DE INSTRUCCIONES
1. El modo Auto FP High Speed Sync no se
puede ajustar en el transmisor Strato TTL.
2. El modo Auto FP debe ser ajustado en la
cámara – consulte el manual de su cámara
para los ajustes de menú especícos.
Ajustes de cámara y ash soportados
El disparador Phottix Strato TTL soporta
funciones que se pueden ajustar en los
menús de la cámara. Lea los manuales de
su cámara y flash para una información
detallada. Las funciones no disponibles en un
cuerpo de cámara o ash no se pueden usar
con el sistema Strato TTL.
1. Botón de previsualización de profundidad
de campo (Flash de modelaje):
al pulsar el
botón de previsualización de profundidad de
campo en la cámara (si ésta dispone de dicho
botón), los flashes conectados a receptores
en el mismo canal (con la función activada) se
disparan. Esto es útil para la previsualización
de la disposición de los elementos de
iluminación.
2. Luz de ayuda al Autofocus: Si tanto
las funciones AF-ILL del Strato TTL como
la opción del menú de funciones de flash
personalizadas de la cámara están activadas,
la luz de asistencia al AF del ash conectado
a un receptor Strato TTL con el mismo canal
que el transmisor, se iluminará cuando sea
necesario asistir al enfoque AF (si la función
está activada).
3. Modo de sincronización: el Strato
TTL soporta los ajustes del modo de
69

sincronización del flash a través del botón
de control de dicha función en la cámara o
mediante el menú de la cámara. Se pueden
activar en la cámara (si ésta lo soporta)
los modos de sincronización a la primera
cortinilla, sintronización a la cortinilla trasera
y Auto FP.
4. Bloqueo de exposición (FEL):
del flash se puede probar manualmente y
bloqueada al pulsar el botón AE-L/AF-L en la
cámara.
5. Compensación de exposición: el sistema
Strato TTL soporta ajuste de compensación
de exposición para el ash a través del control
de función de la cámara.
6. Zoom: si la longitud focal del zoom de la
cámara cambia, el zoom del ash conectado a
70
La exposición
un receptor Strato TTL en el mismo canal del
transmisor cambiará dinámicamente (cuando
el ash esté ajustado en modo zoom "Auto",
no en zoom manual. Consulte el manual de
su ash para más detalles).
Conectando el receptor Strato TTL a
ashes mediante un cable sincro
1. Desconecte la unidad de ash y el receptor
Strato TTL.
2. Conecte un cable al puerto sincro de 3,5
mm del receptor.
3. Conecte el extremo opuesto del cable a la
unidad de ash (se incluye un adaptador de
6,3 mm para unidades de ash con puerto de
mayor tamaño).

ES
MANUAL DE INSTRUCCIONES
4. Conecte la unidad de flash y el receptor
Phottix Strato TTL. Ajuste la unidad de ash a
modo manual (en caso necesario).
5. Pulse el botón disparador de la cámara
conectada al transmisor – los flashes
conectados a los receptores en el mismo
canal dispararan.
Por favor tenga en cuenta:
- No es inusual que el flash realice una
descarga tras conectar el Phottix Strato TTL.
- Los flashes conectados a los receptores
Strato TTL por cable no dispondrán de
funciones TTL, Auto FP o SCS, solamente
disparo simple.
Usando el Strato TTL como disparador
de cámara remoto*
1. Desconecte la cámara y el receptor Phottix
Strato TTL.
2. Conecte el cable accesorio Phottix
correspondiente a su cámara al puerto de
accesorios de 2,5 mm del receptor Strato TTL.
3. Conecte el otro extremo del cable al puerto
de mando a distancia de la cámara.
4. Conecte la cámara y el receptor Phottix
Strato TTL. Consulte el manual de su cámara
para ajustes específicos para el uso del
control remoto.
5. El uso del transmisor Phottix Strato TTL
permite el uso de las funciones de disparo
remoto inalámbrico. El botón disparador del
Strato TTL funciona del mismo modo que el
71

botón disparador de la cámara: al pulsar el
botón disparador hasta la mitad se activará el
autofocus, al pulsar por completo se tomará
la fotografía.
Nota:
Al usar el transmisor como control remoto
inalámbrico, al pulsar el disparador en el
transmisor solo se dispararán las cámaras
conectadas a receptores en el mismo canal.
No disparará los flashes conectados a los
receptores en el mismo canal.
*En cámaras compatibles
72
Uso del Strato TTL con control remoto
con cable*
1. Apague la cámara y el receptor Strato TTL
receiver.
2. Conecte el cable accesorio Phottix
correspondiente a su cámara al puerto de
accesorios de 2,5 mm del receptor Strato TTL.
3. Conecte el otro extremo del cable al puerto
de mando a distancia de la cámara.
4. Conecte la cámara y el receptor Phottix
Strato TTL **.
5. Consulte el manual de su cámara para
ajustes específicos para el uso del control
remoto.
6. El receptor Strato TTL funcionará como

ES
MANUAL DE INSTRUCCIONES
un control remoto por cable. Las funciones
del botón disparador son las mismas que
las del disparador de la cámara: al pulsar el
botón disparador hasta la mitad se activará el
autofocus, al pulsar por completo se tomará
la fotografía.
*En cámaras compatibles
**La función de disparo remoto por cable de
cámara se puede usar sin conectar el receptor
Strato TTL y funcionará son baterías en el
receptor.
Precauciones
- Este producto es un instrumento electrónico
de precisión. No lo exponga a ambientes con
suciedad o humedad.
- No lo lance al suelo ni lo aplaste.
- No use productos químicos agresivos o
disolventes para su limpieza. Use un paño
suave.
- Interferencias: el Phottix Strato TTL
transmite y recibe señales de radio a 2,4 GHz.
Sus prestaciones pueden verse afectadas por
la corriente eléctrica, campos magnéticos,
señales de radio, routers inalámbricos,
teléfonos móviles, y otros dispositivos
electrónicos. Otros objetos, como edificios,
paredes, arboles, vallas o coches pueden
también afectar a las prestaciones. Si su
receptor Strato TTL no dispara cambie
ligeramente su situación.
73

Especicaciones técnicas:
Potencia de transmisión: ≤10dBm
Distancia: 100m+
Frecuencia: 2.4GHz
Canales: 4
Voltaje de entrada: 2,1V-3,2V
Voltaje del puerto de ash: Transmisor 6V;
Receptor ≤300V
Baterías: 2x baterías alcalinas AA o baterías
recargables (Transmisor y receptor); 5V DC en
el receptor (puerto externo de alimentación)
Velocidad máxima de sincronización:
1/8000s
Salida: zapata, 3,5mm (Receptor)
Entrada: puerto USB (transmisor y receptor)
74
Enganche: rosca de trípode 1/4”, zapata
(receptor)
Peso: Transmisor 74,6g; Receptor 74,2g----sin
baterías
Dimensiones: Transmisor 92,5 * 47,8 * 45,5
mm; Receptor 93,3 * 46,7 * 45,4 mm
Antena: Antena PCB integrada
Temperatura de funcionamiento:
0℃~ +50
Humedad de funcionamiento: 35﹪~95﹪HR
℃

ES
MANUAL DE INSTRUCCIONES
Declaración de conformidad EC
Nosotros: Phottix (HK) Ltd.
en: 10/F Block A, Yip Fat Factory Building,
Phase 1, 77 Hoi Yuen Rd, Kwun Tong, Kln,
Hongkong
el Representante Europeo Autorizado
Phottix Europe Sp. z o.o.
Piotrkowska 66
90-105 Lodz, Polonia
KRS 0000327336
Declaramos que el producto abajo designado:
Nombre de producto: Phottix Strato TTL
Flash Trigger Transmitter; Phottix Strato
TTL Flash Trigger Receiver
Número de modelo: Strato TTL Transmitter;
Strato TTL Receiver
Cumple con los pertinentes requerimientos
fundamentales según la directiva R&TTE
1999/5/EC,siempre que el producto sea usado
correctamente, y los siguientes estándares u
otros documentos normativos
EN 62479:2010-09
ETSI EN 300 440-1 V1.6.1(2010-08)
ETSI EN 300 440-2 V1.4.1(2010-08)
ETSI EN 301 489-1 V1.9.2/2011-09
ETSI EN 301 489-3 V1.4.1/2002-08
75

Firmado por:
Paul Czernik
CEO/Director gerente
Phottix Europe Sp. z o.o.
CEO/Prezes zarządu
Lodz, octubre 2013
76

Componenti
Trasmettitore
1.Interruttore di alimentazione
2.Pulsante Test
3.Porta USB
4.Pulsante di scatto
5.LED
6.Occhiello per tracolla
7.Schermo LCD
8.Pulsanti di regolazione EV - / +
9.Pulsante di selezione del
canale
10.Pulsante AF-ILL (Illuminatore
ausiliario AF)
11.Vano batterie
12.Slitta a contatto caldo
13.Anello di blocco
It
11
ISTRUZIONI D’USO
12
6
2
3
8
13
5
4
1
7
10
9
77

Ricevitore
1.Interruttore di alimentazione
2.Interrutore di selezione del
canale
3.Pulsante Test
4.Porta USB
5.Pulsante di scatto
6.LED
7.Occhiello per tracolla
8.Slitta contatto caldo
9.Presa di sincronizzazione
10.Presa per cavo di scatto
11.Uscita DC 5V
12.Vano batterie
13.Slitta a contatto freddo (Cold
Shoe) / Attacco ¼’’x20
14. Anello di blocco
78
13
7
12
2
3
4
9
14
6
5
1
8
10
11

It
ISTRUZIONI D’USO
Schermo LCD del trasmettitore
Indicatore di livello della batteria
Valore di esposizione EV
Canale
Illuminatore ausiliario AF
Modalità blocco tasti
Consiglio: Prima di collegare o di scollegare le
attrezzature, spegnere tutti i dispositivi – i ash
a slitta / i flash da studio, le fotocamere ed il
Phottix Strato TTL (trasmettitori e ricevitori).
Compatibilità
Il trasmettitore Strato TTL è compatibile con
altri trigger della Phottix nel seguente modo:
1. Il trasmettitore Strato TTL farà scattare i
ricevitori Strato, Strato II ed i ricetrasmettitori
Atlas II (in modalità RX) impostati sullo stesso
canale.
2. Il trasmettitore Strato TTL farà scattare
i ricevitori Strato II impostati su qualsiasi
gruppo. Tutti i gruppi del ricevitore Strato II
scatteranno se sono impostati sullo stesso
canale del trasmettitore Strato TTL.
3. Il trasmettitore Strato TTL non farà scattare
il Phottix Odin né l’Ares.
4. I trasmettitori Phottix Odin, Atlas II (in
modalità Tx) ed Ares non faranno scattare i
79

ricevitori Strato TTL.
5. L'utilizzo del trasmettitore Strato TTL in
modalità HSS può causare i problemi con
la sincronizzazione tra i ricevitori Strato e
Strato II Multi o i ricetrasmettitori Atlas II (in
modalità RX).
L'inserimento delle batterie
1. Premere il coperchio vano batteria e
farlo scorrere verso la parte posteriore del
trasmettitore o del ricevitore Strato TTL. Il
coperchio vano batteria si aprirà.
2. Rimuovere il coperchio dal Strato TTL.
3. Inserire le batterie AA.
4. Rimettere il coperchio vano batteria e
80
spingerlo nella posizione bloccata.
Indicatore di livello della batteria
Se la tensione della batteria è superiore a
2.4V, l'icona dell'indicatore di livello della
batteria mostra quattro barre . Quando
le batterie si scaricano, le barre scompaiono utilizzare questa informazione approssimativa
per sapere quando è necessario sostituire le
batterie. Quando le batterie sono scariche,
l'indicatore di livello della batteria mostra una
icona della batteria vuota .
Retroilluminazione dello schermo
LCD del trasmettitore
La pressione di qualsiasi pulsante del

It
ISTRUZIONI D’USO
trasmettitore illuminerà la retroilluminazione
dello schermo LCD. La retroilluminazione
si accenderà per circa 10 secondi e poi
si spegnerà se non viene premuto alcun
pulsante.
Funzione di standby automatico
Il trasmettitore passa automaticamente in
modalità stand-by, “IDLE" viene visualizzato
sullo schermo dopo 10 minuti d'inattività.
Modalità blocco tasti
1. Premere e tenere premuto per 2 secondi
il pulsante AF-ILL fino a visualizzare l'icona
di blocco . I pulsanti del trasmettitore
saranno bloccati, perciò premendo
un pulsante non si apporterà alcun
cambiamento.
2. Per sbloccare i pulsanti, premere e tenere
premuto per 2 secondi il pulsante AF-ILL
(l'icona del blocco sparirà).
Accendere / spegnere il trasmettitore
ed il ricevitore
1. Per accendere il trasmettitore o il ricevitore
Phottix Strato TTL – spostare l'interruttore di
alimentazione in posizione "ON".
2. Per spegnere il trasmettitore o il ricevitore
Phottix Strato TTL – spostare l'interruttore di
alimentazione in posizione "OFF".
81

Pulsante Test
1. Grazie al pulsante Test possiamo testare il
lampo del ash.
2. Per il test: premere il pulsante Test sul
trasmettitore. I flash collegati ai ricevitori
Phottix Strato TTL ed impostati sullo stesso
canale saranno attivati se viene premuto il
pulsante Test sul trasmettitore.
3. Se si preme il pulsante Test sul ricevitore,
solo il ash collegato a questo ricevitore viene
attivato.
Per lo Scatto Senza Fili: consultare il paragrafo
“Utilizzo dello Strato TTL come scatto senza
li”, riportato di seguito.
82
LED
1. Il LED sul trasmettitore Strato TTL
lampeggerà di verde ogni 2 secondi quando
il trasmettitore viene acceso e diventerà di
colore verde fisso quando si preme a metà
il pulsante di scatto (sulla fotocamera o
sul trasmettitore Strato TTL quando viene
utilizzato come un telecomando senza fili).
Il LED lampeggerà di luce rosso durante la
trasmissione del segnale o quando si scatta
una foto. In modalità standby, il LED si
spegnerà.
2. Il LED sul ricevitore Strato TTL lampeggia
in verde ogni 2 secondi quando viene acceso
e in modalità standby. Il LED diventa rosso
quando il segnale dal trasmettitore viene
ricevuto e quando il ash collegato oppure la

It
ISTRUZIONI D’USO
fotocamera collegata viene attivato.
3. Quando il livello della batteria è basso, il
LED sul ricevitore lampeggia in rosso ogni 2
secondi.
Canali
1. Il sistema Strato TTL ha 4 canali di
trasmissione: 1, 2, 3, 4.
2. I canali possono essere impostati sul
ricevitore e sul trasmettitore.
Impostazione dei canali sul trasmettitore
1. Premere il pulsante di selezione del canale
sul trasmettitore.
2. Ogni pressione del pulsante cambia il
canale: 1, 2, 3, 4.
3. Vericare se il canale del trasmettitore è lo
stesso dei ricevitore.
4. I canali sono visibili sullo schermo LCD del
trasmettitore.
Impostazione dei canali del ricevitore
1. Utilizzando l'interrutore di selezione del
canale scegliere un canale: 1, 2, 3, 4.
2. Vericare se il ricevitore è impostato sullo
stesso canale del trasmettitore.
83

Collegamento del trasmettitore
Strato TTL alla slitta della fotocamera
1. Spegnere la fotocamera ed il trasmettitore
Strato TTL.
2. Inserire il trasmettitore Strato sulla slitta
della fotocamera.
3. Ruotare l'anello di bloccaggio Strato TTL
per ssarlo saldamente.
4. Accendere il trasmettitore Strato TTL.
5. Accendere la fotocamera e selezionare la
modalità di scatto desiderata.
84
Collegamento del flash al ricevitore
Strato TTL
1. Spegnere il ash e il ricevitore Strato TTL.
2. Inserire il flash sulla slitta hot shoe del
ricevitore.
3. Fissare il ash utilizzando il meccanismo di
bloccaggio del ash.
4. Accendete il ash e il ricevitore Strato TTL.
5. Impostare il ash in modalità TTL.
Nota:
Dopo aver acceso lo Strato TTL, il flash può
attivarsi spontaneamente.

It
ISTRUZIONI D’USO
Utilizzo dello Strato TTL per attivare
i ash
1. Premere a metà il pulsante di scatto della
fotocamera, sino a che il trasmettitore Strato
TTL collegato alla slitta della fotocamera
non si accende. Quando la funzione AF-ILL
è attivata, ed è difficile per la fotocamera
mettere a fuoco, l'illuminatore ausiliario AF
dei ash collegati ai ricevitori Strato TTL sullo
stesso canale del trasmettitore lampeggerà.
I LED sul trasmettitore e sul ricevitore
lampeggeranno in verde.
2. Premere a fondo il pulsante di scatto della
fotocamera per attivare i flash collegati ai
ricevitori Strato TTL sullo stesso canale del
trasmettitore. I LED sul trasmettitore e sul
ricevitore lampeggeranno in rosso.
Nota:
- Premendo il pulsante di scatto sul
trasmettitore Strato TTL – i flash collegati ai
ricevitori sullo stesso canale non attiveranno.
- Premendo il pulsante Test sul trasmettitore
Strato TTL – i ash collegati ai ricevitori sullo
stesso canale emetteranno un lampo.
Regolazione dell’esposizione
Il sistema Strato TTL comanderà i flash
a distanza tramite il segnale radio. La
regolazione dell’esposizione (EV) può essere
fatta per i ash remoti utilizzando i pulsanti di
regolazione EV -/+ sul trasmettitore.
85

Per regolare l’esposizione:
1. Premere i pulsanti di regolazione EV -/+
sul trasmettitore Strato TTL. Le modifiche
saranno visualizzate sul trasmettitore.
2. Scattare una foto ed apportare ulteriori
modiche, se necessario.
Utilizzo della funzione Illuminatore
assistenza AF
Premere il pulsante AF-ILL per attivare o
disattivare la funzione Illuminatore assistenza
AF.
1.Quando questa funzione è attivata: premere
il pulsante di scatto a metà per accendere
l'illuminatore assistenza AF dei ash.
86
2. Quando questa funzione è disattivata:
l'illuminatore assistenza AF dei flash non si
accende quando si preme il pulsante di scatto
a metà.
Nota:
Le funzioni del Illuminatore assistenza AF
possono essere attivate o disattivate nel
menu delle funzioni personalizzate del ash
(Consultare il manuale del flash per ulteriori
dettagli).
Sincronizzazione FP automatico a
tempi rapidi
È possibile utilizzare le funzioni della
Sincronizzazione ad Alta Velocità, con i tempi

It
ISTRUZIONI D’USO
di scatto no a 1/8000 di secondo, se lo Strato
TTL viene utilizzato con le fotocamere ed i
ash che orono queste funzioni.
1. La sincronizzazione FP automatico a
tempi rapidi non può essere impostata sul
trasmettitore Strato TTL.
2. Questa funzione deve essere impostata
sulla fotocamera- consultare il manuale d'uso
della fotocamera per informazioni dettagliate.
Settaggi fotocamera e ash supportati
Il Phottix Strato TTL supporta le funzioni
che possono essere impostate dal menu
della fotocamera. Consultare i manuali d’uso
della fotocamera e del ash per informazioni
dettagliate. Le funzioni non disponibili sulla
fotocamera o sul flash non possono essere
utilizzate con il sistema Strato TTL.
1. Pulsante di anteprima profondità di
campo (luce pilota): Quando si preme il
pulsante di anteprima profondità di campo
sulla fotocamera (se disponibile), i flash
collegati ai ricevitori sullo stesso canale (con
la funzione attiva) verranno attivati. Questo è
utile per controllare l'illuminazione.
2. Illuminatore ausiliario AF: Se la
funzione dell'illuminatore ausiliario AF
è attivata sul trasmettitore Strato TTL e
nelle funzioni personalizzate del flash,
l'illuminatore ausiliario AF del ash collegato
al ricevitore Strato TTL sullo stesso canale del
trasmettitore si illumina in caso di necessità
di assistere AF (se la funzione è attivata).
87

3. Modalità di sincronizzazione: lo Strato
TTL supporta le impostazioni della modalità
di sincronizzazione per il flash tramite il
pulsante di controllo della funzione o dal
menu della fotocamera. Sincro sulla prima
tendina, sincro sulla seconda tendina e sincro
FP automatico possono essere attivate dal
menu della fotocamera (se queste funzioni
sono disponibili sulla fotocamera).
4. Blocco dell'esposizione (FEL): L'esposizione
del ash può essere controllata manualmente
e memorizzata premendo il pulsante AE-L/
AF-L sulla fotocamera.
5. Compensazione dell'esposizione: Il
sistema TTL Strato supporta l'impostazione
della compensazione dell'esposizione del
flash tramite il pulsante di controllo della
funzione della fotocamera.
88
6. Zoom: Se la lunghezza focale dello zoom
della fotocamera viene cambiata, lo zoom
del flash collegato al ricevitore Strato TTL
sullo stesso canale del trasmettitore cambierà
conseguentemente (quando il flash è
impostato sulla modalità zoom "Auto", non
zoom manuale. Consultare il manuale del
ash per ulteriori dettagli).
Collegamento del ricevitore Strato
TTL al flash a slitta/da studio
utilizzando il cavo di sincronizzazione
1. Spegnere il ash ed il ricevitore Strato TTL.
2. Collegare il cavo alla presa di
sincronizzazione 3.5 mm del ricevitore.

It
ISTRUZIONI D’USO
3. Collegare l'altra estremità del cavo al ash
(l'adattatore a 6,3mm per i flash da studio
dotati del jack 6,3 mm è incluso).
4. Accendere il ash ed il ricevitore Strato TTL.
Impostare il flash in modalità manuale (se
disponibile).
5. Premere il pulsante di scatto della
fotocamera collegata al trasmettitore - i
ash collegati ai ricevitori sullo stesso canale
verranno attivati.
Nota:
- Dopo aver acceso lo Strato TTL, il ash può
attivarsi spontaneamente.
- I flash collegati ai ricevitori Strato TTL via
cavo non supportano le funzioni TTL, FP
automatico e SCS, ma esclusivamente la
funzione trigger.
Utilizzo dello Strato TTL come
telecomando senza li *
1. Spegnere la fotocamera e il ricevitore Strato
TTL.
2. Collegare il cavo Phottix adeguato al
modello della vostra fotocamera alla presa
per cavo di scatto sul ricevitore Strato TTL.
3. Collegare l'altra estremità del cavo alla
presa per cavo di scatto della fotocamera.
4. Accendere la fotocamera ed il ricevitore
Strato TTL Consultare il manuale della
fotocamera per ulteriori informazioni
sull'utilizzo del telecomando.
5. L'utilizzo del trasmettitore Strato TTL
consentirà le funzioni di scatto a distanza. Il
pulsante di scatto dello Strato TTL funziona
89

come un pulsante di scatto della fotocamera:
una pressione a metà del pulsante di scatto
imposta la messa a fuoco, premendolo a
fondo – si scatta una foto.
Nota:
Quando si utilizza un trasmettitore come
un telecomando senza fili, premendo il
pulsante di scatto sul trasmettitore attiverà
solo le fotocamere collegate ai ricevitori sullo
stesso canale. Non attiverà i ash collegati ai
ricevitori sullo stesso canale.
*Con le fotocamere compatibili
90
Utilizzo dello Strato TTL come
telecomando a lo*
1. Spegnere la fotocamera e il ricevitore Strato
TTL.
2. Collegare il cavo Phottix adeguato al
modello della vostra fotocamera alla presa
per cavo di scatto sul ricevitore Strato TTL.
3. Collegare l'altra estremità del cavo alla
presa per cavo di scatto della fotocamera.
4. Accendere la fotocamera ed il ricevitore
Strato TTL**.
5. Consultare il manuale della fotocamera
per ulteriori informazioni sull'utilizzo di
telecomando.
6. Il ricevitore Strato TTL funzionerà come

It
ISTRUZIONI D’USO
un telecomando a filo. Il pulsante di scatto
dello Strato TTL funziona come un pulsante
di scatto della fotocamera: una pressione a
metà del pulsante di scatto imposta la messa
a fuoco, premendolo a fondo – si scatta una
foto.
*Con le fotocamere compatibili
**Funzione del telecomando a lo può essere
utilizzata senza accendere il ricevitore Strato
TTL e funziona senza batterie nel ricevitore.
Precauzioni
1. Questo prodotto è uno strumento elettronico
preciso. Non usare in ambienti umidi o
polverosi.
2. Non fare cadere o schiacciare.
3. Non utilizzare sostanze chimiche o solventi
per pulire il prodotto. Utilizzare un tessuto
morbido come i panni di pulizia per le lenti.
4. Interferenza: Il Phottix Strato TTL lavora a
una frequenza di 2.4 Ghz. La sua attività può
essere disturbata dalla corrente elettrica,
campi magnetici, segnali radio, router senza
fili, cellulari ed altri dispositivi elettronici.
Entità come per esempio, grandi edifici, muri,
alberi, recinti o machine possono influenzare
il suo funzionamento. Se il Phottix Strato TTL
non funziona, si consiglia di smuoverlo dalla
posizione in cui è collocato.
91

Speciche Tecniche:
Potenza di trasmissione: ≤10dBm
Portata: 100m+
Frequenza: 2.4GHz
Canali 4 channels
Tensione in ingresso: 2.1V-3.2V
Tensione massima: trasmettitore 6V;
ricevitore ≤300V
Batterie: 2 batterie AA alcaline o batterie
ricaricabili (trasmettitore e ricevitore); 5V DC
sul ricevitore (porta di alimentazione esterna)
Velocità di sincronizzazione max.: 1/8000s
Uscita (Output): Slitta contato caldo, 3.5mm
(ricevitore)
92
Ingresso (Input): porta USB (trasmettitore e
ricevitore)
Attacco: 1/4 " attacco treppiede, slitta a
contatto freddo Cold Shoe (Ricevitore)
Peso: trasmettitore 74,6g; ricevitore 74,2g---senza batterie
Dimensioni:
45.5 mm; ricevitore L 93.3 * W 46.7 * H 45.4 mm
Antenna:
Temperatura di funzionamento:
0℃~ +50
Umidità di funzionamento: 35%~95%RH
trasmettitore L 92.5 * W 47.8 * H
incorporata PCB
℃

It
ISTRUZIONI D’USO
Dichiarazione CE di conformità
Noi: Phottix (HK) Ltd.
Indirizzo: 10/F Block A, Yip Fat Factory Building,
Phase 1, 77 Hoi Yuen Rd, Kwun Tong, Kln,
Hongkong
e
Rappresentante autorizzato per l’Europa
Phottix Europe Sp. z o.o.
Piotrkowska 66
90-105 Lodz, Polonia
KRS 0000327336
dichiariamo che il prodotto indicato sotto:
nome del prodotto: Phottix Strato TTL Flash
Trigger Transmitter; Phottix Strato TTL Flash
Trigger Receiver
numero di modello: Strato TTL Transmitter;
Strato TTL Receiver
è conforme ai requisiti fondamentali secondo la
Direttiva R&TTE 1999/5/EC, purché il prodotto
sia utilizzato correttamente, ed alle seguenti
norme o altri documenti normativi
EN 62479:2010-09
ETSI EN 300 440-1 V1.6.1(2010-08)
ETSI EN 300 440-2 V1.4.1(2010-08)
ETSI EN 301 489-1 V1.9.2/2011-09
ETSI EN 301 489-3 V1.4.1/2002-08
93

Firmato da:
Paul Czernik
CEO/ Direttore generale
Phottix Europe Sp. z o.o.
Lodz, ottobre 2013
94

Elementy
Nadajnik
1.Przełącznik zasilania
2.Przycisk Test
3.Port USB
4.Przycisk wyzwolenia migawki
5.Dioda LED
6.Otwór na smycz
7.Ekran LCD
8.Przycisk regulacji poziomów
EV -/+
9.Przycisk wyboru kanału
10.Przycisk AF-ILL (Lampa
wspomagania autofokusa)
11.Komora baterii
12.Gorąca stopka
13.Pierścień mocujący
Pl
11
INSTRUKCJA OBSŁUGI
12
6
2
3
8
13
5
4
1
7
10
9
95

Odbiornik
1.Przełącznik zasilania
2.Przełącznik wyboru kanału
3.Przycisk Test
4.Port USB
5.Przycisk wyzwolenia migawki
6.Dioda LED
7.Otwór na smycz
8.Gorąca stopka
9.Port synchronizacyjny
10.Port na pilota
11.Port zasilający DC 5V
12.Komora baterii
13.Zimna stopka, mocowanie
1/4 x20
14.Pierścień mocujący
96
13
7
12
2
3
4
9
14
6
5
1
8
10
11

Pl
INSTRUKCJA OBSŁUGI
Ekran LCD nadajnika
Wskaźnik naładowania baterii
Poziom EV -/+
Kanał
AF-ILL
Tryb blokady przycisków
Wskazówka: Wyłącz wszystkie urządzenia –
lampy błyskowe, aparaty oraz Phottix Strato
TTL przed podłączeniem i rozłączeniem.
Kompatybilność
Nadajnik Phottix Strato TTL jest kompatybilny z
wyzwalaczami Phottix w następujący sposób:
1. Nadajnik Strato TTL wyzwoli odbiorniki
Strato, Strato II oraz Atlas II ( w trybie RX)
ustawione na tym samym kanale.
2. Nadajnik Strato TTL wyzwoli odbiorniki
Strato II w każdej grupie. Wszystkie grupy
odbiornika Strato II zostaną wyzwolone jeśli
będą ustawione na tym samym kanale co
nadajnik Strato TTL.
3.Nadajnik Strato TTL nie wyzwoli
odbiorników Phottix Odin oraz Ares.
4. Nadajniki Phottix Odin, Atlas ( w trybie TX)
oraz Ares nie wyzwolą odbiorników Strato
TTL.
97

5. Użycie nadajnika Strato TTL w trybie HSS
może powodować zakłócenia synchronizacji
pomiędzy odbiornikami Strato, Strato II Multi
oraz Atlas (w trybie RX).
Umieszczanie baterii
1. Naciśnij przykrywkę komory baterii
jednocześnie odsuwając ją w kierunku na
zewnątrz wyzwalacza. Przykrywka komory
baterii otworzy się.
2. Podnieś przykrywkę komory baterii.
3. Umieść baterie AA.
4. Zamknij przykrywkę i przesuń w stronę
wyzwalacza, aż do jej zatrzaśnięcia.
98
Wskaźnik poziomu naładowania
baterii
Kiedy napięcie baterii jest większe niż 2.4V,
wskaźnik będzie pokazywał pełne cztery
paski . Wraz ze zużyciem baterii,
paski we wskaźniku napięcia będą znikały
– orientacyjne wskazanie naładowanie
akumulatorków. Używaj tego wskaźnika jako
podpowiedzi, kiedy należy wymienić baterie.
Kiedy baterie zostaną wyczerpane wskaźnik
naładowania stanie się pusty .
Podświetlenie wyświetlacza na
nadajniku
Wciśnięcie jakiegokolwiek przycisku na
nadajniku spowoduje podświetlenie

Pl
INSTRUKCJA OBSŁUGI
wyświetlacza na ok. 10 sekund. Jeśli
żaden z przycisków nie zostanie wciśnięty
podświetlenie wyłączy się.
Funkcja czuwania
Nadajnik przełączy się automatycznie w tryb
czuwania wyświetlając „IDLE” na wyświetlaczu
po 10 minutach bezczynności.
Tryb blokady przycisków
1. Przyciśnięcie i przytrzymanie przycisku AFILL przez 2 sekundy spowoduje wyświetlenie
ikony blokady . Przyciski nadajnika będą
zablokowane, przyciśnięcie któregokolwiek z
nich nie spowoduje żadnych zmian.
2. W trybie blokady wciśnięcie i przytrzymanie
przycisku AF-ILL przez 2 sekundy odblokuje
nadajnik i ikona zniknie.
Włączanie i wyłączanie nadajnika i
odbiornika
1. W celu włączenia nadajnika lub odbiornika
Phottix Strato TTL – przesuń przełącznik
zasilania na pozycję “ON”.
2. W celu wyłączenia nadajnika lub odbiornika
Phottix Strato TTL – przesuń przełącznik
zasilania na pozycję ”OFF”.
Przycisk Test
1. Przycisk test wyzwoli testowy błysk lamp.
2. W celu wykonania testowego błysku:
99

Wciśnij przycisk Test na nadajniku. Lampy
podłączone do odbiorników Strato TTL
będącymi na tym samym kanale zostaną
wyzwolone w momencie przyciśnięcia
przycisku Test.
3.
Wciśnięcie przycisku test na odbiorniku
wyzwoli lampę podłączoną z tym odbiornikiem.
W celu bezprzewodowego wyzwalania: Zobacz
Używanie Strato TTL jako bezprzewodowego
pilota poniżej.
Dioda LED
1. Dioda LED na nadajniku Strato TTL będzie
migała na zielono co 2 sekundy kiedy
włączone jest zasilanie i będzie świeciła na
zielono po wciśnięciu spustu migawki do
100
połowy (na aparacie lub nadajniku Strato
TTL używanego jako bezprzewodowy pilot).
Dioda zmieni kolor na czerwony podczas
przesyłania sygnału lub robienia zdjęcia. W
trybie czuwania, dioda LED zgaśnie.
2. Dioda LED na odbiorniku Strato TTL będzie
migała co 2 sekundy kiedy włączone jest
zasilanie i jest w trybie czuwania. Dioda
zmieni kolor na czerwony kiedy otrzyma
sygnał z nadajnika i kiedy podłączony aparat
zostanie wyzwolony.
3. Kiedy poziom naładowania baterii jest niski
dioda LED na odbiorniku będzie migała na
czerwono co 2 sekundy.
 Loading...