

En
INSTRUCTION MANUAL
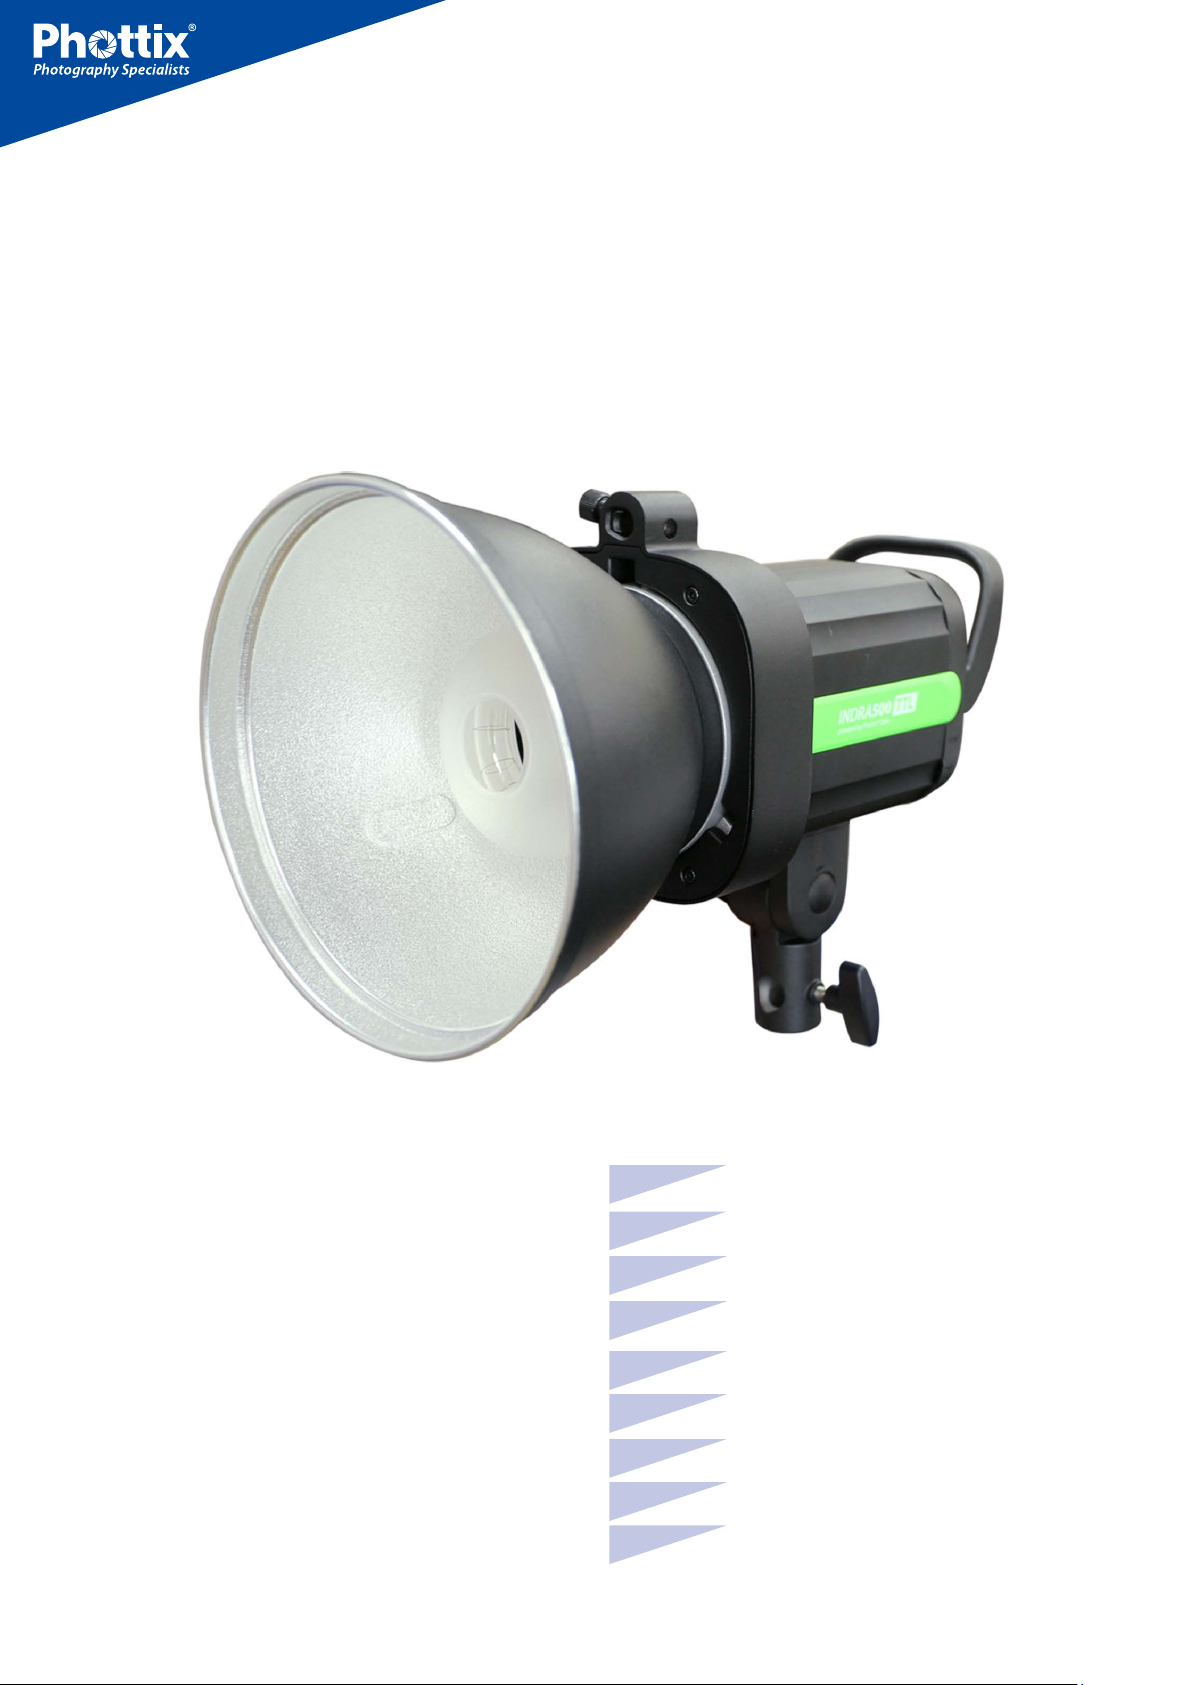
Phottix Indra500 TTL Studio Light
En
De
Fr
Es
It
Pl
Ru
Simp
Cn
Trad
Cn
1
INSTRUCTION MANUAL
BENUTZERHANDBUCH
MANUEL D’UTILISATION
MANUAL DE INSTRUCCIONES
ISTRUZIONI D’USO
INSTRUKCJA OBSŁUGI
РУКОВОДСТВО ПОЛЬЗОВАТЕЛЯ
说明书
說明書
Thank you for purchasing a
Phottix product
En
INSTRUCTION MANUAL
Note: Before using the Phottix Indra500 TTL Studio Light, please read this instruction manual carefully.
The Phottix Indra500 TTL is a battery and AC powered portable studio light with
a built-in radio and optical pulse wireless receiving function. It offers TTL, Manual and Multi Stroboscopic modes, as well as high speed sync and second curtain
sync functions. The Phottix Indra500 TTL Studio Light is compatible with many
existing Phottix products.
Safety instructions
●
The Indra500 contains high voltage electronic parts. Do not disassemble or attempt to repair the Indra500. Keep this product out of the reach
of children.
●
Never use this product near combustible gases, solvents or in an environment with a high electrical charge.
●
Make sure all plugs and cables are well connected during charging
and use.
●
Disconnect the Indra500 TTL Studio light from a power source for 10
minutes before changing the flash tube. Use caution, the flash tube can
get very hot.
●
Do not touch the external power port and ensure it does not have contact with any metal objects – this could cause electric shocks and serious
injury.
●
The external power source should not exceed the technical specifications in this manual.
Table of Content
Parts and Functions …..........................................................…... 2
Flash Modes ……......................................................................... 8
Wireless Receiving Modes ........................................................... 9
Custom Functions ..................................................................... 12
Technical Specs …...................................................................... 13
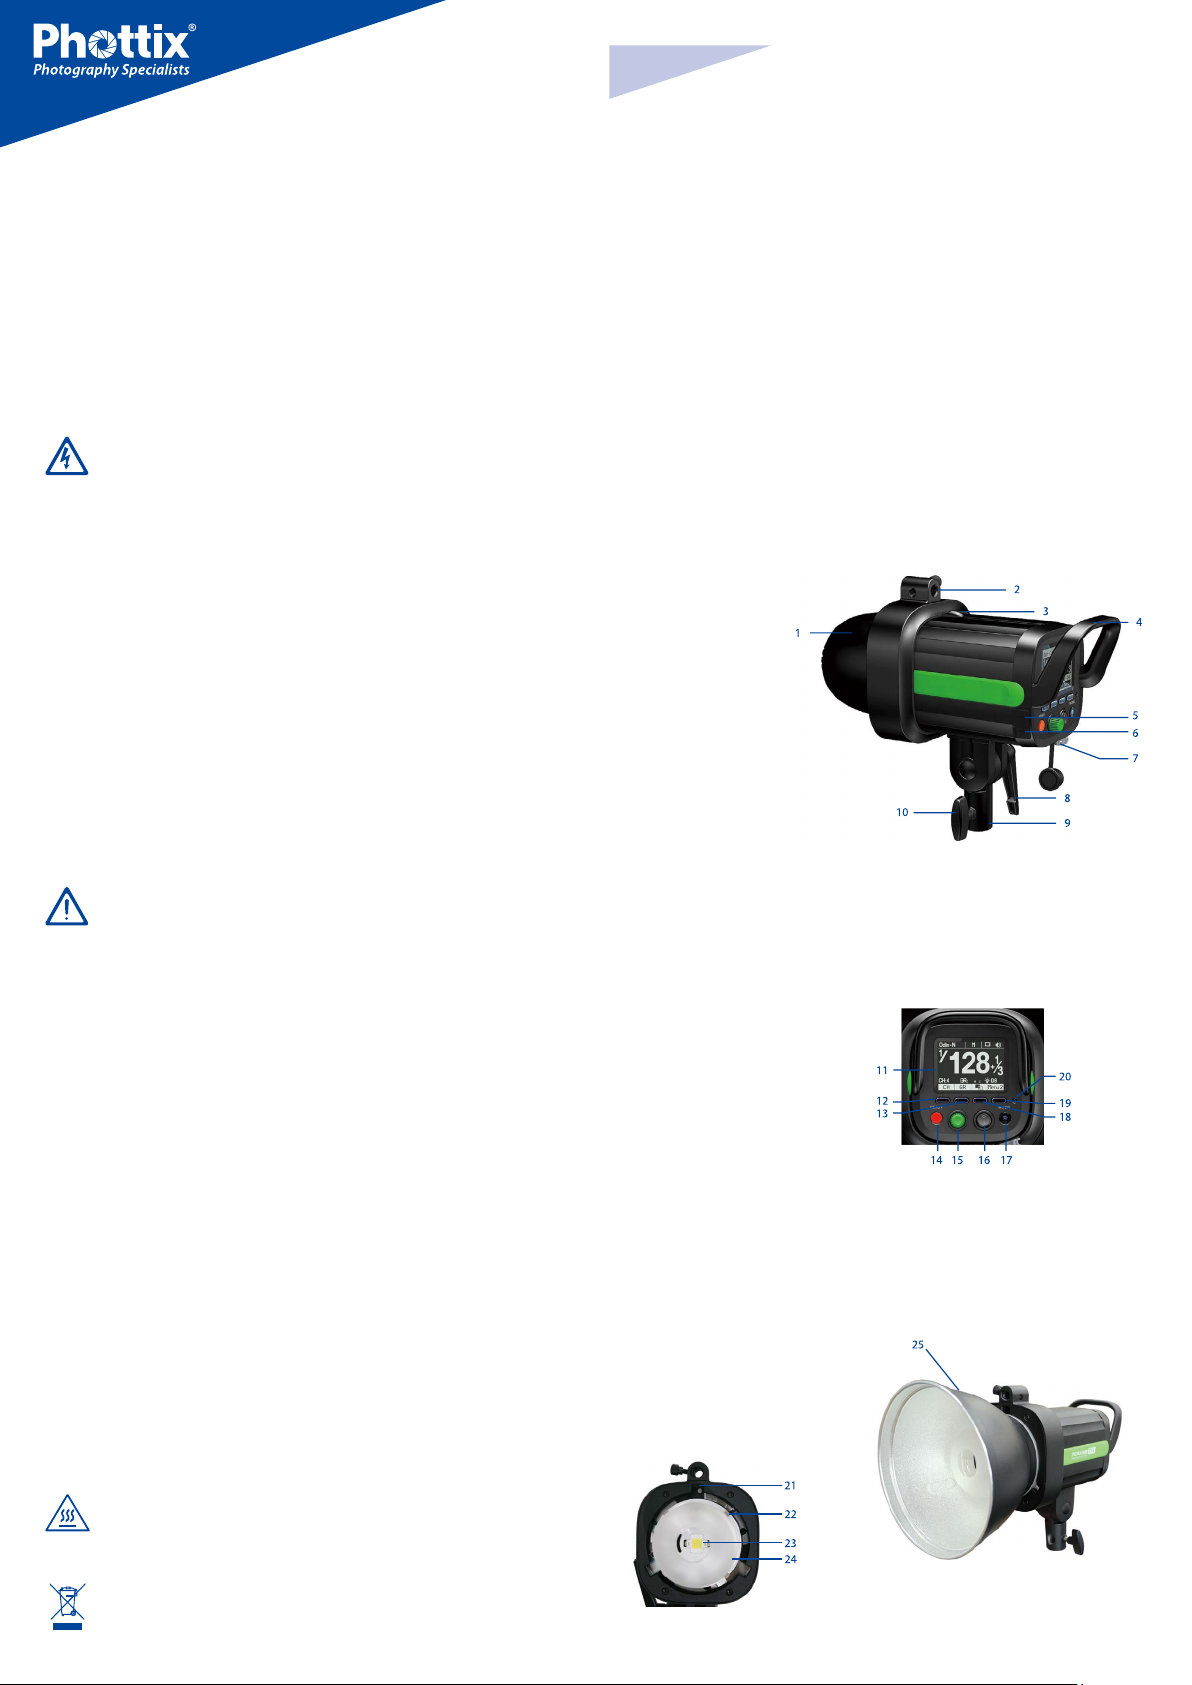
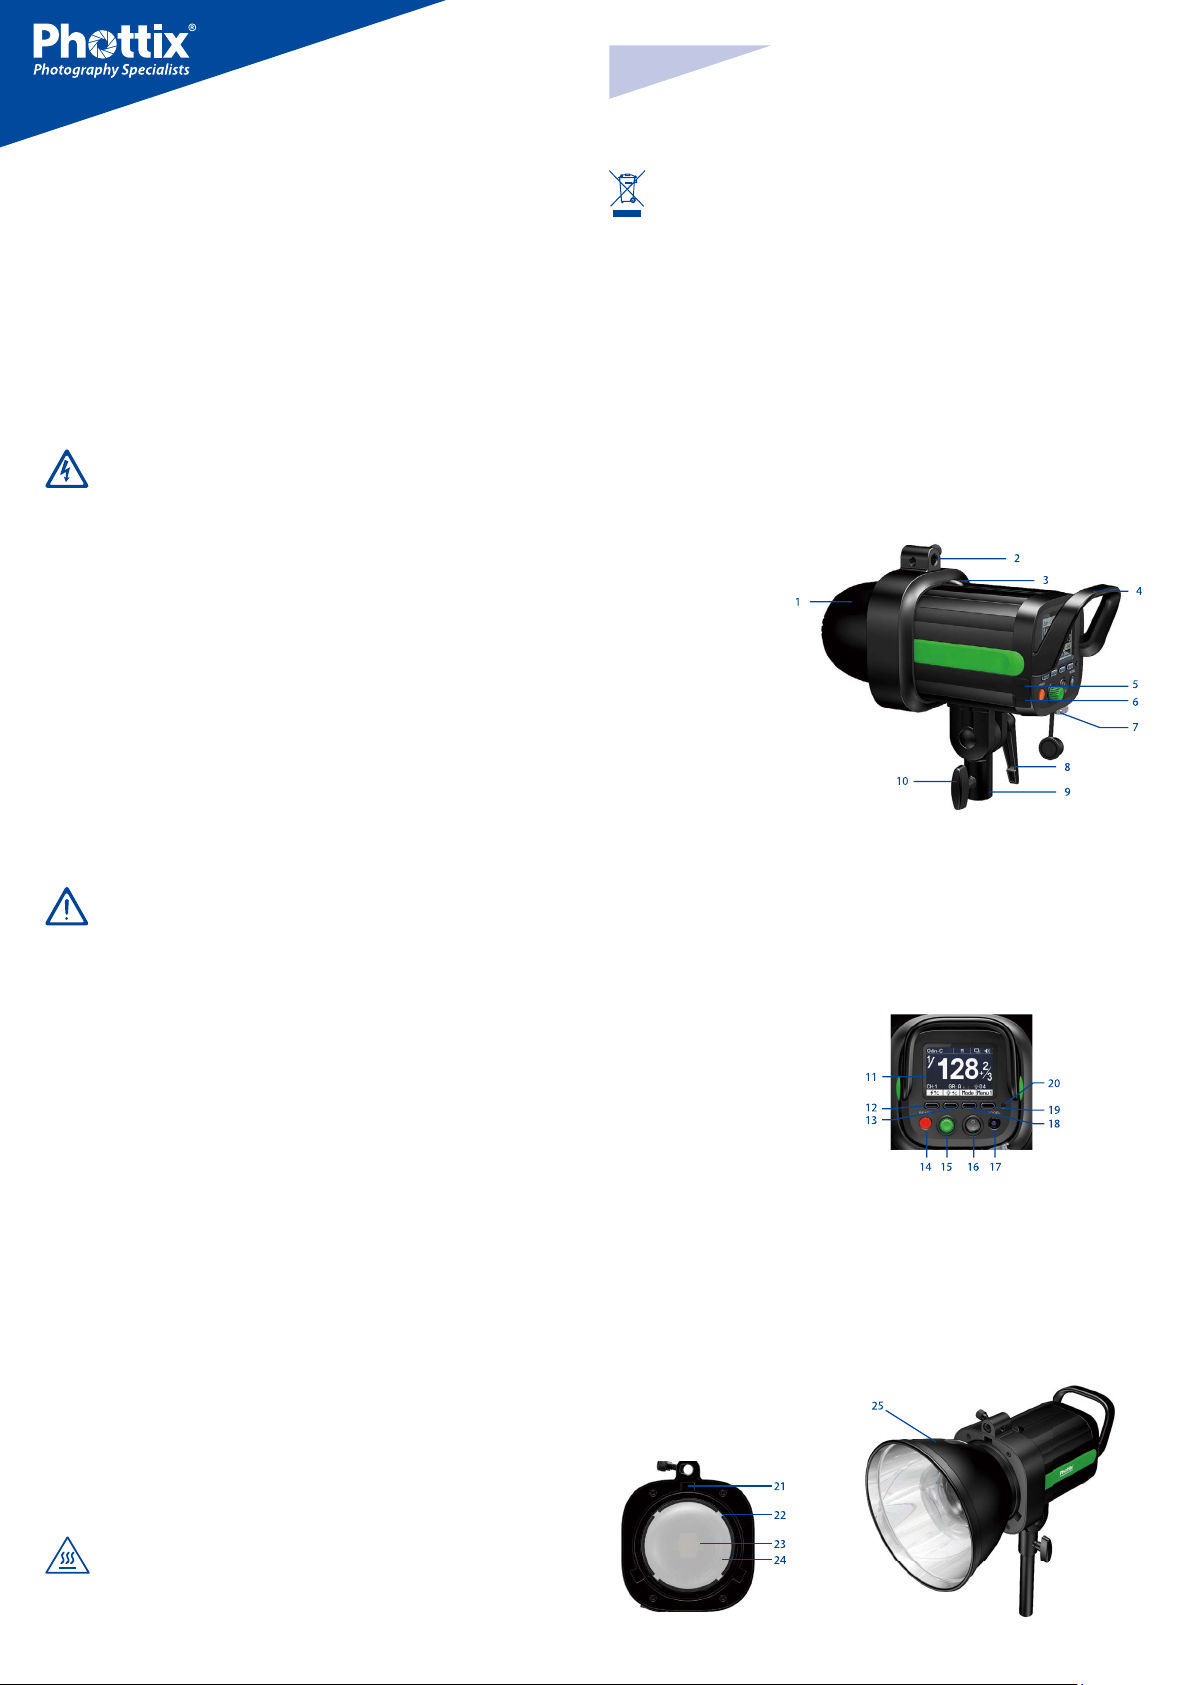
Parts
Full View
1. Front Cover
2. Umbrella Holder
3. Quick-Release
Locking Latch
4. Handle
5. 3.5mm Sync Port
6. USB Output Port
7. External Power Port
8. Angle Adjustment
Ratchet Handle
9. Mounting Column
10. Clamp Screw
●
The external power should be used in an environment with good ventilation. Do not use this product in dusty or sandy conditions.
●
This product is not waterproof. Keep it away from rain, snow and high
humidity conditions.
●
Do not clean the product with organic solvent or alcohol-based liquid.
●
Do not put opaque objects in front of the studio flash head when firing
the studio light. The heat energy emitted by the Indra500 may cause objects to burn, or cause damage to the studio flash tube.
●
Use your studio light safely. Do not fire the Indra500 into the eyes of
people or animals at short distances this may cause damage to the eyes
and/or blindness.
●
Do not leave the studio light in a hot location (direct sunlight, in a
closed car, etc.).
●
Should you notice smoke or an unusual smell coming from this product, immediately turn off the power switch on the studio light.
●
Turn off the power switch on the studio light when not being used for
an extended period of time.
●
Remove the front cover before operating the studio light. Otherwise,
the front cover will get deformed or cause a fire due to the high temperature of the studio light.
Back View
11. LCD Display
12. Function Button 1
13. Function Button 2
14. Test/Ready Button
15. Adjust/Set Knob
16. Power Switch
17. Modeling Light Switch
18. Function Button 3
19. Function Button 4
20. Optical Signal Sensor
Front View
21. Mounting Slot
22. Glass Dome
23. LED Modeling Light
24. Flash Tube
25. Reflector
●
Use caution in touching the studio flash head after use. It may still be
hot and could cause burns.
●
Consult local authorities on the proper disposal or recycling of a Phottix Indra500 TTL Studio Light.
2
En
INSTRUCTION MANUAL
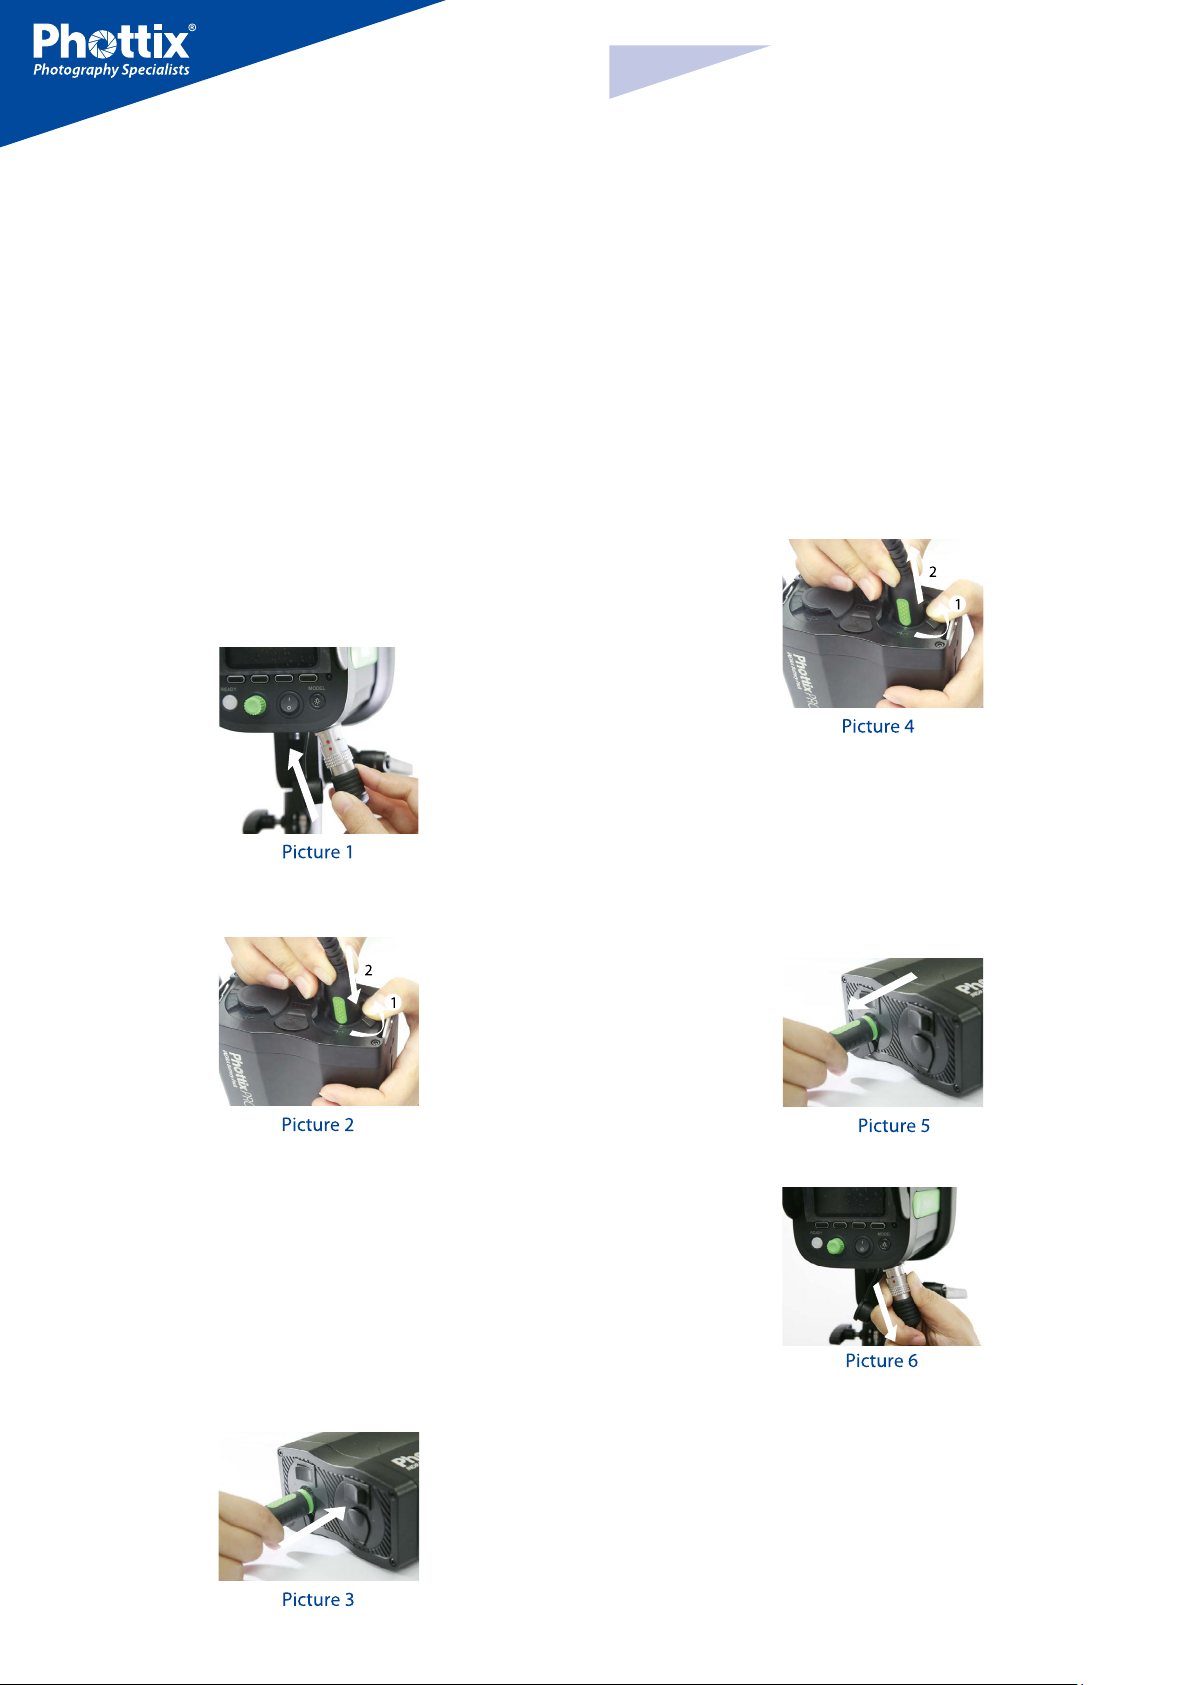
External Power Port
The Indra500 TTL Studio Light can be connected to the Phottix Indra AC Adapter or the Phottix Indra Battery Pack through the external power port.
Please note:
When connecting the external power source, only use Phottix flash power
cords designed for use with the Indra500 TTL Studio Light.
Connecting the Indra500 to the external power
source
Using the Phottix Indra Battery Pack
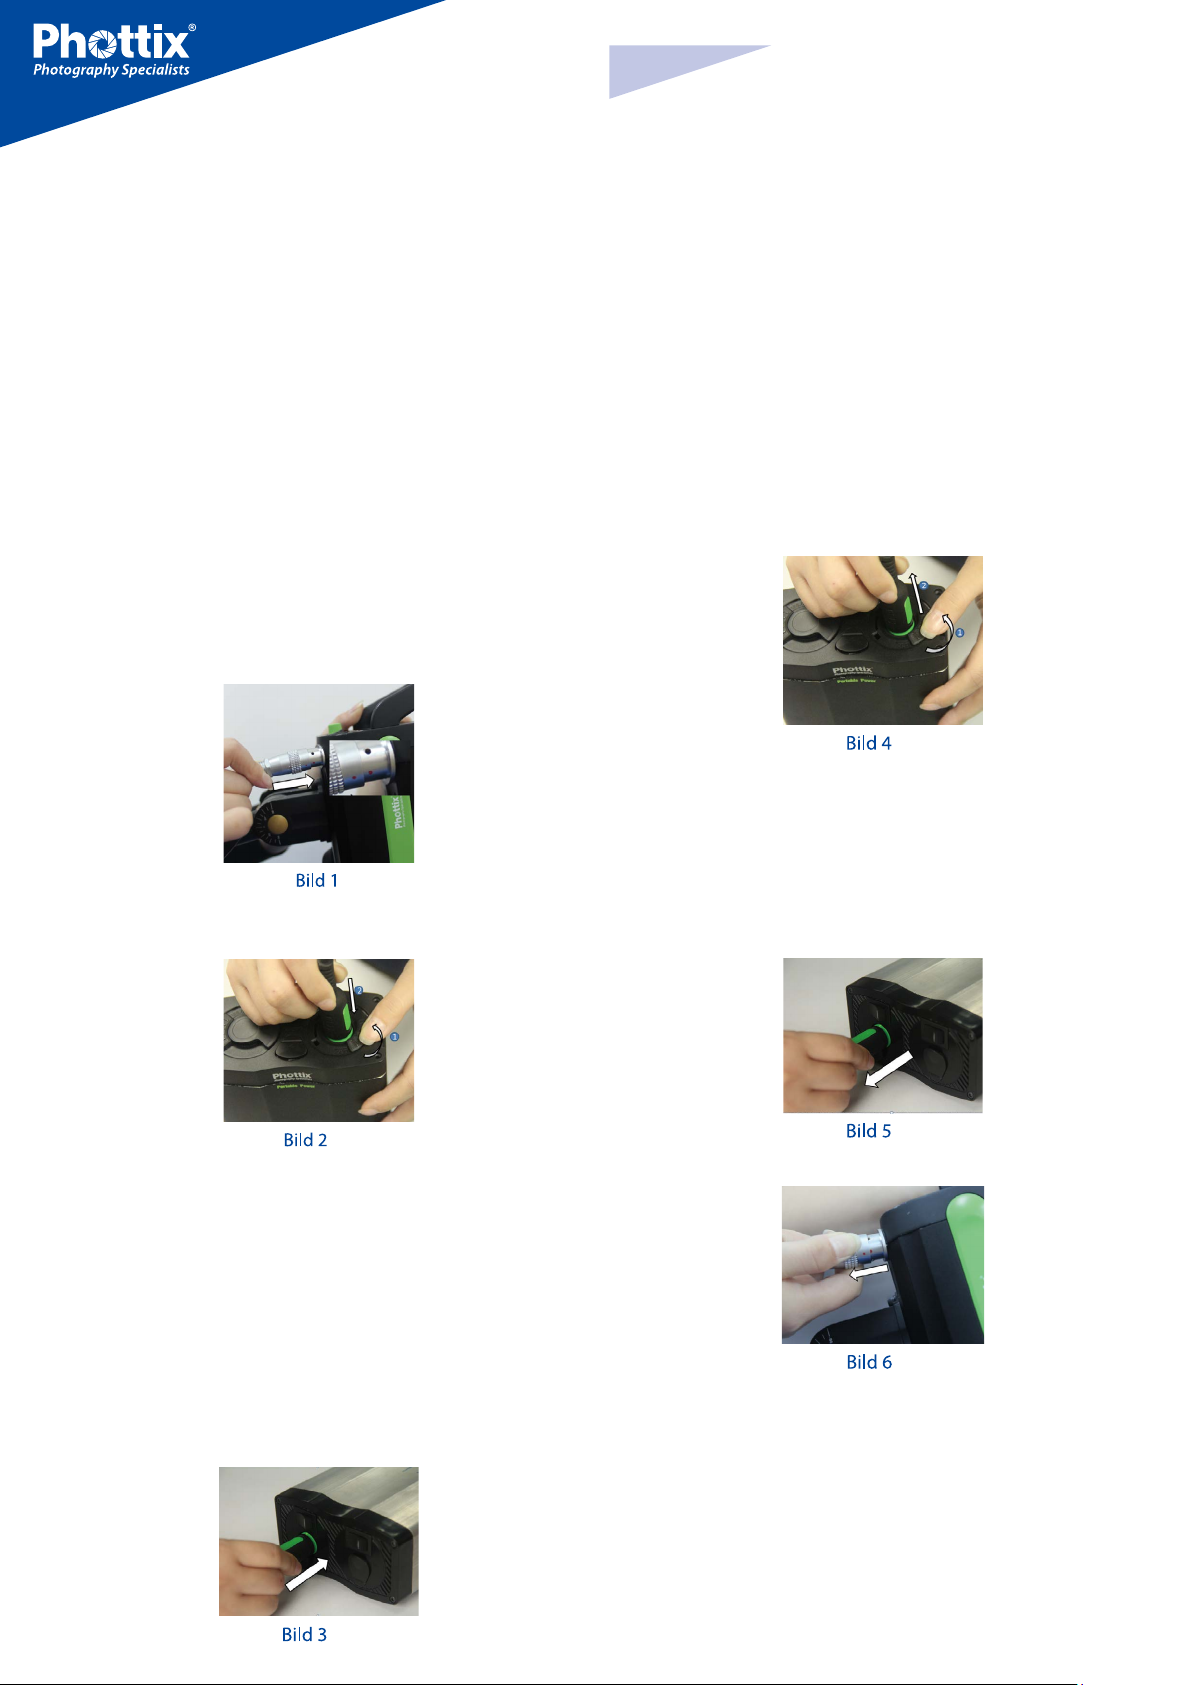
1. Insert one end of the included flash power cord into the external power port
on the Indra500 TTL Studio Light. (See picture 1)
Note: To insert properly, please align the red dots on the cable and port.
3. Connect the AC Adapter to the mains supply.
4. Turn on the main power switch and the output power switch on the AC Adapter.
5. Turn on the power switch on the Phottix Indra500 TTL Studio Light.
Disconnecting the Indra500 from the external
power source
Disconnecting the Phottix Indra Battery Pack
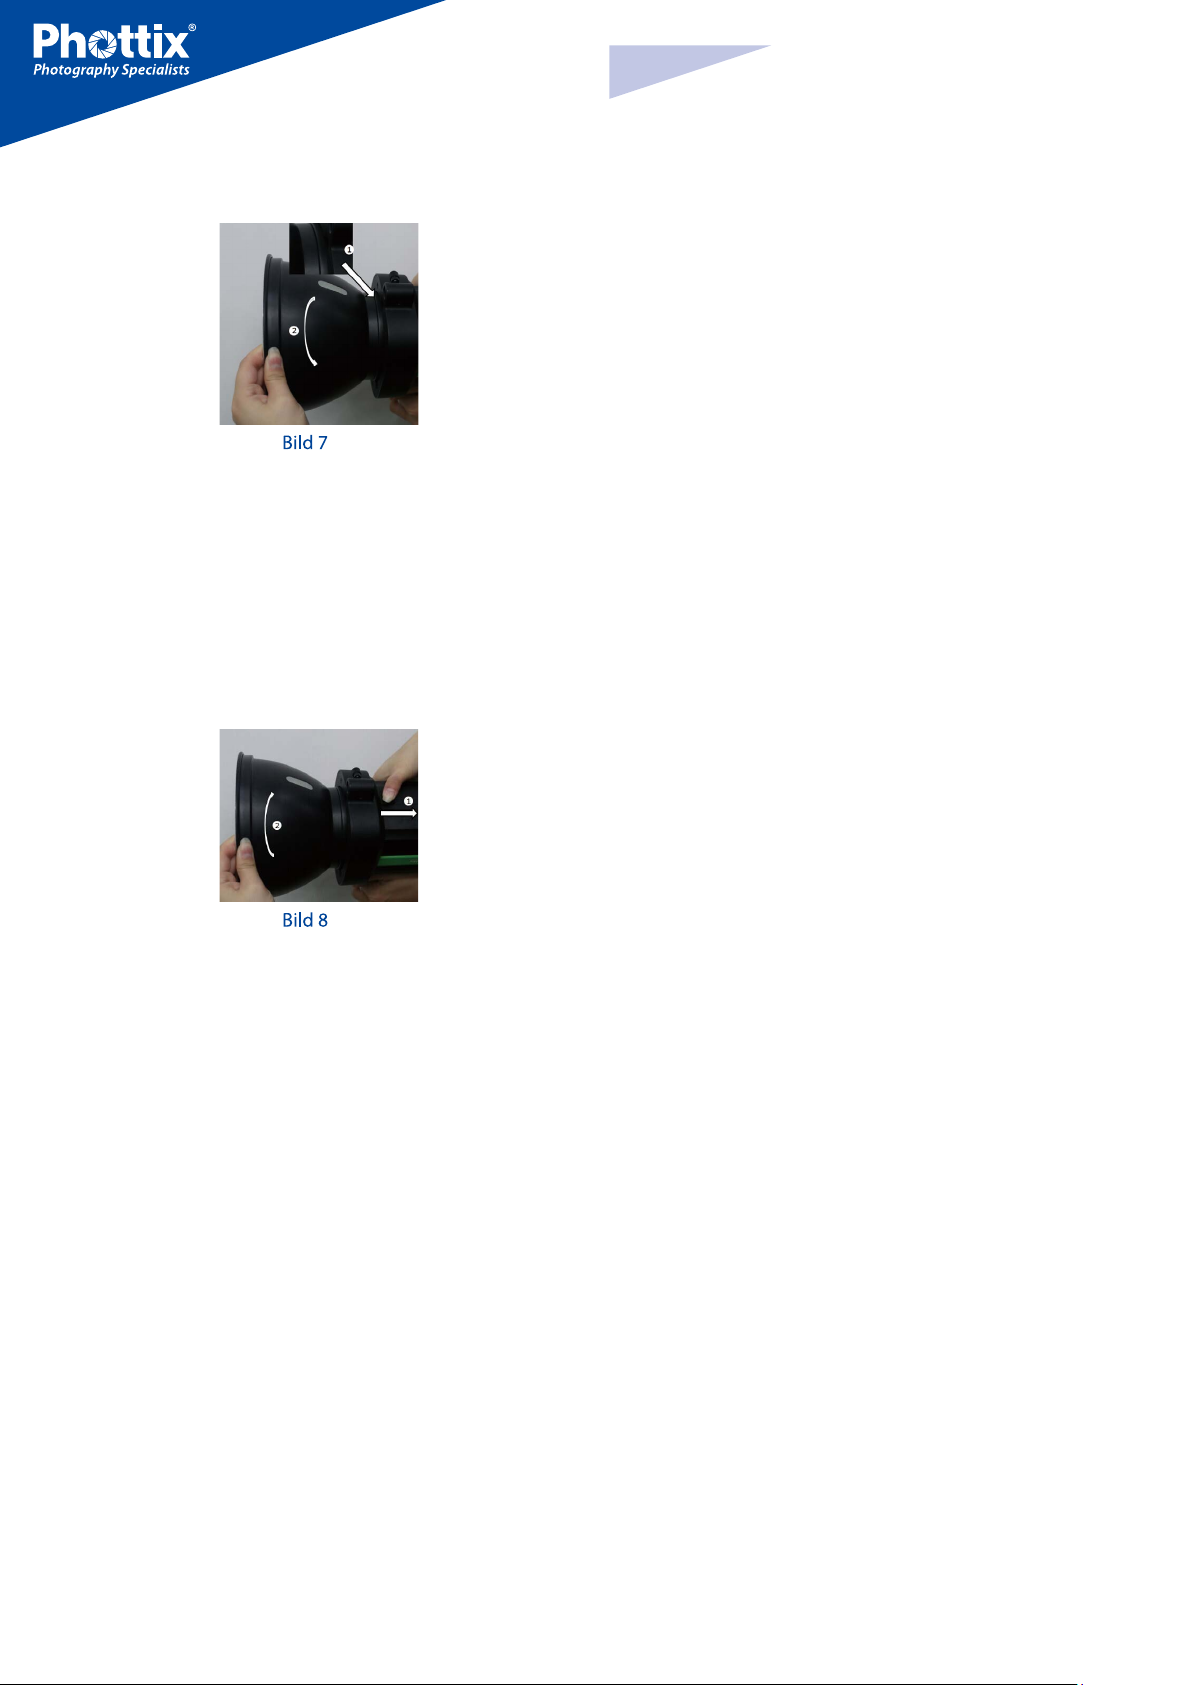
1. Turn off the power switch on the Indra500 TTL Studio Light.
2. Move the output toggle switch on the battery pack to the “OFF” position.
3. Unplug the flash power cord according to picture 4.
2. Insert the other end into the output port on the Phottix Indra Battery Pack.
(See picture 2)
3. Turn on the Output Toggle Switch on the Battery Pack.
4. Turn on the power switch on the Phottix Indra500 TTL Studio Light.
Using the Phottix Indra AC Adapter
1. Insert one end of the included flash power cord into the external power port
on the Indra500 TTL Studio Light. (See picture 1)
4. Unplug the other end according to picture 6.
Disconnecting the Phottix Indra AC Adapter
1. Turn off the power switch on the Indra500 TTL Studio Light.
2. Turn off the main power switch and output power switch on the AC Adapter.
Unplug the flash power cord according to picture 5.
3. Unplug the flash power cable from the Phottix Indra Studio Light (picture 6).
Note: To insert properly, please align the red dots on the cable and port.
2. Insert the other end into the output port on the Phottix Indra AC Adapter.
(See picture 3)
3
Attaching and removing the Reflector
To attach the reflector
1. Hold the Indra500 with one hand.
2. Align the reflector with the mounting slot using your other hand.
3. Insert and rotate the reflector clockwise following the direction of the arrow
in the diagram until the lock engages with a click. This ensures the reflector is

En
INSTRUCTION MANUAL
locked. (See picture7)
4. If using an umbrella, make sure the umbrella pass-through hole in the reflector is aligned with the umbrella holder on the Indra studio light.
To remove the reflector
1. Push the quick-release locking latch with one hand.
2. Rotate the reflector anti-clockwise in the same direction as the arrow in the
diagram and remove it from the Indra500 with the other hand. (See picture 8)
2. The USB port is used for firmware upgrades. Firmware announcements and
instructions will be made available on Phottix websites.
Please note:
Only the manual mode is supported when a flash trigger is connected via the
sync port.
Transmission Channels
The Phottix Indra500 TTL Studio Light Wireless system has four channels; 1, 2,
3, and 4. The same channel needs to be set on the Indra500 TTL Studio Light
when in wireless receiving mode as on the triggering device or flashes used to
trigger the Indra.
Quick Flash Function
The Quick Flash function allows the studio light to fire when it is not fully charged, i.e. the status LED is still flashing green. Quick Flash recycle times are faster;
this helps for snap photography at short distances.
Quick Flash can be used for continuous drive modes, Quick Flash for continuous
shot function can be enabled or disabled in the Menu (See the Menu section
below).
Note: Please be aware to keep the reflector parallel to the mount of the studio
light while removing the reflector to prevent it touches the glass dome and incur damage.
Using the Umbrella Holder
The Phottix Indra500 TTL has an umbrella holder on the top of the light, making
it easy to mount umbrellas and umbrella-style softboxes. Using the umbrella
mount is simple: Insert the umbrella shaft into the umbrella holder on the Phottix Indra Studio Light. Turn the screw on the umbrella holder to tighten against
the umbrella shaft.
Using the Softbox Mount
The Phottix Indra500 TTL features a Bowen’s-compatible locking ring for softboxes, and other light modifying accessories. Using the Softbox Mount is the
same as mounting and removing the Phottix Indra Reflector (above).
To attach: Align the softbox speed ring with the mounting slot on the Indra500.
Insert and rotate the softbox mount clockwise following the direction of the
arrow in the diagram until the lock engages with a click. (See picture7)
To remove: Push the quick-release locking latch backwards, and rotate the softbox mount anti-clockwise to remove it from the Indra500. (See picture 8)
Sync and USB Ports
Please note:
The Quick Flash Function makes flash firing a priority. Under-exposure could
result if the subject is located too far from the camera.
Flash Exposure Bracketing – FEB
Flash Exposure Bracketing (FEB) can be used to automatically change the flash
power over a series of photos. The camera will record a series of images with different exposures. FEB is useful in run-and-gun situations as well as when shooting scenes with different lighting conditions to help ensure a properly exposed
photo. FEB can also be used for HDR photography.
The FEB function is supported but cannot be set on the Indra500 TTL Studio
Light. The availability of this function depends on whether the trigger or camera
is equipped with an FEB function. See your camera manual for more information
on Flash Exposure Bracketing.
Flash Exposure Lock – FEL/FV Lock
Flash Exposure Lock (FEL, also FV Lock in Nikon camera) can be used to lock the
flash exposure before a photo is taken. This is useful when manual spot metering is being used in a scene with different lighting conditions. While in TTL
mode, press the camera’s function button to use this function. See your camera
user manual for more information on FEL functions and usage.
The FEL function is supported but cannot be set on the Indra500 TTL Studio
Light. The availability of this function depends on whether the trigger or camera
is equipped with an FEL function. See you camera manual for more information
on Flash Exposure Lock.
1. A Phottix flash trigger (Phottix Odin TTL, Strato II Multi and Strato TTL) or camera can be connected to the Indra’s 3.5mm sync port using a compatible cable.
The device will then be able to trigger the Indra500 TTL Studio Light.
4

En
INSTRUCTION MANUAL
High Speed Sync – HSS/Auto FP
High Speed Sync (HSS) mode is used to shoot at shutter speeds higher than a
camera’s set flash sync speed (typically 1/200-1/250s). This is useful when using
aperture priority mode and in limiting ambient light. HSS results may vary with
different camera models – refer to your camera user manual for more details.
Please note:
1. HSS function is supported by the Phottix Indra500 TTL Studio Light, but it
cannot be set on the studio light itself.
2. The camera, flash trigger and receiving mode can greatly affect HSS mode.
For best results in HSS mode please use recommended Phottix flash triggers.
Please see the “Compatibility Table” below and refer to your flash trigger and
camera user manuals for more details.
3. HSS function will not work in Manual and Multi Stroboscopic mode.
4. Use the HSS mode frequently will shorten the flash tube life.
5. Nikon’s flash protocols may limit the maximum sync speed of some Nikon
camera bodies.
Compatibility Table
the button will flash green when the light has the minimum recycle charge. It
will flash red when fully charged.
Second Curtain Sync - SCS
The Phottix Indra500 TTL Second Curtain Sync function makes the studio light
fire at the end of an exposure, not the beginning. This helps capture special effects when using slow shutter speeds.
Please note:
1. SCS function is supported by the Phottix Indra500 TTL Studio Light, but it
cannot be set on the studio light itself. Instead please set the SCS function on
your camera or flash trigger. For more details, please refer to your flash trigger
and camera user manuals.
2. SCS function will not work in Multi Stroboscopic mode.
Test/Ready Button
1. Pressing the test button will trigger the studio light. This can be used for metering in Manual mode.
2. This button also offers a Flash-ready indication function. The LED indicator on
5

Menu
En
INSTRUCTION MANUAL
6

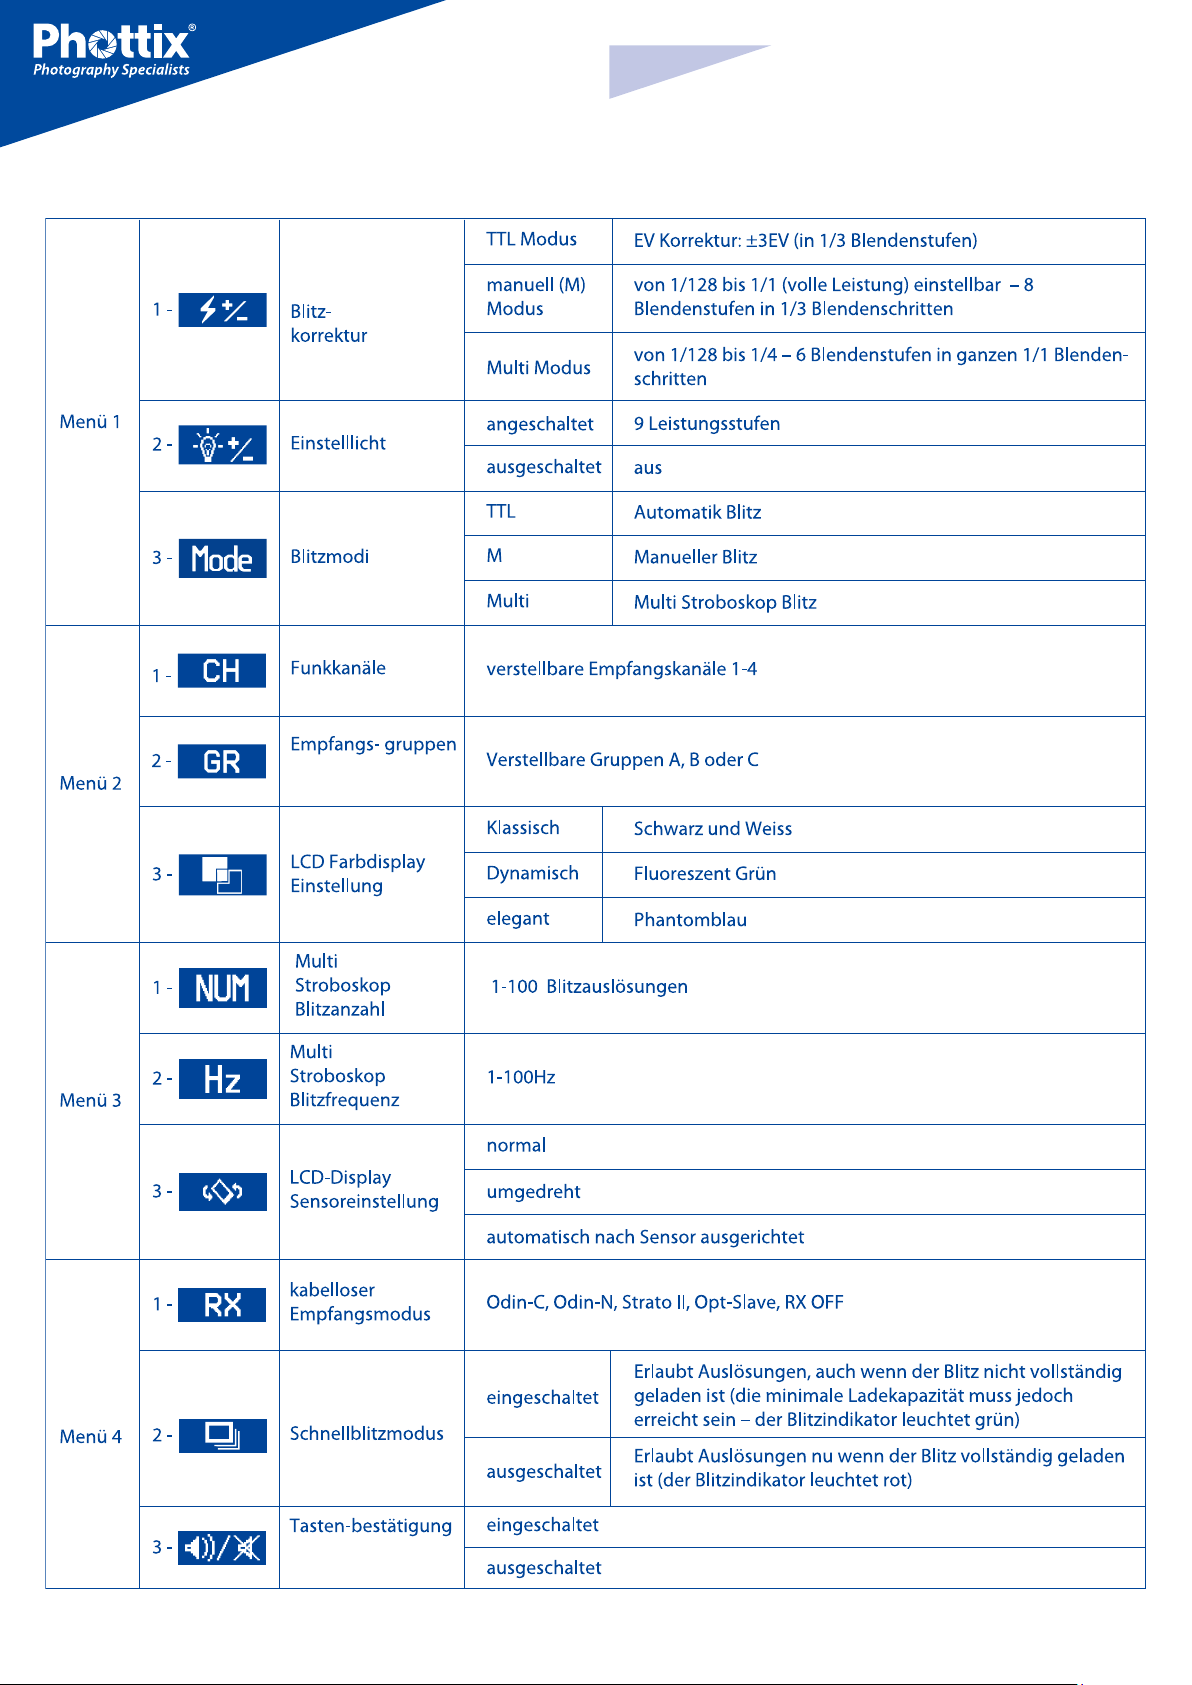
Menu Settings
Use the four function buttons below the LCD display to select the corresponding function setting options. You can edit each setting when the selected function is highlighted. Depending on the LCD color screen settings this will be in
either: red, white, or yellow (The LCD color screen setting and the LCD display
sensor setting will be shown in the Menu list).
1. Turn the “Adjust/Set knob” to change the setting.
2. When finished press the corresponding function button, or the “Adjust/Set
knob” to confirm and exit.
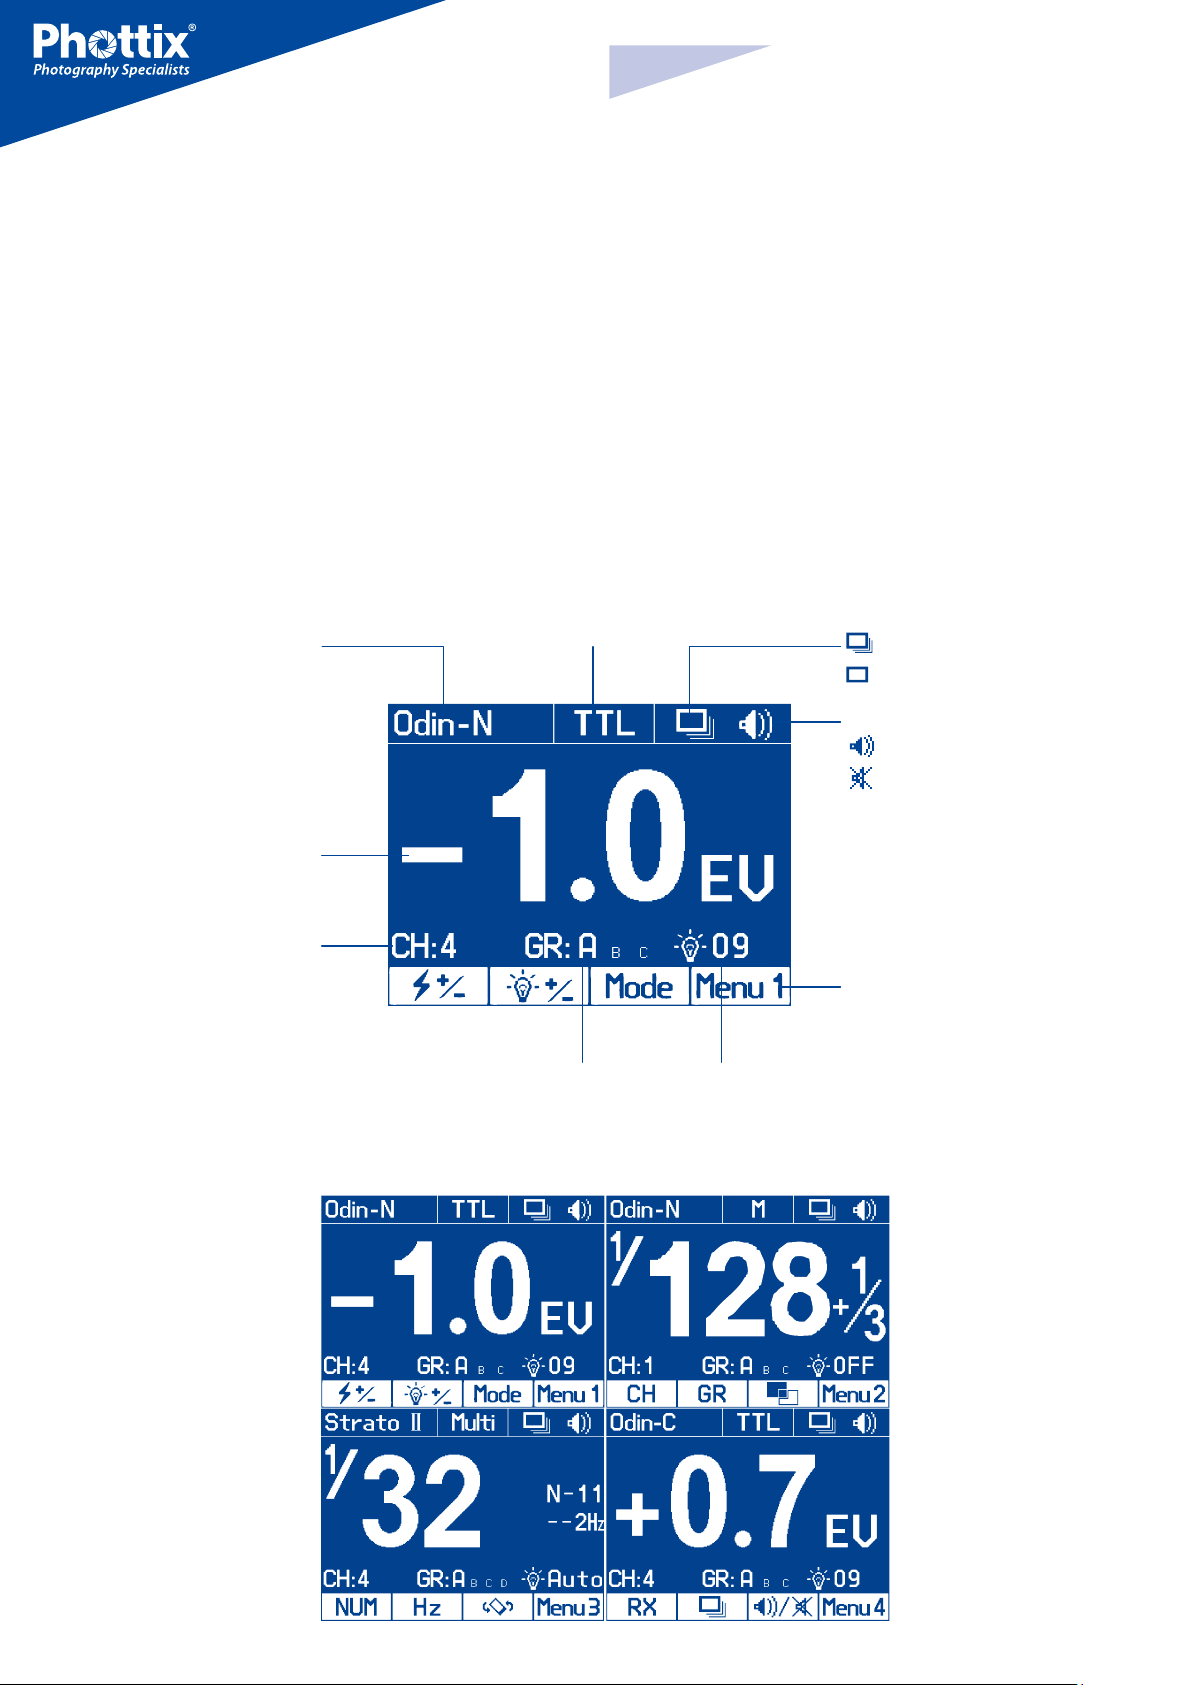
The LCD Display
En
INSTRUCTION MANUAL
Wireless receiving modes:
Odin-C,
Odin-N,
Strato II,
Opt-Slave
RX OFF
Flash exposure
compensation/
Flash output
Wireless receiving channel
Flash modes:
TTL, M, Multi
Wireless
receiving group
Modeling light: Manual
01-09 levels, OFF
Quick flash
: Enable
: Disable
Beep signal
ON
OFF
Menu: see more
details in Menu
function part
Menu Screen
7
En
INSTRUCTION MANUAL
Auto-Save Functions
The Indra500 TTL will remember studio light settings. Previous settings will be
retained each time it is turned on.
Modeling Flash
1. Pressing the camera depth-of-field preview button (if available) will fire the
studio light continuously for 1 second. The modeling flash allows you to see the
lighting effects and balance on the subject. (Please see your camera manual for
more information on the DOF button and button assignment.)
2. The modeling flash is available in all modes, TTL, Manual and Multi.
Modeling Light
The Phottix Indra500 TTL is equipped with an LED modeling light. This is helpful for both previewing lighting set-ups and assisting with focusing in dimly lit
environments.
The Modeling Light has two modes
1. Manual mode: 9 brightness levels from 01 to 09 are available.
2. OFF mode: The modeling light will be turned off.
Please note:
1. When the studio light is firing, the modeling light will not turn off automatically.
2. Using the modeling light uses a lot of battery power.
3. Turn the “Adjust/Set knob” to change the modeling light mode from Manual (01-09 stop) or OFF.
4. Press “Adjust/Set knob” to confirm the settings and exit the editing mode.
Flash Modes
The Phottix Indra500 TTL Studio Light has three flash modes: TTL Auto, Manual
and Multi.
TTL Flash Mode
When the Phottix Indra500 TTL Studio Light is set to TTL mode, the studio light
will fire at the selected flash mode and flash power, as set on a Phottix Odin or
other Phottix compatible flash trigger featuring power control.
Flash Exposure Compensation-FEC
The Phottix Indra500 TTL Studio Light can be used to adjust Flash Exposure
Compensation (FEC) from-3 to +3 in 1/3rd stops. This is useful in environments
where fine-tuning of the TTL system is needed.
Please note:
1. If both the triggering device (if TTL mode is available) and the studio light
are set to TTL modes and EV adjustment is set on both units, then the final exposure value will be the sum of the two Flash Exposure Compensation Values.
2. If the triggering device is set to Manual mode (if available) and the studio
light is set to TTL mode with Flash Exposure Compensation Value, then the
Flash EV Value will be used to calculate the final flash output.
Adjusting the brightness of the Modeling Light
The modeling light can be turned on/off via menu option
or with the modeling light swtich
.
Via Menu option
1. Press Function Button 4 until appears on the LCD display.
2. Press the corresponding function button to
3. When the modeling light option
the LCD display.
4. Turn the “Adjust/Set knob” to change the modeling light mode from Manual (01-09 stop) or OFF.
5. Press the function button corresponding to
knob” to confirm the settings and exit the editing mode.
is selected, it will be highlighted on
.
or the “Adjust/Set
Via Modeling Light Switch
1. Press the modeling light switch to turn on/off the modeling light.
2. When the modeling light is turned on the modeling light icon
highlighted on the LCD display.
8
in
will be
Manual Flash Mode
In Manual mode the studio light will fire at the power levels set. The Phottix
Indra500 TTL Studio Light can be adjusted from 1/128 to 1/1 in 1/3 stop increments (1/128, 1/64, 1/32, 1/16, 1/8, 1/4, 1/2, and 1/1). Flash modes and power
of the studio light cannot be adjusted and controlled on the triggering device.
Multi Stroboscopic Flash Mode
With Multi Stroboscopic mode a series of rapid flashes will be fired. The flash
count, frequency and power of these flashes can be programmed on the Phottix
Indra500 TTL Studio Light. Multi mode is useful for capturing multiple images of
a moving subject in the same photo and for other special effects.
In Multi Stroboscopic mode, the studio light will be fired at the programmed
manual flash power, flash counts (1-100), and frequency (1-100Hz). The flash
power can be set from 1/128 to 1/4 in 1/1 stop increments (1/128, 1/64, 1/32,
1/16, 1/8, and 1/4). Flash modes and power of the studio light cannot be adjusted and controlled on the triggering device.
Please note:
1. Overheating and even damage to the flash tube can be resulted from excessive use of the Multi Stroboscopic mode.
2. If overheated the flash will automatically increase charging time. If the temperature continues to rise, the light will stop firing.
En
INSTRUCTION MANUAL
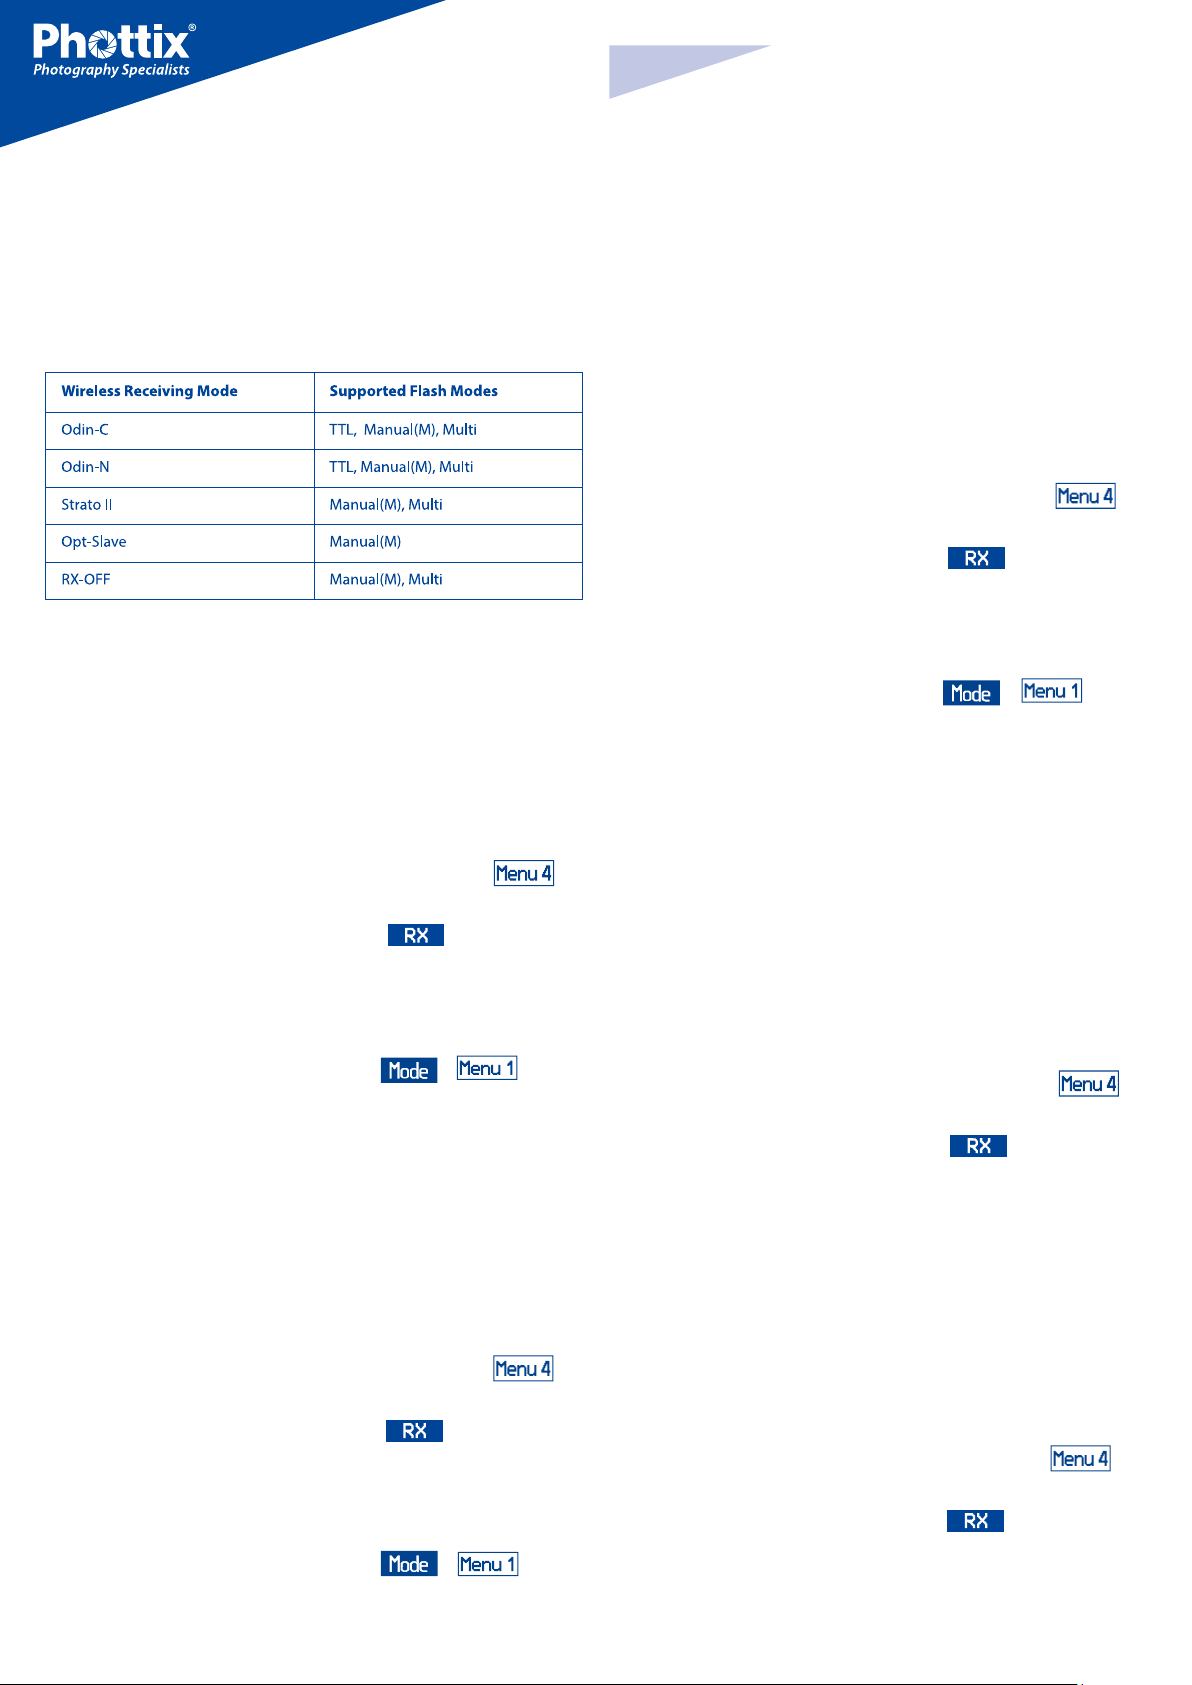
Wireless Receiving Mode
The Phottix Indra500 TTL Studio Light is equipped with 5 wireless receiving
modes: Odin-C, Odin-N, Strato II, Opt-Slave and RX OFF. Please see below for
more details.
Supported Flash Modes
Odin-C Radio Frequency Receiving Mode
This mode allows the Indra500 TTL Studio Light to be triggered by a Phottix
Odin TTL Flash Trigger TCUs for Canon or by a Phottix Mitros+ TTL Transceiver
Flash for Canon in Odin TX mode. To work correctly they must be set to the same
channel and in the same group.
Strato II Radio Frequency Receiving Mode
This mode allows the Indra500 TTL Studio Light to be triggered by the Phottix
Odin TTL Flash Trigger TCUs for Canon/Nikon, the Phottix Mitros+ TTL Transceiver Flash for Canon/Nikon in Odin Tx mode, the Phottix Strato TTL transmitter
for Canon/Nikon or by the Phottix Strato II Multi transmitter for Canon/Nikon.
To work correctly they must be set to the same channel and in the same group.
Please note:
HSS, SCS, and TTL are not supported in Strato II Radio Frequency Receiving Mode.
How to use:
1. Press Function Button 4 or turn the “Adjust/Set Knob” until
pears on the LCD display.
2. Press the corresponding function button to
The wireless recev-
.
ing function option will be highlighted on the LCD display.
3. Turn the “Adjust/Set Knob” to change the wireless mode to Strato II.
4. Press the “Adjust/Set Knob” to confirm the setting.
5. Press the corresponding function button to
in
from Manual and Multi.
to adjust
Opt-Slave Optical Pulse Receiving Mode
ap-
How to use:
1. Press Function Button 4 or turn the “Adjust/Set Knob” until
pears on the LCD display.
2. Press the corresponding function button to
ing function option will be highlighted on the LCD display.
3. Turn the “Adjust/Set Knob” to change the wireless mode to Odin-C.
4. Press the “Adjust/Set Knob” to confirm the setting.
5. Press the corresponding function button to
from TTL, Manual or Multi.
The wireless recev-
.
in
to adjust
Odin-N Radio Frequency Receiving Mode
This mode allows the Indra500 TTL Studio Light to be triggered by a Phottix
Odin TTL Flash Trigger TCUs for Nikon or by a Phottix Mitros+ TTL Transceiver
Flash for Nikon in ODIN TX mode. To work correctly they must be set to the same
channel and in the same group.
How to use:
1. Press Function Button 4 or turn the “Adjust/Set Knob” until
pears on the LCD display.
2. Press the corresponding function button to
ing function option will be highlighted on the LCD display.
3. Turn the “Adjust/Set Knob” to change the wireless mode to Odin-N.
4. Press the “Adjust/Set Knob” to confirm the setting.
5. Press the corresponding function button to
from TTL, Manual or Multi.
9
. The wireless recev-
in
to adjust
ap-
RX OFF Mode
ap-
In this mode any other studio lights or flashes fired nearby will trigger the Indra500 TTL Studio Light.
Please note:
Pre-flashes from nearby TTL flashes will trigger the Phottix Indra if set in OptSlave mode. Please take care when using this mode that nearby TTL flashes
do not trigger the Phottix Indra before you are ready.
How to use:
1. Press Function Button 4 or turn the “Adjust/Set Knob” until appears on the LCD display.
2. Press the corresponding function button to
The wireless recev-
.
ing function option will be highlighted on the LCD display.
3. Turn the “Adjust/Set Knob” to change the wireless mode to Opt-Slave.
4. Press the “Adjust/Set Knob” to confirm the setting.
In this mode wireless receiving is turned off.
How to use:
1. Press Function Button 4 or turn the “Adjust/Set Knob” until
pears on the LCD display.
2. Press the corresponding function button to
The wireless recev-
.
ing function option will be highlighted on the LCD display.
3. Turn the “Adjust/Set Knob” to change the wireless mode to RX OFF..
4. Press the “Adjust/Set Knob” to confirm the setting.
ap-
En
INSTRUCTION MANUAL
5. Press the corresponding function button to
in
to adjust
from Manual and Multi.
For Odin-C/Odin-N/Strato II
Functions in Multi mode
1. Press the corresponding function button to
“Adjust/Set knob”to adjust the flash power from 1/4 to 1/128 - 6 stops.
2. Press the corresponding function button to
“Adjust/Set knob” to adjust the Modeling Light mode (OFF/01-09).
3. Press the corresponding function button to
“Adjust/Set knob”to adjust the Chanel from 1-4.
4. Press the corresponding function button to
“Adjust/Set knob” to adjust the Group from A, B to C.
5. Press the corresponding function button to
“Adjust/Set knob”to adjust the LCD Color Screen Setting (Classic, Dynamic, Elegant).
6. Press the corresponding function button to
“Adjust/Set knob” to adjust the flash count from 1-100 times (based on the flash
frequency and flash output).
7. Press the corresponding function button to
“Adjust/Set knob”to adjust the flash frequency from 1-100Hz.
8. Press the corresponding function button to
the “Adjust/Set knob”to adjust the LCD Display Sensor Setting (Regular, Upside-down and Auto by sensor).
in
in
in
in
in
in
in
in
Turn the
.
. Turn the
. Turn the
Turn the
.
Turn the
.
Turn the
.
Turn the
.
Turn
.
side-down and Auto by sensor).
7. Press the corresponding function button to
in
the con-
.
tinuous flash mode option will be highlighted on the LCD screen. Turn the “Adjust/Set knob” to turn the Quick Continuous flash mode on/off.
8. Press the corresponding function button to
in
Turn the
.
“Adjust/Set knob”to turn the sound on/off.
For Odin-C/Odin-N/Strato II
Functions in Manual mode
1. Press the corresponding function button to in . Turn the
“Adjust/Set knob” to adjust the flash power from 1/1 to 1/128 in 1/3rd stop increments.
2. Press the corresponding function button to
“Adjust/Set knob” to adjust the Modeling Light mode (OFF/01-09).
3. Press the corresponding function button to
“Adjust/Set knob” to adjust the Chanel from 1-4.
4. Press the corresponding function button to
“Adjust/Set knob”to adjust the Group from A, B to C.
5. Press the corresponding function button to
“Adjust/Set knob”to adjust the LCD Color Screen Setting (Classic, Dynamic, Elegant).
6. Press the corresponding function button to
the “Adjust/Set knob” to adjust the LCD Display Sensor Setting (Regular, Upside-down and Auto by sensor).
in . Turn the
in . Turn the
in . Turn the
in . Turn the
in . Turn
9. Press the corresponding function button to
in
the Contin-
,
uous flash mode option will be highlighted on the LCD screen. Turn the “Adjust/
Set knob” to turn the Quick Continuous flash mode on/off.
10. Press the corresponding function button to
in
.
“Adjust/Set knob”to turn the sound on/off.
For Odin-C/Odin-N
Functions in TTL mode
1. Press the corresponding function button to
“Adjust/Set knob”to adjust the Flash Exposure Compensation Value from -3.0EV
to +3.0EV.
2. Press the corresponding function button to
“Adjust/Set knob”to adjust the Modeling Light mode (OFF/01-09).
3. Press the corresponding function button to
“Adjust/Set knob”to adjust the Chanel from 1-4.
4. Press the corresponding function button to
“Adjust/Set knob”to adjust the Group from A, B to C.
5. Press the corresponding function button to
“Adjust/Set knob”to adjust the LCD Color Screen Setting (Classic, Dynamic, Elegant).
6. Press the corresponding function button to
the “Adjust/Set knob”to adjust the LCD Display Sensor Setting (Regular, Up-
10
in . Turn the
in
in
in
in
in
. Turn the
.
.
.
Turn the
Turn the
Turn the
Turn the
Turn
.
7. Press the corresponding function button to
in
. the
Continuous flash mode option will be highlighted on the LCD screen. Turn the
“Adjust/Set Knob” to turn the Quick Continuous flash mode on/off.
8. Press the corresponding function button to
in
. Turn the
“Adjust/Set knob”to turn the sound on/off.
For Opt-Slave/RX OFF
Functions in Manual mode
1. Press the corresponding function button to in . Turn
the “Adjust/Set knob”to adjust the flash power from 1/1 to 1/128 in 1/3rd stop
increments.
2. Press the corresponding function button to
“Adjust/Set knob” to adjust the Modeling Light mode (OFF/01-09).
3. Press the corresponding function button to
“Adjust/Set knob”to adjust the LCD Color Screen Setting (Classic, Dynamic, Elegant).
4. Press the corresponding function button to
the “Adjust/Set knob”to adjust the LCD Display Sensor Setting (Regular, Upside-down and Auto by sensor).
5. Press the corresponding function button to
uous flash mode option will be highlighted on the LCD screen. Turn the “Adjust/
Set knob” to turn the Quick Continuous flash mode on/off.
in
in . Turn the
in
in
. Turn the
Turn
.
, the Contin-
En
INSTRUCTION MANUAL
6. Press the corresponding function button to
in
Turn the
.
“Adjust/Set knob”to turn the sound on/off.
For RX OFF
Functions in Multi mode
1. Press the corresponding function button to
“Adjust/Set knob” to adjust the flash power from 1/4 to 1/128 - 6 stops.
2. Press the corresponding function button to
“Adjust/Set knob” to adjust the Modeling Light mode (OFF/01-09).
3. Press the corresponding function button to
“Adjust/Set knob”to adjust the LCD color screen setting (Classic, Dynamic, Elegant).
4. Press the corresponding function button to
the flash count from 1-100 times (based on the flash frequency and flash output).
5. Press the corresponding function button to
“Adjust/Set knob”to adjust the flash frequency from 1-100Hz.
6. Press the corresponding function button to
the “Adjust/Set knob”to adjust the LCD Display Sensor Setting (Regular, Upside-down and Auto by sensor).
in
in
in
in
in
in
. Turn the
. Turn the
Turn the
.
to adjust
Turn the
.
Turn
.
7. Press the corresponding function button to
in
the Con-
,
tinuous flash mode option will be highlighted on the LCD screen. Turn the “Adjust/Set Knob” to turn the Quick Continuous flash mode on/off.
8. Press the corresponding function button to
in
Turn the
.
“Adjust/Set knob”to turn the sound on/off.
Remarks:
If the “Adjust/Set knob” or the corresponding function button is not pressed
to confirm the selected parameter, the selected parameter will be confirmed
by default within 10 seconds.
11
Custom Functions
En
INSTRUCTION MANUAL
The Phottix Indra500 TTL Studio Light comes with a number of programmable
custom functions. To edit these functions (see below):
1. Press and hold Function button 4 and the “Adjust/Set knob” for 3 seconds to
enter the C.Fn Menu Screen.
Custom Functions Chart
2. Press Function button 1 or Function button 2 to cycle through the menu
items – C.Fn 00 to 03.
3. Turn the “Adjust/Set knob” to change the functions within the menu.
4. Press Function button 4 to exit the C.Fn menu.
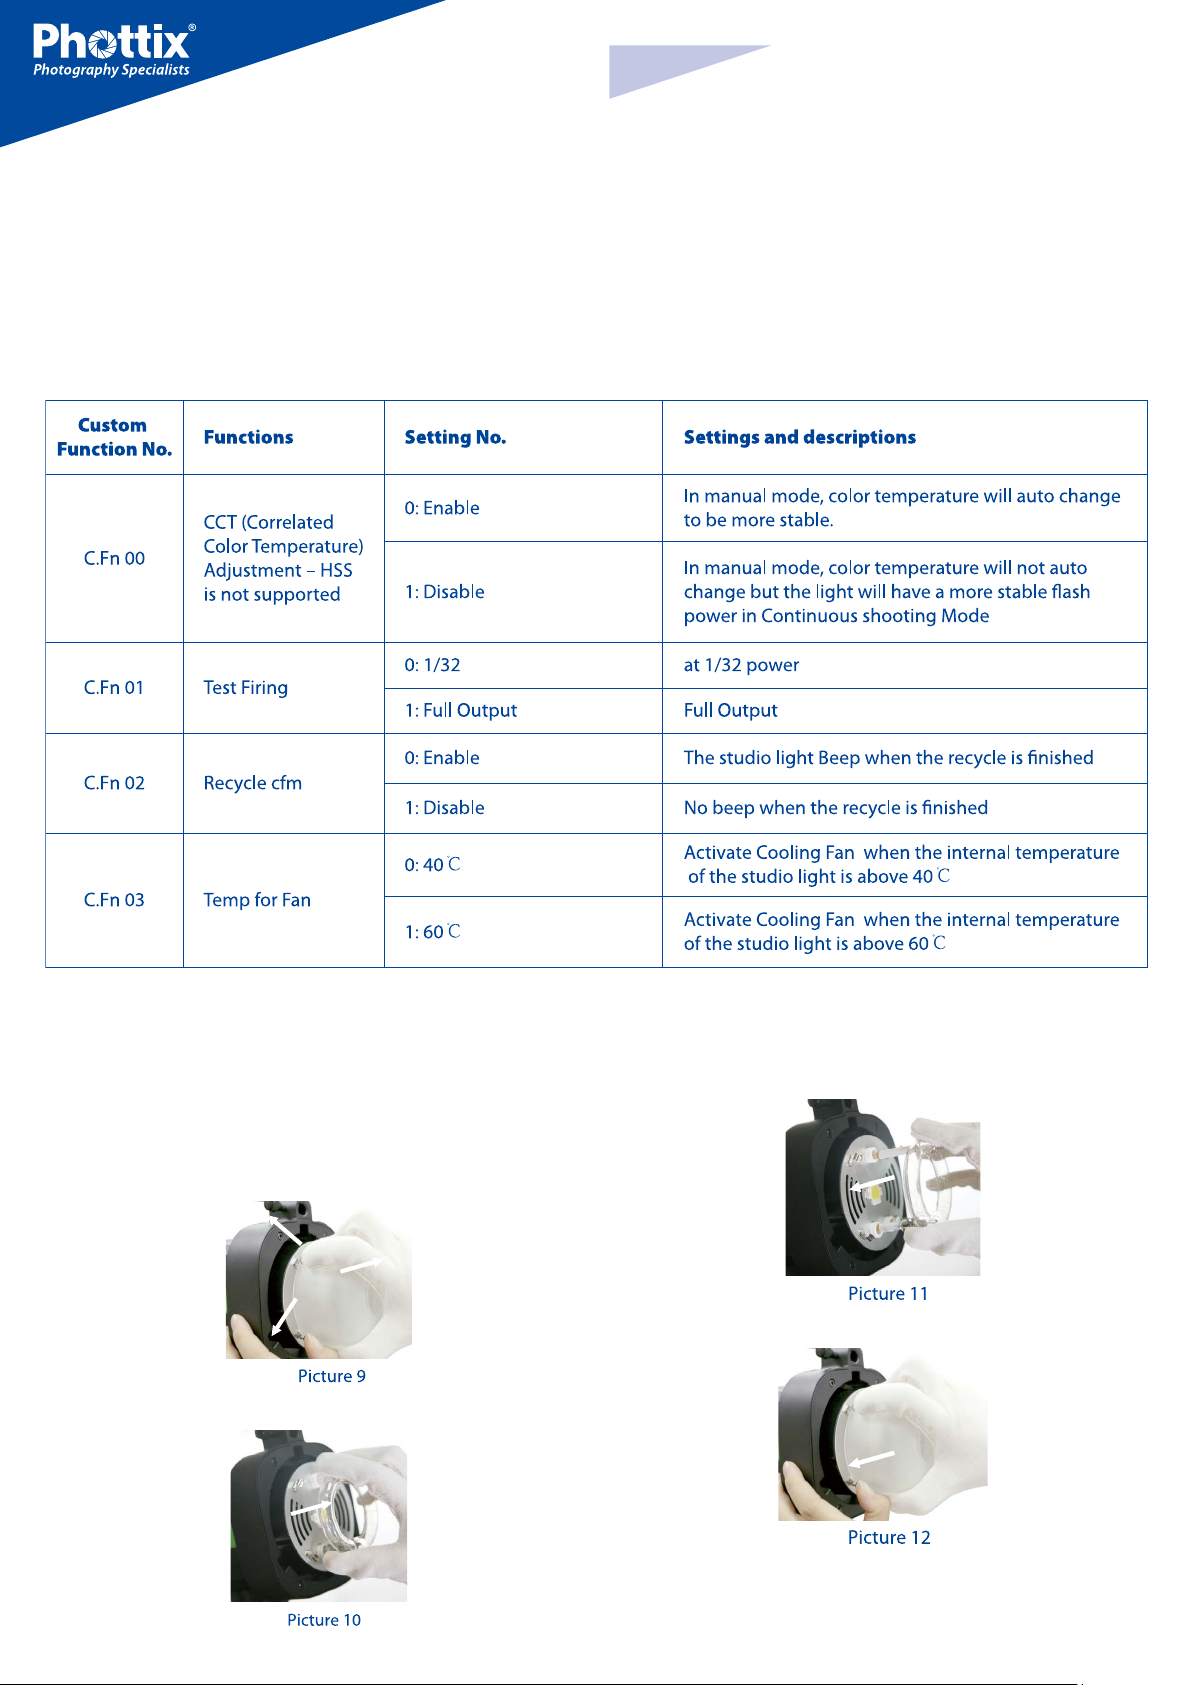
Replacing the flash tube
1. Disconnect the Indra500 TTL Studio light from a power source for 10 minutes
before changing the flash tube.
2. Remove the Reflector as shown above.
3. Gently separate the Glass Dome from the snap mount, remove the Glass
Dome. (Picture 9)
4. Gently hold the flash tube to remove it from the snap slot. (Picture 10)
12
5. Insert a new flash tube into the snap slot. (Picture 11)
6. Mount the Glass Dome align the snap mount. (Picture 12)
7. Attach the Reflector as shown above.
Note: Please wear gloves instead of touching the flash tube directly when replacing the flash tube.

En
INSTRUCTION MANUAL
Resetting to Factory Defaults
The Indra500 TTL Studio Light can be reset to factory defaults.
Press and hold both Function button 1 and the “Adjust/Set knob” for 3 seconds.
This will reset all function settings to factory defaults.
Checking the Studio Light Information
Pressing the combination keys can check the Phottix Indra500 TTL Studio Light
information: Hardware, software, icon library, and product serial number.
1. Press and hold Function button 2 and “Adjust/Set Knob” for 3 seconds. The
information display screen will show the hardware, software, icon library, and
product serial number.
2. Press any button to exit the information display screen and return back to the
standard screen.
3. Triggering the studio light or camera focusing, or taking photos when the studio light is displaying the version information will cause the studio light to exit
the version display screen and return back to the standard screen.
Changes to the Studio Light Capacitor
If the Indra500 is not used for some time physical changes will take place within
the flash’s capacitor. Make sure to turn on the flash for a minimum of 10 minutes
every three months to prevent any changes.
Technical Specification
Max power: 500Ws
Adjustable power stops: 8 Stops (4-500Ws)
Power adjustment: In 1/3stop or full stop increment
Flash modes: TTL Auto, Manual (M), Multi
Light angle: 60°
Guide Number: 45/147.6 (ISO100, m/ft)
Color temperature: 5600±200K (Color temperature may vary at low power
settings)
Flash duration time: t=1 1/250s - 1/12000s
Stroboscopic flash: Frequency: 1-100Hz, Flash Count: 1-100 times
HSS&SCS: Support*
Recycling time(at 1/1 flash power levels; the indicator will light red)
Phottix Indra AC Adapter: Single/Two flashes: 0.9s/1.7s
Phottix Indra Battery Pack (10AH): H mode Single/Two flashes: 1s/2.3s
S mode Single/Two flashes: 1.4s/5.4s
Phottix Indra Battery Pack (5AH) H mode Single/Two flashes: 1.4s/4.9s
S mode Single/Two flashes: 2.6s/10.9s
Input power:
Phottix Indra AC Adapter: AC 220V/110V, 50HZ/60HZ
Phottix Indra Battery Pack: 14.8V/5Ah, 400 full power flashes
14.8V/10Ah, 800 full power flashes
Modeling Light Power: about 4.5W
Modeling Light Modes: OFF, Manual 1-9 levels
Wireless connectivity method: Radio Frequency and Optical pulse
Channel: 4
Wireless receiving modes: Odin-C, Odin-N, Strato II, Opt-Slave, RX OFF (Can
only be fired via 3.5mm sync port)
Receiving range (Approx.): Radio: 100m+
Display: 320X240 TFT LCD display, Support 3 color screen settings
LCD Display Senor Setting: Sense direction automatically and make a
180-degree turn according to the direction
Heat Dissipation Method: Automatically turn on according to the temperature
Recycle confirm: Can be enabled or disabled
Sync Port: 3.5mm mini port
Firmware Upgrade: Upgrade of firmware is made via the USB mini port
Dimension: Length*Diameter: 266mm*180mm
Weight: 2.1kg (Excluding the Studio Light Power Cable)
Please note: Product specifications and external design are subject to change
without further notice.
*On compatible cameras
13

Vielen Dank, dass Sie sich für
ein Phottix Produkt entschieden haben
De
BENUTZERHANDBUCH
Hinweis: Bevor Sie den Phottix Indra500 TTL Studioblitz benutzen, lesen Sie
bitte die Bedienungsanleitung sorgfältig durch.
Der Phottix Indra500 TTL Studioblitz ist ein mittels Akku oder Netzteil gespeistes
portables Studioblitzlicht mit integrierter Funk- und optischer Lichtimpulsempfangsfunktion. Er bietet TTL, manuell und Stroboskop Funktionen, sowie Highspeed und Zweiter Verschlussvorhang Synchronisation. Der Phottix Indra500
TTL Studioblitz ist kompatibel mit vielen weiteren Phottix Produkten.
Sicherheitshinweise
●
Der Indra500 enthält Hochspannungselektrobauteile. Versuchen Sie
nicht den Indra zu öffnen oder zu reparieren. Halten Sie dieses Produkt
außerhalb der Reichweite von Kindern.
●
Verwenden Sie dieses Produkt niemals in der Nähe von brennbaren
Gasen, Lösungsmitteln oder in einer Umgebung mit hoher elektrischer
Ladung.
●
Stellen Sie sicher, dass alle Stecker und Kabel während der Nutzung
und des Ladevorgangs korrekt eingesteckt sind.
●
Entfernen Sie den Indra500 TTL Studioblitz für mindestens 10 Minuten
von seiner Energiequelle, bevor Sie die Blitzröhre tauschen. Geben Sie
Acht, die Blitzröhre kann sehr heiß sein.
●
Berühren Sie die externe Strombuchse nicht und stellen Sie sicher,
dass sie keinen Kontakt mit metallischen Gegenständen bekommt. Dies
könnte einen Kurzschluss und erhebliche Beschädigungen verursachen.
●
Die externe Energiequelle sollte die in dieser Bedienungsanleitung
genannten Leistungsdaten nicht überschreiten.
●
Kontaktieren Sie die örtlichen Behörden für eine ordnungsgemäße
Entsorgung oder Verwertung eines Phottix Indra500 TTL Studioblitzes.
Inhaltsübersicht
Teile und Funktionen............................................................….. 14
Blitz Modi ……........................................................................... 20
Wireless Modus .......................................................................... 21
Individualfunktionen................................................................. 24
Technische Daten....................................................................... 25
Teile
Gesamtansicht
1. Schutzkappe
2. Schirmhalter
3. Schnellverschlusshebel
4. Halter
5. 3.5mm Synchrobuchse
6. USB (Output) Buchse
7. Externe Stromversorgungsbuchse
8. Studioleuchtenneiger
9. Spigot-Anschluss
10. Spigot-Arretierung
●
Das Netzteil sollte in einer Umgebung mit guter Belüftung verwendet
werden. Verwenden Sie dieses Produkt nicht unter staubigen oder sandigen Bedingungen.
●
Dieses Produkt ist nicht wasserdicht. Halten Sie es von Regen, Schnee
und hoher Luftfeuchtigkeit fern.
●
Reinigen Sie das Gehäuse nicht mit organischen Lösungsmitteln oder
Alkohol.
●
Setzen Sie keine lichtundurchlässigen Objekte vor den Studioblitz,
wenn dieser ausgelöst wird. Die Hitze die vom Indra500 erzeugt wird
könnte diese Objekte verbrennen oder Schaden an der Blitzröhre verursachen.
●
Verwenden Sie den Studioblitz mit Vorsicht. Blitzen Sie nicht mit den
Indra500 in die Augen von Personen oder Tieren auf kurze Distanz. Dies
könnte Augenschäden verursachen oder zur Blindheit führen.
●
Setzen Sie dem Blitzlicht nicht zu viel Hitze aus (direktes Sonnenlicht,
geschlossenes Auto etc.)
●
Sollten Sie Rauch oder ungewöhnlichen Geruch feststellen welcher aus
dem Studioblitz kommt, schalten Sie das Gerät sofort aus.
●
Schalten Sie den Studioblitz aus, wenn er über einen längeren Zeitraum
nicht mehr benutzt wird.
●
Entfernen Sie die Schutzkappe bevor Sie den Studioblitz benutzen.
Ansonsten könnte die Schutzkappe deformiert werden oder ein Feuer
aufgrund der hohen Temperaturen des Studioblitzes erzeugen.
Rückansicht
11. LCD Display
12. Funktionstaste 1
13. Funktionstaste 2
14. Testtaste/Bereitschaftsanzeige
15. Einstellknopf
16. Netzschalter
17. Einstelllichttaste
18. Funktionstaste 3
19. Funktionstaste 4
20. Optischer Signalsensor
Vorderansicht
21. Lichtformer-Aufnahme
22. Schutzglas
23. LED Einstelllicht
24. Blitzröhre
25. Reflektor
●
Seien Sie vorsichtig bei Berührung des Studioblitzes nach der Benutzu-
14
ng. Er könnte noch heiß sein und Verbrennungen verursachen.
De
BENUTZERHANDBUCH
Externe Energiequelle
Der Indra500 TTL Studioblitz kann mit dem Phottix Indra Netzadapter oder dem
Phottix Indra Batteriepack durch die externe Stromversorgungsbuchse betrieben werden.
Bitte beachten Sie:
- Benutzen Sie nur Phottix Blitzkabel, welche für die Benutzung des Indra500
TTL Studioblitzes ausgelegt sind.
Verbindung des Indra500 mit einer externen Energiequelle
Verwendung des Phottix Indra Batteriepacks
1. Stecken Sie ein Ende des beiliegenden Blitzkabels in die externe Stromversorgungsbuchse des Indra500 TTL Studioblitzes. (Siehe Bild 1)
Hinweis:Zur korrekten Montage richten Sie Kabel und Buchse anhand der
roten Markierungen aus.
3. Verbinden Sie den Netzadapter mit einer Steckdose.
4. Schalten Sie den Netzschalter des Netzadapters und die entsprechende Output-Buchse ein.
5. Schalten Sie den Netzschalter des Phottix Indra500 TTL Studioblitzes ein.
Entfernung des Indra500 von seiner externen Energiequelle
Entfernung des Phottix Indra Batteriepacks
1. Schalten Sie den Netzschalter am Indra500 TTL Studioblitz aus.
2. Stellen Sie den Schalter an der Output-Buchse des Batteriepacks auf “OFF”.
3. Entfernen Sie das Blitzkabel wie in Bild 4 zu sehen.
2. Stecken Sie die andere Seite des Kabels in die Output-Buchse des Phottix Indra Batteriepacks. (Siehe Bild 2)
3. Schalten Sie den Netzschalter des Batteriepacks ein.
4. Schalten Sie den Netzschalter des Phottix Indra500 TTL Studioblitzes ein.
Verwendung des Phottix Indra Netzadapters
1. Stecken Sie ein Ende des beiliegenden Blitzkabels in die externe Stromversorgungsbuchse des Indra500 TTL Studioblitzes. (Siehe Bild 1)
Hinweis: Zur korrekten Montage richten Sie Kabel und Buchse anhand der
roten Markierungen aus.
4. Entfernen Sie das andere Ende entsprechend Bild 6.
Entfernung des Phottix Indra Netzadapters
1. Schalten Sie den Netzschalter am Indra500 TTL Studioblitz aus.
2. Stellen Sie den Hauptnetzschalter am Netzadapter aus. Entfernen Sie das
Blitzkabel entsprechend Bild 5.
3. Entfernen Sie das Blitzkabel vom Phottix Indra Studioblitz (Bild 6).
2. Stecken Sie die andere Seite des Kabels in die Output-Buchse des Phottix Indra Netzadapters. (Siehe Bild 3)
15
Anbringen und Entfernen des Reflektors
Anbringen des Reflektors
1. Halten Sie den Indra500 in einer Hand.
2. Richten Sie den Reflektor entsprechend der Halterung mit der anderen Hand
aus.
3. Stecken Sie den Reflektor in die Lichtformer-Aufnahme und drehen ihn im
De
BENUTZERHANDBUCH
Uhrzeigersinn entsprechend des Pfeils auf der Abbildung, bis er mit einem Klick
einrastet. Dies stellt sicher, dass der Reflektor Sicher arretiert ist. (Siehe Bild 7)
4. Wenn Sie einen Schirm benutzen, stellen Sie sicher, dass die Schirmaufnahmekerbe des Reflektors mit dem Schirmhalter am Indra Studioblitz in einer Reihe liegt.
Entfernung des Reflektors
1. Drücken Sie den Schnellverschlusshebel mit einer Hand.
2. Drehen Sie den Reflektor gegen den Uhrzeigersinn in der selben Richtung
wie der Pfeil in der Abbildung verdeutlicht und entfernen Sie ihn vom Indra500
Studioblitz mit einer Hand. (Siehe Bild 8)
Synchro und USB Buchse
1. Ein Phottix Funkblitzauslöser (Phottix Odin TTL, Strato II Multi und Strato
TTL) oder eine Kamera kann an den Indra angeschlossen werden, über dessen
3,5mm Synchrobuchse, mittels passendem Kabels. Das entsprechende Gerät ist
dann in der Lage den Indra500 TTL Studioblitz auszulösen.
2. Die USB-Buchse wird für Firmware-Upgrades benötigt. Neuerungen bei der
Firmware werden über die Phottix Webseite verlautbart.
Hinweis:
Nur der manuell Modus wird unterstützt wenn ein Funkblitzauslöser mit der
Syncro-Buchse verbunden ist.
Übertragungskanäle
Das Phottix Indra500 TTL Licht/Funksignalsystem besitzt 4 Kanäle: 1,2,3 und 4.
Dieselben Kanäle müssen am Indra500 TTL Studioblitz eingestellt sein wenn im
Kabellos-Modus Auslöser oder Blitze benutzt werden um den Indra auszulösen.
Schnellblitz-Funktion
Die Schnellblitzfunktion ermöglicht es den Studioblitz auszulösen, wenn dieser
nicht voll geladen ist, also die Bereitschaftsanzeige noch grün blinkt. Die Nachladezeiten bei aktivierter Schnellblitz-Funktion sind schneller. Dies ist hilfreich bei Schnappschussfotografie auf kurze Distanz.
Hinweis: Bitte beachten Sie, dass der Reflektor parallel zum Schnellver-
schluss gehalten werden sollte wenn er entfernt wird, um Berührungen mit
dem Schutzglass und mögliche Schäden zu vermeiden.
Benutzung des Schirmhalters
Der Phottix Indra500 TTL Studioblitz hat auf der Oberseite einen Schirmhalter,
welcher eine einfache Montage von Schirmen und Schirmsoftboxen ermöglicht.
Die Nutzung des Schirmhalters ist simpel: Stecken Sie die Schirmstange in den
Schirmhalter am Phottix Indra Studioblitz. Drehen Sie die Schraube am Schirmhalter gegen den Schaft des Schirmes um diesen zu befestigen.
Benutzung der Softbox-Halterung
Der Phottix Indra500 TTL bietet eine Bowens-kompatible Halterung für Softboxen und andere Lichtformer. Die Benutzung der Softboxhalterung bewerkstelligt
sich genauso wie die Montage und Demontage eines Reflektors (siehe oben).
Die Schnellblitz-Funktion kann für kontinuierliche Serienbildaufnahmen benutzt werden. Die Schnellblitz-Funktion kann über das Menü an- und abgeschaltet werden (Siehe Menüeinstellungen weiter unten).
Hinweis:
Die Schnellblitz-Funktion macht die Blitzauslösung zur Priorität. Unterbelichtungen können die Folge sein, wenn sich das zu fotografierende Objekt zu
weit von der Kamera entfernt befindet.
Blitz-Belichtungsreihen – FEB
Blitz-Belichtungsreihen (FEB) können benutzt werden um automatisch die
Blitzleistung bei Serienaufnahmen zu ändern. Die Kamera nimmt eine Serie
von Aufnahmen mit unterschiedlichen Belichtungen auf. FEB ist nützlich bei
Schnappschussaufnahmen und Aufnahmesituationen in denen sich die Beleuchtungssituation verändert, um korrekt belichtete Aufnahmen zu erhalten.
FEB kann auch für HDR-Fotografie benutzt werden.
Die FEB-Funktion wird unterstützt, kann aber nicht direkt am Indra500 TTL Studioblitz eingestellt werden. Die Verfügbarkeit dieser Funktion hängt davon ab,
ob der Sender oder die Kamera diese Funktion zur Verfügung stellen können.
Schauen Sie in die Bedienungsanleitung Ihrer Kamera für weitere Informationen bezüglich FEB.
Zur Anbringung: Richten Sie die den Softbox-Speedring entsprechend der Halterung am Indra500 aus. Stecken Sie den Softbox-Speedring in die Halterung
und drehen ihn im Uhrzeigersinn entsprechend des Pfeils auf der Abbildung bis
er mit einem Klick einrastet. (Siehe Bild 7)
Zur Entfernung: Drücken Sie den Schnellverschlusshebel zurück und drehen
Sie den Softbox-Speedring gegen den Uhrzeigersinn um ihn vom Indra500 zu
entfernen. (Siehe Bild 8)
16
Blitzbelichtungswertspeicherung – FEL/FV Lock
Blitzbelichtungswertspeicherung (FEL, auch FV Lock bei Nikon Kameras genannt) kann benutzt werden um die Blitzbelichtung vor der Aufnahme zu
speichern. Dies ist nützlich wenn die manuelle Spotmessung bei unterschiedlichen Beleuchtungssituationen benutzt wird. Drücken Sie die entsprechende
Kamera-Funktionstaste im TTL-Modus um diese Funktion zu nutzen. Schauen

De
BENUTZERHANDBUCH
Sie in die Bedienungsanleitung Ihrer Kamera für weitere Informationen bezüglich FEL und dessen Benutzung.
Die FEL-Funktion wird unterstützt, kann aber nicht direkt am Indra500 TTL Studioblitz eingestellt werden. Die Verfügbarkeit dieser Funktion hängt davon ab,
ob der Sender oder die Kamera diese Funktion zur Verfügung stellen können.
Schauen Sie in die Bedienungsanleitung Ihrer Kamera für weitere Informationen bezüglich FEL.
High Speed Synchronisation – HSS/Auto FP
High Speed Synchronisationsmodus (HSS) wird verwendet um schnellere
Verschlusszeiten zu verwenden, als die vorgegebene Synchronzeit des Kameraverschlusses (normalerweise 1/200-1/250s). Dies ist nützlich wenn Sie den
Blendenvorwahl-Modus benutzen und unter begrenztem Umgebungslicht arbeiten. HSS Bildergebnisse mögen je nach Kameramodell differieren – ziehen
Sie für weitere Details die Bedienungsanleitung Ihrer Kamera zu Rate.
Hinweis:
1. Die HSS-Funktion wird unterstützt, kann aber nicht direkt am Indra500 TTL
Studioblitz eingestellt werden.
wenn längere Verschlusszeiten verwendet werden.
Bitte beachten:
1. Die SCS-Funktion wird unterstützt, kann aber nicht direkt am Phottix Indra500 TTL Studioblitz eingestellt werden. Stattdessen aktivieren Sie bitte
die SCS-Funktion an Ihrer Kamera oder am Funkblitzauslöser. Für mehr Informationen ziehen Sie bitte die Bedienungsanleitung Ihrer Kamera bzw. Funkblitzauslösers zu Rate.
2. Die SCS-Funktion funktioniert nicht im Multi Stroboskop-Modus.
Testtaste/Bereitschaftsanzeige
1. Drücken der Testtaste löst den Studioblitz aus. Dies kann dazu benutzt
werden die Belichtung im manuellen Modus zu messen.
2 Die Testtaste besitzt eine integrierte Blitzbereitschaftsanzeige. Die LED-Anzeige leuchtet grün wenn der Studioblitz seine minimale Ladekapazität erreicht
hat. Sie leuchtet rot wenn der Studioblitz vollständig geladen ist.
2. Die Kamera sowie der Funkblitzauslöse-Modus kann den HSS-Modus stark
beeinflussen. Für beste Ergebnisse im HSS-Modus verwenden Sie Phottix
Funkblitzauslöser. Bitte schauen Sie in die “ Kompatibilitätsliste” unten und
ziehen Sie ihre Funkblitzauslöser und Kamera Bedienungsanleitung für
weitere Details zu Rate.
3. HSS-Funktion funktioniert nicht im Manuel Modus und Multi-Stroboskopmodus.
4. Intensive Nutzung des HSS Modus verkürzt die Lebensdauer der Blitzröhre
5. Nikon’s Blitzprogramm vermag die maximale Synchrozeit an einigen Nikon
Kameras zu limitieren.
Kompatibilitätsliste
Zweiter Verschlussvorhang-Synchronisation - SCS
Die Phottix Indra500 TTL SCS-Funktion lässt den Indra Studioblitz am Ende der
Belichtung, nicht am Anfang, auslösen. Hierdurch erzielt man spezielle Effekte
17
Menu
De
BENUTZERHANDBUCH
18
Menü Einstellung
Benutzen Sie die 4 Funktionsknöpfe unterhalb des LCD-Displays um die entsprechenden Funktionseinstellungen vorzunehmen. Sie können jede Einstellung verändern, wenn die ausgewählte Funktion hervorgehoben ist. Abhängig
von der gewählten LCD Farbdisplay Einstellung, wird diese entweder rot, weiß
oder gelb hervorgehoben sein. (Die Farbdisplay Einstellungen und die LCD-Display Sensoreinstellungen sind in der Menüliste aufgeführt.)
1. Drehen Sie den grünen Einstellknopf um die ausgewählte Einstellung zu
verändern.
2. Wenn Sie die Einstellung getätigt haben, drücken Sie den entsprechenden
Funktionsknopf oder den grünen Einstellknopf um diese zu bestätigen und das
Menü zu verlassen.
Das LCD-Display
De
BENUTZERHANDBUCH
drahtlose Empfangsmodi:
Odin-C,
Odin-N,
Strato II,
Opt-Slave
RX OFF
Blitzbelichtungs-korrektur/
Blitzleistung
Empfangs-kanäle
Blitzmodi:
TTL, M, Multi
Empfangsgruppen
Einstelllicht: Manuell
01-09 Leistungsstufe,
OFF
Schnellblitz
: eingeschaltet
: ausgeschaltet
Tonsignal
: AN
: AUS
Menü: siehe Menü
Bildschirm für mehr
Informationen
Menü Bildschirm
19
De
BENUTZERHANDBUCH
Auto-Save Funktion
Der Indra500 TTL sichert die Studioblitz-Einstellungen. Vorher getätigte Einstellungen werden aufgerufen sobald er eingeschaltet wird.
Einstellblitz
1. Drücken der Kamera-Abblendtaste (wenn vorhanden) bewirkt Blitzauslösungen für den Zeitraum von einer Sekunde am Indra Studioblitz. Der Einstellblitz
erlaubt es Ihnen die Beleuchtung und Lichtverteilung zu beurteilen. (Bitte
schauen in die Bedienungsanleitung Ihrer Kamera zur Tastenbelegung und
Funktion der Abblendtaste)
2. Der Einstellblitz ist in allen Modi verfügbar – TTL, Manuell und Multi.
Einstelllicht
Der Phottix Indra500 TTL Studioblitz ist mit einem LED-Einstelllicht ausgestattet. Dieses ist Hilfreich für die Beurteilung der Lichtwirkung und erleichtert die
Fokussierung in ansonsten spärlich beleuchteten Umgebungen.
Das Einstelllicht hat zwei Modi:
1. Manuell Modus: 9 Helligkeitsstufen von 01 bis 09 stehen zur Verfügung.
2. OFF Modus: Das Einstelllicht schaltet sich aus.
Bitte beachten:
1. Wenn der Studioblitz ausgelöst wird, erlischt das Einstelllicht nicht automatisch.
2. Die Nutzung des Einstelllichtes verbraucht sehr viel Akku-Energie.
Änderung der Helligkeit des Einstelllichtes:
nuell (01-09 Stufen), auf OFF zu verändern.
4. Drücken Sie den grünen Einstellknopf um die Einstellung zu bestätigen
und den Einstelllichtmodus zu verlassen.
Blitzmodi
Der Phottix Indra500 TTL Studioblitz hat drei Blitzmodi: TTL Auto, Manuell und
Multi.
TTL Blitzmodus
Wenn der Phottix Indra500 TTL Studioblitz sich im TTL-Modus befindet, wird
er mit dem ausgewählten Blitzmodus und Blitzleistung des Phottix Odin oder
anderen Phottix kompatiblen Funkblitzauslösern und dessen Sendeeinheiten
auslösen.
Blitzbelichtungskorrektur - FEC
Der Phottix Indra500 TTL Studioblitz kann Blitzbelichtungskorrekturen (FEC)
von -3 bis +3 in 1/3 Blendenschritten vollführen. Dies ist nützlich unter Bedingungen in denen eine Feinabstimmung des TTL Systems vonnöten ist.
Bitte beachten:
1. Wenn sich sowohl die Sendeeinheit (wenn bei dieser der TTL-Modus zur
Verfügung steht) als auch der Studioblitz im TTL-Modus befinden und Blitzbelichtungskorrekturen an beiden Geräten getätigt werden, werden sich die
beiden Blitzbelichtungskorrekturwerte zusammen addieren.
2. Wenn sich die Sendeeinheit im Manuell-Modus, (wenn verfügbar) und der
Studioblitz sich im TTL-Modus mit eingestellten Blitzbelichtungskorrekturen
befinden, so wird dessen Blitzbelichtungskorrekturwert (EV) zur Bestimmung der Blitzleistung herangezogen.
Das Einstelllicht kann an/aus gestellt werden über die Menüoption
im
oder mit der Einstelllichttaste
.
Mittels Menüoption
1. Drücken Sie die Funktionstaste 4 bis im LCD-Display erscheint.
2. Drücken Sie die entsprechende Funktionstaste bei
3. Wenn die Einstelllichtoption
Display angezeigt.
4. Drehen Sie den grünen Einstellknopf um den Einstelllichtmodus von Manuell (01-09 Stufen) auf OFF zu verändern.
5. Drücken Sie die Funktionstaste
um die Einstellung zu bestätigen und den Einstelllichtmodus zu verlassen.
ausgewählt wurde, wird diese auf dem
oder den grünen Einstellknopf
.
Mittels Einstelllichttaste:
1. Drücken Sie die Einstelllichttaste um das Einstelllicht ein/auszuschalten.
2. Wenn das Einstelllicht eingeschaltet ist, wird das
LCD-Display hervorgehoben.
3. Drehen Sie den grünen Einstellknopf um den Einstelllichtmodus von Ma-
Symbol auf dem
Manueller Blitzmodus
Im manuellen Blitzmodus löst der Studioblitz mit der vorgewählten Leistungsstufe aus. Der Phottix Indra500 TTL Studioblitz kann auf Leistungswerte
von 1/128 bis 1/1 in 1/3 Blendenstufen eingestellt werden (1/128, 1/64, 1/32,
1/16, 1/8, 1/4, 1/2, und 1/1). Blitzmodus und Leistungseinstellung des Studioblitzes können nicht über die Sendeeinheit verändert und kontrolliert werden.
Multi Stroboskop Blitzmodus
Im Multi Stroboskop Modus wird eine Serie von Schnellblitzen abgegeben. Die
Blitzanzahl, Frequenz und Leistung kann am Phottix Indra500 TTL Studioblitz
programmiert werden. Der Multi Stroboskop Modus ist nützlich um Mehrfachbelichtungen eines sich bewegenden Objektes in einem Foto festzuhalten,
sowie für andere Spezialeffekte.
Im Multi Stroboskop Modus wird der Studioblitz mit der programmierten manuellen Blitzleistung, Bildanzahl (1-100) und Frequenz (1-100Hz) ausgelöst. Die
Blitzleistung kann von 1/128 bis 1/4 in 1/1 Blendenstufen eingestellt werden
(Leistungsstufen: 1/128, 1/64, 1/32, 1/16, 1/8, und 1/4). Blitzmodus und Leistungseinstellung des Studioblitzes können nicht über die Sendeeinheit
verändert und kontrolliert werden.
20

De
BENUTZERHANDBUCH
Bitte beachten:
1. Überhitzung und Beschädigungen können aus übermäßigem Einsatz des
Stroboskop Modus resultieren.
2. Bei Überhitzung erhöht der Studioblitz automatisch die Nachladezeiten.
Wenn dessen Temperatur weiterhin ansteigt, hört der Blitz auf auszulösen.
Kabelloser Empfangsmodus
Der Phottix Indra500 TTL Studioblitz ist ausgestattet mit 7 kabellosen Empfangsmodi: Odin-C, Odin-N, Strato II, Opt-Slave und RX OFF. Weitere Details finden
Sie weiter unten.
Unterstüzte Blitzmodi
2. Drücken Sie die entsprechende Funktionstaste bei
. Die kabellosen Empfangsmodus-Funktionen werden hervorgehoben auf dem
LCD-Bildschirm.
3. Drehen Sie am grünen Einstellknopf um in den Odin-N Modus zu wechseln.
4. Drücken Sie den grünen Einstellknopf um die Einstellung zu bestätigen.
5. Drücken Sie die entsprechende Funktionstaste bei
im
um den TTL, Manuell oder Multi Modus zu wählen.
Strato II Radiofrequenz Empfangsmodus
Dieser Modus erlaubt es, den Indra500 TTL Studioblitz mittels Phottix Odin TTL
Funkblitzauslöser TCUs für Canon/Nikon, dem Phottix Mitros+ TTL Transceiver
Blitzgerät für Canon/Nikon im Odin Tx-Modus, den Phottix Strato TTL Sender für
Canon/Nikon oder Phottix Strato II Multi-Sender für Canon/Nikon auszulösen.
Um korrekt zu arbeiten müssen beide Geräte auf denselben Kanal und Gruppe
eingestellt sein.
Hinweis:
HSS, SCS, und TTL werden nicht unterstützt im Strato II Radiofrequenz Empfangsmodus.
Odin-C Radiofrequenz Empfangsmodus
Dieser Modus erlaubt es, den Indra500 TTL Studioblitz mittels Phottix Odin TTL
Funkblitzauslöser TCUs für Canon oder durch einen Phottix Mitros+ TTL Transceiver Blitzgeräte für Canon im Odin TX Modus auszulösen. Um korrekt zu arbeiten müssen beide Geräte auf denselben Kanal und Gruppe eingestellt sein.
Zur Anwendung:
1. Drücken Sie die Funktionstaste 4 oder den grünen Einstellknopf bis
im LCD-Bildschirm erscheint.
2. Drücken Sie die entsprechende Funktionstaste bei
bellosen Empfangsmodus-Funktionen werden hervorgehoben auf dem
LCD-Bildschirm.
3. Drehen Sie am grünen Einstellknopf um in den Odin-C Modus zu wechseln.
4. Drücken Sie den grünen Einstellknopf um die Einstellung zu bestätigen.
5. Drücken Sie die entsprechende Funktionstaste bei
um den TTL, Manuell oder Multi Modus zu wählen.
im
.
Odin-N Radiofrequenz Empfangsmodus
Dieser Modus erlaubt es, den Indra500 TTL Studioblitz mittels Phottix Odin TTL
Funkblitzauslöser TCUs für Nikon oder durch einen Phottix Mitros+ TTL Transceiver Blitzgeräte für Nikon im Odin TX Modus auszulösen. Um korrekt zu arbeiten müssen beide Geräte auf denselben Kanal und Gruppe eingestellt sein.
Zur Anwendung:
1. Drücken Sie die Funktionstaste 4 oder den grünen Einstellknopf bis
im LCD-Bildschirm erscheint.
21
Die ka-
Zur Anwendung:
1. Drücken Sie die Funktionstaste 4 oder den grünen Einstellknopf bis
im LCD-Bildschirm erscheint.
2. Drücken Sie die entsprechende Funktionstaste bei
bellosen Empfangsmodus-Funktionen werden hervorgehoben auf dem
LCD-Bildschirm.
3. Drehen Sie am grünen Einstellknopf um in den Strato II Modus zu wechseln.
4. Drücken Sie den grünen Einstellknopf um die Einstellung zu bestätigen.
5. Drücken Sie die entsprechende Funktionstaste bei
im
um den Manuell oder Multi Modus zu wählen.
Opt-Slave optische Signale Empfangsmodus
In diesem Modus lösen alle Studioblitzgeräte oder Kompaktblitzgeräte, die in
der Nähe des Indra500 TTL Studioblitzes ausgelöst werden, diesen mit aus.
Beachten Sie:
Vorblitze von in der Nähe befindlichen TTL-Blitzgeräten lösen den Phottix Indra ebenso aus, wenn sich dieser im Opt-Slave Modus befindet. Bitte geben
Sie Acht wenn Sie diesen Modus aktiviert haben, dass nahegelegende TTLBlitzgeräte nicht den Phottix Indra unbeabsichtigt auslösen.
Zur Anwendung:
1. Drücken Sie die Funktionstaste 4 oder den grünen Einstellknopf bis
im LCD-Bildschirm erscheint.
2. Drücken Sie die entsprechende Funktionstaste bei
bellosen Empfangsmodus-Funktionen werden hervorgehoben auf dem
LCD-Bildschirm.
3. Drehen Sie am grünen Einstellknopf um in den Opt-Slave Modus zu
wechseln.
Die ka-
.
Die ka-
.
De
BENUTZERHANDBUCH
4. Drücken Sie den grünen Einstellknopf um die Einstellung zu bestätigen.
RX OFF Modus
In diesem Modus sind die kabellosen Empfangsmodi ausgeschaltet.
Zur Anwendung:
1. Drücken Sie die Funktionstaste 4 oder den grünen Einstellknopf bis
im LCD-Bildschirm erscheint.
2. Drücken Sie die entsprechende Funktionstaste bei
bellosen Empfangsmodus-Funktionen werden hervorgehoben auf dem
LCD-Bildschirm.
3. Drehen Sie am grünen Einstellknopf um in den RX OFF Modus zu wechseln.
4. Drücken Sie den grünen Einstellknopf um die Einstellung zu bestätigen.
5. Drücken Sie die entsprechende Funktionstaste bei
um den Manuell oder Multi Modus zu wählen.
im
.
Die ka-
Für Odin-C/Odin-N/Strato II
Funktionen im Multi Stroboskop Modus
1. Drücken Sie die entsprechende Funktionstaste bei
Drehen Sie den grünen Einstellknopf um die Blitzleistung von 1/4 bis 1/128 in 6
Blendenstufen zu verändern.
2. Drücken Sie die entsprechende Funktionstaste bei
Drehen Sie den grünen Einstellknopf um das Einstelllichtmodus zu verändern
(OFF/01-09).
3. Drücken Sie die entsprechende Funktionstaste bei
Drehen Sie den grünen Einstellknopf um den Empfangskanal zwischen 1-4 zu
wechseln.
4. Drücken Sie die entsprechende Funktionstaste bei
Drehen Sie den grünen Einstellknopf um zwischen den Gruppen A, B und C zu
wählen.
im
im
im
im
.
.
.
.
Drehen Sie den grünen Einstellknopf um den Signalton ein- und auszuschalten
(on/off).
Für Odin-C/Odin-N
Funktionen im TTL-Modus
1.
Drücken Sie die entsprechende Funktionstaste bei
hen Sie den grünen Einstellknopf um den Blitzbelichtungskorrekturwert von
-3.0EV bis +3.0EV einzustellen.
2. Drücken Sie die entsprechende Funktionstaste bei
Drehen Sie den grünen Einstellknopf um das Einstelllichtmodus zu verändern
(OFF/01-09).
3. Drücken Sie die entsprechende Funktionstaste bei
Drehen Sie den grünen Einstellknopf um den Empfangskanal zwischen 1-4 zu
wechseln.
4. Drücken Sie die entsprechende Funktionstaste bei
Drehen Sie den grünen Einstellknopf um zwischen den Gruppen A, B und C zu
wählen.
5. Drücken Sie die entsprechende Funktionstaste bei
Drehen Sie den grünen Einstellknopf um die LCD-Bildschirm Einstellung zu ändern (Klassisch, Dynamisch, Elegant).
6. Drücken Sie die entsprechende Funktionstaste bei
Drehen Sie den grünen Einstellknopf die LCD-Bildschirmsensoreinstellung zu
verändern (normal, umgekehrt und automatisch erfasst vom Sensor).
7. Drücken Sie die entsprechende Funktionstaste bei
. Der Serienblitzmodus wird auf dem LCD-Bildschirm hervorgehoben. Drehen
Sie den grünen Einstellknopf um den Schnellblitzmodus ein- und auszuschalten
(on/off).
8. Drücken Sie die entsprechende Funktionstaste bei
Drehen Sie den grünen Einstellknopf um den Signalton ein- und auszuschalten
(on/off).
im
im
im
im
im
im
im
im
. Dre-
.
.
.
.
.
.
5. Drücken Sie die entsprechende Funktionstaste bei
im
Drehen Sie den grünen Einstellknopf um die LCD-Bildschirm Einstellung zu ändern (Klassisch, Dynamisch, Elegant).
6. Drücken Sie die entsprechende Funktionstaste bei
im
Drehen Sie den grünen Einstellknopf um die Blitzanzahl von 1-100 (abhängig
von der Blitzfrequenz und Blitzleistung) festzulegen.
7. Drücken Sie die entsprechende Funktionstaste bei
im
Drehen Sie den grünen Einstellknopf um die Blitzfrequenz von 1-100Hz festzulegen.
8. Drücken Sie die entsprechende Funktionstaste bei
im
Drehen Sie den grünen Einstellknopf die LCD-Bildschirmsensoreinstellung zu
verändern (normal, umgekehrt und automatisch erfasst vom Sensor).
9. Drücken Sie die entsprechende Funktionstaste bei
im
Der Serienblitzmodus wird auf dem LCD-Bildschirm hervorgehoben. Drehen Sie
den grünen Einstellknopf um den Schnellblitzmodus ein- und auszuschalten
(on/off).
10. Drücken Sie die entsprechende Funktionstaste bei
22
im
.
Für Odin-C/Odin-N/Strato II
Funktionen im Manuellen Modus
.
1. Drücken Sie die entsprechende Funktionstaste bei im .
Drehen Sie den grünen Einstellknopf um die Blitzleistung von 1/1 bis 1/128 in
1/3 Blendstufen zu verändern.
.
2. Drücken Sie die entsprechende Funktionstaste bei
Drehen Sie den grünen Einstellknopf um das Einstelllichtmodus zu verändern
(OFF/01-09).
.
3. Drücken Sie die entsprechende Funktionstaste bei
Drehen Sie den grünen Einstellknopf um den Empfangskanal zwischen 1-4 zu
wechseln.
,
4. Drücken Sie die entsprechende Funktionstaste bei
Drehen Sie den grünen Einstellknopf um zwischen den Gruppen A, B und C zu
wählen.
5. Drücken Sie die entsprechende Funktionstaste bei
.
Drehen Sie den grünen Einstellknopf um die LCD-Bildschirm Einstellung zu än-
im .
im .
im .
im .
De
BENUTZERHANDBUCH
dern (Klassisch, Dynamisch, Elegant).
6. Drücken Sie die entsprechende Funktionstaste bei
im .
Drehen Sie den grünen Einstellknopf die LCD-Bildschirmsensoreinstellung zu
verändern (normal, umgekehrt und automatisch erfasst vom Sensor).
7. Drücken Sie die entsprechende Funktionstaste bei
im
.
Der Serienblitzmodus wird auf dem LCD-Bildschirm hervorgehoben. Drehen Sie
den grünen Einstellknopf um den Schnellblitzmodus ein- und auszuschalten
(on/off).
8. Drücken Sie die entsprechende Funktionstaste bei
im
.
Drehen Sie den grünen Einstellknopf um den Signalton ein- und auszuschalten
(on/off).
Für Opt-Slave/RX OFF
Funktionen im Manuell Modus
1. Drücken Sie die entsprechende Funktionstaste bei im .
Drehen Sie den grünen Einstellknopf um die Blitzleistung von 1/1 bis 1/128 in
1/3 Blendstufen zu verändern.
2. Drücken Sie die entsprechende Funktionstaste bei
Drehen Sie den grünen Einstellknopf um das Einstelllichtmodus zu verändern
(OFF/01-09).
im
.
5. Drücken Sie die entsprechende Funktionstaste bei
im
.
Drehen Sie den grünen Einstellknopf um die Blitzfrequenz von 1-100Hz zu regulieren.
6. Drücken Sie die entsprechende Funktionstaste bei
im
.
Drehen Sie den grünen Einstellknopf die LCD-Bildschirmsensoreinstellung zu
verändern (normal, umgekehrt und automatisch erfasst vom Sensor).
7. Drücken Sie die entsprechende Funktionstaste bei
im
,
Der Serienblitzmodus wird auf dem LCD-Bildschirm hervorgehoben. Drehen Sie
den grünen Einstellknopf um den Schnellblitzmodus ein- und auszuschalten
(on/off).
8. Drücken Sie die entsprechende Funktionstaste bei
im
.
Drehen Sie den grünen Einstellknopf um den Signalton ein- und auszuschalten
(on/off).
Hinweis:
Wenn der Einstellknopf oder die entsprechende Funktionstaste nicht
gedrückt oder bestätigt wird, wird nach 10 Sekunden der eingestellte Parameter automatisch bestätigt.
3. Drücken Sie die entsprechende Funktionstaste bei
im .
Drehen Sie den grünen Einstellknopf um die LCD-Bildschirm Einstellung zu ändern (Klassisch, Dynamisch, Elegant).
4. Drücken Sie die entsprechende Funktionstaste bei
im
.
Drehen Sie den grünen Einstellknopf die LCD-Bildschirmsensoreinstellung zu
verändern (normal, umgekehrt und automatisch erfasst vom Sensor).
5. Drücken Sie die entsprechende Funktionstaste bei
im
,
Der Serienblitzmodus wird auf dem LCD-Bildschirm hervorgehoben. Drehen Sie
den grünen Einstellknopf um den Schnellblitzmodus ein- und auszuschalten
(on/off).
6. Drücken Sie die entsprechende Funktionstaste bei
im
.
Drehen Sie den grünen Einstellknopf um den Signalton ein- und auszuschalten
(on/off).
Für RX OFF
Funktionen im Multi Stroboskop Modus
1. Drücken Sie die entsprechende Funktionstaste bei
Drehen Sie den grünen Einstellknopf um die Blitzleistung von 1/4 bis 1/128 in 6
Blendenstufen zu verändern.
2. Drücken Sie die entsprechende Funktionstaste bei
Drehen Sie den grünen Einstellknopf um das Einstelllichtmodus zu verändern
(OFF/01-09).
im
im
.
.
3. Drücken Sie die entsprechende Funktionstaste bei
im
Drehen Sie den grünen Einstellknopf um die LCD-Bildschirm Einstellung zu ändern (Klassisch, Dynamisch, Elegant).
4. Drücken Sie die entsprechende Funktionstaste bei
im
um die Blitzanzahl von 1-100 Auslösungen zu regulieren (basierend auf der
Blitzfrequenz und Blitzleistung).
23
.
Individualfunktionen
De
BENUTZERHANDBUCH
Der Phottix Indra500 TTL Studioblitz ist mit vier Individualfunktionen ausgestattet. Um diese anzupassen, gehen Sie wie folgt vor (siehe unten):
1. Drücken und Halten Sie die Funktionstaste 4 und den grünen Einstellknopf
für 3 Sekunden um das Individualfunktionsmenü zu aktivieren.
2. Drücken Sie die Funktionstaste 1 oder Funktionstaste 2 um durch die
Individualfunktionen Tabelle
Menüpunkte 00 bis 03 zu wechseln.
3. Drehen Sie den grünen Einstellknopf um die gewählte Individualfunktion zu
ändern.
4. Drücken Sie die Funktionstaste 4 um das Menü zu verlassen.
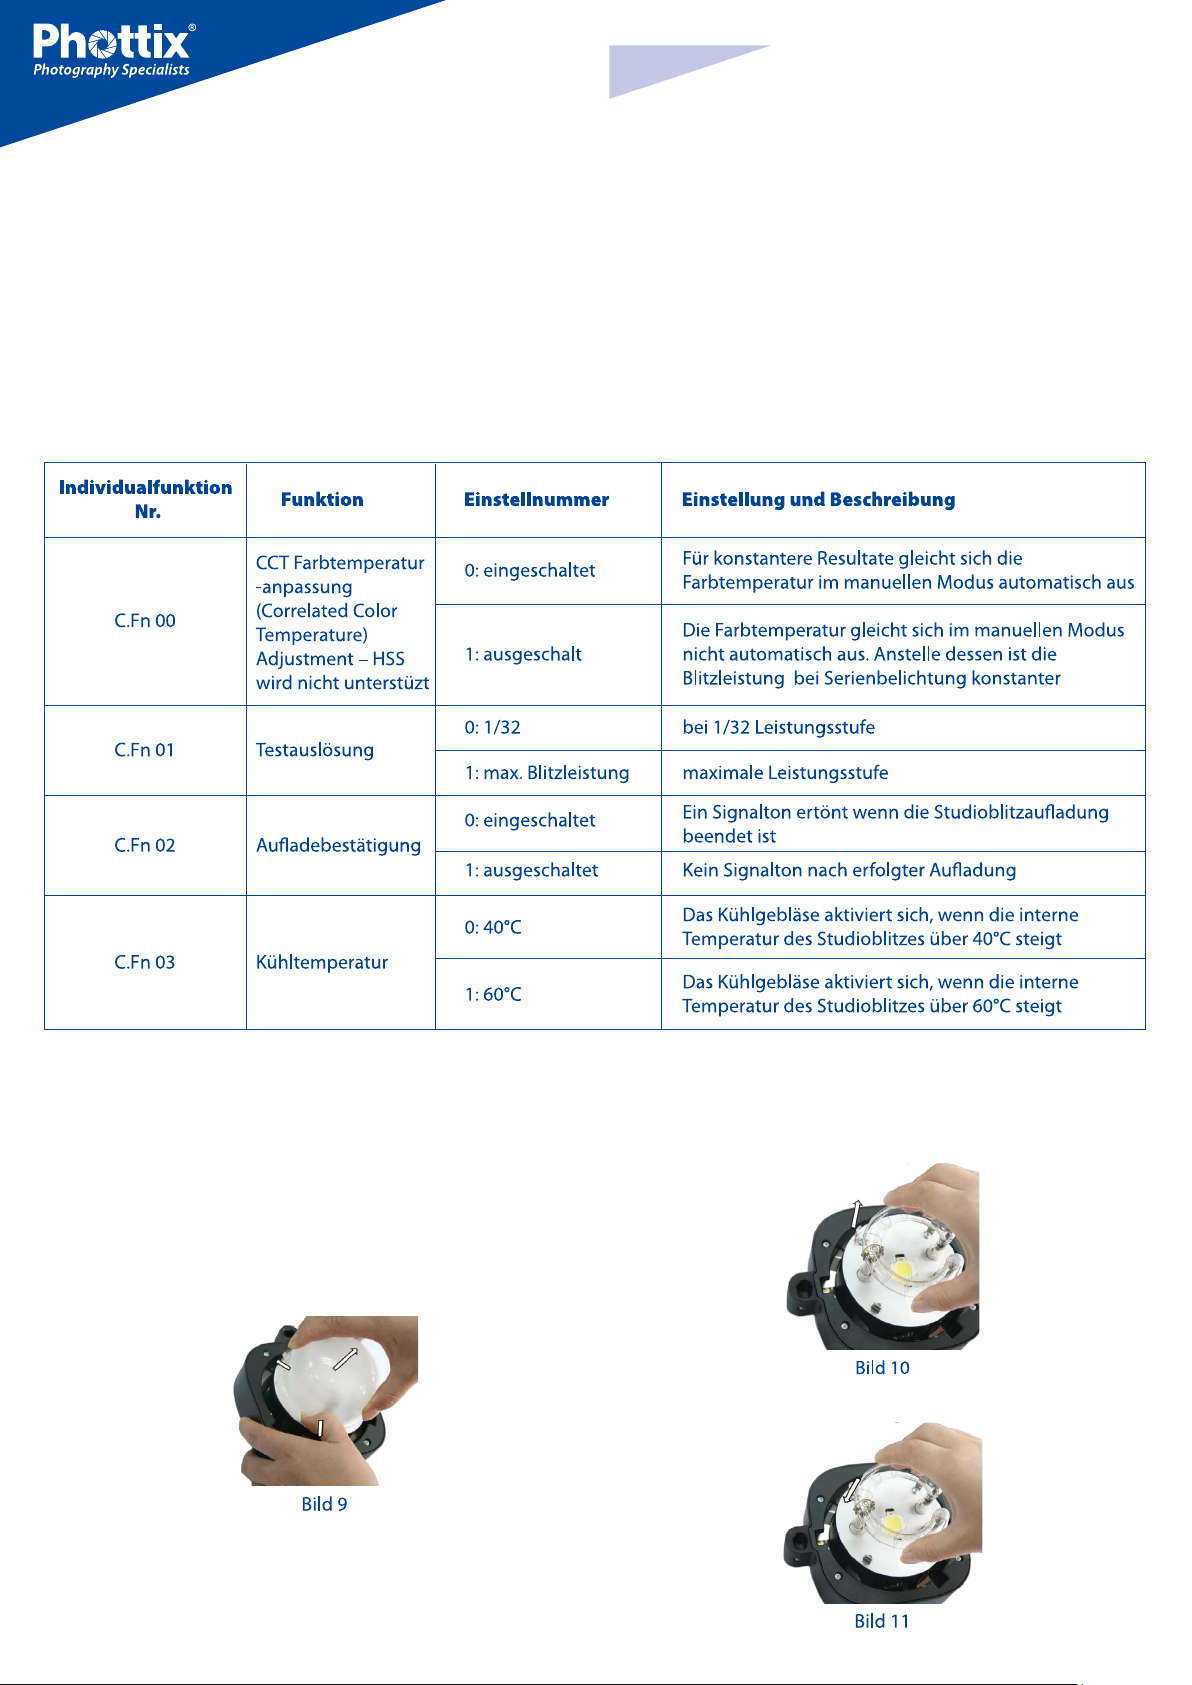
Austausch der Blitzröhre
1 Entfernen Sie den Indra500 TTL Studioblitz von der Stromversorgung für 10
Minuten bevor Sie die Blitzröhre austauschen.
2. Entfernen Sie den Reflektor wie oben beschrieben.
3. Entfernen Sie die Glaskuppel vom Klickverschluss und heben diese vorsichtig
aus der Fassung. (Bild 9)
24
4. Entfernen Sie die Blitzröhre vorsichtig aus ihrer Fassung. (Bild 10)
5. Stecken Sie eine neue Blitzröhre in die Fassung. (Bild 11)

De
BENUTZERHANDBUCH
6. Setzen Sie die Glaskuppel wieder in den Klickverschluss ein. (Bild 12)
7. Montieren Sie den Reflektor, wie oben beschrieben.
Hinweis: Bitte tragen Sie Handschuhe beim Austausch und berühren Sie die
Blitzröhre nicht direkt mit den Händen.
Rücksetzen auf Werkseinstellungen
Der Indra500 TTL Studioblitz kann auf Werkseinstellungen zurückgesetzt
werden.
Drücken und Halten Sie die Funktionstaste 1 und den grünen Einstellknopf für 3
Sekunden. Dies wird alle Funktionen auf ihre Werkseinstellungen zurücksetzen.
Technische Daten
Maximale Leistung: 500Ws
Einstellbarer Leistungsbereich: 8 Stufen (4-500Ws)
Leistungsregelung: In 1/3 oder vollen Blendenstufen
Blitzmodus: TTL Auto, Manuell (M), Multi Stroboskop
Leuchtwinkel: 60°
Leitzahl: 45/147.6 (ISO100, m/ft)
Farbtemperatur: 5600±200K (die Farbtemperatur kann bei kleinen Leis-
tungsstufen unter Umständen variieren.)
Abbrennzeit: t=1 1/250s - 1/12000s
Stroboskopblitz: Frequenz: 1-100Hz, Blitzanzahl: 1-100 Auslösungen
HSS&SCS: wird unterstützt*
Ladezeiten(bei 1/1 Blitzleistungsstufe; die Anzeige leuchtet rot auf)
Phottix Indra AC Netzadapter: Einzel/Zwei Blitzköpfe: 0.9s/1.7s
Phottix Indra Batteriepack (10AH): H Modus Einzel/Zwei Blitzköpfe: 1s/2.3s
S Modus Einzel/Zwei Blitzköpfe: 1.4s/5.4s
Phottix Indra Batteriepack (5AH) H Modus Einzel/Zwei Blitzköpfe: 1.4s/4.9s
S Modus Einzel/Zwei Blitzköpfe: 2.6s/10.9s
Eingangsleistung:
Überprüfung der Studioblitz-Informationen
Durch Drücken der Tastenkombination können die Phottix Indra500 TTL Studioblitzdaten abgerufen werden. Hardware, Software, Symbol-Galerie und Produkt Seriennummer.
1. Drücken und Halten Sie die Funktionstaste 2 und den grünen Einstellknopf
für 3 Sekunden. Das Informationsdisplay zeigt danach die Hardware, Software,
Symbol-Galerie und Produkt Seriennummer an.
2. Drücken Sie eine beliebige Taste um das Informationsdisplay zu verlassen und
zum Standard-Menü zurückzukehren.
3. Auslösen des Studioblitzes oder der Kamerafokussierung bzw. Aufnahme
eines Bildes beendet die Anzeige der Studioblitz-Informationen und lässt den
Studioblitz in das Standard-Menü zurückkehren.
Veränderungen am Studioblitzkondensator
Wenn der Indra500 Studioblitz für einige Zeit nicht verwendet wird, treten physische Veränderungen innerhalb des Blitzkondensators auf. Stellen Sie deshalb
sicher den Studioblitz alle 3 Monate für mindestens 10 Minuten anzuschalten
um Veränderungen vorzubeugen.
Phottix Indra AC Netzadapter: AC 220V/110V, 50HZ/60HZ
Phottix Indra Batteriepack: 14.8V/5Ah, 400 Blitze bei voller Leistung
14.8V/10Ah, 800 Blitze bei voller Leistung
Einstelllichtleistung: etwa 4,5W
Einstelllicht-Modi: OFF, Manuell 1-9 Stufen
Kabellose Empfangsmethoden: per Radio Frequenz und optischen Impulsen
Kanal: 4
Kabellose Empfangsmodi: Odin-C, Odin-N, Strato II, Opt-Slave, RX OFF (kann
dann nur durch 3.5mm Synchrobuchse ausgelöst werden.)
Empfangsbereich (ungefähr):
Radiosignalübertragung: 100m+
Bildschirm: 320X240 TFT LCD Bildschirm, unterstützt 3 verschiedene Farbeinstellungen
LCD Senoreinstellung: Erkennt die Ausrichtung des Studioblitzes automatisch
und veranlasst bei Bedarf eine 180° Drehung des Bildschirmdisplays.
Wärmeregulierung: Automatisch, entsprechend der Temperatur
Nachladebestätigung: kann an- und ausgeschaltet werden.
Synchrobuchse: 3.5mm Buchse
Firmware Update: Update mittels Mini-USB Buchse
Dimensionen: Länge x Durchmesser: 266mm x 180mm
Gewicht: 2.1kg (Angabe ohne Studioblitz Stromkabel)
Hinweis: Produktspezifikationen und äußere Designelemente könnten sich
zukünftig ohne extra Angaben ändern.
* mit kompatiblen Kameras
25
Merci d’avoir fait
l’acquisition d’un produit Phottix
Fr
MANUEL D’UTILISATION
Note: Avant d’utiliser le flash de studio Phottix Indra500 TTL, lisez attentivement ces instructions.
Le Phottix Indra500 TTL est un flash de studio portable, alimenté par une batterie externe ou par un adaptateur secteur AC, avec une fonction de réception
sans fil par signal optique et radio intégrée. Ce flash offre le mode TTL, Manuel
et Multi Stroboscopique, ainsi que la synchronisation à haute vitesse (HSS) et
la synchronisation sur le deuxième rideau (SCS). Le flash de studio Phottix Indra500 TTL est compatible avec de nombreux produits de Phottix.
Consignes de sécurité
●
Le flash de studio Indra500 contient des pièces électroniques à haute
tension. Ne tentez jamais de démonter ou de réparer vous-mêmes ce
flash. Gardez-le hors de portée des enfants.
●
Ne jamais utiliser ce produit à proximité de gaz inflammables, de solvants ou dans un environnement avec une haute charge électrique.
●
Assurez-vous que toutes les prises et les câbles soient bien connectés
lors de la charge et de l’utilisation.
●
Avant de changer le tube flash, mettez le Phottix Indra500 TTL hors circuit, débranchez-le et attendez environ 10 minutes. Soyez prudents - le
tube flash peut être très chaud.
●
Ne touchez jamais à la prise d’alimentation externe avec des objets en
métal : risque de choc électrique et de sérieuses blessures.
●
La source d’alimentation externe doit répondre aux spécifications
techniques de ce manuel.
●
L’alimentation externe doit être utilisée dans un environnement bien
ventilé. Ne pas utiliser ce produit dans un environnement poussiéreux
ou sablonneux.
●
Ce produit n’est pas étanche. Protégez-le de la pluie, de la neige et de
l’humidité.
●
Ne pas nettoyer le produit avec un solvant organique ou un liquide à
base d’alcool.
●
Au moment du déclenchement d’un éclair, aucune matière opaque
ne doit se trouver directement devant ni sur le tube flash - l’énergie de
l’éclair peut provoquer des brûlures ou endommager le tube flash.
●
Utilisez prudemment votre flash de studio. Ne déclenchez jamais le
flash à proximité des yeux de personnes ou d’animaux – cela peut occasionner de graves troubles visuels pouvant aller jusqu’à l’aveuglement.
●
Renseignez-vous auprès des autorités locales pour la destruction ap-
propriée ou le recyclage du flash de studio Phottix Indra500 TTL.
Table des matières
Éléments et Fonctions...............................................………...…26
Modes de flash….........................................................................32
Modes de réception sans fil.........................................................33
Fonctions Personalisées............................................................. 36
Caractéristiques techniques...................................................... 37
Éléments
Vue complète
1. Capuchon de protection
2. Support parapluie
3. Loquet de déverrouillage
rapide
4. Poignée
5. Port de synchronisation 3.5mm
6. Port USB
7. Prise d’alimentation externe
8. Poignée de réglage d’angle
à cliquet
9. Colonne de montage
10. Vis de fixation
Dos
11. Écran LCD
12. Bouton de fonction 1
13. Bouton de fonction 2
14. Bouton Test/Témoin
15. Molette de réglage/
d’ajustement
16. Interrupteur marche/arrêt
17. Bouton de lampe pilote
18. Bouton de fonction 3
19. Bouton de fonction 4
20. Capteur de signal optique
●
Ne laissez pas ce flash de studio dans un endroit très chaud (p.ex. au
soleil ou dans une voiture fermée)
●
Si vous remarquez de la fumée ou une odeur inhabituelle se dégageant du flash de studio, éteignez-le immédiatement en utilisant le bouton marche/arrêt.
●
Éteignez le flash en utilisant le bouton marche/arrêt si vous ne l’utilisez
pas pendant une période prolongée.
●
Retirez le capuchon de protection avant d’utiliser le flash de studio.
Autrement, le capuchon de protection se déformera ou provoquera un
incendie à cause de la forte chaleur dégagée par le flash de studio.
●
Soyez prudent en touchant le produit après utilisation. Il peut être
chaud et causer des brûlures.
26
Front View
21. Fente de montage
22. Dôme de verre
23. Lampe pilote LED
24. Tube flash
25. Réflecteur

Prise d’alimentation externe
Le flash de studio Indra500 TTL peut être connecté à l’adaptateur secteur Phottix Indra AC ou bien à l’Alimentation Externe Phottix Indra à l’aide de la prise
d’alimentation externe.
Veuillez noter:
Fr
MANUEL D’UTILISATION
- Quand vous connectez une source d’alimentation externe, n’utilisez qu’un
câble d’alimentation de Phottix conçu pour l’utilisation avec le flash de studio
Indra500 TTL.
Connexion du flash Indra500 à la source d’alimentation externe
Utilisation de l’Alimentation Externe Phottix Indra
1. Insérez une extrémité du cordon d’alimentation du flash fourni dans une
prise d’alimentation externe du flash de studio Indra500 TTL. (Voir photo 1)
Veuillez noter: Pour l’insérer correctement, aligner les points rouges du câble
et de la prise.
3. Connectez l’adaptateur secteur à l’alimentation secteur.
4. Allumez l’interrupteur d’alimentation principal et l’interrupter 1 ou 2 de l’adaptateur secteur.
5. Mettez l’interrupteur du flash de studio Phottix Indra500 TTL en position de
marche.
Déconnexion de l’Indra500 de la source d’alimentation externe
Déconnexion de l’alimentation externe Phottix Indra
1. Mettez l’interrupteur d’alimentation du flash de studio Phottix Indra500 TTL
en position d’arrêt.
2. Éteignez l’alimentation externe.
3. Débranchez le cordon d’alimentation comme indiqué sur la photo 4.
2. Insérez l’autre extrémité dans un port de sortie de l’Alimentation Externe
Phottix Indra. (Voir photo 2)
3. Allumez l’alimentation externe.
4. Mettez l’interrupteur du flash de studio Phottix Indra500 TTL en position de
marche.
Utilisation de l’adaptateur secteur Phottix Indra AC
1. Insérez une extrémité du cordon d’alimentation du flash fourni dans une prise
d’alimentation externe du flash de studio Indra500 TTL. (Voir photo 1)
Veuillez noter: Pour l’insérer correctement, aligner les points rouges du câ-
ble et de la prise.
2. Insérez l’autre extrémité dans un port de sortie de l’adaptateur secteur Phottix Indra AC. (Voir photo 3)
4. Débranchez l’autre extrémité comme indiqué sur la photo 6.
Déconnexion de l’adaptateur secteur Phottix Indra
1. Mettez l’interrupteur d’alimentation du flash de studio Phottix Indra500 TTL
en position d’arrêt.
2. Éteignez l’interrupter d’alimentation principal ainsi que l’interrupter 1 ou 2
de l’adaptateur secteur. Débranchez le cordon d’alimentation comme indiqué
sur la photo 5.
3. Débranchez le cordon d’alimentation du flash de studio Phottix Indra (photo 6).
27
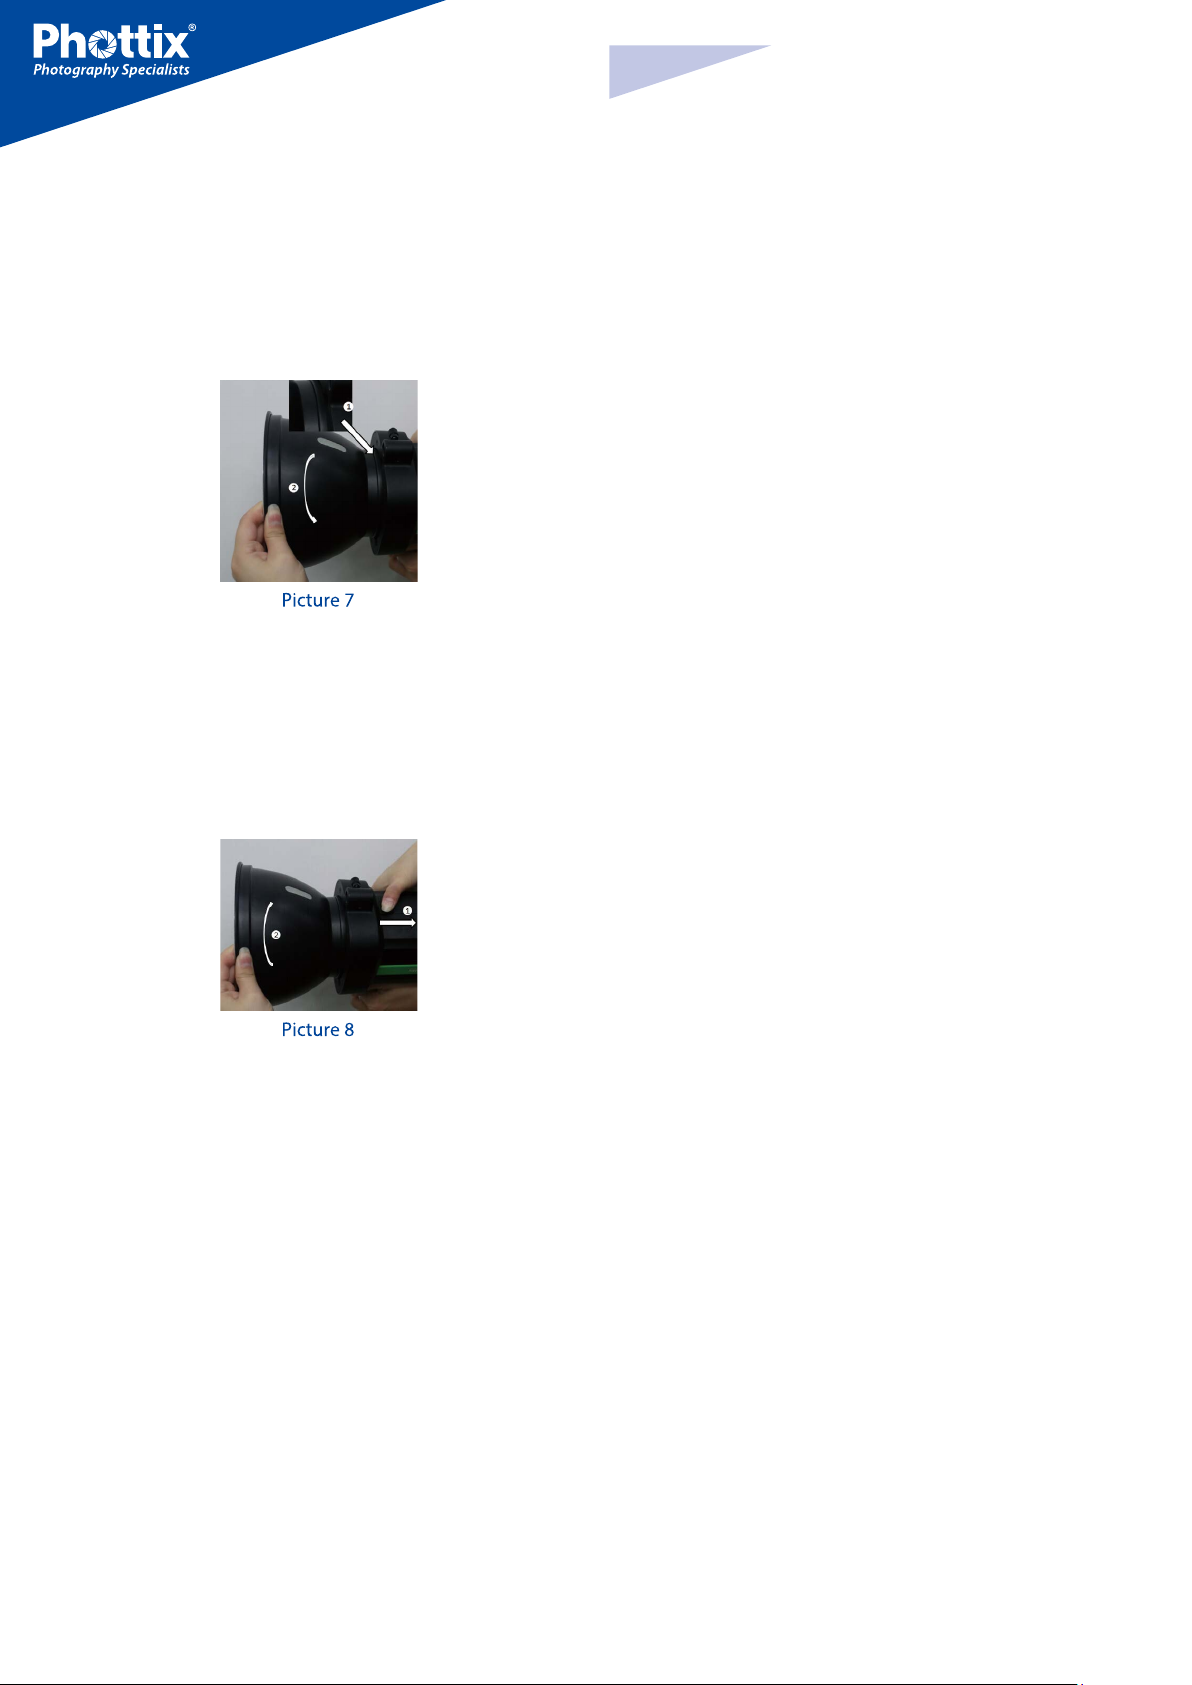
Fr
MANUEL D’UTILISATION
Fixation et enlèvement du Réflecteur
Pour fixer le réflecteur
1. Maintenez votre Indra500 d’une main.
2. Alignez le réflecteur avec les fentes de montage à l’aide de l’autre main.
3. Insérez le réflecteur et tournez-le dans le sens des aiguilles d’une montre
jusqu’à ce que celui-ci est fixé. (Voir la photo 7)
4. Si vous utilisez un parapluie, assurez-vous que l’ouverture pour parapluie
dans le réflecteur est alignée avec le support parapluie du flash de studio Indra.
Pour enlever le réflecteur:
1. Poussez le loquet de déverrouillage rapide d’une main.
2. Tournez le réflecteur dans le sens inverse des aiguilles d’une montre et retirez-le avec l’autre main. (Voir la photo 8)
Retirer la boîte à lumière: appuyer sur le loquet de déverrouillage et faîtes
tourner la boîte dans le sens anti-horaire (image 8)
Port de synchronisation et Port USB
1. Un déclencheur de flash de Phottix (Odin TTL, Strato II Multi et Strato TTL) ou
bien un appareil photo peut être connecté au port de synchronisation de 3,5
mm à l’aide d’un câble de synchronisation compatible. Le dispositif pourra alors
déclencher le flash de studio Indra500 TTL.
2. Le port USB est utilisé pour les mises à jour du firmware. Les informations
sur les mises à jour et les instructions seront disponibles sur le site internet de
Phottix.
Veuillez noter:
Seul le mode manuel (non TTL) est assuré lorsque le déclencheur de flash est
connecté via le port de synchronisation.
Canaux de transmission
Le système sans fil du flash de studio Phottix Indra500 TTL dispose des canaux:
1, 2, 3 et 4. Le même canal doit être réglé sur le flash de studio Indra500 TTL
lorsque celui-ci est réglé en mode de réception sans fil que sur le dispositif de
déclenchement ou sur les flashes utilisés pour déclencher l’Indra.
Remarque: lorsque vous retirez le réflecteur, attention à ne pas toucher le
dôme de verre de protection pour éviter d’endommager celui-ci.
Utilisation du support parapluie
Le flash de studio Phottix Indra500 TTL est équipé d’un support parapluie, ce
qui facilite le montage des parapluies et des boîtes à lumière de type parapluie.
L’utilisation du support parapluie est simple: Insérez la tige de parapluie dans
le support parapluie sur le flash de studio Phottix Indra. Tournez la vis sur le
support parapluie afin de bien serrer la tige de parapluie.
Utilisation de la boîte à lumière
Le flash de studio Phottix Indra 500 TTL est doté d’une monture de type Bowens, vous permettant de fixer des boîtes à lumière ou différents accessoires pour
modeler la lumière. Ces accessoires utilisent le même principe de montage/
démontage que celui du réflecteur de la torche Phottix Indra (ci-dessus).
Fixer la boîte à lumière: Aligner l’adaptateur ‘’speedring” de la boîte avec la
fente visible sur l’Indra 500.Insérez la boîte et faite la tourner dans le sens horaire
(en suivant la flèche sur le schéma) jusqu’à entendre un ‘’clic” de verrouillage.
(Voir Photo7)
28
Fonction Flash Rapide
La fonction Flash Rapide (Quick Flash) permet le déclenchement du flash de
studio quand celui-ci n’est pas complètement chargé, c’est-à-dire la LED d’état
clignote encore en vert. Les temps de recharge sont plus rapides dans cette
fonction. Cela facilite la prise des photos instantanées des sujets à proximité.
Le Flash Rapide peut être utilisé pour le mode rafale. Il peut être activé ou désactivé dans le Menu (voir la section Menu ci-dessous).
Veuillez noter:
En mode Flash Rapide, le déclenchement du flash devient prioritaire. Une
sous-exposition peut être observée quand le sujet se trouve trop loin de l’appareil photo.
Bracketing d’Exposition au Flash (FEB)
Le bracketing d’expositiion au flash peut être utilisé pour changer automatiquement la puissance du flash pour une série des photos. L’appareil photo enregistre une série de photos avec des valeurs d’exposition différentes. Le mode FEB
est pratique pour assurer une valeur d’exposition correcte dans les situations
où vous n’avez pas le temps de régler la valeur d’exposition. Il peut être utilisé
également pour la photographie HDR.
Le mode FEB est disponible mais il ne peut pas être réglé sur le flash de studio
Indra500 TTL. Ce mode est disponible si le déclencheur ou l’appareil photo dispose du mode FEB. Consultez le mode d’emploi de votre appareil photo pour
plus de détails.

Fr
MANUEL D’UTILISATION
Mémorisation d’Exposition au Flash (FEL, FV
Lock)
La Mémorisation d’Exposition au Flash (FEL, ou FV Lock dans un apparaeil
photo de Nikon) peut être utilisée pour mémoriser l’exposition au flash avant
que la photo soit prise. Cette fonction est très pratique pendant l’usage du
mode manuel de mesure spot quand il y a beaucoup de sources de lumière.
En mode TTL, appuyez sur le bouton de l’appareil pour utiliser cette fonction.
Consultez le manuel d’utilisation de votre appareil pour avoir plus d’informations sur le FEL et son usage.
Le mode FEL est disponible mais il ne peut pas être réglé sur le flash de studio
Indra500 TTL. Ce mode est disponible si le déclencheur ou l’appareil photo
dispose du mode FEB. Consultez le mode d’emploi de votre appareil photo
pour plus de détails.
Synchronisation à Haute Vitesse – HSS/Auto FP
La synchronisation à haute vitesse (HSS) permet de photographier avec des
vitesses d’obturation plus grandes que la vitesse de synchronisation d’un
flash installé sur l’appareil photo (typiquement 1/200-1/250s). Cette fonction
est très utile lorsque vous utilisez le mode Av (mode Priorité à l’ouverture) et
pour compenser la lumière ambiante. Les résultats HSS peuvent varier selon
les modèles des appareils – consultez le manuel de votre appareil photo pour
plus de détails.
Synchronisation sur le Deuxième Rideau (SCS)
Le mode SCS du flash Phottix Indra permet de déclencher le flash à la fin de la
fermeture de l’obturateur. Ce mode est idéal pour obtenir des effets spéciaux
(avec une vitesse d’obturation lente).
Bouton Test/Témoin
1. En appuyant sur le bouton Test vous déclenchez le flash de studio. Cela peut
être utilisé pour effectuer une mesure en mode manuel.
2. Ce bouton offre aussi une fonction d’indication de disponibilité du flash
(témoin du flash rechargé). La diode LED sur ce bouton clignote en vert si le
flash est rechargé au minimum, et s’il est complètement rechargé, la diode LED
clignotera en rouge.
Veuillez noter:
Veuillez noter:
1. Le mode SCS est disponible sur le flash de studio Phottix Indra500 TTL mais
il ne peut pas être réglé directement sur ce flash. Réglez le mode SCS sur
l’appareil photo ou bien sur le déclencheur de flash. Pour plus d’informations,
consultez les manuels d’utilisation de votre déclencheur de flash et de votre
appareil photo.
2. Le mode SCS n’est pas disponible en mode Multi Stroboscopique.
1. Le mode HSS est disponible sur le flash de studio Phottix Indra500 TTL mais
il ne peut pas être réglé directement sur ce flash.
2. Un appareil photo, un déclencheur de flash et un mode de réception peuvent influer sur le mode HSS. Pour obtenir des meilleurs résultats, veuillez
utiliser les déclencheurs de flash de Phottix. Pour plus d’informations, veuillez
voir le “Tableau de compatibilité” ci-dessous et consulter les manuels d’utilisation de votre déclencheur de flash et de votre appareil photo.
3. Le mode HSS n’est pas disponible en modes Multi ni Manuel.
4. L’utilisation du mode HSS de façon intensive risque de raccourcir la durée
de vie du tube flash.
5. Le protocole du système flash de la marque Nikon peut limiter la vitesse
maximale de synchronisation avec certains boîtiers Nikon.
Tableau de Compatibilité
29
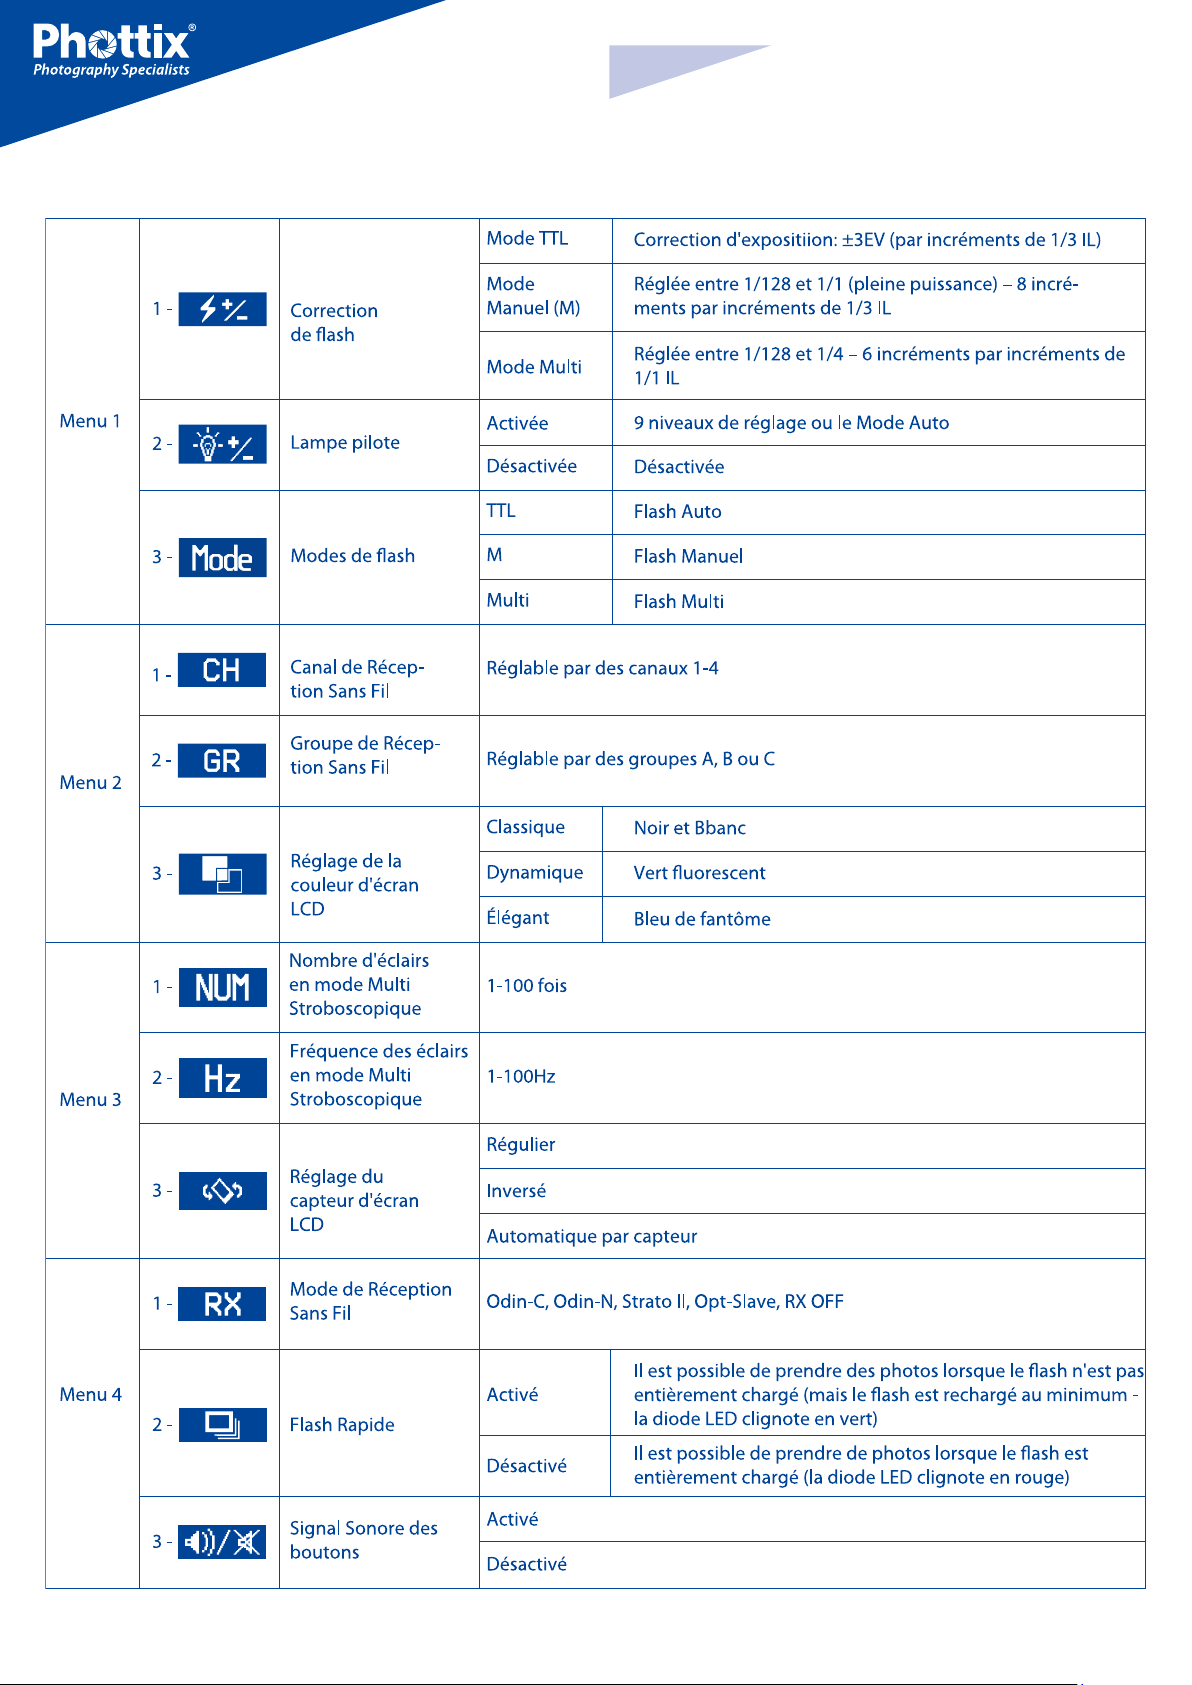
Menu
Fr
MANUEL D’UTILISATION
30

Paramètres Menu
Utilisez les quatre boutons de fonction situés sous l’écran LCD pour sélectionner les options de réglage de la fonction correspondante. Vous pouvez modifier chaque paramètre lorsque la fonction sélectionnée est mise en surbrillance.
En fonction du réglage de la couleur d’écran LCD, ce sera: rouge, blanc ou bien
jaunew (Les réglages de la couleur d’écran LCD et du capteur d’écran LCD seront
affichés dans la liste du Menu).
1. Tournez le bouton de réglage/d’ajustement pour modifier le paramètre.
2. Une fois terminé, appuyez sur le bouton de fonction correspondant ou bien
sur le bouton de réglage/d’ajustement pour confirmer et sortir.
Écran LCD
Fr
MANUEL D’UTILISATION
Modes de Réception Sans Fil:
Odin-C,
Odin-N,
Strato II,
Opt-Slave
RX OFF
Correction d’expositiion au flash /
Puissance du flash
Canal de Réception Sans Fil
Modes de flash:
TTL, M, Multi
Groupe de Réception
Sans Fil
Lampe pilote: Manuel
avec niveaux 01-09,
Auto, OFF
Flash Rapide
: Activé
: Désactivé
Signal sonore
activé
désactivé
Menu: voir plus de détails
dans la partie sur les
fonctions du Menu
Écran Menu
31

Fr
MANUEL D’UTILISATION
Fonction d’Auto-Enregistrement
Le flash de studio Indra500 TTL enregistre les paramètres du flash. Les réglages
précédents seront conservés à chaque fois qu’il est allumé.
Éclairage lampe pilote
1. Une pression sur le bouton de contrôle de la profondeur de champ (si disponible) déclenchera le flash pendant 1 seconde. Cette fonction permet de voir les
effets et l’équilibre de la lumière sur le sujet. (Consultez le manuel d’utilisation
de l’appareil pour plus de détails sur le bouton test de profondeur de champ).
2. Cette fonction est disponible pour tous les modes: TTL, Manuel et Multi.
Lampe Pilote
Le Phottix Indra500 TTL est équipé d’une lampe pilote LED. Cette fonction est
utile pour vérifier l’éclairage ou pour aider la mise au point dans des environnements peu éclairés.
La Lampe Pilote fonctionne en trois modes:
1. Mode manuel: il existe 9 niveaux de réglage (de 01 à 09).
2. Mode éteint (OFF): la lampe pilote sera éteinte.
Veuillez noter:
2. Quand la lampe pilote est allumée, l’icône de la lampe pilote sera mise en
surbrillance sur l’écran LCD.
3. Tournez la “molette de réglage/d’ajustement” afin de régler le mode de la
lampe pilote sur Manuel (9 niveaux) ou OFF (éteint).
4. Tournez la “molette de réglage/d’ajustement” pour confirmer les réglages
et quitter le menu.
Modes du flash
Le flash de studio Phottix Indra500 TTL possède trois modes: TTL Auto, Manuel
et Multi.
Mode TTL
Quand le flash de studio Phottix Indra500 TTL est réglé en mode TTL, le flash de
studio se déclenchera avec la puissance et le mode du flash sélectionnés, selon
les paramètres du déclencheur Phottix Odin ou d’un autre déclencheur compatible avec Phottix permettant le contrôle de la puissance.
Correction d’Exposition au Flash (FEC)
Le flash de studio Phottix Indra500 TTL peut être utilisé pour régler la valeur
de correction d’exposition au flash (FEC) de -3 à +3 IL par incréments de 1/3 IL.
C’est très pratique quand il faut régler précisément l’exposition calculée par le
système TTL.
1. Lors du déclenchement du flash de studio, la lampe pilote s’éteindra automatiquement. Après chaque déclenchement, la lampe pilote se rallume
automatiquement.
2. Cette fonction consomme beaucoup de batterie.
Réglage de la luminosité de la Lampe Pilote:
La lampe pilote peut être allumée/éteinte à l’aide de l’option
menu
ou bien à l’aide du bouton de lampe pilote
de
.
Via l’option de Menu:
1. Appuyez sur le bouton de fonction 4 jusqu’à ce que
sur l’écran LCD.
2. Appuyez sur le bouton de fonction correspondant à
3. Quand l’option de la lampe pilote
surbrillance sur l’écran LCD
4. Tournez la “molette de réglage/d’ajustement” afin de régler le mode de la
lampe pilote sur Manuel (9 niveaux) ou OFF (éteint).
5. Appuyez ur le bouton de fonction correspondant à
la “molette de réglage/d’ajustement” pour confirmer les réglages et quitter
le menu.
.
est sélectionnée, elle sera mise en
s’affiche
.
ou tournez
Veuillez noter:
1. Si un dispositif de déclenchement (si le mode TTL est disponible) ainsi que
le flash de studio sont réglés en mode TTL et si la correction d’exposition est
réglée sur ce dispositif et sur le flash, alors la valeur finale de l’exposition sera
la somme de deux valeurs de correction.
2. Si un dispositif de déclenchement est réglé en mode Manuel (si disponible)
et le flash de studio est réglé en mode TTL avec la valeur de correction d’exposition au flash, alors la valeur d’exposition du flash sera utilisée pour calculer
la puissance du flash finale.
Mode Manuel
En mode Manuel le flash de studio est déclenché selon les puissances réglées.
Le flash de studio Phottix Indra500 TTL permet de régler la puissance du flash
entre 1/1 et 1/128 par incréments de 1/3 IL (1/128, 1/64, 1/32, 1/16, 1/8, 1/4, 1/2
et 1/1). Les modes du flash et la puissance du flash de studio ne peuvent pas être
réglés ni contrôlés sur le dispositif de déclenchement.
Mode Multi Stroboscopique
En Mode Multi une série d’éclairs rapides sera émise. La quantité, la fréquence et
la puissance peuvent être programmées sur le flash de studio Phottix Indra500
TTL. Le Mode Multi est idéal pour prendre plusieurs vues d’un sujet en mouvement sur une seule photo ainsi que pour d’autres effets spéciaux.
Via le bouton de lampe pilote:
1. Appuyez sur le bouton de lampe pilote pour allumer/éteindre la Lampe
Pilote.
32
En mode Multi, le flash de studio est déclenché selon la puissance du flash réglé
manuellement, le nombre d’éclairs (1-100) et la fréquence (1-100Hz). La puissance du flash peut être réglée entre 1/128 et 1/4 par incréments de 1/1 (1/128,
1/64, 1/32, 1/16, 1/8 et 1/4). Les modes du flash et la puissance du flash de studio

Fr
MANUEL D’UTILISATION
ne peuvent pas être réglés ni contrôlés sur le dispositif de déclenchement.
Veuillez noter:
1. La surchauffe ou tout autre dommage du tube flash peut être lié à une
utilisation intensive en mode Multi Stroboscopique.
2. En cas de surchauffe, le temps de recyclage du flash augmente automatiquement afin d’assurer un refroidissement du système. Si toutefois la
température continue d’augmenter, la torche cesse automatiquement
d’émettre des flashes.
Mode de réception sans fil
Le flash de studio Phottix Indra500 TTL possède 5 modes de réception sans fil:
Odin-C, Odin-N, Strato II, Opt-Slave et RX OFF. Pour plus de détails veuillez voir
ci-dessous.
Modes pris en charge:
Comment utiliser:
1. Appuyez sur le bouton de fonction 4 ou tournez la “molette de
réglage/d’ajustement” jusqu’à ce que
2. Appuyez sur le bouton de fonction correspondant à
s’affiche sur l’écran LCD.
. L’option de
la fonction de la réception sans fil sera en surbrillance sur l’écran LCD.
3. Tournez la “molette de réglage/d’ajustement” afin de choisir le mode
Odin-N.
4. Appuyez sur la “molette de réglage/d’ajustement” pour confirmer le
réglage.
5. Appuyez sur le bouton de fonction correspondant à
pour ajuster du mode TTL, Manuel ou Multi.
dans le
Mode de réception Strato II
Ce mode permet le déclenchement du flash de studio Indra500 TTL en utilisant
le transmetteur Phottix Odin TTL pour Canon/Nikon ou bien le transmetteur intégré du flash Phottix Mitros+ TTL pour Canon/Nikon réglé en mode Odin TX
ou bien le transmetteur Phottix Strato TTL pour Canon/Nikon ou bien encore
le transmetteur Phottix Strato II Multi pour Canon/Nikon. Afin de fonctionner
correctement, ils doivent être réglés sur le même canal et le même groupe.
Mode de réception Odin-C
Ce mode permet le déclenchement du flash de studio Indra500 TTL en utilisant
le transmetteur Phottix Odin TTL pour Canon ou bien le transmetteur intégré du
flash Phottix Mitros+ TTL pour Canon réglé en mode Odin TX. Pour fonctionner
correctement, ils doivent être réglés sur le même canal et le même groupe.
Comment utiliser:
1. Appuyez sur le bouton de fonction 4 ou tournez la “molette de
réglage/d’ajustement” jusqu’à ce que
2. Appuyez sur le bouton de fonction correspondant à
la fonction de la réception sans fil sera en surbrillance sur l’écran LCD.
3. Tournez la “molette de réglage/d’ajustement” afin de choisir le mode
Odin-C.
4. Appuyez sur la “molette de réglage/d’ajustement” pour confirmer le
réglage.
s’affiche sur l’écran LCD.
L’option de
.
Veuillez noter:
Les synchronisations HSS, SCS et le mode TTL ne sont pas disponibles en mode
de réception Strato II.
Comment utiliser:
1. Appuyez sur le bouton de fonction 4 ou tournez la “molette de
réglage/d’ajustement” jusqu’à ce que
2. Appuyez sur le bouton de fonction correspondant à
s’affiche sur l’écran LCD.
L’option de
.
la fonction de la réception sans fil sera en surbrillance sur l’écran LCD.
3. Tournez la “molette de réglage/d’ajustement” afin de choisir le mode Strato
II.
4. Appuyez sur la “molette de réglage/d’ajustement” pour confirmer le
réglage.
5. Appuyez sur le bouton de fonction correspondant à
pour ajuster du mode Manuel ou Multi.
dans le
Mode de réception Opt-Slave
Ce mode permet le déclenchement du flash de studio Indra500 TTL par tout
autre flash cobra ou flash de studio déclenché à proximité.
5. Appuyez sur le bouton de fonction correspondant à
pour ajuster du mode TTL, Manuel ou Multi.
Mode de réception Odin-N
Ce mode permet le déclenchement du flash de studio Indra500 TTL en utilisant
le transmetteur Phottix Odin TTL pour Nikon ou bien le transmetteur intégré du
flash Phottix Mitros+ TTL pour Nikon réglé en mode Odin TX. Pour fonctionner
correctement, ils doivent être réglés sur le même canal et le même groupe.
33
dans le
Veuillez noter:
Les pré-flashs des autres flashs réglés en mode TTL se trouvant à proximité
déclencheront le Phottix Indra si celui-ci est réglé en mode Opt-Slave. Faitez
attention lors de l’utilisation de ce mode afin que les flashs réglés en mode
TTL qui se trouvent à proximité ne déclenchent pas le Phottix Indra avant que
vous soyez prêt.
Comment utiliser:
1. Appuyez sur le bouton de fonction 4 ou tournez la “molette de

Fr
MANUEL D’UTILISATION
réglage/d’ajustement” jusqu’à ce que s’affiche sur l’écran LCD.
2. Appuyez sur le bouton de fonction correspondant à
L’option de
.
la fonction de la réception sans fil sera en surbrillance sur l’écran LCD.
3. Tournez la “molette de réglage/d’ajustement” afin de choisir le mode Opt-
Slave.
4. Appuyez sur la “molette de réglage/d’ajustement” pour confirmer le
réglage.
Mode RX OFF
Dans ce mode, la réception sans fil est désactivée.
Comment utiliser:
11. Appuyez sur le bouton de fonction 4 ou tournez la “molette de
réglage/d’ajustement” jusqu’à ce que
2. Appuyez sur le bouton de fonction correspondant à
la fonction de la réception sans fil sera en surbrillance sur l’écran LCD.
3. Tournez la “molette de réglage/d’ajustement” afin de choisir le mode RX
OFF.
4. Appuyez sur la “molette de réglage/d’ajustement” pour confirmer le
réglage.
5. Appuyez sur le bouton de fonction correspondant à
pour ajuster du mode Manuel ou Multi.
s’affiche sur l’écran LCD.
L’option de
.
dans le
Pour Odin-C/Odin-N/Strato II
Fonctions en mode Multi:
1. Appuyez sur le bouton de fonction correspondant à
Tournez la “molette de réglage/d’ajustement” pour régler la puis-
.
sance du flash entre 1/4 et 1/128 (6 incréments).
2. Appuyez sur le bouton de fonction correspondant à
. Tournez la “molette de réglage/d’ajustement” pour régler le mode de
la Lampe Pilote (OFF/01-09).
3. Appuyez sur le bouton de fonction correspondant à
. Tournez la “molette de réglage/d’ajustement” pour régler le Canal
(1-4).
4. Appuyez sur le bouton de fonction correspondant à
. Tournez la “molette de réglage/d’ajustement” pour régler le Groupe
(A, B ou C).
dans le
dans le
dans le
dans le
8. Appuyez sur le bouton de fonction correspondant à
. Tournez la “molette de réglage/d’ajustement” pour régler le capteur
d’écran LCD (Régulier, Inversé et Automatique par capteur).
9. Appuyez sur le bouton de fonction correspondant à
, L’option du Mode Rafale sera en surbrillance sur l’écran LCD. Tournez
la “molette de réglage/d’ajustement” pour activer/désactiver le Mode Rafale.
10. Appuyez sur le bouton de fonction correspondant à
. Tournez la “molette de réglage/d’ajustement” pour activer/désacti-
ver le son.
Pour Odin-C/Odin-N
Fonctions en mode TTL:
1. Appuyez sur le bouton de fonction correspondant à
. Tournez la “molette de réglage/d’ajustement” pour régler la valeur de
la correction d’exposition au flash entre -3.0EV et +3.0EV.
2. Appuyez sur le bouton de fonction correspondant à
. Tournez la “molette de réglage/d’ajustement” pour régler le mode de
la Lampe Pilote (OFF/01-09).
3. Appuyez sur le bouton de fonction correspondant à
(1-4).
4. Appuyez sur le bouton de fonction correspondant à
(A, B ou C).
5. Appuyez sur le bouton de fonction correspondant à
d’écran LCD (Classique, Dynamique, Élégant).
6. Appuyez sur le bouton de fonction correspondant à
d’écran LCD (Régulier, Inversé et Automatique par capteur).
7. Appuyez sur le bouton de fonction correspondant à
la “molette de réglage/d’ajustement” pour activer/désactiver le Mode Rafale.
8. Appuyez sur le bouton de fonction correspondant à
tiver le son.
. Tournez la “molette de réglage/d’ajustement” pour régler le Canal
. Tournez la “molette de réglage/d’ajustement” pour régler le Groupe
. Tournez la “molette de réglage/d’ajustement” pour régler la couleur
. Tournez la “molette de réglage/d’ajustement” pour régler le capteur
. L’option du Mode Rafale sera en surbrillance sur l’écran LCD. Tournez
. Tournez la “molette de réglage/d’ajustement” pour activer/désac-
dans le
dans le
dans le
dans le
dans le
dans le
dans le
dans le
dans le
dans le
dans le
5. Appuyez sur le bouton de fonction correspondant à
Tournez la “molette de réglage/d’ajustement” pour régler la couleur
.
d’écran LCD (Classique, Dynamique, Élégant).
6. Appuyez sur le bouton de fonction correspondant à
. Tournez la “molette de réglage/d’ajustement” pour régler le nombre
d’éclairs (1-100 fois, en fonction de la fréquence et de la puissance du flash).
7. Appuyez sur le bouton de fonction correspondant à
le
. Tournez la “molette de réglage/d’ajustement” pour régler la
fréquence (1-100Hz).
34
dans le
dans le
dans
Pour Odin-C/Odin-N/Strato II
Fonctions en mode Manuel:
1. Appuyez sur le bouton de fonction correspondant à dans le
. Tournez la “molette de réglage/d’ajustement” pour régler la puis-
sance du flash entre 1/1 et 1/128 (par incréments de 1/3 IL).
2. Appuyez sur le bouton de fonction correspondant à
. Tournez la “molette de réglage/d’ajustement” pour régler le mode de
la Lampe Pilote (OFF/01-09).
3. Appuyez sur le bouton de fonction correspondant à
dans le
dans le

Fr
MANUEL D’UTILISATION
. Tournez la “molette de réglage/d’ajustement” pour régler le Canal
(1-4).
4. Appuyez sur le bouton de fonction correspondant à
dans le
. Tournez la “molette de réglage/d’ajustement” pour régler le Groupe
(A, B ou C).
5. Appuyez sur le bouton de fonction correspondant à
. Tournez la “molette de réglage/d’ajustement” pour régler la couleur
dans le
d’écran LCD (Classique, Dynamique, Élégant).
6. Appuyez sur le bouton de fonction correspondant à
dans le
. Tournez la “molette de réglage/d’ajustement” pour régler le capteur
d’écran LCD (Régulier, Inversé et Automatique par capteur).
7. Appuyez sur le bouton de fonction correspondant à
. L’option du Mode Rafale sera en surbrillance sur l’écran LCD. Tournez
dans le
la “molette de réglage/d’ajustement” pour activer/désactiver le Mode Rafale.
8. Appuyez sur le bouton de fonction correspondant à
. Tournez la “molette de réglage/d’ajustement” pour activer/désac-
dans le
tiver le son.
Pour Opt-Slave/RX OFF
Fonctions en mode Manuel:
1. Appuyez sur le bouton de fonction correspondant à dans le
. Tournez la “molette de réglage/d’ajustement” pour régler la puis-
sance du flash entre 1/1 et 1/128 (par incréments de 1/3 IL).
3. Appuyez sur le bouton de fonction correspondant à
in .
Tournez la “molette de réglage/d’ajustement” pour régler la couleur d’écran LCD
(Classique, Dynamique, Élégant).
4. Appuyez sur le bouton de fonction correspondant à
dans le
pour régler le nombre d’éclairs (1-100 fois, en fonction de la fréquence et de la
puissance du flash).
5. Appuyez sur le bouton de fonction correspondant à
dans le
. Tournez la “molette de réglage/d’ajustement” pour régler la fréquence du flash
(1-100Hz).
6. Appuyez sur le bouton de fonction correspondant à
. Tournez la “molette de réglage/d’ajustement” pour régler le capteur
dans le
d’écran LCD (Régulier, Inversé et Automatique par capteur).
7. Appuyez sur le bouton de fonction correspondant à
, L’option du Mode Rafale sera en surbrillance sur l’écran LCD. Tournez
dans le
la “molette de réglage/d’ajustement” pour activer/désactiver le Mode Rafale.
8. Appuyez sur le bouton de fonction correspondant à
dans le
. Tournez la “molette de réglage/d’ajustement” pour activer/désacti-
ver le son.
Veuillez noter:
Si la “molette de réglage/d’ajustement” ou le bouton de fonction correspondant n’est pas appuyé afin de confirmer un paramètre sélectionné, ce paramètre sera confirmé automatiquement en 10 secondes.
2. Appuyez sur le bouton de fonction correspondant à
. Tournez la “molette de réglage/d’ajustement” pour régler le mode de
dans le
la Lampe Pilote (OFF/01-09).
3. Appuyez sur le bouton de fonction correspondant à
dans le
. Tournez la “molette de réglage/d’ajustement” pour régler la couleur
d’écran LCD (Classique, Dynamique, Élégant).
4. Appuyez sur le bouton de fonction correspondant à
Tournez la “molette de réglage/d’ajustement” pour régler le capteur
.
dans le
d’écran LCD (Régulier, Inversé et Automatique par capteur).
5. Appuyez sur le bouton de fonction correspondant à
, L’option du Mode Rafale sera en surbrillance sur l’écran LCD. Tourn-
dans le
ez la “molette de réglage/d’ajustement” pour activer/désactiver le Mode Rafale.
6. Appuyez sur le bouton de fonction correspondant à
. Tournez la “molette de réglage/d’ajustement” pour activer/désactiver
dans le
le son.
Pour RX OFF
Fonctions en mode Multi
1. Appuyez sur le bouton de fonction correspondant à dans le
. Tournez la “molette de réglage/d’ajustement” pour régler la puis-
sance du flash entre 1/4 et 1/128 (6 incréments).
2. Appuyez sur le bouton de fonction correspondant à
in .
Tournez la “molette de réglage/d’ajustement” pour régler le mode de la Lampe
Pilote (OFF/01-09).
35

Fr
MANUEL D’UTILISATION
Fonctions Personalisées
Le flash de studio Phottix Indra500 TTLoffre un grand nombre de fonctions personnalisées. Pour les éditer (en bas):
1. Appuyez sur le bouton de fonction 4 et sur la „molette de réglage/d’ajustement” et maintenez-les pendant 3 secondes pour afficher l’écran des Fonctions
Personnalisées (C.Fn.)
Tableau des Fonctions Personnalisées :
2. Appuyez sur le bouton de fonction 1 ou sur le bouton de fonction 2 pour
choisir entre les fonctions personalisées de 00 à 03.
3. Tournez la „molette de réglage/d’ajustement” pour changer la fonction.
4. Appuyez sur le bouton de fonction 4 pour sortir du menu des Fonctions Personalisées.
Remplacement du tube flash:
1. Déconnectez le flash de studio Indra500 TTL de la source d’alimentation et
attendez environ 10 minutes.
2. Retirez le Réflecteur comme illustré ci-dessus.
3. Séparez délicatement le dôme de verre de sa fixation et retirez le dôme de
verre. (photo 9)
36
4. Tirez doucement le tube flash afin de le retirez des fentes de montage. (photo
10)
5. Insérez le nouveau tube flash. (photo 11)

Fr
MANUEL D’UTILISATION
6. Montez le dôme de verre. (photo 12)
7. Installez le réflecteur comme illustré ci-dessus.
Veuillez noter: Nous vous conseillons de porter des gants lorsque vous manipulez le tube éclair (lors d’un remplacement de tube par exemple).
Restaurer les Paramètres d’Usine
Le flash de studio Indra500 TTL peut être restauré aux paramètres d’usine.
Appuyez sur le bouton de fonction 1 et sur la „molette de réglage/d’ajustement”
et maintenez-les pendant 3 secondes. Tous les réglages seront restaurés aux
paramètres d’usine.
Caractéristiques techniques
Puissance maximale: 500Ws
Niveaux de puissance réglables: 8 niveaux (4-500Ws)
Réglage de la puissance: par incréments de 1/3 ou pleine puissance
Modes du flash: TTL Auto, Manuel (M), Multi
Light angle: 60°
Nombre Guide: 45/147.6 (ISO100, mètres/pieds)
Température de couleur: 5600±200K(Température de couleur peut varier à
faible
Durée de l’éclair: t=1 1/250s - 1/12000s
Flash Stroboscopique: Fréquence: 1-100Hz, Nombre d’éclairs: 1-100 fois
HSS & SCS: supportés*
Temps de recharge (à puissance 1/1; la diode s’allumera en rouge)
Adaptateur secteur Phottix Indra AC: Un/Deux flashs: 0.9s/1.7s
Alimentation externe Phottix Indra (10AH): Mode H Un/Deux flashs: 1s/2.3s
Mode S Un/Deux flashs: 1.4s/5.4s
Alimentation externe Phottix Indra (5AH): Mode H Un/Deux flashs: 1.4s/4.9s
Mode S Un/Deux flashs: 2.6s/10.9s
Affichage de l’information sut le flash de studio
En appuyant sur une combinaison de boutons vous pouvez vérifier l’information sur le flash de studio Phottix Indra500 TTL: matériel, logiciel, bibliothèque
de symboles et numéro de série.
1. Appuyez sur le bouton de fonction 2 et sur la „molette de réglage/d’ajustement” et maintenez-les pendant 3 secondes. L’écran affichera des informations
sur le matériel, le logiciel, la bibliothèque d’icônes et le numéro de série du produit.
2. Appuyez sur n’importe quel bouton pour annuler cet affichage et activer
l’écran standard.
3. Le déclenchement du flash de studio, l’utilisation de la mise au point ou la
prise de photos lors de l’affichage des informations sur le flash de studio provoquera l’annulation de cet affichage et l’activation de l’écran standard.
Modifications sur le condensateur du flash
Si le flash de studio Indra500 n’est pas utilisé pour une longue période, des
changements physiques auront lieu sur le condensateur du flash. Allumez le
flash pendant 10 minutes minimum tous les trois mois pour éviter ces changements physiques.
Puissance d’entrée:
Adaptateur secteur Phottix Indra AC: AC 220V/110V, 50HZ/60HZ
Alimentation externe Phottix Indra: 14.8V/5Ah, 400 éclairs de pleine puissance
14.8V/10Ah, 800 éclairs de pleine puissance
Puissance de la Lampe Pilote: enviro 4.5W
Modes de la Lampe Pilote: OFF, Manuel (1-9 niveaux)
Méthode de communication sans fil: impulsions optiques et signal radio
Canaux: 4
Modes de réception sans fil: Odin-C, Odin-N, Strato II, Opt-Slave, RX OFF (le
flash ne peut être déclenché que via le port de synchronisation 3.5mm)
Portée de la réception (Approx.):
Radio: 100m+
Écran: écran LCD 320X240 TFT, 3 couleurs possibles
Réglage du capteur d’écran LCD: détection automatique de la direction et
rotation de 180 degrés en fonction de cette direction
Méthode de dissipation de chaleur: Activation automatique en fonction de la
température
Confirmation du recyclage: peut être activée ou désactivée
Port de synchronisation: mini port 3.5mm
Mise à jour du firmware: la misa à jour se fait via le port mini USB
Dimensions: Diamètre: 180mm, Longueur: 266mm
Poids: 2.1kg (sans le câble de l’alimentation du flash)
Veuillez noter: Les spécifications du produit et le design extérieur peuvent être
modifiés sans préavis.
*avec les appareils compatibles
37

Gracias por haber comprado
un producto Phottix
Es
MANUAL DE INSTRUCCIONES
Atención: Antes de usar el flash de estudio Phottix Indra500 TTL lea detenidamente este manual del usuario.
La unidad Phottix Indra500 TTL es un flash de estudio alimentado por baterías y
corriente de red; está dotada de un receptor incorporado del disparador inalámbrico Phottix y de una función de recepción inalámbrica de impulsos ópticos.
Garantiza los modos de medición a través del objetivo (TTL), manual y múltiple
estrobóscopico, así como funciones de sincronización de alta velocidad y sincronización para la segunda cortinilla. El flash de estudio Phottix Indra500 TTL
es compatible con múltiples productos de la marca Phottix disponibles en el
mercado.
Instrucciones de seguridad
●
En el flash de estudio Indra500 se encuentran los elementos electrónicos bajo alta tensión. El flash Indra500 no debe desmontarse ni repararse.
Conservar el producto en lugar inaccesible a los niños.
●
Nunca usar este producto en las proximidades de gases inflamables,
solventes ni en un ambiente donde existan descargas eléctricas.
●
Comprobar si durante la carga y el uso, todos los enchufes y cables
están conectados de modo seguro.
●
Antes de sustituir el flash desconectar la lámpara de estudio Indra500
TTL de la fuente de alimentación por 10 minutos. ¡Tener cuidado! El flash
puede calentarse hasta altas temperaturas.
●
No tocar el puerto externo y comprobar si no está en contacto con
objetos metálicos, ya que tal situación puede causar descargas eléctricas
y, como consecuencia, conllevar a lesiones graves.
●
Los parámetros de la fuente externa de alimentación no deben exced-
er las especificaciones técnicas indicadas en este manual.
●
La fuente externa de alimentación debe usarse en un ambiente bien
ventilado. No se debe usar este producto en condiciones de alto contenido de polvo e impurezas.
su uso. Todavía puede estar calentada y crear peligro de quemaduras.
●
Para obtener más información sobre la eliminación o reciclaje del flash
de estudio Phottix Indra500 TTL consultar a las autoridades correspondientes.
Índice
Partes y funciones …...........................................................…... 38
Modos del flash…....................................................................... 44
Modos de la recepción inalámbrica............................................45
Funciones no estándares........................................................... 48
Especificaciones técnicas........................................................... 49
Partes
Vista entera
1. Protección frontal
2. Orificio para el parasol
3. Clip de cierre rápido
4. Manilla
5. Puerto de sincronización 3,5 mm
6. Puerto de salida USB
7. Puerto de alimentación externa
8. Palanca de regulación del ángulo
9. Columna de fijación
10. Tornillo del aro
●
Este producto no es resistente al agua. Debe protegerse contra las pre-
cipitaciones y alta humedad.
●
No limpiar el producto con solventes orgánicos o fluidos a base de al-
cohol.
●
No colocar ningún objeto opaco en frente del cabezal del flash de estudio durante el disparo. La energía térmica emitida por el dispositivo
Indra500 puede causar el incendio de objetos o daño del flash.
●
Al usar la lámpara de estudio deben seguirse los principios de seguridad. No encender el dispositivo Indra500 dirigido directamente a los ojos
de personas o animales que se encuentran en sus proximidades, pues
esto puede causar daños oculares y/o conllevar a la pérdida de la visión.
●
No dejar el flash de estudio en un lugar de alta temperatura de aire
(rayos solares directos, coche cerrado, etc.).
Vista trasera
11. Pantalla LCD
12. Botón de función 1
13. Botón de función 2
14. Botón medición / preparado
15. Selector de regulación / ajuste
16. Interruptor de alimentación
17. Interruptor de luz de modelado
18. Botón de función 3
19. Botón de función 4
20. Sensor de señales ópticas
Vista frontal
●
Cuando del dispositivo salga humo u olor extraño, desconecte el dispositivo inmediatamente con el botón de alimentación.
●
Si el flash de estudio no se usa por un tiempo prolongado, apagar su
alimentación.
●
Antes de usar el flash de estudio retirar de ella la protección frontal. En
otro caso, la protección frontal se deformará debido a altas temperaturas
emitidas por la lámpara de estudio.
●
Tener cuidado al tocar el cabezal de la lámpara de estudio después de
38
21. Abertura de fijación
22. Cúpula de vidrio
23. Luz de modelado LED
24. Flash
25. Reflector

Puerto de alimentación externa
El flash de estudio Indra500 TTL puede conectarse al alimentador o a la batería
de red Phottix Indra o a través del puerto de alimentación externa.
Vale la pena recordar:
Es
MANUAL DE INSTRUCCIONES
Al conectar la fuente externa de alimentación se deben usar solo los cables
de alimentación del flash Phottix destinados al uso con el flash de estudio
Indra500 TTL.
Cómo conectar el dispositivo Indra500 a la fuente
de alimentación externa
Uso de la batería Phottix Indra
1. Colocar un extremo del cable de la alimentación del flash suministrado en el
puerto de la fuente externa de alimentación de la lámpara de estudio Indra500
TTL. (Ver la lustración 1)
Atención: Para colocar el cable correctamente es necesario colocar en línea
los puntos rojos que se encuentran en el cable y el puerto.
ilustración 3
3. Conectar el alimentador de red a la fuente de alimentación de red.
4. Encender el interruptor principal de alimentación y el interruptor inicial del
alimentador de red.
5. Encender la alimentación con el interruptor que se encuentra en el flash de
estudio Phottix Indra500 TTL.
Desconexión del dispositivo Indra500 de la fuente
de alimentación externa
Desconexión de la batería Phottix Indra
1. Apagar la alimentación con el interruptor localizado en el flash de estudio
Indra500 TTL.
2. Colocar el interruptor inicial de la batería en la posición OFF [Descon.].
3. Desconectar el cable de alimentación del flash según las instrucciones en la
ilustración 4.
ilustración 1
2. Colocar el otro extremo del cable en el puerto de salida de la batería Phottix
Indra. (Ver la ilustración 2)
ilustración 2
3. Encender el interruptor del acumulador.
4. Encender la alimentación con el interruptor que se encuentra en el flash Phottix Indra500 TTL.
Uso del alimentador de red Phottix Indra
1. Colocar un extremo del cable suministrado para la alimentación del flash en
el puerto de la fuente externa de la lámpara Indra500 TTL. (Ver la ilustración 1)
Atención: Para colocar el cable correctamente es necesario colocar en línea
los puntos rojos que se encuentran en el cable y el puerto.
ilustración 4
4. Desconectar el otro extremo del cable según las instrucciones en la ilustración 6.
Desconexión del alimentador de red Phottix Indra
1. Apagar la alimentación con el interruptor localizado en el flash de estudio
Indra500 TTL.
2. Apagar el interruptor principal de alimentación y el interruptor inicial del alimentador de red.
Desconectar el cable de alimentación del flash según las instrucciones en la ilustración 5.
2. Colocar el otro extremo del cable en el puerto de salida del alimentador de
red Phottix Indra. (Ver la ilustración 3)
39
ilustración 5
3. Desconectar el cable de alimentación del flash de la lámpara Phottix Indra
(ilustración 6).

ilustración 6
Es
MANUAL DE INSTRUCCIONES
Fijación del softbox
El flash de estudio Phottix Indra500 TTL está dotado de la fijación de tipo Bowens. La fijación de los softbox es idéntica que en el caso de fijación y desconexión del reflector (ver instrucciones anteriores).
Fijación: Colocar en línea el anillo de montaje rápido del softbox y el orificio de
fijación del dispositivo Indra500. Colocar y girar el adaptador en sentido contrario de las agujas del reloj, según la flecha indicada en el esquema, hasta el
momento en que se oiga un click. (Ver la ilustración 7)
Fijación y desconexión del reflector
Para fijar el reflector
1. Con una mano sujetar el dispositivo Indra500.
2. Con otra mano colocar en línea el reflector y la abertura de fijación.
3. Colocar y girar el reflector en sentido horario, según la flecha mostrada en
el esquema hasta que se oiga un click. Esto significa que el reflector está bloqueado. (ver la ilustración 7)
ilustración 7
4. Usando el parasol comprobar si la abertura de paso para su fijación en el
reflector está colocada en línea con el orificio del parasol de la lámpara de
estudio Indra.
Para desconectar el reflector
1. Con una mano presionar el clip de cierre rápido.
2. Con otra mano girar el reflector en sentido contrario de las agujas del reloj,
según la flecha indicada en el esquema y desconectarlo del dispositivo Indra500. (Ver la ilustración 8)
Desconexión: Empujar el clip de cierre rápido hacia atrás y girar el adaptador
en sentido antihorario para desconectarlo del dispositivo Indra500. (Ver la ilustración 8)
Puertos de sincronización y USB
1. El disparador del flash Phottix (Phottix Odin TTL, Strato II Multi i Strato TTL) o
la cámara pueden conectarse al puerto de sincronización 3,5 mm por medio de
un cable compatible. El dispositivo será capaz de realizar el disparo del flash de
estudio Indra500 TTL.
2. El puerto USB sirve para actualizar el software del dispositivo. La información
y las instrucciones relativas al software se dispondrán en las páginas web de la
marca Phottix.
Por favor tenga en cuenta:
Solo se puede usar el modo manual cuando se conecta un disparador remoto
de flash (trigger) a través del puerto sincro.
Canales de transmisión
El sistema inalámbrico del flash de estudio Phottix Indra500 TTL dispone de cuatro canales: 1, 2, 3 y 4. En el caso del modo de recepción inalámbrica se debe
ajustar el mismo canal para el flash de estudio Indra500 TTL y el dispositivo disparador o los flashes utilizados para el disparo del flash de estidio Indra.
Función Quick Flash
ilustración 8
Nota: Por favor tenga cuidado en mantener el reflector paralelo a la montura
del flash de estudio al extraerlo para evitar que toque la protección de vidrio y
se provoquen daños.
Uso del orificio para el parasol
El flash de estudio Phottix Indra500 TTL está dotado de un orificio para el parasol localizado en la parte superior del dispositivo, para facilitar su fijación. El
uso del orificio para el parasol es simple: colocar la vara del parasol en el orificio
del flash de estudio Phottix Indra. Enroscar el tornillo en el orificio para apretar
la vara del parasol.
40
La función Quick Flash permite disparar el flash de estudio, si no está enteramente cargada, o sea, el diodo LED sigue intermitente en verde. En el caso de la
función Quick Flash, los tiempos de procesamiento son menores – esto ayuda a
realizar fotos desde una distancia muy corta.
La función Quick Flash puede usarse en el caso de modos en serie. El Menú permite activar o desactivar la función Quick Flash en el caso del trabajo continuo
del obturador (ver la sección Menú abajo).
Vale la pena recordar:
En el caso de la función Quick Flash, la prioridad es el disparo. El resultado de
la distancia excesiva de la cámara puede ser la subexposición.
Bracketing de exposición
La función de bracketing de exposición del destello (FEB) puede usarse para
cambiar automáticamente la potencia del destello en una serie de fotos consecutivas. La cámara registrará una serie de imágenes de diferente grado de la
exposición. La función de secuencia de exposición del flash (FEB) es útil al hacer

Es
MANUAL DE INSTRUCCIONES
fotos no posadas, así como en el caso de capturas en varias condiciones de iluminación para asegurar la iluminación adecuada al realizar la foto. La función de
secuencia de exposición del flash (FEB) podrá usarse también en el caso de fotos
hechas en la técnica HDR.
La función de bracketing de exposición del destello (FEB) es soportada, sin embargo, no puede ajustarse en el menú del flash. Esta función está disponible si
el disparador o la cámara están dotados de la función de bracketing (FEB). Para
obtener más información sobre la función de bracketing del flash, lea el manual
de uso de la cámara.
Tabla de compatibilidad
Bloqueo de exposición de la lámpara – FEL/FV
Lock
La función de bloqueo de exposición del flash (FEL, así como FV Lock para las
cámaras Nikon) puede usarse para bloquear la exposición del flash antes de disparar la foto. Es útil si se usa la función de medición puntual manual en el caso
de una captura de diferentes condiciones de iluminación. Para el funcionamiento en modo de medición por el objetivo (TTL), para poder usar esta función, se
debe presionar el botón de función de la cámara. Para obtener más información
sobre esta función y la operación del bloqueo de exposición del flash, lea el
manual de uso de la cámara.
La función de bloqueo de exposición del flash (FEL) es soportada, sin embargo, no puede ajustarse en el menú del flash. Esta función está disponible si el
disparador o la cámara están dotados de la función de bloqueo de exposición
del flash (FEL). Para obtener más información sobre la función de bloqueo de
exposición de la lámpara, lea el manual de uso de la cámara.
Sincronización para la segunda cortinilla del obturador - SCS
La función de sincronización para la segunda cortinilla de la lámpara Phottix
Indra500 TTL enciende el flash de estudio al final, y no al principio de la exposición, ayudando así a capturar efectos especiales al aplicar tiempos más largos de exposición.
Sincronización de alta velocidad – HSS/Auto FP
El modo de sincronización de alta velocidad (HSS) sirve para realizar fotos con
una velocidad más alta que el tiempo ajustado de sincronización del destello de
la cámara (normalmente 1/200-1/250 s). Esto es útil al usar el modo de prioridad
de apertura y en las condiciones de iluminación natural limitada. Los efectos
de trabajo en modo de sincronización de alta velocidad (HSS) pueden variar en
función de los modelos de cámaras. Para obtener más detalles, lea el manual de
uso de la cámara.
Vale la pena recordar:
1. La función de sincronización de alta velocidad (HSS) es soportada por el
flash Phottix Indra500 TTL, sin embargo, no puede ajustarse en el propio flash.
2. La selección de la cámara, disparador del flash y modo de recepción
tiene una influencia importante en el funcionamiento de la función de sincronización de alta velocidad (HSS). Para obtener los mejores resultados de
trabajo en modo de sincronización de alta velocidad (HSS) es recomendable
usar los disparadores recomendados del flash Phottix. Para obtener más detalles lea la tabla de compatibilidad a continuación y los manuales de uso del
disparador del flash y de la cámara.
3. La función HSS no funcionará en modos Manual y Multi Estroboscópico.
4. El uso frecuente del modo HSS acortará la vida del tubo de destello.
Vale la pena recordar:
1. La función de sincronización para la segunda cortinilla del obturador (SCS)
es soportada por el flash de estudio Phottix Indra500 TTL, sin embargo, no se
puede ajustar en el propio flash. En vez de ello, la función de sincronización
para la segunda cortinilla del obturador (SCS) debe ajustarse en la cámara
utilizada o en el disparador. Para conocer más detalles lea los manuales de
uso del disparador del flash y de la cámara utilizados.
2. La función de sincronización para la segunda cortinilla (SCS) no funcionará
en modo de destello estroboscópico múltiple.
Botón medición / preparado
1. Al presionar el botón de medición se disparará el flash de estudio. Se puede
usar este botón en el modo manual.
2. Este botón sirve también para indicar la disposición del flash. El testigo LED
en el botón parpadeará en verde, si el nivel de carga de la lámpara es mínimo. Si
parpadea en rojo, significará la carga entera.
5. Los protocolos de flash de Nikon pueden limitar la velocidad máxima de
sincronización de algunos cuerpos de cámara Nikon.
41

Menú
Es
MANUAL DE INSTRUCCIONES
42

Ajustes del menú
Los cuatro botones de función situados debajo de la pantalla LCD sirven para
seleccionar sus funciones correspondientes. Puede modificarse cada ajuste, si
la función seleccionada está iluminada. En función de los ajustes del color de la
pantalla LCD serán: color rojo, blanco o amarillo (ajuste del color de la pantalla
LCD y ajuste del sensor de la pantalla LCD se dispondrán en la lista del menú).
1. Girar el selector de regulación / ajuste para cambiar el ajuste.
2. Una vez terminado, presionar el botón de función correspondiente de la opción o el selector de regulación / ajuste para confirmar y salir del menú.
Pantalla LCD
Modos del flash:
Modos de recepción
inalámbrica: Odin-C,
Odin-N,
Strato II,
Opt-Slave
Compensación
de exposición del
flash / Valor de
salida del destello
medición por el objetivo (TTL),
manual (M), múltiple (Multi)
Es
MANUAL DE INSTRUCCIONES
Flash rápido:
: Activado
: Desactivado
Señal acústical
: ON [Con.]
: OFF [Descon.]
Pantalla del menú
Canal de
recepción
inalámbrica
Grupo de recepción inalámbrica
Menú: más detalles se
encuentran en la parte
relativa a las funciones del
menú
Lámpara de modelado:
Manual [Manual] 01-09
stop, OFF [Descon.]
43

Es
MANUAL DE INSTRUCCIONES
Funciones de memorización automática
El dispositivo Indra500 TTL guarda los ajustes del flash de estudio. Los ajustes
anteriores se recuperarán cada vez al encender el dispositivo.
Destello de modelado
1. Al presionar la vista de la profundidad de campo de la cámara (si está disponible) se activará el funcionamiento continuo del flash de estudio de duración de
1 segundo. La función del destello de modelado permite comprobar los efectos
luminosos y el balance de blancos en el objeto. (Para obtener más información
sobre el funcionamiento del botón de profundidad de campo y sus funciones,
lea el manual de uso de la cámara.)
2. La función del destello de modelado está disponible en todos los modos, o
sea, medición por el objetivo (TTL), manual (Manual) y múltiple (Multi).
Luz de modelado
El dispositivo Phottix Indra500 TTL está dotado de función de la luz de modelado LED. Es útil tanto en el caso de previsualización de la configuración de la iluminación, como de ayuda en el caso de enfoque en entornos poco iluminados.
Función de la luz de modelado opera en dos modos:
1. Modo manual (Manual): Están disponibles 9 niveles de intensidad, en el rango de 01 hasta 09.
Con el selector de la luz de modelad
1. Presionar el selector de la luz de modelado para desactivar la función de la
luz de modelado.
2. Después de activar la función de la luz de modelado en el display LCD se
iluminará el ícono de la luz de modelado
3. Girar el selector de regulación / ajuste para ajustar el modo de función de la
luz de modelado para manual (rango 01-09) o desactivado.
4. Presionar el selector de regulación / ajuste para confirmar los ajustes o salir
del modo de modificación.
.
Modos de destello
El flash de estudio Phottix Indra500 TTL dispone de tres modos de destello: automático con medición por el objetivo (TTL Auto), manual (Manual) y múltiple
(Multi).
Modo de destello con medición por el objetivo
Si el flash de estudio Phottix Indra500 TTL está en modo de medición por el
objetivo (TTL), la lámpara iluminará en modo de destello y con la potencia del
destello seleccionada, según los ajustes del disparador del flash Phottix Odin
u otro compatible con los dispositivos de la marca Phottix que disponen de la
función de control de la potencia.
2. Modo desconectado (OFF): La luz de modelado se desconectará.
Nota:
1. Al disparar el flash de estudio la luz de modelado no se desactivará automáticamente.
2. El uso de la función de la luz de modelado consume la gran parte de alimentación de la batería.
Regulación de intensidad de la luz de modelado:
La luz de modelado puede activarse / desactivarse con la opción del menú
o del conmutador de la luz de modelado .
Con la opción del menú:
1. Presionar el botón de función 4 hasta que aparezca
LCD.
2. Presionar el botón de función correspondiente a
3. Una vez seleccionada la opción de la luz de modelado
nará en el display LCD.
4. Girar el selector de regulación / ajuste para ajustar el modo de función de
la luz de modelado para manual (rango 01-09) o desconectado.
5. Presionar el botón de función correspondiente a
regulación / ajuste para confirmar el ajuste y salir del modo de modificación.
en el display
.
ésta se ilumi-
o el selector de
Compensación de exposición del flash – FEC
El flash de estudio Phottix Indra500 TTL puede usarse para regular la compensación de exposición del flash (FEC) en el rango de -3 hasta +3 en pasos de 1/3.
Es útil en ambientes donde se requiera un reajuste de los parámetros del sistema de medición por el objetivo.
Vale la pena recordar:
1. Si tanto el dispositivo disparador (si está disponible el modo TTL), como
el flash de estudio trabajan en modos de medición por el objetivo (TTL) y
se ha ajustado la regulación de exposición en ambos dispositivos, el valor
definitivo de la exposición será la suma de dos valores de compensación de
la exposición del flash.
2. Si el dispositivo disparador se ha ajustado en modo manual (si está disponible), y el flash de estudio en modo de medición por el objetivo (TTL) con el
valor de compensación de la exposición del flash, el valor de exposición del
flash se usará para calcular el valor inicial definitivo del flash.
Modo manual del destello
Para el trabajo en modo manual del destello el flash de estudio se encenderá
una vez alcanzados los niveles de potencia ajustados. El flash estudio Phottix
Indra500 TTL puede regularse en el rango de 1/128 hasta 1/1 para los incrementos progresivos en pasos 1/3 (1/128, 1/64, 1/32, 1/16, 1/8, 1/4, ½ y 1/1). Los
modos del destello y de la potencia del flash de estudio no pueden ajustarse ni
controlarse en el dispositivo disparador.
44

Es
MANUAL DE INSTRUCCIONES
Modo de destellos estroboscópicos múltiples
El modo de destellos estroboscópicos múltiples activado permite realizar una
serie de destellos rápidos. El número, la frecuencia y la potencia de estos destellos pueden programarse en el flash de estudio Phottix Indra500 TTL. El modo de
destellos múltiples es útil al capturar un objeto que se mueve en la misma foto,
así como en el caso de otros efectos especiales.
En el modo de destellos estroboscópicos múltiples activo el flash de estudio
se encenderá con la potencia del destello, número de destellos (1-100) y frecuencia (1-100 Hz) programados manualmente. La potencia del destello puede
ajustarse en el rango de 1/128 hasta 1/4 para los incrementos progresivos en
pasos de 1/1 (1/128, 1/64, 1/32, 1/16, 1/8, i 1/4). Los modos del destello y de la
potencia del flash de estudio no pueden ajustarse ni controlarse en el dispositivo disparador.
Vale la pena recordar:
1. El uso excesivo del modo de flash estroboscópico múltiple puede sobrevenir en sobrecalentamiento o incluso daños a la unidad de flash.
2. En el caso de sobrecalentamiento se prolongará el tiempo de carga de la
unidad de flash. Si la temperatura continuase aumentando, el flash dejaría
de disparar.
Modo de recepción inalámbrica
El flash de estudio Phottix Indra500 TTL dispone de cinco modos de recepción
inalámbrica: Odin-C, Odin-N, Strato II, Opt-Slave y RX OFF. Lea la información a
continuación para conocer los detalles.
5. Presionar el botón de función correspondiente a
en
para hacer la regulación desde el nivel de modo de medición por el objetivo,
manual o múltiple.
Modo de recepción Odin-N
Este modo permite disparar el flash de estudio Indra500 TTL por medio del disparador Phottix Odin TTL TCU para las cámaras Nikon o el disparador incorporado Phottix Mitros+ TTL versión Nikon en modo ODIN TX. Para que funcionen
correctamente deben estar ajustados para el mismo canal y el mismo grupo.
Modo de uso:
1. Presionar el botón de función 4 o el selector de regulación / ajuste hasta
que aparezca
2. Presionar el botón de función correspondiente a
recepción inalámbrica se visualizará en el display LCD.
3. Girar el selector de regulación / ajuste para cambiar el modo inalámbrico
para Odin-N.
4. Presionar el selector de regulación / ajuste para confirmar el ajuste.
5. Presionar el botón funcional correspondiente a
hacer la regulación desde el nivel de medición por el objetivo, manual o múltiple.
en el display LCD.
. La función de
en
para
Modo de recepción Strato II
Modos del destello soportados
Modo de recepción Odin-C
Este modo permite disparar el flash de estudio Indra500 TTL por medio del disparador Phottix Odin TTL TCU para las cámaras Canon o el disparador incorporado Phottix Mitros+ TTL versión Canon en modo Odin TX. Para que funcionen
correctamente deben estar ajustados para el mismo canal y el mismo grupo.
Modo de uso:
1. Presionar el botón de función 4 o el selector de regulación / ajuste hasta
que aparezca
2. Presionar el botón de función correspondiente a
recepción inalámbrica se visualizará en el display LCD.
3. Girar el selector de regulación / ajuste para cambiar el modo inalámbrico
para Odin-C.
4. Presionar el selector de regulación / ajuste para confirmar el ajuste.
45
en el display LCD.
. La función de
Este modo permite disparar el flash de estudio Indra500 TTL por medio del disparador Phottix Odin TTL TCU para las cámaras Canon/Nikon o el disparador incorporado Phottix Mitros+ TTL versión Canon/Nikon en modo Odin TX, emisor
Phottix Strato TTL versión Canon/Nikon o emisor Phottix Strato II versión Canon/Nikon. Para que funcionen correctamente deben estar ajustados para el mismo canal y el mismo grupo.
Nota:
Las funciones de sincronización de alta velocidad (HSS), sincronización a la
segunda cortinilla (SCS) y medición por el objetivo (TTL) no están soportadas
en modo Strato II.
Modo de uso:
1. Presionar el botón de función 4 o el selector de regulación / ajuste hasta
que aparezca
2. Presionar el botón de función correspondiente a
en el display LCD.
La opción de
.
función de recepción se visualizará en el display LCD.
3. Girar el selector de regulación / ajuste para cambiar el modo inalámbrico
para Strato II.
4. Presionar el selector de regulación / ajuste para confirmar el ajuste.
5. Presionar el botón funcional correspondiente a
en
para
hacer el ajuste desde el nivel manual o múltiple.
Modo de disparo con el destello Opt-Slave
Este modo permite disparar el flash de estudio Indra500 TTL en el caso de la
presencia próxima de otros flashes o lámparas de estudio disparados.

Es
MANUAL DE INSTRUCCIONES
Nota:
Los predestellos procedentes de los flashes alrededor que funcionan en
modo de medición por el objetivo (TTL) dispararán el dispositivo Phottix Indra, si éste trabaja en modo Opt-Slave. Tener cuidado al usar este modo para
que los flashes TTL alrededor no disparen el flash de estudio Phottix Indra
antes de que el usuario se prepare.
Modo de uso:
1. Presionar el botón de función 4 o el selector de regulación / ajuste hasta
que aparezca
2. Presionar el botón de función correspondiente a
en el display LCD.
.La opción de
función de recepción inalámbrica se iluminará en el display LCD.
3. Girar el selector de regulación / ajuste para cambiar el modo inalámbrico
para Opt-Slave.
4. Presionar el selector de regulación / ajuste para confirmar el ajuste.
Modo RX OFF
En este modo la función de recepción inalámbrica no está activa.
Modo de uso:
1. Presionar el botón de función 4 o el selector de regulación / ajuste hasta
que aparezca
2. Presionar el botón de función correspondiente a
función de recepción inalámbrica se iluminará en el display LCD.
3. Girar el selector de regulación / ajuste para cambiar el modo inalámbrico
para RX OFF.
4. Presionar el selector de regulación / ajuste para confirmar el ajuste.
5. Presionar el botón de función correspondiente a
para hacer la regulación desde el nivel manual o múltiple.
en el display LCD.
La opción de
.
en
Modos Odin-C/Odin-N/Strato II
Funciones en modo múltiple (Multi):
1. Presionar el botón de función correspondiente a
Girar el selector de regulación / ajuste para ajustar la potencia del destello en el
rango de 1/4 hasta 1/128-6 pasos.
2. Presionar el botón de función correspondiente a
el selector de regulación / ajuste para ajustar el modo de función de la luz de
modelado (OFF [Descon.]/01-09).
3. Presionar el botón de función correspondiente a
el selector de regulación / ajuste para ajustar el canal en el rango 1-4.
4. Presionar el botón de función correspondiente a
el selector de regulación / ajuste para ajustar el grupo (A, B o C).
5. Presionar el botón de función correspondiente a
el selector de regulación / ajuste para ajustar el color de la pantalla LCD (Classic
[Clásico], Dynamic [Dinámico], Elegant [Elegante]).
6. Presionar el botón de función correspondiente a
el selector de regulación / ajuste para ajustar el número de destellos en el rango
46
en
en
en
en
en
en
. Girar
. Girar
. Girar
Girar
.
. Girar
de 1 - 100 veces (basándose en la frecuencia o el valor inicial del destello).
7. Presionar el botón de función correspondiente a
en
. Girar
el selector de regulación / ajuste para ajustar la frecuencia del destello en el
rango de 1 - 100 Hz.
8. Presionar el botón de función correspondiente a
en
.
el selector de regulación / ajuste para ajustar el sensor del display LCD (Regular
[Normal], Upside-down [Boca abajo] y Auto by sensor [Automático por sensor]).
9. Presionar el botón de función correspondiente a
en
, opción de modo en serie se iluminará en la pantalla LCD. Girar el selector de regulación / ajuste para activar / desactivar el modo en serie.
10. Presionar el botón de función correspondiente a
en
Girar el selector de regulación / ajuste para activar / desactivar el sonido.
Modos Odin-C/Odin-N/
Funciones en modo de medición por el objetivo (TTL):
1. Presionar el botón de función correspondiente a
Girar el selector de regulación / ajuste para ajustar el valor de compensación de
exposición de la lámpara en el rango de -3.0EV hasta +3.0EV.
2. Presionar el botón de función correspondiente a
el selector de regulación / ajuste para ajustar el modo de función de la luz de
modealdp (OFF [Descon.]/01-09).
3. Presionar el botón de función correspondiente a
el selector de regulación / ajuste para ajustar el canal en el rango de 1-4.
4. Presionar el botón funcional correspondiente a
selector de regulación / ajuste para ajustar el grupo (A, B o C).
5. Presionar el botón de función correspondiente a
el selector de regulación / ajuste para ajustar el color de la pantalla LCD (Classic
[Clásico], Dynamic [Dinámico], Elegant [Elegante]).
6. Presionar el botón de función correspondiente a
el selector de regulación / ajuste para ajustar el sensor del display LCD (Regular
[Normal], Upside-down [Boca abajo] y Auto by sensor [Automático por sensor]).
7. Presionar el botón de función correspondiente a
ción de modo en serie se iluminará en la pantalla LCD. Girar el selector de regulación / ajuste para activar / desactivar el modo en serie.
.
8. Presionar el botón de función correspondiente a
rar el selector de regulación / ajuste para activar / desactivar el sonido.
en
en
en
en
en
en
en
en .
. Girar
. Girar
. Girar el
. Girar
. Girar
Modos Odin-C/Odin-N/Strato II
Funciones en el modo (Manual):
1. Presionar el botón de función correspondiente a en
el selector de regulación / ajuste para ajustar la potencial del destello en el rango de 1/1 hasta 1/128 para los incrementos progresivos en pasos 1/3.
2. Presionar el botón de función correspondiente a
en . Girar
el selector de regulación / ajuste para ajustar el modo de función de la luz de
modelado (OFF [Descon.]/01-09).
3. Presionar el botón de función correspondiente a
en . Girar
el selector de regulación / ajuste para ajustar el canal en el rango de 1-4.
. Girar
Girar
.
. op-
. Gi-

Es
MANUAL DE INSTRUCCIONES
4. Presionar el botón de función correspondiente a en . Girar
el selector de regulación / ajuste para ajustar el grupo (A, B o C).
5. Presionar el botón de función correspondiente a
en . Girar
el selector de regulación / ajuste para ajustar el color de la pantalla LCD (Classic
[Clásico], Dynamic [Dinámico], Elegant [Elegante]).
6. Presionar el botón de función correspondiente a
en . Girar
el selector de regulación / ajuste para ajustar el sensor del display LCD (Regular
[Normal], Upside-down [Boca abajo] y Auto by sensor [Automático por sensor]).
7. Presionar el botón de función correspondiente a
en
opción de modo en serie se iluminará en la pantalla LCD. Girar el selector de
regulación / ajuste para activar / desactivar el modo en serie.
8. Presionar el botón de función correspondiente a
en
. Girar
el selector de regulación / ajuste para activar / desactivar el sonido.
Modos Opt-Slave/RX OFF
Funciones en modo manual (Manual):
1. Presionar el botón de función correspondiente a en .
Girar el selector de regulación / ajuste para ajustar la potencia del destello en el
rango de 1/1 hasta 1/128 para los incrementos progresivos en pasos 1/3.
5. Presionar el botón de función correspondiente a
en
el selector de regulación / ajuste para ajustar la frecuencia del destello en el
rango de 1 - 100 Hz.
6. Presionar el botón de función correspondiente a
en
el selector de regulación / ajuste para ajustar el sensor del display LCD (Regular
[Normal], Upside-down [Boca abajo] y Auto by sensor [Automático por sensor]).
7. Presionar el botón de función correspondiente a
en
opción de modo en serie se iluminará en la pantalla LCD. Girar el selector de
regulación / ajuste para activar / desactivar el modo en serie.
.
8. Presionar el botón de función correspondiente a
en
rar el selector de regulación / ajuste para activar / desactivar el sonido..
Notas:
Si el selector de regulación / ajuste o el correspondiente botón de función
no se presiona para confirmar el parámetro seleccionado, éste se confirmará
automáticamente en 10 segundos.
. Girar
. Girar
, la
. Gi-
2. Presionar el botón de función correspondiente a
en
. Girar
el selector de regulación / ajuste para ajustar el modo de función de la luz de
modelado (OFF [Descon.]/01-09).
3. Presionar el botón de función correspondiente a
en . Girar
el selector de regulación / ajuste para ajustar el color de la pantalla LCD (Classic
[Clásico], Dynamic [Dinámico], Elegant [Elegante]).
4. Presionar el botón de función correspondiente a
en
Girar
.
el selector de regulación / ajuste para ajustar el sensor del display LCD (Regular
[Normal], Upside-down [Boca abajo] y Auto by sensor [Automático por sensor]).
5. Presionar el botón de función correspondiente a
en
, opción de modo en serie se iluminará en la pantalla LCD. Girar el selector de regulación / ajuste para activar / desactivar el modo en serie.
6. Presionar el botón de función correspondiente a
en
. Girar
el selector de regulación / ajuste para activar / desactivar el sonido.
Modo RX OFF
Funciones en modo múltiple (Multi):
1. Presionar el botón de función correspondiente a
el selector de regulación / ajuste para ajustar la potencia del destello en el rango
de 1/4 hasta 1/128-6 pasos.
en
. Girar
2. Presionar el botón de función correspondiente a
en
el selector de regulación / ajuste para ajustar el modo de función de la luz de
modelado (OFF [Descon.]/Auto [Automático]/01-09).
3. Presionar el botón de función correspondiente a
en
el selector de regulación / ajuste para ajustar el color de la pantalla LCD (Classic
[Clásico], Dynamic [Dinámico], Elegant [Elegante]).
4. Presionar el botón de función correspondiente a
en
ajustar el número de destellos en el rango de 1-100 veces (basándose en la frecuencia y el valor inicial del destello).
47
. Girar
Girar
.
para

Funciones personalizadas
Es
MANUAL DE INSTRUCCIONES
El flash de estudio Phottix Indra500 TTL está dotado de una serie de funciones
personalizadas programables. Para modificar estas funciones se deben realizar
las siguientes operaciones (ver abajo):
1. Presionar y mantener presionado el botón de función 4 y el selector de regulación / ajuste por 3 segundos para ir a la pantalla del menú C.Fn.
2. Presionar el botón de función 1 o botón de función 2 para ver las posiciones
Tabla de funciones personalizadas
del menú – desde C.Fn 00 hasta 03.
3. Girar el selector de regulación / ajuste para cambiar las funciones dentro del
menú.
4. Presionar el botón de función 4 para salir del menú C.Fn.
Cambio de la lámpara de destello
1. Desconectar el flash de estudio Indra500 TTL de
la fuente de alimentación 10 minutos antes de proceder al cambio
de la bombilla de destello.
2. Desconectar el reflector de modo mostrado arriba.
3. Separar ligeramente la cúpula de vidrio de la fijación
por clip, desconectar la cúpula de vidrio. (Ilustración 9)
ilustración 9
48
4. Sujetar ligeramente la lámpara para extraerla del orificio con el clip.
(Ilustración 10)
ilustración 10

Es
MANUAL DE INSTRUCCIONES
5. Colocar la lámpara nueva en el orificio con el clip. (Ilustración 11)
ilustración 11
6. Fijar la cúpula de vidrio y colocar el orificio con el clip en línea. (Ilustración 12)
ilustración 12
7. Fijar el reflector de modo mostrado arriba.
Nota: por favor use guantes para no tocar directamente el tubo del flash al
reemplazarlo.
Especificaciones técnicas
Potencia máxima: 500W
Regulación de potencia: 8 niveles (4 – 500 W)
Regulación de potencia: En pasos de 1/3 o 1 diafragma
Modos del flash: Medición por el objetivo (TTL), Manual (M), Múltiple (Multi)
Ángulo de iluminación: 60º
Número guía: 45/147.6 (ISO100, m/ft)
Temperatura de color: 5.600±200 K (la temperatura de color puede variar en
ajustes de potencia bajos)
Tiempo del flash: t=1 1/250s - 1/12000s
Flas estroboscópico: Frecuencia: 1 - 100 Hz, Número de destellos 1 - 100 veces
Funciones HSS y SCS: Sí*
Tiempo de recarga (a potencia de flash 1/1; el indicador se iluminará en
rojo)
Adaptador AC Phottix Indra : Uno/ dos flashes: 0,9s/1,7s
Battery Pack Phottix Indra (10AH): Modo H Uno/ dos flashes: 1s/2,3s
Modo S Uno/ dos flashes: 1,4s/5,4s
Battery Pack Phottix Indra (5AH) Modo H Uno/ dos flashes: 1,4s/4,9s
Modo S Uno/ dos flashes: 2,6s/10,9s
Recuperación de ajustes originales
Se pueden recuperar los ajustes originales del flash de estudio Indra500 TTL.
Para ello, se deben presionar al mismo tiempo y mantener presionados el botón
de función 1 y el selector de regulación / ajuste por 3 segundos. Así se recuperarán todos los valores predefinidos.
Comprobación de la información relativa al flash
de estudio
Al presionar la combinación de botones se puede obtener la información relativa al flash de estudio Phottix Indra500 TTL sobre: Accesorios, software, biblioteca de íconos y número de serie del producto.
1. Presionar y mantener presionado el botón de función 2 y el selector de regulación / ajuste 3 por 3 segundos. En la pantalla aparecerá la información sobre
los accesorios, software, biblioteca de íconos y número de serie del producto.
2. Presionar cualquier botón para salir de la pantalla de información y volver al
menú inicial.
3. Al disparar el flash de estudio, usar la función de enfoque de la cámara o hacer
fotos cuando sea visualizada la información sobre la versión se saldrá de la pantalla de versión y volverá a la pantalla inicial del flash de estudio.
Alimentación:
Adaptador AC Phottix Indra: AC 220V/110V, 50HZ/60HZ
Battery Pack Phottix Indra: 14,8V/5Ah, 400 destellos a toda potencia
14,8V/10Ah, 800 destellos a toda potencia
Potencia de la luz de modelado: aprox. 4,5 W
Modos de la luz de modelado: OFF [Descon.], Manual [Manual] en el rango
de 1-9
Método de conexión inalámbrica: Frecuencias de radio e impulsos ópticos
Canales: 4
Modos de recepción inalámbrica: Odin-C, Odin-N, Strato II, Opt-Slave, RX OFF
(Se puede disparar solo a través del puerto de sincronización 3,5 mm)
Cobertura de recepción (aproximada):De radio: más de 100 m
Pantalla: Pantalla LCD 320X240 TFT, 3 ajustes de color de la pantalla
Ajuste del sensor de la pantalla LCD: Detección automática de la dirección y
giro de 180 grados de acuerdo con esta dirección
Método de dispersión del calor: Encendido automático en función de la
temperatura
Confirmación del procesamiento: Posibilidad de conexión o desconexión
Puerto de sincronización: minipuerto 3,5 mm
Actualización del software: La actualización del software se realiza a través
del minipuerto USB
Cambios del condensador del flash de estudio
Si el flash de estudio Indra500 no se usa por algún tiempo, en el condensador []
se producirán cambios físicos. Es recomendable encender el flash por al menos
10 minutos una vez a tres meses para prevenir tales cambios.
49
Dimensiones: Longitud: 266 mm
Diámetro: 180 mm
Peso: 2,1 kg (sin cable de alimentación de la lámpara de estudio)
Recuerde: Las especificaciones del producto y estructura externa están sujetas
a cambios sin previa notificación.
*En cámaras compatibles

Grazie per aver scelto un
prodotto del marchio Phottix
It
ISTRUZIONI D’USO
Attenzione: Prima dell’uso del flash da studio Phottix Indra500 TTL leggere attentamente il presente manuale d’istruzione.
Il flash Phottix Indra500 TTL è un flash da studio alimentato da accumulatori o
dall’alimentatore di corrente; è dotato di un ricevitore incorporato dello scatto
wireless Phottix e della funzione di ricezione wireless degli impulsi ottici. Garantisce le modalità TTL, manuale e multiplo stroboscopico, nonché la funzione di
sincronizzazione ad alta velocità (HSS) e di sincronizzazione sulla seconda tendina (SCS). Il flash da studio Phottix Indra500 TTL è compatibile con tanti prodotti
Phottix disponibili sul mercato.
Indicazioni di sicurezza
●
Nel flash da studio Indra500 si trovano elementi elettronici sotto alta
tensione. Non smontare, né provare a riparare il flash da studio Indra500.
Conservare lontano dalla portata dei bambini.
●
Non usare mail il prodotto nelle vicinanze di gas infiammabili, solventi
o in ambienti in presenza di scariche elettriche.
●
Controllare se durante la ricarica e l’uso tutte le spine e i cavi siano stati
collegati in modo sicuro.
●
Prima di sostituire la lampada flash, scollegare il flash da studio Indra500 TTL dalla fonte di alimentazione per 10 minuti. Procedere con
cautela! La lampada flash può raggiungere alte temperature.
●
Non toccare la porta di alimentazione esterna e controllare che non sia
a contatto con oggetti metallici – esiste il pericolo di scossa elettrica e, in
conseguenza, di lesioni gravi.
●
I parametri della fonte esterna di alimentazione non devono superare i
limiti della specifica tecnica, riportati nel presente manuale.
●
Per ottenere le informazioni sul corretto smaltimento del flash da
studio Phottix Indra500 TTL rivolgersi agli organi competenti.
Indice
Componenti e funzioni ….....................................................…..50
Modalità del flash........................................................................56
Modalità di ricezione wireless.....................................................57
Funzioni personalizzate............................................................. 60
Specifiche tecniche..................................................................... 61
Componenti
Vista completa
1. Coperchio anteriore
2. Staffa portaombrello
3. Serratura a molla con
attacco rapido
4. Impugnatura
5. Porta di sincronizzazione 3,5 mm
6. Porta di uscita USB
7. Porta di alimentazione esterna
8. Manico di regolazione
dell’angolo a nottolino
9. Colonna di fissaggio
10. Vite dell’anello di fissaggio
●
La fonte di alimentazione esterna deve essere usata in ambienti ben
ventilati. Non usare il prodotto in ambienti polverosi.
●
Questo prodotto non è resistente all’acqua. È necessario proteggerlo
contro gli agenti atmosferici e l’alta umidità.
●
Non pulire il prodotto con solventi organici, né liquidi a base di alcol.
●
Non mettere oggetti non trasparenti davanti alla testa del flash da studio durante lo scatto. L’energia termica emessa dal flash Indra500 può
incendiare oggetti o danneggiare il flash da studio.
●
Usando il flash da studio, attenersi alle norme di sicurezza. Non scattare
il flash Indra500 quando è diretto verso gli occhi delle persone o degli
animali che si trovano in prossimità – esiste il rischio di provocare lesioni
agli occhi e/o perdita della vista.
●
Non posizionare il flash da studio negli ambienti ad alta temperatura
d’aria (luce diretta dei raggi solari, in una macchina chiusa, ecc.)
●
Se dal flash fuoriesce il fumo o l’odore strano, spegnerlo immediatamente tramite il pulsante di alimentazione.
●
Se il flash da studio non viene utilizzato per un periodo prolungato,
scollegare l’alimentazione.
●
Prima di usare il flash da studio, togliere il coperchio anteriore, altrimenti il coperchio si può deformare in seguito alle alte temperature
dovute al flash da studio.
Vista posteriore
Vista anteriore
11. Display LCD
12. Pulsante di funzione 1
13. Pulsante di funzione 2
14. Pulsante test / pronto
15. Manopola di regolazione /
impostazione
16. Interruttore di alimentazione
17. Interruttore di luce modellante
18. Pulsante di funzione 3
19. Pulsante di funzione 4
20. Sensore di segnali ottici
21. Foro di fissaggio
22. Cupoletta di vetro
23. Luce modellante LED
24. Lampada flash
25. Riflettore
●
Procedere con cautela mentre si tocca la testa del flash da studio dopo
il suo uso. Può continuare ad essere calda e provocare ustioni.
50

Porta di alimentazione esterna
Il flash da studio Indra500 TTL può essere collegato all’alimentatore di corrente
Phottix Indra oppure all’accumulatore Phottix Indra attraverso la porta di alimentazione esterna.
It
ISTRUZIONI D’USO
Importante:
Collegando la fonte esterna di alimentazione usare soltanto i cavi di alimentazione del flash da studio Phottix, destinati per l’uso con il flash da studio
Indra500 TTL.
Collegamento del flash Indra500 alla fonte di alimentazione esterna
Uso dell’accumulatore Phottix Indra
1. Posizionare una delle estremità del cavo di alimentazione incluso nella porta
di alimentazione esterna del flash Indra500 TTL (vedi: fig. 1)
Attenzione: Per posizionare il cavo in modo corretto, mettere in linea i quattro
punti rossi situati sul cavo e sulla porta.
figura 3
3. Collegare l’alimentatore di corrente alla rete di alimentazione.
4. Accendere l’interruttore principale di alimentazione e il selettore di uscita
dell’alimentatore di corrente.
5. Accendere l’alimentazione tramite l’interruttore situato sul flash da studio
Phottix Indra500 TTL.
Scollegamento del flash Indra500 dalla fonte di
alimentazione esterna
Scollegamento dell’accumulatore Phottix Indra
1. Scollegare l’alimentazione tramite l’interruttore situato sul flash da studio
Indra500 TTL.
2. Mettere il selettore di uscita dell’accumulatore in posizione OFF [Spento].
3. Scollegare il cavo di alimentazione del flash secondo le istruzioni riportate
nella figura.
figura 1
2. Posizionare l’altra estremità del cavo nella porta di uscita dell’accumulatore
Phottix Indra. (vedi: fig. 2)
figura 2
3. Accendere l’interruttore dell’accumulatore.
4. Accendere l’alimentazione tramite l’interruttore situato sul flash da studio
Phottix Indra500 TTL.
Uso dell’alimentatore di corrente Phottix Indra
1. Posizionare una delle estremità del cavo di alimentazione incluso nella porta
di alimentazione esterna del flash Indra500 TTL. (vedi: fig. 1)
Attenzione:
punti rossi situati sul cavo e sulla porta.
Per posizionare il cavo in modo corretto, mettere in linea i quattro
figura 4
4. Scollegare l’altra estremità del cavo secondo le istruzioni riportate nella
figura 6.
Scollegamento dell’alimentatore di corrente Phottix Indra
1. Scollegare l’alimentazione tramite l’interruttore situato sul flash da studio
Indra500 TTL.
2. Disattivare l’interruttore generale di alimentazione e il selettore di uscita
dell’alimentatore di corrente. Scollegare il cavo di alimentazione del flash
secondo le istruzioni riportate nella figura 5.
2. Posizionare l’altra estremità del cavo nella porta di uscita dell’alimentatore di
corrente Phottix Indra. (vedi: fig. 3)
51
figura 5
3. Scollegare il cavo di alimentazione dal flash Phottix Indra (fig. 6).

figura 6
Fissaggio e scollegamento del riflettore
Per fissare il riflettore
1. Tenere il flash Indra500 con una mano.
2. Con l’altra mano posizionare il riflettore e il foro di fissaggio in linea.
It
ISTRUZIONI D’USO
Fissaggio di softbox
Il flash da studio Phottix Indra500 TTL è dotato di un fissaggio di tipo Bowens. Il
fissaggio dei softbox è identico al fissaggio e scollegamento del riflettore (vedi
di sopra).
Fissaggio: posizionare in linea la staffa ad aggancio rapido al softbox e il foro di
fissaggio del flash Indra500. Posizionare e girare l’adattatore in senso antiorario,
in direzione della freccia riportata nello schema, fino a sentire un click (vedi: fig.
7).
Scollegamento: spingere la serratura a nottolino con attacco rapido indietro
e girare l’adattatore in senso antiorario per scollegarlo dal flash Indra500 (vedi:
fig. 8).
Porte di sincronizzazione e USB
3. Posizionare e girare il riflettore in senso orario, in direzione della freccia riportata nello schema, fino a sentire un click. Da questo momento il riflettore è
bloccato (vedi: fig. 7)
figura 7
4. Con l’ombrello, controllare se il foro passante è in linea con il portaombrelli
del flash da studio Indra.
Per scollegare il riflettore
1. Con una mano premere sulla serratura a molla.
2. Con l’altra mano girare il riflettore in senso antiorario, in direzione della freccia
riportata nello schema e scollegarlo dal flash Indra500 (vedi: fig. 8).
1. I trigger Phottix (Phottix Odin TTL, Strato II Multi e Strato TTL) o la fotocamera
possono essere collegati alla porta di sincronizzazione 3,5 mm tramite un cavo
compatibile. In tal caso il dispositivo sarà in grado di provocare lo scatto del flash
da studio Indra500 TTL.
2. La porta USB serve per aggiornare il software. Le informazioni e le indicazioni
sul software verranno pubblicate sul sito web del marchio Phottix.
Nota:
È possibile utilizzare solo la modalità manuale (e non TTL) quando un trigger è
collegato tramite la porta di sincronizzazione.
Canali di trasmissione
Il sistema wireless del flash da studio Phottix Indra500 TTL è dotato di quattro
canali: 1, 2, 3 e 4. In caso di ricezione wireless è necessario impostare lo stesso
canale per il flash da studio Indra500 TTL e il trigger oppure le lampo usate per
far scattare il flash da studio Indra.
Funzione Quick Flash
La funzione Quick Flash permette di far scattare il flash da studio se questo non
è completamente carico, cioè il diodo LED continua a lampeggiare con la luce
verde. In caso di funzione Quick Flash i tempi di elaborazione sono più brevi, il
che facilita le riprese da vicino.
figura 8
Nota: Quando si rimuove il riflettore, si prega di non toccare la cupoletta di vetro di protezione per evitare di danneggiarlo.
Utilizzo della staffa portaombrello
Il flash da studio Phottix Indra500 TTL è dotato di una staffa portaombrello
situata nella parte superiore del flash. La staffa facilita il fissaggio dell’ombrello. Il suo uso è semplicissimo: posizionare il bastone dell’ombrello nella staffa
portaombrelli del flash da studio Phottix Indra. Avvitare la vite all’ombrello per
stringerlo al bastone.
52
La funzione Quick Flash può essere utilizzata in caso di modalità di serie. Il Menu
permette di attivare o disattivare la funzione Quick Flash soltanto se il lavoro
continuo dell’otturatore è attivo (vedi: sezione Menu di sotto).
Importante:
In caso di funzione Quick Flash la priorità è lo scatto. Se l’oggetto si trova a
troppa distanza dalla fotocamera, è possibile la sottoesposizione.
Bracketing dell’esposizione
La funzione di bracketing dell’esposizione del flash (FEB) può essere utilizzata
in caso di cambio automatico della potenza del flash in una serie di foto che si
susseguono. La funzione di sequenza del flash (FEB) è utile nelle situazioni in qui
le riprese vengono fatte di sorpresa e in diverse condizioni di illuminazione (per

It
ISTRUZIONI D’USO
garantire un’adeguata illuminazione quando viene scattata la foto). La funzione
di sequenza di esposizione del flash (FEB) può essere utilizzata anche in caso di
fotografie con la tecnica HDR.
La funzione di bracketing dell’esposizione del flash (FEB) è supportata, però non
è possibile impostarla nel menu del flash. Questa funzione è disponibile a seconda se lo scatto o la fotocamera sono dotate della funzione di bracketing (FEB).
Per le informazioni più dettagliate sulla funzione di bracketing del flash, vedi le
istruzioni d’uso della fotocamera utilizzata.
Blocco dell’esposizione del flash – FEL/FV Lock
La funzione di blocco dell’esposizione del flash (FEL, e anche FV Lock in caso di
macchine fotografiche Nikon) serve per bloccare l’esposizione del flash prima
che venga scattata la foto. È utile se si utilizza la funzione di misurazione manuale in caso di riprese in diverse condizioni di illuminazione. In caso di lavoro
con la modalità di misurazione attraverso l’obiettivo (TTL), è necessario premere
il pulsante di funzione della fotocamera per poterla usare. Per le informazioni
più dettagliate su questa funzione e sul blocco dell’esposizione del flash, vedi le
istruzioni d’uso della fotocamera utilizzata.
La funzione di blocco dell’esposizione del flash (FEL) è supportata, però non è
possibile impostarla nel menu del flash. Questa funzione è disponibile a seconda se lo scatto o la fotocamera sono dotate di blocco dell’esposizione del
flash (FEL). Per le informazioni più dettagliate sulla funzione di blocco dell’esposizione del flash, vedi le istruzioni d’uso della fotocamera utilizzata.
Sincronizzazione ad alta velocità – HSS/Auto FP
La sincronizzazione ad alta velocità (HSS) serve per scattare foto con la velocità dell’otturatore maggiore rispetto al tempo di sincronizzazione del flash impostato (di solito: 1/200-1/250 s). È utile se si usa la modalità di priorità del diaframma e nelle condizioni di illuminazione naturale limitata. Gli effetti del lavoro
in modalità di sincronizzazione ad alta velocità (HSS) possono essere diversi, a
seconda del modello della fotocamera – per altri dettagli, vedi le istruzioni d’uso
della fotocamera utilizzata.
Tabella di compatibilità
Sincronizzazione sulla seconda tendina - SCS
La funzione di sincronizzazione sulla seconda tendina del flash Phottix Indra500
TTL attiva il flash da studio alla fine, e non all’inizio dell’esposizione. È molto
utile per riprendere gli effetti speciali in caso di tempi più lunghi di esposizione.
Importante:
1. La funzione di sincronizzazione sulla seconda tendina (SCS) è supportata
dal flash da studio Phottix Indra500 TTL , però non è possibile impostarla nel
menu del flash. La funzione di sincronizzazione sulla seconda tendina (SCS)
deve essere impostata nel trigger o nella fotocamera utilizzata. Per ulteriori
dettagli, vedi le istruzioni d’uso del trigger e della fotocamera utilizzata.
2. La funzione di sincronizzazione sulla seconda tendina (SCS) non è disponibile in modalità di flash multiplo stroboscopico.
Pulsante test / pronto
Importante:
1. La funzione di sincronizzazione ad alta velocità (HSS) è supportata dal flash
da studio Phottix Indra500 TTL , però non è possibile impostarla nel menu
del flash.
2. Una fotocamera, un trigger o la modalità di ricezione possono influire in
modo importante sulla funzione di sincronizzazione ad alta velocità (HSS).
Per ottenere i risultati ottimali di lavoro in modalità di sincronizzazione ad
alta velocità (HSS) si consiglia di usare i trigger raccomandati per il flash da
studio Phottix. Per ulteriori dettagli, vedi la seguente tabella di compatibilità
e le istruzioni d’uso del trigger e della fotocamera utilizzata.
3. La funzione di sincronizzazione ad alta velocità (HSS) non è disponibile in
modalità manuale ed in modalità di flash multiplo stroboscopico.
4. L’uso frequente di modalità HSS riduce la durata del la lampada flash.
5. Protocolli di flash Nikon possono limitare la velocità massima di sincronizzazione con alcune fotocamere Nikon.
53
1. Premendo il pulsante test si fa scattare il flash da studio. Il pulsante può essere
usato in modalità manuale.
2. Inoltre, questo pulsante garantisce anche la funzione di indicazione dello stato di pronto della lampada flash. La spia LED sul pulsante lampeggerà con la
luce verde se il livello di caricamento della lampada è minimo. Se la spia lampeggerà con la luce rossa, il livello di caricamento è massimo.

Menu
It
ISTRUZIONI D’USO
54

Impostazioni del menu
I quattro pulsanti di funzione situati sotto il display LCD servono per selezionare
le opzioni corrispondenti delle impostazioni delle funzioni. È possibile modificare una qualsiasi impostazione se la funzione selezionata è illuminata. A seconda delle impostazioni del colore del display LCD sarà: il colore rosso, bianco
o giallo (Le impostazioni del colore del dislay LCD e le impostazioni del sensore
del display LCD saranno disponibili nel menu).
1. Girare la manopola di regolazione / impostazione per modificare l’impostazione.
2. Alla fine premere il pulsante di funzione corrispondente all’opzione oppure
la manopola di regolazione / impostazione per confermare e chiudere il menu.
It
ISTRUZIONI D’USO
Display LCD
Modalità di ricezione
wireless: Odin-C,
Odin-N,
Strato II,
Opt-Slave
RX OFF
Compensazione di
esposizione della
lampada flash/Valore
di uscita del flash
Canale di ricezione
wireless
Modalità di flash:
TTL, Manuale (M),
Multipla (Multi)
Gruppo di ricezione
wireless
Flash rapido:
: Abilitato
: Disabilitato
Segnale acustico
Menu: ulteriori dettagli
nella parte riguardante le
funzioni del menu
Lampada modellante:
Manual [manuale] 01-09
gradi, OFF [spento]
: ON [acceso]
: OFF [spento]
Schermata menu
55

It
ISTRUZIONI D’USO
Funzioni di memorizzazione automatica
Il flash Indra500 TTL salva le impostazioni del flash da studio. Le impostazioni
precedenti vengono attivate ad ogni accensione.
Flash modellante
1. Premendo il pulsante di anteprima della profondità del campo dell’immagine
(se disponibile), si attiva il funzionamento continuo (di 1 secondo) del flash da
studio. La funzione del flash modellante permette di verificare gli effetti luminosi e il bilanciamento del bianco sull’oggetto. (Per ulteriori informazioni sul funzionamento del pulsante di anteprima della profondità del campo e sulle sue
funzioni, vedi le istruzioni d’uso della fotocamera utilizzata).
2. La funzione del flash modellante è disponibile per tutte le modalità, cioè della
misurazione attraverso l’obiettivo (TTL), manuale (Manual) e multipla (Multi).
Luce modellante
Il flash Phottix Indra500 TTL è dotato della funzione della luce modellante LED.
Questa funzione è utile in caso di anteprima della configurazione dell’illuminazione e della focalizzazione negli ambienti poco illuminati.
La funzione della luce modellante è disponibile per le due modalità:
1. Modalità manuale (Manual): Sono disponibili 9 livelli di luminosità da 01
a 09.
2. Modalità spenta (OFF): La luce modellante verrà spenta.
Attenzione:
1. Mentre si fa scattare il flash da studio, la luce modellante non viene
automaticamente spenta.
Tramite il selettore della luce modellante:
1. Premere il pulsante della luce modellante per disattivare la funzione della
luce modellante.
2. Dopo aver attivato la funzione della luce modellante, sul display LCD verrà
illuminata l’icona della luce modellante
3. Girare la manopola di regolazione / impostazione per impostare la modalità della luce modellante manuale (da 01-09) o spenta.
4. Premere la manopola di regolazione / impostazione per confermare le impostazioni e lasciare la modalità di modifica.
.
Modalità di flash
Il flash da studio Phottix Indra500 TTL è dotato di tre modalità di flash: automatica con misurazione attraverso l’obiettivo (TTL Auto), manuale (Manual) e
multipla (Multi).
Modalità di flash con misurazione attraverso l’obiettivo
(TTL)
Se il flash da studio Phottix Indra500 TTL lavora in modalità TTL, allora il flash
verrà attivato nella modalità di flash selezionata e con la potenza del flash
prescelta, secondo le impostazioni del trigger Phottix Odin o di altri trigger
Phottix compatibili, dotati della funzione di gestione della potenza.
Compensazione dell’esposizione della lampada – FEC
Il flash da studio Phottix Indra500 TTL può essere usato per la regolazione della compensazione dell’esposizione della lampada (FEC) da -3 a +3 a passi 1/3.
Questa funzione è utile negli ambienti dove si devono sintonizzare i parametri
del sistema di misurazione attraverso l’obiettivo (TTL).
2. L’uso della funzione della luce modellante permette di risparmiare l’energia dell’accumulatore.
Regolazione della luminosità della luce modellante
La luce modellante si accende / spegne tramite l’opzione menu op-
pure
del selettore della luce modellante
.
Tramite le opzioni menu:
1. Premere il pulsante di funzione 4 finché sul display LCD non appaia
.
2. Premere il pulsante di funzione corrispondente a
3. Dopo aver selezionato l’opzione della luce modellante
illuminata sul display LCD.
4. Girare la manopola di regolazione / impostazione per impostare la modal-
ità della luce modellante manuale (da 01-09) o spenta.
5. Premere il pulsante di funzione corrispondente a
opola di regolazione / impostazione per confermare le impostazioni e lasciare
la modalità di modifica.
56
.
questa verrà
oppure la man-
Importante:
1. Se sia un trigger (se è disponibile la modalità TTL) che il flash da studio
lavorano in modalità TTL ed è stata impostata la regolazione dell’esposizione
in entrambi i dispositivi, allora il valore definitivo dell’esposizione sarà la somma di entrambi i valori della compensazione dell’esposizione della lampada.
2. Se il trigger lavora in modalità manuale (se disponibile) e il flash da studio
in modalità TTL con il valore di compensazione dell’esposizione della lampada, allora il valore dell’esposizione della lampada flash verrà utilizzato per
calcolare il valore di uscita definitivo della lampada flash.
Flash in modalità manuale
In caso di lavoro in modalità manuale di flash, il flash da studio verrà attivato
soltanto dopo aver raggiunto i parametri di potenza impostati. Il flash da studio
Phottix Indra500 TTL può essere regolato da 1/128 a 1/1 con aumenti graduali
a passi 1/3 (1/128, 1/64, 1/32, 1/16, 1/8, 1/4, 1/2, e 1/1). Le modalità di flash e la
potenza del flash da studio non possono essere adattati, né controllati tramite
il trigger.
Modalità di flash multipli stroboscopici
La modalità di flash multipli stroboscopici permette di effettuare una serie di
flash veloci. Il numero, la frequenza e la potenza di questi flash possono essere

It
ISTRUZIONI D’USO
programmati nel flash da studio Phottix Indra500 TTL. La modalità di flash multipli stroboscopici è utile in caso di riprese dell’oggetto in movimento nella stessa
fotografia e anche con altri effetti speciali.
In caso di lavoro in modalità di flash multipli stroboscopici, il flash da studio
verrà attivato soltanto dopo aver programmato manualmente la potenza del
flash, il numero dei flash (1-100) e la frequenza (1-100Hz). La potenza del flash
può essere impostata da 1/128 a 1/4 con aumento graduale a passi 1/1 (1/128,
1/64, 1/32, 1/16, 1/8, e 1/4). Le modalità di flash e la potenza del flash da studio
non possono essere adattati, né controllati tramite il trigger.
Importante:
1. Il surriscaldamento o il danneggiamento alla lampada flash possono essere
dovuti all’uso eccessivo della modalità di flash multipli stroboscopici.
2. In caso di surriscaldamento il tempo di caricamento verrà prolungato. Se
la temperatura continua ad aumentare, il flash cessa automaticamente di
lampeggiare.
Modalità di ricezione wireless
Il flash da studio Phottix Indra500 TTL è dotato di cinque modalità di ricezione
wireless: Odin-C, Odin-N, Strato II, Opt-Slave e RX OFF. Per ulteriori dettagli, vedi
la seguente tabella.
Modalità di ricezione Odin-N
Questa modalità permette di far scattare il flash da studio Indra500 TTL tramite
il trasmettitore Phottix Odin TTL per Nikon oppure tramite il trasmettitore
incorporato Phottix Mitros+ TTL per Nikon impostato in modalità Odin TX. Per
un funzionamento corretto, devono essere impostate nello stesso canale e nello
stesso gruppo.
Modo d’uso:
1. Premere il pulsante di funzione 4 oppure girare la manopola di regolazione/impostazione finché non appaia la scritta
2. Premere il pulsante di funzione corrispondente a
funzione di ricezione wireless verrà visualizzata sul display LCD.
3. Girare la manopola di regolazione/impostazione per cambiare la modalità
wireless a Odin-N.
4. Premere la manopola di regolazione/impostazione per confermare l’impostazione.
5. Premere il pulsante di funzione corrispondente a
effettuare la regolazione dal livello della modalità TTL, manuale o multipla.
sul display LCD.
. L’opzione della
nel
per
Modalità di ricezione Strato II
Gestione della modalità di flash:
Modalità di ricezione Odin-C
Questa modalità permette di far scattare il flash da studio Indra500 TTL tramite il
trasmettitore Phottix Odin TTL per Canon oppure tramite il trasmettitore incorporato Phottix Mitros+ TTL per Canon impostato in modalità Odin TX. Per un
funzionamento corretto, devono essere impostate nello stesso canale e nello
stesso gruppo.
Modo d’uso:
1. Premere il pulsante di funzione 4 oppure girare la manopola di regolazi-
one/impostazione finché non appaia la scritta
2. Premere il pulsante di funzione corrispondente a
funzione di ricezione wireless verrà visualizzata sul display LCD.
3. Girare la manopola di regolazione/impostazione per cambiare la modalità
wireless a Odin-C.
4. Premere la manopola di regolazione/impostazione per confermare
l’impostazione.
5. Premere il pulsante di funzione corrispondente a
per effettuare la regolazione dal livello della modalità TTL, manuale o multipla.
57
sul display LCD.
. L’opzione della
nel
Questa modalità permette di far scattare il flash da studio Indra500 TTL tramite
il trasmettitore Phottix Odin TTL TCU per Canon/Nikon oppure tramite il trasmettitore incorporato Phottix Mitros+ TTL per Canon/Nikon in modalità Odin
TX, il trasmettitore Phottix Strato TTL per Canon/Nikon oppure il trasmettitore
Phottix Strato II per Canon/Nikon. Per un funzionamento corretto, devono essere impostate nello stesso canale e nello stesso gruppo.
Attenzione:
Le funzioni di sincronizzazione ad alta velocità (HSS), di sincronizzazione sulla
seconda tendina (SCS) e di misurazione attraverso l’obiettivo (TTL) non sono supportati in modalità Strato II.
Modo d’uso:
1. Premere il pulsante di funzione 4 oppure girare la manopola di regolazione/impostazione finché non appaia la scritta
2. Premere il pulsante di funzione corrispondente a
sul display LCD.
. L’opzione della
funzione di ricezione verrà visualizzata sul display LCD.
3. Girare la manopola di regolazione/impostazione per cambiare la modalità
wireless a Strato II.
4. Premere la manopola di regolazione/impostazione per confermare l’impostazione.
5. Premere il pulsante di funzione corrispondente a
nel
per effettuare la regolazione dal livello della modalità manuale o multipla.
Modalità di scatto tramite il flash Opt-Slave
Questa modalità permette di far scattare il flash da studio Indra500 TTL in caso
di vicinanza di altri flash in funzione.
Attenzione:
I pre-flash provenienti dalle lampade che lavorano in modalità TTL faranno
scattare il flash Indra500 se questo lavora in modalità Opt-Slave. È necessario

It
ISTRUZIONI D’USO
fare attenzione durante l’uso di questa modalità perché le lampade TTL che
si trovano in vicinanze non facciano scattare il flash da studio Phottix Indra
prima che l’utente sia pronto.
Modo d’uso:
1. Premere il pulsante di funzione 4 oppure girare la manopola di regolazi-
one/impostazione finché non appaia la scritta
2. Premere il pulsante di funzione corrispondente a
sul display LCD.
L’opzione della
.
funzione di ricezione wireless verrà visualizzata sul display LCD.
3. Girare la manopola di regolazione/impostazione per cambiare la modalità
wireless a Opt-Slave.
4. Premere la manopola di regolazione/impostazione per confermare l’im-
postazione.
Modalità RX OFF
In caso di questa modalità la funzione della ricezione wireless non è attiva.
Modo d’uso:
1. Premere il pulsante di funzione 4 oppure girare la manopola di regolazi-
one/impostazione finché non appaia la scritta
2. Premere il pulsante di funzione corrispondente a
funzione di ricezione wireless verrà visualizzata sul display LCD.
3. Girare la manopola di regolazione/impostazione per cambiare la modalità
wireless a RX OFF.
4. Premere la manopola di regolazione/impostazione per confermare l’im-
postazione.
5. Premere il pulsante di funzione corrispondente a
per effettuare la regolazione dal livello della modalità manuale o multipla.
sul display LCD.
L’opzione della
.
nel
flash da 1 - 100 volte (a seconda della frequenza e del valore di uscita del flsah).
7. Premere il pulsante di funzione corrispondente a
nel
Girare la manopola di regolazione/impostazione per adattare la frequenza del
flash da 1 - 100 Hz.
8. Premere il pulsante di funzione corrispondente a
nel
Girare la manopola di regolazione/impostazione per adattare le impostazioni
del sensore del display LCD (Regular [Normale], Upside-down [Inverso] e Auto
by sensor [Automatico attraverso il sensore]).
9. Premere il pulsante di funzione corrispondente a
nel
l’opzione della modalità di serie verrà illuminata sul display LCD. Girare la manopola di regolazione/impostazione per attivare / disattivare la modalità di serie.
10. Premere il pulsante di funzione corrispondente a
nel
Girare la manopola di regolazione/impostazione per accendere / spegnere il
suono.
Riguarda le modalità Odin-C/Odin-N/
Funzioni in modalità TTL
1. Premere il pulsante di funzione corrispondente a
Girare la manopola di regolazione / impostazione per adattare il valore di compensazione dell’esposizione della lampada da -3.0EV a +3.0EV.
2. Premere il pulsante di funzione corrispondente a
Girare la manopola di regolazione / impostazione per adattare la modalità di
funzione della luce modellante (OFF [Spento]/01-09).
3. Premere il pulsante di funzione corrispondente a
Girare la manopola di regolazione / impostazione per adattare il canale da 1-4.
4. Premere il pulsante di funzione corrispondente a
Girare la manopola di regolazione / impostazione per adattare il gruppo (A, B
oppure C).
nel .
nel
nel
nel
.
.
,
.
.
.
.
Riguarda le modalità Odin-C/Odin-N/Strato II
Funzioni in modalità multipla (Multi)
1. Premere il pulsante di funzione corrispondente a
Girare la manopola di regolazione/impostazione per impostare la potenza del
flash da 1/4 a 1/128-6 passi.
2. Premere il pulsante di funzione corrispondente a
Girare la manopola di regolazione/impostazione per adattare la modalità di funzione della luce modellante (OFF [Spento]/01-09).
3. Premere il pulsante di funzione corrispondente a
Girare la manopola di regolazione/impostazione per adattare il canale da 1-4.
4. Premere il pulsante di funzione corrispondente a
Girare la manopola di regolazione/impostazione per adattare il gruppo (A, B
oppure C).
5. Premere il pulsante di funzione corrispondente a
Girare la manopola di regolazione/impostazione per adattare le impostazioni
di colore del display LCD (Classic [Classico], Dynamic [Dinamico], Elegant [Elegante]).
6. Premere il pulsante di funzione corrispondente a
. Girare la manopola di regolazione/impostazione per adattare il numero dei
58
nel
nel
nel
nel
w
nel
5. Premere il pulsante di funzione corrispondente a
nel
Girare la manopola di regolazione / impostazione per adattare le impostazioni
di colore del display LCD (Classic [Classico], Dynamic [Dinamico], Elegant [Elegante]).
6. Premere il pulsante di funzione corrispondente a
.
Girare la manopola di regolazione / impostazione per adattare le impostazioni
nel
del sensore del display LCD (Regular [Normale], Upside-donwn [Inverso] e Auto
by sensor [Automatico attraverso il sensore]).
.
7. Premere il pulsante di funzione corrispondente a
nel
l’opzione della modalità di serie verrà illuminata sul display LCD. Girare la manopola di regolazione / impostazione per attivare / disattivare la modalità di serie.
.
8. Premere il pulsante di funzione corrispondente a
nel
Girare la manopola di regolazione / impostazione per accendere / spegnere il
.
suono.
Riguarda le modalità Odin-C/Odin-N/Strato II
.
Funzioni in modalità manuale (Manual)
1. Premere il pulsante di funzione corrispondente a nel .
Girare la manopola di regolazione / impostazione per impostare la potenza del
flash da 1/1 a 1/128 con aumenti graduali a passi 1/3.
.
.
.
.

It
ISTRUZIONI D’USO
2. Premere il pulsante di funzione corrispondente a nel .
Girare la manopola di regolazione / impostazione per adattare la modalità di
funzione della luce modellante (OFF [Spento]/01-09).
3. Premere il pulsante di funzione corrispondente a
nel .
Girare la manopola di regolazione / impostazione per adattare il canale da 1-4.
4. Premere il pulsante di funzione corrispondente a
nel .
Girare la manopola di regolazione / impostazione per adattare il gruppo (A, B o C).
5. Premere il pulsante di funzione corrispondente a nel .
Girare la manopola di regolazione / impostazione per adattare le impostazioni
di colore del display LCD (Classic [Classico], Dynamic [Dinamico], Elegant [Elegante]).
6. Premere il pulsante di funzione corrispondente a
nel .
Girare la manopola di regolazione / impostazione per adattare le impostazioni
del sensore del display LCD (Regular [Normale], Upside-down [Inverso] e Auto
by sensor [Automatico attraverso il sensore]).
7. Premere il pulsante di funzione corrispondente a
nel
.
l’opzione della modalità di serie verrà illuminata sul display LCD. Girare la manopola di regolazione / impostazione per attivare / disattivare la modalità di serie.
8. Premere il pulsante di funzione corrispondente a
nel
.
Girare la manopola di regolazione / impostazione per accendere / spegnere il
suono.
flash da 1/4 a 1/128-6 passi.
2. Premere il pulsante di funzione corrispondente a
nel
.
Girare la manopola di regolazione / impostazione per adattare la modalità di
funzione della luce modellante (OFF [Spento]/01-09).
3. Premere il pulsante di funzione corrispondente a
nel
.
Girare la manopola di regolazione / impostazione per adattare le impostazioni
di colore del display LCD (Classic [Classico], Dynamic [Dinamico], Elegant [Elegante]).
4. Premere il pulsante di funzione corrispondente a
nel
per adattare il numero dei flash da 1-100 volte (a seconda della frequenza e del
valore di uscita del flash).
5. Premere il pulsante di funzione corrispondente a
nel
.
Girare la manopola di regolazione / impostazione per adattare la frequenza del
flash da 1 - 100 Hz.
6. Premere il pulsante di funzione corrispondente a
nel
.
Girare la manopola di regolazione / impostazione per adattare le impostazioni
del sensore del display LCD (Regular [Normale], Upside-down [Inverso] e Auto
by sensor [Automatico attraverso il sensore]).
7. Premere il pulsante di funzione corrispondente a
nel
,
l’opzione della modalità di serie verrà illuminata sul display LCD. Girare la manopola di regolazione / impostazione per attivare / disattivare la modalità di serie.
Riguarda le modalità Opt-Slave/RX OFF
Funzioni in modalità manuale (Manual)
1. Premere il pulsante di funzione corrispondente a nel .
Girare la manopola di regolazione / impostazione per impostare la potenza del
flash da 1/1 a1/128 con aumenti graduali a passi 1/3.
2. Premere il pulsante di funzione corrispondente a
Girare la manopola di regolazione / impostazione per adattare la modalità di
funzione della luce modellante (OFF [Spento]/01-09).
3. Premere il pulsante di funzione corrispondente a
Girare la manopola di regolazione / impostazione per adattare le impostazioni
di colore del display LCD (Classic [Classico], Dynamic [Dinamico], Elegant [Elegante]).
4. Premere il pulsante di funzione corrispondente a
Girare la manopola di regolazione / impostazione per adattare le impostazioni
del sensore del display LCD (Regular [Normale], Upside-down [Inverso] e Auto
by sensor [Automatico attraverso il sensore]).
5. Premere il pulsante di funzione corrispondente a
l’opzione della modalità di serie verrà illuminata sul display LCD. Girare la manopola di regolazione / impostazione per attivare / disattivare la modalità di serie.
nel
nel .
nel
nel
.
8. Premere il pulsante di funzione corrispondente a
nel
Girare la manopola di regolazione / impostazione per accendere / spegnere il
suono.
Importante:
Se la manopola di regolazione / impostazione o il corrispondente pulsante
di funzione non verranno premuti per confermare il parametro selezionato,
allora il parametro verrà confermato automaticamente entro 10 secondi.
.
,
.
6. Premere il pulsante di funzione corrispondente a
nel
Girare la manopola di regolazione / impostazione per accendere / spegnere il
suono.
Riguarda la modalità RX OFF
Funzioni in modalità multipla(Multi):
1. Premere il pulsante di funzione corrispondente a
Girare la manopola di regolazione / impostazione per impostare la potenza del
59
nel
.
.

Funzioni non standard
It
ISTRUZIONI D’USO
Il flash da studio Phottix Indra500 TTL è dotato di una serie di funzioni non
standard da programmare. Per modificare queste funzioni è necessario effettuare le seguenti operazioni (vedi di sotto):
1. Premere e tenere premuto il pulsante di funzione 4 e la manopola di regolazione / impostazione per 3 secondi per passare alla schermata menu C.Fn.
Tabella delle funzioni non standard
2. Premere il pulsante di funzione 1 o il pulsante di funzione 2 per scorrere le voci
del menu – da C.Fn 00 a 03.
3. Girare la manopola di regolazione / impostazione per cambiare la funzione
nell’ambito del menu.
4. Premere il pulsante di funzione 4 per uscire dal menu C.Fn.
Sostituzione della lampada flash
1. Scollegare il flash da studio Indra500 TTL dalla fonte di alimentazione a 10
minuti prima di sostituzione della lampada flash.
2. Scollegare il riflettore come sopra.
3. Separare delicatamente la cupoletta di vetro dal fermo a nottolino. (Figura 9)
figura 9
4. Tenere delicatamente la lampada flash per estrarla dalla fessura. (Figura 10)
60
figura 10
5. Inserire una nuova lampada flash nella fessura. (Figura 11)
figura 11
6. Fissare la cupoletta di vetro e mettere in linea la fessura. (Figura 12)

Specifica tecnica
figura 1
7. Montare il riflettore come sopra.
Nota: Si prega di indossare i guanti, quando si deve sostituire il tubo flash.
Ritorno alle impostazioni di fabbrica
Si può ritornare alle impostazioni di fabbrica del flash da studio Indra500 TTL.
A questo scopo è necessario premere contemporaneamente e tenere premuto
il pulsante di funzione 1 e la manopola di regolazione / impostazione per 3 secondi. Tutte le funzioni ritorneranno ai valori di default.
Controllo delle informazioni relative al flash da
studio
It
Potenza massima: 500W
Regolazione della potenza: 8 livelli (4 - 500W)
Regolazione della potenza: A passi 1/3 o 1 diaframma
Modalità del flash: TTL, Manuale (M), Multipla(Multi)
Angolo di illuminazione: 60 °
Numero guida: 45/147.6 (ISO100, m/ft)
Temperatura dal colore: 5600±200K (La temperatura di colore può variare con
impostazioni di bassa potenza) .
Tempo del flash: t=1 1/250 s - 1/12000 s
Flash stroboscopico: Frequenza: 1 - 100 Hz, Numero dei flash: 1 - 100 volte
Funzioni HSS e SCS: Supportate*
Tempo di ricarica (a livelli di potenza del flash 1/1 : l’indicatore si illumina
di rosso)
Phottix Indra AC Adapter: Uno/Due flash: 0.9s/1.7s
Phottix Indra Battery Pack (10AH): Modo H Uno/Due flash: 1s/2.3s
Modo S Uno/Due flash: 1.4s/5.4s
Phottix Indra Battery Pack (5AH) Modo H Uno/Due flash: 1.4s/4.9s
Modo S Uno/Due flash: 2.6s/10.9s
ISTRUZIONI D’USO
Premere una combinazione di pulsanti può aiutare a verificare le informazioni
relative al flash da studio Phottix Indra500 TTL in riferimento a: accessori, software, biblioteca delle icone e numero di serie del prodotto.
1. Premere e tenere premuto per tre secondi il pulsante di funzione 2 e la manopola di regolazione / impostazione. Sullo schermo verranno visualizzate le
informazioni sugli accessori, software, biblioteca delle icone e numero di serie
del prodotto.
2. Premere un qualsiasi pulsante per uscire dalla schermata di informazioni e
ritornare alla schermata iniziale.
3. Lo scatto del flash, l’utilizzo della funzione di focalizzazione della fotocamera
o le riprese durante la visualizzazione delle informazioni sulla versione comportano l’uscita dalla schermata della versione e il ritorno alla schermata iniziale del
flash da studio.
Sostituzione del condensatore del flash da studio
Se il flash da studio Indra500 non viene usato per un periodo di tempo, nel condensatore della lampada flash avvengo dei cambiamenti fisici. Per prevenire
questi cambiamenti, si consiglia di accendere la lampada flash per almeno 10
minuti una volta ogni tre mesi.
Potenza di ingresso:
Phottix Indra AC Adapter: AC 220V/110V, 50HZ/60HZ
Phottix Indra Battery Pack: 14.8V/5Ah, 400 flash di potenza massima
14.8V/10Ah, 800 flash di potenza massima
Potenza della luce modellante: circa 4,5 W
Modalità della luce modellante: OFF [Spento], Manual [Manuale] da 1-9
Metodo di collegamento wireless: Frequenze radio e impulsi ottici
Canali: 4
Modalità di ricezione wireless: Odin-C, Odin-N, Strato II, Opt-Slave, RX OFF
(soltanto attraverso la porta di sincronizzazione 3,5 mm)
Campo di ricezione (approssimativo): Radio: più di 100 m
Display: Display LCD 320X240 TFT, Supporta 3 impostazioni del colore dello
schermo
Impostazione del sensore del display LCD: Rilevamento automatico della
direzione e rotazione a 180 gradi secondo questa direzione
Metodo di dispersione del calore: Attivazione automatica a seconda della
temperatura
Conferma dell’elaborazione: Possibilità di attivarla o disattivarla
Porta di sincronizzazione: mini porta 3,5 mm
Aggiornamento del software: Aggiornamento del software attraverso la mini
porta USB
Dimensioni: Lunghezza*Diametro: 266mm*180 mm
Peso: 2,1 kg (senza cavo di alimentazione del flash da studio)
Importante: Le specifiche del prodotto e la struttura esterna possono essere
modificate senza preavviso.
* su fotocamere compatibili
61

Dziękujemy za zakup
produktu marki Phottix
Uwaga: Przed użyciem lampy studyjnej Phottix Indra500 TTL należy uważnie
zapoznać się z niniejszym podręcznikiem użytkownika.
Lampa Phottix Indra500 TTL jest lampą studyjną zasilaną akumulatorami i
prądem sieciowym; wyposażona jest we wbudowany odbiornik wyzwalacza
bezprzewodowego Phottix oraz funkcję bezprzewodowego odbierania impulsów optycznych. Zapewnia tryby pomiaru przez obiektyw (TTL), ręczny
i wielokrotny stroboskopowy, jak również funkcje synchronizacji z krótkimi
czasami otwarcia migawki i synchronizacji na drugą kurtynę migawki. Lampa
studyjna Phottix Indra500 TTL jest kompatybilna z wieloma dostępnymi na rynku produktami marki Phottix.
Pl
●
Przed użyciem lampy studyjnej zdjąć z niej osłonę przednią. W przeciwnym wypadku osłona przednia ulegnie zniekształceniu w wyniku działania wysokiej temperatury wywołanej przez lampę studyjną.
●
Zachować ostrożność podczas dotykania głowicy lampy studyjnej po
jej użyciu. Nadal może być rozgrzana i stwarzać zagrożenie poparzeniem.
●
W celu uzyskania informacji na temat prawidłowej utylizacji lampy
studyjnej Phottix Indra500 TTL należy zasięgnąć informacji u odpowiednich organów.
INSTRUKCJA OBSŁUGI
Wskazówki bezpieczeństwa
●
W lampie studyjnej Indra500 znajdują się elementy elektroniczne pod
wysokim napięciem. Nie należy demontować ani próbować naprawiać
lampy Indra500. Przechowywać produkt w miejscu niedostępnym dla
dzieci.
●
Nigdy nie używać tego produktu w pobliżu gazów palnych, rozpuszczal-
ników lub w otoczeniu, gdzie występują wyładowania elektryczne.
●
Sprawdzić, czy podczas ładowania i użytkowania wszystkie wtyki i
przewody są podłączone w sposób bezpieczny.
●
Przed wymianą lampy błyskowej odłączyć lampę studyjną Indra500
TTL od źródła zasilania na 10 minut. Zachować ostrożność! Lampa błyskowa może nagrzewać się do wysokiej temperatury.
●
Nie dotykać portu zasilania zewnętrznego i sprawdzić, czy nie styka
się on z przedmiotami metalowymi – co może spowodować porażenie
prądem i w konsekwencji prowadzić do poważnych obrażeń.
●
Parametry zewnętrznego źródła zasilania nie powinny przekraczać
granic specyfikacji technicznych zawartych w niniejszym podręczniku.
●
Z zewnętrznego źródła zasilania należy korzystać w dobrze wietrzonym otoczeniu. Nie należy używać tego produktu w warunkach o dużym
zapyleniu i zakurzeniu.
●
Ten produkt nie jest wodoodporny. Należy chronić go przed wpływem
opadów atmosferycznych i wysokiej wilgoci.
Spis treści
Części i funkcje …..................................................................…..62
Tryby błysku ……....................................................................... 68
Tryby odbioru bezprzewodowego .............................................69
Funkcje niestandardowe ........................................................... 72
Specyfikacje techniczne …........................................................ 73
Części
Widok pełny
1. Osłona przednia
2. Uchwyt do parasolki
3. Szybkozłączny zamek
zatrzaskowy
4. Uchwyt
5. Port synchronizacji 3,5 mm
6. Port wyjściowy USB
7. Port zasilania zewnętrznego
8. Zapadkowy uchwyt regulacji kąta
9. Kolumna mocująca
10. Śruba obejmy
●
Nie czyścić produktu za pomocą rozpuszczalników organicznych lub
cieczy na bazie alkoholu.
●
Nie umieszczać żadnych nieprzejrzystych przedmiotów naprzeciw
głowicy lampy studyjnej w czasie jej wyzwalania. Energia cieplna emitowana przez urządzenie Indra500 może powodować podpalenie przedmiotów lub uszkodzenie studyjnej lampy błyskowej.
●
Używając lampy studyjnej należy stosować się do zasad bezpieczeństwa. Nie włączać urządzenia Indra500 skierowanego bezpośrednio
w stronę oczu ludzi lub zwierząt, znajdujących się w bliskiej odległości,
bo może to spowodować uszkodzenie wzroku i/lub prowadzić do jego
utraty.
●
Nie pozostawiać lampy studyjnej w miejscu o wysokiej temperaturze
powietrza (bezpośrednie działanie promieni słonecznych, w zamkniętym
samochodzie itd.)
Widok z tyłu
11. Wyświetlacz LCD
12. Przycisk funkcyjny 1
13. Przycisk funkcyjny 2
14. Przycisk pomiar / gotowy
15. Pokrętło regulacji / ustawienia
16. Włącznik zasilania
17. Włącznik światła modelującego
18. Przycisk funkcyjny 3
19. Przycisk funkcyjny 4
20. Czujnik sygnałów optycznych
Widok z przodu
●
W przypadku, gdy z urządzenia wydobywa się dym lub dziwny zapach,
należy niezwłocznie wyłączyć urządzenie za pomocą jego przycisku zasilania.
●
Jeśli lampa studyjna nie jest używana przez dłuższy okres czasu, należy
62
wyłączyć jej zasilanie.
21. Otwór mocowania
22. Kopułka szklana
23. Światło modelujące LED
24. Lampa błyskowa
25. Reflektor

Port zasilania zewnętrznego
Lampę studyjną Indra500 TTL można podłączyć do zasilacza sieciowego Phottix
Indra lub akumulatora przez port zasilania zewnętrznego.
Warto pamiętać:
Podłączając zewnętrzne źródło zasilania należy stosować jedynie przewody
zasilania lampy błyskowej Phottix, przeznaczone do użytku z lampą studyjną
Indra500 TTL.
Pl
3. Podłączyć zasilacz sieciowy do źródła zasilania sieciowego.
4. Włączyć główny przełącznik zasilania i przełącznik wyjściowy zasilacza sieciowego.
INSTRUKCJA OBSŁUGI
Podłączanie urządzenia Indra500 do źródła zasilania zewnętrznego
Stosowanie akumulatora Phottix Indra
1. Umieścić jeden koniec dostarczonego przewodu zasilania lampy błyskowej
w porcie zewnętrznego źródła zasilania lampy studyjnej Indra500 TTL. (Patrz
ilustracja 1)
Uwaga: Aby umieścić przewód w sposób prawidłowy, należy ustawić w linii
czerwone punkty znajdujące się na przewodzie i porcie.
2. Umieścić drugi koniec przewodu w porcie wyjściowym akumulatora Phottix
Indra. (Patrz ilustracja 2)
5. Włączyć zasilanie za pomocą włącznika znajdującego się na lampie studyjnej
Phottix Indra500 TTL.
Odłączanie urządzenia Indra500 od źródła zasilania zewnętrznego
Odłączanie akumulatora Phottix Indra
1. Wyłączyć zasilanie za pomocą włącznika znajdującego Się na lampie studyjnej Indra500 TTL.
2. Przemieścić przełącznik wyjściowy akumulatora w położenie OFF [Wył.].
3. Odłączyć przewód zasilający lampy błyskowej zgodnie z instrukcjami przedstawionymi na ilustracji 4.
3. Włączyć przełącznik wyjściowy akumulatora.
4. Włączyć zasilanie za pomocą włącznika znajdującego się na lampie studyjnej
Phottix Indra500 TTL.
Stosowanie zasilacza sieciowego Phottix Indra
1. Umieścić jeden koniec dostarczonego przewodu zasilania lampy błyskowej
w porcie zewnętrznego źródła zasilania lampy studyjnej Indra500 TTL. (Patrz
ilustracja 1)
Uwaga: Aby umieścić przewód w sposób prawidłowy, należy ustawić w linii
czerwone punkty znajdujące się na przewodzie i porcie.
2. Umieścić drugi koniec przewodu w porcie wyjściowym zasilacza sieciowego
Phottix Indra. (Patrz ilustracja 3)
4. Odłączyć drugi koniec przewodu zgodnie z instrukcjami przedstawionymi
na ilustracji 6.
Odłączanie zasilacza sieciowego Phottix Indra
1. Wyłączyć zasilanie za pomocą przełącznika znajdującego się na lampie studyjnej Indra500 TTL.
2. Wyłączyć główny przełącznik zasilania i przełącznik wyjściowy zasilacza sieciowego. Odłączyć przewód zasilający lampy błyskowej zgodnie z instrukcjami
przedstawionymi na ilustracji 5.
63

Pl
INSTRUKCJA OBSŁUGI
3. Odłączyć przewód zasilający lampy błyskowej z lampy błyskowej Phottix Indra (ilustracja 6).
Mocowanie i odłączanie reflektora
Aby zamocować reflektor
1. Przytrzymać jedną ręką urządzenie Indra500.
2. Drugą ręką ustawić w linii reflektor i otwór mocowania.
3. Umieścić i obrócić reflektor zgodnie z ruchem wskazówek zegara zgodnie z
kierunkiem strzałki na schemacie do momentu, w którym słyszalne będzie kliknięcie. Będzie to oznaczać, że reflektor jest zablokowany. (Patrz ilustracja 7)
Korzystanie z uchwytu do parasolki jest proste: Umieścić trzpień parasolki w
uchwycie do parasolki lampy studyjnej Phottix Indra. Wkręcić śrubę w uchwycie
do parasolki, aby docisnąć go do trzpienia parasolki.
Mocowanie softboxu
Lampa studyjna Phottix Indra500 TTL jest wyposażona w mocowanie typu
Bowens. Mocowanie softboxów jest identyczne, jak w przypadku mocowania i
odłączania reflektora (powyżej).
Mocowanie: Ustawić w linii uchwyt szybkiego montażu do softboxu i otwór
mocowania urządzenia Indra500. Umieścić i obrócić adapter w kierunku przeciwnym do ruchu wskazówek zegara, zgodnie z kierunkiem strzałki na schemacie
do momentu, w którym słyszalne będzie kliknięcie. (Patrz ilustracja 7)
Odłączanie: Pchnąć szybkozłączny zamek zatrzaskowy do tyłu i obrócić adapter w kierunku przeciwnym do ruchu wskazówek zegara, aby odłączyć go od
urządzenia Indra500. (Patrz ilustracja 8)
Porty synchronizacji i USB
1. Wyzwalacz lampy błyskowej Phottix (Phottix Odin TTL, Strato II Multi i Strato
TTL) lub aparat można podłączyć do portu synchronizacji 3,5 mm za pomocą
kompatybilnego przewodu. Urządzenie będzie wówczas w stanie spowodować
wyzwolenie lampy studyjnej Indra500 TTL.
4. Używając parasolki, sprawdzić, czy otwór przelotowy przeznaczony do jej
zamocowania na reflektorze jest ustawiony w linii z uchwytem do parasolki
lampy studyjnej Indra.
Aby odłączyć reflektor
1. Jedną ręką nacisnąć szybkozłączny zamek zatrzaskowy.
2. Drugą ręką obrócić reflektor w kierunku przeciwnym do ruchu wskazówek zegara w tym samym kierunku, co strzałka na schemacie i odłączyć go od urządzenia Indra500. (Patrz ilustracja 8)
Warto pamiętać: Podczas demotażu reflektora należy zwrócić szczególną
uwagę aby nie dotknął on szklanej kopuły i nie uszkodził jej.
2. Port USB służy do uaktualniania oprogramowania sprzętowego. Informacje i
wskazówki dotyczące oprogramowania sprzętowego zostaną udostępnione na
stronach internetowych marki Phottix.
Uwaga: Gdy wyzwalacz lamp błyskowych jest podłączony za pomocą prze-
wodu do portu synchronizacji, działać będzie jedynie Tryb Ręczny (M).
Kanały transmisji
Bezprzewodowy system lampy studyjnej Phottix Indra500 TTL dysponuje czterema kanałami; 1, 2, 3, i 4. W przypadku trybu odbioru bezprzewodowego należy
ustawić ten sam kanał dla lampy studyjnej Indra500 TTL i urządzenia wyzwalającego lub lamp błyskowych stosowanych do wyzwalania lampy studyjnej
Indra.
Funkcja Quick Flash
Funkcja Quick Flash umożliwia wyzwalanie lampy studyjnej, jeśli nie jest ona w
pełni naładowana, tj. dioda LED nadal pulsuje na zielono. W przypadku funkcji Quick Flash czasy przetwarzania są krótsze; pomaga to w robieniu zdjęcia z
bliskiej odległości.
Funkcji Quick Flash można używać w przypadku trybów seryjnych, Menu
umożliwia włączenie lub wyłączenie funkcji Quick Flash w przypadku uaktywnionej ciągłej pracy migawki (Patrz sekcja Menu poniżej).
Warto pamiętać:
Używanie uchwytu do parasolki
Lampa studyjna Phottix Indra500 TTL jest wyposażona w znajdujący się w
górnej części urządzenia uchwyt do parasolki, ułatwiający jej zamocowanie.
64
W przypadku funkcji Quick Flash priorytetem jest wyzwolenie. Wynikiem
znajdowania się przedmiotu w zbyt dalekiej odległości od aparatu może być
niedoświetlenie.

Pl
INSTRUKCJA OBSŁUGI
Bracketing ekspozycji błysku – FEB
Funkcji bracketingu ekspozycji błysku (FEB) można użyć w celu automatycznej
zmiany mocy błysku w serii kolejnych zdjęć. Aparat zarejestruje serię obrazów
o różnym stopniu ekspozycji. Funkcja sekwencji ekspozycji lampy (FEB) jest użyteczna w sytuacjach fotografowania z zaskoczenia, jak również w przypadku
ujęć w różnych warunkach oświetleniowych w celu zapewnienia odpowiedniego oświetlenia podczas robienia zdjęcia. Funkcji sekwencji ekspozycji lampy
(FEB) można też użyć w przypadku fotografii w technice HDR.
Funkcja bracketingu ekspozycji błysku (FEB) jest obsługiwania, jednak nie ma
możliwości ustawienia jej w menu lampy. Ta funkcja jest dostępna w zależności od tego, czy wyzwalacz lub aparat są wyposażone w funkcję bracketingu
(FEB). Aby uzyskać więcej informacji na temat funkcji bracketingu lampy, należy
zapoznać się z podręcznikiem obsługi używanego aparatu.
Blokada ekspozycji lampy – FEL/FV Lock
Funkcji blokady ekspozycji lampy (FEL, a także FV Lock w przypadku aparatów
Nikon) można użyć do zablokowania ekspozycji lampy przed zrobieniem zdjęcia. Jest to przydatne, jeśli korzysta się z funkcji ręcznego pomiaru punktowego
w przypadku ujęcia o różnych warunkach oświetleniowych. W przypadku pracy w trybie pomiaru przez obiektyw (TTL) należy nacisnąć przycisk funkcyjny
aparatu, aby z niej skorzystać. Aby uzyskać więcej informacji na temat funkcji i
obsługi blokady ekspozycji lampy, należy zapoznać się z podręcznikiem obsługi
używanego aparatu.
4. Częste używanie funkcji HSS skraca żywotność lampy błyskowej.
5. Protokoły transmisji Nikon mogą ograniczyć maksymalny czas synchronizacji w niektórych modelach aparatów Nikon.
Tabela kompatybilności
Synchronizacja na drugą kurtynę migawki - SCS
Funkcja blokady ekspozycji lampy (FEL) jest obsługiwania, jednak nie ma możliwości ustawienia jej w menu lampy. Ta funkcja jest dostępna w zależności od
tego, czy wyzwalacz lub aparat są wyposażone w funkcję blokady ekspozycji
lampy (FEL). Aby uzyskać więcej informacji na temat funkcji blokady ekspozycji
lampy, należy zapoznać się z podręcznikiem obsługi używanego aparatu.
Synchronizacja z krótkimi czasami otwarcia migawki – HSS/Auto FP
Tryb synchronizacji z krótkimi czasami otwarcia migawki (HSS) służy do robienia
zdjęć przy prędkości migawki większej niż ustawiony czas synchronizacji błysku
aparatu (zwykle 1/200-1/250 s). Jest to przydatne podczas korzystania z trybu
priorytetu przysłony oraz w warunkach ograniczonego naturalnego podświetlenia. Efekty pracy w trybie synchronizacji z krótkimi czasami otwarcia migawki
(HSS) mogą się różnić w zależności od modeli aparatów – aby uzyskać więcej
szczegółów, należy zapoznać się z podręcznikiem użytkownika aparatu.
Warto pamiętać:
1. Funkcja synchronizacji z krótkimi czasami otwarcia migawki (HSS) jest
obsługiwana przez lampę studyjną Phottix Indra500 TTL, jednak nie można
jej ustawić w samej lampie.
2. Wybór aparatu, wyzwalacza lampy błyskowej i trybu odbioru ma duży
wpływ na działanie funkcji synchronizacji z krótkimi czasami otwarcia migawki (HSS). W celu osiągnięcia najlepszych efektów pracy w trybie synchronizacji z krótkimi czasami otwarcia migawki (HSS) zaleca się stosowanie polecanych wyzwalaczy lampy błyskowej Phottix. Aby uzyskać więcej szczegółów,
należy zapoznać się z poniższą Tabelą kompatybilności oraz z podręcznikami
użytkownika używanego wyzwalacza lampy błyskowej i aparatu.
Funkcja synchronizacji na drugą kurtynę lampy Phottix Indra500 TTL włącza
lampę studyjną pod koniec, a nie na początku ekspozycji. Pomaga to w uchwyceniu efektów specjalnych podczas stosowania dłuższych czasów naświetlania.
Warto pamiętać:
1. Funkcja synchronizacji na drugą kurtynę migawki (SCS) jest obsługiwana
przez lampę studyjną Phottix Indra500 TTL, jednak nie można jej ustawić
w samej lampie. Zamiast tego, funkcję synchronizacji na drugą kurtynę migawki (SCS) należy ustawić w używanym aparacie lub wyzwalaczu. Aby uzyskać więcej szczegółów, należy zapoznać się z podręcznikami użytkownika
używanego wyzwalacza lampy błyskowej i aparatu.
2. Funkcja synchronizacji na drugą kurtynę migawki (SCS) nie będzie działać
w trybie wielokrotnego błysku stroboskopowego.
Przycisk pomiar / gotowy
1. Naciśnięcie przycisku pomiaru wyzwoli lampę studyjną. Można z niego korzystać w trybie ręcznym.
2. Ten przycisk zapewnia także funkcję wskazania gotowości lampy błyskowej.
Kontrolka LED na przycisku będzie migać na zielono, jeśli poziom naładowania
lampy jest minimalny. Miganie na czerwono będzie oznaczać pełne naładowanie.
3. Funkcja HSS nie będzie działać w trybie wielokrotnego błysku stroboskopowego (Multi) ani w trybie ręcznym (Manual).
65

Menu
Pl
INSTRUKCJA OBSŁUGI
66

Ustawienia menu
Cztery przyciski funkcyjne umieszczone poniżej wyświetlacza LCD służą do wybrania odpowiadających im opcji ustawień funkcji. Można modyfikować każde
ustawienie, jeśli wybrana funkcja jest podświetlona. W zależności od ustawień
koloru ekranu LCD będzie to: kolor czerwony, biały lub żółty (Ustawienie koloru
ekranu LCD oraz ustawienie czujnika wyświetlacza LCD zostaną udostępnione
na liście menu).
1. Obrócić pokrętło regulacji / ustawienia w celu zmiany ustawienia.
2. Po ukończeniu nacisnąć odpowiadający opcji przycisk funkcyjny lub pokrętło
regulacji / ustawienia w celu potwierdzenia i opuścić menu.
Wyświetlacz LCD
Pl
INSTRUKCJA OBSŁUGI
Tryby odbioru
bezprzewodowego:
Odin-C,
Odin-N,
Strato II,
Opt-Slave
Kompensacja ekspozycji
lampy błyskowej/Wartość
wyjściowa błysku
Kanał odbioru
bezprzewodowego
Tryby błysku:
pomiar przez obiektyw (TTL),
Ręczny (M), Wielokrotny (Multi)
Grupa odbioru
bezprzewodowego
Lampa modelująca: Manual [Ręczny] 01-09 stopni,
OFF [Wył.]
Szybki błysk
: Włączony
: Wyłączony
Sygnał dźwiękowy
ON [Wł.]
OFF [Wył.]
Menu: więcej szczegółów
zawiera część dotycząca
funkcji menu
Ekran menu
67

Pl
INSTRUKCJA OBSŁUGI
Funkcje automatycznego zapisu
Urządzenie Indra500 TTL zapamiętuje ustawienia lampy studyjnej. Wcześniejsze
ustawienia zostaną przywrócone przy każdym włączeniu.
Błysk modelujący
1. Naciśnięcie przycisku podglądu głębi pola obrazu aparatu (jeśli jest dostępny)
włączy ciągłe działanie lampy studyjnej trwające 1 sekundę. Funkcja błysku
modelującego umożliwia sprawdzenie efektów świetlnych i balansu bieli na
przedmiocie. (Aby uzyskać więcej informacji na temat działania przycisku podglądu głębi pola i jego zadań, należy zapoznać się z podręcznikiem użytkownika
używanego aparatu.)
2. Funkcja błysku modelującego jest dostępna we wszystkich trybach, tj. pomiaru przez obiektyw (TTL), ręcznym (Manual) i wielokrotnym (Multi).
Światło modelujące
Urządzenie Phottix Indra500 TTL jest wyposażone w funkcję światła modelującego LED. Jest to przydatne zarówno w przypadku podglądu konfiguracji
oświetlenia, jak i pomocy w przypadku ogniskowania w słabo oświetlonych
otoczeniach.
Funkcja światła modelującego działa w trzech trybach
1. Tryb ręczny (Manual): Dostępnych jest 9 poziomów jasności w zakresie od
01 do 09.
2. Tryb wyłączony (OFF): Światło modelujące zostanie wyłączone.
Uwaga:
1. Podczas wyzwalania lampy studyjnej światło modelujące nie będzie się
wyłączać automatycznie.
Za pomocą przełącznika światła modelującego:
1. Nacisnąć przełącznik światła modelującego, aby wyłączyć funkcję światła
modelującego.
2. Po włączeniu funkcji światła modelującego na wyświetlaczu LCD zostanie
podświetlona ikona światła modelującego
3. Obrócić pokrętło regulacji / ustawienia, aby ustawić tryb funkcji światła
modelującego na ręczny (zakres 01-09)(zakres 01-09) lub wyłączony.
4. Nacisnąć pokrętło regulacji / ustawienia, aby potwierdzić ustawienia i
opuścić tryb modyfikacji.
.
Tryby błysku
Lampa studyjna Phottix Indra500 TTL dysponuje trzema trybami błysku: automatyczny z pomiarem przez obiektyw (TTL Auto), ręczny (Manual) i wielokrotny (Multi).
Tryb błysku z pomiarem przez obiektyw
Jeśli lampę studyjną Phottix Indra500 TTL ustawiono w trybie pomiaru przez
obiektyw (TTL), wówczas zaświeci ona w wybranym trybie błysku i wybranej
mocy błysku, zgodnie z ustawieniami wyzwalacza lampy błyskowej Phottix
Odin lub innego kompatybilnego z urządzeniami marki Phottix, dysponującymi funkcją sterowania mocą.
Kompensacja ekspozycji lampy – FEC
Lampy studyjnej Phottix Indra500 TTL można użyć do regulacji kompensacji
ekspozycji lampy (FEC) w zakresie od-3 do +3 w krokach 1/3. Jest to przydatne w otoczeniach, gdzie wymagane jest dostrajanie parametrów systemu
pomiaru przez obiektyw.
2. Korzystanie z funkcji światła modelującego zużywa dużą ilość zasilania
akumulatora.
Regulacja jasności światła modelującego
Światło modelujące można włączyć / wyłączyć za pomocą opcji menu
lub przełącznika światła modelującego
.
Za pomocą opcji menu
1. Nacisnąć przycisk funkcyjny 4 do momentu pojawienia się na
wyświetlaczu LCD.
2. Nacisnąć przycisk funkcyjny odpowiadający
3. Po wybraniu opcji światła modelującego
na wyświetlaczu LCD.
4. Obrócić pokrętło regulacji / ustawienia, aby ustawić tryb funkcji światła
modelującego na ręczny (zakres 01-09) lub wyłączony.
5. Nacisnąć przycisk funkcyjny odpowiadający
lacji / ustawienia, aby potwierdzić ustawienia i opuścić tryb modyfikacji.
.
zostanie ona podświetlona
lub pokrętło regu-
Warto pamiętać:
1. Jeśli zarówno urządzenie wyzwalające (w przypadku, gdy dostępny jest
tryb TTL), jak i lampa studyjna pracują w trybach pomiaru przez obiektyw
(TTL) i ustawiono regulację ekspozycji w obu urządzeniach, wówczas ostateczna wartość ekspozycji będzie stanowić sumę dwóch wartości kompensacji
ekspozycji lampy.
2. Jeśli urządzenie wyzwalające ustawiono w trybie ręcznym (jeśli jest
dostępny), a lampę studyjną w trybie pomiaru przez obiektyw (TTL) z wartością kompensacji ekspozycji lampy, wówczas wartość ekspozycji lampy
błyskowej zostanie wykorzystana do obliczenia ostatecznej wartości wyjściowej lampy błyskowej.
Ręczny tryb błysku
W przypadku pracy w ręcznym trybie błysku lampa studyjna zostanie włączona
po osiągnięciu ustawionych poziomów mocy. Lampę studyjną Phottix Indra500
TTL można regulować w zakresie od 1/128 to 1/1 przy stopniowych przyrostach
w krokach 1/3 (1/128, 1/64, 1/32, 1/16, 1/8, 1/4, 1/2, i 1/1). Trybów błysku i mocy
lampy studyjnej nie można dostosować i kontrolować na urządzeniu wyzwalającym.
68

Pl
INSTRUKCJA OBSŁUGI
Tryb wielokrotnych błysków stroboskopowych
Uaktywniony tryb wielokrotnych błysków stroboskopowych umożliwia wykonanie serii szybkich błysków. Liczbę, częstotliwość oraz moc tych błysków można zaprogramować w lampie studyjnej Phottix Indra500 TTL. Tryb wielokrotnych błysków jest przydatny w przypadku wychwytywania ujęć poruszającego
się obiektu na tym samym zdjęciu, jak również przy innych efektach specjalnych.
W aktywnym trybie wielokrotnych błysków stroboskopowych lampa studyjna
zostanie włączona przy zaprogramowanej ręcznie mocy błysku, liczbie błysków
(1-100) oraz częstotliwości (1-100Hz). Moc błysku można ustawić w zakresie od
1/128 do 1/4 przy stopniowych przyrostach w krokach 1/1 (1/128, 1/64, 1/32,
1/16, 1/8, i 1/4). Trybów błysku i mocy lampy studyjnej nie można dostosować i
kontrolować na urządzeniu wyzwalającym.
Warto pamiętać:
1. Przegrzanie lub uszkodzenie może być wynikiem nadmiernego korzystania
z trybu wielokrotnych błysków stroboskopowych.
2. W przypadku przegrzania czas ładowania zostanie wydłużony. Jeśli temperatura wciąż będzie wzrastać, lampa przestanie wyzwalać.
Tryb odbioru bezprzewodowego
Lampa studyjna Phottix Indra500 TTL dysponuje pięcioma trybami odbioru bezprzewodowego: Odin-C, Odin-N, Strato II, Opt-Slave i RX OFF. Należy zapoznać
się z poniższymi informacjami w celu uzyskania szczegółów.
dokonać regulacji z poziomu trybu pomiaru przez obiektyw, ręcznego lub
wielokrotnego.
Tryb odbioru Odin-N
Ten tryb umożliwia wyzwolenie lampy studyjnej Indra500 TTL za pomocą wyzwalacza Phottix Odin TTL TCU do aparatów Nikon lub wbudowanego wyzwalacza Phottix Mitros+ TTL wersja Nikon w trybie ODIN TX. Aby działać poprawnie muszą zostać ustawione na tym samym kanale i w tej samej grupie.
Sposób użycia:
1. Nacisnąć przycisk funkcyjny 4 lub pokrętło regulacji/ustawienia do momentu pojawienia się
2. Nacisnąć przycisk funkcyjny odpowiadający
oru bezprzewodowego zostanie wyświetlona na wyświetlaczu LCD.
3. Obrócić pokrętło regulacji / ustawienia w celu zmiany trybu bezprzewodowego na Odin-N.
4. Nacisnąć pokrętło regulacji / ustawienia w celu potwierdzenia ustawienia.
5. Nacisnąć przycisk funkcyjny odpowiadający
dokonać regulacji z poziomu trybu pomiaru przez obiektyw, ręcznego lub
wielokrotnego.
na wyświetlaczu LCD.
. Opcja funkcji odbi-
w aby
Tryb odbioru Strato II
Obsługiwane tryby błysku
Tryb odbioru Odin-C
Ten tryb umożliwia wyzwolenie lampy studyjnej Indra500 TTL za pomocą wyzwalacza Phottix Odin TTL TCU do aparatów Canon lub wbudowanego wyzwalacza Phottix Mitros+ TTL wersja Canon w trybie Odin TX. Aby działać
prawnie muszą zostać ustawione na tym samym kanale i w tej samej grupie.
Sposób użycia:
1. Nacisnąć przycisk funkcyjny 4 lub przekręć pokrętło regulacji/ustawienia
do momentu pojawienia się
2. Nacisnąć przycisk funkcyjny odpowiadający
oru bezprzewodowego zostanie wyświetlona na wyświetlaczu LCD.
3. Obrócić pokrętło regulacji / ustawienia w celu zmiany trybu bezprzewodowego na Odin-C.
4. Nacisnąć pokrętło regulacji / ustawienia w celu potwierdzenia ustawienia.
na wyświetlaczu LCD.
. Opcja funkcji odbi-
Ten tryb umożliwia wyzwolenie lampy studyjnej Indra500 TTL za pomocą wyzwalacza Phottix Odin TTL TCU do aparatów Canon/Nikon lub wbudowanego
wyzwalacza Phottix Mitros+ TTL wersja Canon/Nikon w trybie Odin TX, nadajnika Phottix Strato TTL wersja Canon/Nikon lub nadajnika Phottix Strato II wersja
Canon/Nikon. Aby działać poprawnie muszą zostać ustawione na tym samym
kanale i w tej samej grupie.
Uwaga:
Funkcje synchronizacji z krótkimi czasami otwarcia migawki (HSS), synchronizacji
na drugą kurtynę migawki (SCS) i pomiaru przez obiektyw (TTL) nie są obsługiwane w trybie Strato II.
Sposób użycia:
1. Nacisnąć przycisk funkcyjny 4 lub pokrętło regulacji/ustawienia do mo-
po-
mentu pojawienia się
2. Nacisnąć przycisk funkcyjny odpowiadający
oru zostanie wyświetlona na wyświetlaczu LCD.
3. Obrócić pokrętło regulacji / ustawienia w celu zmiany trybu bezprzewodowego na Strato II.
4. Nacisnąć pokrętło regulacji / ustawienia w celu potwierdzenia ustawienia.
5. Nacisnąć przycisk funkcyjny odpowiadający
dokonać regulacji z poziomu trybu ręcznego lub wielokrotnego.
na wyświetlaczu LCD.
Tryb wyzwalania za pomocą błysku Opt-Slave
Ten tryb umożliwia wyzwolenie lampy studyjnej Indra500 TTL w przypadku
bliskiej obecności innych wyzwolonych lamp błyskowych lub lamp studyjnych.
. Opcja funkcji odbi-
w
aby
5. Nacisnąć przycisk funkcyjny odpowiadający
69
w aby

Pl
INSTRUKCJA OBSŁUGI
Uwaga:
Przedbłyski pochodzące z umieszczonych w pobliżu lamp błyskowych działających w trybie pomiaru przez obiektyw (TTL) wyzwolą urządzenie Phottix
Indra, jeśli pracuje ono w trybie Opt-Slave. Należy zachować ostrożność podczas korzystania z tego trybu, aby umieszczone w pobliżu lampy błyskowe
TTL nie wyzwoliły lampy studyjnej Phottix Indra, zanim użytkownik zdąży się
przygotować.
Sposób użycia:
1. Nacisnąć przycisk funkcyjny 4 lub pokrętło regulacji/ustawienia do momentu pojawienia się
2. Nacisnąć przycisk funkcyjny odpowiadający
na wyświetlaczu LCD.
Opcja funkcji odbi-
.
oru bezprzewodowego zostanie wyświetlona na wyświetlaczu LCD.
3. Obrócić pokrętło regulacji / ustawienia w celu zmiany trybu bezprzewodowego na Opt-Slave.
4. Nacisnąć pokrętło regulacji / ustawienia w celu potwierdzenia ustawienia.
Tryb RX OFF
W przypadku tego trybu funkcja odbioru bezprzewodowego nie jest aktywna.
Sposób użycia:
1. Nacisnąć przycisk funkcyjny 4 lub pokrętło regulacji/ustawienia do
momentu pojawienia się
2. Nacisnąć przycisk funkcyjny odpowiadający
wodowego zostanie wyświetlona na wyświetlaczu LCD.
3. Obrócić pokrętło regulacji / ustawienia w celu zmiany trybu bezprzewodowego na RX OFF.
4. Nacisnąć pokrętło regulacji / ustawienia w celu potwierdzenia ustawienia.
na wyświetlaczu LCD.
. Opcja funkcji odbioru bezprze-
pokrętło regulacji / ustawienia, aby dostosować liczbę błysków w zakresie 1 100 razy (w oparciu o częstotliwość i wartość wyjściową błysku).
7. Nacisnąć przycisk funkcyjny odpowiadający
w . Obrócić
pokrętło regulacji / ustawienia w celu dostosowania częstotliwości błysku w
zakresie 1 - 100 Hz.
8. Nacisnąć przycisk funkcyjny odpowiadający
w . Obrócić
pokrętło regulacji / ustawienia, aby dostosować ustawienie czujnika wyświetlacza LCD (Regular [Normalny], Upside-down [Odwrócony] i Auto by sensor [Automatyczny przez czujnik]).
9. Nacisnąć przycisk funkcyjny odpowiadający
w , opcja trybu seryjnego zostanie podświetlona na ekranie LCD. Obrócić pokrętło regulacji
/ ustawienia, aby włączyć / wyłączyć tryb seryjny.
10. Nacisnąć przycisk funkcyjny odpowiadający
w . Obrócić
pokrętło regulacji / ustawienia, aby włączyć / wyłączyć dźwięk.
Dotyczy trybów Odin-C/Odin-N
Funkcje w trybie pomiaru przez obiektyw (TTL):
1. Nacisnąć przycisk funkcyjny odpowiadający
pokrętło regulacji / ustawienia, aby dostosować wartość kompensacji ekspozycji lampy w zakresie od -3.0EV do +3.0EV.
2. Nacisnąć przycisk funkcyjny odpowiadający
pokrętło regulacji / ustawienia, aby dostosować tryb funkcji światła modelującego (OFF [Wył.]/01-09).
3. Nacisnąć przycisk funkcyjny odpowiadający
pokrętło pokrętło regulacji / ustawienia w celu dostosowania kanału w zakresie
1-4.
4. Nacisnąć przycisk funkcyjny odpowiadający
pokrętło regulacji / ustawienia w celu dostosowania grupy (A, B lub C).
in . Obrócić
in
. Obrócić
in . Obrócić
in . Obrócić
5. Nacisnąć przycisk funkcyjny odpowiadający
w aby
dokonać regulacji z poziomu trybu ręcznego lub wielokrotnego.
Dotyczy trybów Odin-C/Odin-N/Strato II
Funkcje w trybie wielokrotnym (Multi):
1. Nacisnąć przycisk funkcyjny odpowiadający
pokrętło regulacji / ustawienia, aby ustawić moc błysku w zakresie od 1/4 do
1/128-6 kroków.
2. Nacisnąć przycisk funkcyjny odpowiadający
pokrętło regulacji / ustawienia, aby dostosować tryb funkcji światła modelującego (OFF [Wył.]/01-09).
3. Nacisnąć przycisk funkcyjny odpowiadający
pokrętło regulacji / ustawienia w celu dostosowania kanału w zakresie 1-4.
4. Nacisnąć przycisk funkcyjny odpowiadający
pokrętło regulacji / ustawienia w celu dostosowania grupy (A, B lub C).
5. Nacisnąć przycisk funkcyjny odpowiadający
pokrętło regulacji / ustawienia, aby dostosować ustawienia koloru ekranu LCD
(Classic [Klasyczny], Dynamic [Dynamiczny], Elegant [Elegancki]).
6. Nacisnąć przycisk funkcyjny odpowiadający
70
w
w
Obrócić
.
. Obrócić
w . Obrócić
w . Obrócić
w . Obrócić
w . Obrócić
5. Nacisnąć przycisk funkcyjny odpowiadający
in . Obrócić
pokrętło regulacji / ustawienia, aby dostosować ustawienia koloru ekranu LCD
(Classic [Klasyczny], Dynamic [Dynamiczny], Elegant [Elegancki]).
6. Nacisnąć przycisk funkcyjny odpowiadający
in . Obrócić
pokrętło regulacji / ustawienia, aby dostosować ustawienie czujnika wyświetlacza LCD (Regular [Normalny], Upside-down [Odwrócony] i Auto by sensor [Automatyczny przez czujnik]).
7. Nacisnąć przycisk funkcyjny odpowiadający
in
. opcja
trybu seryjnego zostanie podświetlona na ekranie LCD. Obrócić pokrętło regulacji / ustawienia, aby włączyć / wyłączyć tryb seryjny.
8. Nacisnąć przycisk funkcyjny odpowiadający
in . Obrócić
pokrętło regulacji / ustawienia, aby włączyć / wyłączyć dźwięk.
Dotyczy trybów Odin-C/Odin-N/Strato II
Funkcje w trybie ręcznym (Manual):
1. Nacisnąć przycisk funkcyjny odpowiadający in . Obrócić
pokrętło regulacji / ustawienia, aby ustawić moc błysku w zakresie od 1/1 do
1/128 przy stopniowych przyrostach w krokach 1/3.
2. Nacisnąć przycisk funkcyjny odpowiadający
w
. Obrócić

Pl
INSTRUKCJA OBSŁUGI
pokrętło regulacji / ustawienia, aby dostosować tryb funkcji światła modelującego (OFF [Wył.]/01-09).
3. Nacisnąć przycisk funkcyjny odpowiadający
w . Obrócić
pokrętło regulacji / ustawienia w celu dostosowania kanału w zakresie 1-4.
4. Nacisnąć przycisk funkcyjny odpowiadający
w . Obrócić
pokrętło regulacji / ustawienia w celu dostosowania grupy (A, B lub C).
5. Nacisnąć przycisk funkcyjny odpowiadający
w . Obrócić
pokrętło regulacji / ustawienia, aby dostosować ustawienia koloru ekranu LCD
(Classic [Klasyczny], Dynamic [Dynamiczny], Elegant [Elegancki]).
6. Nacisnąć przycisk funkcyjny odpowiadający
w . Obrócić
pokrętło regulacji / ustawienia, aby dostosować ustawienie czujnika wyświetlacza LCD (Regular [Normalny], Upside-down [Odwrócony] i Auto by sensor [Automatyczny przez czujnik]).
7. Nacisnąć przycisk funkcyjny odpowiadający
w
. opcja
trybu seryjnego zostanie podświetlona na ekranie LCD. Obrócić pokrętło regulacji / ustawienia, aby włączyć / wyłączyć tryb seryjny.
8. Nacisnąć przycisk funkcyjny odpowiadający
w
. Obrócić
pokrętło regulacji / ustawienia, aby włączyć / wyłączyć dźwięk.
Dotyczy trybów Opt-Slave/RX OFF
Funkcje w trybie ręcznym (Manual):
1. Nacisnąć przycisk funkcyjny odpowiadający w . Obrócić
pokrętło regulacji / ustawienia, aby ustawić moc błysku w zakresie od 1/1 do
1/128 przy stopniowych przyrostach w krokach 1/3.
pokrętło regulacji / ustawienia, aby dostosować tryb funkcji światła modelującego (OFF [Wył.]/01-09).
3. Nacisnąć przycisk funkcyjny odpowiadający
w
Obrócić
.
pokrętło regulacji / ustawienia, aby dostosować ustawienia koloru ekranu LCD
(Classic [Klasyczny], Dynamic [Dynamiczny], Elegant [Elegancki]).
4. Nacisnąć przycisk funkcyjny odpowiadający
w aby dostosować liczbę błysków w zakresie 1-100 razy (w oparciu o częstotliwość i wartość
wyjściową błysku).
5. Nacisnąć przycisk funkcyjny odpowiadający
w . Obrócić
pokrętło regulacji / ustawienia w celu dostosowania częstotliwości błysku w
zakresie 1 - 100 Hz.
6. Nacisnąć przycisk funkcyjny odpowiadający
w . Obrócić
pokrętło regulacji / ustawienia, aby dostosować ustawienie czujnika wyświetlacza LCD (Regular [Normalny], Upside-down [Odwrócony] i Auto by sensor [Automatyczny przez czujnik]).
7. Nacisnąć przycisk funkcyjny odpowiadający
w , opcja trybu seryjnego zostanie podświetlona na ekranie LCD. Obrócić pokrętło regulacji
/ ustawienia, aby włączyć / wyłączyć tryb seryjny.
8. Nacisnąć przycisk funkcyjny odpowiadający
w . Obrócić
pokrętło regulacji / ustawienia, aby włączyć / wyłączyć dźwięk.
Uwagi:
Jeśli pokrętło regulacji / ustawienia lub odpowiadający przycisk funkcyjny nie
zostanie naciśnięty w celu potwierdzenia wybranego parametru, wówczas
wybrany parametr zostanie automatycznie potwierdzony w ciągu 10 sekund.
2. Nacisnąć przycisk funkcyjny odpowiadający
w
. Obrócić
pokrętło regulacji / ustawienia, aby dostosować tryb funkcji światła modelującego(OFF [Wył.]/01-09).
3. Nacisnąć przycisk funkcyjny odpowiadający
w . Obrócić
pokrętło regulacji / ustawienia, aby dostosować ustawienia koloru ekranu LCD
(Classic [Klasyczny], Dynamic [Dynamiczny], Elegant [Elegancki]).
4. Nacisnąć przycisk funkcyjny odpowiadający
w
Obrócić
.
pokrętło regulacji / ustawienia, aby dostosować ustawienie czujnika wyświetlacza LCD (Regular [Normalny], Upside-down [Odwrócony] i Auto by sensor [Automatyczny przez czujnik]).
5. Nacisnąć przycisk funkcyjny odpowiadający
w
, opcja trybu seryjnego zostanie podświetlona na ekranie LCD. Obrócić pokrętło regulacji
/ ustawienia, aby włączyć / wyłączyć tryb seryjny.
6. Nacisnąć przycisk funkcyjny odpowiadający
w
. Obrócić
pokrętło regulacji / ustawienia, aby włączyć / wyłączyć dźwięk.
Dotyczy trybów RX OFF:
Funkcje w trybie wielokrotnym (Multi)
1. Nacisnąć przycisk funkcyjny odpowiadający
pokrętło regulacji / ustawienia, aby ustawić moc błysku w zakresie od 1/4 do
1/128-6 kroków.
w
. Obrócić
2. Nacisnąć przycisk funkcyjny odpowiadający
71
w
. Obrócić

Pl
INSTRUKCJA OBSŁUGI
Funkcje niestandardowe
Lampa studyjna Phottix Indra500 TTL jest wyposażona w szereg funkcji niestandardowych, które można programować. Aby modyfikować te funkcje należy wykonać następujące czynności (patrz poniżej):
1. Nacisnąć i przytrzymać przycisk funkcyjny 4 oraz pokrętło regulacji / ustawie-
Tabela funkcji niestandardowych
nia przez 3 sekundy, aby przejść do ekranu menu C.Fn.
2. Nacisnąć przycisk funkcyjny 1 lub przycisk funkcyjny 2, aby przejrzeć pozycje
menu – od C.Fn 00 do 03.
3. Obrócić pokrętło regulacji / ustawienia, aby zmienić funkcje w ramach menu.
4. Nacisnąć przycisk funkcyjny 4, aby wyjść z menu C.Fn.
Wymiana lampy błyskowej
1. Odłączyć lampę studyjną Indra500 TTL od źródła zasilania na 10 minut przed
wymianą lampy błyskowej.
2. Odłączyć reflektor w sposób pokazany powyżej.
3. Delikatnie oddzielić kopułkę szklaną od mocowania zatrzaskowego, odłączyć
kopułkę szklaną. (Ilustracja 9)
4. Delikatnie przytrzymać lampę błyskową w celu wyjęcia jej ze szczeliny zatrzaskowej. (Ilustracja 10)
5. Umieścić nową lampę błyskową w szczelinie zatrzaskowej. (Ilustracja 11)
72

Pl
INSTRUKCJA OBSŁUGI
6. Zamocować kopułkę szklaną i ustawić w linii szczelinę zatrzaskową.
(Ilustracja 12)
7. Zamontować reflektor w sposób pokazany powyżej.
Uwaga: Podczas zmiany lampy błyskowej należy użyć rękawic ochronnych
aby nie dotykać jej bezpośrednio.
Przywracanie ustawień fabrycznych
Ustawienia lampy studyjnej Indra500 TTL można przywrócić do ustawień fabrycznych.
W tym celu należy w tym samym czasie nacisnąć i przytrzymać przycisk funkcyjny 1 oraz pokrętło regulacji / ustawienia przez 3 sekundy. Dzięki temu wszystkim ustawieniom funkcji zostaną przywrócone wartości domyślne.
Sprawdzanie informacji dotyczących lampy
Specyfikacja techniczna
Maksymalna moc: 500W
Regulacja mocy: 8 poziomów (4 - 500W)
Regulacja mocy: W krokach 1/3 lub 1 przysłona
Tryby błysku: Pomiaru przez obiektyw (TTL), Ręczny (M), Wielokrotny (Multi)
Kąt emisji: 60°
Liczba przewodnia: 45/147.6 (ISO100, m/ft)
Temperatura barwowa: 5600±200K(temperatura barwowa może się różnić
przy niskiej mocy)
Czas błysku lampy: t=1 1/250 s - 1/12000 s
Błysk stroboskopowy: Częstotliwość: 1 - 100 Hz, Liczba błysków: 1 - 100 razy
Funkcje HSS i SCS: Obsługiwane*
Czas ładowania(do poziomu mocy 1/1; dioda będzie świecić na czerwono)
Zasilacz sieciowy Phottix Indra: Jedna/Dwie lampy: 0.9s/1.7s
Akumulator Phottix Indra (10AH): Tryb H Jedna/Dwie lampy: 1s/2.3s
Tryb S Jedna/Dwie lampy: 1.4s/5.4s
Akumulator Phottix Indra (5AH) Tryb H Jedna/Dwie lampy: 1.4s/4.9s
Tryb S Jedna/Dwie lampy: 2.6s/10.9s
Moc wejściowa:
Zasilacz sieciowy Phottix Indra: AC 220V/110V, 50HZ/60HZ
Akumulator Phottix Indra: 14.8V/5Ah, 400 błysków o pełnej mocy
14.8V/10Ah, 800 błysków o pełnej mocy
studyjnej
Naciśnięcie kombinacji przycisków może pomóc w sprawdzeniu informacji dotyczących lampy studyjnej Phottix Indra500 TTL w odniesieniu do: Osprzętu,
oprogramowania, biblioteki ikon oraz numeru seryjnego produktu.
1. Nacisnąć i przytrzymać przycisk funkcyjny 2 oraz pokrętło regulacji / ustawienia przez 3 sekundy. Na ekranie pojawią się wyświetlone informacje na temat
osprzętu, oprogramowania, biblioteki ikon oraz numeru seryjnego produktu.
2. Nacisnąć dowolny przycisk, aby wyjść z ekranu informacji i powrócić do
ekranu startowego.
3. Wyzwolenie lampy studyjnej, używanie funkcji ogniskowania aparatu lub
robienie zdjęć podczas gdy wyświetlane są informacje dotyczące wersji spowoduje wyjście z ekranu wersji i powrót do ekranu startowego lampy studyjnej.
Zmiany kondensatora lampy studyjnej
Jeśli lampa studyjna Indra500 nie jest używana przez pewien okres czasu, w
kondensatorze lampy błyskowej zajdą zmiany fizyczne. Zaleca się włączenie
lampy błyskowej na co najmniej 10 minut raz na trzy miesiące, aby zapobiec
zajściu jakichkolwiek zmian.
Moc światła modelującego: około 4.5W
Tryby światła modelującego: OFF [Wył.], Auto [Automatyczny], Manual
[Ręczny] w zakresie 1-9
Metoda łączności bezprzewodowej: Częstotliwości radiowe i impulsy optyczne
Kanały: 4
Tryby odbioru bezprzewodowego: Odin-C, Odin-N, Strato II, Opt-Slave, RX
OFF (Można wyzwolić tylko przez port synchronizacji 3,5 mm)
Zasięg odbioru (w przybliżeniu):Radiowy: więcej niż 100 m
Wyświetlacz: Wyświetlacz LCD 320X240 TFT, Obsługa 3 ustawień koloru ekranu
Ustawienie czujnika wyświetlacza LCD: Automatyczne wykrywanie kierunku i
180-stopniowy obrót zgodnie z tym kierunkiem
Metoda rozpraszania ciepła: Automatyczne włączanie w zależności od temperatury
Potwierdzenie przetwarzania: Możliwość włączenia lub wyłączenia
Port synchronizacji: mini port 3,5 mm
Aktualizacja oprogramowania sprzętowego: Aktualizacja oprogramowania
sprzętowego odbywa się przez mini port USB
Wymiary: Średnica: 180 mm, Długość: 266 mm
Waga: 2,1 kg (bez przewodu zasilania lampy studyjnej)
Warto pamiętać: Specyfikacje produktu i konstrukcja zewnętrzna podlegają
zmianom bez wcześniejszego uprzedzenia.
* Z kompatybilnymi aparatami
73

Благодарим Вас за
приобретение данного
продукта компании Phottix
Внимание: Прежде чем приступить к работе с осветителем, пожалуйста,
ознакомьтесь с данным руководством пользователя.
Phottix Indra500 TTL является портативным студийным осветителем,
работающим как от постоянного источника питания, так и от переносного
аккумулятора, а также имеющий функции встроенной системы
беспроводного радио- и оптического управления. Этот осветитель
позволяет работать в режимах TTL, Ручной установки мощности (Manual) и Стробоскопическом (Мульти), а также поддерживает функции
высокоскоростной синхронизации и синхронизации по задней шторке.
Студийный осветитель Phottix Indra500 TTL совместим с широкой
линейкой уже имеющихся продуктов компании Phottix.
Инструкции по мерам безопасной
эксплуатации вспышки
●
Студийная вспышка Indra500 состоит из электрических
компонентов
или ремонтировать вспышку. Никогда не притрагивайтесь ко
внутренним компонентам вспышки.
высокого напряжения. Не пытайтесь разобрать
Ru
●
Заметив дым либо подозрительный запах исходящий от
осветителя, следует немедленно выключить его из сети.
●
Выключите переключатель питания если вспышка не будет
использована в течение длительного времени.
●
Снимите покрытие вспышки перед её использованием.
●
Будьте осторожны прикасаясь к головке вспышки непосредственно
после использования. Она может оказаться горячей и привести к
ожогам.
●
Проконсультируйтесь с местными представителями власти по
поводу правильной утилизации данного продукта.
РУКОВОДСТВО ПОЛЬЗОВАТЕЛЯ
Таблица Компонентов
Компоненты и Функции......................................................... 74
Режимы вспышки......................................................................81
●
Никогда не используйте вспышку в непосредственной близости
от горючих газов, растворителей либо в местах с открытым высоким
электрическим напряжением.
●
Убедитесь в том, что вилка и кабели плотно подключены во время
подзарядки и использования.
●
Отключите студийную вспышку Indra500 TTL от источника
питания на 10 минут перед тем, как заменять лампу вспышки.
Будьте осторожны – лампа может быть очень горячей.
●
Не прикасайтесь к контактам разъема для внешнего источника
питания. Убедитесь, что данные контакты никогда не будут
прикасаться к металлическим предметам - это может привести к
увечью, а также послужить причиной электрического замыкания.
●
Источник внешнего питания не должен превышать технических
показателей, указанных в данном руководстве.
●
Внешнее питание должно быть использовано в условиях
хорошей вентиляции. Не используйте данный продукт в пыльных
или иных загрязнённых условиях.
●
Данный продукт не является водоустойчивым. Избегайте
попадания воды на поверхность вспышки. Не подвергайте её
воздействию повышенной влажности.
Беспроводное управление.......................................................82
Пользовательские функции.................................................. 85
Технические спецификации.................................................... 86
●
Не чистите данный продукт при помощи органических
растворителей либо спиртосодержащих жидкостей.
●
Не размещайте тёмные предметы в непосредственной близи
от головки вспышки при её срабатывании. Тепловая энергия,
исходящая от Indra500, может привести к ожогам, а также повредить
лампу вспышки.
●
Соблюдайте безопасность при использовании вспышки. Не
следует направлять вспышку в глаза людей или животных при её
срабатывании с близкого расстояния - это может привести к потере
зрения.
●
Не оставляйте вспышку и батареи в местах повышенной
температуры (прямой солнечный свет, в закрытом автомобиле и т.д.)
74

Ru
РУКОВОДСТВО ПОЛЬЗОВАТЕЛЯ
Компоненты
Полномасштабный вид
1. Покрытие вспышки
2. Отверстие держателя
зонта
3. Защёлка быстросъёмного
крепления
4. Ручка
5. Порт синхронизации
3.5мм
6. USB порт выхода
7. Порт внешнего питания
8. Рукоятка установки угла
крепления
9. Колонка крепления
10. Зажимной винт
Вид сзади
11. ЖК-дисплей
12. Кнопка функции 1
13. Кнопка функции 2
14. Кнопка Тест/готовность
15. Рукоятка настройки/установки
16. Переключатель питания
17. Переключатель
моделирующего света
18. Кнопка функции 3
19. Кнопка функции 4
20. Сенсор оптического сигнала
Порт внешнего питания
Студийный осветитель Indra500 TTL может быть подключён к сетевому
адаптеру Phottix Indra либо к внешнему аккумулятору через порт
внешнего питания.
Внимание:
При подключении к порту внешнего питания следует использовать
только те кабели питание Phottix, которые предназначены для
использования со студийным осветителем Indra500 TTL.
Подключение Indra500 к источнику внешнего
питания
Использование аккумулятора Phottix Indra
1. Подключите один конец кабеля в порт для внешнего источника питания
осветителя Indra500 TTL. (рис. 1)
Внимание: Для правильного подключения необходимо выровнять
красные метки кабеля и порта.
2. Вставьте другой конец кабеля в соответствующий порт выхода
аккумулятора Phottix Indra. (рис. 2)
Вид спреди
21. Слот установки
22. Стеклянный колпак
23. Светодиод моделирующего света
24. Лампа-вспышка
25. Отражатель
75
3. Включите питание аккумулятора.
4. Включите питание осветителя Phottix Indra500 TTL.
Использование адаптера сетевого питания Phottix Indra
1. Подключите один конец кабеля в порт для внешнего источника питания
осветителя Indra500 TTL. (рис. 1)
Внимание: Для правильного подключения необходимо выровнять
красные метки кабеля и порта.
2. Вставьте другой конец кабеля в соответствующий порт выхода сетевого
адаптера Phottix Indra. (рис. 3)

Ru
РУКОВОДСТВО ПОЛЬЗОВАТЕЛЯ
Подключение и снятие отражателя
Подключение рефлектора
1. Удерживайте Indra500 в одной руке.
2. При помощи другой руки выровняйте отражатель на уровне с
установочным слотом.
3. Подключите сетевой адаптер к сети переменного тока.
4. Включите питание и переключатель выходной мощности сетевого
адаптера.
5. Включите питание осветителя Phottix Indra500 TTL.
Отключение Indra500 от источника
внешнего питания
Отключение от аккумулятора Phottix Indra
1. Выключите питание осветителя Indra500 TTL.
2. Выключите переключатель выходной мощности аккумулятора.
3. Отключите сетевой кабель вспышки (рис. 4)
3. Вставьте и поверните отражатель по направлению часовой стрелки до
щелчка запора. Убедитесь, что отражатель плотно закреплён. (рис.7)
4. В случае если используется зонт, убедитесь в том, что отверстие в
отражателе совпадает с держателем зонта осветителя Indra.
Для снятия отражателя
1. Нажмите на защёлку запора одной рукой.
2. Проверните отражатель против часовой стрелки по направлении
стрелки на диаграмме и снимите его с осветителя Indra500. (рис 8)
4. Отключите другой конец кабеля (рис. 6)
Отключение от адаптера сетевого питания Phottix Indra
1. Выключите питание осветителя Indra500 TTL.
2. Выключите питание и переключатель выходной мощности сетевого
адаптера. Отключите кабель сетевого питания (рис. 5)
3. Отключите кабель питания от осветителя Phottix Indra (рис 6).
Внимание: При снятии отражателя удерживайте его в параллельном
положении относительно студийной лампы избегая его прикосновения со
стеклянным куполом, что может привести к повреждению последнего.
Использование крепления для зонтов
Осветитель Phottix Indra500 TTL оснащён креплением для зонтов на
верхней части осветителя. Он легко удерживает зонт либо зонтовой
софтбокс. Использовать крепление можно просто: вставьте рукоятку
зонта в крепление студийного осветителя, и зафиксируйте его затянув
винт.
Использование крепления для софтбоксов
Осветитель Phottix Indra500 TTL включает совместимый с Bowen’s кольцевой адаптер для софтбоксов и других аксессуаров для
модификации света. Процедура установки и снятия адаптера для
софтбоксов такая же, как и для установки и снятия отражателя (см. выше)..
Для установки: Выровняйте кольцевой адаптер для софтбокса и
76
крепительное отверстие на Indra500. Вставьте и проверните по часовой

Ru
РУКОВОДСТВО ПОЛЬЗОВАТЕЛЯ
стрелке крепление софтбокса по стрелке до щелчка запора. (рис 7)
Для снятия: Нажмите на защёлку затвора, и проверните крепление
софтбокса против часовой стрелки для снятия его с Indra500. (рис 8)
Порты синхронизации (Sync) и USB
1. Некоторые синхронизаторы работы вспышек Phottix (Phottix Odin TTL,
Strato II Multi и Strato TTL) либо камера могут быть подключены к порту
синхронизации 3.5мм осветителя Indra500 при помощи совместимого
кабеля. Устройство сможет произвести срабатывание осветителя.
2. Порт USB port используется для обновления ПО. Информация о версии
обновления ПО и её инструкция будет доступна на веб-страницах Phottix.
Внимание:
При подключении синхронизатора к порту синхронизации вспышки будет
доступен только режим ручной настройки (мануальный).
Каналы передачи
Система беспроводного управления вспышкиPhottix Indra500 TTL имеет
4 канала: 1, 2, 3 и 4. Одинаковый канал должен быть установлен как
на осветителе Indra500 TTL в режиме беспроводного приёмника, так
и на устройстве синхронизатора (триггера), либо вспышки, которая
используется в качестве триггера спуска Indra.
Функция быстрой вспышки
Фиксация Экспозиции при съемке со вспышкой
- FEL /FV Lock
Фиксация экспозиции при съемке со вспышкой (FEL, также FV Lock
на камерах Nikon) обеспечивает фиксацию экспозиции при съёмке со
вспышкой Использование данной функции помогает при использовании
ручного замера по точке на сцене с изменяющимися условиями
осветления.
Находясь в режиме TTL, нажмите кнопку камеры для использования
данной функции. Подробно ознакомьтесь с использованием данной
функции FEL в руководстве по эксплуатации данной вспышкой.
Функция FEL поддерживается, но не может быть установлена на студийном
осветителе Indra500 TTL. Доступность данной функции зависит от того
обладает ли этой функцией синхронизатор либо камера. Ознакомьтесь
с подробностями функции FEL в руководстве по эксплуатации вашей
камеры.
Высокоскоростная синхронизация – HSS/
Auto FP
Режим высокоскоростной синхронизации (HSS) используется для
съёмки при скоростях выдержки более высоких чем обычная скорость
синхронизации работы камеры со вспышкой (обычно 1/200-1/250сек).
Использование данной функции помогает при съёмке в режиме
приоритета выдержки, а также для ограничения рассеянного света.
Возможности HSS могут быть разными, и зависят от модели фотоаппарата
- ознакомьтесь с данными техническими возможностями в руководстве по
эксплуатации вашего фотоаппарата.
Функция быстрой вспышки позволяет студийной вспышке срабатывать
в моменте, когда она ещё не полностью перезарядилась, т.е. лампочка
статуса будет светиться зелёным цветом. Время перезарядки в режиме
быстрой вспышки короче – это может пригодиться для быстрой съёмки на
коротком расстоянии.
Функция быстрой вспышки может быть использована для серийной
съёмки. Данная функция может быть включена и выключена в Меню (см.
ниже секция Меню).
Внимание:
Функция быстрой вспышки устанавливает приоритет срабатывания
вспышки. Недостаточная экспозиция может быть результатом того, что
объект находится слишком далеко от камеры.
Брекетинг при съёмке со вспышкой - FEB
Брекетинг при съёмке со вспышкой (FEB) позволяет снять серию кадров
со вспышкой с автоматическим изменением мощности вспышки. Камера
произведет серию снимков с различной экспозицией. Функция FEB
полезна при съёмке в ситуациях, когда у вас нет достаточного времени для
подготовки, либо при изменяющихся условиях освещения для достижения
оптимального уровня экспозиции снимков. Также функция FEB может быть
использована для фотографии HDR.
Внимание:
1. Функция HSS поддерживается, но не может быть установлена на
студийном осветителе Indra500 TTL.
2. Камера, синхронизатор вспышек и режим приёмника могут
иметь значительное влияние на режим HSS. Для достижения
лучшего результата в режиме HSS рекомендуется использование
синхронизаторов производства Phottix. Пожалуйста, ознакомьтесь с
«Таблицей совместимости» ниже, а также подробности можно узнать в
инструкциях для вашей вспышки и камеры.
3. Функция HSS не работает в Мульти-стробоскопическом и Мануальном
режиме.
4. Частое использование режима HSS приведёт к уменьшению срока
службы лампы вспышки.
5. Протоколы вспышки Nikon могут ограничивать максимальную
скорость синхронизации на некоторых камерах Nikon.
Функция FEB function поддерживается, но не может быть установлена
на студийном осветителе Indra500 TTL. Доступность данной функции
зависит от того обладает ли этой функцией синхронизатор либо
камера. Ознакомьтесь с подробностями функции FEB в руководстве по
эксплуатации вашей камеры.
77

Таблица Совместимости
Ru
РУКОВОДСТВО ПОЛЬЗОВАТЕЛЯ
Синхронизация по второй шторке - SCS
Вспышка Phottix Mitros+ срабатывать непосредственно перед закрытием
затвора. Данная функция может быть полезной при длительных
выдержках для создания специальных эффектов.
Please note:
1. Функция SCS поддерживается, но не может быть установлена
на студийном осветителе Indra500 TTL. Функцию SCS необходимо
установить на фотоаппарате либо синхронизаторе вспышек.
Подробности можно узнать в инструкциях для вашей вспышки и
камеры.
2. Функция SCS не работает в Мульти-стробоскопическом режиме.
Кнопка тест/готовность
1. Нажатие кнопки Тест приведёт к срабатыванию студийного осветителя.
Это может быть использовано для работы с экспонометрами в режиме
ручной настройки.
2. Данная кнопка также является индикатором готовности вспышки.
ЖК-индикатор на кнопке будет зелёным, когда вспышка достигла
минимального заряда, и красным, когда вспышка полностью заряжена.
78

Меню
Ru
РУКОВОДСТВО ПОЛЬЗОВАТЕЛЯ
79

Настройки Меню
Используйте четыре кнопки функций, расположенные снизу от экрана,
для выбора соответствующих опций настроек. Выделив одну функцию,
можно изменять её настройки. В зависимости от настройки цвета экрана,
настройки будут отображаться в красном, белом или жёлтом цветах
(настройки цвета экрана и сенсора дисплея будут указаны в списке меню).
1. Поверните рукоятку настройки/установок для изменений настроек.
2. Завершив изменения настроек, нажмите соответствующую кнопку, либо
рукоятку настройки/установок для подтверждения и выхода.
ЖК-экран
Ru
РУКОВОДСТВО ПОЛЬЗОВАТЕЛЯ
Режимы беспроводного
приёмника: Odin-C,
Odin-N,
Strato II,
Opt-Slave
RX OFF
Компенсация
экспозиции вспышки/
Мощность вспышки
Канал
беспроводного
приёмника
Режимы вспышки:
TTL, M, Multi
Группа
беспроводного
приёмника
Моделирующий свет:
Ручной уровень 01-09,
Выкл.
Быстрая вспышка
: вкл.
: выкл.
Звуковой сигнал
вкл.
выкла.
Меню: см. подробнее в
разделе Меню функций.
Экран Меню
80

Ru
РУКОВОДСТВО ПОЛЬЗОВАТЕЛЯ
Функция автоматического запоминания
настроек
Осветитель Indra500 TTL запомнит последние установленные настройки.
Предыдущие настройки будут сохранены каждый раз после включения
устройства.
Моделирующая вспышка
1. Нажатие на камере кнопку предварительного просмотра глубины
резкости приведёт к срабатыванию вспышки непрерывно в течение 1
секунды. Моделирующая вспышка позволяет оценить световые эффекты
и баланс освещённости объекта. (Более подробную информацию по
использованию кнопки глубины резкости и настроек кнопок можно узнать
в инструкции по эксплуатации фотоаппарата).
2. Моделирующая вспышка может быть использована во всех режимах,
TTL, Ручном и Мульти.
Моделирующий свет
Устройство Phottix Indra500 TTL оснащено моделирующим светом от
светодиодов. Данная функция служит для предварительного просмотра
установок света, а также помогает фокусировке в затемнённых условиях.
Моделирующий свет имеет три режима
1. Мануальный режим: 9 уровней яркости доступны от 01 до 09.
из режима настроек.
При помощи выключателя моделирующего света
1. Нажмите на переключатель моделирующего света для включения/
выключения моделирующего света.
2. Если моделирующий свет включён, значок
на экране.
3. Поверните рукоятку настройки/установок для изменения режима
моделирующего света между Manual (ручной: 01-09 стоп), либо OFF
(выключить).
4. Нажмите на рукоятку настройки/установок для подтверждения
настроек и выхода из режима настроек.
будет отображаться
Режимы вспышки
Студийная вспышка Phottix Indra500 TTL имеет три режима работы: TTL
(автоматически), Manual (ручная настройка) и Multi (мульти).
Режим TTL вспышки
Если студийный осветитель Phottix Indra500 TTL установлен в режиме TTL,
студийный осветитель будет срабатывать в режиме и уровне мощности
вспышки, установленными на Phottix Odin либо других совместимых с
Phottix триггерах вспышек, контролирующих её уровень мощности.
2. Режим выкл.: Моделирующий свет отключён.
Внимание:
1. При срабатывании студийного осветителя, моделирующий свет не
выключится автоматически.
2. Использование моделирующего света потребляет значительно
больше энергии батареи.
Настройка яркости моделирующего света
Моделирующий свет может быть включён/отключён в опции меню
B либо при помощи выключателя моделирующего
света
.
Способ применения
1. Нажмите Кнопку функции 4 пока на дисплее не отобразится значок
.
2. Нажмите на соответствующую кнопку функции
3. Если опция моделирующего свет будет выбрана
выделена на экране.
4. Поверните рукоятку настройки/установок для изменения режима
моделирующего света между Manual (ручной: 01-09 стоп), либо OFF
(выключить).
.
, она будет
Компенсация экспозиции при съёмке со вспышкой - FEC
Студийный осветитель Phottix Indra500 TTL позволяет производить
компенсацию экспозиции при съёмке со вспышкой (FEC) в пределах от
-3 до +3 с шагом 1/3 ступени. Это помогает в ситуациях, когда требуется
точная настройка системы TTL в определенных условиях.
Внимание:
1. Если устройство-триггер (учитывая, что режим TTL на нём доступен) а
также студийный осветитель установлены в режимах TTL, и коррекция
EV установлена на двух устройствах, тогда значение окончательной
экспозиции будет равняться сумме двух значений компенсации.
2. Если устройство-триггер установлен в режиме ручной настройки
(если он доступен), а студийный осветитель установлен в режиме
TTL с компенсацией экспозиции вспышки, тогда данное значение
компенсации вспышки будет использовано для вычисления
окончательной экспозиции вспышки.
Режим ручной настройки вспышки (Manual)
В режиме ручной настройки вспышки, студийный осветитель сработает
исходя из установленного уровня мощности. Студийный осветитель Phottix Indra500 TTL может быть установлен от 1/128 до 1/1 с шагом в 1/3 стопа
(1/128, 1/64, 1/32, 1/16, 1/8, 1/4, 1/2, and 1/1). Настройки режима вспышки
и мощности студийного осветителя не могут осуществляться с триггерустройства.
5. Нажмите на соответствующую кнопку функции
рукоятку настройки/установок для подтверждения настроек и выхода
81
либо

Ru
РУКОВОДСТВО ПОЛЬЗОВАТЕЛЯ
Мульти (Multi) стробоскопический режим
При помощи стробоскопического режима Мульти можно произвести
серию быстрых вспышек. Их количество, частота и мощность может быть
запрограммирована на студийном осветителе Phottix Indra500 TTL. Режим
Мульти способствует запечатлению множества снимков движущегося
объекта на одной фотографии и множество других эффектов.
В режиме стробоскопического режима Мульти студийный осветитель
будет срабатывать исходя из запрограммированных настроек уровня
мощности, количества срабатываний (1-100) и частоты(1-100Гц).
Мощность вспышки может быть установлено от 1/128 до 1/4 с шагом 1/1
(1/128, 1/64, 1/32, 1/16, 1/8, и 1/4). Настройки режима вспышки и мощности
студийного осветителя не могут осуществляться с триггер-устройства.
Внимание:
1. Слишком длительное использование вспышки в мульти
стробоскопическом режиме может привести к перегреву и даже
повреждению вспышки.
2. Если вспышка перегрета, автоматически увеличится время её
подзарядки. Если температура будет продолжать повышаться, вспышка
прекратит срабатывания.
4. Нажмите на рукоятку настройки/установок для подтверждения
настройки.
5. Нажмите на соответствую кнопку функици до появления значка
B
для выбора между режимами вспышки TTL, Ручным
или Мульти.
Режим радио приёмника Odin-N
Данный режим позволяет использовать студийный осветитель Indra500
TTL для срабатывания от передатчика (TCU) радиосинхронизатора работы
вспышек Phottix Odin TTL для Nikon, либо от вспышки-трансивера Phottix
Mitros+ TTL для Nikon в режиме Odin TX. Для того, чтобы они корректно
работали, необходимо настроить их на один и тот же канал и группу.
Способ применения:
1. Нажмите на кнопку функции 4 либо поверните ручку настройки пока
не появится на экране значок
2. Нажмите на соответствующую кнопку функции до появления на
экране значка беспроводного радио приёмника
3. Поверните рукоятку настройки/установок для выбора
беспроводного режима Odin-N.
.
.
Режим беспроводного приёмника
Студийный осветитель Phottix Indra500 TTL оснащён 5 режимами
беспроводного приёмника: Odin-C, Odin-N, Strato II, Opt-Slave and RX OFF.
Пожалуйста, смотрите ниже для более подробной информации.
Поддерживаемые режимы вспышки
Режим радио приёмника Odin-C
Данный режим позволяет использовать студийный осветитель Indra500
TTL для срабатывания от передатчика (TCU) радиосинхронизатора работы
вспышек Phottix Odin TTL для Canon, либо от вспышки-трансивера Phottix
Mitros+ TTL для Canon в режиме Odin TX. Для того, чтобы они корректно
работали, необходимо настроить их на один и тот же канал и группу.
Способ применения:
1. Нажмите на кнопку функции 4 либо поверните ручку настройки пока
не появится на экране значок
2. Нажмите на соответствующую кнопку функции до появления на
экране значка беспроводного радио приёмника
3. Поверните рукоятку настройки/установок для выбора беспроводного
режима Odin-C.
.
.
4. Нажмите на рукоятку настройки/установок для подтверждения
настройки.
5. Нажмите на соответствую кнопку функици до появления значка
B
для выбора между режимами вспышки TTL, Ручным
или Мульти.
Режим радио приёмника Strato II
Данный режим позволяет использовать студийный осветитель Indra500
TTL для срабатывания от передатчика (TCU) радиосинхронизатора
работы вспышек Phottix Odin TTL для Canon/Nikon, либо от вспышкитрансивера Phottix Mitros+ TTL для Canon/Nikon в режиме Odin Tx, либо
от передатчика радиосинхронизатора работы вспышек Phottix Strato TTL
для Canon/Nikon, либо от передатчика радиосинхронизатора работы
вспышек Phottix Strato Strato II Multi для Canon/Nikon. Для того, чтобы они
корректно работали, необходимо настроить их на один и тот же канал и
группу.
Внимание:
функции HSS, SCS и TTL не поддерживаются в режиме радио приёмник
Strato II.
Способ применения:
1. Нажмите на кнопку функции 4 либо поверните ручку настройки пока
не появится на экране значок
2. Нажмите на соответствующую кнопку функции до появления на экране
значка беспроводного радио приёмника
3. Поверните рукоятку настройки/установок для выбора беспроводного
режима Strato II.
4. Нажмите на рукоятку настройки/установок для подтверждения
настройки.
.
.
82

Ru
РУКОВОДСТВО ПОЛЬЗОВАТЕЛЯ
5. Нажмите на соответствую кнопку функици до появления значка
B для выбора между режимами вспышки Ручным
или Мульти.
Режим приёмника оптического сигнала Opt-Slave
В данном режиме срабатывание других вспышек поблизости приведёт к
срабатыванию студийного осветителя Indra500 TTL.
Внимание:
Предварительная вспышка, исходящая от находящихся поблизости
вспышек TTL, приведёт к срабатыванию Phottix Indra в режиме Opt-Slave.
Пожалуйста, убедитесь в том, что вспышки поблизости не приведут к
срабатыванию Phottix Indra не своевременно.
Способ применения:
1. Нажмите на кнопку функции 4 либо поверните ручку настройки пока
не появится на экране значок
2. Нажмите на соответствующую кнопку функции до появления на
экране значка беспроводного радио приёмника
3. Поверните рукоятку настройки/установок для выбора беспроводного
режима Opt-Slave.
4. Нажмите на рукоятку настройки/установок для подтверждения
настройки.
.
.
Режим выключенного приёмника RX OFF
3. Нажмите на соответствующую кнопку функции до появления на экране
значка
B
. Поверните рукоятку настройки/установок для
настройки канала 1-4.
4. Нажмите на соответствующую кнопку функции до появления на экране
значка
B . Поверните рукоятку настройки/установок для
настройки группы A, B и C.
5. Нажмите на соответствующую кнопку функции до появления на экране
значка
B
Поверните рукоятку настройки/установок для
.
настройки цвета отображения ЖК-экрана (классический, динамичный,
элегантный).
6. Нажмите на соответствующую кнопку функции до появления на экране
значка
in
Поверните рукоятку настройки/установок
.
для настройки количества срабатываний вспышки от 1-100 раз (зависит от
частоты и выходной мощности вспышки).
7. Нажмите на соответствующую кнопку функции до появления на экране
значка
B
Поверните рукоятку настройки/установок для
.
настройки частоты вспышки от 1 до 100Гц.
8. Нажмите на соответствующую кнопку функции до появления на экране
значка
B
Поверните рукоятку настройки/установок для
.
настройки сенсора ЖК (обычный, перевёрнутый и автоматический сенсор).
9. Нажмите на соответствующую кнопку функции до появления на экране
значка
B
Поверните рукоятку настройки/установок для
,
включения/выключения режима быстрой вспышки.
10. Нажмите на соответствующую кнопку функции до появления на экране
значка
B
Поверните рукоятку настройки/установок для
.
включения/выключения звукового сигнала.
В данном режиме режим беспроводного приёмника будет выключен.
Способ применения:
1. Нажмите на кнопку функции 4 либо поверните ручку настройки пока
не появится на экране значок
.
2. Нажмите на соответствующую кнопку функции до появления на
экране значка беспроводного радио приёмника
.
3. Поверните рукоятку настройки/установок для выбора беспроводного
режима RX OFF.
4. Нажмите на рукоятку настройки/установок для подтверждения
настройки.
5. Нажмите на соответствую кнопку функици до появления значка
B для выбора между режимами вспышки Ручным или
Мульти.
Для Odin-C/Odin-N/Strato II
Функции в режиме Мульти
1. Нажмите на соответствующую кнопку функции до появления на экране
значка
B
выбора мощности вспышки от 1/4 до 1/128-в 6 стопов.
2. Нажмите на соответствующую кнопку функции до появления на экране
значка
B
настройки режима моделирующего света (выкл./01-09).
83
Поверните рукоятку настройки/установок для
.
. Поверните рукоятку настройки/установок для
Для Odin-C/Odin-N
Функции в режиме TTL
1. Нажмите на соответствующую кнопку функции до появления на экране
значка
для настройки значения компенсации экспозиции вспышки от -3.0EV до
+3.0EV.
2. Нажмите на соответствующую кнопку функции до появления на экране
значка
для настройки режима моделирующего света (OFF/01-09).
3. Нажмите на соответствующую кнопку функции до появления на экране
значка
настройки канала 1-4.
4. Нажмите на соответствующую кнопку функции до появления на экране
значка
настройки группы A, B и C.
5. Нажмите на соответствующую кнопку функции до появления на экране
значка
настройки цвета отображения ЖК-экрана (классический, динамичный,
элегантный).
6. Нажмите на соответствующую кнопку функции до появления на экране
значка
для настройки сенсора ЖК (обычный, перевёрнутый и автоматический
сенсор).
B . Поверните рукоятку настройки/установок
B
B
B
B
B
. Поверните рукоятку настройки/установок
.
Поверните рукоятку настройки/установок для
Поверните рукоятку настройки/установок для
.
Поверните рукоятку настройки/установок для
.
Поверните рукоятку настройки/установок
.

Ru
РУКОВОДСТВО ПОЛЬЗОВАТЕЛЯ
7. Нажмите на соответствующую кнопку функции до появления на экране
значка
B
Поверните рукоятку настройки/установок
.
для включения/выключения режима быстрой вспышки.
8. Нажмите на соответствующую кнопку функции до появления на экране
значка
B
Поверните рукоятку настройки/установок
.
для включения/выключения звукового сигнала.
Для Odin-C/Odin-N/Strato II
Функции в режиме ручной настройки
1. Нажмите на соответствующую кнопку функции до появления на экране
значка
выбора мощности вспышки от 1/1 до 1/128 со 1/3 стопом.
2. Нажмите на соответствующую кнопку функции до появления на экране
значка
настройки режима моделирующего света (OFF/01-09).
3. Нажмите на соответствующую кнопку функции до появления на экране
значка
настройки канала 1-4.
4. Нажмите на соответствующую кнопку функции до появления на экране
значка
настройки группы A, B и C.
5. Нажмите на соответствующую кнопку функции до появления на экране
значка
для настройки цвета отображения ЖК-экрана (классический, динамичный,
элегантный).
6. Нажмите на соответствующуюкнопку функции до появления на экране
значка
настройки сенсора ЖК(обычный, перевёрнутыйи автоматический сенсор).
7. Нажмите на соответствующую кнопку функции до появления на экране
значка
для включения/выключения режима быстрой вспышки.
8. Нажмите на соответствующую кнопку функции до появления на экране
значка
включения/выключения звукового сигнала.
B . Поверните рукоятку настройки/установок для
B . Поверните рукоятку настройки/установок для
B . Поверните рукоятку настройки/установок для
B . Поверните рукоятку настройки/установок для
B . Поверните рукоятку настройки/установок
B . Поверните рукояткунастройки/установок для
B
B
. Поверните рукоятку настройки/установок
. Поверните рукоятку настройки/установок для
Для Opt-Slave/RX OFF
настройки сенсора ЖК (обычный, перевёрнутый и автоматический сенсор).
5. Нажмите на соответствующую кнопку функции до появления на экране
значка
in
, Поверните рукоятку настройки/установок для
включения/выключения режима быстрой вспышки.
6. Нажмите на соответствующую кнопку функции до появления на экране
значка
B
Поверните рукоятку настройки/установок для
.
включения/выключения звукового сигнала.
Для RX OFF
Функции в режиме Мульти
1. Нажмите на соответствующую кнопку функции до появления на экране
значка
выбора мощности вспышки от 1/4 до 1/128-в 6 стопов.
2. Нажмите на соответствующую кнопку функции до появления на экране
значка
настройки режима моделирующего света (OFF/01-09).
3. Нажмите на соответствующую кнопку функции до появления на экране
значка
настройки цвета отображения ЖК-экрана (классический, динамичный,
элегантный).
4. Нажмите на соответствующую кнопку функции до появления на экране
значка
настройки количества срабатываний вспышки от 1-100 раз (зависит от
частоты и выходной мощности вспышки)
5. Нажмите на соответствующую кнопку функции до появления на экране
значка
настройки частоты вспышки от 1 до 100Гц.
6. Нажмите на соответствующую кнопку функции до появления на экране
значка
настройки сенсора ЖК (обычный, перевёрнутый и автоматический сенсор).
7. Нажмите на соответствующую кнопку функции до появления на экране
значка
включения/выключения режима быстрой вспышки.
8. Нажмите на соответствующую кнопку функции до появления на экране
значка
включения/выключения звукового сигнала.
B
B
B
B
B
B
B
B
. Поверните рукоятку настройки/установок для
. Поверните рукоятку настройки/установок для
Поверните рукоятку настройки/установок для
.
Поверните рукоятку настройки/установок для
Поверните рукоятку настройки/установок для
.
Поверните рукоятку настройки/установок для
.
Поверните рукоятку настройки/установок для
,
Поверните рукоятку настройки/установок для
.
Функции в режиме ручной настройки
1. Нажмите на соответствующую кнопку функции до появления на экране
значка
выбора мощности вспышки от 1/1 до 1/128 со 1/3 стопом.
2. Нажмите на соответствующую кнопку функции до появления на экране
значка
настройки режима моделирующего света (OFF/01-09).
3. Нажмите на соответствующую кнопку функции до появления на экране
значка
настройки цвета отображения ЖК-экрана (классический, динамичный,
элегантный).
4. Нажмите на соответствующую кнопку функции до появления на экране
значка
84
B . Поверните рукоятку настройки/установок для
B
B . Поверните рукоятку настройки/установок для
B
. Поверните рукоятку настройки/установок для
. Поверните рукоятку настройки/установок для
Примечание:
Если рукоятка настройки/установок либо соответствующая кнопка
функции не будет нажата для подтверждения выбора параметра,
выбранный параметр будет автоматически подтверждён через 10
секунд.

Ru
РУКОВОДСТВО ПОЛЬЗОВАТЕЛЯ
Пользовательские функции
Студийный осветитель Phottix Indra500 имеет возможность
программирования множества пользовательских настроек. Для установки
данных функций:
1. Нажмите и удерживайте кнопку функции 4 и рукоятку настройки/
установок в течение 3 секунд для входа в меню C.Fn.
Таблица пользовательских функций
2. Кнопками функций 1 и 2 переместите выбор между меню функций C.Fn
от 00 до 03.
3. Поверните рукоятку настройки/установок для изменения функции
внутри меню.
4. Нажмите кнопку функции 4 для выхода из меню C.Fn.
Замена лампы-вспышки
1. Отключите студийный осветитель Indra500 TTL от источника питания на
10 минут перед заменой лампы-вспышки.
2. Снимите отражатель так, как это указано выше.
3. Осторожно отсоедините стеклянный колпак от крепления защёлки,
снимите его. (рис. 9)
85
4. Осторожно удерживая лампу, извлеките её из крепления. (рис. 10)

Ru
РУКОВОДСТВО ПОЛЬЗОВАТЕЛЯ
5. Вставьте новую лампу в соответствующее крепление. (рис. 11)
6. Установите на место стеклянный колпак. (рис. 12)
7. Подсоедините отражатель так как указано выше.
Внимание: при замене лампы-вспышки оденьте резиновые перчатки.
Технические характеристики
Максимальная мощность: 500Вт
Настройка мощности стопы: в 8 шагов (4-500Дж)
Настройка мощности: с шагом 1/3 стопа либо полный стоп
Режимы вспышки: TTL автомат., Ручная настройка (M), Мульти
Угол освещения: 60°
Ведущее число: 45/147.6 (ISO100, м/фут)
Температура цвета: 5600±200K (Температура цвета может отличаться при
настройках малой мощности)
Длительность вспышки: t=1 1/250сек - 1/12000сек
Стробоскопическая вспышка:
HSS и SCS: поддерживаются*
Время подзарядки вспышки (при уровне мощности вспышки 1/1;
индикатор светиться красным цветом)
Сетевой адаптер Phottix Indra AC : одна/две вспышки: 0.9/1.7сек.
Phottix Indra акумулятор (10AH): H режим одна/две вспышки: 1/2.3 сек.
S режим одна/две вспышки: 1.4/5.4 сек.
Phottix Indra акумулятор (5AH) H режим одна/две вспышки: 1.4/4.9 сек.
S режим одна/две вспышки: 2.6s/10.9 сек.
Частота: 1-100Гц, Кол-во вспышек: 1-100 раз
Восстановление стандартных настроек
Студийный осветитель Indra500 TTL имеет возможность восстановления
стандартных настроек. Нажмите и удерживайте кнопку функции 1 вместе
с рукояткой настройки/установки в течение 3 секунд. Все настройки
функций будут сброшены и установлены по умолчанию.
Отображение информации об устройстве
Нажатие комбинации кнопок позволит узнать следующую информацию о
студийном осветителе Phottix Indra500 TTL: номер аппаратного средства,
ПО, библиотеки икон и серийный номер.
1. Нажмите и удерживайте кнопку функции 2 и рукоятку настройки/
установок в течение 3 секунд. На экране отобразятся номер аппаратного
средства, ПО, библиотеки икон и серийный номер.
2. Нажмите любую кнопку для выхода из информационного экрана и
возврата в стандартный экран.
3. Срабатывание вспышки, фокусировка либо срабатывание спуска камеры
в моменте, когда осветитель отображает информацию об устройстве
приведёт к выходу из информационного экрана, и возврату в стандартный
экран.
Входная мощность:
сетевой адаптер Phottix Indra: AC 220В/110В, 50Гц/60Гц
Аккумулятор Phottix Indra:
14.4В/5Aч, 400 срабатываний на полной мощности.
14.8В /10 Aч, 800 срабатываний на полной мощности.
Мощность моделирующего света: около 4.5Вт
Режимы моделирующего света: выкл., ручной 1-9 уровней
Способ беспроводного соединения: радио частота и оптический
импульс
Каналы: 4
Режимы беспроводного приёмника: Odin-C, Odin-N, Strato II, Opt-Slave,
RX OFF (Может срабатывать только через 3.5 мм порт синхронизации)
Дальность передачи (прибл.): Радио: 100м+
Экран: 320X240 TFT ЖК экран, поддерживает 3 цветовых настройки
Настройки сенсора ЖК-дисплея: определяет направление
автоматически, и переворачивается на 180 градусов в зависимости от
направления.
Способ рассеивания тепла: автоматически включается в зависимости от
температуры
Подтверждение зарядки: может быть включено/выключено
Изменения конденсатора вспышки
Если Indra500 не используется в течение длительного времени, возможны
некоторые физические изменения конденсатора вспышки. Для избежания
таких изменений рекомендуется включать вспышку как минимум на 10
минут раз в три месяца.
86
Порт синхронизации: 3.5мм мини порт
Обновление ПО: через USB мини порт
Объём: длина * диаметр: 266мм * 180мм
Вес: 2.1кг (не включая сетевой кабель осветителя)
Внимание: Допускается изменения характеристик продукта и внешнего
дизайна без дополнительного извещения.
*На совместимых фотоаппаратах.

感谢您购买Phottix产品
Cn
Simp
说明书
注意:在使用Phottix Indra500 TTL影楼灯前,请仔细阅读
使用说明书。
Phottix Indra500 是一款由移动电源和交流电源供电的便携
式TTL影楼灯。内置无线电接收和光学无线接收功能。支持
TTL模式、手动模式(M)和频闪模式(Multi)。支持高速
同步(HSS)和后帘同步(SCS)。Phottix Indra500 TTL影
楼灯可以和Phottix多款现行闪光灯引闪器兼容使用。
安全须知
● 本产品内包含高压电器元件。请勿试图自行打开或进
行维修。 禁止让儿童接触本产品。
● 不要在有易燃气体、液体化学品或高电荷环境下使用
本产品。
● 确保所有插头、插座是可靠稳固连接的。
● 更换闪光灯管时,要先切断Indra500影楼灯和供电
电源的连接达10分钟以上。请小心,影楼灯灯管使用
后会很烫。
● 请勿用金属物体接触影楼灯的外置电源端口,有可能
触电或造成重伤!
● 请参考本说明书中的技术参数选择合适的电源。
目录
部件和功能
闪光模式
无线接收模式
自定义功能
技术参数
…...................................................................... .87
.....…….....................................................................93
............................................................................97
…............................................................................ 98
部件
全视图
1. 灯头前盖
2. 摄影伞插孔
3. 反光罩锁扣
4. 把手
5. 3.5mm同步端口
6. USB输出端口
7. 外置电源端口
8. 把手角度调节旋钮
9. 把手固定柱
10. 固定螺栓
..................................................................... 94
● 外置电源应有良好的散热空间,请不要在布满粉尘及
固体悬浮的环境中使用。
● 本产品不具备防水特性,请远离雨、雪等高湿度的场
合。
● 请勿使用有机溶剂或含酒精的液体来清洁本产品。
● 影楼灯闪光时,请勿在影楼灯的灯头前放置不透光的
物体,否则影楼灯发出的热量将可能烧灼放置的物体
或是损坏影楼灯灯管!
● 请安全使用您的影楼灯。切勿在短距离内直接对着人
或动物的眼睛触发影楼灯,否则会损伤眼睛,甚至导
致失明。
● 请勿将产品置于高温环境下(如直射阳光、封闭的汽
车等)。
● 如在使用过程中出现冒烟或发出焦味时,请立即关闭
影楼灯的电源开关。
● 长期不使用时,请务必切断影楼灯的电源开关。
● 在使用闪光灯时,请务必取下灯头前盖,以免闪光时
温度过高,导致前盖变形或燃烧。
● 产品外壳在使用后会很烫,请勿触摸,有灼伤的危
险。
后视图
11. LCD显示界面
12. 功能按钮1
13. 功能按钮2
14. 测试/闪光就绪按钮
15. 调节/确定旋钮
16. 电源开关
17. 造型灯开关
18. 功能按钮3
19. 功能按钮4
20. 光学信号传感器
前视图
21. 反光罩固定卡位
22. 玻璃防护灯罩
23. LED造型灯
24. 闪光灯灯管
25. 反光罩
● 有关Phottix Indra500 TTL影楼灯 交流电源适配器的
妥善处理和回收,请咨询地方当局。
87

Cn
Simp
说明书
外置电源端口
通过外置电源端口可以将影楼灯连接至Phottix Indra交流电
源适配器和Phottix Indra移动电源。
请注意:
外接外置电源时,只能搭配Phottix Indra500 TTL影楼灯
专用的电源线。
连接影楼灯和外置电源
使用Phottix Indra移动电源时
1. 将Indra500 TTL影楼灯电源线的一端插入 Indra500 TTL
影楼灯的外置电源端口。(图一)
注:插入时请对准电源线和电源端口上的红点标记卡位。
3. 将交流电源适配器接入到交流市电。
4. 打开交流电源适配器输入电源开关和电源输出开关。
5. 打开Indra500 TTL影楼灯电源开关。
断开影楼灯和外置电源
断开Phottix Indra移动电源时
1. 关闭Indra500 TTL影楼灯的电源开关。
2. 将移动电源开关打到“OFF”, 按照(图四)的方式拔下
影楼灯的电源线。
图四
3. 按照(图六)拔下影楼灯电源的另一端。
图一
2.
将另一端插入Phottix Indra移动电源的闪光灯输出插孔。
(图二)
图二
3. 打开移动电源输出拨动开关。
4. 打开Indra500 TTL影楼灯电源开关。
使用Phottix Indra 交流电源适配器时
1. 将Indra500 TTL影楼灯电源线的一端插入 Indra500 TTL
影楼灯的外置电源端口。(图一)
注:插入时请对准电源线和电源端口上的红点标记卡位。
2. 将另一端插入Phottix Indra交流电源适配器的电源输出
插座。(图三)
断开Phottix Indra交流电源时
1. 关闭Indra500 TTL影楼灯的电源开关。
2. 将交流电源输入/输出电源开关打到“OFF”,按照(图
五)所示拔下影楼灯的电源线。
图五
3. 按照(图六)所示从影楼灯上拔下电源线的另一端。
图六
反光罩的装卸
安装反光罩
1. 用一只手托住闪光灯灯体。
图三
88
2. 另一只手将反光罩对准反光罩固定卡位。
3. 反光罩装入卡位后,按箭头方向顺时针转动反光罩直到

Cn
Simp
说明书
听到“咔”的声响。这样才能确保反光罩被可靠锁固。(图
七)
图七
4. 使用摄影伞时,请确保反光罩上的摄影伞插孔和Indra 影
楼灯上的摄影伞插孔对齐。
取下反光罩
1. 用一只手按箭头方向拨动反光罩锁扣按钮。
2. 另一只手按照箭头方向逆时针转动反光罩,即可拆卸反光
罩。(图八)
用同步端口连接引闪器只能使用手动模式。
注:
传输频道
Phottix Indra500 TTL影楼灯无线系统有4个频道:1、2、3
和4。处于无线接收模式下的Phottix Indra500 TTL影楼灯
需与引闪它的引闪装置或闪光灯设置为同一频道。
快速闪光功能
快速闪光功能允许影楼灯在还没有完全充满电时,即LED状
态指示灯亮绿灯的时候就可以进行闪光。快速闪光回电时间
较快。快速闪光对于短距离内的抓拍很有帮助。
快速闪光功能用于连拍模式,您可以在下面菜单功能中选择
连拍模式功能开启或关闭。
请注意:
快速闪光以闪光为优先。使用快速闪光拍摄较远处景物
时,可能会导致曝光不足。
图八
注:取下反光罩时请保持反光罩与影楼灯平衡,不要碰到玻
璃罩。
使用摄影伞插孔
Phottix Indra500 TTL影楼灯顶部的摄影伞插孔方便安装摄
影伞和伞式柔光箱。使用摄影伞插孔安装时非常简单:将伞
中间的伞把插入到Phottix Indra影楼灯上的插孔中。旋转摄
影伞插孔上的螺丝固定摄影伞。
使用柔光箱
Phottix Indra500 TTL影楼灯上的反光罩固定卡位兼容保荣
卡口,可以用来安装柔光箱或其它饰光器材。柔光箱的拆装
方式和反光罩的拆装方式相同:
安装:将柔光箱卡口对准反光罩固定卡位,然后顺时针方向
转动,直到听到“咔”的声响。(如图七)
拆卸:向后拨动反光罩锁扣按钮,同时按逆时针方向转动柔
光箱卡口,即可拆卸柔光箱。(如图八)
闪光包围曝光
闪光包围曝光(FEB)可用来自动改变一组照片的闪光功率。
相机将记录一组不同曝光的照片。在拍摄移动的主体及在一
个拍摄场景中有多种不同灯光效果的情况下,使用闪光包围
曝光可以确保记录到合适曝光的照片。闪光包围曝光也可用
于高动态范围摄影。
Phottix Indra500 TTL影楼灯支持闪光包围曝光功能,但该
功能的实现主要取决于使用的引闪器和相机是否具备该功
能,在Phottix Indra500 TTL影楼灯上不能设置闪光包围曝
光。更多关于闪光包围曝光的信息请参阅你的相机使用手
册。
闪光曝光锁定
闪光曝光锁定(FV锁定)可用来在拍摄照片前锁定闪光曝光
量,这对于在使用手动点测光的情况下,在一个场景中有多
种不同灯光效果很有帮助。在TTL模式下,通过相机上的功
能按钮可以开启闪光曝光锁定功能,更多闪光曝光锁定功能
和使用详情,请参阅相机使用手册。
Phottix Indra500 TTL影楼灯支持闪光曝光锁定功能,但该
功能的实现主要取决于使用的引闪器和相机是否具备支持该
功能。更多关于闪光曝光锁定的信息请参阅你的相机使用手
册。
同步端口和USB端口
1. 3.5mm同步端口可通过兼容的同步线连接至Phottix闪光
灯引闪器(ODIN TTL、Strato II、Strato TTL)或相机来引
闪Indra500 TTL影楼灯。
2. USB端口用于固件升级。软件最新公告及说明都会发布在
Phottix网站上。
89
高速同步
高速同步(HSS/ 自动 FP)模式下,可以使用高于相机设
置的影楼灯同步速度(通常是1/200-1/250s)的快门速度
进行拍摄。在您需要使用光圈优先模式或限制环境光的情况
下,高速同步功能将很有帮助。高速同步能达到的同步速度
将可能因相机型号不同而有所差异,详情请参阅相机使用手
册。

请注意:
1. Phottix Indra500 TTL影楼灯支持高速同步功能,但此
影楼灯不能设置这项功能。需在您所使用的相机或引闪器
上设置高速同步功能。
2. 相机、触发器和接收模式都可以在很大程度上影响高速
同步模式。为取得最佳效果,使用高速同步模式时,您可
以选用本手册中兼容表里所列出的触发器。详请参阅引闪
器和相机使用手册。
3. 手动模式(Manual)和频闪模式(Multi)下不支持高
速同步。
4. 经常使用高速同步会缩短灯管寿命。
5.尼康的闪光灯协议可能会限制部分尼康相机的最大同步
速度。
产品兼容性
Cn
Simp
说明书
后帘同步
后帘同步(SCS)是在曝光快结束时触发影楼灯,而不是在
曝光开始时触发,它可以结合低快门速度达到创意性效果。
请注意:
1. Phottix Indra500 TTL影楼灯支持后帘同步功能,但灯
本身不能设置这项功能。需在您所使用的相机或引闪器上
设置后帘同步功能。详情请参阅引闪器和相机使用手册。
2. 频闪模式(Multi)不支持后帘同步。
测试/闪光就绪按钮(READY)
1. 按测试按钮将会触发影楼灯闪光,可用于手动模式下测
光。
2. 此按键也具有闪光灯回电指示功能,达到最小闪光电压时
LED亮绿灯。充满电后,LED指示灯亮红灯。
90

菜单功能介绍
Cn
Simp
说明书
91

菜单功能参数设置
使用LCD显示屏下面的四个功能按钮,选定对应的功能设置
项。被选定的功能项在LCD显示屏上将会以红/白/黄色高亮
显示(LCD彩屏设置和LCD显示屏感应设置除外,这两项功
能将会以菜单形式显示),可以开始设置功能。
1. 通过“调节/确定旋钮”即可选择参数。
2. 参数设置完毕后,请再次按对应的功能按键或按压设置旋
钮确认,并退出参数编辑状态。
液晶显示屏显示界面
Cn
Simp
说明书
无线接收模式:
Odin-C,
Odin-N,
Strato II,
Opt-Slave
RX OFF
闪光曝光
补偿/闪光
输出
无线接收频道
闪光模式:
TTL、M、Multi
无线接收组别 造型灯:
亮度级别:01-09九级、
OFF(关闭)
快速闪光
:
开启
:
关闭
按键提示音
开启
关闭
菜单栏:
详见菜单功
能介绍
菜单栏显示界面
92

Cn
Simp
说明书
自动存储功能
Phottix Indra500 TTL 能够自动保存影楼灯设置。即使关机
重启,之前所有设置仍将会保存在影楼灯内,直到下次您重
新设置为止。
造型闪光
1. 按相机上的景深预览按钮(如果相机上有)将会触发影
楼灯连续闪光约1秒。造型闪光有利于看到被摄体的光影
效果和光平衡(请阅读您的相机使用说明书获得更多关于
景深预览按钮功能的信息)。
2. 所有模式(TTL、手动(M)和频闪模式(Multi))下都
可以使用造型闪光。
造型灯
Phottix Indra500 TTL影楼灯配备一个LED造型灯。造型灯
有利于预览灯光的布置,还可以在黑暗的环境下提供辅助对
焦及照明用途。
3. 旋转“调节/确认旋钮” 可以选择手动模式(01-09亮
度级)或关闭模式(OFF)。
4. 按“调节/确定旋钮”,确定并退出编辑模式。
闪光模式
Phottix Indra500 TTL影楼灯具有三种闪光模式:TTL模
式、手动模式(M)和频闪模式(Multi)。
TTL闪光模式
当Phottix Indra500 TTL影楼灯设置为TTL模式时,被引闪
时,影楼灯将会按照引闪装置上设置的闪光模式和闪光功率
闪光,即用户可以在Phottix Odin或其他兼容的Phottix引
闪器上调节影楼灯的闪光功率。
闪光曝光补偿
Phottix Indra500 TTL影楼灯可以在±3档间以1/3档为增量
调节闪光曝光补偿(FEC)。闪光曝光补偿对于基于环境的需
要而需要微调TTL系统的情况有很大帮助。
造型灯有两种模式
1. 手动模式:01-09, 共9个亮度级别
2. 关闭模式(OFF):造型灯将被关闭。
请注意:
1. 闪光灯闪光时,造型灯不会自动关闭。
2. 使用造型灯电量消耗会很大。
造型灯亮度参数设置
通过Phottix Indra500 TTL影楼灯
或者造型灯快捷按钮
开启或关闭造型灯。
下的菜单选项
通过菜单选项设置
1. 按功能按钮4,直至
2. 按
3. 造型灯亮度选项被选定后,在LCD显示屏上,将会高亮
显示。
对应的功能按钮。
出现在LCD显示屏上。
请注意:
1. 如在引闪装置上设置为TTL模式(如果所使用的引闪装
置支持该功能),在Phottix Indra500 TTL影楼灯上也设
置为TTL模式,且两者都设置了EV补偿值,那么最终的EV
值是两者的EV设定值累计计算而得出来的。
2. 如在引闪装置上设置为M模式(如果所使用的引闪装置
支持该功能),在Phottix Indra500 TTL影楼灯上设置为
TTL模式,且在影楼灯上设置了EV补偿值,那么Phottix
Indra500 TTL影楼灯上设置的EV补偿值也将参与最终的
闪光输出量的计算。
手动闪光模式(M)
Phottix Indra500 TTL影楼灯设置为手动模式(M),影楼
灯将会按照设置的手动闪光功率闪光,而不能在主控端的引
闪器或闪光灯上调节影楼灯的闪光模式和闪光功率。影楼
灯的手动模式(M)闪光功率可在1/128,1/64,1/32,
1/16,1/8,1/4,1/2,1/1
中以1/3
档为增量设置。
频闪闪光模式(Multi)
4. 旋转“调节/确定旋钮”可以选择手动模式(01-09亮度
级)或关闭模式(OFF)。
5. 设置完成后,按
旋钮”,确定并退出编辑模式。
对应的功能按钮或“调节/确定
通过造型灯按钮设置
1. 按造型灯按钮可以开启或关闭造型灯。
2. 造型灯开启后,造型灯选项
亮显示。
93
将会在LCD显示屏上高
Phottix Indra500 TTL影楼灯设置为频闪模式(Multi),
可以发出一系列快速闪光。您可以在Phottix Indra500 TTL
影楼灯上设置功率、频率和闪光次数。频闪模式有利于在同
一张照片上拍摄移动的被摄体的多个图像以达到特殊效果。
Phottix Indra500 TTL影楼灯设置为频闪模式(Multi),
影楼灯将会按照自身设置的手动闪光功率、闪光次数
(1-100次)和闪光频率(1-100Hz)闪光,而不能在主控
端的引闪器或闪光灯上调节影楼灯的闪光模式和闪光功率。
影楼灯频闪模式(Multi)的闪光功率可在1/128,1/64,
1/32,1/16,1/8,1/4中以整档为增量设置。

Cn
Simp
说明书
请注意:
1. 过多使用频闪会导致过热甚至损坏灯管。
2. 影楼灯过热将会自动延长回电时间, 如温度继续升高将
会停止闪光。
无线接收模式
Phottix Indra500 TTL影楼灯具有Odin-C, Odin-N, Strato
II, Opt-Slave及RX OFF模式。详情请参见下文。
接收支持的闪光模式
4. 按“调节/确定旋钮”确认设置。
5. 按
下对应的功能按钮,旋转“调节/确
在
定旋钮”进行 TTL、M、Multi选择。
Strato II无线电接收模式
处于该模式下的Indra500 TTL影楼灯可以被同一频道和同一
组别下的Phottix Odin TTL 触发器(佳能版或尼康版)的
发射器、处于ODIN TX模式下的Phottix Mitros+ 收发一体
TTL闪光灯(佳能版或尼康版)、Phottix Strato TTL无线电
触发器(佳能版或尼康版)的发射器及Phottix Strato II多
功能无线电触发器二代(佳能版或尼康版)的发射器触发。
请注意:
Strato II无线电接收模式不支持高速同步、后帘同步和TTL
功能。
如何设置:
1. 按功能按钮4或旋转“调节/确定旋钮”直至LCD显示屏
上显示
2. 按
收功能高亮显示。
。
对应的功能按钮,LCD显示屏上对应的无线接
Odin-C无线电接收模式
处于该模式下的Phottix Indra500 TTL影楼灯,可以被处于
同一频道和同一组别下的Phottix Odin TTL 触发器(佳能
版)的发射器和处于ODIN TX模式下的Phottix Mitros+收
发一体TTL闪光灯(佳能版)触发。
如何设置:
1. 按功能按钮4或旋转“调节/确定旋钮”直至LCD显示屏
上显示
2. 按
收功能高亮显示。
3. 旋转“调节/确定旋钮”,将无线模式切换到Odin-C。
4. 按“调节/确定旋钮”,确认设置。
5. 按
确定旋钮”进行 TTL、M、Multi选择。
。
对应的功能按钮,LCD显示屏上对应的无线接
在
下对应的功能按钮,旋转“调节/
Odin-N无线电接收模式
处于该模式下的Indra500 TTL影楼灯可以被同一频道和同一
组别下的Phottix Odin TTL触发器(尼康版)的发射器和处
于ODIN TX模式下的Phottix Mitros+ 收发一体TTL闪光灯
(尼康版)触发。
如何设置:
3. 调“调节/确定旋钮”将无线模式切换到Strato II。
4. 按“调节/确定旋钮”,确认设置。
5. 按
在
下对应的功能按钮。旋转“调节/
确定旋钮”进行 M、Multi选择。
Opt-Slave光学接收模式
该模式下,来自附近其他闪光灯或影楼灯的闪光都可能触发
Indra500 TTL影楼灯。
请注意:
来自附近TTL闪光灯的预闪将触发处于Opt-Slave模式下
的Phottix Indra影楼灯。使用该模式时请小心,以防附近
的TTL闪光灯在你没有准备好之前触发Phottix Indra影楼
灯。
如何设置:
1. 按功能按钮4或旋转“调节/确定旋钮”直至LCD显示屏
上显示
2. 按
接收功能高亮显示。
3. 调节“调节/确定旋钮”将无线模式切换到Opt-Slave。
4. 按“调节/确定旋钮”,确认设置。
。
对应的功能按钮,LCD显示屏上对应的无线
1. 按功能按钮4或旋转“调节/确定旋钮”直至LCD显示屏
上显示
2. 按
。
对应的功能按钮,LCD显示屏上对应的无线接
收功能高亮显示。
3. 调节“调节/确定旋钮”将无线模式切换到Odin-N。
94

Cn
Simp
说明书
RX OFF模式
该模式下,无线接收功能将被关闭。
如何设置:
1. 按功能按钮4或旋转“调节/确定旋钮”直至LCD显示屏
上显示
2. 按
收功能高亮显示。
3. 调节“调节/确定旋钮”将无线模式切换到 RX OFF。
4. 按“调节/确定旋钮”,确认设置。
5. 按
。
对应的功能按钮,LCD显示屏上对应的无线接
在
下对应的功能按钮选择M或Multi。
For Odin-C/Odin-N/Strato II
在Multi功能下
1. 按 在
定旋钮”调节输出能量(1/4到1/128,共6档)。
2. 按
定旋钮”调节造型灯的亮度(OFF/01-09等级)。
3. 按
旋钮”进行频道的选择(CH1-CH4之间)。
4. 按
旋钮”进行组别的选择(A,B,C组)。
在
在
在 下对应的功能按钮,旋转“调节/确定
下对应的功能按钮,旋转“调节/确
下对应的功能按钮,旋转“调节/确
下对应的功能按钮,旋转“调节/确定
4. 按
在
下对应的功能按钮,旋转“调节/确定
旋钮”进行组别的选择(A,B,C组)。
5. 按
在
下对应的功能按钮,旋转“调节/确定
旋钮”进行LCD彩屏设置(经典,活力,典雅三种)。
6. 按
在
下对应的功能按钮,旋转“调节/确定
旋钮”进行LCD屏幕感应设置(常规,倒置,自动感应)。
7. 按
在
下对应的功能按钮,旋转“调节/确定
旋钮”,进行是否允许快速闪光选择。
8. 按
在
下对应的功能按钮,旋转“调节/确定
旋钮”控制按键操作音的打开/关闭。
For Odin-C/Odin-N/Strato II
在M(Manual)功能下
1. 按
在
定旋钮”调节输出能量(1/1到1/128,每两档之间分1/3
档)。
2. 按
在
旋钮”调节造型灯的亮度(OFF/01-09等级)。
3. 按
在
定旋钮”进行频道的选择(CH1-CH4之间)。
4. 按
在
定旋钮”进行组别的选择(A,B,C组)。
下对应的功能按钮,旋转“调节/确
下对应的功能按钮,旋转“调节/确定
下对应的功能按钮,旋转“调节/确
下对应的功能按钮,旋转“调节/确
5. 按
在
下对应的功能按钮,旋转“调节/确
定旋钮”进行LCD彩屏设置(经典,活力,典雅三种)。
6. 按
在
下对应的功能按钮,旋转“调节/确定
旋钮”进行频闪次数的调节(1-100次,根据频率和闪光输
出量对应输出次数)。
7. 按
在
下对应的功能按钮,旋转“调节/确
定旋钮”进行频闪频率的调节(1-100Hz)。
8. 按
在
下对应的功能按钮,旋转“调节/确定
旋钮”进行LCD屏幕感应设置(常规,倒置,自动感应)。
9. 按
在
下对应的功能按钮,旋转“调节/确定
旋钮”,进行是否允许快速闪光选择。
10. 按
在
下对应的功能按钮,旋转“调节/确
定旋钮”控制按键操作音的打开/关闭。
For Odin-C/Odin-N
在TTL功能下
1. 按
旋钮”调节曝光补偿(-3.0EV到3.0EV)。
2. 按
在
旋钮”调节造型灯(OFF /01-09等级)。
3. 按
旋钮”进行频道的选择(CH1-CH4之间)。
95
在
在
下对应的功能按钮,旋转“调节/确定
下对应的功能按钮,旋转“调节/确定
下对应的功能按钮,旋转“调节/确定
5. 按
在 下对应的功能按钮,旋转“调节/确定
旋钮”进行LCD彩屏设置(经典,活力,典雅三种)。
6. 按
在
下对应的功能按钮,旋转“调节/确定
旋钮”进行LCD屏幕感应设置(常规,倒置,自动感应)。
7. 按 在 下对应的功能按钮。旋转“调节/确
定旋钮”,进行是否允许快速闪光选择。
8. 按
在 下对应的功能按钮,旋转“调节/确
定旋钮”控制按键操作音的打开/关闭。
For Opt-Slave/RX OFF
在M(Manaul)功能下
1. 按
在
确定旋钮”调节输出能量(1/1到1/128,每两档之间分1/3
档)。
2. 按
在
定旋钮”调节造型灯的亮度(OFF/01-09等级)。
3. 按
在
旋钮”进行LCD彩屏设置(经典,活力,典雅三种)。
4. 按
在
旋钮”进行LCD屏幕感应设置(常规,倒置,自动感应)。
在
5. 按
旋钮”,进行是否允许快速闪光选择。
下对应的功能按钮,旋转“调节/
下对应的功能按钮,旋转“调节/确
下对应的功能按钮,旋转“调节/确定
下对应的功能按钮,旋转“调节/确定
下对应的功能按钮,旋转“调节/确定

6. 按
在
下对应的功能按钮,旋转“调节/确
定旋钮”控制按键操作音的打开/关闭。
For RX OFF
在Multi功能下
Cn
Simp
说明书
1. 按 在
下对应的功能按钮,旋转“调节/确
定旋钮”调节输出能量(1/4到1/128,共6档)。
2. 按
在 下对应的功能按钮,旋转“调节/确
定旋钮”调节造型灯的亮度(OFF/01-09等级)。
3. 按
在 下对应的功能按钮,旋转“调节/
确定旋钮”进行LCD彩屏设置(经典,活力,典雅三种)。
4. 按
在 下对应的功能按钮,旋转“调节/
确定旋钮”进行频闪次数的调节(1-100次,根据频率和闪
光输出量对应输出次数)。
5. 按
在 下对应的功能按钮,旋转“调节/确
定旋钮”进行频闪频率的调节(1-100Hz)。
6. 按
在 下对应的功能按钮,旋转“调节/
确定旋钮”进行LCD屏幕感应设置(常规,倒置,自动感
应)。
7. 按
在 下对应的功能按钮,旋转“调节/确
定旋钮”进行是否允许快速闪光选择。
8. 按
在 下对应的功能按钮,旋转“调节/确
定旋钮”控制按键操作音的打开/关闭。
注
:
选定参数后,如不按相应的功能按钮或“调节/确定旋
钮”确认,10秒内仍默认选中。
96

自定义功能
Cn
Simp
说明书
Phottix Indra500 TTL影楼灯具备可编辑的自定义功能。编
辑自定义功能步骤如下:
1. 同时按住功能按钮4和“调节/确定旋钮”约3秒将进入自
定义功能菜单屏幕。
自定义功能表
2. 按功能按钮1和2将循环自定义功能菜单项 – C.Fn 00至
C.Fn03。
3. 旋转调节/确定按钮可在菜单内改变自定义功能。
4. 按功能按键4退出自定义功能菜单。
更换灯管
1. 确保切断电源10分钟以上。
2. 按反光罩拆卸方式取下反光罩。
3. 稍微用力掰开玻璃防护罩卡位
4.
轻握住闪光灯灯管从卡槽中取出。(图十)
97
,
5. 将新的灯管插入卡槽中。(图十一)
取下玻璃防护罩。(图九)
6. 对准卡位装上玻璃防护罩。(图十二)
7. 按反光罩安装方式装回反光罩。
注:更换灯管时,请佩戴手套,不要直接用手接触灯管。

Cn
Simp
说明书
影楼灯恢复默认值
如需将Phottix Indra500 TTL影楼灯所有功能恢复到出厂设
置,只需同时按住功能按钮1和“调节/确定旋钮”约3秒即
可。
影楼灯版本信息查询
通过组合键,可以查询影楼灯的硬件版本号、软件版本号、
图标库版本号和产品序列号。
同时按住功能按钮2和“调节/确定旋钮”约3秒。版本信息
界面将会显示影楼灯的硬件版本号、软件版本号、图标库版
本号和产品序列号。
按任意按键都可以退出影楼灯版本信息显示界面返回到正常
的工作显示界面。
在影楼灯显示版本信息界面时,如果引闪影楼灯或者相机对
焦、拍照,影楼灯将会自动退出版本信息显示界面,返回到
工作界面。
影楼灯电容器的物理变化
如果影楼灯一段时间内未使用,影楼灯内的电容器会发生物
理变化。请每三个月开启至少10分钟以避免电容器的物理变
化。
规格参数
最大闪光能量: 500Ws
功率调节档位: 8档(4-500Ws)
功率调节步长: 1/3档,或整档
闪光模式: TTL自动、M手动和Multi频闪
闪光指数: 45/147.6 (ISO100,m/ft)
发光角度: 60°
相关色温: 5600±200K(在低输出功率下色温有可能会
有变化)
闪光持续时间: t =1 1/250s-1/12000s
频闪闪光: 频率:1-100Hz
闪光次数:1-100次
高速/后帘同步:支持*
回电时间(1/1,按影楼灯闪光指示灯亮红灯时为准):
Phottix Indra 交流电源适配器:单/双灯:0.9s/1.7s
Phottix Indra移动电源(10AH电池):
H mode 单/双灯:1s/2.3s
S mode 单/双灯:1.4s/5.4s
Phottix Indra移动电源(5AH电池):
H mode 单/双灯:1.4s/4.9s
S mode 单/双灯:2.6s/10.9s
输入电源:
Phottix Indra交流电源适配器: AC 220V/110V, 50HZ/60HZ
Phottix Indra移动电源: 14.8V/5Ah: 400次全功率闪光
造型灯功率: 约4.5W
造型灯控制模式:
无线接收方式: 光学脉冲和无线电
频道: 4
无线接收模式: Odin-C、 Odin-N、Strato II、
Opt-Slave、RX OFF(仅允许3.5mm同步
端口触发)
接收范围: 无线 电 传 输 : 1 00 米 以 上
显示分辨率: 320*240 TFT LCD彩屏,支持3种配色模式
LCD屏幕感应设置:可自动感应方位,根据方位180度翻转
显示屏幕
散热方式: 根据温度自动开启风扇
回电指示音: 可设置开启或关闭
同步端口: 3.5mm mini端口
软件升级: 采用USB mini端口,可通过软件对影楼灯
固件升级。
外部尺寸: 长x直径:约266mm*180mm
14.8V/10Ah: 800次全功率闪光
OFF,1-9档
重量: 约2100g(不含影楼灯电源线)
注:当产品的设计和规格有变化时,恕不另行通知
*仅支持兼容的相机
98

感謝您購買Phottix產品
Cn
Trad
說明書
注意:在使用Phottix Indra500 TTL影樓燈前,請仔細閱讀
使用說明書。
Phottix Indra500 是一款由移動電源和交流電源供電的可擕
式TTL影樓燈。內置無線電接收和光學無線接收功能。支援
TTL模式、手動模式(M)和頻閃模式(Multi)。支援高速
同步(HSS)和後簾同步(SCS)。Phottix Indra500 TTL影
樓燈可以和Phottix多款現行閃光燈引閃器相容使用。
安全須知
● 本產品內包含高壓電器元件。請勿試圖自行打開或進
行維修。 禁止讓兒童接觸本產品。
● 不要在有易燃氣體、液體化學品或高電荷環境下使用
本產品。
● 確保所有插頭、插座是可靠穩固連接的。
● 更換閃光燈管時,要先切斷Indra500影樓燈和供電
電源的連接達10分鐘以上。請小心,影樓燈燈管使用
後會很燙。
● 請勿用金屬物體接觸影樓燈的外置電源埠,有可能觸
電或造成重傷!
● 請參考本說明書中的技術參數選擇合適的電源。
目錄
部件和功能
閃光模式
無線接收模式
自訂功能
技術參數
…...................................................................…..99
…….......................................................................105
...............................................................................109
…..........................................................................110
部件
全視圖
1. 燈頭前蓋
2. 攝影傘插孔
3. 反光罩鎖扣
4. 把手
5. 3.5mm同步埠
6. USB輸出埠
7. 外置電源埠
8. 把手角度調節旋鈕
9. 把手固定柱
10. 固定螺栓
....................................................................106
● 外置電源應有良好的散熱空間,請不要在佈滿粉塵及
固體懸浮的環境中使用。
● 本產品不具備防水特性,請遠離雨、雪等高濕度的場
合。
● 請勿使用有機溶劑或含酒精的液體來清潔本產品。
● 影樓燈閃光時,請勿在影樓燈的燈頭前放置不透光的
物體,否則影樓燈發出的熱量將可能燒灼放置的物體
或是損壞影樓燈燈管!
● 請安全使用您的影樓燈。切勿在短距離內直接對著人
或動物的眼睛觸發影樓燈,否則會損傷眼睛,甚至導
致失明。
● 請勿將產品置於高溫環境下(如直射陽光、封閉的汽
車等)。
● 如在使用過程中出現冒煙或發出焦味時,請立即關閉
影樓燈的電源開關。
● 長期不使用時,請務必切斷影樓燈的電源開關。
● 在使用閃光燈時,請務必取下燈頭前蓋,以免閃光時
溫度過高,導致前蓋變形或燃燒。
● 產品外殼在使用後會很燙,請勿觸摸,有灼傷的危
險。
後視圖
11. LCD顯示介面
12. 功能按鈕1
13. 功能按鈕2
14. 測試/閃光就緒按鈕
15. 調節/確定旋鈕
16. 電源開關
17. 造型燈開關
18. 功能按鈕3
19. 功能按鈕4
20. 光學信號感測器
前視圖
21. 反光罩固定卡位
22. 玻璃防護燈罩
23. LED造型燈
24. 閃光燈燈管
25. 反光罩
● 有關Phottix Indra500 TTL影樓燈 交流電源適配器的
妥善處理和回收,請諮詢地方當局。
99

Cn
Trad
說明書
外置電源埠
通過外置電源埠可以將影樓燈連接至Phottix Indra交流電源
適配器和Phottix Indra移動電源。
請注意:
外接外置電源時,只能搭配Phottix Indra500 TTL影樓燈
專用的電源線。
連接影樓燈和外置電源
使用Phottix Indra移動電源時
1. 將Indra500 TTL影樓燈電源線的一端插入 Indra500 TTL
影樓燈的外置電源埠。(圖一)
注:插入時請對準電源線和電源埠上的紅點標記卡位。
3. 將交流電源適配器接入到交流市電。
4. 打開交流電源適配器輸入電源開關和電源輸出開關。
5. 打開Indra500 TTL影樓燈電源開關。
斷開影樓燈和外置電源
斷開Phottix Indra移動電源時
1. 關閉Indra500 TTL影樓燈的電源開關。
2. 將移動電源開關打到“OFF”,按照(圖四)的方式拔下
影樓燈的電源線。
圖四
3. 按照(圖六)拔下影樓燈電源的另一端。
圖一
2. 將另一端插入Phottix Indra移動電源的閃光燈輸出插孔。
(圖二)
圖二
3. 打開移動電源輸出撥動開關。
4. 打開Indra500 TTL影樓燈電源開關。
使用Phottix Indra 交流電源適配器時
1. 將Indra500 TTL影樓燈電源線的一端插入 Indra500 TTL
影樓燈的外置電源埠。(圖一)
注:插入時請對準電源線和電源埠上的紅點標記卡位。
2. 將另一端插入Phottix Indra交流電源適配器的電源輸出插
座。(圖三)
斷開Phottix Indra交流電源時
1. 關閉Indra500 TTL影樓燈的電源開關。
2. 將交流電源輸入/輸出電源開關打到“OFF”,按照(圖
五)所示拔下影樓燈的電源線。
圖五
3. 按照(圖六)所示從影樓燈上拔下電源線的另一端。
圖六
反光罩的裝卸
安裝反光罩
1. 用一隻手托住閃光燈燈體。
2. 另一隻手將反光罩對準反光罩固定卡位。
圖三
100
3. 反光罩裝入卡位後,按箭頭方向順時針轉動反光罩直到聽
 Loading...