

10
18
26
34
42
50
57
1

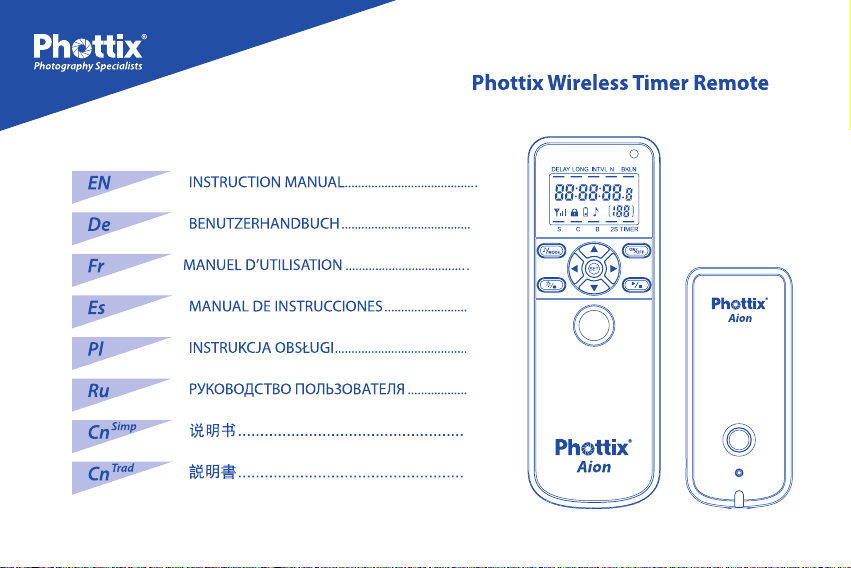
Phottix Aion Wireless Timer Instructions
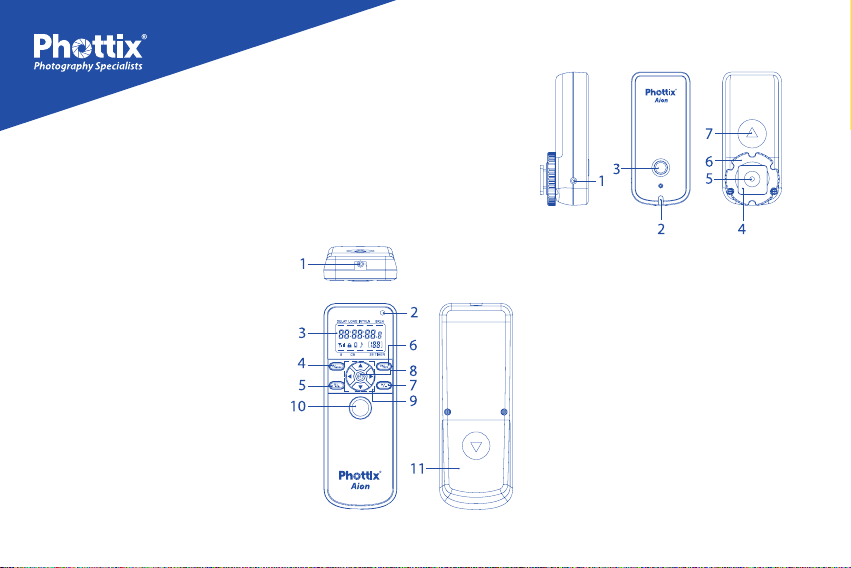
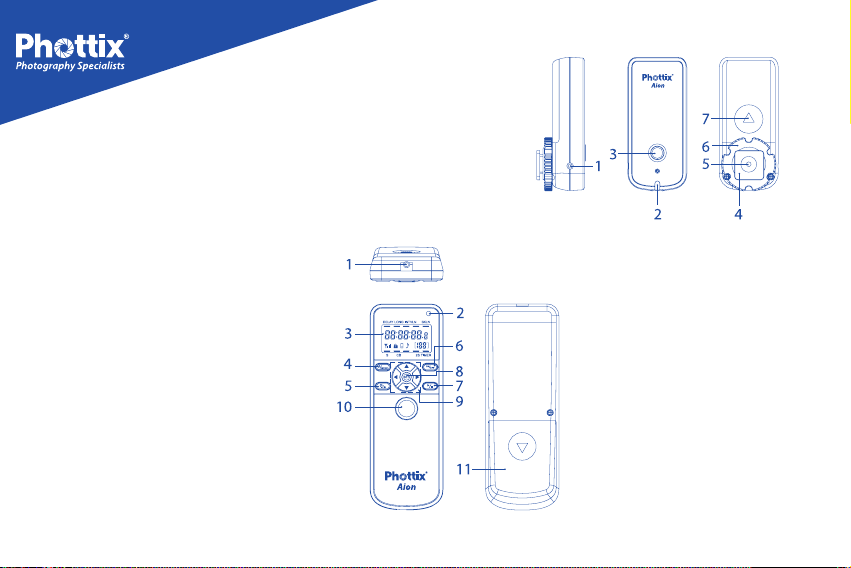
Parts
Timer
1. Cable Port
2. Function LED
3. LCD Display
4. Sound / Mode Button
5. Backlight / Lock Button
6. Power Button
7. Play / Stop Button
8. Set Button
9. Adjustment buttons
10. Shutter Button
11. Battery Door
Receiver
1. Cable Port
2. Function LED
3. Power Button
4. Cold Shoe
5. 3/16 Mounting Lug
6. Locking Ring
7. Battery Door
1

The Phottix Aion Wireless Timer and Shutter release
will work as a wired or wireless timer and remote
shutter release system.
Tip: Turn off all devices – cameras, and Phottix
Aion Timers or Receivers - when connecting and
disconnecting devices.
Inserting batteries in Timer and Receiver
1. Press the battery cover in while pushing it
away from the timer or Receiver. The battery
cover will slide open.
2. Remove the battery cover.
3. Insert AAA batteries.
4. Replace the battery cover and push back into
the locked position.
Turning timer and Receiver on/off
1. To turn on the Phottix Aion Timer and
Receiver unit – press the Power Button.
2. To turn off the Phottix Aion Timer and
Receiver unit – press the Power Button.
3. The Timer will beep and images will appear
on the LCD screen when the unit powers on.
2
4. The Receiver’s LED will flash green then
red when the unit powers on. The LED will
continue to ash green when the unit is on.
Turning the sound on/off
1. By default sounds on the timer unit are on.
You will hear audible beeps from the Phottix
Aion when it is first powered on, when
starting and stopping programs or when a
photo is taken.
2. When the sound function is enabled a
musical symbol is visible on the LCD.
3. To disable sound press and hold the Sound
/ Mode Button until the sound symbol
disappears.
Using the Backlight
1. Use the Backlight to illuminate the LCD
screen.
2. Press and release the Backlight / Lock Button.
The backlight will illuminate the LCD for
approximately 10 seconds before turning o
automatically.

Using the Lock Button
1. The Lock Button disabled all buttons on the
timer. This can be useful when running a long
multiple exposure program.
2. Press and hold the Backlight / Lock Button.
A lock symbol will appear on the LCD. No
buttons will function after the unit is locked.
3. To disengage: Press and hold the Backlight
/ Lock Button again until the lock symbol
disappears.
The Wireless Signal Strength Indicator
1. The Wireless Signal Strength Indicator on
the LCD shows the signal strength between
the timer and Receiver if The Aion system is
being used wirelessly.
2. Use this as an indication of range – when the
transmitter and Receiver are within range the
three bar icon will appear on the LCD.
3. When the transmitter and Receiver are not in
range the three bar icon will not appear.
Function LEDs on Timer and Receiver
The Function LED on the Timer will:
1. Turn green when focusing.
2. Turn red when a photo is taken.
The Function LED on the Receiver will:
1. Flash green when the Receiver is powered
on.
2. Turn to a solid green when a focus signal is
received from the Timer.
3. Turn red when a photo is taken.
Connecting the Timer or Receiver to a
camera
1. Turn o the timer and camera.
2. Attach a compatible Phottix Accessory Cable
to the Timer or Receiver.
3. Attach the other end to camera’s remote
port.
4. Turn on the Timer and camera.
3

Disconnecting the Timer or Receiver
from the camera
1. Turn o the Timer or Receiver and camera.
2. Remove the Phottix Accessory Cable from
the camera’s remote port.
3. Remove the Phottix Accessory Cable from
the Timer or Receiver.
Using the Timer
The Phottix Aion Wireless Digital Timer has two
modes: Shutter release modes and Timer mode.
Changing modes on the timer
Press the Sound / Mode Button to cycle between
modes. A small indicator line will appear on the LCD
over the selection. The modes are:
S: Shutter Release. A half-press of the Stutter
Button will focus, a full press will open the shutter.
The LED on the Timer and Receiver will light green
when focus is achieved.
4
C: Continuous. A half-press of the Stutter Button
will focus, a full press will open the shutter and take
five photos. The LED on the Timer and Receiver
will light red as the images are recorded. Holding
the Stutter Button will result in more photos being
recorded, in groups of 5.
B: Bulb. A half-press of the Stutter Button will focus,
a full press will open the shutter and lock it. The LCD
screen on the timer will begin to time the exposure.
The LED on the Timer and Receiver will light red. To
stop the exposure fully press the Stutter Button to
close the shutter.
2S: 2 Second. A half-press of the Stutter Button
will focus, a full press will take a photo after a two
second delay. The LED on the Timer will ash green
while the 2 second delay is underway and red when
the image is recorded.
Timer: Gives access to the timer mode functions.

will shoot during the current program (-- being
unlimited, 199 being programmable maximum.)
BKLN: Bracketed Long Exposure. Useful for low-light
multiple exposure HDR images.
Timer Mode
Using Timer mode
1. To access the timer mode press the Sound/
Mode Button until Timer is selected on the
LCD.
2. With Timer selected you have access to the
following timer functions:
DELAY: Delayed Exposure - A self-timer before a
photo is taken.
LONG: Long Exposure - A programmable long
exposure for cameras B Bulb Mode. The shutter will
stay open for the time programmed into the timer.
INTVL: Interval - The timer will take photos at the
time intervals programmed into the timer.
N: Number - The number of exposures the timer
Setting the timer
1. Press the left or right Adjustment Buttons
to select DELAY, LONG, INTVL, N, BKLN. A
small indicator line will appear on the LCD
under the selection.
2. Press the Set Button to edit the time.
3. The up and down Adjustment Buttons will
change the time.
4. The left and right Adjustment Buttons will
move from hours, minutes, seconds, and
part seconds. The left and right Adjustment
Buttons will also move to the next or previous
timer function.
* The DELAY, LONG, INTVL and N functions can be
used together. A program using one or all of these
functions can be created.
5

Starting and Stopping the Timer
1. Pressing the Play / Stop Button will start
programmed timer functions.
2. Pressing the Play / Stop Button will stop a
running program.
The BKLN Function
The Bracketed Long Exposure function allows
a group of photos to be taken at automatically
exponentially changing exposure times.
1. Set the camera to B Bulb mode.
2. Selected BKLN in the timer mode.
3. Press the Set Button and the up arrow
Selection Button to turn on BKLN mode on.
4. Set your long exposure time under the LONG
timer mode.
5. Set the number of exposures under the N
timer mode. The number of exposures can be
set from 1 to 7.
6. Pressing the Play / Stop Button will start the
program.
6
The Aion Timer will double the exposure time (one
stop) set under the LONG setting for each of the
number of frames set under the N setting.
Example:
LONG time set to .5 second.
N set to 5
With BKLN set to .5 second you would get the
following with the above settings.
Image 1 : .5 second
Image 2 : 1 second
Image 3 : 2 seconds
Image 4 : 4 seconds
Image 5 : 8 seconds
When using this function for HDR images a little
math work is required. If the proper exposure is 2
seconds and a group of 5 images are being recorded
the fastest exposure, .5 second, needs to be entered
on the Aion Timer. Images will be recorded based
on the first exposure time entered and counted
forward. Unlike bracketed exposures on a camera
the Aion will not shoot faster then slower images.

Warnings
- This product is a precise electronic
instrument. Do not expose to damp
environments or dust.
- Do not drop or crush.
- Do not use harsh chemical(s) or solvents to
clean the body. Use a soft cloth or lens paper.
- Interference: The Phottix Aion transmits
and receives radio signals at 2.4 GHz. Its
performance can be affected by electrical
current, magnetic fields, radio signals,
wireless routers, cellular phones, and other
electronic devices. Environmental objects,
such as large buildings or walls, trees, fences,
or cars can also affect performance. If your
Phottix Aion will not trigger move its location
slightly.
Technical Specifications
Range: 60 meter
Batteries: AAA
Storage Temperature: -10 °C to 60 °C
Standby Timer: 48 Hours
Timer
Transmitting power: ≤-10dBm
Working voltage: 3.0 V
Size: 130.4 X 46.2 X 22 mm
Weight: 56.5g
Receiver
Receiving sensitivity: -90 dBm
Working voltage: 3.0 V
Size: 85 X37.4 X30.9 mm
Weight: 37.5 g
7

Company:
Name:
Model Number:
Phottix (HK) Ltd.
Phottix Aion Wireless Timer Remote
Aion
FCC ID: P9M-AIONTX
FCC ID: P9M-AIONRX
This device complies with Part 15 of the FCC
Rules. Operation is subject to the following two
conditions: (1) this device may not cause harmful
interference, and (2) this device must accept any
interference received, including interference that
may cause undesired operation.
Changes or modifications not expressly approved
by the party responsible for compliance could void
the user’s authority to operate the equipment.
8
NOTE: This equipment has been tested and found
to comply with the limits for a Class B digital device,
pursuant to Part 15 of the FCC Rules. These limits are
designed to provide reasonable protection against
harmful interference in a residential installation.
This equipment generates, uses and can radiate
radio frequency energy and, if not installed and
used in accordance with the instructions, may cause
harmful interference to radio communications.
However, there is no guarantee that interference
will not occur in a particular installation. If this
equipment does cause harmful interference to radio
or television reception, which can be determined
by turning the equipment off and on, the user is
encouraged to try to correct the interference by one
or more of the following measures:
--Reorient or relocate the receiving antenna.
--Increase the separation between the equipment
and receiver.

--Connect the equipment into an outlet on a
circuit dierent from that to which the receiver
is connected.
--Consult the dealer or an experienced radio/TV
technician for help.
9
Phottix Aion Funktimer Bedienungsanleitung
Bestandteile
Timer (Sender)
1. Kabelanschluss
2. Kontroll-LED
3. LCD Display
4. Sound / Modus
5. Hintergrundbeleuchtung / Sperren
6. Power An / Aus
7. Start / Stopp
8. Auswahltaste / SET
9. Navigationspfeile
10. Auslösetaste
11. Batteriefach-Abdeckung
10
Empfänger
1. Kabelanschluss
2. Kontroll-LED
3. Power An / Aus
4. Blitzschuhanschluss
(Cold Shoe)
5. 3/16“ Mounting Lug
6. Feststellring
7. BatteriefachAbdeckung

Das Phottix Aion System kann als Funk- oder
Kabeltimer und als Funk- oder Kabelauslöser
eingesetzt werden.
Hinweis: Schalten Sie bitte alle Geräte (Sender,
Empfänger, Kamera) während des Verbindens oder
des Trennens aus.
Timer(Sender)und Empfänger ein-/
ausschalten
1. Zum Einschalten des Phottix Aion Timers und
Empfängers drücken Sie die Powertaste.
2. Zum Ausschalten des Phottix Aion Timers
und Empfängers drücken Sie die Powertaste.
3. Nach dem Einschalten ertönt ein Kontrollton
und das Display des Timers ist an.
4. Am Empfänger leuchtet die LED erst grün
und dann rot. Die LED blinkt permanent
grün, wenn der Empfänger an ist.
Batterien einsetzen
1. Drücken und schieben Sie den BatteriefachDeckel des Senders oder des Empfängers
vom Gerät weg, um das Batteriefach zu
önen.
2. Entfernen Sie den Batteriefach-Deckel.
3. Setzen Sie die AAA/Micro Akkus/Batterien ein
(auf korrekte Polarität achten).
4. Verschließen Sie das Batteriefach mit dem
Batteriefach-Deckel bis er einrastet.
Ton (Sound) ein-/ausschalten
1. Standardgemäß ist der Ton eingeschaltet. Bei
folgenden Funktionen ertönt ein Signalton:
Timer einschalten, Programme starten oder
stoppen und beim Auslösen.
2. Wenn der Ton eingeschaltet ist, erscheint in
der Mitte des Displays ein Notensymbol.
3. Zum Ausschalten des Signaltons drücken
und halten Sie die Sound/Modustaste bis das
Notensymbol erlischt.
11

Hintergrundbeleuchtung einschalten
1. Benutzen Sie die Hintergrundbeleuchtung,
um das LCD-Display aufzuhellen.
2. Drücken Sie 1x die Hintergrundbeleuchtung/
Sperrentaste. Die Beleuchtung wird für 10
Sekunden leuchten und dann automatisch
erlöschen.
Tastensperre (Lock) ein-/ausschalten
1. Die Sperrtaste deaktiviert (sperrt) alle Tasten
des Timers, dies ist besonders nützlich für
Langzeitbelichtungen.
2. Drücken und halten Sie die
Hintergrundbeleuchtung/Sperrentaste, bis
das Schlosssymbol im Display erscheint.
3. Zum Aufheben der Sperrung drücken und
halten Sie die Hintergrundbeleuchtung/
Sperrentaste, bis das Schlosssymbol im
Display erlischt.
12
Funksignalanzeige
1. Die Funksignalanzeige zeigt den
Funkempfang zwischen Timer und
Empfänger an, wenn der Phottix Aion mittels
Funksignal verwendet wird.
2. Bei korrektem Funkempfang zwischen Timer
und Empfänger erscheint links unten im
Display das Funksymbol.
3. Wenn kein Funksymbol links unten im
Display erscheint, befinden sich Timer und
Empfänger nicht in Funkreichweite und es ist
keine Auslösung möglich.
Kontroll-LEDs: Timer (Sender) und
Empfänger
Timer LED:
1. LED leuchtet beim Fokussieren grün.
2. LED leuchtet beim Auslösen rot.
Empfänger LED:
1. LED blinkt grün, wenn der Empfänger
eingeschaltet ist.
2. LED leuchtet beim Fokussieren permanent
grün.
3. LED leuchtet beim Auslösen rot.

Timer (Sender) und Empfänger mit der
Kamera verbinden
1. Schalten Sie die Kamera und den Timer aus.
2. Verbinden Sie die Kamera mit dem
passenden Phottix Zubehörkabel mit dem
Timer (für Kabelauslösung) oder dem
Empfänger (für Funkauslösung).
3. Schalten Sie die Kamera und den Timer an.
Timer (Sender) und Empfänger von der
Kamera trennen
1. Schalten Sie die Kamera und den Timer aus.
2. Entfernen Sie das Phottix Zubehörkabel von
der Kamera.
3. Entfernen Sie das Phottix Zubehörkabel vom
Timer oder vom Empfänger.
Funktionen
Das Phottix Aion Timer-System hat 5 Haupt-Modi:
4 Auslöse-Modi und einen Timer-Modus, der
wiederum weitere Funktionen bereit hält.
Modusauswahl
Drücken Sie die Sound/Modustaste bis Sie den
gewünschten Modus ausgewählt haben. Den
ausgewählten Modus erkennen Sie an der kleinen
Linie darüber (im Display). Folgende Modi sind
wählbar:
S = Auslösung (single): Drücken Sie die
Auslösetaste halb durch und die Kamera wird
scharfgestellt – voll durchgedrückt wird die Kamera
ausgelöst. Die LEDs am Timer und am Empfänger
leuchten grün, wenn die Fokussierung erfolgt ist.
C = Continuous: Drücken Sie die Auslösetaste halb
durch und die Kamera wird scharfgestellt – voll
durchgedrückt wird die Kamera 5x ausgelöst. Die
LEDs am Timer und am Empfänger leuchten rot,
während die Fotos aufgezeichnet werden. Wenn Sie
die Auslösetaste gedrückt halten, werden mehrere
Gruppen á 5 Fotos ausgelöst.
13

B = Bulb: Drücken Sie die Auslösetaste halb
durch und die Kamera wird scharfgestellt – voll
durchgedrückt wird die Auslösung gestartet. Im
Display wird die Belichtungszeit angezeigt. Die
LEDs am Timer und am Empfänger leuchten rot.
Zum Beenden der Bulb-Aufnahme drücken Sie die
Auslösetaste erneut.
2S = 2s Verzögerung: Drücken Sie die Auslösetaste
halb durch und die Kamera wird scharfgestellt – voll
durchgedrückt wird die Kamera nach 2 Sekunden
ausgelöst. Die LEDs am Timer und am Empfänger
blinken 2 Sekunden grün und leuchten dann rot,
wenn die Auslösung erfolgt.
Timer = Timer-Modus: Das Phottix Aion System
befindet sich im Timer-Modus und kann nun
folgende Funktionen verwenden.
Timer-Modus
Timer-Modus aktivieren
1. Aktivieren Sie den Timer-Modus, indem Sie
die Sound/Modustaste so oft drücken, bis im
Display die Linie über „Timer“ erscheint.
14
2. Im Timer-Modus haben Sie Zugriff auf
folgende Funktionen:
DELAY = Aufnahme-Verzögerung: Selbstauslöser
mit Zeitwahl
LONG = Langzeitbelichtung: Programmierbare
Langzeitbelichtung für Kameras mit Bulb-Modus.
INTVL = Intervall: Der Timer nimmt Fotos im
programmierten Abstand auf.
N = Anzahl: Anzahl der Fotos, die während des
Programms ausgelöst werden. Es können entweder
1-199 oder unendlich Auslösungen eingestellt
werden.
BKLN = Bracketing Langzeitbelichtung: Hiermit
können Belichtungsreihen erzeugt werden, z.B. für
HDR-Aufnahmen.
Timer Einstellungen
1. Drücken Sie den linken oder rechten
Navigationspfeil, um eine der folgenden
Funktionen auszuwählen: DELAY, LONG,

INTVL, N, BKLN. Die Auswahl wird im
Display durch eine Linie unter der Funktion
angezeigt.
2. Drücken Sie die SET-Taste, um die
Zeiteinstellung für die zuvor gewählte
Funktion vornehmen zu können.
a. Mit den Navigationspfeilen „hoch“ und
„runter“ stellen Sie dann die Zeit ein.
b. Mit den Navigationspfeilen „rechts“
und „links“ können Sie zur nächsten
Einstellung springen: Stunden - Minuten -
Sekunden - Teilsekunden.
* Die Funktionen DELAY, LONG, INTVL und N
können kombiniert und zugleich genutzt werden.
Ihr Programm kann eine oder mehrere dieser
Funktionen enthalten.
Timer starten und stoppen
1. Drücken Sie die Start/Stopptaste und Ihr
eingestelltes Programm wird gestartet.
2. Drücken Sie die Start/Stopptaste und das
laufende Programm wird gestoppt.
Die BKLN Funktion (nur für Kameras mit
Bulb-Modus)
Die Bracketing Langzeitbelichtung ermöglicht
Ihnen die Aufnahme einer automatischen
Belichtungsreihe.
1. Stellen Sie die Kamera in den Bulb-Modus.
2. Wählen Sie nun die BKLN Funktion im Timer
aus.
3. Drücken Sie die SET-Taste und dann den
Navigationspfeil „hoch“, um die BKLN
Funktion einzuschalten.
4. Stellen Sie die Belichtungszeit im Modus
LONG ein.
5. Stellen Sie die Anzahl der Fotos im Modus N
ein (1-7 Aufnahmen sind möglich).
6. Drücken Sie die Start/Stopptaste, um das
Programm zu starten.
15

Das Phottix Aion Timer System wird die Zeit, die
unter LONG eingestellt wurde für jede Aufnahme,
die unter N eingestellt wurde automatisch
verdoppeln.
Beispiel:
LONG = .5 Sekunde, N = 5 Fotos
Mit der BKLN Funktion würden nun Aufnahmen mit
folgenden Belichtungszeiten ausgelöst werden:
1. Foto = .5 Sekunde Belichtungszeit
2. Foto = 1 Sekunden Belichtungszeit
3. Foto = 2 Sekunden Belichtungszeit
4. Foto = 4 Sekunden Belichtungszeit
5. Foto = 8 Sekunden Belichtungszeit
Um die BKLN Funktion für HDR Fotos nutzen zu
können, ist ein wenig Mathematik nötig. Wenn
die korrekte Belichtungszeit 2 Sekunden ist, dann
müssen Sie bei 5 Aufnahmen für die erste Aufnahme
unter LONG .5 Sekunde einstellen. Die BKLN
Funktion des Phottix Aion zählt und berechnet
16
immer von der 1. Aufnahme. Dies ist bei den Kamera
HDR-Funktionen meist anders, diese rechnen von
allein hoch und runter.
Warnhinweise
- Das Phottix Aion Funktimer System besteht
aus präzisen elektronischen Geräten. Die
Geräte sind keine Spielzeuge und gehören
somit nicht in Kinderhände.
- Setzen Sie die Geräte nicht in staubiger oder
feuchter Umgebung ein.
- Nicht fallen lassen oder zerlegen.
- Verwenden Sie keine ätzenden Chemikalien
oder Lösungsmittel, um die Geräte zu
reinigen.
- Interferenzen: Phottix Aion Funktimer sendet
und empfängt Funksignale im 2,4GHz
Bereich.
- Die Leistung kann durch elektrischen Strom,
Magnetfelder, Funkwellen, WLAN-Routern,
Mobiltelefone und andere elektronische
Geräte beeinträchtigt werden.

- Große Gebäude, Mauern, Bäume, Zäune oder
Autos können sich negativ auf die Leistung
auswirken.
Technische Daten
Reichweite: bis zu 60m
Batterien/Akkus: AAA/Micro
Lagertemperatur: -10C° bis 60C°
Standby-Timer: 48 Stunden
Timer (Sender)
Sendeleistung: ≤-10dBm
Betriebsspannung: 3.0V
Dimensionen: 130.4 x 46.2 x 22mm
Gewicht: 56.5g
Empfänger
Empfangsempndlichkeit: -90dBm
Betriebsspannung: 3.0V
Dimensionen: 85 x 37.4 x 30.9mm
Gewicht: 37.5g
17

Phottix Aion intervallomètre sans fil
Mode d'emploi
Composants
Corps
1. Port câble
2. Indicateur LED
3. Panneau de commande
4. Bouton de son/mode
5. Bouton de verrouillage
/rétro-éclairage
6. Commande démarrage/arrêt
7. Bouton Play / Stop
8. Bouton de Set (réglage)
9. Bouton èche
10. Déclencheur
11. Volet du logement pour piles
18
Récepteur
1. Port câble
2. Indicateur LED
3. Commande démarrage/arrêt
4. Grie sans contact
5. Monture 3/16
6. Anneau de verrouillage
7. Volet du logement pour piles

Le Phottix Aion peut être utilisé comme
intervallomètre et déclencheur sans l ou avec l.
Indication: Éteindre tout équipement –
intervallomètre Phottix Aion, récepteurs, appareils -
avant la connexion ou la déconnexion.
Insertion des piles
1. Faites glisser le volet du logement pour
piles à l’arrière de l'intervallomètre ou du
récepteur.
2. Enlevez le volet du logement.
3. Insérez les piles AAA.
4. Faites glisser le volet du logement pour piles
dans la position antérieure et fermer.
Mise en marche/arrêt de Phottix Aion
1. Pour mettre en marche l'intervallomètre et
le récepteur Phottix Aion – appuyez sur la
commande démarrage/arrêt.
2. Pour mettre en arrêt l'intervallomètre et
le récepteur Phottix Aion – appuyez sur la
commande démarrage/arrêt.
3. Un bip se fait entendre et les images sur
l'écran de contrôle affichent lorsque le
système Phottix Aion est en marche.
4. L'indicateur LED du récepteur clignotera
en vert et ensuite en rouge lorsque le
récepteur est mis en marche. L'indicateur
LED continuera à clignoter en vert quand le
système est en fonction.
Bouton de son
1. L'intervallomètre contient un indicateur
sonore lorsqu'il est mise en marche. Vous
entendrez un bip provenant de Phottix Aion
lorsqu'il est mis en marche, pendant une
démarrage ou arrêt d'une programmation ou
la prise de vu.
19

2. Lorsque le bip est active, une icône de note
de musique est affiché sur le panneau de
commande.
3. Pour désactiver le bip appuyer et maintenez
sur le bouton de son/mode jusqu'à
disparaitre l'icône de note de musique.
Bouton de rétro-éclairage
1. Utilisez le rétro-éclairage pour activer le
rétro-éclairage du panneau de commande.
2. Appuyez sur le bouton de verrouillage/rétroéclairage. Le rétro-éclairage reste allumé
pendant environ 10 secondes avant de
s'éteindre automatiquement.
Bouton de verrouillage
1. Le bouton de verrouillage est prévu
pour verrouiller toutes les commandes. Il
peut être utile lorsque vous utilisez une
programmation de longues poses en mode
continu.
2. Appuyez sur le bouton de verrouillage/
rétro-éclairage jusqu’à ce que l’icône de
20
verrouillage s’affiche sur le panneau de
commande. Toutes les commandes sont
verrouillées.
3. Pour déverrouiller, appuyez sur le bouton de
verrouillage/rétro-éclairage jusqu’à ce que
l’icône de verrouillage ne s’ache plus.
Indicateur de la puissance du signal à
distance
1. Lorsque le système Phottix Aion est utilisé
sans fil, l'indicateur de la puissance du
signal à distance affiche sur le panneau de
commande le signal entre l'intervallomètre
et le récepteur.
2. Utilisez cette fonction comme une indication
de la portée – lorsque l'émetteur et le
récepteur sont à la portée, les trois icônes
de barre s'afficheront sur le panneau de
commande.
3. Lorsque l'émetteur et le récepteur ne se
trouvent pas à la porte, les trois icônes ne
s'acheront pas.

2. Attachez le câble accessoire compatible à
l'intervallomètre ou au récepteur.
3. Attachez l'autre extrémité du câble au port à
télécommande de l'appareil.
4. Allumez l'intervallomètre et l'appareil.
Indicateur LED de l'intervallomètre et du
récepteur
L'indicateur LED de l'intervallomètre:
1. S'allumera en vert pendant la mise au point.
2. S'allumera en rouge pendant la prise de vue.
L'indicateur LED du récepteur:
1. Clignotera en vert lorsque le récepteur est
mis en marche.
2. S'allumera en fort vert lorsque le signal de
mise au point est réceptionné de l'émetteur.
3. S'allumera en rouge pendant la prise de vue.
Connexion de l'intervallomètre ou du
récepteur à l'appareil
1. Éteignez l'intervallomètre et l’appareil photo.
Déconnexion de l'intervallomètre ou du
récepteur de l'appareil
1. Éteignez l'intervallomètre, le récepteur et
l'appareil photo.
2. Déconnectez le câble accessoire de port de
l'appareil.
3. Déconnectez le câble accessoire de
l'intervallomètre ou du récepteur.
Utilisation de l'intervallomètre
Le Phottix Aion fonctionne en deux modes:
déclencheur et retardateur.
21

Réglage des modes de l'intervallomètre
Appuyez sur le bouton de son/mode pour faire
votre sélection. Au cours de sélection d'un mode
le petit indicateur s'affichera sur le panneau de
commande. Voici les modes:
S: Shutter Release (Déclencheur). Enfoncez à
moitié le déclencheur et vérifiez la mise au point,
puis enfoncez-le complètement pour ouvrir
l'obturateur. L'indicateur LED sur l'intervallomètre
et le récepteur s'allumera en vert lorsque la mise au
point.
C: Continuous (Continu). Enfoncez à moitié le
déclencheur et vérifiez la mise au point, puis
enfoncez-le complètement pour ouvrir l'obturateur:
l'appareil prendra les cinq photos. Au cours
d'enregistrement des photos, l'indicateur LED sur
l'intervallomètre et le récepteur s'allumera en rouge.
Vous pouvez maintenir le déclencheur pour prendre
plus de cinq photos. Les photos seront regroupées
par 5.
B: Bulb. Enfoncez à moitié le déclencheur et vériez
la mise au point, puis enfoncez-le complètement
pour ouvrir l'obturateur et le verrouiller. Le panneau
de commande LCD commencera à compter le temps
22
d'exposition. L'indicateur LED sur l'intervallomètre
et le récepteur s'allumera en rouge. Pour arrêter
l'exposition et fermer l'obturateur enfoncez
complétement le déclencheur.
2S: Enfoncez à moitié le déclencheur et vériez la
mise au point, puis enfoncez-le complètement pour
prendre la photo avec un retard de 2 secondes.
L'indicateur LED sur l'intervallomètre s'allumera
en vert lorsque le retardement est en cours, et il
s'allumera en rouge lorsque la photo est enregistrée.
Intervallomètre: donne l'accès à la photographie
programmée.
Photographie programmée
Utilisation de la photographie
programmée
1. Pour avoir l'accès à la photographie
programmée appuyez sur le bouton
de son/mode jusqu'à ce que l'icône de
l'intervallomètre (Timer) est choisi sur le
panneau de commande.
2. Àpres avoir choisi l'intervallomètre (Timer)
vous avez l'accès aux fonctions suivantes:

DELAY (Temporisation): Délai d’ouverture de
l’obturateur.
LONG: Durée – Temps d’exposition programmable
pour les appareils B Bulb Mode. L'obturateur restera
ouvert pendant le temps programmé.
INTV: Intervalle – L'intervallomètre prendra la
photo à intervalles programmées.
N: Nombre de vues – Le nombre de vues pris
pendant une programmation sélectionnée. (-illimitée, nombre de vues maximum 199.)
BKLN: Bracketing d'exposition. Utile pour les prises
de vues HDR en lumière faible.
Réglage de l'intervallomètre
1. À l’aide du bouton flèche gauche ou droite
sélectionnez le mode DELAY, LONG, INTVL, N,
BKLN. La sélection active est indiquée par le
curseur sur le panneau de commande.
2. Appuyez sur le bouton de Set (réglage) pour
programmer le temps.
3. Appuyez sur le bouton flèche le haut ou le
bas pour faire la modication du temps.
4. Appuyez sur le bouton flèche la gauche ou
la droite pour faire la sélection d'heure, de
minute, de seconde, de dixième de seconde.
Le bouton flèche la gauche ou la droite
permet de passer d'un réglage à un autre.
Les fonctions DELAY, LONG, INTVL et N peuvent
être combinées ensemble. Il est possible de
combiner une programmation pour une ou
l'ensemble de ces fonctions.
Mise en marche/arrêt de l'intervallomètre
1. Appuyez sur le bouton Play/Stop
pour déclencher les programmations
sélectionnées.
2. Appuyez sur le bouton Play/Stop pour arrêter
les programmations sélectionnées.
23

Fonction BKLN
La fonction BKLN permet aux groupes de
prises de vues d'être prises automatiquement
et exponentiellement en changeant le temps
d'exposition.
1. Choisissez le mode B Bulb dans l'appareil
photo.
2. Sélectionnez le mode BKLN dans
l'intervallomètre.
3. Appuyez sur le bouton Set (réglage) et le
bouton flèche le haut pour activer le mode
BKNL.
4. En mode LONG choisissez le temps
d'exposition souhaité.
5. En mode N déterminez le nombre
d'expositions. Le nombre d'exposition est
disponible de 1 à 7.
6. Appuyez le bouton Play/Stop pour mettre la
programmation en marche.
L'intervallomètre Phottix Aion doublera le
temps d'exposition réglé en mode LONG (d'un
diaphragme) pour chaque nombre de cadres réglé
en mode N.
24
Exemple:
LONG temps réglé à .5 seconde
N réglé à 5
Avec le réglage BKLN réglé à .5 seconde vous aurez
le schéma suivant:
Photographie 1: .5 seconde
Photographie 2: 1 secondes
Photographie 3: 2 secondes
Photographie 4: 4 secondes
Photographie 5: 8 secondes
Pendant l'utilisation de ces fonctions dans
la phototgraphie HDR une calculation sera
indispensable. Si l'exposition correcte est
de 2 secondes et le groupe de 5 photos est
enregistrée avec une exposition la plus rapide,
l'exposition la plus courte devrait avoir .5
seconde. Les photos seront enregistrées selon
le premier temps d'exposition et seront compté
en avant. Contrairement à l'auto-bracketing de
l'appareil, le Phottix Aion déclenchera les photos
progressivement et avec une exposition plus
longue.

Précautions:
- C'est un système électronique. Ne manipulez
pas le produit avec les mains mouillées, ne
l’immergez pas et ne l’exposez pas à l’eau, à la
pluie ou à la poussière.
- Ne laissez pas votre appareil tomber.
- Ne pas utiliser les moyens chimiques pour
un nettoyage du produit. Pour nettoyer le
système utiliser un chion.
- Interférence: Le système Phottix Aion utilise
la fréquence 2.4 GHz pour transmettre et
recevoir les signaux radio. Pour obtenir
des résultats optimaux garder hors
de portée des champs magnétiques
puissants : des charges statiques ou des
champs électromagnétiques. Des grands
immeubles, murs, arbres, camions peuvent
perturber le signal radio. Pour obtenir des
résultats optimaux, positionnez l'appareil
verticalement. Si le Phottix Aion ne déclenche
pas repositionnez-le.
Spécification technique
Portée: 60 mètres
Batteries: AAA
Température de traitement: -10—60°C
Temps de veille: 48 heures
Intervallomètre
Puissance de transmission: ≤-10dBm
Voltage: 3.0 V
Dimensions: 130.4 X 46.2 X 22 mm
Poids: 56.6g
Récepteur
Sensibilité du récepteur: -90 dBm
Voltage: 3.0V
Dimensions: 85 X 37.4 X 30.9 mm
Poids: 37.5g
25

Phottix Aion temporizador sin cable
Manual de instrucciones
Partes
Cuerpo
1. Puerto para cable
2. Indicador LED
3. Panel de control
4. Botón de la señal acústica/modo
5. Botón de la luz/bloqueo
6. Botón encendido/apagado
7. Botón Play/Stop
8. Botón de Set(Ajustar)
9. Botón de echas
10. Disparador
11. Tapa del compartimento de la batería
26
Receptor
1. Puerto para cable
2. Indicador LED
3. Botón encendido/apagado
4. Zapata sin contacto
5. Montura de trípode 3/16
6. Anillo de bloqueo
7. Tapa del compartimento
de la batería

El Phottix Aion presenta las funciones de
temporizador y disparador sin cable o con cable.
Consejo: Apague el equipo – temporizador Phottix
Aion, receptores, cámaras – antes la conexión o la
desconexión.
Introducción de las baterías
1. Mueve la tapa del compartimento de las
baterías de la parte trasera del temporizador
y del receptor.
2. Retire la tapa.
3. Introduzca las baterías AAA.
4. Vuelva a colocar la tapa del compartimento y
cierre.
Botón encendido/apagado
1. Para encender el temporizador y el receptor
– pulse el botón encendido/apagado.
2. Para apagar el temporizador y el receptor –
pulse el botón encendido/apagado.
3. Mientras el sistema Phottix Aion está
encendido, se oirá un pitido y aparecerán
unas imágenes en el panel de control.
4. El indicador LED del receptor parpadeará en
verde y después en rojo mientras el sistema
Phottix Aion está encendido. El indicador LED
continuará a parpadear en verde mientras el
sistema está activo.
Botón de la señal acústica
1. El temporizador esta equipado con un
indicador acústico mientras el sistema esta
funcionando. Sonará un pitido mientras
el sistema está activo, los ajustes están
encendidos o apagados, el tomar una
fotografía.
27

2. Mientras la señal acústica esta activa,
aparezca el icono de la nota en el panel de
control.
3. Para desactivar la señal acústica pulse y
mantenga el botón de la señal acústica/
modo hasta que desaparezca el icono de la
nota.
2. Pulse el botón de la luz/bloqueo hasta
que aparezca el icono de bloqueo en el
panel de control. Todos los controles están
bloqueados.
3. Para liberar el bloqueo, pulse el botón de la
luz /bloqueo hasta que desaparezca el icono
de bloqueo.
Botón de la luz
1. Puede activar la iluminación del panel de
control.
2. Pulse el botón de la luz/bloqueo. La luz
permanecerá encendida durante 10
segundos antes de apagar automáticamente.
Botón de bloqueo
1. El botón de bloqueo está previsto para
bloquear todos los controles. Puede ser
útil mientras el trabajo en exposiciones
prolongadas.
28
Indicador LED del temporizador y del
receptor
El indicador LED del temporizador:
1. Aparecerá en color verde durante enfocar.
2. Aparecerá en color verde intenso mientras
tomar la fotografía.
El indicador LED del receptor:
1. Parpadeará en color verde mientras el
receptor está activo.
2. Aparecerá en color verde intenso mientras la
señal de enfocar está recibido de transmisor.
3. Aparecerá en color rojo mientras tomar la
fotografía.

Conexión del temporizador o del
receptor a la cámara.
1. Apague el temporizador y la cámara.
2. Introduzca el cable accesorio compatible en
el temporizador o en el receptor.
3. Introduzca el otro extremo del cable al
puerto para control remoto en la cámara.
4. Encienda el temporizador y la cámara.
Desconexión del temporizador o del
receptor de la cámara.
1. Apague el temporizador, el receptor y la
cámara.
2. Desconecte el cable accesorio del puerto de
la cámara.
3. Desconecte el cable accesorio del
temporizador o del receptor.
Uso del temporizador
El Phottix Aion presenta las funciones de: disparador
y temporizador.
Ajustar los modos del temporizador
Pulse el botón de la señal acústica/modo para
seleccionar el modo. Un pequeño indicador
aparecerá en el panel de control mientras la
selección de modo. Los modos:
S: Shutter Release (Disparador). Pulse el
disparador hasta la mitad para comprobar el foco
y púlselo por completo para abrir el obturador. El
indicador LED en el temporizador y receptor se
pondrá verde mientras el enfoque.
C: Continuous (Continuo). Pulse el disparador
hasta la mitad para comprobar el foco y púlselo por
completo para abrir el obturador: la cámara tomara
las cinco fotografías. Mientras la grabación de las
fotografías, el indicador LED en el temporizador
29

y receptor se pondrá rojo. Puede mantener el
disparador para tomar mas de cinco fotografías. Las
fotografías serán agrupadas por 5.
B: Bulb. Pulse el disparador hasta la mitad para
comprobar el foco y púlselo por completo para
abrir el obturador y bloquear. El panel de control
empezará a contar el tiempo de exposición. El
indicador LED en el temporizador y receptor se
pondrá en rojo. Para dejar la exposición y abrir el
obturador pulse el disparador por completo.
2S: Pulse el disparador hasta la mitad para
comprobar el foco y púlselo por completo para abrir
el obturador y tomar la fotografía con el retardo en
2 segundos. El indicador LED en el temporizador se
pondrá verde mientras el retardo esta funcionando,
y se pondrá rojo mientras la fotografía se toma.
Temporizador: permite trabajar en modo de
fotografía temporizada.
30
Fotografía temporizada
Uso de la fotografía temporizada
1. Para tener acceso a la fotografía temporizada
pulse el botón de la señal acústica/modo
hasta que aparezca el icono del temporizador
(Timer) en el panel de control.
2. Después haber seleccionado el temporizador
(Timer) tiene acceso a la siguientes funciones.
DELAY (Retardo): Retardo después de que se pulse
el disparador.
LONG: Prolongado – Tiempo de exposición para las
cámaras B Bulb Modo. El obturador seguirá abierto
durante el tiempo determinado.
INTV: Intervalo – El temporizador tomará las
fotografías a intervalos programados.
N: Número de disparos – El numero de disparos
tomado mientras una programación seleccionada. (-
- ilimitado, numero de fotografías limitado a 199)
BKLN: Bracketing de la exposición. Valor útil para
las fotografías tomadas en débiles condiciones de la
luz.

Ajustes del temporizador
1. Utilice el botón de flechas para ajustar el
temporizador. Pulse hacia la izquierda o hacia
la derecha para seleccionar el modo DELAY,
LONG, INTVL, N, BKLN. La selección actual
queda indicada por el cursor en el panel de
control.
2. Pulse en botón de Set (ajustar) para
congurar el tiempo.
3. Utilice el botón de flechas para ajustar el
tiempo. Pulse hacia arriba o hacia abajo para
cambiar el tiempo.
4. Utilice el botón de flechas para ajustar la
hora, minuta, segundo y décima de segundo.
Pulse hacia la izquierda o hacia la derecha
permite modicar los ajustes.
Las funciones DELAY, LONG, INTVL y N pueden
combinarse una con otra o todas en la misma
conguración.
Encender/Apagar el temporizador
1. Pulse el botón Play / Stop para disparar las
conguraciones seleccionadas.
2. Pulse el botón Play/Stop para apagar las
conguraciones seleccionadas.
Función BKLN
La función BKLN permite tomar los grupos de
fotografías de la manera automática y exponencial
cambiando el tiempo de exposición.
1. Seleccione el modo B Bulb en la cámara.
2. Seleccione el modo BKLN en el temporizador.
3. Pulse el botón Set (ajustar) y el botón echa
hacia arriba para activar el modo BKLN.
4. En el modo LONG seleccione el tiempo de
exposición deseado.
31

5. En el modo N seleccione el numero de
exposiciones. El numero de exposiciones es
disponible desde 1 hasta 7.
6. Pulse el botón Play/Stop para poner en
marcha la conguración.
El temporizador Phottix Aion doble el tiempo
de exposición seleccionado en modo LONG (de
un diafragma) para cada número de fotograma
ajustado en modo N.
Mientras el uso de estas funciones en la fotografía
HDR un cálculo será indispensable. Si la exposición
correcta está de 2 segundos y el grupo de 5
fotografías está tomado con la exposición más
rápida, la exposición más corta tendrá .5 segundo.
Las fotografías serán tomadas según el primer
tiempo de exposición y serán contadas adelante. En
contraste al auto-bracketing de la cámara el Phottix
Aion disparará las fotografías de manera progresiva
y con la exposición más larga.
Ejemplo:
LONG tiempo jado a .5 segundo
N jado a 5
Con el ajuste BKLN fijado a .5 segundo recibirá el
siguiente esquema:
Fotografía 1: .5 segundo
Fotografía 2: 1 segundo
Fotografía 3: 2 segundo
Fotografía 4: 4 segundo
Fotografía 5: 8 segundo
32
Precauciones de uso:
- Es un sistema electrónico. Manténgalo en un
lugar seco: este producto no es resistente al
agua y podría estropearse si se sumerge en el
agua o se expone a altos niveles de humedad
o polvo.
- Evite los golpes: el producto podría no
funcionar correctamente si se somete a
golpes o vibraciones fuertes.
- No usar detergentes químicos para limpiar la
unidad. Usar una bayeta.

- Interferencias : Para transmitir y recibir
la señal radio el sistema Phottix Aion
usa la frecuencia 2.4 GHz. Manténgase
lejos de campos magnéticos potentes:
las cargas estáticas fuertes y los campos
electromagnéticos que producen los
equipos, como los transmisores de radio,
podrían interferir con el dispositivo.
Los edificios, arboles grandes, paredes
y camiones pueden interferir la señal
radio. Si el temporizador Phottix Aion no
se dispara cambie la posición.
Especificaciones técnicas:
Distancia: 60metros
Pilas: AAA
Temperatura de guardar: -10—60°C
Tiempo de espera: 48 horas
Temporizador:
Poder de transmisión: ≤-10dBm
Voltaje: 3.0V
Dimensiones: 130.4 X 46.2 X 22 mm
Peso: 56.6 g
Receptor
Sensibilidad del receptor: -90 dBm
Voltaje: 3.0V
Dimensiones: 85 X 37.4 X 30.9 mm
Peso: 37.5g
33

Instrukcja obsługi interwałometra
bezprzewodowego
Phottix Aion
Elementy
Interwałometr
1. Wejście przewodu
2. Kontrolka sygnalizacyjna LED
3. Wyświetlacz LCD
4. Przycisk dźwięku/trybu
5. Przycisk podświetlenia/blokady
6. Przycisk zasilania
7. Przycisk uruchom/zatrzymaj „Play / Stop”
8. Przycisk zatwierdzenia opcji „Set”
9. Przyciski wyboru
10. Przycisk spustu migawki
11. Przykrywka baterii
34
Odbiornik
1. Wejście przewodu
2. Kontrolka
sygnalizacyjna LED
3. Przycisk zasilania
4. Zimna stopka
5. Gwint mocowania
3/16
6. Pierścień zaciskowy
7. Przykrywa komory
baterii

Bezprzewodowy interwałometr Phottix
Aion posiada funkcję wyzwalania zarówno
przewodowego jak i zdalnego.
Wskazówka: Wyłącz wszelkie urządzenia – aparaty,
nadajnik i odbiornik – podczas podłączania i
rozłączania interwałometra.
Instalacja baterii w nadajniku i
odbiorniku
1. Naciśnij przykrywę komory baterii i przesuń
na zewnątrz urządzenia.
2. Zdejmij przykrywę.
3. Umieść baterie typu AAA.
4. Włóż przykrywę komory baterii i wsuń aż do
zatrzaśnięcia.
Włączanie i wyłączanie nadajnika i
odbiornika
1. Włączanie nadajnika i odbiornika odbywa się
przez przyciśnięcie przycisku zasilania.
2. Wyłączanie nadajnika i odbiornika odbywa
się przez ponowne przyciśnięcie przycisku
zasilania.
3. Urządzenie wyda krótki dźwięk i wyświetlacz
zostanie włączony po uruchomieniu
urządzenia.
4. Kontrolka sygnalizacyjna zabłyśnie na
zielono, a następnie na czerwono po
włączeniu urządzenia. Kontrolka będzie
migała na zielono podczas pracy urządzenia.
Włączanie i wyłączanie sygnalizacji
dźwiękowej
1. Domyślnie sygnalizacja dźwiękowa jest
włączona. Słyszalna jest ona podczas pracy
włączania, uruchamiania i zatrzymywania
programów lub podczas wykonywania
zdjęcia.
35

2. Widoczny symbol muzyczny na wyświetlaczu
oznacza włączoną sygnalizację dźwiękową.
3. W celu wyłączenia sygnalizacji dźwiękowej
wciśnij i przytrzymaj przycisk dźwięku/
trybu aż symbol przestanie być widoczny na
wyświetlaczu.
Funkcja podświetlenia
1. Korzystaj z funkcji podświetlenia kiedy
obrazy wyświetlaczu nie będą już widoczne.
2. Wciśnij przycisk podświetlenia/blokady.
Podświetlenie zostanie włączone na ok.
10 sekund, a następnie automatycznie się
wyłączy.
3. W celu wyłączenia blokady wciśnij i
przytrzymaj przycisk podświetlenia/blokady
do momentu zniknięcia ikony blokady.
Wskaźnik siły sygnału
1. Wskaźnik siły sygnału na wyświetlaczu
przedstawia siłę połączenia nadajnika
z odbiornikiem kiedy urządzenie
wykorzystywane jest w trybie zdalnym.
2. Proszę używać tego jako wskaźnika zasięgu
pracy kiedy trzy kreski widoczne będą na
wyświetlaczu.
3. Kiedy urządzenia nie będą w zasięgu trzy
kreski nie będą widoczne.
Funkcja blokady
1. Przycisk blokady blokuje wszelkie przycisku
na urządzeniu. Może to być pomocne
podczas długich czasów naświetlania.
2. Wciśnij i przytrzymaj przycisk podświetlenia/
blokady. Ikona blokady wyświetli się na
wyświetlaczu. Żaden z przycisków nie będzie
działał do momentu wyłączenia blokady.
36
Kontrolki sygnalizacyjne LED na
nadajniku i odbiorniku
Działanie kontrolki sygnalizacyjnej LED na
nadajniku:
1. Zmienia kolor na zielony podczas ustawiania
ostrości.
2. Zmienia kolor na czerwony podczas
wyzwalania migawki.

Działanie kontrolki LED na odbiorniku:
1. Miga na zielono podczas pracy urządzenia.
2. Świeci na zielono po ustawieniu ostrości.
3. Zmienia kolor na czerwono podczas
wyzwalania migawki.
Wyłączanie nadajnika/odbiornika
1. Wyłącz interwałometr i aparat.
2. Odłącz przewód od wejścia na pilota w
aparacie.
3. Odłącz przewód od nadajnika lub odbiornika.
Używanie interwałometru
Bezprzewodowy interwałometr Phottix Aion
posiada dwa tryby: wyzwalacz migawki i tryb
interwałometru.
Podłączanie nadajnika/odbiornika do
aparatu
1. Wyłącz interwałometr i aparat.
2. Podłącz właściwy przewód do nadajnika lub
odbiornika.
3. Podłącz przewód do właściwego wejścia na
pilota w aparacie.
4. Włącz interwałometr i aparat.
Zmiana trybów
Wciśniej przycisk dźwięku/trybu aby przełączać
tryby. Mała linia-podkreślenie będzie widoczna na
wyświetlaczu. Dostępne tryby to:
S: Wyzwalanie migawki. Wciśnięty do połowy
przycisk wyzwalania migawki będzie ustawiał
ostrość, wciśnięty do końca wyzwoli migawkę.
Kontrolki sygnalizacyjne zaświecą na zielono kiedy
ostrość zostanie ustawiona.
37

C: Tryb ciągły. Wciśnięty do połowy przycisk
wyzwalania migawki ustawi ostrość, wciśnięty do
końca wyzwoli migawkę i wykona 5 zdjęć. Kontrolka
sygnalizacyjna na nadajniku i odbiorniku będą
świeciły na czerwono podczas wykonywania zdjęć.
Ciągłe przyciśnięcie przycisku wyzwalania migawki
będzie skutkowało większą ilością wykonanych
zdjęć – w grupach po 5 zdjęć.
B: Tryb długiej ekspozycji. Wciśnięty do połowy
przycisk wyzwalania migawki ustawi ostrość,
wciśnięty do końca otworzy i zablokuje migawkę. Na
wyświetlaczu zacznie być odliczany czas ekspozycji.
Kontrolka sygnalizacyjna LED będzie świeciła na
czerwono. W celu zamknięcia migawki wciśnij do
końca przycisk wyzwalania migawki.
2S: 2 sekundowe opóźnienie. Wciśnięty do
połowy przycisk wyzwalania migawki ustawi
ostrość, wciśnięty do końca wyzwoli migawkę po 2
sekundach. Kontrolka sygnalizacyjna będzie migała
na zielono w trakcie 2 sekundowego opóźnienia,
a następnie na czerwono podczas wykonywania
zdjęcia.
Timer: Włącza funkcję interwałometru.
38
Funkcja interwałometru
Używanie interwałometru
1. W celu włączenia funkcji interwałometru
wciśnij przycisk dźwięku/trybu do momentu
wybrania trybu Timer na wyświetlaczu.
2. Kiedy tryb interwałometru jest aktywny
dostępne są poniższe funkcje:
DELAY: Opóźniona ekspozycja – Wyzwolenie
migawki z opóźnieniem.
LONG: Długa ekspozycja – Programowalny czas
ekspozycji dla aparatów w trybie B. Migawka
zostanie otwarta na zaprogramowany czas.
INTVL: Interwały – Interwałometr będzie
wykonywał zdjęcia w ustawionych odstępach czasu.
N: Liczba zdjęć – Liczba zdjęć zostanie wykonana
podczas tego trybu ( - - nieskończoność, możliwość
ustawienia do 199 zdjęć).
BKLN: Bracketing. Wykorzystywane przy niskiej
ilości oświetlenia, wielo-ekspozycyjnej fotografii
HDR.

Ustawianie interwałometru
1. Wciśnij lewy lub prawy przycisk wyboru
aby wybrać tryb DELAY, LONG, INTVL, N,
BKLN. Małe podkreślenie będzie wskazywało
aktywny tryb.
2. Wciśnij przycisk Set aby ustawić czas.
3. Przycisk wyboru góra/dół zmieni czas.
4. Przycisk wyboru lewo/prawo będzie
przełączało pomiędzy godzinami, minutami
i sekundami. Przyciski wyboru lewo/
prawo będą przełączały również pomiędzy
kolejnymi funkcjami interwałometru.
* Tryby DELAY, LONG, INTVL i N mogą być łączone.
Uruchamianie i zatrzymywanie
interwałometru.
1. Wciśnięcie przycisku „Play / Stop” uruchomi
zaprogramowaną funkcję.
2. Ponowne wciśnięcie przycisku „Play / Stop”
zatrzyma uruchomiony program.
Funkcja bracketingu
Funkcja bracketingu umożliwia wykonanie grupy
zdjęć ze zmiennymi czasami ekspozycji.
1. Ustaw tryb B w aparacie.
2. Ustaw tryb BKLN na interwałometrze.
3. Wciśnij przycisk Set i górnego przycisku
wyboru aby włączyć tryb BKLN.
4. Ustaw czas długiej ekspozycji w trybie LONG.
5. Ustaw ilość ekspozycji w trybie N. Ilość
ekspozycji może zostać wybrana pomiędzy 1
a 7.
6. Wciśnięcie przycisku Play / Stop Button
uruchomi program.
Phottix Aion podwoi czas ekspozycji (jedna
przysłona) ustawiony w trybie LONG dla każej ilości
klatek ustawionych w trybie N.
39

Przykład:
LONG czas ustawiony na .5 sekundę.
N ustawione na 5
Przy trybie BKLN ustawionym na .5 sekundę
otrzymamy następujący wynik.
Zdjęcie 1: .5 sekunda
Zdjęcie 2: 1 sekundy
Zdjęcie 3: 2 sekundy
Zdjęcie 4: 4 sekund
Zdjęcie 5: 8 sekund
Podczas używania tych funkcji w fotografii HDR
niezbędna będzie kalkulacja. Jeśli właściwy czas
ekspozycji to 2 sekundy i liczba wykonywanych
zdjęć to 5 to najkrótszy czas ekspozycji powinien
wynosić .5 sekundę. Zdjęcia zostaną wykonane w
oparciu o pierwszy czas ekspozycji i liczone naprzód.
Inaczej niż ma to miejsce w auto bracketingu w
aparatach Phottix Aion będzie wykonywał co raz to
dłuższe ekspozycje.
40
Ostrzeżenia
- Ten produkt jest precyzyjnym urządzeniem
elektrycznym. Nie wystawiaj urządzenia na
działanie zanieczyszczeń lub kurzu.
- Nie upuszczać i nie łamać.
- Nie używać ostrych środków do czyszczenia
urządzenia. Do tego celu używaj delikatnej
ściereczki.
- Zakłócenia: Phottix Aion nadaje i odbiera na
częstotliwości 2.4 GHz. Sprawność urządzenia
może zależeć od napięcia elektrycznego, pola
elektromagnetycznego sygnałów radiowych,
bezprzewodowych, telefonów komórkowych
i innych urządzeń. Obiekty takie jak duże
budynki, ściany, drzewa, ogrodzenia mogą
również wpłynąć na pracę urządzenia. Jeśli
Phottix Aion nie wyzwala, spróbuj zmienić
jego położenie.

Specyfikacja
Zasięg: 60 metrów
Zasilania: Baterie AAA
Temperatura przechowywania: -10 C do 60 C
Czas działania w trybie oczekiwania: 48 godzin
Nadajnik
Moc nadajnika: ≤-10dBm
Napięcie: 3.0 V
Wymiary: 130.4 X 46.2 X 22 mm
Waga: 56.5g
Odbiorni
Moc odbiornika: -90 dBm
Napięcie: 3.0 V
Wymiary: 85 X 37.4 X 30.9 mm
Waga: 37.5 g
41

Инструкция для беспроводного
таймера Phottix Aion
Компоненты:
Таймер
1. Порт для кабеля
2. Лампочка статуса
3. ЖК-экран
4. Кнопка звука/режима
5. Кнопка подсветки/замка
6. Кнопка питания
7. Кнопка воспроизведения/стоп
8. Кнопка настройки (SET)
9. Кнопки регулирования
10. Кнопка спуска затвора
11. Батарейная крышка
42
Приёмник
1. Порт кабеля
2. Лампочка статуса
3. Кнопка питания
4. Крепление башмака
5. Проушина для крепления
3/16
6. Крепительное кольцо
7. Батарейная крышка

Беспроводной Таймер Phottix Aion
представляет собой систему как проводного,
так и беспроводного таймера, а также пульта
дистанционного спуска затвора.
Рекомендация: Перед подключением и
отключения данного устройства, выключите
фотоаппарат, Phottix Aion таймер и приёмники.
Включение и выключение таймера
1. Дл я включения таймера и приёмника
Phottix Aion, нажмите кнопку питания
(Power).
2. Для выключения таймера и приёмника
Phottix Aion, нажмите повторно кнопку
питания.
3. При включении таймера, устройство
произведёт звуковой сигнал и появится
изображение на экране.
4. При включении приёмника, освещение
экрана смениться с зелёного на красный, а
позже снова на зелёный цвет.
Установка батарей
1. Нажмите на батарейную крышку, и плавно
отодвиньте её.
2. Откройте крышку.
3. Вставьте АА батареи как указано.
4. Вставьте обратно крышку и плотно
задвиньте её до щелчка.
Включени/выключение звука
1. По умолчанию звуки таймера включены.
Вы услышите сигнал при включении
устройства Phottix Aion, во время начала
и окончания програм, либо во время
фотографирования.
2. Если функция звука включена, на экране
появится соответствующий графический
символ звука.
43

3. Для выключения звуковых сигналов,
нажмите и удерживайте кнопку Звука/
Режима пока неисчезнет звуковой символ.
Подсветка
1. Подсветка используется для освещения
жк-экрана.
2. Нажмите и отпустите кнопку Подсветка/
Замок. Жк-экран осветиться на 10 секунд.
Кнопка Замок
1. Кнопка замок блокирует все кнопки
таймера. Данная функция может быть
полезной при выполнении длительной
сложной программы.
2. Нажмите и удерживайте кнопку замка. На
жк-экране появится графический символ
замка. Все кнопки будут заблокированы.
3. Для выключения блокировки нажмите и
удерживатйе кнопку замка пока на экране
не исчезнет графический символ замка.
44
Лампочка статуса на Таймере и
Приёмнике
Лампочка статуса таймера изменит свой цвет:
1. на зелёный во время фокусировки.
2. на красный в момент произведения
снимка.
Лампочка статуса приёмника
изменит свой цвет:
1. на зелёный мигающий, когда приёмник
находится во включённом состоянии.
2. на зелёный постоянный, когда сигнал
фокуса получен от Таймера.
3. на красный в момент произведения
фотографии.
Использование Таймера:
Безпроводной цифровой таймер Phottix Aion
работает в двух режимах: режим спуска затвора
и режим таймера.

Изменение режимов таймера
Для выбора режима нажмите кнопку Звук/Режим.
Небольшая линия индикатор появится на экране
при очередном выборе режима:
S: спуск затвора. Неполное нажатие кнопки
спуска активизирует фокус, её полное нажатие
приведёт к срабатыванию затвора. Экран
таймера и приёмника будут зелёного цвета, когда
фокусировка произведена.
C: серийный. Неполное нажатие кнопки
спуска активизирует фокус, её полное нажатие
приведёт к срабатыванию затвора пять раз.
Лампочка статуса на таймере и приёмнике будет
красного цвета во время фотографирования.
Удержание кнопки спуска позволит производить
дальнейшие серийные снимки, по 5 в группе.
В: режим Bulb – длительной экспозиции.
Неполное нажатие кнопки спуска активизирует
фокус, её полное нажатие откроет створки
затвора и заблокирует их. На экране таймер
отобразиться отсчёт времени экспозиции.
Лампочки статуса на таймере и приёмнике будут
красного цвета. Для остановки экспозиции
нажмите полностью на кнопку спуска, что
приведёт к закрытию створок затвора.
2S: 2-х секундная задержка. Неполное
нажатие кнопки спуска активизирует фокус,
её полное нажатие произведёт снимок после
двухсекундной задержки. Лампочка статуса
будет зелёного цвета во время 2-секундной
задержки, и красного во время произведения
снимка.
Таймер: делает доступными функции режима
таймера.
45

Режим Таймера
Использование режима таймера
1. Для доступа к режиму таймера нажмите
кнопку звук/режим и выберите режим
Таймер.
2. Ес л и выбран режим Таймера, у вас
появляется доступ к следующим функциям:
DELAY: экспозиция с задержкой – автоспуск
затвора.
LONG: длительная экспозиция –
запрограммированная длительная экспозиция
для режима фотоаппарат В (Bulb). Затвор будет
оставаться открытым в течении заданного
времени.
INTVL: интервал – таймер будет производить
снимки с заданным ему интервалом.
N: количество – количество снимков которое
произведёт таймер во время данной программы
( -- неограниченное количество, 199 –
максимальное программированное количество).
BKLN: Брекетированная длительная
экспозиция. Полезно при многократном HDR
фотографировании в малоосвещённых условиях.
46
Настройка таймера:
1. Нажмите кнопки регулирования (влево
или вправо) для выбора режимов DELAY,
LONG, INTVL, N, BKLN. Под выбранным
режимом появится небольшая полосаиндикатор.
2. Нажмите на кнопку установок (SET) для
установки времени.
3. Кнопки вверх/вниз позволят изменить
время.
4. Кнопки влево/вправо позволят
перемещаться между меню выбора часов,
минут, секунд, и долей секунд. Также
кнопки влеве/вправо позволят перейти
к следующей или предыдущей функции
таймера.
* Функции DELAY, LONG, INTVL и N могут быть
использованы вместе одновременно. Программа
для использования одной, нескольких или всех
этих функций может быть создана.

5. Установите количество снимков в режиме
N таймера. Количество снимков может
быть от 1 до 7.
6. Нажмите кнопку воспроизведения/стоп
для начала программы.
Старт/стоп таймера
1. Нажатие кнопки воспроизведения/стоп
приведёт в действие функции таймера.
2. Повторное нажатие данной кнопки
прервёт действие программы.
Функция BKLN
Функция BKLN (Bracketed Long Exposure)
позволит произвести серию снимков
автоматически экспоненциально изменяя время
экспозиции.
1. Установите фотокамеру в режиме В (Bulb).
2. Выберите режим BKLN таймера.
3. Нажмите кнопку настойек (SET) и кнопку
вверх для включения режима BKLN.
4. Установите время длительной экспозиции
выбрав режим LONG таймера.
Таймер Aion будет удваивать время эскпозиции (с
каждым шагом) выбранное для настройки LONG
для каждого количества снимков выбранных для
настойки N.
Пример:
Время LONG установлено на .5 секунду.
N установлено на 5.
В режиме BKLN установленным на .5 секунду вы
получите следующее действие:
Снимок 1: .5 секунда
Снимок 2: 1 секунды
Снимок 3: 2 секунды
Снимок 4: 4 секунд
Снимок 5: 8 секунд
47

При использвоании данной функции для
фотографирования HDR необходимо провести
небольшие математические вычисления. Если
время экспозиции 2 секунды и количество
выполненных снимков 5, тогда самый короткий
временной промежуток экспозиции будет
равен 0.5 секунды. Снимки будут выполнены
исходя из первого времени экспозиции и будут
считаться вперёд. Иначе будет происходить при
автобрекетировании - в фотоаппаратах Phottix
Aion будет производить с каждым снимком более
длительную экспозицию.
Предупреждения:
- Не подвергайте данное устройство
контакту с влажным или пыльным
окружением.
- Не роняйте и давите его.
- Не используйте неблагоприятные
химические препараты или растворители
для чистки видоискателя. Используйте
соответствующую мягкую тряпку и
кисточку.
48
- Помехи: устройство Phottix Aion
использует радио частоту 2.4гГц для
передачи и приёма сигнала. Помехи
могут создаваться от электрического
тока, магнитных полей и радио сигналов.
Объекты окружающей среды, такие
как высокие здания, стены, деревья,
заборы или машины могут повлиять на
работоспособность устройства. Если ваш
приёмник Phottix Aion не срабатывает,
переместите его на небольшое растояние
и попробуйте ещё раз.

Технические характеристики:
Дальности действия: 60 метров
Батареи: ААА
Температура хранения: от -10Ц до 60Ц
Время нахождения в режиме ожидания: 48 часов
Таймер:
Сила сигнала передатчика: ≤-10dBm
Рабочее напряжение: 3.0В
Размер: 130.4 х 46.2 х 22 мм
Вес: 56,5 г
Приёмник:
Чувствительность приёмника сигнала: -90 dBm
Рабочее напряжение: 3.0В
Размер: 85 х 37.4 х 30,9 мм
Вес: 37,5 г
49

Phottix Aion 无线定时器说明书
部件:
定时器:
1. 数据线接口
2. 功能 LED 指示灯
3. 液晶显示屏
4. 声音 / 模式按钮
5. 背光灯 / 锁键按钮
6. 开关按钮
7. 播放 / 停止按钮
8. 设置按钮
9. 调节按钮
10. 快门按钮
11. 电池盖
50
接收器
1. 数据线接口
2. 功能 LED 指示灯
3. 开关按钮
4. 冷靴
5. 3/16 旋转螺口
6. 锁环
7. 电池盖

Phottix Aion 无线定时器和快门线可以用作一个有
线 / 无线定时器和遥控快门释放系统。
注意:安装和拆卸定时器或接收器,必须关闭所
有装置:相机,Phottix Aion 定时器或接收器。
在定时器和接收器上安装电池
1. 先按住定时器或接收器上的电池盖,再朝
外推电池盖就会滑开。
2. 取下电池盖。
3. 按图所示插入 AAA 电池。
4. 放回电池盖,并往后推至锁紧的位置。
打开或关闭定时器和接收器
1. 打开 Phottix Aion 定时器和接收器装置—按
下开关按钮。
2. 关闭 Phottix Aion 定时器和接收器装置—按
下开关按钮。
3. 打开装置电源开关后,LCD 液晶显示屏上
面会出现图案。
4. 打开装置电源开关后,接收器上的 LED 将
会闪烁绿灯,然后闪烁红灯。当装置一直
被打开时,LED 会不断闪烁绿灯。
关掉 / 打开声音
1. 默认情况下声音是开机运行的。当第一次
开机和开始或终止程序时,以及拍照时,
你都将会听到从 Phottix Aion 传出来的“滴”
的声音。
2. 声音功能开启时,在液晶显示屏上可以看
到一个音乐符号。
3. 关闭声音只需长按声音 / 模式按钮,直到声
音图标消失。
51

使用背光灯
1. 用背光灯照亮 LCD 显示屏。
2. 按下并释放背光灯 / 锁键按扭。 背光灯在
自动关闭前会照亮 LCD显示屏大约 10 秒
钟。
锁键按钮的使用
1. 锁键按钮可使定时器上的所有按键功能处
于无效状态。 这对正在进行的长时间多次
曝光的项目是非常有帮助的。
2. 按下背光灯 / 锁键按扭不放,LCD 显示屏
上会出现一个锁住的标识。装置被锁定后,
所有的按键功能将不能使用。
3. 解锁:再次按住背光灯 / 锁键按钮直到锁键
标志消失。
无线信号强度指示灯
1. LCD 上的无线信号强弱指示灯用来显示定
时器与接收器之间的信号强弱。
2. 用来指示范围 ---- 当发送器与接收器在使
用范围内时,LCD 显示屏上将出现三条竖
线型符号。
52
3. 当发送器与接收器不在使用范围内时,
LCD显示屏上的三条竖线型符号就会消失。
定时器与接收器上的 LED 功能
定时器上的 LED 功能:
1. 对焦时,LED 变成绿色。
2. 拍照时, LED 转为红色。
接收器上的 LED 功能:
1. 接收器处于打开的状态时: LED 闪烁绿色。
2. 当从定时器接收到对焦信号时, LED 灯不
再闪烁,转为绿色。
3. 拍照时,LED 转为红色。
将定时器或接收器连接到相机
1. 关闭定时器与相机。
2. 将一根可兼容的 Phottix 配件连接线接到定
时器或接收器。
3. 将连接线的另一端接到相机的遥控端口。
4. 打开定时器与相机。

将定时器或者接收器与相机分离
1. 关闭定时器或者接收器与相机。
2. 将 Phottix 配件连接线从相机的遥控端口移
除。
3. 将 Phottix 配件连接线从定时器或接收器上
移除 。
定时器的使用
Phottix Aion 无线定时器有两种模式:快门释放模
式与定时模式。
定时器模式的更改:
按着声音 / 模式按钮,循环显示模式。在执行选
择时,LCD 显示屏上会出现一个小的指示线,模
式分别为:
S: 快门释放模式
半按快门按钮则为对焦;全按快门按则是释放快
门。接收器和定时器上的 LED 指示灯在成功对焦
后会闪绿光。
C: 连拍模式 半按快门则为对焦,全按快门将会打
开快门连续拍摄五张照片。拍照时,定时器和接
收器上的 LED 指示灯会亮红灯。按住快门按钮不
放就能拍摄更多的照片,一组 5 张(具体张数视
相机而定)。
B:Bulb 长时间曝光模式 半按快门则为对焦,
全按快门就能打开快门并且锁定它。定时器上的
液晶显示屏就会开始对曝光计时。定时器和接收
器上的 LED 指示灯也会亮红灯,要结束曝光,只
需全按快门按钮,快门关闭。
2S:延时两秒模式 半按快门则为对焦,全按快
门按钮就会在两秒钟后拍照。定时器上的 LED 指
示灯在延时的两秒钟内会闪烁绿灯,当拍照时就
会变成红灯。
定时:实现定时模式功能
53

定时器模式
使用定时器模式
1. 要获得定时器模式,需按“声音 / 模式按钮”
直到在 LCD 显示屏选中 Timer 的功能栏。
2. 选择了“Timer”模式,你就能实现以下定
时器功能:
DELAY:延时曝光模式——在拍照前自定延时
LONG:长时期模式——针对拥有 B Bulb 模式的
相机设定的可编程长时间曝光。在预设的时间内
相机快门一直开启。
INTVL:间隔曝光模式——定时器会按照定时器
内已经设置好的间隔时间进行拍照。
N:曝光张数模式——定时器会按照当前程序设
置好的曝光张数来拍摄(1-199张内无限制拍摄)。
BKLN:等长曝光模式——适用于低光多重曝光
HDR 图片。
定时器的设置
1. 按左右调节键来选择延时曝光模式,长时
间曝光模式,间隔曝光模式,数量曝光模式,
等长曝光模式。当您在选择时,LCD 显示
屏上会出现一个小的指示线。
54
2. 按设置键来编辑时间。
3. 上下调节键可用来更改时间。
4. 左右调节键可用来在小时,分钟,秒数以
及不足秒数之间进行切换。 左右调节键也
可以用来前一种或后一种定时器功能的切
换。
* 延时曝光模式,长时间曝光模式,间隔曝光模式,
数量模式可一起使用。可编制一个程序,既可以
使用其中一个功能也可以使用所有这些功能。
定时器的启动与停止
1. 按播放 / 停止按钮启动指定的定时器功能。
2. 按播放 / 停止按钮停止正在运行的程序。
BKLN 功能
等长时间曝光功能允许多组照片在曝光次数变更
时自动的呈指数拍摄。
1. 将相机设置为 B bulb 模式。
2. 在定时器模式中选定 BKLN。
3. 按设置按钮与向上的箭头选择按钮开启
BKLN。

4. 在(L)长时间曝光模式下设置长时间曝光。
5. 在(N)数量模式下设置曝光次数。 曝光
次数可以设置为 1 到 7。
6. 按播放 / 停止按钮开始程序。
例如:
L 模式设置为 .5 秒
N 模式设置为 5 秒
将 BKLN 设置为 .5,连同上面的设置一起你将获
得如下:
图片 1: .5 秒
图片 2: 1 秒
图片 3: 2 秒
图片 4: 4 秒
图片 5: 8 秒
当此功能用于 HDR 图片时, 需要一点点的数学
知识。 如果合适的曝光是 2 秒且一组有 5 张图片
的组图正在记录显示最快的曝光, 那么 .5 秒就需
要输入到 Aion 定时器。
图片的记录基于第一次曝光时间的输入以及后续
的曝光时间记录。 与相机上的曝光补偿不一样的
是,Aion 不会拍摄更快速度照图片。
警告
- 本产品属精密电子仪器,请注意防潮防尘。
- 不要摔落或碰撞。
- 不要用化学或有机溶剂清洁机身 , 请用柔软
干净的布或镜头纸对其外表面进行擦拭。
- 干扰:Phottix Aion 发送与接收无线电信号
的频率是 2.4 GHz。其性能会受到电流,
磁场,无线电信号,无线路由器,移动电
话及其它电子设备的影响。周边环境物品 ,
如 : 大型公共建筑、树木、围栏或墙壁或汽
车也会影响其性能。如果你的 Phottix Aion
不能触发,请稍微移动它的位置。
55

技术规格:
有效范围: 60 米
电池: AAA
储存温度 : -10 oC - 60oC
待机时间: 48 小时
定时器
发送功率: ≤ -10dBm
工作电压: 3.0 V
尺寸大小: 130.4 X 46.2 X 22 mm
重量: 56.5g
接收器
接收灵敏度 : -90 dBm
工作电压: 3.0 V
尺寸大小: 85 X 37.4 X 30.9 mm
重量: 37.5 g
56

Phottix Aion 无线定时器说明书
部件:
定时器:
1. 数据线接口
2. 功能 LED 指示灯
3. 液晶显示屏
4. 声音 / 模式按钮
5. 背光灯 / 锁键按钮
6. 开关按钮
7. 播放 / 停止按钮
8. 设置按钮
9. 调节按钮
10. 快门按钮
11. 电池盖
接收器
1. 数据线接口
2. 功能 LED 指示灯
3. 开关按钮
4. 冷靴
5. 3/16 旋转螺口
6. 锁环
7. 电池盖
57

Phottix Aion 无线定时器和快门线可以用作一个有
线 / 无线定时器和遥控快门释放系统。
注意:安装和拆卸定时器或接收器,必须关闭所
有装置:相机,Phottix Aion 定时器或接收器。
在定时器和接收器上安装电池
1. 先按住定时器或接收器上的电池盖,再朝
外推电池盖就会滑开。
2. 取下电池盖。
3. 按图所示插入 AAA 电池。
4. 放回电池盖,并往后推至锁紧的位置。
打开或关闭定时器和接收器
1. 打开 Phottix Aion 定时器和接收器装置—按
下开关按钮。
2. 关闭 Phottix Aion 定时器和接收器装置—按
下开关按钮。
3. 打开装置电源开关后,LCD 液晶显示屏上
面会出现图案。
4. 打开装置电源开关后,接收器上的 LED 将
会闪烁绿灯,然后闪烁红灯。当装置一直
被打开时,LED 会不断闪烁绿灯。
58
关掉 / 打开声音
1. 默认情况下声音是开机运行的。当第一次
开机和开始或终止程序时,以及拍照时,
你都将会听到从 Phottix Aion 传出来的“滴”
的声音。
2. 声音功能开启时,在液晶显示屏上可以看
到一个音乐符号。
3. 关闭声音只需长按声音 / 模式按钮,直到声
音图标消失。
使用背光灯
1. 用背光灯照亮 LCD 显示屏。
2. 按下并释放背光灯 / 锁键按扭。 背光灯在
自动关闭前会照亮 LCD显示屏大约 10 秒
钟。
锁键按钮的使用
1. 锁键按钮可使定时器上的所有按键功能处
于无效状态。 这对正在进行的长时间多次
曝光的项目是非常有帮助的。
2. 按下背光灯 / 锁键按扭不放,LCD 显示屏
上会出现一个锁住的标识。装置被锁定后,
所有的按键功能将不能使用。

3. 解锁:再次按住背光灯 / 锁键按钮直到锁键
标志消失。
无线信号强度指示灯
1. LCD 上的无线信号强弱指示灯用来显示定
时器与接收器之间的信号强弱。
2. 用来指示范围 ---- 当发送器与接收器在使
用范围内时,LCD 显示屏上将出现三条竖
线型符号。
3. 当发送器与接收器不在使用范围内时,
LCD显示屏上的三条竖线型符号就会消失。
定时器与接收器上的 LED 功能
定时器上的 LED 功能:
1. 对焦时,LED 变成绿色。
2. 拍照时, LED 转为红色。
接收器上的 LED 功能:
1. 接收器处于打开的状态时: LED 闪烁绿色。
2. 当从定时器接收到对焦信号时, LED 灯不
再闪烁,转为绿色。
3. 拍照时,LED 转为红色。
将定时器或接收器连接到相机
1. 关闭定时器与相机。
2. 将一根可相容的 Phottix 配件连接线接到定
时器或接收器。
3. 将连接线的另一端接到相机的遥控埠。
4. 打开定时器与相机。
将定时器或者接收器与相机分离
1. 关闭定时器或者接收器与相机。
2. 将 Phottix 配件连接线从相机的遥控埠移除。
3. 将 Phottix 配件连接线从定时器或接收器上
移除。
59

定时器的使用
Phottix Aion 无线定时器有两种模式:快门释放模
式与定时模式。
定时器模式的更改:
按着声音 / 模式按钮,循环显示模式。在执行选
择时,LCD 显示屏上会出现一个小的指示线,模
式分别为:
S: 快门释放模式
半按快门按钮则为对焦;全按快门按则是释放快
门。接收器和定时器上的 LED 指示灯在成功对焦
后会闪绿光。
C: 连拍模式
开快门连续拍摄五张照片。拍照时,定时器和接
收器上的 LED 指示灯会亮红灯。按住快门按钮不
放就能拍摄更多的照片,一组 5 张(具体张数视
相机而定)。
B:Bulb 长时间曝光模式
全按快门就能打开快门并且锁定它。定时器上的
液晶显示屏就会开始对曝光计时。定时器和接收
器上的 LED 指示灯也会亮红灯,要结束曝光,只
需全按快门按钮,快门关闭。
60
半按快门则为对焦,全按快门将会打
半按快门则为对焦,
2S:延时两秒模式
门按钮就会在两秒钟后拍照。定时器上的 LED 指
示灯在延时的两秒钟内会闪烁绿灯,当拍照时就
会变成红灯。
实现定时模式功能
定时:
半按快门则为对焦,全按快
定时器模式
使用定时器模式
1. 要获得定时器模式,需按“声音 / 模式按钮”
直到在 LCD 显示屏选中 Timer 的功能栏。
2. 选择了“Timer”模式,你就能实现以下定
时器功能:
DELAY:延时曝光模式
LONG:长时期模式
相机设定的可编程长时间曝光。在预设的时间内
相机快门一直开启。
INTVL:间隔曝光模式
内已经设置好的间隔时间进行拍照。
N:曝光张数模式
置好的曝光张数来拍摄(1-199张内无限制拍摄)。
BKLN:
HDR 图片。
等长曝光模式——适用于低光多重曝光
——在拍照前自定延时。
——针对拥有 B Bulb 模式的
——定时器会按照定时器
——定时器会按照当前程序设

定时器的设置
1. 按左右调节键来选择延时曝光模式,长时
间曝光模式,间隔曝光模式,数量曝光模式,
等长曝光模式。当您在选择时,LCD 显示
屏上会出现一个小的指示线。
2. 按设置键来编辑时间。
3. 上下调节键可用来更改时间。
4. 左右调节键可用来在小时,分钟,秒数以
及不足秒数之间进行切换。左右调节键也
可以用来前一种或后一种定时器功能的切
换。
* 延时曝光模式,长时间曝光模式,间隔曝光模式,
数量模式可一起使用。可编制一个程序,既可以
使用其中一个功能也可以使用所有这些功能。
定时器的启动与停止
1. 按播放 / 停止按钮启动指定的定时器功能。
2. 按播放 / 停止按钮停止正在运行的程序。
BKLN 功能
等长时间曝光功能允许多组照片在曝光次数变更
时自动的呈指数拍摄。
1. 将相机设置为B bulb 模式。
2. 在定时器模式中选定
3. 按设置按钮与向上的箭头选择按钮开启
4. 在 (L) 长时间曝光模式下设置长时间曝光。
5. 在(N)数量模式下设置曝光次数。 曝光
6. 按播放 / 停止按钮开始程序。
。
BKLN
次数可以设置为 1 到 7。
BKLN
。
例如:
L 模式设置为 .5 秒
N 模式设置为 5 秒
将 BKLN 设置为 .5,连同上面的设置一起你将获
得如下:
图片 1: .5 秒
图片 2: 1 秒
图片 3: 2 秒
图片 4: 4 秒
图片 5: 8 秒
61

当此功能用于 HDR 图片时, 需要一点点的数学
知识。 如果合适的曝光是 2 秒且一组有 5 张图片
的组图正在记录显示最快的曝光, 那么 .5 秒就需
要输入到 Aion 定时器。
图片的记录基于第一次曝光时间的输入以及后续
的曝光时间记录。 与相机上的曝光补偿不一样的
是,Aion 不会拍摄更快速度照图片。
警告
- 本产品属精密电子仪器,请注意防潮防尘。
- 不要摔落或碰撞。
- 不要用化学或有机溶剂清洁机身 , 请用柔软
干净的布或镜头纸对其外表面进行擦拭。
- 干扰:Phottix Aion 发送与接收无线电信号
的频率是 2.4 GHz。其性能会受到电流,
磁场,无线电信号,无线路由器,移动电
话及其它电子设备的影响。周边环境物品 ,
如 : 大型公共建筑、树木、围栏或墙壁或汽
车也会影响其性能。如果你的 Phottix Aion
不能触发,请稍微移动它的位置。
62
技术规格:
有效范围: 60 米
电池: AAA
储存温度 : -10 oC - 60 oC
待机时间: 48 小时
定时器
发送功率: ≤ -10dBm
工作电压: 3.0 V
尺寸大小: 130.4 X 46.2 X 22 mm
重量: 56.5g
接收器
接收灵敏度 : 90 dBm
工作电压: 3.0 V
尺寸大小: 85 X 37.4 X 30.9 mm
重量: 37.5 g

63

64
 Loading...