

Page 1

Page 2
IMPORTANT SAFETY INSTRUCTIONS
!
!
The apparatus shall not be exposed to dripping or splashing and that no objects lled with liquids, such as vases, shall be placed
on the apparatus. The MAINS plug is used as the disconnect device, the disconnect device shall remain readily operable.
Warning: the user shall not place this apparatus in the conned area during the operation so that the mains switch can be easily
accessible.
1. Rea d th es e in st ru ct io ns before o pe ra ti ng this
apparatus.
2. Keep these instructi ons for future r eference.
3. Heed all warnings to ensure safe ope ration.
4. Follow all instructi ons provided in this document.
5. Do not use this apparatus near water or in locations
where conden sation may occur.
6. Clean only with dry cloth. Do not use aerosol or liquid
cleaners. Un plug this appara tus before clean ing.
7. Do not block any of the ventilation openings. Install in
accordance w ith the manufact urer’s instructio ns.
8. Do not install near any hea t sources such as radiators,
heat registers, stoves, or other apparatus (includin g
ampliers) t hat produce heat .
9. Do not defeat the safety purpose of the polar ized or
grounding-ty pe plug . A polar ized pl ug has two blades
with one wider than the other. A grounding type plug
has two blades and a third grounding prong. The wide
blade or t he third prong is provided for your safety. If
the provided plug does not t in to your outlet, consult
an electrici an for replaceme nt of the obsole te outlet.
10. Protect the power cord from being walked on or pinched
particularly at plug, convenience receptacles, and the
point where they exit from t he apparatus.
11. Only use attachments/a ccess ories specied by the
manufacturer.
12. Use only with a cart, stand, tripod,
brack et, or table speci ed by the
ma nu fa ct ur er, or so ld wit h th e
appa ratu s. When a cart is used,
use caution when movi ng the cart/
app ara tus comb ina tio n to avo id
injury from tip-over.
13. Unplug thi s apparatus during lighting storms or when
unused for l ong periods of t ime.
14. Refer all serv icin g to qual ifie d service personn el.
Servic ing is require d when the apparatus has been
damaged in any way, such as power-sup ply cord or
plug is damaged, liquid has been spilled or objects
have fallen into the apparatus, the appar atus has been
exposed to rain or moisture, does not operate normally,
or has been dropped.
CAUTION: TO REDUCE THE RISK OF ELECTRI C SHOCK,
DO NOT REMOVE COVER (OR BACK)
NO USER SERVICEABLE PARTS INSIDE
REFER SERVICING TO QUALIFIED PERSONNEL
The lightning ash with arrowhead symbol, within an equilateral triangle, is intended to alert the user to the presence
of uninsulated “dangerous voltage” within the product’s
enclosure that may be of sufcient
magnitude to constitute a risk of electric shock to persons.
The exclamation point within an equilateral triangle is intended
to alert the user to the presence of important operating and
maintenance (servicing) instructions in the literature accompanying the appliance.
WARNING: To reduce the risk of re or electric shock, do not expose
this apparatus to rain or moisture.
CAU TION : Use of con trols or adju stmen ts or perf orman ce of
proc edures other than those specif ied may resul t in hazard ous
radiation exposure.
Page 3

TAB LE OF CO NT ENTS
PAA3
Personal Audio Analayzer
INTRODUCTION ....................................................................................................... 4
FEATURES ............................................................................................................... 4
CONTROLS AND DISPLAY..................................................................................... 6
GETTING STARTED ................................................................................................ 8
OPERATING TIPS .................................................................................................... 9
AUDIO ANALYSIS FUNCTIONS ........................................................................... 10
RTA (Real Time Analyzer) - Accoustic........................................................... 10
SPL (Sound Pressure Level) Meter............................................................... 10
RT60 (Reverb Time Analyzing)...................................................................... 11
RTA (Real Time Analyzer) - Electrical Signal................................................. 12
Level Meter.................................................................................................... 13
MEMORY ................................................................................................................ 13
Store ............................................................................................................. 13
Recall ............................................................................................................ 14
Average ......................................................................................................... 14
EQ Setting ..................................................................................................... 14
SETTINGS ............................................................................................................... 15
Weighting ...................................................................................................... 15
Level Range .................................................................................................. 15
Max Level ...................................................................................................... 16
Peak Hold ..................................................................................................... 16
Response Time ............................................................................................. 16
Calibration .................................................................................................... 17
PHASE CHECK....................................................................................................... 17
GENER ATOR .......................................................................................................... 18
POWER.................................................................................................................... 18
SIMULTANEOUS OPERATION WITH DESKTOP ................................................ 19
DIMENSIONS ..........................................................................................................21
SPECIFICATIONS................................................................................................... 22
AUDIO TEST SIGNAL TRACK LISTING .............................................................. 23
page
Phonic reserves the right to improve or alter any information suppied within this document without prior notice.
V1.0 JAN 21, 2005
Page 4

PHONIC CORPORATION PAA3 User's Manual
page 5
INTRODUCTION
Thank you for purchasing the Phonic PAA3
Personal Audio Assistant, a highly accurate audio
analyzer that sits comfortably in the palm of your
hand, and features all the tools you need to set up
any audio system.
With 31-band real-time spectrum analysis, Sound
Pressure Level and dBu / dBV / line voltage
measurement, EQ setting, phase checking, and
reverb time analyzation, the PAA3 is the ideal
companion for all sound engineers. This personal
audio assistant is battery powered (4 AA size),
with a built in microphone, and XLR inputs and
outputs, ensuring all audio analyzing situations
are possible. With the PAA3, you will conquer
the accoustics of all environments with precision
and ease.
Phonic understands the importance of sound
reproduction management. We know that as
a professional, your main concern is sound
quality. Consequently, with an audio tool like the
PAA3, you expect a precise ruler to obtain proper
measurements and guarantee the best possible
quality of sound that any professional would
expect. Phonic, therefore, took the utmost of care
in ensuring the PAA3 is an extremely accurate and
effective means for you to gather all the useful
data to determine what your set up needs.
To help you familiarize yourself with the PAA3, this
manual includes instructions on every function
listed in the main menu and sub-menus. It is
recommended that you take the time to have a
read of it, before you store it in an easily accessible
place, in case it's needed in future.
FEATURES
●
Palm Sized Audio Analyzer
●
31-band Real Time Spectrum Analyzer
●
Built-in calibrated measurement microphone
●
Sound Pressure Level Meter from 30 dB to
130 dB
●
Line signal measurement displayed in dBu,
dBV, or Voltage
●
A, C weighting or at
●
3 level range selection for dB SPL and line
signal
●
Line signal measuring range:
dBu = -50 ~ +40dBu
dBV= -52 ~ +38dBV
Volts = 5mV ~ +80V
●
Maximum level and peak hold display
●
4 standard response times: 35 ms, 125 ms (F),
250 ms (M), 1 sec (S)
●
10 memories for measurement, and 6 for
average calculation
●
31-band EQ setting level display (boost/cut)
●
160 x 160 graphic display with backlight and
contrast adjustment
●
Phase checker
●
SPL meter Calibration through sound level
calibrator (eg: B & K Type 4231)
●
Reverb Time (RT60) Analyzer
●
Noise generator with pink noise, 1 kHz and
polarity test signal, balanced output
●
USB communication port, for simultaneous
operation through laptop or PC
●
Low power consumption for up to 7 hours
continuous operation with 4 AA size alkaline
batteries (adapter power supply operation
available. When power is used from adapter,
it automatically cuts off battery power)
●
3 power modes: (1) Power saving mode:
Auto Off- when none of the buttons has been
pressed for 15 minutes (2) Manual Off (3) Off
●
XLR input and output sockets
page 4
PAA3 User's Manual PHONIC CORPORATION
Page 5
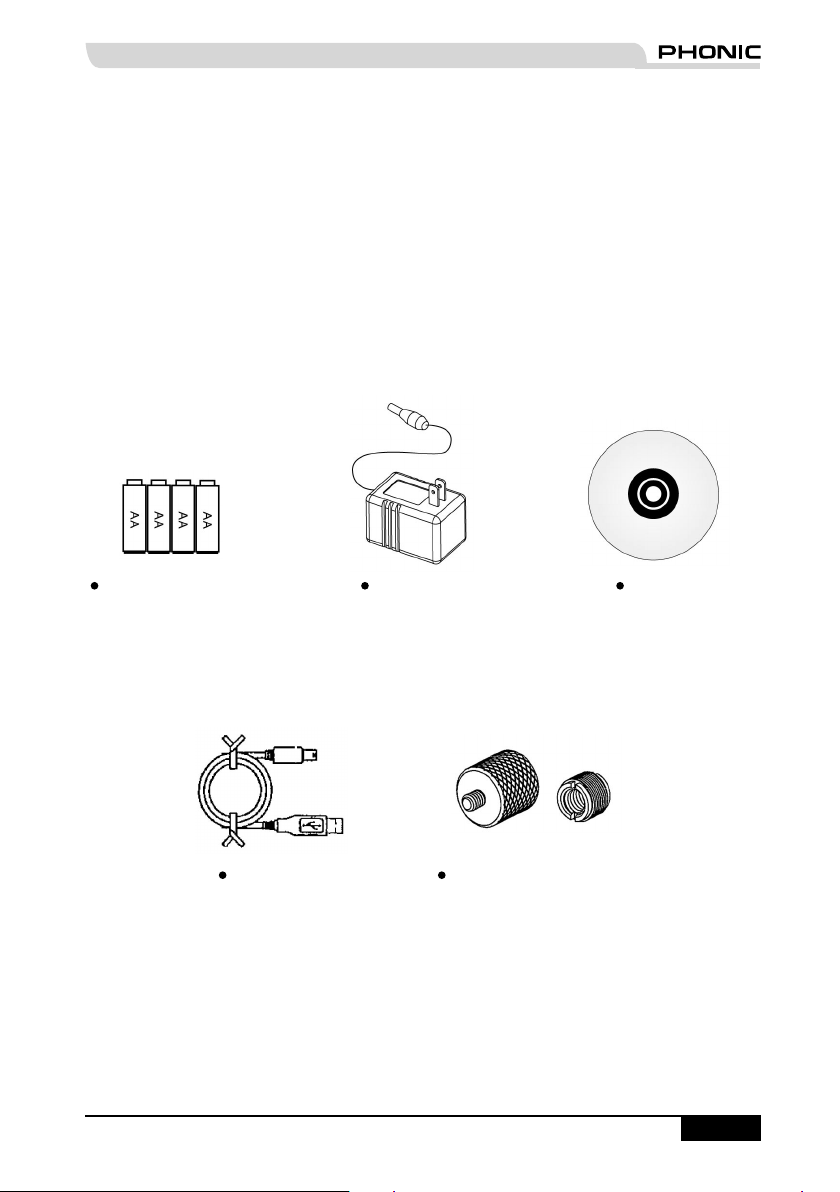
INSIDE THE GIFT BOX
1 x PAA3 Unit
4 x AA Size Batteries
1 x AC Power Adaptor
1 x USB Cable
1 x Leather Case
1 x 3/8" and 5/8" Microphone Stand Adaptors
1 x CD-ROM including 26 test signals and software for PC interface
1 x User Manual (though if you didn't receive the user manual, you probably aren't reading this)
4 x AA Size Batteries Power Adaptor CD-ROM
USB Cable Microphone Stand Adaptors
PHONIC CORPORATION PAA3 User's Manual
page 5
Page 6
PHONIC CORPORATION PAA3 User's Manual
page 7
CONTROLS AND DISPLAY
1
2
34
5
6
7
8
7
8
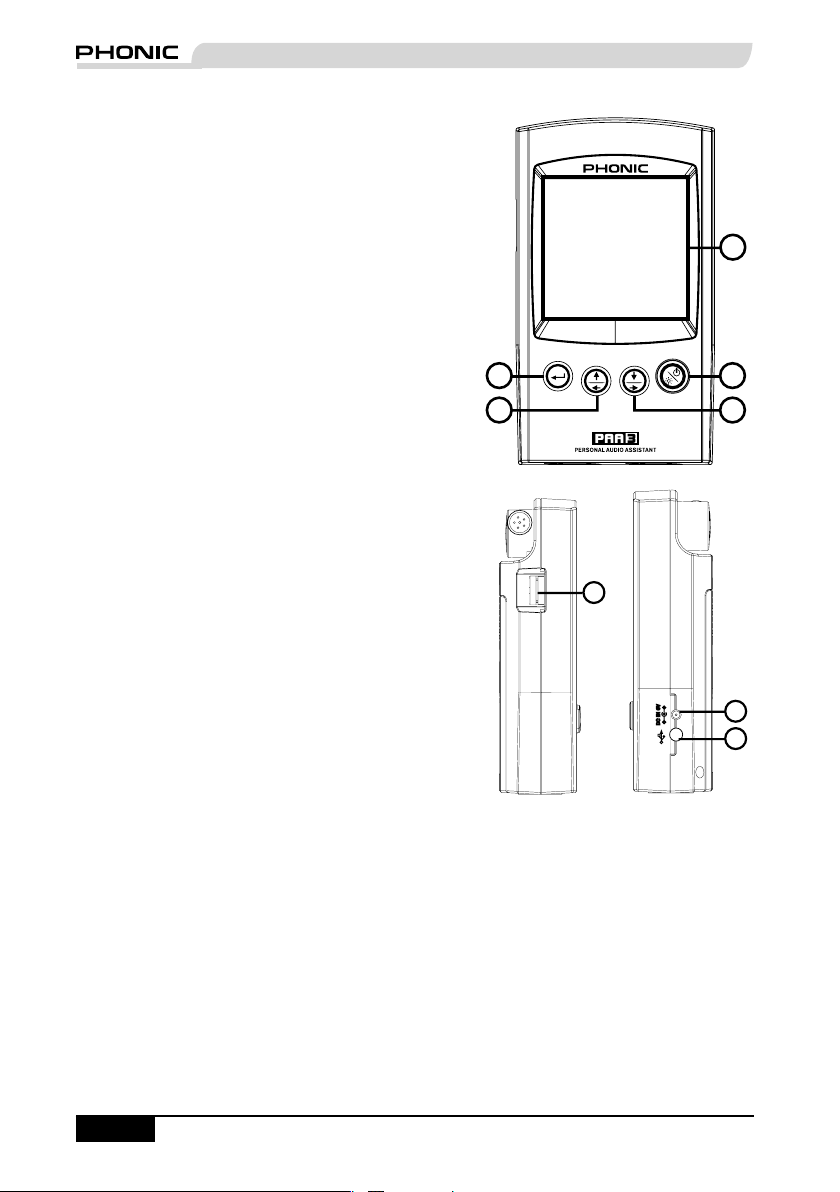
1. LCD Display
160 x 160 graphic LCD screen provides clear
and large display.
2. Power / Backlight Button
Before turning the power on, please ensure
the POWER LOCK switch (at the rear of the
PAA3) is set to the "ON" position. Pressing the
Power button for 2 seconds will the power of
the PAA3 on. After the power is on, this button
allows users to turn the LCD backlight on and
off. Holding the button for about 3 seconds
will initiate the PAA3's shutdown sequence,
saving all stored memories of the PAA3.
3. Right / Down Button
Press this button to scroll down or to the right
of the currently selected option.
4. Left / Up Button
Press this button to scroll up or to the left of the
currently selected option.
5. Enter Button
Press this button to move from Real Time
Spectrum Analyzer (RTA) display to the
PAA3's function menu. After moving the cursor
to a desired function in the menu by the right/
down or left/up buttons, press the enter button
to select.
6. Jog Control
Jog control, on the left-hand side of this unit,
provides users with a hassle free method of
scrolling menus and selecting options with a
single hand. Simply rotate to scroll up and
down menus and push the wheel inwards to
select (to either enter a sub menu or nalize
a setting). Alternately, the three function
buttons (the afore-mentioned buttons 3 to 5)
may also be used to scroll options and nalize
selections.
7. 6V DC Power Input
This port is used to connect the included 6V
AC to DC converter. When adapter is plugged
in, the battery power will be replaced by the
adaptor, allowing users to use the PAA3
without fear of running out of power. Use the
adapter provided along with the PAA3 only, as
to avoid damaging the device. Please note
that this will not charge batteries placed into
the PAA3's batery compartment.
8. USB Port
This USB connector is for the addition of the
provided USB cable, to be connect the PAA3
to any desktop or notebook computer with
a USB port. Please see the Simultaneous
Operation With Desktop Computer section for
more information.
page 6
PAA3 User's Manual PHONIC CORPORATION
Page 7
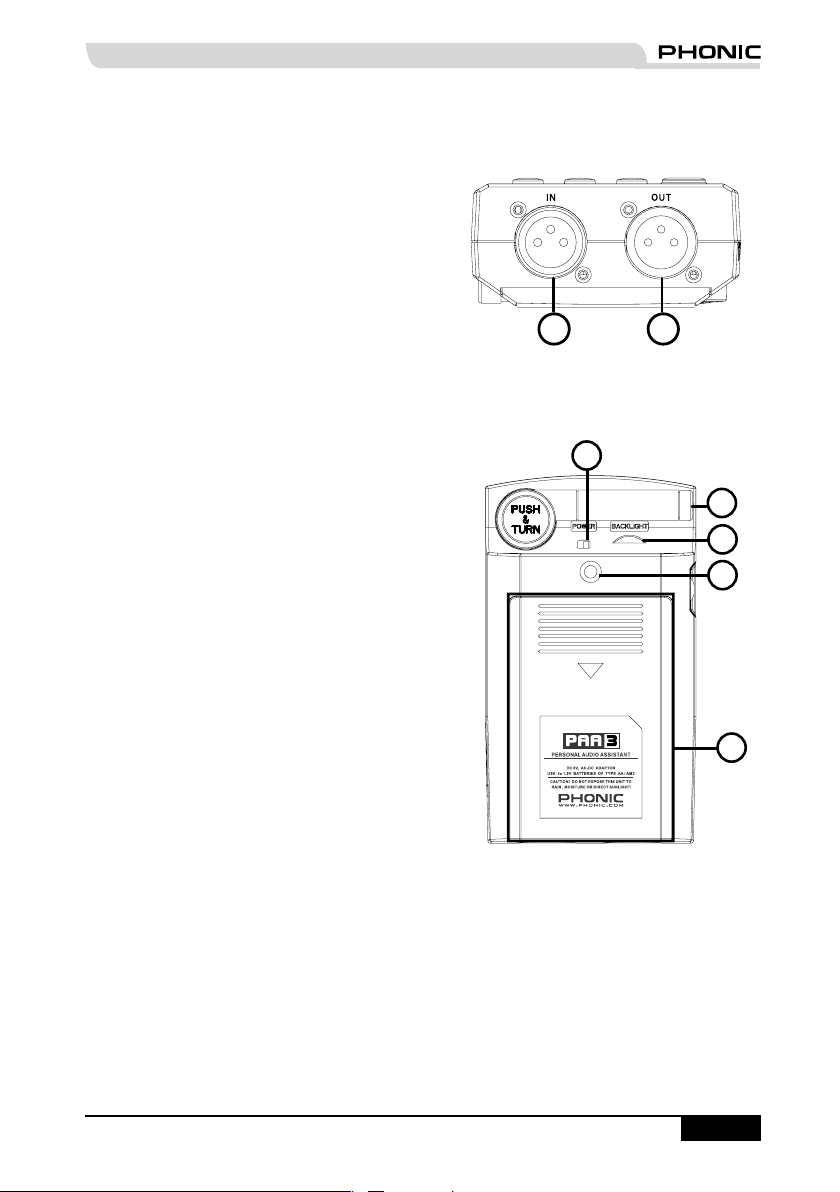
9. Male XLR Socket (Line Output)
9
10
15
11
14
12
13
Through this XLR male connector, users can
send out three built-in audio test signals: pink
noise,1 kHz tone, and the polarity signal. The
output level is balanced -10dBu under a 6V DV
power supply.
10. Female XLR Socket (Line Input)
This port allows you to send balanced, line-
level input to the PAA3. This signal input
allows you to measure signals in dBu, dBV
or AC voltage for balanced and unbalanced
signals. It is particularly useful for checking the
phase of a connections.
11. Contrast Control
By adjusting this control, users can change
the contrast of the PAA3's LCD screen to
better adapt the device to different lighting
conditions.
12. Power Lock
Set this switch to the "ON" position before
turning on the PAA3. You can set to the "OFF"
position to prevent accidental powering up of
the PAA3 when the unit is not in use. It is
recommended that users move this switch to
the off position when the PAA3 will not be used
for a long period of time. Provided that the
shut down procedure was followed correctly,
turning this switch off after saving your settings
will not cause the loss of any data.
13. Built-in Microphone
Turn this accurate built-in Omni-directional mic
to operation position (stands 45 degrees) by
pressing the axis base. Always press the axis
base before rotating the mic, as it is locked into
place. If you attempt to rotate the mic without
pushing in rst, you could very well damage
your PAA3.
14. Stand Mount
A stand mount is located on the back for
connection to a tripod or any other stand that
has a standard #6 - 20 connecting screw,
often found on camera tripods. Also included
is a stand adapter, allowing the PAA3 to be
mounted on microphone stands as well.
15. Battery Compartment
The PAA3 requires four AA batteries for
operation. Under normal conditions, the PAA3
can last for up to seven hours of continuous
operation with the use of Duracell alkaline
batteries.
PHONIC CORPORATION PAA3 User's Manual
page 7
Page 8

PHONIC CORPORATION PAA3 User's Manual
page 9
GETTING STARTED
1. Open the battery compartment and insert
four AA batteries, ensuring the positive and
negative ends are correctly aligned. You may
simply opt to use the 6V DC power adaptor. To
do so, plug the DC-head of the power adaptor
to the PAA3, and the wallwart power connector
into a suitable AC power source.
ATTENTION: Use the adapter provided along with the
PAA3 only, as to avoid damaging the PAA3. When
connecting the adaptor, ensure the power of the PAA3
is off. Sudden unplugging of the adaptor power may
cause the system to crash.
2. Push the axis base to release the PAA3's
built in microphone. To best measure audio
properties, turn the microphone until it sits at a
suitable angle. The mic will lock into place at
around 45 degrees.
3. Set the power switch (on the rear of the PAA3)
to the "ON" position.
4. Press and hold the power button (on the front)
for approximately three seconds to turn the
power of the PAA3 on.
5. A startup screen will appear for about 10
seconds, then the real time spectrum analyzer
will appear on the screen. Above the RTA,
users will note the level range, weighting type,
maximum sound pressure level, frequency
range and SPL meter.
6. If a backlight is needed, simply press the
power / backlight button. Press again to turn
the backlight off.
7. Use the ENTER button to bring up the main
PAA3 menu, then the UP / RIGHT and DOWN
/ LEFT buttons to navigate through the various
options. Press the ENTER button to enter
the main menu and use the UP / RIGHT and
DOWN / LEFT buttons to select a function.
Then press ENTER again to activate the
highlight function or to enter into the submenus. The user may also use the jog control
to activate all functions.
page 8
PAA3 User's Manual PHONIC CORPORATION
Page 9

OPERATING TIPS:
1. All functions can be activated by using
the ENTER, LEFT / UP and DOWN /
RIGHT buttons, or by the jog control. It is
recommended to use these three buttons
when taking low SPL measurements.
2. Pressing the ENTER button when the ESC
(escape) is highlighted in most of the function
menus will allow you to exit the main menu or
sub-menus.
3. Press and hold the ENTER button or jog
control for 2 seconds in most of the function
menus to return to the real time spectrum
analyzer.
4. When in RTA mode, holding the jog control
or the ENTER button for 2 seconds will
automatically jump to the Sound Pressure
Level or Signal Level meters.
5. Always turn off the power by going to the
POWER menu. Select OFF if you wish to save
the measurement data and function setting
into the memory of the PAA3. You may also
simply hold the power / backlight button for 2.5
seconds.
6. It is not recommended to continue using PAA3
for any measurement when the battery is low.
Always have extra batteries or the 6VDC
power adaptor ready to ensure the accuracy
of measurements.
7. When any result is above the level range,
the measurement is still accurate unless a
CLIPPING warning appears in the LEVEL box
while taking the measurement. When clipping
occurs, reset the level range.
8. To refresh the maximum SPL display, press
both the left and right buttons simultaneously.
9. Turn on backlight only when the level range is
set at 70~130 dB SPL or -20~+40 dBu. A noise
will occur when turning on the backlight and it
may affect the result of measurements in the
lower range.
10. While taking measurements, hold the right
button and press enter to immediately jump
immediately to the STORE page.
When the battery is low, a blinking - and very aptly
titled - "BATTERY LOW" icon will appear in the
WEIGHT box, and remain on screen for the last 3
minutes of battery life. Low quality batteries may
cause the PAA3 to shutdown without warning. An
enlarged, blinking battery icon will appear in the
center of the LCD screen if the user starts the
PAA3 with insufcient battery power.
Quick Shutdown: Simply press the Power Button
down for around 2.5 seconds and the shutdown
procedure will be initiated automatically. This can
save you valuable minutes while on the job!
PHONIC CORPORATION PAA3 User's Manual
page 9
Page 10

PHONIC CORPORATION PAA3 User's Manual
page 11
AUDIO ANALYSIS FUNCTIONS
RAN GE
50 ~ 110 SP L
WEI GHT MAX
A
99.
2
The following section contains information
concerning acoustic analysis, and illustrates how
to use the PAA3 to measure various properties of
your audio.
RTA (Real Time Analyzer) - Accoustic
This function analyzes the audio received through
either the built-in mic or Line In connection, divided
into 31-bands at 1/3 octave intervals, and displays
the relevent information on a bar graph that shows
the decible level of each band of sound from 20 Hz
to 20 kHz in four different response times (35 ms,
125 ms, 250 ms, and 1 sec) and in three weighting
types (A weighting, C weighting and Flat). For
more info on response times and weighting,
please consult the appropriate sections.
Beneath you will nd two readouts: the
numbers in the left column display the
frequency while the numbers in the right
column display the frequency levels. The
graphic shown indicates that the user has set
the level range at 50~110 SPL, A weighting.
The max level during the time of measurement
is 105.5 dB, The user is reading at 1 kHz,
which has a dB SPL of 102.8. If you would like
to store the measurement data in the memory
of PAA3, go to the STORE menu. Users can
save the measured spectrum data into one of
the ten memories. Please refer to MEMORY/
STORE for more information.
5. Scroll through the various values located in
the 'Hz' box until you come to a ashing ESC.
Press enter to exit RTA mode.
SPL (Sound Pressure Level) Meter
This feature of the PAA3 gives users an accurate
measurement of the overall "loudness" of their
sound, measured in decibels (dB). This is a true
RMS-measurement, using standard display time
average, and standard A, C, and Flat weightings.
Procedure:
1. After the start up sequence of the PAA3 is
complete, the real time analyzer will appear on
the LCD screen.
2. Go to the SETTING menu to set the
appropriate weighting, level range, response
time, or other relevant properties.
3. Select VALUE from the main menu to enter
RTA mode.
4. Press ENTER to freeze measurement data.
Press ENTER again on the highlighted VALUE
to view the value of each center frequency.
5. Use the LEFT/UP and RIGHT/ DOWN buttons
or simply scroll the JOG control to view the
level of dB SPL in real-time for the center
frequency of all 31 bands. The default readout
is the ALL FREQUENCY level.
page 10
PAA3 User's Manual PHONIC CORPORATION
Procedure:
1. Enter the SPL/LINE menu and set the
measurement unit to SPL.
2. You may select a range level, weighting,
response time or a maximum level by going
into the SETTINGS menu, then onto the
appropriate menus. The selected values of
these options will be displayed above the RTA
on the PAA3's default screen.
Page 11

3. On the main RTA display, hold the ENTER
button for approximately 2 seconds to activate
the SPL screen. Press the ENTER button
once to exit.
NB. You can easily refresh the Max SPL value
by holding both the ← left and → right keys
simultaneously for at least one second.
RT60 (Reverb Time Analyzing)
The RT60 function of the PAA3 is easy enough
to understand: it is basically the time it takes for
a signal to drop 60 dB. Getting the average of
many different RT60 calculations from around a
room allows users to get an idea as to how much
absorption or reection of audio the room provides.
Depending on your needs, you may wish to have
a high or low RT60 measurement. For example,
for public speaking, an RT60 measurement of
less than 1 second is preferable, as to have a
clear, concise voice conveyed to the audience.
With choirs or instrumental music, an RT60
measurement of greater than 1.5 seconds may be
appropriate. It all depends on your needs.
Measuring Reverb Time:
1. Press enter to open the main menu and select
“RT60.”
2. Simply click “RUN” to get your RT60 reading.
3. The PAA3 will wait for a signal greater than 30
dB over the background noise level (detected
prior to the measurement). A little helpful hint:
the louder the test signal, the greater accuracy
of your RT60 calculation.
4. Play the pink noise from the included CD
through your audio system. Slowly move the
master fader up, to a point where the audio
level received by the PAA3 is greater than 30
dB. Quickly mute the system to get your RT60
reading as accurate as possible.
5. After the measurement is taken, the RT60
measurement will appear onscreen.
PHONIC CORPORATION PAA3 User's Manual
page 11
Page 12

PHONIC CORPORATION PAA3 User's Manual
page 13
Accumulation:
Users are able to accumulate various RT60 calculations by pressing enter while the “ACxx” (where
xx equals the number of accumulated values) option is highlighted. Up to 30 measurements can be
accumulated. When RT60 measurements are accumulated, the average of said memories is automatically
taken and displayed onscreen. After 30 memories have been accumulated, users will be forced to store
their data, or else lose it.
AC 01
Store:
Storing the results of RT60 measurements is simple. First highlight the STO option
and push ENTER. When the store page comes up, choose one of the memory
slots from 1 to 10, and select YES to store. The memory slot you selected will
have a box surrounding the number now, as to indicate that a memory is stored in
that particular slot. Selecting “A/C” will clear all memory slots.
Average:
To get the average of RT60 measurements that are stored in the PAA3, simply
select AVG. Select from memories 1 to 10 (memory slots with saved data
are indicated by a box surrounding the slot number), a dot will appear next to
the number to show that a memory slot is selected. When all memories are
selected, simply select AVG to determine the average, or ESC to escape. When
differently weighted items are attempted to be averaged, a warning will appear
onscreen advising users to select again.
RTA (Real Time Analyzer) - Electrical
Signal
By simply connecting an XLR jack to the PAA3's
in jack, the RTA function can accurately measure
your signal.
STO
AVG
Recall:
RT60 measurements can be recalled at anytime by selecting the “RCL” option
in the RT60 menu. Memory slots 1 to 10 and A to F can all be recalled with
ease. Each memory location page displays only 4 memories at a time, however,
therefore users must select NEXT to continue onto the next page of stored
memories.
RCL
Procedure:
1. Enter the SPL/LINE menu and set the
measurement unit to dBu, dBV, or voltage, as
required.
2. Send a signal through the PAA3's female
XLR jack (Pin 2 - Hot; Pin 3 - Cold; Pin 1 Ground).
3. Go to the SETTING menu, where you may
want to adjust the RANGE, WEIGHTING,
RESP TIME (response time), or MAX LEVEL
of your measurement.
4. Return to the RTA display. Here you can
read the level of any or all frequencies. If
all frequency readouts are needed, press
“ENTER” button (or the jog control) for two
seconds to enter line level meter.
page 12
PAA3 User's Manual PHONIC CORPORATION
Page 13

Level Meter
ME MO RY
SE TT IN G
CA BL E T ES T
ST ORE
RE CA LL
AVE RAGE
10
2
5
6
A
31
100
315
1K
10K
3.1 5K
PO WE R O FF
ES C
ES C
ES C
3
4
7
8
1
YE S
NO
9
ME MOR Y
Measure the line voltage level in units of dBu, dBV,
and AC voltage, using standard response time,
and standard A, C, or at weightings (under normal
conditions, at is preferable). Using the PAA3 to
meaure DC voltage may damage the PAA3 and
will void the warranty.
Procedure:
1. Enter the SPL / LINE menu and set the
2. You may select a range level, weighting,
3. On the main RTA display, hold the ENTER
NB. You can easily refresh the Max SPL value
ATTENTION:
If the level is lower than 127 mV when measuring voltage,
the PAA3 will show it in mV. If the level is higher than
127mV, the data will be shown in voltage For example,
120mV will read as 120.0mV, and 200mV will be shown
as 0.2V.
The measurements for line voltage cannot be saved into
the memory of the PAA3.
PHONIC CORPORATION PAA3 User's Manual
measurement unit to dBu, dBV, or voltage, as
required.
response time or a maximum level by going
into the SETTINGS menu, then onto the
appropriate menus. The selected values of
these options will be displayed above the RTA
on the PAA3's default screen.
button for approximately 2 seconds to activate
the Level Meter screen. Press the ENTER
button once to exit.
by holding both the ← left and → right keys
simultaneously for at least one second.
MEMORY
The sub-menus of MEMORY include: STORE,
RECALL, AVERAGE, EQ SETTING. Through
these options, users are able to store their RTA
measurements.
Store
The user can save up to 10 sets of measured
data (1 to 10), as well as 6 averaged sets (A to F),
into the memory of the PAA3, allowing them to be
used later for further analysis or uploading to your
computer.
Procedure (after making an accoustic
RTA measurement):
1. To enter the store menu, hold the right button
down and press ENTER, or go into the
MEMORY menu and select STORE.
2. Select any slot, from position 1 to 10, and
press YES to nalize. Previously saved data
will be over-written.
3. Memory locations with stored data will be
indicated with a box surrounding the slot
number.
4. Selecting A/C in the STORE menu will
automatically clear all memory slots.
ATTENTION: This function is only available when for
accoustic analysis.
page 13
Page 14

PHONIC CORPORATION PAA3 User's Manual
page 15
Recall
Users can recall all data saved in the memory of
the PAA3 to read the measurements.
Procedure:
1. Enter into the MEMORY menu and select
RECALL.
2. Select any of the used memory slots (indicated
by a box surrounding the slot number) from 1
to 10 or A to F.
3. Each value will be displayed under VALUE in
a 31-band center frequency value and an all
frequency value.
4. When you see a ashing ESC in the Hz
column, press ENTER to return to the
MEMORY menu.
Average
The user can choose from memories 1 to 10 to
compute average calculations, which are essential
for EQ setting.
and pushing the ENTER key, or simply choose
ALL if you want to do the average calculation
for all ten saved measurements. Move the
cursor over selected memories and press
ENTER again to unselect.
3. A small dot will appear to the left of selected
memory slots for identication.
4. Highlight AVG and press the ENTER key
after all selections have been made. A list
of selected measurements will be shown for
conrmation.
5. Press RUN and the PAA3 will automatically
calculate the average, or press ESC to
cancel.
6. After running the average calculation,
COMPLETE will appear on the screen. The
user may then select from memory slots A to
F (pressing YES to conrm) to save selected
average calculations to the PAA3. Previously
saved data will be automatically over-written.
The PAA3 will automatically revert back to the
EQ SETTING menu as soon as calculations
are complete.
ATTENTION: It is not recommended to calculate average
of saved data with different weighting settings. The PAA3
will ignore the peak value when calculating the average,
even if the peak value was activated.
EQ Setting
The EQ setting of audio system will vary from one
venue to another. The ultimate goal in setting your
EQ is to create a completely at response and
to eliminate every possible source of feedback.
Though the PAA3's EQ SETTING function, even a
novice user can successfully accomplish this.
Procedure:
1. Go to the MEMORY menu and select
AVERAGE.
2. Select any combination of data from memories
1 to 10 by moving the cursor to that number
page 14
PAA3 User's Manual PHONIC CORPORATION
Page 15

Procedure:
WE IGH TIN G
FL A
T
A
C
SE TTI NG
ES C
A
31
100
315
1K
10K
3.1 5K
LE VEL RA NGE
70 ~ 13 0 d BS PL
30 ~ 90 d BS PL
SE TTI NG
50 ~ 110 d BS PL
ES C
A
31
100
315
1K
10K
3.1 5K
1. Play the pink noise from the included CD (or
from the PAA3 GENERATOR tool) through
your audio system.
2. Pick a number of signicant locations around
the area the audience will be situated, and
take RTA measurements, and save each into
the PAA3’s memory.
3. Enter into the MEMORY / AVERAGE menu,
and select the saved memories measured
from those locations to calculate the average.
4. Go to the MEMORY / EQ SETTING menu.
You will discover the amount of dB you need to
boost or cut in each center frequency by using
the Jog. Control or the UP/DOWN buttons to
scroll. Example shown indicates that the user
should cut -5.2 dB at 1 kHz.
ATTENTION: Any user's EQ setting ability is limited by
the temperature and the size of the audience at the time
measurements were taken.
SETTINGS
The sub-menus of SETTING include WEIGHTING,
LEVEL RANGE, MAX LEVEL, PEAK HOLD,
RESPONSE TIME, and CALIBRATION.
Weighting
Any audio analyzer needs to be designed so
that it hears sound properties in the same way
as humans. Generally, the sensitivity of human
hearing is restricted to the frequency range of
20 Hz to 20 kHz. The human ear, however, is
most sensitive to sounds in the range of 500 Hz
to 8 kHz. The ear becomes progressively less
sensitive to sound out of this range.
To account for this limitation of human hearing,
many audio analyzers, including the PAA3,
incorporate a ltering of acoustic signals according
to frequency. This ltering (weighting type) is
devised to correspond to the varying sensitivity of
the human ear to sound over the audible frequency
range. The PAA3 comes with both A-weighting and
C-weighting standardized by the ANSI (American
National Standards Institute). A-weighting is
the most frequently used weighting type and is
used for measuring lower sound levels, while C-
weighting is best suited for higher sound levels.
The user can set the weighting for measurements
in dBu, dBV or voltage.
Procedure:
1. Go to the SETTING/ WEIGHTING menu.
2. Select an appropriate weighting for the
measurement. A tick appears next to your
selection.
3. Press ESC to the previous menu.
Level Range
The PAA3 has three different ranges for
measurements in SPL, dBu, dBV and voltage.
SPL: 30 ~ 90 / 50 ~ 110 / 70 ~ 130
dBu: -50 ~ +10 / -35 ~ +25 / -20 ~ +40
dBV: -52 ~ +8 / -37 ~ +23 / -22 ~ +38
VAC: 5m ~ 2.45V / 14m ~ 14V / 77.5m ~ 80V
Procedure:
1. Go to the SETTING menu, and proceed onto
the LEVEL RANGE menu.
2. Select an appropriate level range for your
measurement and press the ENTER button.
PHONIC CORPORATION PAA3 User's Manual
page 15
Page 16

PHONIC CORPORATION PAA3 User's Manual
page 17
3. Press ESC to return to the previous menu, or
MA X LE VE L
RE SET
SE TTI NG
ES C
A
31
100
315
1K
10K
3.1 5K
RES P T IME
35 ms
125 m s (F)
250 m s
250 m s (M)
c (S)
1 se
SET TIN G
ESC
A
31
100
315
1K
10K
3.1 5K
hold the ENTER button for 2 seconds to revert
back to the RTA screen.
Max Level
Maximum level your audio has reached will
constantly be shown on the LCD screen. The
user should reset the max level before each new
measurement.
Procedure:
1. Enter the SETTING menu, then onto the MAX
LEVEL menu.
2. Highlight RESET and press ENTER button to
reset the max level measurement (doing so
will automatically return you to the SETTING
sub-menu). Press ESC to return if it you do not
want to reset.
3. A new max level display will be shown in the
MAX column three seconds after returning to
the RTA operation.
Quick Refresh: While on the RTA screen,
simply press the left and right buttons
simultaneously to refresh the maximum level.
Peak Hold
Peak hold allows the user in RTA mode to
constantly display the peak values of all measured
frequencies, individually or collectively.
Procedure:
1. Enter the SETTING menu, then select the
PEAK HOLD option.
2. Highlight and select ON to activate peak hold
display.
3. Highlight and select OFF to cancel the peak
hold display function.
4. Press ESC to return to the SETTING menu.
ATTENTION: When saving the memory with “PEAK
HOLD” on, the peak level will only be displayed when the
user recalls that memory when the PEAK HOLD setting is
on. By setting the PEAK HOLD off, the user may then view
the levels from all frequencies, individually or collectively.
Response Time
Response time settings will vary according to the
user's measurement goals.
35 ms: Extremely Fast (for explosive sound)
125 ms (F): Fast
250 ms (M): Medium
1 sec (S): Slow
Procedure:
1. Go to the SETTING menu, then enter the
RESP TIME menu.
2. Select an appropriate response time (a tick
will appear next to your selection), or ESC to
cancel.
page 16
PAA3 User's Manual PHONIC CORPORATION
Page 17

Calibration
You should never actually need to calibrate your
PAA3. If measurement data or operation of the
unit is abnormal, however, it may be necessary
to. Anyone can calibrate the PAA3 and regain
accurate sound pressure level measurement by
using a sound level calibrator with 1/2” diameter
adapter that sends out a 1 kHz tone. A B&K TYPE
4231 sound level calibrator is suggested.
Procedure:
1. First, turn the PEAK HOLD OFF and set the
RESP TIME (response time) to 250 ms.
2. Place a sound level calibrator with a
microphone connector of a 1/2” diameter close
to the PAA3's built-in mic.
3. Enter the SETTING menu and activate the
function.
4. Adjust the level measured from the SPL
calibrator by pressing UP/DOWN buttons until
the level is equal to that of the sound level
calibrator (typically 94 dB). Pressing the UP
button each time will increase the value by
0.1dB; pressing the DOWN button each time
will decrease by 0.1 dB.
5. Press the ENTER button to complete the
calibration and to return to RTA display.
ATTENTION: If you want to cancel calibration, simply
press the ENTER button to exit before making any
adjustment. To resort the default calibration, simply adjust
the offset value to 0.0 dB.
PHASE CHECK
Measuring the phase of a signal allows you to
gure out whether a speaker is correctly wired.
A polarity signal is usually needed when checking
the phase of a speaker or ensure that an output
connection is correct.
Procedure:
1. Go to the SPL/LINE and select dBu to check a
device's output connection or SPL to check a
speaker's wiring.
2. Go to the SETTING menu, and select
POLARITY (or play the included PAA3 CD
through your system).
3. If checking speaker wiring, stand one meter
in front of the speaker that plays the polarity
signal, go to the PHASE CHECK menu and
activate.
4. A large “+” appearing on
screen means the signal
is in phase, and the
wiring is correct.
5. If instead of a "+" you get
a “-”, the speaker is out
of phase and should be
corrected.
6. A big “?” or a screen
switching between
plus and minus
symbols means the
sound pressure level
is at a level that is not
detectable by the PAA3.
So turn it up!
ATTENTION: Make sure the sound pressure level of
the polarity signal from the system is louder than the
environment noise, otherwise the PAA3 will not be able to
detect the phase of the speaker.
PHONIC CORPORATION PAA3 User's Manual
page 17
Page 18

PHONIC CORPORATION PAA3 User's Manual
page 19
GENERATOR
PO WER
ES C
AU TO OF F
OF F
MA NUA L OF F
A
31
100
315
1K
10K
3.1 5K
PO LAR ITY
PI NK
NO ISE
1K H z
ES C
OF F
GE NER ATO
R
A
31
100
315
1K
10K
3.1 5K
The PAA3 can send out pink noise, a polarity
signal, and a 1 kHz tone, all of which is sent out
via the Male XLR connector (on the bottom of
the PAA3) to any external system, at a level of
-10 dBu.
Tones:
Pink noise: mostly used for acoustic
environment adjusting. For example: sound
system equalization.
Polarity: often used to check the phase of
speakers.
1 kHz tone: a widely used among the
professionals for audio signal testing.
POWER
To follow the correct power-down procedure is
quite important to the PAA3. The easiest way to do
so, however, is to hold the POWER / BACKLIGHT
button of the PAA3 for approximately 2.5 seconds.
The device will automatically shutdown. If that’s
too easy, and you prefer to do things the difcult
way, you may also do one of the following:
Procedure:
1. Enter the POWER menu.
2. Select AUTO OFF, and the PAA3 will
automatically shut itself down after being left
idle for 15 minutes.
Procedure:
1. Connect the PAA3 to your audio system via
the XLR-male connector on the bottom of the
device.
2. Go into the GENERATOR menu and select
one of the signal to activate.
3. Selecting MANUAL OFF will disable AUTO
OFF mode, and ensure the PAA3 will not shut
itself down automatically, unless the batteries
are low.
4. Select OFF, and the PAA3 will immediately
shut down, saving all of your settings and
measurement data before hand.
3. Select ESC to return to previous menu or
press OFF to cancel.
page 18
PAA3 User's Manual PHONIC CORPORATION
Page 19

SIMULTANEOUS OPERATION WITH DESKTOP
There are many advantages to being able to
connect the PAA3 with your desktop computer or
notebook. It allows remote operation of the PAA3,
for one, which is particularly useful when taking
measurements in areas that require an absense of
any individuals. It also allows users to to save and
print data stored in the PAA3's memory.
The PAA3 software, supported by Windows 98 and
above, can be found on the included CD (which,
incidently, also contains 26 testing signals). With
this program, most functions are easily accessible
through a menu identical to that of the PAA3
device itself.
ATTENTION: When operating the PAA3 through a PC, it
is recommended that you make use of the power adapter
instead of batteries. Also, choose an optimal position for
the PAA3 to be placed before controlling the PAA3 with
your computer.
Installing the PAA3 software:
1. Turn on the computer and insert the PAA3 CD
provided.
2. Find paa3_setup.exe on the disc and double
click to begin installation.
3. Select an appropriate installation directory and
click "next" to continue. The PAA3 software
will be installed automatically.
PAA3 ON LINE
Connection:
1. After installation, open the PAA3 software.
2. Connect the PAA3 to your PC via the provided
USB cable, then turn the PAA3 on.
3. Go to FILE, select ON LINE to connect to the
PAA3. The data previously saved in the PAA3
will immediately be uploaded.
4. As soon as uploading is nished, you may
begin to operate PAA3 by moving the cursor
of the mouse and click the onscreen MENU to
enter the various functions of the PAA3.
5. Now that PAA3 is operating simultaneously
with the PC. The functions being activated will
show both on the PAA3 and the PC or laptop.
6. Go to FILE and click ON LINE once more if you
need to disable the PAA3's online operation.
Using the PAA3 on line:
The simple menu located below the FILE pull
down menu at the top left hand side of main PAA3
program will allow users to access the PAA3's
functions. This menu is basically identical to that
of the PAA3 itself, so as long as you can navigate
the PAA3 menu, you will be able to navigate this
one.
Display Type:
Clicking on the SPL METER (or LEVEL METER)
button to the right of the aforementioned menu will
allow users to switch the on screen display type
between that of the spectrum analysis and the
meter display.
Memories:
Taking up most of the bottom half of the PAA3
program window is the memory section. Here lists
all stored memories of the PAA3, downloaded to
the computer. The two tabs allow users to view
either the RTA memories or RT60 memories
stored.
Backlight:
The backlight button to the right-hand-side of the
PAA3 program will allow users to remotely active
the PAA3's backlight.
PHONIC CORPORATION PAA3 User's Manual
page 19
Page 20

PHONIC CORPORATION PAA3 User's Manual
page 21
PAA3 OFF LINE
The following functions can actually be accessed
while in either on line or off line modes, unless
indicated otherwise.
Printing:
1. Go to FILE, select Print, and a printer selection
window will appear.
2. Select a printer from the list.
3. Select all data or one of the 16 memories.
Users may also choose to print RT60 data.
4. Choose the print quality level (draft, low
quality, medium quality, or high quality).
5. Click on Print, and the printer window will
disappear as soon as the transmission is
complete
ATTENTION: Along with the 31-band value of the selected
memory and the EQ SETTING value, the name of the
le, date of printing, LEVEL RANGE, WEIGHTING, and
maximum level will also be printed on the data sheet.
Open File:
1. When off line, go to the FILE menu and select
"Open File".
2. Locate the le previously saved in your PC
and double click it.
3. The data is now ready for viewing, editing and
any additions you may want to make to it.
Save File:
1. Go to the FILE menu and select Save File.
2. Select a directory (or create a new one), and
give a name to the le.
3. Click on SAVE to save the le, and your entire
session will be saved under that one le
name.
Peak Hold:
1. Click on ON to view the peak value of each
frequency and all frequency. The level can
be found either from the bar meter or in the
RTA peak chart on the right hand side of the
program window.
2. Click on OFF to view the RTA value of each
frequency and all frequency.
MEMORY
Select one of the memory slots (1 to 10 or A to F) in
the RTA section of the memory chart at the bottom
of the PAA3 software window to view the properties
of saved data. Users can click on the bar-meter in
the spectrum to see a specic frequency for readout
or view them in the RTA Value column.
ATTENTION: User may rename every memory by double
clicking the number of the memory in the memory chart.
Memory Functions:
The Memory pull down menu (as well as the
following options) is not available while the PAA3
is under On Line operation.
Average:
1. Go to MEMORY / AVERAGE pull down
menu, then select RTA AVERAGE or RT60
AVERAGE, to activate average function.
2. Choose by clicking memory 1 to 10 for
average calculation. The original level range
setting of each memory level range will display
next to its number.
3. Click on AVG to run the calculation, the
results of which will be displayed immediately.
4. Select a memory from A~F, and click on
Save to save the result (the old one will be
over-written), or click on Cancel to exit. User
can view the result (either in graphic or in
text) immediately both in result box or in the
memory chart, with level range displayed at
the top.
EQ Setting:
1. Select a memory (1 to 10 or A to F) with
which you would like to adjust the EQ.
2. Go to MEMORY / EQ SETTING and
activate EQ setting function.
3. Move the cursor and click on each bar
meter to nd out how much dB you need to cut
or boost for each center frequency.
Clear:
1. Go to MEMORY, then onto CLEAR.
2. Select a memory slot, 1 to 10 or A to F, from
the sub-menu, and the memory will be deleted
immediately; select “All” if you need to wipe all
memories saved.
page 20
PAA3 User's Manual PHONIC CORPORATION
Page 21

DIMENSIONS
145mm / 5.7"
39.5 / 1.6"
83mm / 3.3"
PHONIC CORPORATION PAA3 User's Manual
page 21
Page 22

PHONIC CORPORATION PAA3 User's Manual
page 23
SPECIFICATIONS
Input/Output:
Microphone Built-in miniature omni direction condenser microphone
Line XLR jacks for line input and output
Data Port USB 1.1 interface
Display : 160X160 LCD screen with contrast adjustment and back
SPL, dBu, dBV, Voltage Bar graph and digit display
RTA 31-band, 0.5dB resolution Center frequencies ISO standard
from 20Hz to 20KHz
Measurement Range
SPL (Microphone input) 30 to 130 dB SPL
dBu (Line input) -50 to +40 dBu
dBV (Line Input) -52 to +38 dBV
Voltage (Line Input) 5 mV to 80 V
Setting
Weighting A, C or Flat
Peak hold ON/OFF
Maximum level display RESET
Response time 35 ms, 125 ms, 250 ms, 1 sec
Other Function
RT60 Reverberation time display, up to 30 seconds
Memory 10 RTA+ 6 average calculation
Average calculation For 10 RTA memories
EQ setting value display 31-band
Phase checker Through polarity signal
Transmission Simultaneous operation with PC or laptop through USB port
Noise Generator
(Based on 6VDC power source)
Pink noise Balanced output, -10 dBu
1K Hz Signal Balanced output, -10 dBu
Polarity Signal Balanced output, -10 dBu
Power Source 4 x AA batteries (battery life: up to 7 hours with alkaline
batteries) or external 6 VDC adapter
Dimensions (HxWxD) 144.95 x 82.95 x 39.42 mm (5.7” x 3.26” x 1.55”)
Weight (with batteries) 354 g (0.78 lbs)
light
page 22
PAA3 User's Manual PHONIC CORPORATION
Page 23

AUDIO TEST SIGNAL TRACK LISTING
The following is the list of the audio test signals on the CD included along with the PAA3:
1 Pink Noise, 60 seconds
2 Polarity Test Signal, 60 seconds
3 White Noise, 60 seconds
4 250 Hz Sine Wave, 30 seconds
5 500 Hz Sine Wave, 30 seconds
6 1 kHz Sine Wave, 30 seconds
7 2 kHz Sine Wave, 30 seconds
8 5 kHz Sine Wave, 30 seconds
9 10 kHz Sine Wave, 30 seconds
10 12.5 kHz Sine Wave, 30 seconds
11 Stepped Sequence Frequency Up 20Hz~20 kHz, 5 seconds for each frequency: 20Hz, 25Hz,
31.5Hz, 40Hz, 50Hz, 63Hz, 80Hz, 100Hz, 125Hz, 160Hz, 200Hz, 250Hz, 315Hz, 400Hz, 500Hz,
630Hz, 800Hz, 1 kHz, 1.25 kHz, 1.6 kHz, 2 kHz, 2.5 kHz, 3.15 kHz, 4 kHz, 5 kHz, 6.3 kHz, 8 kHz,
10 kHz, 12.5 kHz, 16 kHz, 20 kHz
12 Channel Test, at 1 kHz, Left Channel, 10 seconds
13 Channel Test, at 1 kHz, Right Channel, 10 seconds
14 Frequency Sweep Up 20Hz~20 kHz, 50 seconds
15 In Phase, at 250 Hz, 30 seconds
16 Out Of Phase, at 250 Hz, 30 seconds
17 Digital Blank, 60 seconds
18 SMPTE/EBU, Time Code, 30 seconds
19 High E
20 Low B
21 Low G
22 Low D
23 Low A
24 Low E
25 Frequency Sweep Up, 20Hz~20 kHz, 35 seconds
26 Frequency Sweep Down, 20 kHz~20Hz, 35 seconds
PHONIC CORPORATION PAA3 User's Manual
page 23
Page 24

 Loading...