

Page 1
FIREFLY 808 UNIVERSAL
User's Manual
Manual del Usuario
Page 2

English Español
FIREFLY 808 UNIVERSAL
FIREWIRE & USB INTERFACE
INTERFASE FIREWIRE & USB
ENGLISH ..................................................I
ESPAÑOL ..................................................II
V1.1 06/15/2012
Page 3

User’s Manual
CONTENTS
English
INTRODUCTION
FEATURES
INSTANT SETUP
QUICK START
SET UP
FRONT PANEL DESCRIPTION
REAR PANEL DESCRIPTION
FIREWIRE / USB INTERFACE
SYSTEM REQUIREMENTS
DRIVER INSTALLATION
CHANNEL ASSIGNMENT
CUBASE LE 4
FIREWIRE DEVICE CONTROL PANEL
FIREFLY 808 UNIVERSAL MIXER SOFTWARE
1
1
1
1
1
2
3
5
5
5
8
8
8
10
STAND ALONE MODE
SPECIFICATIONS
APPENDIX
APPLICATION
DIMENSION
BLOCK DIAGRAM
APPENDIX
Phonic preserves the right to improve or alter any information within this
document without prior notice
11
12
1
4
5
6
3FIREFLY 808 UNIVERSAL
Page 4
4 FIREFLY 808 UNIVERSAL
English
1. Read these instructions before operating this
apparatus.
2. Keep these instructions for future reference.
3. Heed all warnings to ensure safe operation.
4. Follow all instructions provided in this document.
5. Do not use this apparatus near water or in locations
where condensation may occur.
6. Clean only with dry cloth. Do not use aerosol or liquid
cleaners. Unplug this apparatus before cleaning.
7. Do not block any of the ventilation openings. Install
in accordance with the manufacturer’s instructions.
8. Do not install near any heat sources such as radiators,
heat registers, stoves, or other apparatus (including
.
9. Do not defeat the safety purpose of the polarized or
grounding-type plug. A polarized plug has two blades
with one wider than the other. A grounding type plug
has two blades and a third grounding prong. The wide
blade or the third prong is provided for your safety. If
the provided plug does not into your outlet, consult
an electrician for replacement of the obsolete outlet.
10. Protect the power cord from being walked on or
pinched particularly at plug, convenience receptacles,
and the point where they exit from the apparatus.
11. Only use attachments/accessories by the
manufacturer.
12. Use only with a cart, stand, tripod, bracket, or
table by the manufacturer, or sold with
the apparatus. When a cart is used, use caution
when moving the cart/apparatus
combination to avoid injury from tipover.
13. Unplug this apparatus during lighting
storms or when unused for long
periods of time.
14. Refer all servicing to service personnel.
Servicing is required when the apparatus has been
damaged in any way, such as power-supply cord or
plug is damaged, liquid has been spilled or objects
have fallen into the apparatus, the apparatus has
been exposed to rain or moisture, does not operate
normally, or has been dropped.
IMPORTANT SAFETY INSTRUCTIONS
CAUTION: TO REDUCE THE RISK OF ELECTRIC SHOCK,
DO NOT REMOVE COVER (OR BACK)
NO USER SERVICEABLE PARTS INSIDE
REFER SERVICING TO QUALIFIED PERSONNEL
The lightning flash with arrowhead symbol, within an
equilateral triangle, is intended to alert the user to the
presence of uninsulated “dangerous voltage” within the
product
’
magnitude to constitute a risk of electric shock to persons.
The exclamation point within an equilateral triangle is intended to alert the user to the presence of important operating and maintenance (servicing) instructions in the literature
accompanying the appliance.
WARNING: To reduce the risk of or electric shock, do
not expose this apparatus to rain or moisture.
CAUTION: Use of controls or adjustments or performance
of procedures other than those may result in
hazardous radiation exposure.
The apparatus shall not be exposed to dripping or splashing and that no objects with liquids, such as vases,
shall be placed on the apparatus. The MAINS plug is used as the disconnect device, the disconnect device shall
remain readily operable.
Warning: the user shall not place this apparatus in the area during the operation so that the mains switch
can be easily accessible.
CAUTION
RISK OF ELECTRIC SHOCK
DO NOT OPEN
Page 5

INTRODUCTION
Congratulations on your purchase of one of the newest
members of the Firefly series from Phonic, the Firefly 808
Universal. We know how to make the best audio gear for
you and we know your need to create great recordings and
productions. The Firey 808 Universal features a eight mic/line
inputs (with +48V phantom power), digital AES/EBU I/O and
word sync, ADAT I/O, MIDI I/O, S/PDIF I/O, and all of these with
FireWire and USB interfaces for digitally transferring your audio
to your computer in high resolution audio (up to 192kHz) that
meets today modern productions standards.
We know how eager you are to get started – wanting to get
the Firey out and hook it all up is probably your number one
priority right now – but before you do, we strongly urge you to
take a look through this manual. Inside, you will nd important
facts and figures on the set up, use and applications of your
Firey 808 Universal. If you do happen to be one of the many
people who refuse to read user manuals, then we just urge you
to at least glance at the Instant Setup section. After glancing at
or reading through the manual (we applaud you if you do read
the entire manual), please store it in a place that is easy for you
to nd, because chances are there’s something you missed the
rst time around.
FEATURES
FireWire (IEEE 1394) & USB 2.0 audio interface
24-bit resolution, up to 192k Hz sampling rate
18 simultaneous inputs and outputs FireWire audio
interface
8 microphone preamps with trim controls and individual
phantom power switches
8 analog line Inputs including 2 Instrument Inputs
8 channels of optical ADAT I/O (4 ch. via 96k dual SMUX)
S/PDIF I/O, AES/EBU I/O, MIDI I/O and word clock I/O
Headphone output and Main output with volume control for
monitoring purpose
Channel meters on channel 1 to 8 for input or output
Synchronization, sampling rate, digit I/O and MIDI in/out
indicators
Dual FireWire ports for daisy chaining and direct
connection to Mac or PC
Stand-alone mixer functionality for field and studio use
without computer
Instrument input, pad switch, balanced TRS send jacks on
Inputs 1 and 2
Compatible with Windows XP, Windows Vista and Mac
OSX
Steinberg Cubase LE 4 software included
INSTANT SETUP
Quick Start
1. Install the USB or FireWire driver and mixer software
included with your Firefly onto your computer. More
detailed instructions can be found in the "Driver Installation"
section of this manual. Mac users do not need to install
the drivers, however have their own mixer software that
can ben installed to allow for adjustment of signal levels,
sampling rates and so forth.
2. During the driver installation process, you will be instructed
to connect the Firefly to the computer and turn it on.
Connect the Firey to the computer using the FireWire or
USB cables included along with the unit.
3. Connect the supplied AC power cable into the power inlet
connector at the rear back of the Firey 808. Turn the unit
on using the power switch on the front of the unit.
4. Connect a microphone to the XLR input connector on
the front of the unit. You can take a look at the mic LED
meter and adjust the level control so it sits at a good level
for recording. Do the same with the various mic and line
inputs on the rear of the Firey. It's advisable to keep the
unit off when plugging in or unplugging microphones,
instruments and such.
5. Open the Phonic Control Panel software and check that the
Firey's inputs and outputs are all shown in the appropriate
windows. In this section you are also able to change the
size of the buffer, sampling rate and a few other properties.
6. You can use your headphones with the Phones output to
monitor your input and output audio on the Firey.
7. Now you are ready to start designing high resolution audio
productions and ready to nd out all the advantages of your
brand new Firey.
Setup
1. If you have experience connecting our FireWire products
you’ll nd this setup familiar and easy.
2. Turn on your computer and be sure to have a FireWire or
USB port available.
3. Connect your Firefly to an AC power outlet through the
provided AC power cable.
4. Connect the supplied FireWire or USB cable to a port on
the back of your Firey, and connect the other end to your
computer. You only need to connect a single FireWire cord
to your computer – the second port on the Firey is to allow
you to daisy chain the Firefly with additional Firefly 808
Universals.
5. Turn the unit on using the switch located on the back panel.
6. Your computer will automatically recognize the Firefly
provided you have installed the appropriate drivers (see
the Quick Start section). You should be able to view and
edit your Firey’s channel properties in the Phonic FireWire
Control Panel software.
7. Your next and final step would be to activate the Firefly
in your DAW software. Most programs will make you
open a project before you do so. Then all you need to
do is go to the “devices”, “tools” or “properties” pull-down
menu (depending on your software of choice) - here you
should nd an option that allows you to view and change
your desired inputs and outputs and assign them to your
project's channels. Activate the Firey and you're done!
English
1FIREFLY 808 UNIVERSAL
Page 6
2 FIREFLY 808 UNIVERSAL
English
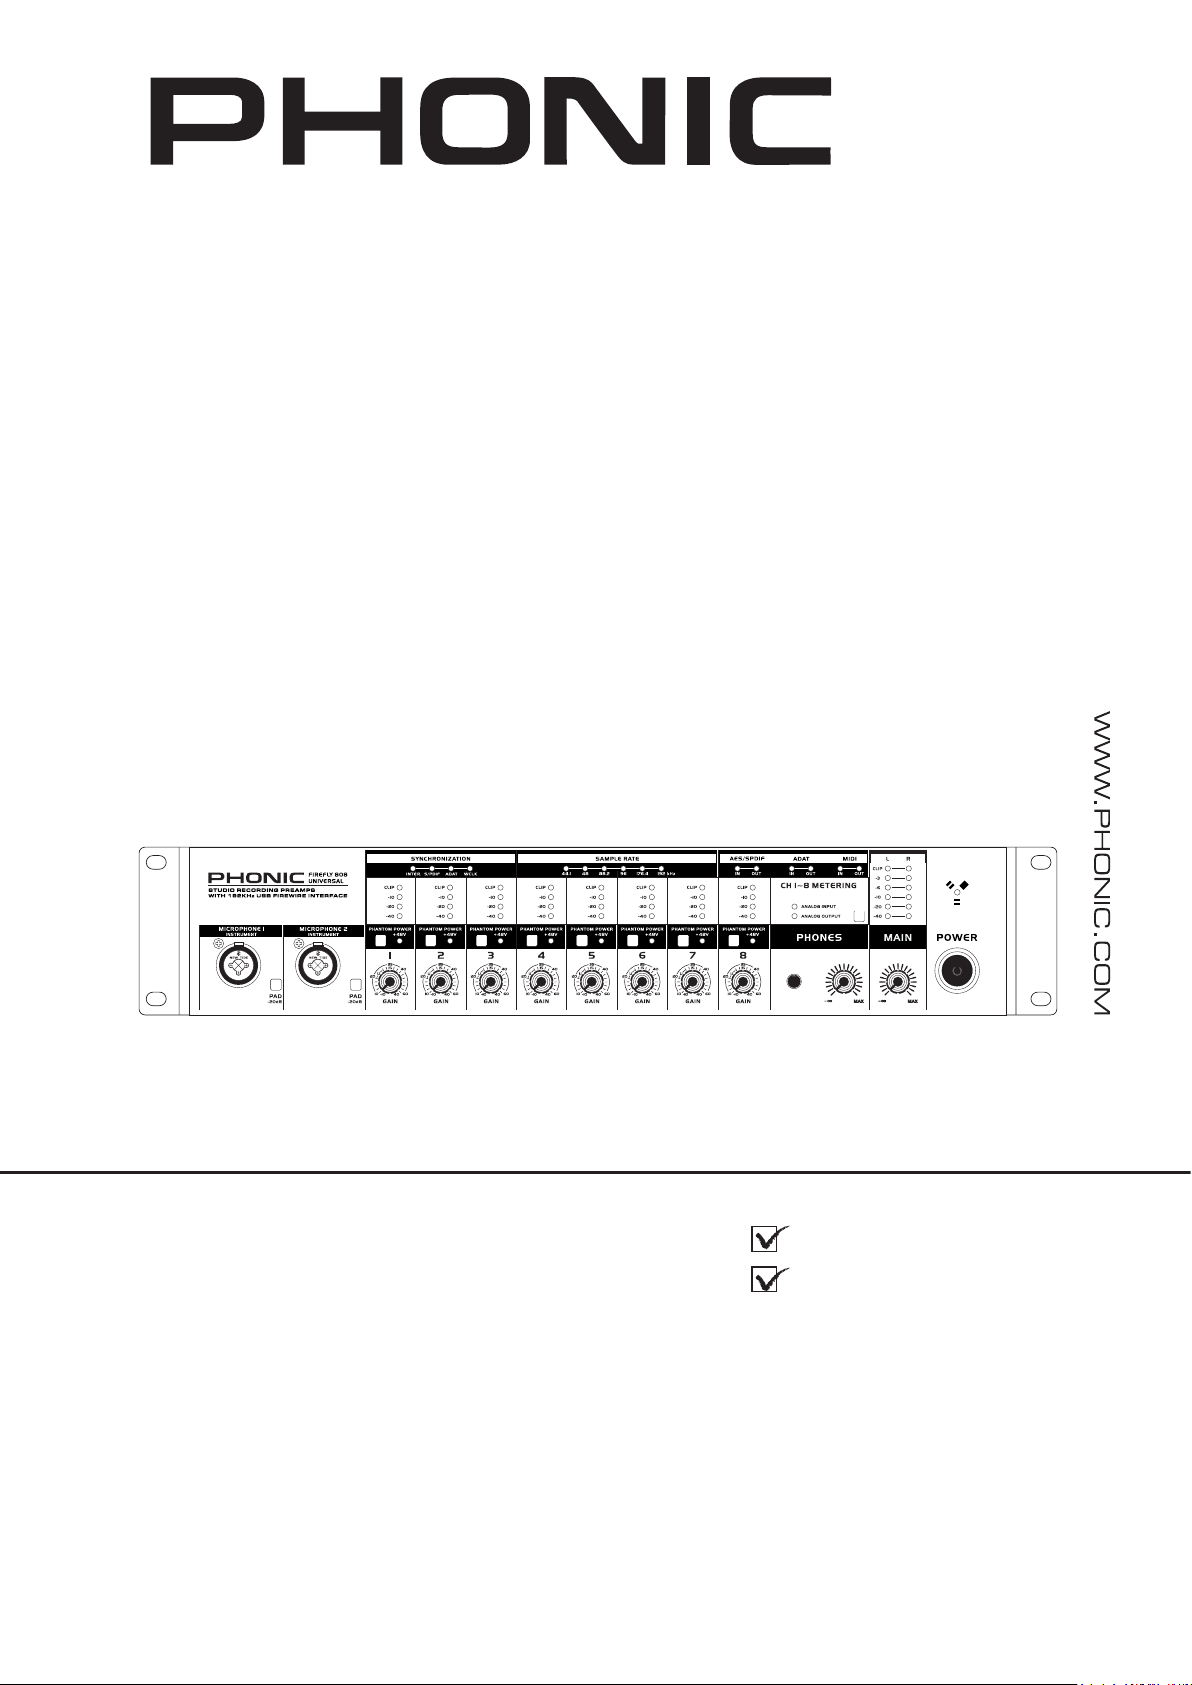
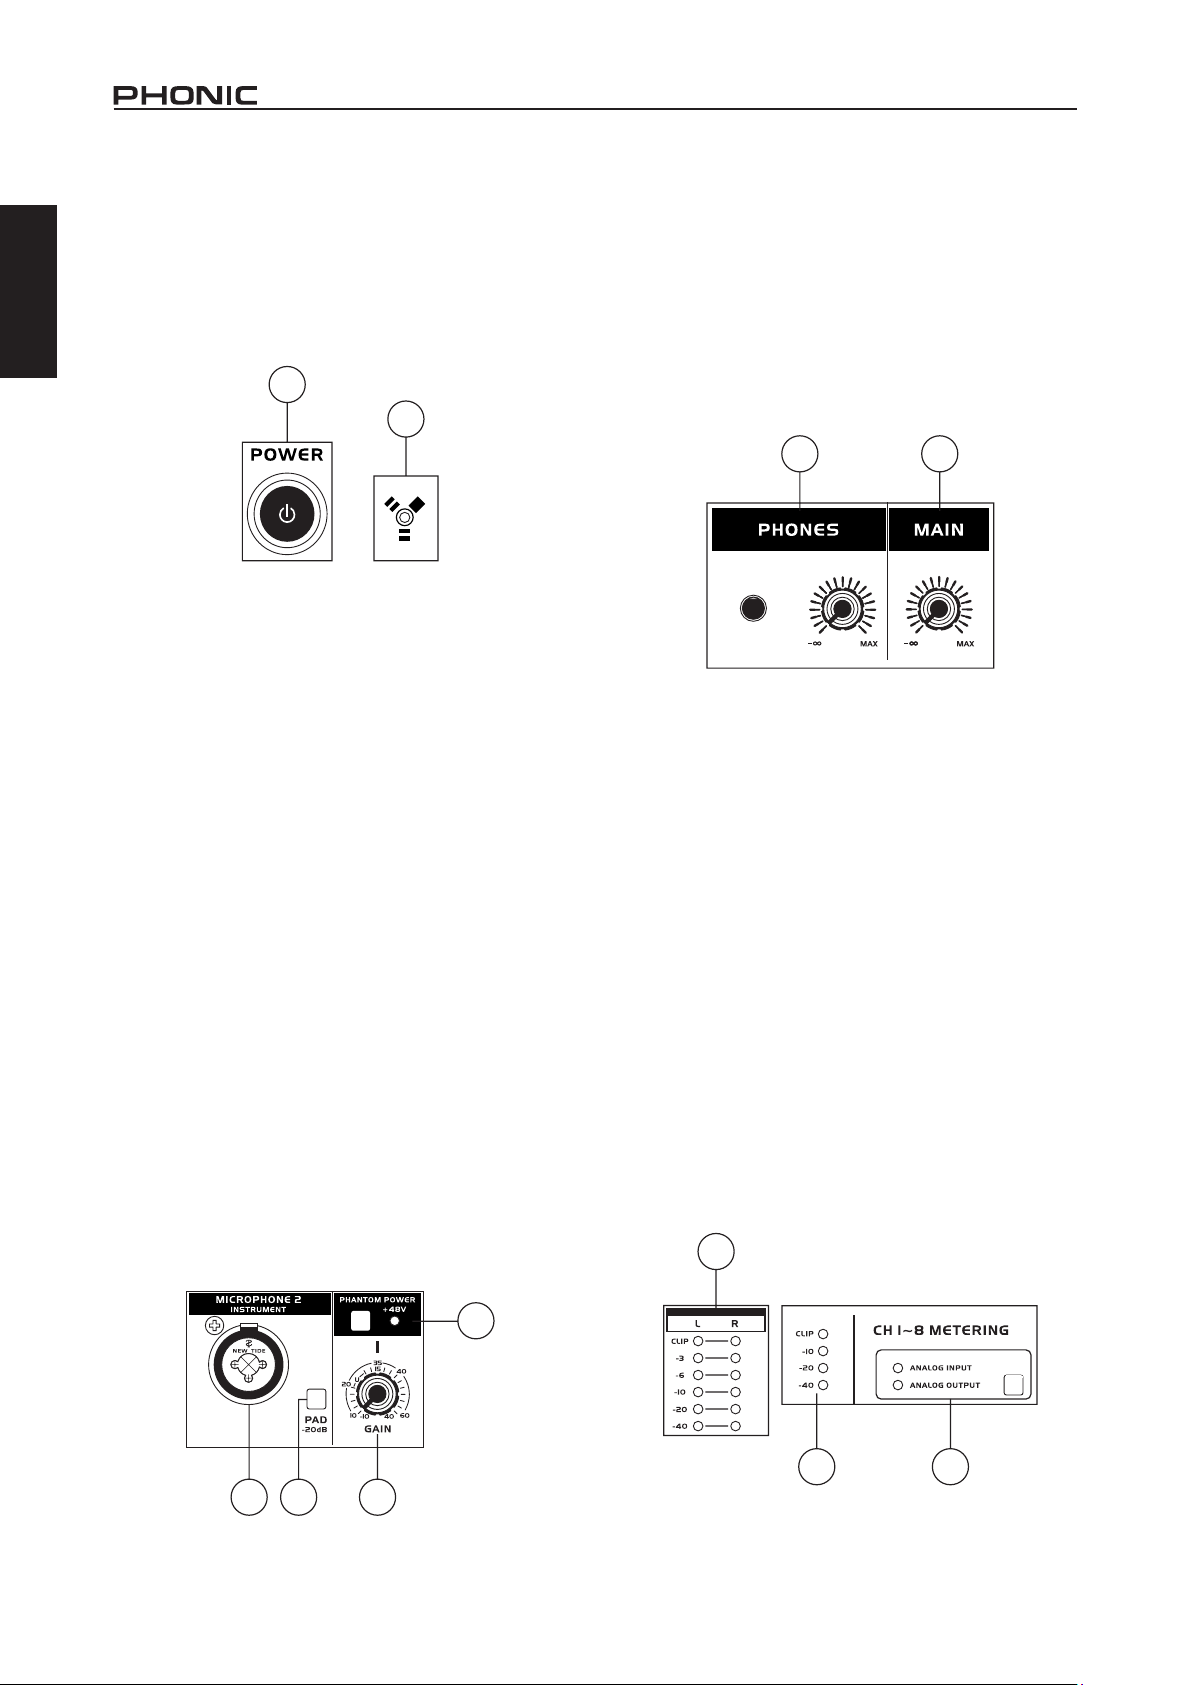
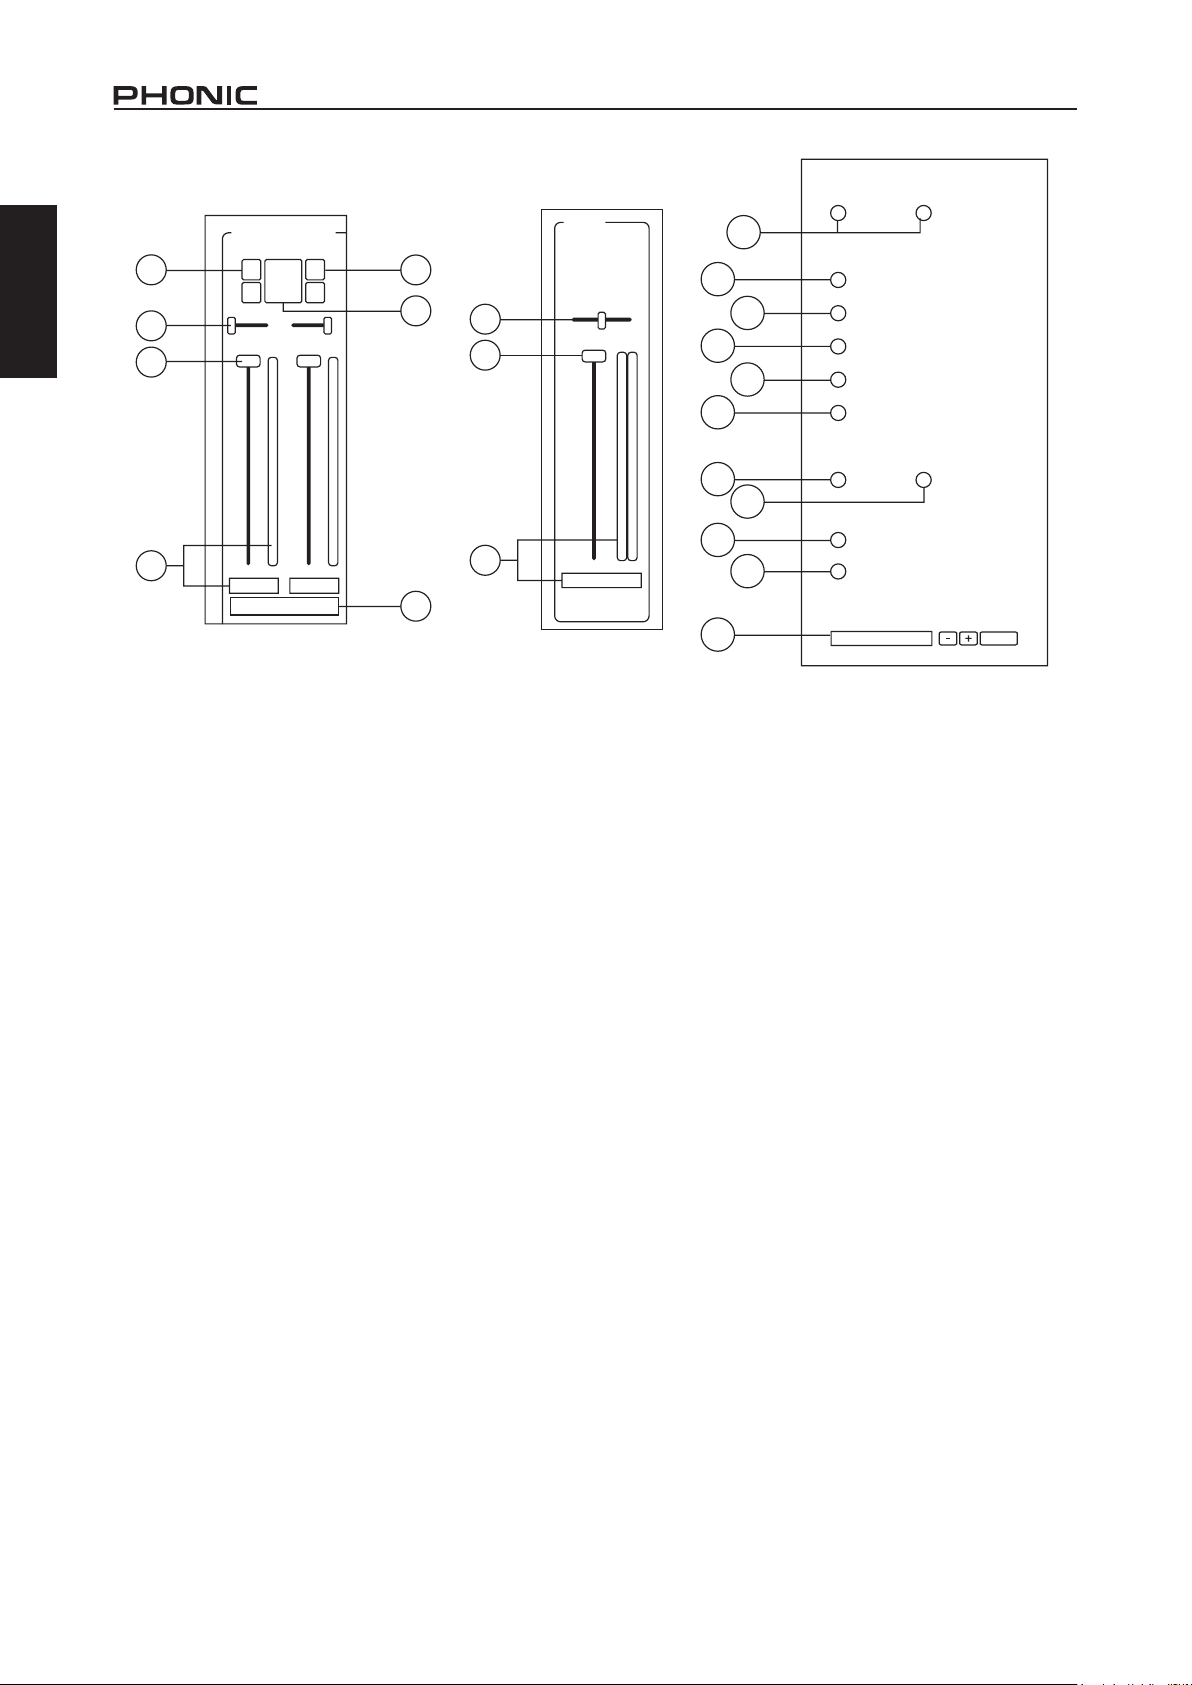
Front Panel Description
1. Power Button
Push this button in to turn the Firey 808 Universal on. When
the unit is on, the button will light up.
2. FireWire LED
This LED will light up when a connection to the computer is
established through the FireWire interface.
7. Headphone Output Jack and Gain Control
All the audio signals that are mixed inside the Firefly 808
Universal can be monitored with headphones through this jack.
You can also use the corresponding control to adjust the signal
level.
8. Main Level Control
This control adjusts the nal level of the audio sent through the
main left and right outputs, the signal of which is taken either
1
2
from the FireWire return signal or the various analog and digital
inputs (depending on your software settings).
3. Channel 1 and 2 Inputs
These two combo jacks allow users to connect either balanced
XLR 3-pin connectors, for dynamic or condenser microphones,
or ¼” TRS phone jacks for instruments such as electric or bass
guitars.
NOTE: When plugging line-level signals into the combo jacks, disengage
the PAD button to lower the signal level to an acceptable degree.
4. Input Gain Controls 1 - 8
Turn these knobs clockwise to increase the microphone/line
input gain for the corresponding channels. You have 50dB of
gain to work with, but be sure not to adjust it to a level that will
make the input meter hit the “clip” point. A good region to be
in is about -6dB – this will give you a greater signal level with
enough headroom to avoid clipping.
5. PAD selector
This button controls the input sensitivity for channels 1 and 2.
Pushing this button in will attenuate the input signal by 20dB,
allowing you to connect a microphone or instrument to the
combo input jack.
6. +48V Phantom Power
Pushing one of these buttons will activate the +48V phantom
power for the corresponding channel, allowing you to use
condenser or ribbon microphones (or other devices that require
+48V) to work properly. Activation of phantom power will be
accompanied by an illuminated LED. If you are not sure if your
mic uses phantom power, please refer to the microphone user’s
manual.
7
9. LED Level Meter
This stereo 6-segment LED meter displays the signal level of
sum of all 8 analog input channels. User’s are advised to keep
this meter sitting around the -6dB mark to make the best use of
audio possible without causing any unnecessary clipping.
10. Channel LED Level Meters
The input/output signal levels from analog inputs/outputs 1
to 8 are shown in these 4-segment LED meters. Whether
these meters display the input or output level is dependant on
the input/output select button. Users are advised to try and
keep their signal level around the -20, -10 marks, as to avoid
distortion and clipping.
11. Input/Output Select Switch and Indicator
This button determines whether the LED level meter will display
the input or output signal of the Firefly 808’s input/output
channels. This button is an easy way to compare input and
output levels. Depending which setting is currently active, an
LED will light up next to the corresponding setting (“analog
input” or “analog output”).
8
9
6
10
5
3
4
11
Page 7
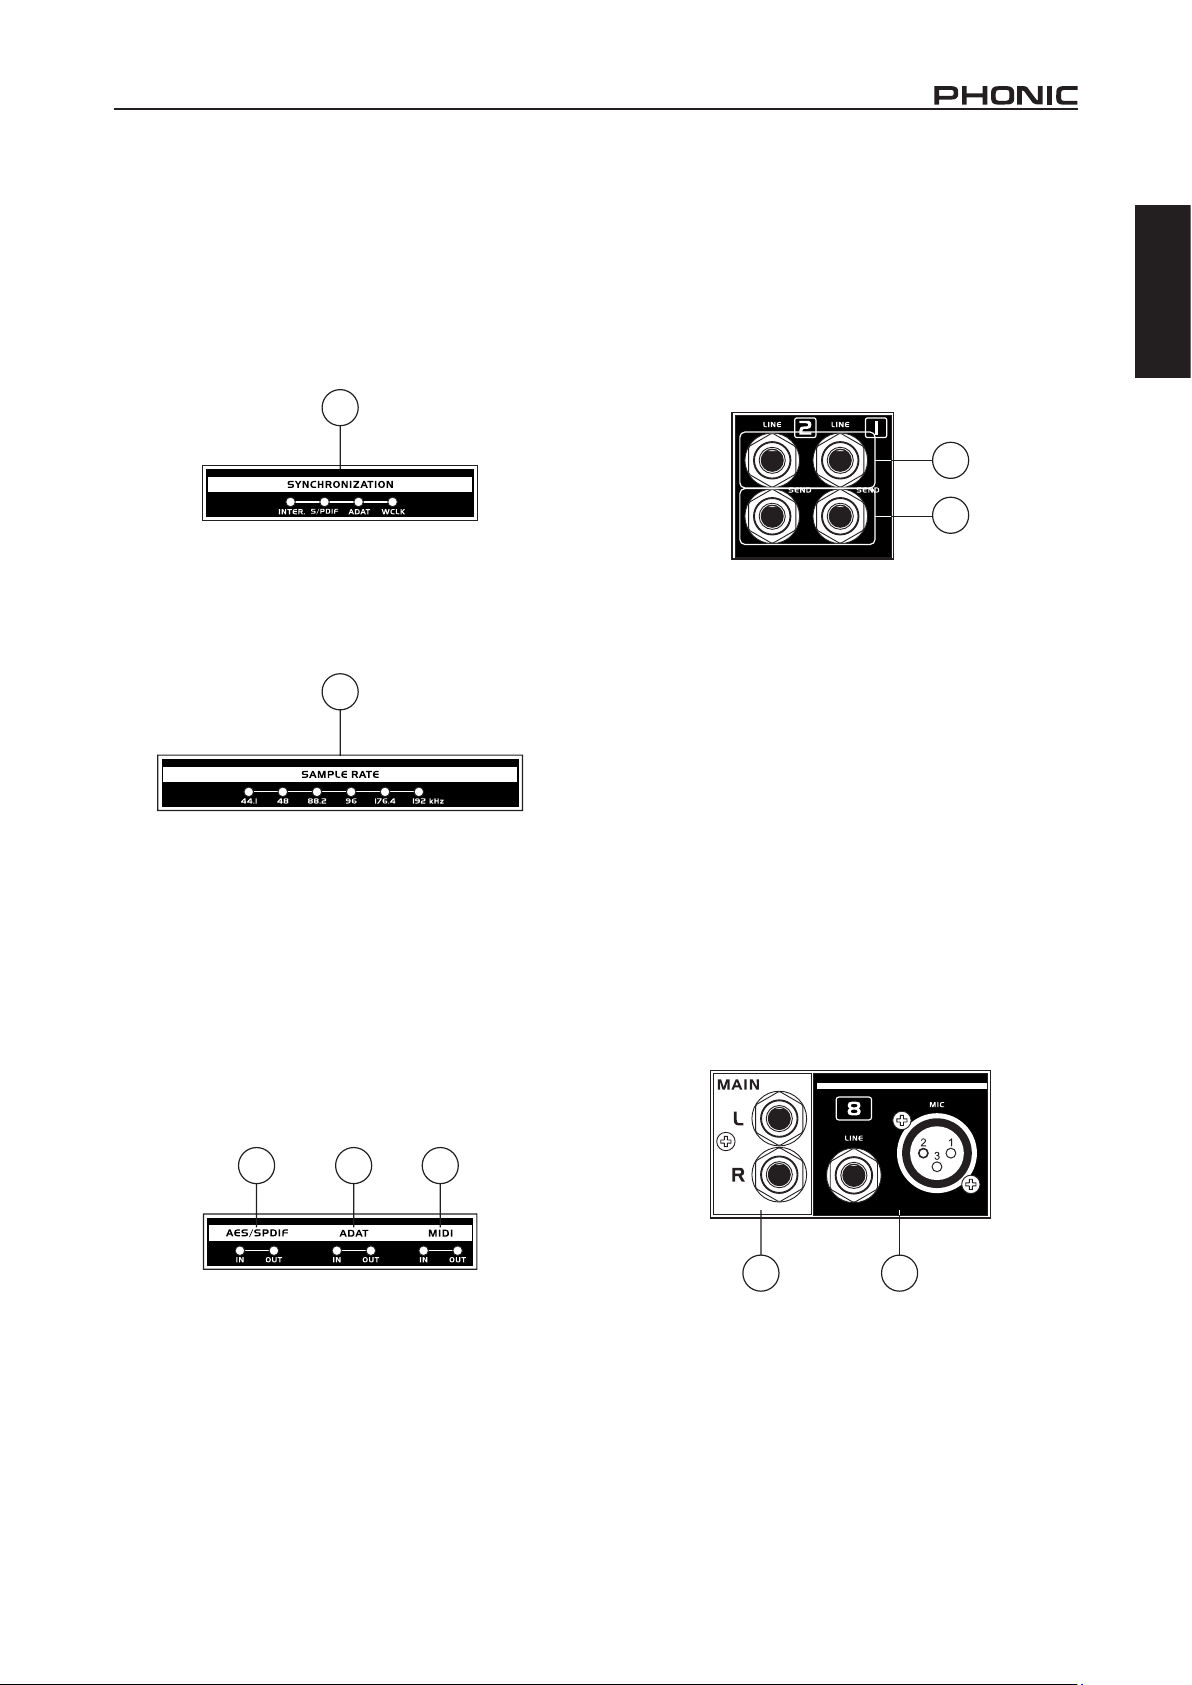
12. Synchronization Indicators
Firey 808 Universal can be synchronized with any WCLK sync
device, enabling you to use it for your audio/video recording
studios as well as cinema and video production that requires
high resolution audio. When the Firey 808 is synchronized,
one of these LEDs will light up to indicate which device the
Firey is currently synced with. If you try to sync with a device
not connected to the Firey, the corresponding light will ash
briey and return back to the previous setting.
12
Rear Panel Description
17. Line Input Channel 1 and 2
These input jacks allow users to connect line-level devices, the
signal of which is fed through the FireWire interface, and sent
directly out the channel 1 and 2 sends.
18. Channel 1 and 2 Sends
These outputs act as direct sends of the channel 1 and 2 inputs,
allowing the signal to be used in other devices.
17
English
13. Sampling Rate Indicator
When Firefly 808 is synchronized, one of these LEDs will
light up to show the sampling rate of the device the Firey is
synchronized with. The Firey will automatically be set to that
rate.
13
14. AES/SPDIF LED Indicator
These input and output LEDs will light up when the AES/EBU or
S/PDIF interface is in use.
15. ADAT LED Indicator
You can use your optical devices in conjunction with the Firey
808. When the ADAT optical connection is in use, the input
and output LEDs will activate to let you know the connection is
successful.
16. MIDI Indicator
When using the MIDI interface, these input and output LEDs will
light up.
18
19. Input Channels 3 to 8
Each of these channels features a balanced ¼” TRS Line
Inputs and can be used to connect any line level device like CD
players, DAT recorders. You can even connect an analog mixer
that does not have FireWire interface to allow you to send that
signal to the computer. Also present are 3-pin XLR mic input
connectors for use with condenser or dynamic microphones.
20. Main Outputs
These ¼” TRS outputs will allow users to send the main stereo
mix of the Firey 808’s return signal to external devices. The
signals from analog channels 1, 3, 5 and 7 are sent through the
left output, whereas the 2, 4, 6 and 8 signals are sent through
the right output. When the FireWire or USB interface is in use,
users are able to use the Mixer software's crossfader to select
the degree of the FireWire return signal and the analog input
signal that is sent to these outputs. The Main outputs can be
connected to active speakers, studio monitors, or other mixers,
depending on your needs.
14 15 16
20
19
3FIREFLY 808 UNIVERSAL
Page 8
4 FIREFLY 808 UNIVERSAL
English
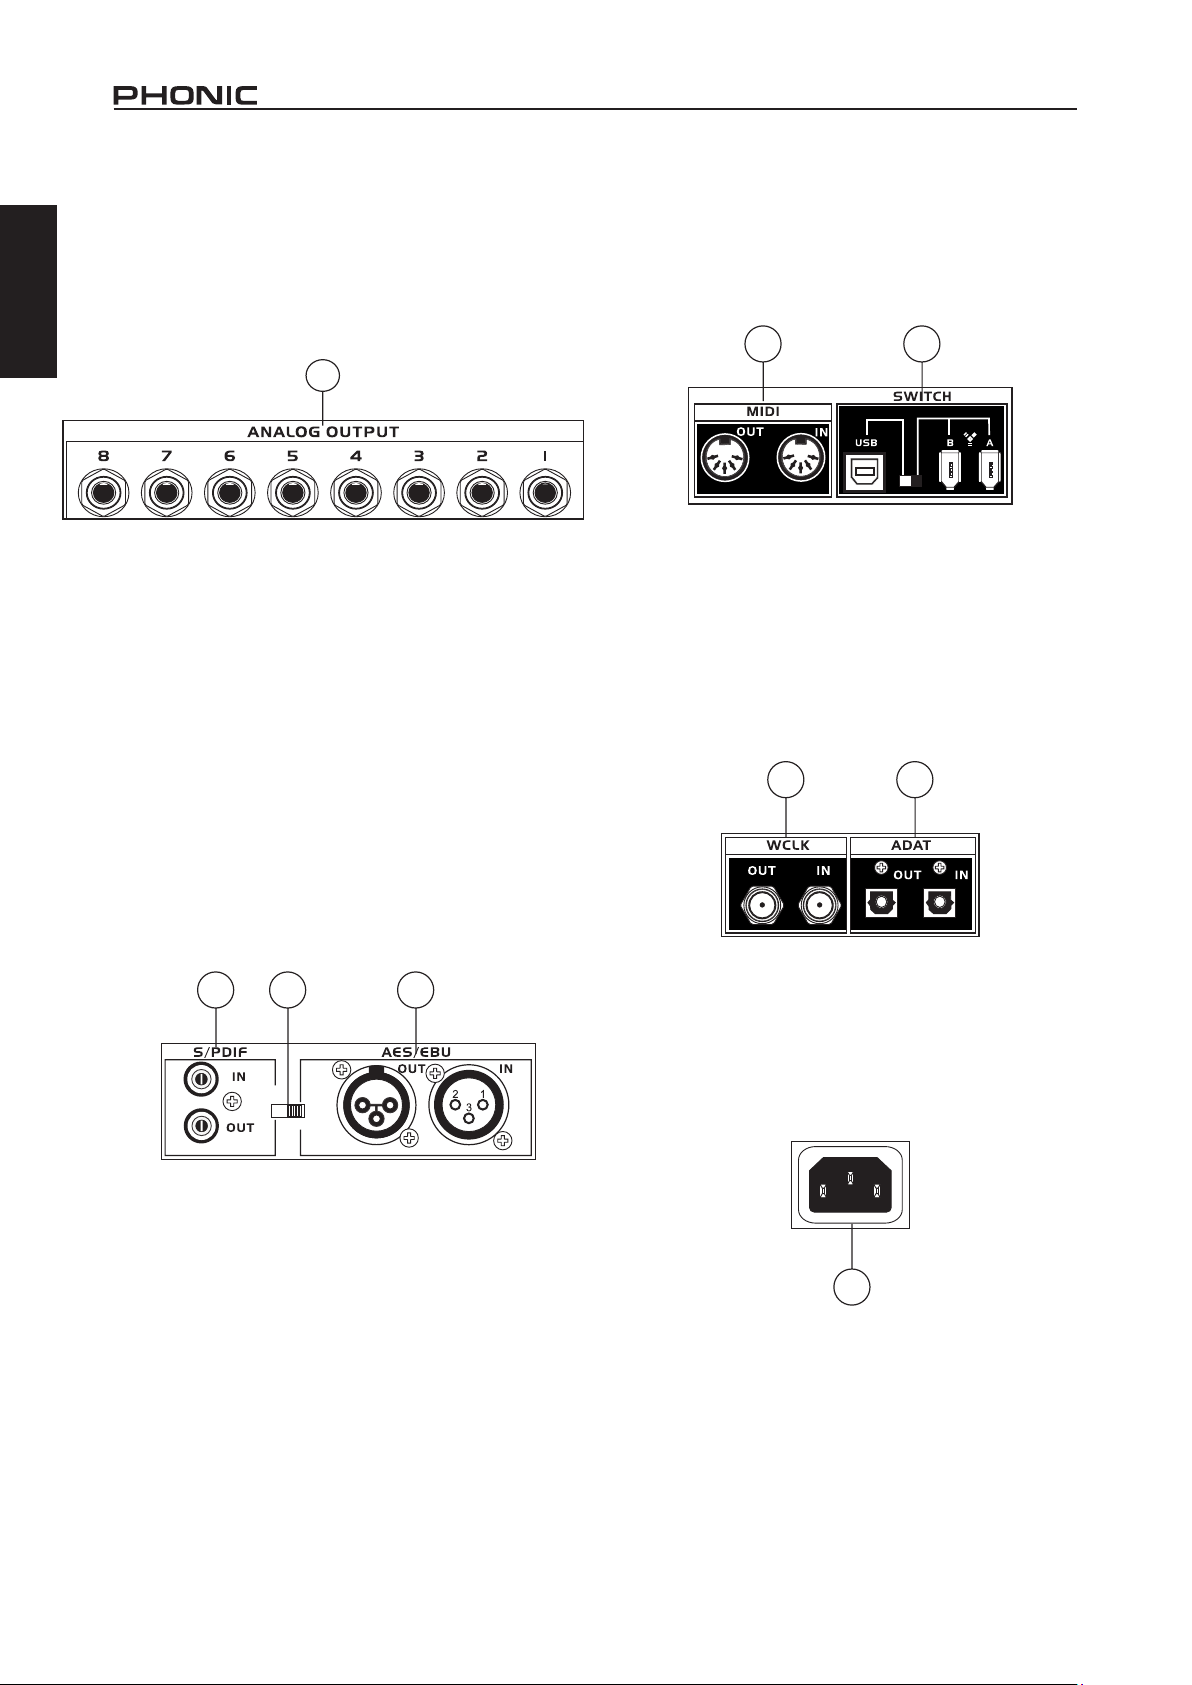
21. Analog Outputs
These are balanced ¼" TRS line outputs with line (+4dBu) level
signals. Users are able to use these outputs to get a stereo
output channel from each pair of odd and even numbered
outputs, or even a surround mix (5.2 or 6.2). Analog outputs 1
and 2 can be used to send a stereo mix of your analog inputs
or FireWire/USB return signal, which is ideal for use with studio
monitors or subwoofers (if making a surround mix).
26. MIDI In/Out
These inputs will allow you to send 16 MIDI channels through
the FireWire or USB interface to your computer, as well as
receive 16 back. These channels will be present within the
Firefly Control Software, and available for use in most MIDIenabled programs.
26 25
21
22. AES/EBU In/Out
This is a standard XLR AES/EBU digital interface that lets you
connect your digital AES-enabled devices to your Firey. The
IN or OUT LED on the front of the Firey will light up when the
inputs and outputs are in use.
23. S/PDIF / AES IN Switch
This switch determines which of these digital inputs will be used.
24. S/PDIF In/Out
This is a standard RCA S/PDIF Digital Audio Input/Output that
can be used with digital mixers, DAT recorders, or any external
device that uses the RCA digital interface format. Please use a
75 ohm coaxial cable with RCA plug when using S/PDIF. The
most common problems or glitches incorporated with S/PDIF
transfer are due to use of improper analog cables. Users may
also use these inputs for "High-Speed" S/PDIF devices when
that option is selected in the computer's Firey mixer software.
24 2223
S/PD IF
IN
AES IN
27. ADAT In/Out
This is a standard TOSlink ADAT optical interface that you
can use in the same way as you would use your typical ADAT
devices. This input can also be used for SMUX inputs when
this option is selected in the computer's Firey mixer software.
28. WCLK IN/OUT
These are BNC input/output connectors for standard Word
Clock Syncs, as are used in DVTRs and other digital devices.
28 27
29. AC Power Input and Fuse Holder
Connect the supplied AC power cord to this connector. The
other end should be connected to a suitable power supply. The
power supply’s fuse is located just below this connector. If your
fuse blows, remove the fuse holder’s cover and replace the fuse
with another suitable fuse (as indicated on the fuse-holder’s
cover).
25. FireWire / USB Ports and Select Switch
These connections are digital USB and FireWire (aka IEEE
1394) ports that you can use to connect the Firefly 808
Universal to your computer. Doing so will enable you to use
your computer for high quality multi-track recording, as well
as editing, mixing, and so forth, in your favorite Digital Audio
Workstation Software.
The switch that accompanies these ports is used to determine
which of the ports you will be using.
You have two FireWire ports at your disposal; however you
need only connect one to your computer. The second port will
allow you to connect a second Firey 808 Universal, allowing
twice the number of inputs!
29
Page 9
FireWire / USB Interface
System Requirements
The following are the minimum required specications for use with the Firey 808 Universal. If your computer does not meet these
requirements, you will experience lagging of audio and possible freezing of your computer when attempting to operate the device.
Windows
• Microsoft® Windows® XP SP1 and SP2 / Vista®
• Available USB 2.0 or FireWire port (suggested FireWire Interface: ADS Pyro 64 FireWire card with TI chip)
• Intel Pentium® 4 processor or equivalent AMD Athlon processor
• Motherboard with Intel or VIA chipset
• 5400 RPM or faster hard disk drive (7200 RPM or faster with 8 MB cache recommended)
• 512 MB or more of RAM (1 GB or more recommended)
Macintosh
• OS X 10.3.5 or later with native FireWire support
• G4 or newer processor
• 512 MB or more of RAM
Driver Installation
To use the Firey 808 on a PC, it is important to install all the necessary drivers from the included CD (ASIO and WDM drivers). It is
important that users read all instructions carefully before continuing on to the each step of installation, as users will be required to unplug
and plug in their FireWire device. These drivers are not necessary for Mac users, however Mac users may wish to install our Mixer
software from the included CD. It’s important to remember that the driver you install will depend on whether you are using FireWire or
USB, so make sure you install the right one!
Windows XP (with Service Pack 1 or 2) / Vista
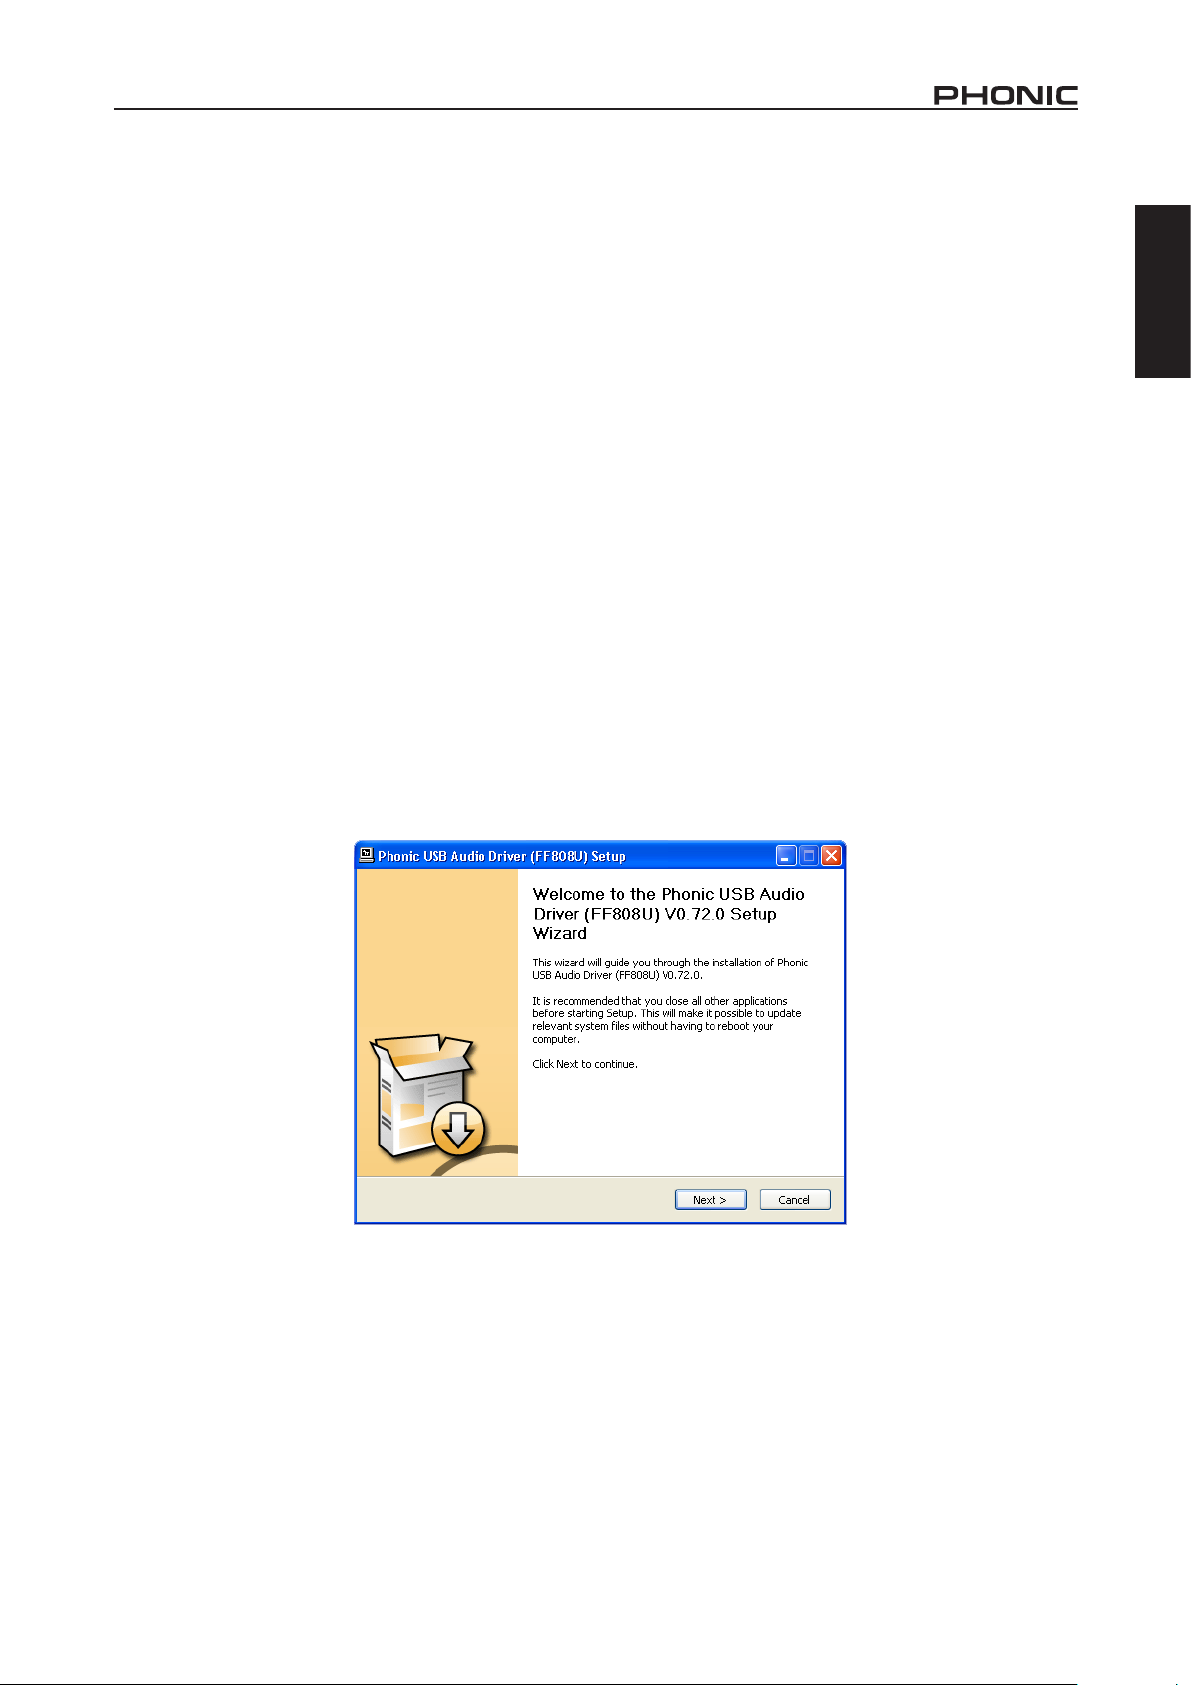
1. It is recommended that you quit all applications before starting the installation process.
2. Ensure the Firey is not yet connected to your Computer’s FireWire or USB input.
3. Insert the installation CD included with your Firey into the CD-ROM drive of your computer. If the CD does not automatically start the
installation process within a few moments, then navigate to “My Computer” g your CD-ROM drive g “FireWire Drivers and Control
Panel” or "USB Drivers and Control Panel" g run “setup.exe” to begin the installation manually. The Phonic Control Panel software
and the Firey 808 Universal Mixer software will also be installed at this time.
4. Follow the installation instructions. The following applies to the USB driver installation, however the FireWire installation is almost
identical.
English
Make sure no other programs are running on your PC and that the
Firey 808 Universal is not connected to your PC, then click “Next”.
5FIREFLY 808 UNIVERSAL
Page 10
6 FIREFLY 808 UNIVERSAL
English
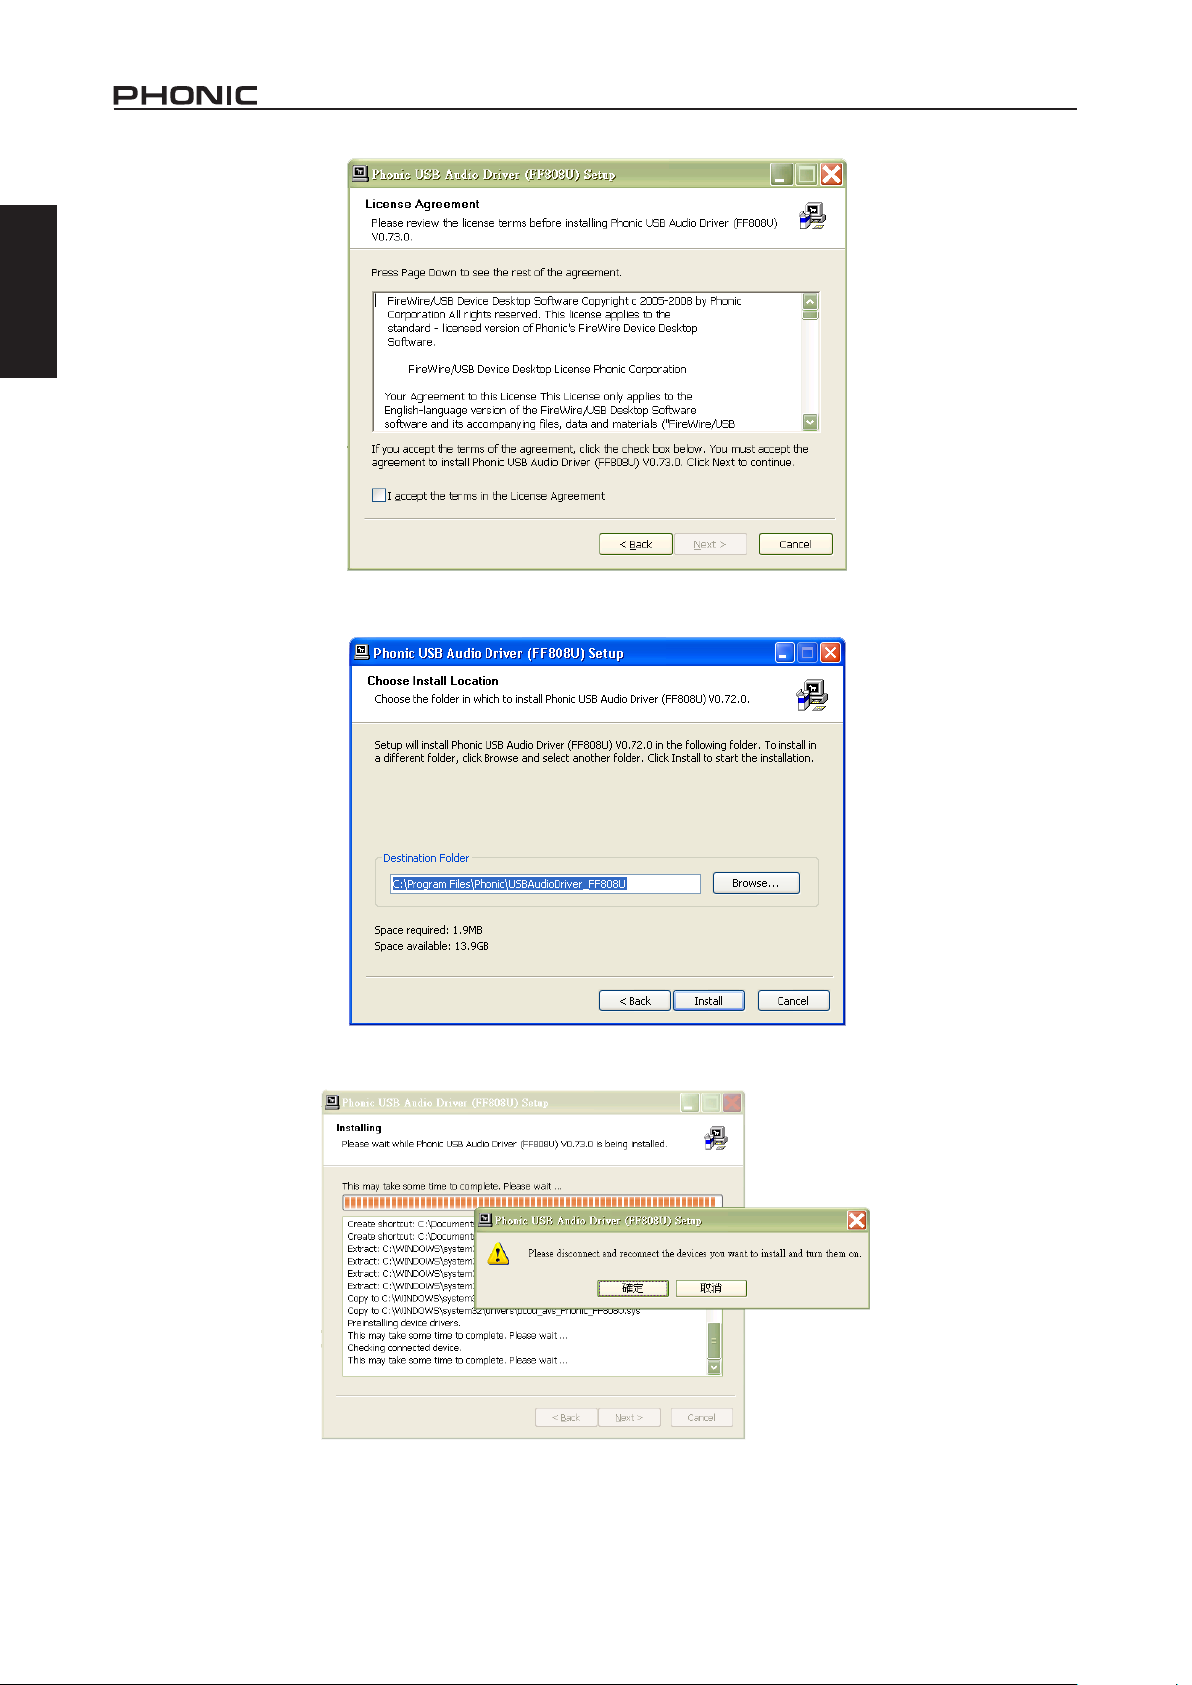
Read and accept the terms of the License Agreement, and click “Next” to continue.
Select a new destination for the installation, or else click “Install” to accept the default directory.
Connect the Firey to the Computer and turn the power on or, if
the Firey is already connected, turn it off and then on again.
Page 11
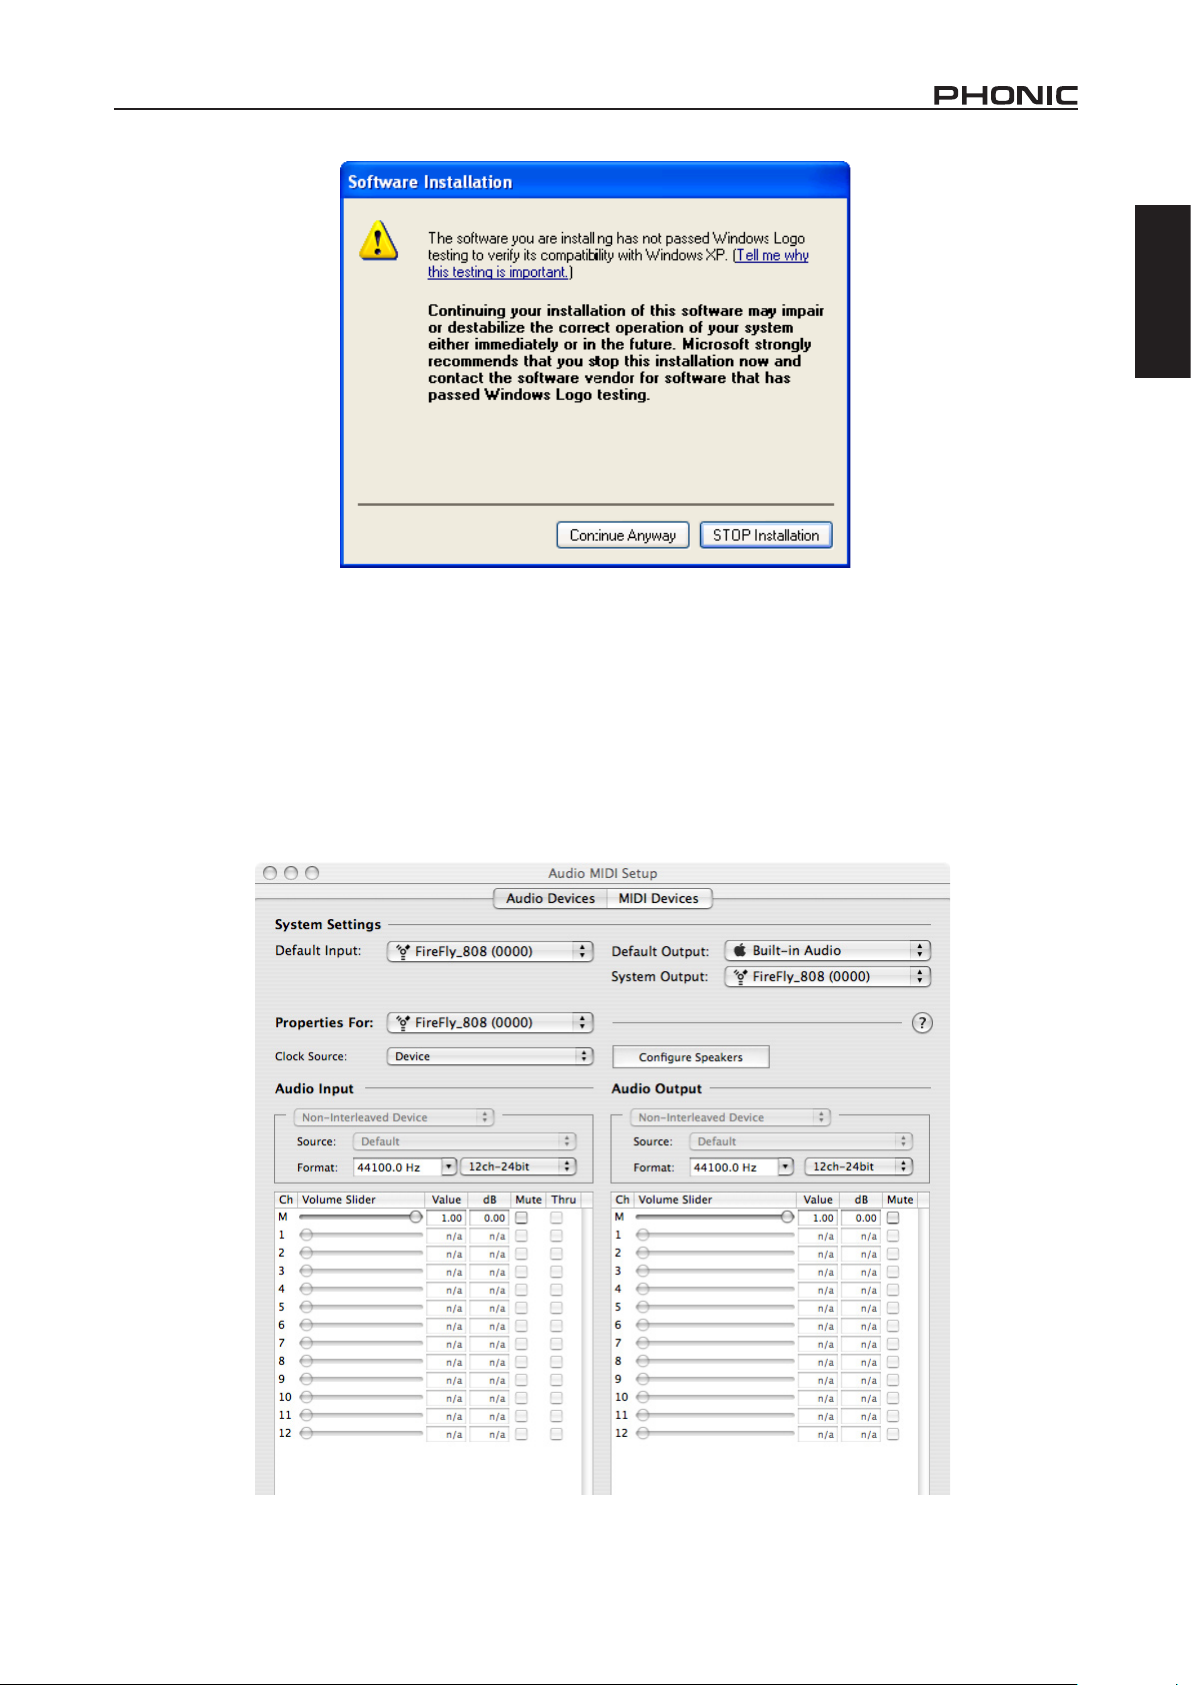
If a message is displayed indicating that the software has not passed Windows Logo test,
click “Continue Anyway.” On Vista, you may receive a similar message regarding Signed Drivers.
After installation is complete, the Phonic Control Panel software will be visible
in the taskbar and you are free to use the device as they wish.
Macintosh OS X (10.3.5 or later)
The Firey 808 Universal works with the primary audio drivers of Macintosh OS X 10.3.5 and later. First verify that you are running
Macintosh OS X 10.3.5 or above, then connect the Firey to a FireWire port to the computer. To ensure your Firey is working, enter the
Utilities folder and double-click the Audio MIDI Setup icon.
Enter the Audio Device’s section. From the “Properties for” pull-down tab, select Firey 808. At the bottom of the window, users can
edit the setup of the Firey 808. Properties such as sampling rate and clock source can be altered and users may also opt to make the
Firey their default input and/or output device.
Mac users are able to use GarageBand, Logic Pro, as well as a host of other programs, in conjunction with the Firey 808 Universal.
English
7FIREFLY 808 UNIVERSAL
Page 12

8 FIREFLY 808 UNIVERSAL
English
Channel Assignment
When using a Digital Audio Workstation on a PC, and within
the included Phonic FireWire control panel software, the
following names have been attributed to the input channels of
the FireWire device. They can be altered through the Phonic
Control Panel software.
FireWire Input Channel Name Device Channel
Line[1] I L Analog Input 1
Line[1] I R Analog Input 2
Line[2] I L Analog Input 3
Line[2] I R Analog Input 4
Line[3] I L Analog Input 5
Line[3] I R Analog Input 6
Line[4] I L Analog Input 7
Line[4] I R Analog Input 8
SPDIF[1] I L S/PDIF or AES In
SPDIF[1] I R S/PDIF or AES In
TOS[1] I L ADAT or SMUX In
TOS[2] I R ADAT or SMUX In
MIDI I 1 MIDI In
FireWire Output Channel Name Device Channel
Line[1] O L Analog Output 1
Line[1] O R Analog Output 2
Line[2] O L Analog Output 3
Line[2] O R Analog Output 4
Line[3] O L Analog Output 5
Line[3] O R Analog Output 6
Line[4] O L Analog Output 7
Line[4] O R Analog Output 8
SPDIF[1] O L S/PDIF or AES Out
SPDIF[1] O R S/PDIF or AES Out
TOS[1] O L ADAT or SMUX Out
TOS[2] O R ADAT or SMUX Out
MIDI O 1 MIDI Out
To alter an input channel’s name on your computer, open the
Phonic Control Panel software. On the left hand side of the
control panel, users will nd the settings categories. By clicking
“Input Channels”, the main window will display the titles input
channels. You can then highlight the channel names and press
the “Edit Channel Name” button on the bottom of the control
window. A new window will appear that will allow users to enter a
new name for the channel.
If you would like to use the Firey as your default audio output
device on your PC, simply go into the Windows control panel and
select “Sound and Audio Devices.” Click on the Audio tab and
use the pull-down menu to select the Firey 808 Universal from
the list of available devices. The Firey can also be selected as
the default output device for individual programs by editing said
programs’ settings / options.
Cubase LE 4
Cubase LE is a fairly powerful program provided along with the
Firefly interface that allows users to record, mix, edit, delete,
and alter their tracks. Please note that only 8 tracks can be
recorded at once with the version of Cubase included, and
users must upgrade to Cubase SX, or nd other suitable DAW
software, if they choose to record more tracks.
Installation
Insert the Cubase LE 4 installation CD that came with your
Firefly into the CD-ROM drive of your computer. Run the
installer. You must install Steinberg’s registration software to be
able to use the software successfully.
Setup
After successfully completing the installation process, the
following process must be followed to work efciently with the
Friey.
1. Open the Cubase LE 4 program and start a new Project.
Add a track or two to this project.
2. Go to the ‘Devices’ pull-down menu and select ‘Device
Setup’. On the left, select ‘VST Multitrack’.
3. From the ASIO Driver drop-down list select the “Phonic
ASIO Driver.” A pop-up box will ask you if you want to switch
the ASIO driver. Click ‘Switch.’ This completes the basic
installation and setup.
4. Activating audio tracks received from the Firey.
a. Go to the “devices” pull-down menu and select ‘VST
Inputs’. This will display the various inputs (“Phonic
FF808U Ch 1”, “Phonic FF808U Ch 2”, etc.)
b. Activate 8 of these channels by clicking the “Active”
button located next to each channel name. Please note,
only 8 input channels can be activated at any one time
in this version of Cubase. This is a limitation of Cubase
LE 4. If more input channels are needed, we suggest
upgrading to a higher version of Cubase, or use other
DAW software.
5. For further instructions on the operation of Cubase, please
consult the user manual by pressing F1 while the program is
open.
If you wish to reset the Phonic ASIO driver, simply go to the ‘
devices’ pull-down menu and select ‘device setup’. Simply
click “reset” and select the “Phonic ASIO Driver”. Click ‘ok
’ to continue and the Firefly 808 should once again become
functional.
FireWire Device Control Panel
The FireWire control panel can be accessed at any time by
entering choosing the shortcut from your Programs menu.
This program will not only allow users to alter their device and
channel names and properties, but will also let them correct
for latency issues, change sampling rates, and so forth. When
opening the software, a number of options will be available
for users to select from, allowing them to adjust the available
properties.
Devices
In the Devices section, users are able to view and edit the name
of the Phonic FireWire or USB Devices currently connected to
their computer.
Page 13

Input Channels
The Input Channels section allows users to view and edit the
name of the various input channels received from the FireWire
or USB interface. For a list of default channel names, please
consult the table on page 11.
Output Channels
By entering the Output Channels section, users can view
and edit the names of the various output channels from the
computer to the Firey 808 Universal.
English
Settings
Users are able to adjust various buffer times in the Settings
section.
The Stream Buffer Depth is adjustable between 0.5 and 20
milliseconds. It adjusts the buffer used when streaming a signal
from the Firey. If the depth is set too high, an obvious latency
will become evident. If the depth is too low, various clicks and
pops may become obvious. It is best to set the Stream Buffer
Depth to a level that allows users to get the lowest latency,
while still maintaining an optimal performance. The default
settings are ideal for most computers.
The ASIO Buffer Depth is adjustable between 4 and 40
milliseconds. This allows users to adjust the latency of the
stream received by ASIO driver-based software (including
Steinberg Cubase LE 4).
The WDM (Windows Driver Model) Sound Buffer Depth is
adjustable between 4 and 40 milliseconds. This allows users
to adjust the latency of the stream received by WDM based
programs.
Also in this section, users are able to view their “drop out
statistics”, where the number of times the FireWire connection
has been interrupted can be viewed.
Synchronization
In the Synchronization section, users can adjust the sampling
rate and other synchronization properties. Many of these
adjustable properties, as they are, are set for optimum
performance and, unless you are sure of what you need to
change, are probably best left alone.
First off, the sync mode can be altered, though making this
alteration is not recommended for novice users. The sync mode
is basically the way the computer determines what the ‘clock
source’ (ie. device that your computer will use to determine the
timing of all digital signals received) will be. The default setting
for this feature is “CSP,” meaning the Firefly is the “master”
clock source of the device. The other options allow users to
make the FireWire follow the “timing” of whichever device is
the clock source. Having two clock sources has the potential
to create very undesireable results, so it is best avoided. If the
Firey is the only piece of digital audio equipment attached to
the computer, there is no reason this option should be changed.
Users are also able to change between automatic and manual
sampling rate settings. When the sampling rate is manually set,
users can select between sampling rates of 44.1, 48.0, 88.2,
96.0 and 128 kHz per second for analog inputs and 176.4 and
192.0 kHz per second for some digital devices. Many devices
have sampling rates that do not surpass 44.1 kHz per second,
therefore, when using multiple digital devices, users are advised
not to exceed this level unless they are sure the secondary
device’s sampling rate can.
Streams
In the Streams section, the Firefly device properties can be
viewed. Each input and output stream can be scrutinized, and
the isochronous stream number and its supported sampling
rates can be viewed.
9FIREFLY 808 UNIVERSAL
Page 14
10 FIREFLY 808 UNIVERSAL
English
Firey 808 Universal Mixer Software
1
4
5
6
Input Monitor Mixer
Line1
Line2
M M
Link
S S
0.0 dB0.0 dB
Disconnected
- Host Connection -
Output
s
Master 1/2
2
3
8
9
11
12
13
14
15
16
17
18
19
10
0.0 dB
20
7
21
USB 2.0 1394a
- Sync Source -
Device
Coax SPDIF
Opt. SPDIF
Word Clock
PC
- Digital I/O Selection -
SPDIF HS-SPDIF
- ADAT ADA
T ( 44.1 / 48 kHz)
SMUX ( 88.2 / 96 kHz)
- Sample Rate -
96.0 kHz
SET
When there is no digital audio workstation software is in use,
the Firefly 808 Universal can be controlled using this basic
mixer which is included along with the driver and control panel
software. The signal from this mixing panel is able to be fed
back to the Firey 808 Universal as a stereo signal, routed to
analog outputs 1 and 2 and the headphones output.
Channel Inputs
1. Mute Button
Pushing this button will mute the corresponding channel,
stopping it from being sent back to the Firey.
2. Solo Button
Use this button to solo the corresponding channel back to
the Firefly allowing users to monitor the signal. The soloed
channels will be sent to analog outputs 1 and 2 and the
headphones output on the Firey 808.
3. Link Button
Pushing this button will enable a link function, allowing users to
control two channels as if they were one with the fader, mute
and solo buttons being ‘linked’ to two inputs.
4. Pan
Each of the Firefly’s inputs are set to either left or right by
default, with odd channels being set to the left, and even
channels being set to the right.
5. Fader
Click and hold the mouse button on the fader to adjust the
volume of the signal coming into the computer through the
FireWire/USB connection for each channel. When in link mode,
a single fader will control 2 channels simultaneously.
6. Level Meter
These two parts of the PC-based mixer give users an idea of the
input levels received through the FireWire/USB interface. The
graphic bar will give visual representation of the level and users
are able to read the exact input level in decibels underneath the
fader.
7. Channel Status (digital channels only)
This display window will show whether a digital device is
connected to or disconnected from the Firey unit. The status
will be updated automatically when a digital device is connected
to the correct inputs.
Output Channel
8. Balance
The balance control for the master output is set to the center by
default. Moving it to the left will attenuate the right signal and
intensify the left signal accordingly; moving it to the right will do
the opposite.
9. Fader
Click and hold the mouse button on the fader to adjust the volume
of the stereo output signal being sent through the FireWire/USB
connection to the Firey. The signal controlled by these controls
is sent through the Firey’s analog outputs 1 and 2.
10. Level Meter
This gives users an idea of the output levels of both channels
sent through the FireWire/USB interface. The graphic bar will
give visual representation of the level and users are able to read
the exact input level in decibels underneath the fader.
Host Connection
11. USB / 1394a Selection
This indicator will light up in red to show whether the USB 2.0
or FireWire interface is being used to access the Firefly 808
Universal.
Sync Source
12. Device
Pushing this will allow you to use the Firey 808 Universal as
the sync source for all your digital gear.
13. Coaxial S/PDIF
Selecting this option will activate any coaxial S/PDIF device as
the sync source for your digital gear. If no device is connected
to the S/PDIF input on the Firey 808, the corresponding sync
source LED on the face of the device will flash briefly then
return back to the previously selected sync source.
14. Optical S/PDIF
Selecting this option will activate any optical S/PDIF device as
the sync source for your digital gear. If no optical S/PDIF device
is connected to the TOSlink ADAT input on the rear of the Firey
808 Universal, the corresponding sync source LED on the face
of the device will ash briey then return back to the previously
selected sync source.
Page 15

- Host Connection USB 2.0 1394a
11
12
13
14
15
16
17
18
19
20
21
15. Word Clock
This option will allow you to use a word clock as your sync source.
If no word clock device is connected to the BNC word clock input
on the rear of the Firey, then the corresponding sync source LED
on the face of the mixer will ash briey and then return back to
the previously selected sync source. Please see the diagram
below for information on hooking up a world clock as your sync
source.
- Sync Source -
Device
Coax SPDIF
Opt. SPDIF
Word Clock
PC
- Digital I/O Selection -
SPDIF HS-SPDIF
- ADAT ADA
T ( 44.1 / 48 kHz)
SMUX ( 88.2 / 96 kHz)
- Sample Rate -
96.0 kHz
Word Clo ck to Other Slav es
SET
19. ADAT
Select this option to use the TOSlink ADAT inputs on the rear of
the Firey 808 Universal.
20. SMUX
By selecting SMUX as your digital input/output device, you are
able to connect a SMUX enabled product to the “ADAT” TOSlink
inputs of the Firefly. The SMUX output signal is typically 8
channel, however if you set the sampling rate to 96 kHz, this is
reduced to 4 channels.
Other Features
21. Sampling Rate Selection
Here you can select the sampling rate of the signal sent to the
computer. For most applications, you will be able to select
between 44.1, 48, 88.2 and 96 kHz. If you choose ADAT as
your digital input selection, you are then able to select 44.1 kHz
or 48 kHz. When using high speed S/PDIF devices, you are
able to select between 176.4 and 192 kHz sampling rates. If
the 192 kHz sampling rate is set, the Firey’s level meter will be
disabled.
22. Crossfader
The mixing software’s crossfader allows users to adjust the
signal returned to the computer’s analog 1 and 2 outputs.
When centered, the signal will be a 50-50 mix of the pure signal
received by the Firey 808 Universal and the signal returned to
the 808 from the computer. When pulled to the left, the monitor
signal from the 808 gradually becomes more dominant; when
pulled all the way to the left, this signal is the only signal audible.
If this control is pulled to the right, however, the stereo signal
from the mixing panel software will become more dominant.
22
Cross Fader
Input Monitor Mixer Main 1/2 - from PC
English
World Cl ock
IN
BNC T-A dapter
World Cl ock from Maste r
16. PC
This is the default option, and allows you to use the PC as the
sync source. When set to PC, the corresponding sync source
LED on the front of the Firey 808 Universal will light up.
Note: If ADAT and S/PDIF devices are not set to the same sync source,
the user will be prompted to correct the problem.
Digital I/O Select
17. S/PDIF
Selecting this option will allow you to use a S/PDIF or AES
enabled digital device with the Firey.
18. High Speed S/PDIF
If you connect a high speed S/PDIF product to the S/PDIF
connector on the rear of the Firey 808 Universal, clicking this
option will allow you to use the output signal from this device.
Stand-Alone Mode
The Firey 808 Universal can work independently, without any
FireWire connection being established. The following is just a
couple of points of interest that you may need to know to use
the Firey in stand-alone mode.
Firstly, whatever settings you have made in regards to digital
inputs, outputs, and sampling rates while using the Firey 808’s
mixer software will be kept even after you restart the device and/
or disconnect the FireWire /USB cable. This means whatever
inputs and outputs you have set will be activated/deactived as
per your previous settings. The default sampling rate is 44.1
kHz, and the default digital input/output is S/PDIF.
Also, the analog inputs are routed to their corresponding analog
outputs, as well as a mix of these inputs being sent through any
digital outputs that have been set (ADAT, S/PDIF, etcetera).
11FIREFLY 808 UNIVERSAL
Page 16

12 FIREFLY 808 UNIVERSAL
English
SPECIFICATIONS
Frequency Response
Mic Input to Line Output (Gain @ unity) +0.04, –0.26 dB, 20 Hz to 20 kHz
Mic Input to Digital Output (AES, 96 kHz
sample rate)
Distortion (THD & IMD)
Mic Input to Line Output (@ +4 dBu output) THD+N: < 0.007%, 20 Hz to 20 kHz BW, 1 kHz input @ +4 dBu, preamp at unity gain
Mic Input to Digital Output (AES, 48 kHz
sample rate)
Dynamic Range
Noise
Signal-to-Noise (A-weighted): >100 dB (ref. +4 dBu, Mic In to Line Out, Gain @ unity)
Equivalent Input Noise (E.I.N.), 20 Hz to 20
kHz Bandwidth, 150Ω source impedance
Residual Output Noise
Common Mode Rejection Ratio (CMRR) Mic In: >60 dB @ 1 kHz, Gain @ maximum
Crosstalk (Mic Input to Line Output) < –100 dB @ 1 kHz, +10 dBu signal on adjacent input, 150Ω source impedance
Input Gain Control Range
Phantom Power +48 VDC, individual switches
Rated Output Line: +4 dBu
Maximum Input Levels
Input Impedance
Ch 1 and 2 Mic Input 1.1 kΩ
Ch 3 through 8 Mic Input 1.1 kΩ
Inst Input 500 kΩ
Line Input 22 kΩ balanced, 11 kΩ unbalanced
Line out 100 Ω balanced
Signal Level LEDs -40, -20, -10 dBu, 0 dBu (normal operating level), OL = 14 dBu
Sample Frequency Selections 44.1 kHz, 48 kHz, 88.2 kHz, 96 kHz, 176.4 kHz, 192 kHz, External
Input & Output connectors
Analog Input Connectors
Analog Output Connectors Thirteen 1/4” TRS outputs and one for headphones
Digital Input Connectors RCA for S/PDIF, XLR for AES, BNC for external word clock and Toslink Optical inputs
Digital Output Connectors RCA for S/PDIF, XLR for AES, BNC for external word clock and Toslink Optical outputs
Two Toslink Optical Connectors
AC Power Requirements
Dimensions 482 x 88 x 290 mm (19” x 3.46” x 11.42”)
Weight 4.53 kg (10 lbs)
+0, –0.2 dB, 20 Hz to 85 kHz
THD+N: < 0.004%, 10mV rms input, gain at –1 dB FS output
>110 dB (through A-to-D converters)
>120 dB (Mic In to Line Out)
–129 dBu @ +60 dB gain
Line Out: < –100 dBu (Channel Gain at unity)
Digital Out (AES, 48 kHz): < –110 dB FS
Mic In: +10 dB to +50 dB
Line In: –10 dB to + 40 dB
Mic Input: +12 dBu, Gain @ unity
Inst Input: +20 dBu, Gain @ –20 dB
Line Input: > +20 dBu, Gain @ 0 dB
Two combo jack; Six balanced XLR mic inputs
Two 1/4” TS high-impedance instrument inputs (through combo jack)
Eight 1/4” TRS balanced line inputs
Transmit channels 1-8 at 44.1/48 kHz operation
Transmits channels 1-4 at 88.2/96 kHz operation
Power Consumption: 60 watts
Universal AC Power Supply: 100 VAC 240 VAC, 50-60 Hz
Page 17

SERVICE AND REPAIR
For replacement parts, service and repairs please contact the Phonic distributor in your
country. Phonic does not release service manuals to consumers, and advice users to not
attempt any self repairs, as doing so voids all warranties. You can locate a dealer near you at
http://www.phonic.com/where/.
WARRANTY INFORMATION
Phonic stands behind every product we make with a no-hassles warranty. Warranty coverage
may be extended, depending on your region. Phonic Corporation warrants this product for a
minimum of one year from the original date of purchase against defects in material and
workmanship under use as instructed by the user’s manual. Phonic, at its option, shall repair
or replace the defective unit covered by this warranty. Please retain the dated sales receipt as
evidence of the date of purchase. You will need it for any warranty service. No returns or repairs
will be accepted without a proper RMA number (return merchandise authorization). In order to
keep this warranty in effect, the product must have been handled and used as prescribed in the
instructions accompanying this warranty. Any tampering of the product or attempts of self repair
voids all warranty. This warranty does not cover any damage due to accident, misuse, abuse,
or negligence. This warranty is valid only if the product was purchased new from an authorized
Phonic dealer/distributor. For complete warranty policy information, please visit
http://www.phonic.com/warranty/.
CUSTOMER SERVICE AND TECHNICAL SUPPORT
We encourage you to visit our online help at http://www.phonic.com/support/. There you can find
answers to frequently asked questions, tech tips, driver downloads, returns instruction and other
helpful information. We make every effort to answer your questions within one business day.
support@phonic.com
http://www.phonic.com
English
13FIREFLY 808 UNIVERSAL
Page 18

English Español
FIREFLY 808 UNIVERSAL
Manual del Usuario
CONTENIDO
INTRODUCCIÓN
CARACTERÍSTICAS
CONFIGURACIÓN INSTANTE
INICIO RÁPIDO
SETUP
DESCRIPCIÓN DEL PANEL
DESCRIPCIÓN DEL PANEL DE DORSO
INTERFASE FIREWIRE / USB
REQUISITOS DEL SISTEMA
INSTALACIÓN DEL CONTROLADOR
ASIGNACIÓN DEL CANAL
CUBASE LE 4
PANEL DE CONTROL DE DISPOSITIVO FIREWIRE
SOFTWARE DE MEZCLADORA FIREFLY 808 UNIVERSAL10
1
1
1
1
1
2
3
5
5
5
8
8
9
MODO STAND ALONE
ESPECIFICACIONES
APPENDIX
APLICACIONES
DIMENSION
DIAGRAMA DE BLOQUE
APÉNDICE
Phonic se reserva el derecho de mejorar o alterar cualquier información
provista dentro de este documento sin previo aviso.
12
13
1
4
5
6
Page 19

English Español
FIREFLY 808 UNIVERSAL
Page 20

English Español
FIREFLY 808 UNIVERSAL
INTRODUCCIÓN
Felicitaciones por su compra de uno de los miembros más
recientes de la serie Firey de Phonic, la Firey 808 Universal.
Sabemos cómo hacer el mejor equipo de audio para usted
y sabemos su necesidad de crear magníficas grabaciones y
producciones. La Firey 808 Universal presenta ocho entradas
de mic/línea (con fuente fantasma +48V), AES/EBU I/O
(entrada/salida) digital y sincronización de word, ADAT I/O, MIDI
I/O, S/PDIF I/O y, todo esto con interfase FireWire y USB para
transferir digitalmente su audio a su computadora en audio de
resolución alta (hasta 192kHz) que satisface los estandards de
producciones modernas de hoy.
Sabemos que está ansioso por empezar –queriendo sacar
la Firefly y conectar todo es probablemente su primer
prioridad en este momento- pero antes de hacerlo, le
insistimos encarecidamente que lea este manual. Adentro,
usted encontrará hechos y figuras importantes acerca de la
conguración, uso y aplicaciones de su Firey 808 Universal.
Si usted es una de esas personas que se rehusa a leer los
manuales de usuario, entonces solo le pedimos que hojee al
menos la sección Conguración Instante. Después de hojear o
leer el manual (le fecilitamos si usted lee el manual entero), por
favor guardelo en un lugar de fácil acceso, pues puede ser que
le ha escapado algo en la primera leída.
CARACTERISTICAS
● Interfase de audio FireWire (IEEE 1394) & USB 2.0
● Resolución de 24-bits, hasta 192 kHz de índice de muestreo
● Interfase de audio FireWire de 18 entradas y salidas
simultaneas
● 8 preamplificadores de micrófono con interruptores de
control de trim y fuente fantasma individual
● 8 entradas de línea análogas incluyendo 2 entradas de
instrumento
● 8 canales de ADAT I/O óptica (4 canales vía 96k dual
SMUX)
● S/PDIF I/O, AES/EBU I/O, MIDI I/O y word clock I/O
● Salida de audífono y salida principal con control de volumen
para propósito de monitoreo
● Medidores de canal en los canles 1 a 8 para entrada o
salida
● Indicadores de sincronización, índice de muestreo, dígito
I/O y MIDI I/O (I/O= entrada/salida)
● Puertos duales FireWire para encadenamiento daisy y
conexión directa a Mac o PC
● Mezcladora stand-alone con funcionalidad para uso en
campo o estudio sin computadora
● Entrada de instrumento, interruptor de pad, jacks de envío
TRS balanceado en entradas 1 y 2
● Compatible con Windows XP, Windows Vista y Mac OSX
● Incluye software Steinberg Cubase LE 4
CONFIGURACIÓN INSTANTE
INICIO RÁPIDO
1. Instale el controlador USB o FireWire y el software de la
mezcladora incluido con su Firey en su computadora. Más
instrucciones detalladas se puede encontrar en la sección “
Instalación del Controlador” de este manual. Los usuarios
de Mac no necesitan instalar los controladores, no obstante
tienen su propio software de la mezcladora que puede ser
instalado para permitir el ajuste de los niveles de la señal,
índice de muestreo y así sucesivamente.
2. Durante el proceso de la instalación del controlador, le darán
instrucciones para conectar la Firey con la computadora y
encenderla. Conecte la Firey con la computadora usando
los cables de FireWire o USB incluidos junto con la unidad.
3. Conecte el cable de energía AC suministrado en el
conectador de entrada de la energía en la parte posterior
de Firey 808. Encienda la unidad utilizando el interruptor de
energía en el frente de la unidad.
4. Conecte un micrófono con el conectador de la entrada de
XLR en el frente de la unidad. Usted puede hechar una
ojeada al medidor LED del micrófono y ajustar el control
de nivel de tal manera que se sitúa en un buen nivel para
la grabación. Haga lo mismo con las varias entradas de
mic y línea en la parte posterior de la Firey. Se aconseja
mantener la unidad apagada al enchufar o desenchufar
micrófonos, instrumentos y cosas así.
5. Abra el software del Panel de Control de Phonic y chequee
que las entradas y salidas de Firefly están todas en
ventanas apropiadas. En esta sección usted también puede
cambiar el tamaño de buffer, índice de muestreo y algunas
otras propiedades.
6. Usted puede utilizar sus auriculares con las salidas de
Audífonos para monitorear su audio de entrada y salida en
la Firey.
7. Usted está listo ahora para comenzar a diseñar producciones
de audio de alta resolución y listo para descubrir todas las
ventajas de su nueva Firey.
SETUP
1. Si usted tiene experiencia de conectar nuestros productos
FireWire, encontrará esta conguración familiar y fácil.
2. Encienda su computadora y asegúrese de tener el puerto
FireWire o USB disponible.
3. Conecte su Firey a una salida de energía AC con el cable
AC proporcionado.
4. Conecte el cable de FireWire o USB suministrado a un
puerto en el reverso de su Firey, y conecte el otro extremo
a su computadora. Usted solo tiene que conectar un simple
cable FireWire a su computadora – el segundo puerto en
Firey es para permitirle daisy chain la Firey con Firey 808
Universals adicionales.
5. Encienda la unidad usando el interruptor localizado en el
panel de dorso.
6. Su computadora reconocerá automaticamente la Firefly
si usted ha instalado los controladores apropiados (vea la
sección Inicio Rápido). Usted debe de poder ver y editar las
propiedades de canal de su Firey en el software de Panel
de Control FireWire de Phonic.
7. El siguiente y último paso sería activar la Firefly en su
software DAW. La mayoría de los programas harán que
usted abra un proyecto antes de hacerlo. Luego todo lo que
usted tiene que hacer es ir a los menues desplegable de “
dispositivos”, “herramientas” o “propiedades” (dependiendo
de su elección de software), aquí usted podría encontrar una
opción que le permite ver y cambiar sus entradas y salidas
deseadas y asignarlas a los canales de su proyecto. Active
la Firey y estará listo para arrancar!
1
Page 21

DESCRIPCIÓN DEL PANEL FRONTAL
1. Botón de Energía
Pulse este botón para encender la Firefly 808 Universal.
Cuando la unidad está encendida, el botón de energía se
iluminará.
2. LED de FireWire
Este LED se iluminará cuando se establece una conexión a la
computadora a través de la interfase FireWire.
1
2
3. Entradas de Canal 1 y 2
Estos dos jacks combo permiten a los usuarios a conectar
a conectores balanceados XLR de 3 pines para micrófonos
dinámicos o de condensador, o a jacks de audífono de 1/4” TRS
para instrumentos como guitarras eléctricas o guitarras bass.
NOTA: Cuando se enchufa las señales de nivel de línea en jacks combo,
desenganchen el botón PAD para bajar el nivel de la señal a un grado
aceptable.
4. Controles de Ganancia de Entrada 1-8
Gire estas perillas en sentido de reloj para incrementar la
ganancia de entrada de micrófono/línea para los canales
correspondientes. Usted tiene 50dB de ganancia para trabajar,
pero asegúrese de no ajustarla a un nivel que hará que el
medidor de entrada llega al punto “clip”. Una buena región
es cercana a -6dB –ésto le dará un nivel de señal mayor con
suciente espacio libre para evitar clipping.
7. Jack de Salida de Audífono y Control de Ganancia
Todas las señales de audio mezcladas dentro de Firefly 808
Universal pueden ser monitoreadas con audífonos a través de
este jack. Usted también puede usar el control correspondiente
para ajustar el nivel de la señal.
8. Control de Nivel Principal
Este control ajusta el nivel final de envío de audio por las
salidas de principal izquierda y derecha, la señal de cual es
tomada desde señal de retorno de FireWire o varias entradas
análogas y digitales (dependiendo de sus seteos de software).
7
9. Medidor de nivel LED
Este medidor LED estéreo de 6 segmentos exhibe el nivel de
señal de la suma de los 8 canales de entrada análogas. Se
aconseja a los usuarios mantener la configuración de este
medidor alrededor de -6dB para el mejor uso posible de audio
sin causar ningún corte innecesario.
8
9
English Español
5. Selector PAD
Este botón controla la sensibilidad de entrada para los canales
1 y 2. Pulsando este botón atenuará la señal de entrada por
20dB, permitiéndole conectar un micrófono o instrumento a jack
de entrada combo.
6. Fuente Fantasma +48V
Pulsando uno de estos botones activará la fuente fantasma
+48V para el canal correspondiente, permitiéndole a usted usar
micrófonos de condensador o de cinta (u otros dispositivos que
requieren +48V) para funcionar correctamente. La activación de
la fuente fantasma será acompañada por un LED iluminado. Si
usted no está seguro si su micrófono usa fuente fantasma, por
favor consulte el manual del usuario de micrófono.
6
5
3
4
10. Medidores de Nivel LED de Canal
Los niveles de la señal de entrada/salida desde entradas/
salidas análogas 1 a 8 están mostrados en estos medidores
LED de 4 segmentos. Estos medidores exhiben el nivel de
entrada o salida dependiendo de botón de selección de
entrada/salida. Se aconseja a los usuarios probar y mantener el
nivel de la señal alrededor de -20, -10, para evitar la distorsión
y corte.
11. Interruptor de Selección de Entrada/Salida e Indicador
Este botón determina si el medidor LED de nivel exhibirá la
señal de entrada o salida de los canales de entrada/salida de
Firey 808. Este botón es una manera fácil para comparar los
niveles de entrada y salida. Dependiendo de qué conguración
está actualmente activada, un LED se iluminará junto a la
configuración correspondiente (“entrada análoga” o “salida
análoga”).
10
11
FIREFLY 808 UNIVERSAL
2
Page 22

English Español
FIREFLY 808 UNIVERSAL
DESCRIPCIÓN DEL PANEL DE DORSO
12. Indicadores de Sincronización
Firefly 808 Universal puede ser sincronizada con cualquier
dispositivo de sincronización WCLK, permitiéndole usarla para
sus estudios de grabación de audio/video y producción de
cinema y video que requiren audio de alta resolución. Cuando
la Firey 808 está sincronizada, uno de estos LEDs se iluminará
para indicar con qué dispositivo está sincronizada la Firefly
actualmente. Si usted trata de sincronizar con un dispositivo
no conectado a Firefly, la luz correspondiente se destellará
brevemente y retorna a la conguración previa.
17. Entrada de Línea de Canales 1 y 2
Estos jacks de entrada permiten a los usuarios conectar los
dispositivos de nivel de línea, la señal de cual es alimentada a
través de interfase FireWire y enviada directamente los envíos
de canales 1 y 2.
18. Envíos de Canales 1 y 2
Estas salidas actúan como envíos directos de entradas de
canales 1 y 2, permitiendo que la señal sea usada en otros
dispositivos.
12
17
18
13. Indicador de Índice de Muestreo
Cuando la Firefly 808 está sincronizada, uno de estos LEDs
se iluminará para mostrar el índice de muestreo de dispositivo
que está sincronizado con la Firefly. La Firefly seteará
automáticamente a ese índice.
13
19. Canales de Entrada 3 a 8
Cada uno de estos canales presenta Entradas de Línea
1/4” TRS balanceadas y puede ser usadas para conectar
cualquier dispositivo de nivel de línea como reproductores
de CD, grabadoras de DAT. Usted puede incluso conectar
una mezcladora análoga que no tiene interfase FireWire
para permitirle enviar esa señal a la computadora. También
presentan conectores de entrada mic XLR de 3-pines para usar
con micrónfonos de condensador o dinámicos.
14. Indicador LED de AES/SPDIF
Estos LEDs de entrada y salida se encenderán cuando la
interfase AES/EBU o S/PDIF está en uso.
15. Indicador LED de ADAT
Usted puede usar sus dispositivos ópticos junto con la Firey
808. Cuando se usa la conexión óptica ADAT, los LEDs de
entrada y salida se activarán para que usted sepa que la
conexión es exitosa.
16. Indicador de MIDI
Cuando se usa la interfase MIDI, estos LEDs de entrada y
salida se iluminarán.
14 15 16
20. Salidas Principal (Main)
Estas salidas de 1/4” TRS permitirán a los usuarios enviar la
mezcla de estéreo principal de la señal de retorno de Firey 808
a dispositivos externos. Las señales desde canales análogos
1, 3, 5 y 7 son enviadas por la salida izquierda, en tanto las
señales 2, 4, 6 y 8 son enviadas por la salida derecha. Cuando
la interfase FireWire o USB está en uso, los usuarios pueden
usar el crossfader de software de la Mezcladora Firefly para
seleccionar el grado de la señal de retorno de FireWire y la
señal de entrada análoga que es enviada a estas salidas. Las
salidas principales pueden ser conectadas a altavoces activos,
monitores de estudio u otras mezcladoras, dependiendo de sus
necesidades.
20
19
3
Page 23

21. Salidas Análogas
Éstas son salidas de línea 1/4” TRS balanceadas con señales
de nivel de línea (+4dBu). Los usuarios pueden usar estas
salidas para tener un canal de salida de estéreo desde cada
par de salidas par e impar, incluso una mezcla surround (5.2 o
6.2). Las salidas análogas 1 y 2 pueden ser usadas para enviar
una mezcla de estéreo de sus entradas análogas o señal de
retorno de FireWire/USB, que es ideal para usar con monitores
de estudio o subwoofers (si se realiza una mezcla surround).
21
22. Entrada/Salida de AES/EBU
Ésto es una interfase digital estándar XLR AES/EBU que le deja
conectar sus dispositivos digitales AES a su Firey. El LED de
ENTRADA o SALIDA en la parte frontal de Firey se iluminará
cuando las entradas y salidas están en uso.
23. Interruptor de Entrada de S/PDIF/AES
Este interruptor determina cuál de estas entradas digitales
serán utilizadas.
26. Entrada/Salida de MIDI
Estas entradas le permitirán a usted enviar 16 canales MIDI
por la interfase FireWire/USB a su computadora, y recibe 16
de vuelta. Estos canales presentarán dentro de Software de
Control de Firey, y disponibles para usar en la mayoría de los
programas con MIDI.
26 25
27. Entrada/Salida de ADAT
Es una interfase óptica estándar TOSlink ADAT que usted puede
usar de la misma manera como usa los dispositivos típicos
ADAT. Esta entrada también puede ser usada para entradas
SMUX cuando esta opción esta seleccionada en el software de
mezcladora de Firey de la computadora.
28. ENTRADA/SALIDA de WCLK
Son conectores de entrada/salida BNC para Sincronizaciones
Word Clock estándar, también usados en DVTRs y otros
dispositivos digitales.
English Español
24. Entrada/Salida de S/PDIF
Es una Entrada/Salida de Audio Digital estándar RCA S/PDIF
que puede ser usada con mezcladoras digitales, grabadoras
de DAT o cualquier dispositivo externo que usa formato de
interfase digital RCA. Por favor utilice cable coaxial de 75 ohms
con enchufe RCA cuando se usa S/PDIF. Los problemas o
dicultades más comunes incorporados con la transmisión de
S/PDIF son debido al uso incorrecto de los cables análogos.
Los usuario s también pueden u sar estas entradas para
dispositivos S/PDIF de “Alta Velocidad” cuando esa opción está
seleccionada en el software de la mezcladora de Firey de la
computadora.
24 2223
S/PD IF
IN
AES IN
25. Puertos FireWire / USB e Interruptor de Selección
Estas conexiones son puertos digitales USB y FireWire (conocido
también como IEEE 1394) que usted puede usar para conectar la
Firefly 808 Universal a su computadora. Haciendolo le permitirá
usar su computadora para grabación de multi-pista de alta calidad,
así como para editar, mezclar y más, en su Software de Digital
Audio Workstation favorito.
El interruptor que acompaña estos puertos es utilizado para
determinar los puertos que usted utilizará.
Usted tiene dos puertos FireWire a su disposición; sin embargo,
usted solo necesita conectar uno a su computadora. El segundo
puerto le permitirá conectar una segunda Firefly 808 Universal,
permitiendo dos veces el número de entradas!
28 27
29. Entrada de Energía AC y Portafusible
Conecte el cable de energía AC suministrado a este conector.
El otro extremo debe estar conectado a un suministro de
energía apropiado. El fusible de suministro de energía está
localizado justo debajo de este conector. Si el fusible explota,
remueva la tapa de portafusible y reemplacelo con otro fusible
compatible (como indicado en la cubierta de portafusible).
29
FIREFLY 808 UNIVERSAL
4
Page 24

English Español
FIREFLY 808 UNIVERSAL
INTERFASE FIREWIRE / USB
REQUISITOS DEL SISTEMA
Las siguientes especificaciones son requisitos mínimos para usar la Firefly 808 Universal. Si su computadora no satisface estos
requisitos, usted experimentará un retardo en el audio y un posible bloqueo de su computadora cuando opera la mezcladora.
Windows
● Microsoft® Windows® XP SP1 y SP2 / Vista®
● Puerto USB 2.0 o FireWire disponible (Interfase FireWire sugerida: tarjeta ADS Pyro 64 FireWire con chip TI)
● Procesador Intel Pentium® 4 o equivalente procesador AMD Athlon
● Motherboard con chipset Intel o VIA
● Drive de disco duro de 5400 RPM o más rápido (7200 RPM o más rápido con 8 MB de cache recomendado)
● RAM 512 MB o más (1 GB o más recomendado)
Macintosh
● OS X 10.3.5 o posteriores con soporte FireWire nativo
● G4 o procesador más nuevo
● RAM 512 MB o más
INSTALACIÓN DEL CONTROLADOR
Para usar la Firey 808 en una PC, es importante instalar todos los controladores necesarios de CD includido (controladores ASIO y
WDM). Es importante que los usuarios lean todas las instrucciones cuidadosamente antes de continuar en cada paso de la instalación,
ya que los usuarios necesitarán desenchufar y enchufar en su dispositivo FireWire. Estos controladores no son necesarios para los
usuarios de Mac, sin embargo, los usuarios de Mac pueden desear instalar nuestro software de Mezcladora desde CD incluido. Es
importante recordar que el controlador que usted instala dependerá si usted está utilizando FireWire o USB, asique asegúrese de
instalar el correcto!
Windows XP (con Service Pack 1 o 2) / Vista
1. Se recomienda que usted salga de todas las aplicaciones antes de empezar los procesos de instalación.
2. Asegúrese que la Firey no está conectada todavía a la entrada de FireWire o USB de su computadora.
3. Inserte el CD de instalación incluido con su Firey en el CD-ROM drive de su computadora. Si el CD no comienza el proceso de
instalación automáticamente dentro de pocos minutos, entonces vaya a “Mi Computadora” → su CD-ROM drive → “FireWire Drivers
and Control Panel” o “USB Drivers and Control Panel” → ejecute “setup.exe” para empezar la instalación manualmente. El software
de Panel de Control de de Phonic y la Mezcladora Firey 808 Universal también serán instalados en este momento.
4. Sigua las instrucciones de instalación. Lo que sigue se aplica a la instalación del controlador USB, no obstante la instalación de
FireWire es casi idéntica.
Firey 808 Universal no está conectada a su PC, entonces haga click en “Next” (Siguiente)
5
Asegúrese que ningún otro programa está corriendo en su PC y que
Page 25

English Español
Lea y acepte los términos de Acuerdo de Licencia y haga click en
Seleccione una nueva destinación para la inatalación o haga click
en “Install” (Instalar) para aceptar el directorio por default.
“Next” para continuar.
Conecte la Firey con la Computadora y encienda la energía o, si la Firey
FIREFLY 808 UNIVERSAL
está ya conectada, apaguela y luego enciendala nuevamente.
6
Page 26

English Español
FIREFLY 808 UNIVERSAL
Si se muestra un mensaje indicando que el software no ha pasado por el testeo de Windows
Logo, haga click en “Continue Anyway (Continuar de Todo Modo). En Vista, usted podría
Luego de que la instalación está completa, el software de Panel deControl de Phonic será
visible en barra de tareas y usted está libre de usar el dispositivo como lo desea.
Macintosh OS X (10.3.5 o posteriores)
La Firey 808 Universal trabaja con los controladores de audio principal de Macintosh OS X 10.3.5 y versiones posteriores. Primero
verique que usted está corriendo Macintosh OS X 10.3.5 o superior, luego conecte la Firey al puerto FireWire a la computadora.
Para asegurar que su Firey está funcionando, ingrese a la carpeta de Utilidades y haga doble click en el ícono de Audio MIDI Setup
(Conguración de Audio MIDI).
recibir un mensaje similar referente a Signed Drivers.
Entre a la sección de Audio Device (Dispositivo de Audio). De tab desplegable “Properties for” (Propiedades para), seleccione
Firey 808 Universal. En la parte inferior de la ventana, los usuarios pueden editar la conguración de la Firey 808 Universal. Las
propiedades como índice de muestreo y fuente clock pueden ser alteradas y los usuarios también pueden optar por hacer de Firey su
dispositivo de entrada y/o salida por default.
Los usuarios de Mac pueden usar GarageBand, Logic Pro y también como host de otros programas, junto con Firey 808 Universal.
7
Page 27

ASIGNACIÓN DEL CANAL
Cuando se usa Digital Audio Workstation en una PC y, dentro
de software de panel de control de FireWire de Phonic incluido,
los siguientes nombres han sido atribuidos a los canales de
entrada de dispositivo FireWire. Ellos pueden ser alterados por
el software de Panel de Control de Phonic.
Nombre de Canal de Entrada de
FireWire
Línea[1] Entrada Izq. Entrada Análoga 1
Línea[1] Entrada Der. Entrada Análoga 2
Línea[2] Entrada Izq. Entrada Análoga 3
Línea[2] Entrada Der. Entrada Análoga 4
Línea[3] Entrada Izq. Entrada Análoga 5
Línea[3] Entrada Der. Entrada Análoga 6
Línea[4] Entrada Izq. Entrada Análoga 7
Línea[4] Entrada Der. Entrada Análoga 8
SPDIF[1] Entrada Izq. Entrada S/PDIF o AES
SPDIF[1] Entrada Der. Entrada S/PDIF o AES
TOS[1] Entrada Izq. Entrada ADAT o SMUX
TOS[2] Entrada Der. Entrada ADAT o SMUX
MIDI Entrada 1 Entrada MIDI
Nombre de Canal de Salida de
FireWire
Línea[1] Salida Izq. Salida Análoga 1
Línea[1] Salida Der. Salida Análoga 2
Línea[2] Salida Izq. Salida Análoga 3
Línea[2] Salida Der. Salida Análoga 4
Línea[3] Salida Izq. Salida Análoga 5
Línea[3] Salida Der. Salida Análoga 6
Línea[4] Salida Izq. Salida Análoga 7
Línea[4] Salida Der. Salida Análoga 8
SPDIF[1] Salida Izq. Salida S/PDIF o AES
SPDIF[1] Salida Der. Salida S/PDIF o AES
TOS[1] Salida Izq. Salida ADAT o SMUX
TOS[2] Salida Der. Salida ADAT o SMUX
MIDI Salida 1 Salida MIDI
Para alterar el nombre del canal de entrada en su computadora,
abra el software de Panel de Control de Phonic. En el lado de
la mano izquierda de panel de control, los usuarios encontrarán
las categorías de las configuraciones. Haciendo click en “Input
Channels” (Canales de Entrada), la ventana principal mostrará
los títulos de canales de entrada. Usted puede entonces resaltar
los nombres de canal y presione el botón “Edit Channel Name”
(Editar Nombre del Canal) en la parte inferior de la ventana de
control. Una nueva ventana aparecerá para permitir a los usuarios
a ingresar el nombre del canal.
Si le gustaría usar la Firefly como su dispositivo de salida de
audio por default en su PC, simplemente vaya a panel de
control de Windows y seleccione “Sound and Audio Devices”
(Dispositivos de Sonido y Audio). Haga click en Audio tab y, use
el menú desplegable para seleccionar la Firey 808 Universal de
la lista de los dispositivos disponibles. La Firey también puede
ser seleccionada como dispositivo de salida por default para los
programas individuales editando configuraciones/opciones de
dichos programas.
Canal de Dispositivo
Canal de Dispositivo
CUBASE LE 4
Cubase LE es un programa realmente poderoso proporcionado
junto con la Interfase Firey que permite a los usuarios a grabar,
mezclar, editar, borrar y alterar sus pistas. Por favor note que
solamente 8 pistas pueden ser grabadas al mismo tiempo con
la versión de Cubase incluido, los usuarios deben actualizar
a Cubase SX o encuentrar otro software DAW compatible si
quiere grabar más pistas.
Instalación
Inserte el CD de instalación de Cubase LE 4 que viene con su
Firey en el CD drive de su computadora. Ejecute el instalador.
Usted debe instalar el software de registración de Steinberg
para poder usar el software con éxito.
Setup
Luego de completar el proceso de instalación exitosamente,
debe seguir el siguiente procedimiento para trabajar
ecientemente con Firey.
1. Abra el programa Cubase LE 4 y comience un nuevo
proyecto. Agregue una o dos pistas a este proyecto.
2. Vaya a menú desplegable ‘Devices’ (Dispositivos) y
seleccione ‘Device Setup’ (Conguración de Dispositivo). En
el lado izquierdo, seleccione ‘VST Multitrack’.
3. De la lista desplegable de Controlador ASIO seleccione “
Phonic ASIO Driver”. Un cuadro emergente le preguntará si
usted quiere cambiar el controlador ASIO. Haga click en ‘
Switch’. Ésto completa la instalación y conguración básica.
4. Activando las pistas de audio recibidas desde Firey.
a. Vaya a menú desplegable “devices” (dispositivos) y
seleccione ‘VST Inputs’ (Entradas VST). Mostrará varias
entradas (“Phonic FF808 Ch 1”, “Phonic FF808 Ch 2”,
etc.)
b. Active 8 de estos canales haciendo click en el botón
“Active” localizado junto a cada nombre del canal.
Por favor note que solamente 8 canales de entrada
pueden ser activados al mismo tiempo en esta versión
de Cubase. Ésto es una limitación de Cubase LE 4. Si
requiere más canales de entrada, sugerimos actualizar
a versiones superiores de Cubase, o usar otro DAW
software.
5. Para más instrucciones sobre la operación de Cubase, por
favor consulte el manual del usuario presionando F1 mientras
el programa está abierto.
Si usted desea resetear el controlador Phonic ASIO,
simplemente vaya a menu desplegable ‘devices’ y seleccione
‘device setup’. Haga click en “reset” y seleccione “Phonic
ASIO Driver”. Haga click en ‘ok’ para continuar y la Firey 808
Universal se hará una vez más funcional.
English Español
FIREFLY 808 UNIVERSAL
8
Page 28

English Español
FIREFLY 808 UNIVERSAL
PANEL DE CONTROL DE DISPOSITIVO FIREWIRE
El panel de control FireWire puede ser accedido en cualquier
momento seleccionando el atajo desde menú de Programas.
Este programa no solo permitirá a los usuarios alterar los
nombres y las propiedades de su dispositivo y canal, sino
también les dejará corregir los problemas de latencia, cambiar
los índices de muestreo y demás. Cuando se opera el
software, un número de opciones estarán disponibles para que
seleccione los usuarios, permitiendoles ajustar las propiedades
disponibles.
Canales de Salida
Ingresando a la sección de Canales de Salida, los usuarios
pueden ver y editar los nombres de los varios canales de salida
desde la computadora a Firey 808 Universal.
Dispositivos
En la sección de Dispositivos, los usuarios pueden ver y editar
el nombre de los Dispositivos FireWire o USB de Phonic
conectados actualmente en su computadora.
Sincronización
En la sección de Sincronización, los usuarios pueden ajustar
el índice de muestreo y otras propiedades de sincronización.
Varias de estas propiedades ajustables, están seteadas a
rendimiento óptimo y al menos que usted está seguro de su
necesidad de cambiar, es mejor dejarlas así.
Canales de Entrada
La sección de los Canales de Entrada permite a los usuarios
a ver y editar el nombre de los varios canales de entrada
recibidos de la interfase FireWire o USB. Para la lista de los
nombres de canal por default, por favor consulte la tabla de la
página 24.
El modo de sincronización puede ser alterado, pero no es
recomendado hacer esta alteración para los usarios novatos.
El modo de sincronización es básicamente la manera en
que la computadora determina qué ‘clock source’ (fuente de
reloj) (esto es, el dispositivo que su computadora usará para
determinar el tiempo de todas las señales digitales recibidas)
será. La configuración por default para esta característica es
“CSP”, significa que la Firefly es fuente de reloj “master” de
dispositivo. Las otras opciones permiten a los usuarios hacer
que la FireWire siga “la regulación de tiempo” de cualquier
dispositivo que es fuente de reloj. Con dos fuentes de reloj tiene
la potencial de crear resultados no deseados, por lo tanto es
mejor evitarlo. Si la Firey es la única pieza de equipo de audio
digital conectada a la computadora, no hay razón para que esta
opción sea cambiada.
Los usuarios también pueden cambiar entre configuraciones
automáticas o manuales de índice de muestreo. Cuando el
índice de muestreo está seteado manualmente, los usuarios
pueden seleccionar entre índices de muestreo 44.1, 48.0, 88.2,
96.0 y 128 kHz por segundo para entradas análogas y 176.4
y 192.0 kHz por segundo para algunos dispositivos digitales.
Muchos dispositivos tienen índices de muestreo que no
sobrepasan de 44.1 kHz por segundo, por lo tanto, cuando se
usa dispositivos digitales multiples, se aconseja a los usuarios
no exceder este nivel, al menos que están seguros de que el
índice de muestreo de dispositivo secundario puede.
9
Page 29

Conguraciones
Los usuarios pueden ajustar varios tiempos buffer en la sección
de Conguraciones.
La Profundidad de Buffer de Corriente (Stream Buffer Depth)
es ajustable entre 0.5 y 20 milisegundos. Ajusta el buffer usado
cuando fluye una señal desde Firefly. Si la profundidad está
seteada demasiada alta, una latencia obvia se hará evidente.
Si es demasiada baja, varios clicks y pops pueden hacerse
obvios. Es mejor setear la Profundidad de Buffer de Corriente
a un nivel que permite a los usuarios obtener la latencia más
baja, mientras sigue manteniendo un funcionamiento óptimo.
Las conguraciones por default son ideales para la mayoría de
las computradoras.
SOFTWARE DE MEZCLADORA FIREFLY 808U
Input Monitor Mixer
Line1
1
4
Line2
M M
Link
S S
2
3
5
English Español
La Profundidad de Buffer de ASIO es ajustable entre 4 y
40 milisegundos. Permite a los usuarios ajustar la latencia
de la corriente recibida por software de ASIO driver-based
(incluyendo Steinberg Cubase LE 4).
La Profundidad de Buffer de Sonido de WDM (Windows Driver
Model – Modelo de Controlador de Windows) es ajustable entre
4 y 40 milisegundos. Permite a los usuarios ajustar la latencia
de corriente recibida por programas basados en WDM.
También en esta sección, los usuarios pueden ver sus “
estadísticas de bajas” , donde puede visualizar el número de
veces en que la conexión FireWire ha sido interrumpida.
Corrientes
En la sección de Corrientes, las propiedades de dispositivo
Firefly pueden ser visualizadas. Cada corriente de entrada
y salida puede ser escudriñada, y el número de corriente
isócronas y los índices de muestreo soportados pueden ser
visualizados.
6
Cuando no hay software de Digital Audio Workstation en uso,
la Firefly 808 Universal puede ser controlada usando esta
mezcladora básica que está incluida junto con el software de
controlador y de panel de control. La señal desde este panel de
mezcla está habilitada para ser retroalimentada a Firefly 808
Universal como señal de estéreo, ruteada a salidas análogas 1
y 2 y salida de audífonos.
0.0 dB0.0 dB
Disconnected
7
Entradas de Canal
1. Botón Mute
Pulsando este botón enmudecerá el canal correspondiente,
parandolo de ser enviado de vuelta a Firey.
2. Botón Solo
Use este botón para hacer solo el canal correspondiente de
vuelta a Firey permitiendo a los usuarios a monitorear la señal.
Los canales a solos serán enviados a salidas análogas 1 y 2 y
a la salida de audífonos en el Firey 808.
3. Botón Link
Pulsando este botón habilitará una función link, permitiendo
a los usuarios a controlar dos canales como si fueran con el
fader, los botones mute y solo linkeados a dos entradas.
4. Pan
Cada una de las entradas de Firefly están seteadas o a la
izquierda o a la derecha por default, con canales impares a la
izquierda y canales pares a la derecha.
FIREFLY 808 UNIVERSAL
5. Fader
Haga click en el botón de mouse y mantengalo apretado
en el fader para ajustar el volumen de la señal entrando a
la computadora por la conexión FireWire/USB para cada
canal. En el modo link, un fader singular controlará 2 canales
simultáneamente.
6. Medidor de Nivel
Estas dos partes de la mezcladora PC-basado proporcionan
a los usuarios una idea de los niveles de entrada recibidos a
través de la interfase FireWire/USB. La barra de gráfico dará
representación visual de nivel y los usuarios pueden leer el
nivel de entrada exacto en decibeles debajo de fader.
10
Page 30

English Español
FIREFLY 808 UNIVERSAL
7. Estados de Canal (canales digitales solamente)
Esta ventana de exhibición mostrará si un dispositivo digital
está conectado a o desconectado de la unidad Firefly. Los
estados serán actualizados automáticamente cuando un
dispositivo digital está conectado a las entradas correctas.
Canal de Salida
8. Balanceo
El control de balanceo para la salida master está seteado
al centro por default. Moviendolo a la izquierda atenuará la
señal derecha e intensica la señal izquierda; moviendolo a la
derecha hará lo opuesto.
9. Fader
Haga click en el botón de mouse y mantengalo apretado en el
fader para ajustar el volumen de la señal de salida de estéreo
siendo enviada por la conexión FireWire/USB a Firefly. La
señal controlada por estos controles es enviada por las salidas
análogas 1 y 2 de Firey.
11
12
13
14
15
16
17
18
19
10. Medidor de Nivel
Proporciona a los usuarios una idea de los niveles de salida
de ambos canales enviados por la interfase FireWire/USB. La
barra de gráco dará una representación visual de nivel y los
usuarios pueden leer el nivel de entrada exacta en decibeles
debajo de fader.
Outputs
Master 1/2
8
9
10
0.0 dB
14. S/PDIF Óptico
Seleccionando esta opción activará cualquier dispositivo óptico
S/PDIF como fuente de sincronización para su equipo digital.
Si no hay dispositivo S/PDIF óptico conectado a entrada
TOSlink ADAT en el dorso de Firefly 808 Universal, el LED
correspondiente de la fuente de sincronización en la cara de
dispositivo se destellará brevemente, luego retona a la fuente
de sincronización seleccionada previamente.
15. Word Clock
Esta opción le permitirá usar un word clock como su fuente de
sincronización. Si no hay dispositivo de word clock conectado a
entrada BNC de word clock en el dorso de Firey, entonces el
LED de la fuente de sincronización correspondiente en la cara
de mezcladora se destellará brevemente y luego retona a la
fuente de sincronización seleccionada anteriormente. Por favor
vea el diagrama de abajo para información en la conexión de
un word clock como su fuente de sincronización.
20
21
- Host Connection USB 2.0 1394a
- Sync Source -
Device
Coax SPDIF
Opt. SPDIF
Word Clock
PC
- Digital I/O Selection -
SPDIF HS-SPDIF
- ADAT ADA
T ( 44.1 / 48 kHz)
SMUX ( 88.2 / 96 kHz)
- Sample Rate -
96.0 kHz
Word Clo ck to Other Slav es
SET
Conexión Host
11. Selección USB / 1394a
Este indicador se encenderá en rojo para mostrar si la interfase
USB 2.0 o FireWire se está siendo utilizando para acceder a
Firey 808 Universal.
Fuente de Sincronización
12. Dispositivo
Pulsandolo le permitirá a usted usar la Firefly 808 Universal
como fuente de sincronización para todo su equipo digital.
13. Coaxial S/PDIF
Seleccionando esta opción activará cualquier dispositivo
coaxial S/PDIF como fuente de sincronización para su
equipo digital. Si no hay dispositivo conectado a la entrada
de S/PDIF en Firefly 808 Universal, el correspondiente LED
de fuente de sincronización en la cara del dispositivo se
destellará brevemente, luego retorna a fuente de sincronización
seleccionada previamente.
11
World Cl ock
IN
BNC T-A dapter
World Cl ock from Maste r
16. PC
Ésta es la opción por default y, le permite usar la PC como
fuente de sincronización. Cuando setea a PC, el LED
correspondiente a la fuente de sincronización en la parte frontal
de Firey 808 Universal se iluminará.
Nota: Si los dispositivos ADAT y S/PDIF no están setados a la misma
fuente de sincronización, incitará al usuario a corregir el problema.
Page 31

- Host Connection USB 2.0 1394a
11
12
13
14
15
16
17
18
19
20
21
- Sync Source -
Device
Coax SPDIF
Opt. SPDIF
Word Clock
PC
- Digital I/O Selection -
SPDIF HS-SPDIF
- ADAT ADA
T ( 44.1 / 48 kHz)
SMUX ( 88.2 / 96 kHz)
- Sample Rate -
96.0 kHz
SET
Selección de Entrada/Salida Digital
17. S/PDIF
Seleccionando esta opción le permitirá usar un dispositivo
digital S/PDIF o AES con la Firey.
18. S/PDIF de Alta Velocidad
Si usted conecta un producto S/PDIF de alta velocidad a
conector S/PDIF en el dorso de Firey 808 Universal, haciendo
click en esta opción le permitirá usar la señal de salida desde
este dispositivo.
19. ADAT
Seleccione esta opción para usar las entradas TOSlink ADAT
en el dorso de Firey 808 Universal.
22. Crossfader
El crossfader de software de mezcla permite a los usuarios
a ajustar la señal retornada a las salidas análogas 1 y 2 de
la computadora. Cuando está en el centro, la señal será
una mezcla 50-50 de señal pura recibida por la Firefly 808
Universal y la señal retornada a 808 desde la computadora.
Cuando es tirado a izquierda, la señal monitor de 808 se hace
gradualmente más dominante; cuando es tirado todo a la
izquierda, esta señal es la única señal audible. Sin embargo, si
este control es tirado a la derecha, la señal estérea de software
de panel de mezcla se hará más dominante.
22
Cross Fader
Input Monitor Mixer Main 1/2 - from PC
MODO STAND ALONE
La Firey 808 Universal puede funcionar independientemente,
sin que ninguna conexión FireWire esté establecida. Lo
siguiente es solamente un par de puntos de interés que usted
podría necesitar para saber usar la Firey en modo stand-alone.
En primer lugar, cualquier conguración que usted haya hecho
a las entradas digitales, salidas e índices de muestreo mientra
se usa el software de la mezcladora de Firefly 808 Universal
será guardada aún después de reiniciar el dispositivo y/o
desconetar el cable FireWire/USB. Esto signica que cualquiera
que sean las entradas y salidas que usted ha seteado serán
activadas/desactivadas como por sus conguraciones previas.
El índice de muestreo por default es de 44.1 kHz, y la entrada/
salida digital por default es S/PDIF.
También, las entradas análogas son ruteadas a sus salidas
análogas correspondientes y, también una mezcla de estas
entradas siendo enviada por cualquir salida digital que ha sido
seteada (ADAT, S/PDIF, etc).
English Español
20. SMUX
Seleccionando SMUX como su dispositivo de entrada/salida
digital, usted puede conectar un producto accesible a SMUX a
entradas “ADAT” TOSlink de Firey. La señal de salida SMUX
es normalmente de 8 canales, sin embargo, si usted setea el
índice de muestreo a 96 kHz, se reduce a 4 canales.
Otras Características
21. Selección de Índice de Muestreo
Aquí usted puede seleccionar el índice de muestreo de la señal
enviada a la computadora. Para la mayoría de las aplicaciones,
usted puede seleccionar entre 44.1, 48, 88.2 y 96 kHz. Si usted
elije ADAT como su selección de entrada digital, entonces
puede seleccionar 44.1 o 48 kHz. Cuando se usa dispositivos
S/PDIF de alta velocidad, puede seleccionar entre índices
de muestreo 176.4 y 192 kHz. Si el índice de muestreo está
seteado a 192 kHz, el medidor de nivel de Firey será inválido.
FIREFLY 808 UNIVERSAL
12
Page 32

English Español
FIREFLY 808 UNIVERSAL
ESPECIFICACIONES
Respuesta en Frecuencia
Entrada de Mic a Salida de Línea
(Ganancia @ unidad)
Entrada de Mic a Salida de Digital
(AES, 96 kHz índice de muestra)
Distorsión (THD & IMD)
Entrada de Mic a Salida de Línea (@ +4 dBu
salida)
Entrada de Mic a Salida Digital
(AES, 48 kHz índice de muestreo)
Rango Dinámico
Ruido
Señal-a-Ruido (A-ponderado) >100 dB (ref. +4 dBu, Entrada de Mic a Salida de Línea, Ganancia @ unidad)
Ganancia –129 dBu @ +60 dB
Ruido de Salida Residual
Proporción de Rechazo Modo Común (CMRR) Entrada de Mic: >60 dB @ 1kHz, Ganancia @ máxima
Crosstalk (Entrada de Mic a Salida de Línea) < -100 dB @ 1kHz, +10 dBu señal en entrada adyacente, 150W impedancia de fuente
Rango de Control de Ganancia de Entrada
Fuente Fantasma +48 VDC, interruptores individuales
Salida Tasada Línea: +4 dBu
Niveles de Entrada Máx.
Impedancia de Entrada
Entrada de Mic de Canales 1 y 2 1.1 kΩ
Entrada de Mic de Canales 3 a 8 1.1 kΩ
Entrada Inst 500 kΩ
Entrada de Línea 22 kΩ balanceada, 11 kΩ desbalanceada
Salida de Línea 100 Ω balanceada
LEDs de Nivel de Señal -40, -20, -10 dBu, 0 dBu (nivel de operación normal), OL = 14 dBu
Selecciones de Frecuencia de Muestreo
Conectores de Entrada & Salida
Conectores de Entrada Análoga
Conectores de Salida Análoga Trece salidas 1/4” TRS y una para audífonos
Conectores de Entrada Digital RCA para S/PDIF, XLR para AES, BNC para word clock externo y entradas Toslink Óptico
Conectores de Salida Digital RCA para S/PDIF, XLR para AES, BNC para word clock externo y salidas Toslink Óptico
Dos Conectores Ópticos Toslink
Requisitos de Energía AC
Dimensiones 482 x 88 x 290 mm (19” x 3.46” x 11.42”)
Peso 4.53 kg (10 lbs)
THD+N: <0.007%, 20 Hz a 20 kHz BW, 1 kHz entrada @ +4 dBu, preamp en
THD+N: <0.004%, entrada 10mV rms, ganancia en -1 dB FS salida
Salida de Línea: <-100 dBu (Ganancia de Canal en la unidad)
44.1 kHz, 48 kHz, 88.2 kHz, 96 kHz, 176.4 kHz, 192 kHz, Externo
Dos jacks combo; seis entradas de mic balanceadas XLR
Dos 1/4” TS entradas de instrumento de impedancia alta (por jack combo)
Canales de transmisión 1-8 en 44.1/48 kHz operación
Canales de transmisión 1-4 en 88.2/96 kHz operación
Suministro de Energía AC Universal: 100 VAC 240 VAC, 50-60 Hz
+0.04, -0.26 dB, 20Hz a 20 kHz
+0, -0.2 dB, 20 Hz a 85 kHz
ganancia de unidad
>110 dB (por convertidores A-a-D)
>120 dB (Entrada de Mic a Salida de Línea)
Salida Digital (AES, 48 kHz): <-110 dB FS
Entrada de Mic: +10 dB a +50 dB
Entrada de Línea: -10 dB a +40 dB
Entrada de Mic: +12 dBu, Ganancia @ unidad
Entrada Inst: +20 dBu, Ganancia @ -20 dB
Entrada de Línea: > +20 dBu, Ganancia @ 0 dB
Ocho entradas de línea 1/4” TRS balanceadas
Consumo de Energía: 60 watts
13
Page 33

SERVICIO Y REPARACIÓN
Para refacciones de reemplazo y reparaciones, por favor póngase en contacto con nuestro
distribuidor de Phonic en su país. Phonic no distribuye manuales de servicio directamente a los
consumidores y, avisa a los usuarios que no intenten hacer cualquier reparación por si mismo,
haciendo ésto invalidará todas las garantías del equipo. Puede encontrar un distribuidor cerca
de usted en http://www.phonic.com/where/.
INFORMACIÓN DE LA GARANTIA
Phonic respalda cada producto que hacemos con una garantía sin enredo. La cobertura de
garantía podría ser ampliada dependiendo de su región. Phonic Corporation garantiza este
producto por un mínimo de un año desde la fecha original de su compra, contra defectos en
materiales y mano de obra bajo el uso que se instruya en el manual del usuario. Phonic, a su
propia opinión, reparará o cambiará la unidad defectuosa que se encuentra dentro de esta
garantía. Por favor, guarde los recibos de venta con la fecha de compra como evidencia de la
fecha de compra. Va a necesitar este comprobante para cualquier servicio de garantía. No se
aceptarán reparaciones o devoluciones sin un número RMA apropiado (return merchandise
autorization). En orden de tener esta garantía válida, el producto deberá de haber sido
manejado y utilizado como se describe en las instrucciones que acompañan esta garantía.
Cualquier atentado hacia el producto o cualquier intento de repararlo por usted mismo,
cancelará completamente esta garantía. Esta garantía no cubre daños ocasionados por
accidentes, mal uso, abuso o negligencia. Esta garantía es válida solamente si el producto fue
comprado nuevo de un representante/distribuidor autorizado de Phonic. Para la información
completa acerca de la política de garantía, por favor visite http://www.phonic.com/warranty/.
SERVICIO AL CLIENTE Y SOPORTE TÉCNICO
Le invitamos a que visite nuestro sistema de ayuda en línea en www.phonic.com/support/. Ahí
podrá encontrar respuestas a las preguntas más frecuentes, consejos técnicos, descarga de
drivers, instrucciones de devolución de equipos y más información de mucho interés. Nosotros
haremos todo el esfuerzo para contestar sus preguntas lo antes posible.
support@phonic.com
http://www.phonic.com
English Español
FIREFLY 808 UNIVERSAL
Page 34

Appendix Apéndice
FIREFLY 808 UNIVERSAL
APPLICATIONS APLICACIONES
MICRÓFONO
COMPUTADORA
MEZCLADORA DIGITAL
GRABADORA MULTI-PIST
A
STUDIO MONITORS
AUDÍFONO
8 entrada, 8 salida
MICROPHONE
MICRÓFONO
MICROPHONE
COMPUTER
DIGITAL MIXER
MULTI-TRACK RECORDER
HEADPHONE
8 in, 8 out
STUDIO MONITORS
MICRÓFONO
MICROPHONE
呺ܟ亢
呺ܟ亢 呺ܟ亢
MICRÓFONO
MICROPHONE
呺ܟ亢
MICRÓFONO
MICROPHONE
呺ܟ亢
MICRÓFONO
MICROPHONE
呺ܟ亢
MICRÓFONO
MICROPHONE
呺ܟ亢
MICRÓFONO
MICROPHONE
呺ܟ亢
ᔩ䷇ᅸⲥ䷇ㆅ
㘇ᴎ
⺕䔼ᔩ䷇
⬉㛥
᭄ᄫ䇗䷇ৄ
8 䏃䕧ܹ, 8 䏃䕧ߎ
Recording vocals (multi-part harmonies, choirs, etc.) or speeches
Grabando vocales (armonias, choirs, etc multi-partes) o discursos
1
Page 35

MÁQUINA DE TAMBOR
EFECTO DE GUITARRA
GUITARRA
TECLADO
AUDÍFONO AMP
BASS
MICRÓFONO
MICROPHONE
呺ܟ亢
MICRÓFONO
MICROPHONE
呺ܟ亢
MICRÓFONO
MICROPHONE
呺ܟ亢
MICRÓFONO
MICROPHONE
呺ܟ亢
AUDÍFONO
HEADPHONE
㘇ᴎ
AUDÍFONO
HEADPHONE
㘇ᴎ
AUDÍFONO
HEADPHONE
㘇ᴎ
AUDÍFONO
HEADPHONE
㘇ᴎ
AUDÍFONO
HEADPHONE
㘇ᴎ
AUDÍFONO
HEADPHONE
㘇ᴎ
AUDÍFONO
HEADPHONE
㘇ᴎ
AUDÍFONO
HEADPHONE
㘇ᴎ
HEADPHONE AMP
㘇ᴎࡳ⥛ᬒ఼
AUDÍFONO AMP
HEADPHONE AMP
㘇ᴎࡳ⥛ᬒ఼
KEYBOARD
⬉ᄤ⨈
哧ໄѻ⫳఼
ঢ়ᅗᬜᵰ఼
Ԣ䷇ঢ়ᅗ
ঢ়ᅗ
DRUM MACHINE
GUITAR EFFECT
EFECTO DE GUITARRA
ঢ়ᅗᬜᵰ఼
GUITAR EFFECT
GUITAR
BASS
Making studio recordings (without the studio)
Haciendo grabaciones de estudio (sin el estudio)
Appendix Apéndice
FIREFLY 808 UNIVERSAL
2
Page 36

Appendix Apéndice
FIREFLY 808 UNIVERSAL
SUBWOOFER
(ATRÁS)
8 entrada, 8 salida
8 in, 8 out
8 䏃䕧ܹ, 8 䏃䕧ߎ
COMPUTADORA
COMPUTER
⬉㛥
STUDIO MONITORS
STUDIO MONITORS
ᔩ䷇ᅸⲥ䷇ㆅ
SUBWOOFER
(BACK)
䍙Ԣ䷇ু
䷇ㆅ
(Ё䯈) (
ࠡջ)
SPEAKERS
(ৢջ)
ALTAVOCES
䷇ㆅ
SPEAKERS
ALTAVOCES
(MEDIO)
䷇ㆅ
SPEAKERS
ALTAVOCES
(FRENTE)
(MIDDLE) (FRONT)
Getting 6.2 audio from your FireFly
Obteniendo audio 6.2 de su FireFly
3
Page 37

DIMENSION DIMENSION
482 / 19”
88 / 3.5” 290 / 11.4”
Appendix Apéndice
FIREFLY 808 UNIVERSAL
measurements are shown in mm/inches
Todas las medidas están mostradas en mm/pulgadas.
4
Page 38

Appendix Apéndice
FIREFLY 808 UNIVERSAL
BLOCK DIAGRAM DIAGRAMA DE BLOQUE
N
I
1
H
C
esorPlangiSlatigiD ross
SA
E
MA
S
SANI2HC
.1
H
C
NI3HC
SA
EMA
S
SA
NI
8~4H
C
.3
HC
N
O
ITAZIN
O
RHCNYS
E
T
A
R
E
LPMA
S
F
I
DP
S
/S
E
A
T
AD
A
ERIW
R
IF
T
UO
/
NIPSD
E
TEM8
1HC G
NI
R
CIM
TN
EM
URTS
NI
z
HK
0.
2B
SU
V
84LABO
G
V
84LAB
O
G
8/
7
/
6/5
/4/
3/
2/
1T
UO
G
O
L
ANA
1TU
O
G
OL
A
N
A
2
T
UOG
OL
A
N
A
7/5
/
3/
1
T
UO
GOL
A
NA
8
/6/
4
/2TUOGOL
A
NA
8~
1
T
U
O
GOLAN
A
N
I
T
U
O
/
N
I
TU
OLX
IM
V84+
K
CAJ4931
BSU
/ER
IWERI
F
NI
N
I
A
G
XIM
T
UO
TU
O
E
R
I
WRIF
PILC
0
1
-
02-
0
4
-
9
2.88
T
U
O/
NI
K
L
CW
N
IAG
E
NI
L
D
N
ES
8
4
TU
O
R
X
I
M
RETNI
1.
44
UBE
/
SEA
NI
21
3
C
IM
21
3
N
I
SEA
V84+
69
TUO
TAD
A
4
.671
KLCW
PILC
01-
0
2
-
0
4-
9
V
8
4
+
S
E
NOHP
NI
E
N
I
L
29
1
TU
O
/
N
ITA
D
A
T
UO/NI
K
CA
JOBM
O
C
V84+
TUO
UBE/SEA
12
3
P
I
L
C
3
-
6
-
0
1
-
0
2
-
04
-
T
U
O/NIFIDP/S
P
IL
C
3-6
-
0
1-
0
2-
0
4
-
D
AP
B
d
0
2-
TU
O
/NIID
I
M
TUOS
E
NOHP
5
Page 39

APPENDIX
Reference Books
Phonic recommends the following books for those interested in advanced audio engineering and sound system operation:
APÉNDICE
Libros de Referencia
Phonic recomienda los siguientes libros para los interesados en ingeniería de audio y operación de sistema de sonido avanzados:
Appendix Apéndice
● Sound System Engineering by Don and Carolyn Davis,
Focal Press, ISBN: 0-240-80305-1
● Sound Reinforcement Handbook by Gary D. Davis, Hal
Leonard Publishing Corporation, ISBN: 0-88188-900-8
● Audio System Design and Installation by Philip
Giddings, Focal Press, ISBN: 0-240-80286-1
● Practical Recording Techniques by Bruce and Jenny
Bartlett, Focal Press, ISBN: 0-240-80306-X
● Modern Recording Techniques by Huber & Runstein,
Focal Press, ISBN: 0-240-80308-6
● Sound Advice – The Musician’s Guide to the Recording
Studio by Wayne Wadham, Schirmer Books, ISBN:
0-02-872694-4
● Professional Microphone Techniques by David Mills
Huber, Philip Williams. Hal Leonard Publishing
Corporation, ISBN: 0-87288-685-9
● Anatomy of a Home Studio: How Everything Really
Works, from Microphones to Midi by Scott Wilkinson,
Steve Oppenheimer, Mark Isham. Mix Books,
ISBN:091837121X
● Live Sound Reinforcement: A Comprehensive
Guide to P.A. and Music Reinforcement Systems
and Technology by Scott Hunter Stark. Mix Books,
ISBN:0918371074
● Audiopro Home Recording Course Vol 1: A
Comprehensive Multimedia Audio Recording Text by
Bill Gibson. Mix Books, ISBN: 0918371104
● Audiopro Home Recording Course Vol. 2: A
Comprehensive Multimedia Audio Recording Text by
Bill Gibson. Mix Books, ISBN:
FIREFLY 808 UNIVERSAL
6
Page 40

 Loading...