

Page 1
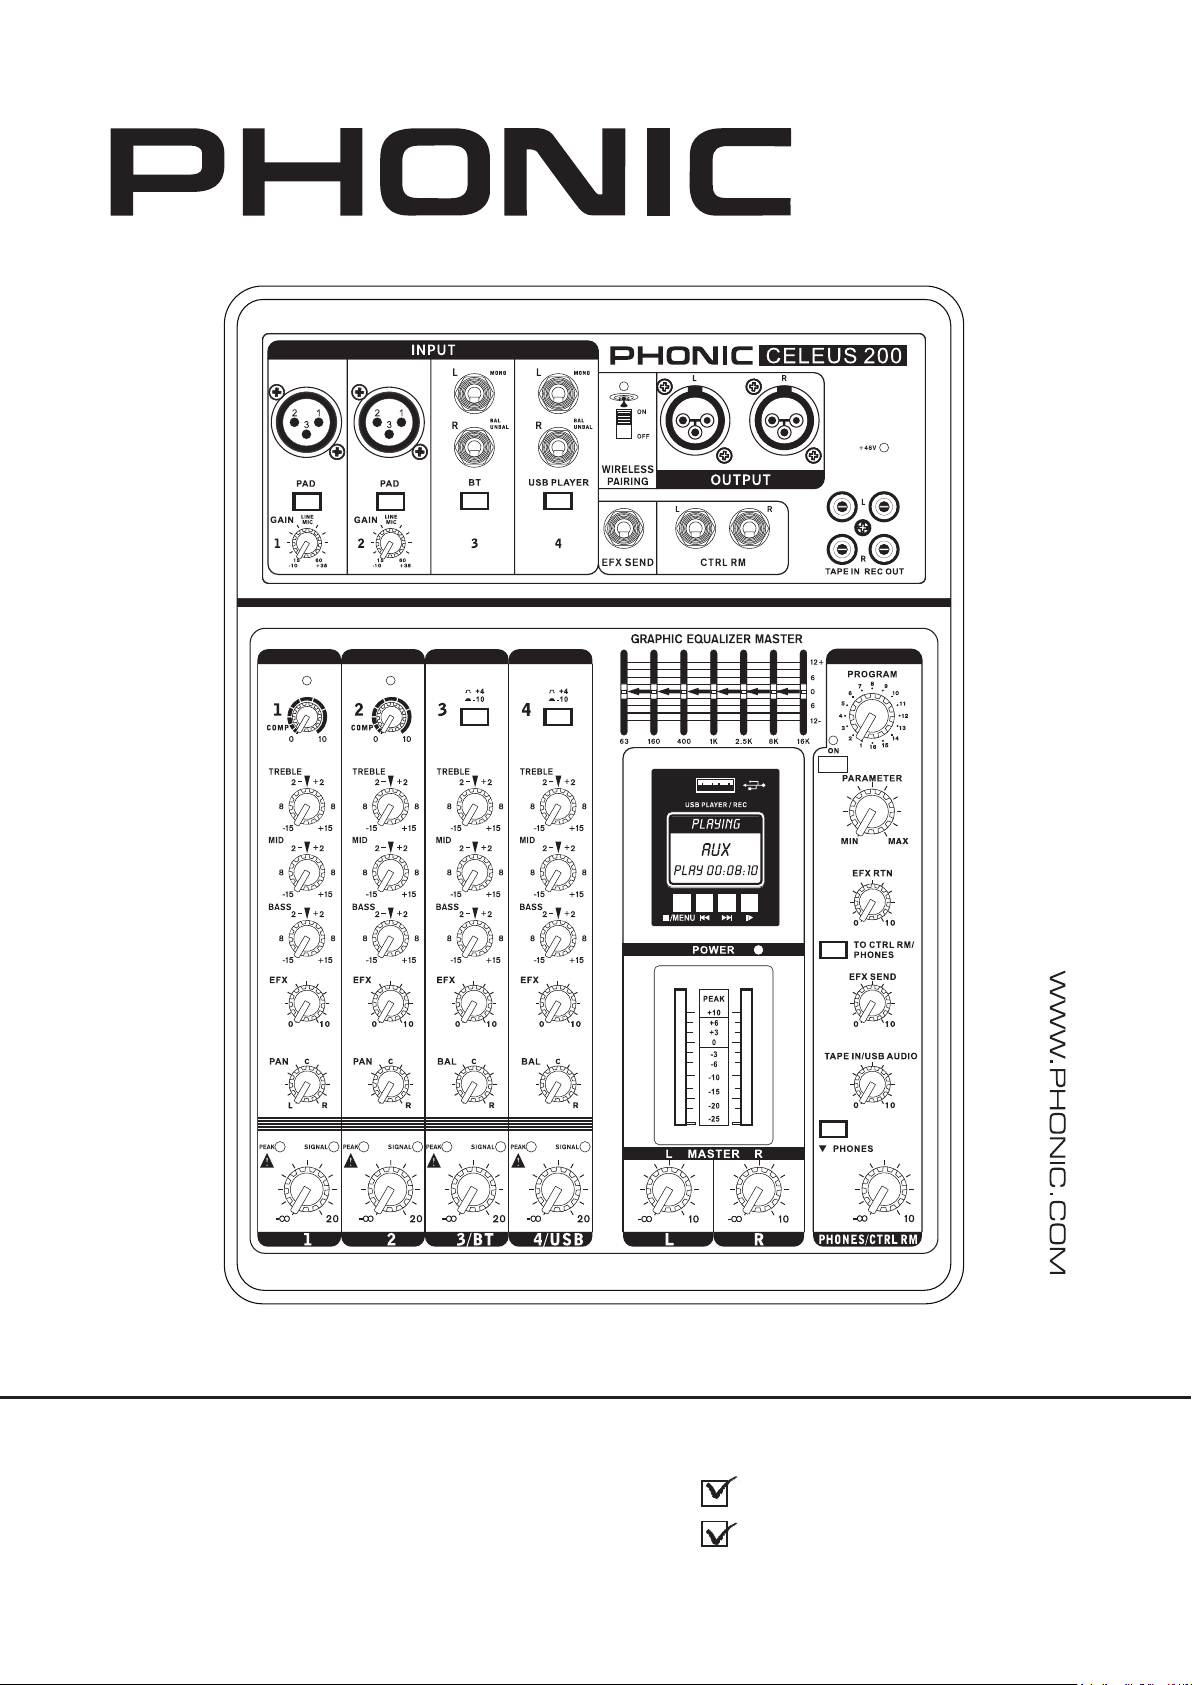
User's Manual
CELEUS 200
Manual del Usuario
Page 2

English Español
CELEUS 200
ANALOG MIXERS
MEZCLADORES ANALÓGICO
ENGLISH .........................................I
ESPAÑOL .....................................II
APPENDIX .....................................III
V1.3 08/08/2016
Page 3

USER'S MANUAL
CONTENTS
INTRODUCTION......................................................................1
FEATURES...............................................................................1
USB SYSTEM REQUIREMENTS.......................................1
BASIC SETUP...........................................................................1
BLUETOOTH SETUP..................................................2
USB PLAYBACK.........................................................2
USB RECORDING...........................................................2
AUDIO INTERFACE..........................................................2
MAKING CONNECTIONS....................................................3
CONTROLS AND SETTINGS...................................................4
SPECIFICATIONS...................................................................7
English
APPENDIX
DIGITAL EFFECTS TABLE.......................................................1
APPLICATION.........................................................................2
DIMENSIONS............................................................................4
BLOCK DIAGRAMS..................................................................5
Phonic reserves the right to improve or alter any information within this
document without prior notice.
CELEUS 200
1
Page 4
IMPORTANT SAFETY INSTRUCTIONS
The apparatus shall not be exposed to dripping or splashing and that no objects
shall be placed on the apparatus. The MAINS plug is used as the disconnect device, the disconnect device shall
English
remain readily operable.
Warning: the user shall not place this apparatus in the
can be easily accessible.
1. Read these instructions before operating this
apparatus.
2. Keep these instructions for future reference.
3. Heed all warnings to ensure safe operation.
4. Follow all instructions provided in this document.
5. Do not use this apparatus near water or in locations
where condensation may occur.
6. Clean only with dry cloth. Do not use aerosol or liquid
cleaners. Unplug this apparatus before cleaning.
7. Do not block any of the ventilation openings. Install
in accordance with the manufacturer
8. Do not install near any heat sources such as radiators,
heat registers, stoves, or other apparatus (including
9. Do not defeat the safety purpose of the polarized or
grounding-type plug. A polarized plug has two blades
with one wider than the other. A grounding type plug
has two blades and a third grounding prong. The wide
blade or the third prong is provided for your safety. If
the provided plug does not
an electrician for replacement of the obsolete outlet.
’
s instructions.
.
into your outlet, consult
with liquids, such as vases,
area during the operation so that the mains switch
CAUTION
RISK OF ELECTRIC SHOCK
DO NOT OPEN
CAUTION: TO REDUCE THE RISK OF ELECTRIC SHOCK,
DO NOT REMOVE COVER (OR BACK)
NO USER SERVICEABLE PARTS INSIDE
REFER SERVICING TO QUALIFIED PERSONNEL
The lightning flash with arrowhead symbol, within an
equilateral triangle, is intended to alert the user to the
“
presence of uninsulated
product
’
magnitude to constitute a risk of electric shock to persons.
The exclamation point within an equilateral triangle is in-
tended to alert the user to the presence of important operat-
ing and maintenance (servicing) instructions in the literature
accompanying the appliance.
WARNING: To reduce the risk of or electric shock, do
not expose this apparatus to rain or moisture.
dangerous voltage” within the
10. Protect the power cord from being walked on or
pinched particularly at plug, convenience receptacles,
and the point where they exit from the apparatus.
11. Only use attachments/accessories
by the
manufacturer.
12. Use only with a cart, stand, tripod, bracket, or
table
by the manufacturer, or sold with
the apparatus. When a cart is used, use caution
when moving the cart/apparatus
combination to avoid injury from tipover.
13. Unplug this apparatus during lighting
storms or when unused for long
periods of time.
14. Refer all servicing to
service personnel.
Servicing is required when the apparatus has been
damaged in any way, such as power-supply cord or
plug is damaged, liquid has been spilled or objects
have fallen into the apparatus, the apparatus has
been exposed to rain or moisture, does not operate
normally, or has been dropped.
CAUTION: Use of controls or adjustments or performance
of procedures other than those
may result in
hazardous radiation exposure.
2
CELEUS 200
Page 5

INTRODUCTION
Thank you for choosing one of Phonic’s many quality
compact mixers. The CELEUS 200 compact mixers –
designed by the ingenious engineers that have created
a variety of mixers fantastic in style and performance in
the past – displays similar prociency that previous Phonic
products have shown; with more than a few renements,
of course. The CELEUS 200 features full gain ranges,
amazingly low distortion levels, and incredibly wide
dynamic ranges, just showing the dominance these small
machines will have on the pro audio market.
We know how eager you are to get started – getting the
mixer out and hooking all your gear up is probably your
number one priority right now – but before you do, we
strongly urge you to take a look through this manual.
Inside, you will nd important facts and gures on the set
up, use and applications of your brand new mixer. If you do
happen to be one of the many people who atly refuse to
read user manuals, then we just urge you to at least glance
at the Basic Setup section. After glancing at or reading
through the manual (we applaud you if you do read the
entire manual), please store it in a place that is easy for
you to nd, because chances are there’s something you
missed the rst time around.
FEATURES
● Audiophile-quality microphone preampliers
● 2 mono mic/line inputs, 2 stereo line input channels
● Flexible ‘compander’ (compressor/expander) available
on channels 1 and 2
● Super musical 3-band equalizers on all input channels
● 7-band graphic equalizer
● 41-segment level meter for master audio levels
● Bluetooth audio streaming from tablets and smartphones
● USB recording module for recording/playback of digital
audio les; supports playback of mp3 and wma les
● USB connectivity for stereo streaming to and from the
computer
● 32/40-bit digital eect processor with 16 preset programs
each with its own adjustable parameter
● Independent EFX control on each input channel
● Balanced stereo main out through XLR connectors
● Stereo headphone output jack with independent level
control, plus stereo Control Room output for monitors
● Stereo RCA 2T return inputs and record outputs
USB SYSTEM REQUIREMENTS
Windows
• Windows™ XP SP2, Vista™, 7, 8 or 10
• Intel™ Pentium™ 4 processor or better
• 512 MB RAM (1 GB recommended)
BASIC SETUP
Getting Started
1. Ensure all power is turned o on your mixer. To totally
ensure this, the power supply should not be connected
to the unit.
2. All faders and level controls should be set at the lowest
level and all channels switched o to ensure no sound is
inadvertently sent through the outputs when the device
is switched on. All levels can be altered to acceptable
degrees after the device is turned on using the channel
setup instructions.
3. Plug any necessary equipment into the device’s various
outputs. This could include ampliers and speakers,
monitors, signal processors, and/or recording devices.
4. Plug the supplied power cable into the inlet on the back
of the device and then into a power outlet of a suitable
voltage.
5. Turn the power switch on and follow the channel setup
instructions to get the most out of your mixer.
Channel Setup
1. To ensure the correct audio level of the input channel
is selected, each of the level input controls of the mixer
should be turned counterclockwise or down as far as
they will go.
2. No input other than the one being set should have any
device plugged in. This will ensure the purest signal is
used when setting channels.
3. Set the level control of the channel you are setting to
around the middle point of the control.
4. Ensure the channel has a signal sent to it similar to
the signal that will be sent when in common use. For
example, if the channel is using a microphone, then you
should speak or sing at the same level the performer
normally would during a performance; if a guitar is
plugged into the channel, then the guitar should also
be strummed as it normally would be (and so on). This
ensures levels are completely accurate and avoids
having to reset them later.
5. Set the gain so the Level Meter indicates the audio
level is around 0 dB. For channels 2 and 3, which do
not feature a gain control, adjust the level controls
appropriately.
6. This channel is now ready to be used; you can stop
making the audio signal.
7. You can repeat the same process for other channels.
English
Macintosh
• Apple™ Mac™ OSX 10.5 or higher
• G4™ processor or better
• 512 MB RAM (1 GB recommended)
CELEUS 200
1
Page 6

BLUETOOTH SETUP
1. Set the "Wireless Pairing" switch to the ON position and
English
push the BT button on channel 3.
2. Enter your laptop, cell phone or tablet’s Bluetooth setup
options to nd the “Phonic.BT” Bluetooth device.
3. If requested, the password for the CELEUS 200’s
Bluetooth function is 0000. A lot of modern smartphones
will enter this as the default password.
4. Audio signals received through the Bluetooth interface
will be routed to channel 3 on the mixer.
5. To reset the connection, turn your laptop, cell phone or
tablet’s Bluetooth connection o and then on again.
6. When using cell phones and tablets, it may be an idea to
turn “Airplane Mode” or “Flight Mode” on to stop phone
calls or push notications from interrupting your audio.
Note: Not all modern Bluetooth-enabled devices allow for use of external
audio playback. In the case of laptops in particular, Bluetooth may be used
for data transmission only - depending on the model. This is a limitation of
these devices and you will not be able to use the CELEUS 200’s Bluetooth
function with these devices.
USB PLAYBACK
1. Power on the device.
2. Insert an appropriately formatted (FAT32) USB ash
drive.
3. Press the PLAY button to play the current track, or
the << and >> buttons to skip forward and backwards
between tracks.
4. The CELEUS 200 can play MP3 and WMA les.
5. Use the level control for channel 4 to adjust the USB
player’s volume. Ensure the USB PLAYER button is
engaged.
6. Press the STOP/MENU button to access the File Browser
(Folders) and Repeat Mode functions.
Folders – Freely navigate songs in each folder on USB
ash disc using the << and >> buttons. Press PLAY button
to select, press MENU button to go back.
Repeat Mode – There 4 repeat modes available.
No Repeat – Play each le in the current folder or root
once.
Repeat One – Continuously repeat selected song.
Repeat Folder – Continuously repeat all the song in the
current folder or root directory.
Random – Enables random playback of les in current
folder or root.
USB RECORDING
1. Insert a FAT-32 formatted USB ash drive to the USB
player.
2. In the main menu, select “Recordings” and press the
PLAY button to enter the recording function.
3. Here you have three options: 'Start voice recording,'
'Recordings library,' and 'Storage'. To select the recording
destination, enter the 'Storage' menu and choose either the
USB ash drive or the internal storage (70MB available).
4. Select "Start voice recording" to begin recording
immediately. The unit will save an audio le to the
selected storage destination.
5. Push the PLAY button to pause recording. Pushing
the PLAY button again will resume recording from the
position at which it was paused.
6. Press the STOP/MENU button at any time to stop the
recording. The device will then ask if you wish to save
your recording. Select "Yes" or "No".
7. Press the STOP/MENU button to exit.
Note: As the quality of the ash drive can aect recording performance,
Phonic recommends using Sandisk brand drives to help ensure stable
recording performance.
USB MODULE STORAGE
The CELEUS USB player module features approximately
70MB of onboard storage to use for playback. That may
sound small but that could mean up to 60 minutes of music
at 128 Kbps, or a few hours of speech at 40 Kbps.
To upload les to the onboard storage, you will need a USB-A
to USB-A cable. Connect the USB connector on the face of
the CELEUS to your computer and it will be recognized as a
USB storage device. Copy audio les to the CELEUS 200.
Files on onboard storage will only be available when a USB
ash drive is not connected.
AUDIO INTERFACE
By simply connecting the USB cable provided along with
your CELEUS to the device and your personal computer or
laptop, you are able to send DVD quality (16-bit stereo, with
a 48 kHz sampling rate) signal to and from your mixer. By
doing this, you are actually turning your CELEUS 200 into
a highly useful plug’n’play soundcard for your computer.
The USB sends an audio stream of the Main Left and Right
(record out) signal of your mixer to the computer. You can
use almost any dedicated Digital Audio Workstation (DAW)
software to record the signal from the CELEUS mixer. You
can also set the mixer as your default audio device.
The USB interface also returns a stereo audio signal from
your computer back to the TAPE IN/USB AUDIO control of
the CELEUS. This can be used with your main mix or sent
to your headphone mix.
Windows
1. Turn on both the CELEUS and the computer.
2. Connect the CELEUS mixer to the computer via the
provided USB cable.
3. Let Windows nd the device and install an appropriate
driver.
4. Enter the Control Panel and select Sounds and Audio
Devices.
5. When here, go to the Audio tab and select the “USB
Audio Codec” as your default sound recording and
playback device.
6. Depending whether you have Windows XP, Vista, 7, 8 or
10, this may dier slightly, but the setting can always be
found within the Control Panel’s audio menu.
7. If you don’t want to use the CELEUS as your default
audio device, you can simply enter your DAW or other
audio program and select it as your default device in the
program only.
8. Be sure to set your minimum buer settings to 64
samples as to avoid clicks and pops.
Mac
1. Turn both the CELEUS and the computer on.
2. Connect the CELEUS mixer to the computer via the
provided USB cable.
3. Enter the AUDIO MIDI SETUP menu.
4. Select the “USB Audio Codec” as your input and output
device.
5. The CELEUS is now your default audio device.
6. Alternatively, enter your DAW software (or other relevant
audio program) and select the “USB Audio Codec” in the
device preferences.
7. Be sure to set your minimum buer settings to 64
samples as to avoid clicks and pops.
2
CELEUS 200
Page 7
MAKING CONNECTIONS
67
Front Panel
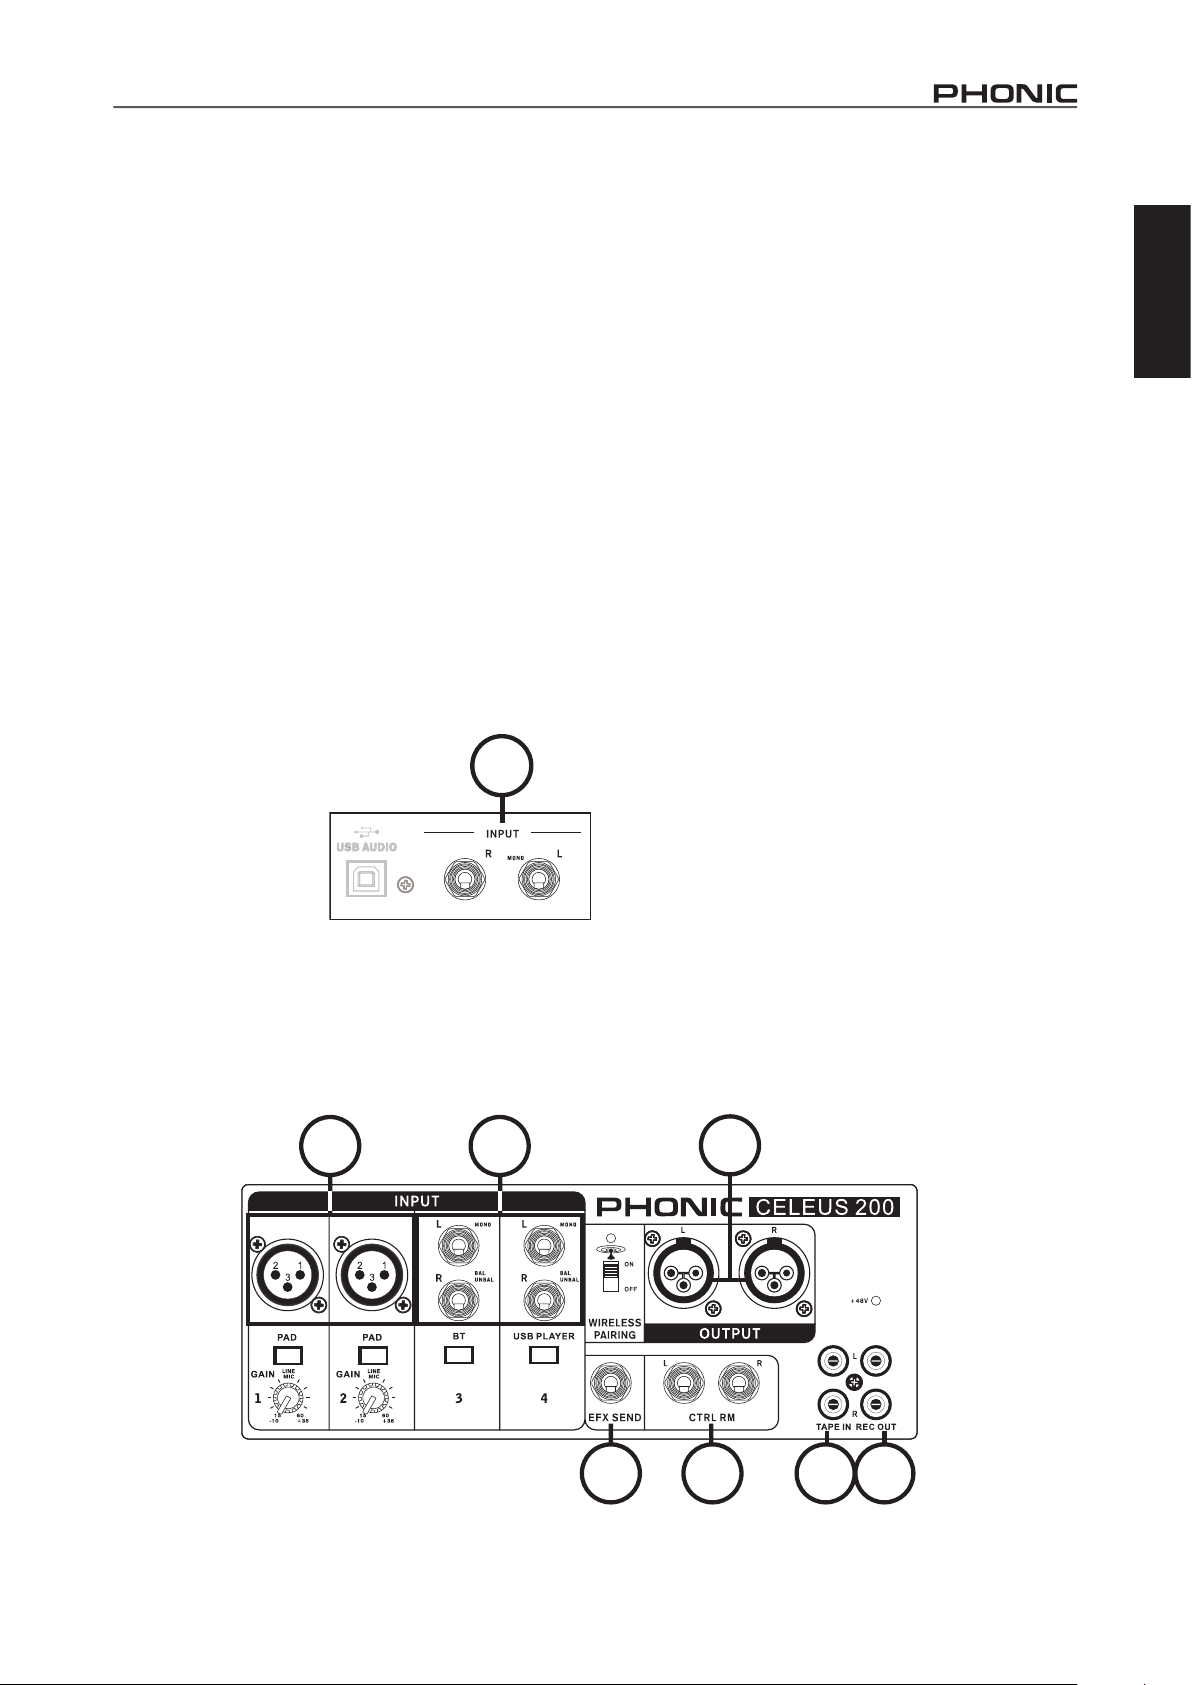
1. XLR Jacks
These jacks accept XLR inputs for balanced signals. They
can be used in conjunction with microphones – such as
professional condenser, dynamic or ribbon microphones
– with standard XLR male connectors. With low noise
preampliers, these inputs serve for crystal clear sound
replication.
NB. When using an unbalanced microphone, please ensure phantom power
is switched o. However, when using condenser microphones the phantom
power should be activated.
2. Stereo Channel Inputs
The CELEUS 200 features 2 stereo input channels
(channels 3 and 4), the inputs of which dier slightly to the
mono channels. Each channel includes two ¼" TRS phone
jacks ideal for use with keyboards, drum machines and
electric guitars.
If you wish to use a mono device on a stereo input, simply
plug the device’s ¼” phone jack into the left (mono) input jack
and leave the right input bare. The signal will be duplicated
to the right due to the miracle of 'jack normalizing'.
Channels 1 and 2 also
includes line-level inputs,
conveniently located on
the rear of the CELEUS
200 mixer, that can double
as a single stereo channel
if needed. The "L" port is
routed to channel 1 while
"R" is routed to channel 2.
Stereo channels can also be used with return signals
from external digital sources. Channel 3 doubles as the
Bluetooth channel, while channel 4 also works with the on
board USB playback module. When channels are used for
these signals, the stereo inputs are eectively disengaged.
2
3. EFX Output
These 1/4" TS phone jack is the nal output of the EFX mix,
as controlled by the individual EFX rotary controls found
on each channel. This can be used to feed any number of
external signal processors. The signal can then be returned
to the CELEUS 200 through a stereo line input channel.
4. Main Output Connectors
These balanced XLR connections will send the nal stereo
line level signal sent from the main mix. These outputs can
be connected to an amplier for sending the signal out to
speakers, or directly to active speakers.
5. Control Room Output Connectors
These 1/4” TS phone jack outputs are fed from the Control
Room / Phones mix as controlled by the Control Room /
Phones level control. This output has extensive use, as it
can be used to feed the signal from the mixer to an active
monitor, for the monitoring of the audio signal from within a
booth, among many other possible uses.
6. Tape In (L and R)
These inputs accommodate RCA cables from such devices
as tape, CD and MP3 players. The line from this feed is
directed to the Tape In mix and controlled by the Tape In /
USB Audio level control.
7. Record Out (L and R)
As with the Tape In ports, these outputs will accommodate
RCA cables, able to be fed to a variety of recording
devices. This may include cassette recorders or even
laptop computers. Phonic suggests the use of a y-cable
for connection of consumer electronics that feature mini-
stereo jacks.
English
CELEUS 200
12
3 5
4
3
Page 8
Rear Panel
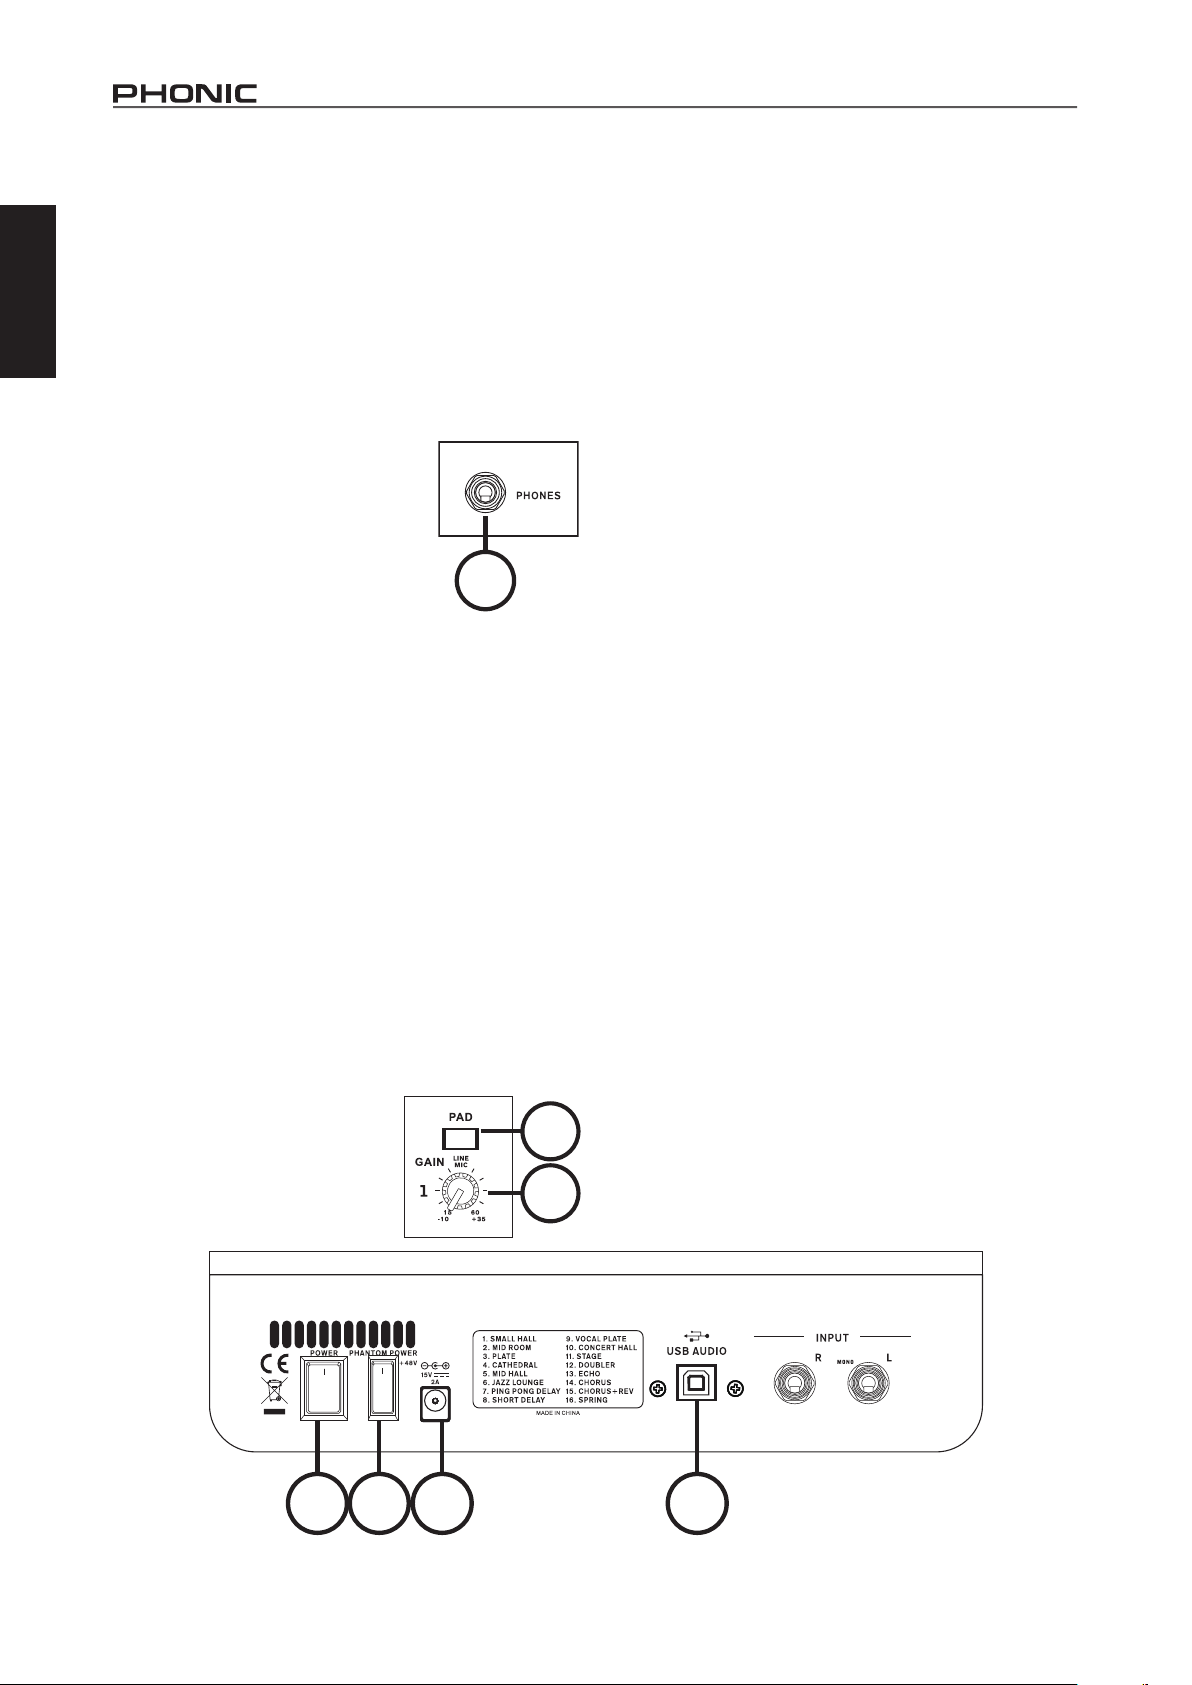
8. USB Connector
English
This USB-B connection is for the USB computer interface.
Use the included USB cable to connect this to your
computer's USB port.
9. DC Power Input
This standard DC power input port is for connection of the
included power supply. Please use the included power
supply only as using the incorrect voltage can cause
irreversible damage to the mixer.
10. Headphones Jack
This stereo output port, found on the
very front of the mixer, is suited for use
with headphones, allowing monitoring
of the mix. The audio level of this output
is controlled using the Phones/Control
Room control on the front panel.
CONTROLS AND SETTINGS
11. Phantom Power Switch
When this switch is in the on position, it activates +48V
of phantom power for XLR microphone inputs, allowing
condenser microphones to be used on these channels.
Activating Phantom Power will be accompanied by an
illuminated LED above the mic input. Before turning Phantom
Power on, turn all level controls to a minimum to avoid the
possibility of a ghastly popping sound from the speakers.
NB. Phantom Power should be used in conjunction with balanced
microphones. When Phantom Power is engaged, single ended
(unbalanced) microphones and instruments should not be used
on the Mic inputs. Phantom Power will not cause damage to most
dynamic microphones, however if unsure, the microphone’s user
manual should be consulted.
12. Power Switch
This switch is used to turn the mixer on and o. Ensure you
turn all level controls down before activating. This ensures
no audio is inadvertently sent through your system.
Channel Controls
13. PAD Button
The PAD button is used to
attenuate the input signal by 25
dB. This should only be pushed
in when using line-level input
devices.
10
13
14
14. Gain Control
This controls the sensitivity of the input signal of the Line/
Microphone input of the rst and second input channels.
The gain should be adjusted to a level that allows the
maximum use of the audio, while still maintaining the
quality of the feed. This can be accomplished by adjusting
it to a level that will allow the peak indicator occasionally
illuminate.
15. Compressor Control and Indicator
This controls the onboard compressor function on channel
1. Turning this control up towards the 12 o’clock position will
adjust the threshold and ratio of the compressor at varying
degrees. Once you reach the 12 o’clock position, the
control will then adjust the compression settings along with
an onboard expander (or, in other words, a 'compander').
The LED that accompanies this control will light up when
the compressor is triggered.
16. TREBLE (High Frequency) Control
This control is used to give a shelving boost or cut of ±15
dB to high frequency (12 KHz) sounds. This will adjust
the amount of treble included in the audio of the channel,
adding strength and crispness to sounds such as guitars,
cymbals and synthesizers.
17. MID (Middle Frequency) Control
This control is used to provide a peaking style of boost and
cut to the level of middle frequency (2.5 KHz) sounds at a
range of ±15 dB. Changing middle frequencies of an audio
feed can be rather dicult when used in a professional
audio mix, as it is usually more desirable to cut middle
frequency sounds rather than boost them, soothing overly
harsh vocal and instrument sounds in the audio.
18. BASS (Low Frequency) Control
This control is used to give a shelving boost or cut of ±15
dB to low frequency (80 Hz) sounds. This will adjust the
amount of bass included in the audio of the channel, and
bring more warmth and punch to drums and bass guitars.
19. EFX Control
This control alters the signal level that is sent to the EFX
output, which can be used in conjunction with external
signal processors (this signal of which can be returned to
mixer via the stereo return inputs), or simply as additional
auxiliary outputs for any means required. This control also
adjusts the level of audio that is sent to the built-in digital
eect panel.
891112
4
CELEUS 200
Page 9
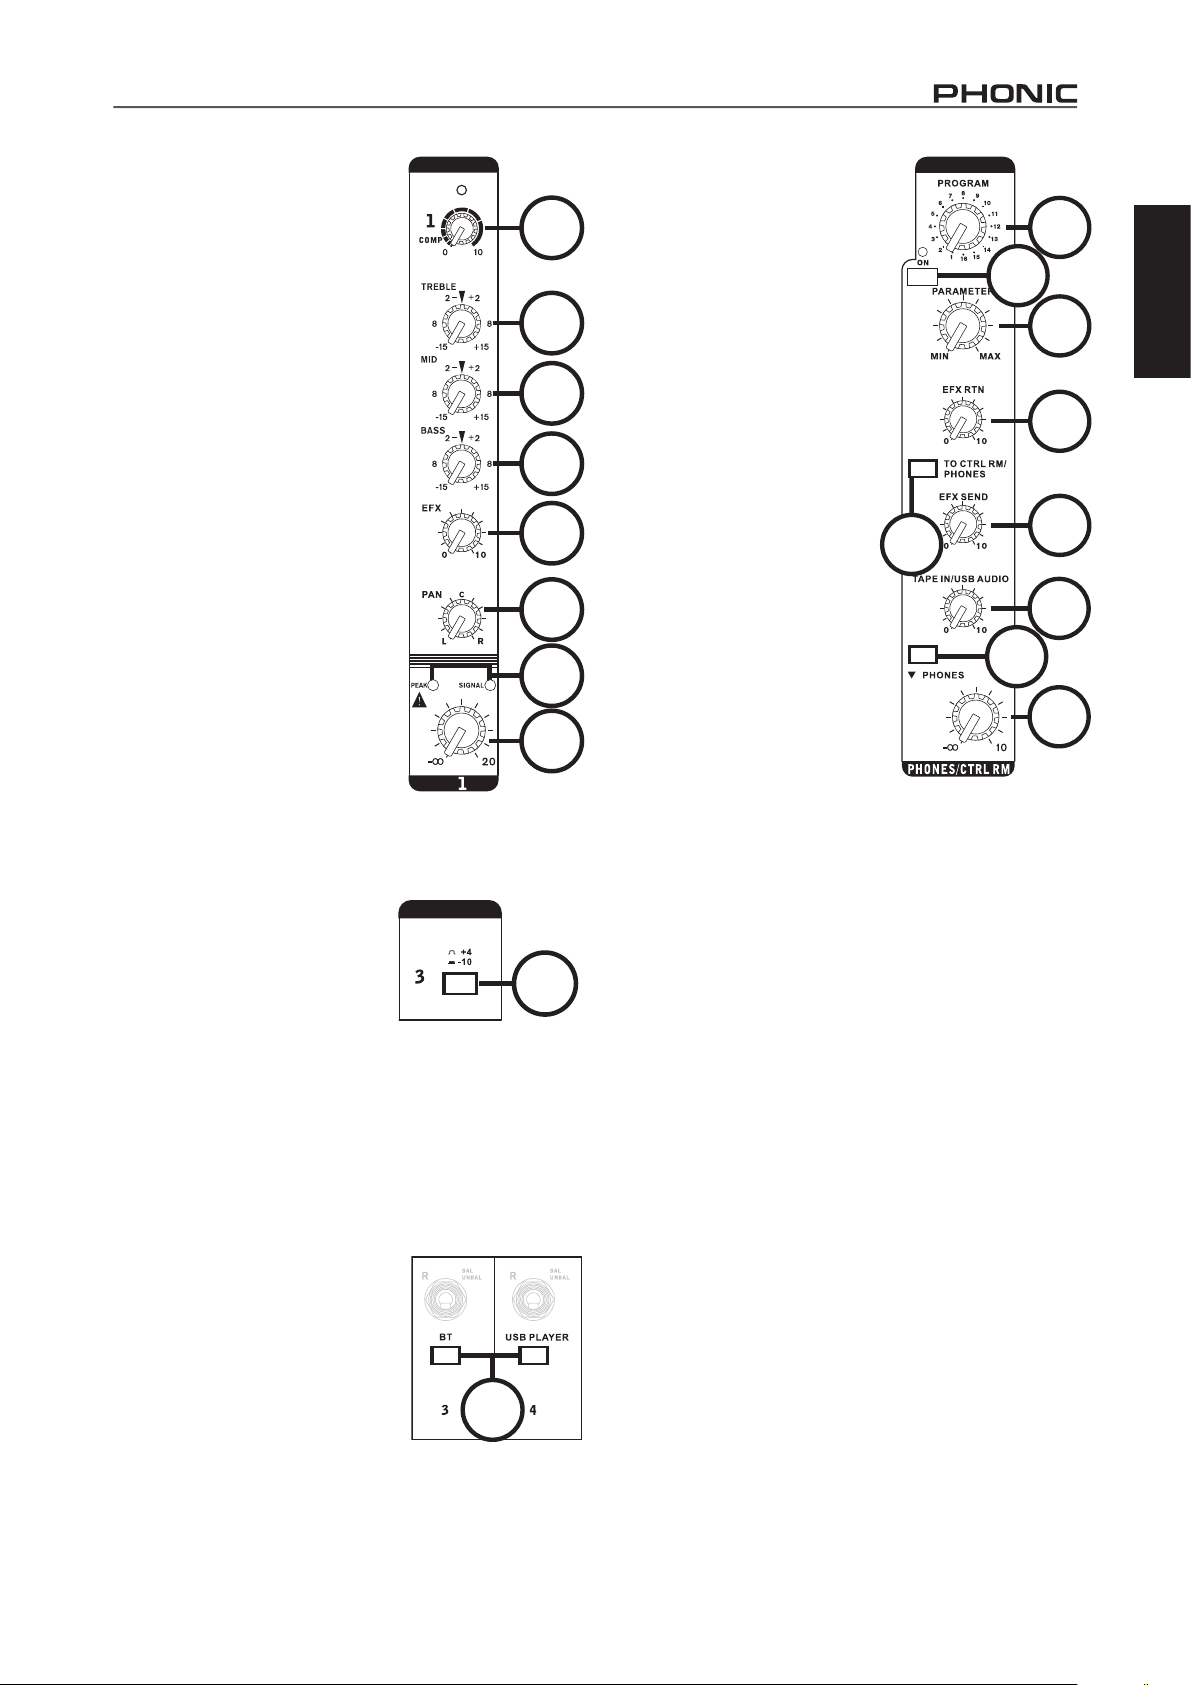
20. Pan / Balance Controls
This alternates the degree or level
of audio that the left and right side
of the main mix should receive. On
mono channels, the PAN control
will adjust the level that the left and
right should receive (pan), where as
on a stereo channel, adjusting the
BAL control will attenuate the left
or right audio signals accordingly
(balance).
21. Peak & Signal Indicators
These LEDs will light up when
signals reach certain levels. The
Signal LED on the right will light up
when an any audio signal is present
on the channel. The indicator on
the left (Peak) will light up when
the channel hits high peaks, 6 dB
before overload occurs.
It is best to adjust the channel level
control so as to allow the Peak
indicator to light up on regular
intervals only. This will ensure a
greater dynamic range of audio.
22. Channel Level Control
This control will alter the signal level that is sent from the
corresponding channel to the main mix.
23. +4 / -10 Buttons
These buttons, located on
stereo channels, are used
adjust the input sensitivity of
the corresponding channel,
which will adapt the mixer to
external devices dependeing
on their operating levels. If the input source is -10 dBu
(consumer audio standard), it is best to engage the switch,
giving the signal a slight boost. If the input source is +4
dbV (professional audio standard) the button should be
disengaged. If you are unsure of the source’s operating
level, leave the switch disengaged until you test the
source’s signal level.
24. 'BT' and 'USB Player' buttons
Located on channels 3 and 4, these
buttons enable their corresponding
channels to be used for their
respective digital audio signals.
The BT button allows channel 3
to be used for the Bluetooth audio
streaming function, while the USB
Player button allows channel 4 to
control the signal from the onboard
USB audio player.
15
16
17
18
19
20
21
22
23
24
Digital Eect Processor
25. Program Control
This control will allow users
to select one of the 16 built-in
digital eects of the CELEUS
analog mixer. The eect
names that correspond with the
numbers can be found on the
top of the mixer’s face, or in the
digital eect table.
26. Eects On Button and
Indicator
Pushing this button will turn the
built-in eect processor on and
o. When the eect processor
is activated, the corresponding
LED will light up to indicate so.
27. Parameter Control
Turning this control will adjust
the one main parameter of the
selected eect. Each eect’s
parameter can be found on the
digital eect table.
28. EFX RTN Control
This control adjusts the nal output level of the DFX
processor as sent to the main mix. For more EFX in your
signal ('wet'), turn this control up and your channels' level
controls down. For 'dryer' audio, turn the individual channel
level controls up and reduce the EFX control.
29. "To Phones / Control Room" Button
This button will allow you to send your EFX signal to the
Headphone and Control Room mixes for monitoring.
30. EFX Send Control
This is the nal level control for the EFX Send mix. Your
EFX mix is created by using the individual EFX controls
found on input channels 1 through 4.
29
25
26
27
28
30
31
32
33
Main Section
31. Tape In/USB Audio Control
This control adjusts the incoming signal from both the RCA
"Tape In" jacks and the USB audio interface return signal.
The signals are then sent to the main mix. If there are input
signals from both the USB interface and the Tape In, the
two signals are combined and controlled simultaneously.
32. Tape In/USB To Phones/Control Room Button
Pushing this button in will send your Tape In/USB signal to
the Headphone and Control Room mixes for monitoring.
33. Phones/Control Room Control
This level control determines the nal output level of both
the Headphone jack as well as the stereo Control Room
outputs. The default signal for this mix is the main mix
unless the "EFX TO MAIN" or "TAPE IN/USB TO MAIN"
buttons are engaged.
English
CELEUS 200
5
Page 10
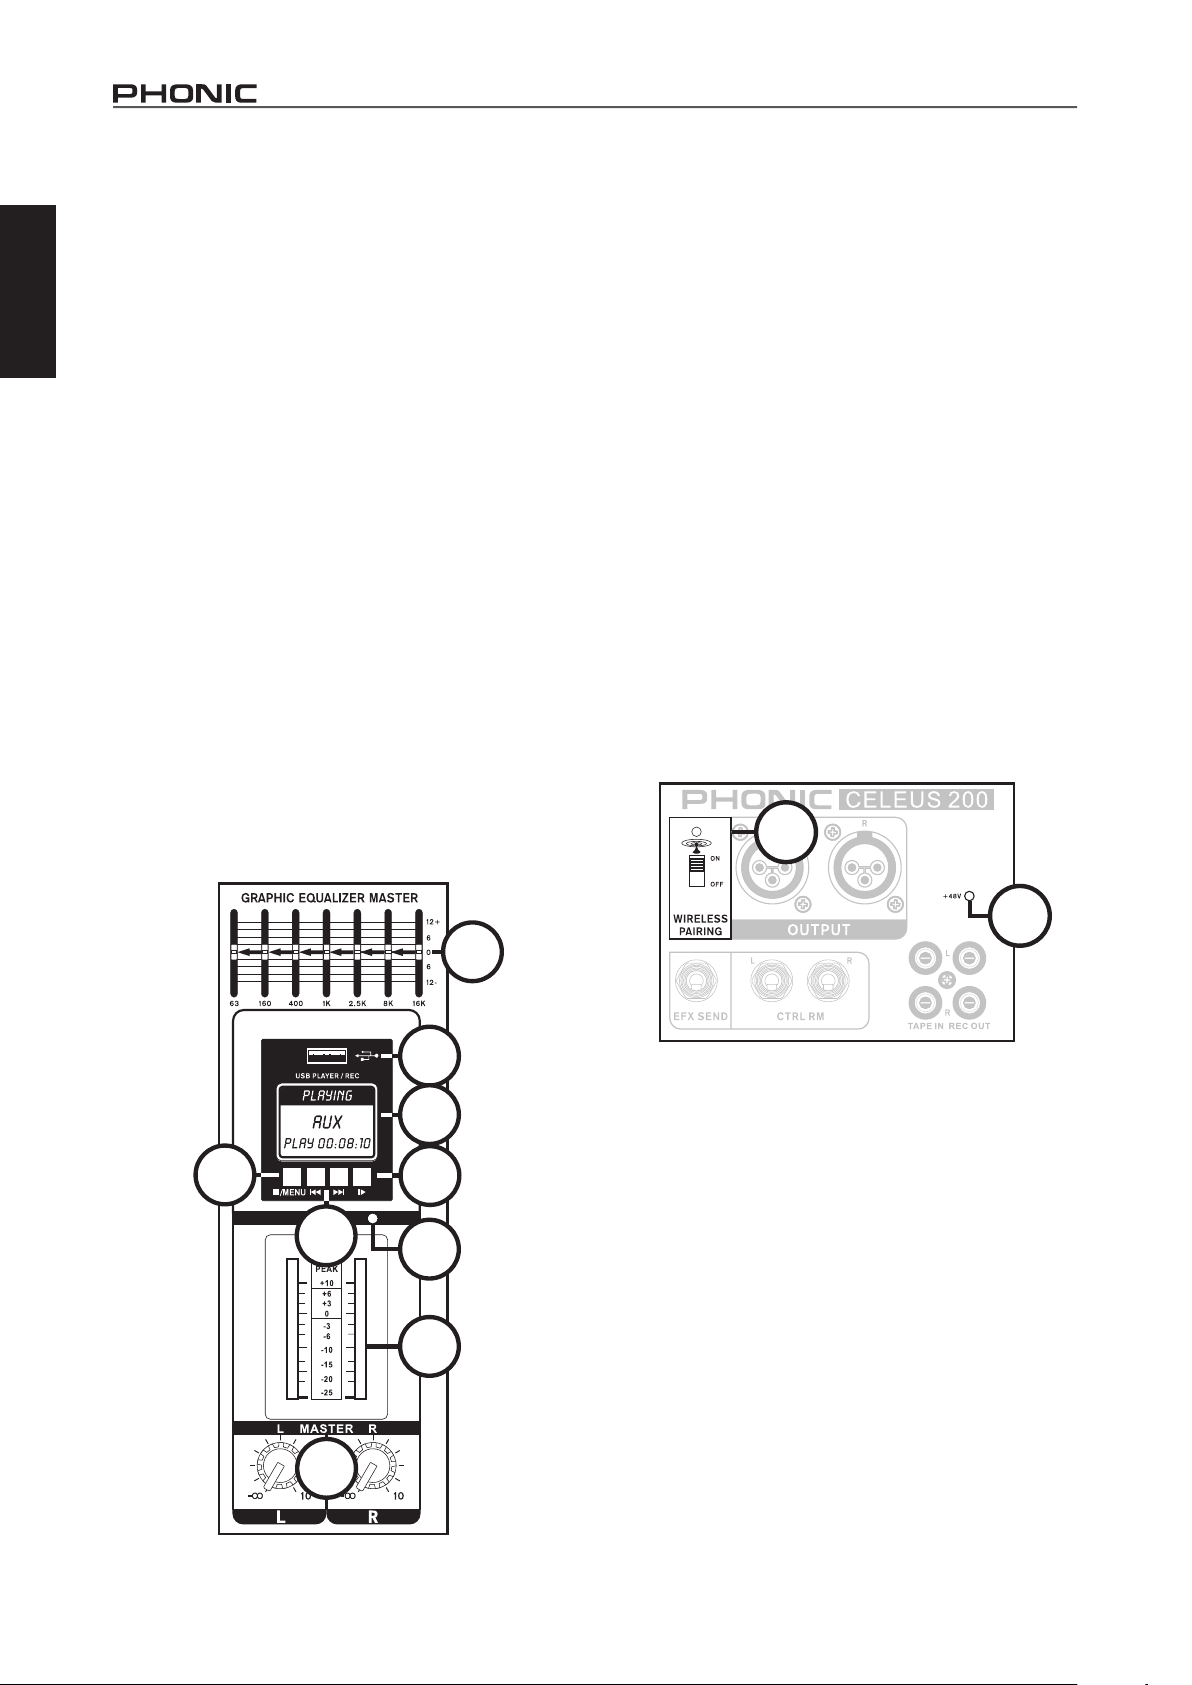
34. Graphic Equalizer
This graphic equalizer allows you to adjust the frequency
response of the main signal, with a maximum of ±12 dB of
English
signal boost or cut for each of the frequencies.
35. Power Indicator
This indicator illuminates when power is activated.
36. Master L/R Level Controls
These rotary controls are the nal level control for the Master
Left and Right audio sends, sent to the Main Outputs on the
rear. When turned all the way up, the Main L/R controls
provide 10 dB of gain to the signal. When set all the way
down, the signal is eectively muted. These will also adjust
the nal output level of the signal sent through the USB
interface to the computer.
37. Level Meter
This dual 41 segment level meter gives an accurate indication
of when audio levels of the Main L/R signal reach certain
levels. The 0 dB indicator illuminates is approximately equal to
an output level of +4 dBu (balanced), and the PEAK indicator
illuminates about 1.5 dB before the signal is dynamically
clipped. To make the maximum use of audio, set the various
level controls so that it sits steadily around 0 dB to make full
use of audio, while still maintaining fantastic clarity.
USB Recorder Description
The USB Recorder’s source signal is taken directly from
each individual input channel. When playing audio, the
signal will pass through Channel 4 when the USB PLAYER
button is engaged. The CELEUS 200 supports playback of
WMA and MP3 les with bit rates of up to 320 kbit/s.
38. USB Port
Connect your USB ash drive to this input. Once a drive
is connected, the les will initiate and the main menu will
appear on screen. Users are advised to format their USB
memory sticks with a FAT-32 le system. This connector
can also be used to connect to your PC to take advantage of
the onboard storage.
39. Display
This display will display the track number currently being
played. It also oers play, pause and record indicators as
well as the current play/record time.
40. Play Button
Push this button to start and stop playback and recording
of the currently displayed track. Starting a track after it is
paused will resume the track from the point at which it was
paused (in both record and playback mode).
41. Back/Next Buttons
Pushing these buttons will allow users to skip back and
forwards between tracks. When the menu is activated,
these buttons are used to scroll through on screen options.
42. Stop/Menu Button
Push this button to stop playback or recording when
applicable. Push and hold the button to access the USB
recorder/player’s main menu.
43
42
41
36
38
39
40
35
37
44
34
43. Wireless Pairing Switch and Indicator
This switch turns the Bluetooth function of the CELEUS
200 on and o. The "WIRELESS READY" LED will light up
when a connection is established between most Bluetoothenabled Smartdevice and the CELEUS. The bluetooth
signal is fed through channel 3. Ensure the channel's "BT"
button is engaged on this channel. The CELEUS 200 will
appear as Phonic.BT in your device's bluetooth selection
menu.
44. +48V Indicator
This LED indicator will light up when Phantom Power is
activated on microphone inputs.
6
CELEUS 200
Page 11

SPECIFICATIONS
Total Channels 4
Balanced Mono XLR Channels (Mic/Line) 2 (one with stereo line inputs)
Balanced Stereo Line Channels 2
2T Input Stereo RCA
Main L/R Stereo Output 2 x XLR
Control Room Output 2 x 1/4” TS
EFX Send 1 x 1/4” TS
Rec Out Stereo RCA
Phones Stereo TRS
USB Interface Stereo In/Out
USB Connector Type USB Type B
USB Audio Bitrate 16-bit
USB Audio Sampling Rate 48 kHz
USB Module Onboard Storage 70MB
Wireless Frequency (Streaming Audio) 2.4 GHz
Phones Level Control Yes
Main L/R Level Control 2 x Rotary
Metering 2 x 41
Phantom Power Supply +48V DC
Frequency Response (Mic input to any output)
20Hz - 60KHz +0/-1 dB
20Hz - 100KHz +0/-3 dB
Crosstalk (1KHz @ 0dBu, 20Hz to 20KHz bandwidth, channel in to main L/R outputs)
Channel fader down, other channels at unity <-90 dB
Noise (20Hz to 20KHz; measured at main output, Channels 1-3 unit gain; EQ at; all channels on main mix. Reference=+6dBu)
Master @ unity, channel fader down 80 dB
Master @ unity, channel fader @ unity -84 dBu
S/N ratio, ref to +4 >90 dB
Microphone Preamp E.I.N. (150 ohms terminated, max gain) <-129.5 dBm
THD (Any output, 1KHz @ +14dBu, 20Hz to 20KHz, channel inputs) <0.005%
CMRR (1 KHz @ -60dBu, Gain at maximum) 80 dB
Maximum Level
Mic Preamp Input +10 dBu
All Other Input +21 dBu
Balanced Output +28 dBu
Impedance
Mic Preamp Input 2 K ohms
All Other Input (except insert) 10 K ohms
RCA 2T Output 1.1 K ohms
Channel Equalization 3-band, +/-15dB
Low EQ 80Hz
Mid EQ 2.5 KHz
Hi EQ 12 kHz
Compressor 2
32/40-bit Digital Eect Processor 16 eects each with one adjustable parameter
Power Requirement 100-240 VAC, 50/60 Hz External
Dimensions (H x W x D) 87 x 250 x 341 mm (3.4” x 9.8” x 13.4”)
Weight 1.69 kg (3.7 lbs)
English
CELEUS 200
7
Page 12

SERVICE AND REPAIR
English
For replacement parts, service and repairs please contact the Phonic distributor in your
country. Phonic does not release service manuals to consumers, and advice users to not
attempt any self repairs, as doing so voids all warranties. Yo u can locate a dealer near you at
http://www.phonic.com/where/.
WARRANTY INFORMATION
Phonic stands behind every product we make with a no-hassles warranty. Warranty coverage
may be extended, depending on your region. Phonic Corporation warrants this product for a
minimum of one year from the original date of purchase against defects in material and
workmanship under use as instructed by the user’s manual. Phonic, at its option, shall repair
or replace the defective unit covered by this warranty. Please retain the dated sales receipt as
evidence of the date of purchase. You will need it for any warranty service. No returns or repairs
will be accepted without a proper RMA number (return merchandise authorization). In order to
keep this warranty in effect, the product must have been handled and used as prescribed in the
instructions accompanying this warranty. Any tampering of the product or attempts of self repair
voids all warranty. This warranty does not cover any damage due to accident, misuse, abuse,
or negligence. This warranty is valid only if the product was purchased new from an authorized
Phonic dealer/distributor. For complete warranty policy information, please visit
http://www.phonic.com/warranty/.
CUSTOMER SERVICE AND TECHNICAL SUPPORT
We encourage you to visit our online help at http://www.phonic.com/support/. There you can find
answers to frequently asked questions, tech tips, driver downloads, returns instruction and other
helpful information.
http://www.phonic.com
8
CELEUS 200
Page 13

Manual del Usuario
CONTENIDO
INTRODUCCION..........................................................................1
CARACTERISTICAS....................................................................1
REQUISITOS DEL SISTEMA USB..................................................1
CONFIGURACION BASICA.........................................................1
CONFIGURACIÓN BLUETOOTH...................................................2
REPRODUCCION USB..................................................................2
GRABACIÓN USB..........................................................................2
INTERFAZ DE AUDIO.....................................................................2
HACER CONEXIONES................................................................3
CONTROLES Y AJUSTES..............................................................4
ESPECIFICACIONES.....................................................................7
Español
APÉNDICE
TABLA DE EFECTOS DIGTALES...................................................1
APLICACIONES.............................................................................2
DIMENSIONES..............................................................................4
Phonic se reserva el derecho de mejorar o alterar cualquier información
provista dentro de este documento sin previo aviso.
CELEUS 200
9
Page 14
Español
10
CELEUS 200
Page 15

INTRODUCTION
Gracias por haber elegido unos de nuestros mezcladores
compactos de gran calidad Phonic. El mezclador compacto
CELEUS 200 que está diseñado por nuestros competentes
ingenieros, que anteriormente han creado una gran variedad
de mezcladores fantásticos, con gran estilo y rendimiento.
Al igual que los productos anteriores de Phonic, el CELEUS
200 muestra una gran ecacia; naturalmente con una gran
variedad de características añadidas. CELEUS 200 ofrece
niveles de distorsión increíblemente bajos, un rango dinámico
de alta efciencia, y muchas otras características que predicen el
predominio que estas pequeñas máquinas tendrán en el mercado
del audio profesional.
Sabemos que está impaciente para empezar - conectar todo
su equipo, probablemente, es su prioridad número uno en
este momento. Pero antes de hacerlo, le recomendamos
encarecidamente que lea el manual. En el interior, encontrará datos
y cifras importantes sobre la conguración, uso y aplicaciones de
su nueva mezcladora. Si no desea leer detalladamente el manual
de usuario, entonces le aconsejamos que, al menos, eche un
vistazo a la sección de conguración básica. Después de hojear
o leer el manual (le felicitamos si usted lee todo el manual), por
favor guárdelo en un lugar que sea fácil de encontrar, porque lo
más probable es que haya algo que paso por alto la primera vez.
CARACTERISTICAS
● Preamplicadores de micrófono de alta calidad
● 2 entrada de micrófono mono, 2 canales estéreo de entrada
linear
● Compresor/expansor (compander) Flexible disponible en las
entradas 1 y 2
● Ecualizadores de 3 bandas en todos los canales de entrada
● Ecualizador gráco de 7 bandas
● Medidor de nivel de 41 segmentos para los niveles de audio
maestro
● Transmisión de audio Bluetooth desde tablets y smartphones
● Módulo de grabación USB para la grabación/reproducción de
archivos de audio digital, soporta la reproducción de archivos
WMA y MP3
● Conectividad USB para la transmisión de señales de audio
estéreo hacia y desde cualquier ordenador moderno
● Procesador de efectos digital de 32/40-bits con 16 programas
predenidos, cada uno con su propio parámetro ajustable
● Control de EFX independiente en cada canal de entrada
● Estéreo equilibrado principal a través de conectores XLR
● Salida de auriculares estéreo con control de nivel independiente,
mas salida de sala de control incluida para para el monitoreo
de la señal
● Entradas de retorno 2T RCA estéreo y salidas de grabación
CONFIGURACIÓN BASICA
Iniciando
1. Asegúrese de que todo el voltaje de la mezcladora esté
apagado. Para asegurarse de esto, el cable de AC no debe de
estar conectado a la unidad.
2. Todos los faders y controles de nivel deben estar seteados en el
nivel más bajo para asegurarse que no se envíe ningún sonido
inadvertidamente a través de las salidas cuando se enciende el
dispositivo. Todos los niveles deben ser alterados a los grados
aceptables después de que se enciende el dispositivo.
3. Conecte todos los instrumentos y equipo necesarios en las
varias entradas del dispositivo como sea necesario. Esto
puede incluir amplifcadores, altavoces, procesadores de señal
y/o aparatos de grabación.
4. Enchufe el cable de alimentación en el receptor adecuado
situado en la parte posterior del dispositivo. Enchufe el cable
en una fuente de corriente adecuada.
5. Active el interruptor de encendido y siga las instrucciones de
conguración de canal para sacar el máximo partido de su
mesa de mezclas.
Confguración de Canal
1. Para asegurar que se seleccionó el nivel de audio correcto
para cada canal de entrada, cada fader de canal deberá setear
primero a la posición 0.
2. Ninguna de las entradas que no sea del conjunto, debe tener
cualquier dispositivo enchufado. Esto asegurará que se utiliza
una señal inalterada al establecer canales.
3. Ajuste el control de nivel del canal ha medio nivel .
4. Elija el canal que quiera ajustar, y asegúrese de que cada canal
tenga señal de envío similar a la señal que será enviada en uso
normal. Por ejemplo, si el canal tiene un micrófono conectado,
entonces hable o cante al micrófono al mismo nivel que el
cantante usaría durante su presentación. Si se conecta una
guitarra en ese canal, entonces la guitarra deberá tocarse al
mismo nivel en que se tocaría normalmente. Asi se asegurara
que los niveles de canal estaran correctamente ajustados lo
que evitara tener que reiniciarlos mas tarde.
5. Establecer el GAIN de forma el medidor de nivel (Level Meter)
indique un de nivel de audio alrededor de 0 dB. Los canales
2 y 3 no tienen un control Gain, ajuste entonces de forma
apropiada con los otros controles disponibles.
6. Este canal está ahora listo para usarse; ya puede dejar de
hacer la prueba de audio.
7. Se puede repetir el mismo procedimiento para otros canales.
Español
REQUISITOS DEL SISTEMA USB
Windows
• Windows ™ XP SP2, Vista ™, 7, 8 o 10
• Intel™ Pentium™ 4 o mejor
• RAM 512 MB (1 GB recomendado)
Macintosh
• Apple™ Mac™ OSX 10.5 or higher
• G4™ processor or better
• 512 MB RAM (1 GB recommended)
CELEUS 200
1
Page 16

Español
CONFIGURACIÓN BLUETOOTH
1. Active el Bluetooth presionando el botón "ON".
2. Localice y empareje con ¨Phonic.BT¨ en el menú de
confguración Bluetooth de su celular, tableta, PC u otros
dispositivos Bluetooth disponibles.
3. Si su dispositivo requiere contraseña, por favor ingrese
la contraseña de CELEUS 200 que es ¨0000¨. Muchos
dispositivos modernos entraran esta contraseña por defecto.
4. Las señales audio recibidas mediante el interface del Bluetooth
serán ruteadas al canal 3 de la mezcladora.
5. Para restablecer la conexión, apague y vuelva a encender la
conexión Bluetooth de su ordenador portátil, teléfono celular o
tableta.
6. Cuando esté usando teléfonos inteligentes y tabletas, sería
ideal que activase el ¨Airplane Mode¨ o ¨Flight Mode¨ (modo
de vuelo) para evitar llamadas o notifcaciones que puedan
interrumpir su audio.
Nota: No todas las unidades con Bluetooth permiten una reproducción de
audio externa. Para los ordenadores portátiles en particular, En algunos
dispositivos el Bluetooth puede ser usado para transmisión de datos
solamente . Esto es una limitación de estos dispositivos y usted no tendrá la
posibilidad de usar la función Bluetooth del CELEUS 200.
REPRODUCTOR USB
1. Encienda el dispositivo.
2. Inserte un formato adecuado (FAT32) unidad fash USB.
3. Pulse la tecla PLAY para reproducir la pista actual, o los botones
<< y >> para saltar hacia adelante y hacia atrás entre las pistas.
4. El CELEUS 200 puede reproducir archivos MP3 y WMA.
5. Utilice el control de nivel del canal 4, para ajustar el volumen del
reproductor USB.
6. Pulse al tecla STOP / MENU para acceder al explorador de
archivos (carpetas) y las funciones de repetición/ Repeat Mode.
Achivos/Folders – Elija a su gusto las canciones en cada archivo
del disco USB fash utilizando las teclas << y >>. Presione la tecla
PLAY para seleccionar, pulse la tecla MENU para volver atrás.
Modo de repetición/Repeat Mode – Hay 4 modos de repetición
disponibles.
No repitir/ No repeat – reproduce cada pista del archivo en
curso solo una vez..
Repetir una/Repeat one – Constantemente repetir la canción
seleccionada.
Repetir Archivo/Repeat Folder – Continuamente repite todas
la canciónes del Archivo seleccionado.
Aleatorio/ Random – Permite la reproducción aleatoria de los
archivos de la carpeta seleccionada o de su conjunto.
GRABACIÓN USB
1. Inserte una unidad ash USB con formato FAT-32 al reproductor
USB.
2. En el menú principal, seleccione "Grabaciones/Recordings" y
pulse el botón PLAY para entrar a la función de grabación.
3. Aquí tiene tres opciones: 'Comenzar la grabación de voz/'Start
voice recording,' 'Biblioteca de grabaciones /'Recordings
library," y "almacenamiento/Storage". Para seleccionar el
destino de la grabación, entrar en el menú "Almacenamiento/
Storage" y elija la unidad ash USB o la memoria interna (70
MB disponibles).
4. Seleccionar "Iniciar grabación de voz" para comenzar a grabar
inmediatamente. La unidad guardará un archivo de audio en el
destino de almacenamiento seleccionado.
5. Pulse el botón PLAY para pausar la grabación. Al pulsar el
botón de PLAY una segunda vez la grabación se pondrá de
nuevo en marcha desde la posición en la que se detuvo.
6. Pulse el botón STOP/MENU en cualquier momento para
detener la grabación. El dispositivo le preguntará entonces si
desea guardar la grabación. Seleccione "Sí" o "No".
7. Pulse el botón STOP/MENU para salir.
Nota: La calidad de la unidad ash puede afectar al rendimiento de la
grabación, Phonic recomienda el uso de unidades de la marca SanDisk
para ayudar a garantizar un rendimiento estable de grabación.
MÓDULO DE ALMACENAMIENTO USB
El módulo reproductor Celeus USB cuenta con aproximadamente
70 MB de almacenamiento interno que se utilizará para la
reproducción. Esta cifra puede parecer pequeña, pero eso podría
signicar 60 minutos más o menos de la música a 128 Kbps, o
unas cuantas horas de discurso a 40 kbps.
Para cargar archivos en el almacenamiento a bordo, se necesita
un cable USB-A a USB-A. Conecte el conector USB en la parte
frontal de Celeus al ordenador entonces se reconocerá como
un dispositivo de almacenamiento USB. Basta con copiar los
archivos a la Celeus.
Tenga en cuenta que no se puede grabar en el almacenamiento
interno. Los archivos de almacenamiento sólo estarán disponibles
cuando una unidad ash USB no está conectada.
INTERFAZ DE AUDIO
Simplemente conectando el cable USB suministrado junto con el
dispositivo CELEUS, y su ordenador portátil, podrá enviar o recibir
una señal de calidad DVD (16 bits estéreo, con una frecuencia de
muestreo de 48 kHz) desde su mesa de mezclas. Al hacer esto,
en realidad se está convirtiendo su CELEUS 200 en una tarjeta de
sonido plug'n'play de gran utilidad para su equipo.
El USB envía una señal de audio del MAIN Izquierdo y Derecho
(salida de grabación/ Record out) desde su mesa de mezclas
hasta la computadora. Usted puede utilizar casi cualquier
software dedicado a una estación de trabajo digital (Digital
Audio Workstation / DAW) para grabar la señal de la mezcladora
CELEUS. También puede congurar el mezclador como un
dispositivo de audio por defecto.
La interfaz USB también devuelve la señal de audio desde el
ordenador al sistema de control de audio del CELEUS "TAPE IN/
USB AUDIO". Esto se puede utilizar con su mezcla principal (Main
Mix) o enviado a sus auriculares.
Windows
1. Encienda el CELEUS y el ordenador.
2. Conecte el mezclador CELEUS al ordenador mediante el cable
USB suministrado.
3. Dejar que Windows encuentre el dispositivo y que instale un
controlador adecuado.
4. Abra el “Panel de control” y seleccione “Dispositivos de sonido
y audio”.
5. Después vaya a la pestaña de audio y seleccione la opción
"USB Audio Codec", como el dispositivo de reproducción y
grabación de audio por defecto.
6. Dependiendo de si usted tiene Windows XP, Vista, 7, 8 o 10,
puede variar ligeramente, pero el entorno siempre se puede
encontrar dentro del menú “audio’ de “Panel de control”.
7. Si usted no desea utilizar el CELEUS como dispositivo de
audio predeterminado, sólo tiene que introducir su DAW u
otro programa de audio, y seleccionarlo como su dispositivo
predeterminado/por defecto.
8. Asegúrese de ajustar la confguración de búfer en 64 muestras
mínimo, para evitar ruidos desagradables.
Mac
1. Encender el CELEUS y el ordenador.
2. Conecte el mezclador CELEUS al ordenador mediante el cable
USB suministrado.
3. Entre en el menú AUDIO MIDI SETUP.
4. Seleccione la opción "USB Audio Codec" como dispositivo de
entrada y salida.
5. El CELEUS es ahora su dispositivo de audio predeterminado.
6. Como alternativa, utilice su software DAW (u otro programa
de audio correspondiente) y seleccione la opción "USB Audio
Codec" en las preferencias de dispositivo.
7. Asegúrese de ajustar la conguración de búfer en 64 muestras
mínimo, para evitar ruidos desagradables.
2
CELEUS 200
Page 17
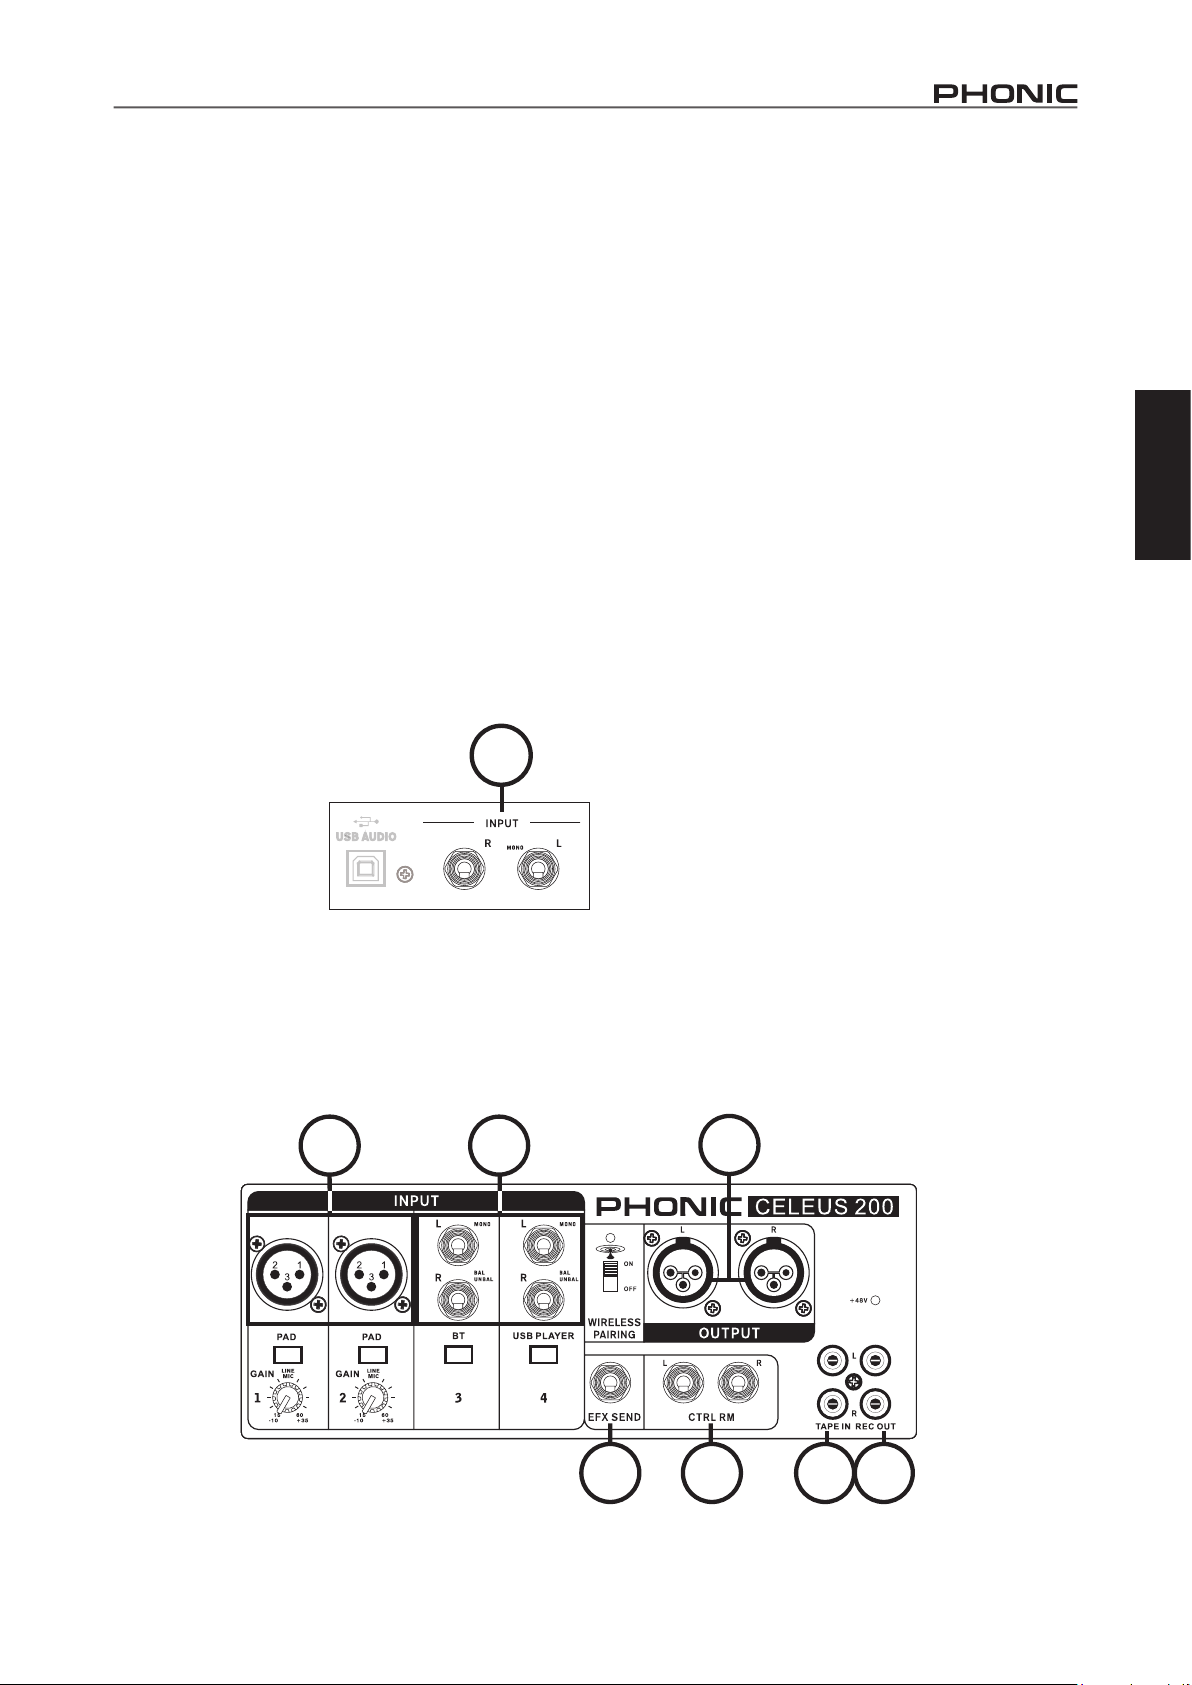
HACIENDO CONEXIONES
Panel Frontal
1. Conectores Jack XLR
Estas entradas aceptan las conexiones XLR para una señal
balanceada. Pueden ser utilizadas en conjunto con una amplia
gama de micrófonos, tales como micrófonos profesionales de
condensador, dinámicos o ribbon, con conectores macho estándar
XLR. Con preamplifcadores de bajo ruido, estas entradas sirven
para reproducir sonido cristalino y limpio.
NOTA: Cuando se utiliza un micrófono desbalanceado, por favor asegúrese
de que la fuente fantasma esté apagada. Sin embargo, cuando se utiliza
micrófonos de condensador, la fuente fantasma deberá ser activada
2. Entradas Canales Estéreo
El CELEUS 200 dispone de 2 entradas de canales estéreo
(canales del 3 al 4). Estas entradas diferen ligeramente de los
canales mono. Cada canal incluye 2 conectores TRS de 1/4", lo
cuales son ideales para un uso con teclados, baterías y guitarras
eléctricas.
Si desea usar una sistema mono en una entrada estéreo,
simplemente conecte el sistema en la conexion 1/4", a la izquierda
(mono) de la entrada estéreo, y dejad la conexión de la derecha
vacía. La señal será duplicada a la derecha gracias al milagro de
la función "Jack normalizing".
Los canales 1 y 2 también
incluye entradas de línea,
convenientemente ubicados
en la parte posterior de la
mezcladora Celeus 200,
que pueden doblar como un
estéreo canal de música en
caso necesario. El puerto "L"
se dirige al canal 1 mientras
que "R" se dirige al canal 2.
Los canales estéreo también se pueden utilizar con señales de
retorno, las cuales son procedentes de fuentes digitales externas.
El canal 3 se dobla como el canal Bluetooth, mientras que el canal
4 también funciona con el módulo de reproducción USB a bordo.
Cuando se utilizan canales de estas señales, las entradas estéreo
se desacoplan efectivamente.
2
3. Salida EFX
Estas conexiones TS de 6.35mm (1/4”) son la salida nal de la
mezcla EFX, se pueden ajustar mediante las perillas EFX que se
encuentran en cada canal. Esta función puede ser utilizada para
alimentar cualquier número de procesadores de señal externos.
La señal a continuación, puede ser devuelta al CELEUS 200 a
través de un canal de entrada linear estéreo.
4. Conectores de Salida
Estas conexiones XLR balanceadas enviaran la señal estéreo
nal de nivel lineal desde la mezcla principal (MAIN MIX). Estas
salidas pueden estar conectadas a un amplifcador para mandar
una señal de salida a los altavoces, o directamente a altavoces
activos.
5. Conectores de Salida de la Sala de Control (Control Room)
Estas salidas TS de 6.35mm (1/4 ") son alimentadas y controladas
desde la mezcla de auriculares/Sala de Control (Control Room/
Phones mix). Esta salida tiene una amplia utilización, ya que
puede ser utilizada para alimentar la señal de la mezcladora a
un monitor de ordenador, se puede por ejemplo gracias a esto,
monitoreo la señal a distancia, entre muchos otros usos posibles.
6. Tape In (L y R)
Estas entradas conectan cables RCA de dispositivos como
reproductores de CD y reproductores mp3. Esta línea de
alimentación está dirigida a la "Tape In mix" y controlada por el
nivel de control USB y la función Tape In (USB Audio level control/
Tape In).
7. Salidas de Grabación (L y R)
Como en los puertos de entrada de Tape, estas salidas adaptaran
los cables RCA, capaz de alimentar una variedad de dispositivos
de grabación. Esto podría incluir por ejemplo un grabador de cinta
o incluso un ordenador portátil. Phonic sugiere utilizar un cable
Y para los aparatos de consumo clásicos que disponen de una
conexión mini-estéreo.
Español
CELEUS 200
12
3 5
4
67
3
Page 18
Español
Panel Trasero
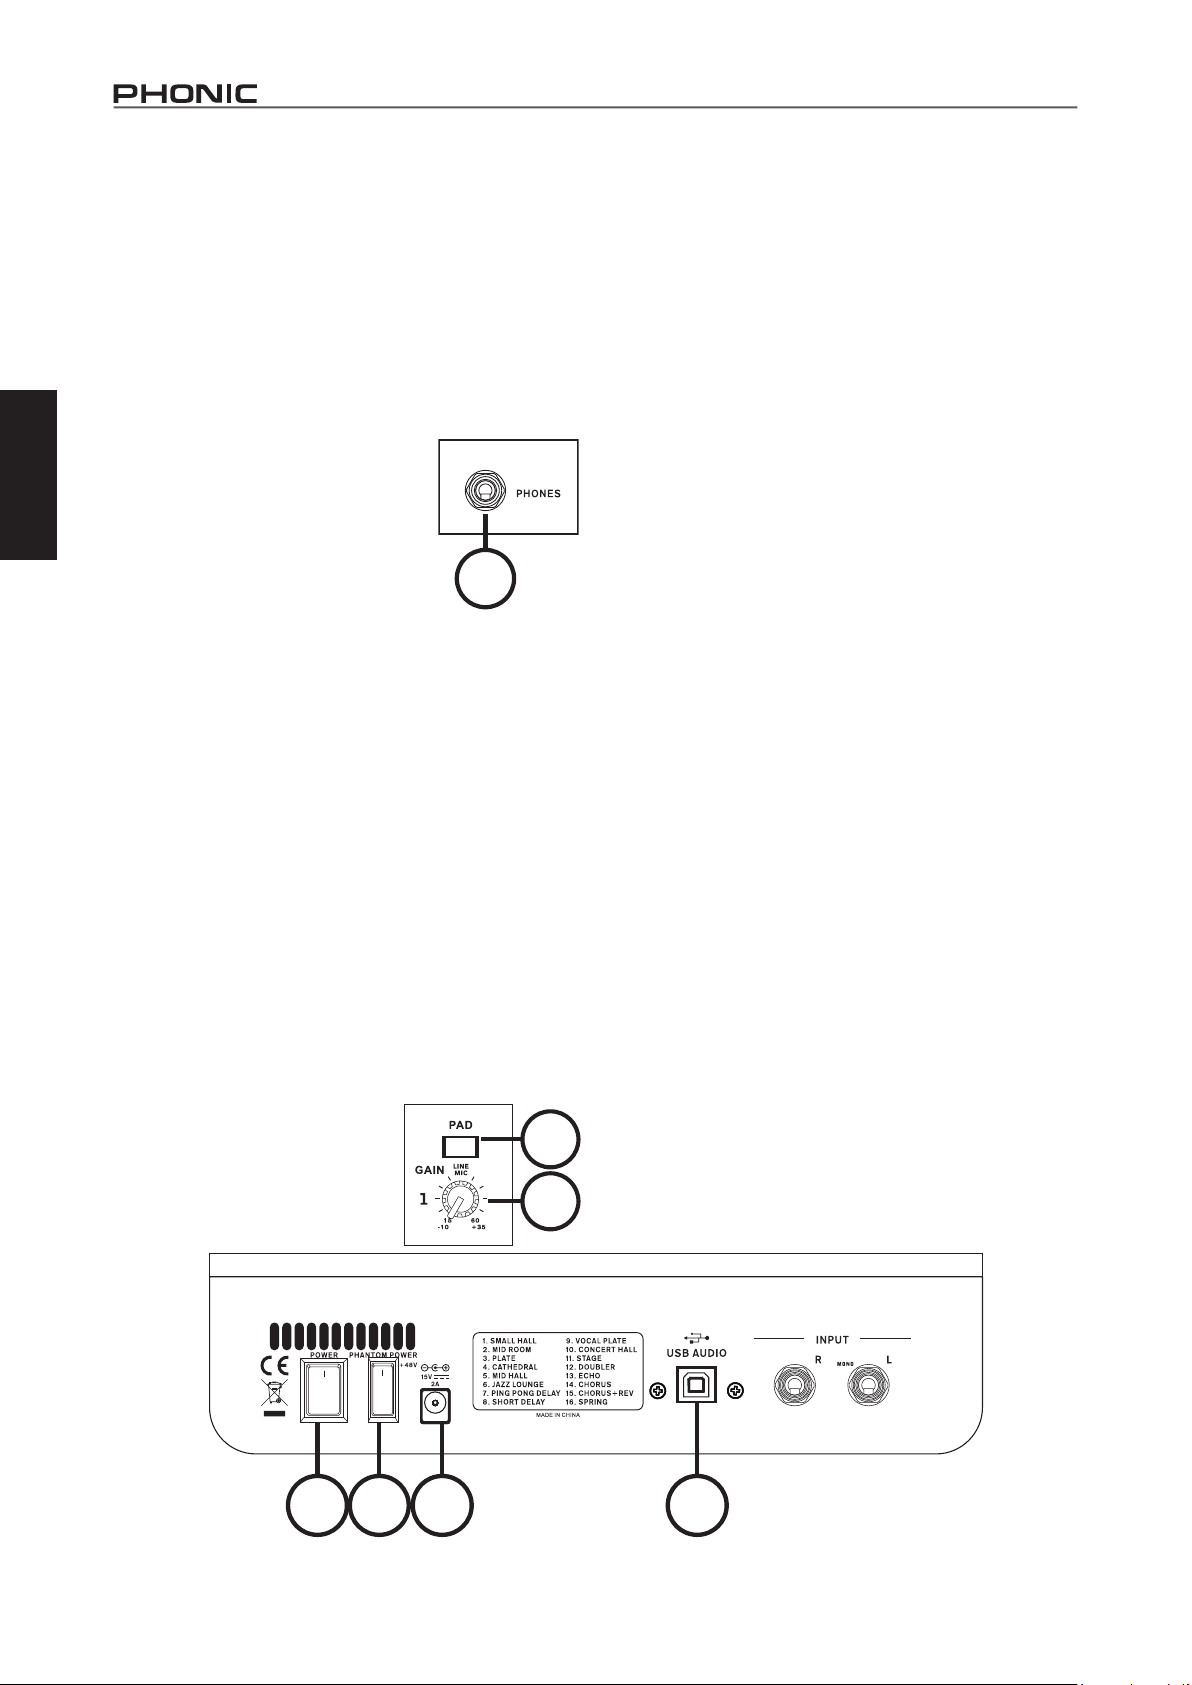
8. Conector USB
Esta conexión USB-B esta para la interfaz USB del ordenador.
Utilice el cable USB incluido para conectar este al puerto USB de
su ordenador.
9. Entrada de corriente CC
Este puerto de entrada de alimentación de CC estándar, esta
utilizada para conectar el cable de alimentación. Utilizar el cable de
alimentación incluido solamente, si utiliza una tensión incorrecta
puede causar daños irreversibles a su mezclador.
10. Headphones Jack
Esta salida estéreo, que se sitúa justo
en frente del mezclador, es compatible
conauriculares que permiten el monitoreo del
mix. El nivel audio de esta salida es controlado
por: Phones/Control Room control, situado en
la parte frontal del mezclador.
10
CONTROLES Y AJUSTES
11. Alimentación Fantasma
Cuando este interruptor está en posición ON, activa la alimentación
fantasma de +48V, para la entrada de micrófono XLR. Esto
permite a todos los micrófonos de condensador de ser utilizados
en estos canales. La activación de la alimentación fantasma
estará acompañada por una iluminación LED situada encima de
la conexion "mic input/entrada de microfono". Antes de encender la
alimentación fantasma, asegúrese de bien poner al mínimo todos
los niveles para evitar ruidos desagradables.
NOTA: La alimentación fantasma debería ser usada con
micrófonos balanceados. Cuando la alimentación fantasma esta
activada Micrófonos no balanceados no deberían ser utilizados
en las entradas de micrófonos. La fuente fantasma puede causar
daños a la mayoría de los micrófonos dinámicos. En caso de
duda, consulte el manual de uso del aparato.
12. Interruptor de Alimentación
Este interruptor activara y desactivara el mezclador. Asegúrese
de ajustar todos los niveles a zero antes de la activación. Esto
permite asegurarse de que ningún audio será enviado de forma
inadvertida en el sistema de su instalación.
Control de Canales
13. Botón PAD
El botón PAD se utiliza para atenuar la
señal de entrada de 25 dB. Esto sólo
debe ser utilizado para dispositivos
con nivel entrada de linear.
13
14
14. Control de Aumentos de Señal (GAIN)
Esto controla la sensibilidad de la señal de entrada línear /Entrada
de micrófono del primer canal. El GAIN de la señal se debe ajustar
a un nivel que permita el uso óptimo del audio, mantenimiento
la calidad de la alimentación. Esto se puede lograr ajustando
a un nivel que permita que el indicador de pico solo se ilumine
ocasionalmente.
15. Indicador y Control del Compresor
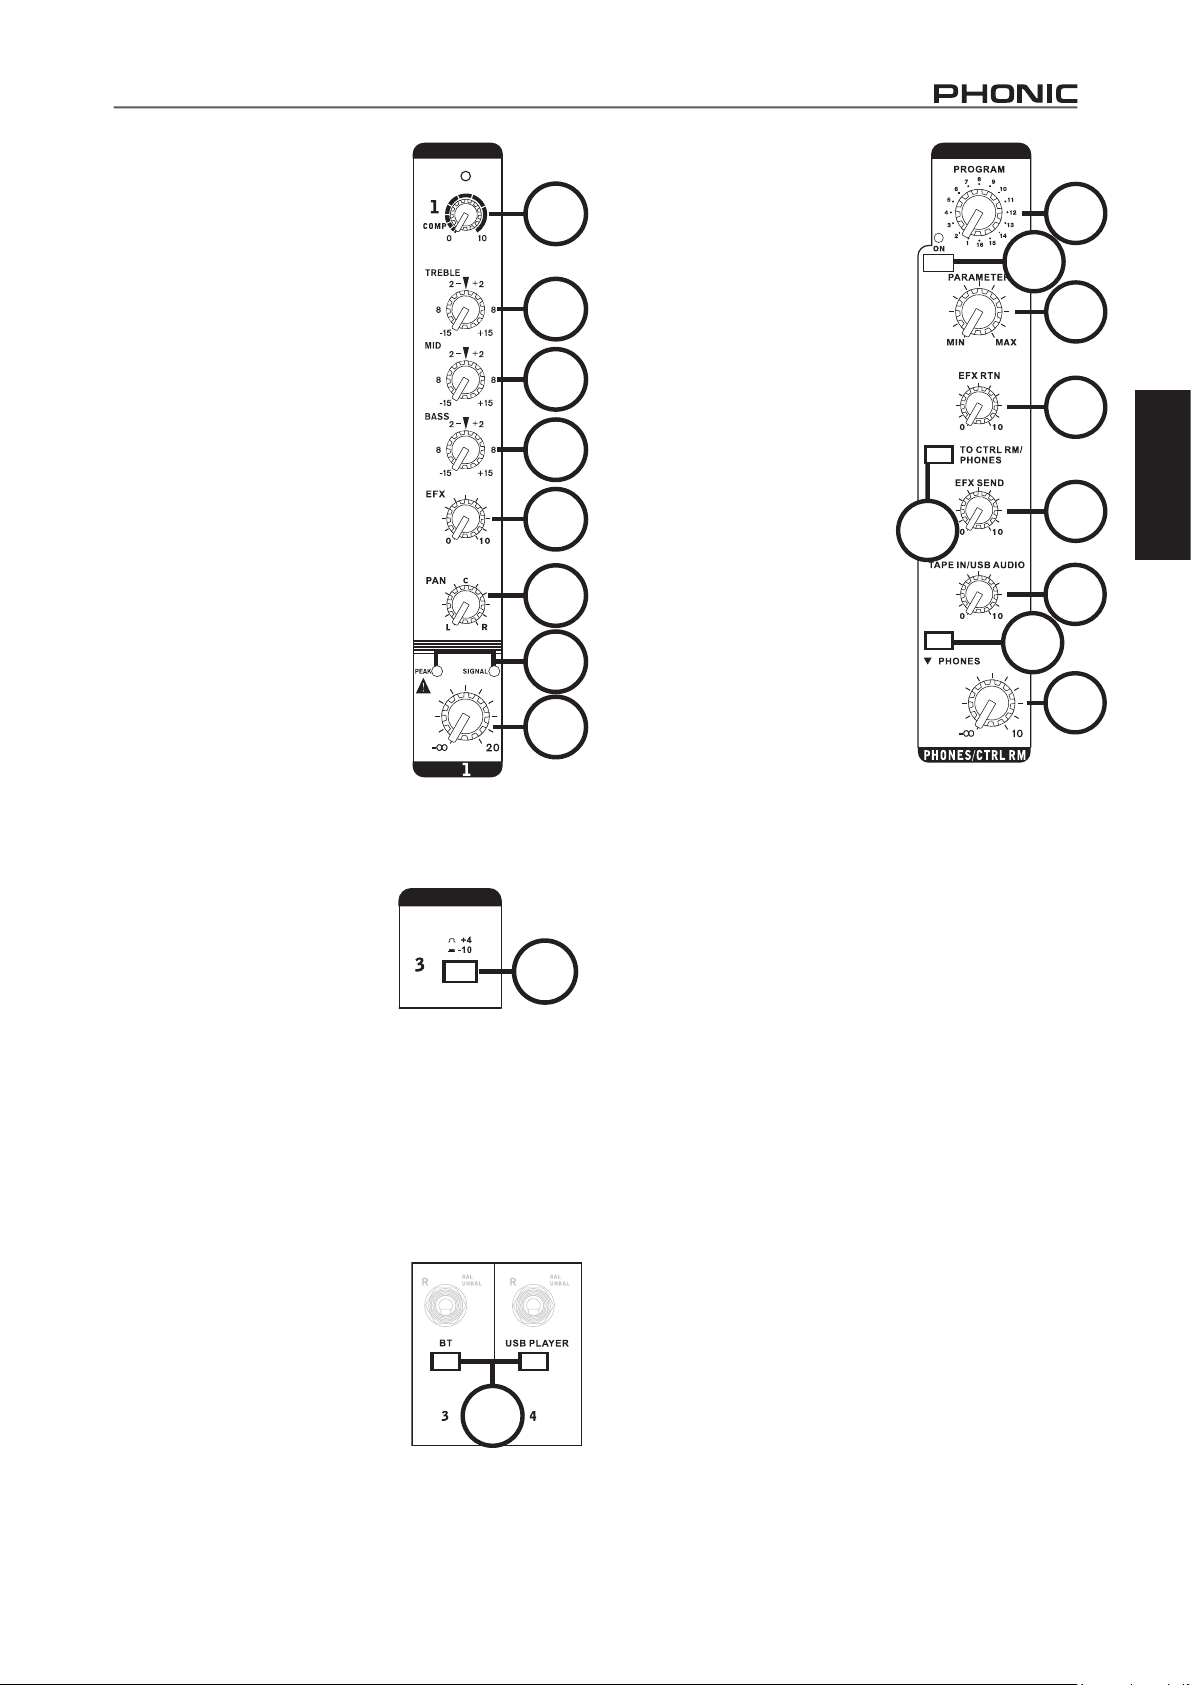
Esta función controla el funcionamiento del compresor en el
canal 1. Si se ajusta este control girándolo hasta 12:00h ajustará
el umbral y la proporción del compresor en diversos grados. Una
vez que llegue a la posición 12:00h y pase ese punto, esa perilla
ajustara los parámetros de compresión y el expansor (o, en otras
palabras, el compresor-expansor “Compander”). El LED que
acompaña este control rotativo se iluminará cuando se activa el
compresor.
16. Control de Frecuencias Altas (Agudos/TREBLE)
Este mando se utiliza para dar un empuje a varios niveles, o
un corte a ±15 dB a frecuencias altas de audio (12kHz). Este
mando ajustara el nivel de frecuencias altas que se incluyen en
el audio del canal. Se aumentara así la potencia y la claridad de
instrumentos como guitarra, címbalos y sintetizadores.
17. Control de frecuencias medianas (MID)
Este mando es usado para proporcionar un aumento, o una
disminución a las frecuencias medianas (2.5KHz) en un nivel
de ±15 dB. Cambiar las frecuencias medianas en una señal de
audio, puede ser difícil, cuando se utiliza un audio mix profesional.
Suele ser mejor cortar las frecuencias medias que aumentarlas,
suavizando así los instrumentos y las voces demasiados
estridentes.
18. Control LOW (Frecuencia Grave)
Este control es utilizado para dar un realce tipo Shelving o un
recorte de ±15dB a los sonidos de frecuencia baja (80 Hz). Esto
ajustará la cantidad de graves incluidos en el audio del canal y,
dará más calidez y fuerza a las baterías e guitarras bass.
19. Control de Nivel de EFX
Este control altera el nivel de la señal que es enviada a la salida
EFX que puede ser utilizado junto con procesadores de señal
externos (esta señal puede ser devuelta a la mezcladora vía
las entradas de retorno estéreo), o simplemente como salidas
auxiliares adicionales. Este control también ajusta el nivel de
audio que se envía al panel de efecto digital incorporado.
891112
4
CELEUS 200
Page 19
20. Controles de Pan/Balance
Este control regula el nivel o el grado
en el que el audio de la mezcla principal
debería recibir; sea al lado izquierdo
o derecho. En los canales mono, el
control PAN ajustará el nivel que la
izquierda y la derecha deben recibir
(pan); mientras que en el canal estéreo,
ajustando el control BAL atenuará
las señales de audio a la izquierda o
derecha (balanceo).
21. Indicadores de Pico
Estos LED se iluminan cuando las
señales alcanzan ciertos niveles. El
LED de la señal situado en la derecha
se iluminará cuando cualquier señal
de audio está presente en el canal. El
indicador en la izquierda (Pico/Peak) se
iluminará cuando el canal alcanza picos
altos, 6 dB antes de que la sobrecarga
se produzca. Es mejor ajustar el control
de nivel del canal con el n de permitir
que el indicador de pico (Peak) se
ilumine sólo a intervalos regulares. Esto
asegurará un mayor rango dinámico de
audio.
22. Control de Nivel de Canales
Este control alterará el nivel de la señal, que haya sido enviado al
canal correspondiente en la mezcla principal.
23. Teclas +4 / -10
Estas teclas, que se encuentran en
los canales estéreo, se utilizan para
ajustar la sensibilidad de entrada
del canal correspondiente. Hará
que el mezclador se adapte a los
dispositivos externos (que pueden
utilizar diferentes niveles de operación). Si la fuente de entrada
es de -10 dBu (consumo de audio estándar), lo mejor es activar
el interruptor, permitiendo aumentar la potencia de la señal. Si la
fuente de entrada es +4 dbV (estándar de audio profesional) la
tecla del canal de entrada correspondiente debe ser desactivada.
Si no está seguro del nivel operacional de la fuente de audio,
deje el interruptor desactivado hasta que se prueba la señal de la
fuente de audio.
24. Teclas “Reproducción USB/USB Player” y “BT”
Situado en los canales 3 y 4, estos
botones permiten que los canales
correspondientes se puedan utilizar
para sus respectivas señales de audio
digitales. El botón BT permite que el
canal 3 utilice su función de transmisión
de audio a través de Bluetooth, mientras
que el botón “USB Player” permite que
el canal 4 pueda controlar la señal de
reproducción del USB que viene de la
grabadora USB integrada.
24
15
16
17
18
19
20
21
22
23
Procesador de Efectos
Digitales
25. Control de Programa
Este control permitirá a los usuarios
seleccionar uno de los 16 efectos
digitales integrados de la mezcladora
amplifcada CELEUS. Los nombres
de efecto corresponden con los
números se puede encontrar lo que
corresponde en la parte superior de la
cara frontal de la mezcladora, o en la
tabla de efecto digital.
26. Activación de Efectos e Indicador
Esta tecla permite a los usuarios
encender o apagar el procesador de
efectos. Cuando el procesador de
efectos está activado el indicador LED
se iluminará.
27. Control de Parámetro
Este control rotativo ajustará el
parámetro principal de efecto
seleccionado. Cada parámetro de
efecto puede ser encontrado en la
tabla de efecto digital.
28. Control EFX RTN
Este control ajusta el nivel de la salida
nal de procesador DFX que esta enviado en la mezcla principal
(Main Mix). Si desea implementar más efectos (EFX) en su señal
(conocido como una señal “wet”), gire el control EFX hacia arriba
y bajar los controles de nivel del canal hacia abajo. Si quiere un
audio más inalterado, gire el control de nivel del canal hacia arriba
y reducir la potencia del control EFX.
29. Tecla envio a los auriculares / Sala de Control
Esta tecla le permitirá enviar su señal EFX a sus auriculares y la
sala de control, esta función le dará la posibilidad de monitorear
su señal.
30. Envío de Control de Efectos
Este es el control de nivel nal para el envío EFX a su mezcla. Su
mezcla EFX se crea mediante el uso de los controles EFX que se
encuentran en los canales de entrada 1 a 4.
29
25
26
27
28
30
31
32
33
Sección Principal
31. Control Audio Tape In/USB
Este control ajusta la señal de entrada RCA y "Tape In/cinta" y la
señal de retorno de la interfaz USB. A continuación las señales
se enviaran a la mezcla principal. Si hay señales de entrada
en la interfaz USB y la entrada de Tape In, las dos señales se
combinaran y se controlaran simultáneamente.
32. Tecla de Envió tape In/USB a Auriculares/Sala de Control
Si se pulsa este botón enviará su señal TAPE IN/USB en los
auriculares y la sala de control para monitoreo.
33. Control Auriculares y Sala de Control
Este control de nivel determina el nivel de salida nal del puerto
de los auriculares/Phone así que la salida estéreo de la sala
de control. La señal por defecto para esta mezcla es la mezcla
principal a menos que el "EFX TO MAIN" o "TAPE IN / USB TO
MAIN" estén activados.
Español
CELEUS 200
5
Page 20
34. Ecualizador Gráco
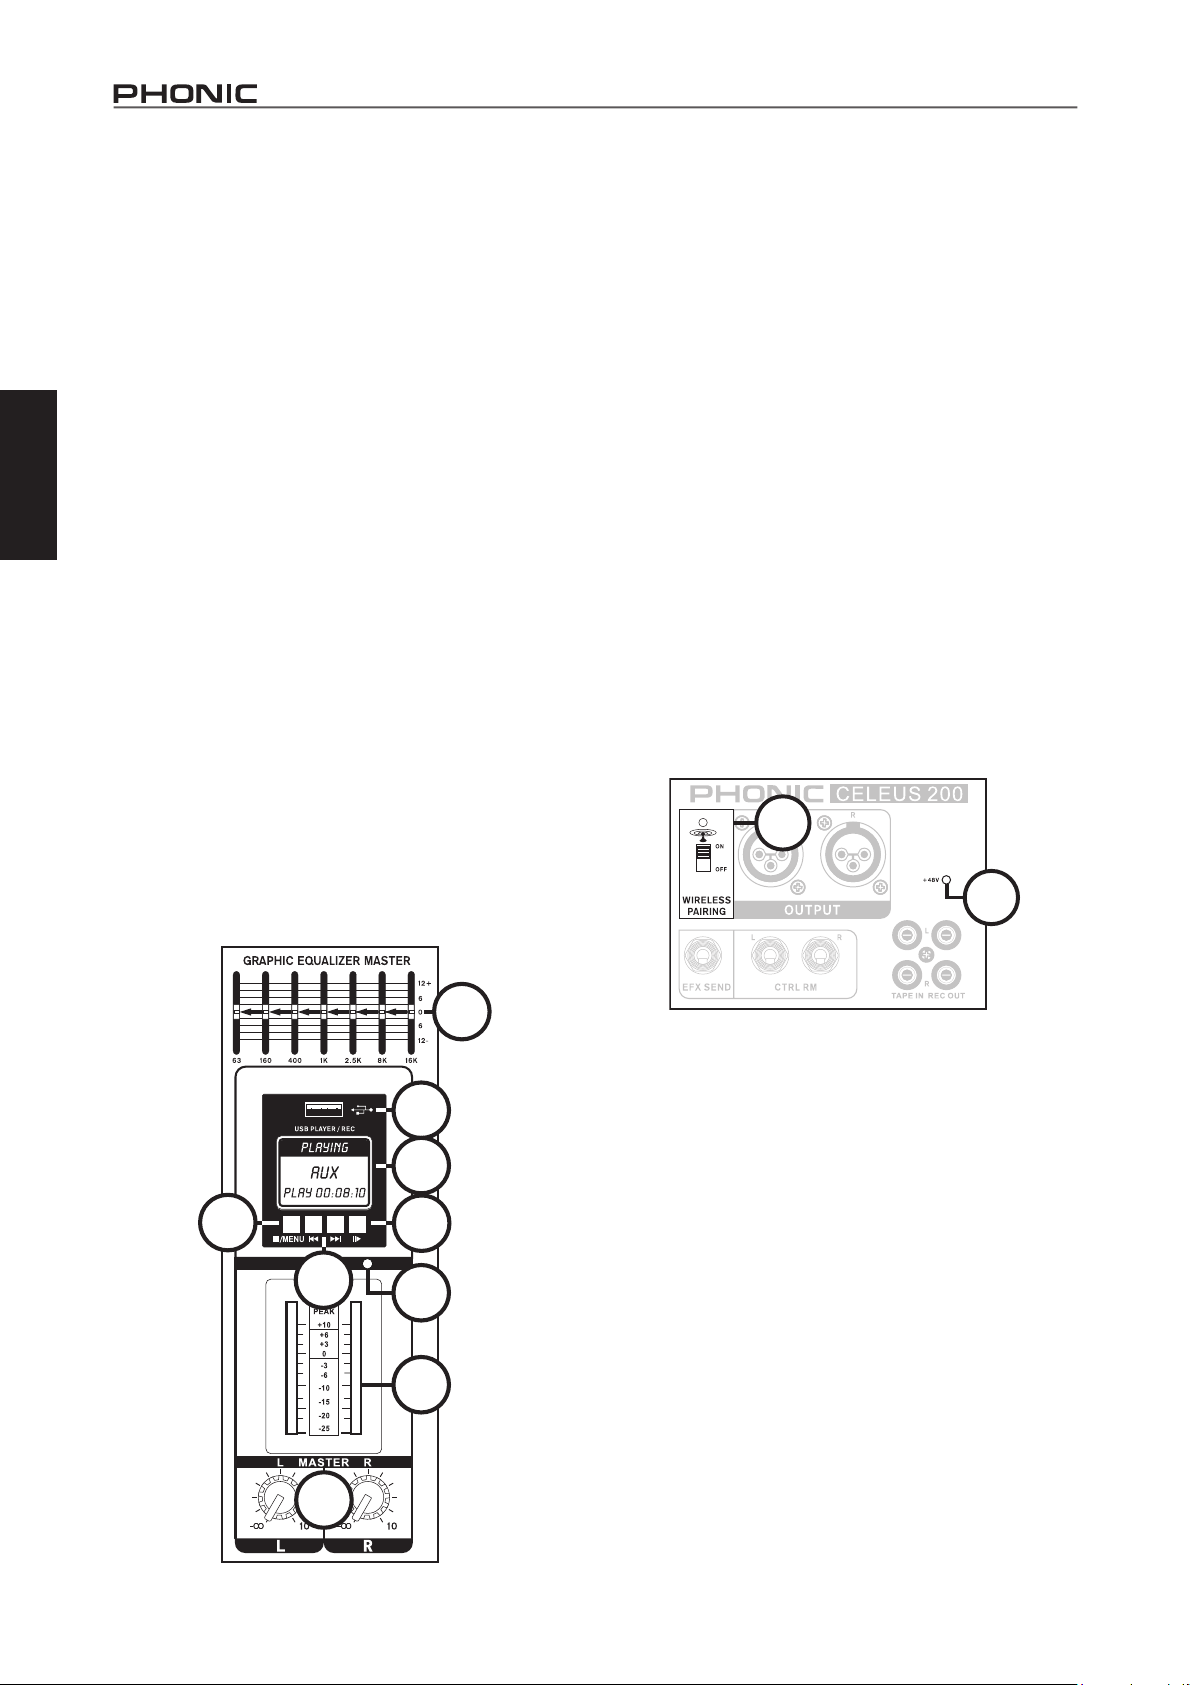
Este ecualizador gráco estéreo permite que el usuario ajuste la
respuesta en frecuencia de una señal, con un máximo de ±12 dB
de aumento o corte de señal para cada frecuencia.
35. Indicador de Energía
Este indicador se iluminará cuando se enciende la Mezcladora.
38. Puerto USB
Conecte su unidad fash USB a esta entrada. Una vez que una
unidad está conectada, los archivos se iniciarán y el menú
principal aparecerá en la pantalla. Se recomienda que los usuarios
formateen sus unidades fash USB con el sistema de archivos FAT-
32. Este conector también se puede utilizar para conectar su PC
para aprovechar de un almacenamiento aumentado.
Español
36. Controles de niveles L/R (Izquierdo/Derecho)
Estos controles rotativos, son el control de nivel nal para las
alimentaciones de audio del grupo derecho e izquierdo; estas
alimentaciones de audio, son enviadas a la salida principal que se
encuentra en la parte trasera del mezclador. Cuando se jira estas
perillas hasta el máximo, el Control L/R provee 10 dB de ganancia
a la señal, y, cuando se establece hasta el mínimo, estos controles
pueden completamente silenciar la señal. Estos controles también
ajustan el nivel de salida nal enviado a través de la interfaz USB
de su computadora.
37. Medidor de Nivel
Este medidor de nivel dual de 41 segmentos, dá una indicación
precisa de los niveles que alcanza el audio de la señal L / R Principal .
Cuando el indicador de 0 dB se ilumina signifca que el nivel de salida
es aproximadamente igual que 4+ dBu (equilibrada). El indicador
PEAK se iluminará 6 dB antes de que la señal se distorsione (Clipp).
Para hacer el máximo uso de su audio, ajuste los diversos controles
para que su medidor de nivel indique de manera constante un
alrededor de 0 dB, mantendrá así un nivel de claridad fantástica.
Descripción de Grabadora USB
Señal de la fuente del grabador USB se toma directamente de
los canales de cada entrada individual. Cuando se reproduce el
audio, la señal pasara a través del canal 4 solo cuando la tecla
USB PLAYER esta activada. El CELEUS 200 es compatible la
reproducción de archivos WMA y MP3 con velocidades de bits de
hasta 320 kbit/s.
39. Pantalla
Esta pantalla mostrará el número de pista que se está
reproduciendo. También indica si la pista está en reproducción,
en pausa y así que el tiempo de reproducción / grabación actual.
40. Tecla de Reproducción
Pulse esta tecla para iniciar y detener la reproducción y la
grabación de la pista actual. La reproducción de la pista se
reiniciará a partir del lugar en la que se detuvo en pausa (tanto en
modo de grabación o reproducción).
41. Teclas Anterior / Siguiente
Presionando estas teclas permitirá a los usuarios saltar hacia atrás
y hacia adelante entre las pistas. Cuando se activa el menú, estos
botones se utilizan para desplazarse por las opciones de pantalla.
42. Tecla Stop/Menú (MENU)
Pulse esta tecla para detener la reproducción o la grabación
según sea el caso. Mantenga pulsado esta tecla para acceder al
menú principal del grabador/reproductor USB.
43
44
34
43. Asociación Inalámbrica e Indicadores (Pairing
Switch and Indicators)
Este interruptor activa y desactiva la función Bluetooth del
CELEUS 200. El indicador "INALÁMBRICO LISTO / WIRELESS
READY" se ilumina cuando se establece una conexión entre un
unidad SMART y el CELEUS. La senal bluetooth esta alimentada
a traves del canal 3. Asegurase de que la tecla BT esta activada
en el canal. El CELEUS 200 aparecera como Phonic.BT en el
menu Bluethooth de su dispositivo.
44. Indicador + 48V
Este indicador LED se enciende cuando la fuente fantasma está
activada en la entrada de micrófono.
42
41
38
39
40
35
37
36
6
CELEUS 200
Page 21
ESPECIFICACIÓNES
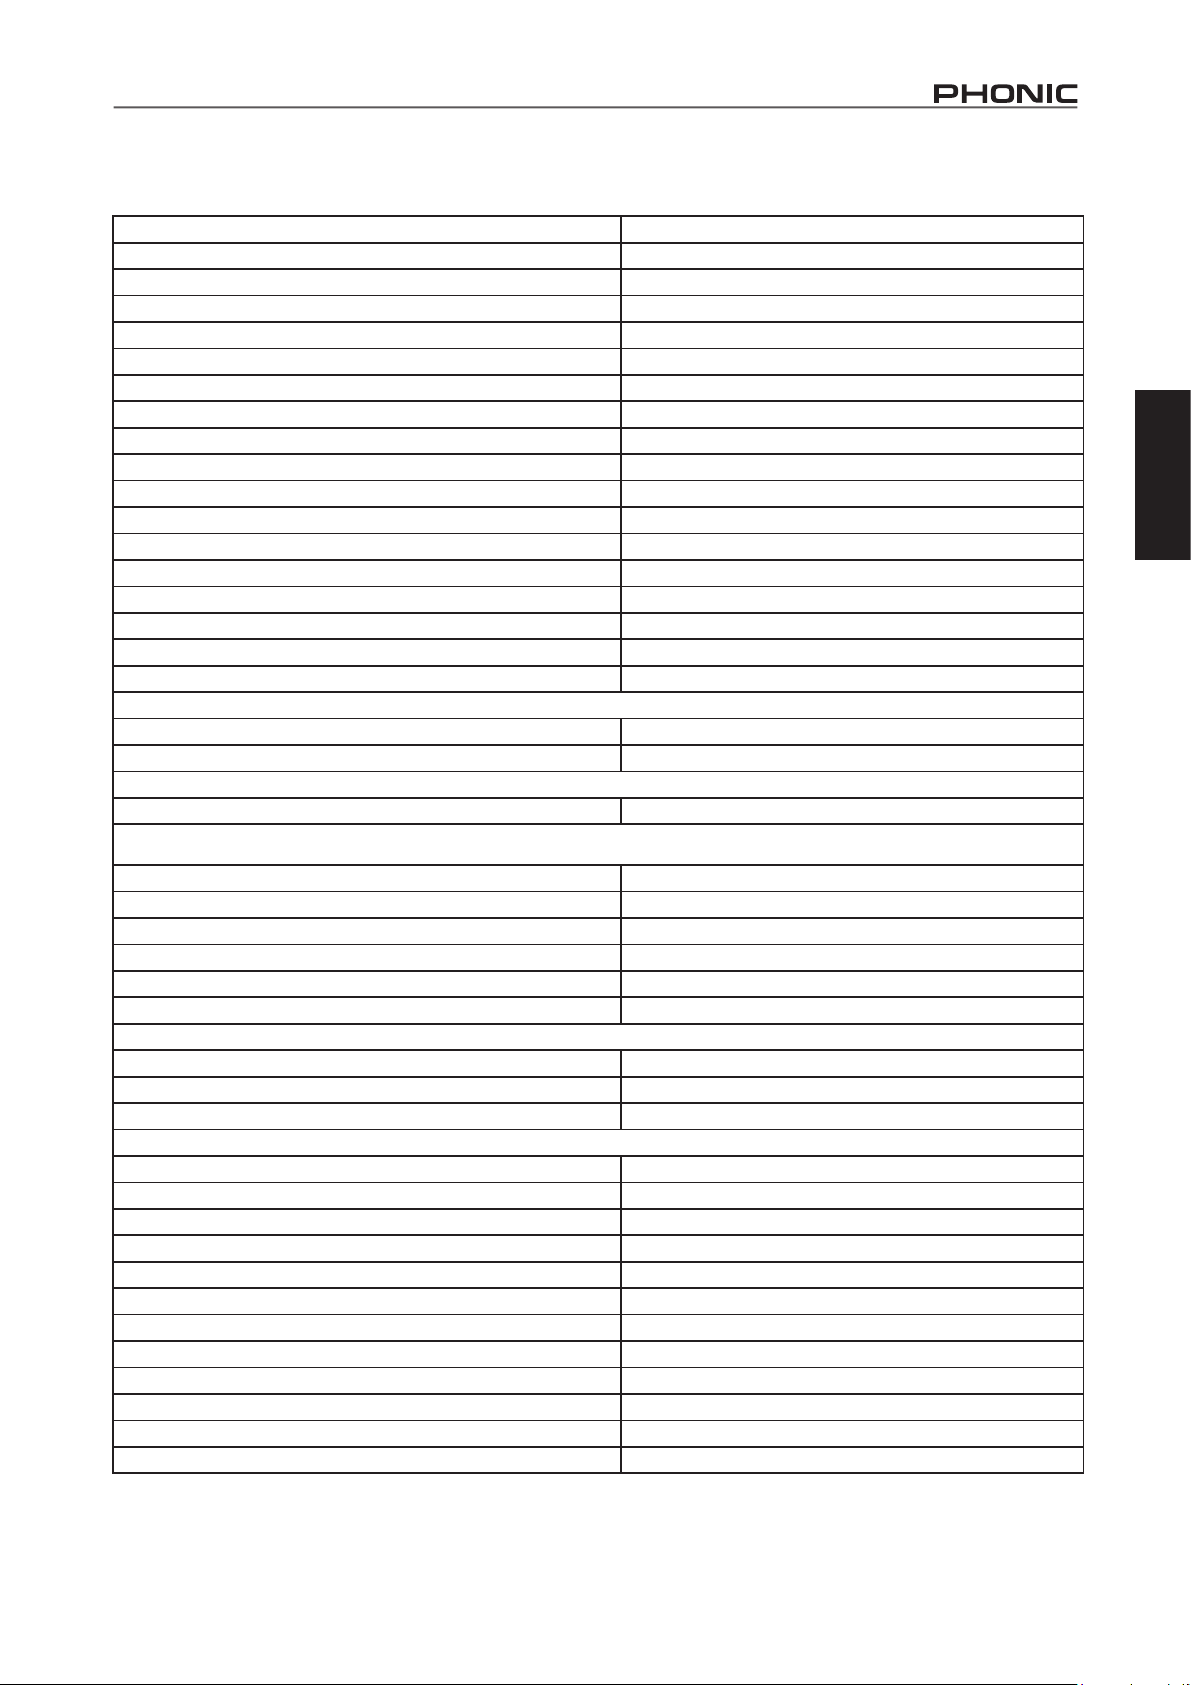
Canales Totales 4
Canales Mono XLR Balanceados (micrófono / línea) 2 (uno con entradas lineares estéreo)
Canales Líneares Estéreo Balanceados 2
Entrada 2T RCA estéreo
Salida Estéreo Principal L/R 2 x XLR
Salida de la Sala de Control (Control Room) 2 x 1/4” TS
Envío AUX / EFX 1 x 1/4” TS
Salida de Grabación RCA estéreo
Auriculares/Phones TRS estéreo
Interfaz USB Estéreo de entrada / salida
Tipo de Conector USB USB tipo B
Bitrate de Audio USB 16-bit
Grupo de Salida 48 kHz
Inserciones 2.4 GHz
Control de Nivel de Auriculares Sí
Nivel de Control Principal L/ R 2 x Rotativo
Fuente Fantasma 2 x 41
Frecuencia de Muestreo de Audio USB + 48V DC
Respuesta de Frecuencia (Entrada mic a cualquier salida)
20Hz - 60KHz +0/-1 dB
20Hz - 100KHz +0/-3 dB
Crosstalk (1KHz @ 0dBu, 20 Hz a 20 KHz de ancho de banda, canal dirigido hacia salidas Main L / R)
Canal fader bajado, otros canales en unidad <-90 dB
Ruido (20Hz a 20KHz, medido en la salida principal, Canales 1-3 ganancia de unidad; EQ plano, todos los canales en mezcla principal;. Canales 1/3 en lo mas izquierda como sea
posible, canales 2/4 tan a la mas derecha como sea posible Referencia = + 6dBu)
Maestro @ unidad, canal deslizador hacia abajo 80 dB
Maestro @ unidad, fader de canal @ unidad -84 dBu
S / N, ref a 4 >90 dB
Micrófono preamplifcador E.I.N. (150 ohmios terminados, ganancia max) <-129.5 dBm
THD (Cualquier salida, 1KHz @ + 14dBu, 20Hz a 20KHz, entradas de canal) <0.005%
CMRR (1 KHz @ -60dBu, ganancia al máximo) 80 dB
Nivel Máximo
Entrada Mic Preamp +10 dBu
Todas Otras entradas +21 dBu
Salida Balanceada +28 dBu
Impedancia
Entrada Mic Preamp 2 K ohmios
Todos Otras Entradas (excepto inserción/insert) 10 K ohmios
Salida 2T RCA 1.1 K ohmios
Canal de Nivelación 3 bandas, +/- 15dB
EQ Bajo 80Hz
EQ Medio 2,5 KHz
EQ Alto 12 kHz
Compresor 2
Procesador de Efectos Digitales 32/40-bit 16 efectos cada uno con un parámetro ajustable
Requisitos de Energía 100-240 VCA, 50/60 Hz Externo
Dimensiones (H x W x D) 87 x 250 x 341 mm (3.4” x 9.8” x 13.4”)
Peso 1.69 kg (3.7 lbs)
Español
CELEUS 200
7
Page 22

Español
SERVICIO Y REPARACIÓN
Para refacciones de reemplazo y reparaciones, por favor póngase en contacto con nuestro
distribuidor de Phonic en su país. Phonic no distribuye manuales de servicio directamente a los
consumidores y, avisa a los usuarios que no intenten hacer cualquier reparación por si mismo,
haciendo ésto invalidará todas las garantías del equipo. Puede encontrar un distribuidor cerca
de usted en http://www.phonic.com/where/.
INFORMACIÓN DE LA GARANTIA
Phonic respalda cada producto que hacemos con una garantía sin enredo. La cobertura de
garantía podría ser ampliada dependiendo de su región. Phonic Corporation garantiza este
producto por un mínimo de un año desde la fecha original de su compra, contra defectos en
materiales y mano de obra bajo el uso que se instruya en el manual del usuario. Phonic, a su
propia opinión, reparará o cambiará la unidad defectuosa que se encuentra dentro de esta
garantía. Por favor, guarde los recibos de venta con la fecha de compra como evidencia de la
fecha de compra. Va a necesitar este comprobante para cualquier servicio de garantía. No se
aceptarán reparaciones o devoluciones sin un número RMA apropiado (return merchandise
autorization). En orden de tener esta garantía válida, el producto deberá de haber sido
manejado y utilizado como se describe en las instrucciones que acompañan esta garantía.
Cualquier atentado hacia el producto o cualquier intento de repararlo por usted mismo,
cancelará completamente esta garantía. Esta garantía no cubre daños ocasionados por
accidentes, mal uso, abuso o negligencia. Esta garantía es válida solamente si el producto fue
comprado nuevo de un representante/distribuidor autorizado de Phonic. Para la información
completa acerca de la política de garantía, por favor visite http://www.phonic.com/warranty/.
SERVICIO AL CLIENTE Y SOPORTE TÉCNICO
Le invitamos a que visite nuestro sistema de ayuda en línea en www.phonic.com/support/. Ahí
podrá encontrar respuestas a las preguntas más frecuentes, consejos técnicos, descarga de
drivers, instrucciones de devolución de equipos y más información de mucho interés.
http://www.phonic.com
8
CELEUS 200
Page 23
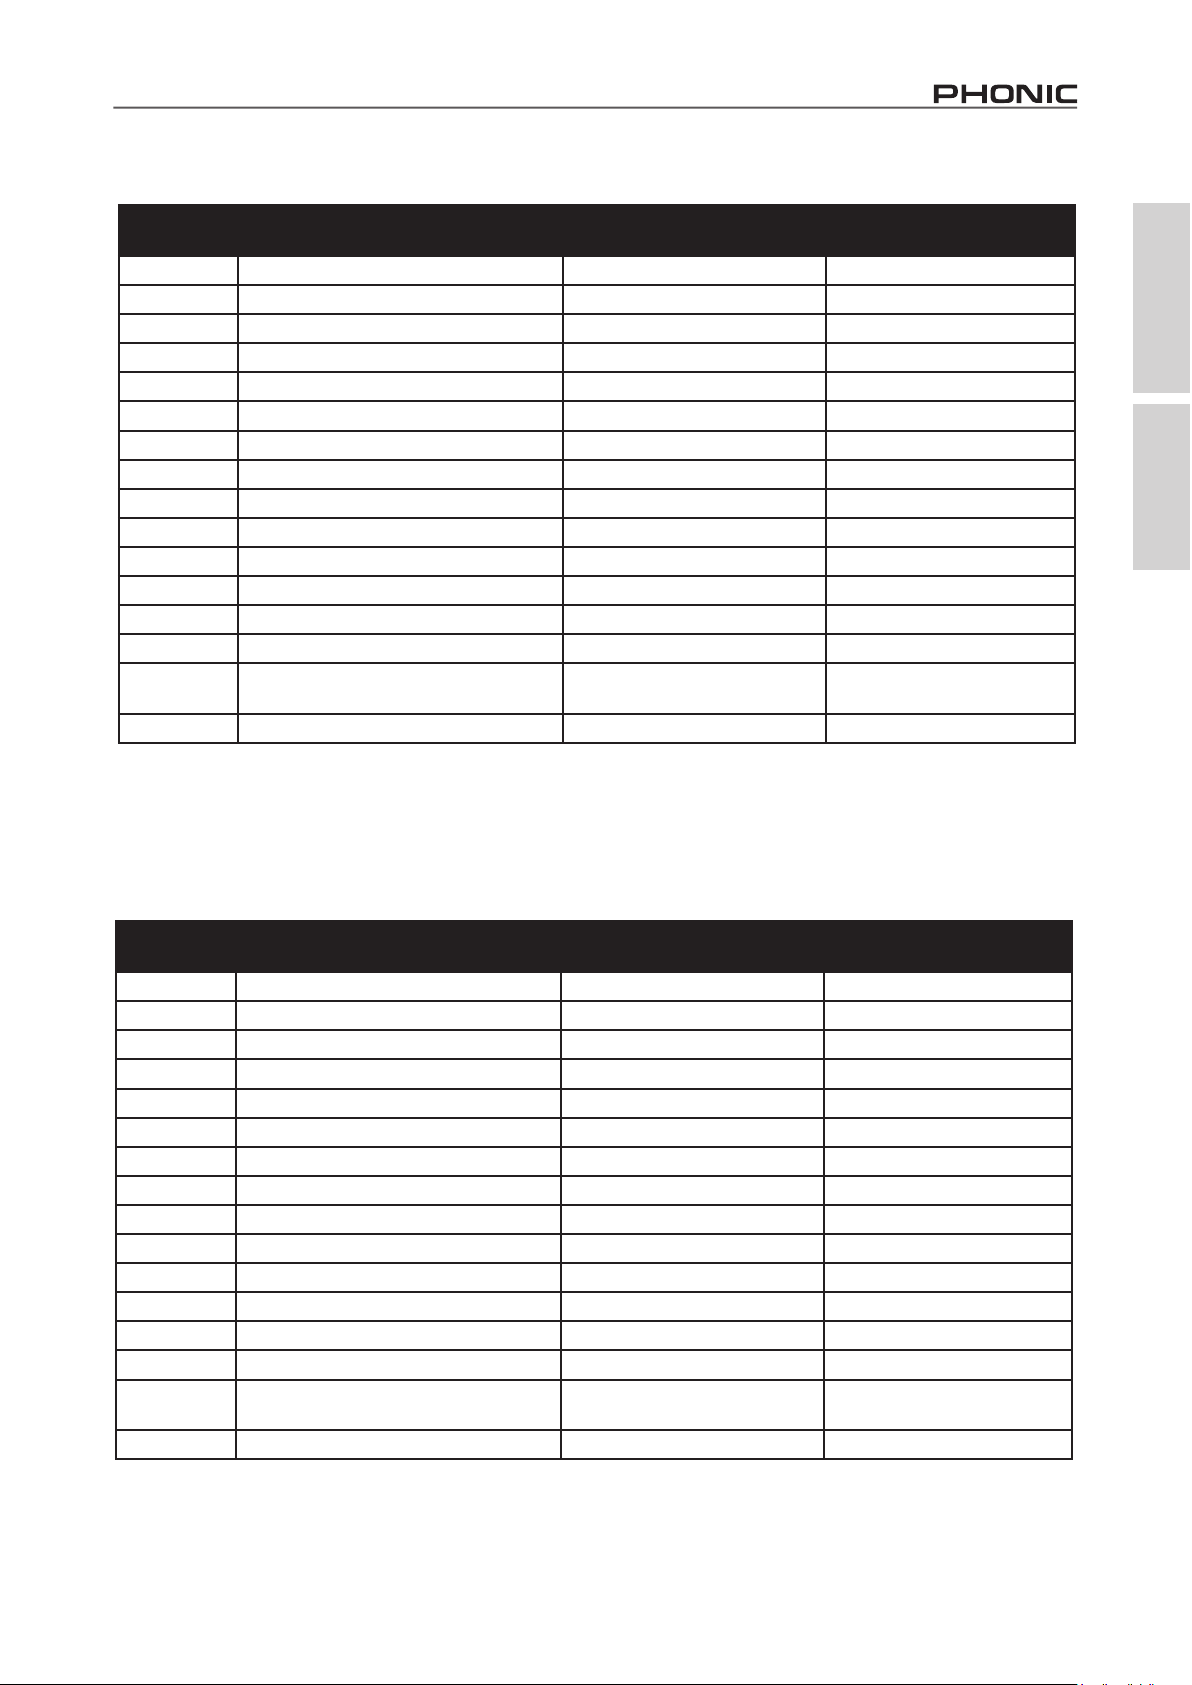
DIGITAL EFFECT TABLE
Program
Number
1 Small Hall Reverb Time (S) 0.3 to 1.1
2 Mid Room Reverb Time (S) 0.1 to 0.45
3 Plate Reverb Time (S) 0.9 to 1.45
4 Cathedral Reverb Time (S) 1.1 to 3.8
5 Mid Hall Reverb Time (S) 0.5 to 1.66
6 Jazz Lounge Reverb Time (S) 0.15 to 0.9
7 Ping Pong Delay Delay Average (S) 0.08 to 0.55
8 Short Delay Delay Average (S) 0.05 to 0.4
9 Vocal Plate Reverb Time (S) 0.2 to 2.2
10 Concert Hall Reverb Time (S) 0.3 to 2.45
11 Stage Reverb Time (S) 0.6 to 1.6
12 Doubler Feedback Ratio 20% to 90%
13 Echo Delay Average (S) 0.12 to 0.55
14 Chorus LFO 0.66 to 9.6
15 Chorus + Rev
16 Spring LFO 0.16 to 1.33
Program Name Parameter Parameter Range
LFO
Reverb Time (S)
0.8 to 8.8
0.4 to 0.8
Appendix Apéndice
TABLA DE EFECTO DIGITAL
Numero de
Programa
1 Small Hall Tiempo de Reverberación (S) 0,3 a 1,1
2 Mid Room Tiempo de Reverberación (S) 0,1 a 0,45
3 Plate Tiempo de Reverberación (S) 0,9 a 1,45
4 Cathedral Tiempo de Reverberación (S) 1,1 a 3,8
5 Mid Hall Tiempo de Reverberación (S) 0,5 a 1,66
6 Jazz Lounge Tiempo de Reverberación (S) 0,15 a 0,9
7 Ping Pong Delay Retraso medio (S) 0,08 a 0,55
8 Short Delay Retraso medio (S) 0,05 a 0,4
9 Vocal Plate Tiempo de Reverberación (S) 0,2 a 2,2
10 Concert Hall Tiempo de Reverberación (S) 0,3 a 2,45
11 Stage Tiempo de Reverberación (S) 0,6 a 1,6
12 Doubler Proporción Feedback de 20% asta 90%
13 Echo Retraso medio (S) 0,12 a 0,55
14 Chorus LFO 0,66 a 9,6
15 Chorus + Rev
16 Spring LFO 0,16 a 1,33
Nombre de Programa Parámetro Rango de Parámetro
LFO
Tiempo de Reverberación
0,8 a 8,8
0,4 a 0,8
CELEUS 200
1
Page 24
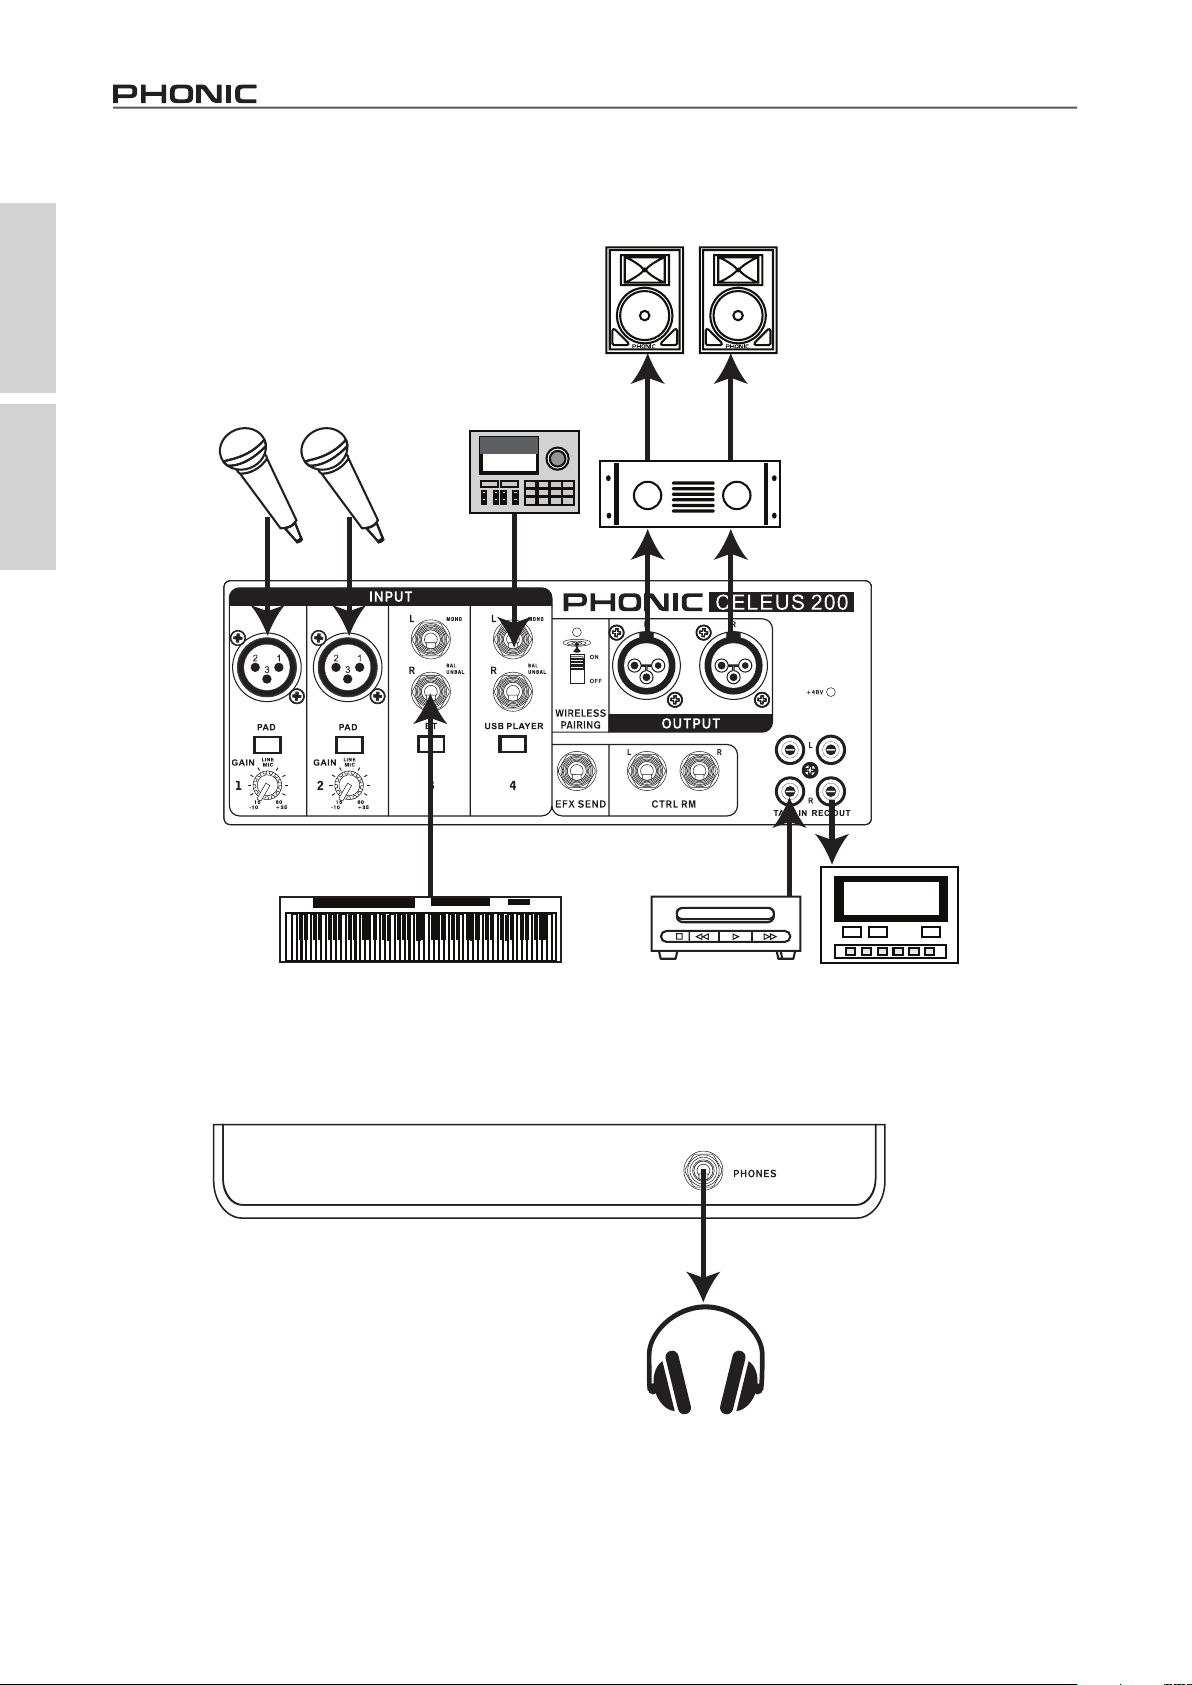
APPLICATIONS APLICACIONES
TO
FOH MAIN SPEAKERS
VOCAL MICROPHONES
MICRÓFONOS DE VOZ
Appendix Apéndice
ALTAVOCES PRINCIPALES FOH
DRUM MACHINE
CAJA DE RITMO
AMP
KEYBOARD
TECLADO
CD PLAYER
REPRODUCTOR DE CD
DAT RECORDER
GRABADORA DE DA
2
CELEUS 200
Page 25
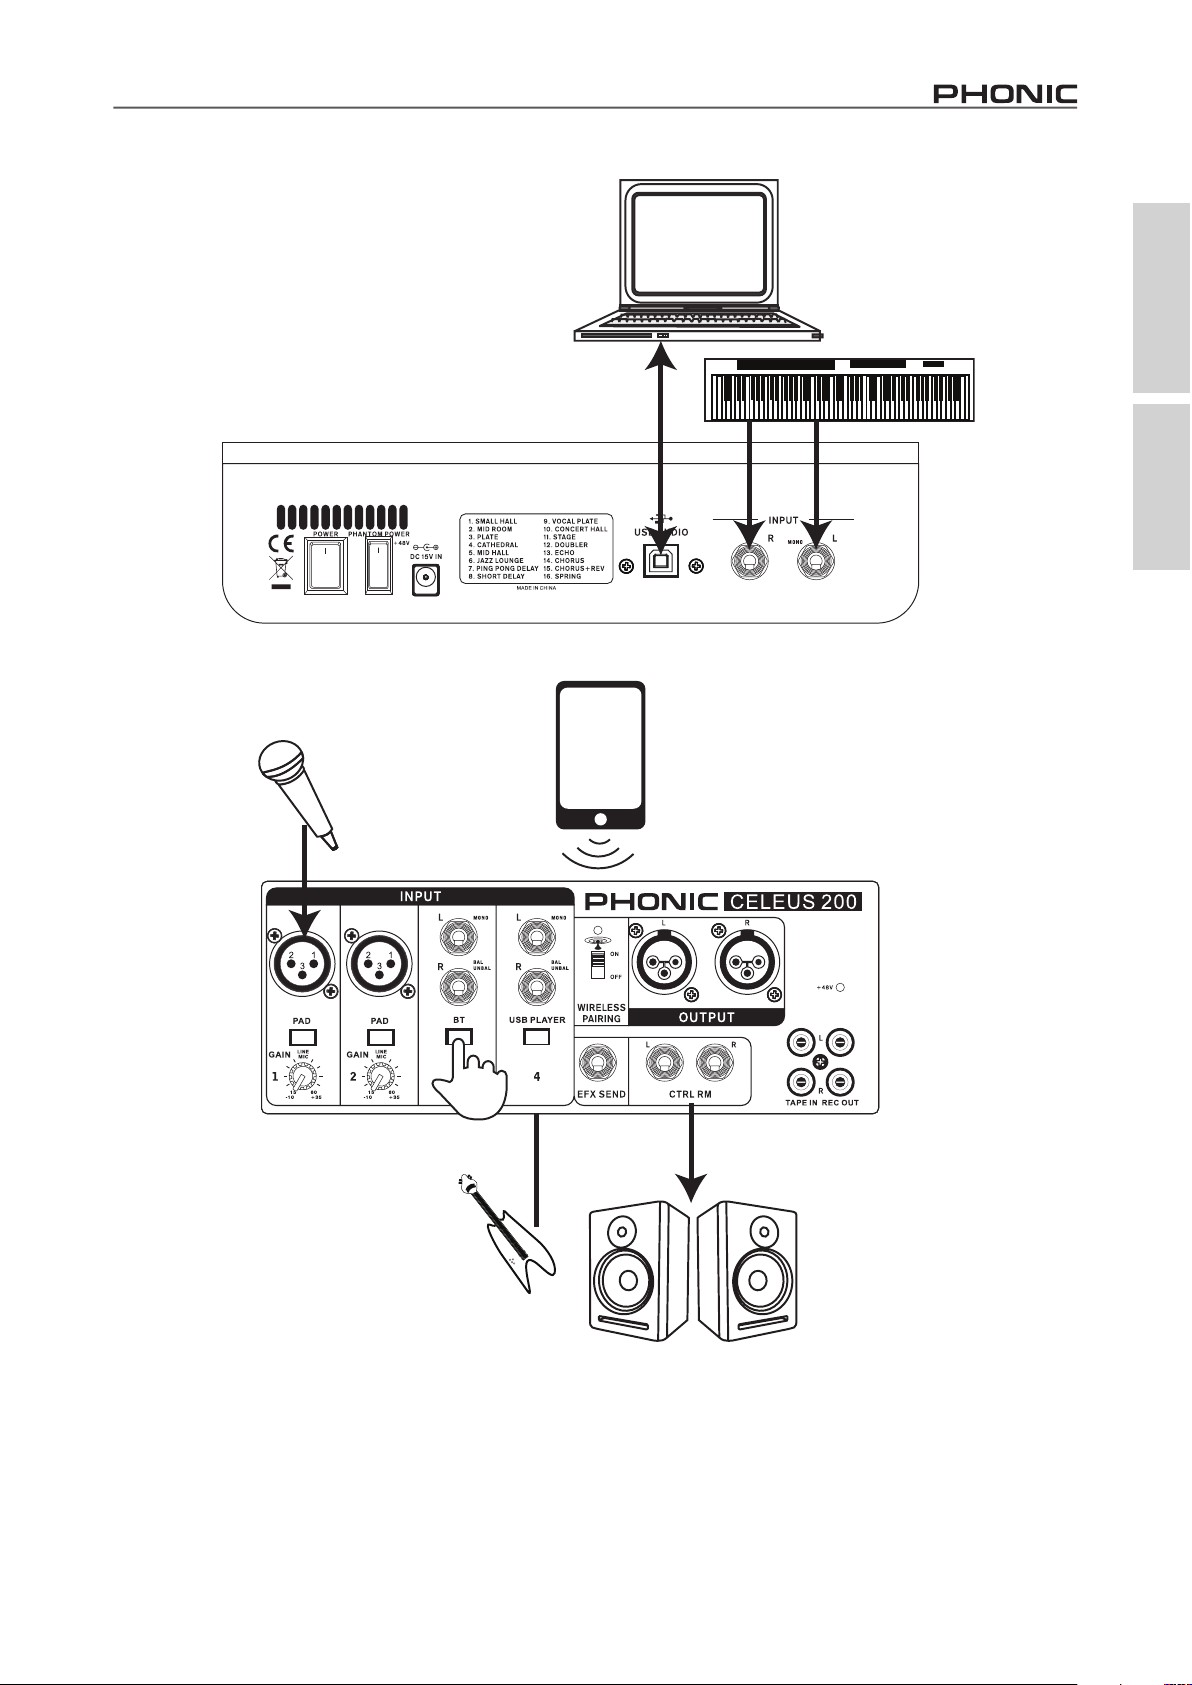
MONITORES DE ESTUDIO
VOCAL MICROPHONE
MICRÓFONOS DE VOZ
PC
SMARTPHONE
TELÉFONO INTELIGENTE
KEYBOARD
TECLADO
Appendix Apéndice
CELEUS 200
ELECTRIC GUITAR
GUITARRA ELÉCTICA
STUDIO MONITORS
3
Page 26
Appendix Apéndice
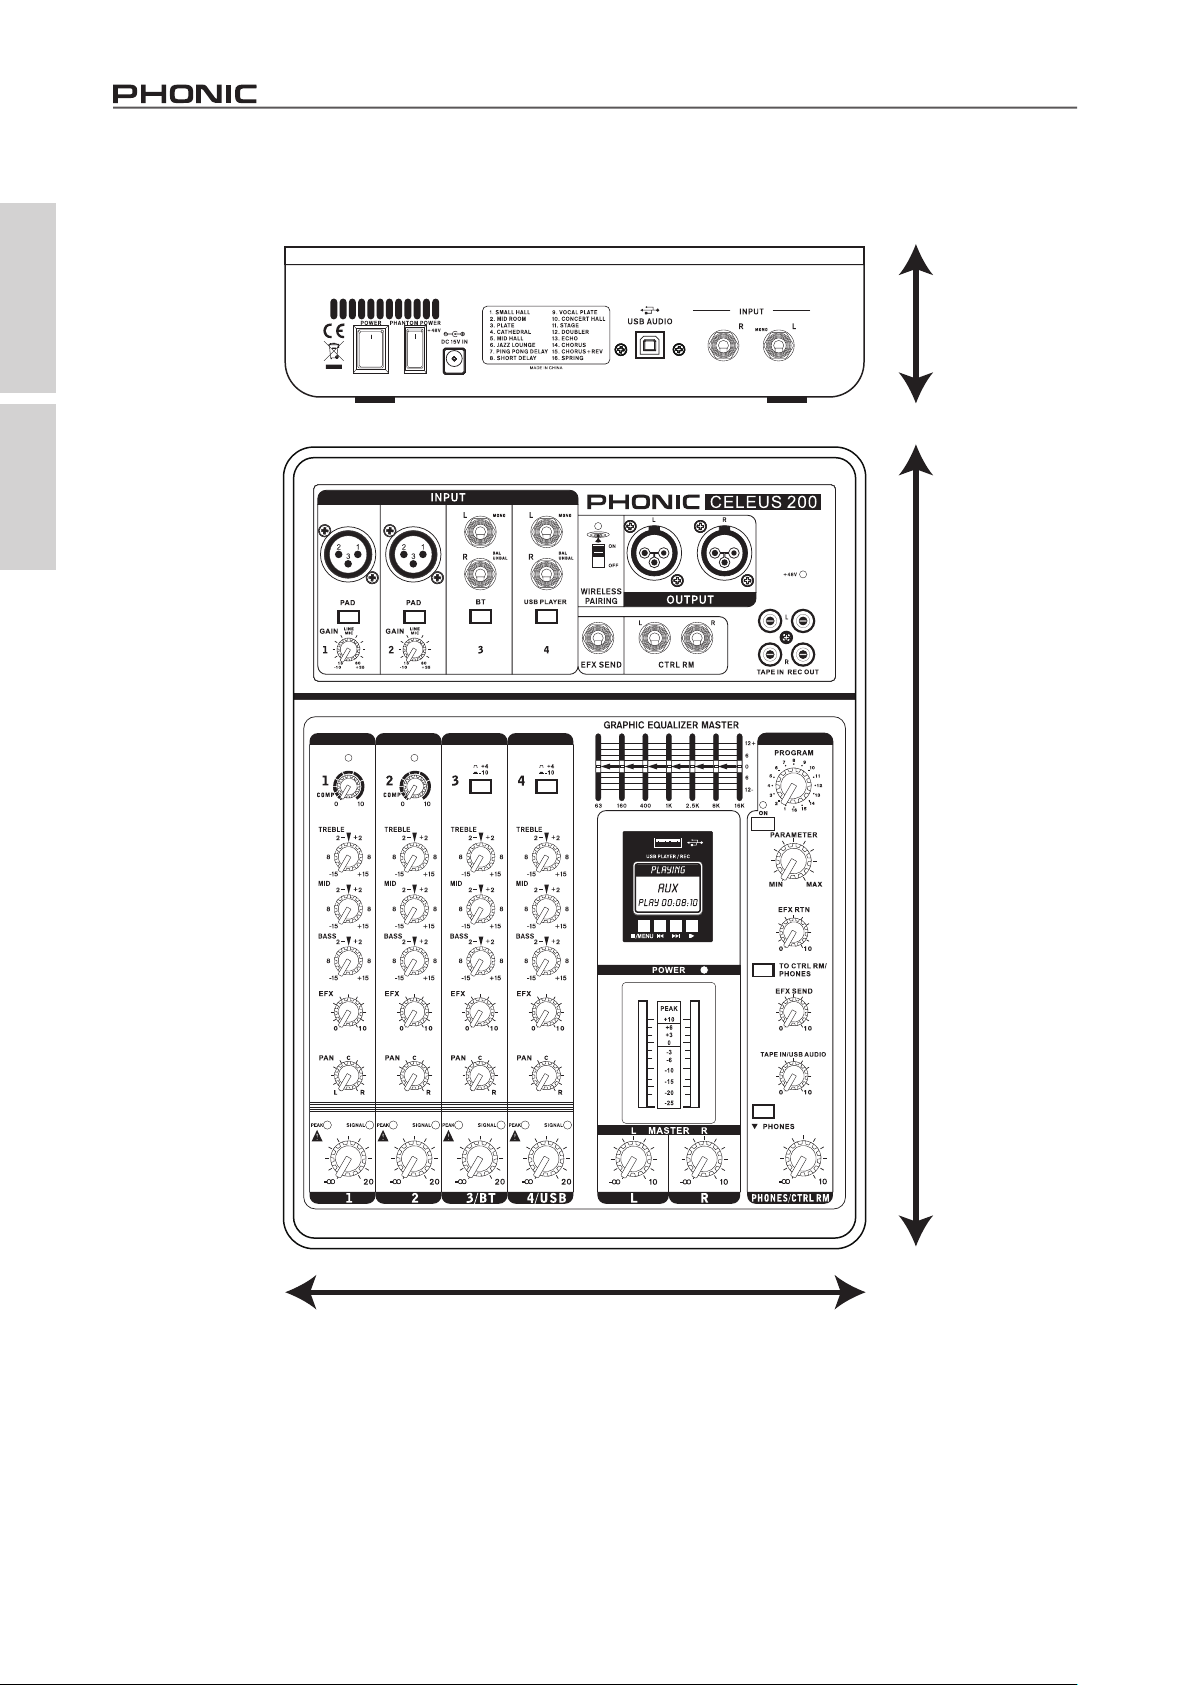
341 mm / 13.4”
87 mm / 3.4”
DIMENSIONS DIMENSIONES
250 mm / 9.8”
All measurements are shown in mm/inches.
Todas las medidas están mostradas en mm/pulgadas.
4
CELEUS 200
Page 27

NOTES
Appendix Apéndice
CELEUS 200
5
Page 28

 Loading...