

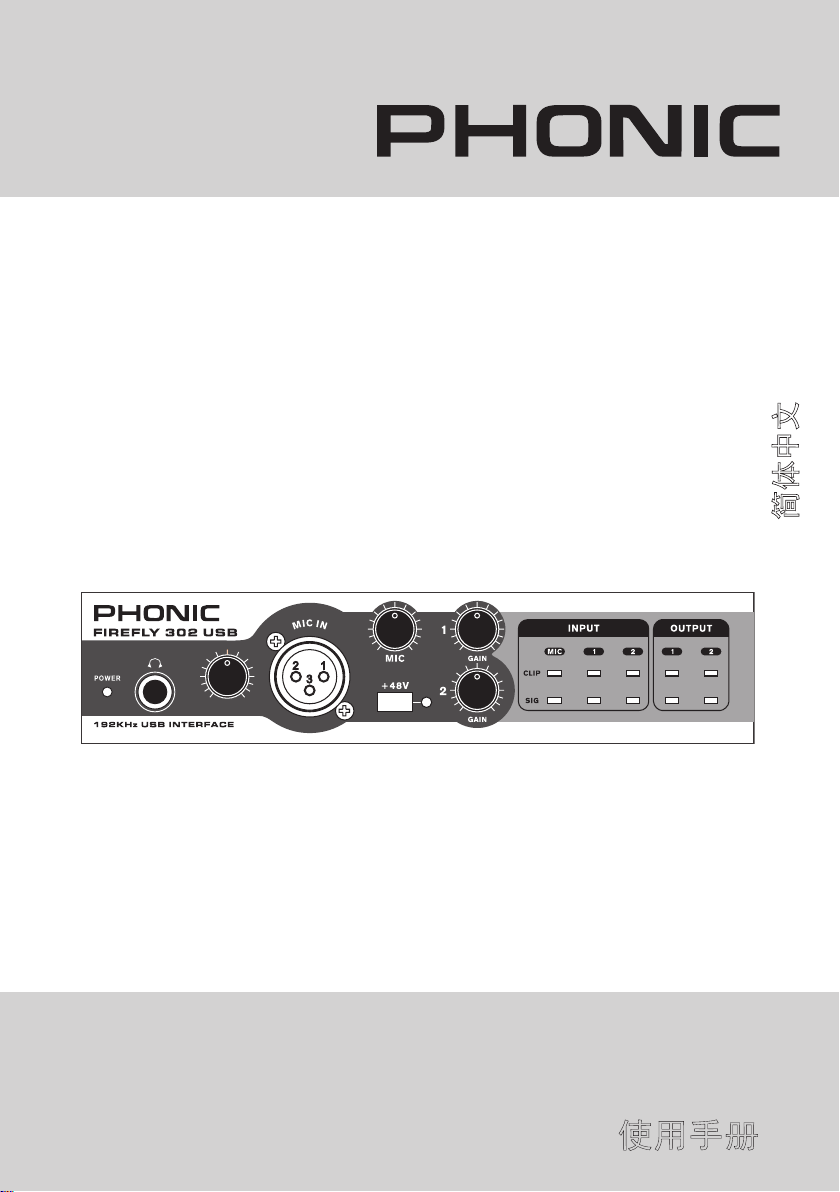
FIREFLY 302 USB
Portable USB Audio Interface
Interfase de Audio USB Portable
便携式USB音频界面
English / Español / 简体中文
User’s Manual
Manual del Usuario
使用手册
FIREFLY 302 USB
Portable USB Audio Interface
Interfase de Audio USB Portable
便携式USB音频界面
CONTENTS CONTENIDO
INTRODUCTION 4
FEATURES 4
INSTALLATION 5
QUICK START 5
FRONT PANEL DESCRIPTION 6
REAR PANEL DESCRIPTION 7
USB 2.0 INTERFACE 8
DRIVER INSTALLATION 8
CHANNEL ASSIGNMENT 14
OPERATING WITH DAW SOFTWARE 14
PC OPERATION 15
MAC OPERATION 17
SPECIFICATIONS 20
APPLICATION 56
DIMENSION 58
INTRODUCCIÓN 22
CARACTERÍSTICAS 22
INSTALACIÓN 23
INICIO RÁPIDO 23
DESCRIPCIÓN DEL PANEL FRONTAL 24
DESCRIPCIÓN DEL PANEL DORSAL 25
INTERFASE USB 2.0 27
INSTALACIÓN DE DRIVER 27
ASIGNACIÓN DE CANAL 33
OPERACIÓN CON SOFTWARE DAW 33
OPERACIÓN PC 34
OPERACIÓN MAC 36
ESPECIFICACIONES 39
APLICACIONES 56
DIMENSIÓN 58
目录
简介 41
特色 41
安装 41
快速启动 41
前面板 42
后面板 43
USB2.0界面 44
驱动安装 44
声道指定 50
使用DAW软件 50
PC机操作 51
Mac机操作 53
规格 55
应用 56
尺寸 58
BLOCK DIAGRAM 59
Phonic preserves the right to improve or alter any information within this document without prior notice
Phonic se reserva el derecho de mejorar o alterar cualquier información provista dentro de este documento sin previo aviso
DIAGRAMA DEL BLOQUE 59
PHONIC保留不预先通知即可更新本手册的权利
线路图 59
V1.0 11/21/2008
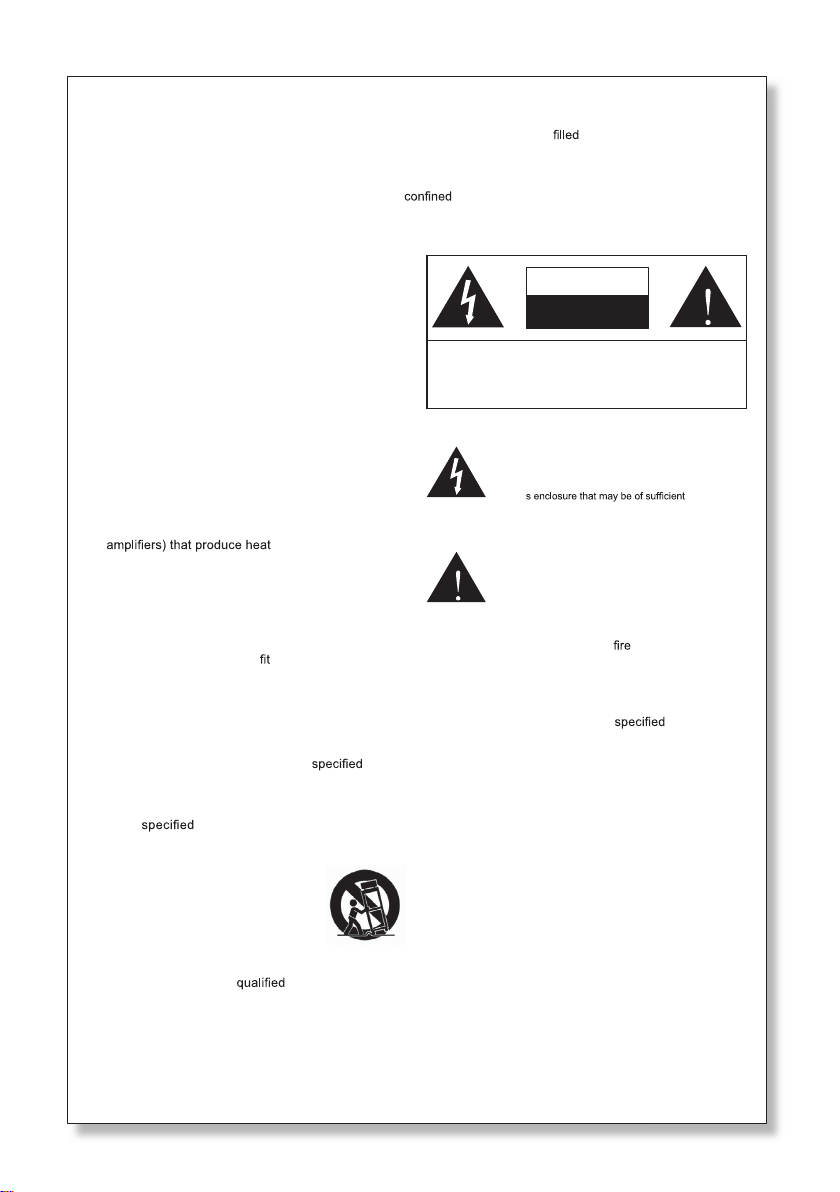
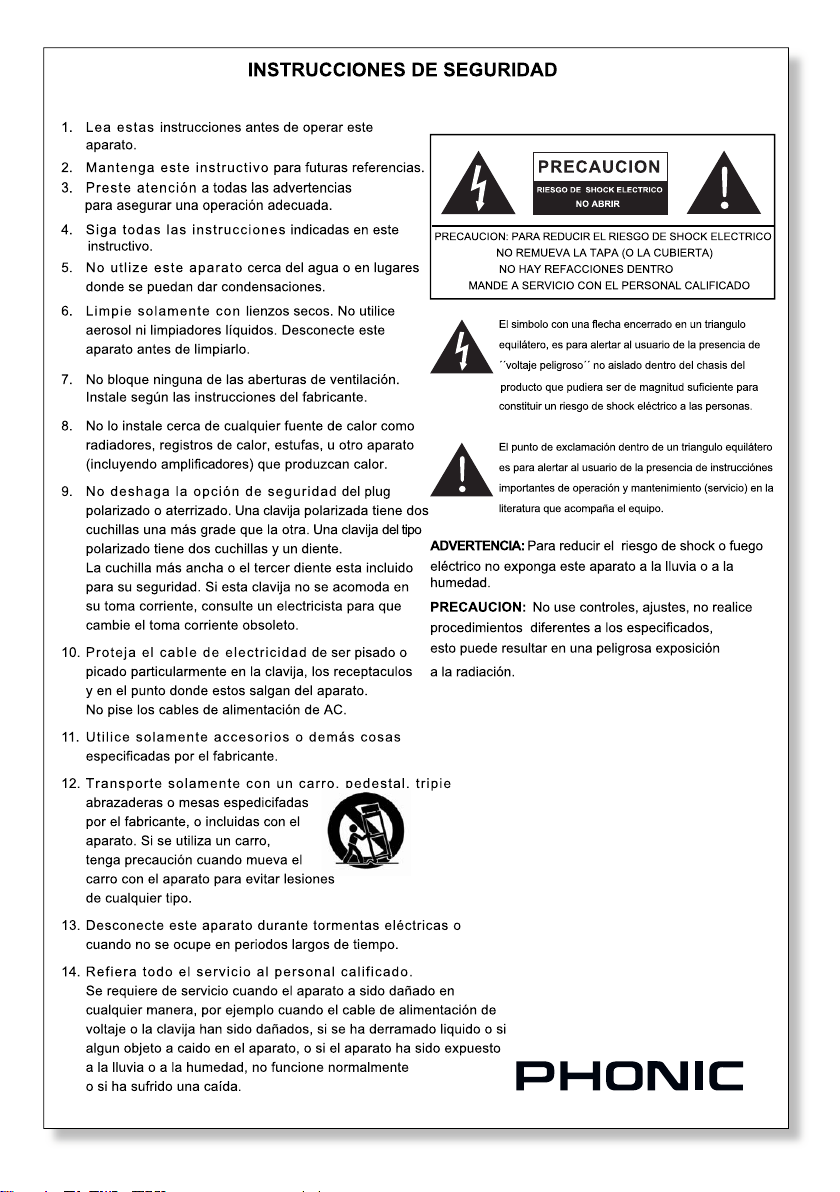
IMPORTANT SAFETY INSTRUCTIONS
The apparatus shall not be exposed to dripping or splashing and that no objects with liquids, such as vases,
shall be placed on the apparatus. The MAINS plug is used as the disconnect device, the disconnect device shall
remain readily operable.
Warning: the user shall not place this apparatus in the area during the operation so that the mains switch
can be easily accessible.
1. Read these instructions before operating this
apparatus.
2. Keep these instructions for future reference.
3. Heed all warnings to ensure safe operation.
4. Follow all instructions provided in this document.
5. Do not use this apparatus near water or in locations
where condensation may occur.
6. Clean only with dry cloth. Do not use aerosol or liquid
cleaners. Unplug this apparatus before cleaning.
7. Do not block any of the ventilation openings. Install
in accordance with the manufacturer’s instructions.
8. Do not install near any heat sources such as radiators,
heat registers, stoves, or other apparatus (including
.
9. Do not defeat the safety purpose of the polarized or
grounding-type plug. A polarized plug has two blades
with one wider than the other. A grounding type plug
has two blades and a third grounding prong. The wide
blade or the third prong is provided for your safety. If
the provided plug does not into your outlet, consult
an electrician for replacement of the obsolete outlet.
10. Protect the power cord from being walked on or
pinched particularly at plug, convenience receptacles,
and the point where they exit from the apparatus.
11. Only use attachments/accessories by the
manufacturer.
12. Use only with a cart, stand, tripod, bracket, or
table by the manufacturer, or sold with
the apparatus. When a cart is used, use caution
when moving the cart/appara tu s
combination to avoid injury from tipover.
13. Unplug this apparatus during lighting
storms or whe n un us ed for long
periods of time.
14. Refer all servicing to service personnel.
Servicing is required when the apparatus has been
damaged in any way, such as power-supply cord or
plug is damaged, liquid has been spilled or objects
have fallen into the apparatus, the apparatus has
been exposed to rain or moisture, does not operate
normally, or has been dropped.
CAUTION: TO REDUCE THE RISK OF ELECTRIC SHOCK,
REFER SERVICING TO QUALIFIED PERSONNEL
WARNING: To reduce the risk of or electric shock, do
not expose this apparatus to rain or moisture.
CAUTION: Use of controls or adjustments or performance
of procedures other than those may result in
hazardous radiation exposure.
CAUTION
RISK OF ELECTRIC SHOCK
DO NOT OPEN
DO NOT REMOVE COVER (OR BACK)
NO USER SERVICEABLE PARTS INSIDE
The lightning flash with arrowhead symbol , within an
equilateral triangle, is intended to alert the user to the
presence of uninsulated “dangerous voltage” within the
product
’
magnitude to constitute a risk of electric shock to persons.
The exclamation point within an equilateral triangle is in-
tended to alert the user to the presence of important operat-
ing and maintenance (servicing) instructions in the literature
accompanying the appliance.

INTRODUCTION
Congratulations on your purchase of one of
the newest members of the Phonic Firey
series of recording interfaces, the Firey 302
USB. Through the Firey’s ultra low-noise
microphone input and two line inputs, together
with the USB 2.0 interface, users are able to
digitally transfer their audio to a computer
in high resolution audio that meets today’s
modern production standards (24-bit, with
a sampling rate selectable up to 192 kHz).
Never again will you have to worry about
loss of audio, as the Firey is the only tool
you need to transfer those analog recordings
to digital.
Light, easy to use, and with no problematic
conguration necessary, the Firey certainly
shines when it comes to simplicity and mobility.
We know how eager you are to get started
– wanting to get the product out of the box
and hook it all up is probably your number
one priority right now – but before you do, we
strongly urge you to take a look through this
manual. Inside, you will nd important facts
on the set up, use and applications of your
brand new Firey. If you do happen to be one
of the many people who atly refuse to read
user manuals, then we just urge you to at
least glance at the Instant Setup section. After
glancing at or reading through the manual (we
applaud you if you do read the entire manual),
please store it in a place that is easy for you to
nd, because chances are there’s something
you missed the rst time around.
FEATURES
● 5 x 6 24 -bit /192 kHz USB str eam I/O
● 2 x 2 an alog ope rati on (RCA )
● Front- pan el microp hone in (X LR) with
+4 8V p hant om p ower
● He a d p h o n e output w i t h dedicat e d
le vel cont rol
● Ne ar-zero latency A S I O s o f t w a r e
di rect mon itor ing
● Powe r in dica tor LED
● DC p ower sup ply incl uded
● Easy -to- see sig nal and clip L ED in-
di cato rs f or i nput and output
● Mac OSX an d Wi ndow s XP / Vi sta
co mpat ible
4
Firey 302 USB

INSTALLATION
1. Turn your computer on and connect the
Firey 302 USB to the computer via the
included USB cable. It is recommended
not to turn the unit’s power on just yet,
however.
2.
Run the setup.exe le on the included
driver CD, and follow the installation
instructions displayed on screen.
3.
When prompted to “disconnect and recon-
nect” the Firey, change the power select
switch on the rear of the device to DC
IN.
4.
Continue to follow the on-screen installa-
tion instructions to nalize the setup.
5.
Open your audio editing / DAW software,
and check the Firey’s ASIO driver has
been read successfully by the program.
This is usually done in the “Devices”
submenu. You may also want to edit
the Firey’s properties. This is usually
done by clicking on the Tools pull down
menu, and selecting “Properties”. In this
area, you can usually select the Firey’s
different inputs and outputs, and assign
them to various channels. This, of course,
depends on the software you are using,
so check the software’s user’s manual for
more information.
QUICK START
1. Connect the DC converter to the 9-12V
jack in and change the power selector
switch to the DC IN position.
2.
Plug your USB cable into Firey’s USB
port and the other end into any available
USB port on your computer. Provided you
have already installed the required driver,
the computer should detect your Firey
302 USB.
3.
Connect a microphone to the XLR input
connector. Talk into the mic and check the
LED sig and clip indicators. Adjust the Mic
level control as you see necessary.
4.
Connect any analog line inputs you wish to
use. We advise that you do not attempt to
use the 1/4” and RCA connectors on any
one input channel at the same time.
5.
Open your audio software and congure
it so the Firey 302 USB is set as your
input/output device. Please note that the
analog and S/PDIF outputs cannot be
used to output the signal from the computer simultaneously.
6.
Plug your headphones into the head-
phone output of the Firey to monitor the
return signal.
7.
Now you are ready to design high resolution audio productions.
Firey 302 USB
5
4
1
2 3
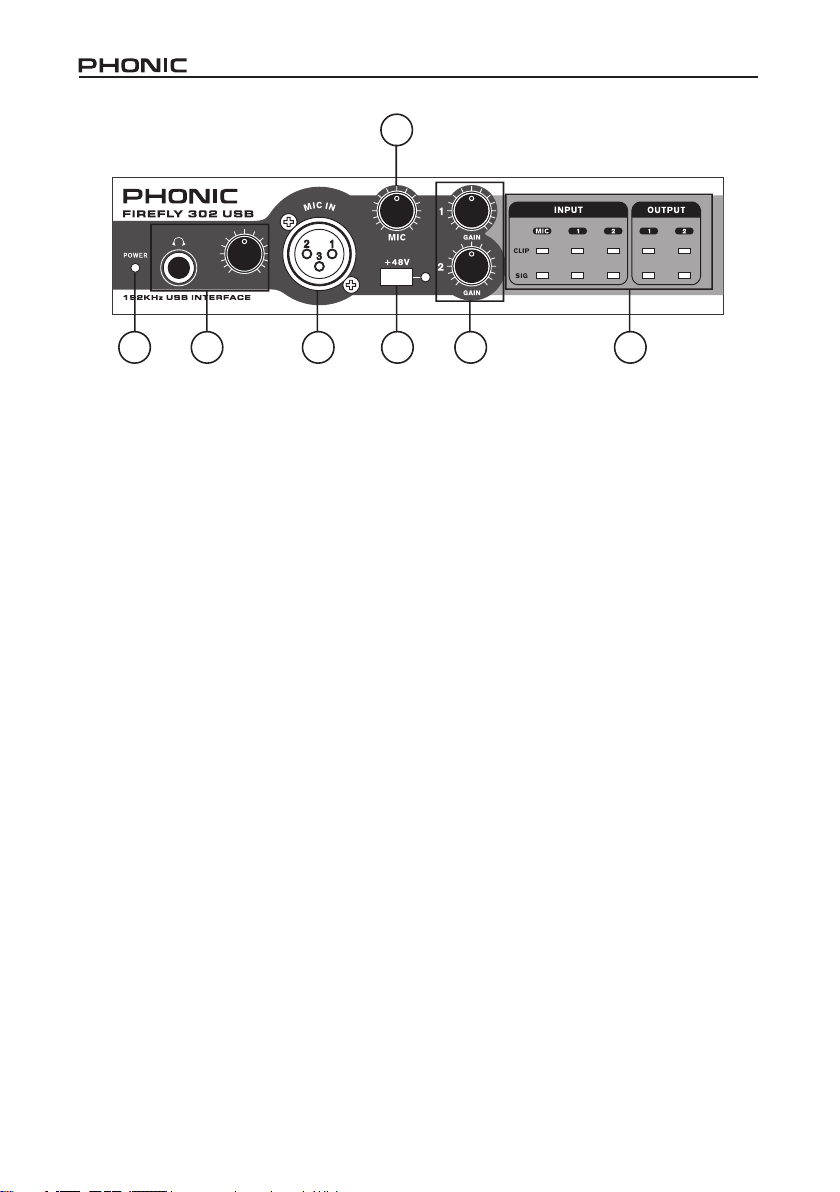
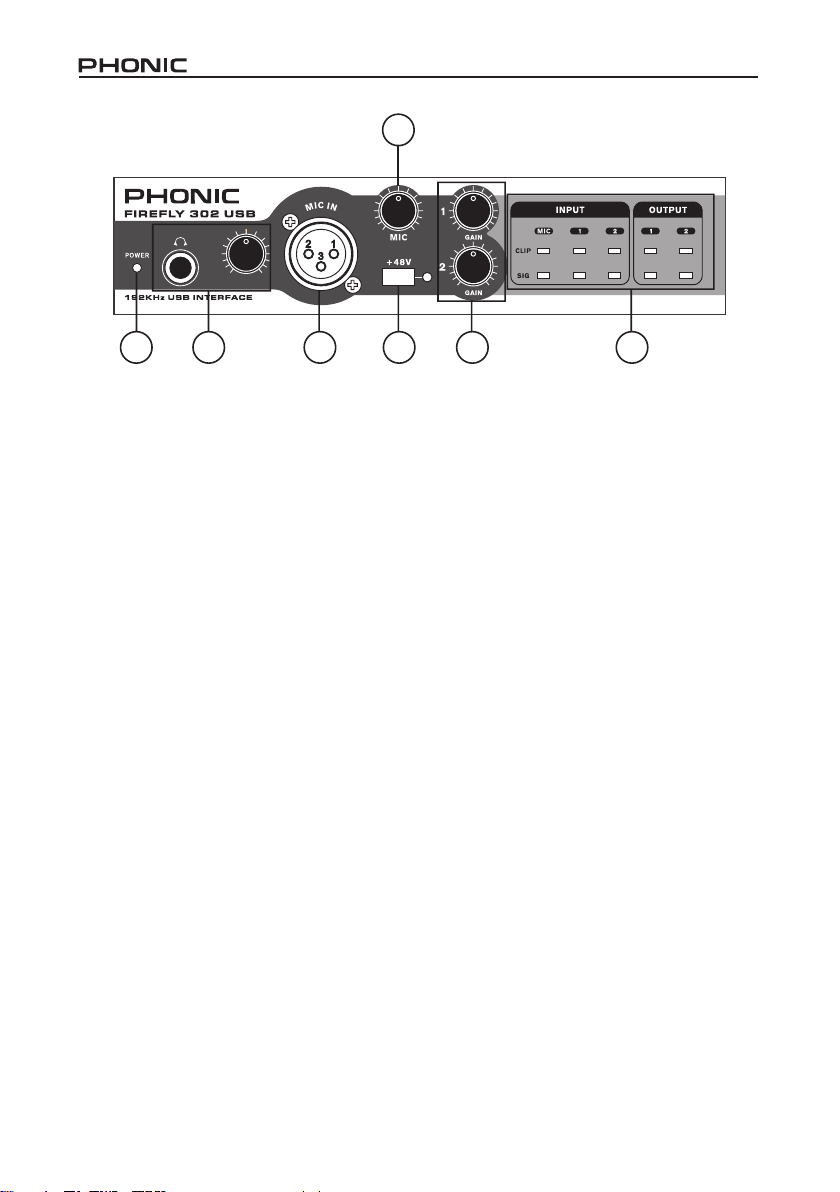
FRONT PANEL DESCRIPTION
1. Power LED Indicator
When you connect the DC power converter and
change the power switch to the DC IN position,
the unit will be powered and the front power LED
will be illuminated.
2. Headphone Output Jack and Control
All the audio signals that are mixed on computer
can be monitored with the Headphone output.
You can also control the level of this signal with
the corresponding level control.
3. XLR Microphone Connector
This is a balanced microphone XLR 3-pin connector, which you can use to connect dynamic
or condenser microphones. Phantom power
may be applied to allow condenser or ribbon
microphones to be connected.
4. Mic Gain
Turn this knob clockwise to increase the Microphone input’s gain. You have 44dB of possible
gain with this knob, so please take care when
applying gain to ensure the Mic Clip LED does
not light up.
6 5
5. Gain 1 and 2
These knobs control the input gain for the RCA
and 1/4” plug input jacks located on the rear
panel. Turn them clockwise to increase the
signal level gain or turn them counterclockwise
to lower the input levels. Gain 1 controls the
Analog In 1 RCA and 1/4” TRS input jacks, and
Gain 2 controls the Analog In 2 RCA and 1/4”
TRS input jacks. Each gain control is independent of the other, so you can easily match your
input levels.
6. +48V Phantom Power
Pushing this button will activate +48V of phantom
power on the microphone input, allowing users
to connect condenser microphones, ribbon microphones, or other input devices that require
+48V power to operate. If you are not entirely
sure if your mic requires phantom power, please
refer to the microphone’s operation manual or
consult the manufacturer.
7. Signal / Clip Indicators
These LED indicators give users an idea of
when their analog and mic inputs and outputs
are receiving a signal (sig) and when that signal
reaches high peaks just prior to the signal being
dynamically clipped, which may cause undesirable effects to the integrity of your audio (clip).
7
6
Firey 302 USB
9
10 11
12
8
13 14 15 16
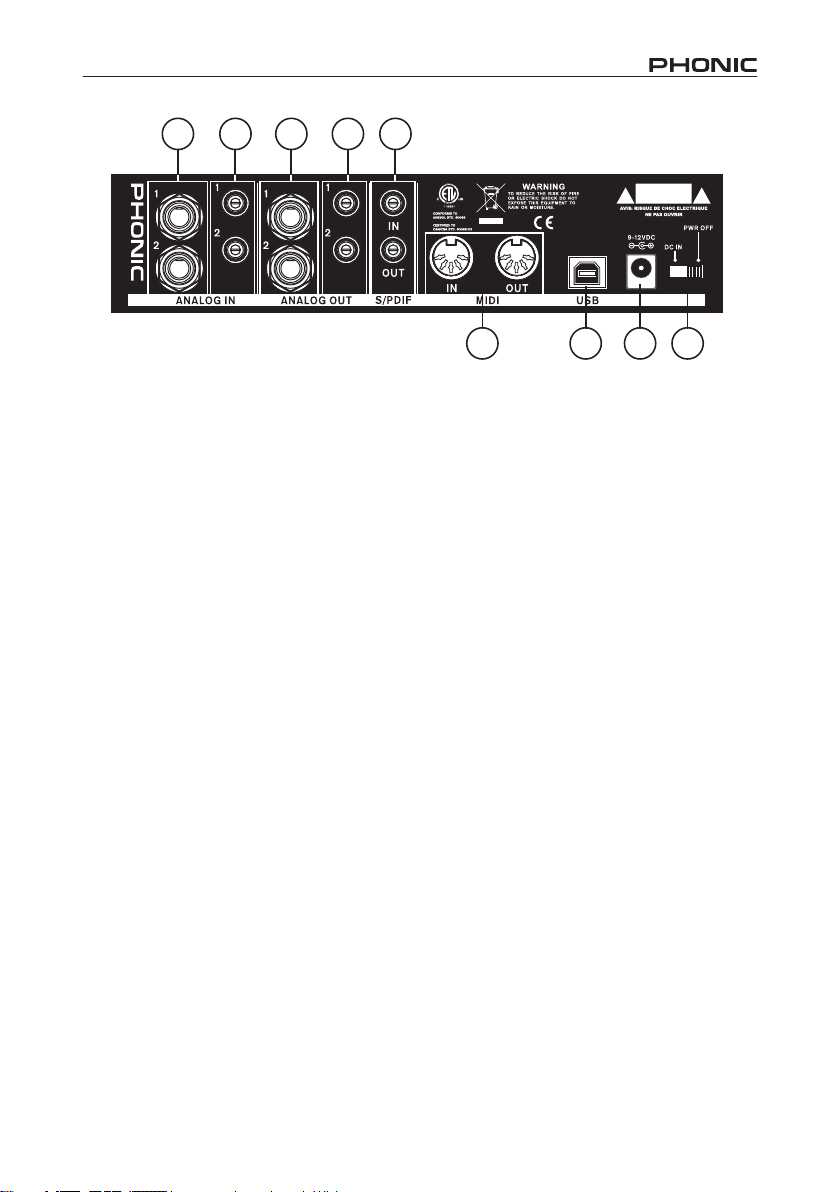
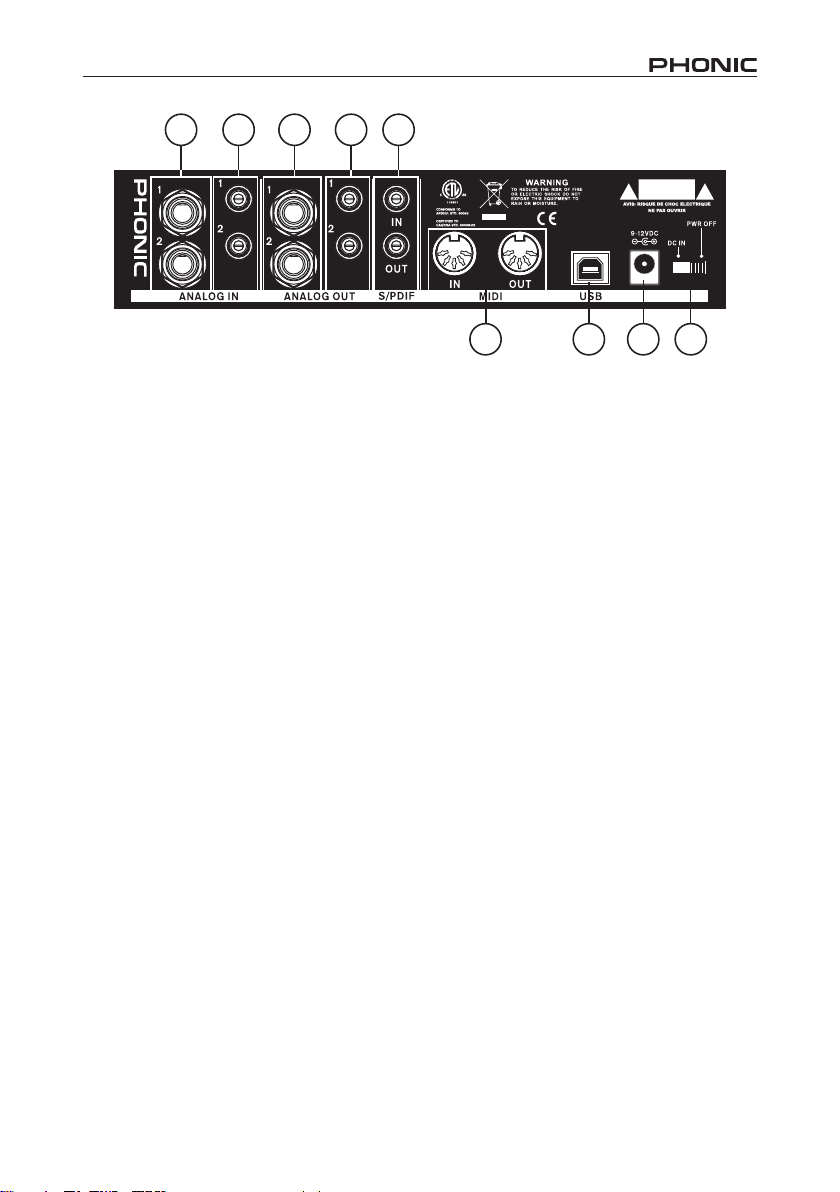
REAR PANEL DESCRIPTION
8. Analog 1/4” TRS Inputs 1 and 2
These are balanced 1/4” TRS Line Inputs and
can be used to connect any line level devices,
such as CD players or DAT recorders.
9. Analog RCA Inputs 1 and 2
These are RCA inputs and can be used to
connect any device like CD players, DAT recorders, turntables, and even analog mixers
(taking the signal from a mixer’s Record or 2
track outputs).
Important Note: Keep in mind that the two RCA inputs
are completely independent of one another; however
these inputs should not be used if the corresponding
1/4” analog 1 and 2 inputs are used, as doing so would
have quite undesirable results. You can, however, mix
and match these inputs. If, for example, you wanted to
use Input 1’s RCA connector and Input 2’s 1/4” con-
nector that would not cause any problems.
10. Analog 1/4” TRS Outputs 1 and 2
This are balanced 1/4” TRS Line Outputs with
line level signal (+4dBu). Use them to get a stereo output channel and connect them to active
monitors (such as the Phonic P8A), or perhaps
to an amplier and a passive pair of speakers.
You could also use them with signal processors,
mixers or other external devices.
11. Analog RCA Outputs 1 and 2
These are RCA line outputs. They accept RCA
cables and can be connected to any external
device that uses RCA connectors. This could
include tape recorders and MP3 recorders.
12. S/PDIF In/Out
These are a standard S/PDIF Digital Audio
Input/Outputs that can be use with digital mixers, DAT recorders, or any external device that
uses this Digital format. The S/PDIF’s output
sampling rate is determined by the sampling
rate set by the Firey control software. Please
use a 75 ohm coaxial cable with RCA plug if you
are using the S/PDIF connection, as the most
common problems associated with glitches in
digital interfaces are the result of using poor
quality cables.
13. MIDI In/Out
You can have 16 simultaneous MIDI input/output channels sent to and from your computer
through the Firey 302 USB.
14. USB Port
This is a digital USB 2.0 connector that you can
use to connect to your computer. Doing so allows
users to send their audio signal from the Firey
to the computer, and vise-versa.
15. 9-12VDC Input Power Jack
Connect the supplied DC converter to this jack
to feed the unit. Please only use this DC converter in order to ensure no damage is done to
the Firey. If for any reason your converter gets
lost or damaged and you need a replacement,
please contact your local Phonic dealer.
16. Power Switch
Use this switch to turn the Firey 302 USB on
and off.
Firey 302 USB
7

USB INTERFACE
SYSTEM REQUIREMENTS
The following are the minimum required specications for use with the Firey 302 USB. If your
computer does not meet these requirements, you will experience lagging of audio and possible
freezing of your computer when attempting to operate the Firey.
Windows
• Microsoft® Windows® XP (with SP2) or Microsoft® Windows® Vista
• Available USB 2.0 port
• Intel Pentium® 4 processor or equivalent AMD Athlon processor
• Motherboard with Intel or VIA chipset
• 5400 RPM or faster hard disk drive (7200 RPM or faster with 8 MB cache recommended)
• 256 MB or more of RAM (512 MB recommended)
Macintosh
• OS X Leopard 10.5.1 or later with USB support
• Intel Core 2 Duo or later processor (G4 processors are not supported)
• 256 MB or more of RAM (512 MB or more recommended)
DRIVER INSTALLATION
To use the Firey efciently (or at all) on any computer, it is important to install all the necessary
drivers from the included CD. We advise that users read all instructions carefully before continuing on to each step of the installation process, as they will be asked to, however disconnect and
reconnect their Firey.
Windows XP (with Service Pack 1 or 2)
1. It is recommended that you quit all applications before starting the installation process.
2. Connect the Firey 302 USB to the computer, leaving the power of the unit off.
3. Insert the installation CD included with your Firey into the CD-ROM drive of your computer.
If the CD does not automatically start the installation process within a few moments, then
navigate to “My Computer” → your CD-ROM drive → “Firey302USB_Driver” → double-click
“setup.exe” to begin the installation manually. The Firey Control Panel software also will be
installed at this time.
4. Follow the on-screen installation instructions, turning the Firey on when asked to ‘discon-
nect and reconnect’ the unit.
8
Firey 302 USB
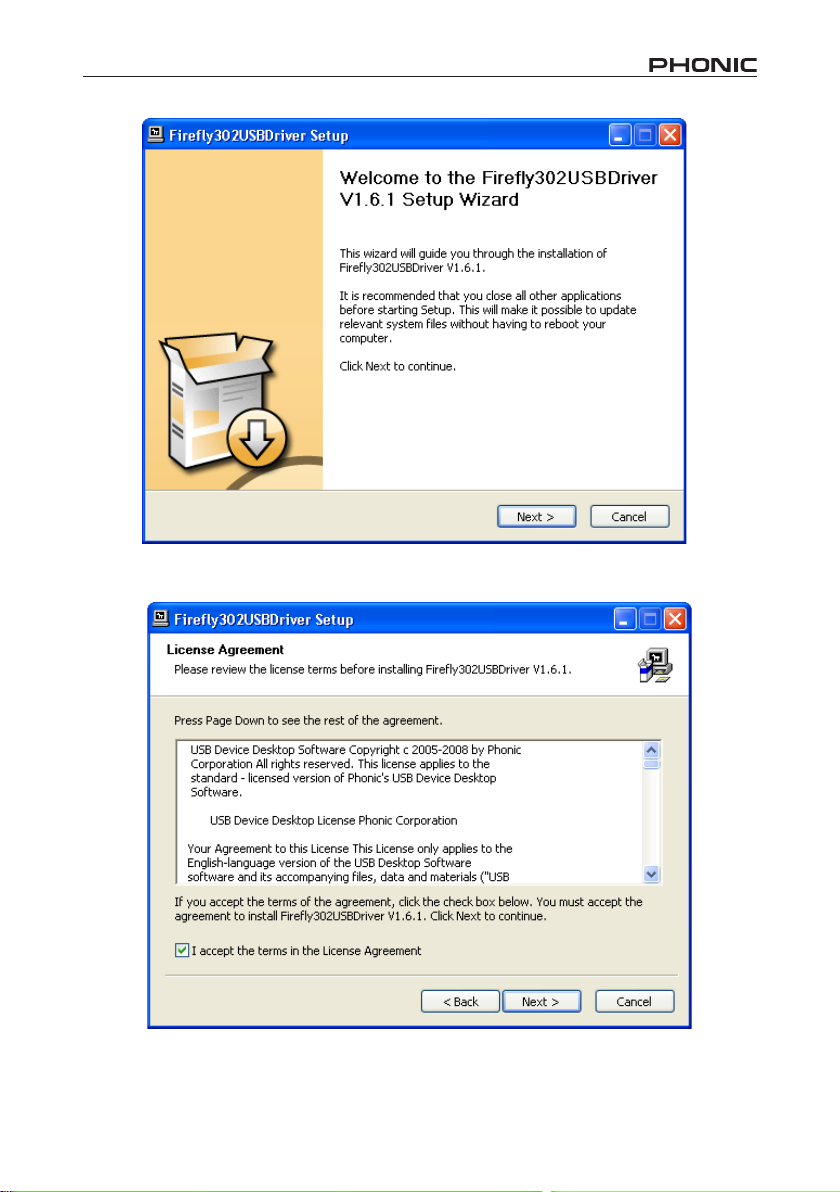
Make sure no other programs are running on your PC and click “Next”.
Read and accept the terms of the License Agreement and click “Next” to continue.
Firey 302 USB
9
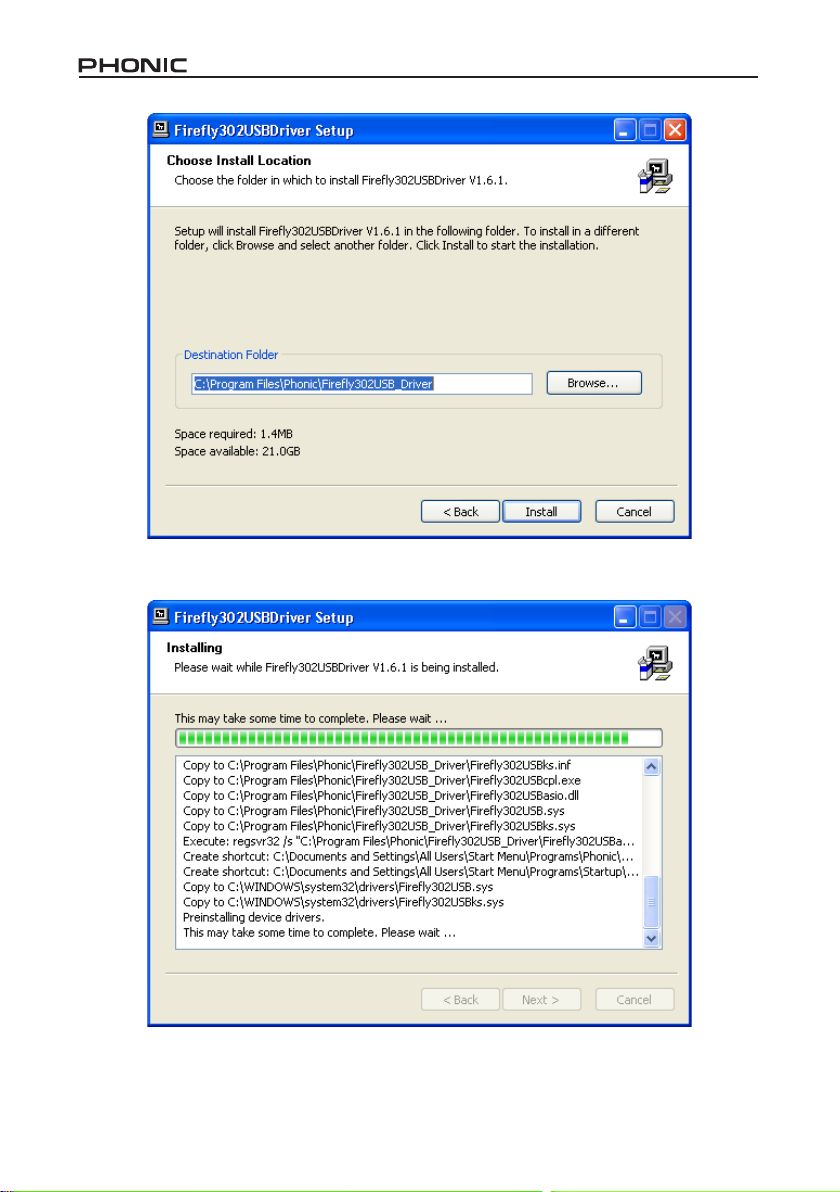
Either select a new destination for the installation,
or else click “Install” to accept the default directory.
The installation will then commence.
10
Firey 302 USB
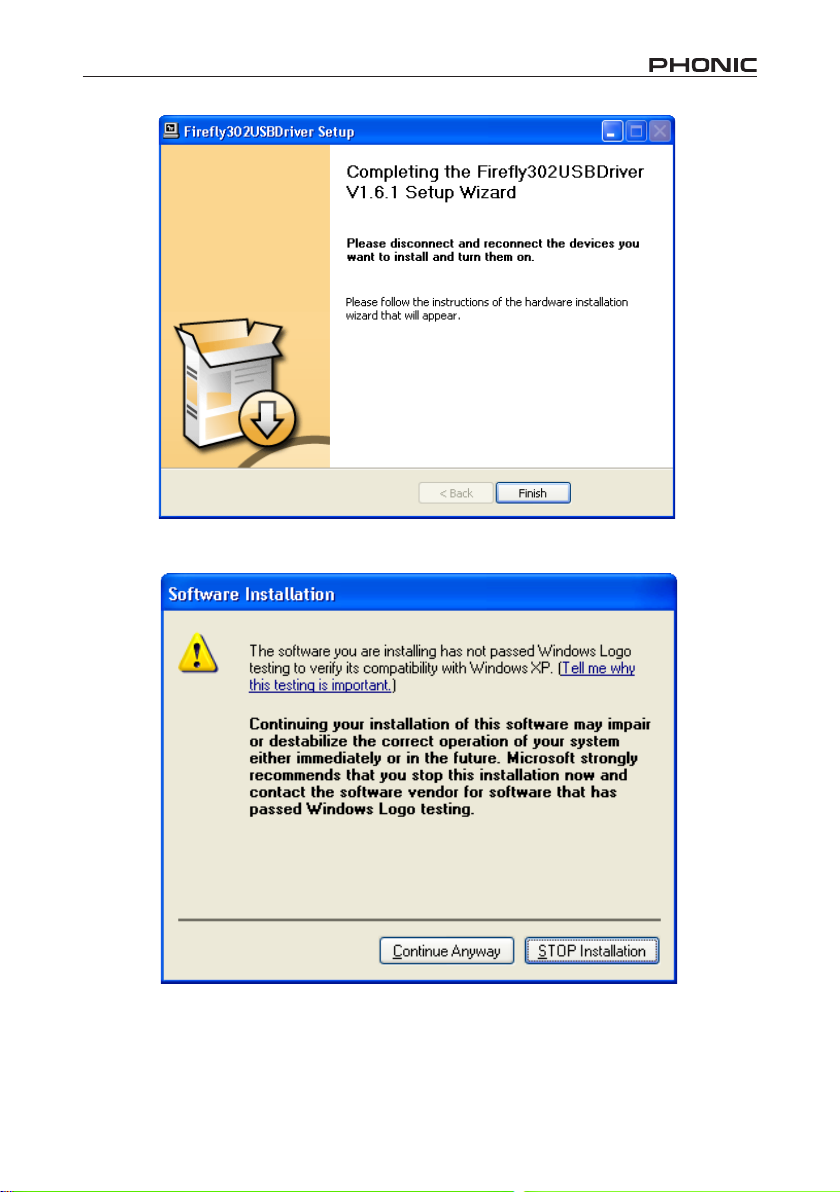
Connect the Firey 302 USB to the computer and push ‘Finish’ to complete the installation.
If a message is displayed indicating that the software has not passed
Windows Logo test, click “Continue Anyway.”
After installation is complete, an installation complete message
will appear on screen. Click ‘Finish’ to exit.
Firey 302 USB
11
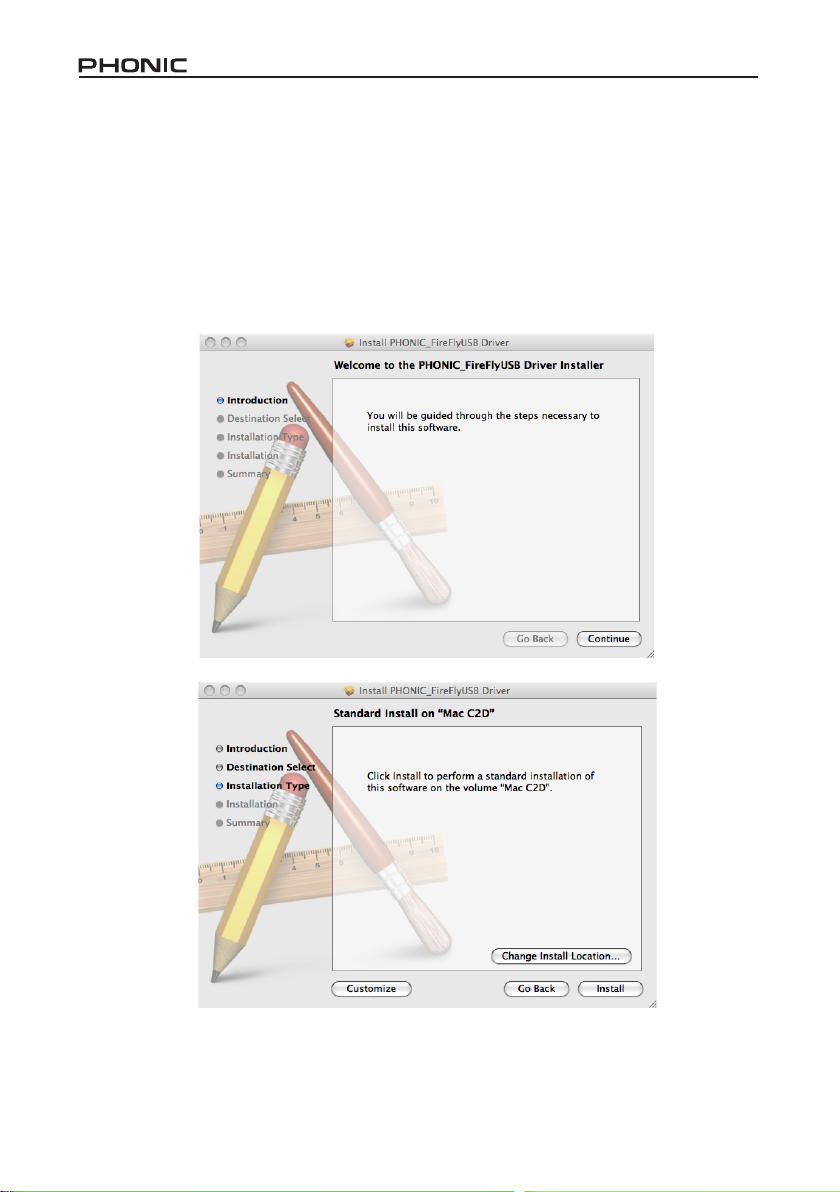
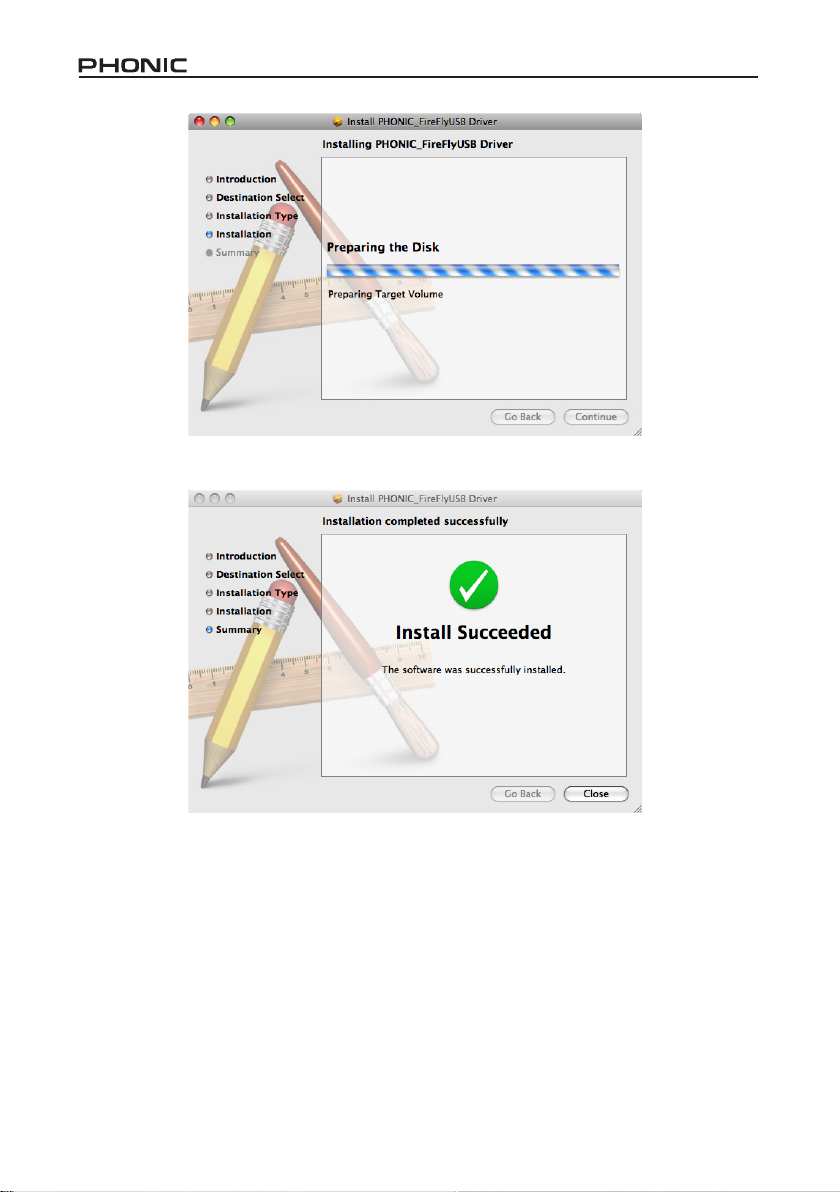
Mac OSX Driver Installation
1. It is recommended that you quit all applications before starting the installation process.
2. Do not connect the Firey 302 USB to the Mac until after you have installed the driver.
3. Insert the installation disc into the CD drive of your computer. If the CD does not automatically
start the installation process, navigate to your CD drive → “Phonic” → “Firey302USB” → then
run “PHONIC_FireyUSB.mpkg” to begin the installation manually. The Firey Control Panel
software also will be installed at this time.
4. Follow the on-screen installation instructions.
5. After installing the Mac driver, connect the Firey 302 USB to the Mac’s USB port.
Select “Change Install Location...” to select a new destination for the Mac software. If not, the
software will automatically be installed to the default location.
12
Firey 302 USB
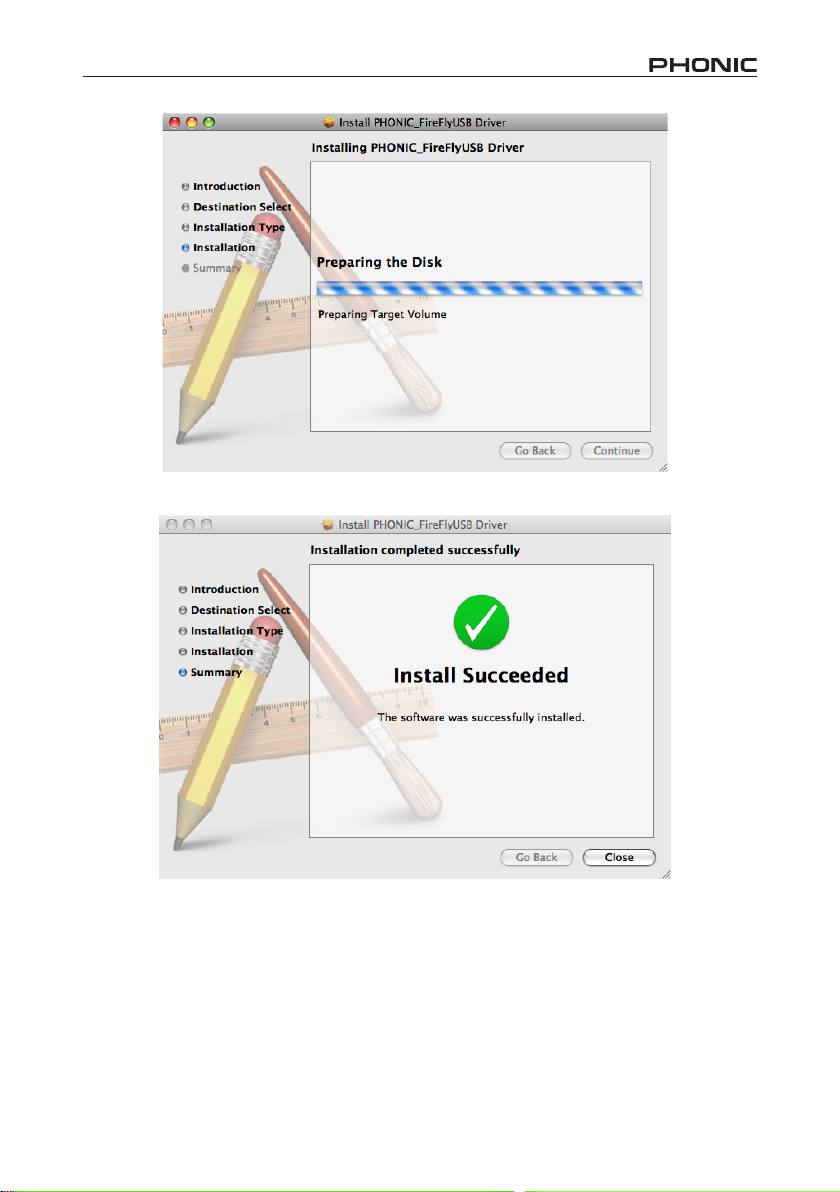
Click ‘Close’ once the installation has completed.
Firey 302 USB
13

CHANNEL ASSIGNMENT
When using a Digital Audio Workstation on
a PC, and within the included Phonic Firey
302 USB control panel software, the following
names have been attributed to the input chan-
nels of the Firey.
Channel Name Firey Channel
Analog In 1 1/4” and RCA Analog Input 1
Analog In 2 1/4” and RCA Analog Input 2
Mic In Microphone Input
Mic In Microphone Input
S/PDIF In S/PDIF Input
S/PDIF In S/PDIF Input
Midi In MIDI Input
If you would like to use the Firey 302 USB as
your default audio output device on your PC,
simply go into the Windows control panel and
select “Sound and Audio Devices.” Select the
Audio tab, and use the pull-down menu to se-
lect one of the Firey 302 USB’s inputs from the
list of available output devices. The Firey 302
USB can also be selected as the default output
device for individual programs by editing said
programs’ settings / options.
OPERATING WITH DAW
SOFTWARE
After successfully completing the installation
process, the following process must be fol-
lowed to work efciently with the Firey 302
USB. In the following example, we are using
Cubase - however most other software should
be similar.
1. Open the program.
2. Go to the ‘Devices’ pull-down menu and select
‘Device Setup’. On the left, select ‘VST Multitrack’.
3. From the ASIO Driver drop-down list select the
‘Firey302USB ASIO Driver’. A pop-up box
will ask you if you want to switch to the ASIO
driver. Click ‘Switch’. This completes the basic
setup.
4. The following steps should be followed to acti-
vate audio tracks received from or sent by the
Firey 302 USB.
a. Go to the “devices” pull-down menu and
select ‘VST Inputs’. This will display the
various inputs (“Analog In 1”, “Analog In
2”, etc.)
b. Activate channels by clicking the “Ac-
tive” button located next to each channel
name.
5. For further instructions on the operation of Cu-
base, please consult the owner’s manual by
pressing F1 while the program is open.
If you wish to reset the Firey ASIO driver, simply go to the ‘devices’ pull-down menu and select
‘device setup’. Simply click ‘reset’ and select the
‘Firey302USB ASIO Driver’. Click ‘ok’ to continue
and the Firey 302 USB should once again be-
come functional.
14
Firey 302 USB
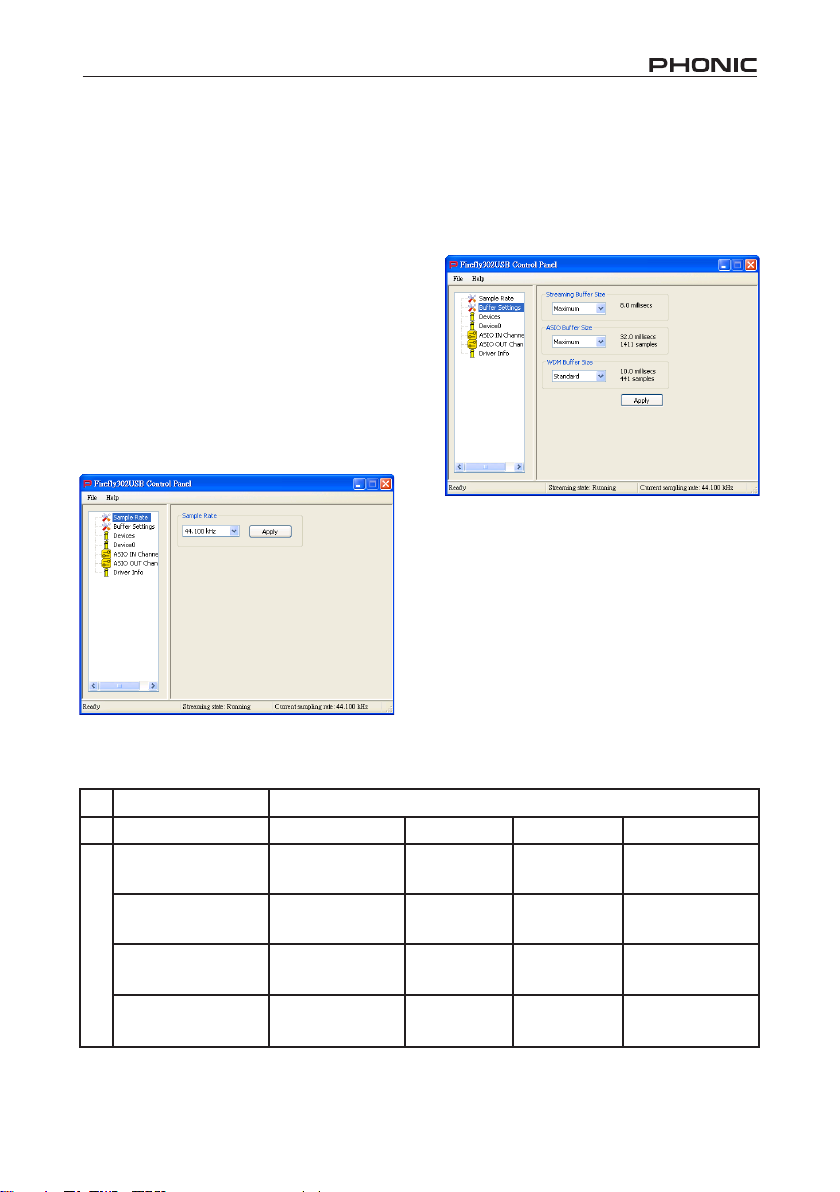
WINDOWS OPERATION
The Firey control panel on the PC can be
accessed at any time by entering choosing
the shortcut from your Programs menu. This
program will not only allow users to alter their
device and channel names and properties, but
will also let them adjust buffer settings, change
sampling rates, and so forth.
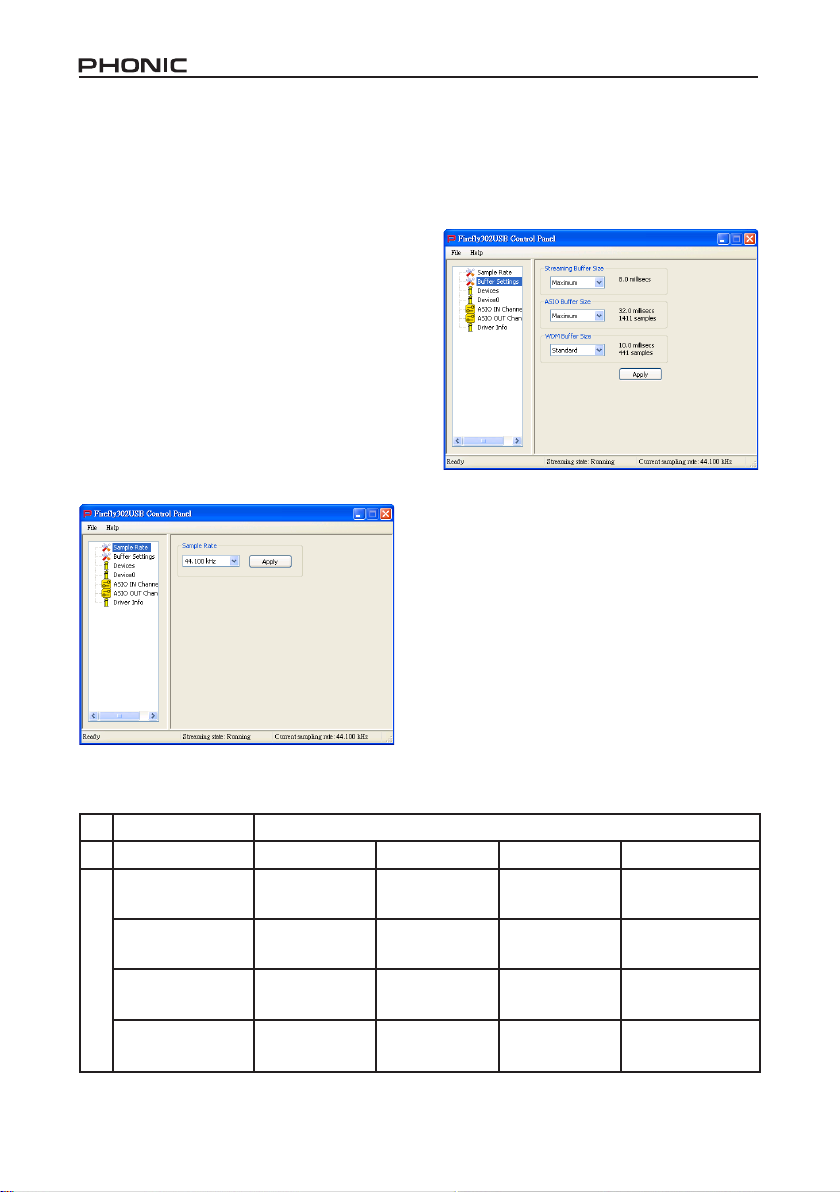
Sample Rate
In this menu, users are able to adjust the sam-
pling rate of the Firey 302 USB. The sampling
rate can be chosen between 44.1, 48, 88.2, 96,
176.4 and 192 kHz. Press ‘apply’ once a new
sampling rate is selected.
Buffer Settings
The Buffer Settings menu is used to adjust the
Streaming Buffer, as well as the buffer settings
when using the ASIO and WDM drivers.
The ‘Streaming Buffer’ can be adjusted between Minimum (1 millisecond), Small (2 milliseconds), Large (4 milliseconds) and Maximum
(8 milliseconds). The selection of the Streaming Buffer size will determine the size of the
ASIO and WDM buffer sizes, as displayed in
the table at the bottom of this page.
When selecting a new buffer size, users can
click ‘Apply’ to apply the newly selected buffer
setting to the device.
Minimum 1.5 ms
Small/Smaller 2.0 ms
Large/Small 3.0 ms
Maximum/Standard 4.0 ms
ASIO / WDM Buffer Setting
Firey 302 USB
Streaming Buffer Setting
Minimum (1 ms) Small (2 ms) Large (4 ms) Maximum (8 ms)
66 samples
88 samples
132 samples
176 samples
3.0 ms
132 samples
4.0 ms
176 samples
6.0 ms
256 samples
8.0 ms
353 samples
6.0 ms
256 samples
8.0 ms
353 samples
12.0 ms
529 samples
16.0 ms
706 samples
12.0 ms
529 samples
16.0 ms
706 samples
24.0 ms
1058 samples
32.0 ms
529 samples
15
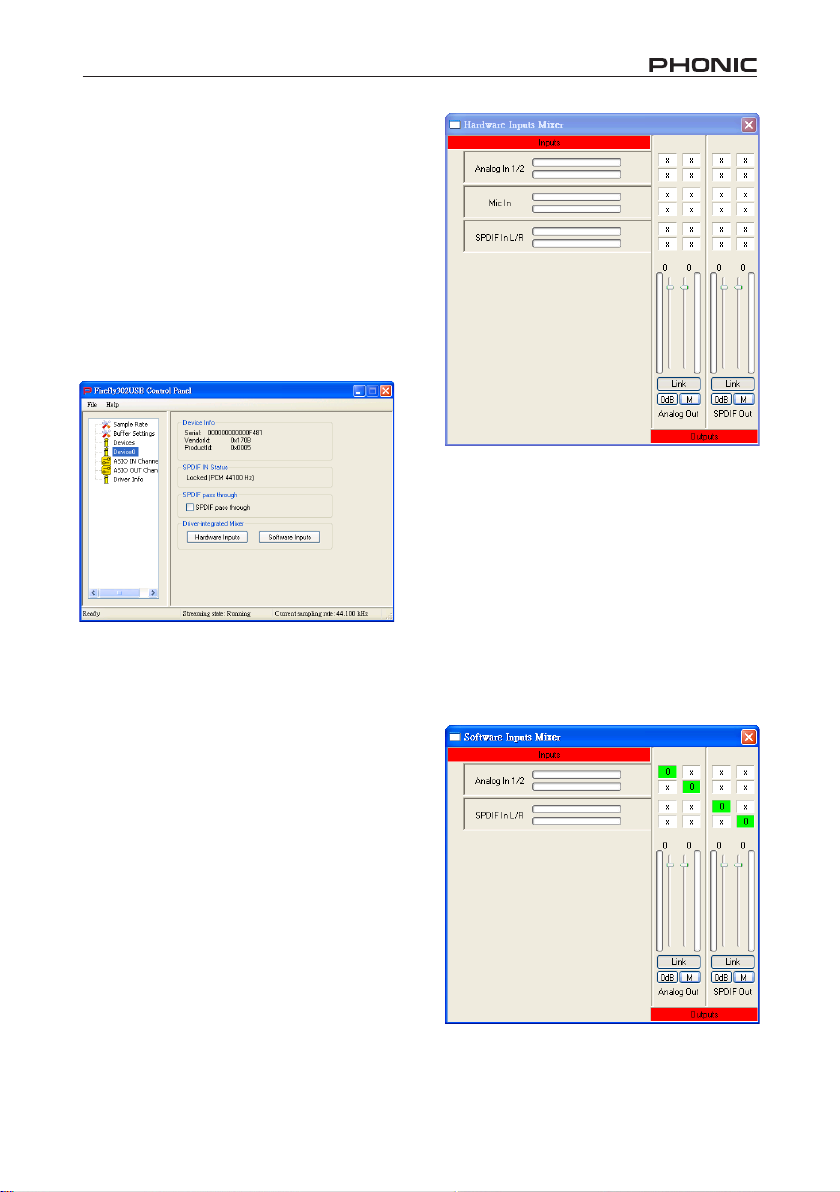
Devices / Device0
In the Devices section, users are able to view
and edit the name of any Phonic USB Devices
connected to the computer. The Device0 menu
offers device info as well as a S/PDIF pass
through function for users to take advantage
of. There is also two driver-integrated mixers
that users are able to utilize to better customize
their input/output levels to suit their computer.
Hardware Inputs Mixer
This software-based mixer allows users to adjust levels and routing options of all input sig-
nals of the Firey 302 USB. All of the outputs
from this mixer can then be utilized by DAW
and other suitable applications.
Level meters are incorporated into the mixing
software. Users are given visual depictions of
current incoming and outgoing signals from this
software mixer.
Software Inputs Mixer
This mixer allows users to monitor and adjust
the levels (and routing) of the output signals
from the PC. Like the Hardware Inputs Mixer,
users are able to adjust volume levels and
mute output tracks as necessary. Also like the
Hardware mixer, level meters are provided on
the software mixer’s inputs and outputs.
Input Channels
The Input Channels section allows users to
view and edit the name of the various input
channels received from the USB input. Please
note that the channel names used in the picture
below may differ from your unit’s.
16
Firey 302 USB
Output Channels
By entering the Output Channels section, users can view and edit the names of the two
analog output channels and two S/PDIF output
channels that are sent from the computer to the
Firey.
MAC OPERATION
After installing the Firey 302 USB driver and
software to your Mac computer, enter the Audio
MIDI Setup application and you should be able
to select the Phonic Firey 302 USB as your
default input and output device.
Driver Information
This section allows users to check the version
of their currently used driver and the interface.
New drivers will be made available from time
to time on the Phonic document center, and
an announcement will usually be made on the
Phonic home page.
Also in the Audio MIDI Setup, you will be able to
adjust volume levels of your various input and
output signals, as well as the sampling rate and
resolution you want to use. Users are able to
select between 44.1, 48, 88.2, 96, 176.4 and
192 kHz sampling rates. Resolution can be selected between 24-bit, 20-bit and 16-bit. Both
the sampling rate and resolution can be adjusted in your DAW software as well (depending on
what software you use).
Also in the Audio MIDI Setup, tracks can be
muted at will, and input signals can be set to
‘thru’, which - put simply - will return the input
signals directly back to their corresponding outputs.
The input and output channel names listed correspond with each of the Firey’s input and outputs. Channels 1 to 6 on the input correspond,
in order, with analog inputs 1 and 2 (listed in
the Audio MIDI Setup as channels 1 and 2), the
microphone input (channels 3 and 4) and the
S/PDIF left and right input signals (channels 5
and 6). The output channels 1 to 4 are, in order, analog outputs 1 and 2 and S/PDIF outputs
left and right.
Firey 302 USB
17
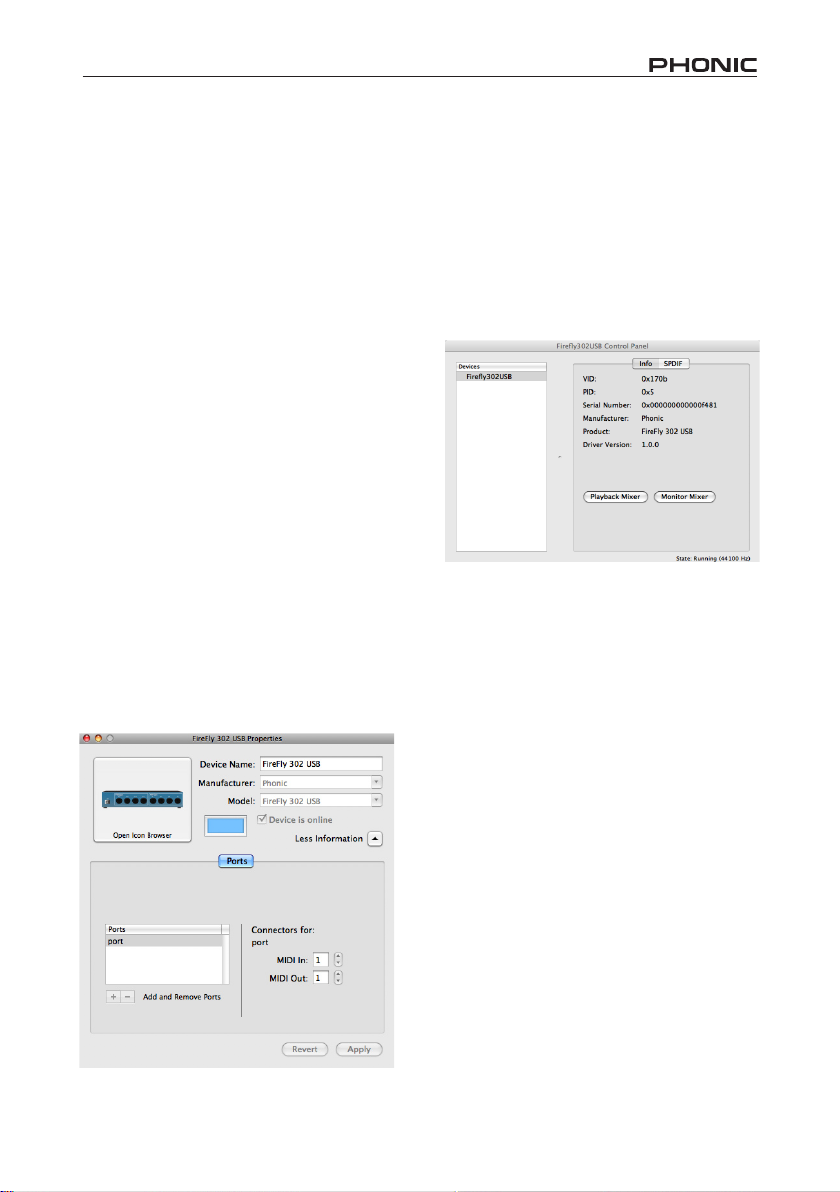
MIDI Setup
Also in the Audio MIDI Setup section, users are
able to adjust the Firey’s MIDI functions by selecting ‘MIDI Devices’ at the top of the window.
Within the MIDI Devices section, a ‘Firey 302
USB’ icon should be present and users can select it to get the following screen.
Firey 302 USB Control Panel
As many of the Firey’s features are adjustable through the Audio MIDI Setup section,
the Firey302USB Control Panel serves a few
very specic surfaces. As seen in the image
below, the main page of the software allows
users to view a few important details on the
product, including the driver version, serial
number, etcetera.
Users can also select one of the two internal
mixers that the Firey’s software offers.
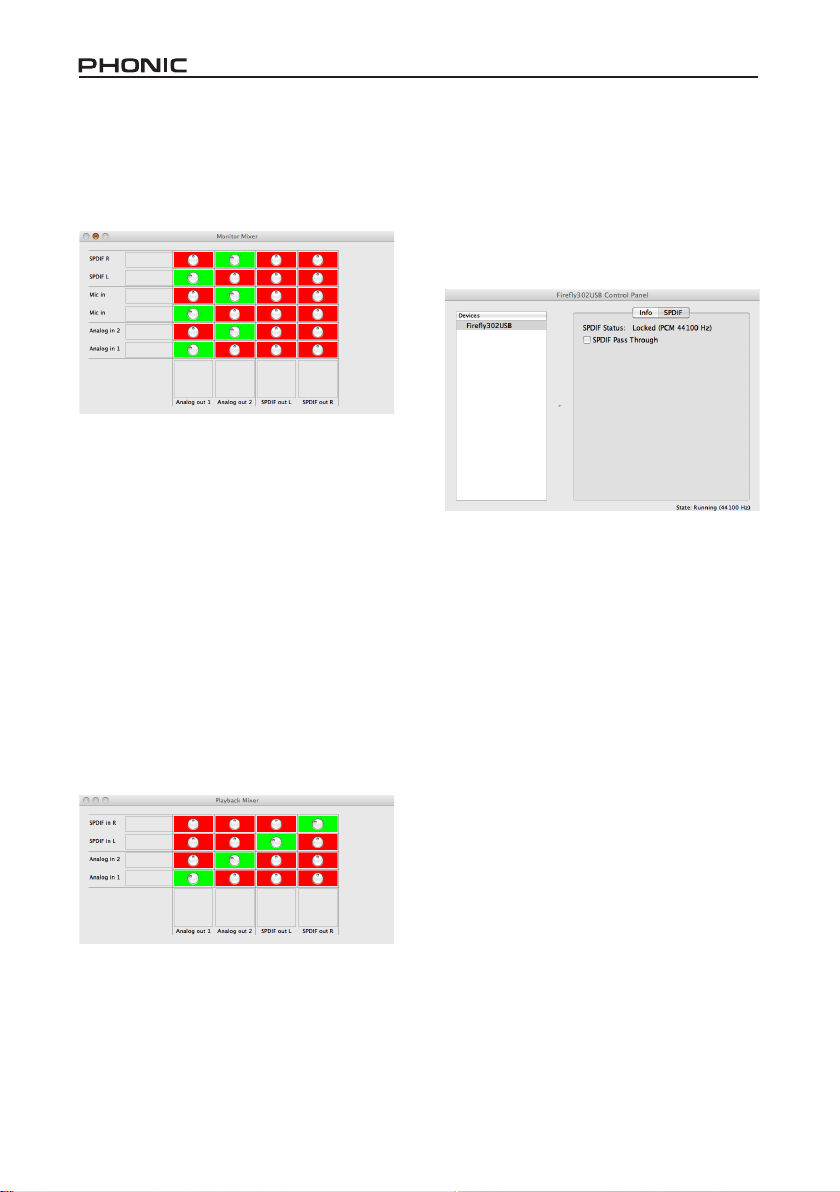
Monitor Mixer
The Monitor Mixer, in essence, allows you to
adjust your Firey’s input signals before sending them off to your DAW software. All of the
inputs are listed; the SPDIF 1 and 0 inputs that
are listed in the software are representative of
the S/PDIF left and right input signals, I2S 3
and 2 are both the microphone input, and the
I2S 1 and 0 channels are analog inputs 1 and
2 on the Firey 302 USB.
You can opt to adjust your device’s input signals
in this mixer, or you can just opt to leave it alone
all together and rely on your DAW software’s
level controls.
In case you’re wondering why there’s only one
microphone input, but two microphone chan-
nels on the Firey - this function allows you to
make a stereo mix of your microphone signal!
18
Firey 302 USB
Playback Mixer
The control panel software also offers a Playback Mixer. This is the ‘software mixer’, allowing users to adjust the signal they send out to
the Firey 302 USB’s outputs. All of the output
signals from your DAW software can be adjusted individually before being sent out their
respective outputs on the Firey.
As with the Monitor Mixer, each of the listed
output channels is representative of one of the
Firey’s output channels. Channels 1 and 2
are analog outputs 1 and 2, while 3 and 4 are
the left and right S/PDIF outputs.
S/PDIF Pass Through
Also included on the Firey 302 USB Control
Panel is the SPDIF Pass Through function.
This basically allows you to send your S/PDIF
input signals directly out through from the
computer to the Firey’s S/PDIF outputs.
Firey 302 USB
19
SPECIFICATIONS
Line Inputs
Connectors 1/4” TRS, RCA
Max input (balanced) +10 dBu
Max input (unbalanced) +10 dBu
Input gain range -∞ to +10 dBu
Impedance 10K Ohm (Unbalanced), 20K Ohm (Balanced).
Microphone Input
Connectors XLR
Available gain 44dB
Input range: -40 ~ -+4 dBu
Impedance 2k ohm
Line Outputs
Connectors 1/4” TRS, RCA
Max output (balanced) +8 dBu
Max output (unbalanced) +2 dBu
Impedance 100 Ohm (Unbalanced), 200 Ohm (Balanced)
System
Signal-to-noise ratio -97 dB @ 48 kHz (A-WEIGHTING)
THD + N 0.002% 1 kHz, @ 48 kHz
Frequency response 20 Hz to 20 kHz @ 48 kHz,+0.03/-0.23 dB
Crosstalk -81 dB (A-WEIGHTING)
S/PDIF Input and Output
Connector Coaxial RCA
Sample rates 44.1, 48, 88.2, 96, 176.4, 192 kHz
Headphone Outputs
Max output +2 dBV (1.3Vrms) into 32 ohms
Physical Attributes and Power
Power supply DC 9 ~12V (AC to DC adaptor)
Dimensions (W x D x H) 196 x 130 x 44 mm / 7.7” x 5.1” x 1.7”
Weight 0.9 kg / 1.98 lbs
20
Firey 302 USB

Firey 302 USB
22
INTRODUCCIÓN
Felicitaciones en su compra de uno de los
más nuevos miembros de la serie Firey de
Phonic de interfases de grabación, la Firey
302 USB. A través de la entrada de micrófono
con ruido ultra bajo de Firey y dos entradas
de línea, junto con la interfase USB 2.0, los
usuarios pueden transferir digitalmente su
audio a una computadora en audio de alta
resolución que satisface los estándares de
producción moderna de hoy (24-bits con un
índice de muestreo seleccionable hasta 192
kHz). Usted nunca tendrá que preocuparse
más por la pérdida de audio, ya que la Firey
es la única herramienta que usted necesita
para transferir aquellas grabaciones análogas
a digitales.
Ligera, fácil de utilizar, y sin conguración
problemática necesaria, la Firefly brilla
ciertamente cuando se habla de la simplicidad
y movilidad.
Sabemos cuán impaciente está usted de
querer comenzar – desean do sacar el
producto de la caja y conectarlo todo es
probablemente su prioridad número uno en
este momento - pero antes de que usted
lo haga, le sugerimos fuertemente que
eche una mirada por este manual. Adentro,
usted encontrará hechos importantes sobre
la conguración, uso y aplicaciones de su
nueva Firey. Si usted es una de la mucha
gente que se rechaza plenamente a leer los
manuales del usuario, entonces le pedimos
que por lo menos eche un vistazo a la sección
Instalación. Después de echar un vistazo o
de leer el manual (le aplaudimos si usted lee
el manual entero), por favor guardelo en un
lugar que sea fácil de encontrar para usted,
porque puede caber la posibilidad que se le
haya escapado algo en la primera leída.
CARACTERÍSTICAS
● 5 x 6 E/S de uido USB a 24-bits/192kHz
● 2 x 2 operación análoga (RCA)
● Entrada de micrófono en el panel frontal
(XLR) con fuente fantasma de +48V
● Salida de audífono con control de nivel
dedicado
● Software ASIO de monitoreo directo con
latencia casi-cero
● Indicador LED de energía
● Fuente de alimentación DC incluida
● Indicadores LED de señal y clip fácil de
ver para entrada y salida
● Compatible con Mac OSX y Windows XP
/ Vista

INSTALACIÓN
1. Encienda su computadora y conecte la
Firey 302 USB con la computadora vía
el cable USB incluido. Sin embargo, es
recomendado no encender la unidad
todavía.
2. Corra el archivo setup.exe en el CD
de contro lado r inclu ido y siga las
instrucciones de instalación exhibidas
en la pantalla.
3. Cua ndo le pida que “desconecta y
reconecta” la Firey, cambie el selector
de la energía en la parte posterior del
dispositivo a DC IN.
4. Continúe siguiendo las instrucciones de
instalación en la pantalla para nalizar la
conguración.
5. Abra su software DAW / edición de audio,
y chequee que el controlador ASIO de
Firefly ha sido leído con éxito por el
programa. Esto se hace generalmente
en el submenú “Devices” (dispositivos).
Usted puede también querer editar las
propiedades de Firefly. Esto se hace
generalmen te ha ciendo cli ck en el
menú desplegable de Herramientas,
y seleccionando “Propiedades”. En
esta área, usted puede seleccionar
generalmente las diferentes entradas y
salidas de Firey, y asignalas a varios
canales. Esto, por supuesto, depende
de software que usted está utilizando,
así que chequee el manual del usuario
del software para más información.
INICIO RÁPIDO
1. Conecte el convertidor DC a la entrada
de jack de 9-12V y cambie el selector de
energía a la posición DC IN.
2.
Enchufe su cable USB en el puerto
USB de la Firey y el otro extremo en
cualquier puerto USB disponible en su
computadora. Siempre que usted ya
tiene instalado el controlador requerido,
la computadora debería detectar su Firey
302 USB.
3.
Conecte un micrófono a conector de
entrada XLR. Hable en el micrófono y
chequee los indicadores LED de sig y clip.
Ajuste el control de nivel del Micrófono
como usted considera necesario.
4.
Conecte cualquier entrada de línea
análoga que usted desea utilizar. Le
aconsejamos que no usar los conectores
RCA y 1/4” en canal de entrada a la
vez.
5.
Abra su software de audio y conguralo
de tal manera que la Firey 302 USB se
setea como su dispositivo de entrada/
salida. Por favor observe que las salidas
S/ PDI F y análogas no pu ede n ser
utilizadas para producir la señal de la
computadora simultáneamente.
6.
Enchufe sus audífonos en la salida de
audífono de Firey para monitorear la
señal de retorno.
7.
Usted está listo ahora para diseñar
la s pro duc cio nes de aud io de alta
resolución.
Firey 302 USB
23
Firey 302 USB
24
4
1
2 3
DESCRIPCIÓN DEL PANEL
FRONTAL
1. Indicador LED de Energía
Cuando usted conecta el convertidor de la
energía DC y cambia el interruptor de energía a
la posición DC IN, la unidad será accionada y el
LED de energía delantero será iluminado.
2. Jack de Salida de Audífono y Control
Todas las señales de audio que están mezcladas
en la computadora pueden ser monitoreadas
con la salida de Audífono. Usted puede también
controlar el nivel de esta señal con el control de
nivel correspondiente.
3. Conector de Micrófono XLR
Éste es un conector de micrófono balanceado
XLR de 3-pines, que usted puede utilizar
para conectar los micrófonos dinámicos o de
condensador. La fuente fantasma puede ser
aplicada para permitir que los micrófonos de
condensador o de cinta sean conectados.
4. Ganancia de Micrófono
Gire esta perilla a la derecha para aumentar la
ganancia de la entrada del Micrófono. Usted
tiene 44dB de ganancia posible con esta
perilla, por lo tanto ten cuidado al aplicar la
ganancia para asegurarse que el LED de Clip
del Micrófono no se ilumine.
6 5
5. Ganancia 1 y 2
Estas perillas controlan la ganancia de la
entrada para jacks de entrada de enchufe RCA
y 1/4” situados en el panel del dorso. Girelas a
la derecha para aumentar la ganancia del nivel
de señal o girelas a la izquierda para bajar los
niveles de entrada. La Ganancia 1 controla la
Entrada Análoga 1 RCA y jacks de entrada TRS
de 1/4”, y la Ganancia 2 controla la Entrada
Análoga 2 RCA y jacks de entrada TRS de 1/4”.
Cada control de ganancia es independiente de
otro, así que usted puede emparejar fácilmente
sus niveles de entrada.
6. Fuente Fantasma a +48V
Pulsando este botón activará +48V de la
fuente fantasma en la entrada del micrófono,
pe rmiti endo a los usua rios c onect ar lo s
micrófonos de condensador, micrófonos de
cinta, u otros dispositivos de entrada que
necesitan energía de +48V para operar. Si
usted no está totalmente seguro si su micrófono
requiere fuente fantasma, por favor reera al
manual de micrófono o consulte al fabricante.
7. Indicadores de Señal / Clip
Estos indicadores LED dan a los usuarios una
idea de cuando sus entradas y salidas análogas
y de micrófono están recibiendo una señal
(sig) y cuando esa señal alcanza a los picos
altos justo antes de que la señal es recortada
dinámicamente, que puede causar efectos
indeseables a la integridad de su audio (clip).
7
9
10 11
12
8
13 14 15 16
DESCRIPCIÓN DEL PANEL
DORSAL
8. Entradas 1 y 2 Análogas TRS de 1/4”
Éstas son Entradas de Línea balanceadas TRS
de 1/4” y pueden ser utilizadas para conectar
cualquier dispositivo del nivel de línea, tales
como reproductores de CD o grabadoras de
DAT.
9. Entradas 1 y 2 Análogas RCA
Éstas son entradas RCA y pueden ser utilizadas
para conectar cualquier dispositivo como
reproductores de CD, grabadoras de DAT,
giradiscos e incluso mezcladoras análogas
(tomando la señal desde las salidas de 2-Track
o de Grabación de la mezcladora).
Nota Importante: Tenga presente que las dos
entradas RCA son totalmente independiente
una de otra; no obstante, estas entradas
no deben ser utilizadas si las entradas 1 y
2 análogas de 1/4” correspondientes están
siendo usadas, ya que haciendo eso podría
tener resultados bastante indeseables. Usted
puede, sin embargo, mezclar y emparejar estas
entradas. Si, por ejemplo, usted quisiera utilizar
el conector RCA de Entrada 1 y conector 1/4” de
Entrada 2 no causaría ningún problema.
10. Salidas 1 y 2 Análogas TRS de 1/4”
Son Salidas de Línea balanceadas TRS de 1/4”
con señal del nivel de línea (+4dBu). Utilícelas
para conseguir un canal de salida estéreo y
conectelas a los monitores activos (tales como
el Phonic P8A), o quizás a un amplicador y un
par de altavoces pasivos. Usted podría también
utilizarlas con los procesadores de señal,
mezcladoras u otros dispositivos externos.
11. Salidas 1 y 2 Análogas RCA
Éstas son salidas de línea RCA. Aceptan cables
RCA y pueden ser conectadas a cualquier
dispositivo externo que utiliza conectores RCA.
Esto podría incluir a grabadoras de cinta y
grabadoras de MP3.
12. Entrada/Salida de S/PDIF
Éstas son Entrada/Salidas de Audio Digital de
S/PDIF estándares que pueden ser usadas con
las mezcladoras digitales, grabadoras de DAT,
o cualquier dispositivo externo que utiliza este
formato Digital. El índice de muestreo de la
salida de S/PDIF está determinado por el índice
de muestreo seteado por el software de control
de Firey. Utilice por favor un cable coaxial de 75
ohms con enchufe RCA si usted está utilizando
la conexión de S/PDIF, ya que los problemas
más comunes asociados a interferencias en
interfases digitales son el resultado de usar
cables de mala calidad.
Firey 302 USB
25

Firey 302 USB
26
9
10 11
12
8
13 14 15 16
13. Entrada/Salida MIDI
Usted puede tener 16 canales de entrada/salida
simultáneos de MIDI enviados a y desde su
computadora a través de Firey 302 US.
14. Puerto USB
Éste es un conector digital USB 2.0 que usted
puede utilizar para conectar a su computadora.
Haciendolo permite a los usuarios enviar su
señal de audio desde la Firey a la computadora,
y viceversa.
15. Jack de Energía de Entrada a 9-12VDC
Conecte el convertidor de DC suministrado a
este jack para alimentar la unidad. Por favor
utilice solamente este convertidor de DC para
asegurarse que ningún daño se hará a la Firey.
Si por alguna razón, su convertidor se pierde o
es dañado y usted necesita un repuesto, por
favor contacte a su vendedor local de Phonic.
16. Interruptor de Energía
Utilice este interruptor para encender o apagar
la Firey 302 USB.

INTERFASE USB
REQUISITOS DEL SISTEMA
Las siguientes especicaciones son requisitos mínimos para usar la Firey 302 USB. Si su
computadora no satisface estos requisitos, usted experimentará un retardo en el audio y un
posible bloqueo de su computadora cuando opera la Firey.
Windows
• Microsoft® Windows® XP (con SP2) o Microsoft® Windows® Vista
• Puerto USB 2.0 disponible
• Procesador Intel Pentium® 4 o procesador equivalente AMD Athlon
• Motherboard con chipset Intel o VIA
• Drive de disco duro de 5400 RPM o más rápido (7200 RPM o más rápido con 8 MB de cache
recomendado)
• RAM 256 MB o más (512MB recomendado)
Macintosh
• OS X Leopard 10.5.1 o posteriores con soporte USB
• Procesador Intel Core 2 Duo o posterior (no soporta procesadores G4)
• RAM 256 MB o más (512MB o más recomendado)
INSTALACIÓN DE DRIVER
Para usar la Firey ecientemente en cualquier computadora, es importante instalar todos
los controladores necesarios de CD incluido. Aconsejamos a que los usuarios lean todas las
instrucciones cuidadosamente antes de continuar en cada paso de proceso de instalación, ya
que se les pedirán desenchufar y enchufar su Firey.
Windows XP (con Service Pack 2)
1. Se recomienda que usted salga de todas las aplicaciones antes de empezar los procesos de
instalación.
2.
Conecte la Firey 302 USB con la computadora, dejando la energía de la unidad apagada.
3.
Inserte el CD de instalación incluido con su Firey en el CD-ROM drive de su computadora.
Si el CD no comienza el proceso de instalación automáticamente en pocos minutos, entonces
vaya a “Mi Computadora” → su CD-ROM drive → “Firey-302USB_Driver” → doble click en
“setup.exe” para empezar la instalación manualmente. El software de Panel de Control de de
Firey también será instalado en este momento.
4.
Siga las instrucciones de instalación en-pantalla, encienda la Firey cuando le pida que
‘desconecte y reconecte’ la unidad.
Firey 302 USB
27

Firey 302 USB
28
Asegúrese que ningún otro programa está corriendo en su PC y haga click
en “Next” (Siguiente)
Lea y acepte los términos de Acuerdo de Licencia y haga click en “Next” para
continuar.

Seleccione una nueva destinación para la inatalación o haga click en “Install”
(Instalar) para aceptar el directorio por default.
La instalación comenzará entonces.
Firey 302 USB
29

Firey 302 USB
30
Conecte la Firey 302 USB con la computadora y pulse ‘Finish’ (Terminar)
para completar la instalación.
Si se muestra un mensaje indicando que el software no ha pasado por el testeo de Windows
Logo, haga click en “Continue Anyway” (Continuar de Todo Modo).
Luego de que la instalación está completa, un mensaje de la instalación completa apa-
recerá en la pantalla. Haga click en ‘Finish’ para salir.

INSTALACIÓN DE DRIVER MAC OSX
1. Se recomienda que cierre todas las aplicaciones antes de iniciar el proceso de instalación.
2.
No conecte la Firey 302 USB a Mac hasta después que haya inslatado el driver.
3.
Inserte el disco de instalación en el CD drive de su computadora. Si el CD no comienza el
proceso de instalación automáticamente, entonces vaya a su CD drive → “Phonic” → “Firey-
302USB” → ejecute “PHONIC_FireyUSB.mpkg” para empezar la instalación manualmente. El
software de Panel de Control de de Firey también será instalado en este momento.
4.
Siga las instrucciones de instalación en-pantalla
5.
Luego de instalar el driver para Mac, conecte la Firey 302 USB a puerto USB de Mac.
Seleccione “Change Install Location…”(Cambiar Ubicación de Instalación) para seleccionar un
nuevo destino para el software Mac. Sino, el software será instalado automáticamente en la
ubicación por default.
Firey 302 USB
31
Firey 302 USB
32
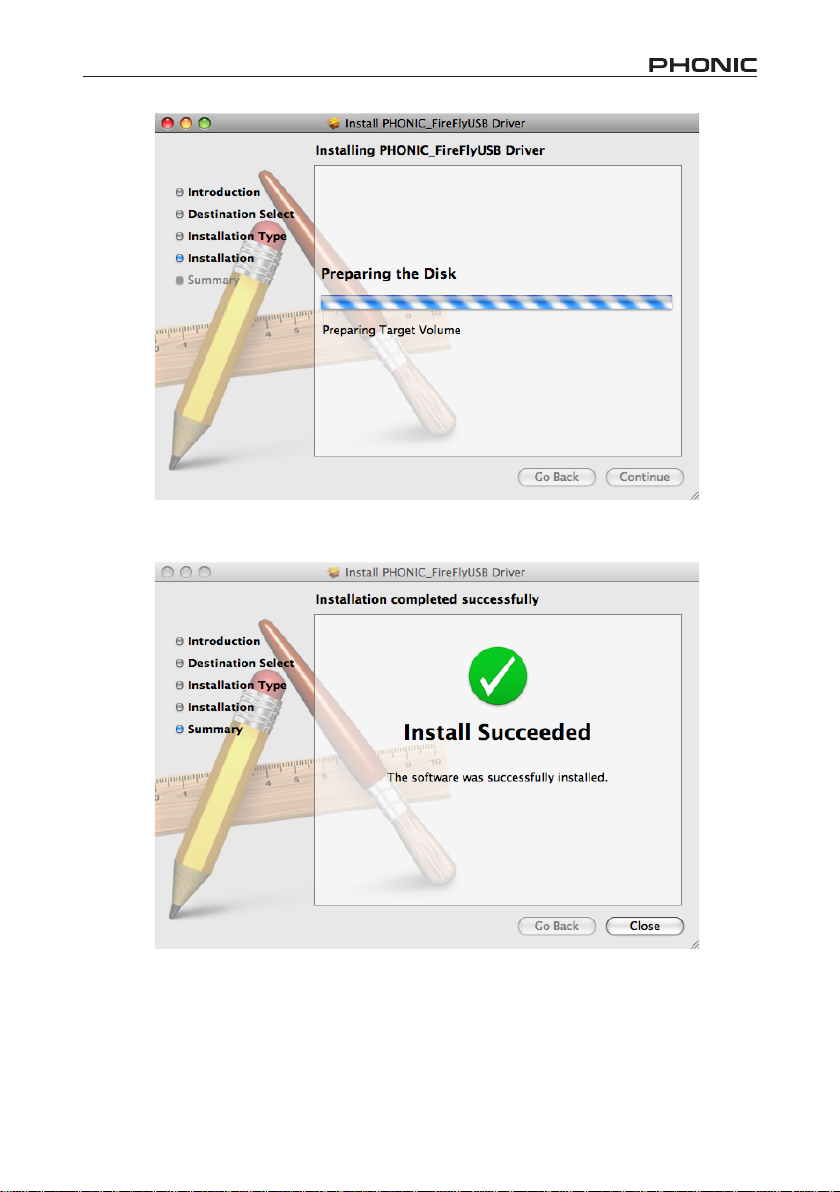
Haga click en ‘Close’ (Cerrar) una vez que la instalación ha
completado.

ASIGNACIÓN DEL CANAL
Cuando se usa Digital Audio Workstation en
una PC y, dentro de software de panel de
control de FireWire de Phonic incluido, los
siguientes nombres han sido atribuidos a los
canales de entrada de Firey.
Nombre de Canal Canal Firey
Analog In 1 1/4” y RCA Entrada
Análoga 1
Analog In 2 1/4” y RCA Entrada
Análoga 2
Mic In Entrada de
Micrófono
Mic In Entrada de
Micrófono
S/PDIF In Entrada de S/PDIF
S/PDIF In Entrada de S/PDIF
Midi In Entrada de MIDI
Si le gustaría usar la Firey 302 USB como su
dispositivo de salida de audio por default en
su PC, simplemente vaya al panel de control
de Windows y seleccione “Sound and Audio
Devices” (Dispositivos de Sonido y Audio).
Seleccione Audio tab y, use el menú desplegable
para seleccionar una de las entradas de Firey
302 USB de la lista de los dispositivos de salida
disponibles. La Firey 302 USB también puede
ser seleccionada como dispositivo de salida
por default para los programas individuales
editando conguraciones/opciones de dichos
programas.
OPERACIÓN CON
SOFTWARE DAW
Luego de completar el proceso de instalación
exitosamente, debe seguir el siguiente
procedimiento para trabajar ecientemente
con Firey 302 USB. En el siguiente ejemplo
utilizamos Cubase - sin embargo, la mayoría de
otro software debe ser similar.
1. Abra el programa.
Vaya a menú desplegable ‘Devices’
2.
(Dispositivos) y seleccione ‘Device Setup’
(Conguración de Dispositivo). En el lado
izquierdo, seleccione ‘VST Multitrack’.
De la lista desplegable de Controlador ASIO
3.
seleccione ‘Firey302USB ASIO Driver’.
Un cuadro emergente le preguntará si
usted quiere cambiar a controlador ASIO.
Haga click en ‘Switch’. Ésto completa la
conguración básica.
Debe seguir los siguientes pasos para
4.
activar las pistas de audio recibidas desde o
enviadas por Firey 302 USB.
Vaya a menú desplegable “devices”
a.
(dispositivos) y seleccione ‘VST Inputs’
(Entradas VST). Esto mostrará varias
entradas (“Analog In 1”, “Analog In 2”,
etc.)
Active los canales haciendo click en el
b.
botón “Active” localizado junto a cada
nombre del canal.
Para más instrucciones sobre la operación
5.
de Cubase, por favor consulte el manual
del usuario presionando F1 mientras el
programa está abierto.
Si usted desea resetear el controlador Firey
ASIO, simplemente vaya a menú desplegable
‘devices’ y seleccione ‘device setup’. Haga click
en “reset” y seleccione “Firey302USB ASIO
Driver”. Haga click en ‘ok’ para continuar y la
Firey 302 USB debe volver a ser funcional.
Firey 302 USB
33
Firey 302 USB
34
OPERACIÓN PC
El panel de control Firey en la PC puede ser
accedido en cualquier momento seleccionando
el atajo desde menú de Programas. Este
programa no solo permitirá a los usuarios
alterar los nombres y las propiedades de su
dispositivo y canal, sino también les dejará
ajustar los seteos de buffer, cambiar los índices
de muestreo y demás.
Índice de Muestreo
En este menú, los usuarios pueden ajustar
el índice de muestreo de Firey 302 USB. El
índice de muestreo puede ser elegido entre
44.1, 48, 88.2, 96, 176.4 y 192 kHz. Presione
‘apply’ (aplicar) una vez que el nuevo índice de
muestro es seleccionado.
Seteos de Buffer
El menú de Seteos de Buffer es utilizado para
ajustar Streaming Buffer, así como los seteos
de buffer al usar los controladores ASIO y
WDM.
El ‘Streaming Buffer’ puede ser ajustado
entre Mínimo (1 milisegundo), Chico (2
milisegundos), Grande (4 milisegundos) y
Máximo (8 milisegundos). La selección del
tamaño de Streaming Buffer determinará los
tamaños de buffer de ASIO y WDM, como se
muestra en la tabla en la parte inferior de esta
página.
Al seleccionar un nuevo tamaño de buffer,
los usuarios pueden hacer click en ‘Apply’
para aplicar nuevamente el seteo de buffer
seleccionado al dispositivo.
Mínimo 1.5 ms
Chico/Más Chico 2.0 ms
Grande/Chico 3.0 ms
Máximo/Estándar 4.0 ms
Seteo de Buffer ASIO / WDM
Seteo de Streaming Buffer
Mínimo (1 ms) Chico (2 ms) Grande (4 ms) Máximo (8 ms)
66 muestreos
88 muestreos
132 muestreos
176 muestreos
3.0 ms
132 muestreos
4.0 ms
176 muestreos
6.0 ms
256 muestreos
8.0 ms
353 muestreos
6.0 ms
256 muestreos
8.0 ms
353 muestreos
12.0 ms
529 muestreos
16.0 ms
706 muestreos
12.0 ms
529 muestreos
16.0 ms
706 muestreos
24.0 ms
1058 muestreos
32.0 ms
529 muestreos
Devices / Device0
En la sección de Devices (Dispositivos), los
usuarios pueden ver y editar el nombre de
cualquier dispositivo USB de Phonic conectado
a la computadora. El menú Device0 ofrece
información de dispositivo así como los ajustes
de S/PDIF para que el usuario se aproveche.
Hay también dos mezcladoras de driverintergrado que los usuarios pueden utilizar
para personalizar mejor sus niveles de entrada/
salida para adaptarse a su computadora.
Mezcladora de Entradas de
Hardware
Esta mezcladora basado en software permite
a los usuarios ajustar las opciones de niveles y
ruteo de todas las señales de entrada de Firey
302 USB. Todas las salidas de esta mezcladora
pueden entonces ser utilizadas por DAW y
otras aplicaciones convenientes.
Los medidores de nivel son incorporados en
el software de mezcla. Dan a los usuarios
representacione visuales de señales entrantes
y salientes actuales de esta mezcladora de
software.
Mezcladora de Entradas de
Software
Esta mezcladora permite a los usuarios
monitorear y ajustar los niveles (y ruteo) de
las señales de salida desde PC. Como la
Mezcladora de Entradas de Hardware, los
usuarios pueden ajustar los niveles de volumen
y mute las pistas de salida como sea necesario.
También como la Mezcladora de Hardware,
los medidores de nivel se proporcionan en las
entradas y las salidas de la mezcladora de
software.
Firey 302 USB
35

Firey 302 USB
36
Canales de Entrada
La sección de los Canales de Entrada permite
a los usuarios ver y editar el nombre de los
varios canales de entrada recibidos de la
entrada USB. Por favor note que los nombres
del canal usados en el cuadro de abajo pueden
diferenciar de su unidad.
Canales de Salida
Entrando a la sección Canales de Salida, los
usuarios pueden ver y editar los nombres de
los dos canales de salida análoga y los dos
canales de salida S/PDIF que son enviados
desde la computadora a la Firey.
OPERACIÓN MAC
Después de instalar el controlador y el software
Firey 302 USB a su computadora Mac, ingrese
a la aplicación Audio MIDI Setup y usted debe
poder seleccionar Phonic Firey 302 USB como
su dispositivo de entrada y salida por default.
También en Audio MIDI Setup, usted podrá
Información de Driver
Esta sección permite a los usuarios chequear
la versión de su controlador e interfase que
se están utilizando actualmente . Los nuevos
controladores estarán disponibles de vez en
cuando en el centro de documentación de
Phonic y, generalmente se hará un anuncio en
la página principal de Phonic.
ajustar los niveles de volumen de sus varias
señales de entrada y salida, así como el índice
de muestreo y la resolución que usted quiere
utilizar. Los usuarios pueden seleccionar
entre los índices de muestreo 44.1, 48, 88.2,
96, 176.4 y 192 kHz. La resolución puede ser
seleccionada entre 24-bits, 20-bits y 16-bits.
El índice de muestreo y la resolución pueden
ser ajustados en su software de DAW también
(dependiendo de qué software usted usa).
También en Audio MIDI Setup, las pistas
pueden ser silenciado a voluntad y, las
señales de entrada pueden ser seteado a
‘thru’, que - sencillamente - retornaran las
señales de entrada directamente a sus salidas
correspondientes.
Los nombres del canal de entrada y salida
listados corresponden con cada una de las
entrada y salidas de Firey. Los canales 1 a
6 en la entrada corresponden, en orden, con
las entradas análogas 1 y 2 (listado en Audio
MIDI Setup como canales 1 y 2), la entrada
de micrófono (canales 3 y 4) y las señales
de entrada izquierda y derecha de S/PDIF
(canales 5 y 6). Los canales de salida 1 a 4 son,
en orden, salidas analógicas 1 y 2 y salidas de
S/PDIF izquierda y derecha.
MIDI Setup
También en la sección Audio MIDI Setup,
los usuarios pueden ajustar las funciones de
MIDI de la Firey seleccionando ‘MIDI Device’
(Dispositivos de MIDI) en la parte superior de
la ventana. Dentro de la sección MIDI Devices,
un ícono de ‘Firey 302 USB’ debe de estar
presente y los usuarios pueden seleccionarlo
para obtener la pantalla siguiente.
Panel de Control de Firey 302 USB
Como muchas de las características de Firey
son ajustables a través de la sección Audio MIDI
Setup, el Panel de Control de Firey302USB
sirve algunas supercies muy especícas.
Como se ve en la imagen de abajo, la página
principal de software permite a los usuarios ver
algunos detalles importantes sobre el producto,
incluyendo la versión del driver, número de
serie, etcétera.
Los usuarios pueden también seleccionar
una de las dos mezcladoras internas que el
software de Firey ofrece.
Monitor Mixer
La Mezcladora Monitor, esencialmente, le
permite ajustar las señales de entrada de su
Firey antes de enviarlas a su software de
DAW. Todas las entradas están listadas; las
entradas SPDIF 1 y 0 están listadas en el
software son representativos de las señales
de entrada izquierda y derecha de S/PDIF, I2S
3 y 2 son ambos entrada del micrófono y, los
canales I2S 1 y 0 son entradas análogas 1 y 2
en Firey 302 USB.
Usted puede optar ajustar las señales de
entrada de su dispositivo en esta mezcladora,
o usted puede simplemente optar por dejarlo
solo todos juntos y conar en los controles de
nivel de su software de DAW.
Firey 302 USB
37
Firey 302 USB
38
En caso de que usted se esté preguntando
porqué hay solamente una entrada del
micrófono, pero dos canales del micrófono en
la Firey - esta función le permite hacer una
mezcla estérea de su señal del micrófono!
Playback Mixer
El software de panel de control también ofrece
un Playback Mixer. Éste es ‘software mixer’,
permitiendo a los usuarios ajustar la señal
que envían a las salidas de Firey 302 USB.
Todas las señales de salida desde su software
de DAW pueden ser ajustadas individualmente
antes de ser enviadas sus salidas respectivas
en la Firey.
Como con Monitor Mixer, cada uno de los
canales de salida listados es representativo
de uno de los canales de salida de la Firey.
Los canales 1 y 2 son salidas análogas 1 y
2, mientras que 3 y 4 son salidas izquierda y
derecha de S/PDIF.
S/PDIF Pass Through
También se incluye en el Panel de Control
de Firey 302 USB la función S/PDIF Pass
Through. Esto le permite básicamente enviar
sus señales de entrada de S/PDIF directamente
a través de la computadora a las salidas S/
PDIF de la Firey.
ESPECIFICACIONES
Entradas de Línea
Conectores 1/4” TRS, RCA
Entrada máx (balanceada) +10 dBu
Entrada máx (desbalanceada) +10 dBu
Rango de ganancia de entrada -∞ a +10 dBu
Impedancia 10K Ohms (Desbalanceada), 20K Ohms (Balanceada)
Entrada de Micrófono
Conectores XLR
Ganancia disponible 44 dB
Rango de entrada: -40 ~ -+4 dBu
Impedancia 2k ohm
Salidas de Línea
Conectores 1/4” TRS, RCA
Salida máx (balanceada) +8 dBu
Salida máx (desbalanceada) +2 dBu
Impedancia 100 Ohms (Desbalanceada), 200 Ohms (Balanceada)
Sistema
Relación señal-ruido -97 dB @ 48 kHz (PONDERACIÓN-A)
THD + N 0.002% 1 kHz, @ 48 kHz
Respuesta en frecuencia 20 Hz a 20 kHz @ 48 kHz, +0.03/-0.23 dB
Crosstalk -81 dB (PONDERACIÓN-A)
Entrada y Salida de S/PDIF
Conector RCA coaxial
Índice de muestreo 44.1, 48, 88.2, 96, 176.4, 192 kHz
Salidas de Audífono
Salida máx +2 dBV (1.3Vrms) en 32 ohms
Atributos Físicos y Energía
Fuente de alimentación DC 9 ~ 12V (adaptador AC a DC)
Dimensiones (An x P x Al) 196 x 130 x 44 mm / 7.7” x 5.1” x 1.7”
Peso 0.9 kg / 1.98 lbs
Firey 302 USB
39
重要安全说明
1. 请在使用本机前,仔细阅读以下说明。
2. 请保留本使用手册,以便日后参考。
3. 为保障操作安全,请注意所有安全警告。
4. 请遵守本使用手册内所有的操作说明。
5. 请不要在靠近水的地方,或任何空气潮湿的地点操作本机。
6. 本机只能用干燥布料擦拭,请勿使用喷雾式或液体清洁剂。清洁本机前请先将电源插头拔掉。
7. 请勿遮盖任何散热口。确实依照本使用手册来安装本机。
8. 请勿将本机安装在任何热 源附近。例如:暖气、电暖气 、炉灶或其它发热的装置(包括功率
扩大机)。
9. 请注意极性或接地式电源插头的安全目的。极性电源插头有宽窄两个宽扁金属插脚。接地式
电源插头有两支宽扁金属插脚和第三支接地插脚。较宽的金属插脚(极性电源插头)或第三支
接地插脚(接地式电源插头)是为安全要求而制定的。如果随机所附的插头与您的插座不符,
请在更换不符的插座前,先咨询电工人员。
10. 请不要踩踏或挤压电源线,尤其是插头、便利插座、电源线与机身相接处。
11. 本机只可以使用生产商指定的零件/配件。
12. 本机只可以使用与本机搭售或由生产商指定的机柜、支架、三脚架、拖架
或桌子。在使用机柜时,请小心移动已安装设备的机柜,以避免机柜翻倒
造成身体伤害。
13. 在雷雨天或长期不使用的情况下,请拔掉电源插头。
14. 所有检查与维修都必须交给合格的维修人员。本机的任何损伤都须要检修,例如: 电源线或插
头受损,曾有液体溅入或物体掉入机身内,曾暴露于雨天或潮湿的地方,不正常的运作,或曾
掉落等。
这个三角形闪电标志是用来警告用户,装置内的非绝缘危险电压足以造成使人触
电的危险性。
这个三角形惊叹号标志是用来警告用户,随机使用手册中有重要操作与保养维修
说明。
警告: 为减少火灾或触电的危险性,请勿将本机暴露于雨天或潮湿的地方。
注意: 任何未经本使用手册许可的操控,调整或设定步骤都可能产生危险的电磁幅射。
CA UTI ON
RISK OF ELECTRIC SHOCK
DO NOT OPEN
PHONIC CORPORATION

简介
感谢您选购Phonic品牌的最新款Firefly
系列录音界面:Firefly 302 USB。此款
Fire f ly拥有超低噪音麦克风输入,两路
高电平输入,USB 2 . 0接口,用户可将
音频数字化,高分辨率(2 4位,取样比
19 2KHz)地传输至计算机,以满足现代
音频产品的需要。您再也不必为音频的
损耗而担心,仅拥有F irefly您即可将模
拟录音转换成数字录音。
Firefly 302 USB轻质小巧,简单易用,
配置理想,无疑 将 音 频 界 面 的 闪 亮 之
星!
您一定早已迫不及待地想一试为快,尽
情的摆弄这台设备可能是您的首选—但
是,我们强烈恳 请 您 先 仔 细 阅 读 此 手
册。其中包括一些重要的安装,使用,
以及应用说明。如果您刚好是那种不喜
欢大篇幅的阅读使用手册的用户,我们
提请您至少浏览一下快速安装部分。读
完后请妥善保管,以便日后参阅。
特色
● 24位/192KHz USB输入/输出( 5 x 6 )
● 模拟RCA输入( 2 x 2 )
● 带+48V幻象电源麦克风输入(XLR)
● 附制动电平控制的耳机输出
● 可直接监控的接近低延迟的ASIO软件
● 电源LED指示灯
● DC电源供电
● 输入输出简单易读的Sig信号和Clip峰
值LED指示灯
● 与Mac和Windows XP/Vista计算机兼容
驱动安装
1. 启动计算机,使用随附的USB连接线
将Firey 302 USB连接至计算机。建
议暂时不开启Firey。
运行驱动CD中的setup.exe文件,按
2.
提示进行安装。
安装至“disconnect and reconnect”关
3.
闭并重启Firefly的提示时,将后面板
的电源选择开关调节DC IN位置。
继续按提示进行安装。
4.
5.
打 开 音 频 编 辑 / D A W 软 件 , 在
“Device ”下的子菜单中检查F i r e f ly
ASIO驱动是否已成功解读。如想编
辑Firefly的属性,点击工具栏的下拉
菜单,选择“Pr oper ties”。在此对话
框中,可选择Firefly的不同输入和输
出,并将其指定到不同的声道。此项
设置还取决于您所使用的软件,欲获
知更多信息,请查询相关使用手册。
快速启动
1. 将D C转换器连至9-12V的插孔并将
电源选择开关切换至DC IN的位置。
将USB连接线插入Firefly USB端口,
2.
另一端插入计算机的USB接口。计算
机将自动检测Firey 302 USB。
将一个麦克风插入XLR输入连接器。
3.
测试麦克风以及信号和峰值LED指示
灯;有需要可调节麦克风音量控制。
接入任意模拟输入,请注意同时使用
4.
RCA和1/4”输入将会产生混音,声音
嘈杂,使用时务必一次仅用一个。
打开音频软件并完成Firey 302 USB
5.
的设定,使之成为输入/输出设备。
请注意,模拟和S/PDIF输出不能同
时输出计算机信号。
将耳机插入Firefly的耳机输出插口,
6.
并监听倒送信号。
Firey 302 USB
快速安装完毕,可进行音频制作。
7.
41

4
1
2 3
前面板
1. 电源LED指示灯 Power LED Indicator
连接好DC电源转换器,将电源开关打至
DC IN位置,电源即为开启状态,前面
板的LED指示灯将变亮,指示Firef ly已
接通电源并运行。
2. 耳机输出插孔和控制
Headphone Output Jack and Control
经计算机混音后的信号都可用耳机输出
进行监听,并可通过相应的电平控制进
行调节。
3. XLR麦克风连接器
XLR Microphone Connector
此插 孔 为 平衡 式 麦 克风 3 芯 X L R连 接
器,连接动圈式 麦 克 风 或 电 容 式 麦 克
风。连接电容式麦克风或铝带式麦克风
时需开启幻象电源。
4. 麦克风增益控制 Mic Gain
顺时针旋转此旋钮可增加麦克风的输入
增益。此 旋钮可对信号进 行44 d B的增
益调节,使用此功能时请确保麦克风的
Clip LED不闪亮。
6 5
5. 增益 1和2 Gain 1 and 2
此旋钮可控制背面板上的RC A和1/4 ”插
孔输入的增益,顺时针旋转可增加信号
的增益,逆时针旋转将减少输入信号的
电平。Gain 1控制Analog In 1 RCA和
1/4”TRS输入插孔,Gain 2控制Analog
In RCA 2和1/4”TRS输入插孔。两个增
益旋钮为独立控制,可方便的调节输入
电平。
6. +48V幻象电源 +48V Phantom Power
按下此按钮将开启麦克风输入的+48V幻
象电源,即可接入电容式麦克风,铝带
式麦克风,或其它需开启+48V电源的设
备。如果您无法正确的把握麦克风是否
需要幻象电源,请参考麦克风的使用手
册。
7. 信号/峰值指示灯 Sig / Clip Indicators
这些指示灯可指示模拟和麦克风输入和
输出的信号(Si g),信号达到 峰值 回还
时,为避免损坏机件,Clip峰值指示灯
将闪亮。
7
42
Firey 302 USB
9
10 11
12
8
13 14 15 16
后面板
8. 模拟1/4”TRS输入1和2
Analog 1/4” TRS Inputs 1 and 2
此插孔为平衡1/4”T R S高电平输入,可
连接 任意高电平 设备, 如CD播放器或
DAT录音机。
9. 模拟RCA输入1和2
Analog RCA Inputs 1 and 2
这些RCA输入可连接任一设备如CD播
放器,D AT录音机,唱片机,甚至模拟
调音台( 从调音台的录音或2-轨道输出
信号)。
特别注 意 : 2 个 R CA 输 入 是 分 别独 立
的,但使用1/4”模拟1和2输入的时候,
为防止对F i refly造成损伤,不可以使用
RCA输入。如确实需要,可搭配使用,
如使用RCA输入1时可使用1/4”输入2。
10. 模拟1/4” TRS输出1和2
Analog 1/4” TRS Outputs 1 and 2
此插 孔为带高 电平信号 (+ 4 d B u)的平
衡1/4”TR S高电平输出,可做为立体声
输出声道连接有源监听音箱(如P h o n i c
P8A),或功放,或无源音箱。此插孔还
可以连接调音台,信号处理器或任何外
部装置。
11. 模拟RCA输出1和2
Analog RCA Outputs 1 and 2
这些R C A高 电平输出可 连接R CA连接
线,并可连接使用此种类型的连接器的
外部装置(磁带录音机,M P 3录音机等
等)。
12. S/PDIF输入/输出 S/PDIF In/Out
此插孔为标准的S/PDIF数字音频输入/输
出,可连接数字调音台,DAT录音机,
或其它使用R CA数字接口的外部装置。
S/PDIF的输出取样比由Firefly控制软件
设定并进行控制。使用S/PDIF连接时,
请务必使用带插头的75欧姆共轴电线。
13. MIDI输入/输出 MIDI In/Out
Firey 302 USB可同时接入16路MIDI输
入/输出声道。
14. USB接口 USB Ports
此端子为数字USB 2 . 0接口,可连接计
算机,将Fi refly的信号传输至计算机,
反之亦然。
15. 9-12VDC输入电源插孔
9-12VDC Input Power Jack
将随附DC转换器插入此插孔,请务必只
使用DC转换器,以确保不至对设备造成
损坏。万一,转换器损坏或遗失了,需
订购新的请与当地的经销商联系。
16. 电源选择开关
Power Selector Switch
此开关可提供两种选择:DC IN连接DC
输入电源;PWR OFF可关闭电源。
Firey 302 USB
43

USB界面
系统要求
以下为连接Firefly 302 USB对计算机系统的最低要求,如果无法达到以下配置,操作
中将产生不便。
Windows
• Microsoft®Windows®XP(SP2)或Microsoft®Windows®/Vista
• 可用的USB2.0接口
• Intel 奔腾处理器®4处理器或类似的AMD Athlon处理器
• 主板Intel 或VIA 芯片集
• 5400 RPM或更快的硬盘驱动(7200 RPM或8MB高速缓冲处理器)
• 256MB或更多RAM(512MB或更大)
Macintosh
• OS X Leopard 10.5.1或支持USB的操作系统
• Intel Core 2 Duo或更新的处理器(不支持G4处理器)
• 256MB或更多RAM(512MB或更大)
驱动程序安装
为了能有效的在任何计算上使用Firefly 302 USB,必须安装随附的驱动CD。安装每一
步时,应仔细阅读指导,此过程中会提示用户插入或拔出设备。
Windows XP (Service Pack 1或2)
1. 启动安装前,应关闭所有的应用程序。
2. 将Firey 302 USB连接至计算机并关闭Firey电源。
3. 将内附的安装CD置入计算机的CD-ROM驱动。如果放入CD后一段时间后未进行自
动安装程序,点击“我的电脑”→CD-ROM驱动→“Firey 302 USB_Driver”→双击
“setup.exe” 手动启动安装。与此同时可安装Firey控制面板软件。
4. 按照桌面提示进行安装,系统提示需插入或拔出设备时,开启或关闭Fi refly电源即
可。
44
Firey 302 USB

确保关闭所有其它运行程序,点击“Next”下一步。
阅读并接受协议书条款,点击“Next”下一步继续。
Firey 302 USB
45

选择新的目的盘安装,或点击“Install”下一步接受默认目录。
安装进行中。
46
Firey 302 USB

将Firey 302 USB连接至计算机并点击“Finish”完成安装。
如果桌面提示软件未能通过Windows Logo测试,点击 “Continue Anyway”下一步。
安装完成后,Firey安装进程即已完成,此时用户即可放心的使用此装置。
Firey 302 USB
47
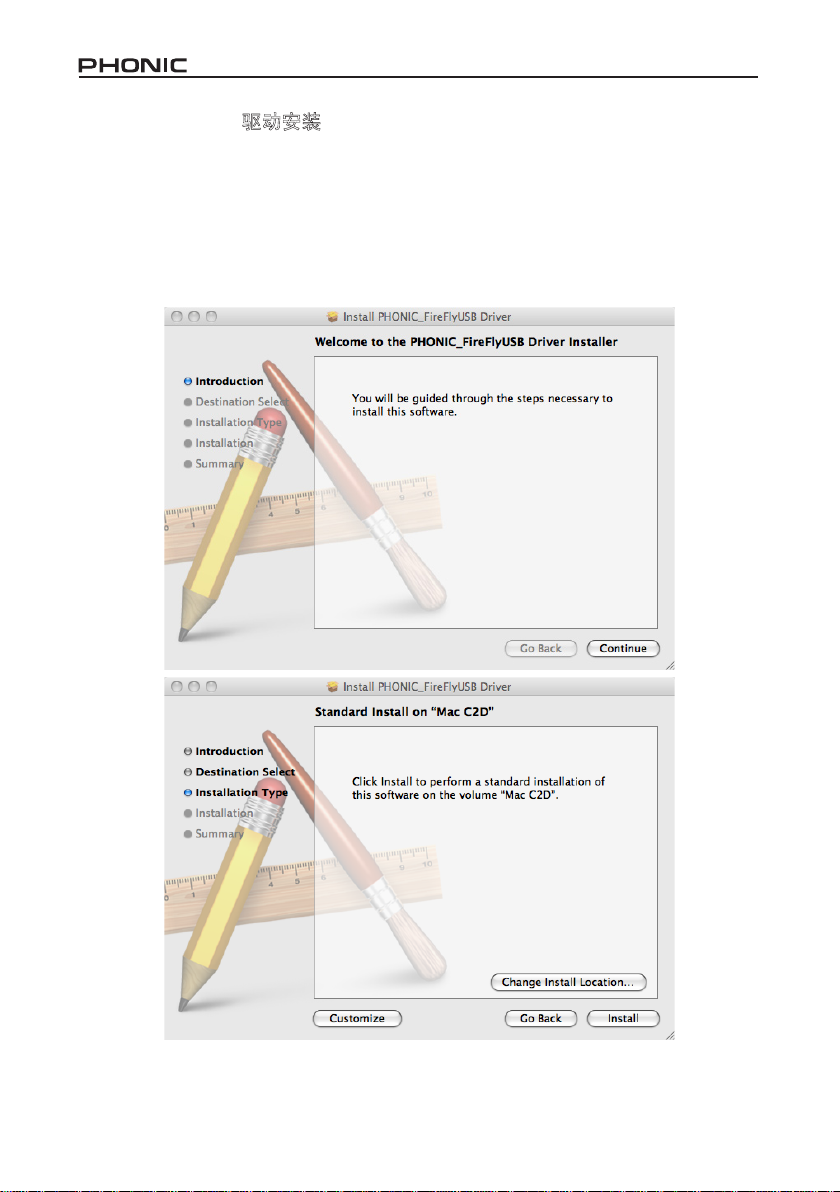
Macintosh OS X 驱动安装
1. 启动安装前,应关闭所有的应用程序。
2.
完成驱动安装后再将Firey 302 USB连接至计算机。
3.
将内 附 的 安 装 C D置 入 计 算 机 的 C D驱 动 。 如 果 放 入 C D后一段 时 间 后 系 统 未
进行自动安装程序,点击CD驱动→“Phonic”→ “Firefly 302 USB”→然后运行
“PHONIC_FireyUSB.mpkg” 手动启动安装。与此同时可安装Firey控制面板软件。
4.
按照桌面提示进行安装。
5.
完成安装Mac驱动后,将Firey 302 USB连接至Mac的USB接口。
点击“Change Install Location…”选择Mac软件新的目的安装盘。
否则,程序将自动安装至默认位置。
48
Firey 302 USB
安装完成,点击“Close”退出。
Firey 302 USB
49
声道指定
使用DAW软件
在个人计算机上 使 用 D i g i t a l A u d i o
Workstation数字音频工作站,以及内含
的Phonic Firey 302 USB控制面板软件
时,以下的声道将被指定到Firef l y的输
入声道。
声道名称
Analog In 1
Analog In 1
Mic In
Mic In
S/PDIF In
S/PDIF In
Midi In
Firey声道
1/4”和RCA模拟输入1
1/4”和RCA模拟输入2
麦克风输入
麦克风输入
S/PDIF输入
S/PDIF输入
MIDI输入
如果您想在P C上将Fir e fly 302 U SB
设定为默 认设置,只 需打开Wi n do w s
控制 面板,选 择“S ou n d and A u d i o
Devices”声音音频设置。选择音频钮,
从输 出设置的 下拉菜单 中选择F i r ef ly
302 USB的任意输入。也可通过编辑程
序设置/选择将Firefly 302 USB设为默
认的输出设备。
成功完成安装过程后,还需进行以下步
骤才能有效的使用Firey 302 USB。
打开Cubase程序。
1.
2.
打 开 “ D e v i c e ”的 下 拉 菜 单 选 择
“Device Setup”设置安装,在左边选
择“VST Multitrack”VST多轨道。
在 A S I O驱 动 的 下 拉 菜 单 中 选 择
3.
“Firelfy 302 USB ASIO Driver”。弹
出的对话框将询问您是否转换A S IO
驱动。点击“Switch”转换。这样就完
成了基本的安装。
激活Firefly 302 USB接收或发送的
4.
的音频轨道。
a . 打开“ D ev i c e ”的下拉菜 单选择
“VST I n p u t” VST输入,将会显
示各种的输入(“A n a l o g In 1”,
“Analog In 2”等等)。
b. 点击各声道下方的“Active”激活声
道。
欲获知更多C u b a s e的操作,请在程
5.
序运行时按F1查询。
如果您想重新设置F i r e f l y ASIO驱动,
只需打开“D e v ic e s ”的下拉菜单,选择
“devices setup”设置安装,点击“reset”
重设,然后选择“Firey 302 USB ASIO
Driv e r”,点击“ O K”继续,F irefly 302
USB将可再次运作。
50
Firey 302 USB
Windows操作
从 程 序 菜 单 中 的 捷 径 可 快 捷 的 打 开
Fire f ly的控制面板。此程序不仅可以更
改设置还可设定声道的名称以及属性,
以及纠正潜伏事件,更改取样比等等。
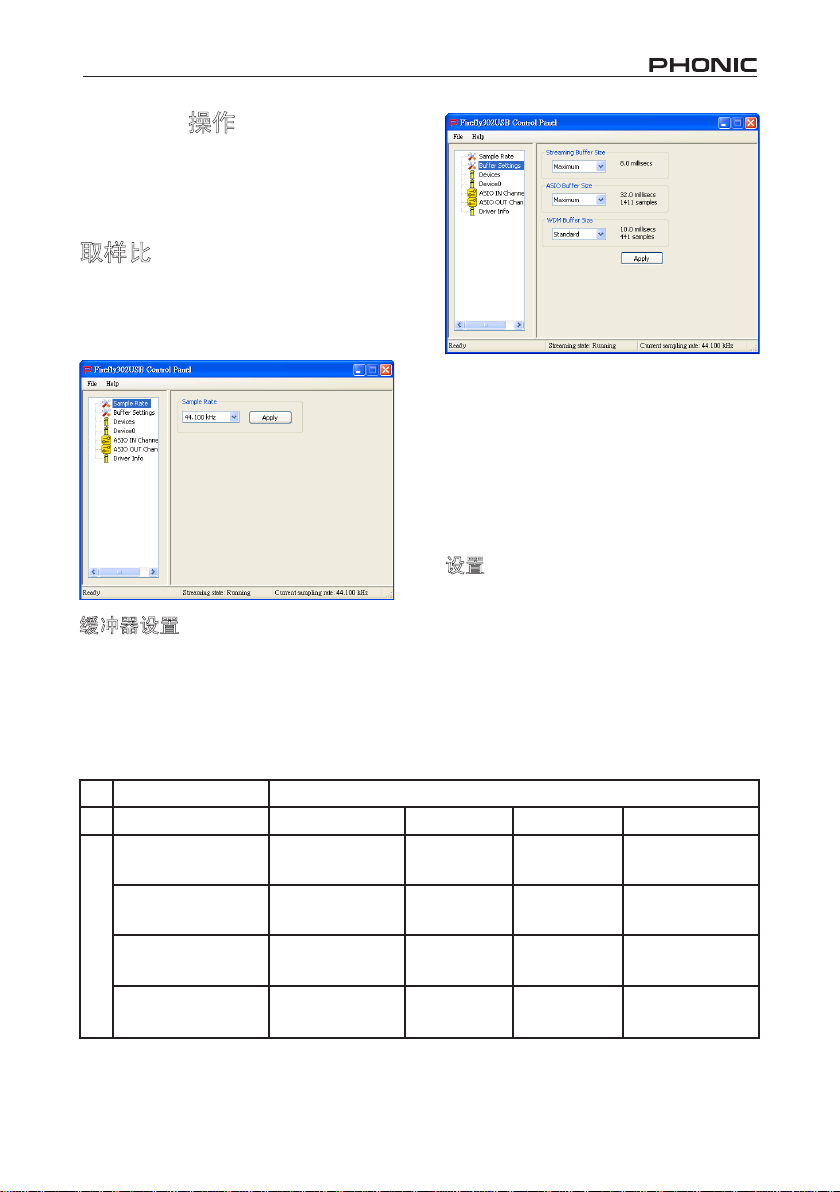
取样比(Sample Rate)
在此菜单中, 用户可在4 4 . 1,4 8 . 0,
88.2,96.0,176.4和192 kHz/s间调节
Firey 302 USB的取样比。重新设置取
样比后请点击“apply”应用。
缓冲器设置(Buffer Settings)
B u f f e r S e t t i n g s菜 单 可 用 于 调 节
Streaming Buffer音频流缓冲器,以及使
用ASIO和WDM驱动时的缓冲器设置。
用 户 可 在 M i n i m u m 最 小 ( 1毫 秒 ) ,
Sm a ll小( 2毫 秒),La r ge大( 4毫 秒)和
Maxim u m ( 8毫秒)间调节“ S t r e aming
Buffer”。所选择的Streaming Buffer大小
将决定ASIO和WDM缓冲器的大小,详
情请见本页下面的表格。
重新设置缓冲器大小后,请点击“apply”
将最新选择的缓冲器设置应用于设备。
设置(Device/Device0)
De v i c e区 内,用 户可检视和 编辑连 接
至计算机的Phonic USB设备的名称。
Device0可为用户提供所需的设备信息
以及S/PDIF Pass Through功能。此
外,还有两个与驱动整合的调音台,使
得用 户可更好的调节输 入/输 出,使其
满足计算机的需求。
Minimum 1.5 ms
Small/Smaller 2.0 ms
Large/Small 3.0 ms
Maximum/Standard 4.0 ms
ASIO / WDM Buffer Setting
Firey 302 USB
Streaming Buffer Setting
Minimum (1 ms) Small (2 ms) Large (4 ms) Maximum (8 ms)
66 samples
88 samples
132 samples
176 samples
3.0 ms
132 samples
4.0 ms
176 samples
6.0 ms
256 samples
8.0 ms
353 samples
6.0 ms
256 samples
8.0 ms
353 samples
12.0 ms
529 samples
16.0 ms
706 samples
12.0 ms
529 samples
16.0 ms
706 samples
24.0 ms
1058 samples
32.0 ms
529 samples
51
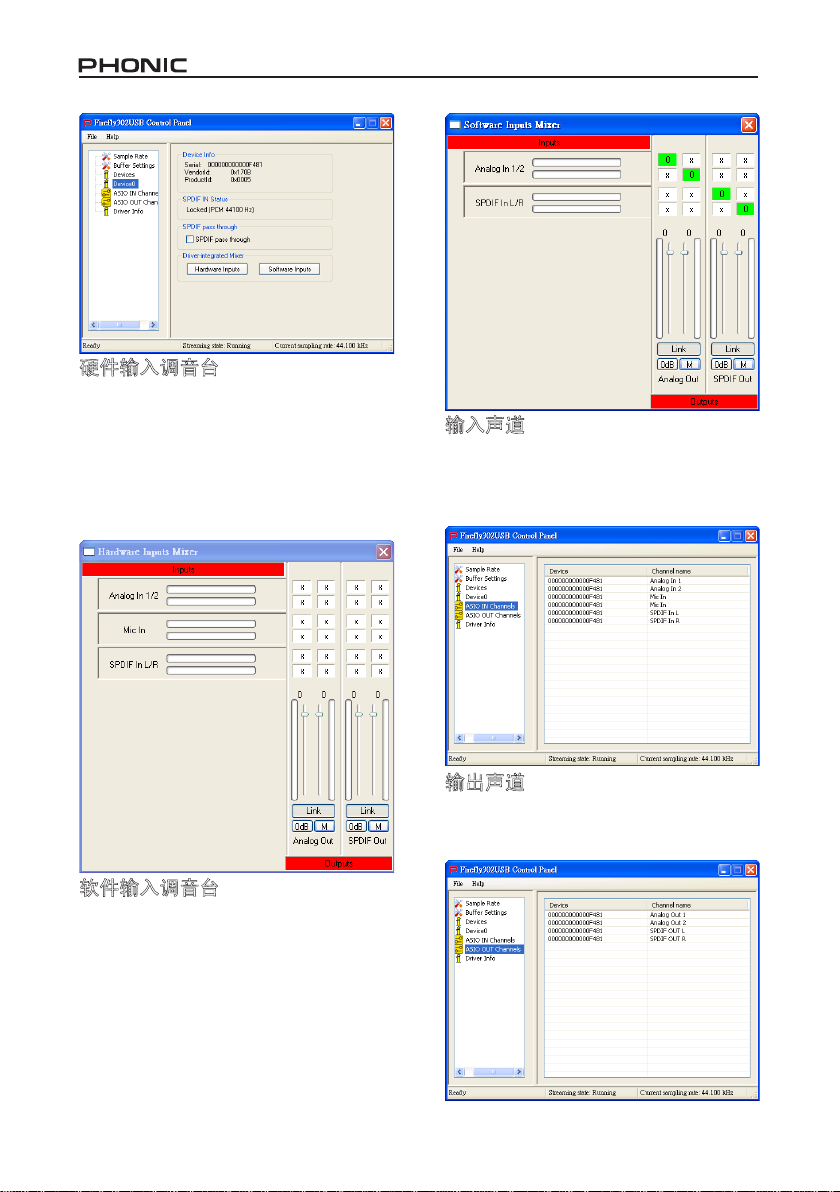
硬件输入调音台
借 助 软 件 的 调 音 台 使 得 用 户 可 调 节
Firefly 302 USB所有输入信号的音量和
指定选项。调音台的所有输出都可应用
于DAW软件和其他应用软件。
此外,混音软件还融合了电平表测量技
术,使得用户可更加形象地描述当前输
入/输出软件调音台的信号。
软件输入调音台
软件输入调音台使得用户可监听并调节
所有计算机输出的信号的电平。类似于
硬件调音台,如有需要,用户可调节和
削减输出音轨。同样,软件调音台输入
和输出也可提供电平表测量。
输入声道
输入声道区内, 用 户 可 检 视 和 编 辑 从
U S B输入接 收 到 的各种输 入 声 道的名
称。请注意,下图所示的声道名称与您
的设备或有所不同。
输出声道
输出声道区内,用户可检视和编辑从计
算机至Firefly的两路模拟输出声道和两
路S/PDIF输入声道的名称。
52
Firey 302 USB

驱动资讯
在此区域,用户可查询当前所使用的驱
动和 界面的版本 。Ph o n i c将 不定期 地
更新文件中心的驱动,相关的公告请见
Phonic网站首页。
MAC操作
将F ir ef l y 30 2 US B驱动和 软件安 装
至M a c计算机之后,进入A udi o MID I
Set up应用软件,您即可将Fire fly 302
USB设置为默认的输入输出设备。
在Audio MIDI Setup区,用户可随意削
减音轨,还可将输入信号设置为“thru”,
即可将输入信号 直 接 倒 送 回 相 应 的 输
出。
输入和输出声道的名称对应Firef l y的输
入和输出。输入的声道1至6,按顺序,
分别 与模拟 输入1和2( 在A u d i o MI D I
Setup区为Channel 1和2),麦克风输入
(Channel 3和4)和S/PDIF左和右输入信
号(Channel 5和6)对应。输出声道1至
4,按顺序,分别与模拟输出1和2以及
S/PDIF输出左和右相对应。
MIDI 安装 (MIDI Setup)
在Audio MIDI Setup区,用户可选择窗
口顶部的“MIDI Devices”调节Firefly的
MIDI功能。在MODI Devices区内,用
户可看见“Firefly 302 USB”的图标,选
择后将可进入下面的桌面。
在Audio MIDI Setup,您还可调节各种
输入和输出信号的音量,以及满意的取
样比和解析率。用户可在44.1,48.0,
88.2,96.0,176.4和192 kHz/s间选择
取样比,在24位,20位,16位间选择解
析率。您也可在DAW软件中调节取样比
和解析率(取决于您所使用的软件)。
Firey 302 USB
Firey 302 USB控制面板
F i r e f l y的大部 分功能都 可通过A u d io
MIDI S etup控制区调节,F i refly 302
USB Control Panel只提供一小部分的控
制功能。如下图所示,软件的主页面可
为用户提供一些有关产品的重要细节,
包括驱动版本,序列号等等。
用户可在两个Fire f l y软件自带的调音台
中任选其一。
53
监听调音台
实质上,监听调音台可在信号输往DAW
软件前对信号进行调节。所有的输入均
已列出;软件中所列出的SPIF 1和0输
入代表S P I F L和R输入信号,1 2 S和3
均为麦克风输入,12S和0声道为Firefly
302 USB的模拟输入1和2。
您可在监听调音台中选择调节设备的输
入信号,或者您也可置之不理,完全交
由DAW软件的电平控制。
假如您对:为什 么 只 有 一 路 麦 克 风 输
入,而Firefly却有两路麦克风声道感到
奇怪的话,答案 是 : 实 际 上 这 个 功 能
使得您可利用麦克风信号进行立体声混
音。
重播调音台
控制面板还可提 供 重 播 调 音 台 。 这 个
软件调音台使得用户可调节输往Firefly
302 USB输出的信号。将所有DAW软件
的输出信号输往Firefl y上各自对应的输
出前均可进行独立控制。
如监听调音台所示,列出的各输出声道
均表示一路Fi r e fly输出声道。声道1和
2为模 拟 输 出1和2, 声 道 3和4为L 和 R
S/PDIF输出。
S/PDIF Pass Through
S/PDIF Pass Through功能位于Firefly
302 USB控制面板,可将S/PDIF输入
信号直接从计算机输往Fir efly S/PD IF
输出。
54
Firey 302 USB
规格
高电平输入
连接器
最大输入(平衡)
最大输入(非平衡)
输入增益范围
阻抗
麦克风输入
连接器
可获得增益
输入范围
阻抗
高电平输出
连接器
最大输出(平衡)
最大输出(非平衡)
阻抗
系统
信噪比
THD + N 0.002% 1 KHz@48KHz
频率响应
串音
S/PDIF 输入/输出
连接器
取样比
耳机输出
最大输出
物理属性和电源
电源供应
尺寸(WxDxH) 196 x 130 x 44 mm/7.7" x 5.1" x 1.7"
重量
1/4"TRS,RCA
+10dBu
+10dBu
- ∞ ~ +10dBu
10K ohms(非平衡),20K(平衡)
XLR
44dB
- 40 ~ +4 dBu
20 K ohms
1/4"TRS,RCA
+ 8 dBu
+ 2 dBu
100 ohms(非平衡),200 ohms (平衡)
- 90.6 dB@48KHz(A加权)
20Hz ~ 20 KHz@48KHz,+0.03/- 0.23dB
-72dB(A加权)
共轴 RCA
44.1,48,88.2,96,176.4,192KHz
+2 dBV(1.3Vrms)至 32 ohms
DC 9 ~ 12V(AC至DC适配器)
0.9 kg/1.98 lbs
Firey 302 USB
55
APPLICATIONS APLICACIONES 应用
5HSURGX FWRUGH&DV VHWWHGH$X GLRR5HSUR GXFWR/3
/$3723&20387(5
&20387$'25$32577,/
༈᠈ᓣ㘇ᴎ
AUDÍFONOS
HEADPHONES
ヨ䆄ᴀ⬉㛥
Ⲧᓣᔩ䷇⺕ᏺ᪁ᬒ఼/3᪁ᬒ఼
$XGLR &D VVHWWH 3OD\HURU/33OD\H U
Turning Analog Recordings Digital
Haciendo Grabaciones Análogas a Digitales
模拟录音转换数字录音
56
Firey 302 USB

HDM1.8HDM1.8
.(<%2$5 '
ঢ়ᅗ
GUITARRA
GUITAR
GUITAR EFFECTS
ঢ়ᅗᬜᵰ఼
EFECTOS DE GUITARRA
ACTIVE MONITORS
᳝⑤ⲥ఼
MONITORES ACTIVOS
/$3723&20387(5
&20387$'25$32577,/
ヨ䆄ᴀ⬉㛥
⬉ᄤ⨈
7(&/$'2
DRUM MACHINE
哧ໄড়៤఼
MÁQUINA DE TAMBOR
MICROPHONES
呺ܟ亢
MICRÓFONOS
༈᠈ᓣ㘇ᴎ
AUDÍFONOS
HEADPHONES
Mobile Studio Recording
Grabación de Estudio Móvil
移动录音棚录音
Firey 302 USB
57

DIMENSION DIMENSION 尺寸
196 / 7.7
51 / 2
1
.6/
551
measurements are shown in mm/inches
1
.
6/55
1
Todas las medidas están mostradas en mm/pulgadas.
尺寸是以毫米
58
mm/英寸inch
表示。
Firey 302 USB
BLOCK DIAGRAM DIAGRAMA DE BLOQUE 线路图
USB2.0
Digital Signal Prosessor
+12V
DC IN +12V
POWER
0
-30
0
-30
0
-30
OUT1
+48V
0
-30
POWER SW.
GAIN
-38
-60
LINE 1
OUT2
LINE 2
PHONES
MIC
21
3
+48V
S/PDIF IN
GAIN
MIDI IN
S/PDIF OUT
GAIN
PHONES OUT
MIDI OUT
Firey 302 USB
59

support@phonic.com http://www.phonic.com
CÓMO COMPRAR EQUIPO ADICIONAL
Y ACCESORIOS DE PHONIC
Para comprar equipos y accesorios opcionales de
Phonic, póngase en contacto con cualquiera de los
distribuidores autorizados de Phonic. Para una lista
de los distribuidores de Phonic visite nuestra página
web en www.phonic.com y entre a la sección Get
Gear. También, puede ponerse en contacto directa
mente con Phonic y le ayudaremos a encontrar un
distribuidor cerca de usted.
SERVICIO Y REPARACIÓN
Para refacciones de reemplazo y reparaciones, por
favor póngase en contacto con nuestro distribuidor
de Phonic en su país. Phonic no distribuye manuales
de servicio directamente a los consumidores y, avisa
a los usuarios que no intenten hacer cualquier
reparación por si mismo, haciendo ésto invalidará
todas las garantías del equipo. Puede encontrar un
distribuidor cerca de usted en
http://www.phonic.com/where/.
INFORMACIÓN DE LA GARANTIA
Phonic respalda cada producto que hacemos con
una garantía sin enredo. La cobertura de garantía
podría ser ampliada dependiendo de su región.
Phonic Corporation garantiza este producto por un
mínimo de un año desde la fecha original de su
compra, contra defectos en materiales y mano de
obra bajo el uso que se instruya en el manual del
usuario. Phonic, a su propia opinión, reparará o
cambiará la unidad defectuosa que se encuentra
dentro de esta garantía. Por favor, guarde los recibos
de venta con la fecha de compra como evidencia de
la fecha de compra. Va a necesitar este comprobante
para cualquier servicio de garantía. No se aceptarán
reparaciones o devoluciones sin un número RMA
apropiado (return merchandise autorization). En
orden de tener esta garantía válida, el producto
deberá de haber sido manejado y utilizado como se
describe en las instrucciones que acompañan esta
garantía. Cualquier atentado hacia el producto o
cualquier intento de repararlo por usted mismo,
cancelará completamente esta garantía. Esta
garantía no cubre daños ocasionados por accidentes, mal uso, abuso o negligencia. Esta garantía es
válida solamente si el producto fue comprado nuevo
de un representante/distribuidor autorizado de
Phonic. Para la información completa acerca de la
política de garantía, por favor visite
http://www.phonic.com/warranty/.
SERVICIO AL CLIENTE Y SOPORTE
TÉCNICO
Le invitamos a que visite nuestro sistema de ayuda
en línea en www.phonic.com/support/. Ahí podrá
encontrar respuestas a las preguntas más frecuentes, consejos técnicos, descarga de drivers, instrucciones de devolución de equipos y más información
de mucho interés. Nosotros haremos todo el
esfuerzo para contestar sus preguntas lo antes
posible.
TO PURCHASE ADDITIONAL
PHONIC GEAR AND ACCESSORIES
To purchase Phonic gear and optional
accessories, contact any authorized
Phonic distributor. For a list of Phonic
distributors please visit our website at
www.phonic.com and click on Get Gear.
You may also contact Phonic directly and
we will assist you in locating a distributor
near you.
SERVICE AND REPAIR
For replacement parts, service and repairs
please contact the Phonic distributor in
your country. Phonic does not release
service manuals to consumers, and advice
users to not attempt any self repairs, as
doing so voids all warranties. You can
locate a dealer near you at
http://www.phonic.com/where/.
WARRANTY INFORMATION
Phonic stands behind every product we
make with a no-hassles warranty.
Warranty coverage may be extended,
depending on your region. Phonic Corpo
ration warrants this product for a minimum
of one year from the original date of
purchase against defects in material and
workmanship under use as instructed by
the user’s manual. Phonic, at its option,
shall repair or replace the defective unit
covered by this warranty. Please retain the
dated sales receipt as evidence of the date
of purchase. You will need it for any
warranty service. No returns or repairs will
be accepted without a proper RMA number
(return merchandise authorization). In
order to keep this warranty in effect, the
product must have been handled and used
as prescribed in the instructions accompa
nying this warranty. Any tempering of the
product or attempts of self repair voids all
warranty. This warranty does not cover
any damage due to accident, misuse,
abuse, or negligence. This warranty is
valid only if the product was purchased
new from an authorized Phonic
dealer/distributor. For complete warranty
policy information, please visit
http://www.phonic.com/warranty/.
CUSTOMER SERVICE AND
TECHNICAL SUPPORT
We encourage you to visit our online help
at http://www.phonic.com/support/. There
you can find answers to frequently asked
questions, tech tips, driver downloads,
returns instruction and other helpful
information. We make every effort to
answer your questions within one business
day.
购买Phonic产 品 及 其周边
器材
使用者如 需购买Phonic产品及 其周边
器材,请 与Phonic授 权的经销 商取得
联 系 。 访 问 我 们 的 网 站
www.phonic.com,点击 Get Gear 即
可查 询 Phoni c地 区经 销 商 的联 系 方
式。您也 可直接联系 Phonic公 司,我
们将协助 您快速定 位离您最 近的经销
商。
服务与维修
订购替换 零件或维 修事宜, 请与您所
在地区的Phonic经销商 联系。Phonic
不对使用 者发行维 修手册, 且建议使
用者切勿 擅自维修 机器,否 则将无法
获 得 任 何 保 固 服 务 。 您 可 登 录
http://www.phonic.com/where/定位离
您最近的经销商。
产品保固资讯
Phonic承 诺对每项产 品提供最完善的
保固服务 。我们将 根据客户 群体所在
的地区来 拓展我们 的服务所 涵盖的范
围。自原 始购买日起 ,Phonic即对在
严格遵照 使用说明 书的操作 规范下,
因产品材 质和做工 所产生的 问题提供
至少 1年的 保固服 务。 Phonic可在此
保固范围 内任意地 选择维修 或更换缺
陷产品。 请务必妥 善保管购 买产品的
凭证 , 以 此获 得 保 固服 务 。 未获 得
RMA号的将不 受理退货,以及 保固服
务。保固 服务只限 于正常使 用情况下
产生的问 题。使用 者需严格 遵照使用
说明书正 确使用, 任何肆意 损坏或擅
自维修机 器,意外 事故,错 误使用,
人为 疏 忽 ,都 将 不 在保 固 受 理范 围
内。此外 ,担保维 修只限于 在授权经
销商处的 有效购买 。欲知全 部的保固
政 策 资 讯 , 请 参 考
http://www.phonic.com/warranty/。
客户服务和技术支持
欢 迎 您 访 问 我 们 的 网 站
http://www.phonic.com/support/。 从
该网站上 ,您可获 得各种常 见问题的
答案 , 技 术指 导 , 并可 下 载 产品 驱
动,获得 有关退货 指导以及 其它帮助
资讯。我 们竭尽全 力在一个 工作日内
回复您的询问。
 Loading...