

Page 1

DFX2000
DIGITAL EFFECTS PROCESSOR
PROCESADOR DE EFECTOS DIGITAL
数字效果处理器
PROCESSADOR DIGITAL DE EFEITOS
/ Português
简体中文
DFX2000
User's Manual
Manual del Usuario
使用手册
English / Español /
Guia do Usuário
Page 2

DFX2000
DIGITAL EFFECTS PROCESSOR
PROCESADOR DE EFECTOS DIGITAL
数字效果处理器
PROCESSADOR DIGITAL DE EFEITOS
CONTENTS CONTENIDO
INTRODUCTION 4
FEATURES 4
QUICK SETUP 4
FRONT PANEL DESCRIPTION 4
REAR PANEL DESCRIPTION 6
EDITING, STORING AND RECALLING
PRESETS
SETUP 8
EFFECT ALGORITHMS AND PARAMETERS
SPECIFICATIONS 12
APPLICATION 42
Effect Parameter Overview 44
Default Settings 49
Parameter Range of Effects Algorithms
Effects Structure 57
6
9
53
目录
INTRODUCCIÓN 14
CARACTERÍSTICAS 14
MONTAJE RÁPIDO 14
DESCRIPCIÓN DE PANEL FRONTAL 14
DESCRIPCIÓN DE PANEL DORSAL 16
EDITAR, ALMACENAR Y
RECUPERAR PRESETS 16
CONFIGURACIÓN 20
ALGORÍTMOS Y PARÁMETROS DE EFECTO
ESPECIFICACIONES 24
APLICACIÓN 42
Vista General de Parámetro de Efecto 44
20
Conguraciones por Default 49
Gama de Parámetro de Algoritmos de Efectos
Estructura de Efectos 57
53
CONTEÚDO
简介 26
功能 26
快速安装 26
前面板 26
后面板 28
编辑,存储和召回预设 28
设置 30
效果演算法和参数 30
规格 32
应用 42
效果参数综述 44
默认设置 49
效果演算法的参数范围 53
效果构成 57
Phonic preserves the right to improve or alter any information within this document without prior notice
Phonic se reserva el derecho de mejorar o alterar cualquier información provista dentro de este documento sin previo aviso
Phonic se reserva el derecho de mejorar o alterar cualquier información provista dentro de este documento sin previo aviso
INTRODUÇÃO 34
RECURSOS 34
AJUSTE RÁPIDO 34
DESCRIÇÃO DO PAINEL FRONTAL 34
DESCRIÇÃO DO PAINEL TRASEIRO 35
EDIÇÃO, ARMAZENAMENTO E SELEÇÃO
DE EFEITOS PRÉ-AJUSTADOS 36
AJUSTE 38
ALGORITMOS E PARÂMETROS DE EFEITO38
ESPECIFICAÇÕES 41
APLICAÇÕES 42
Lista dos Parâmetros de Efeito 44
Ajustes de Fábrica 49
Faixa de Parâmetro dos Algoritmos de Efeito 53
Estrutura dos Efeitos 57
PHONIC
保留不预先通知即可更新本文件的权利
V1.0 11/12/2010
Page 3

1. Read these instructions before ope rating this
apparatus.
2. Keep these instructions for future reference.
3. Heed all warnings to ensure safe operation.
4. Follow all instructions provided in this document.
5. Do not use this apparatus near water or in locations
where condensation may occur.
6. Clean only with dry cloth. Do not use aerosol or liquid
cleaners. Unplug this apparatus before cleaning.
7. Do not block any of the ventilation openings. Install
in accordance with the manufacturer’s instructions.
8. Do not install near any heat sources such as radiators,
heat registers, stoves, or other apparatus (including
.
9. Do not defeat the safety purpose of the polarized or
grounding-type plug. A polarized plug has two blades
with one wider than the other. A grounding type plug
has two blades and a third grounding prong. The wide
blade or the third prong is provided for your safety. If
the provided plug does not into your outlet, consult
an electrician for replacement of the obsolete outlet.
10. Protect the power cord from being walked on or
pinched particularly at plug, convenience receptacles,
and the point where they exit from the apparatus.
11. Only use attachments/accessories by the
manufacturer.
12. Use only with a cart, stand, tripod, bracket, or
table by the manufacturer, or sold with
the apparatus. When a cart is used, use caution
when moving the cart/apparatus
combination to avoid injury from tipover.
13. Unplug this apparatus during lighting
storms or when unused for long
periods of time.
14. Refer all servicing to service personnel.
Servicing is required when the apparatus has been
damaged in any way, such as power-supply cord or
plug is damaged, liquid has been spilled or objects
have fallen into the apparatus, the apparatus has
been exposed to rain or moisture, does not operate
normally, or has been dropped.
IMPORTANT SAFETY INSTRUCTIONS
CAUTION: TO REDUCE THE RISK OF ELECTRIC SHOCK,
DO NOT REMOVE COVER (OR BACK)
NO USER SERVICEABLE PARTS INSIDE
REFER SERVICING TO QUALIFIED PERSONNEL
The lightning flash with arrowhead symbol, within an
equilateral triangle, is intended to alert the user to the
presence of uninsulated “dangerous voltage” within the
product
’
magnitude to constitute a risk of electric shock to persons.
The exclamation point within an equilateral triangle is intended to alert the user to the presence of important operat-
ing and maintenance (servicing) instructions in the literature
accompanying the appliance.
WARNING: To reduce the risk of or electric shock, do
not expose this apparatus to rain or moisture.
CAUTION: Use of controls or adjustments or performance
of procedures other than those may result in
hazardous radiation exposure.
The apparatus shall not be exposed to dripping or splashing and that no objects with liquids, such as vases,
shall be placed on the apparatus. The MAINS plug is used as the disconnect device, the disconnect device shall
remain readily operable.
Warning: the user shall not place this apparatus in the area during the operation so that the mains switch
can be easily accessible.
CAUTION
RISK OF ELECTRIC SHOCK
DO NOT OPEN
Page 4

4 DFX2000
INTRODUCTION
Congratulations on your purchase of another ne product, built
with precision and care, and bound to give you many years of
faithful service. The DFX2000 is a high-denition digital effects
processor with 101 amazing algorithms, all of which were developed in-house our engineers. Each effect has up to 7 parameters that can be easily adjusted, as well as a low- and high-frequency EQ, and the simple ‘compare’ key allows you to quickly
and easily compare your new effect to the original. Once you’re
done, store your effect in one of the user-denable preset slots.
This is just a taste of what this great effects processor has to
offer.
Though you’re undoubtedly eager to unpack your DFX2000 and
get started, we’d like to strongly advise that you read this manual thoroughly rst. Inside, you’ll nd important information on the
user and operation of this device, and a few helpful hints just to
make things easier. In the rear of this booklet, you’ll nd a blank
table that can be used to record all of your saved presets, so you
may want to keep it handy once you’re done reading.
FEATURES
● 101 breathtaking new algorithms, most in true stereo
● 40-bit High-Denition Algorithm for ultra-natural reverb and
delay
● 49 effect combinations with selectable serial/parallel congu-
ration
● Awesome modulation, dynamic, psychoacoustic and EQ algorithms
● Innovative distortion and special effects
● Up to 7 adjustable parameters plus HI and LO EQ per effect
● High-resolution 24-bit A/D and D/A converters with 128 times
oversampling
● True stereo processing for realistic channel separation in
stereo image
● 100 factory presets plus 100 user memory locations
● Extensive MIDI implementation
● Internal power supply for professional applications
● Servo-balanced XLR and 1/4” TRS inputs and outputs
QUICK SETUP
1. Make sure your unit is off. Preferably remove the AC
power cable.
2. Connect all of your required output devices to the
DFX2000’s inputs. Commonly, this would be a mixer
or guitar amplier’s insert point.
3. Connect all of your required input devices to the
DFX2000’s output connectors.
4. Turn your devices on in this order: instruments, mixer,
signal processors, amps/speakers.
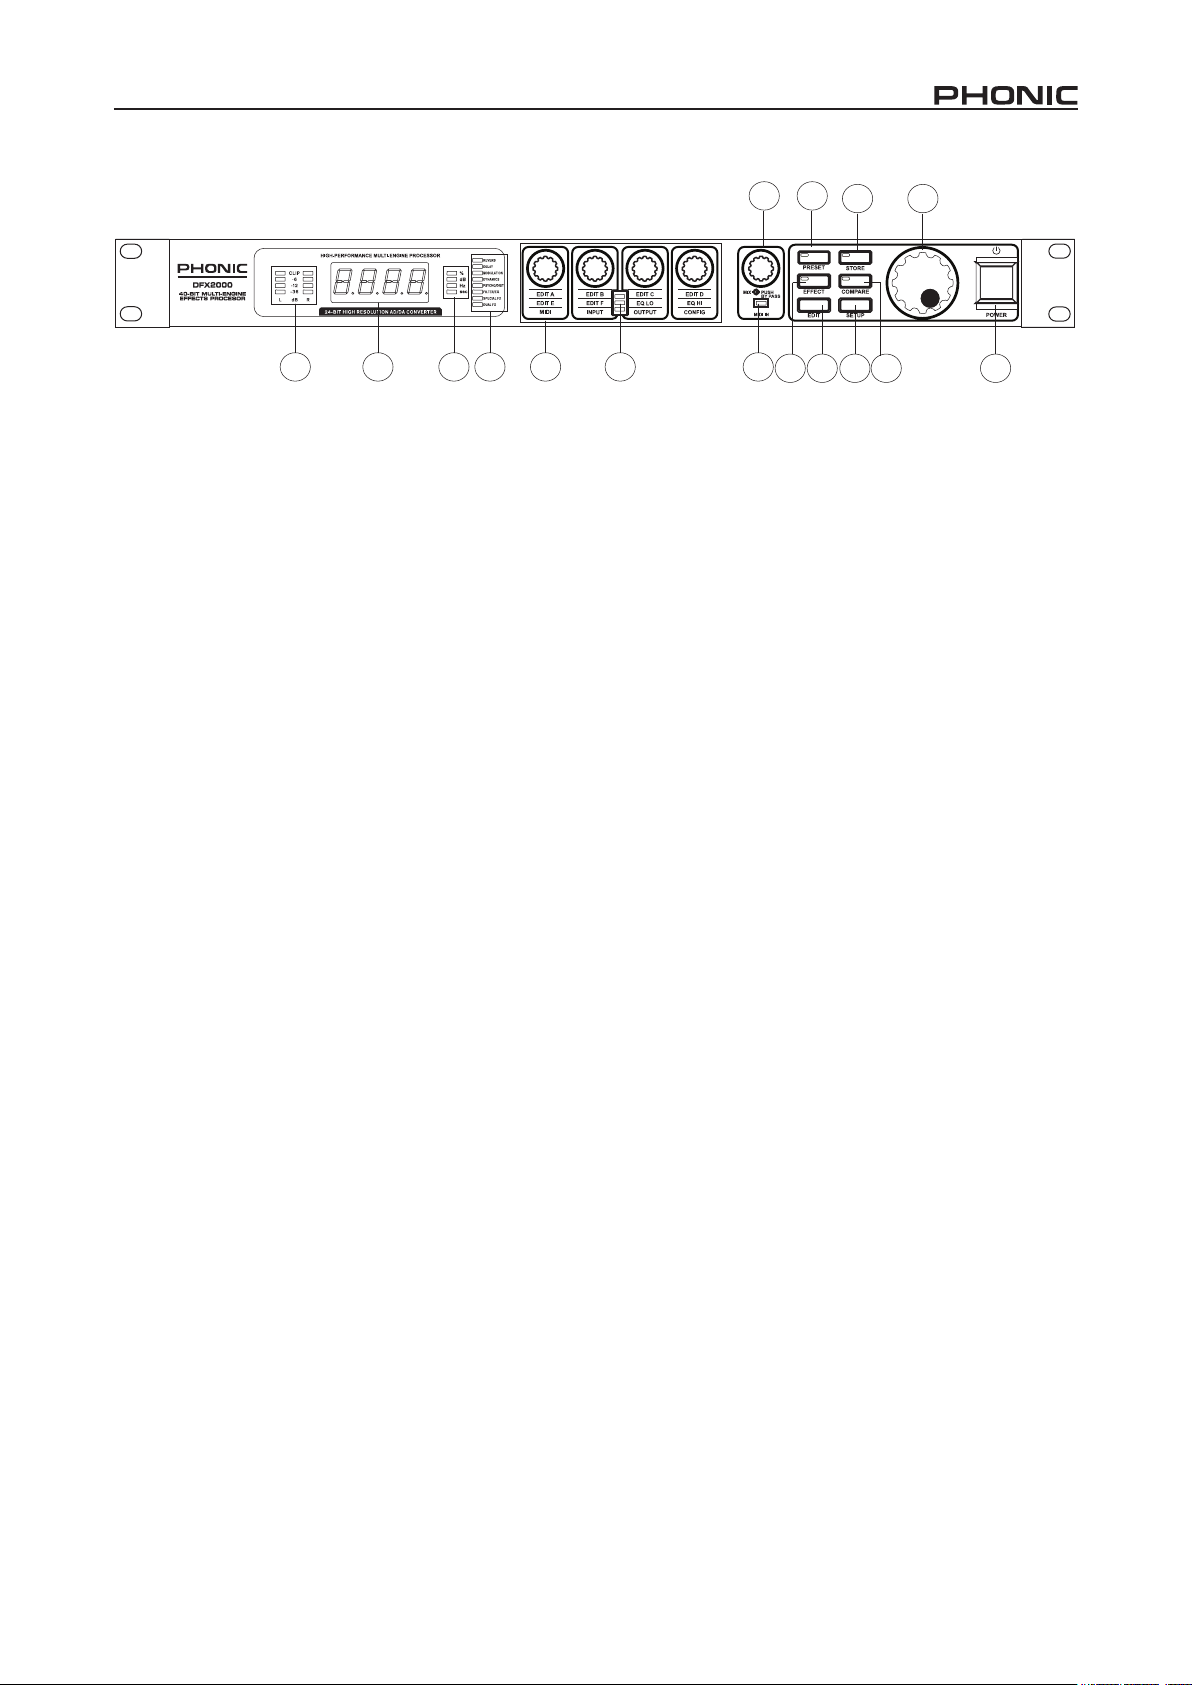
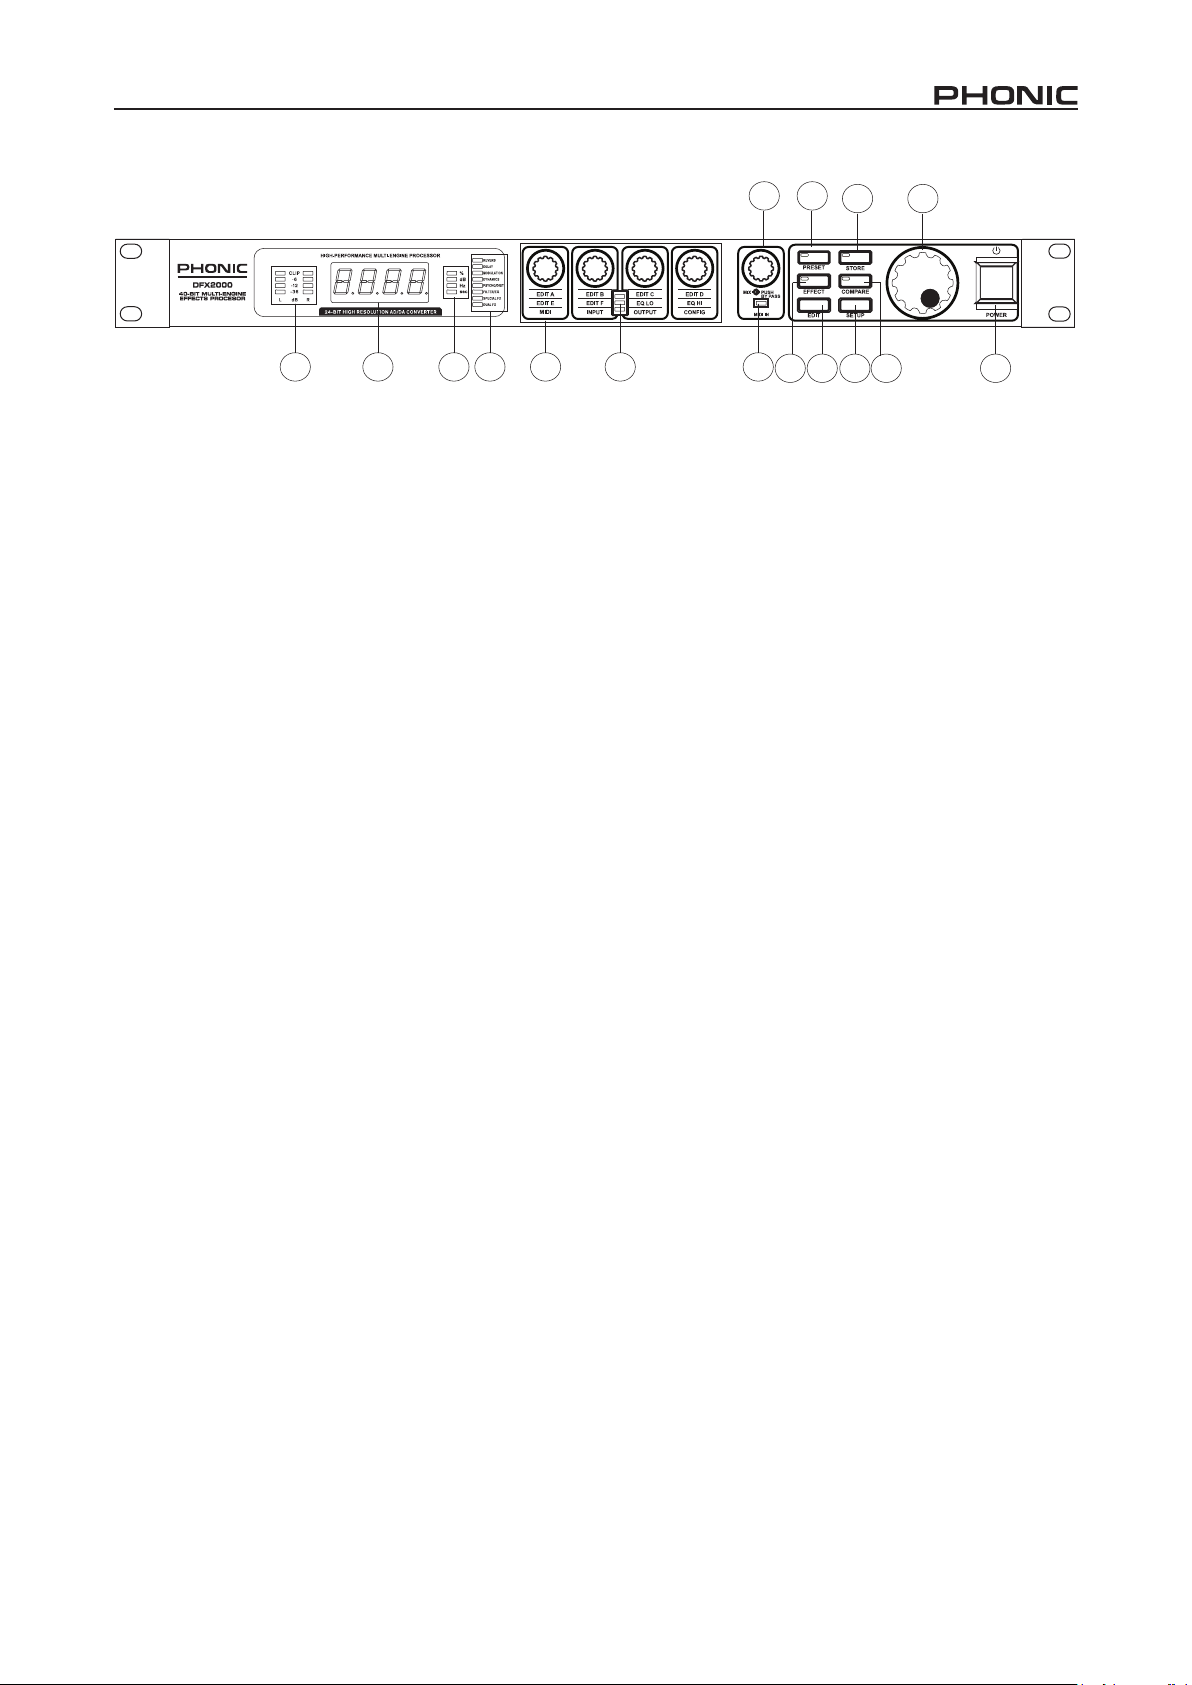
FRONT PANEL DESCRIPTION
1. Input Level Meter
This stereo 4-segment LED meter gives users a visual indica-
tion of when their input signal reaches certain levels. It’s best
to set the input to a level that will ensure the red Clip LED does
not light up. If it does, reduce the output level of your external
device slightly.
2. Display
This 4-digital alphanumerical display shows the name of the currently used preset. When editing presets, this display will show
the current preset along with the corresponding parameter’s
value.
3. Status LEDs
When adjusting a preset’s properties, one of these LEDs will let
you know what kind of properties you are actually editing. They
are as follows:
% – Set the absolute value of a parameter
dB – Increase or decrease the amplitude or adjust the compres-
sor’s threshold
Hz – Adjust the frequency
Sec – Adjust the time parameter
4. Effect Group LEDs
When your selected effect falls under one of these categories,
the corresponding LED will light up.
Page 5
7 9
12 15
1 2 3 4 6 5 8
5. Edit LEDs
Each of the DFX2000’s effects has four adjustable parameters.
These LEDs indicate which parameters are actually being edited. If the top LED is lit up, the parameters listed on the top
line underneath each Edit Control will be adjustable by the corresponding controls (in this case, it’s parameters A, B, C and D).
The same goes for the middle LED (the parameters listed in the
center under each control will be adjustable) and the bottom LED
(the settings listed underneath each control will be adjustable).
For a full list of what these parameters are, check out the Appendix to this manual.
6. Edit Controls
Use any of these controls to adjust their corresponding parameters, as determined by the effect you’re currently editing. One
of the Edit LEDs will let you know which particular parameters
you’re editing. If you’re unsure though, turning one of these controls slightly will give the name of the corresponding parameter
on the main display for a brief moment.
Pushing the setup button will allow the settings (shown below
each of these controls, at the very bottom) to become adjust-
able.
7. Mix/Bypass Control
Turning this control left and right allows you to adjust the level
of saturation the selected effect will have over the input signal.
This level will go from between 0% and 100%, with 0% meaning
the signal will pass through unprocessed (or is “dry”) and 100%
having the input completely affected by the selected effect (ie.
the signal is “wet”).
Pushing this control in will activate a bypass, allowing the unprocessed input signal to pass through the output. This is handy for
comparing the processed and unprocessed signals.
8. MIDI LED
This LED will ash whenever the DFX2000 receives any valid
MIDI signal.
9. Preset Button
To select one of the built-in presets, push this button and use the
jog wheel to skim through the available presets.
1110 14 13 16
10. Effect Button
To select one of the 101 core effect algorithms, push the effect
button and use the Jog Wheel to browse through those available.
For a complete list of the unit’s effects, please check the manuals’ appendix section.
11. Edit Button
Pushing this button will allow users to make use of the four Edit
Controls.
12. Store Button
To save a preset, push this button. You can then use the jog
wheel to nd a free (or “disposable”) user-denable preset slot
and push the Store button again to conrm. When any adjustment is made to the parameters of a preset, the LED within this
button will ash to indicated as such.
13. Compare Button
When you have made adjustments to presets (and the LED
within the store button is ashing), this button will allow you to
compare your original and updated effects. Pushing it once will
switch you to the original preset (the word COMP will be visible
in the main display window), and pushing it again will return you
to your edited effect. You can then make further renements, or
store your preset if you’re happy with the results.
14. Setup Button
Pushing the setup button will allow you to make use of the setup
functions listed on the four Edit Controls’: MIDI, Input, Output and
Conguration. Check the Setup section out for more information
on how to use these.
15. Jog Wheel
When the device is idling, you can use the jog wheel to select
programs from the long list of those available. When in edit or
setup modes, turning the jog wheel will adjust the corresponding
parameters higher (by turning it to the right) or lower (by turning
it left).
16. Power Button
Flicking this switch will turn the DFX2000 on and off. Remember
to keep the power switch in the “off” position when connecting or
disconnecting the power cord to or from the unit.
5DFX2000
Page 6
6 DFX2000
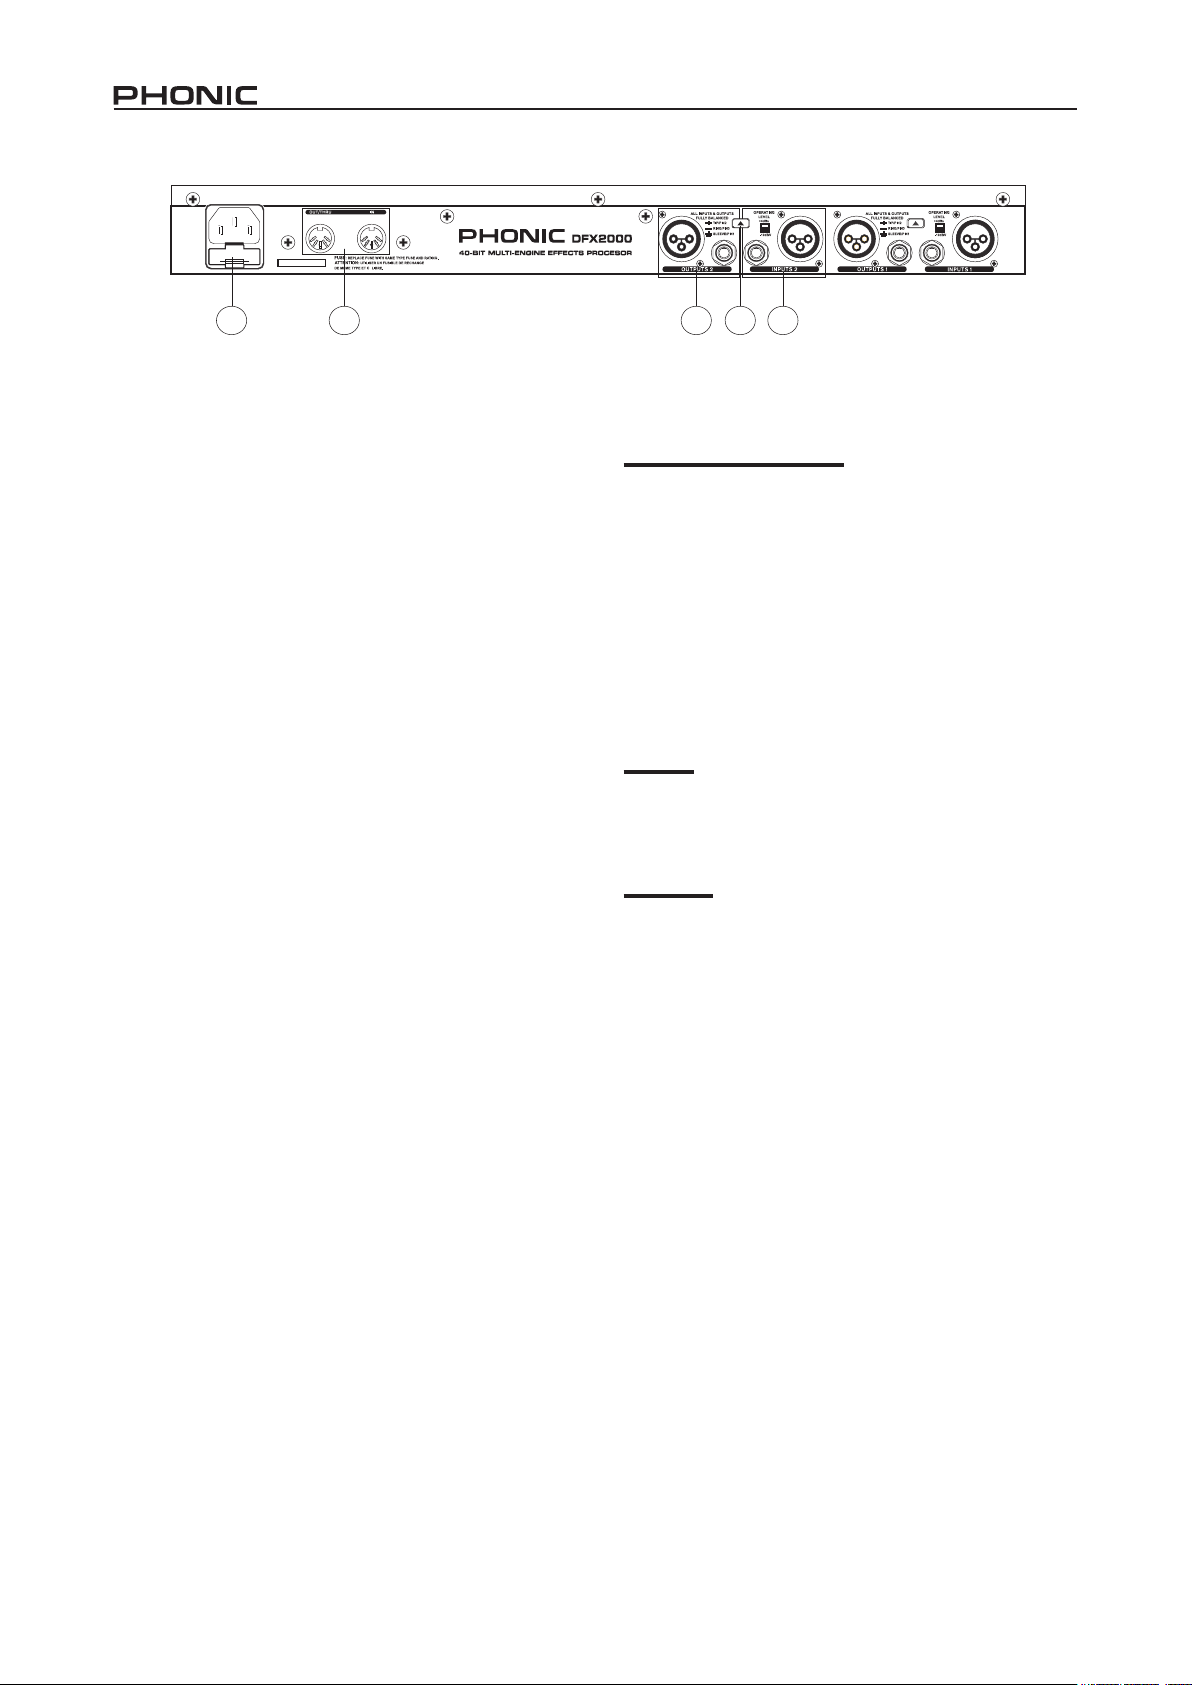
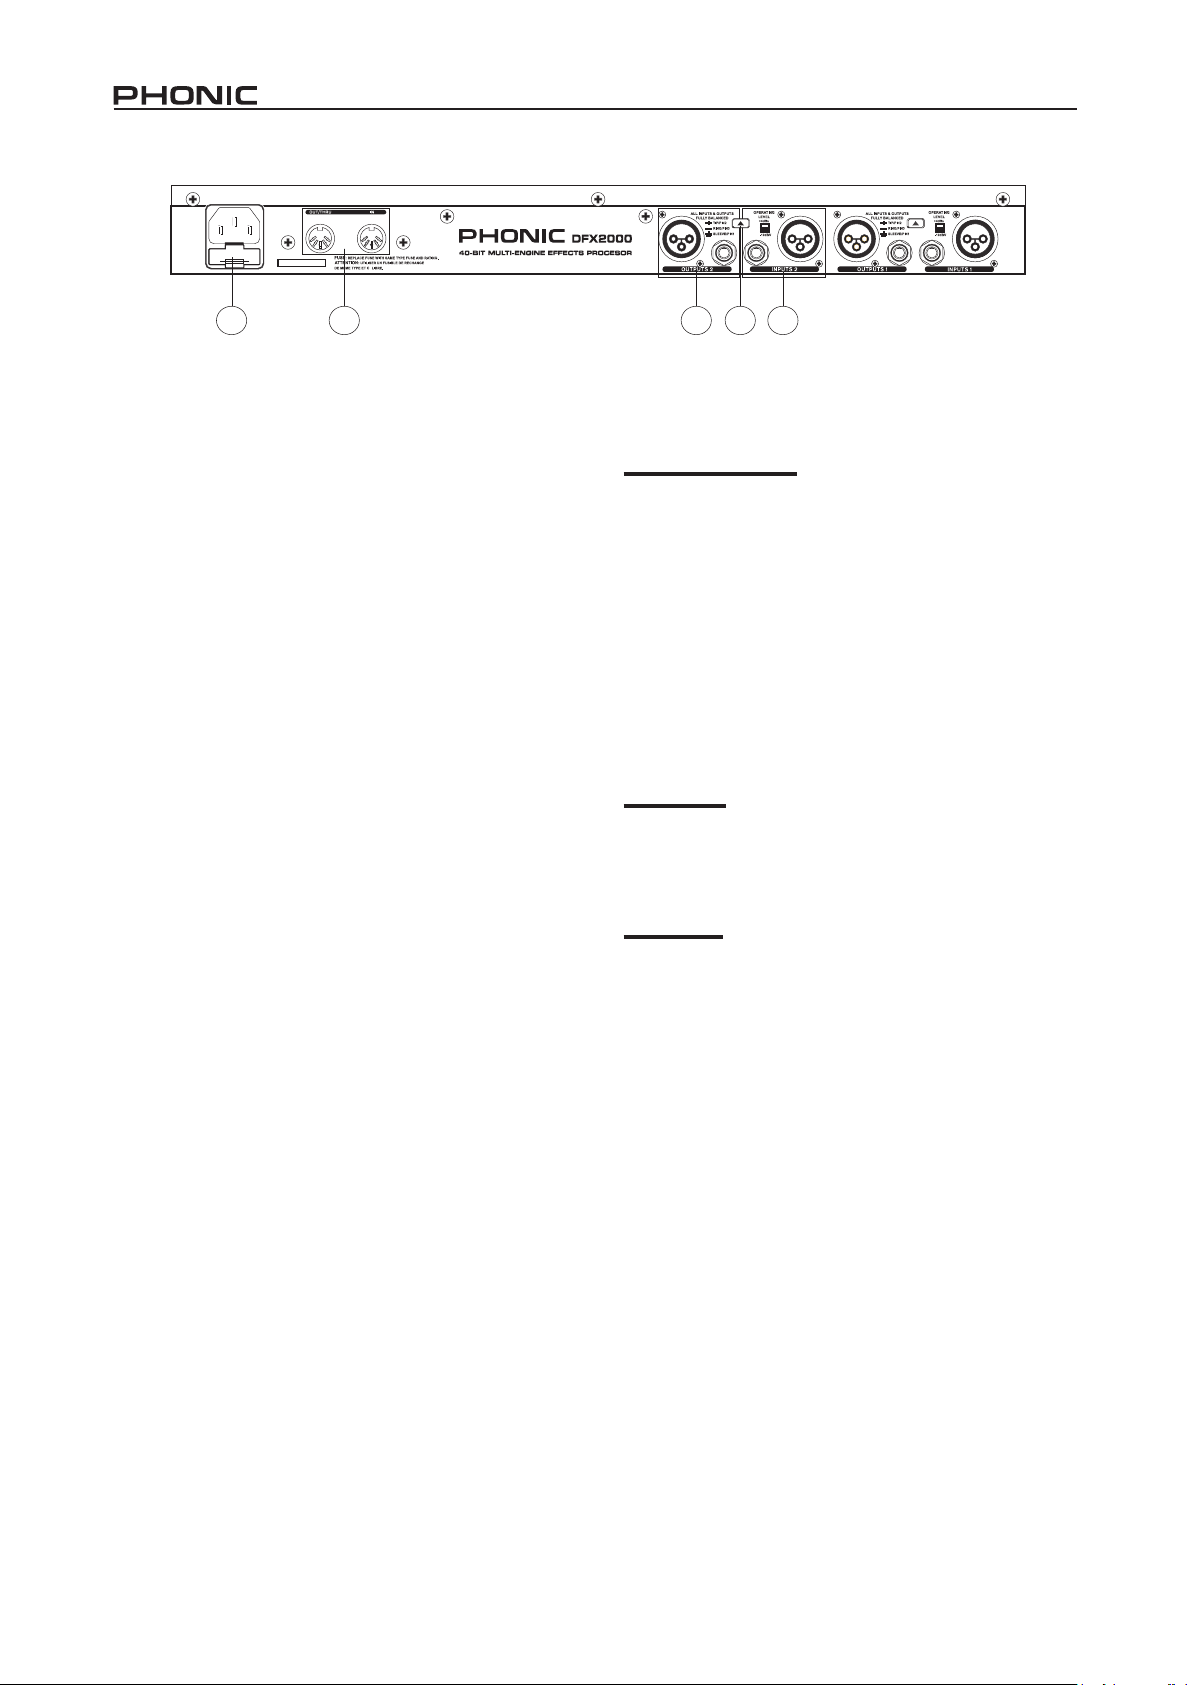
REAR PANEL DESCRIPTION
17 21 19 1820
17. AC Power Socket and Fuse
Used for the addition of a power cable, allowing power to be
supplied to the DFX2000. Please use the power cable that is
included with this device only. The Fuse holder, located below
the AC Power connector, is for the DFX2000’s fuse. If the fuse
happens to blow, open the holder cover, and replace the fuse
with a suitable replacement.
18. Input Connectors
These balanced 1/4” TRS and XLR jacks are used for receiving
signals from external devices. Please note that only one of these
inputs should be used on each channel at any one time.
19. Output Connectors
These balanced output connectors, the same as featured on the
input, send their corresponding signals to external devices. All
outputs run in parallel to one another, meaning you can use the
1/4” and XLR outputs simultaneously if necessary.
20. Operating Level Button
This switch swaps the input and output levels of the corresponding channel between -10 dBV (consumer level) and +4 dBu (pro-
fessional level).
21. MIDI Connectors
These MIDI in and MIDI out/thru connectors are available for us-
ers to utilize. This allows users to dump and receive data to and
from the computer, as well as adjust parameters in real time by
use of a computer or other MIDI device.
EDITING, STORING AND RECALLING
PRESETS
Editing and Comparing
To edit an effect, rst select an effect by pushing the effect button
and rotating the Jog Wheel. If the Jog Wheel is left stationary for
2 seconds, then the currently selected effect will be applied. You
can then change the different properties of the effect by push-
ing the Edit Button, and using the four Edit Controls to adjust
their corresponding parameters (check this manual’s Appendix
for more information on effect parameters).
When you make even the slightest modication to a preset, the
LED in the Store Button will ash to let you know that the effect/
preset has been changed and that you may want to save your
adjustments. By pushing the Compare Button, your edited effect
will be disabled and you will be able to hear the original effect.
Pushing the button again will return you to your edited effect.
Storing
To store an effect that you have edited, simply press the Store
Button. Turn the jog wheel to select one of the user denable
preset slots (from U.001 to U.100) and press the Store Button
once again to conrm.
Recalling
The DFX2000 has 100 factory pre-set effects, as well as 100
user-denable slots. Users can recall a preset at any time by
pushing the preset button and using the jog wheel to nd select one of the factory-set (I.001 – I.100) or user-dened (U.001
– U.100) presets. There will be a brief moment before the effect
is applied to your signal. Keep in mind that different effects may
be set at different levels.
MIDI SETUP
When you push the Setup Button, the rst Edit Control will allow
you to scroll through and adjust the various settings of the MIDI
interface. Turning the jog wheel will adjust these values and/or
conrm the settings.
CHAN:
This function allows users to select a particular MIDI channel on
which to accept signals. This is particularly helpful when using
a chain of MIDI devices, as channels carrying MIDI signals not
intended for the DFX2000 will be completely ignored.
Page 7
OMNI:
The omni-channel function allows users to accept MIDI signals
from all 16 MIDI channels.
CONT:
This option allows you to set the status of controller commands
through the MIDI interface. The available settings are: OFF,
RECV (allows the DFX2000 to receive controller data), SEND
(allows the DFX2000 to send controller data) and BOTH (allows
the DFX2000 to both send and receive controller data).
PRGM:
This function allows you to set the status of program changes
through the MIDI. The available settings are: OFF, RECV (al-
lows the DFX2000 to receive program changes), SEND (allows
the DFX2000 to send program changes) and BOTH (allows the
DFX2000 to both send and receive program changes).
STOR:
When this is set to ON, the DFX2000 will receive controller 112
as the direct storage command. The current settings are saved
in the program location that corresponds with the controller value; no conrmation is required. When set to OFF, controller 112
will be ignored.
DUMP:
When your computer’s MIDI program is set to receive MIDI data,
using the Edit control to select the DUMP function, and turning
the jog wheel to conrm, will send all your preset programs to the
computer. Saving this le on your PC will enable you to send
these presets back to the DFX2000 at any time in future.
DR.EN:
When this is displayed on screen, turn the jog wheel slightly to
select, and the display will ash. In this mode your DFX2000
can receive system exclusive data from external MIDI devices
through the MIDI Input on the rear of the device.
MIDI
This setting will decide whether the Out/Thru jack on the rear of
the RISC 2024P will be a MIDI Out or Thru. When set to Out, this
jack will output MIDI signals from the DFX2000. When set to
MIDI thru, the signals received by the MIDI input will continue on
through the Out/Thru jack.
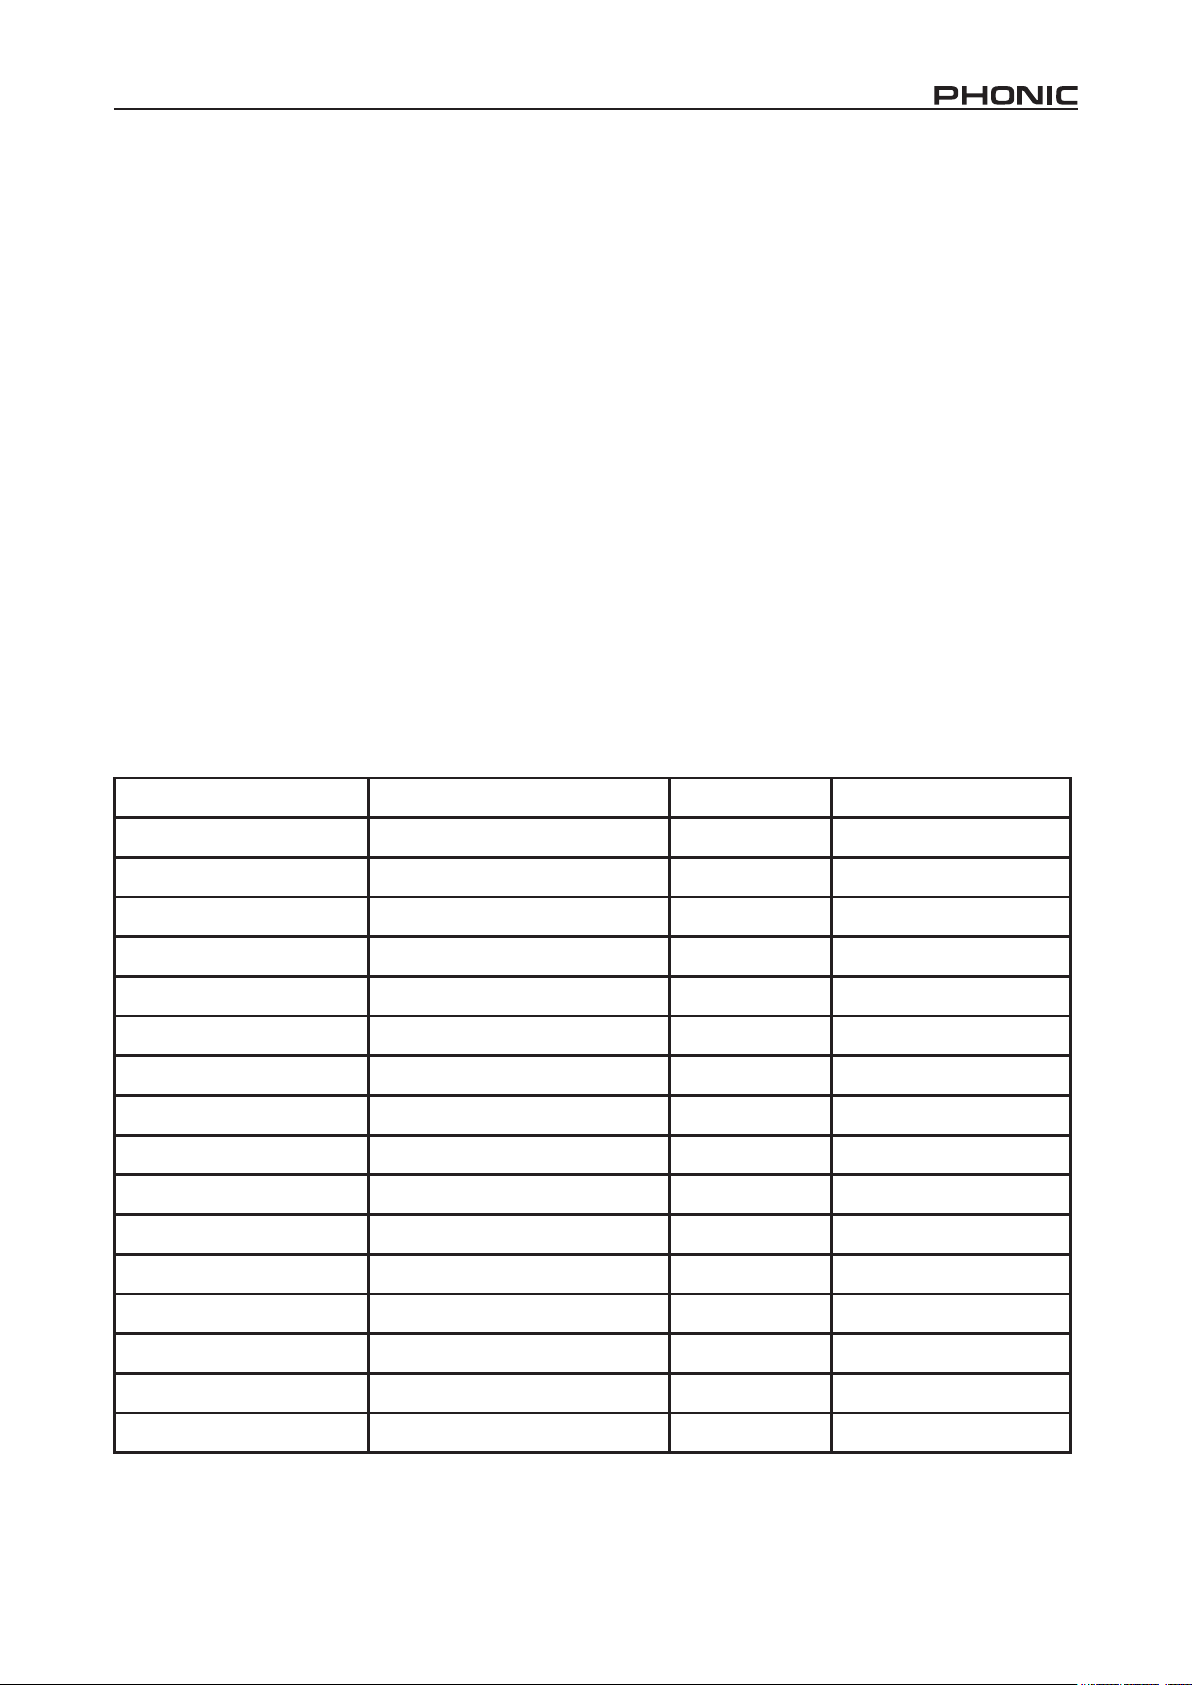
MIDI Control Chart
Parameter Name Display MIDI Control # Control Value Range
Bank Select I.001 - I.100 / U.001 - U.100 0 0 = Factory / 1 = User
Algorithm Algorithm Title 102 0 - 100
Edit A Effect Dependant 103 Effect Dependant
Edit B Effect Dependant 104 Effect Dependant
Edit C Effect Dependant 105 Effect Dependant
Edit D Effect Dependant 106 Effect Dependant
Edit E Effect Dependant 107 Effect Dependant
Edit F Effect Dependant 108 Effect Dependant
EQ Low ±16 dB 109 84 to 116; 0dB at 100
EQ High ±16 dB 110 84 to 116; 0dB at 100
Mix Effect Dependant 111 Effect Dependant
Store U.001 - U.100 112 0 - 99
In/Out BYP / 0 - 100% 113 0 = BYP / 1 = Mix
Combination SER1 / SER2 / PARA 114 0 = S1 / 1 = S2 / 2 = PA
Input Mode MONO / STER 115 0 = Mono, 1 = Stereo
External/Internal Mix EXT / INTN 116 0 = External, 1 = Internal
7DFX2000
Page 8

8 DFX2000
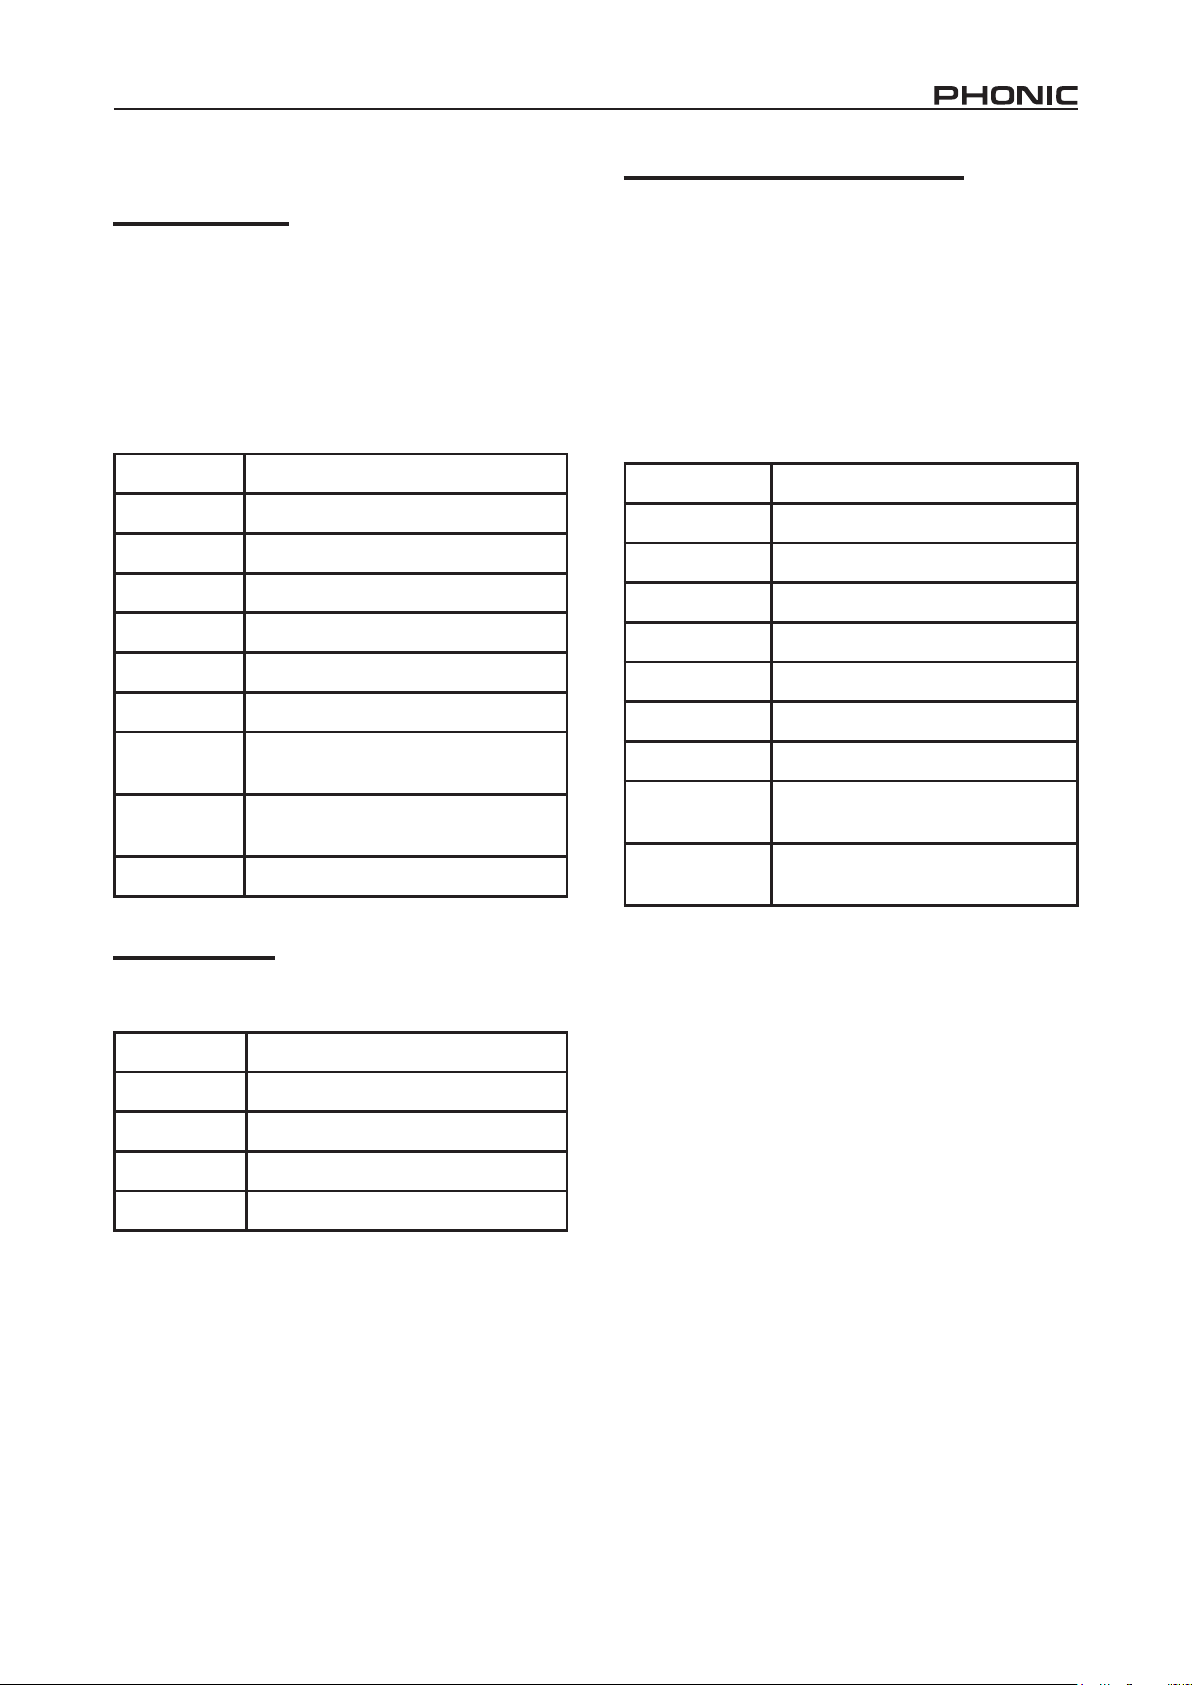
MIDI Implementation Chart
Function Transmitted Recognized
Basic Channel
Note Number
Velocity
After Touch
Pitch Bender
Control
Program Change
System Exclusive YES YES
System Common
Default OFF, 1 - 16 OFF, 1 - 16
Changed OFF, 1 - 16 OFF, 1 - 16
True Voice N/A N/A
Note ON N/A N/A
Note OFF N/A N/A
Key’s N/A N/A
Channel’s N/A N/A
True # 1 - 100 1 - 100
Song Pos N/A N/A
Song Sel N/A N/A
N/A N/A
N/A N/A
0, 102 - 116 0, 102 - 116
Yes (0 - 99) Yes (0 - 99)
Tune N/A N/A
Local ON/OFF N/A N/A
All notes OFF N/A N/A
AUX messages
Active Sense N/A N/A
Reset N/A N/A
SETUP
Input Mode
By pushing the Setup button, users are able to use the second
Edit Control to adjust the input mode of the DFX2000 between
mono (MONO) and stereo (STER). When the input mode is set
to mono, input channel 1 is used exclusively. In stereo mode,
the selected effect is applied separately to both channels. Delay
effects can have their left and right channels’ properties edited
separately.
Output Mode
After pushing the Setup button, users can use the third Edit Control to select the two options for the input mode. When INTL is
selected, the mixing of audio will be done internally, and thus the
Mix/Bypass Control will be active. When set to EXTN, the signal
will be 100% wet, and thus the external device will determine the
level of effect saturation by the DFX2000.
Dual Engine Conguration
Once again, by pushing the Setup button, users are able to use
the fourth Edit Control to decide the structure of the effect combi-
nations (presets 53 through 101). You can choose either serial 1
(SER1), serial 2 (SER2) and parallel (PARA).
Page 9
EFFECT ALGORITHMS AND PARAMETERS
Reverb algorithms
The DFX2000 offers 17 reverb algorithms, each of which is
named to appropriately match the effect the algorithm has on
your audio signal. Cathedral mimics the long, drawn out reverberation heard in Cathedrals which is appropriate for individual
instruments. Plate effects simulate plate reverberations and are
appropriate for use with drums and vocals. The Spring reverb
simulates the classic spring reverberation. Large Hall, Room
and Studio reverbs mimic the reverberations that would be present in these various sized rooms. Gate Reverb algorithms syn-
thetically cut off the reverberation after a period of time.
Modulation and Pitch Shifter effects
There are various types of these effects; Chorus effects will detune the input signal in conjunction with a slight pitch variation,
and is effective for dispersing signals. Flanger effects provide
slight delays and shifts in phasing. With Phaser effects, a secondary phase-shifted signal is added to the input signal. The
Pitch Shifter effect adjusts the pitch of the signal, commonly used
with vocals. Vibrato effects adjust the pitch (speed) of peak frequencies of a tone and are used commonly used with guitars.
Tremolo effects are also commonly applied to guitar signals, and
involve applying fast or slow variations in the volume. Auto Panning does exactly what the title suggests: the signal is panned
from left to right and back again repeatedly, making great use of
the ability of stereo.
Parameter What it does
Pre-delay Adjusts the time until the rst reection
Early level
Hi ratio
High pass
lter
Density
Gate
threshold
Gate hold
time
Gate release
time
Reverb time
Adjusts the balance between early and
later reverb reections
Adjusts the reverb time of high frequency
sounds alone
Adjusts the cut-off frequency of the high
pass lter
Adjusts the density of the Reverb effect
between ‘spacious’ and ‘tight’
Adjusts the threshold of the gate effect
Adjusts the time it takes until the gate
effect is activated after the signal is over
the threshold
Adjusts the time it takes for the gate
effect to deactivate after the signal falls
below the threshold
Adjusts the length/time of the reverb
effect
Delay algorithms
Delay effects add a slight (or long) delay to one or both channels
at varying speeds.
Parameter What it does
Delay coarse
Delay ne
Feedback
Delay
Adjusts the delay time of the left and right
channels in 100ms increments
Adjusts the delay time of the left and right
channels in 1ms increments
Adjusts the repetition of the left and right
channels
Adjusts the delay time of the left and right
channels
Parameter What it does
L.F.O. Sets the modulation speed
Pre-delay
Depth
Phase
LPF
Pitch shift Adjusts the pitch
Modulation mode Determines the delay time
Wave type
Way
Adjusts the time until the rst
modulation
Adjusts the delay time variation (hence
the depth)
Determines the phase between
modulation delay 1 and 2
Adjusts the roll-off frequency of the low
pass lter
Decides whether sine or triangular
wave types will be used to modulate
the signal
Changes the panning of the effect
between left to right, right to left and
centered to left/right
9DFX2000
Page 10
10 DFX2000
Dynamic effects
Compressors are signal processors that reduce signals over a
user-dened threshold by a user-dened amount/ratio. Limiters
work just as Compressors do, with an innity-to-1 ratio. A noise
Gate is a signal processor that turns off or signicantly attenuates the audio signal passing through it when the signal level
falls below a user adjustable threshold. An Expander helps to
make troublesome background noise (such as humming) inau-
dible by reducing signals with low amplitudes. A De-noiser also
eliminates noise and interference. A De-esser will help to reduce
sibilance in the human voice.
Parameter What it does
Drive Adjusts the distortion level
Level Adjusts the volume
EQ low 1 Adjusts the low EQ
EQ low 2 Adjusts the low EQ
EQ high 1 Adjusts the high EQ
Parameter What it does
Gain
Ratio Adjusts the compressor / expander ratio
Threshold
Knee
Attack time
Release time
Compressor
threshold
Limiter threshold
Hold time
BPF
Q Q factor
Adjusts the input gain of the
compressor, limiter, expander
Adjusts the threshold of the gate,
compressor, expander effect
Adjusts the gate/compressor kneecurve from sharp to smooth
Adjusts the time it will take for the effect
to kick in after the signal rises above
the set threshold
Adjusts the time it will take for the effect
to deactivate after the signal falls below
the set threshold
Adjusts the threshold of the
compressor/limiter effect
Adjusts the threshold at which the
limiter will kick in
Adjusts the time the gate or de-noiser
will remain open/active
Adjusts the frequency which will be
decreased for the de-esser
Psycho-acoustical effects
Parameter What it does
HPF
Drive Adjusts the strength of the exciter effect
Harmonic
Gain Allows for gain correction
Adjusts the cut off frequency of the high
pass lter
Activates harmonic amplication
dependent on the input level
EQ high 2 Adjusts the high EQ
Filter/EQ effects
The Graphic EQ effect allows you to use the 4 Effect controls to
adjust 5 separate Equalization bands (predetermined).
Parameter What it does
L.F.O.
Freq1_Depth Adjusts the depth of the signal at 200 Hz
Freq2_Depth Adjusts the depth of the signal at 500 Hz
Freq3_Depth Adjusts the depth of the signal at 1.12 kHz
Freq4_Depth Adjusts the depth of the signal at 2.8 kHz
Freq5_Depth Adjusts the depth of the signal at 8 kHz
Phase 1
Phase 2
Phase 3
Phase 4
Phase 5
Q 1/2 Q factor (parametric EQ)
Frequency 1 Adjusts mid frequency (parametric EQ)
Frequency 2 Adjusts mid frequency (parametric EQ)
dB 1 Adjusts the boost/cut at 200 Hz
Adjusts the rate/speed of low frequency
oscillations
Adjusts the phasing of the signal at 200 Hz
between 0 and 180˚
Adjusts the phasing of the signal at 500 Hz
between 0 and 180˚
Adjusts the phasing of the signal at 1.12 kHz
between 0 and 180˚
Adjusts the phasing of the signal at 2.8 kHz
between 0 and 180˚
Adjusts the phasing of the signal at 8 kHz
between 0 and 180˚
dB 2 Adjusts the boost/cut at 400 Hz
Guitar Distortion effect
Guitar distortion is used for exactly what the name suggests: distorting guitar signals. You can hear guitar distortion in most of the
most popular rock songs going back decades.
dB 3 Adjusts the boost/cut at 800 Hz
dB 4 Adjusts the boost/cut at 1.6 kHz
dB 5 Adjusts the boost/cut at 3.15 kHz
dB 6 Adjusts the boost/cut at 6.3 kHz
Bass Adjusts the boost/cut at 100 Hz
Treble Adjusts the boost/cut at 12 kHz
Mix Used for gain correction
Page 11
Special effects
The DFX2000 has 3 special effects in total. The Harmonic effect
can be used to add more harmony to vocals. The Sampler effect
allows you to record up to 9 seconds of audio, using Edit A to
record and Edit B to playback. A Resonator mimics an oscillation
system that amplies specic frequencies.
Parameter What it does
Drive Adjusts the strength of Harmonic effect
Gain Used for gain correction
Harmonic
dB
Frequency
Q Q factor
Record Start / stop recording
Play Start / stop playing
Speed Adjusts the playback speed
Mode
Start time Selects the playback starting point
Adjust the harmonic overtone of the
effect
Adjusts the level of the signal in
decibels
Adjusts the frequency at which the
harmonic sound will be created
Changes the direction of playback
(forward or backwards) and the
number of repetitions.
Stop time Selects the playback stop point
LFO
Pre-delay Adjusts the time until the rst oscillation
Depth
Phase Adjust the phasing by 0 to 180 degrees
LPF
Wave type
Adjusts the intensity of low frequency
oscillations
Adjusts the strength of the resonator
effect
Adjusts the cut off frequency of a low
pass lter
Swaps between sine and triangular
wave types
Effect algorithm combinations (multi-effect
programs)
There are a number of combination effects featured on the
DFX2000 (49 in total), each of which takes the most important
and interesting parameters from the separate effects and lets
you adjust them to create fantastic and unique sounding audio.
11DFX2000
Page 12
SPECIFICATIONS
ANALOG INPUTS
Connectors XLR and 1/4” TRS
Type RF ltered, servo-balanced input stage
Impedance 24 kΩ balanced
Nominal Operating Level -10 dBV or +4 dBu (selectable)
Max. Input Level +15 dBu at +4 dBu nominal level, +1 dBV at -10 dBV nominal level
ANALOG OUTPUTS
Connectors XLR and 1/4” TRS
Type Electronically servo-balanced output stage
Impedance 200 Ω balanced
Max. Output Level +15 dBu at +4 dBu nominal level, +1 dBV at -10 dBV nominal level
SYSTEM SPECIFICATIONS
Bandwidth 20 Hz to 20 kHz, +/- 3 dB
SNR 91 dB, unweighted, 20 Hz to 20 kHz
THD 0.018 % typ. @ +4 dBu, 1 kHz, 0 dBu input, gain 1
Crosstalk < -76 dB
MIDI INTERFACE
Type 5-pin DIN-socket IN / OUT or THRU
DIGITAL PROCESSING
Converters 24-bit Sigma-Delta, 128-times oversampling
Sampling Rate 44.1 kHz
DISPLAY
Type 4-digit 14 segment alpha-numeric LED-Display
POWER SUPPLY
USA/Canada 120 V ~, 60 Hz
Mains Voltages
General Export Model 100 - 120 V ~, 200 - 240 V ~, 50 - 60 Hz
Fuse
Power Consumption 15 Watts max.
Mains Connection Standard IEC receptacle
PHYSICAL
Dimensions (HxWxD) 44 x 482.6 x 217 mm (1 3/4” x 19” x 8 1/2”)
Net Weight 4.63 lbs (2.1 kg )
U.K./Australia 240 V ~, 50 Hz
Europe 230 V ~, 50 Hz
100 - 120 V ~: T 200 mA H
200 - 240 V ~: T 100 mA H
12 DFX2000
Page 13
Page 14

14 DFX2000
INTRODUCCIÓN
Felicidades por su compra de otro producto de buena calidad,
construído con precisión y cuidado, y garantiza darle muchos
años de servicio conable. El DFX2000 es un procesador de
efectos digital de alta denición con 101 algoritmos asombrosos,
todos fueron desarrollados por nuestros ingenieros. Cada efecto
tiene hasta 7 parámetros que pueden ser ajustados fácilmente,
como ser una baja –y alta – frecuencia EQ, y la simple tecla
'compara' le permite comparar su nuevo efecto con el original
rápidamente y fácilmente. Una vez que está hecho, almacenar
su efecto en uno de los espacios denibles de usuario predeterminados. Esto es solamente una pizca de este gran procesador
de efectos que tiene para ofrecer.
Aunque indudablemente usted está impaciente para desempaquetar su DFX2000 y comenzar, nos gustaría aconsejarle
encarecidamente que lea este manual a fondo primero. En su
interior, usted encontrará información importante sobre el uso y
la operación de este dispositivo, y unas sugerencias útiles para
hacer que las cosas sean más fáciles. En el reverso de este fol-
leto, usted encontrará una tabla en blanco que puede ser usada
para registrar todos sus presets salvdos, que usted podría querer tenerla a mano una vez que haya leído.
CARACTERÍSTICAS
● 101 nuevos algoritmos impresionantes, el que tiene más en
los estéreo verdadero
● Algoritmo de Alta Denición 40-bits para reverberación ultranatural y retardo
● 49 combinaciones de efecto con conguración seleccionable
serial/paralela
● Modulación imponente, dinámica, psicoacústica y algoritmos
EQ
● Distorsión innovadora y efectos especiales
● Hasta 7 parámetros ajustables más EQ ALTO y BAJO por
efecto
● Alta resolución 24 bit A/D y convertidores D/A con 128 tiempos de sobremuestreo
● Procesamiento de estéreo verdadero para separación de
canal realista en imagen estérea
● 100 presets de fábrica más 100 posiciones de memoria de
usuario
● Implementación MIDI extensiva
● Fuente de energía interna para aplicaciones profesionales
● Entradas y salidas servo-balanceado XLR y 1/4 “ TRS
MONTAJE RÁPIDO
1. Asegúrese de que su unidad está apagada. Preferentemente
quite el cable de corriente alterna.
2. Conecte todos sus dispositivos de salida requeridos a las
entradas de DFX2000. Comúnmente, esto sería un punto de
inserción de amplicador de mezcladora o guitarra.
3. Conecte todos sus dispositivos de entrada requeridos a los
conectores de salida de DFX2000
4. Encienda sus dispositivos en este orden: instrumentos, mez
cladora, procesadores de señal, amplicadores/altavoces.
DESCRIPCIÓN DE PANEL FRONTAL
1. Medidor de Nivel de Entrada
Este medidor LED 4-segmento de estéreo proporciona a los usuarios una indicación visual cuando su señal de entrada alcanza
a ciertos niveles. Es mejor setear la entrada a un nivel que ase-
gurará que el Clip LED rojo no se encienda. Si lo hace, reduzca
un poco el nivel de salida de su dispositivo externo.
2. Exhibidor
Este exhibidor alfanumérico 4 digital muestra el nombre del preset en uso actualmente. Cuando edita presets, este exhibidor
mostrará el actual preset con el valor del parámetro correspon-
diente.
3. Estados de LEDs
Cuando ajusta las propiedades de un preset, uno de estos LEDs
le avisará qué tipo de propiedades está usted realmente edi-
tando. Ellos son los siguientes:
% - Setea el valor absoluto de un parámetro
dB - Aumenta o disminuye la amplitud o ajusta el umbral del
compresor.
Hz - Ajusta la frecuencia.
Sec.- Ajusta el parámetro de tiempo.
4. LEDs de Grupo de Efecto
Cuando su efecto seleccionado es una de estas categorías, el
LED correspondiente se encenderá.
5. LEDs de Edición
Cada uno de los efectos de DFX2000 tiene cuatro parámetros
ajustables. Estos LEDs indican cuales parámetros son en realidad los que están siendo editando. Si el LED superior está
encendido, los parámetros listados en la línea superior debajo
de cada Control de Editar serán ajustables por los controles correspondientes (en este caso, sus parámetros A, B, C y D). Lo
mismo para el LED de medio (los parámetros listados en el centro debajo de cada control serán ajustables) y el LED inferior (los
ajustes listados debajo de cada control serán ajustables). Para
una lista completa de estos parámetros, consulte el Apéndice de
este manual.
-
Page 15
7 9
12 15
1 2 3 4 6 5 8
6. Controles de Edición
Use cualquiera de estos controles para ajustar sus parámetros
correspondientes, determinados por el efecto que usted está
editando actualmente. Uno de los LEDs de edición le avisará
cuales son los parámetros particulares que usted está editando.
Si está inseguro, girando uno de estos controles ligeramente le
dará el nombre del parámetro correspondiente en el exhibidor
principal durante un breve momento.
Presionando el botón de congurar permitirá que las congura-
ciones (mostrado debajo de cada uno de estos controles, en el
mismo inferior) sean ajustables.
7. Control Mix/Bypass
Girando este control hacia la izquierda o derecha le permite ajustar el nivel de saturación, el efecto seleccionado tendrá sobre la
señal de entrada. Este nivel irá desde 0 % a 100 %, con el 0 %
signica que la señal pasará inprocesada (o es "seca") y el 100
% tiene la entrada completamente afectada por el efecto seleccionado (es decir, la señal es "mojada").
Presionando este control se activará una desviación, permitiendo a la señal de entrada inprocesada pasar por la salida. Esto es
práctico para comparar las señales procesadas e inprocesadas.
8. MIDI LED
Este LED se encenderá siempre que el DFX2000 reciba cualquier señal de MIDI válida.
9. Botón Preset
Para seleccionar uno de los los presets incorporados, presione
este botón y use jog wheel para hojear los presets disponibles.
10. Botón Efecto
Para seleccionar uno de los 101 algoritmos de efecto principales, presione el botón de efecto y use Jog wheel para hojear
por aquellos disponibles. Para una lista completa de los efectos
de la unidad, por favor consulte la sección de apéndice de los
manuales.
1110 14 13 16
11. Botón Editar
Presionando este botón permitirá a los usuarios a aprovechar
los cuatro Controles de Editar.
12. Botón Almacenar
Para guardar un preset, presione este botón. Usted entonces
puede usar el jog wheel para encontrar un espacio libre ("o disponible") de preset denible de usuario y presione el botón Almacenar otra vez para conrmar. Cuando cualquier ajuste está
hecho a los parámetros de un preset, el LED en este botón se
destellará para indicar tal.
13. Botón Comparar
Cuando usted ha hecho ajustes a presets (y el LED del botón almacenar está destellando), este botón le permitirá comparar su
original y los efectos actualizados. Presionando una vez cambiará al preset original (la palabra COMP será visible en la ventana
de exhibidor principal), y presionandolo otra vez retornará a su
efecto editado. Usted puede entonces hacer más renamientos,
o almacenar su preset si está satisfecho con los resultados.
14. Botón Congurar
Presionando el botón de congurar le permitirá aprovechar de
las funciones de conguración listadas en los cuatro Controles
de Editar: MIDI, Entrada, Salida y Conguración. Consulte la
sección de Conguración para más información sobre cómo
usarlos.
15. Jog wheel
Cuando el dispositivo está ocioso, usted puede usar jog wheel
para seleccionar programas de una lista larga de disponibles.
Cuando está en modos de editar o congurar, girando jog wheel
ajustará los parámetros correspondientes más altos (girándolo a
la derecha) o más abajos (girándolo a la izquierda).
16. Botón de Energía
Chasqueando este interruptor encenderá o apagará el DFX2000.
Acuérdese de mantener el interruptor de electricidad en la
posición "apagado" cuando conecta o desconecta el cable eléc-
trico a/de la unidad.
15DFX2000
Page 16
16 DFX2000
DESCRIPCIÓN DE PANEL DORSAL
17 21 19 1820
17. Enchufe y Fusible de Corriente Alterna
Usado en adición de un cable eléctrico, permitiendo que la electricidad sea suministrada a la mezcladora. Por favor use el cable
eléctrico incluído en este dispositivo solamente. El portafusible,
localizado debajo del conector de corriente alterna es para el
fusible de DFX2000. Si el fusible explota, abra la cubierta de
portafusible y sustituya el fusible por un reemplazo compatible
(como indicado al lado del conector de electricidad).
18. Conectores de Entrada
Estos jacks balanceados 1/4" TRS y XLR son usados para recibir señales de dispositivos externos. Por favor note que sólo
una de estas entradas debería ser usada en cada canal en un
momento dado.
19. Conectores de Salida
Estos conectores de salida balanceados, lo mismo como de-
scripto en la entrada, envían sus señales correspondientes a
dispositivos externos. Todas las salidas van en paralela una al
otra, signica que usted puede usar las salidas 1/4 " y XLR si-
multáneamente en caso necesario.
20. Botón de Nivel de Operación
Este interruptor cambia la entrada y los niveles de salida del
canal correspondiente entre-10 dBV (nivel de consumidor) y +4
dBu (nivel profesional).
21. Conectores MIDI
Estos conectores MIDI entrada y MIDI salida/a través están
disponibles a usuarios para utilizar. Ésto permite a usuarios a
descargar y recibir datos hacia/desde la computadora, así como
ajustar parámetros en tiempo real usando computadora u otro
dispositivo MIDI.
EDITAR, ALMACENAR Y RECUPERAR
PRESETS
Editar y Comparar
Para editar un efecto, primero seleccione un efecto presionando
el botón de efecto y girando el jog wheel. Si el Jog Wheel se
deja inmóvil por 5 segundos, entonces el efecto seleccionado
actualmente será aplicado. Usted puede entonces cambiar las
diferentes propiedades del efecto presionando el Botón Editar, y
usando los cuatro Controles de Editar para ajustar sus parámetros correspondientes (consulte el Apéndice de este manual para
mayor información sobre los parámetros de efecto).
Cuando usted hace aunque sea modicación pequeña a un
preset, el LED en el Botón Almacenar destellará para hacerle
saber que el efecto/preset ha sido cambiado y que usted podría
querer salvar sus ajustes. Presionando el Botón Comparar, su
efecto editado será inutilizado y usted será capaz de oír el efecto
original. Presionando el botón nuevamente retornará a su efecto
editado.
Almacenar
Para almacenar un efecto que usted haya editado, simplemente
presione el Botón Almacenar. Gire jog wheel para seleccionar
uno de los espacios de preset denible de usuario (de U.001 a
U.100) y presione el Botón Almacenar nuevamente para conr-
mar.
Recuperar
DFX2000 tiene 100 efectos preset de fábrica y 100 espacios
denibles de usuario. Los usuarios pueden recuperar un preset
en cualquier momento presionando el botón preset y usando jog
wheel para seleccionar presets seteados por la fábrica (1.001-
1.100) o denidos por el usuario (U.001-U.100). Habrá un breve
momento antes de que el efecto es aplicado a su señal. Recu-
erde que efectos diferentes deben setear en diferentes niveles.
Page 17

CONFIGURACIÓN MIDI
Cuando usted presione el Botón Congurar, el primer Control
de Editar le permitirá a usted deslizar y ajustar varias congu-
raciones de interfase MIDI. Girando el jog wheel ajustará estos
valores y/o conrmará las conguraciones.
CHAN:
Esta función permite a los usuarios a seleccionar un canal particular MIDI para aceptar las señales. Ésto es particularmente
útil cuando se usa cadena de dispositivos MIDI, los canales que
llevan señales MIDI no pretendidas por DFX2000 serán ignoradas completamente.
OMNI:
La función de canal omni permite a los usuarios acceptar señales MIDI de todos los 16 canales MIDI.
CONT:
Esta opción le permite setear los estados de los comandos de
controlador a través de la interfase MIDI. Las conguraciones
disponibles son: OFF-APAGADO, RECV-RECIBIR (permite a
DFX2000 recibir datos de controlador), SEND-ENVIAR (permite
a DFX2000 enviar datos de controlador) y BOTH-AMBOS (permite a DFX2000 enviar y recibir datos de controlador).
PRGM:
Esta función le permite a usted setear el estado de los cambios
de programa a través de MIDI. Las conguraciones disponibles
son: OFF-APAGADO, RECV-RECIBIR (permite a DFX2000 recibir cambios del programa), SEND-ENVIAR (permite a DFX2000
enviar cambios del programa) y BOTH-AMBOS (permite a
DFX2000 enviar y recibir cambios del programa).
STOR:
Cuando está seteado en ON (ENCENDIDO), DFX2000 recibirá
control 112 como comando de almacenamiento. Las conguraciones actuales son guadadas en un lugar del programa que
corresponde con el valor de controlador; no se requiere conr-
mación. Cuando está seteado a OFF (APAGADO), el contol 112
será ignorado.
DUMP:
Cuando el programa MIDI de su computadora está seteado para
recibir datos MIDI, usando el control Editar para seleccionar la
función DUMP (DESCARGAR), y girando el jog wheel para conrmar, enviará todos sus programas presets a la computadora.
Guardando este archivo en su PC le permite a usted enviar estos presets de vuelta a DFX2000 en algún otro momento.
DR.EN:
Cuando se muestra ésto en la pantalla, gire el jog wheel suavemente para seleccionar, y el exhibidor destellará. En este modo
su DFX2000 puede recibir dato exclusivo de sistema desde los
dispositivos MIDI externos a través de la Entrada MIDI en el
dorso del dispositivo.
17DFX2000
Page 18
18 DFX2000
MIDI
Esta conguración decidirá cuál Out/Thru (Salida/A través) jack en la parte trasera de DFX2000 será un MIDI Out o Thru. Cuando se
setea a Out, este jack generará señales MIDI de DFX2000. Cuando se setea a MIDI thru, las señales recibidas por entrada MIDI continuarán por jack Out/Thru.
Cuadro de Control MIDI
Nombre de Parámetro Display Control MIDI # Rango de Valor de Control
Banco Selecto I.001 - I.100 / U.001 - U.100 0 0 = Fábrica / 1 = Usuario
Algoritmo Título de Algoritmo 102 0 - 100
Edit A Effect Dependant 103 Effect Dependant
Edit B Effect Dependant 104 Effect Dependant
Edit C Effect Dependant 105 Effect Dependant
Edit D Effect Dependant 106 Effect Dependant
Edit E Effect Dependant 107 Effect Dependant
Edit F Effect Dependant 108 Effect Dependant
EQ Bajo ±16 dB 109 84 to 116; 0dB at 100
EQ Allto ±16 dB 110 84 to 116; 0dB at 100
Mix Effect Dependant 111 Effect Dependant
Almacenamiento U.001 - U.100 112 0 - 99
Entrada/Salida BYP / 0 - 100% 113 0 = BYP / 1 = MIX
Combinación SER1 / SER2 / PARA 114 0 = S1 / 1 = S2 / 2 = PA
Modo de Entrada MONO / STER 115 0 = Mono, 1 = Stereo
Mix Externo/Interno EXT / INTN 116 0 = Externo, 1 = Interno
Page 19

Cuadro de Implementación MIDI
Función Transmitido Reconocido
Canal Básico
Número de Nota
Velocidad
Luego de Toque
Bender de Tono N/A N/A
Control 0, 102 - 116 0, 102 - 116
Cambio del Programa
Sistema Exclusivo SÍ SÍ
Sistema común
Default APAGADO, 1 - 16 APAGADO, 1 - 16
Cambiado APAGADO, 1 - 16 APAGADO, 1 - 16
N/A N/A
Voz Verdadera N/A N/A
Nota ENCENDIDO N/A N/A
Nota APAGADO N/A N/A
De Key N/A N/A
De Canal N/A N/A
Sí (0 - 99) Sí (0 - 99)
Verdadero # 1 - 100 1 - 100
Canción Pos N/A N/A
Canción Sel N/A N/A
Mensajes AUX
Melodía N/A N/A
Local ENCENDIDO/APAGADO N/A N/A
Todas las notas APAGADO N/A N/A
Sentido Activo N/A N/A
Resetear N/A N/A
19DFX2000
Page 20

20 DFX2000
CONFIGURACIÓN
Modo Entrada
Presionándo el botón CONFIGURAR, los usuarios están dis-
ponibles a usar el segundo Control de Editar para ajustar el
modo de entrada de DFX2000 entre mono (MONO) y estéreo
(STER). Cuando el modo de entrada está seteado a mono, el
canal de entrada 1 es usado exclusivamente. En modo estéreo,
el efecto seleccionado es aplicado separadamente a ambos canales. Los efectos de retardo pueden tener las propiedadesd de
sus canales de izquierdo y derecho editados separadamente.
Modo Salida
Luego de presionar el botón CONFIGURAR, los usuarios pueden
usar el tercer Control Editar para seleccionar las dos opciones
de modo de entrada. Cuando INTL está seleccionado, la mezcla
de audio será hecho internamente, y el Control Mix/Bypass será
activado. Cuando setea a EXTN, la señal será de 100% wet, y el
dispositivo externo determinará el nivel de efecto de saturación
por el DFX2000.
Conguración de Motor Dual
Una vez más, presionando el botón CONFIGURAR, los usuarios
están capacitados a usar el cuarto Control de Editar para decidir la estructura de las combinaciones de efecto (presets de 53
a 101) Usted puede elegir serial 1 (SER1), serial 2 (SER2) y
paralelo(PARA).
ALGORITMOS Y PARÁMETROS DE
EFECTO
Algoritmos de Reverberación
El DFX2000 ofrece 17 algoritmos de reverberación, cada uno de
los cuales es nombrado de manera apropiada correspondiendo
el efecto de algoritmo en su señal de audio. Catedral imita la re-
verberación larga, prolongada escuchada en las Catedrales que
es apropiado para instrumentos individuales. Los efectos Plate
simula reverberaciones plate y son apropiados para usar con
tambores y vocales. La reverberación Spring simula la clásica
reverberación spring. Las reverberaciones Hall Grande, Cuarto
y Studio simulan las reverberaciones que podrían presentar en
estos cuartos de varios tamaños. Los algoritmos Gate Reverb
cortan sintéticamente la reverberación después de un período
de tiempo.
Parámetro Lo que hace
Predemora (Pre-
delay)
Nivel Temprano
(Early level)
Índice alto (Hi ratio)
Filtro de paso alto
(High pass lter)
Densidad (Density)
Umbral de Puerta
(Gate threshold)
Tiempo de retención
de puerta
(Gate hold time)
Tiempo de liberación
de puerta
(Gate release time)
Tiempo de
reverberación
(Reverb time)
Ajusta el tiempo hasta la primera
reexión
Ajusta el equilibrio entre las
reexiones de reverberación
temprana y tarde
Ajusta el tiempo de reverberación
de sonidos de alta frecuencia sólos
Ajusta la frecuencia de corte de
ltro de alto paso
Ajusta la densidad de efecto de
Reverberación entre ‘espacioso’ y
pretado’
Ajusta el umbral de efecto puerta
Ajusta el tiempo que toma hasta
que el efecto de puerta es activado
luego de ue la señal está sobre el
umbral
Ajusta el tiempo que toma para
el efecto de puerta de desactivar
luego de que la señal cae debajo
de umbral
Ajusta longitud/tiempo de efecto de
reverberación
Page 21

Algoritmos de Retardo
Los efectos de retardo agrega escaso (o largo) retardo a uno o
ambos canales en velocidades variables.
Parámetro Lo que hace
Retardo
basto(Delay
coarse)
Retardo
sutil(Delay ne)
Retroacción
(Feedback)
Retardo(Delay)
Ajusta el tiempo de retardo de los
canales de izquierdo y derecho en
incrementos de 100ms
Ajusta el tiempo de retardo de los
canales de izquierdo y derecho en
incrementos de 1ms
Ajusta la repetición de los canales de
izquierdo y derecho
Ajusta el tiempo de retardo de los
canales de izquierdo y derecho
Efectos dinámicos
Los Compresores son procesadores de señales que reducen
señales sobre un umbral denido por el usuario por cantidad/índice denido por el usuario. Los Limitadores funcionan como los
Compresores con un índice innito-a-1. Un ruido Puerta es un
procesador de señal que apaga o atenua signicamente la señal
de audio que pasa cuando el nivel de la señal cae debajo de
umbral ajustable de usuario. Un Expansor ayuda a hacer inaudible el ruido de fondo dicultoso (como el zumbido) reduciendo
las señales con amplitudes bajas. Un De-noiser también elimina
ruido e interferencia. Un De-esser ayudará a reducir sonido sibilante en la voz humana.
Parámetro Lo que hace
Ganancia
Ajusta la ganacia de entrada de
compresor, limitador y expansor
Modulación y Efectos de Cambio de Tono
Hay varios tipos de estos efectos; los efectos Chorus desanarán la señal de entrada junto con la variación de tono suave y
es efectivo para dispersar señales. Los efectos Flanger proveen
pequeños retardos y cambios en fases. Con los efectos Phaser,
una señal secundaria de cambio de fase es agregada a la entrada de señal. El efecto Pitch Shifter ajusta la señal de tono,
comúnmente usado con vocales. Los efectos Vibrato ajustan el
tono(velocidad) de las frecuencias de cresta de un tono y son
utilizados comúnmente con las guitarras. Los efectos Tremolo
son también aplicados comúnmente a las señales de guitarra e
incluyen aplicación de variaciones rápida y lenta en el volumen.
Auto Panning hace exactamente lo que el nombre sugiere: la se-
ñal va de izquierda a derecha y retorna de nuevo repetidamente,
haciendo gran uso de la capacidad de estéreo.
Parámetro Lo que hace
L.F.O. Setea la velocidad de la moculación
Pre-retardo
(Pre-delay)
Profundidad
(Depth)
Fase (Phase)
LPF
Cambio de Tono
(Pitch shift)
Modo de
Modulación
Tipo onda
Way
Ajusta el tiempo hasta la primera
modulación
Ajusta la variación de tiempo de retardo
(en consecuencia la profundidad)
Determina la fase entre retardo de
modulación 1 y 2
Ajusta la frecuencia roll-off de ltro de
paso bajo
Ajusta el tono
Determina el tiempo de retardo
Decide qué tipos de onda seno o
triangular será usado para modular la
señal
Cambia el efecto entre izquierda a
derecha, derecha a izquierda y centrado
a izquierda/derecha
Índice
Umbral
Knee
Tiempo de ataque
Tiempo de
liberación
Umbral de
compresor
Umbral de limitador
Tiempo de
Retención
BPF
Q Factor Q
Ajusta el índice de compresor/
expansor
Ajusta el umbral de efecto de puerta,
compresor, expansor
Ajusta la curva knee de puerta/
compresor de aguda a suave
Ajusta el tiempo que llevará el efecto
de aportar luego de que la señal
aumenta sobre el umbral seteado
Ajusta el tiempo que llevará el efecto
de desactivar luego de que la señal
cae debajo del umbral seteado
Ajusta el umbral de efecto de
compresor/limitador
Ajusta el umbral por el que el
limitador aportará
Ajusta el tiempo de puerta o de-
noiser que quedará abierto/activo
Ajusta la frecuencia por la que será
decrementada para el deeseer
21DFX2000
Page 22

22 DFX2000
Efectos psicoacústicos
Parámetro Lo que hace
HPF
Drive Ajusta la fuerza de efecto excitador
Harmonic
Gain Permite para corrección de ganancia
Ajusta la frecuencia de corte de ltro
de paso alto
Activa la amplicación armónica
dependiendo de nivel de entrada
Efecto de Distorsión de Guitarra
La distorsión de la guitarra es usada exactamente como se indica su nombre: distorsionar las señales de la guitarra. Usted
puede escuchar la distorsión de la guitarra en la mayoría de las
canciones de rock más populares de décadas pasadas.
Parámetro Lo que hace
Drive Ajusta el nivel de distorsión
Level Ajusta el volumen
EQ low 1 Ajusta EQ bajo
EQ low 2 Ajusta EQ bajo
EQ high 1 Ajusta EQ alto
EQ high 2 Ajusta EQ alto
Efectos Filtro/EQ
El efecto Gráco EQ le permite a usted usar los 4 controles de
Efecto para ajustar 5 bandas separadas de Ecualización (pre-
determinadas).
Parámetro Lo que hace
L.F.O.
Frec1_Profundidad
Frec2_ Profundidad
Frec3_ Profundidad
Frec4_ Profundidad
Frec5_ Profundidad
Fase 1
Fase 2
Fase 3
Fase 4
Fase 5
Q 1/2 Factor Q (paramétrico EQ)
Frecuencia 1
Frecuencia 2
dB 1 Ajusta incremento/corte en 200 Hz
Ajusta índice/velocidad de las
oscilaciones de la frecuencia baja
Ajusta la profundidad de la señal en
200 Hz
Ajusta la profundidad de la señal en
500 Hz
Ajusta la profundidad de la señal en
1.12 kHz
Ajusta la profundidad de la señal en
2.8 kHz
Ajusta la profundidad de la señal en
8 kHz
Ajusta fase de la señal en 200 Hz entre
0 y 180˚
Ajusta fase de la señal en 500 Hz entre
0 y 180˚
Ajusta fase de la señal en 1.12 kHz
entre 0 y 180˚
Ajusta fase de la señal en 2.8 kHz
entre 0 y 180˚
Ajusta fase de la señal en 8 kHz entre
0 y 180˚
Ajusta frecuencia mid (paramétrico
EQ)
Ajusta frecuencia mid (paramétrico
EQ)
dB 2 Ajusta incremento/corte en 400 Hz
dB 3 Ajusta incremento/corte en 800 Hz
dB 4 Ajusta incremento/corte en 1.6 kHz
dB 5 Ajusta incremento/corte en 3.15 kHz
dB 6 Ajusta incremento/corte en 6.3 kHz
Bajo Ajusta incremento/corte en 100 Hz
Triple Ajusta incremento/corte en 12 kHz
Mix Usado para corrección de ganancia
Page 23

Efectos Especiales
DFX2000 tiene 3 efectos especiales en total. El efecto Armónica
puede ser usado para agregar más armonía a las vocales. El
efecto Sampler le permite grabar hasta 5 segundos de audio,
usando Edit A para grabar y Edit B para reproducir. Un Resonador simula un sistema de oscilación que amplica las frecuencias especícas.
Parámetro Lo que hace
Drive
Ganancia
Armónico Ajusta nota de armónica de efecto
dB
Frecuencia
Q Factor Q
Grabar Grabación Comenzar/ Parar
Play Play Comenzar/Parar
Velocidad
Modo
Tiempo de comenzar
Tiempo de parar
LFO
Pre-retardo
Profundidad
Fase Ajusta la fase de 0 a 180 grados
LPF
Tipo de onda
Ajusta la fuerza de efecto de
armónica
Usado para corrección de
ganancia
Ajusta nivel de la señal en
decibeles
Ajusta la frecuencia en la que
el sonido de la armónica será
creado
Ajusta la velocidad de la
reproducción
Cambia el sentido de la
reproducción (hacia adelante
o hacia atrás) y el número de
repeticiones.
Selecciona el punto de comienzo
de la reproducción
Selecciona el punto de parada de
la reproducción
Ajusta la intensidad de las
oscilaciones de la frecuencia baja
Ajusta el tiempo hasta la primera
oscilación
Ajusta la fuerza de efecto de
resonador
Ajusta la frecuencia cortada de
ltro de paso bajo
Intercambia entre tipos de onda
seno y triangular
Algoritmo de efectos de combinación
(programas multi-efectos)
Hay un número de efectos de combinación característicos en
DFX2000 (49 en total), cada cual toma los parámetros más importantes e interesantes de efectos separados y deja a usted
ajustarlos para crear un sonido fantástico y único.
23DFX2000
Page 24

ESPECIFICACIONES
ENTRADAS ANALÓGICAS
Conectores XLR y 1/4” TRS
Tipo RF ltrado, etapa de entrada servo-balanceda
Impedancia 24 kΩ balanceda
Nivel de Operación Nominal -10 dBV o +4 dBu (seleccionable)
Nivel de Entrada Máx.
SALIDAS ANÁLOGAS
Conectores XLR y 1/4” TRS
Tipo Etapa de salida servo-balanceda electrónicamente
Impedancia 200 Ω balanceda
Nivel de Salida Máx.
ESPECIFICACIONES DE SISTEMA
Ancho de banda 20 Hz a 20 kHz, +/- 3 dB
SNR 91 dB, desponderado, 20 Hz a 20 kHz
THD 0.018 % tipo @ +4 dBu, 1 kHz, 0 dBu entrada, ganancia 1
Crosstalk < -76 dB
INTERFASE MIDI
Tipo 5-pin DIN-socket IN / OUT o THRU
PROCESAMIENTO DIGITAL
Convertidores 24-bit Sigma-Delta, 128-tiempos de sobremuestreo
Índice de Muestreo 44.1 kHz
DISPLAY
Tipo 4-dígito 14 segmento alfanumérico LED-Display
SUMINISTRO DE ENERGÍA
Voltajes Principales
Fusible
Consumo de Energía 15 Watts máx.
Conexiones Principales Estándar IEC receptáculo
FÍSICO
Dimensiones (AnxAlxP) 44 x 482.6 x 217 mm (1 3/4” x 19” x 8 1/2”)
Peso Neto 4.63 lbs (2.1 kg )
+15 dBu en nivel nominal +4 dBu, +1 dBV en nivel nominal
-10 Dbv
+15 dBu en +4 dBu nivel nominal , +1 dBV en -10 dBV nivel
nominal
USA/Canadá 120 V ~, 60 Hz
Reino Unido./Australia 240 V ~, 50 Hz
Europa 230 V ~, 50 Hz
Modelo General de Exportación 100 - 120 V ~, 200 - 240 V
~, 50 - 60 Hz
100 - 120 V ~: T 200 mA H
200 - 240 V ~: T 100 mA H
24 DFX2000
Page 25

重要安全说明
1. 请在使用本机前,仔细阅读以下说明。
2. 请保留本使用手册,以便日后参考。
3. 为保障操作安全,请注意所有安全警告。
4. 请遵守本使用手册内所有的操作说明。
5. 请不要在靠近水的地方,或任何空气潮湿的地点操作本机。
6. 本机只能用干燥布料擦拭,请勿使用喷雾式或液体清洁剂。清洁本机前请先将电源插头拔掉。
7. 请勿遮盖任何散热口。确实依照本使用手册来安装本机。
8. 请勿将本机安装在任何热源附近。例如:暖气、电暖气、炉灶或其它发热的装置(包括功率
扩大机)。
9. 请注意极性或接地式电源插头的安全目的。极性电源插头有宽窄两个宽扁金属插脚。接地式
电源插头有两支宽扁金属插脚和第三支接地插脚。较宽的金属插脚(极性电源插头)或第三支
接地插脚(接地式电源插头)是为安全要求而制定的。如果随机所附的插头与您的插座不符,
请在更换不符的插座前,先咨询电工人员。
10. 请不要踩踏或挤压电源线,尤其是插头、便利插座、电源线与机身相接处。
11. 本机只可以使用生产商指定的零件/配件。
12. 本机只可以使用与本机搭售或由生产商指定的机柜、支架、三脚架、拖架
或桌子。在使用机柜时,请小心移动已安装设备的机柜,以避免机柜翻倒
造成身体伤害。
13. 在雷雨天或长期不使用的情况下,请拔掉电源插头。
14. 所有检查与维修都必须交给合格的维修人员。本机的任何损伤都须要检修,例如: 电源线或插
头受损,曾有液体溅入或物体掉入机身内,曾暴露于雨天或潮湿的地方,不正常的运作,或曾
掉落等。
这个三角形闪电标志是用来警告用户,装置内的非绝缘危险电压足以造成使人触
电的
危险性。
这个三角形惊叹号标志是用来警告用户,随机使用手册中有重要操作与保养维修
说明。
警告: 为减少火灾或触电的危险性,请勿将本机暴露于雨天或潮湿的地方。
注意: 任何未经本使用手册许可的操控,调整或设定步骤都可能产生危险的电磁幅射。
CAUTION
RISK OF ELECTRIC SHOCK
DO NOT OPEN
PHONIC CORPORATION
Page 26

26 DFX2000
简介
感谢您 购买Phonic产品,我们衷心地希望DFX2000是您物有所
值,值得信赖的投资。DFX2000由Phonic工程师团队精心打造,
是一款拥有101种惊人的演算法的高精度数字效果处理器。各种
效果均设有多达7种可调参数,以及低频和高频均衡,简单易用
的“比较”控制使得用户可快速地对比效果处理信号与原始信号。
完成所有的信号处理后,用户还可将效果存储至一个用户自定义预
设存储单元。这还只是DFX2000效果处理器所有功能中的一种。
您一定早已迫不及待地想一试为快吧?尽情的摆弄这台设备可能
是您的首选,但是,我们强烈恳请您先仔细阅读本说明书,其中
包括一些重要的设置以及使用说明。读完后请妥善保管,以便日
后参阅。
功能
● 101种惊人的新演算法,大部分为真正的立体声
● 40位高清晰演算法为用户展现超自然的混响和延迟效果
● 49种效果组合以及可选串行/并行设置
● 出色的调制,动态,心理声学和均衡演算法
● 创新立异的失真和特殊效果
● 每种效果多达7种可调参数以及HI和LO EQ
● 高分辨率的24位A/D和D/A转换器,可重复取样128次
● 真正的立体声处理以立体声示象展现逼真的声道分离
● 100种厂商预设以及100个用户存储单元
● 大范围的MIDI执行
● 内置用于专业应用的电源
● 伺服平衡式XLR和1/4" TRS输入和输出
快速安装
1、 确保关闭DFX2000,最好将AC电源线断开。
2、 将所需的输出设备连接至DFX2000的输入。一般可连接调音
台或吉他功放的插入点。
3、 将所需的输入设备连接至DFX2000的输出。
4、 按以下顺序开启设备:乐器,调音台,信号处理器,功放/音
箱。
前面板
1、输入电平表
这个立体声4段LED电平表可在输入信号达到一定值时直观地指示
信号的电平。建议将输入电平设置在红色Clip过载指示灯以下。如
果红色Clip指示灯变亮,建议稍微调低外部设备的输出电平。
2、显示器
这个4位字符显示器可显示当前使用预设的名称。编辑预设时,显
示器将同时显示当前预设和相应的参数值。
3、状态LED指示灯
调节某一预设的属性时,这些LED中的任意一个将指示您当前正
在调节的属性是哪一种。以下为详情:
% - 设置参数的绝对值
dB - 增加或减少振幅或调节压缩器的极限值
Hz - 调节频率
Sec- 调节时间参数
4、效果组合LED指示灯
所选的效果属于面板显示器处所列出的某一类别时,相应的LED指
示灯将变亮。
5、编辑LED指示灯
DFX2000的每种效果均设有4种可调参数。这些LED指示灯可指示
当前正在编辑的参数。如果最上面的LED变亮,位于各个Edit编辑
控制下方的第一个参数即为相应控制当前正在调节的属性(这种情
况下,参数为A,B,C,D)。中间的LED(调节的为各个编辑控
制下方位于中间的参数)和最下面的LED(调节的为各个编辑控制
下方位于最下面的参数)原理一样。详细的参数列表,请查看本说
明书后面的附录。
Page 27

7 9
12 15
1 2 3 4 6 5 8
6、编辑控制
这些旋钮可调节各自相应的参数,具体取决于用户当前正在编辑
的效果。编辑LED指示灯可指示用户当前正在编辑的参数。如果
您还是不太确定,稍微旋转这些旋钮中的某一个,主显示器上将
短暂地显示出相应参数的名称。
按下 设置按钮可使设置(位于这些控制的下方 ,最 底下 )变得可
调。
7、混音/旁通控制
向左和向右旋转此旋钮可调节选择效果作用于输入信号的饱和度。
调节的范围为0%至100%,0%意味着信号将会不经处理地通过
(或“干”处理),100%意味着输入信号完全经选择效果处理(这
类处理称之为“湿”处理)。
按下此按钮可开启旁通,使得未处理的输入信号直接输往输出,
非常适用于比较处理信号和未处理信号。
8、MIDI LED
DFX2000接收到任何有效的MIDI信号时,该LED灯将变亮。
9、预设按钮
按下此按钮可选择一种内置预设,使用编码器可滚动查看可用的
预设。
10、效果按钮
按下此按钮可选择101种效果演算法中的一种,使用编码器可滚
动查看可用的演算法。欲知详细的效果列表,请查看本说明书后
面的附录。
1110 14 13 16
11、编辑按钮
按下此按钮使得用户可使用4个编辑控制。
12、存储按钮
按下此 按钮可 保存预 设。之 后用户 可使用 编码器 寻 找空 闲 的
(或“空置的”)用户自定义预设存储单元并再次按下存储按钮进
行确认。当某一预设的参数正在被调整时,存储按钮上的LED指
示灯将闪亮进行提示。
13、比较按钮
用户调整预设时(存储按钮上的LED将闪亮),此按钮可对比原始
信号和处理信号。按下一次可切换至原始预设(COMP字样将显示
在主显示屏上),再次按下按钮可返回至编辑的效果。用户可选
择进一步地对信号进行完善,如果对处理的结果感到满意也可选
择存储预设。
14、设置按钮
按下设置按钮,使得用户可使用4个编辑控制的设置功能:MIDI,
Input输入,Output输出和Conguration设置。请参考设置部分了
解更多详细的操作方法。
15、编码器
DFX2000空载时,用户可使用编码器选择可用的音乐效果。编辑
或设置模式下,旋转此旋钮可调节较高数值(向右旋转)或较低数
值(向左旋转)的相应参数。
16、电源控制
拨动此开关可开启和关闭DFX2000。连接或断开电源线之前请务
必确保电源开关处于OFF的位置。
27DFX2000
Page 28

28 DFX2000
后面板
17 21 19 1820
17、AC电源插孔和保险丝
该电源插孔可与AC电源线一起为DFX2000提供电源。请务必只
使用随附的电源线。电源插孔下方的保险丝盒内为该连接器的保
险丝。若保险丝熔断,请使用适配的保险丝替换。
18、输入连接器
这些平衡式1/4" TRS和XLR插孔可接收来自外部设备的信号。请
务必注意每声道一次只能使用其中一个输入插孔。
MIDI设置
按下设置按钮时,第一个编辑控制可滚动和调节MIDI界面的不同
设置。旋转编码器可调节不同的数值和/或确认设置。
CHAN:
此功能使得用户可选择某一特定的MIDI声道接收信号。使用一系
列的MIDI设备时此功能将非常有益,因为传输MIDI信号的声道如
果不将信号传送至DFX2000将被完全忽略。
19、输出连接器
这些平衡式 输出插孔可将相应 的信号输往外部设备。所 有输出
相互 之间为并行关系 ,也就是说如有 需要 您可同时使用1/4"和
XLR输出。
20、操作电平控制
此开关可在-10dBV(消费电平)和+4dBu(专业电平)之间切换相应声
道的输入和输出电平。
21、MIDI连接器
这些MIDI In和MIDI Out/Thru连接器使得DFX2000可与计算机进
行数据的相互传送,并可通过计算机或其它MIDI设备 实时地 调
节参数。
编辑,存储和召回预设
编辑和比较
编辑效果时,先按下效果按钮选择一种效果并旋转编码器。如果
编码器向左停留2秒,那么当前选择的效果便开始作用。用户可按
下编辑按钮调节效果的不同属性,并使用4个编辑旋钮控制调节相
应的参数(详细的效果参数请查看说明书的附录)。当用户对预设进
行调节时(即使调节非常细微),存储按钮上的LED将闪亮以指示效
果/预设正在被调节,用户可自行决定是否需要保存变更。按下比
较按钮,编辑的效果将不再作用,用户可听到原始的效果。再次
按下该按钮,将返回至编辑的效果。
存储
简单地按下存储按钮即可保存用户正在编辑的效果。旋转编码器
可选择一个用户自定义预设存储单元(U.001至U.100),再次按下
存储按钮可进行确认。
召回预设
DFX2000拥有100种厂商预设效果,以及100个用户自定义存储
单元。任何时候用户都可通过按下预设按钮和使用编码器选择一
种厂商(I.001 — I.100)或用户自定义(U.001 — U.100)预设。效果
作用于信号前将有一个短暂的时间空隙。请务必注意不同效果应
设置不同的音量。
OMNI:
OMNI声道功能使得DFX2000可接收所有16路MIDI声道的MIDI信
号。
CONT:
此控制可通过MIDI界面设置控制器指令的状态。可用的设置有:
OFF,RECV(使 得DFX2000可接收控 制器 数据),SEND(使得
DFX2000可传送控制器数据)和BOTH(使得DFX2000可接收和传
送控制器数据)。
PRGM:
此控制可通过MIDI界面设置音乐效果的状态。可用的 设置有 :
OFF,RECV(使得DFX2000可接收音乐效果变更),SEND(使得
DFX2000可传送音乐效果变更)和BOTH(使得DFX2000可接收和
传送音乐效果变更)。
STOR:
此控制 ON开启时,DFX2000将接收控制器112作为直接存储 指
令。当前的设置将保存于音乐效果存储单元以对应控制器数值;
无需进行确认。此控制OFF关闭时,控制器112将不再作用。
DUMP:
当计算机的MIDI程序设置成接收MIDI数据时,使用编辑控制可选
择DUMP功能,旋转编码器进行确认,可将所有预设音乐效果传
送至计算机。将文件保存至计算机使得用户可在日后的任意时间
将这些预设回传至DFX2000。
DR.EN:
当DR.EN出现在显示屏上时,稍微地旋转编码器进行选择,显示
屏将闪亮。在该模式下,DFX2000后面板的MIDI输入将只接收来
自外部MIDI设备的数据。
MIDI
该设 置可决定DFX2000后面板的out/thru插孔 是MIDI输出还是
thru。设置成out时,该插孔将输出DFX2000的MIDI信号。设置成
MIDI thru时,MIDI输入接收到的信号将传送至out/thru插孔。
Page 29

MIDI控制表
参数名称 显示
预设选择
演算法 演算法名称
编辑 A
编辑 B
编辑 C
编辑 D
编辑 E
编辑 F
EQ低 ±16 dB 109 84 ~ 116; 100时为0dB
EQ高 ±16 dB 110 84 ~ 116; 100时为0dB
混音 取决于效果
存储
输入/输出 BYP / 0 - 100% 113 0 = BYP / 1 = MIX
组合
输入模式
外部/内部混音 EXT / INTN 116 0 = 外部, 1 = 内部
I.001 - I.100 / U.001 - U.100 0 0 = 厂商预设 / 1 = 用户自定
取决于效果
取决于效果
取决于效果
取决于效果
取决于效果
取决于效果
U.001 - U.100 112 0 - 99
SER1 / SER2 / PARA 114 0 = S1 / 1 = S2 / 2 = PA
MONO / STER 115 0 = 单声道, 1 = 立体声
MIDI 控制 #
102 0 - 100
103
104
105
106
107
108
111
控制值范围
取决于效果
取决于效果
取决于效果
取决于效果
取决于效果
取决于效果
取决于效果
MIDI执行表
Function Transmitted Recognized
Basic Channel Default OFF, 1 - 16 OFF, 1 - 16
Note Number
Velocity Note ON N/A N/A
After Touch Key’s N/A N/A
Pitch Bender
Control
Program Change
System Exclusive YES YES
System Common Song Pos N/A N/A
AUX messages Local ON/OFF N/A N/A
Changed OFF, 1 - 16 OFF, 1 - 16
True Voice N/A N/A
Note OFF N/A N/A
Channel’s N/A N/A
True # 1 - 100 1 - 100
Song Sel N/A N/A
Tune N/A N/A
All notes OFF N/A N/A
Active Sense N/A N/A
Reset N/A N/A
N/A N/A
N/A N/A
0, 102 - 116 0, 102 - 116
Yes (0 - 99) Yes (0 - 99)
29DFX2000
Page 30

30 DFX2000
设置
输入模式
按下设置按钮,用户可使用第二个编辑控制在单声道(MONO)和
立体声(STER)之间调节DFX2000的输入模式。输入模式设置成
单声道时,将排他地使用输入声道1。立体声模式下,选择的效
果将分别作用于两个声道。可分别编辑延迟效果的左声道和右声
道的属性。
输出模式
按下设置按 钮后,用户可使用 第三个编辑控制选择两种 输入模
式。选择INTL时,混合的音频将在 设备内 部处理 ,因而应开启
mix/bypass控制。设置成EXTN时,信号为100%的湿处理,因而
外部设备将决定效果饱和程度。
双处理器配置
按下设置按钮后,用户可使用第四个编辑控制决定效果组合的构成
(经101的预设53)。用户可选择Serial 1(SER1),Serial 2(SER2)和
parallel(PARA)。
效果演算法和参数
混响演算法
DFX2000可提供17种混响演算法,各种演算法的名称都相应的
衬托演算法作用于音频信号的效果。大教堂模仿教堂里所听到的
悠长回荡的混响,非常适用于独立的乐器。金属效果模仿金属混
响,适用于鼓声和歌唱声。弹簧混响可模仿经典的弹簧混响。大
礼堂,房间和录音室混响可模拟不同大小房间的混响效果。门混
响演算法可在一段时间后综合地削减混响。
参数 作用
前置延迟 在第一次反射前调节时间
早期电平 在早期和晚期混响反射间调节平衡
高比率 单独调节高频声音的混响时间
高通滤波器 调节高通滤波器的切除频率
密度
门限值 调节门效果的极限值
门限值保持时间
门限值释放时间
混响时间
延迟演算法
延迟效果可以不同的速度对一路或两路声道添加细微的(或长的)延
迟。
参数 作用
粗糙的延迟
精细的延迟
回授 调节左声道和右声道的循环
延迟 调节左声道和右声道的延迟时间
在"放散"和"紧实"间调节混响效果的密度
调节信号超过极限值后门效果启动前所需
的时间
调节信号低于极限值后门效果关闭前所需
的时间
调节混响效果的长度/时间
以100ms的增量调节左和右声道的延迟时间
以1ms的增量调节左和右声道的延迟时间
调制和音调移位效果
调制和音调效果拥有不同的类型。合唱效果可重新定调输入信号
同时进行微小的变调处理,非常适用于分散的信号。Flanger效果
可在相位上提供细微的延迟和移位。相位效果可对输入信号添加
二级相位移位效果。音调移位效果可调节音调峰值频率的定调(速
度),适用于吉他。颤声效果同样适用于吉他,可对音量进行快速
或缓慢的变更。自动音场平衡正如其名:信号音场将从左至右如
此反复,非常适用于立体声。
参数 作用
L.F.O.
前置延迟 在第一次反射前调节时间
深度
相位
LPF
定调移位 调节音调
调制模式 调节延迟时间
波型 决定使用正弦波还是三角波调制信号
相位方向
设置调制曲线(三角形曲线,正弦曲线,矩
形曲线)
调节延迟时间变化(因而称之为深度)
在调制延迟1和2之间决定相位
调节低通滤波器的切除频率
在左至右,右至左和中间至左/右之间调节
效果的相位
动态效果
压缩器是一种信号处理器,可使用自定义数量/比率在自定义极限
值/极限音量之 上削减信号。限幅器原理与压缩器一样,比率为
∞-1。噪声门是一种可在信号电平低于用户自定义极限值时消除或
严重地削减经过的信号的处理器。扩展器可使用低振幅削减信号来
消除多余的背景噪音(例如吵杂声)使之听不见。降噪器可消除噪音
和干扰。齿音消除器可消除人声中的唇齿磨擦声。
参数 作用
增益 调节压缩器,限幅器,扩展器的输入增益
比率
极限值 调节噪声门,压缩器,扩展器效果的极限值
拐点
启动时间 调节信号超过极限值后效果启动所需的时间
释放时间 调节信号低于极限值后效果关闭所需的时间
压缩器极限值
限幅器极限值 调节限幅器启动的极限值
保持时间
BPF
Q Q因素
调节压缩器/扩展器比率
从急剧到平缓调节噪声门/压缩器的拐点曲线
调节压缩器/限幅器效果的极限值
调节噪声门或降噪器开启/启动的时间
调节齿音消除器频率减少的临界点
心理声学效果
参数 作用
HPF
浓度 调节激励器效果的强度
和声 根据输入电平启动和声放大
增益 进行增益修正
调节高通滤波器的切除频率
Page 31

吉他失真效果
吉他失真正如其名:失真吉他信号。几十年来您可在大部分最流
行的摇滚音乐中听到失真的吉他声。
参数 作用
程度 调节失真电平
音量 调节音量
EQ 低 1 调节低 EQ
EQ 低 2 调节低 EQ
EQ 高 1 调节高 EQ
EQ 高 2 调节高 EQ
滤波器/EQ效果
图形均衡器效果可通过4种效果控制调节5个独立的均衡频段(预
定的)。
参数 作用
L.F.O. 调节低频振动的比率/速度
频率1_深度 在200Hz时调节信号的深度
频率2_深度 在500Hz时调节信号的深度
频率3_深度 在1.12kHz时调节信号的深度
频率4_深度 在2.8kHz时调节信号的深度
频率5_深度 在8kHz时调节信号的深度
相位 1 200Hz时在0至180˚之间调节信号的相位
相位 2 500Hz时在0至180˚之间调节信号的相位
相位 3 1.12kHz时在0至180˚之间调节信号的相位
相位 4 2.8kHz时在0至180˚之间调节信号的相位
相位 5 8kHz时在0至180˚之间调节信号的相位
Q 1/2 Q因素 (参数 EQ)
频率 1 调节中频频率(参数EQ)
频率 2 调节中频频率(参数EQ)
dB 1 200Hz时调节削减/增强
dB 2 400Hz时调节削减/增强
dB 3 800Hz时调节削减/增强
dB 4 1.6kHz时调节削减/增强
dB 5 3.15kHz时调节削减/增强
dB 6 6.3kHz时调节削减/增强
低音
高音
混音 进行增益修正
100Hz时调节削减/增强
12kHz时调节削减/增强
特殊效果
DFX2000一共有3种特殊效果。和声效果可调节声音的和谐度。取
样效果可录制高达9秒的音频,使用Edit A录制和Edit B重放。共鸣
器可模仿振动系统放大特定频率。
参数 作用
程度 调节和声效果的浓度
增益 进行增益修正
和声 调节效果的谐波
dB 以dB调节信号电平
频率 调节和声产生的频率临界点
Q Q因素
录音
播放
速度 调节播放速度
模式
开始时间 选择重放的开始点
停止时间 选择重放的停止点
LFO
前置延迟 调节第一次振动前的时间
深度 调节共鸣器效果的强度
相位
LPF
波型 切换正弦波和三角波类型
开始/停止录音
开始/停止播放
调节重放的指向(向前或向后)以及循环的数量
调节低频振动的强度
在0至180˚之间调节相位
调节低通滤波器的切除频率
效果演算法组合(多重效果音乐)
DFX2000拥有多种效果组合(一共49种),各种效果均采用各种独
立效果中最重要最具吸引力的参数,使得用户可使用这些效果的
组合创造神奇的,与众不同的音频。
31DFX2000
Page 32

规格
模拟输入
连接器
类型
阻抗
额定操作电平
最大输入电平
模拟输出
连接器
类型 电子伺服平衡式输出级
阻抗
最大输出电平
系统规格
频宽
SNR 91 dB, 非加权, 20 Hz ~ 20 kHz
THD 一般为 0.018 % @ +4 dBu, 1 kHz, 0 dBu 输入, 增益 1
串音
MIDI界面
类型
数字处理
+4 dBu额定电平时为+15 dBu, -10 dBV额定电平时为+1 dBV
+4 dBu额定电平时为+15 dBu, -10 dBV额定电平时为+1 dBV
5芯 DIN插座 IN / OUT 或 THRU
XLR 和 1/4" TRS
RF滤波, 伺服平衡式输入级
24 kΩ 平衡式
-10 dBV 或 +4 dBu (可调)
XLR 和 1/4" TRS
200 Ω平衡式
20 Hz ~ 20 kHz, +/- 3 dB
< -76 dB
转换器
取样比
显示
类型
电源供应
电压
常规出口型号 100 - 120 V ~, 200 - 240 V ~, 50 - 60 Hz
保险丝
功耗
电源连接
物理属性
尺寸(长x宽x高) 482.6 x 217 x 44 mm (19” x 8 1/2” x 1 3/4”)
净重
24位 Sigma-Delta, 128次重复取样
44.1 kHz
4位 14段字符LED显示
美国/加拿大120 V ~, 60 Hz
英国/澳大利亚 240 V ~, 50 Hz
欧洲 230 V ~, 50 Hz
100 - 120 V ~: T 200 mA H
200 - 240 V ~: T 100 mA H
最大15 W
标准IEC插座
4.63 lbs (2.1 kg )
32 DFX2000
Page 33

INSTRUÇÕES DE SEGURANÇA
O aparelho não deve ser exposto ao contato com líquidos e nem pode servir como apoio a recipientes
contendo qualquer tipo de líquido. O conector do cabo de força ou fonte de alimentação é usado para a
conexão e desconexão do aparelho na tomada elétrica.
ATENÇÃO: Não posicione o aparelho em locais onde o acesso ao conector de força ou tecla liga/desliga
seja dificultado. Mantenha estes acessíveis.
1. Leia estas instruções antes de operar a unidade.
2. Mantenha estas instruções para referências
futuras.
3. Siga todos os avisos para garantir a operação em
segurança.
4. Siga as instruções contidas neste documento.
5. Não utilize este aparelho perto de água ou em
locais úmidos.
6. Limpe usando apenas um pano seco e macio.
Não utilize limpadores em aerosol, ou líquidos.
Retire o aparelho da tomada antes de efetuar
qualquer tipo de limpeza.
7. Não obstrua as aberturas de ventilação. Instale de
acordo com o recomendado pelo fabricante.
8. Não instale o aparelho perto de fontes de calor, tal
como radiadores, fogões, amplificadores e outros
aparelhos que produzam calor.
9. Não inutilize o dispositivo de segurança dos cabos
polarizados e do cabo de três pinos. O cabo
polarizado possui duas lâminas sendo uma, mais
grossa que a outra. O cabo de três pinos possui o
pino central para segurança. Se o conector
proporcionado não entra em sua tomada,
consulte um eletricista para o uso de
adaptadores ou a troca da tomada.
10. Proteja o cabo de força de ser pisado ou pinçado,
principalmente no conector e no ponto onde o
cabo sai do aparelho.
11. Use apenas acessórios especificados pelo
fabricante.
12. Use somente estantes, carrinhos, tripés ou
suportes que sejam especificados pelo fabricante
ou que acompanhem o produto. Ao
usar estes, assegure-se de tomar o
devido cuidado na movimentação
para evitar queda do conjunto e
possível dano físico.
13. Desconecte o aparelho da tomada durante
tempestades elétricas ou quando não for usá-lo
por longos períodos.
14. Sempre encaminhe seu aparelho à uma
assistência técnica autorizada. O conserto é
necessário sempre que o aparelho tenha sido
danificado de qualquer forma, tal como
problemas na fonte de alimentação, cabo de
força, infiltração de líquidos ou objetos,
exposição do aparelho à chuva ou umidade ou
caso tenha sido sofrido alguma queda.
CAUTION: TO REDUCE THE RISK OF ELECTRIC SHOCK,
DO NOT REMOVE COVER (OR BACK)
NO USER SERVICEABLE PARTS INSIDE
REFER SERVICING TO QUALIFIED PERSONNEL
CAUTION
RISK OF ELECTRIC SHOCK
DO NOT OPEN
O símbolo do raio dentro de um triângulo
representa o risco de voltagem perigosa,
não isolada, que pode ter magnitude
suficiente para produzir um choque
elétrico severo em pessoas.
O ponto de exclamação dentro de um
triângulo alerta o usuário sobre a
presença de informações importantes de
operação e manutenção (assistência) no
manual que acompanha o aparelho.
ALERTA: Para reduzir o risco de choque elétrico ou
fogo, não exponha este aparelho à chuva ou à
umidade.
CUIDADO: O uso de controles, ajustes ou a
execução de procedimentos que não sejam os
especificados neste manual podem resultar em
danos físicos e exposição à radiação que pode
causar danos à saúde.
Page 34

34 DFX2000
INTRODUÇÃO
Parabens pela compra de um produto PHONIC, desenvolvido
com precisão e alta qualidade, pronto para fornecer anos de vida
útil. O processador digital de efeitos de alta denição, DFX2000,
possui 101 algoritmos de efeitos digitais desenvolvidos pela nossa
equipe técnica de engenheiros de áudio. Cada efeito possui até
7 (sete) parâmetros que podem ser facilmente ajustados, assim
como um equalizador de graves e agudos e uma tecla ‘compare’
para facilmente comparar seu efeito original com o novo. Assim
que pronto, salve seu novo efeito na memória de usuário. Isto é
apenas um pouco do que seu processador é capaz de fazer.
DESCRIÇÃO DO PAINEL FRONTAL
1. Medidor de Nível de Entrada
Este medidor LED estéreo de 4 segmentos permite visualizar a
intensidade do sinal de entrada. O melhor é ajustar a entrada para
que o nível não acenda o LED vermelho de Clip. Caso acenda,
reduza o nível de saída da sua fonte sonora.
2. Mostrador (Display)
Este mostrador alfa numérico de 4 dígitos mostra o nome do efeito
sendo usado. Ao editar efeitos, o mostrador apresenta o efeito
atual e o valor do parâmetro do mesmo.
Sabemos de sua vontade de ir logo ligando e usando seu
DFX2000. Mas antes, recomendamos a leitura completa deste
manual para ajudá-lo a obter o melhor desempenho possível de
seu processador de efeitos. Aqui é possível obter informações
importantes sobre a operação do dispositivo e também são
encontradas dicas importantes de como facilitar a operação do
mesmo. Após a leitura, recomendamos manter este manual em
local seguro para referência futura caso se faça necessário.
RECURSOS
● 101 novos algoritmos, a maioria, verdadeiramente, em
estéreo
● Algoritmo de 40-bits de alta denição para reverberações e
delays naturais
● 49 combinações de feitos com conguração serial/paralela
selecionável
● Modulação dinâmica, psico-acústica e de Equalização de
alto padrão
● Efeitos especiais e de distorção de vanguarda
● Até 7 (sete) parâmetros ajustáveis além de Equalização de
graves e agudos por efeito
● Conversores de alta resolução. A/D e D/A, de 24 bits com
taxa de amostragem de até 128 vezes
● Processamento estéreo verdadeiro para separação de
canais realista na imagem estéreo
● 100 efeitos pré-ajustados de fábrica e mais 100 memórias
de usuário
● Implementação MIDI extensiva e completa
● Fonte de alimentação interna para uso em aplicações
prossionais
● Entradas e saídas servo-balanceadas tipo XLR e 1/4” TRS
AJUSTE RÁPIDO
1. Assegure-se que a unidade esteja desligada. Para isso,
desconecte o cabo de força da tomada
2. Conecte todo seu equipamento a ser usado com a unidade
nas entradas de seu DFX2000. Normalmente estas seriam
as saídas do mixer ou o ponto de insert do amplicador de
guitarra.
3. Conecte o equipamento de destino nas saídas de seu
DFX2000. Normalmente isto seria a entrada EFX Return ou
AUX return no mixer.
4. Ligue os aparelhos nesta ordem: instrumentos, mixer, processadores de sinal e amplicadores/caixas.
3. LEDs Indicadores de Edição
Ao ajustar as propriedades de um efeito, um destes LEDs indicam
quais são esta propriedades sendo editadas. Podendo ser:
% – Ajusta o valor absoluto de um parâmetro
dB – Aumenta ou diminui a amplitude ou ajusta o limiar (threshold)
do compressor
Hz – Ajusta a frequência
Sec – Ajusta o parâmetro de tempo
4. LEDs Indicadores de Categoria (Effect Group)
Ao selecionar um efeito, ele é classicado de acordo com uma
destas categorias e acende o indicador LED correspondente.
5. LEDs indicadores de Edição (Edit)
Cada efeito do DFX2000 possui 4 parâmetros ajustáveis. Estes
LEDs indicam quais parâmetros estão sendo editados. Caso
o LED superior esteja acesso, os parâmetros listados na linha
superior abaixo de cada controle de edição serão ajustáveis pelos
controles correspondentes (neste caso são os parâmetros A, B,
C e D). O mesmo acontece para o LED do meio (os parâmetros
listados na linha do meio abaixo de cada controle serão ajustados),
e para o LED inferior (os ajustes listados na linha de baixo abaixo
de cada controle serão editados). Para uma lista completa de quais
são estes parâmetros verique o apêndice A deste manual.
6. Controle de Edição
Use qualquer um destes controles para ajustar os parâmetros
correspondentes, conforme determinado pelo efeito sendo
editado. Um dos LEDS de Edit (explicado acima) indica qual
parâmetro particular está sendo editado. Caso não tenha
certeza, gire um destes controles e veja o nome do parâmetro
correspondente no visor por alguns segundos. Ao apertar a tecla
de Setup é possível fazer com quer os parâmetros (mostrados
abaixo de cada controle) sejam ajustáveis.
7. Controle Mix/Bypass
Ao girar este controle para a esquerda ou direita é possível ajustar
a quantidade do nível de saturação, do efeito selecionado, que
será aplicado ao sinal de entrada. Este nível varia entre 0% e
100%, sendo 0% o sinal que passa sem alteração (ou “seco”) e
100% sendo o sinal totalmente afetado pelo efeito selecionado
(Sinal “com efeito full”).
Aperte este controle para ativar o bypass, permitindo que o sinal
de entrada, sem processamento, passe direto para a saída. Isto é
prático para comparar o sinal processado e não processado.
8. LED indicador de MIDI
Este LED pisca sempre que seu DFX2000 recebe um sinal MIDI
válido.
9. Tecla Preset
Para selecionar um dos efeitos pré-ajustados de fábrica (Presets),
aperte esta tecla e use a roda de Jog para alternar entre os efeitos
disponíveis.
Page 35

7 9
17 21 19 1820
12 15
1 2 3 4 6 5 8
10. Tecla Effect
Para selecionar um dos 101 algoritmos base dos efeitos, aperte
a tecla Effect e use a roda Jog para alternar entre os disponíveis.
Para uma lista completa, verique o apêndice deste manual.
11. Tecla Edit
Aperte este controle para fazer uso dos 4 controles de edição.
12. Tecla Store
Para armazenar um efeito, aperte esta tecla. Você poderá então
usar o controle jog wheel para encontrar uma memória de usuário
livre (ou um efeito para escrever em cima) e apertar a tecla Store
novamente para conrmar e salvar seu novo ajuste. Quando
qualquer ajuste é feito aos parâmetros de um efeito, o indicador
LED desta tecla pisca para indicar que o efeito foi editado. Assim
que armazenado ela para de piscar.
13. Tecla Compare
Ao fazer ajustes a efeitos pré-ajustados, (e com o indicador LED
da tecla Store piscando), esta tecla pode ser usada para comparar
o efeito original e o efeito editado. Aperte a tecla uma vez para
ouvir o efeito original (a palavra COMP se torna visível no visor
principal), e aperte novamente para voltar ao efeito sendo editado.
Você poderá fazer mais alguns ajustes renados ou armazenar
seu novo efeito se você estiver contente com o mesmo.
14. Tecla Setup
Aperte a tecla Setup para fazer uso das funções de ajuste
listadas nos quarto controles de Edit’: MIDI, Entrada, Saída e
Conguração. Verique a seção de edição adiante para mais
informações de como usá-la.
15. Roda Jog (controle giratório de seleção)
Quando a unidade não estiver em uso, você pode usar o controle
jog wheel para selecionar programas da lista disponível. Durante
o modo de edição, gire este controle para ajustar os parâmetros
correspondentes em maior valor (girando para a direita) ou menor
valor (girando-o para a esquerda).
1110 14 13 16
DESCRIÇÃO DO PAINEL TRASEIRO
17. Conector AC e Fusível (Fuse)
Conecte aqui seu cabo de força para alimentar seu DFX2000.
Por favor, use apenas o cabo de força fornecido com a unidade.
O compartimento do fusível, localizado abaixo do conector de
AC, segura o fusível de seu DFX2000. Caso o fusível estoure,
abra a capa protetora e substitua o fusível por outro de iguais
características.
18. Conectores de Entrada (Input)
As entradas balanceadas de 1/4” TRS e XLR servem para receber
os sinais de dispositivos externos. Note que apenas um destes
conectores podem ser usado em um canal não sendo possível
usar os dois ao mesmo tempo.
19. Conectores de Saída (Output)
Estes conectores balanceados de saída, iguais aos de entrada,
enviam o sinal da unidade para dispositivos externos. Todas as
saídas correm em paralelo, signicando que é possível usar
os dois conectores, de 1/4” e XLR, ao mesmo tempo caso
necessário.
20. Tecla de Nível de Operação
Esta tecla alterna entre os níveis de entrada e saída do canal
correspondente entre -10 dBV (nível de linha) e +4 dBu (nível
prossional).
21. Conectores MIDI
Conexões de MIDI in e MIDI Out/Thru se encontram disponíveis
na unidade. É possível receber e mandar dados MIDI para um
computador, assim como ajustar parâmetros em tempo real com
o uso de um computador ou outro dispositivo MIDI externo.
16. Tecla Power
Esta tecla liga e desliga seu DFX2000. Lembre-se de manter a
tecla na posição “off” sempre que conectar ou desconectar o cabo
de força na unidade.
35DFX2000
Page 36

36 DFX2000
EDIÇÃO, ARMAZENAMENTO E SELEÇÃO DE EFEITOS PRÉ-AJUSTADOS
Edição e Comparação
Para editar um efeito, selecione um efeito apertando a tecla
Effect e girando o controle jog wheel. Ao deixar o controle jog
wheel parado por mais que 2 segundos, o efeito selecionado
será aplicado. Você pode então alterar as diferentes propriedades
do efeito apertando a tecla Edit, e utilizando os quarto controles
de edição para ajustar os parâmetros correspondentes (veja os
Apêndices deste manual para mais detalhes sobre os parâmetros
de efeitos). Ao fazer qualquer modicação, o LED na tecla Store
pisca para avisar que o efeito/parâmetro foi alterado e que você
pode armazenar os novos ajustes. Apertando a tecla Compare,
seu efeito editado é suspenso e você pode ouvir o efeito original.
Aperte a tecla novamente para voltar ao efeito editado.
Armazenando
Para armazenar um efeito editado na memória, aperte a tecla
Store. Gire o controle jog wheel para selecionar um dos locais
de memória de usuário no qual deseja armazenar seu novo
efeito (de U.001 a U.100) e aperte a tecla Store novamente para
conrmar.
Seleção de Efeitos
Seu DFX2000 possui 100 programas pré-ajustados de fábrica
e 100 programas de usuário. Você pode selecionar qualquer
programa apertando a tecla preset e usando o controle jog wheel
para encontrar aquele que deseja entre os programas de fábrica
(I.001 a I.100) ou de usuário (U.001 a U.100). Haverá um pequeno
intervalo antes que o efeito seja selecionado e aplicado ao sinal.
Note que os efeitos podem ter níveis diferentes entre eles.
AJUSTE MIDI
Ao apertar a tecla Setup, o primeiro controle de edição, permite
ajustar os variados ajustes da interface MIDI. Gire o controle jog
wheel para ajustar os valores e/ou conrmar os ajustes.
CHAN:
Esta função determina o canal MIDI que a unidade aceita as
mensagens. Isto é útil ao utilizar uma rede de dispositivos MIDI,
onde mensagens de canais diferentes serão ignorados pelo seu
DFX2000.
OMNI:
A função de Canal Omni permite que todas as mensagens, de
todos os 16 canais MIDI, sejam aceitas.
CONT:
Esta opção permite ajustar os ajustes de recepção de mensagens
de controlador através da interface MIDI. Os ajustes disponíveis
são; OFF, RECV (permite que o DFX2000 receba dados de
controladores), SEND (permite enviar dados de controladores)
e BOTH (permite que o DFX2000 envie e receba dados de
controladores).
PRGM:
Esta função permite ajustar a condição da mensagem de troca de
programa (Program Change). Os ajustes disponíveis são; OFF,
RECV (permite que o DFX2000 receba comandos de program
change), SEND (permite que o DFX2000 envie comandos de
program change) e BOTH (permite que o DFX2000 receba e
envie comandos de program change).
STOR:
Ao ajustar isto em ON, o DFX2000 recebe os dados de controlador
112 como comando de armazenamento direto. Os ajustes
atuais são então armazenados na localidade de programa que
corresponda com o valor do controlador; não haverá necessidade
de conrmação. Ajustado em OFF, a mensagem de controlador
112 é ignorada.
DUMP:
Quando seu programa MIDI no computador é ajustado para
receber dados MIDI, o uso do controle de Edit para selecionar a
função DUMP, e também o uso o controle jog wheel para conrmar
esta ação, envia todos seus programas para o computador. O
armazenamento deste arquivo em seu PC permite enviá-los de
volta a seu DFX2000 a qualquer momento no futuro recuperando
os dados.
DR.EN:
Quando isto é mostrado no visor, gire levemente o controle jog
wheel para selecionar e então o visor pisca. Neste modo, seu
DFX2000, pode receber dados de system exclusive de dispositivos
MIDI externos via a entrada MIDI na traseira da unidade.
MIDI
Este ajuste seleciona se o conector MIDI de Out/Thru na traseira
de seu DFX2000 será uma saída MIDI Out ou MIDI Thru. Ao
ajustar em Out, este conector envia mensagens MIDI desde
o DFX2000. Quando ajustada em MIDI Thru, as mensagens
recebidas pela entrada MIDI In são retransmitidas através do
conector Out/Thru.
Page 37

Tabela de Controles MIDI
Nome do Parâmetro Visor Controle MIDI # Valor Possível
Seleção de Banco I.001 - I.100 / U.001 - U.100 0 0 = Fabrica / 1 = Usuário
Algoritmo Nome do Algoritmo 102 0 - 100
Edit A Depende do Efeito 103 Depende do Efeito
Edit B Depende do Efeito 104 Depende do Efeito
Edit C Depende do Efeito 105 Depende do Efeito
Edit D Depende do Efeito 106 Depende do Efeito
Edit E Depende do Efeito 107 Depende do Efeito
Edit F Depende do Efeito 108 Depende do Efeito
EQ Low ±16 dB 109 84 a 116; 0dB a 100
EQ High ±16 dB 110 84 a 116; 0dB a 100
Mix Depende do Efeito 111 Depende do Efeito
Armazenar U.001 - U.100 112 0 - 99
In/Out BYP / 0 - 100% 113 0 = BYP / 1 = MIX
Combinação SER1 / SER2 / PARA 114 0 = S1 / 1 = S2 / 2 = PA
Modo de Entrada MONO / STER 115 0 = Mono, 1 = Stereo
Mix Externo/Interno EXT / INTN 116 0 = Externo, 1 = Interno
Tabela de Implementação MIDI
Função Transmitido Reconhecido
Canal Básico Default OFF, 1 - 16 OFF, 1 - 16
Número de Nota
Velocidade Nota ON N/D N/D
After Touch Notas N/D N/D
Pitch Bender
Controlador
Program Change
System Exclusive SIM SIM
Sistema Comum Song Pos N/D N/D
Mensagens AUX Local ON/OFF N/D N/D
Alterado OFF, 1 - 16 OFF, 1 - 16
True Voice N/D N/D
Nota OFF N/D N/D
Canais N/D N/D
# verdadeiro 1 - 100 1 – 100
Song Sel N/D N/D
Tune N/D N/D
All notes OFF N/D N/D
Active Sense N/D N/D
Reset N/D N/D
N/D N/D
N/D N/D
0, 102 - 116 0, 102 - 116
Sim (0 - 99) Sim (0 - 99)
N/D = Não Disponível
37DFX2000
Page 38

38 DFX2000
AJUSTE
Modo de Entrada
Ao apertar a tecla Setup, é possível usar o Segundo controle de
Edit para ajustar o modo de entrada do DFX2000 entre mono
(MONO) e estéreo (STER). Quando o modo de entrada se
encontra em mono, somente o canal de entrada 1 é usado. No
modo estéreo, o efeito selecionado é aplicado aos dois canais
separadamente. Efeitos de Delay podem ter as propriedades de
seus canais, esquerdo e direito, editado separadamente.
Modo de Saída
Após apertar a tecla Setup, é possível usar o terceiro controle
de Edit para selecionar as duas opções para o modo de entrada.
Quando INTL se encontra selecionado, a mixagem do áudio será
feita internamente, e o controle de Mix/Bypass estará ativado.
Quando selecionado em EXTN, o sinal será 100% efeito, e o
dispositivo externo determina a quantidade de saturação de
efeito do DFX2000.
Conguração Dual Engine
Uma vez mais, ao apertar a tecla Setup, é possível usar o quarto
controle de Edit para decidir a estrutura das combinações de efeito
(programas 53 a 101). Você pode escolher entre serial 1 (SER1),
serial 2 (SER2) e paralelo (PARA).
ALGORITMOS E PARÂMETROS
DE EFEITO
Algoritmos de Reverberação
O DFX2000 oferece 17 algoritmos de reverberação, nomeados
de forma a combinar com o resultado que o efeito tem sobre o
sinal. O algoritmo Cathedral emula a reverberação longa ouvida
em catedrais e é interessante em alguns instrumentos. Os efeitos
Plate simulam reverberações planas e são apropriados para uso
com vocais e percussões. O algoritmo Spring Reverb simula a
clássica reverberação de mola. Os algoritmos Large Hall, Room
e Studio emulam as reverberações que estão presentes em salas
de diversos tamanhos. Os algoritmos de Gate Reverb cortam a
reverberação de maneira sintetizada após um tempo.
Parâmetro O que faz
Pre-delay
Early level
Hi ratio
High pass lter
Density
Gate threshold
Gate hold time
Gate release time
Reverb time
Ajusta o tempo antes da primeira
reexão
Ajusta o equilíbrio entre as reexões
de reverberação anterior e posterior
Ajusta o tempo de reverberação de
frequências agudas apenas
Ajusta a frequência de corte do ltro
passa alta
Ajusta a densidade do efeito de rever-
beração entre ‘espaçoso’ e ‘justo’
Ajusta o limiar (threshold) de um efeito
de gate
Ajusta o tempo que leva até que o efeito de gate seja ativado após o sinal ter
ultrapassado o limiar
Ajusta o tempo que leva para que o
efeito de gate seja desativado após o
sinal ter caído para baixo do limiar
Ajusta o comprimento/tempo do efeito
de reverberação
Algoritmos de Delay
Efeitos de Delay adicionam um atraso (curto ou longo) para um
ou ambos os canais a velocidades variáveis.
Parâmetro O que faz
Ajusta o tempo de atraso (delay) dos
Delay coarse
Delay ne
Feedback
Delay
canais esquerdo e direito em incrementos
de 100ms
Ajusta o tempo de delay dos canais esquerdo e direito em incrementos de 1ms
Ajusta a repetição dos canais esquerdo e
direito
Ajusta o tempo de delay dos canais
esquedo e direito
Efeitos de Modulação e Pitch Shifter
Existem diversos tipos destes efeitos; o Chorus desana o sinal
de entrada em conjunto com uma pequena variação de anação,
e é útil para a dispersão de sinais. O Flanger apresenta um
pequeno atraso e mudanças na fase. Com efeitos de Phaser,
um Segundo sinal com mudanças de fase é adicionado ao sinal
de entrada. O efeito de The Pitch Shift ajusta a anação do sinal
e é utilizado normalmente cpom vocais. Os efeitos de Vibrato
ajustam a velocidade de frequências de pico de um tom e são
uasadas normalmente com guitarras. Efeitos de Tremolo também
são usados em sinais de guitarras e envolvem variações rápidas
ou vagarosas no volume. O Auto Panning faz exatamente o que
seu nome sugere: o sinal é “paneado” da esquerda para a direita
e vice-versa repetidamente fazendo uso extremo do estéreo.
Parâmetro O que faz
L.F.O.
Pre-delay
Depth
Phase
LPF
Pitch shift Ajusta a anação
Modulation mode Determina o tempo de atraso
Wave type
Way
Ajusta a curva de modulação (triangu-
lar, senoidal, retangular)
Ajusta o tempo até a primeira modulação
Ajusta a variação do tempo de delay (a
profundidade)
Determina a fase entre os efeitos de
modulation delay 1 e 2
Ajusta a frequência de sobra (roll off)
do ltro passa baixa
Decide se uma onda senoidal ou trian-
gular será usada para modular o sinal
Altera o paneamento do sinal entre
esq/dir, dir/esq ou esq/dir centralizado
Page 39

Efeitos Dinâmicos
Compressores são processadores de sinais que reduzem o sinal
sobre um limiar estabelecido pelo usuário por uma quantidade/
taxa definida por um usuário. Limitadores funcionam como
compressores com taxa innita. Um Noise Gate é um processador
de sinal que corta ou reduz signicativamente o sinal quando o
nível ca abaixo de um limiar ajustado pelo usuário. Um Expander
ajuda a fazer com que o ruído de fundo indesejado (tal como ruído
de palco) seja inaudível reduzindo os sinais de baixa amplitude.
Um De-noiser também elimina ruído e interferência e um De-esser
ajuda a reduzir a sibilância na voz humana.
Parâmetro O que faz
Gain
Ratio
Threshold
Knee
Attack time
Release time
Compressor threshold
Limiter threshold
Hold time
BPF
Q Fator Q
Ajusta o ganho de entrada do
compressor, limitador, expander
Ajusta a taxa do compressor /
expander
Ajusta o limiar do efeito de gate,
compressor, expander
Ajusta a curva do gate/compres-
sor entre aguda ou suave
Ajusta o tempo que leva para que
o efeito atue quando o sinal ca
acima do limiar ajustado
Ajusta o tempo que leva para que
o efeito se desligue após o sinal
ter caído para baixo do limiar
ajustado
Ajusta o limiar do efeito compres-
sor/limiter
Ajusta o limiar no qual o limitador
passa a atuar
Ajusta o tempo pelo qual o gate
ou o de-noiser permanecem
ativos
Ajusta a frequência que será
decrescida pelo de-esser
Efeitos Psico-acústicos
Parâmetro O que faz
HPF
Drive
Harmonic
Gain Permite a correção do ganho
Ajusta a frequência de corte do
ltro passa alta
Ajusta a intensidade do efeito de
exciter
Ativa a amplicação harmônica
dependente do nível de entrada
Efeitos de Distorção de Guitarra
A distorção para guitarra é usada para distorcer os sinais da
guitarra. É possível ouvir este efeito em bandas de rock metal
existentes por décadas.
Parâmetro O que faz
Drive Ajusta o nível da distorção
Level Ajusta o volume
EQ low 1 Ajusta o equalizador dos graves
EQ low 2 Ajusta o equalizador dos graves
EQ high 1 Ajusta o equalizador de agudos
EQ high 2 Ajusta o equalizador de agudos
Efeitods de Filtro/EQ
O efeito de equalização gráca permite usar os 4 controles de
Effect para ajustar 5 bandas de equalização separadas (pré
determinadas).
Parâmetro O que faz
L.F.O.
Freq1_Depth Ajusta a profundidade do sinal em 200 Hz
Freq2_Depth Ajusta a profundidade do sinal em 500 Hz
Freq3_Depth
Freq4_Depth Ajusta a profundidade do sinal em 2.8 kHz
Freq5_Depth Ajusta a profundidade do sinal em 8 kHz
Phase 1
Phase 2
Phase 3
Phase 4
Phase 5
Q 1/2 Fator Q (Equalizador paramétrico)
Frequency 1
Frequency 2
dB 1 Ajusta o ganho/corte em 200 Hz
dB 2 Ajusta o ganho/corte em 400 Hz
dB 3 Ajusta o ganho/corte em 800 Hz
dB 4 Ajusta o ganho/corte em 1.6 kHz
dB 5 Ajusta o ganho/corte em 3.15 kHz
dB 6 Ajusta o ganho/corte em 6.3 kHz
Bass Ajusta o ganho/corte em 100 Hz
Treble Ajusta o ganho/corte em 12 kHz
Mix Usado para a correção do ganho
Ajusta a taxa/velocidade das oscilações
dos graves
Ajusta a profundidade do sinal em 1.12
kHz
Ajusta a fase do sinal em 200 Hz entre 0
e 180˚
Ajusta a fase do sinal em 500 Hz entre 0
e 180˚
Ajusta a fase do sinal em 1.12 kHz entre
0 e 180˚
Ajusta a fase do sinal em 2.8 kHz entre 0
e 180˚
Ajusta a fase do sinal em 8 kHz entre 0 e
180˚
Ajusta a frequência média (Equalizador
paramétrico)
Ajusta a frequência média (Equalizador
paramétrico)
39DFX2000
Page 40

40 DFX2000
Efeitos Especiais
O DFX2000 possui 3 efeitos especiais no total. O efeito Harmonic
pode ser usado para adicionar mais harmonia a vocais. O
Sampler permite a gravação de até 9 segundos de áudio usando
o controle Edit A para gravar e o controle Edit B para disparar o
som. O Resonator imita um sistema de oscilador que amplica
freqüências especicas.
Parâmetro O que faz
Drive Ajusta a intensidade do efeito Harmonic
Gain Usado para correção de ganho
Harmonic Ajusta o sobre tom harmônico do efeito
dB Ajusta o nível do sinal em decibéis
Frequency
Q Fator Q
Record Inicio / Interrupção da gravação
Play Inicio / Interrupção da reprodução
Speed Ajusta a velocidade de reprodução
Mode
Start time Seleciona o ponto de inicio da reprodução
Stop time Seleciona o ponto de m da reprodução
LFO
Pre-delay Ajusta o tempo até a primeira oscilação
Depth Ajusta a intensidade do efeito de Resonator
Phase Ajusta a fase entre 0 e 180 graus
LPF
Wave type Troca as ondas entre senoidal e triangular
Ajusta a frequência na qual o som harmônico
sera criado
Altera a direção da reprodução (normal ou
ao contrário) e o número de repetições.
Ajusta a intensidade das oscilações das
frequências graves
Ajusta a frequência de corte do ltro passa
baixa
Combinações de Algoritmos de Efeitos
(programas multi-efeito)
Existe um número de efeitos combinados em seu DFX2000 (49 no
total), no qual, cada um toma os parâmetros mais interessantes
e importantes de cada efeito separado e permite o ajuste para a
criação de sons únicos.
Page 41

Especicações
41DFX2000
Page 42

42 DFX2000
APPLICATION APLICACIÓN 应用
MIXER INSERT POINT
䇗䷇ৄᦦܹ
APLICAÇÕES
Insert Application
Insert a Y cord (tip=send, ring=return, sleeve=ground) into your mixer's insert point, and connect the corresponding jacks on the other
end into the RISC2024P's input and output jacks. The output mode of the RISC2024P should be set to "Internal."
Insertar Aplicación
Inserte el cable Y (tip=envío, ring=retorno, sleeve=tierra) en el punto de inserción de su mezcladora, y conecte los jacks
correspondientes en el otro extremo en los jacks de entrada y salida de RISC2024P. El modo de salida de RISC2024P debería estar
puesto en “Interno.”
插入点应用
使用一根Y型连接线(尖端=输出,环端=回传,套筒=接地)连接调音台的插入点,将另一端相应的插头连接至
孔。
DFX2000
的输出模式应设置成
“Internal”
DFX2000
的输入和输出插
Aplicações de Insert
Insira um cabo Y (ponta = envio, anel = volta, carcaça = terra) no ponto de Insert (inserção) de seu mixer, e conecte os plugues
correspondentes em cada conector de entrada e saída do DFX2000. O modo de saída do DFX2000 deve estar ajustado em “Internal.”
Page 43

Auxiliary Device
AUX
SEND
A
UX RETURN
MIXER
AUXצ䗕
AUX
RETURN
AUXצ䗕
AUX䔌ߎ
AUX SEND
AUX䔌ߎ
䇗䷇ৄ
Use the RISC2024P as an auxiliary device by connecting your mixer’s AUX or EFX outputs to the RISC’s inputs, and the RISC’s output
jacks to your mixer’s AUX return jacks. Set the device’s output mode to “External” when using this conguration.
Dispositivo Auxiliar
Utilice el RISC2024P como un dsipositivo auxiliar conectando las salidas de AUX o EFX de su mezcladora a las entradas de RISC, y
los jacks de salida de RISC a jacks de retorno AUX de su mezcladora. Setée el modo de salida de dispositivo a “Externo” cuando se
usa esta conguración.
辅助设备
将调音台的
配置应将
DFX2000
AUX或EFX
的输出模式设置成
输出连接至
DFX
的输入,
“External”
DFX
的输出插孔连接至调音台的
。
AUX
倒送插孔可将
DFX2000
用作一台辅助设备。使用此
Dispositivo Auxiliar
Use o DFX2000 como um dispositivo auxiliar conectando os cabos provenientes dos conectores de saída AUX ou EFX de seu mixer nas
entradas de seu DFX, e as saídas de seu DFX nos conectores de entrada AUX Return no mixer. Coloque o modo de saída em “External”
ao usar esta conguração.
43DFX2000
Page 44
44 DFX2000
Effect Parameter Overview
Vista General de Parámetro de Efecto
效果参数综述
Lista dos Parâmetros de Efeito (em inglês)
No. Effect Edit A Edit B Edit C Edit D Edit E Edit F Bass
Reverb
1 Cathedral
2 Small Hall
3 Spring
4 Concert
5 Large Hall
6 Plate
7 Thin Plate
8 Drum Plate
9 Vocal Plate
10 Slice Plate
11 Room
12 Studio
13 Ambience
14 Reect
15 Space
Gate Re-
16
17
Delay
18 Delay
19 Echo Left Delay Right Delay Feedback LPF
20
21
verb 1
Gate Re-
verb 2
PingPong
Delay
Round
Delay
Reverb
Time
Reverb
Time
Reverb
Time
Reverb
Time
Reverb
Time
Reverb
Time
Reverb
Time
Reverb
Time
Reverb
Time
Reverb
Time
Reverb
Time
Reverb
Time
Reverb
Time
Reverb
Time
Reverb
Time
Gate Tresh-
old
Gate Tresh-
old
Left Delay
Coarse
Left Delay Right Delay
Delay 1 Delay 2 Delay 3 Feedback 1 Feedback 2 Feedback 3 Bass Treble Mix
Pre Delay Early Level Hi Ratio HPF Density Bass Treble Mix
Pre Delay Early Level Hi Ratio HPF Density Bass Treble Mix
Pre Delay Early Level Hi Ratio HPF Density Bass Treble Mix
Pre Delay Early Level Hi Ratio HPF Density Bass Treble Mix
Pre Delay Early Level Hi Ratio HPF Density Bass Treble Mix
Pre Delay Early Level Hi Ratio HPF Density Bass Treble Mix
Pre Delay Early Level Hi Ratio HPF Density Bass Treble Mix
Pre Delay Early Level Hi Ratio HPF Density Bass Treble Mix
Pre Delay Early Level Hi Ratio HPF Density Bass Treble Mix
Pre Delay Early Level Hi Ratio HPF Density Bass Treble Mix
Pre Delay Early Level Hi Ratio HPF Density Bass Treble Mix
Pre Delay Early Level Hi Ratio HPF Density Bass Treble Mix
Pre Delay Early Level Hi Ratio HPF Density Bass Treble Mix
Pre Delay Early Level Hi Ratio HPF Density Bass Treble Mix
Pre Delay Early Level Hi Ratio HPF Density Bass Treble Mix
Gate Hold
Time
Gate Hold
Time
Left Delay
Fine
Gate Re-
lease Time
Gate Re-
lease Time
Right Delay
Coarse
Feedback
Left
Reverb
Time
Reverb
Time
Right Delay
Fine
Feedback
Right
Pre Delay Density Bass Treble Mix
Pre Delay Density Bass Treble Mix
Feedback
Left
Feedback HPFeedback
Feedback
Delay Left
Feedback
Right
LP
Feedback
Delay Right
Treble
Bass Treble Mix
Bass Treble Mix
Bass Treble Mix
Mix
Page 45

Modulation
22 Chorus L.F.O. Pre Delay Depth Phase LPF Wave Type Bass Treble Mix
23
24
25
26 Flanger L.F.O. Pre Delay Depth Phase LPF Wave Type Bass Treble Mix
27
28
29 S. Flanger L.F.O. Pre Delay Depth Phase LPF Wave Type Bass Treble Mix
30 Phaser L.F.O. Pre Delay Depth Phase LPF Wave Type Bass Treble Mix
31
32
33
Analog
Chorus
Vintage
Chorus
Ultra Cho-
rus
Vintage
Flanger
Jet Stream
Flanger
Vintage
Phaser
Dual
Phaser
Round
Phaser
L.F.O. Pre Delay Depth Phase LPF Wave Type Bass Treble Mix
L.F.O. Pre Delay Depth Phase LPF Wave Type Bass Treble Mix
L.F.O. Pre Delay Depth Phase LPF Wave Type Bass Treble Mix
L.F.O. Pre Delay Depth Phase LPF Wave Type Bass Treble Mix
L.F.O. Pre Delay Depth Phase LPF Wave Type Bass Treble Mix
L.F.O. Pre Delay Depth Phase LPF Wave Type Bass Treble Mix
L.F.O. Pre Delay Depth Phase LPF Wave Type Bass Treble Mix
L.F.O. Pre Delay Depth Phase LPF Wave Type Bass Treble Mix
No. Effect Edit A Edit B Edit C Edit D Edit E Edit F Bass
Pitch Shift
34 Pitch Shifter
35 Vibrato L.F.O. Depth
36 Tremolo L.F.O. Depth Phase Wave Type NA NA Bass Treble Mix
Auto Pan-
37
Dynamics
38
39
40 Expander Gain Ratio Threhold Knee Attack Time
41 Noise Gate Threhold Attack Time
42 De-Noiser Threhold Attack Time
43 De-Esser Threhold Attack Time
Psycho Acoustics
44 Exciter HPF Drive Harmonic Gain NA NA Bass Treble Mix
ning
Compres-
sor
Compres-
sor/Limitter
1:detuning
in semi-
tones
L.F.O. Depth Way Wave Type NA NA Bass Treble Mix
Gain Ratio Threhold Knee Attack Time
Gain Ratio
Pitch Shift
1:detuning
in centres
Pitch Shift
2:detuning
in semi-
tones
Modulation
Mode
Compres-
sor Thresh-
old
Release
Time
Release
Time
Release
Time
Pitch Shift
2:detuning
in centres
Wave Type NA NA Bass Treble Mix
Limtter
Threshold
Hold Time Range NA Bass Treble
Hold Time Range LPF Bass Treble
Gain BPF Q Bass Treble
Pitch Shift
3:detuning
in semi-
tones
Attack Time
Pitch Shift
3:detuning
in centres
Release
Time
Release
Time
Release
Time
Treble
Bass Treble Mix
Bass Treble
Bass Treble
Bass Treble
Mix
On/
Off
On/
Off
On/
Off
On/
Off
On/
Off
On/
Off
45DFX2000
Page 46

46 DFX2000
Guitar Distortion
45 Distortion Drive Level EQ-LOW1 EQ-LOW2 EQ-High1 EQ-High2 Bass Treble Mix
Filter/EQ
Tremolo-
46
47
48
49 Graphic-EQ
Special FX
50 Harmonic Drive Gain Harmonic dB Frequency Q Bass Treble Mix
51 Sampler Record Play SPEED MODE Start Time Stop time Bass Treble Mix
52 Resonator L.F.O. Pre Delay Depth Phase LPF Wave Type Bass Treble Mix
Combonation
53
54
55
56
57
58
59
60
61
62
63
GEQ
Sweep-
GEQ
Parameter-
EQ
Chorus/Re-
verb
Flanger/Re-
verb
Phaser/Re-
verb
Delay/Re-
verb
Tremolo/
Reverb
Vibrato/Re-
verb
Resonator/
Reverb
Sweep-
GEQ/Re-
verb
Chorus/De-
lay
Flanger/De-
lay
Phaser/De-
lay
L.F.O.
L.F.O. Phase1 Phase2 Phase3 Phase4 Phase5 Bass Treble Mix
dB-1
dB-
1(200Hz)
L.F.O. Pre Delay Depth Reverb Mix
L.F.O. Pre Delay Depth Reverb Mix
L.F.O. Pre Delay Depth Reverb Mix
Left Delay Right Delay Feedback Reverb Mix
L.F.O. Depth Phase Reverb Mix
L.F.O. Depth
L.F.O. Pre Delay Depth Reverb Mix
L.F.O. Phase1 Phase2 Reverb Mix
L.F.O. Pre Delay Depth Delay Mix Delay Feedback Bass Treble Mix
L.F.O. Pre Delay Depth Delay Mix Delay Feedback Bass Treble Mix
L.F.O. Pre Delay Depth Delay Mix Delay Feedback Bass Treble Mix
Freq1_Depth Freq2_Depth Freq3_Depth Freq4_Depth Freq5_Depth Bass Treble Mix
Frequen-
cy-1
dB-
2(400Hz)
Q-1 dB-2
dB-
3(800Hz)
Modulation
Mode
dB-
4(1.6kHz)
Reverb Mix
Frequen-
cy-2
dB-
5(3.15kHz)
Reverb
Time
Reverb
Time
Reverb
Time
Reverb
Time
Reverb
Time
Reverb
Time
Reverb
Time
Reverb
Time
Q-2 Bass Treble Gain
dB-
6(6.3kHz)
Density Bass Treble Mix
Density Bass Treble Mix
Density Bass Treble Mix
Density Bass Treble Mix
Density Bass Treble Mix
Density Bass Treble Mix
Density Bass Treble Mix
Density Bass Treble Mix
Bass Treble Gain
No. Effect Edit A Edit B Edit C Edit D Edit E Edit F Bass
64 Pitch/Delay
Tremolo/
65
66
Delay
Vibrato/De-
lay
Pitch Shift
1:detuning
in semi-
tones
L.F.O. Depth Phase Delay Mix Delay Feedback Bass Treble Mix
L.F.O. Depth
Pitch Shift
2:detuning
in semi-
tones
Pitch Shift
3:detuning
in semi-
tones
Modulation
Mode
Delay Mix Delay Feedback Bass Treble Mix
Delay Mix Delay Feedback Bass Treble Mix
Tre-
ble
Mix
Page 47

Resonator/
67
68
69
70
71
72
73
74
75
Delay
Sweep-
GEQ/Delay
Tremolo-
GEQ/Delay
Flanger/
Chorus
Phaser/
Chorus
Pitch/Cho-
rus
Tremolo/
Chorus
Vibrato/
Chorus
Resonator/
Chorus
L.F.O. Pre Delay Depth Delay Mix Delay Feedback Bass Treble Mix
L.F.O. Phase1 Phase2 Delay Mix Delay Feedback Bass Treble Mix
L.F.O.
Freq1_Depth Freq2_Depth
Delay Mix Delay Feedback Bass Treble Mix
L.F.O. Pre Delay Depth Chorus Mix L.F.O. Depth Bass Treble Mix
L.F.O. Pre Delay Depth Chorus Mix L.F.O. Depth Bass Treble Mix
Pitch Shift
1:detuning
in semi-
tones
Pitch Shift
2:detuning
in semi-
tones
Pitch Shift
3:detuning
in semi-
tones
Chorus Mix L.F.O. Depth Bass Treble Mix
L.F.O. Depth Phase Chorus Mix L.F.O. Depth Bass Treble Mix
L.F.O. Depth
Modulation
Mode
Chorus Mix L.F.O. Depth Bass Treble Mix
L.F.O. Pre Delay Depth Chorus Mix L.F.O. Depth Bass Treble Mix
Sweep-
76
GEQ/Cho-
L.F.O. Phase1 Phase2 Chorus Mix L.F.O. Depth Bass Treble Mix
rus
Tremolo-
77
GEQ/Cho-
L.F.O.
Freq1_Depth Freq2_Depth
Chorus Mix L.F.O. Depth Bass Treble Mix
rus
Round De-
78
79
80
81
82
83
lay/Chorus
Phaser/
Flanger
Pitch/Flang-
er
Tremolo/
Flanger
Vibrato/
Flanger
Resonator/
Flanger
DELAY 1 DELAY 2 Feedback Chorus Mix L.F.O. Depth Bass Treble Mix
L.F.O. Pre Delay Depth Flanger Mix L.F.O. Depth Bass Treble Mix
Pitch Shift
1:detuning
in semi-
tones
Pitch Shift
2:detuning
in semi-
tones
Pitch Shift
3:detuning
in semi-
tones
Flanger Mix L.F.O. Depth Bass Treble Mix
L.F.O. Depth Phase Flanger Mix L.F.O. Depth Bass Treble Mix
L.F.O. Depth
Modulation
Mode
Flanger Mix L.F.O. Depth Bass Treble Mix
L.F.O. Pre Delay Depth Flanger Mix L.F.O. Depth Bass Treble Mix
Sweep-
84
GEQ/Flang-erL.F.O. Phase1 Phase2 Flanger Mix L.F.O. Depth Bass Treble Mix
Tremolo-
85
GEQ/Flang-erL.F.O.
Round De-
86
lay/Flanger
87
88
89
Pitch/
Phaser
Tremolo/
Phaser
Vibrato/
Phaser
Freq1_Depth Freq2_Depth
Flanger Mix L.F.O. Depth Bass Treble Mix
DELAY 1 DELAY 2 Feedback Flanger Mix L.F.O. Depth Bass Treble Mix
Pitch Shift
1:detuning
in semi-
tones
Pitch Shift
2:detuning
in semi-
tones
Pitch Shift
3:detuning
in semi-
tones
Phaser Mix L.F.O. Depth Bass Treble Mix
L.F.O. Depth Phase Phaser Mix L.F.O. Depth Bass Treble Mix
L.F.O. Depth
Modulation
Mode
Phaser Mix L.F.O. Depth Bass Treble Mix
47DFX2000
Page 48

48 DFX2000
90
91
Resonator/
Phaser
Sweep-
GEQ/
Phaser
L.F.O. Pre Delay Depth Phaser Mix L.F.O. Depth Bass Treble Mix
L.F.O. Phase1 Phase2 Phaser Mix L.F.O. Depth Bass Treble Mix
No. Effect Edit A Edit B Edit C Edit D Edit E Edit F Bass
Tremolo-
92
GEQ/
L.F.O.
Freq1_Depth Freq2_Depth
Phaser Mix L.F.O. Depth Bass Treble Mix
Phaser
Round De-
93
94
95
96
97
98
99
100
101
lay/Phaser
Tremolo/
Pitch
Vibrato/
Pitch
Resonator/
Pitch
Sweep-
GEQ/Pitch
Tremolo-
GEQ/Pitch
Round
Delay/Pitch
Distortion/
Reverb
Distortion/
Delay
DELAY 1 DELAY 2 Feedback Phaser Mix L.F.O. Depth Bass Treble Mix
Pitch Shift
2:detuning
in semi-
tones
Pitch Shift
2:detuning
in semi-
tones
Pitch Shift
2:detuning
in semi-
tones
Pitch Shift
2:detuning
in semi-
tones
Pitch Shift
2:detuning
in semi-
tones
Pitch Shift
2:detuning
in semi-
tones
Bass Treble Mix
Bass Treble Mix
Bass Treble Mix
Bass Treble Mix
Bass Treble Mix
Bass Treble Mix
L.F.O. Depth Phase Pitch Mix
L.F.O. Depth
Modulation
Mode
Pitch Mix
L.F.O. Pre Delay Depth Pitch Mix
L.F.O. Phase1 Phase2 Pitch Mix
L.F.O.
Freq1_Depth Freq2_Depth
Pitch Mix
DELAY 1 DELAY 2 Feedback Pitch Mix
Drive Level Reverb Mix
Reverb
Time
Pitch Shift :
detuning in
semitones
Pitch Shift :
detuning in
semitones
Pitch Shift :
detuning in
semitones
Pitch Shift :
detuning in
semitones
Pitch Shift :
detuning in
semitones
Pitch Shift :
detuning in
semitones
Pre Delay Density Bass Treble Mix
Drive Level Delay Mix Left Delay Right Delay Feedback Bass Treble Mix
Treble
Mix
Page 49

Default Settings
Conguraciones por Default
默认设置
Ajustes de Fábrica (em inglês)
No. Effect Edit A Edit B Edit C Edit D Edit E Edit F Bass
Reverb
1 Cathedral 5.3 Sec 30 mS 100% 90% 20 Hz 100% 0 dB 0 dB 50%
2 Small Hall 0.8 Sec 20 mS 72% 95% 28 Hz 100% 0 dB 0 dB 50%
3 Spring 1.9 Sec 30 mS 100% 98% 20 Hz 30% 0 dB 0 dB 50%
4 Concert 2.4 Sec 25 mS 100% 99% 20 Hz 95% 0 dB 0 dB 50%
5 Large Hall 2.8 Sec 40 mS 100% 97% 20 Hz 95% 0 dB 0 dB 50%
6 Plate 2.8 Sec 10 mS 100% 100% 20 Hz 100% 0 dB 0 dB 50%
7 Thin Plate 3.4 Sec 1 mS 80% 98% 20 Hz 100% 0 dB 0 dB 50%
8 Drum Plate 1 Sec 10 mS 100% 100% 20 Hz 85% 0 dB 0 dB 50%
9 Vocal Plate 2.8 Sec 30 mS 70% 98% 20 Hz 100% 0 dB 0 dB 50%
10 Slice Plate 3 Sec 0 mS 100% 100% 630 Hz 100% 0 dB 0 dB 50%
11 Room 1 Sec 25 mS 100% 100% 63 Hz 100% 0 dB 0 dB 50%
12 Studio 0.6 Sec 6 mS 100% 92% 20 Hz 75% 0 dB 0 dB 50%
13 Ambience 0.8 Sec 20 mS 0% 98% 20 Hz 30% 0 dB 0 dB 50%
14 Reect 0.7 Sec 22 mS 100% 100% 20 Hz 100% 0 dB 0 dB 50%
15 Space 1.6 Sec 22 mS 95% 100% 20 Hz 75% 0 dB 0 dB 50%
16 Gate
Reverb 1
17 Gate
Reverb 2
-12 dB 55 mS 37 mS 1.8 Sec 60 mS 98% 0 dB 0 dB 50%
-20 dB 76 mS 50 mS 2.7 Sec 60 mS 98% 0 dB 0 dB 50%
Treble
Mix
No. Effect Edit A Edit B Edit C Edit D Edit E Edit F Bass
Delay
18 Delay 300 mS 50 mS 400 mS 50 mS 35% 25% 0 dB 0 dB 50%
19 Echo 190 mS 205 mS 50% 5.6 kHz 180 Hz 5.6 kHz 0 dB 0 dB 50%
20 PingPong
Delay
21 Round
Delay
Modulation
22 Chorus 0.2 Hz 2 mS 50% 180 degree 10 kHz Triangle 0 dB 0 dB 50%
23 Analog
Chorus
24 Vintage
Chorus
25 Ultra
Chorus
26 Flanger 0.2 Hz 3 mS 85% 180 degree 5k Hz Triangle 0 dB 0 dB 50%
27 Vintage
Flanger
28 Jet Stream
Flanger
29 S. Flanger 0.1 Hz 1 mS 60% 180 degree 10 kHz Triangle 0 dB 0 dB 50%
320 mS 380 mS 45% 40% 190 mS 255 mS 0 dB 0 dB 50%
190 mS 170 mS 120 mS 45% 45% 45% 0 dB 0 dB 50%
3 Hz 2 mS 20% 180 degree 10 kHz Triangle 0 dB 0 dB 50%
1.4 Hz 2 mS 20% 90 degree 10 kHz Triangle 0 dB 0 dB 50%
2.2 Hz 2 mS 25% 180 degree 10 kHz Triangle 0 dB 0 dB 50%
1.3 Hz 1 mS 45% 180 degree 10 kHz Triangle 0 dB 0 dB 50%
1.8 Hz 2 mS 35% 180 degree 10 kHz Triangle 0 dB 0 dB 50%
Treble
Mix
49DFX2000
Page 50

50 DFX2000
30 Phaser 1.2 Hz 1 mS 100% 180 degree 10 kHz Triangle 0 dB 0 dB 100%
31 Vintage
2.85 Hz 2 mS 100% 90 degree 10 kHz Triangle 0 dB 0 dB 100%
Phaser
32 Dual
0.8 Hz 2 mS 100% 180 degree 10 kHz Triangle 0 dB 0 dB 100%
Phaser
33 Round
5.1 Hz 3 mS 100% 90 degree 10 kHz Triangle 0 dB 0 dB 100%
Phaser
34 Pitch Shifter 2 0 Stereo Stereo Off Off 0 dB 0 dB 100%
35 Vibrato 1.2 Hz 85% 5 Sine NA NA 0 dB 0 dB 100%
36 Tremolo 2.05 Hz 85% 0 degree Sine NA NA 0 dB 0 dB 100%
37 Auto
0.5 Hz 80% L<->R Sine NA NA 0 dB 0 dB 100%
Panning
Dynamics
Compressor
38
39
Compressor/
Limitter
+3 4 -30 1 38 ms 107 ms 0 dB 0 dB On
+3 4 -24 dB 0 dB 38 ms 107 ms 0 dB 0 dB On
40 Expander +3 4 -9 dB 1 38 ms 107 ms 0 dB 0 dB On
41 Noise Gate -12 dB 38 ms 107 ms 33 ms -12 dB NA 0 dB 0 dB On
42 De-Noiser -12 dB 38 ms 107 ms 33 ms -80 dB 900 Hz 0 dB 0 dB On
43 De-Esser -36 dB 38 ms 107 ms +6 dB 5.6 kHz 3 0 dB 0 dB On
Psycho Acoustics
44 Exciter 2.0 kHz 9 dB 7 -9 dB NA NA 0 dB 0 dB 50%
Guitar Distortion
45 Distortion 20% 8% 4 dB 4 dB 4 dB 2 dB 0 dB 0 dB 50%
Filter/EQ
46 Tremolo-
2.2 Hz 100% 100% 100% 100% 100% 0 dB 0 dB 100%
GEQ
47 Sweep-
1.5 Hz 30 degree 60 degree 90 degree 120 degree 150 degree 0dB 0dB 100%
GEQ
48 Parameter-
-3 dB 200 Hz 2.2 2 3.15 kHz 5 0dB 0dB 0
EQ
49 Graphic-EQ 0 dB 0 dB 0 dB 0 dB 0 dB 0 dB 0 dB 0 dB 0
No. Effect Edit A Edit B Edit C Edit D Edit E Edit F Bass
Treble
Mix
Special FX
50 Harmonic 0 dB 0 dB 5 2 dB 3.15 kHz 5 0 dB 0 dB 100%
51 Sampler Stop Stop 0 1 0 ms 9000 ms 0 dB 0 dB 50%
52 Resonator 0.45Hz 30mS 40% 0 degree 5.6 kHz Sine 0 dB 0 dB 100%
Combonation
53 Chorus/
0.2 Hz 20 mS 100% 50% 2.0 Sec 100% 0 dB 0 dB 60%
Reverb
54 Flanger/
0.2 Hz 3mS 100% 50% 2.0 Sec 100% 0 dB 0 dB 60%
Reverb
55 Phaser/
0.3 Hz 2mS 100% 50% 2.0 Sec 100% 0 dB 0 dB 50%
Reverb
56 Delay/
190 mS 205 mS 50% 50% 2.0 Sec 100% 0 dB 0 dB 50%
Reverb
57 Tremolo/
0.75 Hz 85% 0 degree 50% 2.0 Sec 100% 0 dB 0 dB 75%
Reverb
Page 51

58 Vibrato/
Reverb
59 Resonator/
Reverb
60 Sweep-
GEQ/
Reverb
61 Chorus/
Delay
62 Flanger/
Delay
63 Phaser/
Delay
64 Pitch/Delay +2 Stereo Off 50% 190 mS 50% 0 dB 0 dB 100%
65 Tremolo/
Delay
66 Vibrato/
Delay
67 Resonator/
Delay
68 Sweep-
GEQ/Delay
69 Tremolo-
GEQ/Delay
70 Flanger/
Chorus
71 Phaser/
Chorus
72 Pitch/
Chorus
73 Tremolo/
Chorus
74 Vibrato/
Chorus
75 Resonator/
Chorus
76 Sweep-
GEQ/
Chorus
77 Tremolo-
GEQ/
Chorus
78 Round
Delay/
Chorus
79 Phaser/
Flanger
80 Pitch/
Flanger
81 Tremolo/
Flanger
82 Vibrato/
Flanger
83 Resonator/
Flanger
1.2 Hz 85% 5 50% 2.0 Sec 100% 0 dB 0 dB 80%
20 Hz 20 mS 100% 50% 2.0 Sec 100% 0 dB 0 dB 80%
1.5 Hz 90 degree 180 degree 50% 2.0 Sec 100% 0 dB 0 dB 75%
0.3 H 20 mS 100% 50% 190 mS 50% 0 dB 0 dB 60%
0.2 Hz 3 mS 100% 50% 190 mS 50% 0 dB 0 dB 60%
1.2 Hz 2 mS 100% 50% 190 mS 50% 0 dB 0 dB 50%
0.7 Hz 85% 0 degree 50% 190 mS 50% 0 dB 0 dB 75%
1.2 Hz 85% 5 50% 190 mS 50% 0 dB 0 dB 80%
0.45 Hz 20 mS 100% 50% 190 mS 50% 0 dB 0 dB 80%
1.5 Hz 90 degree 180 degree 50% 190 mS 50% 0 dB 0 dB 75%
2.2 H 50% 50% 50% 190 mS 50% 0 dB 0 dB 75%
0.2 Hz 3 mS 100% 50% 0.3 Hz 50% 0 dB 0 dB 50%
1.2Hz 2 mS 100% 50% 0.3 Hz 50% 0 dB 0 dB 50%
+2 Stereo Off 50% 0.3 Hz 50% 0 dB 0 dB 50%
2.2 Hz 85% 0 degree 50% 0.3 Hz 50% 0 dB 0 dB 50%
1.2 Hz 85% 5 50% 0.3 Hz 50% 0 dB 0 dB 50%
0.45 Hz 20 mS 100% 50% 0.3 Hz 50% 0 dB 0 dB 50%
1.5 Hz 90 degree 180 degree 50% 0.3 Hz 50% 0 dB 0 dB 50%
0.7 Hz 100% 100% 50% 0.3 Hz 50% 0 dB 0 dB 50%
190 mS 170 mS 45% 50% 0.3 Hz 50% 0 dB 0 dB 50%
1.2 Hz 3 mS 100% 50% 1.2 Hz 50% 0 dB 0 dB 50%
+2 Stereo Off 50% 1.2 Hz 50% 0 dB 0 dB 100%
0.7 Hz 85% 0 degree 50% 1.2 Hz 50% 0 dB 0 dB 50%
1.2 Hz 85% 5 50% 1.2 Hz 50% 0 dB 0 dB 50%
0.45 Hz 20 mS 100% 50% 1.2 Hz 50% 0 dB 0 dB 50%
51DFX2000
Page 52

52 DFX2000
84 Sweep-
GEQ/
Flanger
85 Tremolo-
GEQ/
Flanger
86 Round
Delay/
Flanger
87 Pitch/
Phaser
No. Effect Edit A Edit B Edit C Edit D Edit E Edit F Bass
88 Tremolo/
Phaser
89 Vibrato/
Phaser
90 Resonator/
Phaser
91 Sweep-
GEQ/
Phaser
92 Tremolo-
GEQ/
Phaser
93 Round
Delay/
Phaser
94 Tremolo/
Pitch
95 Vibrato/
Pitch
96 Resonator/
Pitch
97 Sweep-
GEQ/Pitch
98 Tremolo-
GEQ/Pitch
99 Round
Delay/Pitch
100 Distortion/
Reverb
101 Distortion/
Delay
1.5Hz 90 degree 180 degree 50% 1.2 Hz 50% 0 dB 0 dB 50%
0.7 Hz 100% 100% 50% 1.2 Hz 50% 0 dB 0 dB 50%
190 mS 170 mS 45% 50% 1.2 Hz 50% 0 dB 0 dB 50%
+2 Stereo Off 50% 1.2 Hz 50% 0 dB 0 dB 100%
0.7 Hz 85% 0 degree 50% 1.2 Hz 50% 0 dB 0 dB 50%
1.2 Hz 85% 5 50% 1.2 Hz 50% 0 dB 0 dB 50%
0.45 Hz 20 mS 100% 50% 1.2 Hz 50% 0 dB 0 dB 50%
1.5 Hz 90 degree 180 degree 50% 1.2 Hz 50% 0 dB 0 dB 50%
0.7 Hz 100% 100% 50% 1.2 Hz 50% 0 dB 0 dB 50%
190 mS 170 mS 45% 50% 1.2 Hz 50% 0 dB 0 dB 50%
0.7 Hz 85% 0 degree 100% +2 Stereo 0 dB 0 dB 50%
1.2 Hz 85% 5 100% +2 Stereo 0 dB 0 dB 50%
0.45 Hz 20 mS 100% 100% +2 Stereo 0 dB 0 dB 50%
1.5 Hz 90 degree 180 degree 100% +2 Stereo 0 dB 0 dB 50%
0.75 Hz 100% 100% 100% +2 Stereo 0 dB 0 dB 50%
190mS 170 mS 45% 100% +2 Stereo 0 dB 0 dB 50%
20% 8% 50% 5.3 Sec 30 mS 100% 0 dB 0 dB 100%
20% 8% 50% 190 mS 205 mS 50% 0 dB 0 dB 100%
Treble
Mix
Page 53

Parameter Range of Effects Algorithms
Gama de Parámetro de Algoritmos de Efectos
效果演算法的参数范围
Faixa de Parâmetro dos Algoritmos de Efeito (em inglês)
No. Effect Edit A Edit B Edit C Edit D Edit E Edit F Bass
Reverb
1 Cathedral
2 Small Hall
3 Spring
4 Concert
5 Large Hall
6 Plate
7 Thin Plate
8 Drum Plate
9 Vocal Plate
10 Slice Plate
11 Room
12 Studio
13 Ambience
14 Reect
15 Space
16
17
Gate
Reverb 1
Gate
Reverb 2
0.1~12.7
Sec
0.1~12.7
Sec
0.1~12.7
Sec
0.1~12.7
Sec
0.1~12.7
Sec
0.1~12.7
Sec
0.1~12.7
Sec
0.1~12.7
Sec
0.1~12.7
Sec
0.1~12.7
Sec
0.1~12.7
Sec
0.1~12.7
Sec
0.1~12.7
Sec
0.1~12.7
Sec
0.1~12.7
Sec
0~100 mS 0~100% 0~100% 0Hz~2k Hz 0~100%
0~100 mS 0~100% 0~100% 0Hz~2k Hz 0~100%
0~100 mS 0~100% 0~100% 0Hz~2k Hz 0~100%
0~100 mS 0~100% 0~100% 0Hz~2k Hz 0~100%
0~100 mS 0~100% 0~100% 0Hz~2k Hz 0~100%
0~100 mS 0~100% 0~100% 0Hz~2k Hz 0~100%
0~100 mS 0~100% 0~100% 0Hz~2k Hz 0~100%
0~100 mS 0~100% 0~100% 0Hz~2k Hz 0~100%
0~100 mS 0~100% 0~100% 0Hz~2k Hz 0~100%
0~100 mS 0~100% 0~100% 0Hz~2k Hz 0~100%
0~100 mS 0~100% 0~100% 0Hz~2k Hz 0~100%
0~100 mS 0~100% 0~100% 0Hz~2k Hz 0~100%
0~100 mS 0~100% 0~100% 0Hz~2k Hz 0~100%
0~100 mS 0~100% 0~100% 0Hz~2k Hz 0~100%
0~100 mS 0~100% 0~100% 0Hz~2k Hz 0~100%
-60~0 dB 1~112 8mS 5~632 mS
-60~0 dB 1~112 8mS 5~632 mS
0.1~12.7Sec
0.1~12.7Sec
0~100mS 0~100%
0~100mS 0~100%
+16
dB~-16
dB
+16
dB~-16
dB
+16
dB~-16
dB
+16
dB~-16
dB
+16
dB~-16
dB
+16
dB~-16
dB
+16
dB~-16
dB
+16
dB~-16
dB
+16
dB~-16
dB
+16
dB~-16
dB
+16
dB~-16
dB
+16
dB~-16
dB
+16
dB~-16
dB
+16
dB~-16
dB
+16
dB~-16
dB
+16
dB~-16
dB
+16
dB~-16
dB
Treble
+16
dB~-16
dB
+16
dB~-16
dB
+16
dB~-16
dB
+16
dB~-16
dB
+16
dB~-16
dB
+16
dB~-16
dB
+16
dB~-16
dB
+16
dB~-16
dB
+16
dB~-16
dB
+16
dB~-16
dB
+16
dB~-16
dB
+16
dB~-16
dB
+16
dB~-16
dB
+16
dB~-16
dB
+16
dB~-16
dB
+16
dB~-16
dB
+16
dB~-16
dB
Mix
0~100%
0~100%
0~100%
0~100%
0~100%
0~100%
0~100%
0~100%
0~100%
0~100%
0~100%
0~100%
0~100%
0~100%
0~100%
0~100%
0~100%
53DFX2000
Page 54

54 DFX2000
No. Effect Edit A Edit B Edit C Edit D Edit E Edit F
Filter/EQ
Tremolo-
46
47
48
GEQ
Sweep-
GEQ
Parameter-EQ+16 dB~-16 dB200Hz~10
49 Graphic-EQ
0.1~31.65
Hz
0.1~31.65 Hz0~180
0~100% 0~100% 0~100% 0~100% 0~100%
degree
kHz
0~180
degree
0.5~10
0~180
degree
+16dB~-
16dB
0~180
degree
200Hz~10kHz
0~180
degree
0.5~10
+16 dB~-16 dB+16 dB~-16 dB+16 dB~-16 dB+16 dB~-16 dB+16 dB~-16 dB+16 dB~-16
dB
Special FX
50 Harmonic
51 Sampler
52 Resonator
+16 dB~-16 dB+16 dB~-30
dB
Record,
Stop
0.1~31.65
Hz
Play, Stop -100~+100 0~10 0~9000 mS
1~127 mS 0~100%
0~10
+16 dB~-16 dB200 Hz~10
kHz
0~180
degree
100 Hz~20
kHz
0.5~10
100~9000
mS
Sine,
Triangle
Combonation
53
54
55
56
57
58
59
Chorus/
Reverb
Flanger/
Reverb
Phaser/
Reverb
Delay/
Reverb
Tremolo/
Reverb
Vibrato/
Reverb
Resonator/
Reverb
Sweep-
60
GEQ/
Reverb
61
62
63
Chorus/
Delay
Flanger/
Delay
Phaser/
Delay
64 Pitch/Delay -12~+12
Tremolo/
65
Delay
0.1~31.65
Hz
0.1~31.65
Hz
0.1~31.65
Hz
1~127 mS 0~100% 0~100%
1~127 mS 0~100% 0~100%
1~127mS 0~100% 0~100%
0~635 mS 0~635 mS 0~99% 0~100%
0.1~31.65
Hz
0.1~31.65
Hz
0.1~31.65
Hz
0~100%
0~100% 0~10 0~100%
5~63.5 mS 0~100% 0~100%
0.1~31.65 Hz0~180
degree
0.1~31.65
Hz
0.1~31.65
Hz
0.1~31.65
Hz
1~127mS 0~100% 0~100% 0~370 mS 0~99%
1~127mS 0~100% 0~100% 0~370 mS 0~99%
1~127mS 0~100% 0~100% 0~370 mS 0~99%
Stereo,
-12~+12
0.1~31.65
Hz
0~100%
0~180
degree
0~180
degree
Off,
-12~+12
0~180
degree
0~100%
0~100%
0~100% 0~370 mS 0~99%
0~100% 0~370 mS 0~99%
0.1~12.7Sec
0.1~12.7Sec
0.1~12.7Sec
0.1~12.7Sec
0.1~12.7
Sec
0.1~12.7
Sec
0.1~12.7
Sec
0.1~12.7
Sec
0~100%
0~100%
0~100%
0~100%
0~100%
0~100%
0~100%
0~100%
Bass Treble
+16
dB~-16
+16
dB~-16
+16
dB~-16
+16
dB~-16
+16
dB~-16
+16
dB~-16
+16
dB~-16
+16
dB~-16
+16
dB~-16
+16
dB~-16
+16
dB~-16
+16
dB~-16
+16
dB~-16
+16
dB~-16
+16
dB~-16
+16
dB~-16
+16
dB~-16
+16
dB~-16
+16
dB~-16
+16
dB~-16
dB
dB
dB
dB
dB
dB
dB
dB
dB
dB
dB
dB
dB
dB
dB
dB
dB
dB
dB
dB
+16
dB~-16
dB
+16
dB~-16
dB
+16
dB~-16
dB
+16
dB~-16
dB
+16
dB~-16
dB
+16
dB~-16
dB
+16
dB~-16
dB
+16
dB~-16
dB
+16
dB~-16
dB
+16
dB~-16
dB
+16
dB~-16
dB
+16
dB~-16
dB
+16
dB~-16
dB
+16
dB~-16
dB
+16
dB~-16
dB
+16
dB~-16
dB
+16
dB~-16
dB
+16
dB~-16
dB
+16
dB~-16
dB
+16
dB~-16
dB
Mix
0~100%
0~100%
+16
dB~-16
dB
+16
dB~-16
dB
0~100%
0~100%
0~100%
0~100%
0~100%
0~100%
0~100%
0~100%
0~100%
0~100%
0~100%
0~100%
0~100%
0~100%
0~100%
0~100%
Page 55

66
67
68
69
70
71
72
73
74
75
76
Vibrato/
Delay
Resonator/
Delay
Sweep-
GEQ/Delay
Tremolo-
GEQ/Delay
Flanger/
Chorus
Phaser/
Chorus
Pitch/
Chorus
Tremolo/
Chorus
Vibrato/
Chorus
Resonator/
Chorus
Sweep-
GEQ/
Chorus
0.1~31.65
Hz
0.1~31.65
Hz
0~100% 0~10 0~100% 0~370 mS 0~99%
1~127mS 0~100% 0~100% 0~370 mS 0~99%
0.1~31.65 Hz0~180
degree
0.1~31.65
Hz
0.1~31.65
Hz
0.1~31.65
Hz
-12~+12
0.1~31.65Hz
0.1~31.65Hz
0.1~31.65Hz
0.1~31.65Hz
0~100% 0~100% 0~100% 0~370 mS 0~99%
1~127 mS 0~100% 0~100%
1~127 mS 0~100% 0~100%
Stereo,
-12~+12
0~100%
0~100% 0~10 0~100%
1~127 mS 0~100% 0~100%
0~180
degree
0~180
degree
Off,
-12~+12
0~180
degree
0~180
degree
0~100% 0~370 mS 0~99%
0~100%
0~100%
0~100%
0.1~31.65
Hz
0.1~31.65
Hz
0.1~31.65
Hz
0.1~31.65
Hz
0.1~31.65
Hz
0.1~31.65
Hz
0.1~31.65
Hz
0~99%
0~99%
0~99%
0~99%
0~99%
0~99%
0~99%
+16
dB~-16
dB
+16
dB~-16
dB
+16
dB~-16
dB
+16
dB~-16
dB
+16
dB~-16
dB
+16
dB~-16
dB
+16
dB~-16
dB
+16
dB~-16
dB
+16
dB~-16
dB
+16
dB~-16
dB
+16
dB~-16
dB
+16
dB~-16
dB
+16
dB~-16
dB
+16
dB~-16
dB
+16
dB~-16
dB
+16
dB~-16
dB
+16
dB~-16
dB
+16
dB~-16
dB
+16
dB~-16
dB
+16
dB~-16
dB
+16
dB~-16
dB
+16
dB~-16
dB
0~100%
0~100%
0~100%
0~100%
0~100%
0~100%
0~100%
0~100%
0~100%
0~100%
0~100%
No. Effect Edit A Edit B Edit C Edit D Edit E Edit F Bass
77
78
79
80
81
82
83
84
Tremolo-
GEQ/
Chorus
Round
Delay/
Chorus
Phaser/
Flanger
Pitch/
Flanger
Tremolo/
Flanger
Vibrato/
Flanger
Resonator/
Flanger
Sweep-
GEQ/
Flanger
0.1~31.65Hz
0~290mS
0.1~31.65Hz
-12~+12
0.1~31.65Hz
0.1~31.65Hz
0.1~31.65Hz
0.1~31.65Hz
0~100% 0~100% 0~100%
0~290mS 0~99% 0~100%
1~127 mS 0~100% 0~100%
Stereo,
-12~+12
0~100%
Off,
-12~+12
0~180
degree
0~100%
0~100%
0~100% 0~10 0~100%
1~127 mS 0~100% 0~100%
0~180
degree
0~180
degree
0~100%
0.1~31.65
Hz
0.1~31.65
Hz
0.1~31.65
Hz
0.1~31.65
Hz
0.1~31.65
Hz
0.1~31.65
Hz
0.1~31.65
Hz
0.1~31.65
Hz
0~99%
0~99%
0~100%
0~100%
0~100%
0~100%
0~100%
0~100%
+16
dB~-16
dB
+16
dB~-16
dB
+16
dB~-16
dB
+16
dB~-16
dB
+16
dB~-16
dB
+16
dB~-16
dB
+16
dB~-16
dB
+16
dB~-16
dB
Treble
+16
dB~-16
dB
+16
dB~-16
dB
+16
dB~-16
dB
+16
dB~-16
dB
+16
dB~-16
dB
+16
dB~-16
dB
+16
dB~-16
dB
+16
dB~-16
dB
Mix
0~100%
0~100%
0~100%
0~100%
0~100%
0~100%
0~100%
0~100%
55DFX2000
Page 56

56 DFX2000
85
86
87
88
89
90
91
92
93
94
95
96
97
98
99
100
101
Tremolo-
GEQ/
Flanger
Round
Delay/
Flanger
Pitch/
Phaser
Tremolo/
Phaser
Vibrato/
Phaser
Resonator/
Phaser
Sweep-
GEQ/
Phaser
Tremolo-
GEQ/
Phaser
Round
Delay/
Phaser
Tremolo/
Pitch
Vibrato/
Pitch
Resonator/
Pitch
Sweep-
GEQ/Pitch
Tremolo-
GEQ/Pitch
Round
Delay/Pitch
Distortion/
Reverb
Distortion/
Delay
0.1~31.65Hz
0~100% 0~100% 0~100%
0~290mS 0~290mS 0~99% 0~100%
-12~+12
0.1~31.65Hz
0.1~31.65Hz
0.1~31.65Hz
0.1~31.65Hz
0.1~31.65Hz
0~290mS
0.1~31.65Hz
0.1~31.65Hz
0.1~31.65Hz
0.1~31.65Hz
0.1~31.65Hz
Stereo,
-12~+12
0~100%
0~100% 0~10 0~100 %
1~127 mS 0~100% 0~100 %
0~180
degree
0~100% 0~100% 0~100 %
0~290 mS 0~99% 0~100 %
0~100%
0~100% 0~10 0~100% -12~+12
1~127 mS 0~100% 0~100% -12~+12
0~180
degree
0~100% 0~100% 0~100% -12~+12
Off,
-12~+12
0~180
degree
0~180
degree
0~180
degree
0~180
degree
0~100 %
0~100 %
0~100 %
0~100% -12~+12
0~100% -12~+12
0~290mS 0~290 mS 0~99% 0~100% -12~+12
0~100% 0~100% 0~100%
0.1~12.7
Sec
0.1~31.65
Hz
0.1~31.65
Hz
0.1~31.65
Hz
0.1~31.65
Hz
0.1~31.65
Hz
0.1~31.65
Hz
0.1~31.65
Hz
0.1~31.65
Hz
0.1~31.65
Hz
0~100%
0~100%
0~100 %
0~100 %
0~100 %
0~100 %
0~100 %
0~100 %
0~100 %
Stereo,
-12~+12
Stereo,
-12~+12
Stereo,
-12~+12
Stereo,
-12~+12
Stereo,
-12~+12
Stereo,
-12~+12
0~100 mS 0~100%
0~100% 0~100% 0~100% 0~635 mS 0~635 mS 0~99%
+16
dB~-16
dB
+16
dB~-16
dB
+16
dB~-16
dB
+16
dB~-16
dB
+16
dB~-16
dB
+16
dB~-16
dB
+16
dB~-16
dB
+16
dB~-16
dB
+16
dB~-16
dB
+16
dB~-16
dB
+16
dB~-16
dB
+16
dB~-16
dB
+16
dB~-16
dB
+16
dB~-16
dB
+16
dB~-16
dB
+16
dB~-16
dB
+16
dB~-16
dB
+16
dB~-16
dB
+16
dB~-16
dB
+16
dB~-16
dB
+16
dB~-16
dB
+16
dB~-16
dB
+16
dB~-16
dB
+16
dB~-16
dB
+16
dB~-16
dB
+16
dB~-16
dB
+16
dB~-16
dB
+16
dB~-16
dB
+16
dB~-16
dB
+16
dB~-16
dB
+16
dB~-16
dB
+16
dB~-16
dB
+16
dB~-16
dB
+16
dB~-16
dB
0~100%
0~100%
0~100%
0~100%
0~100%
0~100%
0~100%
0~100%
0~100%
0~100%
0~100%
0~100%
0~100%
0~100%
0~100%
0~100%
0~100%
Page 57

Effects Structure
1-15
16-17
18
19
L L
DELAY
HP
LP
FB
R R
DELAY
HP
LP
FB
L L
DELAY
FB
R R
DELAY
FB
IN OUT
L
L
R
R
PRE-DELAY FILTER REVERB EQ
PRE-DELAY FILTER REVERB EQ
IN OUT
IN OUT
IN OUT
L
L
R R
PRE-DELAY EQGATEREVERB
PRE-DELAY EQ
EQ
EQ
EQ
EQ
GATEREVERB
Effects Structure
Algorithm
No.
IN OUT
IN OUT
20
DELAY
DELAY
FB
FB
DELAY
DELAY
L L
R
R
EQ
EQ
22-33
35-37
38-414448-52
IN
L
R
OUT
L
R
EFFECT_L EQ
EFFECT_R EQ
34
IN OUT
L
R
R
L
PITCH 1
+
PITCH 3
PITCH 2
M
I
X
E
R
EQ
EQ
Effects Structure
Algorithm
No.
21
L L
DELAY 1
FB FB
FB
DELAY 2 DELAY 3
EQ
R R
DELAY 1
FB FB
FB
DELAY 2 DELAY 3
EQ
Estructura de Efectos
效果构成
Estrutura dos Efeitos (em inglês)
57DFX2000
Page 58
53-101
45
IN OUT
L
L
R
R
DISTORTION
EQ
DISTORTION
EQ
OUT
L
L
EFFECT 1
EFFECT 2
1+2
IN
A) SERIAL 1
B) SERIAL 2
C) PARALLEL
EQ
R
R
EFFECT 2 EFFECT 2
1+2
EQ
OUT
L
R
EFFECT 1 EFFECT 2
IN
IN
L
EQ
R
EQ
OUT
L
IN
L
EQ
R
EQ
R
Effects Structure
Algorithm
No.
Effects Structure
Algorithm
No.
46
IN OUT
L
R
R
L
GEQ 1-5
DEPTH
LFO
GEQ 1-5
EQ
EQ
47
IN OUT
L
R
R
L
GEQ 1-5
PHASE
LFO
GEQ 1-5
EQ
EQ
EFFECT 1
EFFECT 2
EFFECT 1
EFFECT 2
42-43
IN OUT
L
R R
L
FILTER
G
A
T
E
EQ
EQ
DYNAMICS
DYNAMICS
FILTER
58 DFX2000
Page 59

support@phonic.com http://www.phonic.com
SERVICIO Y REPARACIÓN
Para refacciones de reemplazo y
reparaciones, por favor póngase en
contacto con nuestro distribuidor de Phonic
en su país. Phonic no distribuye manuales
de servicio directamente a los
consumidores y, avisa a los usuarios que no
intenten hacer cualquier reparación por si
mismo, haciendo ésto invalidará todas las
garantías del equipo. Puede encontrar un
distribuidor cerca de usted en
http://www.phonic.com/where/.
INFORMACIÓN DE LA GARANTIA
Phonic respalda cada producto que
hacemos con una garantía sin enredo. La
cobertura de garantía podría ser ampliada
dependiendo de su región. Phonic
Corporation garantiza este producto por un
mínimo de un año desde la fecha original de
SERVICE AND REPAIR
For replacement parts, service and repairs
please contact the Phonic distributor in your
country. Phonic does not release service
manuals to consumers, and advice users to
not attempt any self repairs, as doing so
voids all warranties. You can locate a dealer
near you at http://www.phonic.com/where/.
WARRANTY INFORMATION
Phonic stands behind every product we
make with a no-hassles warranty. Warranty
coverage may be extended, depending on
your region. Phonic Corporation warrants
this product for a minimum of one year from
the original date of purchase against
defects in material and workmanship under
use as instructed by the user’s manual.
Phonic, at its option, shall repair or replace
the defective unit covered by this warranty.
Please retain the dated sales receipt as
evidence of the date of purchase. You will
need it for any warranty service. No returns
or repairs will be accepted without a proper
RMA number (return merchandise
authorization). In order to keep this
warranty in effect, the product must have
been handled and used as prescribed in
the instructions accompanying this
warranty. Any tampering of the product or
attempts of self repair voids all warranty.
This warranty does not cover any damage
due to accident, misuse, abuse, or
negligence.
This warranty is valid only if the
product was purchased new from an
authorized Phonic dealer/distributor. For
complete warranty policy information,
please visit http://www.phonic.com/warranty/.
CUSTOMER SERVICE AND
TECHNICAL SUPPORT
We encourage you to visit our online help at
http://www.phonic.com/support/. There you
can find answers to frequently asked
questions, tech tips, driver downloads,
returns instruction and other helpful
information. We make every effort to answer
your questions within one business day.
su compra, contra defectos en materiales y
mano de obra bajo el uso que se instruya en
el manual del usuario. Phonic, a su propia
opinión, reparará o cambiará la unidad
defectuosa que se encuentra dentro de esta
garantía. Por favor, guarde los recibos de
venta con la fecha de compra como
evidencia de la fecha de compra. Va a
necesitar este comprobante para cualquier
servicio de garantía. No se aceptarán
reparaciones o devoluciones sin un número
RMA apropiado (return merchandise
autorization). En orden de tener esta
garantía válida, el producto deberá de
haber sido manejado y utilizado como se
describe en las instrucciones que
acompañan esta garantía. Cualquier
atentado hacia el producto o cualquier
intento de repararlo por usted mismo,
cancelará completamente esta garantía.
Esta garantía no cubre daños ocasionados
por accidentes, mal uso, abuso o
negligencia. Esta garantía es válida
solamente si el producto fue comprado
nuevo de un representante/distribuidor
autorizado de Phonic. Para la información
completa acerca de la política de garantía,
por favor visite http://www.phonic.com/warranty/.
SERVICIO AL CLIENTE Y
SOPORTE TÉCNICO
Le invitamos a que visite nuestro sistema de
ayuda en línea en www.phonic.com/support/.
Ahí podrá encontrar respuestas a las
preguntas más frecuentes, consejos técnicos,
descarga de drivers, instrucciones de
devolución de equipos y más información de
mucho interés. Nosotros haremos todo el
esfuerzo para contestar sus preguntas lo
antes posible.
ASSISTÊNCIA TÉCNICA E
REPAROS
Para obter serviço de assistência técnica ou
comprar partes, entre em contato com a
Equipo, distribuidora exclusiva da marca no
Brasil. A Phonic não disponibiliza manuais
de técnicos aos consumidores e recomenda
que o usuário tente consertar o produto sem
que este serviço seja realizado através de
uma assistência técnica autorizada.
INFORMAÇÃO DE GARANTIA
A Phonic garante os produtos que fabrica
de acordo com a lei vigente em cada país. A
Equipo garante seu produto PHONIC por
90 dias contra defeitos de fabricação. Caso
tenha duvidas a respeito dos termos de
garantia, pro favor, consulte o Certificado
de Garantia Equipo que acompanha este
produto.
SUPORTE TÉCNICO E COMPRA
DE OUTROS EQUIPAMENTOS
PHONIC
Para adquirir qualquer produto Phonic,
entre em contato com a revenda autorizada
mais próxima. Para uma lista completa dos
produtos Phonic, visite nosso site
www.phonic.com e clique em Get Gear.
Caso deseje, entre em contato com a
Equipo que lhe direcionaremos a uma
revenda autorizada.
Para informações técnicas e dicas sobre o
produto que acaba de adquirir, por favor
visite o site da Equipo (www.equipo.com.br)
ou consulte o suporte técnico da empresa
pelo telefone: (11) 2199.2999.
A Phonic conta ainda com uma área
especial em seu website onde você pode
encontrar dicas, downloads de drivers e
outras informações adicionais sobre cada
produto. Acesse: http://www.phonic.com.br/help/
服务与维修
如需更换零件,服务和维修,请联系您所在
国家的Phonic代理商。 Phonic不向 用户提
供维 修手册,且建议 用户不要擅自维 修机
器,否则将无法获得任何保修服务。您可登
录http://www.phonic.com/where/查找离您
最近的代理商。
保修信息
Phonic承诺对每 件产品提供无忧的保修服
务。根据所在地区的不同,保修时间或有延
长。自原始购买之日起,Phonic即对在严
格遵照使用说明书的操作规范下,因产品材
质和做工所产生的问题提供至少1年的保修
服务。Phonic可 根据保修条 例自行选择维
修或更换缺陷产品。请务必妥善保管购买凭
证,以此获得保修服务。 对未获 得RMA编
号(退货授权)的申请,Phonic将不予办理退
货或维修服务。保修服务只适用于正常使用
下所产生的问题。用户需严格遵照使用说明
书正确使用产品,任何因肆意损坏,擅自维
修,意外事故,错误使用或人为疏忽所造成
的问题,都不在保修受理范围之内。此外,
担保维修只适用于在授权代理商处的有效购
买 。如需了解 全 部 的 保 修 信 息 ,请登录
http://www.phonic.com/warranty/。
客户服务和技术支持
敬请访问http://www.phonic.com/support/。
从该 网站上,您可获 得各种常见问题 的解
答,技术指导,并可下载产品驱动,获得有
关退货指导以及其它有用的信息。我们将竭
尽全力在两个工作日内回复您的问题。
Page 60

 Loading...