


Phonak SkyTM M
User Guide
Phonak Sky M-M
Phonak Sky M-M Trial

This user guide is valid for: |
|
Models |
CE mark applied |
Phonak Sky M90-M |
2019 |
Phonak Sky M70-M |
2019 |
Phonak Sky M50-M |
2019 |
Phonak Sky M30-M |
2019 |
Phonak Sky M-M Trial |
2019 |
Your hearing aid details
 If no box is checked and you do not know the model of your hearing aid, please ask your hearing care professional.
 Your hearing aids operate between 2.4 GHz–
2.48 GHz frequency range. When flying please check if flight operator requires devices to be switched into flight mode, see chapter 12.
Model |
Battery size |
c Sky M-M (M90/M70/M50/M30) |
312 |
c Sky M-M Trial |
312 |
Earpiece
cClassic earmold
cUniversal eartip
cDome
cSlimTip
3
Contents
Your hearing aids have been developed by |
|
Your hearing aid |
|
Phonak – the world leader in hearing solutions based |
1. |
Quick guide |
6 |
in Zurich, Switzerland. |
2. |
Parts of the hearing aid |
8 |
|
|
Using the hearing aid |
|
These premium products are the result of decades of |
3. |
Left & right hearing aid markings |
10 |
research and expertise and are designed to keep you |
4. |
On/Off |
11 |
connected to the beauty of sound! We thank you for |
5. |
Batteries |
12 |
making such a great choice and wish you many years of |
6. |
Putting on the hearing aid |
17 |
listening pleasure. |
7. |
Removing the hearing aid |
19 |
|
8. |
Multi-function button with indicator light |
21 |
Please read the user guide carefully to make sure that you |
9. |
Connectivity overview |
24 |
understand and get the best out of your hearing aids. For |
10. |
Initial pairing |
25 |
more information about features and benefits, simply |
11. |
Phone calls |
27 |
contact your hearing care professional. |
12. |
Flight mode |
31 |
|
|
Further information |
|
Phonak – life is on |
13. |
Care and maintenance |
33 |
www.phonak.com |
14. |
Exchanging the earpiece |
36 |
|
15. |
Service and warranty |
40 |
|
16. |
Compliance information |
42 |
|
17. |
Information and description of symbols |
48 |
|
18. |
Troubleshooting |
52 |
|
19. |
Important safety information |
54 |
4

1. Quick guide
Left & right hearing aid markings
Blue marking for left hearing aid.
Red marking for right hearing aid.
Changing batteries
|
|
|
1. |
2. |
3. |
Remove the |
Open the battery |
Place battery in |
sticker from the |
door. For secured |
the battery door |
new battery and |
battery doors |
with the “+” |
wait two minutes. |
refer to chapter |
symbol facing |
|
5.2. |
upwards. |
On/Off
On |
Off |
For secured battery |
|
|
doors instructions refer |
|
|
to chapter 5.2. |
Multi-function button with indicator light
The button has several functions. It functions as a volume control and/or a program change depending on the hearing aid programming.
This is indicated in your individual instructions. If paired with a Bluetooth® enabled phone, a short press will accept and a long press will reject an incoming call. For indicator light refer to chapter 8.
Flight mode
To enter flight mode press the lower part
of the button for 7 seconds while closing the battery door. To exit flight mode, simply open and close the battery door again.
6 |
7 |
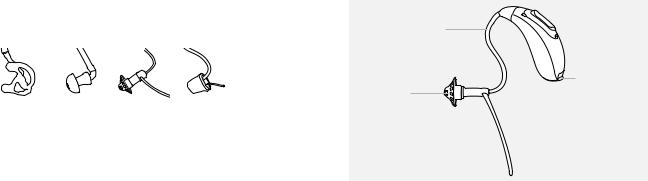
2. Parts of the hearing aid
The following pictures show the possible earpieces and hearing aid model described in this user guide.
Possible earpieces
|
|
|
|
|
|
|
Classic |
Universal |
Dome |
SlimTip |
|||
earmold |
eartip |
|
|
|
|
|
Sky M-M / Sky M-M Trial
Tube
Earpiece:
Dome (detachable)
 Multi-function button with indicator light
Battery door
Anchor
8 |
9 |
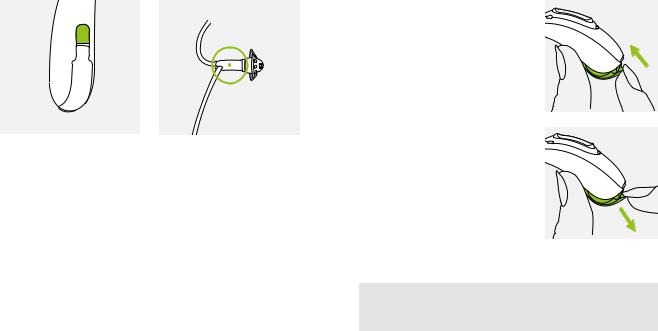
3. Left & right hearing aid markings
There is a red or blue marking to tell you if it is a left or a right hearing aid.
Blue marking for left hearing aid.
Red marking for right hearing aid.
4. On/Off
The battery door is also the on/off switch. To open secured battery doors refer to chapter 5.2.
1.
Closed battery door = hearing aid is on
2.
Open battery door = hearing aid is off
 When you switch on the hearing aid you may hear a start-up melody.
10 |
11 |
5. Batteries
5.1 Insert battery (standard battery doors)
|
|
|
|
|
1. |
|
2. |
3. |
|
Remove the sticker |
Open the |
Place battery in the battery |
||
from the new |
battery door. |
door with the “+” symbol |
||
battery and wait |
|
|
facing upwards. |
|
two minutes. |
|
|
|
|
If the battery door is secured for smaller children continue to read the important information below, and refer to specific instructions in chapter 5.2 for inserting the battery.
 If it is difficult to close the battery door: Check that the battery is inserted correctly and the “+” symbol is facing upwards. If the battery is not inserted correctly, the hearing aid will not work and the battery door can be damaged.
Low power: You will hear two beeps when the battery is low. You will have approximately 30 minutes to change the battery (this can vary, depending on the hearing aid settings and battery). We recommend that you always have a new battery on hand.
Replacement battery
This hearing aid requires a size 312 zinc-air battery.
Model
Phonak Sky
M-M/M-M Trial
Zinc-air |
Color |
IEC |
ANSI |
battery |
marking on |
code |
code |
size |
package |
|
|
312 |
brown |
PR41 |
7002ZD |
 Please ensure you use the correct type of battery in your hearing aids (zinc-air). Please also read chapter 19.2 for further information on product safety.
12 |
13 |
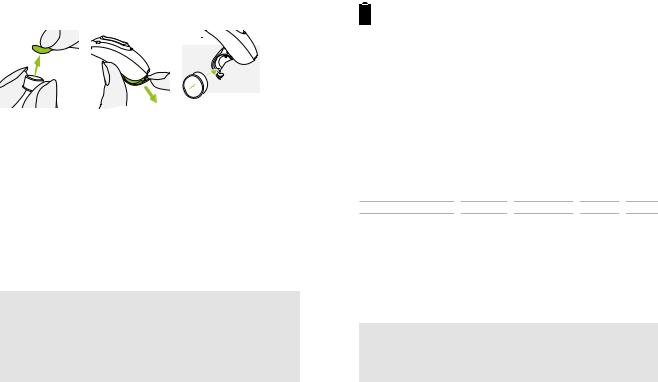
5.2 Insert battery with a secured battery door
This hearing aid can be fitted with a secured battery door if needed for safety reasons (children below 36 months).
Opening the battery door |
Inserting the battery |
1.
Place the tip of the tool in the small hole at the bottom of the hearing aid.
2.
Use the tool as a leverage to open the battery door with force in the direction of the green arrow.
1.
Remove the sticker from the new battery and wait for 2 minutes.
2.
Place battery in the battery door with the “+” symbol facing upwards.
14 |
15 |

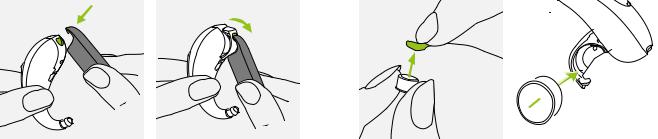
Closing the battery door
The battery is only secured when the battery door is closed correctly. Always check after closing, that the battery door cannot be opened by hand.
6. Putting on the hearing aid
6.1Putting on the hearing aid with classic earmold
1.
Take the earmold up to your ear and place the ear canal part into your ear canal.
2.
Place the hearing aid behind your ear.
3.
Insert the upper part of the earmold into the upper part of the bowl of your ear.
16 |
17 |
6.2Putting on the hearing aid with dome, SlimTip or universal eartip
1.
Place the hearing aid behind your ear.
2.
Insert the earpiece into your ear canal.
3.
If there is an anchor attached to the earpiece, tuck it into the bowl of your ear to secure your hearing aid.
7. Removing the hearing aid
7.1Removing the hearing aid with classic earmold
1.
Lift the hearing aid above the upper part of your ear.
2.
Grasp the earmold with your fingers and gently remove it.
 Please try to avoid gripping the tube to remove the hearing aid.
18 |
19 |
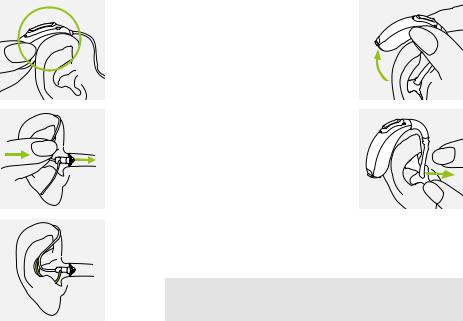
7.2Removing the hearing aid with dome, SlimTip or universal eartip
1.
Pull on the bend of the tube and remove the hearing aid from behind the ear.
8.Multi-function button with indicator light
The multi-function button has several functions.
It functions as a volume control and/or a program change depending on the hearing aid programming. This is indicated in your individual “Hearing aid instructions”. Please ask your hearing care professional for
a printout.
If the hearing aid is paired with a Bluetooth® enabled phone, a short press on the upper or lower part of the button will accept an incoming call and a long press will reject an incoming call – refer to chapter 11.
20 |
21 |
 Loading...