


Phonak SKY M70-PR, SKY M90-PR, SKY M50-PR, SKY M30-PR, BTE RIC User Manual
...Phonak Sky M
User Guide
Phonak Sky M-PR
Phonak Sky M-PR Trial

This user guide is valid for: |
|
Hearing aids |
|
Phonak Sky M90-PR |
2019 |
Phonak Sky M70-PR |
2019 |
Phonak Sky M50-PR |
2019 |
Phonak Sky M30-PR |
2019 |
Phonak Sky M-PR Trial |
2019 |
Charging accessory |
|
Phonak Charger BTE RIC |
2019 |
Your hearing aid & charger details
 If no box is checked and you do not know the model of your hearing aid or charging accessory, please ask your hearing care professional.
 The hearing aids described in this user guide contain a built-in and non-removable rechargeable lithiumion battery.
 Please also read safety information regarding handling rechargeable hearing aids (chapter 22).
Hearing aid models |
Earpieces |
c Sky M-PR (M90/M70/M50/M30) |
c Classic earmold |
c Sky M-PR Trial |
c Universal eartip |
Charging accessory |
c Dome |
c SlimTip |
|
c Charger BTE RIC incl. power supply |
|
3
Your hearing aids and charger have been developed by Phonak – the world leader in hearing solutions based in Zurich, Switzerland.
These premium products are the result of decades of research and expertise and are designed to keep you connected to the beauty of sound! We thank you for making such a great choice and wish you many years of listening pleasure.
Please read the user guide carefully to make sure that you understand and get the best out of your hearing aids. For more information about features and benefits, simply contact your hearing care professional.
Phonak - life is on
www.phonak.com
4 |
5 |
Contents
|
Your hearing aid and charger |
|
|
Further information |
|
1. |
Quick guide |
8 |
15. |
Operating conditions |
37 |
2. |
Parts of the hearing aid & charger |
10 |
16. |
Care and maintenance |
38 |
|
Using the charger |
|
17. |
Exchanging the earpiece |
41 |
3. |
Preparing the charger |
12 |
18. |
Service and warranty |
44 |
4. |
Charging the hearing aids |
13 |
19. |
Compliance information |
46 |
|
Using the hearing aid |
|
20. Information and description of symbols |
54 |
|
5. |
Left & right hearing aid markings |
17 |
21. |
Troubleshooting |
58 |
6. |
Putting on the hearing aid |
18 |
22. |
Important safety information |
62 |
7. |
Removing the hearing aid |
20 |
|
|
|
8. |
Multi-function button with indicator light |
22 |
|
|
|
9. |
On/Off |
25 |
|
|
|
10. |
Connectivity overview |
26 |
|
|
|
11. |
Initial pairing |
27 |
|
|
|
12. |
Phone calls |
29 |
|
|
|
13. |
Flight mode |
33 |
|
|
|
14. |
Rebooting your hearing aid |
36 |
|
|
|
6 |
7 |
1. Quick guide
Charging your hearing aid
 Before using your hearing aid for the first time, it is recommended to charge it for 3 hours.
After placing your hearing aid
in the charger, the indicator light will show the charging state of the battery until the hearing aid is fully charged. When fully charged the indicator light will be constantly on, i.e. solid
green light.
Left & right hearing aid markings
Blue marking for left hearing aid.
Red marking for right hearing aid.
Multi-function button with indicator light
The button has several functions. It functions as an on/off switch, a volume control and/or a program
change depending on the hearing aid programming. This is indicated in your individual instructions. If paired with a Bluetooth® enabled phone,
a short press will accept and a long press will reject an incoming call.
On/Off
Firmly press the lower part of the button for 3 seconds until the indicator light turns solid green (On) or solid
red (Off).
Enter flight mode
When device is off, press the lower part of the button for 7 seconds until the solid orange light appears. Then release the button.
8 |
9 |
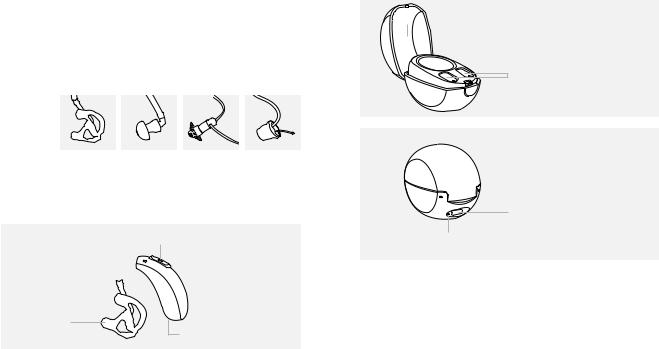
2. Parts of the hearing aid & charger
The following pictures show the hearing aid model and charger accessory described in this user guide. You can identify your personal models by:
•checking “Your hearing aid & charger details” on page 3.
•comparing your hearing aid and charger with the following models.
Possible earpieces
Classic |
Universal |
Dome |
SlimTip |
earmold |
eartip |
|
|
Sky M-PR / Sky M-PR Trial
Multi-function button with indicator light
Hook 

Classic |
|
earmold (detachable) |
Charging contacts |
10
Charger
Hearing aid charging slots with left/right indicators
USB port to external power supply
Indicator light for power
11

3. Preparing the charger
Connecting the power supply
c |
|
a |
d |
b |
a)Plug the larger end of the charging cable into the power supply.
b)Plug the smaller end into the USB port on the charger.
c)Plug the power supply into a power outlet.
d)The indicator light is green when the charger is connected to the power supply.
4. Charging the hearing aids
 Low power: You will hear two beeps when the battery is low. You will have approximately 60 minutes before you have to charge the hearing aids (this can vary, depending on the hearing aid settings).
 The hearing aid contains a built-in and nonremovable rechargeable lithium-ion battery.
 Before using your hearing aid for the first time, it is recommended to charge it for 3 hours.
 The hearing aid must be dry before charging, see chapter 16.
12 |
13 |
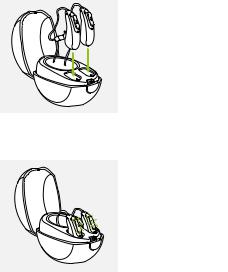
4.1 Using the charger
Please refer to chapter 3 for how to set up the charger.
1.
Insert the hearing aid into the charging slots. Make sure the left and right hearing aid markings match the left (blue), right (red) indicators next to the charging slots. The hearing aids will automatically be muted when inserted into the charger.
2.
The indicator light will show the charging state of the battery until the hearing aid is fully charged. When fully charged the indicator light will be solid green.
The charging process will automatically stop when the batteries are fully charged, so the hearing aid can be safely left in the charger. It can take up to 3 hours to charge the hearing aid. The charger can be closed while charging.
Charging times
Indicator light |
Charging state |
Approx. charging times |
|
|
|
|
0 – 10% |
|
|
|
|
|
|
30 min (30%) |
|
11 – 80% |
60 min (50%) |
|
|
90 min (80%) |
|
|
|
|
81 – 99% |
|
|
|
|
|
100% |
3 h |
|
|
|
14 |
15 |

3. |
|
2 |
|
Remove the hearing aid from the |
1 |
||
charger by |
|||
|
|||
1. |
pulling the hearing aid gently |
|
|
|
toward yourself and |
|
|
2. |
lifting it out of the charger. |
|
|
 Do not hold the tube to remove the hearing aid from the charger as this can damage the tube.
When the charger is connected to the power supply,
the hearing aid switches on automatically when removed from the charger. The indicator light starts blinking.
The solid green light indicates for 3 seconds that the hearing aid is ready.
If you unplug the charger while the hearing aid is charging inside, please make sure to turn off the hearing aid to prevent discharge.
 Turn off your hearing aid before inserting it in the disconnected charger to store it.
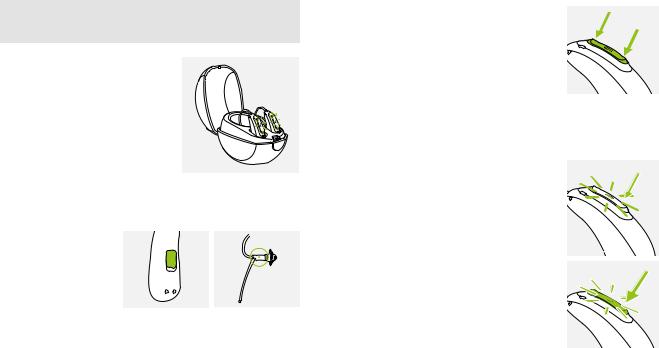
5. Left & right hearing aid markings
There is a red or blue marking on the back of the hearing aid and on the speaker. This will tell you if it is a left or a right hearing aid.
Blue marking
for left hearing aid.
Red marking
for right hearing aid.
16 |
17 |

6. Putting on the hearing aid
6.1Putting on the hearing aid with classic earmold
1.
Take the earmold up to your ear and place the ear canal part into your ear canal.
2.
Place the hearing aid behind your ear.
3.
Insert the upper part of the earmold into the upper part of the bowl of your ear.
6.2Putting on the hearing aid with dome, SlimTip or universal eartip
1.
Place the hearing aid behind your ear.
2.
Insert the earpiece into your ear canal.
3.
If there is an anchor attached to the earpiece, tuck it into the bowl of your ear to secure your hearing aid.
18 |
19 |
7. Removing the hearing aid
7.1Removing the hearing aid with classic earmold
1.
Lift the hearing aid above the upper part of your ear.
2.
Grasp the earmold with your fingers and gently remove it.
 Please try to avoid gripping the tube to remove the hearing aid.
7.2Removing the hearing aid with dome, SlimTip or universal eartip
1.
Pull on the bend of the tube and remove the hearing aid from behind the ear.
20 |
21 |

8.Multi-function button with indicator light
The multi-function button has several functions.
It functions as an on/off switch, a volume control and/or a program change depending on the hearing aid programming. This is indicated in your individual “Hearing aid instructions”. Please ask your hearing care professional for a printout.
If the hearing aid is paired with a Bluetooth® enabled phone, a short press on the upper or the lower part of the button will accept an incoming call and a long press will reject an incoming call – refer to chapter 12.
Indicator light
Parents and caregivers of infants and young children can easily be informed about the hearing aid status with the indicator light. The indicator light is integrated in the multi-function button and shows the status of the hearing aid as long as it is powered on and charged.
Your hearing care professional can activate/deactivate the indicator light in different ways.
The complete list of the hearing aid status alerts is shown below. Please ask your hearing care professional to mark what has been activated accordingly.
22 |
23 |
 Loading...