

Page 1
Instructions for use
Mode d’emploi
Instrucciones de manejo
Page 2

AFETY RECAUTIONS
cAUTiom
RISK OF ELECTRIC SHOCK
A
CAUTION; TO REOUCE THE RISK OF ELECTRIC SHOCK, DO NOT
REMOVE COVER (OR BACK]. NO USER-SERVICEABLE PARTS
INSIDE. REFER SERVICING TO QUALIFIED SERVICE PERSONNEL.
This “bolt of lightning” indicates uninsulated material
within your unit may cause an electrical shock. For the
A
safety of everyone in your household, please do not
remove product covering.
The “exclamation point” calls attention to features for
which you should read the enclosed literature closely
to prevent operating and maintenance problems.
DO NOT OPEN
A
A
WARNING: TO PREVENT FIRE OR SHOCK HAZARD, DO
NOT EXPOSE THIS EQUIPMENT TO RAIN OR
MOISTURE.
VMS
introduction
Congratulations on purchasing your
new VCR.
You can’t wait to get it working, hut
before you do. spare a few moments to
read this brief introduction to the v. orld
of video recording. It may repay you
handsomely in terms of improved
results, and avoiding of costly mis
takes.
Positioning
Do not place the VCR directly on top
of, or underneath, your TV set. Ensure
that there is at least 20 cm betv. een the
VCR and the TV set. and that air can
circulate freely through the ventilation
openings of the VCR.
CAUTION: To prevent electrical shock, match wide blade
of plug to wide slot, and fully insert.
ATTENTION: Pour éviter les chocs électriques, introduire
la lame la plus large de la fiche dans la borne
correspondante de la prise et pousser
jusqu’au fond.
FCC Warning: Any unauthorized changes or modifications
to this equipment void the user’ authority to
operate it.
For Customer Use
Enter below the Serial No. which is located on the
rear of the cabinet.
Retain this information for future reference.
Model No.
Serial No.
Page 3

This VCR, equipped with a HQ (High Quality) system, is compatible with any
uthcrVHSVCR.
This VCR is also equipped with SQPB (S-VHS Quasi PlayBack), making it
possible to play back S-VHS recordings with regular VHS resolution.
Philips Consumer Electronics Company recommends that you use only video
cassette tapes that have been tested and inspected for use in two. four, six and eight
hour VCRs, and which are labeled with the lVHSj mark.
The use of the tapes that have not been inspected for use in two, four, six. and eight
hour VCRs may result in poor picture quality and excessive deposits on the video
heads, which may not be covered by the warranty if damage occurs.
Note to the Cable TV System Installer: This reminder is provided to call the
Cable TV system installer's attention to Article 820-40 of the National Electrical
Cude, which provides guidelines for proper grounding - in particular, specify ing
that the cable ground shall be connected to the grounding sy.stem of the building, as
close to the point of cable entry as possible.
Operation is subject to the following two conditions: ( 1 ) this device may not cause
iuterlcrencc. and (2) this device must accept any interference, including interfer
ence that may cause undcsired operation of the device.
IMPORTANT
Audio-Visual material may consist
of copynghted works which must
not be recorded without the
authority of the owner of the
copyright.
Please refer to relevant laws in your
country.
VCR Maintenance
• Remo\ e any light adhesive stick-on
labels from the video cassette tape
before putting the tape in the VCR
since these labels may be jammed in
the VCR.
• Periodical maintenance is required to
maintain your VCR’s performance.
Your VCR has an automatic head
cleaner, but the video heads eventu
ally w ill require cleaning or replace
ment, Cleaning or replacement of the
\ ideo heads should be performed
only by an authorized serx'ice center.
DBS''’ is an official trademark of DIRECTV, Inc., a unit of GM Hughes Electronics.
— 3 —
Conversion Plug
Use the conversion plug (provided)
depending on the type of your AC
WALL outlet for connection to
countries outside of USA and
Canada.
Page 4

ABLE OF ONTENTS
Description of Controls
Getting Connected Up
Setting Up
.......................
Basic Operations
........
........
..............
10
11
14
5
Front Panel
Display Window....
On-Screen Display
Rear Panel
Remote Control
VCR to TV Connection.......
VCR to AV TV Connection
Menu Operations
Turning On VCR
Clock Setting
Selecting Language.
Channel Setting
Playback................................................................................................................14
Recording............................................................................................................ 14
One Touch Recording (OTR)
Inde.K Search........................................................................................................15
Automatic Operations...........................................................................................15
............
.............
.....
.....
.....
...........
.......
...............................................................................
10
in
11
11
12
13
13
13
Advanced Operations
.........
16
Using On-Screen Display......................................................................................16
Stabilizing Playback Quality.
Picture Control
Special Effect Playbacks
Tracking Adjustments
Timer Recording.
Tape Duplication...................................................................................................20
......................
.......
...........
........................................................................16
......................................................................
.......................................................................17
...............................................................................................................................IS
........................................................................18
Before Requesting Service................................................................................................21
Specifications................................................................................................................ 22
16
•4 —
Page 5

ESCRIPTION OF ONTROLS
Front Panel
7 PLAY ► button
Starts normal playback. 14-P.14)
8 AUDIO/VIDEO input jacks
For connecting another VCR or a
portable video camera. t')-P.20)
9 VCR/TV button
Selects which built-in tuner (either TV's
orVCR'sl to use.
Pressing this button turns on or off the
VCR indicator on the display.
Whi'n the VCR hulicalor i-i on:
The VCR's tuner becomes active for the
TV. You cannot select the channels on
the TV.
Whm the VCR indicator is oft:
The TV's tuner becomes active for
itself. So you can w atch another TV''
broadcast while recording a TV
broadcast selected with the VCR's
tuner. C)-P.14)
10 Display window
See the next page.
1 POWER button
• rums tlic VCR i>n or olì.
• Sus tils' VCR lor an imattondcd
»scortimi! (timer rccoi'ding) after
timer seltiri“s are completed. ('>P.1S)
2 STILL/PAUSE
Stops the tape during recording (pause)
or plnyKjck Istiil picture). t»)-R14. R17)
Riess aeam to resume normal recording
or press PLAY ► to resume normal
pl.iybaek.
Also, press for more than 2 seconds
diirmg playback to viev: a slow motion
picture
00
button
3 Cassette Compartment
Where a video cassette is inserted.
4 ►/OK button
Changes the selection w hen using the
menus. (>)-P.ll)
5 REC (record)/OTR • button
• Starts recording when pressed once.
PRP.14)
• Starts a recording for 30 minutes to 9
hours long w'hen pressed more than
once. The shut-off time increases in
30 minute interv als. (^P.I5)
6 STOP/EJECTB/i^ button
Stops the tape when the tape is runnina.
(■>P.14)
Press again to eject the cassette when
the tape is not running. (>)-P.I4)
11IR (infrared) remote sensor
Receives the signal from the (IR)
remote control.
12 MENU/EXIT button
Display the main menu.
Press again to exit from the menu
operations. (9-P.ll)
13 CHANNEL T/A buttons
• Changes the channels on the VCR.
Release at a desired channel.
• Moves the cursor up and down w hen
using the menus. (>>P.ll)
• Ad justs the tracking during play back,
still picture, and slow motion picture
1A-P.!7>
14 REW (Rewmd)^'^ button
• Rew inds the tape when the tape is not
running. (>>-P.!4)
• Starts reverse rapid visual search
during playback. l'FP.14)
15 FF (Fast forward) ►► button
• Fast fonvards the tape when the tape
is not running. (>VP.14)
• Starts fonvard rapid v isual search
during playback. (>fP.14)
— 5
Page 6
ESCRIPTION OF ONTROLS
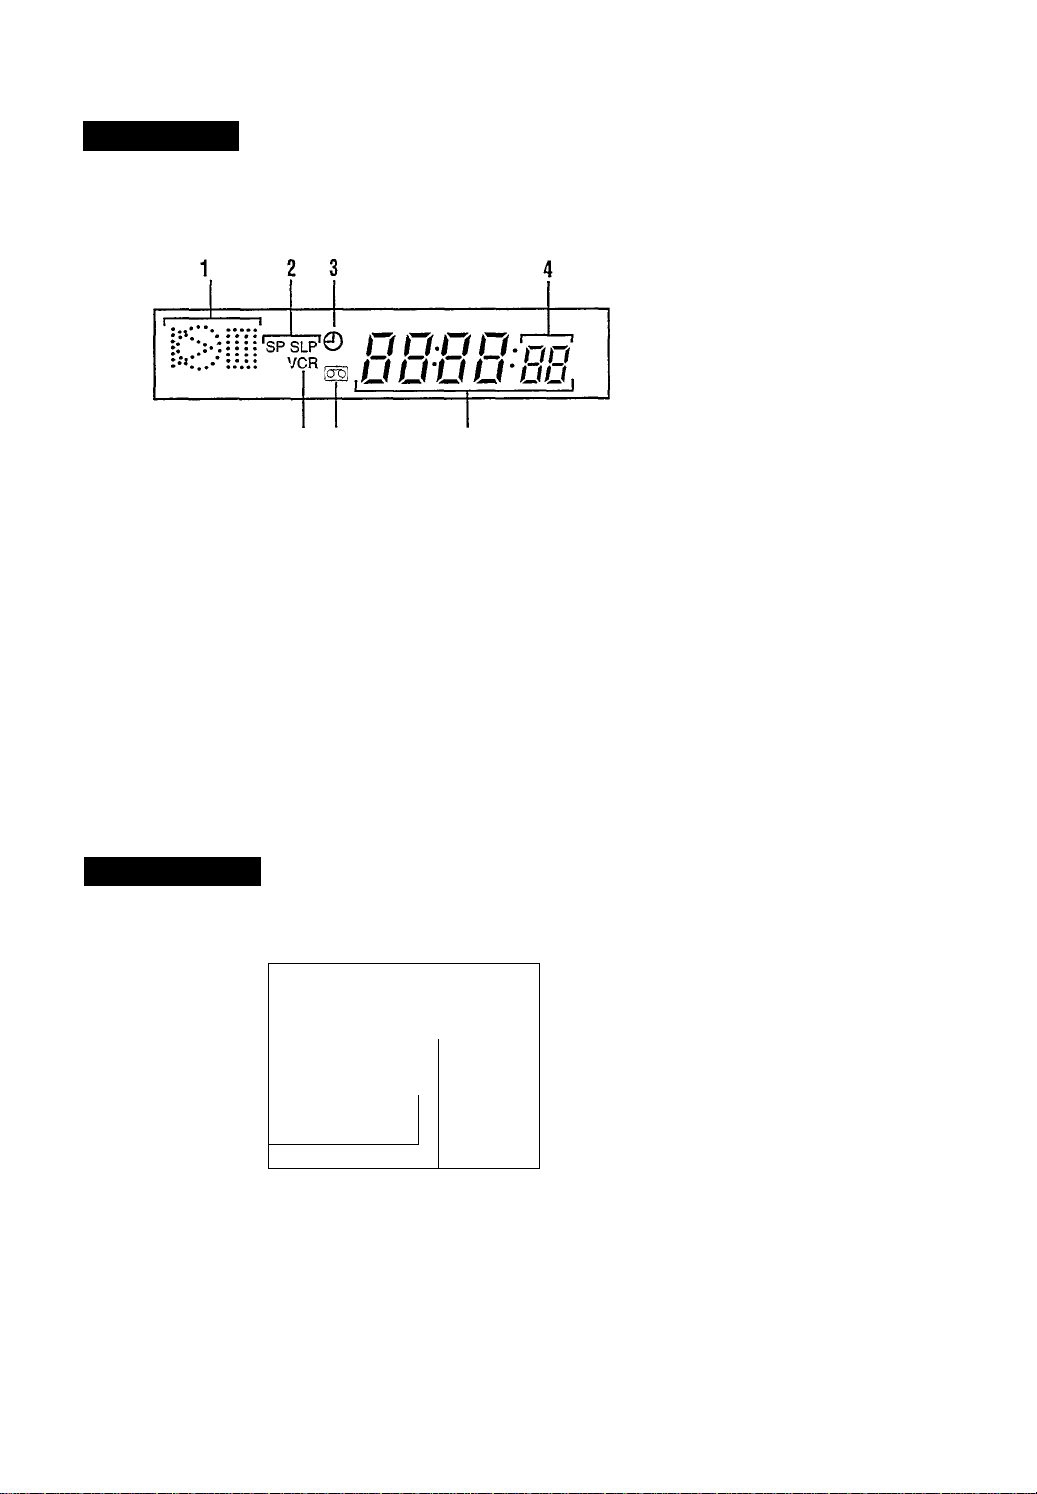
Display Window
5 6
(Continued)
1 Play mode indicators
O: Lights up during recording.
>: Lights up during playback.
[0: Lights up during a pause.
2 Speed indicator
Indicates the tape -speed.
SP ~ Standard Play
SLP - Super Long Play
3 © (Timer) indicator
Lights up when the VCR is set for an
unattended recording (timer recording).
4 Channel indicator
A channel number selected with the T\^
tuner built-in the VCR appears.
When the external line input is selected;
“L-F’ appears when "AW IN FRONT'
is selected.
“L-I” appears when "AW IN REAR” is
selected.
5 VCR indicator
Lights up when the TV tuner built in
the VCR is active for the TV.
On-Screen Display
The following information (VCR operating status) appears on the TV screen. (>)-R16)
— Current time
Channel no.
— Time Counter
— Index no.
J
Remaining tape length
[stop
12:00PM -|
CH.12
IREMAINING
ITIME 10:59 INDEX -1-
(SLP 0:00:00
6 (Cassette-in) indicator
Lights up w hen there is a cassette in the
VCR.
7 Digital clock/counter
• Normally the present time appears.
• When a tape is inserted, the time
counter appears (and is reset to
0:00:00).
If you always rewind your tapes
completely, y ou can use this counter
reading as an indc'. to find where a
programme starts.
A'ote on the displayed infonnation
• When you playback a thin tape like a T-
160 cassette tape or compact viJo <
cassette tape ( VHS-C). the )xmamm\;
tape length wiU flash.
— 6 —
Page 7
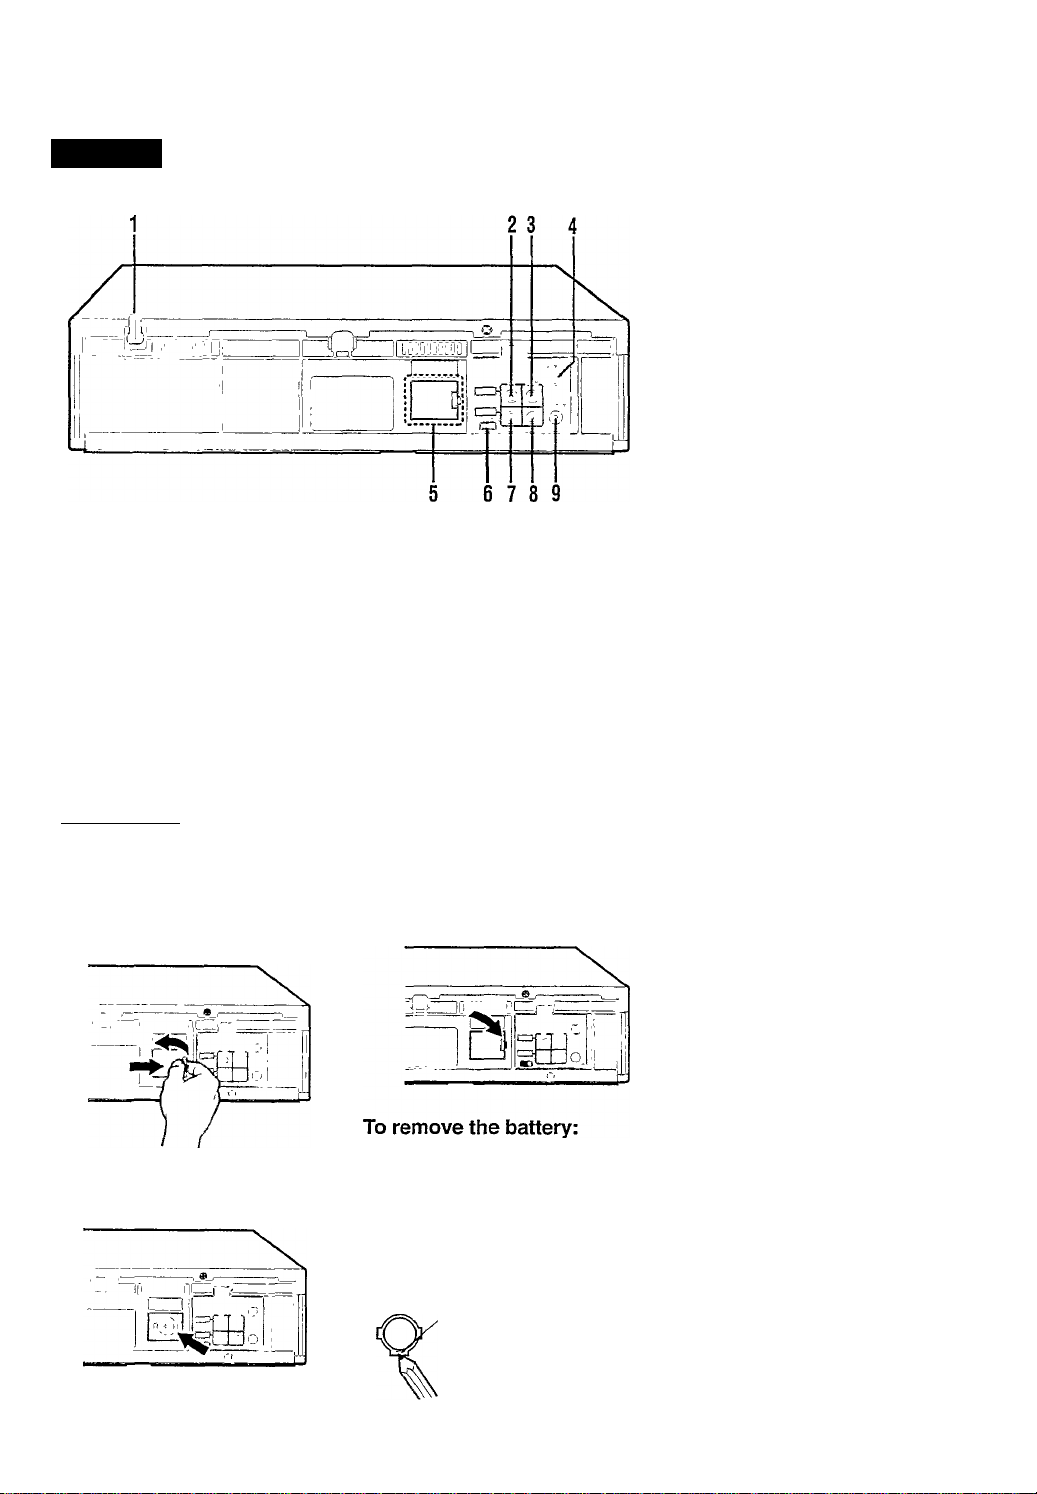
Rear Panel
1 AC (alternating current)
power cord
C< imiccl ihc ,\C piw (.r cord to jn AC
nutkt
2 AUDIO IN (input) jack
1(11 tonncaiay to the audio output Ijck
0)1 (mother VCR or a portable video
i..iuiera
3 AUDIO OUT (output) jack
For connecting to the audio input jack
on a TV or another VCR. 10)
4 ANT. (antenna) IN (input)
terminal (from Antenna)
Connect your antenna. Cable box, or
DBS tuner to this terminal. (>)-R10)
5 Backup battery compartment
Place the backup battery.
6 CH3/CH4 selector
Set the viiieo output channel to the one
not used for regular TV broadcasting in
your area. (>>-R10)
7 VIDEO IN (input) jack
For connecting to the video output jack
on another VCR or a portable \ ideo
camera. (’FR20)
8 VIDEO OUT (output) jack
For connecting to the video input jack
on a TV or another VCR. (“fRIO)
9 RF OUT (output) terminal (to
TV)
Use the supplied RF coaxial cable to
connect this terminal to the UHFA'HF
input terminal on the TV. (>FR10)
To insert the backup battery:
IMPORTANT
Bcloiv inserting the backup battery', plug the AC power cord into an AC outlet
C>P. Ul). Without connecting the AC power cord, the backup battery will be used
up mimcdwiely.
1 ( jpon tlio battery compartment lid
fi ir the backup battery'.
3 Replace the lid.
2 Install the battery —CR2025 —
niaiching pialarity indicated inside
the baticry compartment.
17
^ Depress this part with a
soft material like a pencil
and so on. (Do not use a
metallic material.)
Q&
Note:
Without tlm backup battery, this VCR can
keep the memorized timer recordin<t
content', and cloi k time only for a few
minutes if a power interruption occurs.
I-WARNING
On lithium battery
The battery' used in this device
may present a fire or chemical
bum hazard if mistreated. Do not
recharge, disassemble, heat above
100 C or incinerate.
Replace battery' with Panasonic
(Matsushita Electric), Sanyo,
Sony or Maxell CR2025; use of
another battery' may present a risk
of fire or e.xplosion.
• Dispose of used battery'
promptly.
• Keep away from' children.
• Do not disassemble and do not
dispose of in fire.
— 7 —
Page 8

ESCRIPTION OF ONTROLS
Remote Control
(Continued)
1 CBL/DBS button
Does not function for this VCR.
2 POWER button
Before using this button, press VCR,
TV, or CBL/DBS to select your target
component.
• After pressing VCR:
- Turns the VCR on or off.
- Sets the VCR for an unattended
recording (timer recording) after
timer settings are completed.
(>)-P.18)
For some PhiUp\ T\' only:
• After pressing TV, turns the TV on or
off.
8 SLOW/BACK-button
9 EXIT/STATUS button
3 УСЯЯУ button
Selects which built-in tuner (either TV’s
or VCR’s) to use.
Pressing this button turns on or off the
VCR indicator on the display.
When the VCR indirator is on:
The VCR’s tuner becomes active for the
TV. You cannot select the channels on
the TV.
When the VCR iiuliciitor h oft':
The TV’s tuner becomes active for
itself. So you can watch another TV
broadcast while recording a TV
broadcast selected with the VCR’s
tuner. (>fP.14)
10 SPEED button
11 REG (record)/OTR button
4 SKIP SEARCH button
Skips playback for 30 seconds by time
counter reading.
When pressed more than once up to 4
times, the search time increase in 30second intervals up to 2 minutes.
(A-P.17)
12 TV button
13 VCR button
5 VOL (volume) ▲ / т buttons
For some Philips T\' only:
Changes the T\' volume.
Release at desired volume.
14 EJECT ± button
6 STILL/SLOW !► button
Stops the tape during recording (pause)
or playback (still picture) temporarily.
(A-P.14.P.17)
Press again to resume normal recording
or press PLAY ► to resume normal
playback.
Also, press for more than 2 seconds
during playback to view a slow motion
picture.
15 CH (channel) a / ▼ button
(Rewind) / button
Before using this button, press VCR
- Revv inds the tape. Alsrs dunng
playback, starts rapid reverse
visual search. (A-P.14)
- Goes back to the prev lous menu
screen when usinc the menus,
Ci-P.ll)
During a slow motion picture, adjust the
playback speed in the reverse directkm.
C>-P.I7)
Before asing this button, press VCR
- Displays the time counter, present
time, channel number, and
remaining tape length. (A-P.lO)
- Exits from menu operations when
using the menus. (AP.l 1)
Selects the tape speed for recording (SP,
SLP). During playback, the tape speed
is automaticallv selected (SP, SLP).
(4-P,14,P.lS) '
• Start recording when pressed once,
PEP.14)
• Starts a recording for 3(^1 minutes to v)
hours long. When pressed more than
once, the shut-off time increases m
30-minute interv als. (•)■?. 15)
Makes the remote control ready for
operating some PHILIPS TV
Makes the remote control ready for
operating the VCR.
Ejects the cassette. (A-P.14)
Before usine this button, press VCR or
TV.
• After pressing VCR, changes the
channels on the VCR. Release at a
desired channel.
For some Philips TV only:
• After pressing "n/. ehangcs the
channels on the TV. Release at a
desired channel.
— 8 —
Page 9
16PLAY^/Abutton
Bclmc usiii^' this huUon, prc^^ VCR.
• AKci prc'Aiivj VCR.
- Stalls »1)011 j! pl.iyback t')-P.14)
- Mii\cs up the cursor V.ben using
themcmis (>>-P.U)
17 ►► (Fast forward) / ►/OK
button
Hetote Using this button, press VCR.
• Alter pressing VCR'
- Fast Inn'.ard the tape. Also dunng
pl..i\bacK, starts rapid forward
search. CfEld)
Vfsual
- Selects the items on the menus or
goes to the next menu screen when
nstng the menus. (>)-P. 11 >
18 STOP
B/T
• Stop, the tape (4-P.14)
• M< n es di)« n the cursor w hen Using
the Hleiicv. pi-PH)
button
19 SLOW/FORWARD + button
I Juniig a slow motion pictuiv. adjust the
playbach speed m the fonvard direction.
(■d-P.17)
20 MENU button
Before using this button, press VCR.
• After pressing VCR. calls up the
main menu. (>)-P.l I)
21 TIMER button
Display the Timer Recording menu.
(№18)
22 Number buttons
(0,1, 2,3, 4,5,6, 7,8
and 9)
Before using these buttons, press
VCR. TV, or CBLVDBS to select your
target component.
• Press to select a channel on the
VCR, TV. Cable Bo.x. or DBS
tuner.
To select channels 1 to 9, press 0
then the channel you want. For
example, for channel 4, press 0
then 4.
• Also used to programme the Timer
Recordings. (№18)
23 CLEAR button
Erases unwanted timer proaramraes
(№18)
24 AUDIO/MUTE button
For soiuf Philip\ T\' only:
Turns off the TV sound.
25 INDEX / ►► buttons
Locates an index marked at the
beginning of every' recording.
(№16)
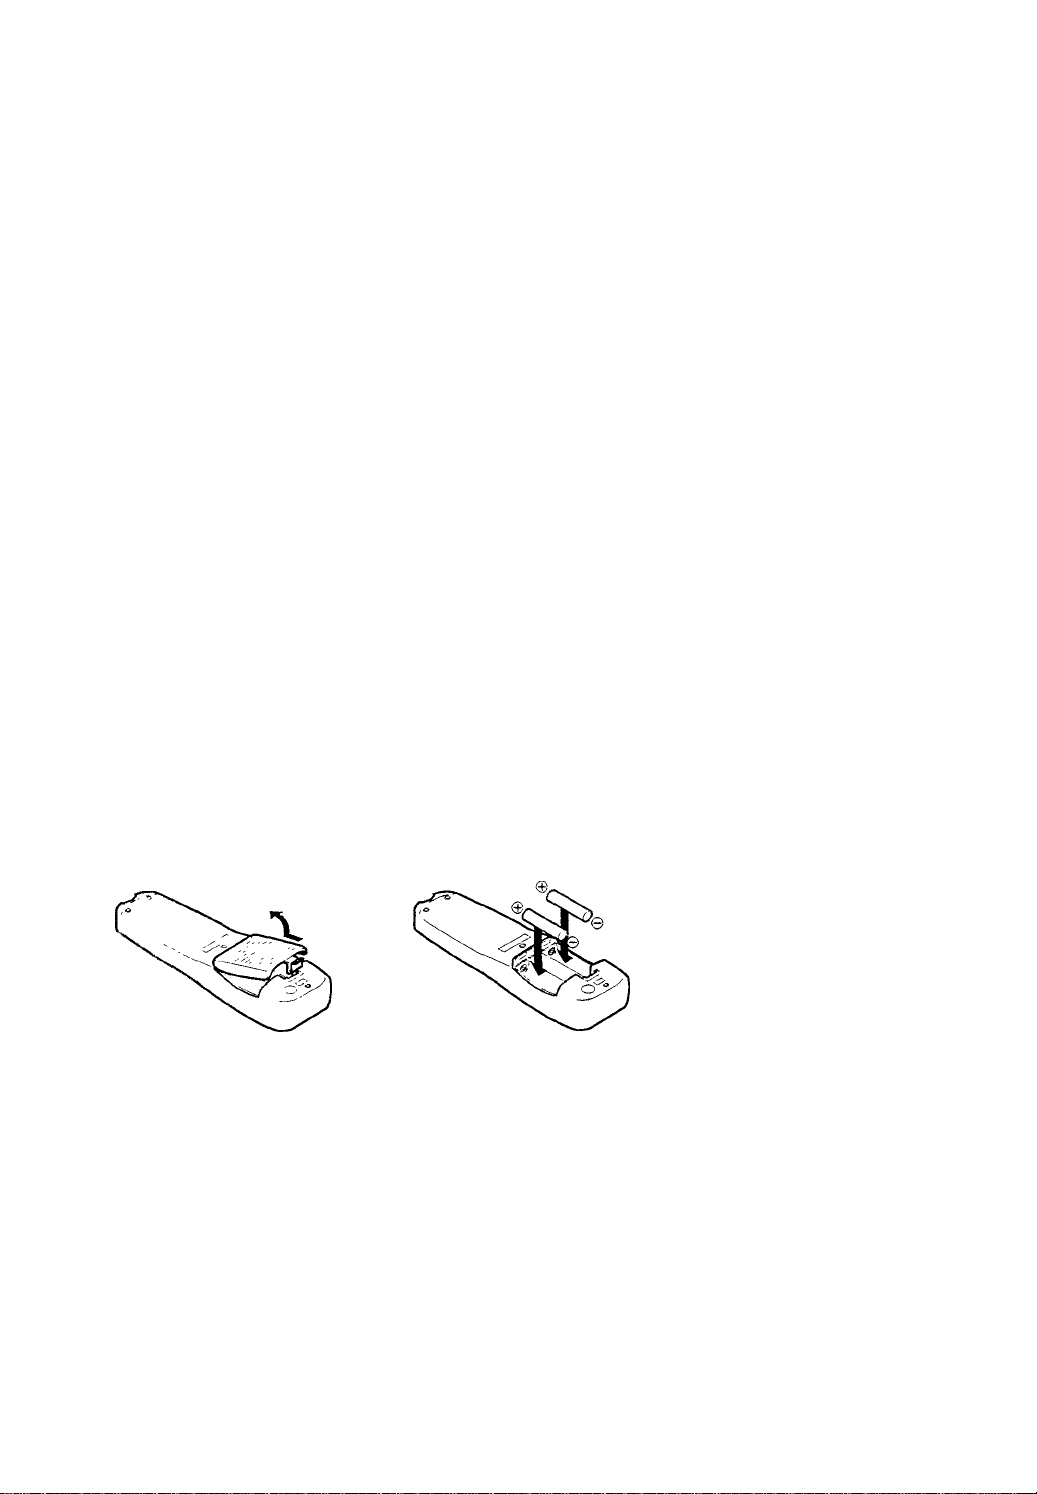
To insert the batteries:
"I Reroox e fhe batto'y compartment lid
In mi the liotti im of the remote
eonliol
CADTION----------------------------
On Battery Replacement
Do not i))i\ old and new butteries,
(.Also never mix alkaline batteries
v.tih rnanuanese batteries.)
Install two batteries—R6(SUM-
3)/AA — matching polarity'
indicated inside the battery'
compartment.
3 Replace the lid.
Note:
This remote control and batteries are
supplied accessories.
Check to make sure they are included.
Also, check "Specifications” to see what
other accessories are included.
9 —
Page 10

ETTING ONNECTED
VCR to TV Connection
1 Disconnect the antenna, Cable box, or DBS tuner from the TV
Connec ti on
Diagr am
and the AC power cord of the TV from the AC outlet.
2 Connect the antenna. Cable box, or DBS tuner to the VCR.
3 Connect the VCR to the TV using the RF coaxial cable.
4 Plug the AC pow er cords of the VCR and TV into the AC out
lets.
5 Insert the backup battery. See page 7.
Outdoor antenna
Set Your Video Channel
Set the CH3/CH4 selector to either CH3 or CH4 whichever
channel not used in your area.
If both are used, select the channel giving a better picture
when playing a tape.
To watch a picture from this VCR on the TV, select the
same channel (either channel 3 or 4) on the TV, you have
set the CH3/CH4 .selector to on thi.s VCR.
r- CAUTION •
Do not plug the AC power cords until all
connections are completed.
Indoor antenna
Back of TV
Back of VCR
VCR to AV TV Connection
With this connection, you can get better pictures and sounds when playing back a tape.
To watch a picture from this VCR on the
TV, select the video input on the TV, to w'hich
this VCR is connected.
10 —
Back of TV
Page 11

ETTING
Fur LISA and Canada users ONLY
This VCR sets the dock automaticully
when pinver is first connected. Firstly,
make sure the antenna cable is
connected. Then, connect the VCR's
pi iwer plug to an AC outlet, "Auto” will
appear on the display panel until the
clock is set. The current time will appear
on the VCR display panel. You can only
peiiovm this function if your area has
PBS channel that sends the clock setting
data
Opcratiiins hereafter are described
using the buttons on the remote
control unless mentioned otherwise.
The buttons on the front panel haring
the s,ime (or nearly same) name or same
(or nearly same) murk function e,\actly
the s,mic as those on the remote control.
Menu Operations
Before operating the VCR, be
familiar with the menu operations
first because most of the features
built into the VCR can be available
only on the menus,
1 Picss VCR on the remote control.
• Wkni ii'.iii;; ilic hultnns on fmit
Itiim l. •<Up ihn step.
2 Press MENU
(or MENU/
EXIT on the
fiont panel) to
display the
шаш menu screen.
3 Press A or T (or CHANNEL А/
T on the front panel) to select a
desired feature on the menu, then
press OK/^.
4 When you select a feature, go to
the section m this manual and
follow the instructions described
there.
To go back to the previous menu
.screen, press •<.
To exit from the menu operations,
press EXIT/STATUS (or MENU/
EXIT on the front panel again),
:£i£CT AT c
♦ ,C=!iET
Ti.\cft<=Tl,P-
l'-TiîtSETUF'
то£*.0Рс'--чем
Turning On VCR
For the first time you turn on this VCR,
some basic settings must be done first
before going on to further operations.
Make sure..,.
• Your VCR, TV, and antenna are
connected correctly.
Опту
_____________________
1 Turn on the TV.
2 Select the video channel (either
channel 3 or channel 4, which you
have selected with the CH3/CH4
selector on the VCR) or the video
input (to which this VCR is con
nected).
Select the Language
Press VCR.
• When using the
buttons on front
panel, skip this
step.
Press POWER.
The VCR turns on, then the menu for
selecting the language appears.
Press A or T to select either
“ENGLISH,” “ESPAÑOL" (Span
ish), or “FRANÇAIS" (French)
whichever you want to use on the
screen.
Press OK/^.
The following message appears on
the TV.
COV.ECT?'
TOVC«i
TbENfe'SH ►,c cicrT
EOftFLAYC
Start Channel Set
Press OK/^ again to programme the
receivable channels automatically.
The following message appears on the
TV.
♦£\3Li?h(
•íSEL£(^:C’íCR
C-:TOCCTTi\JE
The local channel receivable in your
area are automatically programmed in
the VCR tuner.
• If "NO TV SIGNALS” appears on the
TV, an antenna. Cable box, or DBS tuner
is not connected correctly. Check the
connection and press
OKJ>- again.
MTien the auto programming is
completed
The following message appears on the
TV, and the lowest channel will be
tuned in.
To cancel the auto programming,
press STOP ■.
“TUNER NOT SET' appears for a
while.
To turn off the VCR
Press POWER again.
The VCR turns off.
Ne.xt time you turn on the VCR, the
menu for selecting the language will
not appear, and messages and menus
will be displayed in the language you
have selected.
To change the channels on the VCR
Press CH A/v.
Selected channel numbers appear on
the display. WTien the line input is
selected;
“L-F' appears when "PJV IN FRONT’
is selected.
“L-I” appears when “A/V IN REAR”
is selected.
Л'о/с.-
И!гш( iipi'ntitm: Ьтитч fmtuton only
wlun a humi i\ on the T\'si.rccn. When
no menu\ Л on the TV saeetu they
¡Kill non (lilli ientlv.
11 —
Page 12

ETTING P (Continued)
IMPORTANT
The setup and adjustment proce
dures explained hereafter are written
under the following conditions:
• You have turned on the TV and
selected the video channel {or
video input).
• You have turned on the VCR.
Clock Setting
There are two ways of setting the clock
— Auto Clock Set and Manual Clock
Set.
Auto Clock Set is only possible when
using this VCR in North America.
Make sure....
• To make each entry within 10
seconds: otherwise, the VCR cancels
the clock setting and you will have to
start over again.
Manual Clock Set
Select Initial Setup Mode
1 Press VCR. l^rcT AT cKCOSii^ c;
2 Press MENU.
3 Press A or T to
select “INITIAL
SET UP" then
press OK/k.
The Initial Set Up menu appears.
Select Clock Set Mode
Press A or ▼ to
select “CLOCK”
then press
Set Time
Press A or
set the time.
“AUTOCLOCK”
is automatically set
to “OFF.”
• Each time you press the button, the set
time change.s by I-minute inteivals. If
you hold the button, the set time
changes by 30-minute intervals.
Press OK/^.
TOir.Df JS^EaiT
TP re ..
D^Te 01u1‘3
AUTOCt.CC<C‘l
Fi5CH AUTO
OST AUTO
TiVSZCVE AUTO
TOSrrFUSHATTH^NKC-
JOELOPUS^evT
* •
'to
TiVE
D^TE 01 or:
iuToac:<CFF
OST oil
__
Set Month and Day
1 Press A or T to set the month and
day.
• Each time you press the button, the set
dale changes by 1-day inten als. If you
hold the button, the set time changes
by 15-day intervals.
2 Press OK/^.
Set Year
1 Press A or ▼ to set the year.
• Each time you press the button, the set
date changes by )-year intervals. If
you hold the button, the set time
changes rapidly.
2 Press 6k/>-.
Set Day Saving Time
1 Press A or ▼ to select the Day
Saving Time (D.S.T.) setting you
want.
ON: Select this to activate the day
saving time setting.
OFF: Select this to deactivate the
day saving time setting.
2 Press OK/^.
Start Clock
Press EXIT/STATUS.
The internal clock starts and the normal
TV screen resumes.
Auto Clock Set
Select Initial Setup Mode
1 Press VCR.
2 Press MENU.
3 Press A or T to
select “INITIAL
SET UP” then
press OK/^.
The Initial Set Up menu appears.
Select Clock Set Mode
Press A or T to
select “CLOCK”
then press OK/k.
enecT AT cfcoìsk:
TO F.OPUSKEOT
01 M :
autoclco<c:j
fcSCK iUTO
OST AUTO
TiVSZO’.E AUTO
TOSETPuSMATThEU^C
TO ELD PUSH E> IT
Set Auto Clock
1 If “AUTO CLOCK” is "OFF.”
press A or T to set it to “ON."
2 Press OK/^.
Set PBS Channel
1 Press A or T to select the PBS
(Public Broadcasting Sen ice)
channel (“AUTO" or preset channel!
from which the VCR receives the
current time signal.
• Normally select 'AUTO.” The VCR
will find an appropriate channel.
• VTien “AUTO" does not v. ork
correctly, select a PBS dwnne!
manually from preset channel number
2 Press OK/^.
Set Day Saving Time
1 Press A or ▼ to select the Day
Saving Time (D.S.T.i setting you
want.
AUTO: Normally select this.
ON: Select this only when
“AUTO” does not v. ork
correctly.
OFF: Select this to deactivate the
day saving time setting.
2 Press OK/>-.
Set Time Zone
1 Press A or T to select your residen
tial area.
• Normally select "AUTO." Tlie VCR
will find a proper channel in \ our area.
• ^\Tlen “AUTO" does not v, ork
correctly, select your residential aiea
manually.
2 Press OK/P-.
Start the Clock
1 Press EXlT/STATUS.
2 Press POWER.
The VCR starts setting the internal
clock (“Auto" appears on the
display).
Leave the VCR turned off until the
current time appears on the display .
______
12 —
Page 13

If Auto Clock Set does not work
comctly
appears.
If (his happens, do the dock setting
again Using one of the following.
• Repeat the Auto Clock Set procedure
and select u PBS channel manually
in step 4.
• Set the dock manually.
To reset the clock
By repealing the Manual Clock Set or
Лшо Clock Set procedures, you can
reset the dock.
• l!7i, n von t -\WTO CLOCK " to "ON, ”
till’ < imriit lime •e.ltiiii: wiUhe lost.
Л'п/t s III! the Clock Set
• HVi- ¡1 ' /’/AS СЯ, f. set to "ЛиТО" or
"(IN," tli( I hnktmte Will he correeled
i v, ; v h'mrtexi e/'t midnn^ht hours) using
the tune signal sent from the PBS
I honnel
• When the Dm Socing Time is set to
■■.WTO"oi "ON.” thedoikKill
witomotK alls' aih'itiue hv ] hour train 2
ЛМ to SAM on the Ihst Siiiiduy of April,
and delay h\ I hour from 2 AM to I AM
on the last Sumkiy ofOrtoher.
Selecting Language
\i m cun also change the language used
on the menus any time you want.
Select Initial Setup Mode
1 Press VCR.
2 Press MENU.
3 Press A or ▼ to
select "INITIAL
SET UP" then
piess OK/^.
The Initial Set Up menu appears.
:eL6CT AT ch:;e^^c
► clC
t!s:'j:cE
rOg-.OFo-SE-iT
Channel Setting
When you want to do channel setting
by yourself, follow this procedure. You
can also add or delete channels.
Select Tuner Set Up Mode
1 Press VCR.
2 Press MENU.
3 Press A or T to
select "TUNER
SET UP” then
press OK/>-.
The Tuner Set Up menu appears.
Select TV or Cable
1 Press A or T to select “CABLE/
ANTENNA.”
2 Press OK/^.
Each time you press the button, the
setting changes.
CABLE:
Select this mode when you use a
Cable box or DBS tuner to watch
TV broadcast.
ANT (Antenna):
Select this mode when you do not
use a Cable box or DBS tuner to
watch TV broadcast.
Start Auto Channel Set_______
Press A or T to select “AUTO CH.
PROGRAMMING” then press OK/^.
The following message appears on the
__________________
TV.
fJTOCHSETFfc;EEC'.
FtEliEV/irT
iEcECT AT CHCDi'EKO-C
C“5'-£A.‘iTEV4i.
autoc^ppc:ps”m vs
,aJ}DCEL£TeCH
JOevOPUSKD'T
__________
To add or delete a channel
You can add or delete a channel
manually if you w’ant.
1 Press VCR.
2 Press MENU.
3 Press A or T to select “TUNER
SET UP” then ►.
4 Press A or T to select "ADD/
DELETE CH” then press OKJp~.
5 Press A or ▼ to
select a channel to
add or delete.
• You can also use
the CH A/T
buttons and number buttons to select a
channel.
6 Press OK/^.
Each time you press the button,
“DELETED” and “ADDED” are
alternately selected for the selected
channel.
DELETED:
Select this to delete the channel.
ADDED:
Select this to add the channel.
7 Press EXIT/STATUS to exit from
the menu operations.
124 caETto
Ca.ETtD
125
01 —■> CElSTcO
C2 C ~ ED
‘Yd
Select Language
__________
3 Press A or ▼ to select
“LANGUAGE."
3 Press OK/^ to select the language
oil fhcTV screen.
Each tune you press the button, the
language changes as follows:
English-*-*Spanish-^French
I
Finish Setting
Press EXIT/STATUS.
The local channels receivable in your
area are automatically programmed in
the VCR tuner.
When the auto programming is
completed
The lowest channel will be tuned in.
— 13 —
Page 14

ASIC PERATIONS
Playback
Make sure....
• Your VCR, TV, and antenna are
connected correctly.
• The remote control operation mode
is set correctly for operating your
target component.
- Press VCR to operate the VCR.
- Press TV to operate the TV.
Опту
1 Turn on the TV.
2 Select the video channel (or video
input).
i'i
< On VCR
Insert a cassette.
The VCR turns on.
• If the record tab on a cassette is removed,
playback will start automatically.
• If a cassette is already in the VCR, turn
on the VCR.
Press PLAY ►.
• When you want to play back the same
tape repeatedly, press and hold PLAY ►
for more than 5 seconds. (See "Repeat
playback" on page 15.)
To rapidly locate a particular
scene
Press ►► or ◄◄ during playback. (No
sound comes out.)
To resume playback, press PLAY ►
again.
• If ►► or is held down for more than
2 seconds, simply releasing it will cancel
the search.
To stop playback
Press STOP ■.
To rewind the tape
Press ◄◄ when the tape is not
running.
To fast forward the tape
Press ►► when the tape is not running.
_______________
___________________
Start Playback
Recording
When using this VCR, an index mark is
always marked at the beginning of
every' recording. This index marks
make it easier for you to search for the
beginning of the recordings (see “Index
Search” (>i-P.16).)
Make sure....
• The record tab on the cassette is not
removed.
• Your VCR, TV, and antenna are
connected correctly.
• The remote control operation mode
is set correctly for operating your
target component.
- Press VCR to operate the VCR.
- Press TV to operate the TV.
Опту
_____________________
1 Turn on the TV.
2 Select the video channel (or video
input).
On VCR
Insert a cassette v/ith the record tab in
place.
The VCR turns on.
• If a cassette is already in the VCR, turn
on the VCR.
To rewind the tape, press
Select Tape Speed
Press SPEED until the desired tape
speed (SP, SLP) appears on the display.
Press CH A / T or Number buttons to
select the channel to record.
• If you use a Cable box or DBS tuner,
select the Cable box or DBS tuner output
channel.
Press REC/OTR.
___________________
Select a Channel
Start Recording
__________
____________
_____________
To pause recording
Press STILL/SLOW !► briefly (or
STILL/PAUSE II on the front panel).
To resume recording, press the same
button again.
To stop recording
Press STOP ■.
To watch another TV
programme while recording
1 Press VCR/TV so that the VCR
indicator goes off from the display.
2 Select a different channel you want
to v/atch on the TV.
You can watch the programme of the
selected channel on the TV. without
affecting recording on the VCR.
• If you IOC u Cable box or DBS tuner, you
cannot watch another programme u htk
recording.
Erase protection
Cassettes have the record tab to ensure
that recordings are not accidentally
erased.
To prevent accidental erasure:
Break off the record tab with a
screwdriver.
♦ Ч
To record again:
Cover the opening with adhesive tape.
Adhesive tape
To eject the tape
Press EJECT A.
14-
Page 15

One Touch Recording (OTR)
Till.' OTR function lets you quickly
specify how' long you want a recording
to ciintinuc. You do not have to
pri igranimc the timer.
Make ^ure....
• The record tab on the cassette is not
reinovcd,
• Yi lur VCR. TV, and antenna are
c( mnccted correctly.
• The remote control operation mode
is set correctly for operating your
target component.
- Press VCR to operate the VCR.
~ Press TV to operate the TV.
On TV
____________________
1 Turn on the TV.
2 Select the \ idco channel (or video
input).
On VCR
___________________
Insert a cassette with the record tab in
place.
The VCR turns on.
• It a cassette is already in the VCR, turn
on the VCR.
To rewind the tape, press ◄◄ .
Select Channel
Press CH A / T or Number buttons to
select the channel to record.
• It you Use a Cable ho\ ur DBS tuner,
select the Cable bos or DBS tuner output
channel.
_____________
Select Recording Length
Press REC/OTR repeatedly until the
desired recording length appears.
Each time you press the button,
recording length increases in 30minute intervals.
►0:30-<-1:00-*1 ;30
I
__
REC (Normal recording)'*
......
8:30-*9:00pure
To check time remaining during an OTR
Press EXIT/STATUS.
To change the recording
length during an OTR
Press REC/OTR until the desired
length appears.
To cancel an OTR
Press STOP ■ to stop recording before
the preset recording length is reached.
If you want to cancel the OTR mode
but continue recording, press REC/
OTR several times until “OTR”
changes to “REC” on the TV screen.
Notes on the indications on the display
while an OTR operation
• DurinK recording, the displayed time
counts down. When "0:00" ts reached,
recording stops and the VCR turns o ff
automatically.
• If an OTR is engaged during pause, the
displayed time counts down normally, but
recording does not begin until you cancel
the pause.
Automatic Operations
Auto playback
When a tape is inserted, the VCR turns
on. If the record tab is removed,
playback begins.
Repeat playback
]
When you press and hold PLAY ► for
more than 5 seconds, you can play back
the same tape repeatedly (50 times).
When the tape runs to its end, the VCR
automatically rewinds the tape, and
starts playback.
Auto rewind
When a tape reaches its end during
playback, fast forwarding, or manual
recording, the VCR rewinds the tape
and stops.
Memory rewind power off
When you press POWER during
rewinding, the VCR turns off after
rewinding is completed.
Eject cassette
You can eject the tape simply by
pressing EJECT tit even while the
VCR is turned off.
When you press EJECT the VCR
automatically turns on, ejects the tape,
then turns off.
Start OTR
Press REC/OTR twice.
Rcciirdmg starts immediately, and the
O (Record) indicator lights up on the
display.
Till', indicates that the
VCR will
.aitiiiiiatieaUy shut off
after 3(1 minutes of
reemdm.e.
— 15 —
Page 16

DVANCED PERATIONS
Index Search
You can locate an index marked at the
beginning of each recording on a tape
recorded on this VCR (or an indexed
tape).
Press INDEX or INDEX
repeatedly before starting play.
Rapid forward or reverse search
begins.
When it finds the designated index,
playback starts automatically.
• Locate an index number by pressing the
button repeatedly, indicating how many
index marks ahead of or behind that
recording you want is from the tape's
curent position.
• Up to ±9th index mark from the current
position on the tape can be located.
Using On-Screen Display
You can display the VCR operating
status on the TV screen.
For the information about what you can
see on the TV screen, see page 6.
Select VCR Set Up Mode
1 Press VCR.
2 Press MENU.
3 Press A or ▼ to
select “VCR SET
UP” then press
OK/k.
The VCR Set Up menu appears.
Select On-Screen Mode
1 Press A or ▼ to select “ON
SCREEN MODE."
2 Press OK/»-.
Each time you press the button, the
setting changes.
ON:
When you press a tape running
button (Stop, Play, etc.), the VCR
status appears for 5 seconds.
COUNTER:
When you press a tape running
button, the VCR operating status
appears for 5 seconds.
After 5 seconds, the VCR status
disappears except the time counter.
OFF:
The VCR operating status does not
appear even if you press a tape
running button.
'rLCCT A.T C-COScKCK
•OSSCSEEM'.'OCE C'i
Ti"caFcCSPceo
v.ciOST;eL'2E'=! off
P.CTuPc
TO£:.DFUgK£>J
______
Stabilizing Playback Quality
With this function, y ou can correct
vertical vibration while playing back a
tape recorded in SLP mode.
Select VCR Set Up Mode
1 Press VCR.
2 Press MENU.
3 Press A or ▼ to
select “VCR SET
UP” then press
OK/»-.
The VCR Set Up menu appears.
Set Video Stabilizer
1 Press A or ▼ to select “VIDEO
STABILIZER.”
2 Press OK/»-.
Each time you press the button, the
setting changes.
ON:
Select this to activate X’ideo
Stabilizer.
OFF:
Select this to cancel Video Stabi
lizer.
Finish Setting
Press EXIT/STATUS.
Notes;
• This function has no ct/LCt on a tape
recorded in SP mode.
• ^ fter watching a tape using this
function, make sure to cancel this
function.
\ C£0-T.'-t iCtP
P.zriri r
TOG .D.-oi-ie
_________
_____________
Finish Settinn
______________
Press EXIT/STATUS.
To display the VCR status on the TV
screen manually, press EXIT/
STATUS. The VCR status appears for
about 5 seconds.
• If “ON SCREEN MODE" is set to
“OFF.” no VCR status appears though
you press EXIT/STATUS.
16 —
Page 17

Picture Control Special Effect Playbacks
Tracking Adjustments
Ti I 'xt u hotter picture when \ iew ing
tiipos with noise such as rental tapes.
Select VCR Set Up Mode
1 Press VCR.
2 Press MENU.
3 Press A or ▼ to
select “VCR SET
UP" then press
OK/k.
The VCR Set Up menu appears.
Select Picture Control Mode
CiOST.i?,CER C=<^
■ Zr^n f.C^""L
TO g’Of.j.'Re-iT
1 Press A or ▼ to select "PICTURE.”
2 Press OK/^.
Each time you press the button, the
setting changes,
NORMAL:
Select this when you play hack a
tape with no picture adjustments.
ENHANCER:
Select this when you want to make
a playback picture softer.
INCREDIBLE:
Select this when you want to make
a playback picture sharper.
Are you familiar with tape playback?
If so, you are ready to enjoy the special
effect playback features described
below.
To skip playback for a certain period
Press SKIP SEARCH during playback
to search fonvard for 30 seconds by the
time counter reading.
Each time you press the button, the
search time increases as follows:
30-»60-*-90-*-120 sec.
The VCR automatically resumes
normal playback after searching for the
specified period.
To view a still picture
Press STILL/SLOW '► briefly tor
STILUPAUSE II on the front panel)
during playback.
Playback is freezed and a still picture
appears.
To resume playback, press STILU
SLOW !► (or STILUPAUSE II on
the front panel) again or PLAY ►.
Auto tracking
Each time a tape is inserted, auto
tracking starts working and
continuously analy ses the signal to
adjust for optimum picture quality
during playback. So, there is no need
for you to minimize noises in most
tapes during playback.
Manual tracking
• During normal play back:
If auto tracking cannot eliminate
noises well during playback, press
CHANNEL A or T on the front
panel.
• During a slow motion picture:
Press CHANNEL A or T on the
front panel to minimize noises in the
slow motion picture.
• During a still picture:
Press CHANNEL A or T on the
front panel to reduce jitter in the still
picture.
Finish Setting
______________
Press EXIT/STATUS.
To view a slow motion picture
Press STILUSLOW !► for more than
2 seconds during playback.
To decrease the slow motion speed
(and reverse the slow motion
playback), press SLOW/BACK —.
To increase the slow motion speed
(and forward the slow motion
playback), and press SLOW/BACK +.
To resume playback, press PLAY ►.
Notes:
• No sound comes out during special effect
playbacks.
• If you keep viewing slow motion and still
pictures for 5 minutes, the VCR
automatically stops to protect the tape
and video heads.
• During special effect playbacks, some
noise bars will appear on the T\' screen.
To cancel manual tracking, stop the
tape, eject the tape, then re-insert it.
— 17 —
Page 18

DVANCED PERATIONS (Continued)
Tinier Recording
To record while you’re away, follow
^tep I — 10 below. For each
programme you set, the VCR will turn
on, start recording, and turn off
automatically. You can store up to 8
programmes.
Make sure....
• The clock is set to the correct time
before setting timer recording.
• A cassette is inserted in the VCR and
the record tab of the cassette must
not be removed.
• The remote control operation mode
is set correctly for operating your
target component.
- Press VCR to operate the VCR.
- Press TV to operate the TV.
FOR EACH STEP BELOW, YOU
NEED TO FINISH WITHIN 60
SECONDS; OTHERWISE,
PROGRAMMING WILL HAVE TO
BE RESTARTED FROM STEP 1.
Select Timer Mode
Prc's TIMER.
The Timer Record
ing menu appears.
Select Programme mode
Press A or ▼ to
select “QUICK
PROGRAMMING”
then press OK/^.
The Quick Program
ming menu appears.
• If you have already made 8 pro
grammes, “ALL PROGRAMS IN
LISE” appears and goes back to the
Timer Recording menu. If this
happens, delete unwanted pro
grammes (see page 19).
__________
ELECT AT chco-ek:
TOENDPyilEVlT
O'.s TiV= PROSRIM
F,i03PS'.l 1
CKs.wEu'—
STP«T.,- -----------------M
STCP.'-
-------------
F EC SPEED SEP
DITE.'-
Cíeles
Select Channel
Press CH A or T to
enter the TV
channel.
• To record from
external line input,
press CH A or T until “A/V IN REAR”
or “AW IN FRONT’ appears on the TV
screen.
OYETVEFP.CÔ'îM
i
ST/RT*.'- -AV
STOP*'- ------------------
PECS'EEO S'.P
o^TE*'- 07 C4,;-:.
CETO.ALY.-SCñV.t£fA’>
lTOE\DPUSHe>'T
____________
Select Start Time___________
Press START + or —
(Number button 1 or
4).
• Each time you press
the button, the set
time changes by 1-minute intentais. If
you hold the button, the set time changes
by 30-minute interv als.
0-.ET(VEPfC3».=.V
CHS.V.EL*'-tC Cî£'_ETV'
STPRT*- cscor*
STO'’-'-
---------
FcCCFcEO
D^Ts*- or:-!,:;-
SET Û 5'L’l'-Í OR V.
TO E\CFd$>IDT
___________
Select Stop Time____________
Press STOP + or (Number button 2 or
5).
• Each time you press
the button, the set
time changes by 1-minute inter, ak. If
you hold the button, the set time changes
by 30-minute interx'ak.
Select Tape Speed
Press SPEED.
• Each time you press
the button, the tape
speed alternates
between “SF* and
“SLP."
C\erv=Ffi03RîM
PP.CC'I^M 1
12 C.SEÆTV
ST.kRT*'- CÎ c? f:,\
$TCP*'- c? C5 FM
nrCS'££D S'.'s-
0M£*'- 07c-í:í
SETO-'LY=3iOaV.££KL’» = 9
TO END PITCH EmT
_________
__________
0\£T)VE PFCCR.W
PPCCRiM 1
C-'i'd.EL*'- 12 C-£lETV'
START C5ÍDFV
P=CS'££D ÍÍ.P
CLTEV- 07:i:i
TO ELD PUSH D-iT
c:> P’.i
LY-:.C’RV’.£E^.
Select Start Date
Press DATE -b or —
(Number button 3 or
6).
• Each time you press
the button, the set
date changes by 1-day intervals. If you
hold the button, the set time changes by
15-day interv als. You can only specify the
date within one year.
The year and day of the week is displayed
automatically.
0\ET,V£ ffCSP.AM
PA03PÎV 1
CIIÍV.EL*'- 12 CiP'.&Tv'
START*'- C3;:>P.”
STC?*'- O f!.*
F£C$Fc£D $LP
OATC*'- 07-31:3
FP OVi'
£rrDf'LYr'3CRV.E£KL^=3
TQ£\DP0SHEmT_____________
C^ELeT.'
ÍV
.f-a
Select Recording Type
_______
If you want to record the same
programme daily, press DAILY
(Number button 8).
The VCR will record a T\' programme
every day (Monday through Friday) at
the same time and length. (Daily
Recording)
If you want to record the same
programme weekly, press WEEKLY
(Number button 9).
The VCR will record a TV programme
once a week at the same day. time, and
length. (Weekly Recording)
If you want to cancel the currently
set programme, press CLEAR.
Confirm Programme
_________
Press EXIT/STATUS.
“PROGRAM WAS COMPLETED"
appears on the TV screen.
After 3 seconds, the above message
disappears, and the normal TV picture
resumes. The 0 (Timer) indicator
lights up on the display.
• If “PROGRAM NOT COMPLETED"
appears, try again from step 1.
If you want to store other
programmes, repeat steps 1 to 9.
Finish Settings
_____________
Press POWER to turn off the VCR.
After a timer recording has
taken place
Press POWER to turn on the VCR.
You can operate your VCR normally.
To Stop a started timer
recording
Press POWER.
Recording stops and the VCR turns off.
If it is a Daily or Weekly Recording,
future recordings will be carried out as
programmed.
18 —
Page 19

Useful function for Timer Recording: Auto Tape Speed
With this function activated, the VCR
can change the tape speed and record
the programme in SLP mode if enough
tape is not remaining for recording in
,SP mode.
1 Press VCR.
2 Press MENU.
3 Press A or ▼ to select "VCR SET
UP” then ►.
4 Press A or T to select “TIMER REC
SPEED.”
5 Press OK/^.
Each time you press the button, the
setting changes.
AUTO:
Select this to allow the VCR to
change the tape speed from SP to
SLP when there is not enough tape
length remaining.
MANUAL:
Select this not to allow the VCR to
change the tape speed.
6 Press EXIT/STATUS to exit from
the menu operations.
To check, edit or erase the
programmes
1 Turn on the VCR and TV.
2 Press VCR.
3 Press TIMER.
4 Press A or ▼ to
select
“PROGRAM
REVIEW” then
press OK/>-.
The list of the timer recording
programmes appears.
5 Press OK/k
repeatedly to view
the more detailed
programme
TOEFiSSPFCCP’’^CL£i!={
information.
• When you press the button for the first
time, the detailed programme
information for Programme I appears.
By pressing this button repeatedly, you
can review the detailed information of
all other programmes.
6 If you want to change the
programme setting shown on the
TV screen, press the following
buttons:
START +/-: Changes the start time.
STOP +/—: Changes the stop time.
DATE +/-: Changes the date.
If you want to erase the
programme setting shown on the
TV'' screen, press CLEAR. The
detailed information of the next
programme appears.
7 Press EXIT/STATUS to exit from the
menu operations.
FA CA STAAT STC? OiiTE
1 L-F C>C ® 10 CO c:o 10
: L-1 IC'C
3 iLi I1C ® 01 CO OnL/
4 .'S C3C
s
7
C’ 5Ti’‘=FnC:=-i''
V10 4S VC’.
=■ 03 IS V.IC.1C
€'.?^E>iT
fp:c®:v t
CHiVvEU'- 12
c.
STCP*'- IC'COPV
0:.TE.'- 0731,-a
FE OAi-
P.= E'.^-<E^D^g\lT
How to see the programme list
9 Cp (7)
PR CH START STOP DATE
1
12 08-30P 09.30 D07/31
2
13 10 00A 10:45 MON
3
125 11:30P 01.00 DAILY
4
45 03.00P 03:15 W06/16
5
6
7
8
NEXT=
Programme numbers
Preset channel numbers
Start time
“A” stands for “AM,” and “P”
stands for “PM.”
Stop time
Start date
©
“D” stands for "DAILY,” and “W”
stands for “WEEKLY.”
• If the programme has worked
once for the Daily recording,
“DAILV”’ will be shown instead
of the start date.
• If the programme has worked
once for the Weekly recording,
the day of the week (in this
example, “MON”) will be shown
instead of the start date.
-E
END=EX1T
Notes:
• This function does not work for OTR (One
Touch Recordin,!;).
• With Day Saving Time activated (see page
12}, the timer will not work correctly
when the internal dock adjusts itself to
the summer time or winter time.
— 19 —
Page 20

DVANCED PERATIONS (Continued)
Tape Duplication
Connec ti on
1 Connect the recording VCR (this VCR) and the playing
VCR.
Diagr am
Playing VCR
Dubbing from any VHS VCR (or video
camera) to another is simple.
Explanations on this page uses this
VCR as the recording VCR.
Refer also the manual supplied with the
other VCR (for playback).
Make sure....
• You can also use the AUDIOA^'IDEO
input jacks on the front panel to
connect another VCR or video
camera. If you use these jacks on the
front panel, they have the priority
over the ones on the rear panel.
• To record from the AUDIOA^IDEO
IN jacks on the rear panel, make sure
no connection is made to the
AUDIOATDEO input jacks on the
front panel.
• The remote control operation mode
is set correctly for operating your
target component.
- Press VCR to operate the VCR.
- Press TV to operate the TV.
2 Connect the recording VCR (this VCR) to the TV.
Recording VCR (this VCR)
At VCRs
Insert a source tape in the plaj'ing VCR
and a blank tape in the recording VCR.
• If a tape without the record tab is inserted
in the playing VCR, playback automati
cally starts. In this case, press the STOP
button.
• If the VCR indicator on the recording
VCR (this VCR) does not light up, press
VCR/TV once.
At TV
Turn the channel on the TV to your
video channel.
Select Line Input
Press CH A or T, pointing the remote
control at this VCR. to select the
external line input.
“L-F’ appears when “PJV IN FRONT”
is selected.
“L-I” appears when “A/V IN REAR”
is selected.
Select Tape Speed
Press SPEED, pointing tlie remote
control at this VCR, until the desired
tape speed (SP, SLP) appears on the
display.
Play Back Tape
Press the PLAY button on the playing
VCR.
Record (Copy) Tape
Press REC/OTR, pointing the remote
control at this VCR.
Remember: press the buttons in steps 5
and 6 simultaneously to avoid missing
any of the recording.
20 —
Page 21

EFORE EQUESTING ERVICE
Check the fullowing points once again if you are having some difficulties with your VCR.
IMPORTANT
Periodic maintenance is required in order to maintain the VCR’s continuous excellent performance. After a period of time
the video heads will require replacement. If cleaning or replacement of the video heads is required, this service should be
performed at an authorized video system serv’ice center.
r- Power -
No power.
- Recording & Playback
TV programme cannot be recorded.
Timer recording cannot be performed.
There is no playback picture, or the playback picture is
noisv or contains streaks.
During a still or slow motion picture, the picture
may contain some vertical jitter when using
a TV which has an automatic vertical hold control.
■ Correction
Check that the AC power cord is correctly connected to
an AC outlet.
Check that the VCR is turned on.
-Correction
• Check the connections between the VCR, the antenna,
and the TV.
• Make sure that the record tab on the back of the cassette
is not removed. (*)-P.14)
• Set the timer on-time and timer off-time correctly.
(>>P.18)
• Make sure that the VCR is turned off after setting is
made. (>PP.18)
• Timer recording may not be performed or stopped if a
pow'er interruption occurs before or during timer record
ing. If the power resumes w'ithin one minute, timer
recording w’ill also resume.
• Select your video channel correctly.
• Press VCR/TV so that the VCR indicator lights up.
• Adjust the tracking slowly in either direction. (►)-?. 18)
• Adjust the vertical hold control manually on the TV, if
available.
------------------------------------------------
If the top of your playback picture waves
back and forth excessively.
Remote Control
The remote control cannot work.
------------
Because the VCR playback signal is not as stable as an
off-the-airTV signal, the top of yourT\^ screen may be
bent or unstable during playback. To solve this problem,
slow’ly turn the horizontal hold control on your TV to
correct the w'avy picture. If your TV does not have the
horizontal hold control or adjusting the control does not
help, contact your local TV'^ service center.
Correction
• Aim the remote control directly at the remote sensor on
the VCR.
• Avoid all obstacles which may interfere with the signal
path.
• Inspect or replace the batteries. (►)-P.9)
• Make sure batteries are inserted correctly. (>)-P.9)
------------------------------------------------
— 21
Page 22

Miscellaneous
You cannot watch TV.
Correction
Press VCR/TV so that the VCR indicator goes off.
A cassette cannot be inserted.
The cassette does not eject.
The cassette ejects w'hen you press REC/OTR, or when
you press POWER to set timer recording.
PECIFICATIONS
General
Mains voltage
Mains frequency
Power consumption
Ambient temperature
Relative humidity
Dimensions
Mass
Position for use
Video output channel
Number of pre-programmable memoiy' blocks
Number of days in advance
Tuner
Video signal
Broadcast channels
CATV channels
Insert the cassette w ith the w indow side up and the record
tab facing you.
Check that a cassette tape is not already inserted. Press
EJECTS.
Check that the AC power cord is correctly connected to
an AC outlet.
If the 0 (Timer) indicator is lit on the display, press
POWER to cancel timer recording, then press EJECT
Check that the record tab on the back of the cassette is
not removed. (>)-P.14)
Design and specifications are subject to change without notice.
USA and Canada: AC 120V
Other countries : AC llOV- 127 V
USA and Canada: 60Hz
Other countries; 50/60Hz
Approx. 23 w'atts
4UF(5X) to 104°F(40°C)
10% to 80%
Approx. 400(W) X 94(H) x 272(D) mm
Approx. 3.1kg
Horizontal
Channel 3 or 4 (selectable)
8
365 or every day, or every' w'eek
NTSC
VHP 2- 13,UHF 14-69
Mid-band:
Super-band:
Hyper-band:
Low band:
Ultra-band:
A —I
J —W
AA —EEE
A5—AI
65-125
240V
Video
Input (VIDEO IN)
Output (VIDEO OUT)
Resolution
Signal/noise ratio
Audio
Input (AUDIO IN)
Output (AUDIO OUT)
Accessories supplied
0.5 to 2.0 Vp-p, 75 ohms
1.0+0.2 Vp-p, 75 ohms
Better than 240 lines
Better than 43 dB
-8 dBs, 50k ohms (0dBs=0.775 Vrms)
-6 dBs, Ik ohms (0dBs=0.775 Vrms)
Remote control unit
RF coaxial cable
Batteries - R6(SUM-3)/,\A (only for checking operations)
Conversion plug
Backup batteiy' - CR2025
— 22
Page 23

SAFETY INSTRUCTIONS
Read before operating equipment.
1. Read Instructions - Read all of the safety and operating instruc
tions before you operate the appliance.
2. Keep Instructions - Keep the safety and operating instructions
for future reference.
3. Heed Warnings - Adhere to all warnings on the appliance and in
the operating instructions.
4. Follow Instructions - Follow all operating and use instructions.
5. Cleaning - Unplug this video product from the wall outlet before
cleaning. Do not use liquid cleaners or aerosol cleaners. Use a
damp cloth for cleaning.
Exception: A product that is meant for uninterrupted service and
for some specific reason, such as the possibility of the loss of an
authorization code for a cable TV converter, is not intended to be
unplugged by the user for cleaning or any other purpose, may
exclude the reference to unplugging the appliance in item 5.
6. Attachments - Do not use attachments not recommended by
the video product manufacturer. They may be hazardous.
7. Water and Moisture - Do not use this video product near water
- for example, near a bath tub, wash bowl, kitchen sink, or
laundry tub, in a wet basement, or near a swimming pool, etc.
8. Accessories - Do not place this video product on an unstable
cart, stand, tripod, bracket, or table. The video product
may fall, causing serious damage to the appliance.
Use only with a cart, stand, tripod, bracket, or table
recommended by the manufacturer, or sold with the
video product. Any mounting of the appliance should
follow the manufacturer’s instructions and should use a mounting
accessory recommended by the manufacturer. Move an appli
ance and cart combination with care. Quick stops, excessive
force, and uneven surfaces may cause the appliance and cart
combination to overturn.
9. Ventilation - Slots and openings in the cabinet are provided for
ventilation, to ensure reliable operation of the video product, and to
protect it from overheating. Do not block or cover these openings.
Do not block the openings by placing the video product on a bed,
sofa, rug, or other similar surface. Do not place this video product
near or over a radiator or heat register. Do not place this video
product in a built-in installation such as a bookcase or rack unless
proper ventilation is provided or the manufacturer’s instructions
have been adhered to.
10. Power Sources - Operate this video product only from the type of
power source indicated on the marking label. If you are not sure of
the type of power supply to your home, consult your appliance
dealer or local power company. For video products intended to
operate from battery power, or other sources, refer to the operating
instructions.
11. Grounding or Polarization - This video product has a polarized
alternating-current line plug (a plug having one blade wider than
the other). This plug will fit into the power outlet only one way. This
is a safety feature. If you are unable to insert the plug fully into the
outlet, reverse the plug. If the plug still does not fit, ask your
electrician to replace your obsolete outlet. Do not defeat the safety
purpose of the polarized plug.
12. Power Cord Protection - Route power supply cords so that they
are not likely to be walked on or pinched by items placed upon or
against them, paying particular attention to cords at plugs, conve
nience receptacles, and the point where they exit from the appli
ance.
13. Outdoor Antenna Grounding - If you connect an outside antenna
or cable system to the video product, be sure the antenna or cable
system is grounded so as to provide some protection against
voltage surges and built-up static charges. Section 810 of the
National Electrical Code, ANSI/NFPA No. 70, provides information
with respect to proper grounding of the mast and supporting
Page 24

structure, grounding of the lead-in wire to an antenna discharge
unit, size of grounding conductors, location of antenna discharge
unit, connection to grounding electrodes, and requirements for the
grounding eiectrode. (See Figure 1.)
14. Lightning - For added protection of this video product receiver
during a lightning storm, or when it is left unattended and unused
for a long time, unpiug it from the wali outlet and disconnect the
antenna or cable system. This wiil prevent damage to the video
product due to iightning and power-line surges.
15. Power Lines - Do not locate an outside antenna system near
overhead power lines or other eiectric iight or power circuits or
where it can fall into such power lines or circuits. When instaliing
an outside antenna system, refrain from touching such power iines
or circuits, as contact with them might be fatal.
16. Overloading - Do not overload wall outlets and extension cords
as this can result in a risk of fire or electric shock.
17. Object and Liquid Entry - Never push objects of any kind into
this video product through openings as they may tough dangerous
voltage points or short out parts, resulting in a fire or electric
shock. Never spill liquid of any kind on the video product.
18. Servicing - Do not attempt to service this video product yourself
as opening or removing covers may expose you to dangerous
voltage or other hazards. Refer all servicing to qualified service
personnel.
19. Damage Requiring Service - Unplug this video product from the
wall outlet and refer servicing to qualified sen/ice personnel under
the following conditions:
a. When the power-supply cord or plug is damaged.
b. If liquid spills or objects fall into the video product.
c. If the video product is exposed to rain or water.
d. If the video product does not operate normally by following the
operating instructions. Adjust only those controls that are covered
by the operating instructions. An improper adjustment of other
controls may result in damage and will often require extensive
work by a qualified technician to restore the video product to its
normal operation.
e. If the video product is dropped or the cabinet is damaged.
f. When the video product exhibits a distinct change in perfor
mance, this indicates a need for service.
20. Replacement Parts - when replacement parts are required, be
sure the service technician uses replacement parts specified by
the manufacturer or which have the same characteristics as the
original part. Unauthorized substitutions may result in fire, electric
shock or other hazards.
21. Safety Check - Upon completion of any service or repairs to this
video product, ask the service technician to perform safety checks
to determine that the video product is in proper operating condi
tion.
22. Heat - Situate this video product away from heat sources such as
radiators, heat registers, stoves, or other products (including
amplifiers) that produce heat.
FIGURE 1
EXAMPLE OF ANTENNA GROUNDING AS PER NATIONAL ELECTRICAL CODE (NEC)
GROUNDING
ELECTRODE SYSTEM
(NEC ART 290 PART N)
Page 25

Philips Consumer Electronics Company
Factory Service Center Locations
•k
Seattle/Tacoma Area
• San FrancîscdVMetro Area
k
Los Angeles
★ Indicates In>Home Service Only
1-800-242-9225
• Indicates ln*Home/Carry-!n Service
See Reverse Side for More Details.
Detroit/Toledo "
------
Cleveland/
, - NOhfo*
Chicago , * Columbu^
^ • Charlotte
'Kñóxvllle/E Tennessee
* Dallas
Houstoa^Galveston
Beaumont/Austin
San Antonio
At!anta/N Georgia
k
Orlando
« Tampa/W Florida
•Ft. Myers/SW Florida
k
Mlami/SE Florida
★ Pittsburgh/WV Area "
*PhiladeIphia/S New Jersey
JJiVash/Balt
NOTE: If you reside in one of our Philips Factory Service Branch areas (see directory on back), you can contact the nearest
Service Branch to obtain efficient and expedient repair for your product. If your product is In-Warranty, you should have
proot-of-purchase to ensure l\lo Charge Service. For Out-of-Warranb/ service, call the location nearest you.
NOTA: Si vous résidez dans une des régions desservies par une succursale de service après vente du fabricant Philips (voir
liste ci-dessous), vous pourrez contacter la branche de service après vente la plus près de chez vous pour obtenir un service
après vente rapide et efficace. Si le produit est sous garantie, il suffira de présenter une preuve d'achat pour bénéficier d'un
service sans frais. Pour les produits non couverts par la garantie, contactez le centre le plus près de chez vous.
NOTA: Si Ud. reside en una de nuestras zonas para sucursales Philips de sendeio al de fábrica (ver directorio más abajo), Ud.
puede comunicarse con la sucursal de servicio más cercana para obtener una reparación oportuna y eficaz de su producto.
Si su producto está todavía bajo garantía, Ud. debe presentar comprobante de compra para no ocasionar ningunos cargos
por servicio. Para servicio después del vencimiento de la garantía, llame al lugar más cercano de los abajo indicados.
In Canada
To obtain efficient and expedient carry-in, mail-in, or in-home service for your product,
please contact Philips at: 1 -800-661 -6162 (French speaking)
1-800-363-7278 (English speaking)
Au Canada
Comment obtenir le sen/ice après-vente pour les produits apportés ou envoyés par la poste à notre centre de service ou le
service à domicile
Veuillez contacter philips á: 1 -800-661 -6162 (Francophone)
1-800-363-7278
En el Canadá
Cómo recibir servicio efficiente para su producto, en persona, por correo o a domicilio
Favor de comunicarse con Philips al: 1 -800-661 -6162 (francòfono)
1-800-363-7278 (anglofono)
Page 26

Quality service is as close as your telephone! Simply look over the list below for the number of a Factory
Service Center near you. Your product will receive efficient and expedient carry-in, mail-in, or in-home
SERVICE, AND YOU WILL RECEIVE PEACE OF MIND, KNOWING YOUR PRODUCT IS BEING GIVEN THE EXPERT AHENTIDN OF PhILIPS’
Factory Service. And, if the phone number listed for your area is long distance, call
1-800-242-9225
for
Factory Service.
COHMEHT obtenir NOTRE SERVICE APRÈS VENTE RAPIDE ET EFFICACE SOIT PAR COURRIER, À DOMICILE. OU EN SE PRÉSENTANT À UN CENTRE DE SERVICE
PHILIPS. PLUS DE COO CENTRES DE RÉCEPTION DE PRODUITS À RÉPARER À TRAVERS LE PAYS: CONTACTER LE CENTRE DE SERVICE AUX CONSOMMATEURS LE PLUS
PROCHE POUR SAVOIR LEÙIPLACEMENT DE CES DÉPÔTS DANS UN RAYON DE 50 À 75 MILES (80 KM À120 KM) DU CENTRE DE SERVICE LOCAL.
CÓMO OBTENER UN SERVICIO OPORTUNO Y EFICIENTE POR CORREO, EN CASA O EN PERSONA PARA SU PRODUCTO A TRAVÉS DE UN CENTRO PHILIPS DE SERVICIO.
MAS DE 500 SITIOS POR TODO EL PAIS PARA LA RECEPCION DE PRODUCTOS NECESITADOS DE REPARACIONES: COMUNICARSE CON EL CENTRO DE SERVICIO DE
FABRICA MAS CERCANO PARA ESTOS LUGARES DENTRO DE UN RADIO DE 80 A120 KM (50 A 75 MILUS) DEL CENTRO DE SERVICIO LOCAL.
GEORGIA
Philips Factory Service of Georgia
200 N. Cobb Piavy., Suite 120 of N. Carolina
Marietta, GA 30062
(770)795-0085
FT. MYERS, FLORIDA
Philips Factory Sen'ice Satellite - Ft.
Myers
11601 Cleveland Ave., Suite 15
Ft. Myers, FL 33907
(941)278-4242
FLORIDA
Philips Factory Serx'ice of Florida
1911 US Highway 301 North
Tampa, FL 33619
(813)621-8181
WESTERN U.S.A.
Philips Factory Service
Western Region
681 East Brokaw Rd.
San Jose, CA 95112
(408)436-8566
NORTH CAROLINA ILLINOIS
Philips Factory Service
520 G Clanton Rd. Itasca, IL 60143
Charlotte, NC 28217
(704)529-6330
TEXAS
Philips Factory Service of Texas
1110 N. Post Oak Rd., Suite 100
Houston, TX 77055
(713) 682-3990
CENTRAL U.S.A.
Philips Factory Service Central US
950 Keynote Circle
Brooklyn Heights, OH 44131
(216)741-3334
MICHIGAN
Philips Factory Service
of Michigan
25173 Dequindre
Madison Heights, Ml 48071
(248) 544-2110
Philips Factory Service of Illinois
1360 W. Hamilton PkLvy.
(630)775-0990
TENNESSEE
Philips Factory Service
of East Tennessee
6700 D Papermill Rd.
KnBxville.TN 37919
(423)584-6614
MID-ATLANTIC
Philips Factory Service
Mid-Atlantic
352 Dunks Ferry' Rd.
Bensalem, PA 19020
(215) 638-7500
Page 27

Page 28

THE BEST CHOICE FOR YOUR
VIDEO CASSETTE RECORDER
Philips offers a full range of High Grade &
Extra High Grade Video Cassettes.
PHILIPS
LPT0068-001A
 Loading...