

Philips MCD109 98 User Manual

DVD Micro Theatre
MCD109

Manufactured under license from Dolby Laboratories.
“Dolby”, “Pro-logic” and the double-D symbol are trade-
marks of Dolby Laboratories.
This product incorporates copyright protection technol-
ogy that is protected by method claims of certain U.S.
patents and other intellectual property rights owned by
Macrovision Corporation and other rights owners. Use of
this copyright protection technology must be authorized
by Macrovision Corporation, and is intended for home
and other limited viewing uses only unless otherwise au-
thorized by Macrovision Corporation. Reserve engineer-
ing or disassembly is prohibited.
CAUTION
Use of controls or adjustments or
performance of procedures other
than herein may result in hazardous
radiation exposure or other unsafe
operation.
2

Index
English ------------------------------------------------ 4
-------------------------------------------------------- 31
English
3

Contents
English
General Information
Features .................................................................. 5
Supplied accessories ............................................ 5
Environment information ................................... 5
Installation .............................................................. 5
Maintenance of disc and disc lens .................... 5
Connections
Connecting the right speaker ............................ 6
Connecting a TV set ............................................ 7
Connecting the power cord .............................. 7
Connecting additional
equippments..........................................................................8
Functional Overview
Controls on the system ...................................... 9
Remote control ........................................... 10~11
Getting Started
Step 1: Using the Remote Control ................. 12
Step 2: Setting up the TV ........................... 12~14
Step 3: Setting language preference ................ 14
Basic Functions
Switching the system on/off ............................. 15
Power saving automatic standby ..................... 15
Volume control ................................................... 15
Sound Control .................................................... 15
Selecting the color system that matches
your TV set
Setting up Progressive Scan feature
To deactivate Progressive manually
Setting the OSD Language
Setting the Audio, Subtitle and Disc Menu
language
DBB (Dynamic Bass Boost)
DSC (Digital Sound Control)
Disc Operations
Playable Discs ...................................................... 16
Region Codes ...................................................... 16
Playing discs ......................................................... 17
Using the Disc Menu.......................................... 17
Using PBC feature (available for 2.0-version
VCD only)
Resuming playback...............................................17
Selecting and searching .............................. 17~18
Selecting a different track/chapter
Fast forwarding/reversing
GOTO
Different play modes:
REPEAT, SHUFFLE and REPEAT A-B .............. 18
REPEAT
SHUFFLE
REPEAT A-B
Programming favourite tracks ......................... 19
Display information............................................ 19
Playing in slow motion ...................................... 19
ZOOM .................................................................. 20
AUDIO ................................................................. 20
SUBTITLE (DVD only) ...................................... 20
Camera angle (DVD only)................................ 20
Playing a title (DVD only) ................................. 20
Playing MP3/WMA/JPEG disc .......................... 21
Playing Kodak Picture disc ................................ 21
DVD MENU Operations
Using the menu bar ........................................... 22
Using the setup menu (user preference
settings) ........... ............................................. 23~25
TV Display
Screen Saver
Night Mode
Test Tone
Changing the password
Restricting playback by setting parental level
Rating explanations
OSD language (Menu Language)
Default
Specifications ........................................... 26
Tr oubleshooting ............................. 27~29
Glossary ......................................................... 30
4

General Information
Features
Your DVD MICRO THEATRE System with 2.0channel full analog amplifier creates the same
dynamic sound qualities that you find in full
fledged cinemas and incorporates some of the
best features in home theater technology. Other
features include:
Additional Component Connections
Lets you connect other audio and audio/visual
components to the DVD micro system.
Night Mode
Selects Dynamic ON or OFF cyclically
Parental Control (Rating Level)
Lets you set a ratings level so that your children
cannot watch a DVD that has a rating higher
than you set.
Supplied accessories
– Remote control with one CR2025 battery
–Two speakers
–AC power cord
– DIN cable
– Composite video cable (yellow)
– User Manual and Quick Start Guide
If any item is damaged or missing, contact
your retailer or Philips.
Environmental information
All unnecessary packaging has been omitted. We
have tried to make the packaging easy to
separate into three materials: cardboard (box),
polystyrene foam (buffer) and polyethylene (bags,
protective foam sheet).
Your system consists of materials which can be
recycled and reused if disassembled by a
specialised company. Please observe the local
regulations regarding the disposal of packaging
materials, exhausted batteries and old equipment.
Installation
● Place the player on a flat, hard, and stable surface
● In a cabinet, allow about 10cm (4 inches) of free
space all around the player for adequate
ventilation.
● Do not expose your player to extreme
temperatures or humidity.
● The apparatus shall not be exposed to dripping
or splashing and that no objects filled with liquid
such as vase shall be placed on the apparatus.
● No naked flame sources, such as lighted candles,
shall be placed on the apparatus.
● The ventilation should not be impeded by
covering the ventilation openings with items,
such as newpapers, table-cloths, cur tains, et.
Maintenance of disc and disc lens
● When a disc becomes dirty,
clean it with a cleaning cloth.
Wipe the disc from the
center out, in a straight line.
● Do not expose the player,
batteries or discs to humidity,
rain, sand or excessive heat
(caused by heating
equipment or direct sunlight). Always keep the
disc tray closed to avoid dust on the lens.
● Do not use solvents such as benzene, thinner,
commercially available cleaners, or anti-static
spray intended for colour discs.
● The lens may cloud over when the player is
suddenly moved from cold to warm
surroundings, making it impossible to play a disc.
Leave the player in the warm environment until
the moisture evaporates.
● To protect the CD lens for its
peformance, use CD lens cleaner to clean
the lens regularly or when the lens
performance is reduced.
English
5
Connections
English
Speaker wires
TV
Right speaker Left speaker
Video cable
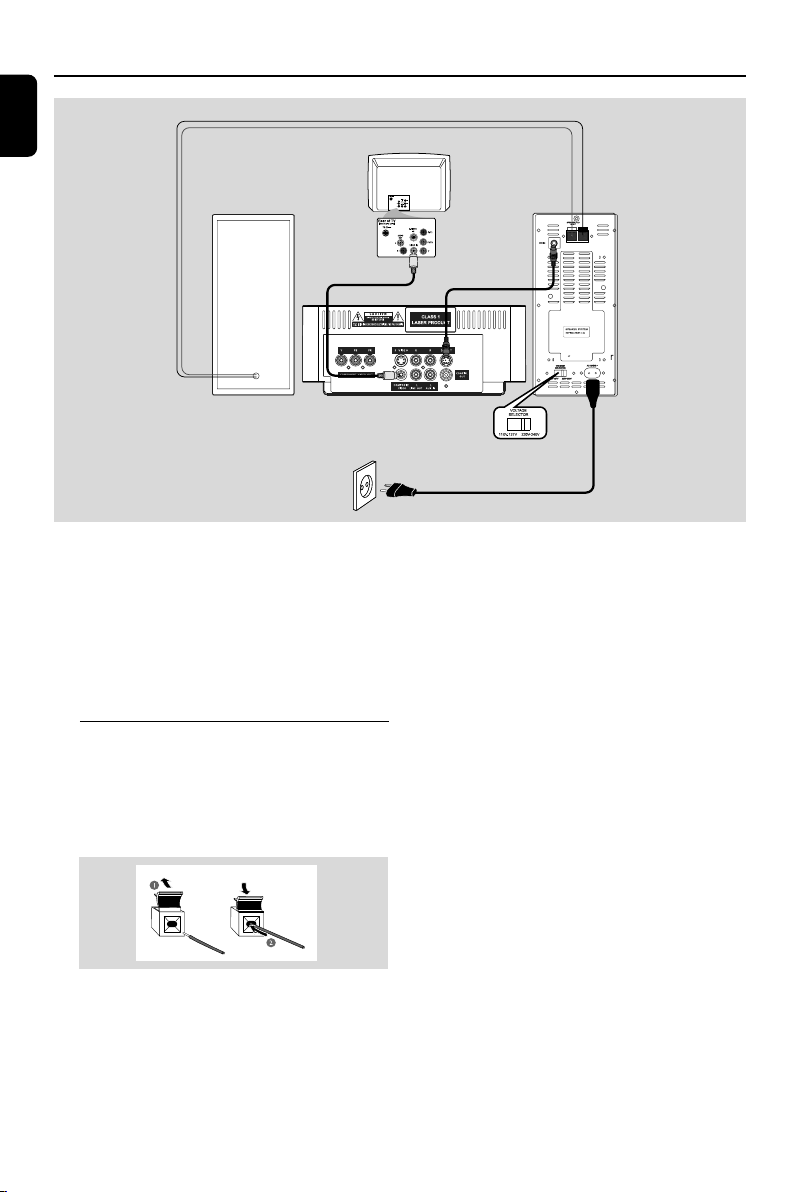
IMPORTANT!
– The type plate is located at the
bottom of the system.
– Before connecting the AC power cord
to the wall outlet, ensure that all other
connections have been made.
–Never make or change any
connections with the power switched on.
Connecting the right speaker
Connect the supplied wires of the right speaker
to SPEAKER RIGHT on the left speaker, red wire
to red jack ( “+”), black wire to black jack (“-”).
Fully insert the stripped portion of the speaker
wire into the terminal as shown.
DIN cable
DVD player
Voltage selector
AC power cord
Notes:
– Ensure that the speaker wires are correctly
connected. Improper connections may damage the
system due to short-circuit.
–For optimal sound performance, use the supplied
speakers.
– Do not connect more than one speaker to any
one pair of +/- speaker jacks.
– Do not connect speakers with an impedance
lower than the speakers supplied. Please refer to
the SPECIFICATIONS section of this manual.
6
Connections
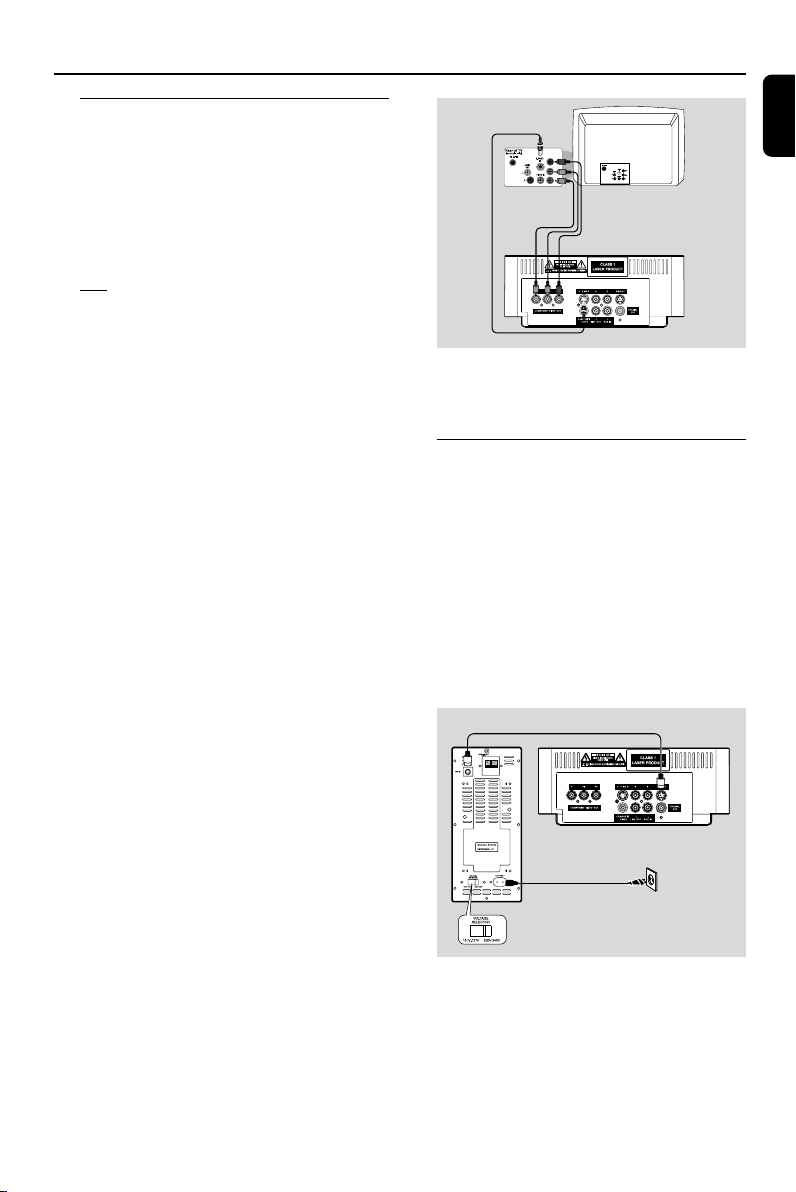
Connecting a TV set
You must connect a TV to your DVD micro
system in order to view the playback of DVD/
VCD and picture disc.
IMPORTANT!
– There are various ways to connect the
system to a TV. You only need to make
one of the best connections, depending
on the capabilities of your TV system.
– S-Video or Component Video
connection provides higher picture
quality. These options must be available
on your TV set.
– Connect the system directly to the TV
set.
● Connect the COMPOSITE VIDEO jack to
the video input jack on the TV using a video
cable (yellow).
OR
Option 1
Connect the S-VIDEO output jack to the SVideo input jack on the TV using an S-Video
cable (not supplied).
OR
Option 2
Use the component video cables (red/blue/
green, not supplied) to connect the DVD micro
system’s COMPONENT VIDEO OUT video
output jacks to the corresponding component
video input jacks (or labeled as Pr/Cr Pb/Cb Y
or YUV) on the TV.
Option 1
Option 2
Note:
–To avoid magnetic interference, do not position
the speakers too close to your TV.
Connecting the power cord
IMPORTANT!
– If your system is equipped with a
Voltage Selector, set the VOLTAGE
SELECTOR (located on the back of the
left speaker) to match the local power
line.
– Never make or change any
connection with the power switched on.
– The DVD player can only be operated
after the supplied DIN cable is
connected.
DIN cable
1
English
IMPORTANT!
– The progressive scan video quality is
only possible when using Y Pb Pr and a
progressive scan TV is required. (Proceed
to “Setting up the TV for detailed
Progressive Scan setup.)
Left speaker
DVD player
2
AC power cord
Voltage selector
1 Connect the supplied DIN cable to DVD player’s
DIN jack and the left speaker’s DIN jack.
2 Connect the supplied AC power cord to the left
speaker’s AC MAINS and the wall socket.
7
Connections
English
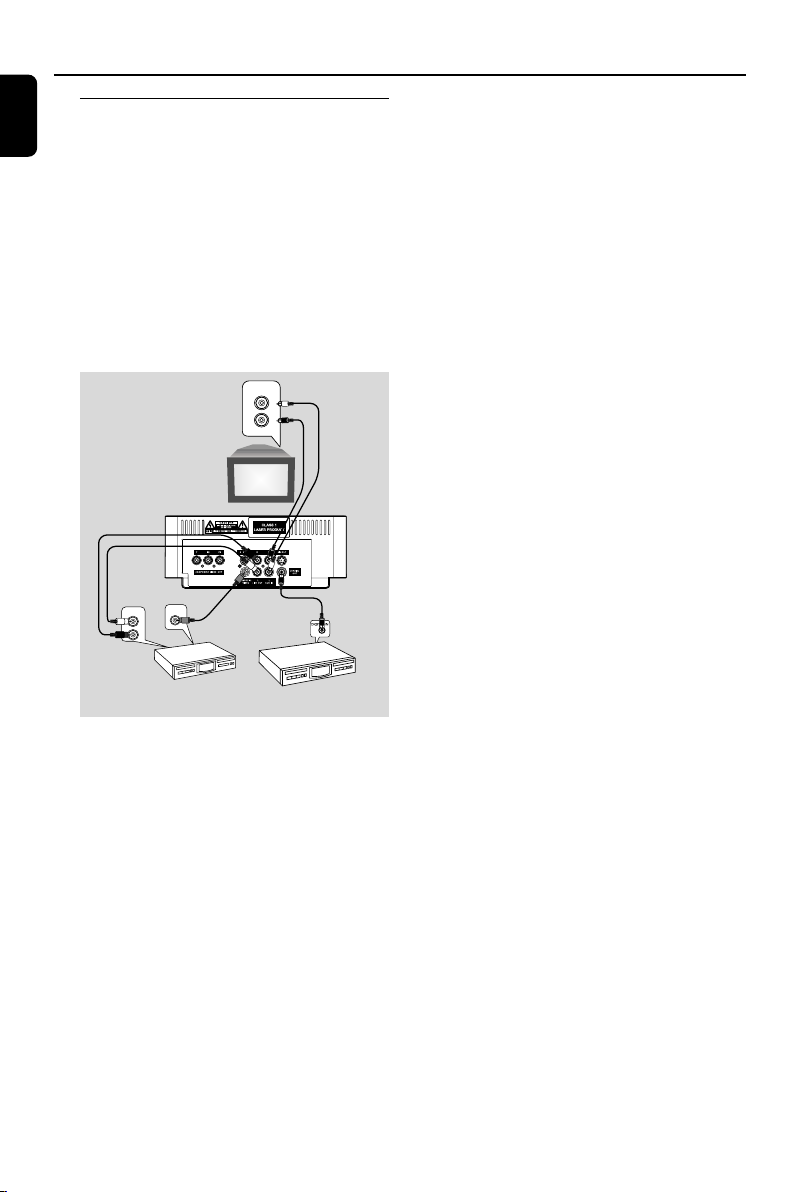
Connecting additional
equippments
IMPORTANT!
– Some discs are copy-protected. You
cannot record the disc through a VCR or
digital recording device.
–When making connections, make sure
the colour of the cable plugs matches the
colour of jacks.
–Always refer to the owner’s manual of
the other equipment for complete
connection and usage details.
AUDIO IN
B
L
R
Television
(for example)
VIDEO IN
AUDIO OUT
Recording (digital) C
● Connect the system’s COAXIAL OUT (digital
out) jack to the DIGITAL IN jack on a digital
recording device (DTS-Digital Theater System
compatible, with a Dolby Digital decoder, for
example).
Before operation, set COAXIAL OUTPUT
according to the audio connection.
L
R
A
C
VCR
(for example)
CD Recorder
(for example)
Viewing and listening to the playback of
other equipment A
● Using the audio cables (red/white, not supplied)
Connect the system’s AUX IN (R/L) jacks to
the AUDIO OUT jacks on the other audio/visual
device (such as a TV, VCR, Laser Disc player or
cassette deck).
Before starting operation, press AUX on the
remote repeatedly in order to activate the input
source (AUX).
Using the VCR for recording DVDs B
● Connect one of the system's COMPOSITE
VIDEO jacks to the corresponding VIDEO IN
jack, and LINE OUT (R/L) jacks to the
AUDIO IN jacks on the VCR. This will allow you
to make analogue stereo (two channel, right and
left) recordings.
8
Functional Overview
English
1
2
3
4
5
6
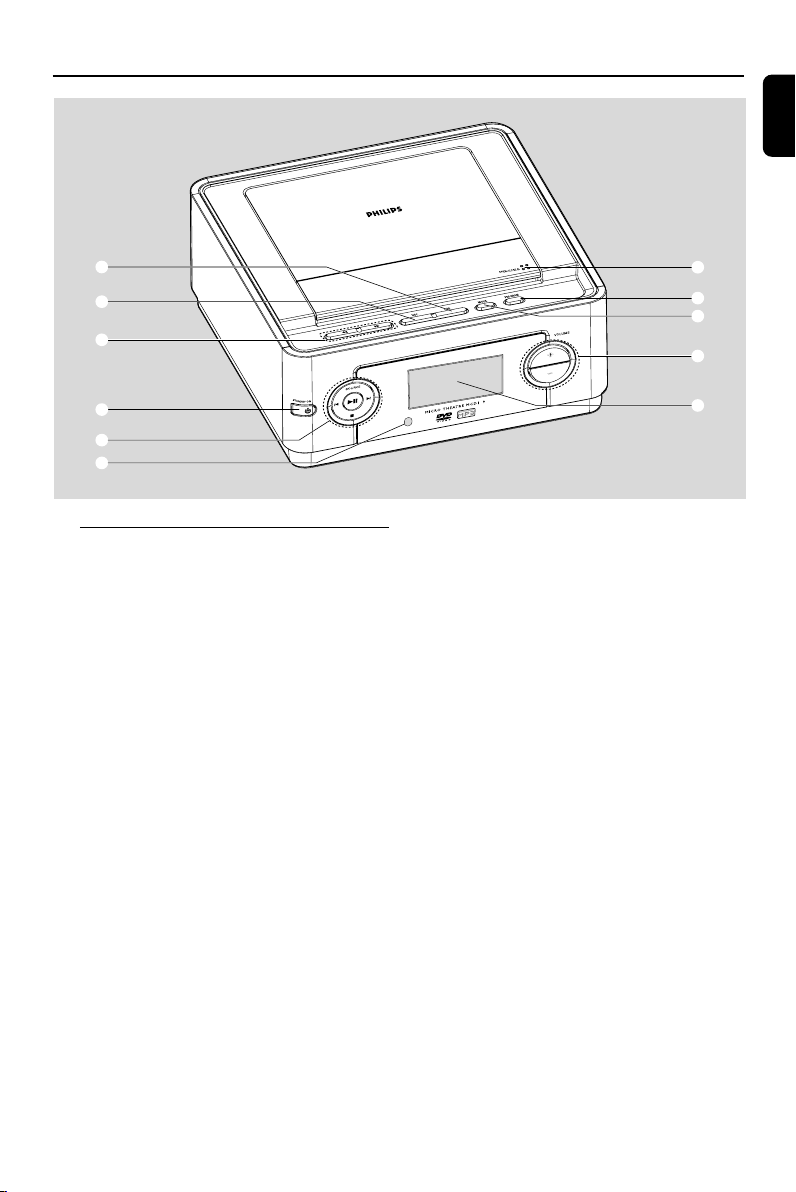
Controls on the system
1 DBB
– enables or disables bass enhancement.
2 DSC
– selects different types of preset sound equalizer
settings (CLASSIC, POP, ROCK or JAZZ).
3 à / á
– fast searches backward/forward in a disc at
different speeds.
4 STANDBY-ON B
– switches the system on or to standby mode.
5 ÉÅ
– starts or interrupts disc playback
SOURCE
– selects the respective sound source: DVD or
AUX.
¡ / ™
– press to skip to the previous/next chapter/title/
track.
9
– stops disc playback or erases a program.
6 iR Sensor
– point the remote control towards this sensor.
7
8
9
0
0
!
7 OPEN/CLOSEç
– opens or closes the disc door.
8 PROGRAM
– For VCD/CD only: program the favourite tracks
9 MODE
– selects various repeat play modes (For VCD
with PBC feature, PBC must be turned off.)
0 VOLUME +/-
– adjusts the volume upward/downward.
! Display
– shows the current status of the DVD player.
9
 Loading...