

Philips MC5037 User Manual [en, es, fr]
Micro Hi-Fi System
Mc-70
Mc-50
Mc-45
Toll Free Help Line
Ligne d'assistance en service libre
Linea de ayuda telefònica sin cargo
800-531-0039

Return your Warranty Registration card today to
ensure you receive all the benefits you’re entitled to.
' Once your Philips purchase is registered, you're eligible to
receive all the privileges of owning a Philips product.
^Warranty i
Verification
Registering your product within
10 days confirms your right to
maximum protection under the
terms and conditions of your Philips
warranty
^ Owner I
Confirmation
Your completed Warranty Registration
Card serves as verification of ownership
in the event of product theft or loss.
• So complete and return the Warranty Registration Card
enclosed with your purchase at once. And take advantage
of these important benefits.
PHILIPS
Congratulations on your purchase,
and welcome to the "family!"
Dear Philips product owner:
Thank you for your confidence in Philips .You’ve selected one of the best-built,
best-backed products available today.And we’ll do everything in our power to
keep you happy with your purchase for many years to come.
As a member of the Philips “family.” you’re entitled to protection by one of the
most comprehensive warranties and outstanding service networks in the
industry.
What’s more, your purchase guarantees you’ll receive all the information and
special offers for which you qualify, plus easy access to accessories from our
convenient home shopping network.
And most importantly you can count on our uncompromising commitment to
your total satisfaction.
All of this is our way of saying welcome-and thanks for investing in a Philips
product.
Sincerely,
Robert Minkhorst
President and Chief Executive Officer
P.S. Remember, to get the most from your Philips product, you must
return your Warranty Registration Card within 10 days. So please
mail it to us right now!
. Model I
0-—,—
--------------
_j
Registration
Returning your Warranty Registration
Card right away guarantees you’ll
receive all the information and special
offers which you qualify for as the
owner of your model.
Know these.
symbols
RISK OF ELECTRIC SHOCK
A A
CAUTION: TO REDUCE THE RISK OF ELECTRIC SHOCK, 00 NOT
REMOVE COVER (OR BACK). NO USER-SERVICEABLE PARTS
INSIDE. REFER SERVICING TO QUALIFIED SERVICE PERSONNEL.
A
household, please do not remove product
covering.
A
maintenance problems.
WARNING I TO PREVENT
FIRE OR SHOCK HAZARD, DO NOT
EXPOSE THIS EQUIPMENTTO RAIN OR
MOISTURE.
DO NOT OPEN
This "bolt of lighting" indicates
uninsulated material within your
unit may cause an electrical shock.
For the safety of everyone in your
The "exclamation point" calls
attention features for which you
should read the enclosed literature
closely to prevent operating and
CAUTION: To prevent
electric shock, match wide blade of
plug to wide slot, and fully insert.
For Customer Use
Enter below the Serial No. which is located
on the rear of the cabinet. Retain this
information for future reference .
Serial No.
PHILIPS Visit our \A/orld Wide Web Site at http://www.phiiipsusa.com

!B;
1
(D
^3^
0
3«rl>
....
STANDBV-ON
-o
H)i](M?e
CD/CD-R/CD-RW COMPATIBLE iDl
-
-------
------------ _
2. * I '4' I “
SLEEFWCREOIBIE SURROUND SHUPrif REPEAT PROORAMDISC AU O@0
------------
MICRO SYSTEM
iOi
cos
-
PHONES
@
-----------
®

IMPORTANT SAFETY INSTRUCTIONS
- Read before operating equipment
This product was designed and
manufactured to meet strict quaiity and
safety standards.There are, however, some
instailation and operation precautions which
you shouid be particuiariy aware of
1. Read these instructions Ali the safety
and operating instructions should be read
before the appliance is operated.
2. Keep these instructions The safety
and operating instructions should be
retained for future reference.
3. Heed all warnings - All warnings on the
appliance and in the operating instructions
should be adhered to.
4. Follow all instructions All operating
and use instructions should be followed.
5. Do not use this apparatus near
water - for example, near a bathtub,
washbowl, kitchen sink, laundry tub, in a wet
basement or near a swimming pool, etc,
6. Clean only with a damp cloth. The
appliance should be cleaned only as
recommended by the manufacturer
7. Install in accordance with the
manufacturer’s instructions. Do not
block any of the ventilation openings.
For example, the appliance should not be
situated on a bed, sofa, rug, or similar
surface or placed in a built-in installation,
such as a bookcase or cabinet that may
impede the flow of air through the
ventilation openings,
8. Do not install near any heat sources
such as radiators, heat registers, stoves, or
other apparatus (including amplifiers) that
produce heat.
9. Do not defeat the
safety purpose of the
polarized or
grounding-type plug.
AC Polarized
Plug
A polarized plug has two blades with one
wider than the other A grounding type plug has
two blades and a third grounding prong.The
wide blade or the third prong are provided for
your safety When the provided plug does not
ft into your outlet, consult an electrician for ,
replacement of the obsolete outlet
lO.Protect the power cord from being
walked on or pinched particuiariy at plugs,
convenience receptacles, and the point
where they exit from the apparatus.
11.Only use attachments/accessories
specif ed by the manufacturer
12. Use only with a cart, stand,
tripod, bracket or table specif ed
by the manufacturer or sold with
the apparatus. When a cart is used, use
caution when moving the cart/apparatus
combination to avoid injury from tip-over
13. Unplug this apparatus during lightning
storms or when unused for long periods of
time.
14. Refer all servicing to qualified service
personnel. Servicing is required when the
apparatus has been damaged in any way,
such as power-supply cord or plug is
damaged, liquid has been spilled or objects
have fallen into the apparatus, the apparatus
has been exposed to rain or moisture, does
not operate normally, or has been dropped.
15. Battery usage CAUTION -To prevent
battery leakage which may result in bodily injury
or damage to the unit:
• Install all batteries correctly, + and - as
marked on the unit.
• Do not mix batteries (old and new or
carbon and alkaline, etc.).
• Remove batteries when the unit is not used
for a long f me. i
EL 6475-E001:0b/8

Index
English
Français 33
Canada
English:
This digital apparatus does not exceed
the Class B limits for radio noise
emissions from digital apparatus as set
out in the Radio Interference
Regulations of the Canadian
Department of Communications.
Français:
Cet appareil numérique n'emet pas de
bruits radioélectriques dépassant les
limites applicables aux appareils
numériques de Class B prescrites dans
le Règlement sur le Brouillage
Radioélectrique édicté par le Ministère
des Communications du Canada.
This warning label is located on the rearside
and inside this laser product.
L^SER RADIATION
WHEN OPEN. DO NOT STARE INTO BEAM.
riAl.ir'cn INVISIBLE LASER RADIATION WHEN OPEN.
UANUtK-AVOID DIRECT EXPOSURE TO BEAM.
ALTTIINANAKYMATTOMAALLE LASERSATEILYLLE. ALA
KATSO SATEESEEN.
OSVNUG (ASeRSTRAlT#C5 NAR DE^m Da. AR OFPNAD
OCH SfARREN AR URKOPPLAD. BETRAKTA EJ STRÂLEN.
DANGER - Invisible laser radiation when open,
AVOID DIRECT EXPOSURE TO BEAM.
Español '
CAUTION
Use of controls or adjustments or
performance of procedures other
than herein may result in hazardous
radiation exposure or other unsafe
operation.
ATTENTION
L'utilisation des commandes ou
réglages ou le non-respect des
procédures ci-incluses peuvent se
traduire par une exposition
dangereuse à l'irradiation.
ATENCIÓN
El uso de mando o ajustes a la
ejecucción de métodos que no sean
losi%qui descritos puede ocasionar
peligro de exposición a radiación.
59

PLUG & PLAY
PLUG & PLAY
_ . , I Suivez les instructions I .
Branchez le système I sur l'afficheur 1 Appuyez sur "PLAY'
Read this first!
Congratulations on your purchase of this Philips product!
Everything you need to get started is in this box.
If you have any proWems.P/iillps RepresentotiVes can help
you get t/te most from your new product by explaining;
Sf Hookup
^ FirstTime Setup
^ Feature Operation
Do not attempt to return
this product to the store.
For Fast Help, Call Us First!
1-800-531-0039
Thank you for making Philips part of your liomel
Lisez d’abord ceci!
Nous vous fe/icitons pour l'achat de cet appareil Philips!
Tout ce dont vous avez besoin pour so mise en service se
trouve dans cet emballage.
S; vous avez le moindre problème, les représentants.de
Philips peuvent vous aider à tirer entière satisfaction de
votre nouvel achat en vous expliquant:
BT ies connexions
^ La première installation
^ L'utilisation des fonctions
Ne cherchez pas à retourner ce produit au magasin.
Pour une assistance rapide, appeleznous d'abord!
1-800-531-0039
Nous vous remercions d'avoir fait entrer Philips dans
votre maison!
MODO DE DEMOSTRACION
___
9
I Mantenga apretado el botón
l durante 5 segundos
" ^
Mantenga apretado el botón |
durante 5 segundos 1
PLUG&PLAY
¡Antes de todo lea esto!
¡Se le felicita por su compra de este producto Philips!
Esta caja contiene todo lo que necesita para empezar.
Si tiene algún profalemo, los representantes de Philips
pueden ayudarle a obtener el máximo rendimiento de su
producto explicándole lo siguiente:
1^ La conexión
^ La primera configuración
Sf La utilización de los fundones :
No intente devolver este producto a la tienda.
¡Para obtener ayuda rápida, antes de
todo llámenos!
1-800-531-0039
¡Gracias por hacer que Philips forme parte de su hogar!

Contents
General Information
Environmental Information
Supplied Accessories.............................................8
Safety Information..................................................8
.....................................
Preparations
Rear Connections.............................................9-10
Optional Connections...........................................10
Inserting batteries into the remote
control
..................................................................
Controls
Controls on the system and remote
control
.............................................................
11-12
Basic Functions
Plug and Play.......................................................13
Demonstration mode............................................14
Switching the system on
Switching the system to Standby mode
Power Saving Automatic Standby
Display mode
Volume Control...............................................14-15
Interactive Sound Control
.......................................................
......................................
...............
.......................
....................................
CD Operation
Discs for Playback...............................................16
Loading Disc........................................................16
Disc Playback
Programming the disc tracks
Repeat.................................................................18
Shuffle..................................................................18
......................................................
..........................
17-18
Tape Operation/Recording
8
Tape Playback
General Information on Recording
Preparation for Recording....................................22
One Touch Recording
CD Synchro Recording
Digital Recording via Digital Out
................................................
.......................
..........................................
........................................
..........................
21-22
22
22
23
23
External Sources
10
Listening to External Sources
..............................
23
Clock/Timer
Clock Setting........................................................24
Display Clock
Timer Setting........................................................25
Sieep Timer Setting..............................................26
.......................................................
24
Specifications..........................................27
14
14
14
14
15
17
Maintenance
.............................................
Troubleshooting
..............................
28
28-29
Radio Reception
Storing Preset Radio Stations
Tuning to Preset Radio Stations
Erasing a Preset Radio Station............................20
......................
..........................
19—20
20

General Information
This system complies with the FCC rules.
Part 15 and with 21 CFR 1040.10.
Operation is subject to the following two
conditions:
- This device may not cause harmful
interference, and
- This device must accept any interference
received, including interference that may
cause undesired operation.
Environmental Information
All unnecessary packaging has been omitted. We
have tried to make the packaging easy to
separate into three materials: cardboard (box),
polystyrene foam (buffer-) and polyethylene (bags,
protective foam sheet).
Your system consists of materials v\/hich can be
recycled and reused if disassembled by a
specialized company. Please observe the local
regulations regarding the disposal of packaging
materials, exhausted batteries and old
equipment.
Supplied accessories
- - Remote control
Batteries (two AA size) for remote control
- AM loop antenna
- FM wire antenna
- AC power cord
Safety Information
Before operating the system, check that the
Operating voltage indicated on the typeplate (or
the voltage indication beside the voltage
selector) of your system is identical with the .
voltage of your local power supply. If not, please
consult your cealer
Place the system on a flat, hard and stable
surface.
Place the system in a location with adequate
ventilation to prevent internal heat build-up In
your system. Allow at least 10 cm (4 inches)
clearance from the rear and the top of the unit
and 5 cm (2 inches) from each side.
Do not expose the system, batteries or discs to
excessive moisture, rain, sand or heat sources,
caused by heating equipment or direct sunlight,
If the system is brought directly from a cold to a
warm location, or is placed in a very damp room,
moisture may condense on the lens of the disc
unit inside the system. Should this occur; the CD
player would not operate normally. Leave the ■
power on for about one hour with no disc in the
system until normal playback is possible.
The mechanical par ts of the set contain selflubricating bearings and must not be oiled or .
lubricated.
When the system is switched to Standby
mode, it is still consuming some power,
To disconnect the system from the
power supply completely, remove the AC
power plug from the wall socket.

Preparations
I
Rear Connections
The type plate is located at the rear of the
system.
) Power
Before connecting the AC power cord to the
wall outlet, ensure that all other connections
have been made.
WARNING!
- For optimal performance, use only the
original power cable.
- Never make or change connections with
the power switched on.
To avoid overheating of the system, a safety
circuit has been built in. Therefore, your
system may switch to Standby mode
automatically under extreme conditions. If
this happens, let the system cool down
before reusing it (not available for all versions].
@ Antennas Connection
Connect the supplied AM loop antenna and FM
antenna to the respective terminals. Adjust the
position of the antenna for optimal reception.
AM Antenna
Position the antenna as far as possible from aTV,
VCR or other radiation source.
Preparations
FM Antenna
• For better FM stereo reception, connect an
outdoor FM antenna to the FM ANTENNA
terminal.
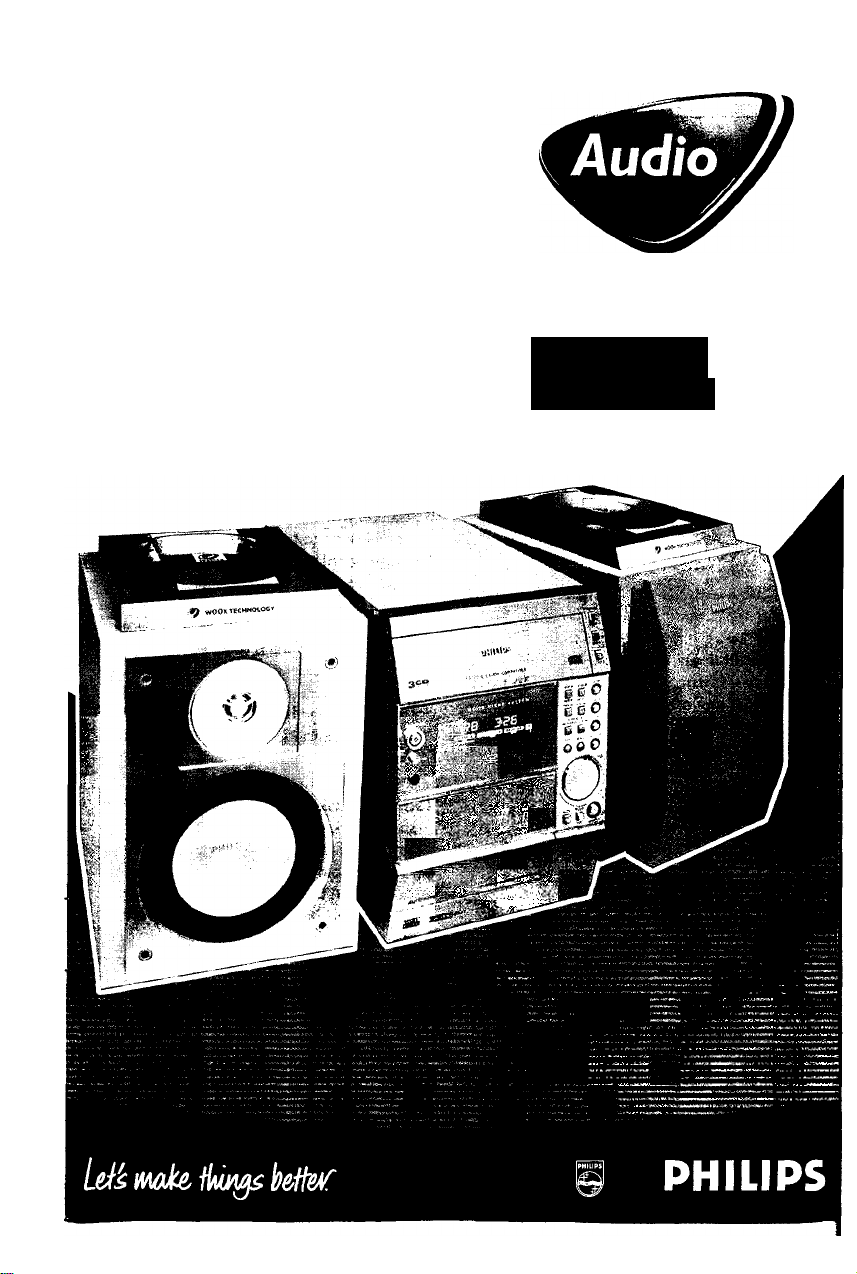
(c) Speakers Connection
Front Speakers
Connect the speaker wires to the SPEAKERS
(FRONT) terminals, right speaker to ”R" and left
speaker to "L", colored (marked) wire to " +"
and black (unmarked) wire to " —",
C Fully insert the stripped portion of the speaker
wire into the terminal as shown.
Notes:
- For optimal sound performance, use the
supplied speakers.
- Do not connect more than one speaker to any
one pair of -hi — speaker terminals.
- Do not connect speakers with an impedance
lower than the speakers supplied. Please refer to
the SPECIFICATIONS section of this manual.
Connecting other equipment to your system
Connect the audio left and right OUT terminals
of a TVVCR, baser Disc player DVD player or
CD Recorder to the
Note:
- If you are connecting equipment with a mono
output (a single audio out terminal), connect it to
the AUX/CDR IN left terminal. Alternatively, you
can use a "single to double” cinch cable (still be
mono sound).
Digital Out Connection
Connect this digital output when recording on
any audio equipment with digital input (CD
Recorder Digital Audio Tape [DAT] deck. Digital
to Analog Converter and Digital Signal Processor,
for example). Use a cinch cable to connect the
DIGITAL OUT terminal to the digital input
terminal of the equipment.
AUX/CDR IN terminals.
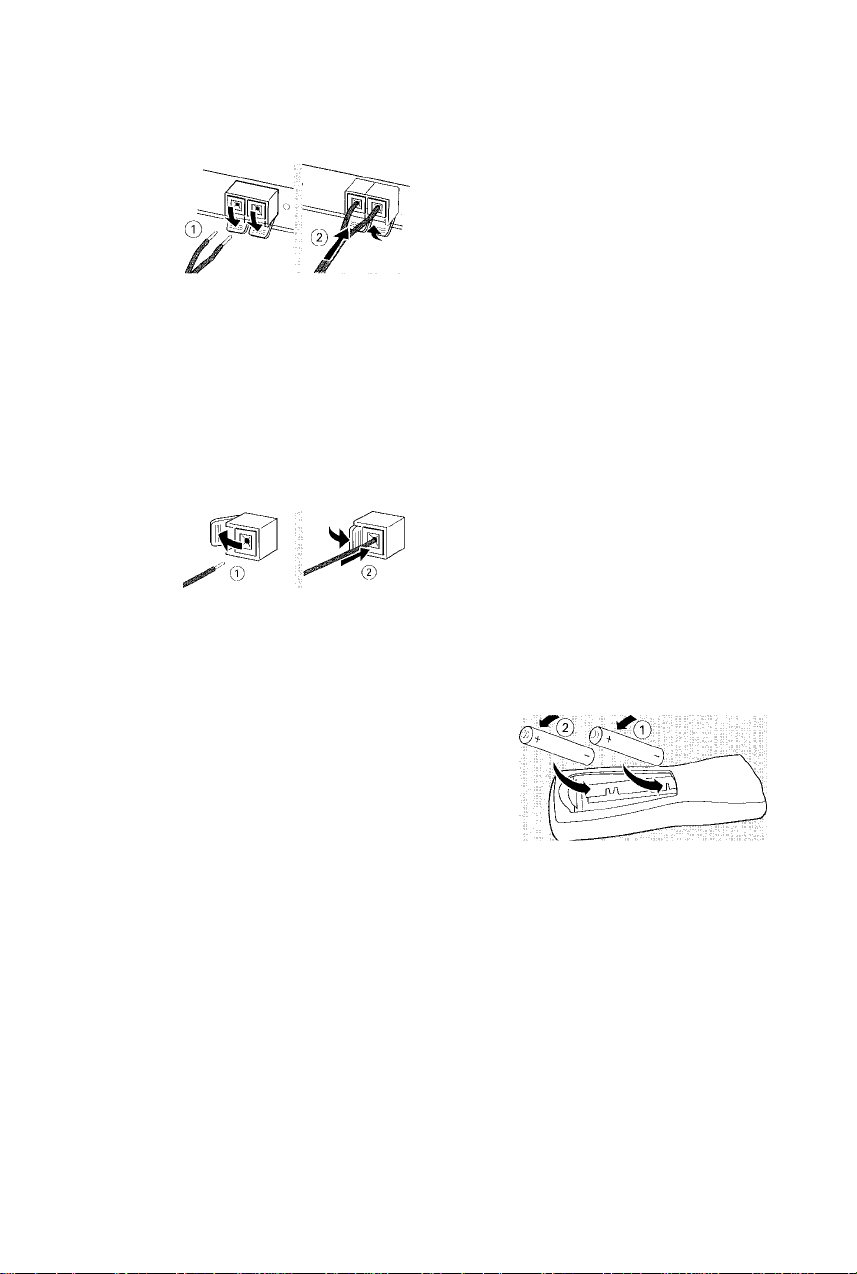
Inserting batteries into the Remote Control
nserttwo batteries (Type R06 orAA) into the
remote control with the correct polarity as
ndicated by the + and — symbols inside the
battery compartment.
Optional Connections
The optional equipment and connecting cords
are not supplied. Refer to the operating
instructions of the connected equipment for
details.
Subwoofer Out Connection Connect the subwoofer to the SUBWOOFER OUT terminal. The subwoofer reproduces just
the low bass sound effect (explosions or the
rumble of spaceships, for example).
10
CAUTION!
- Remove batteries if they are exhausted
or will not be used for a long time,
- Do not use old and new or different
types of batteries in combination.
- Batteries contain chemical substancesi so
they should be disposed off properly.

Controls (main system’s illustration on page 3)
Controls on the system and remote control
STANDBY ON 6
©
to switch the system on or to Standby mode,
DIM
@
to select various dim mode : DIM 1, DIM 2,
DIM 3 or DIM OFF.
iR
@
infrared sensor for remote control.
^ OPEN
®
to open the tape deck door
PHONES
to connect headphones.
PROG (PROGRAM)
for CD
...............
to program disc tracks.
forTUNER
.........
to program preset radio stations.
for CLOCK
BASS/TREBLE
©
to select BASS orTREBLE sound feature,
BASS/TREBLE +1- (on the remote control)
to increase or decrease the low or high tone
level for the respective BASS orTREBLE sound
feature selected.
wOOx (for model MC-70 only)
(on the system only) to select the next wOOx
level or switch off wOOx sound effect.
(on the remote control only) to switch on or off
the wOOx sound effect.
wOOx LEVEL
fon the remote control only) to select a desired
wOOx level: WOOX 1, WOOX 2 or
WOOX 3.
VOL (VOLUME +/-)
to increase or decrease the volume.
(on the system only) to increase or decrease the
low or high tone level for the respective BASS or
TREBLE sound feature selected.
• REC
to start recording on a tape.
SOURCE - to select the following:
CD 1*2«3 (CD 123)
to select disc tray 1,2 or 3.
TUNER
to select waveband : FM or AM.
TAPE
to select tape mode.
........
to select 12- or 24-hour clock
mode.
AUX/CDR
- to select a connected external source :
CDR or AUX (auxiliary) mode.
(g) Mode Selection
PLAY PAUSE ►!!
for CD
...............
to start or interrupt playback.
forTAPE
............
to start playback,
for PLUG & PLAY...(on the system only) to
initiate and start plug & play
mode.
STOP/DEMO STOP ■
for CD
...............
to stop playback or to clear a
program.
forTUNER
forTAPE
for DEMO
for CLOCK
for PLUG & PLAY...(on the system only) to exit
PREV/NEXT !◄ M (PRESETAT)
for GD
forTUNER
forTAPE
for CLOCK
SEARCH /TUNE ◄◄ ►►
for CD
forTUNER
forTAPE.............to rewind or fast forward.
for CLOCK
@ CD OPEN*CLOSE (CD 1/CD 2/CD 3)^
- to open or close the individual disc tray ; CD 1,
CD 2 or CD 3
@ DISC TRAYS @ DISPLAY SCREEN
- to view the current status of the system.
(§) MUTE
- to interrupt or resume sound reproduction.
(g) CD DIRECT 1/2/3
- to select a disc tray for playback.
(§) IS (INCREDIBLE SURROUND)
- to activate or deactivate the surround sound
effect.
.........
.........................
............
..........
........
...............
.........
............
........
................
.........
........
to stop programming,
(on the system only) to delete the
preset radio station.
to stop playback or recording.
(on the system only) to activate/
deactivate the demonstration.
to exit dock setting or cancel
timer.
plug & play mode,
to skip to the beginning of the
current, previous, or next track.
to select a preset radio station.
to select tape side (back or
front).
to set the minute.
to search backward/forward.
to tune to a lower or higher radio
frequency.
to set the hour
11

Controls
AUTO REV. (AUTO REVERSE)
to select the desired tape playback modes.
TIMER
to display timer or set the timer.
REPEAT
to playback track(s)/disc(s)/program repeatedly.
SHUFFLE
to playback all available discs and their tracks/
program in random order
TIMER ON/OFF
to activate or deactivate the timer function.
SLEEP
to activate, deactivate or set the sleep timer
function.
SNOOZE
to temporarily deactivate the wake up timer.
CD RESUME
to continue playback from the last selected track
after an interruption (only when the CD source
is still in the active mode),
to resume the last selected CD active mode
CLOCK
to display clock or set the clock.
(!)
to switch the system to Standby mode
|L0i(+)
............
woWwooVlevel ;
O O —
PHILIPS
Q-0J'
Notes for remote control:
- First, select the source you wish to
control by pressing one of the source select
keys on the remote control (CD 123 or
TUNER, for example).
- Then select the desired function ( ►, H,
►/, for example).
12

Basic Functions
IMPORTANT!
Before you operate the system, complete
the preparation procedures.
Plug and Play
Plug and Play allows you to store all available
radio stations automatically.
If Plug and Play has not been installed
When you turn on the system, "fli.l'rO
INSTHLL - PRESS PLAY" will be displayed.
Press PLAY ►(►II) on the system to start
installation,
“INSTFiLL" will be displayed and followed
by “TUriER" and then "flUTO".
^ PROGRAM will start flashing.
The system will search for all radio stations
on the FM band, then the AM band.
-> All available radio stations with sufficient signal
strength will be stored automatically.
“> The system will stop searching when all the
available radio stations are stored or when the
memory for 40 preset radio stations is used.
-» The last preset radio station will play when
Plug and Play is completed.
To reinstall Plug and Play
In Standby or Demonstration mode, press and
hold PLAY ► ( ►!!) on the system until
''fll.n"U INSTnL.,i... ■■ PRESS Pi..HY'"is
displayed.
2 Press PLAY ►(►II) again to start installation.
All previously stored radio stations will be
replaced.
To exit without storing the Plug and Play
• Press ■ on the system.
Notes;
- When the power is turned on, the disc tray may
open and dose to initialize the system.
- If you do not complete Plug and Play installation,
Plug and Play will be reinitiated the next time you
turn on the power.
- If no stereo frequency is detected during
Plug and Play, "CHECK flHT’ENNfl" will be
displayed.
- During Plug and Play, if no button is pressed
within 15 seconds, the system wilt exit Plug and
Play mode automatically.
13

Basic Functions
Demonstration mode
The system has a demonstration mode that
shows the various features offered by the system.
To activate the demonstration
0
In Standby mode, press and hold
DEMO STOP on the system until
"L.ltfll.i Ur!" is displayed.
The demonstration will begin.
To deactivate the demonstration
• Press and hold DEMO STOP on the system
until" " is displayed.
The system will switch to Standby mode.
Note:
- Even if you remove the AC power cord and
reconnect it to the wall socket, the demonstration
will remain off until you activate it again.
Switching the system on
In Standby/Demonstration mode
• Press STANDBY ON
The system will switch to the last selected
source.
• Press CD 1 *2*3 (CD 123), TUNER TAPE,
AUX/CDR
The system will switch to the selected source,
• Press any one of the CD OPEN'CLOSE
(CD / CD 2^ / CD 3:^) button
The system will switch to CD mode.
Switching the system to Standby mode
In Demonstration mode
• Press and hold DEMO STOP on the system.
In any other source mode
• Press STANDBY ON (or (!) on the remote
control).
The clock will appear on the display when Lhe
system is in Standby mode.
Note:
- If you have not deactivated the demonstration, it
will resume five seconds after the system switches
to Standby mode.
Power Saving Automatic Standby
As a power-saving feature, the system will
automatically switch to Standby mode if you do
not press any buttons within 30 minutes after: a
disc or tape has stopped playing. ,
Dim mode
Tbu can select the desired brightness for the |
display I
Press DIM repeatedly to select DIM 1, DIM 2,
DIM 3 or DIM OFF display mode. I
DIM and the corresponding mode numberiwil
appear on the display, except for DIM OFF
mode, '
DIM OFF
...........
All available LEDs light up, display
screen will have full brightness,
music level bar active.
DIM 1
DIM 2
DIM 3
................
................
................
Some LFDs light up, display
screen will have full brightness,
music level bar inactive.
All lightings turn off display
screen will have full brightness,
music level bar inactive,
All lightings turn off display
screen will be at half brightness,
music level bar inactive,
I I music level bar
Volume Control
Adjust VOL to increase (turn knob clockwise or
press VOLUME +) or decrease (turn knob
countcndockwise or press VOLUME —) the
sound level.
the volume level.
^ When reached the minimum volume level,
" " will be displayed.
To listen through the headphones
Connect the headphones plug
to the PHONES socket at the
front of the system.
The speakers will be muted. O
" will be displayed. "Xx" denotes
PHONES
14

Basic Functions
To switch off the volume temporarily
Press MUTE on the remote control.
Playback will continue without sound and
TiUTE'" will be displayed.
To restore the volume, press MUTE again or
increase the volume level.
Interactive Sound Control
For optimal sound listening, you are only
able to select either BASSITREBLE or
wOOx (for model MC-70 only).
wOOx (for model MC-70 only)
There are three wOOx settings to enhance the
bass response.
Press wOOx on the system repeatedly to select
the next wOOx level or switch off the wOOx
effect.
OR
1^0
Press wOOx on the remote control to switch
ON (enhanced) or OFF (normal) the wOOx
sound effect
When wOOx is switched on, press wOOx
LEVEL on the remote control repeatedly to
select the desired wOOx level: WOOX 1,
WOOX 2, WOOX 3 or WOOX OFF,
If'f.dOCfX' i,2 or ,3”” is selected,
WOOX and the corresponding level [jtfar J|
number will appear on the display.
■4 If't.aOO.X .Ot'-'F'"” is selected, the **
wOOx sound effect will be switched off
Notes:
- When switched off the wOOx effect, the last
Bass/Treble will resume automatically.
- Some discs or tapes might be recorded in high
modulation, which causes a distortion at high
volume. If this occurs, deaaivate wOOx or reduce
the volume.
0^2
Bass/Treble
The BASS (low tone) and TREBLE (high tone)
feature enables you to define the soundprocessor settings.
Press BASS +/- or TREBLE +/- on the
remote control repeatedly to select the next
Bass orTreble level.
OR
Press BASS or TREBLE on the system to
select Bass orTreble sound feature.
Adjust the VOL on the system to select the
desired Bass orTreble level.
-♦ "BlibS XX" or "TREE XX" will be
displayed. ".X.X" denotes the level as follows :
a n i'i II p am^iTD
BASS TREBLE
Notes:
- The volume knob can be used to adjust Bass/
Treble level immediately after you have selected the
respective Bass/Treble sound feature. If the volume
knob is not used within 5 seconds, it will become
normal volume control function.
- The Bass/Treble mode will exit automatically if
wOOx feature selected (for model tAC-70 only).
IS (Incredible Surround)
The Incredible Surround magnifies the virtual
distance between the front speakers for an
incredibly wide, enveloping, stereo effect.
Press IS on the remote control repeatedly to
activate/deactivate the surround sound effect.
-» If activated,
appear on the display and '
SLIRROl.IND" will be displayed.
-* If deactivated,“! S UF'F'" will be displayed.
incredible surround will
15

CD Operation
IMPORTANT!
- This system is designed for regular discs.
Therefore, do not use any accessories such
as disc stabilizer rings or disc treatment
sheets, etc., as offered on the market,
because they may jam the changer
mechanism.
- Do not load more than one disc into
each tray.
Discs for Playback
This system can playback all digital audio CD,
finalized digital audio CD-Rccordable (CDR)
discs and finalized digital audio CD-Rewritable
(CDRW)discs,
nCDMPACT nCDMPACT nCOMPACT
iD§© (ojD§[g (oId§(@
DIGITAL AUDIO DjGITALAUDIO DIGITAL AUDIO
lilamuiBniEl IReWritabiel
Loading Discs
Press CD 1*2*3
(CD 123) to select
CD mode
Press one of the
CD OPEN-CLOSE
button (CD \ ±l
CD 2^/CD 3^)
to open the desired
disc tray
^ The selected disc tray slides out.
Load a disc with the label side facing up.
Press again the corresponding button to close
the disc tray.
“ ' will be displayed. The selected
disc tray total number of tracks and the playing
time will appear on the display.
To select a desired disc tray
Press CD 1-2-3 (or CD 123 on the renaote
control) repeatedly.
Notes:
“ To ensure good system performance, wait until
the disc trays completely read the disc(s) before
proceeding.
- The CD changer Is only able to read the status
of the current selected disc tray.
16

CD Operation
Disc Playback
a disc is loaded in the disc tray
the current selected disc tray is empty
the current selected disc tray is loaded
I (£1^1 the disc tray is currently playing
To play all discs on the disc tray
• Press PLAY ►(►II),
-♦ All the available discs will play once, then stop.
During playback, the selected disc tray, track
number and elapsed playing time of the current
track will appear on the display.
To play one disc only
• Press one of the CD DIRECT 1/2/3 buttons
on the remote control,
-► The selected disc will play once, then stop.
To interrupt playback
• Press PAUSE II (►II),
-♦ The current track time flashing,
• To resume playback press PLAY ►( ►H)
again.
To stop playback
• Press ■,
To search for a particular passage during playback
• Press and hold or ►► and release it when
the desired passage is located.
During searching, the volume will be reduced.
To select a desired track
• Press M or N repeatedly until the desired
track appears on the display
• If playback is stopped, press PLAY ► ( ► II) to
start playback.
Note:
- In Shuffle mode, pressing H will cause the
player to skip only to the beginning of the current
track.
To skip to the beginning of the current track during playback
• Press H once.
To resume playback from the last selected track
• In CD stop or pause mode, press CD
RESUME on the remote control to start
playback again from where you have stopped.
Notes:
- Resume will not be available if you have
changed the disc, opened the disc tray or
disconnected the system power supply.
- Select CD RESUME in any other source mode
wilt only able to resume the last selected CD active
mode (for example, CD stop or playback).
To replace disc during playback
You are able to replace or load in disc into the
other two disc trays without interrupting current
playback
While playback, press the CD OPEN*CLOSE
button of the inactive disc trays (refer to
“Loading Disc").
• If you press CD OPEN*CLOSE button of the
active disc tray, the disc will stop playing and the
disc tray will slide out
Once the disc tray is opened, it will be
deselected.
Programming the disc tracks
Programming tracks is possible when playback is
stopped. Up to 40 trades can be stored in the
memory in any order
1 Load the desired discs on the disc trays (refer to
"Loading Disc").
2 Press PROG to start programming.
PROGRAM will start flashing.
3 Press CD 1*2«3 or CD DIRECT 1/2/3 button
to select a disc.
4 Press N or ►! repeatedly to select the desired
track.
5 Press PROG to store the track
• Repeat steps 3-5 to store other discs and tracks.
6 Press PLAY ►(►!!) to start program
playback.
"PLRY PROGRHn" will be displayed.
• To end programming without starting playback,
press ■ once .
-» The total number of tracks programmed and
the total playing time will appear on the display
17

CD Operation
Notes:
- If the total playing time is more than "93 59"
or if one of the programmed tracks has a number
greater than 30, then "
display instead of the total playing time.
- If you attempt to program more than 40 tracks,
- If you press any of the CD DIRECT 11213
buttons on the remote control, the system will play
the selected disc or track, and the stored program
will be ignored temporarily. The program symbol
also will disappear temporarily from the display. It
will reappear when playback of the selected disc
ends.
- During programming, if no button is pressed
within 20 seconds, the system will exit the Program
mode automatically.
To review the program
• Stop playback and press N or ►! repeatedly.
• To exit review mode, press ■ ,
To erase the entire program
• Press ■ once when playback is stopped or
twice during playback,
^ ' " will be displayed,
PROGRAM will disappear from the display.
Note:
- The program will be erased when the system is
disconnected from the power supply or when the
disc tray is opened.
....... ......
" will appear on the
" will be displayed.
Repeat
The current track, a disc, all available discs or all
programmed tracks can be played repeatedly,
1 Press REPEAT on the remote control
repeatedly to select various repeat modes,
• In normal playback
''THiiCK" to repeat the current track,
REPEAT will appear on the display,
^ "D.i 5C" to repeat the entire disc, repeat
and DISC will appear on the display.
->'nLL DISC" - to repeat all available discs,
REPEAT, DISC .,ind ALL will appear on the display,
• In program playback
''T'KhiCK" - to repeat the current
programmed track, repeat and program will
appear on the disolay
" " to repeat all programmed
tracks, REPEAT, PROGRAM, DISC and ALL wil
appear on the display.
18
• The selected tracWdisc{s)/program will now be
played repeatedly until you press ■ .
2 To resume normal playback, press REPEAT ^
until the " " mode is displayed.
REPEAT will disappear from the display.
Notes;
- Selecting SHUFFLE during repeat playback will
cancel all repeat modes.
- Pressing any CD OPEN’CLOSE button will
cancel all repeat modes.
Shuffle
All the available discs and their tracks or all the
programmed tracks can be played in random
order
1 Press SHUFFLE on the remote control,
SHUFFLE will appear on the display,
• The discs and the tracks will be played In
random order until you press ■ .
2 To resume normal playback, press SHUFFLE
again.
SHUFFLE will disappear from the display.
When select REPEAT mode during shuffling
9 In normal shuffled playback
track.
-> "(9LL DISC" - to repeat shuffling all
available discs.
9
In program shuffled playback
“>''TRHLC' - to repeat shuffling the current
programmed track,
^ "t■d■<^,,U.)l-:!■1l1" - to repeat shuffling all
programmed tracks.
Note:
- Pressing any CD OPEN'CLOSE button will
cancel shuffle mode.
For Recordirtg, please refer to “Tape
Operation/Recording".
- to repeat shuffling the current

Radío Reception
Storing Preset Radio Stations
You can store up to 40 preset radio stations in
the memory
Automatic Preset Programming
Plug and Play setting (refer to “Basic Functions Plug and Play").
OR
Press TUNER to select TUNER mode,
-♦ "TUNER" will be displayed. A few seconds
later the current radio frequency will appear on
the display.
^ If an FM station is received in stereo, co will
appear on the display.
To begin automatic preset from a desired
preset number
Press I'd or ►! to select the desired preset
number
-» If a radio station has been stored in one of
the presets, it will not be stored again under
another preset number.
Press and hold PROG until "fHJTO" appears on
the display.
PROGRAM will start flashing.
-> The system will start searching for all radio
stations on the FM band and then the AM band.
-» All available radio stations with sufficient signal
strength will be stored automatically.
•d The system will stop searching when all the
available radio stations are stored or when the
memory for 40 preset radio stations is used.
•d The last preset radio station will then be
played when completed.
To stop storing the automatic preset
• Press PROG or ■ on the system.
Note:
- If no preset number is selected, automatic preset
will begin from preset (1j and all your former
presets will be overridden.
Manual Preset Programming
Press TUNER repeatedly to select the desired
waveband : FM or AM.
Press PROG,
PROGRAM will start flashing.
The next available preset number will be
displayed for selection.
Press and hold or ►► until the frequency
indication starts to change, then release.
-> The display will show "5ERRCH" until a
radio station with sufficient signal strength is
found.
To store the radio station to another
preset number
Press M or ►! to select the desired preset
number
Press PROG again to store the radio station.
PROGRAM will disappear from the display
Repeat steps 2-4 to store other preset radio
stations.
19

Radío Reception
Tuning to a weak radio station
• Press briefly and repeatedly until the
optimal reception is found.
To stop storing the manual preset
9 Press ■ on the system.
Notes;
- If you attempt to store more than 40 preset
radio stations, 'PKUGKHfl FULL." will be
displayed.
- During programming, if no button is pressed
within 20 seconds, the system will exit the Program
mode automatically.
Tuning to Preset Radio Stations
Once you’ve preset the radio stations, press M
or H to select the desired preset number
The preset number radio frequency, and
waveband will appear on the display.
Erasing a Preset Radio Station
Press M or ►! to select the preset radio station
to be erased.
Press and hold ■ on the system until '‘F'RFL
LJb.L.t. 1 l£i...i" appears on the display
^ I ne radio frequency remain on the display.
The preset numbers of all other preset radio
stations in the band with higher numbers are
also decreased by one.
Repeat steps 1-2 to erase other preset radio
stations.
For Recording, please refer to “Tape
OperotionIRecording".
20

Tape Operation/Recording
IMPORTANT!
- Before playing a tape, check and tighten
slack tape with a pencil. Slack tape may get
jammed or may burst in the mechanism.
- C-120 tape is extremely thin and is easily
deformed or damaged. It is not
recommended for use in this system.
- Store the tapes at room temperature and
do not put them too close to a magnetic
field (for example, a transformer, TV or
speaker).
Tape Playback
1 Press TAPE to select tape mode.
2 Press OPEN to open the tape deck door.
3 Insert a recorded tape and close the tape door
• Load the tape with the open side down and the
full spool to the left.
№
UZZ3
M..
Press PLAY ►(►II) to start playback.
-♦ ” " with playback direction indicator will
appear on the display.
To stop playback
Press ■.
To change the playback side
Press M or ►!.
-» The (BACK) or ► (FRONT) appear on
the display, depending on the tape side selected.
To change the playback mode
Press AUTO REV. on the remote control
repeatedly to select the different playback
modes.
H : playback on one side of the tape only,
db : both sides are played once.
CTb ; both sides are played repeatedly up
to 10 times each side unless you press ■.
To rewind or fast forward during playback
Press and hold or ►► until the desired
passage is reached, then release.
The tape continues playing.
The tape will stop automatically at the end of
the tape during rewinding or fast forwarding.
^ During searching, the sound is reduced to a
low volume.
To rewind or fast forward when playback is stopped
Press AA or ►►.
Press H when you reached the desired passage.
21

Tape Operation/Recording
Note:
- During rewinding or fast forwarding of a tape, it
is also possible to select another source (CD,
TUNER orAUX, for example).
General Information on Recording
For recording, use only tape of lEC type
(normal tape) or lEC type II (CrO^).
The recording level is set automatically regardless
of the position of the Volume, Incredible
Surround, BASS/TREBLE, and so forth.
The tape is secured at both ends with leader
tape. At the beginning and end of the tape,
nothing will be recorded for six to seven
seconds.
To prevent accidental recording, break out the
tab on the left shoulder of the tape side you
want to protect.
(.hlID
if ‘ " Is displayed, the protection
tab has been broken. Put a piece of clear
adhesive tape over the opening. Do not cover
the CrOj tape detection hole when covering the
tab opening.
IMPORTANT!
Recording is permissible if copyright or
other rights of third parties are not
infringed upon.
Preparation for Recording
1 Press TAPE to select tape mode, ’
2 Load a recordable tape into the tape deck.
3 Press M or N to select the recording tape side,
M appears on the display for the reverse ;
side.
► appears on the display for the fooa/ardi
side,
4 Press AUTO REV. on the remote control
repeatedly to select a recording mode.
~ for recording on one side only,
for recording on both sides.
5 Prepare the source to be recorded.
CD 1*2*3 - load the disc(s),
TUNER - tune to the desired radio station.
AUX - - connect external equipment.
When recording is in progress
mia starts flashing,
• It is not possible to change tape side,
0 It IS not possible to listen to another source,
• It is not possible to activate the timer function.
One Touch Recording
1 Press CD 1*2*3, TUNER or AUX to select the
source,
2 Start playback of the selected source.
3 Press • REC to start recording.
^DUni^
22
To stop recording
• Press ■ on the system.
Note:
- One Touch Recording is not possible in TAPE
mode, "bt;:,i..E'C E;0(..iRCE" will be displayed.

Tape Operation/Recording
CD Synchro Recording
1 Press CD 1*2»3 to select the disc.
• Press M or ►! to select the desired track to
start recording.
• You can program the tracks in the order you
want them to be recorded (refer to "CD
Operation - Programming the disc tracks").
2 Press • REC to start recording.
-♦ The disc will start playback automatically.
To select another track during recording
1
Press
2 Press
3 Press
lb stop recording
• Press ■.
Recording and disc playback will stop
simultaneously.
Digital Recording via Digital Out
For CD digital recording, please refer to the
instruction manuals for the CD recorder digital
audio equipment and so forth.
External Sources
ICRO SY$TE
B I I d ' a I
!ji i;
0.1
■a"c
Listening to External Sources
Connect the audio out terminals of the external
equipment (TViVCR, Laser Disc player DVD
player or CD Recorder) to the AUX/CDR IN
terminals of your system.
Press AUX/CDR repeatedly to select CDR
mode or normal AUX mode.
->■ "CDR" or"ffl..'X" will be displayed.
If the sound from the external source is
distorted, select CDR mode for listening.
I#
Notes:
- You are advised not to listen to and record from
the same source simultaneously.
- All the interactive sound control features (IS or
BASS/TREBLE. for example) are available for
selection.
- Refer to the operating instructions for the
connected equipment for details.
For Recording, please refer to "Tape
Operation/Recording".
23

Clocl</Timer
!?:.> e-i 1111 [ p gi 1 mi^
TiMffi DA3S volume:-LbyEL vnroLt
SLEERNOnCOIliLE; SUBROUNU
MICRO SYSTEM
Clock Setting
The clock can be set in either 12-hour or
24-hour mode ("H
example)
1 Press and hold CLOCK on the remote control
until the time flashing on the display,
2 Press PROG repeatedly to select clock mode.
^ If 12-hour mode is selected," "
will start flashing.
^ If 24-hour mode is selected, 'aXcX'.X '' will
start flashing.
3 Press or ►► repeatedly to set the hour
4 Press N or ►! repeatedly to set the minute,
5 Press CLOCK again to store the setting.
^ The clock will start working.
To exit without storing the setting
• Press ■ on the system,
Notes:
~ The clock setting will be cancelled when the
power cord is disconnected or if a power failure
occurs.
- During clock setting, if no button is pressed
within 90 seconds, the system will exit clock setting
mode automatically.
Display Clock
I he system allows you Lo select clock display or
for
normal display in any source mode. When in
Standby mode, the dock will automatically be
displayed.
Press CLOCK on the remote control
repeatedly to select clock display or normal
display mode.
-» When in dock display mode, clock will be
displayed. If the clock has not been set,"
will appear on the display.
Note:
- If you pressed any keys during dock display
mode, the display will briefly show the information
related to the selected mode.
..........■.....
'
24

Clock/Timer
Timer Setting
The system can switch on to CD,TUNER, or
TAPE mode automatically at a preset time,
serving as an alarm to wake you up.
IMPORTANT!
- Before setting the timer, ensure that the
clock is set correctly.
- The timer will always be switched on
after it has been set.
- The timer will not start if a recording is in
progress.
- The volume of the timer will increase
gradually from the minimum level to the
lost tuned volume level.
1 Press and hold TIMER on the remote control
for more than two seconds.
-> "Hi'1 iS'OO" or'uU^uU" orthe last timer
setting will start flashing.
-» TIMER © will start flashing.
The selected source will be lighted while
other available sources are flashing.
2 Press CD 1'Z*3, TUNER or TAPE to select
the desired source.
9
Before setting the timer make sure the music
source has been prepared.
CD 1*2«3 - Load the disc(s).To start from a
specific track, make a program (refer to "CD
Operation - Programming the disc tracks”).
TUNER - tune to the desired radio station.
TAPE - load a prerecorded tape.
3 Press or ►► repeatedly to set the hour for
the timer to start.
4 Press M or ►! repeatedly to set the minute for
the timer to start.
5 Press TIMER to store the start time.
-♦ "TIMER OM" will be displayed and followed
by the set timer ".X.X’'.X'.X'" and then the selected
source.
TIMER 0 will remain on the display.
9
At the preset time, the selected source will play.
Notes:
- If CD is the selected source and it is not
available when the preset time is reached,Tuner
will be selected automatically.
- During timer setting, if no button is pressed
within 90 seconds, the system wilt exit timer setting
mode automatically.
To check the TIMER
Press TIMER on the remote control.
If the timer has been activated, the set timer
information will be displayed.
If the timer has been deactivated,
be displayed.
To activate/deactivate the TIMER
Press TIMER ON/OFF repeatedly on the
remote control.
-♦ If activated, the last set timer information will
be shown for a few seconds and tjmer © will
appear on the display.
If deactivated, "OFF” will be displayed.
To deactivate the wake up timer (five minutes interval)
After timer wake up, press SNOOZE on the
remote control.
-> The system will switch to standby mode for
five minutes. After that, it resumes the timer last
source again.
selected
To cancel the snooze function, press SNOOZE
again.
Note:
- You are only able to activate the Snooze
function within 30 minutes after tim er wake up.
will
To exit without storing the setting
9
Press ■ on the system.
25

Clock/Timer
Sleep Timer Setting
The sleep timer enables the system to switch to
Standby mode automatically within a preset
amount of lime.
Press SLEEP on the remote control repeatedly
to select a preset amount of time.
-> The selections are as follows (time in
minutes):
"SL.i:::.i::iiP ,T.T" or will be displayed.
"XX" is the time in minutes.
When you reach the desired length of time, stop
pressing the SLEEP button.
-♦ SLEEP will appear on the display except for
“ “ mode.
The Sleep Timer is now set. Before the
system switches to standby mode, a countdown
of 10 seconds will be displayed.
While SLEEP mode is activated
To check the remaining length of time
Press SLEEP once
To change the preset sleep timer
Press SLEEP twice.
^ The display will show the remaining time
followed by the sequence of sleep timer options.
To deactivate the Sleep Timer
Press SLEEP repeatedly until " " is
displayed, or press the STANDBY ON button.
26
 Loading...