


HF3650, HF3651


2
1
9
7543 6
8
1
11
10


English 6
Español 25
Français (Canada) 45

6
English
IMPORTANT SAFETY INSTRUCTIONS
Read and follow all instructions in this user manual and heed all warnings.
WARNING
To reduce the risk of burns, fire, electric shock, or injury to persons:
-
This appliance is for indoor use only.
-
If the adapter, cord or appliance has been damaged in any way, liquid has spilled or objects have
fallen into and/or onto the appliance, the appliance has been exposed to rain or moisture, does
not operate normally or has been dropped or damaged, it should not be operated and needs
servicing by qualified service personnel (see 'Service and assistance').
-
Water and electricity are a dangerous combination. Do not use this appliance in wet surroundings
(e.g. in the bathroom or near a shower or swimming pool).
-
Make sure the adapter does not get wet.
-
Do not let water run into the appliance or spill water onto the appliance.
-
Do not immerse the appliance in water or rinse under the tap.
-
The adapter contains a transformer, which converts an unsafe 100–240V AC to a safe 24VDC
low voltage. Do not cut off the adapter to replace it with another plug, as this causes a hazardous
situation.
-
Only use the original adapter. Do not use the adapter or any of the other accessories if they are
damaged. Call 1-866-832-4361 for assistance.
-
Do not use the adapter in or near a power outlet that contains an electric air freshener to prevent
damage to the adapter.
-
Protect the power cord from being walked on or pinched, particularly at plugs, wall sockets and
points where it exits from the lamp.
-
The appliance has no on/off switch. To disconnect the appliance from the power source, remove
the plug from the wall outlet.
-
This appliance is not intended for use by persons (including children) with reduced physical,
sensory or mental capabilities, or lack of experience and knowledge, unless they have been given
supervision or instruction concerning use of the appliance by a person responsible for their safety.
-
Do not install near any heat sources such as radiators, stoves, or other apparatus that produce
heat.
-
Do not impair the cooling of the appliance by covering the appliance with items such as blankets,
curtains, clothes, papers, etc.
CAUTION
-
Do not drop the appliance on the floor, hit it hard or expose it to other heavy shocks.
-
Place the appliance on a stable, level and non-slippery surface.
-
This appliance is only intended for household use, including similar use in hotels. Do not use
attachments not recommended by Philips North America LLC (USA) or Philips Electronics Ltd
(Canada).
-
Check if the voltage indicated on the appliance corresponds to the local voltage before you
connect the appliance.

English
-
Unplug this appliance during lightning storms or when unused for long periods of time.
GENERAL
-
Do not use this appliance as a means to reduce your hours of sleep. The purpose of this appliance
is to help you wake up more easily. It does not diminish your need for sleep.
-
Consult your doctor before you start using the appliance if you have suffered from or are
suffering from depression.
-
If you feel uncomfortable at any point while using RelaxBreathe in the breathing exercise, just go
back to breathing normally.
-
If you often wake up too early or with a headache reduce the set light intensity level and/or the
set sunrise simulation time.
-
If you often wake up by the alarm sound, increase the set light intensity level or the set sunrise
simulation time.
-
If you share a bedroom with someone else, this person may unintentionally wake up from the
light of the appliance, even though this person is further removed from the appliance. This is the
result of differences in light sensitivity between people.
-
The power consumption of the appliance is lowest if no device is connected to the USB port and
the lamp, radio and display are turned off.
SAVE THESE INSTRUCTIONS
7

8
English
Contents
IMPORTANT SAFETY INSTRUCTIONS ___________________________________________________ 6
Introduction _______________________________________________________________________ 9
General description _________________________________________________________________ 9
Intended use _______________________________________________________________________ 9
The effects of the Sleep & Wake-Up Light ______________________________________________ 9
Interactive menu icons_______________________________________________________________ 10
Navigating the menu ________________________________________________________________ 11
Setting wake-up profiles _____________________________________________________________ 11
Time + alarm back-up________________________________________________________________ 12
Snoozing __________________________________________________________________________ 12
Dismissing the alarm ________________________________________________________________ 12
Using the Sleep & Wake-Up Light as a bedside lamp _____________________________________ 13
Midnight Light _____________________________________________________________________ 13
Settings____________________________________________________________________________ 13
Music______________________________________________________________________________ 15
Wind-down programs _______________________________________________________________ 16
Sunset simulation ___________________________________________________________________ 16
RelaxBreathe _______________________________________________________________________ 17
Charging your mobile phone _________________________________________________________ 18
Cleaning and storage________________________________________________________________ 18
Disposal ___________________________________________________________________________ 18
Service and assistance _______________________________________________________________ 18
90-Day Money-Back Guarantee ______________________________________________________ 18
Full Two-Year Warranty______________________________________________________________ 19
Troubleshooting ____________________________________________________________________ 20
Safety and compliance_______________________________________________________________ 22
Electromagnetic fields (EMF) _________________________________________________________ 22
FCC and IC information ______________________________________________________________ 22
Open-source and third-party software _________________________________________________ 23
Specifications_______________________________________________________________________ 23

Introduction
Congratulations on your purchase and welcome to Philips! To fully benefit
from the support that Philips offers, register your product at
www.philips.com/welcome.
The Philips Sleep & Wake-Up Light helps you wake up more pleasantly. If
the Sunrise Simulation is active, the light intensity of the lamp gradually
increases to the set level and the light color changes from deep morning
red to bright daylight. The light gently prepares your body for waking up
at the set time. To make waking up an even more pleasant experience,
you can use natural wake-up sounds or the FM radio to wake up to.
General description
1 Lamp housing
2 Display
3 USB charging port
4 Reset button
5 Radio antenna
6 Adapter DC-inlet
7 Auxiliary (AUX) input
8 Speaker
9 Snooze/Midnight Light button
10 Adapter
11 Small plug
English
9
Intended use
The Philips Sleep & Wake-Up Light is intended to give you a more natural
and refreshed wake up and a relaxed feeling before falling asleep.
This is not a general illumination product.
The effects of the Sleep & Wake-Up Light
The Philips Sleep & Wake-Up Light gently prepares your body for waking
up during the last 30 minutes of sleep. In the early morning hours our eyes
are more sensitive to light than when we are awake. During that period
the relatively low light levels of a simulated natural sunrise prepare our
body for waking up and getting alert.
People who use the Sleep & Wake-Up Light wake up more easily, have a
better overall mood in the morning and feel more energetic. Because the
sensitivity to light differs per person, you can set the light intensity of your
Sleep & Wake-Up Light to a level that matches your light sensitivity for an
optimal start of the day.
10
English
To fully experience the effects of the Sleep & Wake-Up Light, place the
appliance at approximately 16–20in. / 40–50cm from your head, on a
flat stable surface of your bedside table.
For more information about the Sleep & Wake-Up Light, see
www.philips.com.
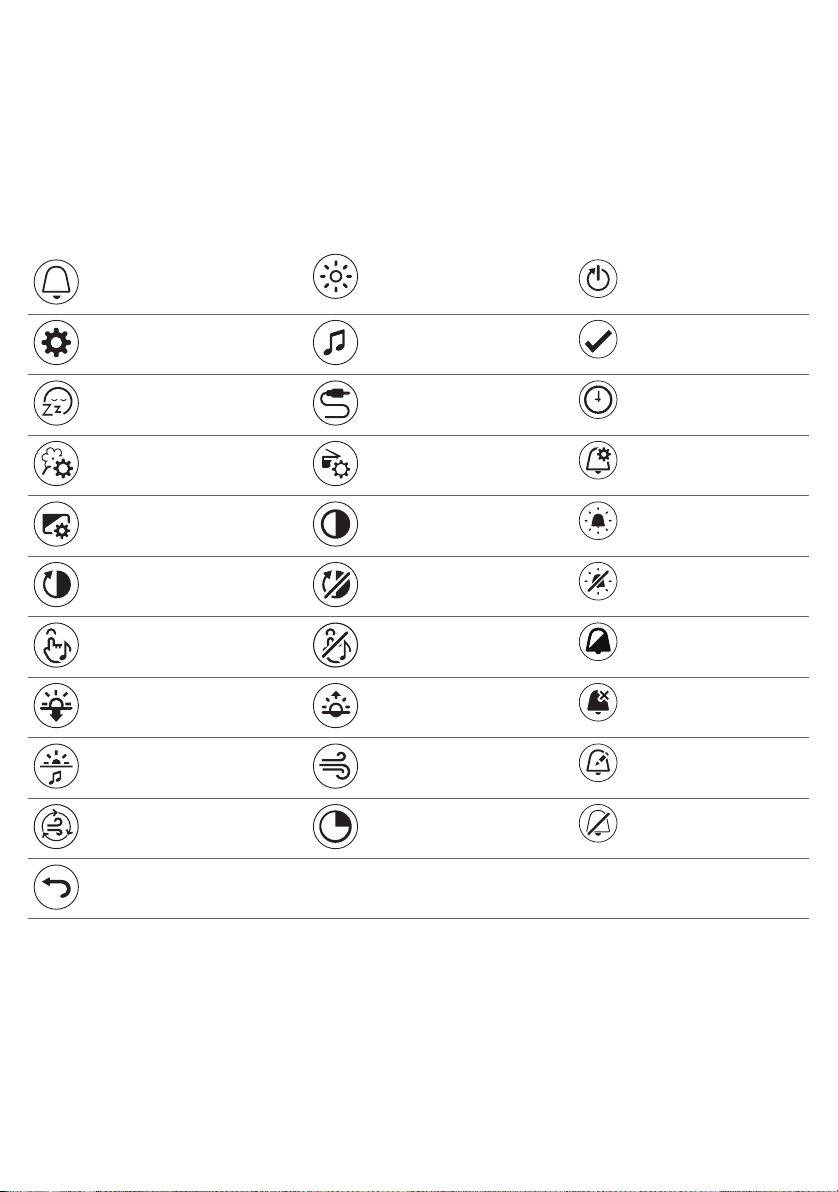
Interactive menu icons
Wake-up profile/Alarm Light intensity and light
Settings Sounds Confirm and save
Wind-down program AUX inlet Clock time
Select natural sound Select radio preset Change alarm settings
Display settings Display brightness Keep light on
Enable display timeout Disable display timeout Keep light off
Enable shortcuts
on/off
setting
Enable audio feedback Disable audio feedback Alarm toggle on/off
Sunset simulation Duration of the wake-up
profile
Light or sound guidance RelaxBreathe Edit wake-up profile
RelaxBreathe pace Duration of relaxation
program
Return to a higher level in
the menu
Dismiss alarm
Deactivate alarm
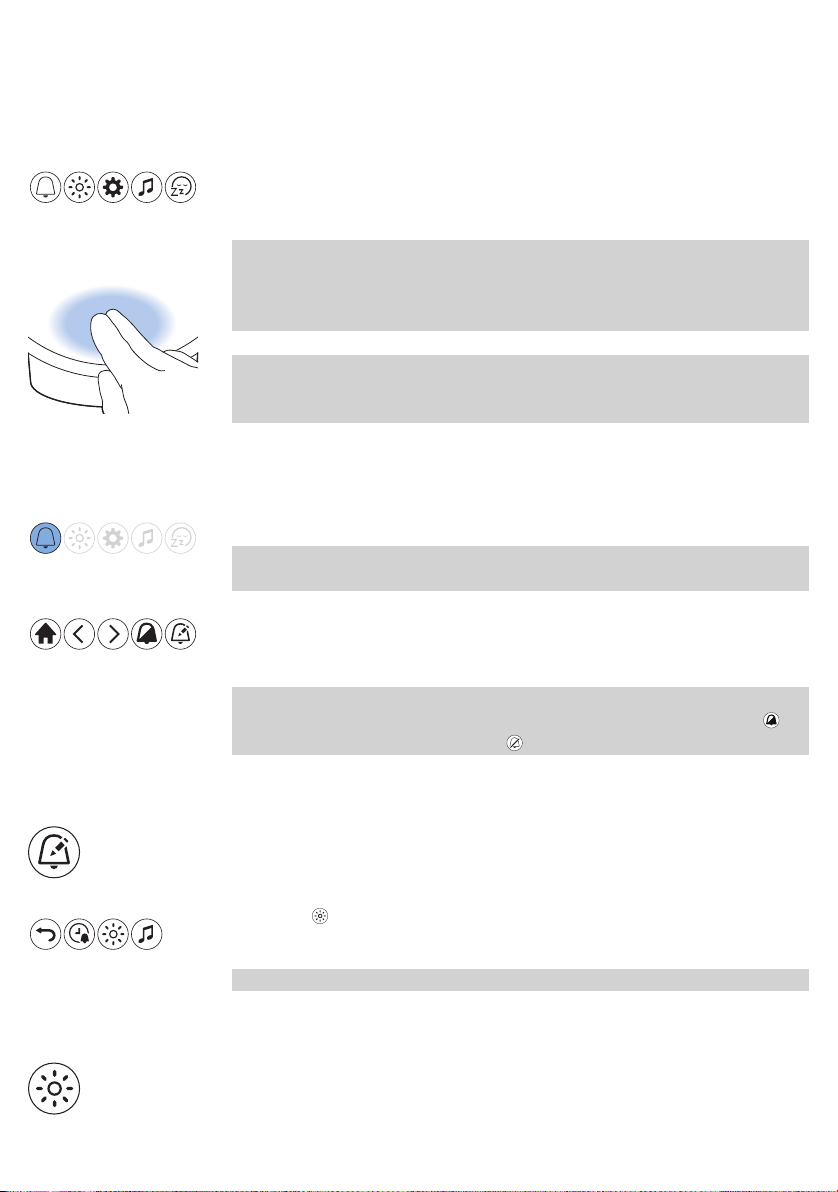
Navigating the menu
On the display you can select and set the wake-up profile, bedside light,
settings, sound (source) or the unwind program.
Note: All your personalized settings and profiles will be permanently
stored in the memory, they will not be erased by removing the adapter
from the electrical outlet. You can change all settings at any time, the last
setting will be stored.
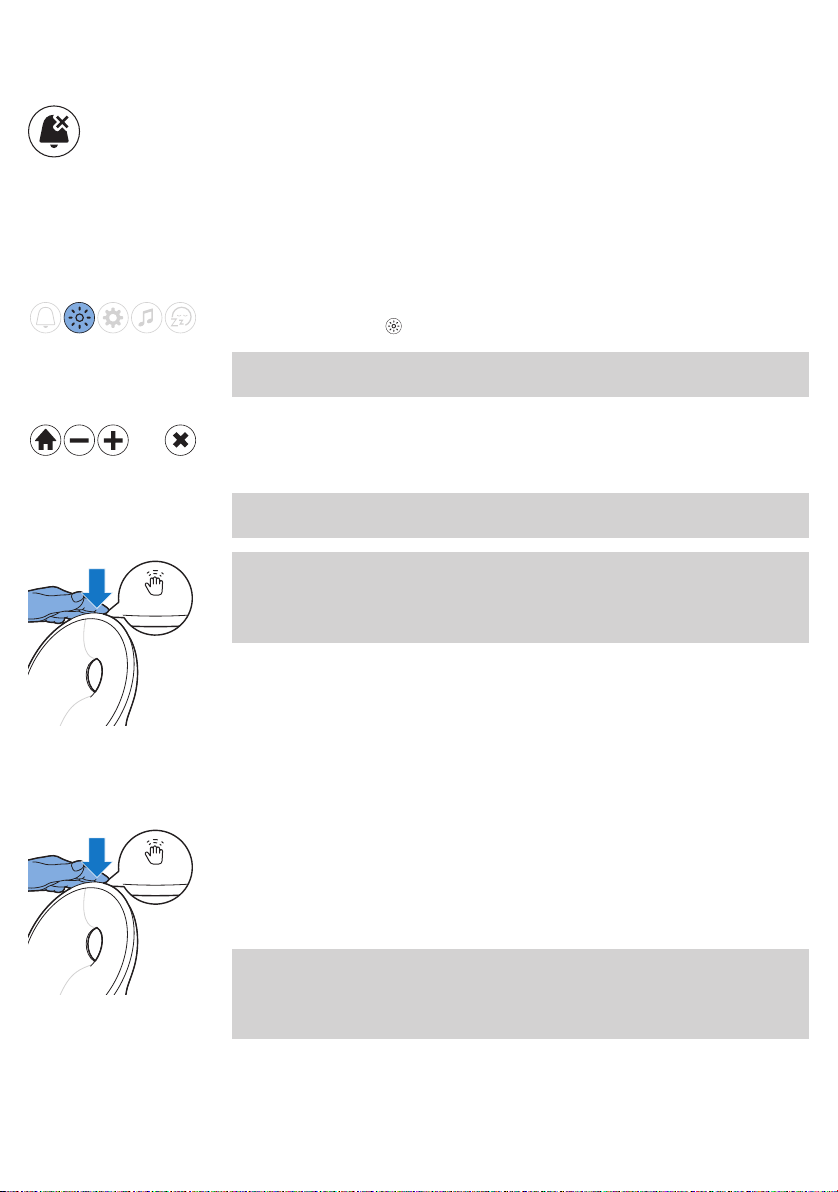
Note: If the display is blank, move your hand towards the lower part of the
Sleep & Wake-Up Light to show the display menu. You will see the menu
buttons.
Setting wake-up profiles
Press the Wake-up/Alarm icon to start setting a wake-up profile.
Note: Press and hold the alarm button for 1 second to deactivate all set
alarms at once.
English
11
You can set two different wake-up profiles. For each profile you can set
the alarm time, the light intensity, the wake-up curve duration, and the
type of wake-up sound and its volume.
Note: The set alarm will automatically go off at the same time every day
until you deactivate the alarm by first pressing the alarm toggle icon
and then the deactivate alarm icon to deactivate the alarm.
Light intensity of the wake-up profile
The lamp of the appliance simulates a sunrise. Like a sunrise, the
brightness of the lamp increases gradually. During this wake-up curve, the
color of the light changes from soft red to warm orange to bright yellow.
Press icon on the display to choose one of the 25 light intensity levels.
Note: The main display of the appliance shows if the alarm has been set.
Duration of the wake-up profile
Press this icon to open the menu.
12
English
The default duration of the wake-up curve (brightness increase to the set
maximum light intensity) is 30 minutes. Press icon to change the
duration of the wake-up profile to your preference.
Press + or - to increase or decrease the brightness of the light in the wakeup curve.
Type of sound
Press this icon to open the sounds menu to set the sound of the wake-up
profile.
1 Press the toggle icon to choose one of the three sounds options: a
natural sound, radio or no sound.
2 Press the natural sound icon to select one of the natural sounds or
press the radio icon to select one of the radio presets.
3 You can set the volume with the loudspeaker icon .
Time + alarm back-up
In the event of a power failure, all functions of the appliance, including
the display, do not work. However, the internal clock and a back-up alarm
remain active for at least 8 more hours.
If during the power failure the set alarm time is due, a back-up alarm goes
off generating a beeping sound for approximately 30 seconds.
Snoozing
When the wake-up curve has ended (when the set maximum light
intensity has been reached) and the alarm sound is playing, you can tap
the top of the appliance to snooze.
The lamp stays on, but the sound is muted. After 9 minutes, the alarm
sound starts playing again.
Note: The light and sound automatically turn off 60 minutes after the
alarm has gone off or 60 minutes after the last snooze action.
Dismissing the alarm
When the wake-up curve is active or the alarm goes off, you can dismiss it
by pressing this icon on the appliance. If you dismiss the alarm, the alarm
profile is deactivated for that day.

English
Using the Sleep & Wake-Up Light as a bedside lamp
You can use the Sleep & Wake-Up Light as a bedside lamp.
Press this icon on the display to switch on the bedside lamp.
Note: Long-press the lamp icon to switch off the bedside lamp.
You can increase and decrease the brightness of the light. You can select a
brightness level between 1 (low) and 25 (high). The default brightness
level is 20.
Note: To switch off the bedside lamp, press the cross button in the menu.
Tip: When the light is on, you can also turn off the light with a single tap
on top of the Sleep & Wake-Up Light. All active programs will stop. Set
alarms are still active.
13
Midnight Light
If you wake up during the night, you can tap the top of the appliance to
activate a dim light. This dim, subtle orange light provides you with just
enough light to find your way in the dark. Switch off the Midnight Light by
tapping the top of the appliance again.
Note: The Midnight Light cannot be activated directly when the main light
is already on. In that case, first tap the top of the appliance to deactivate
the main light. Then tap again to activate the Midnight Light.
Settings
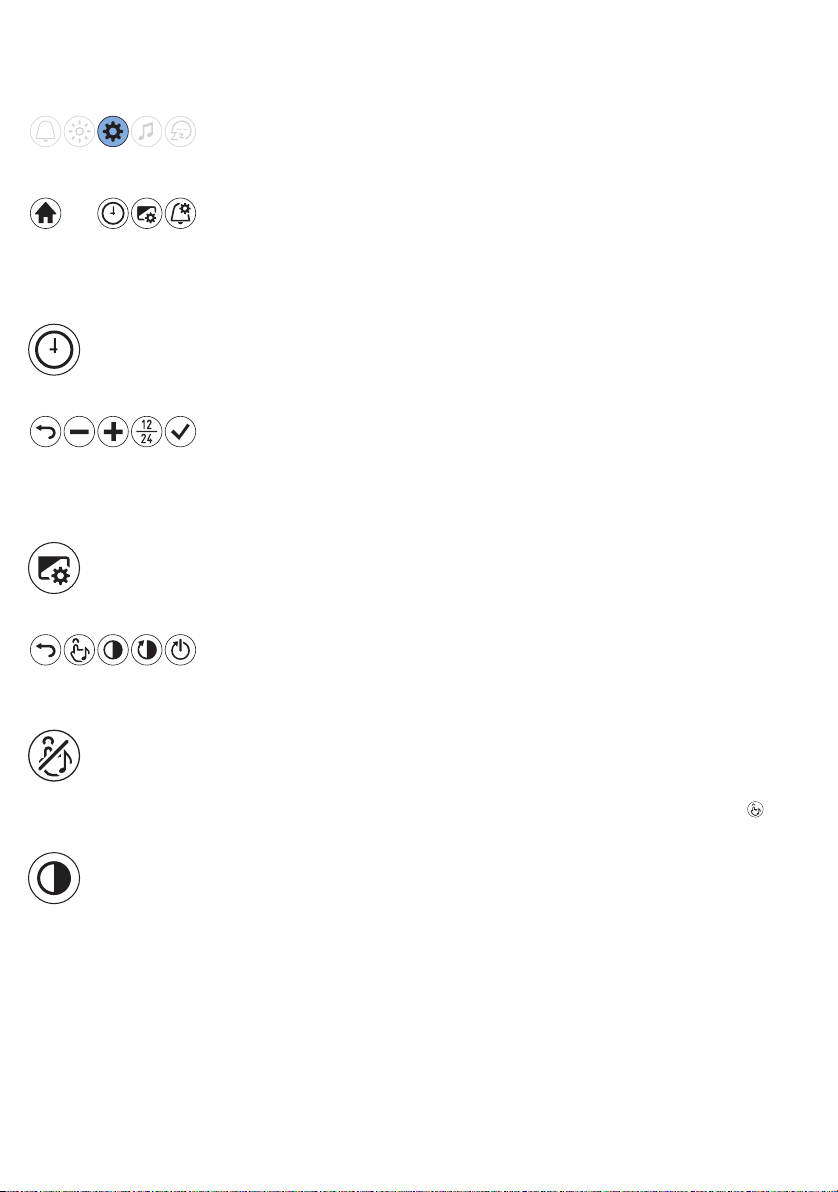
Press the settings icon to open the settings menu.
In the settings menu, you can adjust the clock time, the display settings
and the alarm settings.

14
English
Time
Display settings
Press this icon to open the time menu.
In this menu you can change the time by pressing + or -.
Press the time notation icon to toggle between the 12-hour clock and
24-hour clock.
Press the display settings button in the settings menu to set the display
settings.
In the display settings menu, you can deactivate and reactivate the audio
feedback, adjust the display brightness, switch the display on or off and
select shortcuts.
Audio feedback
If you do not want to hear clicks when you press an icon, press the audio
feedback icon to turn off the audio feedback. You hear one click as a
confirmation.
To reactivate the audio feedback, press this icon .
Display brightness
You can adjust the display brightness from level 1 to level 6. Choose a level
that is optimal for you to see the display at night. The appliance
automatically adjusts the display brightness when the light in your
bedroom changes.
Display timeout
If you do not want the appliance to produce any light, not even from the
time indication, press the display timeout icon.
Normally, if you do not touch the display for some time in any menu, the
display reverts to time and status indication only. When the display
timeout is activated, no time indication is shown.
Press the the display timeout icon to turn on the display again.
Tip: If you want to check the time or select a function while the display
timeout is activated, just place your hand near the display to turn it on for
a few seconds.

Alarm settings
Music
Listening to radio
English
15
Shortcuts
Press the shortcuts icon to get quick access to five key functions right from
the main screen, so you can immediately turn on the light, have access to
alarm and sound menus as well as the wind-down programs.
The light switches off when you dismiss the alarm.
If you do not want this, press this icon in the alarm settings menu and
save the setting to ensure that the light stays on after you dismiss the
alarm.
Tip: When the radio or music is on, you can turn off the sound with a
single tap on top of the Sleep & Wake-Up Light. All active programs will
stop. Set alarms are still active.
You can listen to the FM radio with the Sleep & Wake-Up Light. If you
selected the radio function in the sounds menu, it shows the selected
radio station. You can manually change the radio station by selecting the
FM frequency of another radio station.
Tip: Make sure to unwind the antenna fully and move it around until you
receive the best reception.
You can preset 5 radio stations. First, select a radio station by setting the
FM frequency. Press and hold the double arrow button to automatically
search for the next radio station.
After setting a radio station, you can easily add another preset radio
station by selecting the toggle button. With this process, you can preset 5
radio stations.
Set the preferred volume with the loudspeaker button.
Note: To save your settings, select the check mark button .

16
English
Music via Auxiliary (AUX) inlet
You can use the Sleep & Wake-Up Light as a speaker for music by
connecting a music playing device (for instance your mobile phone) to the
AUX inlet.
Note: You cannot wake up to music from a device connected to the AUX
inlet.
If the sound is not loud enough when you have set the Sleep & Wake-Up
Light to maximum volume, increase the volume of your music playing
device.
If the sound is too loud or distorted when you have set the Sleep & WakeUp Light to a low volume setting, decrease the volume of your music
playing device.
Note: Press and hold the music note icon to activate/deactivate the sound
via the menu. You can also deactivate the sound by tapping the top of the
appliance.
Note: You need an AUX cable to connect the Sleep & Wake-Up Light to a
music playing device.
Wind-down programs
The appliance features two wind-down programs to help you relax before
you fall asleep.
Note: You can deactivate the active wind-down program by tapping the
top of the appliance.
Sunset simulation
During the sunset simulation, the brightness of the light decreases
gradually with colors changing from bright yellow to warm orange to soft
red. You can set the duration of the sunset simulation and the initial light
intensity of the sunset simulation.
You can also select a sound that fades away during the sunset simulation.
You can set the sound source and the initial volume. You can either
choose a natural sound, radio or no sound. You can also play your own
music by connecting a music playing device to the AUX socket.
Note: If you have set your sunset simulation in the setup wizard, it will
start immediately. If you have not set it, the appliance starts with a default
sunset simulation.

RelaxBreathe
English
RelaxBreathe uses the belly breathing technique as a basis for the
breathing program. You can choose one of the breathing programs,
guided by light or sound. The combination of the belly breathing exercise
and the guidance of the Sleep & Wake-Up Light helps you slow down and
feel relaxed.
You can select one of seven relaxation programs with preset breathing
pace. Each relaxation program has a different breathing pace. The '4
breaths' program is preset to 4 breaths per minute. The '5 breaths'
program is preset to 5 breaths per minute. Each next program has one
additional breath per minute. The last program (10 breaths) is preset to 10
breaths per minute.
You can select light or sound to guide you during the selected relaxation
program. Follow the light or sound when you inhale and exhale.
-
For guidance with light, inhale when the light intensity increases. In
between the two subtle light flashes, hold your breath. Exhale slowly
when the light intensity decreases.
-
For guidance with sound, inhale when the intensity of the sound of the
waves increases. When the intensity of the sound pauses, hold your
breath. Slowly exhale when the intensity of the sound of the waves
decreases.
Follow your preferred pace with the help of light or sound for a more
relaxed feeling. You can even do this with your eyes closed.
Press this icon to set the duration of the relaxation program. You can
select a duration of 5, 10 or 15 minutes.
17
Belly breathing for relaxation
Belly breathing is the most recognized breathing exercise technique to
help people relax. When you breathe from your belly, your diaphragm
pulls down automatically. This pulls down your lungs and allows you to
inhale fully and deeply.
Caution: If you feel uncomfortable at any point during this breathing
exercise, just go back to breathing normally.
How to do belly breathing
1 Lie down comfortably on your back.
2 Inhale through your nose, exhale through your nose or mouth.

18
English
3 Place one hand on your stomach and your other hand on your chest.
You should see your hand on your stomach move up with each inhale
and move down with each exhale. The hand on your chest should only
move slightly.
4 Your breath should only come from your belly. Try to make your exhale
longer than your inhale as this will quickly make you feel more relaxed.
Note: The RelaxBreathe function of the appliance can guide you during
belly breathing.
Charging your mobile phone
You can use the USB port (see 'General description') to charge your mobile
phone (max 1A).
Cleaning and storage
-
Clean the appliance with a soft, dry cloth.
-
Do not use abrasive cleaning agents, pads or cleaning solvents like
alcohol, acetone, etc., as this may damage the surface of the appliance.
-
If you are not going to use the appliance for an extended period of
time, remove the adapter from the wall outlet and store the appliance
in a safe, dry location where it will not be crushed, banged, or subject
to damage.
-
Do not wrap the cord around the appliance when storing it.
Disposal
Your product is designed and manufactured with high quality materials
and components, which can be recycled and reused. For recycling
information, please contact your local waste management facilities or visit
www.recycle.philips.com.
Service and assistance
This appliance has no other user-serviceable parts. For assistance visit our
website: www.philips.com/support or call toll free: 1-866-832-4361.
Online information is available 24 hours a day, 7 days a week.
90-Day Money-Back Guarantee
If you are not fully satisfied with your product send the product back and
we’ll refund you the full purchase price.
The product must be shipped prepaid by insured mail, insurance prepaid,
have the original sales receipt, indicating purchase price and date of

purchase, and the money-back guarantee return authorization form
enclosed.
We cannot be responsible for lost mail.
The product must be postmarked no later than 90 days after the date of
purchase. Philips reserves the right to verify the purchase price of the
product and limit refunds not to exceed suggested retail price.
To obtain money-back guarantee return authorization form, call
1-866-832-4361 for assistance.
Delivery of refund check will occur 6–8 weeks after receipt of returned
product.
Full Two-Year Warranty
Philips North America LLC (USA) and Philips Electronics Ltd (Canada)
warrant this new product against defects in materials or workmanship for
a period of two years from the date of purchase, and agree to repair or
replace any defective product without charge.
IMPORTANT: This warranty does not cover damage resulting from
accident, misuse or abuse, lack of reasonable care, or the affixing of any
attachment not provided with the product or loss of parts or subjecting
the product to any but the specified voltage or bateries.*
NORESPONSIBILITY IS ASSUMED FOR ANY SPECIAL, INCIDENTAL OR
CONSEQUENTIAL DAMAGES.
In order to obtain warranty service, go to www.philips.com/support for
assistance. It is suggested that for your protection you return shipments of
product by insured mail, insurance prepaid. Damage occurring during
shipment is not covered by this warranty.
NOTE: No other warranty, written or oral, is authorized by Philips North
America LLC.
This warranty gives you specific legal rights, and you may also have other
rights which vary from state to state, province to province or country to
country. Some states do not allow the exclusion or limitation of incidental
or consequential damages, so the above exclusion and limitations may not
apply to you.
* Read enclosed instructions carefully.
In US manufactured for: Philips Personal Health, a division of Philips North
America LLC, P.O. Box 10313, Stamford, CT 06904.
English
19
In Canada imported by: Philips Electronics LTD, 281 Hillmount Road,
Markham, Ontario L6C 2S3.
PHILIPS and Philips shield are registered trademarks of Koninklijke Philips
N.V.

20
English
©2021 Philips North America LLC. All rights reserved.
Troubleshooting
This chapter summarizes the most common problems you could
encounter with the appliance.
If you are unable to solve the problem with the information below, visit
www.philips.com/support or call 1-866-832-4361 for assistance.
Problem Solution
The appliance does not
work at all.
The appliance functions
properly, but the lamp
does not work
anymore.
The appliance does not
respond when I try to
set different functions.
The lamp does not go
on when the alarm
goes off.
The lamp does not go
on right away when I
switch it on.
I do not hear the alarm
sound when the alarm
goes off.
Perhaps the adapter is not inserted properly in the wall outlet. Insert the
adapter properly in the wall outlet.
Perhaps the plug is not inserted properly in the appliance. Insert the plug
properly in the appliance.
Perhaps there is a power failure. Check if the power supply works by
connecting another appliance.
The appliance uses durable LED technology. The lamp should last a long
time. However, if the lamp stops working, go to
www.philips.com/support or call 1-866-832-4361 for assistance.
If you want to go back to factory settings, press the reset button on the
back of the appliance (see 'General description'). If you press the reset
button, the setup wizard needs to be set again.
Perhaps you set a light intensity level that is too low. Increase the light
intensity level in your wake-up profile.
Perhaps you turned off the alarm function. The alarm icon is visible on the
display when the alarm function is active.
It may take between 1 to 5 seconds for the lamp to switch on, depending
on the set light intensity level.
Perhaps you set a sound level that is too low. To set a higher sound level,
increase the volume level of the wake-up sound in your wake-up profile
(see 'Setting wake-up profiles').
When you have set an alarm, you will first see the light of the wake up
curve. The alarm sound only starts playing when the set alarm time is
reached. You can change the duration of the wake up light curve.
Perhaps you turned off the alarm function. The alarm icon is visible on the
display when the alarm function is active.

Problem Solution
If you selected the FM radio as the alarm sound, turn on the FM radio
after you turn off the alarm to check if the FM radio works.
Check if your FM radio is correctly tuned to a radio station. If necessary,
adjust the frequency. If it does not work, call 1-866-832-4361 for
assistance.
English
21
The FM radio does not
work.
The FM radio produces
a crackling sound.
The alarm went off
yesterday, but it did not
go off today.
I wanted to snooze, but
the alarm did not go off
again after 9 minutes.
Perhaps you set the volume too low. Increase the volume level.
Check if your FM radio is correctly tuned to a radio station. If necessary,
adjust the frequency.
Change the position of the antenna by moving it around. Make sure you
have unwound the antenna completely.
Call 1-866-832-4361 for assistance.
Perhaps the broadcast signal is weak. Adjust the frequency and/or
change the position of the antenna by moving it around. Make sure you
have unwound the antenna completely.
Perhaps you turned off the alarm function. The alarm icon is visible on the
display when the alarm function is active.
Perhaps you set a volume level and/or light intensity level that is too low.
Set a higher volume and/or light intensity level in your wake-up profile
(see 'Setting wake-up profiles').
When there has been a power failure, the clock time will keep on running
up to 8 hours. Perhaps the power failure lasted longer. In this case, you
have to set the clock time again.
Tap on the top of the Sleep & Wake-Up Light to snooze. If you press the
button to dismiss the alarm, the alarm profile is deactivated for that day.
The light wakes me too
early.
The light wakes me too
late.
I am unable to turn the
Midnight Light on/off.
Perhaps the light intensity level you have set is not appropriate for you.
Try a lower light intensity level if you wake up too early. You can also
change the duration of the wake-up curve (see 'Setting wake-up
profiles'). If light intensity 1 is not low enough, move the appliance
further away from the bed.
Perhaps the light intensity you have set is too low. Select a higher light
intensity. Perhaps the appliance is positioned at a lower level than your
head. Make sure the appliance is located at a height at which the light is
not blocked by your bed, comforter, blanket or pillow. Also make sure the
appliance is not placed too far away.
Make sure you tap on the correct position (top/back) of the appliance.

22
English
Problem Solution
I am unable to stream
music via USB.
The AUX inlet doesn't
work properly.
Suddenly the device
makes a beeping
sound.
The USB connection is only for charging your mobile phone. You are not
able to stream music to the Sleep & Wake-Up Light.
Try to set the volume on your mobile phone either higher or lower. If
necessary, adjust the volume level on the appliance as well.
The backup alarm went off. The internal clock and the back-up alarm
remain active for at least 8 hours. If an alarm is due during this back-up
period, it will go off. The alarm sound stops automatically after
approximately 30 seconds. You also can stop the alarm sound
immediately by connecting the appliance to the power briefly.
To prevent the back-up alarm from going off when the power is
disconnected (e.g. during storage), disable the alarms before you
disconnect the appliance from the power.
Safety and compliance
This appliance meets the safety requirements in the USA and Canada for:
-
UL 153, CSA C22.2 No. 250.4 (Portable Electric Luminaires)
-
UL 62368-1, CSA C22.2 No. 62368-1:19 (Audio/Video, Information and
Communication Technology Equipment)
Electromagnetic fields (EMF)
This Philips appliance complies with all applicable standards and
regulations regarding exposure to electromagnetic fields.
FCC and IC information
-
This equipment has been tested and found to comply with the limits
for a Class B digital device, pursuant to part 15 of the FCC rules and
Canadian ICES-003 and ICES-005 standards. These limits are designed
to provide reasonable protection against harmful interference in a
residential installation. This equipment generates uses and can radiate
radio frequency energy and, if not installed and used in accordance
with the instructions, may cause harmful interference to radio
communications. However, there is no guarantee that interference will
not occur in a particular installation. If this equipment does cause
harmful interference to radio or television reception, which can be
determined by turning the equipment off and on, the user is
encouraged to try to correct the interference by one or more of the
following measures:
-
Reorient or relocate the receiving antenna.
-
Increase the separation between the equipment and the receiver.

-
Connect the equipment into an outlet on a circuit different from
that to which the receiver is connected.
-
Consult the dealer or an experienced radio/TV technician for help.
-
This device complies with Part 15 of the FCC rules/Industry Canada
license-exempt RSS standard(s). Operation is subject to the following
two conditions: (1) This device may not cause harmful interference, and
(2) this device must accept any interference received, including
interference that may cause undesired operation.
Open-source and third-party software
A copy of the open-source software and third-party commercial software
license agreement can be found on the website
www.philips.com/support
Search for the device number HF3670 / HF3671 / HF3672 / HF3650 /
HF3651 / HF3652 / HF3653 / HF3654 on the technical documentation
page of the product.
Specifications
Adapter
Manufacturer PHILIPS
English
23
Type number HF20
Rated input voltage 100 – 240V AC
Rated input frequency 50 / 60Hz
Rated output voltage 24V DC
Rated output current 0.75A
Rated output power 18W
No-load power < 0.1W
Efficiency class VI
Safety classification Class 2 power supply
Dimensions
(height x width x depth)
Weight Approx. 0.11kg (3.9oz.)
Cord length Approx. 183cm (6ft)
35 x 78 x 47 mm (1.38 x 3.07 x 1.85 in.)

24
English
Main unit
Manufacturer
Type number HF3650, HF3651
Rated input voltage 24V DC
Rated input current 0.75A
Rated input power 18W
PHILIPS
Standby power appliance
(main unit + adapter)
Conditions: night (12 h / 0 lux), day (12 h / 500 lux), all
functions suspended
Safety classification Portable luminaire
Dimensions
(height x width x depth)
Weight Approx. 0.79kg (27.9oz.)
< 0.5W (display at maximum brightness)
< 0.25W (display off)
Approx. 225 x 220 x 120 mm (8.86 x 8.66 x 4.72in.)
Ports
USB charging 5V DC, 1A
AUX sensitivity 280 mV
Light
Light output (level 1 – 25) Approx. 1 lux – 350*lux at 45cm (approx. 1 lux –
350*lux at 17.7in.)
*depending on model
Light color (level 1 – 25) Approx. 1500 K – 2800K
FM
FM-radio frequency band
87.5 MHz – 108.0 MHz
Operating conditions
Temperature
Relative humidity
Atmospheric pressure
5 °C to 35 °C (41 °F to 95 °F)
20 % to 90 % (no condensation)
86 kPa to 106 kPa
Storage conditions
Temperature
Relative humidity
Atmospheric pressure 86 kPa to 106 kPa
-20 °C to 50 °C (-4 °F to 122 °F)
20 % to 90 % (no condensation)

Español
INSTRUCCIONES IMPORTANTES DE SEGURIDAD
Lea y siga las instrucciones en este manual del usuario y preste atención a todas las
advertencias.
ADVERTENCIA
Para reducir el riesgo de quemaduras, incendio, descarga eléctrica o lesiones:
-
Este dispositivo está diseñado para usarse solo en interiores.
-
Si el adaptador, el cable del adaptador o el aparato han sido dañados de alguna forma, algún
líquido se ha derramado u objetos se han caído dentro del dispositivo, el dispositivo ha sido
expuesto a lluvia o humedad, no opera con normalidad o ha sido tirado o dañado, no debe
operarse y necesita obtener servicio por parte del personal (ver 'Servicio y asistencia') de servicio
calificado.
-
El agua y la electricidad son una combinación peligrosa. No use este aparato en entornos mojados
(p. ej. en el baño o cerca de la ducha o piscina).
-
Asegúrese de que el adaptador no se moje.
-
No permita que el agua entre al dispositivo ni vierta agua sobre el mismo.
-
No sumerja el aparato en agua ni lo enjuague bajo la llave.
-
El adaptador contiene un transformador, el cual convierte un voltaje inseguro de 100–240 V CA
a un voltaje bajo seguro de 24VCC. No corte el adaptador para sustituirlo por otra clavija, ya que
podría provocar situaciones de peligro.
-
Solamente utilice el adaptador original. No use el adaptador u otros accesorios si están dañados.
Llame al 1-866-832-4361 para asistencia.
-
No utilice el adaptador dentro o cerca de una salida de corriente que contenga un ventilador de
aire eléctrico para prevenir daño al adaptador.
-
Proteja el cable de alimentación de ser pisado o aplastado, particularmente en los enchufes, las
salidas y puntos donde estos salen de la lámpara.
-
El dispositivo no tiene interruptor de encendido/apagado. Para desconectar el dispositivo de la
fuente de poder, quite el enchufe de la toma de corriente.
-
Este aparato no debe ser usado por personas (incluyendo niños) con su capacidad física, psíquica
o sensorial reducida, ni por quienes tengan falta de conocimientos y la experiencia necesarios, a
menos que sean supervisados o instruidos acerca del uso del aparato por una persona
responsable de su seguridad.
-
No instalar cerca de fuentes de calor, como radiadores, estufas u otros aparatos que irradien calor.
-
No interfiera con el enfriado del aparato al cubrirlo con artículos como sábanas, cortinas, ropa,
papeles, etc.
25
PRECAUCIÓN
-
No deje caer el dispositivo en el piso, lo golpee fuertemente o exponga a cualquier otro golpe
duro.
-
Ubique el dispositivo en una superficie estable, a nivel y no resbaladiza.

26
Español
-
Este dispositivo solamente está destinado para uso doméstico, incluyendo uso similar en hoteles.
No utilice accesorios que no estén recomendados por Philips North America LLC (EE.UU.) o Philips
Electronics Ltd (Canadá).
-
Antes de enchufar el aparato, compruebe si el voltaje indicado en el mismo corresponde con el
voltaje de la red local.
-
Desconecte el dispositivo durante tormentas eléctricas o cuando no lo utilice por un período
prolongado.
GENERAL
-
No utilice el dispositivo como medio para reducir sus horas de sueño. El propósito de este
dispositivo es el de ayudarle a despertar más fácilmente. No disminuye su necesidad de sueño.
-
Consulte a su médico antes de comenzar a usar el dispositivo si ha sufrido o está sufriendo de
depresión.
-
Si se siente incómodo en cualquier momento al usar RelaxBreathe en el ejercicio de respiración,
vuelva a respirar normalmente.
-
Si despierta muy temprano o con dolor de cabeza de forma frecuente, reduzca el nivel de
intensidad de la luz o el tiempo de simulación del amanecer establecidos.
-
Si frecuentemente se despierta por el sonido de la alarma, aumente el nivel de intensidad de la
luz establecido o el tiempo de simulación del amanecer establecido.
-
Si comparte habitación con alguien más, esta persona puede intencionalmente despertar por la
luz del dispositivo, incluso si esta persona se quita posteriormente del dispositivo. Este es el
resultado de las diferencias en la sensibilidad de la luz entre la gente.
-
El consumo de energía del dispositivo es más bajo si ningún dispositivo está conectado a un
puerto USB y la lámpara, radio y pantalla están apagadas.
CONSERVE ESTAS INSTRUCCIONES

Español
27
Contenido
INSTRUCCIONES IMPORTANTES DE SEGURIDAD_________________________________________ 25
Introducción _______________________________________________________________________ 28
Información general_________________________________________________________________ 28
Uso previsto ________________________________________________________________________ 28
Golpee en la parte superior de la luz de despertar y dormir para dormitar __________________ 28
Íconos de menú interactivo___________________________________________________________ 29
Navegar el menú____________________________________________________________________ 30
Establecer perfiles de despertador_____________________________________________________ 30
Hora + alarma de respaldo ___________________________________________________________ 31
Dormitar___________________________________________________________________________ 31
Apagar la alarma ___________________________________________________________________ 32
Uso de la luz para despertar y dormir como lámpara de buró. _____________________________ 32
Luz de medianoche _________________________________________________________________ 32
Ajustes ____________________________________________________________________________ 33
Música ____________________________________________________________________________ 34
Programas de relajación _____________________________________________________________ 35
Simulación del atardecer_____________________________________________________________ 36
RelaxBreathe _______________________________________________________________________ 36
Cargar su teléfono móvil _____________________________________________________________ 37
Limpieza y almacenamiento __________________________________________________________ 37
Desecho ___________________________________________________________________________ 38
Servicio y asistencia _________________________________________________________________ 38
Garantía de devolución del importe de 90 días _________________________________________ 38
Garantía Total de Dos Años __________________________________________________________ 38
Solución de problemas ______________________________________________________________ 39
Seguridad y cumplimiento ___________________________________________________________ 42
Campos electromagnéticos (CEM)_____________________________________________________ 42
Información de FCC e IC _____________________________________________________________ 42
Software de código abierto y de terceros_______________________________________________ 43
Especificaciones ____________________________________________________________________ 43

28
Español
Introducción
Enhorabuena por la adquisición de este producto, y bienvenido a Philips.
Para sacar el mayor partido a la asistencia que Philips le ofrece, registre el
producto en www.philips.com/welcome.
La luz para dormir y despertar de Philips te ayuda a despertar de una
manera más agradable. Si el modo simulación del amanecer está activado,
la intensidad de la luz de la lámpara aumenta gradualmente al nivel
establecido y el color de la luz cambia de rojo amanecer a luz de día
brillante. La luz prepara al cuerpo paulatinamente para despertar a la hora
establecida. Para hacer que despertar sea una experiencia más agradable
aún, puede programar sonidos naturales o la radio FM para escucharlos al
abrir los ojos.
Información general
1 Carcasa de lámpara
2 Pantalla
3 Puerto de carga USB
4 Botón de restablecimiento
5 Antena de radio
6 Entrada CC del adaptador
7 Entrada auxiliar (AUX)
8 Altavoz
9 Botón de dormitar/luz de medianoche
10 Adaptador
11 Enchufe pequeño
Uso previsto
La luz para despertar y dormir de Philips está diseñada para
proporcionarle un despertar más fresco y natural y una sensación de
relajación antes de dormir.
Este no es un producto de iluminación general.
Golpee en la parte superior de la luz de despertar y dormir para dormitar
La luz para despertar y dormir de Philips prepara al cuerpo de forma
paulatina para que se despierte durante los últimos 30minutos de sueño.
En las primeras horas de la mañana los ojos están más sensibles a la luz
que cuando estamos despiertos. Durante ese periodo los niveles
relativamente bajos de luz del amanecer natural simulado preparan al
cuerpo para despertar y estar alerta.
Las personas que usan la luz para dormir y despertar se levantan más
fácilmente, tienen un mejor humor en general en la mañana y se sienten
con más energía. Ya que la sensibilidad a la luz varía de persona a
persona, puede establecer la intensidad de la luz para dormir y despertar a
un nivel que coincida con su sensibilidad a la luz para comenzar el día de
la mejor manera.
Para experimentar plenamente los efectos de la luz para despertar y
dormir, coloque el dispositivo aproximadamente a 16–20pulgadas /
40–50cm de su cabeza, sobre una superficie plana y estable de su buró.
Para obtener más información acerca de la luz para despertar y dormir,
consulte www.philips.com.
Íconos de menú interactivo
Perfil despertador/Alarma Intensidad de la luz y
apagado/encendido de
la luz.
Ajustes Sonidos Confirmar y guardar la
Programas de relajación Entrada AUX Hora del reloj
Español
Habilitar los accesos
directos
configuración
29
Seleccionar un sonido
natural
Configuración de pantalla Brillo de la pantalla Mantener la luz
Habilitar el tiempo de
espera de la pantalla
Habilitar comentarios de
audio
Simulación del atardecer Duración del perfil
Guía de luz o sonido RelaxBreathe Editar el perfil
Ritmo de RelaxBreathe Duración del programa
Volver a un nivel superior
en el menú
Seleccionar un ajuste
preestablecido de la
radio
Deshabilitar el tiempo de
espera de la pantalla
Deshabilitar comentarios
de audio
despertador
de relajación
Cambiar la
configuración de la
alarma
encendida
Mantener la luz
apagada
Interruptor de
encendido y apagado
de la alarma
Apagar la alarma
despertador
Desactivar la alarma

30
Español
Navegar el menú
En la pantalla puede seleccionar y establecer el perfil despertador, luz de
cama, ajustes, sonido (fuente) o el programa de relajación.
Nota: Todos los ajustes personalizados y perfiles se almacenarán
permanentemente en la memoria, no se borrarán al quitar el adaptador
del tomacorriente eléctrico. Puede cambiar todos los ajustes en cualquier
momento, el último ajuste se almacenará.
Nota: Si la pantalla está en blanco, mueva su mano hacia la parte inferior
de la luz de despertar y dormir para visualizar el menú de la pantalla. Verá
los botones del menú.
Establecer perfiles de despertador
Pulse el ícono Despertador/Alarma para comenzar a configurar un perfil
despertador.
Nota: Presione y sostenga el botón de alarma por 1 segundo para
desactivar todas las alarmas establecidas a la vez.
Puede establecer dos perfiles de despertador diferentes. Para cada perfil,
puede establecer la hora de la alarma, la intensidad de la luz, la duración
de la curva del despertador, el tipo de sonido del despertador y el
volumen.
Nota: La alarma establecida se activará de forma automática a la misma
hora todos los días hasta que la desactive al presionar primero el ícono de
interruptor de la alarma y, luego, el ícono de desactivación de la alarma
.
Intensidad de la luz del perfil despertador
La luz del dispositivo simula un amanecer. Al igual que un amanecer, el
brillo de la lámpara se incrementa gradualmente. Durante la curva del
despertador, el color de la luz cambia de rojo suave a naranja cálido a
amarillo brillante.
Presione el ícono en la pantalla para elegir uno de los 25niveles de
intensidad de la luz.
Nota: La pantalla principal del aparato muestra si se estableció la alarma.

Duración del perfil despertador
Presione este ícono para abrir el menú.
La duración predeterminada de la curva del despertador (el brillo
aumenta hasta la intensidad de la luz máxima establecida) es de 30
minutos. Presione el ícono para cambiar la duración del perfil
despertador como lo prefiera.
Presione + o - para aumentar o disminuir el brillo de la luz en la curva del
despertador.
Tipo de sonido
Presione este ícono para abrir el menú de sonidos con el fin de configurar
el sonido del perfil despertador.
1 Presione el ícono de interruptor para elegir una de las tres opciones
de sonido: un sonido natural, la radio o ningún sonido.
2 Presione el ícono de sonido natural para seleccionar uno de los
sonidos naturales o presione el ícono de radio para seleccionar uno
de los ajustes preestablecidos de la radio.
3 Puede ajustar el volumen mediante el ícono de altavoz .
Español
31
Hora + alarma de respaldo
En el caso de una falla eléctrica, todas las funciones del aparato,
incluyendo la pantalla, no funcionarán. Sin embargo, el reloj interno y la
alarma de respaldo se mantienen activos por al menos 8 horas.
Si, durante la falla eléctrica, se hace la hora de la alarma establecida,
sonará una alarma de respaldo que generará un sonido de pitido durante
aproximadamente 30segundos.
Dormitar
Cuando termina la curva del despertador (cuando se alcanza la máxima
intensidad de luz establecida) y está sonando la alarma, puede golpear la
parte superior del aparato para dormitar.
La lámpara permanece encendida, pero el sonido de alarma se detiene.
Después de 9 minutos, el sonido de la alarma empieza a sonar de nuevo.
Nota: La luz y sonido se apagan automáticamente 60 minutos después de
la hora de la alarma o 60 minutos después de la última acción de dormitar.
32
Español
Apagar la alarma
Cuando se activa la curva del despertador o suena la alarma, puede
ignorarla presionando este icono en el dispositivo. Si ignora la alarma, el
perfil de la alarma se desactivará durante el resto de ese día.
Uso de la luz para despertar y dormir como lámpara de buró.
Puede usar la luz para despertar y dormir como lámpara de buró.
Presione este ícono en la pantalla para encender la lámpara de buró.
Nota: Mantenga presionado el ícono de la lámpara para apagar la
lámpara de buró.
Puede aumentar y disminuir el brillo de la luz. Puede seleccionar un nivel
de brillo de entre 1(bajo) y 25(alto). El nivel predeterminado del brillo es
de20.
Nota: Para apagar la lámpara de buró, presione el ícono de cruz en el
menú.
Sugerencia: Cuando la luz está encendida, también puede apagarla con
un solo golpe en la parte superior de la luz para despertar y dormir. Todos
los programas activos se detendrán. Las alarmas establecidas quedan
activas.
Luz de medianoche
Si despierta durante la noche, puede golpear la parte superior del
dispositivo para activar una luz suave. Esta luz de color naranja claro le
proporciona luz suficiente para encontrar su camino en la oscuridad.
Apague la luz de medianoche con un golpe en la parte superior del
dispositivo.
Nota: La luz de medianoche no se puede activar directamente cuando la
luz principal ya está encendida. En ese caso, primero golpee la parte
superior del dispositivo para desactivar la luz principal. Luego golpee otra
vez para activar la luz de medianoche.
Ajustes
Presione el ícono de configuración para abrir el menú de configuración.
En el menú de configuración, puede establecer la hora del reloj y la
configuración de la pantalla y de la alarma.
Hora
Presione este ícono para abrir el menú de la hora.
En este menú, puede cambiar la hora si presiona + o -.
Presione el ícono de notación de tiempo para alternar entre el reloj de
12horas y el de 24horas.
Configuración de pantalla
Pulse el botón de configuración de pantalla en el menú de configuración
para establecer las opciones de configuración de la pantalla.
Español
33
En el menú de configuración de la pantalla, puede desactivar y volver a
activar los comentarios de audio, establecer el brillo de la pantalla,
encender o apagar la pantalla, y seleccionar los accesos directos.
Comentarios de audio
Si no desea escuchar los clics cuando presiona un icono, presione el icono
de comentarios de audio para apagar los comentarios de audio. Escuchará
un clic de confirmación.
Para volver a activar los comentarios de audio, presione este ícono .
Brillo de la pantalla
Puede ajustar el brillo de la pantalla del nivel 1 al nivel 6. Elija un nivel que
sea óptimo para ver la pantalla en la noche. El dispositivo ajusta
automáticamente el brillo de la pantalla cuando cambia la luz de la
recámara.

34
Español
Tiempo de espera de la pantalla
Si desea que el aparato no produzca ninguna luz, ni siquiera desde la luz
que indica la hora, presione el ícono de tiempo de espera de la pantalla.
Por lo general, si no toca algún menú en la pantalla por cierto tiempo, la
pantalla se revierte al indicador de hora y estado solamente. Cuando se
activa el tiempo de espera de la pantalla, no se muestra la hora.
Presione el ícono de tiempo de espera de la pantalla para volver a
encender la pantalla.
Sugerencia: Si desea comprobar la hora o seleccionar una función
mientras el tiempo de espera de la pantalla esté desactivado, solo debe
colocar la mano cerca de la pantalla para encenderla durante unos pocos
segundos.
Accesos directos
Presione el ícono de accesos directos para obtener un acceso rápido a
cinco funciones clave directamente desde la pantalla principal, para que
pueda encender la luz de inmediato y tener acceso a los menús de la
alarma y el sonido, además de a los programas de relajación.
Configuración de la alarma
La luz se apaga cuando ignore la alarma.
Si no desea que esto suceda, presione este ícono en el menú de
configuración de la alarma y guarde la configuración para asegurarse de
que la luz permanezca encendida cada vez que ignore la alarma.
Música
Sugerencia: Cuando la radio o la música estén encendidas, puede apagar
el sonido con un solo golpe en la parte superior de la luz para despertar y
dormir. Todos los programas activos se detendrán. Las alarmas
establecidas quedan activas.
Escuchar la radio
Puede escuchar la radio FM con la luz para despertar y dormir. Si
seleccionó la función de radio en el menú de sonidos, se mostrará la
estación de radio seleccionada. Puede cambiar la estación de radio de
forma manual al seleccionar la frecuencia FM de otra estación.
Sugerencia: Asegúrese de extender la antena completamente y moverla
hasta lograr una buena recepción.

Puede preestablecer 5 estaciones de radio. Primero, seleccione la estación
al establecer la frecuencia FM. Mantenga pulsado el botón de dos flechas
para buscar automáticamente la próxima estación.
Después de establecer la estación, puede agregar otra estación
preestablecida al seleccionar el botón de alternar. Con este proceso,
puede preestablecer 5 estaciones.
Establezca el volumen preferido con el botón de altavoz.
Nota: Para guardar su configuración, seleccione el botón de marca de
verificación .
Música a través de la entrada auxiliar (AUX)
Puede usar la luz para despertar y dormir como bocina si conecta un
dispositivo de reproducción de música (como su teléfono celular) a una
entrada AUX.
Nota: No puede despertarse con la música de un dispositivo conectado a
la entrada AUX.
Si el sonido está puesto en el volumen máximo de la luz para despertar y
dormir y no es lo suficientemente alto, súbalo desde el dispositivo
reproductor.
Si el sonido es muy alto o se distorsiona cuando establece la luz para
despertar y dormir a un volumen bajo, baje el volumen desde el
dispositivo reproductor.
Nota: Mantenga presionado el icono de nota musical durante para
activar/desactivar el sonido en el menú. También puede desactivar el
sonido al golpear la parte superior del dispositivo.
Español
35
Nota: Necesita un cable AUX para conectar la luz para despertar y dormir
a un dispositivo reproductor.
Programas de relajación
El dispositivo tiene dos programas de relajación para ayudarlo a relajarse
antes de dormir.
Nota: También puede desactivar el programa de relajación activo al
golpear la parte superior del dispositivo.

36
Español
Simulación del atardecer
Durante la simulación del atardecer, el brillo de la luz disminuye
gradualmente con colores que cambian de amarillo brillante a naranja
cálido a rojo suave. Puede establecer la duración de la simulación del
atardecer y la intensidad de la luz inicial.
También puede seleccionar un sonido que se desvanezca durante la
simulación del atardecer. Puede establecer la fuente de sonido y el
volumen inicial. Puede elegir un sonido natural, radio o sin sonido.
También puede reproducir su propia música conectando un dispositivo
reproductor al enchufe AUX.
Nota: Si estableció la simulación del atardecer en el asistente de
configuración, esta comenzará inmediatamente. Si no la estableció, el
dispositivo comienza con una simulación del atardecer predeterminada.
RelaxBreathe
RelaxBreathe utiliza la técnica de respiración abdominal como base del
programa de respiración. Puede elegir uno de los programas de
respiración, guiados por luz o sonido. La combinación del ejercicio de
respiración abdominal y la guía de la luz para despertar y dormir le ayuda
a calmarse y sentirse relajado.
Puede seleccionar uno de entre siete programas de relajación con ritmos
de respiración preestablecidos. Cada programa de relajación tiene un
ritmo de respiración diferente. El programa de “4respiraciones” está
preestablecido en 4respiraciones por minuto. El programa de
“5respiraciones” está preestablecido en 5respiraciones por minuto. Cada
programa subsecuente tiene una respiración más por minuto. El último
programa '10 respiraciones' está preestablecido a 10 respiraciones por
minuto.
Puede seleccionar luz o sonido para la guía durante el programa de
relajación seleccionado. Siga la luz o el sonido cuando inhale y exhale.
-
En la guía con luz, inhale cuando aumente la intensidad de la luz. Entre
los dos destellos suaves de luz, aguante la respiración. Exhale
lentamente cuando disminuya la intensidad de la luz.
-
En la guía con sonido, inhale cuando aumente la intensidad del sonido
de las olas. Cuando la intensidad del sonido pause, aguante la
respiración. Exhale lentamente cuando la intensidad del sonido de las
olas disminuya.
Siga su ritmo preferido con la ayuda de la luz o el sonido para obtener una
sensación de mayor relajación. Puede hacer esto con los ojos cerrados.

Español
Presione este ícono para establecer la duración del programa de
relajación. Puede seleccionar una duración de5, 10o 15minutos.
La respiración abdominal para relajarse
La relajación abdominal es la técnica de ejercicios de respiración más
reconocida para ayudar a relajarse. Cuando respira con el abdomen,
automáticamente el diafragma tira hacia abajo automáticamente. Esto
tira también a los pulmones hacia abajo y permite inhalar completa y
profundamente.
Precaución: Si se siente incómodo en cualquier momento durante el
ejercicio de relajación, vuelva a respirar normalmente.
Cómo respirar con el abdomen
1 Acuéstese cómodamente sobre la espalda.
2 Inhale por la nariz, exhale por la nariz o la boca.
3 Coloque una mano en su abdomen y la otra en su pecho.
Debe ver subir la mano que está sobre su abdomen con cada
inhalación y bajar con cada exhalación. La mano sobre su pecho debe
moverse un poco solamente.
4 Su respiración debe provenir únicamente del abdomen. Intente hacer
que su exhalación sea más larga que su inhalación lo que le hará
sentirse más relajado rápidamente.
Nota: La función RelaxBreathe del dispositivo lo puede guiar durante la
respiración con el abdomen.
37
Cargar su teléfono móvil
Puede usar el puerto (ver 'Información general') USB para cargar su
teléfono celular (máx. 1A).
Limpieza y almacenamiento
-
Limpie el dispositivo con un paño suave seco.
-
No utilice agentes de limpieza abrasivos, esponjas o solventes
limpiadores como alcohol, acetona, etc., ya que esto puede dañar la
superficie del dispositivo.
-
Si no va a utilizar el dispositivo por un periodo largo de tiempo, quite el
adaptador del toma corriente y almacene el dispositivo en un lugar
seguro y seco donde no pueda ser aplastado, golpeado o dañado.
-
No enrolle el cable en el dispositivo cuando lo almacene.

38
Español
Desecho
Su producto está diseñado y fabricado con materiales y componentes de
alta calidad, que pueden ser reciclados y reusados. Para obtener
información sobre reciclado, comuníquese con las oficinas locales de
manejo de desechos o visite www.recycle.philips.com.
Servicio y asistencia
Este aparato no tiene otras partes que requieran servicio por parte del
usuario. Para asistencia visite nuestro sitio web:
www.philps.com/soporte o llame gratuitamente: 1-866-832-4361.
La información en línea está disponible las 24horas, los siete días de la
semana.
Garantía de devolución del importe de 90 días
Si no está completamente satisfecho con su producto, envíelo de regreso y
le reembolsaremos el total de la compra.
El producto debe enviarse por correo certificado pago, con seguro
prepago, junto con el recibo original de compra, donde se indique el
precio y la fecha de compra, así como el formulario de autorización para la
garantía de devolución de dinero.
No asumimos ninguna responsabilidad por los paquetes perdidos.
El paquete del producto debe contar con matasellos que no supere los
90días a partir de la fecha de compra. Philips se reserva el derecho a
verificar el precio de compra del producto y limita los reembolsos al precio
de venta minorista sugerido.
Para obtener el formulario de autorización para la garantía de devolución
del dinero, llame al1-866-832-4361 para obtener asistencia.
La entrega del cheque de reembolso ocurrirá de 6 a8 semanas después de
la recepción del producto devuelto.
Garantía Total de Dos Años
Philips North America LLC (EE. UU.) y Philips Electronics Ltd (Canadá)
garantizan este nuevo producto contra defectos en los materiales o en la
mano de obra por un período de dos años desde la fecha de compra y
acepta reparar o remplazar cualquier producto defectuoso sin cargo.
IMPORTANTE: Esta garantía no cubre ningún daño que surja como
resultado de un accidente, de un uso indebido o abuso, de la falta de
cuidado razonable o del uso de cualquier accesorio no provisto con el
producto ni la pérdida de piezas, así como tampoco ningún daño derivado
del uso del producto con una tensión o con baterías que no sean las
especificadas.*

Español
NINGUNARESPONSABILIDAD ES ASUMIDA POR CUALQUIER DAÑO,
INCIDENTAL O RESULTANTE.
Para obtener el servicio de garantía, simplemente ingrese a
www.philips.com/support para obtener asistencia. Para su protección,
se sugiere que el envío de las devoluciones del producto se realice por
correo certificado con seguro pagado. Cualquier daño que ocurra durante
el envío no será cubierto por esta garantía.
NOTA: PhilipsNorthAmerica LLC. no extiende ninguna otra garantía, ni
escrita ni oral.
Esta garantía le brinda derechos legales específicos y usted también
puede tener otros derechos los cuales varían de estado a estado, de
región en región o de país en país. En algunos estados no se permite la
exclusión o la limitación de los daños fortuitos o resultantes, de modo que
es posible que las limitaciones o exclusiones arriba mencionadas no
apliquen a su caso.
* Lea las instrucciones adjuntas atentamente.
En EUA manufacturado para: Philips Personal Health, una división de
Philips North America LLC, P.O. Box 10313, Stamford, CT 06904.
En Canadá importado por: Philips Electronics LTD, 281 Hillmount Road,
Markham, Ontario L6C 2S3.
PHILIPS y el logotipo de Philips son marcas comerciales registradas de
Koninklijke Philips N.V.
39
©2021 Philips North America LLC. Todos los derechos reservados.
Solución de problemas
Este capítulo resume los problemas más comunes que puede encontrar
con el dispositivo.
Si no le es posible resolver el problema con la información proporcionada
abajo, visite www.philips.com/soporte o llame al 1-866-832-4361 para
asistencia.
Problema Solución
El dispositivo no
funciona en absoluto.
Tal vez el adaptador no está insertado apropiadamente en el toma
corriente. Inserte el adaptador apropiadamente en el toma corriente.
Tal vez el enchufe no está insertado apropiadamente en el dispositivo.
Inserte el enchufe apropiadamente en el dispositivo.
Tal vez haya un corte de energía. Verifique si la fuente funciona al
conectar otro dispositivo.

40
Español
Problema Solución
El dispositivo funciona
adecuadamente, pero
la lámpara ya no
funciona.
El dispositivo no
responde cuando trato
de poner diferentes
funciones.
La lámpara no
enciende cuando la
alarma se apaga.
La lámpara no
enciende de inmediato
cuando la enciendo.
No escucho el sonido
de alarma cuando la
alarma se apaga.
El dispositivo utiliza tecnología LED durable. La lámpara debe durar un
largo tiempo. Sin embargo, si la lámpara deja de funcionar, visite
www.philips.com/support o llame al 1-866-832-4361 para asistencia.
Si desea restablecer la configuración de fábrica, presione el botón
restablecer en la parte posterior del dispositivo (ver 'Información
general'). Si presiona el botón restablecer, el asistente de configuración se
debe restablecer de nuevo.
Tal vez estableció un nivel de intensidad de la luz que es demasiado bajo.
Aumente el nivel de intensidad de la luz en su perfil despertador.
Tal vez apagó la función de alarma. El ícono de la alarma es visible en la
pantalla cuando la función de alarma está activa.
La lámpara puede tardar de 1 a 5 segundos en encender, dependiendo
del nivel de intensidad de la luz establecido.
Tal vez estableció un nivel de intensidad de sonido que es demasiado
bajo. Para establecer un nivel de sonido más alto, aumente el nivel del
volumen para despertar en su perfil despertador (ver 'Establecer perfiles
de despertador').
Cuando haya programado una alarma, primero verá la luz de la curva del
despertador. El sonido de la alarma solo comienza a sonar a la hora a la
que se programó. Puede cambiar la duración de la curva del despertador.
La radio FM no
funciona.
Tal vez apagó la función de alarma. El ícono de la alarma es visible en la
pantalla cuando la función de alarma está activa.
Si seleccionó la radio FM como sonido de alarma, encienda la radio FM
después de apagar la alarma para verificar si la radio FM funciona.
Compruebe si su radio FM está correctamente sintonizada con una
estación. Si es necesario, ajuste la frecuencia. Si no funciona, llame al
1-866-832-4361 para asistencia.
Tal vez estableció un volumen demasiado bajo. Incremente el nivel de
volumen.
Compruebe si su radio FM está correctamente sintonizada con una
estación. Si es necesario, ajuste la frecuencia.
Cambie la posición de la antena moviéndola. Asegúrese de que ha
desplegado la antena completamente.
Llame al 1-866-832-4361 para asistencia.

Problema Solución
Español
41
La radio FM produce un
sonido cortado.
La alarma sonó ayer,
pero no lo hizo hoy.
Quería dormitar, pero
la alarma no se apagó
otra vez después de 9
minutos.
La luz me despierta
muy temprano.
La luz me despierta
muy tarde.
Tal vez la señal de transmisión es débil. Ajuste la frecuencia o cambie la
posición de la antena moviéndola. Asegúrese de que ha desplegado la
antena completamente.
Tal vez apagó la función de alarma. El ícono de la alarma es visible en la
pantalla cuando la función de alarma está activa.
Tal vez estableció un nivel de volumen y/o de intensidad de la luz que es
demasiado bajo. Establezca un nivel de volumen y de intensidad de la luz
más alto en su perfil despertador (ver 'Establecer perfiles de
despertador').
Cuando se produzca un corte de energía, el reloj seguirá caminando
hasta por 8 horas. Tal vez el corte de energía fue más largo. En ese caso
tiene que poner el reloj otra vez.
Golpee en la parte superior de la luz para despertar y dormir para
dormitar. Si presiona el botón para ignorar la alarma, el perfil de alarma
de ese día se desactiva.
Tal vez el nivel de volumen que estableció no es apropiado para usted.
Intente un nivel de intensidad de la luz más bajo si despierta muy
temprano. También puede cambiar la duración de la curva del
despertador (ver 'Establecer perfiles de despertador'). Si la intensidad de
la luz 1 no es lo suficientemente baja, mueva el dispositivo lejos de la
cama.
Tal vez la intensidad de la luz que estableció es demasiado baja.
Seleccione una mayor intensidad. Tal vez el dispositivo esté posicionado
en un nivel más bajo que el de su cabeza. Asegúrese de que el dispositivo
este ubicado en lo alto con lo cual la luz no esté bloqueada por su cama,
edredón, cobija o almohada. También asegúrese de que el dispositivo no
esté ubicado demasiado lejos.
No puedo encender o
apagar la Luz de
medianoche.
No puedo enviar por
stream música vía USB.
La entrada auxiliar
(AUX) no funciona
correctamente.
Asegúrese de que golpea en la posición correcta (arriba/parte posterior)
del aparato.
La conexión USB es únicamente para cargar el teléfono móvil. No puede
enviar música por stream a la luz para despertar y dormir.
Intente establecer el volumen del teléfono celular ya sea más alto o más
bajo. Si es necesario, ajuste el nivel del volumen en el dispositivo también.

42
Español
Problema Solución
De repente el
dispositivo emite
sonidos de bip.
La alarma de respaldo se encendió. El reloj interno y la alarma de respaldo
permanecen activos durante al menos 8 horas. Si se activa una alarma
durante este período de respaldo, se apagará. El sonido de alarma se
detiene automáticamente después de aproximadamente 30 segundos.
También puede detener el sonido de la alarma inmediatamente
conectando el aparato a la corriente brevemente.
Para evitar que se active la alarma de respaldo cuando se desconecta la
alimentación (por ejemplo, durante el almacenamiento), desactive las
alarmas antes de desconectar el aparato de la alimentación.
Seguridad y cumplimiento
Este dispositivo cumple con los requisitos de seguridad de los Estados
Unidos y Canadá para:
-
UL 153, CSA C22.2 No. 250.4 (Luminarias eléctricas portátiles)
-
UL 62368-1, CSA C22.2 No. 62368-1:19 (Equipos de tecnología para
audio/video, información y comunicaciones)
Campos electromagnéticos (CEM)
Este Philips aparato cumple con todos los estándares y las regulaciones
aplicables sobre la exposición a campos electromagnéticos.
Información de FCC e IC
-
Este equipo se probó y se asegura que cumple con los límites de un
dispositivo digital de Clase B, según las especificaciones de la parte 15
de las reglas de la FCC y las normas canadienses ICES-003 e ICES-005.
Estos límites están diseñados para brindar una protección razonable en
contra de la interferencia perjudicial en una instalación doméstica. Este
equipo genera, usa y puede irradiar energía de radiofrecuencia, y si no
se instala y se utiliza de acuerdo con las instrucciones, puede causar
interferencia perjudicial a las comunicaciones por radio. Sin embargo,
no hay garantía de que no ocurrirá interferencia en una instalación en
particular. Si este equipo causa interferencia perjudicial a la recepción
de radio o televisión, lo cual puede determinarse encendiendo y
apagando el equipo, se le recomienda al usuario tratar de corregir la
interferencia tomando una o más de las siguientes medidas:
-
Reorientar o cambiar de lugar la antena receptora.
-
Aumentar la distancia entre el equipo y el aparato receptor.
-
Conecte el equipo en un enchufe en un circuito diferente al que está
conectado el recibidor.
-
Consultar a un distribuidor o a un técnico de radio/televisión con
experiencia para recibir ayuda.

-
Este dispositivo cumple con la Parte 15 de las reglas de la
FCC/estándares RSS de exención de licencia de Industry Canada. El
funcionamiento está sujeto a las dos condiciones siguientes: (1) Es
posible que este dispositivo no cause interferencia perjudicial, y (2) este
dispositivo debe aceptar cualquier interferencia que reciba, inclusive
aquella que pueda causar un funcionamiento no deseado.
Software de código abierto y de terceros
Puede encontrar una copia del software de código abierto y del acuerdo
de licencia de software comercial de terceros en el sitio web
www.philips.com/support
Busque el número de dispositivo HF3670 / HF3671 / HF3672 / HF3650 /
HF3651 / HF3652 / HF3653 / HF3654 en la página de documentación
técnica del producto.
Especificaciones
Adaptador
Fabricante PHILIPS
Número de tipo HF20
Español
43
Voltaje de entrada nominal 100 – 240V CA
Frecuencia de entrada nominal 50 / 60Hz
Voltaje de salida nominal 24V CC
Corriente de salida nominal 0.75A
Potencia de salida nominal 18W
Potencia sin carga < 0.1W
Clase de eficiencia VI
Clasificación de seguridad Suministro eléctrico clase 2
Dimensiones
(alto x ancho x profundidad)
Peso Aprox. 0.11kg (3.9oz.)
Longitud del cable Aprox. 183cm (6pies)
35x78x47mm (1.38x3.07x1.85pulgadas)
Unidad principal
Fabricante
PHILIPS

44
Español
Número de tipo HF3650, HF3651
Voltaje de entrada nominal 24V CC
Corriente de entrada nominal 0.75A
Potencia de entrada nominal 18W
Aparato con energía en modo de espera
(unidad principal + adaptador)
Condiciones: (noche 12 h / 0 lux, día 12 h / 500 lux, todas las
funciones suspendidas)
Menos de 0.5W (pantalla con el brillo máximo)
Menos de 0.25W (pantalla apagada)
Clasificación de seguridad Luminaria portátil
Dimensiones
(alto x ancho x profundidad)
Aprox. 225 x 220 x 120 mm (8.86 x 8.66 x
4.72pulgadas)
Peso Aprox. 0.79kg (27.9oz.)
Puertos
Carga USB 5V CC, 1A
Sensibilidad AUX 280mV
Luz
Emisión de luz (nivel 1 – 25) Aproximadamente entre 1y350*lux a 45cm
(aproximadamente entre 1y350*lux a 17.7pulgadas)
*dependiendo del modelo
Color de la luz (nivel 1 – 25) Aprox. 1500 K – 2800K
FM
Banda de frecuencia de radio FM
87.5 MHz – 108.0 MHz
Condiciones de funcionamiento
Temperatura
Humedad relativa
Presión atmosférica
Condiciones de almacenamiento
Temperatura
Humedad relativa
Presión atmosférica
5 °C a 35 °C (41 °F a 95 °F)
20 % a 90 % (sin condensación)
De 86kPa a 106kPa
-20 °C a 50 °C (-4 °F a 122 °F)
20 % a 90 % (sin condensación)
De 86kPa a 106kPa

Français (Canada)
IMPORTANTES CONSIGNES DE SÉCURITÉ
Lisez et suivez toutes les instructions du manuel d’utilisation et tenez compte des
avertissements.
AVERTISSEMENT
Pour réduire tout risque de brûlure, d’électrocution, d’incendie ou de blessure:
-
Cet appareil est destiné à un usage en intérieur uniquement.
-
N’utilisez pas l’appareil si l’adaptateur, le cordon de l’adaptateur ou l’appareil a été endommagé,
si du liquide a coulé sur l’appareil, si des objets sont tombés à l’intérieur ou sur celui-ci, si
l’appareil a été exposé à la pluie ou à l’humidité, s’il ne fonctionne pas normalement ou s’il est
tombé au sol: l’appareil devra être réparé par un technicien (voir «Service à la clientèle et
assistance») qualifié.
-
L’eau et l’électricité ne font pas bon ménage. N’utilisez pas cet appareil dans un environnement
humide (par exemple, dans la salle de bains ou près d’une douche ou d’une piscine).
-
Gardez l’adaptateur au sec.
-
Veillez à ne pas faire pénétrer d’eau dans l’appareil ni à en renverser sur celui-ci.
-
Ne plongez pas l’appareil dans l’eau et ne le rincez pas sous le robinet.
-
L’adaptateur est équipé d’un transformateur qui convertit la tension dangereuse de
100à240Vc.a. en une tension sécuritaire de 24Vc.c. Pour éviter tout risque d’accident, ne
coupez pas la fiche de l’adaptateur pour la remplacer par une autre.
-
Utilisez uniquement l’adaptateur d’origine. N’utilisez pas l’adaptateur, si celui-ci ou si tout autre
accessoire est endommagé. Appelez au 1866832-4361 pour obtenir de l’aide.
-
N’utilisez pas l’adaptateur dans une prise de courant ou près d’une prise de courant qui contient
un désodorisant électrique afin d’éviter d’endommager l’adaptateur.
-
Évitez de marcher sur le cordon d’alimentation ou de le pincer, notamment au niveau des fiches,
des prises de courant et de son point de sortie sur la lampe.
-
L’appareil n’a pas d’interrupteur marche/arrêt. Pour débrancher l’appareil de la source
d’alimentation, retirez la fiche de la prise murale.
-
Cet appareil ne doit pas être utilisé par des personnes (incluant des enfants) avec des capacités
physiques, sensorielles ou mentales réduites, ou qui n’ont pas l’expérience et les connaissances
nécessaires, à moins qu’elles ne soient sous la surveillance d’une personne responsable de leur
sécurité ou qu’elles aient reçu de cette personne des directives concernant l’utilisation de
l’appareil.
-
N’installez pas l’appareil près d’une source de chaleur comme un radiateur, un four ou tout autre
appareil qui produit de la chaleur.
-
Ne recouvrez pas l’appareil avec une couverture, un rideau, des vêtements ou du papier, car cela
pourrait nuire à son refroidissement.
45
AVERTISSEMENT
-
Évitez de faire tomber l’appareil au sol, de le taper durement ou de l’exposer à d’autres chocs
violents.
-
Placez l’appareil sur une surface stable, plane et non glissante.

46
Français (Canada)
-
Cet appareil est destiné uniquement à un usage domestique, ou à un usage similaire, notamment
dans les hôtels. N’utilisez pas d’accessoires non recommandés par PhilipsNorthAmericaLLC
(États-Unis) ou PhilipsElectronicsLtd (Canada).
-
Avant de brancher l'appareil, vérifiez si la tension qui y est indiquée correspond à celle du réseau
électrique local.
-
Débranchez cet appareil pendant les orages avec éclairs ou s’il n’est pas utilisé pendant de
longues périodes.
GÉNÉRALITÉS
-
N’utilisez pas cet appareil comme un moyen de réduire vos heures de sommeil. Cet appareil est
conçu pour vous aider à vous réveiller plus facilement. Il ne diminue pas votre besoin de sommeil.
-
Consultez votre médecin avant d’utiliser l’appareil si vous avez souffert ou que vous souffrez de
dépression.
-
Si vous ressentez une quelconque gêne en utilisant la fonction de relaxation durant l’exercice de
respiration ventrale, revenez simplement à votre respiration normale.
-
Si vous vous réveillez souvent trop tôt, ou avec un mal de tête, réduisez le niveau d’intensité
lumineuse ou la durée de la simulation du lever du soleil.
-
Si vous êtes souvent réveillez par l’alarme sonore, augmentez le niveau d’intensité lumineuse ou
la durée de la simulation du lever du soleil.
-
Si vous partagez votre chambre, l’autre personne risque d’être également réveillée par la lumière
de l’appareil, même si cette personne en est relativement éloignée. C’est dû à la différence de
sensibilité à la lumière d’une personne à une autre.
-
La consommation électrique de l’appareil est plus faible si la lampe, la radio et l’affichage sont
éteints.
CONSERVEZ CES INSTRUCTIONS

Français (Canada)
47
Table des matières
IMPORTANTES CONSIGNES DE SÉCURITÉ_______________________________________________ 45
Introduction _______________________________________________________________________ 48
Description générale ________________________________________________________________ 48
Utilisation prévue ___________________________________________________________________ 48
Les effets de la Lampe de repos et de réveil_____________________________________________ 48
Icônes du menu interactif ____________________________________________________________ 49
Navigation dans le menu_____________________________________________________________ 50
Réglage des profils de réveil __________________________________________________________ 50
Heure + alarme d’appoint ____________________________________________________________ 51
Répétition _________________________________________________________________________ 51
Arrêt de l’alarme____________________________________________________________________ 52
Utilisation de la Lampe de repos et de réveil comme lampe de chevet______________________ 52
Éclairage nocturne __________________________________________________________________ 52
Réglages___________________________________________________________________________ 53
Musique ___________________________________________________________________________ 54
Programmes de détente _____________________________________________________________ 55
Simulation du crépuscule ____________________________________________________________ 56
RelaxBreathe _______________________________________________________________________ 56
Charge du téléphone cellulaire _______________________________________________________ 57
Nettoyage et rangement_____________________________________________________________ 57
Mise au rebut ______________________________________________________________________ 58
Service à la clientèle et assistance _____________________________________________________ 58
Garantie de remboursement de 90jours _______________________________________________ 58
Garantie complète de deux ans _______________________________________________________ 58
Résolution des problèmes____________________________________________________________ 59
Sécurité et conformité _______________________________________________________________ 62
Champs électromagnétiques (CEM) ___________________________________________________ 62
Renseignements de FCC et d'IC _______________________________________________________ 62
Logiciels libres et tiers _______________________________________________________________ 63
Spécifications_______________________________________________________________________ 63

48
Français (Canada)
Introduction
Félicitations pour votre achat et bienvenue dans l'univers Philips! Pour
profiter pleinement des avantages de l'assistance Philips, enregistrez votre
produit à l'adresse www.philips.com/welcome.
La Lampe de repos et de réveil Philips adoucit votre réveil. Si la simulation
du lever du soleil est activée, l’intensité lumineuse de la lampe augmente
progressivement jusqu’au niveau défini et la couleur de la lumière passe
d’un rouge matinal foncé à la lumière vive du jour. La lumière prépare
doucement votre corps pour le réveil à l’heure que vous avez définie. Pour
rendre votre réveil encore plus agréable, vous pouvez utiliser des sons
naturels ou la radio FM.
Description générale
1 Corps de la lampe
2 Écran
3 Port de charge USB
4 Bouton de réinitialisation
5 Antenne radio
6 Adaptateur de prise c.c.
7 Entrée auxiliaire (AUX)
8 Haut-parleur
9 Bouton de rappel/d’éclairage nocturne
10 Adaptateur
11 Petite fiche
Utilisation prévue
La lampe de repos et de réveil vous permet de vous réveiller de façon
naturelle et énergisante, et de vous endormir détendu.
Il ne s’agit pas d’un produit d’éclairage général.
Les effets de la Lampe de repos et de réveil
La lampe de repos et de réveil Philips prépare en douceur votre corps pour
le réveil au cours des 30dernières minutes de sommeil. Au réveil, les yeux
sont plus sensibles à la lumière que lorsque nous sommes éveillés. Durant
cette période, la lumière légère d’un lever de soleil simulé prépare notre
corps au réveil et nous aide à être frais et dispos.
Les gens qui utilisent la Lampe de repos et de réveil se réveillent plus
facilement, sont de meilleure humeur et ont plus d’énergie. La sensibilité à
la lumière diffère d’une personne à l’autre. Vous pouvez donc régler
l’intensité lumineuse de la Lampe de repos et de réveil à un niveau qui
vous convient pour commencer la journée du bon pied.
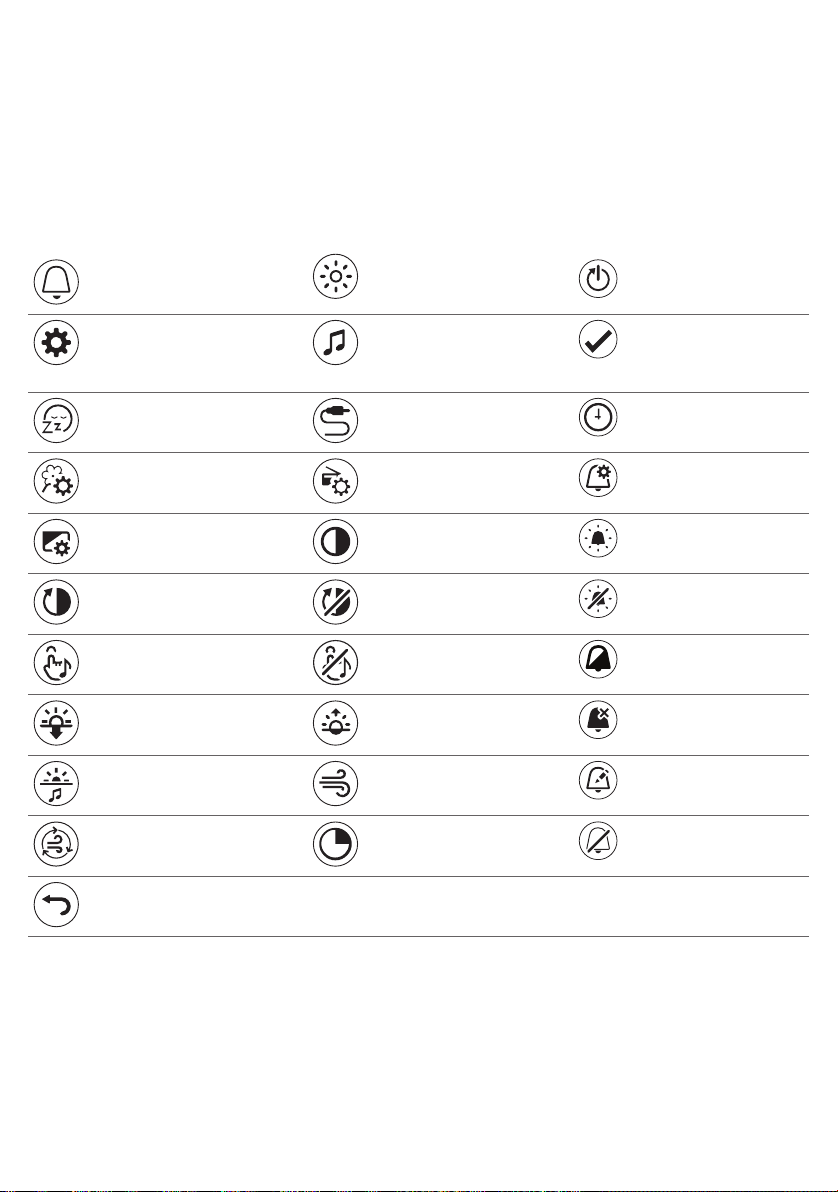
Pour ressentir pleinement les effets de la lumière de repos et de réveil,
placez-le à environ 40–50cm / 16–20po. de votre tête, sur une surface
plane et stable de votre table de chevet.
Pour plus d’informations sur la lampe de repos et de réveil, rendez-vous
sur le site www.philips.com.
Icônes du menu interactif
Profil de réveil/Alarme Intensité lumineuse et
lumière allumée/éteinte
Réglages Sons Confirmer et
Programme de détente Entrée AUX Horloge
Français (Canada)
Activer les raccourcis
enregistrer les
paramètres
49
Sélectionner un son
naturel
Paramètres d’affichage Luminosité de l’afficheur Maintenir la lumière
Activer le délai d’affichage Désactiver le délai
Activer le retour audio Désactiver le retour
Simulation du crépuscule Durée du profil de réveil Arrêt de l'alarme
Guidage lumineux ou
sonore
Rythme RelaxBreathe Durée du programme de
Revenir au niveau
supérieur du menu
Sélectionner une
présélection radio
d’affichage
audio
RelaxBreathe Modifier le profil de
relaxation
Modifier les
paramètres d’alarme
allumée
Maintenir la lumière
éteinte
Activation/désactiva
tion de l’alarme
réveil
Désactiver l’alarme

50
Français (Canada)
Navigation dans le menu
Sur l’écran, vous pouvez définir le profil de réveil, la lumière de chevet, les
réglages, la sonnerie (source) et le programme de détente.
Remarque: Vos profils et vos réglages personnalisés sont enregistrés de
façon permanente; ils ne seront pas effacés si vous débranchez
l’adaptateur de la prise de courant. Vous pouvez modifier les réglages à
tout moment; le dernier réglage sera enregistré.
Remarque: Si l’écran est vide, approchez votre main de la partie inférieure
de la lampe de repos et de réveil afin d’afficher le menu. Vous pourrez voir
les boutons du menu.
Réglage des profils de réveil
Appuyez sur l’icône Réveil/Alarme pour commencer le réglage du profil
de réveil.
Remarque: Maintenez enfoncé le bouton d’alarme pendant une seconde
pour désactiver toutes les alarmes à la fois.
Vous pouvez définir deux profils de réveil. Pour chaque profil, vous pouvez
régler l’heure de l’alarme, l’intensité lumineuse, la durée de la courbe de
réveil, le type de son que vous souhaitez au réveil et le volume.
Remarque: L’alarme définie se déclenche automatiquement tous les jours
à la même heure jusqu’à ce que vous la désactiviez en appuyant d’abord
sur l’icône Activation/désactivation de l’alarme, puis sur l’icône de
désactivation de l’alarme .
Intensité lumineuse du profil de réveil
La lampe simule le lever du soleil. La luminosité de la lampe augmente
progressivement. Tout au long de la courbe de réveil, la couleur de la
lumière passe d’un rouge léger, à un orange chaud, puis à un jaune vif.
Appuyez sur l’icône sur l’afficheur pour choisir l’un des 25niveaux
d’intensité lumineuse.
Remarque: L’afficheur principal de l’appareil indique si l’alarme a été
réglée.
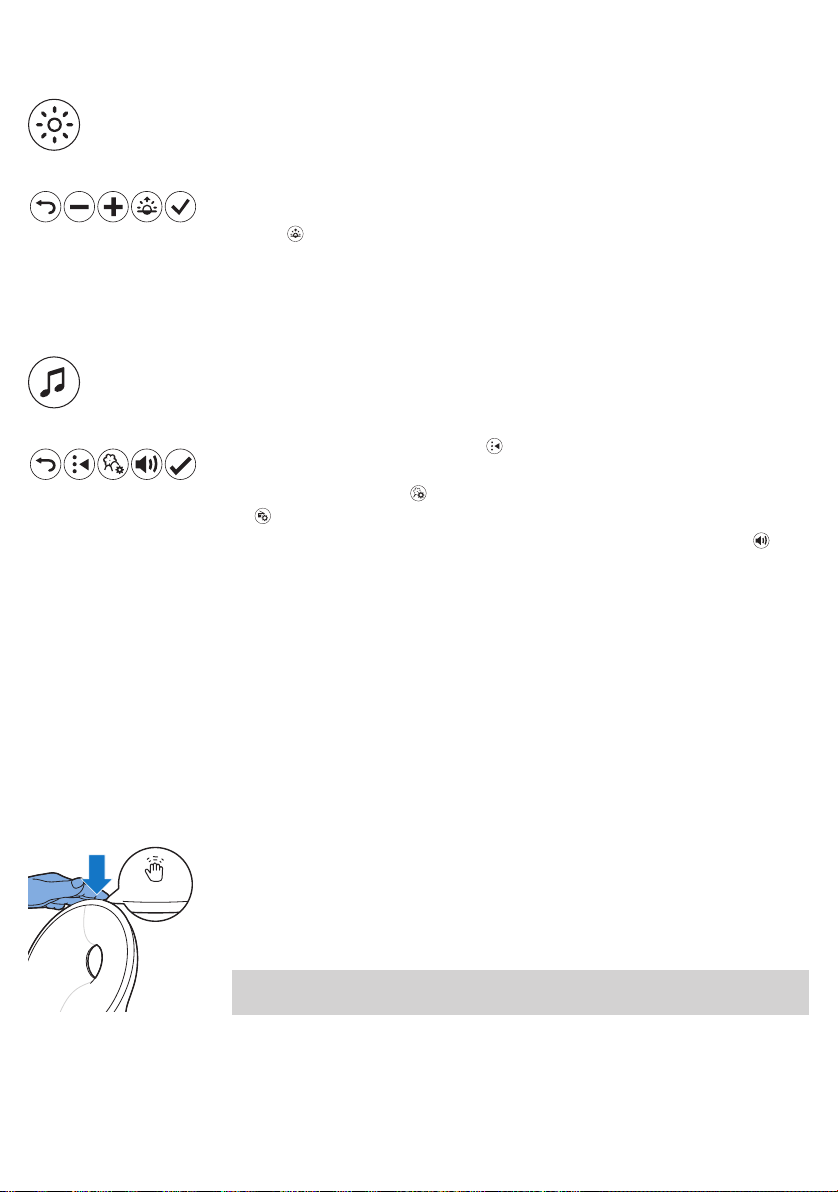
Durée du profil de réveil
Appuyez sur cette icône pour ouvrir le menu.
La durée par défaut de la courbe de réveil (durant laquelle la luminosité
augmente jusqu’au maximum défini) est de 30minutes. Appuyez sur
l’icône pour modifier la durée du profil de réveil à votre convenance.
Appuyez sur + ou - pour augmenter ou diminuer la luminosité de la
courbe de réveil.
Type de son
Appuyez sur cette icône pour ouvrir le menu des sons et définir le son de
votre profil de réveil.
1 Appuyez sur l’icône à bascule pour choisir parmi trois sons: un son
naturel, la radio ou pas de son.
2 Appuyez sur l’icône pour sélectionner un son naturel ou sur l’icône
pour sélectionner une présélection radio.
3 Vous pouvez régler le volume à l’aide de l’icône du haut-parleur .
Français (Canada)
51
Heure + alarme d’appoint
En cas de panne d’électricité, aucune fonction de l’appareil, y compris
l’afficheur, ne fonctionne. Cependant, l’horloge interne et l’alarme
d’appoint restent actives pendant au moins 8heures.
Si une coupure de courant survient à l’heure de l’alarme, une alarme de
secours se déclenche et émet un signal sonore pendant environ
30secondes.
Répétition
À la fin de la courbe de réveil, quand l’intensité lumineuse maximale est
atteinte et que l’alarme est déclenchée, vous pouvez taper sur le dessus de
l’appareil pour sommeiller quelques minutes.
La lampe reste allumée, mais le son s’arrête. Après 9minutes, l’alarme se
déclenche de nouveau.
Remarque: La lumière et le son s’éteignent automatiquement 60minutes
après le déclenchement de l’alarme ou 60minutes après le dernier rappel.
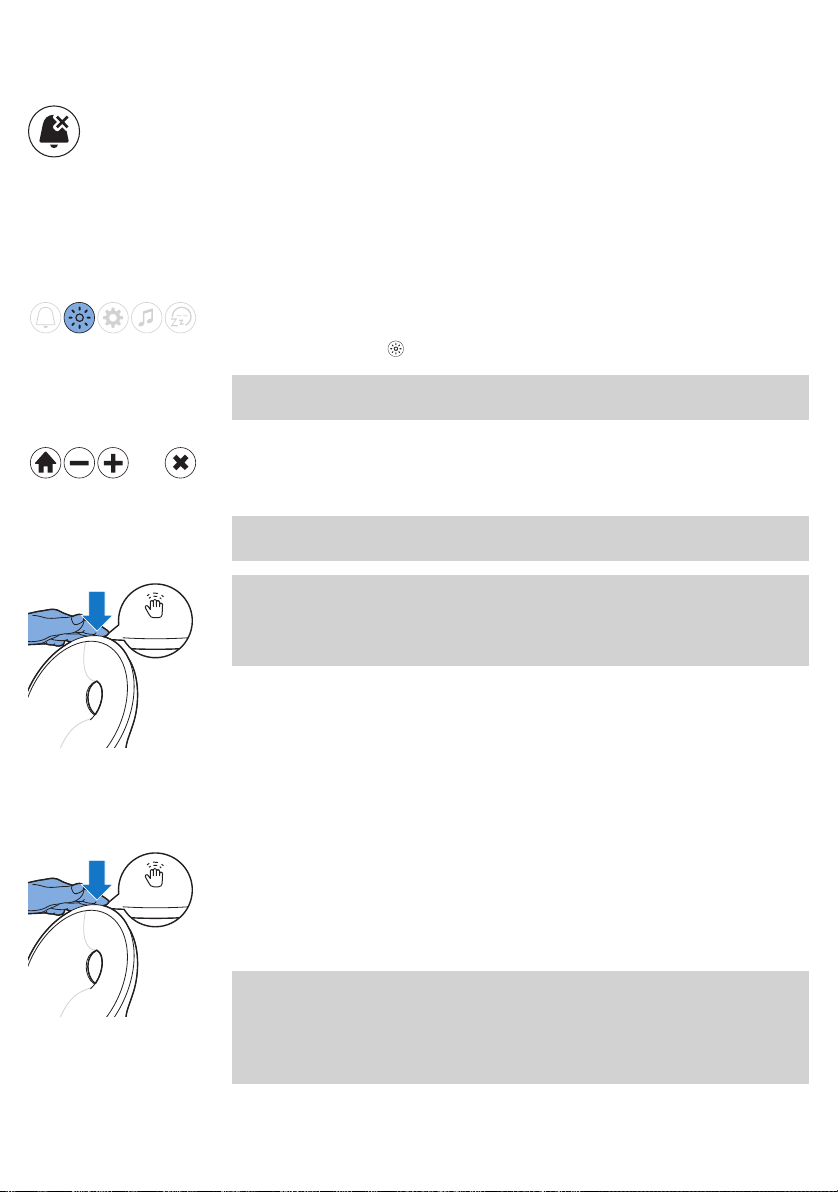
52
Français (Canada)
Arrêt de l’alarme
Pour ignorer la courbe de réveil ou l’alarme lorsqu’elles se déclenchent,
appuyez sur cette icône de l’appareil. Si vous ignorez l’alarme, le profil
d’alarme est désactivé pour la journée.
Utilisation de la Lampe de repos et de réveil comme lampe de chevet
Vous pouvez utiliser la Lampe de repos et de réveil comme lampe de
chevet.
Appuyez sur l’icône sur l’afficheur pour allumer la lampe de chevet.
Remarque: Appuyez longuement sur l’icône de la lampe pour éteindre la
lampe de chevet.
Vous pouvez augmenter ou diminuer l’intensité lumineuse. Vous pouvez
choisir une luminosité entre le niveau 1 (basse) et 25 (élevée). Le réglage
par défaut de la luminosité est de20.
Remarque: Pour éteindre la lampe de chevet, appuyez sur la croix dans le
menu.
Suggestion: Lorsque la lumière est allumée, vous pouvez aussi l’éteindre
en tapant une fois sur le dessus de la Lampe de repos et de réveil. Tous les
programmes actifs cessent alors. Les alarmes qui sont réglées restent
actives.
Éclairage nocturne
Si vous vous réveillez pendant la nuit, vous pouvez taper sur le dessus de
l’appareil pour allumer une faible lumière. Cette douce lumière tamisée
orange vous apporte un éclairage suffisant pour vous permettre de vous
déplacer dans l’obscurité. Éteignez l’éclairage nocturne en tapant de
nouveau sur le dessus de l’appareil.
Remarque: Il est impossible d’allumer directement l’éclairage nocturne
lorsque la lumière principale est déjà allumée. Dans ce cas, tapez d’abord
une fois sur le dessus de l’appareil pour éteindre la lumière principale.
Puis, tapez de nouveau sur le dessus de l’appareil pour allumer l’éclairage
nocturne.

Réglages
Appuyez sur l’icône des paramètres pour ouvrir le menu correspondant.
Vous pouvez y régler l’heure, les paramètres d’affichage et les paramètres
d’alarme.
Heure
Appuyez sur cette icône pour ouvrir le menu de l’heure.
Dans ce menu, vous pouvez modifier l’heure en appuyant sur + ou -.
Appuyez sur l’icône d’affichage de l’heure pour basculer entre les formats
12heures et 24heures.
Paramètres d’affichage
Appuyez sur le bouton des paramètres d’affichage dans le menu des
paramètres pour définir les paramètres d’affichage.
Français (Canada)
53
Dans le menu des paramètres d’affichage, vous pouvez désactiver et
réactiver le signal sonore, régler la luminosité de l’affichage, allumer ou
éteindre l’afficheur, puis sélectionner des raccourcis.
Retour audio
Si vous ne souhaitez pas entendre ce son, appuyez sur l’icône du retour
audio pour désactiver le retour audio. Vous entendez alors un dernier clic
de confirmation.
Pour réactiver le retour audio, appuyez sur l’icône .
Luminosité de l’afficheur
Vous pouvez régler le niveau de luminosité de l’affichage entre1 et6.
Choisissez le niveau qui vous convient le plus pour voir l’écran durant la
nuit. L’appareil ajuste automatiquement la luminosité de l’afficheur
lorsque la lumière dans votre chambre à coucher change.

54
Français (Canada)
Délai d’affichage
Si vous ne souhaitez pas que l’appareil produise de la lumière, même pour
afficher l’heure, appuyez sur l’icône de délai d’affichage.
Normalement, si vous ne le touchez pas pendant quelques instants,
l’afficheur indique de nouveau l’heure et l’état uniquement. Si le délai
d’affichage est activé, l’heure ne s’affiche pas.
Appuyez sur l’icône de délai d’affichage pour rallumer l’afficheur.
Suggestion: Si vous souhaitez vérifier l’heure ou sélectionner une
fonctionalors que le délai d’affichage est activé, il suffit de placer la main
près de l’afficheur pour l’allumer pendant quelques secondes.
Raccourcis
Appuyez sur l’icône des raccourcis pour accéder rapidement aux cinq
fonctions principales de l’écran principal de manière à pouvoir allumer
immédiatement la lumière et accéder aux menus des alarmes et des sons,
ainsi qu’aux programmes de relaxation.
Réglages de l’alarme
La lumière s’éteint si vous arrêtez l’alarme.
Si vous ne souhaitez pas qu’il reste éteint, appuyez sur l’icône du menu
des paramètres d’alarme et enregistrez le paramètre pour que le voyant
s’allume à chaque fois que vous ignorez l’alarme.
Musique
Écouter la radio
Suggestion: Si vous écoutez la radio ou de la musique, vous pouvez
éteindre le son en tapant une fois sur le dessus de la lampe de repos et de
réveil. Tous les programmes actifs cessent alors. Les alarmes qui sont
réglées restent actives.
Vous pouvez écouter la radioFM avec la Lampe de repos et de réveil. Si
vous avez sélectionné la fonction radio dans le menu des sons, la lumière
de repos et de réveil indique la station de radio choisie. Vous pouvez
modifier manuellement la station de radio en sélectionnant la
fréquenceFM ou une autre station.
Suggestion: Assurez-vous de déployer complètement l’antenne et de
positionner celle-ci de façon à assurer une réception optimale.

Vous pouvez mémoriser 5stations. Tout d’abord, sélectionnez une station
en réglant la fréquenceFM. Maintenez enfoncé le bouton avec la double
flèche pour rechercher automatiquement la station suivante.
Après avoir réglé la station, vous pouvez facilement ajouter une autre
station en utilisant le bouton à bascule. De cette manière, vous pouvez
enregistrer 5stations.
Définissez le volume souhaité à l’aide du bouton du haut-parleur.
Remarque: Pour enregistrer vos paramètres, sélectionnez la coche .
Musique avec l’entrée auxiliaire (AUX)
Vous pouvez utiliser la lampe de repos et de réveil comme haut-parleur en
branchant un appareil de lecture audio (par exemple, un téléphone
cellulaire) sur l’entréeAUX.
Remarque: Vous ne pouvez pas vous faire réveiller par de la musique
provenant d’un appareil branché sur l’entréeAUX.
Si le son n’est pas suffisant alors que vous avez réglé le volume de la
lampe de repos et de réveil au maximum, augmentez le volume de votre
appareil de lecture audio.
Si le son est trop élevé ou déformé alors que vous avez réglé le volume de
la lampe de repos et de réveil à un niveau bas, réduisez le volume de votre
appareil de lecture audio.
Remarque: Pour activer ou désactiver le son à l’aide du menu, maintenez
enfoncée l’icône de la note de musique. Vous pouvez aussi désactiver le
son en tapant sur le dessus de l’appareil.
Français (Canada)
55
Remarque: Vous avez besoin d’un câbleAUX pour brancher un appareil
de lecture audio sur votre Lampe de repos et de réveil.
Programmes de détente
L’appareil comporte deux programmes de détente pour vous aider à vous
relaxer avant de vous endormir.
Remarque: Vous pouvez désactiver le programme de détente en tapant
sur le dessus de l’appareil.

56
Français (Canada)
Simulation du crépuscule
Au cours de la simulation du crépuscule, la luminosité se réduit
progressivement et les couleurs passent d’un jaune vif, à un orange chaud,
puis à un rouge léger. Vous pouvez régler la durée de la simulation du
crépuscule et son intensité lumineuse initiale.
Vous pouvez aussi sélectionner un son qui s’estompera pour
accompagner le crépuscule. Vous pouvez définir la source sonore et régler
le volume initial. Vous pouvez choisir un son naturel, la radio ou aucun
son. Vous pouvez aussi écouter votre propre musique en branchant un
appareil de lecture audio sur la prise AUX.
Remarque: Si vous avez réglé la simulation du crépuscule dans l’assistant
de configuration, la simulation démarre immédiatement. Si vous ne l’avez
pas réglé, l’appareil entame une simulation de crépuscule par défaut.
RelaxBreathe
Le programme de relaxation utilise la technique de la respiration ventrale.
Vous pouvez choisir un des programmes de relaxation guidée par la
lumière et le son. La respiration ventrale guidée par la lampe de repos et
de réveil vous aide à ralentir votre rythme pour vous détendre.
Vous pouvez sélectionner l’un des septprogrammes de relaxation avec
des rythmes de respiration prédéfinis. Le rythme est différent pour chaque
programme de respiration. Le programme «4respirations» est réglé sur
4respirations par minute. Le programme «5respirations» est réglé sur
5respirations par minute. Chaque programme est réglé sur une
respiration supplémentaire par minute. Le programme «10respirations»,
qui est le dernier, est réglé sur 10respirations par minute.
Vous pouvez choisir de la lumière ou un son pour vous guider durant le
programme de relaxation sélectionné. Suivez la lumière ou le son lorsque
vous inspirez, puis expirez.
-
Si vous vous laissez guider par la lumière, inspirez lorsque l’intensité
lumineuse augmente. Retenez votre respiration pendant que la douce
lumière clignote deux fois. Expirez lentement pendant que l’intensité
lumineuse diminue.
-
Si vous vous laissez guider par le son, inspirez lorsque le bruit des
vagues augmente. Retenez votre respiration lorsque le son cesse
d’augmenter. Expirez lentement pendant que le bruit des vagues
diminue.
Suivez le rythme qui vous convient en vous laissant guider par la lumière
ou le son pour vous sentir encore plus détendu. Vous pouvez même
fermer les yeux.
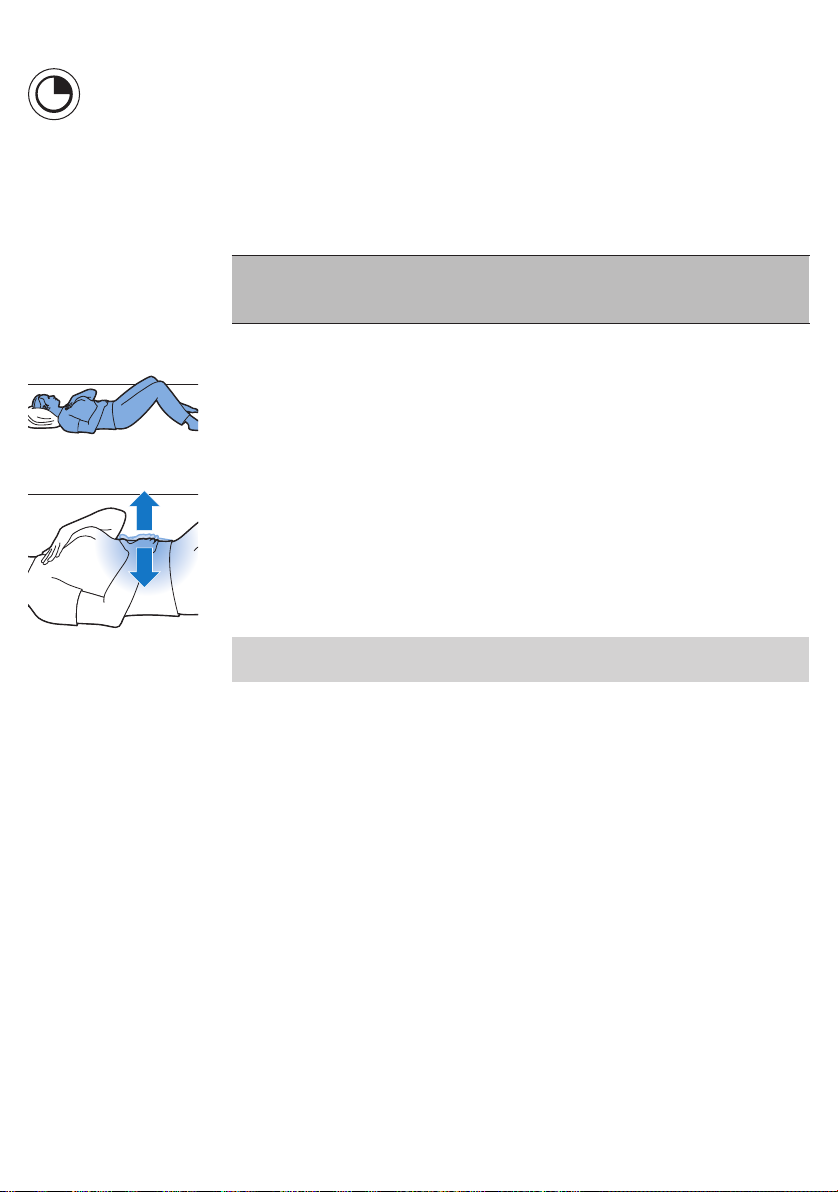
Français (Canada)
Appuyez sur cette icône pour définir la durée du programme de
relaxation. Vous pouvez sélectionner une durée de 5, 10ou 15minutes.
Respiration ventrale de détente
La respiration ventrale est la technique respiratoire de détente la plus
reconnue. Elle permet automatiquement à votre diaphragme de
s’abaisser. Vos poumons sont alors moins comprimés et vous pouvez
respirer en profondeur.
Attention: Si vous ressentez une quelconque gêne durant l’exercice
de respiration ventrale, revenez simplement à votre respiration
normale.
Pratique de la respiration ventrale
1 Allongez-vous confortablement sur le dos.
2 Inspirez par le nez, puis expirez par le nez ou la bouche.
3 Placez une main sur le ventre et l’autre main sur la poitrine.
Vous devriez voir votre main sur le ventre monter à chaque inspiration
et descendre à chaque expiration. La main sur la poitrine ne devrait
bouger que légèrement.
4 La respiration ne doit se produire que par le ventre. Essayez d’expirer
plus longuement que vous n’inspirez, afin de vous détendre encore
plus.
Remarque: La fonction de relaxation de l’appareil peut vous guider
durant la respiration ventrale.
57
Charge du téléphone cellulaire
Vous pouvez utiliser la prise (voir «Description générale») USB pour
recharger votre téléphone cellulaire (max 1A).
Nettoyage et rangement
-
Nettoyez l’appareil avec un chiffon doux et sec.
-
N’utilisez pas de nettoyants abrasifs, de tampons à récurer, ni de
solvants de nettoyage comme l’alcool ou l’acétone, car ils pourraient
endommager la surface de l’appareil.
-
Si vous comptez ne pas utiliser l’appareil pendant une période
prolongée, débranchez l’adaptateur de la prise murale et rangez
l’appareil dans un endroit sec et à l’abri des chocs.
-
N’enroulez pas le cordon autour de l’appareil au moment de
l’entreposage.

58
Français (Canada)
Mise au rebut
Votre produit a été conçu et fabriqué avec des matériaux et composants
de grande qualité, qui peuvent être recyclés et réutilisés. Pour obtenir des
informations sur le recyclage, contactez vos installations locales de gestion
des déchets ou visitez le site www.recycle.philips.com.
Service à la clientèle et assistance
Cet appareil ne contient aucune pièce réparable par l’utilisateur. Pour
obtenir de l’aide, visitez notre site Web: www.philips.com/support ou
téléphonez-nous sans frais au: 1-866-832-4361.
Des informations en ligne sont accessibles 24heures sur24, 7jours sur7.
Garantie de remboursement de 90jours
Si vous n’êtes pas entièrement satisfait de l’appareil, retournez-le et nous
vous rembourserons le prix d’achat complet.
Le produit doit être expédié port payé par poste assurée avec assurance
prépayée, et l’envoi doit comprendre le reçu original indiquant le prix et la
date de l’achat, ainsi que le formulaire d’autorisation de retour en vertu
de la garantie de remboursement.
Nous n’assumons aucune responsabilité en cas de perte par la poste.
L’envoi de l’appareil doit être fait au plus tard 90jours suivant la date
d’achat, le cachet de la poste en faisant foi. Philips se réserve le droit de
vérifier le prix d’achat de l’appareil et de limiter le montant du
remboursement au prix de détail suggéré.
Pour obtenir un remboursement dans le cadre de la garantie «satisfait ou
remboursé», composez le 1866832-4361 pour obtenir de l'aide.
Le chèque de remboursement sera envoyé 6à 8semaines après réception
du produit retourné.
Garantie complète de deux ans
Philips North America LLC (États-Unis) et Philips Electronics Ltd (Canada)
garantissent ce nouveau produit contre les défauts de matériaux ou de
main-d’œuvre pour une période de deux ans à partir de la date d’achat, et
accepte de réparer ou de remplacer sans frais tout produit défectueux.
IMPORTANT: Cette garantie ne couvre pas les dommages causés par un
accident, un usage abusif, un manque d’entretien, l’ajout d’accessoires
non fournis avec le produit, la perte de pièces ou l’alimentation de
l’appareil avec une tension électrique autre que celle spécifiée ou que
celle des piles.*
L’ENTREPRISENE POURRA EN AUCUN CAS ÊTRE TENUE RESPONSABLE
DE DOMMAGES PARTICULIERS, ACCESSOIRES OU INDIRECTS.

Français (Canada)
Pour obtenir un service d’entretien couvert par cette garantie, visitez
www.philips.com/support afin d’obtenir de l’aide. Pour votre
protection, nous vous recommandons d’effectuer vos envois de retour par
courrier avec assurance prépayée. Tout dommage résultant de
l’expédition n’est pas couvert par cette garantie.
REMARQUE: Aucune autre garantie, écrite ou orale, n’est autorisée par
Philips North AmericaLLC.
Cette garantie vous confère des droits légaux précis; il est possible que
vous ayez d’autres droits pouvant varier d’un État à l’autre, d’une province
à l’autre ou d’un pays à l’autre. Certains États et certaines provinces
n’autorisent pas l’exclusion ou la limitation des dommages indirects ou
consécutifs; par conséquent, il est possible que certaines limitations ou
exclusions présentées ci-dessus ne s’appliquent pas à votre cas.
* Veuillez lire attentivement les instructions fournies.
Fabriqué aux États-Unis pour: Philips Personal Health, une division de
Philips North America LLC, P.O. Box10313, Stamford, CT06904, États-Unis.
Importé au Canada par: Philips Electronics LTD, 281Hillmount Road,
Markham, Ontario L6C2S3.
PHILIPS et le blason Philips sont des marques de commerce enregistrées
de Koninklijke Philips N.V.
59
©2021 Philips North America LLC. Tous droits réservés.
Résolution des problèmes
Ce chapitre récapitule les problèmes les plus courants que vous pouvez
rencontrer avec l’appareil.
Si vous ne parvenez pas à résoudre le problème à l’aide des
renseignements ci-dessous, rendez-vous sur le site
www.philips.com/support ou composez le 1866832-4361 pour obtenir
de l’aide.
Problème Solution
L’appareil ne
fonctionne pas du tout.
L’adaptateur n’est peut-être pas inséré correctement dans la prise murale.
Branchez correctement l’adaptateur sur la prise murale.
La fiche n’est peut-être pas insérée correctement dans l’appareil.
Branchez la fiche correctement sur l’appareil.
Il y a peut-être une panne de courant. Vérifiez si l’alimentation électrique
fonctionne en branchant un autre appareil.

60
Français (Canada)
Problème Solution
L’appareil fonctionne
correctement, mais la
lampe ne s’allume plus.
L’appareil ne répond
pas lorsque j’essaie de
régler différentes
fonctions.
La lampe ne s’allume
pas lorsque l’alarme se
déclenche.
La lampe ne s’allume
pas immédiatement
lorsque je l’allume.
Il n’y a aucun son
lorsque l’alarme se
déclenche.
L’appareil utilise la technologie DEL durable. La lampe est conçue pour
durer longtemps. Cependant, si la lampe cesse de fonctionner, consultez
le site www.philips.com/support ou appelez au 1866832-4361 pour
obtenir de l’aide.
Si vous souhaitez rétablir les réglages par défaut, appuyez sur le bouton
de réinitialisation situé à l’arrière de l’appareil (voir «Description
générale»). Si vous appuyez sur le bouton de réinitialisation, l’assistant de
configuration doit de nouveau être réglé.
Vous avez peut-être défini un niveau d’intensité lumineuse trop faible.
Augmentez le niveau d’intensité lumineuse dans votre profil de réveil.
Vous avez peut-être désactivé la fonction d’alarme. L’icône de l’alarme est
visible sur l’écran lorsque la fonction d’alarme est activée.
Il peut s’écouler entre 1 et 5secondes avant que la lampe ne s’allume,
selon le réglage du niveau d’intensité lumineuse.
Vous avez peut-être défini un niveau sonore trop faible. Pour définir un
niveau sonore plus élevé, augmentez le volume de la sonnerie de réveil
dans votre profil de réveil (voir «Réglage des profils de réveil»).
Si vous avez réglé l’alarme, vous verrez d’abord la lumière de la courbe de
réveil. La sonnerie d’alarme se déclenche seulement à l’heure à laquelle
l’alarme est réglée. Vous pouvez modifier la durée de la courbe de réveil.
Vous avez peut-être désactivé la fonction d’alarme. L’icône de l’alarme est
visible sur l’écran lorsque la fonction d’alarme est activée.
Si vous avez sélectionné la radioFM comme sonnerie de réveil, allumez la
radioFM après avoir éteint l’alarme pour vérifier si la radioFM fonctionne.
Vérifiez si votre radioFM est correctement réglée sur une station. Si
nécessaire, réglez la fréquence. Si elle ne fonctionne pas, composez le
1866832-4361 pour obtenir de l’aide.
La radioFM ne
fonctionne pas.
La radioFM grésille. Le signal de diffusion est peut-être faible. Réglez la fréquence ou
Vous avez peut-être réglé le volume trop bas. Augmentez le niveau du
volume.
Vérifiez si votre radioFM est correctement réglée sur une station. Si
nécessaire, réglez la fréquence.
Déplacez l’antenne. Assurez-vous que l’antenne est entièrement
déployée.
Appelez au 1866832-4361 pour obtenir de l’aide.
déplacez l’antenne. Assurez-vous que l’antenne est entièrement
déployée.

Problème Solution
Français (Canada)
61
L’alarme s’est
déclenchée hier, mais
pas aujourd’hui.
Je voulais sommeiller
un peu, mais l’alarme
s’est déclenchée de
nouveau après
9minutes.
La lumière me réveille
trop tôt.
La lumière me réveille
trop tard.
Vous avez peut-être désactivé la fonction d’alarme. L’icône de l’alarme est
visible sur l’écran lorsque la fonction d’alarme est activée.
Vous avez peut-être défini un niveau de volume et (ou) d’intensité
lumineuse trop faible. Augmentez le volume et le niveau d’intensité
lumineuse dans votre profil de réveil (voir «Réglage des profils de
réveil»).
Lorsqu’une panne de courant survient, l’horloge continue de fonctionner
pendant un maximum de huitheures. La panne de courant a peut-être
duré plus longtemps. Dans ce cas, vous devez de nouveau régler
l’horloge.
Tapez sur le dessus de la Lampe de repos et de réveil pour sommeiller
quelques minutes. Si vous appuyez sur le bouton pour éteindre l’alarme,
le profil d’alarme est désactivé pour la journée.
Le niveau d’intensité lumineuse que vous avez défini n’est peut-être pas
approprié pour vous. Si vous vous réveillez trop tôt, essayez un niveau
d’intensité lumineuse plus faible. Vous pouvez aussi modifier la durée de
la courbe de réveil (voir «Réglage des profils de réveil»). Si l’intensité
lumineuse1 n’est pas assez faible, éloignez davantage l’appareil du lit.
Vous avez peut-être défini un niveau d’intensité lumineuse trop faible.
Sélectionnez une intensité lumineuse plus forte. L’appareil se trouve peutêtre à un niveau plus bas que le niveau de votre tête. Assurez-vous que
l’appareil est placé de manière à ce que la lumière ne soit pas bloquée par
votre lit, une couette, des couvertures ou un oreiller. Assurez-vous
également que l’appareil n’est pas placé trop loin.
Je ne parviens pas à
allumer ou à éteindre
l’éclairage nocturne.
Je ne parviens pas à
écouter de la musique
par l’intermédiaire du
port USB.
La prise d’entrée AUX
ne fonctionne pas
correctement.
Assurez-vous de taper au bon endroit (dessus ou derrière) sur l’appareil.
La connexion USB sert uniquement au chargement de votre téléphone
cellulaire. Vous ne parvenez pas à écouter de la musique avec votre
Lampe de repos et de réveil.
Essayez d’augmenter ou de diminuer le volume sur votre téléphone
cellulaire. Si nécessaire, réglez aussi le volume de l’appareil.

62
Français (Canada)
Problème Solution
L’appareil émet un
signal sonore soudain.
L’alarme d’appoint s’est déclenchée. L’horloge interne et l’alarme
d’appoint
restent actives pendant au moins huitheures. Si une alarme est
programmée pendant cette période, elle se déclenchera. L’alarme s’arrête
automatiquement au bout d’environ 30secondes. Vous pouvez
également l’arrêter immédiatement en branchant l’appareil brièvement
sur le secteur.
Pour éviter que l’alarme de secours se déclenche lorsque l’appareil est
débranché (parce qu’il est rangé, par exemple), désactivez les alarmes
avant de débrancher l’appareil.
Sécurité et conformité
Cet appareil est conforme aux normes de sécurité des États-Unis et du
Canada:
-
UL153, CSAC22.2 n°250.4 (Luminaires électriques portatifs)
-
UL62368-1, CSAC22.2 N°62368-1:19 (équipements des technologies
de l’audio/vidéo, de l’information et de la communication)
Champs électromagnétiques (CEM)
Cet Philips appareil est conforme à toutes les normes et à tous les
règlements applicables relatifs à l'exposition aux champs
électromagnétiques.
Renseignements de FCC et d'IC
-
À l’issue des tests dont il a fait l’objet, cet équipement a été déclaré
conforme à l’article15 de la réglementation de la FCC et de la
réglementation canadienne (ICES-003 et ICES-005) applicable aux
appareils numériques de classeB. Ces limites sont conçues pour fournir
une protection suffisante contre les interférences nuisibles dans les
installations résidentielles. Ce matériel génère, utilise et peut émettre
de l’énergie par radiofréquence et, s’il n’est pas installé et utilisé
conformément aux instructions, il peut également envoyer des
interférences nuisibles vers des communications radio. Cependant, il
n’est pas garanti que des interférences ne se produiront pas dans une
installation particulière. Dans le cas où cet équipement créerait des
interférences nuisibles avec la réception radio ou télévisée, ce qui peut
être vérifié en éteignant et en rallumant l’appareil, il est conseillé
d’essayer de corriger ces interférences en appliquant une ou plusieurs
des mesures suivantes:
-
Réorientez ou déplacez l’antenne de réception.
-
Augmentez la distance entre l’équipement et le récepteur.

-
Branchez l’appareil sur une prise d’un circuit secteur différent de
celui du récepteur.
-
Consultez le détaillant ou un technicien de radiotélévision
expérimenté.
-
Cet appareil est conforme à l’article15 du règlement de laFCC et aux
normesRSS sans licence d’Industrie Canada. Son utilisation est soumise
aux deuxconditions suivantes: (1) cet appareil ne doit pas provoquer
d’interférence nuisible; et (2) cet appareil doit accepter toute
interférence reçue, y compris les interférences pouvant entraîner un
fonctionnement indésirable.
Logiciels libres et tiers
Vous pouvez trouver une copie du contrat de licence des logiciels à code
source ouvert ou des logiciels commerciaux tiers sur le site
www.philips.com/support
Recherchez le numéro de l’appareil HF3670 / HF3671 / HF3672 / HF3650
/ HF3651 / HF3652 / HF3653 / HF3654 sur la page de la documentation
technique du produit.
Spécifications
Français (Canada)
63
Adaptateur
Fabricant PHILIPS
Numéro du type HF20
Tension d’alimentation nominale 100–240Vc.a.
Fréquence d’entrée nominale 50 / 60Hz
Tension de sortie nominale 24V c.c.
Courant à la sortie nominale: 0,75A
Puissance de sortie nominale 18W
Alimentation sans charge < 0,1W
Classe d’efficacité VI
Classification de sécurité Bloc d’alimentation de classe2
Dimensions
(hauteurxlargeurxprofondeur)
Poids Environ 0,11kg (3,9oz.)
Longueur du cordon Environ 183cm (6pi.)
35x78x47mm (1,38x3,07x1,85po.)

64
Français (Canada)
Unité principale
Fabricant
Numéro du type HF3650, HF3651
Tension d’alimentation nominale 24Vc.c.
Courant à l’entrée nominale: 0,75A
Puissance d’entrée nominale 18W
PHILIPS
Appareil en mode veille
(unité principale + adaptateur)
(Conditions : nuit (12h / 0lux), jour (12h / 500lux), avec toutes
les fonctions suspendues
Classification de sécurité Luminaire portatif
Dimensions
(hauteurxlargeurxprofondeur)
Poids Environ 0,79kg (27,9oz.)
< 0,5W (afficheur à la luminosité maximale)
< 0,25W (afficheur éteint)
Environ 225x220x120mm (8,86 x 8,66 x 4,72po.)
Ports
Charge USB 5Vc.c., 1A
Sensibilité AUX 280mV
Lumière
Émission lumineuse (niveau 1 – 25) Environ 1 à 350*lux à 45cm (environ 1 à 350*lux à
17,7po.)
*selon le modèle
Couleur de la lumière (niveau 1 – 25) Environ 1500 K – 2800K
FM
Bande de fréquence radio: FM
87,5MHz à108,0MHz
Environnement d’utilisation
Température
Humidité relative
Pression atmosphérique
Conditions d’entreposage
Température
Humidité relative
Pression atmosphérique
5°C à 35°C (41°F à 95°F)
20% à 90% (sans condensation)
86kPa à 106kPa
-20°C à 50°C (-4°F à 122°F)
20% à 90% (sans condensation)
86kPa à 106kPa

Specifications are subject to change without notice.
© 2021 Koninklijke Philips N.V.
All rights reserved.
Les caractéristiques sont susceptibles d’être modifiées sans avis préalable.
© Koninklijke Philips N.V., 2021
Tous droits réservés.
Las especificaciones están sujetas a modificaciones sin previo aviso.
© 2021 Koninklijke Philips N.V.
Todos los derechos reservados.
4222.002.7345.4 (11/12/2021)
>75 % recycled paper
>75 % papier recyclé
 Loading...