

Philips HD8525/01 User Manual
Register your product and get support at
www.philips.com/welcome
Type HD 8525 / HD8527
Italiano
EnglishDeutschFrançaisEspañolPortuguês
ISTRUZIONI PER L'USO
OPERATING INSTRUCTIONS
BEDIENUNGSANLEITUNG
MODE D’EMPLOI
INSTRUCCIONES DE USO
INSTRUÇÕES DE USO
LEGGERE ATTENTAMENTE QUESTE ISTRUZIONI D'USO PRIMA DI UTILIZZARE LA MACCHINA.
VOR DEM GEBRAUCH DER MASCHINE IST DIE VORLIEGENDE BEDIENUNGSANLEITUNG AUFMERKSAM ZU LESEN.
READ THESE INSTRUCTIONS CAREFULLY BEFORE USING THE MACHINE.
LIRE ATTENTIVEMENT CE MODE D'EMPLOI AVANT D’UTILISER LA MACHINE.
LEER ATENTAMENTE ESTAS INSTRUCCIONES DE USO ANTES DE USAR LA MÁQUINA.
LEIA ATENTAMENTE ESTAS INSTRUÇÕES DE USO ANTES DE UTILIZAR A MÁQUINA.
2 3
1
4
5
6
7
8
9
10 12
11 13
14 15 16 17 18
22
20
23
19
21
16 in
40 cm
20 cm
8 in
20 cm
8 in
20 cm
8 in
Fig. - Abb. - Afb. - R ys. - Kuva. - Εικ. (A) Fig. - Abb. - Afb. - R ys. - Kuva. - Εικ. (B)
20 cm
8 in
25
24
• 2 •
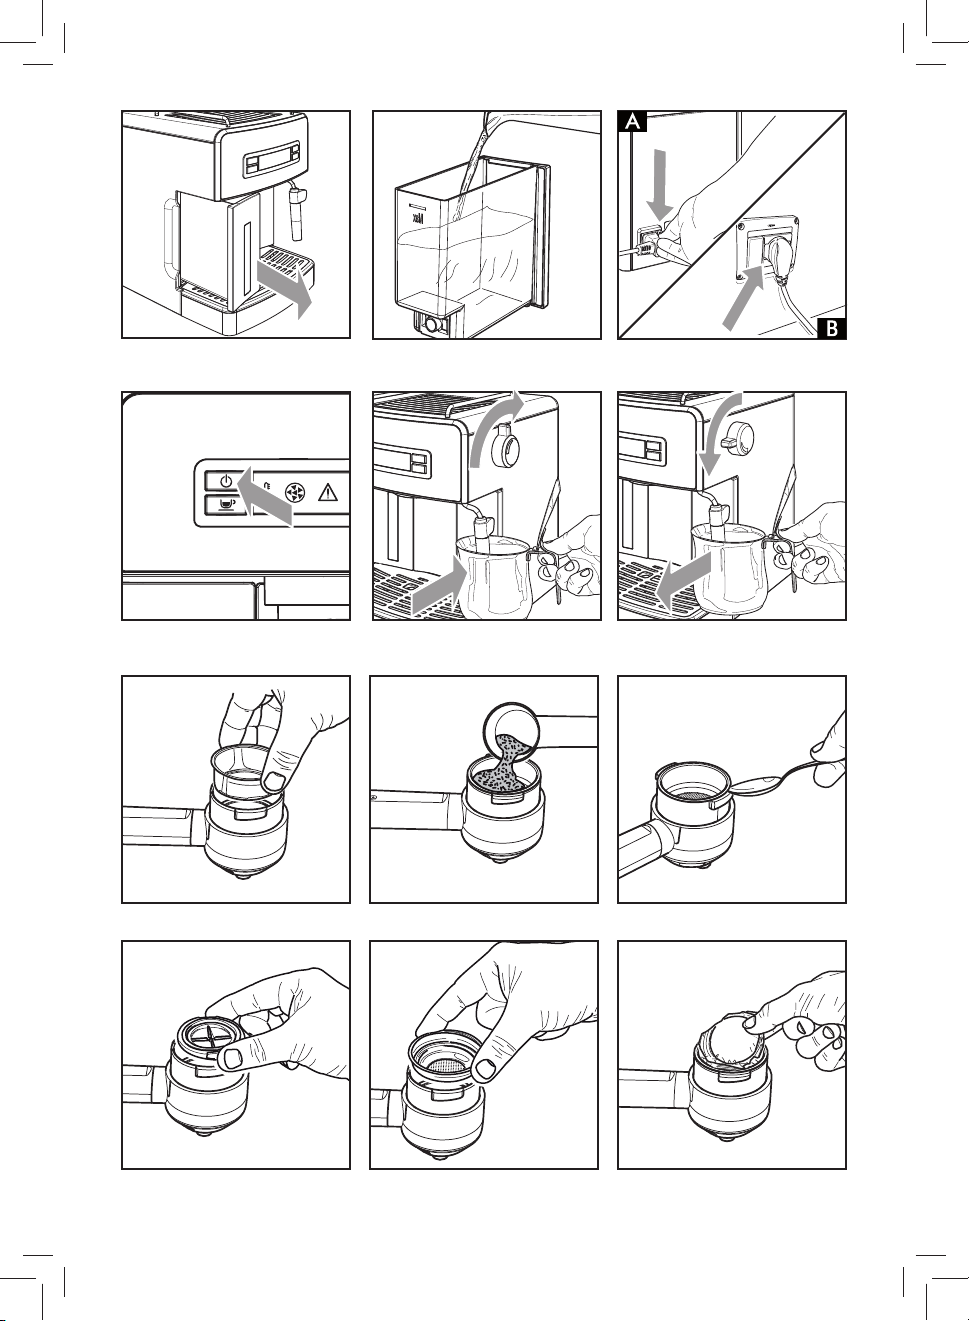
Fig. - Abb. - Afb. - R ys. - Kuva. - Εικ. (1)
Fig. - Abb. - Afb. - R ys. - Kuva. - Εικ. (2)
Fig. - Abb. - Afb. - R ys. - Kuva. - Εικ. (3)
Fig. - Abb. - Afb. - R ys. - Kuva. - Εικ. (4)
Fig. - Abb. - Afb. - R ys. - Kuva. - Εικ. (7)
Fig. - Abb. - Afb. - R ys. - Kuva. - Εικ. (10)
Fig. - Abb. - Afb. - R ys. - Kuva. - Εικ. (5)
Fig. - Abb. - Afb. - R ys. - Kuva. - Εικ. (8)
Fig. - Abb. - Afb. - R ys. - Kuva. - Εικ. (11)
Fig. - Abb. - Afb. - R ys. - Kuva. - Εικ. (6)
Fig. - Abb. - Afb. - R ys. - Kuva. - Εικ. (9)
Fig. - Abb. - Afb. - R ys. - Kuva. - Εικ. (12)
• 3 •
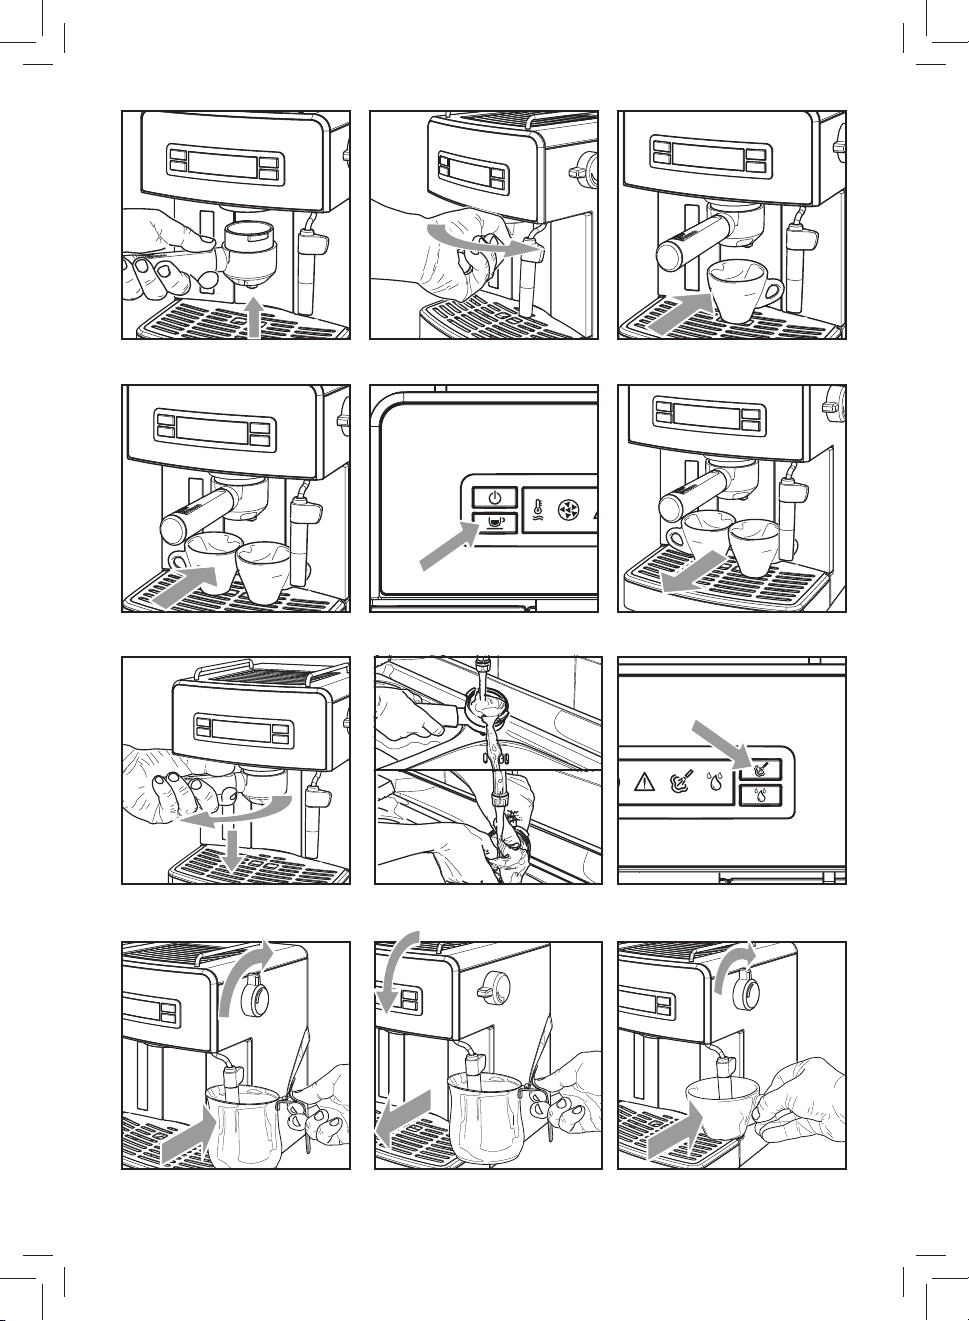
Fig. - Abb. - Afb. - R ys. - Kuva. - Εικ. (13)
Fig. - Abb. - Afb. - R ys. - Kuva. - Εικ. (14)
Fig. - Abb. - Afb. - R ys. - Kuva. - Εικ. (15)
Fig. - Abb. - Afb. - R ys. - Kuva. - Εικ. (16)
Fig. - Abb. - Afb. - R ys. - Kuva. - Εικ. (19)
Fig. - Abb. - Afb. - R ys. - Kuva. - Εικ. (22)
Fig. - Abb. - Afb. - R ys. - Kuva. - Εικ. (17)
Fig. - Abb. - Afb. - R ys. - Kuva. - Εικ. (20)
Fig. - Abb. - Afb. - R ys. - Kuva. - Εικ. (23)
Fig. - Abb. - Afb. - R ys. - Kuva. - Εικ. (18)
Fig. - Abb. - Afb. - R ys. - Kuva. - Εικ. (21)
Fig. - Abb. - Afb. - R ys. - Kuva. - Εικ. (24)
• 4 •
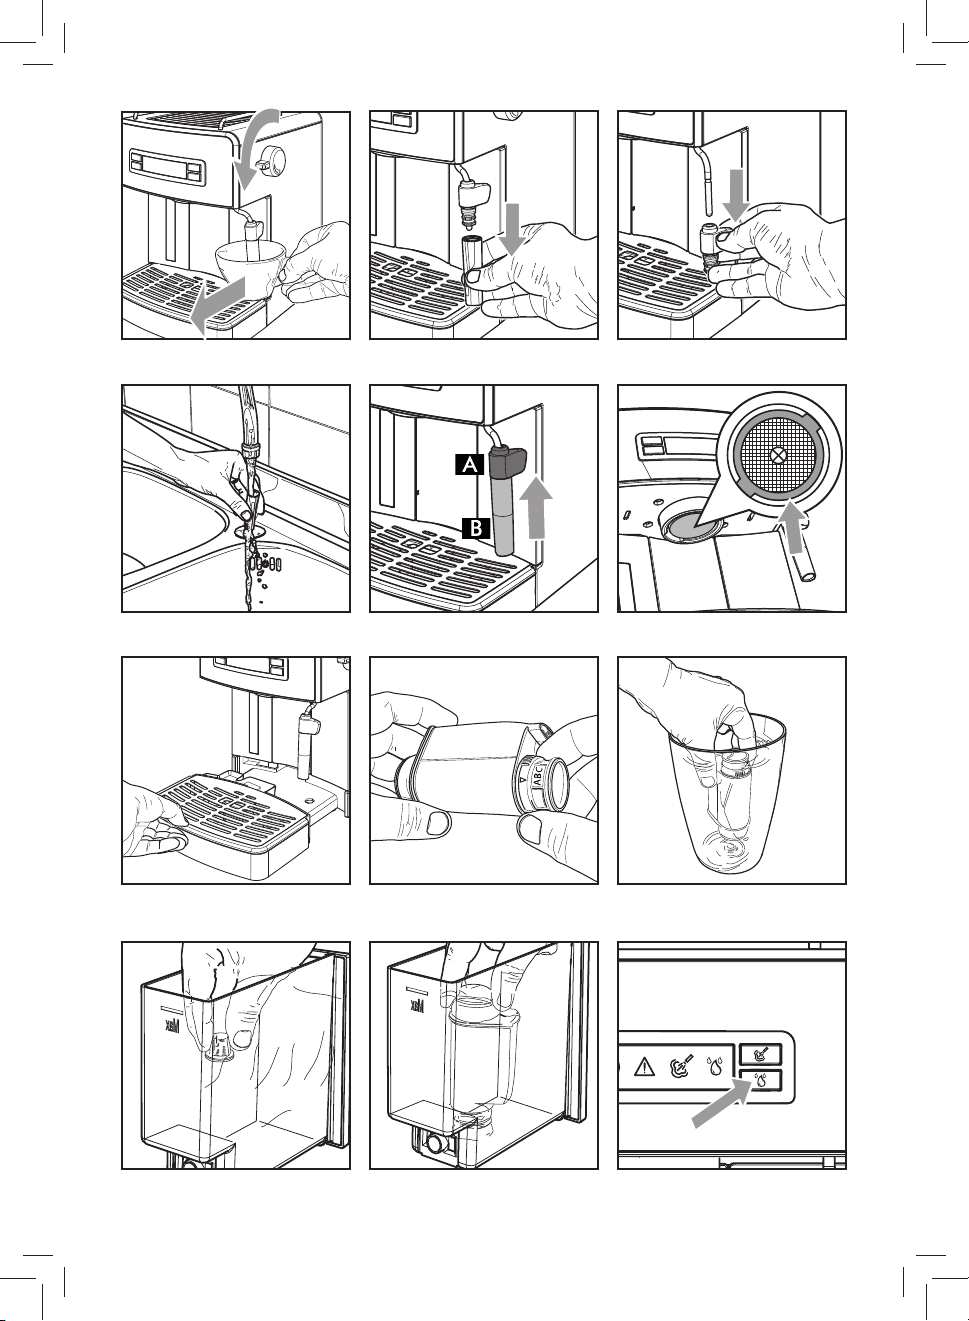
Fig. - Abb. - Afb. - R ys. - Kuva. - Εικ. (25)
Fig. - Abb. - Afb. - R ys. - Kuva. - Εικ. (26)
Fig. - Abb. - Afb. - R ys. - Kuva. - Εικ. (27)
Fig. - Abb. - Afb. - R ys. - Kuva. - Εικ. (28)
Fig. - Abb. - Afb. - R ys. - Kuva. - Εικ. (31)
Fig. - Abb. - Afb. - R ys. - Kuva. - Εικ. (34)
Fig. - Abb. - Afb. - R ys. - Kuva. - Εικ. (29)
Fig. - Abb. - Afb. - R ys. - Kuva. - Εικ. (32)
Fig. - Abb. - Afb. - R ys. - Kuva. - Εικ. (35)
Fig. - Abb. - Afb. - R ys. - Kuva. - Εικ. (30)
Fig. - Abb. - Afb. - R ys. - Kuva. - Εικ. (33)
Fig. - Abb. - Afb. - R ys. - Kuva. - Εικ. (36)
• 5 •
1 Generalità
La macchina per ca è è indicata per la preparazione di 1 o 2
tazze di ca è espresso ed è dotata di un tubo orientabile per
l’erogazione del vapore e dell’acqua calda. I co man di sulla parte frontale del l’ap pa rec chio sono cont rassegnati con simboli di
facile in ter pre ta zio ne.
La macchina è st ata progettata per u so domestico e non è indicata per un funzionamento continuo di tipo professionale.
Attenzione. Non si assumono re spon sa bi li tà per
eventuali danni in caso di:
• Impiego errato e non con for me agli scopi previsti;
• Riparazioni non ese gui te presso centri d’assistenza
autorizzati;
• Manomissione del cavo d'alimentazione;
• Manomissione di qual si a si com po nen te della macchina;
• Impie go di pezzi di ri cam bi o e accessori non or iginali;
• Mancata decalci cazione e stoccaggio in locali al di
sotto di 0°C.
In questi casi viene a decadere la garanzia.
1.1 Per facilitare la lettura
Il triangolo d’avvertimento indica
tutte le istruzioni importanti per
scrupo losamente a tali in dicazioni per evi tare ferimenti gra vi!
Il riferimen to ad illustrazioni, par ti dell’apparecchio o elementi
di co man do, ecc. è in di ca to da numeri o lettere; in questo caso
si rimanda all’illus trazione.
Questo simbolo evidenzia le in for ma zio ni da
tenere in maggiore con si de ra zio ne, per un mi-
gliore uti liz zo della mac chi na.
Le illustrazioni corrispondenti al te sto si trovano nelle
prime pagine del manuale. Consultare queste pagine
du ran te la lettura delle istr u zio ni per l’uso.
1.2 Impiego di queste istruzioni per l’uso
Conservare queste ist ruzioni per l’uso in un luogo sicur o e allegarle alla mac chi na per ca è qualora un’altra persona dovesse
utilizzarla.
Per ulteriori informazioni o nel caso di problemi, rivolgetevi ai
centri assistenza autorizzati.
la sicurezza del l’uten te. Attenersi
2 Dati tecnici
Il costruttore si riserva il diritto di modi care le carat teristiche
tecniche del prodotto.
Tensione nominale - Potenza nominale - Alimentazione
Vedi targhetta posta sull’apparecchio
Materiale corpo
Plastica modello HD8525
Metallo modello HD8527
Dimensioni (l x a x p) (mm)
210 x 300 x 280
Peso (kg)
HD 8525 = 3,9
HD 8527 = 5,4
Lunghezza cavo
1,3 m
Pannello di comando
Sulla parte frontale
Porta ltro
Pressurizzato
Pannarello
Speciale per cappuccini
Serbatoio acqua
1,25 litri - Estraibile
Pressione pomp a
15 ba r
Caldaia
Inox
Dispositivi di sicurezza
Ter mof us ibi le
3 Norme di sicurezza
Mai mettere a contatto del l’ac qua le parti sotto corrente: pe ri co lo di cortocircuito! Il vapore sur ri scal da to
e l’acqua calda possono pro vo ca re scottature! Mai dirigere il getto di va po re o dell’acqua calda ver so parti
del corpo, toccare con pre cau zio ne il beccuccio vapore /
ac qua calda: pe ri co lo di scottature!
Destinazione d’uso
La macchina per ca è è prevista esclu si va men te per l’impiego
do me sti co. Questo apparecchio può essere utilizzato da bambini di età superiore a 8 anni e da persone con ridotte capacità
si che, sensoriali o mentali o con mancanz a di esperienza e conoscenza, se sono controllate o istruite all’uso dell’apparecchio
in modo sicuro e comprendano i pericoli che sono presenti. I
bambini non giochino con l’apparecchio. Pulizia e manuten-
• 6 •

zione da parte dell’utente non deve essere fatta dai bambini
senza sorveglianza.
Alimentazione di corrente
Collegare la macchina per ca è soltanto ad una presa di corrente adeguata. La tensione deve corrispondere a quella indicata sulla targhetta dell’apparecchio.
Cavo d’alimentazione
Mai usare la macchi na per ca è se il c avo d’alimentazio ne è di fet to so. Se il cavo d’alimentazione è danneggiato, deve essere
cambiato dal produttore o dal suo servizio assistenza clienti.
Non far passare il cavo d’ali men ta zio ne per angoli e su spigoli
vivi, sopra oggetti molto caldi e pro teg ger lo dall’olio.
Non portare o tirare la macchina per ca è tenendola per il
cavo. Non estr arre la spina tirandola per il cavo op pure toccarla
con le mani bagnate. Evitare che il cavo d’ali men ta zio ne cada
liberamente da tavoli o sca ali.
Protezione d’altre persone
Tenere i bambini sotto supervisione, per evitare che giochino
con l’apparecchio. I bambini non si rendono conto del pericolo
connesso agli elettrodomestici. Non lasciare alla portata dei
bam bi ni i ma te ria li utilizzati per im bal la re la mac chi na.
Pericolo d’ustioni
Evitare di dirigere contro se stessi e/o altri il getto di vapore
sur ri scal da to e/o d’acqua calda. Non toccare direttamente il
tubo vapore; us are sempre le apposite maniglie o ma no po le.
Non disinserire (to glie re) mai il porta ltro pressurizzato durante l’erogazione del ca è.
Durante la fase di riscaldamento dal grup po erogazione ca è
pos so no uscire gocce d’acqua calda.
Non toccare il gruppo erogazione a macchina accesa o prima
che questo si sia ra reddato.
Ubicazione
Sistemare la macchina per ca è in un po sto sicuro, dove nessuno può rovesciarla o venirne ferito. Acqua calda o vapore
s u r ri s c a l d a t o p o t r e b b e r o f u o r i u s c i r e : pericolo di scottature!
Non tenere la macchina a tem peratura inferiore a 0°C; c'è il pe ricolo che il gelo possa danneggiare la macchina.
Non usare la macchina per ca è al l’aper to.
Non posare la macchina su su per ci mol to calde e nelle vicinanze di amme libere per evitare che la carcassa fonda o co mun que si danneggi.
Pulizia
Prima di pulire la macchina, è in di spensa bi le spegnere la macchina con il tasto ON/OFF e poi staccare la spina dalla presa di
corrente. Inoltre, aspettare che la macchina si ra red di.
Mai immergere la mac chi na nel l’ac qua!
È severamente vietato cercare d’in ter ve ni re all’interno della
macchina. Non utilizzare, per scopi alimentari, l’acqua rimasta
nel serbatoio per alcuni giorni, lavare il serbatoio e riempirlo
con acqua fresca potabile.
Spazio per l’uso e la ma nu ten zio ne
Per il corretto e buon funzionamento della macchina per ca è
si consiglia quanto segue:
• Scegliere un piano d’appoggio ben li vel la to;
• Scegli ere un ambiente su c i e n t e m e n t e i l l u m i n a t o , i g i e n i co e con presa di cor ren te facilmente accessibile;
• Prevedere una distanza minima dal le pa re ti della macchina come indicato in gu ra - Fig.A.
Custodia della macchina
Quando la macchina rimane inutilizzata per un pe ri o do prolungato, spegnere la mac chi na e staccare la spina dalla pre sa.
Custodirla in luogo asciutto e non ac ces si bi le ai bam bi ni. Proteggerla dalla polvere e dallo sporco.
Non tenere la macchina a temperatura inferiore a 0 ° C. Il gelo
può danneggiare la macchina.
Riparazioni / Manutenzione
Nel caso di guasti, difetti o sospetto di di fet to dopo una caduta, stac ca re subito la spina dalla presa. Mai met tere in funzione
una macchina di fet to sa. Soltanto i Centri di Assistenza Au to riz za ti possono e ettuare in ter ven ti e riparazioni. Nel caso di
interventi non eseguiti a regola d’arte, si declina ogni re spon sa bi li tà per eventuali danni.
Antincendio
In caso di incendio utilizzare estin to ri ad anidride carbonica
(CO
). Non utilizz are acqua o estintori a polvere.
2
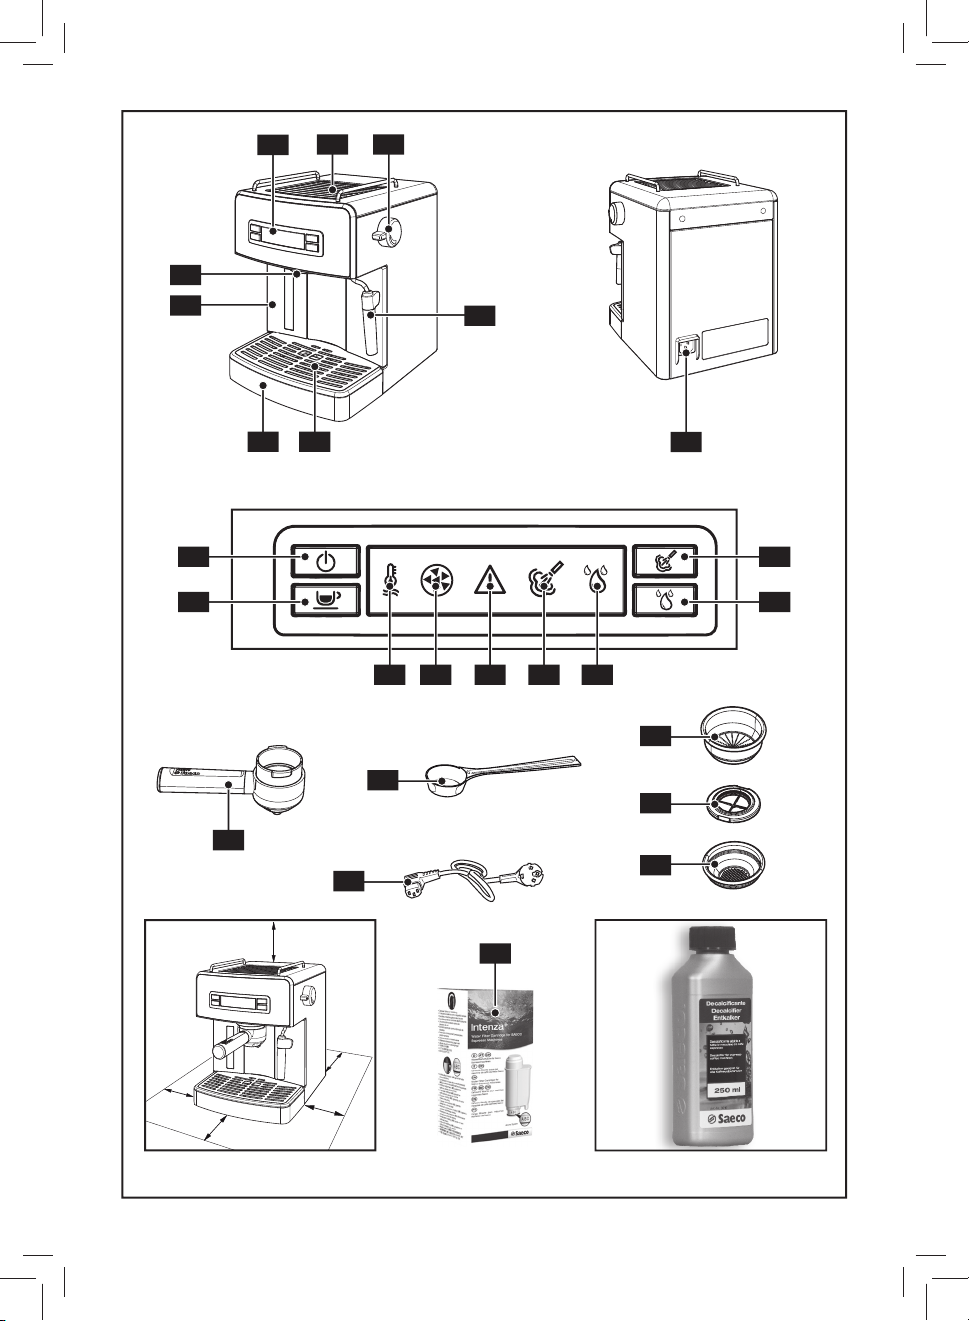
Legenda componenti macchina (Pag.2)
1 Pannello comandi
2 Supporto appoggia tazze
3 Pomello acqua calda / vapore
4 Gruppo erogatore ca è
5 Serbatoio acqua
6 Vasca recupero acqua
7 Griglia appoggia taz ze
8 Tubo vapore (pannarello)
9 Presa per cavo alimentazione
10 Tasto ON/OFF
11 Tasto "Erogazione ca è"
12 Tasto "Vapore"
13 Tasto "Risciacquo"
14 LED "Temperatura"
15 LED "Decalci cazione"
16 LED "Allarme"
17 LED "Vapore"
18 LED "Risciacquo"
19 Porta ltro pressurizzato
20 Misurino per ca è macinato
21 Cavo alimentazione
• 7 •
Italiano
22 Filtro per ca è macinato
(unico per l'erogazione di 1 o 2 ca è)
23 Adattatore per ltro ca è in cialde
24 Filtro per ca è in cialde
25 Filtro acqua "Intenza+" (Venduto separatamente)
4 Installazione
Per la propria sicurezza e quella di ter zi at te ner si scrupolosamente alle “Nor me di si cu rez za” riportate nel
cap. 3.
4.1 Imballaggio
L’imballaggio originale è stato progettato e realizzato per
proteggere la macchina durante la spedizione. Si consiglia di
conservarlo per un eventuale trasporto f uturo.
4.2 Avvertenze d'installazione
Non prelevare la macchina prendendola dalle
ringhiere protezione tazze.
Prima di inst allare la macchina, attenersi alle seguenti prescrizioni di sicurez za:
• sistemare la macchina in un luogo si cu ro;
• accer tarsi che i bambin i non ab bia no la possibilità di gioca re con la mac chi na;
• evitare che la macchina venga col lo ca ta su super ci molto
calde o vicino a am me libere.
La macchina per ca è è ora pronta per es se re collegata alla
rete elettrica.
Nota: si consiglia di lavare i componenti prima
del loro primo utilizzo e/o dopo un periodo d'i-
nutilizzo.
4.3 Ser ba to io ac qua
•
Estrarre il serbatoio del l’ac qua (5).
1
•
Sciacquarlo e riemp irlo con ac qua fre s ca potabile; non
2
superare il livello (MAX) riport ato nel serbatoio.
• Inserire il serbatoio acqua nel suo alloggiamento nella
macchina da ca è assicurandosi d'inserirlo no a battuta;
il pro lo deve essere aderente a quello della macchina da
ca è.
Nota: il livello dell'acqua può essere visualizzato tramite la nestra inserita nella parte fron-
tale del serbatoio.
4.4 Collegamento della macchina
La corrente elettrica può es se re pe ri co lo sa! Di
c o n s e g u e n z a , a t te n e r s i s e m p r e s c r u p o l o s a m e n te al le nor me di si cu rez z a. Non usare mai cavi d i fet to si !
I cavi e le spi ne difettosi de vo no es s e re so sti tu i ti im me dia ta men te da Centri di Assistenza Autorizzati.
La tensione dell’apparecchio è stata impos tata in fabbrica. Veri care che la tensione della rete corrisponda alle indicazioni
riportate sulla targhetta d’identi cazione posta sul fondo
dell’apparecchio.
•
Inserire la spina nella presa di corrente posta nella
3A
parte pos teriore della macchina da ca è.
•
Inserire l'altro c apo della spina in una presa di corr ente
3B
a parete di tensione adeguata.
4.5 Primo avvio
Durante il primo avvio della macchina da ca è il circuito deve
essere caricato.
Premere il ta sto ON/OFF (10); I led (14 )" ", ( 16 ) " " e (17)
4
"
" lampeggiano; questo signi ca che il circuito deve
essere caricato.
Inserire un contenitore sotto al tubo vapore (pannarello).
5
Aprire il pomello vapore (3)"acqua calda/vapore" ruotan-
dolo in senso orario. La pompa viene attivata automaticamente. Attendere che dal tubo vapore (pannarello) fuoriesca un getto regolare d'acqua.
Chiudere il pomello (3) "acqua calda /vapore" ruotandolo
6
in senso antiorario. Rimuovere il contenitore.
Solo dopo aver eseguito correttamente il caricamento del circuito la macchina inizia la fase di risc aldamento.
Immettere nel ser ba to io sem pre e sol tan to ac-
qua fre sca po ta bi le non gas sa ta. Ac qua cal da
non ché al tri liquidi possono dan neg gia re il ser ba to io.
Non mettere in fun zio ne la mac chi na se il livello di acqua è al di sotto dell'indicazione MIN: ac cer tar si che ve
ne sia a su cien za al l’in ter no del serbatoio acqua.
• 8 •
Nota: se il pomello viene lasciato aperto dopo
alcuni se condi la pompa vie ne disattivat a auto-
maticamente e lampeggia il led (16 )"
".
4.6 Caricamento del circuito
Dopo aver terminato l'acqua n el serbatoio, il circuito della macchina deve essere ricaric ato.
Nota: se la macchina ha funzionato per molto
tempo senz a acqua i led (14 )"
"
" lampeggiano, consultare la tabella "risoluzione
dei problemi".
Inserire un contenitore sotto al tubo vapore (panna-
•
5
rello).
• Aprire il pomello (3) “ac qua cal da/va po re” ruotandolo in
sen s o orario. La pompa viene attivata automatic amente.
• Attendere che dal tubo va po re (pannarello) fuoriesca un
get to regolare d'acqua.
•
Chiudere il pomello (3) “ac qua calda/vapore” ruotan-
6
dolo in sen so antiorario. Rimuovere il contenitore.
Nota: se durante la fase di riscaldamento viene
erroneamente aperto il pomello vapore il led
(16) "
" lampeggia. Chiudere la manopola e attende-
re il pronto macchina.
", ( 16 )" " e (17)
4.7 Primo utilizzo o dopo un periodo di inutilizzo
Questa semplice operazione vi assicura un'erogazione ottimale
e deve essere eseguita:
- al primo av vio;
- quando la macchina rimane inutilizzata per lungo tempo
(per più di 2 settimane).
D Erogare tu tto il contenuto del serbatoi o dell’acqua dal tubo
vapore/acqua calda (p annarello); per terminare l'erogazione chiudere il r ubinetto (3) ruotandolo in senso antiorario.
Durante questa operazione è assolutamente
normale che la pompa si disattivi automaticamente lampeggiando il led (16 )"
nopola. At tendere che il led (14) "
sso prima di riaprire la manopola".
E
Riempire il serbatoio con acqua fresca potabile.
2
Reinserire il serbatoio acqua nel suo alloggiamento nella
macchina da ca è assicurandosi d'inserirlo no a battuta;
il pro lo deve essere aderente a quello della macchina da
ca è.
F
G
H 17 Premere il tasto " " ed erogare una tazza di acqua
Al ter mine fermare l’erogazione premere il tasto "
I Ripetere le operazioni descritte al punto (H) no al termi-
L
M
La macchina ora è pronta; per i dettagli di funzionamento per
l’erogazione del ca è e del va po re si rimanda ai ca pi to li relativi.
Inserire dal basso il porta ltro nel gruppo ero-
13 14
gazione (4) e ruotarlo da sinistra verso destra no al suo
bloccaggio.
Inserire un contenitore adeguato sot to al porta ltro.
15
calda.
ne dell'acqua presente nel serbatoio dell'acqua.
Riempire nuovamente il serbatoio dell'acqua con ac-
2
qua fresc a potabile.
Rimuovere il porta ltro dal gruppo ruotandolo da de-
19
stra verso sinistra e sciacquarlo con acqua fresca potabile.
". Richiudere la ma-
" si accenda i n modo
".
Italiano
L’acqua erogata deve essere vuotata in un ap-
posito scarico e non può essere utilizzata per
l’alimentazione. Se il contenitore si riempie, durante il
ciclo, fermare l’erogazione e vuotarlo prima di riprendere l’operazione.
A
Risciacquare il serbatoio acqua e riempirlo con acqua
2
fresca potabile. Reinserire il serbatoio acqua nel suo alloggiamento nella macchina da c a è assicurandosi d'inserirlo
no a bat tuta; i l pro lo deve essere aderen te a quell o della
macchina da ca è.
B Accendere la macchina premendo il tasto (10). Attendere
che il led (14 )"
C 5 Sis tem are u n con teni tor e sot to al t ubo va po re (p anna -
rello).
Aprire il rub inetto (3) ruotandolo in se nso orario. La pompa
viene attivata automaticamente.
" si accenda in modo sso.
5 Risciacquo
Nota: assicurarsi che il porta ltro sia inserito
per ottenere un riscaldamento ottimale di tut-
ta la macchina.
La macchina da ca è è predisposta per eseguire un risciacquo
automatico del circuito ca è con acqua fresca ogni volta che
la si accende; questo garantisce un corretto riscaldamento di
tutta la macchina e un miglior aroma del ca è.
Si consiglia di posizionare un contenitore sotto
l'erogatore.
Questa funzione è attivata all'acquisto della macchina (il Led
(18) "
" è acceso) e viene eseguita al termine della fase di
riscaldamento quando Led (14) "
" si accende in modo sso.
• 9 •
Nota: nel caso in cui non esca acqua dal porta-
ltro eseguire il risciacquo manualmente come
descritto nel par. 7.1.
Il risciacquo può:
A essere interrotto premendo il tasto "
";
B essere disattivato premendo il tasto " " quando il Led (14
) "
" è lampeggiante o sso; in questo caso il Led (18) " "
si spegne.
Nota: nel caso in cui il risciacquo venga disat-
tivato può essere riattivato solo premendo il
tasto "
".
" oppure il tasto "
6 Risparmio energia
La macchina è predisposta per il r isparmio dell'energia.
La macchina dopo 9 minuti che non viene utilizzata, si spegne
per risparmiare l'energia nel pieno rispetto della natura.
Per utilizzare la macchina si deve premere il tasto ON/OFF (10)
"
".
7.1 Riscaldamento porta ltro
Se la funzione "ri sciacquo" non è attivata e/o si vuole pr eriscaldare manualmente il por ta ltro procedere come segue:
•
Inserire dal basso il porta ltro pressurizz ato nel grup-
13
po erogazione (4).
Ruotare il porta ltro pressurizzato da si ni stra verso
•
14
destra no al suo bloccaggio. Lasciare la presa dal ma ni co
del porta ltro pressurizzato, il manico ruota leg ger men te
verso sinistra. Questo movimento garantisce il perfetto
funzionamento del porta ltro.
•
Preriscaldare il porta ltro pressurizzato premendo
17
il tasto "
pressurizzato (que sta operazione si rende ne ces sa ria solo
per il primo ca è).
• Dopo aver fatto scorrere 50cc di acqua, premere nuovamente il tasto "
•
19
ruotandolo da destra verso sinistra e vuotare l’acqua residua.
Ora procedere con le operazioni descritte nei paragra successivi per l'erogazione del ca è.
"; l’acqua co min ce rà ad usci re dal porta ltro
" per fer ma re l’erogazione.
Togliere il porta ltro pressurizzato dalla macchina
Si consiglia di posizionare un contenitore sotto
l'erogatore.
7 Erogazione del ca è
Attenzione! Durante l’erogazione del ca è è
vie ta to disinserire il porta ltro pressurizzato
ruotandolo ma nual men te in sen so ora rio. Pe ri co lo d’ustio ni.
• Dur ante questa operazio ne, il Led (14) "
funzionamento deve essere considerato normale e non
un’anomalia.
• Assicurarsi, prima dell’uso che il ser ba to io acqua della
macchina con ten ga una quantità d'acqua su ciente.
Nota: se durante la fase di riscaldamento viene
erroneamente aperto il pomello vapore il led
(16) "
" lampeggia. Chiudere la manopola e attende-
re il pronto macchina.
se dopo aver premuto il tasto 11 " " non esce
ca è, premere nuovamente il tasto 11 "
consultare la tabella "risoluzione dei problemi" prima
di rimuover e il porta ltro.
Prima di erogare ca è si deve veri care che la macchina sia
pronta. La macchina è pronta quando il led (14) "
in modo sso.
" lampeggia; tale
" e
"si accende
• 10 •
7.2 Con ca è macinato
• 7 Inserire il ltro (22) nel porta ltro pressurizzato (19);
al primo utiliz zo il ltro è già inserito. Con lo speciale ltro
(22) di cui è dotata la mac chi na, non occorre cambiar e l t ro
per ottenere uno o due ca è.
•
Versare 1-1,5 misurini per il ca è singolo o 2 misurini
8
rasi per il ca è doppio; pulire il bor do del porta ltro pressurizzato dai re si dui di ca è.
Nota: non pressare il ca è perchè il porta ltro
è dotato di u n sistema già otti mizzato per l'ero-
gazione di un vero ca è espresso.
•
Inserire dal basso il porta ltro (19) nel gruppo eroga-
13
zione (4).
•
Ruotare il porta ltro da si ni stra verso destra no al
14
suo bloccaggio.
•
Prelevare 1 o 2 tazzin e preriscaldat e e posizionarle
16
sotto al porta ltro pressurizzato; veri care che siano correttamente si ste ma te sotto ai fori di uscita ca è.
•
Premere il tasto " " .
17
•
Rag giun ta la quantità di ca è de si de ra ta, premere
18
nuovamente il tasto "
" per fermare l’erogazione del
ca è. Al termine dell’erogazione at ten de re qual che secondo; prelevare le tazzine con il ca è .
Al termine dell'erogazione ca è attendere la ne del
•
19
lampeggio del
surizzato r uotandolo da destra verso si nistra e vuotarlo dei
fondi residui.
è dovuto alle caratte ristiche del por ta ltro.
to. Lavare giornalmente a ne utilizzo.
Led (14 ) " "
Nota: nel porta ltro pressurizzato rimane una
piccola quantità di acqua; questo è normale ed
Nota importante: Il ltro (22) deve essere mantenuto pulito per garantire un perfetto risulta-
poi estrarre il porta ltro pres-
7.3 Con ca è in cialde
• 9 Togliere il ltro per ca è macinato (22) dal porta ltro
pressurizzato (19).
•
Inserire, nel por ta ltro pressuriz zato (19), l'adattatore
10
per cialde (23), con la parte bombata rivolta verso il basso.
•
Dopo, inserire il ltro per cialde (24) nel porta ltro
11
pressurizzato (19).
•
Inserire la cialda n el porta ltro; assicurarsi che la c arta
12
della cialda non fuoriesca dal porta ltro.
•
Inserire dal basso il porta ltro pressurizz ato nel grup-
13
po erogazione (4).
•
Ruotare il porta ltro da si ni stra verso destra no al
14
suo bloccaggio.
•
Prelevare 1 tazzin a preriscaldata e posizionar la sotto
15
al porta ltro; veri care che sia correttamente sistemata
sotto ai for i d'uscita ca è.
•
Premere il tasto " " .
17
• Rag giun ta la quantità di ca è de si de ra ta, premere nuovamente il tasto "
termine dell’erogazione at ten de re qual che secondo; prelevare la tazzina con il ca è.
•
Al termine dell'erogazione ca è attendere la ne del
19
lampeggio del le d 14 poi estrar re il porta ltro pressurizzato ruotandolo da destra verso sinistra e smaltire la cialda
utilizzata.
Not a imp orta nte: I l ltr o (24) e l 'adat tato re (23)
devono essere mantenuti puliti per garantire
un perfetto risultato. Lavare giornalmente a ne utilizzo.
" per fermare l’erogazione del ca è. Al
8 Scelta del tipo di ca è - Con si gli
In linea di massima si possono uti liz za re tutti i tipi di ca è esistenti in commercio. Tuttavia, il ca è è un prodotto na tu ra le
ed il suo gusto cambia in funzione del l’ori gi ne e della mi sce la; pertanto si consiglia di provare diversi tipi di ca è al ne
di trovare la miscela più adatta al vostro gusto personale. Per
migliori risultati si consiglia co mun que di utilizzare miscele
espres sa men te pre pa ra te per macchine espresso. Il ca è dovrebbe sempre fuo riu sci re re golar men te dal porta ltro pressurizzato senza goc cio la re. La velocità di fuoriuscita del ca è
può es se re modi cata cambiando leggermente la dose del
ca è nel ltro e/o utilizz ando ca è con un grado di ma cinatura
di erente. Per un miglior risultato in tazza e per facilità di pulizia e preparazione, Saeco consiglia l'utilizzo di ca è in cialde
monodose contrassegnate dal marchio ESE.
PRIMA DI ESEGUIRE QUALSIASI OPERA ZIONE RELA-
TIVA ALL’EROGAZIONE DEL VAPORE O DELL’ACQUA
CALDA VERIFICARE CHE IL TUBO VAPORE (PANNARELLO)
SIA ORIENTATO SOPRA LA VASCA RECUPERO ACQUA.
9 Ac qua calda
Pericolo di scottature! All’inizio dell’erogazione
posso no ve ri car si brevi spruzzi di acqua calda.
Il tubo d’erogazione può rag giun ge re temperature elevate: evitare di toc car lo di ret ta men te con le mani.
•
Inserire dal basso il porta ltro pressurizz ato nel grup-
13
po erogazione (4).
•
Ruotare il porta ltro pressurizzato da si ni stra verso
14
destra no al suo bloccaggio. Lasciare la presa dal ma ni co
del porta ltro pressurizzato, il manico ruota leg ger men te
verso sinistra. Questo movimento garantisce il perfetto
funzionamento del porta ltro.
• Premere l’interruttore ON/OFF (10) e il Led (14) "
a lampeggiare. Attendere che il Led (14) "
modo sso.
•
Sistemare un contenitore o un bic chie re da tè sot to al
5
tubo va po re (pannarello).
• Aprire il po mel lo (3) ruotandolo in senso orario. La pompa
viene attiv ata automaticamente e il Led (14) "
• 6 Quando è stata prelevata la quan ti tà de si de ra ta di
ac qua cal da, chiudere il po mel lo (3) ruotandolo in senso
antiorario.
" inizia
" si accenda in
" si spegne.
Italiano
• 11 •
• Prelevare il contenitore con l'acqua c alda.
Nota: Durante questa operazione è assoluta-
mente normale che la pompa si disattivi automaticamente lampeggiando il Led (16) "
re la manopola. Atte ndere che il Led (14) "
in modo sso prima di riaprire la monopola.
". Richiude" si accenda
tomaticamente. Far ruotare lentamente il recipiente contenente il latte, dal bas so verso l’alto per rendere unifor me
il riscaldamento.
• Al termin e, chiudere il pom ello (3) ruotandolo in senso antiorario; prelevare la tazza con il latte montato.
• Pulir e dopo ques ta op eraz ione il tub o vap ore co n un p anno
umido.
10 Va po re / Cappuccino
Pericolo di scottature! All’inizio dell’erogazione
pos so no ve ri car si brevi spruzzi di acqua calda.
Il tubo d’erogazione può rag giun ge re temperature elevate: evitare di toc car lo di ret ta men te con le mani.
•
Inserire dal basso il porta ltro pressurizz ato nel grup-
13
po erogazione (4).
•
Ruotare il porta ltro pressurizzato da si ni stra verso
14
destra no al suo bloccaggio. Lasciare la presa dal ma ni co
del porta ltro pressurizzato, il manico ruota leg ger men te
verso sinistra. Questo movimento garantisce il perfetto
funzionamento del porta ltro.
• Premere l’interruttore ON/OFF (10) e il Led (14) "
a lampeggiare. Attendere che il Led (14) "
modo sso.
•
Premere il tasto (12) " "; si spegne il Led (14) " " e
21
comincia a lampeggiare il Led (17) "
Nota: se durante la fase di riscaldamento viene
erroneamente aper to il pomello vapore 3 il Led
(16) "
" lampeggia. Chiudere la manopola e attende-
re il pronto macchina.
• Attendere che il Led (17) "
a questo punto la mac chi na è pron ta per l’erogazione del
va po re.
•
Inserire un contenitore sotto al tubo vapore.
22
• Aprire il po mel lo (3) per qual che istante, in modo da far
uscire l’ac qua residua dal tubo vapore (pannarello); in breve tem po co min ce rà ad uscire solo vapore.
•
Chiudere il pomello (3) e togliere il contenitore.
23
• Riempire con latte freddo 1/3 del con te ni to re che si desi-
dera uti liz za re per pre pa ra re il cappuccino.
Per garantire un miglior risultato utilizzare
latte freddo.
•
Immergere il tubo vapore nel latte e aprire il pomello
24
(3) ruotandolo in senso orario; la pompa viene attivat a au-
".
" si accenda in modo sso;
" inizia
" si accenda in
Lo stesso sistema può essere uti lizza to per il
r i s c a l d a m e n t o d i a l t r e b e v a n d e .
• Quando si vuole terminare l'utilizzo del vapore premere il
tasto (12) "
(17) "
in m odo ve loce. Ques to in dica c he la macch ina ha una te mperatura t roppo alta per erogare ca è.
" oppure il tasto (11) " "; i Led (14) " ",
" e (16) " " lamp eggiano contemporaneamente
10.1 Ra reddamento della macchina
Per abbass are la temperatura agire come segue:
• 5 Sistemare un contenitore o un bic chie re da tè sot to al
tubo va po re (pannarello).
• Aprire il po mel lo (3) ruotandolo in senso orar io.
• Quando la macchina ha raggiunto la temperatura corretta
la pompa si spegne automaticamente e lampeggia il led
(16) "
".
Chiudere il pomello (3) ruotandolo in senso antiorario
6
e togliere il contenitore.
• Prima di erogare ca è si deve veri care che la macchina
sia pronta. La macchina è pronta quando il led (14) "
accende in modo sso.
" si
11 Pulizia
La manutenzion e e la pulizia possono essere e ettuate solt anto quando la macchina è fr edda e scollegata dalla rete elet trica.
• Non immergere la mac chi na nel l’ac qua e non inserire i
com po nen ti nella la va sto vi glie.
• Non utilizzare alcol etilico, solventi e/o agenti chimici aggressivi.
• Si consiglia di pulire quo ti dia na men te il serbatoio del l’ac qua e di riempirlo con acqua fresca.
•
Ogni settimana pulire l'anello caldaia a macchina
30
spenta, fredda e scollegata con un panno umido.
•
Gio rnalm ente, d opo av er ris calda to il l at te, sm on-
26 27
tare la parte esterna del pannarello e lavarla con acqua
potabile fresca.
• 12 •
• 26 27 28 Settimanalmente si deve pulire il tubo vapo re. Per eseguire questa op erazione, si deve:
- rimuovere la parte e sterna del pannarello (per la re golare
pulizia);
- s lare la parte super iore del pannarello dal tubo vapo re;
- lavare la parte superiore del pannarello con acqua fresca
potabile;
- lavare il tubo vapore con un panno umido e rimuovere
eventuali residui di lat te;
- riposizionare la parte superiore nel tubo vapore (assicurarsi che sia completamente inserita);
Dopo la pulizia rimontare la parte esterna del panna-
29
rello assicurandosi che sia inserita no a battuta. Assicurarsi che la parte in plastica sia correttamente inserita
nella parte in metallo.
•
Giornalmente vuotare e lavare la vasca raccogli gocce.
31
• Per la puli zia dell’apparecchio utiliz zare un panno morbid o
inumidito d'acqua.
•
Per la pulizia del porta ltro pressurizzato pro ce de re
20
come segue:
-
estrarre il ltro, lavarlo con cura con acqua c alda.
9
- estrarre l'adattatore (se presente), lavarlo con cura con
acqua calda.
- lavare l’interno del por ta ltro pressurizzato.
• Non as ciugare la macchina e/o i suoi componenti uti lizzando un forno a microonde e/o un forno convenzionale.
Nota: non lavare il porta ltro pressurizzato
nella lavastoviglie.
12 De cal ci ca zio ne
Il calcare è naturalmente presente nell’acqua che viene utilizzata per il funzionamento della macchina. Questo deve essere
rimosso reg olarmente perchè può intas are il circuito dell’acqua
e del ca è del vostro appare cchio.
Per la vostra macchina Philips-Saeco questo è un processo facile. La decalci cazione è consigliata quando si accende il Led
(15) "
". La decalci cazione è necessaria quando lampeggia
il Led 15 "
questo caso la riparazione non è coperta da garanzia.
tenere al meglio la performance e la funzionalità della
macchina per tutta la sua vita, nonchè per evitare, se
".
Eseguire questa operazione prima che il vostro
apparecchio smetta di funzionare perchè in
Usare il prodotto decalci cante Saeco (Fig.B).
E' stato formulato speci catamente per man-
correttamente usato, ogni alterazione del prodotto
erogato. prima d’iniziare il ciclo di decalci cazione
assicurarsi che: SIA STATO RIMOSSO IL FILTRO ACQUA se
utilizzato.
Non bere la soluzione decalci cante e i prodotti
erogati no al com pletamento del c iclo. Non uti-
lizzar e in nessun caso l’aceto come decalci cante.
1
2
3 2 Versare METÀ del contenuto della bottiglia di de-
4
5 Lasciare agire il decalci cante circa 15-20 minuti con la
6 Accendere la macchina
7 Ripetere le operazioni descritte al punto 6 no al comple-
mente lamp eggiando il led (16) "
nopola. At tendere che il led (14) "
sso prima di riaprire la manopola".
8
9 Inserire un contenitore sotto al por ta ltro.
10 Accendere la macchina premendo il tasto ON/OFF (10) " ";
Inserire dal basso il porta ltro pressurizzato nel
13 14
gruppo erogazione (4) e ruotarlo da sinistra verso destra
no al suo bloccaggio.
Rimuovere e svuot are il serbatoio dell’acqua.
1
calci cante concentrato Saeco nel serbatoio dell’acqua
dell’apparecchio e riempire con acqua fresca potabile no
al livello MAX. Reinserire il serbatoio acqua nel suo alloggiamento nella macchina da c a è assicurandosi d'inserirlo
no a bat tuta; i l pro lo deve essere aderen te a quell o della
macchina da ca è.
Accendere la macchina premendo il tasto ON/OFF (10)
4
"
".
Prelevare (come descritto nel capitolo 9 del manuale),
5
dal tubo vapore (panna rello), 2 tazze (circa 150 ml. ciascuna)
di acqua; dopodichè spegnere la macchina premendo il tasto ON/OFF (10) "
macchina spenta.
Prelevare (come descritto nel capitolo 9 del manuale)
5
dal
tubo vapore (pannarello)
di acqua. Successivamente spegnere la macchina
il tasto ON/OFF (10) "
to svuotamento del serbatoio dell’acqua.
Durante questa operazione è assolutamente
normale che la pompa si disattivi automatica-
Risciacquare il serbatoio acqua con acqua fresca pota-
2
bile e riempirlo completamente.
premere il tasto "
ro contenuto del serbatoio. Per fermare l’erogazione premere
nuovamente il tasto "
".
premendo il t asto ON/OFF (10) " "
2 tazze (circa 150 ml ciascuna)
premendo
"
e lasciarla spent a per 3 minuti.
". Richiudere la ma-
" si accenda i n modo
" e tramite il por ta ltro, prelevare l’in te-
".
Italiano
• 13 •
11 2
Riempire nuovamente il serbatoio acqua con acqua fresca. Reinseri re il serbatoio acqua nel suo alloggiamen to nella
macchina da ca è assicurandosi d'inserirlo no a battuta; il
pro lo de ve ess ere ad eren te a que llo de lla ma cchin a da ca è.
Posizionare un contenitore capiente (circa 1 litro) sot-
5
to al tubo vapore (pannarello).
Aprire il rubinetto di erogazione dell’acqua (3) ruotandolo
in senso orario e prelevare l’intero contenuto del serbatoio
acqua tramite il tubo vapore (pannarello).
Dopo aver nito il prelievo di acqua, per fer mare l’ero-
12
6
gazione chiude re il rubinetto erogaz ione acqua (3) ruotando in senso antiorario.
13 Ripetere un’altra volta le operazioni dal punto (8) per un
totale di 4 serbatoi.
14 19
Rimuovere il porta ltro dal gruppo ruotandolo da destra verso sinistra e sciacquarlo con acqua fres ca potabile.
Il ciclo di decalci cazione è cosi concluso.
Riempire nuovamen te il serbatoio con acqua fresc a. Se ne-
2
cessario e ettuare il caricamento del circuito come descritto
nel par. 4.5.
Al termine di tale operazione tenere premuto per 3 secondi i
tasti (11) "
spegne.
dalle norme vigenti ne l Paese d’utilizzo.
" e (12) " , in questo modo il led 15 " " si
La soluzione decalci cante deve essere smalti-
ta secondo quanto previsto dal costruttore e/o
13 Filtro "Intenza+" (opzionale)
Il ltro acqua “INTENZA +” può migliorare la qualità dell’acqua.
L’utilizzo del ltro “INTENZA+” limiterà la formazione di calcare
e garantirà un aroma più intenso al vostro espresso . Quindi,
per gustare al meglio il vostro espresso, si consiglia d’installare
il ltro acqua “INTENZA +”, che può essere acquistato presso
il vostro rivenditore di ducia, on-line nel negozio Philips
all’indirizzo http://shop.philips.com o presso i centri di assistenza autorizzati.
• 34 Rimuovere il ltrino bianco presente nel serbatoio,
conservar lo in luogo asciutto protet to dalla polvere.
•
Togliere il ltro acqua “INTENZA+” dalla confezione.
32
Impostare il ltro in base alla durezza dell’acqua.
•
Immergere il ltro acqua “INTENZA+" in posizione
33
verticale (con l’apertura vers o l’alto) in acqua fredda e pre mere delicatamente i lati per far usc ire le bolle d’aria.
•
Inserire il ltro nel serbatoio vuoto. Premere no al
35
punto d’arresto.
• 14 •
• Rie mpire il serbatoio dell'acqua con acqua f resca potabile e
reinserirlo nella macchina.
Per attivare il ltro "Intenza+" procedere come segue:
•
Premere l’interruttore ON/OFF (10) e il Led (14) " "
4
inizia a lampeggiare. Attendere che il Led (14) "
cenda in modo sso.
•
Sistemare un contenitore o un bic chie re da tè sot to al
5
tubo va po re (pannarello).
• Aprire il po mel lo (3) ruotandolo in senso orar io.
•
Quando è stato prelevato circa 1 litro di acqua cal da,
6
chiudere il po mel lo (3) ruotandolo in senso ant iorario.
• Svuotare il contenitore con l'acqua calda.
Durante questa operazione è assolutamente
normale che la pompa si disattivi automaticamente lamp eggiando il led (16) "
nopola. At tendere che il led (14) "
sso prima di riaprire la manopola".
A questo punto il ltro è attivato e la macchina è pronta per
l'utilizzo.
". Richiudere la ma-
" si accenda i n modo
" si ac-
14 Smaltimento
INFORMAZIONE AGLI UTENTI: ai sensi dell’art. 13 del Decreto
Legislativo 25 luglio 2005, n. 151"Attuazione delle Direttive
2002/95/CE, 2002/96/CE e 2003/108/CE, relative alla riduzione
dell'uso di sostanze pericolose nelle apparecchiature elettriche
ed elettroniche, nonché allo smaltimento dei ri uti"
Il simbolo
parecchiatura o sulla sua confezione indica che il prodotto alla
ne della propria vita utile d eve essere raccolto separat amente
dagli altri ri uti. L’utente dovrà, pertanto, conferire l’apparecchiatura giunta a ne vita agli idonei centri di raccolta di erenziata dei ri uti elettronici ed elettrotecnici, oppure riconsegnarla al rivenditore al momento dell’acquisto di una nuova
apparecchiatura di tipo equivalente, in ragione di uno a uno.
L’adeguata raccolta di erenziata per l’avvio succe ssivo dell’apparecchiatura dismessa al riciclaggio, al trattamento e allo
smaltimento ambientalmente compatibile contribuisce ad
evitare possibili e etti negativi sull’ambiente e sulla salute e
favorisce il rei mpiego e/o riciclo dei materiali di c ui è composta
l’apparecchiatura.
Lo smaltimento abusivo del prodotto da parte dell’utente
comporta l’applicazione delle sanzioni amministrative previste dalla normativa vigente.
del cassonet to barrato riportato sull’ap-
Guasto Cause possibili Rimedio
La macchina non si ac cen de.
La pompa è molto ru mo ro sa. Manca acqua nel ser ba to io.
I Led (14) " ", (17) " " e (16) "
" lampeggiano contempora-
neamente.
Il ca è é troppo freddo.
Non si forma la schiu ma del lat te.
Non si riesce a preparare un cappuccino.
Il ca è sgorga troppo ve lo ce men te, non si forma la crema.
Il ca è non sgorga o sgor ga solo
a gocce.
Il ca è sgorga dai bordi.
(Led 16) "
Led 15 " " acceso.
La pompa si spegne durante l'e-
rogazione di acqua o di vapore e
si accende il Led (16) "
" acceso.
Macchina non collegata alla rete elettrica.
Primo avvio macchina oppure la macchina
è in sovratemperatura.
Porta ltro non inserito per il preriscaldamento (cap. 7).
Tazzine fredde. Preriscadare le tazzine con acqua calda.
Latte non adatto: latte in polvere, latte
magro.
Pannarello sporco. Pulire il pannarello come descritto nel Cap.11.
Manca acqua nel serbatoio.
Troppo poco ca è nel porta ltro. Aggiungere il ca è (cap. 7).
Macinatura trop po grossa. Usare una miscela diversa (cap.8).
Ca è vecchio o non adatto. Usare una mi sce la diver sa (cap.8).
Cialda vecchia o non adat ta. Cambiare la cialda utilizzata.
Manca un componente nel porta ltro.
Mancanza di acqua.
Macinatura trop po ne. Usare una miscela diversa (cap.8).
Ca è premuto nel porta ltro. Smuovere il ca è macinato.
Troppo ca è nel porta ltro. Ridurre la quantità di ca è nel porta ltro.
Macchina calci cata. Decalci care la macchina (cap.12).
Filtro nel porta ltro otturato. Pulire il ltro (cap.11).
Cialda non adatta. Cambiare il tipo di cialda.
Porta ltro inserito male nel grup po ero-
gazione ca è.
Bordo superiore del porta ltro sporco. Pulire il bordo del por ta ltro.
Cialda inserita in modo errato.
Troppo ca è nel porta ltro.
Pomello acqua (3) aperto. Chiudere pomello (3).
Eseguire la decalci cazione Consultare il capitolo 12.
Time out di sicurezza. Chiudere pomello acqua.
".
Collegare la macchina alla rete elet trica.
Rabboccare con ac qua ed eseguire il caricamento
del circuito (Par 4.6).
Assicurarsi che il serbatoio sia pieno ed inserito
no a battuta e abbassare la temperatura come
descrit to nel paragrafo 10.1.
Preriscaldare il porta ltro.
Utilizzare latte intero.
Rabboccare con acqua ed eseguire il caricamento
del circuito (Par. 4.6).
Veri care che tutti i componenti siano presenti e
correttamente montati.
Rabboccare con acqua ed eseguire il caricamento
del circuito (Par 4.6).
Inserire correttamente il porta ltro (cap.7).
Inserire correttamente la cialda facendo in modo
che non esca dal p orta ltro.
Ridurre la quantità di ca è uti liz zan do il misurino.
Italiano
Per i guasti non con tem pla ti dalla suddetta ta bel la o in c aso che i rimedi sug ge ri ti non li ri sol va no, rivolger si ad un
centro assistenza. Consultare il sito www.Philips.com/Support.
• 15 •

IMPORTANT SAFEGUARDS
When using electrical appliances, basic safety precautions should always be
followed, including the following:
1. Read all instructions.
2. Do not touch hot surfaces. Use handles or knobs.
3. To protect against re, electric shock and injury to person do not immerse
cord, plugs, or machine in water or other liquid.
4. Close supervision is necessar y when the appliance is used by or near children.
5. Unplug from outlet when not in use and before cleaning. Allow to cool
before putting on or taking o parts, and before cleaning the appliance.
6. Do not operate any appliance with a damaged cord or plug or after the
appliance malfunctions, or has been damaged in any manner. Return
appliance to the nearest authorized service facility for examination, repair
or adjustment.
7. The use accessory attachments not recommended by the appliance
manufacturer may result in re, electric shock or injury to persons.
8. Do not use outdoors.
9. Do not let cords hang over edge of table or counter, or touch hot surfaces.
10. Do not place on or near a hot gas or electric burner, or in a heated oven.
11. Always attach plug to appliance rst, then plug cord into wall outlet. To
disconnect, turn any control to “o ”, then remove plug from wall outlet.
12. Do not use appliance for other than intended use.
13. Save these Instructions.
SAVE THESE INSTRUCTIONS
• 16 •

INSTRUCTIONS FOR THE POWER
SUPPLY CORD
A. A short power-supply cord (or detachable power-supply cord) is to be
provided to reduce risks resulting from becoming entangled in or tripping
over a longer cord.
B. Longer detachable power-supply cords or extension cords are available and
may used if care is exercised in their use.
C. If a long detachable power-supply cord or extension cord is used,
1. The marked electrical rating of the detachable power-supply cord or
extension cord should be at least as great as the electrical rating of the
appliance
2. If the appliance is of the grounded type, the extension cord should be a
grounding-type 3-wire cord, and
3. The longer cord should be arranged so that it will not drape over the
counter top or table top where it can be pulled on by children or tripped
over.
English
• 17 •
1 General Information
The co ee machine is suitable for preparing 1 or 2 cups of
espresso co ee and is provided with a swivel steam and hot
water wand. The controls on the front side of the machine are
labelled with eas y-to-read symbols.
The machine has been designed for domestic use and is not
suitable for professional, continuous use.
Warning. No liability is held for damage caused
by:
• Incorrect use not in accordance with the intended
purposes;
• Repairs not carried out in authorised service centres;
• Tampering with the power cor d;
• Tampering with any part of the machine;
• Use of non-o riginal spare par ts and accessories;
• Failure to descale the machine and storage at temperatures below 0°C.
In these cases, the warranty is void.
1.1 To Simplify Manual Reading
The warning triangle indicates
all important instructions for the
user’s safety. Carefully follow these
instructions to avoid serious injur y!
References to illustrations, parts of the appliance or controls,
etc. are indicated by numbers or letters. Whenever possible,
refer to the illus tration.
2 Technical Specifications
The manufacturer reserves the right to make changes to the
technical speci c ations of the product.
Nominal Voltage - Power Rating - Power Supply
See label on the appliance
Housing Material
Plastic model HD8525
Metal model HD8527
Size (w x h x d) (mm)
210 x 300 x 280
Weight (kg)
HD 8525 = 3.9
HD 8527 = 5.4
Power Cord Length
1.3 m
Control Panel
Front side
Filter Holder
Pressurized type
Pannarello
Special for cappuccinos
Water Tank
1.25 litres - Removable type
Pump Pressure
15 ba r
Boiler
Stainless steel
Safety Devices
Thermal fuse
This symbol is used to highlight information
that is particularly important to ensure opti-
mal use of the machine.
The illustrations corresponding to the text can be
found on the rst pages of the manual. Please refer to
these pages while reading the operating instructions.
1.2 How to Use these Operating Instructions
Keep these operating instructions in a safe place and make
them available to anyone who may use the co ee machine.
For further information or in case of problems, please refer to
an authorised service centre.
• 18 •
3 Safety Regulations
Never allow water to come into contact with any of the
electrical par ts of the machine: Danger of short circuit!
Overheated steam and hot water may cause burning!
Never direct the steam or hot water jet towards body
parts. Handle the steam/hot water spout with care:
danger of scalding!
Intended Use
This co ee machine is intended for domestic use only. The use
by children older than 8 years and by persons with reduced
physical, mental or sensory abilities or with lack of experience
and skills is allowed, provided that they are supervised or instructed on how to use the appliance correctly and that they
understand the hazards involved. Children must not play with
the appliance. Children must not carry out any cleaning and

maintenance operations without being monitored.
Power Supply
Connect the co ee machine only to a suitable socket. The voltage must correspond to that indicated on the appliance label.
Power Cord
Never use the co ee machine if the power cord is defective or
damaged. If the power cord is damaged, it must be replaced
by the manufac turer or by its author ised service centre. Do not
pass the power cord around corners, over sharp edges or over
hot objec ts and keep it away from oil.
Do not use the power cord to carry or pull the co ee machine.
Do not pull out the plug by the power cord o r touch it with wet
hands. Do not let the power cord hang freely from tables or
shelves.
For the Safety of Others
Prevent children from playing with the machine. Children are
not aware of the risks related to electrical household appliances. Do not leave the machine packaging materials within
the reach of children.
Danger of burns
Never direct jets of overheated steam and/or hot water towards yourself or others. Do not touch the steam wand with
bare hands. Always us e the handles or knobs provided.
Do not disconnect (remove) the pressurized lter holder while
co ee is brewed.
Hot water drips may spill out of the brew unit during the
warm-up phase.
Do not touch the brew unit when the machine is on or before
it cools down.
Location
Place the co ee machine in a safe place, wh ere there will be no
danger of overt urning or injury. Hot water or overhe ated steam
may spill out of the machine: danger of scalding!
Do not keep the machine at a temperature below 0°C. Frost
may damage it.
Do not use the co ee machine outdoors.
In order to prevent its housing from melting or being damaged, do not place the machine on very hot surfaces and close
to open ames.
Cleaning
Bef ore c leani ng th e mach ine, t urn i t o by pre ssin g the O N/OFF
button, th en remove the plug from th e socket. Wait also for the
machine to cool down.
Never immerse the machine in water!
It is strictly forbidden to tamper with the internal parts of the
machine. Water left in the tank for several days should not be
consumed. Wash the tank and ll it with fresh drinking water.
Suitable Location for Operation and Maintenance
In order to ensure correct and e cient perfor mance of the coffee machine, we reco mmend following the instr uctions below:
• Choose a level surface.
• Choose a location that is su ciently well-lit, clean and
near an easily reachable socket.
• Allow for a minimum distance from the sides of the
machine as shown in Fig. A.
Storing the Machine
If the machine is to remain inactive for a long time, turn it o
and unplug it. Stor e the machine in a dry pla ce, out of the reach
of children. Keep it protec ted from dust and dir t.
Do not keep the machine at a temperature below 0°C. Frost
may damage it.
Repairs / Maintenance
In case of failure, problems or a suspected fault resulting from
the falling of the machine, immediately remove the plug from
the socket. Never attempt to operate a faulty machine. Servicing and repairs may only be carried out by Authorised Service
Centres. All liability for damages resulting from work not carried out by prof essionals is declined.
Fire Safety Precautions
In case of re, use carbon dioxide (CO2) extinguishers. Do not
use water or dry powder extinguishers.
Key to Machine Parts (Page 2)
1 Control panel
2 Cup holder rest
3 Hot water/steam knob
4 Co ee brew unit
5 Water tank
6 Water recovery tray
7 Cup holder grill
8 Steam wand (Pannarello)
9 Power cord socket
10 ON/OFF button
11 "Co ee brew" button
12 "Steam" button
13 "Rinsing" button
14 "Temperature" light
15 "Descaling" light
16 "Alarm" light
17 "Steam" light
18 "Rinsing" light
19 Pressurized lter holder
20 Ground co ee measuring scoop
21 Power cord
English
• 19 •
22 Ground co ee lter
(single piece for 1 or 2 co ee(s))
23 Co ee pod lter adapter
24 Co e e pod lter
25 "Intenza+" water lter (sold separately)
4 Installation
For your own and other people safety, carefully follow
the "Safety Regulations" indicated in chapter 3.
4.1 Packaging
The original packaging has been designed and manufactured
to protect the machine during transport. We recommend
keeping the pac kaging material for possible future transport.
4.2 Installation Precautions
Do not move the machine by grabbing the cup
protection grilles.
Before installing the machine, read the following safety precautions carefully:
• Place the machine in a safe place.
• Make sure children cannot play with the machine.
• Do not place the machine on hot surfaces or near open
a m e s .
The co ee machine is now ready to b e connected to the elec tric
network.
Note: we recommend washing the components
before using them for the rst time and/or af-
ter they have not be en used for a cert ain period of tim e.
4.3 Water tank
• 1 Remove the water tank (5).
•
Rinse it and ll it with fresh drinking water, making
2
sure that the (MAX) level indicated in the tank is not
exceeded.
Fill the tank only with fresh, non-sparkling,
drinking water. Hot water or any other liquid
may damage the tank. Do not operate the machine
when the water level in the tank is below the MIN
threshold. Make sure there is enough water in the water tank.
• Insert the water tank into its seat in the co ee machine
and make sure that it locks into place - its pro le should
adhere to that of the co ee machine.
Note: the water level can be checked looking
through the window on the front side of the
tank.
4.4 Machine Connection
Electric power may be very dangerous! It is
therefore necessary to strictly follow the safety
regulat ions. Do not use fau lty power cords . Faulty cords
and plugs m ust be replaced im mediately by Author ised
Service Centres.
The voltage of the appliance has been pre-set by the manufacturer. Check that the voltage matches the indication on the
data plate at the bottom of the appliance.
•
Insert the plug into the socket on the back of the
3A
machine.
•
Insert the o ther end of the plug into a wall socke t with
3B
suitable power voltage.
4.5 First Use
At rst start-up, the co ee machine circ uit must be primed.
Press the ON/OFF button (10); when the (14 )" ", (16 )"
4
" and (17) lights " " start blinking, the circuit must
be primed.
Place a container under the steam wand (Pannarello).
5
Open the "hot water/steam" knob (3) by turning it
clockwise. The pump is activated automatically. Wait
until a steady jet of water ows out of the steam wand
(Pannarello).
Close the "hot water/steam" knob (3) by turning it
6
counter-clock wise. Remove the container.
The machine begins the warm-up phase only after the water
circuit has been correctly primed.
Note: if the knob is left open, the pump is automatically disengaged after a few seconds and
the "
" light (16) starts blinking.
• 20 •
4.6 Circuit Priming
When the water tank is empty, the machine circuit must be
primed again.
Note: if the machine has been operating with-
out water for a l ot of time and the "
(16) and "
"Troubleshooting" table.
•
• Open the "hot water/steam" knob (3) by turning it
• Wait until a steady jet of water ows out of the steam
•
starts blinking. Close the knob and wait until the machine is ready.
" (17) lights are blink ing, please re fer to the
Place a container under the steam wand (Pannarello).
5
clockwise. The pump is activated automatic ally.
wand (Pannarello).
Close the "hot water/steam" knob (3) by turning it
6
counter-clock wise. Remove the container.
Note: if the steam knob is opened by mistake
during the warm-up phase, the "
" (14), " "
" light (16)
4.7 Using the Machine for the First Time or
After a Period of Inactivity
This simple operation ensures an optimum brewing and must
be performed:
- at r st start-up;
- when the machine remains inactive for a long time (more
than 2 weeks).
Dispensed water must be emptied into an ad-
equate drain. It is not suitable for food use. If
the container lls up during the cycle, stop dispensing
water and empty the container before resuming the
operation.
During this operation the pump is automati-
cally disengaged and the "
blinking: this is a normal behaviour of the machine.
Close the k nob. Wait until the "
before opening the knob again.
E 2 Fill the water tank with fresh drinking water. Insert
the water tank back into its seat in t he co ee machine and
make sure that it lock s into place - its pro le should adhere
to that of the co ee machine.
F
G
H
At the end of the process, stop the operation by pressing
I Repeat the operations described in step (H) until the
L
M 19 Remove the lter holder from the unit by turning it
Now the machine is rea dy. Please see related chapters for o perating details on how to brew co ee and dispense steam.
Insert the lter holder into the brew unit (4) from
13 14
the bottom and turn it from left to right until it locks into
place.
Place a suitable container under the lter holder.
15
Press the " " button and dispense a cup of hot
17
water.
the "
" button.
water tank is completely empty.
Re ll the water tank with fresh drinking water.
2
from right to left and rinse it with fresh drinking water.
" light (16) is
" light (14) is steady on
5 Rinsing
Note: make sure the lter holder is inserted to
ensure a proper war m-up of the machine.
The machine is set s o as to automatically rinse the co ee circui t
with fresh water every time it is turned on. This is conceived to
ensure the correct machine warm-up and an optimum co ee
aroma.
English
A
Rinse the water tank and re ll it with fresh drinking
2
water. Insert the water tank back into its seat in the co ee
machine and make sure that it locks into place - its pro le
should adhere to that of the co ee machine.
B Turn on the machi ne by pressing the (10) button. Wait until
the "
" light (14) turns on steady.
C
Place a container under the steam wand (Pannarello).
5
Open the knob (3) by turning it clockwise. The pump is
activated automatically.
D Dispense the whole water tank content from the steam/
hot water wand (Pannarello); to stop the dispensing
process, clo se the knob (3) by turning it counter-cloc kwise.
Place a container under the dispensing spout.
On ne wly purc hased m achines this fun ction is acti ve (the "
light (18) is on) and is performed at the end of the warm-up
phase, when the "
Note: should no water pour from the lter
holder, perform a manual rinse as described in
sect. 7.1.
The rinsing procedure may:
A be stopped by pressing the "
" light (14) is steady on.
" or " " button;
• 21 •
"
B be deactivated by pressing the " " button while the " "
light (14) is bli nking or stea dy-on. In thi s case the "
(18) turns o .
Note: if the rinsing procedure is deactivated,
it can be reactivated only by pressing the "
button.
" light
6 Energy Saving
The machine is designed for energy saving.
holder grip. The handle will turn slightly to the left. This
movement guarantees optimum lter holder performance.
Preheat the pressurized lter holder by pressing the "
•
17
" button; some water will ow out of the pressurized
lter holder (this operation is necessary only for the rst
co ee).
"
• After 50cc of water have been dispensed, press the "
button again to stop the dispensing procedure.
Remove the pressu rized lter holder by tu rning it from
•
19
right to lef t and then drain the remaining water.
Place a container under the dispensing spout.
"
After 9 minutes of inactivity, the machine turns o in order to
save energy and respect nature.
Press the ON/OFF "
" button (10) to operate the mac hine.
7 Coffee Brewing
Warning! During the co ee brewing it is forbidden to remove the pressurized lter holder by
manually turning it clockwise. Danger of burns!
• During this operation, the "
to be considered as a standard and not a faulty operating
mode.
• Before using the machine, make sure that there is enough
water in the machine tank.
Note: if the steam knob is opened by mistake
during the warm-up phase, the "
starts blinking. Close the knob and wait until the machine is ready.
If co ee is NOT brewed after pressing the brew
button "
button (11) again and check the "Troubleshooting" table before removing the lter holder.
Ensure the machine is ready before brewing co ee. The machine is ready when the "
" (11), press the "co ee cup" brew
7.1 Filter Holder Warm-Up
If the "rinse" func tion is not activa ted and/or the lter holder is
to be warmed-up manually, do as follows:
•
Insert the pressurized lter holder into the brew unit
13
(4) from the bottom.
•
Turn the pressurized lter holder from left to right
14
until it locks into place. Release the pressurized lter
" light (14) is blinking; this is
" light (16)
" light (14) is steady on.
Now you can go on with the co ee brewing procedures described in the following sec tions.
7.2 Using Ground Co ee
• 7 Insert the lter (22) in the pressurized lter holder
(19); the lter is already inserted when using the machine
for the rst time. As the machine is tted with the special
lter (22), there is no need to change the lter to prepare
either one or two co ees.
•
Add 1-1.5 measuring scoop(s) for a single co ee and 2
8
measuring scoops for a double co ee. Remove any co ee
residues from the rim of the pressurized lter holder.
Note: do not press the co ee, since the lter
holder is provided with an optimized system
for original espresso brewing.
•
Insert the lter holder (19) into the brew unit (4) from
13
the bottom.
•
Turn the lter holder from left to right until it locks
14
into place.
•
Take 1 or 2 preheated cups and place them under
16
the pressurized lter holder. Make sure that they are
placed correc tly under the co ee brewing nozzles.
•
Press the " " button.
17
•
When the desired quantity of co ee has been
18
brewed, press the "
procedure. Wait for a few seconds after brewing, then
remove the cups of co ee.
•
After brewing, wait until the
19
blinking, then remove the pressurized lter holder by
turning it from right to left and empty the remaining
co ee grounds.
" button again to stop the brewing
" " light (14)
stops
• 22 •
Note: a small quantity of water remains in the
pressurized lter holder. This has to be considere d as a bsol utel y norm al an d is du e to th e lt er hol der
characteristics.
Important note: The lter (22) should be kept
clean to guarantee perfect results. Clean daily
after use.
7.3 Using Co ee Pods
• 9 Remove the ground co ee lter (22) from the
pressurized lter holder (19).
•
Insert the pod adapter (23) into the pressurized lter
10
holder (19) ensuring that its convex par t faces down.
•
Then insert the pod lter (24) into the pressurized
11
lter holder (19).
•
Insert the p od into the lter holder; m ake sure that the
12
paper of the po d does not stick out of the lter holder.
•
Insert the pressurized lter holder into the brew unit
13
(4) from the bottom.
•
Turn the lter holder from left to right until it locks
14
into place.
•
Take 1 preheated cup and place it under the lter
15
holder. Check that it is placed correctly under the co ee
brewing noz zles.
•
Press the " " button.
17
• When the desired quantity of co ee has been brewed,
press the "
procedure. Wait for a few seconds after brewing, then
remove the cup of co ee.
•
After brewing, wait until the (14) co ee light stops
19
blinking, then remove the pressurized lter holder by
turning it from right to lef t and dispose of the used pod.
Important note: The lter (24) and the adapter
(23) should be kept clean to guarantee perfect
results. Clean daily after use.
" button again to stop the brewing
without dripping. The co ee brewing speed can be modi ed
by slightly changing the amount of co ee in the lter and/or
using a di erent co ee grind. Saeco recommends using ESE
single-dose co ee pods for a tasty co ee and easier cleaning
and preparation.
BEFORE PERFORMING ANY OPERATIONS RELATED
TO HOT WATER/STEAM DISPENSING, MAKE SURE
THAT THE STEAM WAND (PANNARELLO) IS DIRECTED OVER
THE WATER RECOVERY TRAY.
9 Hot Water
Danger of scalding! Dispensing may be preced-
ed by small jets of hot water. The steam wand
may reach high temperatures: never touch it with bare
hands.
•
Insert the pressurized lter holder into the brew unit
13
(4) from the bottom.
•
Turn the pressurized lter holder from left to right
14
until it locks into place. Release the pressurized lter
holder grip. The handle will turn slightly to the left. This
movement guarantees optimum lter holder performance.
• Press the ON/OFF button (10). The "
blinking. Wait until the "
• 5 Place a container or a tea glass under the steam wand
(Pannarello).
• Open the knob (3) by turning it clockwise. The pump is
automatically disengaged and the "
• 6 When the desired amount of hot water has been
dispensed, close the knob (3) by turning it counterclockwise.
• Remove the hot water container.
" light (14) turns on steady.
" light (14) starts
" light (14) turns o .
English
8 Tips for Choosing Coffee
As a general rule, any type of co ee available on the market
can be used. However, co ee is a natural product and its avour changes according to its origin and blend; therefore, it is
advisable to t ry di erent ty pes of co ee in order to nd out the
blend that best suits your personal tastes. For optimal results,
we recommend using espresso machine blends. As a rule, coffee should always come out of the pressurized lter holder,
Note: during this operation the pump is auto-
matically disengaged and the "
is blinking: this is a normal behaviour of the machine.
Close the k nob. Wait until the "
before opening the knob again.
" light (14) is steady on
" light (16)
• 23 •
10 Steam / Cappuccino
Danger of scalding! Dispensing may be preceded
by small jets of hot water. The steam wand may
reach high temperatures: never touch it with bare
hands.
•
Insert the pressurized lter holder into the brew unit
13
(4) from the bottom.
Turn the pressurized lter holder from left to right
•
14
until it locks into place. Release the pressurized lter
holder grip. The handle will turn slightly to the left. This
movement guarantees optimum lter holder performance.
• Press the ON/OFF button (10). The "
blinking. Wait until the "
• 21 Press the " " but ton (12). The " " light (14) turns o
and the "
starts blinking. Close the knob and wait until the machine is ready.
• Wait until the "
machine is ready for dispensing steam.
•
22
• Open the knob (3) for a few seconds so that the remaining
water can ow out of the steam wand (Pannar ello). Within
a short time only steam will come out.
•
23
• Fi ll 1/3 of the containe r - the one you wish to use to prepare
the cappuccino - with cold milk.
•
24
knob (3) by turning it clock wise; the pump is automatically
engaged. Rotate the milk container with slow upward
movements to obt ain uniform warmth.
• Once nished, close the knob (3) by turning it counter-
clockwise and remove the cup with frothed milk.
• After this operation, clean the steam wand with a wet
cloth.
• To stop the steam dispensing procedure, press the "
(12) or "
" light (17) starts blinking.
Note: if the stea m knob (3) is opened by mistake
during the warm-up phase, the "
Place a container under the steam wand.
Close the knob (3) and remove the container.
Use cold milk to get a better result.
Immerse the steam wand in the milk and open the
The same procedure can be used to heat other
beverages.
" button (11). The " " (14), " " (17) and "
" light (14) turns on steady.
" light (17) is steady on. Now the
" light (14) starts
" light (16)
" (16) lights blink fast at the same time. This is to indicate
that the machine temperature is too high to brew co ee.
10.1 Machine Cooling
Proceed as follows to lower the temperature:
•
Place a container or a tea glass under the steam wand
5
(Pannarello).
• Open the knob (3) by turning it clockwise.
• When the machine reaches the proper temperature, the
pump is automatically disengaged and the "
is blinking.
Close the kno b (3) by turning it counter-clo ckwise and
6
remove the container.
• Ensure the machine is ready before brewing co ee. The
machine is ready when the "
" light (14) is steady on.
11 Cleaning
Maintenance and cleaning can only be carried out when the
machine is cold and disconnected from the ele ctric network.
• Do not immerse the machine in water or place any of its
parts in a dishwasher.
• Do not use spirit, solvents and/or aggressive chemical
agents.
• We recommend cleaning the water tank and re lling it
with fresh water every day.
•
Every week, clean the boiler ring with a wet cloth
30
when the machine is o , cold and disconnected from the
mains.
•
•
"
Every day, after heat ing milk, remove the exter nal
26 27
part of the Pannarello and wash it with fresh drinking
water.
26 27 28
this, perform the following operations:
- Remove the external part of the Pannarello (for standard
cleaning);
- Remove the upper part of the Pannarello from the steam
wand;
- Wash the upper par t of the Pannarello with f resh drinking
water;
- Wash the steam wand with a wet cloth and remove any
milk residue;
- Re t the upper part in the steam wand (make sure it is
completely inserted);
Clean the steam wand weekly. In order to do
" light (16)
• 24 •
 Loading...