

Page 1
HD8652
Page 2

Page 3

English 5
Français 32
Nederlands 60
Page 4
Memo
Memo
Milk
clean
1 3
2 456
7
8
9
10
11
12
13
16
17
18
20
21
19
14
15
2523 2422
26
27
2830
31
32
29
1
Page 5

English
Contents
Introduction 6
Important 6
Warning 6
Caution 7
Electromagnetic fields (EMF) 7
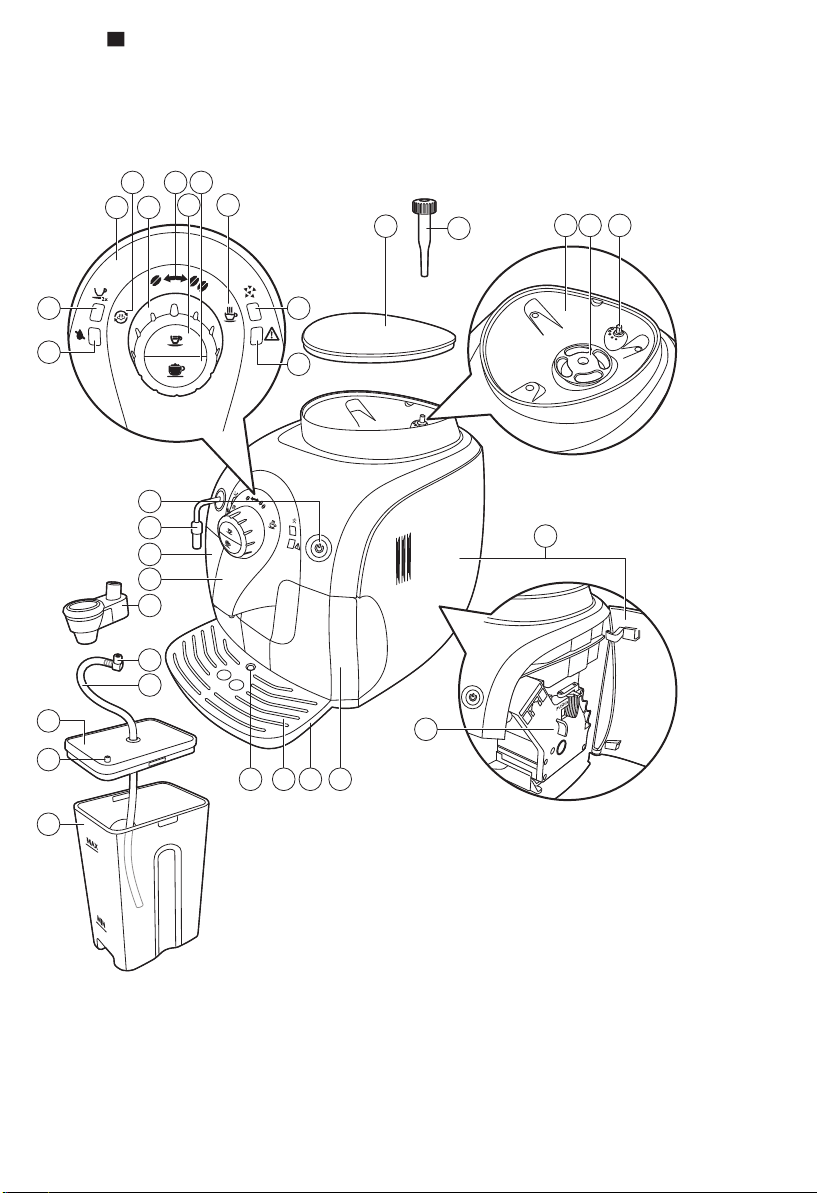
Machine overview (Fig. 1) 7
First installation 8
Installing the machine 8
Filling the water tank 9
Filling the coffee bean container 10
Heating up the machine 10
Installing the Intenza+ water filter 11
Using the machine 11
Brewing 1 or 2 cups of espresso 12
Brewing milk- based beverages 12
Brewing cappuccino 12
Frothing milk 13
Hot water 14
Adjusting the machine 14
Adjusting the grinding degree 14
Adjusting the coffee volume with the MEMO function 15
Adjusting the cappuccino volume with the MEMO function 15
Cleaning and maintenance 15
Quick clean of the milk system 16
Cleaning the automatic milk frother (daily) 16
Full milk carafe cleaning with milk circuit cleaner (monthly) 16
Cleaning the brew group 19
Lubrication 21
Descaling the machine 22
Descaling procedure 22
Preparation 22
Descaling cycle 23
Rinsing cycle 23
Interruption of the descaling process 24
Meaning of light signals 25
Troubleshooting 27
Recycling 30
Guarantee and support 30
Ordering maintenance products 30
Technical specifications 30
5
Page 6

6
English
Introduction
Important
Warning
Dear customer, we thank you for buying this Philips 2100 series automatic
espresso machine! To fully benefit from the support that Philips offers,
please register your product at www.philips.com/welcome. The machine is
suitable for preparing espresso coffee using whole coffee beans. It can also
dispense steam and hot water. In this user manual you find all the
information you need to install, use, maintain and get the best out of your
machine.
For more product information and instruction videos, have a look on our
website www.philips.com/support.
This machine is equipped with safety features. Nevertheless, read and
follow the safety instructions carefully and only use the machine as
described in these instructions, to avoid accidental injury or damage due to
improper use of the machine. Keep this user manual for future reference.
-
Connect the machine to a wall socket with a voltage matching the
technical specifications of the machine.
-
Connect the machine to an earthed wall socket.
-
Do not let the power cord hang over the edge of a table or counter, or
touch hot surfaces.
-
Never immerse the machine, mains plug or power cord in water (danger
of electrical shock).
-
Do not pour liquids on the power cord connector.
-
Never direct the hot water jet towards body parts: danger of burns.
-
Do not touch hot surfaces. Use handles and knobs.
-
Remove the mains plug from the wall socket to switch off the machine.
-
If a malfunction occurs.
-
If the machine will not be used for a long time.
-
Before cleaning the machine.
-
Pull on the plug, not on the power cord.
-
Do not touch the mains plug with wet hands.
-
Do not use the machine if the mains plug, the power cord or the machine
itself is damaged.
-
Do not make any modifications to the machine or its power cord.
-
Only have repairs carried out by a service center authorized by Philips to
avoid a hazard.
-
The machine should not be used by children younger than 8 years old.
-
This machine can be used by children aged from 8 years and above and
by persons with reduced physical, sensory or mental capabilities or lack
of experience and knowledge if they have been given supervision or
instruction concerning use of the machine in a safe way and if they
understand the hazards involved.
-
Cleaning and user maintenance shall not be made by children unless
they are older than 8 and supervised.
Page 7

Caution
English
-
Keep the machine and its cord out of the reach of children aged less than
8 years.
-
Children should be supervised to ensure that they do not play with the
machine.
-
Never insert fingers or other objects in the coffee grinder.
-
This machine is intended for normal household use only. It is not
intended for use in environments such as staff kitchens of shops, offices,
farms or other work environments.
-
Always put the machine on a flat and stable surface. Keep it in upright
position, also during transport.
-
Do not place the machine on a hotplate or directly next to a hot oven,
heater or similar source of heat.
-
Only put roasted coffee beans in the bean hopper. If ground coffee,
instant coffee, raw coffee beans or any other substance is put in the
coffee bean hopper, it may cause damage to the machine.
-
Let the machine cool down before inserting or removing any parts. The
heating surfaces may retain residual heat after use.
-
Never fill the water tank with warm, hot or sparkling water, as this may
cause damage to the water tank and the machine.
-
Never use souring pads, abrasive cleaning agents or aggressive liquids
such as petrol or acetone to clean the machine. Simply use a soft cloth
dampened with water.
-
Descale your machine regularly. The machine indicates when descaling is
needed. Not doing this will make your appliance stop working properly.
In this case repair is not covered under your guarantee.
-
Do not keep the machine at temperatures below 0°C.Water left in the
heating system may freeze and cause damage.
-
Do not leave water in the water tank when the machine is not used over
a long period of time. The water can be contaminated. Use fresh water
every time you use the machine.
7
Electromagnetic fields (EMF)
This Philips appliance complies with all applicable standards and
regulations regarding exposure to electromagnetic fields.
Machine overview (Fig. 1)
1 Control panel
2 Steam/ milk clean icon
3 Control dial
4 Coffee bean icons
5 Espresso button (Memo function)
6 Cappuccino button (Memo function)
7 Hot water icon
8 Descaling light
9 Warning light
10 2-cups/memo light
11 Water tank empty light
Page 8
15cm
15cm
15cm
15cm
15cm
8
English
12 On/off button with light
13 Hot water/steam wand with protective handle
14 Water tank
15 Coffee dispensing spout
16 Automatic milk frother
17 Milk tube connector
18 Suction tube
19 Top of the milk carafe
20 Pin on top of the milk carafe
21 Milk carafe
22 Drip tray full indicator
23 Drip tray cover
24 Drip tray
25 Coffee grounds container
26 Brew group
27 Service door
28 Grinder adjustment knob
29 Ceramic coffee grinder
30 Coffee bean container
31 Grinding degree adjustment tool
32 Lid of coffee bean container
First installation
Installing the machine
1 Remove all packaging material from the machine.
2 Place the machine on a table or worktop away from the tap, the sink and
heat sources.
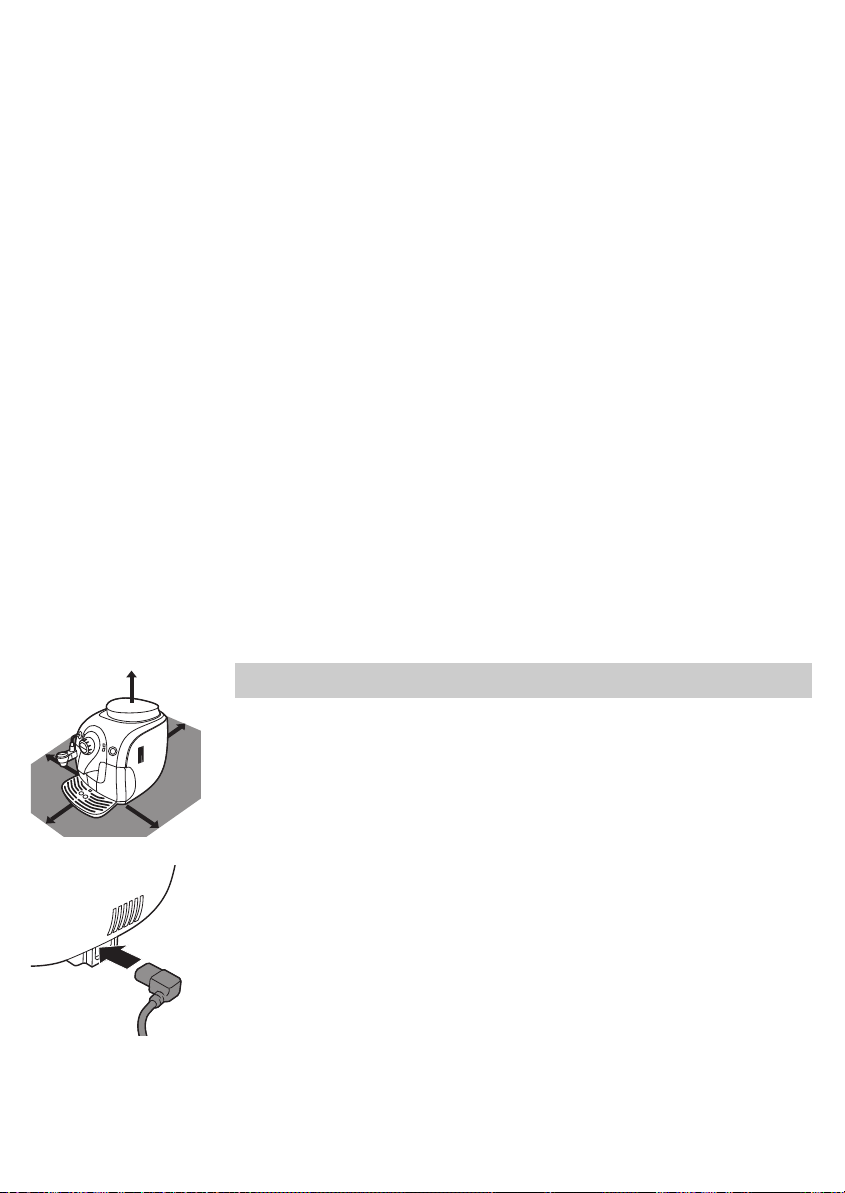
Note: Leave at least 15 cm of free space above, behind and on both sides
of the machine.
3 Insert the small plug into the socket located on the back of the machine.
4 Insert the plug into the wall socket.
Page 9
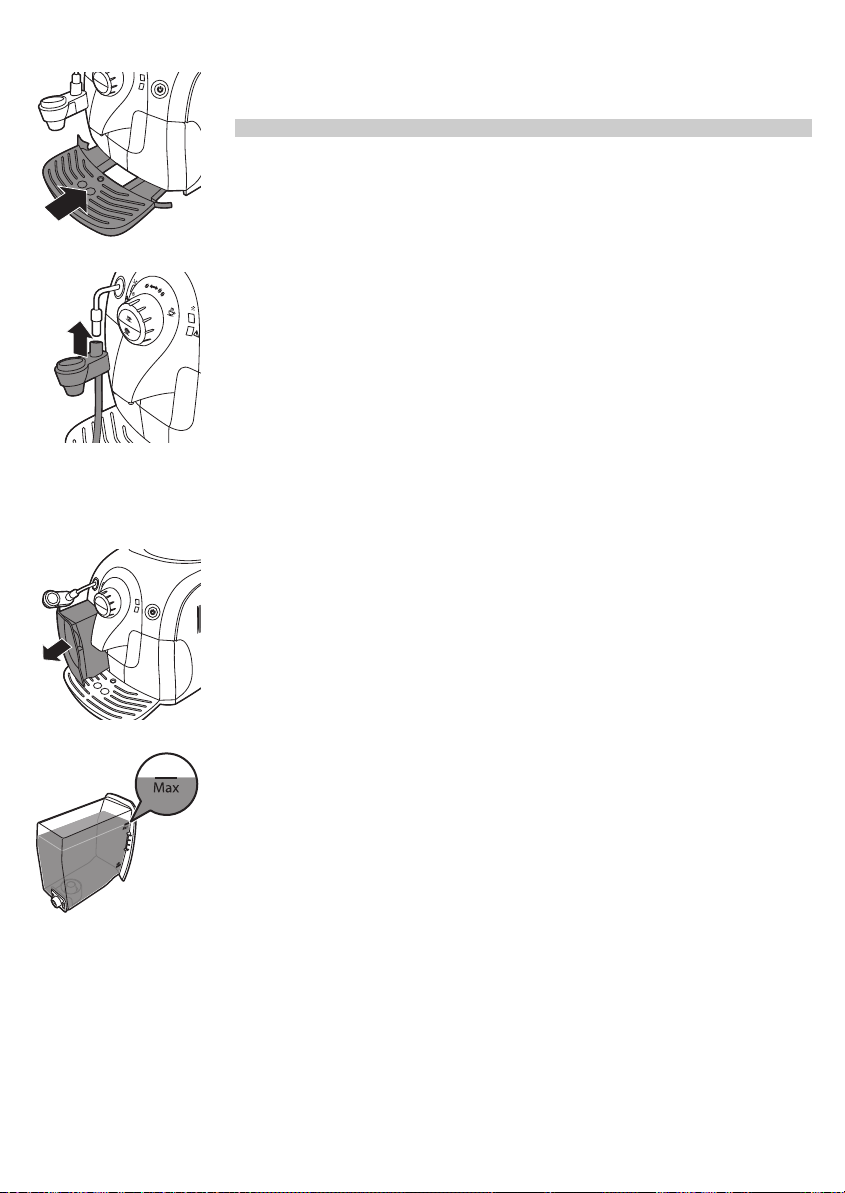
5 Remove the protective sticker from the drip tray and slide the drip tray
into the guiding grooves in the front of the machine.
Note: Make sure the drip tray is fully inserted.
6 Insert the automatic milk frother.
Filling the water tank
1 Turn the automatic milk frother to the left.
2 Remove the water tank from the machine.
3 Rinse the water tank under the tap.
English
9
4 Fill the water tank with cold tap water up to the MAX indication.
5 Slide the water tank back into the machine.
Page 10
10
English
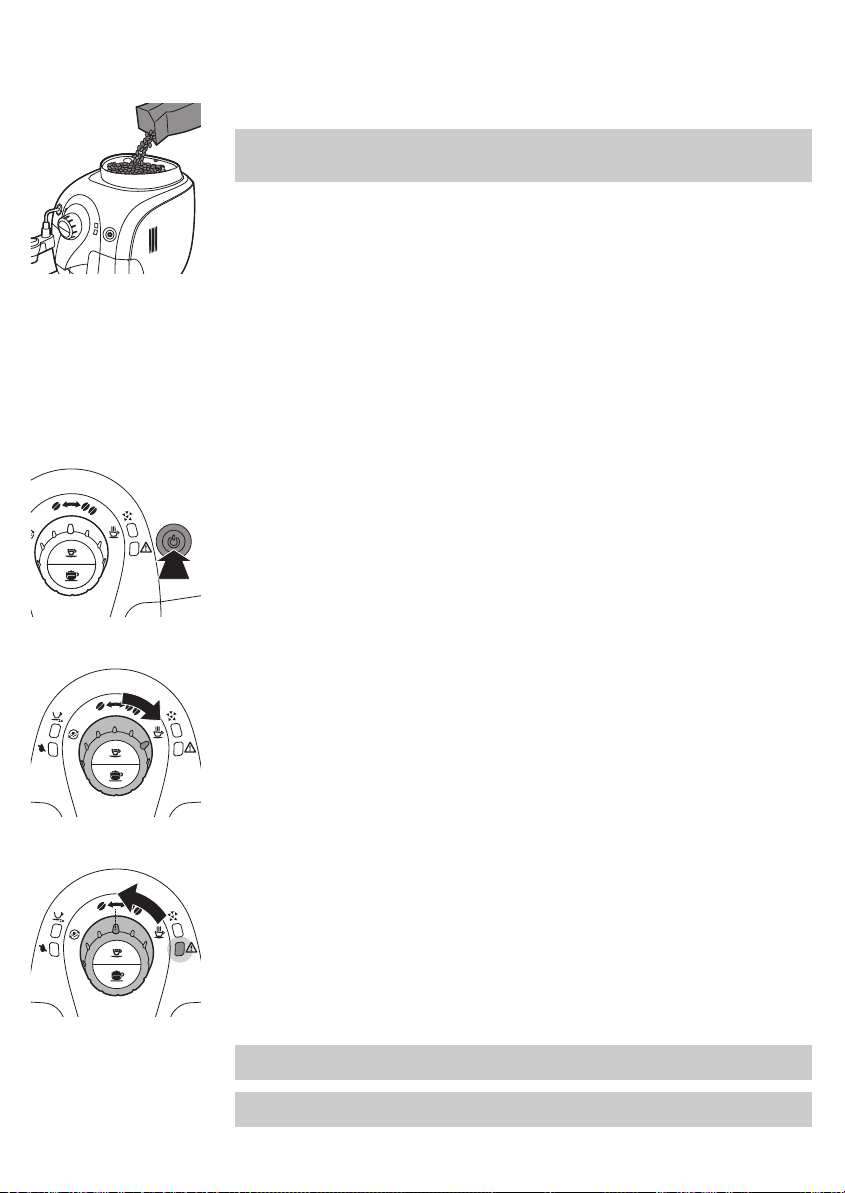
Filling the coffee bean container
1 Fill the coffee bean container with espresso beans.
Note: Only use espresso beans. Never use ground coffee, unroasted
coffee beans or caramelised coffee beans, as this may cause damage to
the machine.
2 Put the lid on the coffee bean container.
Heating up the machine
During the initial heat-up process, fresh water flows through the internal
circuit to heat up the machine. This takes a few seconds.
1 Place a big cup under the hot water/steam wand and the coffee spout.
Make sure the control dial points to one of the coffee bean icons.
2 Press the on/off button.
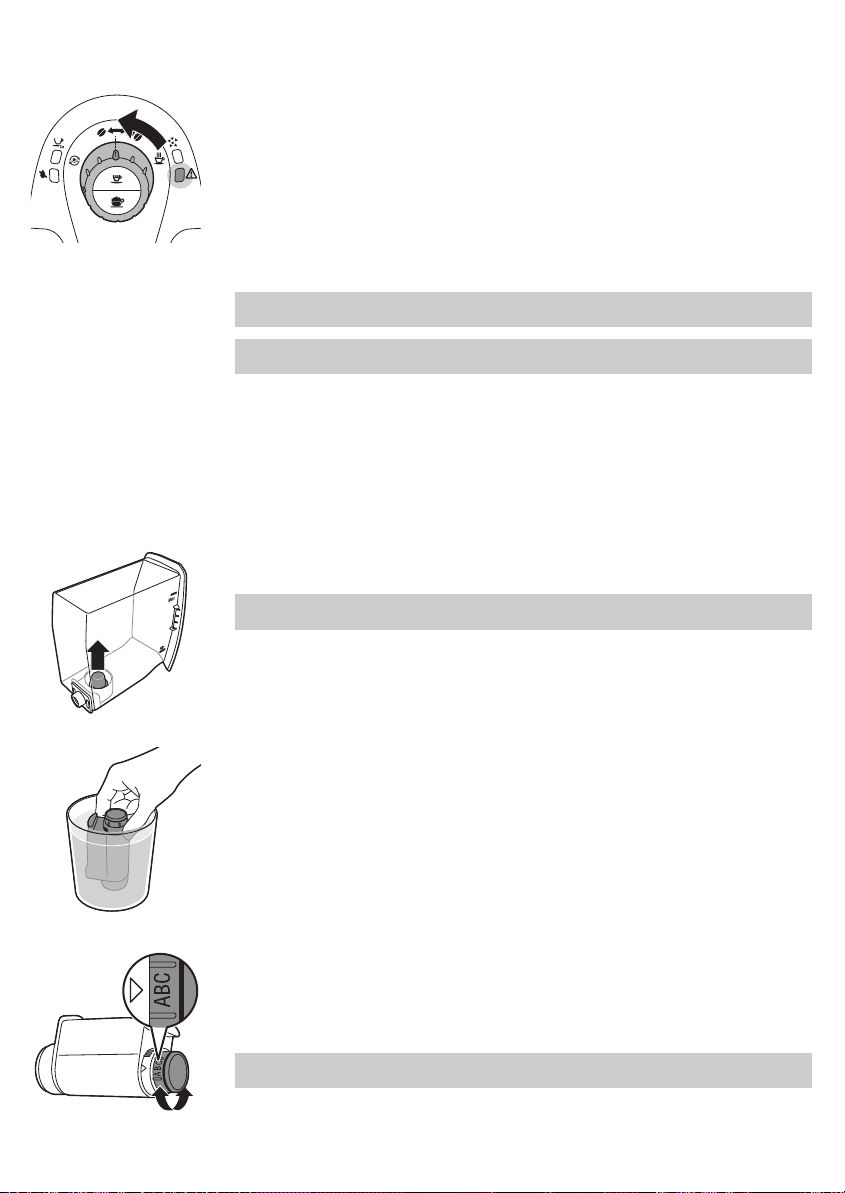
3 When the warning light flashes quickly, turn the control dial to the hot
water icon and wait a few seconds.
-
The warning light goes out and some water comes out of the hot
water/steam wand or automatic milk frother.
4 After a few seconds, when hot water stops coming out of the hot
water/steam wand and the warning light flashes slowly, turn the control
dial back to the single bean icon.
-
The machine is heating up and the on/off button flashes slowly.
-
When the machine has heated up, it performs an automatic rinsing
cycle to clean the internal circuit with fresh water. Water flows from
the coffee spout.
-
When the on/off button lights up continuously, the machine is ready
for the manual rinsing cycle.
Note:You can stop the automatic rinsing cycle by pressing the espresso
or the cappuccino button.
Note:The automatic rinsing cycle also takes place 60 minutes after the
appliance switches to standby mode or switches off.
Page 11
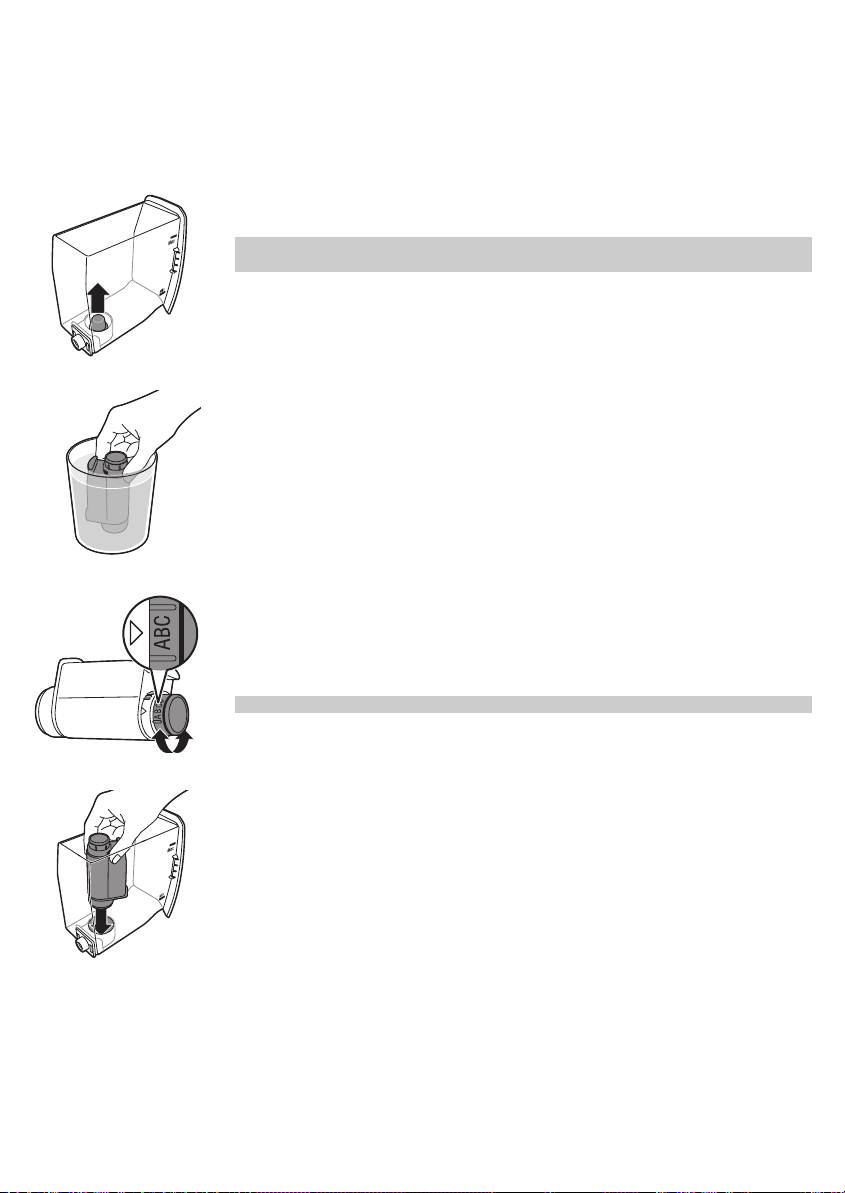
Installing the Intenza+ water filter
We advise you to install the Intenza+ water filter as this prevents scale
build-up in your machine. You can buy the Intenza+ water filter separately.
For more details, see chapter ‘Guarantee and support’, section ‘Ordering
maintenance products’.
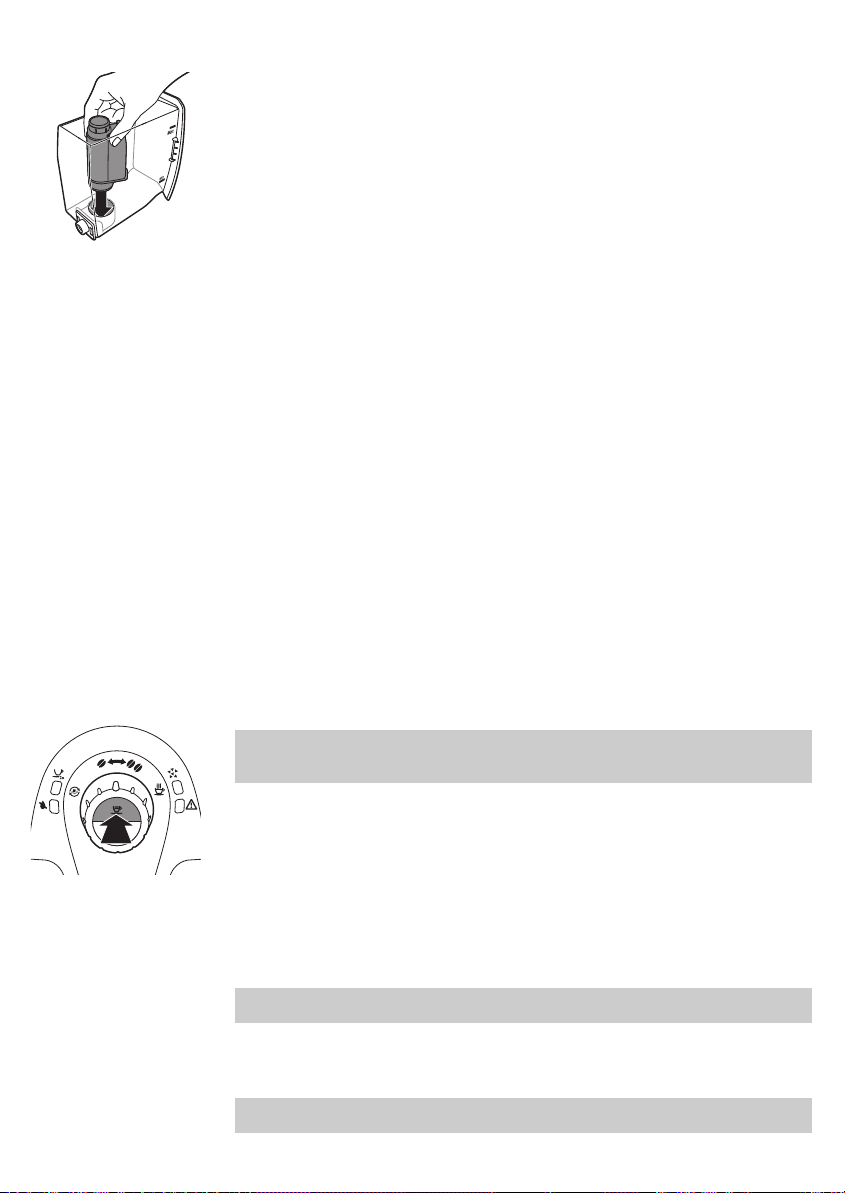
1 Remove the small white filter from the water tank and store it in a dry
place.
Note: Please keep the small white filter for future use. You will need it for
the descaling process.
2 Remove the filter from its packaging and immerse it in cold water with the
opening pointing upwards. Press the sides of the filter gently to let out
the air bubbles.
3 Turn the knob of the filter to the setting that corresponds to the water
hardness of the area you live in.
a Very soft water/ soft water
b Hard water (default)
c Very hard water
Note: You can test the water hardness with a water hardness test strip.
English
11
4 Place the filter in the empty water tank. Press it down until it cannot
move any further.
5 Fill the water tank with fresh water up to the MAX indication and slide it
into the machine.
6 Let the machine brew hot water until the water tank is empty (see
chapter ‘Using the machine’, section ‘Hot water’).
7 Refill the water tank with fresh water up to the MAX indication and slide it
back into the machine.
-
The on/off button lights up continuously.
The machine is ready for use.
Using the machine
To guarantee perfect espresso, the machine regularly rinses its inner circuit
with water. This automatic rinsing cycle takes place 60 minutes after the
appliance switches to standby mode or switches off. During the automatic
Page 12
12
English
rinsing cycle, some of the water flows through the inner circuit directly into
the drip tray. Empty the drip tray regularly.
Brewing 1 or 2 cups of espresso
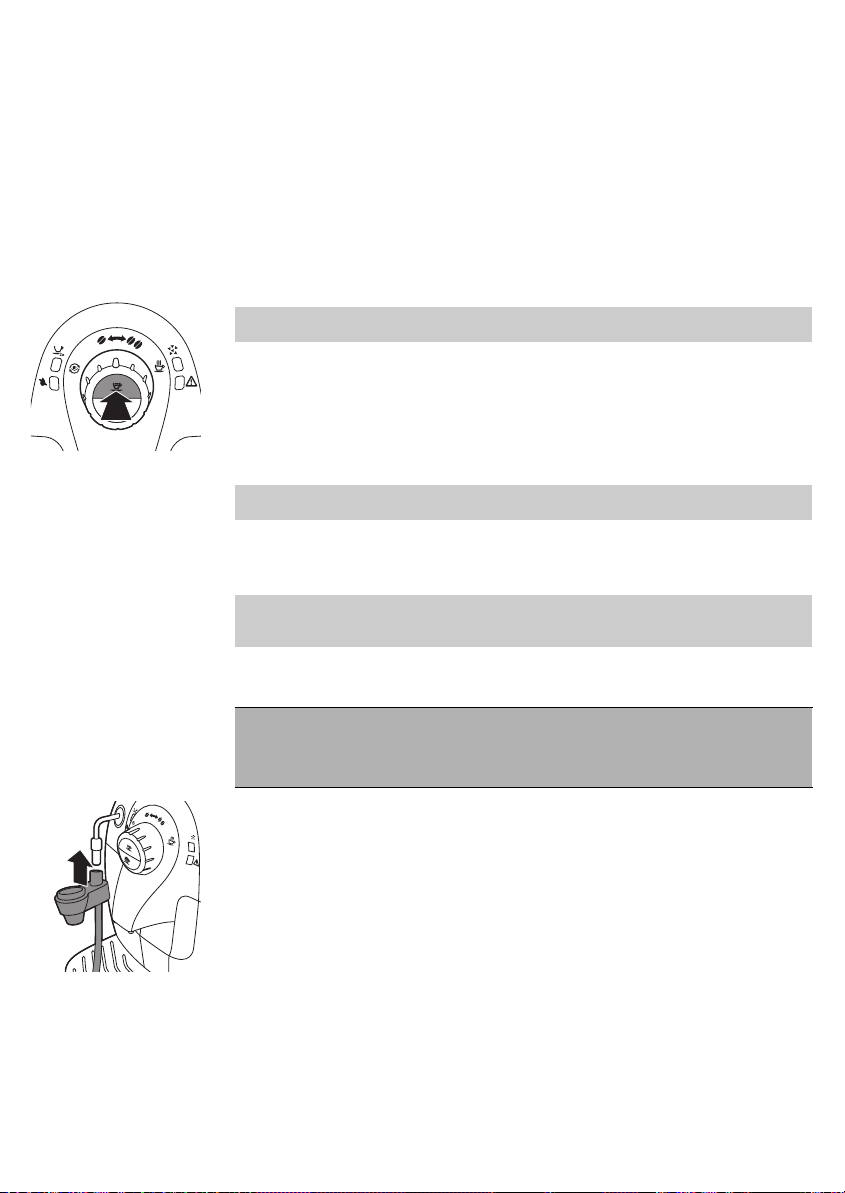
1 Make sure the on/off button light lights up continuously and the control
dial points to the desired coffee strength bean icon.
2 Place 1 or 2 cups under the coffee spout.
3 Select the coffee strength by turning the dial to one or two beans. Select
2 beans for a stronger taste.
4 Press the espresso button.
Note:You can interrupt the brewing cycle at any time. Press the same
button that you pressed to start brewing coffee.
-
Press the espresso button once to brew 1 cup of coffee.
-
Press the espresso button twice to brew 2 cups of coffee.
-
When brewing 2 cups of coffee the 2-cup light lights up. The machine
grinds the required amount of coffee beans for one cup and then fills
both cups half. Then the machine grinds coffee beans for one cup
again and fills both cups fully.
Note:When the machine is left in standby mode, it switches off
automatically after 60 minutes.
Brewing milk- based beverages
Note: Use cold milk (at a temperature of approximately 5°C/41°F) with a
protein content of at least 3% to ensure an optimal frothing result. You can
use whole milk, semi-skimmed milk, soy milk and lactose free milk.
Brewing cappuccino
Warning: Danger of burning! Dispensing may be preceded by
small jets of hot water. When steam is used, the hot water/steam
wand and automatic milk frother could be hot. Only grab the
steam wand by its protective handle.
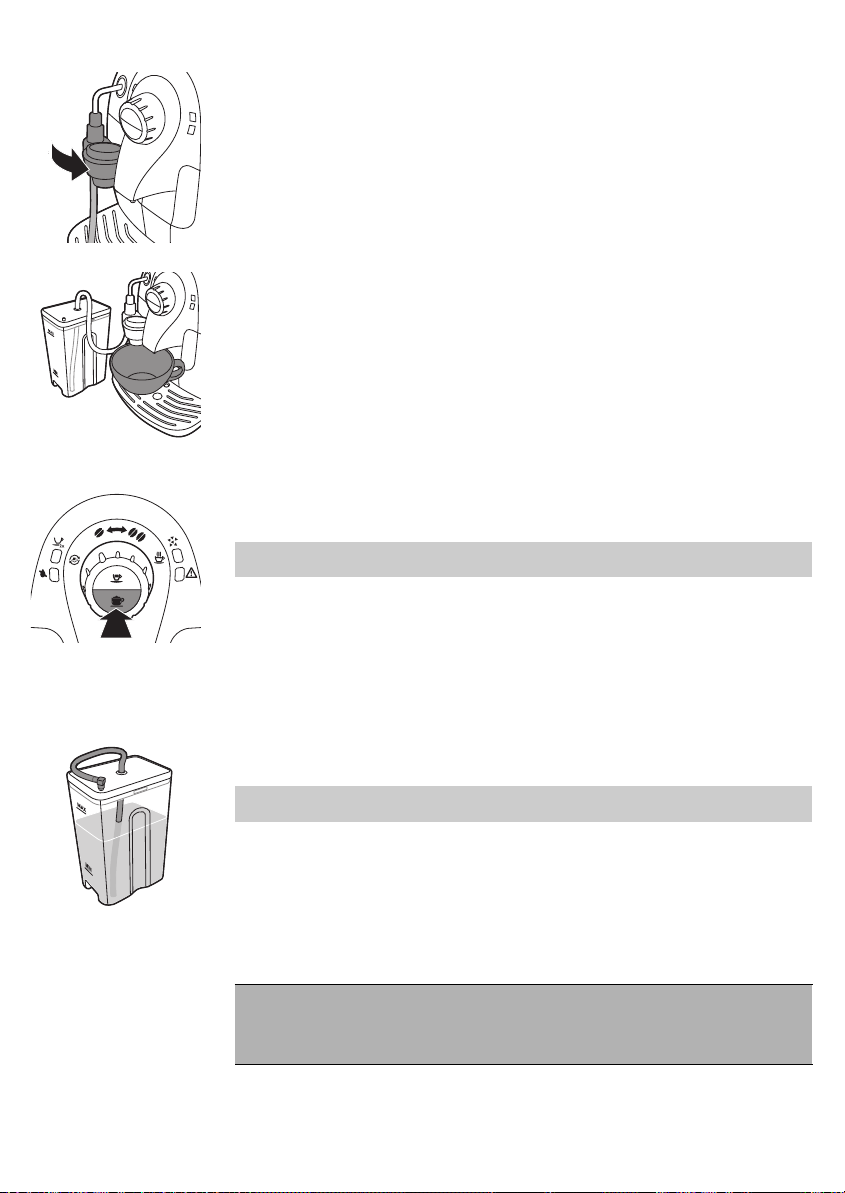
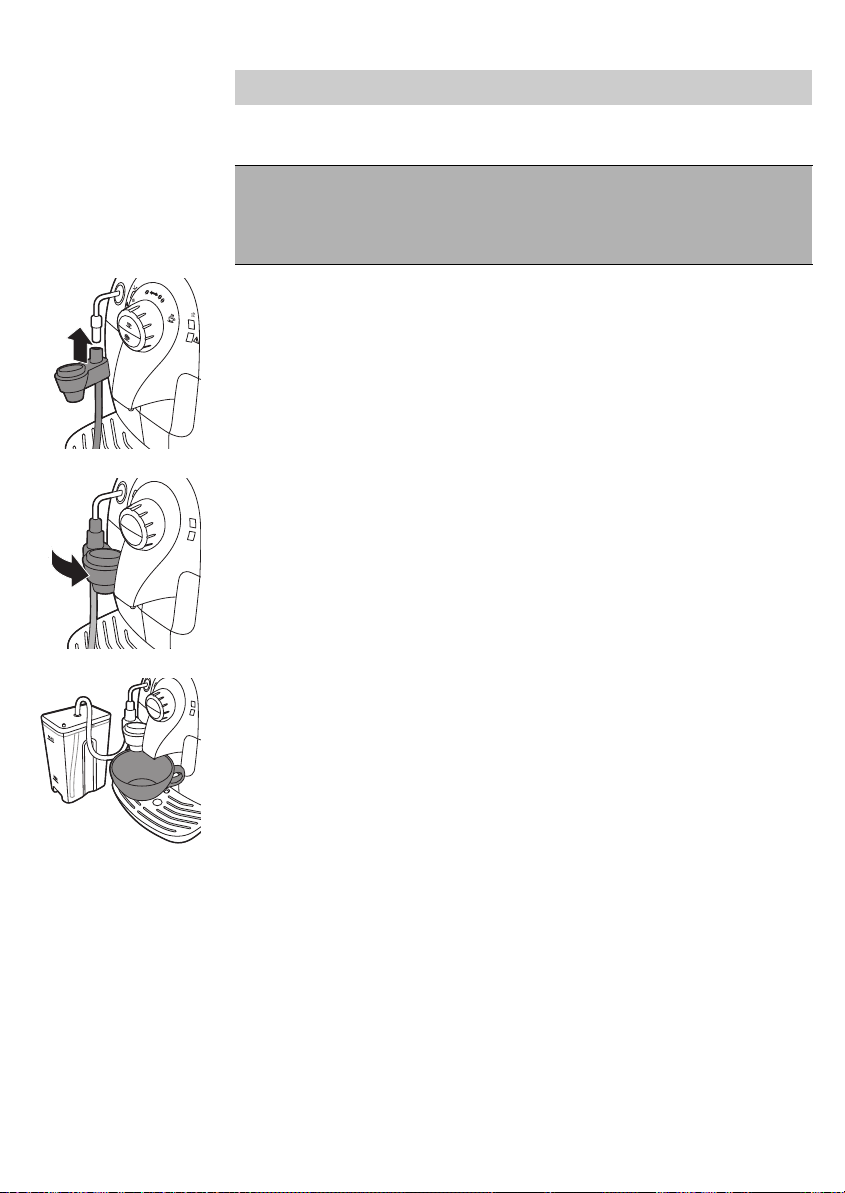
1 Attach the automatic milk frother to the hot water/steam wand.
Page 13
English
2 Turn the hot water/steam wand with the automatic milk frother towards
the machine until the automatic milk frother touches the machine and is
in horizontal position.
3 Remove the lid of the milk carafe and pour the milk in the milk carafe.
Close the lid of the milk carafe.
4 Insert the other end of the suction tube into the milk carafe till the bottom
of the milk carafe.
5 Place a large cup under the automatic milk frother and the coffee spout.
6 Select the coffee strength by turning the dial to one or two beans. Select
2 beans for a stronger taste.
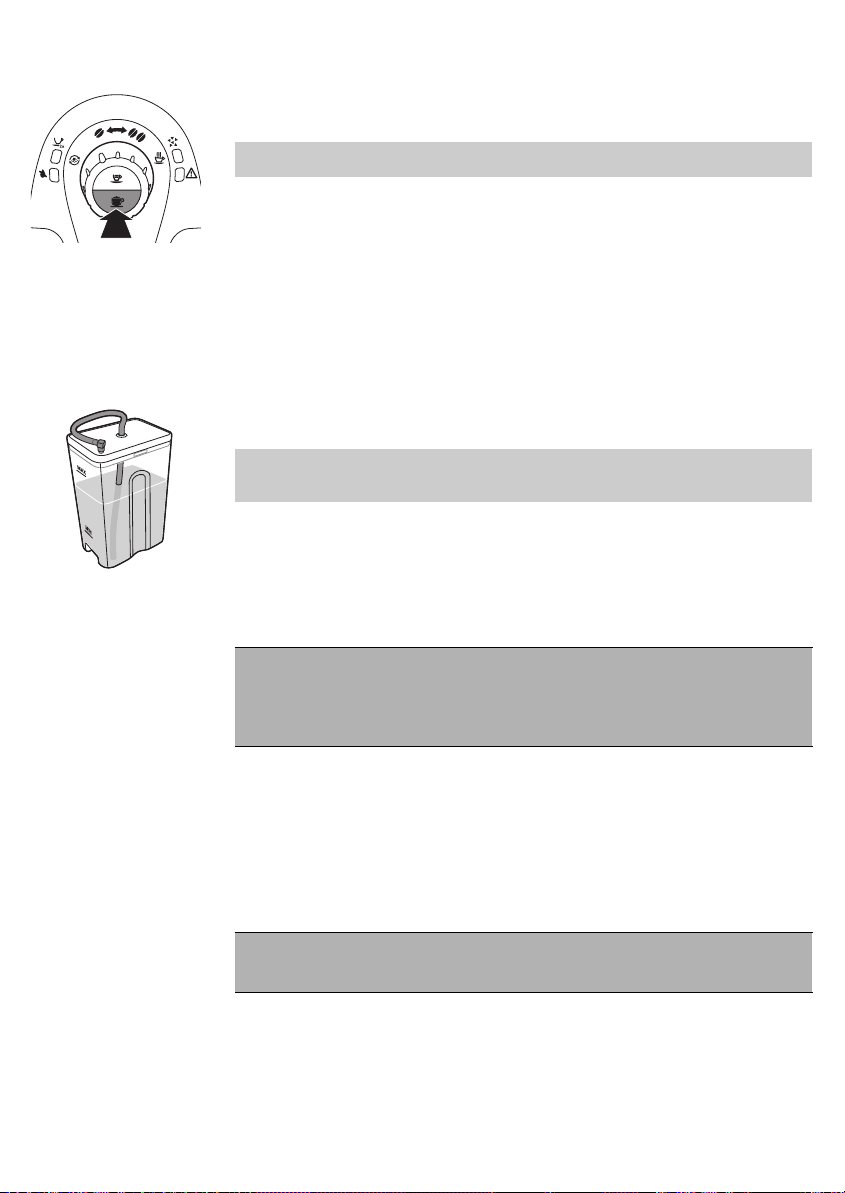
7 Press the cappuccino button. The machine dispenses first the milk and
then coffee.
-
It will take a few seconds before the machine stops dispensing.
Note: If you want to interrupt the brewing cycle press the cappuccino
button again.
8 The amount of coffee and milk can be customized, see chapter 'Adjusting
the machine', section 'Adjusting coffee and milk length'.
9 Place a cup under the automatic milk frother. Perform a quick clean
dispensing hot water for 3-5 seconds after brewing a cappuccino, see
chapter 'Cleaning and maintenance', section 'Quick Clean of the milk
system'.
10 Remove the milk tube connector from the automatic milk frother.
11 Plug the milk connector to the pin on the milk container lid and put the
milk container in the fridge.
Note: After dispensing a milk based beverage perform a quick clean of
the milk system by dispensing hot water for 5 seconds.
13
Frothing milk
Warning: Danger of burning! Dispensing may be preceded by
small jets of hot water. When steam is used, the hot water/steam
wand and automatic milk frother could be hot. Only grab the
steam wand by its protective handle.
1 Follow steps 1 to 5 from 'Brewing cappuccino' and turn the dial to the
steam/milk clean icon to froth milk.
Page 14
14
English
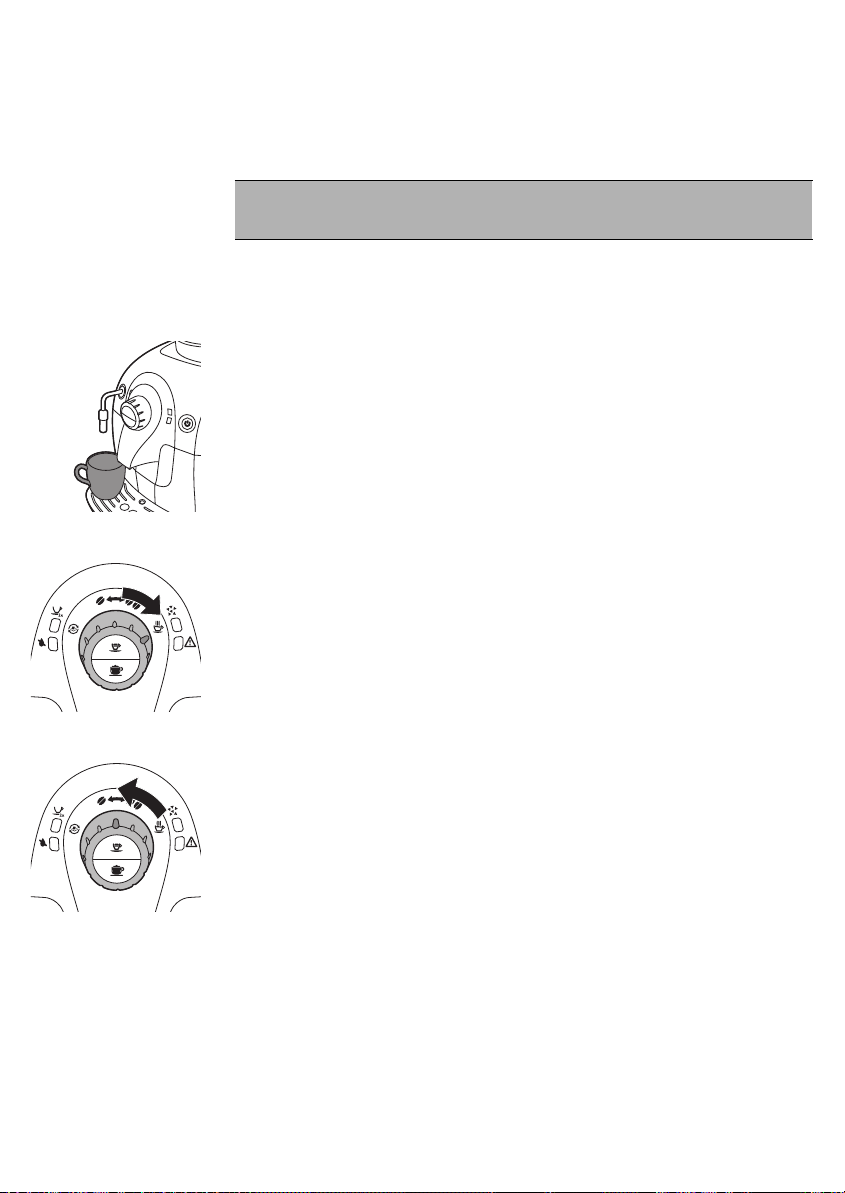
Hot water
2 Turn the control dial to one or two coffee beans icon to stop frothing
milk.
Warning: Danger of scalding! Dispensing may be preceded by
small jets of hot water. Use the appropriate protective handle
only.
1 Make sure the on/off button lights up continuously. If the on/off button
flashes slowly, the machine is heating up.
2 Remove the automatic milk frother. Keep the protective handle on the
hot water/steam wand.
3 Place a cup under the hot water/steam wand.
4 Turn the control dial to the hot water icon.
-
Water comes out of the hot water/steam wand.
5 Turn the control dial back to one of the coffee bean icons when the cup
contains the preferred amount of hot water.
Adjusting the machine
You can adjust the grinding degree and coffee volume to obtain coffee that
is perfectly customised to your taste.
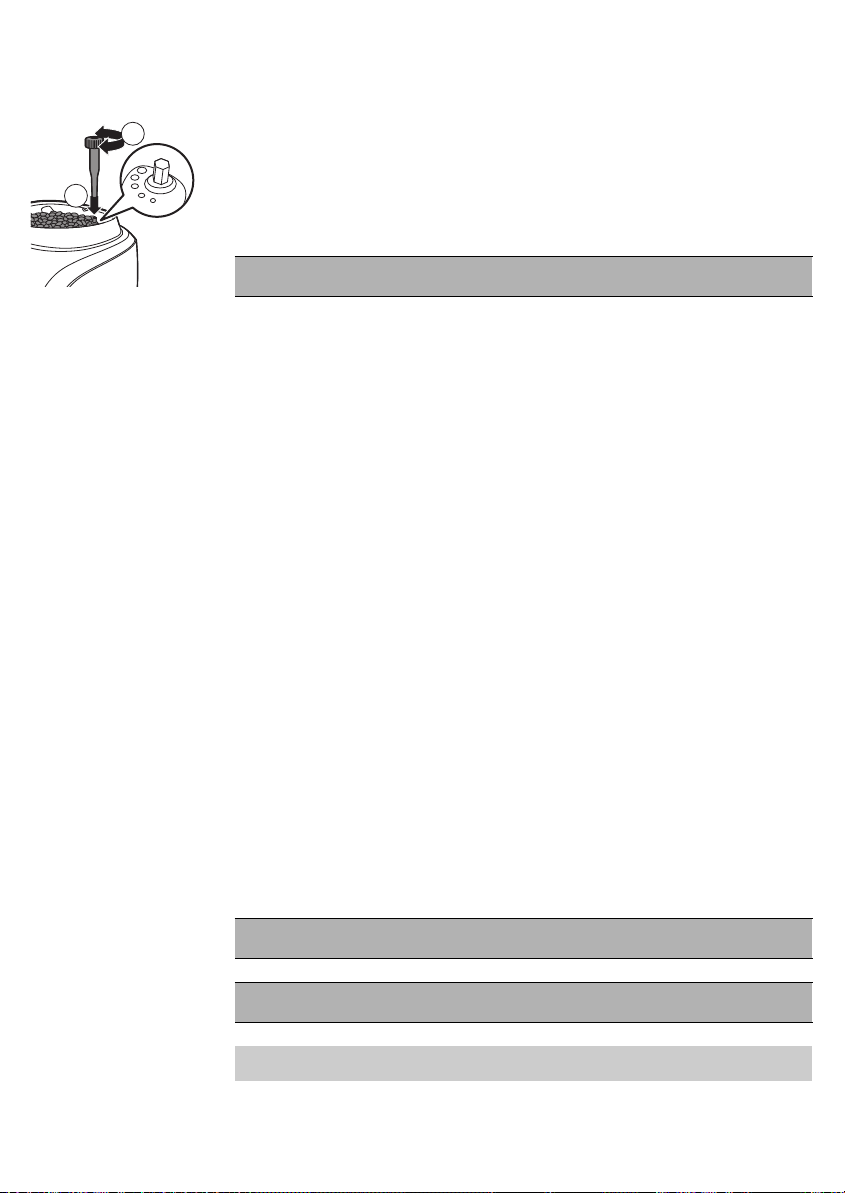
Adjusting the grinding degree
You can adjust the grinding degree of the machine.The ceramic coffee
grinder guarantees accurate and perfect grinding and coarseness for every
Page 15
2
1
English
cup of coffee. It ensures full aroma preservation, delivering the perfect taste
in every cup.
-
Press the grinding degree adjustment knob firmly and then turn it one
notch at a time.
-
There are 5 different grinding degree settings you can choose from.The
smaller the dot, the stronger the coffee.
-
The difference becomes noticeable after you have brewed 2-3 cups f
coffee at the new setting.
Warning: Do not turn the grinding degree adjustment knob more
than one notch at a time to prevent damage to the grinder.
Adjusting the coffee volume with the MEMO function
You can adjust the coffee volume to your taste and the size of your cups.
The espresso button can be programmed.
1 Place one cup under the coffee dispensing spout.
2 Press and hold the espresso button. Release the button when the
machine starts to grind coffee beans.
-
The 2-cups light and the on/off button flash slowly.
3 Press the espresso button when the cup contains the desired amount of
coffee.
The machine automatically saves the new setting.
Adjusting the cappuccino volume with the MEMO function
You can adjust the coffee volume to your taste and the size of your cups.
The cappuccino button can be programmed.
1 Place a cup under the coffee dispensing spout.
2 Press and hold the cappuccino button. Release the button when the
machine starts to grind coffee beans.
-
The 2-cup light and the on/off button flash slowly.
3 Press the cappuccino button again when the cup contains the desired
amount of milk.
The machine automatically saves the new setting.
15
Cleaning and maintenance
Regular cleaning and descaling prolongs the lifetime of your machine and
ensures optimum quality and taste of your coffee.
Warning: Never use scouring pads, abrasive cleaning agents or
aggressive liquids to clean the machine.
Warning: Always unplug the machine and let it cool down before
you clean it.
Note: None of the detachable parts are dishwasher-proof. Rinse them under
the tap.
Page 16
16
English
Quick clean of the milk system
Note: After brewing a cappuccino perform a quick clean of the milk system.
1 Place a cup under the automatic milk frother.
2 Turn the control dial to the hot water icon.
3 Dispense HOT WATER for 5 seconds
4 Turn the control dial to one of the coffee bean icons to stop hot water
dispensing.
Cleaning the automatic milk frother (daily)
1 Place a cup under the automatic milk frother.
2 Insert the suction tube into a cup filled with fresh water.
3 Turn the control dial to the steam/milk clean icon.
4 Dispense hot water for 5 seconds.
5 Turn the control dial to one of the coffee beans to stop hot water
dispensing.
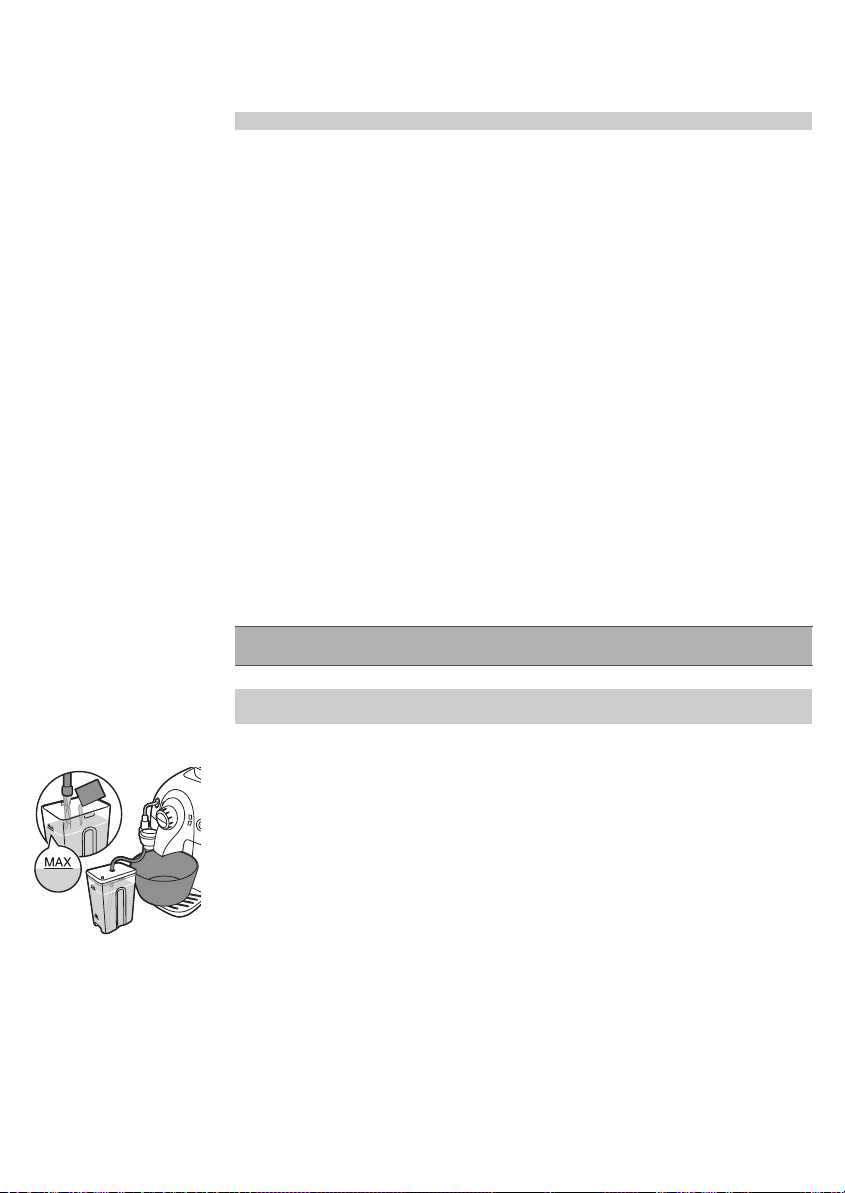
Full milk carafe cleaning with milk circuit cleaner (monthly)
Monthly cleaning of the automatic milk frother
Monthly cleaning of the automatic milk frother consists of two cleaning
cycles carried out in sequence: the first cycle requires the use of Saeco milk
circuit cleaner dissolved in water and the second cycle uses only water to
rinse the circuit.
Caution: If the machine has been recently used, the steam tube and the
automatic milk frother could be hot.
Note: Before you start the procedure, make sure that the water tank is filled
up to the MAX level.
Cleaning cycle with milk circuit cleaner and water.
1 Pour the content of a Saeco milk circuit cleaner sachet into the milk
carafe and fill the milk carafe with water up to the MAX level. Close the
lid of the milk carafe.
2 Insert the other end of the suction tube into the milk carafe till the bottom
of the milk carafe.
3 Place a large container under the milk dispensing spout.
4 Turn the control dial to the steam/milk clean icon.
-
The machine dispenses the cleaning solution through the milk
dispensing spout.
5 Let the machine dispense water until the water tank empty light lights up.
6 Detach the suction tube from the machine. Rinse the milk carafe
thoroughly and fill it with fresh water up to the MAX level.
7 Repeat steps 3 to 6.
Cleaning the parts of the automatic milk frother
The automatic milk frother comprises four parts that must be disassembled:
Page 17

1
2
4
5
3
2
1
1
English
1 Suction tube
2 Milk frother lid
3 Rubber ring
4 Milk frother
5 Rubber cover
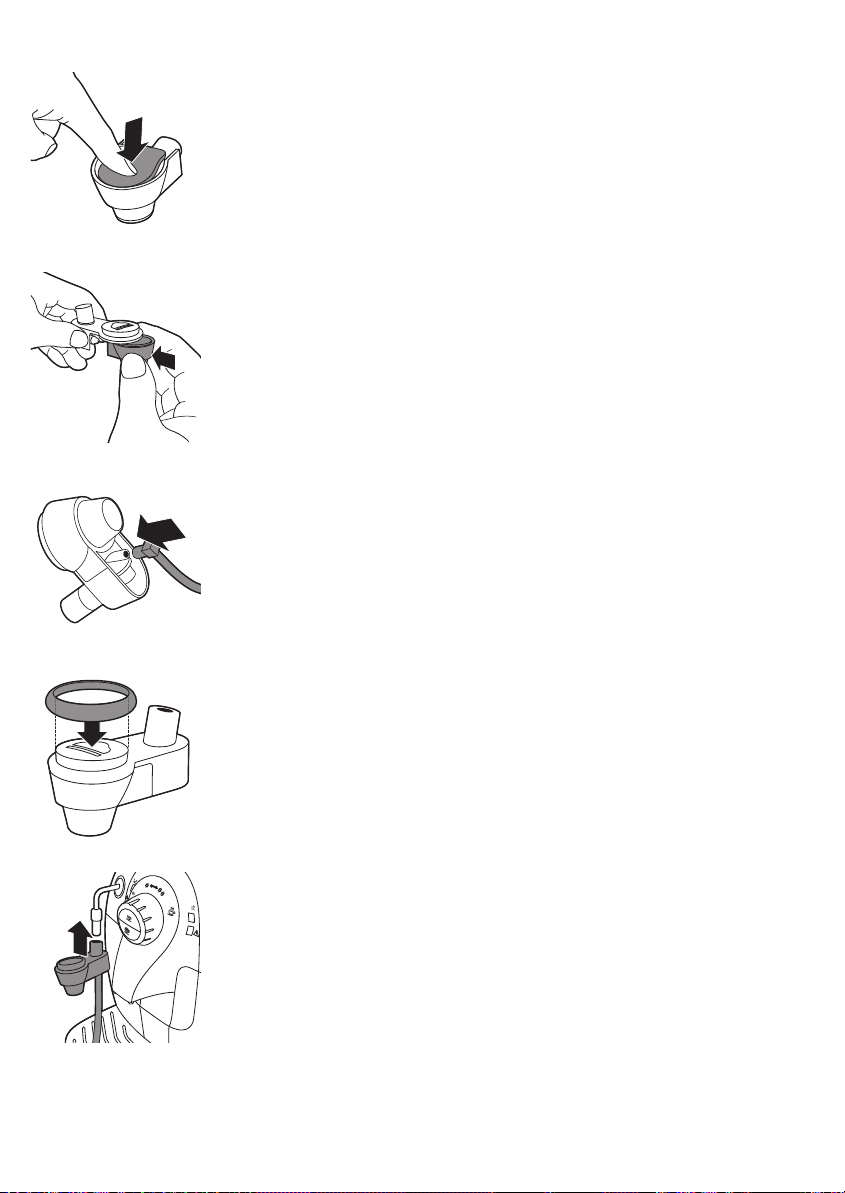
How to clean the automatic milk frother
1 Remove the automatic milk frother from the steam tube.
Caution: If the machine has been recently used, the steam tube and the
automatic milk frother could be hot.
2 Remove the suction tube from the milk frother lid.
3 Remove the rubber ring from the automatic milk frother.
17
4 To detach the automatic milk frother, press the sides (1) and remove it by
pulling it out while making slight lateral movements (2).
5 Remove the rubber lid from the milk frother.
6 Rinse the components with lukewarm water.
Note: You can also clean these components in the dishwasher.
Page 18
18
English
7 To reassemble, press in the middle to attach the rubber lid to the milk
frother and make sure it is in place.
8 Attach the automatic milk frother to the milk frother lid. When the two
parts lock into place, you hear a click.
9 Insert the suction tube into the automatic milk frother.
10 Place the rubber ring back onto the automatic milk frother.
11 Attach the automatic milk frother back to the hot water/steam wand.
Page 19
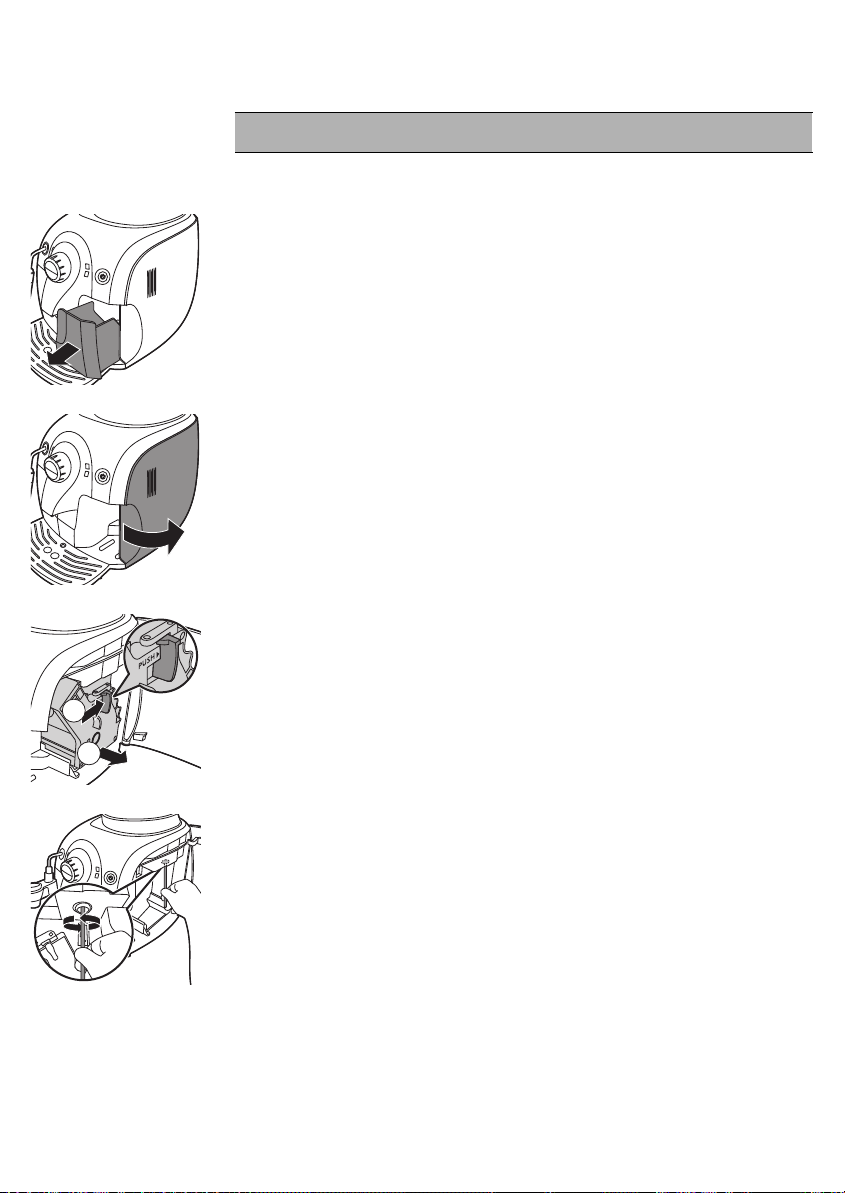
Cleaning the brew group
1
2
Warning: Do not clean the brew group in the dishwasher and do
not use washing-up liquid or a cleaning agent to clean it.
Clean the brew group once a week.
1 Switch off the machine and unplug it.
2 Remove the coffee grounds container from the machine.
3 Open the service door.
English
19
4 Press the PUSH button and pull at the grip of the brew group to remove it
from the machine.
5 Clean the coffee exit duct thoroughly with a spoon handle or another
round-tipped kitchen utensil.
6 Clean the inside of the machine with a damp cloth.
Page 20
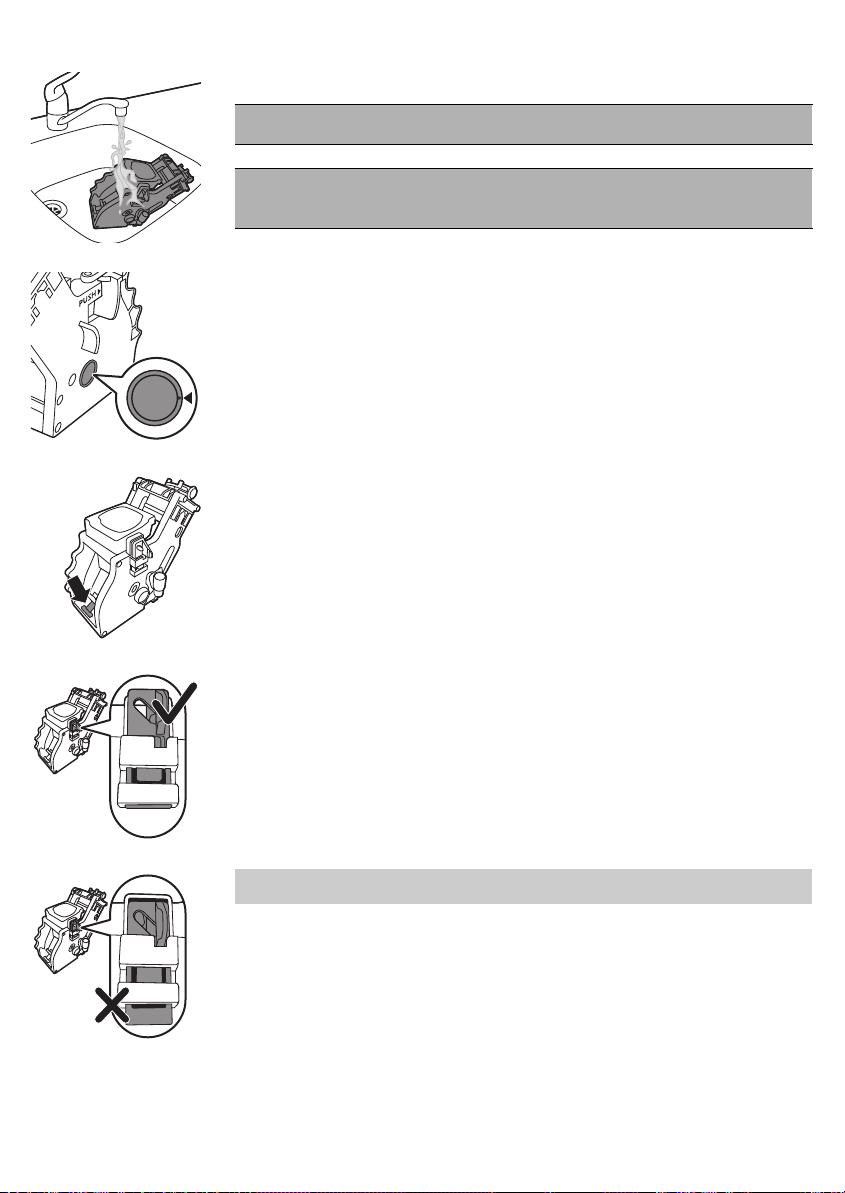
20
English
7 Rinse the outside of the brew group under a lukewarm tap.
Warning: Never use any washing-up liquid or other cleaning
agent to clean the brewing unit.
Warning: Do not dry the brew group with a cloth to prevent fibers
from collecting inside the brewing unit.After rinsing, just shake
excess water off the brewing unit or let it air-dry.
8 Before you slide the brew group back into the machine, make sure the
two reference signs on the side match. If they do not match, perform the
following step:
-
Make sure the lever is in contact with the base of the brew group.
9 Make sure the locking hook of the brew group is in the correct position.
-
To position the hook correctly, push it upwards until it is in uppermost
position.
Note:The hook is not correctly positioned if it is still in bottommost
position.
Page 21
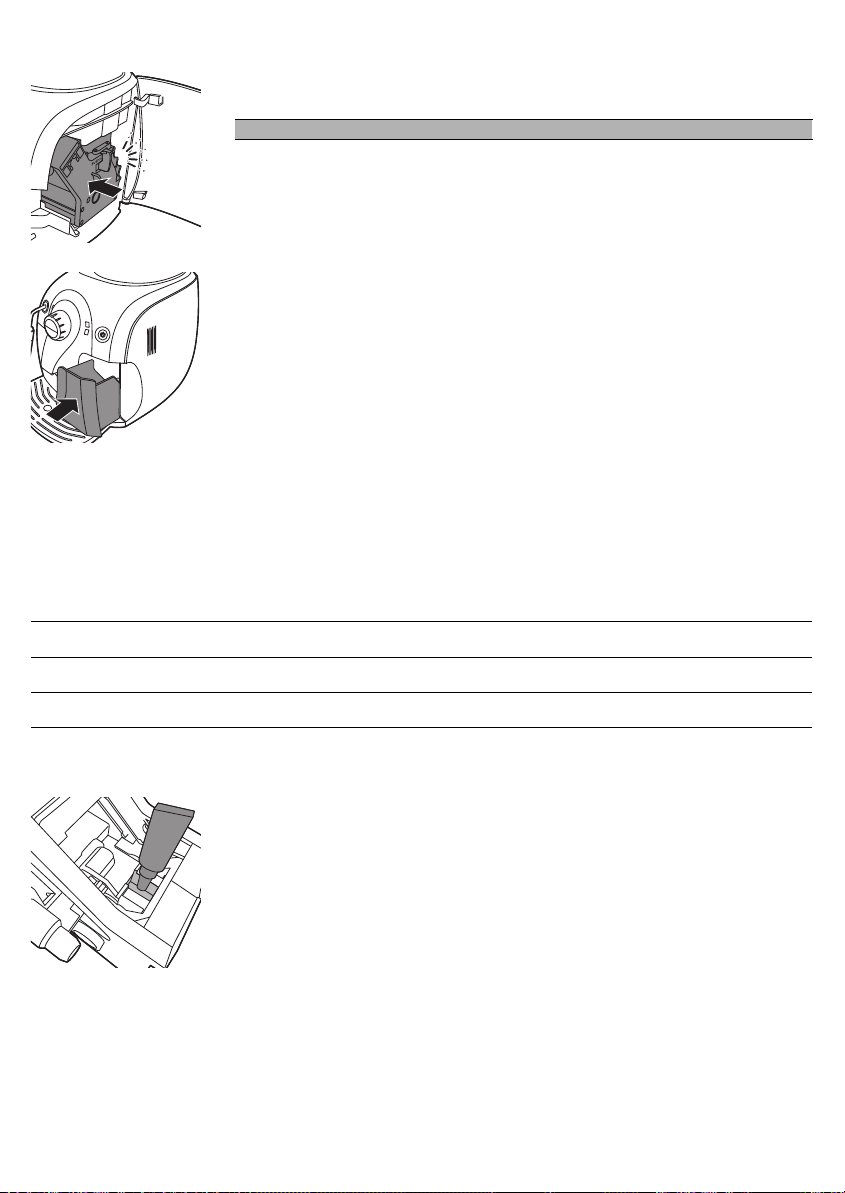
10 Slide the brew group back into the machine along the guiding rails on the
sides until it clicks into position.
Warning: Do not press the PUSH button.
11 Close the service door.
12 Slide the coffee grounds container back into the machine.
Lubrication
For optimal performance of the machine you have to lubricate the brew
group. See table below for the lubrication frequency. For support visit our
website: www.philips.com/support.
Type of usage
Low 1-5 Every 4 months
Nr of daily products Lubrication frequency
English
21
Normal 6-10 Every 2 months
Heavy >10 Monthly
1 Switch off the machine and unplug it.
2 Remove the brew group and rinse it under a lukewarm tap as described
in section 'Weekly cleaning of the brew group'.
3 Apply a thin layer of grease around the shaft in the bottom of the brew
group.
Page 22
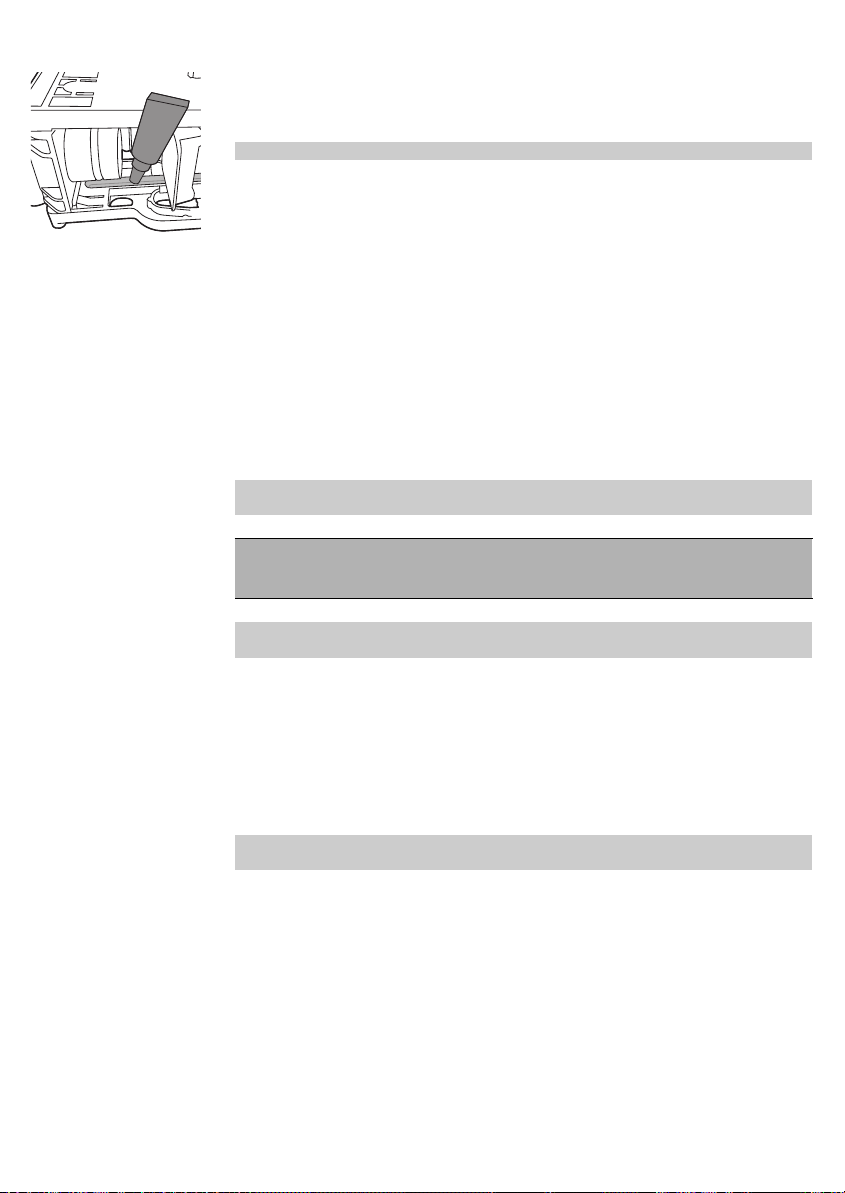
22
English
4 Apply a thin layer of grease to the rails on both sides (see figure).
5 Insert the brew group as described in section 'Weekly cleaning of the
brew group'.
You can use the grease tube multiple times.
Descaling the machine
Scale builds up inside the machine during use. It is essential to descale the
machine when the orange descaling light lights up continuously. Only use
the special Philips Saeco descaling solution to descale the machine. The
Philips Saeco descaling solution is designed to ensure optimal performance
of the machine. You can buy the Philips Saeco descaling solution in the
online shop at www.shop.philips.com/service.
Note:The use of other descaling products may cause damage to the
machine and leave residues in the water.
Warning: Never drink the water with descaling mixture that you
pour into the water tank or any water with residues that comes
out of the machine during the descaling procedure.
Note: For more on-line support please visit our dedicated descaling page:
www.philips.com/descale.
Descaling procedure
The descaling procedure lasts approximately 30 minutes and consists of a
descaling cycle and a rinsing cycle.
Preparation
1 Switch off the machine.
Warning: If you do not switch off the machine, you cannot enter the
descaling
2 Empty the drip tray and place it back. Remove the automatic milk frother
(if present).
3 Empty the water tank and remove the Intenza+ water filter (if present).
Pour the entire bottle of the Philips/Saeco descaling solution into the
water tank.
4 Add water to the descaling solution in the water tank up to the MAX
indication.
5 Make sure the control dial is set to the coffee bean icon.
6 Place a bowl under the hot water/steam wand and coffee dispensing
spout.
Page 23
5 sec
English
23
Descaling cycle
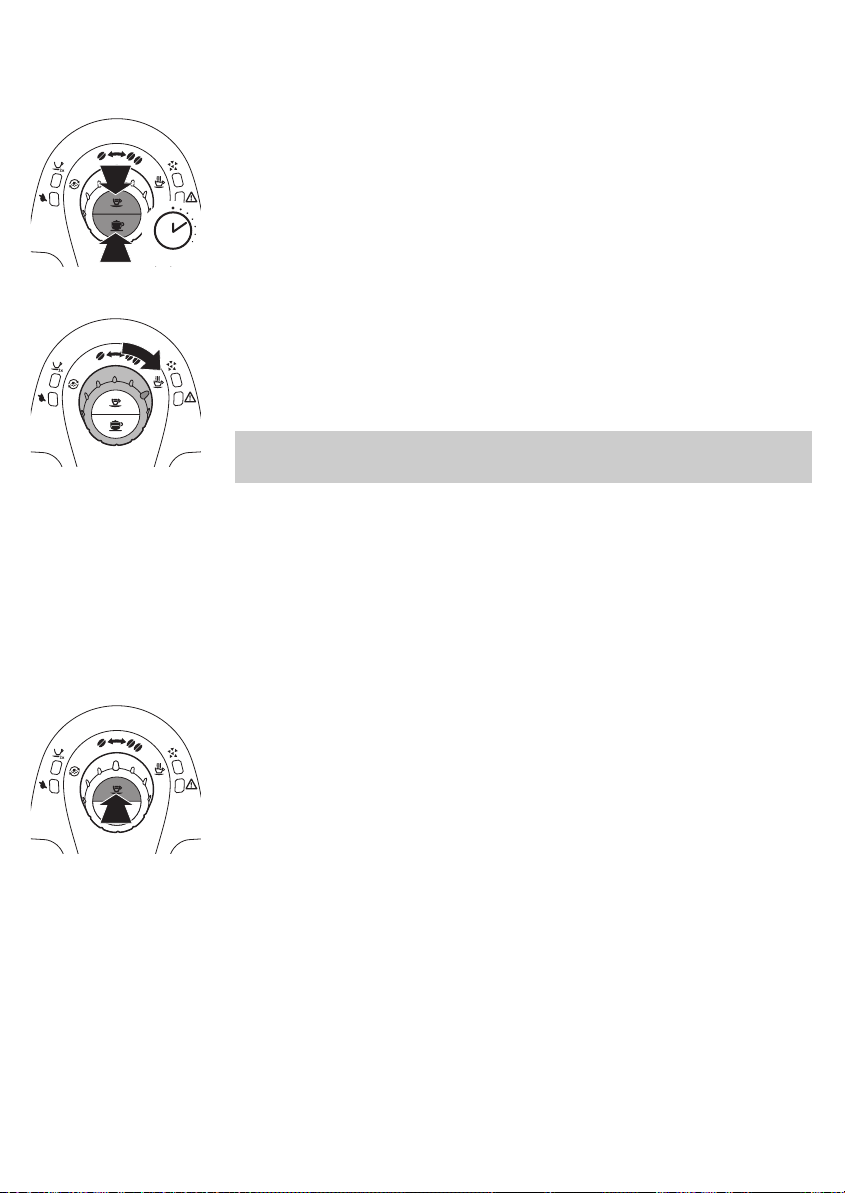
1 Press the espresso button and cappuccino button simultaneously for
approximately 5 seconds.
-
The orange descaling light flashes slowly during the entire descaling
cycle.
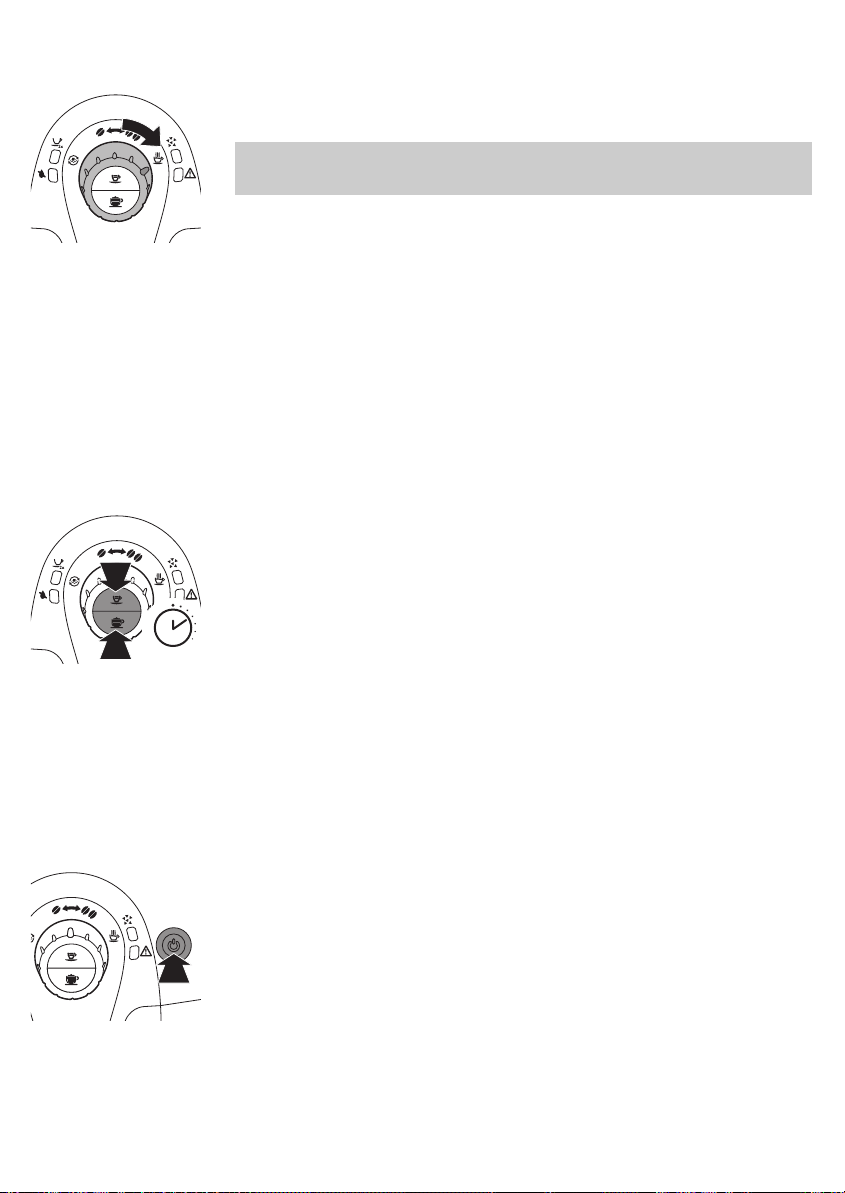
2 Turn the control dial to the hot water icon and brew hot water. Let hot
water flow out of the hot water/steam wand for 10 seconds.
3 Turn the control dial back to the single bean icon.Wait approximately 1
minute to let the descaling solution act.
4 Press the espresso button to brew a cup of espresso.Wait approximately
1 minute to let the descaling solution act.
Note: During the descaling process, the coffee grinding function does not
work.If you press the espresso button, only water will flow out of the
machine.
5 Repeat steps 2 to 4 until the ‘water tank empty’ light lights up
continuously.
Rinsing cycle
1 Remove the water tank from the machine and rinse it.
2 Fill the water tank with fresh tap water up to the MAX indication and slide
the water tank back into the machine.
3 Empty the big cup and place it back onto the drip tray under the hot
water/steam wand.
4 Press the espresso button and brew a cup of espresso. Repeat this twice.
Page 24
5 sec
24
English
5 Turn the control dial to the hot water icon.
6 Let hot water flow out of the hot water/steam wand until the ‘water tank
empty’ light lights up continuously.
Note: If you want to interrupt the water flow, turn the control dial back to
the coffee bean icon.To restart the water flow, turn it back to the hot
water icon.
7 Remove the drip tray, rinse it and place it back.
8 Reattach the automatic milk frother.
9 Remove the water tank and rinse it.
10 Reinstall the Intenza+ water filter (if present).
11 Fill the water tank with fresh tap water up to the MAX indication and slide
the water tank back into the machine.
12 Press the on/off button to switch off the machine.
When you switch the machine back on, it is ready for use again.
Interruption of the descaling process
If the machine gets stuck in the descaling procedure, you can press the
on/off button.This allows you to complete the descaling procedure. Follow
the steps below to make sure your machine is ready to brew coffee again.
1 Press the espresso button and cappuccino button simultaneously for
approximately 5 seconds.
2 Remove the drip tray, rinse it and place it back.
3 Remove the water tank and rinse it.
4 Fill the water tank with fresh tap water up to the MAX indication and slide
the water tank back into the machine.
5 Press the espresso button and brew a cup of espresso. Repeat this twice.
6 Turn the control dial to the hot water icon. Let hot water flow out of the
hot water/steam wand until the water tank empty light lights up
continuously.
7 Remove the drip tray, rinse it and place it back.
8 Reattach the automatic milk frother.
9 Remove the water tank and rinse it.
10 Reinstall the Intenza+ water filter (if present).
11 Fill the water tank with fresh tap water up to the MAX indication and slide
the water tank back into the machine.
12 Press the on/off button to switch off the machine.
When you switch the machine back on, it is ready for use again.
Page 25
Meaning of light signals
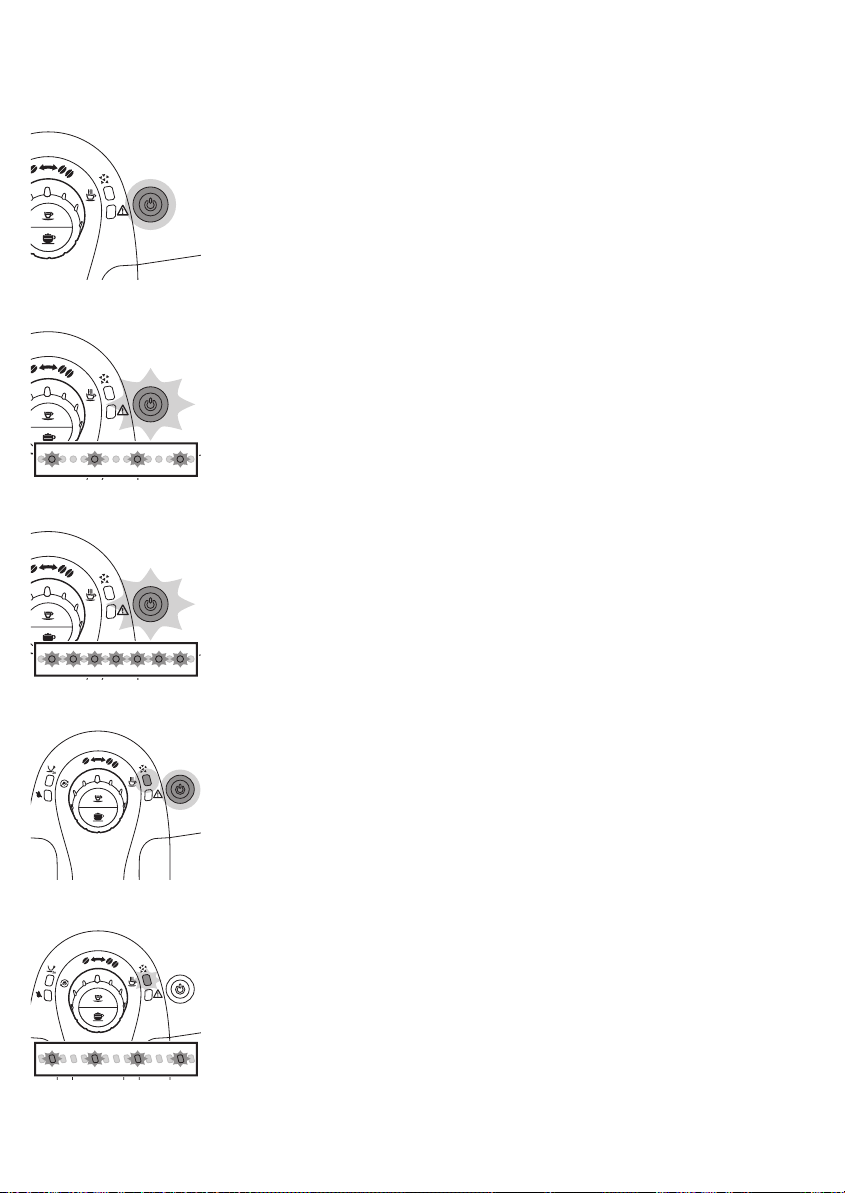
-
The on/off button light lights up continuously. The machine is ready for
use.
-
The on/off button flashes slowly. The machine is warming up or
performing a procedure.
-
The on/off button flashes quickly. The machine is overheated. Brew a
cup of hot water to cool down the machine.
English
25
-
The descaling and on/off button lights light up continuously. You have to
descale the machine. Follow the instructions in chapter ‘Descaling the
machine’.
-
The descaling light flashes slowly. The machine is in the descaling cycle.
Page 26
26
English
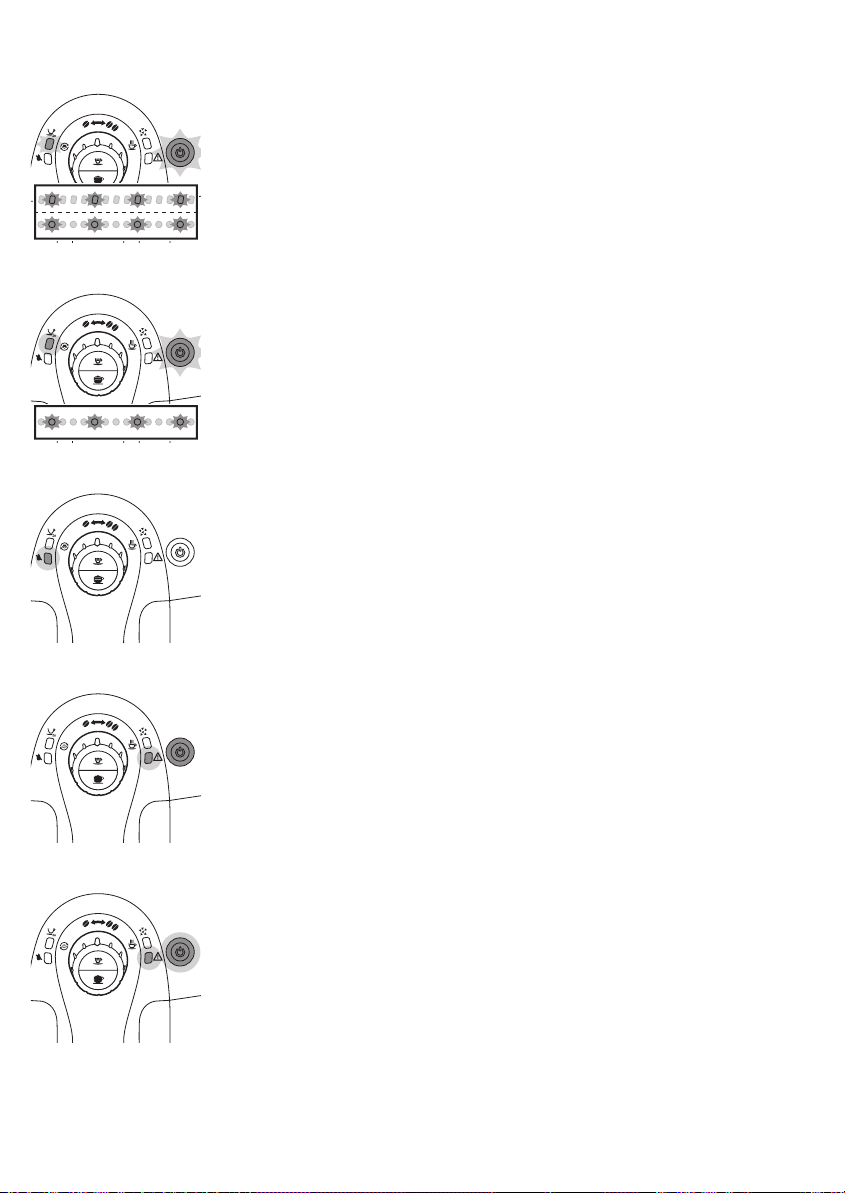
-
The 2-cup and on/off button lights flash slowly. The machine is
programming the amount of coffee to brew. Follow the instructions in
chapter ‘Using the machine’, section ‘Adjusting the coffee volume’.
-
The 2-cup light lights up continuously and the on/off button flashes
slowly. The machine is brewing two cups of coffee.
-
The water tank empty light lights up continuously.The water level is low.
Fill the water tank with fresh water up to the MAX level.
-
The warning light lights up continuously and the on/off button light goes
out. The coffee grounds container is full. Empty the coffee grounds
container while the machine is on. Make sure that the warning light
flashes before you reinsert the coffee grounds container.
-
The warning and on/off button lights light up continuously. The coffee
bean container is empty. Refill the coffee bean container.
Page 27
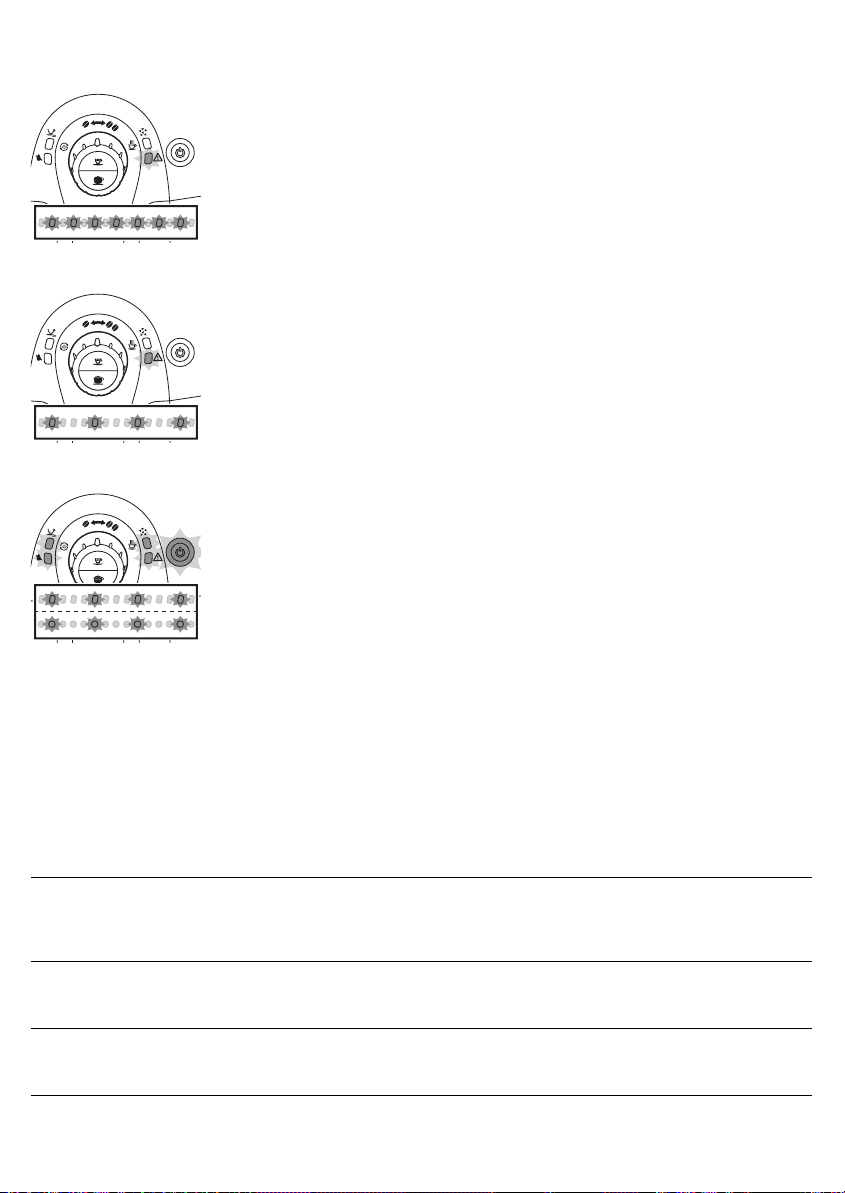
English
-
The warning light flashes quickly. There is no water in the internal circuit.
Turn the control dial to the hot water icon and let hot water come out of
the machine until the water flows continuously. See chapter ‘Preparing
for use’ section ‘Heating up the machine’. Follow steps 3 and 4.
-
The warning light flashes slowly. The brewing unit is not correctly
inserted, the coffee grounds container is not inserted, the service door is
open or the control dial is not in the correct position. Make sure the
brewing unit and coffee grounds container are inserted correctly, the
service door is closed and the control dial is in the correct position. If you
cannot take out the brewing unit or place it back, switch the machine off
and back on again.
-
All the lights flash slowly and simultaneously. The machine is out of
order. Switch off the machine for 30 seconds, then switch it back on.Try
this two or three times. If the machine does not reset, contact the Philips
Consumer Care Centre.
27
Troubleshooting
This chapter summarises the most common problems you could encounter
with the machine. If you are unable to solve the problem with the
information below, visit www.philips.com/support for a list of frequently
asked questions or contact the Philips Consumer Care Centre in your
country.
Problem
There is water under the
machine.
The machine does not switch on. The machine is
Cause Solution
The drip tray is too full
and overflowed.
The machine is not
placed on a horizontal
surface.
disconnected.
Empty the drip tray when the drip tray
full indicator pops up through the drip
tray. Always empty the drip tray before
you start descaling the machine.
Place the machine on a horizontal
surface so that the drip tray full indicator
works properly.
Make sure the small plug is inserted into
the socket. Plug in and switch on the
machine.
Page 28

28
English
The machine is stuck in the
descaling procedure.
The coffee is not hot enough. The cups you use are
The coffee temperature
decreases over time.
No hot water or steam comes
out of the hot water/steam
wand.
The coffee has too little crema
or is watery.
The descaling process
has been interrupted or
proceeded in an
incorrect order.
cold.
You added milk. Whether the milk you add is warm or
The machine has not
been descaled in time.
The hot water/steam
wand is clogged.
The automatic milk
frother may be dirty.
Replace the water filter
(if present).
The grinder is set to a
coarse setting.
The coffee blend is not
the correct one.
The machine is
performing its selfadjustment.
Press the on/off button. You can restart
the descaling procedure or follow the
instructions in chapter ‘Descaling the
machine’, section ‘Interruption of the
descaling process'.
Preheat the cups by rinsing them with
hot water.
cold, it will always decrease the
temperature of the coffee to some
extent.
Descale the machine.
Check if the hole of the hot water/steam
wand is clogged. If so, clean the hole
with a pin.
Clean the automatic milk frother.
Remove the water filter en try again to
dispense hot water. If this works replace
the water filter.
Adjust the grinder to a finer setting.
Try another coffee blend.
Brew a few cups of coffee.
The brew group cannot be
removed.
The brew group cannot be
inserted.
The brew group is dirty. Clean the brew group.
The brew group is not
positioned correctly.
The coffee grounds
container is not
removed.
The machine is still in the
descaling process.
The brew group is not in
the correct position.
Close the maintenance door. Switch the
machine off and back on again. Wait for
the machine ready screen to appear
and then remove the brew group.
Remove the coffee grounds container
before removing the brew group.
You cannot remove the brew group
when the descaling process is active.
First complete the descaling process
and then remove the brew group.
The brew group was not put in rest
position before it was placed back.
Make sure that the lever is in contact
with the base of the brew group and
that the hook of the brew group is in the
correct position.
Page 29

English
Place the drip tray and the coffee
grounds container back. Leave the brew
group out. Close the maintenance door
and switch the machine on and off.
Then try to reinsert the brew group.
29
The machine grinds the coffee
beans but no coffee comes out.
The coffee is too weak. The grinder is set to a
The drip tray is quickly filled. This is normal. The
The grind is set too fine. Adjust the grinder to a coarser setting.
The brew group is dirty. Clean the brew group.
The coffee dispensing
spout is dirty.
The coffee exit duct is
blocked.
coarse setting.
The machine is
performing its
selfadjustment.
The coffee blend is not
the correct one.
machine uses water to
rinse the internal circuit
and brew group. Some
water flows through the
internal system directly
into the drip tray.
Clean the coffee dispensing spout and
its holes with a pipe cleaner.
Clean the coffee exit duct with the
handle of the multifunctional tool or a
spoon handle.
Adjust the ceramic coffee grinder to a
finer setting (see chapter ‘Using the
machine’, section ‘Adjusting the grinding
degree’).
Brew a few cups of coffee to let the
machine adjust itself to the new grinding
settings.
Use a different type of coffee beans.
Empty the drip tray when the 'drip tray
full' full indicator pops up through the
drip tray cover.
Place a cup under the dispensing spout
to collect rinsing water.
There is not enough coffee in my
cup.
The brew group or the drains behind or
under the brew group may be blocked.
Rinse the brew group with lukewarm
water and clean the upper filter
carefully. Also clean the inside of the
machine with a soft, damp cloth.
There is no water in the
internal circuit.
The cup volume has
been changed.
The brew group is dirty. Clean the brew group (see chapter
Air may be present in the internal circuit.
Rinse the internal circuit of the machine
by turning the control dial to the hot
water icon and letting some hot water
flow out of the machine.
Set with the memo function the cup
volume.
‘Cleaning and maintenance’, section
‘Cleaning the brew group’).
Page 30
30
English
The milk does not froth. The automatic milk
frother is dirty or not
assembled or installed
correctly.
The type of milk used is
not suitable for frothing.
Recycling
-
This symbol means that this product shall not be disposed of with normal
household waste (2012/19/EU).
-
Follow your country's rules for the separate collection of electrical and
electronic products. Correct disposal helps prevent negative
consequences for the environment and human health.
Guarantee and support
If you need information or support, please visit www.saeco.com/support or
read the separate guarantee leaflet.
If you need information or support, please contact the Philips Saeco hotline
in your country. Contacts are included in the warranty booklet supplied
separately or visit www.saeco.com/support.
Clean the automatic milk frother and
make sure it is correctly assembled or
installed.
Different types of milk result in different
amounts of froth and different froth
qualities. Semi-skimmed or full-fat
cow's milk give good results.
Ordering maintenance products
-
Intenza+ water filter (CA6702)
-
Lubricant (HD5061)
-
Descaling solution (CA6700)
Technical specifications
Feature Value/ location
Nominal voltage Inside of service door
Power rating Inside of service door
Size (w x h x d) 295mm x 325mm x 420mm
Weight 6.9 kg
Material Plastic
Cord length 0.8m -1.2m
Water tank capacity 1000ml
Page 31

Cup size Up to 95mm
Coffee bean container capacity 170g
Coffee grounds container capacity 8 cakes
Pump pressure 15 bar
Boiler Stainless steel
Safety devices Thermal fuse
English
31
Page 32

32
Français
Table des matières
Introduction 33
Important 33
Avertissement 33
Attention 34
Champs électromagnétiques (CEM) 35
Présentation de la machine (Fig. 1) 35
Première installation 35
Installation de la machine 35
Remplissage du réservoir 36
Remplissage du bac à grains de café 37
Processus de chauffe de la machine 37
Installation du filtre à eau Intenza+ 38
Utilisation de la machine 39
Préparation d'une ou deux tasses d'espresso 39
Préparer des boissons à base de lait 39
Préparer un cappuccino 40
Production de mousse de lait 41
Eau chaude 41
Réglage de la machine 42
Réglage du niveau de mouture du café 42
Régler le volume du café avec la fonction MEMO 43
Régler le volume du cappuccino avec la fonction MEMO 43
Nettoyage et entretien 43
Nettoyage rapide du système de production du lait 43
Nettoyage (quotidien) du mousseur à lait automatique 44
Nettoyage complet de la carafe à lait avec nettoyeur de circuit du lait (mensuellement) 44
Nettoyage du groupe café 47
Lubrification 49
Détartrage de l'appareil 50
Procédure de détartrage 50
Préparation 50
Cycle de détartrage 51
Cycle de rinçage 51
Interruption du processus de détartrage 52
Signification des voyants 53
Dépannage 55
Recyclage 58
Garantie et assistance 58
Commande de produits d'entretien 58
Caractéristiques techniques 58
Page 33

Introduction
Important
Avertissement
Français
Cher client, vous venez d'acheter une machine à espresso automatique de
la série Philips 2100 et nous vous en remercions. Pour bénéficier pleinement
de l'assistance Philips, veuillez enregistrer votre produit sur le site
www.philips.com/welcome. Cette machine convient à la préparation de café
espresso à partir de grains de café entiers. Elle distribue également de la
vapeur et de l’eau chaude. Vous trouverez dans ce mode d'emploi toutes
les informations nécessaires pour installer, utiliser, entretenir et obtenir les
meilleurs résultats avec votre machine.
Pour plus d'informations et vidéos d'instructions sur les produits, veuillez
consulter notre site Internet www.philips.com/support.
Cette machine est équipée de fonctions de sécurité. Veuillez néanmoins lire
et suivre attentivement les consignes de sécurité et utiliser la machine
uniquement tel qu'indiqué dans ces instructions, afin d'éviter toute blessure
ou tout dommage accidentels dus à une mauvaise utilisation. Conservez ce
mode d’emploi pour toute consultation ultérieure.
-
Connectez la machine à une prise murale avec une tension qui
correspond aux spécifications techniques de la machine.
-
Branchez la machine sur une prise murale mise à la terre.
-
Ne laissez pas le cordon pendre de la table ou du plan de travail ou
entrer en contact aves des surfaces chaudes.
-
Ne plongez jamais la machine, le cordon ou le câble d'alimentation dans
l'eau (risque d'électrocution).
-
Ne versez pas de liquides sur le connecteur du cordon d'alimentation.
-
N'orientez jamais le jet d'eau chaude vers des parties du corps : il y a un
risque de brûlures.
-
Évitez de toucher les surfaces chaudes. Utilisez les poignées et boutons.
-
Retirez la fiche de la prise de courant pour éteindre la machine.
-
En cas de dysfonctionnement.
-
Si vous ne comptez pas utiliser la machine pendant longtemps.
-
Avant de nettoyer la machine.
-
Tirez la prise et non le cordon d'alimentation.
-
Ne touchez pas la prise secteur avec les mains humides.
-
N'utilisez jamais l'appareil si la fiche, le cordon d'alimentation ou
l'appareil lui-même est endommagé..
-
Évitez d'effectuer toute modification de la machine ou de son cordon
d'alimentation.
-
Effectuez uniquement les réparations auprès d'un centre de service
autorisé par Philips pour éviter tout risque.
-
la machine ne peut être utilisée par des enfants âgés de moins de 8 ans.
33
Page 34

34
Français
Attention
-
Cette machine peut être utilisée par des enfants âgés de 8 ans ou plus,
des personnes dont les capacités physiques, sensorielles ou
intellectuelles sont réduites ou des personnes manquant d'expérience et
de connaissances, à condition que ces enfants ou personnes soient sous
surveillance ou qu'ils aient reçu des instructions quant à l'utilisation
sécurisée de la machine et qu'ils aient pris connaissance des dangers
encourus.
-
Le nettoyage et l'entretien ne peuvent pas être réalisés par des enfants
sauf s'ils sont âgés de plus de 8 ans et sous surveillance.
-
Tenez la machine et son cordon hors de portée des enfants de moins de
8 ans.
-
Veillez à ce que les enfants ne jouent pas avec l'appareil.
-
N'insérez jamais vos doigts ou des objets dans le moulin à café.
-
Cette machine est uniquement destinée à un usage domestique normal.
Elle ne peut être utilisée dans des environnements tels que des cuisines
réservées aux employés dans les entreprises, magasins, fermes et autres
environnements de travail.
-
Placez toujours l'appareil sur une surface stable et plane. Maintenez-le
en position verticale, également pendant le transport.
-
Ne placez pas la machine sur une plaque chauffante ou directement à
côté d'un four chaud, d'un appareil de chauffage ou d'une source
similaire de chaleur.
-
Veillez à placer uniquement des grains de café torréfiés dans le bac à
grains. Le café moulu, le café soluble, les grains de café bruts ou toute
autre substance placée dans le bac à grains risquerait d'endommager la
machine.
-
Laissez refroidir la machine avant d'insérer ou de retirer tout composant.
Les surfaces de chauffe risquent de retenir la chaleur après leur
utilisation.
-
Ne remplissez jamais le réservoir d'eau avec de l'eau chaude, tiède ou
gazeuse car vous risqueriez de l'endommager ou d'endommager la
machine.
-
N'utilisez jamais des tampons à récurer, des produits abrasifs ou des
détergents agressifs tels que de l'essence ou de l'acétone pour nettoyer
la machine. Utilisez uniquement un chiffon doux humidifié avec de l'eau.
-
Détartrez votre machine régulièrement. La machine indiquera lorsqu'un
détartrage sera nécessaire. Sans détartrage, votre appareil cessera de
fonctionner correctement, et sa réparation ne sera pas couverte par la
garantie.
-
Ne conservez pas la machine à des températures inférieures à 0 °C. L'eau
restant dans le système de chauffe peut geler et causer des dommages.
-
Veillez à ne pas laisser d'eau dans le réservoir lorsque la machine est
inutilisée pendant une période prolongée. Il se peut que l'eau soit
contaminée. Utilisez de l'eau fraîche à chaque utilisation de la machine.
Page 35

Champs électromagnétiques (CEM)
Cet appareil Philips est conforme à toutes les normes et à tous les
règlements applicables relatifs à l’exposition aux champs
électromagnétiques.
Présentation de la machine (Fig. 1)
1 Panneau de commande
2 Icône de nettoyage de la vapeur/du lait
3 Bouton de commande
4 Icônes de grain de café
5 Bouton Espresso (fonction Memo)
6 Bouton Cappuccino (fonction Memo)
7 Icône d'eau chaude
8 Voyant de détartrage
9 Voyant d'avertissement
10 Voyant 2 tasses/memo
11 Voyant « Réservoir d'eau vide »
12 Bouton marche/arrêt avec voyant
13 Buse à eau chaude/vapeur avec manche protecteur
14 Réservoir d'eau
15 Buse de distribution du café
16 Mousseur à lait automatique
17 Connecteur bec d'admission de lait
18 Tube d'aspiration
19 Haut de la carafe à lait
20 Broche au-dessus de la carafe à lait
21 Carafe à lait
22 Indicateur « Plateau égouttoir plein »
23 Grille du plateau égouttoir
24 Plateau égouttoir
25 Bac à marcs de café
26 Chambre d'extraction
27 Porte d'accès au groupe café
28 Bouton de réglage du moulin
29 Moulin à café en céramique
30 bac à marcs de café
31 Outil de réglage du niveau de mouture
32 Couvercle du bac à marcs de café
Français
35
Première installation
Installation de la machine
1 Retirez la machine de son emballage.
2 Placez la machine sur une table ou un plan de travail, à l'écart des
robinets, de l'évier et de toute source de chaleur.
Page 36
15cm
15cm
15cm
15cm
15cm
36
Français
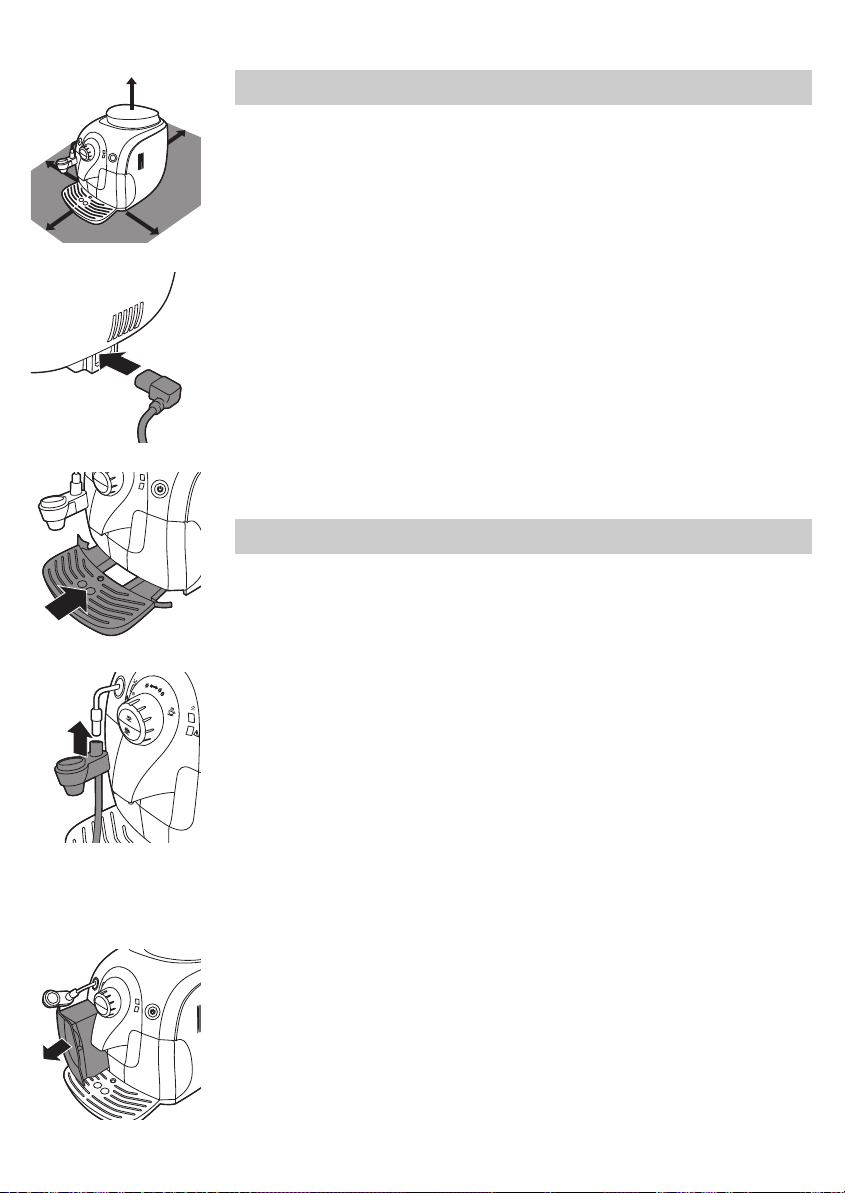
Remarque : Laissez un espace libre d'au moins 15 cm au-dessus, à
l'arrière et sur les côtés de la machine.
3 Insérez la petite fiche dans la prise située à l’arrière de l’appareil.
4 Connectez la prise au secteur.
5 Retirez l'autocollant de protection du plateau égouttoir et faites glisser le
plateau égouttoir dans les rainures à l'avant de la machine.
Remarque : Assurez-vous que le plateau égouttoir est entièrement
inséré.
6 Insérez le mousseur à lait automatique.
Remplissage du réservoir
1 Réglez le mousseur à lait automatique vers la gauche.
2 Retirez le réservoir d'eau de la machine.
3 Rincez le réservoir d'eau sous le robinet.
Page 37
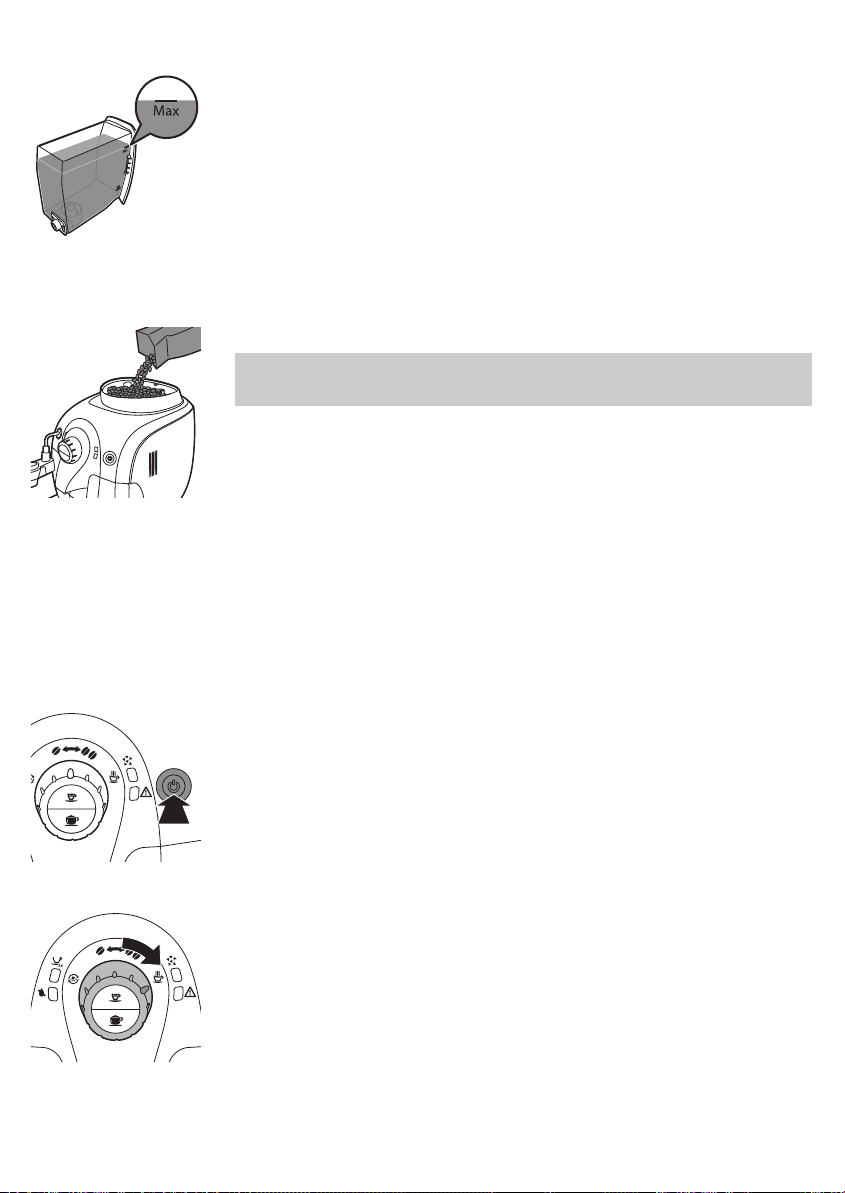
4 Remplissez le réservoir avec de l'eau froide du robinet, jusqu'au niveau
maximal (MAX).
5 Glissez le réservoir d’eau dans l’appareil.
Remplissage du bac à grains de café
1 Remplissez le réservoir de grains de café spécial espresso.
Remarque : Utilisez uniquement des grains de café espresso. N'utilisez
jamais du café moulu, des grains de café non torréfiés ou caramélisés car
cela risque d'endommager la machine.
2 Placez le couvercle sur le bac à grains de café.
Processus de chauffe de la machine
Pendant le processus de chauffe initial, de l'eau fraîche s'écoule par le
circuit interne pour chauffer la machine. Cela prend quelques secondes.
1 Placez une grande tasse sous la buse à eau chaude/vapeur et le bec
verseur de café. Assurez-vous que le bouton de commande est réglé sur
une des icônes de grains de café.
2 Appuyez sur le bouton marche/arrêt.
Français
37
3 Lorsque le voyant d'avertissement clignote rapidement, tournez le
bouton de commande jusqu'à l'icône d'eau chaude et patientez
quelques secondes.
-
Le voyant d'avertissement s'éteint et un peu d'eau s'écoule de la buse
à eau chaude/vapeur ou du mousseur à lait automatique.
Page 38
38
Français
4 Au bout de quelques secondes, lorsque l'eau chaude cesse de s'écouler
de la buse à eau chaude/vapeur et que le voyant d'avertissement
clignote lentement, réglez le bouton de commande à nouveau sur l'icône
de grain unique.
-
La machine chauffe et le bouton marche/arrêt clignote lentement.
-
Lorsque la machine a fini de chauffer, elle effectue un cycle de
rinçage automatique pour nettoyer le circuit interne avec de l'eau
fraîche. L'eau s'écoule de l'unité d'écoulement du café.
-
Lorsque le bouton marche/arrêt reste allumé, la machine est prête
pour le cycle de rinçage manuel.
Remarque : Vous pouvez interrompre le cycle de rinçage automatique en
appuyant sur le bouton pour cappuccino.
Remarque : Le cycle de rinçage automatique s'effectue également
60 minutes après que l'appareil bascule en mode veille ou s'éteint.
Installation du filtre à eau Intenza+
Nous vous conseillons d'installer le filtre à eau Intenza+, car il empêche
l'accumulation de tartre dans votre machine. Vous pouvez acheter le filtre à
eau Intenza+ séparément. Pour plus de détails, veuillez vous reporter à la
section « Commande de produits d'entretien » du chapitre « Garantie et
assistance ».
1 Retirez le petit filtre blanc du réservoir d'eau et rangez-le dans un endroit
sec.
Remarque : Veuillez conserver le petit filtre blanc pour un usage ultérieur.
Vous en aurez besoin pour la procédure de détartrage.
2 Enlevez le filtre de son emballage et plongez-le dans l'eau froide avec
l'ouverture orientée vers le haut. Appuyez légèrement sur les côtés du
filtre pour en faire sortir les bulles d'air.
3 Tournez le bouton du filtre sur le réglage qui correspond à la dureté de
l'eau de la région dans laquelle vous habitez.
a Eau très douce/eau douce
b Eau calcaire (par défaut)
c Eau très calcaire
Remarque : Vous pouvez mesurer la dureté de l'eau à l'aide d'une
bandelette de test prévue à cet effet.
Page 39
4 Placez le filtre à eau dans le réservoir d’eau vide. Appuyez dessus jusqu'à
ce qu'il ne puisse plus bouger.
5 Remplissez le réservoir d'eau avec de l'eau fraîche jusqu'à l'indication
MAX et glissez-le dans la machine.
6 Laissez la machine faire passer l'eau chaude jusqu'à ce que le réservoir
d'eau soit vide (voir le chapitre « Utilisation de la machine », section «
Eau chaude »).
7 Remplissez le réservoir d'eau avec de l'eau fraîche jusqu'à l'indication
MAX, puis remettez-le en place dans la machine.
-
Le bouton marche/arrêt reste allumé.
La machine est prête à l’emploi.
Utilisation de la machine
Pour garantir un espresso optimal, la machine rince régulièrement son circuit
interne avec de l'eau. Ce cycle de rinçage automatique s'effectue également
60 minutes après que l'appareil bascule en mode veille ou s'éteint. Au cours
du cycle de rinçage automatique, de l'eau s'écoule à travers le circuit interne
directement dans le plateau égouttoir. Videz le plateau égouttoir
régulièrement.
Préparation d'une ou deux tasses d'espresso
1 Assurez-vous que le voyant du bouton marche/arrêt s'allume de manière
continue et que le bouton de commande est dirigé vers l'icône souhaitée
du grain indiquant l'intensité.
2 Placez une ou deux tasses sous l'unité d'écoulement du café.
3 Définissez la puissance du café en tournant le bouton vers un ou deux
grains. Sélectionnez deux grains pour un goût plus fort.
4 Appuyez sur le bouton Espresso.
Remarque : Vous pouvez interrompre le cycle de préparation à tout
moment. Appuyez sur le même bouton que vous avez appuyé pour
commencer à préparer le café.
-
Appuyez une fois sur le bouton d'espresso pour préparer une tasse de
café.
-
Appuyez deux fois sur le bouton d'espresso pour préparer
deux tasses de café.
-
Lorsque vous préparez 2 tasses de café, le voyant des deux tasses
s'allume. La machine moud la quantité de grains de café requise pour
une tasse, puis remplit chaque tasse à moitié. La machine moud
ensuite une nouvelle fois la quantité de grains de café requise pour
une tasse et remplit les deux tasses entièrement.
Remarque : Lorsque la machine est laissée en mode veille, elle s'éteint
automatiquement au bout de 60 minutes.
Français
39
Préparer des boissons à base de lait
Remarque : Utilisez du lait froid (à une température d'environ 5 °C) avec une
teneur en protéines d'au moins 3 % pour garantir une mousse de qualité
Page 40
40
Français
optimale. Vous pouvez utiliser du lait entier, du lait écrémé, du lait de soja et
du lait sans lactose.
Préparer un cappuccino
Avertissement : Risque de brûlures ! De petits jets d’eau chaude
peuvent précéder l'écoulement de l'eau. Lorsque vous utilisez de
la vapeur, la buse à eau chaude/vapeur et le mousseur à lait
automatique risquent d'être chauds. Prenez la buse à vapeur
uniquement par son manche protecteur.
1 Fixez le mousseur à lait automatique à la buse à eau chaude/vapeur.
2 Tournez la buse à eau chaude/vapeur à l'aide du mousseur à lait
automatique vers la machine jusqu'à ce que le mousseur à lait
automatique touche la machine et se trouve en position horizontale.
3 Retirez le couvercle de la carafe à lait et versez le lait dans celle-ci.
Fermez le couvercle de la carafe à lait.
4 Insérez l'autre extrémité du tube d'aspiration dans la carafe à lait
jusqu'au fond de la carafe à lait.
5 Placez une grande tasse sous le mousseur à lait automatique et la buse
de distribution du café.
6 Définissez la puissance du café en tournant le bouton vers un ou deux
grains. Sélectionnez deux grains pour un goût plus fort.
Page 41
Français
7 Appuyez sur le bouton du cappuccino. La machine verse d'abord le lait,
puis le café.
-
La machine prend quelques secondes avant d'arrêter l'écoulement.
Remarque : Si vous voulez interrompre le cycle de préparation, appuyez
à nouveau sur le bouton cappuccino.
8 La quantité de café et de lait peut être personnalisée. Veuillez vous
reporter au chapitre « Réglage de la machine », section « Réglage de la
longueur du café et du lait ».
9 Placez une tasse sous le mousseur à lait automatique. Effectuez un
nettoyage rapide en versant de l'eau chaude pendant 3 à 5 secondes
après avoir préparé un cappuccino. Reportez-vous à la section
« Nettoyage rapide du système de production du lait » du chapitre
« Nettoyage et entretien ».
10 Retirez le raccord du bec d'admission du lait du mousseur à lait
automatique.
11 Branchez le raccord du lait sur la broche du couvercle du réservoir de lait
et placez le réservoir de lait dans le frigo.
Remarque : Après avoir versé une boisson à base de lait, effectuez un
nettoyage rapide du système de production du lait en distribuant de
l'eau chaude pendant 5 secondes.
41
Eau chaude
Production de mousse de lait
Avertissement : Risque de brûlures ! De petits jets d’eau chaude
peuvent précéder l'écoulement de l'eau. Lorsque vous utilisez de
la vapeur, la buse à eau chaude/vapeur et le mousseur à lait
automatique risquent d'être chauds. Prenez la buse à vapeur
uniquement par son manche protecteur.
1 Suivez les étapes 1 à 5 de la section « Préparer un cappuccino » et
tournez le bouton vers l'icône de nettoyage de la vapeur/du lait pour
mousser le lait.
2 Tournez le bouton de commande sur un ou deux grains de café pour
arrêter de mousser le lait.
Avertissement : Risque de brûlures ! De petits jets d’eau chaude
peuvent précéder l'écoulement de l'eau. Utilisez uniquement le
manche protecteur adéquat.
1 Assurez-vous que le bouton marche/arrêt reste allumé. Si le bouton de
marche/arrêt clignote lentement, la machine chauffe.
2 Retirez le mousseur à lait automatique. Gardez le manche protecteur sur
la buse à eau chaude/vapeur.
Page 42
2
1
42
Français
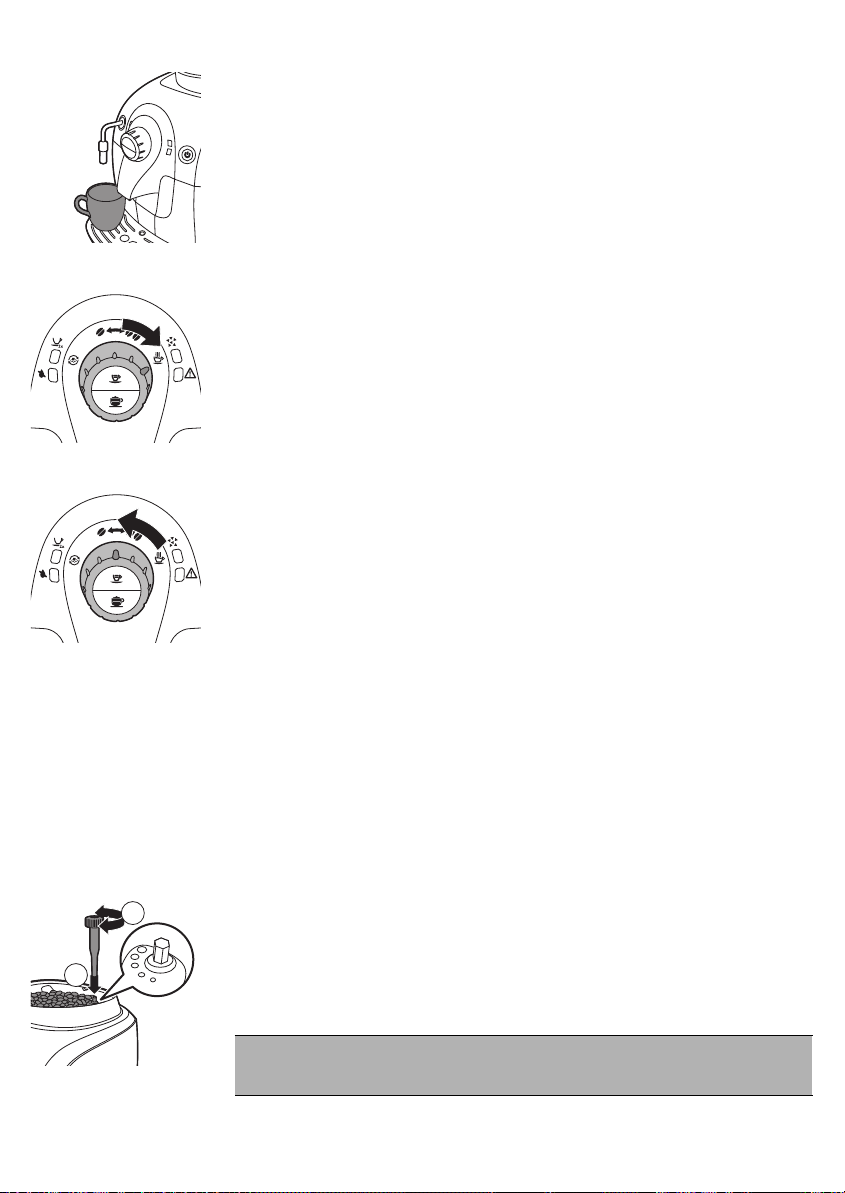
3 Placez une tasse sous la buse à eau chaude/vapeur.
4 Réglez le bouton de commande sur l'icône d'eau chaude.
-
De l'eau s'écoule de la buse à eau chaude/vapeur.
5 Réglez le bouton de commande à nouveau sur une des icônes de grain
de café lorsque la tasse contient la quantité souhaitée d'eau chaude.
Réglage de la machine
Vous pouvez régler le niveau de mouture et le volume de café pour obtenir
un café parfaitement adapté à vos goûts.
Réglage du niveau de mouture du café
Vous pouvez régler le niveau de mouture de la machine. Le moulin à café
en céramique garantit une mouture et une finesse précises et parfaites à
chaque tasse de café. Il préserve un arôme intense, pour un goût parfait à
chaque tasse.
-
Appuyez fermement sur le bouton de réglage de la mouture, puis
tournez-le d'un cran à la fois.
-
Vous pouvez choisir parmi 5 paramètres de mouture différents. Plus le
point est petit, plus le café est intense.
-
La différence devient perceptible après que vous avez préparé 2 ou 3
tasses de café sur le nouveau paramètre.
Avertissement : Ne tournez pas le bouton de réglage de la
mouture de plus d'un cran à la fois afin d'éviter d'endommager le
moulin à café.
Page 43

Régler le volume du café avec la fonction MEMO
Vous pouvez régler le volume du café selon vos goûts et la taille des tasses.
Le bouton espresso peut être programmé.
1 Placez une tasse sous la buse de distribution du café.
2 Maintenez le bouton espresso enfoncé. Relâchez le bouton lorsque la
machine commence à moudre des grains de café.
-
Le voyant 2 tasses et le bouton marche/arrêt clignotent lentement.
3 Appuyez sur le bouton espresso lorsque la tasse contient la quantité de
café souhaitée.
La machine enregistre automatiquement le nouveau réglage.
Régler le volume du cappuccino avec la fonction MEMO
Vous pouvez régler le volume du café selon vos goûts et la taille des tasses.
Le bouton cappuccino peut être programmé.
1 Placez une tasse sous la buse de distribution du café.
2 Maintenez le bouton cappuccino enfoncé. Relâchez le bouton lorsque la
machine commence à moudre des grains de café.
-
Le voyant 2 tasses et le bouton marche/arrêt clignotent lentement.
3 Appuyez à nouveau sur le bouton cappuccino lorsque la tasse contient la
quantité de lait souhaitée.
La machine enregistre automatiquement le nouveau réglage.
Nettoyage et entretien
Un nettoyage et un détartrage réguliers prolongent la durée de vie de votre
machine et assurent la qualité et le goût de votre café.
Avertissement : N'utilisez jamais de tampons à récurer, de
produits de nettoyage abrasifs ou de liquides agressifs pour
nettoyer la machine.
Français
43
Avertissement : Débranchez toujours la machine et laissez-la
refroidir avant de la nettoyer.
Remarque : Aucune des parties amovibles ne passe au lave-vaisselle.
Rincez-les sous le robinet.
Nettoyage rapide du système de production du lait
Remarque : Après avoir préparé un cappuccino, effectuez un nettoyage
rapide du système de production du lait.
1 Placez une tasse sous le mousseur à lait automatique.
2 Réglez le bouton de commande sur l'icône d'eau chaude.
3 Versez de l'EAU CHAUDE pendant 5 secondes.
4 Tournez le bouton de commande sur une des icônes de grains pour
arrêter de verser l'eau chaude.
Page 44
44
Français
Nettoyage (quotidien) du mousseur à lait automatique
1 Placez une tasse sous le mousseur à lait automatique.
2 Insérez le tube d'aspiration dans une tasse remplie d'eau douce.
3 Réglez le bouton de commande sur l'icône de nettoyage de la vapeur/du
lait.
4 Versez de l'eau chaude pendant 5 secondes.
5 Tournez le bouton de commande sur une des icônes de grains de café
pour arrêter de verser l'eau chaude.
Nettoyage complet de la carafe à lait avec nettoyeur de circuit du lait (mensuellement)
Nettoyage mensuel du mousseur à lait automatique
Le nettoyage mensuel du mousseur à lait correspond à deux cycles de
nettoyage effectués l'un après l'autre : pour le premier cycle, le nettoyage
utilise le nettoyeur de circuit de lait Saeco mélangé dans l'eau, et pour le
second cycle, seule l'eau est utilisée.
Attention : Si la machine a récemment été utilisée, le tube à vapeur et le
mousseur à lait peuvent être chauds.
Remarque : Avant de commencer la procédure, assurez-vous que le
réservoir d’eau est rempli jusqu’à la mesure MAX.
Cycle de nettoyage avec nettoyeur de circuit du lait et eau.
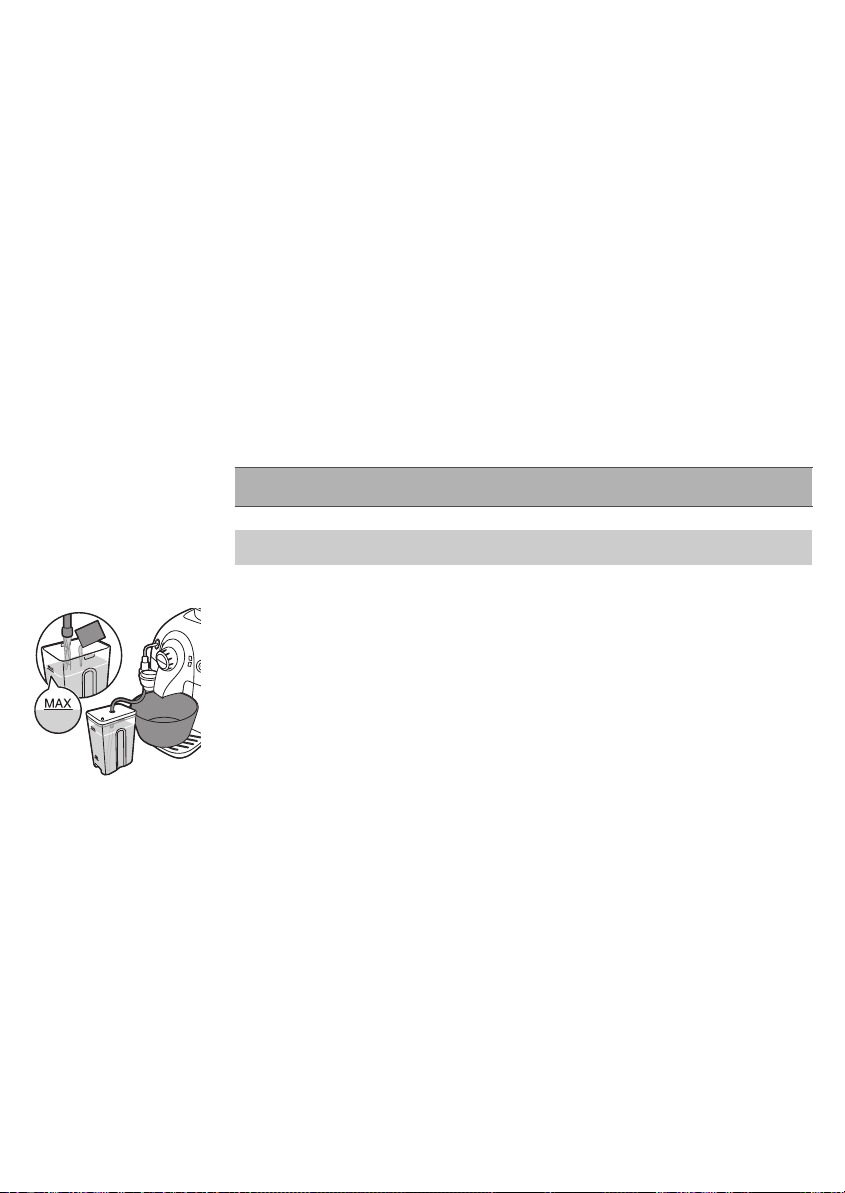
1 Versez le contenu d'un sachet de nettoyeur de circuit du lait Saeco dans
la carafe à lait et remplissez la carafe à lait d’eau jusqu’à la mesure
maximum. Fermez le couvercle de la carafe à lait.
2 Insérez l'autre extrémité du tube d'aspiration dans la carafe à lait
jusqu'au fond de la carafe à lait.
3 Placez un grand récipient sous la buse de distribution de lait.
4 Réglez le bouton de commande sur l'icône de nettoyage de la vapeur/du
lait.
-
La machine commence à distribuer la solution de nettoyage à travers
la buse de distribution du lait.
5 Laissez la machine verser l'eau jusqu'à ce que la lumière du réservoir
d'eau vide s'allume.
6 Retirez le tube d'aspiration de la machine. Rincez soigneusement la
carafe à lait et remplissez-la d’eau claire jusqu’au niveau maximal (MAX).
7 Répétez les étapes 3 à 6.
Nettoyage des pièces du mousseur à lait automatique
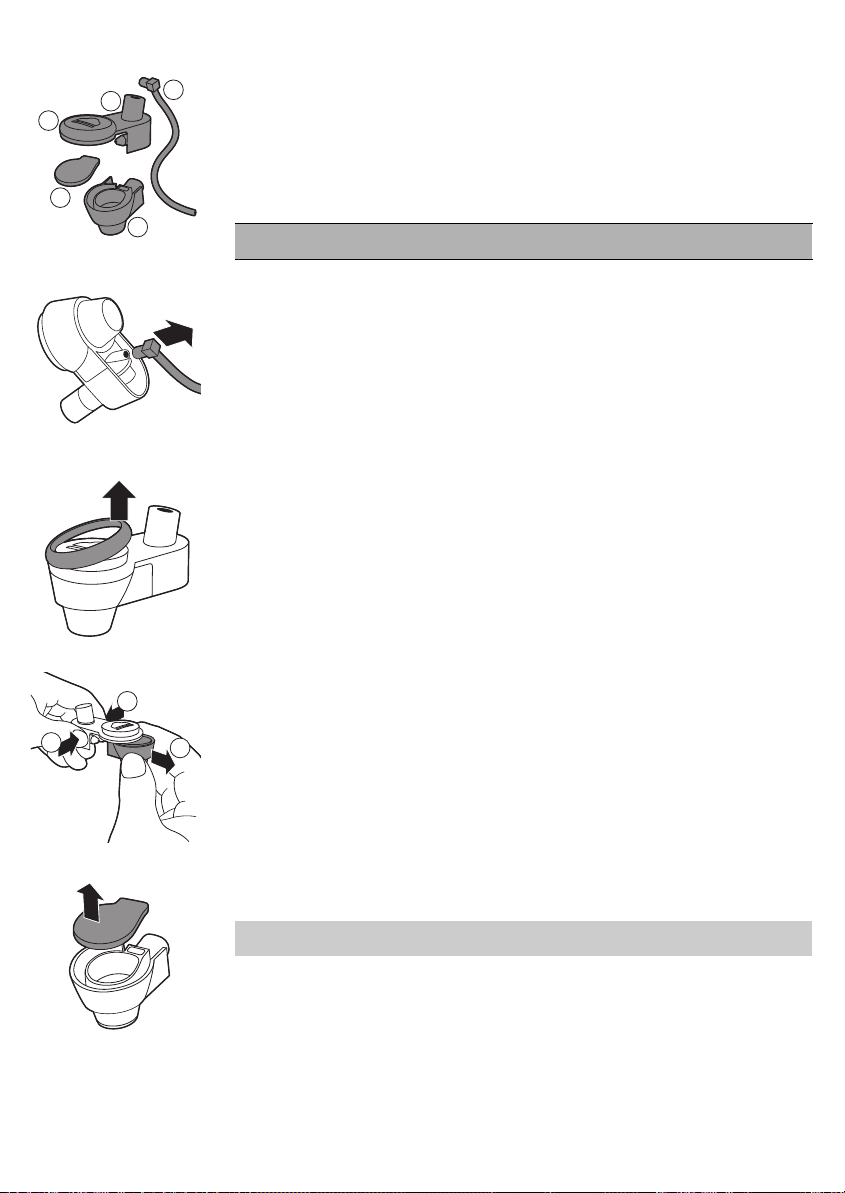
Le mousseur à lait automatique se compose de quatre parties qui doivent
être démontées :
Page 45
1
2
4
5
3
2
1
1
Français
1 Tube d'aspiration
2 Couvercle du mousseur à lait
3 Joint
4 Mousseur à lait
5 Couvercle en caoutchouc
Comment nettoyer le mousseur à lait automatique
1 Retirez le mousseur à lait automatique du tube à vapeur.
Attention : Si la machine a récemment été utilisée, le tube à vapeur et
le mousseur à lait peuvent être chauds.
2 Retirez le tube d'aspiration du couvercle du mousseur à lait.
3 Retirez le joint du mousseur à lait automatique.
45
4 Pour retirer le mousseur à lait automatique, appuyez sur les côtés (1).
Puis, tirez-le en faisant de petits mouvements latéraux (2).
5 Retirez le couvercle en caoutchouc du mousseur à lait.
6 Rincez les composants à l'eau tiède.
Remarque : Vous pouvez également nettoyer ces composants au lavevaisselle.
Page 46
46
Français
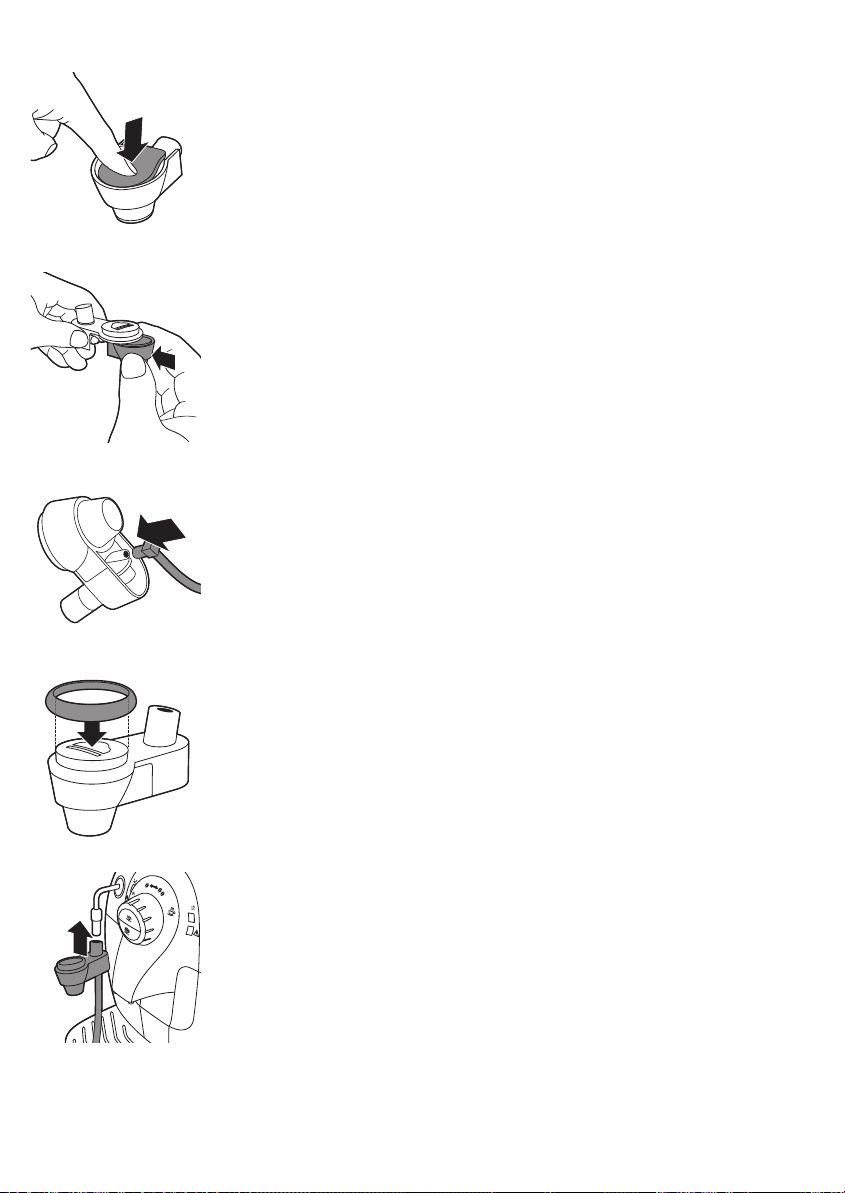
7 Pour remonter la machine, appuyez au milieu pour fixer le couvercle en
caoutchouc sur le mousseur à lait et s'assurer qu'il est en place.
8 Fixez le mousseur à lait automatique au couvercle du mousseur à lait.
Vous devez entendre un clic quand les deux parties s'enclenchent.
9 Insérez le tube d'aspiration dans le mousseur à lait automatique.
10 Replacez le joint sur le mousseur à lait automatique.
11 Fixez le mousseur à lait automatique à nouveau à la buse à eau
chaude/vapeur.
Page 47
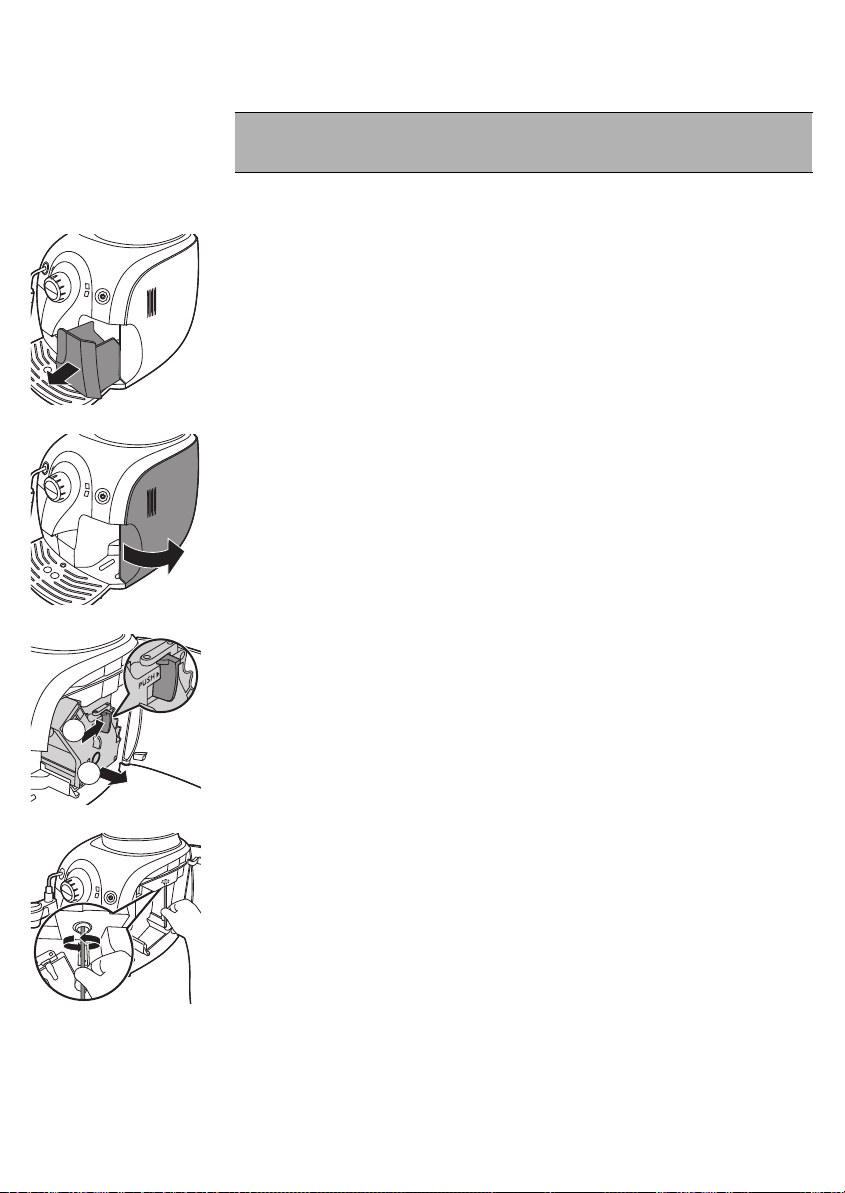
Nettoyage du groupe café
1
2
Avertissement : Ne nettoyez pas le groupe café dans le lavevaisselle et n’utilisez pas de liquide vaisselle ou de détergent
pour le nettoyer.
Nettoyez le groupe café une fois par semaine.
1 Mettez la machine hors tension et débranchez-la.
2 Enlevez le bac à marc de café de la machine.
3 Ouvrez le portillon de l'appareil.
Français
47
4 Appuyez sur le bouton PUSH et tirez le groupe café pour l'enlever de la
machine.
5 Nettoyez soigneusement le conduit de sortie du café à l'aide d'un
manche de cuillère ou d'un autre ustensile de cuisine au bout arrondi.
6 Nettoyez l'intérieur de l'appareil avec un chiffon humide.
Page 48
48
Français
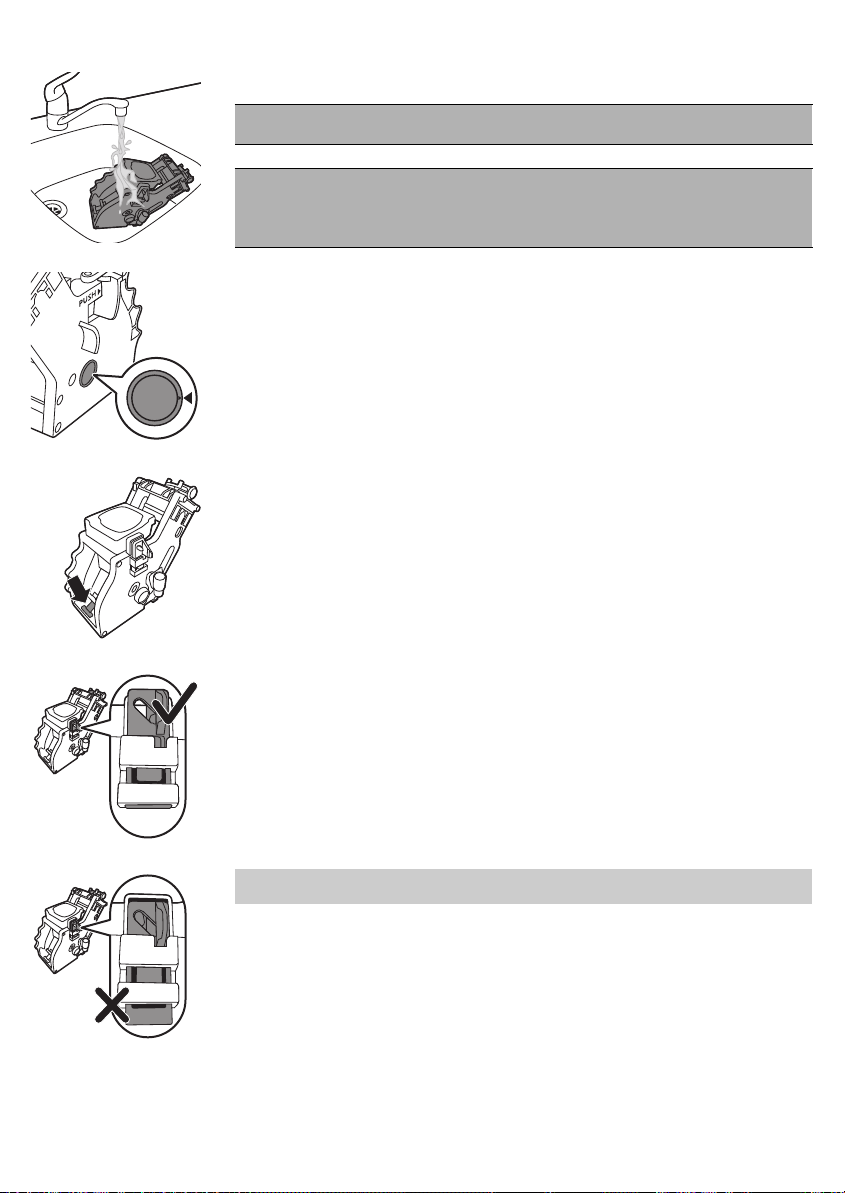
7 Rincez l'extérieur du groupe café sous l'eau tiède du robinet.
Avertissement : N'utilisez jamais de liquide vaisselle ou tout autre
produit de nettoyage pour nettoyer le groupe café.
Avertissement : Ne séchez pas le groupe café avec un chiffon
pour ne pas que des fibres ne tombent dans le groupe café. Après
rinçage, retirez l'excès d'eau en secouant le groupe café ou en le
laissant sécher à l'air libre.
8 Avant d'insérer le groupe café dans la machine, assurez-vous que les
deux repères situés sur le côté correspondent. S'ils ne correspondent
pas, procédez comme suit :
-
Assurez-vous que le levier est en contact avec la base du groupe café.
9 Assurez-vous que le crochet de verrouillage de la chambre d'extraction
est placé dans la bonne position.
-
Pour positionner correctement le crochet, poussez-le vers le haut
jusqu'à ce qu'il soit dans la position la plus haute.
Remarque : Le crochet n'est pas correctement placé s'il est toujours dans
la position la plus basse.
Page 49
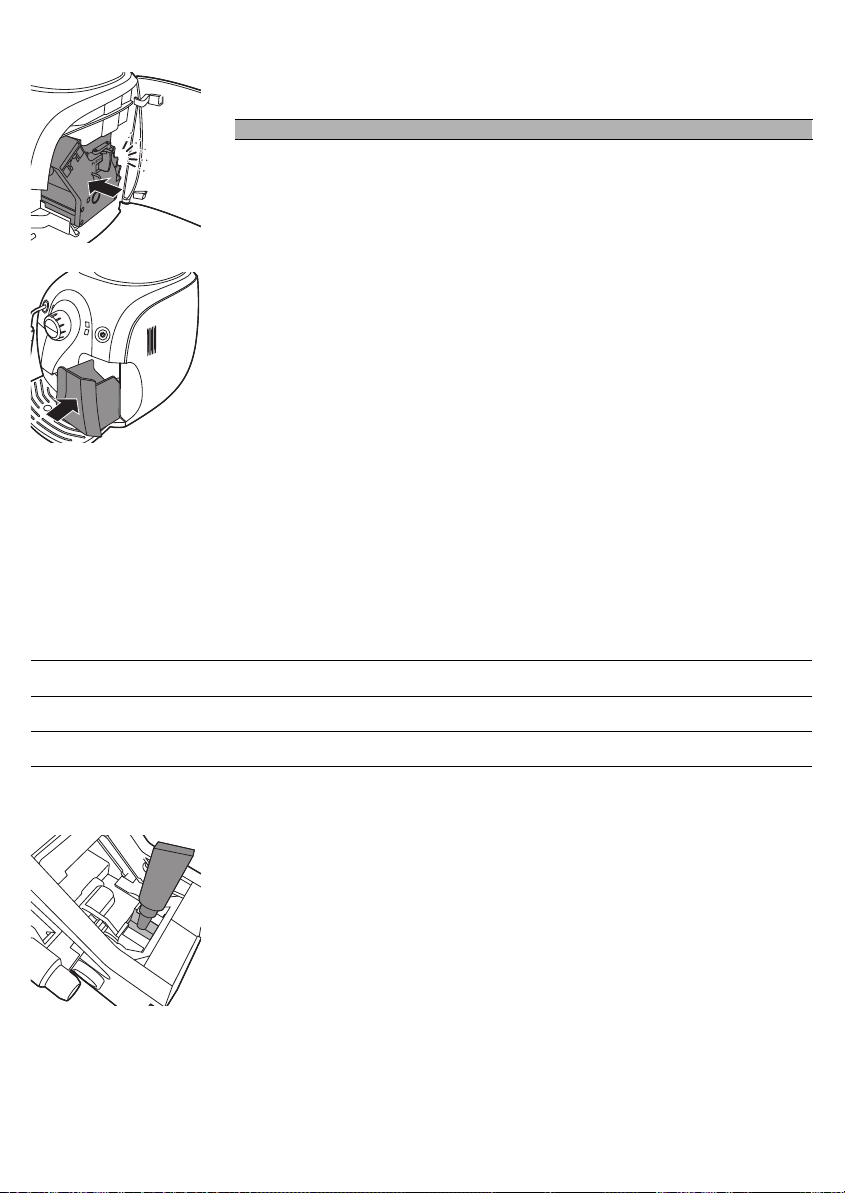
10 Replacez le groupe café dans la machine en le faisant glisser le long des
rainures latérales de guidage jusqu'à ce qu'il soit enclenché.
Avertissement : N'appuyez pas sur le bouton PUSH.
11 Fermez le portillon de l’appareil.
12 Insérez le bac à marcs de café dans la machine.
Lubrification
Pour des performances optimales, vous devez lubrifier le groupe café.
Reportez-vous au tableau ci-dessous pour connaître la fréquence de
lubrification. Si vous avez besoin d'aide, visitez notre site Web :
www.philips.com/support.
Type d'utilisation
Faible 1-5 Tous les 4 mois
Nombre de produits
journaliers
Fréquence de lubrification
Français
49
Normale 6-10 Tous les 2 mois
Élevée >10 Mensuelle
1 Mettez la machine hors tension et débranchez-la.
2 Retirez le groupe café et rincez-le sous l'eau tiède du robinet tel que
décrit dans la section « Nettoyage hebdomadaire du groupe café ».
3 Appliquez une fine couche de graisse autour de l'axe dans le fond du
groupe café.
Page 50

50
Français
4 Appliquez une fine couche de graisse sur les rails des deux côtés (se
reporter à l'image).
5 Insérez le groupe café tel que décrit dans la section « Nettoyage
hebdomadaire du groupe café ».
Vous pouvez utiliser le tube de graisse plusieurs fois.
Détartrage de l'appareil
Des résidus de calcaire se forment lors de l'utilisation de la machine. Il est
essentiel de détartrer la machine lorsque le voyant de détartrage orange
reste allumé. Veuillez utiliser uniquement la solution de détartrage Philips
Saeco pour détartrer la machine. La solution de détartrage Philips Saeco est
conçue pour garantir des performances optimales de la machine. Vous
pouvez acheter la solution de détartrage Philips Saeco dans la boutique en
ligne www.shop.philips.com/service.
Remarque : L'utilisation d'autres produits de détartrage pourrait
endommager la machine et laisser des résidus dans l'eau.
Avertissement : Ne buvez jamais l'eau mélangée à la solution de
détartrage que vous avez versée dans le réservoir d'eau ou l'eau
contenant des résidus issus de la machine au cours de la
procédure de détartrage.
Remarque : Pour bénéficier d'une assistance en ligne accrue, veuillez visiter
notre page de détartrage dédiée : www.philips.com/descale.
Procédure de détartrage
La procédure de détartrage dure environ 30 minutes et consiste en un cycle
de détartrage et un cycle de rinçage.
Préparation
1 Éteignez la machine.
Avertissement : Si vous n'éteignez pas la machine, vous ne pouvez pas
démarrer le détartrage.
2 Videz le plateau égouttoir et remettez-le en place. Retirez le mousseur à
lait automatique (le cas échéant).
3 Videz le réservoir d’eau et retirez le filtre à eau Intenza+ (le cas échéant).
Versez le contenu d’une bouteille complète de solution de détartrage
Philips/Saeco dans le réservoir d’eau.
4 Ajoutez de l'eau à la solution de détartrage dans le réservoir d'eau
jusqu'à l'indication MAX.
5 Assurez-vous que le bouton de commande est réglé sur l'icône de grain
de café.
6 Placez un bol sous la buse à eau chaude/vapeur et le bec verseur de
café.
Page 51
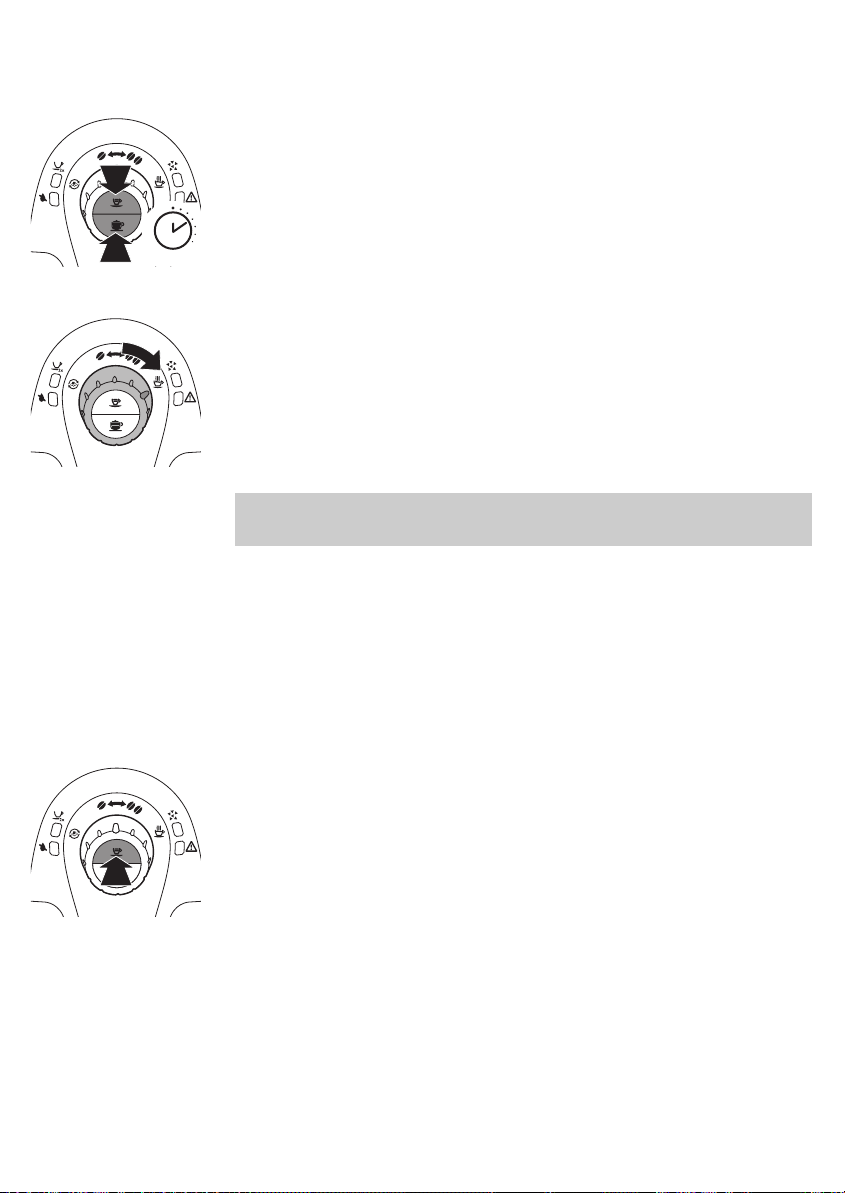
5 sec
Français
Cycle de détartrage
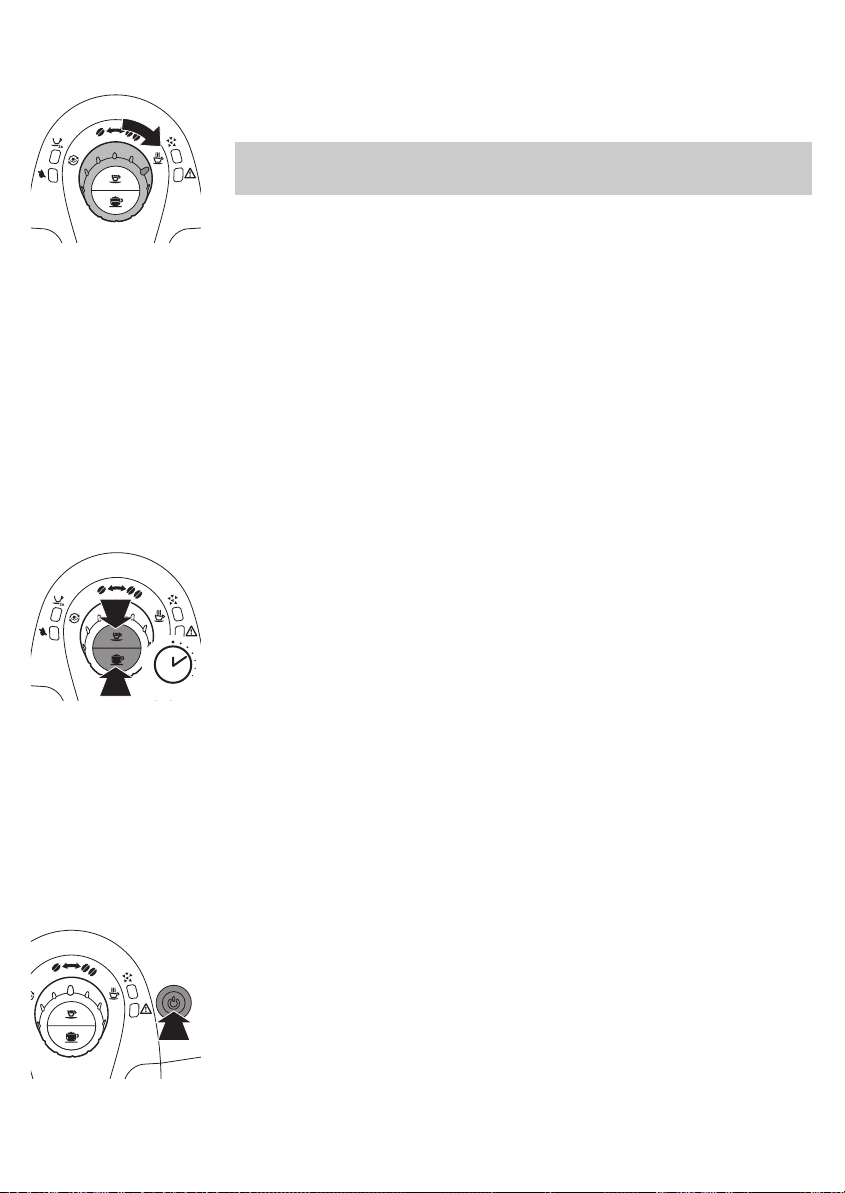
1 Appuyez simultanément sur le bouton pour espresso et le bouton pour
cappuccino pendant environ 5 secondes.
-
Le voyant de détartrage orange clignote lentement pendant tout le
cycle de détartrage.
2 Réglez le bouton de commande sur l'icône d'eau chaude et préparez de
l'eau chaude. Laissez l'eau s'écouler de la buse à eau chaude/vapeur
pendant 10 secondes.
3 Réglez à nouveau le bouton de commande sur l'icône du grain de café
unique. Attendez environ 1 minute pour laisser agir la solution de
détartrage.
4 Appuyez sur le bouton pour espresso pour préparer une tasse
d'espresso. Attendez environ 1 minute pour laisser agir la solution de
détartrage.
Remarque : Pendant la procédure de détartrage, la fonction de mouture
de café ne fonctionne pas. Si vous appuyez sur le bouton pour espresso,
seule de l'eau s'écoulera de la machine.
5 Répétez les étapes 2 à 4 jusqu'à ce que le voyant « Réservoir d'eau
vide » reste allumé.
51
Cycle de rinçage
1 Retirez le réservoir d'eau de la machine et rincez-le.
2 Remplissez le réservoir d'eau avec de l'eau du robinet jusqu'à l'indication
MAX et replacez le réservoir d'eau dans la machine.
3 Videz la grande tasse et replacez-la sur le plateau égouttoir, sous la buse
à eau chaude/vapeur.
4 Appuyez sur le bouton pour espresso pour préparer une tasse
d'espresso. Répétez l'opération une deuxième fois.
Page 52
5 sec
52
Français
5 Réglez le bouton de commande sur l'icône d'eau chaude.
6 Laissez l'eau chaude s'écouler de la buse à eau chaude/vapeur jusqu'à
ce que le voyant « Réservoir d'eau vide » reste allumé.
Remarque : Si vous voulez interrompre l'écoulement de l'eau, réglez à
nouveau le bouton de commande sur l'icône de grain de café. Pour
redémarrer l'écoulement de l'eau, réglez-le sur l'icône d'eau chaude.
7 Retirez le plateau égouttoir, rincez-le et remettez-le en place.
8 Remettez le mousseur à lait automatique en place.
9 Retirez le réservoir d'eau et rincez-le.
10 Réinstallez le filtre à eau Intenza+ (le cas échéant).
11 Remplissez le réservoir d'eau avec de l'eau du robinet jusqu'à l'indication
MAX et replacez le réservoir d'eau dans la machine.
12 Appuyez sur le bouton marche/arrêt pour éteindre la machine.
Lorsque vous remettez la machine en marche, elle est de nouveau prête
à être utilisée.
Interruption du processus de détartrage
Si la machine se bloque pendant la procédure de détartrage, vous pouvez
appuyer sur le bouton marche/arrêt. Cela vous permet de compléter la
procédure de détartrage. Suivez les étapes ci-dessous pour vous assurer
que votre machine est de nouveau prête à l'emploi.
1 Appuyez simultanément sur le bouton pour espresso et le bouton pour
cappuccino pendant environ 5 secondes.
2 Retirez le plateau égouttoir, rincez-le et remettez-le en place.
3 Retirez le réservoir d'eau et rincez-le.
4 Remplissez le réservoir d'eau avec de l'eau du robinet jusqu'à l'indication
MAX et replacez le réservoir d'eau dans la machine.
5 Appuyez sur le bouton pour espresso pour préparer une tasse
d'espresso. Répétez l'opération une deuxième fois.
6 Réglez le bouton de commande sur l'icône d'eau chaude. Laissez l'eau
chaude s'écouler de la buse à eau chaude/vapeur jusqu'à ce que le
voyant « Réservoir d'eau vide » reste allumé.
7 Retirez le plateau égouttoir, rincez-le et remettez-le en place.
8 Remettez le mousseur à lait automatique en place.
9 Retirez le réservoir d'eau et rincez-le.
10 Réinstallez le filtre à eau Intenza+ (le cas échéant).
11 Remplissez le réservoir d'eau avec de l'eau du robinet jusqu'à l'indication
MAX et replacez le réservoir d'eau dans la machine.
12 Appuyez sur le bouton marche/arrêt pour éteindre la machine.
Lorsque vous remettez la machine en marche, elle est de nouveau prête
à être utilisée.
Page 53
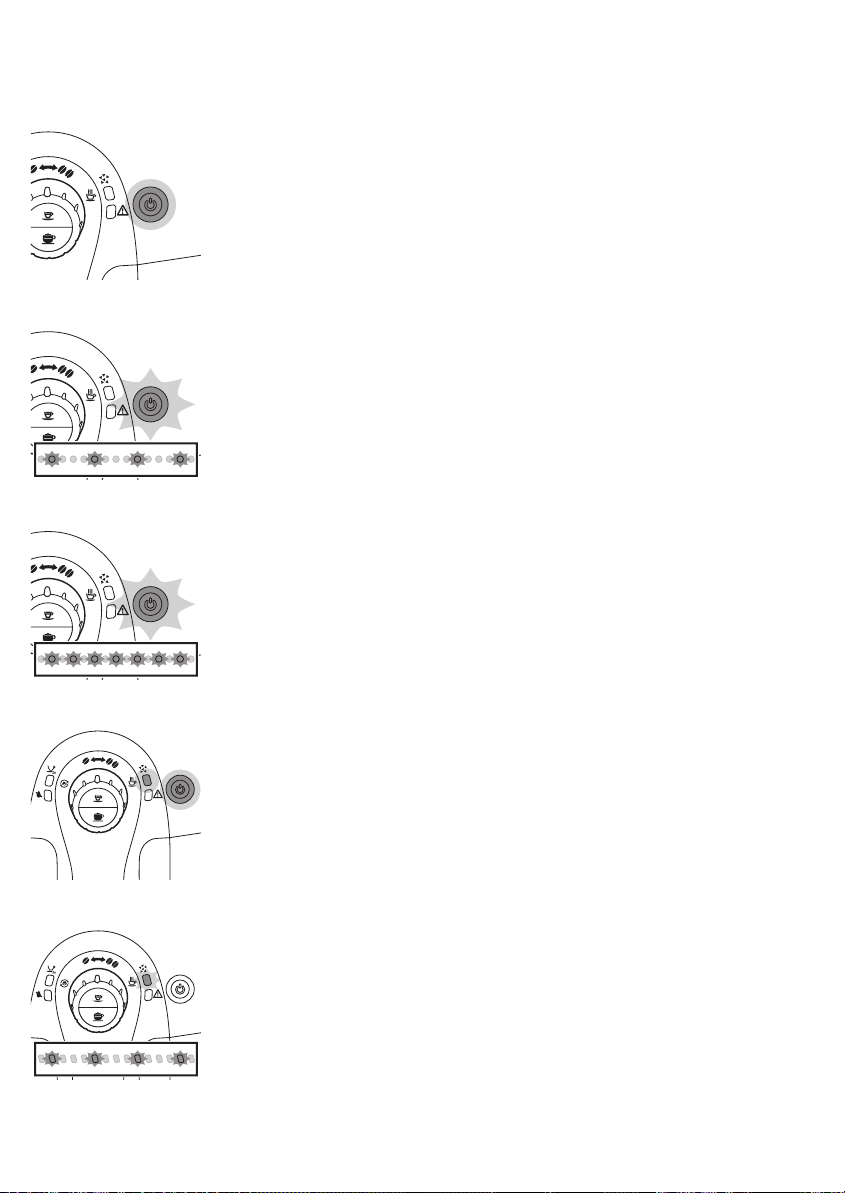
Signification des voyants
-
Le voyant du bouton marche/arrêt reste allumé. La machine est prête à
l’emploi.
-
Le bouton marche/arrêt clignote lentement. La machine chauffe ou
effectue une procédure.
-
Le bouton marche/arrêt clignote rapidement. La machine surchauffe.
Préparez une tasse d'eau chaude pour faire refroidir la machine.
Français
53
-
Les voyants du bouton marche/arrêt et de détartrage restent allumés.
Vous devez détartrer la machine. Suivez les instructions du chapitre
« Détartrage de la machine ».
-
Le voyant de détartrage clignote lentement. La machine est dans le cycle
de détartrage.
Page 54
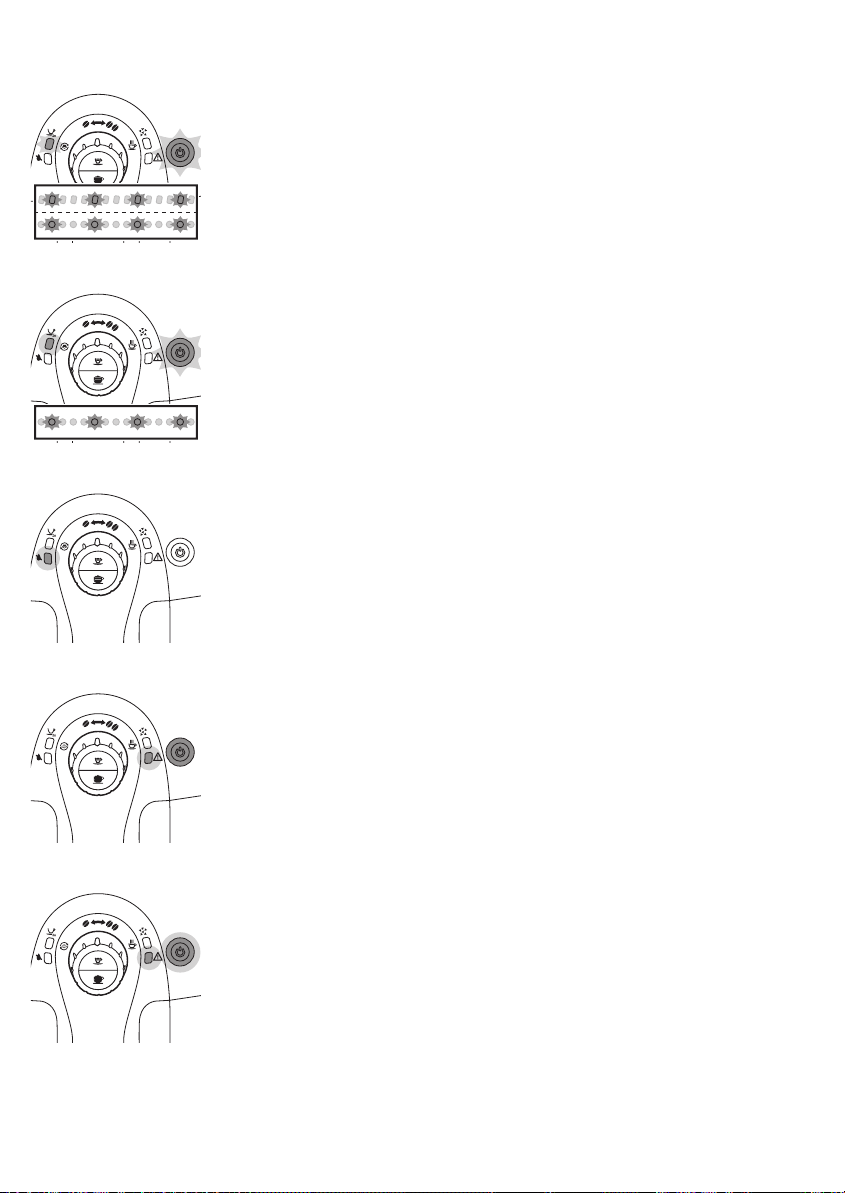
54
Français
-
Les voyants des boutons 2 tasses et marche/arrêt clignotent lentement.
La machine programme la quantité de café à préparer. Suivez les
instructions du chapitre « Utilisation de la machine », section « Réglage
du volume de café ».
-
Le voyant 2 tasses reste allumé et le bouton marche/arrêt clignote
lentement. La machine prépare deux tasses de café.
-
Le voyant « Réservoir d'eau vide » reste allumé. Le niveau d'eau est bas.
Remplissez le réservoir d’eau avec de l’eau fraîche jusqu’au niveau MAX.
-
Le voyant d'avertissement reste allumé et le voyant du bouton
marche/arrêt s'éteint. Le bac à marcs de café est plein. Videz le bac à
marcs de café lorsque l’appareil est allumé. Assurez-vous que le voyant
d'avertissement clignote avant de réinsérer le bac à marcs de café.
-
Les voyants du bouton d'avertissement et de marche/arrêt restent
allumés. Le réservoir à grains de café est vide. Remplissez à nouveau le
bac à marcs de café.
Page 55
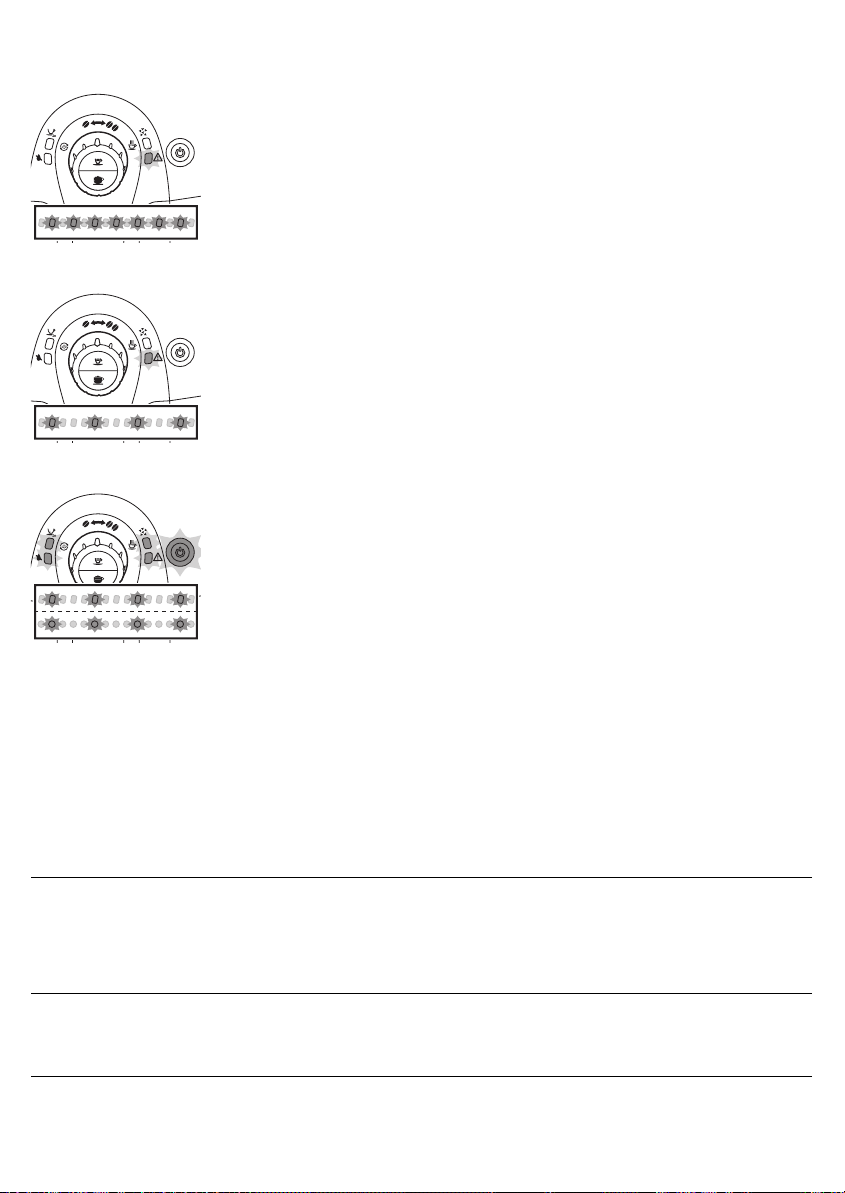
Français
-
Le voyant d'avertissement clignote rapidement. Il n'y a pas d'eau dans le
circuit interne. Réglez le bouton de commande sur l'icône d'eau chaude
et laissez l'eau chaude sortir de la machine jusqu'à ce que l'eau s'écoule
en continu. Veuillez vous reporter au chapitre « Avant utilisation »,
section « Processus de chauffe de la machine ». Suivez les étapes 3 et 4.
-
Le voyant d'avertissement clignote lentement. L'unité de préparation n'a
pas été correctement mise en place, le bac à marcs de café n'a pas été
mis en place, le portillon de l'appareil est ouvert ou le bouton de
commande n'est pas dans la bonne position. Assurez-vous que l'unité de
préparation et le bac à marcs de café ont été mis en place correctement,
que le portillon de l'appareil est fermé et que le bouton de commande
est dans la bonne position. Si vous ne pouvez pas extraire l'unité de
préparation ou la remettre en place, éteignez la machine et rallumez-la.
-
Tous les voyants clignotent lentement et simultanément. L’appareil ne
fonctionne pas. Éteignez la machine pendant 30 secondes puis
rallumez-la. Répétez cette opération deux ou trois fois. Si la machine ne
se réinitialise pas, contactez le Service Consommateurs Philips.
55
Dépannage
Cette rubrique récapitule les problèmes les plus courants que vous pouvez
rencontrer avec la machine. Si vous ne parvenez pas à résoudre le problème
à l'aide des informations ci-dessous, rendez-vous sur le site
www.philips.com/support et consultez la liste de questions fréquemment
posées ou contactez le Service Consommateurs Philips de votre pays.
Problème
Il y a de l’eau sous l’appareil. Le plateau égouttoir est
Cause Solution
trop plein et a débordé.
L’appareil ne repose pas
sur une surface
horizontale.
Videz le plateau égouttoir lorsque le
voyant « Plateau égouttoir plein »
apparaît à travers le plateau égouttoir.
Videz toujours le plateau égouttoir
avant de commencer à détartrer la
machine.
Placez l’appareil sur une surface
horizontale afin que le voyant « Plateau
égouttoir plein » fonctionne
correctement.
Page 56
56
Français
La machine ne s'allume pas. L’appareil est débranché. Assurez-vous que la petite fiche est
La machine se bloque pendant
la procédure de détartrage.
Le café n’est pas assez chaud. Les tasses que vous
La température du café diminue
progressivement.
De l'eau chaude ou de la vapeur
ne s'échappe pas de la buse à
eau chaude/vapeur.
Le processus de
détartrage a été
interrompu ou effectué
dans le mauvais ordre.
utilisez sont froides.
Vous avez ajouté du lait. Que le lait que vous ajoutez soit froid ou
La machine n'a pas été
détartrée à temps.
La buse à eau
chaude/vapeur est
obstruée.
Il se peut que le
mousseur à lait
automatique soit sale.
Remplacez le filtre à eau
(le cas échéant).
correctement insérée dans la prise
secteur. Branchez la machine et mettezla en marche.
Appuyez sur le bouton marche/arrêt.
Vous pouvez relancer la procédure de
détartrage ou suivre les instructions de
la section « Interruption du processus de
détartrage » du chapitre « Détartrage de
la machine ».
Préchauffez les tasses en les rinçant à
l’eau chaude.
chaud, il réduira toujours un peu la
température du café.
Détartrez l’appareil.
Vérifiez si l'orifice de la buse à eau
chaude/vapeur n'est pas bouché. Si
c'est le cas, nettoyez l'orifice à l'aide
d'une aiguille.
Nettoyez le mousseur à lait
automatique.
Retirez le filtre à eau et essayez à
nouveau de verser de l'eau chaude. Si
cela fonctionne, remplacez le filtre à
eau.
Le café a trop peu de crème ou
est aqueux.
Impossible de retirer le groupe
café.
Le réglage du moulin est
défini sur une mouture
grosse.
Le mélange de café n’est
pas adéquat.
L’appareil est en mode
réglage automatique.
Le groupe café est sale. Nettoyez le groupe café.
Le groupe café n’est pas
placé correctement.
Le bac à marc de café
n'a pas été retiré.
La machine est encore
en mode détartrage.
Réglez le moulin sur une mouture plus
fine.
Changez de mélange de café.
Préparez quelques tasses de café.
Fermez la porte destinée à l’entretien.
Mettez l’appareil hors tension, puis
remettez-le en marche. Attendez le
message indiquant que la machine est
prête, puis retirez le groupe café.
Retirez le bac à marc de café avant de
retirer le groupe café.
Il est impossible de retirer le groupe café
en mode détartrage. Terminez d’abord
le processus de détartrage, puis retirez
le groupe café.
Page 57

Français
57
Impossible d’insérer le groupe
café.
La machine moud les grains de
café, mais aucun café ne
s'écoule.
Le café n'est pas assez fort. Le réglage du moulin est
Le groupe café n’est pas
positionné correctement.
Le réglage de la mouture
est trop fin.
Le groupe café est sale. Nettoyez le groupe café.
La buse de distribution
du café est sale.
Le conduit de sortie du
café est bloqué.
défini sur une mouture
grosse.
Le groupe café n’a pas été placé en
pause avant d’être remis en place.
Assurez-vous que le levier est en
contact avec la base du groupe café et
que le crochet du groupe café est dans
la bonne position.
Remettez en place le plateau égouttoir
et le bac à marc de café. Laissez le
groupe café à l’extérieur. Fermez la
porte destinée à l’entretien puis allumez
et éteignez l’appareil. Essayez ensuite
de réinsérer le groupe café.
Réglez le moulin sur une mouture plus
grosse.
Nettoyez la buse de distribution du café
et ses trous avec un nettoyeur de
conduite.
Nettoyez le conduit de sortie du café à
l’aide du manche de l’outil
multifonctions ou du manche d’une
cuillère.
Réglez le moulin à café en céramique
sur une mouture plus fine (voir le
chapitre « Utilisation de la machine »,
section « Réglage du niveau de mouture
du café » ).
Le plateau égouttoir se remplit
rapidement.
L’appareil est en mode
réglage automatique.
Le mélange de café n’est
pas adéquat.
Ce phénomène est
normal. L’appareil utilise
l’eau pour rincer le circuit
interne et le groupe café.
De l’eau coule dans le
système interne
directement dans le
plateau égouttoir.
Préparez quelques tasses de café pour
laisser la machine se régler
automatiquement sur les nouveaux
réglages de mouture.
Utilisez un autre type de grains de café.
Videz le plateau égouttoir lorsque le
voyant « Plateau égouttoir plein » est
allumé à travers le couvercle du plateau
égouttoir.
Placez une tasse sous la buse de
distribution pour recueillir l’eau de
rinçage.
Le groupe café ou les tuyaux à l'arrière
ou sous le groupe café est/sont peutêtre bloqué(s). Rincez le groupe café à
l'eau tiède et nettoyez soigneusement
le filtre supérieur. Nettoyez également
l'intérieur de l'appareil avec un chiffon
doux et humide.
Page 58

58
Français
Il n'y a pas assez de café dans
ma tasse.
Le lait ne mousse pas. Le mousseur à lait
Il n'y a pas d'eau dans le
circuit interne.
Le volume de la tasse a
été modifié.
Le groupe café est sale. Nettoyez le groupe café (consultez la
automatique est sale ou
n'est pas monté ou
installé correctement.
Le type de lait utilisé ne
convient pas pour
produire de la mousse.
Recyclage
-
Ce symbole signifie que ce produit ne doit pas être jetées avec les
déchets ménagèrs (2012/19/EU).
-
Respectez les réglementations de votre pays concernant la collecte
séparée des appareils électriques et électroniques. La mise au rebut
appropriée des piles permet de protéger l'environnement et la santé.
Il y a peut-être de l'air dans le circuit
interne. Rincez le circuit interne de la
machine en réglant le bouton de
commande sur l'icône d'eau chaude et
en laissant un peu d'eau s'écouler de la
machine.
Réglez le volume de la tasse à l'aide de
la fonction memo.
section « Nettoyage du groupe café »
du chapitre « Nettoyage et entretien »).
Nettoyez le mousseur à lait automatique
et vérifiez le montage ou l'installation.
Selon le type de lait, la quantité et la
qualité de la mousse seront différentes.
Le lait de vache semi-écrémé ou entier
donne de bons résultats.
Garantie et assistance
Si vous avez besoin d'informations ou d'une assistance, visitez le site Web
www.saeco.com/support ou lisez le dépliant séparé sur la garantie
internationale.
Pour toute information ou assistance, veuillez contacter la hotline Philips
Saeco dans votre pays. Les contacts sont inclus dans la brochure de
garantie fournie séparément ou sur le site www.saeco.com/support.
Commande de produits d'entretien
-
Filtre à eau Intenza+ (CA6702)
-
Lubrifiant (HD5061)
-
Solution de détartrage (CA6700)
Caractéristiques techniques
Fonction
Tension nominale Intérieur de la porte d'accès au groupe café
Valeur/emplacement
Page 59

Français
Puissance nominale Intérieur de la porte d'accès au groupe café
Dimensions (l x H x P) 295 mm x 325 mm x 420 mm
Poids 6,9 kg
Matériau Plastique
Longueur du cordon 0,8 m - 1,2 m
Capacité du réservoir d’eau 1 000 ml
Taille de tasse Jusqu'à 95 mm
Capacité du bac à marcs de café 170 g
Capacité du bac à marcs de café 8 galettes
Pression de la pompe 15 bars
Chaudière Acier inoxydable
Dispositifs de sécurité Fusible thermique
59
Page 60

60
Nederlands
Inhoudsopgave
Introductie 61
Belangrijk 61
Waarschuwing 61
Let op 62
Elektromagnetische velden (EMV) 62
Apparaatoverzicht (fig. 1) 63
Eerste installatie 63
Het apparaat installeren 63
Het waterreservoir vullen 64
Het bonenreservoir vullen 65
Het apparaat opwarmen 65
Het Intenza+-waterfilter installeren 66
Het apparaat gebruiken 67
1 of 2 kopjes espresso zetten 67
Koffie met melk zetten 68
Cappuccino zetten 68
Melk opschuimen 69
Heet water 70
Het apparaat instellen 70
De maalgraad instellen 70
De hoeveelheid koffie aanpassen met de MEMO-functie 71
De hoeveelheid cappuccino aanpassen met de MEMO-functie 71
Schoonmaken en onderhoud 71
Snelle reiniging van het melksysteem 72
Reiniging van de automatische melkopschuimer (dagelijks) 72
Volledige reiniging van het melksysteem met reinigingsmiddel (maandelijks) 72
De zetgroep schoonmaken 75
Smeren 77
Het apparaat ontkalken 78
Ontkalkingsprocedure 78
Voorbereiding 78
Ontkalkingscyclus 79
Spoelcyclus 79
Onderbreking van het ontkalkingsproces 80
Betekenis van lampjes 81
Problemen oplossen 83
Recyclen 86
Garantie en ondersteuning 86
Onderhoudsproducten bestellen 86
Technische gegevens 86
Page 61

Introductie
Belangrijk
Waarschuwing
Nederlands
Geachte klant, hartelijk dank voor de aanschaf van dit automatische Philipsespressoapparaat uit de 2100-serie. Registreer uw product op
www.philips.com/welcome om optimaal gebruik te kunnen maken van de
door Philips geboden ondersteuning. Het apparaat is geschikt voor de
bereiding van espressokoffie met koffiebonen. Daarnaast levert het
apparaat stoom en heet water. In deze gebruikershandleiding vindt u alle
informatie die u nodig hebt om uw espressoapparaat te installeren en te
gebruiken, en om het beste uit uw apparaat te halen.
Ga voor meer productinformatie en instructievideo’s naar onze website:
www.philips.com/support.
Dit apparaat is voorzien van beveiligingsfuncties. Toch verzoeken we u de
veiligheidsinstructies zorgvuldig te lezen en te volgen, en het apparaat
alleen te gebruiken zoals beschreven in deze instructies om te voorkomen
dat u per ongeluk letsel of schade oploopt door verkeerd gebruik van het
apparaat. Bewaar deze handleiding goed om deze indien nodig te kunnen
raadplegen.
-
Sluit de machine aan op een stopcontact met een voltage dat
overeenkomt met de technische specificaties van de machine.
-
Sluit de machine uitsluitend aan op een geaard stopcontact.
-
Zorg ervoor dat het netsnoer niet over de rand van een tafel of aanrecht
hangt of in aanraking komt met hete oppervlakken.
-
Dompel de machine, de stekker of het netsnoer nooit onder in water
(gevaar van een elektrische schok).
-
Giet geen vloeistoffen over de stekker
-
Richt de heetwateruitloop nooit op lichaamsdelen: gevaar van
brandwonden.
-
Raak geen hete oppervlakken aan. Gebruik handgrepen en knoppen.
-
Haal de stekker uit het stopcontact om het apparaat uit te schakelen.
-
Als zich een storing voordoet.
-
Als het apparaat gedurende langere tijd niet wordt gebruikt.
-
Voordat u het apparaat schoonmaakt.
-
Trek aan de stekker en niet aan het netsnoer als u de stekker uit het
stopcontact haalt.
-
Raak de stekker niet met natte handen aan.
-
Gebruik de machine niet als de stekker, het netsnoer of de machine zelf
beschadigd is..
-
Breng geen aanpassingen aan de machine of het netsnoer aan.
-
Laat reparaties alleen uitvoeren door een door Philips erkend
servicecentrum om gevaar te vermijden.
-
De machine moet niet worden gebruikt door kinderen jonger dan 8 jaar.
61
Page 62

62
Nederlands
Let op
-
Deze machine kan worden gebruikt door kinderen vanaf 8 jaar en door
personen met verminderde lichamelijke, zintuiglijke of geestelijke
capaciteiten of weinig ervaring en kennis, mits zij onder toezicht staan of
instructies hebben ontvangen over veilig gebruik van de machine en zij
de gevaren van het gebruik begrijpen.
-
Reiniging en onderhoud mogen alleen door kinderen worden uitgevoerd
die ouder zijn dan 8 en alleen onder toezicht.
-
Houd de machine en het snoer buiten het bereik van kinderen die jonger
zijn dan 8 jaar oud.
-
Houd toezicht op kinderen om te voorkomen dat ze met de machine
gaan spelen.
-
Steek nooit vingers of andere voorwerpen in de koffiemolen.
-
Deze machine is uitsluitend bedoeld voor normaal huishoudelijk gebruik.
Deze machine is niet bedoeld voor gebruik in personeelskeukens van
bijvoorbeeld winkels, kantoren, boerderijen of vergelijkbare
werkomgevingen.
-
Plaats het apparaat op een vlakke en stabiele ondergrond. Houd de
machine rechtop, ook tijdens transport.
-
Plaats de machine niet op een warmhoudplaat of naast een hete oven,
verwarmingselement of vergelijkbare warmtebron.
-
Vul het bonenreservoir uitsluitend met gebrande koffiebonen. Als u het
bonenreservoir met gemalen koffie, oploskoffie, ongebrande koffiebonen
of een andere substantie vult, kan dit schade aan de machine
veroorzaken.
-
Laat de machine afkoelen, voordat u onderdelen plaatst of verwijdert. De
verwarmingsoppervlakken houden na gebruik nog een tijdje warmte vast.
-
Vul het waterreservoir nooit met warm of heet water of met spuitwater,
omdat dit schade kan veroorzaken aan het waterreservoir en aan de
machine.
-
Gebruik nooit schuursponzen, schurende schoonmaakmiddelen of
agressieve vloeistoffen zoals benzine of aceton om de machine schoon
te maken. Gebruik een zachte vochtige doek.
-
Ontkalk uw machine regelmatig. De machine geeft aan wanneer u deze
moet ontkalken. Als u dit niet doet, zal de machine na verloop van tijd
niet goed meer werken. In dit geval vallen reparaties niet onder de
garantie.
-
Plaats de machine niet op een locatie met een temperatuur onder de 0
°C. Water in het verwarmingssysteem kan bevriezen en schade
veroorzaken.
-
Zorg ervoor dat het waterreservoir leeg is wanneer u de machine
gedurende langere tijd niet gebruikt. Het water is na langere tijd niet vers
meer. Gebruik altijd vers water wanneer u de machine gebruikt.
Elektromagnetische velden (EMV)
Dit Philips-apparaat voldoet aan alle toepasselijke richtlijnen en
voorschriften met betrekking tot blootstelling aan elektromagnetische
velden.
Page 63
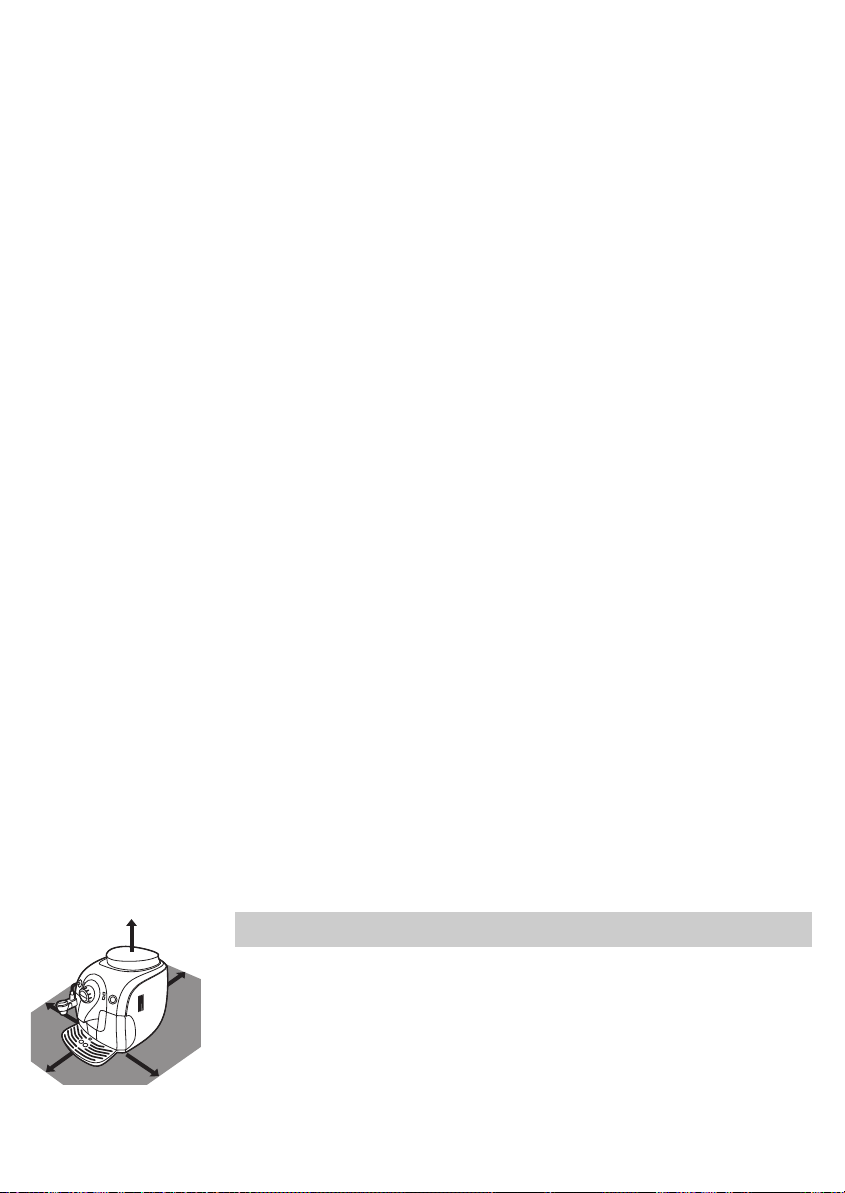
Apparaatoverzicht (fig. 1)
15cm
15cm
15cm
15cm
15cm
1 Bedieningspaneel
2 ‘Stoom/melk reinigen’-pictogram
3 Bedieningsknop
4 Koffieboonpictogrammen
5 Espressoknop (Memo-functie)
6 Cappuccinoknop (Memo-functie)
7 Heetwaterpictogram
8 Ontkalkingslampje
9 Waarschuwingslampje
10 Lampje voor 2 kopjes/memo
11 Lampje voor ‘waterreservoir leeg’
12 Aan-uitknop met lampje
13 Heetwater-/stoompijpje met beschermend handvat
14 Waterreservoir
15 Koffie-uitloop
16 Automatische melkopschuimer
17 Koppelstuk voor melkslangetje
18 Aanzuigslang
19 Bovenste gedeelte van de melkkan
20 Pinnetje op deksel melkkan
21 Melkkan
22 Lekbak vol-indicator
23 Rooster lekbak
24 Lekbak
25 Koffiediklade
26 Zetgroep
27 Servicedeur
28 Instelknop molen
29 Keramische koffiemolen
30 Bonenreservoir
31 Hulpmiddel voor aanpassing maalgraad
32 Deksel van bonenreservoir
Nederlands
63
Eerste installatie
Het apparaat installeren
1 Verwijder al het verpakkingsmateriaal van de machine.
2 Plaats de machine op een tafel of aanrecht, uit de buurt van de kraan, de
gootsteen en warmtebronnen.
Opmerking: Laat boven, achter en aan beide zijden van de machine een
ruimte van ten minste 15 cm vrij.
Page 64
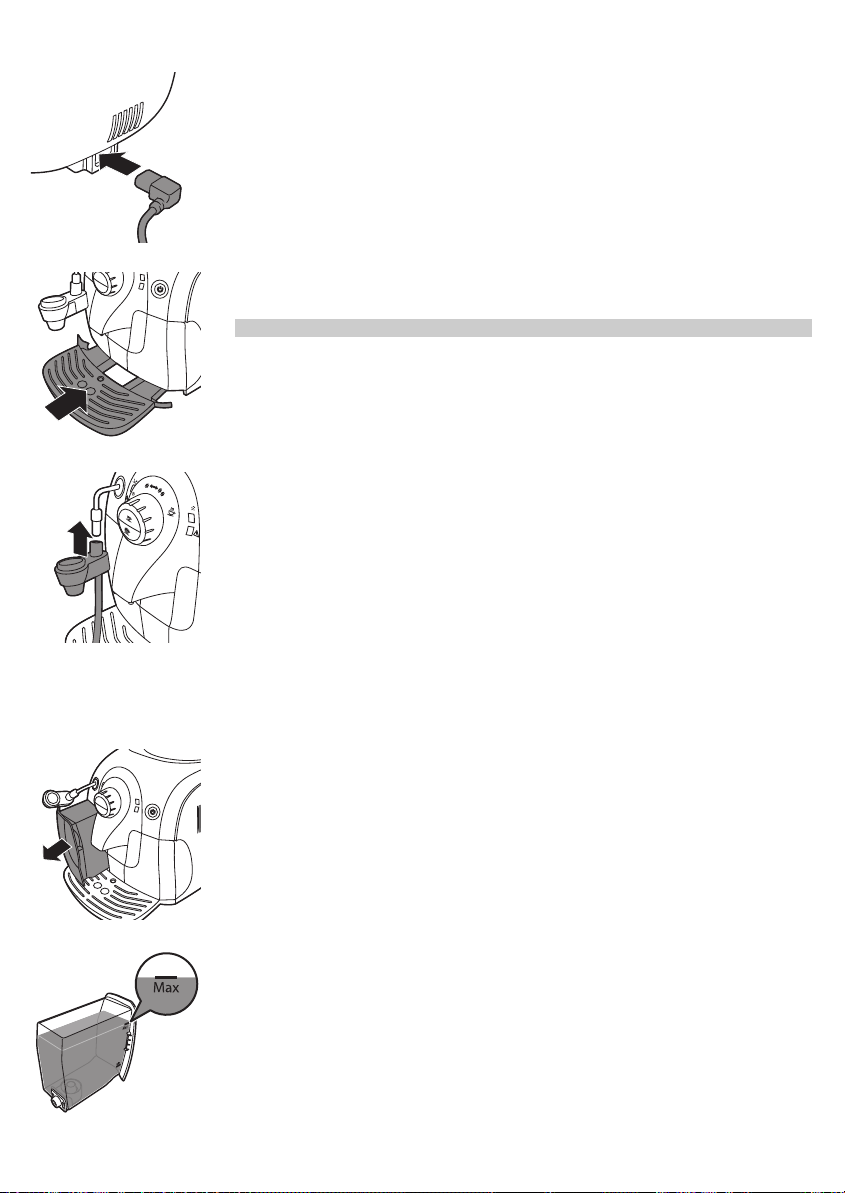
64
Nederlands
3 Steek de kleine stekker in de aansluitopening aan de achterkant van het
apparaat.
4 Steek de stekker in het stopcontact.
5 Verwijder de beschermende sticker van de lekbak en schuif de lekbak in
de geleidegroeven aan de voorzijde van het apparaat.
Opmerking: Zorg ervoor dat de lekbak volledig is geplaatst.
6 Bevestig de automatische melkopschuimer op het pijpje.
Het waterreservoir vullen
1 Draai de automatische melkopschuimer naar links.
2 Verwijder het waterreservoir uit het apparaat.
3 Spoel het waterreservoir onder de kraan.
4 Vul het waterreservoir tot aan de MAX-aanduiding met koud kraanwater.
5 Schuif het waterreservoir terug in het apparaat.
Page 65
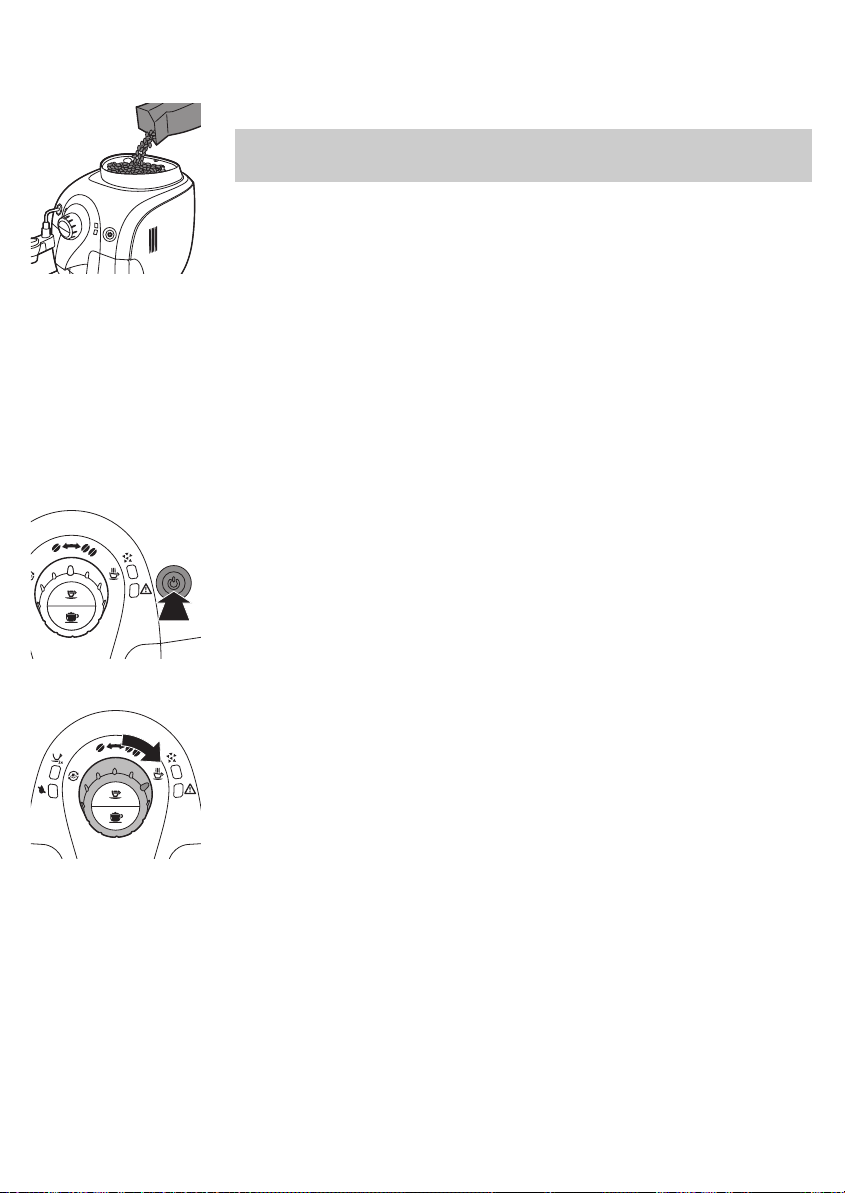
Het bonenreservoir vullen
1 Vul het bonenreservoir met espressobonen.
Opmerking: Gebruik alleen espressobonen. Gebruik nooit gemalen koffie,
ongebrande koffiebonen of gekarameliseerde koffiebonen. Dit kan
schade aan het apparaat kan veroorzaken.
2 Plaats het deksel op het bonenreservoir.
Het apparaat opwarmen
Wanneer het apparaat voor het eerst wordt opgewarmd, stroomt er vers
water door het interne doorloopsysteem om het apparaat op te warmen. Dit
duurt een paar seconden.
1 Plaats een grote kop onder het heetwater-/stoompijpje en de koffie-
uitloop. Zorg dat de bedieningsknop naar een van de
koffieboonpictogrammen wijst.
2 Druk op de aan-uitknop.
Nederlands
65
3 Wanneer het waarschuwingslampje snel knippert, draait u de
bedieningsknop naar het heetwaterpictogram en wacht u enkele
seconden.
-
Het waarschuwingslampje gaat uit en er komt een beetje water uit het
heetwater-/stoompijpje of de automatische melkopschuimer.
Page 66
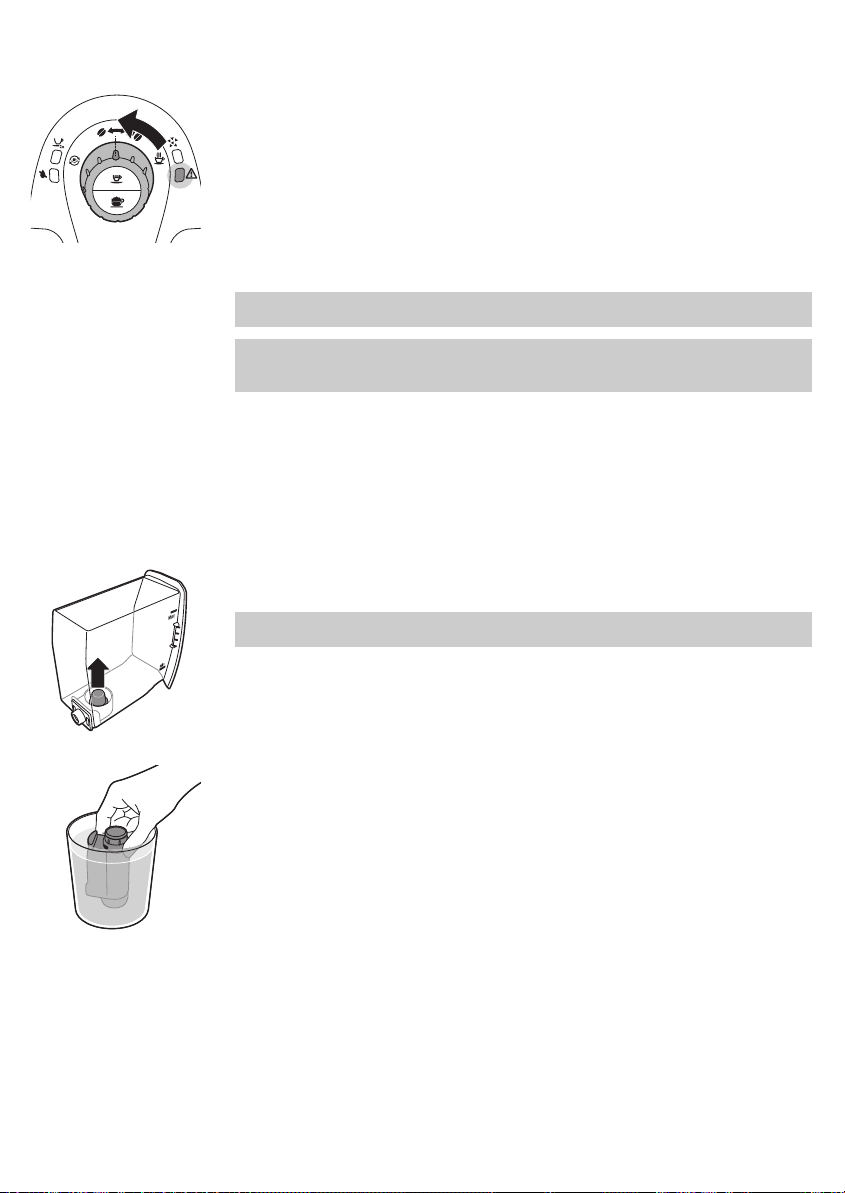
66
Nederlands
4 Als er na een paar seconden geen heet water meer uit het heetwater-
/stoompijpje komt en het waarschuwingslampje langzaam knippert,
draait u de bedieningsknop terug naar het pictogram van één koffieboon.
-
Het apparaat is aan het opwarmen en de aan-uitknop knippert
langzaam.
-
Wanneer het apparaat is opgewarmd, voert het een automatische
spoelcyclus met schoon water uit om het interne doorloopsysteem te
reinigen. Er stroomt water uit de koffie-uitloop.
-
Wanneer de aan-uitknop onafgebroken brandt, is het apparaat klaar
voor de handmatige spoelcyclus.
Opmerking: U kunt de automatische spoelcyclus afbreken door op de
knop voor espresso of cappuccino te drukken.
Opmerking: 60 minuten nadat het apparaat is overgeschakeld naar
stand-by of is uitgeschakeld, wordt ook een automatische spoelcyclus
uitgevoerd.
Het Intenza+-waterfilter installeren
Wij raden u aan het Intenza+-waterfilter te installeren om kalkaanslag in uw
apparaat te voorkomen. U kunt het Intenza+-waterfilter afzonderlijk
aanschaffen. Raadpleeg voor meer informatie het gedeelte
'Onderhoudsproducten bestellen' in het hoofdstuk 'Garantie en
ondersteuning'.
1 Verwijder het kleine witte filter uit het waterreservoir en bewaar het op
een droge plaats.
Opmerking: Bewaar het kleine witte filter voor toekomstig gebruik. U hebt
het filter nodig voor het ontkalkingsproces.
2 Haal het filter uit de verpakking en dompel het in koud water met de
opening naar boven gericht. Druk zachtjes op de zijkanten van het filter
om luchtbelletjes te laten ontsnappen.
Page 67
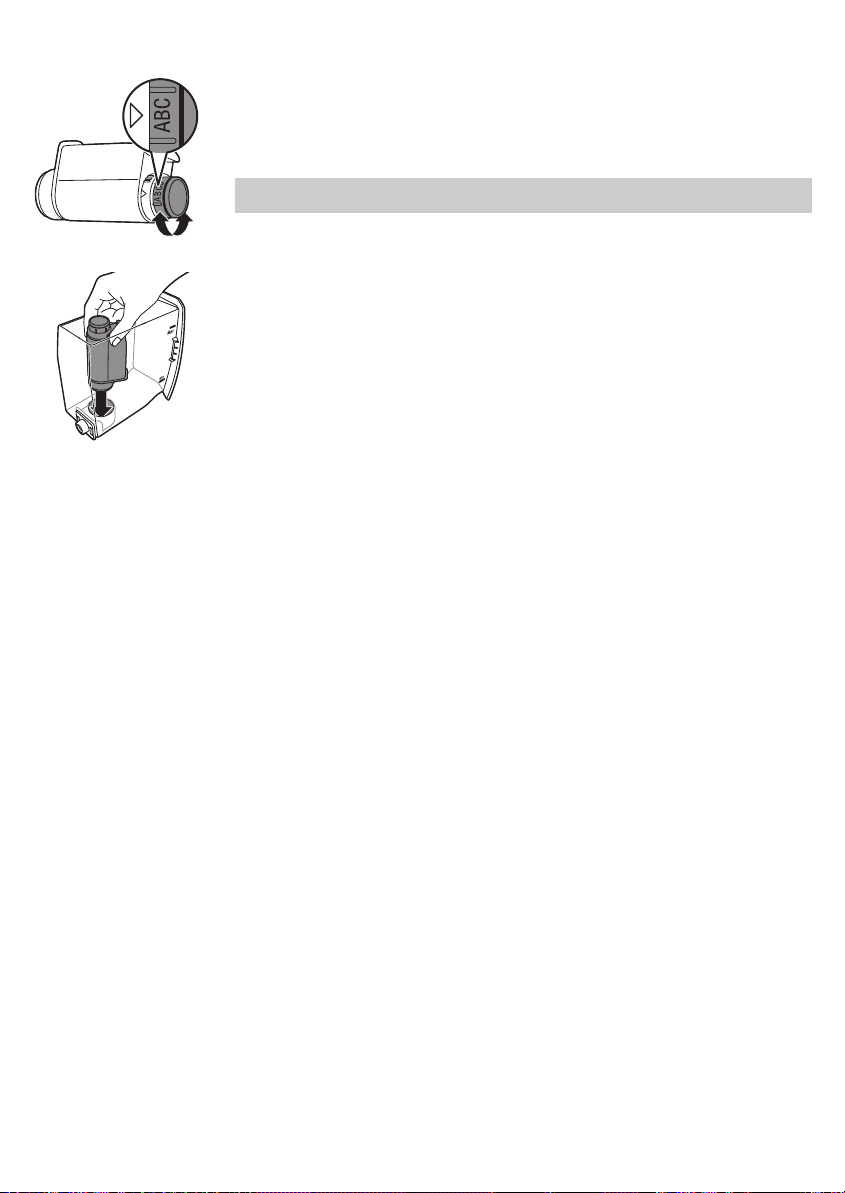
3 Draai de knop van het filter naar de instelling die overeenkomt met de
waterhardheid van het gebied waarin u woont.
a Zeer zacht water/zacht water
b Hard water (standaard)
c Zeer hard water
Opmerking: U kunt de waterhardheid meten met een teststrip voor
waterhardheid.
4 Plaats het filter in het lege waterreservoir. Druk het filter naar beneden
totdat het niet verder kan.
5 Vul het waterreservoir tot aan de MAX-aanduiding met vers water en
schuif het reservoir in het apparaat.
6 Tap heet water totdat het waterreservoir leeg is (zie het gedeelte 'Heet
water' in het hoofdstuk 'Het apparaat gebruiken').
7 Vul het waterreservoir opnieuw tot aan de MAX-aanduiding met vers
water en schuif het terug in het apparaat.
-
De aan-uitknop brandt onafgebroken.
Het apparaat is klaar voor gebruik.
Het apparaat gebruiken
Voor perfecte espresso spoelt het apparaat het interne doorloopsysteem
regelmatig schoon met water. Deze spoelcyclus wordt automatisch
uitgevoerd, 60 minuten nadat het apparaat is overgeschakeld naar stand-by
of is uitgeschakeld. Tijdens de automatische spoelcyclus loopt een deel van
het water via het interne doorloopsysteem rechtstreeks in de lekbak. Leeg
de lekbak regelmatig.
Nederlands
67
1 of 2 kopjes espresso zetten
1 Controleer of het lampje van de aan-uitknop onafgebroken brandt en of
de bedieningsknop naar het gewenste koffieboonpictogram voor
koffiesterkte wijst.
2 Plaats 1 of 2 kopjes onder de koffie-uitloop.
3 Selecteer de koffiesterkte door de bedieningsknop naar één of twee
bonen te draaien. Selecteer twee bonen voor een sterkere smaak.
Page 68
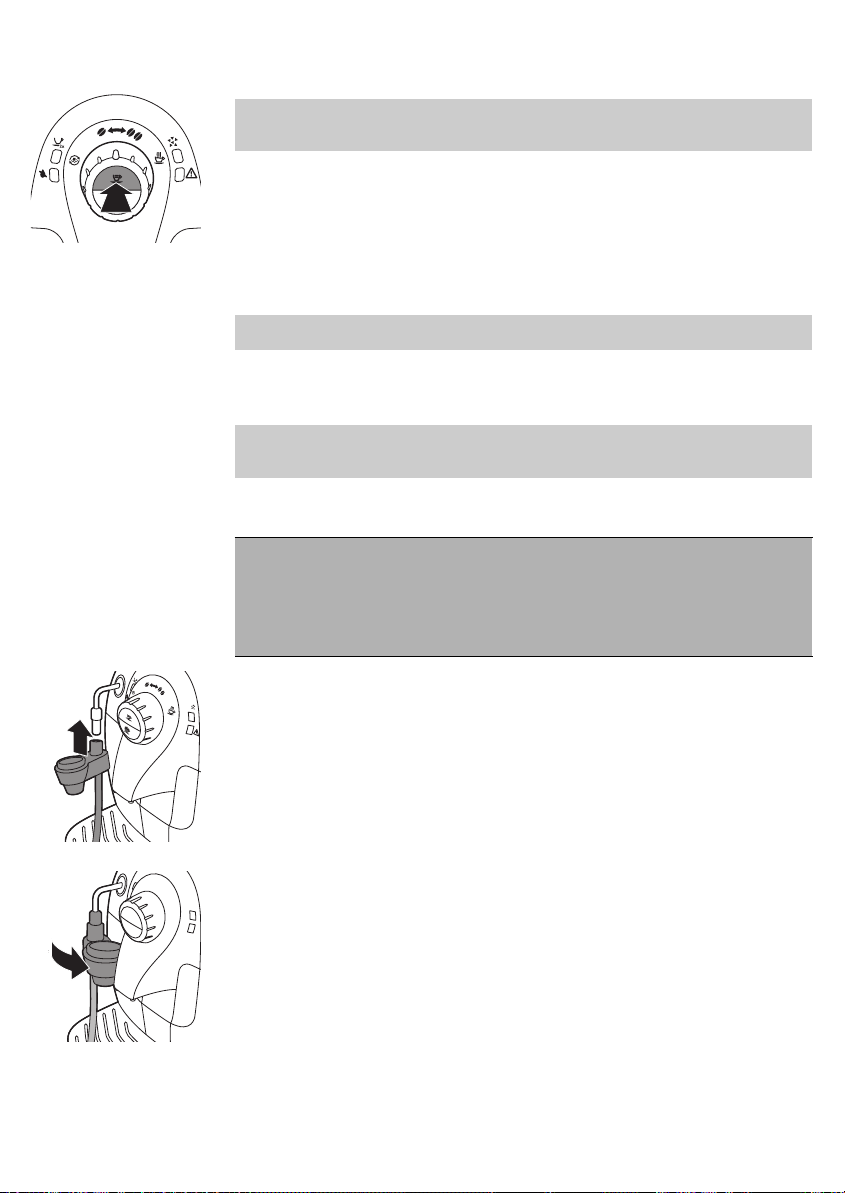
68
Nederlands
4 Druk op de espressoknop.
Opmerking: U kunt het koffiezetten op elk gewenst moment
onderbreken. Druk op dezelfde knop waarop u hebt gedrukt om het
koffiezetten te starten.
-
Druk eenmaal op de espressoknop om 1 kopje koffie te zetten.
-
Druk tweemaal op de espressoknop om 2 kopjes koffie te zetten.
-
Wanneer u twee kopjes koffie zet, gaat het lampje voor 2 kopjes
branden. Het apparaat maalt de benodigde hoeveelheid koffiebonen
voor één kopje en vult dan beide kopjes voor de helft. Vervolgens
maalt het apparaat nogmaals koffiebonen voor één kopje en worden
beide kopjes volledig gevuld.
Opmerking: Wanneer u het apparaat in stand-by laat staan, wordt het na
60 minuten automatisch uitgeschakeld.
Koffie met melk zetten
Opmerking: Gebruik koude melk (met een temperatuur van ongeveer 5 °C)
met een eiwitgehalte van ten minste 3% voor het beste schuimresultaat. U
kunt volle melk, halfvolle melk, sojamelk en lactosevrije melk gebruiken.
Cappuccino zetten
Waarschuwing: Gevaar van brandwonden! Voordat de afgifte van
water begint, kunnen er een paar straaltjes heet water uit het
stoompijpje komen. Wanneer u de stoomfunctie gebruikt, kunnen
het heetwater-/stoompijpje en de automatische melkopschuimer
heet zijn. Raak het stoompijpje alleen aan bij het beschermende
handvat.
1 Bevestig de automatische melkopschuimer op het heetwater-
/stoompijpje.
2 Draai het heetwater-/stoompijpje met de automatische melkopschuimer
richting het apparaat, totdat de automatische melkopschuimer het
apparaat raakt en zich in horizontale positie bevindt.
3 Verwijder het deksel van de melkkan en giet de melk in de melkkan. Sluit
het deksel van de melkkan.
4 Dompel het andere uiteinde van het melkslangetje in de melk tot aan de
bodem van de melkkan.
Page 69
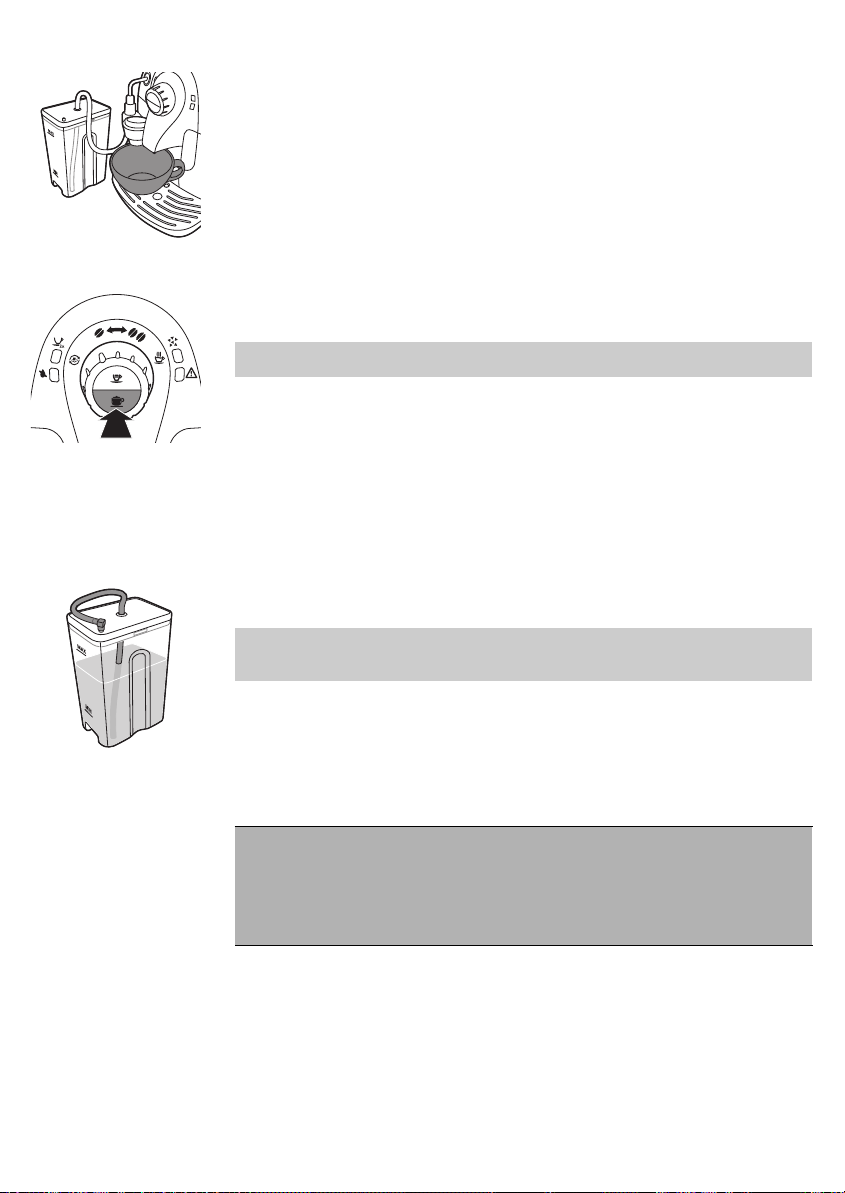
Nederlands
5 Plaats een grote kop onder de automatische melkopschuimer en de
koffie-uitloop.
6 Selecteer de koffiesterkte door de bedieningsknop naar één of twee
bonen te draaien. Selecteer twee bonen voor een sterkere smaak.
7 Druk op de cappuccinoknop. Het apparaat geeft eerst de melk af en
vervolgens koffie.
-
Het duurt enkele seconden voordat het apparaat stopt met de afgifte.
Opmerking: Als u het koffiezetten wilt onderbreken, drukt u nogmaals op
de cappuccinoknop.
8 De hoeveelheid koffie en melk kan worden aangepast. Zie het gedeelte
'De hoeveelheid koffie en melk aanpassen' in het hoofdstuk 'Het
apparaat instellen'.
9 Plaats een kop onder de automatische melkopschuimer. Voer nadat u
een cappuccino hebt gezet een snelle reiniging uit door gedurende 3-5
seconden heet water te tappen. Zie het gedeelte 'Snelle reiniging van het
melksysteem' in het hoofdstuk 'Schoonmaken en onderhoud'.
10 Verwijder het koppelstuk voor het melkslangetje van de automatische
melkopschuimer.
11 Sluit het koppelstuk aan op het pinnetje op het deksel van de melkkan en
zet de melkkan in de koelkast.
Opmerking: Voer nadat u een drank met melk hebt gezet een snelle
reiniging van het melksysteem uit door gedurende 5 seconden heet
water te tappen.
69
Melk opschuimen
Waarschuwing: Gevaar van brandwonden! Voordat de afgifte van
water begint, kunnen er een paar straaltjes heet water uit het
stoompijpje komen. Wanneer u de stoomfunctie gebruikt, kunnen
het heetwater-/stoompijpje en de automatische melkopschuimer
heet zijn. Raak het stoompijpje alleen aan bij het beschermende
handvat.
1 Volg stap 1 tot en met 5 van 'Cappuccino zetten' en draai de knop naar
het ‘stoom/melk reinigen’-pictogram om melk op te schuimen.
2 Draai de bedieningsknop naar het pictogram met één of twee
koffiebonen om melk op te schuimen.
Page 70
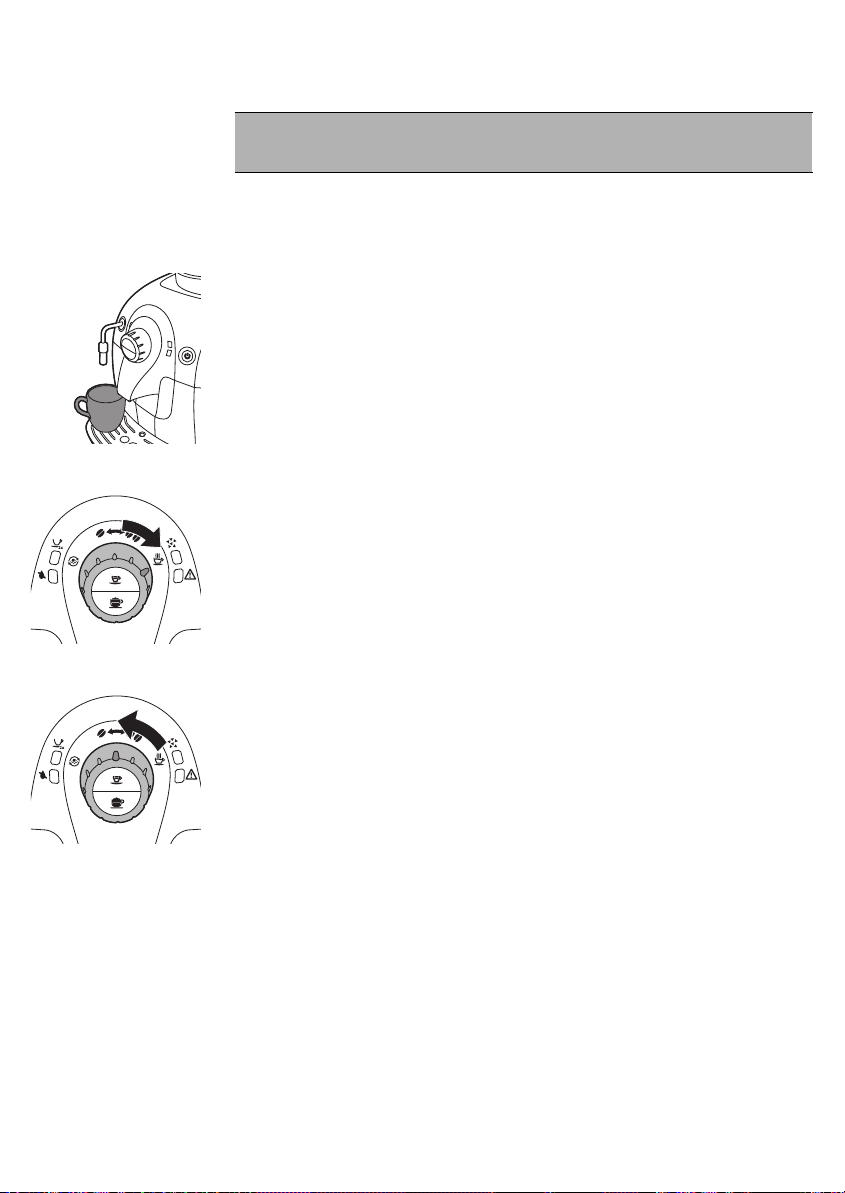
70
Nederlands
Heet water
Waarschuwing: verbrandingsgevaar. Voordat de afgifte van water
begint, kunnen er een paar straaltjes heet water uit het
stoompijpje komen. Raak alleen het beschermende handvat aan.
1 Controleer of de aan-uitknop onafgebroken brandt. Als de aan-uitknop
langzaam knippert, is het apparaat aan het opwarmen.
2 Verwijder de automatische melkopschuimer. Laat het beschermende
handvat op het heetwater-/stoompijpje zitten.
3 Plaats een kop onder het heetwater-/stoompijpje.
4 Draai de bedieningsknop naar het heetwaterpictogram.
-
Er komt water uit het heetwater-/stoompijpje.
5 Draai de bedieningsknop terug naar een van de
koffieboonpictogrammen wanneer de kop de gewenste hoeveelheid
heet water bevat.
Het apparaat instellen
U kunt de maalgraad en de hoeveelheid koffie instellen voor koffie die
perfect is afgestemd op uw smaak.
De maalgraad instellen
U kunt zelf de maalgraad van het apparaat instellen. Met de keramische
koffiemolen bent u verzekerd van een nauwkeurige, perfecte maling en
maalgraad voor elke kop koffie. In de molen blijft het volledige aroma
behouden, waardoor u met elke kop kunt genieten van een perfecte smaak.
Page 71
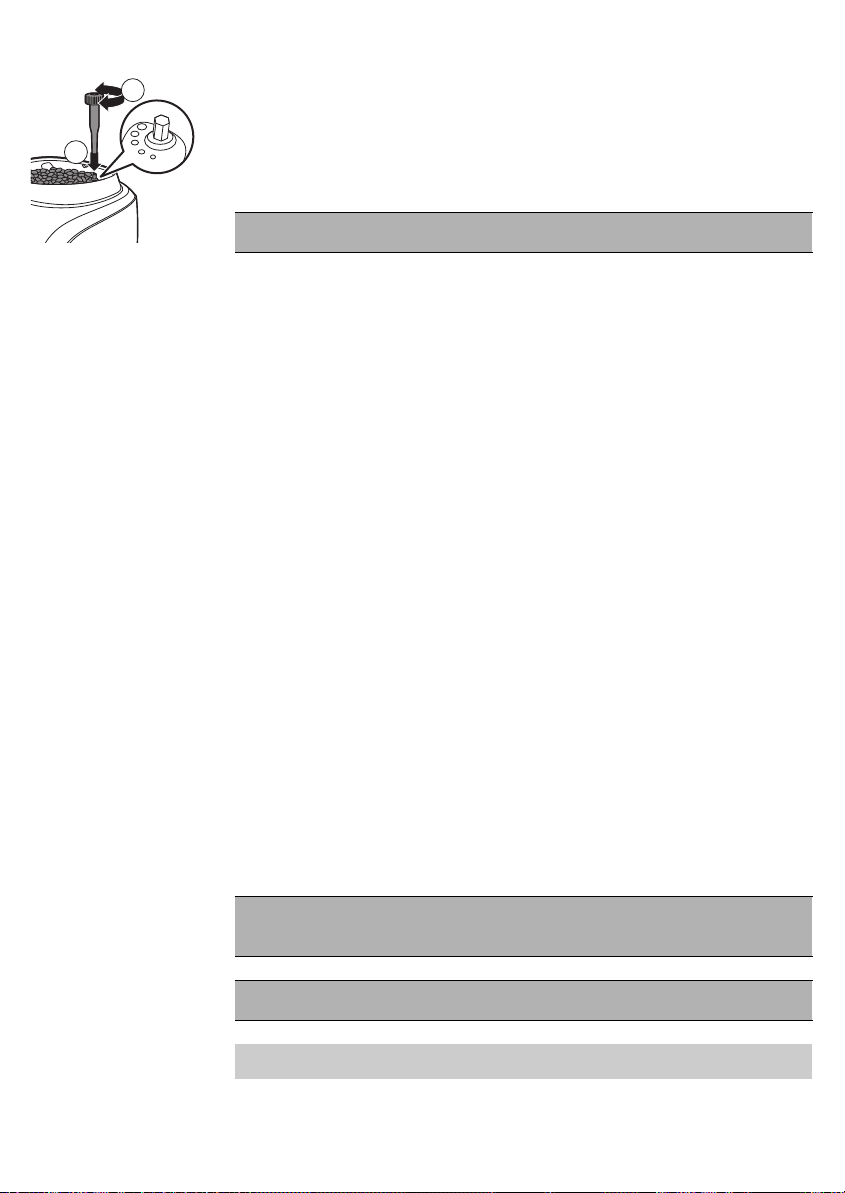
2
1
Nederlands
-
Druk de instelknop voor de maalgraad stevig in en draai de knop één
stapje per keer.
-
Er zijn 5 verschillende maalgraadinstellingen waaruit u kunt kiezen. Hoe
kleiner de stip, hoe sterker de koffie.
-
Het verschil wordt merkbaar nadat u 2 of 3 koppen koffie hebt gezet met
de nieuwe instelling.
Waarschuwing: Draai de instelknop voor de maalgraad niet meer
dan één stapje per keer, om schade aan de molen te voorkomen.
De hoeveelheid koffie aanpassen met de MEMO-functie
U kunt de hoeveelheid koffie aanpassen aan uw smaak en aan de grootte
van uw koppen. De espressoknop kan worden geprogrammeerd.
1 Plaats een kop onder de koffie-uitloop.
2 Houd de espressoknop ingedrukt. Laat de knop los wanneer het
apparaat koffiebonen begint te malen.
-
Het lampje voor 2 kopjes en de aan-uitknop knipperen langzaam.
3 Druk op de espressoknop wanneer de kop de gewenste hoeveelheid
koffie bevat.
Het apparaat slaat de nieuwe instelling automatisch op.
De hoeveelheid cappuccino aanpassen met de MEMOfunctie
U kunt de hoeveelheid koffie aanpassen aan uw smaak en aan de grootte
van uw koppen. De cappuccinoknop kan worden geprogrammeerd.
1 Plaats een kop onder de koffie-uitloop.
2 Houd de cappuccinoknop ingedrukt. Laat de knop los wanneer het
apparaat koffiebonen begint te malen.
-
Het lampje voor 2 kopjes en de aan-uitknop knipperen langzaam.
3 Druk nogmaals op de cappuccinoknop wanneer de kop de gewenste
hoeveelheid melk bevat.
Het apparaat slaat de nieuwe instelling automatisch op.
71
Schoonmaken en onderhoud
Regelmatig schoonmaken en ontkalken verlengt de levensduur van uw
apparaat en zorgt voor optimale kwaliteit en smaak van uw koffie.
Waarschuwing: Gebruik geen schuursponsjes, schurende
schoonmaakmiddelen of agressieve vloeistoffen om het apparaat
schoon te maken.
Waarschuwing: Haal altijd de stekker uit het stopcontact en laat
het apparaat afkoelen voordat u het gaat schoonmaken.
Opmerking: Geen van de afneembare delen is vaatwasmachinebestendig.
Spoel ze af onder de kraan.
Page 72

72
Nederlands
Snelle reiniging van het melksysteem
Opmerking: Voer nadat u een cappuccino hebt gezet een snelle reiniging
van het melksysteem uit.
1 Plaats een kop onder de automatische melkopschuimer.
2 Draai de bedieningsknop naar het heetwaterpictogram.
3 Tap heet water gedurende 5 seconden.
4 Draai de bedieningsknop naar een van de koffieboonpictogrammen om
de afgifte van heet water te stoppen.
Reiniging van de automatische melkopschuimer (dagelijks)
1 Plaats een kop onder de automatische melkopschuimer.
2 Plaats het melkslangetje in een kop met vers water.
3 Draai de bedieningsknop naar het ‘stoom/melk reinigen’-pictogram.
4 Tap heet water gedurende 5 seconden.
5 Draai de bedieningsknop naar een van de koffieboonpictogrammen om
de afgifte van heet water te stoppen.
Volledige reiniging van het melksysteem met reinigingsmiddel (maandelijks)
Maandelijkse reiniging van de automatische melkopschuimer
De maandelijkse reiniging van de melkopschuimer bestaat uit twee
reinigingscycli die na elkaar worden uitgevoerd: voor de eerste cyclus hebt u
het Saeco-reinigingsmiddel nodig dat u oplost in water en voor de tweede
cyclus hebt u alleen water nodig om de leidingen te spoelen.
Let op: Als u de machine net hebt gebruikt, kunnen het stoompijpje en de
automatische melkopschuimer nog heet zijn.
Opmerking: Controleer of het waterreservoir tot de MAX-aanduiding is
gevuld voordat u de procedure start.
Reiniging van het melksysteem met reinigingsmiddel en water
Page 73
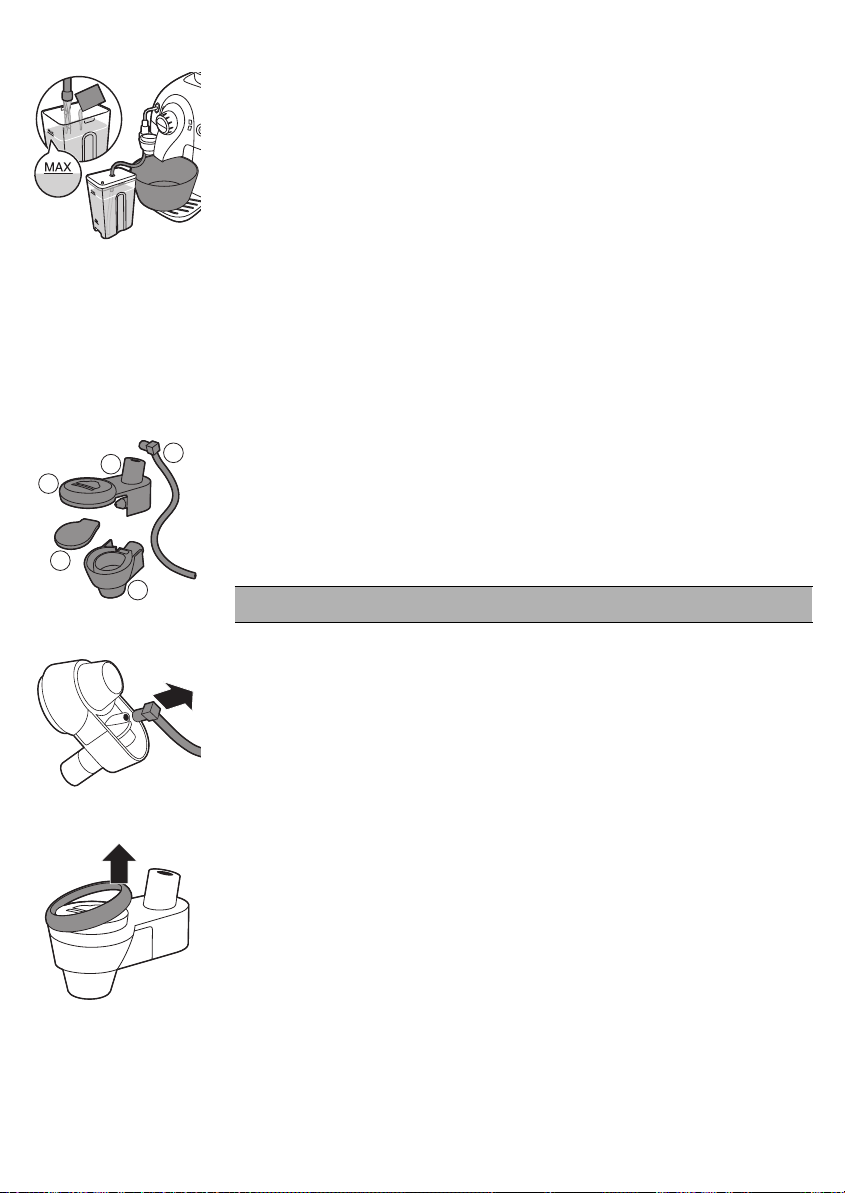
1
2
4
5
3
Nederlands
1 Giet de inhoud van het zakje Saeco-melksysteemreiniger in de melkkan
en vul de melkkan tot de MAX-aanduiding met water. Sluit het deksel
van de melkkan.
2 Dompel het andere uiteinde van het melkslangetje in de melk tot aan de
bodem van de melkkan.
3 Plaats een grote kom onder de melkschuimuitloop.
4 Draai de bedieningsknop naar het ‘stoom/melk reinigen’-pictogram.
-
Het apparaat spoelt de reinigingsoplossing door de
melkschuimuitloop.
5 Tap heet water totdat het 'waterreservoir leeg'-lampje gaat branden.
6 Verwijder het melkslangetje van het apparaat. Spoel de melkkan grondig
schoon en vul de kan tot de MAX-aanduiding met vers water.
7 Herhaal stap 3 tot en met 6.
73
De onderdelen van de automatische melkopschuimer reinigen
De automatische melkopschuimer bestaat uit vier onderdelen die u uit
elkaar moet halen.
1 Aanzuigslang
2 Deksel van de melkopschuimer
3 Rubberen ring
4 Melkopschuimer
5 Rubberen kap
De automatische melkopschuimer reinigen
1 Verwijder de automatische melkopschuimer uit het stoompijpje.
Let op: Als u de machine net hebt gebruikt, kunnen het stoompijpje en
de automatische melkopschuimer nog heet zijn.
2 Verwijder de aanzuigslang uit het deksel van de melkopschuimer.
3 Verwijder de rubberen ring van de automatische melkopschuimer.
Page 74
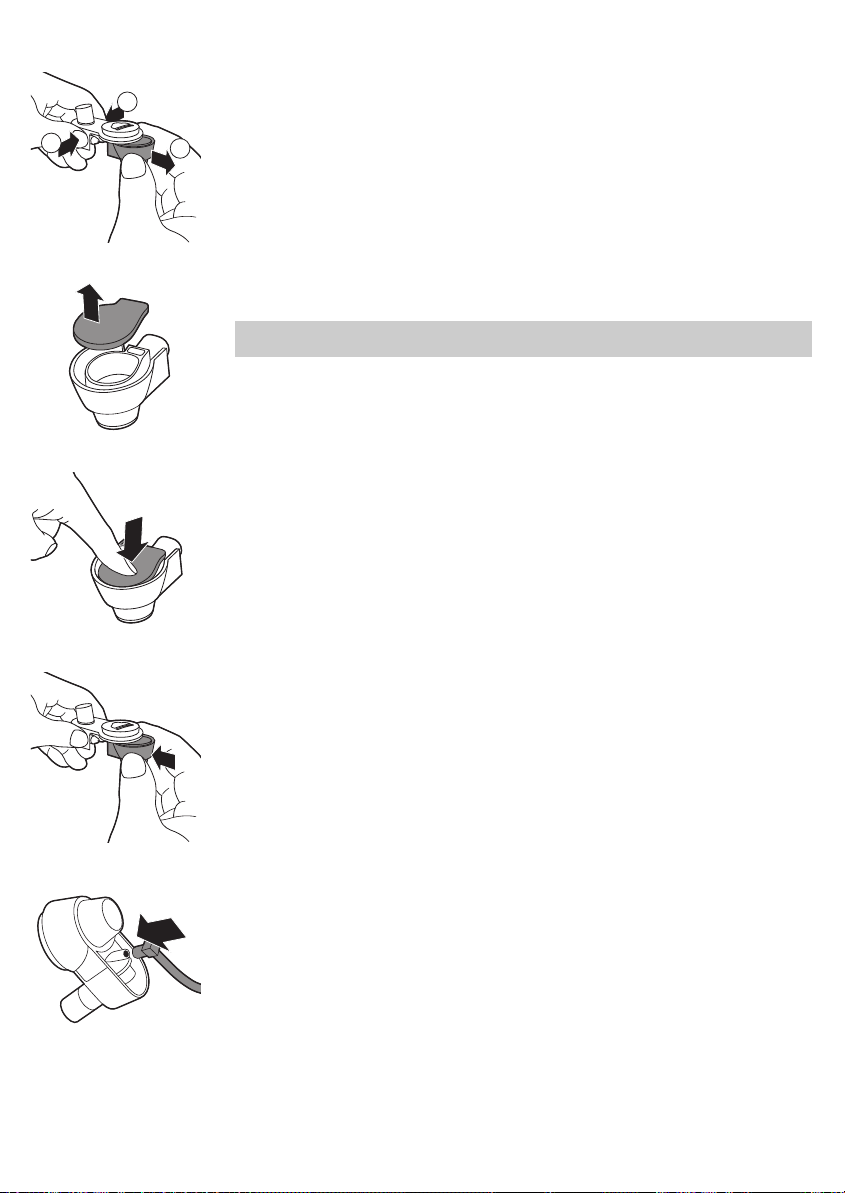
2
1
1
74
Nederlands
4 Druk op de zijkanten (1) om de automatische melkopschuimer
ontgrendelen en verwijder de opschuimer door deze uit het deksel te
trekken terwijl u de opschuimer een klein beetje heen en weer beweegt
(2).
5 Verwijder het rubberen deksel van de melkopschuimer.
6 Spoel de onderdelen af met lauw water.
Opmerking: U kunt deze onderdelen ook in de afwasmachine
schoonmaken.
7 Druk in het midden van het deksel om het rubberen deksel weer op de
melkopschuimer te bevestigen en controleer of het deksel goed zit.
8 Bevestig de automatische melkopschuimer aan het deksel van de
melkopschuimer. Wanneer de twee onderdelen goed op hun plaats
zitten, hoort u een klik.
9 Plaats de aanzuigslang in de automatische melkopschuimer.
Page 75
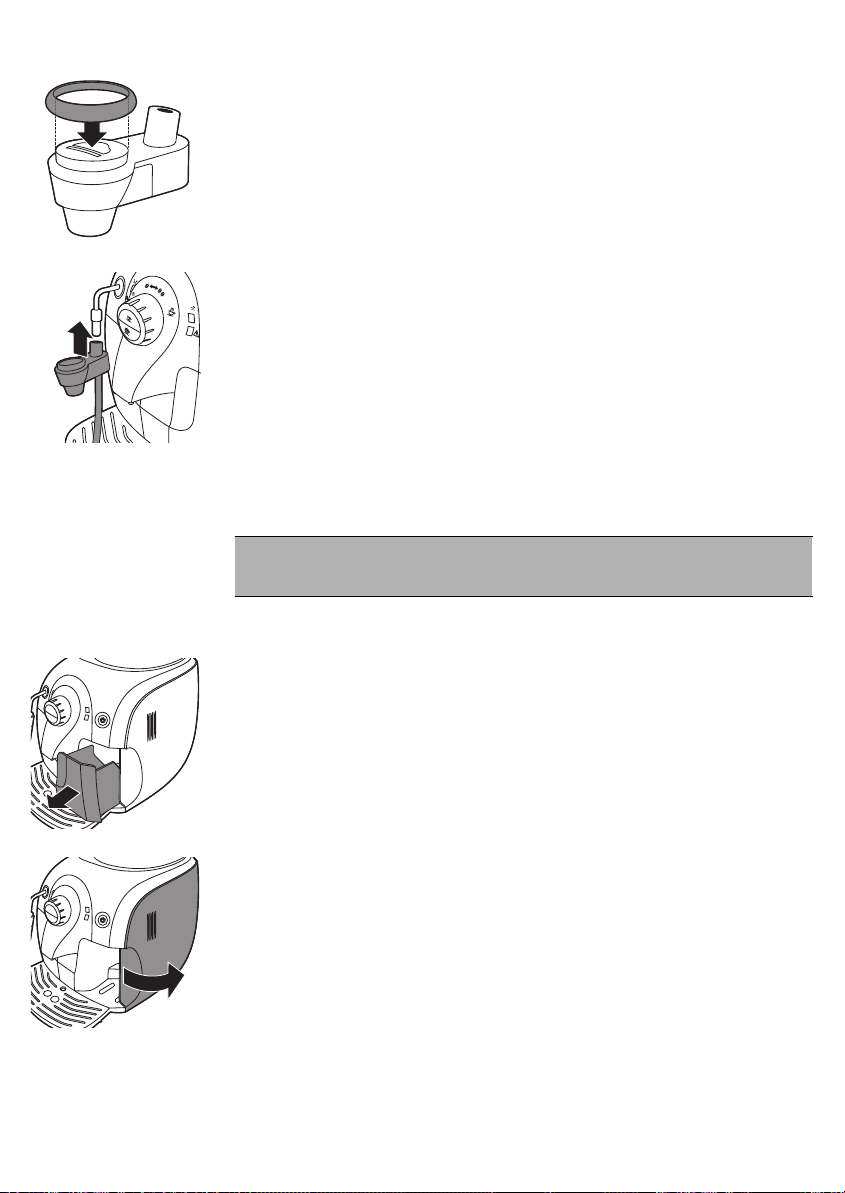
10 Plaats de rubberen ring terug op de automatische melkopschuimer.
11 Bevestig de automatische melkopschuimer weer op het heetwater-
/stoompijpje.
De zetgroep schoonmaken
Waarschuwing: Maak de zetgroep niet schoon in de
vaatwasmachine en gebruik geen afwasmiddel of
schoonmaakmiddelen om deze schoon te maken.
Nederlands
75
Maak de zetgroep één keer per week schoon.
1 Schakel het apparaat uit en haal de stekker uit het stopcontact.
2 Verwijder de koffiedikbak uit het apparaat.
3 Open de servicedeur.
Page 76
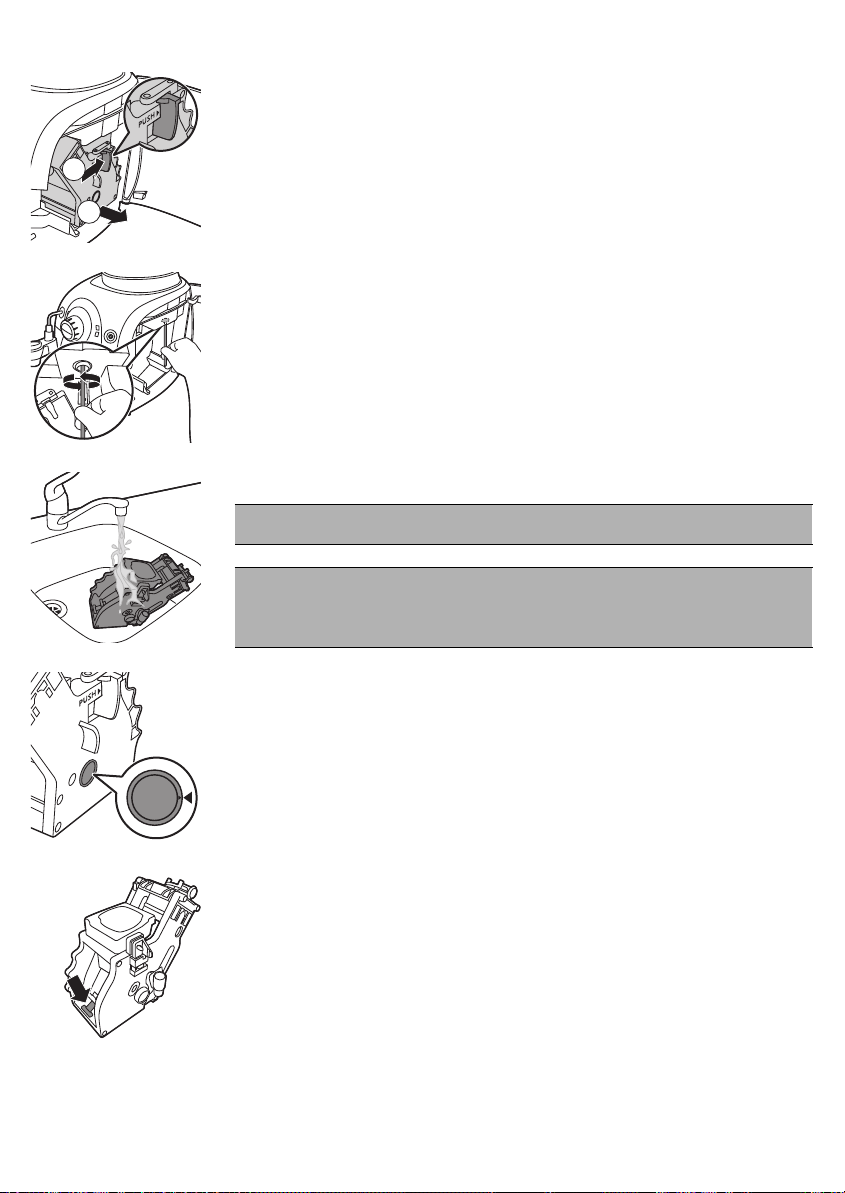
1
2
76
Nederlands
4 Druk op de PUSH-knop en trek aan de handgreep van de zetgroep om
deze uit het apparaat te verwijderen.
5 Maak de uitgang van het koffiekanaal grondig schoon met de steel van
een lepel of ander keukengerei met een rond uiteinde.
6 Maak de binnenkant van het apparaat schoon met een vochtige doek.
7 Spoel de buitenkant van de zetgroep af onder een lauwe kraan.
Waarschuwing: Gebruik nooit afwasmiddel of een ander
schoonmaakmiddel om de zetgroep schoon te maken.
Waarschuwing: Droog de zetgroep niet met een doek. Zo
voorkomt u dat zich vezels ophopen in de zetgroep. Schud na het
spoelen alleen het overtollige water van de zetgroep af of laat
deze aan de lucht drogen.
8 Zorg ervoor dat de twee referentietekens op de zijkant tegenover elkaar
staan voordat u de zetgroep weer in het apparaat schuift. Als ze niet
tegenover elkaar staan, voert u de volgende stap uit:
-
Zorg ervoor dat de hendel contact maakt met de voet van de
zetgroep.
9 Controleer of de vergrendelhaak van de zetgroep in de juiste stand staat.
Page 77
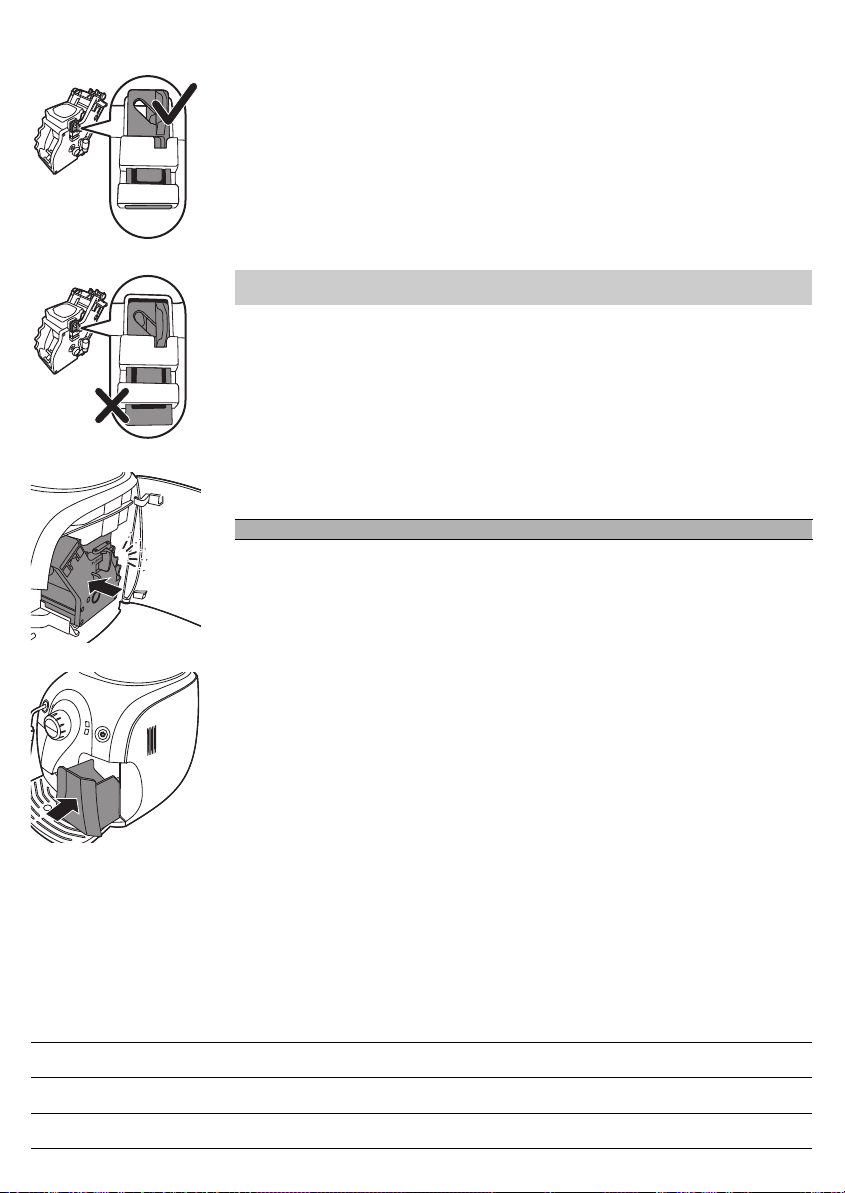
Nederlands
-
Duw de haak omhoog tot in de bovenste stand om de haak in de
juiste positie te zetten.
Opmerking: De haak bevindt zich niet in de juiste positie als deze nog in
de onderste stand staat.
10 Schuif de zetgroep over de geleiderails aan de zijkant terug in het
apparaat tot deze vastklikt.
Waarschuwing: Druk niet op de PUSH-knop.
11 Sluit de servicedeur.
77
12 Schuif de koffiedikbak terug in het apparaat.
Smeren
Voor optimale prestaties van het apparaat dient u de zetgroep regelmatig te
smeren. Raadpleeg de onderstaande tabel voor de aanbevolen
smeerfrequentie. Ga voor ondersteuning naar onze website:
www.philips.com/support.
Gebruik
Laag 1-5 Iedere 4 maanden
Normaal 6-10 Iedere 2 maanden
Zwaar > 10 Maandelijks
Aant. producten/dag Smeerfrequentie
Page 78
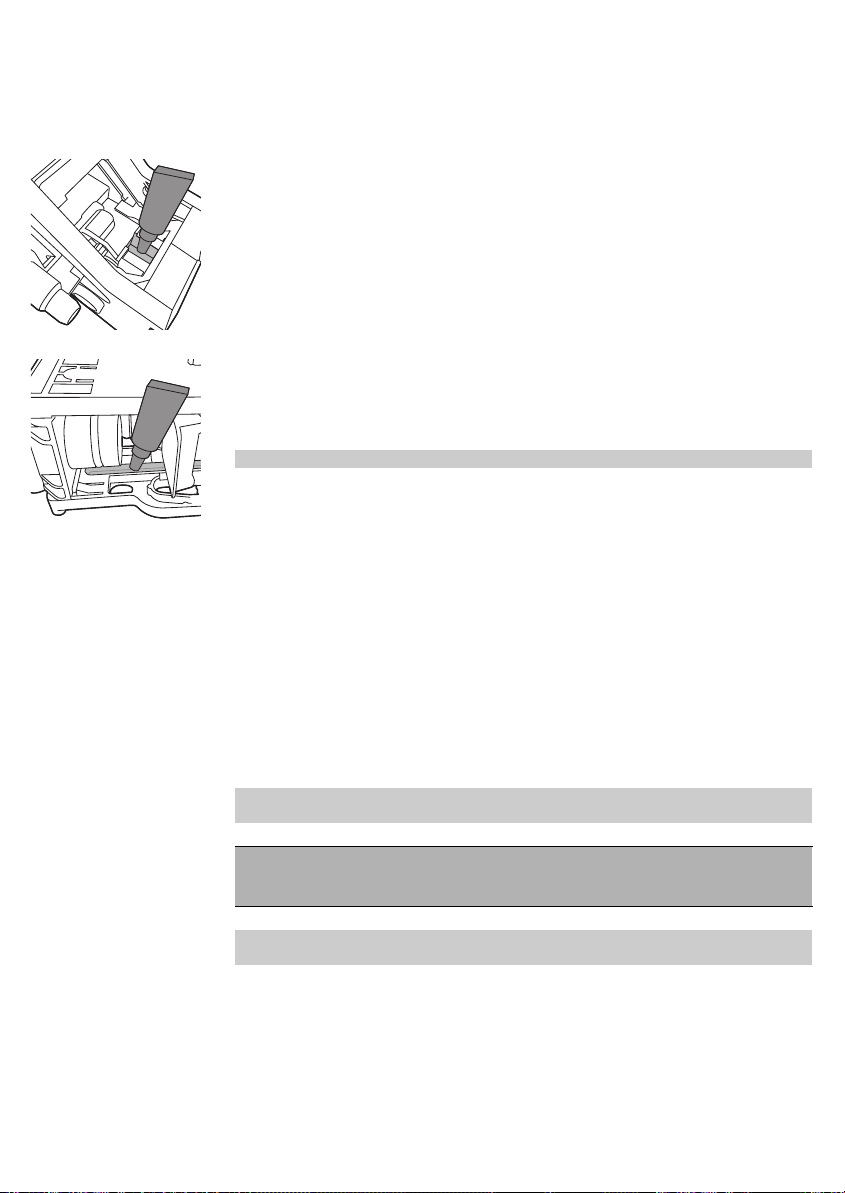
78
Nederlands
1 Schakel het apparaat uit en haal de stekker uit het stopcontact.
2 Verwijder de zetgroep en spoel deze onder de kraan af met lauwwarm
water, zoals beschreven in het gedeelte 'Wekelijkse reiniging van de
zetgroep'.
3 Breng een dunne laag smeermiddel aan op de as onder in de zetgroep.
4 Breng een dunne laag smeermiddel aan op de geleiders aan beide zijden
(zie afbeelding).
5 Plaats de zetgroep zoals beschreven in het gedeelte 'Wekelijkse reiniging
van de zetgroep'.
U kunt de tube smeermiddel meerdere keren gebruiken.
Het apparaat ontkalken
Tijdens het gebruik hoopt zich kalk op in het apparaat. Het is zeer belangrijk
dat het apparaat wordt ontkalkt wanneer het oranje ontkalkingslampje
onafgebroken brandt. Gebruik alleen de speciale Philips Saecoontkalkingsoplossing om het apparaat te ontkalken. De Philips Saecoontkalkingsoplossing is speciaal gemaakt om ervoor te zorgen dat het
apparaat optimaal presteert. U kunt de Philips Saeco-ontkalkingsoplossing
kopen in de online shop op www.shop.philips.com/service.
Opmerking: Het gebruik van andere ontkalkingsproducten kan schade aan
het apparaat veroorzaken en resten achterlaten in het water.
Waarschuwing: Drink nooit het water met het ontkalkingsmengsel
dat u in het waterreservoir giet of het water met resten dat
tijdens het ontkalkingsproces uit het apparaat stroomt.
Opmerking: Ga voor meer online ondersteuning naar onze speciale pagina
over ontkalken: www.philips.com/descale.
Ontkalkingsprocedure
Het ontkalkingsproces duurt circa 30 minuten en bestaat uit een
ontkalkingscyclus en een spoelcyclus.
Voorbereiding
1 Schakel het apparaat uit.
Page 79
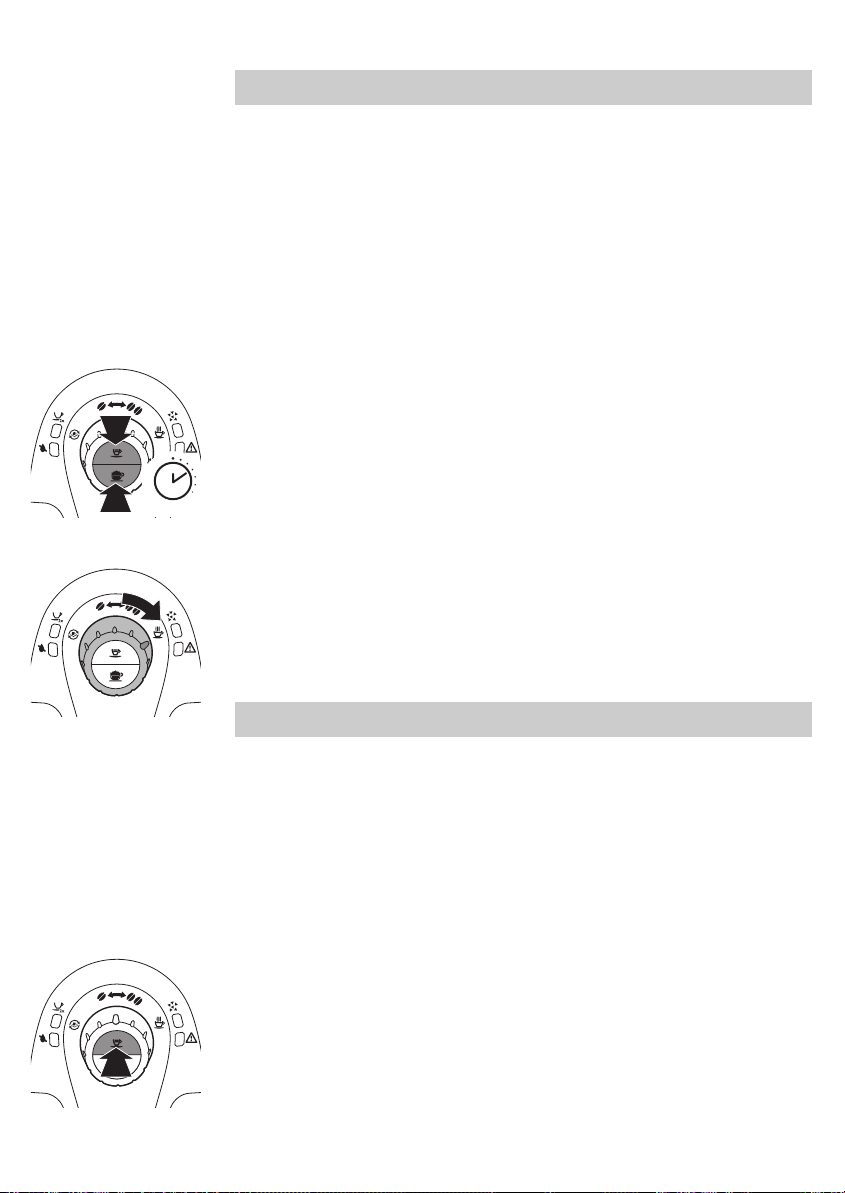
5 sec
Nederlands
Waarschuwing: Als u het apparaat niet uitschakelt, kunt u de
ontkalkingscyclus niet starten.
2 Leeg de lekbak en plaats deze weer terug. Verwijder de automatische
melkopschuimer (indien aanwezig).
3 Leeg het waterreservoir en verwijder het Intenza+-filter (indien
aanwezig). Giet de volledige fles Philips/Saeco-ontkalkingsoplossing in
het waterreservoir.
4 Vul de ontkalkingsoplossing in het waterreservoir aan met water, tot de
MAX-aanduiding.
5 Zorg dat de bedieningsknop is ingesteld op het koffieboonpictogram.
6 Plaats een kom onder het heetwater-/stoompijpje en de koffie-uitloop.
79
Ontkalkingscyclus
1 Houd de knop voor espresso en de knop voor cappuccino gelijktijdig
ingedrukt gedurende circa 5 seconden.
-
Het oranje ontkalkingslampje knippert langzaam tijdens de hele
ontkalkingscyclus.
2 Draai de bedieningsknop naar het heetwaterpictogram en tap heet water.
Laat gedurende 10 seconden heet water uit het heetwater-/stoompijpje
stromen.
3 Draai de bedieningsknop terug naar het pictogram van één koffieboon.
Wacht circa 1 minuut om de ontkalkingsoplossing te laten inwerken.
4 Druk op de espressoknop om een kop espresso te zetten. Wacht
ongeveer 1 minuut om de ontkalkingsoplossing te laten inwerken.
Opmerking: Tijdens het ontkalkingsproces werkt de maalfunctie niet. Als
u op de espressoknop drukt, stroomt er alleen water uit het apparaat.
5 Herhaal stap 2 tot en met 4 tot het 'waterreservoir leeg'-lampje
onafgebroken brandt.
Spoelcyclus
1 Verwijder het waterreservoir uit het apparaat en spoel het schoon.
2 Vul het waterreservoir met vers kraanwater tot de MAX-aanduiding en
schuif het waterreservoir terug in het apparaat.
3 Leeg de kom en plaats deze terug op de lekbak onder het heetwater-
/stoompijpje.
4 Druk op de espressoknop en zet een kop espresso. Herhaal dit twee keer.
Page 80
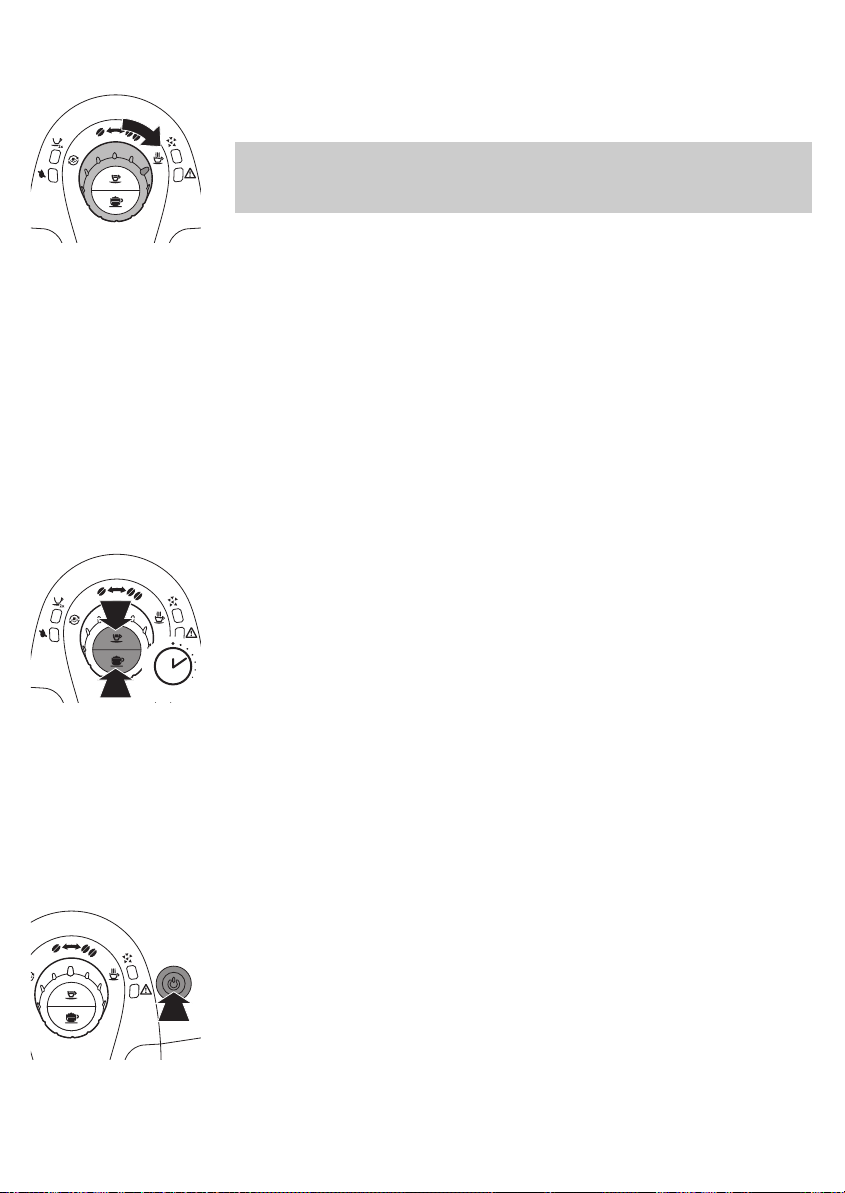
5 sec
80
Nederlands
5 Draai de bedieningsknop naar het heetwaterpictogram.
6 Laat heet water uit het heetwater-/stoompijpje stromen totdat het
'waterreservoir leeg'-lampje onafgebroken brandt.
Opmerking: Als u de waterstroom wilt onderbreken, draait u de
bedieningsknop terug naar het koffieboonpictogram. Als u weer heet
water wilt tappen, draait u de bedieningsknop terug naar het
heetwaterpictogram.
7 Verwijder de lekbak, spoel de bak schoon en plaats deze weer terug.
8 Bevestig de automatische melkopschuimer weer op het pijpje.
9 Verwijder het waterreservoir en spoel het om.
10 Plaats het Intenza+-waterfilter weer terug (indien aanwezig).
11 Vul het waterreservoir met vers kraanwater tot de MAX-aanduiding en
schuif het waterreservoir terug in het apparaat.
12 Druk op de aan-uitknop om het apparaat uit te schakelen.
Wanneer u het apparaat weer inschakelt, is het klaar voor gebruik.
Onderbreking van het ontkalkingsproces
Druk op de aan-uitknop als het apparaat vastloopt tijdens het
ontkalkingsproces. Op deze manier kunt u het ontkalkingsproces voltooien.
Via de onderstaande stappen kunt u uw apparaat weer gereedmaken voor
de afgifte van koffie.
1 Houd de knop voor espresso en de knop voor cappuccino gelijktijdig
ingedrukt gedurende circa 5 seconden.
2 Verwijder de lekbak, spoel de bak schoon en plaats deze weer terug.
3 Verwijder het waterreservoir en spoel het om.
4 Vul het waterreservoir met vers kraanwater tot de MAX-aanduiding en
schuif het waterreservoir terug in het apparaat.
5 Druk op de espressoknop en zet een kop espresso. Herhaal dit twee keer.
6 Draai de bedieningsknop naar het heetwaterpictogram. Laat heet water
uit het heetwater-/stoompijpje stromen totdat het 'waterreservoir leeg'lampje onafgebroken brandt.
7 Verwijder de lekbak, spoel de bak schoon en plaats deze weer terug.
8 Bevestig de automatische melkopschuimer weer op het pijpje.
9 Verwijder het waterreservoir en spoel het om.
10 Plaats het Intenza+-waterfilter weer terug (indien aanwezig).
11 Vul het waterreservoir met vers kraanwater tot de MAX-aanduiding en
schuif het waterreservoir terug in het apparaat.
12 Druk op de aan-uitknop om het apparaat uit te schakelen.
Wanneer u het apparaat weer inschakelt, is het klaar voor gebruik.
Page 81
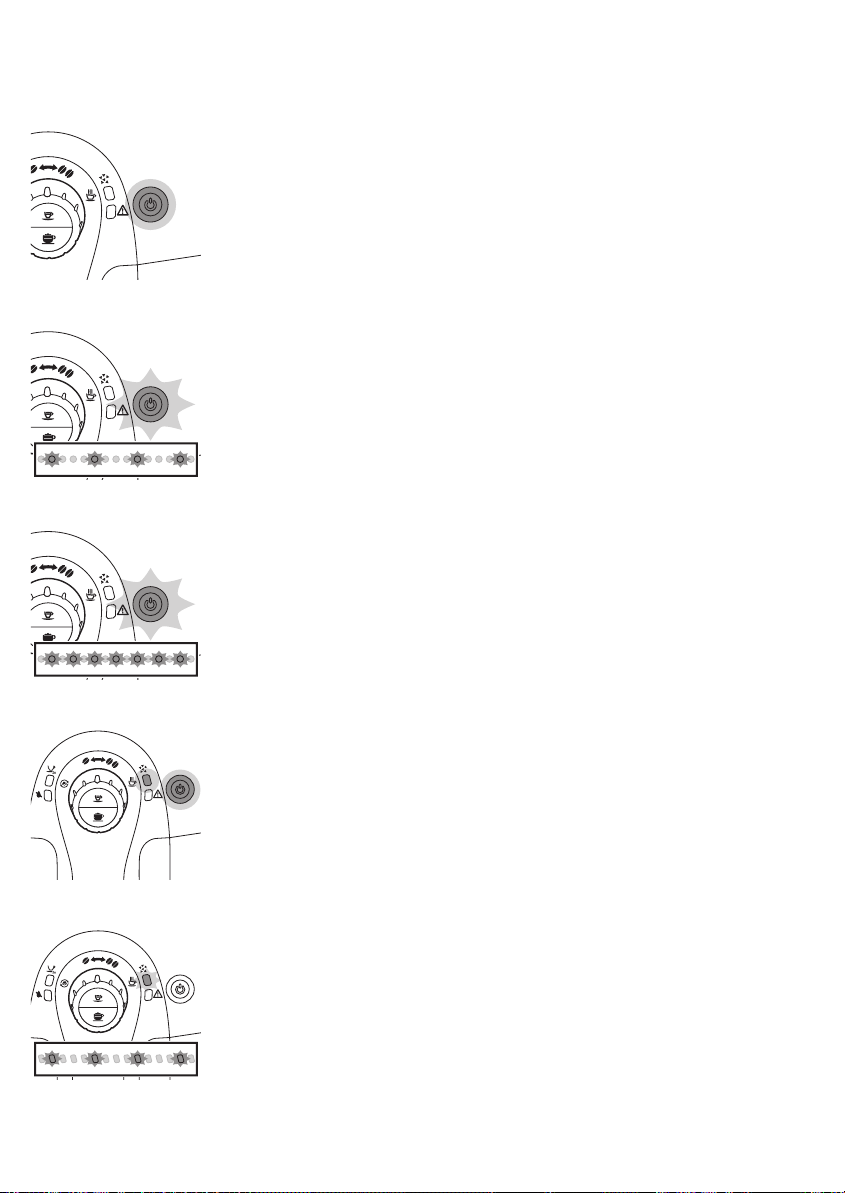
Betekenis van lampjes
-
Het lampje van de aan-uitknop brandt onafgebroken. Het apparaat is
klaar voor gebruik.
-
De aan-uitknop knippert langzaam. Het apparaat is aan het opwarmen of
voert een procedure uit.
-
De aan-uitknop knippert snel. Het apparaat is oververhit. Tap een kop
heet water om het apparaat af te koelen.
Nederlands
81
-
Het ontkalkingslampje en het lampje van de aan-uitknop branden
onafgebroken. U moet het apparaat ontkalken. Volg de instructies in het
hoofdstuk 'Het apparaat ontkalken'.
-
Het ontkalkingslampje knippert langzaam. Het apparaat bevindt zich in
de ontkalkingscyclus.
Page 82
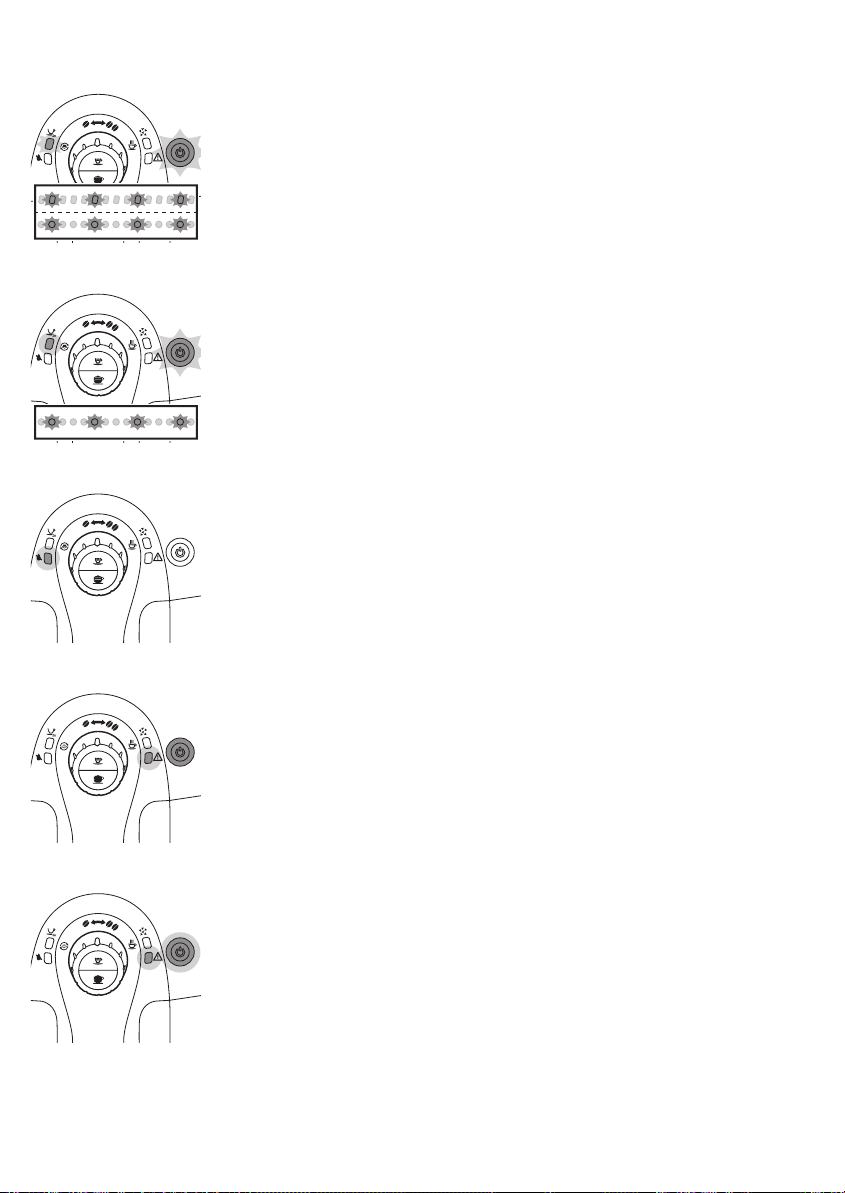
82
Nederlands
-
Het lampje voor 2 kopjes en het lampje van de aan-uitknop knipperen
langzaam. Het apparaat programmeert de te zetten hoeveelheid koffie.
Volg de instructies in het gedeelte ‘De koffiehoeveelheid aanpassen’ van
het hoofdstuk 'Het apparaat gebruiken'.
-
Het lampje voor 2 kopjes brandt onafgebroken en de aan-uitknop
knippert langzaam. Het apparaat is twee koppen koffie aan het zetten.
-
Het 'waterreservoir leeg'-lampje brandt onafgebroken. Het waterniveau
is laag. Vul het waterreservoir tot aan het MAX-niveau met vers water.
-
Het waarschuwingslampje brandt onafgebroken en het lampje van de
aan-uitknop gaat uit. De koffiedikbak is vol. Leeg de koffiedikbak terwijl
het apparaat is ingeschakeld. Controleer of het waarschuwingslampje
knippert voordat u de koffiedikbak weer terugplaatst.
-
Het waarschuwingslampje en het lampje van de aan-uitknop branden
onafgebroken. Het bonenreservoir is leeg. Vul het bonenreservoir bij.
Page 83
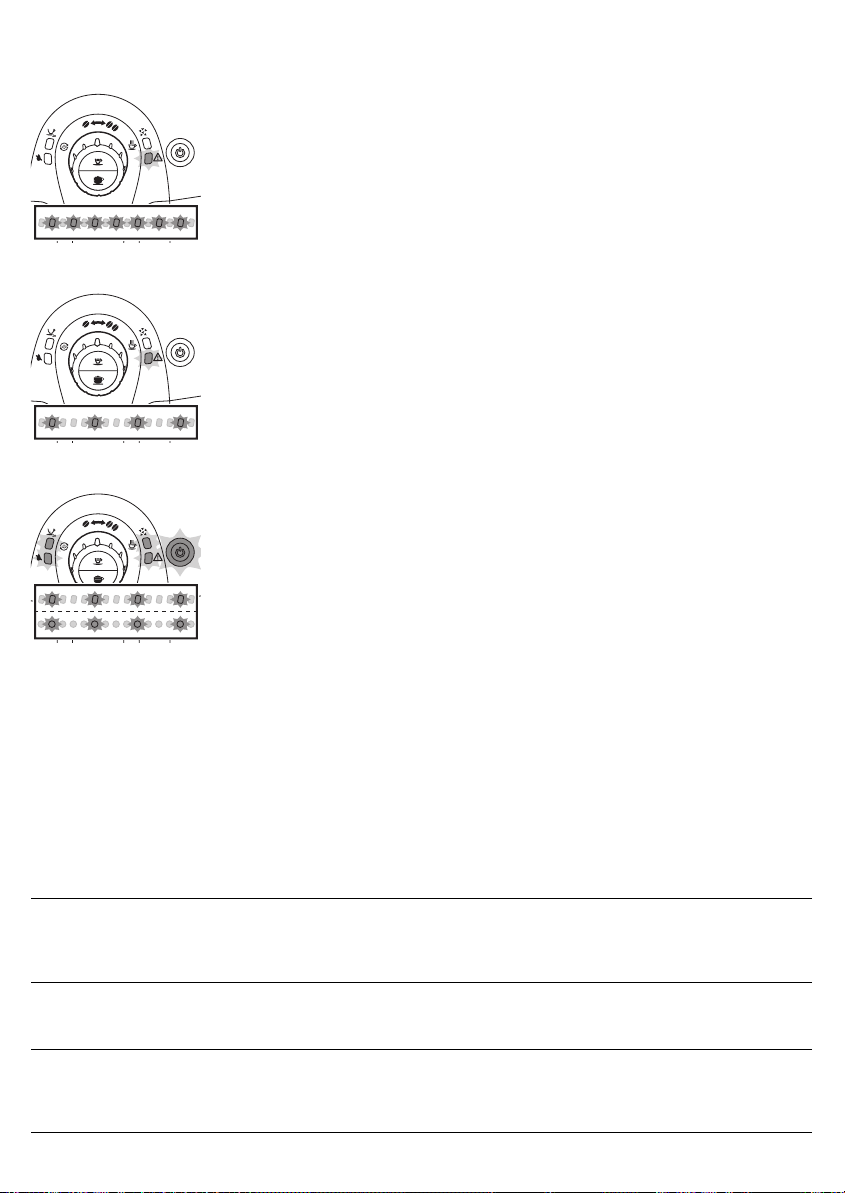
Nederlands
-
Het waarschuwingslampje knippert snel. Er zit geen water in het interne
doorloopsysteem. Draai de bedieningsknop naar het heetwaterpictogram
en laat heet water uit het apparaat komen totdat het water onafgebroken
stroomt. Zie het gedeelte ‘Het apparaat opwarmen’ in het hoofdstuk
'Eerste installatie'. Volg stap 3 en 4.
-
Het waarschuwingslampje knippert langzaam. De zetgroep is niet correct
geplaatst, de koffiedikbak is niet geplaatst, de servicedeur staat open of
de bedieningsknop staat niet in de juiste stand. Controleer of de zetgroep
en de koffiedikbak correct zijn geplaatst, de servicedeur gesloten is en de
bedieningsknop in de juiste stand staat. Als u de zetgroep niet kunt
verwijderen of terugplaatsen, schakelt u het apparaat uit en weer in.
-
Alle lampjes knipperen langzaam en gelijktijdig. Het apparaat werkt niet.
Schakel het apparaat uit en na 30 seconden weer in. Probeer dit twee of
drie keer. Als het apparaat niet wordt gereset, neemt u contact op met
het Philips Consumer Care Centre.
83
Problemen oplossen
In dit hoofdstuk worden in het kort de meest voorkomende problemen
behandeld die zich kunnen voordoen tijdens het gebruik van het apparaat.
Als u het probleem niet kunt oplossen met behulp van de onderstaande
informatie, gaat u naar www.philips.com/support voor een lijst met
veelgestelde vragen of neemt u contact op met het Philips Consumer Care
Center in uw land.
Probleem
Er bevindt zich water onder het
apparaat.
Het apparaat wordt niet
ingeschakeld.
Oorzaak Oplossing
De lekbak is vol en is
overgestroomd.
Het apparaat staat niet
op een horizontale
ondergrond.
Het apparaat is niet op
het stopcontact
aangesloten.
Leeg de lekbak wanneer de 'lekbak vol'indicator boven het deksel van de
lekbak uitkomt. Leeg altijd de lekbak
voordat u het apparaat ontkalkt.
Plaats het apparaat op een horizontale
ondergrond zodat de 'lekbak vol'indicator goed werkt.
Zorg ervoor dat de kleine stekker goed
in de aansluitopening zit. Steek de
stekker in het stopcontact en schakel
het apparaat in.
Page 84

84
Nederlands
Het apparaat is vastgelopen
tijdens het ontkalkingsproces.
De koffie is niet heet genoeg. De koppen die u gebruikt
De koffietemperatuur neemt in
de loop der tijd af.
Er komt geen heet water of
stoom uit het heetwater/stoompijpje.
De koffie heeft te weinig
crèmelaag of is waterig.
Het ontkalkingsproces is
onderbroken of in de
verkeerde volgorde
uitgevoerd.
zijn koud.
U hebt melk toegevoegd. Of u nu koude of warme melk toevoegt,
Het apparaat is niet op
tijd ontkalkt.
Het heetwater/stoompijpje is verstopt.
De automatische
melkopschuimer is
mogelijk vuil.
Vervang het waterfilter
(indien aanwezig).
De molen is op een te
grove maling ingesteld.
De koffiemelange is niet
de juist melange.
Druk op de aan-uitknop. U kunt het
ontkalkingsproces opnieuw starten of
de instructies volgen in het gedeelte
‘Onderbreking van het
ontkalkingsproces' in het hoofdstuk 'Het
apparaat ontkalken'.
Verwarm de koppen voor door ze af te
spoelen met heet water.
door de melk wordt de koffie altijd iets
minder warm.
Ontkalk het apparaat.
Controleer of de opening van het
heetwater-/stoompijpje verstopt is. Zo
ja, dan maakt u de opening schoon met
een speld.
Maak de automatische melkopschuimer
schoon.
Verwijder het waterfilter en probeer
opnieuw heet water te tappen. Als dit
werkt, vervangt u het waterfilter.
Stel de molen in op een fijnere maling.
Probeer een andere koffiemelange.
De zetgroep kan niet worden
verwijderd.
De zetgroep kan niet worden
geplaatst.
Het apparaat is bezig
zichzelf in te stellen.
De zetgroep is vuil. Maak de zetgroep schoon.
De zetgroep is niet goed
geplaatst.
De koffiedikbak is niet
verwijderd.
Het apparaat is nog
bezig met het
ontkalkingsproces.
De zetgroep staat niet in
de juiste stand.
Zet een paar koppen koffie.
Sluit de onderhoudsdeur. Schakel het
apparaat uit en weer in. Wacht totdat
het display aangeeft dat het apparaat
gereed is en verwijder dan de zetgroep.
Verwijder de koffiedikbak voordat u de
zetgroep verwijdert.
U kunt de zetgroep niet verwijderen
wanneer het ontkalkingsproces nog
actief is. Voltooi eerst het
ontkalkingsproces en verwijder dan de
zetgroep.
De zetgroep is niet in de ruststand
geplaatst voordat deze werd
teruggeplaatst. Zorg dat de hendel
contact maakt met de voet van de
zetgroep en dat de haak van de
zetgroep in de juiste stand staat.
Page 85
Nederlands
Plaats de lekbak en de koffiedikbak
terug. Laat de zetgroep buiten het
apparaat. Sluit de onderhoudsdeur en
schakel het apparaat in en uit. Probeer
vervolgens de zetgroep weer te
plaatsen.
85
Het apparaat maalt de
koffiebonen maar er komt geen
koffie uit.
De koffie is te slap. De molen is op een te
De lekbak is snel vol. Dit is normaal. Het
De maling is te fijn
ingesteld.
De zetgroep is vuil. Maak de zetgroep schoon.
De koffie-uitloop is vuil. Maak de koffie-uitloop en de openingen
De uitgang van het
koffiekanaal is verstopt.
grove maling ingesteld.
Het apparaat is bezig
zichzelf in te stellen.
De koffiemelange is niet
de juist melange.
apparaat gebruikt water
om het interne
doorloopsysteem en de
zetgroep te spoelen. Via
het interne systeem
vloeit er wat water
rechtstreeks in de lekbak.
Stel de molen in op een grovere maling.
van de uitloop schoon met een
pijpenrager.
Maak de uitgang van het koffiekanaal
schoon met de handgreep van het
multifunctionele gereedschap of de
steel van een lepel.
Stel de keramische koffiemolen in op
een fijnere maling (zie het gedeelte 'De
maalgraad instellen' in het hoofdstuk
'Het apparaat gebruiken').
Zet een paar koppen koffie zodat het
apparaat zich kan aanpassen aan de
nieuwe maalinstellingen.
Gebruik een andere soort koffiebonen.
Leeg de lekbak wanneer de 'lekbak vol'indicator boven het deksel van de
lekbak uitkomt.
Er zit niet genoeg koffie in mijn
kop.
Er zit geen water in het
interne
doorloopsysteem.
De hoeveelheid koffie is
gewijzigd.
Plaats een kop onder de uitloop om het
spoelwater op te vangen.
De zetgroep of de afvoer achter of
onder de zetgroep is mogelijk verstopt.
Spoel de zetgroep af met lauw water en
maak het filter aan de bovenkant
voorzichtig schoon. Maak ook de
binnenkant van het apparaat schoon
met een zachte, vochtige doek.
Er kan lucht in het interne
doorloopsysteem zitten. Spoel het
interne doorloopsysteem van het
apparaat door de bedieningsknop naar
het heetwaterpictogram te draaien en
wat heet water uit het apparaat te laten
stromen.
Stel de hoeveelheid koffie in met de
MEMO-functie.
Page 86

86
Nederlands
De zetgroep is vuil. Maak de zetgroep schoon (zie het
De melk schuimt niet op. De automatische
melkopschuimer is vuil of
niet goed in elkaar gezet
of geplaatst.
Het type melk dat u
gebruikt, is niet geschikt
voor opschuimen.
Recyclen
-
Dit symbool betekent dat dit product niet samen met het gewone
huishoudelijke afval mag worden weggegooid (2012/19/EU).
-
Volg de in uw land geldende regels voor de gescheiden inzameling van
elektrische en elektronische producten. Als u oude producten correct
verwijdert, voorkomt u negatieve gevolgen voor het milieu en de
volksgezondheid.
Garantie en ondersteuning
Als u informatie of ondersteuning nodig hebt, gaat u naar
www.saeco.com/support of leest u de meegeleverde garantiefolder.
Als u informatie of ondersteuning nodig hebt, bel dan de Philips Saecohotline in uw land. Contactgegevens kunt u vinden in de meegeleverde
garantiefolder of op www.saeco.com/support.
gedeelte 'De zetgroep schoonmaken' in
het hoofdstuk 'Schoonmaken en
onderhoud').
Maak de automatische melkopschuimer
schoon en zorg dat deze goed in elkaar
wordt gezet of geplaatst.
Verschillende typen melk leveren
verschillende hoeveelheden schuim en
een verschillende kwaliteit. Halfvolle en
volle koeienmelk geven een goed
resultaat.
Onderhoudsproducten bestellen
-
Intenza+-waterfilter (CA6702)
-
Smeermiddel (HD5061)
-
Ontkalkingsoplossing (CA6700)
Technische gegevens
Functie
Nominale spanning Binnenkant servicedeur
Vermogen Binnenkant servicedeur
Afmetingen (b x h x d) 295 x 325 x 420 mm
Gewicht 6,9 kg
Materiaal Plastic
Waarde/locatie
Page 87

Snoerlengte 0,8 -1,2 m
Capaciteit waterreservoir 1000 ml
Hoogte van koppen Maximaal 95 mm
Inhoud van bonenreservoir 170 g
Inhoud van koffiedikbak 8 koeken
Pompdruk 15 bar
Boiler Roestvrij staal
Veiligheidsvoorzieningen Thermische zekering
Nederlands
87
Page 88

Page 89

Page 90

Page 91

Page 92

4219.460.3288.1 REV00
29-01-2016
 Loading...