

Philips HD3412, HD3410, HD3411 User Manual
HD 3410-12

2
English Page 4
• Keep pages 3 and 34 open when reading
these operating instructions.
Français Page 6
• Dépliez les pages 3 et 34 en lisant le mode
d'emploi.
Deutsch Seite 8
• Schlagen Sie beim Lesen der
Gebrauchsanweisung Seite 3 und 34 auf.
Nederlands Pagina 10
• Sla bij het lezen van de gebruiksaanwijzing
pagina 3 en 34 op.
Italiano Pagina 12
• Prima di usare l'apparecchio, aprite le pagina 3
e 34 e leggete attentamente le istruzioni per
l'uso.
Español Página 14
• Desplegar las páginas 3 y 34 al leer las
instrucciones de manejo.
Português Página 16
• Durante a leitura do modo de emprêgo,
desdobre e verifique as pág. 3 e 34.
Dansk Side 18
• Hold side 3 og 34 opslået mens De læser
brugsanvisningen.
Norsk Side 20
• Slå opp på side 3 og 34 før De leser videre.
Svenska Sid 22
• Ha sidan 3 och sidan 34 utvikt när ni läser
bruksanvisningen.
Suomi Sivu 24
• Pidä sivu 3 ja 34 auki samalla kun luet
käyttöohjetta.
Ελληνικά Σελίδα 26
• Για τις οδηγίες χρήσεως, ανοίξτε τις
σελίδες 3 και 34.
3
I
E
F G H
J
E
D
A
C
B
1

4
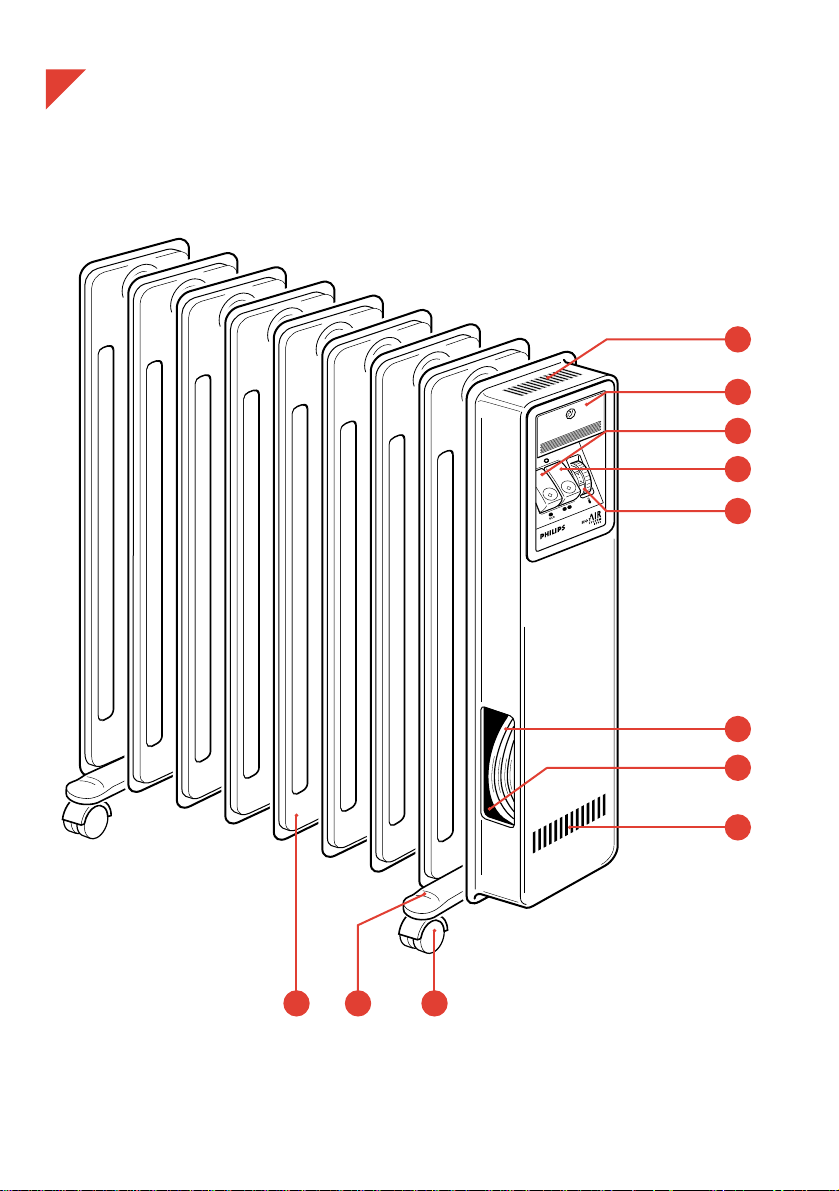
General description (fig. 1)
A On/off switch: 1st heating element
B On/off switch: 2nd heating element
C Thermostat knob
D Hand grip
E Vents
F Radiator
G Supports
H Wheels
I Mains cord
J Cord storage
Working
The heating element inside the radiator heats up
the oil.
The warm radiator causes both a natural hot air
flow (convection / heat distribution) and heat
radiance (warm feeling on the skin).
Mounting the supports
For safety: Mount the wheels before using the
appliance.
- Place the heater on the floor upside down
(fig. 2). (It is quite normal if you can hear the oil
moving inside the radiator.)
Important
• Read the instructions for use together with the illustrations (pages 3 and 34) before using
the appliance.
• Before connecting the appliance check that the voltage indicated on the type plate
corresponds to the mains voltage in your home.
• Be careful when moving the appliance. First disconnect from the mains power and allow it to
cool down.
• If the appliance is covered there is a risk of fire. Do not dry laundry on the heater.
• This heater is filled with a precise quantity of special oil. If leakage occurs and for all repairs
requiring opening of the oil container contact your Philips dealer or an authorised Philips
Service Centre.
• Do not place the heater against or under inflammable objects. Allow a free space of at least
50 cm (approx. 20”) to furniture, curtains etc.
• The heater must not be located below a wall socket.
• Keep the mains cord at a safe distance from the hot parts of the appliance.
• For your own safety and that of others: water and electricity are a dangerous combination!
Do not use the heater in the neighbourhood of a bath, shower or swimming pool.
• Use the heater only in a vertical position.
• Always remove the full length of mains cord from the mains cord storage before switching
on.
• Connect the appliance to an earthed wall socket.
• All installation and wiring must comply with current IEE regulations.
• It may happen, especially if both knobs (A) and (B) are in “on” position and another
electrical device is switched on as well, that a fuse or circuit breaker cuts off the mains
power. In such a case, the fuse or the circuit breaker may not be able to handle high
electrical power.
You may connect one of the involved appliances to another circuit (employing another fuse
or circuit breaker) or have the electrical installation revised by an authorized electrician.
- For United Kingdom (240 V AC):
Connect the heater (all types) via a 13 Ampere (or higher) fuse.
- For other countries (220-230 V AC):
Connect types HD 3410 and HD 3411 via a 10 Ampere (or higher) fuse;
Connect type HD 3412 via a 13 Ampere (or higher) fuse.
• If the mains cord of this appliance is damaged, it must only be replaced by Philips or their
service representative, as special tools and/or parts are required.
English

- Mount the separately packed supports with
wheels (figs. 3 - 6).
Tighten the winged nuts well using a pair of
pliers. Check if the supports are correctly fixed.
- Put the heater into normal position. Wait for at
least three minutes before connecting up and
switching on.
How to use
Power setting
Higher power settings result in quicker heating.
- Set switch (A) to position “on” (•) (fig. 7) for low
power.
- Set switch (B) to position “on” (••) (fig. 8) for
medium power.
- Set both switches (A) and (B) to position “on”
(• ••) (fig. 9) for high power.
Setting the temperature
- Set the thermostat by means of knob (C)
(fig. 10). (Position 10 = maximum,
position 1 = minimum.)
After this, the heater will keep its environment
at the set temperature by switching on and off
at intervals.
When a heating element has been switched on by
the thermostat the pilot lamp in the corresponding
switch (A) and/or (B) will illuminate.
You can adjust the thermostat knob setting during
use.
A good way of finding the ideal thermostat knob
setting for you is as follows:
- First set the knob to position 10 (= maximum).
- As soon as the temperature is comfortable, turn
down the thermostat knob slowly until the
heater goes off.
Cleaning
- Before cleaning turn the heater off and remove
the mains plug from the wall socket. Wait for
the heater to cool down sufficiently.
- You may clean the outside of the heater with a
damp cloth. Make sure that no water runs into
the appliance.
* The vents (E) may be cleaned using the
vacuum cleaner with small long-haired nozzle.
Non-rewireable mains plug (for Hong Kong
only)
This appliance is supplied with a round-pin type
earthed non-rewireable 15 Ampere fused plug. If
the supplied plug is not suitable for the socket
outlets in your home it can be removed and an
appropriate one fitted. (See below ).
Please note: Do not connect the supplied
15 Ampere round-pin type plug to a socket for flatpin type plugs via a "multiplug" adapter.
For U.K. only:
The appliance is supplied with a non-rewirable 13
Amp. plug.
The plug must never be used without the fuse
cover being in place.
If a replacement fuse cover is required, it must be
of the same type or colour as the coloured insert
around the fuse cover.
Replacement fuse covers are available from
Electrical Retailers or direct from Philips, tel.
0181 - 689 - 2166, ext. 8014.
Replacement 13 Amp. fuses must be BSI or
ASTA BS 1362 approved.
Important safety information
If the non-rewirable plug is not suitable for the
socket outlets in your home, it can be removed
and replaced by a plug of the correct type.
The non-rewirable plug must be cut from the
mains cord, the fuse removed, and the plug safely
discarded to prevent further use.
The removed plug can be hazardous if inserted
into a live mains socket.
Wiring Instructions (for U.K. only):
please refer to page 2
5

6
Description générale (fig. 1)
A Interrupteur marche/arrêt: 1er élément
chauffant
B Interrupteur marche/arrêt: 2ème élément
chauffant
C Bouton thermostat
D Poignée
E Trous d'aération
F Radiateur
G Supports
H Roues
I Cordon d'alimentation
J Compartiment de rangement
Fonctionnement
L'élément chauffant a l'intérieur du radiateur
chauffe l'huile.
Le radiateur provoque une circulation naturelle
d'air chaud (distribution de la chaleur) et un
chauffage radiant ("sensation de bien-être").
Montage des supports
Pour plus de sécurité : Montez les roues avant
toute utilisation de l'appareil.
- Placez l'appareil par terre à l'envers (fig. 2). (Il
est normal d'entendre l'huile bouger dans le
radiateur.)
Important
• Lisez les instructions en suivant les illustrations (pages 3 et 34) avant toute utilisation de
l'appareil.
• Avant de brancher l'appareil vérifiez que la tension indiquée sur la plaque signalétique
correspond à la tension du secteur de votre logement.
• Faites attention lorsque vous déplacez l'appareil. Avant tout, débranchez-le du secteur
laissez-le refroidir.
• Si l'appareil est couvert, il y a un risque de feu. Ne séchez pas de linge sur le chauffage.
• Cet appareil est rempli d'une quantité précise d'huile spéciale. En cas de fuite et pour toute
réparation nécessitant l'ouverture de l'appareil, contactez votre Revendeur Philips ou un
Centre Service Agréé.
• Ne placez jamais l'appareil contre ou sous des objets inflammables. Laissez un espace
suffisant d'au moins 50 cm des meubles, rideaux etc...
• L'appareil ne doit pas être sous une prise de courant.
• Maintenez le cordon d'alimentation à une distance de sécurité des parties chaudes de
l'appareil.
• Pour votre propre sécurité et celle des autres : l'eau et l'électricité forment une combinaison
dangereuse ! N'utilisez pas l'appareil à proximité d'une salle de bain ou d'une piscine.
• Utilisez l'appareil uniquement dans une position verticale.
• Déroulez toujours toute la longueur du cordon d'alimentation avant toute utilisation.
• Branchez l'appareil à une prise de courant munie d'une terre.
• L'installation et tous les branchements doivent être conformes aux normes en vigueur.
• Il peut arriver, surtout si les deux boutons (A) et (B) sont sur la position "on" et qu'un autre
appareil électrique est allumé, qu'un fusible ou disjoncteur coupe le secteur. Dans un tel
cas, le fusible ou le disjoncteur sont incapables de fournir une puissance électrique
suffisante.
- Vous pouvez brancher l'un des appareils à un autre circuit (employant un autre fusible ou
disjoncteur) ou faire vérifier l'installation électrique par un électricien.
Branchez les types HD 3410 et HD 3411 sur un fusible de 10 Ampères (230/240 V) (ou
supérieur).
Branchez le type HD 3412 sur un fusible de 13 Ampères (230/240 V) (ou supérieur).
• Si le cordon d'alimentation de l'appareil est endommagé, il doit être seulement remplacé par
Philips ou un Centre Service Agréé, car des outils spéciaux sont nécessaires.
Français

- Montez le support roulettes (figs. 3 - 6). Serrez
les écrous papillon en utilisant une paire de
pinces. Assurez-vous que les supports sont
correctement fixés.
- Mettez l'appareil en position normale et
attendez au moins trois minutes avant de le
brancher.
Utilisation
Réglage de la puissance
Des réglages hauts en puissance permettent un
chauffage plus rapide.
- Mettez l'interrupteur (A) sur la position “marche"
1 (fig. 7) pour une faible puissance.
- Mettez l'interrupteur (B) sur la position “marche"
2 (fig. 8) pour une puissance moyenne.
- Mettez les deux interrupteurs (A) et (B) sur la
position “marche" 1 2 (fig. 9) pour une
puissance maximum.
Réglage de la température
- Réglez le thermostat à l'aide du bouton (C)
(fig. 10).
(position 10 = maximum, position 1= minimum.)
Après cela, l'appareil garde la température
désirée en allumant et coupant de temps à
autre.
Quand un élément chauffant est allumé par le
thermostat la lampe témoin de l'interrupteur
correspondant (A) et/ou (B) s'allume.
Vous pouvez ajuster le bouton thermostat
pendant l'utilisation.
Pour trouver la température idéale, procédez
comme suit :
- Mettez d'abord le bouton thermostat sur la
position 10 (= maximum).
- Dès que la température est idéale, baissez le
bouton thermostat lentement jusqu'à ce que
l'appareil s'arrête.
Nettoyage
- Avant tout nettoyage, débranchez la fiche de la
prise de courant et laissez l'appareil refroidir.
- Vous pouvez nettoyer l'extérieur de l'appareil
avec un chiffon humide. Faites attention de ne
pas faire couler d'eau dans l'appareil.
• Les trous d'aération (E) peuvent être nettoyés
avec un aspirateur.
7

8
Allgemeine Beschreibung (Abb. 1)
A Ein-/Ausschalter: Heizelement 1
B Ein-/Ausschalter: Heizelement 2
C Thermostatschalter
D Griff
E Luftauslaßöffnungen
F Radiator
G Gerätefüße
H Räder
I Netzkabel
J Kabelaufwicklung
Arbeitsweise des Geräts
Die Heizelemente im Radiator erhitzendas Öl. Der
warme Radiator erzeugt eine natürliche
Umwälzung der Wärme im Raum und eine direkte
Wärmestrahlung.
Gerätefüße anbringen
Zu Ihrer Sicherheit: Bringen Sie die Gerätefüße
an, bevor Sie den Radiator in Betrieb nehmen!
- Stellen Sie das Gerät kopfüber auf den Boden
(Abb. 2). Es ist normal, wenn Sie dabei hören,
wie das Öl fließt.
Wichtig
• Lesen Sie diese Gebrauchsanweisung sorgfältig durch, und sehen Sie sich dabei die
Abbildungen (Seiten 3 und 34) an, bevor Sie das Gerät zum ersten Mal benutzen.
• Prüfen Sie vor Inbetriebnahme, ob die Spannungsangabe auf dem Typenschild mit der
örtlichen Netzspannung übereinstimmt.
• Bewegen Sie den Radiator stets mit Vorsicht. Ziehen Sie zuvor den Stecker aus der
Steckdose und lassen Sie das Gerät abkühlen.
• Legen Sie nichts auf das Gerät, auch keine Wäsche zum Trocknen. Brandgefahr!
• Der Radiator ist mit einer bestimmten Menge Spezialöl gefüllt. Sollte das Gerät Öl verlieren,
so wenden Sie sich, wie in allen anderen Fällen wegen einer Reparatur an Ihren PhilipsHändler oder an ein Philips Service-Centre.
• Stellen Sie den Radiator nicht an oder unter brennbaren Gegenständen auf. Wahren Sie
einen Abstand von mindestens 50 cm zu Möbeln, Vorhängen usw.
• Der Radiator darf nicht unter einer Wandsteckdose aufgestellt werden.
• Sorgen Sie dafür, daß das Netzkabel die heißen Teile des Geräts nicht berühren kann.
• Beachten Sie zu Ihrer eigenen und zu anderer Personen Sicherheit, daß jeder Kontakt
zwischen Wasser und Elektrizität gefährlich ist! Verwenden Sie den Radiator darum nicht in
der Nähe von Badewanne, Dusche oder Schwimmbecken.
• Verwenden Sie den Radiator nur in aufrechter Stellung.
• Wickeln Sie stets die volle Länge des Netzkabels ab, bevor Sie das Gerät einschalten.
• Betreiben Sie das Gerät nur an einer Schuko-Steckdose und an einer VDE-geprüften Leitung.
• Es kann vorkommen, daß die Sicherung den Strom unterbricht, besonders wenn die beiden
Schalter (A) und (B) eingeschaltet oder weitere Geräte an denselben Stromkreis
angeschlossen sind. Die Stromentnahme ist dann höher als zulässig. Sie können in diesem
Falle eines der Geräte ausschalten und über eine andere Sicherung an einen anderen
Stromkreis anschließen oder einen geprüften Elektriker beauftragen, die Anlage
entsprechend anzupassen.
Sicherung für HD 3410 und 3411: 230/240 V, 10 A träge.
Sicherung für HD 3412: 230/240 V, 16 A träge.
• Wenn das Netzkabel defekt oder beschädigt ist, muß es von einer durch Philips autorisierten
Werkstatt ersetzt werden, da für die Reparatur Spezial-Werkzeug und/oder spezielle Teile
benötigt werden.
Deutsch

- Bringen Sie die getrennt verpackten Gerätefüße
mit den Rädern so an, wie in den Abb. 3 bis 6
gezeigt. Ziehen Sie die Flügelmuttern mit einer
Zange fest an. Prüfen Sie, ob die Gerätefüße
fest und richtig sitzen.
- Stellen Sie das Gerät auf die Gerätefüße, und
warten Sie mindestens 3 Minuten, bevor Sie
den Stecker in die Steckdose stecken und den
Radiator einschalten.
Gebrauch des Geräts
Schalterstellung
Höherer Stromverbrauch sorgt für schnelleres
Aufheizen.
- Stellen Sie den Schalter (A) auf "Ein" (1)
(Abb. 7) für geringe Wärmeentwicklung.
- Stellen Sie den Schalter (B) auf "Ein" (2)
(Abb. 8) für mittlere Wärmeentwicklung.
- Stellen Sie beide Schalter (A) und (B) auf "Ein"
(1 2 (Abb. 9) für hohe Wärmeentwicklung.
Temperaturwahl
- Stellen Sie am Schalter (C) die gewünschte
Temperatur ein (Abb. 10):
1 = Minimum, 10 = Maximum.
Der Thermostat hält die Umgebung des
Radiators konstant, indem er das Gerät bei
Bedarf ein- und ausschaltet.
Die Kontrollampen der Schalter (A) und (B)
leuchten auf, wenn der Thermostat die
betreffenden Heizelemente eingeschaltet hat.
Der Thermostat kann während des Betriebs
verstellt werden.
Um die beste Einstellung ausfindig zu machen,
verfahren Sie wie folgt:
- Stellen Sie zunächst den Schalter (C)
auf 10 = Maximum.
- Sobald die gewünschte Umgebungstemperatur
erreicht ist, drehen Sie den Schalter langsam
so weit zurück, bis die Heizelemente
ausgeschaltet werden.
Reinigung
- Ziehen Sie vor jeder Reinigung den Stecker aus
der Steckdose, und warten Sie, bis das Gerät
genügend abgekühlt ist.
- Sie können die Außenseiten des Radiators mit
einem feuchten Tuch reinigen. Achten Sie
darauf, das kein Wasser in das Innere des
Geräts gelangt.
• Die Luftauslaßöffnungen (E) können mit einem
Staubsauger unter Verwendung der
langhaarigen Düse gesäubert werden.
9
 Loading...