

Page 1
FC8822, FC8812
Page 2
Page 3
FC8822
Wheels stuck
ݓઁሂ
Top cover or dust container not placed properly
רۆࠋࠦӧ٦ݾ
Bumper stuck
ߓԎሑᇆሂ
Robot lifted up from oor
՚ֽϴุఓᇊୃስײᆋ༏ӧచ
Colour of oor too dark
ֽϴဂ೨ขτ
Battery not inserted properly / Charging error (switch is o)
ԁሑݾԍմ༆IJܵၜܵтij
12
5
6
4
3
2
1
7
8
9
10
17
20
19
18
22
23
21
25
24
26
16
11
10
15 14
13
Page 4

Page 5

English 6
Deutsch 29
Eesti 54
Latviešu 78
Lietuviškai 101
Nederlands 124
Polski 149
Page 6

1
1110 129
234
5 6 7 8
6
English
Introduction
Congratulations on your purchase and welcome to Philips! To fully benefit
from the support that Philips offers, register your product at
www.philips.com/welcome.
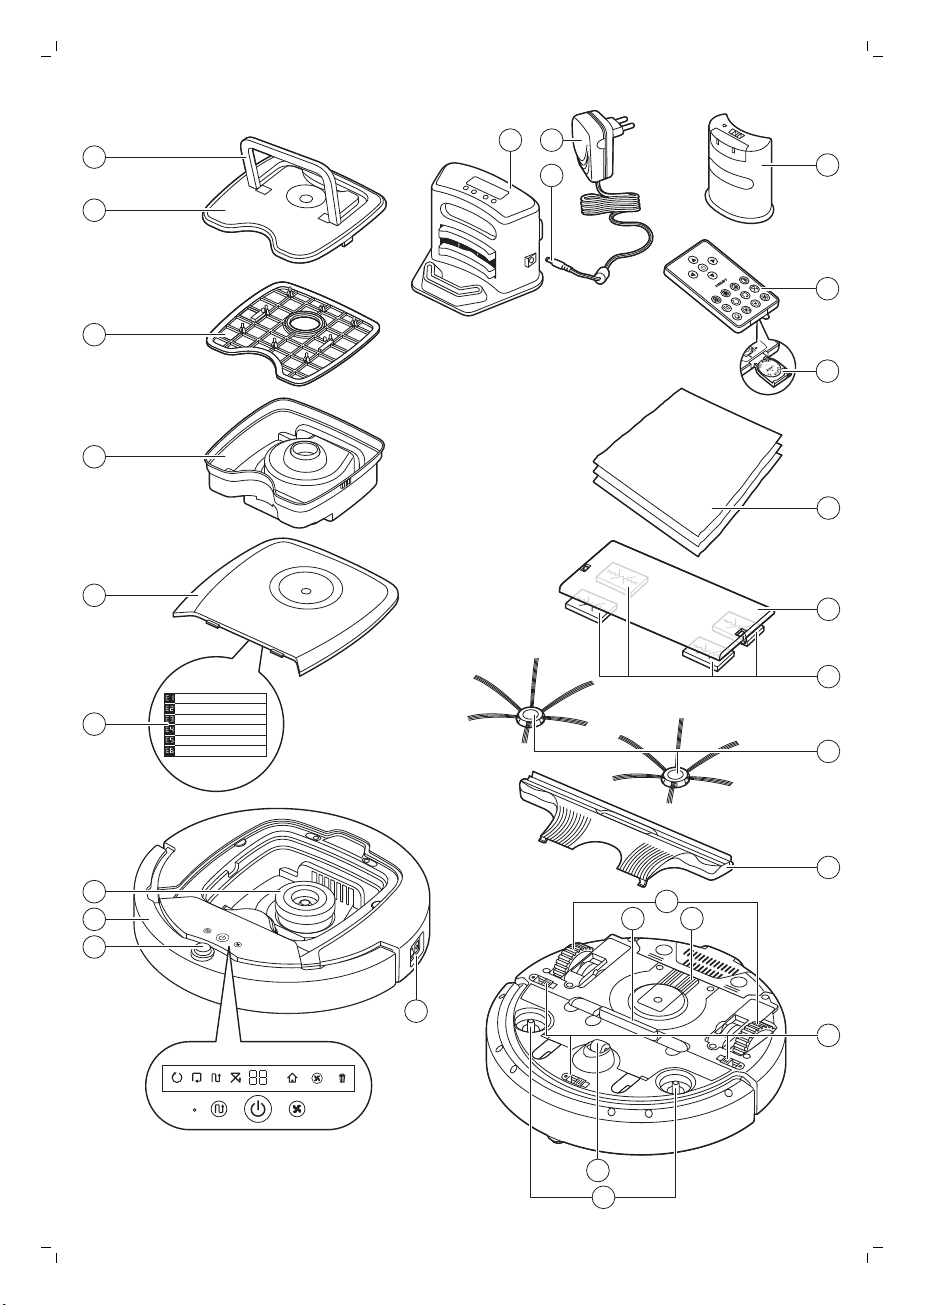
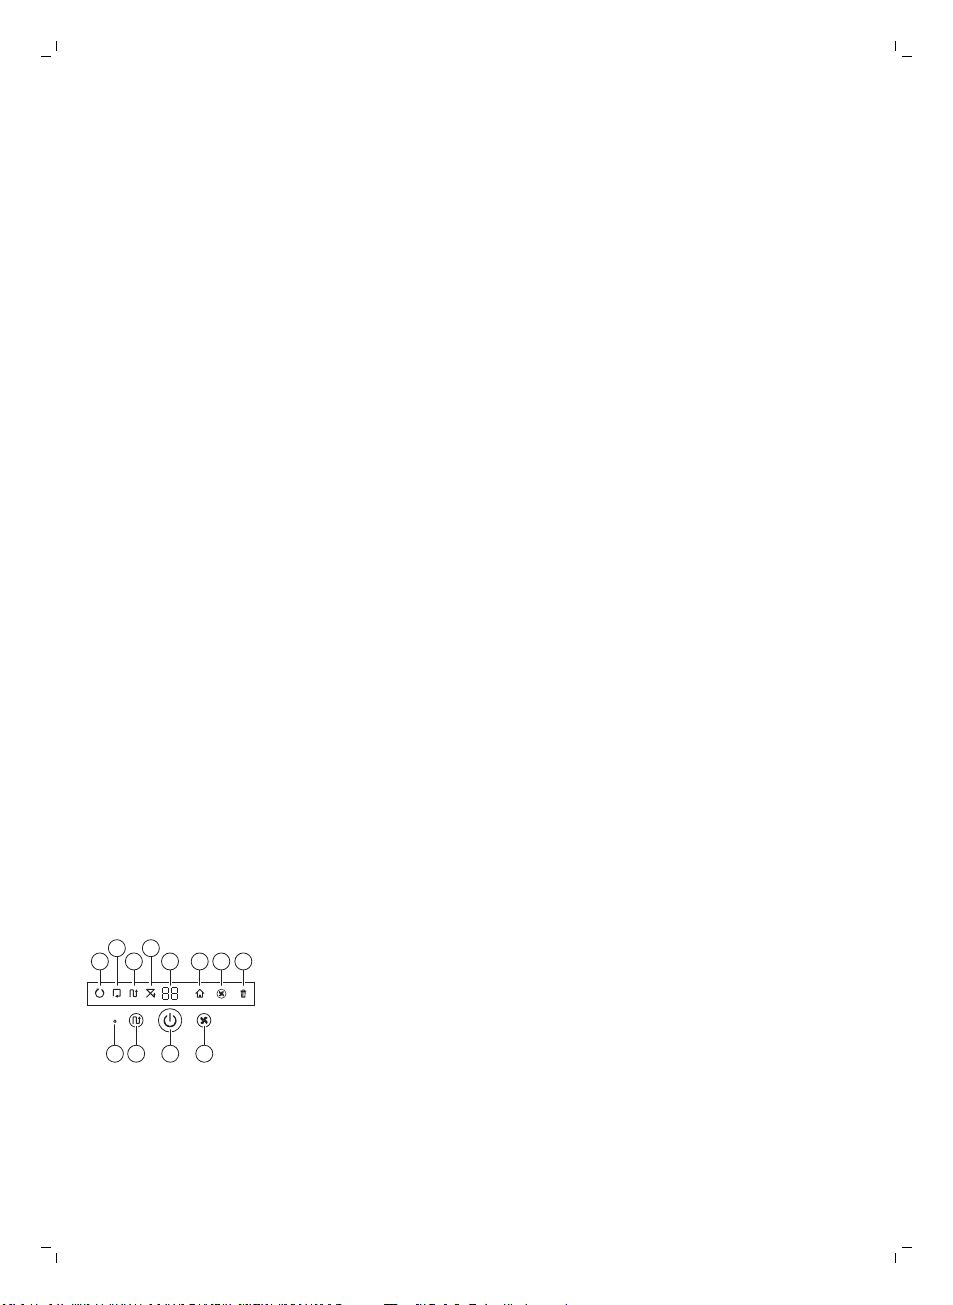
General description
1 Handle of dust container lid
2 Dust container lid
3 Filter
4 Dust container
5 Top cover
6 Error codes table
7 Fan
8 Bumper
9 Docking station sensor
10 Power switch
11 Front wheel
12 Side brush shafts
13 Drop-off sensors
14 Wheels
15 Suction opening
16 TriActive XL nozzle
17 Side brushes
18 Fixation blocks for dry wipes
19 Dry wipe holder
20 Dry wipes
21 Battery holder
22 Remote control
23 Invisible wall (FC8822)
24 Docking station
25 Adapter
26 Small plug
Display and remote control
Display of robot
1 Spiral mode indicator
2 Wall-following mode indicator
3 Zigzag pattern mode indicator
4 Random mode indicator
5 Cleaning time
6 Docking icon
7 Fan speed indicator
8 Dustbin full indicator
9 Sound sensor
10 Mode selection button
11 Start/stop button
12 Fan speed button
English
Page 7

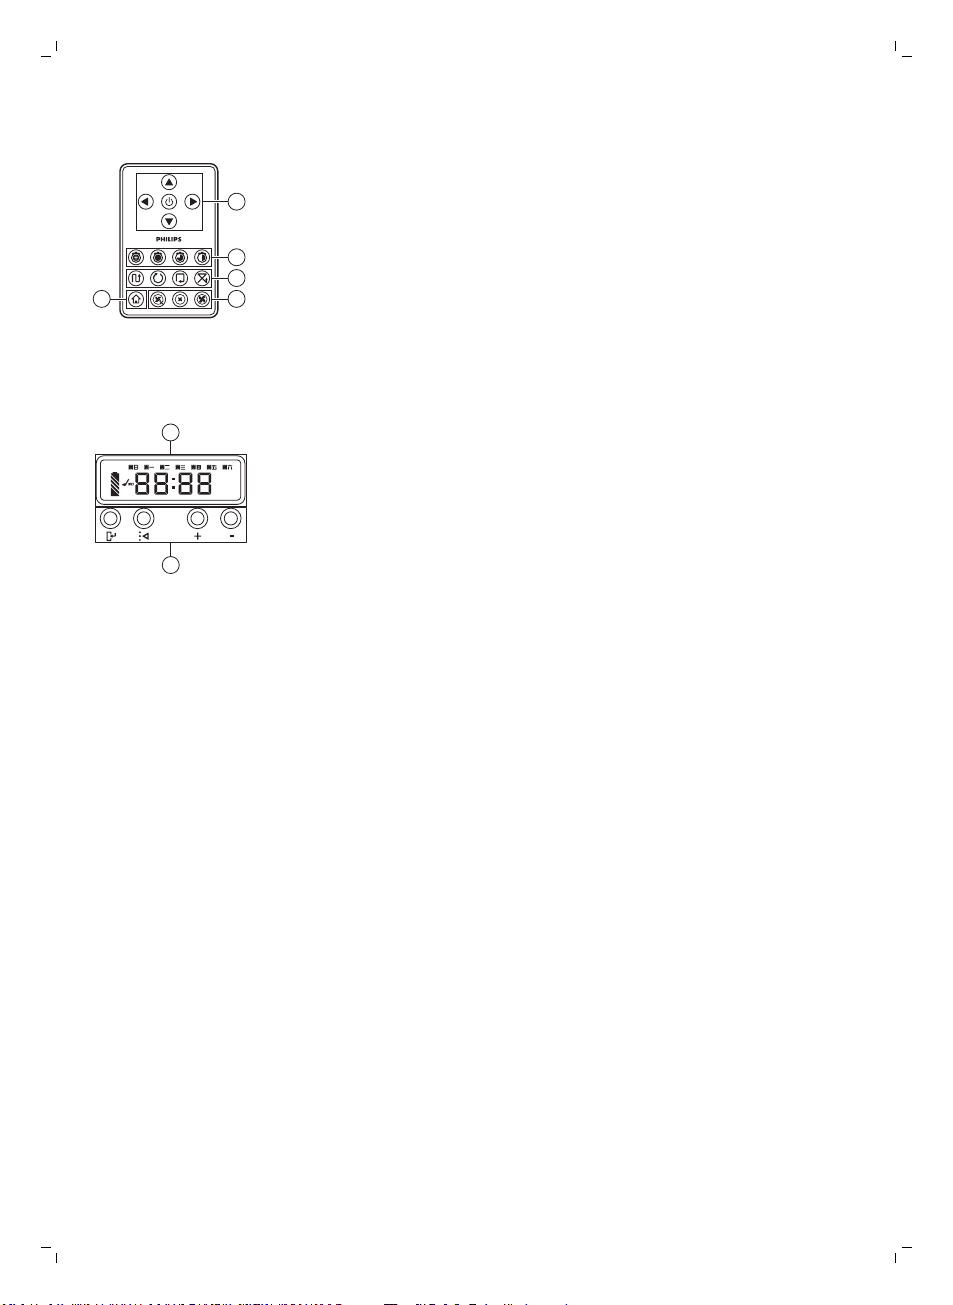
Remote control
2
1
3
45
1
2
1 Navigation buttons and start/stop
2 Cleaning time buttons
3 Cleaning mode buttons
4 Fan speed buttons
5 Docking button
Control panel of docking station
1 Display with time, day and programming indications
2 Adjusting and setting buttons
How your robot works
English
7
What your robot cleans
This robot is equipped with features that make it a suitable cleaner to help
you clean the floors in your home.
The robot is especially suitable for cleaning hard floors, such as wooden,
tiled or linoleum floors. It may experience problems cleaning soft floors,
such as carpet or rugs. If you use the robot on a carpet or rug, please stay
close by the first time to see if the robot can deal with this type of floor. The
robot also needs supervision when you use it on very dark or shiny hard
floors.
How your robot cleans
Cleaning system
The robot has a 3-stage cleaning system to clean your floors efficiently.
Page 8
8
English
-
The two side brushes help the robot clean in corners and along walls.
They also help to remove dirt from the floor and move it towards the
suction opening.
-
The suction power of the robot picks up loose dirt and transports it
through the suction opening into the dust container.
-
The robot comes with a dry wipe holder that allows you to clean your
hard floor even more thoroughly with dry wipes.
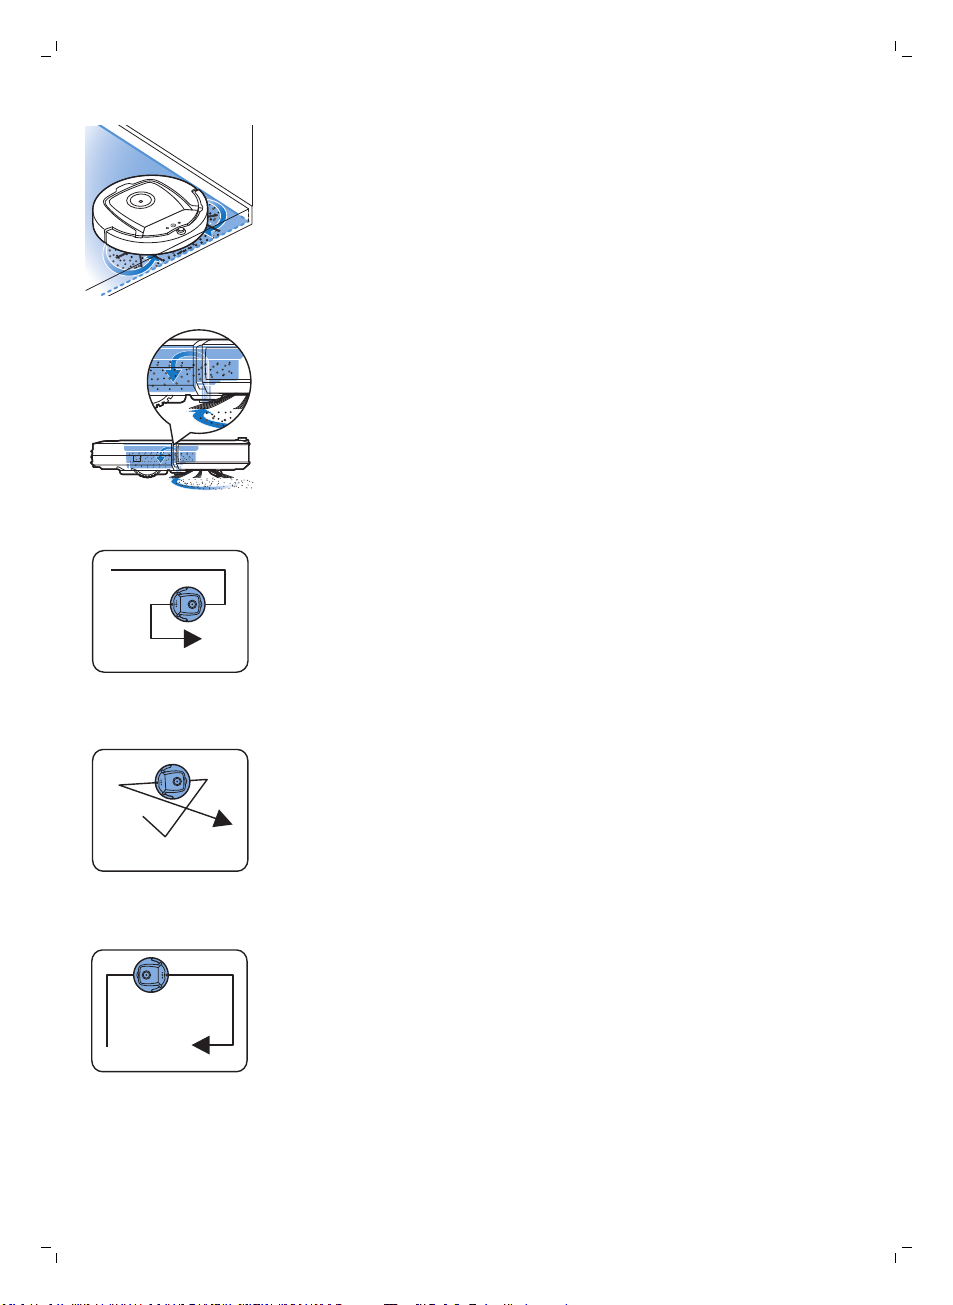
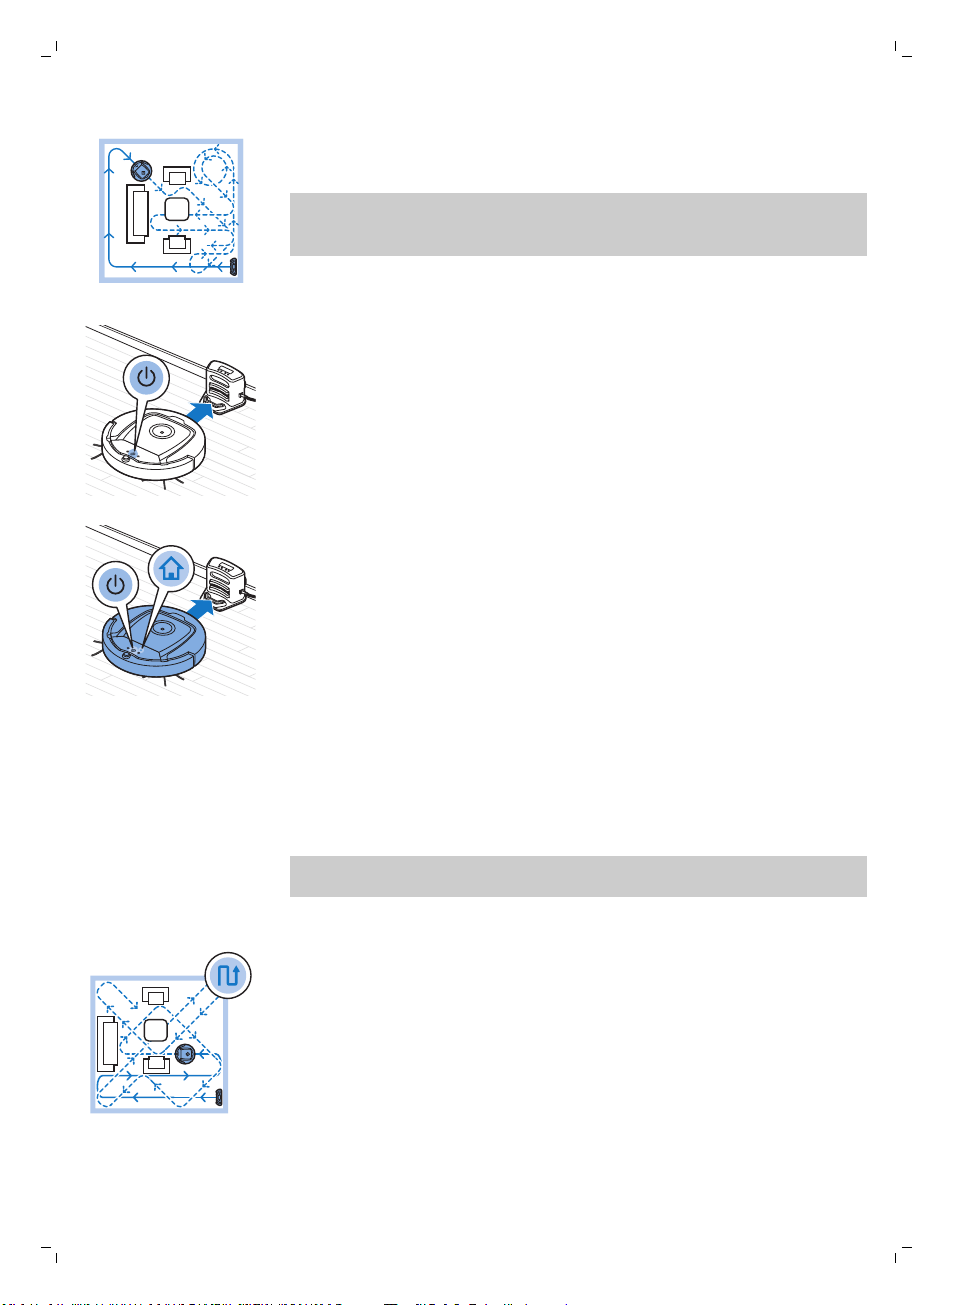
Cleaning patterns
In its auto cleaning mode, the robot uses an automatic sequence of cleaning
patterns to clean each area of the room optimally. The cleaning patterns it
uses are:
1 Z-pattern or zigzag pattern
2 Random pattern
3 Wall-following pattern
Page 9
4 Spiral pattern
In its auto cleaning mode, the robot uses these patterns in a fixed
sequence:z-pattern, random pattern, wall-following pattern, and spiral
pattern.
When the robot has completed this sequence of patterns, it starts moving in
Z-pattern again. The robot continues to use this sequence of patterns to
clean the room until the rechargeable battery runs low, or until it is switched
off manually.
If the robot detects a particularly dirty area during its cleaning run, it
switches to spiral mode and switches to turbo fan speed to ensure thorough
dirt removal.
Note: You can also select each mode individually by pressing the
appropriate button on the remote control. The manually selected modes are
only active for a couple of minutes. After that, the robot switches back to
auto-cleaning mode.
For more details, see chapter 'Using your robot', section 'Cleaning modes'.
How your robot avoids height differences
The robot has three drop-off sensors in its bottom. It uses these drop-off
sensors to detect and avoid height differences such as staircases.
Note: It is normal for the robot to move slightly over the edge of a height
difference, as its front drop-off sensor is located behind the bumper.
English
9
Caution: In some cases, the drop-off sensors may not detect a staircase or
other height difference in time. Therefore monitor the robot carefully the
first few times you use it, and when you operate it near a staircase or
another height difference. It is important that you clean the drop-off
sensors regularly to ensure the robot continues to detect height
differences properly (see chapter ' Cleaning and maintenance' for
instructions).
Before first use
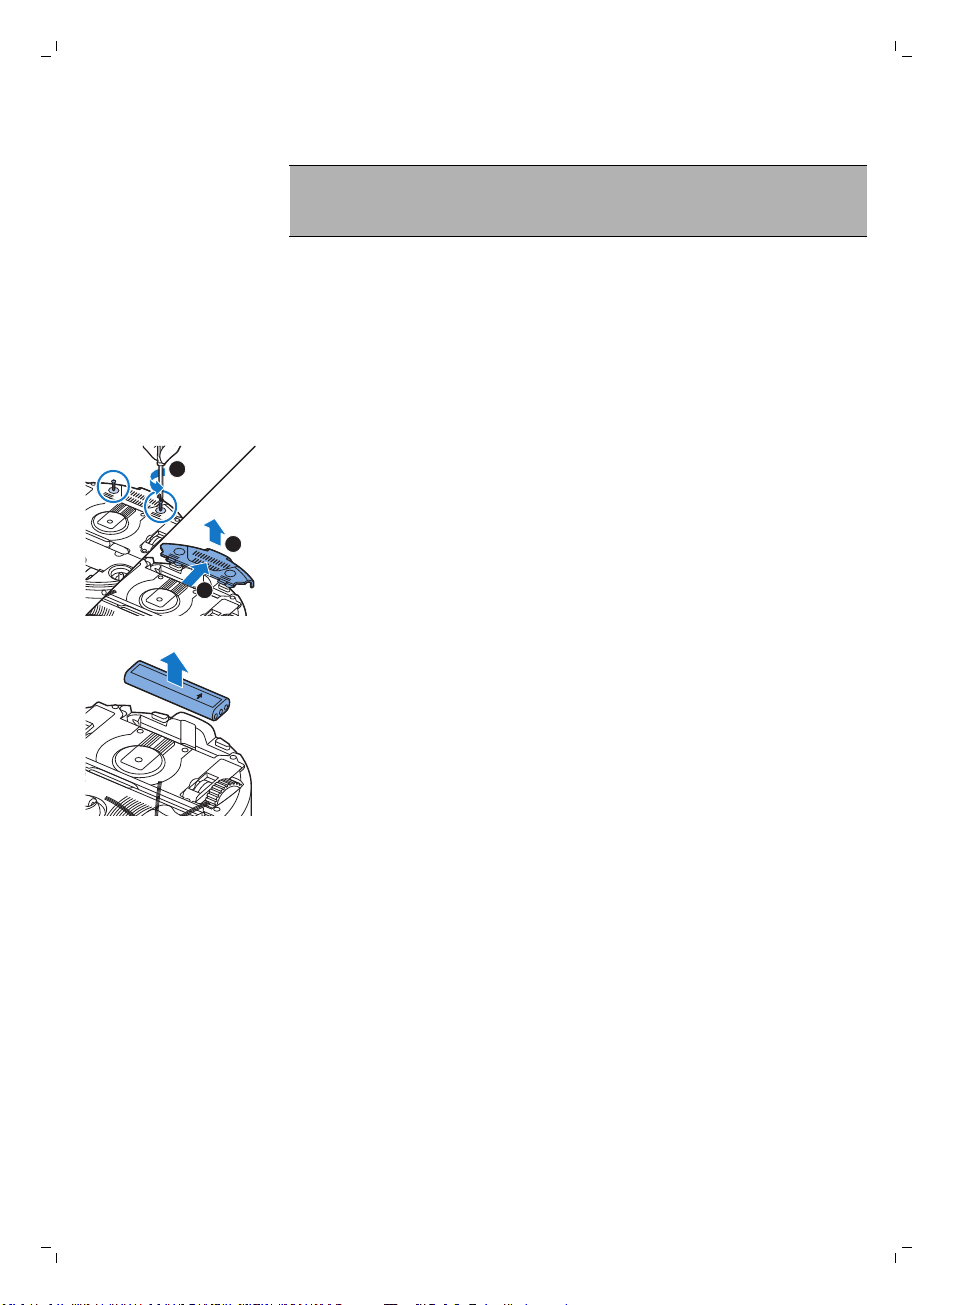
Mounting the side brushes
1 Unpack the side brushes and place the robot upside down on a table or
on the floor.
Page 10
1
2
100 厘米
100 cm
30 厘米30 厘米
30 cm
80
厘米
80 cm
10
English
2 Push the side brushes onto the shafts on the bottom of the robot.
Note: Make sure you attach the side brushes properly. Press them onto
the shaft until you hear them lock into position with a click.
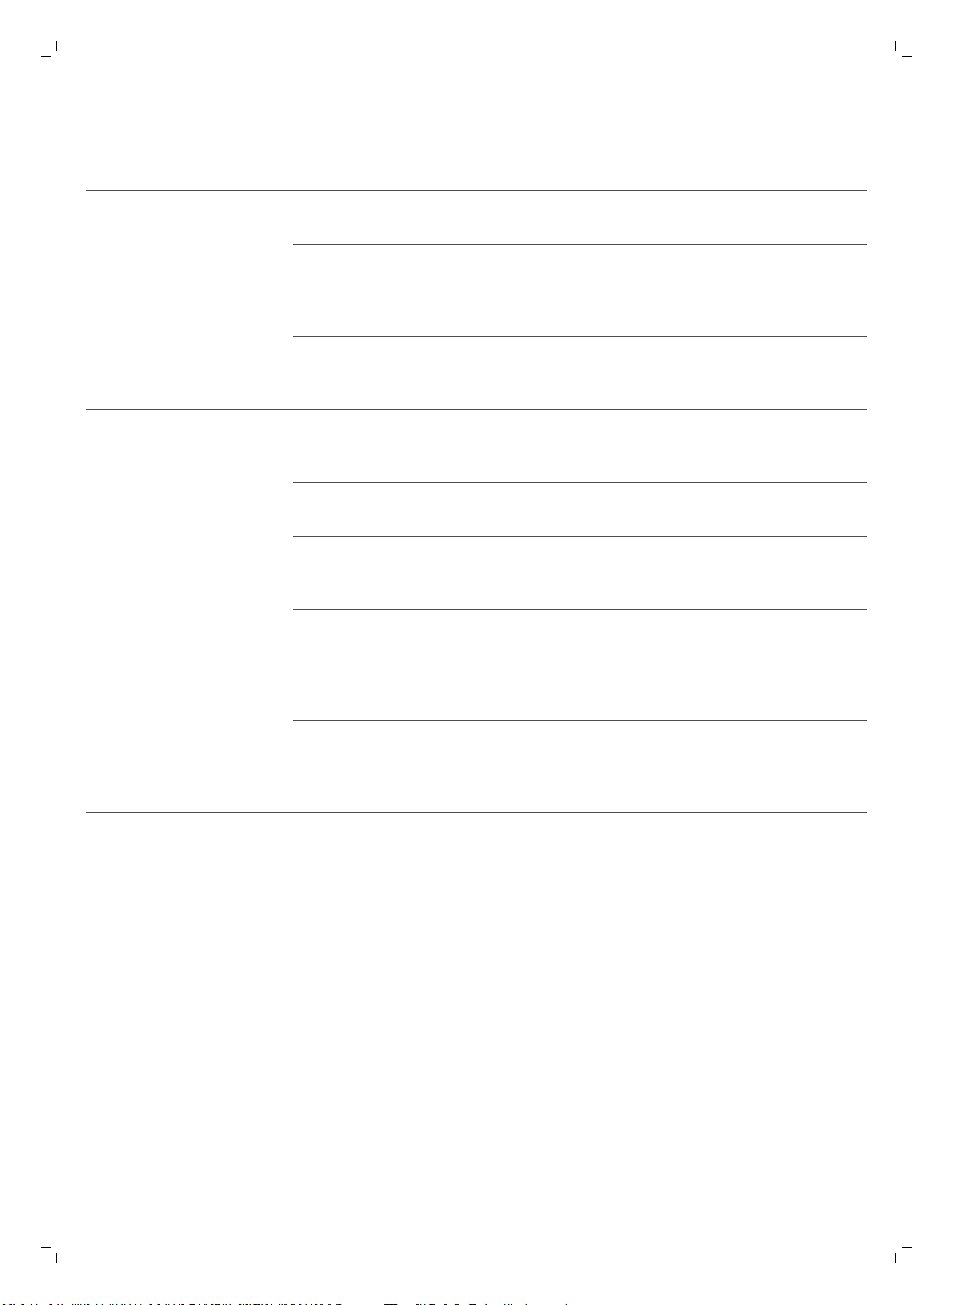
Removing the tag from the remote control
The remote control works on a CR2025 coin-shaped battery. This battery is
protected with a protection tag that has to be removed before use.
1 Pull the battery protection tag out of the battery compartment of the
remote control. Now the remote control is ready for use.
Preparing for use
Installing the docking station
1 Insert the small plug of the adapter into the socket on the docking station
(1) and insert the adapter into the wall socket (2).
-
2 Place the docking station on a horizontal, level floor against the wall.
Note: Make sure that there are no obstacles or height differences 80 cm
in front, 30 cm to the right and 100 cm to the left of the docking station.
Tip: To ensure the docking station stays firmly in the selected spot, fasten
it to the wall with screws or with two strips of double-sided tape.
The display of the docking station comes on.
Page 11
Charging
English
When charging for the first time and when the rechargeable battery of the
robot is empty, the charging time is four hours.
Your robot can be charged in two ways:
-
On the docking station, either manually or automatically during use;
-
By connecting the robot directly to the mains.
Note: When the rechargeable battery is fully charged, your robot can clean
for up to 120 minutes
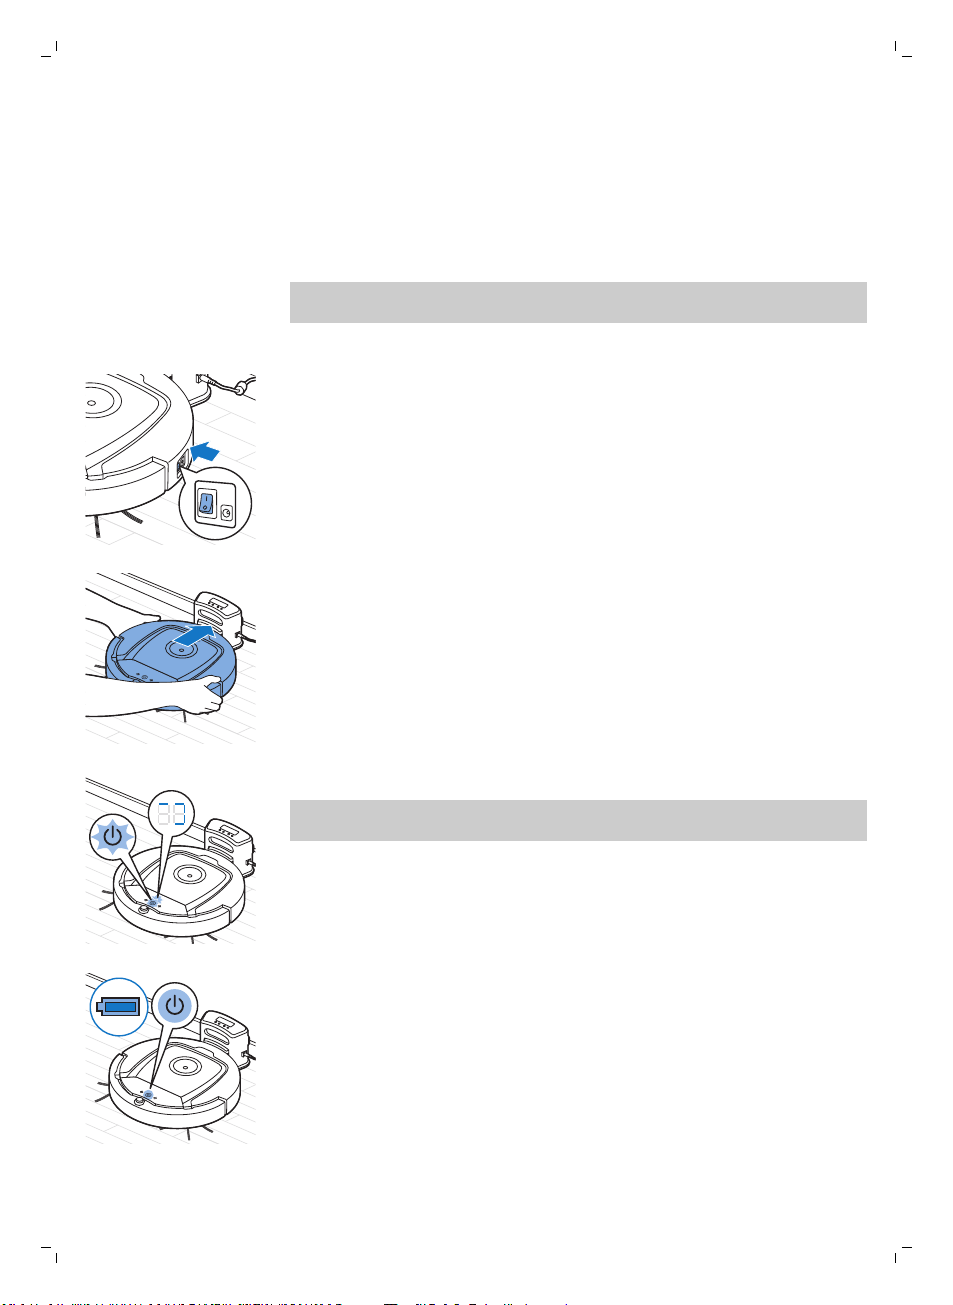
Charging on the docking station
1 Press the power switch to switch on the robot.
2 Place the robot on the plugged-in docking station.
11
3 The start/stop button starts flashing.
Note: Because this is the first time you charge the robot, the display of
the robot shows the booting indicator.
4 When the rechargeable battery is fully charged, the start/stop button
lights up continuously.
Page 12
12
English
Charging automatically during use
1 When the robot has finished cleaning or when only 15% of the battery
power remains, it automatically searches for the docking station to
recharge. When the robot searches for the docking station, the light in the
start/stop button turns orange.
2 When the rechargeable battery is fully charged, the start/stop button
lights up continuously.
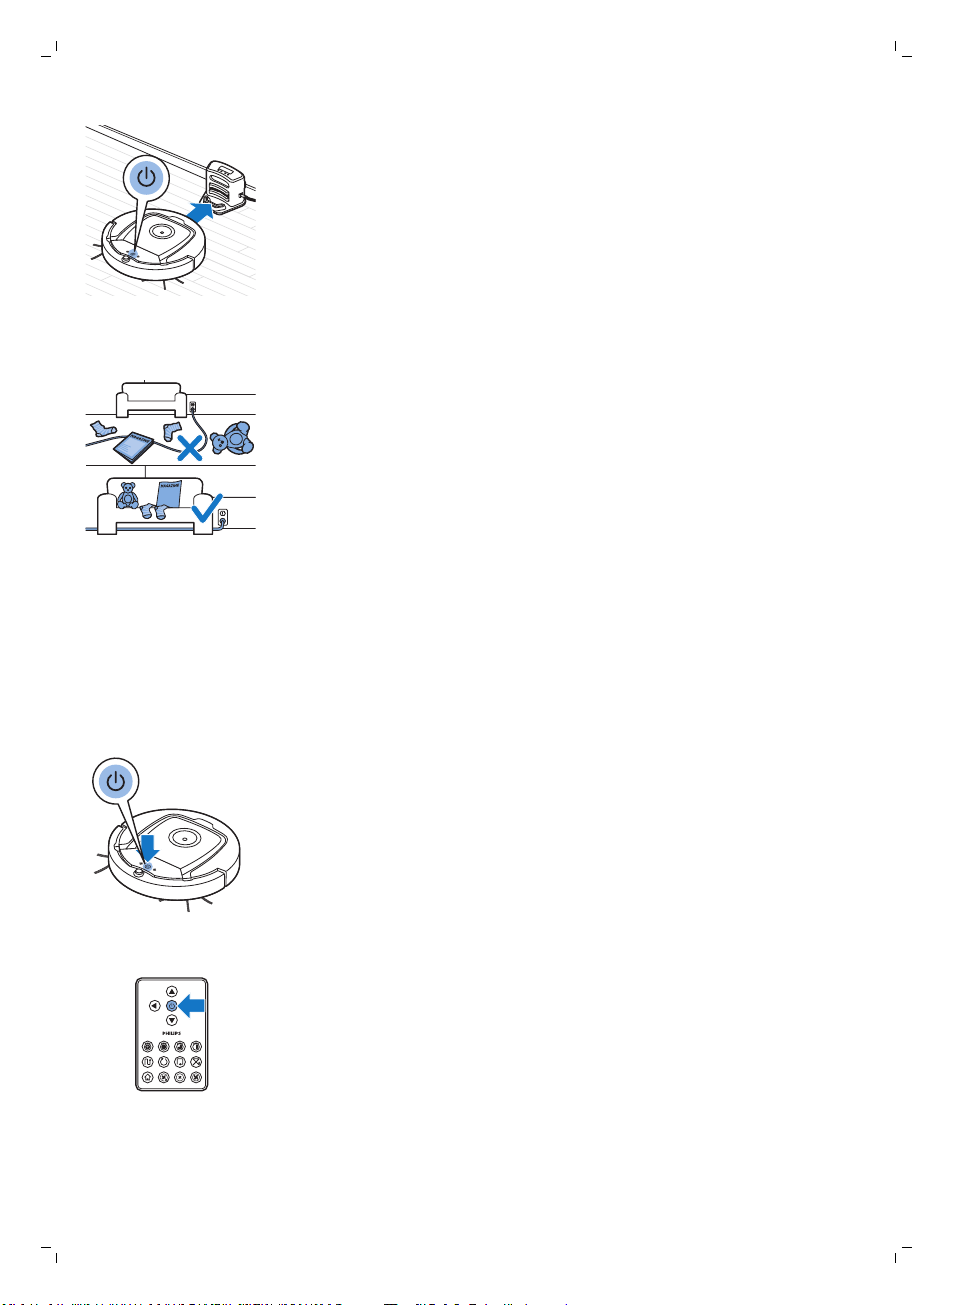
Preparing the room for a cleaning run
Before you start the robot on its cleaning run, make sure that you remove all
loose and fragile objects from the floor. Also remove all cables, wires and
cords from the floor.
Using your robot
Starting and stopping
1 Set the power switch on the side of the robot to the 'on' position.
2 Press the start/stop button.
-
You can press the start/stop button on the robot.
-
You can also press the start/stop button on the remote control.
3 The start/stop button is continuously on and the robot starts cleaning.
Page 13
English
4 The robot cleans in the auto-cleaning mode until its battery runs low. In
the auto-cleaning mode, it follows repeated sequences of Z-pattern,
random, wall-following and spiral patterns.
Note: To select an individual mode, press one of the mode buttons on
the remote control. See section 'Cleaning mode selection' for more
details.
5 When the battery runs low, the start/stop button turns orange and the
robot searches for the docking station to recharge.
6 You can also press the start/stop button to interrupt or stop the cleaning
run. If you press the start/stop button again and there is still enough
energy in the rechargeable battery, the robot continues cleaning in the
auto-cleaning mode.
7 To make the robot return to the docking station before the rechargeable
battery runs low, press the docking button on the remote control. The
docking icon on the display of the robot comes on and the robot returns
to the docking station.
13
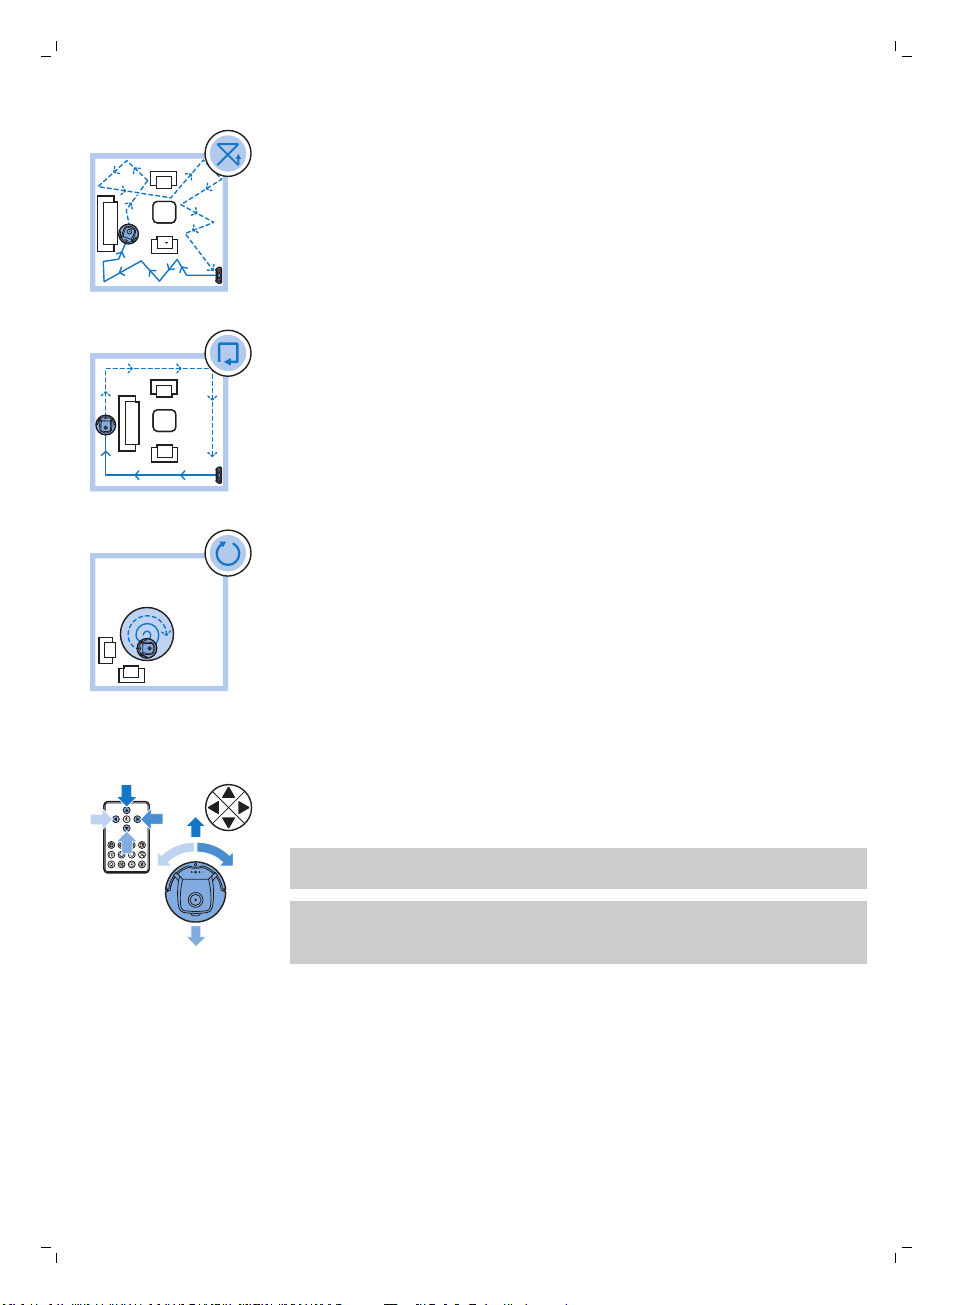
Cleaning mode selection
Next to the auto-cleaning mode, this robot has four individual cleaning
modes that can each be activated by pressing the appropriate button on the
remote control.
Note: The manually selected modes are only active for a couple of minutes.
After that, the robot switches back to auto-cleaning mode.
Z-pattern mode
In Z-pattern mode, the robot cleans by making Z-shaped loops through the
room to clean large areas.
Page 14
14
English
Random mode
In this mode, the robot cleans the room in a mixed pattern of straight and
crisscross movements.
Wall-following mode
In this mode, the robot follows the walls of the room to give the area
alongside the walls an extra clean.
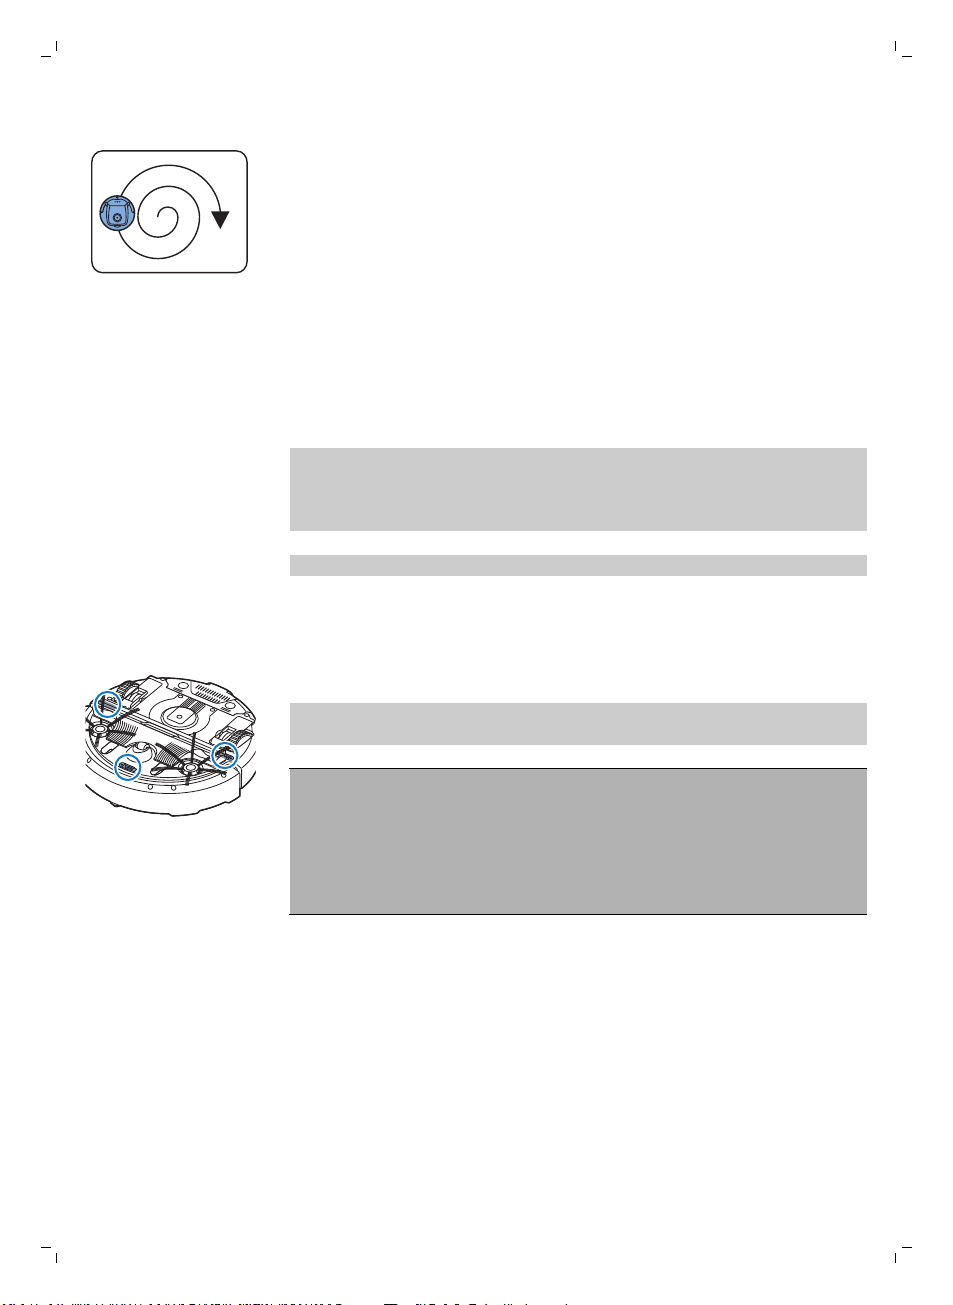
Spiral mode
In this mode, the robot moves in a spiral pattern to clean a small area. If the
dust detection sensor detects dirt, the robot automatically switches the fan
to turbo speed.
Manual driving
1 Use the arrow buttons above and below and to the left and right of the
start/stop button on the remote control to navigate the robot through the
room.
Note: Be careful when you drive the robot manually close to height
differences and staircases.
Note: The vacuuming function and the side brushes only work when the
robot is driven forward. The left, right or back buttons are only for
maneuvering the robot.
Page 15
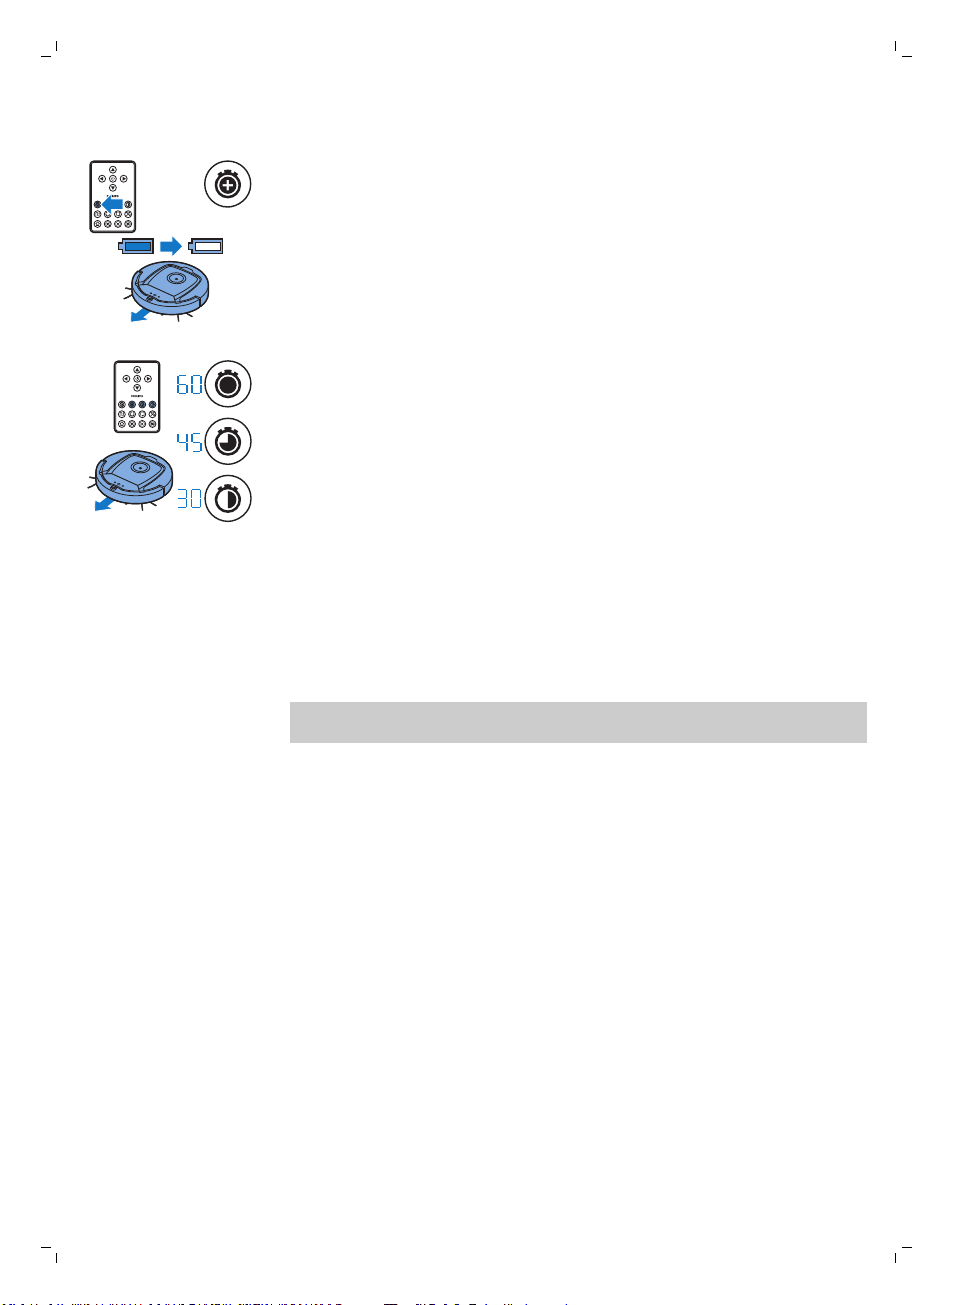
Using the cleaning time buttons
-
By default, the robot cleans in auto cleaning mode until its rechargeable
battery runs low. The robot will then automatically return to its docking
station. If you selected one of the other cleaning times (see below), you
can switch back to the default mode by pressing the maximum cleaning
time button on the remote control.
-
The other cleaning time buttons on the remote control allow you to let
the robot operate for 60, 45 and 30 minutes respectively. When the
cleaning time is finished, the robot returns to its docking station. The
docking icon will light up on the display.
-
If you do not want the robot to return to the docking station at the end of
the cleaning time, press the cleaning time button twice. The docking icon
disappears from the display. When the cleaning time is finished, the robot
stops.
Operating the docking station
Setting clock time and day
If you want to use cleaning programs, you have to set the clock time and the
day of the week on the display of the docking station first.
English
15
Note: For the pictures that belong to the steps below, see the pages at the
back of this manual.
1 Press the set button. The set mode indicator and the clock time indicator
start flashing.
2 Press the select button once. The hour indication starts flashing.
3 Use the + and - buttons on the docking station to set the hour.The set
hour appears on the display.
4 Press the select button to confirm the hour set. The minutes indication
starts flashing.
5 Use the + and - buttons on the docking station to set the minutes. The set
minutes appear on the display.
6 Press the select button to confirm the minutes set. The indication 'Su’ for
Sunday starts flashing.
7 Use the + and - buttons on the docking station to set the current day of
the week.
8 Press the select button to confirm the day of the week.
9 Press the set button to confirm the clock time and day of the week
setting. Both the set mode indicator and the clock time indicator stop
flashing and turn solid.
Page 16
1
2
3
16
English
Programming cleaning times
If you have set the time and the day of the week on the display of the
docking station, you can program cleaning times for your robot.
Note: For the pictures that belong to the steps below, see the pages at the
back of this manual.
The programming options available are:
Program Indications on display
Cleaning every day All day indications are on
Cleaning on weekdays Mo to Fri indications are on
Cleaning on 2 consecutive days Indications of 2 days are on, e.g. Fri and Sa
Cleaning 1 day a week Indication of selected day is on
1 Press the set button. The set mode indicator and the cleaning program
indicator start flashing.
2 Press the select button once. The hour indication starts flashing.
3 Use the + and - buttons on the docking station to set the hour. The set
hour appears on the display.
4 Press the select button to confirm the hour set. The minutes indication
starts flashing.
5 Use the + and - buttons on the docking station to set the minutes. The set
minutes appear on the display.
6 Press the select button to confirm the minutes set. The indication ‘Su’ for
Sunday starts flashing.
7 Use the + and - buttons on the docking station to toggle between
cleaning programs (see the table above for the programming options
available).
8 Press the select button to confirm the program selected.
9 Press the set button to confirm the programming. Both the set mode
indicator and the cleaning program indicator stop flashing and turn solid.
10 When you have set a cleaning program, the display shows the cleaning
program indicator and the day or days selected. If you leave the robot on
standby and its rechargeable battery is fully charged, it will start cleaning
at the programmed time on the programmed day or days.
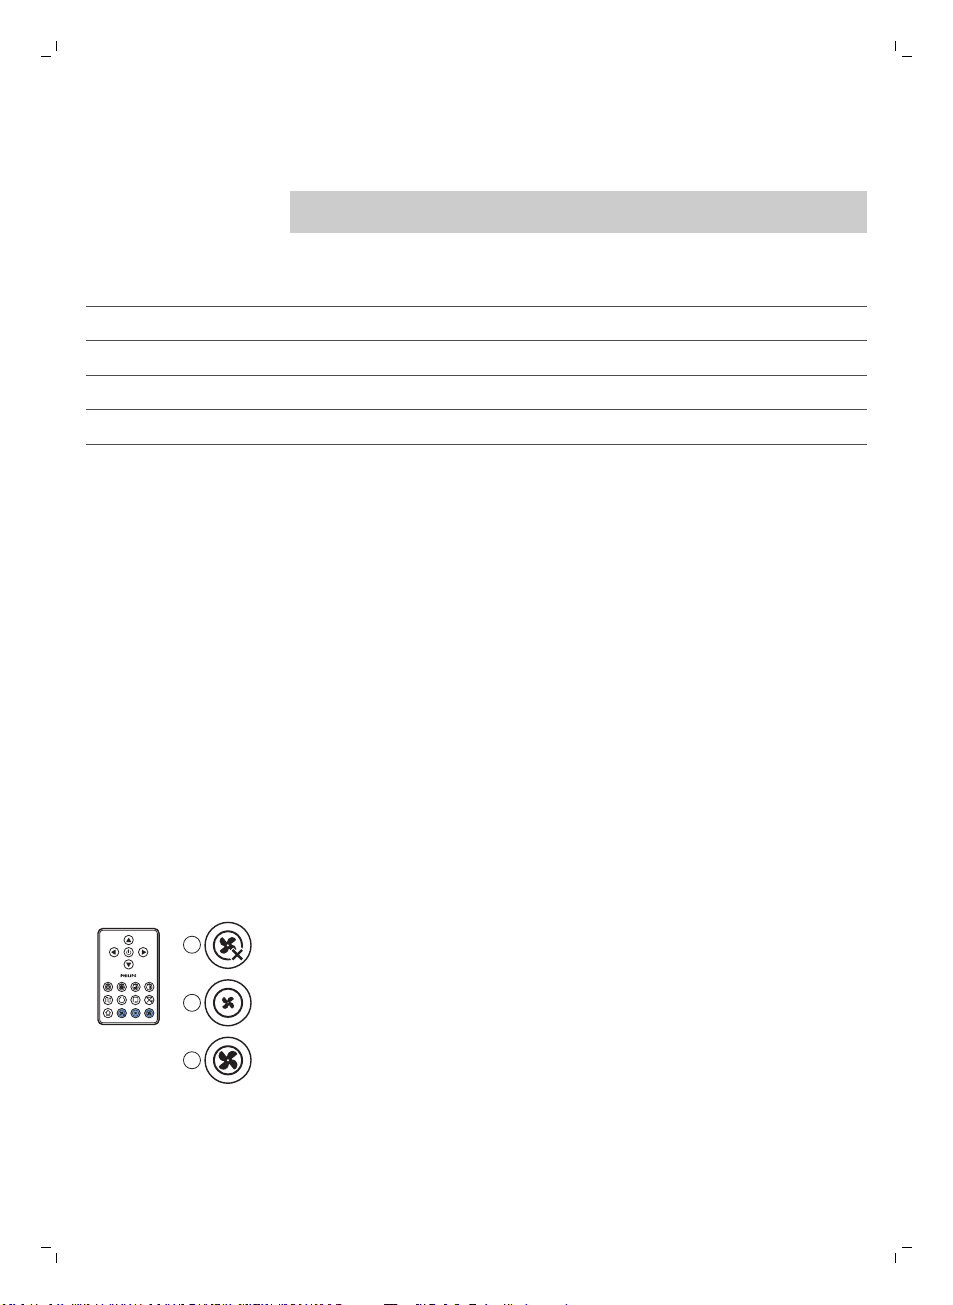
Fan speed buttons
You can use the fan speed buttons to increase the fan speed to turbo or to
switch off the fan. The default setting is normal fan speed.
1 Press this button to switch off the fan
2 Press this button to switch on the fan at normal speed.
3 The turbo fan button increases the fan speed.
Page 17
Clap response
The clap response is enabled when the robot enters sleep mode in the
following situations:
-
when it stops cleaning due to an error
-
when it cannot find its docking station in 20 minutes
If you do not see the robot, you can locate it by clapping your hands once.
The robot will respond by beeping and by lighting up all icons on its display.
Using the dry wipe attachment
The dry wipe attachment is a feature that allows you to clean hard floors
with dry wipes.
Note: If you use the dry wipe attachment, the robot may have trouble
crossing thresholds or climbing onto rugs.
Preparing the dry wipe attachment for use
1 Turn the robot upside down and place it on the floor or on a table.
2 Place the dry wipe on a table and place the dry wipe attachment on the
wipe with its fixation lugs pointing towards you.
English
17
3 Fold both ends of the dry wipe around the dry wipe attachment and
fasten the dry wipe onto the attachment by pushing the fixation blocks
into the recesses.
4 Insert the fixation lug of the dry wipe attachment into the opening just
behind the wheel on one side of the robot and push
into place with a click. Then repeat these actions on the other side.
5 Turn the robot and place it on the floor on its wheels with the dry wipe
attachment touching the floor.
until you hear it lock
Using the robot with the dry wipe attachment
When the dry wipe attachment is attached, you can use the robot in any
mode and on all hard floors. Do not use the dry wipe attachment on carpet
or rugs.
Page 18
1
2
1
2
18
English
Removing
1 Remove
the floor.
2 Turn the robot upside down and place it on the floor or on a table.
3 Push one
other side of the robot to release it.
robot.
the dry wipe attachment
the dry wipe attachment as soon as you have finished wiping
end of the dry wipe attachment towards the wheel on the
Using the invisible wall (FC8822)
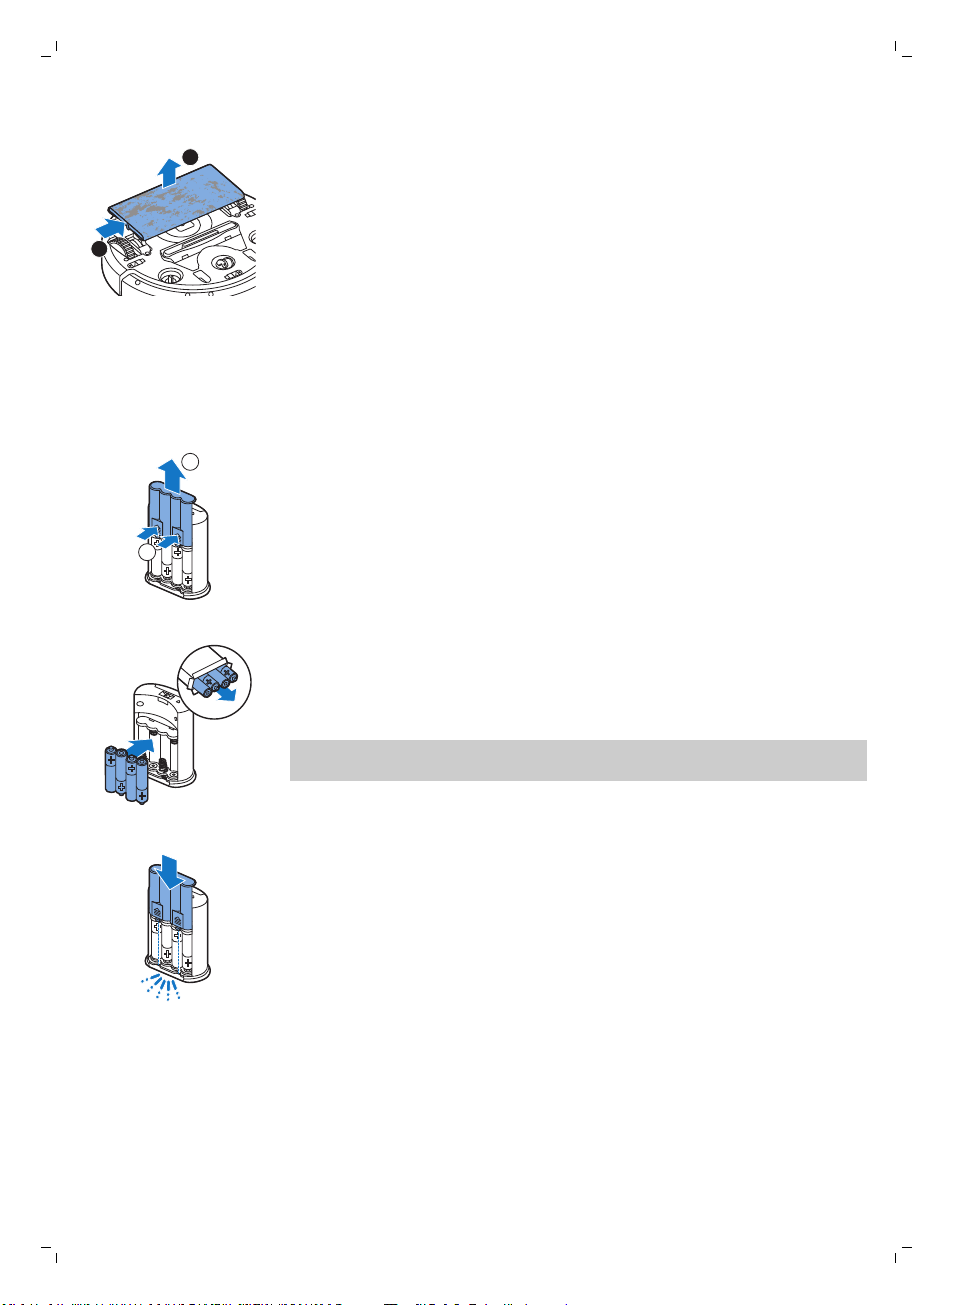
Placing the batteries in the invisible wall
The invisible wall operates on four AA batteries.
1 Push the two release tabs at the bottom of the back cover (1) and slide
the back cover upwards and off the invisible wall (2).
2 Take four new AA batteries from the pack and insert them into the
battery compartment of the invisible wall.
Note: Make sure the + and - poles of the batteries point in the right
direction.
Then pull the attachment off the
3 Slide the back cover onto the invisible wall again.
Page 19
3
1
2
English
19
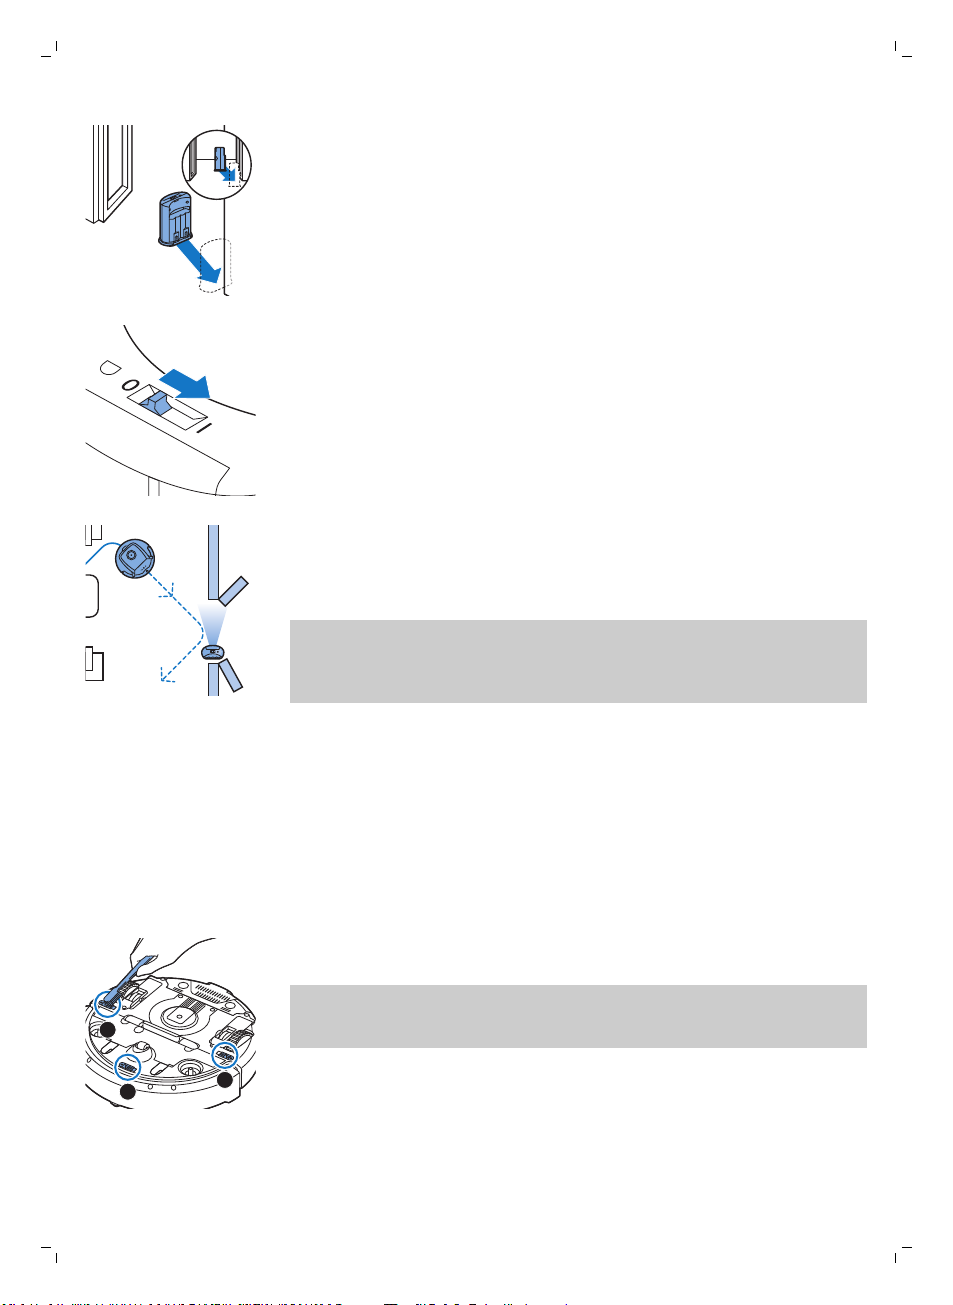
Positioning the invisible wall to stop the robot
You can use the invisible wall to prevent the the robot entering a room
or area that you want to keep it out of.
1 Place the unit at a point you do not want the robot to cross, e.g at an
open door to a room that is off-limits to the robot.
2 Switch on the invisible wall with the on/off slide on top of the unit.
3 Start the robot.
4 When the robot comes too close to the invisible wall, the light on the
invisible wall starts flashing and the invisible wall emits a beam of
infrared light. This beam of infrared light makes the robot change its
course and move away from the invisible wall.
Note: If you use the invisible wall, regularly check if the batteries still contain
sufficient power. You can check this by switching the virtual wall off and on
again. If there is enough energy in the batteries, the LED on the invisible wall
will light up briefly.
Cleaning and maintenance
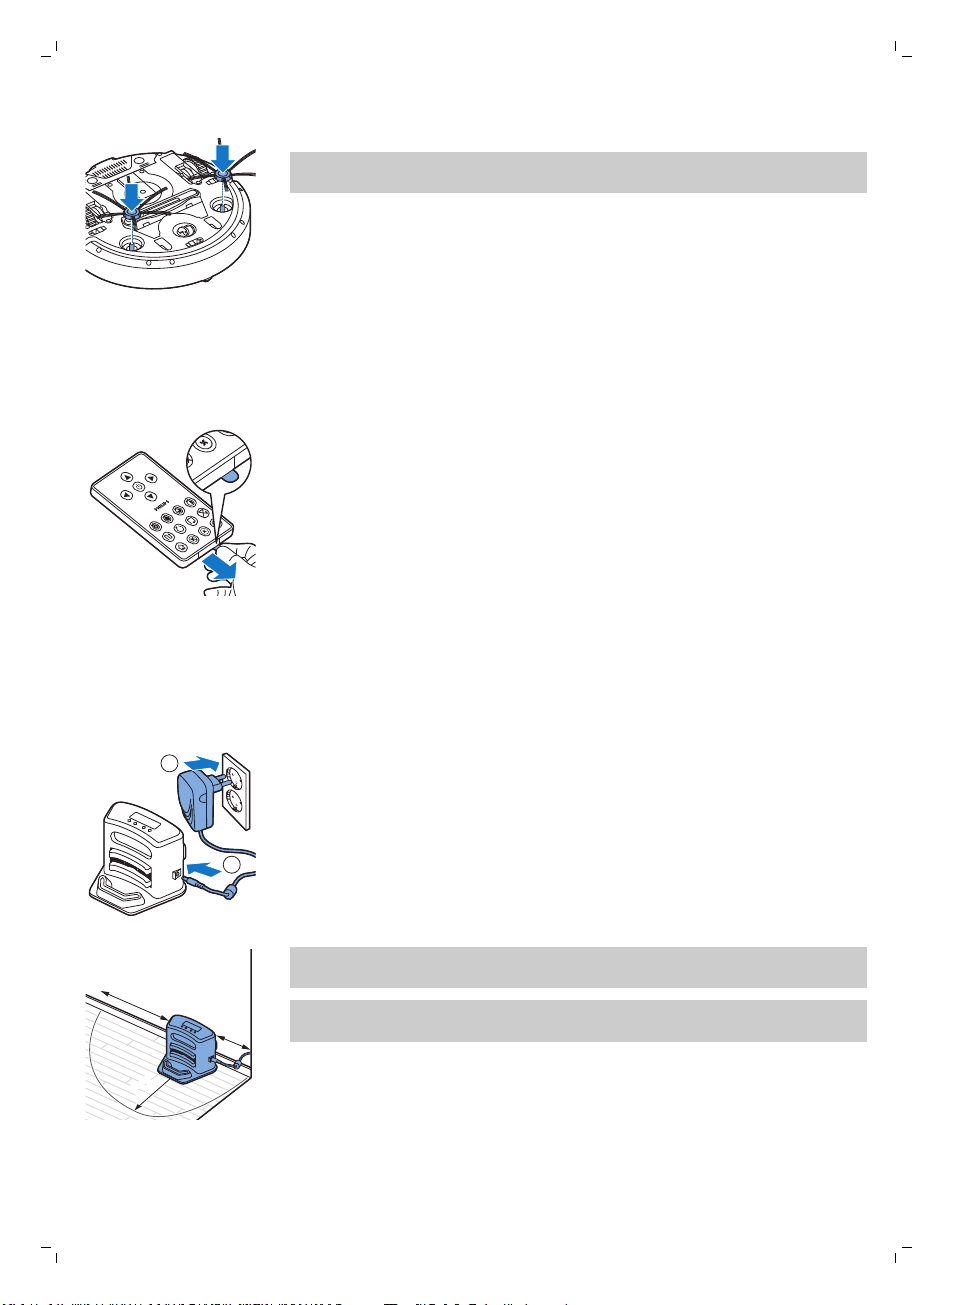
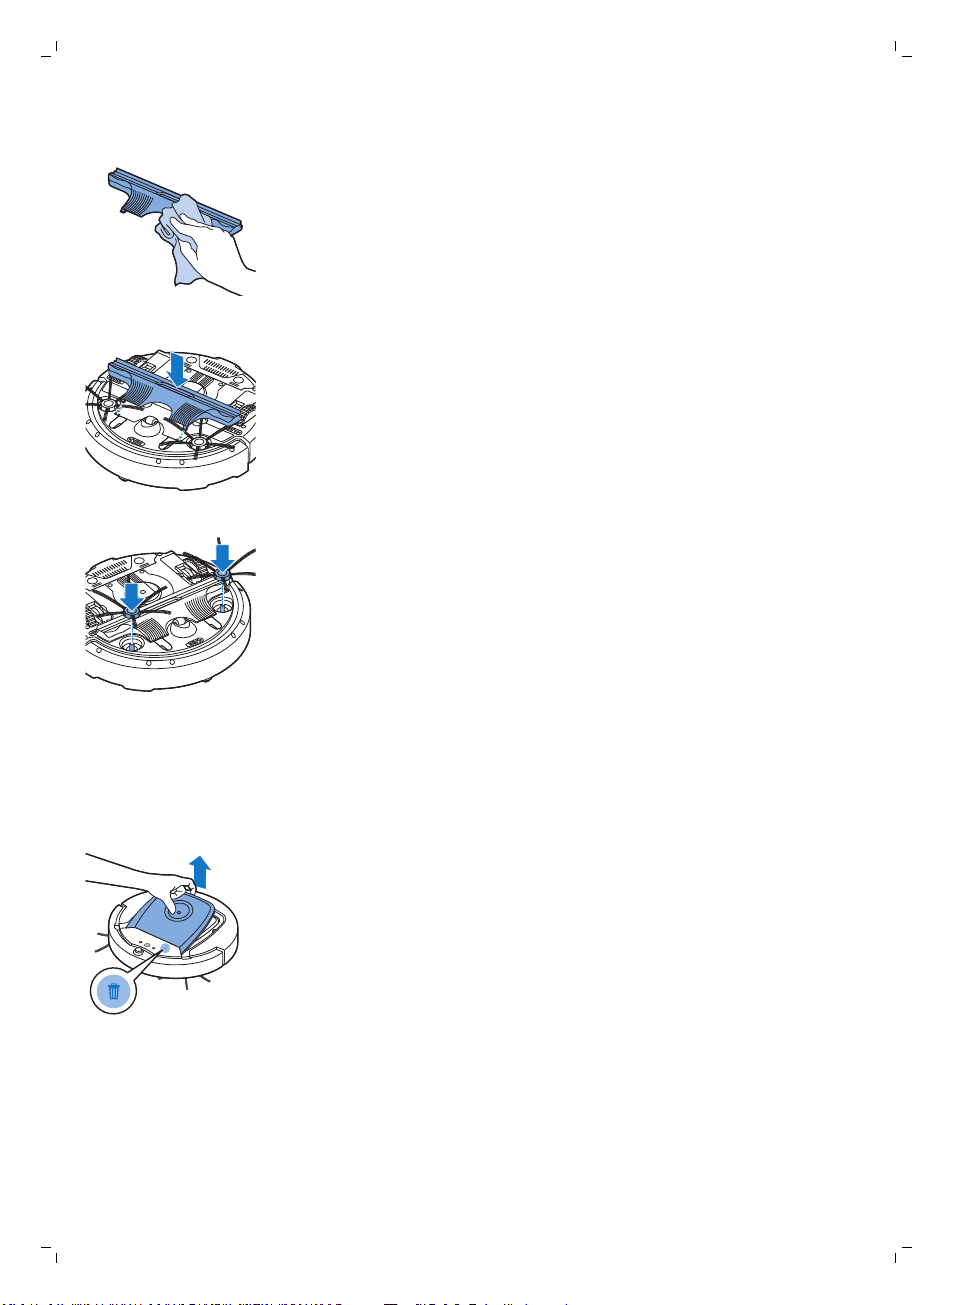
Cleaning the robot
To maintain good cleaning performance, you have to clean the drop-off
sensors, the wheels, the side brushes and the suction opening from time to
time.
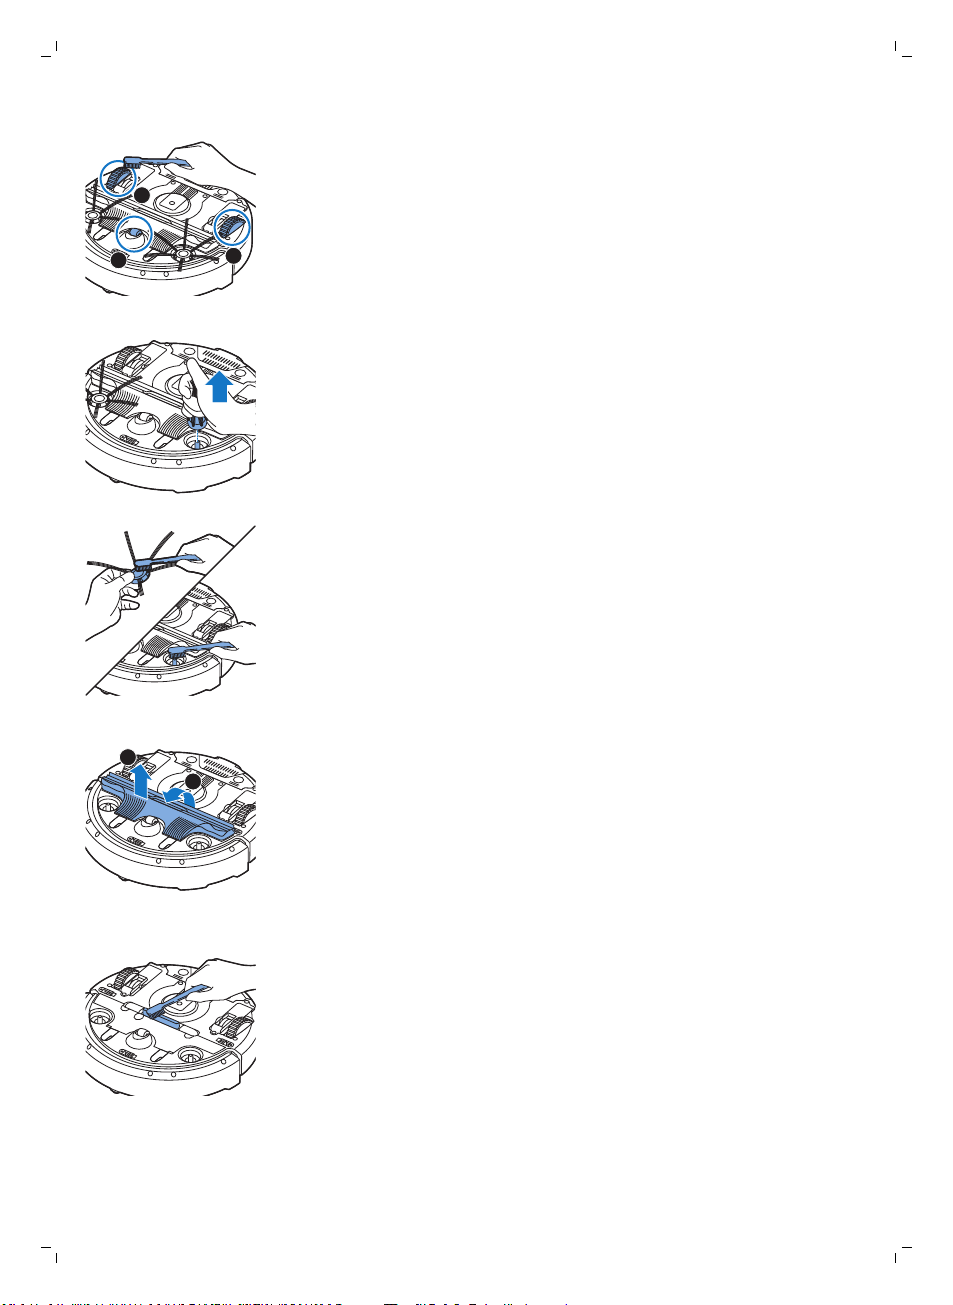
1 Place the robot upside down on a flat surface
2 Use a brush with soft bristles (e.g. a toothbrush) to remove dust or fluff
from the drop-off sensors.
Note: It is important that you clean the drop-off sensors regularly. If the
drop-off sensors are dirty, the robot may fail to detect height differences
or staircases.
Page 20
1
2
3
1
2
20
English
3 Use a brush with soft bristles (e.g. a toothbrush) to remove dust or fluff
from the front wheel and side wheels.
4 To clean the side brushes, grab them by the bristles and pull them off
their shafts.
5 Remove fluff, hairs and threads from the shaft and from the side brush
with a soft brush (e.g. a toothbrush) or a cloth.
6 Check the side brushes and the bottom of the robot for any sharp objects
that could damage your floor.
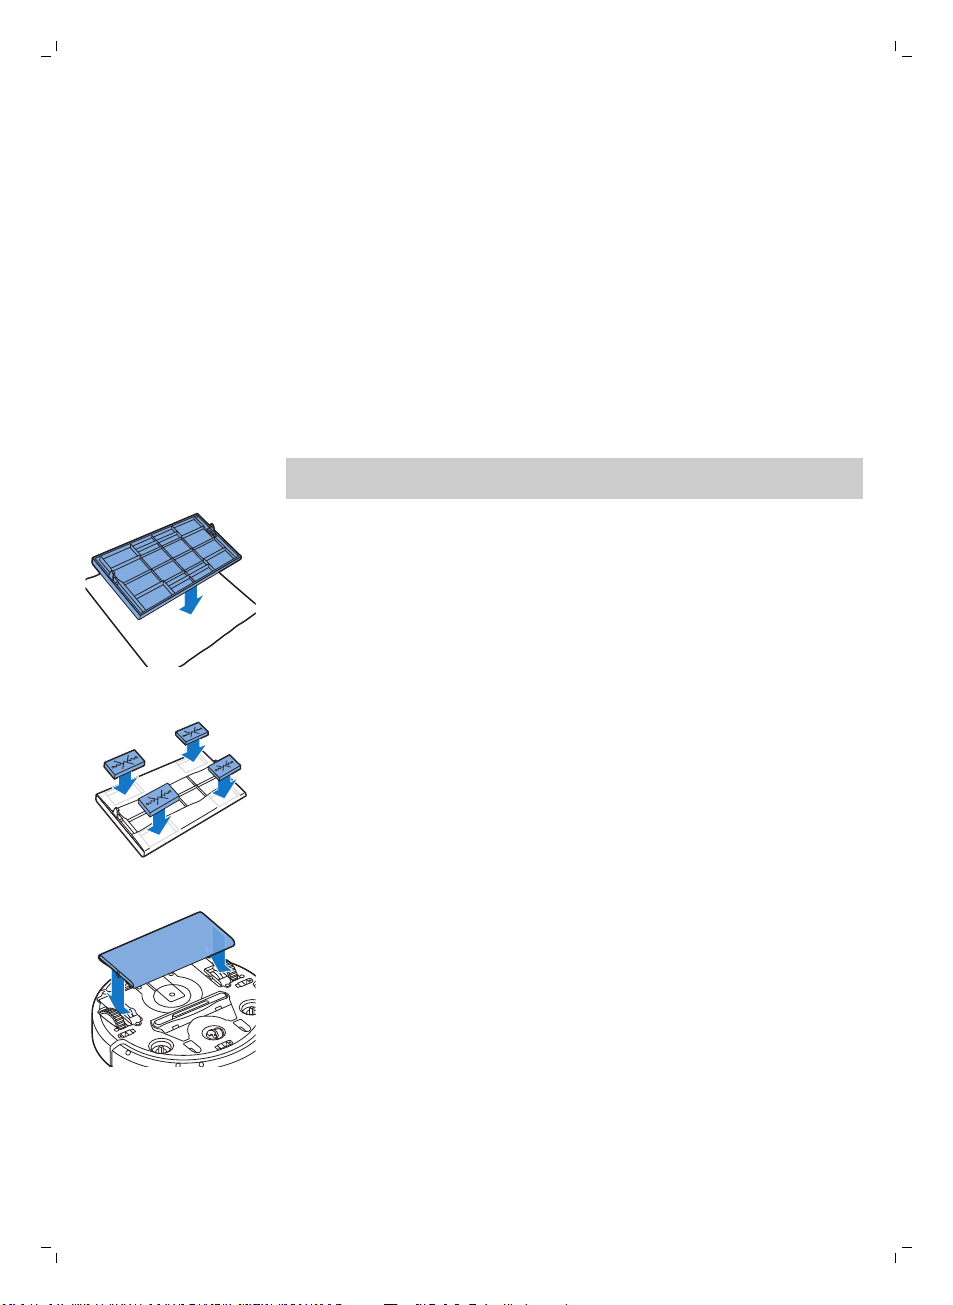
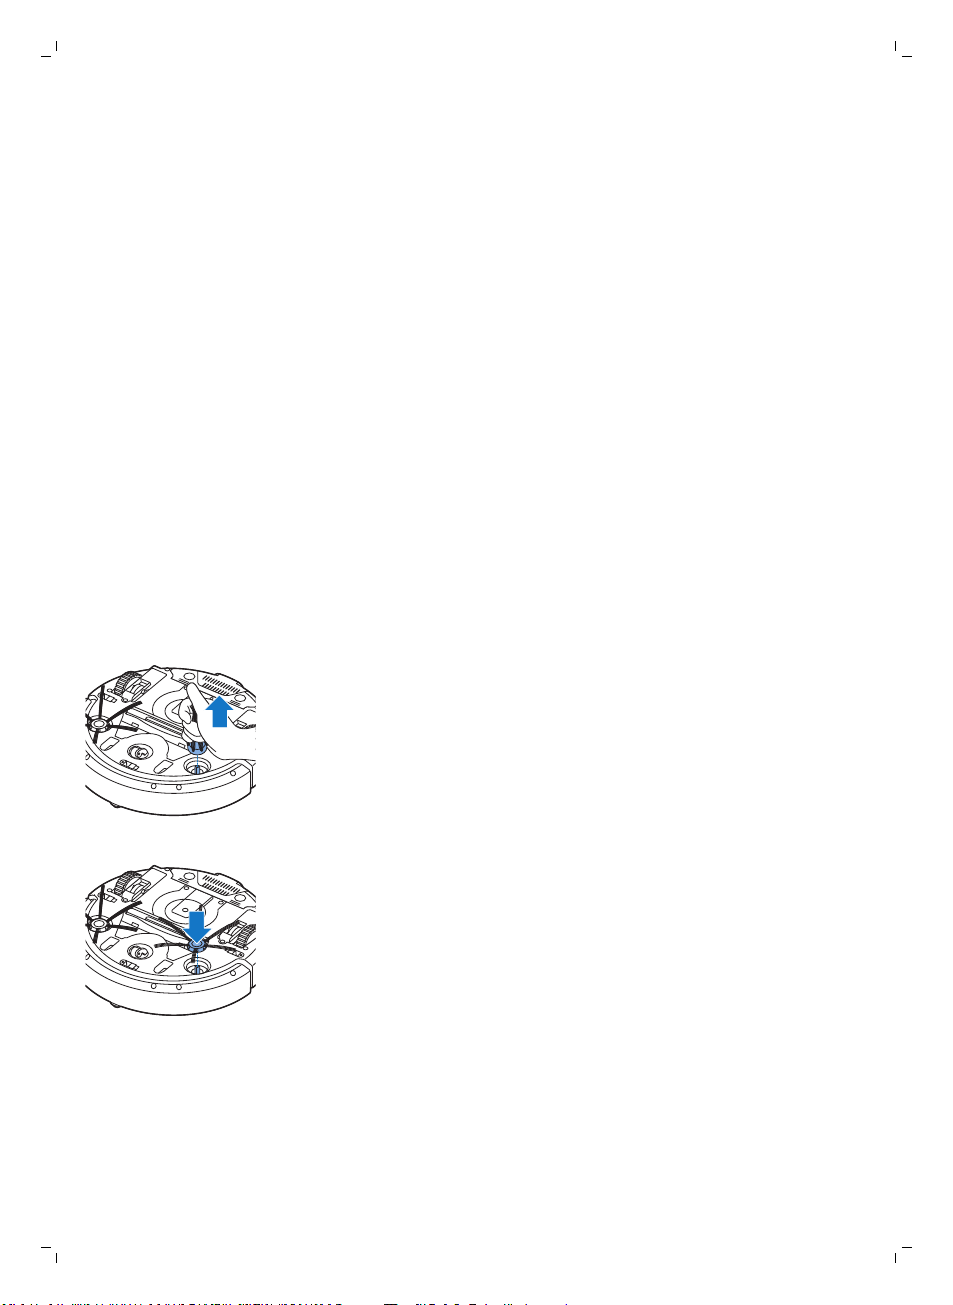
7 Undo the snap connections of the TriActive XL nozzle by inserting by
inserting your fingers at the places marked with arrows and pull the
TriActive nozzle off the robot.
8 Clean the suction opening with a soft brush (e.g. a toothbrush).
Page 21
English
9 Remove all visible dirt from the TriActive nozzle.
10 Insert the snap hooks of the TriActive nozzle into the holes in the bottom
of the robot. Push the TriActive nozzle back into position. Check if the
nozzle can move a few millimeters up and down freely.
11 Push the side brushes onto the shafts on the bottom of the robot again.
21
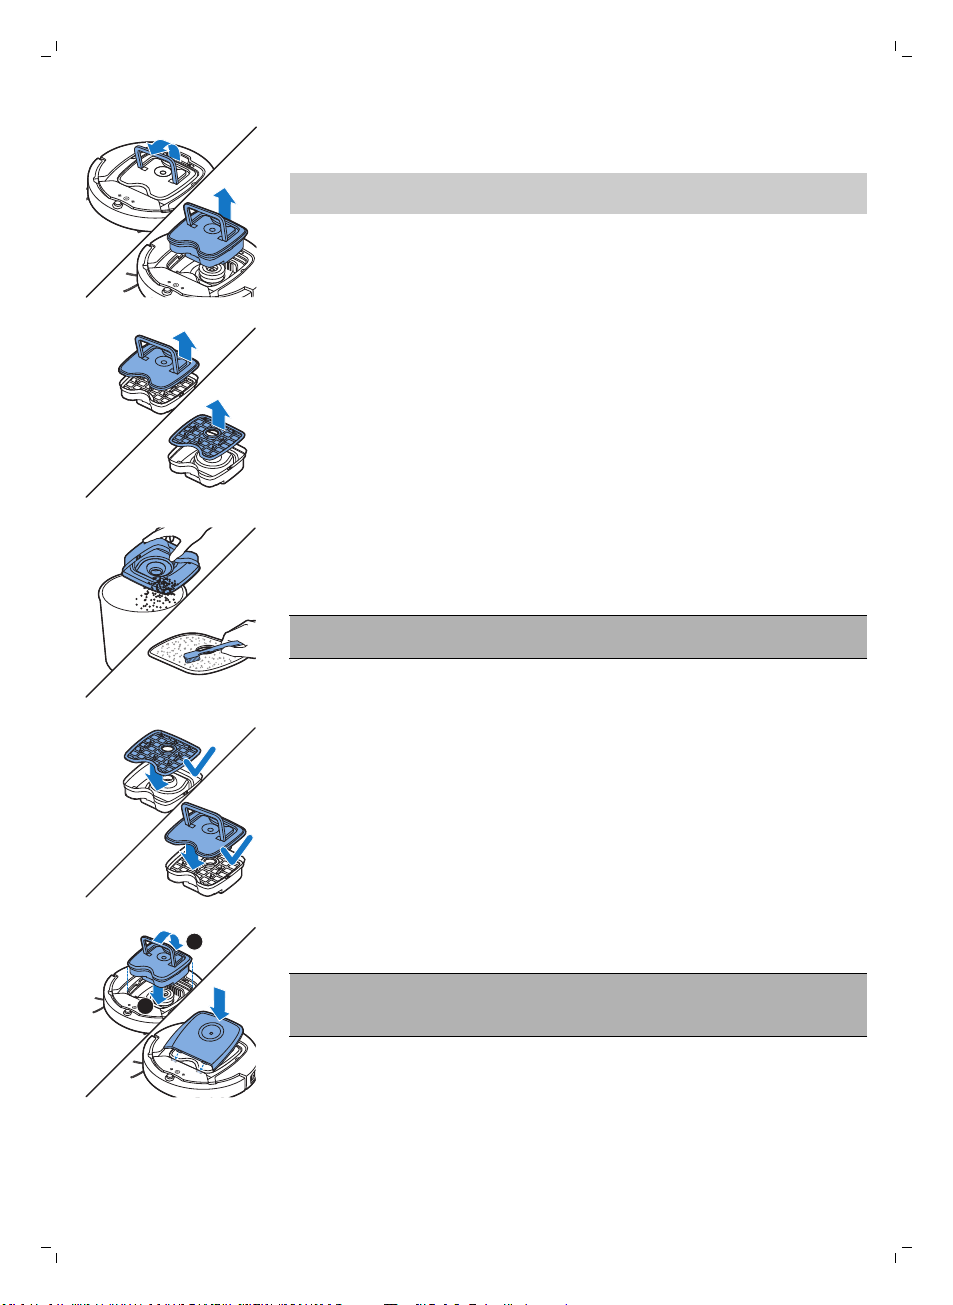
Emptying and cleaning the dust container
Empty and clean the dust container when the dust container full indicator
lights up continuously.
1 Make sure that the power switch is in 'off' position.
2 Remove the cover.
Page 22
1
2
22
English
3 Pull up the handle of the dust container lid and lift the dust container out
of the dust container compartment.
Note: When you remove or reinsert the dust container, take care not to
damage the blades of the motor fan.
4 Carefully lift the lid off the dust container (1) and take out the filter (2).
5 Shake the dust container over a dustbin to empty it. Clean the filter and
the inside of the dust container with a cloth or a toothbrush with soft
bristles. Also clean the suction opening in the bottom of the dust
container.
Caution: Do not clean the dust container and the filter with water or in
the dishwasher.
6 Put the filter back into the dust container (1). Then place the lid on the
dust container(2).
7 Put the dust container back into the dust container compartment and put
the top cover back on the robot.
Caution: Always make sure the filter is present inside the dust
container. If you use the robot without the filter inside the dust
container, the motor will be damaged.
Page 23
Ordering accessories
To buy accessories or spare parts, visit www.shop.philips.com/service or go
to your Philips dealer. You can also contact the Philips Consumer Care
Center in your country (see the international warranty leaflet for contact
details).
Replacement
Replacing the filter
Replace the filter if it is very dirty or damaged. You can order a new filter kit
under type number FC8066. See 'Emptying and cleaning the dust container'
in chapter 'Cleaning and maintenance' for instructions on how to remove
the filter from the dust container and how to place it in the dust container.
Replacing the side brushes
Replace the side brushes after some time to ensure proper cleaning results.
Always replace the side brushes when you notice signs of wear or damage.
We also recommend that you replace both side brushes at the same time.
You can order spare side brushes as part of replacement kit FC8068. This kit
also contains two filters and three dry wipes.
1 Make sure that the power switch is in 'off' position.
2 To replace the side brushes, grab the old side brushes by the bristles and
pull them off their shafts.
English
23
3 Push the new side brushes onto the shafts.
Replacing dry wipes
You can order new dry wipes. They are part of replacement kit FC8068. This
replacement kit also contains two side brushes and two filters.
Page 24
2
3
1
24
English
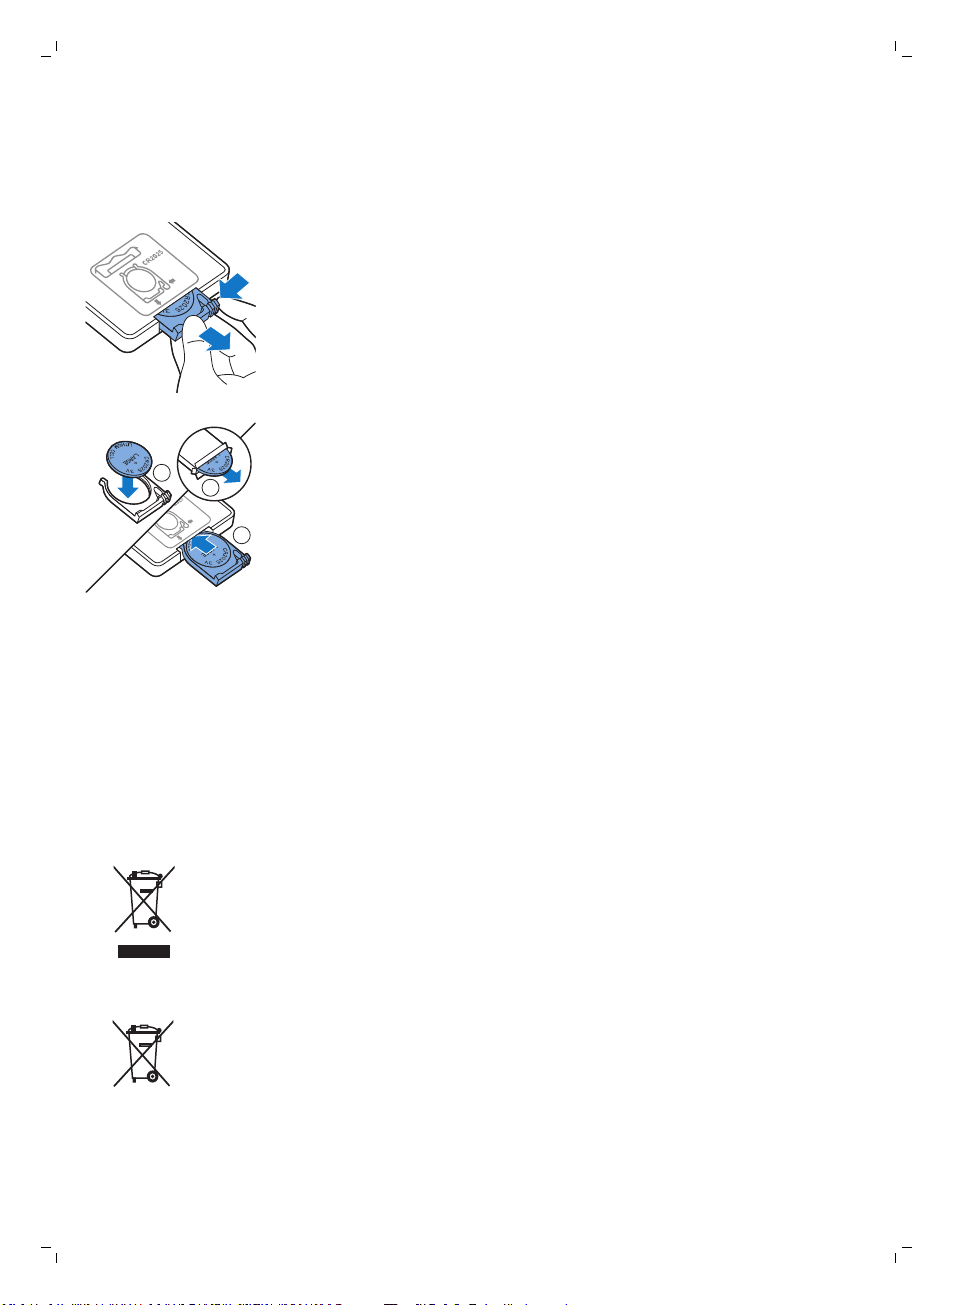
Replacing the battery of the remote control
The remote control works on a CR2025 coin-shaped battery. Replace the
battery when the robot no longer responds when you press the buttons on
the remote control.
1 Hold the remote control upside down. Push the release button on the
battery holder and at the same time slide the battery holder out of the
remote control.
2 Remove the empty battery from the battery holder and place a new
battery in the battery holder. Then slide the battery holder back into the
remote control.
Replacing the rechargeable battery
The rechargeable battery of the robot may only be replaced by qualified
service engineers. Take the robot to an authorized Philips service center to
have the battery replaced when you can no longer recharge it or when it
runs out of power quickly. You can find the contact details of the Philips
Consumer Care Center in your country in the international warranty leaflet.
Recycling
-
This symbol means that this product shall not be disposed of with normal
household waste (2012/19/EU).
-
This symbol means that this product contains a built-in rechargeable
battery which shall not be disposed of with normal household waste
(2006/66/EC). We strongly advise you to take your product to an official
collection point or a Philips service center to have a professional remove
the rechargeable battery.
-
Follow your country’s rules for the separate collection of electrical and
electronic products and rechargeable batteries. Correct disposal helps
prevent negative consequences for the environment and human health.
Page 25
Removing the rechargeable battery
1
3
2
this side up
Warning: Only remove the rechargeable battery when you discard
the appliance. Make sure the battery is completely empty when
you remove it.
To remove the rechargeable battery, follow the instructions below. You can
also take the robot to a Philips service center to have the rechargeable
battery removed. Contact the Philips Consumer Care Center in your country
for the address of a service center near you.
1 Start the robot from a place somewhere in the room and not from the
docking station.
2 Let the robot run until the rechargeable battery is empty to make sure
that the rechargeable battery is completely discharged before you
remove it and dispose of it.
3 Undo the screws of the battery compartment lid and remove the lid.
4 Lift out the rechargeable battery and disconnect it.
5 Take the robot and the rechargeable battery to a collection point for
electrical and electronic waste.
English
25
Troubleshooting
This chapter summarizes the most common problems you could encounter
with the appliance. If you are unable to solve the problem with the
information below, visit www.philips.com/support for a list of frequently
asked questions or contact the Consumer Care Center in your country.
Page 26
26
English
Troubleshooting
Problem
The robot does not start
cleaning when I press the
start/stop button.
Possible cause Solution
The rechargeable battery is
empty.
The small plug is still inserted
in the socket on the robot.
Charge the rechargeable battery (see
chapter 'Preparing for use').
The robot does not work on mains power.
It only works on its rechargeable battery.
Therefore, always disconnect the adapter
from the robot and the mains before use.
The warning indicator
flashes quickly.
The power switch is not set to
'on' (I) position.
One or both wheels are stuck. Set the power switch to 'off'. Remove the
One or both side brushes are
stuck.
The top cover is not present
or is not closed properly.
The bumper is stuck. Press the start/stop button. Lift the robot
The robot was lifted while it
was cleaning.
Press the power switch. Press the
start/stop button on the robot or on the
remote control to start cleaning.
fluff, hair, thread or wire that is caught
around the wheel suspension.
Clean the side brushes (see chapter
'Cleaning and maintenance').
When the top cover is not present or is not
closed properly, the robot does not work.
Place the top cover on the robot properly.
so that its bumper comes free. Place the
robot at some distance from the obstacle
and press the start/stop button to make it
resume cleaning.
Press the start/stop button. Place the
robot on the floor. Then press the
start/stop button to make the robot
resume cleaning.
Page 27
Problem Possible cause Solution
The robot does not clean
properly.
The bristles of one or both
side brushes are crooked or
bent.
Soak the brush or brushes in warm water
for a while. If this does not restore the
bristles to their proper shape, replace the
side brushes (see chapter 'Replacement').
English
27
The filter in the dust container
is dirty.
The suction opening in the
bottom of the dust container
is clogged.
The front wheel is jammed
with hair or other dirt.
The robot is cleaning a very
dark or shiny surface, which
triggers the drop-off
sensors.This causes the robot
to move in an unusual
pattern.
The robot is cleaning a floor
that reflects sunlight quite
strongly. This triggers the
drop-off sensors and causes
the robot to move in an
unusual pattern.
Clean the filter in the dust container with a
cloth or a toothbrush with soft bristles.You
can also clean the filter and dust container
with a regular vacuum cleaner at a low
suction power setting.
If brushing or vacuuming does not help to
clean the filter, replace the filter with a
new one. We advise you to replace the
filter at least once a year.
Clean the suction opening (see chapter
'Cleaning and maintenance').
Clean the front wheel (see chapter
'Cleaning and maintenance').
Press the start/stop button and then move
the robot to a lighter colored piece of the
floor. If the problem continues to occur on
lighter colored floors, please go to
www.philips.com/support or contact the
Consumer Care Center in your country.
Close the curtains to block sunlight from
entering the room. You can also start
cleaning when the sunlight is less bright.
The rechargeable battery
can no longer be charged
or runs empty very fast.
The battery of the remote
control runs empty too
fast.
The rechargeable battery has
reached the end of its life.
Perhaps you did not insert
the correct type of battery.
Replace the rechargeable battery (see
chapter 'Replacement').
For the remote control, you need a
CR2025 coin-shaped battery. If the
problem persists, go to
www.philips.com/support or contact the
Consumer Care Center in your country.
Page 28
28
English
Problem Possible cause Solution
The robot is moving in
circles.
The robot is in spot-cleaning
mode.
This is normal behavior. The spiral mode
can be activated when a lot of dirt is
detected on the floor for a thorough clean.
It is also part of the auto cleaning mode.
After approximately one minute the robot
resumes its normal cleaning pattern. You
can also stop the spiral mode by selecting
a different cleaning mode on the remote
control.
The robot cannot find the
docking station.
The robot beeps when it
is on the docking station.
There is not enough room for
the robot to navigate towards
the docking station.
The robot is still actively
searching.
The robot was not started
from the docking station.
You try to charge the robot
with the power switch is in off
position.
Try to find another place for the docking
station. See 'Installing the docking station'
in chapter 'Preparing for use'.
Give the robot around 20 minutes to return
to the docking station.
If you want the robot to return to the
docking station after a cleaning run, start it
from the docking station.
Press the power switch to switch on the
robot.
Error codes
Error code
E1 Wheels stuck Remove robot from the obstacle and press the
E2 Top cover or dust
E3 Bumper stuck Remove the robot from the obstacle. The error
E4 Robot lifted from floor Put the robot back on the floor to make the
Possible cause Solution
starts/stop button to resume cleaning.
container not placed
properly
Place the dust container in and the top cover
on the robot properly. The error code
disappears from the display automatically.
code disappears from the display
automatically.
error code disappear.
E5 Color of floor too dark Place robot on a lighter area of the floor. Clean
E6
Battery not inserted
properly
Charging error Check if the power switch is in ‘on’ position
the drop-off sensors.
Read the instructions in ‘Inserting the
rechargeable battery into the robot’ in chapter
‘Before first use’.
when the robot is on the docking station
Page 29
Einführung
1
1110 129
234
5 6 7 8
Herzlichen Glückwunsch zu Ihrem Kauf und willkommen bei Philips! Um die
Unterstützung von Philips optimal nutzen zu können, sollten Sie Ihr Produkt
unter www.philips.com/welcome registrieren.
Allgemeine Beschreibung
1 Griff des Staubbehälterdeckels
2 Staubbehälterdeckel
3 Filter
4 Staubbehälter
5 Obere Abdeckung
6 Fehlercodetabelle
7 Ventilator
8 Stoßfänger
9 Sensor Docking-Station
10 Netzschalter
11 Vorderrad
12 Seitenbürstenschäfte
13 Stopp-Sensoren
14 Laufräder
15 Ansaugöffnung
16 TriActive XL-Düse
17 Seitenbürsten
18 Befestigungsblöcke für Trockenreinigungstücher
19 Halterung für Trockenreinigungstücher
20 Trockenreinigungstücher
21 Batteriehalterung
22 Fernbedienung
23 Unsichtbare Wand (FC8822)
24 Docking-Station
25 Ladegerät
26 Gerätestecker
Deutsch
29
Display und Fernbedienung
Display des Roboters
1 Spiralmodusanzeige
2 "Den Wänden entlang"-Anzeige
3 Zickzackmuster-Modusanzeige
4 Zufallsmodusanzeige
5 Reinigungszeit
6 Docking-Symbol
7 Anzeige der Ventilatorgeschwindigkeit
8 Staubfüllanzeige
9 Geräuschsensor
10 Moduswahltaste
11 Start/Stopptaste
12 Taste für die Ventilatorgeschwindigkeit
Deutsch
Page 30
2
1
3
45
1
2
30
Deutsch
Fernbedienung
1 Navigationstasten und Start/Stopp
2 Tasten für die Reinigungszeit
3 Tasten für den Reinigungsmodus
4 Tasten für die Ventilatorgeschwindigkeit
5 Docking-Taste
Bedienfeld der Dockingstation
1 Display mit Anzeigen für Uhrzeit, Wochentag und Programmierung
2 Tasten einstellen/anpassen
So funktioniert Ihr Roboter
Das reinigt Ihr Roboter
Dieser Roboter ist mit Funktionen ausgestattet, die ihn zu einem idealen
Reinigungsgerät machen, um Sie beim Reinigen der Böden in Ihrem Heim zu
unterstützen.
Der Roboter ist besonders zum Reinigen harter Böden, wie etwa Holz-,
Kachel- oder Linoleum-Böden, geeignet. Beim Reinigen weicher Böden,
zum Beispiel Teppichböden oder Teppiche, können Probleme auftreten.
Wenn Sie den Roboter auf einem Teppichboden oder Teppich verwenden,
bleiben Sie beim ersten Mal in der Nähe, sodass Sie erkennen, ob der
Roboter mit diesem Bodentyp zurechtkommt. Der Roboter muss auch bei
Verwendung auf sehr dunklen oder glänzenden harten Böden überwacht
werden.
So reinigt Ihr Roboter
Reinigungssystem
Der Roboter weist ein 3-stufiges Reinigungssystem zur effizienten Reinigung
Ihrer Böden auf.
Page 31

Deutsch
-
Die beiden Seitenbürsten unterstützen den Roboter bei der Reinigung
von Ecken und entlang Wänden und Möbelstücken. Sie helfen auch,
Schmutz vom Boden zu beseitigen und ihn Richtung Ansaugöffnung zu
bewegen.
-
Mit der Saugkraft des Roboters wird loser Schmutz aufgesaugt und durch
die Ansaugöffnung in den Staubcontainer transportiert.
-
Der Roboter ist mit einer Halterung für Trockenreinigungstücher
ausgestattet, sodass Sie Ihre Hartböden noch gründlicher mit
Trockenreinigungstüchern reinigen können.
Reinigungsmuster
Im automatischen Reinigungsmodus verwendet der Roboter eine
automatische Abfolge von Reinigungsmustern, sodass jeder Bereich des
Raums optimal gereinigt wird. Die folgenden Reinigungsmuster werden
verwendet:
1 Z-Muster oder Zickzack-Muster
31
2 Zufälliges Muster
3 Den Wänden entlang
Page 32

32
Deutsch
4 Spiralförmige Bewegungen
Im automatischen Reinigungsmodus verwendet der Roboter diese Muster in
einer bestimmten Reihenfolge: Z-Muster, zufälliges Muster, den Wänden
entlang und Spiralmuster.
Wenn der Roboter mit dieser Muster-Abfolge fertig ist, beginnt er wieder mit
dem Z-Muster. Der Roboter verwendet diese Muster-Abfolge zur Reinigung
des Raums, bis der Akku fast leer ist oder das Gerät manuell ausgeschaltet
wird.
Wenn der Roboter einen besonders verschmutzten Bereich während der
Reinigung erkennt, schaltet er in den Spiralmodus und aktiviert die TurboVentilatorgeschwindigkeit, um eine gründliche Schmutzentfernung zu
garantieren.
Hinweis: Sie können jeden Modus auch einzeln auswählen, indem Sie die
entsprechende Taste auf der Fernbedienung drücken. Manuell ausgewählte
Modi sind nur für einige Minuten aktiv. Danach wechselt der Roboter zurück
zum automatischen Reinigungsmodus.
Weitere Hinweise finden Sie im Kapitel "Ihren Roboter verwenden",
Abschnitt "Reinigungsmodus auswählen".
So vermeidet Ihr Roboter Höhenunterschiede
Der Roboter hat drei Stopp-Sensoren an der Unterseite. Er verwendet diese
Stopp-Sensoren, um Höhenunterschiede, wie z. B. Stufen, zu erkennen und
zu vermeiden.
Hinweis: Es ist normal, dass sich der Roboter etwas über den Rand eines
Höhenunterschieds bewegt, da sich der vordere Stopp-Sensor hinter dem
Stoßfänger befindet.
Achtung: In einigen Fällen können die Stopp-Sensoren einen
Treppenabsatz oder anderen Höhenunterschied nicht rechtzeitig
erkennen. Beobachten Sie den Roboter bei den ersten Einsätzen also
sorgfältig, sowie bei Nutzung in der Nähe einer Treppe oder eines
sonstigen Höhenunterschieds. Es ist wichtig, dass Sie die Stopp-Sensoren
regelmäßig reinigen, damit der Roboter Höhenunterschiede korrekt
erkennt (siehe Anweisungen im Kapitel „Reinigung und Wartung“).
Page 33

1
2
100 厘米
100 cm
30 厘米30 厘米
30 cm
80
厘米
80 cm
Vor dem ersten Gebrauch
Deutsch
33
Die Seitenbürsten
montieren
1 Packen Sie
auf einen Tisch oder auf dem Boden.
2 Drücken Sie die Seitenbürsten auf die Metallschäfte unten am Roboter.
Hinweis: Vergewissern Sie sich, dass die Seitenbürsten ordnungsgemäß
angebracht sind. Drücken Sie sie auf den Schaft, bis sie mit einem Klicken
einrasten.
die Seitenbürsten aus, und legen Sie den Roboter umgekehrt
Lasche von der Fernbedienung abnehmen
Die Fernbedienung funktioniert mit einer CR2025-Knopfzelle. Diese Batterie
ist mit einer Schutzlasche versehen, die vor dem Gebrauch entfernt werden
muss.
1 Ziehen Sie die Batterieschutzlasche aus dem Batteriefach der
Fernbedienung. Jetzt ist die Fernbedienung einsatzbereit.
Für den Gebrauch vorbereiten
Docking-Station aufstellen
1 Stecken Sie den kleinen Stecker des Adapters in die entsprechende
2 Stellen Sie die Docking-Station auf einen ebenen Untergrund an eine
Buchse der Docking-Station (1) und den Adapter in die Steckdose (2).
-
Das Display der Docking-Station wird eingeschaltet.
Wand.
Hinweis: Achten Sie darauf, dass sich 80 cm vor der Docking-Station,
30 cm rechts davon und 100 cm links von der Docking-Station keine
Hindernisse oder Höhenunterschiede befinden.
Tipp: Um sicherzustellen, dass die Docking-Station stabil in Position
bleibt, befestigen Sie sie mit Schrauben oder zwei Streifen doppelseitigen
Klebebands an der Wand.
Page 34

34
Deutsch
Laden
Wenn Sie den Akku des Roboters zum ersten Mal aufladen, und wenn der
Akku leer ist, dauert der Ladevorgang vier Stunden.
Es gibt zwei Möglichkeiten zum Aufladen des Roboters:
-
An der Docking-Station entweder manuell oder automatisch während
des Betriebs
-
Durch direktes Anschließen des Roboters an das Stromnetz
Hinweis: Wenn der Akku vollständig aufgeladen ist, kann der Roboter bis zu
120 Minuten lang reinigen.
An der Docking-Station aufladen
1 Drücken Sie den Netzschalter, um den Roboter einzuschalten.
2 Stellen Sie den Roboter in die eingesteckte Docking-Station.
3 Die Start-/Stopp-Taste beginnt zu blinken.
Hinweis: Da Sie den Roboter zum ersten Mal aufladen, wird auf dem
Display des Roboters die Startanzeige angezeigt.
4 Ist der Akku vollständig geladen, leuchtet die Start-/Stopp-Taste
dauerhaft.
Page 35

Automatisches Aufladen während des Betriebs
1 Wenn der Roboter die Reinigung beendet hat oder der Akku nur noch
15 % Kapazität aufweist, sucht der Roboter zum Aufladen automatisch die
Docking-Station. Wenn der Roboter die Docking-Station sucht, wechselt
die Farbe der LED in der Start-/Stopp-Taste zu Orange.
2 Ist der Akku vollständig geladen, leuchtet die Start-/Stopp-Taste
dauerhaft.
Den Raum für die Reinigung vorbereiten
Bevor Sie mit dem Roboter die Reinigung starten, sollten Sie sich
vergewissern, dass sich keine losen und zerbrechlichen Gegenstände auf
dem Boden befinden. Bringen Sie auch alle Kabel, Drähte und Schnüre in
Sicherheit.
Ihren Roboter verwenden
Deutsch
35
Ein- und Ausschalten
1 Schalten Sie den Netzschalter auf der Seite des Roboters in die Position
"on" (Ein).
2 Drücken Sie die Start-/Stopp-Taste.
-
Sie können die Start-/Stopp-Taste auf dem Roboter drücken.
-
Sie können auch die Start-/Stopp-Taste auf der Fernbedienung
drücken.
3 Die Start-/Stopp-Taste leuchtet dauerhaft und der Roboter beginnt mit
der Reinigung.
Page 36

36
Deutsch
4 Der Roboter reinigt im automatischen Reinigungsmodus, bis der Akku fast
leer ist. Im automatischen Reinigungsmodus wird eine bestimmte
Muster-Abfolge wiederholt: Z-Muster, zufälliges Muster, den Wänden
entlang und Spiralmuster.
Hinweis: Um einen einzelnen Modus auszuwählen, drücken Sie eine der
Modus-Tasten auf der Fernbedienung. Weitere Hinweise finden Sie im
Abschnitt „Reinigungsmodus auswählen“.
5 Wenn der Akku fast leer ist, wechselt die Start-/Stopp-Taste zu Orange,
und der Roboter sucht zum Aufladen die Docking-Station.
6 Sie können auch die Start-/Stopp-Taste, um den Reinigungsvorgang
vorübergehend anzuhalten oder ganz zu stoppen. Wenn Sie die Start/Stopp-Taste erneut drücken und der Akku noch ausreichend Energie
hat, fährt der Roboter mit der Reinigung im automatischen Modus fort.
7 Damit der Roboter zur Docking-Station zurückkehrt, bevor der Akku fast
leer ist, drücken Sie die Docking-Taste auf der Fernbedienung. Das
Docking-Symbol auf dem Display des Roboters schaltet sich ein, und der
Roboter kehrt zur Docking-Station zurück.
Reinigungsmodus auswählen
Neben dem automatischen Reinigungsmodus hat dieser Roboter vier
einzelne Reinigungsmodi. Jeder Modus kann durch Drücken der
entsprechenden Taste auf der Fernbedienung aktiviert werden.
Hinweis: Manuell ausgewählte Modi sind nur für einige Minuten aktiv.
Danach wechselt der Roboter zurück zum automatischen Reinigungsmodus.
Z-Muster-Modus
Im Z-Muster-Modus zieht der Roboter Z-förmige Schleifen im Raum, um
große Flächen zu reinigen.
Page 37

Deutsch
37
Zufallsmodus
In diesem Modus reinigt der Roboter den Raum mit einem gemischten
Muster aus geraden und zickzackförmigen Bewegungen.
Den Wänden entlang
In diesem Modus folgt der Roboter dem Verlauf der Wände, um den Bereich
an den Wänden zusätzlich zu reinigen.
Spiralmodus
In diesem Modus bewegt sich der Roboter in einem spiralförmigen Muster,
um einen kleinen Bereich zu reinigen. Wenn der Staubsensor Schmutz
erkennt, schaltet der Roboter den Ventilator automatisch in den
Turbomodus.
Manuelle Steuerung
1 Verwenden Sie die Pfeiltasten oberhalb und unterhalb bzw. rechts und
links der Start-/Stopp-Taste auf der Fernbedienung, um den Roboter
durch den Raum zu navigieren.
Hinweis: Seien Sie vorsichtig, wenn Sie den Roboter in der Nähe eines
Höhenunterschieds bzw. einer Treppe manuell steuern.
Hinweis: Die Saugfunktion und die Seitenbürsten funktionieren nur, wenn
der Roboter vorwärts fährt. Die Tasten nach links, rechts und zurück
dienen nur zum Manövrieren des Roboters.
Page 38

38
Deutsch
Die Tasten zur Reinigungszeit verwenden
-
Standardmäßig reinigt der Roboter im automatischen Reinigungsmodus,
bis der Akku fast leer ist. Dann kehrt der Roboter automatisch zur
Docking-Station zurück. Wenn Sie eine andere Reinigungszeit
ausgewählt haben (siehe unten), können Sie zum Standardmodus
zurückkehren, indem Sie auf der Fernbedienung die Taste für die
maximale Reinigungszeit drücken.
-
Mit den anderen Tasten für die Reinigungszeit auf der Fernbedienung
können Sie den Roboter 60, 45 oder 30 Minuten lang betreiben. Wenn
die Reinigungszeit abgelaufen ist, kehrt der Roboter zur Docking-Station
zurück. Das Docking-Symbol leuchtet auf dem Display auf.
-
Wenn Sie nicht möchten, dass der Roboter am Ende der Reinigungszeit
zur Docking-Station zurückkehrt, drücken Sie die Taste für die
Reinigungszeit zweimal. Das Docking-Symbol wird nicht mehr auf dem
Display angezeigt. Wenn die Reinigungszeit abgelaufen ist, stoppt der
Roboter.
Bedienung der Docking-Station
Uhrzeit und Tag einstellen
Wenn Sie Reinigungsprogramme verwenden möchten, müssen Sie zuerst
die Uhrzeit und den Wochentag auf dem Display der Docking-Station
einstellen.
Hinweis: Die Bilder zu den nachfolgend beschriebenen Schritten finden Sie
auf den Seiten am Ende dieser Bedienungsanleitung.
1 Drücken Sie die Set-Taste (Einstelltaste). Die Set-Anzeige und die
Uhrzeit-Anzeige blinken.
2 Drücken Sie die Select-Taste (Auswahltaste) einmal. Die Stundenanzeige
beginnt zu blinken.
3 Verwenden Sie die Tasten "+" und "-" auf der Docking-Station, um die
Stunde einzustellen. Die eingestellte Stunde wird auf dem Display
angezeigt.
4 Drücken Sie die Select-Taste (Auswahltaste), um die eingestellte Stunde
zu bestätigen. Die Minutenanzeige beginnt zu blinken.
5 Verwenden Sie auf der Docking-Station die Tasten "+" und "-", um die
Minuten einzustellen. Die eingestellten Minuten werden auf dem Display
angezeigt.
6 Drücken Sie die Select-Taste (Auswahltaste), um die eingestellten
Minuten zu bestätigen. Die Anzeige "Su" für Sonntag blinkt.
7 Verwenden Sie die Tasten "+" und "-" auf der Docking-Station, um den
aktuellen Wochentag einzustellen.
8 Drücken Sie die Select-Taste (Auswahltaste), um den Wochentag zu
bestätigen.
Page 39

9 Drücken Sie die Set-Taste (Einstelltaste), um die Einstellungen für Uhrzeit
und Wochentag zu bestätigen. Sowohl die Set-Anzeige als auch die
Uhrzeit-Anzeige hören auf zu blinken und leuchten durchgehend.
Reinigungszeiten programmieren
Wenn Sie die Uhrzeit und den Wochentag auf dem Display der DockingStation eingestellt haben, können Sie Reinigungszeiten für den Roboter
programmieren.
Hinweis: Die Bilder zu den nachfolgend beschriebenen Schritten finden Sie
auf den Seiten am Ende dieser Bedienungsanleitung.
Die verfügbaren Programmieroptionen sind:
Programm
Jeden Tag reinigen Die Anzeigen leuchten für alle Tage.
An Werktagen reinigen Die Anzeigen von Mo bis Fr leuchten.
Anzeigen auf dem Display
Deutsch
39
An zwei aufeinanderfolgenden Tagen
reinigen
An einem Tag pro Woche reinigen Die Anzeige des ausgewählten Tages leuchtet.
1 Drücken Sie die Set-Taste (Einstelltaste). Die Set-Anzeige und die
Reinigungsprogramm-Anzeige blinken.
2 Drücken Sie die Select-Taste (Auswahltaste) einmal. Die Stundenanzeige
beginnt zu blinken.
3 Verwenden Sie auf der Docking-Station die Tasten "+" und "-", um die
Stunde einzustellen. Die eingestellte Stunde wird auf dem Display
angezeigt.
4 Drücken Sie die Select-Taste (Auswahltaste), um die eingestellte Stunde
zu bestätigen. Die Minutenanzeige beginnt zu blinken.
5 Verwenden Sie auf der Docking-Station die Tasten "+" und "-", um die
Minuten einzustellen. Die eingestellten Minuten werden auf dem Display
angezeigt.
6 Drücken Sie die Select-Taste (Auswahltaste), um die eingestellten
Minuten zu bestätigen. Die Anzeige "Su" für Sonntag blinkt.
7 Verwenden Sie die Tasten "+" und "-" auf der Docking-Station, um
zwischen den Reinigungsprogrammen zu wechseln. (Die verfügbaren
Programmieroptionen finden Sie in der Tabelle oben.)
8 Bestätigen Sie das ausgewählte Programm mit der Select-Taste
(Auswahltaste).
9 Drücken Sie die Set-Taste (Einstelltaste), um die Programmierung zu
bestätigen. Sowohl die Set-Anzeige als auch die ReinigungsprogrammAnzeige hören auf zu blinken und leuchten durchgehend.
10 Wenn Sie ein Reinigungsprogramm eingestellt haben, werden auf dem
Display das ausgewählte Reinigungsprogramm und die ausgewählten
Tage angezeigt. Wenn der Roboter im Standby-Modus bleibt und sein
Akku vollständig aufgeladen ist, startet er die Reinigung an den
programmierten Tagen zur programmierten Uhrzeit.
Die Anzeigen von zwei Tagen leuchten, z. B. Fr und Sa.
Page 40

40
Deutsch
Tasten für die Ventilatorgeschwindigkeit
1
2
3
Mit den Tasten für die Ventilatorgeschwindigkeit können Sie die
Ventilatorgeschwindigkeit auf die Turbo-Einstellung erhöhen bzw. den
Ventilator ausschalten. Die Standardeinstellung ist die normale
Ventilatorgeschwindigkeit.
1 Drücken Sie diese Taste, um den Ventilator auszuschalten.
2 Drücken Sie diese Taste, um den Ventilator in normaler Geschwindigkeit
einzuschalten.
3 Die Turbo-Ventilatortaste erhöht die Ventilatorgeschwindigkeit.
Klatsch-Funktion
Die Klatsch-Funktion wird aktiviert, wenn der Roboter in den folgenden
Situationen in den Ruhemodus wechselt:
-
wenn er aufgrund eines Fehlers anhält
-
wenn Sie eine kurze Reinigungszeit programmiert haben
-
wenn er die Docking-Station nicht innerhalb von 20 Minuten finden kann
Wenn Sie den Roboter nicht sehen, können Sie ihn durch einmaliges
Klatschen finden. Der Roboter reagiert durch einen Piepton und
Aufleuchten aller Symbole auf dem Display.
Den Trockenwischaufsatz verwenden
Der Trockenwischaufsatz ermöglicht es Ihnen, Hartböden mit
Trockenreinigungstüchern zu reinigen.
Hinweis: Wenn Sie den Trockenwischaufsatz verwenden, hat der Roboter
möglicherweise Schwierigkeiten dabei, Schwellen zu überwinden oder auf
Teppiche zu gelangen.
Den Trockenwischaufsatz für den Gebrauch vorbereiten
1 Legen Sie den Roboter umgekehrt auf den Boden oder einen Tisch.
2 Legen Sie das Trockenreinigungstuch auf einen Tisch, und setzen Sie den
Trockenwischaufsatz so auf das Reinigungstuch, dass die
Befestigungslaschen in Ihre Richtung zeigen.
3 Falten Sie beide Enden des Trockenreinigungstuchs um den
Trockenwischaufsatz, und befestigen Sie das Reinigungstuch auf dem
Aufsatz, indem Sie die Befestigungsblöcke in die Aussparungen drücken.
Page 41

1
2
1
2
Deutsch
4 Stecken Sie die Befestigungslasche des Trockenwischaufsatzes in die
Öffnung direkt hinter dem Laufrad auf einer Seite des Roboters, und
drücken Sie diese nach unten, bis sie hörbar einrastet. Wiederholen Sie
diesen Vorgang dann auf der anderen Seite.
5 Drehen Sie den Roboter um, und setzen Sie ihn mit den Rädern auf den
Boden. Der Trockenwischaufsatz berührt dabei den Boden.
41
Den Roboter mit dem Trockenwischaufsatz verwenden
Wenn der Trockenwischaufsatz angebracht ist, können Sie den Roboter mit
einem beliebigen Modus auf allen Hartböden einsetzen. Verwenden Sie den
Trockenwischaufsatz nicht auf Teppichen.
Den Trockenwischaufsatz abnehmen
1 Nehmen Sie den Trockenwischaufsatz ab, sobald Sie den Boden fertig
gewischt haben.
2 Legen Sie den Roboter umgekehrt auf den Boden oder einen Tisch.
3 Drücken Sie eine Seite des Trockenwischaufsatzes in Richtung des
Laufrades auf der anderen Seite des Roboters, um die Verriegelung zu
lösen. Ziehen Sie dann den Aufsatz vom Roboter.
Die unsichtbare Wand verwenden (FC8822)
Die Batterien in die unsichtbare Wand einsetzen
Die unsichtbare Wand wird mit vier AA-Batterien betrieben.
1 Drücken Sie die beiden Entriegelungslaschen an der Unterseite der
hinteren Abdeckung (1), und schieben Sie die hintere Abdeckung nach
oben aus der unsichtbaren Wand (2) heraus.
2 Nehmen Sie vier neue AA-Batterien aus der Verpackung, und legen Sie
sie in das Batteriefach der unsichtbaren Wand ein.
Hinweis: Achten Sie darauf, dass die Polung (+) bzw. (–) auf den
Batterien mit den Markierungen im Batteriefach übereinstimmt.
Page 42

42
Deutsch
3 Schieben Sie die Abdeckung wieder zurück auf die unsichtbare Wand.
Die unsichtbare Wand zum Stoppen des Roboters aufstellen
Sie können mit der unsichtbaren Wand verhindern, dass sich der Roboter in
einen Raum oder Bereich bewegt, der keine Reinigung benötigt.
1 Stellen Sie die Einheit an eine Stelle, die der Roboter nicht überschreiten
soll, z. B. an eine Tür zu einem Raum, der für den Roboter tabu sein soll.
2 Schalten Sie die unsichtbare Wand am Ein-/Ausschalter auf der
Oberseite der Einheit ein.
3 Starten Sie den Roboter.
4 Wenn der Roboter zu nah an die unsichtbare Wand gerät, blinkt das Licht
an der unsichtbaren Wand, und aus der Wand wird ein Strahl infraroten
Lichts ausgegeben. Durch den infraroten Lichtstrahl ändert der Roboter
seinen Kurs und bewegt sich weg von der unsichtbaren Wand.
Hinweis: Wenn Sie die unsichtbare Wand verwenden, überprüfen Sie
regelmäßig, ob die Batterien noch ausreichend geladen sind. Dies können
Sie prüfen, indem Sie die unsichtbare Wand aus- und wieder einschalten.
Wenn die Batterien ausreichende Energie aufweisen, leuchtet die LED der
unsichtbaren Wand kurz auf.
Reinigung und Wartung
Den Roboter reinigen
Um weiterhin eine gute Reinigungsleistung zu gewährleisten, müssen Sie die
Stopp-Sensoren, die Räder, die Seitenbürsten und die Ansaugöffnung von
Zeit zu Zeit reinigen.
1 Legen Sie den Roboter umgekehrt auf eine ebene Oberfläche.
Page 43

3
1
2
1
2
3
1
2
Deutsch
2 Verwenden Sie eine Bürste mit weichen Borsten (z. B. eine Zahnbürste),
um Staub oder Fusseln von den Stopp-Sensoren zu entfernen.
Hinweis: Sie müssen die Stopp-Sensoren unbedingt regelmäßig reinigen.
Wenn die Stopp-Sensoren verschmutzt sind, kann der Roboter
Höhenunterschiede oder Treppenabsätze eventuell nicht rechtzeitig
erkennen.
3 Verwenden Sie eine Bürste mit weichen Borsten (z. B. eine Zahnbürste),
um Staub oder Fussel vom Vorderrad und den Seitenrädern zu entfernen.
4 Um die Seitenbürsten zu reinigen, fassen Sie sie an den Borsten, und
ziehen Sie sie vom Schaft.
43
5 Entfernen Sie mit einer weichen Bürste (z. B. einer Zahnbürste) oder
einem Tuch Fusseln, Haare und Fäden vom Schaft und von der
Seitenbürste.
6 Überprüfen Sie die Seitenbürsten und die Unterseite des Roboters auf
spitze Gegenstände, die den Boden beschädigen könnten.
7 Öffnen Sie die Schnappverschlüsse der TriActive XL-Düse. Halten Sie sie
dazu an den mit Pfeilen markierten Stellen, und ziehen Sie die TriActiveDüse vom Roboter ab.
Page 44

44
Deutsch
8 Reinigen Sie
Zahnbürste).
9 Entfernen Sie sämtlichen sichtbaren Schmutz von der TriActive-Düse.
10 Setzen Sie die Schnapp-Klammern der TriActive-Düse in die Löcher
unten am Roboter. Drücken Sie die TriActive-Düse wieder in Position.
Prüfen Sie, dass die Bürste sich einige Millimeter nach oben und unten
frei bewegen kann.
die Ansaugöffnung mit einer weichen Bürste (z. B. einer
11 Drücken Sie die Seitenbürsten wieder auf die Metallschäfte unten am
Roboter.
Den Staubbehälter entleeren und reinigen
Leeren und reinigen Sie den Staubbehälter, wenn die Anzeige für den vollen
Staubbehälter dauerhaft leuchtet.
1 Vergewissern Sie sich, dass sich der Netzschalter in der Position „off“
(Aus) befindet.
Page 45

Deutsch
2 Nehmen Sie die Abdeckung ab.
3 Ziehen Sie den Griff am Staubbehälterdeckel nach oben, und heben Sie
den Staubbehälter aus der Staubbehälterkammer.
Hinweis: Achten Sie beim Entnehmen oder Wiedereinsetzen des
Staubbehälters darauf, nicht die Flügel der Motorbelüftung zu
beschädigen.
4 Nehmen Sie den Deckel vorsichtig vom Staubbehälter (1) und nehmen
Sie den Filter (2) heraus.
45
5 Schütteln Sie den Staubbehälter über einen Papierkorb aus, um ihn zu
entleeren. Reinigen Sie den Filter sowie das Innere des Staubbehälters
mit einem Tuch oder einer Zahnbürste mit weichen Borsten. Reinigen Sie
auch die Ansaugöffnung unten am Staubbehälter.
Achtung: Reinigen Sie den Staubbehälter und den Filter nicht mit
Wasser oder in der Spülmaschine.
6 Setzen Sie den Filter wieder in den Staubbehälter (1) ein. Setzen Sie dann
den Deckel auf den Staubbehälter (2).
Page 46

1
2
46
Deutsch
7 Setzen Sie den Staubbehälter wieder in die Staubbehälterkammer ein,
und setzen Sie die obere Abdeckung wieder auf den Roboter.
Achtung: Achten Sie immer darauf, dass der Filter ordnungsgemäß in
den Staubbehälter eingesetzt ist. Wenn Sie den Roboter ohne Filter im
Staubbehälter verwenden, wird der Motor beschädigt.
Bestellen von Zubehör
Um Zubehör oder Ersatzteile zu kaufen, gehen Sie auf
www.shop.philips.com/service, oder suchen Sie Ihren Philips Händler auf.
Sie können sich auch an ein Philips Service-Center in Ihrem Land wenden.
Die Kontaktdaten finden Sie in der internationalen Garantieschrift.
Austausch
Den Filter auswechseln
Wechseln Sie den Filter, wenn er stark verschmutzt oder beschädigt ist. Sie
können ein neues Filterset unter der Typennummer FC8066 bestellen.
Anweisungen zum Entfernen des alten Filters aus dem Staubbehälter und
zum Einsetzen des neuen Filters in den Staubbehälter finden Sie unter "Den
Staubbehälter entleeren und reinigen“ im Kapitel "Reinigung und Wartung“.
Die Seitenbürsten auswechseln
Wechseln Sie die Seitenbürsten nach einiger Zeit aus, um optimale
Reinigungsergebnisse sicherzustellen.
Ersetzen Sie die Seitenbürsten immer, sobald sie Anzeichen von Abnutzung
oder Beschädigung aufweisen. Wir empfehlen auch, beide Seitenbürsten zur
gleichen Zeit auszuwechseln. Sie können Ersatz-Seitenbürsten als Teil des
Ersatzsets FC8068 bestellen. Dieses Set enthält außerdem zwei Filter und
drei Trockenreinigungstücher.
1 Vergewissern Sie sich, dass sich der Netzschalter in der Position „off“
(Aus) befindet.
2 Um die Seitenbürsten auszuwechseln, greifen Sie die alten Seitenbürsten
an den Borsten, und ziehen Sie sie vom Schaft.
Page 47

3 Drücken Sie dann die neuen Seitenbürsten auf den Schaft.
2
3
1
Trockenreinigungstücher austauschen
Sie können neue Trockenreinigungstücher bestellen. Diese sind Teil des
Ersatzsets FC8068. Dieses Ersatzset enthält außerdem zwei Seitenbürsten
und zwei Filter.
Die Batterie der Fernbedienung austauschen
Die Fernbedienung funktioniert mit einer CR2025-Knopfzelle. Wechseln Sie
die Batterie, wenn der Roboter beim Drücken der Tasten auf der
Fernbedienung nicht mehr reagiert.
1 Drehen Sie die Fernbedienung um. Drücken Sie die Entriegelungstaste
der Batterie-Halterung und schieben Sie diese dabei gleichzeitig aus der
Fernbedienung.
Deutsch
47
Den Akku ersetzen
2 Nehmen Sie die leere Batterie aus der Batterie-Halterung und setzen Sie
eine neue Batterie ein. Schieben Sie die Batterie-Halterung zurück in die
Fernbedienung.
Der Akku des Roboters darf nur von qualifizierten Servicetechnikern
ausgetauscht werden. Lassen Sie den Akku des Roboters bei einem
autorisierten Philips Service-Center austauschen, wenn Sie ihn nicht mehr
aufladen können oder er sich schnell entlädt. Die Kontaktdaten des Philips
Consumer Care-Centers in Ihrem Land finden Sie in der internationalen
Garantieschrift.
Page 48

48
Deutsch
Recycling
-
Dieses Symbol bedeutet, dass das Produkt nicht mit dem normalen
Hausmüll entsorgt werden kann (2012/19/EU).
-
Dieses Symbol bedeutet, dass das Produkt einen eingebauteten Akku
enthält, der nicht mit dem normalen Hausmüll entsorgt werden darf
(2006/66/EG). Wir empfehlen dringend, das Produkt bei einer offiziellen
Sammelstelle oder einem Philips Service-Center abzugeben, um den
Akku fachgerecht ausbauen zu lassen.
1 Altgeräte/Altakkus/Batterien können kostenlos an geeigneten
Rücknahmestellen abgegeben werden.
2 Diese werden dort fachgerecht gesammelt oder zur Wiederverwendung
vorbereitet. Altgeräte/Altakkus/Batterien können Schadstoffe enthalten,
die der Umwelt und der menschlichen Gesundheit schaden können.
Enthaltene Rohstoffe können durch ihre Wiederverwertung einen Beitrag
zum Umweltschutz leisten.
3 Die Löschung personenbezogener Daten auf den zu entsorgenden
Altgeräten muss vom Endnutzer eigenverantwortlich vorgenommen
werden.
4 Hinweise für Verbraucher in Deutschland: Die in Punkt 1 genannte
Rückgabe ist gesetzlich vorgeschrieben. Altgeräte mit Altbatterien
und/oder Altakkus, die nicht vom Altgerät umschlossen sind, sind vor der
Abgabe an einer Rücknahmestelle von diesen zu trennen. Dies gilt nicht,
falls die Altgeräte für eine Wiederverwendung noch geeignet (d.h.
funktionstüchtig) sind und von den anderen Altgeräten getrennt werden.
Sammel- und Rücknahmestellen in DE: https://www.stiftung-ear.de/;
für Batterien auch Rückgabe im Handel möglich.
Den Akku entfernen
Warnhinweis: Bauen Sie den wiederaufladbaren Akku nur zur
Entsorgung des Geräts aus. Vergewissern Sie sich, dass der Akku
ganz leer ist, bevor Sie ihn ausbauen.
Gehen Sie folgendermaßen vor, um den Akku zu entfernen: Sie können den
Roboter auch zu einem Philips Service-Center bringen, um den Akku
entfernen zu lassen. Wenden Sie sich an das Philips Consumer Care-Center
in Ihrem Land, um die Adresse eines Service-Centers in Ihrer Nähe zu
erfragen.
1 Starten Sie den Roboter an einem Ort im Zimmer und nicht in der
Docking-Station.
2 Lassen Sie den Roboter so lange laufen, bis der Akku leer ist, um
sicherzustellen, dass der Akku vollständig entladen ist, bevor Sie ihn
entfernen und entsorgen.
Page 49

1
3
2
3 Lösen Sie die Schrauben an der Akkufachabdeckung, und entfernen Sie
this side up
die Abdeckung.
4 Heben Sie den Akku heraus, und trennen Sie ihn ab.
5 Bringen Sie den Roboter und den Akku zu einer Sammelstelle für
elektrische und elektronische Abfälle.
Fehlerbehebung
In diesem Kapitel sind die häufigsten Probleme aufgeführt, die beim
Gebrauch des Geräts auftreten können. Sollten Sie ein Problem mithilfe der
nachstehenden Informationen nicht beheben können, besuchen Sie unsere
Website unter: www.philips.com/support und ziehen Sie die Liste „Häufig
gestellte Fragen“ hinzu, oder wenden Sie sich an das Philips Consumer
Care-Center in Ihrem Land.
Deutsch
49
Fehlerbehebung
Problem
Der Roboter fängt nicht
an zu reinigen, wenn ich
auf die Start-/StoppTaste drücke.
Mögliche Ursache Die Lösung
Der Akku ist leer. Laden Sie den Akku auf (siehe Kapitel "Für
Der kleine Stecker ist immer
noch in der Buchse am
Roboter eingesteckt.
Der Netzschalter ist nicht auf
Position "On" (I, Ein) gestellt.
den Gebrauch vorbereiten").
Der Roboter arbeitet bei Netzspannung
nicht. Er arbeitet nur mit seinem Akku.
Daher vor Benutzung immer den Adapter
vom Netz und vom Roboter trennen.
Drücken Sie den Netzschalter. Drücken Sie
die Start-/Stopp-Taste am Roboter oder
an der Fernbedienung, um mit der
Reinigung zu starten.
Page 50

50
Deutsch
Problem Mögliche Ursache Die Lösung
Die Warnanzeige blinkt
schnell.
Ein oder beide Räder sind
stecken geblieben.
Schalten Sie den Netzschalter auf "Off"
(Aus). Entfernen Sie Fusseln, Haare, Fäden
oder Drähte, die sich an der
Radaufhängung angesammelt haben.
Eine oder beide
Seitenbürsten sind blockiert.
Die obere Abdeckung wurde
nicht aufgesetzt bzw. nicht
ordnungsgemäß geschlossen.
Der Stoßfänger ist blockiert. Drücken Sie die Start-/Stopp-Taste.
Der Roboter wurde während
des Reinigens hochgehoben.
Reinigen Sie die Seitenbürsten (siehe
Kapitel "Reinigung und Wartung").
Wenn der obere Deckel nicht eingesetzt
oder korrekt geschlossen wurde,
funktioniert der Roboter nicht. Setzen Sie
den oberen Deckel ordnungsgemäß auf
den Roboter.
Heben Sie den Roboter an, damit sein
Stoßfänger freikommt. Platzieren Sie den
Roboter in einiger Entfernung vom
Hindernis und drücken Sie die Start/Stopp-Taste, um mit der Reinigung
fortzufahren.
Drücken Sie die Start-/Stopp-Taste.
Stellen Sie den Roboter auf den Boden.
Drücken Sie dann auf die Start-/StoppTaste, damit der Roboter mit der
Reinigung fortfährt.
Page 51

Problem Mögliche Ursache Die Lösung
Der Roboter reinigt nicht
ordnungsgemäß.
Die Borsten auf einer oder auf
beiden Seitenbürsten sind
krumm oder verbogen.
Weichen Sie die Bürste oder Bürsten
einige Zeit in warmem Wasser ein. Wenn
die Bürsten dadurch nicht zu ihrer
ursprünglichen Form zurückkehren,
ersetzen Sie die Seitenbürsten (siehe
Kapitel "Austausch").
Deutsch
51
Der Filter im Staubbehälter ist
schmutzig.
Die Ansaugöffnung auf der
Unterseite des
Staubbehälters ist verstopft.
Das Vorderrad ist von Haaren
oder anderem Schmutz
blockiert.
Der Roboter reinigt eine sehr
dunkle oder glänzende
Oberfläche, sodass die
Stopp-Sensoren ausgelöst
werden. Das führt dazu, dass
sich der Roboter in einem
ungewöhnlichen
Reinigungsmuster bewegt.
Der Roboter reinigt einen
Boden, auf dem Sonnenlicht
sehr stark reflektiert wird.
Dadurch werden die StoppSensoren ausgelöst und der
Roboter bewegt sich in
ungewöhnlichen Mustern.
Reinigen Sie den Filter im Staubbehälter
mit einem Tuch oder einer Zahnbürste mit
weichen Borsten. Sie können die Filter und
den Staubbehälter auch mit einem
handelsüblichen Staubsauger bei niedriger
Ansaugstärke reinigen.
Wenn sich der Filter nicht mit einer Bürste
reinigen oder aussaugen lässt, ersetzen Sie
den Filter durch einen neuen. Sie sollten
den Filter mindestens einmal pro Jahr
austauschen.
Reinigen Sie die Ansaugöffnung (siehe
Kapitel "Reinigung und Wartung").
Reinigen Sie das Vorderrad (siehe Kapitel
"Reinigung und Wartung").
Drücken Sie die Start-/Stopp-Taste und
verschieben Sie den Roboter an eine
hellere Stelle des Bodens. Wenn das
Problem auch bei helleren Böden
weiterhin auftritt, gehen Sie zu
www.philips.com/support oder wenden
Sie sich an das Philips Service-Center in
Ihrem Land.
Ziehen Sie die Vorhänge zu, damit kein
Sonnenlicht in den Raum dringt. Sie
können auch mit der Reinigung beginnen,
wenn das Sonnenlicht nicht so hell ist.
Der Akku kann nicht
länger aufgeladen
werden, oder die
Akkuleistung lässt schnell
nach.
Der Akku hat das Ende seiner
Lebensdauer erreicht.
Ersetzen Sie den Akku (siehe Kapitel
„Austausch“).
Page 52

52
Deutsch
Problem Mögliche Ursache Die Lösung
Die Batterie der
Fernbedienung wird zu
schnell leer.
Möglicherweise haben Sie
nicht den richtigen
Batterietyp eingesetzt.
Für die Fernbedienung brauchen Sie eine
CR2025-Knopfzelle. Sollte das Problem
fortbestehen, gehen Sie zu
www.philips.com/support oder wenden
Sie sich an das Philips Service-Center in
Ihrem Land.
Der Roboter bewegt sich
im Kreis.
Der Roboter findet die
Docking-Station nicht.
Der Roboter piept, wenn
er auf der DockingStation steht.
Der Roboter befindet sich im
Modus zur punktuellen
Reinigung.
Es ist nicht genug Platz, damit
der Roboter sich zur DockingStation bewegen kann.
Der Roboter sucht noch aktiv. Warten Sie rund 20 Minuten, bis der
Der Roboter wurde nicht von
der Docking-Station aus
gestartet.
Sie versuchen, den Roboter
aufzuladen, aber der
Netzschalter befindet sich in
der Position „off“ (Aus).
Das ist normales Verhalten. Der
Spiralmodus kann zur gründlichen
Reinigung aktiviert werden, wenn auf dem
Boden eine starke Verschmutzung erkannt
wird. Er ist auch Teil des automatischen
Reinigungsmodus. Nach ungefähr einer
Minute fährt der Roboter mit seinem
normalen Reinigungsmuster fort. Sie
können den Spiralmodus auch stoppen,
indem Sie auf der Fernbedienung einen
anderen Reinigungsmodus auswählen.
Versuchen Sie eine andere Stelle für die
Docking-Station zu finden. Siehe
"Docking-Station aufstellen" im Kapitel
"Für den Gebrauch vorbereiten".
Roboter zur Docking-Station zurückkehrt.
Wenn der Roboter nach einer Reinigung
zur Docking-Station zurückkehren soll,
starten Sie ihn von der Docking-Station
aus.
Drücken Sie den Netzschalter, um den
Roboter einzuschalten.
Fehlercodes
Fehlercode
E1 Räder blockiert Nehmen Sie den Roboter vom Hindernis, und
E2 Obere Abdeckung oder
E3 Stoßfänger blockiert Nehmen Sie den Roboter vom Hindernis. Der
Mögliche Ursache Die Lösung
drücken Sie die Start-/Stopp-Taste, um die
Reinigung fortzusetzen.
Staubbehälter nicht
richtig auf- bzw.
eingesetzt
Setzen Sie den Staubbehälter ordnungsgemäß
ein und die obere Abdeckung auf den Roboter.
Der Fehlercode wird automatisch nicht mehr
auf dem Display angezeigt.
Fehlercode wird automatisch nicht mehr auf
dem Display angezeigt.
Page 53

Fehlercode Mögliche Ursache Die Lösung
E4 Roboter vom Boden
gehoben
Stellen Sie den Roboter wieder auf den
Boden; der Fehlercode wird ausgeblendet.
Deutsch
53
E5 Farbe des Bodens zu
E6
dunkel
Akku nicht richtig
eingelegt
Fehler beim Laden Überprüfen Sie, ob der Netzschalter in der
Setzen Sie den Roboter auf einen helleren
Bereich des Bodens. Reinigen Sie die StoppSensoren.
Lesen Sie die Anweisungen im Abschnitt "Den
Akku in den Roboter einsetzen" im Kapitel "Vor
dem ersten Gebrauch".
Position "on" (Ein) ist, wenn sich der Roboter in
der Docking-Station befindet.
Page 54

1
1110 129
234
5 6 7 8
54
Eesti
Sissejuhatus
Õnnitleme ostu puhul ja tervitame Philipsi poolt! Philipsi pakutava tootetoe
eeliste täielikuks kasutamiseks registreerige oma toode veebisaidil
www.philips.com/welcome.
Üldine kirjeldus
1 Tolmukambri kaane käepide
2 Tolmukambri kaas
3 Filter
4 Tolmukamber
5 Ülemine kate
6 Veakoodide tabel
7 Ventilaator
8 Põrkeraam
9 Dokkimisjaama andur
10 Toitelüliti
11 Esiratas
12 Külgmiste harjade võllid
13 Kukkumissensorid
14 Rattad
15 Imemisava
16 TriActive XL otsak
17 Külgmised harjad
18 Kinnitusklotsid kuivpühkimislappidele
19 Kuivpühkimislappide hoidik
20 Kuivpühkimislapid
21 Patareihoidik
22 Kaugjuhtimispult
23 Nähtamatu sein (FC8822)
24 Dokkimisjaam
25 Adapter
26 Väike pistik
Ekraan ja kaugjuhtimispult
Roboti kuvapaneel
1 Spiraalrežiimi näidik
2 Seina mööda liikumise režiimi näidik
3 Siksakiline liikumise režiimi näidik
4 Juhusliku liikumise režiimi näidik
5 Puhastamisaeg
6 Dokkimisikoon
7 Ventilaatori kiiruse näidik
8 Tolmukasti täituvuse näidik
9 Heliandur
10 Režiimi valikunupp
11 Käivitamis-/seiskamisnupp
12 Ventilaatori kiiruse nupp
Eesti
Page 55

Kaugjuhtimispult
2
1
3
45
1
2
1 Navigeerimisnupud ja käivitamine/seiskamine
2 Puhastusaja nupud
3 Puhastusrežiimi nupud
4 Ventilaatori kiiruse nupud
5 Dokkimisnupp
Dokkimisjaama juhtpaneel
1 Aja-, päeva- ja programmeerimisnäitudega kuvapaneel
2 Reguleerimis- ja seadistusnupud
Kuidas teie robottolmuimeja töötab?
Eesti
55
Mida teie robottolmuimeja puhastada suudab?
Tänu oma omadustele on see robottolmuimeja teile kodus heaks abiliseks
põrandate puhastamisel.
Robottolmuimeja sobib eriti hästi kõvade põrandate, nagu puit, kivi või
linoleum, puhastamiseks. Sellega võib tekkida probleeme pehmete
põrandate, nagu vaipade ja mattide puhastamisel. Kui kasutate
robottolmuimejat vaibal või matil esimest korda, palun jääge masina
lähedusse, et näha kas robottolmuimeja antud tüüpi põrandaga hakkama
saab. Robottolmuimeja vajab järelvalvet ka siis, kui kasutate seda väga
tumedatel või läikivatel kõvadel põrandatel.
Kuidas teie robottolmuimeja puhastab?
Puhastussüsteem
Robottolmuimejal on kolmeetapiline puhastussüsteem põrandate tõhusaks
puhastamiseks.
Page 56

56
Eesti
-
Kaks külgmist harja aitavad tolmuimejal puhastada nurki ja seinaääri.
Samuti aitavad need põrandalt mustust lahti saada ja seda imemisava
suunas liigutada.
-
Robottolmuimeja tõmbab imedes lahtise sodi enda külge ja suunab selle
imemisava kaudu tolmukambrisse.
-
Robottolmuimejal on kuivpühkimislappide hoidik. Kuivpühkimislappide
abil saab puhastada kõvakattega põrandaid veelgi põhjalikumalt.
Puhastusrežiimid
Automaatse puhastamise režiimis kasutab robottolmuimeja toa
optimaalseks puhastamiseks puhastusrežiimide automaatset järjestust.
Kasutatavad puhastusrežiimid on:
1 siksakiline liikumine;
2 juhuslik liikumine;
3 seina mööda kulgev liikumine;
Page 57

Eesti
4 spiraalne liikumine.
Automaatse puhastamise režiimis järgib robottolmuimeja neid mustreid
kindlas järjestuses: siksakiline, juhuslik, seina mööda kulgev ja spiraalne
muster.
Kui robottolmuimeja on selle mustrite järjestuse lõpetanud, hakkab see
uuesti siksakilises mustris liikuma. Robottolmuimeja jätkab selle mustrite
järjestuse kasutamist toa puhastamisel seni, kuni aku hakkab tühjaks saama
või kuni see käsitsi välja lülitatakse.
Kui robottolmuimeja tuvastab puhastustsükli käigus eriti määrdunud
piirkonna, lülitub see spiraalse liikumise režiimi ja ventilaator hakkab tööle
turbokiirusel, et tagada mustuse põhjalik eemaldamine.
Märkus. saate valida iga režiimi ka eraldi kaugjuhtimispuldil vastavat nuppu
vajutades. käsitsi valitud režiimid jäävad aktiivseks vaid mõneks minutiks.
Pärast neid lülitab robottolmuimeja tagasi automaatse puhastamise
režiimile.
Lisateabe saamiseks vt peatükis „Robottolmuimeja kasutamine“ jaotist
„Puhastusrežiimid“.
57
Kuidas teie robottolmuimeja väldib kõrguseerinevusi?
Robottolmuimeja põhjal on kolm kukkumissensorit. See kasutab neid
sensoreid pinna kõrguseerinevuste, nagu treppide tuvastamiseks ja
vältimiseks.
Märkus. on normaalne, et robottolmuimeja liigub veidi üle erineva kõrgusega
pinna serva, sest eesmine kukkumissensor paikneb põrkeraami taga.
Ettevaatust! Mõningatel juhtudel ei pruugi kukkumissensorid treppi või
mõnda muud kõrguseerinevust õigeaegselt tuvastada. Seetõttu jälgige
robottolmuimejat hoolikalt paaril esimesel kasutuskorral ja siis, kui
kasutate seda trepi või teiste erikõrgustega kohtade läheduses. On
oluline, et te puhastaksite kukkumissensoreid regulaarselt, tagamaks, et
robottolmuimeja korralikult kõrguseerinevusi tuvastada suudaks (juhiste
jaoks vt ptk „Puhastamine ja hooldus”).
Enne esimest kasutamist
Külgmiste harjade paigaldamine
1 Pakkige lahti külgmised harjad ja pange robottolmuimeja tagurpidi lauale
või põrandale.
Page 58

1
2
100 厘米
100 cm
30 厘米30 厘米
30 cm
80
厘米
80 cm
58
Eesti
2 Lükake külgmised harjad robottolmuimeja põhjal olevatele võllidele.
Märkus. veenduge, et kinnitate külgmised harjad korralikult. Vajutage
need võllile kuni kuulete, et need on klõpsatusega kohale asetunud.
Kaugjuhtimispuldilt sildi eemaldamine
Kaugjuhtimispult töötab CR2025 müntpatareiga. Seda patareid kaitseb
kaitsesilt, mis tuleb enne kasutamist eemaldada.
1 Tõmmake patarei kaitsesilt kaugjuhtimispuldi patareipesast välja. Nüüd
on kaugjuhtimispult kasutusvalmis.
Kasutamiseks valmistumine
Dokkimisjaama paigaldamine
1 Sisestage adapteri väike pistik dokkimisjaama pessa (1) ja adapter
seinakontakti (2).
-
Dokkimisjaama kuvapaneel lülitub sisse.
2 Asetage dokkimisjaam horisontaalsele tasasele põrandale vastu seina.
Märkus. veenduge, et dokkimisjaamast 80 cm eespool, 30 cm paremal ja
100 cm vasakul puuduksid takistused või kõrguseerinevused.
Nõuanne. veendumaks, et dokkimisjaam püsiks kindlalt valitud kohas,
kinnitage see kruvidega või kahepoolset teipi kasutades seina külge.
Page 59

Laadimine
Eesti
Robottolmuimeja esmakordsel laadimisel ja siis, kui robottolmuimeja aku on
tühjaks saanud, on laadimisaeg neli tundi.
Teie robottolmuimejat saab laadida kahel viisil:
-
dokkimisjaamas, kas käsitsi või automaatselt kasutamise ajal;
-
ühendades robottolmuimeja otse vooluvõrku.
Märkus. kui aku on täis laetud, suudab teie robottolmuimeja puhastada kuni
120 minutit.
59
Dokkimisjaamas laadimine
1 Robottolmuimeja sisselülitamiseks vajutage toitelülitit.
2 Pange robottolmuimeja vooluvõrku ühendatud dokkimisjaama.
3 Käivitamis-/seiskamisnupp hakkab vilkuma.
Märkus. kuna tegemist on robottolmuimeja esmakordse laadimisega,
kuvatakse robottolmuimeja paneelil alglaadimise märgutuli.
4 Kui aku on täis laetud, jääb käivitamis-/seiskamisnupp pidevalt põlema.
Page 60

60
Eesti
Automaatne laadimine kasutamise ajal
1 Kui robottolmuimeja on lõpetanud puhastamise või kui aku laetust on
järel vaid 15%, hakkab see laadimiseks automaatselt dokkimisjaama
otsima. Kui robottolmuimeja otsib dokkimisjaama, muutub tuluke
käivitamis-/seiskamisnupus oranžiks.
2 Kui aku on täis laetud, jääb käivitamis-/seiskamisnupp pidevalt põlema.
Ruumi ettevalmistamine puhastustsükliks
Enne robottolmuimeja puhastustsükli alustamist veenduge, et eemaldasite
põrandalt kõik lahtised ja õrnad esemed. Eemaldage põrandalt kõik kaablid,
juhtmed ja nöörid.
Robottolmuimeja kasutamine
Käivitamine ja seiskamine
1 Seadistage roboti küljel asuv toitelüliti asendisse „on”.
2 Vajutage käivitamis-/seiskamisnuppu.
-
Võite vajutada robottolmuimejal olevat käivitamis-/seiskamisnuppu.
-
Võite vajutada ka kaugjuhtimispuldil olevat käivitamis/seiskamisnuppu.
3 Käivitamis-/seiskamisnupp jääb pidevalt sisse ning robottolmuimeja
hakkab puhastama.
Page 61

Eesti
4 Robottolmuimeja puhastab automaatse puhastamise režiimis kuni aku
langeb madalale tasemele. Automaatse puhastamise režiimis järgib see
siksakilise, juhusliku, seina mööda kulgeva ja spiraalse režiimi mustrite
korduvaid seeriaid.
Märkus. eraldi režiimi valimiseks vajutage ühte kaugjuhtimispuldi
režiiminuppudest. Lisateabe saamiseks vt jaotist „Puhastusrežiimi
valimine“.
5 Kui aku on tühjaks saamas, muutub käivitamis-/seiskamisnupu tuluke
oranžiks ja robottolmuimeja hakkab laadimiseks dokkimisjaama otsima.
6 Samuti võite puhastustsükli katkestamiseks või seiskamiseks vajutada
käivitamis-/seiskamisnupule. Kui vajutate uuesti käivitamis/seiskamisnuppu ja akus on veel piisavalt energiat, jätkab
robottolmuimeja automaatse puhastamise režiimi.
7 Et robottolmuimeja naaseks dokkimisjaama enne aku tühjaks saamist,
vajutage kaugjuhtimispuldil olevat dokkimisnuppu. Robottolmuimeja
kuvapaneelil olev dokkimisikoon lülitub sisse ja robottolmuimeja naaseb
dokkimisjaama.
61
Puhastusrežiimi valimine
Lisaks automaatse puhastamise režiimile on robottolmuimejal neli eraldi
puhastusrežiimi, mille saab aktiveerida kaugjuhtimispuldi vastavat nuppu
vajutades.
Märkus. käsitsi valitud režiimid jäävad aktiivseks vaid mõneks minutiks.
Pärast neid lülitab robottolmuimeja tagasi automaatse puhastamise
režiimile.
Siksakilise liikumise režiim
Siksakilise liikumise režiimis teeb robottolmuimeja suurte pindade
puhastamiseks kogu ruumis siksakke.
Page 62

62
Eesti
Juhusliku liikumise režiim
Selles režiimis puhastab robottolmuimeja ruumi sirgeid ja siksakilisi liigutusi
omavahel segades.
Seina mööda liikumise režiim
Selles režiimis kulgeb robottolmuimeja mööda ruumi seina, et teha
seinaääred eriti puhtaks.
Spiraalrežiim
Selles režiimis liigub robottolmuimeja spiraalselt, et väikest musta piirkonda
põhjalikult puhastada. Kui tolmu tuvastamise andur tuvastab tolmu, lülitab
robottolmuimeja ventilaatori automaatselt turbokiirusele.
Käsitsi juhtimine
1 Kasutage kaugjuhtimispuldi käivitamis-/seiskamisnupust üleval ja all ning
vasakul ja paremal olevaid noolenuppe robottolmuimeja läbi ruumi
navigeerimiseks.
Märkus. Olge ettevaatlik robottolmuimejat käsitsi erinevate kõrguste ja
treppide lähedal juhtides.
Märkus. Tolmu imemise funktsioon ja külgmised harjad töötavad ainult
siis, kui robottolmuimeja sõidab otse. Nupud vasakule, paremale ja tagasi
on ette nähtud robottolmuimejaga manööverdamiseks.
Page 63

Puhastusaja nuppude kasutamine
-
Vaikimisi puhastab robottolmuimeja automaatse puhastamise režiimis
kuni selle taaslaetav aku hakkab tühjaks saama. Robottolmuimejale
naaseb siis automaatselt dokkimisjaama. Kui valisite mõne muu
puhastusaja (vt allpool), saate naasta vaikerežiimile, vajutades
maksimaalse puhastusaja nuppu kaugjuhtimispuldil.
-
Teised kaugjuhtimispuldil olevad puhastusaja nupud võimaldavad teil
valida robottolmuimeja 60, 45 ja 30 minutilise puhastusaja vahel. Kui
puhastusaeg on läbi, naaseb robottolmuimeja dokkimisjaama.
Dokkimisikoon süttib kuvapaneelil põlema.
-
Kui te ei soovi, et robottolmuimeja puhastustsükli lõpus dokkimisjaama
naaseb, vajutage puhastusaja nuppu kaks korda. Dokkimisikoon kaob
kuvapaneelilt. Kui puhastusaeg on lõppenud, jääb robottolmuimeja
seisma.
Dokkimisjaama kasutamine
Kellaaja ja päeva seadistamine
Kui soovite kasutada puhastusprogramme, peate kellaaja ja nädalapäeva
seadistama kõigepealt dokkimisjaama ekraanil.
Eesti
63
Märkus. Alltoodud sammude juurde kuuluvaid pilte vt tagaküljel olevatelt
lehekülgedelt.
1 Vajutage seadistusnupule. Määratud režiimi näit ja kellaaja näit hakkavad
vilkuma.
2 Vajutage üks kord valikunuppu. Tundide näit hakkab vilkuma.
3 Tundide seadistamiseks kasutage dokkimisjaamal olevaid + ja - nuppe.
Määratud aeg kuvatakse ekraanile.
4 Vajutage valikunuppu, et kinnitada määratud tunnid. Minutinäidik hakkab
vilkuma.
5 Kasutage + ja - nuppe dokkimisjaamal, et seada minutid. Seadistatud
minutid kuvatakse ekraanile.
6 Vajutage valikunuppu, et kinnitada määratud minutid. Näidik „Su”, mis
tähendab pühapäeva, hakkab vilkuma.
7 Konkreetse nädalapäeva seadistamiseks kasutage dokkimisjaamal
olevaid + ja - nuppe.
8 Nädalapäeva kinnitamiseks vajutage valikunuppu.
9 Seadistatud kellaaja ja nädalapäeva kinnitamiseks vajutage
seadistusnuppu. Nii määratud režiimi näit kui ka kellaaja näit lõpetavad
vilkumise ning jäävad põlema.
Page 64

1
2
3
64
Eesti
Puhastusaegade programmeerimine
Kui olete dokkimisjaama ekraanil kellaaja ja nädalapäeva seadistanud, võite
oma robottolmuimeja koristamisajad määrata.
Märkus. Alltoodud sammude juurde kuuluvaid pilte vt tagaküljel olevatelt
lehekülgedelt.
Saadaolevad programmeerimisvalikud on:
Programm Näidud ekraanil
Puhastamine iga päev Kõikide päevade näidud on sisse lülitatud
Puhastamine argipäevadel Näidud esmaspäevast reedeni on sisse lülitatud
Puhastamine kahel järjestikusel
päeval
Puhastamine ühel päeval nädalas Valitud päeva näit on sisse lülitatud
1 Vajutage seadistusnupule. Seadistatud režiimi näidik ja
koristusprogrammi näidik hakkavad vilkuma.
2 Vajutage üks kord valikunuppu. Tundide näit hakkab vilkuma.
3 Kasutage + ja - nuppe dokkimisjaamal, et seada tunnid. Seadistatud
tunnid kuvatakse ekraanil.
4 Vajutage valikunuppu, et kinnitada määratud tunnid. Minutinäidik hakkab
vilkuma.
5 Kasutage + ja - nuppe dokkimisjaamal, et seada minutid. Seadistatud
minutid kuvatakse ekraanile.
6 Vajutage valikunuppu, et kinnitada määratud minutid. Näidik „Su”, mis
tähendab pühapäeva, hakkab vilkuma.
7 Puhastusprogrammide vahetamiseks kasutage dokkimisjaamal olevaid +
ja - nuppe (vt saadaolevaid programmeerimisvalikuid eespool toodud
tabelist).
8 Valitud programmi kinnitamiseks vajutage valikunuppu.
9 Programmeerimise kinnitamiseks vajutage seadistusnuppu. Nii määratud
režiimi näit kui ka puhastusprogrammi näit lõpetavad vilkumise ning
jäävad põlema.
10 Kui olete koristamisprogrammi seadistanud, näitab ekraan nii
koristamisprogrammi näitu kui ka valitud päeva/päevi. Kui jätate
robottolmuimeja ooterežiimile ja selle aku on täis laetud, alustab see
puhastamist programmeeritud ajal programmeeritud päeval või
päevadel.
Kahe päeva näidud (nt reede ja laupäev) on sisse lülitatud
Ventilaatori kiiruse nupud
Ventilaatori kiiruse suurendamiseks turbokiirusele või ventilaatori
väljalülitamiseks võite kasutada ventilaatori kiiruse nuppe. Vaikeseadeks on
ventilaatori tavakiirus.
1 Ventilaatori väljalülitamiseks vajutage antud nuppu.
2 Ventilaatori sisselülitamiseks tavakiirusel vajutage antud nuppu.
3 Turbokiiruse nupp suurendab ventilaatori kiirust.
Page 65

Plaksule reageerimine
Plaksule reageerimine, kui robottolmuimeja siseneb puhkerežiimi, on
lubatud järgmistes olukordades:
-
kui see lõpetab puhastamise vea tõttu;
-
kui olete programmeerinud lühikese puhastusaja;
-
kui see ei leia 20 minuti jooksul dokkimisjaama.
Kui te robottolmuimejat ei näe, saate määrata selle asukoha oma käsi ühe
korra plaksutades. Robottolmuimeja vastab piiksatuse ning ekraanil kõikide
kujutiste põlema süttimisega.
Kuivpühkimistarviku kasutamine
Kuivpühkimistarvik võimaldab puhastada kõvakattega põrandaid
kuivpühkimislappide abil.
Märkus. Kuivpühkimislapi tarviku kasutamisel võib robottolmuimejal olla
raske ületada lävepakke või sõita vaibale.
Kuivpühkimistarviku kasutamiseks ettevalmistamine
1 Keerake robottolmuimeja tagurpidi ja asetage see põrandale või lauale.
2 Pange lauale kuivpühkimislapp ja asetage kuivpühkimistarvik lapile nii, et
kinnituskõrvad on suunatud teie poole.
Eesti
65
3 Voltige kuivpühkimislapi mõlemad otsad ümber kuivpühkimistarviku ja
kinnitage kuivpühkimislapp tarviku külge, surudes kinnitusklotse
soontesse.
4 Sisestage kuivpühkimistarviku kinnituskõrv robottolmuimeja ühe külje
ratta taga olevasse avasse ja lükake seni, kuni kuulete neid klõpsatusega
kinnitumas. Seejärel korrake neid toiminguid teisel küljel.
5 Keerake robottolmuimeja ümber ja asetage see ratastel põrandale nii, et
kuivpühkimistarvik puudutab põrandat.
Robottolmuimeja kasutamine koos kuivpühkimistarvikuga
Kui kuivpühkimistarvik on külge kinnitatud, võite kasutada robottolmuimejat
igas režiimis ja kõikidel kõvakattega põrandatel. Ärge kasutage
kuivpühkimistarvikut vaipkatetel või vaipadel.
Page 66

1
2
66
Eesti
2
1
Kuivpühkimistarviku eemaldamine
1 Eemaldage kuivpühkimistarvik niipea, kui olete lõpetanud põranda
pühkimise.
2 Keerake robottolmuimeja tagurpidi ja asetage see põrandale või lauale.
3 Lükake kuivpühkimistarviku üks ots selle vabastamiseks robottolmuimeja
teise külje ratta poole. Seejärel tõmmake tarvik robottolmuimeja küljest
ära.
Nähtamatu seina kasutamine (FC8822)
Nähtamatusse seina patareide sisestamine
Nähtamatu sein töötab nelja AA-tüüpi patareiga.
1 Vajutage kahele tagumise katte (1) põhjal olevale vabastussakile ning
libistage tagumist katet ülespoole ja eemaldage see nähtamatu seina (2)
küljest.
2 Võtke pakendist välja neli uut AA-tüüpi patareid ja sisestage need
nähtamatu seina patareipesasse.
Märkus. veenduge, et patareide + ja – poolused oleksid õigesti suunatud.
3 Libistage tagumine kate nähtamatule seinale tagasi.
Page 67

3
1
2
Eesti
67
Nähtamatu seina asukoha valimine robottolmuimeja
seiskamiseks
Võite kasutada nähtamatut seina selleks, et hoida ära robottolmuimeja
sisenemine kohta, kust tahate seda eemale hoida.
1 Asetage seade kohta, millest teisele poole robottolmuimeja ei tohiks
minna, nt robottolmuimejale keelatud ruumi avatud ukse lähedale.
2 Lülitage nähtamatu sein selle peal oleva sisse-/väljalülitamise liuglüliti
abil sisse.
3 Lülitage robottolmuimeja sisse.
4 Kui robottolmuimeja liigub nähtamatule seinale liiga lähedale, hakkab
nähtamatu seina märgutuli vilkuma ja nähtamatu sein laseb välja
infrapunakiire. See infrapunakiir paneb robottolmuimeja oma kurssi
muutma ja nähtamatust seinast eemale liikuma.
Märkus. Nähtamatu seina kasutamise puhul kontrollige regulaarselt, et selles
olevad patareid oleksid piisavalt laetud. Kontrollimiseks lülitage virtuaalseina
sisse ja välja. Kui patareides on piisavalt energiat, süttivad nähtamatul seinal
olevad LED märgutuled korraks põlema.
Puhastamine ja hooldus
Robottolmuimeja puhastamine.
Tõhusaks puhastamiseks tuleb aeg-ajalt kukkumissensoreid, rattaid, külgmisi
harju ja imamisava puhastada.
1 Pange robottolmuimeja tagurpidi tasasele pinnale.
2 Kasutage kukkumissensorite juurest tolmu või ebemete eemaldamiseks
pehmete harjastega harja (nt hambaharja).
Märkus. on tähtis, et puhastaksite kukkumissensoreid regulaarselt. Kui
kukkumissensorid on mustad, ei pruugi robottolmuimeja õigesti
kõrguserinevusi või treppe tuvastada.
Page 68

1
2
3
1
2
68
Eesti
3 Kasutage esiratta ja külgmiste rataste juurest tolmu või ebemete
eemaldamiseks pehmete harjastega harja (nt hambaharja).
4 Külgmiste harjade puhastamiseks haarake selle harjastest ja tõmmake
need võllide küljest ära.
5 Võtke pehmete harjastega harja (nt hambaharja) või riidetüki abil võlli ja
harja küljest ära ebemed, karvad ja niidijupid.
6 Kontrollige robottolmuimeja külgmisi harju ja põhja teravate esemete
suhtes, mis võiksid teie põrandat kahjustada.
7 Tehke lahti TriActive XL otsaku plõksühendused, sisestades selleks oma
näpud nooltega märgitud kohtadele ning tõmmates TriActive-otsaku
robottolmuimeja küljest ära.
8 Puhastage imemisava pehme harjaga (nt hambaharjaga).
Page 69

Eesti
9 Eemaldage TriActive-otsakult kõik nähtav mustus.
10 Sisestage TriActive-otsaku plõkskonksud robottolmuimeja põhjal
asuvatesse aukudesse. Lükake TriActive-otsak oma asendisse tagasi.
Kontrollige, kas otsak saab paari millimeetri ulatuses vabalt üles ja alla
liikuda.
11 Lükake külgmised harjad uuesti robottolmuimeja põhjal olevatele
võllidele.
69
Tolmukambri tühjendamine ja puhastamine
Kui tolmukambri täitumise märgutuli süttib pidevalt põlema, tühjendage ja
puhastage tolmukamber.
1 Veenduge, et toitelüliti oleks väljalülitatud asendis.
2 Eemaldage kate.
Page 70

1
2
70
Eesti
3 Tõmmake tolmukambri kaane käepide üles ja tõstke tolmukamber oma
pesast välja.
Märkus. Tolmukambri väljavõtmisel või tagasipanemisel olge ettevaatlik,
et te ei kahjustaks mootori ventilaatori terasid.
4 Tehke tolmukambri pesa kaas ettevaatlikult lahti (1) ja võtke filter välja (2).
5 Tühjendamiseks raputage tolmukambrit prügikasti kohal. Puhastage filtrit
ja tolmukambri sisemust lapi või pehmete harjastega hambaharjaga.
Puhastage ka tolmukambri põhjal olev imemisava.
Ettevaatust! Ärge puhastage tolmukambrit veega ega ka
nõudepesumasinas.
6 Pange filter tagasi tolmukambrisse (1). Seejärel pange tolmukambrile kaas
peale (2).
7 Pange tolmukamber tagasi selle pessa ja pange ülemine kate
robottolmuimejale tagasi.
Ettevaatust! Veenduge, et tolmukambris oleks filter alati olemas.
Robottolmuimejat ilma filtrita kasutades saab mootor kahjustada.
Page 71

Tarvikute tellimine
Seadme jaoks tarvikute või varuosade ostmiseks minge veebilehele
www.shop.philips.com/service või külastage Philipsi edasimüüjat. Samuti
võite pöörduda oma riigi Philipsi klienditoe keskusesse (vt kontaktandmeid
ülemaailmse garantii lehelt).
Osade vahetamine
Filtri vahetamine
Vahetage filter, kui see on väga must või kahjustatud. Uue filtrikomplekti
saate tellida tüübinumbriga FC8066. Juhiseid selle kohta, kuidas filtrit
tolmukambrist eemaldada ja tolmukambrisse asetada, vt peatükist
„Puhastamine ja hooldus” jaotisest „Tolmukambri tühjendamine ja
puhastamine”.
Külgmiste harjade vahetamine
Korraliku puhastustulemuse saavutamiseks vahetage mõne aja möödumisel
külgmised harjad välja.
Vahetage külgmised harjad alati, kui märkate neil kulumisjälgi või kahjustusi.
Soovitame mõlemad külgmised harjad samaaegselt välja vahetada.
Külgmiste harjade lisapaare saab tellida asenduskomplekti FC8068 osana.
See komplekt sisaldab ka kahte filtrit ja kolme lappi.
1 Veenduge, et toitelüliti oleks väljalülitatud asendis.
2 Külgmiste harjade väljavahetamiseks võtke vanade külgmiste harjade
harjastest kinni ja tõmmake need võllide küljest ära.
Eesti
71
3 Lükake uued külgmised harjad võllide külge.
Kuivpühkimislappide vahetamine
Võite tellida uued kuivpühkimislapid. Need kuuluvad asenduskomplekti
FC8068. See asenduskomplekt sisaldab ka kahte külgharja ja kahte filtrit.
Page 72

2
3
1
72
Eesti
Kaugjuhtimispuldi patarei vahetamine
Kaugjuhtimispult töötab CR2025 müntpatareiga. Asendage patarei, kui
robottolmuimeja kaugjuhtimispuldil olevate nuppude vajutamisel enam ei
reageeri.
1 Hoidke kaugjuhtimispulti tagurpidi. Vajutage patareihoidikul olevat
vabastusnuppu ja samal ajal lükake patareihoidik kaugjuhtimispuldist
välja.
2 Eemaldage tühi patarei patareipesast ja asetage patareipesasse uus
patarei. Seejärel libistage patareihoidik tagasi kaugjuhtimispulti.
Laetava aku vahetamine
Laetavat akut tohib vahetada vaid selleks kvalifitseeritud hoolduseinsener.
Kui laetavat akut ei ole enam võimalik laadida või kui see saab kiiresti
tühjaks, viige robottolmuimeja aku asendamiseks Philipsi volitatud
hoolduskeskusesse. Philipsi klienditeeninduskeskuse kontaktandmed teie
asukohariigis leiate ülemaailmse garantii lehelt.
Ringlussevõtt
-
See sümbol tähendab, et seda toodet ei tohi visata tavaliste
olmejäätmete hulka (2012/19/EL).
-
See sümbol tähendab, et käesolev toode sisaldab sisseehitatud
akupatareid, mida ei tohi visata tavaliste olmejäätmete hulka
(2006/66/EÜ). Me soovitame teil oma toode viia Philipsi ametlikku
kogumispunkti või hoolduskeskusesse, et akupatarei professionaalil
eemaldada lasta.
-
Järgige oma riigi elektriliste ja elektrooniliste toodete ning akupatareide
lahuskogumist reguleerivaid eeskirju. Õigel viisil kasutusest kõrvaldamine
aitab ära hoida kahjulikke tagajärgi keskkonnale ja inimeste tervisele.
Page 73

Laetava aku eemaldamine
1
3
2
this side up
Hoiatus. Eemaldage akupatarei seadmest vaid siis, kui seadme
kasutusest kõrvaldate. Enne aku eemaldamist kontrollige, et see
oleks täiest tühi.
Laetava aku eemaldamiseks järgige allpool kirjeldatud samme. Võite
robottolmuimeja selle laetava aku eemaldamiseks Philipsi volitatud
hoolduskeskusesse viia. Teie lähipiirkonnas asuva hoolduskeskuse aadressi
saamiseks võtke ühendust oma asukohariigi Philipsi
klienditeeninduskeskusega.
1 Käivitage robottolmuimeja kusagil toas, kuid mitte dokkimisjaamas.
2 Laske robottolmuimejal töötada seni, kuni aku on tühi; nii hoolitsete selle
eest, et aku on täiesti tühi enne selle eemaldamist ja utiliseerimist.
3 Keerake akupesa kruvid lahti ja eemaldage kate.
4 Võtke laetav aku välja ning ühendage see lahti.
5 Viige robottolmuimeja ning laetav aku elektriliste ja elektrooniliste
jäätmete kogumispunkti.
Eesti
73
Veaotsing
Selles peatükis võetakse kokku kõige levinumad probleemid, mis teil
seadmega tekkida võivad. Kui te ei suuda alljärgneva teabe abil ise
probleemi lahendada, külastage veebilehte www.philips.com/support, kus
on loetelu korduma kippuvatest küsimustest, või võtke ühendust oma riigi
klienditeeninduskeskusega.
Page 74

74
Eesti
Veaotsing
Probleem
Robottolmuimeja ei
hakka puhastama, kui ma
vajutan käivitamis/seiskamisnupule.
Võimalik põhjus Lahendus
Laetav aku on tühi. Laadige akut (vt jaotis „Kasutamiseks
Väike pistik on ikka veel
robottolmuimeja pistikupesas.
valmistumine“).
Robottolmuimeja ei tööta vooluvõrgu peal.
See töötab vaid oma laetava aku peal.
Seega eemaldage adapter enne
kasutamist nii robottolmuimeja küljest kui
vooluvõrgust.
Hoiatustuli vilgub kiiresti.
Toitelüliti ei ole seatud
asendisse „on” (I).
Üks ratas või mõlemad rattad
on kinni jäänud.
Üks külgmine ratas või
mõlemad külgmised rattad on
takerdunud.
Ülemine kate puudub või ei
ole korralikult kinni.
Põrkeraam on kinni jäänud. Vajutage käivitamis-/seiskamisnuppu.
Robottolmuimejat tõsteti
puhastamise ajal.
Vajutage toitelülitit. Koristamise
alustamiseks vajutage robottolmuimejal
või kaugjuhtimispuldil olevat käivitamis/seiskamisnuppu.
Lülitage toitelüliti asendisse „off”.
Eemaldage ebemed, karvad, niidi- või
traadijupid, mis on ratta vedru külge
jäänud.
Puhastage külgmised harjad (vt jaotis
„Puhastamine ja hooldus“).
Kui ülemine kate puudub või ei ole
korralikult kinni, siis robottolmuimeja ei
tööta. Asetage ülemine kate korralikult
robottolmuimejale.
Tõstke robottolmuimejat nii, et selle
põrkeraam tuleks lahti. Asetage
robottolmuimeja takistuse juurest
lühikesele kaugusele ja vajutage
puhastamise jätkamiseks käivitamis/seiskamisnuppu.
Vajutage käivitamis-/seiskamisnuppu.
Pange robottolmuimeja põrandale.
Seejärel vajutage puhastamise jätkamiseks
käivitamis-/seiskamisnupule.
Page 75

Probleem Võimalik põhjus Lahendus
Robottolmuimeja ei
puhasta põrandat
korralikult.
Ühe või mõlema külgmise
harja harjased on kõverad või
viltu.
Leotage harja või harjasid mõnda aega
soojas vees. Kui see ei taasta harjaseid
õigele kujule, vahetage külgede harjad
välja (vt jaotis „Asendamine”).
Eesti
75
Tolmukambri filter on must. Puhastage tolmukambri filtrit ja sisemust
Tolmukambri põhjal olev
imemisava on ummistunud.
Esimese ratta ümber on
kogunenud juukseid või
muud sodi.
Robottolmuimeja,
puhastades tumedat või
musta värvi pindasid, võib
aktiveerida kukkumissensorid.
Selle tulemusel hakkab
robottolmuimeja ebatavaliselt
liikuma.
Robottolmuimeja puhastab
põrandat, mis peegeldab
tugevasti päikesevalgust. See
aktiveerib kukkumissensorid,
mille tulemusel hakkab
robottolmuimeja ebatavaliselt
liikuma.
lapi või pehmete harjastega
hambaharjaga. Võite filtrit ja tolmukambrit
puhastada ka nõrgal režiimil tavalise
tolmuimejaga.
Kui filtrit ei õnnestu harjaga ega
tolmuimejaga puhastada, vahetage see
uue vastu välja. Soovitame filtrit vahetada
vähemalt üks kord aastas.
Puhastage imemisava (vt jaotis
„Puhastamine ja hooldus“).
Puhastage esimene ratas (vt jaotis
„Puhastamine ja hooldus“).
Vajutage käivitamis-/seiskamisnupule ning
seejärel viige robottolmuimeja heledamat
värvi pinnaga põrandale. Kui probleem
püsib ka heledamat värvi pindadel,
külastage veebilehte
www.philips.com/support või võtke
ühendust oma asukohariigi
klienditeeninduskeskusega.
Tõmmake kardinad ette, et päikesevalgus
ei pääseks tuppa. Võite alustada
puhastamist ka siis, kui päike on vähem
ere.
Akut ei ole enam võimalik
laadida või see saab väga
kiiresti tühjaks.
Kaugjuhtimispuldi patarei
saab liiga kiiresti tühjaks.
Aku kasutusiga on lõppenud. Vahetage aku välja (vt jaotis
Võib-olla pole te sisestanud
õiget tüüpi patareid.
„Asendamine”).
Kaugjuhtimispuldi jaoks vajate CR2025
müntpatareid. Kui probleem püsib, minge
veebilehele www.philips.com/support või
võtke ühendust oma asukohariigi
klienditeeninduskeskusega.
Page 76

76
Eesti
Probleem Võimalik põhjus Lahendus
Robottolmuimeja liigub
ringides.
Robottolmuimeja on
asukohapõhises režiimis.
Selline käitumine on normaalne.
Spiraalrežiimi võib aktiveerida, kui
põrandal on näha palju mustust ning see
vajab põhjalikku puhastamist. See on
osaks ka automaatsest puhastamise
režiimist. Pärast umbes ühte minutit jätkab
robottolmuimeja tavalise puhastamise
mustrit. Spiraalrežiimi saate peatada ka
selleks kaugjuhtimispuldilt mõne teise
puhastusrežiimi valides.
Robottolmuimeja ei
suuda leida
dokkimisjaama.
Robottolmuimeja piiksub
dokkimisjaamas.
Robottolmuimejal ei ole
piisavalt ruumi dokkimisjaama
suunas navigeerimiseks.
Robottolmuimeja otsib
jätkuvalt.
Robottolmuimejat ei
käivitatud dokkimisjaamast.
Üritate robottolmuimejat
laadida, kui toitelüliti on
väljalülitatud asendis.
Püüdke leida dokkimisjaama jaoks mõni
teine koht. Vaadake jaotist „Dokkimisjaama
paigaldamine” peatükis „Kasutamiseks
valmistumine“.
Lubage robottolmuimejale dokkimisjaama
naasmiseks umbes 20 minutit.
Kui soovite, et robottolmuimeja pärast
puhastustsüklit dokkimisjaama naaseks,
siis käivitage see dokkimisjaamast.
Robottolmuimeja sisselülitamiseks
vajutage toitelülitit.
Veakoodid
Veakood
E1 Rattad on kinni jäänud Eemaldage robottolmuimeja takistuse juurest
E2 Ülemine kate või
E3 Põrkeraam on kinni
Võimalik põhjus Lahendus
ja vajutage puhastamise jätkamiseks
käivitamis-/seiskamisnuppu.
tolmukamber pole
õigesti paigaldatud.
jäänud
Asetage tolmukamber sisse ja ülemine kate
korralikult robottolmuimejale. Veateade kustub
ekraanilt automaatselt.
Eemaldage robottolmuimeja takistuse juurest.
Veateade kustub ekraanilt automaatselt.
E4 Robottolmuimeja tõsteti
põrandalt üles
E5 Põranda värv on liiga
tume
Pange robottolmuimeja veakoodi kadumiseks
põrandale tagasi.
Pange robottolmuimeja heledamale
põrandaosale. Puhastage kukkumissensorid.
Page 77

Veakood Võimalik põhjus Lahendus
E6
Aku ei ole õigesti
sisestatud
Lugege juhiseid peatüki „Enne esimest
kasutamist” jaotises „Aku paigaldamine
robottolmuimejasse”.
Eesti
77
Laadimisviga Kontrollige, kas toitelüliti on sisselülitatud
asendis, kui robottolmuimeja on
dokkimisjaamas.
Page 78

1
1110 129
234
5 6 7 8
78
Latviešu
Ievads
Apsveicam ar pirkumu un laipni lūdzam Philips! Lai pilnvērtīgi izmantotu
Philips piedāvātā atbalsta iespējas, reģistrējiet produktu vietnē
www.philips.com/welcome.
Vispārīgs apraksts
1 Putekļu tvertnes vāka rokturis
2 Putekļu tvertnes vāks
3 Filtrs
4 Putekļu tvertne
5 Augšējais pārsegs
6 Kļūdu kodu tabula
7 Ventilators
8 Buferis
9 Dokstacijas sensors
10 Jaudas slēdzis
11 Priekšējais ritenītis
12 Sānu birstu lūkas
13 Nokrišanas sensori
14 Ritentiņi
15 Sūkšanas atvere
16 TriActive XL uzgalis
17 Sānu birstes
18 Fiksācijas bloki sausajām salvetēm
19 Sauso salvešu turētājs
20 Sausās salvetes
21 Akumulatora turētājs
22 Tālvadība
23 Neredzamā siena (FC8822)
24 Dokstacija
25 Adapteris
26 Mazais spraudnis
Displejs un tālvadība
Robota displejs
1 Spirāles režīma indikators
2 Indikators darba režīmam gar sienām
3 Zigzaga trajektorijas režīma indikators
4 Nejaušas trajektorijas režīma indikators
5 Tīrīšanas laiks
6 Dokošanās ikona
7 Ventilatora ātruma indikators
8 Pilna putekļu maisiņa indikators
9 Skaņas sensors
10 Režīma izvēles poga
11 Iedarbināšanas/apturēšanas poga
12 Ventilatora ātruma poga
Latviešu
Page 79

Tālvadība
2
1
3
45
1
2
1 Navigācijas pogas un ieslēgšana/apturēšana
2 Tīrīšanas laika pogas
3 Tīrīšanas režīma pogas
4 Ventilatora ātruma pogas
5 Dokošanas poga
Dokstacijas vadības panelis
1 Displejs ar laika, datuma un programmēšanas rādījumiem
2 Regulēšanas un iestatījumu pogas
Robota darbības princips
Latviešu
79
Ko robots tīra
Kā robots tīra
Šis robots ir aprīkots ar funkcijām, kas to padara piemērotu mājokļa grīdu
tīrīšanai.
Robots ir īpaši piemērots cietu grīdu tīrīšanai, piemēram, koka, lamināta vai
linoleja grīdām. Tam var rasties problēmas, tīrot mīkstas grīdas, piemēram,
paklājus vai grīdsegas. Ja izmantojat robotu uz paklāja vai grīdsegas, lūdzu,
pirmoreiz palieciet tuvumā, lai redzētu, vai robots spēj notīrīt šādu grīdas
segumu. Robotam uzraudzība nepieciešama arī tad, ja izmantojat to uz ļoti
tumšām un spīdīgām cietām grīdām.
Tīrīšanas sistēma
Robotam ir 3 pakāpju tīrīšanas sistēma, lai efektīvi notīrītu grīdas.
Page 80

80
Latviešu
-
Divas sānu birstes palīdz robotam iztīrīt stūrus un vietas gar sienām. Tās
arī palīdz savākt netīrumus no grīdas un pārvietot tos uz sūkšanas atveri.
-
Robota sūkšanas jaudas ietekmē tiek savākti netīrumi un cauri sūkšanas
atverei novirzīti uz putekļu tvertni.
-
Robots tiek piegādāts ar sauso salvešu turētāju, kas dod iespēju cietos
grīdas segumus iztīrīt vēl rūpīgāk.
Tīrīšanas trajektorijas
Automātiskajā tīrīšanas režīmā robots izmanto automātisku tīrīšanas
trajektoriju secību, lai optimāli iztīrītu katru telpas zonu. Tas izmanto tālāk
norādītās tīrīšanas trajektorijas.
1 Z veida trajektorija vai zigzaga trajektorija
2 Nejauši izvēlēta trajektorija
3 Darbība gar sienām
Page 81

Latviešu
4 Spirālveida darbība
Automātiskajā tīrīšanas režīmā robots šīs trajektorijas izmanto noteiktā
secībā: Z veida trajektorija, nejauši izvēlēta trajektorija, darbība gar sienām
un spirālveida trajektorija.
Pēc šīs trajektoriju secības pabeigšanas robots atkal uzsāk Z veida
trajektorijas darbību. Robots turpina izpildīt šo trajektoriju secību telpas
tīrīšanai, līdz akumulatora līmenis kļūst zems vai robotu manuāli izslēdz.
Ja robots nosaka īpaši netīru zonu tīrīšanas laikā, tas pārslēdzas spirālveida
režīmā un ventilatora turbo ātrumā, lai nodrošinātu rūpīgu netīrumu
likvidēšanu.
Piezīme. Varat arī atlasīt katru režīmu atsevišķi, nospiežot atbilstošo pogu uz
tālvadības pults. Manuāli izvēlētie režīmi ir aktīvi tikai dažas minūtes. Pēc
tam robots pārslēdzas atpakaļ uz automātiskajā tīrīšanas režīmā.
Papildinformāciju skatiet nodaļas „Robota izmantošana” sadaļā „Tīrīšanas
režīmi”.
81
Kā robots izvairās no augstuma starpības
Robots ir aprīkots ar trim nokrišanas sensoriem tā apakšpusē. Tas šos
nokrišanas sensorus izmanto, lai noteiktu augstuma starpības un izvairītos
no tām, piemēram, no kāpnēm.
Piezīme. Tā ir normāla parādība, ja robots pārvietojas mazliet pāri augstuma
starpības malai, jo priekšējais nokrišanas sensors atrodas aiz bufera.
Ievērībai! Dažreiz nokrišanas sensoriem neizdodas laikus noteikt kāpnes
vai citas virsmas augstuma izmaiņas. Tāpēc rūpīgi uzraugiet robota
darbību dažas pirmās lietošanas reizes un tad, kad robots darbojas tuvu
kāpnēm vai citām virsmām ar augstuma starpību. Ļoti svarīgi ir regulāri
notīrīt nokrišanas sensorus, lai nodrošinātu, ka robots var turpināt pareizi
noteikt augstuma atšķirības (norādījumus skatiet nodaļā „Tīrīšana un
apkope”).
Page 82

82
Latviešu
Pirms pirmās lietošanas reizes
Sānu birstu uzstādīšana
1 Izņemiet sānu birstes no iepakojuma, apgrieziet robotu otrādi un
novietojiet uz galda vai uz grīdas.
2 Uzlieciet sānu birstes uz vārpstām robota apakšā.
Piezīme. Pārliecinieties, vai sānu birstes ir pareizi uzliktas. Spiediet tās uz
vārpstas, līdz tās ar klikšķi fiksējas pozīcijā.
Etiķetes noņemšana no tālvadības pults
Tālvadības pults darbojas ar pogveida bateriju CR2025. Šo bateriju aizsargā
plomba, kas ir jāizņem pirms lietošanas.
1 Izvelciet baterijas aizsargplombu no tālvadības pults baterijas nodalījuma.
Tālvadības pults ir gatava lietošanai.
Sagatavošana lietošanai
Dokstacijas uzstādīšana
1 Ievietojiet mazo adaptera spraudni dokstacijas (1) ligzdā un iespraudiet
adapteri sienas kontaktligzdā (2).
-
Ieslēdzas dokstacijas displejs.
2 Novietojiet dokstaciju uz horizontālas, līdzenas virsmas pie sienas.
Piezīme. Pārliecinieties, vai nav nekādu šķēršļu vai augstuma starpības
80 cm uz priekšu, 30 cm pa labi un 100 cm pa kreisi no dokstacijas.
Padoms. Lai nodrošinātu to, ka dokstacija stingri paliek izvēlētajā vietā,
varat to piestiprināt pie sienas ar skrūvēm vai divām abpusējās līmlentes
strēmelēm.
100 cm
100 厘米
80 cm
2
1
30 cm
30 厘米30 厘米
厘米
80
Page 83

Uzlāde
Latviešu
Uzlādējot pirmo reizi un kad robota akumulators ir tukšs, uzlādes laiks ir
četras stundas.
Robotu var uzlādēt divējādi:
-
dokstacijā – manuāli vai automātiski lietošanas laikā;
-
pievienojot robotu tieši elektrotīklam.
Piezīme. Kad uzlādējamais akumulators ir pilnībā uzlādēts, robots var tīrīt
līdz pat 120 minūtēm.
Uzlāde dokstacijā
1 Nospiediet jaudas slēdzi, lai ieslēgtu robotu.
2 Novietojiet robotu uz strāvas apgādei pieslēgtās dokstacijas.
83
3 Ieslēgšanas/apturēšanas poga sāk mirgot.
Piezīme. Tā kā šī ir pirmā reize, kad uzlādējat robotu, tā displejā redzams
sāknēšanas indikators.
4 Kad atkārtoti uzlādējamais akumulators ir pilnībā uzlādēts,
ieslēgšanas/apturēšanas poga deg nepārtraukti.
Page 84

84
Latviešu
Automātiska uzlāde lietošanas laikā
1 Kad robots ir pabeidzis tīrīšanu vai atlikuši tikai 15% akumulatora
enerģijas, tas automātiski meklē dokstaciju, lai veiktu uzlādi. Kad robots
meklē dokstaciju, ieslēgšanas/apturēšanas poga izgaismojas oranžā
krāsā.
2 Kad atkārtoti uzlādējamais akumulators ir pilnībā uzlādēts,
ieslēgšanas/apturēšanas poga deg nepārtraukti.
Telpas sagatavošana tīrīšanai
Pirms sākt robota tīrīšanas ciklu, pārliecinieties, vai no grīdas pacelti visi
brīvie un trauslie priekšmeti. Novāciet no grīdas arī visus kabeļus un vadus.
Robota izmantošana
Ieslēgšana un apturēšana
1 Iestatiet jaudas slēdzi robota sānos ieslēgšanas pozīcijā.
2 Nospiediet ieslēgšanas/apturēšanas pogu.
-
Varat nospiest ieslēgšanas/apturēšanas pogu uz robota.
-
Varat arī nospiest ieslēgšanas/apturēšanas pogu uz tālvadības pults.
3 Ieslēgšanas/apturēšanas poga ir nepārtraukti ieslēgta, un robots sāk
tīrīšanu.
Page 85

Latviešu
4 Robots tīra automātiskajā tīrīšanas režīmā, līdz akumulatora uzlādes
līmenis ir zems. Automātiskajā tīrīšanas režīmā tas izpilda atkārtotas
Z veida trajektorijas, nejaušas trajektorijas, darbību gar sienām un
spirālveida trajektorijas.
Piezīme. Lai izvēlētos individuālu režīmu, nospiediet vienu no režīma
pogām tālvadības pultī. Papildinformāciju skatiet sadaļā „Tīrīšanas režīma
izvēle”.
5 Kad akumulatora līmenis ir zems, ieslēgšanas/apturēšanas poga
izgaismojas oranžā krāsā un robots meklē dokstaciju, lai veiktu uzlādi.
6 Varat arī nospiest ieslēgšanas/apturēšanas pogu, lai pārtrauktu vai
apturētu tīrīšanas darbību. Ja atkārtoti nospiežat
ieslēgšanas/apturēšanas pogu un akumulatorā joprojām ir pietiekami
daudz enerģijas, robots turpina tīrīšanu automātiskajā tīrīšanas režīmā.
7 Lai robots atgrieztos dokstacijā, pirms akumulators ir izlādējies,
nospiediet dokstacijas pogu uz tālvadības pults. Iedegas dokošanās
ikona robota displejā, un tas atgriežas dokstacijā.
85
Tīrīšanas režīma izvēle
Papildus automātiskajam tīrīšanas režīmam šim robotam ir četri individuāli
tīrīšanas režīmi, ko iespējams aktivizēt, nospiežot attiecīgo pogu tālvadības
pultī.
Piezīme. Manuāli izvēlētie režīmi ir aktīvi tikai dažas minūtes. Pēc tam robots
pārslēdzas atpakaļ uz automātiskajā tīrīšanas režīmā.
Z trajektorijas režīms
Z trajektorijas režīmā robots tīra, veicot Z formas cilpas telpā, lai iztīrītu
plašas zonas.
Page 86

86
Latviešu
Nejaušas trajektorijas režīms
Šajā režīmā robots iztīra telpu ar jauktu trajektoriju, ko veido taisnas un
šķērsvirziena kustības.
Darba režīms gar sienām
Šajā režīmā robots tīra gar telpas sienām, lai īpaši rūpīgi notīrītu gar sienām.
Spirālveida režīms
Šajā režīmā robots virzās spirālveida trajektorijā, lai rūpīgi notīrītu nelielu
zonu. Ja netīrumu noteikšanas sensors konstatē netīrumus, robots
automātiski ieslēdz ventilatoru turbo ātrumā.
Manuāla vadība
1 Izmantojiet bultiņu pogas, kas atrodas apkārt ieslēgšanas/apturēšanas
pogai tālvadības pultī, lai vadītu robotu telpā.
Piezīme. Uzmanieties, kad manuāli virzāt robotu tuvu vietām, kur ir
augstuma atšķirības un kāpnes.
Piezīme. Putekļu sūkšanas funkcija un sānu birstes darbojas tikai tad, kad
robots tiek virzīts uz priekšu. Pogas virzīšanai pa kreisi, pa labi vai atpakaļ
ir paredzētas tikai robota pārvietošanai telpā.
Page 87

Tīrīšanas laika pogu izmantošana
-
Pēc noklusējuma robots tīra automātiskajā tīrīšanas režīmā, līdz atkārtoti
uzlādējamais akumulators ir gandrīz izlādējies. Tad robots automātiski
atgriežas dokstacijā. Ja ir izvēlēts kāds no citiem tīrīšanas laikiem (skatiet
tālāk), varat atkal ieslēgt noklusējuma režīmu, nospiežot maksimālā
tīrīšanas laika pogu tālvadības pultī.
-
Citas tīrīšanas laika pogas tālvadības pultī ļauj iestatīt robota darbību uz
60, 45 un 30 minūtēm. Kad tīrīšanas laiks ir beidzies, robots atgriežas
savā dokstacijā. Displejā iedegas dokošanās ikona.
-
Ja nevēlaties, lai pēc tīrīšanas laika robots atgrieztos dokstacijā, divas
reizes nospiediet tīrīšanas laika pogu. Dokošanās ikona displejā vairs nav
redzama. Kad tīrīšanas laiks ir beidzies, robots apstājas.
Dokstacijas lietošana
Pulksteņa un datuma iestatīšana
Ja vēlaties izmantot tīrīšanas programmas, vispirms jāiestata pulkstenis un
nedēļas diena dokstacijas displejā.
Latviešu
87
Piezīme. Attēlus par tālāk norādītajām darbībām skatiet lapās rokasgrāmatas
aizmugurē.
1 Nospiediet iestatīšanas pogu. Sāk mirgot iestatītā režīma un pulksteņa
laika indikatori.
2 Nospiediet izvēles pogu vienu reizi. Stundu norāde sāk mirgot.
3 Izmantojiet + un - pogas uz dokstacijas, lai iestatītu stundas. Iestatītās
stundas parādās displejā.
4 Nospiediet izvēles pogu, lai apstiprinātu iestatīto stundu. Sāks
mirgot minūšu norāde.
5 Izmantojiet + un - pogas uz dokstacijas, lai iestatītu minūtes. Iestatītās
minūtes parādās displejā.
6 Nospiediet izvēles pogu, lai apstiprinātu iestatītās minūtes. Sāk mirgot
rādījums „Su”, kas apzīmē svētdienu.
7 Izmantojiet + un - pogas uz dokstacijas, lai iestatītu pašreizējo nedēļas
dienu.
8 Nospiediet izvēles pogu, lai apstiprinātu nedēļas dienu.
9 Nospiediet iestatīšanas pogu, lai apstiprinātu pulksteņa laika un nedēļas
dienas iestatījumu. Iestatītā režīma un pulksteņa laika indikatori pārstāj
mirgot un deg nepārtraukti.
Page 88

1
2
3
88
Latviešu
Tīrīšanas laika programmēšana
Ja esat iestatījis pulksteni un nedēļas
robotam iestatīt tīrīšanas laikus.
Piezīme. Attēlus par tālāk norādītajām darbībām skatiet
aizmugurē.
Pieejamās programmēšanas opcijas:
Programma Displeja
Tīrīšana katru dienu Deg
visu
dienu dokstacijas displejā, varat
lapās rokasgrāmatas
rādījumi
dienu rādījumi
Tīrīšana darba dienās Deg
pēc
Tīrīšana 2 dienas
Tīrīšana 1 dienu nedēļā Deg
kārtas
1 Nospiediet iestatīšanas pogu. Sāk mirgot
laika indikatori.
2 Nospiediet izvēles pogu vienu reizi. Stundu norāde sāk mirgot.
3 Izmantojiet + un - pogas uz dokstacijas, lai iestatītu stundu. Iestatītās
stundas parādās displejā.
4 Nospiediet izvēles pogu, lai apstiprinātu iestatīto stundu. Sāks
mirgot minūšu norāde.
5 Izmantojiet + un - pogas uz dokstacijas, lai iestatītu minūtes. Iestatītās
minūtes parādās displejā.
6 Nospiediet izvēles pogu, lai apstiprinātu iestatītās minūtes. Sāk mirgot
rādījums „Su”, kas apzīmē svētdienu.
7 Izmantojiet + un - pogas uz dokstacijas, lai pārslēgtos starp tīrīšanas
programmām (skatiet iepriekšējo tabulu par pieejamajām
programmēšanas opcijām).
8 Nospiediet izvēles pogu, lai apstiprinātu izvēlēto programmu.
9 Nospiediet iestatīšanas pogu, lai apstiprinātu programmēto. Iestatītā
režīma un tīrīšanas programmas indikatori pārstāj mirgot un deg
nepārtraukti.
10 Kad esat iestatījis tīrīšanas programmu, displejā redzams tīrīšanas
programmas indikators un izvēlētā diena vai dienas. Ja atstājat robotu
gaidstāvē un uzlādējamais akumulators ir pilnībā uzlādēts, tas sāks
tīrīšanu ieprogrammētajā laikā un dienā vai dienās.
Deg
rādījumi no „Mo” līdz „Fri”
2 dienu rādījumi, piem., „Fri” un „Sa”
izvēlētās
dienas rādījums
iestatītā
režīma un pulksteņa
Ventilatora ātruma pogas
Varat izmantot
līdz turbo vai izslēgtu ventilatoru. Noklusējuma iestatījums ir normāls
ventilatora ātrums.
1 Nospiediet šo pogu, lai izslēgtu ventilatoru.
2 Nospiediet šo pogu, lai ieslēgtu ventilatoru normālā ātrumā.
3 Turbo ventilatora poga palielina ventilatora ātrumu.
ventilatora ātruma pogas, lai palielinātu ventilatora
ātrumu
Page 89

Reakcija uz plaukšķināšanu
Reakcija uz plaukšķināšanu ir iespējota, kad robots pāriet snaudas režīmā
šādās situācijās:
-
kad tas pārtrauc tīrīšanu kļūdas dēļ;
-
kad ir ieprogrammēts īss tīrīšanas laiks;
-
kad tas nevar atrast dokstaciju 20 minūšu laikā.
Ja neredzat robotu, varat atrast to, vienreiz sasitot plaukstas. Robots
atbildēs, radot pīkstiena signālu un iedegot visas ikonas displejā.
Sauso salvešu piederuma izmantošana
Sauso salvešu piederums sniedz iespēju tīrīt cietos grīdas segumus ar
sausajām salvetēm.
Piezīme. Ja izmantojat sauso salvešu piederumu, robotam var būt grūtības
šķērsot sliekšņus vai uzbraukt uz paklājiem.
Sauso salvešu piederuma sagatavošana lietošanai
1 Apgrieziet robotu otrādi un novietojiet uz grīdas vai uz galda.
2 Novietojiet sauso salveti uz galda un uzlieciet sauso salvešu piederumu
uz salvetes ar fiksācijas izvirzījumiem pret sevi.
Latviešu
89
3 Aplokiet abus salvetes galus ap salvešu piederumu un fiksējiet sauso
salveti uz piederuma, iestumjot fiksācijas blokus iedobumos.
4 Ievietojiet sauso salvešu piederuma fiksācijas izvirzījumu atverē tūlīt aiz
ritenīša robota sānos un stumiet, līdz atskan klikšķis. Pēc tam atkārtojiet
šīs darbības otrā pusē.
5 Apgrieziet robotu un novietojiet uz grīdas uz ritenīšiem, lai sauso salvešu
piederums pieskaras grīdai.
Page 90

90
Latviešu
Robota izmantošana ar sauso salvešu piederumu
Kad ir pievienots sauso salvešu piederums,
režīmā un uz visiem cietajiem grīdas segumiem. Neizmantojiet sauso salvešu
piederumu uz paklāja vai grīdsegām.
varat izmantot robotu jebkurā
2
1
Sauso salvešu piederuma noņemšana
1 Noņemiet sauso salvešu piederumu, tiklīdz esat pabeidzis grīdas
slaucīšanu.
2 Apgrieziet robotu otrādi un novietojiet uz grīdas vai uz galda.
3 Stumiet vienu
robota
sauso salvešu piederuma galu virzienā pret ritenīti otrā
pusē, lai to atbloķētu. Pēc
tam izvelciet piederumu no robota.
Neredzamās sienas izmantošana (FC8822)
Bateriju ievietošana virtuālajā sienā
Virtuālās
2
1
1 Nospiediet abas atbrīvošanas cilpas aizmugures vāciņa apakšā (1) un
pavirziet vāciņu uz augšu un izslēdziet virtuālo sienu (2).
2 Izņemiet četras jaunas AA baterijas no iepakojuma un ievietojiet virtuālās
sienas bateriju nodalījumā.
Piezīme. pārliecinieties, ka + un – bateriju poli ir ievietoti pareizā virzienā.
siena
darbojas
ar četrām AA baterijām.
3 Uzlieciet atpakaļ vāciņu uz virtuālās sienas.
Page 91

3
1
2
Latviešu
Virtuālās sienas novietošana, lai apturētu robotu
Jūs varat izmantot virtuālo sienu, lai novērstu robotu iekļūšanu noteiktā
telpā vai zonā, kurā nevēlaties to ielaist.
1 Novietojiet ierīci vietā, kuru nevēlaties, lai robots šķērso, piemēram, pie
atvērtām durvīm vai telpas, kur nevēlaties ielaist robotu.
2 Ieslēdziet virtuālo sienu ar ieslēgšanas/izslēgšanas slīdslēdzi ierīces
augšpusē.
3 Palaidiet robotu.
4 Kad robots pietuvojas virtuālajai sienai, sāk mirgot lampiņa uz virtuālās
sienas, un tā izstaro infrasarkanās gaismas kūli. Šis infrasarkanās gaismas
kūlis liek robotam mainīt kursu un virzīties projām no virtuālās sienas.
Piezīme. Ja izmantojat virtuālo sienu, regulāri pārbaudiet, vai baterijās vēl
ir pietiekami daudz jaudas. To varat pārbaudīt izslēdzot un atkal ieslēdzot
virtuālo sienu. Ja baterijās vēl ir pietiekami daudz jaudas, uz īsu brīdi
ieslēgsies LED lampiņas uz virtuālās sienas.
91
Tīrīšana un kopšana
Robota tīrīšana
Lai saglabātu labu tīrīšanas sniegumu, regulāri jānotīra nokrišanas sensori,
ritenīši, sānu birstes un sūkšanas atvere.
1 Nolieciet robotu apgrieztā veidā uz līdzenas virsmas.
2 Izmantojiet birsti ar mīkstiem sariem (piemēram, zobu birsti), lai noņemtu
putekļus vai pūkas no nokrišanas sensoriem.
Piezīme. Ir ļoti svarīgi regulāri notīrīt nokrišanas sensorus. Ja nokrišanas
sensori ir netīri, robotam var neizdoties noteikt augstuma atšķirības vai
kāpnes.
Page 92

1
2
3
1
2
92
Latviešu
3 Izmantojiet birsti ar mīkstiem sariem (piem., zobu birsti), lai noņemtu
putekļus vai pūkas no priekšējā ritenīša un sānu ritenīšiem.
4 Lai notīrītu sānu birstes, satveriet tās aiz sariem un novelciet no vārpstām.
5 Noņemiet pūkas, matus un diegus no vārpstas un sānu birstes, izmantojot
mīkstu birsti (piem., zobu birsti) vai drānu.
6 Pārbaudiet sānu birstes un robota apakšu, lai pārliecinātos, ka tur nav asi
priekšmeti, kas var sabojāt grīdu.
7 Atvienojiet TriActive XL uzgaļa savienojumus, ievietojot pirkstus vietās,
kas apzīmētas ar bultiņām, un noņemiet TriActive uzgali no robota.
8 Iztīriet sūkšanas atveri ar mīkstu birsti (piemēram, zobu birsti).
Page 93

Latviešu
9 Notīriet visus redzamos netīrumus no TriActive uzgaļa.
10 Ievietojiet TriActive uzgaļa fiksatorus atverēs robota apakšā. Iespiediet
TriActive uzgali atpakaļ pozīcijā. Pārbaudiet, vai uzgalis var brīvi kustēties
dažus milimetrus uz augšu un uz leju.
11 Atkal uzlieciet sānu birstes uz vārpstām robota apakšā.
93
Putekļu tvertnes iztukšošana un tīrīšana
Iztukšojiet un iztīriet putekļu tvertni laikā, kad nepārtraukti deg pilnas putekļu
tvertnes indikators.
1 Pārliecinieties, ka jaudas slēdzis ir izslēgtā pozīcijā.
2 Noņemiet vāciņu.
Page 94

1
2
94
Latviešu
3 Paceliet putekļu tvertnes vāka rokturi un izceliet putekļu tvertni ārā no
putekļu tvertnes nodalījuma.
Piezīme. Izņemot vai ievietojot atpakaļ putekļu tvertni, uzmanieties, lai
nesabojātu motora ventilatora lāpstiņas.
4 Uzmanīgi paceliet vāku no putekļu tvertnes (1) un izņemiet filtru (2).
5 Izkratiet putekļu tvertni virs atkritumu groza, lai to iztukšotu. Iztīriet
putekļu tvertnes filtru un iekšpusi ar drānu vai zobu birsti ar mīkstiem
sariem. Iztīriet arī sūkšanas atveri putekļu tvertnes apakšā.
Ievērībai! Netīriet putekļu tvertni un filtru ar ūdeni vai trauku
mazgāšanas mašīnā.
6 Ievietojiet filtru atpakaļ putekļu tvertnē (1). Pēc tam uzlieciet vāku uz
putekļu tvertnes (2).
7 Ielieciet putekļu tvertni atpakaļ nodalījumā un uzlieciet augšējo pārsegu
atpakaļ uz robota.
Ievērībai! Vienmēr pārliecinieties, ka putekļu tvertnē atrodas filtrs.
Izmantojot robotu bez filtra putekļu tvertnē, tiks sabojāts motors.
Page 95

Piederumu pasūtīšana
Lai iegādātos piederumus vai rezerves daļas, apmeklējiet vietni
www.shop.philips.com/service vai vērsieties pie sava Philips izplatītāja.
Varat arī sazināties ar Philips klientu apkalpošanas centru savā valstī
(kontaktinformāciju varat atrast bukletā par garantiju visā pasaulē).
Nomaiņa
Filtra maiņa
Nomainiet filtru, ja tas ir ļoti netīrs vai bojāts. Varat pasūtīt jaunu filtru
komplektu ar tipa numuru FC8066. Skatiet sadaļu “Putekļu tvertnes
iztukšošana un tīrīšana” nodaļā “Tīrīšana un apkope”, lai uzzinātu, kā izņemt
filtru no putekļu tvertnes un ievietot to putekļu tvertnē.
Sānu birstu maiņa
Pēc noteikta laika nomainiet sānu birstes, lai nodrošinātu atbilstošus
tīrīšanas rezultātus.
Vienmēr nomainiet sānu birstes, ja pamanāt nodiluma pazīmes vai
bojājumus. Ieteicams nomainīt abas sānu birstes vienlaikus. Varat pasūtīt
rezerves sānu birstes kā daļu no nomaiņas komplekta FC8068. Komplektā
ietilpst arī divi filtri un trīs sausās salvetes.
1 Pārliecinieties, ka jaudas slēdzis ir izslēgtā pozīcijā.
2 Lai nomainītu sānu birstes, satveriet vecās birstes aiz sariem un novelciet
no vārpstām.
Latviešu
95
3 Uzbīdiet jaunās sānu birstes uz vārpstām.
Sauso salvešu maiņa
Jūs varat pasūtīt jaunas sausās salvetes. Tās ietilpst nomaiņas komplektā
FC8068. Šajā nomaiņas komplektā ietilpst arī divas sānu birstes un divi filtri.
Page 96

2
3
1
96
Latviešu
Tālvadības pults baterijas maiņa
Tālvadības pults darbojas ar pogveida bateriju CR2025. Nomainiet bateriju,
kad robots vairs nereaģē uz tālvadības pults pogu nospiešanu.
1 Turiet tālvadības pulti ar augšpusi uz leju. Nospiediet pogu uz baterijas
turētāja un vienlaikus virziet baterijas turētāju ārā no tālvadības pults.
2 Izņemiet tukšo bateriju no baterijas turētāja un ievietojiet tajā jaunu
bateriju. Pēc tam bīdiet baterijas turētāju atpakaļ tālvadības pultī.
Atkārtoti uzlādējamā akumulatora maiņa
Robota atkārtoti uzlādējamā akumulatora nomaiņu drīkst veikt tikai
kvalificēti apkopes tehniķi. Ja akumulatoru vairs nevar uzlādēt vai tas ātri
izlādējas, nogādājiet robotu pilnvarotajā Philips tehniskās apkopes centrā,
lai nomainītu akumulatoru. Savas valsts Philips klientu apkalpošanas centra
kontaktinformāciju varat skatīt bukletā par starptautisko garantiju.
Otrreizējā pārstrāde
-
Šis simbols nozīmē, ka produktu nedrīkst likvidēt kopā ar parastajiem
sadzīves atkritumiem (2012/19/ES).
-
Šis simbols nozīmē, ka šajā produktā ir ievietots iebūvēts uzlādējamais
akumulators, kuru nedrīkst likvidēt kopā ar parastiem sadzīves
atkritumiem (2006/66/EK). Mēs iesakām produktu nodot oficiālā
savākšanas punktā vai „Philips” pakalpojumu centrā, lai profesionāli
izņemtu uzlādējamo akumulatoru.
-
Ievērojiet vietējos noteikumus par elektrisko un elektronisko produktu un
atkārtoti uzlādējamo bateriju atsevišķu savākšanu. Pareiza produktu
likvidēšana palīdz novērst kaitīgu iedarbību uz vidi un cilvēku veselību.
Page 97

Atkārtoti uzlādējamās baterijas izņemšana
1
3
2
this side up
Brīdinājums. Uzlādējamo bateriju izņemiet tikai tad, kad izmetat
ierīci. Izņemot bateriju, pārliecinieties, ka tā ir pilnīgi tukša.
Lai izņemtu uzlādējamo akumulatoru, izpildiet tālāk norādītās darbības.
Varat arī nogādāt robotu pilnvarotā Philips tehniskās apkopes centrā, lai
izņemtu uzlādējamo akumulatoru. Sazinieties ar savas valsts Philips klientu
apkalpošanas centru, lai noskaidrotu jums tuvumā esoša tehniskās apkopes
centra adresi.
1 Palaidiet robotu no kādas vietas istabā, neizmantojot dokstaciju.
2 Ļaujiet robotam darboties, līdz akumulators ir tukšs, lai nodrošinātu, ka
akumulators ir pilnībā izlādēts, pirms to izņemt un utilizēt.
3 Atskrūvējiet akumulatora nodalījuma vāka skrūves un noņemiet vāku.
4 Izceliet uzlādējamo akumulatoru un atvienojiet to.
5 Nogādājiet robotu un uzlādējamo akumulatoru uz elektrisko un
elektronisko iekārtu atkritumu savākšanas punktu.
Latviešu
97
Traucējummeklēšana
Šajā nodaļā ir apkopotas izplatītākās problēmas, kas var rasties, izmantojot
šo ierīci. Ja jūs nevarat atrisināt problēmu, izmantojot tālāk norādīto
informāciju, apmeklējiet www.philips.com/support, lai saņemtu bieži
uzdoto jautājumu sarakstu, vai sazinieties ar klientu apkalpošanas centru
savā valstī.
Page 98

98
Latviešu
Traucējumu novēršana
Problēma
Robots nesāk tīrīšanu pēc
ieslēgšanas/apturēšanas
pogas nospiešanas.
Iespējamais cēlonis Risinājums
Atkārtoti uzlādējamais
akumulators ir tukšs.
Mazais spraudnis joprojām ir
pievienots robota ligzdai.
Uzlādējiet akumulatoru (skatiet nodaļu
„Sagatavošana lietošanai”).
Robots nedarbojas ar elektrotīkla strāvu.
Tas darbojas tikai ar tā uzlādējamo
akumulatoru. Tāpēc pirms lietošanas
vienmēr atvienojiet adapteri no robota un
elektrotīkla.
Ātri mirgo brīdinājuma
indikators.
Jaudas slēdzis nav iestatīts
ieslēgtā (I) pozīcijā.
Iestrēdzis viens vai abi ritenīši. Iestatiet jaudas slēdzi izslēgtā pozīcijā.
Iestrēgusi viena vai abas sānu
birstes.
Nav uzlikts vai pareizi aizvērts
augšējais pārsegs.
Iestrēdzis buferis. Nospiediet ieslēgšanas/apturēšanas pogu.
Robots tika pacelts tīrīšanas
laikā.
Nospiediet jaudas slēdzi. Nospiediet
ieslēgšanas/apturēšanas pogu uz robota
vai tālvadības pults, lai sāktu tīrīšanu.
Iztīriet pūkas, matiņus, pavedienus vai
vadus, kas saķērušies ap ritenīšu
balstiekārtu.
Iztīriet sānu birstes (skatiet nodaļu
„Tīrīšana un apkope”).
Kad augšējais pārsegs nav uzlikts vai nav
pareizi aizvērts, robots nedarbojas. Pareizi
uzlieciet augšējo pārsegu uz robota.
Paceliet robotu, lai atbrīvotu tā buferi.
Novietojiet robotu nelielā attālumā no
šķēršļa un nospiediet
ieslēgšanas/apturēšanas pogu, lai tas
atsāktu tīrīšanu.
Nospiediet ieslēgšanas/apturēšanas pogu.
Novietojiet robotu uz grīdas. Pēc tam
nospiediet ieslēgšanas/apturēšanas pogu,
lai robots atsāktu tīrīšanu.
Page 99

Problēma Iespējamais cēlonis Risinājums
Robots netīra pareizi.
Vienas vai abu sānu birstu
sari ir saliekti vai izliekušies.
Uz brīdi iemērciet birsti vai birstes siltā
ūdenī. Ja šādi neizdodas atjaunot birstēm
pareizo formu, nomainiet sānu birstes
(skatiet nodaļu „Nomaiņa”).
Latviešu
99
Putekļu tvertnes filtrs ir netīrs. Iztīriet putekļu tvertnes filtru ar drānu vai
Sūkšanas atvere putekļu
tvertnes apakšā ir
nosprostota.
Priekšējā ritenīti iestrēguši
mati vai citi netīrumi.
Robots tīra ļoti tumšu vai
spožu virsmu, kas aktivizē
nokrišanas sensorus. Tāpēc
robots virzās pa neierastu
trajektoriju.
Robots tīra grīdu, kas spēcīgi
atstaro saules gaismu. Tas
aktivizē nokrišanas sensorus
un izraisa robota
pārvietošanos pa neparastu
trajektoriju.
zobu birsti ar mīkstiem sariem. Filtru un
putekļu tvertni var iztīrīt arī parastu putekļu
sūcēju, izmantojot zemu sūkšanas jaudas
iestatījumu.
Ja filtru neizdodas iztīrīt ar birstīti vai
putekļu sūcēju, nomainiet filtru pret jaunu.
Filtru ieteicams nomainīt vismaz reizi gadā.
Iztīriet sūkšanas atveri (skatiet nodaļu
„Tīrīšana un apkope”).
Notīriet priekšējo ritenīti (skatiet nodaļu
„Tīrīšana un apkope”).
Nospiediet ieslēgšanas/apturēšanas pogu
un pēc tam pārvietojiet robotu uz gaišākas
krāsas grīdas segumu. Ja problēmu
neizdodas novērst arī uz gaišākām grīdām,
lūdzu, apmeklējiet vietni
www.philips.com/support vai sazinieties ar
savas valsts klientu apkalpošanas centru.
Aizveriet aizkarus, lai saules gaisma
nevarētu iespīdēt telpā. Varat arī sākt
tīrīšanu laikā, kad saules gaisma nav tik
spilgta.
Akumulatoru vairs nevar
uzlādēt, vai tas ļoti ātri
izlādējas.
Tālvadības pults baterija
iztukšojas pārāk ātri.
Iespējams, akumulators ir
sasniedzis kalpošanas laika
beigas.
Iespējams, neesat ievietojis
pareizā tipa bateriju.
Nomainiet akumulatoru (skatiet nodaļu
„Nomaiņa”).
Tālvadības pultij ir nepieciešama pogveida
baterija CR2025. Ja problēmu neizdodas
novērst, atveriet vietni
www.philips.com/support vai sazinieties ar
klientu apkalpošanas centru savā valstī.
Page 100

100
Latviešu
Problēma Iespējamais cēlonis Risinājums
Robots pārvietojas pa
apļiem.
Robots darbojas režīmā
tīrīšanai vienā vietā.
Tā ir normāla darbība. Spirālveida tīrīšanu
var aktivizēt rūpīgai tīrīšanai, ja uz grīdas ir
konstatēts daudz netīrumu. Tā ir arī daļa
no automātiskā tīrīšanas režīma. Pēc
aptuveni vienas minūtes robots atsāk
parasto tīrīšanas trajektoriju. Varat arī
apturēt spirālveida režīmu tīrīšanai, uz
tālvadības pults atlasot citu tīrīšanas
režīmu.
Robots nevar atrast
dokstaciju.
Robots pīkst, kad tas ir
dokstacijā.
Robotam nepietiek vietas, lai
pārvietotos uz dokstaciju.
Robots joprojām aktīvi meklē. Dodiet robotam aptuveni 20 minūtes, lai
Robots netika palaists no
dokstacijas.
Jūs mēģiniet uzlādēt robotu
ar jaudas slēdzi izslēgtā
pozīcijā.
Novietojiet dokstaciju citā vietā. Skatiet
nodaļas „Sagatavošana lietošanai” sadaļu
„Dokstacijas uzstādīšana”.
tas atgrieztos dokstacijā.
Ja vēlaties, lai pēc tīrīšanas cikla robots
atgrieztos dokstacijā, palaidiet to no
dokstacijas.
Nospiediet jaudas slēdzi, lai ieslēgtu
robotu.
Kļūdu kodi
Kļūdas kods
E1 Iestrēguši ritenīši Noņemiet robotu no šķēršļa un nospiediet
E2 Augšējais pārsegs vai
E3 Iestrēdzis buferis Noņemiet robotu no šķēršļa. Kļūdas kods no
E4 Robots pacelts no
Iespējamais cēlonis Risinājums
ieslēgšanas/apturēšanas pogu, lai atsāktu
tīrīšanu.
putekļu tvertne nav
pareizi ievietota
grīdas.
Pareizi ielieciet putekļu nodalījumu un uzlieciet
augšējo pārsegu uz robota. Kļūdas kods no
displeja pazūd automātiski.
displeja pazūd automātiski.
Nolieciet robotu atpakaļ uz grīdas, lai kļūdas
kods pazustu.
E5 Grīdas krāsa ir pārāk
E6
tumša
Akumulators nav pareizi
ievietots
Uzlādes kļūda Pārbaudiet, vai jaudas slēdzis ir ieslēgtā
Nolieciet robotu uz gaišākas grīdas zonas.
Notīriet nokrišanas sensorus.
Izlasiet instrukcijas sadaļā „Akumulatora
ievietošana robotā” nodaļā „Pirms pirmās
lietošanas reizes”.
pozīcijā, kad robots atrodas dokstacijā.
 Loading...