

Page 1

Vacuum cleaner
FC8802/01
Philips Consumer Lifestyle
Service Manual
PRODUCT INFORMATION
• This product meets the requirements regarding
interference suppression on radio and TV.
• After the product has been repaired, it should function
properly and has to meet the safety requirements as
officially laid down at this moment.
TECHNICAL INFORMATION
• Colour : Metallic Anthracite
• Battery : NiMH 14.4 V 800 mAh
soft-pack
• Charging time : 4 hrs
• Run time : 50 min
• Moving speed : 30 cm/sec
• Navigation : Random walker 3-pattern
combination
• Special features : Stairs detector
• Sensors : Infrared sensors for detecting
and avoiding stairs
• Accuracy Hardfloor : Straigh line deviation
± 8 cm per each 90 cm
• Dustbin capacity : 0.2 L
• Sound level : 60 dB
• Size : 300 x 50 mm
• Heigth : 50 mm
• Net weight : 1.3 kg
INCLUDED ACCESSORIES
• AC power adaptor
• 2 x Exhaust filter
• 2 x Side brushes
REPAIR INSTRUCTION
• No specific issues
OPTIONAL (accessories)
• No specific issues
Published by Philips Consumer Lifestyle Printed in the Netherlands © Copyright reserved Subject to modification
12/07
Page 2
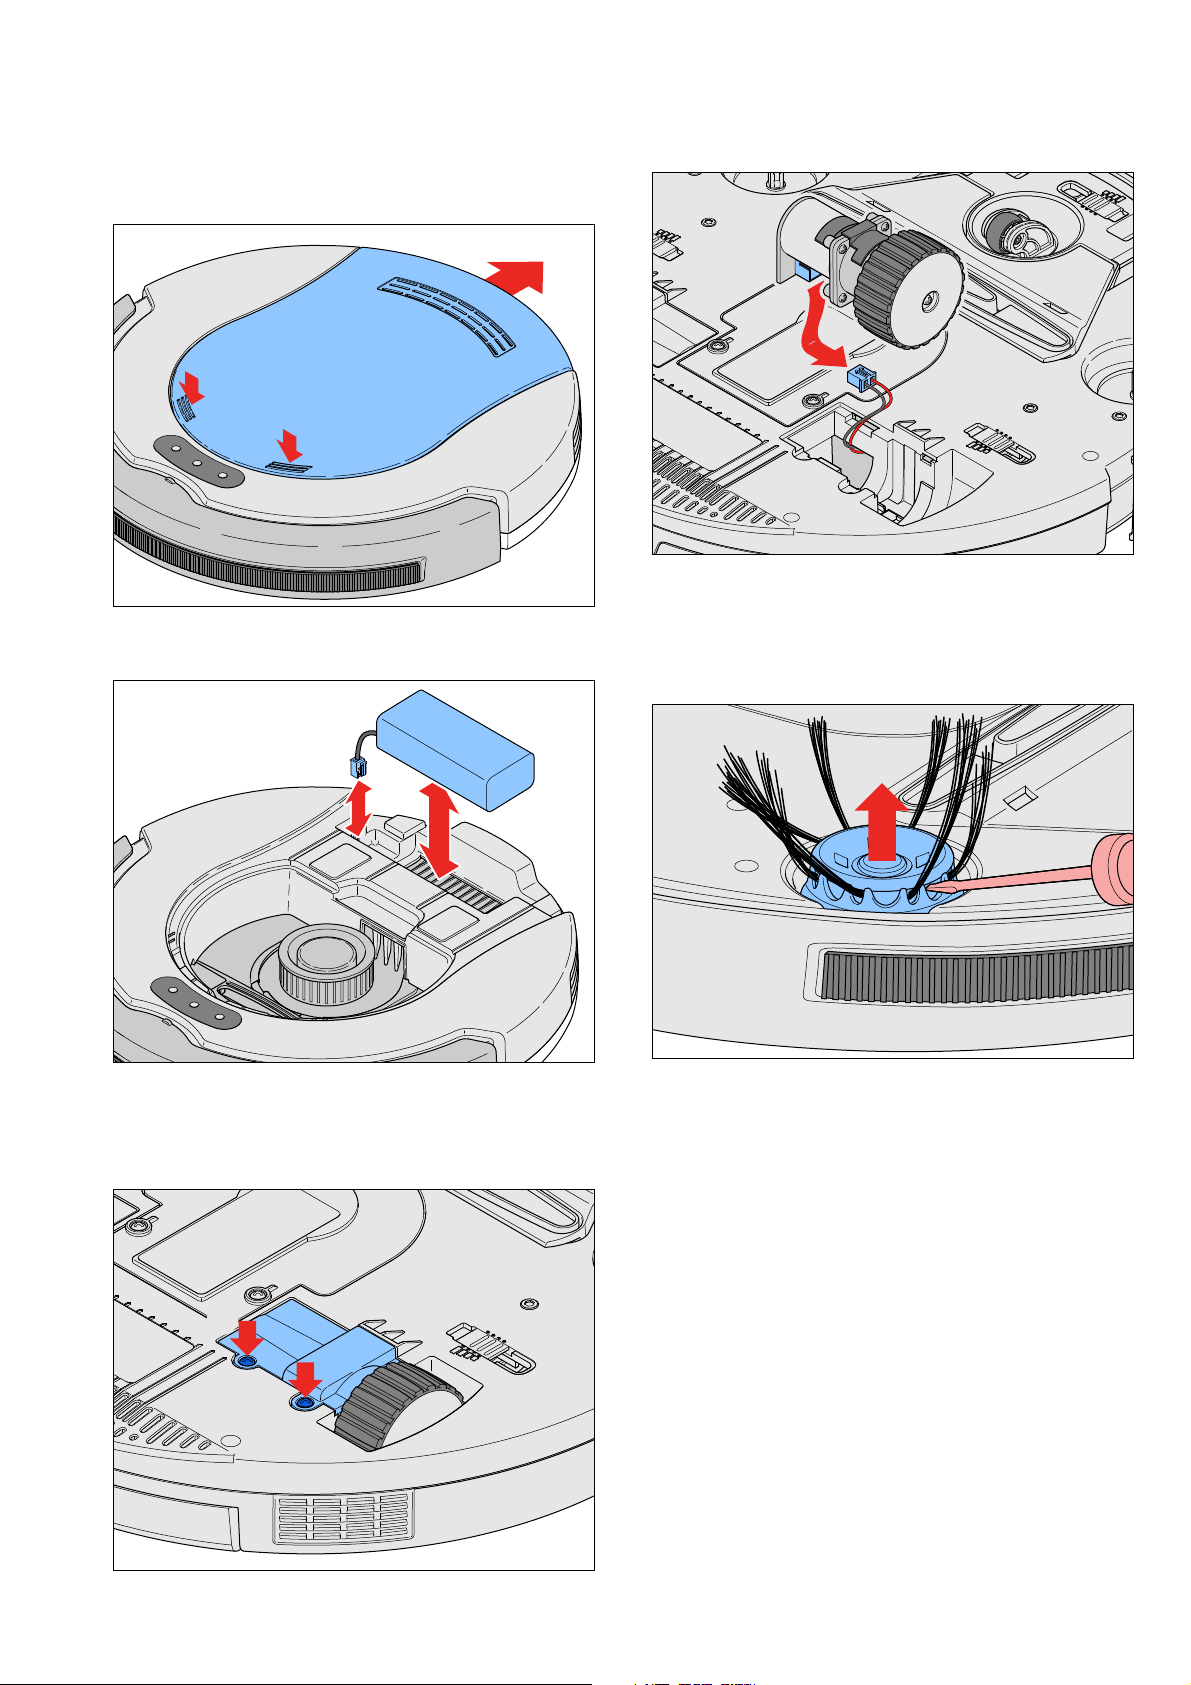
DISASSEMBLY- AND RE-ASSEMBLY ADVISE
FC8802/01
• First make sure that the appliance is unplugged.
• To empty and/or replace the Dustbin assy (1), the Top
Cover (4) has to be removed (see picture).
• To (re)place the Rechargeable battery, (5) (dis)connect
the connector (see picture).
• Disconnect the connector and replace the wheel set.
• When replacing the wheel set make sure that the Rubber
wheel covers (9) are placed in the correct way.
• The Side brushes (6) can easily be removed/replaced.
Put a screwdriver under the plastic part and move the
brush upwards.
• To repair the Wheel sets (10 or 13), turn the appliance
upside down on a clean surface.
• Remove the 2 screws A and take the corresponding
Wheel cover (11 or 12) out (see picture).
A
A
• To place a side brush, put it in the right position and click
it onto the axle.
• When you use new side brushed for the first time, push
the brushes to the outside and place the robot on the
floor.
2-9
Page 3
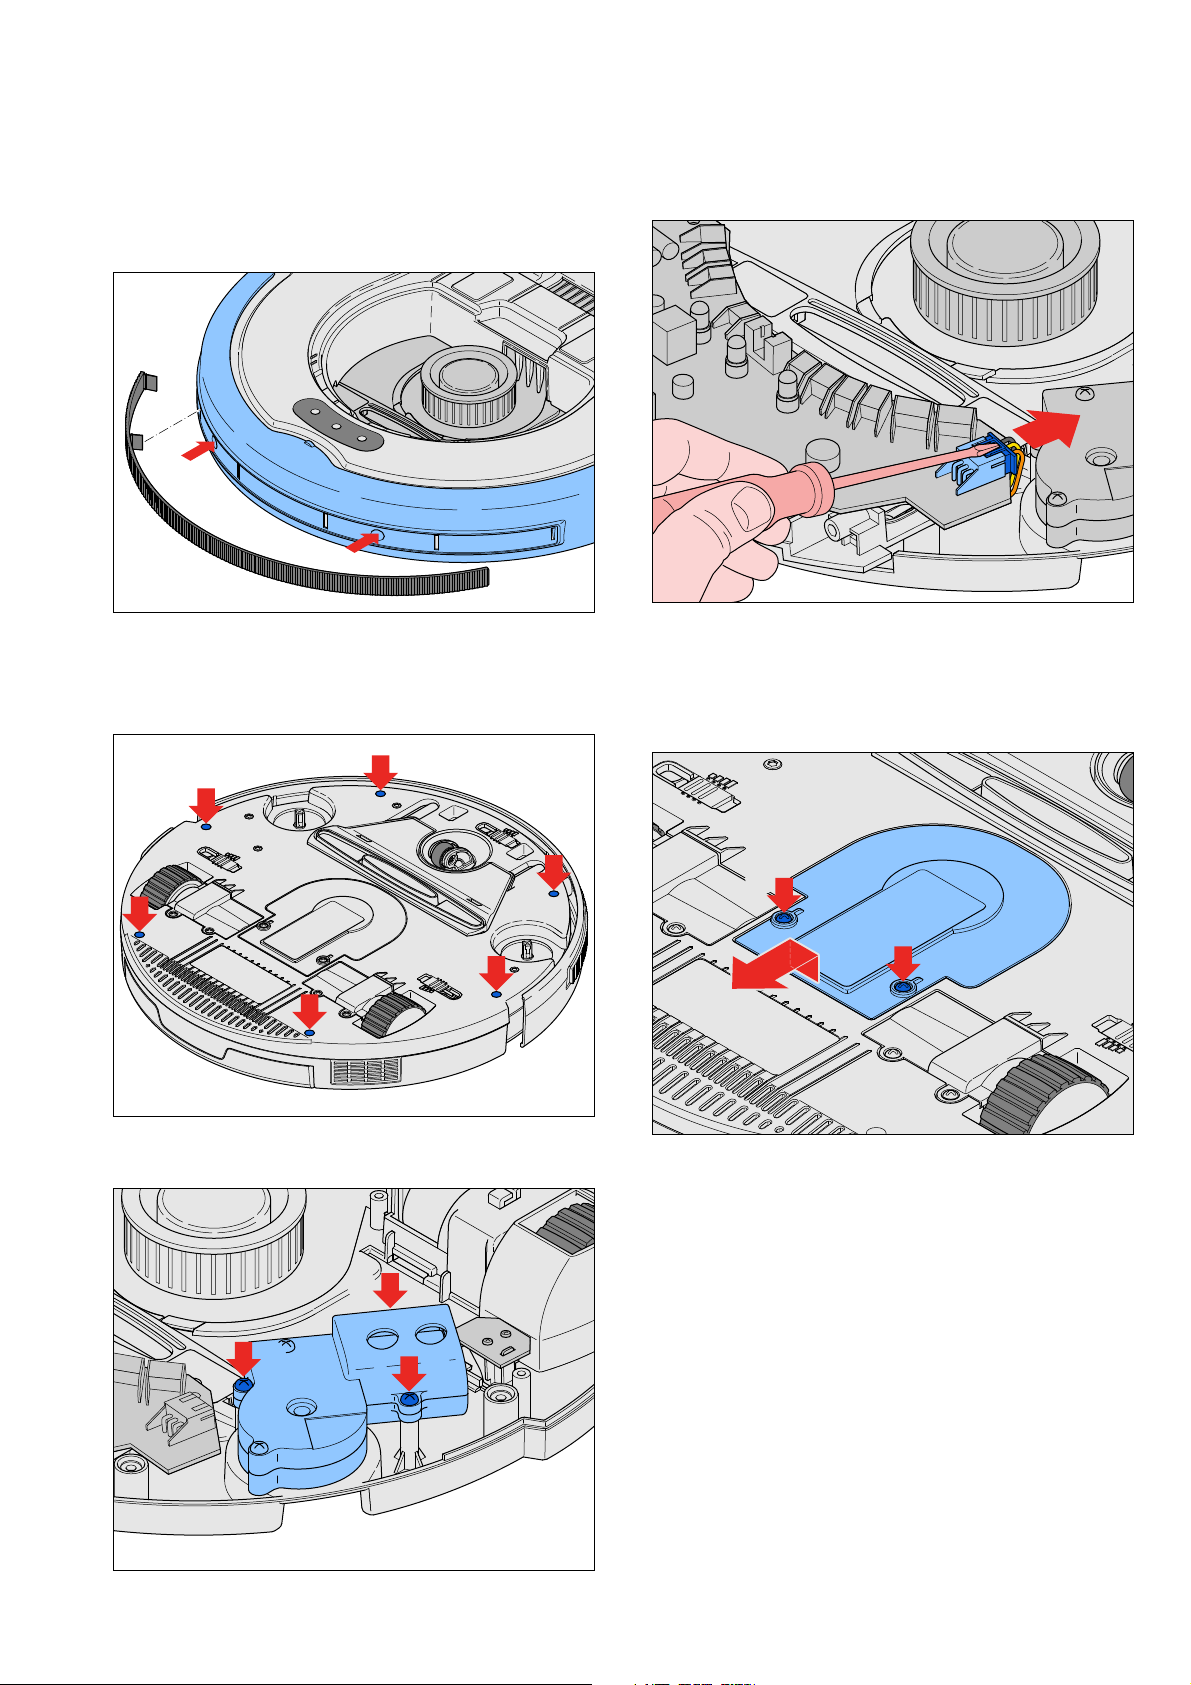
DISASSEMBLY- AND RE-ASSEMBLY ADVISE
FC8802/01
• To reach te inner parts for repair, the Top base (18) has
to be removed.
• First remove the dustbin assy and battery, then remove
the Front bumper (7) by removing the two screws B
behind the Front rubber bumper strip (8) (see picture).
B
B
• After removing the front bumper turn the appliance
upside down on a clean surface and remove the 6 screws
C (see picture). Then turn the appliance back and
remove the top base.
• The PCB main (14) is a complete assy, and can be
replaced. A screwdriver can be used to remove the
connectors. (see picture)
• To replace the Fan assy (23).
• Turn the appliance upside down on a clean surface.
Remove the top base as described before, then remove
the 2 screws E with a small screwdriver and replace the
fan assy (wiring included) (see picture).
C
C
C
C
C
C
To remove/replace a brush set of the side brushes, remove
the 3 screws D (see picture).
D
E
E
D
D
3-9
Page 4

TROUBLESHOOTING
FC8802/01
This chapter summarises the most common problems you could encounter while using your robot. If you are unable to solve
the problem with the information below, please contact the Consumer Care Centre in your country.
Problem Cause Solution
The robot does not start
cleaning when I press the on/
off switch.
The robot does not work
and indicator A ashes.
The robot does not pick up
dirt when I switch it on.
Indicator C lights up
continuously when the robot
is switched on.
The rechargeable battery is empty. Charge the rechargeable battery (See User Manual, chapter
‘Preparing for use’, section ‘Charging’).
The small plug is still inserted in the
socket on the robot and the adapter
is still inserted in the wall socket.
The dust container compartment
cover is not present or is not closed
properly.
The suction opening in the bottom
is clogged.
The battery is low. Charge the rechargeable battery (See User Manual, chapter
One or both wheels are stuck. Press the on/off switch to switch off the robot. Remove the uff,
One or both side brushes are stuck. Clean the side brushes (See User Manual, chapter ‘Cleaning and
The robot does not work on mains power. It only works on its
rechargeable battery and always has to be disconnected from the
mains before use.
When the dust container compartment cover is not present
or is not closed properly, the robot does not work as a safety
precaution. Make sure you place the dust container compartment
cover on the robot properly (See User Manual, chapter ‘Before
rst use’, section ‘Inserting the rechargeable battery’)
Clean the suction opening (See User Manual, chapter ‘Cleaning
and maintenance’, section ‘Cleaning the suction opening and
wheels’).
‘Preparing for use’, section ‘Charging’).
hair thread or wire that is caught around the wheel suspension.
maintenance’, section ‘Cleaning the side brushes’).
The robot does not clean
properly.
The battery can no longer
be charged or runs empty
very fast.
The robot does not clean
and indicator B lights up
continuously.
The bumper is stuck. Press the on/off switch to switch off the robot and pull the
bumper free from the body of the robot.
You lifted the robot while it was
switched on.
The bristles of one or both side
brushes are crooked or bent.
The lter in the dust container is
dirty.
The suction opening in the bottom
is clogged.
The rechargeable battery has
reached the end of its life.
The dust container is not present. Place the dust container in the dust container compartment
Press the on/off switch to switch off the robot. Then press the
on/off switch again to make it resume cleaning in the wanted spot.
Replace the side brushes (See User Manual, chapter ‘Replacement’,
section ‘Replacing the side brushes’).
Clean the lter in the dust container with a brush with soft
bristles (See User Manual, chapter ‘Cleaning and maintenance’,
section ‘Emptying an cleaning the dust container’).
If brushing does not help to clean the lter, replace the lter
with a new one (See User Manual, chapter ‘Replacement’, section
‘Replacing the lter’).
Clean the suction opening (See User Manual, chapter ‘Cleaning
and maintenance’, section ‘Cleaning the suction opening’).
Replace the rechargeable battery (See User Manual, chapter
‘Replacement’, section ‘Replacing the rechargeable battery’).
properly. Make sure you close the dust container compartment
cover properly.
In case of straight line driving issues:
Check and clean the front wheel and both side brushes, after cleaned them the robot will drive better in a straight line.
The drop off sensors are xed on the 2nd position, this cannot be changed by customer and/or repair centres.
4-9
Page 5

ELECTRICAL DIAGRAM
IR, Drop down
sensor (Front)
FC8802/01
J8
Buzzer
J9
IR, Top cover
present sensor
J11
J10
LED,
indicator C
J12
J6
J3
PCB
Main
IR, Bumper sensor
LED, indicator B
LED, indicator A
J4
Left
wheel
M
M
Right
wheel
J5
J7
J2
J1
PCB,
Charge
IR, Dustbin assy
present sensor
IR, Drop down
sensor (Left)
IR, Drop down
sensor (Right)
M
M
M
Right side
Brush set
Left side
Brush set
Fan
Battery
NiMH
14.4 V
ON
CHARGE
1
0
OFF
19V
Switch + DC-In PCB
5-9
Page 6

PARTS LIST
FC8802/01
Pos Service code Description Remark
1
2
3
4
5
6
7
8
9
10
11
12
13
14
15
16
17
18
19
20
21
22
23
24
4222 459 54051
4222 459 54021
4322 006 24761
9965 100 57339
4322 006 24651
4222 459 54031
9965 100 53904
9965 100 53918
9965 100 53909
9965 100 53912
9965 100 53919
9965 100 53903
9965 100 53908
9965 100 53917
9965 100 53907
9965 100 53906
9965 100 53911
9965 100 56357
4322 006 24681
9965 100 53916
9965 100 53915
9965 100 53913
4322 006 24771
9965 100 56354
Dust container
Filter
Adapter
Top cover
Rechargeable battery
Set of side brushes
Front bumper
Front rubber bumper strip
Rubber wheel covers
Right side wheel set
Wheel cover left
Wheel cover right
Left side wheel set
PCB main
Drop down sensor (Right)
Right side brush set
Drop down sensor (Front, Left)
Top base
Rocker switch harrier
Left side brush set
PCB charge (for battery)
Lower housing (Bottom Cover)
DC brushless fan
EU plug
ZDD190060
Titanium Satin Metallic
NiMH battery
Metallic dark Anthracite
S99-0001381-G91
6-9
Page 7

EXPLODED VIEW
2
FC8802/01
24
1
4
5
3
6
7-9
Page 8

EXPLODED VIEW
7
B
8
FC8802/01
B
10
12
9
J7
J5
9
13
9
9
A
A
11
A
A
8-9
Page 9

EXPLODED VIEW
14
15
J10
D
3x
16
J2
J1
J7
J5
J4
J3
J6
J12
J11
J10
J9
J8
FC8802/01
18
19
J3
D
3x
17
J8
J4
J1
20
21
J2
J9
17
J12
J11
22
C
6x
23
E
2x
J6
9-9
 Loading...