

Super automatic
espresso machine
3100 series
EP3360
EN USER MANUAL
FR MODE D’EMPLOI
ES MANUAL DEL USARIO
4219.460.4292.1 PHILIPS3100 OTC GLOSSY_FRONT-BACK COVER_A5_WE.indd 1 16-11-17 11:12

26
2
18
16
14
31
29
32
21
22
23
25
19
4
5
3
11 12
13
17
28
7 6
24
15
27
10
8
9
30
20
1
1

5 sec.
234
FILTER
0%
NEW?
AQUA CLEAN
5
FILTER
1 / 8
AQUA CLEAN
6
0 / 8
ON
OFF7FILTER
2 / 8
AQUA CLEAN
8
9
MEMO
2x
10
11
2
1
1
1213141516
17
1
2
3
4
5
18
2
1
192021
222324252627282930
1
2
1
31
32
2
1
333435
36
START
CALC
CLEAN
373839
REMOVE
FILTER
40
MAX
CALC
CLEAN
CALC
CLEAN
1
2
41


English 8
Español 31
Français (Canada) 55

8
English
Contents
IMPORTANT SAFEGUARDS__________________________________________________________________ 8
CAUTION_____________________________________________________________________________________ 9
Instructions for the power supply cord______________________________________________________ 9
SAVE THESE INSTRUCTIONS________________________________________________________________ 10
Important safety information________________________________________________________________ 10
Warning______________________________________________________________________________________ 10
Caution_______________________________________________________________________________________ 11
Machine overview____________________________________________________________________________ 13
Introduction _________________________________________________________________________________ 13
First installation______________________________________________________________________________ 14
AquaClean filter______________________________________________________________________________ 14
Measuring water hardness__________________________________________________________________ 15
Using the control panel _____________________________________________________________________ 16
Brewing drinks_______________________________________________________________________________ 17
Personalizing drinks__________________________________________________________________________ 18
Adjusting grinder settings____________________________________________________________________ 18
Handling the brew group____________________________________________________________________ 19
Cleaning and maintenance__________________________________________________________________ 19
Descaling procedure_________________________________________________________________________ 23
Warning icons and error codes______________________________________________________________ 25
Ordering accessories_________________________________________________________________________ 26
Troubleshooting_____________________________________________________________________________ 27
Disposal______________________________________________________________________________________ 30
Warranty and support_______________________________________________________________________ 30
IMPORTANT SAFEGUARDS
When using electrical appliances, basic safety precautions should always be followed,
including the following:
1 Read all instructions.
2 Do not touch hot surfaces. Use handles or knobs.
3 To protect against fire, electric shock and injury to persons do not immerse cord, plugs, or
appliance in water or other liquid.
4 Close supervision is necessary when the appliance is used by or near children.
5 Unplug from outlet when not in use and before cleaning. Allow to cool before putting on or
taking off parts, and before cleaning the appliance.
6 Do not operate any appliance with a damaged cord or plug or after the appliance
malfunctions, or has been damaged in any manner. Return appliance to the nearest
authorized service facility for examination, repair or adjustment.
7 The use of accessory attachments not recommended by the appliance manufacturer may
result in fire, electric shock or injury to persons.
English

English
8 Do not use outdoors.
9 Do not let cord hang over edge of table or counter, or touch hot surfaces.
10 Do not place on or near a hot gas or electric burner, or in a heated oven.
11 Always attach plug to appliance first, then plug cord into wall outlet. To disconnect, turn
any control to “off”, then remove plug from wall outlet.
12 Do not use appliance for other than intended use.
SAVE THESE INSTRUCTIONS
CAUTION
This appliance is for household use only. Any servicing, other than cleaning and user
maintenance, should be performed by an authorized service center. Do not immerse machine
in water. To reduce the risk of fire or electric shock, do not disassemble the machine. There
are no parts inside the machine serviceable by the user. Repair should be done by authorized
service personnel only.
1 Check voltage to be sure that the voltage indicated on the nameplate corresponds with
your voltage.
2 Never use warm or hot water to fill the water tank. Use cold water only.
3 Keep your hands and the cord away from hot parts of the appliance during operation.
4 Never clean with scrubbing powders or harsh cleaners. Simply use a soft cloth dampened
with water.
5 For optimal taste of your coffee, use purified or bottled water. Periodic descaling is still
recommended every 2-3 months.
6 Do not use caramelized or flavored coffee beans.
9
Instructions for the power supply cord
-
A short power-supply cord (or detachable power-supply cord) is to be provided to reduce
risks resulting from becoming entangled in or tripping over a longer cord.
-
Longer detachable power-supply cords or extension cords are available and may used if
care is exercised in their use.
-
If a long detachable power-supply cord or extension cord is used.
1 The marked electrical rating of the detachable power-supply cord or extension cord should
be at least as great as the electrical rating of the appliance.
2 If the appliance is of the grounded type, the extension cord should be a grounding-type
3-wire cord, and
3 The longer cord should be arranged so that it will not drape over the counter top or table
top where it can be pulled on by children or tripped over.

10
English
SAVE THESE INSTRUCTIONS
Important safety information
This machine is equipped with safety features. Nevertheless, read and follow the safety
instructions carefully and only use the machine as described in these instructions, to avoid
accidental injury or damage due to improper use of the machine. Keep this safety booklet for
future reference.
Warning
General
-
Check if the voltage indicated on the machine corresponds to the local mains voltage
before you connect the appliance.
-
Connect the machine to an earthed wall socket.
-
Do not let the power cord hang over the edge of a table or worktop and do not let it touch
hot surfaces.
-
To avoid the danger of electric shock, never immerse the machine, mains plug or power
cord in water or any other liquid.
-
Do not pour liquids on the power cord connector.
-
To avoid the danger of burns, keep body parts away from hot water jets produced by the
machine.
-
Do not touch hot surfaces. Use handles and knobs.
-
Switch off the machine with the main switch located on the back (if present) and remove
the mains plug from the wall socket:
-
If a malfunction occurs.
-
If you are not going to use the appliance for a long time.
-
Before you clean the machine.
-
Pull at the plug, not at the power cord.
-
Do not touch the mains plug with wet hands.
-
Do not use the machine if the mains plug, the power cord or the machine itself is damaged
-
Do not make any modifications to the machine or its power cord.
-
Only have repairs carried out by a service center authorized by Philips to avoid ahazard
-
The machine should not be used by children.
-
This machine is not intended for use by persons (including children) with reduced physical,
sensory or mental capabilities, or lack of experience and knowledge, unless they have been
given supervision or instruction concerning use of the machine by a person responsible for
their safety.
-
Cleaning and user maintenance shall not be made by children.
-
Keep the machine and its cord out of the reach of children.
-
Children should be supervised to ensure that they do not play with the machine.
-
Never insert fingers or other objects into the coffee grinder.

English
-
Be carefull when you dispense hot water. Dispensing may be preceded by small jets of hot
water. Wait until the end of the dispensing cycle before you remove the hot water
dispensing spout.
Caution
General
-
This machine is intended for normal household use only. It is not intended for use in
environments such as staff kitchens of shops, offices, farms or other work environments.
-
Always put the machine on a flat and stable surface. Keep it in upright position, also during
transport
-
Do not place the machine on a hotplate or directly next to a hot oven, heater or similar
source of heat.
-
Only put roasted coffee beans in the bean hopper. Putting ground coffee, instant coffee,
raw coffee beans or any other substance in the coffee bean hopper may cause damage to
the machine.
-
Let the machine cool down before you insert or remove any parts. The heating surfaces
may retain residual heat after use.
-
Never fill the water tank with warm, hot or sparkling water, as this may cause damage to
the water tank and the machine.
-
Never use souring pads, abrasive cleaning agents or aggressive liquids such as petrol or
acetone to clean the machine. Simply use a soft cloth dampened with water.
-
Descale your machine regularly. The machine indicates when descaling is needed. Not
doing this will make your machine stop working properly. In this case, repair is not covered
by your warranty.
-
Do not keep the machine at temperatures below 0°C/32°F. Water left in the heating system
may freeze and cause damage.
-
Do not leave water in the water tank when you are not going to use the machine for a long
period of time. The water can become contaminated. Use fresh water every time you use
the machine.
-
Never use any accessories or parts from other manufacturers or that Philips does not
specifically recommend. If you use such accessories or parts, your guarantee becomes
invalid.
-
Regular cleaning and maintenance prolongs the lifetime of your machine and ensures
optimum quality and taste of your coffee.
-
The machine is exposed continuously to moisture, coffee and scale. Therefore it is very
important to regularly clean and maintain the machine as described in the user manual
and shown on the website. If you do not perform these cleaning and maintenance
procedures, your machine eventually may stop working. In this case repair is not covered
by warranty.
-
Do not clean the brew group in the dishwasher and do not use washing-up liquid or a
cleaning agent to clean it. This may cause the brew group to malfunction and may have a
negative effect on the coffee taste.
-
Do not dry the brew group with a cloth to prevent fibers from collecting inside the brew
group.
11

12
English
-
Never drink the solution dispensed during the descaling process.
-
Only put preground coffee into the preground coffee compartment. Other substances and
objects may cause severe damage to the machine. In this case, repair is not covered by
your warranty.
-
The machine shall not be placed in a cabinet when in use.
Machines with milk carafe
Warning
-
To avoid the danger of burns, be aware that dispensing may be preceded by jets of milk
and steam. Wait until the end of the cycle before you remove the milk carafe.
Caution
-
Make sure that the milk carafe is installed and the milk dispensing spout is open before
you select a milk-based coffee beverage or milk froth.
-
Do not put any other liquids in the milk jug/carafe than water (for cleaning) or milk.
-
Do not clean the milk carafe in the dishwasher.
Machines with adjustable coffee and milk dispensing spout
Warning
-
To avoid the danger of burns, be aware that dispensing steam or hot water may be
preceded and followed by small jets of hot water or steam.
-
Never touch or open the door of the internal cappuccinatore while dispensing drinks, as it
may become very hot.
-
Never touch the metal part of the milk tube during and right after performing one of the
cleaning programs for the internal cappuccinatore, as it may become very hot. Let it cool
down first.
-
Never drink the solution dispensed during the monthly cleaning procedure of the
adjustable coffee and milk dispensing spout.
Caution
-
For hygienic reasons, make sure that the outer surface of the adjustable coffee and milk
dispensing spout is clean.
-
After brewing milk-based drinks, the adjustable coffee and milk dispensing spout
automatically dispenses a small amount of steam to clean the internal cappuccinatore and
the metal part of the milk spout.
-
Be careful, the adjustable coffee and milk dispensing spout and the metal part of the milk
spout may be hot if the machine has been used recently.
-
Be careful when you open the internal cappuccinatore door, the adjustable coffee and milk
dispensing spout may dispense a small amount of steam to clean the internal
cappuccinatore.
-
If the internal cappuccinatore door is difficult to close, check if the internal cappuccinatore
is inserted correctly. Follow the instructions in the user manual. Do not push the internal
cappuccinatore too far on the coffee/milk dispensing spout when you insert it. In this case,
the internal cappuccinatore would not work correctly as it would not be able to suck up
milk.

English
-
The metal part of the milk spout may become hot. To avoid the danger of burns, always put
the milk spout in the milk spout holder before you start the cleaning program for the
internal cappuccinatore.
Electromagnetic fields (EMF)
This machine complies with all applicable standards and regulations regarding exposure to
electromagnetic fields.
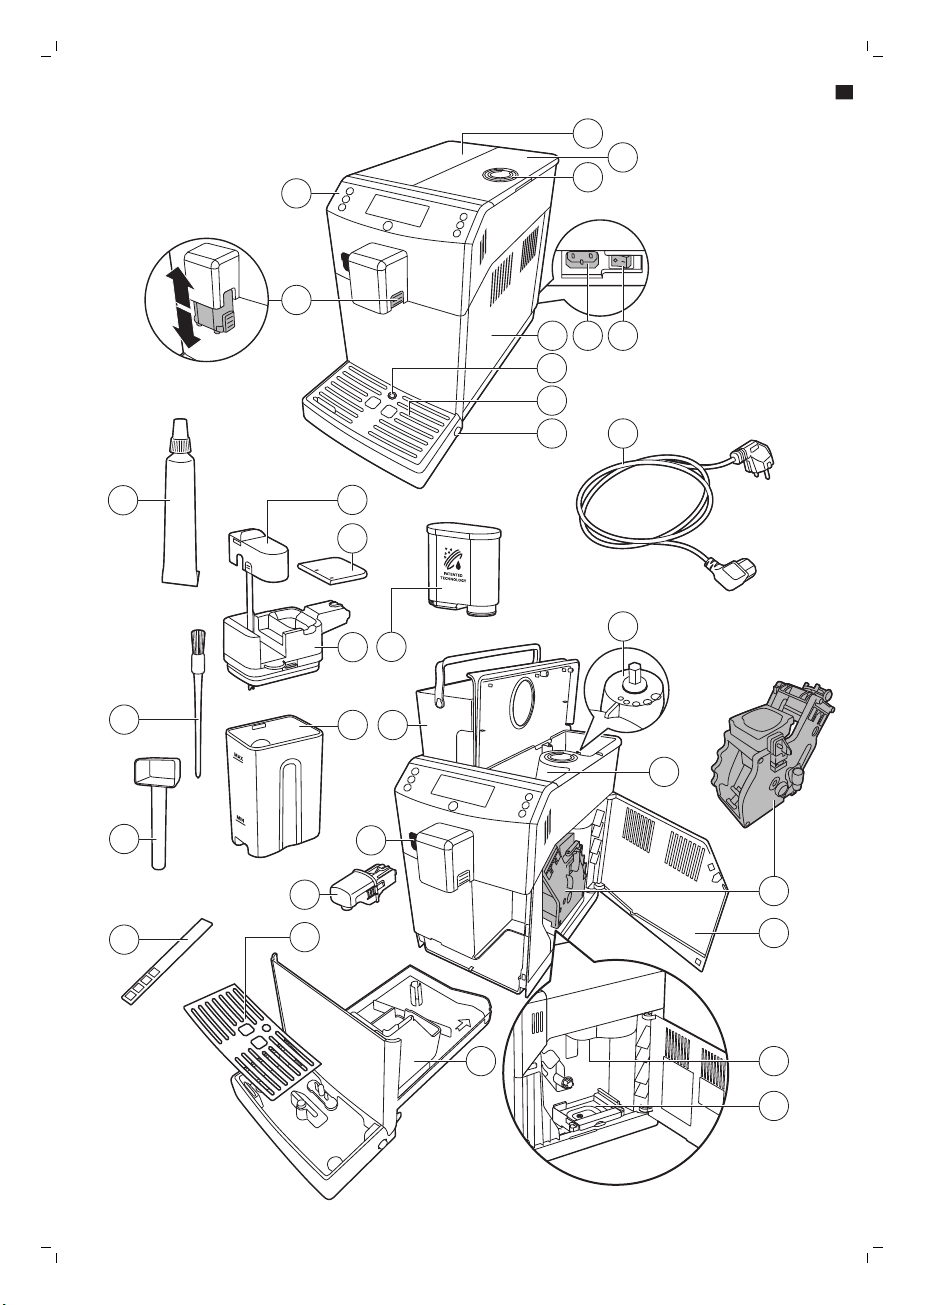
Machine overview
Control panel 17 Coffee exit duct
1
2 Adjustable coffee dispensing spout 18 Coffee residues drawer
3 Lid of water tank 19 Coffee grounds container
4 Lid of bean hopper 20 Drip tray cover
13
5 Lid of pre-ground coffee
compartment
6 Main switch 22 Opening for hot water dispensing spout
7 Socket for cord 23 Water tank
8 Service door 24 Milk container
9 'Drip tray full' indicator 25 AquaClean filter
10 Drip tray 26 Top of milk carafe
11 Drip tray release button 27 Lid of milk carafe
12 Cord 28 Milk spout and milk tube
13 Grind setting knob 29 Grease tube
14 Bean hopper 30 Cleaning brush
15 Brew group 31 Measuring scoop/grind setting tool
16 Inside of service door with cleaning
instructions
21 Hot water dispensing spout
32 Water hardness test strip
Introduction
Congratulations on your purchase of a Philips full-automatic coffee machine! To fully benefit
from the support that Philips offers, please register your product at www.philips.com/coffee-
care.
Read this user manual carefully before you use the machine for the first time and save it for
future reference.

14
English
To help you get the best out of your coffee machine, Philips offers full support in 3 different
ways:
1 The separate quick start guide for first installation and first use.
2 This user manual for more detailed information.
3 Online support and movies: scan the QR code on the front page or visit
www.philips.com/coffee-care
Note: This machine has been tested with coffee. Although it has been carefully cleaned, there
may be some coffee residues left. We guarantee, however, that the machine is absolutely
new.
First installation
To prepare your coffee machine for use, you need to perform a few simple steps such as
filling the water circuit and activating the AquaClean filter. These steps are shown in the
separate quick start guide.
For the best-tasting coffee, you need to brew 5 coffees initially to allow the machine to
complete its self-adjustment.
The machine has been set up to get the best taste out of your coffee beans. Therefore we
advise you not to adjust the grinder settings until you have brewed 100-150 cups (approx. 1
month of usage).
AquaClean filter
The AquaClean filter is designed to reduce limescale deposits in your coffee machine and
provide filtered water to preserve the aroma and flavor of each cup of coffee. If you use a
series of 8 AquaClean filters as indicated by the machine and in this user manual, you don't
have to descale your machine for up to 5000 cups. With each filter you can enjoy up to 625
cups, depending on the selected coffee varieties and the rinsing and cleaning frequencies.
Preparing the AquaClean filter for activation
Before you place the AquaClean filter in the water tank, you need to prepare it for use:
1 Shake the filter for about 5 seconds (Fig. 2).
2 Immerse the filter upside down in a jug with cold water and wait until no more air bubbles
come out (Fig. 3).
3 Push the filter onto the filter connection to the lowest possible point (Fig. 4).
Activating the AquaClean filter
You need to activate every new AquaClean filter that you use. By activating the AquaClean
filter, the machine monitors the capacity of the AquaClean filter and the number of filters
used. There are 3 ways to activate the AquaClean filter.
1. Activating the AquaClean filter during first installation
After turning on for the first time, the machine guides you through the first installation steps
such as filling the water tank, filling the water circuit and activating the AquaClean filter.
Simply follow the instructions on the screen.

English
2. Activating the AquaClean filter when prompted
Note: Replace the AquaClean filter as soon as the capacity has dropped to 0% and the filter
icon flashes quickly. Replace the AquaClean filter at least every 3 months, even if the machine
has not yet indicated that replacement is required.
Tip: We advise you to buy a new filter when the capacity has dropped to 10% and the filter
icon starts flashing slowly. This ensures that you can replace the filter when the capacity has
dropped to 0%.
1 Press the MENU button, scroll to AQUACLEAN FILTER and press the OK button to confirm.
-
The display asks if you want to activate a new filter (Fig. 5).
2 Press the OK button to confirm.
-
The display automatically updates the number of filters used (Fig. 6).
Note: If you want to replace the AquaClean filter after 8 filters have been used, you first need
to descale the machine. Follow the instructions on the display.
3. Activating the AquaClean filter at any other time
You can start using the AquaClean filter at any time by following the instructions below.
1 Press the MENU button, select MENU and press the OK button to confirm. Scroll to
AQUACLEAN FILTER. Press the OK button to confirm.
-
The display shows the numbers of AquaClean filters that have been installed previously
from 0 to 8 filters (Fig. 6).
2 Select ON on the display and press the OK button to confirm (Fig. 7).
-
The display automatically updates the number of filters used (Fig. 8).
-
Then the 'machine ready' screen appears with the AquaClean 100% icon to indicate that
the filter has been installed (Fig. 9).
3 Dispense 2 cups of hot water (0.5 l) to complete the activation. Discard this water.
15
Note: In some situations the machine will tell you that you need to descale the machine
before you can install and activate a new AquaClean filter. This is because your machine has
to be completely limescale-free before you start to use the AquaClean filter. Follow the
instructions on the screen.
Measuring water hardness
Use the water hardness test strip supplied to set the water hardness. Press the MENU button,
select MENU and scroll to select WATER HARDNESS.
1 Immerse the water hardness test strip in tap water for 1 second. Then wait for 1 minute.
2 Check how many squares have turned red.
3 Select the appropriate water hardness setting and press the OK button to confirm.
Number of red squares:
Value to be set 1 2 3 4
MEMO
ESPRESSO
AROMA STRENGTH
MENU
MEMO
COFFEE
MEMO
CAPPUCCINO
HOT WATER
1
2
3
5
4
MEMO
ESPRESSO
MENU
MEMO
COFFEE
AROMA STRENGTH
CAPPUCCINO
LATTE MACCHIATO
MEMO
MEMO
2
45
1
3
16
English
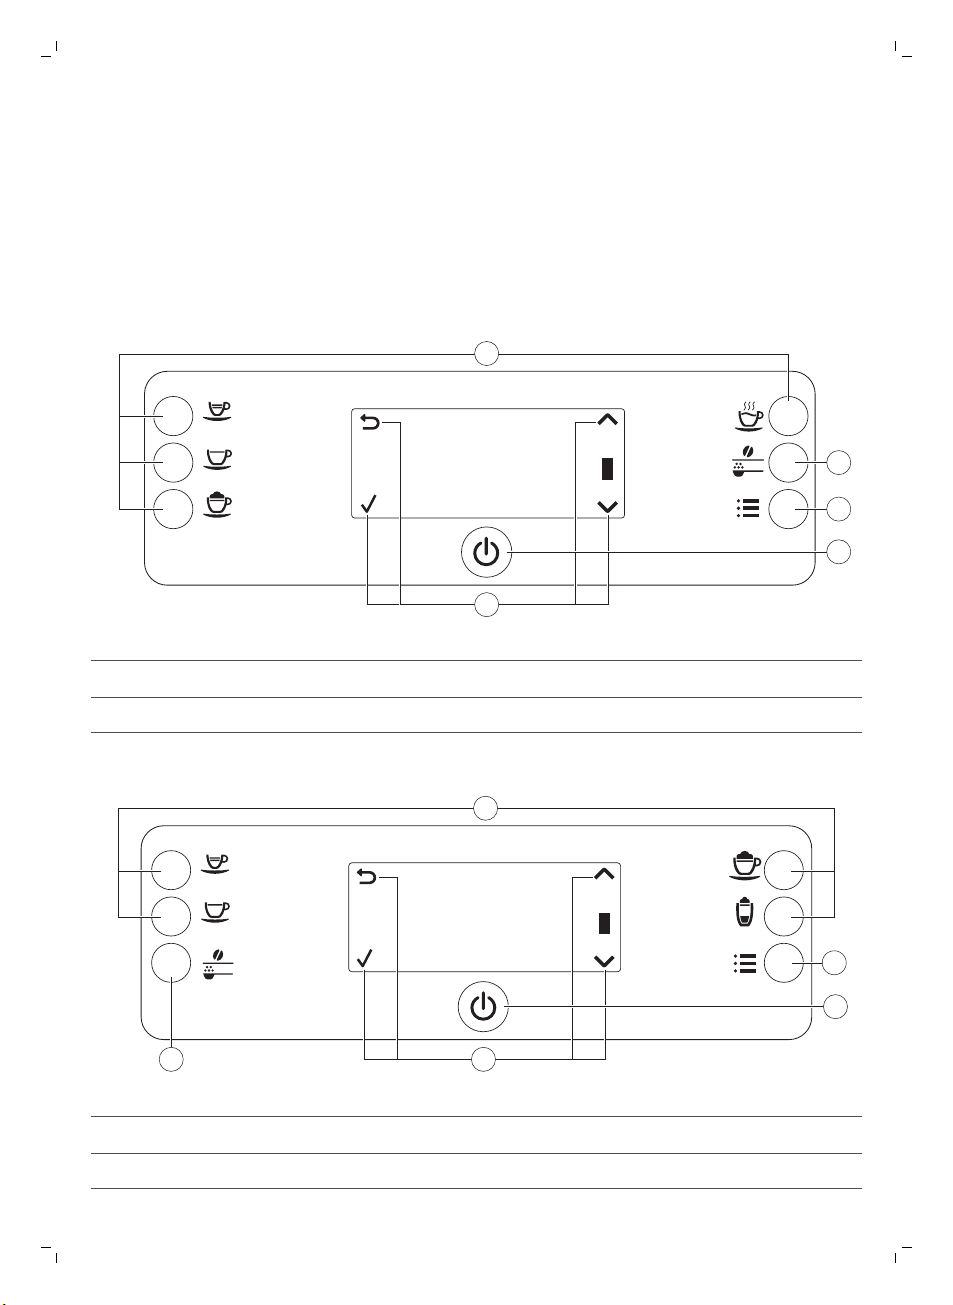
Using the control panel
Below you find an overview and description of the control panel of the machine. Some of the
buttons have a double function; if applicable the navigation icons appear on the display. Use
the buttons next to this icon to select or confirm your choices.
Use the MENU button to select other drinks and to change settings such as the water
hardness and coffee temperature.
EP3558, EP3550
1. One-touch drink buttons 4. On/off button
2. AROMA STRENGTH button 5. Navigation icons (up, down, back, ok)
3. MENU button
EP3363, EP3362, EP3360, EP3559, EP3551
1. One-touch drink buttons 4. Navigation icons (up, down, back, ok)
2. MENU button 5. AROMA STRENGTH button
3. On/off button

English
Brewing drinks
You can select a drink by pressing one of the one-touch drink buttons or by selecting another
drink in the menu.
-
If you want to brew two cups, press the one-touch drink button of the selected drink twice
(Fig. 10) or select a coffee drink via the MENU and press it twice. The machine automatically
carries out two grinding cycles in sequence for the selected drink. You can only brew two
coffee drinks at the same time.
-
Slide the dispensing spout up or down to adjust its height to the size of the cup or glass
you are using.
Brewing coffee drinks
1 Fill the water tank with tap water and fill the bean hopper with beans.
2 To brew a coffee, press one of the one-touch drink buttons. To select another type of
coffee, press the MENU button, select DRINKS, scroll down to the desired drink and press
the OK button.
3 To stop dispensing coffee, press the OK button.
Brewing milk-based drinks
1 Fill the water tank with tap water and fill the bean hopper with beans.
2 Remove the lid of the milk container and fill the milk container with milk (Fig. 11).
Aways use milk coming directly from the fridge for optimal results.
3 Place the lid back onto the milk container.
4 If attached, remove the hot water spout from the machine (Fig. 12).
5 Slightly tilt the milk carafe and attach it to the machine (Fig. 13).
6 Open the milk dispensing spout (Fig. 14) and place a cup on the drip tray.
7 To brew a milk-based drink, press one of the one-touch drink buttons. To select another
type of milk-based drink, press the MENU button, select DRINKS, scroll down to the desired
drink and press the OK button.
8 Directly after dispensing the milk-based drink, the display asks you if you want to perform
the quick clean procedure for the milk carafe. You have 10 seconds to activate the quick
clean procedure. Press the OK button to confirm.
17
Brewing coffee with pre-ground coffee
1 Open the lid and pour one measuring scoop of pre-ground coffee into the pre-ground
coffee compartment. Then close the lid (Fig. 15).
2 Press the AROMA STRENGTH button and select the pre-ground coffee brewing function.
3 Press a one-touch drink button or select another coffee drink.
Note: With pre-ground coffee you can only brew one coffee at a time.
Dispensing hot water
1 If it is not attached, attach the hot water spout to the machine (Fig. 16).

18
English
2 EP3363, EP3362, EP3360, EP3559, EP3551 only: Press the MENU button. Select DRINKS,
confirm and scroll to select HOT WATER.
-
EP3558, EP3550 only: Press the one-touch HOT WATER button to dispense hot water.
3 To stop dispensing hot water, press the OK button.
Personalizing drinks
Adjusting coffee and milk volume
You can adjust the volume of the drink brewed according to your taste and to the size of the
cups. We advise you to use glass cups or cups with a ceramic-coated rim.
1 To adjust the espresso volume, press and hold the ESPRESSO button until the display
shows the MEMO icon (Fig. 17).
-
The machine enters the programming phase and starts to brew the selected drink.
2 When the cup contains the desired amount of espresso, press the OK button to stop
dispensing and to save the coffee volume. To stop dispensing without saving the coffee
volume, press the ' back' button.
-
The tick on the display shows that the button is programmed: every time it is pressed,
the machine brews the set espresso volume.
Note: To set the volume of coffee, cappuccino, latte macchiato (EP3363, EP3362, EP3360,
EP3559, EP3551 only), follow the same procedure: press and hold the button of the drink and
press the OK button when the cup contains the desired amount of coffee or milk. Make sure
that the milk carafe is in place and that the milk spout is open.
Adjusting coffee strength
-
To change the coffee strength, press the AROMA STRENGTH button.
-
Each time you press the AROMA STRENGTH button, the machine selects a higher aroma
strength setting. There are 5 strengths, 1 is very mild and 5 is very strong. After setting 5,
setting 1 is selected again (Fig. 18).
-
The display shows the chosen strength. After adjusting the coffee strength, the display
shows the main menu again and saves the chosen aroma strength when you brew a coffee.
Adjusting grinder settings
You can adjust the grinder settings with the grinder adjustment key integrated into the handle
of the multifunctional tool. At each setting selected, the ceramic coffee grinder guarantees a
perfectly even grind for every cup of coffee you brew. It preserves the full coffee aroma and
delivers the perfect taste to every cup.
1 Open the lid of the bean hopper.
2 Place the grinder adjustment key on the grinder adjustment knob (1). Push and turn to the
left or to the right (2) one notch at a time (Fig. 19).
-
There are 5 different grinder settings you can choose from. The smaller the dot, the
stronger the coffee.

English
Caution: Do not turn the grinder adjustment knob more than one notch at a time to prevent
damage to the grinder.
Note: The difference becomes noticeable after you have brewed 2-3 cups of coffee at the
new setting.
Handling the brew group
Go to www.philips.com/coffee-care for detailed video instructions on how to remove, insert
and clean the brew group.
Removing the brew group from the machine
1 Turn off the machine by pressing the main turn on the back of the machine.
2 Remove the drip tray with the coffee grounds container.
3 Open the service door (Fig. 20).
4 Press the PUSH button (Fig. 21) and pull at the grip of the brew group to remove it from the
machine (Fig. 22).
5 Remove the coffee residues drawer (Fig. 23).
Reinserting the brew group
Before you slide the brew group back into the machine, make sure it is in the correct position.
1 Check if the arrow on the yellow cylinder on the side of the brew group is aligned with the
black arrow and N (Fig. 24).
-
If they are not aligned, push down the lever until it is in contact with the base of the
brew group (Fig. 25).
2 Make sure that the yellow locking hook on the other side of the brew group is in the correct
position.
-
To position the hook correctly, push it upwards until it is in uppermost position (Fig. 26).
3 Place back the coffee residues drawer.
4 Slide the brew group back into the machine along the guiding rails on the sides until it
locks into position with a click. Do not press the PUSH button.
5 Place back the drip tray with the coffee grounds container.
19
Cleaning and maintenance
Regular cleaning and maintenance keeps your machine in top condition and ensures goodtasting coffee for a long time, a steady coffee flow and a perfect milk froth.
Consult the table on when and how to clean all detachable parts of the machine. You can find
more detailed information and video instructions on www.philips.com/coffee-care.

20
English
Cleaning table
Part description
Brew group Weekly Remove the brew group and rinse it under
When to clean How to clean
the tap (see 'Cleaning the brew group under
the tap').
Monthly Clean the brew group with the Philips coffee
oil remover tablet (see 'Cleaning the brew
group with the coffee oil remover tablets').
Go to www.philips.com/coffee-care for
detailed video instructions.
Lubrication of
the brew group
Milk carafe After every day of use Perform the QUICK CARAFE CLEAN as
Drip tray Empty the drip tray as
Coffee grounds
container
Depending on the type of
usage. Consult the
lubrication table (see
'Lubricating the brew
group').
Daily Clean the milk carafe thoroughly (see
Weekly Disassemble the milk carafe and clean all
Monthly Clean the milk carafe with the Philips milk
soon as the red 'drip tray
full' indicator pops up
through the drip tray (Fig.
27). Clean the drip tray
when it suits you.
Empty the coffee grounds
container when prompted
by the machine. Clean it
when it suits you.
Lubricate the brew group with the Philips
grease. Go to www.philips.com/coffee-care
for detailed video instructions.
indicated on the machine after preparing a
milk-based drink (see 'Carafe quick clean').
'Thorough cleaning of the milk carafe').
parts under the tap (see 'Weekly cleaning of
the milk carafe').
circuit cleaner (see 'Monthly cleaning of the
milk carafe').
Remove the drip tray and rinse it under the
tap with some washing-up liquid.
Remove the coffee grounds container while
the machine is turned on and rinse it under
the tap with some washing-up liquid.
Water tank Clean it weekly. Rinse the water tank under the tap

Part description When to clean How to clean
English
21
Coffee funnel Check the coffee funnel
weekly to see if it is
clogged.
Tip: There is a cleaning calendar on the last page of this user manual. Write down the dates
on which you have performed a cleaning action.
Unplug the machine and remove the brew
group. Open the lid of the pre-ground coffee
compartment and insert the spoon handle
into the coffee funnel. Move the handle up
and down until the clogged ground coffee
falls down (Fig. 28). Go to
www.philips.com/coffee-care for detailed
video instructions.
Cleaning the brew group
Regular cleaning of the brew group prevents coffee residues from clogging up the internal
circuits. Visit www.philips.com/coffee-care for support videos on how to remove, insert and
clean the brew group.
Cleaning the brew group under the tap
1 Remove the brew group and the coffee residues drawer.
2 Rinse the coffee residues drawer and the brew group thoroughly with water. Carefully
clean the upper filter of the brew group.
3 Let the brew group air-dry before you place it back. Do not dry the brew group with a cloth
to prevent fibers from collecting inside the brew group.
Cleaning the brew group with the coffee oil remover tablets
Only use Phillips Saeco coffee oil remover tablets. Follow the instructions given in the user
manual that comes with the coffee oil remover tablets.
Lubricating the brew group
Lubricate the brew group regularly to ensure that the moving parts continue to move
smoothly. See the table below for the lubrication frequency. Visit www.philips.com/coffee-
care for detailed video instructions.
Usage frequency
Low 1-5 Every 4 months
Normal 6-10 Every 2 months
Heavy >10 Every month
Nr of drinks brewed daily Lubrication frequency
Cleaning the milk carafe
Carafe quick clean
After preparing a milk-based drink, the carafe cleaning icon appears on the display.
1 2
5
3
4
22
English
1 When the carafe cleaning icon appears on the display, press the OK button if you want to
perform a cleaning cycle. You have 10 seconds to activate the quick clean procedure. Press
the escape button if you do not want to perform the quick clean procedure.
2 Remove the cup with the drink and place an empty cup under the milk dispensing spout
(Fig. 29).
Note: Make sure the milk dispensing spout is pulled out.
3 Press the OK button to start dispensing hot water.
Thorough cleaning of the milk carafe
To clean the milk carafe thoroughly, you have to do the following regularly:
1 Remove the lid of the milk dispensing unit.
2 Lift the milk dispensing spout out of the milk dispensing unit and remove the milk tube
from the milk dispensing spout (Fig. 30).
3 Remove the milk tube from the milk dispensing spout.
4 Rinse the milk tube and milk dispensing spout with lukewarm water thoroughly.
Weekly cleaning of the milk carafe
The milk dispensing spout consists of 5 components. Disassemble all components once a
week and clean them under the tap. You can also clean all components, except for the milk
container, in the dishwasher.
1 Milk tube
2 Rubber support
3 Milk frother
4 Milk frother connector
5 Housing of milk dispensing spout
Disassembling the milk dispensing spout
1 Press the release buttons on both sides of the top of the milk dispensing unit (1) and lift the
top off the milk container (2) (Fig. 31).
2 Turn the milk dispensing unit upside down and hold it firmly in your hand. Pull the milk
tube off the support (Fig. 32).
3 Press the release buttons on the milk frother and remove the milk frother from the the
rubber support (Fig. 33).
4 Pull the milk frother connector out of the milk frother (Fig. 34).
5 Rinse all components under a lukewarm tap.
Reassembling the milk carafe
1 To reassemble the milk dispensing spout, follow steps 2 to 4 of 'Disassembling the milk
dispensing spout' in reverse order.

English
2 Place the milk dispensing spout back into the top of the milk carafe.
3 Place the top of the milk carafe back onto the milk carafe.
Note: Before you place the milk dispensing spout back into the top of the milk carafe, move
the pin inside the top to the correct position. If this pin is not in the correct position, you
cannot place the milk dispensing spout back into the top of the milk carafe (Fig. 35).
Monthly cleaning of the milk carafe
Only use Philips milk circuit cleaner for this cleaning cycle.
1 Pour the contents of the milk circuit cleaner sachet in the milk carafe. Then fill the milk
carafe with water up to the MAX indication (Fig. 36).
2 Insert the milk carafe into the machine and place a container under the milk dispensing
spout.
3 Press the MENU button, select DRINKS and scroll to MILK FROTH. Press the OK button to
start dispensing the cleaning solution.
4 Repeat step 3 until the milk carafe is empty.
5 When the carafe is empty, remove the container and the milk carafe from the machine.
6 Rinse the milk carafe thoroughly and fill it with fresh water up to the MAX level indication.
7 Insert the milk carafe into the machine.
8 Place the container under the milk dispensing spout.
9 Press the MENU button and select MILK FROTH in the DRINKS menu to start the carafe
rinsing cycle.
10 Repeat step 9 until the milk carafe is empty.
11 Repeat steps 6-10.
12 When the machine stops dispensing water, the cleaning cycle is finished.
13 Disassemble all the components and rinse them under a lukewarm tap.
23
Descaling procedure
Please use Philips descaler only. Under no circumstances should you use a descaler based on
sulfuric acid, hydrochloric acid, sulfamic or acetic acid (vinegar) as this may damage the water
circuit in your machine and not dissolve the limescale properly. Not using the Philips descaler
will void your warranty. Failure to descale the appliance will also void your warranty. You can
buy Philips descaling solution in the online shop at www.saeco.com/care.
1 When the machine asks you to descale it (Fig. 37), press the OK button to start. To start
descaling without being prompted by the machine, press the MENU button, scroll to select
START CALC CLEAN and press the OK button to confirm.
-
The display reminds you that you have to insert the milk carafe. (Fig. 38) Fill the milk
carafe with water up to the MIN level indication. Insert the milk carafe into the machine
and open the milk dispensing spout.
-
The display reminds you that you have to open the milk dispensing spout (Fig. 39).
-
The display reminds you that you have to remove the AquaClean filter (Fig. 40).
2 Remove the drip tray and the coffee grounds container, empty them and put them back
into place.
3 Remove the water tank and empty it.

24
English
4 Place a large container (1.5 l) under the coffee dispensing spout.
5 Pour the whole bottle of Philips descaler in the water tank and then fill it with water up to
the CALC CLEAN level (Fig. 41). Then place it back into the machine and press the OK
button to confirm.
6 The first phase of the descaling procedure starts. The descaling procedure lasts approx. 30
minutes and consists of a descaling cycle and a rinsing cycle.
7 Let the machine dispense the descaling solution until the display reminds you that the
water tank is empty.
8 Empty the water tank, rinse it and then refill it with fresh water up to the CALC CLEAN level
indication.
9 Remove and rinse the milk carafe. Fill it with fresh water up to the MIN level indication and
reinsert it into the machine. Then open the milk dispensing spout.
10 Empty the container and place it back under the coffee dispensing spout. Press OK to
confirm.
11 The second phase of the descaling cycle, the rinsing phase, starts and lasts 3 minutes. The
display shows the rinsing icon and the duration of the phase.
12 Wait until the machine stops dispensing water. The descaling procedure is finished when
the tick appears on the display.
13 Press the OK button to exit the descaling cycle. The machine starts heating up and
performs the automatic rinsing cycle.
14 Clean the milk carafe after descaling (see 'Weekly cleaning of the milk carafe').
15 Clean the brew group after descaling (see 'Cleaning the brew group under the tap').
16 Place a new AquaClean filter in the water tank.
Tip: Using the AquaClean filter reduces the need for descaling!
What to do if the descaling procedure is interrupted
You can exit the descaling procedure by pressing the on/off button on the control panel. If
the descaling procedure is interrupted before it is completely finished, do the following:
1 Empty and rinse the water tank thoroughly.
2 Fill the water tank with fresh water up to the CALC CLEAN level indication and turnthe
machine back on. The machine will heat up and perform an automatic rinsing cycle.
3 Before brewing any drinks, perform a manual rinsing cycle. To perform a manual rinsing
cycle, first dispense half a water tank of hot water and then brew 2 cups of pre-ground
coffee without adding ground coffee.
Note: If the descaling procedure was not completed, the machine will require another
descaling procedure as soon as possible.
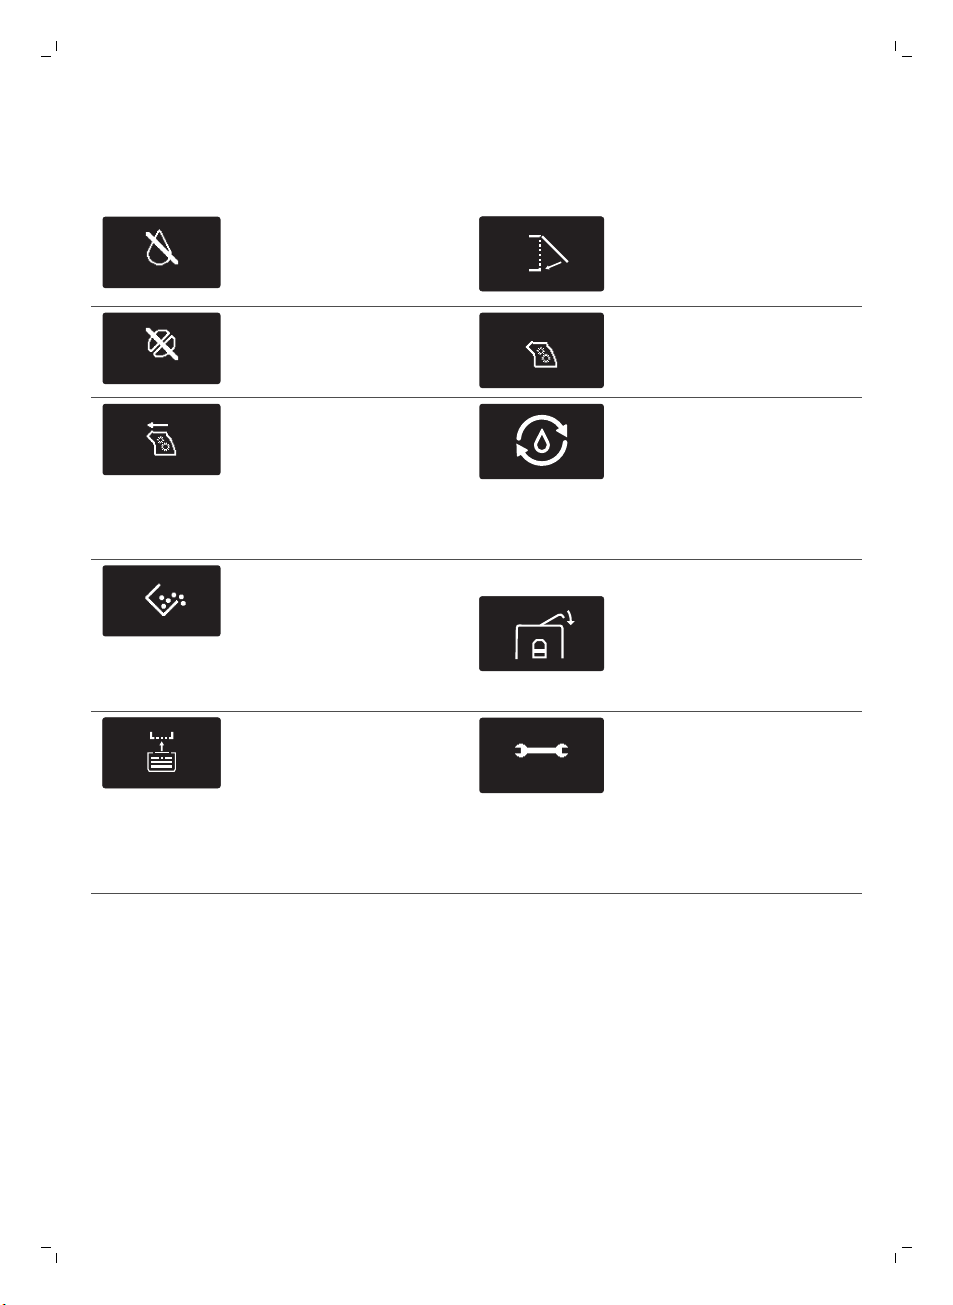
Warning icons and error codes
ADD WATER
ADD COFFEE
10
xx
Meaning of the warning icons
Fill the water tank with
fresh water to the MAX
level indication.
English
Close the service door.
25
The bean hopper is empty.
Put new coffee beans in
the bean hopper.
The brew group is not in
the machine or it is not
inserted correctly. Insert
the brew group.
The coffee grounds
container is full. Make sure
the machine is turned on.
Then remove and empty
the coffee grounds
container.
Insert the drip tray.
The brew group is blocked
by coffee powder. Clean the
brew group.
There is air is the machine,
place a cup under the hot
water spout and select Ok
to start priming. Make sure
the hot water spout is
inserted before starting the
process.
The lid of the bean hopper
is open. Close the lid of the
bean hopper.
If the display shows an error
code, check section
'Meaning of the error codes'
to see what the code on the
display means and what
you can do. The machine
cannot be used when this
icon is on the display.
Meaning of error codes
Below you find a list of the error codes showing problems that you can solve yourself. Video
instructions are available on www.philips.com/coffee-care. If another error code appears,
please contact the Philips Consumer Care Center in your country. For contact details, see the
warranty leaflet.

26
English
Error
Problem Possible solution
code
01 The coffee funnel is
blocked by ground
coffee or a foreign
object.
03 The brew group is
dirty or not wellgreased.
04 The brew group is not
positioned correctly.
05 There is air in the
water circuit.
Turn off the machine and unplug it. Remove the brew
group. Then open the lid of the pre-ground coffee
compartment. Insert the spoon handle and move it up
and down to make clogged ground coffee fal down (Fig.
28). If a foreign object is blocking the coffee funnel,
remove it. Visit www.philips.com/coffee-care for detailed
video instructions
Turn off the machine with the main switch. Rinse the brew
group with fresh water, let it air-dry and then lubricate it
(see 'Lubricating the brew group'). Consult chapter
'Cleaning the brew group' or visit
www.philips.com/coffee-care for detailed video
instructions. Then turn the machine on again.
Turn off the machine with the main switch. Remove the
brew group and reinsert it. Make sure that the brew group
is in the correct position before you insert it. Consult
chapter 'Handling the brew group' or visit
www.philips.com/coffee-care for detailed video
instructions. Then turn the machine on again.
Restart the machine by turning it off and on again with
the main switch. If this works, dispense 2-3 cups of hot
water. Descale the machine if you have not done so for a
longer period of time.
The AquaClean filter
was not prepared
properly before
installation or it is
clogged.
14 The machine is
overheated.
Remove the AquaClean filter and try again to brew a
coffee. If this works, make sure that the AquaClean filter is
prepared properly before you place it back (see
'Preparing the AquaClean filter for activation'). Put the
AquaClean filter back into the water tank. If this still does
not work, the filter is clogged and needs to be replaced.
Turn the machine off and turn it back on again after 30
minutes.
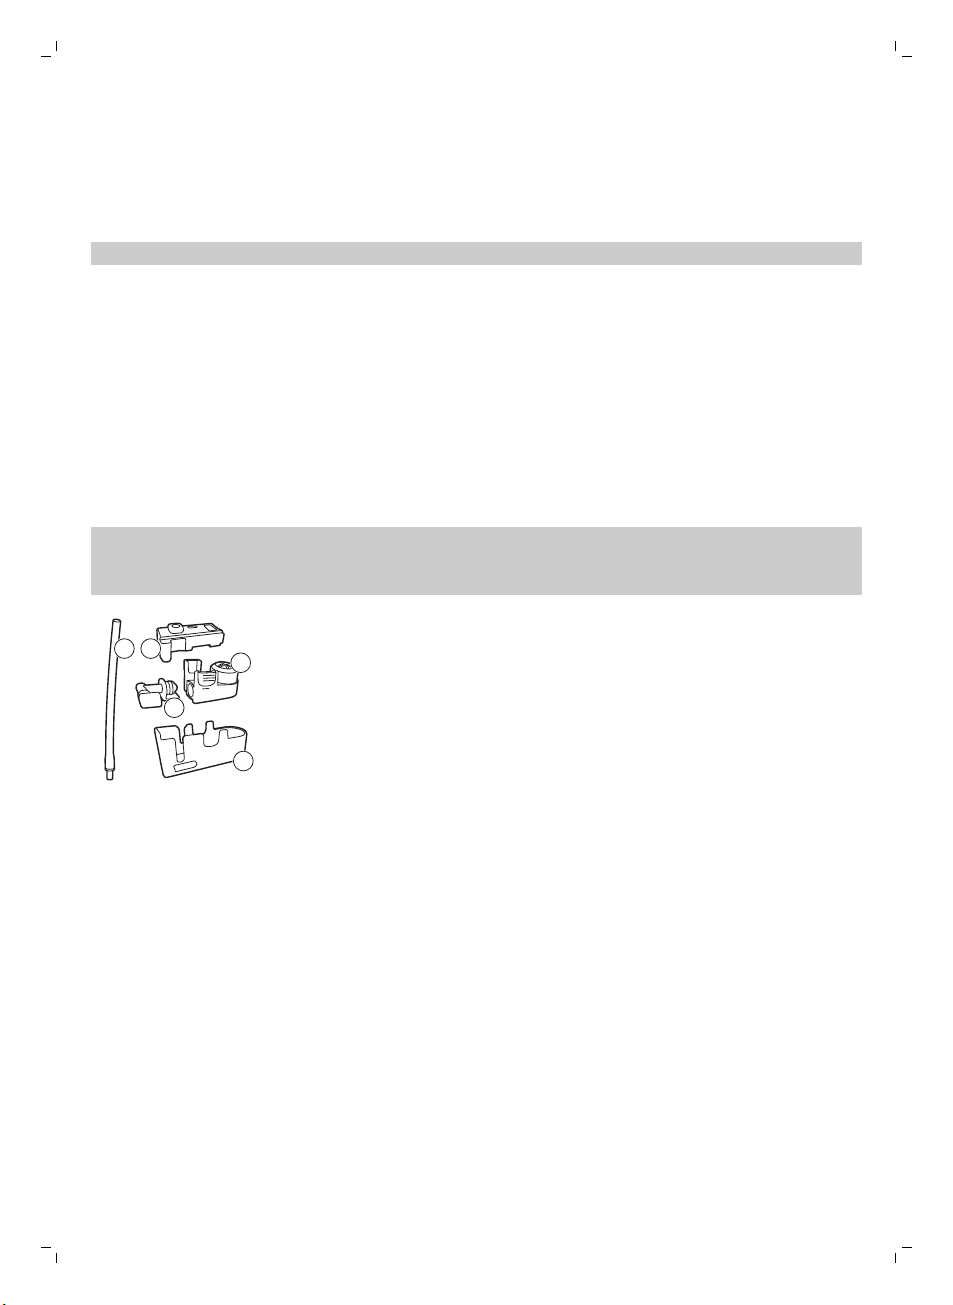
Ordering accessories
To clean and descale the machine, only use the Philips maintenance products. These
products can be purchased from your local retailer, from the authorized service centers or
online at www.philips.com/coffee-care.
Maintenance products and type numbers:
-
Descaling solution CA6700
-
AquaClean filter CA6903
-
Brew group grease HD5061
-
Coffee oil remover tablets CA6704
-
Milk circuit cleaner CA6705
-
Maintenance kit CA6707
 Loading...