


47PFL5432D
Philips 47PFL5432D, 52PFL7422D, 47PFL5432D-37B, 47PFL5432D-37E, 47PFL7422D User Manual
...
Return your Product Registration Card or register online at
www.philips.com/welcome today to get the very most from your purchase.
Registering your model with PHILIPS makes you eligible for all of the valuable benefits listed below, so don’t miss out.
Complete and return your Product Registration Card at once, or register online at www.philips.com/welcome to ensure:
* Proof of Purchase
Returning the enclosed card guarantees that
your date of purchase will be on file, so no
additional paperwork will be required from
you to obtain warranty service.
* Product Safety Notification
By registering your product you’ll receive
notification - directly from the manufacturer in the rare case of a product recall or safety
defect.
* Additional Benefits of
Product Ownership
Registering your product guarantees that
you’ll receive all of the privileges to which
you’re entitled, including special money-saving
offers.
Congratulations on your purchase, and
welcome to the “family!”
Dear PHILIPS product owner:
Thank you for your confidence in PHILIPS.You’ve selected one of
the best-built, best-backed products available today.We’ll do
everything in our power to keep you happy with your purchase for
many years to come.
As a member of the PHILIPS “family,” you’re entitled to protection
by one of the most comprehensive warranties and outstanding
service networks in the industry.What’s more, your purchase
guarantees you’ll receive all the information and special offers for
which you qualify, plus easy access to accessories from our
convenient home shopping network.
Most importantly, you can count on our uncompromising
commitment to your total satisfaction.
All of this is our way of saying welcome - and thanks for investing in
a PHILIPS product.
P.S. To get the most from your PHILIPS purchase, be
sure to complete and return your Product
Registration Card at once, or register online at:
www.philips.com/welcome
For Customer Use
Enter below the Serial No., which is located on the rear of the
cabinet. Retain this information for future reference.
Model No.
Serial No.
Know these
safety symbols
This “bolt of lightning” indicates uninsulated material within your
unit may cause an electrical shock. For the safety of everyone in
your household, please do not remove product covering.
The “exclamation point” calls attention to features for which you
should read the enclosed literature closely to prevent operating
and maintenance problems.
Warning:To reduce the risk of fire or electric shock, this apparatus
should not be exposed to rain or moisture and objects filled with
liquids, such as vases, should not be placed on this apparatus.
CAUTION:To prevent electric shock, match wide blade of plug to
wide slot, fully insert.
ATTENTION :Pour éviter les chocs électriques, introduire la lame la
plus large de la fiche dans la borne correspondante de la prise et
pousser jusqu’au fond.
CAUTION
RISK OF ELECTRIC SHOCK
DO NOT OPEN
CAUTION: TO REDUCE THE RISK OF ELECTRIC SHOCK, DO NOT
REMOVE COVER (OR BACK). NO USER-SERVICEABLE PARTS
INSIDE. REFER SERVICING TO QUALIFIED SERVICE PERSONNEL.
t
s
Visit our World Wide Web Site at http://www.philips.com/welcome
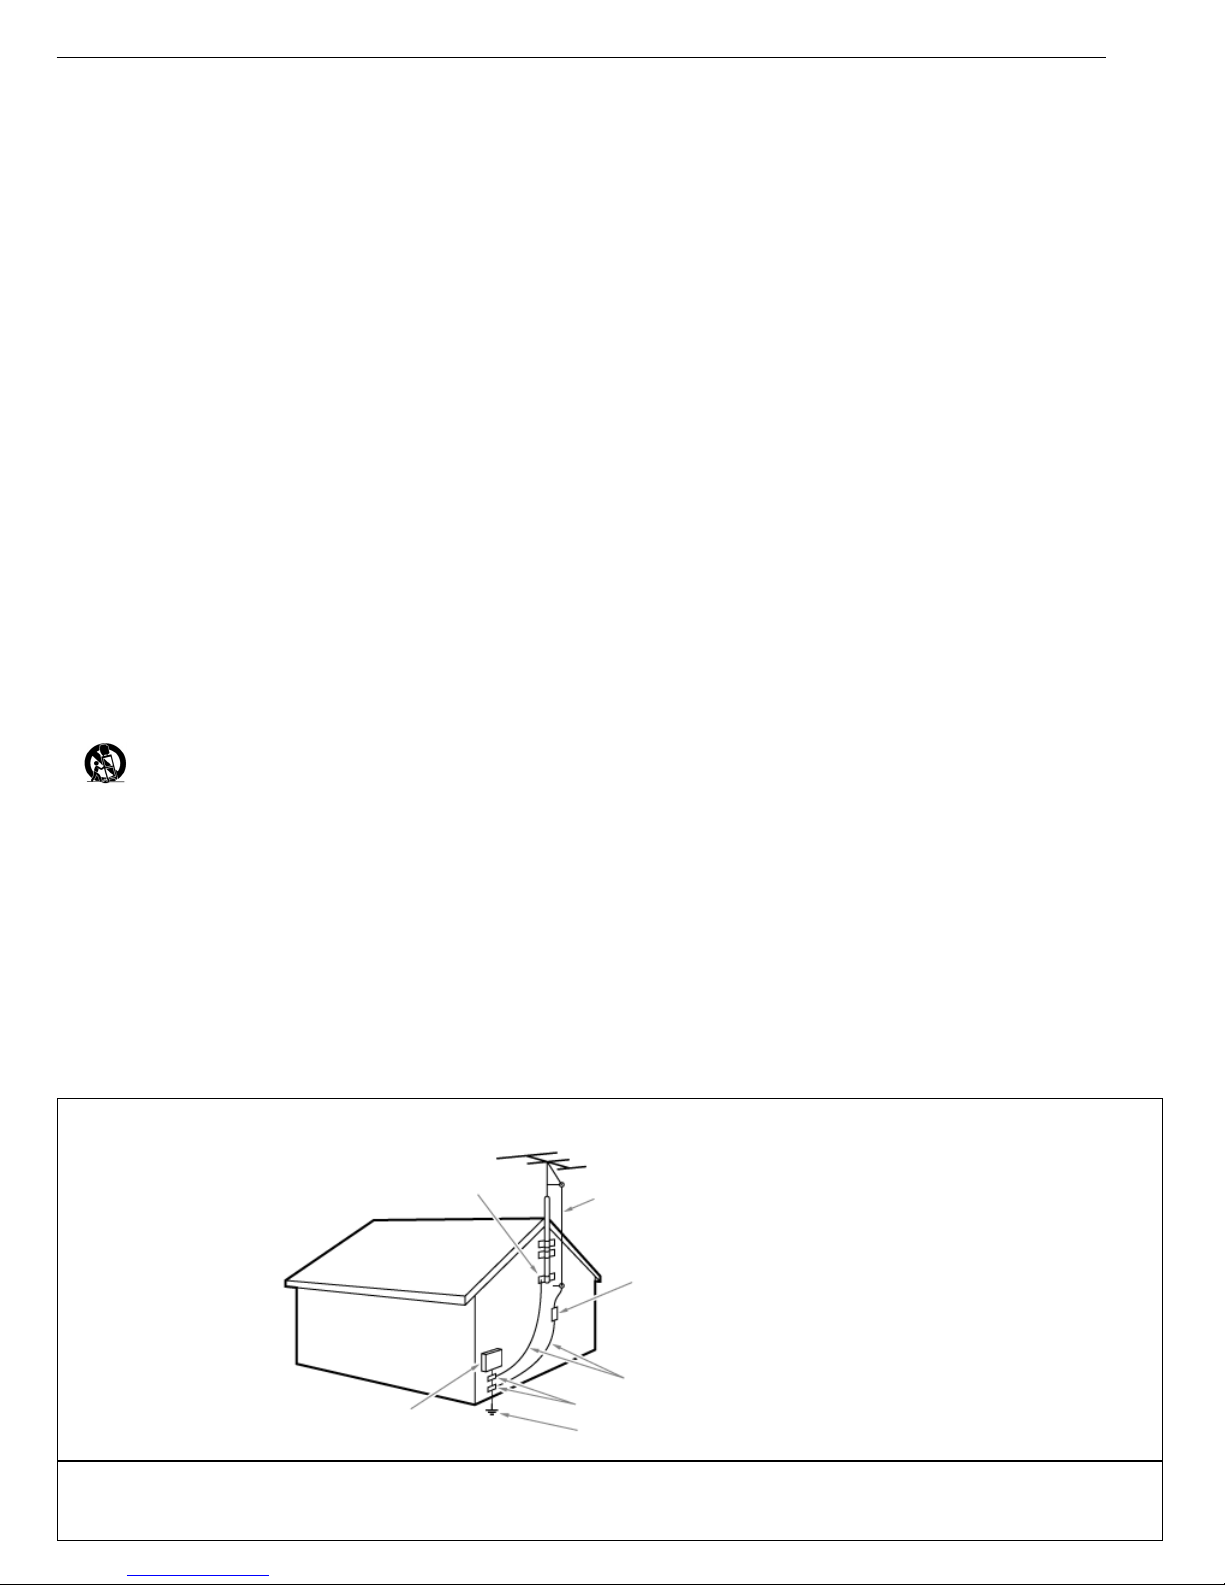
Note to the CATV system installer: this reminder is provided to call the CATV system installer’s attention to Article 820-40 of the NEC that
provides guidelines for proper grounding and, in particular, specifies that the cable ground shall be connected to the grounding system of the
building, as close to the point of cable entry as practical.
1. Read these instructions.
2. Keep these instructions.
3. Heed all warnings.
4. Follow all instructions.
5. Do not use this apparatus near water.
6. Clean only with a dry cloth.
7. Do not block any of the ventilation openings. Install in accordance with the
manufacturers instructions.
8. Do not install near any heat sources such as radiators, heat registers, stoves,
or other apparatus (including amplifiers) that produce heat.
9. Do not defeat the safety purpose of the polarized or grounding-type plug. A
polarized plug has two blades with one wider than the other. A grounding
type plug has two blades and third grounding prong.The wide blade or third
prong are provided for your safety.When the provided plug does not fit into
your outlet, consult an electrician for replacement of the obsolete outlet.
10. Protect the power cord from being walked on or pinched particularly at plugs,
convenience receptacles, and the point where they exit from the apparatus.
11. Only use attachments/accessories specified by the manufacturer.
12. Use only with a cart, stand, tripod, bracket, or table specified by the
manufacturer, or sold with the apparatus.When a cart is used, use
caution when moving the cart/apparatus combination to avoid injury
from tip-over.
13. Unplug this apparatus during lightning storms or when unused for long
periods of time.
14. Refer all servicing to qualified service personnel. Servicing is required when
the apparatus has been damaged in any way, such as power-supply cord or plug
is damaged, liquid has been spilled or objects have fallen into apparatus, the
apparatus has been exposed to rain or moisture, does not operate normally,
or has been dropped.
15. This product may contain lead or mercury. Disposal of these materials may be
regulated due to environmental considerations. For disposal or recycling
information, please contact your local authorities or the Electronic Industries
Alliance: www.eiae.org.
16. Damage Requiring Service - The appliance should be serviced by qualified
service personnel when:
A. The power supply cord or the plug has been damaged; or
B. Objects have fallen, or liquid has been spilled into the appliance; or
C. The appliance has been exposed to rain; or
D. The appliance does not appear to operate normally or exhibits a marked
change in performance; or
E. The appliance has been dropped, or the enclosure damaged.
17. Tilt/Stability - All televisions must comply with recommended international
global safety standards for tilt and stability properties of its cabinets design.
• Do not compromise these design standards by applying excessive pull force to
the front, or top, of the cabinet which could ultimately overturn the product.
• Also, do not endanger yourself, or children, by placing electronic
equipment/toys on the top of the cabinet. Such items could unsuspectingly fall
from the top of the set and cause product damage and/or personal injury.
18. Wall or Ceiling Mounting - The appliance should be mounted to a wall or
ceiling only as recommended by the manufacturer.
19. Power Lines - An outdoor antenna should be located away from power lines.
20. Outdoor Antenna Grounding - If an outside antenna is connected to the
receiver, be sure the antenna system is grounded so as to provide some
protection against voltage surges and built up static charges.
Section 810 of the National Electric Code, ANSI/NFPA No. 70-1984, provides
information with respect to proper grounding of the mats and supporting
structure grounding of the lead-in wire to an antenna-discharge unit, size of
grounding connectors, location of antenna-discharge unit, connection to
grounding electrodes and requirements for the grounding electrode. See
Figure below.
21. Objects and Liquid Entry - Care should be taken so that objects do not fall
and liquids are not spilled into the enclosure through openings.
a) Warning:To reduce the risk of fire or electric shock, this apparatus should
not be exposed to rain or moisture and objects filled with liquids, such as
vases should not be placed on this apparatus.
22. Battery Usage CAUTION - To prevent battery leakage that may result in
bodily injury, property damage, or damage to the unit:
• Install all batteries correctly, with + and - alignment as marked on the unit.
• Do not mix batteries (old and new or carbon and alkaline, etc.)
• Remove batteries when the unit is not used for a long time.
IMPORTANT SAFETY INSTRUCTIONS
Read before operating equipment
EXAMPLE OF ANTENNA GROUNDING AS PER NATIONAL ELECTRICAL CODE (NEC)
GROUND CLAMP
ANTENNA LEAD IN WIRE
ANTENNA DISCHARGE UNIT
(
NEC SECTION 810-20)
GROUNDING CONDUCTORS
(NEC SECTION 810-21)
GROUND CLAMPS
POWER SERVICE GROUNDING ELECTRODE SYSTEM
(
NEC ART 250, PART H )
ELECTRIC SERVICE EQUIPMENT

Content
1 Safety warnings . . . . . . . . . . . . . . . . . . . . . . . . . . . . . . . 2
1.2 Care of the screen . . . . . . . . . . . . . . . . . . . . . . . . . . . . . . . 2
1.3 Warning concerning stationary images on the TV screen . . . 2
1.4 Mounting . . . . . . . . . . . . . . . . . . . . . . . . . . . . . . . . . . . . . . . 2
1.5 Electric, Magnetic and Electromagnetic Fields . . . . . . . . . . . 2
1.6 Pixel characteristics . . . . . . . . . . . . . . . . . . . . . . . . . . . . . . . 3
1.7 VESA Compliance Information for Professional Installation . . 3
1.8 Kensington Security Slot . . . . . . . . . . . . . . . . . . . . . . . . . . . . 3
2 Getting started . . . . . . . . . . . . . . . . . . . . . . . . . . . . . . . 4
2.1 Connection overview . . . . . . . . . . . . . . . . . . . . . . . . . . . . . . 4
3 Use of the Remote Control RC 2033601/01 . . . . . . . . . 6
3.1 Use of the OPTION button . . . . . . . . . . . . . . . . . . . . . . . . 7
3.2 Picture format . . . . . . . . . . . . . . . . . . . . . . . . . . . . . . . . . . . 7
3.3 Buttons on the left of the TV . . . . . . . . . . . . . . . . . . . . . . . . 7
3.4 Turn the TV on . . . . . . . . . . . . . . . . . . . . . . . . . . . . . . . . . . 7
4 First time installation . . . . . . . . . . . . . . . . . . . . . . . . . 8
5How to navigate through the menus . . . . . . . . . . . . . . 9
5.1 Introduction . . . . . . . . . . . . . . . . . . . . . . . . . . . . . . . . . . . . 9
5.2 Use of the TV menu settings . . . . . . . . . . . . . . . . . . . . . . . . 9
5.2.1 Adjust viewing and listening settings . . . . . . . . . . . . . . . . . . .9
5.2.2 Adjust Picture menu settings . . . . . . . . . . . . . . . . . . . . . . . .10
5.2.3 Adjust Sound menu settings . . . . . . . . . . . . . . . . . . . . . . . . .11
6 Adjust feature menu settings . . . . . . . . . . . . . . . . . 12
6.1 Closed captions . . . . . . . . . . . . . . . . . . . . . . . . . . . . . . . . . 12
6.2 Caption service . . . . . . . . . . . . . . . . . . . . . . . . . . . . . . . . . 12
6.3 Digital caption service . . . . . . . . . . . . . . . . . . . . . . . . . . . . 13
6.4 Digital caption options . . . . . . . . . . . . . . . . . . . . . . . . . . . . 13
6.5 Sleeptimer . . . . . . . . . . . . . . . . . . . . . . . . . . . . . . . . . . . . . 13
6.6 Child lock . . . . . . . . . . . . . . . . . . . . . . . . . . . . . . . . . . . . . 13
6.7 Set/Change PIN . . . . . . . . . . . . . . . . . . . . . . . . . . . . . . . . . 15
6.8 On timer . . . . . . . . . . . . . . . . . . . . . . . . . . . . . . . . . . . . . . 16
6.9 Demo . . . . . . . . . . . . . . . . . . . . . . . . . . . . . . . . . . . . . . . . 16
7How to search for and store TV channels . . . . . . . . . 16
7.1 Installation menu . . . . . . . . . . . . . . . . . . . . . . . . . . . . . . . . 16
7.2 Select your language . . . . . . . . . . . . . . . . . . . . . . . . . . . . . . 16
7.3 Store TV channels . . . . . . . . . . . . . . . . . . . . . . . . . . . . . . . 17
7.4 Set your preferences . . . . . . . . . . . . . . . . . . . . . . . . . . . . . 18
7.5 Select your connections . . . . . . . . . . . . . . . . . . . . . . . . . . 19
7.6 Set your clock . . . . . . . . . . . . . . . . . . . . . . . . . . . . . . . . . . 19
7.7 Reset AV settings . . . . . . . . . . . . . . . . . . . . . . . . . . . . . . . . 20
8Create your favorite list . . . . . . . . . . . . . . . . . . . . . . . 20
8.1 Select a channel from the displayed list . . . . . . . . . . . . . . . . 20
8.2 Select another favorite channel list . . . . . . . . . . . . . . . . . . 20
8.3 Create or modify a favorite list . . . . . . . . . . . . . . . . . . . . . . 20
9 Electronic Program Guide . . . . . . . . . . . . . . . . . . . . . . 21
10 Multimedia browser . . . . . . . . . . . . . . . . . . . . . . . . . 21
10.1 To view content from a USB device . . . . . . . . . . . . . . . . . 21
10.2 Multimedia Browser menu . . . . . . . . . . . . . . . . . . . . . . . . . 21
11 To connect and operate accessory devices . . . . . . . . 23
11.1 Side panel overview . . . . . . . . . . . . . . . . . . . . . . . . . . . . . . 23
11.2 To make video and audio connections . . . . . . . . . . . . . . . . 24
11.3 Connect a recorder (VCR / DVD-R) . . . . . . . . . . . . . . . . . 25
11.4 Connect a recorder and a second A/V device . . . . . . . . . . . 25
11.5 Connect a DVD player/recorder, Set top box,
gameconsole,... with a HDMI connector . . . . . . . . . . . . . . 25
11.6 Connect a DVD player/recorder, Set top box,
gameconsole,... with a DVI connector . . . . . . . . . . . . . . . . 25
11.7 Connect a DVD player with a S-VIDEO connector . . . . . . .26
11.8 Connect a recorder and Set top
cable box with RF output . . . . . . . . . . . . . . . . . . . . . . . . . . 26
11.9 Connect a satellite receiver or Set top cable box
with A/V outputs . . . . . . . . . . . . . . . . . . . . . . . . . . . . . . . . 26
11.10 Connect a satellite receiver or Set top
box and a recorder with A/V outputs . . . . . . . . . . . . . . . . . 26
11.11 Connect digital source devices with Video
Component Output connectors (YPbPr) . . . . . . . . . . . . . . 26
11.12 Connect a Home theater amplifier . . . . . . . . . . . . . . . . . . 27
11.13 Connect a PC . . . . . . . . . . . . . . . . . . . . . . . . . . . . . . . . . . . 27
12 Problems . . . . . . . . . . . . . . . . . . . . . . . . . . . . . . . . . . 28
13 Glossary . . . . . . . . . . . . . . . . . . . . . . . . . . . . . . . . . . . 29
14 Recycling . . . . . . . . . . . . . . . . . . . . . . . . . . . . . . . . . . 29
15 Product information . . . . . . . . . . . . . . . . . . . . . . . . . .29
Annex
1 - Philips TV Slideshow Format with background music . . . . . . . .30
2 - Philips TV - Digital camera and USB issues . . . . . . . . . . . . . . .31
3 - Issues referring to connected peripherals with a
HDMI connector . . . . . . . . . . . . . . . . . . . . . . . . . . . . . . . . . .32
4 - Software update . . . . . . . . . . . . . . . . . . . . . . . . . . . . . . . . . . . .33
Index . . . . . . . . . . . . . . . . . . . . . . . . . . . . . . . . . . . . . . . . . . . . . . 35
1
ENGLISH
Manufactured under license from Dolby Laboratories.‘Dolby’ ‘Pro Logic’
and the double-D symbol are trademarks of Dolby Laboratories.
_________________________
HD programming
You must get HD programming to get an HD picture !
Call your Cable or Satellite service to order HDTV Programming.
_________________________
1 Safety warnings
_________________________
1.1 General
ç Do not insert the power plug in a wall socket or hang the TV to the
wall before all connections are made.
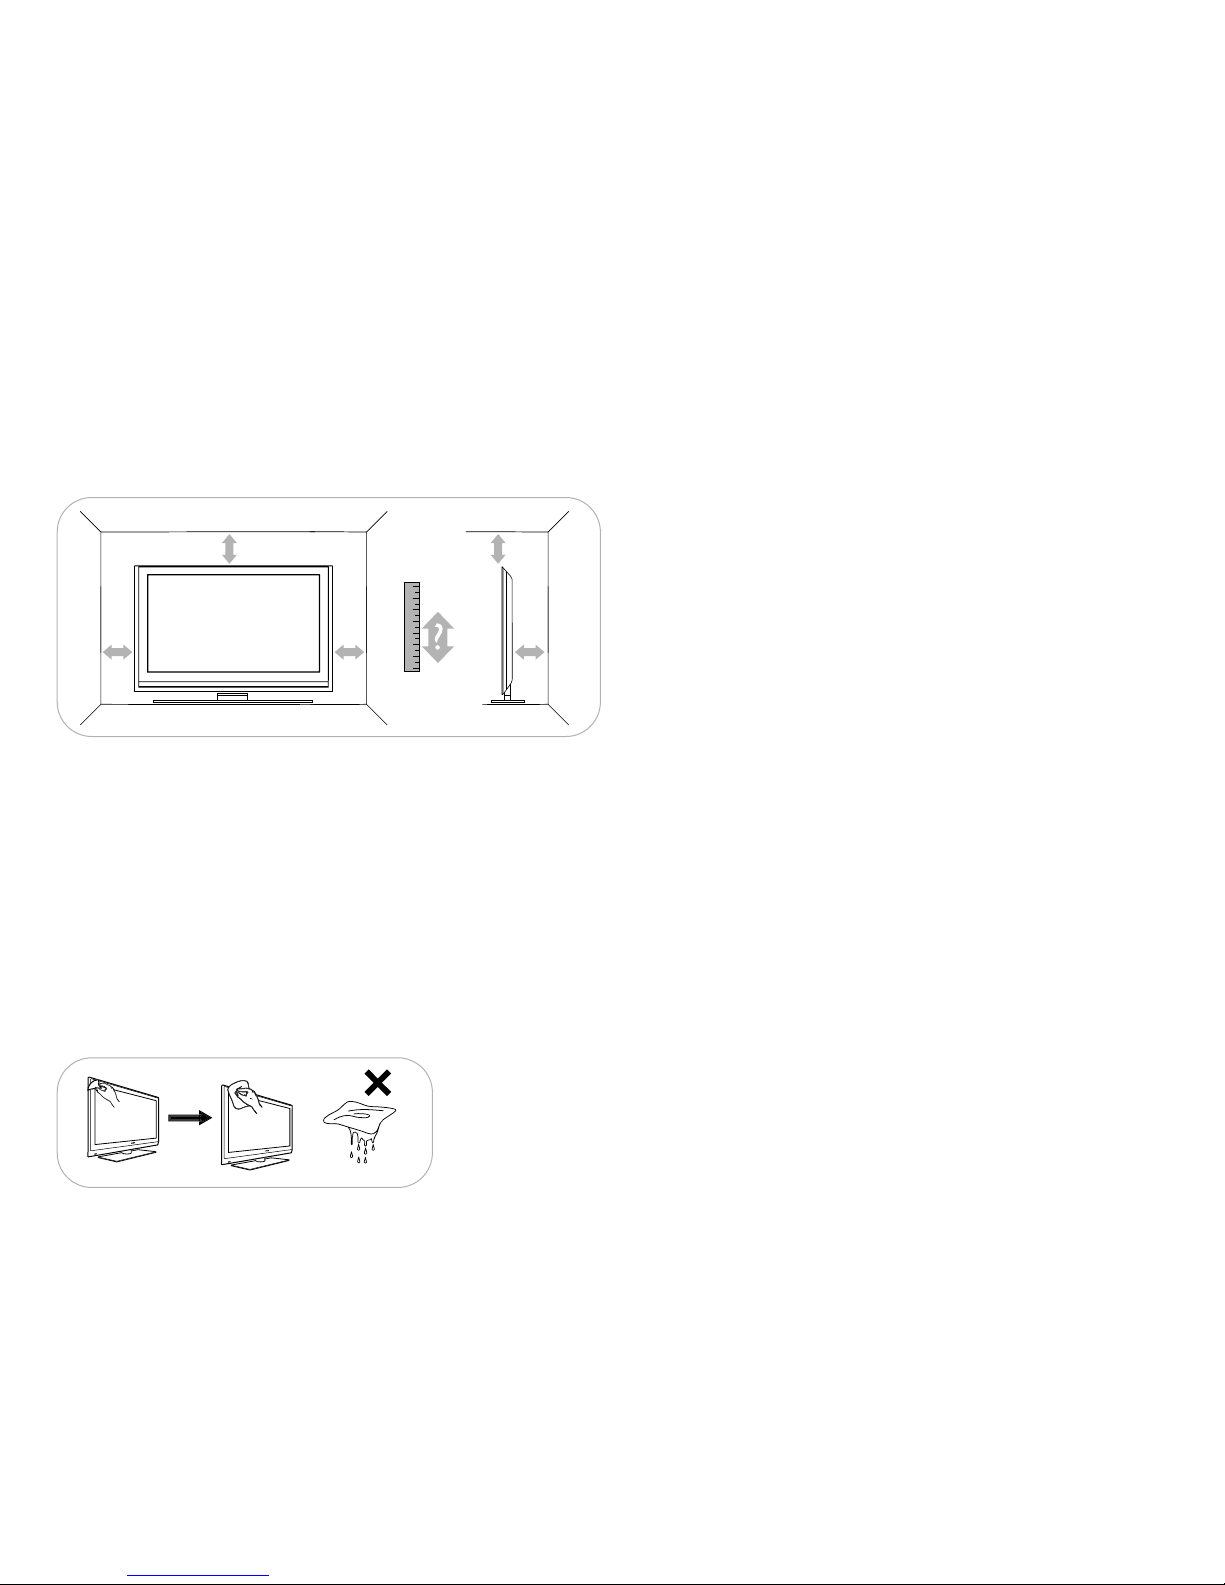
- Place or hang the TV wherever you want, but make sure that air can
circulate freely through the ventilation slots. Leave at least 4” to 6” free
all around the TV.
- Do not place the TV on a carpet.
- Do not install the TV in a confined space such as a book case or a
similar unit.
- To prevent any unsafe situations, no naked flame sources, such as lighted
candles, should be placed in the vicinity.
- Avoid heat, direct sunlight and exposure to rain or water.
- The equipment shall not be exposed to dripping or splashing.
-To prevent damaging the power (AC) cord which could cause a fire or
electric shock, do not place the TV on the cord.
_________________________
1.2 Care of the screen
Do not remove the protective sheet until you have completed the
stand/wall mounting and connection.
Please, handle with care. Use only the soft cloth supplied to clean the
glossy black front of the TV.
Do not touch, push or rub or strike the screen with anything hard as
this may scratch, mar or damage the screen permanently.
And please do not rub with dust clothes with chemical treatment.
Do not touch the surface with bare hands or greasy cloth (some
cosmetics are detrimental to the screen). Unplug the TV before cleaning
the screen.
When the surface becomes dusty, please wipe gently with absorbent
cotton or other soft materials like chamois soaks. Do not use acetone,
toluene and alcohol because they cause chemical damage. Do not use
liquid cleaners or aerosol cleaners.Wipe off saliva or water drops as
soon as possible.Their long time contact with the screen causes
deformations and color fading.
_________________________
1.3 Warning concerning stationary images on the TV
screen
A characteristic of LCD Panels is that displaying the same image for a
long time can cause a permanent after-image to remain on the screen.
Normal use of the TV should involve the showing of pictures that
contain constantly moving and changing images that fill the screen.
Examples of stationary images (this is not an all-inclusive list, you may
encounter others in your viewing):
- TV menus;
- Black bars: when black bars appear at the left and right side of the
screen, it is recommended to change to a picture format so that the
picture fills the entire screen;
- TV channel logo: present a problem if they are bright and stationary.
Moving or low-contrast graphics are less likely to cause uneven aging of
the screen;
- Stock market stickers: presented at the bottom of the TV screen;
- Shopping channel logos and pricing displays: bright and shown
constantly or repeatedly in the same location on the TV screen.
Examples of still pictures also include logos, computer images, time
display, teletext and images displayed in 4:3 mode, static images or
characters, etc.
ç Reduce contrast and brightness when viewing. When the same image
is displayed for 10 minutes, brightness will be reduced automatically.
Once burn-in occurs it will never disappear completely.
) Carefully pay attention to these remarks.The warranty does not
apply to damage caused by not taking into account the above
mentioned warnings on stationary images.
_________________________
1.4 Mounting
Installing the TV requires special skills that should only be performed by
qualified personnel.You should not attempt to do the work yourself.
Philips bears no responsibility for improper mounting or mounting that
results in accident or injury. Make sure that the wall mount is being fixed
securely enough so that it meets safety standards.
) If the TV is mounted on a swivel base or swivel arm, ensure no strain
is placed on the power cord when the TV is swivelled. Strain on the
power cord can loosen connections.This may cause arcing and result in
fire.
________________________
1.5 Electric, Magnetic and Electromagnetic Fields (EMF)
- Philips Royal Electronics manufactures and sells many products targeted
at consumers, which, like any electronic apparatus, in general have the
ability to emit and receive electromagnetic signals.
- One of Philips’ leading Business Principles is to take all necessary health
and safety measures for our products, to comply with all applicable
legal requirements and to stay well within the EMF standards applicable
at the time of producing the products.
- Philips is committed to develop, produce and market products that
cause no adverse health effects.
- Philips confirms that if its products are handled properly for their
intended use, they are safe to use according to scientific evidence
available today.
- Philips plays an active role in the development of international EMF and
safety standards, enabling Philips to anticipate further developments in
standardization for early integration in its products.
2
4" - 6"4" - 6"4" - 6"
4" - 6"
4" - 6"
_________________________
1.6 Pixel characteristics
Your TV display is made with high-precision technology with a high
number of color pixels.Although it has effective pixels of 99,999% or
more, black dots or bright points of light (red, green or blue) may appear
constantly on the screen.This is a structural property of the display
(within common industry standards) and is not a malfunction.
______________________
1.7 VESA Compliance Information for Professional
Installation
) Caution
Consult a Home Theater installation professional.
Improper mounting could result in severe injury or damage.
Koninklijke Philips Electronics NV bears no responsibility for improper
mounting or mounting that results in accident or injury.
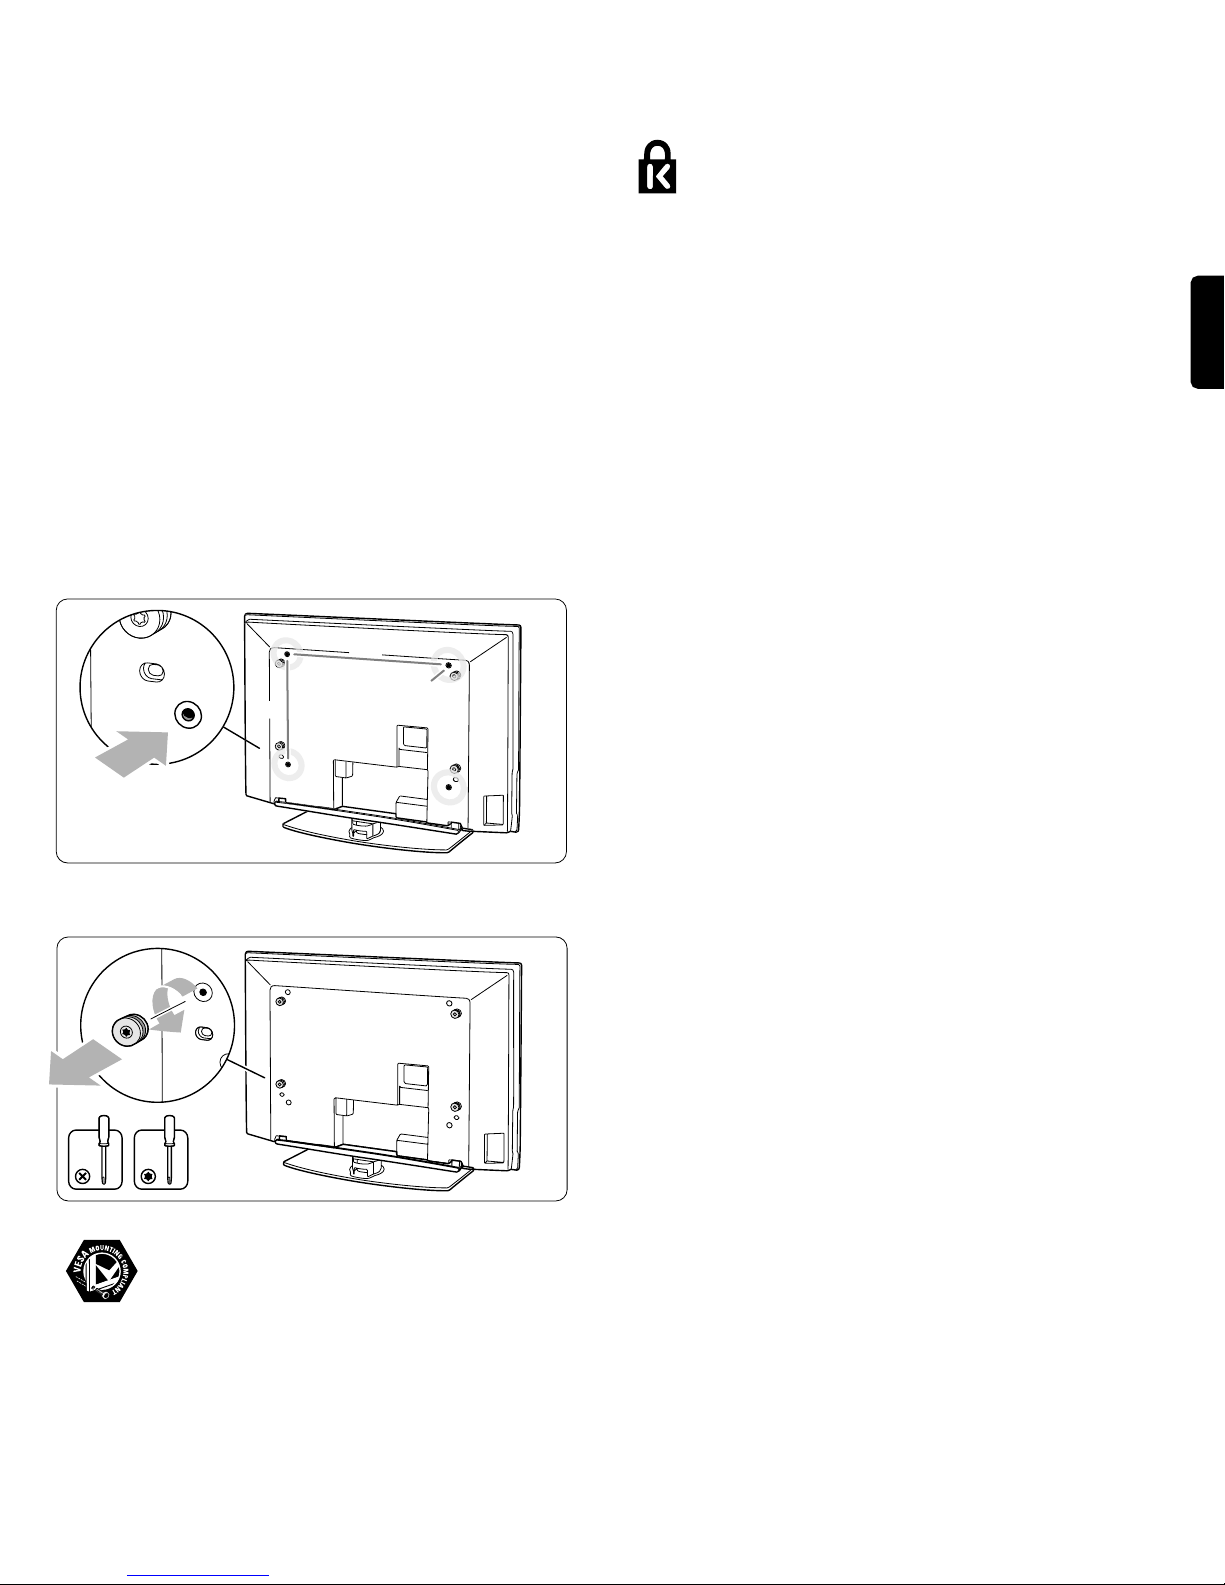
Your TV is prepared for VESA compliant wall mounting.
This bracket is not included. Use a VESA compliant bracket with code
VESA MIS-F, 600, 400, M8.
Consult your dealer for more information.
‡ Locate the VESA screwholes on the back of the TV.
® Should the plastic discs obstruct the VESA bracket, you can unscrew
these 4 discs.
VESA, FDMI and the VESA Mounting Compliant logo are trademarks of the
Video Electronics Standards Association.
_______________________
1.8 Kensington Security Slot (if present)
Your TV is equipped with a Kensington Security Slot, to
prevent it from getting stolen.
An anti-theft Kensington lock has to be purchased separately.
The Kensington lock is a plastic-coated steel cable with a lock. One
end has to be fixed to the opening of the TV and locked with a special
button.The other end is attached to a fixed point.
® Kensington and MicroSaver are registered US trademarks of ACCO World
Corporation with issued registrations and pending applications in other
countries throughout the world. All other registered and unregistered
trademarks are the property of their respective owners.
3
ENGLISH
0
0
6
8
M
0
0
4
4x
4x
_________________________
2.1 Connection overview
There is a wide range of audio and video devices that can be
connected to your TV. See Chapter 11 How to connect and
operate accessory devices.
_________________________
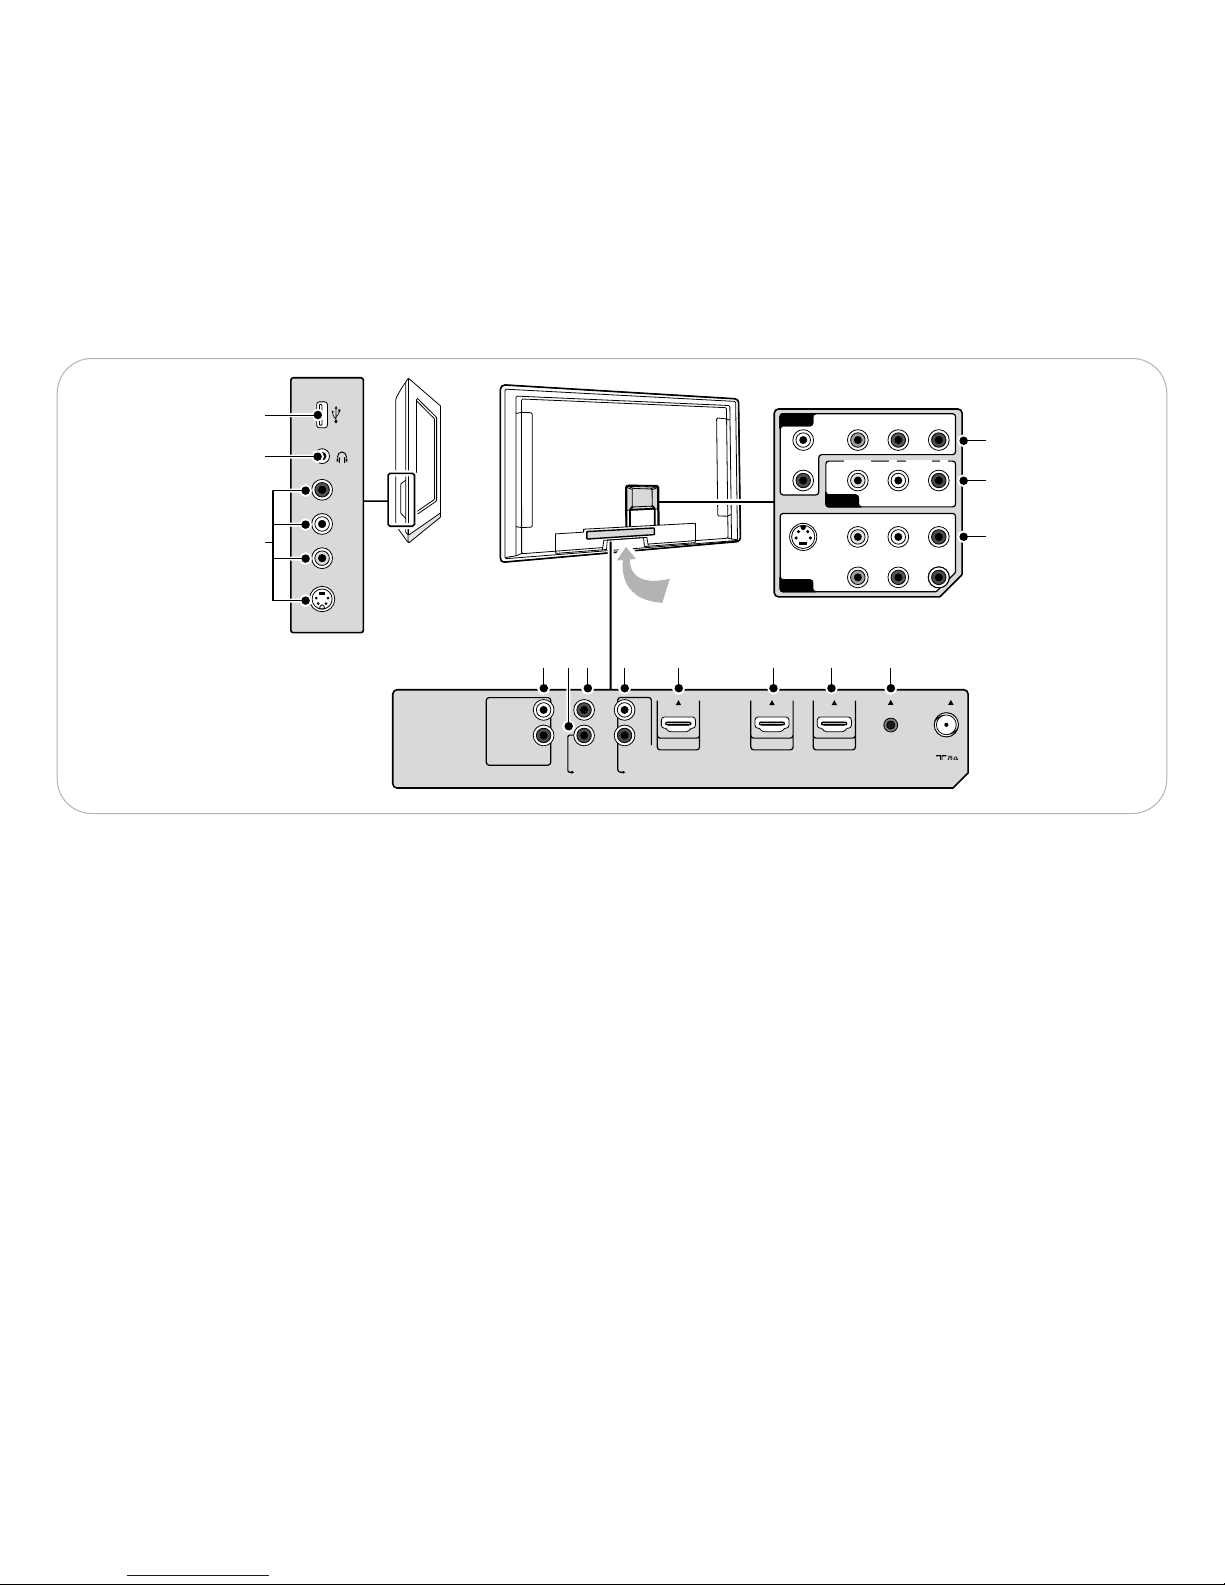
2.1.1 Back connections
1-2-3
AV1 - AV2 - AV3
To connect devices with
- an S-Video connector and L and R audio cables
-devices with 3 separate Component Video Output
connectors (YPbPr) and Analog L and R audio cables
-devices with Video and Audio L and R AV cables.
4-5-6
HDMI *
To connect a device with a HDMI connector. If the accessory
device has a DVI output only, see Chapter 11.7.
7 Analog Audio In L/R
Analog audio for devices connected to a HDMI connector.
8 Digital Audio Out
To connect a digital Home theater amplifier.
9 Digital Audio In
10 Audio Out L/R
11 Service UART
For use only by authorized service personnel.
ç For installers/integrators: Do not connect RS232 without
level shifter.
_________________________
2.1.2 Side connections
12 To connect devices with Video or S-Video and Audio Left and
Right AV cables.
(For ex. camera, camcorder, game, audio,...)
13 To connect your headphone.
14 To connect a USB device.
* According to your type of set, 2 or 3 HDMI connectors are
available.
4
_________________________
2 Getting started
Welcome to the growing family of owners of Philips.
à Before installing your TV or before hanging it on the wall, first
connect your accessory devices.
) Do not insert the power plug into the mains at the bottom of the
TV and in a wall socket before all connections are made.
VIDEO
S VIDEO
AUDIO
L
R
BSU
L
R
AUDIO
YPbPr
VIDEO
Y
S VIDEO
AUDIOLR
Pb Pr
VIDEO L RAUDIO
AV 3
AV 1
AV 2
14
13
12
3
2
1
ANTENNA
SERVICE
UART
AUDIO OUT
L
R
ANALOG
AUDIO IN
OUT
IN
DIGITAL
AUDIO
L
R
DISPLAY SYNCHRONIZED
HDMI 1AV 1 HDMI 1
HDMI 2AV 2 HDMI 2
HDMI 3AV 3 HDMI 3
DISPLAY
SYNC.
++
HDMI 1 HDMI 2 HDMI 3
42"-47"-52"
10 9 8 7 6 5 4 11
_________________________
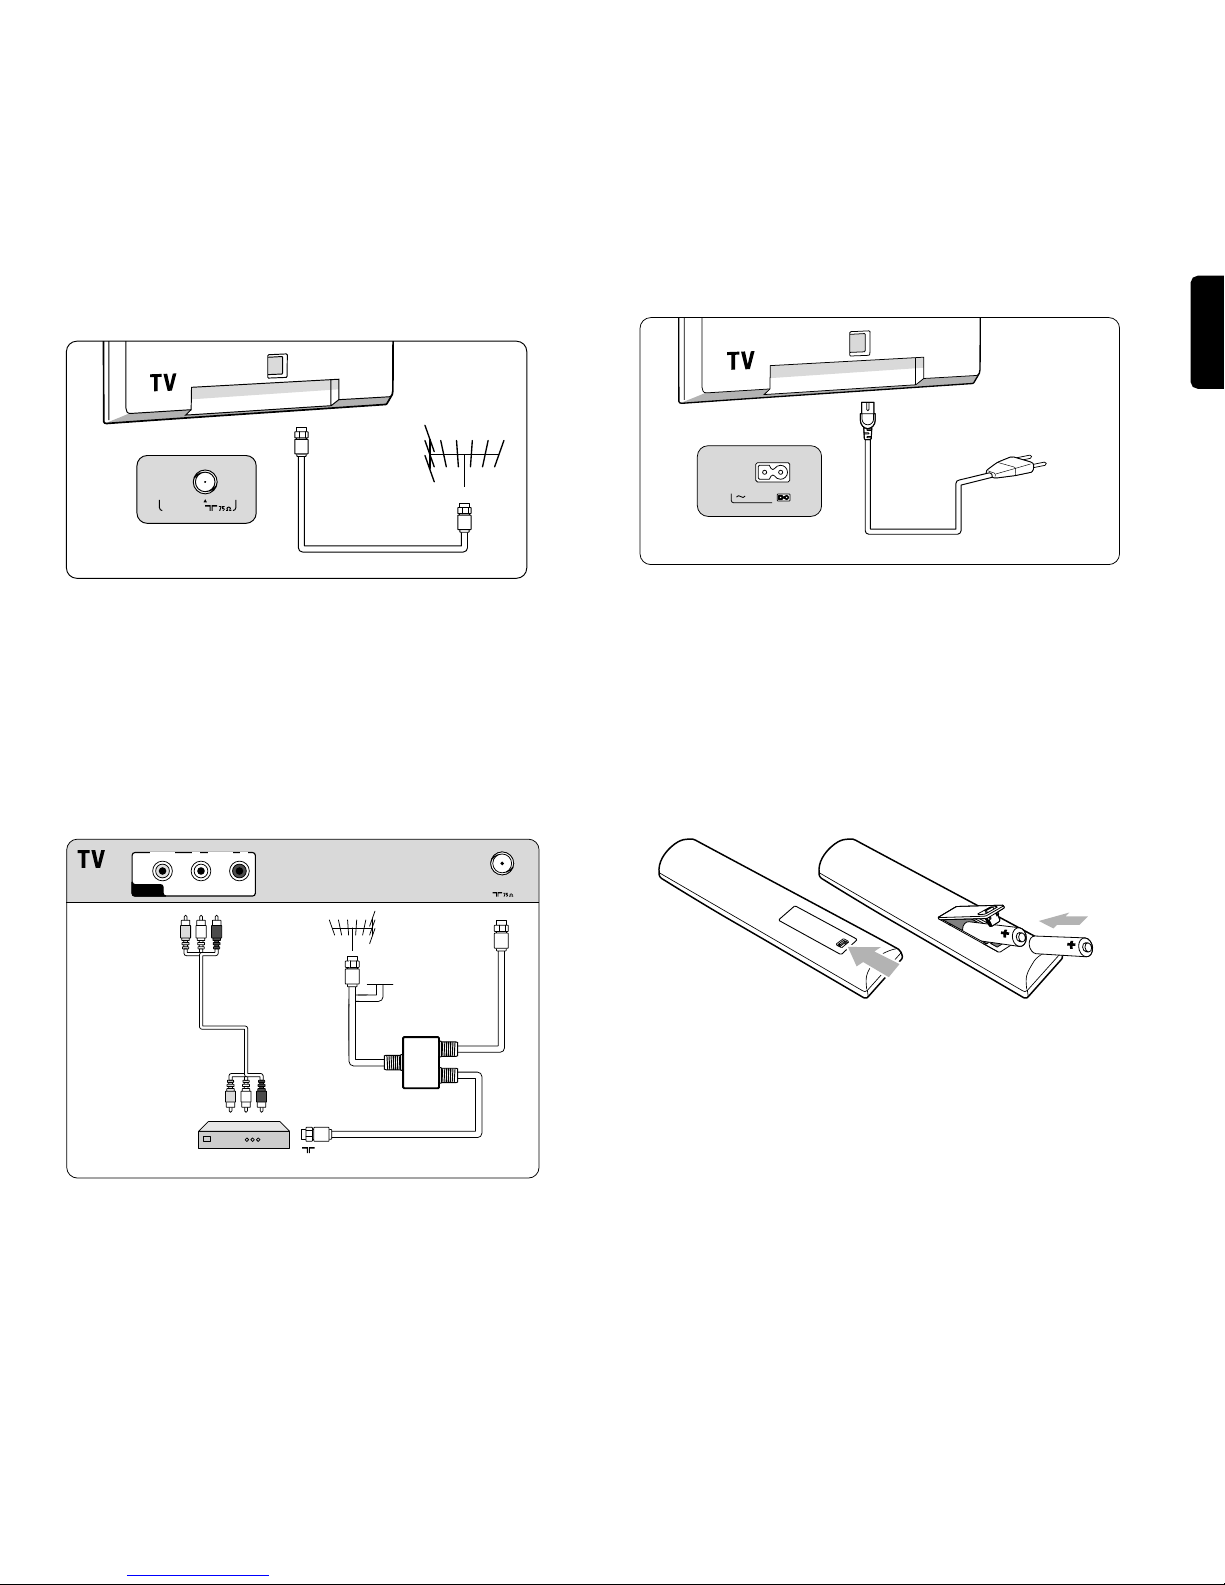
2.1.3 Connect to the TV
Your Philips Digital TV will allow you to enjoy digital programs directly
from your cable or off air.
Connect directly to the TV or connect via your current cable box or
Satellite Receiver box.
________________________
2.1.3.1 Directly to the TV (you will not be able to receive pay
channels)
‡ Connect the cable TV signal or the incoming antenna signal to the
ANTENNA x 75Ω jack at the bottom of the TV.
® See Chapter 7.3 Store TV channels for details on using
Autoprogram to store channels in the TV’s memory.
ç- Broadcasters are in the middle of a transition from analog to digital
TV.This means that a given broadcaster will have two channels on the
air, one analog and one digital.
- This connection will supply stereo sound to the TV if it is being
broadcast by the station you are watching.
________________________
2.1.3.2 Via a cable box or Satellite box
‡ Maintain the connection of the TV cable of your home into your
cable box (or satellite receiver box).
® Connect your Cable box (or satellite receiver box) to the back of
the TV using the best connection options. See Chapter 11.2 To
make audio and video connections.
Ò Select the source using the
SOURCE button on the remote control.
† Press the
OK button to confirm your selection.
à For more information, please refer to your cable box (or satellite
receiver box) manual.
ç Watching Cable TV programs that don’t require the cable
box
Since you’ve connected the cable TV signal directly to the TV’s tuner,
you can also watch the unscrambled programs by simply tuning to
the desired channel.You must first use Autoprogram, however, to
store channels in the TV’s memory. See Chapter 7.3.
This connection will supply stereo sound to the TV if it is being
broadcast by the station you are watching.
_________________________
2.1.4 Connect the mains
) Verify that the power supply voltage corresponds to the voltage
printed on the sticker at the back of the TV. Contact your local
dealer if your power supply is different.
) Ensure the power cord is fully inserted in the TV mains socket and
the wall socket.
_________________________
2.1.5 Remote control
Insert the 2 batteries supplied (Type R03-1,5V).
Be sure the (+) and (-) ends of the batteries line up correctly (inside of
case is marked.)
5
ENGLISH
ANTENNA
OUT
Set top box
CABLE
RF IN
AV2
L + R + VIDEO
SIGNAL
SPLITTER
ANTENNA
VIDEO L RAUDIO
AV 2
MAINS
_________________________
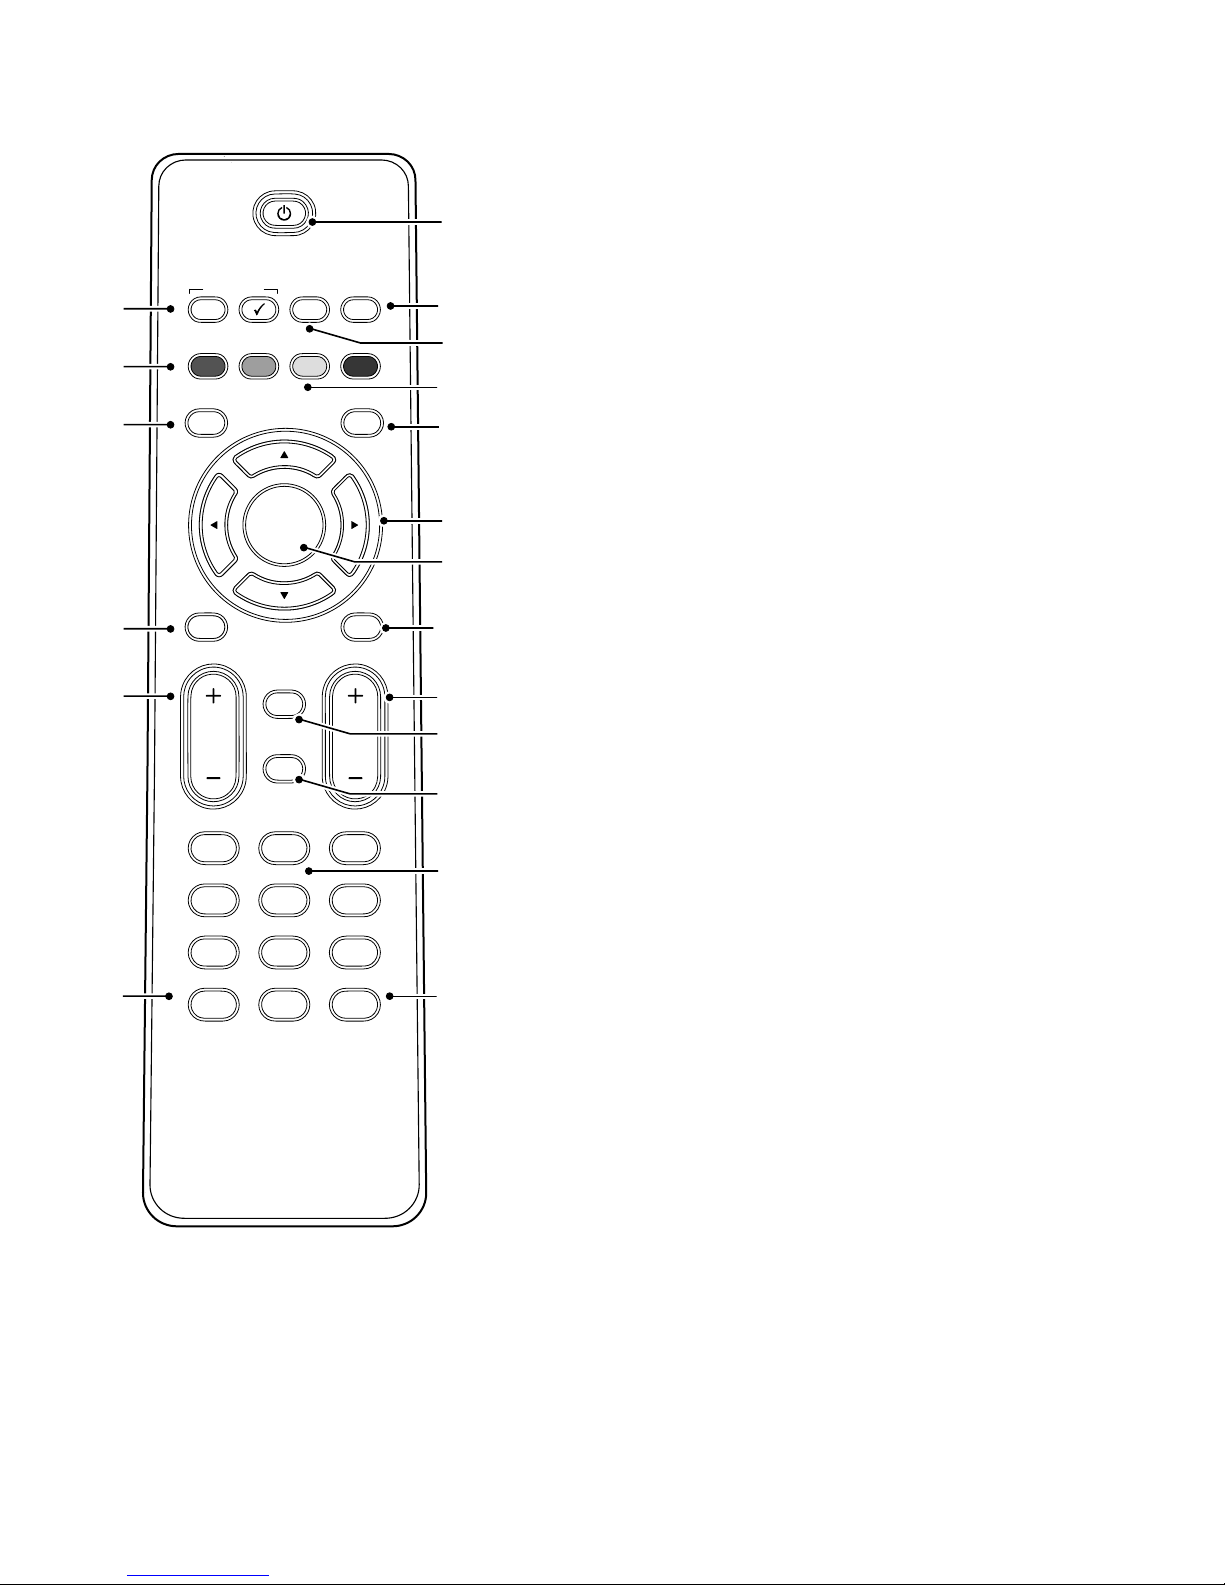
3 Use of the remote control RC 2033601/01
Due to the sensitivity of the remote control, you may experience a
delayed operation at start up of the TV.After a short while your remote
control will work smoothly.
1
POWER Press to turn the TV on/off.
2
FAVORITES
- VIEW
To display the last selected list.You can create up to four
favorite lists. See Chapter 8 Create your favorite list.
- ✔ No function
3 CC Select On, off or On during mute to activate/de-activate
Closed Captions. See Chapter 6.1 Closed Captions.
4
ACTIVE CTRL Press to select Active Control on/off.
See Chapter 5.2.2 Adjust picture menu settings.
5 Color buttons When functions are attached to the color buttons,
the color buttons are shown on screen.
6
DEMO Demo on/off.
7
OPTION To open and close the Quick access menu which
contains a few frequently used options, like Closed captions, Picture
format,... See Chapter 3.1 Use of the Option button.
8
INFO
Display information:Press to display (when available) information
about the selected TV channel and program or accessory device.The
quality and accuracy of the information on the information banner
are transmitted from broadcasters.You may see a difference in
broadcast time if the broadcaster is from a different time zone area.
Display clock: Select to activate/de-activate the clock display on the
screen.
9 Cursor buttons Press the cursor buttons up/down, left/right to
navigate through the menus.
10
OK - To activate a setting.
- To display the list of channels stored (according to the selection
made in the Installation mode - Antenna or Cable, see Chapter 7.3
Store TV channels).
- Starts playing content in the Multimedia Browser application. See
Chapter 10 Multimedia browser.
11
MENU/EXIT Settings menu on/off. See Chapter 5.2 Use of the
TV menu settings.
12
FORMAT See Chapter 3.2 Picture format.
13
VOLUME Press + or - to adjust the volume.
14 Channel selection
-To browse through the TV channels or sources stored and marked in
the selected Favorite channels list. See Chapter 8 Create your
favorite list;
-To quickly browse through the list in the menus;
-To select between Antenna or Cable TV channels, first make your
selection in the Installation menu, Channel installation, Installation
mode, see Chapter 7.3 Store TV channels.
15
MUTE Interrupt the sound or restore it.
16
PREV CH Press to alternate between the currently viewed channel
and the previously viewed channel.
17 Numeric buttons To select a TV channel.
18
SOURCE Press repeatedly to select AV1, AV2, AV3, HDMI 1,
HDMI 2, HDMI 3, Side or TV channels according to where you
connected the accessory devices.
19
- Type the dot (•) for digital channels.
6
FAVORITES
POWER
ACTIVE CTRLCC
DEMO
OPTION INFO
VIEW
OK
FORMATEXIT
MENU
123
456
789
0
.
SOURCE
MUTE
PREV CH
CHVOL
12
10
1
2
6
7
11
13
8
9
4
3
14
17
18 19
15
16
5
_________________________
3.1 Use of the OPTION button
The OPTION button allows you to display the Quick access menu
which will give you direct access to some features and menu options.
‡ Press the
OPTION button.
> The Quick access menu appears.
® Press the cursor up/down to select a menu item.
Ò Press the
OK button to jump to the selected menu item in the TV
menu (except for the clock option).
† Use the cursor buttons to make a selection.
º Press the
OPTION button to exit.
Audio language
See Chapter 5.2.3 Adjust Sound menu settings.
Closed captions
See Chapter 6 Adjust Feature menu settings.
Picture format
See Chapter 5.2.2 Adjust Picture menu settings, or Chapter 3.2
Picture format.
Equalizer
See Chapter 5.2.3 Adjust Sound menu settings.
Clock
Select to activate/deactivate the clock display on the screen.
_________________________
3.2 Widescreen picture format
Avoid black bars on the sides or on top and bottom of the picture.
Change the picture format to a format that fills the screen.
‡ Press
FORMAT to switch on the Picture format menu.
® Press o or œ to select an available picture format.
Ò Press o to shift the picture upwards to make partly covered
subtitles visible.
à Tip
The format Automatic is recommended for minimal distortion.
Automatic (Not for PC.)
Enlarges the picture automatically to fill the
screen. Subtitles remain visible.
Super zoom (Not for HD.)
Removes the black bars on the side of 4:3
broadcasts.There is a minimal distortion.
4:3 (Not for HD.)
Shows the classical 4:3 format.
Movie expand 14:9 (Not for HD.)
Scales classical 4:3 format to 14:9.
Movie expand 16:9 (Not for HD.)
Scales classical 4:3 format to 16:9.
Wide screen
Stretches 4:3 format to 16:9.
Unscaled (Only for HD and PC.)
Maximum sharpness. Distortion may appear on
borders. Black bars may appear with pictures
from your PC.
rNote
Do not forget to name the connection in the Connections menu. See
chapter 7.5 Select your connections.
_________________________
3.3 Buttons on the left of the TV
Should your remote be lost or broken you can still change some of the
basic settings with the buttons on the left side of your TV.
Press the POWER B switch to turn the TV on.
The
MENU button can be used to summon or exit the TV menu
without the remote control.
Use the
VOLUME + and - buttons to adjust the volume.
Use the
CHANNEL + and - buttons to browse through the TV channels
and sources stored and marked in the Favorite channel lists.
_________________________
3.4 Turn the TV on
< Press the B POWER switch at the left side of the TV.
> An indicator on the front of the TV lights up.
< Press the
+ CH - button or the POWER button on the remote
control.
ç The first time (and only the first time) you turn on your TV, you see
a welcome screen followed by the installation procedure. See
Chapter 4 First time installation.
ENGLISH
7
Quick access
Audio language
Closed captions
Picture format
Equalizer
Clock
+ CHANNEL -
+ VOLUME
-
MENU
B POWER
_________________________
4 First time installation
The installation procedure consists of a series of screens that will guide
you through the installation of your TV. Follow the instructions on
screen.
ç If the TV has already been installed before and/or you want to
change the First time installation settings, proceed with Chapter 5.2
Use of the TV menu settings.
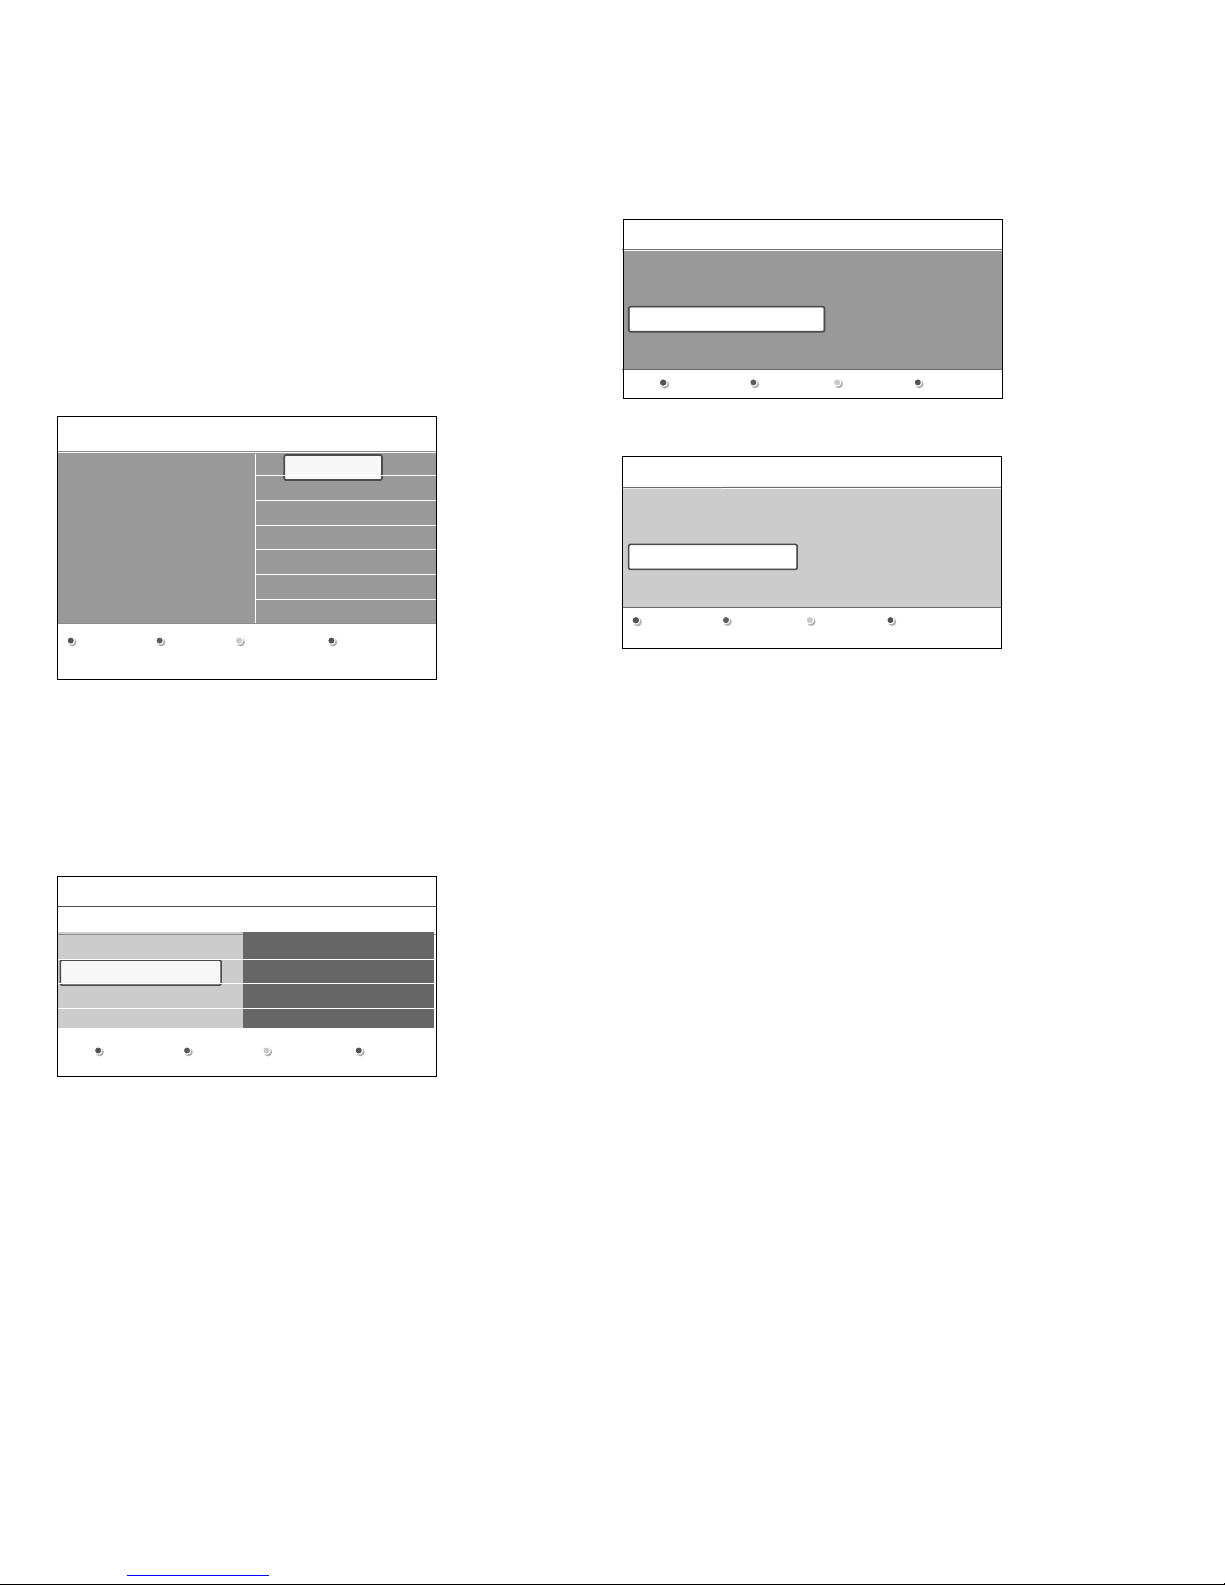
Step 1 - Select your on-screen language
After the Welcome screen you are asked to select a language of the TV's
on-screen menus.The text of the header and the info on screen
continuously change language.
‡ Press the cursor up/down to highlight your language.
® Press the
OK button on the remote control.
Ò Follow the instructions on screen to proceed.
Step 2 - Complete the initial TV installation procedure
‡ Press the green color button on your remote control to start the
television installation.
® Select Cable or Antenna in the Installation mode and press the
green color button.
> When Antenna is selected, the TV will detect antenna signals
and will search for antenna TV (NTSC and ATSC) channels
available in your local area.
> When Cable is selected, the TV will detect cable company
supplied signals and will search for cable TV (NTSC, ATSC, QAM
modulated) channels available in your area.
Ò Press the green color button on your remote control to start the
Automatic channel installation.
> All available TV channels are searched for and stored
automatically.This will take a few minutes.When the search is
complete, the menu will indicate the number of digital and analog
channels found.
ç If you choose to install the channels at a later time, see Chapter 7.3
Store TV channels to select Autoprogram to scan available
channels.
† Press the red color button when the search is completed.
Step 3 - Settings assistant: select your TV settings
The Settings assistant will help you to select your preferred picture and
sound settings. Finally you will arrive at a complete setting which satisfies
you.
‡ Press the green color button on your remote control to enter the
Settings assistant menu.
® Select your location with the cursor up/down.
> If you choose Home it will start display the Settings assistant.
> If you choose Retail store it will skip the Settings assistant.
The TV parameters for Picture and Sound will then be set to
predefined fixed settings.
Ò Press the green color button again to proceed.
† Use the cursor left/right to each time select your preferred screen.
º Press the green color button to each time confirm your selection
and to jump to the following screen.
> The following items will be presented sequentially.
In the header it is mentioned how many screens have been
completed and how many screens there are in total.
◊When finished, press the green color button twice to store all the
settings and to return to the TV installation menu.
ç When you skip or stop the Settings Assistant, the Standard settings
Philips selected for you will be chosen.
‹Press the red color button to finish the First time installation
procedure and to display the first stored TV channel.
ç At any time you can change or reset your settings or adjust
individual settings for Picture and Sound in the TV Settings menu. See
Chapter 5.2.1 Adjust viewing and listening settings.
To control the settings of special TV functions, features and
accessory devices, see Chapter 6 Adjust Feature menu settings.
8
Menu language
English
Français
Español
Português
.............
Please select your
language.....
PHILIPS
using cursor up and down
NEXT
Previous Next
Installation mode
PHILIPS Television installation
Please select your
installation mode.
Antenna
Cable
Previous Next
PHILIPS Installation
This will help you to install the following sections:
Television installation
Settings assistant
SkipPrevious Next Stop
PHILIPS Settings assistant
Please select your location before continuing:
Home
Retail store
_________________________
5How to navigate through the menus
_________________________
5.1 Introduction
A lot of guiding instructions, help texts and messages will be displayed on
your TV when you use the menus or when you try to execute an action.
Read the help texts which are being displayed on the specific item
highlighted.
The color buttons at the bottom of the screen refer to the different
actions which may be executed.
Press the corresponding color button on the remote control to perform
the required or desired action.
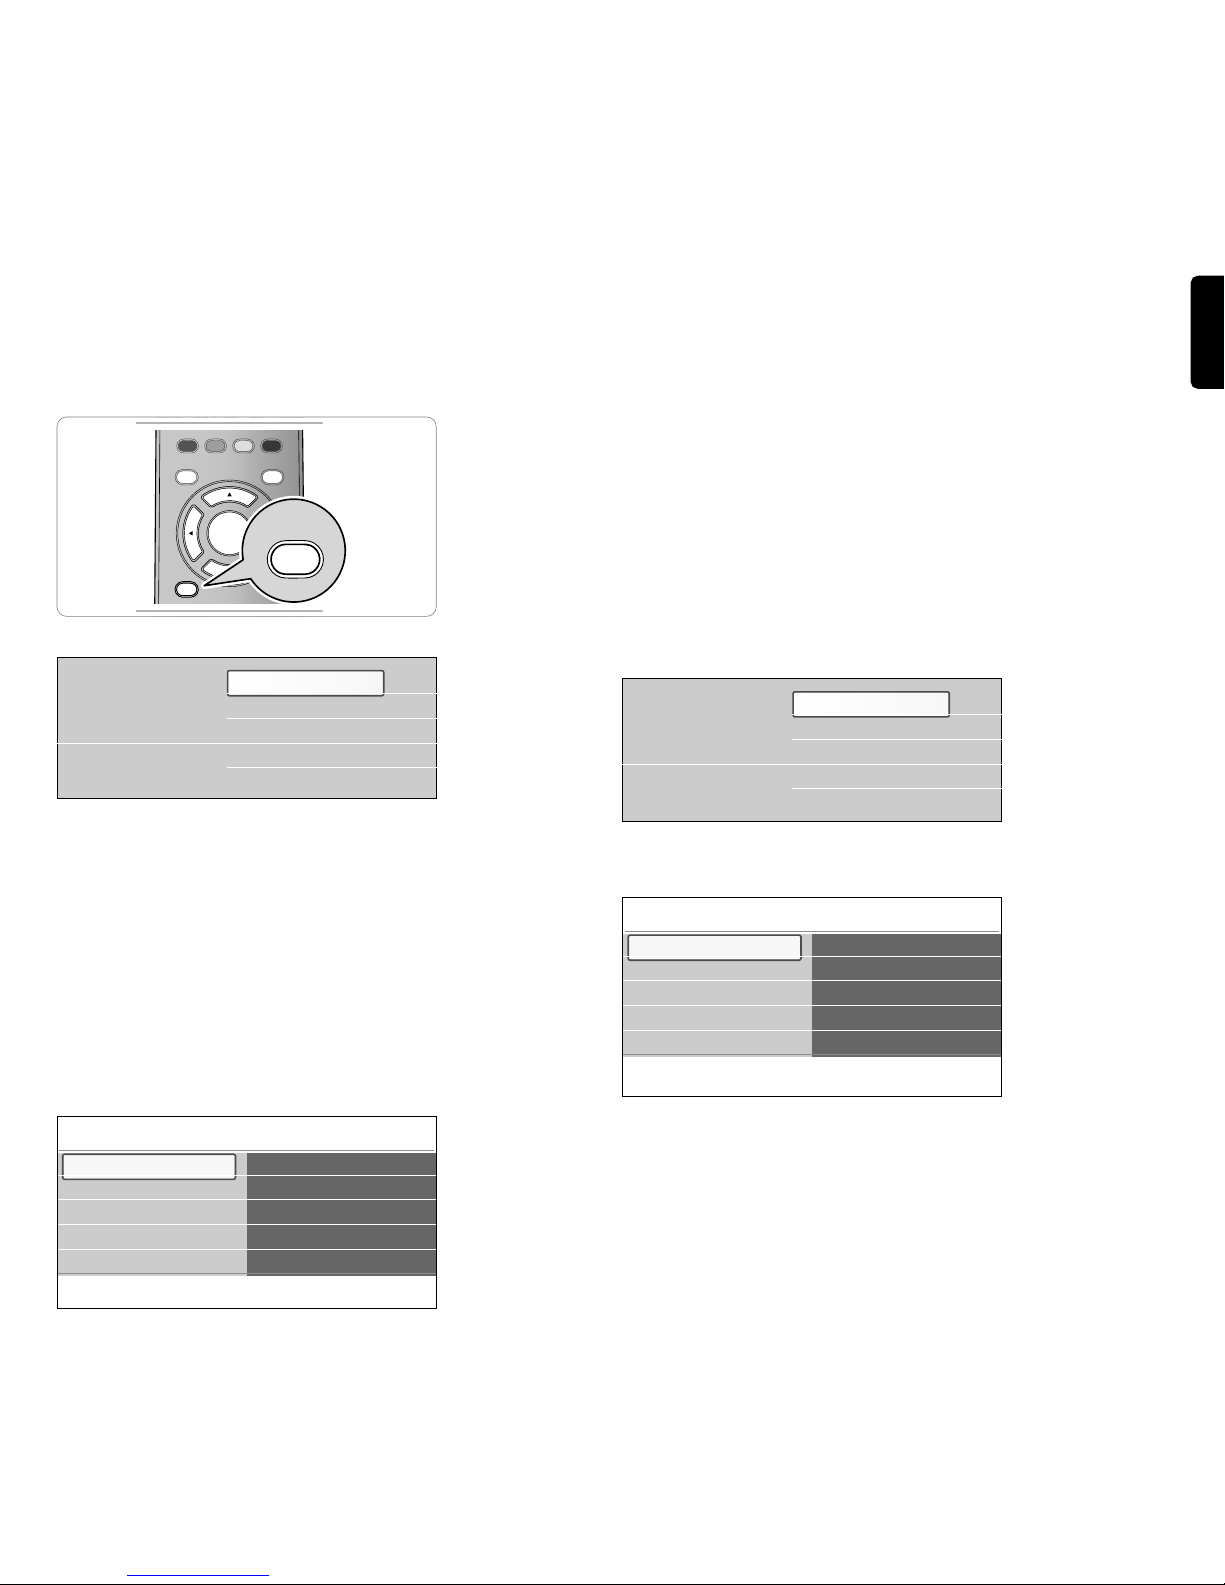
‡ Press the
MENU button on the remote control.
> The main menu appears on the screen.
- TV menu allows you to access the TV menu. See below.
- Channel list allows you to access the TV channel list and to
create up to four favorite lists with your preferred TV channels. See
Chapter 8 - Create your favorite channel list.
- Program guide allows you to access detailed information about
individual digital TV programs.
- Multimedia allows you to access the Multimedia browser
application. It lets you display your personal multimedia (pictures,
audio) files. Multimedia is only present when a USB device is
connected. See Chapter 10 Multimedia browser.
® Use the cursor up/down to highlight and select a menu item.
Ò Use the cursor right to enter the highlighted menu item.
> The right panel shows the content of the highlighted menu item.
† Use the cursor up/down to select a menu item.
- TV settings allows you to adjust your preferred picture and
sound settings
- Features allows you to control the settings of special TV features
- Installation allows you
- to select your menu language;
- to search for and store your TV channels;
- to do a weak ATSC digital channel installation;
- to set or adjust various special functions;
- to select connected peripheral equipment;
- to reset your picture and sound settings to the factory standard
settings;
- to update your TV software.
- Software update allows you to update your current software.
º Press the cursor right to enter the highlighted menu item.
> The content of the right panel is moved to the left panel and the
right panel now shows the content of the newly highlighted item
in the left panel.
ç In some cases it is important that the picture can be watched while
you adjust the settings.This means that when the highlight is on the
right side panel, the other menu items hide away. When the cursor
left is pressed, the hidden menu items reappear and the highlight
moves to the left panel.
◊Press the
MENU button to exit the main menu.
_________________________
5.2 Use of the TV menu settings
The TV menu allows you to access and change settings and preferences
in case you want to change the First time installation settings and/or you
want to control the settings of special TV functions, features and
peripheral equipment.
_________________________
5.2.1 Adjust viewing and listening settings
‡ Press the
MENU button on the remote control.
> The main menu appears on the screen.
® Select TV menu and press the cursor right.
> The TV menu is displayed.
Ò Select TV settings and press the cursor right.
> The TV settings menu is moved to the left.
† Press the
MENU button to exit the menu.
To make it easier to change the settings of the TV, there are 3 ways of
doing it. See further.
ENGLISH
9
DEMO
OPTION INFO
VIEW
OK
FORMATEXIT
MENU
EXIT
MENU
Info
TV menu
TV settings
Settings assistant
Reset to standard
Picture
Sound
TV settings
Features
Installation
Software update
Television
Multimedia
TV menu
Channel list
Program guide
USBdevice 1
Television
Multimedia
TV menu
Channel list
Program guide
USBdevice 1
Info
TV menu
TV settings
Settings assistant
Reset to standard
Picture
Sound
TV settings
Features
Installation
Software update
A. Change settings in an easy-to-use manner with the Settings
assistant
Each time you've made a selection, press the green color button to
confirm your selection.
‡ Select Settings assistant and press the cursor right.
> By means of several split screens/full screens you are prompted to
select your preferred picture and sound settings to finally arrive at a
complete setting which satisfies you. See Chapter 4 First time
installation, Step 3 - Settings assistant.
® Press the green color button to return to the TV menu again.
B. Use of the Standard settings
This allows you to reset your settings for viewing and listening to
predefined factory settings.
‡ Select Reset to standard and press the cursor right.
> A menu appears which allows you to select one of the standard
settings for viewing and listening.
- Current shows your current settings for viewing and listening.
- If you select Natural, it allows you to set your picture and sound
settings to the recommended standard values. In most cases this
will give the best balanced viewing experience.
- If you select Vivid, it allows you to set your picture and sound
settings to rich values, making use of the TV capabilities to its full
extend.
- If you select Movie, it allows you to set your picture and sound
settings to the purest representation of the original source content.
® Press the green color button to store the selected setting.
C. Individual settings for picture and sound
< Select Picture or Sound and press the cursor right.
> A menu appears which allows you to fine tune the picture and
sound settings.
> To adjust the Picture settings, see Chapter 5.2.2 Adjust picture
menu settings.
> To adjust the Sound settings, see Chapter 5.2.3 Adjust sound
menu settings.
_________________________
5.2.2 Adjust Picture menu settings
The picture menu contains the settings that affect the quality of the
picture.
‡ Press the
MENU button on the remote control.
> The main menu appears.
® Select TV menu and press the cursor right.
> The TV menu is moved to the left.
Ò Select TV settings and press the cursor right.
> The TV settings menu is moved to the left panel.
† Select Picture and press the cursor right.
> The Picture menu is moved to the left panel.
º Use the cursor up/down to select the Picture menu items.
◊Press the cursor right to enter the selected Picture menu item.
‹Use the cursor buttons to adjust the settings.
≈Press the cursor left to return to the Picture menu.
Contrast
Adjusts the intensity of bright parts in the picture but keeps the dark
parts unchanged.
Brightness
Adjusts the light output of the complete picture, which will mainly affect
the darker areas of the picture.
Color
Adjusts the saturation level of the colors to suit your personal
preference.
Tint
Allows you to select the color mix (tint) of the picture.
Sharpness
Adjusts the sharpness of fine details in the picture.
Color temperature
Increases or decreases Warm (red) and Cool (blue) colors to suit
personal preferences.
< Select Cool to give the white colors a blue, Normal to give the
white colors a neutral, Warm to give the white colors a red tint.
< Select Custom to make customized settings.
‡ Press the green color button.
> The Custom color temperature screen appears.This allows
you to fine tune the white point (
WP) and black level (BL) of
the picture.
® Use the cursor buttons to select and adjust the settings of:
R-WP: allows you to customize the color temperature by adjusting
the red whitepoint of the picture.
G-WP: allows you to customize the color temperature by adjusting
the green whitepoint of the picture.
B-WP: allows you to customize the color temperature by adjusting
the blue whitepoint of the picture.
R-BL: allows you to customize the color temperature by adjusting
the red blacklevel of the picture.
G-BL: allows you to customize the color temperature by adjusting
the green blacklevel of the picture.
Ò Use the color buttons to reset to the predefined settings.
† Press the red color button or the cursor left to return to the
Picture menu.
10
Info
TV menu
TV settings
Reset to standard
Current
Natural
Vivid
Movie
Settings assistant
Reset to standard
Picture
Sound
TV menu
TV settings
Info
Picture
Contrast
Brightness
Color
Tint
Sharpness
Color temperature
Perfect Pixel HD
120 Hz Clear LCD
Dynamic contrast
Noise reduction
MPEG artefact reduction
Color enhancement
Active Control
Light sensor
Picture format
Settings assistant
Reset to standard
Picture
Sound
 Loading...