

Page 1
中文 English
32PFL7422
37PFL7422
42PFL7422
47PFL7422
37HF7005
User Manual
Quick Start Guide Inside !
用戶手冊
內附快速使用指南!
Model No.:
Serial No.:
P41TP002813 1G
Page 2
How to make the optimal connection?
如何進行最佳連接?
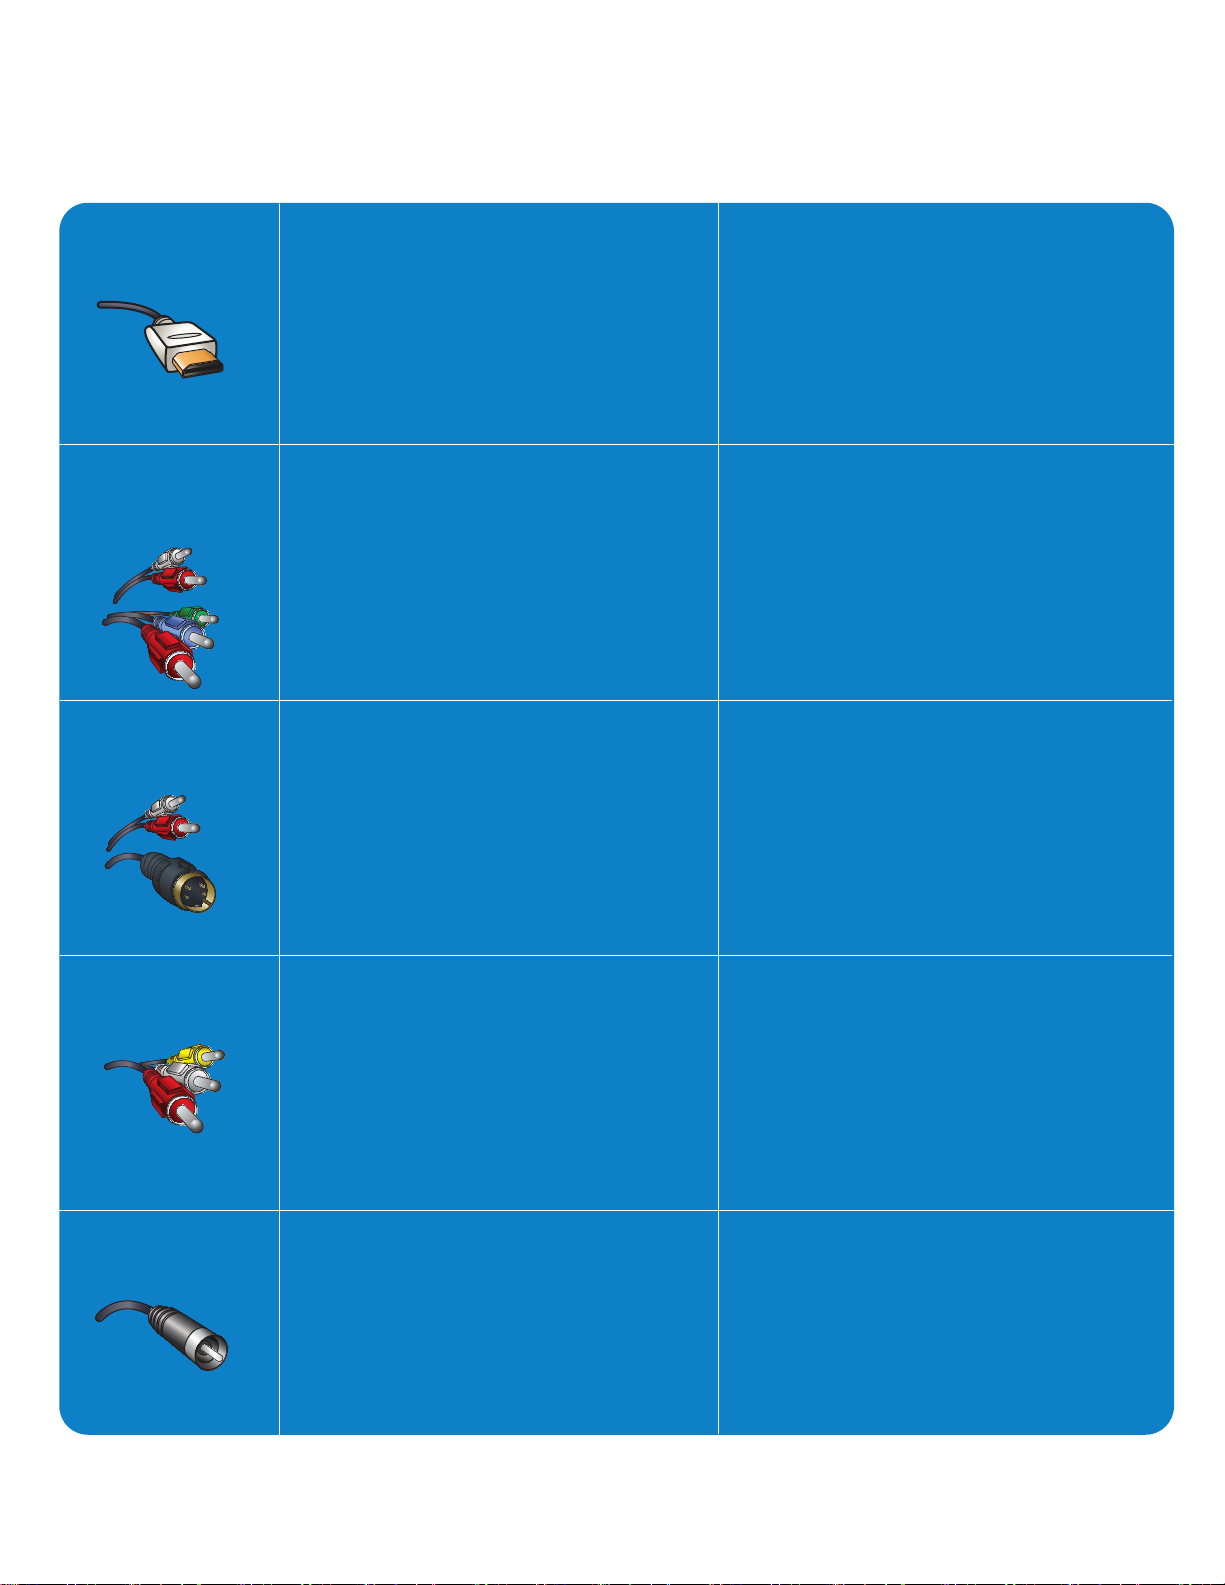
Good
S-Video
Supplies a better picture than RF and
Composite connections.
Used with red/white audio cables.
好
S 視頻
提供比 RF 和复合連接
更好的画面質量。
配合紅色/白色音頻線使用。
Basic
Composite Audio/Video
Separate video (yellow) and audio (red/white)
cables that provide a basic connection from
the cable box and other devices.
Note: The color of audio inputs may differ,
e.g. red/ white or red/ black.
基本
复合音頻/視頻
分离視頻(黃色)和音頻(紅色/白色)線,
通過有線盒和其它設備提供基本連接。
注意:音頻輸入的顏色可能不同,
如紅色/白色或紅色/黑色。
RF
Provides a basic connection for antenna
or cable.
Provides both audio and video.
RF
為天線或有線提供基本連接。
提供音頻和視頻。
Better
Component Video input
Provides superior picture quality by separating
the green, blue and red luminance signals.
Typically used with red/white audio cables.
Best
HDMI
High-Definition Multimedia Interface provides
an uncompressed, all-digital audio/video
connection.
HDMI provides the ultimated connection
(Please use a certified HDMI cable.)
很好
分量視頻輸入
通過將綠色、藍色和紅色亮度信號分离,
提供卓越的画面質量。
通常配合紅色/白色音頻線使用。
最好
HDMI
高清晰多媒体接口提供無壓縮的全數字
音頻/視頻連接。
HDMI 提供的是終极的連接
(請使用通過認證的 HDMI 線纜。)
Cover & Connection 1
Page 3
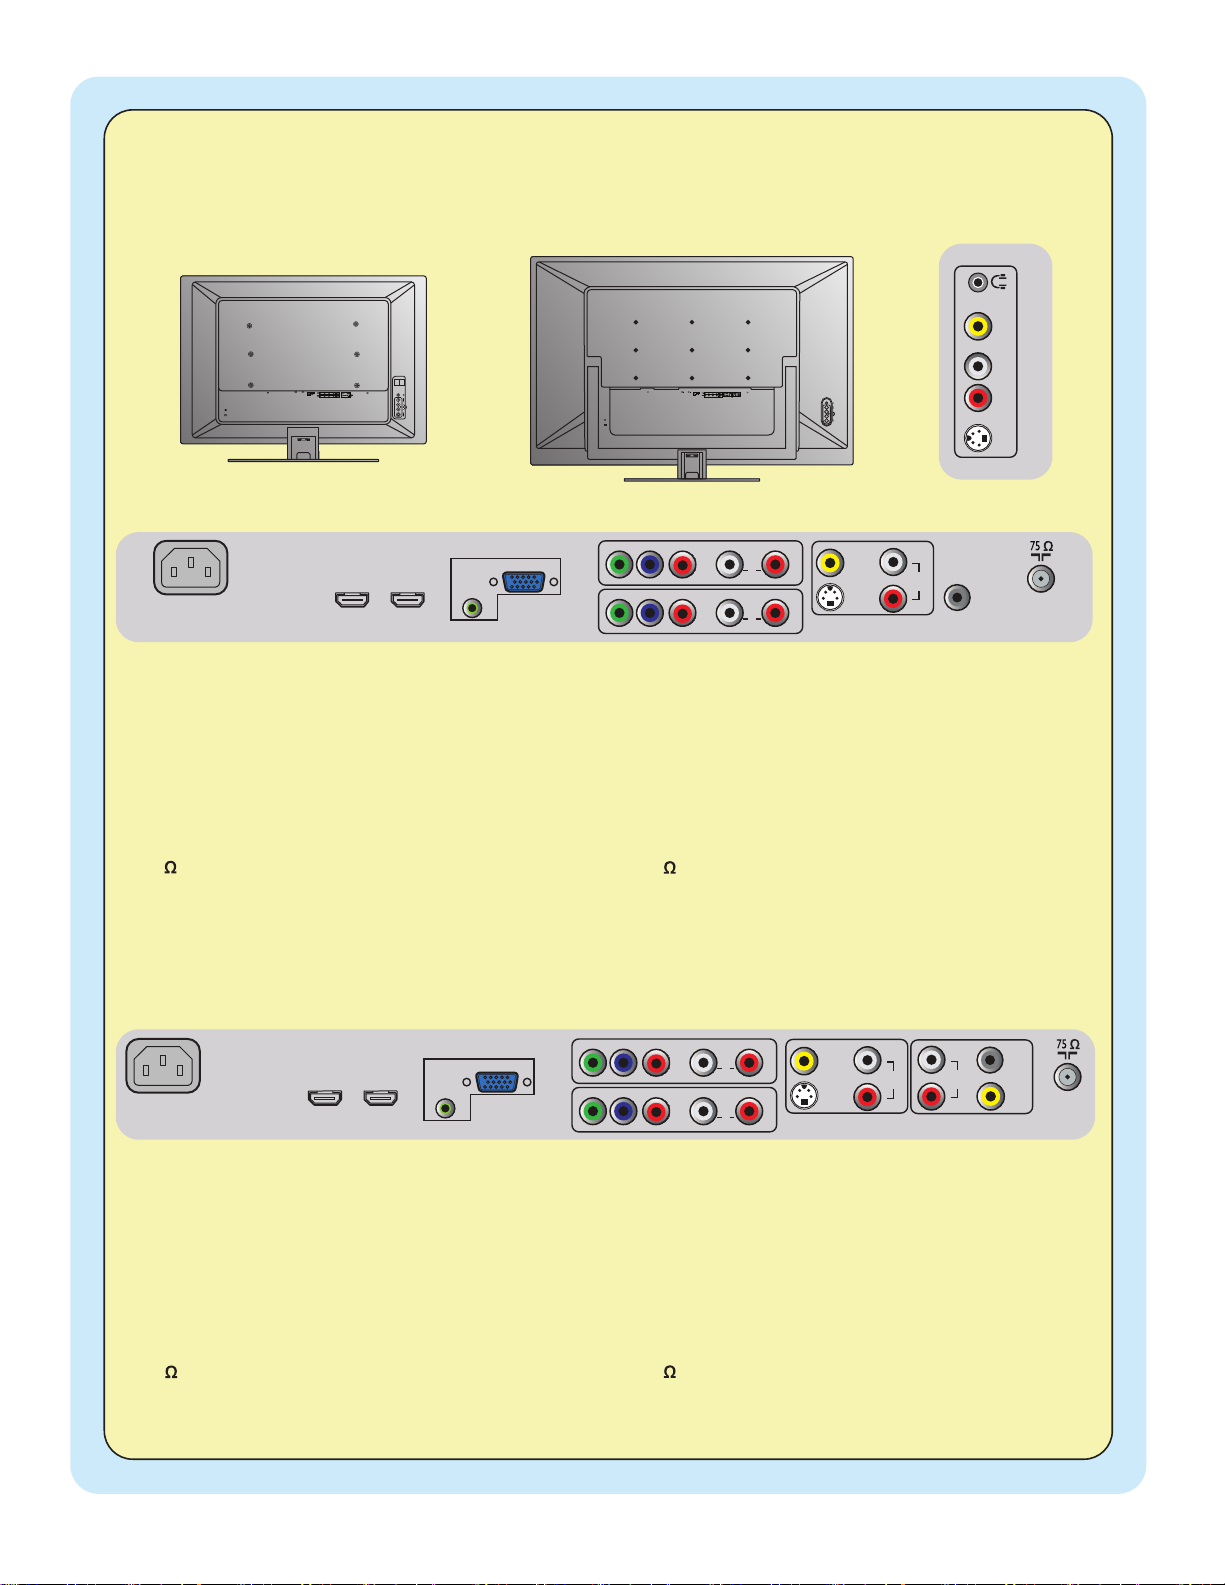
SIDE AV
S-VIDEO R - AUDIO - L VIDEO IN
AC IN
HDMI 2
HDMI 1
PC IN - Audio input, D-SUB
CVI 2 - Component video (YPbPr), Audio L/R input
CVI 1 - Component video (YPbPr), Audio L/R input
AV - Video input, S-video, Audio L/R input,
Audio L/R output, SPDIF output, Video output
75 /RF
Side AV - S-video, Audio L/R input, Video input, Earphone
AC IN
HDMI 2
HDMI 1
PC IN - Audio input, D-SUB
CVI 2 - Component video (YPbPr), Audio L/R input
CVI 1 - Component video (YPbPr), Audio L/R input
AV - Video input, S-video, Audio L/R input
SPDIF output
75 /RF
Side AV - S-video, Audio L/R input, Video input, Earphone
AC IN
HDMI 2
HDMI 1
PC IN - 音頻輸入, D-SUB
CVI 2 - 分量視頻 (YPbPr), 左/右音頻輸入
CVI 1 - 分量視頻 (YPbPr), 左/右音頻輸入
AV - 視頻輸入, S 視頻, 左/右音頻輸入
,
左/右音頻輸出, SPDIF 輸出, 視頻輸出
75 /RF
Side AV - S 視頻, 左/右音頻輸入, 視頻輸入, 耳機
AC IN
HDMI 2
HDMI 1
PC IN - 音頻輸入, D-SUB
CVI 2 - 分量視頻 (YPbPr), 左/右音頻輸入
CVI 1 - 分量視頻 (YPbPr), 左/右音頻輸入
AV - 視頻輸入, S 視頻, 左/右音頻輸入, 左/右音頻輸出
SPDIF 輸出
75 /RF
Side AV - S 視頻, 左/右音頻輸入, 視頻輸入, 耳機
Y
Pb
Pr
RL
AUDIO
IN
Y
Pb
Pr
RL
AUDIO
IN
CVI 2
CVI 1
AC IN
D-SUB
PC IN
AUDIO
AV
VIDEO IN
S-VIDEO
R
L
AUDIO
IN
R
L
AUDIO
OUT
VIDEO
OUT
SPDIF
OUT
HDMI 2 HDMI 1
37PFL7422/37HF7005/42PFL7422/47PFL7422
Y
Pb
Pr
RL
AUDIO
IN
Y Pb
Pr
RL
AUDIO
IN
CVI 2
CVI 1
AC IN
D-SUB
PC IN
AUDIO
AV
VIDEO
IN
S-VIDEO
R
L
AUDIO
IN
SPDIF
OUT
HDMI 2 HDMI 1
32PFL7422
32PFL7422
37PFL7422/37HF7005
42PFL7422/47PFL7422
Cover & Connection 2
Page 4
1
2
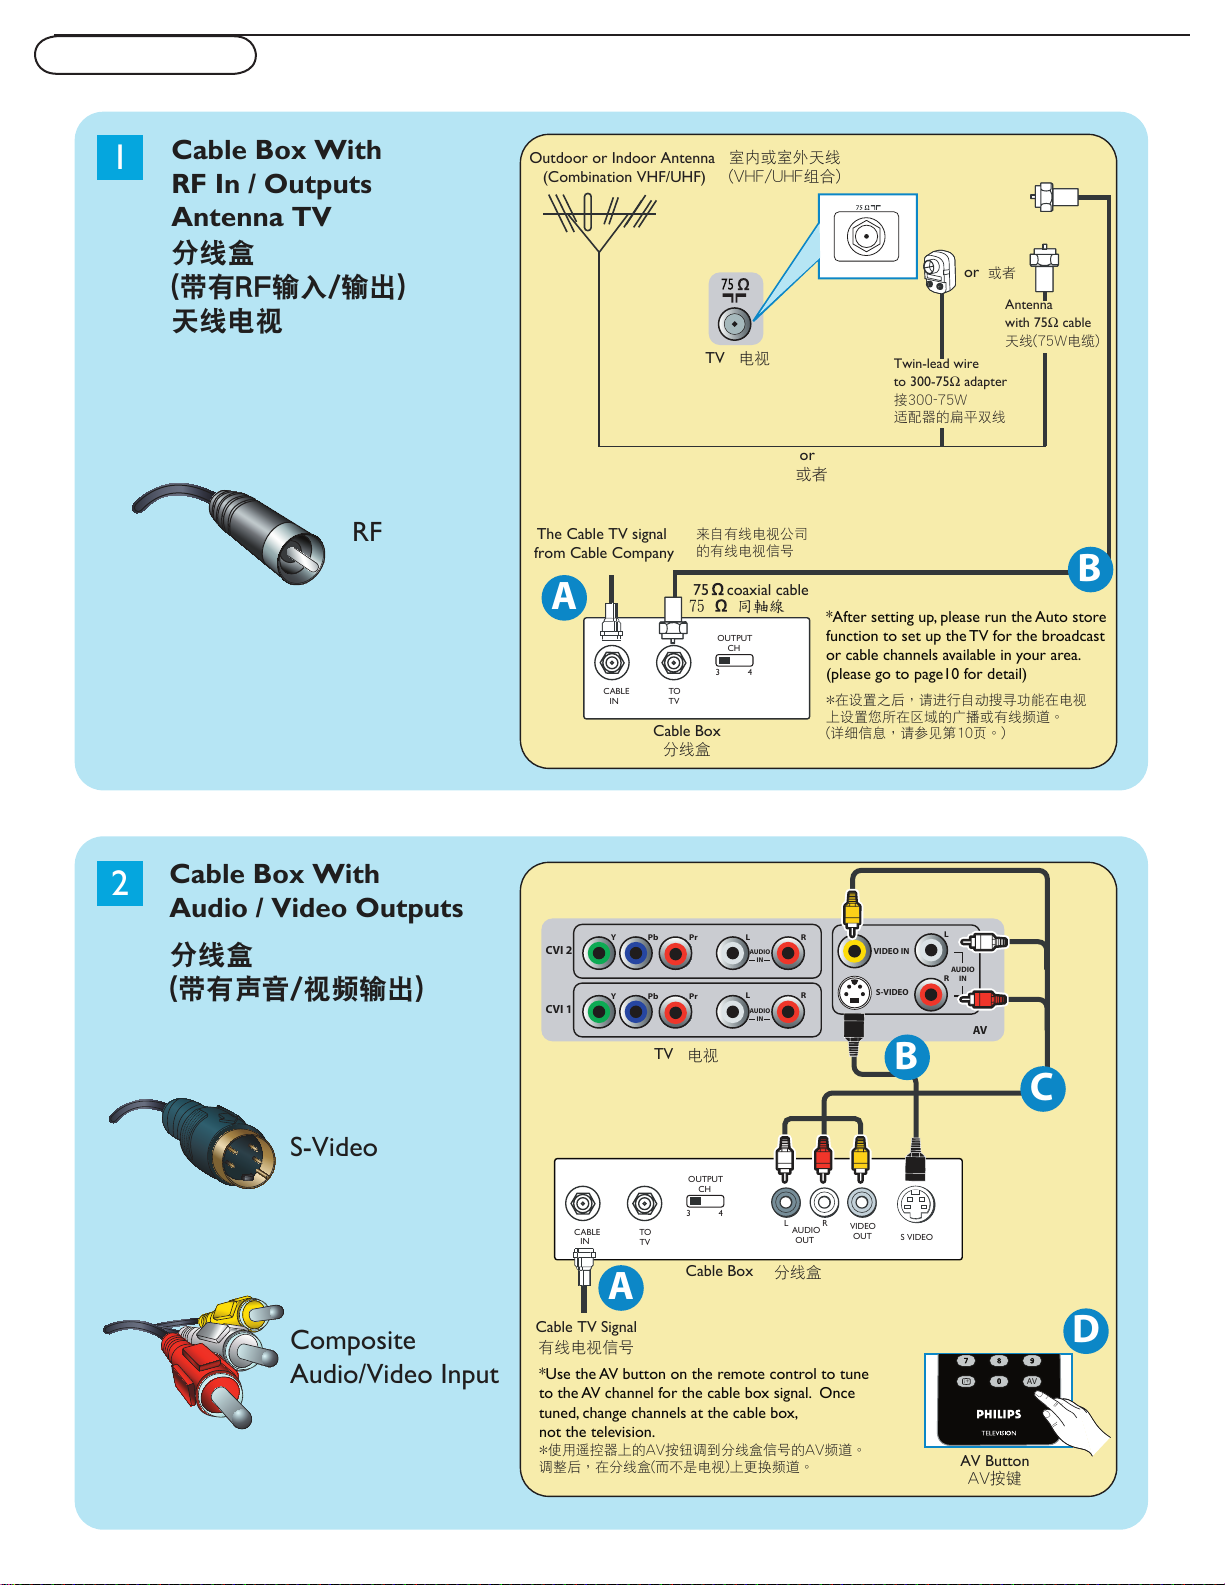
Cable Box With
RF In / Outputs
Antenna TV
分線盒
(帶有RF輸入/輸出)
天線電視
分線盒
(帶有聲音/視頻輸出)
Cable Box With
Audio / Video Outputs
CABLE
IN
TO
TV
VIDEO
OUT
S VIDEO
L
R
AUDIO
OUT
3 4
OUTPUT
CH
Cable Box
Cable TV Signal
A
RF
S-Video
Composite
Audio/Video Input
分線盒
有線電視信號
AV按鍵
AV
i
+
AV Button
A
The Cable TV signal
from Cable Company
來自有線電視公司
的有線電視信號
分線盒
CABLE
IN
TO
TV
3 4
OUTPUT
CH
75 coaxial cable
電視
TV
Cable Box
75 同軸線
Outdoor or Indoor Antenna
(Combination VHF/UHF)
Twin-lead wire
to 300-75
� adapter
接300-75
W
適配器的扁平雙線
Antenna
with 75
� cable
天線(75W電纜)
or 或者
B
or
或者
*After setting up, please run the Auto store
function to set up the TV for the broadcast
or cable channels available in your area.
(please go to page10 for detail)
*在設置之後,請進行自動搜尋功能在電視
上設置您所在區域的廣播或有線頻道
。
(詳細信息,請參見第10頁。)
*Use the AV button on the remote control to tune
to the AV channel for the cable box signal. Once
tuned, change channels at the cable box,
not the television.
D
*使用遙控器上的AV按鈕調到分線盒信號的AV頻道。
調整後,在分線盒(而不是電視)上更換頻道。
室內或室外天線
(VHF/UHF組合)
Y
Pb
Pr
RL
AUDIO
IN
Y
Pb
Pr
RL
AUDIO
IN
CVI 2
CVI 1
AV
VIDEO IN
S-VIDEO
R
L
AUDIO
IN
電視
TV
C
B
Quick start quide
Cover & Connection 3
Page 5
3
4
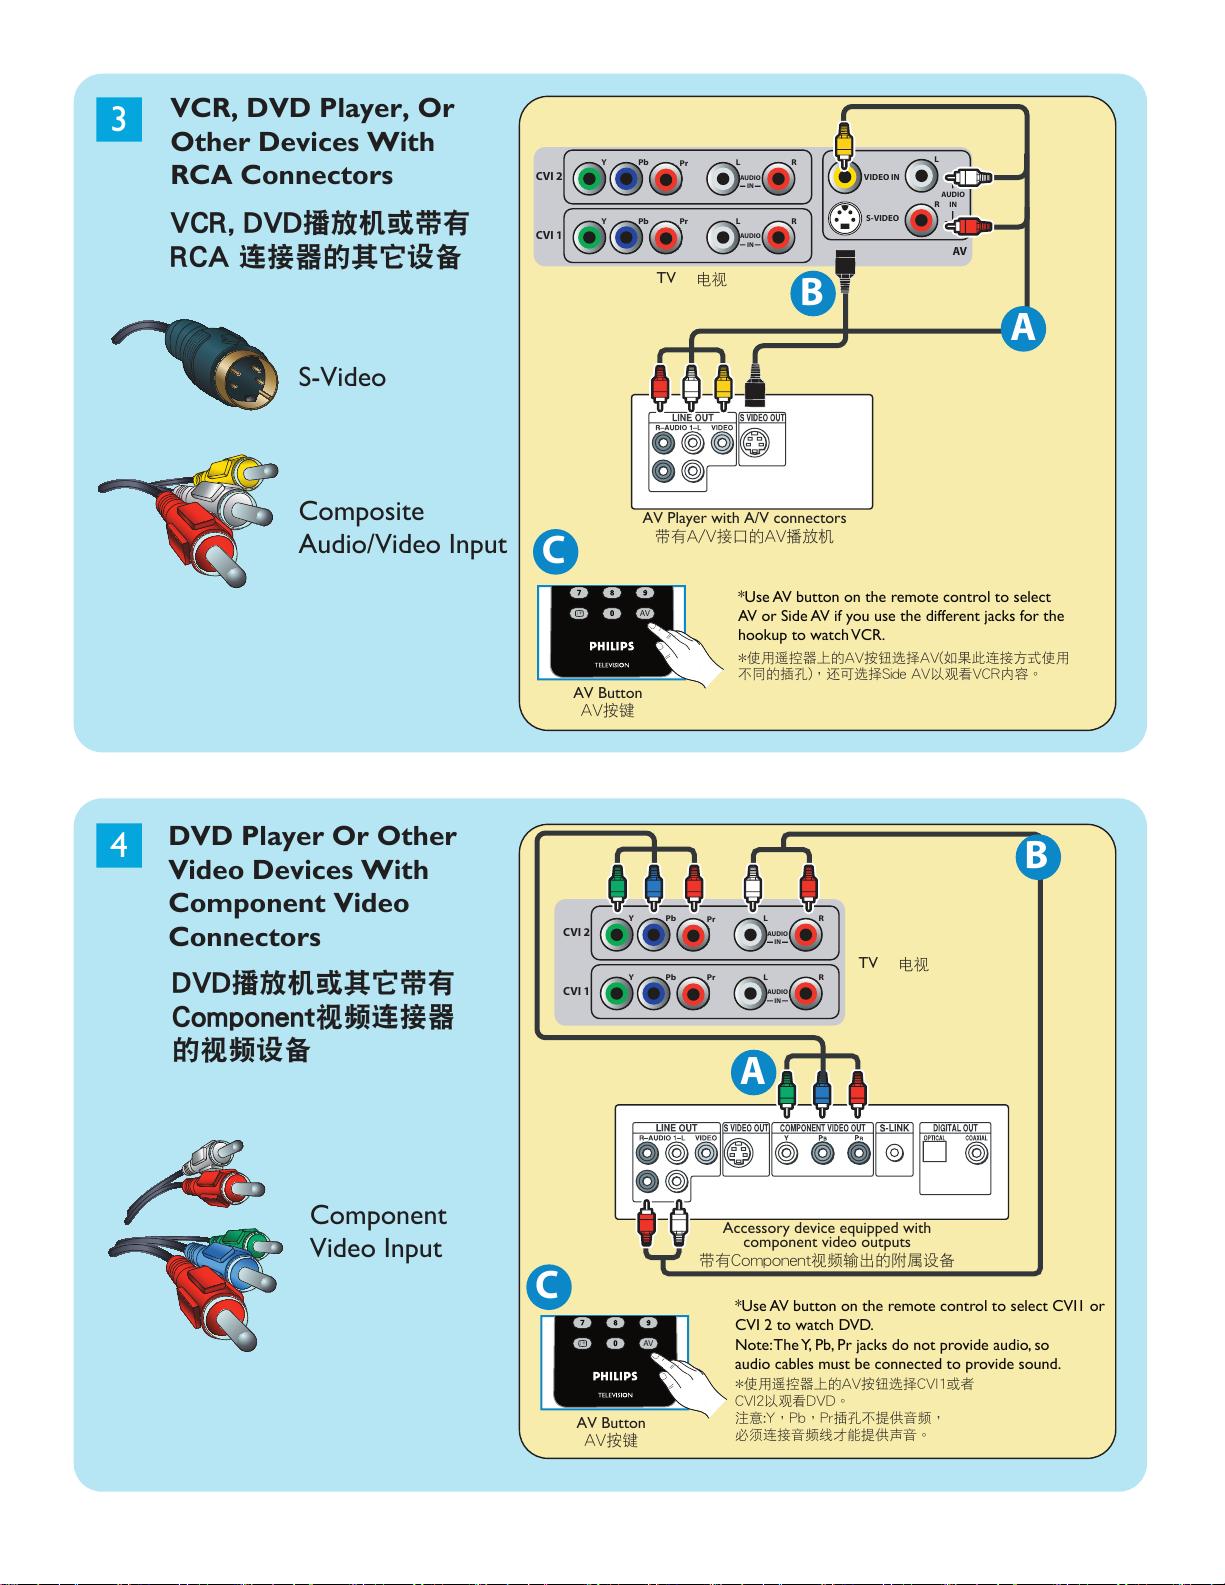
VCR, DVD Player, Or
Other Devices With
RCA Connectors
DVD Player Or Other
Video Devices With
Component Video
Connectors
TV
AV Player with A/V connectors
Accessory device equipped with
component video outputs
C
A
Component
Video Input
S-Video
VCR, DVD播放機或帶有
RCA 連接器的其它設備
DVD播放機或其它帶有
Component視頻連接器
的視頻設備
帶有A/V接口的AV播放機
帶有Component視頻輸出的附屬設備
電視
TV
電視
*Use AV button on the remote control to select
AV or Side AV if you use the different jacks for the
hookup to watch VCR.
*Use AV button on the remote control to select CVI1 or
CVI 2 to watch DVD.
Note: The Y, Pb, Pr jacks do not provide audio, so
audio cables must be connected to provide sound.
Composite
Audio/Video Input
AV按鍵
AV
i
+
AV Button
C
AV按鍵
AV
i
+
AV Button
B
*使用遙控器上的AV按鈕選擇AV(如果此連接方式使用
不同的插孔),還可選擇Side AV以觀看VCR內容。
*使用遙控器上的AV按鈕選擇CVI1或者
CVI2以觀看DVD
。
注意:Y
,Pb,Pr插孔不提供音頻,
必須連接音頻線才能提供聲音。
B
Y
Pb
Pr
RL
AUDIO
IN
Y
Pb
Pr
RL
AUDIO
IN
CVI 2
CVI 1
AV
VIDEO IN
S-VIDEO
R
L
AUDIO
IN
R
L
AUDIO
OUT
VIDEO
OUT
SPDIF
OUT
A
Y
Pb
Pr
RL
AUDIO
IN
Y
Pb
Pr
RL
AUDIO
IN
CVI 2
CVI 1
Cover & Connection 4
Page 6
5
6
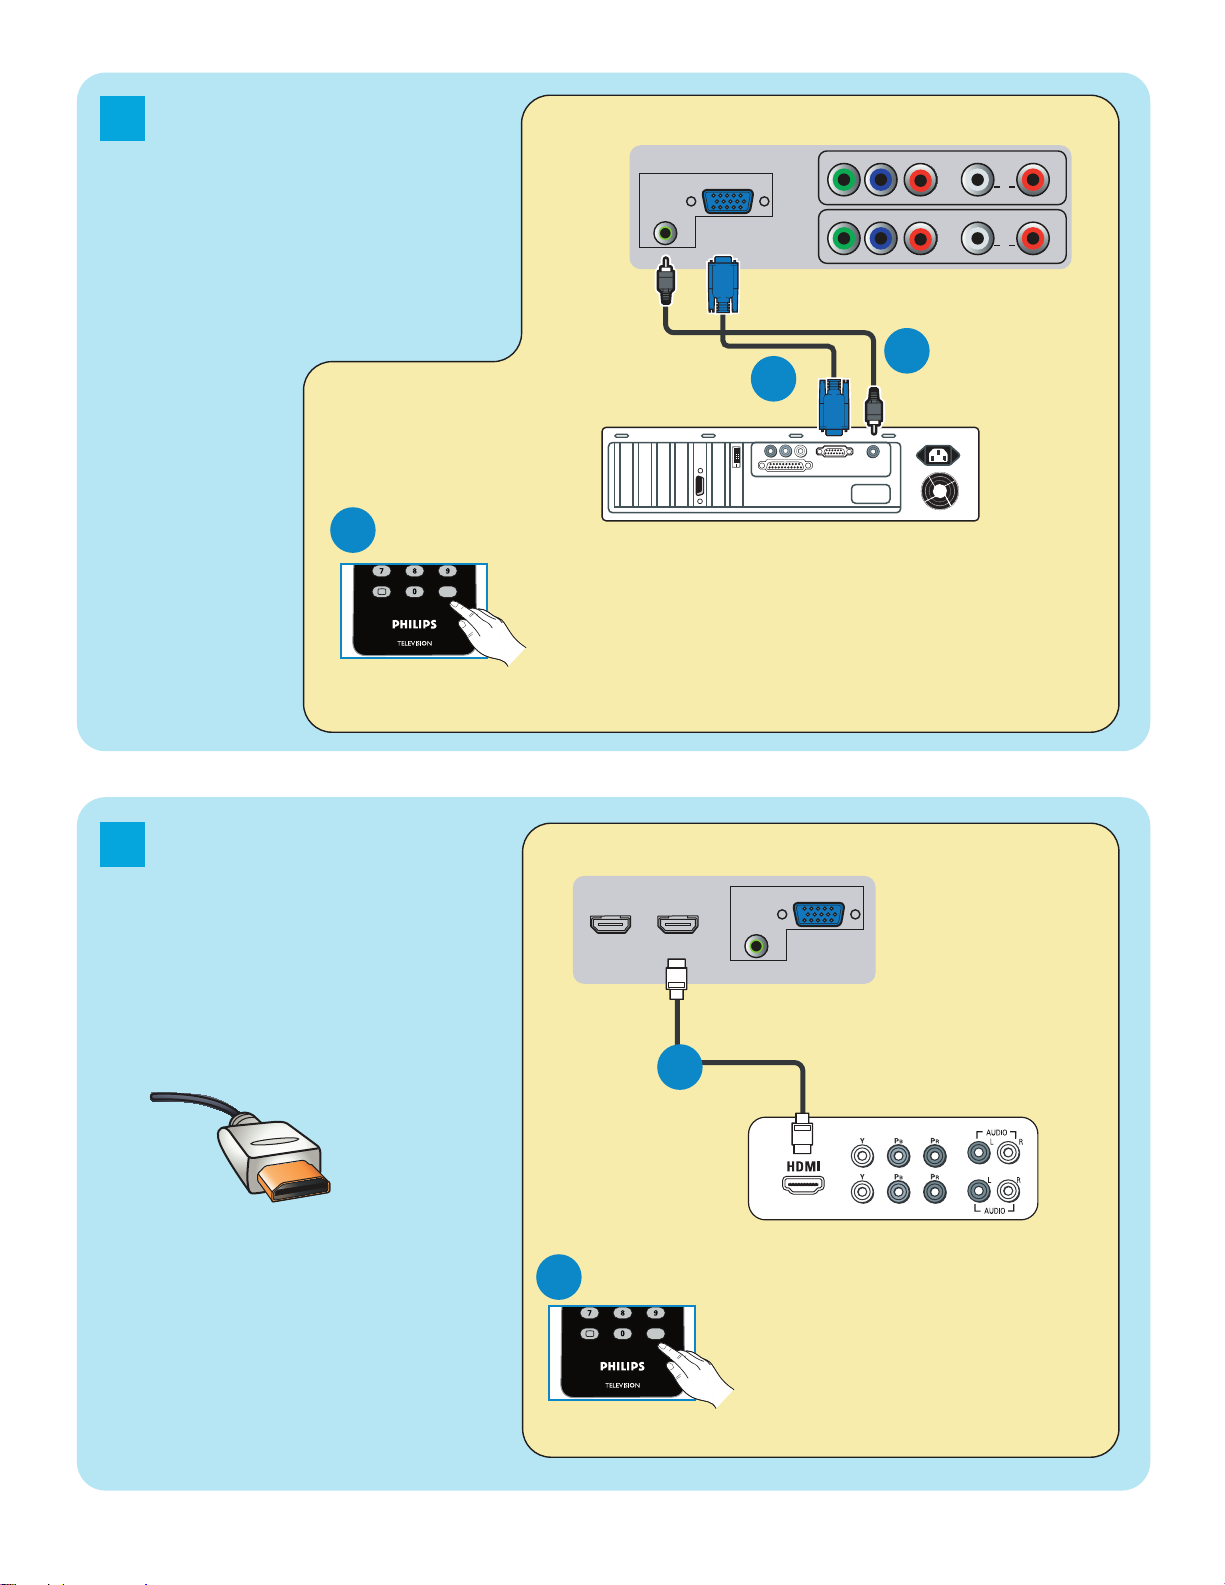
PC (Monitor)
Connections
Computer
B
A
PC (顯示器)連接
TV
電視
計算機
*Use AV button on the remote control to select PC to use your LCD TV
as a PC monitor.
AV按鍵
AV
i
+
AV Button
C
*使用遙控器上的AV按鈕選擇PC,以將液晶電視用作PC顯示器。
DVD Player With
HDMI Connector
DVD player
TV
電視
DVD 播放機
AV按鍵
AV
i
+
AV Button
B
*Use AV button on the remote control to select HDMI 1
or HDMI 2 to watch DVD.
*使用遙控器上的AV按鈕選HDMI1或者HDMI2以觀看DVD。
HDMI
帶有HDMI 連接器的
DVD播放機
Y
Pb
Pr
RL
AUDIO
IN
Y
Pb
Pr
RL
AUDIO
IN
CVI 2
CVI 1
D-SUB
PC IN
AUDIO
D-SUB
PC IN
AUDIO
HDMI 2 HDMI 1
A
Cover & Connection 5
Page 7
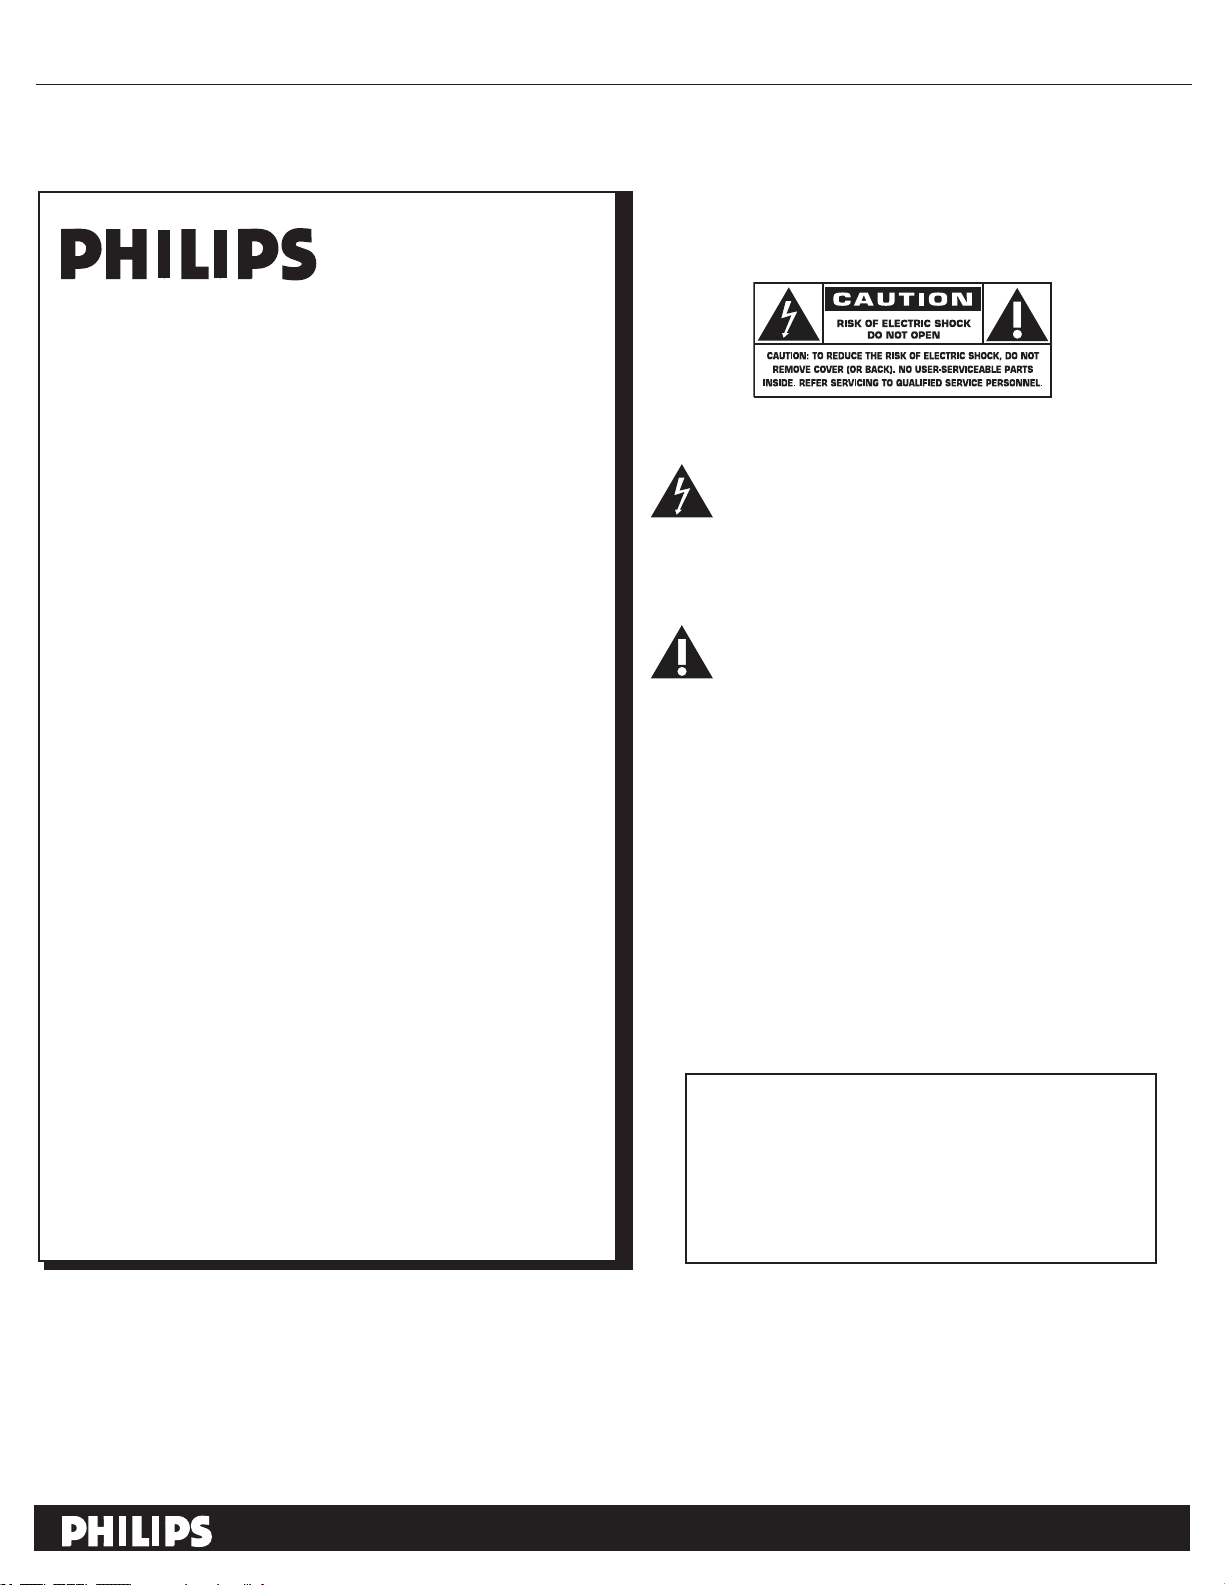
Congratulations on your purchase,
and welcome to the “family!”
Welcome
Know these
safety symbols
Dear PHILIPS product owner:
Thank you for your confidence in PHILIPS. You’ve
selected one of the best-built, best-backed products
available today. We’ll do everything in our power to
keep you happy with your purchase for many years to
come.
This “bolt of lightning” indicates
uninsulated material within your unit
may cause an electrical shock. For the safety
of everyone in your household, please do not
remove product covering.
The “exclamation point” calls attention to
features for which you should read the
enclosed literature closely to prevent operating
and maintenance problems.
WARNING: To reduce the risk of fire or
electric shock, this apparatus should not be
exposed to rain or moisture and objects filled
with liquids, such as vases, should not be placed
on this apparatus.
CAUTION: To prevent electric shock, match
wide blade of plug to wide slot, fully insert.
For Customer Use
Enter below the Serial No. which is located
on the rear of the cabinet. Retain this
information for future reference.
Model No.______ _ ___________ _ _ ___
Serial No. _____ _ ___________ _ _ ____
1
Page 8

IMPORTANT SAFETY INSTRUCTIONS
Read before operating equipment
Read these instructions.
1.
Keep these instructions.
2.
Heed all warnings.
3.
Follow all instructions.
4.
Do not use this apparatus near water.
5.
Clean only with a dry cloth.
6.
Do not block any of the ventilation openings.
7.
Install in accordance with the manufacturers instructions.
Do not install near any heat sources such as radiators,
8.
heat registers, stoves, or other apparatus (including ampli
fiers) that produce heat.
Do not defeat the safety purpose of the polarized or
9.
grounding-type plug. A polarized plug has two blades with
one wider than the other. A grounding type plug has two
blades and third grounding prong. The wide blade or third
prong are provided for your safety. When the provided
plug does not fit into your outlet, consult an electrician for
replacement of the obsolete outlet.
Protect the power cord from being walked on or pinched
10.
particularly at plugs, convenience receptacles, and the
point where they exit from the apparatus.
Only use attachments/accessories specified by the
11.
manufacturer.
12
13.
14.
15.
Use only with a cart, stand, tripod, bracket, or table
specified by the manufacturer, or sold with the
apparatus. When a cart is used, use caution when
moving the cart/apparatus combination to avoid injury
from tip-over.
Unplug this apparatus during lightning storms or when
unused for long periods of time.
Refer all servicing to qualified service personnel. Servicing
is required when the apparatus has been damaged in any
way, such as power-supply cord or plug is damaged, liquid
has been spilled or objects have fallen into apparatus, the
apparatus has been exposed to rain or moisture, does not
operate normally, or has been dropped.
Damage Requiring Service - The appliance should be
serviced by qualified service personnel when:
A. The power supply cord or the plug has been damaged;
B. Objects have fallen, or liquid has been spilled into the
appliance;
C. The appliance has been exposed to rain
D. The appliance does not appear to operate normally or
exhibits a marked change in performance;
E. The appliance has been dropped, or the enclosure
damaged.
Tilt/Stability - All televisions must comply with
16.
recommended international global safety standards for tilt and
stability properties of its cabinet design.
• Do not compromise these design standards by applying
excessive pull force to the front, or top, of the cabinet which
could ultimately overturn the product.
• Also, do not endanger yourself, or children, by placing
electronic equipment/toys on the top of the cabinet. Such
items could unsuspectingly fall from the top of the set and
-
cause product damage and/or personal injury.
Wall or Ceiling Mounting - The appliance should be
17.
mounted to a wall or ceiling only as recommended by the
manufacturer.
Power Lines - An outdoor antenna should be located away
18.
from power lines.
Outdoor Antenna
19.
connected to the receiver, be sure the antenna system is
grounded so as to provide some protection against voltage
surges and built up static charges.
Object and Liquid Entry - Care should be taken so that
20.
objects do not fall and liquids are not spilled into the enclosure
through openings.
Battery Usage CAUTION - To prevent battery leakage that
21.
may result in bodily injury, property damage, or
damage to the unit:
• Install all batteries correctly, with + and - aligned as marked
on the unit.
• Do not mix batteries (old and new or carbon and
alkaline, etc.).
• Remove batteries when the unit is not used for a long time.
For ventilation, leave at least 4” to 6” free all around the TV.
22.
Do not place the TV on a carpet.
The equipment shall not be exposed to dripping or splashing.
23.
The equipment shall not be exposed to rain or moisture and
24.
objects filled with liquids, such as vases, shall be placed on the
apparatus.
The apparatus must be connected to a mains socket outlet
25.
with a protected earthed connection.
The appliance coupler is used as the disconnect device of this
26.
apparatus, the disconnect device shall remain readily operable.
Grounding - If an outside antenna is
2
Page 9

Precaution
ADDITIONAL SAFETY PRECAUTIONS
• ENSURE that LCD TV stand is tightened properly to the set on the right way of tightening of
the screw of the stand to the set. Improper tightening of screw may render the set unsafe.
• If LCD TV is installed on the wall, installation should be carried out by qualified servicemen. Improper or incorrect
installation may render the set unsafe.
• Disconnect main plug when :
— cleaning the TV screen, never use abrasive cleaning agents.
— there is a lightning storm.
— the set is left unattended for a prolonged period of time.
• Do not shift or move the LCD TV around when it is powered on.
• Do not touch, push or rub the surface of the LCD screen with any sharp or hard objects.
• When the surface of the LCD screen becomes dusty, wipe it gently with an absorbent cotton cloth or
other soft material like chamois. DO NOT USE acetone, toluene or alcohol to clean the surface of the screen.
These chemicals will cause damage to the surface.
• Wipe off water or saliva as soon as possible. These liquids can cause deformation and color fading of the
LCD screen when left exposed for some time.
• Be careful of condensation when temperature changes occur. Condensation can cause damage to the LCD
screen and electrically parts. After condensation fades, spots or blemishes will be present on the LCD screen.
POSITIONING THE LCD TELEVISION
• Place the LCD TV on a solid, sturdy base or stand. Be sure the stand is strong enough to handle the weight of
the LCD TV.
• Try to leave at least 6” of space around each side of the LCD TV cabinet to allow for proper ventilation.
• Do not place the LCD TV near a radiator or other sources of heat.
• Do not place the LCD TV where it can be exposed to rain or excessive moisture.
RECYCLING PROCEDURE/END OF LIFE DISPOSAL
• To minimize harm to the environment, the batteries supplied with the LCD TV do not contain mercury or
nickel cadmium. If possible, when disposing of batteries, use recycling means available in your area.
• The LCD TV uses materials that can be recycled. To minimize the amount of waste in the environment, check
your area for companies that will recover used televisions for dismantling and collection of reusable
materials, or contact your dealer for TV recycling tips.
• Please dispose of the carton and packing material through the proper waste disposal management in your
area.
3
Page 10

Contents
Here are a few of the special features of your new
LCD TV.
Audio/Video In Jacks: Use to quickly connect
other
equipment to your LCD TV.
Automatic Channel Storing
Quick and easy setup of available channels.
On-screen Menus: Helpful messages (in English
or Simplified Chinese) for setting TV controls.
Remote Control: Works your LCD TV
features.
Sleep Timer: Turns off the LCD TV within an
amount of time you specify (0-180 minutes from
the current time).
AutoLock: Lets you block viewing of certain TV
channels if you do not want your children viewing
inappropriate material.
Standard broadcast (VHF/UHF) or Cable TV
channel capability.
Stereo capability: Includes a built-in amplifier
and twin-speaker system, allowing reception of
TV programs broadcast in stereo.
Care of the screen See Tips, p. 26
End of life directives - Recycling
Philips has paid a lot of attention to
producing an environmentally friendly product.
Your new TV contains several materials that can
be recycled for new uses. At the end of its life,
specialized companies can dismantle and recycle
this set. This will minimize the amount of
materials being disposed of. Please be sure to
dispose of this set in accordance with all state
and local regulations.
(Auto Store):
Welcome. . . . . . . . . . . . . . . . . . . . . . . . . . . . . . . . . . . . .
IMPORTANT SAFETY INSTRUCTIONS
. . . . . . . . .
Precaution . . . . . . . . . . . . . . . . . . . . . . . . . . . . . . . . . . .
Conten
ts . . . . . . . . . . . . . . . . . . . . . . . . . . . . . . . . . . . . .
Preparation . . . . . . . . . . . . . . . . . . . . . . . . . . . . . . . . . .
Wall mounting . . . . . . . . . . . . . . . . . . . . . . . . . . . . . . . .
Use of the remote control
Buttons on the TV
. . . . . . . . . . . . . . . . . . . . . . . . . . . .
To use the menus . . . . . . . . . . . . . . . . . . . . . . . . . . .
. . . . . . . . . . . . . . . . . . . . . .
. .
How to navigate through the Settings menu
Introduction . . . . . . . . . . . . . . . . . . . . . . . . . .
TV menu
. . . . . . . . . . . . . . . . . . . . . . . . . . . . . . . . . . . .
. . . . . . . .
Install
Select the menu language
Store TV channels
Manual sotre, Prog. no, Finetune, Store
Channel setting, Channel edit, Channel swap,
Name edit, Channel sort
Factory reset
Features menu
Picture menu
Sound menu
Record with your recorder. . . . . . . . . . . . . . . . . . .
. . .
Record a TV program
PC menu
. . . . . . . . . . . . . . . . . . . . . . . . . . . . . . . . . . . .
Picture menu
Sound menu
Features menu
Trouble shooting tips . . . . . . . . . . . . . . . . . . . . . . . . . .
Glossary. . . . . . . . . . . . . . . . . . . . . . . . . . .
Care and cleaning
Specification
. . . . . . . . . . . . . . . . . . . . . . . . . . . . . . . . .
. . . . . . . . . . . . . . . . . . . . . . . . . . . . .
. . . . . . . . . .
1
2
3
4
5
5
6
8
9
9
9
10
10
10
10
11
12
12
13
14
16
18
19
19
20
20
22
23
24
25
26
27
Pixel characteristics
The LCD panel has a high number of colour pixels. Although it has effective pixels of 99.999% or more. Black dots or
bright points of light (red, green or blue) may appear constantly on the screen. This is a structural property of display
(within common industrial standard ) and is not a malfunction. This does not affect the performance of the product.
4
Page 11
Preparation
Do not insert the power plug in a wall socket before
1
all connections are made.
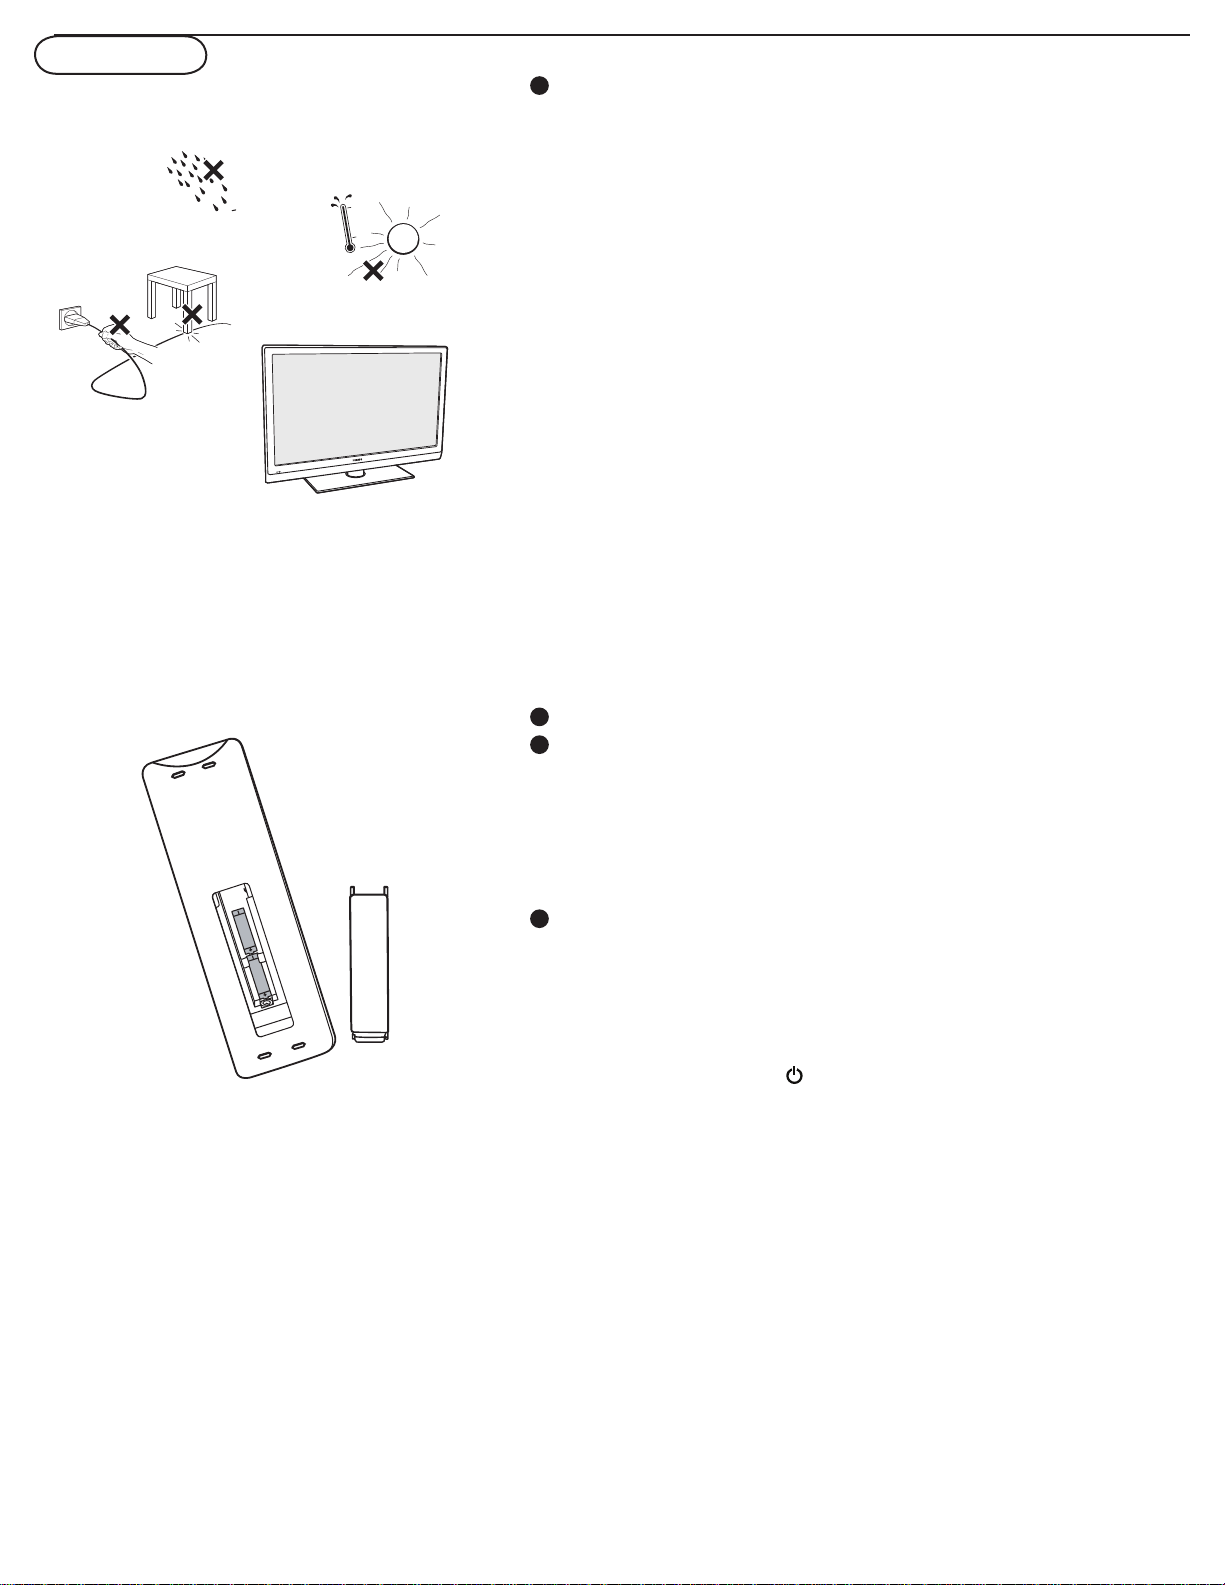
Place the TV on a solid surface.
For ventilation, leave at least 4” to 6” free all around the TV. Do
not place the TV on a carpet. To prevent any unsafe
situations, no naked flame sources, such as lighted candles,
should be placed in the vicinity. Avoid heat, direct sunlight and
exposure to rain or water. The equipment shall not be exposed
to dripping or splashing.
Mounting the TV on the wall
This TV set complies with the VESA standard for wall mounting.
Refer to specification page 27 for detail.
Caution: Installing the TV requires special skills that should
only be performed by qualified personnel. You should not
attempt to do the work yourself. Philips bears no
responsibility for improper mounting or mounting that
results in accident or injury.
Make sure that the wall mount is being fixed securely enough so
that it meets safety standards.
2
To connect accessory devices, see Cover and Connection.
3
Refer to the bottom of the set (Model label) for the
correct operation voltage.
Insert the power cord into the wall socket.
Consult your local dealer if your main power supply voltage is
different than that indicated for the TV. Never place the TV
on top of the (AC) cord. Placing the TV on top of the AC cord
could cause a fire or electric shock.
4
Remote control:
Insert the two supplied A AA batteries.
The batteries supplied do not contain the heavy metals mercury
and cadmium. Please determine and comply with local
regulations when disposing of depleted batteries.
Turn the TV on:
Press the power switch
on the left side of the TV. An
indicator on the front of the TV lights up.
Press the POWER button on the remote control.
5
Page 12
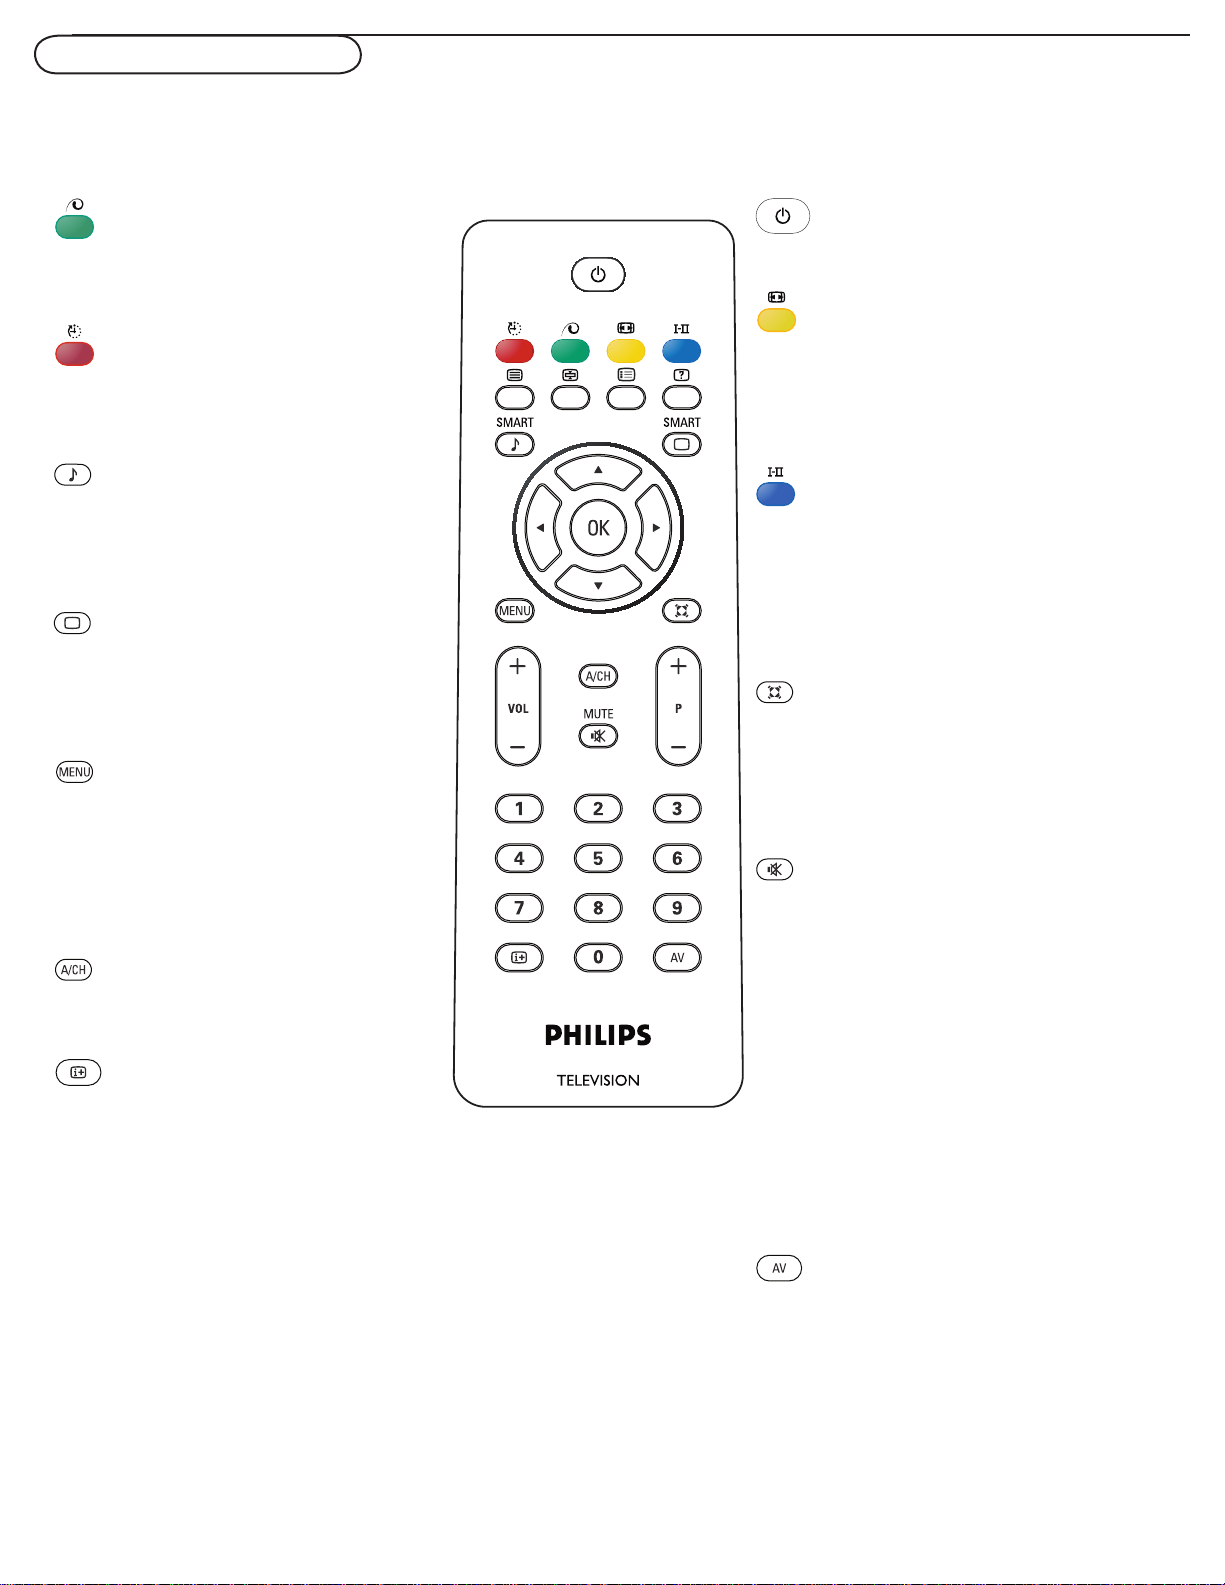
Use of the remote control
Note: Pressing most buttons once will activate the assigned function. Pressing a second time will de-activate it.
When a button enables multiple options, a small list will be shown. Press repeatedly to select the next item in the list.
The list will be removed automatically after six seconds or press OK to remove immediately.
Pixel Plus demo button
Press to turn Pixel plus demonstration on
or off.
Sleep button
Press to set the LCD TV to turn itself off
within a certain time.
Smart Sound button
Press repeatedly to select among the 5
settings: Personal, Speech, Music, Movie, or
Multimedia.
Smart Picture button
Press repeatedly to select either Personal,
Rich, Nature, Soft, or Multimedia of picture
setting.
MENU
Press menu to activate on screen menu
on/off.
VOL +/-
Press + or - to adjust the volume.
A/CH button
Press to go to previously selected channel.
Information button
Press to see the current channel number
on the TV screen.
POWER
Press to turn the LCD TV on or off.
Picture Format button
Press the FORMAT button repeatedly to toggle
among the six screen format sizes:
Super zoom, 4:3, Movie expand 14:9, Movie
expand 16:9, 16:9 Subtitle, or WideScreen.
I-II button / Sound mode
Press repeatedly to select Mono, Stereo, Dual
I, Dual II, Nicam Mono, Nicam Stereo, Nicam
Dual I, Nicam Dual II.
Note: The sound mode selections depond on TV
program and broadcast TV channel of that region.
Incredible Surround button
Adds greater depth and dimension to TV
sound.
Select from Incredible Surround ON or
Incredible Surround OFF.
Mute button
Press to eliminate or restore the LCD TV
sound. Mute will appear on the screen when
the sound is muted.
P +/-
Press to adjust the channel up or down.
Number button
Press the number buttons for direct access to
the TV channels. For 2 digit channel, enter the
2nd digit after enter 1st digit.
AV button
Press to select the video input source:
TV, HDMI 1, HDMI 2, CVI 1, CVI 2, AV, Side
AV, and PC.
6
Page 13
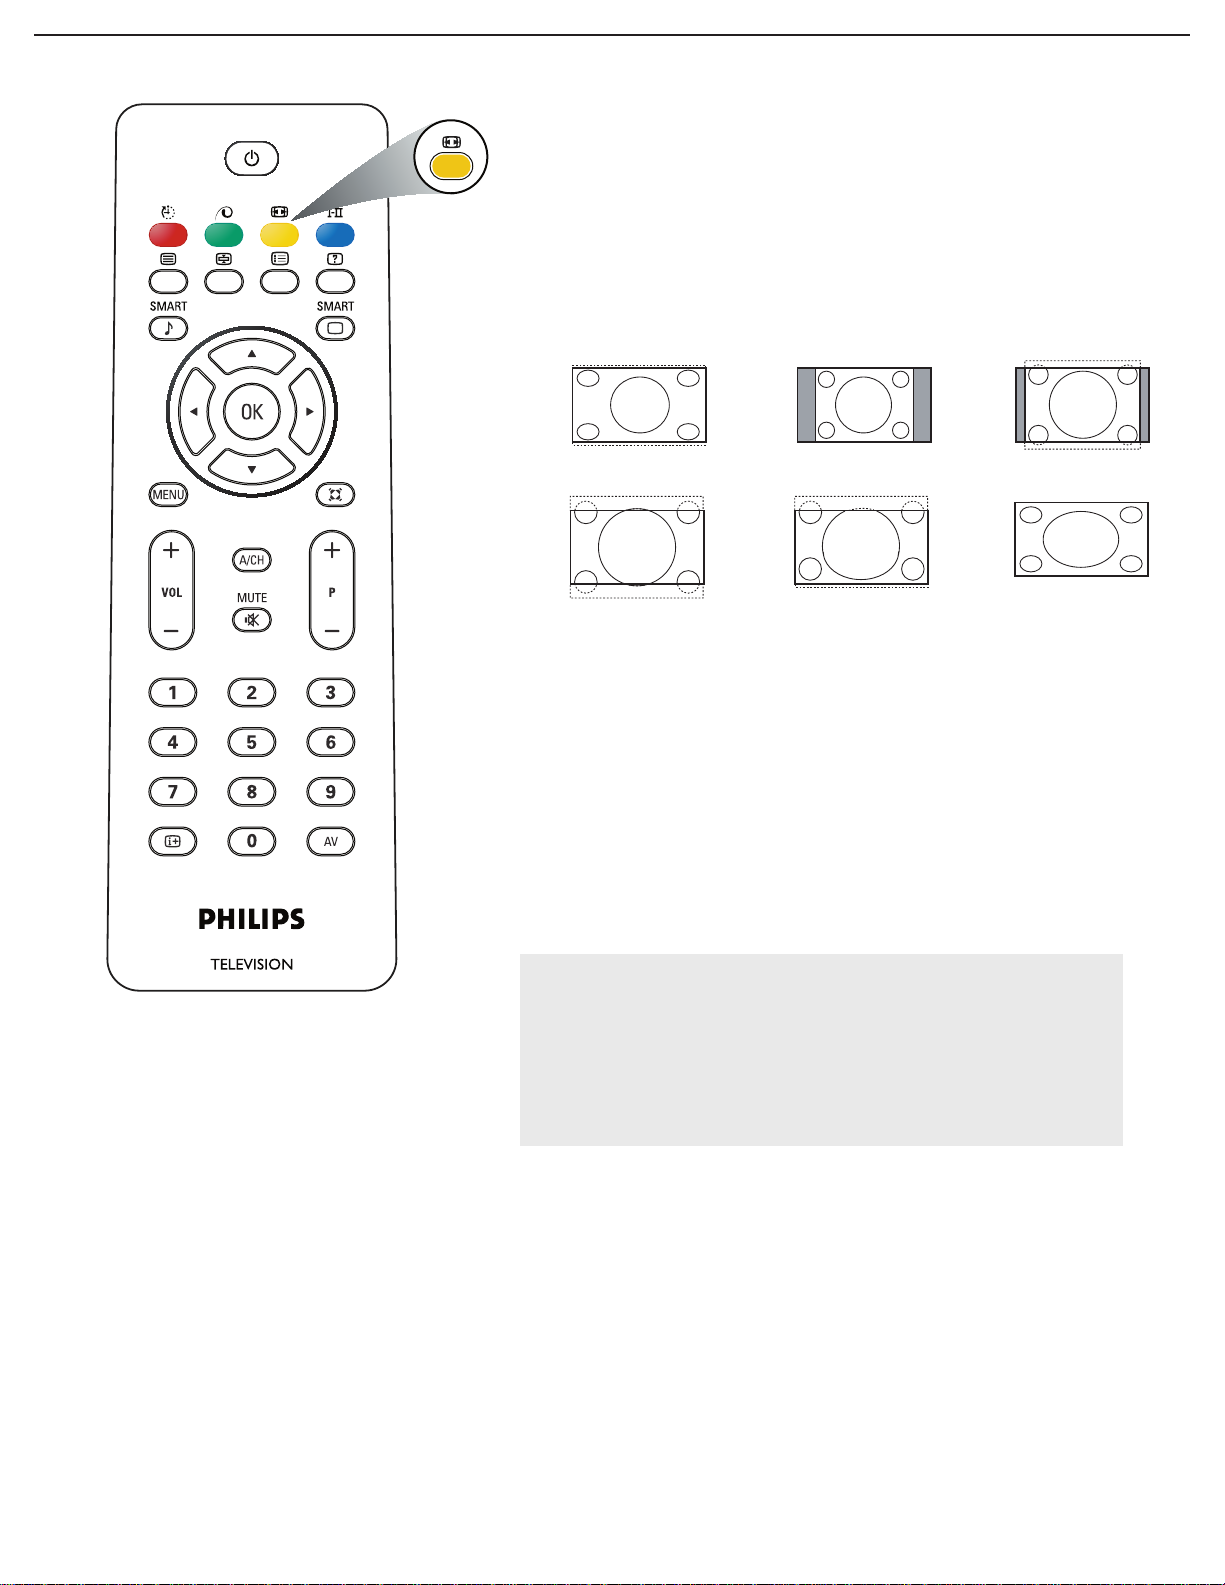
Automatic
Super zoom 4:3 Movie expand 14:9
Movie expand 16:9 16:9 Subtitle
Widescreen
FORMAT
Press this button to display a list of available display formats.
Available display formats are determined by the type of signal you
are receiving.
To choose the display format you prefer, press the FORMAT
button repeatedly:
For 32PFL7422, 37PFL7422, 37HF7005, 42PFL7422, and 47PFL7422
Super Zoom, 4:3, Movie expand 14:9, Movie expand 16:9,
16:9 Subtitle and Widescreen.
16:9 Subtitle makes the picture fill the screen as much as
possible. It is recommended to press the cursor up/down key to
adjust the picture position on the screen and make subtitles visible.
Note:
• For 720p/1080i/1080p, the default picture format will be
Widescreen at HD and HDMI modes. And the picture format
function will not be accessible.
* 32PFL7422 doesn’t support to 1080p.
• For PC mode, the default picture format will be Full screen and
picture format function can be accessible 4:3 and Full screen.
7
Page 14
Buttons on the TV
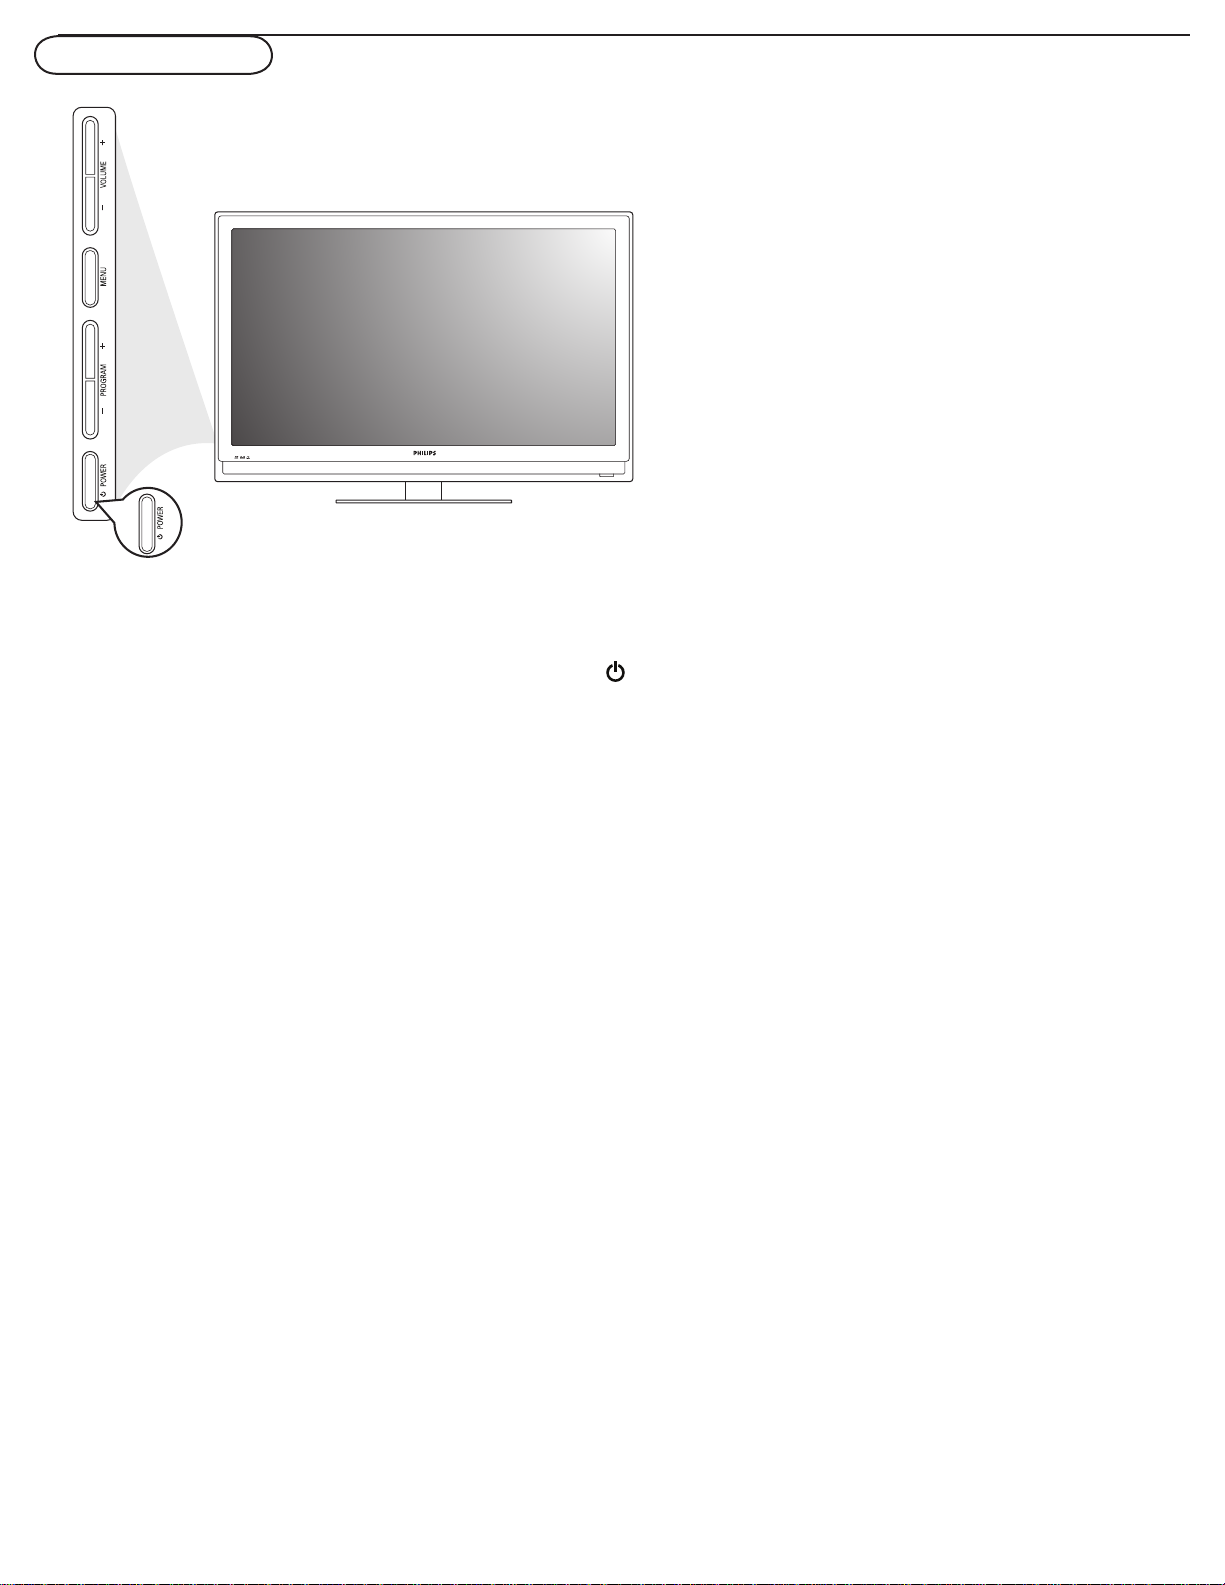
Should your remote be lost or broken you can still change some
of the basic settings with the control buttons on your TV.
Press:
•the button to switch the TV on or off.
•the + VOLUME -button to adjust volume;
•the + PROGRAM -buttons to select the TV channels or
sources.
The MENU button can be used to display the Settings menu
without the remote control. MENU button can also Exit the
menu.
Use:
•the + VOLUME - buttons and the + PROGRAM - buttons to
select menu items in the directions as shown;
•the + VOLUME button to confirm your selection.
8
Page 15
To use the menus
Info
Main Controls Picture4 8
Sound
Features
Install
Contrast
Brightness
Color
Sharpness
Color temp
Contrast +
Picture format
Smart picture
Picture
Info
Picture
Main Controls
Color8
Contrast 100
Brightness 50
Color 50
Sharpness 30
Smart picture
Picture format
Color temp
Contrast +
Info
Main Controls Picture4 8
Sound
Features
Install
Contrast
Brightness
Color
Sharpness
Color temp
Contrast +
Picture format
Smart picture
Picture
Info
Picture
Main Controls
Smart picture8 5
Rich
Nature
Soft
Multimedia
Personal
Contrast 100
Contrast +
Brightness 50
Color 50
Sharpness 30
Color temp
Picture format
Smart picture
Info
Picture
Main Controls
Color8
Contrast 100
Brightness 50
Color 50
Sharpness 30
Smart picture
Picture format
Color temp
Contrast +
Info
Picture
Main Controls
Sharpness8
Contrast 100
Brightness 50
Color 50
Sharpness 30
Smart picture
Picture format
Color temp
Contrast +
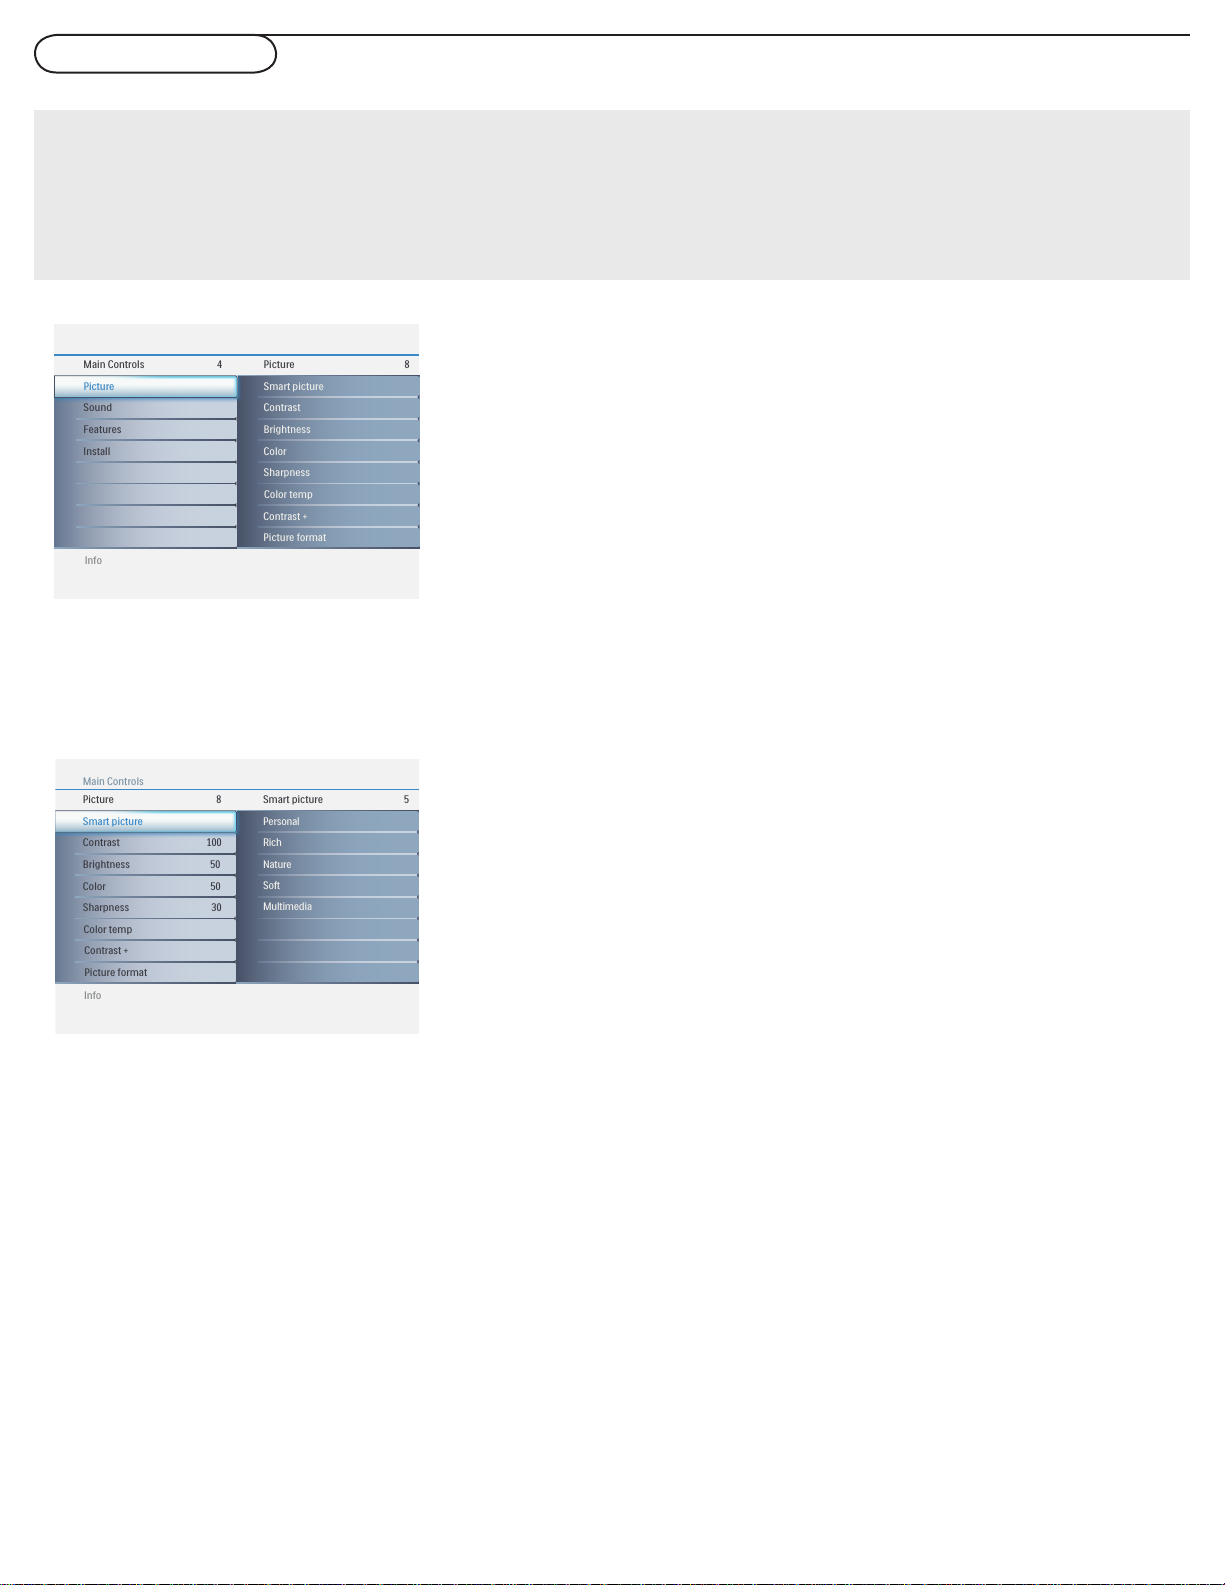
Introduction
When you use a menu or take an action, convenient instructions, help texts and messages will be displayed on your TV.
Please, follow the displayed instructions and read the help text on the specific item highlighted.
The color buttons perform different actions, when using on screen menu. By pressing the corresponding color button on
the remote control to perform the required action when using these menus.
How to navigate through the Settings menus
The Settings menu allows you to access and change
settings and preferences settings.
• Press the MENU button on the remote control to
display the Settings menu.
- Use cursor up/down to highlight and select a menu item
on the left panel.
The right panel shows the content of the menu you have
highlighted in the left panel.
Note: Sometimes not all the menu items are visible on the
screen. Use cursor down to scroll down to additional items.
- Use the cursor right to enter the right panel.
The content of the right panel is moved to the left panel
and the right panel shows the content of the newly
highlighted item in the left panel.
Note: In some cases, you will want to watch the picture on
your screen while adjusting settings. This means that when the
highlight is on the right side panel, the other menu items are
hidden. When the cursor left is pressed again, the hidden
menu items re-appear and the highlight moves to the left
panel.
• Press the cursor left to go one menu level up again.
- Press the OK button on the highlighted item to activate
and to dismiss the menu.
- Press the MENU button again to exit the Settings menu.
Note: The menu is also dismissed by pressing one of the color
buttons (if present) referring to certain actions which may be
executed.
9
Page 16
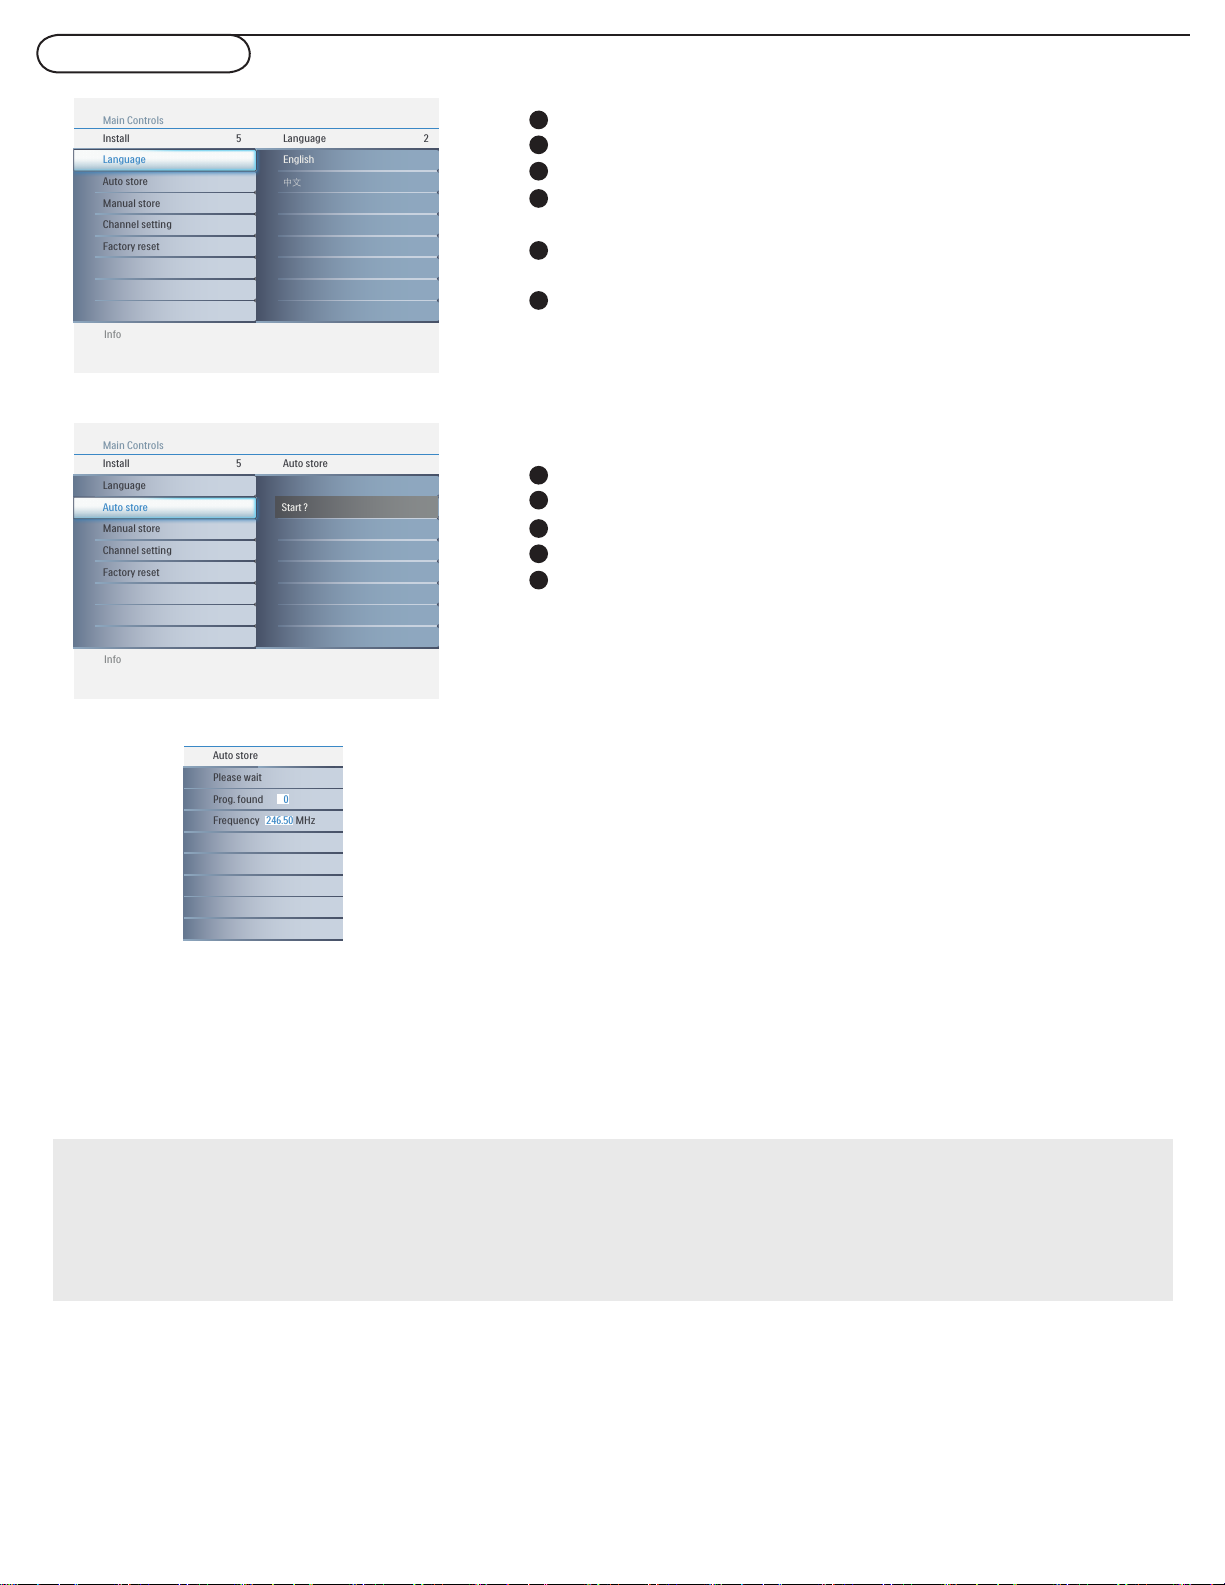
TV menu-Install
Auto store
Please wait
Info
Install
Main Controls
Auto store5
Auto store
Manual store
Channel setting
Factory reset
Language
Start ?
Prog. found
0
Frequency 246.50 MHz
Info
Install
Main Controls
Language5 2
中文
English
Auto store
Manual store
Channel setting
Factory reset
Language
Select the menu language
Press the MENU button on the remote control.
1
2
Use the cursor down to select Install in the Settings menu.
3
Use the cursor right to enter the Install menu.
Select Language and enter the list of available languages with the
4
cursor right.
5
Select your preferred language with the cursor up/down and press
the OK button to confirm your selection.
6
Proceed with the Install menu.
Store TV channels
1
Press the MENU button on the remote control.
2
Use the cursor down to select Install in the Settings menu.
3
Use the cursor right to enter the Install menu.
4
Press cursor down to select Auto store in the Install menu.
5
Use the cursor right to enter the Auto store menu and press OK
to start scanning of channels.
Notes:
• Immediately after unpacking and plugging in your new television, run the auto store function to set up the TV for the broadcast or
cable channels available in your area. If you do not run the auto store function to set up the channels, your television may not
Auto storing may take up to 3 minutes to complete. Please wait
until Auto storing is completed . The TV will then switch
automatically to the first channel found.
operate properly.
• After you’ve run Auto store, check out the results. Press P (+) or the P (-) button and see which channels you can select.
• Remember, an antenna or cable TV signal must first be connected to your LCD TV.
10
Page 17
Info
Manual store
Main Controls I Install
Finetune4
2
Prog. no
Finetune 50
Store
Manual store
Info
Manual store
Main Controls I Install
Prog. no4
Prog. no
Finetune 50
Store
Manual store
2
Info
Manual store
Main Controls I Install
Store4
Prog. no
Finetune 50
Store
Manual store
Store ?
Info
Install
Main Controls
Manual store5 4
Prog. no
Finetune
Store
Manual store
Auto store
Manual store
Channel setting
Factory reset
Language
Info
Manual store
Main Controls I Install
Manual store4
Start?
xxx.xx MHz
Prog. no
Finetune 50
Store
Manual store
Manual store
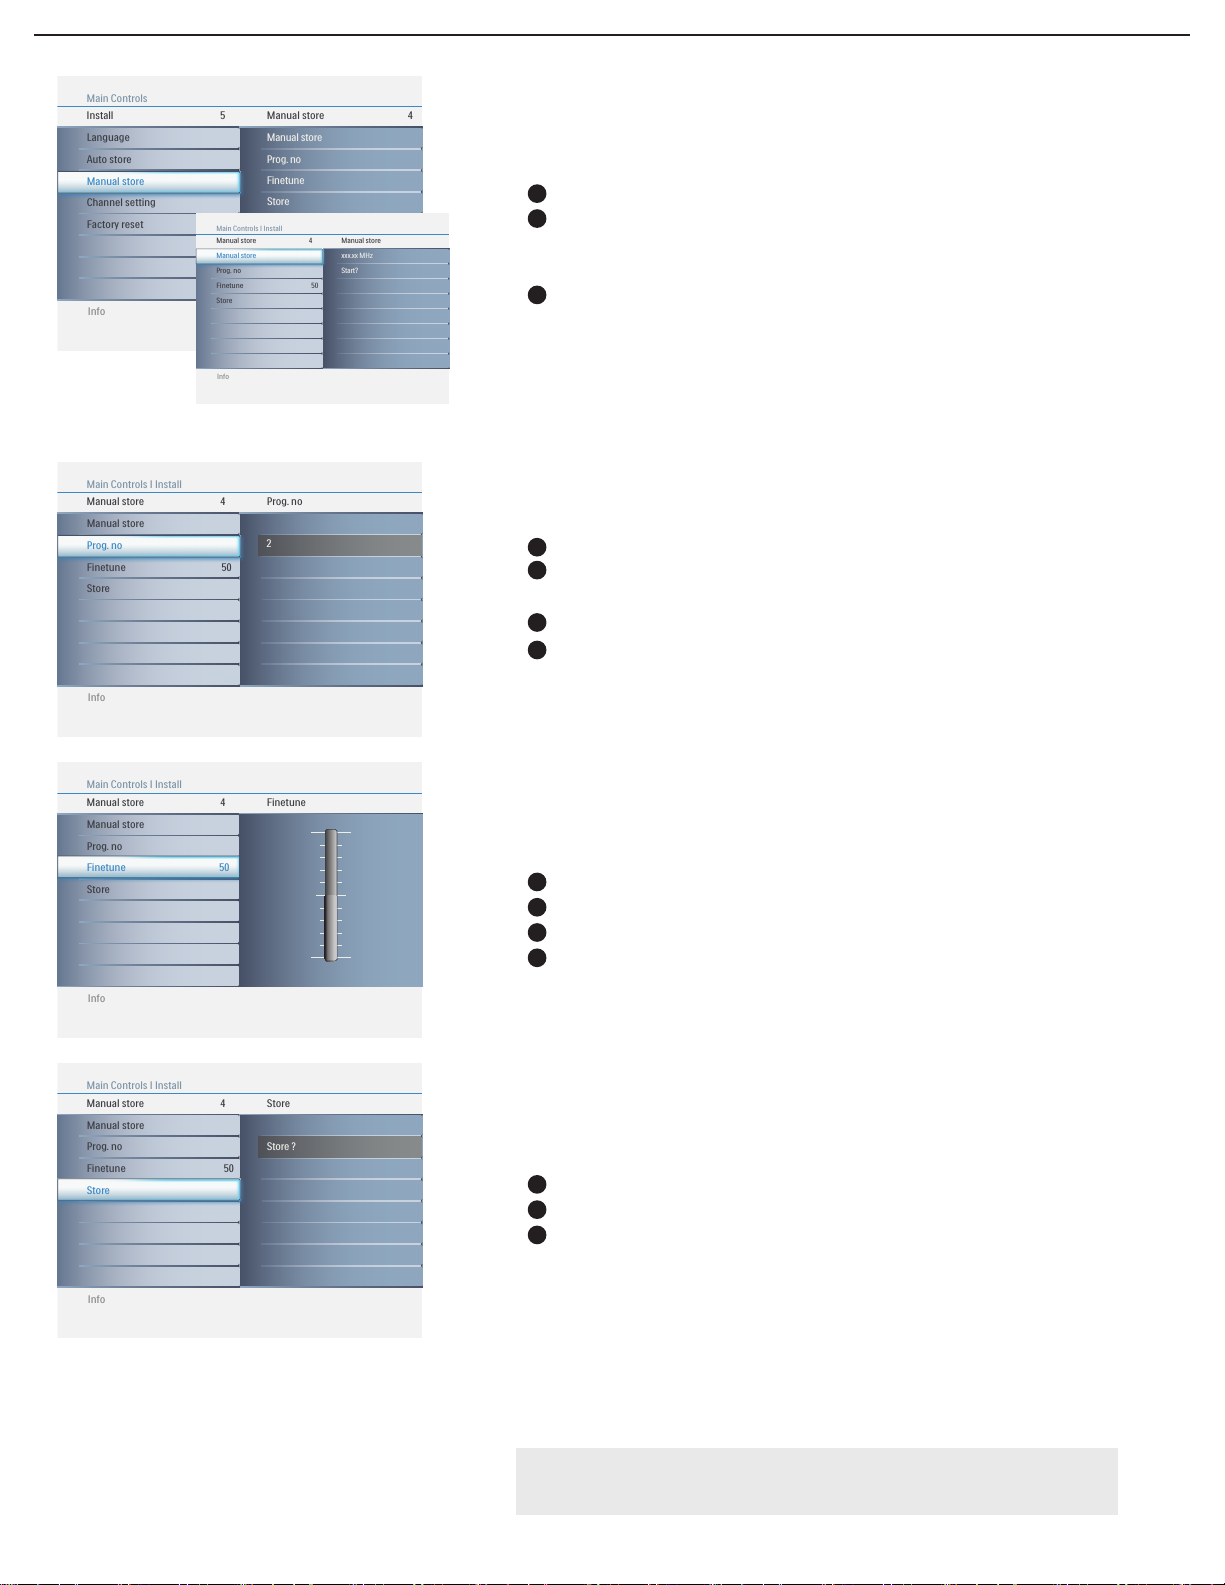
Select Manual store in the Install menu.
1
2
Press the cursor right to enter Manual store, and press the
cursor right again to activate auto search channel frequence or
press number buttons to show your desired channel frequence.
3
Use the cursor right to start searching.
Prog. no
Select Prog. no in the Manual store menu.
1
2
Press the cursor right to enter it, when the channel frequence is
confirmed.
3
Press the cursor up/down to adjust the channel number.
4
Press the cursor right/left to confirm the channel.
Finetune
Select Finetune in the Manual store menu.
1
2
Press the cursor right to enter Finetune.
3
Press the cursor up/down to adjust.
4
Press the cursor right/left to confirm.
Store
Select Store in the Manual store menu.
1
2
Press the cursor right to enter Store.
3
Press the cursor right to confirm stored.
Note:
If the channel reception is satisfatory, please go to page 12.
11
Page 18
Info
Channel setting
Main Controls l Install
Channel edit4 2
Skipped
Channel
Channel swap
Name edit
Channel sort
Channel edit
Info
Channel setting
Main Controls l Install
Channel swap4 3
To
Exchange
From
Channel swap
Name edit
Channel sort
Channel edit
Info
Channel setting
Main Controls l Install
Name edit4 2
. . . . . .
Channel
Channel swap
Name edit
Channel sort
Channel edit
Info
Channel setting
Main Controls l Install
Channel sort4
Channel swap
Name edit
Channel sort
Channel edit
Info
Install
Main Controls
Channel setting5 4
Channel swap
Name edit
Channel sort
Channel edit
Auto store
Manual store
Channel setting
Factory reset
Language
Info
Channel edit
Main Controls l Install I Channel setting
Skipped2 2
Skipped
Active
Skipped
Channel
Info
Channel swap
Main Controls l Install I Channel setting
Exchange3
To
Exchange
From
Exchange ?
Sort?
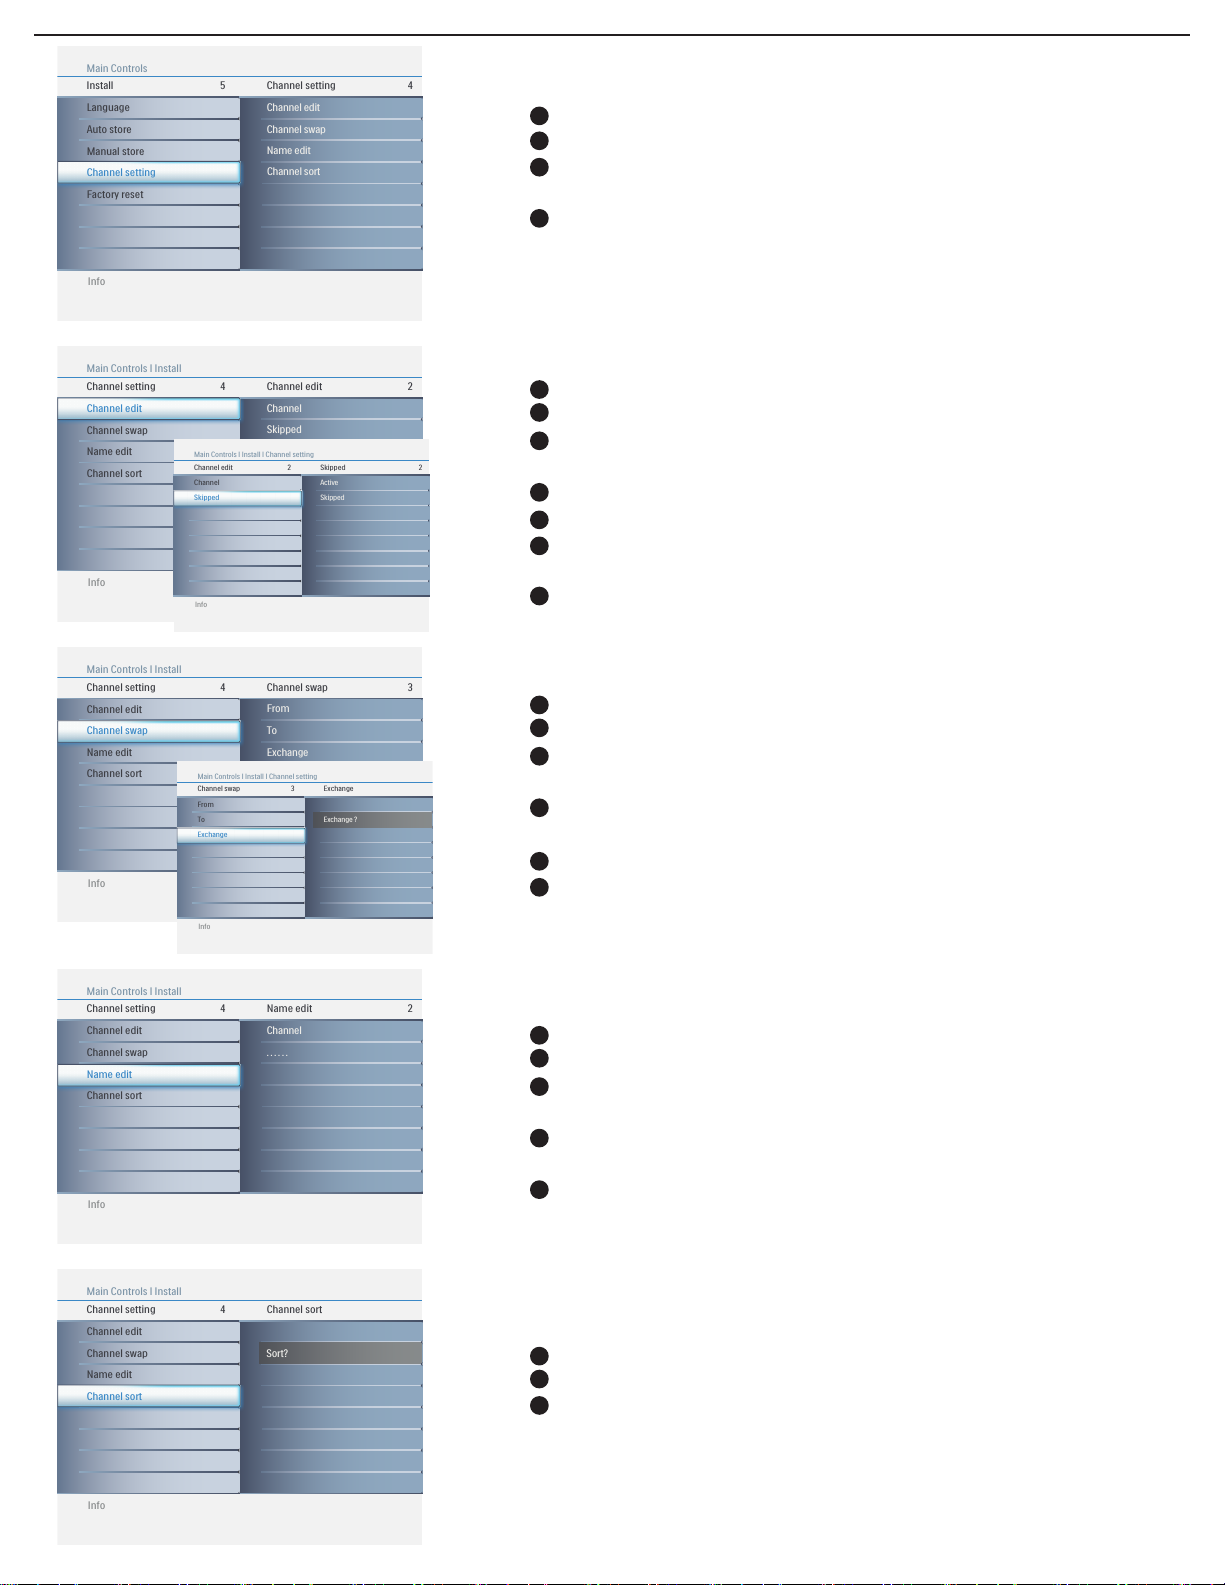
Channel setting
Select Channel setting in the Install menu.
1
2
Press the cursor right to enter Channel setting.
3
Use the cursor up/down to toggle among Channel edit,
Channel swap, Name edit, or Channel sort.
4
Press the cursor right to enter the selection.
Channel edit
Select Channel edit in the Channel setting menu.
1
2
Press the cursor right to enter it.
3
Use the cursor up/down to select the channel that you want to add
or remove.
4
Press the cursor right/left to confirm.
5
Select Skipped in the Channel edit meun.
6
Use the cursor up/down to select Active (to add) or Skipped (to
remove) the channel you selected.
7
Press the cursor right/left to confirm.
Channel swap
Select Channel swap in the Channel setting menu.
1
2
Press the cursor right to enter it.
3
Use the cursor up/down to select From or To and press the
cursor right to enter the selection.
4
Use the cursor up/down to adjust the channel and press the
cursor right/left to confirm.
5
Select Exchange in the Channel swap meun.
6
Press the cursor right to activate Exchange or press the cursor left
to inactivate it.
Name edit
Select Name edit in the Channel setting menu.
1
2
Press the cursor right to enter it.
3
Use the cursor up/down to edit name, and press the cursor right to
move to the next character.
4
Press the cursor left to confirm the first character and press the
cursor right to confirm the last character.
5
Press the cursor right to confirm the name.
Channel sort
Select Channel sort in the Channel setting menu.
1
2
Use the cursor right to sort the channel.
3
Use the cursor left to return to the previous menu.
12
Page 19
Info
Install
Main Controls
Factory reset5 2
Yes
No
Auto store
Manual store
Channel setting
Factory reset
Language
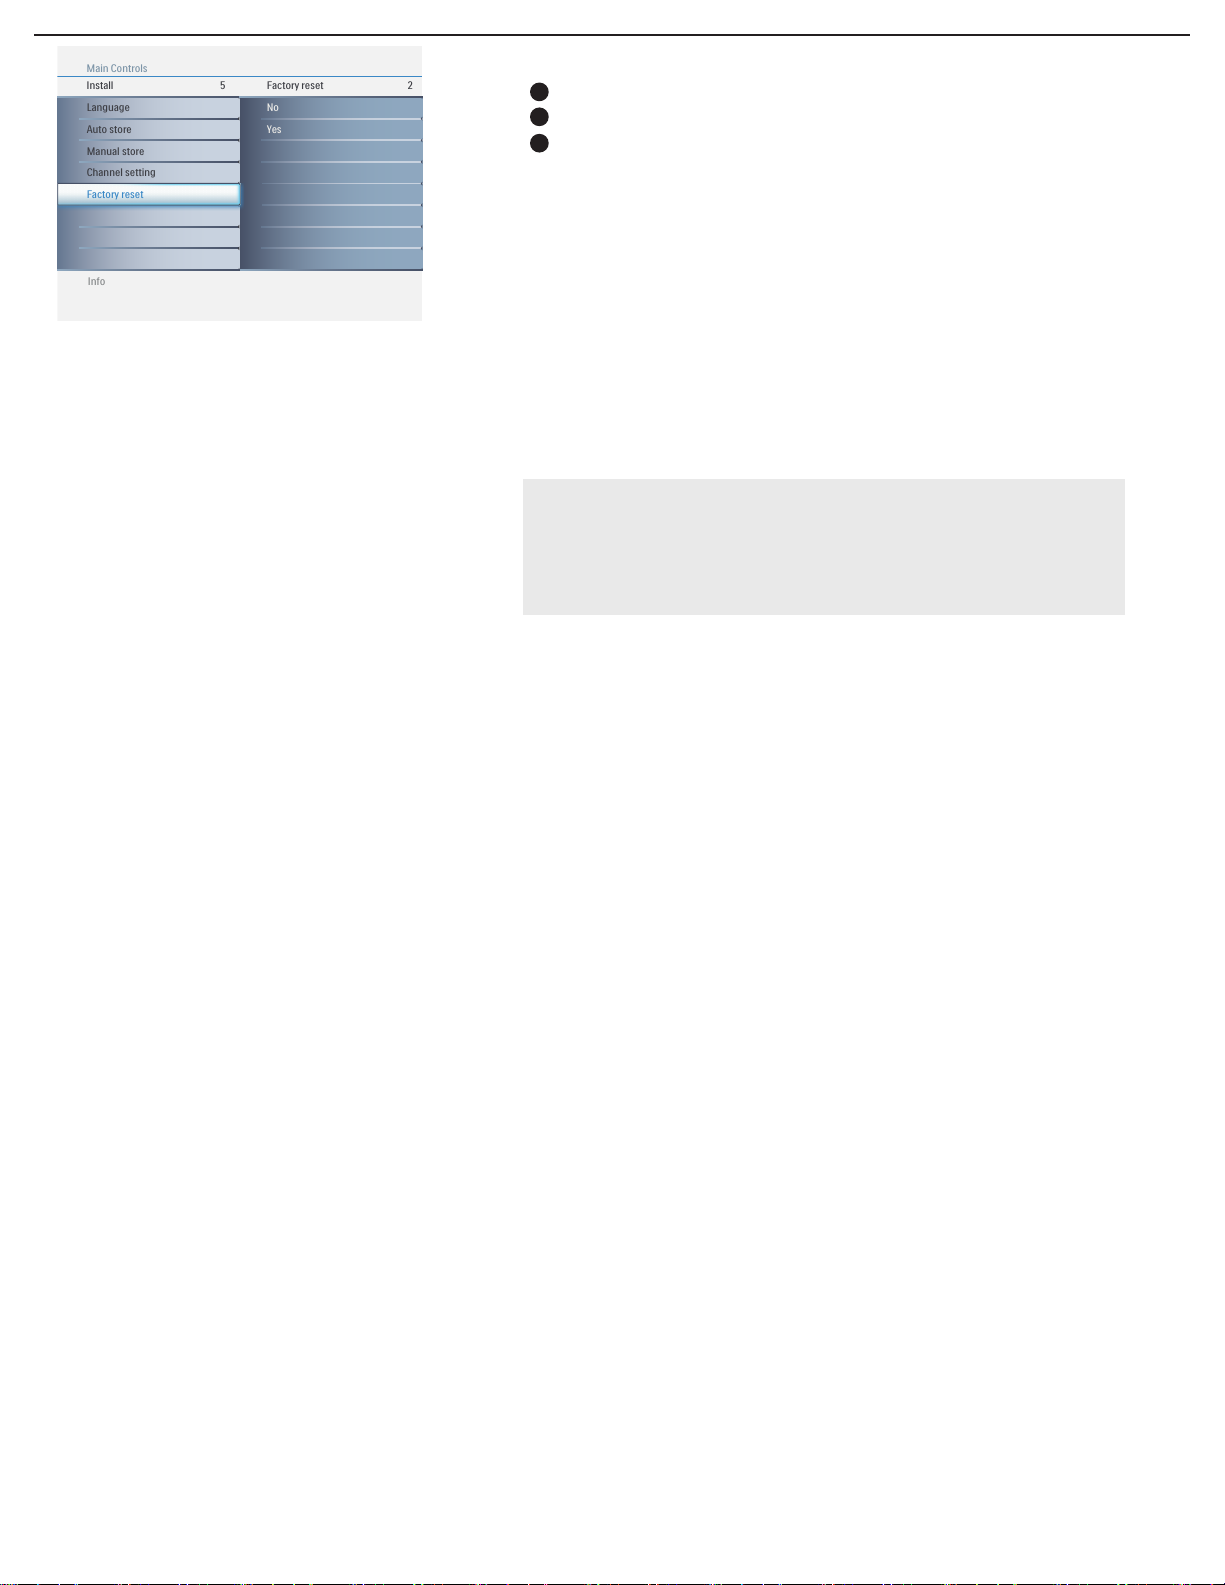
Factory reset
Select Factory reset in the Settings menu.
1
2
Press the cursor right to enter Factory reset.
3
Select Yes and press the cursor right for resetting the original
factory settings.
Note:
If you reset the TV to the factory settings, all your present setting on
picture, sound, and other feature settings will be erased and replaced
by the manufacture’s default settings. However, your AutoLock access
code will not be erased. Please refer to page 15 for detail.
13
Page 20
TV menu-Features
Info
Main Controls Features4 5
Install
NR
Active control
Auto lock
Source list
Timer
Picture
Sound
Features
Info
Features
Main Controls
Timer5 4
Start time
Stop time
Sleep timer
Clock
NR
Active control
Auto lock
Source list
Timer
Info
Features
Main Controls
NR5 2
Off
On
NR
Auto lock
Source list
Timer
Active control
Info
Features
Main Controls
Active control5 2
Off
On
NR
Auto lock
Source list
Timer
Active control
Info
Features
Main Controls
Auto lock5 3
Change code
Clear all
Lock program
NR
Auto lock
Source list
Timer
Active control
Info
Features
Main Controls
Source list5 8
HDMI 1
HDMI 2
TV
NR
Auto lock
Source list
Timer
CVI 1
CVI 2
AV
Side AV
PC
Active control
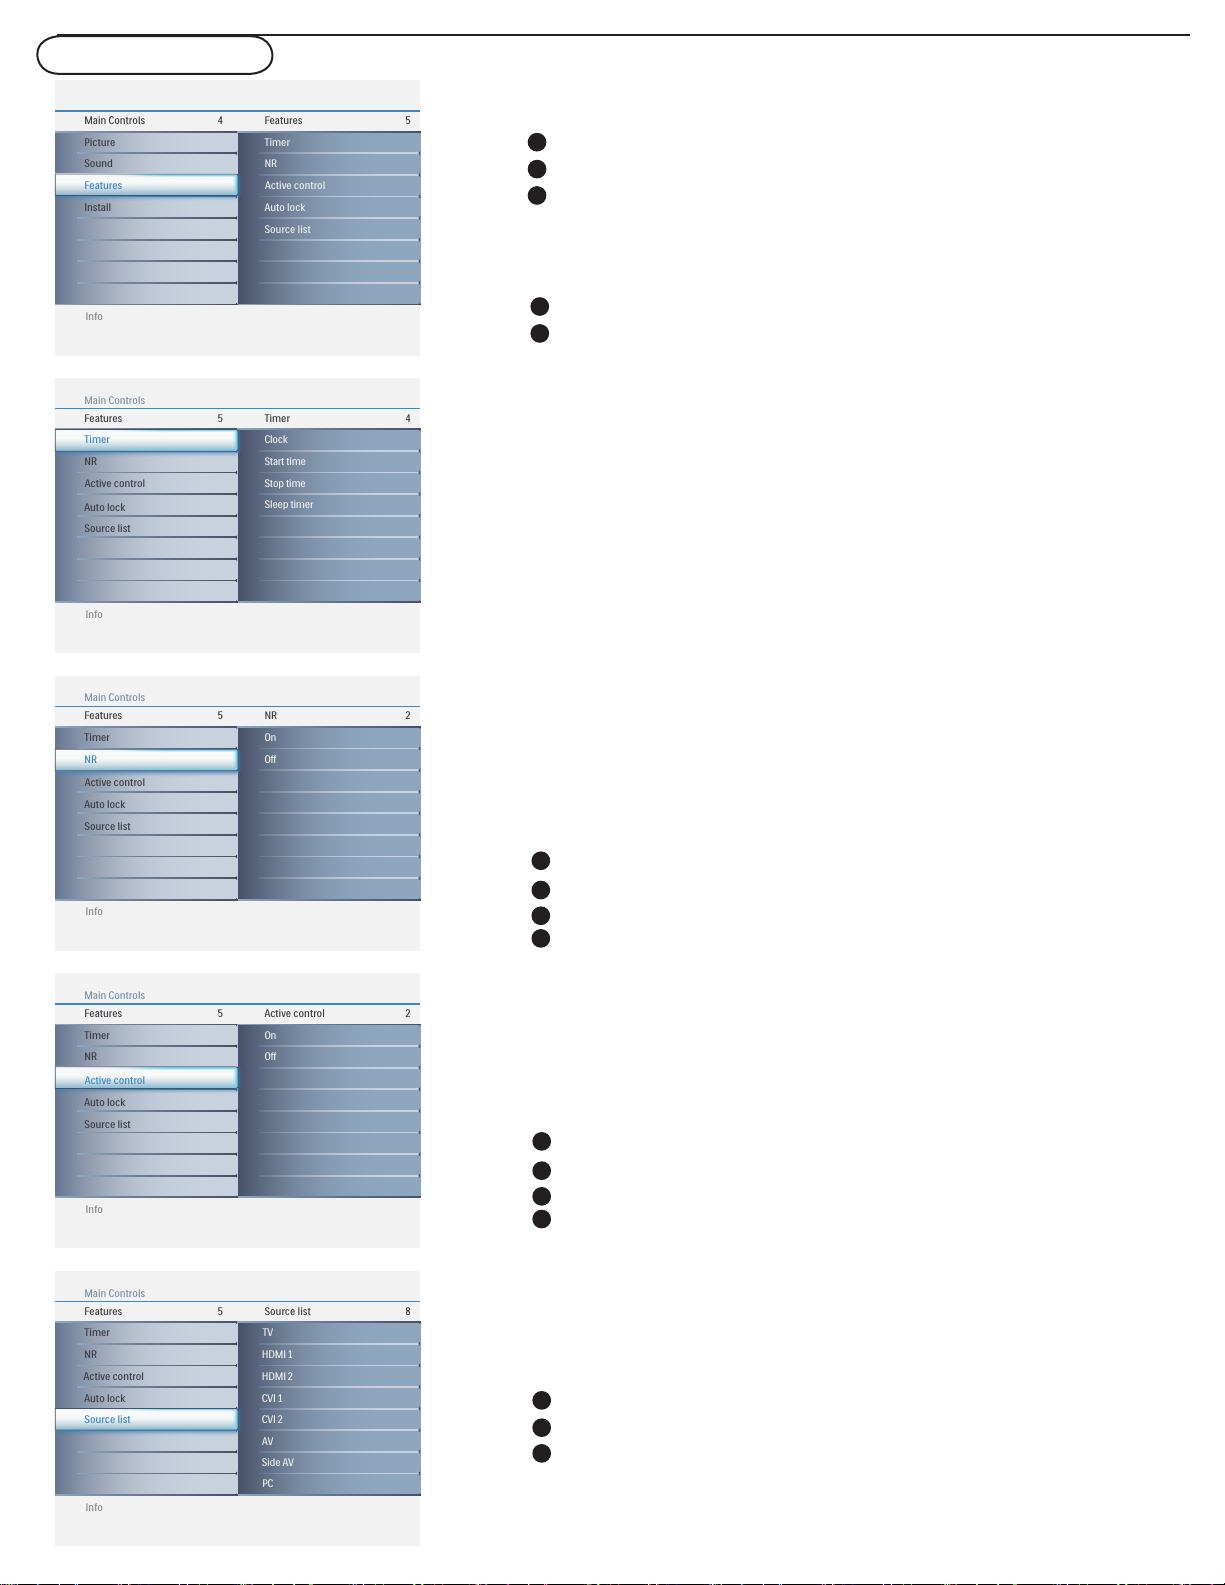
Features menu
1
Select Features in the TV Settings menu.
2
Press the cursor right to enter the features menu.
3
Select the menu items with the cursor up/down, and
adjust the settings with the cursor left/right.
Timer
1
Select Timer in the Features menu.
2
Use the cursor down to choose the item you want to adjust and
press the cursor right to enter Clock, Start time, Stop time,
and Sleep timer.
Clock: Allow you to set the time.
Start time: Allow you to set the time for turning on the
TV automatically.
Stop time: Allow you to set the time for turning off the
TV automatically.
Sleep timer: Allow you to set the time period, after
which the TV will turn to standby mode
automatically.
This list will have values from 0 to 180.
NR
Automatically filters out and reduces the image noise and improves
picture quality when receiving weak video signals.
1
Select NR in the Features menu.
2
Press the cursor right to enter it.
3
Use the cursor down to select On or Off.
4
Press the cursor right to activate or inactivate noise reduction.
Active control
Active control will continuously measures and corrects all incoming
signals in sharpness, noise, contrast and color in order to provide
the best and most consistent picture quality.
1
Select Active control in the Features menu.
2
Press the cursor right to enter it.
3
Use the cursor down to select On or Off
4
Press the cursor right to activate or inactivate Active control.
.
Source list
1
Select Source list in the Features menu.
2
Press the cursor right to enter it.
3
Use the cursor up/down to select the video input source:
TV, HDMI 1, HDMI 2, CVI 1, CVI 2, AV, Side AV, and PC.
14
Page 21
Auto lock
Info
Features
Main Controls
Auto lock5 3
Change code
Clear all
Lock program
NR
Auto lock
Source list
Timer
Active control
Info
Features
Main Controls
Auto lock5
Access Code
NR
Auto lock
Source list
Timer
Active control
Info
Features
Main Controls
Auto lock5 3
Change code
Clear all
Lock program
NR
Auto lock
Source list
Timer
Active control
Info
Auto lock
Main Controls I Features
Lock program3
18
Change code
Lock program
Clear all
Info
Features
Main Controls
Auto lock5
Access Code
NR
Auto lock
Source list
Timer
Active control
Info
Features
Main Controls
Auto lock5 3
Change code
Clear all
Lock program
NR
Auto lock
Source list
Timer
Active control
Info
Auto lock
Main Controls I Features
Lock program3
18
Change code
Lock program
Clear all
Info
Features
Main Controls
Auto lock5
Access Code
NR
Auto lock
Source list
Timer
Active control
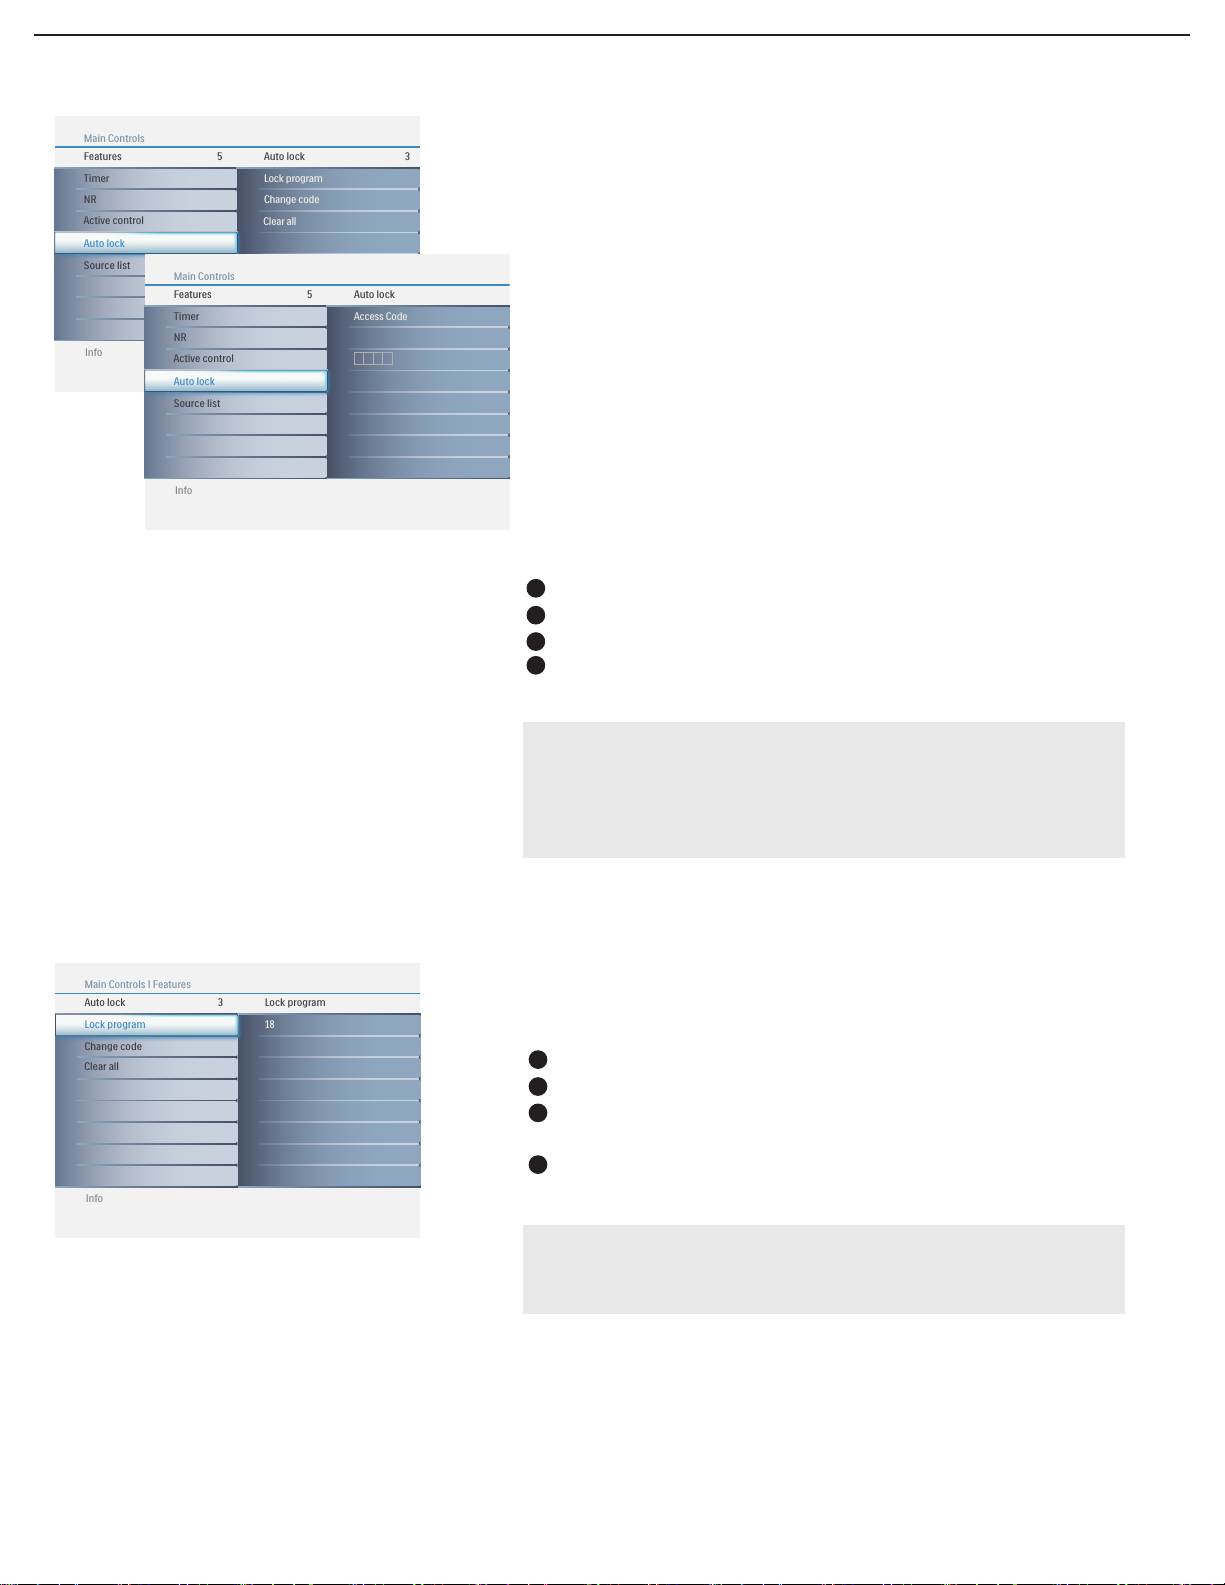
The Auto lock feature allows you to lock channels, and
prevent your children from watching unsuitable content of
programmes.
Auto lock offers various Blocking controls from which to
choose:
Access code - An Access code must be set to prevent
children from unblocking questionable or
censored programming set by their parents.
Lock program - Select the TV channel you want to lock.
Chang code - To change your access code or overwriting.
Clear all - To unlock all locked channels and programming.
1
Select Auto lock in the feature menu.
2
Press the cursor right to enter it.
3
Access code will appear on the screen.
4
Enter a four-digit code using the number buttons.
Note:
Remember that 0711 is the default Auto lock code. If your access code
has been changed by someone other than you (a child, for example)
or you have forgotten the code, you can always get in by inputting the
default code.
Lock program
After your personal access code has been set, you are ready to
select the channels or inputs you want to block out or censor.
1
Select Lock program in the Auto lock menu.
2
Press the cursor right to enter it.
3
Use the number buttons to enter the channel which you are going
to block.
4
Press the cursor up/down to block the current channel.
Note:
You can block additional channels by using the number buttons to
jump to another channel.
15
Page 22
TV menu-Picture & Sound
Info
Main Controls Picture4 8
Sound
Features
Install
Contrast
Brightness
Color
Sharpness
Color temp
Contrast +
Picture format
Smart picture
Picture
Info
Picture
Main Controls
Smart picture8 5
Rich
Nature
Soft
Multimedia
Personal
Contrast 100
Contrast +
Brightness 50
Color 50
Sharpness 30
Color temp
Picture format
Smart picture
Info
Picture
Main Controls
Contrast8
Contrast 100
Brightness 50
Color 50
Sharpness 30
Smart picture
Picture format
Color temp
Contrast +
Info
Picture
Main Controls
Brightness8
Contrast 100
Brightness 50
Color 50
Sharpness 30
Smart picture
Picture format
Color temp
Contrast +
Info
Picture
Main Controls
Color8
Contrast 100
Brightness 50
Color 50
Sharpness 30
Smart picture
Picture format
Color temp
Contrast +
Info
Picture
Main Controls
Sharpness8
Contrast 100
Brightness 50
Color 50
Sharpness 30
Smart picture
Picture format
Color temp
Contrast +
Info
Picture
Main Controls
Color temp8 3
Contrast 100
Brightness 50
Color 50
Sharpness 30
Smart picture
Picture format
Color temp
Warm
Cool
Normal
Contrast +
Info
Picture
Main Controls
Contrast +8 2
Off
On
Contrast 100
Brightness 50
Color 50
Sharpness 30
Color temp
Picture format
Smart picture
Contrast +
Picture
Main Controls
Picture format8 6
4:3
Movie expand 14:9
Movie expand 16:9
Super zoom
Contrast 100
Brightness 50
Color 50
Smart picture
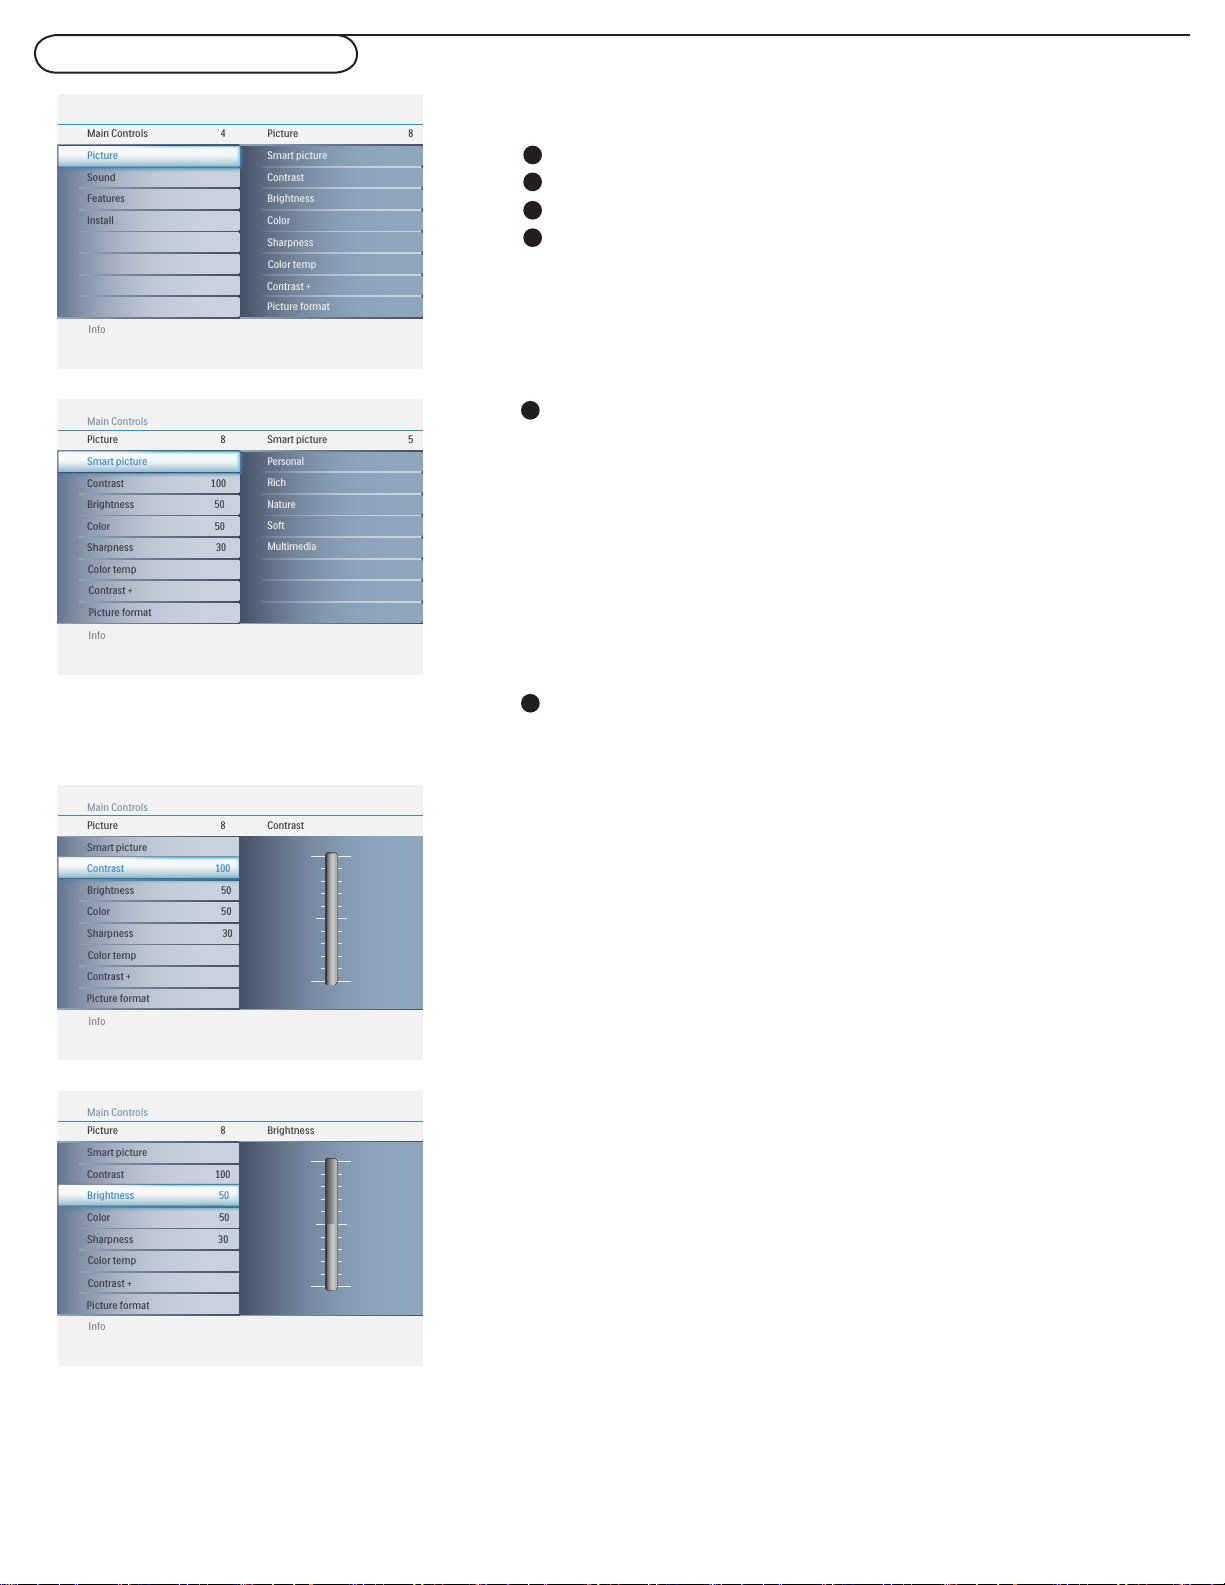
Picture menu
Select Picture in the TV settings menu.
1
2
Press the cursor right again to enter the Picture menu.
3
Select the menu items with the cursor up/down.
4
Adjust the settings with the cursor left/right, and enter the list of
submenu items with the cursor right. Select a submenu item with
the cursor up or down.
Smart picture
Select Smart picture to display a list of predefined picture
1
settings, each corresponding with specific factory settings.
Personal refers to the personal preference settings of picture in
the picture menu.
Note: This Philips TV has been set at the factory to look best in bright
store environments, which typically use fluorescent lighting. As your
home will likely not be as well lit as a store, we recommend that you
cycle through the various smart picture modes to find the one that best
suits your own viewing conditions.
You can press the Smart picture button on the remote control
2
repeatedly to select either Personal, Rich, Nature, Soft, or
Multimedia picture settings.
Note:
• The moment you are in a predefined Smart picture setting and you modify
the Picture menu, all values of the menu will overwrite those previously made
in personal setting.
Contrast
Adjust to “sharpen” the picture quality. The black portions of the
picture become richer in darkness and the white become brighter.
Brightness
Adjust to brighten the dark parts of the picture. This appears to
add white to the color.
16
Page 23
Info
Picture
Main Controls
Color8
Contrast 100
Brightness 50
Color 50
Sharpness 30
Smart picture
Picture format
Color temp
Contrast +
Info
Picture
Main Controls
Sharpness8
Contrast 100
Brightness 50
Color 50
Sharpness 30
Smart picture
Picture format
Color temp
Contrast +
Info
Picture
Main Controls
Color temp8 3
Contrast 100
Brightness 50
Color 50
Sharpness 30
Smart picture
Picture format
Color temp
Warm
Cool
Normal
Contrast +
Info
Picture
Main Controls
Contrast +8 2
Off
On
Contrast 100
Brightness 50
Color 50
Sharpness 30
Color temp
Picture format
Smart picture
Contrast +
Info
Picture
Main Controls
Picture format8 6
4:3
Movie expand 14:9
Movie expand 16:9
16:9 subtitle
Widescreen
Super zoom
Contrast 100
Brightness 50
Color 50
Sharpness 30
Color temp
Picture format
Smart picture
Contrast +
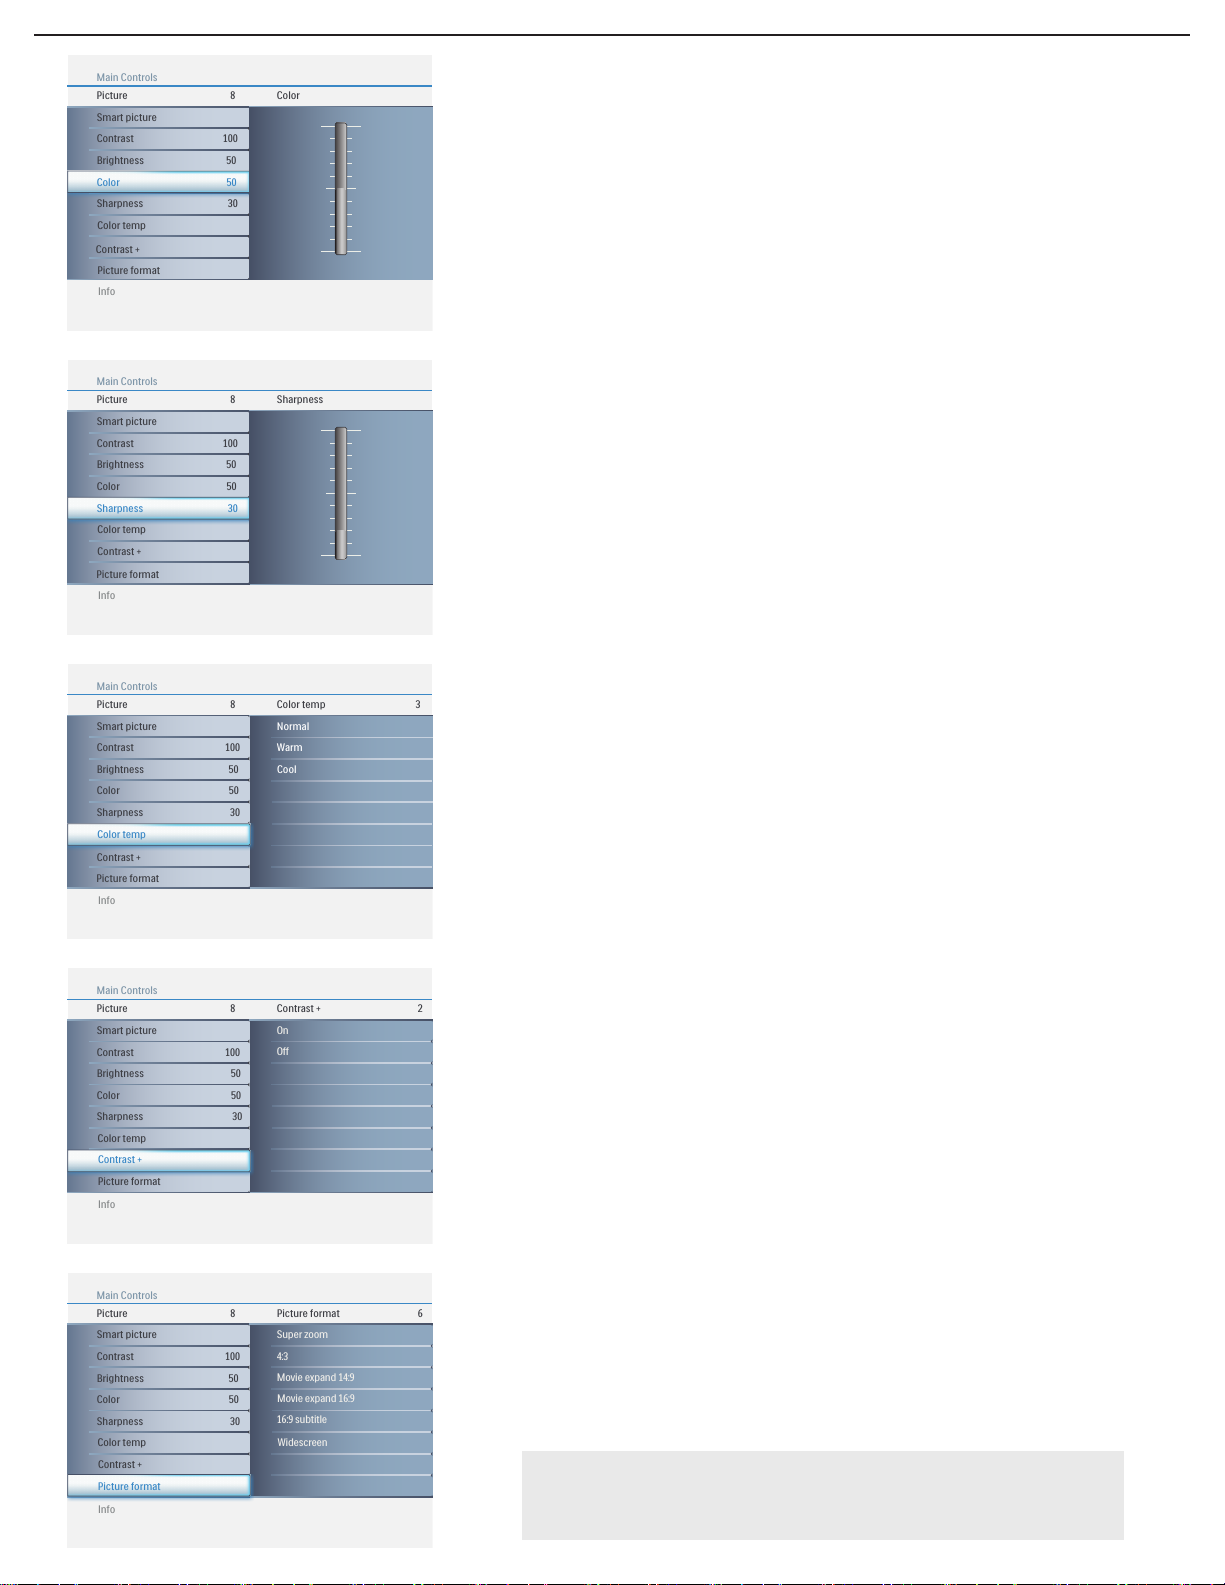
Adjust to add or reduce color.
Color
Sharpness
Adjust to improve detail.
Color temp
Adjust to increase or decrease Warm (red) and Cool (blue)
colors to suit personal preferences.
Select Cool to give the white colors a blue tint, Normal to give
the white colors a neutral tint, Warm to give the white colors
a red tint.
Contrast +
Dynamic contrast will correct the gamma for more natural
detail, makes the dark parts are stretched towards even more
dark, light parts are made whiter.
Picture format
Adjust to change the screen format to match the type of program
you are watching. Please refer to page 7 for detail.
Note:
Any adjustment of Brightness, Color, Contrast or Sharpness will be
stored into Personal at Smart picture section.
17
Page 24
Info
Sound
Main Controls
Smart sound3 5
Speech
Music
Personal
Multimedia
Movie
Incredible surround
AVL
Smart sound
Info
Sound
Main Controls
Incredible surround3 2
Off
On
Incredible surround
AVL
Smart sound
Info
Sound
Main Controls
AVL3 2
Off
On
Incredible surround
AVL
Smart sound
Info
Main Controls Sound4 3
Features
Install
Incredible surround
AVL
Smart sound
Picture
Sound
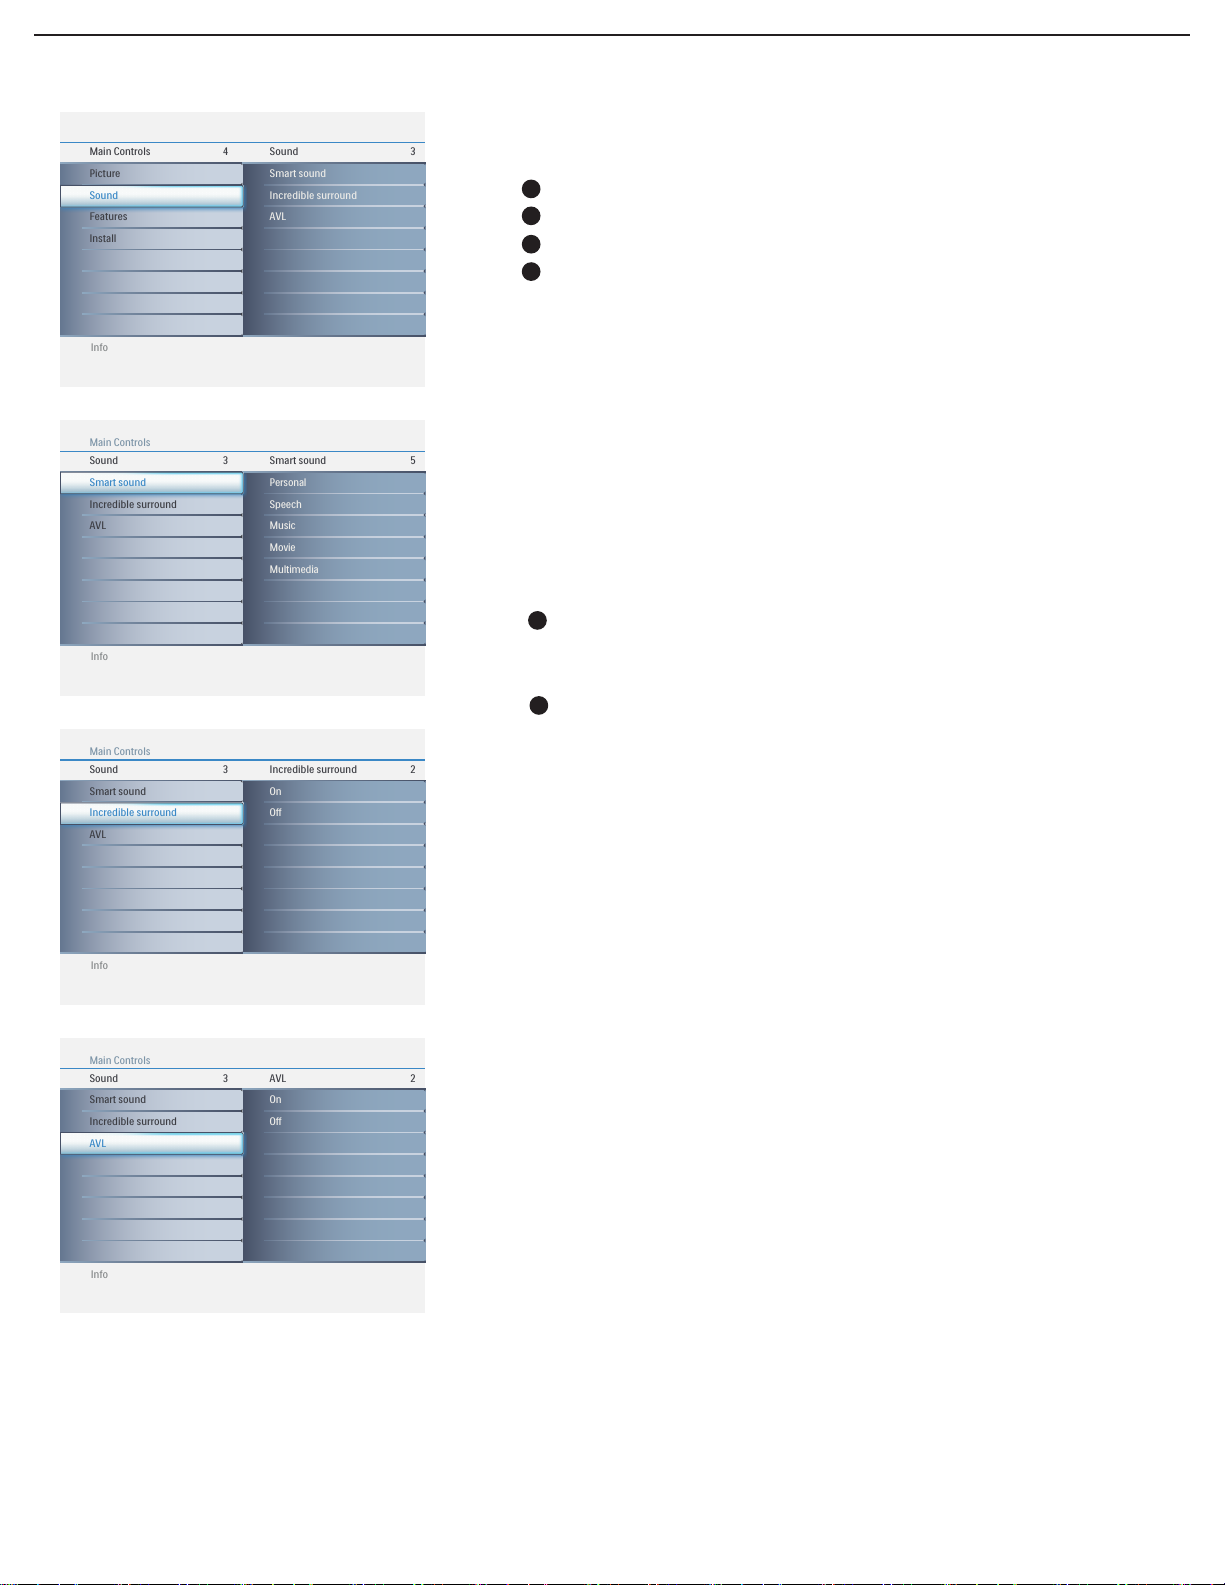
Sound menu
Select Sound in the TV settings menu.
1
2
Press the cursor right to enter it.
3
Select the menu items with the cursor up/down.
4
Press the cursor right to enter the selection.
Smart sound
Smart sound allows you to select from four user presets and a
personal mode that you set according to your own preferences
through the onscreen Sound menu. The five user presets
(Personal, Speech, Music, Movie, and Multimedia) enable you to
tailor the TV sound so as to enhance the particular program you
are watching.
1
Select Smart sound in the Sound menu and press the cursor right
to enter it.
2
You can press the Smart sound button on the remote control
repeatedly to toggle between Personal
, Speech, Music, Movie
and Multimedia.
Incredible surround
Adds greater depth and dimension to TV sound. Select from On
.
or Off
AVL
Automatically reduces the volume differences between channels
and programs, providing a more constant overall level. This will
also reduce the dynamics of sound.
18
Page 25
Record with your recorder
A/CH
AV
i
+
AV
Y
PbPr
VIDEO
RL
A/CH
AV
i
+
Recorder
TV
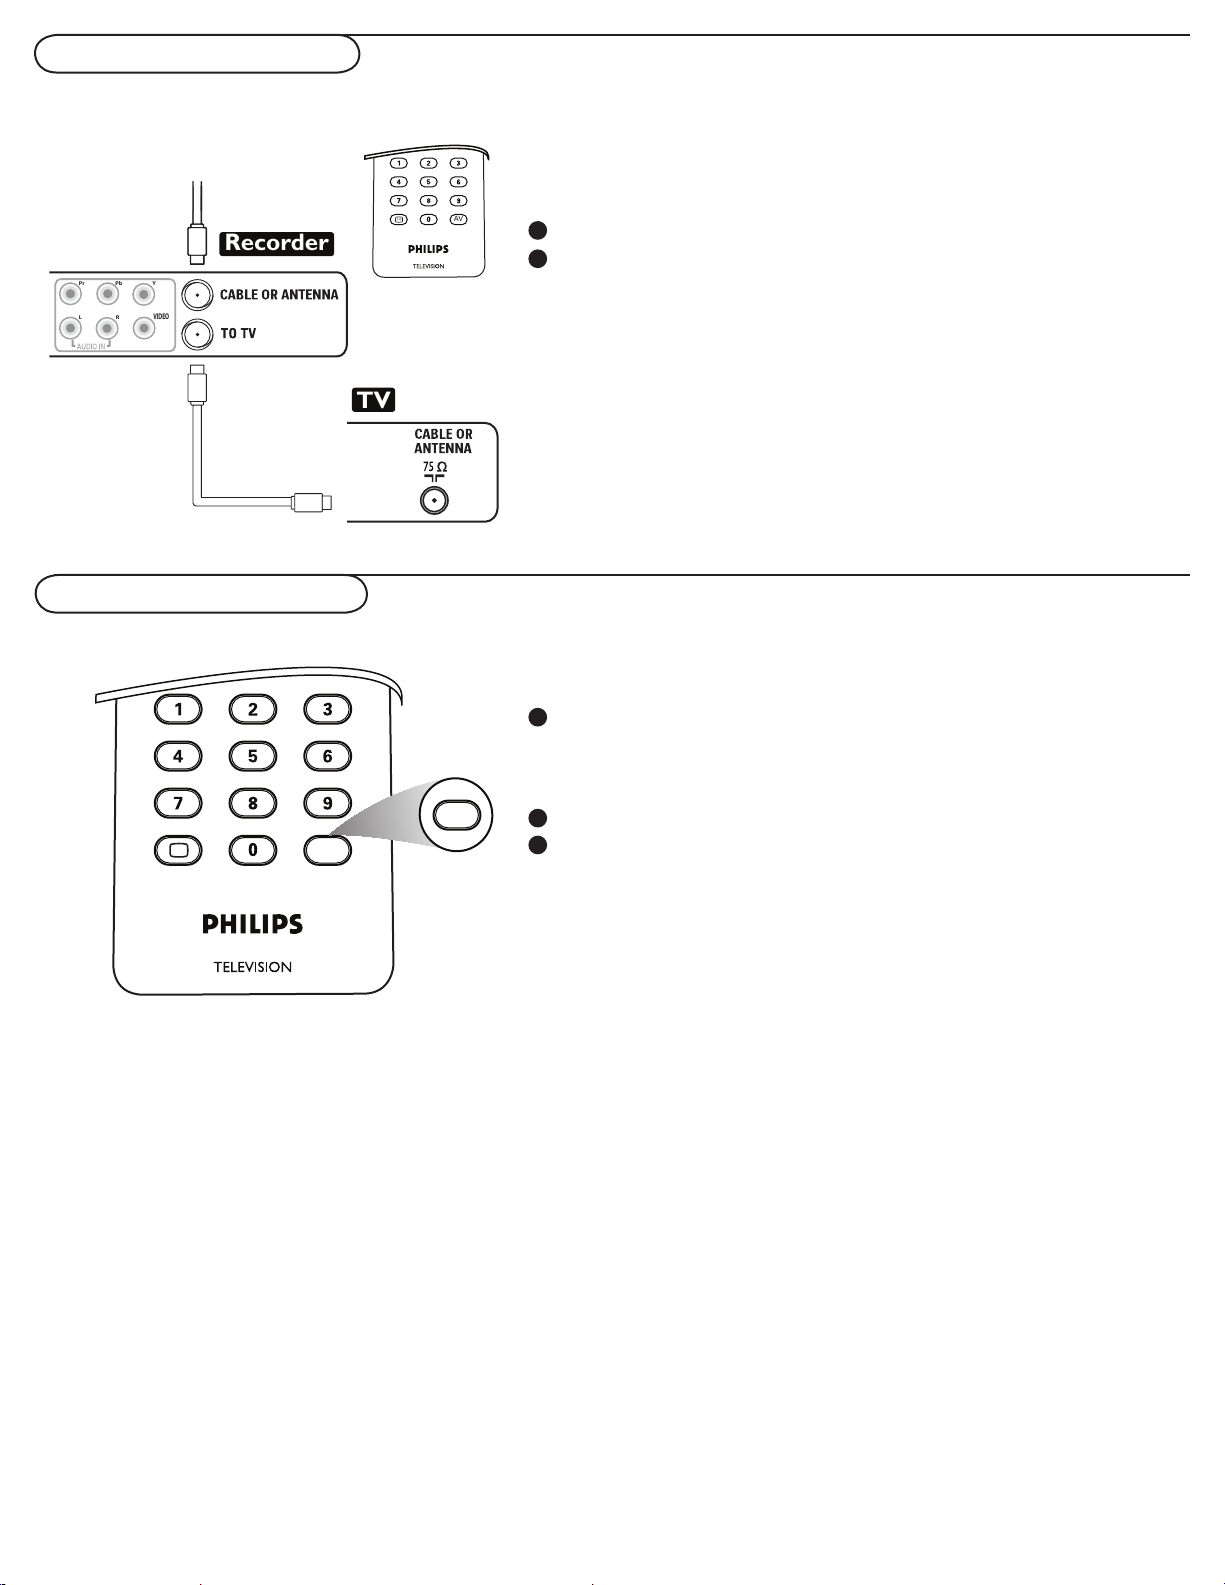
To select connected devices
Record a TV program
You can record a TV program using your recorders tuner
without affecting your TV.
1
Select the channel number on your recorder.
2
Set your recorder to record.
See the handbook for your recorder.
Note: Switching channel numbers on your TV does not disturb
recording !
Press the AV button repeatedly or select Source list in the
1
Settings menu to select TV, HDMI 1, HDMI 2, CVI 1, CVI 2,
AV, Side AV, and PC according to where you connected your
devices.
2
Press the cursor up/down.
3
Press OK.
19
Page 26
Info
Main Controls Picture4 5
Sound
Features
Install
Brightness
Contrast
Auto adjust
Manual adjust
Color temp
Picture
Info
Picture
Main Controls
Color temp5 3
Warm
Cool
Normal
Brightness 100
Contrast 100
Auto adjust
Manual adjust
Color temp
Info
Picture
Main Controls
Brightness5
Brightness 100
Contrast 100
Auto adjust
Manual adjust
Color temp
Info
Picture
Main Controls
Contrast5
Brightness 100
Contrast 100
Auto adjust
Manual adjust
Color temp
Info
Picture
Main Controls
Auto adjust5
Yes
Brightness
Contrast
Auto adjust
Manual adjust
Color temp
Info
Picture
Main Controls
Manual adjust5 4
Clock
Horizontal
Vertical
Phase
Brightness
Contrast
Auto adjust
Manual adjust
Color temp
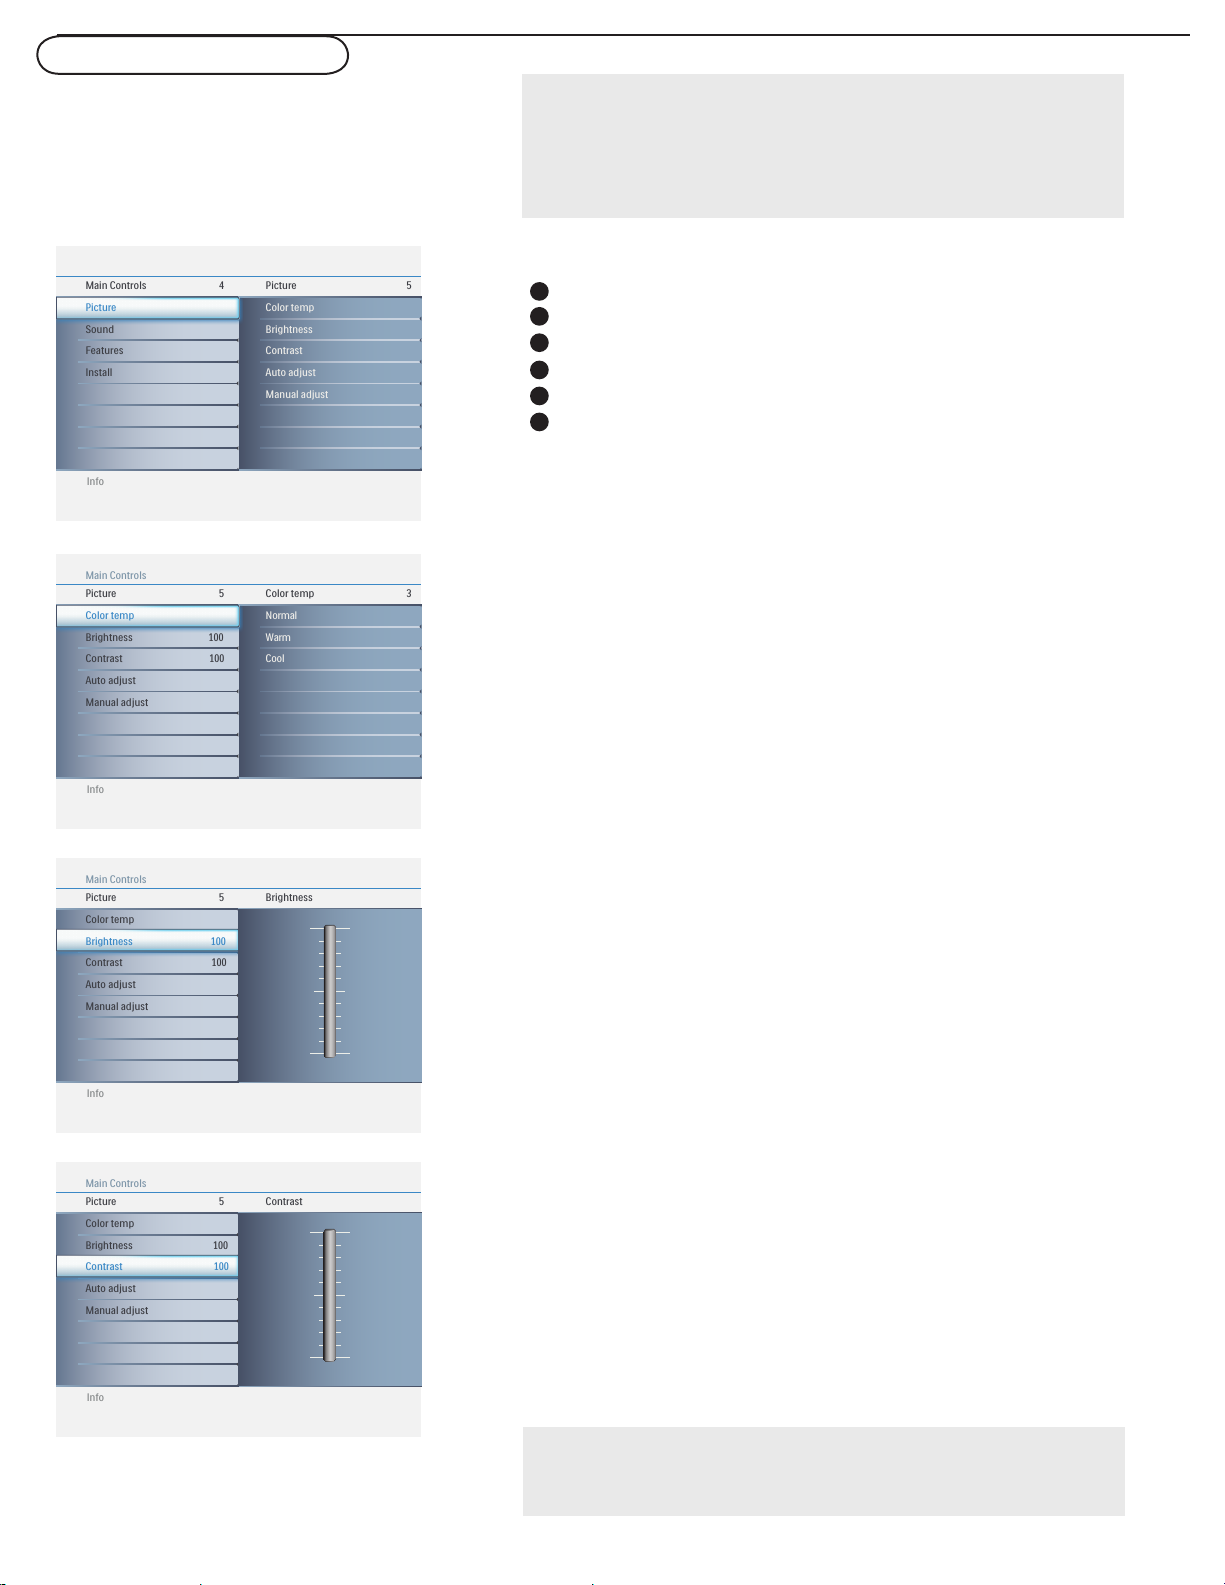
PC menu-Picture & Sound
Note:
This TV can also be used as a PC Monitor. A PC video signal must be
present or the TV will go into standby mode. The PC Picture controls
allow you to adjust the picture.
Please make sure you are in PC mode.
Picture
Press the MENU button on the remote control.
1
2
Select Picture in the Settings menu.
3
Use the cursor right to enter the Picture menu.
Use the cursor up/down to highlight the menu items.
4
5
Press the cursor right to enter the selection.
6
Use the cursor up/down to adjust the item.
Color temp
Adjust to increase or decrease Warm (red) and Cool (blue)
colors to suit personal preferences.
Select Cool to give the white colors a blue tint, Normal to give
the white colors a neutral tint, Warm to give the white colors
a red tint.
Brightness
Adjust to brighten the darkest parts of the picture.
Contrast
Adjust to “sharpen” the Picture quality. The black portions of
the picture become richer in darkness and the white become
brighter.
Note:
Color temp can also be activated by pressing Smart picture button on
your Remote Control.
20
Page 27
Info
Picture
Main Controls
Auto adjust5
Yes
Brightness
Contrast
Auto adjust
Manual adjust
Color temp
Info
Picture
Main Controls
Manual adjust5 4
Clock
Horizontal
Vertical
Phase
Brightness
Contrast
Auto adjust
Manual adjust
Color temp
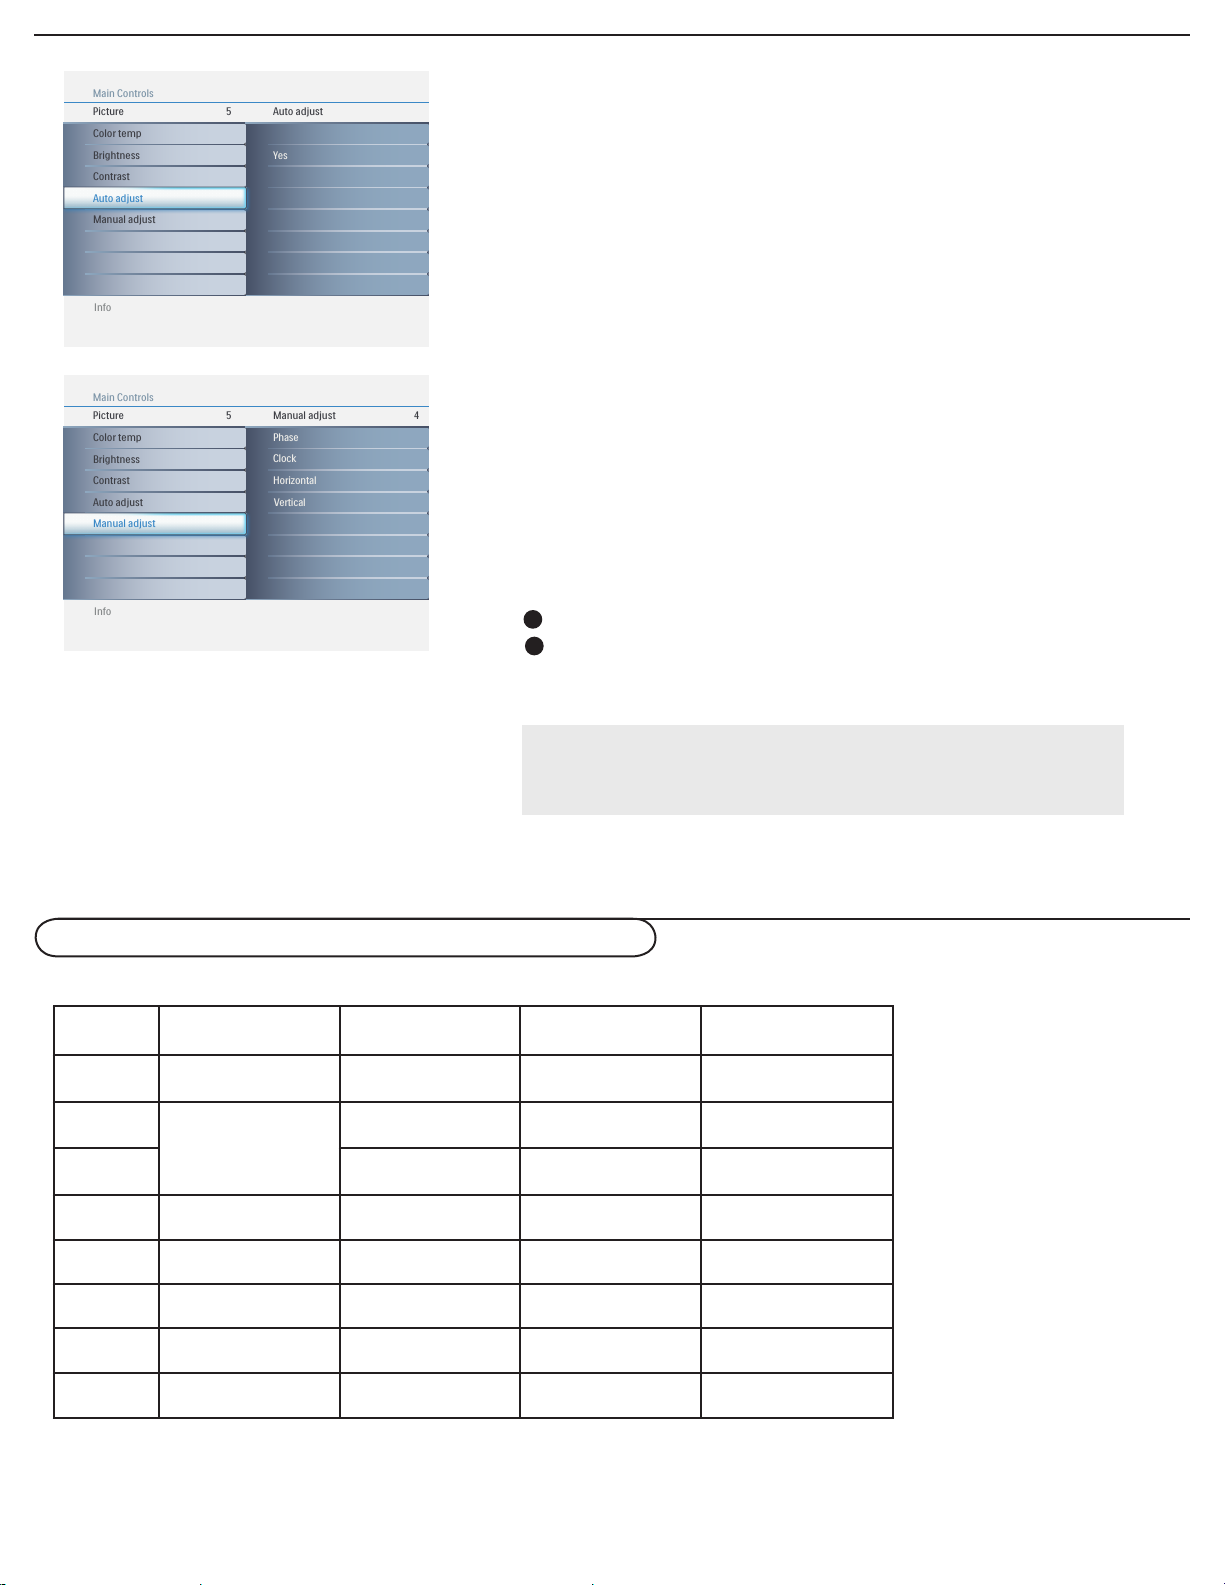
Auto adjust
The PC mode will automatically adjust to the best image
position, phase, and clock setting.
Manual adjust
The Manual adjust control allows you to manually fine tune the
image as it appears on the screen.
Phase - eliminates the horizontal interfering lines.
Clock - eliminates the vertical interfering lines.
Horizontal - adjust the horizontal placement of the
picture.
Vertical - adjust the vertical placement of the picture.
1
Use the cursor up/down to adjust the item.
2
Press the cursor right to confirm.
Note:
If you are willing to reset adjustment back to original value, please
enter to Factory Reset in Install menu.
Setting up the PC mode (Personal Computer Monitor)
32PFL7422/37PFL7422/37HF7005/42PFL7422/47PFL7422 (32”/37”/42”/47” LCD TV)
No Resolution Mode V. Frequency (Hz) H. Frequency (kHz)
1 640 x 480 VGA 59.940 31.469
2
3 VESA 60.317 37.879
4 1024 x 768 VESA 60.004 48.363
5 1280 x 720 CVT 59.855 44.772
6 1280 x 768 CVT 59.87 47.776
*7 1360 x 768 CVT 59.799 47.720
*8 1280 x 1024 VESA 60.000 63.981
*Recommended Resolution
Note: Resolution 1280 x 1024 is only available for 37PFL7422/37HF7005/42PFL7422/47PFL7422
800 x 600
VESA 56.250 35.156
Recommended resolution for
32PFL7422
Recommended resolution for
37PFL7422/37HF7005/42PFL7422/
47PFL7422
21
Page 28
Info
Sound
Main Controls
Smart sound3 5
Speech
Music
Personal
Multimedia
Movie
Incredible surround
AVL
Smart sound
Info
Sound
Main Controls
Incredible surround3 2
Off
On
Incredible surround
AVL
Smart sound
Info
Sound
Main Controls
AVL3 2
Off
On
Incredible surround
AVL
Smart sound
Info
Main Controls Sound4 3
Features
Install
Incredible surround
AVL
Smart sound
Picture
Sound
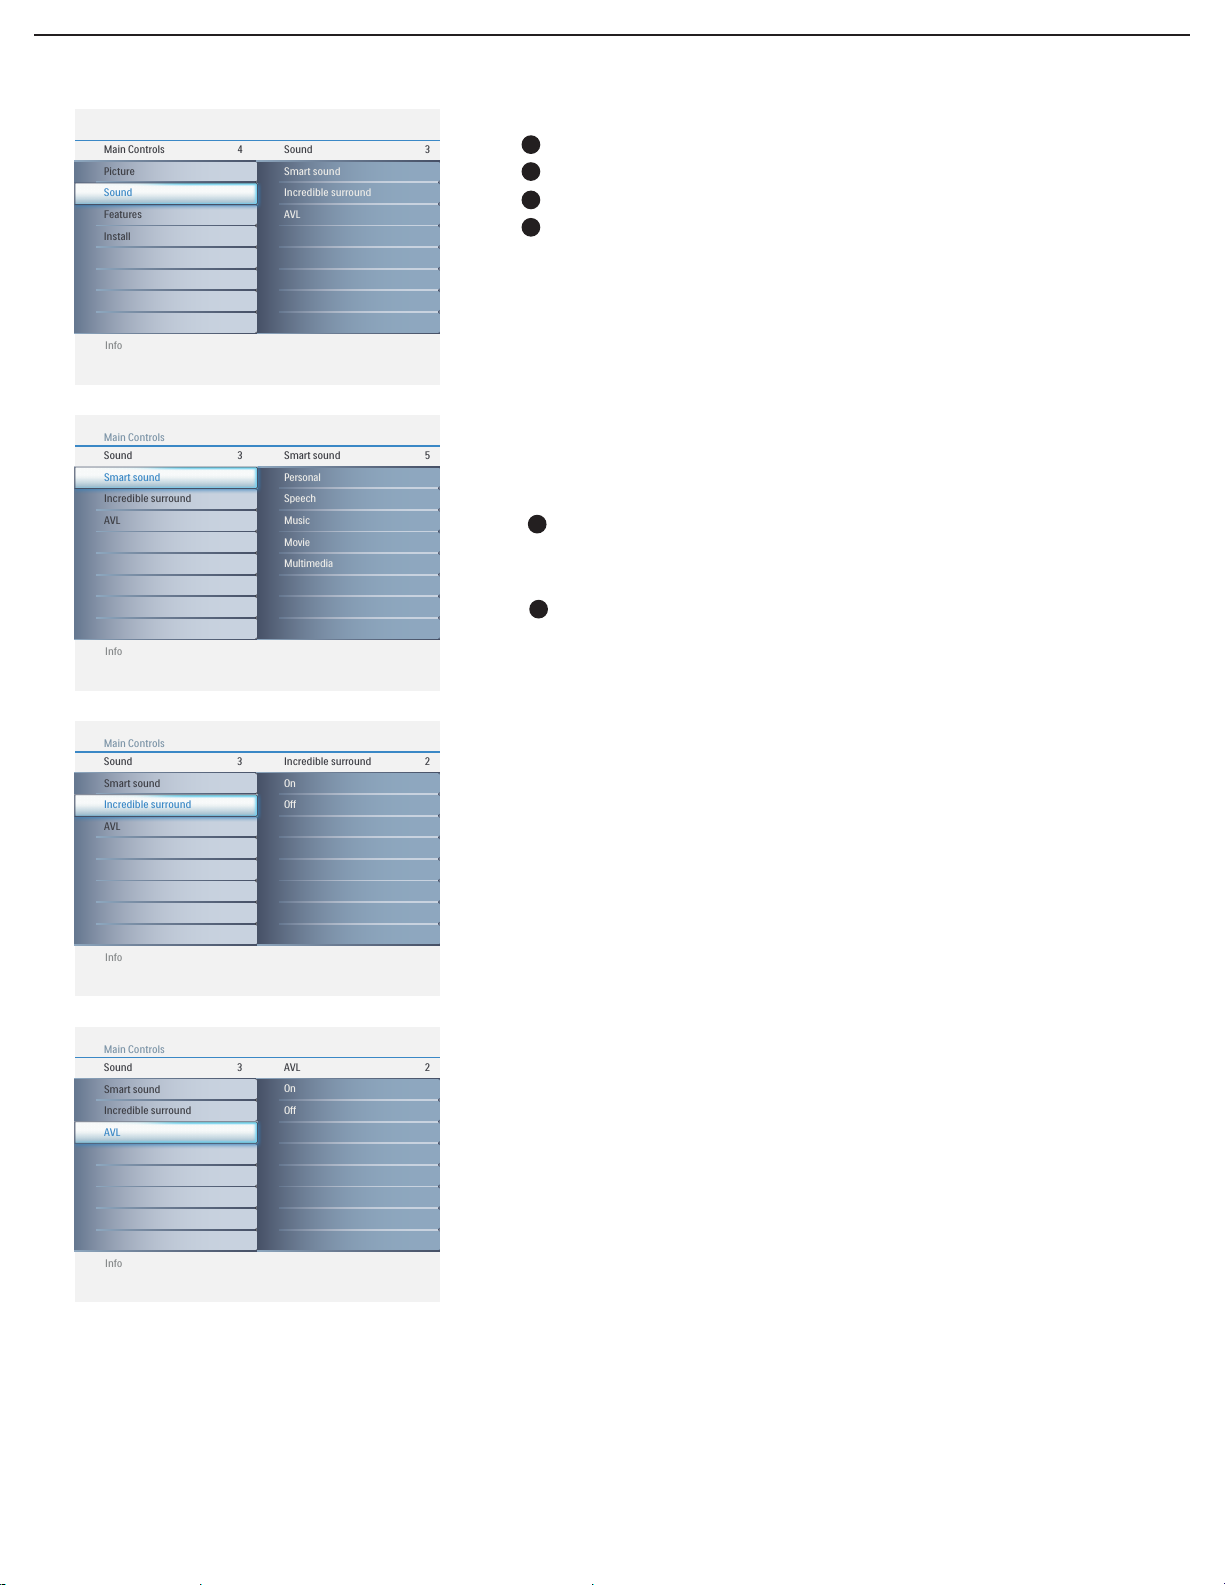
Sound menu
Select Sound in the settings menu.
1
2
Press the cursor right to enter it.
3
Select the menu items with the cursor up/down.
4
Press the cursor right to enter the selection.
Smart sound
Smart sound allows you to select from four user presets and a
personal mode that you set according to your own preferences
through the onscreen Sound menu. The five user presets
(Personal, Speech, Music, Movie, and Multimedia) enable you to
tailor the TV sound so as to enhance the particular program you
are watching.
1
Select Smart sound in the Sound menu and press the cursor right
to enter it.
2
You can press the Smart sound button on the remote control
repeatedly to toggle between Personal
, Speech, Music, Movie
and Multimedia.
Incredible surround
Adds greater depth and dimension to TV sound. Select from On
or Off
.
AVL
Automatically reduces the volume differences between channels
and programs, providing a more constant overall level. This will
also reduce the dynamics of sound.
22
Page 29
Info
Features
Main Controls
Picture format2 2
4:3
Full screen
Picture format
PIP
Info
Features
Main Controls
PIP2 4
Input
Size
Sound
Position
PIP
Picture format
Info
Main Controls Features4 2
Sound
Install
Picture format
PIP
Picture
Features
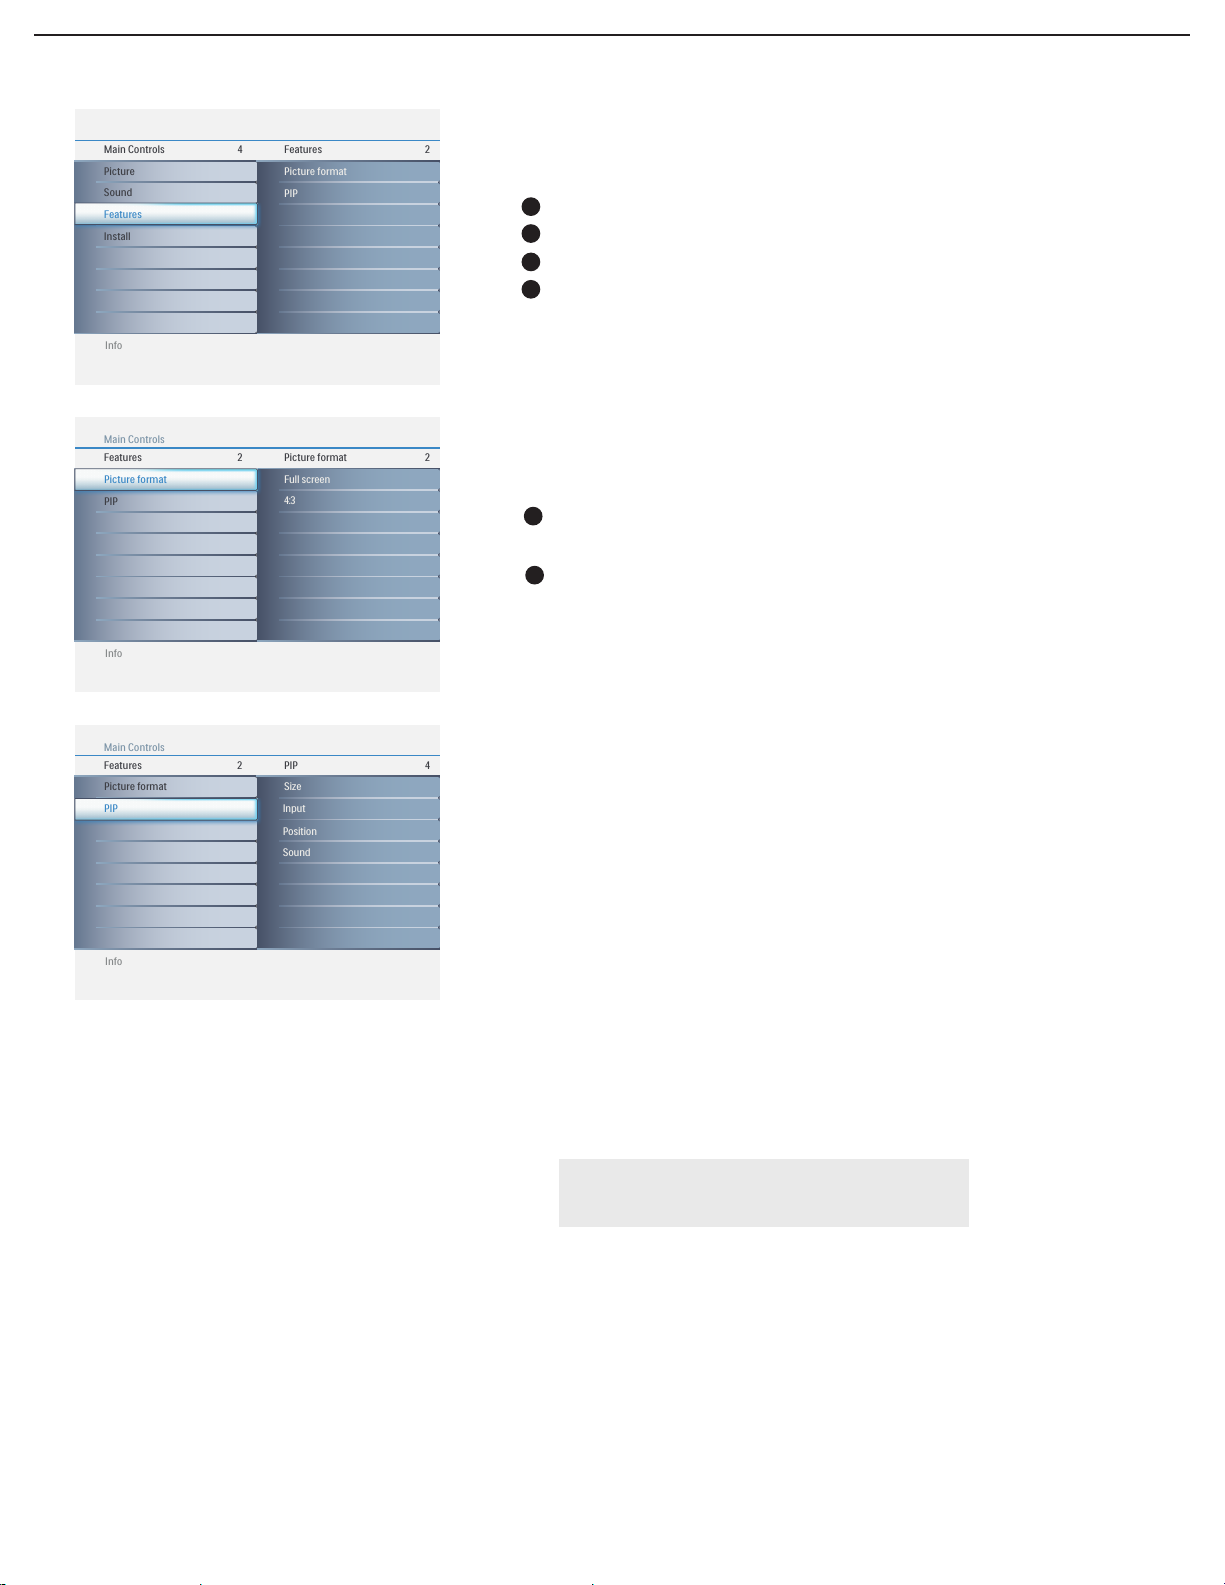
Features menu
Select Features in the settings menu.
1
2
Press the cursor right to enter it.
3
Select the menu items with the cursor up/down.
4
Press the cursor right to enter the selection.
Picture format
1
Select Picture format in the Features menu and press the cursor
right to enter it.
You also can press the Picture format button on the remote
2
control repeatedly to toggle between Full screen and 4:3 format.
PIP
PIP (Picture-in-Picture) feature allows you to call up a subscreen
when you are using your TV as a monitor.
Size - turn off and set the size of PIP. You can choose your
preferred size of small, large, or PBP (Picture Beside
Picture).
Input - select video source of PIP from TV, AV, and Side
AV.
Position - select which corner of the position of PIP.
Sound - select audio source of PC or PIP.
Note:
PIP feature only supports TV, AV, and Side AV.
23
Page 30
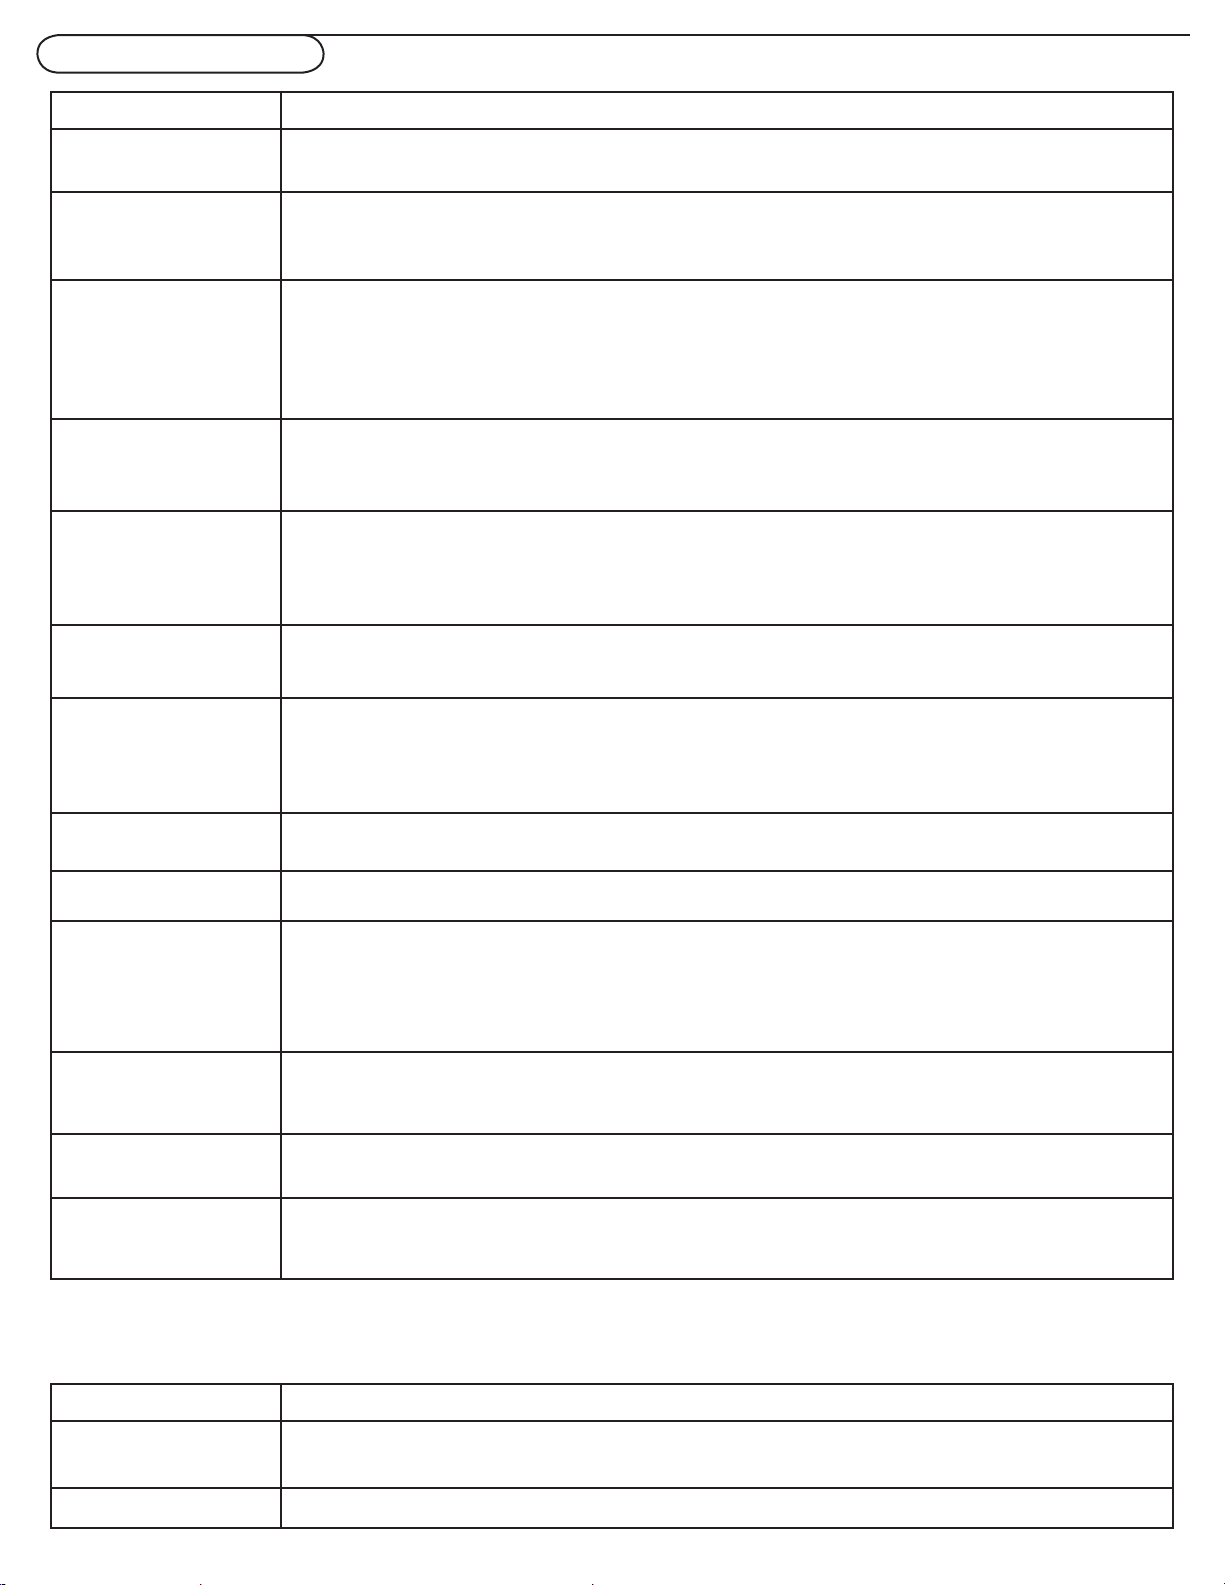
Trouble Shooting Tips
Symptoms Items to Check and Actions to follow
“Ghost” or double
images
No power • Check that the TV’s AC power cord is plugged into the mains socket.
No picture • Check antenna connections at the bottom of the TV to see if they are properly connected to the TV.
No picture and power
switched on
Picture position
adjustment
No photo, music or
video play or in poor
quality only
No sound • Increase the VOLUME.
• This may be caused by obstruction to the antenna due to high rise buildings or hills.
Using a highly directional antenna may improve the picture.
• Unplug the television, wait for 60 seconds. Then re-insert plug into the mains socket
and turn on the television again.
• Possible broadcast station trouble. Try another channel.
• Adjust the contrast and brightness settings. Try another auto picture setting.
• Check if you selected the correct AV source.
• Your TV has a protective mode in case there is too much heat build-up. Check the
clearance around the vents of the device to be certain there are no blocking walls or
cabinets which would limit the air flow.
Most High Definition receiver boxes also have picture-positioning controls in their menu systems. If the
TV cursor controls run out of range before the picture is correctly positioned, the receiver box controls
will need to be adjusted.
• Check if the source complies with a supported code.
• Check that the TV is not muted, press the MUTE button on the remote control.
• When no signal is detected, the TV automatically switches off the sound. This is proper
operation and does not indicate a malfunction.
Good sound but poor
color or no picture
Snowish picture and
noise
Television not
responding to
remote control
Control of accessory
devices
The software will not
install
PC modes do not
work
Standby Your TV consumes energy less than 2w in the standby mode.
• Adjust the contrast, color, tint and brightness setting. Try another auto picture setting.
• Check the antenna connection.
• Check whether the batteries are working. Replace if necessary.
• Clean the remote control sensor lens on the monitor.
• Operating range between TV and the remote control should not be more than approximately twenty feet.
• You can still use the buttons on the side of your TV.
• Check if the remote control is in the correct mode.
• The infrared signals of the screen may influence the reception sensibility of other peripherals Solution:
replace the batteries of the remote control of other devices. E.g. keep away a wireless headphone from
within a radius of approximately four feet.
Possibly the operating system is wrong.
Go to www.philips.com/usasupport to see which operating systems are supported.
• Check whether connections are correct.
• Check whether the source is correctly selected. Press AV button to select the correct source.
• Check whether you have configured the computer on a compatible display resolution.
After improper
shutdown
Miscellaneous See Extras, Specifications on this user manual.
If your TV has been shutdown in an improper way (e.g. power drop, power cord plug out), starting up the
TV again will take a longer time than usual.
24
Page 31
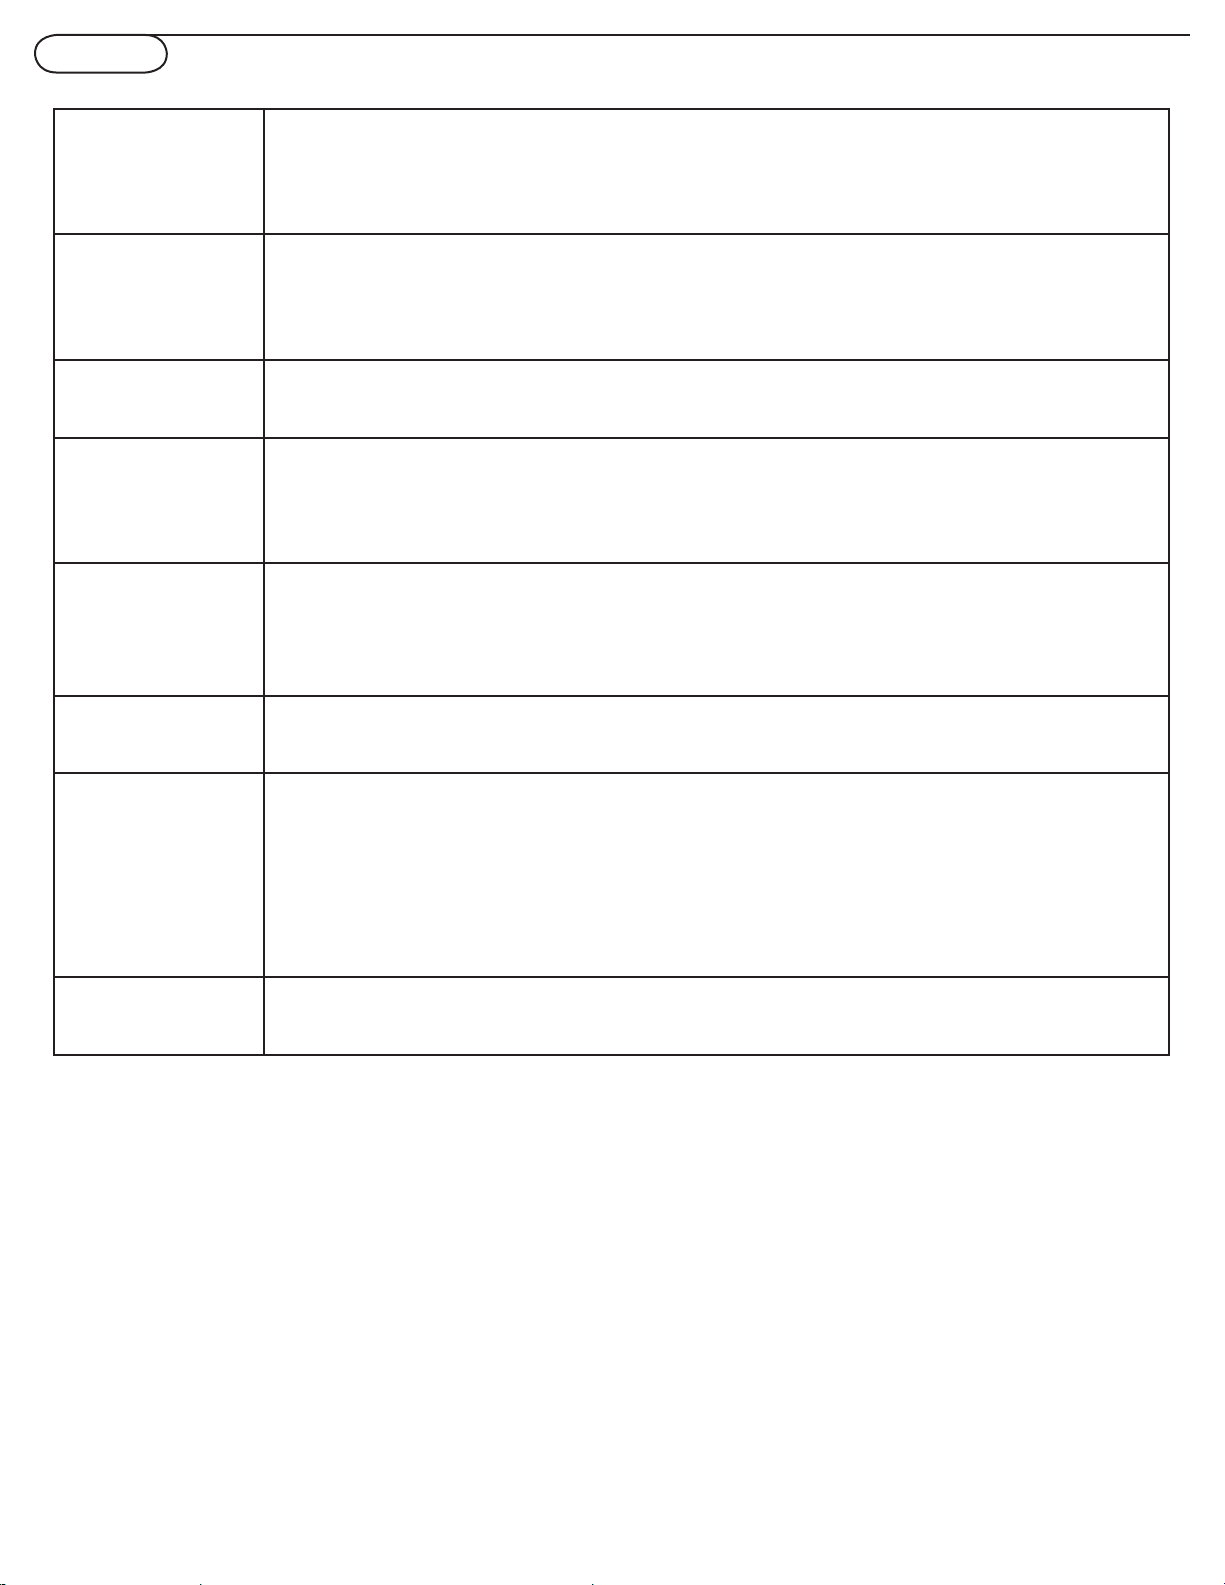
Glossary
Aspect Ratio The ratio between the width and height of the TV picture on the screen. In a normal TV set the aspect
ratio is 4 to 3 (4:3). The new aspect ratio in HDTV is 16:9 which resembles the aspect ratio in a movie
theatre (Widescreen). New TV systems support both 4:3 and 16:9 aspect ratio and can automatically
switch between them.
Audio Video (A/V) A term often used when discussing a channel on a TV receiver or on video equipment, which has been
especially designed to accept VCR audio-video signals. This channel automatically activates special circuitry
within the TV set to prevent picture distortion and skewing. It is also used for audio-video processors,
which handle both types of signals.
CVBS Composite Video Baseband Signal. In broadcast television this refers to the video signal, including the co
lour information and syncs.
Component Video
Input (Y Pb Pr)
HDTV The generally agreed upon definition of HDTV is approximately twice the vertical and
Progressive Scan In Progressive Scanning all the horizontal scan lines are scanned on to the screen at one time. The HDTV
Resolution Resolution: A measurement of the finest (smallest) detail that is visible in a video image. TV Resolutions
Component Video Input is a type of connection that uses a cinch-type connector to allow set top boxes
or analog DVD players to connect a signal to the TV. By offering the cinch-type input (YPbPr) the primary
colors, red, green and blue are connected from a set top box directly into the TV allowing for the signal to
display on the screen.
horizontal picture resolution of today’s NTSC TV, which essentially makes the picture twice as sharp.
HDTV also has a screen ratio of 16:9 as compared with most of today’s TV screens, which have a screen
ratio of 4:3. HDTV offers reduced motion artifacts (i.e. ghosting, dot crawl).
Standards accept both Interlaced Scan and Progressive Scan broadcast and display methods.
may be expressed as number of pixels in an image; or more commonly,
As Total Number of (horizontally scanned) Lines used to create the image.
Standard Digital TV Resolutions:
SDTV: 576i - The picture is 720x576 pixels, 576p - The picture is 720x576 pixels.
HDTV: 720p - The picture is 1280x720 pixels, 1080i - The picture is 1920x1080 pixels,
1080p - The picture is 1920x1080 pixels.
Note: 32PFL7422 doesn’t support to 1080p
-
SPDIF SPDIF (Sony and Philips Digital Interconnect Format) is highly recommended for high quality digital sound
output.
Note: SPDIF only supports at HDMI source.
25
Page 32

Care And Cleaning
WARNING concerning stationary images on the TV
Screen: Do not leave fixed images on the screen for extended periods of time. This can cause uneven aging of the LCD
panel. Normal use of the TV should involve viewing of programs that have constantly moving or changing images. Do
not leave moving images on screen for extended periods of time. Do not display the same images too frequently; if you
do, subtle “ghost” images can be left on the LCD screen. Sources of stationary images may be Laser discs, video games,
Compact Discs Interactive (CD-i), paused Digital Video Discs (DVDs) or video tapes.
Here are some common examples of stationary images:
• DVD menus list DVD content.
• Letter box black bars that appear at the top and bottom of the TV screen when a wide screen (16:9) movie is viewed
on a TV with standard (4:3) aspect ratio. This occurs with some DVDs.
• Video game images and scoreboards
• Television station logos cause a problem if they are bright and stationary. Moving or low-contrast graphics are
less likely to damage the picture tube.
• Stock market tickers may appear at the bottom of the TV screen if the TV programming covers this news.
• Shopping channel logos, pricing displays may be bright and may appear constantly during the show.
These usually appear in the same location on the TV screen.
TV Location
• To avoid cabinet warping, cabinet color changes, and an increased chance of TV failure, do not place the TV
where temperatures can become excessively hot -- for example, in direct sunlight or near a heating appliance.
• Allow a free flow of air around the TV.
Cleaning
• To avoid possible shock hazard, remove the TV’s power cord from the electrical outlet before cleaning.
• Regularly dust the TV with a dry, non-scratching duster.
• When cleaning the TV, take care not to scratch or damage the screen surface. Avoid wearing jewelry or using
anything abrasive. Do not use household cleaners. Wipe the screen with a clean cloth dampened with water.
Use even, easy, vertical strokes when cleaning.
• Occasionally vacuum the vents on the rear of the TV.
• Never use thinners, insecticide sprays, or other chemicals on or near the cabinet. They may permanently blemish
the cabinet.
26
Page 33
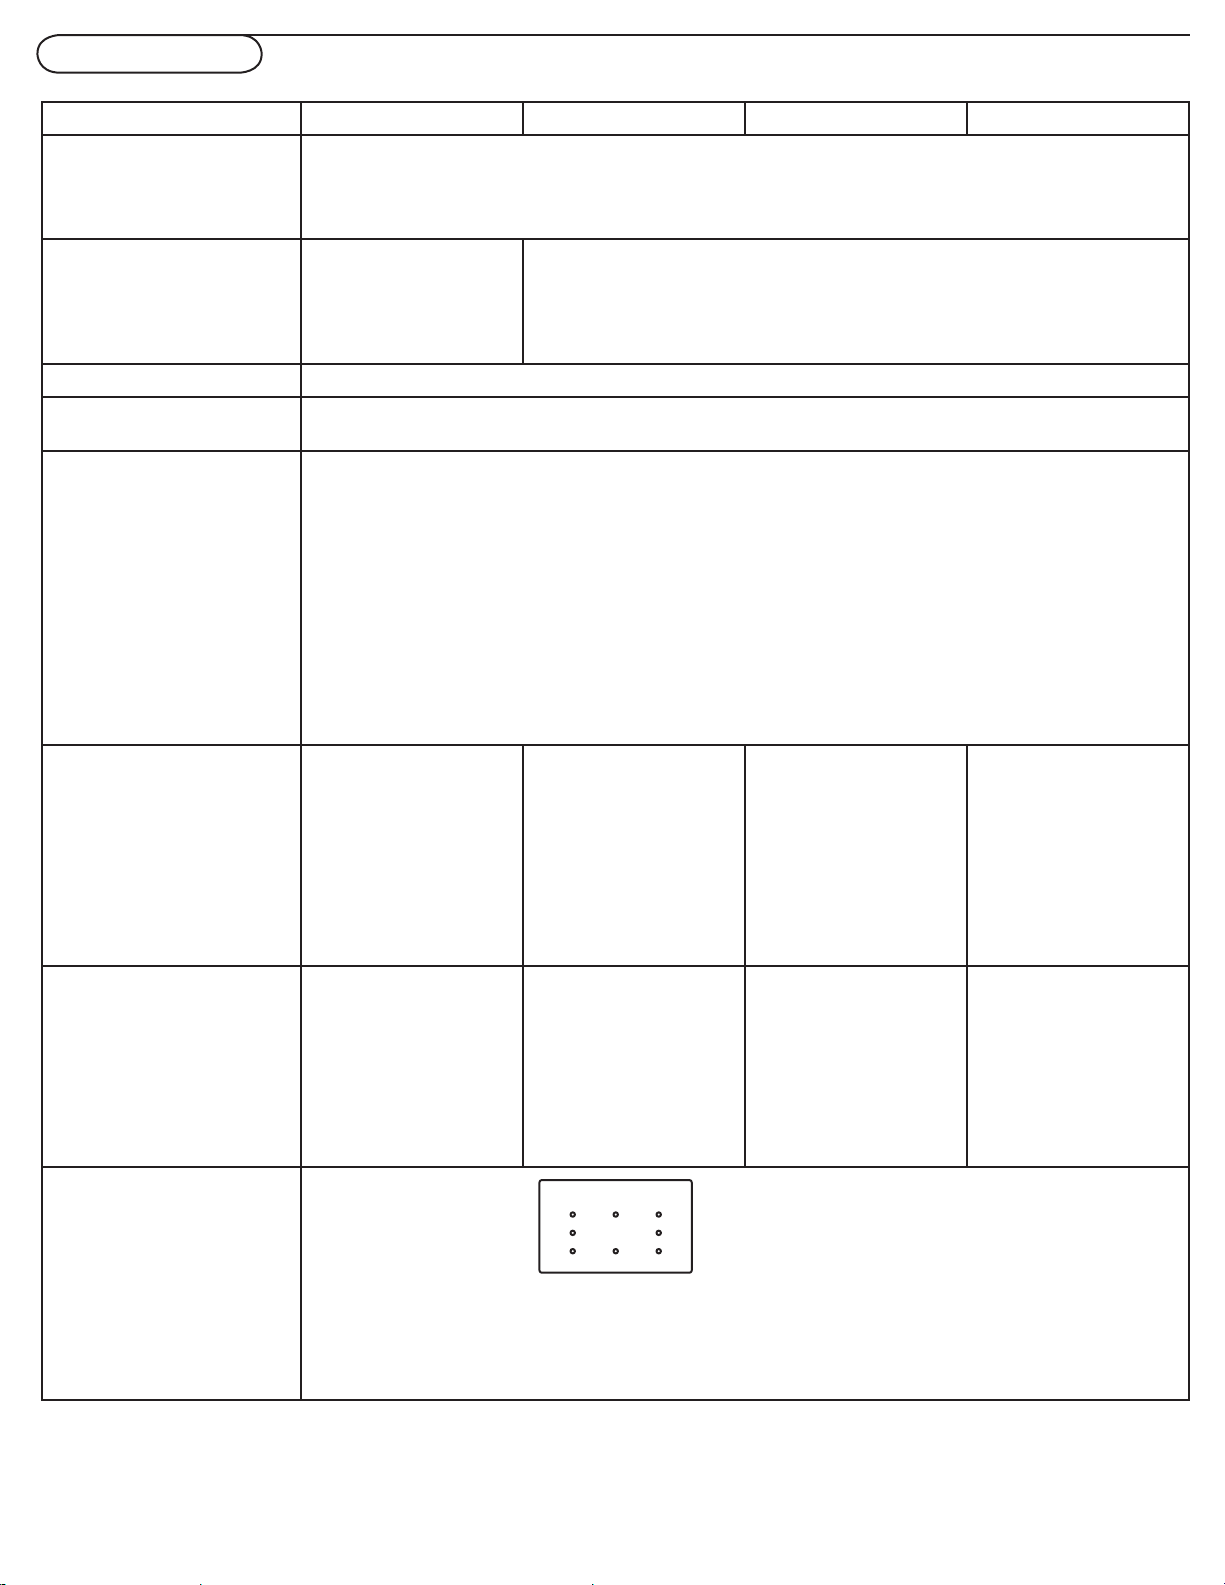
Specification - TV
100x100mm
400x200mm
32PFL7422 37PFL7422/37HF7005 42PFL7422 47PFL7422
PICTURE/ DISPLAY
Aspect ratio
Picture Enhancement
SOUND
Output Power (RMS)
Sound Enhancement
Sound Mode
CONVENIENCE Auto Store, Full text, Sleep timer, Clock
ON SCREEN DISPLAY
LANGUAGE
CONNECTIVITY
Bottom
16:9
Progressive Scan, 3D Comb Filter, Noise Reduction,
Smart Picture (5 modes)
2x5W
Incredible Surround
Mono, Stereo, Smart
2x10W
Incredible Surround
Mono, Stereo, Smart Sound (5 modes)
Sound (5 modes)
English, Simplified Chinese
AC IN
HDMI 2
HDMI 1
PC IN - Audio input, D-Sub
CVI 1 - Component video (YPbPr), Audio L/R input
CVI 2 - Component video (YPbPr), Audio L/R input
AV - Video input, S-video, Audio L/ R input, Audio L/R output, SPDIF output, Video output
75Ω /RF
Side
WEIGHT &
DIMENSIONS:
Weight (incl. Packaging):
Weight (excl. Packaging):
Carton Dimension
(WxHxD):
Product Dimension
(WxHxD)
POWER
Power Consumption
Standby Power Consumption
Mains Power
WALL MOUNT:
Side AV - S-video, Audio L/R input, Video input, Earphone
Note: Audio L/R output and Video output are only available for 37PFL7422/37HF7005/42PFL7422/
47PFL7422
21.9 kg/48.28 lbs
18.2 kg/40.12 lbs
1070 x 668 x 251 mm
42.12” x 26.30” x 9.88”
791 x 604 x 251.5 mm
31.14” x 23.78” x 9.90”
150W
< 2W
100-240V, 60-50Hz
33 kg/72.6 lbs
26 kg/57.20 lbs
1124 x 740 x 332 mm
44.25” x 29.13” x 13.07”
924 x 676 x 280 mm
36.38” x 26.61” x 11.02”
180W
< 2W
100-240V, 60-50Hz
35 kg/77.2 lbs
31 kg/68.40 lbs
1181 x 803 x 362 mm
46.5” x 31.7” x 14.3”
1039 x 745 x 291 mm
40.9” x 29.4” x 11.5”
220W
< 2W
100-240V, 60-50Hz
43.4 kg/95.48 lbs
35.41 kg/77.90 lbs
1301 x 869 x 366 mm
51.22” x 34.21” x 14.41”
1149 x 805 x 287 mm
45.23” x 31.69” x 11.30”
350W
< 2W
100-240V, 60-50Hz
Metric 6 (10mm) screws are needed for wall mounting (not included).
27
 Loading...