


Philips 32PHS4001, 32PHT4001, 43PFS4001, 43PFT4001, 49PFS4001 Manual
...32PHS4001
32PHT4001
43PFS4001
43PFT4001
49PFS4001
49PFT4001

Safety and Screen care |
4 |
Remote Control |
10 |
Safety |
4 |
1.Key overview |
10 |
Risk of electric shock or fire! |
4 |
Top view |
10 |
Risk of short circuit or fire! |
4 |
Middle view |
10 |
Risk of injury or damage to theTV! |
4 |
Bottom view |
10 |
Risk of injury to children! |
4 |
2.Key overview |
11 |
Risk of swallowing batteries! |
4 |
Top view |
11 |
Risk of overheating! |
4 |
Middle view |
11 |
Risk of injury,fire or power cord damage! |
4 |
Bottom view |
11 |
Risk of hearing damage! |
4 |
IR sensor |
12 |
Low temperatures |
4 |
Batteries |
12 |
Screen care |
4 |
Cleaning |
12 |
INITIAL SETUP |
5 |
TV channels |
12 |
Read safety |
5 |
Channel list |
12 |
TV stand installation and wall mounting instructions5 |
About Channel list |
12 |
|
TV stand installation |
5 |
Open a channel list |
12 |
Wall mounting instructions |
5 |
Filter a channel list |
12 |
Tips on placement |
5 |
WatchingTV channels |
12 |
Power cable |
5 |
Tune to a channel |
12 |
Antenna cable |
5 |
About move Channels |
12 |
Satellite dish |
5 |
Lock a channel |
12 |
|
|
Favourite Channels |
12 |
ConnectingYour Devices |
6 |
Open channel menu |
12 |
About connection |
6 |
Channel |
13 |
Connectivity guide |
6 |
||
Antenna port |
6 |
Channelinstallation-Antenna,Cable |
13 |
HDMI ports |
6 |
Update channels |
13 |
Y Pb Pr -Audio L R |
7 |
Channel installation-Satellite |
13 |
CVBS-Audio L R |
7 |
Watching Satellite Channel |
13 |
Audio OutOptical (SPDIF-OUT) |
7 |
Satellite Channel installation |
13 |
Common interface-CAM |
7 |
Channel Edit |
13 |
CI+ |
7 |
Schedule List |
13 |
CAM |
7 |
Signal information |
13 |
Set-top box-STB |
7 |
Software Update (OAD) |
13 |
Satellite receiver |
7 |
CI information |
13 |
HomeTheatre System |
8 |
Dish Setup |
13 |
Connect with HDMIARC |
8 |
Manual Installation |
13 |
Connect with HDMI |
8 |
Add a satellite |
13 |
Blue-ray Disc player |
8 |
Transponder Setup |
14 |
DVD player |
8 |
Ku_HOTBIRD Setup |
14 |
Game console |
8 |
TV Program Guide |
|
USB flash drive |
8 |
14 |
|
Computer |
8 |
What you need |
14 |
Headphone |
8 |
Using theTV Program guide |
14 |
USB interface |
8 |
Open theTV guide |
14 |
Switch on |
|
Record |
14 |
|
Remind |
14 |
|
Power on/off,standby |
8 |
Prev Day |
14 |
Power on |
8 |
Next Day |
14 |
Standby |
8 |
|
|
Power off |
8 |
|
|
Keys onTV |
9 |
|
|
|
9 |
|
|
2
Recording andTime-shift |
15 |
MULTIMEDIA |
17 |
||
Recording |
|
|
15 |
From a USB connection |
17 |
What you need |
|
15 |
Photo |
17 |
|
Record a programme |
15 |
Music |
18 |
||
Open the list of recording |
15 |
Movie |
18 |
||
Time-shift |
|
|
15 |
TEXT |
18 |
What you need |
|
15 |
Specification information |
|
|
UseTime-shift for a programme |
15 |
19 |
|||
Replay |
|
|
15 |
Display resolutions |
19 |
Sources |
|
|
15 |
Multimedia |
19 |
|
|
Sound power |
19 |
||
Switch a device signal |
15 |
Display resolution |
19 |
||
From standby |
|
15 |
Tuner/Reception/Transmission |
19 |
|
EasyLink |
|
|
15 |
Remote Control |
19 |
|
|
|
|
Power Supply |
19 |
Time |
|
|
16 |
Dimensions and weights |
19 |
Time settings |
|
16 |
Software |
20 |
|
Sleep timer |
|
16 |
|||
Time Zone |
|
16 |
Software update |
20 |
|
Auto Standby |
|
16 |
Open source software |
20 |
|
OSDTimer |
|
16 |
Open source license statement |
20 |
|
SummerTime |
|
16 |
Troubleshooting and support |
20 |
|
LOCK |
|
|
16 |
||
|
|
General issues |
20 |
||
System Lock |
|
16 |
Channel issues |
20 |
|
Set Password |
|
16 |
Picture issues |
20 |
|
Channel Lock |
|
16 |
Sound issues |
21 |
|
Parental Guidance |
16 |
HDMI connection issues |
21 |
||
Key Lock |
|
16 |
Computer connection issues |
21 |
|
|
|
|
|
Contact us |
21 |
SETTING |
|
|
16 |
Warning |
21 |
General Settings |
|
16 |
Term of use, copyrights and licenses |
21 |
|
Language |
|
16 |
|||
TTX Language |
|
16 |
Term of use |
21 |
|
Audio Language |
16 |
Copyrights and Licenses |
21 |
||
Subtitle Language |
16 |
|
|
||
Hearing impaired |
16 |
|
|
||
PVR file system |
|
16 |
|
|
|
Aspect ratio |
|
16 |
|
|
|
Blue screen |
|
16 |
|
|
|
First time installation |
16 |
|
|
||
Reset |
|
|
16 |
|
|
Software Update (USB) |
16 |
|
|
||
HDMI CEC-Easylink |
16 |
|
|
||
Help |
|
|
16 |
|
|
Picture |
17 |
|
17 |
|
|
Picture Setting |
17 |
17 |
|
|
|
Sound |
17 |
|
17 |
|
|
Sound Setting |
17 |
17 |
|
|
|
3

Safety and Screen care
Safety
Risk of electric shock or fire!
•Never expose theTV to rain or water.
•Never place liquid containers,such as vases,near theTV.If liquid was spilt on or into theTV,disconnect theTV from the power outlet immediately.Contact Philips Consumer Care to have theTV checked before use.
•Never place theTV,remote control or batteries near naked flames or other heat sources,including direct sunlight.
•To prevent the spread of fire,keep candles or other flames away from theTV,remote control and batteries at all times.
•Never insert objects into the ventilation slots or other openings on theTV.
•When theTV is swivelled ensure that no strain is exerted on the power cord.Strain on the power cord can loosen connections and cause arcing.
•To disconnect theTV from the mains power,the power plug of theTV must be disconnected.When disconnecting the power, always pull the power plug,never the cord.Ensure that you have full access to the power plug,power cord and outlet socket at all times.
Risk of short circuit or fire!
•Never expose the remote control or batteries to rain,water or excessive heat.
•Avoid force coming onto power plugs.Loose power plugs can cause arcing or fire.
Risk of injury or damage to theTV!
•Two people are required to lift and carry aTV that weighs more than 25 kg or 55 lbs.
•When stand mounting theTV,use only the supplied stand. Secure the stand to theTV tightly.Place theTV on a flat,level surface that can support the combined weight of theTV and the stand.
•When you wall mounting theTV,use only a wall mount that can support the weight of theTV.Secure the wall mount to a wall that can support the combined weight of theTV and wall mount. TPVision Europe B.V.bears no responsibility for improper wall mounting that result in accident,injury or damage.
•If you need to store theTV,disassemble the stand from the
TV.Never lay theTV on its back with the stand installed.
•Before you connect theTV to the power outlet,ensure that the power voltage matches the value printed on the back of the TV.Never connect theTV to the power outlet if the voltage is different.
•Parts of this product may be made of glass.Handle with care to avoid injury and damage.
Risk of injury to children!
•Follow these precautions to prevent theTV from toppling over and causing injury to children:
•Never place theTV on a surface covered by a cloth or other material that can be pulled away.
•Ensure that no part of theTV hangs over the edge of the surface.
•Never place theTV on tall furniture (such as a bookcase) without anchoring both the furniture andTV to the wall or a suitable support.
•Educate children about the dangers of climbing on furniture to reach theTV.
Risk of swallowing batteries!
•The product/remote control may contain a coin-type battery, which can be swallowed.Keep the battery out of reach of children at all times!
Risk of overheating!
• Never install theTV in a confined space.Always leave a space of at least 4 inches or 10 cm around theTV for ventilation.Ensure curtains or other objects never cover the ventilation slots on the TV.
Risk of injury, fire or power cord damage!
•Never place theTV or any objects on the power cord.
•Disconnect theTV from the power outlet and antenna before lightning storms.During lightning storms,never touch any part of theTV,power cord or antenna cable.
Risk of hearing damage!
•Avoid using earphones or headphones at high volumes or for prolonged periods of time.
Low temperatures
• If theTV is transported in temperatures below 5oC or 41oF, unpack theTV and wait until theTV temperature matches room temperature before connecting theTV to the power outlet.
Screen care
•Avoid stationary images as much as possible.Stationary images are images that remain on-screen for extended periods of time.Example:on-screen menus,black bars and time displays.If you must use stationary images,reduce screen contrast and brightness to avoid screen damage.
•Unplug theTV before cleaning.
•Clean theTV and frame with a soft,damp cloth.Never use substances such as alcohol,chemicals or household cleaners on the TV.
•Risk of damage to theTV screen! Never touch,push,rub or strike the screen with any object.
•To avoid deformations and color fading,wipe off water drops as soon as possible.
•Note:Stationary images may result in permanent damage to theTV screen.
•Do not display stationary images on the LCD screen for more than two hours as this may result in ghost images.To prevent this, reduce screen brightness and contrast.
•Viewing programs in the 4:3 formats for extended periods of time may leave different traces on the left and right edges of the screen as well as along the borders of the image.Avoid using this mode for extended periods of time.
•Displaying stationary images from video games or computers for an extended period of time may result in partial after-images and the appearance of ghost images caused by screen burn.Reduce screen brightness and contrast accordingly when using theTV in this way.
•Ghost images,partial after-images,and other traces that appear on theTV screen as a result of the above are not covered by the warranty.
4
INITIAL SETUP
Read safety
Please read the safety instructions first before you use theTV. In Help,go to Safety and Screen care.
TV stand installation and wall mounting instructions
TV stand installation
You can find the instructions on how to install theTV stand in the Quick Start Guide that come together in the carton box when you unpack theTV.In case you have misplaced your Quick Start Guide,you can download it from www.philips.com.Use the product type number of theTV to look for the Quick Start Guide to download.
Tips on placement
•Position theTV where light does not shine directly on the screen.
•Position theTV up to 15cm away from the wall.
•The ideal distance to watchTV is 3 times its diagonal screen size.When seated your eyes should be level with centre of screen.
Power cable
•Insert the power plug into the outlet complete.
•Make sure that power plug in the wall socket is accessible at all time.
•Tips:If you do not use theTV for a long period of time,please unplug the power cord.
Antenna cable
•Insert the antenna plug firmly into theANTENNA socket at the back of theTV.
•You can connect your own antenna signal from an antenna distribution system.Use an IEC Coax 75 Ohm RF antenna connector.Use this antenna connection for DVB-T and DVB-C input signals.
Wall mounting instructions
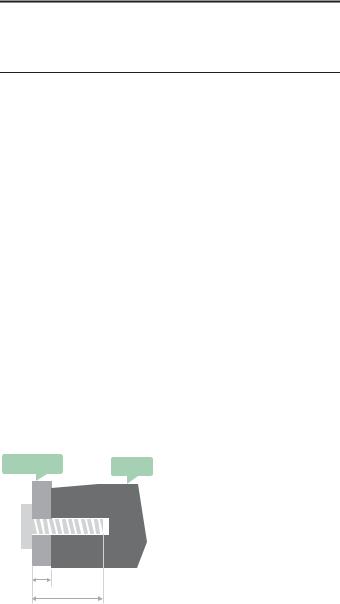
YourTV is also prepared for aVESA –compliant wall mount bracket (sold separately).
UseThe followingVESA code when purchasing the wall mount. To fix the bracket securely,use screws with a length indicated
in the drawing.
VESA TV
Satellite dish
For PHS and PFS models.
Attach the satellite F-type connector to the satellite connection SAT at the back ofTV.
L
min.&max.
Tips:This picture is only for reference.
Take note of the following,the "L" is stand for the thickness of VESA.
32PHS4001 / 32PHT4001:
VESA MIS-F 200x100mm,M4x25mm.
42PFS4012 / 43PFS4001 / 43PFT4001 / 49PFS4001 / 49PFT4001:
VESA MIS-F 200x300mm. Top side M6x43mm. Bottom side M6x28mm.
32PHS4012:
VESA MIS-F 100x100mm,M4x23mm.
43PFS4012:
VESA MIS-F 400x200mm. Top side M6x45mm. Bottom side M6x23mm.
50PFS4012/12:
VESA MIS-F 200x200mm. Top side M6x45mm. Bottom side M6x23mm.
Caution:
Wall mounting theTV requires special skills and should only be performed by qualified personnel.TheTV wall Mounting should meet safety standards according toTV’s weight.Also read the safety precautions before positioning theTV.
TPVision Europe B.V.bears no responsibility for improper actions.TV mounting that results in accident,injury or damage.
5

HDMI ports
ConnectingYour Devices
About connection
Connectivity guide
Always connect a device to theTV with the highest quality connectionAvailable.Also use good quality cables to ensure a good transfer of picture and sound.If you need help to connect several devices to theTV,you can visit the PhilipsTV connectivity guide.The guide offers information on how to connect and which cables to use.Go to www.connectivityguide.philips.com.
Antenna port
DVB-T/T2
If you have a Set-top box (a digital receiver) or Recorder, connect the antenna cables to run the antenna signal through the Set-top box or Recorder first before it enters theTV.In this way, the antenna and Set-top box can send possible additional channels to the Recorder to record.
HDMI Quality
An HDMI connection has the best picture and sound quality. Use an HDMI cable forTV signal.
For best signal quality transfer,use a High speed HDMI cable and do not use an HDMI cable longer than 5 m.
HDMI MHL
HDMI 3 connection on theTV have HDMI MHL (Mobile HighDefinition Link).
Note:32PHS4012:HDMI 2 connection on theTV have HDMI MHL (Mobile High-Definition Link).
HDMI CEC-Easylink
Easylink: With Easylink you can operate a connected device with theTV remote control,EasyLink uses HDMI CEC(Consumer Electronics Control) to communicate with the connected devices. Devices must support HDMI CEC and must be connected with an HDMI connection.
EasyLink setup: TheTV comes with Easylink switched on.Make sure that all HDMI CEC settings are properly set up on the connected EasyLink devices.EasyLink might not work with devices from other brands.
HDMI CEC on other brands: The HDMI CEC functionality has different names on different brands.Some examples are:Anynet, Aquos Link,BraviaTheatre Sync,Kuro Link,Simplink andViera Link. Not all brands are fully compatible with EasyLink.
Example HDMI CEC branding names are property of their respective owners.
Operate devices: You can operate a device connected to HDMI and set up with HDMI CEC ofTV connections.Press MENU key to enter the main menu and select SETTING,press OK key enter the setting menu,on the screen press  /
/ key to select HDMI CEC. Press OK key to enter submenu,select CEC control to turn on and you can adjust these options.
Easy-Link On or Off: Enter the setting menu,on the screen press  /
/ key to select HDMI CEC.Press OK key to enter submenu,select CEC control to turn on or off.
Easy-Link Remote Control: If you want devices to communicate but you don’t want to operate them with theTV remote control, you can switch off Easy-Link remote control separately.
You can control multiple HDMI-CEC compliant devices with yourTV remote control.
In the settings menu,select EasyLink Remote control and select off.
DVI to HDMI
If you still own a device that only has a DVI connection,you can connect the device to any of the HDMI connection with a DVI to HDMI adapter.
Use a DVI to HDMI adapter if your device only a DVI connection.Use one of the HDMI connection and add anAudio L/R cable toAudio in for sound,on the back of theTV.
Copy protection
DVI and HDMI cables support HDCP(High-bandwith Digital Content Protection).HDCP is a copy protection signal that prevents copying content from a DVD disc or Blu-ray Disc.Also referred to as DRM(Digital Rigital Management).
6
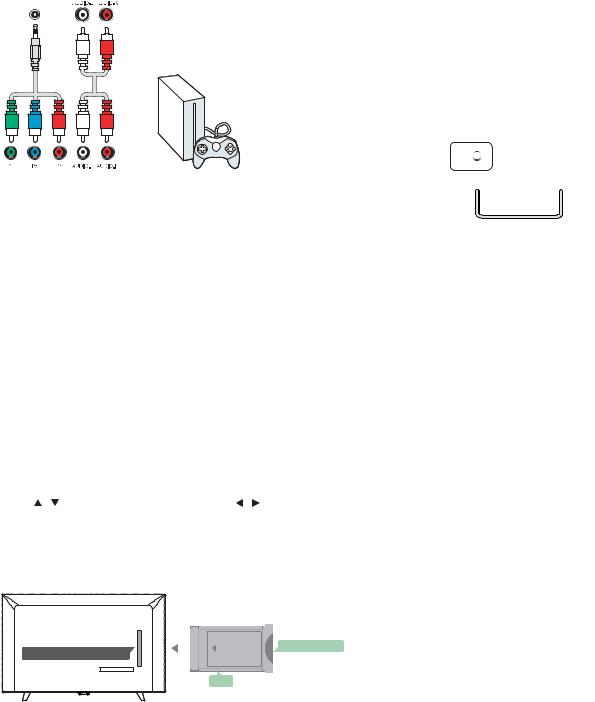
Y Pb Pr - Audio L R
CVBS-Composite video is a high quality connection.Next to the CVBS signal is theAudio left and right for sound.
COMPONENT
Y Pb Pr
Component video is a high quality connection.TheYPbPr connection can be used for High definition (HD)TV signals.
Mini-YPbPr
Please use mini-YPbPr wire to make connection.Match the YPbPr (green,blue,red) connector colours with the cable plugs when you connect.
Use anAudio L/R cinch cable if your device also has sound.
CVBS-Audio L R
CVBS-Composite video is a high quality connection.Next to the CVBS signal is theAudio left and right for sound.
Audio OutOptical (SPDIF-OUT)
Audio-Out-Optical is a high quality sound connection.This optical connection can carry 5.1 audio channels.If your device, typically a HomeTheatre(HTS),has no HDMIARC connection, you can use this connection with theAudio In-Optical connection on the HTS.TheAudio-Out-Optical connection sends the sound from theTV to the HTS.
You can Press MENU key to enter the main menu and select SOUND,press OK key enter the submenu,then on the screen
press / |
key to select SPDIF Mode,press |
/ key to adjust |
the options,like PCM,Auto,off. |
|
|
Common interface-CAM
CI+
|
|
SMART CARD |
|
FRONT |
|
COMMON INTERFACE |
|
|
|
CAM |
|
ThisTV is ready for the CI conditionalAccess.
With CI+ you can watch premium HD programs,like movies and sports live offered by digitalTV broadcasters in your region. These programs are scrambled by theTV broadcaster and descrambled with a prepaid CI+ module.
Contact a digitalTV broadcaster for more information on terms and conditions.
CAM
Insert a CAM module.
Switch off theTV before inserting a CAM.
Use the CAM for the correct method of insertion.Incorrect insertion can damage the CAM andTV.
Use the CI Interface slot on theTV to insert the CAM card. With the front of the card facing to you,gently insert the CAM
as far as it will go.
Leave the card in the slot permanently.
It may take a few minutes before the CAM is activated. Removing the CAM will deactivate the broadcast service on the TV.
If a CAM is inserted and subscription fees are paid,(connection method can differ),you can watch theTV broadcast.The inserted CAM is exclusively for yourTV.
Set-top box-STB
Digital Receriver Set Box
TV
Use 2 antenna to connect the antenna to the Set-top box(a digital receiver) and theTV.
Next to the antenna connections,add an HDMI cable to connect the Set-top box to theTV.
Auto Standby
If you only use the remote control of the Set-top box.Do this to prevent theTV from auto standby after a 5 hour period without a key on the remote control of theTV.
To setAuto Standby,press MENU key and selectTIME and press OK key.
TIME > Auto Standby and set the slider bar to off.
Satellite receiver
DVB-S/S2
Statellite Receriver
Connect the dish antenna cable to the satellite receiver. Next to the antenna connections,add an HDMI cable to
connect the Set-top box to theTV.
Auto Standby
If you only use the remote control of the Set-top box.Do this to prevent theTV from auto standby after a 5 hour period without a key on the remote control of theTV.
To setAuto Standby,press MENU key and selectTIME and press OK key.
TIME > Auto Standby and set the slider bar to off.
7
 Loading...