

Page 1
32PHS4012
42PFS4012
43PFS4012
50PFS4012
Page 2

Safety and Screen care
Safety
Risk of electric shock or fire!
Risk of shor t circuit or fire!
Risk of injury or damage to the TV!
Risk of injury to children!
Risk of swallowing batteries!
Risk of overheating!
Risk of injury, fire or power cord damage!
Risk of hearing damage!
Low temperatures
Screen care
Remote Control
4
1.Key overview
4
Top view
4
Middle view
4
Bottom view
4
2.Key overview
4
Top view
4
Middle view
4
Bottom view
4
IR sensor
4
Batteries
4
Cleaning
4
10
10
10
10
10
11
11
11
11
12
12
12
INITIAL SETUP
Read safety
TV stand installation and wall mounting instr uctions
TV stand installation
Wall mounting instructions
Tips on placement
Power cable
Antenna cable
Satellite dish
Connecting Your Devices
About connection
Connectivity guide
Antenna por t
HDMI por ts
Y Pb Pr - Audio L R
CVBS-Audio L R
Audio Out- Optical (SPDIF-OUT)
Common interface-CAM
CI+
CAM
Set-top box-STB
Satellite receiver
Home Theatre System
Connect with HDMI ARC
Connect with HDMI
Blue-ray Disc player
DVD player
Game console
USB flash drive
Computer
Headphone
USB interface
Switch on
Power on/off, standby
Power on
Standby
Power off
Keys on TV
TV channels
5
Channel list
5
About Channel list
5
Open a channel list
5
Filter a channel list
5
Watching TV channels
5
Tune to a channel
5
About move Channels
5
Lock a channel
5
Favour ite Channels
Open channel menu
6
6
Channel
6
Channelinstallation-Antenna, Cable
6
Update channels
6
Channel installation-Satellite
7
Watching Satellite Channel
7
Satellite Channel installation
7
Channel Edit
7
Schedule List
7
Signal information
7
Software Update (OAD)
7
CI information
7
Dish Setup
8
Manual Installation
8
Add a satellite
8
Transponder Setup
8
Ku_HOTBIRD Setup
8
8
TV Program Guide
8
What you need
8
Using the TV Program guide
8
Open the TV guide
8
Record
Remind
Prev Day
8
Next Day
8
8
8
9
9
12
12
12
12
12
12
12
12
12
12
12
13
13
13
13
13
13
13
13
13
13
13
13
13
13
14
14
14
14
14
14
14
14
14
14
2
Page 3

Recording and Time-shift
Recording
What you need
Record a progr amme
Open the list of recording
Time-shift
What you need
Use Time-shift for a progr amme
Replay
Sources
Switch a device signal
From standby
EasyLink
Time
Time settings
Sleep timer
Time Zone
Auto Standby
OSD Timer
Summer Time
LOCK
System Lock
Set Password
Channel Lock
Parental Guidance
Key Lock
SETTING
General Settings
Language
TTX Language
Audio Language
Subtitle Language
Hearing impaired
PVR file system
Aspect ratio
Blue screen
First time installation
Reset
Software Update (USB)
HDMI CEC-Easylink
Help
MULTIMEDIA
15
From a USB connection
15
Photo
15
Music
15
Movie
15
TEXT
15
15
15
Specification information
15
Display resolutions
Multimedia
Sound power
15
Display resolution
15
Tuner/Reception/Transmission
15
Remote Control
15
Power Supply
Dimensions and weights
16
16
Software
16
Software update
16
Open source software
16
Open source license statement
16
16
Troubleshooting and support
16
General issues
16
Channel issues
16
Picture issues
16
Sound issues
16
HDMI connection issues
16
Computer connection issues
Contact us
Warning
16
16
16
Term of use, copyrights and licenses
Term of use
16
Copyrights and Licenses
16
16
16
16
16
16
16
16
16
16
16
17
17
17
18
18
18
19
19
19
19
19
19
19
19
19
20
20
20
20
20
20
20
20
21
21
21
21
21
21
21
21
Picture 17
Picture Setting 17
Sound 17
Sound Setting 17
17
17
17
17
3
Page 4

Safety and Screen care
Safety
Risk of electric shock or fire!
• Never expose the TV to rain or wate r.
• Never place liquid containers, such as vases, near the TV. If
liquid was spilt on or into the TV, disconnect the TV from the
power outlet imme di at ely. Contact Philips Consumer Care to
have th e TV checked before use.
• Never place the TV, remote control or batteries near naked
flames or other heat sources, including direct sunlight.
• To pre vent the spread of fire, keep cand le s or o th er f la me s
away from the TV, remote control and batteries at all times.
• Never insert objects into the ventilation slots or other
openings on the TV.
• When the TV is swivelled ensure that no strain is exerted on
the power cord. S tr ain on the power cord can loosen
connections and cause arcing.
• To dis co nn ec t th e TV from the mains powe r, the power plug
of the TV must be disconnected. When disconnecting the power,
always pull the power plug, never the cord. Ensure that you h ave
full access to the power plug, power cord and outlet socket at all
times.
Risk of shor t circuit or fire!
• Never expose the remote control or batteries to rain, water
or excessive heat.
• Avoid force coming onto power plugs. Loose power plugs
can cause arcing or fire.
Risk of injury or damage to the TV!
• Two pe op le a re r equired to lift and carry a TV that weighs
more than 25 kg or 55 lbs.
• When stand mounting the TV, use only the supplied stand.
Secure the stand to the TV tightly. Place the TV on a flat, level
surface that can suppor t th e co mb in ed weight of the TV a nd t he
stand.
• When you wall mounting the TV, use only a wall mount that
can suppor t the weight of the TV. Secure the wall mount to a wall
that can suppor t th e co mb in ed weight of the TV a nd w al l mo un t.
TP Vision Europe B.V. bears no responsibility for improper wall
mounting that result in accident, in ju r y or damage.
• If you need to store the TV, disassemble the stand from the
TV. Never lay the TV on its back with the stand installed.
• Before you connect the TV to the power outlet, ensure that
the power voltage matches the value pri nt ed o n th e ba ck o f th e
TV. Never connect the T V to the power outlet if the voltage is
different.
• Parts of this product may be made of glass. Handle with care
to avoid injury and damage.
Risk of injury to children!
• Follow these precautions to prevent the TV from toppling
over and ca us in g in ju r y to children:
• Never place the TV on a surface covered by a cloth or other
material that ca n be p ul le d away.
• Ensure that no par t o f th e TV hangs over the edge o f th e
surface.
• Never place the TV on tall furniture (such as a bookcase)
without anchor ing both t he f ur niture and TV to the wall or a
suitable suppor t.
• Educate children about the dangers of climbing on furniture
to reach the TV.
Risk of swallowing batteries!
• The product/remote control may contain a coin-type batter y,
which can be swallowed. Keep the battery out of reach of children
at all times!
Risk of overheating!
• Never install the TV in a confined space . A lways leave a space
of at least 4 inches or 10 cm around the TV for ventilation. Ensure
cur tains or other o bj ec ts n ever cove r th e ventilation slots on the
TV.
Risk of injury, fire or power cord damage!
• Never place the TV or any objects on the power cord.
• Disconnect the TV from the power outlet and antenna before
lightning stor ms. Dur in g li gh tn in g st or ms, never touch any par t of
the TV, powe r co rd o r an te nn a cable.
Risk of hearing damage!
• Avoid using earphones or headphones at h ig h volumes or for
prolonged periods of time.
Low temperatures
• If the TV is tr ansported in temperatures below 5oC or 41oF,
unpack the TV a nd w ai t un ti l th e TV temper ature ma tc he s ro om
temper ature befo re c on ne cting the TV to the powe r ou tl et .
Screen care
• Avoid stationary images as much as possible. Stationary
images are images that remain on-screen for extended periods of
time. Example: on-screen menus, black bars and time displays. If you
must use stationar y images, red uc e sc re en c on tr ast and brightness
to avoid screen damage.
• Unplug the TV b efore cleaning.
• Clean the TV and frame with a soft, damp cloth. Never use
substances such as alcohol, chemicals or household cleaners on the
TV.
• Risk of damage to the TV screen! Never t ou ch , push, rub or
strike the screen with any object.
• To avoid defo rmations and color fading, wipe off water drops
as soon as possible.
• Note: Stationar y images may r es ul t in per manent damage to
the TV screen.
• Do not display stationar y images on the LCD screen for more
than two hours as th is m ay result in ghost images. To prevent this,
reduce screen brightness and contrast.
• Viewing progr ams in the 4:3 for ma ts for extended periods of
time may leave different traces on the left and r ig ht e dg es o f the
screen as well as along the border s of t he i ma ge . Avo id u si ng t his
mode for extended peri od s of time.
• Displaying stationary images from video games or computers
for an extended period of time may result in partial after-images
and the appearance of ghost images caused by screen burn. Reduce
screen brightness and contrast accordingly when using the TV in
this way.
• Ghost images, par tial after-im ag es , and other traces that
appear on the TV screen as a result of the above are not cove re d by
the warranty.
4
Page 5
INITIAL SETUP
Read safety
Please read the safety instr uc ti on s first befo re you use the TV.
In Help, go to S afety and Screen care .
TV stand installation and wall
mounting instructions
Tips on placement
• Position the TV where light does not shine directly on the
screen.
• Position the TV up to 15cm away from the wall.
• The ideal distance to watch TV is 3 times its diagonal screen
size . Wh en s ea te d your eyes should be level with centre of screen.
Power cable
• Inser t the power plug into the outlet complete.
• Make sure that powe r plug in the wall socket is accessible at all
time.
• Tips: If you do not use the TV for a long period of time, please
unplug the power cord.
TV stand installation
You can find the instructions on how to i ns ta ll t he TV stand in
the Quick Start Guide that come together in the carton box
when you unpack the TV. In case you have misplaced your Quick
Start Guide, you can download it from www.philips.com. Use the
product type number of the TV to look for the Quick Star t Guide
to download.
Wall mounting instructions
Your TV is also prepared for a VE SA – co mp li an t wall mount
bracket (sold separately).
Use The follow in g VESA code when purchasing the wall mount.
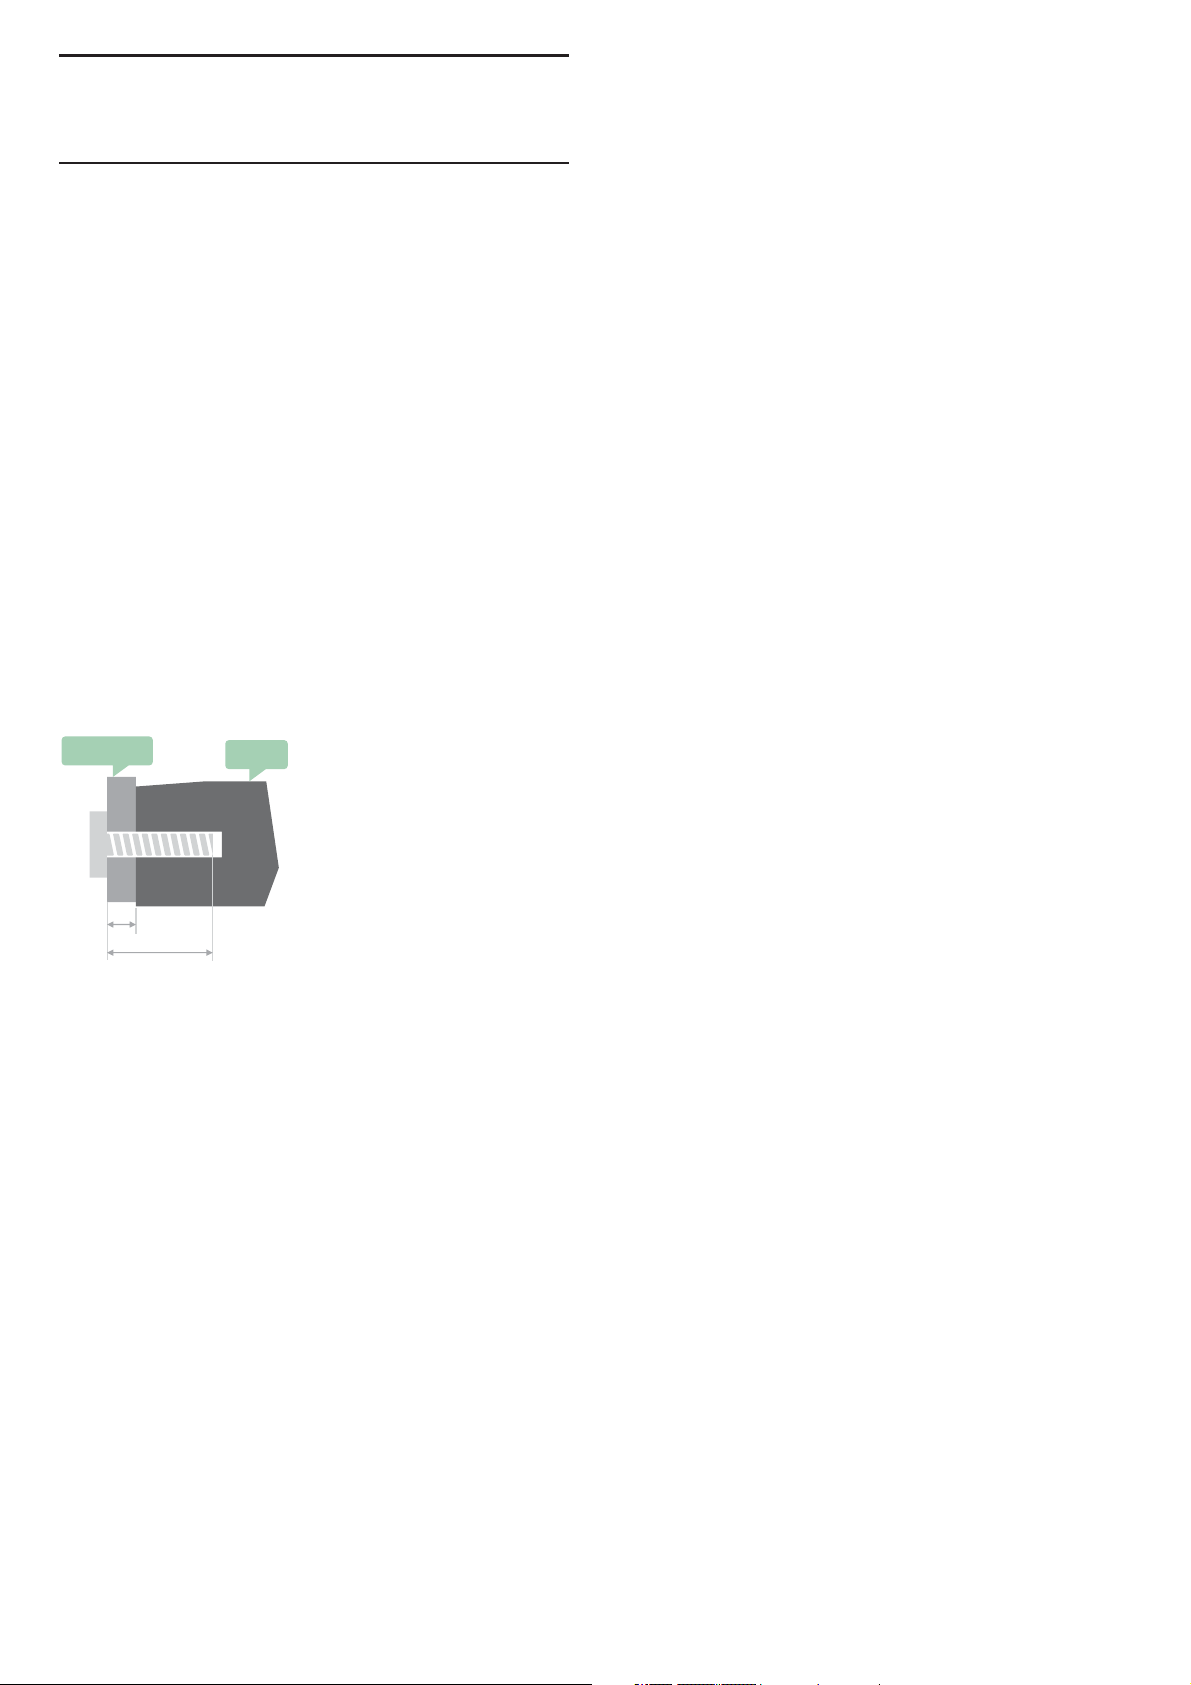
To fix the br acke t securely, use screws with a length indicated
in the drawing.
VESA
L
min.&max.
Tips: T hi s pi ct ure is only for reference.
Take note of the following, the "L" is stand for the thickness of
VESA.
32PHS4001 / 32PHT4001:
VESA MIS-F 200x100mm, M4x25mm.
42PFS4012 / 43PFS4001 / 43PFT4001 / 49PFS4001 /
49PFT4001:
VESA MIS-F 200x300mm.
Top side M6x43mm.
Bottom side M6x28mm.
32PHS4012:
VESA MIS-F 100x100mm, M4x23mm.
43PFS4012:
VESA MIS-F 400x200mm.
Top side M6x45mm.
Bottom side M6x23mm.
50PFS4012/12:
VESA MIS-F 200x200mm.
Top side M6x45mm.
Bottom side M6x23mm.
TV
Antenna cable
• Inser t the antenna pl ug fir mly in to t he ANTENNA socket at
the back of the TV.
• You can connect your own antenna si gn al f ro m an a nt en na
distribu ti on s ys te m. Use an IEC Coax 75 Ohm RF antenna
connector. U se t hi s an te nn a connection for DV B- T an d DVB-C
input signals.
Satellite dish
For PHS and PFS models.
Attach the satellite F-type connector to the satellite connection
SAT at t he b ack of TV.
Caution:
Wal l mo un ti ng t he TV requires special skills and should on ly be
performed by qualified personnel. The TV wall Mounting should
meet safety standards according to TV’s weight. Also read the
safety precautions before positioning the TV.
TP Vision Europe B.V. bears no responsibility for improper
actions.TV mounting that results in accident, injur y or d am ag e.
5
Page 6
Connecting Your Devices
About connection
Connectivity guide
Always connect a device to the T V wi th t he h ighest quality
connection Avail able . A ls o us e go od q ua li ty c ables to ensure a
good transfer of picture and sound. If you need help to connect
several devices to the TV, you can visit the Philips TV connectivity
guide. The guide offer s in formation on how to connect and which
cables to use. Go to www.connectivityguide.philips.com.
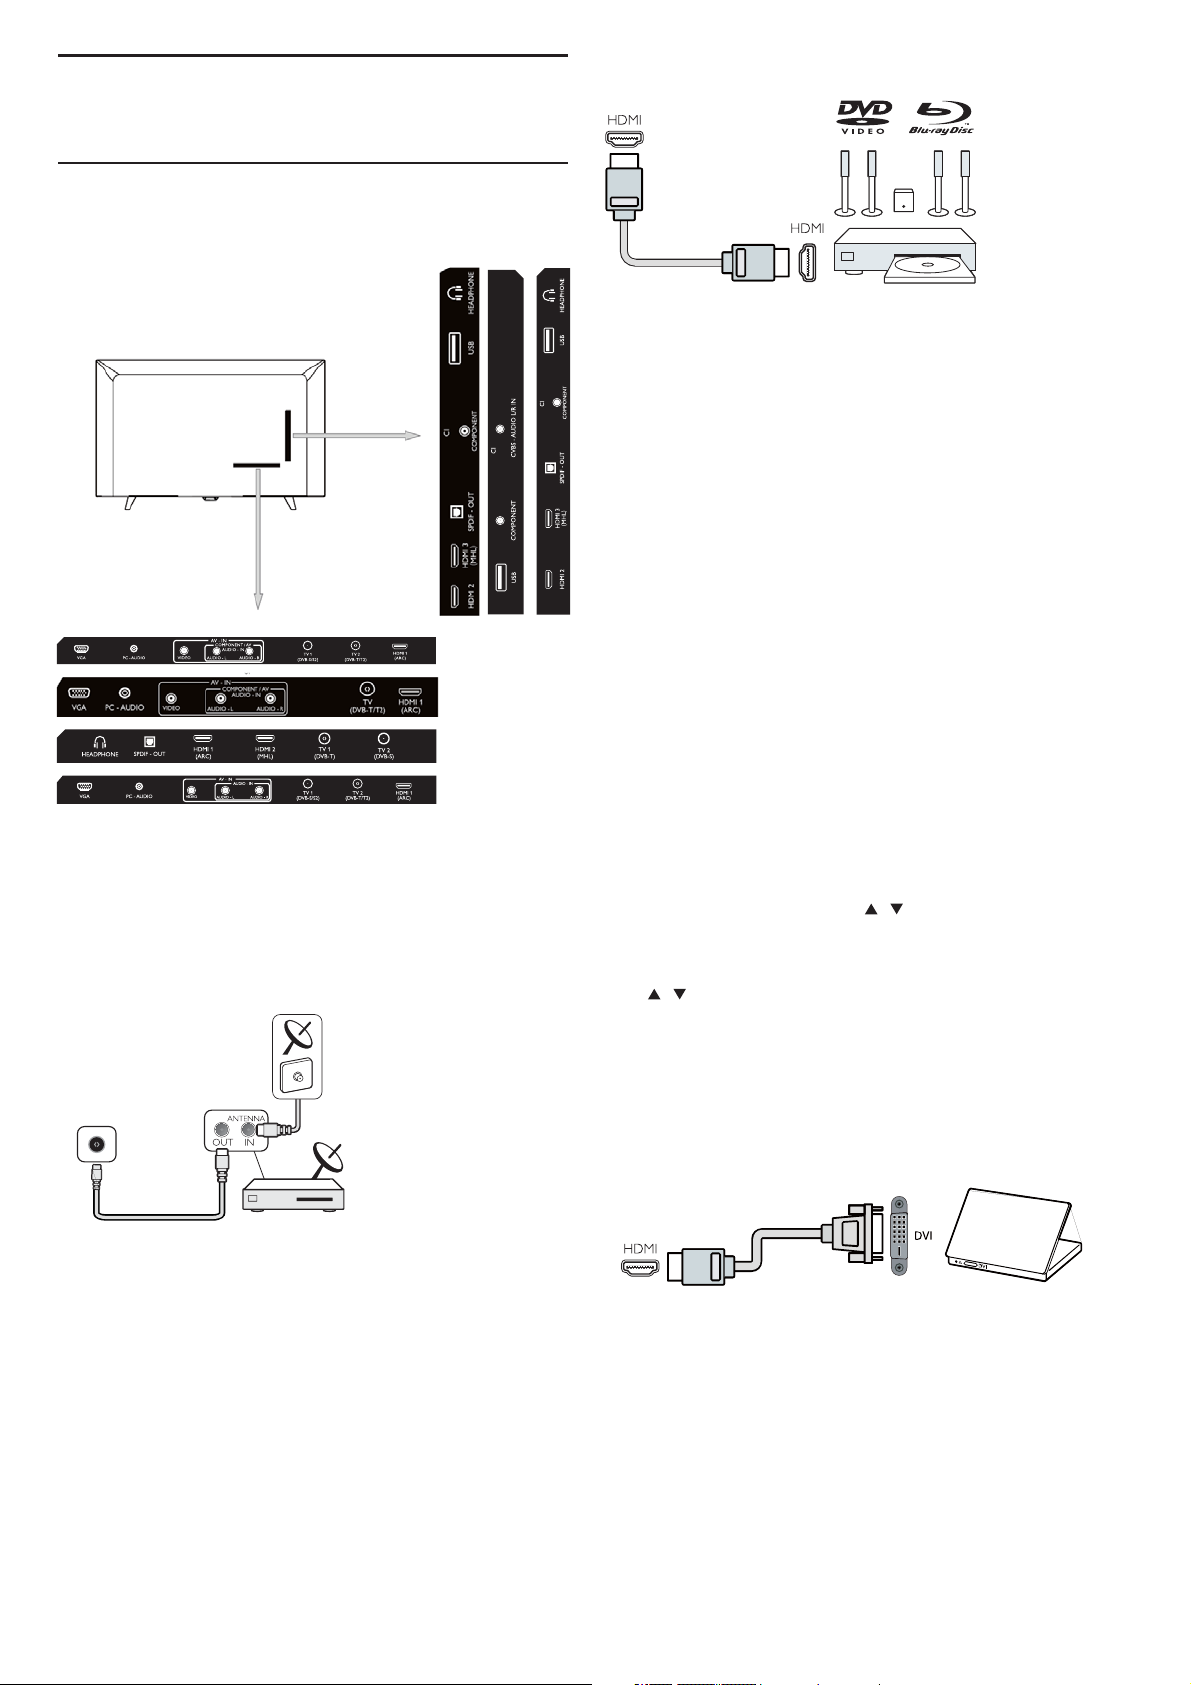
Antenna port
DVB-T/T2
HDMI ports
HDMI Quality
An HDMI connection has the best picture and sound quality.
Use an HDMI cable for TV s ig na l.
For best signal quality tr an sfer, use a High speed HDMI cable and
do not use an HDMI cable longer than 5 m.
HDMI MHL
HDMI 3 connection on the TV h ave HDMI MHL (Mobile High-
Definition Link).
Note:32PHS4012: HDMI 2 connection on the TV have HDMI
MHL (Mobile High-Definition Link).
HDMI CEC-Easylink
Easylink: With Easylink you can operate a connected d ev ic e
with the TV remote control, EasyLink uses HDMI CEC(Consumer
Electronics Control) to communicate with the connected devices.
Devices must support HDMI CEC and must be connected with an
HDMI connection.
EasyLink setup: The TV comes with Easylink switched on. Make
sure that all HDMI CEC settings are proper ly s et u p on t he
connected EasyLink devices. EasyLink might not work with devices
from other brands.
HDMI CEC on other brands: The HDMI CEC functionality has
different names on different brands. Some examples are: Anynet,
Aquos Link, Bravia Theatre Sync , Kuro Link, Simplink and Vier a Link.
Not all br ands are ful ly compatible with EasyLink.
Example HDMI CEC bra nd in g na me s ar e pr op er ty o f their
respective owners.
Operate devices: You can oper at e a de vi ce connected to HDMI
and set up with HDMI CEC of TV connections. Pre ss M EN U key to
enter the main menu and select SETTING, press OK key enter the
setting menu, on the screen press / key to select HDMI CEC.
Press OK key to enter submenu, select CEC co nt ro l to t ur n on and
you can adjust these options.
Easy-Link On or Off: Enter the setting menu, on the scre en
press / key to select HDMI CEC. Press OK key to enter
submenu, select CEC control to turn on or off.
Easy-Link Remote Control: If you want devices to communicate
but you don’t want to operate them with the TV remote control,
you can switch off Easy-Link remote control separately.
You can con tr ol multiple HDMI-CEC compliant devices with
your TV remote control.
In the settings menu, select EasyLink Remote control and select
off.
DVI t o HD MI
If you have a Set-top box (a digital receiver) or Recorder,
connect the antenna cables to ru n th e an te nn a si gn al t hr ou gh the
Set-top box or Recorder fir st before it enters t he TV. In this way,
the antenna and Set-top box can send possible additional
channels to the Recorder to record.
If you still ow n a de vi ce t ha t on ly has a DV I co nn ec ti on , you can
connect the device to any of the HDMI connection with a DVI to
HDMI adapter.
Use a DVI t o HD MI a da pter if your device only a DVI
connection. Use one of the HDMI co nn ec ti on a nd a dd a n Audio
L/R cable to Audio in for sound, o n th e back of the TV.
Copy protection
DVI a nd H DM I ca bles suppor t HD CP (H ig h- ba ndwith Digital
Content Protection). HDCP is a copy protection signal that
prevents copy in g co nt en t fr om a DVD disc or Blu-ray Disc. Al so
referr ed t o as DRM(Digital Rigital Management).
6
Page 7
Y Pb Pr - Audio L R
CVBS-Composite video is a high quality connection. Nex t to
the CVBS signal is the Audio left and r ig ht for sound.
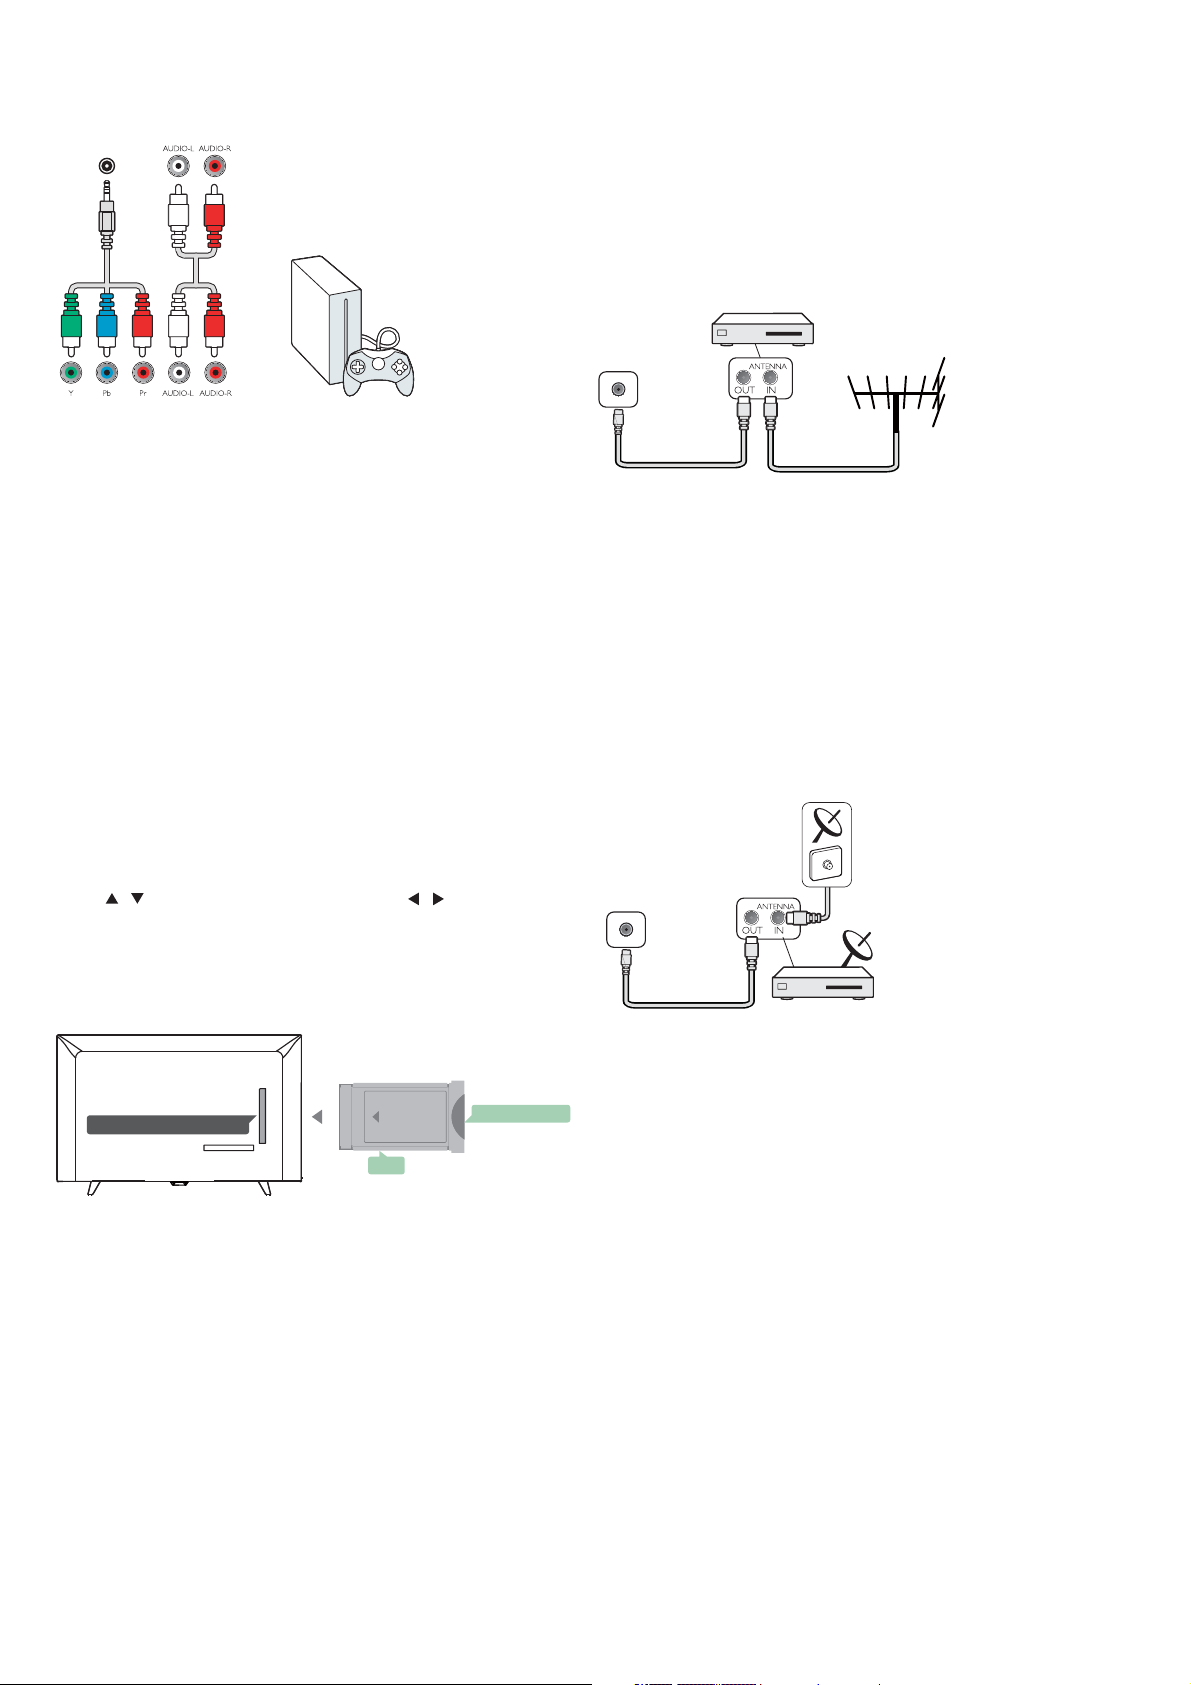
COMPONE TN
Y Pb Pr
Component video is a high quality connection. The YPbPr
connection can be used for High defin it io n (H D) TV signals.
Mini-YPbPr
Please use mini-YPbPr wire to make connection. Match the
YPbPr (green, blue, red) connector colours with the cable plugs
when you connect.
Use an Audio L/R cinch cable if your device also has sound.
CVBS-Audio L R
CVBS-Composite video is a hig h qu al it y co nn ection. Next to
the CVBS signal is the Audio left and r ight for sound.
Audio Out- Optical (SPDIF-OUT)
Audio-Out-Optical is a high quality sound connection. This
optical connection can car r y 5.1 audi o ch an ne ls . If your device,
typically a Home Theatre(HTS), has no HDMI ARC con ne ct io n,
you can use this connection with the Audio In-Optical co nn ec ti on
on the HTS. The Audio-Out-Optical connection sends the sound
from the TV t o th e HT S.
You can P re ss MENU key to enter the main menu and select
SOUND, press OK key enter the submenu, then on the screen
press / key to select SPDIF Mode, press / key to adjust
the options, like PCM, Auto, off.
Leave t he c ar d in t he s lo t permanently.
It may take a few m inutes before the CAM is activated.
Removing the C AM will deacti va te t he b ro ad ca st s er vice on the
TV.
If a C AM is inser ted and subscription fe es a re paid,(connection
method can differ), you can watch the TV broadcast. The inser ted
CAM is exclusively for your TV.
Set-top box-STB
Digit al Rece river S et Box
TV
Use 2 antenna to connect the antenna to the Set-top box(a
digital receiver) and the TV.
Next to the antenna connections, add an HDMI cable to
connect the Set-top box to the T V.
Auto Standby
If you only use the remote control of the Set-top box. Do this to
prevent the TV from auto standby after a 5 hour period without a
key on the remote control of the TV.
To set Auto Standby, press MENU key and select TIME and press
OK key.
TIME > Auto Standby a nd set the slider bar to off.
Satellite receiver
DVB-S/S2
Common interface-CAM
CI+
COMMON INTERFACE
This TV is ready for the CI conditional Access.
With CI+ you can watch premium HD programs, like movies
and spor ts live offer ed by digital TV broadcasters i n your region.
These programs are s cr ambled by the TV broadcaster and
descrambled with a prepaid CI+ module.
Contact a digital TV broadcaster for more info rmation on
terms and conditions.
FRONT
CAM
CAM
Inser t a C AM m od ule.
Switch off the TV b efore inser ting a CA M.
Use the CAM for the correct method of inser t io n. Incorr ec t
inser tion can d am ag e th e CAM and TV.
Use the CI Interface slot on the TV t o in se r t the C AM car d.
With the front of the card facing to you, g en tly inser t the C AM
as far as it will go.
SMART CARD
State llite R eceri ver
Connect the dish antenna cable to the satellite receiver.
Next to the antenna connections, add an HDMI cable to
connect the Set-top box to the T V.
Auto Standby
If you only use the remote co nt ro l of t he S et -t op b ox. Do t hi s to
prevent the TV from auto standby after a 5 hour period without a
key on the remote control of the TV.
To set Auto Standby, press MENU key and select TIME and press
OK key.
TIME > Aut o St an dby and set the slider bar to off.
7
Page 8
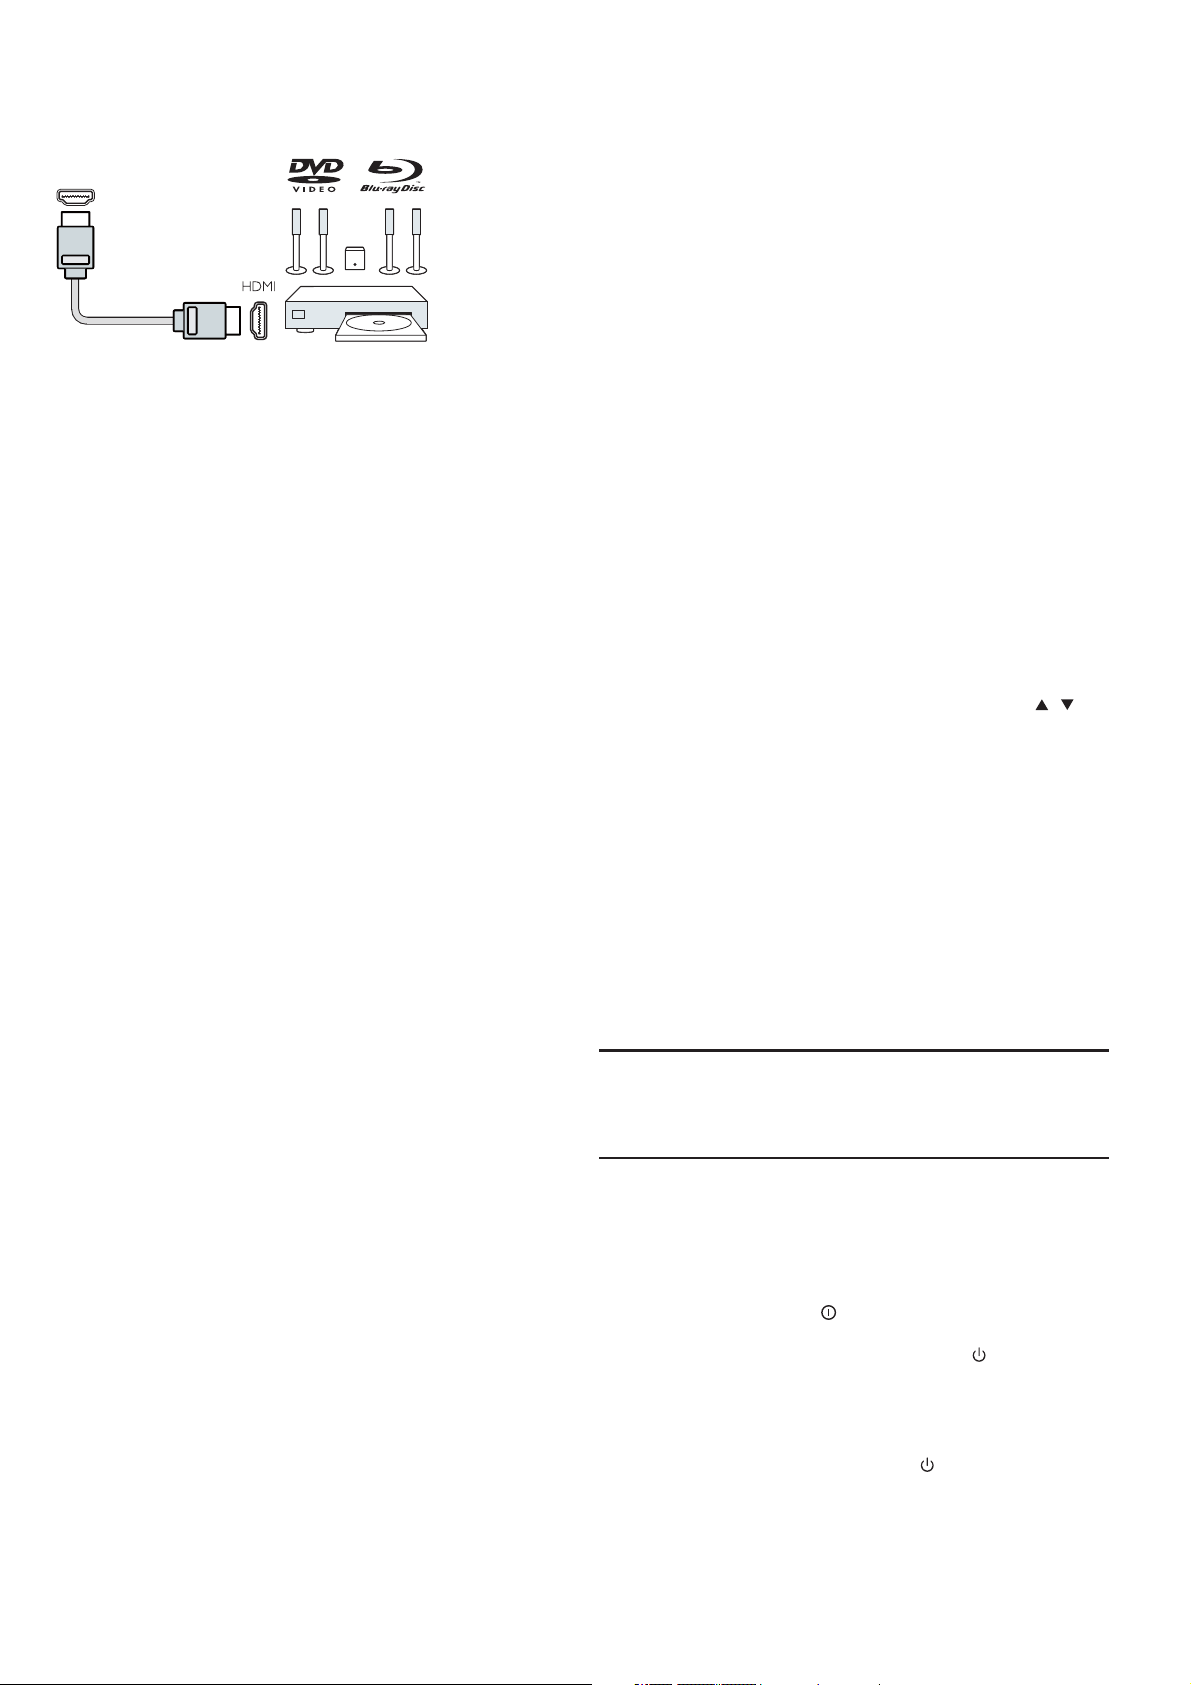
Home Theatre System
Connect with HDMI ARC
HDMI
(ARC)
Use an HDMI cable to connect a Home Theatr e System (HTS)
to the TV. You can connect a Philips Soundbar or an HTS with a
built-in disc player.
HDMI ARC
HDMI 1 connection on the TV h ave HDMI ARC (Audio Return
Channel). If the devic e,typically a Home Theatre System(HTS),
also has the HDMI ARC connection, con ne ct i t to H DM I 1 on t hi s
TV. Wi th t he H DM I ARC connection, you d o no t ne ed t o co nn ec t
the extr a audio ca ble that sends the sound of the TV picture to
the HTS. The HDMI ARC connection combines both signals.
Audio to video synchronisation (sync)
If the sound does not match the video on screen ,you can set a
delay on most Home Theatre System with a di sc p layer to match
the sound with video.
Connect with HDMI
Use an HDMI cable to connect a Home Th ea tr e Sy st em ( HT S)
to the TV. You can connect a Philips Soundbar or an HTS with a
built-in disc player.
If the Home Theatre System has no HDMI ARC connection,
add an optical audio cable (To sl in k) t o se nd the sound of the TV
picture to the Home Theatre System.
Audio to video synchronisation (sync)
If the sound does not match the video on screen, you can set a
delay on most Home Theatre System with a di sc p layer to match
the sound with video.
Home Theatre
TV while the TV is switch o n.
The TV detects the flash drive and show a window with a tips to
whether you can brows e th e US B fl as h dr ive.
If the tips is disappeared, you can press SOURCE key, select
MULTIMEDIA and press OK key to enter.
Computer
You can c on ne ct your computer to the TV and use the TV as a
PC monitor.
With HDMI
Use an HDMI cable to connect the computer to the T V.
With DV I to H DMI
Alternatively, you can use a DVI to HDMI adapter to connect
the PC to HDMI and an audio L/R cable (mini-jack3.5mm) to
AUDIO IN L/R on the back of the TV.
With VGA
Connect the PC IN jack (HD15-HD15) to VGA Por t, on the
back of the TV. Then connect the audio cable to PC-AUDIO fo r
sound.
Headphone
You can c on ne ct a s et o f he ad ph on e to H EA DP HO NE Po r t on
the back of the TV. Press +/- key on the remote control to adjust
the volume.
USB interface
Inser t USB storage device into USB interface of the TV. Press
SOURCE key to enter the signal input menu, then press / key
to select MULTIMEDIA. Press OK key to enter the USB
multimedia.
Note:
1. USB function support file format as,
PHOTO/MUSIC/MOVIE/TEXT, the USB device format can only be
FAT/FAT32 system.
2. When connecting the USB por t on an external d ev ic e cu rrent
is exceed 500mA, It will be caused damage of the TV.
3. When the USB device is working, d o not pull out immediately,
It will be caused damage of the TV system or the USB device
system.
Blue-ray Disc player
Use a High speed HDMI cable to connect the Blue-ray Disc
p l a y e r T o t h e T V .
If the Blue-ray Disc player has EasyLink HDMI C EC , you c an
operate the player with the TV remote control.
DVD player
Use an HDMI cable to connect the DVD playe r to t he TV.
If the DV D pl ayer has EasyLink HDMI CEC , you can op er ate
the player with the TV remote control.
Game console
HDMI: For best quali ty , co nn ec t th e ga me c on so le w it h an
High speed HDMI cable to the T V.
Y Pb Pr- Audio L R: Connect the game console with a
component video cable (Y Pb Pr) and add an audio L/R cable for
sound to the TV.
CVBS- Audio L R: Con ne ct t he g am e co ns ole to TV with a
composite cable (CVBS) and audio L/R cabl e to the TV.
USB flash drive
You can vie w ph ot os o r pl ay your mus ic a nd v id eo s fr om a
connect USB flash dr ive.
Inser t a USB flash drive in one of the USB connections on the
Switch on
Power on/off, standby
Power on
Before you switch on the TV, m ake sure the power supp ly is
stable . Wh en t he TV is powered on, the power indicator is lights up.
If the TV have power switch " ", you can press "I" end to turn
power on, a nd p re ss " O" e nd to turn power off.
When the power indi ca to r is l ig ht s up, pr es s " " key on the
remote control or on the panel control of the TV, and then the TV
system will be r unning up.
Standby
When the TV syste m is r unning, press " " key, and t he n th e TV
will be switch to standby status.
8
Page 9
Power off
To switch the TV off completely, press the hard Switch or
unplug the power cord, and then the power i nd ic at or w il l be
extinguished. If you do not use the TV for a long time, please
unplug the power cord.
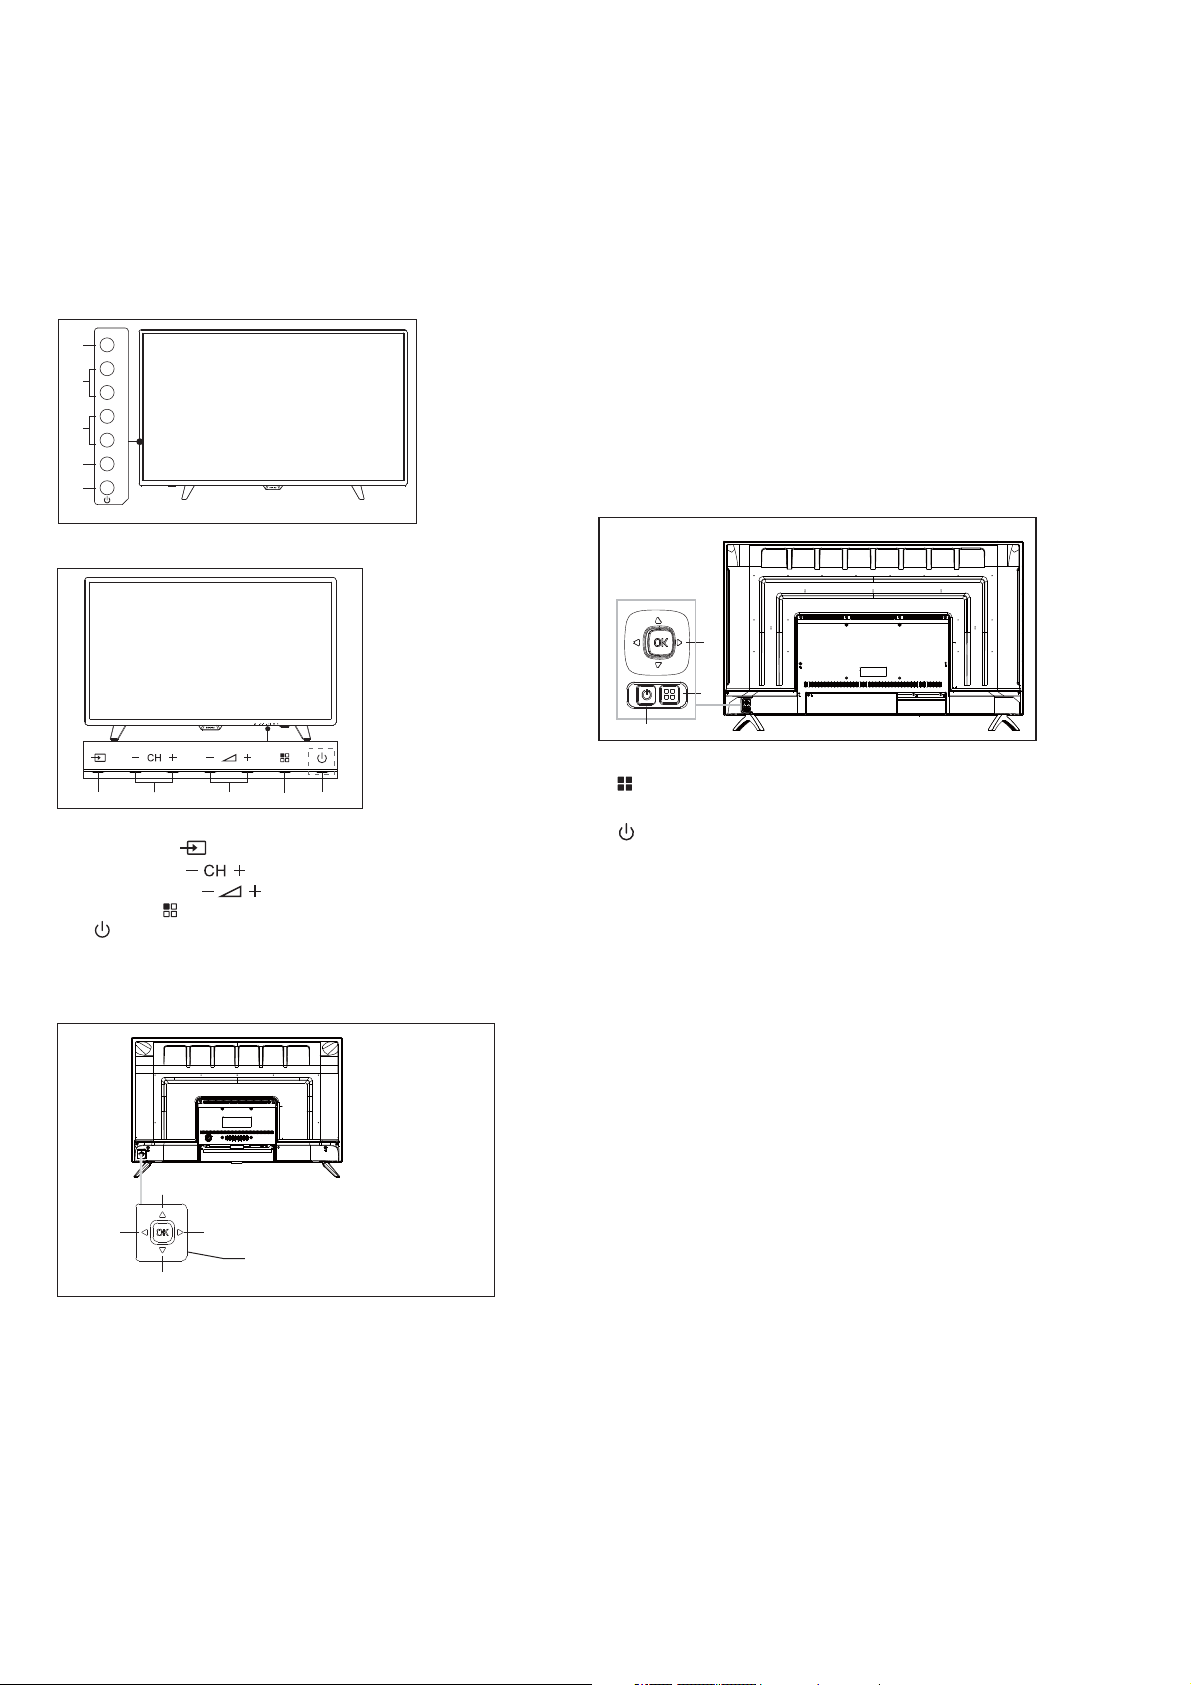
Keys on TV
If you lost the remote control or its batteries are empty, you
can still do some basic TV operations.
View the control buttons as below:
32PHS4001/32PHT4001/42PFS4012
SOURCE
1
CH+
-
CH
2
VOL+
-
VOL
3
MENU
4
5
43PFS4001/43PFT4001/49PFS4001/49PFT4001
③. Under the USB source menu, long press OK rocker 2 seconds to
display the “Input Source” menu on the screen.
Move rocker Left/Right:
①. In non-OSD menu operation, move rocker Left/Right to
decrease/increase the volume, the function is the same with
pressing [VOL+]/[VOL-] key on the remote control.
②. In OSD menu operation, move rocker Left/Right to
adjust the
analog value of selected item, the function is the same with
pressing [t]/[u] key on the remote control.
Move rocker Up/Down:
①. In non-OSD menu operation, move rocker Up/Down to select
the channel
, the function is the same with pressing [CH+]/[CH-]
key on the remote control.
②. In OSD menu operation, move rocker Up/Down to select the
adjustment items, the function is the same with pressing [▲]/[▼]
key on the remote control.
50PFS4012
3
12
3
5
4
1. SOURCE ( ): Display the signal source list.
2. CH-/CH+ ( ): Switch the previous/next channel.
3. VOL-/VOL+ ( ): re du ce /I nc re as e th e volume .
4. MENU ( ): turn on/off the ma in m enu.
5. : Turn on/off the TV, to cut off power supply, please unplug
the power cable .
32PHS4012
Up
Right
Left
Rocker button combination
Down
key(optional)
1
2
1) Menu key: Press this key to display the setup menu. In OSD
menu operation, press this key to return to the previous menu.
2) Standby: To switch the TV on or back to standby.
3) Rocker button combination key:
OK Rocker: Press rocker to enter the source select menu; in OSD
menu operation, press rocker to confirm operation, with the same
function as the [OK] key on the remote control.
Move rocker Up/Down: The channel number increase/ decrease; in
OSD menu operation, moving rocker up/ down to select the
adjustment items, with the same function as the [▲]/[▼] key on the
remote control.
Move rocker Left/Right: volume decrease/increase key; in OSD
menu operation, move rocker left/right to adjust the analog value,
with the same function as the [t]/[u] key on the remote control.
Rocker button combination key(optional):
Press OK Rocker:
①. After turn on the TV, In non-OSD menu operation, press OK
rocker to display the menu which includes 4 sorts: Menu,
Source, Power, Exit. During the menu operation, press OK
rocker to confirm the operation, the function is the same with
pressing [OK] key on the remote control.
②. Under the non USB source menu, long press OK rocker 2
seconds to return to previous page.
9
Page 10
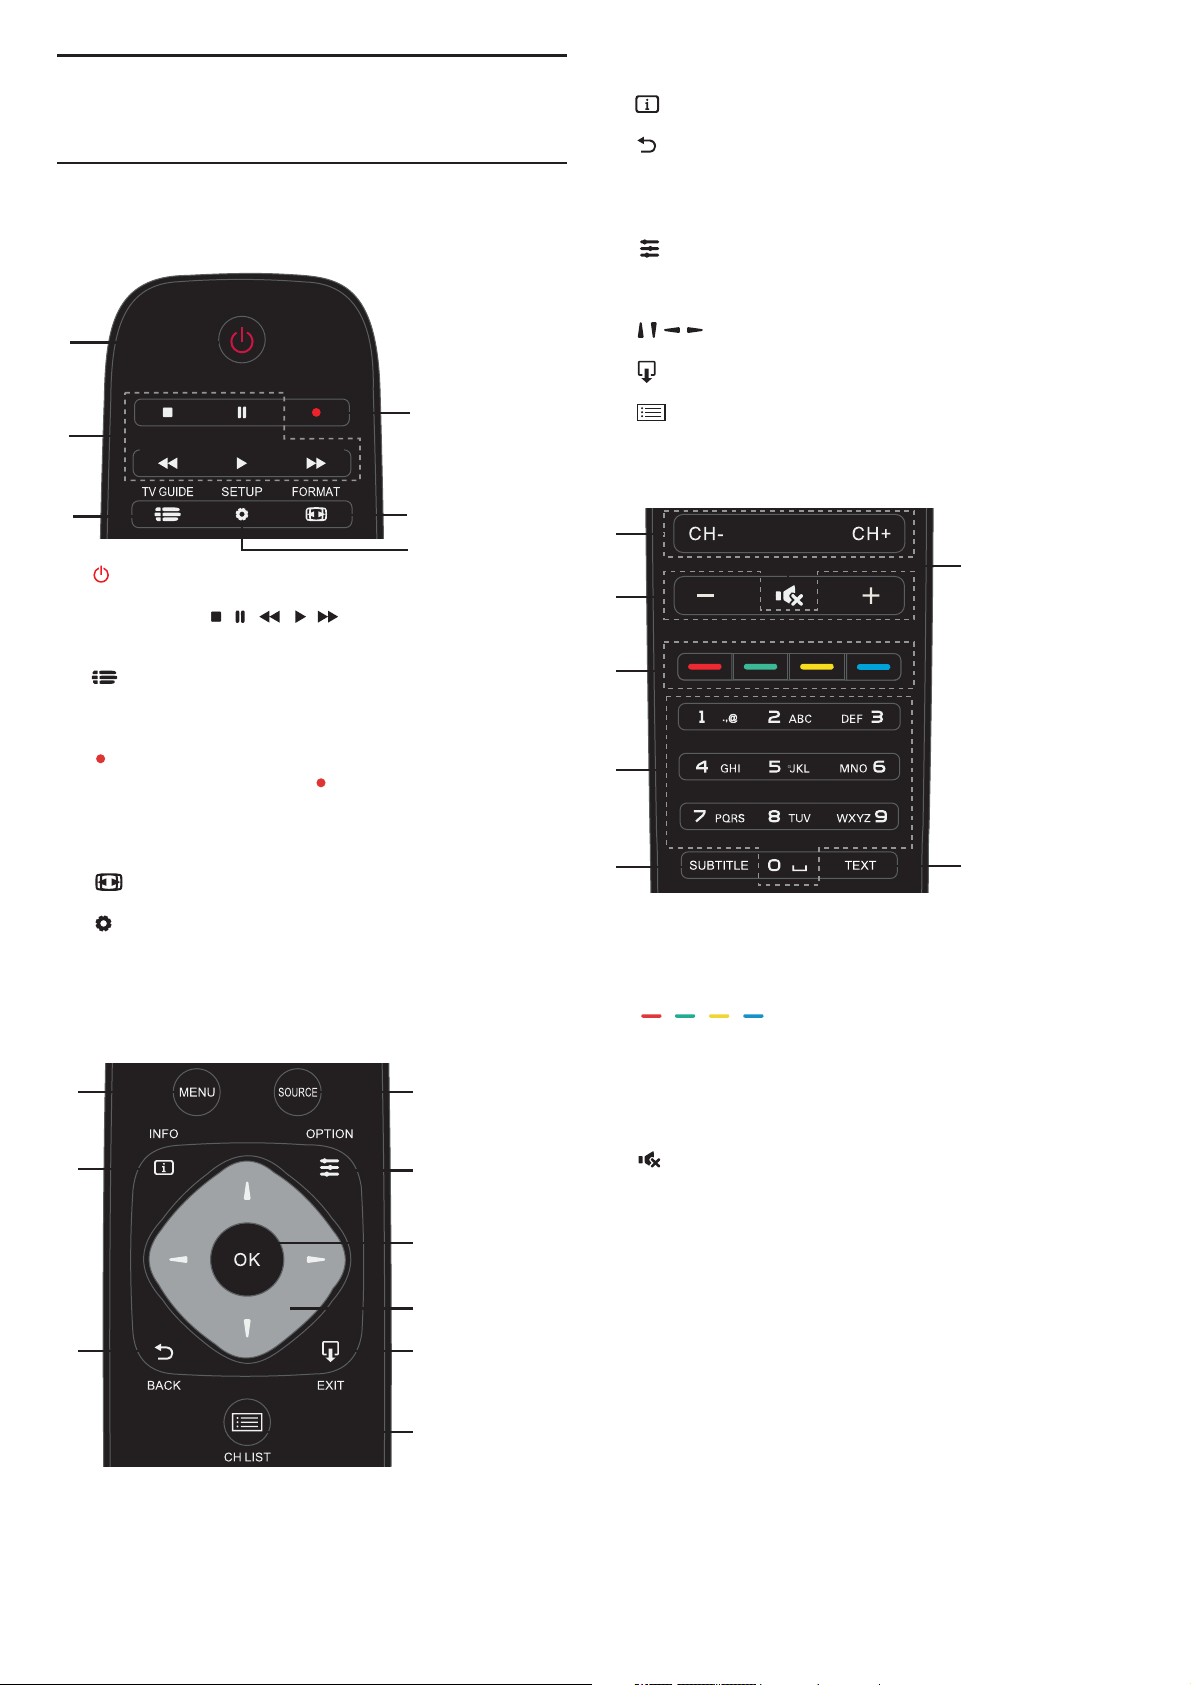
Remote Control
1. Key overview
Top view
1
2
3
1. Standby / on :
- To swi tc h th e TV on or back to Standby.
2.Play back keys
- Shor tcut keys in USB mode: STOP, PAUSE, REWIND, START,
FAS T FO RWARD.
3. TV GUIDE
- An Instant access to TV program guide.
- Availabi li ty o f el ec tr on ic p ro gr am guide (EPG) is dependent
on broadcaster s or operator s.
4. Recording
- To record TV program, press ( Rec or d) o n th e re mo te
control.
- To sch ed ul e a recording of an upcoming TV program, press
TV GUIDE then select the TV program you wish to record. Press
(Record) on remote control to set the recording schedule.
5. FORMAT
- Display the image aspect ratio.
6. SETUP
- Display the setting options on the T V sc re en you can adjust
these items by yo ur self.
Middle view
1
2
,, ,,
(4001 series)
4
5
6
4
5
6
1. MENU
- Turn on/off the menu.
2. INFO
- Display the program inform at io n wh en i t is available.
3. BACK
- Return to the pr ev io us c ha nn el .
4. SOURCE
- To ope n or c lo se the Source menu- the list of connected
devices.
5. OPTION
- Select an item of option settings for the TV.
6. OK
- In menu mode: co nfir m th e in pu t or s election.
7. Ar row/ navigation keys, to navigate up, down, left or
right.
8. EXIT
- Press this key to exit menu.
9. CH LIST
- Look through channel list.
Bottom view
1
6
2
3
4
5
1. CH-/CH+
-To switch to the previous/next cha nn el i n th e ch an ne l li st . To
open the previous/next page in Text/Teletext.
2. -/+ Volume
- To adj us t th e volume level
3. Color key
- The button’s function follow the on-screen instructions.
4. Numeric keys (0~9)
- Select a channel or value.
5. SUBTITLE
- Display the subtitle message when current channel has
subtitle option.
6. Mute
- To mute the sound or to restore it.
7. TEXT
- To ope n or c lose Text/Teletext.
7
7
3
8
9
10
Page 11
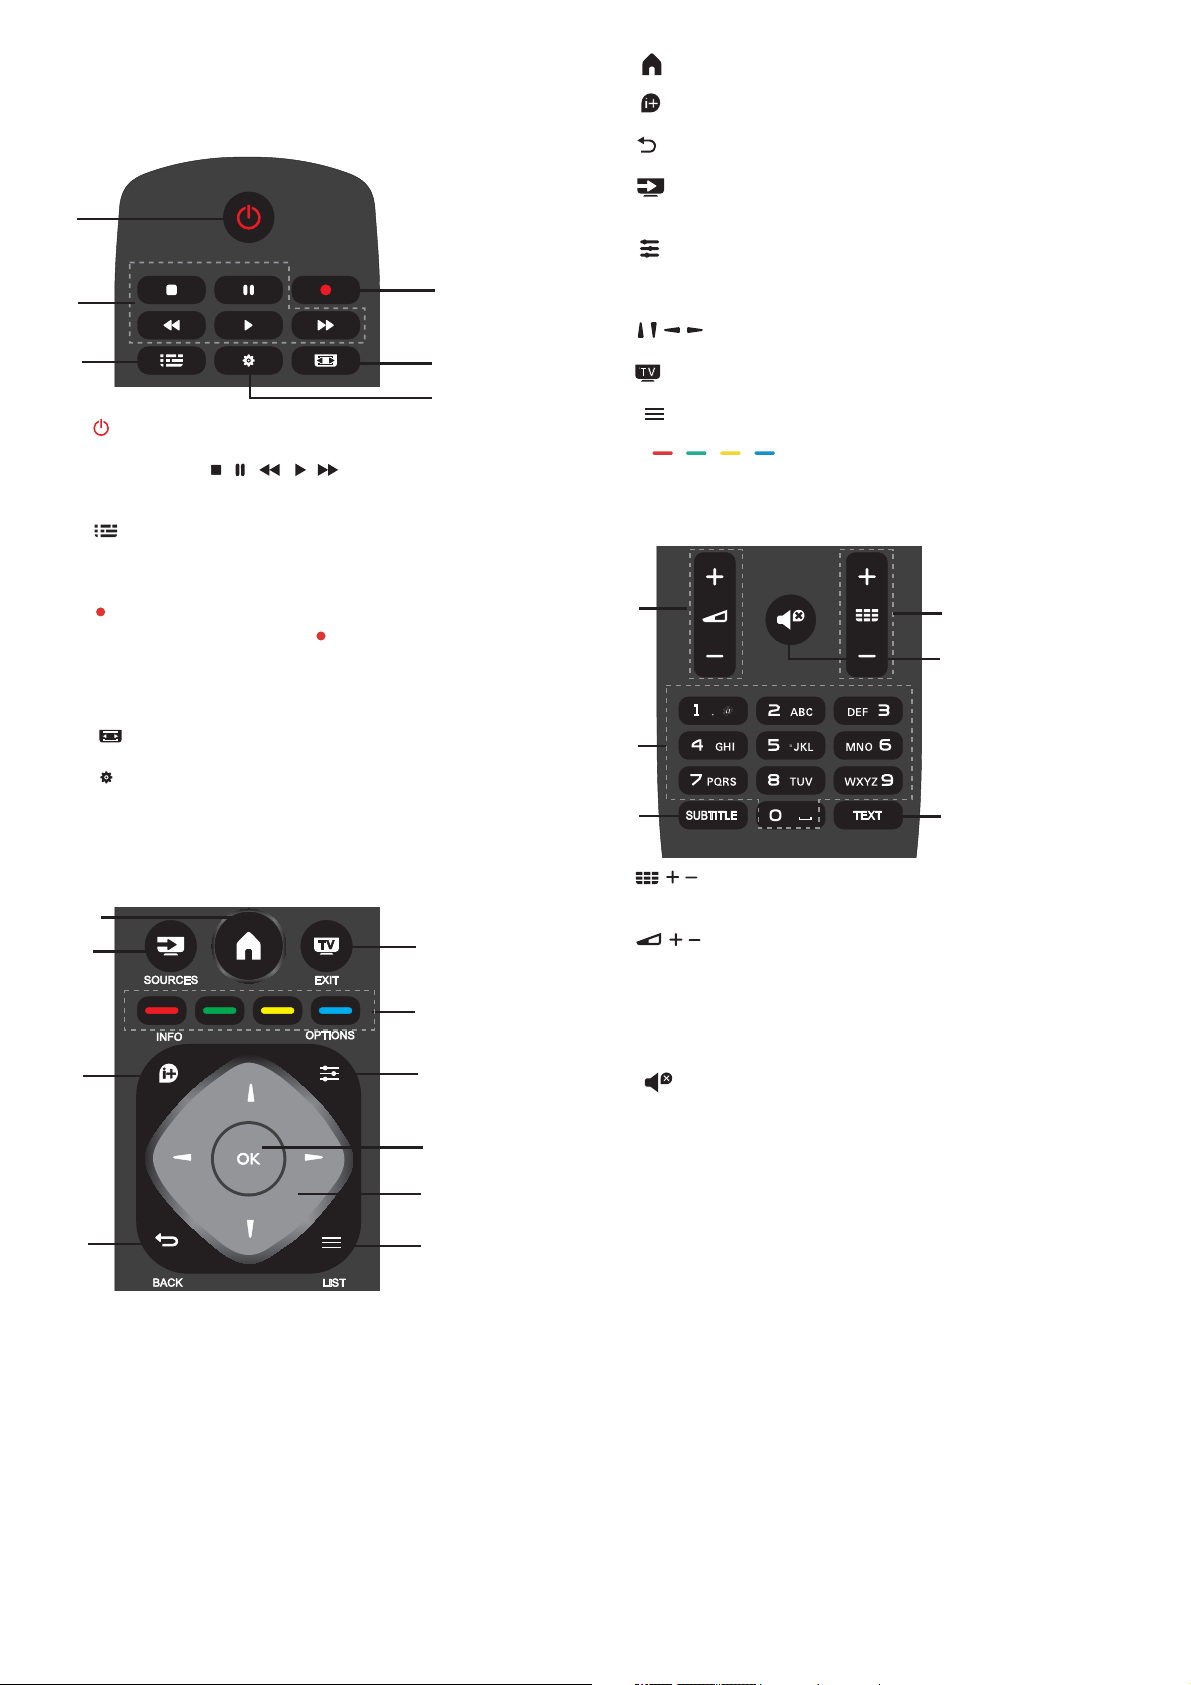
2. Key overview
TV GUIDE
SETUP FORMAT
(4012 series)
Top view
1
2
3
1. Standby / on :
- To swi tc h th e TV on or back to Standby.
2.Play back keys
,, ,,
- Shor tcut keys in USB mode: STOP, PAUSE, REWIND, START,
FAS T FO RWARD.
3. TV GUIDE
- An Instant access to TV program guide.
- Availabi li ty o f el ec tr on ic p ro gr am guide (EPG) is dependent
on broadcaster s or operator s.
4. Recording
- To record TV program, press ( Rec or d) o n th e re mo te
control.
- To sch ed ul e a recording of an upcoming TV program, press TV
GUIDE then select the TV program you wish to record. Press
(Record) on remote control to set the recording schedule.
5. FORMAT
- Display the image aspect ratio.
6. SETUP
- Display the setting options on the TV screen you can adjust
these items by yourself.
4
5
6
1.
- Turn on/off the menu.
2. INFO
- Display the program inform at io n wh en i t is availabl e.
3. BACK
- Return to the pr ev io us c ha nn el .
4. SOURCES
- To ope n or c lo se the Source menu- the list of connected
devices.
5. OPTIONS
- Select an item of option settings for the TV.
6. OK
- In menu mode: co nfir m th e in pu t or s election.
7. Ar row/ navigation keys, to n avigate up, down, left or
right.
8. EXIT
- Press this key to exit menu and DTV.
9. LIST
- Look through channel list.
10. Color key
- The button’s function follow the on-screen instructions.
Bottom view
2
3
4
1
5
6
Middle view
1
4
2
3
10
1. /
-To power on and switch to the previous/next channel in the
channel list. To open the previous/next page in Text/Teletext.
8
2. /
- To adj us t th e volume level
3. Numeric keys (0~9)
- Select a channel or value.
4. SUBTITLE
- Display the subtitle message when current channel has
5
subtitle option.
5.
- To mute the sound or to restore it.
6. TEXT
6
7
9
- To ope n or c lo se Text /Teletext.
11
Page 12

IR sensor
The TV can receive commands from a remote control that
uses IR(infrared) to send commands. If you use such a remote
control, hold it close to the T V an d make sure you point the
remote control at the infrared sensor on the front of the TV.
Make sure that the line-of-sight between the remote control
and TV is not blocke d by fur niture, walls or other obje ct s.
Batteries
1. Slide the battery door in the direction shown by the arrow.
. Insert two type AAA-LR03-1.5V batteries into remote
2
control, make su re t he + a nd t he – e nd s of t he batteries line up
correctly.
3
. Reposition the battery door.
Cleaning
Your Remote control is treated with a scr atch-resistant
coating.
To clean the remote control, use a sof t da mp cloth. Never use
substances such as alcohol, chemicals or household cleaners on
the remote control.
Watching TV channels
Tune to a channel
To watching TV channels, press SOURCE key t o sh ow signal
menu, you can select Satellite, DTV, ATV and press OK key to enter.
Switch channels
To switch channels, press CH-/CH+ key.
If you know t he c ha nn el number, t yp e in t he number in cur rent
TV channel, then the TV w il l au to Switch the number channel by
you typed.
Previous channel
To switch back to the previous tuned channel, press BACK key
to retur n the precio us c ha nn el
Radio channel
If digital broadcasting is avai la ble, digital radi o st at io ns a re
installed during installation. Switch to a radio channel just like you
switch to a TV channel.
About move Channels
1. While you watching TV, press MENU key and select
CHANNEL, press
2.
In channel menu, select Channel Edit and press OK key to
enter
into channel list.
3.In
channel list, you can press key to select your
channel, press key on the remote control to move channel, and
▲/▼
press key to move it.
4. Press
OK key confirm
OK key to enter.
▲/▼
TV channels
Channel list
About Channel list
After a channel installation, al l ch an ne ls a pp ea r on the channel
list. Channels are s how with their name if this information is
available.
There is a channel list with all installed channels. You can only
filter this list to show TV or only Radio channels.
With a channel list selected, pr es s / key to select a
channel, then press OK key to watch the selected channel. You
can page up or page down the channels in that list when using
CH-/ CH+ key.
Radio stations
If digital broadcasting is available, digital radio stations are
installed during i ns ta ll at io n. Switch to a ra dio channel just like you
switch to a TV channel.
Open a channel list
To open the c ur rent channel list..
Press SOURCE Ke y to s wi tc h to TV mode(DTV or ATV).
Press LIST key to open the current channel list.
Press LIST key again to close the channel list.
Filter a channel list
You can filter a list with all channels. You can set the channel list
to show only T V ch an ne ls o r on ly Radio stations.
To set a filter list with all channels.
1. While watching a TV channel.
2. Press / key to select a li st .
3. You can select ALL, DTV or ATV, HD, Radio list etc.
Lock a channel
Lock and unlock a channel
To prevent children from watching a channel or a progra mm e,
you can lock channels or lock age Rated programme.
You can lock a ch an ne l to p re vent children from watching it. To
watching a lock channel you need to enter the lock code. You can’t
lock programmes from connected devices.
To set the lock channel
1. While watching TV channels, press MENU key and select
LOCK, press OK key to enter.
2. Input the code in lock system to log in, select channel lock and
press OK key to enter the channel list.
3. Press key to select you r ch an ne l an d pr es s key on
the remote control to lock the channel, press key again to
unlock the channel.
Parental Guidance
To prevent children from watching a progr am me n ot s ui ta ble for
their age, you can use Parental Guidance.
Some digital broadcaster s have age r ated their progr ammes.
When the age r atin g of a p ro gr amme is equal to or higher than the
age you have set as age r at in g for your child, the programme will b e
locked.
To set an a ge r ating..
1. While watching TV channels, press MENU key and select
LOCK, press OK to enter.
2. Input the code in lock system to log in, select Parental
Guidance and press OK key to enter.
3. Press / key to select your age rating.
The TV will ask for the code to unlock the programme. F or some
broadcasters/operator s, the TV only locks programme with a
higher r ating.
▲/▼
Favourite Channels
About Favourite Channels
You can cre at e a favourite channel list that only holds the
channels you want to watch. With The Favourite channel list
selected, you will only see your favourite channels when you switch
Through channels.
Create a Favourite list
1. While you watching TV, press MENU key and select
CHANNEL, press OK key to enter.
2. In channel menu , select Channel Edit and press OK key to
12
Page 13

enter into channel list.
3. In channel list, you can press / key to select your
channel, long press ke y on t he r emote control to set your
favou rite channel, and long press key again to cancel it.
4. Press BACK key to retur n the current channel, you can long
press key to show the Favourite list.
Rename channel
1. While you entering ATV channel, press MENU key and select
CHANNEL, press OK key to enter.
2. In channel menu, select Channel Edit and press OK key to
enter into channel list.
3. You can press / key to select yo ur c ha nn el , press key
on the remote control to rename the channel.
4. Press OK key to confirm the channel name.
Open channel menu
Press MENU key on the remote control, then press / key
to select CHANNEL on the screen, press OK key to enter the
channel menu.
Channel
to enter satellite signal.
2. Press MENU key and select Channel, then press OK key to
enter channel menu.
3. Select Auto tuning and press OK key to enter Tuning Setup
menu. You ca n pr es s / key to select Countr y, Satellite , Scan
Mode, Channel Type, Service; and press / key adjust these
options, then press OK key to star t tu ni ng .
4. The TV will search for satellites available on the alignment of
your antenna dish. This may
Take a fe w mi nutes. When the tuning was finished, the channel
will store in channel list, you can press CH LIST key on the remote
control to show these information.
Tips: Press MENU key to exit tuning.
Channel Edit
Select CHANNEL, press OK key to enter channel menu, select
Channel Edit, press OK key enter channel list, press / key to
select the item you’d like t o edit. You can select the color keys to
edit these progammes with the tips on the screen.
Delete: Press key o n th e re mo te c on tr ol t o delete the
selected channel.
Move: Press key on the remote control to highlight a c ha nn el ,
and press / key to move, th en p re ss key to confirm location.
Skip: Press key o n th e remote control to skip the channel, and
press key again to cancel it.
Favourite: Long press key on the remote control to set your
favou rite channel, and l on g pr es s key again to cancel it.
Channel installation-Antenna,
Cable
Update channels
Programme scanning
Before you watching the p ro gr ams of the TV, you need to scan
the programs. (Note: Ma ke sure that the antenna is connected
properly before scanning).
Auto Tuning
Press MENU key to enter the main menu and select
CHANNEL, press OK key to enter channel menu, select Auto
Tuning, press key to open tuning setup. You can press / key
to adjust these options, and then press OK key to star t searching.
ATV Ma nual Tuning
Select CHANNEL, press OK key to enter channel menu, select
ATV Manual Tuning, then press key to enter submenu. Yo u ca n
press / key to select the item to set, and then press / key
to adjust the options or search the channels by manual.
DTV Manual Tuning
Select CHANNEL, press OK key to enter channel menu, select
DTV Manual Tuning, then press / key to select channel, pr es s
OK key to start searching.
Channel installation-Satellite
Watching Satellite Channel
Press SOURCE key on the remote control to show menu.
Press / key to select Satellite, and press OK ke y to e nter
Satellite channel.
Satellite Channel installation
Before you watching satellite channel, you have to install
satellite channel. Th is TV has a built-in satellite DVB-S/S2 receiver.
Connect the cable from your satellite dish directly to the TV. Use
a coaxial cable fit for connecting a satellite antenna dish. Make
sure your satellite dish is perfectly aligned before you start
installation.
To install satellite channel...
1. Press SOURCE key and select Satellite, then press OK key
Schedule List
Select CHANNEL, press OK key to enter channel menu, select
Schedule List, Press OK key to look through the Channel schedule
list information or Recorded list information (it is available only in
DTV mode).
Signal information
Select CHANNEL, press OK key to enter channel menu, select
Signal information, Press OK key to look through the signal
inform at io n (i t is available only i n DT V mode).
CI information
Select CHANNEL, press OK key to enter channel menu, select
CI information, Press OK key to look through the CI information (it
is need CI C AM).
Software Update(OAD)
Select Off or On.
Dish Setup
Manual Installation
Press / key to select Dish Setup, then press OK key to enter
the satellite channel Manual installation.
Add a satellite
In the Dish Setup menu, pr es s / key to highlight left, middle
or r ight column. When the satellite is h ig hl ig ht ed , you can press
EXIT key to return previous menu .
1. Press key on th e re mo te c on tr ol t o en te r Add menu.
Satellite Name: Press navigation key to enter rename page .
Use navigation ke ys t o se t a ne w co mp le te n ame.
Longitude Direction: Press / navigation key t o se le ct
desired option.
Longitude Angle: Press / key navi ga ti on key to move the
cursor and press number ke ys o n th e re mo te c on trol to input
desired value.
13
Page 14

Band: Press navigation key to select desired option.
2. Press key o n remote control to enter Edit menu. The
oper ations of Edit m enu are the same as Add menu.
3. Press key on th e re mo te c on tr ol t o en te r Sc an menu.
Press / navigation ke y to s elect your desired item. Press /
navigation key to set Channel Search ,such as: Scan Mode,
Channel Type and Service Type .
4. Press key on th e re mo te c on tr ol t o de le te the selected
satellite.
/
Transponder Setup
Press TV GUIDE key on the remote control to switch satellite
and Transponder.
1. Press key on remote control to enter Add menu.
Frequency: Pre ss / navigation key to move the cur sor and
press number keys on remote control to input desired value.
Symbol (ks/s): Press / navigation key to move the cur sor
and press number keys on remote control to input desired value.
Polarity: Press / navigation key t o se le ct d esired option.
2.Press key on remote control to enter Channel Search
menu. Pr es s / navigation key to select your desired item.
Press / navigation ke y to set Channel Search, such as: Scan
Mode , Channel Type a nd S er vice Type .
Ku_HOTBIRD Setup
When the Ku_HOTBIRD is selected, you can press /
navigation key to select these Item.
LNB (Low Noise Block) Type
Press / navigation ke y to e nter submenu. Then press /
navigation key to select desired option.
LNB Power
Press / navigation ke y to select desired option.
22 kHz
Press / navigation ke y to s elect desired option.
Toneburst
Press / navigation ke y to s elect desired option.
DisEqc1.0 (Digital Satellite Equipment Control)
Press / navigation ke y to s elect desired option.
DisEqc1.1
Press / navigation ke y to s elect desired option.
Motor
Press / navigation ke y to select desired option.
TV Program Guide
What you need
With the TV g ui de you can Vi ew a l is t of t he c ur rent and
scheduled TV programmes of your channels. Dep en di ng on where
the TV guide information (date) is coming from, analogue and
digital channels or only digital channels are shown . Not all channels
offer TV guide information.
The TV can collect TV guide information for the channels that
are installed on the TV (e g: the channels you watc h wi th TV). The TV
can’t collect the TV guide information for channels viewed f ro m a
digital receiver.
Using the TV Program guide
Open the TV guide
Press ( key to access TV program guide list (it is
available o nly in DTV mode). You can select the color key s to edit
these programm es w it h th e ti ps o n th e sc re en. The color key s
function introduce as below:
Record
Press key on the remote control to record the programmes
you wished.
Remind
You can pre ss key on the remote control to set remind the
programmes you wished.
Prev Day
Press key on the remote control to view programmes list of
the previous day.
Next Day
Press key on the remote control to view programmes list of
the next day.
TV GUIDE)
14
Page 15

Recording and Time-shift
Recording
What you need
You can rec or d a di gi ta l TV broadcast and watch it later.
To record a TV programme you need...
1. A connecte d US B Ha rd D rive for matted on this TV.
2. Digital TV c ha nn el s in st alled on this TV.
3. To receive channel information for the TV Guide on screen.
4. A reliable TV clock setting, If you reset the TV clock manually,
the recording may fail.
You can’t record when you are using Time-shift function.
In terms enforcement of copyright legislation, some DVB
providers can apply different restriction by means of DRM(
Digital Right Management) technology. In case of broadcasting
protected channels, re co rd in g, record validity or number of views
may be restricted.
Recording may be completely prohibited, in case of trying to
record a protected broadcasting or play back an e xp ired
recording, an error message can appear.
Record a programme
In DTV mode, press ( Record) key to begin recording the
progamme . The recording function need connect with a USB
Hard Drive for matt ed o n th e TV.
To record the programme you are watching right now, press (
Record) key on the remote control, then the recording will start
immediately. When the programme was recording , you can select
■ key to stop it.
Schedule a recordi ng
You can view and manage your recordings in the list of
recording. Next to the list of recordings, there is a s ep ar ate list
for schooled recordings and reminders.
Open or delete the list of recording
Select CHANNEL, press OK key to enter channel menu, select
Schedule List, Press OK key to look through the Channel
schedule list information or Recorded list information, press /
key to select schedule list or Recorded list. Press / key to
select the recordings, and press OK key to play or press key on
remote control to delete the selected recording file. You can
press EXIT key to quit the list.
quit time-shift function. When you leave pr og ram for a short time,
time-shift function can suspend and cache the playing program to
U disk. When you resume playing, the p ro gr am can continue to be
played.
Replay
Since the TV stores the broadcast yo u ar e wa tc hi ng, you ca n
mostly replay the broadcast for a few seconds.
When you pause the programme, you can press (play) key to
play normally.
Sources
Switch a device signal
In the list of connections-the Source menu-yo u ca n find the
devices connected to the TV. From this Source menu, you can
switch to a device .
Source menu
To open the sources menu, press SOURCE key o n th e remote
control. And then press / key to select the connected device,
press OK key to enter the signal source .
From standby
With the TV i n st an dby, you can switch on a connected device
with your TV remote control.
Play
To switch on bo th d is c pl ayer and TV from standby and star t
playing the disc or programme immediately, press (play ) key on
the remote control.
The device should be with an HDMI cable and both T V an d
device must have HDMI CEC switched on.
EasyLink
With EasyLink you can operate a connected device with the TV
remote control. EasyLink uses HDMI CEC to communicate with
the connected devices. Devices must support HDMI CEC and must
be connected an HDMI connection.
Time-shift
What you need
You can use Time-shift function and resume watching it a bi t
later.
Use Time-shift function you need...
1. A connected USB Hard Drive formatted on this TV.
2. Digital TV c ha nn el s in st al le d on this TV.
3. To receive channel information for the TV Guide on screen.
With the USB Hard Dr ive connected and form atted the TV
continuously stores the TV
Broadcast you are watching. When you switch to another
channel, the broadcast of the former channel is cleared. Also
when you switch the TV to standby the broadcast is cleared.
You can’t use Time-shift function when you are recording.
Use Time-shift for a programme
In DTV mode, press key on the remote control ,time-shift
option menu will show on the screen, and the progr am i s in
suspended status. press ■ key on the remote control to stop and
15
Page 16

Time
SETTING
Time settings
Sleep timer
With the sleep timer, you can set th e TV to switch to standby
automatically after a preset time.
To set the sleep timer…
1. Press MENU key on the remote control, then press /
key to select TIME on the screen, press OK key to enter the TIME
menu.
2. Press / key select Sleep Timer, then press / key to
adjust the value of standby time: Off, 15minute, 30minutes,
45minutes, 60minutes, 90minutes, 120 minutes, 240 minutes.
Disable TV sleep timer:
Select the Off on the screen, then close the TV sleep timer.
Time Zone
Press / key select Time Zone, then press / key to
adjust the time zone of diffe re nt c ou nt r y.
Auto Standby
Press / key select Auto Standby, then press / key to
adjust the time: Off, 3hour s, 4h ou rs, 5hours .
OSD Timer
Press / key select OSD Timer, then press / key to
adjust the menu display time ( 5 Seconds, 15Seconds, 30
Seconds).
Summer Time
Press / key select Summer Time, then press / key to
adjust the Summer Time: On, Off, Auto.
General Settings
Language
Select a language for the TV system.
TTX Language
Select the language for Text/Teletext.
Audio Language
Select the language for audio if the programme is available.
Subtitle Language
Select the subtitle language if the programme is available.
Hearing impaired
Select the Hearing impai re d on o r of f.
PVR file system
Manage the USB device for the recording programme.
Aspect ratio
Adjust aspect ratio as: Zoom1, Zoom2, Auto, 4:3, 16:9.
Blue screen
Turning on blue screen option ON will enable the TV screen to
turn blue when there are no signal input.
First time installation
When the TV was the first time installed, you can setup language,
country, environment, auto tuning.
LOCK
System Lock
Select tur n on/off loc k sy st em . Block progr am o ption can work
when it is on state (The default password: 0000).
Set Password
Set new password.
Channel Lock
Press key to lock the programme in the channel list. You need
input the right pass word to view the progr amme w he n it i s
locked.
Parental Guidance
Adjust the programme blocking level, this function help
Parents blo ck u ns ui ta ble channel for their child age.
Key Lock
Select the Key Lock on or off.
Reset
Resetting the TV will cause all the settings to return to factory
default status.
Software Update (USB)
Upgr ade softwa re w it h th e US B in te rf ac e.
HDMI CEC- Easylink
Setup the HDMI CEC options.
Help
Enter the oper at io n gu id e.
16
Page 17
PICTURE
MULTIMEDIA
Picture Setting
Press MENU key to show main menu, select Picture icon and
press OK key to enter.
Picture Mode: press / key to set the picture display mo de
such as: Per so na l, Vivid, Standard, Mild.
Contrast: press / key to adjust contr ast va lu e of p ic tu re
(0~100).
Brightness: press / key to adjust bri gh tn es s va lu e of
picture (0~100).
Colour: press / key to adjust colour value of picture
(0~100).
Tint: press / key to adjust Tint value of picture (it is
available o nly in NTSC system).
Sharpness: press / key to adjust sharpness val ue o f
picture (0~100).
Colour Temp: press / key to set colour temperature of
picture such as: Cool, Normal, Warm.
Noise Reduction: press / key to set noise reduction of
picture such as: Off, Low, Mid dl e, Hi gh , Default.
HDMI Mode: press / key to set the picture of HDMI
Mode.
SOUND
Sound Setting
Press MENU key to show main menu, select Sound icon and
press OK key to enter.
Sound Style: press / key to set the sound display mo de
such as: Standard, Music, Movie, Sports, Personal.
Tre b l e: press / key to adjust treble value of sound
(0~100).
Bass: press / key to adjust bass value of sound (0~100).
Balance: press / key to adjust balance value of sound (-
50~50).
Auto Volume Level: press / key to turn on or off the auto
volume level.
SPDIF Mode: press / key to select the SPDIF Mode of
sound, such as: PCM, Auto, Off.
AD Switch: press / key to turn on or off the AD Switch.
From a USB connection
Inser t a USB device , press SOURCE key or MENU key to
display menu, select MULTIMEDIA, and press OK key to enter
multimedia player.
Note: If want to exit MULTIMEDIA, please re-select the
source.
Photo
In the multimedia menu, press / key to select Photo, and
press OK key enter. You can press / / / key to select the
picture in the File folder, then press START(►) key o n th e
remote control to play the picture.
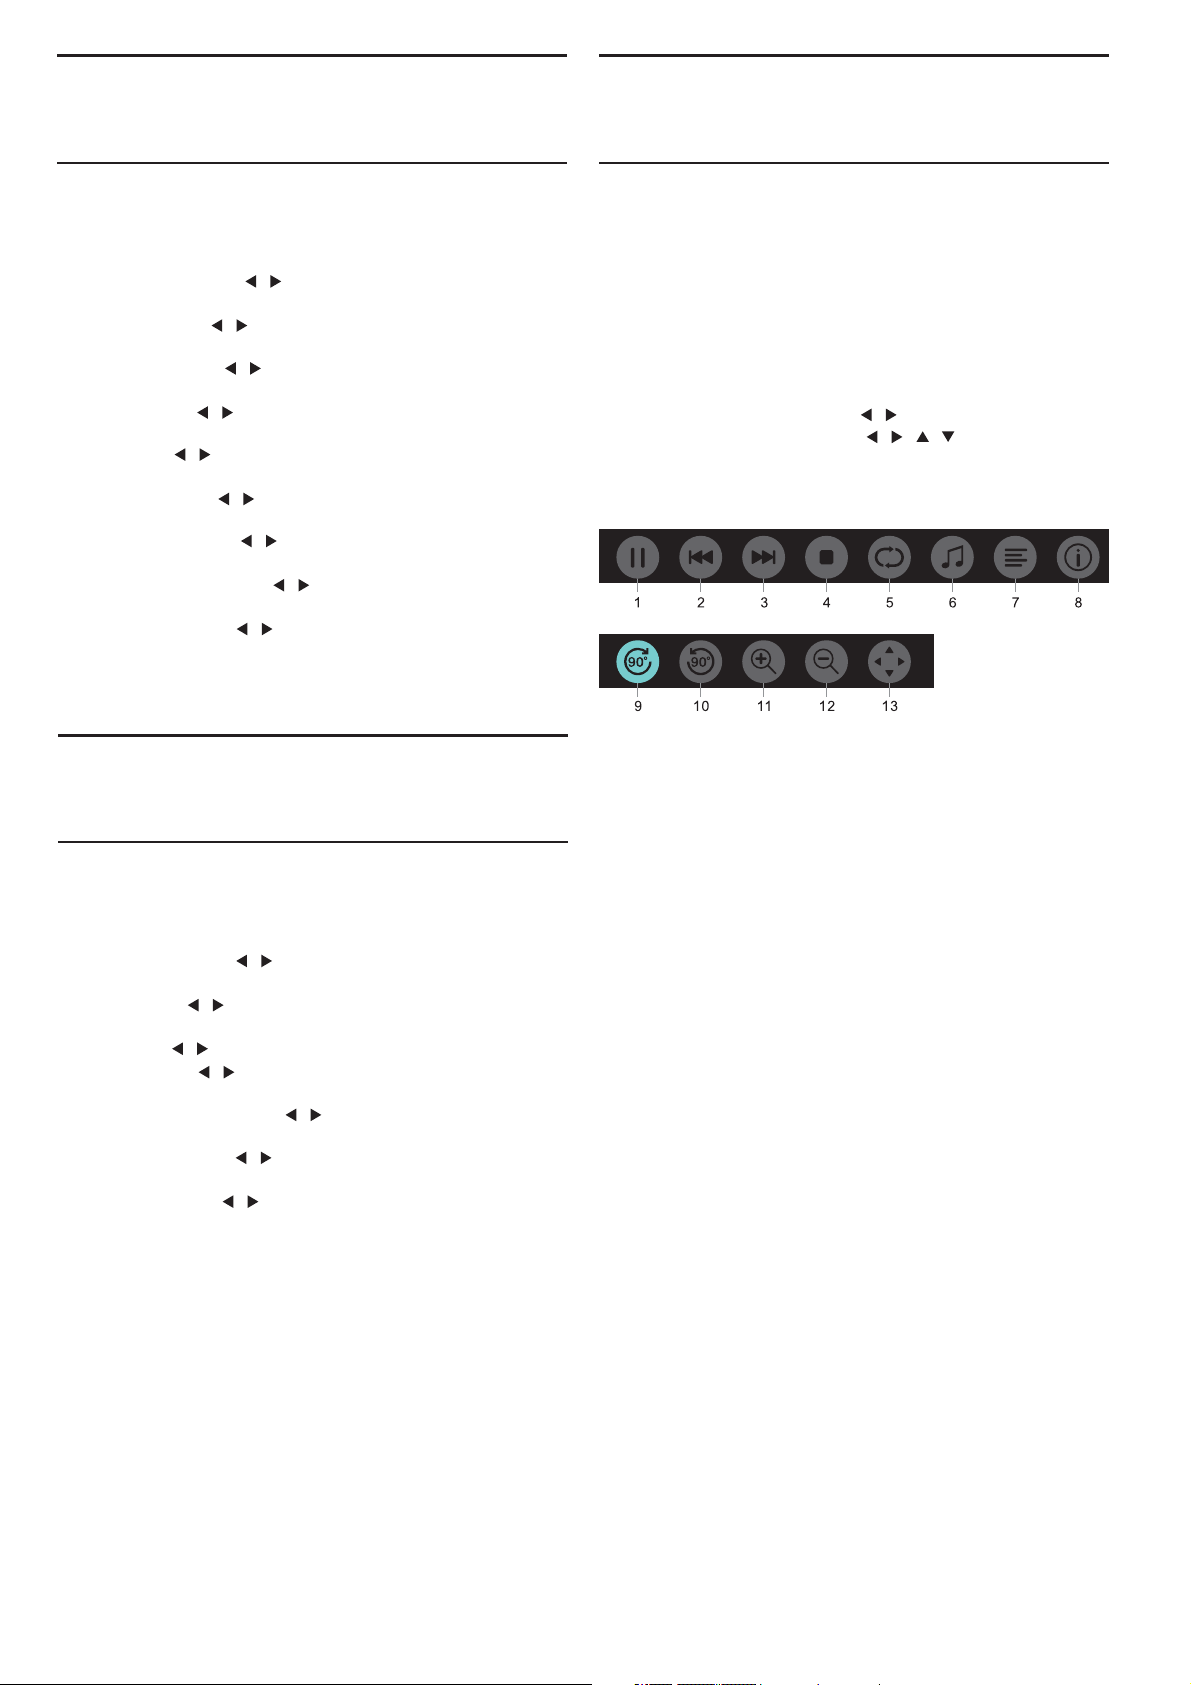
Picture player menu options:
1. Play / Pau se : Play / pause lantern slide .
2. Prev. : Play the previous picture.
3. Next: Play the next picture.
4. Stop: Stop playing picture and return back to previou s
menu.
5. Repeat: Repeat playing picture: repeat1, repeat all, repeat
none.
6. Music: Play background music.
7. Playlist: Show play photo list.
8. Info: Display information of photo.
9. Rotate: Clockwise rotation photo.
10.Rotate: Counter-clockwise rotation photo.
11.Zoom in: Enlarge the photo.
12.Zoom out: Reduce the photo.
13.Move vie w: If the picture big enough to surpasses the
screen, you may use this function to move the picture .
17
Page 18
Music
In the multimedia menu, p re ss / key to select Music, and
press OK key enter. You can select the music in the File folder, and
press START(►) key to play on the remote control.
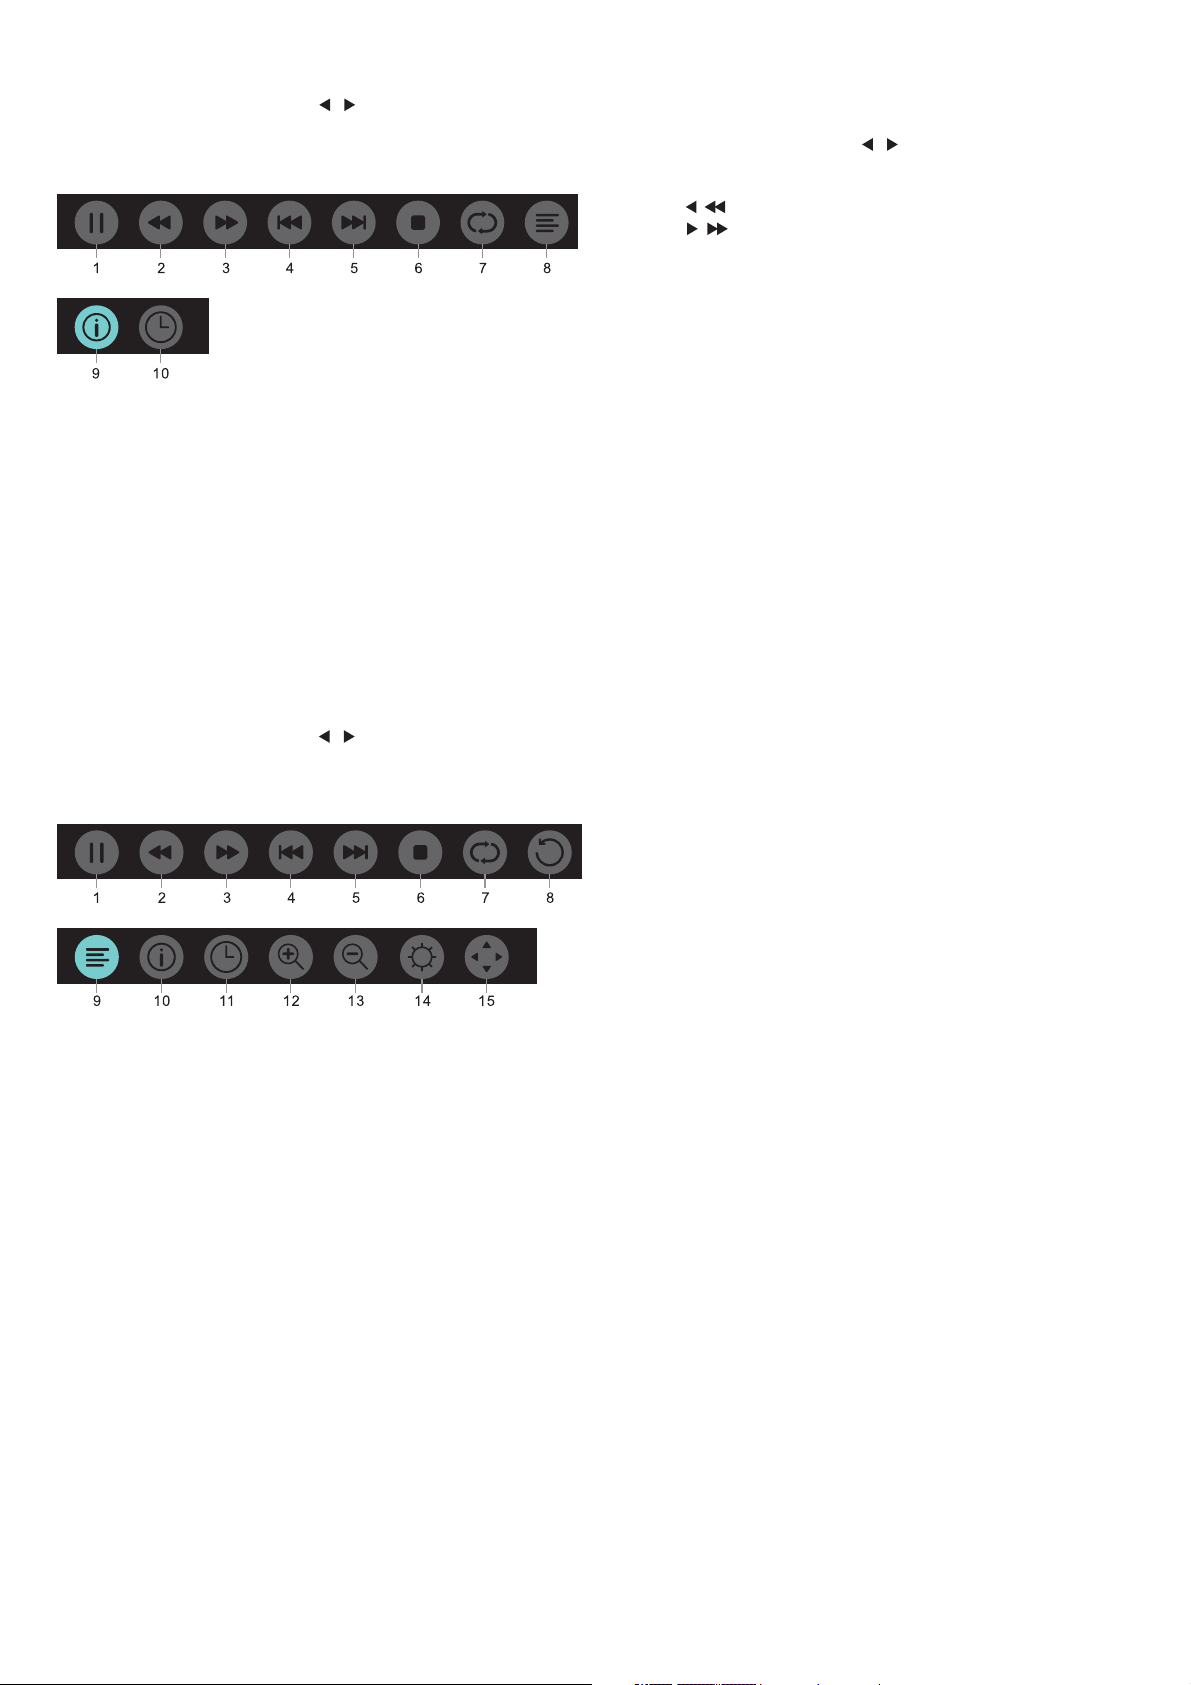
Music player menu options:
1. Play/Pause: Play / p au se music .
2. FB: Press this key to fast back of the music, press START(►)
key to play normally.
3. FF: Press this key to fast forward of the music, press
START(►) key to play norm al ly.
4. Prev.: Play the previous music.
5. Next: Play the next music .
6. Stop: Stop playing music and return back to previous menu.
7. Repeat: Repeat playing music: repeat1, repeat all, repeat none.
8. Playlist: Show play music list.
9. Info: Dis pl ay information of music.
10.Time picker: Select the time to play the music.
TEXT
The text menu options is same as Photo, please refer to photo
options.
In the multimedia menu, press / key to select TEXT, an d
press OK key enter. You can select the TEXT in the File folder, and
press START(►) key to play on the remote control.
1. Press / key t o select the last page.
2. Press / key to select the next page.
Movie
In the multimedia menu, press / key to select Movie, and
press OK key enter. You can select the movie in the File fol de r, and
press START(►) key to play on the remote control.
Video player menu options:
1. Play / Pau se : Play / pause the video.
2. FB: Press this key to fast back of the video, press START(►)
key to play normally.
3. FF: Press this key to fast forward of the video, press
START(►) key to play norm al ly.
4. Prev.: Play the previous video.
5. Next: Play the next video.
6. Stop: Stop playing video and return back to pre vi ou s me nu.
7. Repeat: Repeat playing video: repeat1, repeat all, repeat none.
8. SET A-B: Set A and B, the film will circulating play in the time
of A to B .
9. Playlist: Show play video list.
10.Info: Display information of video.
11.Time picker : Select the time to play the video.
12.Zoom in: Enlarge the photo.
13.Zoom out: Reduce the photo.
14.Aspect Ratio: Adjust the aspect ratio: zoom1, zoom2, auto,
4:3, 16:9.
15.Move view: If the picture big enough to surpasses the screen,
you may use t hi s fu nc ti on t o move the picture.
18
Page 19

Specification
information
Display resolutions
Computer Formats: Resolution-refresh rate:
HD FHD
720×400 70Hz 640×480 60Hz
640×480 60Hz 800×600 60Hz
800×600 60Hz 1024×768 60Hz
1024×768 60Hz 1360×768 60Hz
1360×768 60Hz 1920×1080 60Hz
Video Formats:Resolution-refresh rate:
480i -60Hz
480p -60Hz
576i -50Hz
576p -50Hz
720p -50Hz, 60Hz
1080i -50Hz, 60Hz
1080p -50Hz, 60Hz
Multimedia
Supported storage device: USB (only FAT or FAT 32 USB
storage devices are supported)
Compatible multimedia file formats:
Image: JPEG
Audio: Mp3
Video: MPEG 2 / MPEG4, H .2 64
Sound power
8W×2
Display resolution
32PHS4001 / 32PHT4001 / 32PHS4012 : 1366×768
42PFS4012 / 43PFS4001 / 43PFT4001 / 43PFS4012
/49PFS4001 / 49PFT4001 / 50PFS4012 : 1920×1080
Tuner/Reception/Transmission
Aerial input: 75 ohm coaxial (IEC75)
Supported Systems:
ATV: PAL, SECAM, NTSC
DTV: DVB-T/C/T2
Dimensions and weights
32PHS4001 / 32PHT4001
Without base
Dimension (W×H×D) : 732×430×76(mm)
Weight: 4.4Kg
With base
Dimension (W×H×D): 732×474×193(mm)
Weight: 4.5Kg
32PHS4012
Without base
Dimension (W×H×D) : 732×432×76(mm)
Weight: 4.0Kg
With base
Dimension (W×H×D): 732×492×183(mm)
Weight: 4.0Kg
42PFS4012
Without base
Dimension (W×H×D) : 947×553×78(mm)
Weight: 6.6Kg
With base
Dimension (W×H×D): 947×610×226(mm)
Weight: 6.7Kg
43PFS4001 / 43PFT4001
Without base
Dimension (W×H×D): 970×564×75(mm)
Weight: 8.3Kg
With base
Dimension (W×H×D): 970×614×219(mm)
Weight: 8.5Kg
43PFS4012
Without base
Dimension (W×H×D): 969×567×83(mm)
Weight: 7.4Kg
With base
Dimension (W×H×D): 969×625×226(mm)
Weight: 7.5Kg
49PFS4001 / 49PFT4001
Without base
Dimension (W×H×D): 1102×639×82(mm)
Weight: 9.6Kg
With base
Dimension (W×H×D): 1102×696×258(mm)
Weight: 10.0Kg
50PFS4012
Without base
Dimension (W×H×D): 1126×655×83(mm)
Weight: 10.1Kg
With base
Dimension (W×H×D): 1126×713×226(mm)
Weight: 10.3Kg
Remote Control
Batteries: 2×AAA
Power Supply
Main Power Supply: 100-240V~, 50/60Hz
Standby Energy Consumption: ≤0.5 W
Environment Temperature: 5-40 ℃
Power Consumption:
32PHS4001 / 32PHT4001: 55W
32PHS4012 : 65W
42PFS4012 / 43PFS4001 / 43PFT4001 / 43PFS4012 : 7 5 W
49PFS4001 / 49PFT4001: 110W
50PFS4012 : 108W
19
Page 20

Software
Software update
It might be necessary to update the TV software. You need a
computer and a USB memor y device to upload the software on
the TV. Use a USB memory device with 256MB free space. Make
sure that wr ite pr ot ec ti on i s sw it ch ed o ff .
1. Sta rt the update on TV.
To st ar t the software update....
Press MENU key, select SETTING and press OK key. Select
Software Update (USB), press OK key to star t update the
software.
Identify the TV.
Insert the USB memory into one of the USB connections of
the TV. An identification file is written on the USB memory
device.
Download the TV software.
Insert the USB memory into your computer.
On the USB memor y d ev ic e, select locate file and check it
carefully. View the sof tw ar e na me a s be low:
Model: Software name
32PHS4001 MSD3463_S_SN51_50.bin
32PHS4012 MSD3463_S.bin
32PHT4001 MSD3463_SN51_50.bin
42PFS4012 MSD3463_S_SN51_63.bin
43PFS4001 MSD3463_S_AS358_70.bin
43PFT4001 MSD3463_AS358_70.bin
49PFS4001 MSD3463_AS358_35.bin
49PFT4001 MSD3463_AS358_35.bin
50PFS4012 MSD3463_S_AS358_60.bin
After download these fi le s, and copy them ont o th e US B
memor y de vi ce . Do no t pl ac e th e file in a folder.
• Inser t the USB memor y device to the TV.
• Press MENU key to show Main menu, select SETTING and
press OK key to enter.
• Select Software Update (USB), press OK key and select YES,
the TV will upgrade software automatically.
• When the upgrade process is complete 100%, the TV will
automatically restar t the boot up .
Update the TV software
The update starts automatically. The TV itself off for about a
minutes and then back on again, please wait.
Notice:
• Do not use the remote control.
• Do not remove the USB memory device from the TV.
• Please keep the power stable duri ng t he upgrade software, if
it suddenly power o ff w il l damage for the TV.
Open source software
This television contains open source software. TP Vision
Europe B.V. hereby offers to deliver, upon request, a copy of the
complete corresponding source code for the copyrighted open
source software packages used in this product for which such
offer is requested by the respective licenses.
This offer is valid up to three yea rs after product purchase to
anyone in receipt of this information. To obtain the source code,
please write in English to this email address
[email protected].
General Public License (the GPL), or the GNU Lesser General
Public License (the LGPL), or an
Instructions to obtain source code for this software can be found
in the user manual.
PHILIPS MAKES NO WARRANTIES WHATSOEVER, EITHER
EXPRESS OR IMPLIED, INCLUDING ANY WARRANTIES OF
MERCHANTABILITY OR FITNESS FOR A PARTICULAR
PURPOSE, REGARDING THIS SOFTWARE. Philips offers no
support for this software. The preceding does not aff
warranties and statutory rights regarding any Philips product(s)
you purchased. It only applies to this source code made available
to you.
This television contains open source software. TP Vision
Europe B.V. hereby offers to deliver, upon request, a copy of the
complete corresponding source code fo
source software packages used in this product for which such offer
is requested by the respective licenses. This offer is valid up to
three years after product purchase to anyone in receipt of this
inform at io n. To obtain the source code, p le as e wr ite in English to...
Intellectual Proper ty Dept.
TP Vision Europe B.V.
Prins Bernhardplein 200
1097 JB Amsterdam
y other open source license.
ect your
r the copyrighted open
Troubleshooting and
support
General issues
The TV cannot be switched on:
• Disconnect the power cable form t he p ower outlet. Wait for
one minute before reconnecting it.
• Check that the power ca ble is securely connected.
The remote control is not working properly:
• Check that the remote batteries are correctly inserted
according to the “+/-” orientation.
• Replace the remote control batteries if they are flat or weak.
• Clean the remote control and TV sensor lens.
The TV menu is in the wrong language:
• Change the TV m enu to your preferred language .
When turning the TV on /off or to standby, you hear a c reaking
sound from the TV c hassis:
• No action is required. Th e cr ea king sound comes from the
normal expansion and contraction of the TV as it cools down and
warms up. T hi s do es n’ t im pact its perform an ce .
Channel issues
No digital channels found during the installation:
• See the technical specifications to make sure that your TV
suppor ts DV B- T or DVB-C in your countr y.
• Make sure that all cables are prope rly connected.
Previously installed channels do not appear in the channel list:
• Check that the correct channel list is selected.
Open source license statement
Acknowledgements and License Texts for any open source
software used in this Philips TV.
This is a document describing the distribution of the source
code used on the Philips TV, which fall either under the GNU
Picture issues
The TV is on, but t he re is no picture:
• Check that the antenna is proper ly c on ne ct ed t o th e TV.
• Check that the correct device is selected as the TV source.
There is sound but no picture :
• Check that the picture settings are correctly set.
20
Page 21

Poor TV reception from the antenna connection:
• Check that the antenna is proper ly c on ne ct ed t o th e TV.
• Loudspeakers, unearthed audio devices, neon lights, high
buildings and other large objects can influence reception quality. If
possible, you tr y to improve the reception quality by changing the
antenna direction or moving devices away from the TV.
• If the reception on one par ti cu la r ch an ne l is p oo r, please fine
tune this channel.
There is poor picture quality from connected devices:
• Check that the devices are connected properly.
• Check that the picture settings are correctly set.
The picture does not fit the screen; it is too big or too small:
• Tr y us in g a di fferent picture format.
The picture position is incorrect:
• Picture signals from some devices may not fit the screen
correctly. Please check the signal output of the device .
Sound issues
The pictures are showing but sound quality is poor:
• Check that cables are properly connected.
• Check that the volume is not set to 0.
• Check that the sound is not muted.
• Check that the sound settings are corr ec tly set.
The pictures are showing but sound comes from one speaker
only:
• Verify that sound balance is set to the centre .
Term of use, copyrights
and licenses
Term of use
2017© TP Vision Europe B.V. All rights reser ved. Specifications
are subject to change without notice . Trad em ar ks are the proper ty
of Koninklijke Philips N.V or their respective owners. TP Vision
Europe B.V. reser ves the right to change products at any time
without being obliged to adjust earlier supplies accordingly.
The material in this manual is believed adequate for the
intended use of the system. If t he p ro du ct , or its individual modules
or procedures, are used for purposes other than those specified
herein, confirmation of their validity and suitability must be
obtained. TP Vision Europe B.V. warrants that the material itself
does not infringe any United States patents. No fur ther warr anty is
expressed or implied.
TP Vision Europe B.V. cannot be held responsible neither for any
er ror s in the content of this document nor for any probl em s as a
result of the content in this document. Errors reported to Philips
will be adapted and published on the Philips support website as
soon as possible.
HDMI connection issues
There are p roblems with HDMI devices:
• Please note that HDCP (High-bandwidth Digital Content
Protection) suppor t c an d el ay the time taken for a TV t o di sp lay
content from a HDMI device .
• If the TV does not recognition the HDMI device and on
picture is displaye d, please try switching the signal source to
another device before switching it back again.
• If there are inter mi tt en t so un d di sr uptions, pl ea se c he ck t ha t
output settings from the HDMI device are correct.
Computer connection issues
The computer display on t he TV is not stable:
• Check that your PC uses the suppor ted resolution and
refresh rate.
• Set the TV picture format to display scale.
Contact us
If you cannot resolve your problem, please refer to the FAQs
for this model at www.philips.com/support.
If the problem remains unresolved, please contact your local
Philips Customer Service Center.
Copyrights and Licenses
Warning
Do not attempt to repair the TV yourself. This may cause
severe injure, ir reparabl e da ma ge to your TV or void your
warranty.
Note:
Please make a note of you r TV model and serial num be r be fore
you contact Philips Customer Ser vice Center. T he se numbers are
pr inted on the b ac k/ bo tt om o f th e TV and on the packaging.
21
Page 22
7
 Loading...