


LCD TV

Information for users in the UK
(Not applicable outside the UK)
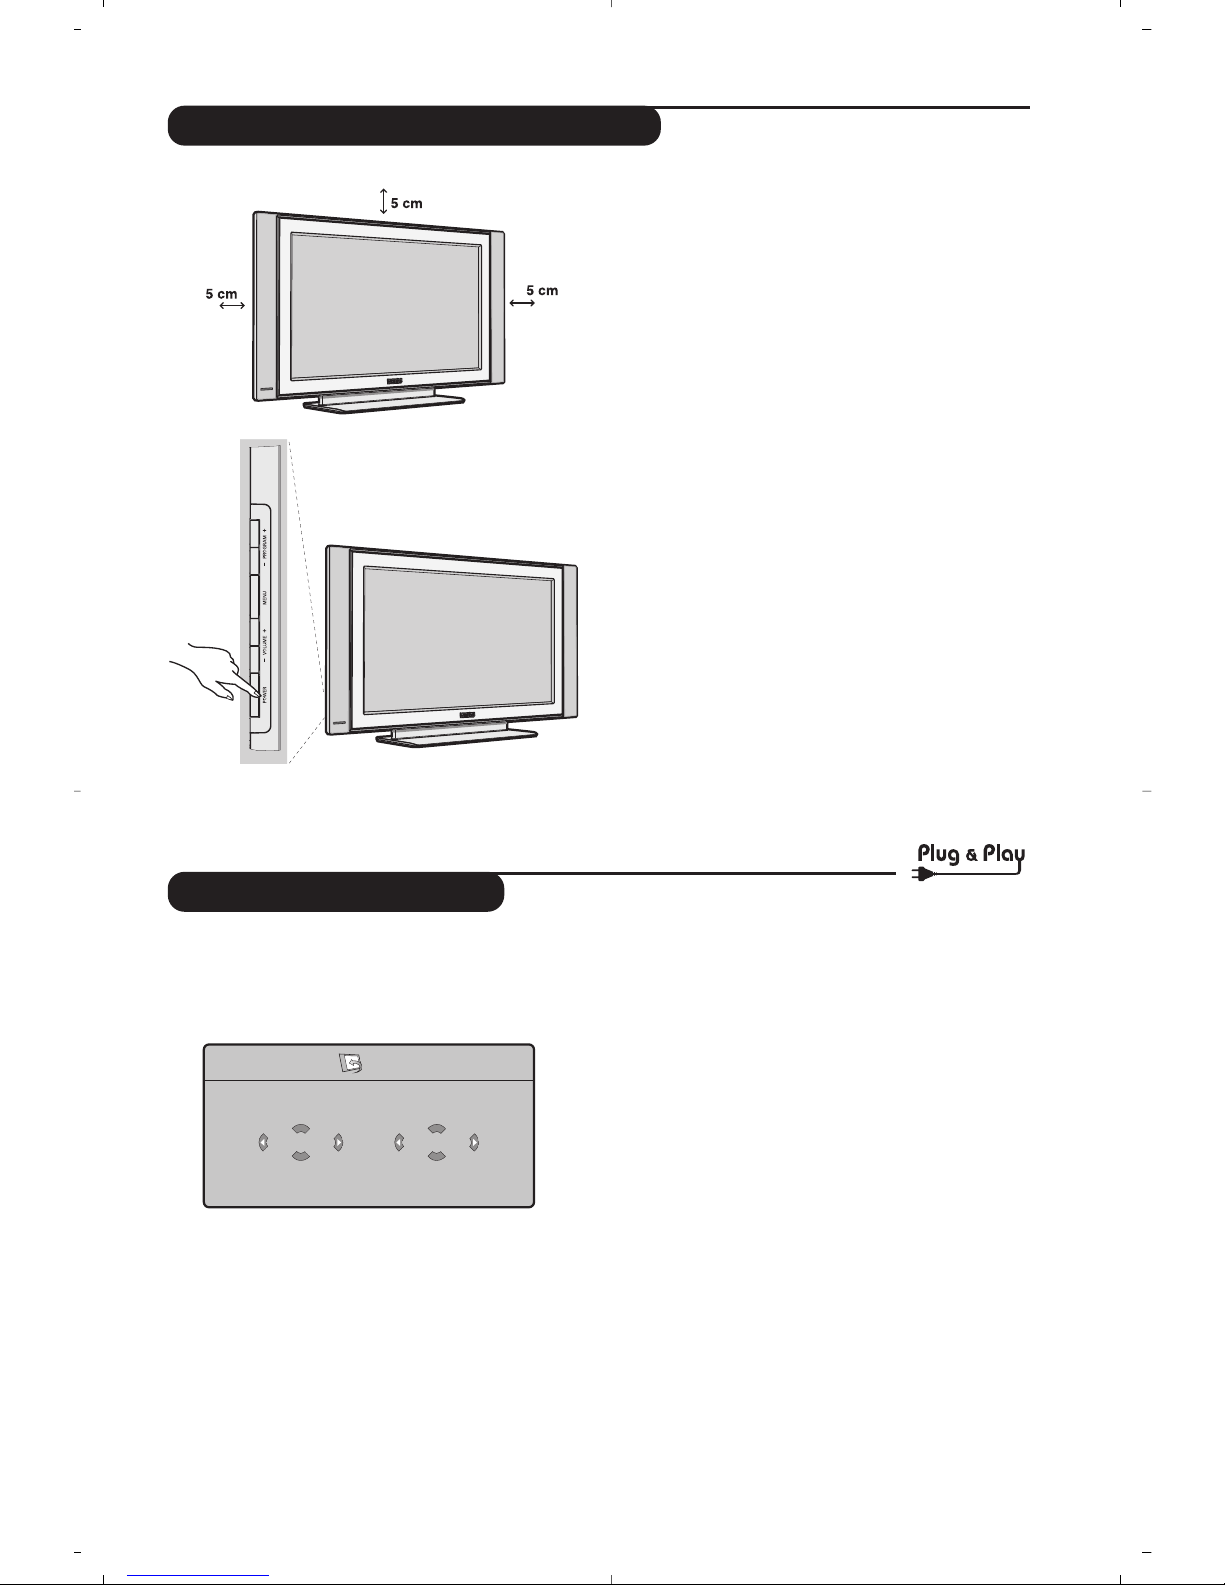
Positioning the TV
For the best results, choose a position where light does not fall directly on the screen, and at some
distance away from radiators or other sources of heat. Leave a space of at least 5 cm all around
the TV for ventilation, making sure that curtains, cupboards etc. cannot obstruct the air flow
through the ventilation apertures.
The TV is intended for use in a domestic environment only and should never be operated or
stored in excessively hot or humid atmospheres.
General Points
Please take note of the section 'Tips' at the end of this booklet.
Interference
The Department of Trade and Industry operates a Radio Interference Investigation Service to help
TV license holders improve reception of BBC and IBA programmes where they are being spoilt by
interference.
If your dealer cannot help, ask at a main Post Office for the booklet "How to improve Television
and Radio Reception".
Mains connection
Before connecting the TV to the mains, check that the mains supply voltage corresponds to the
voltage printed on the type plate on the rear panel of the TV. If the mains voltage is different, consult your dealer.
Important
Should it become necessary to replace the mains fuse, this must be replaced with a fuse of the
same value as indicated on the plug.
1. Remove fuse cover and fuse.
2. The replacement fuse must comply with BS 1362 and have the ASTA approval mark.
If the fuse is lost, make contact with your retailer in order to verify the correct type.
3. Refit the fuse cover.
In order to maintain conformity to the EMC directive, the mains plug on this product must not be
removed.
Connecting the aerial
The aerial should be connected to the socket marked x at the back of the set. An inferior aerial is
likely to result in a poor, perhaps unstable picture with ghost images and lack of contrast. Makeshift or set-top aerials are unlikely to give adequate results.
Your dealer will know from experience the most suitable type for your locality.
Should you wish to use the set in conjunction with other equipment, which connects to the aerial
socket such as TV games, or a video camera, it is recommended that you consult your dealer on
the best method of connection.
Stand (if provided)
Use only the stand provided with the set, making sure that the fixings are properly tightened.A diagram showing how to assemble the stand is packed with the stand. Never use a make-shift stand, or
legs fixed with woodscrews.

1
Introduction
Ta b le of Contents
Thank you for purchasing this television set.
This handbook has been designed to help you install and operate your TV set.
We would strongly recommend that you read it thoroughly.
We hope our technology meets entirely with your satisfaction.
Installation
Presentation of the LCD Television . . . . . . . . . . . . . . . . . . . . . . . . . . . . . . . . . . . . .2
The keys on the TV set . . . . . . . . . . . . . . . . . . . . . . . . . . . . . . . . . . . . . . . . . . . . . .2
Remote control keys . . . . . . . . . . . . . . . . . . . . . . . . . . . . . . . . . . . . . . . . . . . . . . .3
Video recorder or DVD keys . . . . . . . . . . . . . . . . . . . . . . . . . . . . . . . . . . . . . . . . .4
Installing your television set . . . . . . . . . . . . . . . . . . . . . . . . . . . . . . . . . . . . . . . . . .5
Quick installation . . . . . . . . . . . . . . . . . . . . . . . . . . . . . . . . . . . . . . . . . . . . . . . . . .5
Program sort . . . . . . . . . . . . . . . . . . . . . . . . . . . . . . . . . . . . . . . . . . . . . . . . . . . . . .6
Manual store . . . . . . . . . . . . . . . . . . . . . . . . . . . . . . . . . . . . . . . . . . . . . . . . . . . . . .6
Other settings in the Install menu . . . . . . . . . . . . . . . . . . . . . . . . . . . . . . . . . . . . .6
Operation
Picture settings . . . . . . . . . . . . . . . . . . . . . . . . . . . . . . . . . . . . . . . . . . . . . . . . . . . .7
Sound adjustments . . . . . . . . . . . . . . . . . . . . . . . . . . . . . . . . . . . . . . . . . . . . . . . . .7
Feature settings . . . . . . . . . . . . . . . . . . . . . . . . . . . . . . . . . . . . . . . . . . . . . . . . . . . .7
Screen Formats . . . . . . . . . . . . . . . . . . . . . . . . . . . . . . . . . . . . . . . . . . . . . . . . . . . .8
Teletext . . . . . . . . . . . . . . . . . . . . . . . . . . . . . . . . . . . . . . . . . . . . . . . . . . . . . . . . . .9
Using in PC monitor mode . . . . . . . . . . . . . . . . . . . . . . . . . . . . . . . . . . . . . . . . . .10
Using in HD (High Definition) Mode . . . . . . . . . . . . . . . . . . . . . . . . . . . . . . . . . .11
Peripherals
Video recorder . . . . . . . . . . . . . . . . . . . . . . . . . . . . . . . . . . . . . . . . . . . . . . . . . . .12
Other equipment . . . . . . . . . . . . . . . . . . . . . . . . . . . . . . . . . . . . . . . . . . . . . . . . .13
Side connections . . . . . . . . . . . . . . . . . . . . . . . . . . . . . . . . . . . . . . . . . . . . . . . . . .13
Computer . . . . . . . . . . . . . . . . . . . . . . . . . . . . . . . . . . . . . . . . . . . . . . . . . . . . . . .13
Practical information
Tips . . . . . . . . . . . . . . . . . . . . . . . . . . . . . . . . . . . . . . . . . . . . . . . . . . . . . . . . . . . .14
Glossary . . . . . . . . . . . . . . . . . . . . . . . . . . . . . . . . . . . . . . . . . . . . . . . . . . . . . . . .14
°
Recycling
The materials used in your set are either reusable or can be recycled.
To minimise environmental waste, specialist companies collect used appliances
and dismantle them after retrieving any materials that can be used again (ask
your dealer for further details).
FR
NL
DE
IT
DK
NO
SU
SF
RU
ES
PT
GR
TR
HU
PL
CZ
SK
GB

2
Presentation of the LCD Television
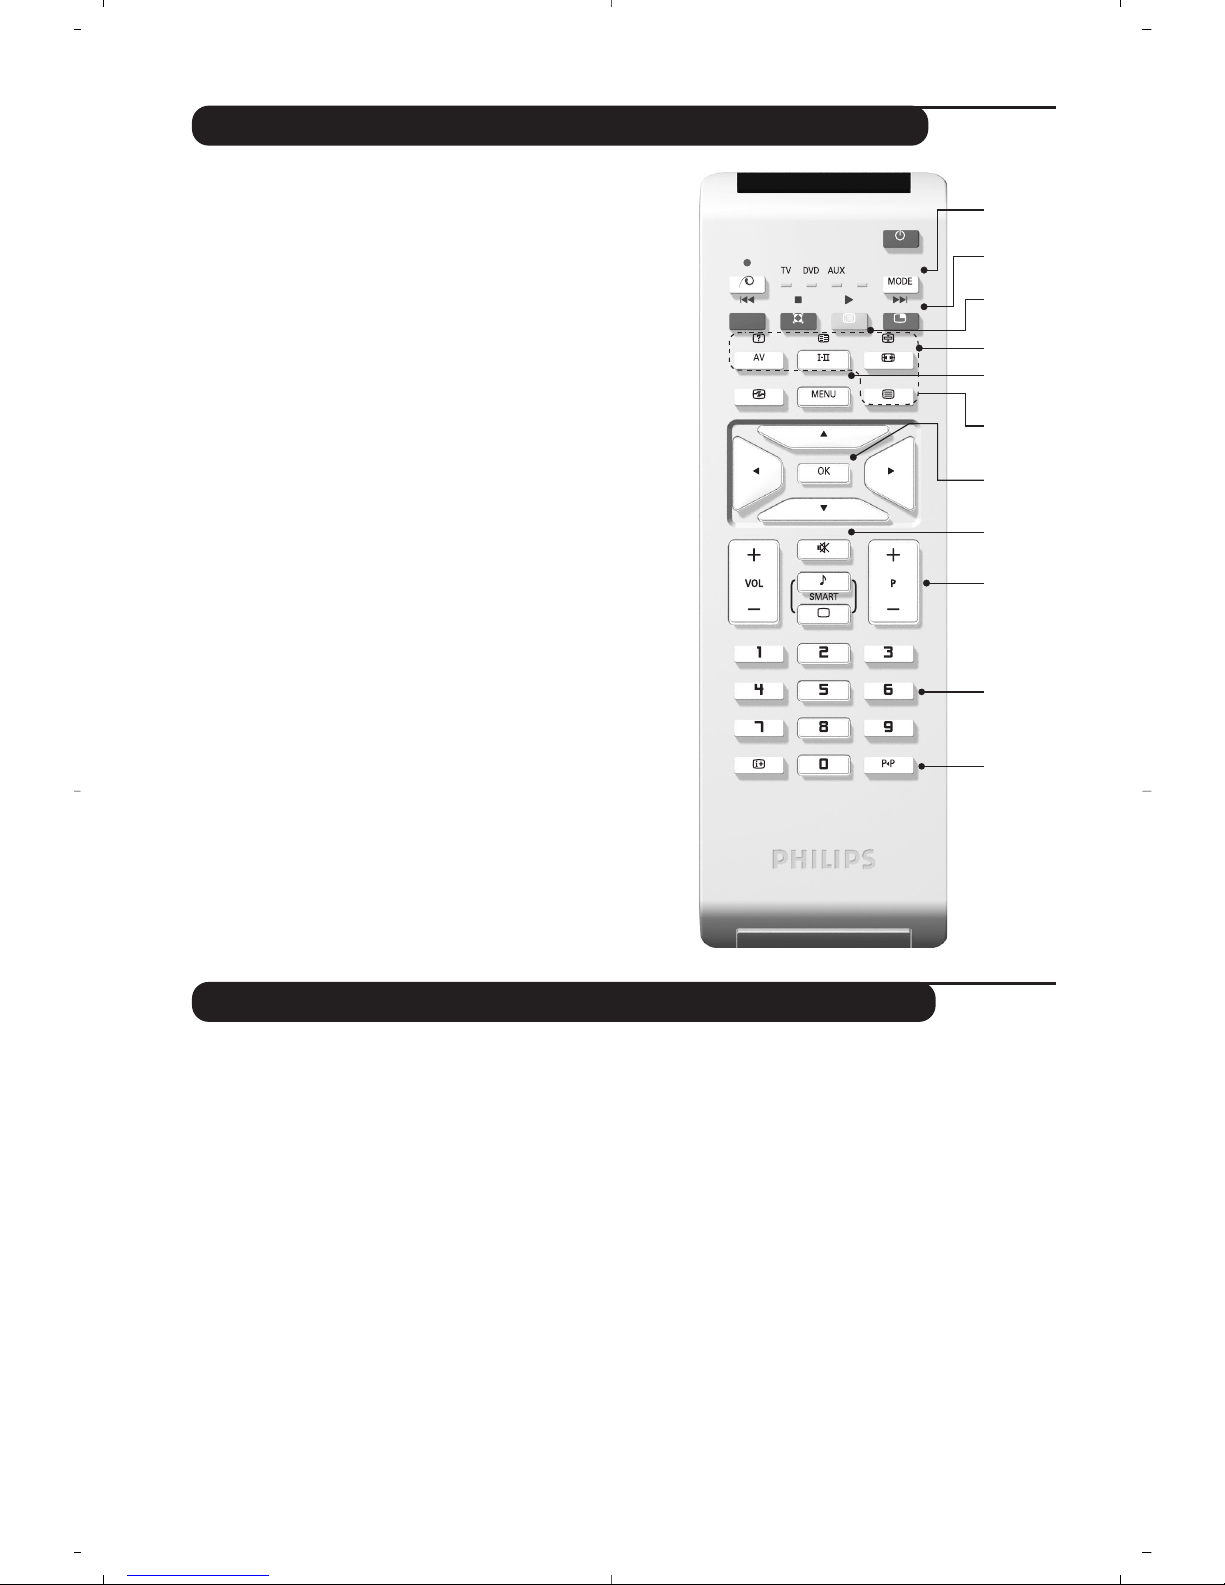
Remote control
&
Television keys:
•
POWER: to switch the TV on or off.
•
VOLUME -/+: to adjust sound level.
•
MENU: to access or close menus.
The PROGRAM -/+ keys can be used to select
an adjustment and the VOLUME -/+ keys to
make that adjustment.
•
PROGRAM -/+ (- P +): to select programmes.
Rear of set :
The main connections are made at the bottom
of the television.
For more details on connections see page 12.
é Power socket
“ DVI and audio input for connecting a HD
(high definition) equipment or computer with
DVI output.
‘ EXT1 and EXT2 sockets
( TV aerial socket
§ Side connections
Pull out the plastic insulation sheet from the
battery,this will activate the remote control.
The battery supplied with the appliance does
not contain mercury or nickel cadmium so as to
protect the environment. Please do not discard
your used batteries, but use the recycling
methods available (consult your distributor).
CR 2025

3
Remote Control Keys for LCD TV Functions
1) . (STANDBY)
To set the TV to standby mode.To switch the TV set on
again, press P –/+, 0 to 9 or AV keys.
2)
x Pixel + (depending on version)
Switches the Pixel + demonstration mode on or off.
3)
· ¢ Ê Æ ∫
Video recorder (page 14)
4)
Q Surround Sound
To activate / deactivate the surround sound effect. In
stereo,this gives the impression that the speakers are
further apart. For models equipped with Virtual Dolby
Surround*, you can experience Dolby Surround Pro
Logic sound effects.
5) AV
To display Source List to select TV or peripheral
equipment connected to EXT1, EXT2/S-VHS2,
AV/S-VHS3, PC or HD (p. 12).
6)
h Active control
Optimizes the picture quality depending on the quality
of the incoming signal and the ambient light conditions.
7) MENU
To call up or exit the TV menus.
8) Cursor (
<>≤≥)
These 4 keys are used to move around the menus.
9) Volume
To adjust the sound level.
10)
ª m Smart picture and sound
Used to access a series of predefined picture and sound
settings.
The personal position relates to settings selected from the
menus.
11)
Ë Screen information
To display / remove the programme number, the time,
the sound mode and the time remaining on the timer.
Hold down for 5 seconds to permanently display the
programme number on the screen.
* Manufactured under license from Dolby Laboratories.“Dolby”
and the double-D symbols are trademarks of Dolby
Laboratories.
1)
2)
3)
4)
5)
6)
7)
8)
9)
10)
11)
4
Remote Control Keys for LCD TV Functions
12) Mode
Press this key to switch between TV, DVD or AUX.
13)
œ PIP on/off (p. 10)
14)
ı List of programmes
To display / clear the list of programmes.Use the keys
<> to select a programme and the key ≥ to
display it.
15)
∏ Screen Format (p. 8)
16)
ù Sound mode
Used to force programmes in Stereo and Nicam Stereo
to Mono or,for bilingual programmes, to choose
between Dual I or Dual II.
The Mono indication is red when in forced position.
17)
Ÿ Å Ó ¤Teletext (p. 9)
18) Not applicable for TV mode.
19)
[ Mute
To mute or restore the sound.
20) P -/+ Selecting TV programmes
To move up or down a programme.
The number and the
sound
mode are displayed for a few seconds.
For some TV programmes the title of the programme
appears at the bottom of the screen.
21) 0/9 Numerical keys
For direct access to programmes.For a 2 digit
programme number, the 2
nd
digit must be entered
before the dash disappears.
22)
Á Previous programme
To access the previously viewed programme.
The remote control lets you control the main functions of the VCR or DVD.
Press the
MODE key to select the required mode : DVD or AUX (video recorder).The remote control
indicator lights up to display the selected mode. It switches off automatically after 20 seconds if left idle.
The remote control automatically returns to TV mode.
The following keys are operational, depending on the equipment :
. standby,
l¢ fast rewind,
∫l fast forward,
· recording,
∆ pause,
Ê stop,
Æ play,
MENU menu,
<>≤≥ navigation and adjustments,
OK validation,
0/9 digit keys,
P -/+ programme selection,
ù audio selection,
Ë OSD menu,
Á DVD :T-C function / VCR : index
function.
The remote control is compatible with all video
recorders using the RC5 standard and all DVDs
using the RC6 standard.
(12
(13
(14
(15
(16
(17
(18
(19
(20
(21
(22
Video recorder or DVD keys (mode selector)
5
Quick installation
When you turn on the TV set for the first time,
a menu is displayed on screen.This menu
prompts you to select the country and language
for the menus:
If the menu is not displayed, press the
MENU key
to display the menu.
& Use the
<> keys on the remote control to
select your country and validate with
≥.
If your country does not appear in the list, select
choice “. . .”
é Next select your language using the
<> keys
and validate with
≥.
“ The search starts automatically.All the available
TV programmes and radio stations will be
stored. This operation takes a few minutes.The
display shows the progress of the search and
the number of programs found. At the end of
the search, the menu disappears.
To exit or interrupt the search, press MENU. If no
programme is found, consult the possible solutions p.14.
‘ If the transmitter or cable network sends the
automatic sort signal, the programs will be
numbered correctly. In this case, the installation
is complete.
( If this is not the case, you need to use the Sort
menu to number the programs correctly.
Some transmitters or cable networks broadcast their
own sort parameters (region, language, etc.). In this
case, indicate your choice using the
<> keys and
validate with
≥.
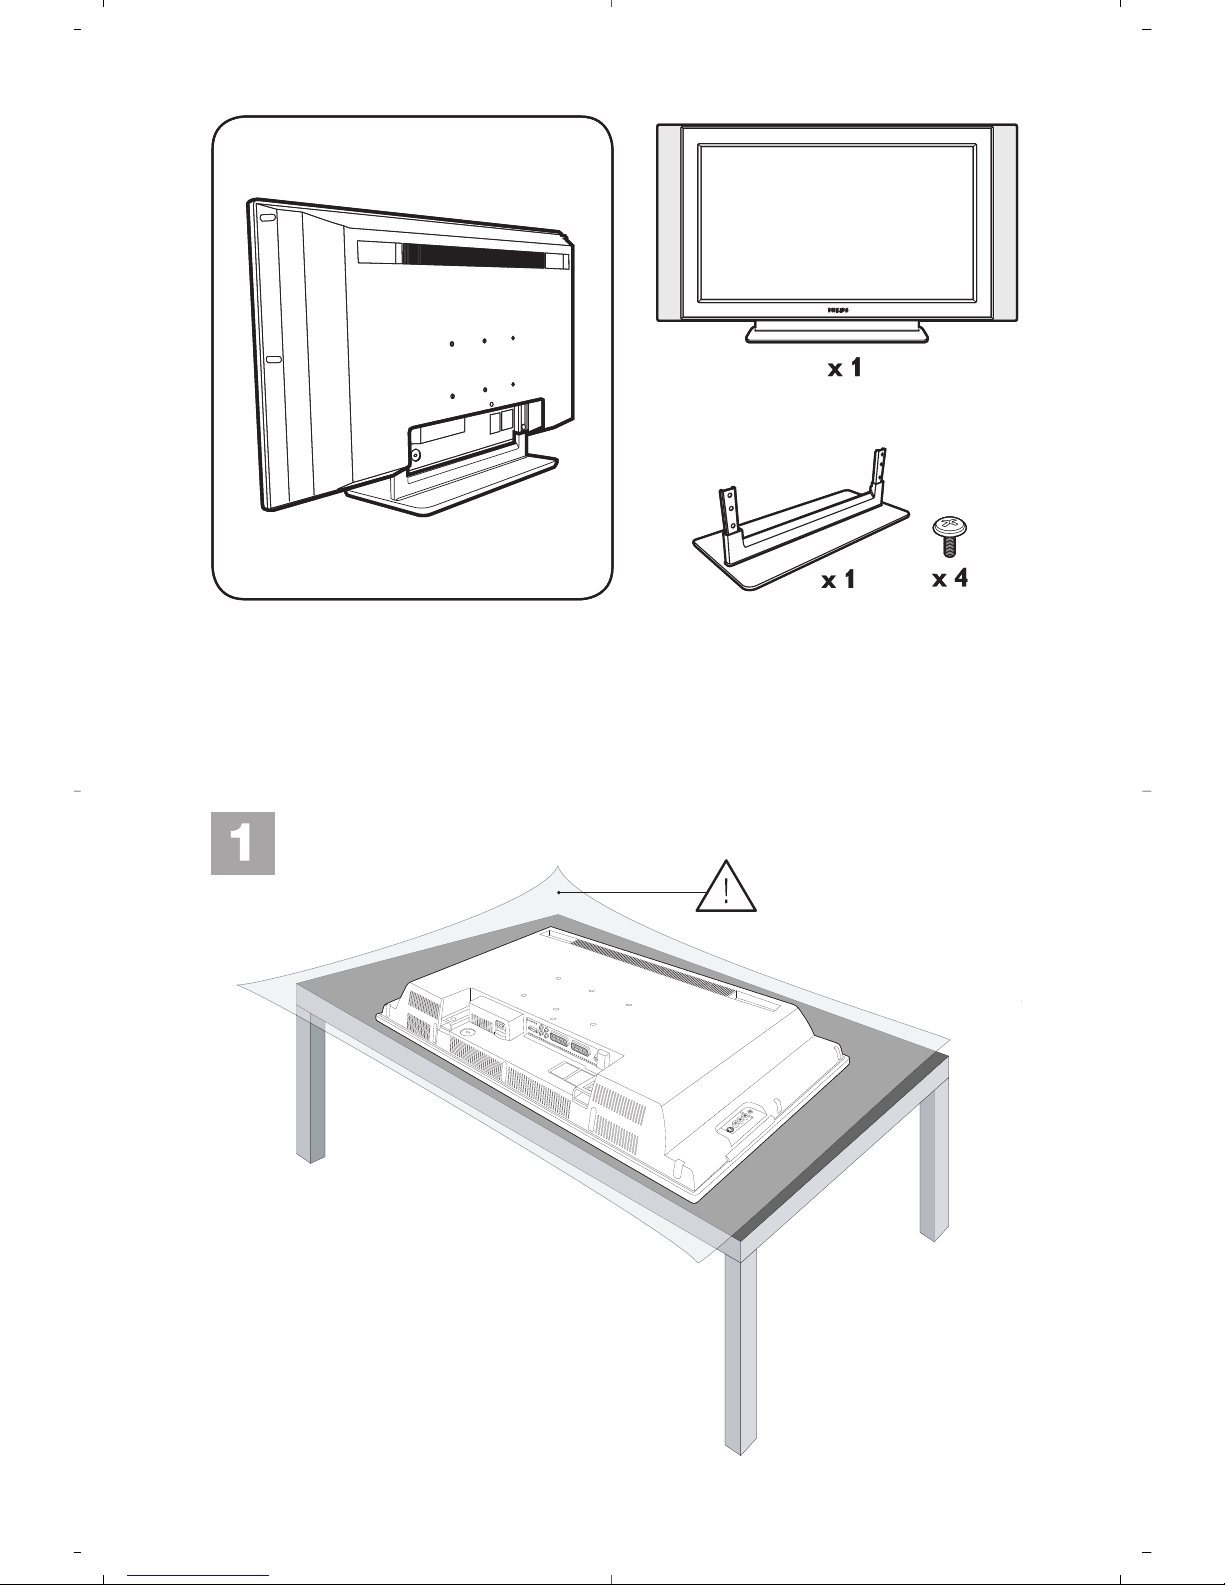
& Positioning the television set
Place your TV on a solid stable surface. To avoid
danger do not expose the TV to water, or a heat
source (e.g. lamp, candle, radiator). Do not
obstruct the ventilation grid at the rear.
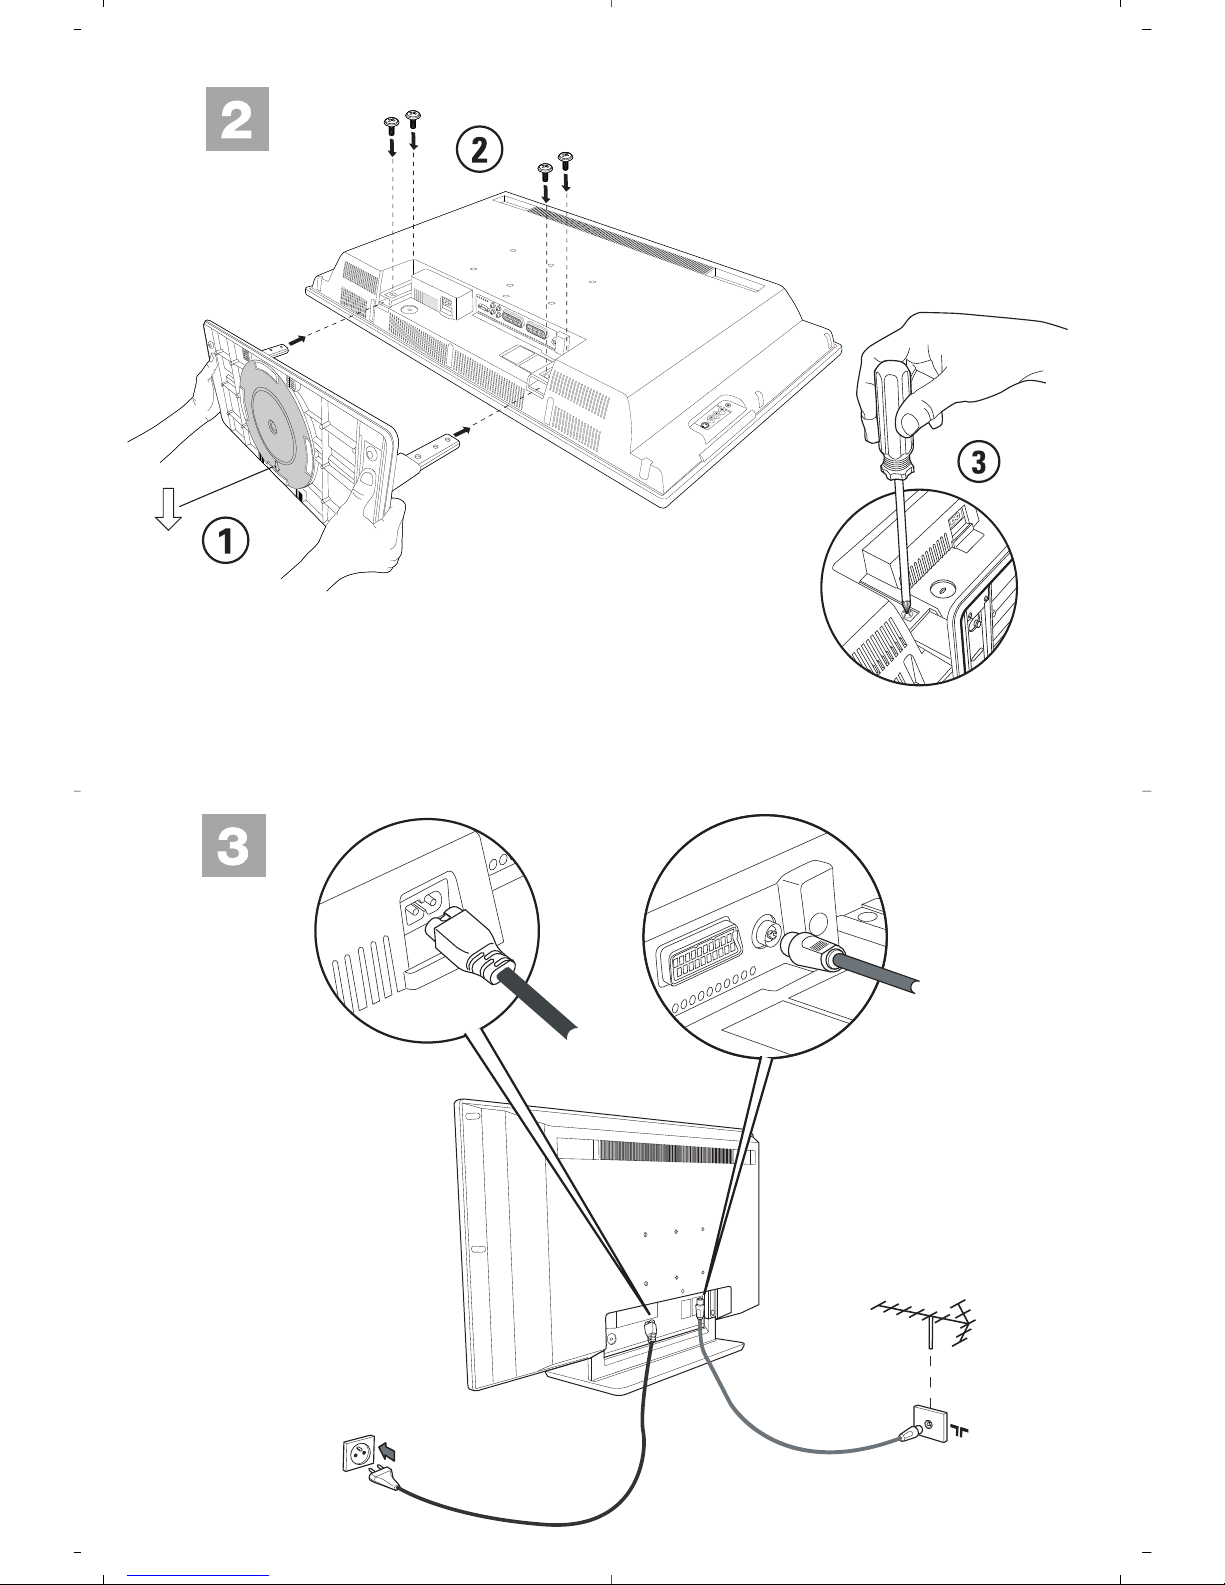
é
Connecting the aerials
• Use the aerial connection lead supplied and
connect the
: socket situated at the bottom
of the TV to your aerial socket.
• Connect the power lead to the television and the
mains plug into the wall socket (220-240 V/50 Hz).
For connecting other appliances see page p.12.
“
Switching on
To switch on the set, press the POWER key. A
green indicator comes on and the screen lights
up. Go straight to the Quick Installation chapter.
If the TV remains in standby mode(red indicator),
press the
P -/+ key on the remote control.
The indicator will flash when you use the remote control.
Installing your television set
Plug’n’Play
Country
GB
Language
English
6
Manual store
Other settings in the Install menu
This menu is used to store the programmes
one at a time.
& Press the
MENU key.
é With the cursor, select the Install menu then
Manual store:
“ System: select
Europe (automatic detection*)
or
Western Europe (BG standard),Eastern
Europe (DK standard),United Kingdom
(I standard) or France (LL’ standard).
* Except for France (LL’ standard), you must select
choice France.
‘ Search: press
≥.The search starts. Once a
programme is found, the scanning stops and its
name is displayed (when available). Go to the
next step. If you know the frequency of the
required programme,this can be entered
directly using the
0 to 9 keys.
If no picture is found, consult the possible solutions (p.14).
( Program No.: enter the required number
with the
≤≥ or 0 to 9 keys.
§ Fine Tune: if the reception is not satisfactory,
adjust using the ≤≥ keys.
è Store: press
≥.The program is stored.
! Repeat steps ‘ to è for each programme to
store.
ç To quit the menus, press Ë.
& Press the MENU key and select the Install
menu:
é Language: to change the display language for
the menus.
“ Country: to select your country (GB for
Great Britain).
This setting is used for the search, automatic
programme sort and teletext display. If your country
does not appear in the list, select “. . .”
‘ Auto Store: to start automatic search for all
programmes available in your region. If the
transmitter or cable network sends the
automatic sort signal, the programmes will be
numbered correctly. If this is not the case, you
need to use the Sort menu to renumber the
programmes.
Some transmitters or cable networks broadcast
their own sort parameters (region, language, etc.). In
this case, indicate your choice using the
<> keys
and validate with ≥.To quit or interrupt the search,
press MENU. If no picture is found, consult the
possible solutions (p. 14).
( Name:
If required,you can give a name to the
programmes and external connectors. Use the
≤≥ keys to move around the name display area
(5 characters) and the
<> keys to select the
characters.When the name has been entered,
use the
≤ key to exit.The name is stored.
Note: on installation, the programs are named
automatically when an identification signal is sent.
§ To quit the menus, press
Ë.
TV Menu
Picture
Sound
Features
Install
Manual Store
System
Search
Program No.
Fine Tune
Store
Europe
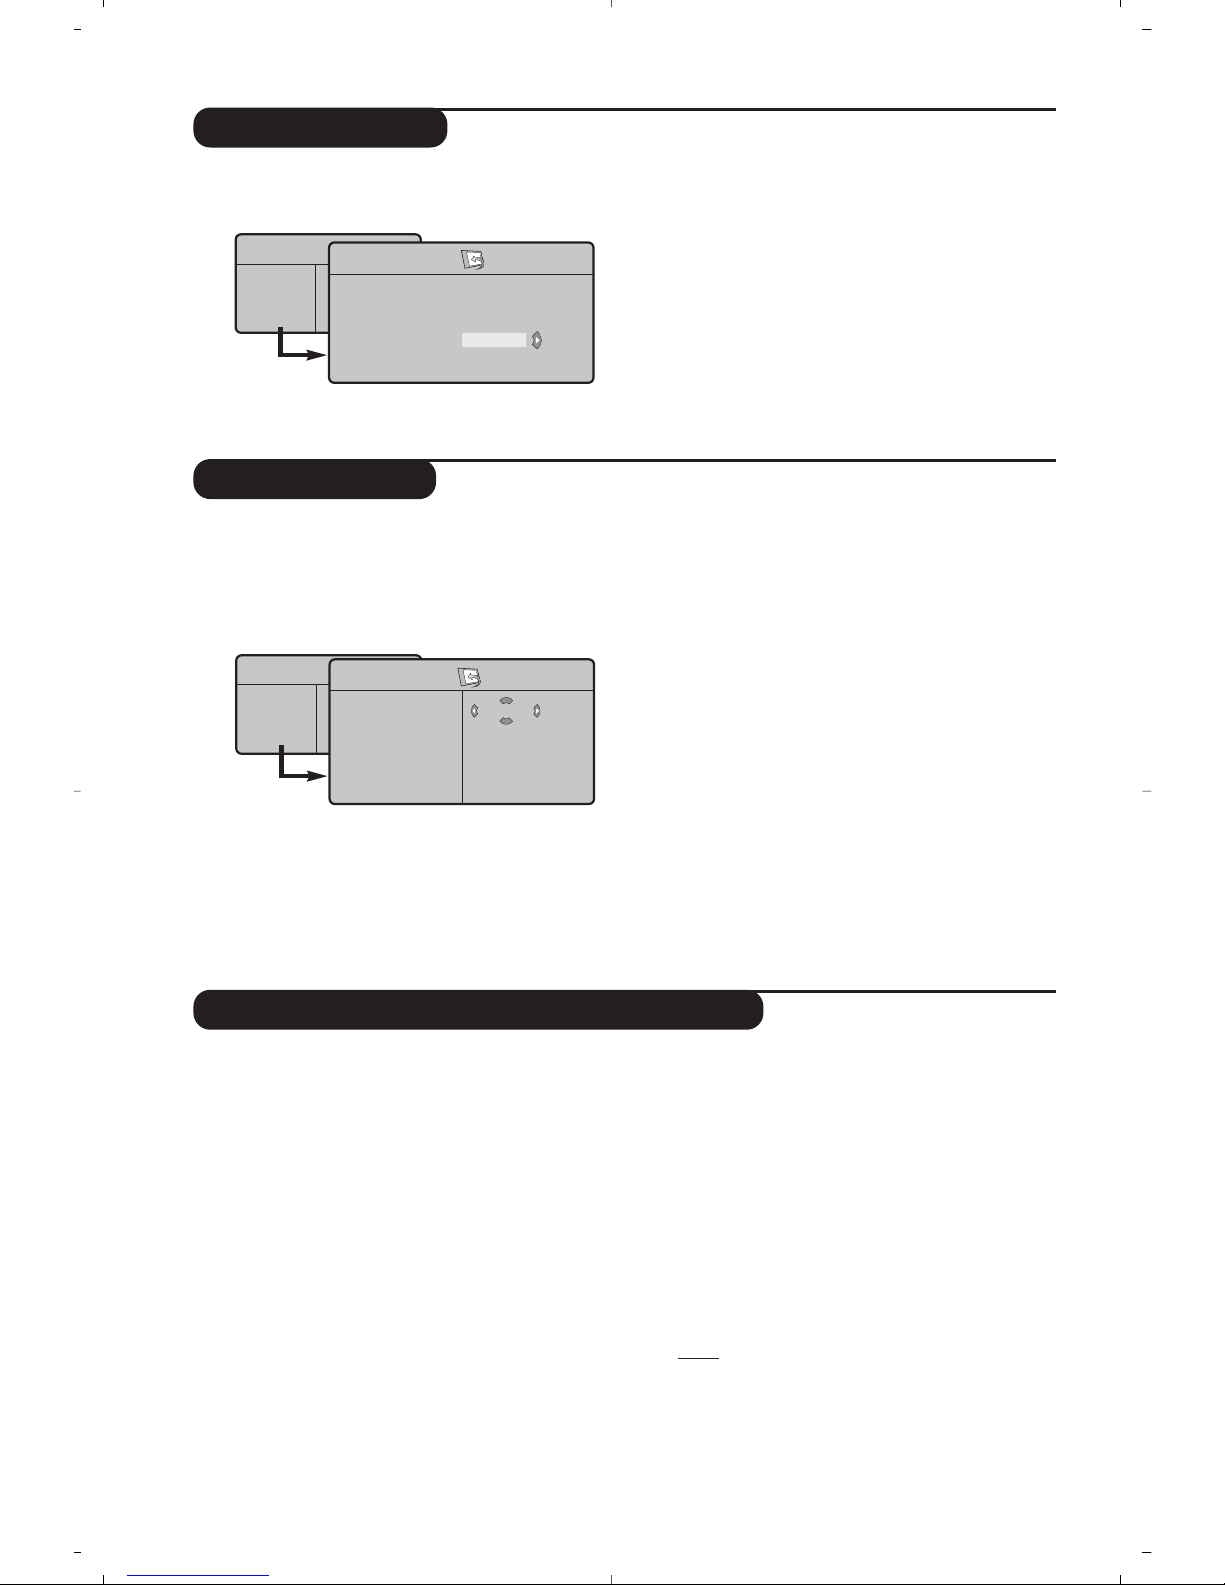
Program sort
& Press the MENU key.The TV Menu is
displayed on the screen.
é With the cursor, select the Install menu
followed by the Sort menu.
“ Select the programme you want to move using
the
<> keys and press ≥.
‘ Then use the
<> keys to select the new
number and validate with
≤.
( Repeat steps “ and ‘ for each program you
wish to renumber.
§ To quit the menus, press
Ë.
TV Menu
Picture
Sound
Features
Install
Install
Language Æ •
Country Æ •
Auto Store Æ •
Manual Store Æ •
Sort Æ •
Name Æ •
0
1
2
3
4
5
7
Picture settings
Sound adjustments
& Press MENU then ≥.The Picture menu is
displayed:
é Use the
<> keys to select a setting and the
≤≥ keys to adjust.
“ Once the adjustments have been made, select
Store and press ≥ to store them. Press Ë
to exit.
Description of the adjustments:
• Brightness: this changes picture brilliance.
• Colour: this changes the intensity of the colour.
• Contrast: this changes the difference
between the light and dark tones.
•
Sharpness: this changes the picture definition.
• Colour Temp.: this changes the colour
rendering:
Cold (bluer), Normal (balanced)
or
Warm (redder).
• Store: to store the picture adjustments and
settings.
& Press MENU, select Sound (>) and press ≥.
The
Sound menu is displayed:
é Use the
<> keys to select a setting and the
≤≥ keys to adjust.
“ Once the adjustments have been made, select
Store and press
≥ to store these changes.
‘ To quit the menus, press
Ë.
Description of the settings:
• Equalizer:to adjust the sound tone (from
bass: 120 Hz to treble: 10 kHz).
• Balance: this balances the sound on the left
and right speakers.
• Delta Volume: this is used to compensate
any volume discrepancies between the
different programs or EXT sockets.This
setting is available for programs 0 to 40 and
the EXT sockets.
• AVL (Automatic Volume Leveller): this is
used to limit increases in sound, especially on
program change or advertising slots.
• Dolby Virtual:To activate / deactivate the
surround sound effect.You can also access
these settings with key Q.
• Store: this is used to store the sound settings.
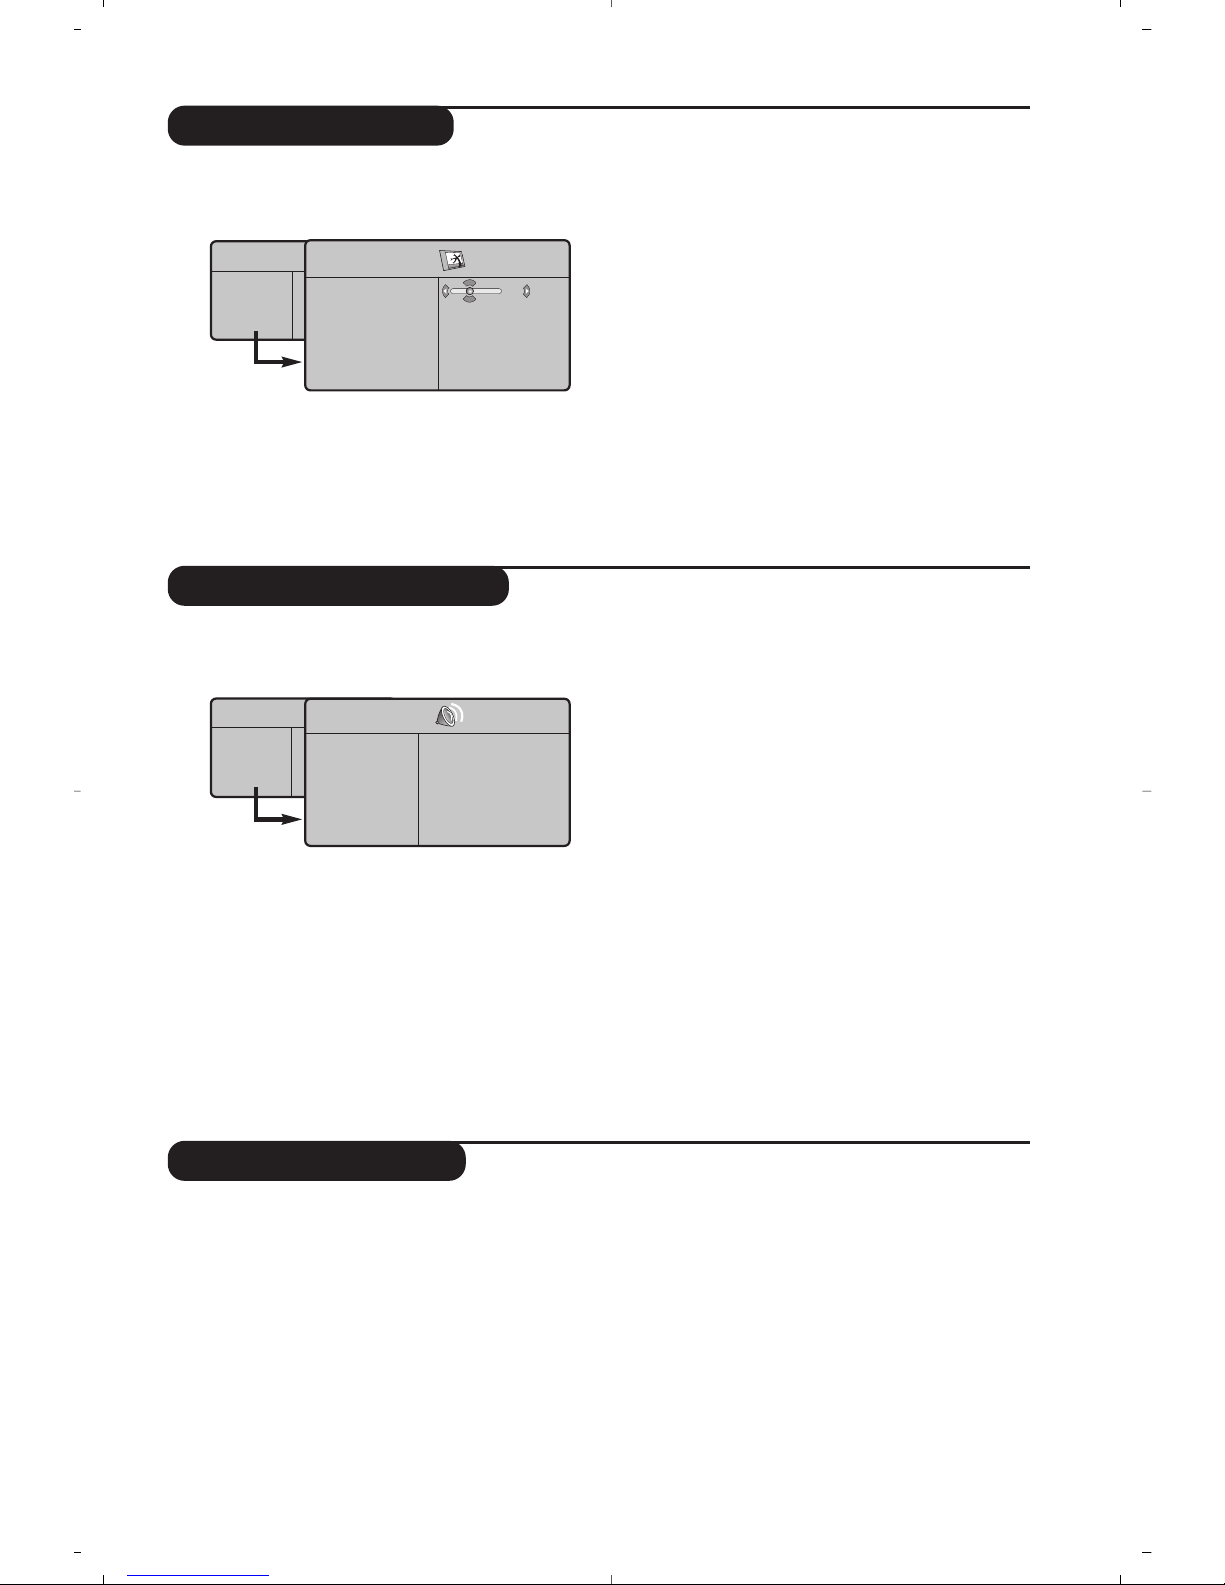
Feature settings
& Press MENU, select Features (>) and
press
≥.You can adjust:
é Contrast +: automatic adjustment of the
picture contrast which permanently sets the
darkest part of the picture to black.
“ NR: attenuates picture noise (snow) in difficult
reception conditions.
‘ Sleep (Only available on certain versions): to
select an automatic standby period.
( PIP: to adjust the size and position of the PIP
screen.
§ To quit the menus, press
Ë.
TV Menu
Picture
Sound
Features
Install
Picture
Brightness
Colour
Contrast
Sharpness
Colour Temp.
Store
39
TV Menu
Picture
Sound
Features
Install
Sound
Equalizer Æ •
Balance Æ •
Delta Volume Æ •
AVL Æ •
Dolby Virtual Æ •
Store Æ •
120 Hz
500 Hz
1500 Hz
5 KHz
10 KHz
8
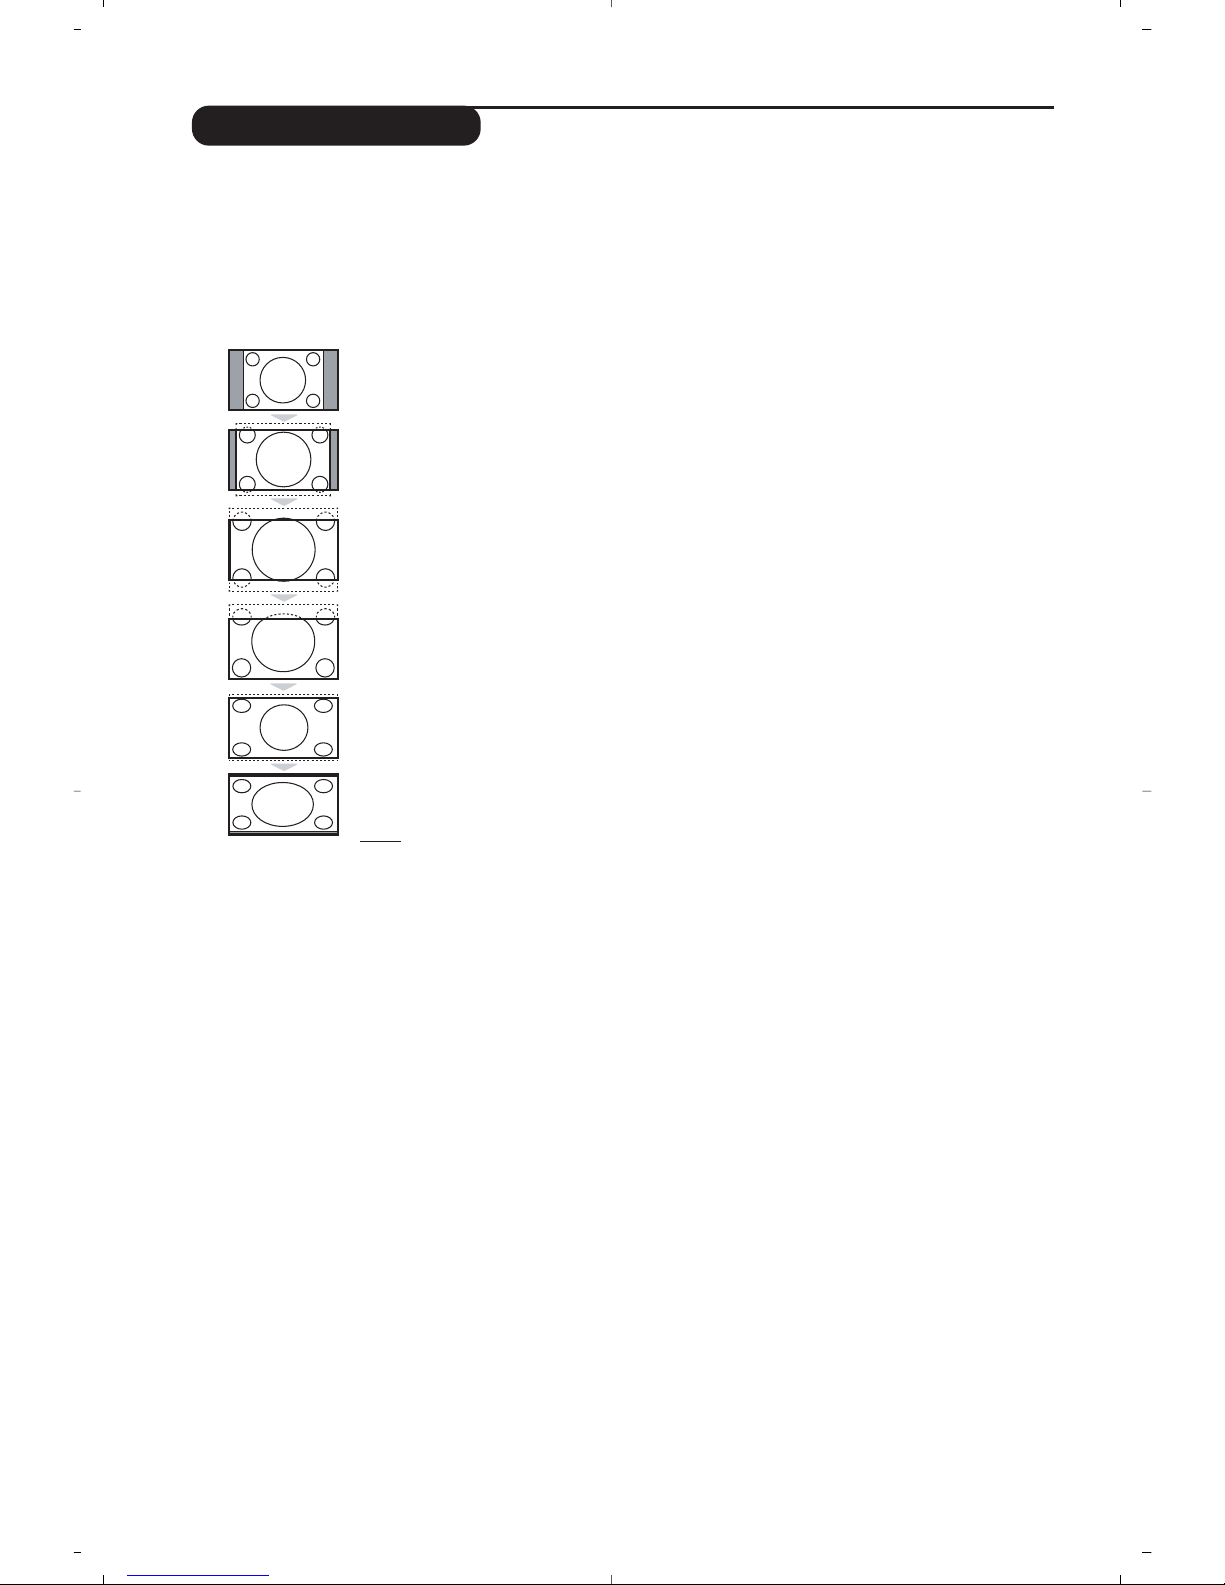
Screen Formats
The pictures you receive may be transmitted in 16:9 format (wide screen) or 4:3 format
(conventional screen).4:3 pictures sometimes have a black band at the top and bottom of the screen
(letterbox format).This function allows you to optimise the picture display on screen.
Press the
∏
key (or ≤≥) to select the different modes:
This TV set is also equipped with automatic switching which will select the correct-screen
format, provided the specific signals are transmitted with the programmes.
4:3
The picture is reproduced in 4:3 format and a black band is displayed on either side
of the picture.
Movie Expand 14:9
The picture is enlarged to 14:9 format, a thin black band remains on both sides of
the picture.
Movie Expand 16:9
The picture is enlarged to 16:9 format.This mode is recommended when displaying
pictures which have black bands at the top and bottom (letterbox format).
Subtitle Zoom
This mode is used to display 4:3 pictures using the full surface of the screen leaving
the sub-titles visible.
Superzoom
This mode is used to display 4:3 pictures using the full surface of the screen by
enlarging the sides of the picture.
Widescreen
This mode restores the correct proportions of images transmitted in 16:9.
Note:
If you display a 4:3 picture in this mode, it will be enlarged horizontally.
9
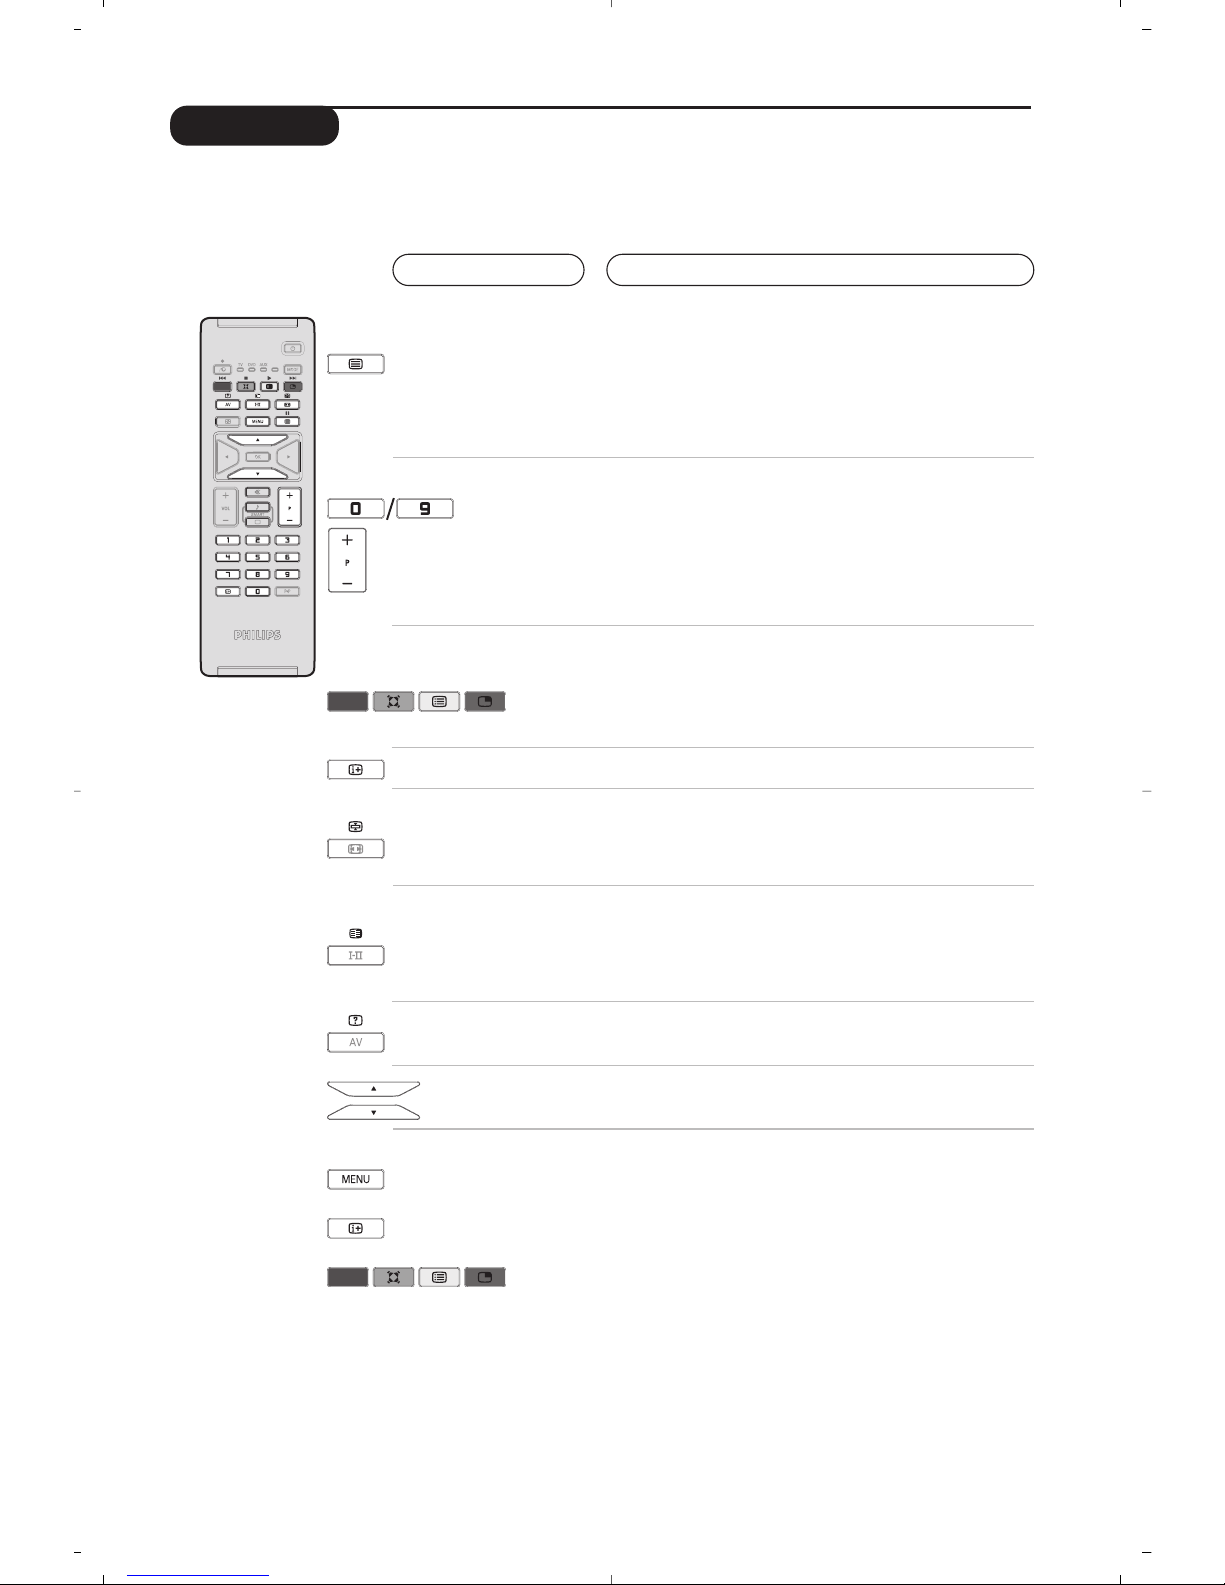
Teletext
Press :
You will obtain :
Teletext is an information system broadcast by certain channels which can be consulted like a
newspaper. It also offers access to subtitles for viewers with hearing problems or who are not familiar
with the transmission language (cable networks, satellite channels, etc.).
Teletext call
Selecting a
page
This is used to call or exit teletext mode.The summary
appears with a list of items that can be accessed. Each
item has a corresponding
3 digit page number.
If the channel selected does not broadcast teletext, the
indication 100 will be displayed and the screen will remain
blank (in this case, exit teletext and select another channel).
Enter the number of the page required using the 0 to 9
or P -/+ keys. Example: page 120, enter 120.
The number is displayed top left,the counter turns and
then the page is displayed.Repeat this operation to view
another page.
If the counter continues to search, this means that the page is
not transmitted. Select another number.
Direct access
to the items
Coloured areas are displayed at the bottom of the screen.
The 4 coloured keys are used to access the items or
corresponding pages.
The coloured areas flash when the item or the page is not yet
available.
Contents
This returns you to the contents page (usually page 100).
Stop
sub-page
acquisition
Double page
teletext
Certain pages contain sub-pages which are automatically
displayed successively.This key is used to stop or resume
sub-page acquisition.The indication
_ appears top left.
To activate or deactivate the double page teletext display
mode.The active pa
ge is di
splayed on the left and the
following page is displayed on the right. Press
Ó
if you want
to hold a page (i.e. the contents page).The active page is then
displayed on the right.To return to normal mode, press Å.
Hidden
information
Enlarge a
page
Favourite
pages
To display or hide the concealed information (games
solutions).
This allows you to display the top or bottom part of the
page and then return to normal size.
Instead of the standard coloured areas displayed at the bottom of
the screen, you can store 4 favourite pages on the first
40 channels which can then be accessed using the coloured keys
(red, green, yellow,blue). Once set, these favourite pages will
become the default every time teletext is selected.
& Press the MENU key to change to favourite pages mode.
é Display the teletext page that you want to store.
“ Press the coloured key of your choice for 3 seconds.The
page is now stored.
‘ Repeat the operation with the other coloured keys.
( Now when you consult teletext,your favourite pages will
appear in colour at the bottom of the screen.To
temporarily retrieve the standard items, press MENU.
To clear everything, and return the standard items as the
default, press
Ë for 5 seconds.

10
Using in PC monitor mode
PC Mode
Your TV can be used as a computer monitor.
The PIP function lets you display a
superimposed image to watch the TV channels
at the same time.
The PIP function only works if your PC has a digital
output.
You must first of all connect the computer and
adjust the resolution (see p.13).
Choosing PC mode
& Press the
AV key on the remote control to
display the
Source List.
é Use the cursor </> key to select
PC and
then press the cursor ≥ key to switch the TV
to PC mode (
DVI In).
To return to TV mode, press the AV key, select
TV and validate with ≥ key.
Using PIP
While in PC mode you can call up a window
for TV channels.
Attention
: the PIP feature is only available if a
computer is connected to the DVI In (see p. 13).
& Press the
œ key to display the PIP screen.
The television image is reproduced in a small
superimposed window.
é Subsequent presses of the
œ key changes
the size of the window, switches to dual
screen and turns PIP off.
“ Use the
P –/+ keys to change the programmes
of the PIP screen.
Using the PC menus
Press the
MENU key to access the specific
settings of the PC monitor mode. Use the
cursor to adjust them (the settings are
automatically saved):
• Picture:
-
Brightness / Contrast : to adjust the
brightness and contrast.
-
Horizontal / Vertical*:to adjust the
horizontal and vertical placing of the image.
-
Adjust Colour: to adjust the colours (cold,
normal or warm).
• Audio Selection: to choose the sound
reproduced on the TV (PC or TV).
• Features:
-
Phase/Clock*: eliminates the horizontal
(
Phase) and vertical (Clock) interfering lines.
-
Format : to choose between full screen or
native format of the PC screens.
-
PIP: to adjust the size and position of the
PIP screen.
-
Auto Adjust*: position is set automatically.
• Reset To Factory Setting: to return to the
factory settings (default settings).
*These adjustments are not available when a
computer is connected to the
DVI In.
NOTE
– When using the LCD TV as a PC monitor, slight diagonal interference lines may be observed when it is
operated under electromagnetic interference environment but will not affect the performance of this product.
– For better performance, good quality VGA cable with good noise isolation filter is recommended.

11
Using in HD (High Definition) Mode
HD Mode
The HD (High Definition) mode allows you to
enjoy clearer and sharper pictures through the
DVI inputs if you are using a HD
receiver/ equipment that can transmit high
definition programming.
You must first of all connect the HD equipment
(see p.13).
Choosing HD mode
& Press the
AV key on the remote control to
display the
Source List.
é Use the cursor </> key to select
HD and
then press the cursor key to switch the TV to
HD mode.
To return to TV mode, press the
AV key, select
TV and validate with ≥ key.
Using the HD menus
Press the
MENU key to access the specific
settings of the HD mode. Use the cursor to
adjust them (the settings are automatically
saved):
Picture:
• Brightness: this changes picture brilliance.
• Colour: this changes the intensity of the
colour.
• Contrast: this changes the difference
between the light and dark tones.
•
Sharpness: this changes the picture definition.
• Colour Temp.: this changes the colour
rendering:
Cold (bluer), Normal (balanced)
or
Warm (redder).
• Store: to store the picture adjustments and
settings.
Sound:
• Equalizer:to adjust the sound tone (from
bass: 120 Hz to treble: 10 kHz).
• Balance: this balances the sound on the left
and right speakers.
• Delta Volume: this is used to compensate
any volume discrepancies between the
different programs or EXT sockets.This
setting is available for programs 0 to 40 and
the EXT sockets.
• AVL (Automatic Volume Leveller): this is
used to limit increases in sound, especially on
program change or advertising slots.
• Dolby Virtual:To activate / deactivate the
surround sound effect.You can also access
these settings with key Q.
• Store: this is used to store the sound
settings.
Features:
• S
leep (Only available on certain versions): to
select an automatic standby period.
•
PIP: to adjust the size and position of the
PIP screen.
• Horizontal Shift: to adjust the horizontal
placing of the image.

12
Connecting peripheral equipment
Carry out the connections shown opposite, using a good quality
euroconnector cable.
If your video recorder does not have a euroconnector socket, the only
connection possible is via the aerial cable.You will therefore need to
tune in your video recorder's test signal and assign it programme
number 0 (refer to manual store, p. 6).
To reproduce the video recorder picture, press
0 key.
Video recorder with decoder
Connect the decoder to the second euroconnector socket of
the video recorder.You will then be able to record scrambled
transmissions.
The television has 2 external sockets situated at the back of the set (EXT1 and EXT2) and sockets on
the side. Press the
AV key on the remote control to display Source List and select TV or peripheral
equipment connected to
EXT1, EXT2/SVHS2, AV/SVHS3, PC or HD.
The EXT1 socket has audio, CVBS/RGB inputs and audio, CVBS outputs.
The EXT2 socket has audio, CVBS/S-VHS inputs and audio, CVBS outputs.
The side connections has audio inputs, CVBS/S-VHS inputs, headphone out.
Video recorder
DVI In
DVI
Audio In
EXT 2 EXT 1
Headphon
e
Audio In
Video In
S-Video

13
Satellite receiver, decoder, CDV, games, etc.
Carry out the connections shown opposite.
To optimise picture quality, connect the equipment which
produces the RGB signals (digital decoder, games, etc.) to EXT1,
and the equipment which produces the S-VHS signals (S-VHS and
Hi-8 video recorders, certain DVD drives) to EXT2 and all other
equipment to either EXT1 or EXT2.
To select connected equipment
Press the
AV key to select EXT1, EXT2/S-VHS2 (S-VHS signals
from the EXT2 socket).
Make the connections as shown opposite.
With the
AV key, select AV/S-VHS3.
For a mono set, connect the sound signal to the AUDIO L (or AUDIO R)
input.The sound automatically comes out of the left and right speakers
of the set.
Headphones
When headphones are connected, the sound on the TV set will be
cut.The
VOLUME -/+
keys are used to adjust the volume level.
The headphone impedance must be between 32 and 600 Ohms.
Make the connections as shown opposite.
With the
AV key, select HD.
For more information on using HD mode see page 11.
Other equipment
Side connections
HD equipment
Computer
PC with DVI
Connect the monitor output (DVI) of your computer to the
DVI-I In of the LCD TV. Connect the sound output Audio out of
the computer to the input DVI Audio in of the LCD TV.
PC with VGA
Connect the monitor output (VGA) of your computer via a
VGA/DVI adaptor to the DVI In of the TV. Connect the sound
output Audio out of the computer to the input DVI Audio in of
the LCD TV.
For more information on using PC mode see page 10.
Configure the computer on 1024 x 768, 60 Hz for
optimum resolution.
Here is the list of the different display resolutions available on
your TV:
640 x 480, 60 Hz 800 x 600, 56 Hz 1024 x 768, 60 Hz
640 x 480, 67 Hz 800 x 600, 60 Hz 1024 x 768, 70 Hz
640 x 480, 72 Hz 800 x 600, 72 Hz 1024 x 768, 75 Hz
640 x 480, 75 Hz 800 x 600, 75 Hz
720 x 400, 70 Hz 832 x 624, 75 Hz

14
Glossary
DVI (Digital Visual Interface):A digital interface
standard created by the Digital Display
Working Group (DDWG) to convert analog
signals into digital signals to accommodate
both analog and digital monitors.
VGA (Video Graphics Array): a common standard
graphics display system for PCs.
RGB signals : These are the three video signals,
Red Green Blue, which make up the picture.
Using these signals improves picture quality.
S-VHS Signals: These are 2 separate Y/C video
signals from the S-VHS and Hi-8 recording
standards.The luminance signals Y (black and
white) and chrominance signals C (colour) are
recorded separately on the tape.This provides
better picture quality than with standard video
(VHS and 8 mm) where the Y/C signals are
combined to provide only one video signal.
NICAM sound: Process by which digital sound
can be transmitted.
System: Television pictures are not broadcast in
the same way in all countries.There are
different standards:BG, DK,I, and L L’.The
System setting (p. 6) is used to select these
different standards.This is not to be confused
with PAL or SECAM colour coding. Pal is used
in most countries in Europe, Secam in France,
Russia and most African countries.The United
States and Japan use a different system called
NTSC.The inputs EXT1 and EXT2 are used to
read NTSC coded recordings.
16:9: Refers to the ration between the length
and height of the screen.Wide screen
televisions have a ration of 16/9, conventional
screen TV sets have a ration of 4/3.
Tips
Poor reception
No picture
No sound
PC and PIP modes
don’t work ?
Remote control
Standby
Cleaning the set
Still no results?
The proximity of mountains or high buildings may be responsible for ghost
pictures, echoing or shadows. In this case, try manually adjusting your picture: see
Fine Tune (p. 6) or modify the orientation of the outside aerial. If you are using an
indoor aerial, reception may be difficult in certain conditions.You can improve
reception by rotating the aerial.If the reception remains poor, you will need to
use an external aerial
Have you connected the aerial socket properly? Have you chosen the right
system? (p. 6). Poorly connected euroconnector cables or aerial sockets are often
the cause of picture or sound problems (sometimes the connectors can become
half disconnected if the TV set is moved or turned). Check all connections.
If on certain channels you receive a picture but no sound,this means that you do not have
the correct TV system. Modify the
System
setting (p.6).
The amplifier connected to the TV does not deliver any sound? Check that you
have not confused the audio output with the audio input.
Check that you have configured the computer on a compatible display resolution
(see p. 10).
The TV set does not react to the remote control;the indicator on the set no
longer flashes when you use the remote control? Replace the battery.
If the set receives no signal for 15 mins,it automatically goes into standby mode.
To save power, your set is fitted with components that give it a very low power
consumption when in standby mode (less than 1 W).
Only use a clean, soft and lint-free cloth to clean the screen and the casing of your
set. Do not use alcohol-based or solvent-based products.
Disconnect the mains plug of the TV for 30 seconds then reconnect it.
If your TV set breaks down, never attempt to repair it yourself: contact your
dealer's after-sales service.

1
Introduction
Sommaire
Vous venez d’acquérir ce téléviseur, merci de votre confiance.
Nous vous conseillons de lire attentivement les instructions qui suivent pour
mieux comprendre les possibilités offertes par votre téléviseur.
Nous espérons que notre technologie vous donnera entière satisfaction.
Installation
Présentation du téléviseur LCD . . . . . . . . . . . . . . . . . . . . . . . . . . . . . . . . . . . . . . .2
Les touches du téléviseur . . . . . . . . . . . . . . . . . . . . . . . . . . . . . . . . . . . . . . . . . . . . 2
Les touches de la télécommande . . . . . . . . . . . . . . . . . . . . . . . . . . . . . . . . . . . . . . 3
Touche magnétoscope ou DVD . . . . . . . . . . . . . . . . . . . . . . . . . . . . . . . . . . . . . . .4
Installation du téléviseur . . . . . . . . . . . . . . . . . . . . . . . . . . . . . . . . . . . . . . . . . . . . . 5
Installation rapide . . . . . . . . . . . . . . . . . . . . . . . . . . . . . . . . . . . . . . . . . . . . . . . . . . .5
Classement des programmes . . . . . . . . . . . . . . . . . . . . . . . . . . . . . . . . . . . . . . . . . 6
Mémorisation manuelle . . . . . . . . . . . . . . . . . . . . . . . . . . . . . . . . . . . . . . . . . . . . . 6
Autres réglages du menu Installation . . . . . . . . . . . . . . . . . . . . . . . . . . . . . . . . . . .6
Utilisation
Réglages de l’image . . . . . . . . . . . . . . . . . . . . . . . . . . . . . . . . . . . . . . . . . . . . . . . . .6
Réglages du son . . . . . . . . . . . . . . . . . . . . . . . . . . . . . . . . . . . . . . . . . . . . . . . . . . . .6
Réglage des options . . . . . . . . . . . . . . . . . . . . . . . . . . . . . . . . . . . . . . . . . . . . . . . . .6
Format 16:9 . . . . . . . . . . . . . . . . . . . . . . . . . . . . . . . . . . . . . . . . . . . . . . . . . . . . . . .8
Télétexte . . . . . . . . . . . . . . . . . . . . . . . . . . . . . . . . . . . . . . . . . . . . . . . . . . . . . . . . . 9
Utilisation en mode moniteur PC . . . . . . . . . . . . . . . . . . . . . . . . . . . . . . . . . . . . .10
Utilisation en mode HD (Haute Définition) . . . . . . . . . . . . . . . . . . . . . . . . . . . . .11
Raccordements
Magnétoscope . . . . . . . . . . . . . . . . . . . . . . . . . . . . . . . . . . . . . . . . . . . . . . . . . . . . 12
Autres appareils . . . . . . . . . . . . . . . . . . . . . . . . . . . . . . . . . . . . . . . . . . . . . . . . . . 13
Connexions latérales . . . . . . . . . . . . . . . . . . . . . . . . . . . . . . . . . . . . . . . . . . . . . . 13
Ordinateur . . . . . . . . . . . . . . . . . . . . . . . . . . . . . . . . . . . . . . . . . . . . . . . . . . . . . . .13
Informations pratiques
Conseils . . . . . . . . . . . . . . . . . . . . . . . . . . . . . . . . . . . . . . . . . . . . . . . . . . . . . . . . 14
Glossaire . . . . . . . . . . . . . . . . . . . . . . . . . . . . . . . . . . . . . . . . . . . . . . . . . . . . . . . .14
°
Directive pour le recyclage
Votre téléviseur utilise des matériaux réutilisables ou qui peuvent être recyclés.
Pour minimiser les déchets dans l'environnement,des entreprises spécialisées
récupèrent les appareils usagés pour les démonter et concentrer les matières
réutilisables (renseignez-vous auprès de votre revendeur).
FR

2
Présentation du téléviseur LCD
Télécommande
&
Les touches du téléviseur
•
POWER : pour allumer ou éteindre le
téléviseur.
•
VOLUME -/+ : pour régler le niveau sonore.
• MENU : pour appeler ou quitter les menus.
Les touches
PROGRAM -/+
permettent de
sélectionner
un réglage et les touches
VOLUME -/+ de régler.
•
PROGRAM -/+ : pour sélectionner les
programmes.
Face arrière :
Les raccordements principaux s’effectuent par
le dessous du téléviseur.
Pour plus de détails sur les raccordements, voir
page 12.
é Alimentation
“ Prise DVI et entrée audio pour le raccordement
d’un appareil HD (Haute Définition) ou d’un
ordinateur avec sortie DVI
‘ Prises péritel EXT 1 et EXT 2
( Prise d’antenne TV
§ Connexions latérales
Retirer le film d’isolation de la pile pour activer
la télécommande.
La pile livrée avec l’appareil ne contient ni mercure ni
cadmium nickel, dans un souci de préserver
l’environnement.Veillez à ne pas jeter vos piles usagées
mais à utiliser les moyens de recyclage mis à votre
disposition (consultez votre revendeur). En cas de
remplacement, utiliser une pile de même type.
CR 2025

3
Les touches de la télécommande
1) .Veille
Permet de mettre en veille le téléviseur. Pour l’allumer,
appuyez sur P –/+, 0 à 9 ou la touche AV .
2)
x Pixel + (selon versions)
Pour activer/désactiver le mode démonstration du
traitement d’image Pixel +.
3)
· ¢ Ê Æ ∫
Magnétoscope (page 14)
4)
Q Son Surround
Pour activer/désactiver l’effet d’élargissement du son.
En stéréo, les haut-parleurs paraissent plus espacés.
Pour les versions équipés du Virtual Dolby Surround *,
vous obtenez les effets sonores arrières du Dolby
Surround Pro Logic.En mono, on obtient un effet spatial
pseudo stéréo.
5) AV
Affiche la Source List et permet de sélectionner le
mode TV ou d’autres appareils connectés à EXT1,
EXT2/S-VHS2, AV/S-VHS3, PC ou HD (p. 12).
6)
h Active control
Optimise la qualité de l’image en fonction du signal reçu
et de la luminosité ambiante.
7) MENU
Pour appeler ou quitter les menus.
8) Curseur (
<>≤≥)
Ces 4 touches permettent de naviguer dans les menus.
9) Volume
Pour ajuster le niveau sonore
10)
ª m Préréglages image et son
Permet d’accéder à une série de préréglages de l’image
et du son.
La position Personnel correspond aux réglages effectués
dans les menus.
11)
Ë Info.d’écran / n° permanent
Pour afficher / effacer le numéro de programme,
l’heure, le mode son, et le temps restant de la
minuterie.Appuyez pendant 5 secondes pour activer
l’affichage permanent du numéro.
* Fabriqué sous licence de Dolby Laboratories. "Dolby" et le symbole
double-D sont des marques de Dolby Laboratories.
1)
2)
3)
4)
5)
6)
7)
8)
9)
10)
11)

4
Les touches de la télécommande
12) Mode
Appuyez sur cette touche pour sélectionner le mode
désiré : TV, DVD ou AUX.
13)
œ Appel du PIP (p. 10)
14)
ı Liste des programmes
Pour afficher / effacer la liste des programmes.Utilisez
ensuite les touches <> pour sélectionner un
programme et la touche ≥ pour l’afficher.
15)
∏ Formats 16:9 (p. 8)
16)
ù Mode son
Permet de forcer les émissions Stéréo et Nicam Stéréo
en Mono ou pour les émissions bilingues de choisir
entre Dual I ou Dual II.
L’indication Mono est rouge lorsqu’il s’agit d’une position
forcée.
17)
Ÿ Å Ó ¤ Appel télétexte (p.9)
18) Ne s’applique pas au mode TV.
19)
[ Coupure son
Pour supprimer ou rétablir le son.
20) P -/+ Sélection des programmes
Pour accéder au programme inférieur ou supérieur. Le
numéro et le mode son s’affichent quelques instants.
Pour certains programmes le titre de l’émission apparaît en
bas de l’écran.
21) 0/9 Touches numériques
Accès direct aux programmes.Pour un programme à 2
chiffres, il faut ajouter le 2ème chiffre avant que le trait
ne disparaisse.
22)
Á Programme précédent
Pour accéder au programme précédemment visualisé.
La touche MODE permet de piloter les fonctions principales du magnétoscope ou du DVD de notre
gamme de produit.
Appuyez sur la touche
MODE pour sélectionner le mode désiré : DVD ou AUX (magnétoscope). Le
voyant de la télécommande s’allume pour montrer le mode sélectionné. Il s’éteint automatiquement
après 20 secondes sans action (retour au mode TV). En fonction de l’équipement, les touches suivantes
sont opérationnelles :
. veille,,
l¢ retour rapide,
∫l avance rapide,
· enregistrement,
∆ pause,
Ê stop,
Æ lecture,
MENU appel menu,
<>≤≥ navigation et réglages,
OK validation,
0/9 touches numériques,
P -/+ sélection des programmes,
ù choix du langage,
Ë menu OSD,
Á DVD: choix Titres-Chapitres,VCR:
fonction index.
La télécommande est compatible avec tous les
magnétoscopes utilisant le standard RC5 et tous
les DVD utilisant le standard RC6.
(12
(13
(14
(15
(16
(17
(18
(19
(20
(21
(22
Touches magnétoscope ou DVD (sélecteur de mode)

5
Installation rapide
La première fois que vous allumez le
téléviseur, un menu apparaît à l’écran.
Ce menu vous invite à choisir le pays ainsi que
la langue des menus :
Si le menu n’apparaît pas, maintenez appuyées
pendant 5 secondes les touches
VOLUME - et
VOLUME + du téléviseur, pour le faire apparaître.
& Utilisez les touches <> de la télécommande
pour choisir votre pays, puis validez avec
≥.
Si votre pays n’apparaît pas dans la liste,
sélectionnez le choix “. . .”
é Sélectionnez ensuite votre langue avec les
touches
<> puis validez avec ≥.
“ La recherche démarre automatiquement.
Tous les programmes TV et stations radio
disponibles sont mémorisés. L’opération prend
quelques minutes. L’affichage montre la
progression de la recherche et le nombre de
programmes trouvés. A la fin, le menu disparaît.
Pour sortir ou interrompre la recherche, appuyez
sur
MENU. Si aucun programme n’est trouvé,
reportez vous au chapitre conseils p. 14.
‘ Si l’émetteur ou le réseau câblé transmet le
signal de classement automatique, les
programmes seront correctement numérotés.
L’installation est alors terminée.
( Si ce n’est pas le cas, vous devez utiliser le
menu
Classement pour les renuméroter.
Certains émetteurs ou réseaux câblés diffusent leurs
propres paramètres de classement (région, langage...).
Dans ce cas, vous devez indiquer votre choix avec les
touches
<> puis valider avec ≥.
& Positionnement du téléviseur
Placez votre téléviseur sur une surface solide et
stable. Pour prévenir toute situation dangereuse,
ne pas exposer le téléviseur à des projections
d’eau, à une source de chaleur (lampe, bougie,
radiateur, ...) et ne pas obstruer les grilles de
ventilation situées à l’arrière.
é Raccordements
• Utilisez le cordon de liaison d’antenne fourni
et raccordez la prise
: située en dessous
du téléviseur à votre prise d’antenne.
• Branchez le cordon d’alimentation sur le
téléviseur et la prise de courant sur le secteur
(220-240 V / 50 Hz).
Pour le raccordement d’autres appareils, voir p.12.
“ Mise en marche
Pour allumer le téléviseur, appuyez sur la touche
POWER. Un voyant s’allume en vert et l’écran
s’illumine.Allez directement au chapitre
installation rapide. Si le téléviseur reste en
veille (voyant rouge), appuyez sur la touche
P -/+ de la télécommande.
Le voyant clignote lorsque vous utilisez la télécommande.
Installation du téléviseur
Plug’n’Play
Country
GB
Language
English

6
Mémorisation manuelle
Autres réglages du menu Installation
Classement des programmes
Ce menu permet de mémoriser les
programmes un par un.
& Appuyez sur la touche
MENU.
é Avec le curseur,sélectionnez le menu
Installation puis Mémo Manuelle :
“ Système : sélectionnez Europe (détection
automatique*) ou
Europe Ouest (norme BG),
Europe Est (norme DK), Royaume-Uni
(norme I) ou France (norme LL’).
* Sauf pour la France (norme LL’), il faut
sélectionner impérativement le choix
France.
‘
Recherche :appuyez sur ≥.La recherche
commence. Dès qu’un programme est trouvé,
le défilement s’arrête et le nom du programme
s’affiche (si disponible).Allez à l’étape suivante.
Si vous connaissez la fréquence du programme
désiré, composez directement son numéro
avec les touches
0 à 9.
Si aucune image n’est trouvée, voir conseils (p. 14).
(
No De Prog. : entrer le numéro souhaité avec
les touches
≤≥ ou 0 à 9.
§
Ajust. Fin : si la réception n’est pas
satisfaisante, réglez avec les touches
≤≥.
è
Mémoriser :appuyez sur ≥. Le programme
est mémorisé.
! Répétez les étapes ‘ à è autant de fois qu’il
y a de programmes à mémoriser.
ç Pour quitter les menus, appuyez sur
Ë.
& Appuyez sur la touche MENU et sélectionnez
le menu
Installation :
é
Langage : pour modifier la langue d’affichage des
menus.
“
Pays : pour choisir votre pays (F pour France).
Ce réglage intervient dans la recherche, le
classement automatique des programmes et
l’affichage du télétexte. Si votre pays n’apparaît pas
dans la liste, sélectionnez le choix “. . .”
‘
Mémo. Auto : pour lancer une recherche
automatique de tous les programmes
disponibles dans votre région.Si l’émetteur ou
le réseau câblé transmet le signal de
classement automatique, les programmes
seront correctement numérotés. Si ce n’est pas
le cas, vous devez utiliser le menu
Classement
pour les renuméroter.
Certains émetteurs ou réseaux câblés diffusent leurs
propres paramètres de classement (région, langage, ...).
Dans ce cas, vous devez indiquer votre choix avec
les touches <> puis valider avec ≥.Pour sortir ou
interrompre la recherche, appuyez sur
MENU
.
Si aucune image n’est trouvée, voir conseils (p. 14).
( Nom du programme:vous pouvez,si vous le
souhaitez, donner un nom aux programmes,
stations radio et prises extérieures. Utilisez les
touches
≤≥ pour vous déplacer dans la zone
d’affichage du nom (5 caractères) et les touches
<> pour choisir les caractères.Lorsque le nom
est entré, utilisez la touche
≤ pour sortir. Le nom
est mémorisé.
Remarque: lors de l’installation, les programmes
sont nommés automatiquement lorsque le signal
d’identification est transmis.
§ Pour quitter les menus, appuyez sur
Ë.
& Appuyez sur la touche MENU. Le Menu TV
s’affiche à l’écran.
é Avec le curseur,sélectionnez le menu
Installation puis le menu Classement .
“ Sélectionnez le programme que vous
souhaitez déplacer avec les touches
<> et
appuyez sur
≥.
‘ Utilisez ensuite les touches
<> pour choisir
le nouveau numéro et validez avec
≤.
( Recommencez les étapes “ et ‘ autant de
fois qu’il y a de programmes à renuméroter.
§ Pour quitter les menus, appuyez sur
Ë.
Menu TV
Image •
Son •
Options •
Installation •
Menu TV
Image •
Son •
Options •
Installation •
Mémo. Manuel.
Système
Recherche
No. De Prog.
Ajust. Fin
Mémoriser
France
Installation
Langage Æ •
Pays Æ •
Mémo. Auto. Æ •
Mémo Manuel. Æ •
Classement Æ •
Nom du Prog. •
0
1
2
3
4
5

7
Réglages de l’image
Réglages du son
& Appuyez sur la touche MENU puis sur ≥.
Le menu
Image apparaît :
é Utilisez les touches
<> pour sélectionner
un réglage et les touches
≤≥ pour régler.
“ Une fois les réglages effectués, sélectionnez le
choix Mémoriser et appuyer sur ≥ pour les
enregistrer.Appuyez sur
Ë pour quitter.
Description des réglages :
•
Lumière : agit sur la luminosité de l’image.
•
Couleur : agit sur l’intensité de la couleur.
•
Contraste : agit sur la différence entre les
tons clairs et les tons foncés.
•
Définition : agit sur la netteté de l’image.
•
Temp. Couleur : agit sur le rendu des
couleurs :
Froide (plus bleue), Normale
(équilibrée) ou Chaude (plus rouge).
•
Mémoriser : pour mémoriser les réglages de
l’image.
& Appuyez sur MENU, sélectionner Son (>) et
appuyez sur
≥. Le menu Son apparaît :
é Utilisez les touches
<> pour sélectionner un
réglage et les touches
≤≥ pour régler.
“ Une fois les réglages effectués, sélectionnez le
choix
Mémoriser et appuyer sur ≥ pour les
enregistrer.
‘ Pour quitter les menus, appuyez sur
Ë.
Description des réglages:
•
Egaliseur : pour régler la tonalité du son (de
grave:120 Hz à aigus: 10 kHz).
•
Balance : pour équilibrer le son sur les haut-
parleurs gauche et droit.
•
Delta Volume : permet de compenser les
écarts de volume qui existent entre les
différents programmes ou les prises EXT.
Ce réglage est opérationnel pour les
programmes 0 à 40 et les prises EXT.
• AVL (Automatic Volume Leveler): contrôle
automatique du volume qui permet de limiter
les augmentations du son, en particulier lors des
changements de programmes ou des publicités.
• Dolby Virtual : pour
activer / désactiver l’effet
d’élargissement du son.
Vous avez également
accès à ce réglage avec la touche
†.
•
Mémoriser : pour mémoriser les réglages du
son.
Réglage des options
& Appuyez sur MENU, sélectionner Options
(>) et appuyez sur ≥.Vous pouvez régler :
é
Contraste + : réglage automatique du
contraste de l’image qui ramène en
permanence la partie la plus sombre de
l’image au noir.
“
Réduct. Bruit : atténue le bruit de l’image (la
neige), en cas de réception difficile.
‘
Minuterie (selon versions): pour sélectionner
une durée de mise en veille automatique.
(
PIP
: pour ajuster la taille et la position de
l’écran PIP
§ Pour quitter les menus, appuyez sur
Ë.
Menu TV
Image
Son
Options
Installation
Mode
Menu TV
Image
Son
Options
Installation
Mode
Son
Egaliseur Æ •
BalanceÆ •
Delta VolumeÆ •
AVLÆ •
Dolby VirtualÆ •
MémoriserÆ •
120 Hz
500 Hz
1500 Hz
5 KHz
10 KHz
Image
Lumière
Couleur
Contraste
Définition
Te mp. Couleur
Mémoriser
39

8
Formats 16:9
Les images que vous recevez peuvent être transmises au format 16:9 (écran large) ou 4:3 (écran
traditionnel). Les images 4:3 ont parfois une bande noire en haut et en bas (format cinémascope).
Cette fonction permet d’éliminer les bandes noires et d’optimiser l’affichage des images sur l’écran.
Appuyez sur la touche
∏ (ou ≤≥) pour sélectionner les différents modes :
Le téléviseur est équipé d’une commutation automatique qui décode le signal spécifique
émis par certains programmes et sélectionne automatiquement le bon format d’écran.
4:3
L’image est reproduite au format 4:3, une bande noire apparaît de chaque côté de
l’image.
Zoom 14:9
L’image est agrandie au format 14:9, une petite bande noire subsiste de chaque côté
de l’image.
Zoom 16:9
L’image est agrandie au format 16:9. Ce mode est recommandé pour visualiser les
images avec bande noire en haut et en bas (format cinémascope).
16:9 Sous-titres
Ce mode permet de visualiser les images 4:3 sur toute la surface de l’écran en
laissant visibles les sous-titres.
Super 4:3
Ce mode permet de visualiser les images 4:3 sur toute la surface de l’écran en
élargissant les côtés de l’image.
16:9
Ce mode permet de restituer les bonnes proportions des images transmises en 16:9.
Si vous visualisez une image 4:3 comme représentée ici, elle sera élargie sur le plan horizontal.

9
Télétexte
Appuyez sur :
Vous obtenez :
Le télétexte est un système d'informations, diffusé par certaines chaînes, qui se consulte comme un
journal. Il permet aussi d'accéder aux sous-titrages pour les personnes malentendantes ou peu
familiarisées avec la langue de transmission (réseaux câblés,chaînes satellites,...).
Appel
télétexte
Sélection
d’une page
Pour appeler ou quitter le télétexte. Le sommaire apparaît
avec la liste des rubriques auxquelles vous pouvez accéder.
Chaque rubrique est repérée par un numéro de page à 3
chiffres.
Si la chaîne sélectionnée ne diffuse pas le télétexte, l'indication
100 s'affiche et l'écran reste noir (dans ce cas, quittez le
télétexte et choisissez une autre chaîne).
Composer le numéro de la page désiré avec les touches
0 à 9 ou P -/+.Exemple:page 120, tapez 120.Le numéro
s’affiche en haut à gauche, le compteur tourne, puis la
page est affichée.
Renouvelez l'opération pour consulter une autre page.
Si le compteur continue à chercher, c’est que la page n'est pas
transmise. Choisissez un autre numéro.
Accès
direct aux rubriques
Des zones colorées sont affichées en bas de l’écran.
Les 4 touches colorées permettent d’accéder aux
rubriques ou aux pages correspondantes.
Les zones colorées clignotent lorsque la rubrique ou la page
n’est pas encore disponible.
Sommaire
Pour revenir au sommaire (généralement la page 100).
Arrêt de
l'alternance des
sous-pages
Double page
télétexte
Certaines pages contiennent des sous-pages qui se
succèdent automatiquement. Cette touche permet d’arrêter
ou reprendre l'alternance des sous-pages.L'indication
_
apparaît en haut à gauche.
Pour activer ou désactiver l’affichage du télétexte en double
page. La page active est affichée à gauche et la page suivante
à droite.Appuyez sur la
touche Ósi vous voulez figer une
page (par exemple le sommaire).La page active devient celle de
droite. Pour revenir en mode normal, appuyez sur Å.
Informations
cachées
Agrandissement
d'une page
Pages
préférées
Pour faire apparaître ou disparaître les informations
cachées (solutions de jeux).
Pour afficher la partie supérieure, inférieure, puis revenir à
la dimension normale.
Pour les programmes télétexte 0 à 40,vous pouvez
mémoriser 4 pages préférées qui seront ensuite directement
accessibles avec les touches colorées (rouge, verte, jaune,
bleue).
& Appuyez sur la touche MENU pour passer en mode pages
préférées.
é Affichez la page télétexte que vous souhaitez mémoriser.
“ Appuyez ensuite pendant 3 secondes sur la touche
colorée de votre choix.La page est mémorisée.
‘ Renouvelez l’opération avec les autres touches colorées.
( À présent, dès que vous consultez le télétexte, vos pages
préférées apparaissent en couleur en bas de l’écran. Pour
retrouver les rubriques habituelles,appuyez sur MENU.
Pour tout effacer, appuyez sur
Ë pendant 5 secondes.

10
Utilisation en mode moniteur PC
Mode PC
Votre téléviseur peut être utilisé comme un
moniteur d’ordinateur. La fonction PIP vous
permettra d’afficher en même temps un écran
d’incrustation d’image pour regarder les chaînes tv.
Attention: la fonction PIP n’est opérationnelle que si
l’ordinateur dispose d’une sortie digitale.
Vous devez d’abord effectuer les raccordements de
l’ordinateur et ajuster la résolution (voir p.13).
Choix du mode PC
&
Appuyez sur la touche AVde la télécommande
pour afficher la
Source List.
é Utilisez les touches <>
pour sélectionner
PC et appuyer sur ≥
pour commuter le
téléviseur en mode PC (
DVI In).
Pour revenir au mode TV, appuyer sur la
touche
AV , sélectionner TV et valider avec ≥.
Utilisation du PIP
En mode PC, vous pouvez afficher une fenêtre
permettant de visualiser les chaînes tv.
Attention
: la fonction PIP n’est opérationnelle que si
l’ordinateur est connecté à l’entrée
DVI in (voir p.13)
& Appuyez sur la touche
g pour afficher l’écran
PIP. L’image de la télévision est reproduite dans
une petite fenêtre d’incrustation.
é Appuyez de nouveau sur
g pour modifier la
taille de la fenêtre, passer en double écran,
puis la faire disparaître.
“ Utilisez les touches P -/+ pour changer les
programmes de l’écran PIP.
Utilisation des menus PC
Appuyez sur la touche
MENU pour accéder
aux réglages spécifiques au mode moniteur
PC. Utilisez le curseur pour régler (les
réglages sont mémorisés automatiquement) :
•
Image
:
-
Lumière/ Contraste
: pour régler la lumière
et le contraste.
-
Horizontal/Vertical* : pour ajuster le
positionnement horizontal et vertical de l’image.
- Régler la couleur : pour régler la teinte des
couleurs (froide, normale ou chaude).
•
Sélection Audio : pour choisir le son qui est
reproduit sur le téléviseur (PC ou TV).
•
Options
:
-
Phase/Horloge
:permet d’éliminer les lignes
parasites horizontales (
Phase) et verticales
(
Horloge).
-
Format d’écran
: pour choisir entre écran
large ou le format original des écrans PC.
-
PIP
: pour ajuster la taille et la position de
l’écran PIP.
-
Ajustement Auto*
: le positionnement est
réglé automatiquement.
•
Revenir réglages usine
: pour revenir aux
réglages d’usine (réglages par défaut).
* Ces réglages ne sont pas disponibles lorsque
l’ordinateur est connecté à l’entrée
DVI in.
Note:
– Lorsque vous utilisez le TV LCD en moniteur PC dans un environnement d’interférences électromagnétiques,
des petites lignes parasites diagonales peuvent apparaître. Ceci n’affecte en rien les performances du produit.
– Pour des performances optimales, il est conseillé d’utiliser un câble VGA de bonne qualité (avec filtre d’isolation).

11
Utilisation en mode HD (Haute Définition)
Mode HD
Le mode HD (Haute Définition) vous permet
de profiter d’une meilleure qualité d’image
lorsque vous connectez un récepteur HD à la
prise DVI.
Vous devez d’abord effectuer les raccordements du
récepteur HD (voir p.13).
Choix du mode HD
&
Appuyez sur la touche AVde la télécommande
pour afficher la
Source List.
é Utilisez les touches <>
pour sélectionner
HD et appuyer sur ≥
pour commuter le
téléviseur en mode HD.
Pour revenir au mode TV, appuyer sur la
touche
AV , sélectionner TV et valider avec ≥.
Utilisation des menus HD
Appuyez sur la touche
MENU pour accéder
aux réglages spécifiques au mode HD. Utilisez
le curseur pour régler (les réglages sont
mémorisés automatiquement) :
•
Image
:
•
Lumière : agit sur la luminosité de l’image.
•
Couleur : agit sur l’intensité de la couleur.
•
Contraste : agit sur la différence entre les
tons clairs et les tons foncés.
•
Définition : agit sur la netteté de l’image.
•
Temp. Couleur : agit sur le rendu des
couleurs :
Froide (plus bleue), Normale
(équilibrée) ou Chaude (plus rouge).
•
Mémoriser : pour mémoriser les réglages de
l’image.
•
Son
:
•
Egaliseur : pour régler la tonalité du son (de
grave:120 Hz à aigus: 10 kHz).
•
Balance : pour équilibrer le son sur les haut-
parleurs gauche et droit.
•
Delta Volume : permet de compenser les
écarts de volume qui existent entre les
différents programmes ou les prises EXT.
Ce réglage est opérationnel pour les
programmes 0 à 40 et les prises EXT.
• AVL (Automatic Volume Leveler): contrôle
automatique du volume qui permet de limiter
les augmentations du son, en particulier lors des
changements de programmes ou des publicités.
• Dolby Virtual : pour
activer / désactiver l’effet
d’élargissement du son.
Vous avez également
accès à ce réglage avec la touche
†.
•
Mémoriser : pour mémoriser les réglages du
son.
•
Options
:
•
Minuterie : pour sélectionner une durée de
mise en veille automatique.
•
PIP
: pour ajuster la taille et la position de
l’écran PIP
•
Horizontal : pour ajuster le
positionnement
horizontal de l’image.

12
Raccordements
Effectuez les raccordements ci-contre. Utilisez un cordon de
liaison péritel de bonne qualité.
Si votre magnétoscope ne possède pas de prise péritel, seule la liaison
par le câble antenne est possible.Vous devez accorder le programme
numéro 0 du téléviseur sur le signal de test du magnétoscope (voir
mémo. manuelle p. 6). Ensuite pour reproduire l’image du
magnétoscope, appuyez sur
0.
Magnétoscope avec Décodeur
Connectez le décodeur sur la deuxième prise péritel du
magnétoscope.Vous pourrez ainsi enregistrer les émissions
cryptées.
Le téléviseur est équipé de 2 prises péritel EXT1 et EXT2 situées à l’arrière et de connexions latérales.
Appuyez sur la touche AVde la télécommande pour afficher la
Source List et sélectionner TV ou d’autres
appareils connectés à EXT1, EXT2/SVHS2,AV/SVHS3, PC ou HD
La prise EXT1 possède les entrées/sorties audio vidéo et les entrées RVB.
La prise EXT2 possède les entrées/sorties audio vidéo et les entrées S-VHS.
Les connexions latérales possèdent une entrée audio, les entrées S-VHS et une sortie casque.
Magnétoscope
DVI In
DVI
Audio In
EXT 2 EXT 1
Headphon
e
Audio In
Video In
S-Video

13
Récepteur satellite, décodeur, DVD, jeux,...
Effectuez les raccordements ci-contre.
Pour optimiser la qualité de l’image, connectez à EXT1 les
équipements délivrant les signaux RVB (décodeur numérique,
lecteurs DVD, jeux, ...), à EXT2 les équipements délivrant les
signaux S-VHS (magnétoscopes S-VHS et Hi-8, ...) et
indifféremment à EXT1 ou EXT2 les autres équipements.
Pour sélectionner les appareils connectés
Appuyez sur la touche
AV pour sélectionner
EXT1, EXT2 /S-VHS2
(signaux S-VHS de la prise EXT2).
Effectuez les raccordements ci-contre.
Avec la touche
AV, sélectionner
AV
/ S-VHS3.
Pour un appareil monophonique, connectez le signal vidéo sur l’entrée
VIDEO et le signal son sur l’entrée AUDIO L (ou AUDIO R). Le son est
reproduit automatiquement sur les haut-parleurs gauche et droit du
téléviseur.
Casque
Lorsque le casque est connecté, le son du téléviseur est coupé.
Les
touches
VOLUME -/+ permettent de régler le volume.
L'impédance du casque doit être comprise entre 32 et 600 ohms.
Effectuez les raccordements ci-contre.
Avec la touche
AV, sélectionner
HD
.
Pour plus d’informations sur l’utilisation en mode HD,voir page 11.
Autres appareils
Connexions latérales
Récepteur HD
Ordinateur
PC avec prise DVI
Connectez la sortie moniteur de votre ordinateur (DVI) à
l’entrée
DVI in du téléviseur.
Connectez la sortie son
Audio out de l’ordinateur à l’entrée
DVI Audio in du téléviseur.
PC avec prise VGA
Connectez la sortie moniteur de votre ordinateur (VGA) à
l’entrée
DVI in du téléviseur grâce à l’adaptateur VGA/DVI
fourni.
Connectez la sortie son
Audio out de l’ordinateur à l’entrée
DVI Audio in du téléviseur.
Pour plus d’informations sur l’utilisation en mode PC, voir page 10.
La résolution optimale de l’écran est obtenue en configurant
l’ordinateur sur 1024 x 768, 60 Hz.
Voici la liste des différentes résolutions d’affichage disponibles
sur votre téléviseur :
640 x 480, 60 Hz 800 x 600, 56 Hz 1024 x 768, 60 Hz
640 x 480, 67 Hz 800 x 600, 60 Hz 1024 x 768, 70 Hz
640 x 480, 72 Hz 800 x 600, 72 Hz 1024 x 768, 75 Hz
640 x 480, 75 Hz 800 x 600, 75 Hz
720 x 400, 70 Hz 832 x 624, 75 Hz

14
Glossaire
DVI (Digital Visual Interface): Interface standard
digitale crée par Digital Display Working
Group (DDWG) et qui convertit les signaux
analogiques en signaux numériques afin de
s’adapter aux moniteurs analogiques et
numériques.
VGA (Video Graphics Array): Système d’affichage
graphique commun aux ordinateurs.
Signaux RVB : Il s’agit de 3 signaux vidéo Rouge,
Vert, Bleu qui composent l’image. L’utilisation
de ces signaux permet d’obtenir une meilleure
qualité d’image.
Signaux S-VHS: Il s’agit de 2 signaux vidéo séparés
Y/C issus des standards d’enregistrement S-VHS
et Hi-8. Les signaux de luminance Y (noir et
blanc) et de chrominance C (couleur) sont
enregistrés séparément sur la bande. On obtient
ainsi une meilleur qualité qu’avec la vidéo
standard (VHS et 8 mm) où les signaux Y/C sont
mélangés pour ne former qu’un seul signal vidéo.
Son NICAM: Procédé permettant de transmettre
le son en qualité numérique.
Système: La transmission des images n’est pas faite
de la même façon dans tous les pays.Il existe
différentes normes : BG, DK, I, et L L’. Le
réglage
Système (p. 6) permet de sélectionner
ces différentes normes. Ne pas confondre avec
le codage couleur PAL ou SECAM. Le Pal est
utilisé dans la plupart des pays d’Europe, le
Secam en France, en Russie et dans la plupart
des pays d’Afrique. Les États Unis et le Japon
utilisent un autre système appelé NTSC. Les
entrées EXT1 et EXT2 permettent de lire les
enregistrements codés en NTSC.
16:9: Désigne les proportions largeur / hauteur
de l’écran. Les téléviseurs à écran large ont
des proportions 16/9 et les écrans
traditionnels: 4/3.
Conseils
Mauvaise réception
Absence d'image
Absence de son
Le mode PC ou le
PIP ne fonctionne
pas ?
La télécommande
ne fonctionne plus ?
Veille
Nettoyage du
téléviseur
Toujours pas de
résultats ?
La proximité de montagnes ou de hauts immeubles peut être la cause d'image
dédoublée, d'écho ou d'ombres. Dans ce cas, essayez d’ajuster manuellement l’accord
de l’image: voir
Ajust. Fin
(p.6) ou modifiez l'orientation de l'antenne extérieure.
Vérifiez également que votre antenne permet de recevoir les émissions dans
cette bande de fréquences (bande UHF ou VHF) ?
Avez-vous bien branché l'antenne ? Avez-vous choisi le bon système ? (p. 6)
Une prise péritel ou une prise d'antenne mal connectée est souvent la cause de
problèmes d'image ou de son (il arrive que les prises se déconnectent légèrement
lorsque l'on déplace ou que l'on tourne le téléviseur).Vérifiez toutes les connexions.
Si certains programmes sont dépourvus de son, mais pas d’image, c’est que vous
n’avez pas le bon système TV. Modifiez le réglage
Système
(p. 6).
L’amplificateur connecté au téléviseur ne délivre pas de son ? Vérifiez que vous
n’avez pas confondu la sortie audio avec l’entrée audio.
Vérifiez que vous avez bien configuré l’ordinateur sur un résolution d’affichage
compatible (voir p.10).
Le voyant du téléviseur ne clignote plus lorsque vous utilisez la télécommande ?
Remplacez la pile.
Si le téléviseur ne reçoit pas de signal pendant 15 mn, il passe automatiquement
en veille.
Pour faire des économies d’énergie, votre téléviseur est équipé de composants
permettant une très faible consommation en veille (inférieure à 1 W).
Le nettoyage de l’écran et du coffret doit être effectué uniquement avec un
chiffon propre, doux et non pelucheux. Ne pas utiliser de produit à base d’alcool
ou de solvant.
Débranchez la prise secteur du téléviseur pendant 30 secondes puis rebranchez
la à nouveau.
En cas de panne, n’essayez jamais de réparer vous même le téléviseur, mais
consultez le service après vente.

1
NL
Inleiding
Inhoudsopgave
Hartelijk dank voor de aankoop van dit televisietoestel.
Deze handleiding is bedoeld om u te helpen bij de installatie en bediening van uw
TV toestel.
We raden u ten sterkste aan de handleiding zorgvuldig door te nemen.
We hopen dat onze technologie u alle redenen tot tevredenheid geeft.
Installatie
Voorstell van de LCD-televisie . . . . . . . . . . . . . . . . . . . . . . . . . . . . . . . . . . . . . . . .2
Toetsen van het TV toestel . . . . . . . . . . . . . . . . . . . . . . . . . . . . . . . . . . . . . . . . . . .2
Toetsen van de afstandsbediening . . . . . . . . . . . . . . . . . . . . . . . . . . . . . . . . . . . . .3
Toets videorecorder . . . . . . . . . . . . . . . . . . . . . . . . . . . . . . . . . . . . . . . . . . . . . . . .4
Installeren van het televisietoestel . . . . . . . . . . . . . . . . . . . . . . . . . . . . . . . . . . . . .5
Snelle installatie . . . . . . . . . . . . . . . . . . . . . . . . . . . . . . . . . . . . . . . . . . . . . . . . . . . .5
Sorteren van de programma’s . . . . . . . . . . . . . . . . . . . . . . . . . . . . . . . . . . . . . . . .6
Handmatig vastleggen in het geheugen . . . . . . . . . . . . . . . . . . . . . . . . . . . . . . . . . .6
Andere instellingen van het menu Installatie . . . . . . . . . . . . . . . . . . . . . . . . . . . . .6
Gebruik
Instellen van het beeld . . . . . . . . . . . . . . . . . . . . . . . . . . . . . . . . . . . . . . . . . . . . . .7
Instellen van het geluid . . . . . . . . . . . . . . . . . . . . . . . . . . . . . . . . . . . . . . . . . . . . . .7
Instellen van de diversen . . . . . . . . . . . . . . . . . . . . . . . . . . . . . . . . . . . . . . . . . . . .7
Formaat 16:9 . . . . . . . . . . . . . . . . . . . . . . . . . . . . . . . . . . . . . . . . . . . . . . . . . . . . . .8
Teletekst . . . . . . . . . . . . . . . . . . . . . . . . . . . . . . . . . . . . . . . . . . . . . . . . . . . . . . . . .9
Gebruik van de modus PC-scherm . . . . . . . . . . . . . . . . . . . . . . . . . . . . . . . . . . . .10
Gebruiken in HD (Hoge Definitie) mode . . . . . . . . . . . . . . . . . . . . . . . . . . . . . . .11
Extra apparatuur
Videorecorder . . . . . . . . . . . . . . . . . . . . . . . . . . . . . . . . . . . . . . . . . . . . . . . . . . .12
Andere apparaten . . . . . . . . . . . . . . . . . . . . . . . . . . . . . . . . . . . . . . . . . . . . . . . . .13
Aansluitingen aan de zijkant . . . . . . . . . . . . . . . . . . . . . . . . . . . . . . . . . . . . . . . . .13
Computer . . . . . . . . . . . . . . . . . . . . . . . . . . . . . . . . . . . . . . . . . . . . . . . . . . . . . . .13
Praktische informatie
Tips . . . . . . . . . . . . . . . . . . . . . . . . . . . . . . . . . . . . . . . . . . . . . . . . . . . . . . . . . . . .14
Verklaring technische termen . . . . . . . . . . . . . . . . . . . . . . . . . . . . . . . . . . . . . . . .14
°
Aanwijzing voor hergebruik
Uw TV toestel bevat materialen die opnieuw gebruikt of gerecycleerd kunnen
worden. Om de hoeveelheid afval in het milieu te beperken,halen gespecialiseerde
ondernemingen gebruikte toestellen op om ze uit elkaar te halen en materiaal dat
geschikt is voor hergebruik te verzamelen (neem contact op met uw verkoper).

2
Voorstell van de LCD-televisie
Afstandsbediening
&
De toesten van de tv :
•
POWER : om de tv aan of uit te zetten.
•
VOLUME -/+ :voor het regelen van het
geluidsvolume.
•
MENU : om een menu op te roepen of te verlaten.
Met de toetsen
PROGRAM -/+ een optie
selecteren en met
VOLUME -/+ de optie regelen.
•
PROGRAM -/+ :voor het selecteren van de
programma’s.
Achterzijde :
De belangrijkste aansluitingen zitten onderaan de
TV.
Zie pagina 12 voor meer details over de aansluitingen.
é Netvoeding
“ DVI en audio uitgang voor het aansluiten van
HD (Hoge Definitie) apparatuur of computer,
met de DVI uitgang.
‘ SCART EXT1,EXT2
( Stekker voor TV
§ Aansluitingen aan de zijkant
Verwijder de beschermfolie van de batterij om
de afstandsbediening te activeren.
Om het milieu te helpen beschermen, bevat de bij
dit televisietoestel geleverde batterij geen kwik of
nikkel cadmium.
Gooi gebruikte batterijen niet weg
maar maak gebruik van de recycleermogelijkheden ter
uwer beschikking (raadpleeg uw verkoper).
CR 2025

3
Toetsen van de afstandsbediening
1) . Wachtstand (Stand-by)
Om de TV in de wachtstand te zetten. Druk op P –/+,
0/9 of AV om de TV weer aan te zetten.
2)
x Pixel + (Niet op alle uitvoeringen aanwezig)
Schakelt de Pixel + demonstratie aan of uit.
3)
· ¢ Ê Æ ∫
Videorecorder (p.14)
4)
Q Surround
Om het effect van verruimd geluid te
activeren/desactiveren. Bij stereo geeft dit de indruk dat
de luidsprekers verder uit elkaar staan.Voor versies
uitgerust met Virtual Dolby Surround * krijgt u de
geluidseffecten van Dolby Surround Pro Logic.
5) AV
Om de Bron te tonen, voor het selecteren van TV of
randapparatuur dat aangesloten is op EXT1,
EXT2/SVHS2,AV/SVHS3, PC of HD (p.12).
6)
h Active Control
Verbetert de beeldkwaliteit naargelang ontvangst en
omgevingslicht.
7) Menu
Om de menu’s op te roepen of te verlaten.
8) Cursor (
<>≤≥)
Deze 4 toetsen worden gebruikt om te kiezen binnen
de menu’s.
9) Volume
Voor het regelen van het geluidsniveau.
10)
ª mVoorinstellingen van beeld en geluid
Geeft toegang tot een aantal instellingen van beeld en
geluid.
De stand Persoonlijk komt overeen met de gekozen
instellingen in de menu’s.
11)
Ë Scherm informatie
Om het programmanummer, de tijd,de geluidsmode en
de resterende tijd op de timer in beeld te brengen of te
verwijderen.Door de toets 5 seconden lang ingedrukt
te houden blijft het programmanummer permanent op
het scherm.
* Geproduceerd onder licentie van Dolby Laboratories.”Dolby” en
het dubbele D-symbool zijn handelsmerken van de Dolby
Laboratories.
1)
2)
3)
4)
5)
6)
7)
8)
9)
10)
11)

4
Toetsen van de afstandsbediening
12) Mode
Druk op deze toets voor het schakelen tussen TV,
DVD of AUX.
13)
œ Oproepen van PIP (p.10)
14)
ı Programmalijst
Om de programmalijst af te beelden of te wissen. Dan
kunt u met de toetsen <> een programma uitkiezen
en het met behulp van de toets ≥ afbeelden.
15)
∏ Formaat 16:9 (p. 8)
16)
ù Geluidsmodus
Om van Stereo en Nicam Stereo naar Mono te
schakelen of te kiezen tussen Dual I of Dual II bij
tweetalige uitzendingen.
De Mono-aanduiding is rood wanneer er geen andere
mogelijkheid is.
17)
Ÿ Å Ó ¤ Oproepen van teletekst (p. 9)
18) Niet van toepassing op TV-modus.
19)
[ Afzetten van het geluid
Om het geluid aan of uit te zetten.
20) P -/+ Kiezen van TV programma’s
Om een programma lager of hoger te kiezen. Nummer
en geluidsmode verschijnen voor een paar seconden in
beeld.
Voor sommige programma’s voorzien van teletekst, verschijnt
de titel van het programma onderaan het scherm.
21) 0/9 Cijfertoetsen
Om direct een programma te kiezen.Voor een
programmanummer van twee cijfers moet het tweede
cijfer worden ingevoerd voor het streepje verdwijnt.
22)
ÁVorig programma
Om terug te schakelen naar het eerder bekeken
programma.
Met de afstandsbediening kunt u de voornaamste functies van de videorecorder en DVD bedienen.
Druk op de toets MODE om de gewenste modus te selecteren:DVD of AUX (videorecorder).Het
controlelampje van de afstandsbediening licht op om aan te tonen welke modus werd geselecteerd.Dit
gebeurt automatisch wanneer er 20 seconden lang niets gebeurt (terug naar TV-modus).
Afhankelijk van de uitrusting kunnen de volgende toetsen worden gebruikt:
. wachtstand,
l¢ snel terugspoelen,
∫l snel voortspoelen,
· opname,
∆ pauze,
Ê stop,
Æ lezen,
MENU oproepen menu,
<>≤≥ navigatie en instellingen,
OK bevestigen,
0/9 cijfertoetsen,
P -/+ keuze van de programma’s,
ù keuze van taal,
Ë OSD- menu,
Á DVD :T-C funktie
VCR : Index funktie
De afstandsbediening is compatibel met alle
videorecorders en satellietontvangers die gebruik
maken van de RC5-standaard en van alle DVD’s die
de RC6-standaard gebruiken.
(12
(13
(14
(15
(16
(17
(18
(19
(20
(21
(22
Toetsen VCR of DVD (keuzetoets)

5
Snelle installatie
Wanneer u de televisie voor het eerst aanzet,
verschijnt er een menu op het scherm.In dit menu
kunt u het land en de taal van de menu’s kiezen:
Indien het menu niet verschijnt, houd de toetsen
VOLUME - en VOLUME + van het
televisietoestel dan 5 seconden ingedrukt om het
te laten verschijnen.
& Gebruik de toetsen
<> van de
afstandsbediening om uw land te kiezen en
bevestig met
≥. Indien uw land niet op de lijst
voorkomt, selecteer dan “. ..”
é Selecteer vervolgens uw taal met de toetsen
<> en bevestig met ≥.
“ Het zoeken start nu automatisch.Alle
beschikbare tv-programma’s en radiostations*
worden in het geheugen opgeslagen. Dit alles
duurt enkele minuten. Op het scherm ziet u
hoe het zoeken vordert en hoeveel
programma’s er gevonden zijn. Na afloop
verdwijnt dit menu.
Druk op de toets
MENU om het zoeken te
stoppen of te onderbreken. Zie het hoofdstuk Tips
op p. 14 als er geen programma wordt gevonden.
‘ Als de kabel of het kabelnetwerk het
automatische sorteersignaal uitzendt, dan
worden de programma’s op de juiste manier
genummerd. De installatie wordt dan beëindigd.
( Indien dit niet het geval is, dient u het menu
Sorteren te gebruiken om ze te nummeren.
Sommige zenders of kabelnetwerken zenden hun
eigen sorteerparameters uit (regio, taal enz...). In
dat geval moet u uw keuze aangeven met de
toetsen
<> en bevestigen met ≥.
&
Plaatsen van de tv
Plaats uw toestel op een stevig en stabiel vlak. Stel
het toestel nooit bloot aan waterspatten,
warmtebronnen (lamp,kaars, radiator, ...) en houd
de ventilatieroosters achteraan het toestel vrij.
é
Aansluiten van de antennes
• Gebruik de bijgeleverde antennekabel en
verbind de stekker
: onderaan het toestel
met uw antennestekker.
• Sluit de stroomkabel aan op het televisietoestel
en stop het netsnoer in de wandcontactdoos
(220-240V / 50 Hz).
Zie pagina 12 voor het aansluiten van andere
apparaten.
“
Inschakelen
Druk op de POWER toets om de televisie aan te
zetten. Een rood indicatielampje gaat branden en
het scherm licht op.Ga rechtstreeks naar het
hoofdstuk
Snelle installatie.Als de televisie in
stand-by blijft (rood lampje) drukt u op de toets
P -/+ van de afstandsbediening.
Het indicatielampje knippert wanneer u de
afstandsbediening gebruikt.
Installeren van het televisietoestel
Plug’n’Play
Country
GB
Language
English

6
Handmatig vastleggen in het geheugen
Andere instellingen van het menu Installatie
Sorteren van de programma’s
Met dit menu kunt u de programma’s één
voor één vastleggen.
& Druk op de toets
MENU.
é Met de cursor selecteert u het menu
Installatie
en vervolgens Handmatig vastleggen:
“
Systeem: selecteer Europe (automatisch
zoeken*) of
West Eur (BG-norm), East Eur
(DK-nrom), UK (I-norm) of France (LL-norm).
* Behalve voor Frankrijk (LL-norm) moet verplicht
de keuze France worden gemaakt
‘
Zoeken: druk op ≥.Het zoeken begint. Zodra
een programma is gevonden,stopt het zoeken en
wordt de programmanaam weergegeven (indien
beschikbaar). Ga naar de volgende stap. Indien u
de frequentie van het gewenste programma kent,
dan kunt u het nummer ervan direct invoeren
met behulp van de toetsen
0 tot 9.
Als geen programma wordt gevonden, zie het
hoofdstuk Tips (p. 14).
(
Programnr.: voer het gewenste nummer in
met de toetsen
≤≥ of
0 tot 9
.
§
Fijnafst. : als de ontvangst niet bevredigend is,
stel dan af met de toetsen
≤≥.
è
Vastleggen: druk op ≥. Het programma is
vastgelegd.
! Herhaal de stappen ‘ tot è voor elk vast te
leggen programma.
Om het menu te verlaten: druk op de toets Ë.
& Druk op de toets MENU en selecteer het
menu
Installatie:
é
Taal: om de taal van de weergave van de
menu’s te wijzigen.
“
Land: om uw land te kiezen.
Deze instelling wordt gebruikt bij het zoeken, het
automatisch sorteren van de programma’s en de
weergave van teletekst. Indien uw land niet in de
lijst voorkomt, selecteer dan “. ..”
‘ Automatisch vastleggen: met dit menu start u
het automatisch zoeken naar de programma’s die
u in uw regio kunt ontvangen.Als de kabel of het
kabelnetwerk het automatische sorteersignaal
uitzendt, dan worden de programma’s op de
juiste manier genummerd. Indien dit niet het
geval is, dan moet u het menu
Sorteren
gebruiken om ze te hernummeren (zie p. 4).
Sommige zenders of sommige kabelnetwerken zenden
hun eigen sorteerparameters uit (regio, taal enz.). In dit
geval moet u uw keuze aanduiden met de toetsen
<> en bevestigen met ≥.Druk op
MENU
om het
zoeken te stoppen of te onderbreken. Indien geen enkel
programma werd gevonden,zie dan het menu Tips (p. 14).
(
Naam:
Indien u dit wenst, kunt u een naam
geven aan de programma’s,
radiostations
en
externe aansluitingen. Gebruik de toetsen
≤≥
om in het naamveld van de ene naar de andere
letterpositie te gaan (5 tekens) en de toetsen
<> om de tekens te selecteren. Druk op ≤
als u de naam heeft ingevoerd.De naam is nu in
het geheugen vastgelegd.
Opmerking: tijdens de installatie krijgen de
programma’s automatisch een naam wanneer het
identificatiesignaal wordt doorgezonden.
§ Druk op
Ë om de menu’s te verlaten.
& Druk op de toets MENU. Het TV menu
verschijnt op het scherm.
é Selecteer het menu
Installatie met de cursor
en vervolgens het menu
Sorteren.
“ Selecteer het programma dat u wil verplaatsen
met de toets
<> en druk op ≥.
‘ Gebruik vervolgens de toetsen
<> om het
nieuwe nummer te kiezen en bevestig
met
≤.
( Herhaal de stappen “ en ‘ zo vaak als er
programma’s hernummerd moeten worden.
§ Om de menu’s te verlaten, druk op
Ë.
TV menu
Beeld
Geluid
Diversen
Installatie
TV menu
Beeld
Geluid
Diversen
Installatie
Handmatig
Systeem
Zoeken
Programnr.
Fijnafst.
Vasteleggen
Europe
Installatie
Taal Æ •
Land Æ •
Automatisch Æ •
Handmatig Æ •
Sorteren Æ •
Naam Æ •
0
1
2
3
4
5

7
Instellen van het beeld
Instellen van het geluid
& Druk op de toets MENU en vervolgens op ≥.
Het menu
Beeld verschijnt:
é Gebruik de toetsen
<> om een instelling te
selecteren en de toetsen
≤≥ om de instelling
af te regelen.
“ Zodra u de instellingen heeft uitgevoerd,
selecteer dan de keuze
Vastleggen en druk
op
≥ om de instelling vast te leggen.
Druk op
Ë om de menu’s te verlaten.
Beschrijving van de instellingen:
•
Helderheid: om de helderheid van het beeld
in te stellen.
•
Kleur: om de kleurintensiteit in te stellen.
•
Contrast: om het verschil tussen de lichte en
de donkere kleuren in te stellen.
•
Scherpte: om de scherpte van het beeld in
te stellen.
•
Kleurtoon: stelt de kleurweergave in:Koel
(blauwer), Normaal (uitgebalanceerd) of
Warm (roder).
•
Vastleggen: om de instellingen van het beeld
in het geheugen vast te leggen.
& Druk op MENU, selecteer Geluid (>) en druk
op
≥. Het menu Geluid verschijnt:
é Gebruik de toetsen
<> om een instelling te
kiezen en de toetsen
≤≥ om in te stellen.
“ Als u het geluid heeft ingesteld, selecteer dan
de optie
Vastleggen en druk op ≥ om de
instelling vast te leggen.
‘ Om de menu’s te verlaten, druk op
Ë.
Beschrijving van de instellingen:
•
Equalizer:
om de frequenties in te stellen (van
lage tonen: 120 Hz tot hoge tonen: 10 kHz).
•
Balans: om het geluid evenwichtig over de
linker- en rechterluidsprekers te verdelen.
•
Delta Volume: stelt u in staat om de
volumeverschillen die tussen de verschillende
programma’s of de EXT-aansluitingen kunnen
bestaan, te compenseren. Deze instelling is
beschikbaar voor de programma’s 0 tot 40 en
de EXT-aansluitingen.
• Max. Volume:controleert automatisch het
volume zodat verhogingen van het geluid kunnen
worden beperkt, met name bij het schakelen
tussen programma’s of reclamespots.
•
Dolby VIrtual:
Om het effect van verruimd
geluid te activeren/desactiveren. Met de Q toets
heeft u eveneens toegang tot al deze instellingen.
•
Vastleggen: om de geluidsinstellingen in het
geheugen vast te leggen.
Instellen van de diversen
& Druk op MENU, selecteer Diversen (>) en
druk op
≥.U kan het volgende instellen:
é
Contrast +: automatische instelling van het
beeldcontrast die het donkerste deel van het
beeld permanent zwart maakt.
“
Ruisonderdrukking: vermindert de beeldruis
(sneeuw) bij een slechte ontvangst.
‘
Timer (niet op alle uitvoeringen aanwezig): voor
het instellen van de tijdsduur waarna
automatisch naar de wachtstand wordt
overgeschakeld.
(
PIP: voor het instellen van het formaat en de
positie van het PIP-scherm.
§
Om de menu’s te verlaten, druk op Ë.
TV menu
Beeld
Geluid
Diversen
Installatie
Beeld
Helderheid
Kleur
Contrast
Scherpte
Kleurtemp.
Vastleggen
39
TV menu
Beeld
Geluid
Diversen
Installatie
Geluid
Equalizer Æ •
Balans Æ •
Delta Vol Æ •
Max. Volume Æ •
Dolby Virtual Æ •
Vastleggen Æ •
120 Hz
500 Hz
1500 Hz
5 KHz
10 KHz

8
16:9 Formaten
De beelden die u ontvangt kunnen in het 16:9 (breedbeeld) of 4:3 (traditioneel beeld) formaat
worden uitgezonden. Soms hebben 4:3 beelden een zwarte balk boven en onder in het beeld
(letterbox uitzendingen). Met de 16:9 functie kunt u de zwarte balken laten verdwijnen en de
(letterbox) uitzending beeldvullend weergeven.
Druk op de toets
∏
(of ≤≥) om een ander beeldformaat te kiezen :
Het televisietoestel is voorzien van een automatische beeldformaat-selectie. Hierdoor wordt
het door sommige zenders specifiek uitgezonden signaal gedecodeerd en automatisch het
juiste beeldformaat geselecteerd.
4:3
Het beeld wordt in het 4:3 formaat weergegeven, met brede zwarte stroken links en
rechts van het beeld.
Filmformaat 14:9
Het beeld wordt naar het 14:9 formaat vergroot, met dunne zwarte stroken links en
rechts van het beeld.
Filmformaat 16:9
Het beeld wordt naar het 16:9 formaat vergroot. Dit formaat is geschikt voor letterboxuitzendingen (met zwarte balken boven en onder in het beeld).
Ondertitel Zoom
In dit formaat worden 4:3 beelden horizontaal en verticaal vergroot zodat het
beeldvullend wordt weergegeven.
Superzoom
Met dit formaat worden 4:3 beelden beeldvullend weergegeven door het 4:3 beeld
horizontaal te vergroten.Eventuele ondertitels blijven zichtbaar.
Breedbeeld
Met deze modus stelt u de goede verhoudingen in van beelden die in 16:9 worden
verzonden.
Pas op: in dit formaat worden 4:3 beelden vervormd weergegeven.

9
Teletekst
Druk op:
U krijgt:
Teletekst is een informatiesysteem dat door bepaalde tv-kanalen wordt uitgezonden en als een krant kan
worden geraadpleegd. Het voorziet ook in ondertiteling voor slechthorenden of voor mensen die weinig
vertrouwd zijn met de taal waarin een bepaald programma wordt uitgezonden (kabelnetwerken,
satellietkanalen, …).
Teletekst
aanzetten
Een pagina
kiezen
Oproepen en verlaten van teletekst.
De pagina met de hoofdindex geeft een lijst van rubrieken die
kunnen worden geraadpleegd. Iedere rubriek heeft een
paginanummer van drie cijfers. Als het gekozen kanaal geen
teletekst uitzendt, dan verschijnt de aanduiding 100 en het scherm
blijft donker (verlaat in dit geval teletekst en kies een ander
kanaal).
Vorm het nummer van de gewenste pagina met de toetsen 0
tot 9 of P -/+.Bijvoorbeeld: voor pagina 120, voer 120 in.Het
nummer verschijnt in de linkerbovenhoek van het scherm, de
paginateller begint te zoeken en vervolgens verschijnt de pagina.
Herhaal de procedure om een andere pagina te raadplegen.Als
de teller blijft zoeken, betekent dit dat de gekozen pagina niet wordt
uitgezonden. Kies in dit geval een ander nummer.
Rechtstreekse keuze
van de subpagina’s
Onderaan de pagina staan gekleurde velden. Met de 4
gekleurde toetsen kunnen de ermee overeenkomende
rubrieken of pagina’s worden opgeroepen.
De gekleurde velden knipperen wanneer de pagina of de rubriek
nog niet beschikbaar is.
Inhoud
Om terug te keren naar de inhoud (gewoonlijk pagina 100).
Weergave van
subpagina’s
onderbreken
Dubbele pagina
teletekst
Sommige pagina’s bevatten subpagina’s die elkaar automatisch
opvolgen. Met deze toets kunt u de afwisseling van de
subpagina’s onderbreken of voortzetten.De aanduiding
_
verschijnt bovenaan rechts.
Om het afbeelden van twee pagina’s van teletekst tegelijk te
activeren of te desactiveren. De actieve pagina staat links en
de volgende pagina staat rechts.Druk op de toets
Ó als u
een pagina wilt bevriezen (bijvoorbeeld de samenvatting).De
actieve pagina wordt de rechterpagina. Om terug te keren
naar normale weergave, druk op Å.
Verborgen
informatie
Een pagina
vergroten
Favoriete
pagina’s
Om verborgen informatie te doen verschijnen of verdwijnen
(oplossingen van spelletjes).
Om het bovenste of het onderste deel van de pagina weer te geven
en vervolgens naar de normale paginagrootte terug te keren.
Voor de teletekstprogramma’s 0 tot 40 kunt u 4 favoriete
pagina’s vastleggen die vervolgens kunnen worden opgeroepen
met de gekleurde toetsen (rood,groen, geel,blauw).
& Druk op de toets MENU om naar de modus favoriete
pagina’s te gaan.
é Geef de teletekstpagina weer die u wilt vastleggen.
“ Houd vervolgens de gekleurde toets van uw keuze
3 seconden ingedrukt. De pagina wordt vastgelegd.
‘ Herhaal deze stappen voor de andere gekleurde toetsen.
(Van nu af aan verschijnen uw favoriete pagina’s onderaan
het scherm zodra u teletekst oproept.
Om de gewone rubrieken terug te vinden,druk
op MENU.
Houd Ë 5 seconden lang ingedrukt om dit ongedaan te maken.

10
Gebruik van de modus PC-scherm
PC-modus
Uw tv kan ook worden gebruikt als
computerscherm. Met de functie PIP kunt u
tegelijk op een verkleind scherm naar TV kijken.
De PIP functionaliteit, werkt enkel als je PC een
digitale uitgang heeft.
U moet eerst de computer aansluiten en de
resolutie aanpassen (zie pagina 13).
PC-modus kiezen
& Druk op de
AV toets van de afstandbediening,
om de
Bron te tonen.
é
Gebruik de cursor <> toetsen voor het
selecteren van
PC en druk op de cursor ≥ toets
om de TV in PC mode te schakelen (
DVI In).
Om terug te keren naar de TV mode, druk op
de
AV
toets, selecteer TV en bevestig met ≥
.
PIP gebruiken
In PC-modus kunt u een venster weergeven
waarin u de tv-zenders kunt bekijken.
Opgelet: de PIP functie is enkel mogelijk als de
computer aangesloten is op de DVI ingang (zie
pag. 13).
& Druk op de toets œom het PIP-scherm
weer te geven.Het tv-beeld wordt in een klein
venster weergegeven.
é Druk opnieuw op de œ toets om de grootte
van het pip venster te wijzigen, naar dual screen
over te schakelen,en het terug te laten
verdwijnen.
“ Gebruik de P -/+ toetsen voor het
omschakelen van de programma’s in het PIP
scherm.
Gebruiken van de PC-menu’s
Druk op de toets MENU om toegang te
krijgen tot de specifieke instellingen in de PCmodus. Gebruik de cursor voor het regelen
van (de instellingen worden automatisch
opgeslagen):
• Beeld:
- Helderheid/Contrast: om de helderheid en
het contrast te regelen.
- Horizontaal/ Verticaal*: voor het horizontaal
en verticaal instellen van de beeldpositie.
- Kleurtemp.: voor het instellen van de
kleuren (koud,normaal of warm).
• Audio keuze: om te kiezen welk geluid wordt
weergegeven op het toestel (PC of TV / Radio).
U kunt bijvoorbeeld naar de radio luisteren
terwijl u de computer gebruikt.
•
Diversen:
- Fase/Clock*:
voor het verwijderen van
horizontale (Fase) en verticale (Clock)
stoorlijnen.
- Formaat: om te schakelen tussen vergrote of
standaard weergave van de PC-schermen.
- PIP: voor het instellen van het formaat en de
positie van het PIP-scherm.
- Automatisch* : de positie wordt automatisch
ingesteld.
• Fabr. inst. : om terug te keren naar de
fabrieksinstellingen (standaard instellingen).
* Deze instellingen zijn niet beschikbaar als de
computer aangesloten is op de DVI ingang.
Opmerking:
– Wanneer u de LCD-tv als monitor voor uw computer gebruikt, kunnen er lichte diagonale storingslijnen te zien
zijn wanneer de monitor wordt gebruikt in een omgeving met elektromagnetische interferentie, maar dit heeft
geen invloed op de prestaties van het product.
– Voor betere prestaties wordt een VGA-kabel van goede kwaliteit met een goed ruisfilter aangeraden.

11
Gebruiken in HD (Hoge Definitie) mode
HD modus
De HD (Hoge Definitie) mode, laat u genieten
van nog scherpere en helderdere beelden via
de DVI ingang,als u gebruik maakt van HD
ontvanger of andere HD-toestelen.
Sluit hiervoor eerst alle HD-toestellen aan (zie p.13)
U moet eerst de computer aansluiten en de
resolutie aanpassen (zie p. 13).
HD-modus kiezen
& Druk op de
AV toets van de afstandbediening,
om de
Bron te tonen.
é
Gebruik de cursor <> toetsen om HD te
selecteren en druk op de cursor
≥ toets om de
TV in HD mode te schakelen.
Om terug te keren naar de TV mode, druk op
de
AV
toets, selecteer TV en bevestig met ≥
.
Gebruiken van het HD-menu
Druk op de MENU toets om toegang te
krijgen tot de specifieke instellingen in de HDmodus. Gebruik de cursor voor het regelen
van (de instellingen worden automatisch
opgeslagen):
• Beeld:
- Helderheid: om de helderheid van het beeld
in te stellen.
- Kleur: om de kleurintensiteit in te stellen.
- Contrast: om het verschil tussen de lichte en
de donkere kleuren in te stellen.
- Scherpte: om de scherpte van het beeld in
te stellen.
- Kleurtoon: stelt de kleurweergave in:Koel
(blauwer), Normaal (uitgebalanceerd) of
Warm (roder).
- Vastleggen: om de instellingen van het beeld
in het geheugen vast te leggen.
• Geluid:
-
Equalizer:
om de frequenties in te stellen (van
lage tonen: 120 Hz tot hoge tonen: 10 kHz).
- Balans: om het geluid evenwichtig over de
linker- en rechterluidsprekers te verdelen.
- Delta Volume: stelt u in staat om de
volumeverschillen die tussen de verschillende
programma’s of de EXT-aansluitingen kunnen
bestaan, te compenseren. Deze instelling is
beschikbaar voor de programma’s 0 tot 40
en de EXT-aansluitingen.
-
Max. Volume
:
controleert automatisch het
volume zodat verhogingen van het geluid kunnen
worden beperkt, met name bij het schakelen
tussen programma’s of reclamespots.
-
Dolby VIrtual
: Om het effect van verruimd
geluid te activeren/desactiveren. Met de Q
toets
heeft u eveneens toegang tot al deze
instellingen.
- Vastleggen: om de geluidsinstellingen in het
geheugen vast te leggen.
•
Diversen:
- Timer
(niet op alle uitvoeringen aanwezig):
voor het instellen van de tijdsduur waarna
automatisch naar de wachtstand wordt
overgeschakeld.
-
PIP: voor het instellen van het formaat en de
positie van het PIP-scherm.
- Horizontaal: voor het horizontaal instellen
van de beeldpositie.

12
Aansluiten van extra apparatuur
Sluit de recorder aan zoals hiernaast is weergegeven. Gebruik
een euroconnector kabel van goede kwaliteit.
Als uw videorecorder geen euroconnector aansluiting heeft, is de
verbinding alleen mogelijk via de antennekabel. U dient dan af te
stemmen op het testsignaal van uw videorecorder en dit
programmanummer 0 toe te kennen (zie handmatig vastleggen,p. 6).
Om het beeld van de videorecorder weer te geven, druk op
0.
Videorecorder met decoder
Sluit de decoder aan op de tweede euroconnector aansluiting
van de videorecorder. U kunt dan ook gecodeerde uitzendingen
opnemen.
De televisie heeft 2 externe aansluitingen aan de achterkant van het toestel (EXT1 en EXT2).
Druk op de
AV toets van de afstandbediening, om de Bron te tonen en selecteer TV of randapparatuur
aangesloten op EXT1, EXT2/SVHS2,AV/SVHS3, PC of HD.
De EXT1 aansluiting heeft audio en video ingangen/uitgangen en RGB ingangen.
De EXT2 aansluiting heeft audio en video ingangen/uitgangen en S-VHS ingangen.
Videorecorder
DVI In
DVI
Audio In
EXT 2 EXT 1
Headphon
e
Audio In
Video In
S-Video

13
Satellietontvanger, decoder, CDV, etc.
Maak de aansluitingen zoals hiernaast is weergegeven.
Sluit voor een optimale beeldkwaliteit apparatuur die RGB
signalen produceert (digitale decoder, DVD, bepaalde CDV drives,
etc.) aan op EXT1, en apparatuur die S-VHS signalen produceert
(S-VHS en Hi-8 videorecorders) op EXT2 en alle andere
apparatuur op EXT1 of EXT2.
Het selecteren van aangesloten apparatuur
Druk op de
AV toets om EXT1, EXT2/S-VHS2 (S-VHS signalen van
de EXT2 aansluiting).
Maak de aansluitingen zoals hiernaast is weergegeven.
Met de toets
AV, kies AV/S-VHS3.
Bij een mono-toestel sluit u het geluidssignaal aan op de ingang AUDIO
L (of AUDIO R). Het geluid komt automatisch uit de linker- en
rechterluidsprekers van het televiesietoestel.
Hoofdtelefoon
Wanneer de hoofdtelefoon aangesloten is, wordt het geluid van
het televisietoestel uitgezet. Met de toetsen
VOLUME -/+ kunt u
het volume regelen.
De impedantie van de hoofdtelefoon moet tussen 32 en 600 ohm liggen.
Maak de aansluitingen zoals hiernaast is weergegeven.
Met de toets
AV, kies HD.
Meer informatie over het gebruik van de HD-modus vindt u op pagina 11.
Andere apparaten
Aansluitingen aan de zijkant
HD ontvanger
Computer
PC met DVI
Sluit de monitor uitgang (DVI) van je computer aan de op de
DVI In van de TV.
Sluit de geluidsuitgang van de computer aan op de
DVI Audio In-
ingang van je TV.
PC met VGA
Sluit de monitor uitgang (VGA) van je computer aan op de
VGA/DVI adapter en deze op de
DVI In van de TV.
Sluit de geluidsuitgang van de computer aan op de
DVI Audio In-
ingang van je TV.
Meer informatie over het gebruik van de PC-modus vindt u op
pagina 10.
De optimale schermresolutie configureert u op de PC met de
instelling 1024 x 768, 60 Hz.
Hier vindt u een lijst met de verschillende resoluties de
beschikbaar zijn op uw televisie:
640 x 480, 60 Hz 800 x 600, 56 Hz 1024 x 768, 60 Hz
640 x 480, 67 Hz 800 x 600, 60 Hz 1024 x 768, 70 Hz
640 x 480, 72 Hz 800 x 600, 72 Hz 1024 x 768, 75 Hz
640 x 480, 75 Hz 800 x 600, 75 Hz
720 x 400, 70 Hz 832 x 624, 75 Hz

14
Verklaring technische termen
DVI (Digital Visual Interface): Een digitale interface
standaard, ontwikkeld door de Digital Display
Working Group (DDWG), om analoge
signalen om te zetten in digitale signalen, om
zo analoge als ook digitale monitoren te
ondersteunen.
VGA (Video Graphics Array):
Een veel gebruikte
standaard voor grafische beeldschermen bij PC’s.
RGB-signalen : dit zijn de 3 videosignalen (rood,
groen, blauw) van het beeldsignaal. Met deze
signalen wordt een betere beeldkwaliteit
verkregen.
S-VHS signalen: Dit zijn twee gescheiden Y/C
videosignalen van de S-VHS en Hi-8
opnamestandaards. De luminantiesignalen Y (zwart
en wit) en chrominantiesignalen C (kleur) worden
apart op de videoband opgenomen. Dit geeft een
betere beeldkwaliteit dan met gewone video (VHS
en 8 mm) waarbij de Y/C signalen worden
gecombineerd tot één videosignaal.
NICAM geluid: Proces waarmee digitaal geluid kan
worden uitgezonden.
Systeem: Televisiebeelden worden niet in alle landen
op dezelfde manier uitgezonden. Er zijn
verschillende standaards:BG, DK, I, en LL’. Met de
Systeem instelling (p. 6) kunnen deze
verschillende standaards worden gekozen.Dit
moet niet worden verward met PAL of SECAM
kleurcodering.Pal wordt gebruikt in de meeste
landen van Europa,Secam in Frankrijk, Rusland en
de meeste Afrikaanse landen. De Verenigde Staten
en Japan gebruiken een ander systeem,NTSC
genaamd. De EXT1 en EXT2 ingangen kunnen
opnames met NTSC kleurcodering weergeven.
16:9:Verwijst naar de verhouding tussen de
breedte en hoogte van het scherm.
Breedbeeldtelevisies hebben een verhouding
van 16:9, de traditionele televisietoestellen
hebben een 4:3 scherm.
Tips
Slechte ontvangst
Geen beeld
Geen geluid
De PC-modus of PIPfunctie werkt niet
De
afstandsbediening
werkt niet meer ?
Stand-by
Schoonmaken
Nog steeds geen
resultaten?
Dubbele beelden, echobeelden of schaduwen kunnen het gevolg zijn van de
nabijheid van bergen of hoge gebouwen. Probeer in zo’n geval het beeld
handmatig bij te stellen: zie “fijnafstemming” (p. 6) of verander de oriëntatie van
de buitenantenne.
Met de binnenantennes kan ontvangst in bepaalde
omstandigheden moeilijk zijn. U kan dit verbeteren door de antenne te draaien.
Indien de ontvangst middelmatig blijft, dan dient u een buitenantenne te gebruiken.
Is de antenne op de juiste manier aangesloten? Hebt u het juiste systeem
gekozen? (p.6) Slecht aangesloten euroconnector kabels of antenne aansluitingen
zijn vaak de oorzaak van problemen met beeld of geluid (soms gaan de
aansluitingen gedeeltelijk los als het TV toestel wordt verplaatst of gedraaid.
Controleer alle aansluitingen.
Als u op bepaalde kanalen wel beeld ontvangt, maar geen geluid, betekent dit dat
u niet het juiste TV systeem hebt.Wijzig de
Systeem instelling (p. 6).
De versterker die is aangesloten op de televisie geeft geen geluid.Controleer of
u de audio ingang en uitgang niet hebt verwisseld.
Controleer of uw computer is ingesteld op een compatibele resolutie (zie pagina 10).
U krijgt in PC-modus geen radiogeluid ?
Reageert het TV toestel niet op de afstandsbediening of knippert het
indicatielampje aan het toestel niet meer wanneer u de afstandsbediening
gebruikt ? Vervang de batterij.
Als het toestel gedurende 15 minuten geen signaal ontvangt, gaat het automatisch
in de wachtstand. Om energie te sparen bestaat uw TV uit onderdelen die in de
wachtstand slechts zeer weinig stroom verbruiken (minder dan 1W).
Het scherm en de kast van uw TV mogen alleen worden schoongemaakt met een
zacht en niet-pluizend doekje. Gebruik nooit een schoonmaakmiddel op basis van
alcohol of oplosmiddel.
Tr ek de stekker van de TV gedurende minstens 30 seconden uit. Steek nadien de
stekker opnieuw in het stopcontact.
Als uw TV toestel defect is, probeer het dan nooit zelf te repareren:neem
contact op met de serviceafdeling van uw verkoper.

CANAL ................FREQ (MHz)
E2 ........................48.25
E3 ........................55.25
E4 ........................62.25
E5 ......................175.25
E6 ......................182.25
E7 ......................189.25
E8 ......................196.25
E9 ......................203.25
E10 ....................210.25
E11 ....................217.25
E12 ....................224.25
R1 ........................49.75
R2 ........................59.25
R3 ........................77.25
R4 ........................85.25
R5 ........................93.25
R6 ......................175.25
R7 ......................183.25
R8 ......................191.25
R9 ......................199.25
R10 ....................207.25
R11 ....................215.25
R12 ....................223.25
S1 ......................105.25
S2 ......................112.25
S3 ......................119.25
S4 ......................126.25
S5 ......................133.25
S6 ......................140.25
S7 ......................147.25
S8 ......................154.25
S9 ......................161.25
S10 ....................168.25
S11 ....................231.25
S12 ....................238.25
S13 ....................245.25
S14 ....................252.25
CANAL ................FREQ (MHz)
S15 ....................259.25
S16 ....................266.25
S17 ....................273.25
S18 ....................280.25
S19 ....................287.25
S20 ....................294.25
H1 ......................303.25
H2 ......................311.25
H3 ......................319.25
H4 ......................327.25
H5 ......................335.25
H6 ......................343.25
H7 ......................351.25
H8 ......................359.25
H9 ......................367.25
H10 ....................375.25
H11 ....................383.25
H12 ....................391.25
H13 ....................399.25
H14 ....................407.25
H15 ....................415.25
H16 ....................423.25
H17 ....................431.25
H18 ....................439.25
H19 ....................447.25
21.......................471.25
22.......................479.25
23.......................487.25
24.......................495.25
25.......................503.25
26.......................511.25
27.......................519.25
28.......................527.25
29.......................535.25
30.......................543.25
31.......................551.25
32.......................559.25
CANAL ................FREQ (MHz)
33.......................567.25
34.......................575.25
35.......................583.25
36.......................591.25
37.......................599.25
38.......................607.25
39.......................615.25
40.......................623.25
41.......................631.25
42.......................639.25
43.......................647.25
44.......................655.25
45.......................663.25
46.......................671.25
47.......................679.25
48.......................687.25
49.......................695.25
50.......................703.25
51.......................711.25
52.......................719.25
53.......................727.25
54.......................735.25
55.......................743.25
56.......................751.25
57.......................759.25
58.......................767.25
59.......................775.25
60.......................783.25
61.......................791.25
62.......................799.25
63.......................807.25
64.......................815.25
65.......................823.25
66.......................831.25
67.......................839.25
68.......................839.25
69.......................855.2
5
ITALY
CANALE..............FREQ (MHz)
A ..........................53.75
B ..........................62.25
C ..........................82.25
D ........................175.25
E ........................183.75
F.........................192.25
G ........................201.25
H ........................210.25
H1 ......................217.25
FRANCE
CANAL ................FREQ (MHz)
2...........................55.75
3...........................60.50
4...........................63.75
5...........................176.0
6...........................184.0
7...........................192.0
8...........................200.0
9...........................208.0
10.........................216.0
B ........................116.75
C ........................128.75
D ........................140.75
E ........................159.75
F.........................164.75
G ........................176.75
H ........................188.75
I..........................200.75
J .........................212.75
K ........................224.75
L.........................236.75
M........................248.75
N ........................260.75
O ........................272.75
P ........................284.75
Q ........................296.75
Ta b le of TV frequencies.
Frequenztabelle der Fernsehsender.
Liste des fréquences TV.
Frequentietabel TV-Zenders.
Tabella delle frequenze TV.
Lista de frecuencias TV.
Lista das frequências TV
Liste over TV senderne.
Tabell over TV-frekvenser.
Tabell över TV-frekvenser.
TV-taajuustaulukko.
KK··ÙÙ¿¿ÏÏÔÔÁÁÔÔ˜˜ ÛÛ˘˘¯¯ÓÓÔÔÙÙ‹‹ÙÙˆˆÓÓ ÔÔÌÌÒÒÓÓ..
CФЛТУН ˜‡ТЪУЪ ФВВ‰‡Ъ˜ЛНУ‚.
A televizió-adóállomások
frekvenciáinak a listája.
Lista częstotliwości stacji nadawczych.
Seznam frekvenčních pásem vysílačů.
Zoznam frekvenčných pásiem vysielačov.
EUROPE

ß
MODEL :
PROD. .NO :
3111 255 1912.1 SD2 ME5
 Loading...