

IN
OUT
OR
3
CABLE BOX
CABLE TV SIGNAL
RF COAXIAL
CABLE
ANT.
AUDIO OUT
COAXIAL
ANT.
4
ANT.
ANTENNA or
CABLE TV SIGNAL
2
1
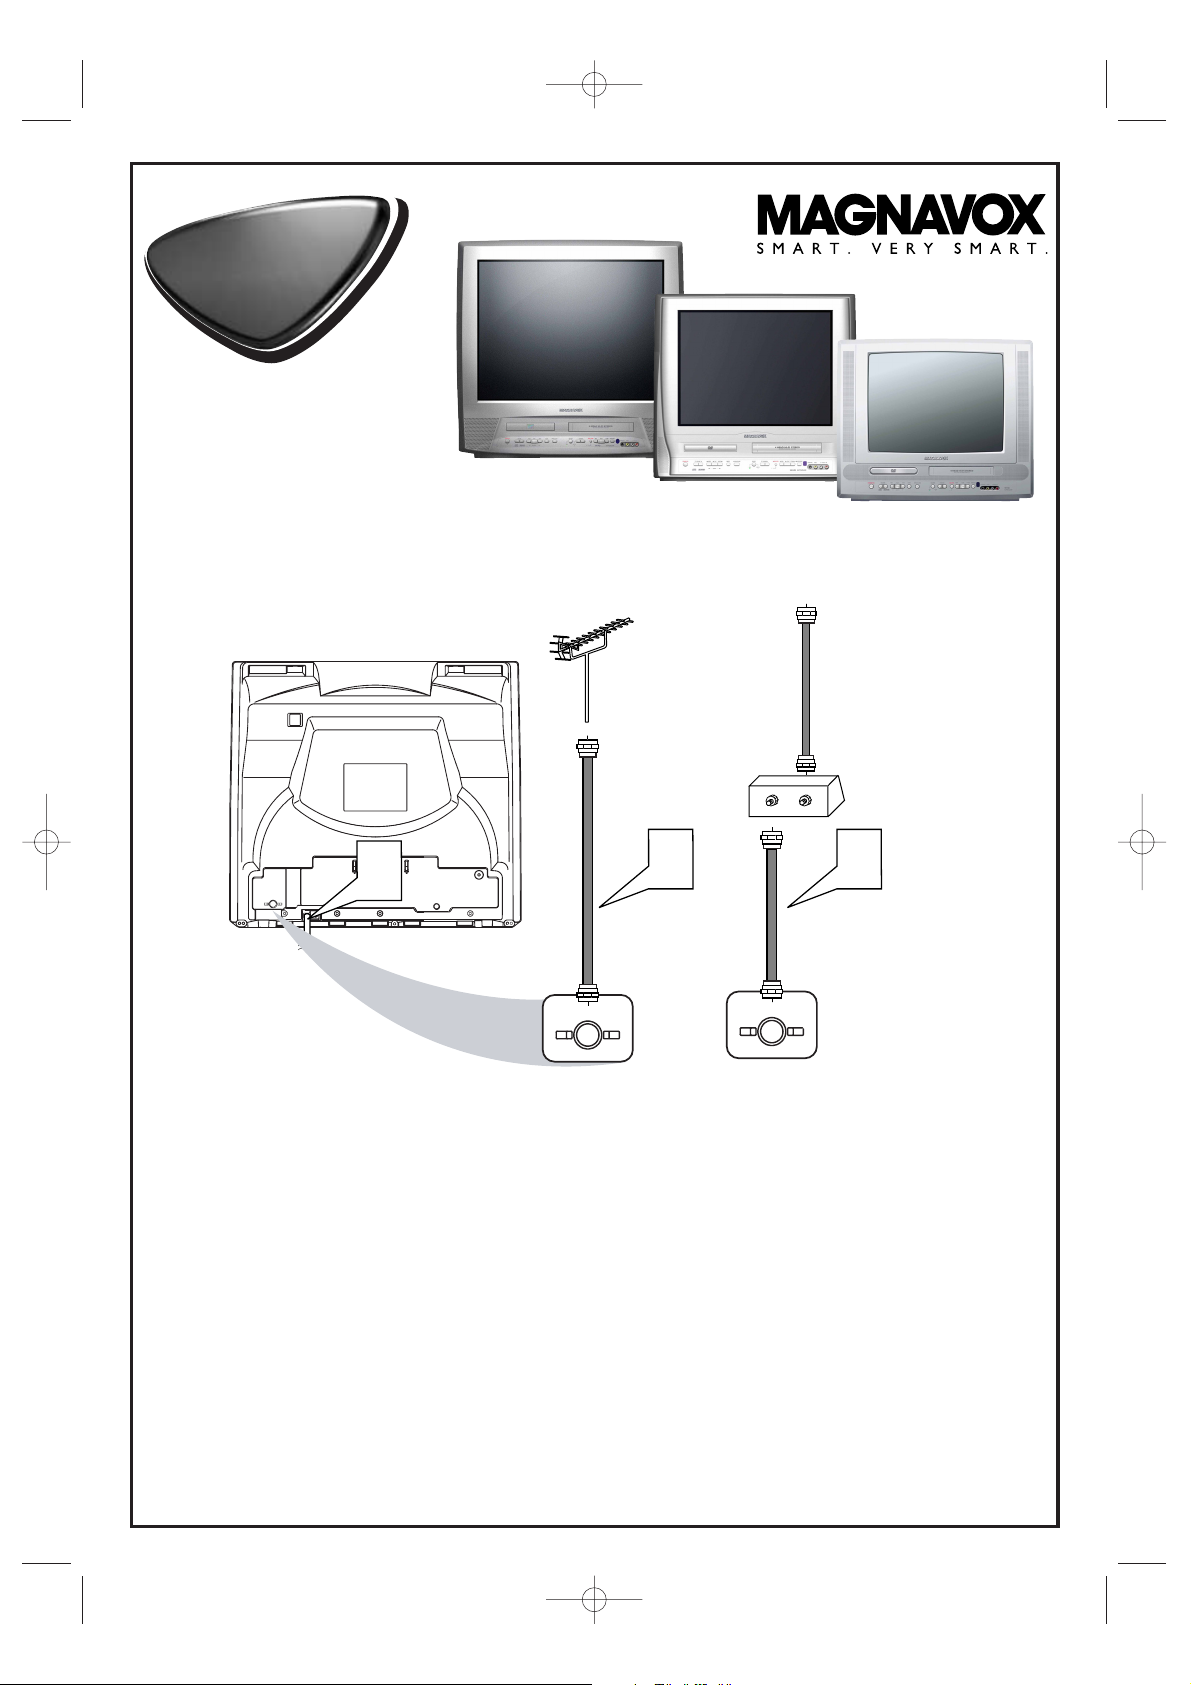
Disconnect all equipment from the power outlets. Connect the equipment to the power outlets only after you
have finished hooking up everything. Never make or change connections with equipment connected to the power outlet.
2
If you do not have a Cable Box, simply connect your Antenna or Cable TV signal directly to the ANT(enna)
jack on the rear of the TV/VCR/DVD.
3
If you do have a Cable Box or Satellite Receiver, first connect the Cable TV or Satellite signal to the IN jack
on the Cable Box or Satellite Receiver. Then, use an RF coaxial cable (not supplied) to connect the OUT
jack of the Cable Box or Satellite Receiver to the ANT(enna) jack on the TV/VCR/DVD. To view any channel, set
the TV/VCR/DVD to the output channel of the Cable Box or Satellite Receiver (channel 3 or 4).Then, select channels at the
Cable Box or Satellite Receiver.
4
When all connections are complete, plug the power cord of the TV/VCR/DVD into an active power
outlet.
5
Press STANDBY-ON on the TV/VCR/DVD or its remote to turn on the unit.
27MDTR20
20MC4304
19MDTR20
Quick-Use
Guide
Quick-Use
Guide
There are many ways to connect your new TV/VCR/DVD to your other equipment.This Quick-Use Guide
shows the easiest, most common connections for the TV/VCR/DVD.
19MDTR20
27MDTR20
20MC4304
Printed in Malaysia
8239 300 39781
1EMN20272
T2132UC/1102UC_MC/0102UC_MC*****
T2132_1102_0102_QUG_ENSP_0303 3/3/05 8:41 PM Page 1

Quick-Use Guide (cont’d)
Quick-Use Guide (cont’d)
Detailed playback features and additional functions are described in the
accompanying owner’s manual.
Watching TV
1
Press STANDBY-ON to turn on the TV/VCR/DVD.The red VCR/TV light will
appear.
2
This unit memorizes TV channels when you connect an Antenna or Cable TV signal
as described in this Quick-Use Guide.
To watch TV, use CH. ▲/▼ to select memorized channels. If a channel is skipped,
use the Number buttons to select it.To update your channels later, refer to the
owner’s manual.
3
Press VOL. ▲/▼ to adjust the volume.
Playing a Videotape
1
With the unit on, press SELECT to put the unit in TV/VCR mode. The red
VCR/TV light will appear.
2
Insert a videotape in the cassette compartment. If play does not start
automatically, press PLAY B.
3
Press STOP C to stop play.
Playing a DVD
1
With the unit on, press SELECT repeatedly to put the TV/VCR/DVD in
DVD mode. The green DVD light will appear on the front of the TV/VCR/DVD.
2
Press OPEN/CLOSE A on the front of the TV/VCR/DVD to open the
disc tray.
3
Place a disc into the tray, with the label facing up and the shiny side facing
down.
Playable Discs
The TV/VCR/DVD will play the following discs.
DVDs must have a Region Code of ALL regions or Region 1.
DVDs must be recorded in the NTSC Color System.
1
2
3
1
2
3
2
3
4
5
1
4
Press PLAY B to close the tray. The tray will close and playback will
begin. If playback does not start automatically, press PLAY B again.
If a DVD menu appears instead, use KLs B,ENTER, or Number buttons to
choose features or start playing from the menu.
5
Press STOP C to stop play.
is a trademark of DVD Format/Logo Licensing Corporation.
T2132_1102_0102_QUG_ENSP_0303 3/3/05 8:41 PM Page 2
VOLUME 20
STANDBY-ON
PICTURE SELECTSLEEP
123
456
789
0 +10
SPEED C.RESET
PLAY
STOP
STANDBY-ON
PICTURE SELECTSLEEP
+100
ZOOM
VOL.
MUTE
CH.
VOLUME NEXTPLAYPREV
SEARCH
123
456
789
SPEED C.RESET
SOURCE CHANNEL REC/OTR
STOP OPEN/CLOSE
VCR/TVDVD
STANDBY-ON
PICTURE SELECTSLEEP
123
456
789
SPEED C.RESET
0 +10
ZOOM
PLAY
STOP
STOP/EJECT
F.FWDPLAYREWSTANDBY-ON
HEADPHONE
0 +10
ZOOM
PLAY
STOP
+100
+100
CH.
VOL.
MUTE
RL
VIDEO
AUDIO
CH.
VOL.
MUTE
ALL
1
 Loading...