

Page 1
Embroidery mode stitch-out
Page 2

To enter embroidery stitch-out
To embroider your design(s), enter embroidery
stitch-out by touching the embroidery toggle icon
(A) on the task bar. The embroidery unit needs to
be connected and the machine enters embroidery
stitch-out. Functions used when embroidering a
design are now shown.
Embroidery stitch-out - overview
1. Crosshair
2. Color list and scroll bar
3. Current stitch
4. Go to stitch
5. Thread tension
6. Basting
7. Color block sort
8. Zoom
9. Zoom to hoop/zoom to all
10. Touch function - pan (always
Embroidery mode - stitch-out
active)
11. More options
12. Speed control
13. Hoop position
14. Precise Positioning
A
Embroidery mode - edit
Embroidery mode - stitch-out
2
1
8
11
9:2
5
3
4
6
7
9
10
12
13
14
Page 3
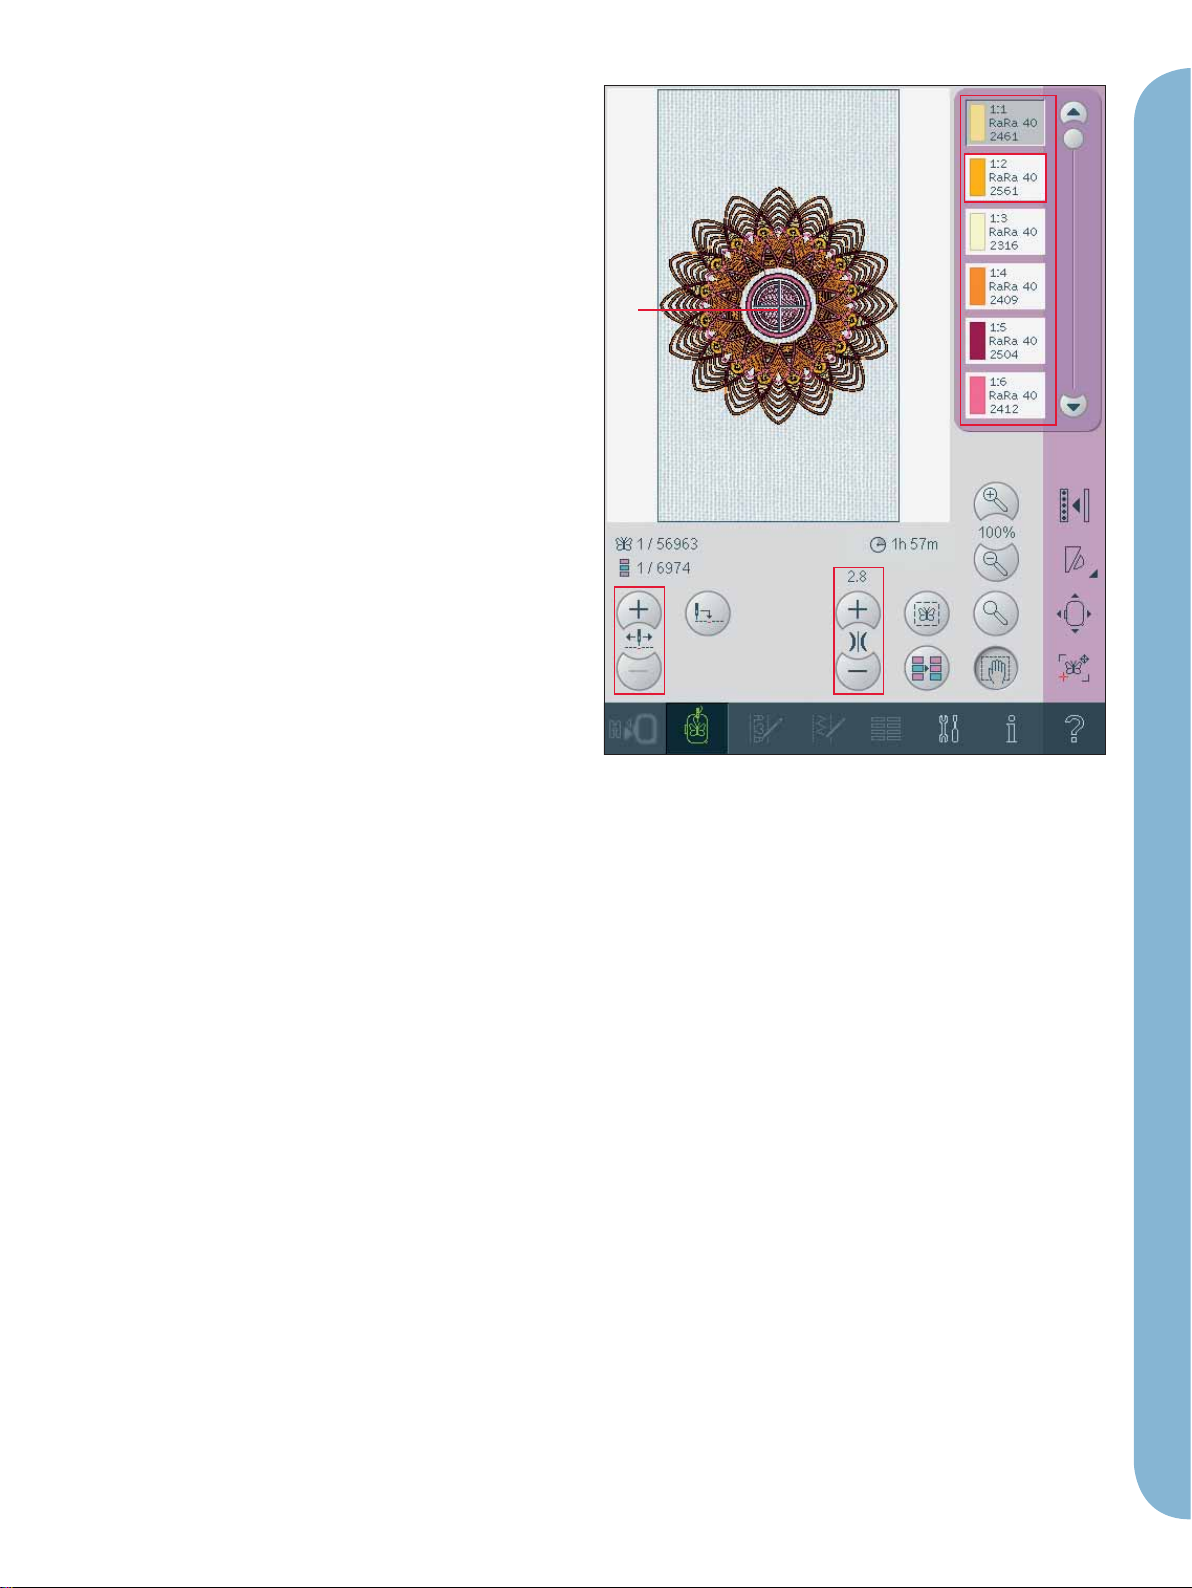
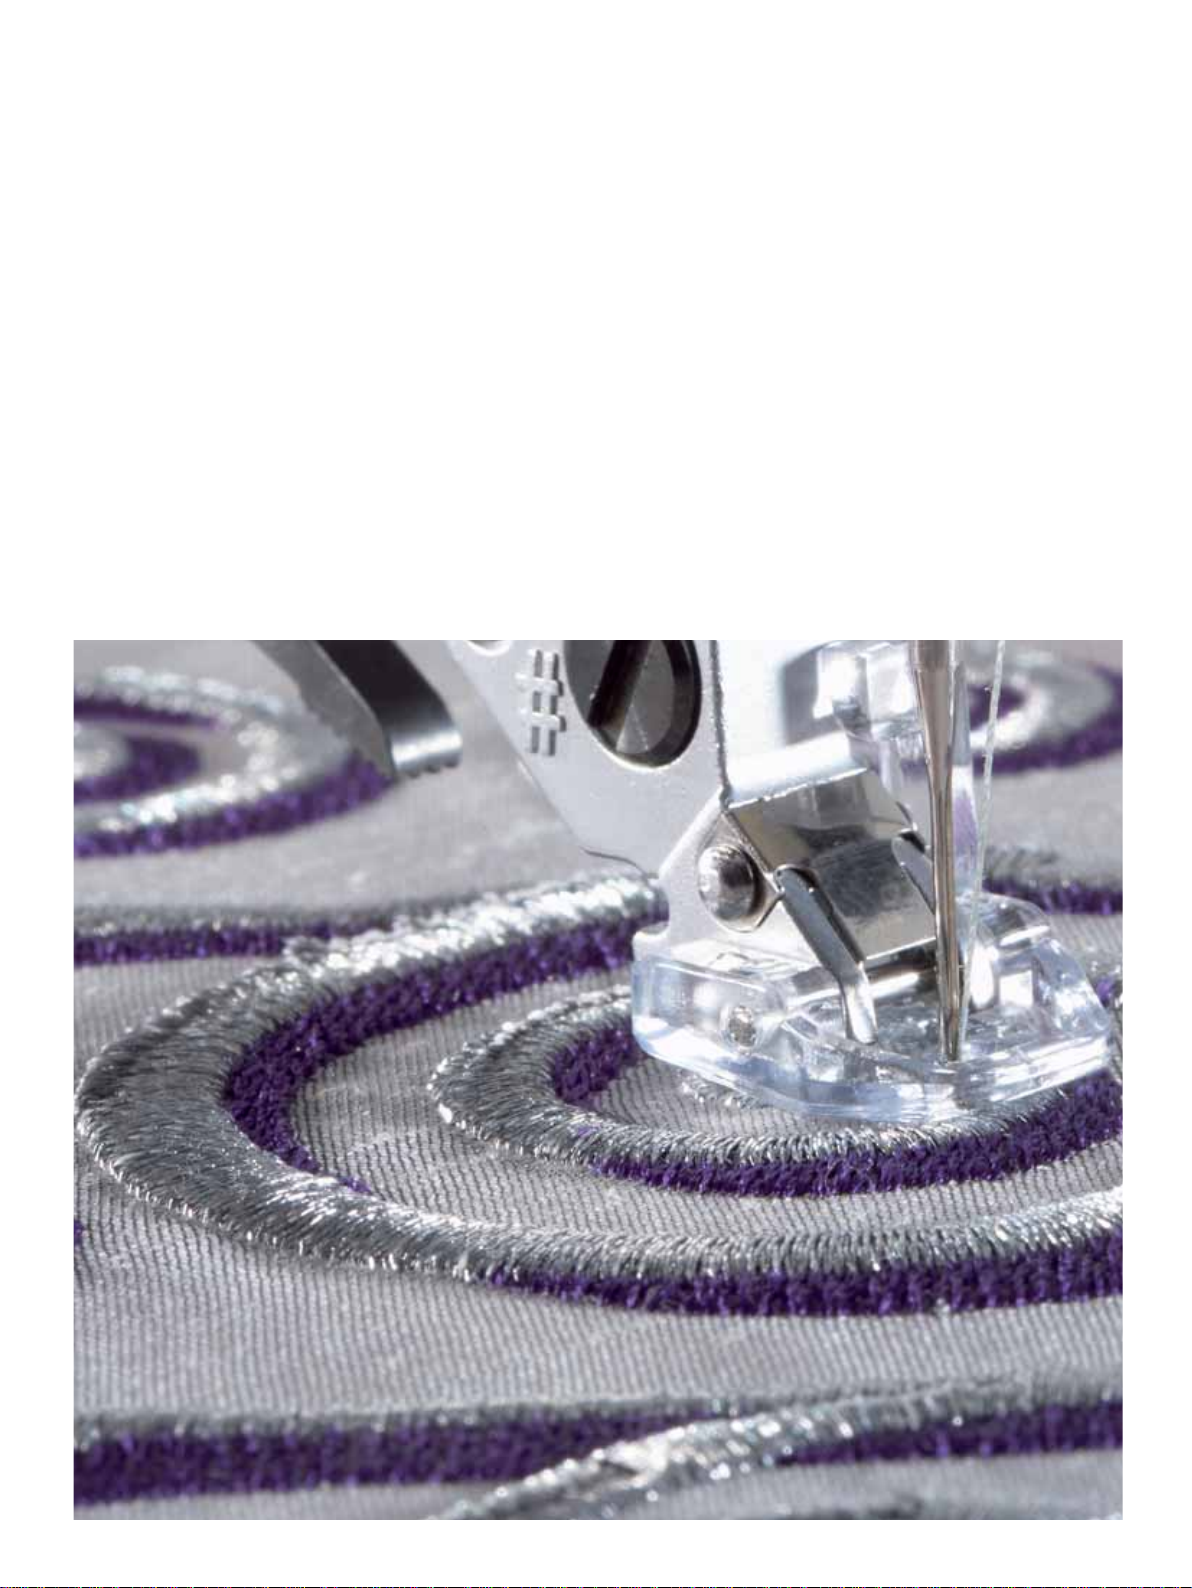
Crosshair (1)
When embroidering, a crosshair indicates current
needle position on the screen.
Color list (2)
All colors in the loaded design(s) are shown in the
order they will be embroidered. Each listed color
shows color order and number. Also shown are
the thread manufacturer, thread weight and color
number. Use the scroll bar to see all of the colors in
the list. To go to the next color block, just touch it
in the color list.
Thread manufacturer and thread number are
displayed for designs in .VP3 and .VIP-format. If
changing color, some information might be lost.
Example (A): 1:2, RaRa 40, 2561 means the second
thread color in the fi rst loaded design is RobisonAnton
40 weight, thread number 2561.
To make changes to the color list, return to
embroidery edit.
Embroidery information (B, C, D)
The current stitch in the design or combination is
shown next to the picture (B). The number after
the slash shows the total number of stitches in the
design or combination.
The current stitch in the current color block is
shown next to the picture (C). The number after
the slash shows the total number of stitches in the
current color block.
An estimation of the embroidery time for the
current color block is shown next to the picture (D).
Current stitch (3)
Touch + to step forward and - to step backwards
stitch by stitch. Use the - icon to move backwards
a few steps if the needle thread breaks or runs
out. Touch and hold to move through the stitches
quickly. The crosshair will follow the stitches in
embroidery fi eld.
Go to stitch (4)
To move to a particular stitch in the design touch
the go to stitch icon. A pop-up will appear, where
you can enter the desired stitch number. Current
stitch will then move to that stitch number. If the
number entered is too large, current stitch will
move to the last stitch in the design(s).
Thread tension (5)
When embroidering with specialty thread or
fabric you may need to adjust the thread tension
to achieve the best result. Thread tension can be
adjusted up or down using the + and the -.
the
A
2
1
BD
C
Basting (6)
Touch the basting icon and the machine will sew a
basting stitch around the design area.
Basting enables you to secure your fabric to a
stabilizer placed beneath it, especially when the
fabric to be embroidered cannot be hooped. Basting
provides support for stretchy fabrics. It also shows
where the design will be placed on the fabric.
Color block sort (7)
To sort the color blocks before embroidering, just
touch the color block sort icon. The color block sort
will reduce the number of thread color changes.
If any color overlaps, the color order will remain
the same, even after sorting. The function will also
recognize if a turnable hoop is used. The two sides
will be sorted individually.
The number of color blocks will not change, i.e.
the blocks with the same color will not be merged
to one block. To merge the color blocks and sew
without stopping between the blocks, use the color
merge function, found in more options.
Note: The color block sort icon is disabled when you
start to embroider.
3
4
5
6
7
Embroidery mode - stitch-out
9:3
Page 4

Zoom (8)
Use to zoom in or out of the embroidery fi eld. Use
zoom in (+) to get a close-up of an area within the
embroidery design. Use (-) to return to zoom out.
Zoom to hoop/zoom to all (9)
Using this icon, you can toggle between zoom to
hoop and zoom to all. Zoom to hoop will adjust
the embroidery fi eld to fi t the selected hoop. Zoom
to all will show all the design(s) in the embroidery
combination the largest view possible.
Pan (10)
In embroidery stitch-out, the pan function is
always active. Use the stylus to pan on screen.
Option bar
More options (11)
8
Background fabric (A)
If you have changed the background fabric color in
embroidery edit, the background fabric icon will be
active and selected. To turn the background fabric
off and have a white background, deselect the icon.
Monochrome (B)
Touch the icon to activate monochrome
embroidery. All designs are shown in a grey color
and the machine does not stop for color block
changes. To deactivate monochrome embroidery,
touch the icon again.
Color merge (C)
If you want the machine to ignore the stop between
Embroidery mode - stitch-out
identical thread colors, e.g. after having used color
block sort, touch the color merge icon.
Full screen (D)
To see your design as large as possible, use the full
screen function. The embroidery will fi ll the whole
screen. To close, touch the screen once.
Save current state (E)
If you want to stop embroidering and save your
current position, touch Start/Stop to stop the
embroidery. Then touch the save current state icon
to save the current position. You can now turn the
machine off.
When saving current state, all your adjustments are
stored and you can continue to embroidery later. A
current state is saved until you re
Note: If you have chosen AutoSave current state in the
Settings menu, this icon will be disabled, and current
state is stored periodically.
place it.
9
10
A
B
11
C
D
E
9:4
Page 5
Speed control (12)
This function enables you to easily reduce the
maximum embroidery speed. Just touch the speed
control icon to reduce the speed. To return to
normal speed, deselect the icon.
You can change the set speed limit. Long touch the
speed control icon to get a pop-up. Set the speed
limit you would like by sliding the button right
or left and then close the pop-up. The next time
you touch the speed control icon, the speed will be
reduced to the limit you have chosen.
You can embroider without closing the pop-up.
Note: If selecting the highest speed in the slider, it is like
choosing no speed limit at all. The icon in the option bar
will then be deselected and the speed limit will be set to
default.
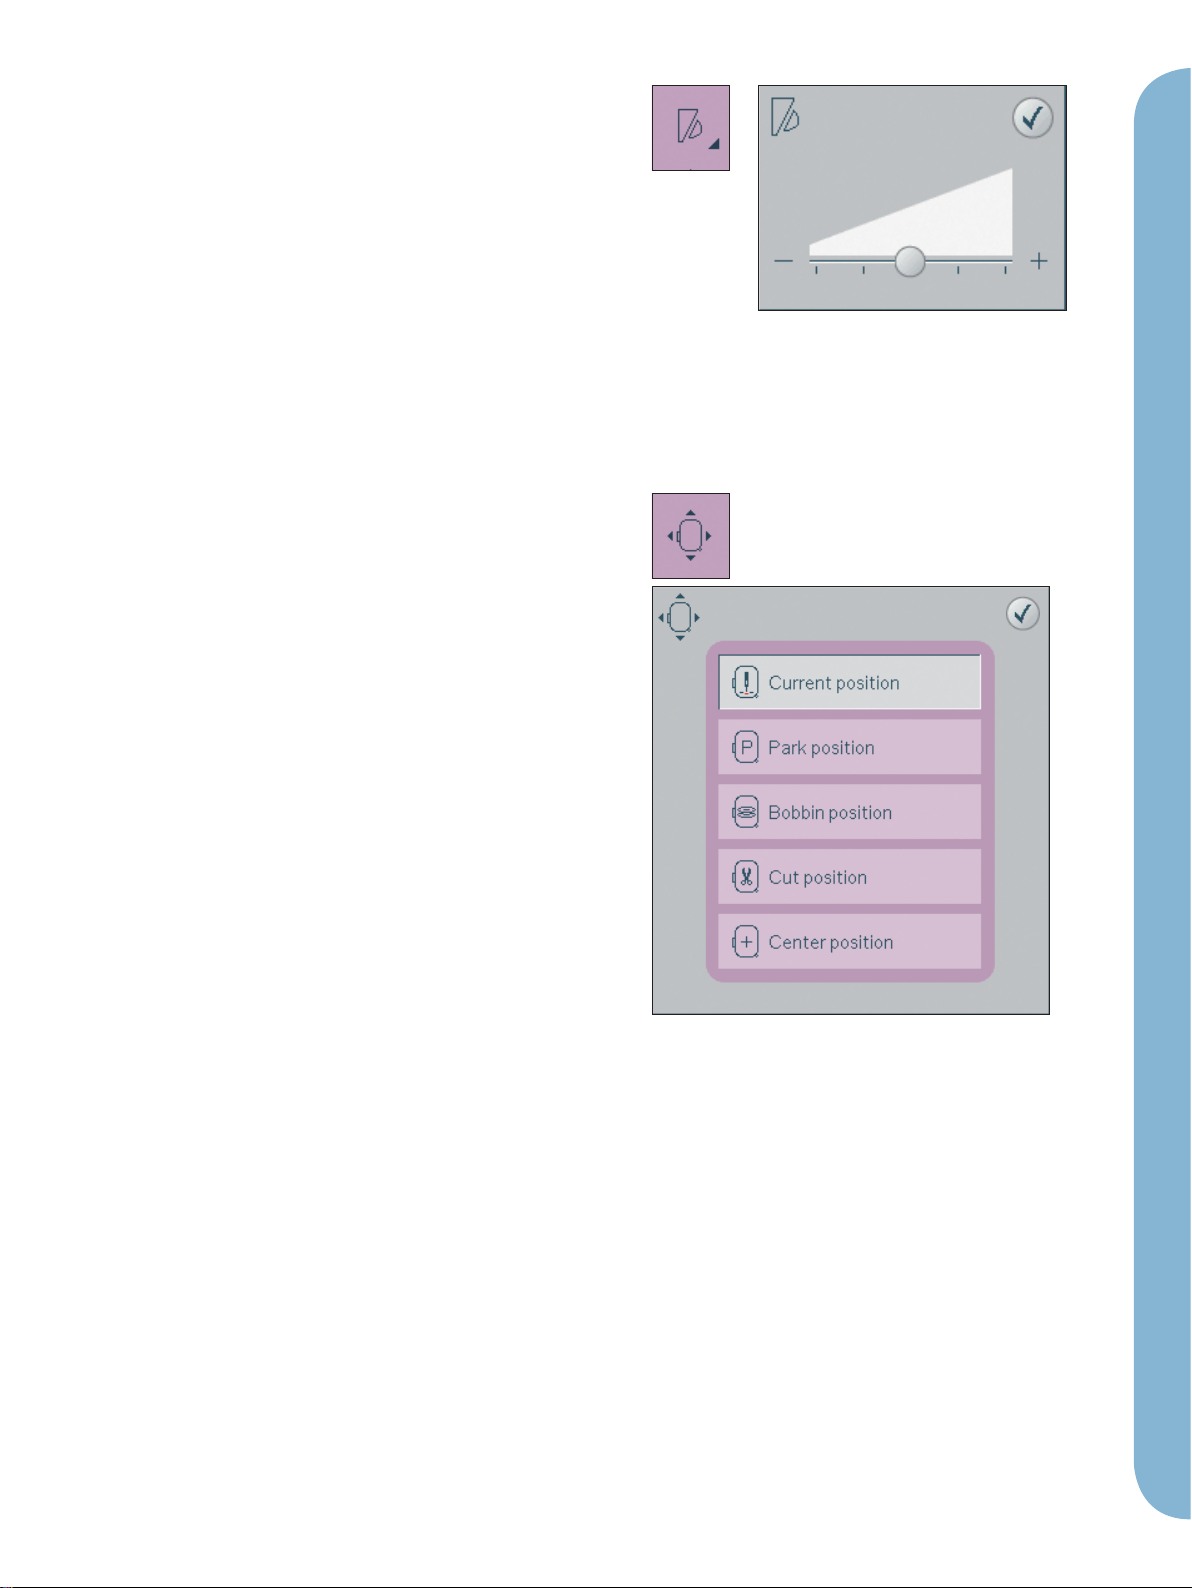
Hoop position (13)
Use the hoop position functions to move the hoop
to different positions.
Current position
When you want to return to the current stitch and
start embroidering again where the embroidery
was interrupted, touch the current position icon.
You can also press the start/stop button once to
return to the current stitch and start to embroider.
12
13
Embroidery mode - stitch-out
Park position
When you have fi nished your embroidery, remove
the hoop and select park position. The embroidery
arm will be placed in a position that will allow easy
storage.
Use the park position when you need to have a free
sewing space with the embroidery arm out of the
way.
Note: It is very important that the hoop is removed,
otherwise it may be damaged.
Bobbin position
To make it easier to change the bobbin, touch
bobbin position. The hoop will move backwards,
allowing you to open the bobbin cover and replace
the bobbin.
Cut position
Cut position will move the hoop towards you
making it easier to cut jump stitches and trim fabric
when embroidering an appliqué.
Center position
Use the center position if you want to check where
the center position of the hoop will be placed on
the fabric.
9:5
Page 6

Precise positioning (14)
Precise positioning allows you to place a design
on an exact spot on your fabric. It is also used
when you want to embroider a design next to a
previously embroidered design.
Use zoom and pan to be sure that you are placing
the design exactly where you want it. Fine tune
with the wheel.
Precise positioning - overview
A Locking point
B Position hoop
C Matching point
D Rotate design
E Touch function - move
F Touch function - rotate
G Touch function - pan
H Wheel
I Orbiting - to check corners
14
AB CD
FG
I
E
H
To select locking point and position hoop
Select locking point (A). Place the red crosshair
where you would like the locking point to be in
your embroidery.
Next activate (B), position hoop. The red crosshair
will be locked on the screen, changing color from
Embroidery mode - stitch-out
red to blue with a ring around the center of the
locking point. Now you can place the design
exactly where you want it on the fabric by using
the stylus or the wheel. Use the arrows to get the
design placed precisely where you want it. The
position of the needle will show where the locking
point will be placed on the fabric.
AB
9:6
Page 7

To select matching point and rotate design
You have the ability to check a second position
within the design to make sure your design is
lined up properly and make further adjustments if
necessary. Activate (C), matching point.
A second crosshair will appear, the matching point.
Place it at the point where you would like another
part of the design to connect. The hoop will move,
following the matching point.
To line up the design where you want it, activate
(D), rotate design. To move the matching point to
the right place on the fabric, the rotate function will
automatically be selected.
Use the stylus or wheel to rotate the design on the
screen around the locking point, kept in position.
The rotated design will connect with the previously
embroidered design.
CD
Embroidery mode - stitch-out
Orbiting - to check corners
Orbiting can be used to trace the design fi eld by
touching each of the four corner icons. You can
fi nd the center of the design again by touching the
centering icon.
The orbit function will also swiftly move the
crosshair to the selected position when doing
precise positioning.
Use the corner icons to set the connecting point
for precise positioning in a corner of the design.
This is the easiest and most precise way since
the connecting point will be automatically
placed exactly in the corner. This is useful when
positioning a design on a patterned fabric.
The orbiting icons may be used when either
locking point or matching point is selected. When
touching an orbiting icon, the selected point will
automatically be set to the corresponding orbiting
position, i.e. at a corner or at the center of the
embroidery.
E.g. when choosing the upper left orbiting icon, the
connecting point will be set at the upper left corner
in the outer line of the designs. After this, you can
continue and make your own adjustments on the
connecting point.
9:7
Page 8

Precise positioning - example
When adding one design to one previously
embroidered, precise positioning is very useful.
1. Choose one of the corners to be the locking
point (A). Either move the locking point using
touch function - move on the screen or the
wheel.
2. Select the next function, position hoop (B), to
move the locking point to the right position in
the hoop.
Move the locking point to the upper left corner
of the embroidered design. Use the touch
function - move. Check that the needle is at the
exact position.
If satisfi ed, close precise positioning and start
embroidering.
I
A
B
3. To line up the design on the screen with the
previously embroidered, select matching point
(C) to be the corner. Use the touch function
- move or the orbiting icons.
Embroidery mode - stitch-out
4. Select the next function, rotate design (D) to
move the matching point to the right position
in the hoop.
Use the touch function - rotate to line up the
designs. Check that the needle is at the exact
position.
5. Close precise positioning and start
embroidering.
I
C
D
9:8
Page 9

Common embroidery
stitch-out pop-ups
Embroidery unit calibration
When the embroidery unit is attached, a popup asks you to slide off the hoop and clear the
machine area for calibrating the embroidery
arm. You will also be reminded to snap on the
embroidery presser foot 6A.
Note: It is very important to remove the hoop, otherwise
the hoop or the embroidery unit may be damaged while
calibrating.
Attach correct hoop
If the size of the hoop attached to the machine
does not match the size displayed on screen, the
machine will not embroider. You must change
the hoop to the displayed size or change the hoop
setting to the hoop size attached.
To change hoop settings, re-enter embroidery edit
and go to select hoop.
Embroidery mode - stitch-out
Bobbin empty
When the bobbin is almost empty, the machine
stops automatically and a pop-up appears on the
screen.
Note: It is possible to embroider until the thread has
completely run out. Press the start/stop button to
continue embroidering without closing the bobbin empty
pop-up.
Close the pop-up. Replace the empty bobbin with a
full one. Pull back excess needle thread and move
a few stitches backwards using the current stitch
icons (3). Start embroidering again by pressing the
start/stop button or the foot control.
Note: Use the bobbin position to get easier access to
the bobbin. When the bobbin is replaced, touch current
position to move the hoop back to where the embroidery
stopped.
Check needle thread
The machine stops automatically if the needle
thread runs out or breaks. Re-thread the needle
thread, close the pop-up, step back a few stitches
and start embroidering again.
3
9:9
Page 10

Change thread color
When it is time to change the needle thread, the
machine stops and the upper thread is cut. Change
the spool and re-thread the machine. The next
recommended color is shown in the pop-up.
Cut thread end
After changing the thread, the machine will sew
a few stitches and then stop so you can cut the
thread end.
Embroidery is fi nished - clear screen
When the embroidery is fi nished, the machine will
ask you if you want to clear the screen. If you touch
OK, the designs will be deleted. Touch cancel to get
back to your design.
Embroidery mode - stitch-out
9:10
 Loading...