

Page 1
a
a
Page 2
CPFAFFi
Automatic
92
INSTRUCTIONS
FOREWORD
Your
dream
has
come
true.
Your
are
now
the
proud
owner
of
a
Pfaff
Automatic
92,
the
sewing
machine
which
will
enable
you
to
master
all
ordinary
sewing
and
darning
jobs
that
may
come
up
in
a
home.
In
addition,
your
machine
can
sew
a
large
number
of
beautiful
decorative
designs
completely
automatically.
This
instruction
book
will
help
you
understand
the
machine
and
give
you
valuable
tips
to
make
sewing
mare
fun
for
you.
Even
if
you
are
an
experienced
seamstress,
you
will
find
this
book
a
valuable
guide
to
easy
sewing.
Follow
these
simple
instructions
and
familiarize
yourself
with
the
exclusive
features
of
your
machine.
You
will
find
sewing
exciting
on
your
easy-to-operate
Pfaff
92.
If
you
have
any
sewing
problems,
picce
conaci
your
Pfaff
dealer.
He
will
be
glad
to
help
you
at
any
time.
G.M.PFAFF
AG
Karisruhe-Durlach
Branch
Page 3

1
Face
cover
2
Take-up
lever
3
Thread
retainer
4
Spool
pins
5
Stitch
width
lever
)A)
6
Foshion
disc
7
Needle
position
lever
(B)
8
Bobbin
winder
9
Balance
wheel
to
stop
motion
knob
11
Motor
disengaging
mechanism
12
Stitch
length
control
13
Reverse
Feed
control
14
Bed
slide
15
Pfoff
rotary
sewing
hook
16
Dual-purpose
needle
plate
17
Sewing
foot
thumb
screw
18
Light
switch
19
Needle
thread
tension
20
Presser
bar
lifter
21
Needle
set
screw
22
Sewing
foot
51i
6
\
7
I
[4
21
1
7—___—22
DR
556
2
Page 4
•
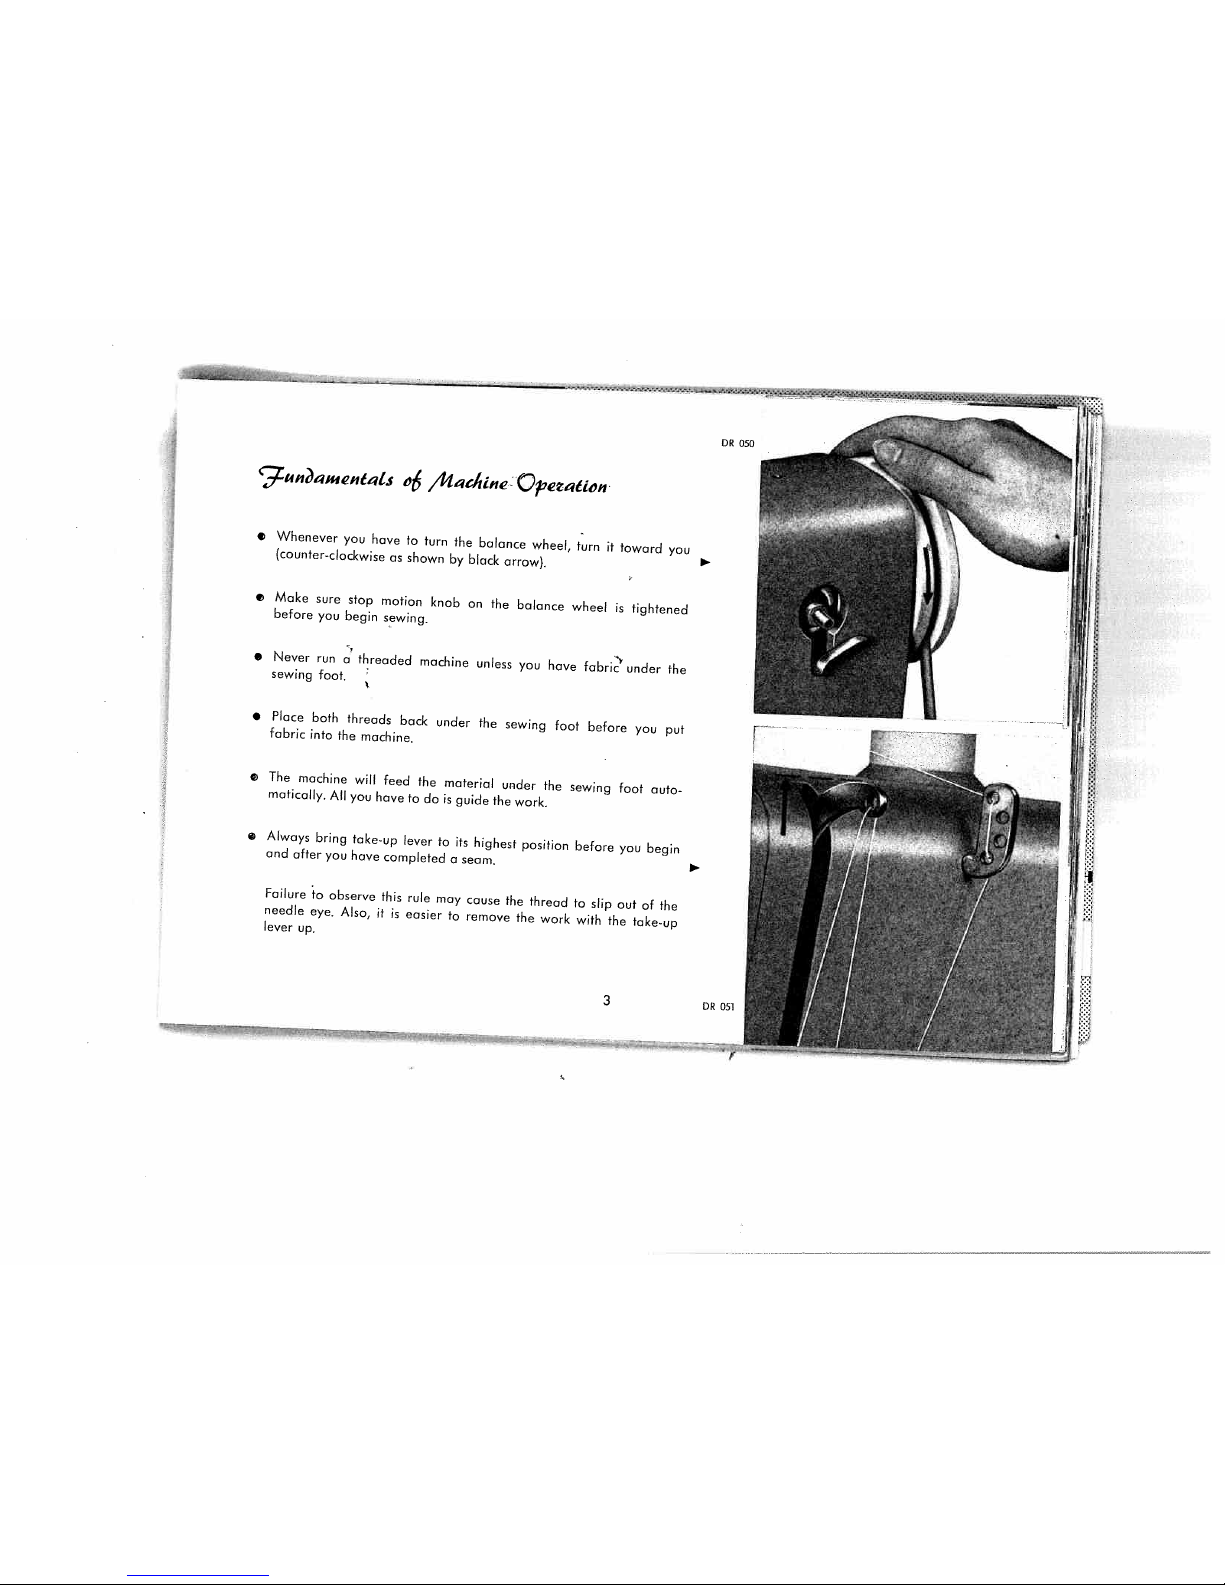
Whenever
you
have
to
turn
the
balance
wheel,
turn
it
toward
you
(counter-clockwise
as
shown
by
black
arrow).
•
Make
sure
stop
motion
knob
on
the
balance
wheel
is
tightened
before
you
begin
sewing.
•
Never
run
a
1
threaded
machine
unless
you
have
fabri
under
the
sewing
foot.
•
Place
both
threads
back
under
the
sewing
foot
before
you
put
fabric
into
the
machine.
The
machine
will
feed
the
material
under
the
sewing
foot
auto
matically.
All
you
have
to
do
is
guide
the
work.
•
Always
bring
take-up
lever
to
its
highest
position
before
you
begin
and
after
you
have
completed
a
seam.
Failure
to
observe
this
rule
may
cause
the
thread
to
slip
out
of
the
needle
eye.
Also,
it
is
easier
to
remove
the
work
with
the
take.up
lever
up.
t
/Uat.411W-
OR
050
L1!1
3
DR
05
F
Page 5
OR
506
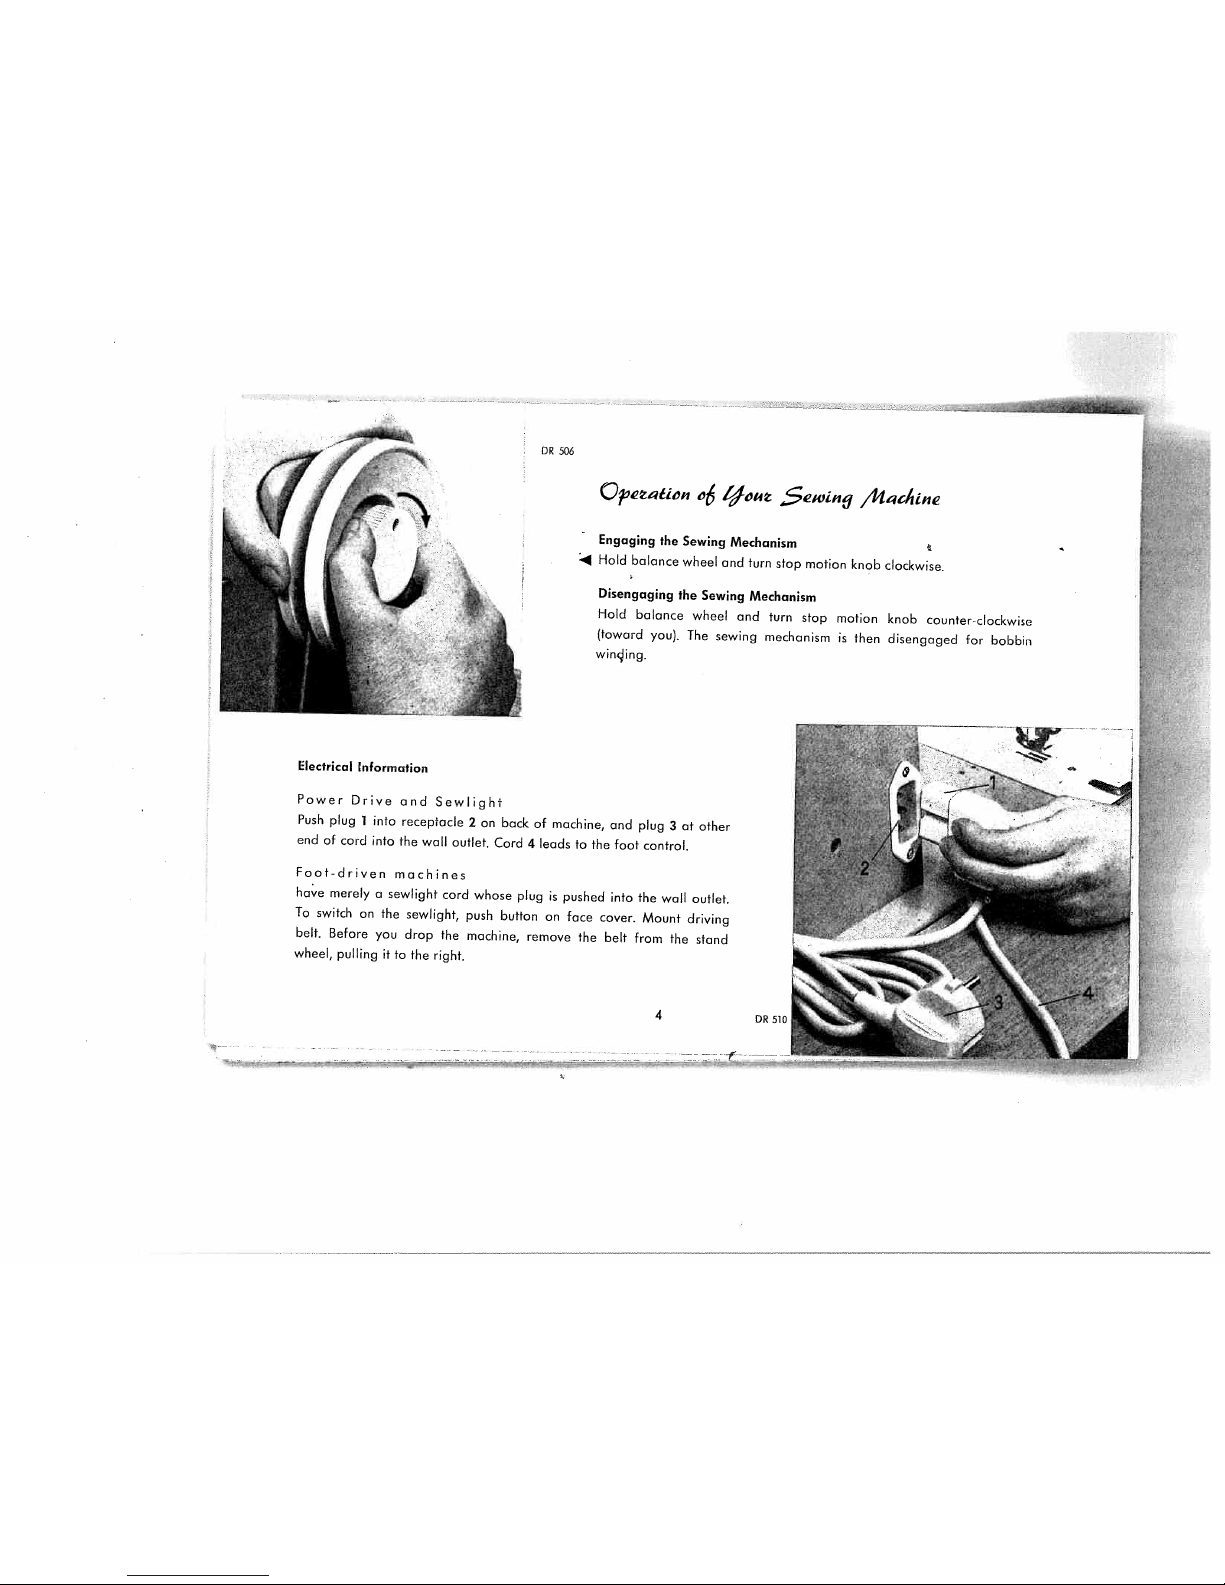
Disengaging
the
Sewing
Mechanism
Hold
balance
wheel
and
turn
stop
motion
(toward
you).
The
sewing
mechanism
is
then
wining.
Electrical
Information
Power
Drive
and
Sewlight
Push
plug
1
into
receptacle
2
on
bock
of
machine,
and
plug
3atother
end
of
card
into
the
wall
outlet.
Cord
4
leads
to
the
foot
control.
Foot-driven
machines
have
merely
a
sewlight
cord
whose
plug
is
pushed
into
the
wall
outlet.
To
switch
on
the
sewlight,
push
button
on
face
cover.
Mount
driving
belt.
Before
you
drop
the
machine,
remove
the
belt
from
the
stand
wheel,
pulling
it
to
the
right.
Qjetion
o6
icti
$winy
,Madine
Engaging
the
Sewing
Mechanism
.4
Hold
balance
wheel
and
turn
stop
motion
knob
clockwise.
knob
counter-clockwise
disengaged
for
bobbin
\
1
4
Page 6
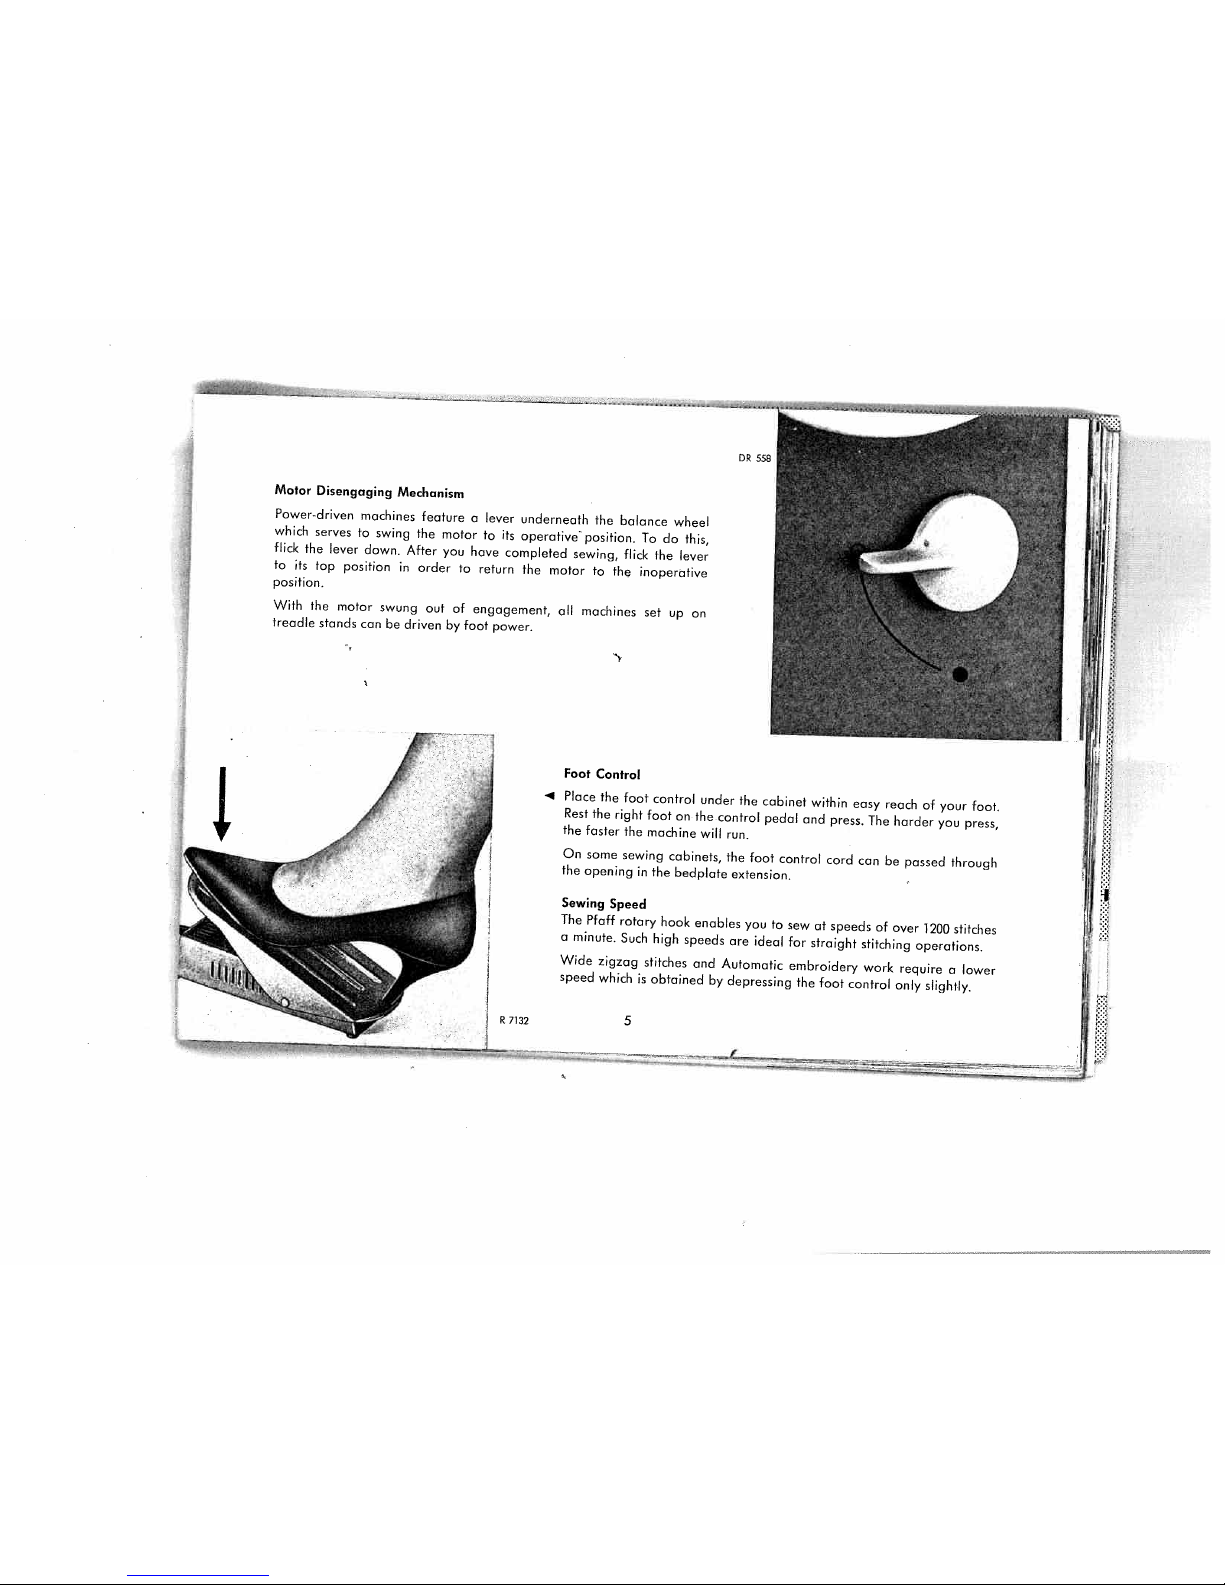
Motor
Disengaging
Mechanism
Power-driven
machines
feature
a
lever
underneath
the
balance
wheel
which
serves
to
swing
the
motor
to
its
operativ&
position.
To
do
this,
flick
the
lever
down.
After
you
have
completed
sewing,
flick
the
lever
to
its
top
position
in
order
to
return
the
motor
to
th
inoperative
position.
With
the
motor
swung
out
of
engagement,
all
machines
set
up
on
treadle
stands
can
be
driven
by
foot
power.
1j
4
Place
the
foot
control
under
the
cabinet
within
easy
reach
of
your
foot.
Rest
the
right
foot
on
the
control
pedal
and
press.
The
harder
you
press,
the
faster
the
machine
will
run.
On
some
sewing
cabinets,
the
foot
control
cord
can
be
passed
through
the
opening
in
the
bedplate
extension.
Sewing
Speed
The
Pfoff
rotary
hook
enables
you
to
sew
at
speeds
of
over
2OO
stitches
a
minute.
Such
high
speeds
are
ideal
for
straight
stitching
operations.
Wide
zigzag
stitches
and
Automatic
embroidery
work
require
o
lower
speed
which
is
obtained
by
depressing
the
foot
control
only
slightly.
f.
Foot
Control
R7132
5
I
Page 7
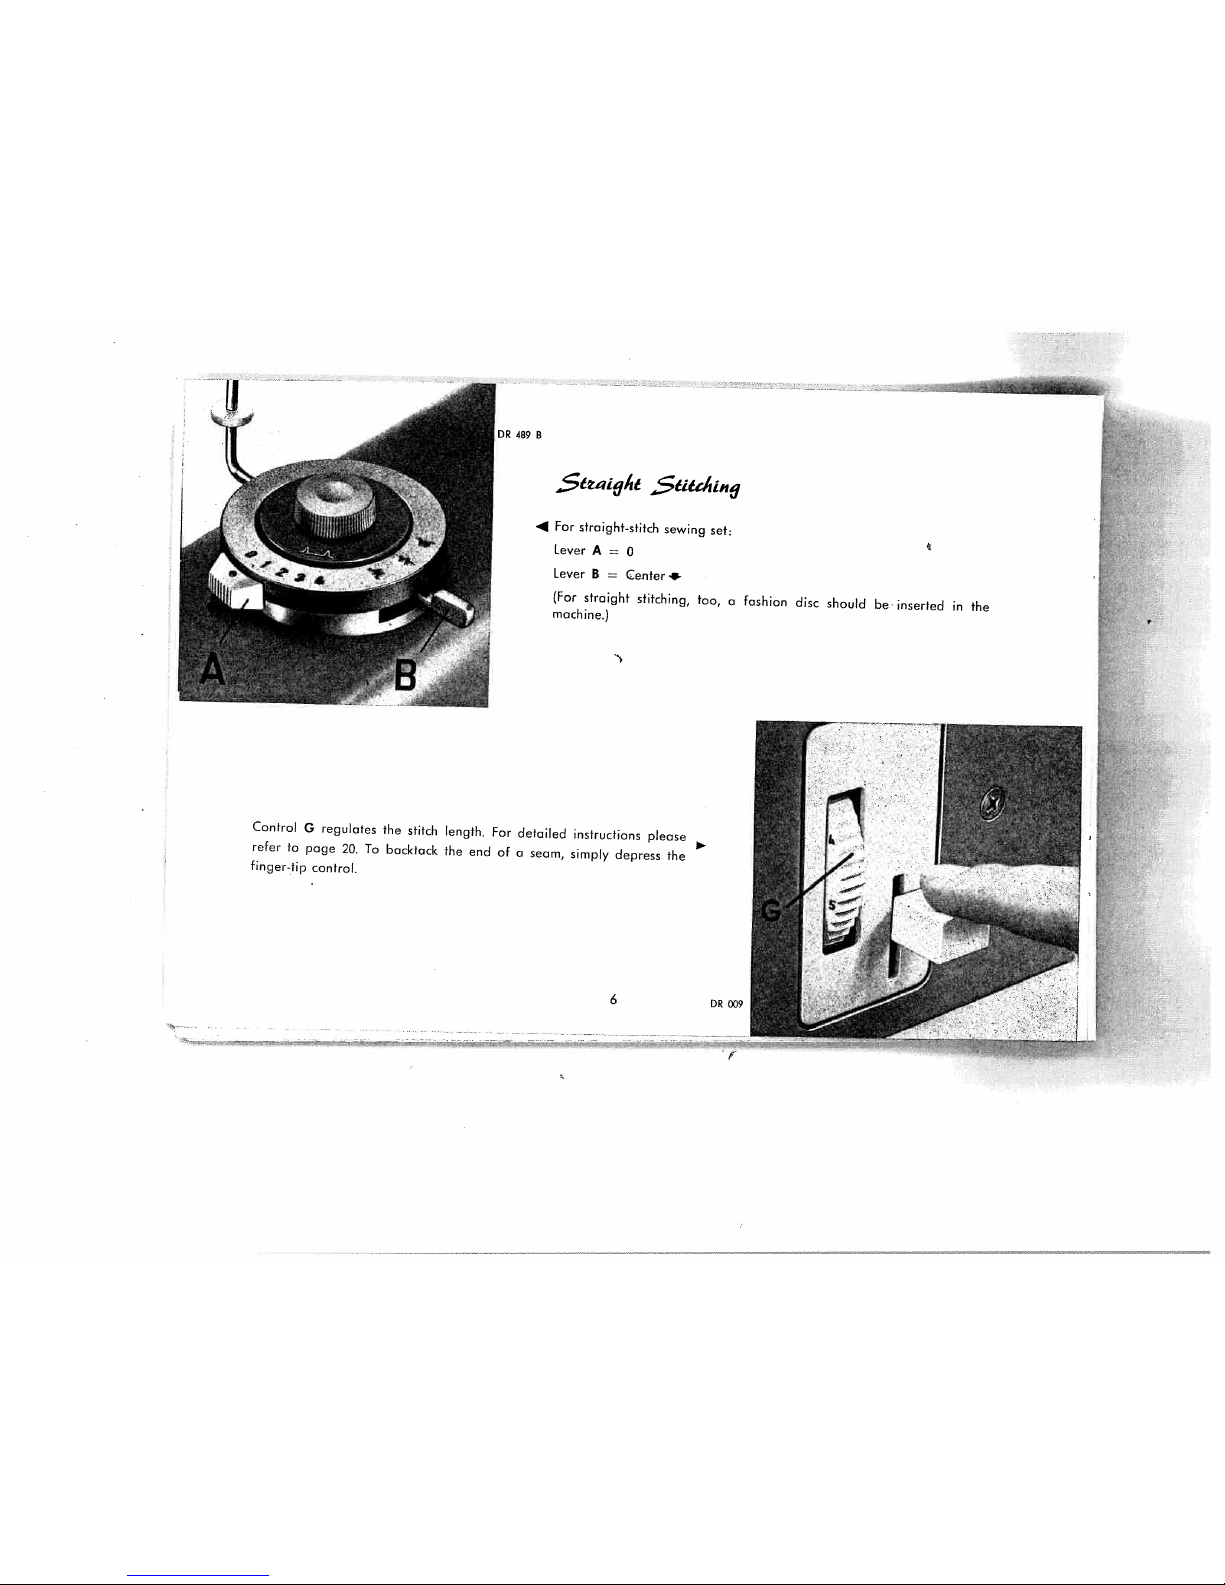
Lever
A
=
0
(For
straight
stitching,
too,
a
fashion
disc
should
be
inserted
in
the
machine.)
Control
G
regulates
the
stitch
length.
For
detailed
instructions
please
refer
to
page
20.
To
backtock
the
end
of
a
seam,
simply
depress
the
finger-tip
control.
4
For
troighi-stitch
sewing
set:
Lever
B
=
Center+
F:
F
[.
I:
F
6
F
Page 8
lJqa9
$ewIi.
-
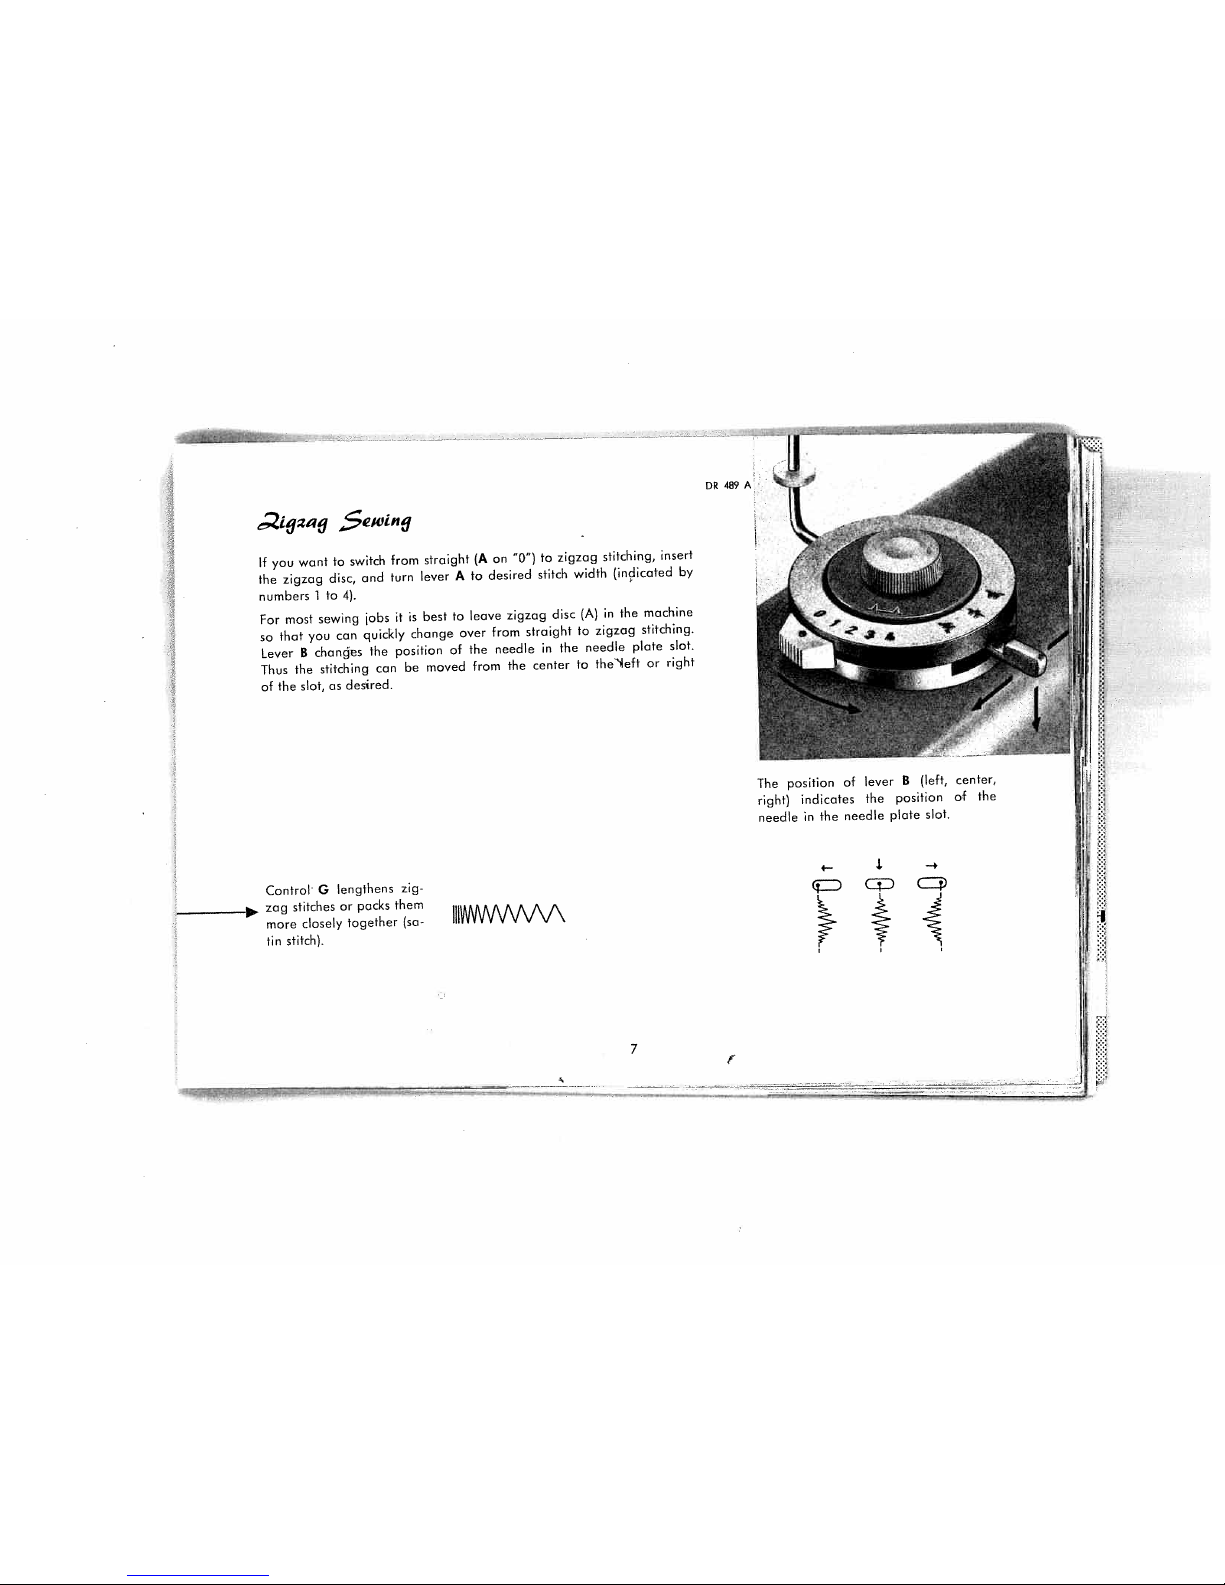
If
you
want
to
switch
from
straight
(A
on
“0”)
to
zigzag
stitching,
insert
the
zigzag
disc,
and
turn
lever
A
to
desired
stitch
width
(indicated
by
numbers
1to4).
For
most
sewing
jobs
it
is
best
to
leave
zigzag
disc
(A)
in
the
machine
so
that
you
can
quickly
change
over
from
straight
to
zigzag
stitching.
Lever
B
chanes
the
position
of
the
needle
in
the
needle
plate
slot.
Thus
the
stitching
can
be
moved
from
the
center
to
the”4eft
or
right
of
the
slot,
as
desired.
Control
G
lengthens
zig
.
zag
stitches
or
packs
them
more
closely
together
(sa
tin
stitch).
—
DR4B9A
j
The
position
of
lever
B
(left,
center,
right)
indicates
the
position
of
the
needle
in
the
needle
plate
slot.
II—
4—
V
.1
-4
I
7
F
Page 9
Aiitcmati
9ashitn
7
jscj
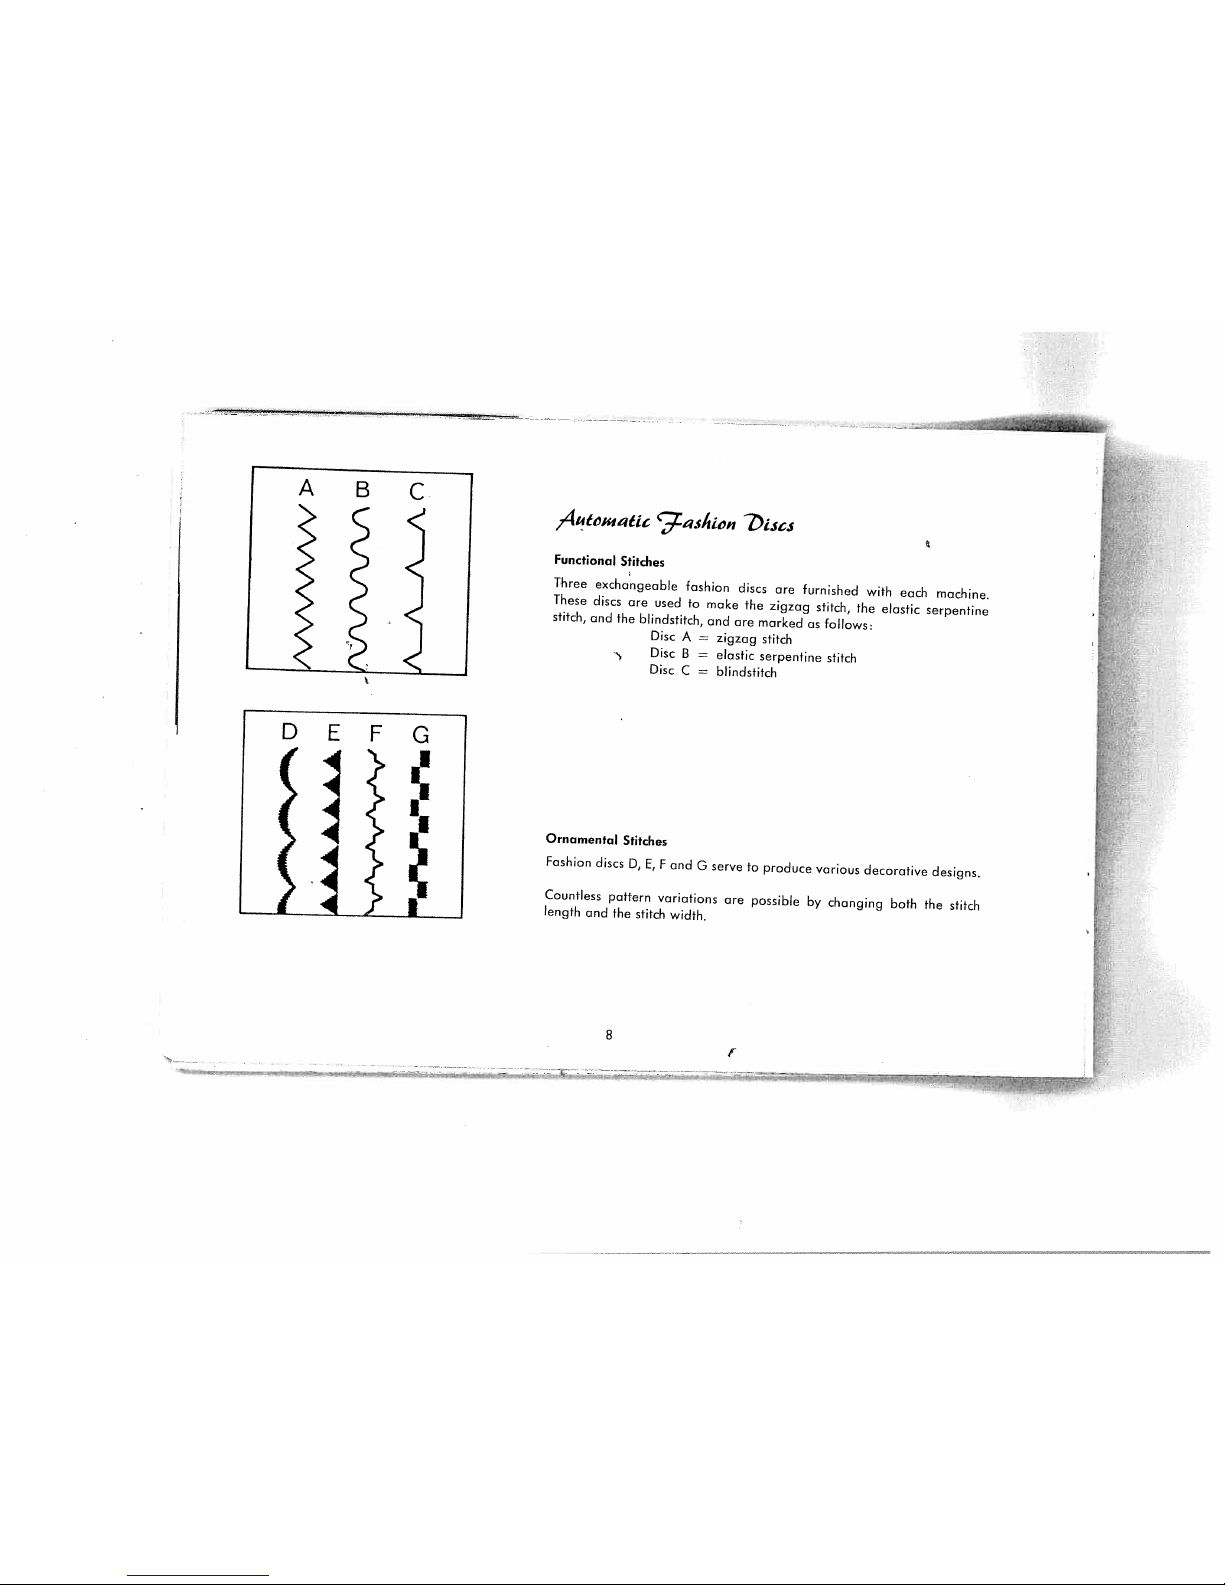
Functional
Stitches
Three
exchangeable
fashion
discs
are
furnished
with
each
machine.
These
discs
are
used
to
make
the
zigzag
stitch,
the
elastic
serpentine
stitch,
and
the
blindstitch,
and
are
marked
as
follows:
Disc
A
zigzag
stitch
Disc
B
=
elastic
serpentine
stitch
Disc
C
blindstitch
Ornamental
Stitches
Fashion
discs
D,
E,
F
and
G
serve
to
produce
various
decorative
designs.
Countless
pattern
variations
are
possible
by
changing
both
the
stitch
length
and
the
stitch
width.
8
Page 10

Changing
the
Fashion
Discs
Always
erk
stitch
width
lever
A
to
“0”
before
you
insert
or
remove
a
disc.
Turn
thumb
nut
R
counter-clockwise
to
re
lease
the
disc
in
the
zigzag
mechanism,
then
pull
it
up
and
take
it
out,
Push
the
disc
onto
the
stud
and
rotate
it
until
stud
H
snaps
into
one
of
the
slots.
Then
tighten
the
thumb
nut
by
turning
it
clockwise.
Set
the
machine
for
the
desired
stitch
width
and
stitch
length.
DR
544
A
RJ
9
Page 11

Ii
It
I
GR
014
2emiwtn
9
t4!
?3o66
in
Caie
Turn
the
balance
wheel
until
the
needle
has
risen
clear
of
the
needle
hole,
lift
front
end
of
bed
slide
and
pull.
Lift
latch
k
with
the
thumb
of
your
left
hand
and
pull
out
bobbin
case
with
bobbin.
When
you
release
the
latch,
the
bobbin
drops
out.
10
DR
013
Page 12
iOmn?tnj
th
73c66
tn
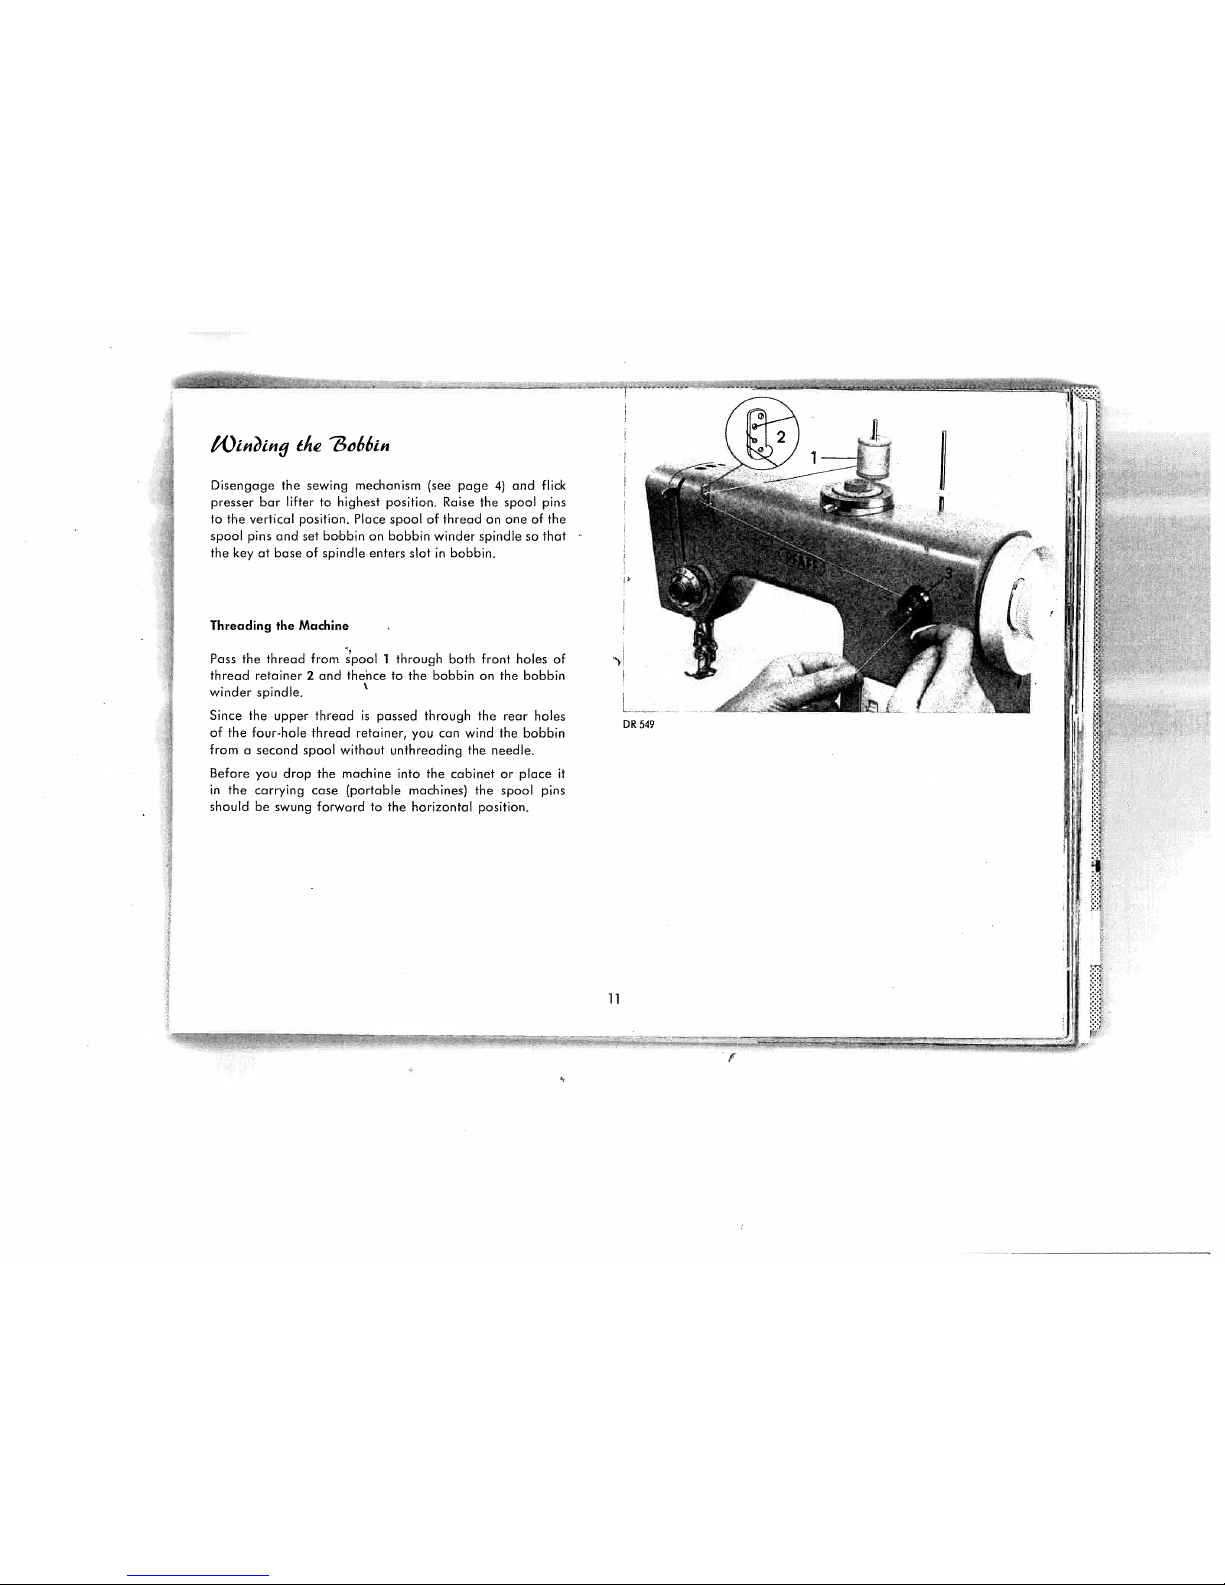
Disengage
the
sewing
mechanism
(see
page4)and
flick
presser
bar
liftertohighest
position.
Raise
the
spool
pins
to
the
vertical
position.
Place
spoolofthreadonone
of
the
spool
pins
and
set
bobbinonbobbin
winder
spindlesothat
the
key
at
base
of
spindle
enters
slot
in
bobbin.
Threading
the
Machine
Pass
the
thread
from
pool
1
through
both
front
holes
of
thread
retainer
2
and
thecetothe
bobbinonthe
bobbin
winder
spindle.
Since
the
upper
threadispassed
through
the
rear
holes
of
the
four-hole
thread
retainer,
you
can
wind
the
bobbin
from
a
second
spool
without
unthreading
the
needle.
Before
you
drop
the
machine
into
the
cabinet
or
place
it
in
the
carrying
case
(portable
machines)
the
spool
pins
should
be
swung
forwardtothe
horizontal
position.
DR
549
11
Page 13
R5868
4
1!
NV
—---..----
,,
,,,
3iseung
t.stt
t,66in
uiit’
the
?3c66j,
Ca5e
CD
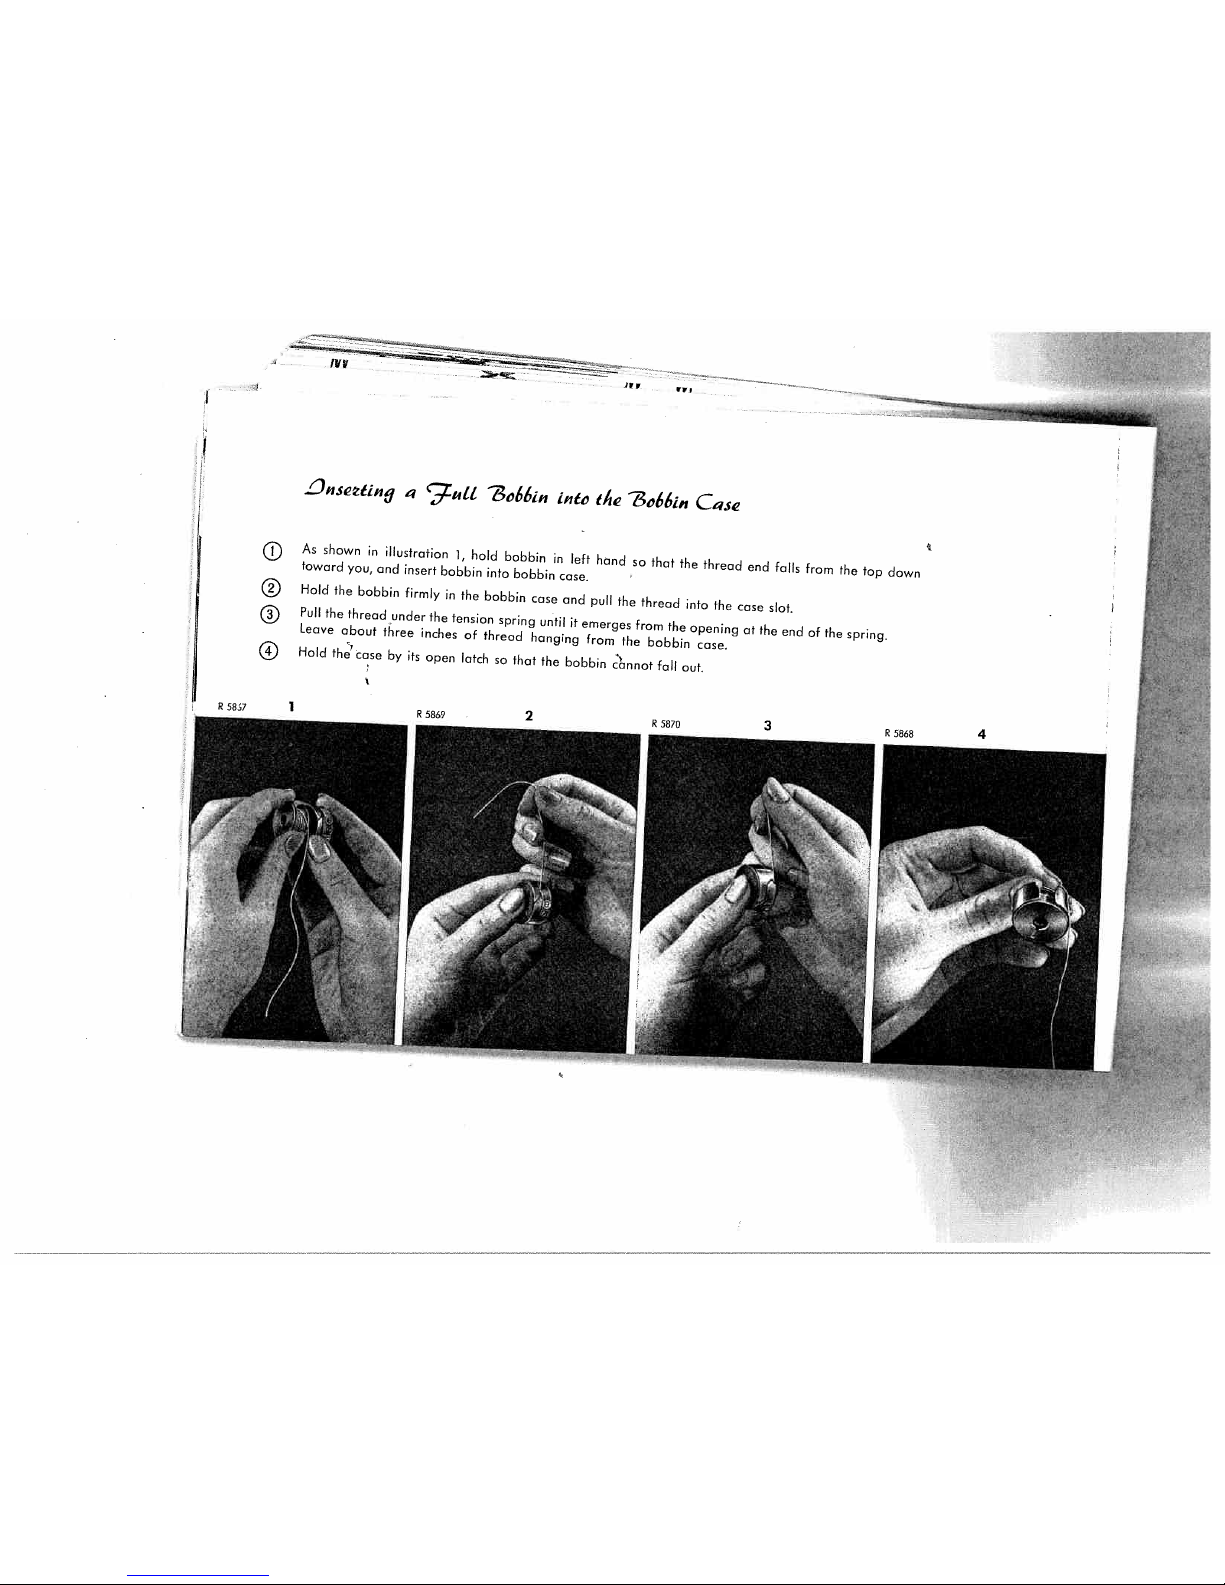
As
shown
in
illustration
1,
hold
bobbin
in
left
hand
so
that
the
thread
end
falls
from
the
top
down
toward
you,
and
insert
bobbin
into
bobbin
case.
Hold
the
bobbin
firmly
in
the
bobbin
case
and
pull
the
thread
into
the
case
slot.
Pull
the
thread
under
the
tension
spring
until
it
emerges
from
the
opening
at
the
end
of
the
spring.
Leave
about
three
inches
of
thread
hanging
from
the
bobbin
case.
Hold
the’
case
by
its
open
latch
so
that
the
bobbin
cbnnot
fall
out.
R
58S7
1
R
5869
2
R
5870
3
::
•
Page 14
.LJiiwZttflJ
th
73t,66in
Ca.c
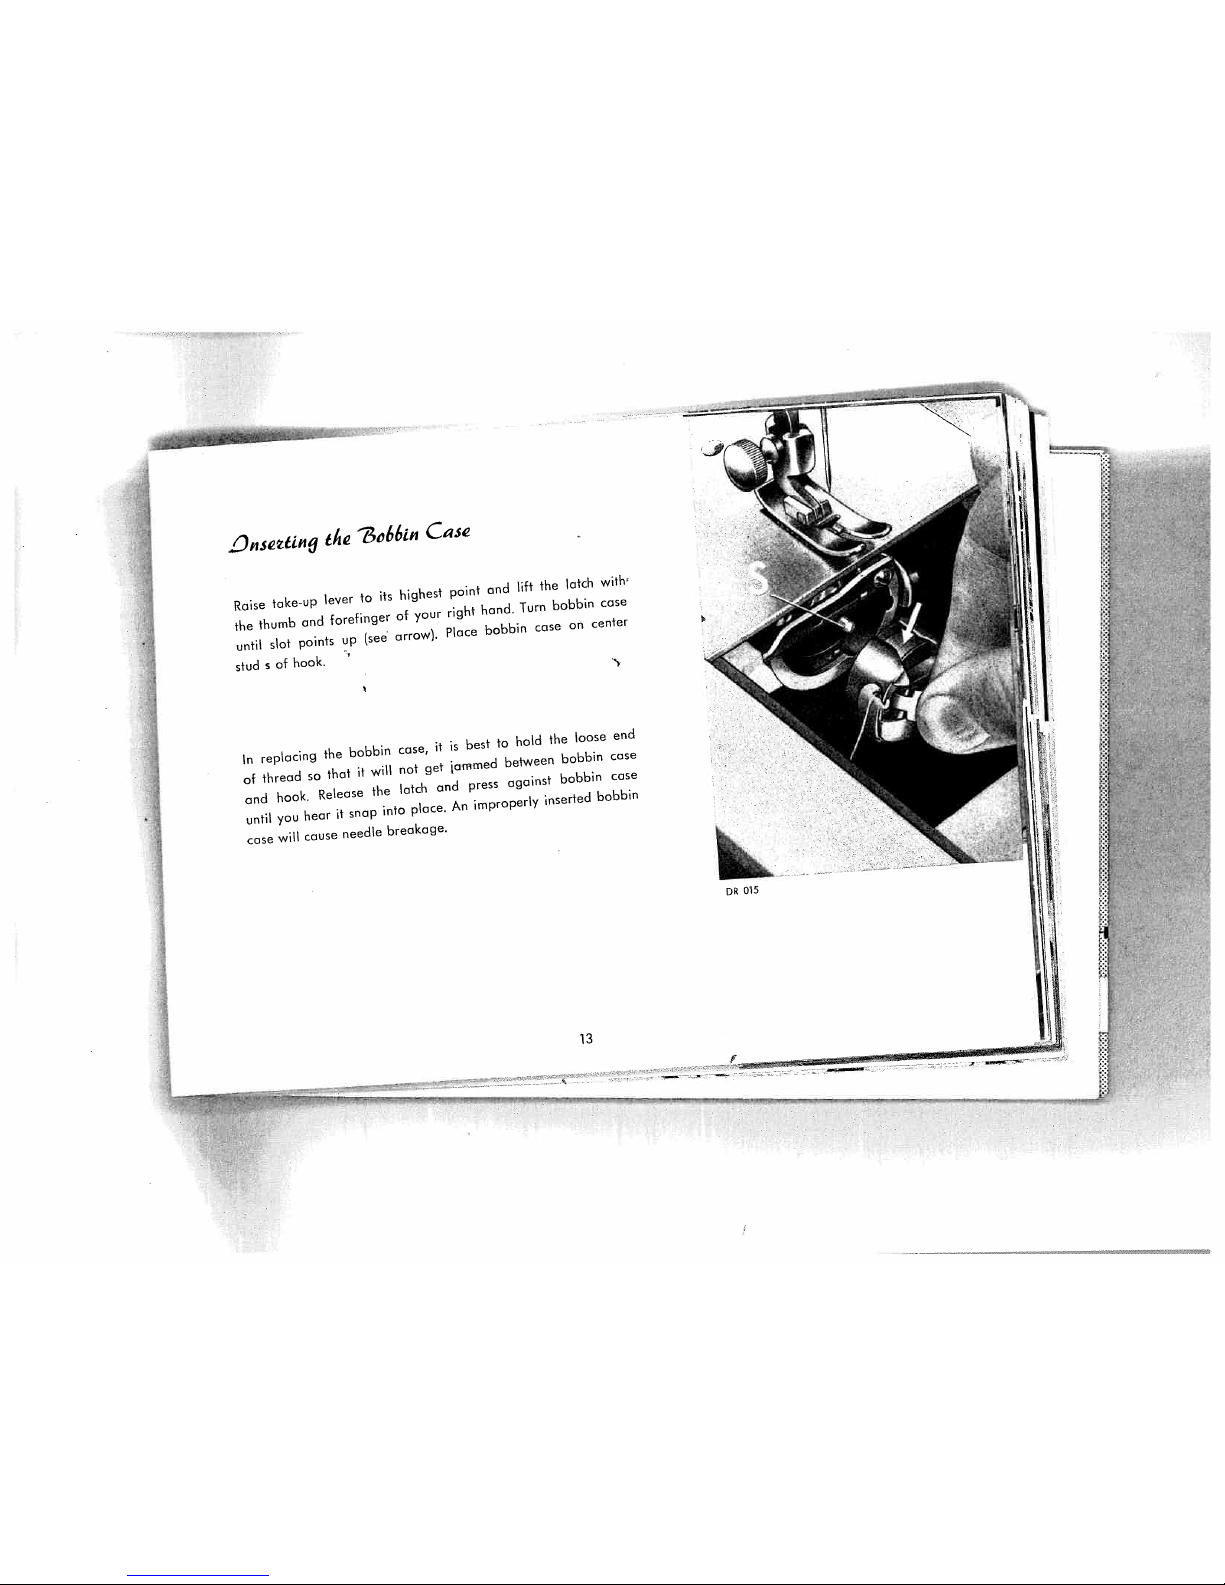
Raise
take-up
lever
to
its
highest
point
and
lift
the
latch
with’
the
thumb
and
forefinger
of
your
right
hand.
Turn
bobbin
case
until
slot
pointS
up
(se
arrow).
Place
bobbin
case
on
center
stud
s
of
hook.
In
replacing
the
bobbin
case,
it
is
best
to
hold
the
loose
end
of
thread
so
that
it
will
not
get
jammed
between
bobbin
case
and
hook.
Release
the
latch
and
press
against
bobbin
case
until
you
hear
it
snap
into
place.
An
improperly
inserted
bobbin
case
will
cause
needle
breakage.
13
—
——
w-
-_
—
DR
015
F
Page 15
mHu2n?1e
/lJee21e
an?
‘hea?
5ie.c
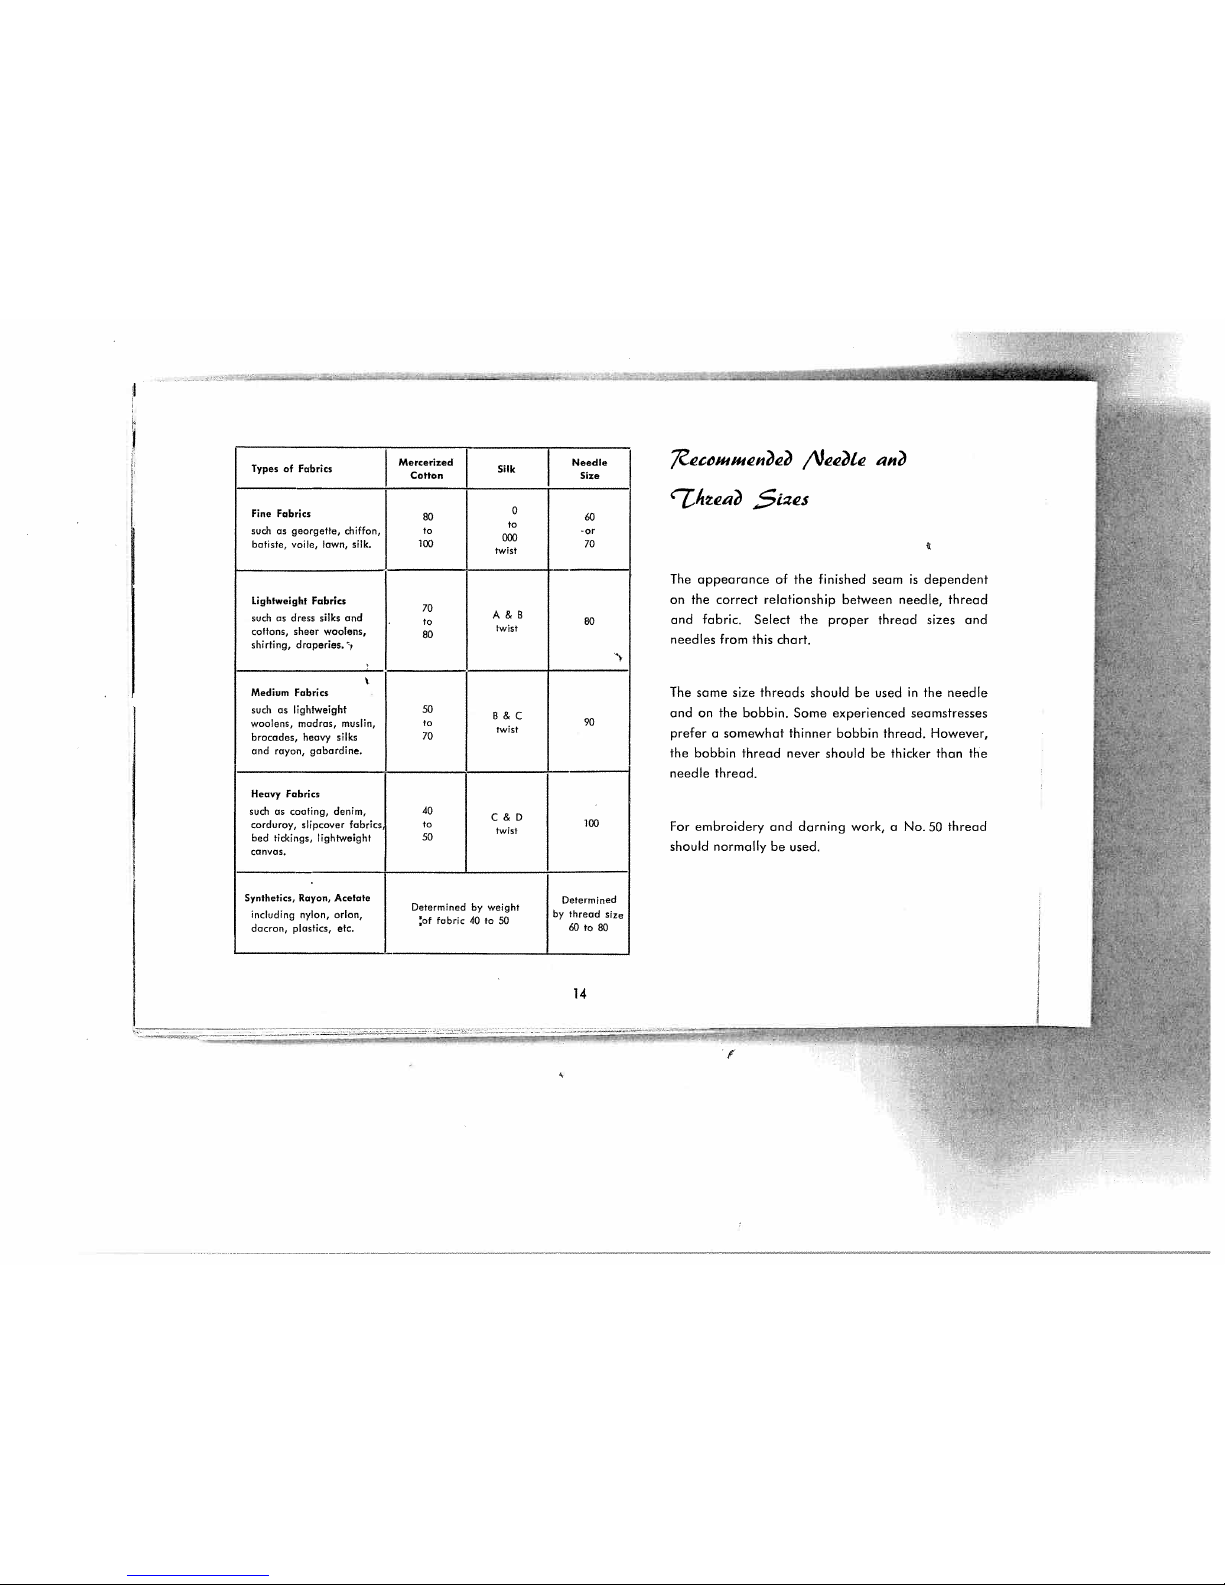
The
appearance
of
the
finished
seam
is
dependent
on
the
correct
relationship
between
needle,
thread
and
fabric. Select
the
proper
thread
sizes
and
needles
from
this
chart.
The
same
size
threads
should
be
used
in
the
needle
and
on
the
bobbin.
Some
experienced
seamstresses
prefer
a
somewhat
thinner bobbin
thread.
However,
the
bobbin
thread
never
should
be
thicker
than
the
needle
thread.
For
embroidery
and
darning
work,
a
No.
50
thread
should
normally
be
used.
Mercerized
Needle
Types
of Fabrics
Silk
Cotton
Size
Fine
Fabrics
0
such
as
georgette,
chiffon,
to
to
-or
000
batisie,
voile,
lawn,
silk.
100
70
twist
Lightweight
Fabrks
70
suchasdress
silks
and
A&B
to
80
cottons,
sheer
woolens,
80
twist
shirting,
droperies.
,
‘5
Medium
Fabrics
such
as
lightweight
50
B&C
woolens,
madras,
muslin,
to
90
twist
brocodes,
heavy
silks
70
and
rayon,
gabardine.
Heavy
Fabrics
such
as
coating,
denim,
40
C&D
corduroy,
slipcover
fabrics
to
100
twist
bed
tickings,
lightweight
50
canvas.
Synthetics,
Rayon,
Acetate
Determined
Determined
by
weight
including
nylon,
orIon,
of
fabric
40
to
50
by
thread
size
dacron,
plastics,
etc.
60
to
80
I
14
Page 16
czan
9aas
a6ciit
7Vee1s
On
Pfoff
92
sewing
machines,
System
130
R,
flat-shank
needles
are
used
for
all
ordinary
sewing
and
embroidery
work.
The
last
colbmn
in
the
chart
on
page
14
gives
you
the
needle
size
required
for
the
material
in
hand.
Genuine
Pfaff
needles,
System
130
R,
are
available
from
every
Pfaff
dealer.
Bent
or
blunt
needles
should
not
be
used.
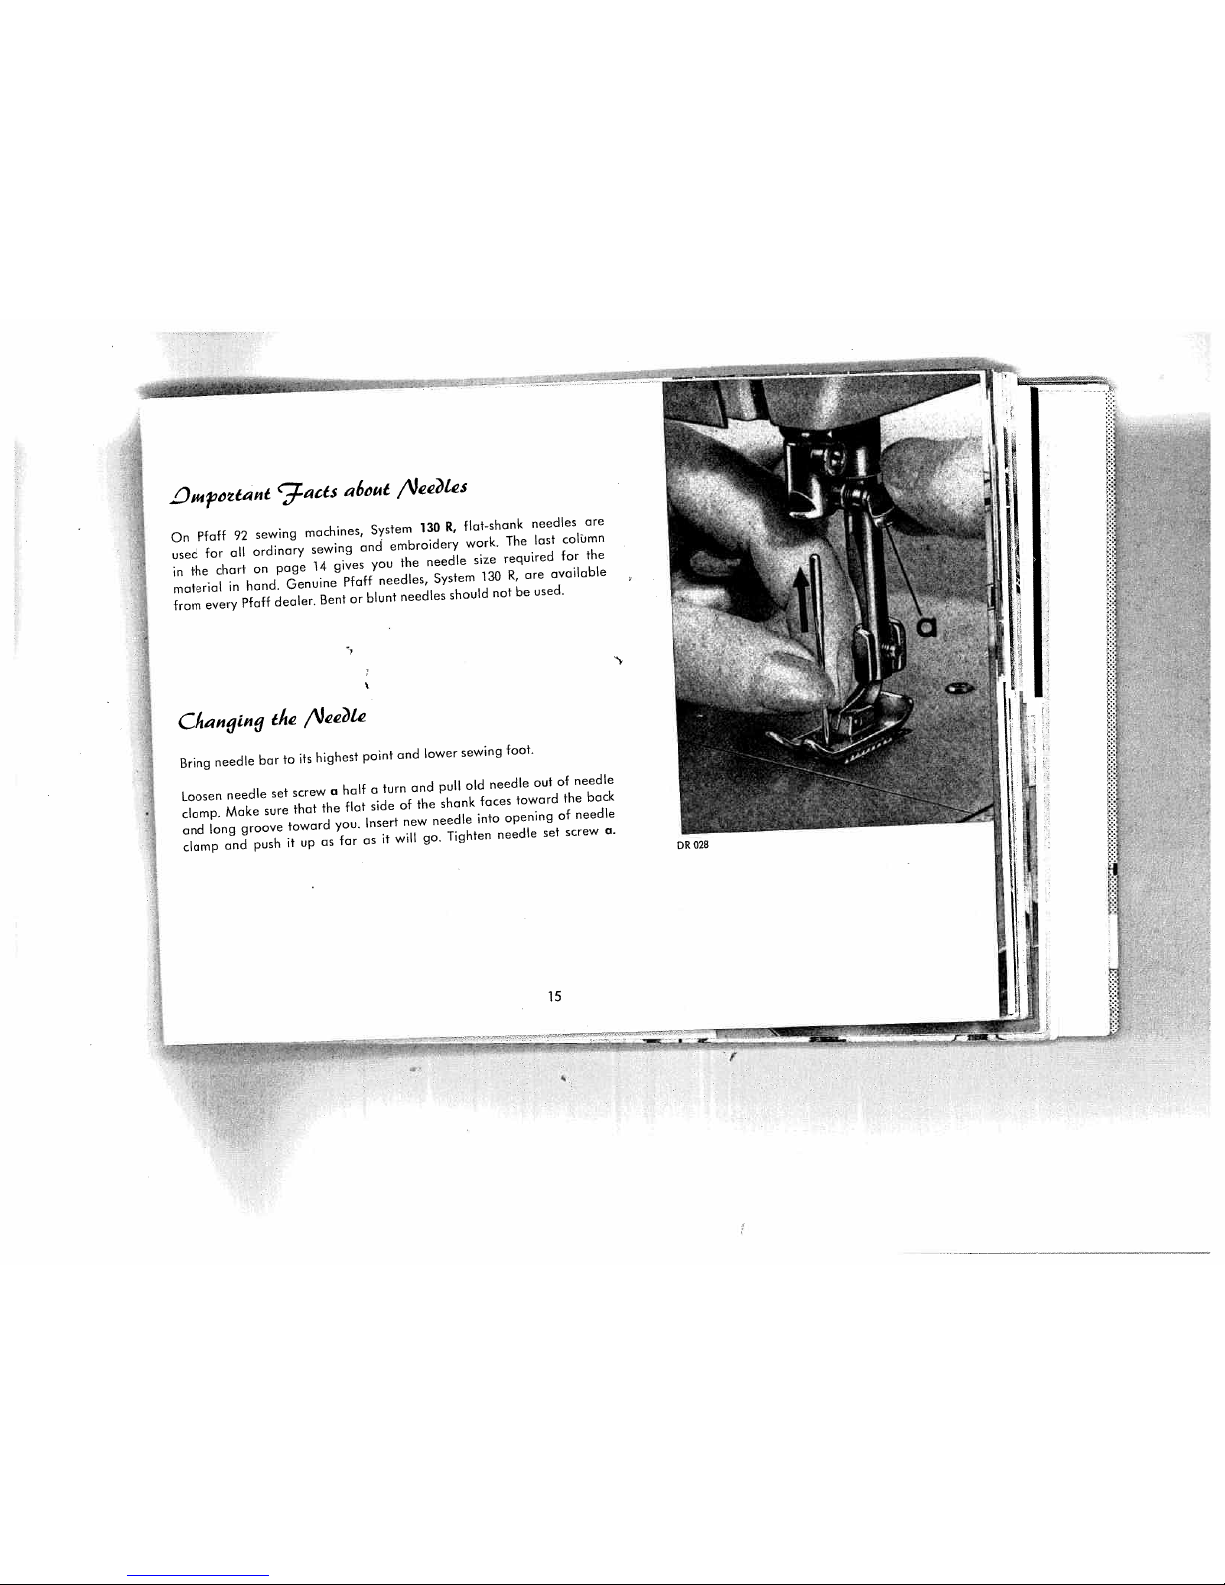
ChanjinfJ
th
/\ket&
Bring
needle
bar
to
its
highest
point
and
lower
sewing
foot.
Loosen
needle
set
screw
a
half
a
turn
and
pull
old
needle
out
of
needle
clomp.
Make
sure
that
the
flat
side
of
the
shonk
faces
toward
the
bock
and
long
groove
toward
you.
Insert
new
needle
into
opening
of
needle
clomp
ond
push
ii
up
as
far
as
it
will
go.
Tighten
needle
set
screw
a.
15
Page 17

t4ii
‘7ha?mnq
Raise
the
spool
pins
to
the
vertical
position
and
place
a
spool
of
thread
on
one
of
them.
Lace
the
thread
rough
the
two
rear
openings
of
thread
retainer
2
(see
illustration).
Pull
thread
between
any
two
of
tension
discs
3,
as
illustrated,
and
jerk
it
far
over
to
the
right
so
that
it
slips
properly
into
the
slot
and
under
the
thread
che&
spring.
At
the
same
time,
press
the
thread
between
spool
and
tension
against
the
top
of
the
machine.
Bring
take-up
lever
4ashigh
as
it
will
go
and
pass
thread
from
right
to
left
through
the
hole
at
its
end
and
into
slot
at
left
of
thread
guide
5.
Then
thread
needle,
front
to
back.
16
Page 18

LI
I
Page 19

I
DR
046
A
Cczect
c7ensi,n
7cyutattcn
Balanced
tensions
are
essential
for
sewing.
If
your
tension
is
correct,
you
will
hove
perfect
seams
as
sketched
below
(Ill).
Sketch
I
—
The
threads
interlock
on
the
underside
of
the
fabric.
C
a
u
s
e
:
Upper
tension
too
loose
or
lower
tension
too
tight.
Caus
Sketch
II
—
The
threads
interlock
on
the
surface
of
the
fabric.
Upper
tension
too
tight
or
lower
tension
too
loose.
Hold
needle
thread
lightly
in
your
left
hand.
Turn
balance
wheel
toward
you
until
the
needle
moves
once
down
and
up
again.
Lightly
pull
needle
thread
to
drawbobbin
thread
up
through
the
needle
hole.
Place
both
threads
back
under
the
sewing
foot.
H
III
th
3o6&
18
Page 20

jjtatin
the
‘7hea
7ensicn
The
bobbin
thread
tension
has
been
set
for
a
medium
grade
and need
not
be
adjusted
for
all
ordinary
sewing
operations.
If
a
special
sewing
operation
should
require
a
looser
or
tighter
tension,
turn
the
small
knurled
screw
on
the
bobbin
case
with
the
tip
of
your
thumb
as
follows:
Turn
it
left
for looser
tension.
-
Turn
it
right
for
tighter
tension.
Determine
whether
the
bobbin
thread
tension
is
set
for
a
medium
grade
by
holding
the
thread
end
between
thumb
and
forefinger
and
letting
the
bobbin
case
hang
freely.
The
tension
should
be
strong
enough
to
keep
the
bobbin
case
from
being
pulled
down
by
its
own
weight.
However,
as
you
jerk
your
hand
slightly,
the
bobbin
case
should
gradually
slide
down.
Do
not
turn
the
knurled,
screw
too
far
to the
left
to
keep
it
from
falling
out.
Choose
the
loweF
tension
slightly
stronger
when
doing
ornamental
stitching
to
be
sure
you
always
have
a
neat
satin
stitch
on
the
right
side
of
the
fabric.
The
upper
tension
is
so
designed
that
all
grades
of
tension
—
loose
to
tight
—
can
be
covered
with
one
complete
turn
of
the
tension
dial.
The
numbers
on
the
tension
dial
indicate
different
degrees
of
tension.
The
higher
the
number,
the
greater
the
tension.
Only
in
very
rare
cases
will
it
be
necessary
to
reset
the
tension.
For
ordinary
sewing,
the
upper
tension
should
be
set
between
3
and
5.
V
A
Your
upper
tension
has
a
third
tension
disc
for
two
needle
work.
19
Page 21

A.ernjth
ji(aticn
The
stitch
length
control
serves
to
regulate
the
stitch
length
and
to
limit
it
in
sewing
backwards.
The
numbers
on
the
control
indicate
the
stitch
length
(te
higher
the
number,
the
longer
the
stitch).
When
the
control
is
set
on
“0”,
the
machine
ceases
feeding.
To
regulate
the
stitch
length,
turn
the
control
until
the
number
indicating
the
desired
stitch
length
is
opposite
the
mark
on
the
left
edge
of
the
slot.
(The
position
of
the
mark
is
indicated
by
an
arrow
in
the
illustration).
To
sew
in
reverse,
simply
press
the
finger-tip
control
down.
When
the
control
is
released,
the
machine
resumes
forward
sewing.
This
feature
is
ideal
for
backtccking
the
beginning
or
end
of
a
seam
and
for
darning
rips.
-
-
-
-
r---;
Fi.
20
Page 22

1$
I
Ii
I,
P11!
OR
042
Chanyin9
the
$eI(in9
9cct
Lift
both
needle
and
presser
bar
to
their
highest
positions
and
turn
sewing
foot
thumb
screw
b
to
the
left.
Tilt
the
foot
sideways
and
-pull
it
down.
Reverse
procedure
to
slip
on
new
foot
and
tighten
screw
b
securely.
DR043
21
—
‘—
—
-r
Page 23

Turn
needle
plate
half
a
turn
so
that
roised
portion
is
at
the
front
(see
illustration)
and
replace.
Press
down
stud
and
replace
bed
slide.
Thread
the
needle
with
darning
wool
and
lower
presser
bar
lifter.
Now
you
can
embroider
and
darn
without
presser
foot,
moving
the
work
freely
by
hand.
22
—
-
—
t-
7!2ainq
4jcu
,41achine
Z’aniny
Remove
the
sewing
foot
and
the
bed
slide.
Lift
front
end
of
needle
plate
and
tilt
out.
Page 24

DR
047
mnj
an
m6ci?iiig
9cct
Remove
the
sewing
foot.
Attach
darning
foot
No.
93-100
154-91
from
ihe
rear.
Hold
spring
clip
c
so
that
it
is
behind
the
needle
set
screw,
and
tighten
screw
b.
At17)tit,s
$,vin
9cct
(with
Clear-View
Shoe)
All-purpose
sewing
foot
No.
93-1
00
179-00
is
attached
as
instructed
on
page
21.
The
transparency
of
its
shoe
facHitates
all
sewing
operations
where
it
is
importanttowatch
the
needle
penetrate
the
fabric.
Special
application
possibilities
are
discussedinthe
second
partofthis
book
under
the
heading
“Using
Sewing
Feet
and
Attachments”.
0R588
23
-
I
Page 25

Ca
an
/i1aIntenanc
Longevity
and
smooth
machine
performance
are
dependent
on
regular
and
proper
cleaning
and
oiling.
Use
Pfaff
sewing
machine
oil
only.
Never
lubricate
maiine
with
animal
or
vegetable
oils.
All
moving
and
rotating
parts
require
regular
lubricatioii.
Begin
under
the
bedplate.
If
you
have
a
portable
machine,
tilt
it
back,
loosen
the
large
thumb
screw
on
the
underside
Qf
the
machine
base,
and
remove
the
base.
In
replacing
the
machine
base,
tighten
thumb
screw
lightly.
DR
590
A
From
time
to
time,
lubricate
the
needle
bar
frame
bearings
in
the
sewing
head.
For
removing
the
face
cover
see
page
26.
The
principal
oiling
points
ore
marked
by
arrows
in
the
illustrationsonthese
pages.
_________
-
Page 26

To
oil
the
zigzag
mechanism,
remove
the
4
fashion
disc
and
apply
a
drop
of
oil
to the
two
marked
oiling
points
(see
arrows).
DR
589
Do
not
lubricate
the
bobbin
winder.
The
raceway
in
the
sewing
hook
is
the
most
important
oiling
point.
Put
one
drop
of
oil
into
the
raceway
each
day
you
sew
(see
picture
at
top
right).
From
time
to
time,
remove
the
needle
plate
and
clean
the
machine
feed
with
a
soft
brush.
Take
a
toothpick
and
remove
accumulations
of
packed
lint.
Take
out
the
bobbin
case
and
the
bobbin
and
clean
the
vicinity
of
the
Sewing
Hook.
Before
you
begin
to
oil
the
mechanism
under
the
bedplote
and
at
the
needlebar
end
of
the
machine,
remove
the
dirt
and
lint
which
has
accumulated
on
these
parts.
25
1;i
:
——
DR
587
Page 27

II
r
IL
i.
L.
GR024
Chaiijinq
the
biqht
73ut6
The
built-in
15-watt
sewing
light
illuminates
the
areaofstitching
perfectly.
To
change
the
light
bulb,
remove
the
face
cover,
push
the
bulb
into
its
socket,
turn
left,
and
pull
out.
When
inserting
sew
light
bulb,
be
sure
to
slide
bulb
pins
into
socket
slots.
Press
bulb
in
and
turn
right.
)
V
7Zeiucomn
9
the
9ate
Côoe
To
change
the
light
bulboroil
the
parts
at
the
needle-bar
end,
remove
the
face
coverbypullingitupwards.
eitacmny
the
‘ae
Ccae
5
Slip
tip
d
into
slot
e
and
push
face
coverupuntil
it
snaps
into
place.
0R512
26
DR505
-
Page 28

1
r
1.
Machine
Sldps
Stitches
Cause:
Remedy:
Needle
incorrectly
inseçted.
Push
needleupas
farasit
will
go
andbesure
that
the
long
groove
faces
toward
yOu,
and flat
sideofshank
away
from
you.
Wrong
needle.
Choose
the
carrect
needle
from
chart
on
page
14.
(For
ordinary
sewing,
use
System
130
R
needles.)
Needle
bent.
Insert
new
needle.
Machine
threaded
improperly.
Check
and
correct
threading
as
instructed
on
pages
16
and
17.
Needle
too
fine
or
too
thick
for
the
thread.
Use
correct
needle
and
thread
(see
chart
on
page
14).
2.
Needle
Thread
Breaks
Cause:
Remedy:
In
The
above
mentioned
may
cause
thread
See
remedies
listed
under
1.
above.
breakage.
tij
Thread
tension
too
tight.
Adjust
tensions
as
instructed.
Ij
Poor,
knotty
or rotten
thread
used.
Use
good
quality
threads
only.
Hook
raceway
is
jammed
with
thread
or
Clean
and
oil
hook
raceway.
needs
oiling.
Burrs
or
sharp
edges
on
needle
plate
slot.
Polish
needle
plate
slot
with
fine
emery
cloth.
j
Page 29

3.
Needle
Breaks
Cause:
Bent
needle
strikes
point
of
sewing
hook.
Needle
too
thin
or
thread
too
heovy.
Fabric
pulls
needle
so
it
bends
and
strikes
needle
plate.
Bobbin
case
inserted
incorrectly.
4.
Faulty
Stitch
Formation
Cause:
Improper
tension.
Thread
too
heavy,
knotty
or
hard.
Bobbin
unevenly
wound.
Pieces
of
thread
between
tension
discs.
5.
Machine
Feeds
Improperly
Cause:
Machine
does
not
feed
because
stitch
lenqth
control
set
on
“0”.
Accumulations
of
lint
packed
between
feed
teeth.
Remedy:
Replace
needle
at
once
to
prevent
further
damage.
Use
correct
needle
and
thread
sizes.
Don’t
force
the
feeding
motion.
Guide
the
material
lightly.
Push
bobbin
case
until
you
hear
it
snap
into
place.
Remedy:
Adjust
tensions
as
instructed.
Use
only
first-rate
thread
—
the
correct
size
for
the
needle
and
fabric.
Don’t
run
thread
over
finger
when
winding
the
bobbin,
but
lead
it
around
needle
thread
tension.
Raise
presser
bar
lifter
and
remove
thread.
Remedy:
Regulate
stitch
length,
as
desired.
Take
off
needle
plate
and
remove
lint
with
a
stiff
brush.
28
Page 30

6.
Machine
Works
Heavily
Couse:
Remedy:
Hook
raceway
locks
oil
or
is
obstructed
by
Clean
and
oil
hook
raceway.
pieces
of
thread.
Mechanism
clogged
by
inferior
oil.
Use
only
Pfoff
sewing
machine
oil
—
never
salod
oil
or
glycerine.
Bobbin
winder
working
whfle
sewing.
Stop
bobbin
winder.
7.
Machine
Fails
to
Sew
Zigkag
or
Ornamental
Stitch
Desired
4
Cause:
Remedy:
Wrong
fashion
disc
inserted
or
none
at
all.
Jerk
stitch
width
lever
to
“0”
and
insert
proper
fashion
disc.
j,..
For
straight
stitching,
too,
a
fashion
disc
should
be
inserted
in
the
machine
(see
pp.
6,
7
and
9).
8.
Motor
Idles
4
Cause:
Remedy:
Motor
disengaging
lever
raised
Flick
lever
down
(see
page
5).
tIl
Thread
Jamming
The
Pfaff
rotary
hook
will
not
normally
jam,
even
if
the
machine
should
be
handled
improperly.
If
thread
should
happen
to
jam
in
the
hook
raceway,
the
power
of
the
motor
in
most
instances
will
be
sufficient
to
overcome
hard
working
of
the
mechanism.
If
this
action
should
not
free
the
jammed
thread,
put
a
dop
of
kerosene
into
the
hook
raceway,
jerk
the
balance
wheel
back,
then
rock
it
back
and
forth.
‘
29
J
JiLl
Page 31

DR
032
(-‘LcIn
9
$Qw1n9
et
an
,,4tta4menLc
(setting
see
page
6)
Zipper
Insertion
Machine
Setting:
A
0;
B
Pin
or
baste
closed
zipper
on
wrong
side
of
fabric.
Position
of
zipper
de
pends
on
whether
or
not
you
want
the
edge
of
the
fabric
to
overlap
the
zip
per.
Turn
fobçic
to
right
side.
Run
a
straight
seam
close
to
left
edge
of
zipper;
stitch
ac1oss
end
and
up
the
other
side
in
one
continuous
operation.
Use
right
edge
of
foot
as
a
guide.
Sew
parallel
rows
of
straight
or
zigzag
stitches
at
various
distances
from
the
fabric
edge
by
using
ad
justable
seam
guide
No.
847
300
and
the
edge
stitcher
(without
qçilting
gauge).
The
seam
guide
is
fastened
to
the
machine
bed
with
the
long
thumb
screw.
For
wider
marginal
stitching,
turn
edge
guide
half
a
turn
and
use
low
end
asa
guide.
(To
sew
narrow
parallel
seams,
guide
fabric
edge
or
prece
ding
seam
along
right
edge
of
sewing
foot,
using
no
edge
guide.)
Quilting
Machine
Setting:
A
0;
B
*
Edge
stitcher
No.847600
used
with
the
quilting
gauge
sews
parallel
rows
of
stitching
at
any
distance
over
the
entire
surface
of
the
fabric.
Always
guide
the
gauge
finger
along
the
preceding
row
of
stitches.
Attractive
tea
cosies,
slippers,
seat
pads
and
covers
can
be
quilted.
J
DROO2
30
F
Edge
Stitching
84
Machine
Setting:
A
0to4;
B
—.
V
r
I
DR
003
Page 32

Second
Seam
847
541
Flat
Felled
Seams
Machine
Setting:
A
0
or
2;
B
+
4
First
Seam
Lay
pieces
together
with
the
wrong
sides
facing
and
truding
‘Is
inch.
Feed
both
pieces
into
felling
foot,
as
bottom
fabric
is
folded
over
DR
048
edge
of
top
piece
and
stitched
down.
Make
sure
that
protruding
seam
allowance
is
not
folded
Open
the
two
pieces,
place
them
under
the
needle
right
side
up,
insert
seam
ridge
into
felling
foot
opening,
and
stitch
down
to
the
left.
Make
sure
that
second
seam
is
placed
close
to
the
edge
but
not
beyond
it.
The
felling
foot
has
a
needle
slot,
rather
than
a
needle
hole,
to
permit
zigzag
felling.
-
—fl---
—-
__________
I,
q1
I
M
Flat
felled
seams
are
used
to
durably
join
two
pieces
of
fabric.
They
are
made
in
two
operations.
Flat
felled
seams
usually
are
straight-stitched.
Narrow
zigzag
stitches
are
used
for
felling
an
elasticized
fabrics
only.
the
bottom
piece
pro-
illustrated,
so
that
the
twice.
31
D49
Page 33

847
551
Hemming
Machine
Setting:
A
=
U
or
2
to
3;
B
The
hemmer
foot
is
indispensable
if
you
want
to
sew
a
uniform
hem.
You
can
hem
with
straight
or
zigzag
stitches,
depending
on
the
type
of
fabr’c
you
are
using.
Clip
off
the
corner
of
th
fabric
to
facilitate
insertion
into
the
hemmer
foot
curl.
Feed
fabric
so
that
the
raw
edge
is
in
line
with
the
left
edge
of
the
hemmer
foot.
If
you
feed
less,
the
fabric
will
not
be
folded
twice
and
the
raw
edge
will
show.
I
Avoid
ugly
ends
by
slowing
down
feeding.
To
do
this,
press
the
fabric
against
the
needle
plate
on
the
left
side
of
the
foot
before
you
come
to
the
end
of
the
hem.
OR
508
F
I
D509
32
Page 34

_838954
Stitching
Synthetic
Materials
Curtains
Machine
Setting:
A
ito
3,
depending
on
material;
B
Stitch
Length:
Minimum
Insert
fashion
disc
A.
:
To
finish
the
edge
of
syntetic
curtain
fabrics,
such
as
Diolen,
use
a
matching
synthetic
thread.
If
necessary,
ease
the
upper
and
lower
tensions
somewhat.
Both
these
hints
should
be
adhered
to
in
order
to
avoid
shrinking
of
both
the
thread
and
the
fabric
in
the
laundry.
.1•
To
butt
seam
the
various
sections
of
curtains,
proceed
as
instructed
on
page
34.
Plastic
Sheets
Machine
Setting:
A
=
0
to
2;
B
Stitch
Length:
Medium
Plastic
curtains,
as
are
used
in
kitchens
and
bathrooms,
are
sewn
with
synthetic
thread
or
cotton
and
a
fine
needle.
Place
a
piece
of
tissue
paper
under
sticky
plastic
sheets
which
can
be
easily
removed
after
the
sewing.
To
prevent
plastic
sheets
from
sticking
to
the
sewing
foot,
apply
a
drop
of
oil
to
its
sole.
33
Page 35

—
838
954
Overcasting
Edges
Machine
Setting:
A
=
2
to
4;
B
=
Overcasting
prevents
frayed
edges.
Use
a
long
wide
zigzag
stitch
and
sew
edge
with
the
needle
taking
one
stitch
into
the
fabric
and
the
other
over
its
edge
(normal
tension
setting).
You
may
overcast
edges
after
fabric
is
cut
and
before
the
pieces
are
joined.
838
954
Butt
Seaming
Machine
Setting:
A
3or4;
B
Two
similar
piecesoffabric
which
do
not
rovel
easily
may
be
butted
together
and
joined
with
zigzag
stitches.
Worn
bed
sheets
may
be
mended
this
way.
Cut
out
worn
center
strip.
Place
the
selvaged
edges
of
the
remaining
pieces
of
sheet
under
the
sewing
foot
so
that
the
abutted
edges
are
centered
under
the
needle.
Join
them
with
close,
wide
zigzag
stitches
to
obtain
a
neat
and
flat
seam.
Hem
raw
edges
of
sheet.
34
OR
037
I
F
Page 36

Triangular
Tears
Triangular
tears
are
best
darned
by
placing
the
torn
section
between
hoops
and
making
close
stitches
across
and
lengthwise.
Move
work
under
the
needle
with
both
hands.
Thin
Spots
Remember
that
“a
stitch
in
time
saves
nine”
and
reinforce
spots
that
have
worn
thin
with
short
stitches
made
lengthwise
and
across
worn
section.
This
job
can
be
donewithoutfoot,too.
Small
Holes
Darn
small
and
medium-size
holes
by
trimming
ragged
edges
with
the
fabric
grain.
First
stitch
back
and
forth
across
the
hole
from
one
side
to
the
other
with
the
machine
running
at
high
speed.
Then
turn
the
fabric
at
right
angles
and
sew
back
and
forth
35
over
preceding
work
with
short
stitches.
Make
sure
the
stitches
are
taken
right
into
the
good
material.
Long
Rips
may
be
darned
with
the
normal
sewing
foot
and
without
hoops.
Set
needle
plate
in
its
normal,
or
sewing,
position
and
use
forward-reverse
feed
control.
DR
056
DR
057
Darning
Machine
setting:
A
0,
B
=
+
Prepare
your
machine
for
darning
as
instructed
on
pages
22
and
23.
Place
fabric
into
darning
hoop,
the
damaged
area
being
in
the
center
of
the
hoop.
Hoops
may
be
obtained
from
your
Pfaff
dealer.
r
-
-
Page 37

Large
holes
can
be
patched
quickly.
The
following
method
may
be
used
for
jersey
nd
other
elastic
fabrics.
Cut
patch
so
that
its
grain
will
match
the
rest
of
the
fabric.
Place
the
patch
over
the
damaged
area.
Sew
it
down
with
an
elastic
serpentine
stitch
of
medium
length.
For
additional
strength,
stitch
over
corners
twice.
Turn
over
and
trim
close
to
seams.
Ordinary
Fabrics
Machine
Setting:
A
2;
8
Stitch
Length:
Minimum
Insert
fashion
disc
A.
Patches
are
inserted
in
ordinary
fabrics
with
short
zigzag
stitches.
Sew
over
corners
twice.
Other
than
that,
proceed
as
instructed
above.
For
added
strength,
sew
around
patch
again,
guiding
the
edge
of
the
sewing
foot along
the
first
seam.
DR582
DR
581
08566
36
r
838
954
u
Inserting
Patches
Elastic
Fabrics
Machine
Setting:
A
4;
8
=
Stitch
Length:
Medium
Insert
fashion
disc
B
(elastic
serpentine
stitch).
F:
r
1*
Page 38

31COS
BIindstitchng
Machine
Setting:
A
=
4;
B
=
Stitch
Length:
Maximum
Insert
fashion
disc
C.
Skirts,
dresses
and
ladies’
coats
of medium
and
heavy-weight
fabrics
are
hemmed
with
blind
stitches.
To
do
this,
insert
the
blindstitch
disc
andaNo.
70
needle.
Use
embroidery
thread
No.
50
or
silk
thread
that
matches
the
fabrlt
Ease
upper
tension
somewhat.
Next,
follow
this
procedure:
Turn
fabric
wrong
side
up.
Fold
finished
edge
of
woolen
fabrics
once
(Fig.
1),
other
thin
fabrics
twice
(Fig.
2).Inthis
latter
case
there
is
no
need
to
finish
the
edge.
It
is
besttopress
or
baste
the
hem.
Guide
the
work
evenly.
Set
stitch
width
lever
Asothat
needle
takes
left stitch
exactly
in
the
folded
edge
and
right
stitch
up
to
or
over
the
hem
edge.
When
hem
is
finished,
stitches
will
not
be
visible
on
top
side.
37
DR
567
_
Page 39

Sewing
Buttonholes
Machine
Setting
A
=
1V
2
(first
notch);
B
Stitch
Length:
Almost
0
(for
buttonhole
seam)
Insert
fashion
disc
A.
Use
only
No.
50
embroidery
and
darning
thread.
Attach
buttonhole
foot
No.
847616
and
set
slide
cn
buttonhole
gauge
to
buttonhole
length
desired.
The
buttonhole
is
the
right
length
when
beginning
of
first
seam
reaches
red
end
of
slide
indicator
(see
arrow).
When
you
follow
the
procedure
on
the
opposite
page,
the
bartacks
at
each
end
of
your
buttonhole
will
be
twice
as
wide
as
a
buttonhole
seam.
If
you
prefer
more
prominent
buttonholes,
pull
a
filler
cord
through
the
hole
in
left
toe
of
foot.
To
get
the
correct
stitch
length,
sew
on
a
piece
of
scrap
material.
In
making
buttonholes
in
soft
or
loosely
woven
fabrics,
it
is
advisable
to
place
a
piece
of
tissue
paper
under
the
material.
To
strengthen
buttonholes
in
tricot
and
knit
fabrics,
insert
a
piece
of
firmly
woven
cotton
material
between
the
fabric
layers.
9’IOO79
.
.
I
Buttonholes
may
be
made
with
the
aid
of
the
all-
purpose
sewing
foot.
Place
the
filler
cord
in
the
left
groove
of
the
clear-view
shoe.
38
Page 40

Instructions
for
Buttonholing
Sew
first
side
overafiller
cord.
When
beginning
of
seam
reaches
red
end
of
slide
indicator
on
buttonhole
gauge,
it
is
the
right
length.
Leave
needle
in
fabric
on
right
side
of
its
throw.
2
Lift
foot,
turn
fabric
around
clockwise,
using
needle
as
a
pivot.
Lower
foot,
take
one
stitch
to
the
left,
pull
filler
cord
taut
and
lay
it
parallel
to
completed
line
of
stitching.
3
Turn
dial
A
untilitis
couht
in
second
notch
(or
stopsat4).
Make4to
6
bortock
stitches,
slightly
holding
the
material
to
reduce
length
of
bar.
4
4
Change
dialAto
“11/2’.
Trim
filler
cordatend
of
first
stitch
row.
Sew
second
row
and
stop
about4to6stitches
(/io”)
from
end
of
first
row.
5
Turn
dialAto
second
notch
position
(or
“4”).
Make
second
tack,
as
instructed
above
(under
3).
6
Turn
dialAto
“0”
and
make3or
4
fastening
stitches.
7
Trim
both
the
sewing
and
filler
threads.
Open
the
buttonhole
with
your
seam
ripper.
Be
careful
not
to
injure
the
bartocks.
E)
39
Page 41

.
r
Button
Sewing
Dorc’t
be
afraid
to
sew
on
buttons
or
rings
with
your
Pfoff.
The
needle
won’t
breok
and
the
threads
will
not
get
loose
either.
Thetlatter
may
happen
only
with
ready-made
clothing
sewn
with
a
chain
stitch.
It
wont
be
worthwiie
to
take
the
machine
out
for
sewing
on
a
single
button,
but
you
will
appreciate
this
feature
when
sewing
lines
of
buttons
on
pillow
and
bed
covers,
on
shirts
or
dresses,
or
when
fastening
rings
on
curtains
etc.
There
your
machine
will
come
in
very
handy.
Attach
all-purpose
sewing
foot
No.
93-100
179-00.
Hooks
aO)d
eyes
are
sewn
on
with
the
aid
of
a
special
button
sewing
r
foot,
No.
847
608,
which
can
be
obtained
from
your
Pfoff
dealer.
Turn
the
needle
plate
half
a
turn
so
thot
the
raised
portion
is
at
the
front
(see
picture
at
the
bottom
of
page
22).
The
raised
portion
of
the
needle
plate
features
an
elongated
needle
hole.
I
t.
Place
button
under
button
sewing
foot
and
align
so
that
needle
will
enter
left
hole.
Let
needle
stitch
through
hole
and
make
one
or
two
tying
stitches.
Raise
needle.
Turn
dial
A
counter-clockwise,
usually
to
3,
until
needle
on
the
right
of
its
throw
is
centered
over
right
hole.
Start
machine
and
sew
as
many
zigzag
stitches
as
you
deem
neces
sary
to
fasten
button
securely.
Return
dial
A
to
0
and
make
two
or
three
tying
stitches.
When
sewing
on
four-hole
buttons,
reposition
button
and
repeat
the
above
process,
stitching
through
the
second
pair
of
holes.
g
40
DR
583
Page 42

838
954
Attaching
Lace
Machine
Setting:
A
=
2;
B
=
You
can
attach
lace
edging
in
one
simple
operation.
Fold
the
edge
of
the
fabric
about
%“
over
to
the
wrong
side,
following
the
texture,
and
preferably
iron
it
down.
Place
the
straight
edge
of
the
lace
onthe
fold
of
the
fabric
and
sew
it
down
with
narrow
zigzag
stitches,
taking
one
stitch
into
lace
and
fabric
and
the
other
into
lace
only.
Cut
off
excessive
cloth
on
the
wrong
side
of
the
material
close
to
the
seam.
Shell-Edging
Made
with
Blindstitch
Disc
Machine
Setting:
A
4;
B
=
+
Stitch
Length:
Medium
Insert
fashion
disc
C,
and
tighten
upper
and
lower
thread
tensions.
Shell
edging
is
an
effective
fashion
trim
an
blouses
(particularly
those
made
of
delicate,
soft
fabrics).
Fold
fabric
along
desired
line.
Guide
work
so
that
needle
takes
one
stitch
in
the
fabric,
and
the
other
over
its
edge.
(As
the
threads
interlock
outside
the
material,
its
edge
is
drawn
back,
producing
the
desired
shell
edging).
Shell
edging
makes
a
nice
trimming
on
handkerchiefs,
too.
OR
044
41
0R564
Page 43

DR
033
838
954
Applique
Work
Machine
Setting:
A
1/2
to
2;
B
Insert
fashion
disc
A.
Applique
is
easy
and
modern.
Trace
design
an
wrong
side
of
fabric
and
baste
a
piece
of
contrasting
material
to
right
side.
Outline
design
on
wrong
side
with
a
narrow
zigzag
stitch
—
and
th
motive
will
appear
on
right
side.
R
7167
42
R
7220
Applique
is
very
effective
on
buster
suits,
pinafores,
bibs,
frocks,
covers,
wall
hangings,
or
wherever
a
gay
note
is
desired.
Fill
out
small,
but
essential
sections
of
design
with
granite
stitches.
V
Trim
excess
material
close
to
the
seam
and
sew
over
edges
of
applique
with
a
medium
wide
satin
stitch.
If
you
want
to
give
the
design
a
plastic
effect,
use
buttonhole
foot
Nr.
847
66
or
all-purpose
sewing
foot,
flick
lever
B
to
the
left
and
satin-stitch
over
a
filler
thread
(see
also
page
38).
Page 44

Machine
Setting:
A
=
3
to
4;
B
=
Insert
fashion
disc
A.
4
Prepare
machine
ts
for
darning.
Script
letters
are
best
for
monogram
embroidery
without
a
sewing
foot.
It
requires
a
little
practice.
You
will
soon
enjoy
creative
embroidery
once
you
have
learned
to
move
the
material
at
a
uniform
rate.
The
fabric
should
be
held
taut
in
the
hoops
and
the
presser
bar
lifter
lowered.
Let
the
needle
stitch
into
the
fabric
at
the
beginnin’
of
your
design
and
draw
bobbin
thread
up
through
the
fabric.
Hold
both
thread
ends
and
sew
over
outline,
moving
hoops
slowly
and
evenly.
To
give
your
monogram
dimensional
quality,
em
broider
outline
twice.
Be
sure
stitches
are
closely
spaced.
DR
038
Monogram
Embroidery
838
954
ü
Sewing
Monograms
Machine
Setting:
A
21/2
to
3;
B
4
The
procedure
below
is
primarily
used
for
block
letters.
Set
needle
plate
so
that
feed
dog
feeds
the
material.
Attach
all-purpose
sewing
foot
and
set
machine
for
satin
stitch.
Sew
outlines
of
monogram,
making
sure
that
seams
do
not
overlap
at
joints
of
letters.
43
DRO31
Page 45

838
954
Straight-Stitch
Hemstitching
Machine’Setting:A0.
B
=
+
Stitch
length:
Medium
to
maximum.
Insert
twin
hemstitching
needle,
System
130
Zwi-Ho,
as
instructed
on
page
15.
Turn
out
needle
set
screw-a
little
further
than
for
ordinary
needles.
The
thread
size,
threading
procedure
and
thread
tension
are
the
same
as
for
cording
work
(see
page
45).
Beautiful
hemstitching
effects
on
blouses,
dresses,
handkerchiefs,
doilies
andsoforth,
can
be
obtained
with
Pfaffs
System
130
twin
needle.
The
harder
the
fabric
yarn,
the
more
pronounced
the
hemstitching
will
be.
For
this
reason,
batiste,
organdy,
georgette,
etc.
are
best
suited
to
hemstitching,
while
woolly
fabrics
are
not
recommended.
Fold
fabric
to mark
seamline
or
trace
seamline
on
fabric.
Sew
first
row.
Guide
fabric
so
that
wing
needle
stitches
along
traced
line.
At
the
end
of
the
seam,
turn
fabric
half
a
turn
and
sew
second
row.
Guide
fabric
in
such
a
way
that
wing
needle
penetrates
the
needle
holes
it
has
made
and
enlarged
previously.
Imitation
hemstitching
thus
requires
at
least
two
operations.
If
desired,
additional
straight
or
curved
ornamental
seams
may
be
stitched
parallel
to
the
first
one.
Exciting
decorative
effects
may
be
obtained
by
using
van-colored
embroidery
and
darning
threads.
Zigzag
Hemstitching
Machine
Setting:
A
Up
to
1/2;
B
+
Insert
fashion
disc
A
Same
as
above,
except
that
the
wing
needle
should
penetrate
the
traced
line
only
when
itison
the
left
of
its
throw.
-
,r
Infert
fashion
disc
A.
Procedure
DR
001
R
8427
44
Page 46

Cording
Machine
Setting:
A0;B
To
cordonyour
Pfaff
92,
useacording
foot andatwin
needle.
Twin
needles
are
available
for
needle
distances
of
1.2
(3/64”),
1.6
(1/16”),
1.8,
2.0 (5/64”),
2.5
(3132),
3.0,
and
4.0
(5/32”)
millimeters.
Cording feet
are
availableinthree
varieties,asfollows:
Pin
tucks
are
made
with
cording
foot
No.
847680(7grooves,
3/64”
wide
each)
and
a
1.2-mm
twin
needle.
For
narrow
cording
use
cording
foot
No.
847675
(5
grooves,
1/16”
wide
each;
see
ill.)
anda1.6-mm
twin
needle.
Wider
cordingismade
with
cording foot
No.
847
671
(3
grooves,
5/64”
wide
each)
and
a twin
needle
withaneedle
distance
of
2.0or2.5
millimeters.
Cording
feet
and
twin
needles,
System
130,
ore
suppliedonspecial
request
and at
extra
cost.
Changing
the
Needle
and
the Sewing
Foot
Bring
take-up
levertohighest
point,
loosen
needle
set screwa,and
pull
ordinary
needle
out
of
needle
clamp.
Insert
twin
needle
into
opening
of
needle
clamp
and
pushitupasfarasit
will
go Make
sure
that
the
flat
sideofthe
shank
faces
toward
the
back.
Tighten
needle
set
screwasecurely.
45
DR
020
Page 47

rum
sewing
foot
thumb
screw
b
to
the
left
and
take
out
the
sewing
foot.
Slip
on
cording
foot
and
tighten
screw
b
securely.
It
is
best
to
turn
out
screw
b
completely
if
you
want
to
slip
on
a
cording
foot
with
the
guide
attached.
Thread
Size
Pin
tucks
and
narrow
cording
are
made
with
a
No.
50
embroidery
thread,
wider
cording
with
sewing
silk
in
the
needle
and
on
the
bobbin.
Set
the
machine
for
a
medium
stitch
length.
Upper
T,hreading
Place
a
spool
of
thread
on
each
of
the
two
spool
pinsPass
both
thread
ends
through
both
thread
retainer
openings
2,
as
illustrated
on
page
17.
Lead
one
thread
between
the
rear
and
center
tension
discs,
and
the
other
between
the
center
and
fr,nt
tension
discs
of
upper
tension
3.
Raise
take-up
ever
4
to
its
highest
position
and
pass
both
threads
thraugh
the
hole
at
its
end.
Pull
threads
into
slat
5,
and
thread
each
needle
from
front
to
back.
The
bobbin
thread
is
drawn
up
as
instructed
on
page
18.
To
do
this,
hold
both
needle
threads
in
your
left
hand.
Thread
Tension
Slightly
increase
the
bobbin
thread
tension,
and
increase
or
decrease
the
needle
thread
tension
depending
on
the
type
of
fabric
used.
If
the
tension
has
been
set
correctly,
the
bobbin
thread
should
appear
as
a
faint
zigzag
line
on
the
other
side.
Filled
Cording
If
you
want
to
make
cording
in
filmy
fabrics
or
render
your
cording
more
prominent,
Pfaff
recommends
th0t
you
insert
a
filler
cord.
Its
thickness
depends
on
the
cording
size
you
want.
Remove
the
bed
slide
and
pass
the
filler
card
from
below
through
hole
g
located
in
front
of
the
oval
needle
hole
f
(see
ill,
on
page
45).
Lay
the
end
of
the
filler
cord
back
under
the
cording
foot
(together
with
the
needle
and
bobbin
thread
ends).
Pull
a
filler
cord
forward
under
the
bed
slide
and
place
the
ball
in
your
lap.
0R521
46
1
Page 48

Spacing
between
Tucks
To
ensure
uniform
spacing
between
parallel
tucks,
place
the
preceding
seam
into
one
of
the
grooves
of
the
foot
and
use
itasa
guide.
For
a
larger
spacing
between
tucks,
use
the
adjustable
guide
(see
ill,
on
page
46)
which
is
part
of
every
cording
foot.
Various
Cording
Effects
Attractive
cording
effect
may
he
obtained
by
combining
horizontal,
vertical
and
diagonal
tucks
or
stitching
curved
tucks
(see
ill,
below).
If
you
want
to
turn
a
corner,
leave
needle
in
fabric
(up
to
needle
eye
only),
lift
foot,
turn
fabric,
lower
foot,
and
continue
sewing.
To
stitch
an
acute
angle,
turn
fabric
halfway,
let
needle
make
one
stitch,
turn
fabric
all
the
way,
and
resume
stitching.
DR
058
DR
473
DR
474
47
DR
475
DR
058A
Page 49

DR
554
{r_rJ
ioI
Coarse-Thread
Embroidery
Machine
Setting:
A
=
0
to
4;
B
=
optional
Insert
fashion
disc
A.
Buy
a
coarse,
four-ply
embroidery
thread
in
the
desired
colors.
Embroidery
designs
made
with
this
thread
are
very
attractive.
They
have
dimensional
quality
and
closely
resemble
manual
embroidery
work.
The
adjoining
designs
were
made
with
the
aid
of
the
zigzag
disc.
To
make
the
design
illustrated
in
the
middle,
alternate
straight
and
zigzag
stitching.
Machine
embroidery
is
made
with
the
machine
running
at
a
moderate
speed.
48
Page 50

—
91100179
Automatk
Embr&dery
Machine
Setting:
A=2
to
4;
B
=
4
Stitch
Length:
Minimum
Insert
fashion
disc
D,
E,
F
or
G,
and
use
No.50
em
broidery
thread.
Numerous
pattern
vriatians
are
possible
by
changing
stitch
width
and
stitch
length.
Selecting
the
most
effec
tive
design
and
color
cbmbinatiOns
will
challenge
your
imagination.
Automatic
embroidery
designs,
too,
ore
rendered
more
prominent
by
using
coarse
embroidery
thread.
It
is
advisable
to
increase
the
stitch
length
slightly.
DR
555
I
r
I
Flower
petals
sewn
with
fashion
disc
E
and
coarse
embroidery
thread.
49
Page 51

Two-Needle
Decorative
Sewing
Machine
Setting:
A
up
to
2;
B
Insert
fashion
discs
A
to
G,
Automatic
embroidery
designs
are
particularly
attractive
when
sewn
with
twin
needles
and
differeit
color
thread.
The
distance
between
both
needles
must
not
exceed
5/64
inch.
(For
threading
the
twin
needles
see
cording
instruc
tions
on
page
45).
Beautiful
border
effects
can
be
produced
by
combining
zigzag,
serpentine,
and
blind-stitch
designs.
Your
Pfaff
can
do
many
additional
sewing
jobs
and
turn
out
beautiful
work.
See
your
Pfaff
dealer
who
will
be
glad
to
advice
you
on
our
extensive
line
of
attachments
designed
to
enlarge
the
range
of
possible
applications
of
your
machine.
Such
additional
applications
include
granite
stitching
and
sewing
on
wool
thread.
Interesting
effects
can
also
be
obtained
with
the
multi-stitch
ruffler
and
the
bias
binder.
50
Page 52

Foreword
.
Essential
Parts
of
Machine
Fundamentals
of
Machine
Ooeration
Operation
of
Your
Sewing
Machine
Motor
Disengaging
Mechanism
.
Electrical
Information
Straight
Stitching
Zigzag
Sewing
Automatic
Fashion
Discs
Changing
tle
Fashion
Discs
Removing
the
Bobbin
Case
Winding
the
Bpbbin
Inserting
a
Full
Bobbin
into
the
Bobbin
Case
Inserting
the
Bobbin
Case
Recommended
Needle
and
Thread
Sizes
.
Important
Facts
about
Needles
Changing
the
Needle
Upper
Threading
Correct
Tension
Regulation
Drawing
Up
the
Bobbin
Thread
Regulating
the
Thread
Tension
Stitch
Length
Regulation
Reverse
Sewing
Changing
the Sewing
Foot
Preparing
Your
Machine
for
Darning
Darning
and
Embroidery
Foot
All-Purpose
Sewing
Foot
(with
Clear-View
Shoe>
Care
and
Maintenance
Changing
the
Light
Bulb
Removing
the
Face
Cover
Replacing
the
Face
Cover
.,
Trouble
Shooting
Zipper
Insertion
Edge
Stitching
Quilting
Flat
Felled
Seams
Hemming
Stitching
Synthetic
Materials
‘1
Overcasting
Edges
Butt
Seaming
Darning
Inserting
Patches
Blindstitching
Sewing
Buttonholes
Button
Sewing
Attaching
Lace
Shell-Edging
Made
with
Blindstitch
Disc
.
Applique
Work
Monogram
Embroidery
Sewing
Monograms
Straight-Stitch
Hemstitching
Zigzag
Hemstitching
Cording
Coarse-Thread
Embroidery
Automatic
Embroidery
Two-Needle
Decorative
Sewing
26
26
26
27
30
30
30
31
32
33
34
34
35
36
37
38
40
41
41
42
43
43
44
44
45
48
49
50
Contents
2
3
4
4
5
6
7
8
9
10
11
12
13
14
15
15
16
18
18
19
20
20
21
22
23
23
24
L
52
Page 53

CPFAF
FD°
Nr
20279
engl.
So
0863
Printed
in
Germany
I
 Loading...