

Peugeot Boxer 2018 Owner's Manual
HANDBOOK
BOXER

Access to the Handbook
From the appropriate Store, download the Scan
MyPeugeot APP smartphone application.
Then select:
- the vehicle,
- the print edition corresponding to the date of 1
vehicle.
Download the content of the vehicle's Handbook.
st
registration of your
The Handbook is available on the PEUGEOT website,
in the "Personal space" section or at the following
address:
http://public.servicebox.peugeot.com/ddb/
Select:
- the language,
- the vehicle, its body style,
- the print edition of your handbook corresponding to the date of 1
registration of your vehicle.
Direct access to the Handbook.
This symbol indicates the latest information
available.
st
Welcome
Thank you for choosing a Peugeot Boxer.
This document presents the information and recommendations required
for you to be able to explore your vehicle in complete safety.
Your vehicle will be fitted with only some of the equipment described in
this document, depending on its trim level, model and the specification
for the country in which it was sold.
The descriptions and illustrations are given without any obligation.
Automobiles PEUGEOT reserves the right to modify the technical
specifications, equipment and accessories without having to update this
edition of the guide.
If ownership of your vehicle is transferred, please ensure this Complete
Handbook is passed on to the new owner.
In this document, you will find all of the instructions and
recommendations on use that will allow you to enjoy your vehicle to the
fullest. It is strongly recommended that you familiarise yourself with it,
as well as the Warranty and Maintenance Record which will provide you
with information about warranties, servicing and roadside assistance
associated with your vehicle.
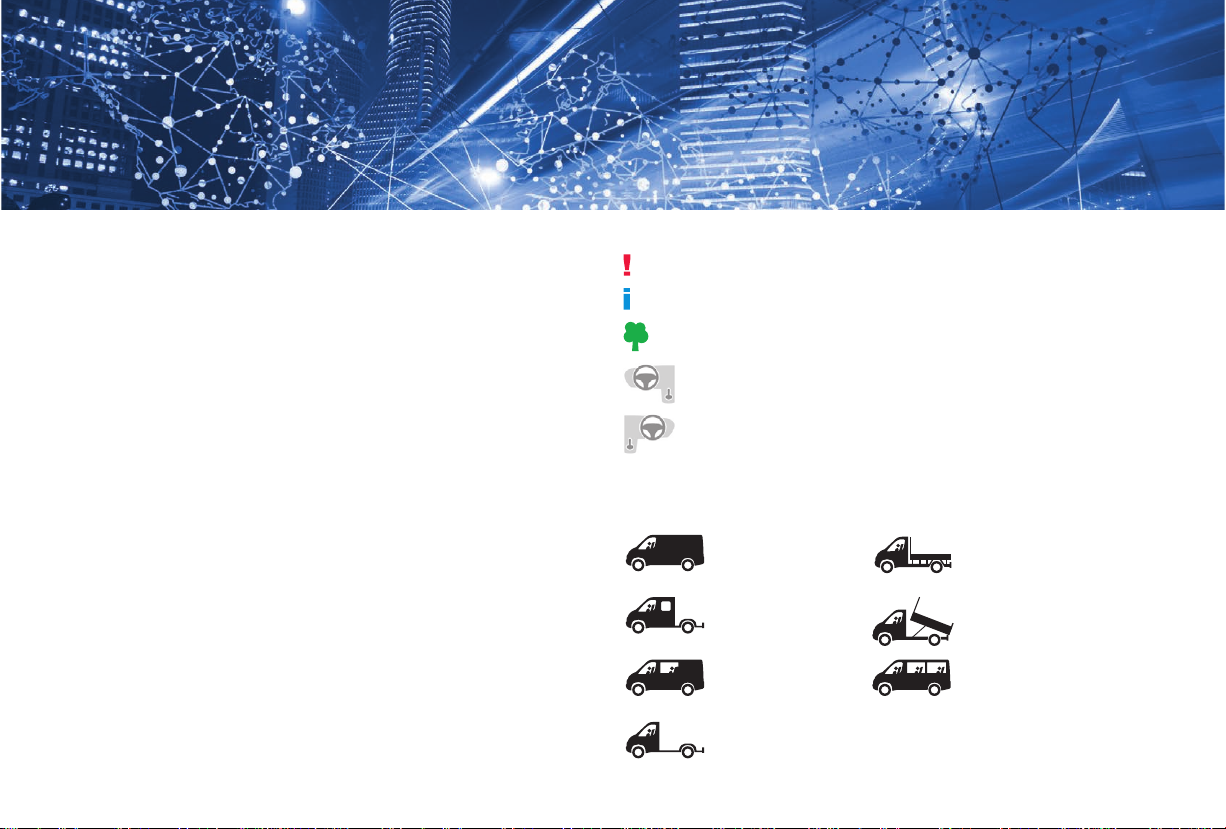
Key
Safety warning
Additional information
Contributes to the protection of the environment
Left-hand drive vehicle
Right-hand drive vehicle
Key
This key will enable you to identify the special features of your vehicle:
Van
Double cab
Crew cab
Chassis cab
Floor cab
Tipper
Combi, minibus
Contents
Instruments and controls 4
Centre console 4
Dashboard instruments
Instrument panels 7
Warning and indicator lamps 8
Indicators 18
Vehicle conguration 22
Setting the date and time 28
Trip computer 28
Tachograph 29
2
Overview
Eco-driving
.
Key 30
Remote control 30
Anti-intrusion security 33
Front doors 33
.
Sliding side door 33
Rear doors 34
Alarm 35
Electric windows 36
Ease of use and c o mfo rt
Driver's seat 37
2-seat front bench seat 39
Rear seats 40
Rear bench seats 40
Steering wheel adjustment 41
Mirrors 42
Heating/Manual air conditioning 43
Automatic air conditioning 44
Additional heating systems 46
Rear heating and/or air conditioning 46
Programmable additional heating 47
Recommendations for ventilation and air
conditioning 50
Front demist – defrost 51
Defrosting the rear screen and
door mirrors 51
Cab layout 52
Rear ttings 57
Exterior ttings 60
Access
Lighting and visibility
Lighting controls 61
LED daytime running lamps 62
Automatic illumination of headlamps 62
Guide-me-home lighting 62
Adaptive lighting 63
Parking lamps 64
Headlamp beam height adjustment 65
Wiper control stalk 65
Safety
General safety recommendations 67
Hazard warning lamps 68
Horn 68
Electronic stability control (ESC) 68
Seat belts 72
Airbags 75
Child seats 77
Deactivating the passenger's front airbag 78
ISOFIX mountings and child seats 83
Child lock 86
Contents
.
Driving Pr act ic al infor mat ion
Driving recommendations 87
Anti-theft protection 89
Starting-switching off the engine 90
Battery standby system 91
Parking brake 91
Manual gearbox 92
Gear shift indicator 92
Stop & Start 93
Hill start assist 95
Trafc sign recognition 96
Speed limiter 99
Fixed speed limiter 100
Cruise control 101
Cruise control (3 litre HDi engine) 103
Lane Departure Warning System 105
Under-ination detection 110
Rear parking sensors, audible assistance 111
Reversing camera 112
Pneumatic suspension 113
Fuel 116
Compatibility of fuels 118
Snow chains 119
Towing a trailer 119
Towbar with quickly detachable towball 120
Roof carrying systems 123
Changing a wiper blade 124
Bonnet 124
Diesel engines 126
Checking levels 126
Checks 129
®
AdBlue
(BlueHDi engines) 132
In the event of a brea kdow n
Temporary puncture repair kit 135
Spare wheel 137
Changing a bulb 143
Changing a fuse 149
Battery 153
Towing 155
Technical data
Engine technical data and towed loads 157
Diesel engines 158
Weights and towed loads 159
Dimensions 162
Identication markings 167
Glossary of labels 168
Special features
Crew cab 171
Chassis cab/Floor cab 172
Double cab 176
Tipper 180
Audio equipment and telematics
Alphabetical index
10
.
.
3
Overview
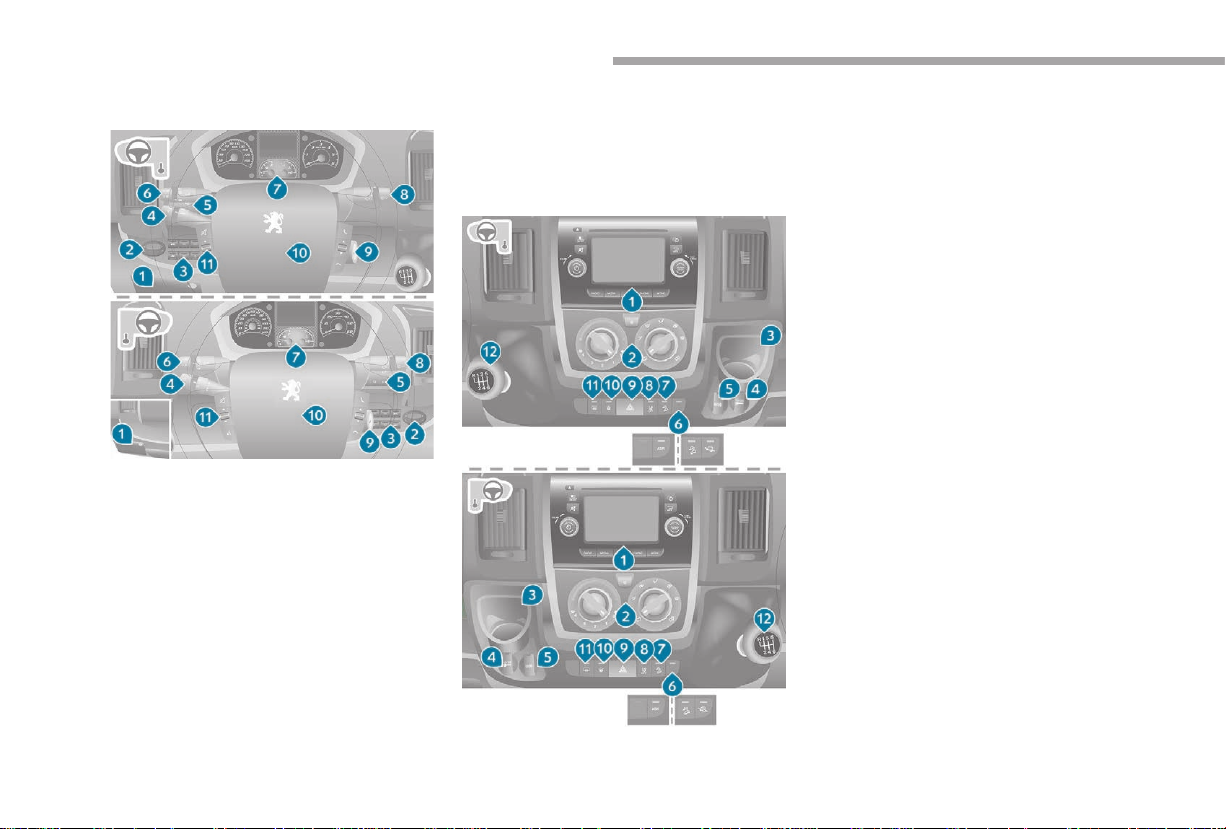
Instruments and controls
1. Fusebox.
2. Programmable additional heating.
3. Pneumatic suspension/Reading lamps/
Additional rear ventilation.
4. Cruise control/speed limiter controls.
5. Vehicle configuration/Headlamp beam
height/Front/rear foglamps.
6. Lighting and direction indicator control
stalk.
7. Instrument panel with display.
8. Wiper/screenwash/trip computer stalk.
9. Ignition switch.
10. Driver's front airbag/Horn.
11. Steering wheel mounted audio system
controls.
Centre console
3. Storage/portable ashtray.
4. 12 Volt accessory socket (180 W max).
5. USB port/Cigarette lighter.
6. Dynamic stability control (DCS/ASR)/
Intelligent traction control.
7. Hill descent control.
8. Lane Departure Warning System.
9. Hazard warning lamps.
10. Central locking/Locking indicator lamp.
11. Demisting/Defrosting.
12. Gear lever.
1. Audio system/Navigation.
2. Heating/Air conditioning.
4

Eco-driving
Eco-driving is a range of everyday practices that allow the motorist to optimise their fuel consumption and CO2 emissions.
Eco-driving
.
Optimise the use of your
gearbox
With a manual gearbox, move off gently
and change up without waiting. During
acceleration, change up early.
With an automatic gearbox, give preference
to automatic mode and avoid pressing the
accelerator pedal heavily or suddenly.
The gear shift indicator invites you to engage
the most suitable gear: as soon as the
indication is displayed in the instrument panel,
follow it straight away.
For vehicles fitted with an automatic gearbox,
this indicator appears only in manual mode.
Drive smoothly
Maintain a safe distance between vehicles,
use engine braking rather than the
brake pedal, and press the accelerator
progressively. These practices contribute
towards a reduction in fuel consumption and
CO
emissions and also help reduce the
2
background traffic noise.
If your vehicle has cruise control, make use of
the system at speeds above 25 mph (40 km/h)
when the traffic is flowing well.
Control the use of your electrical
equipment
Before moving off, if the passenger
compartment is too warm, ventilate it by
opening the windows and air vents before
using the air conditioning.
Above 30 mph (50 km/h), close the windows
and leave the air vents open.
Consider using equipment that can help
keep the temperature in the passenger
compartment down (sunroof blind and window
blinds, etc.).
Unless it has automatic regulation, switch off
the air conditioning as soon as the desired
temperature has been reached.
Switch off the demisting and defrosting
controls, if these are not automatically
managed.
Switch off the heated seat as soon as
possible.
Switch off the headlamps and front foglamps
when the ambient light level does not require
their use.
Avoid running the engine before moving off,
particularly in winter; your vehicle will warm up
much faster while driving.
As a passenger, if you avoid connecting your
multimedia devices (film, music, video game,
etc.), you will contribute towards limiting the
consumption of electrical energy, and so of
fuel.
Disconnect your portable devices before
leaving the vehicle.
5

Eco-driving
Limit the causes of excess
consumption
Spread loads throughout the vehicle; place
the heaviest items in the bottom of the boot,
as close as possible to the rear seats.
Limit the loads carried in the vehicle and
reduce wind resistance (roof bars, roof rack,
bicycle carrier, trailer, etc.). Preferably, use a
roof box.
Remove roof bars and roof racks after use.
At the end of winter, remove snow tyres and
refit your summer tyres.
Observe the recommendations
on maintenance
Check the tyre pressures regularly, when cold,
referring to the label in the door aperture,
driver's side.
Carry out this check in particular:
- before a long journey,
- at each change of season,
- after a long period out of use.
Do not forget the spare wheel and the tyres on
any trailer or caravan.
Have your vehicle serviced regularly (engine
oil, oil filter, air filter, cabin filter, etc.) and
observe the schedule of operations in the
manufacturer's service schedule.
With a BlueHDi Diesel engine, if the SCR
system is faulty, your vehicle becomes
polluting. As soon as possible, visit
a PEUGEOT dealer or a qualified workshop
to make your vehicle's level of nitrogen oxides
emissions compliant to the standard.
When filling the tank, do not continue after the
rd
3
cut-off of the nozzle to avoid overflow.
At the wheel of your new vehicle, it is only
after the first 1,900 miles (3,000 kilometres)
that you will see the fuel consumption settle
down to a consistent average.
6
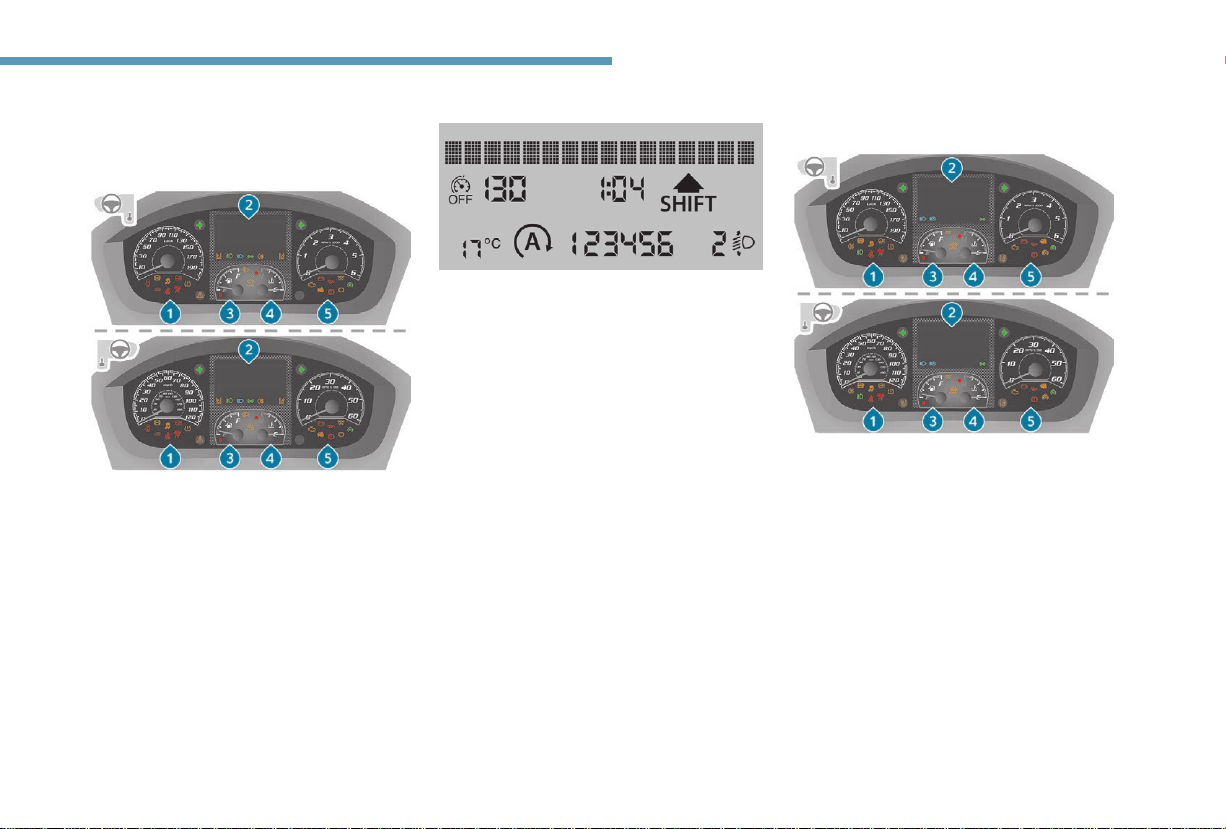
Dashboard instruments
Instrument panels
Level 1 instrument panel/
display screen
1. Speedometer (mph or km/h).
2. Display screen.
3. Fuel gauge.
4. Coolant temperature.
5. Rev counter (rpm x 1,000).
Level 1 display screen
In the lower part:
- Time,
- Exterior temperature,
- Miles/kilometres travelled,
- Trip computer (range, fuel consumption,
etc.),
- Headlamp beam height,
- Programmable overspeed warning,
- Cruise control or speed limiter,
- Gear shift indicator ~ Gear efficiency
indicator,
- Stop & Start.
In the upper part:
- Date,
- Service indicator,
- Alert messages,
- System status messages,
- Vehicle configuration.
Level 2 instrument panel/
display screen
1. Speedometer (mph or km/h).
2. Display screen.
3. Fuel gauge.
4. Coolant temperature.
5. Rev counter (rpm x 1,000).
1
7

Dashboard instruments
Level 2 display screen
In the left-hand part:
- Time,
- Exterior temperature,
- Warning or indicator lamps,
- Cruise control or speed limiter.
In the right-hand part:
- Date,
- Service indicator,
- Trip computer (range, fuel consumption,
etc.),
- Alert messages,
- System status messages,
- Vehicle configuration,
- Headlamp beam height,
- Miles/kilometres travelled.
Brightness of instrument s
and controls
The instruments and controls can be adjusted
for brightness by pressing the MODE button,
with the sidelamps on.
For more information on Vehicle
configuration, refer to the corresponding
section.
Warning and indicator lamps
Visual indicators informing the driver
that a system is in operation (operation
or deactivation indicator lamps) or of the
occurrence of a fault (warning lamps).
When the ignition is switched on
Certain warning lamps come on for a few
seconds when the vehicle's ignition is switched
on.
When the engine is started, these same
warning lamps should go off.
If they remain on, before moving off refer to the
information on the warning lamp concerned.
Associated warnings
Certain warning lamps may come on in one of
two modes: fixed (continuous) or flashing.
Only by relating the type of lighting to the
operating status of the vehicle can it be
ascertained whether the situation is normal or
whether a fault has occurred.
In the event of a fault, the illumination of the
warning lamp may be accompanied by an
audible signal and/or a message.
8

Dashboard instruments
Warning lamps
When the engine is running or the vehicle is
being driven, illumination of one of the following
warning lamps indicates a fault which requires
action on the part of the driver.
Any fault resulting in the illumination of
a warning lamp must be investigated further
using the associated message.
If you encounter any problems, contact
a PEUGEOT dealer or a qualified workshop.
Operation indicator lamps
The lighting of one of the following indicator
lamps confirms that the corresponding system
is on.
Deactivation indicator lamp
If this indicator lamp comes on, this confirms
that the corresponding system has been
switched off intentionally.
This may be accompanied by an audible signal
and a message being displayed.
1
9
Dashboard instruments
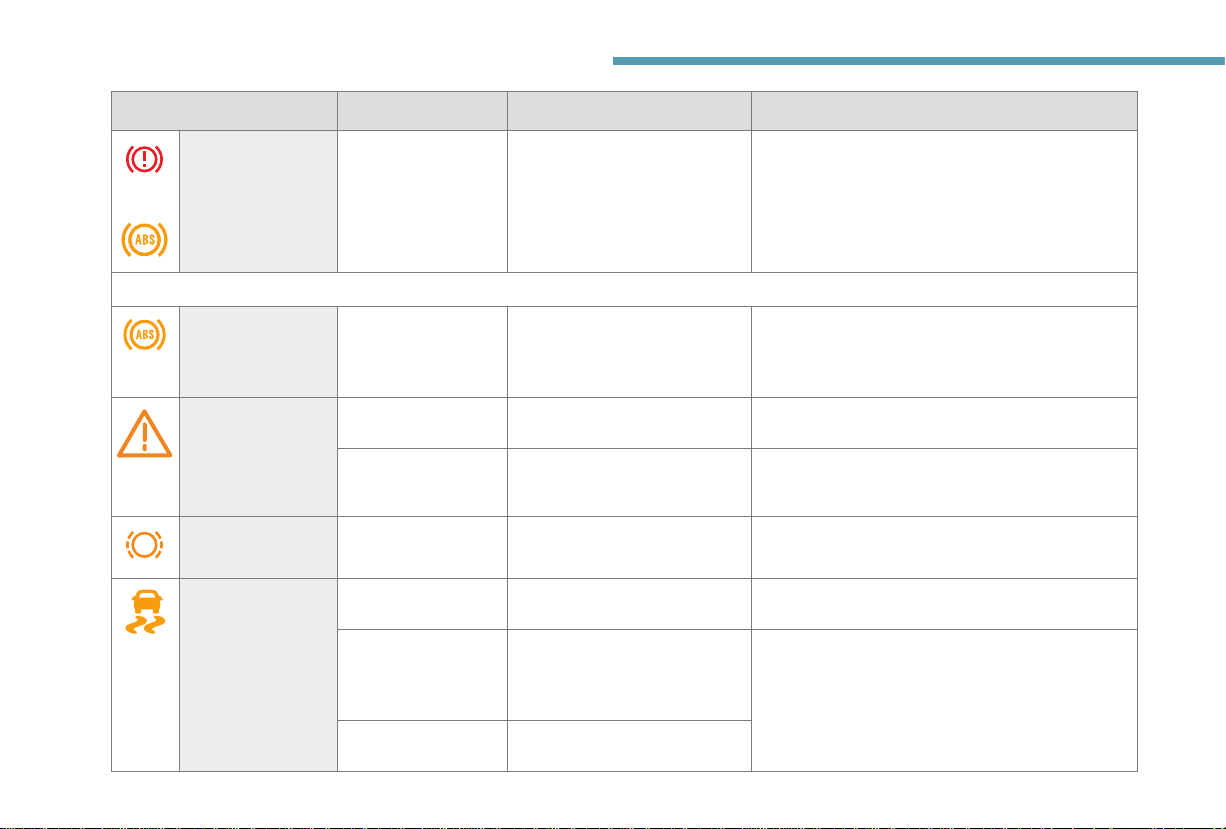
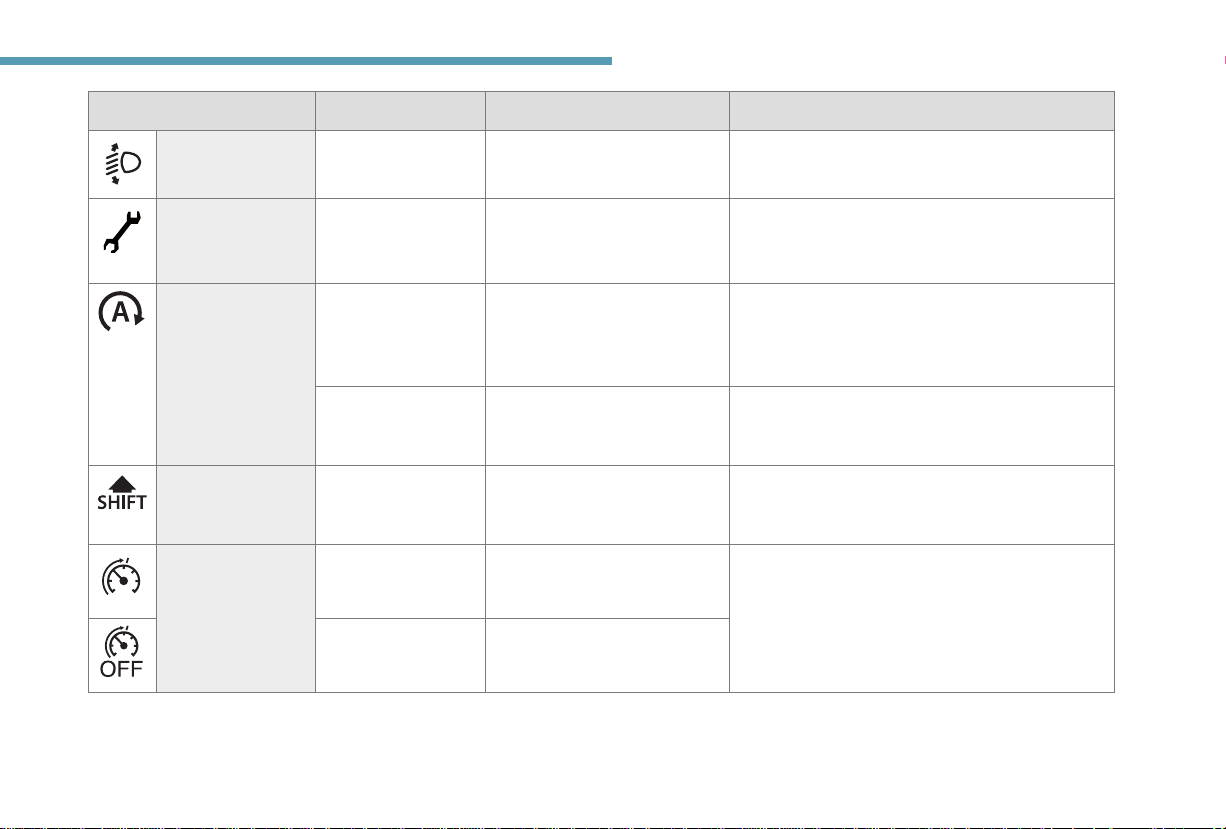
Warning/indicator lamp State Cause Actions/Comments
Red warning/indicator lamps
Coolant
temperature
Engine oil pressure Flashing for a few
On H in the red zone. The coolant temperature is too
Fixed, with the needle
in the red zone.
seconds, with
a message in the
screen.
high
and/or
an abnormal increase.
A high level of deterioration of the
engine oil.
Park and switch off the ignition.
Allow the system to cool sufficiently.
Check the level visually.
For more information on Checking levels, refer to the
corresponding section.
If the level is low, top it up.
If the level is correct, contact a PEUGEOT dealer or
a qualified workshop.
Have the engine oil changed as soon as possible.
After the second level of alert, engine performance will
be limited.
10
Lit temporarily or
fixed, with the engine
running.
Battery charge Fixed. A fault with the charging system
Fixed or flashing,
despite the checks.
Opening detection Fixed. One of the vehicle access
Low oil level
or
a major fault.
or the battery.
A fault with the ignition or
injection system.
openings is not properly closed.
Park and switch off the ignition.
Check the level manually.
For more information on Checking levels, refer to the
corresponding section.
If the level is low, top it up.
If the level is correct, contact a PEUGEOT dealer or
a qualified workshop.
Check the battery terminals.
For more information on the Battery, refer to the
corresponding section.
Have it checked by a PEUGEOT dealer or a qualified
workshop.
Check that the cab doors, the rear and side doors and
the bonnet are closed.
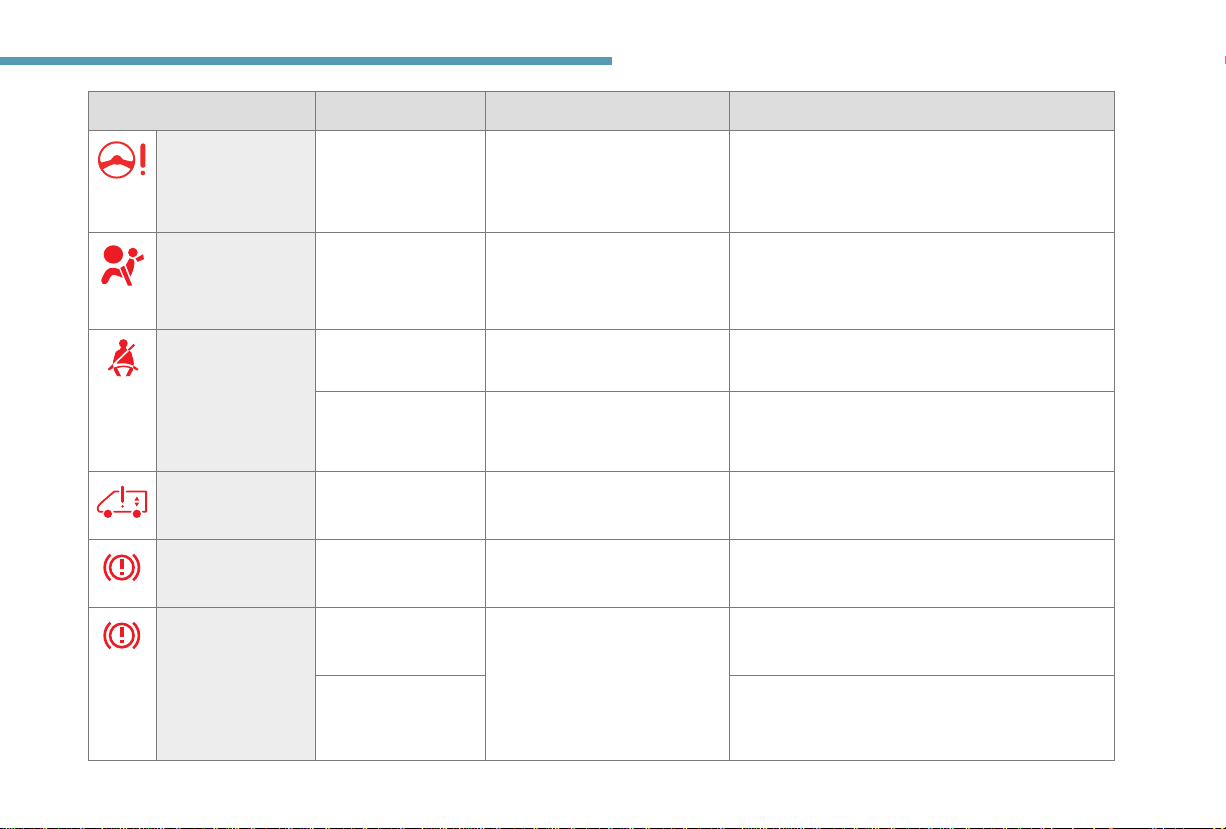
Dashboard instruments
Warning/indicator lamp State Cause Actions/Comments
Power steering Fixed, accompanied
Front/lateral
airbag
Seat belt not
fastened
Pneumatic
suspension
Parking brake Fixed. The parking brake is applied or
Brake fluid level Fixed. The fluid level is too low. Top up with a fluid approved by PEUGEOT.
by an audible signal
and a message in the
screen.
Flashing or fixed. A fault with an airbag or a seat
Fixed, then flashing. The driver has not fastened their
Accompanied by an
audible signal, then
fixed.
Fixed. There is a fault with the system. Have it checked by a PEUGEOT dealer or a qualified
Fixed, although the
level is correct.
The power steering has a fault. The vehicle retains conventional steering without
belt pretensioner.
seat belt.
The vehicle is moving with the
driver's seat belt unfastened.
not properly released.
assistance.
Have it checked by a PEUGEOT dealer or a qualified
workshop.
Have it checked by a PEUGEOT dealer or a qualified
workshop.
For more information on the Airbags, refer to the
corresponding section.
Pull the strap then insert the tongue in the buckle.
Check that the seat belt is fastened correctly by pulling
the strap.
workshop.
Release the parking brake to switch off the warning
lamp, keeping your foot on the brake pedal.
You must stop as soon as it is safe to do so.
Park, switch off the ignition and call a PEUGEOT
dealer or a qualified workshop.
1
11
Dashboard instruments
Indicator lamp State Indicates Actions/Comments
Electronic brake
force distribution
+
Orange warning/indicator lamps
Anti-lock Braking
System (ABS)
Service Temporarily on. Minor faults are present. Contact a PEUGEOT dealer or a qualified workshop.
Fixed. There is a fault with the system. You must stop as soon as it is safe to do so.
Fixed. The anti-lock braking system has
a fault.
Contact a PEUGEOT dealer or a qualified
workshop.
The vehicle retains conventional braking.
Drive carefully at reduced speed and contact
a PEUGEOT dealer or a qualified workshop without
delay.
12
Fixed, accompanied
by a message in the
screen.
Brake pads Fixed. The front brake pads are worn. Have the brake pads replaced by a PEUGEOT dealer
DSC/ASR Flashing. It is operating. The system optimises traction and allows improved
Fixed, accompanied
by an audible signal
and a message in the
screen.
Fixed. There is a fault with the
Major faults are present. Make a note of the warning message and call
There is a fault with the system
or the hill start assist.
Intelligent Traction Control.
a PEUGEOT dealer or a qualified workshop.
or a qualified workshop.
directional stability of the vehicle.
Contact a PEUGEOT dealer or a qualified workshop.
For more information on Dynamic Stability Control
or Anti-Slip Regulation, refer to the corresponding
sections.
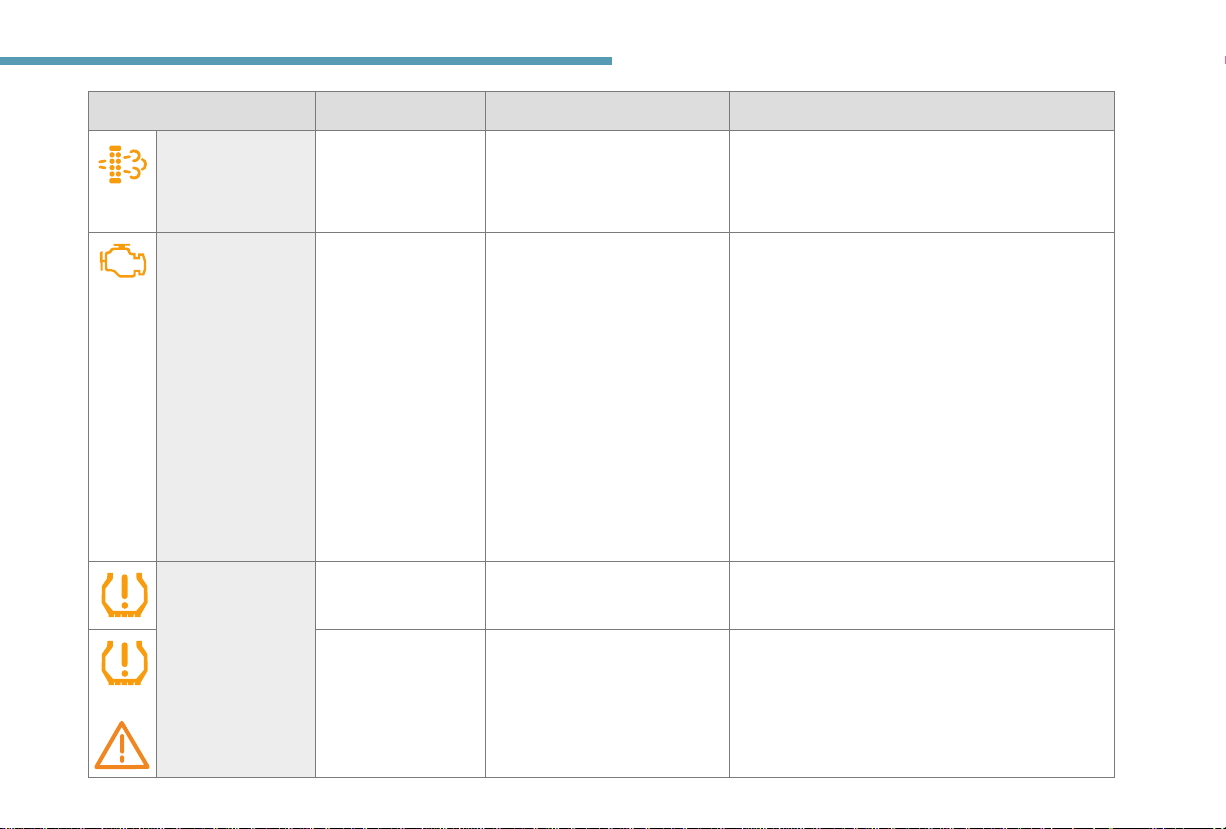
Dashboard instruments
Warning/indicator lamp State Cause Actions/Comments
Particle filter
(Diesel)
Engine diagnostic
system
Under-inflation
detection
Fixed. Regeneration of the particle filter.
Fixed. A fault with the engine or the
Fixed. A deflated or punctured tyre. Park and switch off the ignition.
Fixed, accompanied
by the service lamp.
emission control system (EOBD)
has been detected.
EOBD (European On Board
Diagnosis) is a diagnostics
system which complies with,
among others, the standards on
emissions limits of:
- CO (carbon monoxide),
- HC (unburnt hydrocarbons),
- NOx (nitrogen oxides),
detected by oxygen sensors
placed downstream of the
catalytic converters,
- particles.
A faulty sensor. Have it checked by a PEUGEOT dealer or by
It is recommended that you leave the engine running until the
warning lamp goes off so that regeneration can be completed.
For more information on C heckin g le v els , refer to the
corresponding section.
Have it checked as soon as possible by a PEUGEOT
dealer or by a qualified workshop.
Change or repair the wheel.
a qualified workshop.
1
+
13

Dashboard instruments
Warning/indicator lamp State Cause Actions/Comments
Lane Departure
Warning System
Flashing,
accompanied by an
Unintended wandering to the
left or right.
Turn the steering wheel in the opposite direction to
return to the correct trajectory.
audible signal.
14
Electronic
immobiliser
Water in Diesel fuel
filter
AdBlue
Fixed, accompanied
by an audible signal.
The lane departure warning
system is defective.
Fixed. The ignition key introduced has
not been recognised.
Starting is not possible.
On for about
Triggering of the alarm. Have the state of the locks checked by a PEUGEOT
10 seconds after
switching on the ignition.
Fixed, accompanied
There is water in the fuel filter. Have the filter purged by a PEUGEOT dealer or
by a message in the
screen.
Fixed, then flashing,
Reduced driving range. Have the AdBlue topped up without delay.
accompanied by
a message in the screen.
Clean the windscreen.
If the problem persists, have the system checked by
a PEUGEOT dealer or a qualified workshop.
Use another key and have the faulty key checked by
a PEUGEOT dealer.
For more information on Anti-theft protection, refer
to the corresponding section.
dealer or a qualified workshop.
a qualified workshop.
For more information on Checks, refer to the
corresponding section.
For more information on AdBlue
®
, refer to the
corresponding section.
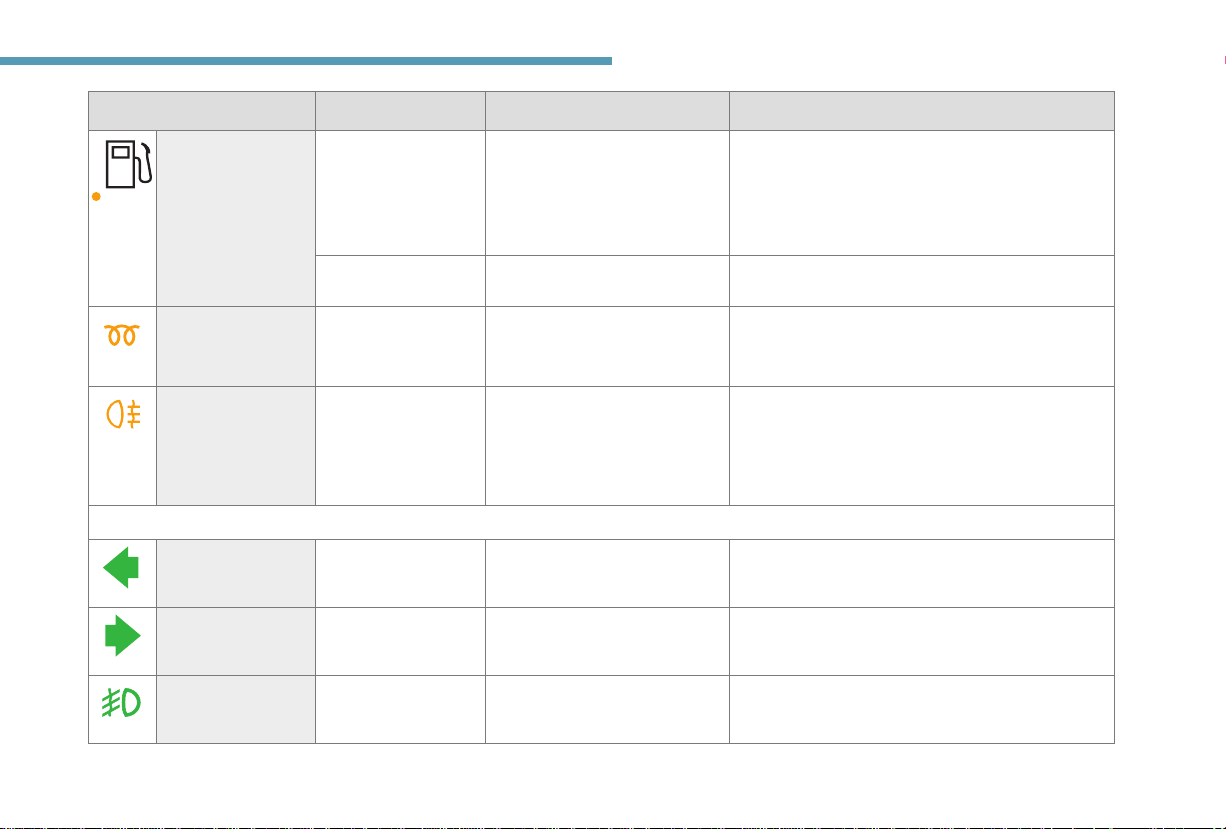
Dashboard instruments
Warning/indicator lamp State Cause Actions/Comments
Low fuel level Fixed, with the needle
Diesel pre-heater Fixed. Climate conditions cause pre-
Rear foglamps Fixed. The button on the MODE control
Green warning/indicator lamps
Left-hand direction
indicator
Right-hand
direction indicator
Front foglamps Fixed. The button on the MODE control
in the E zone.
Flashing. There is a fault with the system. Contact a PEUGEOT dealer or a qualified workshop.
Flashing with audible
signal.
Flashing with audible
signal.
The fuel reserve is being used. Refuel without delay.
heating to be necessary.
panel is engaged.
A steering change using the
lighting control stalk.
A steering change using the
lighting control stalk.
panel is engaged.
The calculation of the remaining fuel depends on
the style of driving, the profile of the road, the time
elapsed and the distance travelled since the lamp first
came on.
Wait until the lamp goes off before starting the engine.
Manual selection.
The lamps only operate when the dipped beam
headlamps are on.
In normal visibility, please switch them off.
Move the stalk down.
Move the stalk up.
Manual selection.
The lamps only operate when the dipped beam
headlamps are on.
1
15
Dashboard instruments
Warning/indicator lamp State Cause Actions/Comments
Cruise control Fixed. Cruise control is selected. Manual selection.
16
Dipped beam
headlamps
Blue warning/indicator lamps
Main beam
headlamps
Adaptive lighting Fixed. This function is activated in the
Warning/indicator in the
display screen
Temperature/Ice The ice warning
Date/Time Setting: the date, the
Fixed. A manual selection. Turn the lighting control stalk ring to the second
Fixed. The lighting control stalk has
Displays Indicates Actions/Comments
lamp, the temperature
flashing, accompanied
by a message on
screen.
time.
been pulled towards you.
"MODE" menu.
Weather conditions which could
result in ice on the road.
A configuration via the "MODE"
menu.
position.
Pull the stalk to return to dipped beam headlamps.
Switching on and off of the main beam headlamps
is managed automatically depending on the driving
conditions and the traffic.
For more information on Vehicle configuration, refer
to the corresponding section.
Be particularly vigilant and do not brake sharply.
For more information on Vehicle configuration, refer
to the corresponding section.
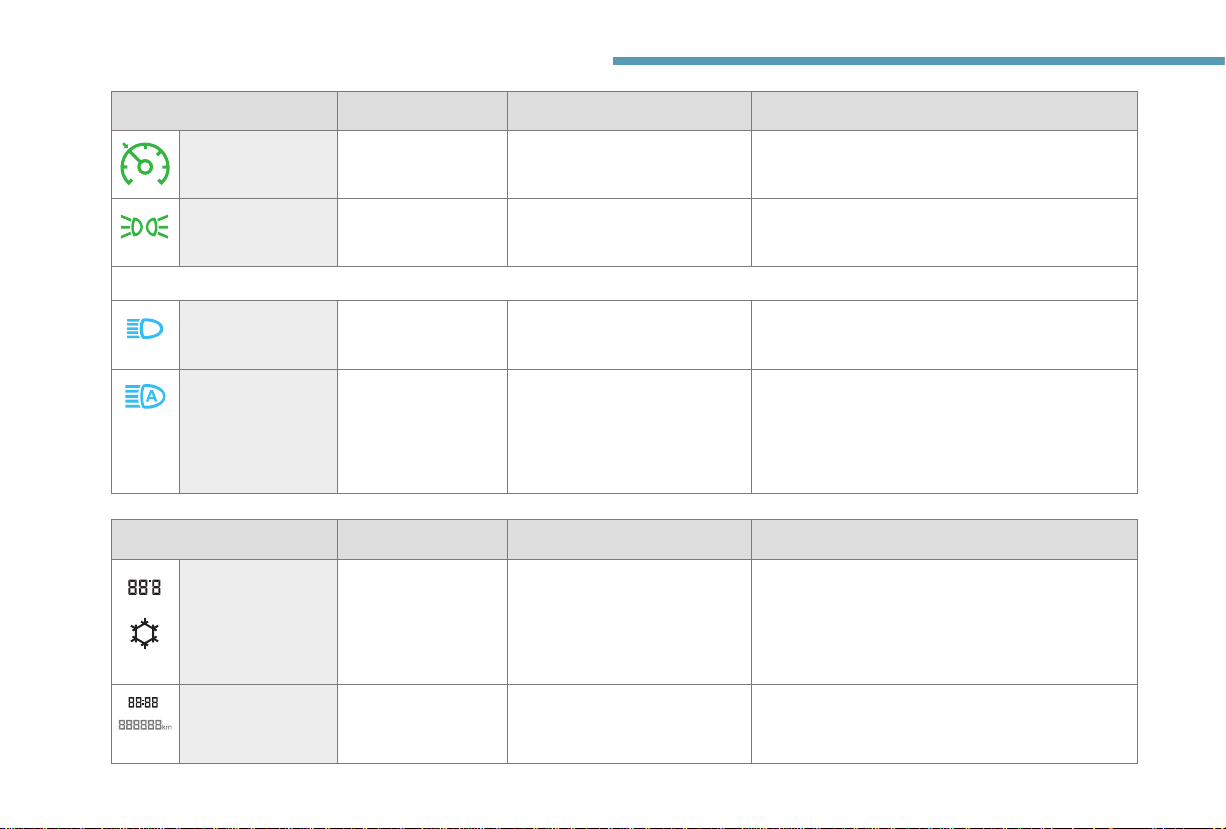
Dashboard instruments
Warning/indicator lamp in
the display screen
Headlamp beam
height
Service spanner A service spanner
Stop & Start Fixed. When the vehicle stops (red
Gear shift indicator An upwards arrow. The next higher gear may be
Speed limiter Fixed. The speed limiter is on. Manual selection.
Displays Indicates Actions/Comments
Headlamp adjustment. A position from 0 to 3 depending
which remains on.
Flashes for a few
seconds, then goes
off.
Fixed with "OFF". The speed limiter is selected but
on the load carried.
A service will soon be due. Refer to the list of checks in the manufacturer's
lights, traffic jams, etc.) the Stop
& Start system puts the engine
into STOP mode.
STOP mode is temporarily
unavailable.
engaged.
inactive.
Adjust using the buttons in the MODE control panel.
service schedule, then have the service carried out.
The warning lamp goes off and the engine restarts
automatically in START mode, as soon as you want to
move off.
For more information on Stop & Start, refer to the
corresponding section.
For more information on the Gear shift indicator,
refer to the corresponding section.
For more information on the Speed limiter, refer to
the corresponding section.
1
17
Dashboard instruments
18
Indicators
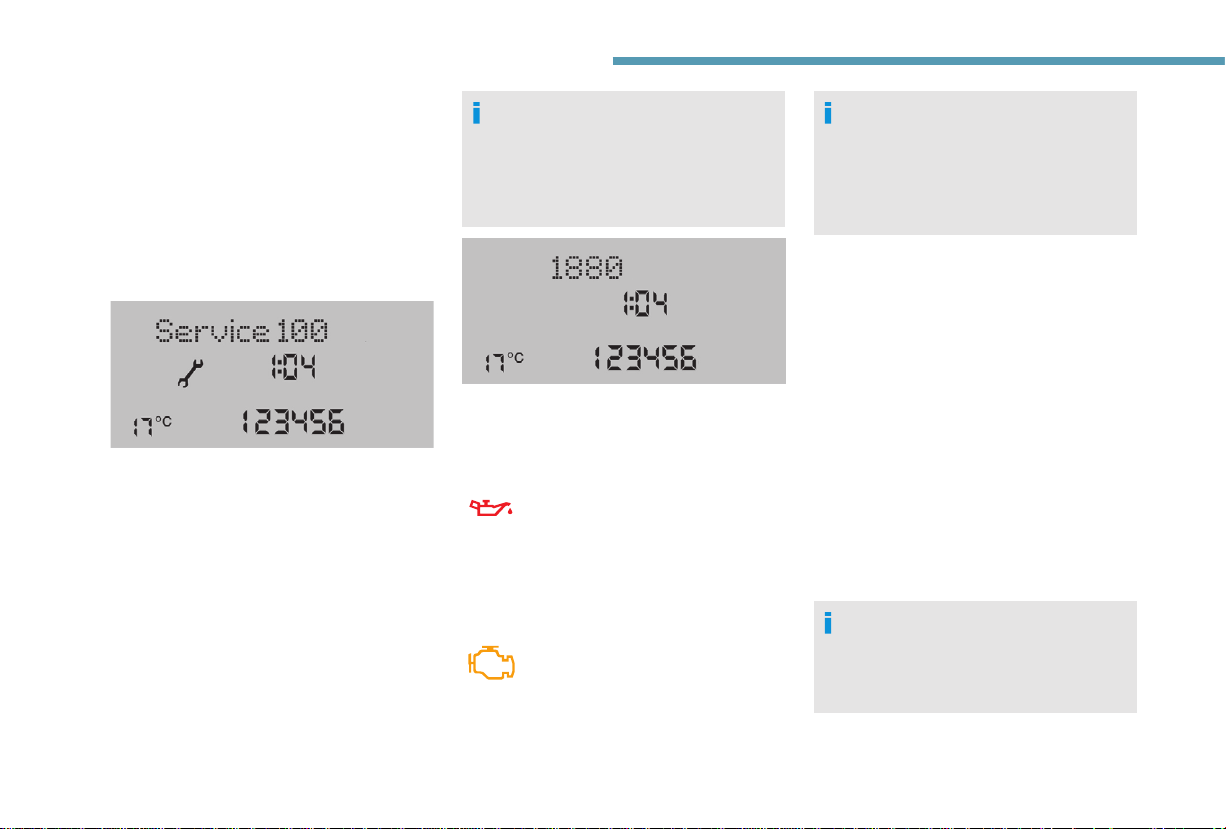
Service informat ion
For a few seconds after the ignition is
switched on, the spanner symbolising service
information comes on: the screen informs you
when the next service is due, in accordance
with the servicing schedule indicated in the
manufacturer's service schedule.
This information is determined in relation to the
distance travelled since the previous service.
Engine oil level
Depending on the engine, the engine oil level
then appears, graduated from 1 (Min.) to 5
(Max.).
If no graduation is displayed, the oil level is
too low; it is essential that you top up to avoid
damaging the engine.
For the oil level reading to be accurate, the
vehicle must be parked on level ground, with
the engine off for more than 30 minutes.
If in doubt, check the level with the
dipstick.
For more information on Checking levels,
refer to the corresponding section.
After a few seconds, the display returns to its
usual functions.
Engine oil condition
This warning lamp flashes and,
if your vehicle has this function,
a message is displayed at every
engine start: the system has
detected deterioration of the engine
oil. Have the oil changed as soon as
possible.
This 2nd warning lamp, coupled with the
st
1
, comes on in the instrument panel
when the oil has not been changed and
the deterioration of the oil has gone
beyond a new threshold. If this warning
comes on at regular intervals, have the
oil changed as soon as possible.
For 3.0 litre HDi engines, the engine
speed is restricted to 3,000 rpm, then
1,500 rpm until the oil is changed. Have
the engine oil changed to avoid any risk of
damage.
Resetting the servicing
information
Continuous flashing of the indicator is stopped
by a qualified workshop using a diagnostic tool,
after each service.
If you have serviced your vehicle personally,
you must reset the service indicator as follows:
F insert the ignition key into the switch,
F turn it to the MAR position,
F simultaneously press the brake and
accelerator pedals for more than
15 seconds.
Refer to the list of checks in the
manufacturer's service schedule which
was given to you on handover of the
vehicle.
Dashboard instruments
Retrieving the service
information
To access the service indicators at any time,
press the MODE button briefly.
Use the up/down arrows to see the scheduling
information and engine oil usage.
Press the MODE button again to return to the
various display menus.
Hold it down to return to the home page.
Menu…
Service Service (Miles/Km before
For more information on Vehicle configuration, refer to the corresponding section.
Choose… Allows you to…
service)
Oil change (Miles/Km before
oil change)
Display the distance remaining
before the next service.
Display the distance remaining
before the next oil change.
1
19
Dashboard instruments
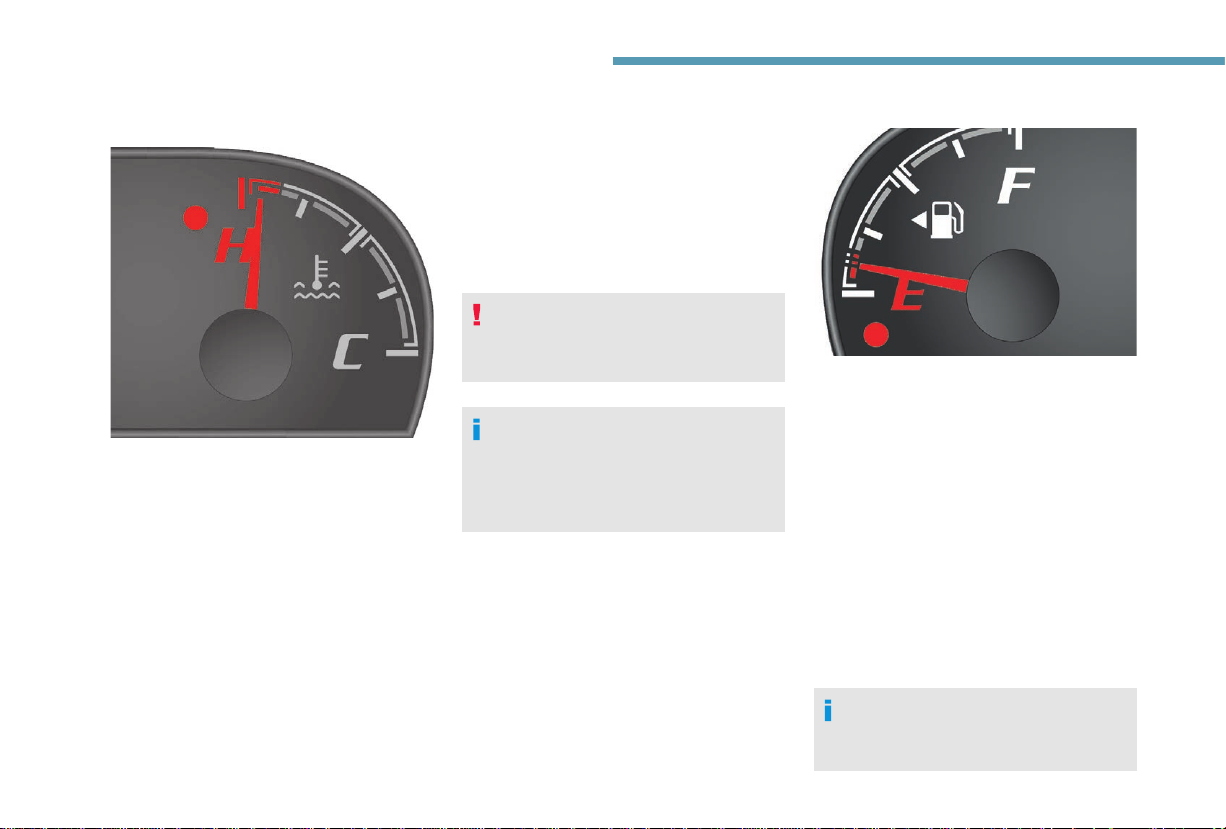
Coolant temperature
The needle is positioned between C (Cold)
and H (Hot): normal operation.
In arduous conditions of use or hot climatic
conditions, the needle may move close to the
red graduations.
If the needle enters the red zone or if the
warning lamp comes on:
- stop immediately, switch off the ignition. The
fan may continue to operate for a certain
time up to approximately 10 minutes.
- wait for the engine to cool down in order to
check the level and top it up if necessary.
When topping up:
Caution, the coolant circuit is pressurised!
In order to avoid any risk of scalding, place
a cloth around the cap and unscrew the cap by
two turns to allow the pressure to drop.
When the pressure has dropped, remove the
cap to check the level and top up.
If the needle remains in the red zone,
contact a PEUGEOT dealer or a qualified
workshop.
Check the coolant level regularly.
For more information on Checking levels,
refer to the corresponding section.
Fuel gauge
The fuel level is tested every time the ignition
is turned on.
The gauge is positioned on:
- F (Full): the tank is full.
- E (Empty): the reserve is being used,
the low level warning lamp lights up
permanently.
The reserve when the warning lamp first comes
on is approximately:
- 10 litres for 60 and 90 litre tanks,
- 12 litres for 120 litre tanks.
Fuel tanks of different capacities are available
as an option.
- 60 litres (all engines),
- 120 litres (except Euro 6 engines).
For more information on Fuel, refer to the
corresponding section.
20
AdBlue® liquid range
indicators
Once the AdBlue® tank is on reserve or after
detection of a fault with the SCR emissions
control system, when the ignition is switched
on, an indicator displays an estimate of the
distance that can be covered, the range, before
engine starting is prevented.
In the event of simultaneous system fault and
low AdBlue
the one displayed.
In the event of the risk of nonstarting related to a lack of
AdBlue
Range greater than 1,500 miles (2,400 km)
When switching on the ignition, there is no
automatic display of range in the instrument
panel.
®
level, the shortest range figure is
®
The engine start prevention system
required by regulations is activated
automatically once the AdBlue
empty.
®
tank is
Remaining range between 1,500 and
375 miles (2,400 and 600 km)
Every time the ignition is switched on, the alert
is given together with an audible signal.
The reserve level has been reached; it is
recommended that you top up as soon as
possible.
Range less than 375 miles (600 km)
The alert will be repeated with the remaining
range updated every 30 miles (50 km) travelled.
As soon as the 1,500 miles
threshold is reached, this warning
lamp comes on, accompanied by
a temporary message indicating
the remaining range, expressed in
kilometres or miles, before engine
starting is blocked.
For more information on AdBlue
(BlueHDi engines) and, in particular
topping up, refer to the corresponding
section.
As soon as the 375 miles threshold
is reached, this warning lamp comes
on, accompanied by a message
indicating the remaining range,
expressed in kilometres or miles,
before engine starting is blocked.
®
Dashboard instruments
Every time the ignition is switched on, the alert
is given together with an audible signal.
It is essential to top up as soon as possible and
before the tank is completely empty. Otherwise
you will not be able to restart the vehicle.
For more information on AdBlue
(BlueHDi engines) and, in particular
topping up, refer to the corresponding
section.
Breakdown related to a lack of AdBlue
0 miles/km range reached: the AdBlue® tank
is empty. The regulatory device prevents the
engine from starting.
Unless the AdBlue
special additive tank, the vehicle will remain
immobilised.
To be able to restart the engine, you must
top up with at least 4 litres of AdBlue
You can also call a PEUGEOT dealer
or a qualified workshop for the top-up
required.
®
is topped up in the
®
®
®
.
1
21
Dashboard instruments
For more information on AdBlue®
(BlueHDi engines) and, in particular
topping up, refer to the corresponding
section.
In the event of a fault with the
SCR emissions control system
Detection
The engine diagnostic warning lamp
comes on.
Every time the ignition is switched
on, the emissions fault is confirmed
by an audible signal and a message.
If it is a temporary fault, the alert disappears
as soon as the exhaust emissions return to the
levels required by the standard.
However, if the warning lamp is still on
after 30 miles (50 km) of driving, the fault
is confirmed.
An engine start prevention system
will be activated automatically after
250 miles (400 km) travelled following this
confirmation.
See a PEUGEOT dealer or a qualified
workshop as soon as possible.
Fault conrmed
In addition to the previous signals, the
remaining range allowed will be displayed in
miles or kilometres in the instrument panel.
The alert will be repeated every 30 seconds
with an update of the driving range.
See a PEUGEOT dealer or a qualified
workshop as soon as possible.
You risk not being able to start the engine.
Starting prevented after 250 miles
(400 km)
At each starting attempt, the alert is
activated and the starting prevention
message is displayed.
To be able to restart the engine, you must see
a PEUGEOT dealer or a qualified workshop.
Vehicle conguration
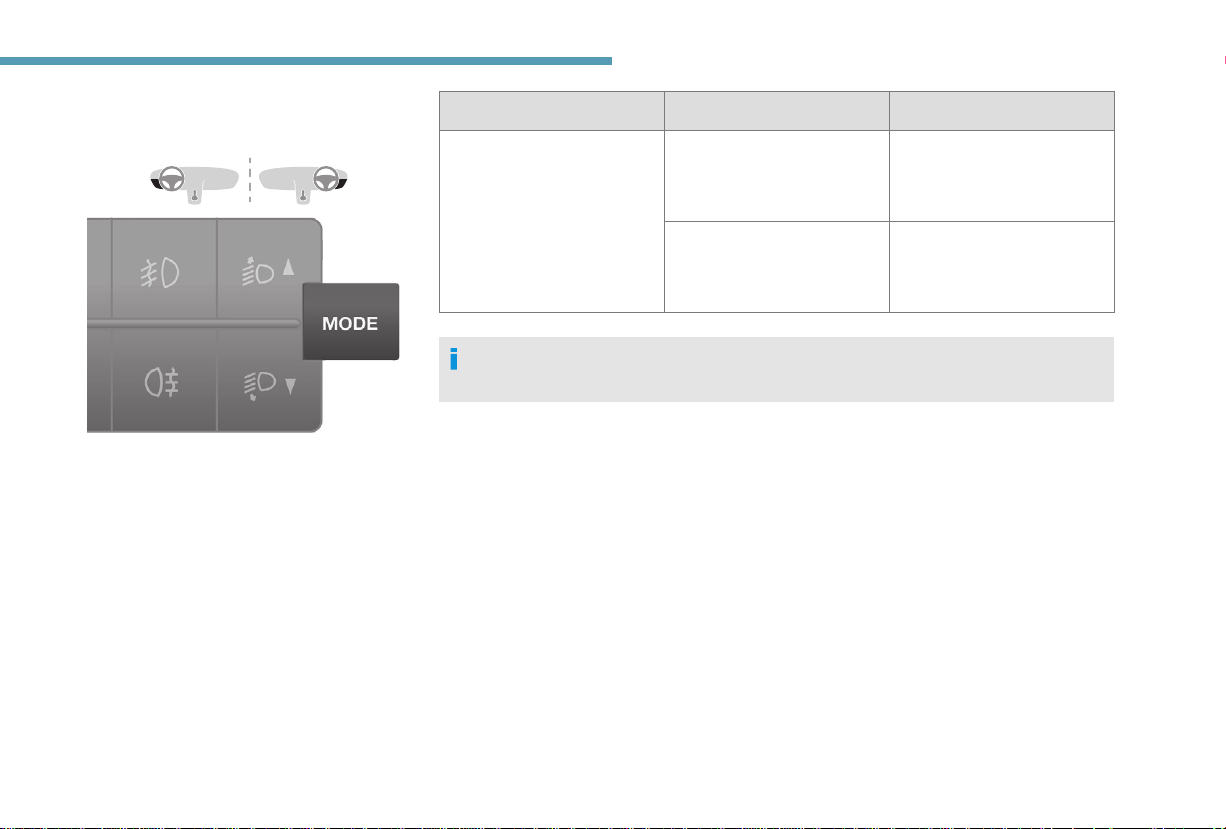
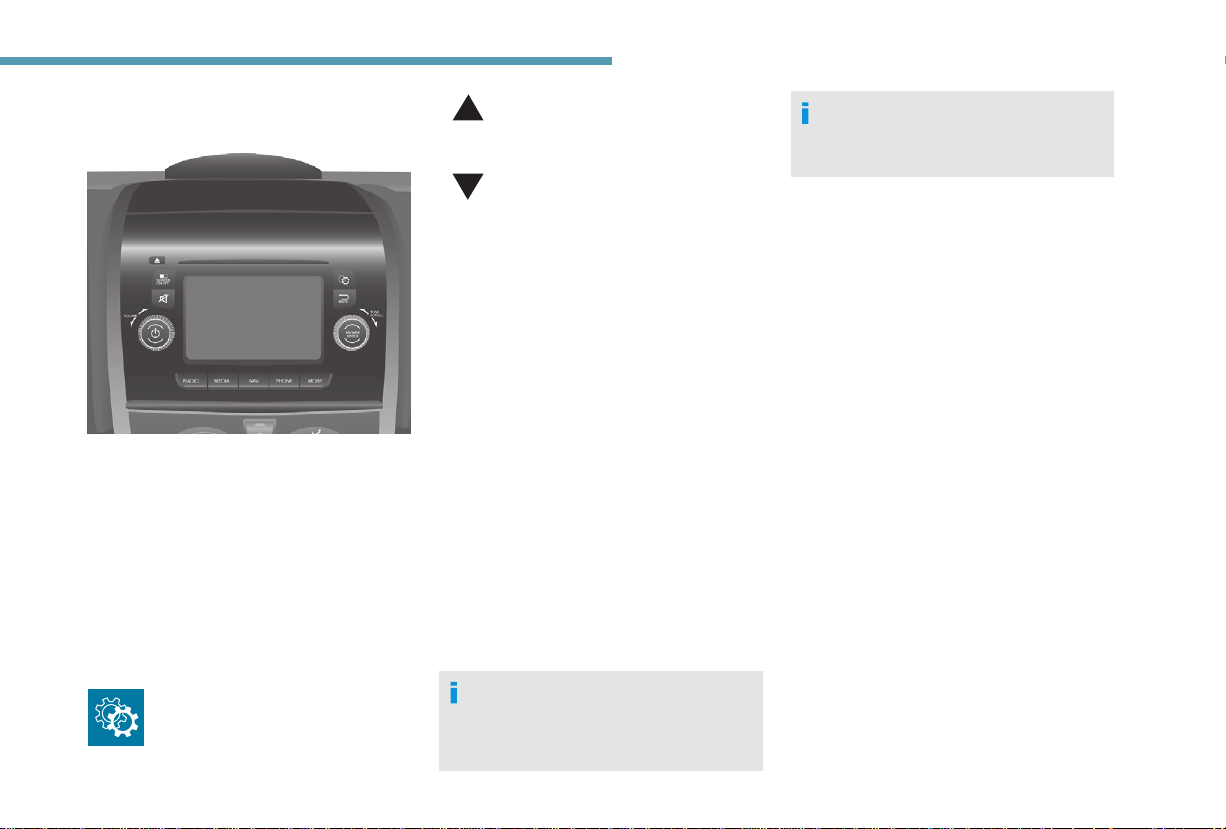
Using the MODE control
panel
This control panel provides access to menus to
personalise some of the vehicle systems.
22
Hold it down to return to the
home page.
Dashboard instruments
1
The corresponding information appears in the
instrument panel screen.
Languages available: Italian, English, German,
French, Spanish, Portuguese, Dutch, Brazilian,
Polish, Russian, Turkish and Arabic.
You have access to all the menus if your
vehicle is fitted with the audio system.
If your vehicle is fitted with the touch screen
audio system, certain menus are only
accessible using the audio system control
panel.
As a safety measure, some menus can
only be accessed when the ignition is off.
This MODE button enables
you to:
- access the menus and
sub-menus,
- confirm your selections,
within a menu,
- quit the menus.
This button enables you to:
- scroll up through a menu,
- increase a value.
This button enables you to:
- scroll down through a menu,
- decrease a value.
23

Dashboard instruments
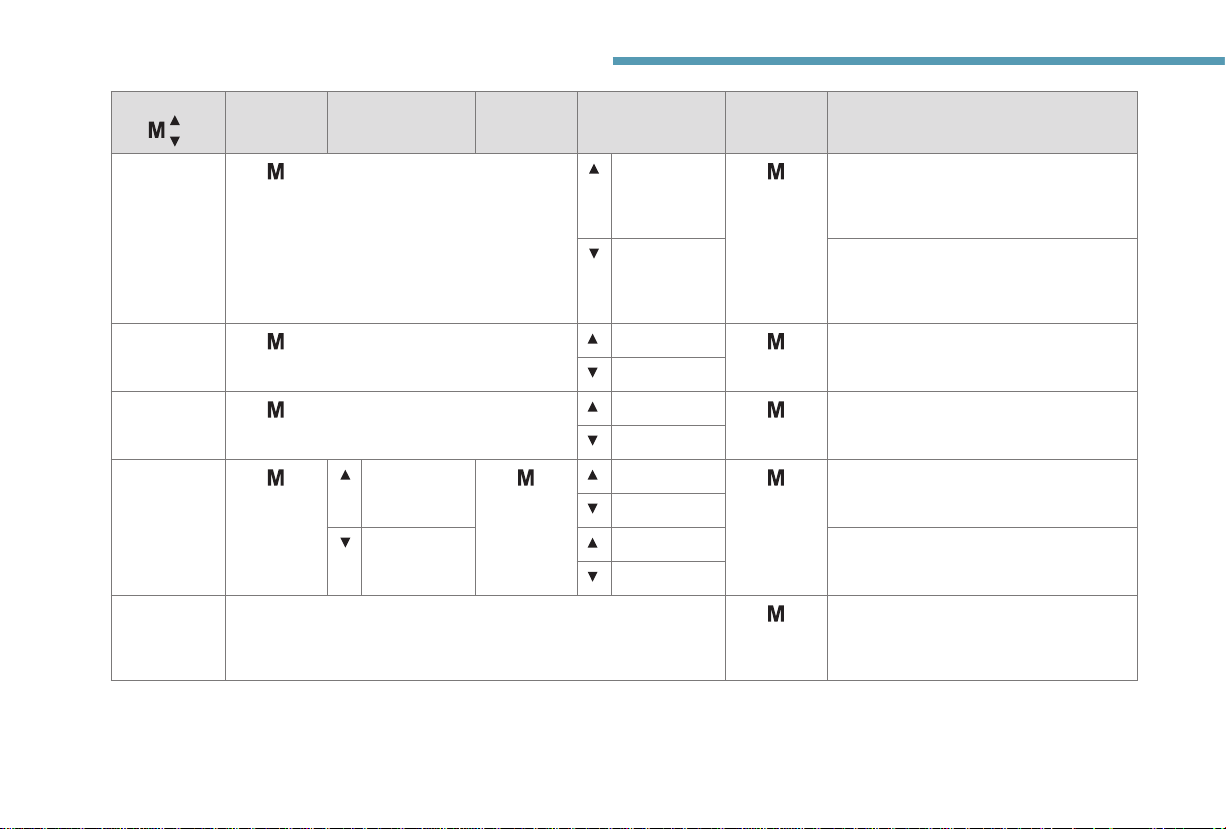
Menu…
Press… Sub-menu… Press… Choose…
1 Brightness Increase Adjust the brightness of the
Decrease
2 Speed beep ON Increase Activate/Deactivate the audible signal
Decrease
OFF
3 Headlamp
sensor
4 Activation
Trip B
5 Traffic Sign ON Activate/Deactivate the reading of
6 Setting the
time
Hours/Minutes Increase Set the clock.
Format 24 hour clock Select the clock display mode.
Increase Adjust the sensitivity of the brightness
Decrease
ON Display a second "Trip B" distance.
OFF
OFF
Decrease
12 hour clock
Confirm and
quit
Allows you to…
instrument panel and instruments and
controls (with sidelamps on).
indicating that the programmed speed
has been exceeded and select the
speed.
sensor (1 to 3), which has an effect on
the headlamps.
traffic signs.
24
7 Setting the
date
Year/Month/
Day
Increase Set the date.
Decrease
Dashboard instruments
Menu…
Press… Sub-menu… Press… Choose…
8 Autoclose ON Activate/Deactivate automatic door
OFF
9 Measurement
unit
10 Languages List of
11 Volume of
announcements
(Buzz)
Distance Km Select the distance display unit.
Miles
Fuel
consumption
Temperature °C Select the temperature display unit.
Tyre pressures psi Select the tyre pressure display unit.
km/l Select the fuel consumption display
l/100 km
°F
bar
kPa
languages
available
Increase Increase/Decrease the volume of
Decrease
Confirm
and quit
Allows you to…
locking above 12 mph (20 km/h).
unit.
Select the display language.
the announcements or of the audible
warning.
1
25
Dashboard instruments
Menu…
12 Service Service (Miles/
13 Daytime
running lamps
14 Automatic
headlamp
dipping
15 Passenger
airbag
(BAG P)
16 Quit menu Quit the menu.
Press… Sub-menu… Press… Choose…
Km before
service)
Oil change
(Miles/Km before
oil change)
ON Activate/Deactivate daytime running lamps.
OFF
ON Activate/Deactivate automatic headlamp
OFF
ON Yes Activate the passenger airbag.
No
OFF Yes Deactivate the passenger airbag.
No
Confirm
and quit
Allows you to…
Display the miles/kilometres remaining
before the next service.
Display the miles/kilometres before the
next oil change.
dipping.
Press the arrow at the bottom to go to the
first menu.
26
Dashboard instruments
Using the touch screen
audio system
This audio system control panel, located in
the middle of the dashboard, gives access to
personalisation menus for certain systems.
The corresponding information appears in the
touch screen.
Nine languages are offered: German, English,
Spanish, French, Italian, Dutch, Polish,
Portuguese, Turkish.
As a safety measure, some menus can only be
accessed when the ignition is off.
This control panel button gives
access to the "Settings" menu.
This button in the screen allows you
to go up a level in a menu or increase
a value.
This button in the screen allows
you to go down a level in a menu or
decrease a value.
"Settings" menu
1. "Display".
2. "Voice commands".
3. "Clock and Date".
4. "Safety/Help".
5. "Lighting".
6. "Doors & locking".
7. "Audio".
8. "Telephone/Bluetooth".
9. "Radio settings".
10. "Restore Settings" to return to factory
settings.
11. "Del. pers. data" to delete all of your
personal data, related to the Bluetooth
equipment, in the audio system.
For more information on the audio,
telephone, radio and navigation systems,
refer to the corresponding sections.
The settings for sub-menus 4, 5 and
6 vary according to the equipment
installed on the vehicle.
From the "Display" sub-menu, you can:
- select "Languages" and choose one of the
languages listed above,
- Select "Measurement unit" and set
consumption (l/100 km, mpg), distances
(km, miles) and temperature (°C, °F),
- select "Display Trip B" to switch trip B On or
Off in the trip computer.
From the "Safety/Help" sub-menu, you can:
- select "Parkview Camera", then "Reversing
camera" to activate or deactivate its use
(On, Off),
- select "Parkview Camera", then "Camera
delay" to activate or deactivate the
maintaining of the display for 10 seconds or
up to 11 mph (18 km/h) (On, Off),
- select "Traffic Sign" to activate or deactivate
its use (On, Off),
- select "Passenger airbag" to activate or
deactivate its use (On, Off).
1
27
Dashboard instruments
From the "Lighting" sub-menu, you can:
- select "Daytime running lamps" to activate
or deactivate their use (On, Off),
- select "Auto headlamp dipping" to activate
or deactivate its use (On, Off),
- select "Headlamp sensor" to adjust its
sensitivity (1, 2, 3).
From the "Doors & locking" sub-menu, you can:
- select "Autoclose" to activate or deactivate
its use (On, Off).
Setting the date and time
Using the MODE control panel
F Press the "MODE" button.
F Select the menu "Set time" to set the time
and the format of the clock (24 h or 12 h) or
select the menu "Set date" to set the day,
month and year.
For more information on Vehicle
configuration, refer to the corresponding
section.
Using the touch screen audio
system
From the "Time and Date" sub-menu:
F select "Set time and format" to set the
hours, minutes, seconds and choose the
format (24 h, 12 h with am or pm),
F select "Set date" to set the day, month and
year.
To set the time manually, "Sync Time" must
be Off.
Trip computer
Information displayed about the current journey
(range, current fuel consumption, average fuel
consumption, etc.).
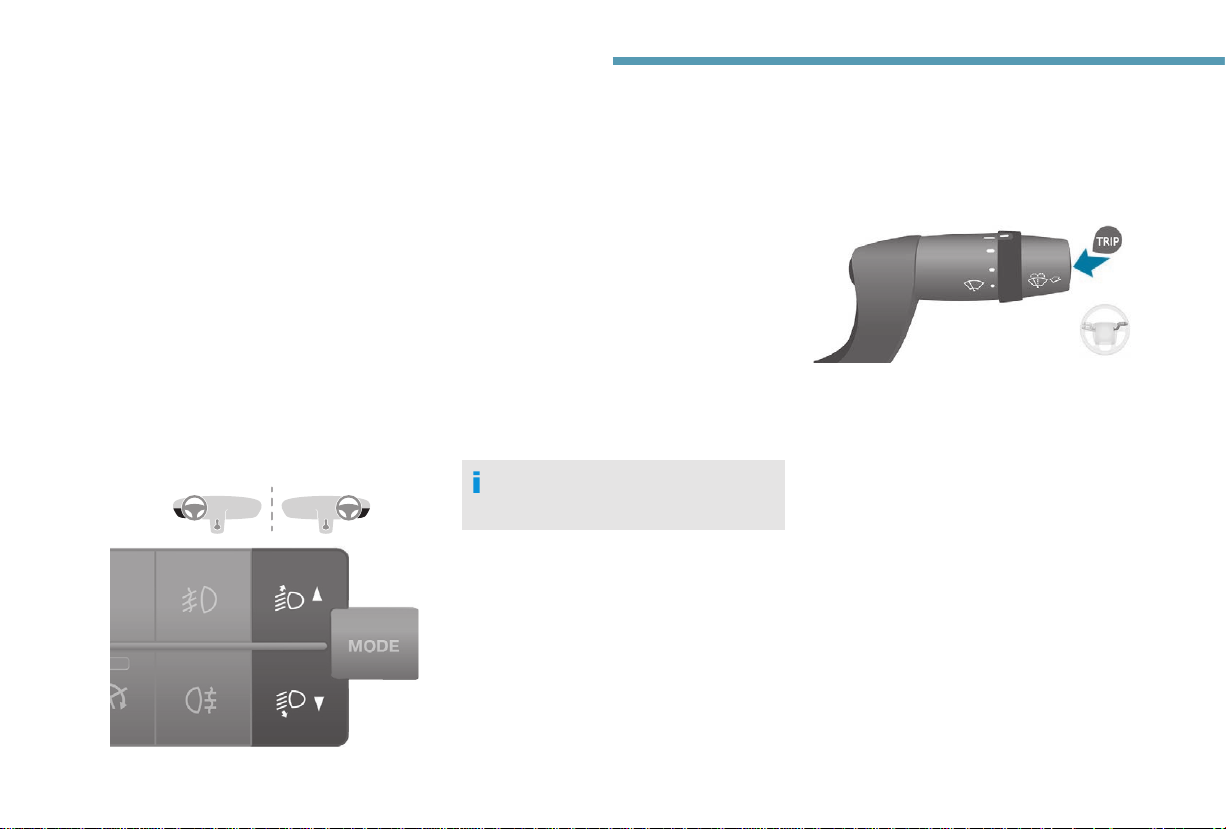
F To access the trip computer information,
press the TRIP button on the end of the
wiper control stalk.
Range
This indicates the distance that can still be
travelled with the fuel remaining in the tank on
the basis of the average consumption over the
last few miles (kilometres) travelled.
Distance A
This indicates the distance travelled since the
last trip computer zero reset.
Average fuel consumption A
This is the average fuel consumption since the
last trip computer zero reset.
28
 Loading...