

Peugeot Boxer 2010 Owner's Manual
3
5
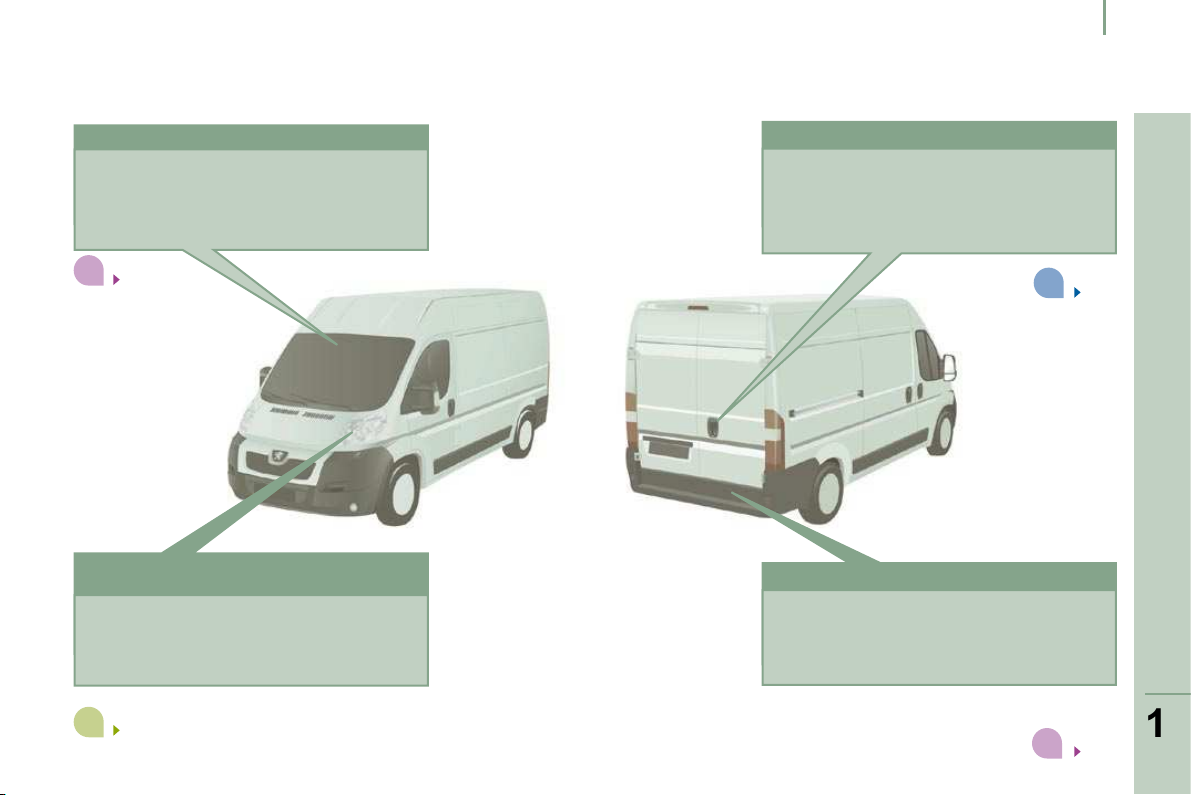
Familiarisation
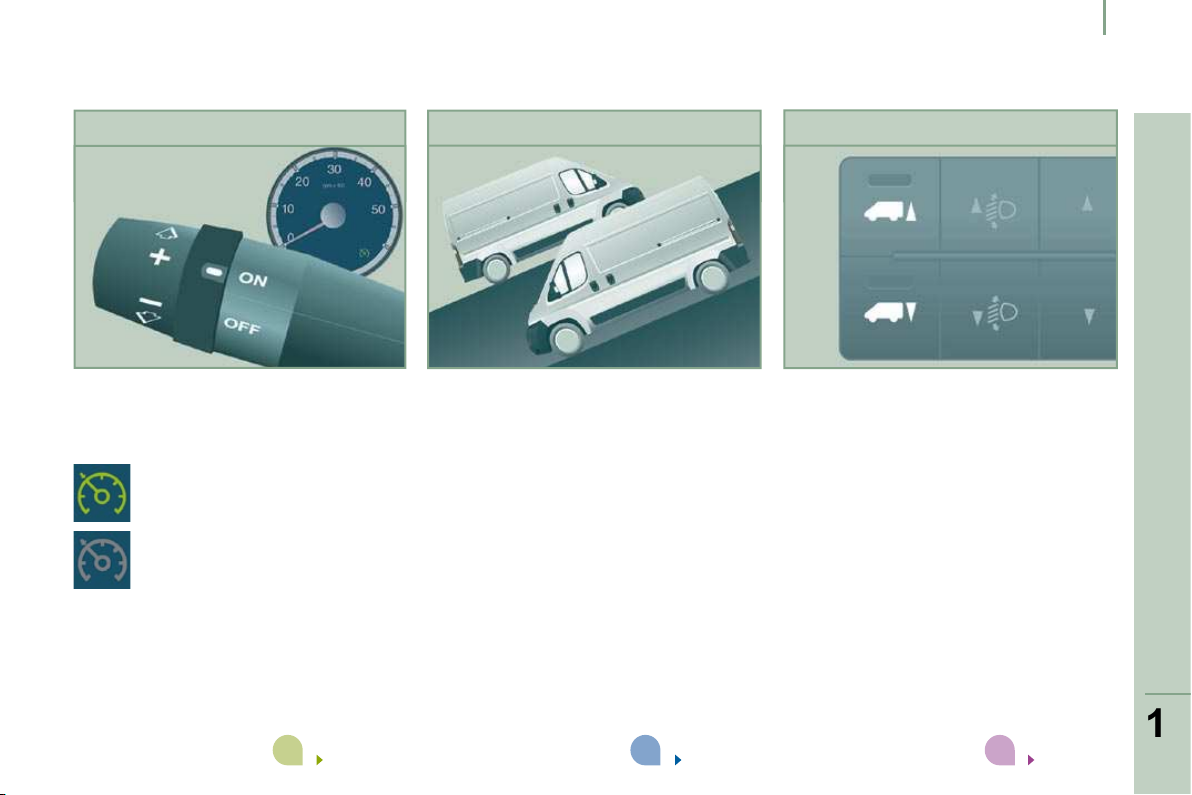
Reversing camera
EXTERIOR
This system is activated automatically
when reverse gear is engaged, with a
visual return on a screen that takes the
place of the interior rear view mirror.
Opening the rear doors to 180°
Once the vehicle has been unlocked, the
rear doors can be opened to 180° to make
unloading/loading operations easier.
Guide-me-home lighting
After switching off the ignition, when you
leave your vehicle, the front lamps remain
on briefly.
77
41
24
Rear parking sensors
This system warns you if an obstacle is
detected behind the vehicle when reverse
gear is engaged.
76
6
Familiarisation
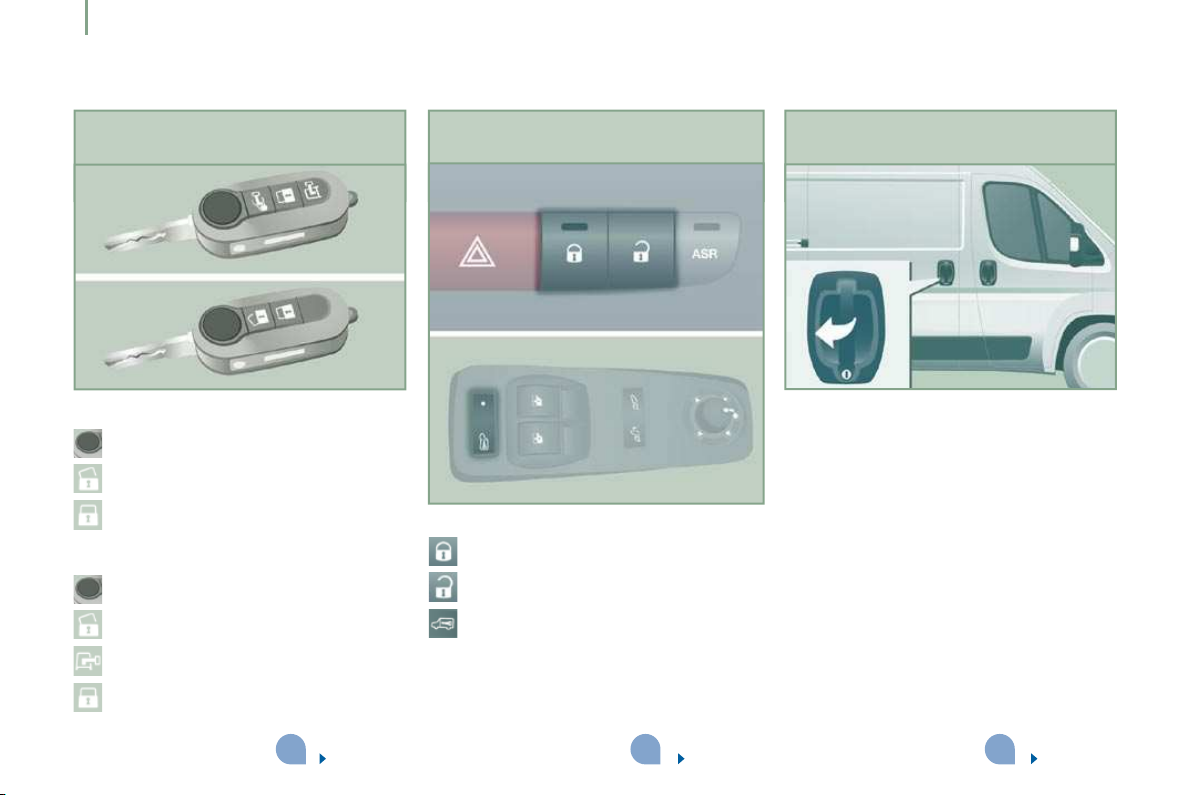
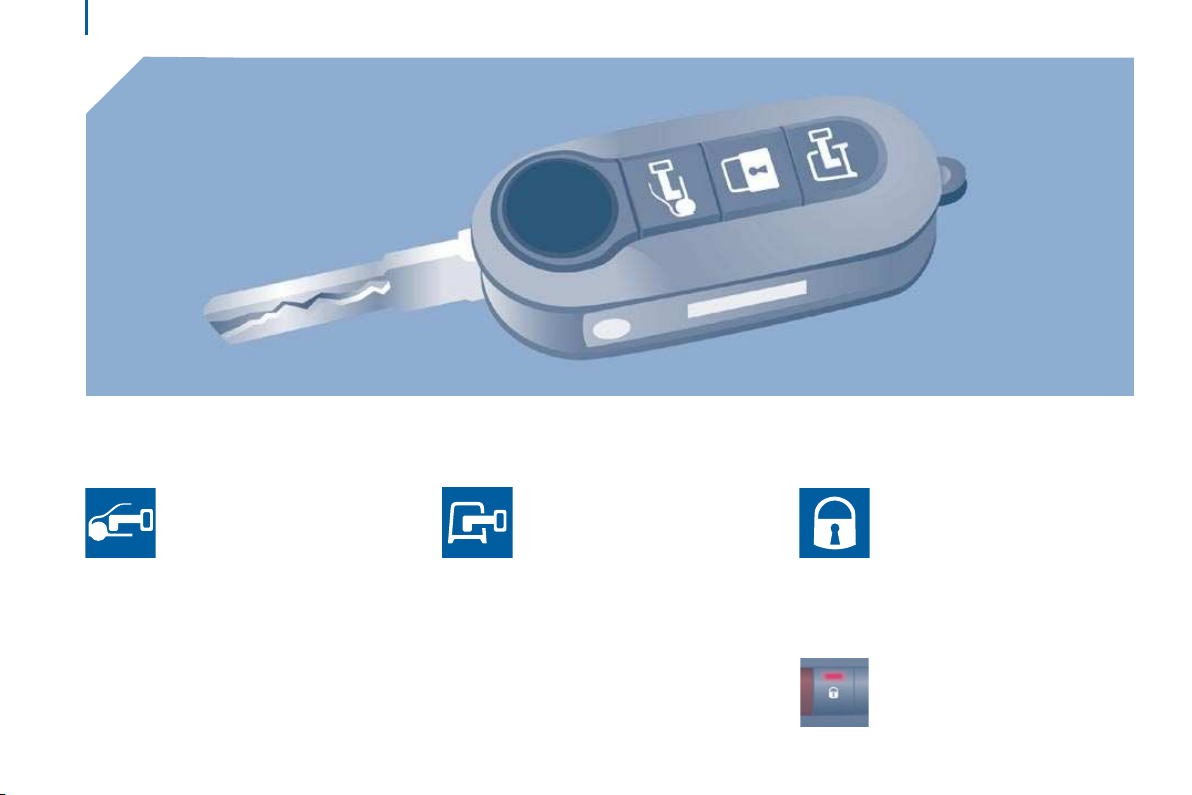
Remote control key
ACCESS
Manual centralised controls
Sliding side door
2 buttons
3 buttons
Unfolding/Folding the key.
Unlocking.
Locking.
Unfolding/Folding the key.
Unlocking the cab.
Unlocking the load space.
Locking the vehicle.
18
Locking the vehicle.
Unlocking the vehicle.
Locking/Unlocking the load space.
25
Opening
Pull the handle towards you then towards
the rear.
Take care not to obstruct the guide space
on the floor so as to allow the door to slide
correctly.
Take care to open the door fully so as to
engage the latch at the bottom of the door.
Do not drive with the sliding side door open.
23
7
Familiarisation
Rear doors Opening to 180°
ACCESS
Fuel tank
Opening
Pull the handle towards you.
Closing
To close, start with the left-hand door then
close the right-hand door.
24
Press the button, located on the door trim
panel, to widen the angle of opening of the
door.
24 130
Opening the fuel filler flap.
Hooking the fuel filler cap.
Capacity of the fuel tank: approximately
90 litres.
8
Familiarisation
INTERIOR
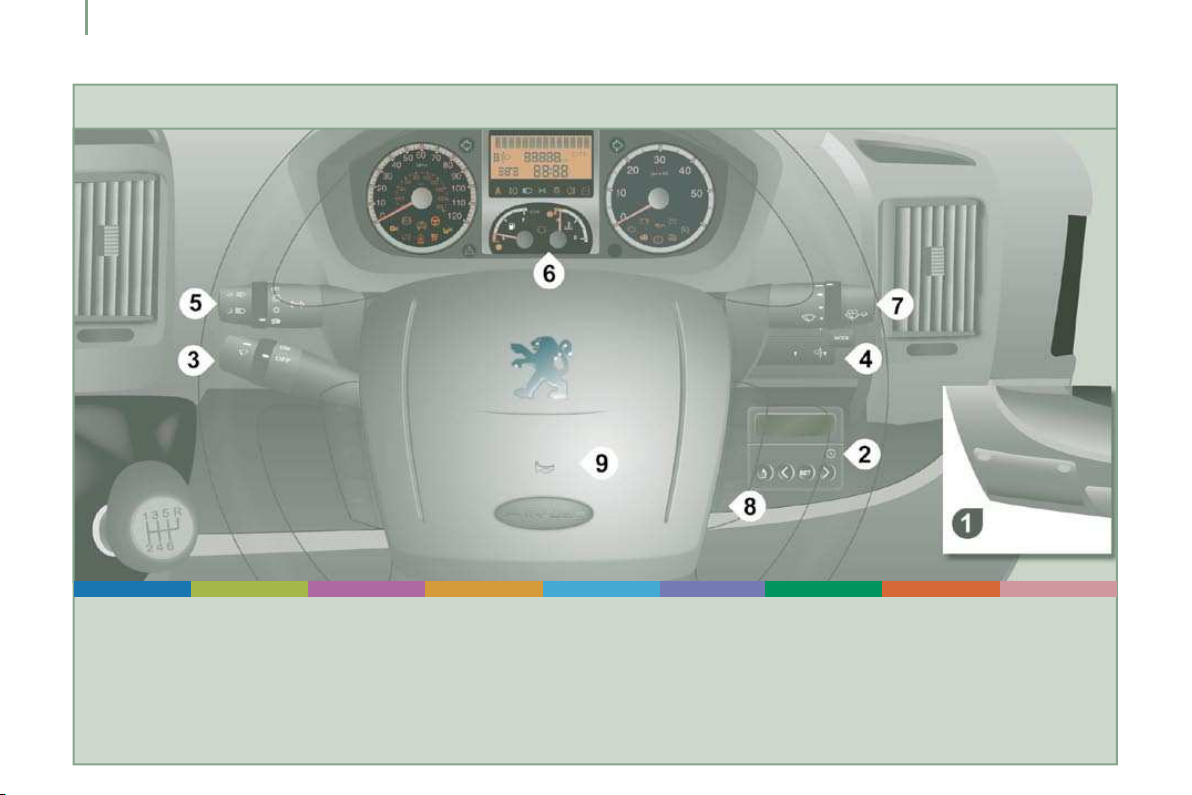
Instruments and controls
1. Fusebox.
2. Programmable heating.
3. Cruise control switch.
4. MODE, configuration and
personalisation/lighting rheostat/
headlamp beam height adjustment/
anti-tilt protection.
5. Lighting and direction indicator control
stalk.
6. Instrument panel with screen.
7. Wiper/screenwash/trip computer control
stalk.
8. Ignition switch.
9. Driver’s airbag/horn.
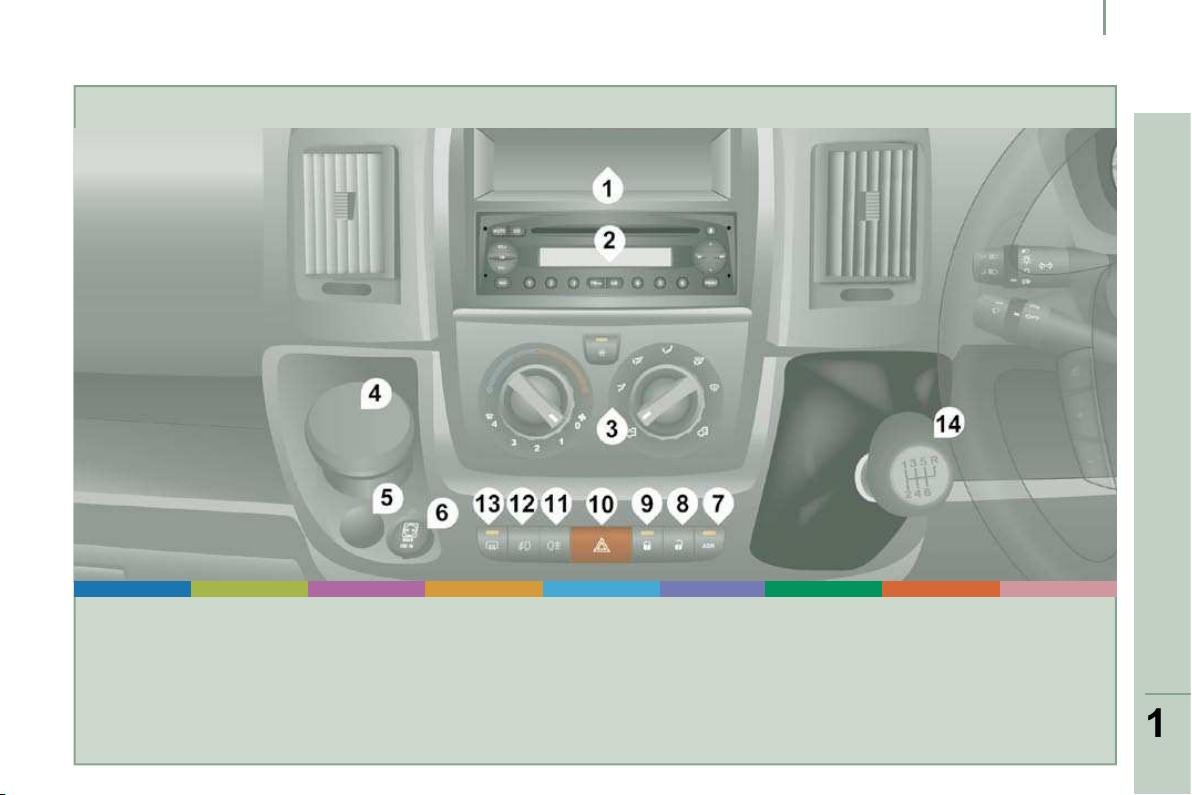
9
Familiarisation
Centre console
1. Storage compartment
2. Audio equipment.
3. Manual air conditioning.
4. Portable ashtray.
5. Cigar lighter.
between 2 adjustable vents.
6. 12 volt accessories socket (180 W max).
7. Dynamic stability control (ASR).
8. Central unlocking of the doors and load
space.
9. Central locking/alarm indicator lamp.
10. Hazard warning lamps.
11. Rear foglamps.
12. Front foglamps.
13. Demisting/defrosting.
14. Gear lever.
10
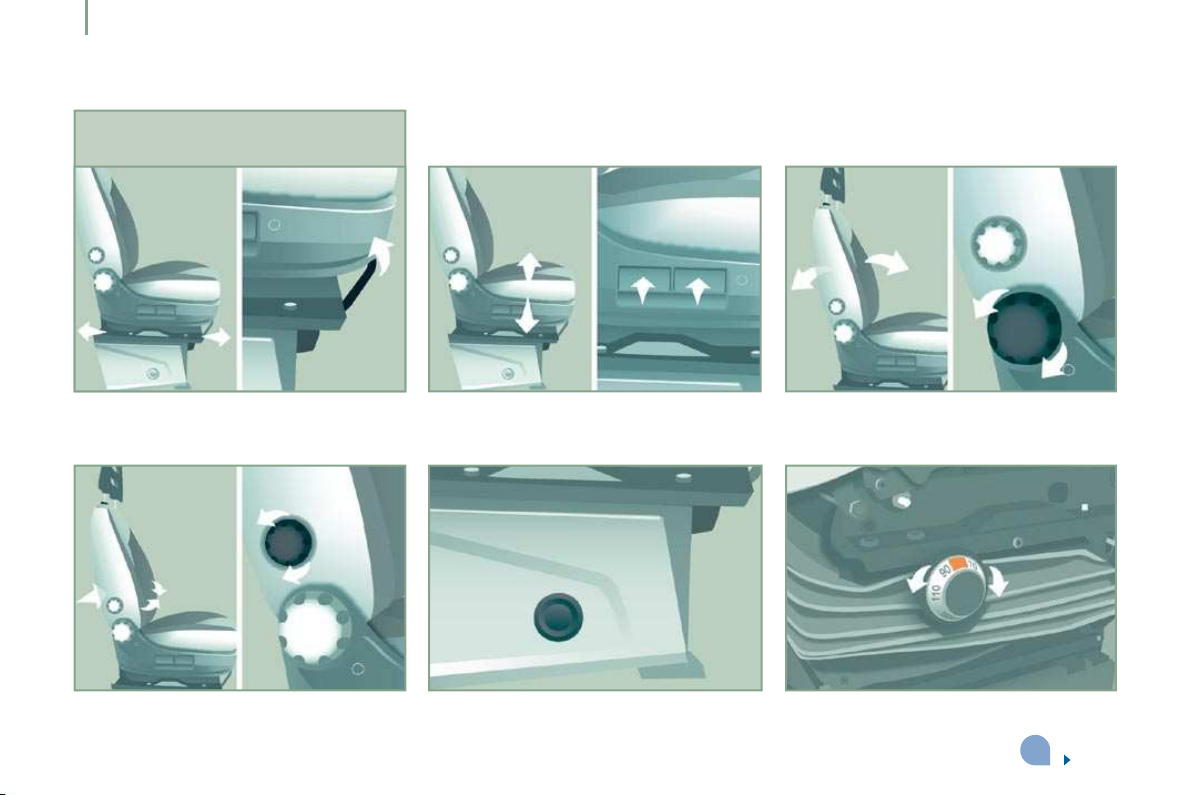
Familiarisation
SITTING COMFORTABLY
Driver's seat adjustments
Forwards-backwards Seat height Seat back angle
Lumbar support Seat heating Variable damping seat
58
5
3
5
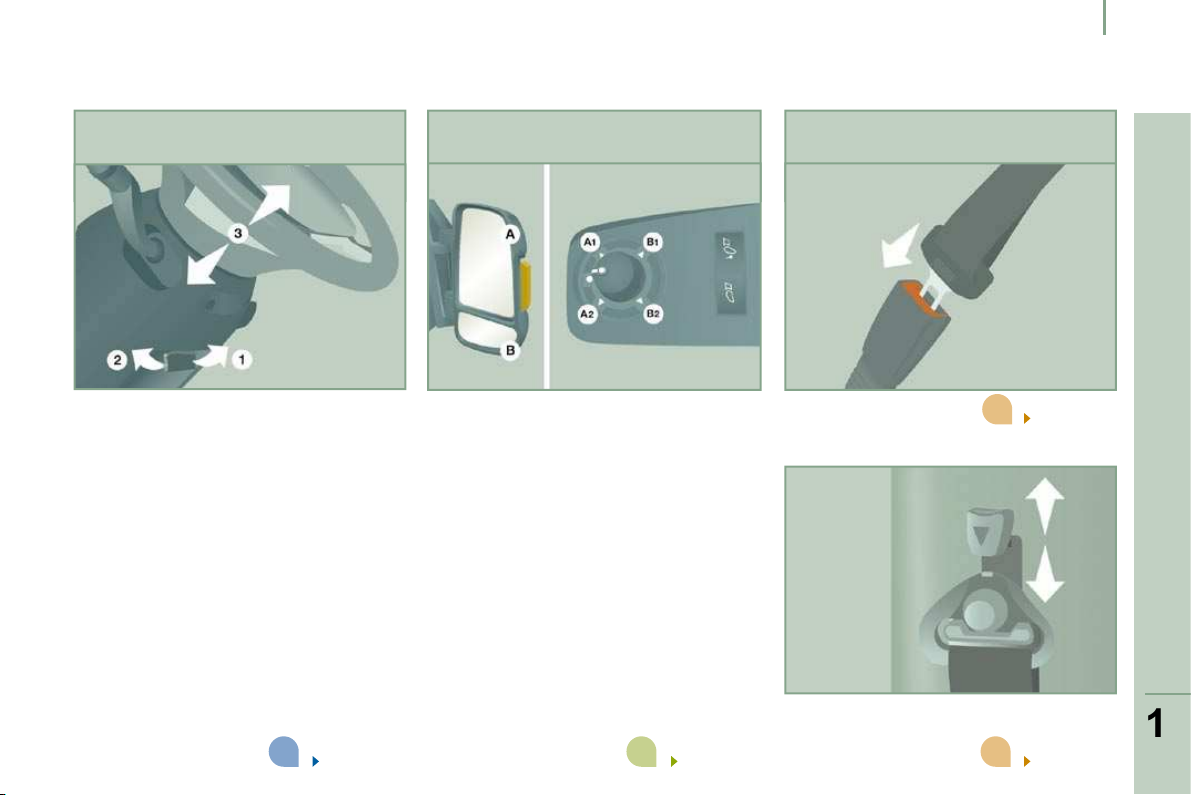
Familiarisation
SITTING COMFORTABLY
Manual adjustment of the reach
of the steering wheel
Door mirror adjustment
Front seat belt
1. Unlocking the adjustment mechanism.
2. Locking the adjustment mechanism.
3. Adjustment of the reach of the steering
wheel.
The mirrors are divided into two zones:
A and B.
1. Driver's mirror:
A1- Adjustment of the upper mirror.
B1- Adjustment of the lower mirror.
2. Passenger's mirror:
A2- Adjustment of the upper mirror.
B2- Adjustment of the lower mirror.
36 70
Fastening.
Height adjustment.
106
106
2
3
3
12
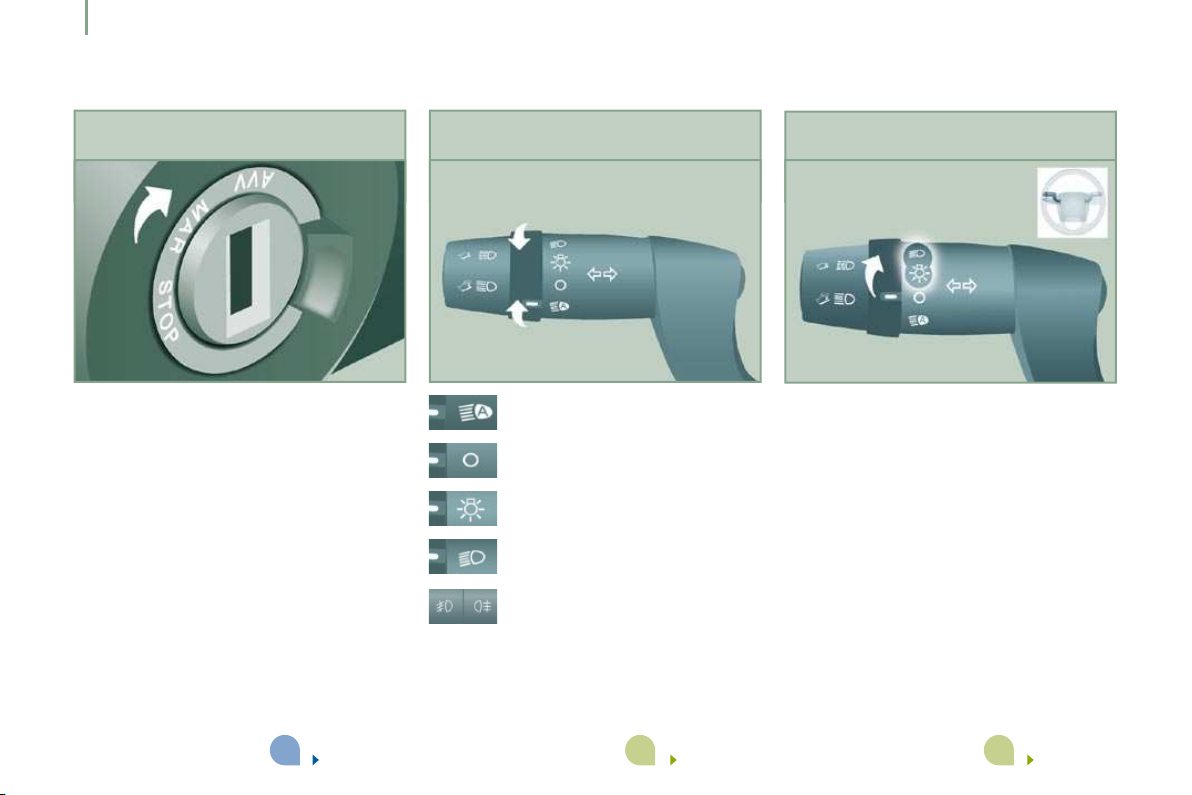
Familiarisation
SEEING CLEARLY
SITTING COMFORTABLY
Ignition switch
Lighting
Sidelamps/PARK
- STOP position.
- RUNNING position.
- START position.
37
Automatic illumination of
headlamps.
Lamps off.
Sidelamps.
Dipped or main beam headlamps.
Front and rear foglamps.
40
With the ignition off and the key in the STOP
position or removed:
Move the ring on the lighting stalk to
position O then to sidelamps, dipped or
main beam headlamps.
The sidelamps will remain on while you are
parked.
42
333
13
Familiarisation
SEEING CLEARLY
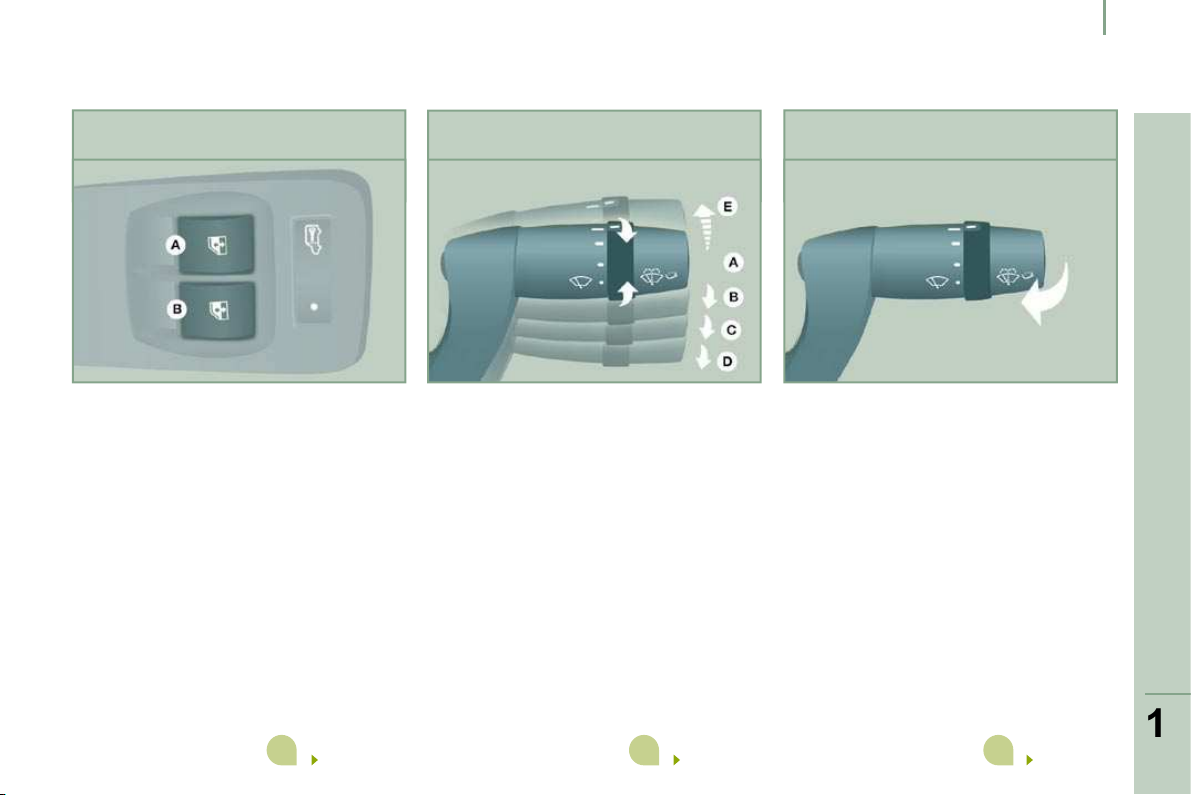
Electric window controls
Windscreen wipers
Windscreen wash
A. Driver's electric window control.
B. Passenger's electric window control.
The electric window functions are
deactivated one minute after the ignition is
switched off.
71
A. Park.
B. Intermittent (4 speeds).
C. Slow continuous.
D. Fast continuous.
E. Single wipe.
43
Pull the control stalk towards you, the
windscreen wash is accompanied by a timed
operation of the wipers.
43
14
Familiarisation
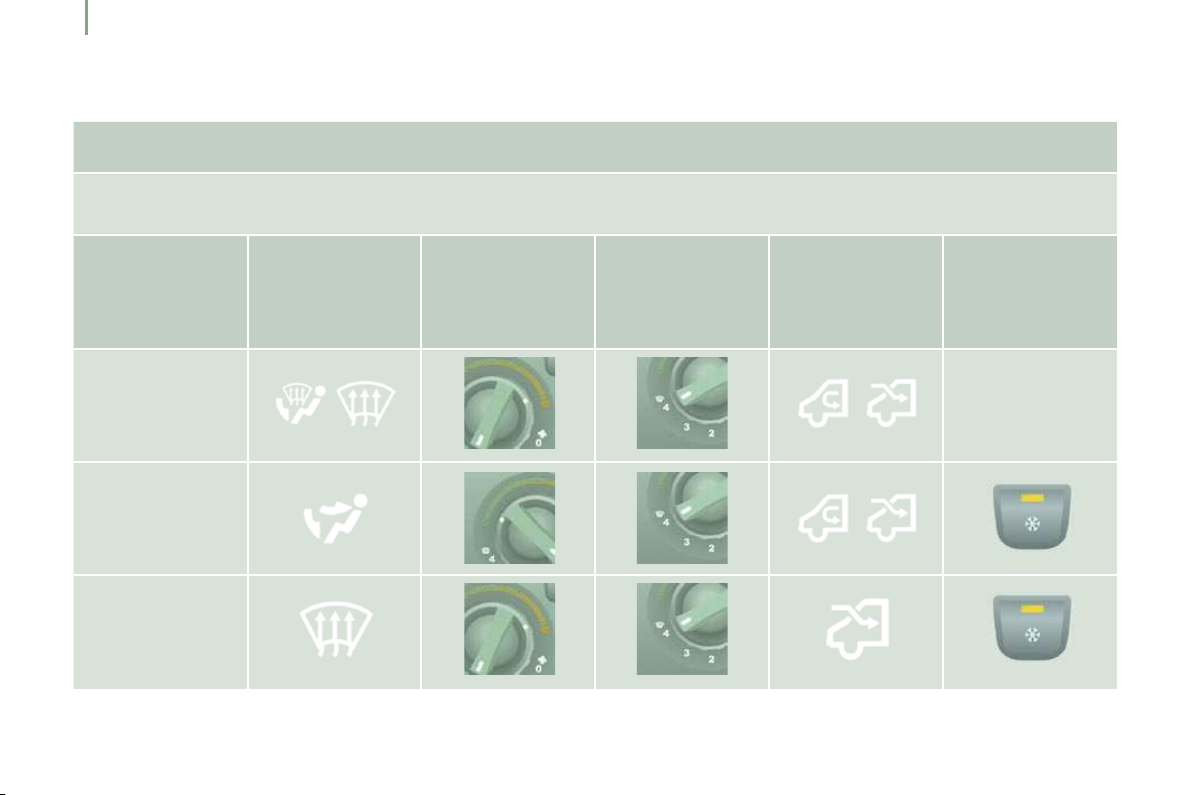
VENTILATION
Digital air conditioning : use of the fully automatic operation by pressing the "AUTO" button is recommended.
Recommended interior settings
Manual Air Conditioning
If I require... Air distribution Temperature Air flow Air recirculation AC
Heating
-
Cooling
Demisting
Defrosting
422
15
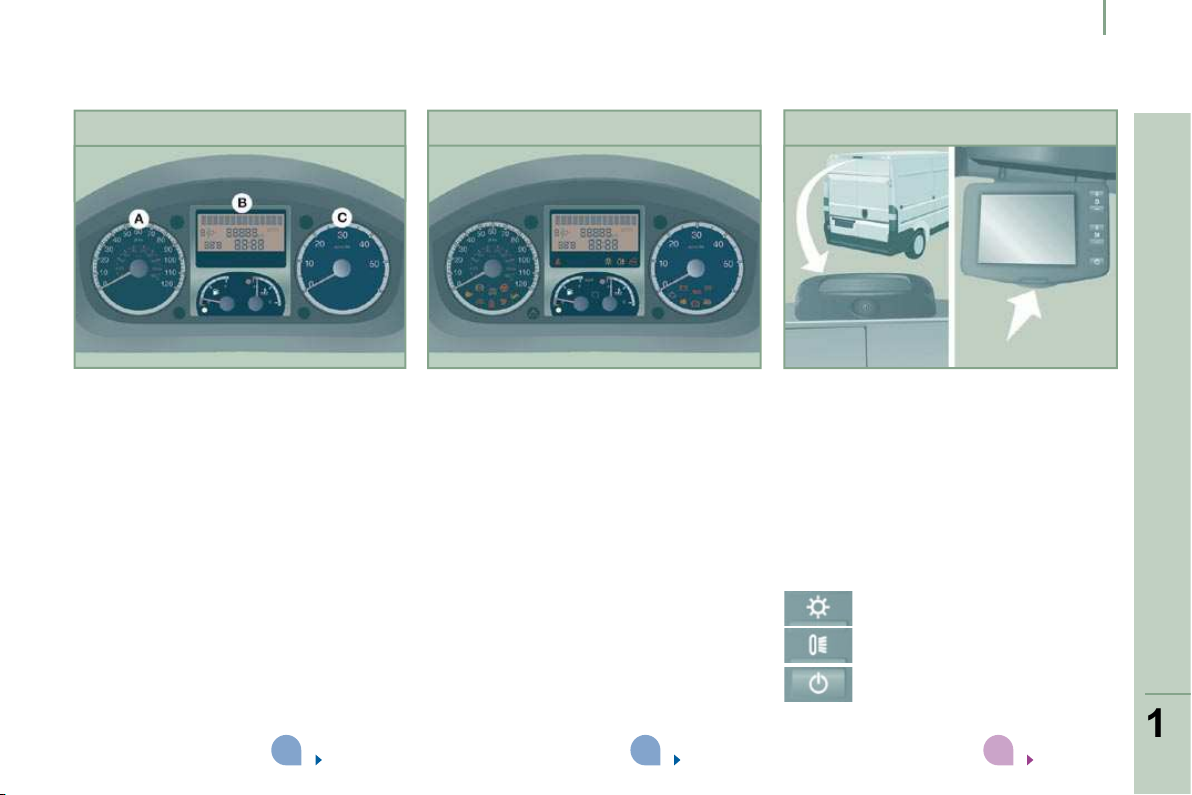
Familiarisation
Instrument panel
MONITORING
Warning lamps
Reversing camera
A. Speedometer.
B. Instrument panel screen.
C. Rev counter.
26
With the ignition on, the orange and red
warning lamps come on.
With the engine running, these warning
lamps should switch off.
If warning lamps remain on, refer to the
chapter concerned.
27
The camera comes on when you engage
reverse gear and remains active up to
approximately 9 mph (15 km/h). It is
deactivated above 11 mph (18 km/h).
Screen
Press the button and place the screen in the
required position.
Buttons
Brightness adjustment.
Back-lighting adjustment.
ON/OFF provides views of the rear
without engaging reverse gear.
77
5
16
Familiarisation
PASSENGER SAFETY
To deactivate the front passenger airbag,
refer to the "MODE" section of chapter 4,
then on the "Passenger airbag" menu,
select OFF.
The airbag warning lamp on the instrument
panel stays on while the airbag is
deactivated.
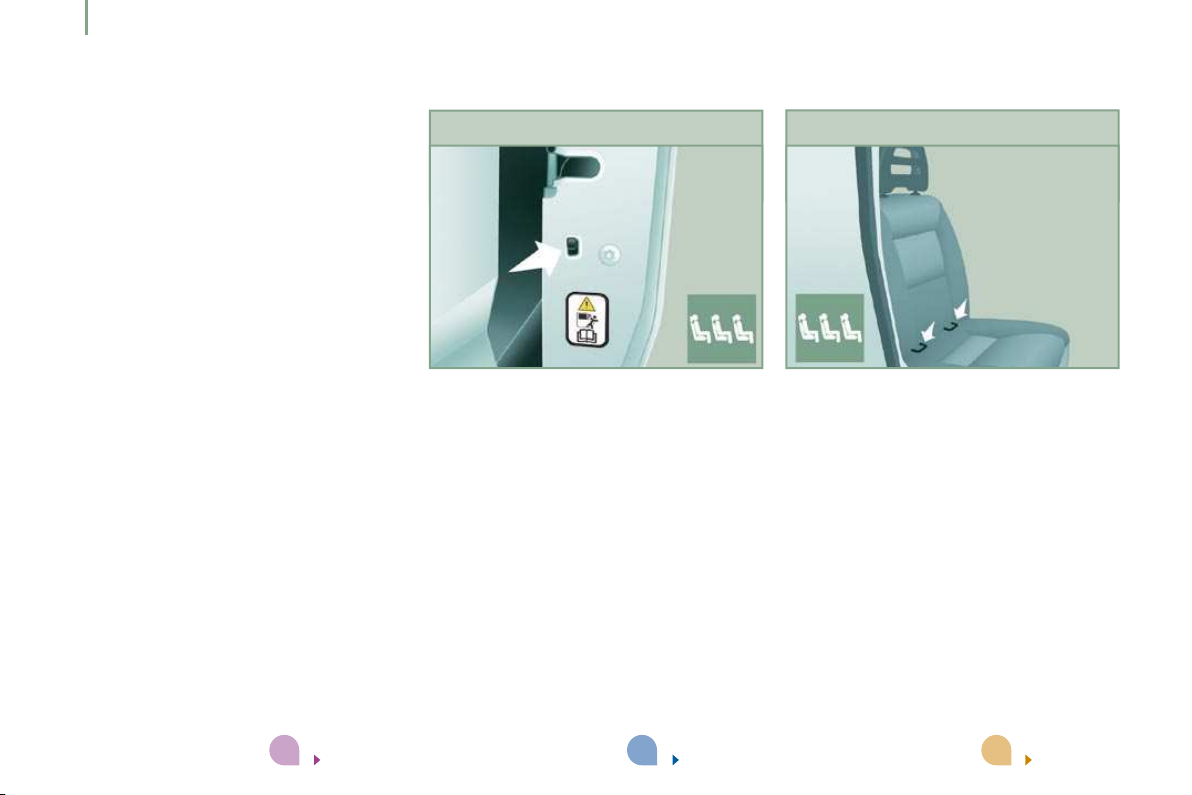
Child lock
Isofix mountings
73
This prevents opening of the sliding side
door from the inside.
23
Two front rings, located between the seat
back and the seat cushion are used to
secure an ISOFIX child seat.
114
3
17
Familiarisation
Cruise control
DRIVING SAFELY
Hill start assist
Pneumatic suspension
The state of the cruise control system is
given on the instrument panel by a warning
lamp located in the rev counter.
Function selected.
Function deactivated.
44
This system, linked with the ESP, makes hill
starts easier and is activated in the following
conditions:
- the vehicle must be stationary, with the
engine running,
- the gradient of the road must be
steeper than 5 %.
38
This equipment allows you to alter the rear
height of the load floor to make loading or
unloading easier.
Press the up control switch; release to stop
the movement. Each press increases by one
level: +1 to +3.
Press the down control switch; release to
stop the movement. Each press decreases
by one level: -1 to -3.
Driving with the load floor too high or too
low may damage components under the
body.
79
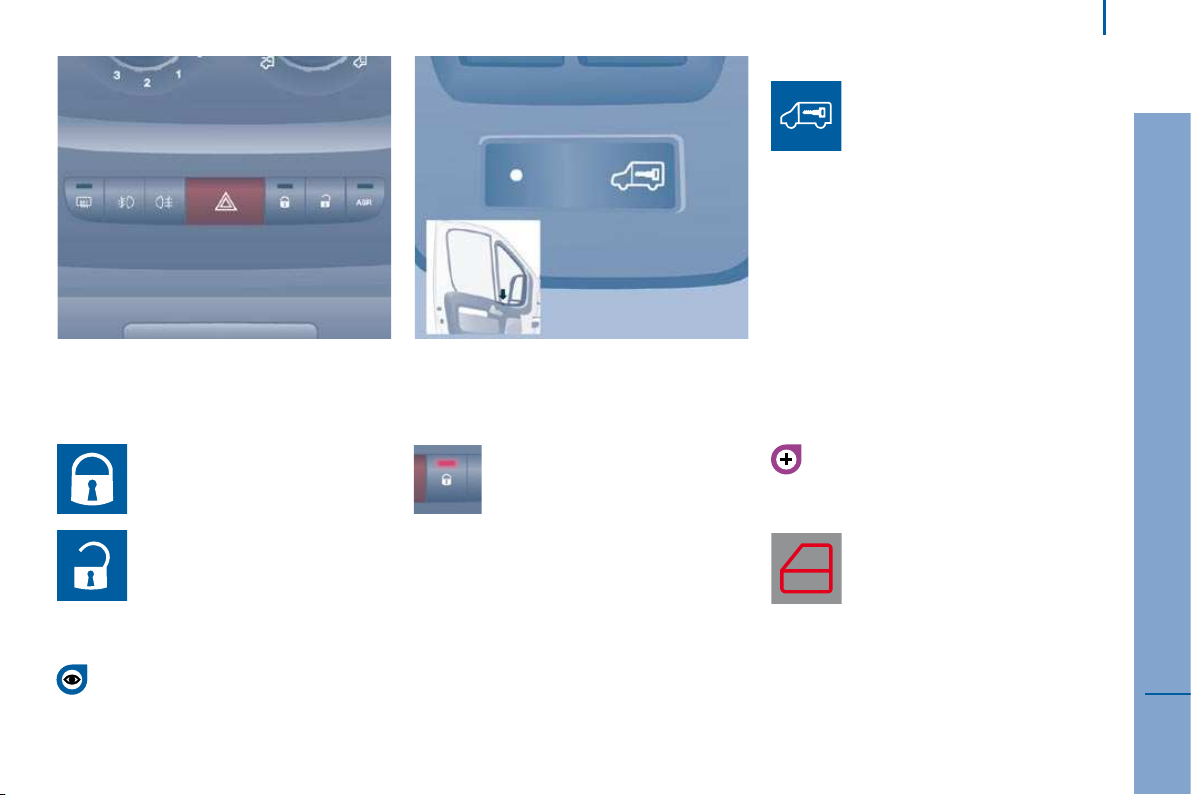
Accesses
REMOTE CONTROL
ACCESS
Unlocking the cab
Press this button to unlock your
vehicle's cab. The interior courtesy
lamp comes on briefl y and the
direction indicators fl ash twice.
Unlocking the rear doors
Central locking
Press this button to unlock the
side door and the rear doors of
the load space.
Press this button briefly
to lock all of your vehicle's doors,
cab and load space. If one of
the doors is open or is
not closed correctly, the central
locking will not work.
The direction indicators flash once.
The indicator lamp on the control
on the centre console comes on
then flashes.
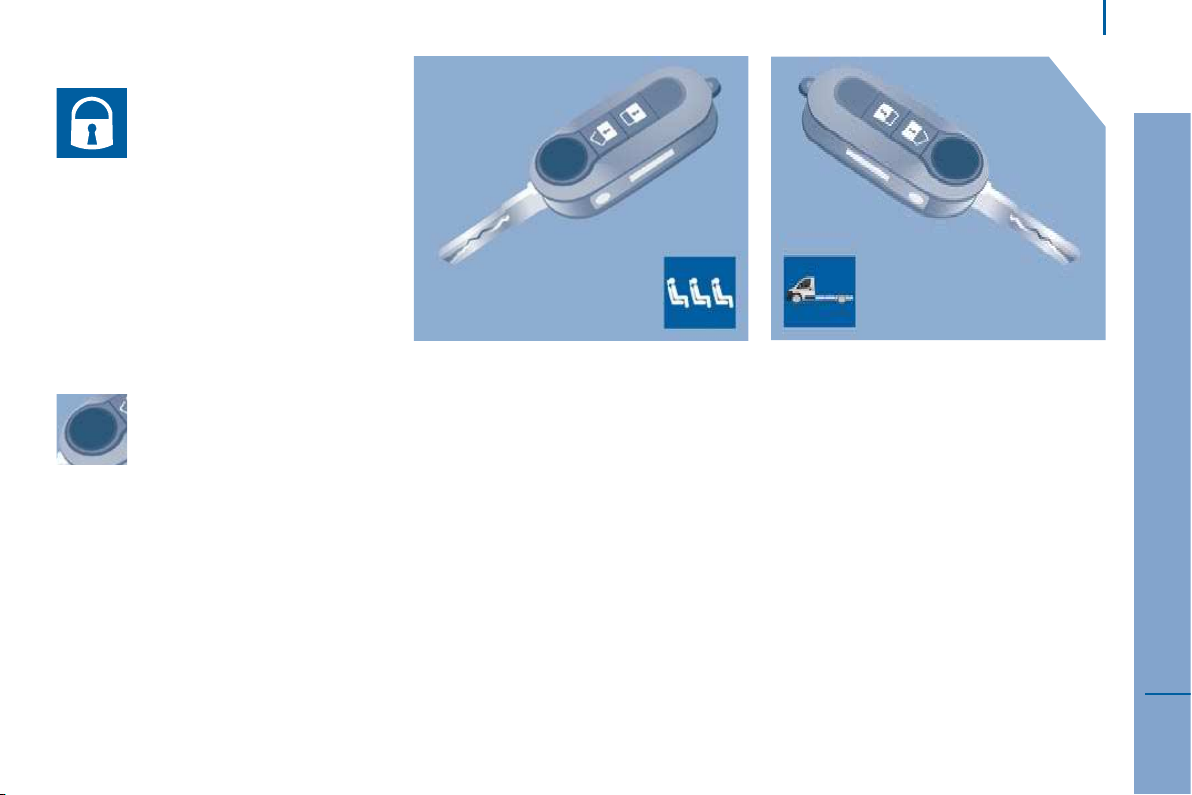
Accesses
Deadlocking
Press this button twice in
succession to deadlock the
vehicle. It is then impossible to
open the doors from the inside or
the outside.
The direction indicators flash three times.
Never leave anyone inside the vehicle when
it is deadlocked.
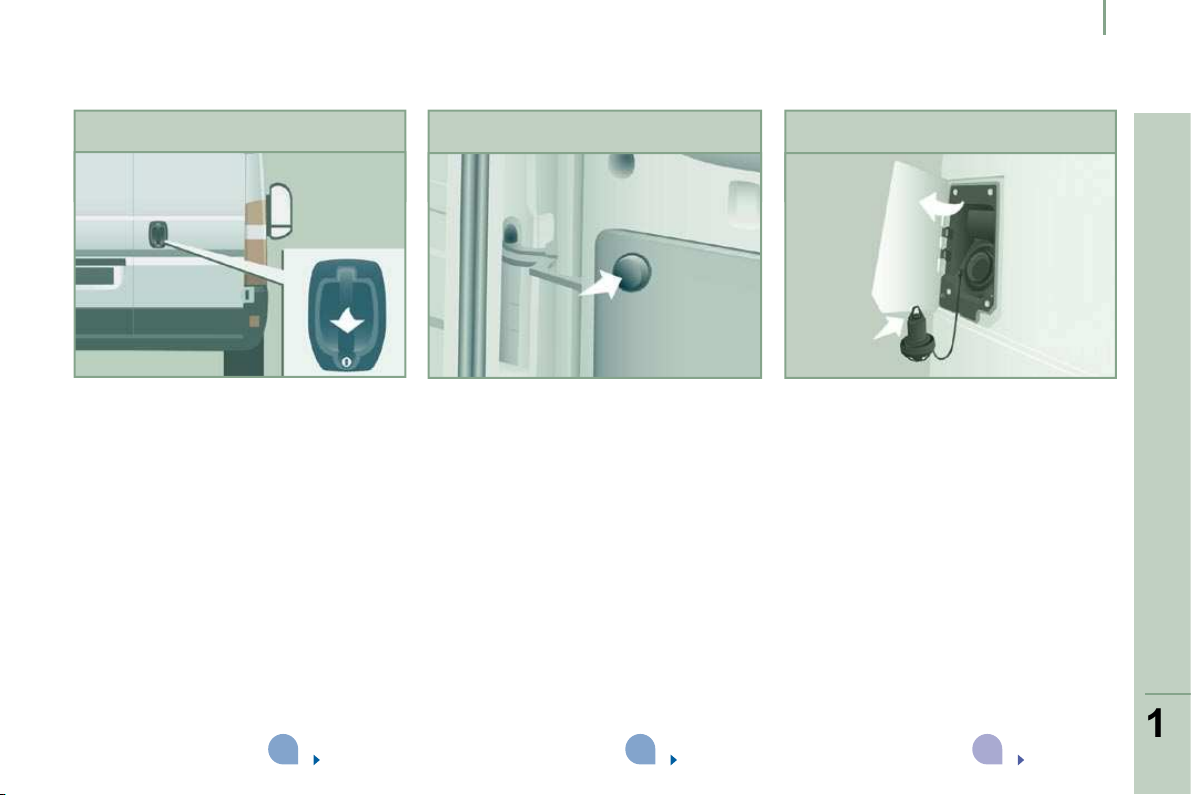
Folding/unfolding the key
Press this button to release the
key from its housing.
To fold the key, press the button
then fold the key into the housing.
If you do not press the button, the mechanism
may be damaged.

Accesses
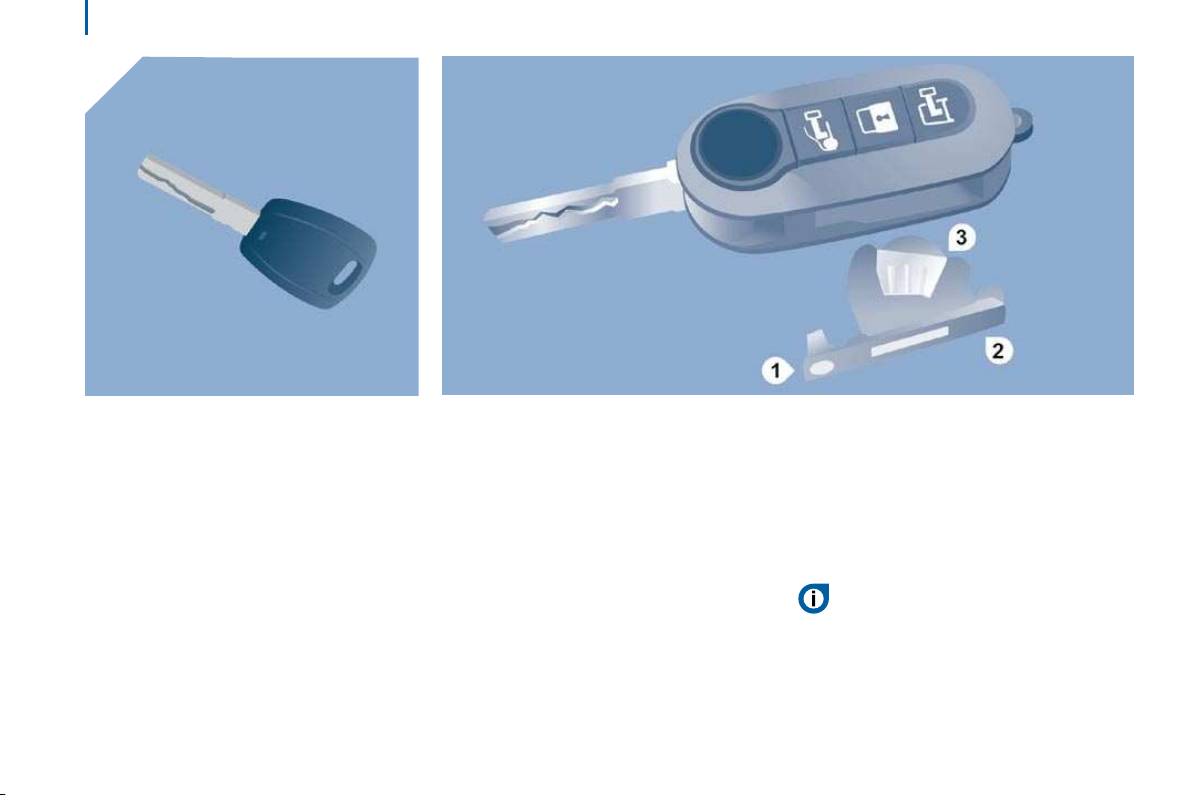
KEY
This locks and unlocks the locks on the
REMOTE CONTROL BATTERY
Changing the remote control battery
vehicle and starts the engine.
Reference: CR 2032/3 volts.
- press the button to eject the key,
- turn the screw 1 from the closed padlock
to the open padlock using a screwdriver
with a thin lip,
- use the screwdriver as a lever to extract
the battery holder housing 2 ,
- remove the housing and change the
battery 3 observing the polarities,
- put the battery holder housing 2 back
inside the key and secure it by turning
the screw 1 .
There is a risk of damage if the
replacement battery is not of the
correct type.
Only use batteries which are identical or of
an equivalent type to those recommended
by a PEUGEOT dealer. Take used batteries
to an approved collection point.
Accesses
ELECTRONIC IMMOBILISER
All of the keys contain an electronic
CONFIDENTIAL CARD
immobiliser device.
This device locks the engine supply system.
It is activated automatically when the key is
removed from the ignition.
After the ignition is switched on, a dialogue
is established between the key and the
electronic immobiliser system.
This warning lamp is switched off
after the ignition is switched on
and the key has been recognised,
the engine can be started.
If the key is not recognised, the engine
cannot be started. Use another key and
have the faulty key checked by a PEUGEOT
dealer.
Make a careful note of the number of the
keys. If they are lost, your PEUGEOT dealer
will be able to carry out his work more
quickly and effectively if you give him this
number and the confidential card.
Do not make any modifications to the
electronic immobiliser system.
Operating the remote control, even when it
is in your pocket, may result in involuntary
unlocking of the doors.
However, if none of the doors is opened
within approximately thirty seconds following
unlocking, the doors relock automatically.
The simultaneous use of other high
frequency equipment (mobile telephones,
domestic alarms…), may interfere with the
operation of the remote control temporarily.
The remote control does not operate while
the key is in the ignition, even if the ignition
is off, except for reinitialisation.
When purchasing a second-hand vehicle:
- ensure that you are given the
confidential card,
- have the keys memorised by a
PEUGEOT dealer to ensure that the
keys in your possession are the only
ones which can start the vehicle.
Driving with the doors locked may
make access to the passenger
compartment by the emergency services
more difficult in an emergency.
As a safety precaution (with children on
board), remove the key from the ignition when
leaving the vehicle, even for a short time.
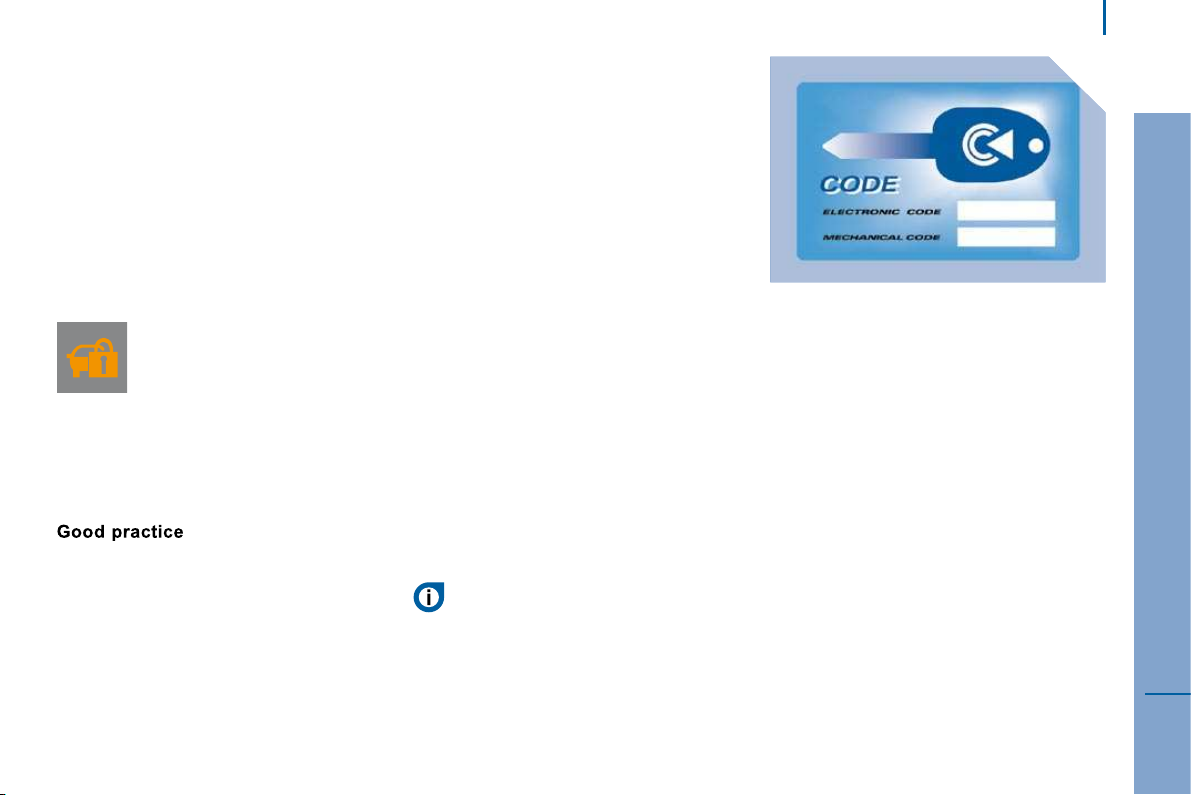
This is given to you on delivery of your
vehicle with the duplicate keys.
It contains the identification code necessary
for any work carried out by a PEUGEOT
dealer on the electronic immobiliser system.
This code is hidden by a film, which should
be removed only if necessary.
Keep your card in a safe place, never inside
the vehicle.
When undertaking a long trip or journey,
however, it is advisable to take it with you
along with your personal papers.
Accesses
While the alarm is monitoring, any intrusion
triggers the siren for approximately
30 seconds, accompanied by lighting of the
direction indicators.
The alarm then returns to monitoring mode
but the triggering event is stored and is
indicated by rapid flashing of the LED, if the
alarm is deactivated.
The alarm is also triggered following an
electrical supply cut-off, when the supply is
restored.
Automatic activation
Deactivation using the key
Deactivation using the remote control
Deactivation of the anti-tilt
protection
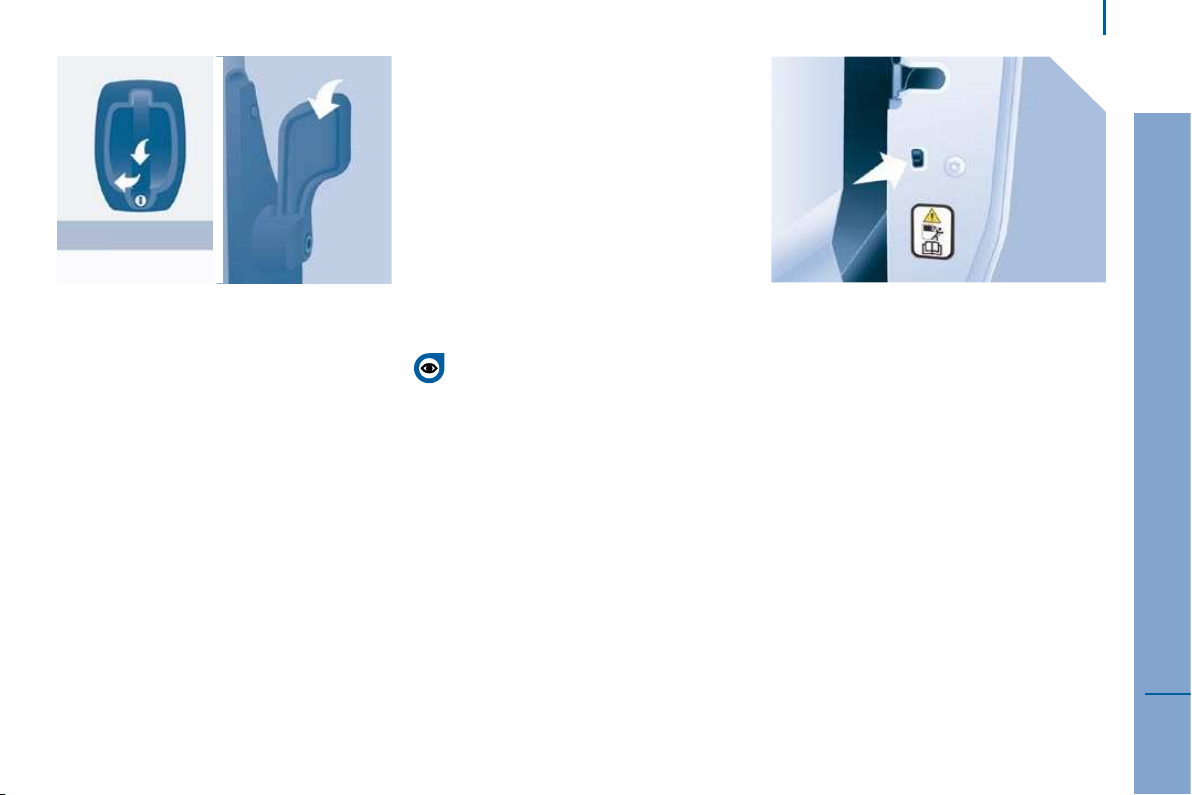
Good practice
If your vehicle is fitted with an ANTI-THEFT
Activation of the alarm
ALARM.
This provides:
- exterior perimeter protection by means
of detectors on the doors and bonnet
and on the electrical supply,
- anti-tilt protection.
The system also includes a siren and an
LED which can be seen from outside,
indicating the three possible statuses of
the alarm:
- alarm activated (monitoring), slow
flashing of the red LED,
- alarm not activated (not monitoring),
LED off,
- alarm triggered (intrusion signal), rapid
flashing of the red LED when the vehicle
is unlocked.
First ensure that all of the doors are closed
correctly.
The alarm is activated by
pressing this padlock, the
protection is active after a few
seconds.
Depending on the country in which the
vehicle is sold: this function activates
monitoring automatically approximately
2 minutes after the last door is closed. To
avoid triggering the alarm when opening a
door, the unlocking button on the remote
control must be pressed again.
Unlock the doors using the key and enter the
vehicle. Switch on the ignition, identification
of the key code will switch off the alarm.
When this button (cab and key) is
pressed, the alarm is deactivated
when the vehicle is unlocked.
Press this button to deactivate the
protection (for example when the
vehicle is being towed with the
alarm set).
The protection remains active
until the central unlocking of the doors is
activated.
To deactivate the siren quickly following
unwanted triggering:
- switch on the ignition, identification of
the key code will switch off the alarm,
- press the unlocking button (cab and key)
on the remote control.
To avoid setting the alarm, when washing
the vehicle for example, lock the vehicle
using the key.
Unlocking the vehicle using the remote
control deactivates the siren automatically.
Accesses
FRONT DOORS
Child lock
Driver's door
Use the remote control to unlock/lock.
SLIDING SIDE DOOR
From outside
From inside
Take care not to obstruct the guide space
on the floor in order for the door to slide
correctly.
Pull the handle towards you then towards
the rear.
To unlock and open, push the handle
towards the rear.
Ensure that the door opens fully in order
for the latch at the bottom of the door to
engage.
To release and close, pull the handle while
sliding the door.
Do not drive with the sliding side
door open.
This prevents opening of the sliding side
door from the inside.
Press the control located on the edge of the
side door.
Accesses
REAR DOORS
From outside
Pull the handle towards you. The two hinged
doors open to 96°.
Opening/Closing the doors
To open, pull the handle towards you then
pull the lever to open the left-hand door.
To close, start with the left-hand door then
close the right-hand door.
Opening to 180°
If your vehicle is fitted with this equipment,
a retractable check strap system permits
extending of the opening from 96° to 180°.
Press the button, located on the door trim
pad, to widen the angle of the door.
The check strap will take up its normal
position again automatically on closing.
Accesses
LOCKING/UNLOCKING FROM INSIDE
Door open warning lamp
Good practice
Cab and load space
Pressing permits electric central
Load space
Protection against attack
locking, when the doors are
closed.
Pressing permits electric central
unlocking.
The doors can still be opened from the
inside.
If one of the doors is open or is not
closed correctly, the central locking
does not work.
The indicator lamp on the control:
- comes on when the doors
are locked and the ignition is
switched on,
- then flashes when the doors
are locked when stationary with
the engine off.
The control is not active when the vehicle
has been locked using the remote control or
the key from the outside.
Press to lock or unlock the side
door and rear doors from the cab.
The warning lamp remains on on
locking.
When the vehicle is started, the system
locks the cab and load space doors
automatically when you reach approximately
12 mph (20 km/h).
If none of the doors is opened during the
journey, the locking remains active.
Activation/deactivation of the function
The function is activated/deactivated by
means of Mode, selecting "Autoclose".
Refer to the "Mode" section in chapter 4.
If this warning lamp comes on,
check that the cab doors, the rear
or side doors and the bonnet are
closed correctly.
If you decide to drive with the doors locked,
be aware that this could make access to the
vehicle by the emergency services more
difficult in an emergency.
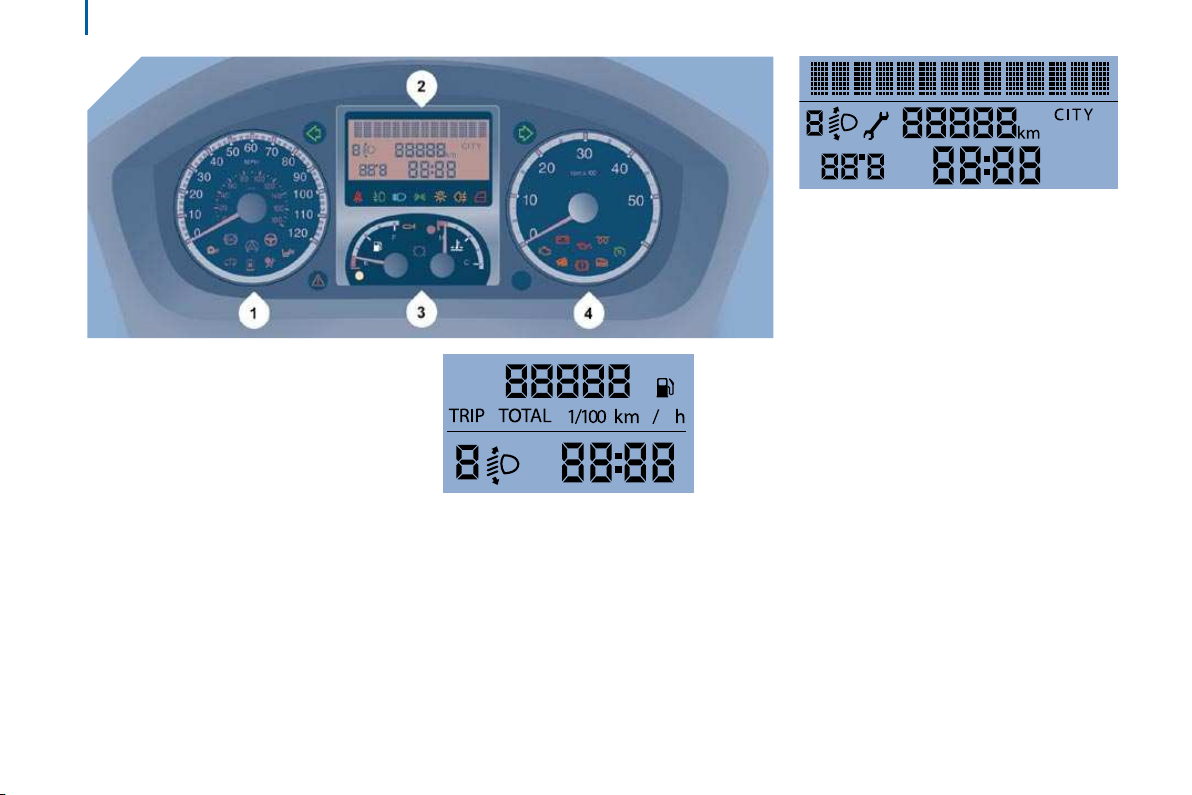
Instruments and controls
INSTRUMENT PANEL
1. Distance recorder in miles/kilometres.
INSTRUMENTS AND CONTROLS
Instrument panel screen 1
Instrument panel screen 2
2. Screen.
3. Dials and gauges.
4. Rev counter.
- Time,
- Miles/Kilometres travelled,
- Range,
- Fuel consumption,
- Average speed,
- Headlamp beam height,
- Programmable overspeed warning via
MODE,
- Service indicator.
- Time,
- Date,
- Ambient temperature,
- Miles/Kilometres travelled,
- Range,
- Fuel consumption,
- Average speed,
- Headlamp beam height,
- Programmable overspeed warning via
MODE,
- Service indicator,
- Warning messages displayed in the top
section,
- Radio (frequency of the current station).
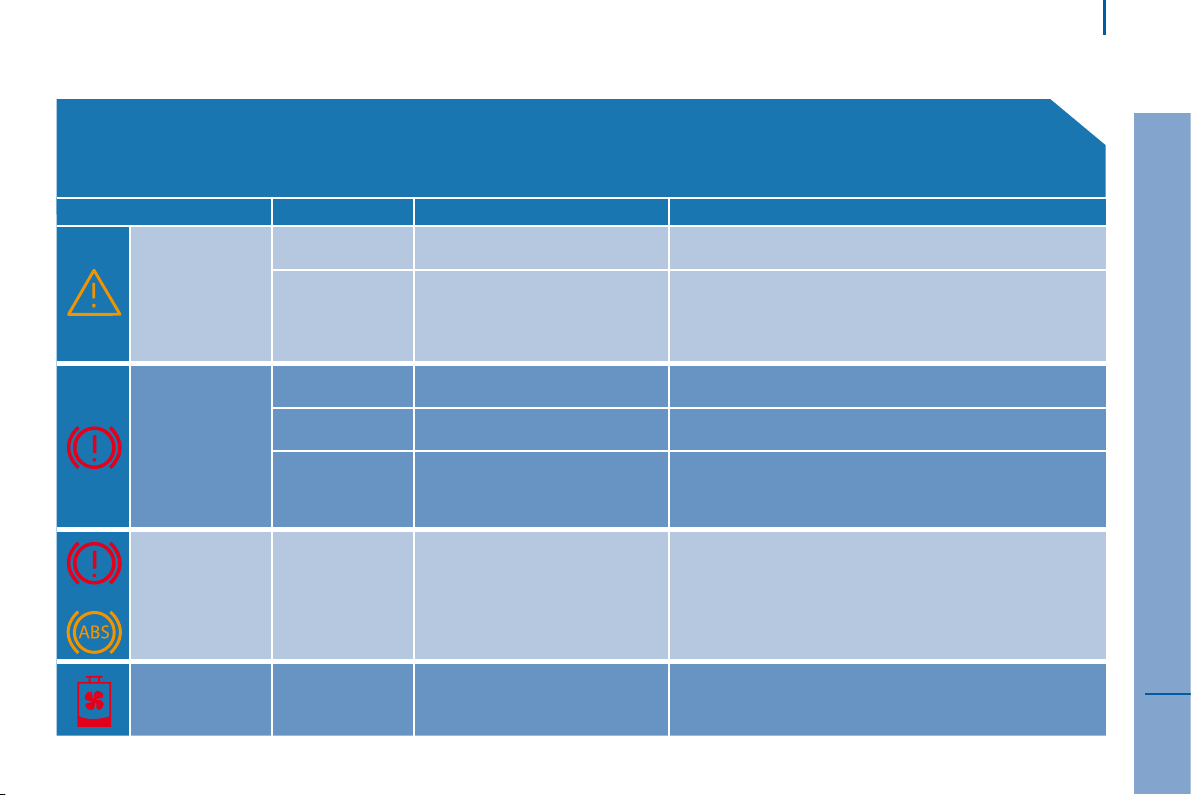
Instruments and controls
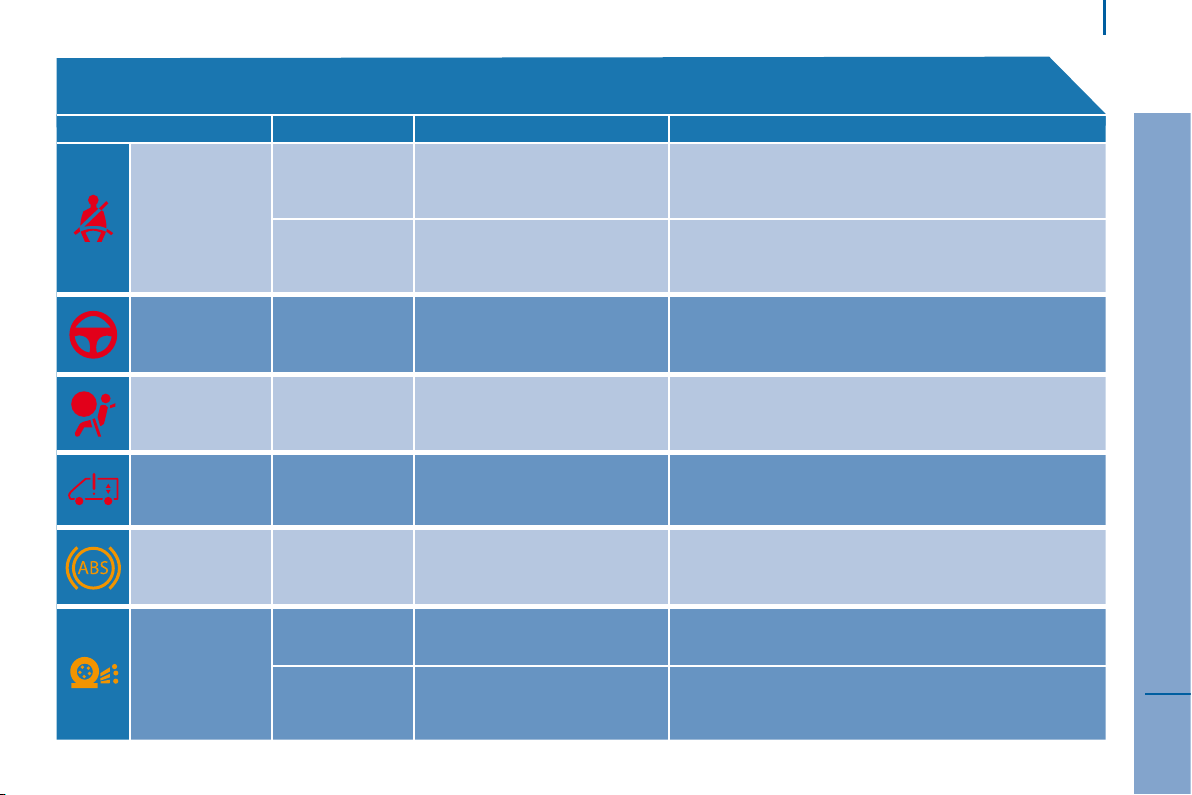
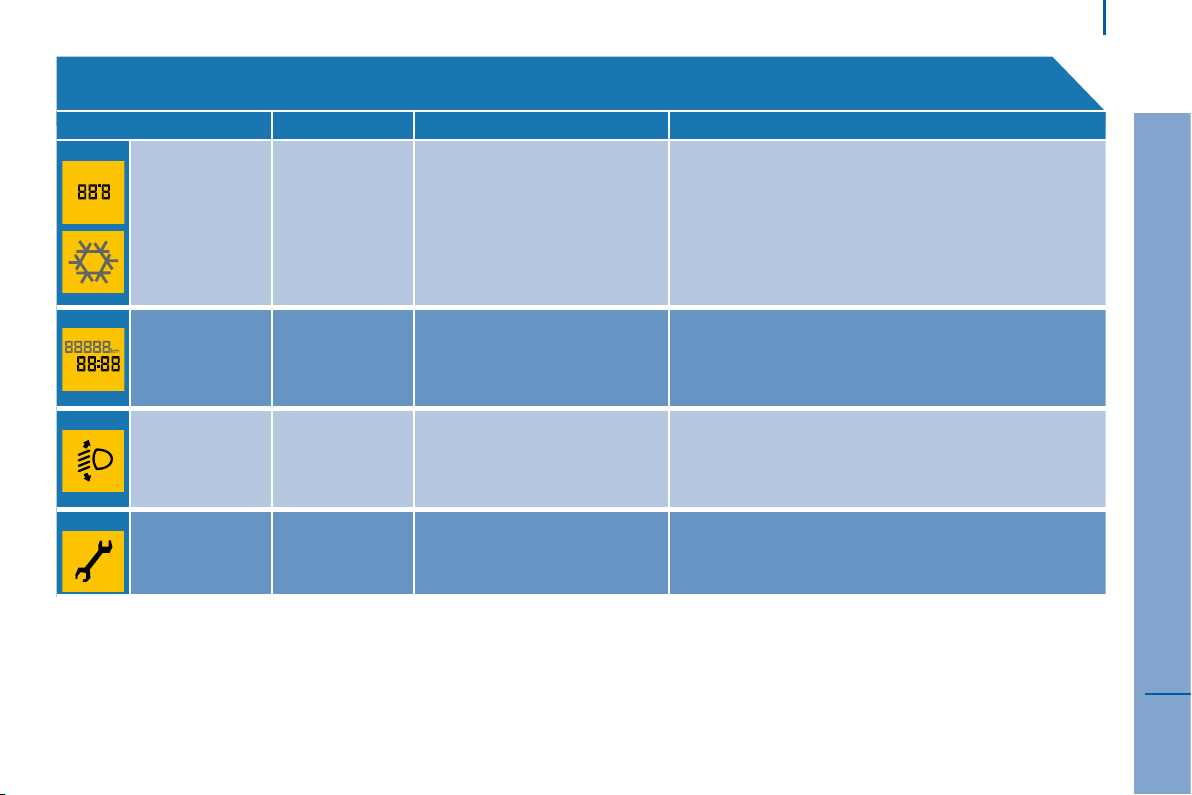
WARNING LAMPS
Each time the engine is started: a series of warning lamps comes on applying a self-checking test. They switch off almost
immediately. When the engine is running: the warning lamp becomes a warning sign if it remains on continuously or flashes.
This initial warning may be accompanied by an audible signal and a message on the screen. "Do not ignore these warnings."
Warning lamp is indicates Solution - action
Service
on temporarily. minor faults. Contact a PEUGEOT dealer.
continuously on,
accompanied by
a message on
the screen.
major faults.
Make a note of the warning message and contact a
PEUGEOT dealer.
Parking brake -
Brake fluid level
on.
that the parking brake is applied or
has not been released correctly.
Releasing the parking brake switches off the warning lamp.
on. that the fluid level is too low. Top up with a fluid recommended by PEUGEOT.
continuously on,
even though the
level is correct.
Stop immediately, park, switch off the ignition and
contact a PEUGEOT dealer.
+
Electronic brake
force distribution
on.
an electronic brake force
distribution fault.
Stop immediately. Consult a PEUGEOT dealer.
Low coolant
level
on. that the fluid level is too low.
Park and switch off the ignition. Allow to cool. Refer to
the "Levels" section of chapter 7. Consult a PEUGEOT
dealer.
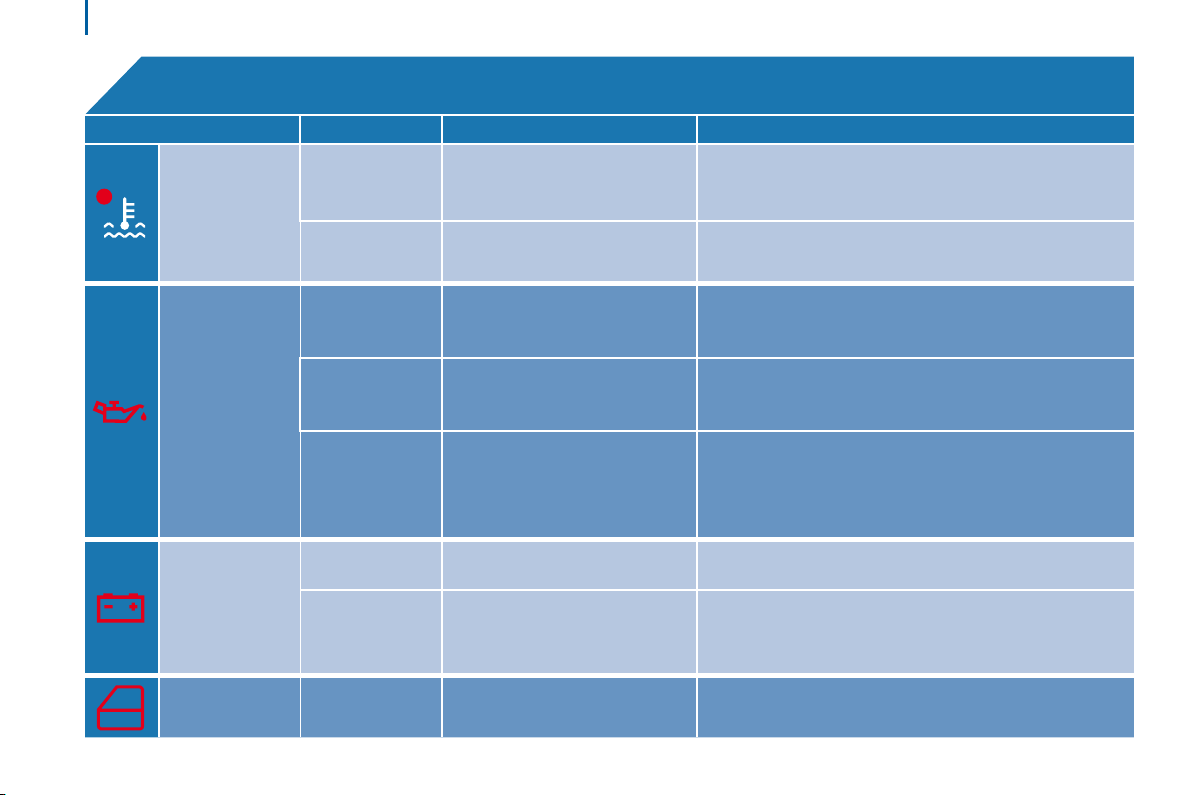
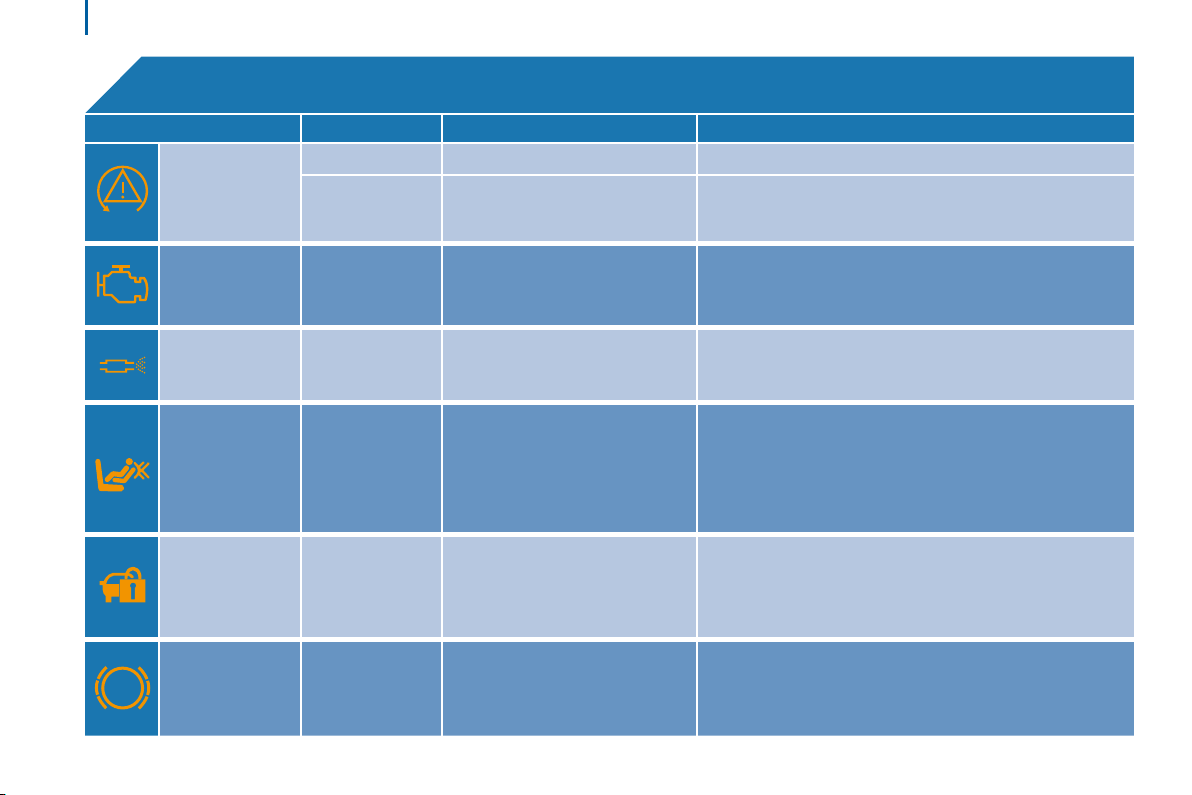
Instruments and controls
Warning lamp is indicates Solution - action
Coolant
temperature
on with the
needle in the red
zone.
an abnormal increase.
Park and switch off the ignition, allow the system to cool.
Visually check the level.
on H in the red
zone.
a coolant temperature.
Refer to the "Levels" section of chapter 7. Consult a
PEUGEOT dealer.
Engine oil
pressure
on while driving. that the pressure is too low.
Park and switch off the ignition, allow the lubrication
system to cool in order to check its level. Refer to the
"Levels" section of chapter 7.
continuously on,
even though the
level is correct.
a major fault. Consult a PEUGEOT dealer.
flashing, for a
few seconds,
with a message
on the screen.
that a service will soon be due.
Refer to the list of checks in the servicing booklet then
carry out the PEUGEOT service.
Battery charge
on. a fault in the charging circuit.
Check the battery terminals… Refer to the "Battery"
section of chapter 8.
continuously on,
fixed or flashing
in spite of the
checks.
a circuit fault, an ignition or
injection malfunction.
Consult a PEUGEOT dealer.
Door or bonnet
open detection
on.
that a door or the bonnet is not
closed correctly.
Check that the cab doors, the rear and side doors and
the bonnet are closed.
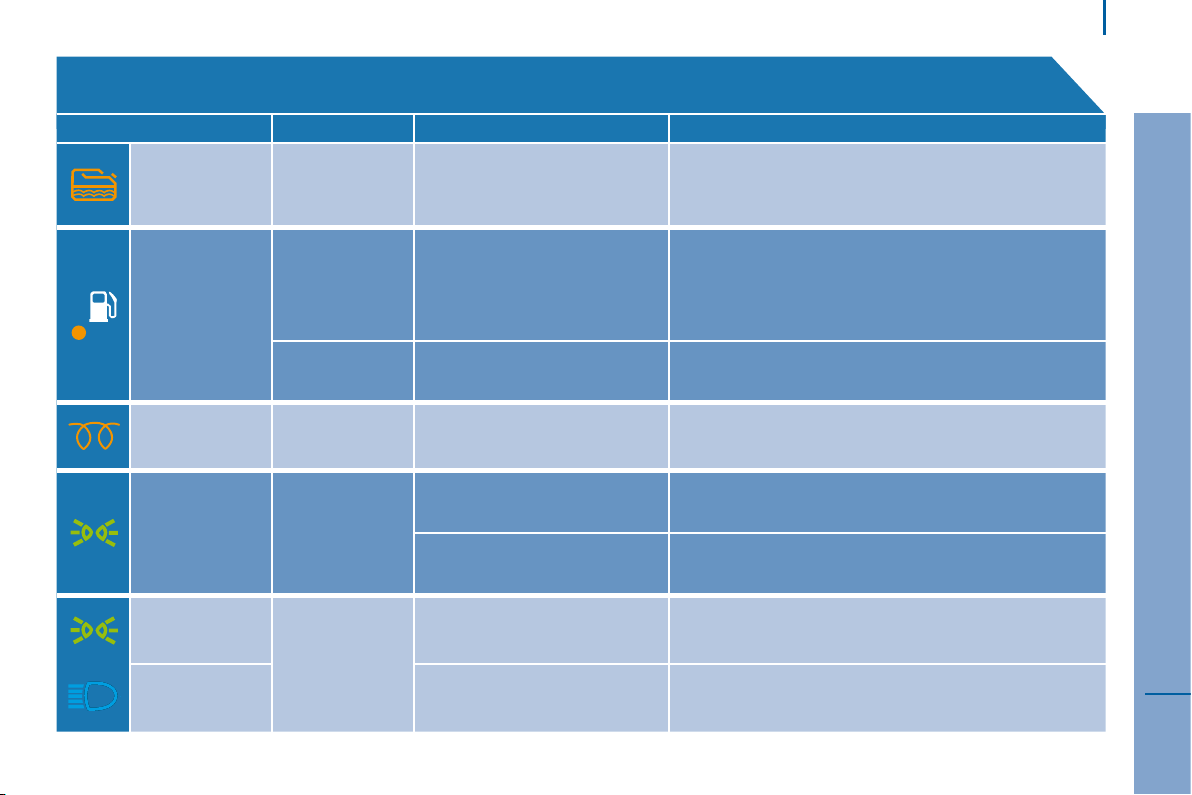
Instruments and controls
Warning lamp is indicates Solution - action
Seat belt not
fastened
on then flashes.
that the driver has not fastened
his seat belt.
Pull the strap then insert the tongue in the buckle.
accompanied
by an audible
signal then
remains on.
that the vehicle is moving
with the driver’s seat belt
unfastened.
Check that the seat belt is fastened correctly by pulling
the strap. Refer to "Seat belts" section of chapter 5.
Power steering
on, accompanied
by an audible signal
and a message on
the screen.
its malfunction.
The vehicle retains conventional steering without
assistance. Have the system checked by a PEUGEOT
dealer.
Front/lateral
airbag
flashing or
continuously on.
a fault with an airbag.
Have the system checked by a PEUGEOT dealer. Refer
to the "Airbags" section of chapter 5.
Suspension on.
a fault with the pneumatic
compensation.
Consult a PEUGEOT dealer.
ABS on. failure of the system.
The vehicle retains conventional braking without
assistance. However, you are advised to stop and
contact a PEUGEOT dealer.
ASR
flashing.
that skidding of the wheels has
been avoided.
The system optimises drive and improves the directional
stability of the vehicle.
Refer to the "Driving safely" section of chapter 5.
on, accompanied
by an audible signal
and a message on
the screen.
its malfunction. Consult a PEUGEOT dealer.
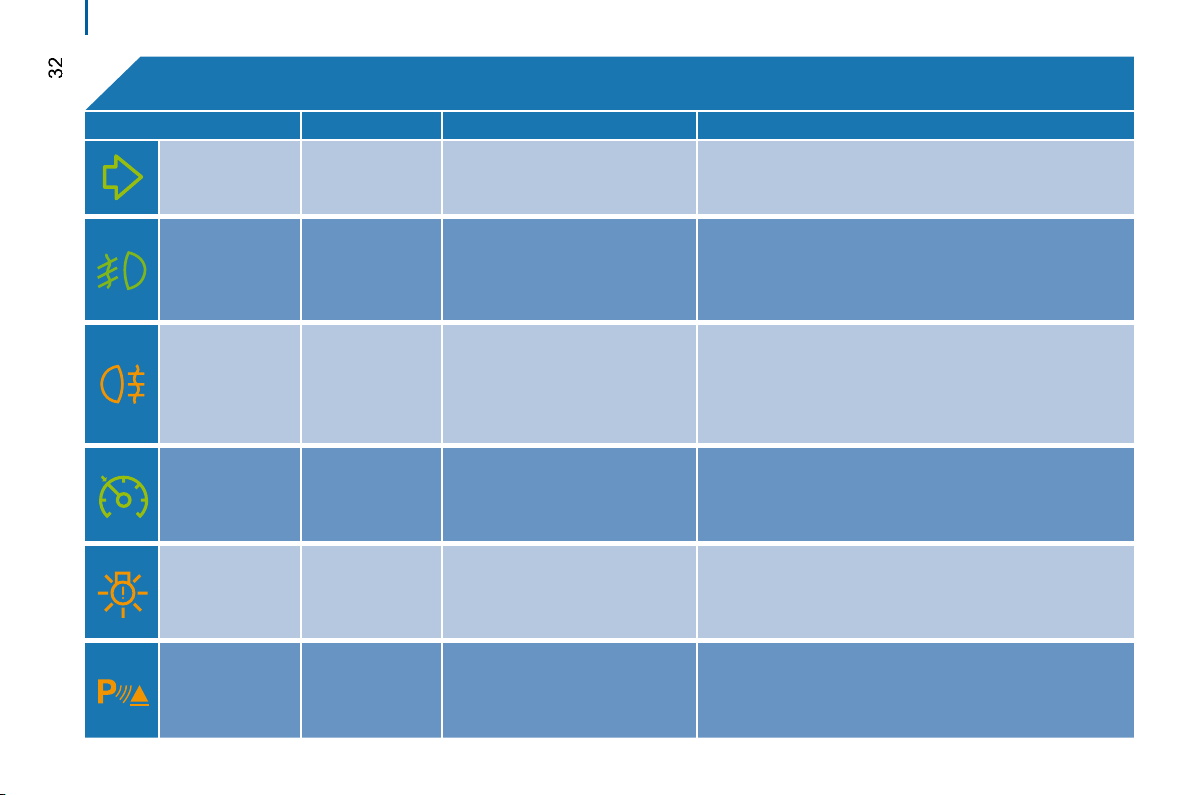
Instruments and controls
Warning lamp is indicates Solution - action
ESP
flashing. that it is in operation.
on.
its malfunction or failure of the
hill start assist.
Consult a PEUGEOT dealer.
Refer to the "Driving safety" section of chapter 5.
Emission control
system
on. a fault with the system.
Have the system checked by a PEUGEOT dealer
without delay.
Anti-pollution on. a fault with the system.
Have the system checked by a PEUGEOT dealer
without delay.
Deactivation
of the front
passenger
airbag
on.
the intentional deactivation of
this airbag when a rear facing
child seat is installed.
Configure via the trip computer MODE menu.
Refer to the "Mode" section of chapter 4.
Electronic
immobiliser
on.
the ignition key inserted is not
recognised.
The vehicle cannot be started.
Use another key and have the faulty key checked by
a PEUGEOT dealer. Refer to the "Access" section of
chapter 2.
Front brake
pads
on. brake pad wear. Have the pads replaced by a PEUGEOT dealer.
Instruments and controls
Warning lamp is indicates Solution - action
Water in Diesel
filter
on, accompanied
by a message on
the screen.
that there is water in the Diesel
fuel filter.
Have the filter bled by a PEUGEOT dealer.
Refer to the "Checks" section of chapter 7.
Low fuel level
on with the
gauge needle in
zone E.
that the fuel reserved is being
used.
Fill up with fuel without delay. The calculation of the
remaining fuel depends on the style of driving, the profile
of the road, the time elapsed and the distance travelled
since the warning lamp first came on.
flashing. a malfunction. Consult a PEUGEOT dealer.
Diesel
pre-heating
on.
that the weather conditions
impose pre-heating.
Wait for the warning lamp to switch off before operating
the starter.
Sidelamps
on, accompanied
by a message on
the screen.
manual selection. Turn the ring on the lighting stalk to the first position.
automatic illumination of
headlamps, ring in position A.
Adjust the sensitivity of the sunshine sensor via the
MODE menu. Refer to the "Mode" section of chapter 4.
Dipped beam
headlamps
on.
manual selection. Turn the ring on the lighting stalk to the second position.
Main beam
headlamps
pulling of the stalk towards you. Pull the stalk to return to dipped beam headlamps.
Instruments and controls
Warning lamp is indicates Solution - action
Direction
indicators
flashing with
buzzer.
a change of direction using the
lighting stalk, to the left of the
steering wheel.
To the Right: press the stalk upwards.
To the Left: press the stalk downwards.
Front foglamps on.
that the button on the centre
console has been pressed.
Manual selection.
The foglamps only operate if the sidelamps or dipped
beam headlamps are on.
Rear foglamps on.
that the button on the centre
console has been pressed.
Manual selection. The foglamps only operate if the
sidelamps or dipped beam headlamps are on. When
visibility is normal, please switch the foglamps off.
Cruise control on.
that the cruise control has been
selected.
Manual selection.
Refer to the "Steering mounted controls" section of
chapter 3.
Faulty bulb
on accompanied
by a message
on the screen.
that one or more bulbs have
blown.
Have the bulb changed.
Refer to the "Changing a bulb" section of chapter 8 or
contact a PEUGEOT dealer.
Rear parking
sensors
on. failure of the system.
The audible assistance is no longer active.
Have the system checked by a PEUGEOT dealer
without delay.
Instruments and controls
Screen displays indicates Solution - action
Temperature/Ice
the ice warning,
the temperature
flashing
accompanied by
a message on
the screen.
weather conditions which could
result in ice on the road.
Be particularly vigilant and do not brake sharply.
Refer to the "Driving Safely" section of chapter 5".
Date 11:00:00
a setting:
Date. Time.
a configuration via the MODE
menu.
Refer to the "Mode" section of chapter 4.
Headlamp beam
height
a headlamp
height setting.
A position from 0 to 3
depending on the load carried
Adjust using the control on the dashboard. Refer to the
"Steering mounted controls" section of chapter 3.
Service spanner
a service
spanner which
remains on.
that a service will soon be due.
Refer to the list of checks in the servicing booklet. Have
the service carried out by a PEUGEOT dealer.
 Loading...