

Peugeot 607 2005 Owner Manual
10
-
Familiarisation
01-06-2005
11
-
Familiarisation
01-06-2005
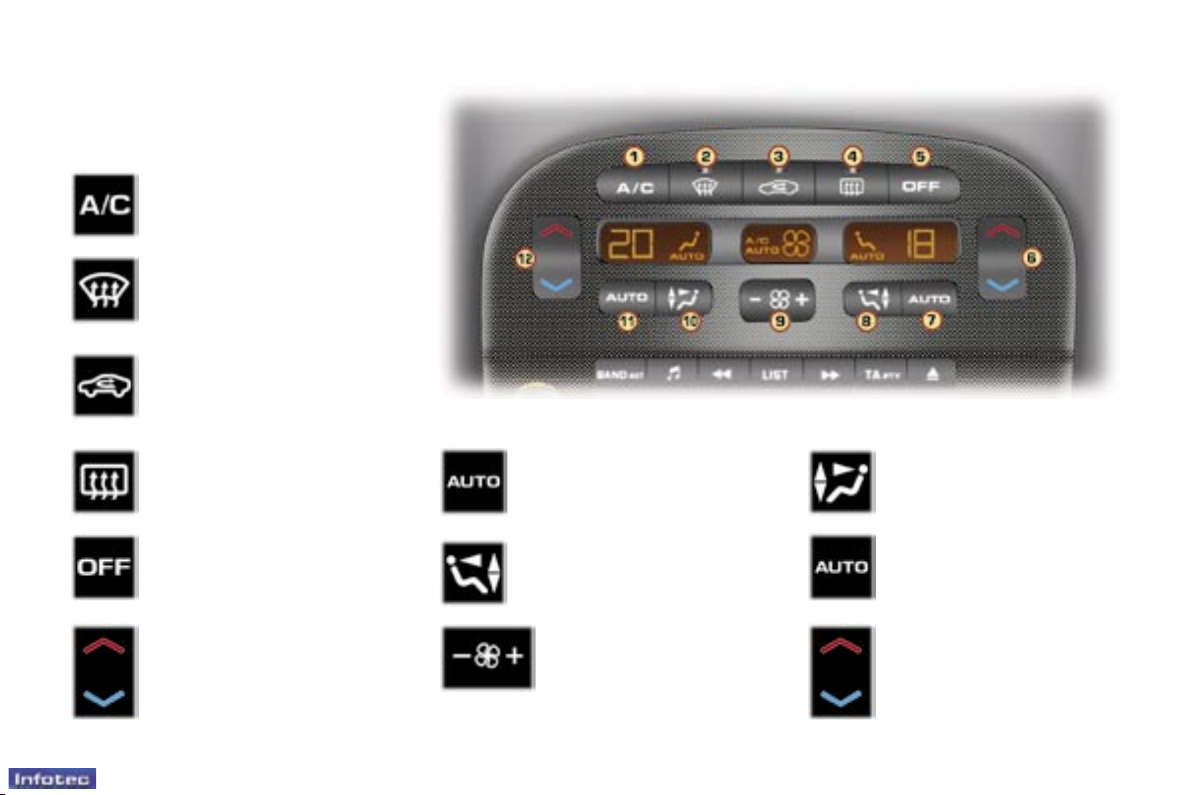
1. Air conditioning on/off.
AUTOMATIC AIR
CONDITIONING
2. Automatic visibility
programme.
3. Air intake/air
recirculation.
4. Rear screen and
exterior mirrors
demisting.
5. System off.
6. Driver's temperature
adjustment.
7. Driver's
automatic comfort
programme.
8. Driver's air
distribution
adjustment.
9. Air ow adjustment.
10. Passenger air
distribution adjustment.
11. Passenger automatic
comfort programme.
12. Passenger temperature
adjustment.
: 42

102
-
Checks
01-06-2005
103
-
Checks
01-06-2005
CHECKING THE LEVELS
Oil level
F Check the level regularly and top
up between changes. Maximum
consumption is 0.5 l per 600 miles
(1,000 km).
Carry out this check with the vehicle
level, engine cold, using the oil level
gauge on the instrument panel or the
dipstick.
There are two marks on
the dipstick:
A = maximum
Never ll past this mark.
B = minimum
To maintain the reliability
of engines and emission
control systems, the use
of additives in engine oil
is prohibited.
Dipstick
Oil change
According to the information given in
the servicing booklet.
Brake and clutch uid level
The level must always be between
the DANGER and MAXIMUM marks
in the reservoir.
If the level drops substantially, contact
a PEUGEOT dealer immediately.
Windscreen and headlamp
wash level
For best quality cleaning and for your
safety, we advise that you use products recommended by PEUGEOT
(reservoir capacity 4 litres or 6.5 litres
with headlamp wash).
Viscosity selection
In all cases, the oil selected must meet
the manufacturer's requirements.
Fluid change:
- must be carried out according to the
manufacturer's servicing schedule.
- use uids recommended by the
manufacturer, which full DOT4
standards.
Used oil
Prevent used oil from coming into
prolonged contact with the skin.
Brake and clutch uid is harmful to
health and very corrosive.
Do not dispose of used oil, brake and
clutch uid or coolant into drains or
onto the ground.
Power steering reservoir
F Open the reservoir, with the en-
gine cold at ambient temperature.
The level should always be above
the MINI mark and close to the
MAXI mark.

103
-
Checks
01-06-2005
CHECKS Handbrake
Where the handbrake travel is too
great or there is a reduction in the
performance of the system, the
handbrake should be adjusted. Have
the system checked by a PEUGEOT
dealer.
Only use products recommended by PEUGEOT
or products of equivalent
quality and specication.
To ensure best performance from components as important
as the power steering and the braking system, PEUGEOT selects and
offers specic products.
To prevent damage to the electrical units, high pressure washing of
the engine compartment is strictly
prohibited.
In order to check the main levels
and certain components, in accordance with the manufacturer's
servicing schedule, refer to the
pages of the servicing booklet
which correspond to your vehicle's engine.
Battery
At the start of winter, have your battery checked by a PEUGEOT dealer.
Air lter and passenger
compartment lter
Have the lter elements replaced
regularly. If you drive in dusty
conditions, change them twice as
often.
Particulate emission lter Additive reservoir (Diesel)
Maintenance of the particulate emission lter and lling of the additive
reservoir must be carried out by a
PEUGEOT dealer, according to the
manufacturer's servicing schedule.
Brake pads
Brake pad wear depends on the
style of driving, in particular for vehicles which are used in town, over
short distances. It may be necessary
to check the thickness of the pads,
even between services.
Manual gearbox
This does not need an oil change.
Have the level checked, according to the manufacturer's servicing
schedule.
Automatic gearbox
This does not need an oil change. Have
the level checked by a PEUGEOT
dealer, according to the manufacturer's
servicing schedule.
Oil lter
Change the lter regularly, in accordance with the servicing schedule.
104
-
Practical information
01-06-2005
105
-
Practical information
01-06-2005
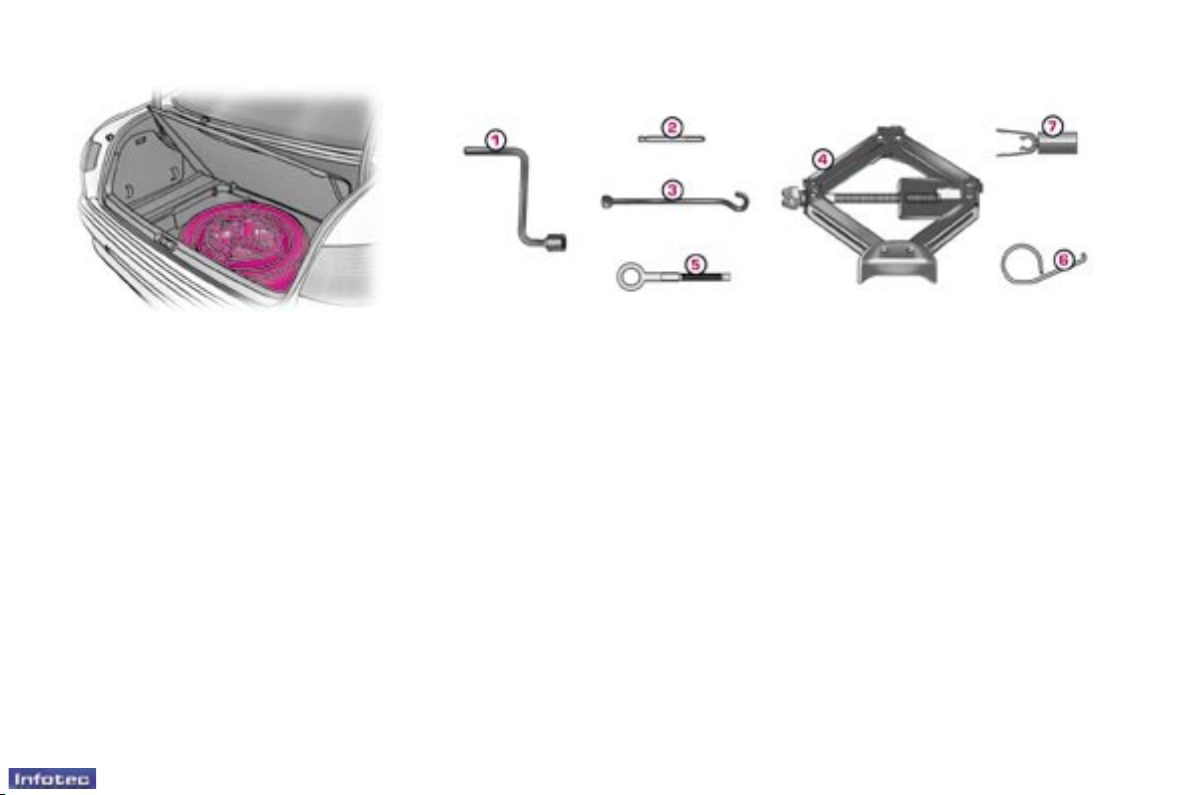
Access to the spare wheel and
the jack in the boot
F Detach the luggage net.
F Lift the boot carpet using the lifting
hook. Secure this hook behind the
boot seal.
CHANGING A WHEEL
F Park the vehicle on level, stable
and non-slippery ground.
F Apply the handbrake, switch off
the ignition and engage rst or
reverse gear (position P for the
automatic gearbox).
Tools available
The following tools are located in the
polystyrene holder in the centre of
the spare wheel:
1 - Wheelbrace.
2 - Centralising tool.
3 - Wheelbrace extension.
4 - Jack.
5 - Removable towing eye.
6 - Alloy wheel trim remover.
7 - Trim cover tool.
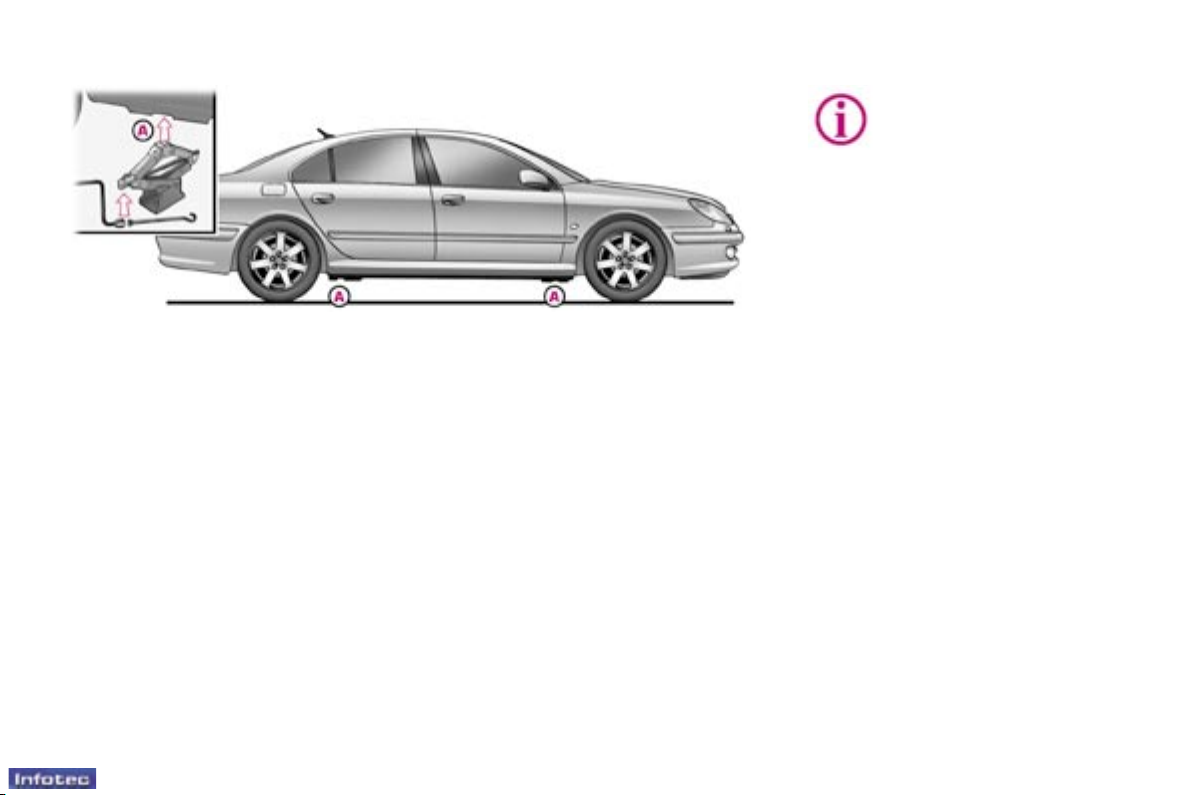
Removal
F For vehicles with alloy wheels
tted with wheel trims, pull the
centre trim by using tool 6 in one
of the holes.
F Loosen the wheel bolts.
F Take the jack 4 from the tool kit.
F Place the jack in one of the four
locations A underneath the vehicle (the nearest one to the wheel
to be changed).
F Extend the jack using wheelbrace
1 and the extension 3.
F Remove a wheel bolt at the top
and t the centralising tool 2 in its
place.
F Unscrew the other bolts and re-
move the wheel.
105
-
Practical information
01-06-2005
Fitting a wheel
F Position the wheel using the cen-
tralising tool 2 to assist you.
F Tighten the bolts by hand and re-
move the centralising tool.
F Partly tighten the bolts using the
wheelbrace 1.
F Fold the jack 4 and remove it.
F Fully tighten the bolts using the
wheelbrace.
F Replace the wheel trim.
For the alloy trims, position the
removal hole opposite the valve.
F Put the tool holder back in posi-
tion. This helps to keep the boot
oor in its correct position, to prevent any deformation of the oor
when loaded.
F Tighten the spare wheel securing
strap to prevent noise and for your
safety in the event of impact.
For your safety, always
change the wheel:
- on level, stable, nonslippery ground,
- with the handbrake applied,
- with rst or reverse gear engaged
(position P for the automatic gearbox),
- never go underneath a vehicle
which is supported only by a jack
(use a ramp).
After changing the wheel:
- have the tightening of the bolts and
the tyre pressure checked by a
PEUGEOT dealer as soon as possible,
- have the punctured wheel repaired
and ret it to the vehicle as soon as
possible,
- the steel spare wheel must only be
used for a very short time.
Tyres tted with the Tyre UnderInation Detection System.
These wheels have a pressure sensor.
Have them repaired by a PEUGEOT
dealer.
106
-
Practical information
01-06-2005
107
-
Practical information
01-06-2005
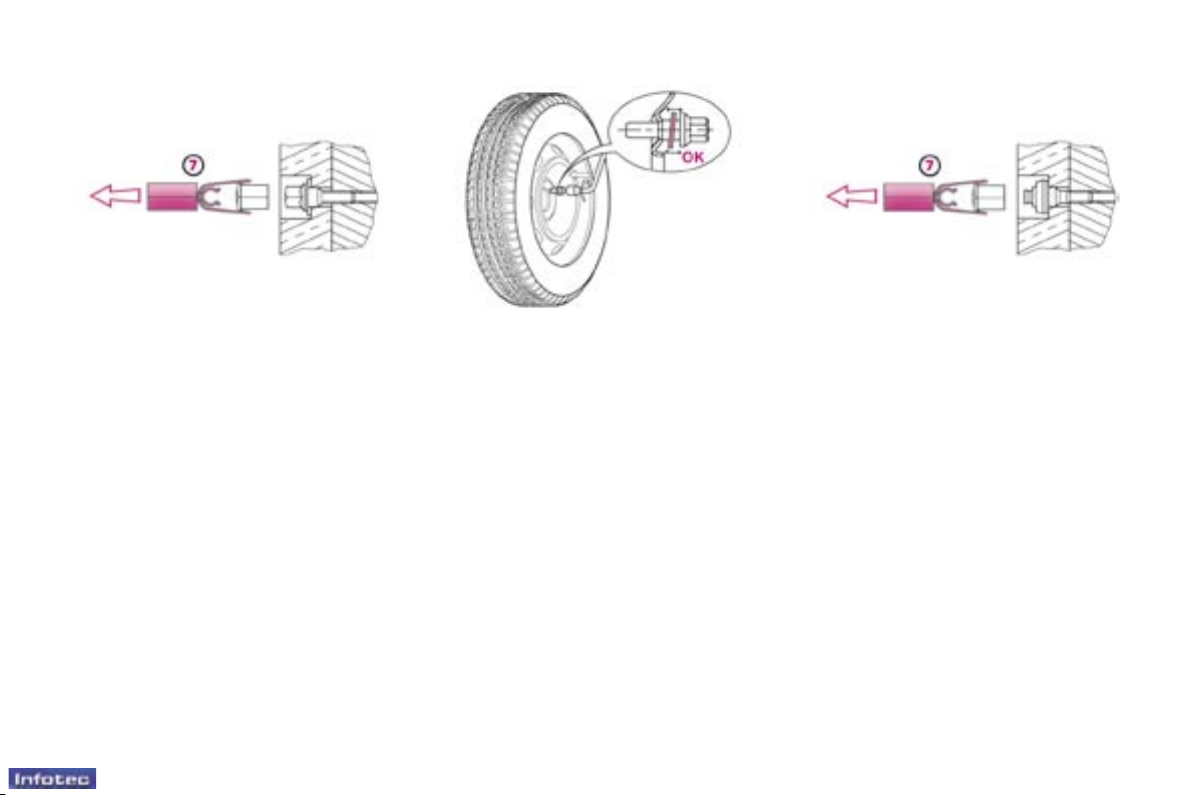
Special features of alloy
wheels
Bolt covers
Alloy wheel bolts are covered by chrome
trims.
Use the yellow tool 7 to remove the
trims before slackening the bolts.
Fitting the spare wheel
If your vehicle is tted with a steel
spare wheel, when tting it, it is nor-
mal to notice when tightening the
bolts that the washers do not come
into contact with the rim. The spare
wheel is secured by the cone-shape
of each bolt.
Anti-theft bolts
If your wheels are tted with an
anti-theft bolt (one per wheel), the
chrome trim must be removed using
the yellow tool 7, before unscrewing
the bolt using the anti-theft socket
and the wheel brace.
Note: the anti-theft socket was given
to you on delivery of your vehicle
along with the duplicate keys and the
condential card.
Make a careful note of the code
number engraved on the head of the
anti-theft socket. This will enable you
to obtain a duplicate socket from a
PEUGEOT dealer.
Fitting snow tyres
If you t snow tyres mounted on steel
wheels to your vehicle, it is essential
to use special bolts available from
your PEUGEOT dealer.
Fitting snow chains
If you wish to t snow chains on your
vehicle, contact a PEUGEOT dealer
to nd out which models are recommended for your vehicle.
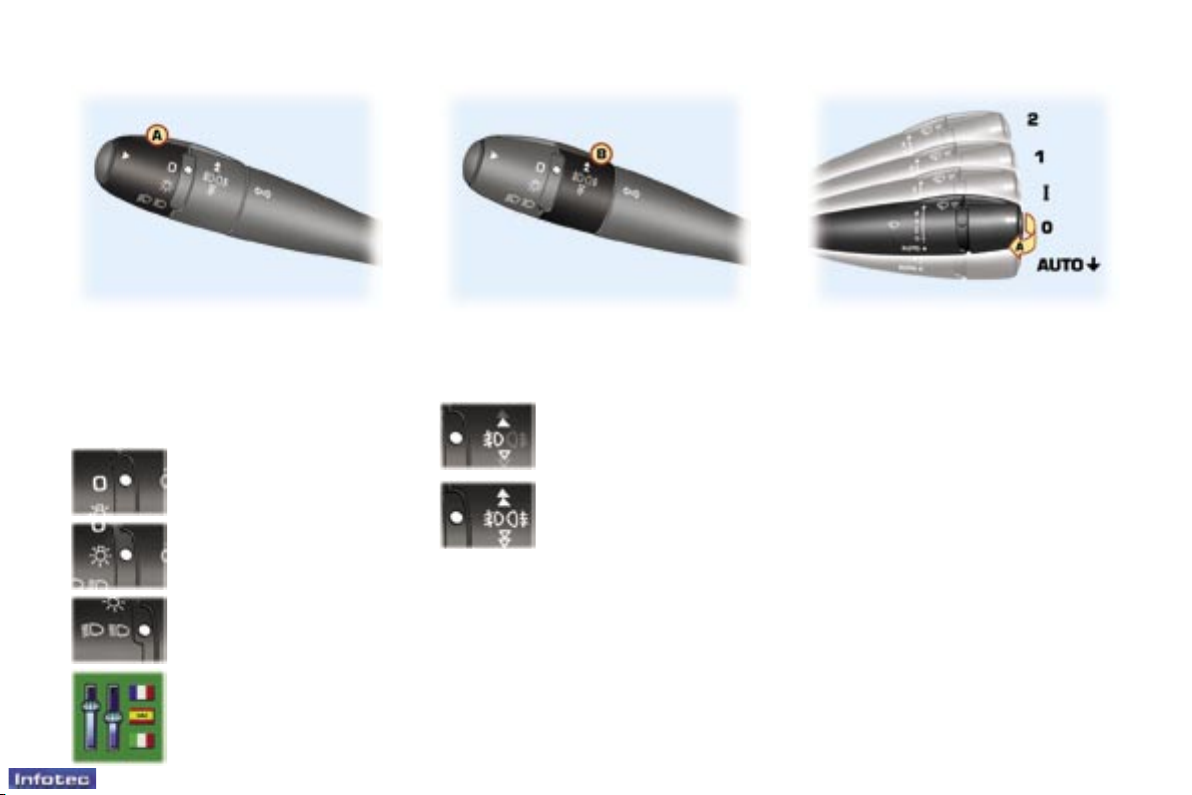
11
-
Familiarisation
01-06-2005
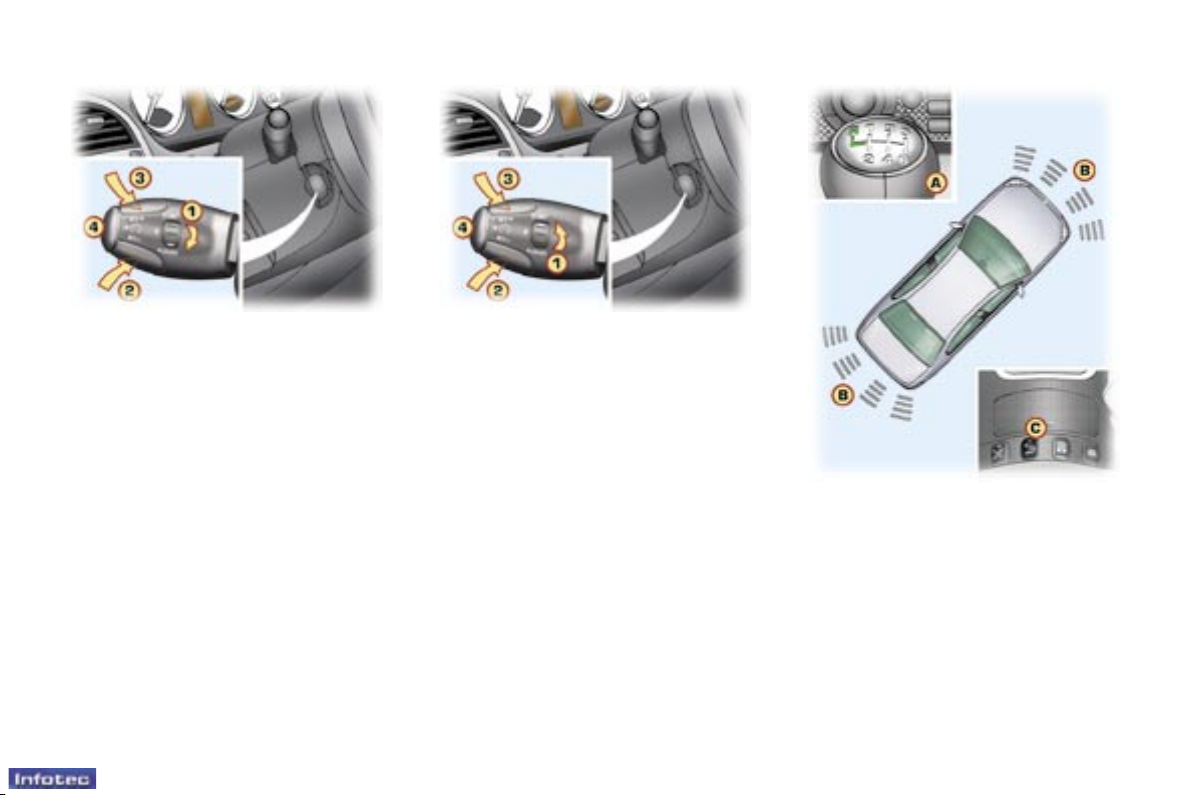
LIGHTS STALK
The position is indicated on the instrument panel by the corresponding
indicator light.
Ring A
Lights off
Side lights
Dipped headlamps/
Main beam headlamps
Automatic switching on
of the lights
Ring B
Front fog lamps
Front fog lamps and
rear fog lamps
: 70
WIPERS STALK
2. Fast wipe.
1. Normal wipe.
I. Intermittent wipe.
0. Park.
AUTO. Automatic wipe or
single wipe.
A. Wash-wipe.
The windscreen wiping must be
reactivated if the ignition has been
switched off for more than one
minute.
: 72

114
-
Practical information
01-06-2005
115
-
Practical information
01-06-2005
CHANGING A WINDSCREEN
WIPER BLADE
Placing the wiper blades in the
maintenance position
F Less than one minute after switch-
ing off the ignition, press the windscreen wiper stalk down once to
position the blades at the top of the
windscreen (maintenance position).
Replacing a blade
F Lift the arm, then unclip the blade
and remove it.
F Fit the new blade and fold down
the arm.
To reposition the blades, switch on the
ignition and operate the windscreen
wiper stalk.
ECONOMY MODE FUNCTION
After the engine has stopped, certain
functions (windscreen wiper, electric
windows, sunroof, electric seats, audio equipment, telephone, etc) can
only be used for a combined duration
of approximately thirty minutes, to
prevent discharging the battery.
Once the thirty minutes are over, a
switching to economy mode message appears on the multi-function
display and the active functions are
put on standby.
These functions are reactivated automatically next time the vehicle is
driven.
In order to resume the use of these
functions immediately, the engine
must be started and left to run for a
few minutes.
The time available to you will then
be double the duration for which the
engine is left running. However, this
period will always be between ve
and thirty minutes.
Note: if the telephone is being used
when economy mode starts, it will
still be possible to nish the call.
A at battery prevents the
engine from starting.
LOAD REDUCTION
FUNCTION
When driving, certain functions (air
conditioning, heated rear screen,
heating system for passenger compartment of diesel vehicles, etc.) may
be switched off temporarily, depending on the level of battery charge.
Reactivation of these functions is
automatic, once the battery charge
is sufcient.
Note: at the risk of discharging the
battery, the functions that have been
switched off may be reactivated
manually.
115
-
Practical information
01-06-2005
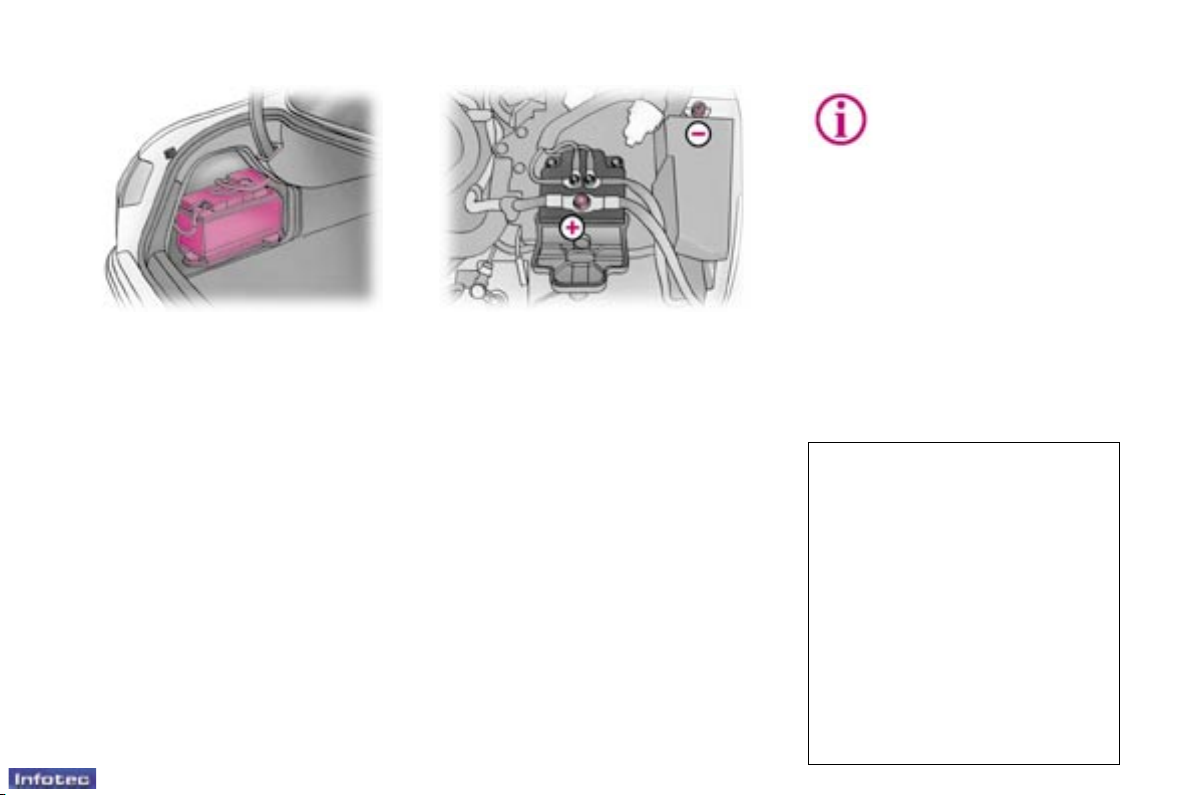
BATTERY
The battery is in the left boot trim.
Never disconnect a terminal when the engine is
running.
Never charge a battery without rst disconnecting the
terminals.
Close the windows and sunroof fully
before disconnecting the battery.
Use cables of suitable cross-sec-
tion; for further information, contact a
PEUGEOT dealer.
After every re-connection of the battery, switch on the ignition and wait
for 1 minute before starting, to alllow
the electronic systems to be initialised. However, if slight difculties
are experienced after this, please
contact a PEUGEOT dealer.
To charge the battery using a
battery charger:
F pull the handle downwards and
fold back the panel to gain access
to the battery,
F disconnect the green terminal (-)
of the battery,
follow the instructions for use given
by the battery charger manufacturer,
F check that the terminals and
connectors are clean. If they are
covered with sulphate (whitish
or greenish deposit), disconnect
them and clean them,
F reconnect the green terminal (-) of
the battery,
F ret the panel and close it.
To start the vehicle from another
battery:
F open the bonnet,
F remove the left side cover,
F use the two additional terminals (+)
and (-) located under the bonnet,
F open the red cover of the (+) terminal,
F connect the red cable between
the (+) terminal and the positive (+)
terminal of the slave battery,
F connect the green or black cable be-
tween the (-) terminal and the negative (-) terminal of the slave battery,
F start the engine and let it run,
F wait for the engine to return to idle
then disconnect the cables,
F close the red cover of the (+) ter-
minal,
F ret the left side cover,
F close the bonnet.
If electrical work is carried out,
disconnect the battery.
It is advisable to disconnect the
battery if the vehicle is not to be
used for a period of more than
one month.
When charging or replacement
of the battery is necessary, do
not close the boot as, since it is
only opened electrically, it would
then be necessary to use the
emergency control (see corresponding section).
Do not connect a slave battery to
the (+) and (-) terminals located
under the bonnet if there is no
battery in the boot (risk of short
circuit).
116
-
Practical information
01-06-2005
117
-
Practical information
01-06-2005
TOWING YOUR VEHICLE
Without lifting (4 wheels on
the road)
You should always use a towbar.
The towing eye is inside the spare
wheel.
From the rear:
F Carefully unclip the top of the
cover using a small screwdriver,
F Screw in the towing eye until it
locks.
Lifting (2 wheels only on the
road)
It is preferable to raise the vehicle using professional lifting equipment.
Never use the radiator crossmember.
From the front:
F Carefully unclip the bottom of the
cover, using a small screwdriver.
F Screw in the towing eye until it
locks.
When towing with the engine switched off, there is
no braking or steering assistance.
Special features of the
automatic gearbox
Towing a vehicle with an automatic
gearbox in reverse gear is prohibi-
ted (absence of lubrication).
When being towed with all four
wheels on the ground, it is imperative
that the following rules are obeyed:
- selector lever in position N,
- the vehicle must be towed at a speed
of less than 30 mph (50 km/h) over
a maximum distance of 30 miles
(50 km),
- do not add oil to the gearbox.

117
-
Practical information
01-06-2005
TOWING A TRAILER,
CARAVAN, BOAT, ETC...
We recommend the use of original
PEUGEOT towbars which have been
tested and approved from the design
stage of your vehicle and that you
entrust the tting of the towbar to a
PEUGEOT dealer.
Note: in certain cases of particularly
arduous use (towing the maximum
load in high temperatures on a steep
slope), the engine automatically
limits its power and selects the appropriate automatic gearbox gear in
manual mode. In this case, cutting off
the air conditioning allows the engine
power to be recovered, and therefore
the towing capacity to be increased.
If the coolant temperature warning
light comes on, stop the vehicle and
switch off the engine as soon as possible.
Tyres: check the tyre pressures of
the towing vehicle (label on the central door pillar on the driver's side)
and of the trailer towed, observing
the recommended pressure.
Brakes: towing increases the braking distance. Drive at a moderate
speed, change down early and brake
gradually.
Side wind: sensitivity to side wind is
increased. Drive smoothly and at a
moderate speed.
Automatic adjustment
For vehicles with Xenon bulbs, this
system automatically corrects the
height of the beam, whatever the
load of the vehicle. The driver is then
assured of having optimum lighting
and not causing a nuisance to other
road users.
Driving advice
Distribution of loads: distribute the
load in the trailer so that the heaviest loads are as close as possible to
the axle and the nose weight is close
to the maximum authorised without,
however, exceeding it.
Cooling: towing a trailer on a slope
increases the coolant temperature.
As the fan is electrically controlled,
its cooling capacity is not dependent
on the engine speed.
In the case of vehicles tted with an
HDI engine, it is advisable, following
intensive use (towing on a motorway,
prolonged driving, ...), to leave the
engine running at idle for approximately 20 seconds before switching
off the ignition. This limits any increase in the temperature of the engine after it has been switched off.
In all cases, pay attention to the coolant temperature.
Lighting
Manual adjustment
Adjust your headlamps so as not to
dazzle other road users. Check the
electrical signalling of the trailer.
118
-
Practical information
01-06-2005
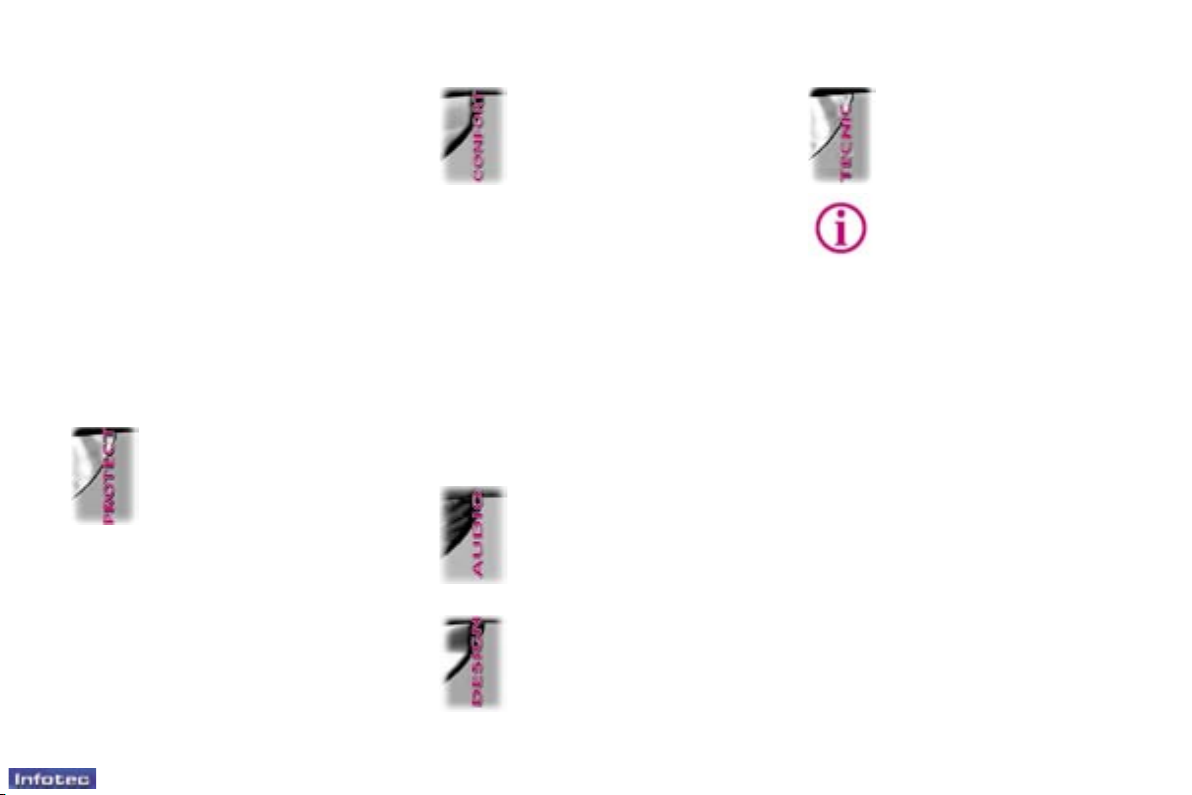
ACCESSORIES FOR YOUR
607
A wide range of accessories recommended by PEUGEOT and original
parts are offered by the Network.
They all benet from PEUGEOT's
recommendation.
These accessories and parts, having
been tested and approved for reliability and safety, are all adapted to
your PEUGEOT vehicle.
The product range offered by PEUGEOT
Accessories is structured around 5 categories: PROTECTION - TOURING IN-CAR TECHNOLOGY - STYLING
UNIVERSAL.
The tting of electrical
equipment or accessories
which are not recommended by PEUGEOT may
result in a failure of your ve-
hicle's electronic system.
Please note this specic warning.
You are advised to contact a representative of the Marque to be shown
the range of recommended equipment and accessories.
"Protection":
parking assistance, antitheft alarm, stolen vehicle
tracking system*, engraved
windows, locking wheel
nuts, rst aid kit, warning triangle, high visibility
safety jacket, snow chains.
"Touring": covers compatible with side air bags, mats,
boot tray, luggage retaining
net, sill protectors.
For leisure pursuits: roof
bars, transportation acces-
sories (bicycle carrier, ski
carrier), roof box, child seats and
booster cushions, rear screen blind,
audio/telephone console, cool box.
Trailer towbar which must be tted by
the PEUGEOT Network.
"In-Car Technology": tele-
phone, hands-free kits, sat-
ellite navigation systems,
CD changer, DVD player,
video screen.
"Styling": alloy wheels,
wheel trims, spoiler, leather
gear lever knob, styling
strips, door spoilers, sport
exhaust.
"Universal": windscreen
wash uid, interior and exterior cleaning and maintenance products.
Wheels which are tted with 235/
45 R 18 tyres cannot be tted with
snow chains. For further information, contact a PEUGEOT dealer.
Note
To prevent the mat from becoming
caught under the pedals:
- ensure that the mat is positioned
and secured correctly,
- never t one mat on top of another.
Compatible portable equipment
For the Audio RD4, the tting of an
auxiliary socket is offered specically
by the Network.
The audio cable for connection to the
auxiliary socket is also offered by the
Network.
Following connection of the cable
and selection of the AUX mode, by
means of the source button, your
portable equipment is ready for use.
Set the portable equipment to half
volume to avoid overloading the audio equipment sound. Then use the
audio equipment volume button.
* According to country.

119
-
Technical data
01-06-2005
MODELS:
Model codes 9U...
PETROL DIESEL
3FYH
XFV6 - XFVJ
XFVJ/D - XFVU/D
RHLH RHRH
ENGINES 2.2 litre 16V 3 litre 24V V6 Injection
2 litre 16V Turbo
Diesel HDI
Capacity (cm3) 2 230 2 946 1 997
Bore x stroke (mm) 86 x 96 87 x 82.6 85 x 88
Number of valves 16 24 16
Max. power: EU standard (KW) 120 155 93 100
Max. power at engine speed (rpm) 5 875 6 000 4 000
Max. torque: EU standard (Nm) 220 290 320
Max. torque at engine speed (rpm) 4 150 3 750 2 000
Fuel Unleaded Unleaded Diesel
Catalytic converter Yes Yes Yes
Particle emission lter (PEF) No No Yes
Electronic injection Yes Yes Yes
GEARBOX
Manual
(6-speed)
Automatic
(6-speed)
Manual
(6-speed)
CAPACITIES (in litres)
Engines (with lter replacement) - (1) 4.75 (1)/5.25 (2) 5.25 (1)
ENGINES AND GEARBOXES
(1) Draining by gravity - (2) Draining by suction
12
-
Familiarisation
01-06-2005
13
-
Familiarisation
01-06-2005
CRUISE CONTROL/SPEED
LIMITER
Cruise control function
1. Selection/Switching off of the
function.
2. Storing of a speed/Decreasing
of the stored speed.
3. Storing of a speed/Increasing of
the stored speed.
4. Deactivation/Recalling of the
stored speed.
In order for it to be stored, the vehicle
speed must be above 25 mph (40 km/h),
with at least fourth gear engaged on the
manual gearbox (second gear on the
automatic gearbox).
Speed limiter function
1. Selection/Switching off of the
function.
2. Decreasing of the speed.
3. Increasing of the speed.
4. Activation/Deactivation of the
system.
Adjustments must be made with the
engine running.
FRONT AND/OR REAR
PARKING ASSISTANCE
A. Activation.
B. Detection.
C. Deactivation/Reactivation.
During parking manoeuvres, you are
guided by an audible signal and/or a
graphic on the multifunction display.
: 92 : 93 : 95

120
-
Technical data
01-06-2005
121
-
Technical data
01-06-2005
Fuel consumption values correct at time of printing. These consumption values were established in accordance with EC Directive 80/1268 (as amended). They may vary depending on the style of driving, trafc conditions, weather conditions, the
load in the vehicle, the maintenance of the vehicle and the use of the accessories.
As per EC Directive 80/1268 (as amended) in MPG (litres/100 km)
Engine Gearbox
Model
codes
9U...
Urban driving
(liter/100 km)
Extra-urban
driving
(liter/100 km)
Mixed driving
(liter/100 km)
Emission
by mass of
CO2 (g/km)
2.2 litre 16V Manual
3FYH
21.7 (13.0) 40.4 (7.0) 30.7 (9.2) 219
3 litre 24V V6
injection
Automatic
XFV6 - XFVJ
XFVJ/D -
XFVU/D
19.0 (14.9) 37.6 (7.5) 27.2 (10.2) 242
2 litre 16V
turbo diesel HDI
Manual
RHLH
RHRH
8.1 (34.9) 5.0 (56.5) 6.1 (46.3) 162
CONSUMPTION
121
-
Technical data
01-06-2005
WEIGHTS AND TOWING LOADS (in kg)
Engines
PETROL DIESEL
2.2 litre 16V
3 litre 24V
V6 injection
2 litre 16V HDI
Gearboxes Manual Automatic Manual
Model codes: 9U... 3FYH
XFV6 - XFVJ
XFVJ/D - XFVU/D
RHLH RHRH
• Kerb weight 1 535 1 644 1 590
• Payload 493 500 493
• Gross vehicle weight (GVW) 2 028 2 144 2 083
• Gross train weight (GTW)
on 12 % gradient 3 628 3 644 3 583
on 8 % gradient 3 828 3 944 3 883
• Braked trailer (within GTW limit)
on 12 % gradient 1 600 1 500 1 500
on 10 % gradient 1 600 1 500 1 500
on 8 % gradient 1 800 1 800 1 800
• Braked trailer* (with load transfer within
GTW limit)
1 850 1 800 1 760
• Unbraked trailer 750 750 750
• Recommended nose weight 74 72 72
*
The weight of the braked trailer may be increased, within the GTW limit, by the same amount by which the GVW of the towing
vehicle is reduced; warning, towing with a lightly loaded towing vehicle may have an adverse effect on its road holding.
The GTW values and the towing loads indicated are valid for a maximum altitude of 1 000 metres; the towing load mentioned
must be reduced by 10 % for every 1 000 additional metres.
The speed of a towing vehicle is limited to 60 mph (100 km/h)**.
High exterior temperatures may result in lowering of the performance of the vehicle in order to protect the engine; when the
exterior temperature is above 45 °C, limit the towed load.
** according to the legislation in force in the country.
123
-
Technical data
01-06-2005
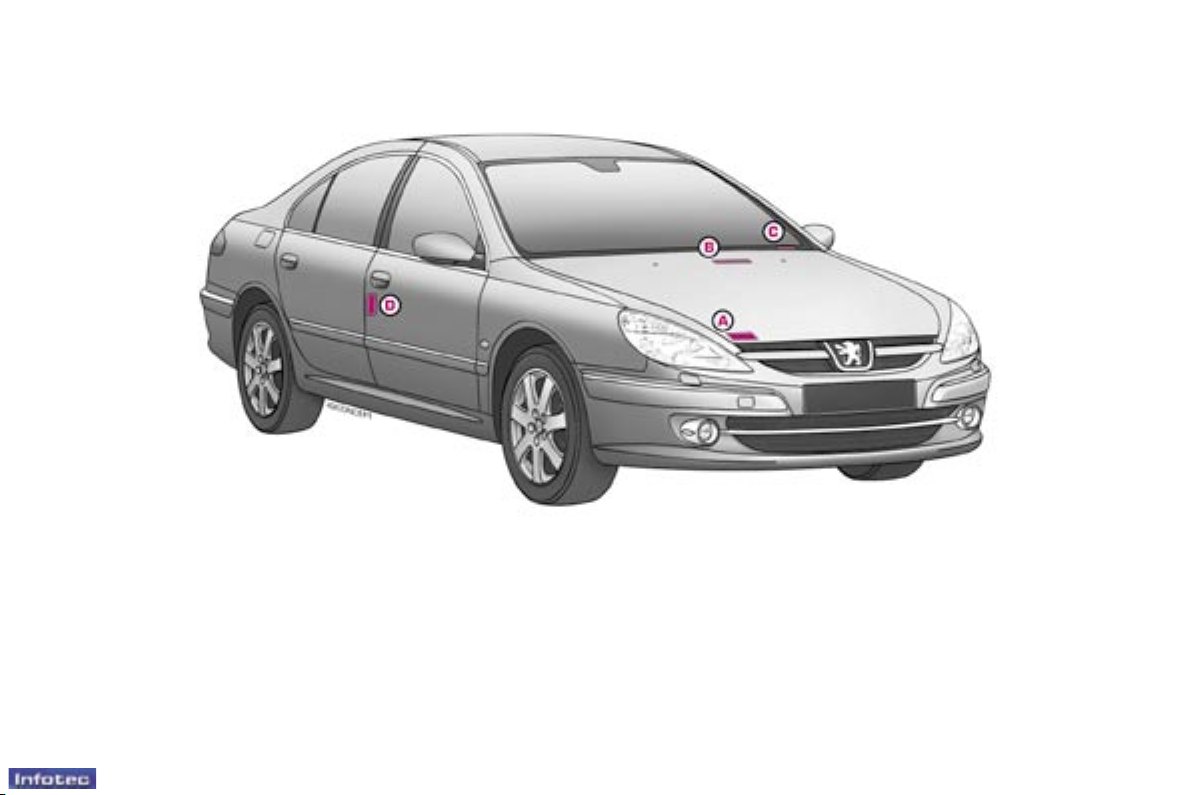
THE IDENTIFICATION
FEATURES OF YOUR 607
A. Manufacturer's plate.
B. Serial number on the
bodywork.
C. Serial number on the fascia.
D. Tyres.
Label D on the central door pillar on
the driver's side indicates:
- the dimensions of the rims and tyres,
- the makes of tyre recommended by
the manufacturer,
- the tyre pressures (checking of
the tyre pressure must be carried out when the tyres are cold,
at least once a month),
- the paint colour reference.
13
-
Familiarisation
01-06-2005
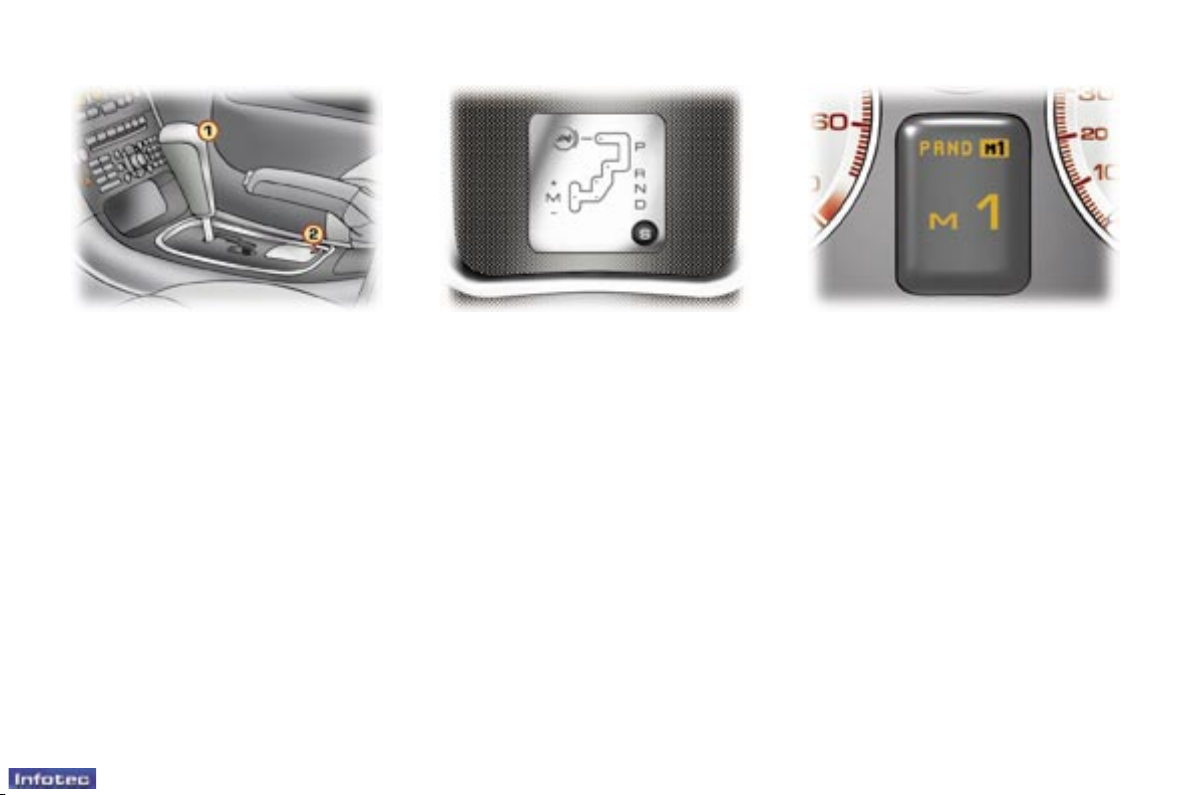
"PORSCHE TIPTRONIC
SYSTEM" AUTOMATIC
GEARBOX
1. Gear lever.
2. "SPORT" button.
P : Park.
R : Reverse.
N : Neutral.
D : Drive.
M : Manual mode.
S : Sport programme.
1 2 3 4 5 6 : gears engaged.
Position selection gate
Move the lever in the gate to select
one of the positions.
Once the position has been selected,
the corresponding indicator light is
displayed on the instrument panel
display.
: 89
Switching the engine on
With the handbrake applied, select
position P or N.
Switch on the ignition.
Moving off
With the engine running, from position P or N, with your foot on the
brake, release the handbrake.
Select position R, D or M.
Release the brake pedal gradually;
the vehicle moves off immediately.
Indication on the instrument
panel display
14
-
Familiarisation
01-06-2005
15
-
Familiarisation
01-06-2005
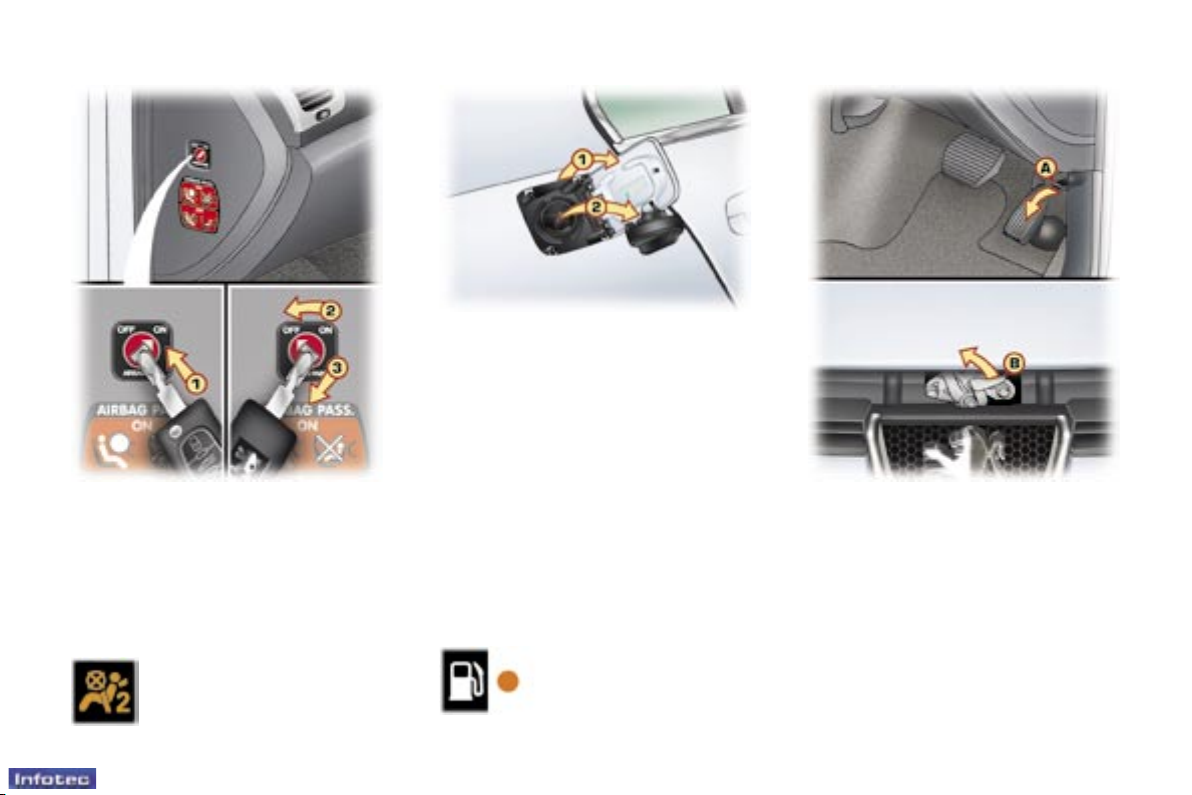
OPENING THE BONNET
A. Internal control.
B. External control.
FILLING WITH FUEL
1. Opening of the fuel ller ap.
2. Opening and hooking of the fuel
tank cap.
Capacity of the fuel tank:
Approximately 80 litres.
Type of petrol:
Unleaded RON 95/RON 98.
Type of Diesel :
Diesel.
: 98
Low fuel level
When this warning light
comes on on the instrument
panel, you have enough
fuel left to drive approximately 30 miles (50 km).
: 69
Passenger air bag disarmed
* According to country.
: 85
DISARMING THE
PASSENGER AIR BAG*
1. Insertion of the key.
2. Selection of the "OFF" position.
3. Removal of the key retaining the
position.
This warning light comes
on on the instrument panel
throughout the period of
disarming.
15
-
Familiarisation
01-06-2005
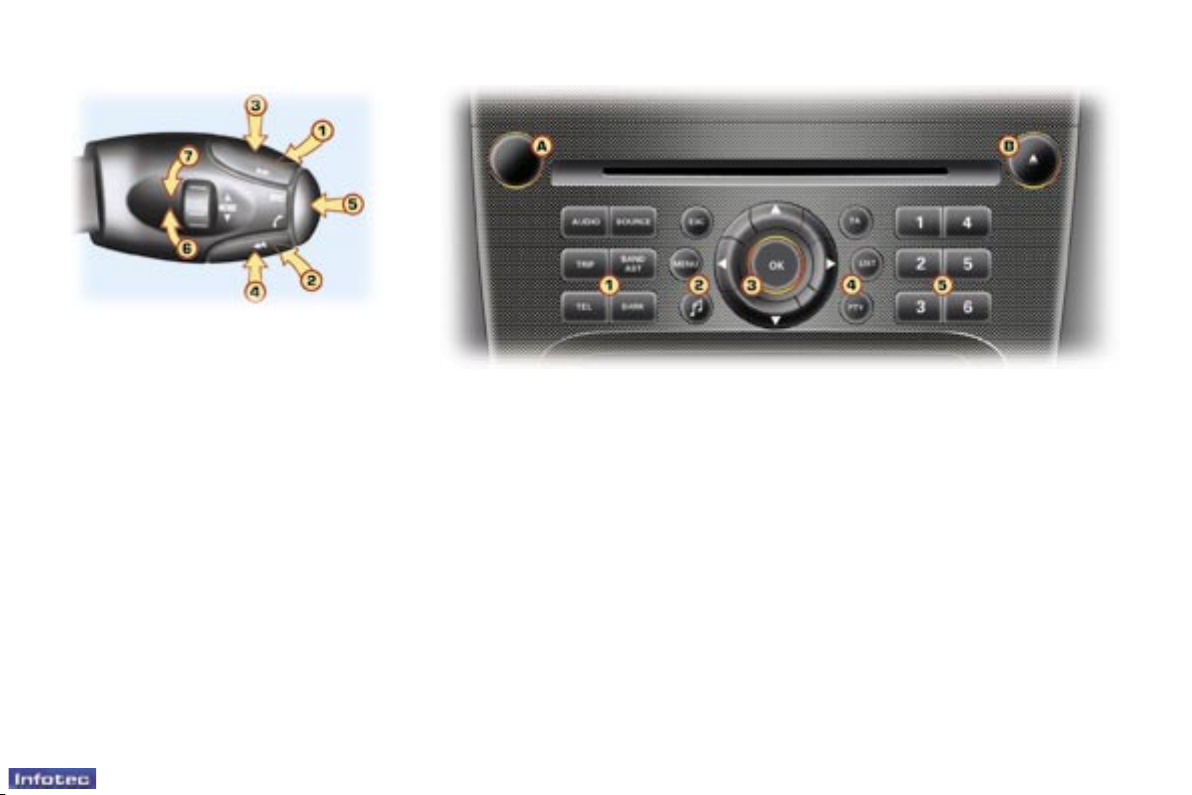
AUDIO EQUIPMENT
STEERING WHEEL CONTROL
Volume adjustment
1 - Increase by pressing the back
2 - Decrease by pressing the back
1+2 -
Cutting off/Restoring of the sound
Search/Selection by pressing
3 - Higher radio frequency - CD/CD
changer: next
4 - Lower radio frequency - CD/CD
changer: previous
Keypad (4)
TA: trafc information priority on/off.
LIST: displaying of the list of stations
received, of the tracks on the CD.
PTY: access to the search by type of
programme.
Sound sources
5 - Change of sound source
Access to the telephone
displays
Selection of the stations/CDs in
the changer by rotation
6 - Higher stored station - Next CD
7 - Lower stored station - Previous
CD
Keypad (1)
AUDIO: access to the radio displays.
SOURCE: change of source be-
tween radio, CD, CD changer.
TRIP: access to the trip computer
displays.
BAND AST: selection of the frequen-
cy bands.
TEL: access to the hands-free kit
displays.
DARK: 1st press: black screen under
the banner - 2nd press: completely
black screen - 3rd press: return to
the display.
Keypad (2)
ESC (Escape): cancellation of the
operation in progress.
MENU: displaying of the general menu.
¯: access to the musical ambience
settings.
Keypad (3)
Navigator.
RD4 CONTROL PAD
Keypad (5)
Storing of the radio station.
Selection of the stored station, of the
CD in relation to the position in the
CD changer.
:
Audio and telematics
Button (A)
ON/OFF and volume adjustment.
Button (B)
CD eject.
16
-
Familiarisation
01-06-2005
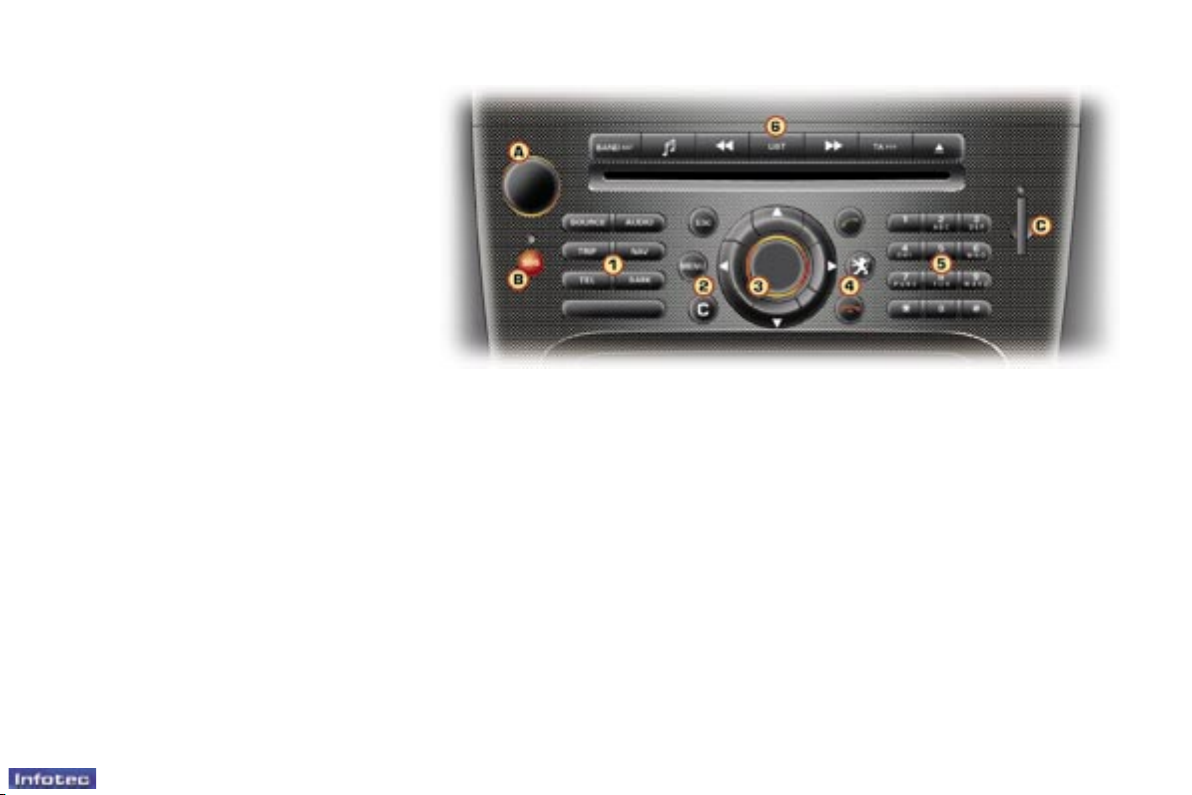
Button (A)
ON/OFF and volume adjustment.
Button (B)
Emergency call.
Keypad (1)
AUDIO: access to the radio displays.
SOURCE: change of source between radio, CD, CD changer.
TRIP: access to the trip computer
displays.
NAV: access to the navigation - guidance displays.
TEL: access to the telephone displays.
DARK: 1st press: black screen under
the banner - 2nd press: completely
black screen - 3rd press: return to
the display.
Keypad (2)
ESC (Escape): cancellation of the
operation in progress.
MENU: displaying of the general
menu.
C: deletion of the last character entered or of the entire line.
Keypad (3)
Navigator.
Movement by rotation of the dial or
by pressing the arrows.
Conrmation or displaying of the
contextual menus by pressing the
dial.
Keypad (4)
TEL (green): pick up an incoming
call.
LION: access to the PEUGEOT services menu.
TEL (red): hang up.
RT3 CONTROL PAD
Keypad (5)
Storing of the radio station.
Selection of the stored station, of the
CD in relation to the position in the
CD changer.
Telephone keypad - alphanumeric
keypad for entering the descriptions.
Keypad (6)
Audio - CD player controls bar.
:
Audio and telematics
Location (C)
SIM card ap.

17
-
Instruments and controls
01-06-2005
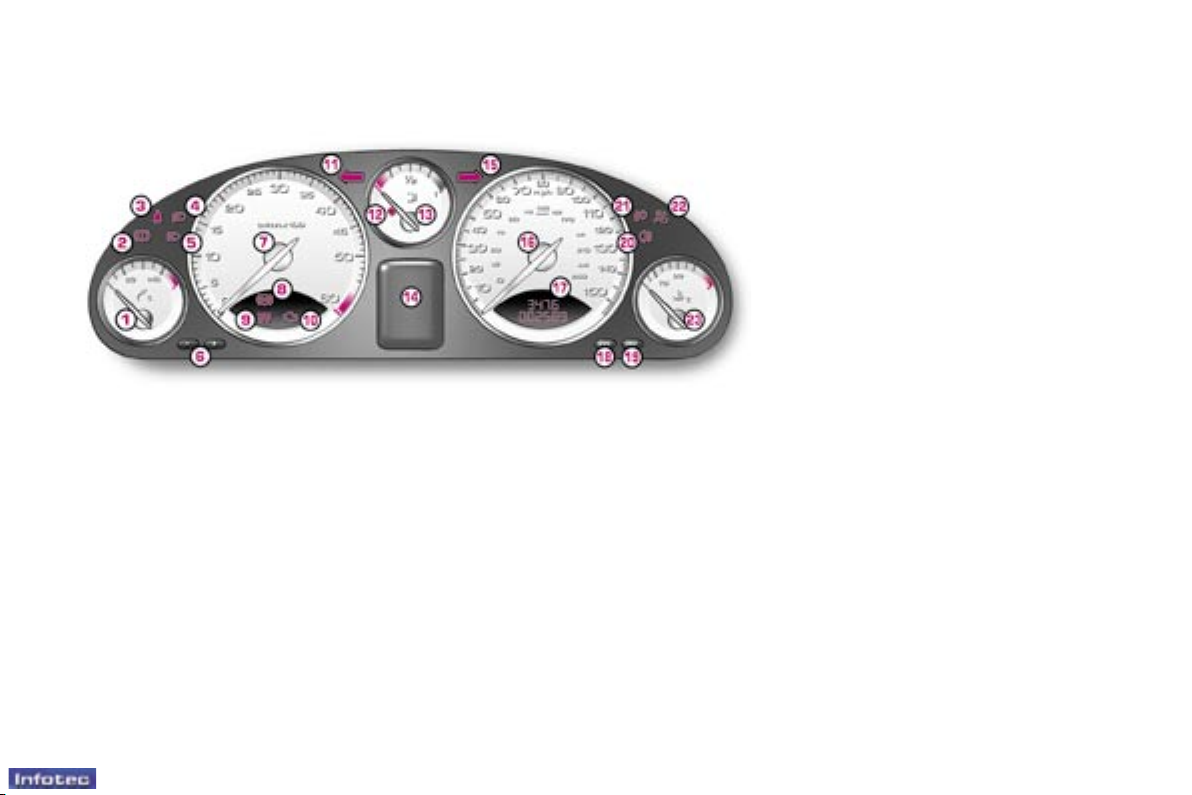
PETROL MANUAL AND AUTOMATIC GEARBOXES INSTRUMENT
PANEL
1 - Engine oil temperature indicator.
2 - Handbrake, low brake uid
level and electronic brake force
distribution warning light.
3 - Driver's seat belt not fastened
warning light.
4 - Dipped headlamps indicator
light.
5 - Main beam headlamps
indicator light.
6 - Lighting rheostat buttons.
7 - Rev counter.
8 - Anti-lock braking system
(ABS) warning light.
9 - Emission control system
warning light.
10 - Left direction
indicator.
11 - Low fuel level warning
light.
12 - Fuel gauge.
13 - Functions display screen:
- Check.
- Engine oil level gauge.
- Warning and status indicator
lights.
- Cruise control/speed
limiter.
- Automatic gearbox.
- Trip computer.
- Satellite navigation system.
14 - Right direction indicator.
15 - Speedometer.
16 - Service indicator, total and trip
distance recorders.
17 - Trip distance recorder zero
reset button.
18 - Manual check button.
19 - Rear fog lamps indicator
light.
20 - Front fog lamps indicator
light.
21 - Passenger air bag
disarmed warning light*.
22 - Coolant temperature indicator.
* According to country.
18
-
Instruments and controls
01-06-2005
19
-
Instruments and controls
01-06-2005
DIESEL MANUAL AND AUTOMATIC GEARBOXES INSTRUMENT
PANEL
1 - Engine oil temperature indicator.
2 - Handbrake, low brake uid level
and electronic brake force
distribution warning light.
3 - Driver's seat belt not fastened
warning light.
4 - Dipped headlamps
indicator light.
5 - Main beam headlamps
indicator light.
6 - Lighting rheostat buttons.
7 - Rev counter.
8 - Anti-lock braking system
(ABS) warning light.
9 - Diesel engine pre-heating
warning light.
10 - Emission control system
warning light.
11 - Left direction indicator.
12 - Low fuel level warning
light.
13 - Fuel gauge.
14 - Functions display screen:
- Check.
- Engine oil level gauge.
- Warning and status indicator
lights.
- Cruise control/speed limiter.
- Automatic gearbox.
- Trip computer.
- Satellite navigation system.
15 - Right direction indicator.
16 - Speedometer.
17 - Service indicator, total and
trip distance recorders.
18 - Trip distance recorder
zero reset button.
19 - Manual check button.
20 - Rear fog lamps indicator
light.
21 - Front fog lamps indicator
light.
22 - Passenger air bag disarmed
warning light*.
23 - Coolant temperature indicator.
* According to country.
30
-
Instruments and controls
01-06-2005
31
-
Instruments and controls
01-06-2005
INSTRUMENT PANEL
DISPLAY
After switching on the ignition, two
functions are shown in succession:
- service indicator,
- total distance recorder
(total and trip distances).
Note: the total and trip distances are
displayed for 30 seconds when the
ignition is switched off, on opening
the driver's door, as well as on locking and unlocking the vehicle.
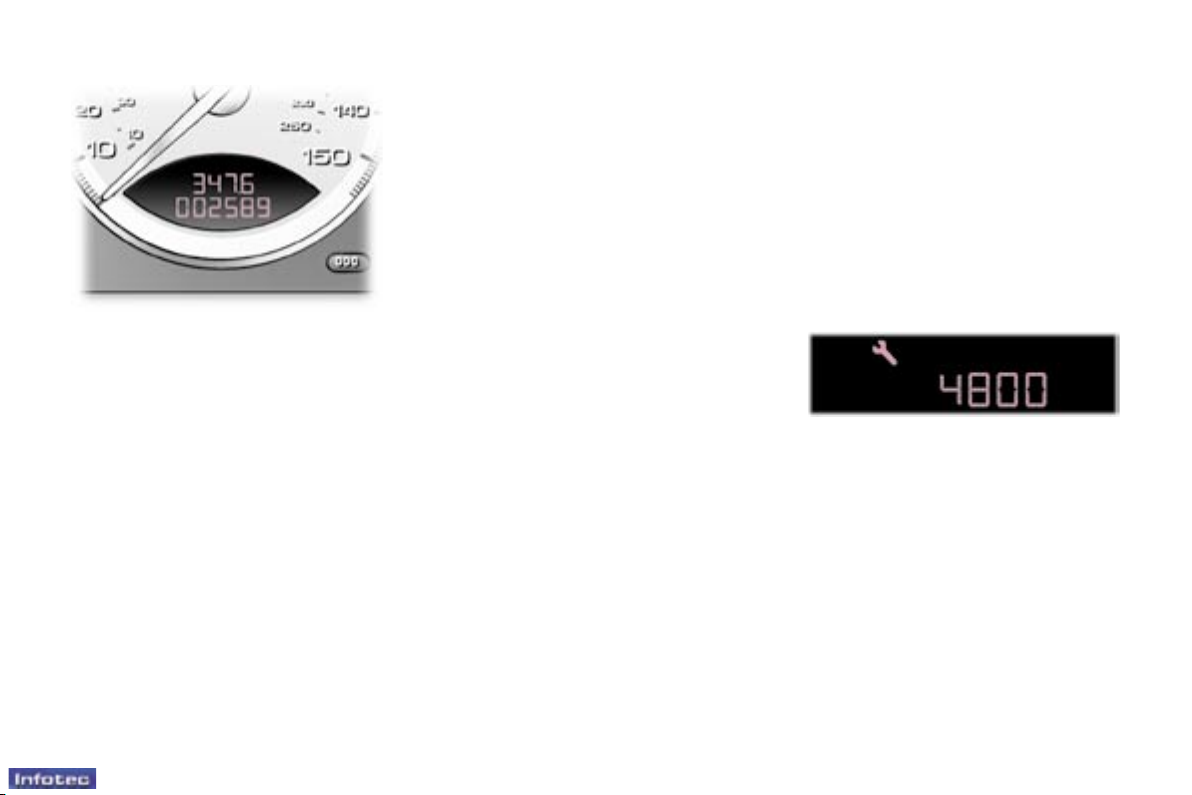
Service indicator
This is a visual reminder of when the
next service is due. This service is to
be carried out according to the manufacturer's servicing schedule.
The point at which the service is due
is calculated from the last indicator
zero reset. It is determined by two
parameters:
- the distance travelled,
- the time elapsed since the last
service.
Note: the distance remaining before
the next service is due may be weighted by the time factor.
The service information appears on
the display, located in the speedometer dial, at the same time as the
engine oil level on the instrument
panel display.
Operation
As soon as the ignition is switched
on and for 7 seconds, the spanner
symbolising ''service operation'' is lit.
The trip recorder display shows the
distance remaining (in round gures)
before the next service.
Example: 4,800 miles/km remain
before the next service is due.
When the ignition comes on and for
7 seconds the display indicates:
7 seconds after the ignition is switched
on, the total distance recorder resumes
normal operation and the display shows
the total and trip distances.
32
-
Instruments and controls
01-06-2005
33
-
Instruments and controls
01-06-2005
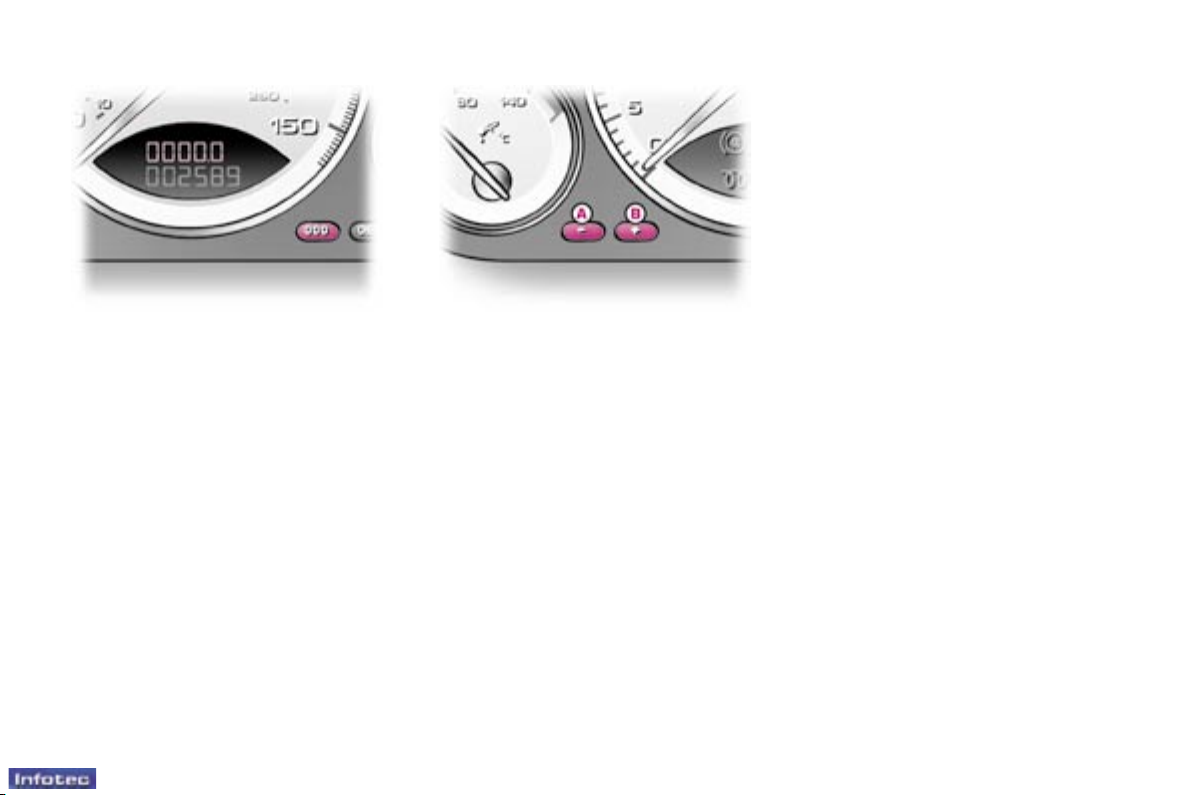
Trip recorder zero reset
button
With the ignition on, press the button
until the zeros appear.
Lighting rheostat button
With the headlamps on, press button
B to increase the brightness of
the lighting of the instruments and
controls or button A to reduce it.
As soon as the lighting reaches the
required level of brightness, release
the button.
33
-
Instruments and controls
01-06-2005
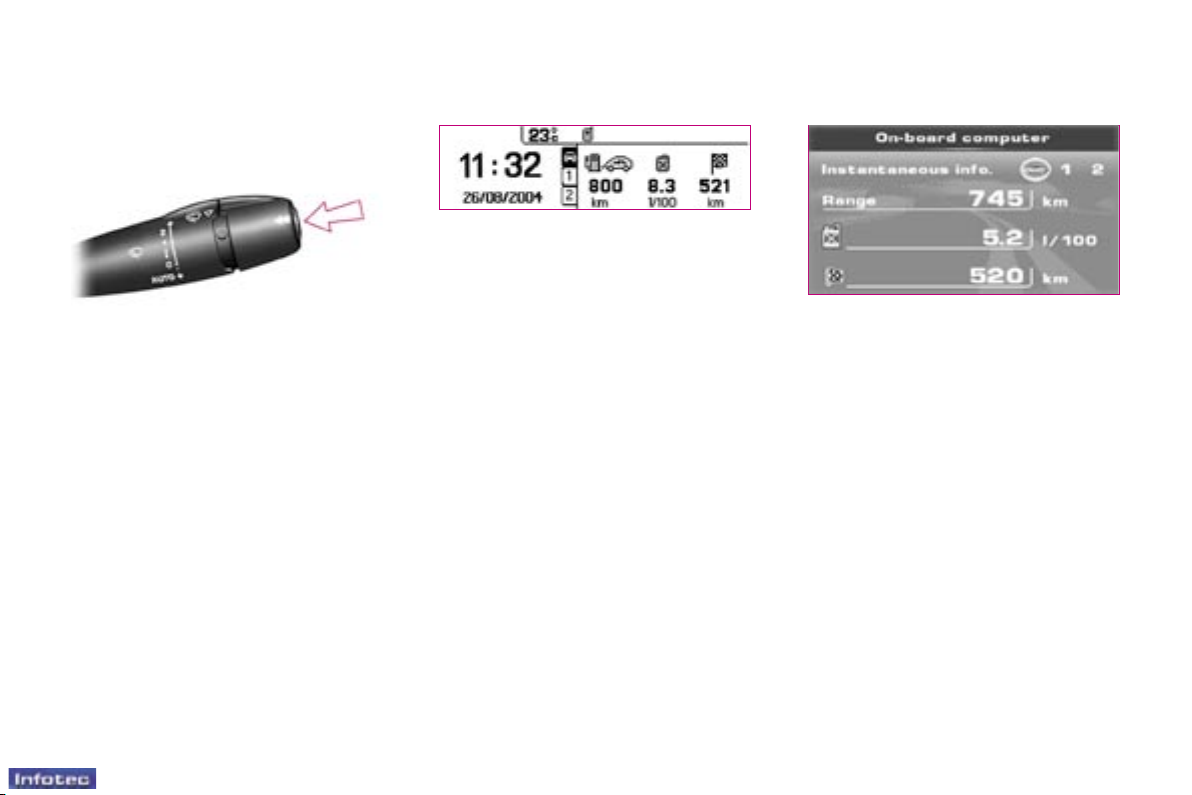
TRIP COMPUTER
Each press on the button, located at
the end of the wipers stalk, displays
different trip computer data in succession, depending on the multifunction display:
- the "vehicle" tab with:
• the range, the current consumption
and the distance remaining to be
travelled,
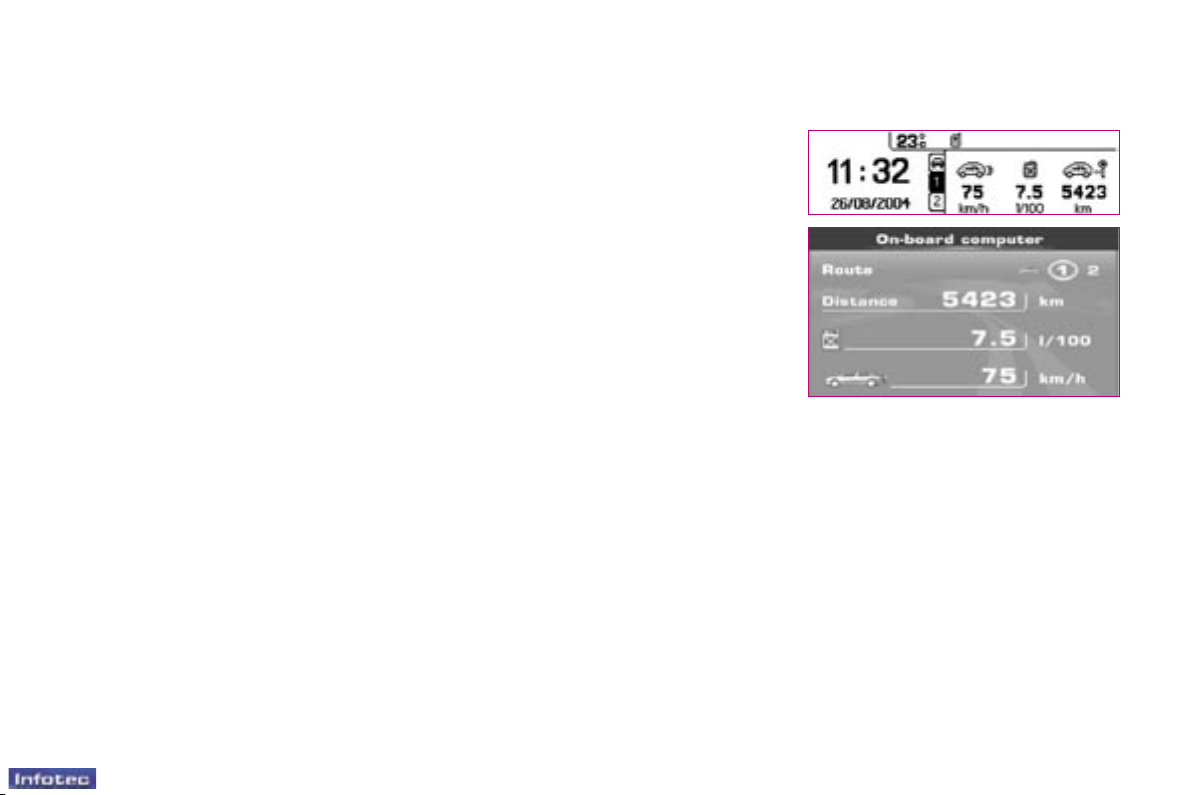
- tab "1" (route 1) with:
• the average speed, the average
consumption and the distance travelled calculated over route "1",
- tab "2" (route 2) with the same
characteristics for a second route.
Colour screen C Colour and map screen DT
- the "Current info" with:
• the range, the current consumption
and the distance remaining to be
travelled,
- "Route 1" with:
• the distance travelled, the average consumption and the average
speed calculated over route "1",
- "Route 2" with the same characteristics for a second route.
34
-
Instruments and controls
01-06-2005
35
-
Instruments and controls
01-06-2005
Range (km or miles)
This shows the distance that can still
be covered with the fuel remaining in
the tank in accordance with the average consumption over the last few
miles (kilometres).
This gure may increase if there is a
change in the style of driving or the
road surface, producing a signicant
drop in current consumption.
When the range is less than 30 miles
(50 km), four dashes are displayed.
After lling with fuel, the range is
displayed when it exceeds 62 miles
(100 km).
If dashes are displayed for long
periods instead of digits, contact a
PEUGEOT dealer.
Current consumption
(l/100 or km/l or mpg)
This is the average quantity of fuel consumed during the last few seconds.
This function is displayed only when
the vehicle is travelling at a speed
greater than 20 mph (30 km/h).
Average consumption
(l/100 or km/l or mpg)
This is the average fuel consumption since the computer was last set
to zero.
Distance travelled
(km or miles)
This indicates the distance travelled
since the computer was last set to
zero.
Distance remaining to be
travelled (km or miles)
This is the distance remaining to be
travelled to the nal destination. It is
either calculated by the navigation
system if guidance is activated or
entered by the user.
If the distance is not entered, dashes
are displayed in place of the digits.
Average speed (km/h or mph)
This is the average speed calculated
since the computer was last set to
zero (with the ignition on).
The routes "1" and "2" are independ-
ent but have identical application.
Route "1" for example allows you
to make daily calculations and route
"2" monthly calculations.
The routes
Zero reset
When the required route is displayed,
press the end of the wipers stalk for
more than two seconds.

35
-
Instruments and controls
01-06-2005
Warnings log
This summarises the active warning
messages, displaying them on the
multifunction display in succession.
Status of the functions
This summarises the active or inactive status of the functions present on
the vehicle.
Inputting the distance remaining
to be travelled
When guidance is not activated, this
enables you to enter an approximate
distance to the nal destination.
Access via the general menu
C screen
DT screen
"TRIP" menu
Press the "MENU" or "TRIP" button
to gain access to the general menu.
Select the "Trip computer" application using the navigator, then
conrm.
The "Trip computer" menu offers
various options:
- Inputting of the distance to be travelled,
- Warnings log,
- Status of the functions.
The different trip computer data also
appears on the instrument panel display at the same time.
Indication on the instrument
panel display
36
-
Multifunction displays
01-06-2005
37
-
Multifunction displays
01-06-2005
COLOUR SCREEN C
This displays the following information, via the RD4 audio equipment
control pad:
- the time,
- the date,
- the exterior temperature (the value
displayed ashes if there is a risk of
ice),
- the accesses check,
- the vehicle functions warning or
status messages, displayed temporarily,
- the audio sources displays,
- the trip computer displays,
- the personalisation and conguration displays,
- the hands-free kit displays.
Management of the displays
Example: "TRIP"
General menu
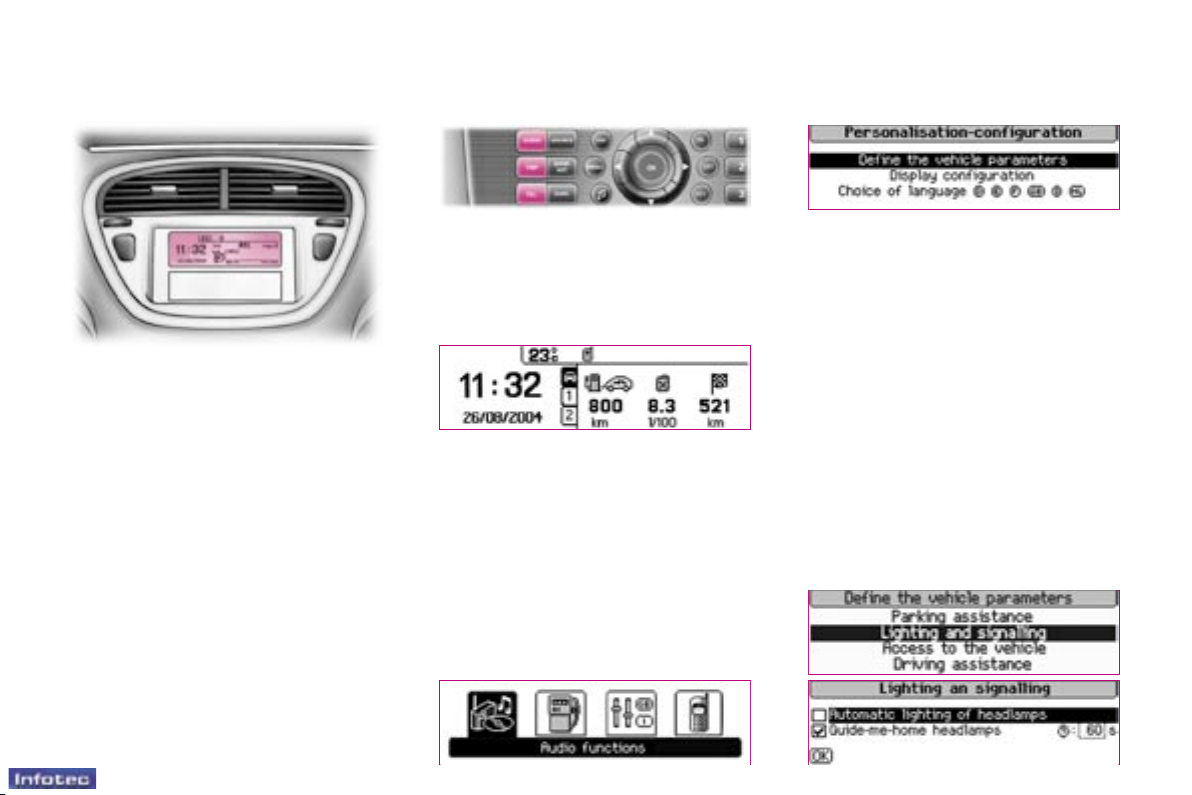
Press the "MENU" button to gain access to the general menu and select
one of the following functions:
- "Audio functions",
- "Trip computer",
- "Personalisation-Conguration",
- "Telephone".
"Personalisation-Conguration"
menu
This provides access to successive
conrmation windows.
Dening the vehicle parameters
This enables you to activate or deactivate certain driving and comfort
elements:
- "Automatic switching on of the
lights",
- "Follow-me-home lighting" and
"Duration",
- "Remote control action",
- "Permanent locking of the boot".
The "AUDIO", "TRIP" and "TEL"
buttons on the RD4 audio equipment
control pad permit displaying in the
main window.
Example: "Audio functions"
Example: "Automatic switching on of
the lights"
37
-
Multifunction displays
01-06-2005
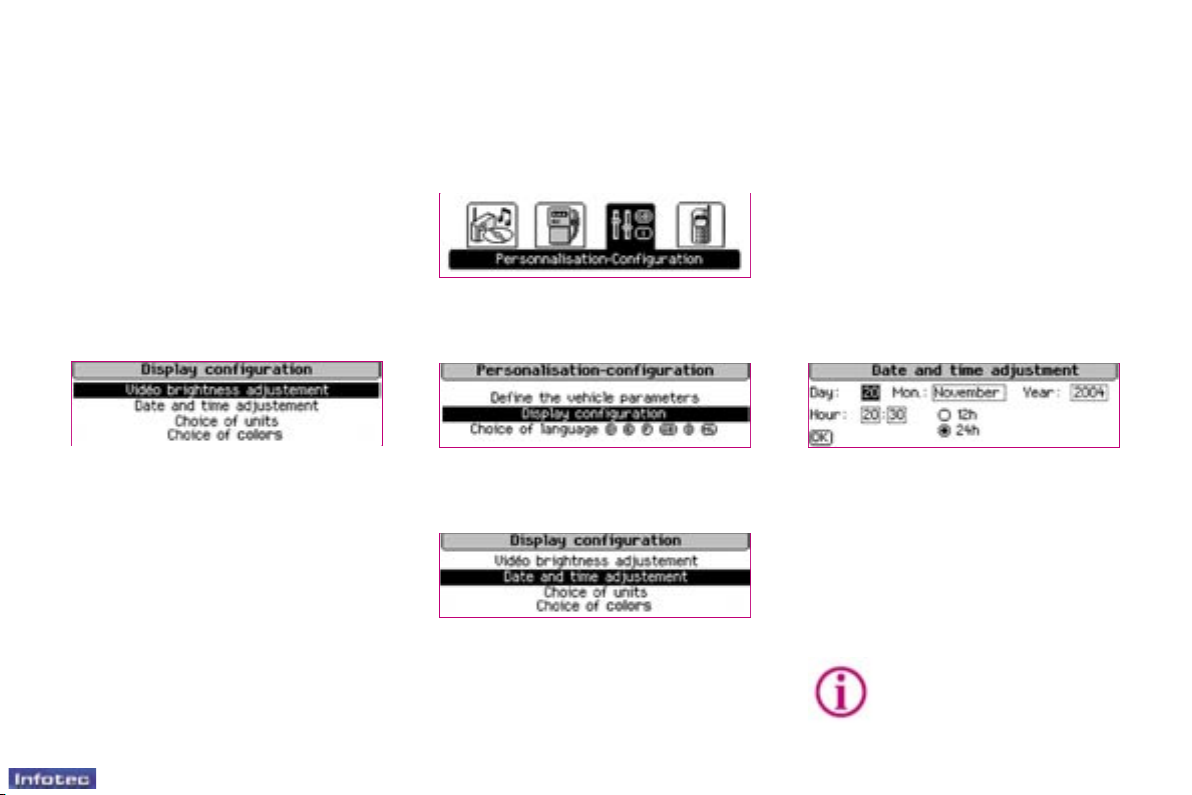
Selection of the language
German, Spanish, French, English,
Italian, Dutch, Portuguese and
Brazilian Portuguese.
Conguration of the display
- "Setting the brightness-video".
- "Setting the date and time".
- "Selection of the units":
• temperature (°C or °F),
• fuel consumption (l/100, mpg or
km/l).
- "Selection of the colours".
Changing the date and time
From the general menu, select the
"Personalisation-Configurati on "
icon using the navigator, then conrm.
From the list displayed, select "Con-
guration of the display", then
conrm.
From the list displayed, select
"Setting the date and time", then
conrm.
Set the parameters one by one:
- the zone selected is displayed on
the screen,
- use the navigator to move from one
zone to another,
- your new parameters are conrmed one by one, by pressing the
navigator button,
- all of the changes are saved, if you
click on "OK" on the screen, or
cancelled, if you press the "ESC"
button on the control pad.
For safety reasons, conguration of the multifunction displays by the driver
must be carried out while
stationary.
 Loading...