

Peugeot 607 2002 Owner Manual
15-07-2002
YOUR AT A GLANCE
10
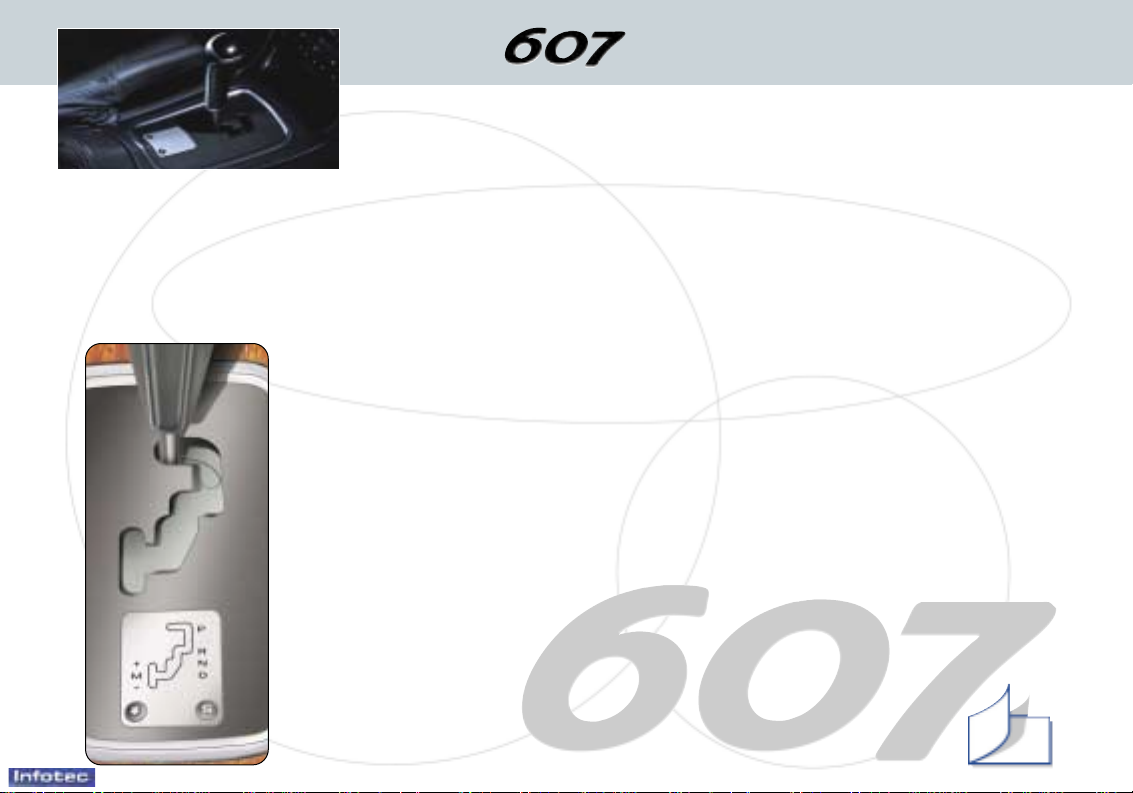
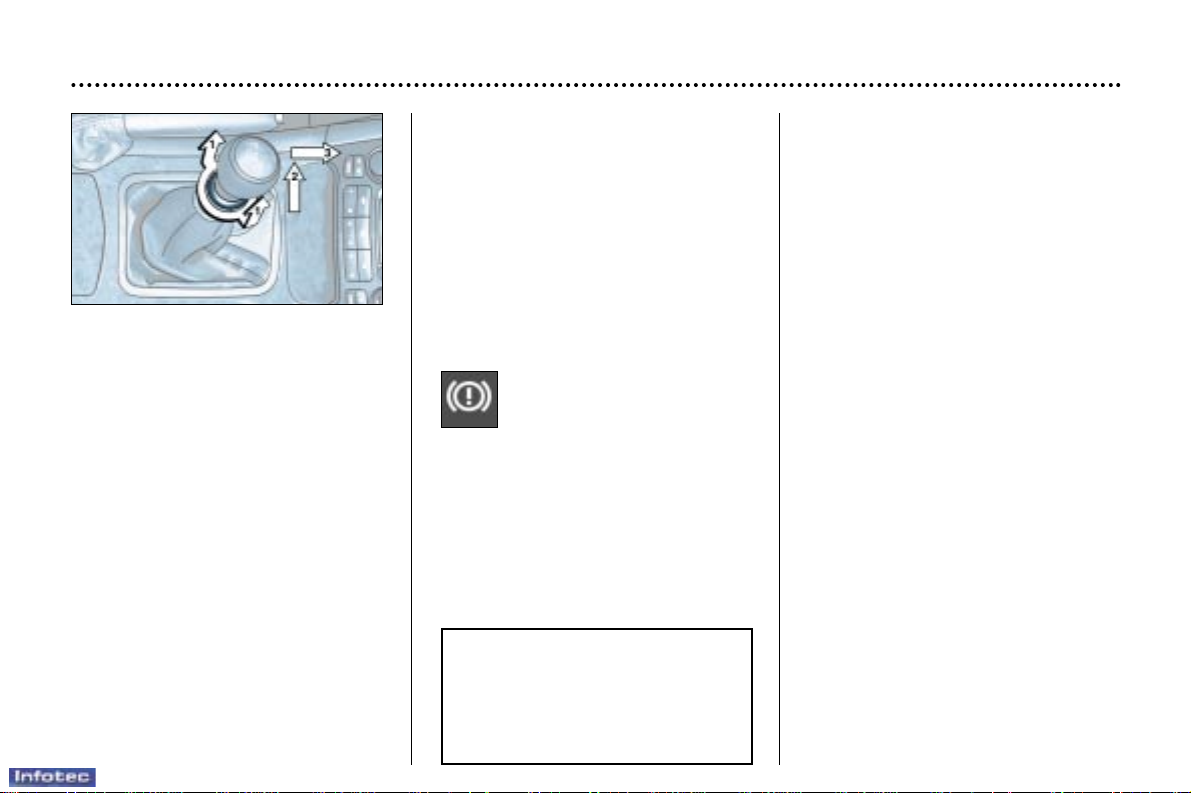
AUTOMATIC GEARBOX
'PORSCHE TIPTRONIC system'
The four speed automatic gearbox offers a choice between the comfort
of integral automatic operation, enhanced by a sport programme and
a snow programme, or the pleasure of manual gear changing.
Gear selection gate
☞ Move the lever in the gate to select one of the functions.
Once the function is selected, the indicator light for that function is displayed on the instrument panel screen.
S: sport programme.
: snow programme.
Park: to immobilise the vehicle and to start the
engine, with the handbrake on or off.
Reverse: to engage reverse; select this function
with the vehicle stationary and the engine at idle.
Neutral: to start the engine and to park, with the
handbrake on.
Note: if position N is engaged by mistake while
the car is moving, allow the engine to return to
idling speed before engaging function D to accelerate.
Drive: for automatic gear changing.
Manual: for manual gear changing.
To change the four gears manually:
☞ Push the lever to the + symbol to change up to
the next gear and pull it towards the - symbol to
change down a gear.
Note: the S (sport) and
(snow) programmes do
not operate in manual mode.
Moving Off
With the engine running, to move
off from position P:
☞ it is essential to press the
brake pedal to exit position P ,
☞ select function R, D or M, then
gradually release the pressure
on the brake pedal; the vehicle will move off immediately.
You can also move off from position N:
☞ release the handbrake, with
your foot on the brake,
☞ select function R, D or M, then
gradually release the pressure
on the brake pedal; the vehicle will move off immediately.
WARNING
When the engine is idling with
the brakes not applied, if function
R, D or M is selected, the vehicle
moves without the accelerator
being pressed.
For this reason, do not leave
children unsupervised inside
the vehicle, with the engine
running.
When maintenance operations
have to be carried out with the
engine running, apply the handbrake and select position P.
123
15-07-2002
YOUR 607 IN DETAIL
101
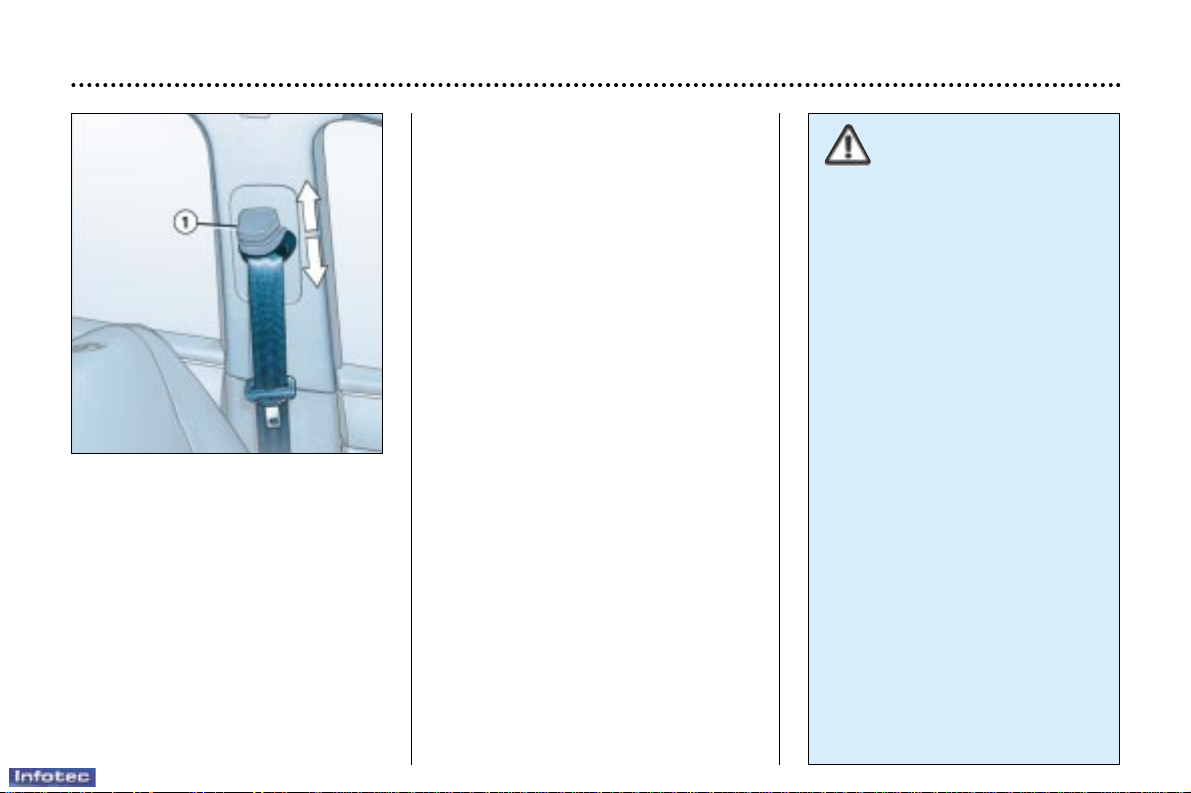
SEAT BELTS
Front seat belt height adjustment :
☞ To lower the attachment point,
squeeze control 1 and slide it
downwards.
☞ To raise the attachment point,
squeeze control 1 and slide it
upwards.
To lock the seat belts
☞ Pull the strap, then insert the end
into the buckle.
Front seat belts with
pre-tensioner and force limiter
Safety in the event of a frontal impact
has been improved by the introduction of seat belts with pre-tensioner
and force limiter connected to the
front air bags. Depending on the
seriousness of the impact, the pretensioning system instantly tightens
the seat belts firmly against the bodies of the occupants.
The pre-tensioning seat belts are
armed when the ignition is on.
The force limiter reduces the pressure of the seat belt on the body of
the occupant in the event of an accident.
Rear seat belts with force limiter
The rear seats are all fitted with a
three-point inertia reel seat belt.
Third rear central seat belt
– pull the belt located between the
two head restraints at the left rear,
– insert the fixed buckle in the black
clasp located on the left,
– insert the sliding buckle in the red
and black (movable) clasp.
To release it, press the black button
of the locking clasp.
To be effective, a seat
belt must be tightened as
close to the body as possible.
Depending on the nature and seriousness of the impact, the pretensioners may be triggered
before and independently of the
air bags.
In all cases, the air bag warning
light comes on.
After an impact, have the system
checked by a PEUGEOT dealer.
The system has been designed to
be fully operational for ten years.
For improved safety, have it
checked by a PEUGEOT dealer
within ten years of purchase of the
vehicle.

15-07-2002
YOUR 607 IN DETAIL
102
THE REMOTE CONTROL KEY
From the driver's door, the key
allows you to lock or unlock the
doors, the boot and the fuel filler flap,
as well as to fold back and unfold the
exterior mirrors.
The remote control in the key performs the same functions at a distance.
If one of the front doors or the boot is
open, the central locking does not
function.
Selective unlocking with the
remote control key
This function must be initialised by a
PEUGEOT dealer.
Press button B to unlock the driver's
door as well as to fold out the exterior mirrors.
Press button B again to unlock the
other doors, the boot and the fuel
filler flap.
Folding/opening out the key
To tuck away the key blade, fold it
down into the remote control module.
To open out the key, press button D.
Deadlocking
This renders the internal and external door controls inoperative, and
enables automatic closing of the windows and the sunroof.
With the key
☞ Lock the vehicle and keep the key
in the locking position for approximately one second.
With the remote control incorporated in the key
☞ Press button A once to lock the
vehicle (the direction indicators
come on for approximately two
seconds).
☞ Within a maximum of five sec-
onds, press button A a second
time to deadlock the vehicle (the
direction indicators come on for
approximately two seconds).
Unlocking with the remote
control key
☞ Press button B.
This is confirmed by rapid flashing of
the direction indicators.
Locking with the remote
control key
☞ Press button A.
This is confirmed by fixed lighting of
the direction indicators for approximately two seconds.
If one of the doors or the boot is
open, the central locking does not
function.
Note: the function that controls folding back of the exterior mirrors can
be disarmed by a PEUGEOT dealer.
Opening the boot with the
remote control key
☞ Press and hold button C.
Note: this also unlocks the doors or
the driver's door only, if selective
unlocking is initialised.
15-07-2002
YOUR 607 IN DETAIL
103
Electronic engine immobiliser
This locks the engine control system
a few moments after the ignition has
been switched off and therefore prevents starting of the vehicle by anyone who does not have the key.
The ignition key has an electronic
chip which has a special code. When
the ignition is switched on, the code
is recognised and starting is possible.
If the system does not function
correctly, the central locking button
indicator light, situated on the centre
console, flashes rapidly when the
ignition is switched on (2nd notch).
WARNING: your vehicle is no longer
protected in this event.
Contact a PEUGEOT dealer as soon
as possible.
Flat battery
(CR 2025/3 volt battery)
This is indicated by illumination of a
warning light on the instrument panel
display, accompanied by an audible
signal and a message on the multifunction display.
Contact a PEUGEOT dealer to
replace the battery.
Key in ignition
A buzzer sounds on opening the driver's door, if the key has been left in
the ignition.
Locating your car
To locate your car in a car park:
☞ press button A; the courtesy lights
come on and the direction indicators flash for a few seconds.
CONFIDENTIAL CARD
The confidential card contains the
identification code necessary for any
work carried out by a PEUGEOT
dealer on the system. This code is
hidden by a film, which should be
removed only if necessary.
Keep your card in a safe place,
never inside the vehicle.
Programming the
remote control
in the key
☞ Switch off the ignition.
☞ Switch the ignition on again.
☞ Immediately press button A.
☞ Switch off the ignition and remove
the remote control key from the
ignition lock. The remote control
key is now working again.
15-07-2002
Make a careful note of the number on each key. The key number is coded on the label attached to the key. If
the key is lost, your PEUGEOT dealer can rapidly supply you with new keys.
The high-frequency remote control key is a high-performance system.
Do not operate it while it is in your pocket as there is a possibility that it may unlock your vehicle without your
knowledge.
The remote control cannot operate if the key is in the ignition, even if the ignition is switched off, except for
reprogramming.
Do not operate the deadlock if there is someone inside the vehicle.
As a safety measure (when there are children on board), remove the ignition key when leaving the vehicle, even for a
short time.
Do not handle the buttons of your remote control when out of range of your vehicle as you run the risk of stopping it from
working. It would then be necessary to reprogramme the remote control.
When buying a second-hand car:
– Ensure that you are given the confidential card;
– Have the key codes memorised by a PEUGEOT dealer, to ensure that the keys in your possession are the only ones
which can start your vehicle.
Do not make any modifications to the electronic engine immobiliser system.
YOUR 607 IN DETAIL
104

15-07-2002
YOUR 607 IN DETAIL
103
Electronic engine immobiliser
This locks the engine control system
a few moments after the ignition has
been switched off and therefore prevents starting of the vehicle by anyone who does not have the key.
The ignition key has an electronic
chip which has a special code. When
the ignition is switched on, the code
is recognised and starting is possible.
If the system does not function
correctly, the central locking button
indicator light, situated on the centre
console, flashes rapidly when the
ignition is switched on (2nd notch).
WARNING: your vehicle is no longer
protected in this event.
Contact a PEUGEOT dealer as soon
as possible.
Flat battery
(CR 2025/3 volt battery)
This is indicated by illumination of a
warning light on the instrument panel
display, accompanied by an audible
signal and a message on the multifunction display.
Contact a PEUGEOT dealer to
replace the battery.
Key in ignition
A buzzer sounds on opening the driver's door, if the key has been left in
the ignition.
Locating your car
To locate your car in a car park:
☞ press button A; the courtesy lights
come on and the direction indicators flash for a few seconds.
CONFIDENTIAL CARD
The confidential card contains the
identification code necessary for any
work carried out by a PEUGEOT
dealer on the system. This code is
hidden by a film, which should be
removed only if necessary.
Keep your card in a safe place,
never inside the vehicle.
Programming the
remote control
in the key
☞ Switch off the ignition.
☞ Switch the ignition on again.
☞ Immediately press button A.
☞ Switch off the ignition and remove
the remote control key from the
ignition lock. The remote control
key is now working again.
15-07-2002
Make a careful note of the number on each key. The key number is coded on the label attached to the key. If
the key is lost, your PEUGEOT dealer can rapidly supply you with new keys.
The high-frequency remote control key is a high-performance system.
Do not operate it while it is in your pocket as there is a possibility that it may unlock your vehicle without your
knowledge.
The remote control cannot operate if the key is in the ignition, even if the ignition is switched off, except for
reprogramming.
Do not operate the deadlock if there is someone inside the vehicle.
As a safety measure (when there are children on board), remove the ignition key when leaving the vehicle, even for a
short time.
Do not handle the buttons of your remote control when out of range of your vehicle as you run the risk of stopping it from
working. It would then be necessary to reprogramme the remote control.
When buying a second-hand car:
– Ensure that you are given the confidential card;
– Have the key codes memorised by a PEUGEOT dealer, to ensure that the keys in your possession are the only ones
which can start your vehicle.
Do not make any modifications to the electronic engine immobiliser system.
YOUR 607 IN DETAIL
104
15-07-2002
YOUR 607 IN DETAIL
105
THE ALARM
This provides two types of protection, exterior and interior:
– exterior protection: when this is
set, the alarm sounds if a door, the
boot or the bonnet is opened.
– interior protection: when this is set,
the alarm sounds if the sensors
detect a variation in the air movement inside the vehicle (breaking
of a window or a movement inside
the vehicle).
Setting the alarm
☞ Switch off the ignition and get out
of the vehicle.
☞ Set the alarm within five minutes
of getting out of the vehicle, by
locking or deadlocking using the
remote control (button B indicator
light flashes once per second).
Note: if you wish to lock your vehicle
without setting the alarm, use the
door lock.
When the alarm is triggered, the
siren sounds and the direction indicators flash for thirty seconds.
It then stops, but the alarm remains
set.
Warning: if the alarm has been triggered ten times in succession, on
the eleventh time it becomes inactive.
Note: if button B flashes rapidly, the
alarm has been triggered while you
were away from your vehicle.
Automatic activation
The alarm is activated automatically
two minutes after the door or boot
were last closed.
In order to avoid accidental triggering
of the alarm when a door or the boot
is opened, it is essential to press the
remote control opening button first.
Disarming
Unlock the vehicle with the remote
control key (button B indicator light
goes out).
Note: if the alarm has been triggered
while you were away from your car,
the rapid flashing of the indicator
light will stop when you switch on the
ignition.
To set the alarm with exterior
protection only
If, while you are away from the vehicle, you wish to leave a window partially open or a pet inside the vehicle,
you should choose exterior protection only.
☞ Switch off the ignition
☞ In the next ten seconds, press
button A until indicator light B is
on continuously.
☞ Get out of the vehicle.
☞ Set the alarm by locking or dead-
locking using the remote control
switch (button B indicator light
flashes once a second).
Note: when the alarm is set but the
remote control does not operate:
☞ Unlock the doors with the key and
open the door. The alarm is triggered.
☞ Switch on the ignition in the next
ten seconds. The alarm is disarmed.
Incorrect operation
When the ignition is switched on, if
button B lights for ten seconds, there
is a fault in the siren connection.
Contact a PEUGEOT dealer to have
the system checked.
15-07-2002
YOUR 607 IN DETAIL
107
Vehicle unlocked
☞ Press and hold button C of the
remote control key or press pushbutton A.
Note: push-button A can be deactivated. Rotate control B, located
inside the boot lid, a quarter of a turn
(anti-clockwise) using the key.
Closing the boot
☞ Press the centre of the boot lid
with both hands, until it locks.
'Boot open' warning
With the ignition on (2nd notch), with
the engine running or when the vehicle is moving, the door open warning
light comes on, accompanied by an
audible signal and a diagram on the
multi-function display, if the boot is
not properly closed.
THE BOOT
Opening the boot
With the vehicle locked / deadlocked
☞ Press and hold button C of the
remote control key.
This action will also unlock the doors
and the fuel filler flap.
SUNROOF
Control the sunroof:
– manually: lightly press the switch;
the roof stops as soon as the
switch is released.
– automatically: press the switch
down; the roof opens partially or
opens or closes completely
depending on where the switch is
pressed.
– to partially open the roof: press
part A of the switch. To close it,
press part B of the switch.
– to open the roof completely:
press part B of the switch.
– to close it completely: press part
A of the switch.
– safety auto-reverse
When the sunroof is closing and
meets an obstacle, it stops then
opens again.
Note: the sunroof shutter is manual.
15-07-2002
The engine and the ignition must
be switched off when filling with
fuel :
☞ Open the fuel filler flap by press-
ing its front right hand edge,
☞ Unscrew the cap and hook it over
the tab located on the inside of the
flap.
When filling up your tank, do not continue after the 3rd cut-off of the
pump; this could cause your vehicle
to malfunction.
The capacity of the tank is approximately 80 litres.
☞ After filling the tank, screw the cap
on fully and close the flap.
Fuel filler cap open
When this light comes on,
accompanied by an audible
signal and the message
'Fuel cap open' on the display, screw the cap on again
and close the fuel filler flap.
FILLING WITH FUEL
Low fuel level
When the minimum fuel
level is reached, this warning light comes on, accompanied by an audible signal
and the message 'Fuel
level low' on the multi-function display.
You can can still drive approximately 30 miles (50 km) without
filling up with fuel.
Filling with fuel
Locking and unlocking of the fuel
filler flap, the doors and the boot is
simultaneous (except when selective
unlocking is initialised; in this case
press the unlocking button of the
remote control again).
YOUR 607 IN DETAIL
108
BONNET
Opening
☞ Pull the lever, located in the dri-
ver's footwell, downwards.
☞ Lift the catch and raise the bon-
net.
Bonnet assister struts open the bonnet and keep it open.
Closing
☞ Lower the bonnet and release it at
the end of its travel.
☞ Check that it is locked.
'Bonnet open' warning
With the ignition on (2nd notch), with
the engine running or when the vehicle is moving, the door open warning light comes on, accompanied by
an audible signal and a diagram on
the multi-function display, if the bonnet is not properly closed.
15-07-2002
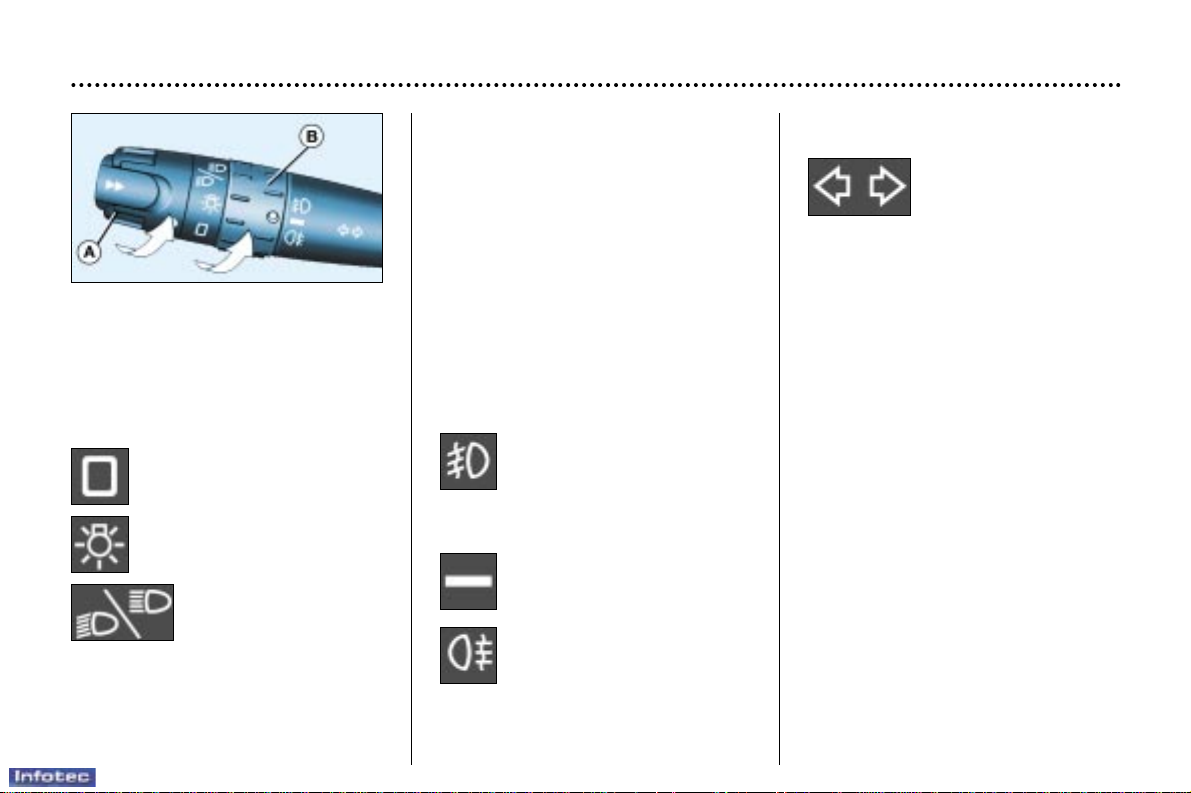
Direction indicators
(flashers)
Left : downwards.
Right : upwards
Note : If you forget to return the
direction indicator to its normal position, the volume of the audible signal
will increase, if you are driving at a
speed greater than 40 mph
(60 km/h).
Parking lights
The parking lights are lit on the side
the traffic is on.
With the engine switched off, place
the indicator lights stalk on the traffic
side (i.e. for parking on the right;
switching on of the lights on the left).
Dipped / main
beam change
☞ Pull the stalk fully towards you.
Note : with the ignition and the automatic lights function switched off, on
opening the driver's door a buzzer
sounds if you have left your lights on.
Front and rear fog lamps (ring B)
☞ Turn ring B to the position
required. The position is confirmed by the light on the instrument panel.
Front fog
lamps
These operate with the side lights and
the dipped / main beam headlamps.
Neutral
position.
Rear fog lamps
These operate with the side lights
and the front fog lamps, or the
dipped / main beam headlamps.
LIGHTS STALK
Front and rear lights (ring A)
☞ Turn ring A to the position
required.
Lights off
Side lights
Dipped / main beam
headlamps
YOUR 607 IN DETAIL
109
15-07-2002
CRUISE CONTROL
Cruise control enables the vehicle to maintain a steady speed
programmed by the driver, without the accelerator being
pressed.
In order for it to be memorised,
the speed of the vehicle must be
greater than 25mph (40km/h) or
40mph (60km/h) depending on
engine.
Operation
☞ Place the ring of stalk
A in the ON position.
The indicator light
comes on, accompanied by an audible
signal.
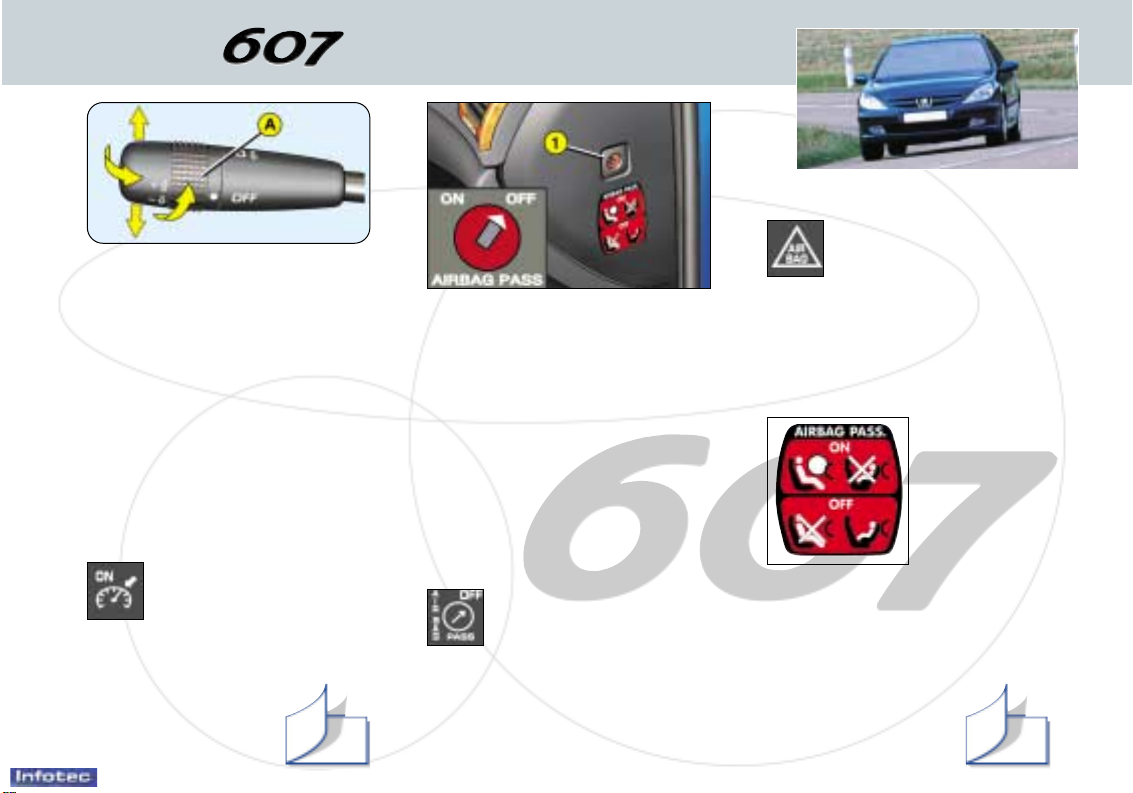
FRONT AIR BAGS
Disarming the passenger
air bag*
☞
with the ignition off, insert the
key into slot 1 and turn it:
– to the 'ON' position, the pas-
senger air bag is armed,
– to the 'OFF' position, the pas-
senger air bag is disarmed.
Operating check
When the passenger air
bag is disarmed, the
warning light comes on
when the ignition is
switched on (2nd notch),
accompanied by an audible signal and the message 'Passenger
air bag disarmed'.
Front air bag faulty
If this warning light
comes on, accompanied
by an audible signal and
the message 'Air bag
faulty', contact a
PEUGEOT dealer to have the
system checked.
Passenger air bag
precautions
☞
Disarm the
air bag if
you install
a rearfacing child
seat.
☞
Arm the air
bag for an
adult passenger.
Never place your feet or any
object on the fascia.
* According to destination.
YOUR AT A GLANCE
11
128 130
15-07-2002
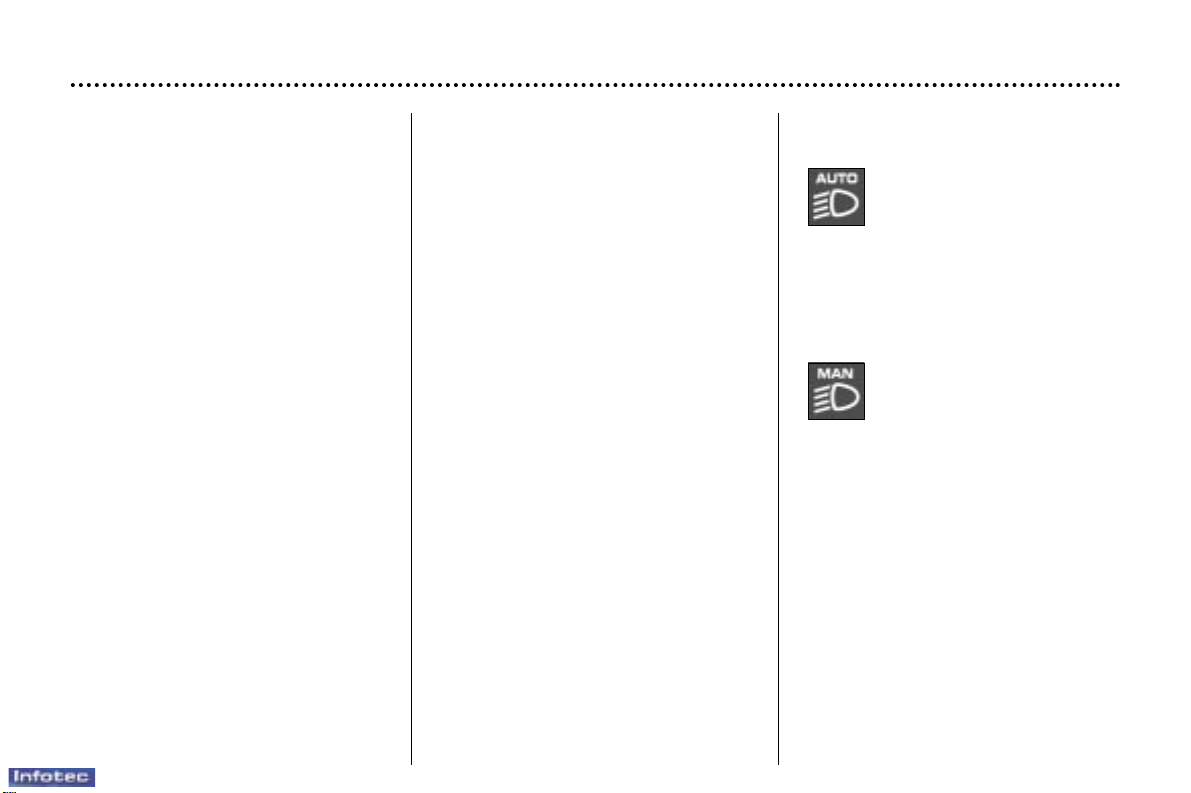
Automatic switching
on of the lights
Side lights and dipped beam headlamps switch on automatically if the
light is poor, or during continuous
operation of the windscreen wipers.
They switch off as soon as the light
becomes bright enough or the windscreen wipers stop.
Note : in foggy weather, the brightness sensor can detect sufficient
light. As a consequence, the lights
will not come on automatically.
This function is active when the vehicle is supplied to the customer.
To switch the function on or off:
☞ Place the key in the accessories
position (1st notch),
☞ Change the stalk position to 0,
☞ Press the end of the stalk for more
than two seconds.
Note : after the ignition is switched
off and depending on the brightness,
the lights remain on for approximately thirty seconds or until the vehicle is
locked.
Do not cover the sunshine /
brightness sensor located in the
centre of the fascia. It helps to
regulate the air conditioning,
automatic switching on of the
lights and the automatic adjustment of the instrument panel
brightness.
YOUR 607 IN DETAIL
110
Operating check
Activation
When this function is activated, the indicator light
comes on, accompanied by
an audible signal.
The light also comes on as soon as
the driver changes the stalk position
to 0.
Neutralisation
When neutralising the function, the indicator light
comes on, accompanied by
an audible signal.
The indicator light also comes on as
soon as the driver uses the manual
lighting controls.
If the sunshine / brightness sensor does not function correctly,
the system activates the function
(the lights come on) and the dipped
beam headlamps indicator light on
the instrument panel flashes.
Contact a PEUGEOT dealer to have
the system checked.

15-07-2002
Do not cover the rain
sensor located on the
windscreen behind the
interior mirror.
When using an automatic
car wash, switch off the ignition or
check that the wiper stalk is not in
the automatic position.
In winter, it is advisable to wait
until the windscreen is completely
free of ice before operating the
automatic wipe
YOUR 607 IN DETAIL
111
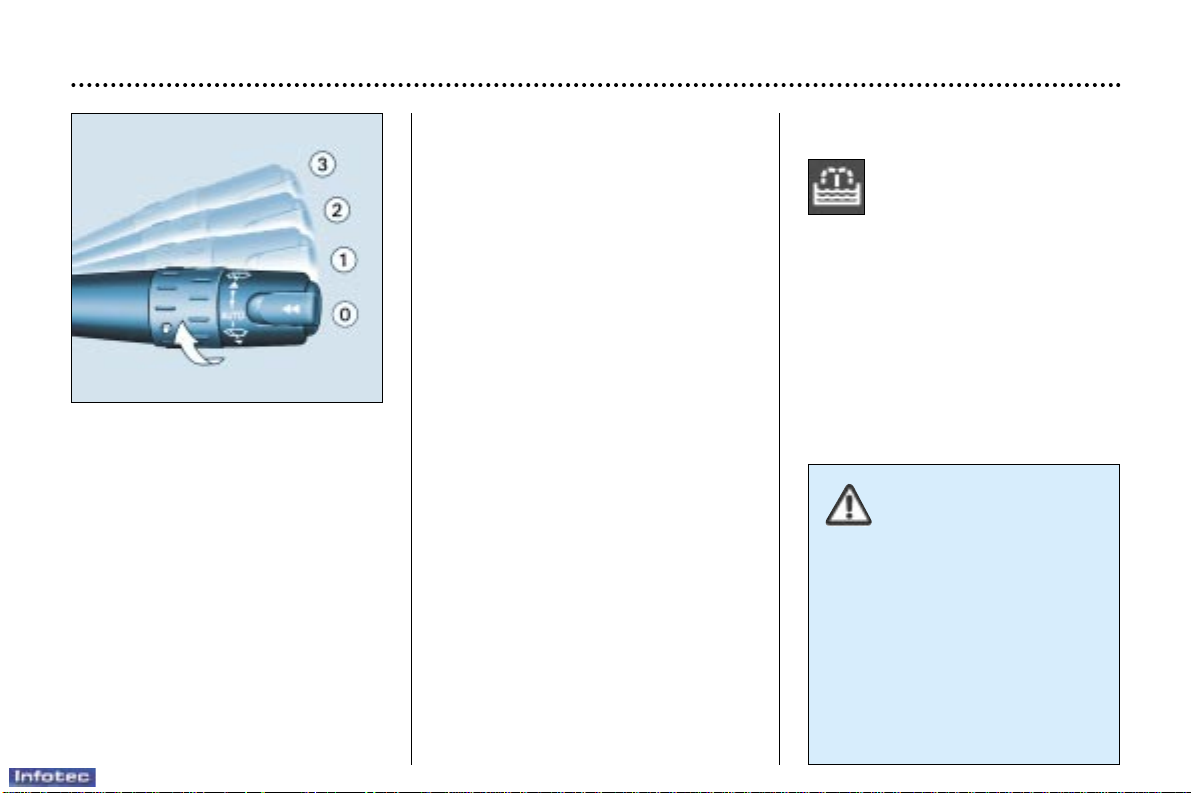
WINDSCREEN
WIPER STALK
Windscreen wipers
3 Fast wipe
2 Normal wipe
1 Automatic wipe
0 Off
When the ignition has been
switched off for more than a
minute with the control in a wipe
position (1, 2 or 3), it is necesary
to reactivate this function. To d o
this, move the stalk to any position,
then move it back to the required
position.
Maintenance position
This position enables the wiper
blades to be removed.
In the minute following switching off
of the ignition, any action on the stalk
positions the wipers in the centre of
the windscreen so that they may be
cleaned or replaced.
To park the wipers after this has
been done, switch on the ignition
and operate the stalk.
Windscreen and headlamp wash
Pull the windscreen wiper stalk
towards you.
The windscreen wash then the windscreen wipers operate for a fixed
period. The windscreen wash and
headlamp wash operate simultaneously for a few seconds, only if the
dipped beam or main beam headlamps are on.
Screenwash/headlamp wash low
When the minimum level of
the reservoir is reached, this
warning light comes on,
accompanied by an audible
signal and the message
'Screenwash low' on the multi-function display.
Next time you stop, fill the screenwash / headlamp wash reservoir.
If the reservoir is empty, the warning
light comes on when the ignition is
switched on, or every time the stalk
is operated, until the reservoir is
filled.

15-07-2002
YOUR 607 IN DETAIL
112
Automatic windscreen wiper
In position 1, the wiper operates
automatically and adjusts its speed
to the intensity of the rainfall.
Operating check
Activation
The indicator light comes on,
accompanied by an audible
signal, as soon as the driver
sets the windscreen wiper
stalk to position 1.
Neutralisation
When the function is neutralised, going from position 1
to another position, the indicator light comes on, accompanied by an audible signal.
In cases of malfunction, the driver
is informed by the message 'Rain
sensor faulty' on the multi-function
display.
In position 1, the windscreen wiper
will operate on intermittent wipe.
Contact a PEUGEOT dealer to have
the system checked.
15-07-2002
Do not cover the rain
sensor located on the
windscreen behind the
interior mirror.
When using an automatic
car wash, switch off the ignition or
check that the wiper stalk is not in
the automatic position.
In winter, it is advisable to wait
until the windscreen is completely
free of ice before operating the
automatic wipe
YOUR 607 IN DETAIL
111
WINDSCREEN
WIPER STALK
Windscreen wipers
3 Fast wipe
2 Normal wipe
1 Automatic wipe
0 Off
When the ignition has been
switched off for more than a
minute with the control in a wipe
position (1, 2 or 3), it is necesary
to reactivate this function. To d o
this, move the stalk to any position,
then move it back to the required
position.
Maintenance position
This position enables the wiper
blades to be removed.
In the minute following switching off
of the ignition, any action on the stalk
positions the wipers in the centre of
the windscreen so that they may be
cleaned or replaced.
To park the wipers after this has
been done, switch on the ignition
and operate the stalk.
Windscreen and headlamp wash
Pull the windscreen wiper stalk
towards you.
The windscreen wash then the windscreen wipers operate for a fixed
period. The windscreen wash and
headlamp wash operate simultaneously for a few seconds, only if the
dipped beam or main beam headlamps are on.
Screenwash/headlamp wash low
When the minimum level of
the reservoir is reached, this
warning light comes on,
accompanied by an audible
signal and the message
'Screenwash low' on the multi-function display.
Next time you stop, fill the screenwash / headlamp wash reservoir.
If the reservoir is empty, the warning
light comes on when the ignition is
switched on, or every time the stalk
is operated, until the reservoir is
filled.
15-07-2002
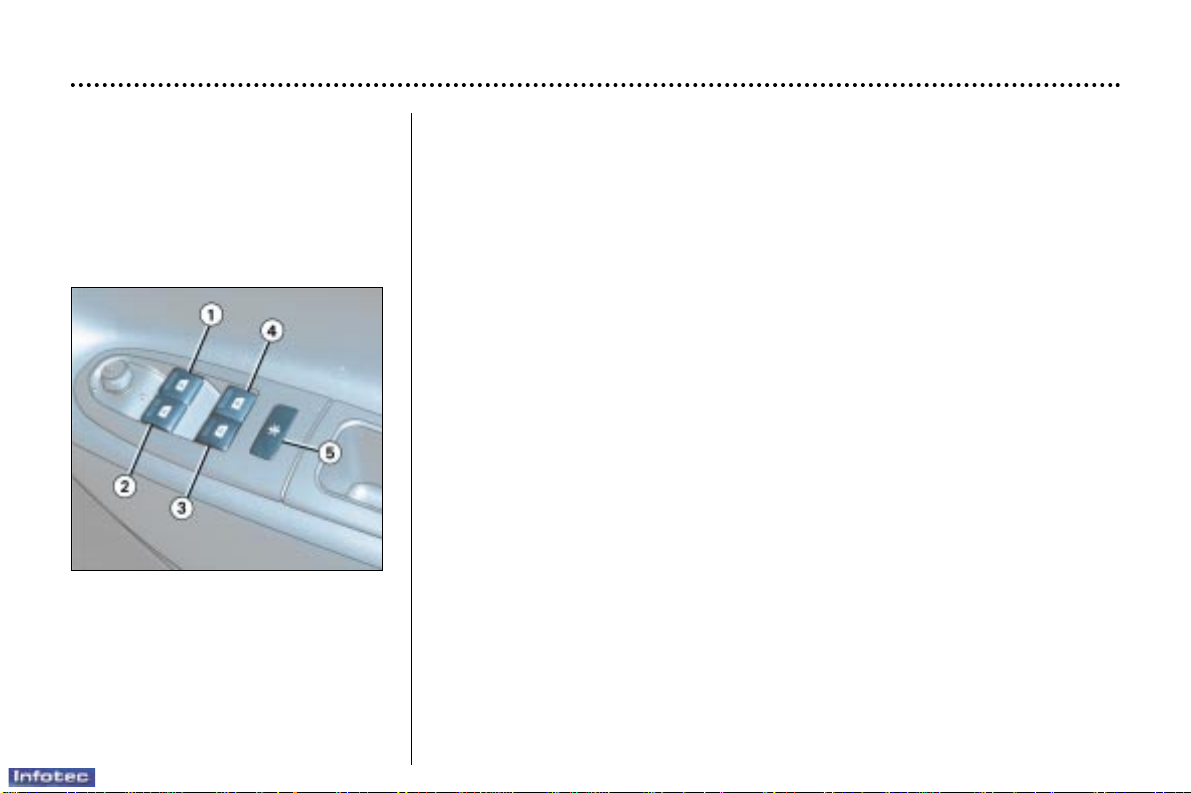
YOUR 607 IN DETAIL
116
ELECTRIC WINDOWS
1 - Passenger's electric window switch.
2 - Driver's electric window switch.
3 - Rear right electric window switch.
4 - Rear left electric window switch.
5 - Neutralisation of the rear lighter and the rear electric windows (child
safety).
You have two options :
Manual operation :
☞ press or pull switch 1 gently. The window stops as soon as the switch is
released.
Automatic operation :
☞ press or pull switch 1 fully.
One touch opens or closes the window completely.
Safety auto-reverse
When the window rises and meets an obstacle, it stops and lowers again.
Note : In the case of ice or after reconnecting the battery, if the window will
not rise, pull the switch until the window closes completely.
15-07-2002
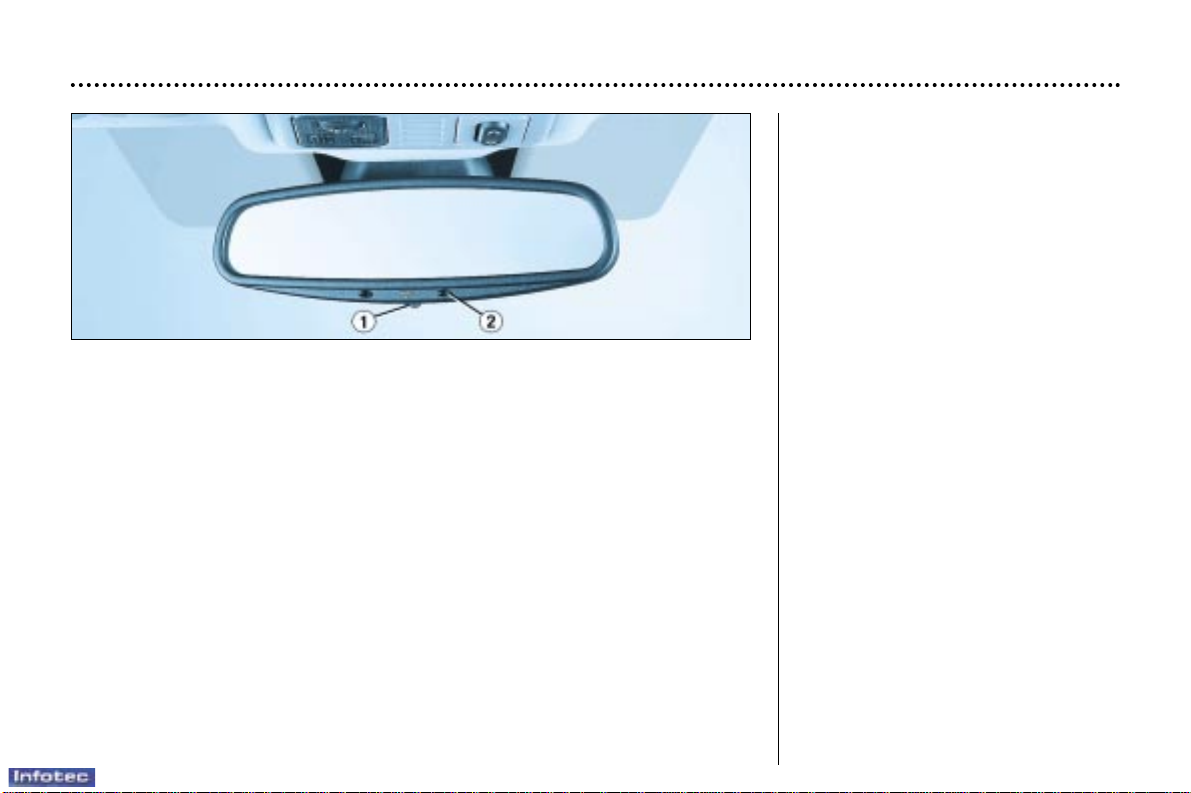
YOUR 607 IN DETAIL
118
Automatic day/night interior mirror
This automatically and gradually changes between the day and night positions.
To prevent dazzling, the glass of the mirror darkens automatically depending on
the intensity of the light from behind. It clears as the light (headlamps of following vehicles, sunlight) decreases, ensuring maximum visibility.
Operation
Switch on the ignition and press switch 1 :
– Indicator light 2 lit (switch pressed): automatic operation.
– Indicator light 2 off: automatic system off. The mirror remains at its most clear.
Special feature
To ensure maximum visibility during manoeuvres, the mirror clears automatically when reverse gear is engaged.
Manual interior mirror
The interior mirror has two positions:
– day (normal),
– night (anti-dazzle).
To change from one to the other,
push or pull the lever on the lower
edge of the mirror.
Areas for toll cards /
car park tickets
The athermic windscreen has two
non-reflective zones located either
side of the base of the interior
mirror.
They are intended for affixing toll
cards and/or car park tickets.
15-07-2002
YOUR 607 IN DETAIL
119
HORN
Press one of the spokes or the centre of the steering wheel.
Manual adjustment of the
headlamps
Depending on the load in your vehicle, adjusting the beam of your headlamps is recommended.
0 1 or 2 people in the front seats.
– 3 people.
1 5 people.
2 5 people + maximum authorised
loads.
3 Driver + maximum authorised
loads.
Initial setting is position 0.
Automatic adjustment of
headlamps
Refer to the paragraph on Lighting
under the section entitled 'Towing a
trailer...'.
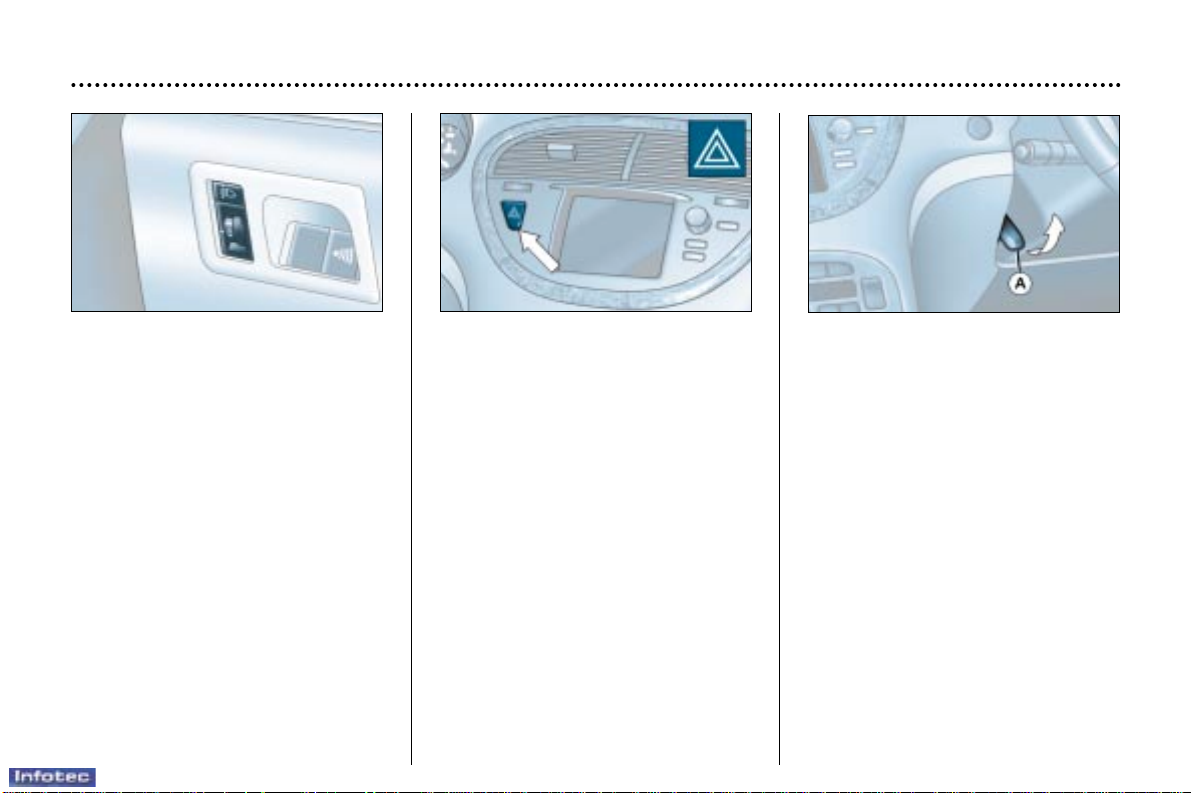
HAZARD WARNING LIGHTS
Press the button, the direction indicators flash.
They can operate with the ignition
off.
Steering wheel height and
depth adjustment
☞ When the vehicle is stationary,
unlock the steering wheel by
pulling handle A downwards.
☞ Adjust the height and depth of the
steering wheel then lock by pushing handle A fully upwards.
Automatic lighting of hazard
warning lights*
When braking in an emergency,
depending on the force of deceleration, the hazard warning lights come
on automatically. They switch off
automatically the first time you accelerate.
It is also possible to switch them off
by pressing the button on the fascia.
* According to destination.
15-07-2002
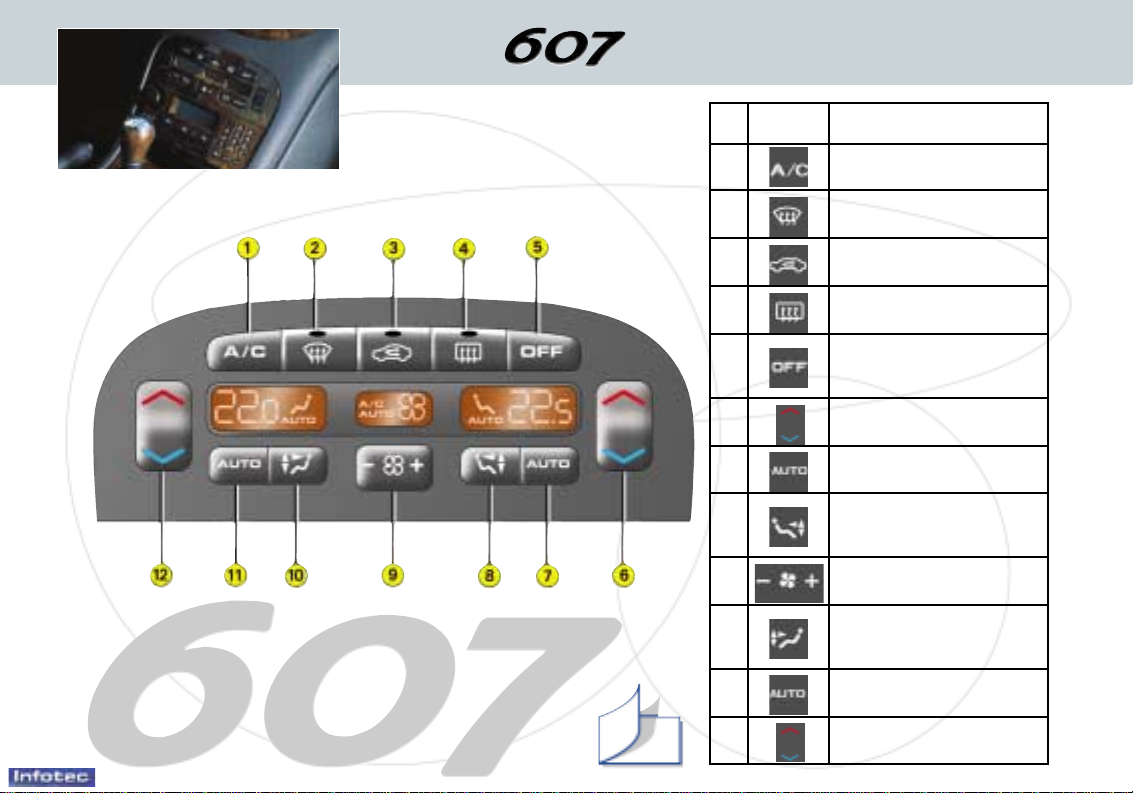
No. Symbol Function
1 Air conditioning
on/off.
2 Front visibility
programme.
3 Air intake
control.
4 Rear screen
demisting.
5
Switching
off.
6 Driver
setting
7 Driver comfort
programme.
8 Driver
air distribution
setting.
9 Air flow
adjustment.
10 Passenger
air distribution
setting.
11 Passenger comfort
programme.
12 Passenger
setting.
12
YOUR AT A GLANCE
AUTOMA TIC AIR CONDITIONING
Do not cover the sunshine / brightness sensor located
in the centre of the fascia.
It helps to regulate the air conditioning, automatic
switching on of the lights and the automatic adjustment of the instrument panel brightness.
90
15-07-2002
YOUR 607 IN DETAIL
120
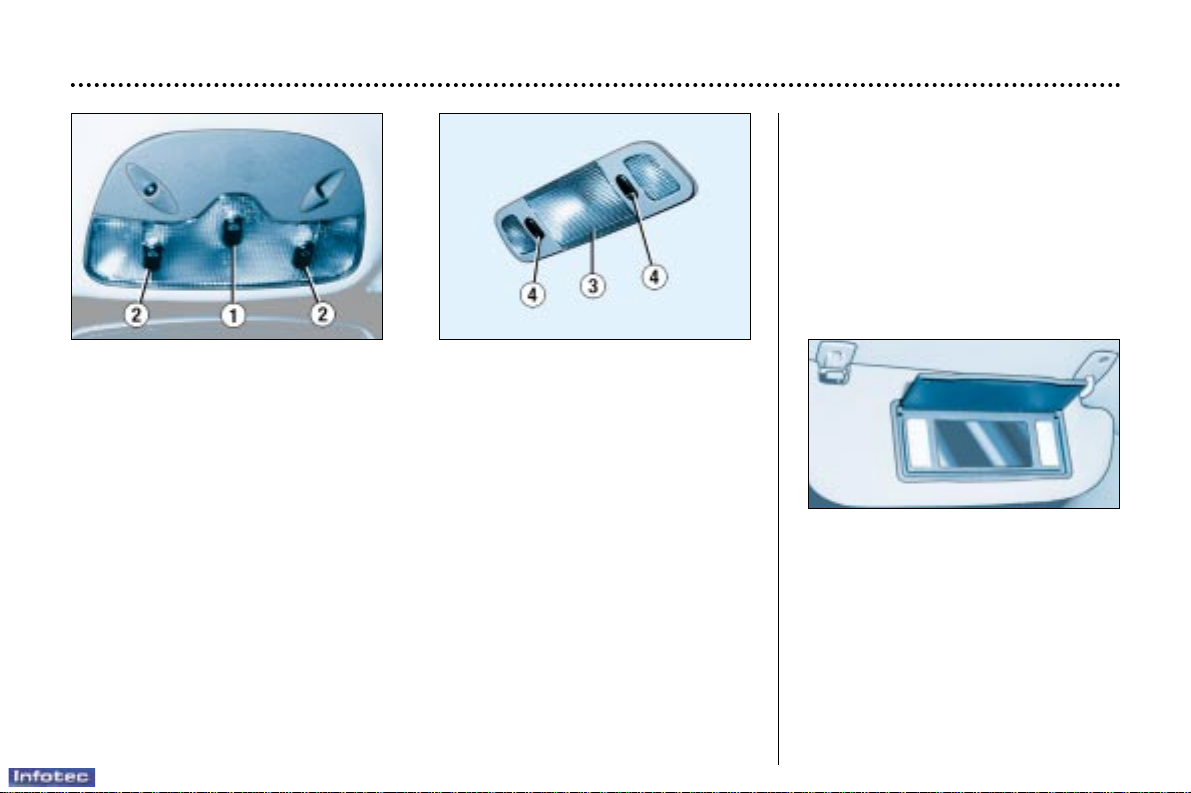
SUN VISOR WITH
ILLUMINATED COURTESY
MIRROR
With the ignition on, the mirror is
automatically illuminated when the
flap is opened.
COURTESY LIGHTS
1 - Front courtesy light
2 - Front map reading lights
With the key in the accesories position (1st notch) or with the ignition on,
operate the relevant switch.
3 - Rear courtesy light
4 - Rear map reading lights
With the key in the accesories position (1st notch) or with the ignition on,
operate the relevant switch.
The front and rear courtesy lights come on when the ignition key is removed, on
unlocking the vehicle or on opening one of the doors.
They gradually go off after the ignition has been switched on or the vehicle is
locked.
☞ Pressing switch 1 turns on the front and rear courtesy lights.
Note: The courtesy lights and sill lights can be neutralised by pressing switch 1
for more than three seconds. The map reading lights are not affected by this and
may be switched on.
☞ To re-activate the lights, press the switch.
Sill illumination
The sill light is at the bottom of each
door trim.
The light comes on automatically
when the door is opened and goes
off automatically when the door is
closed.
15-07-2002
YOUR 607 IN DETAIL
121
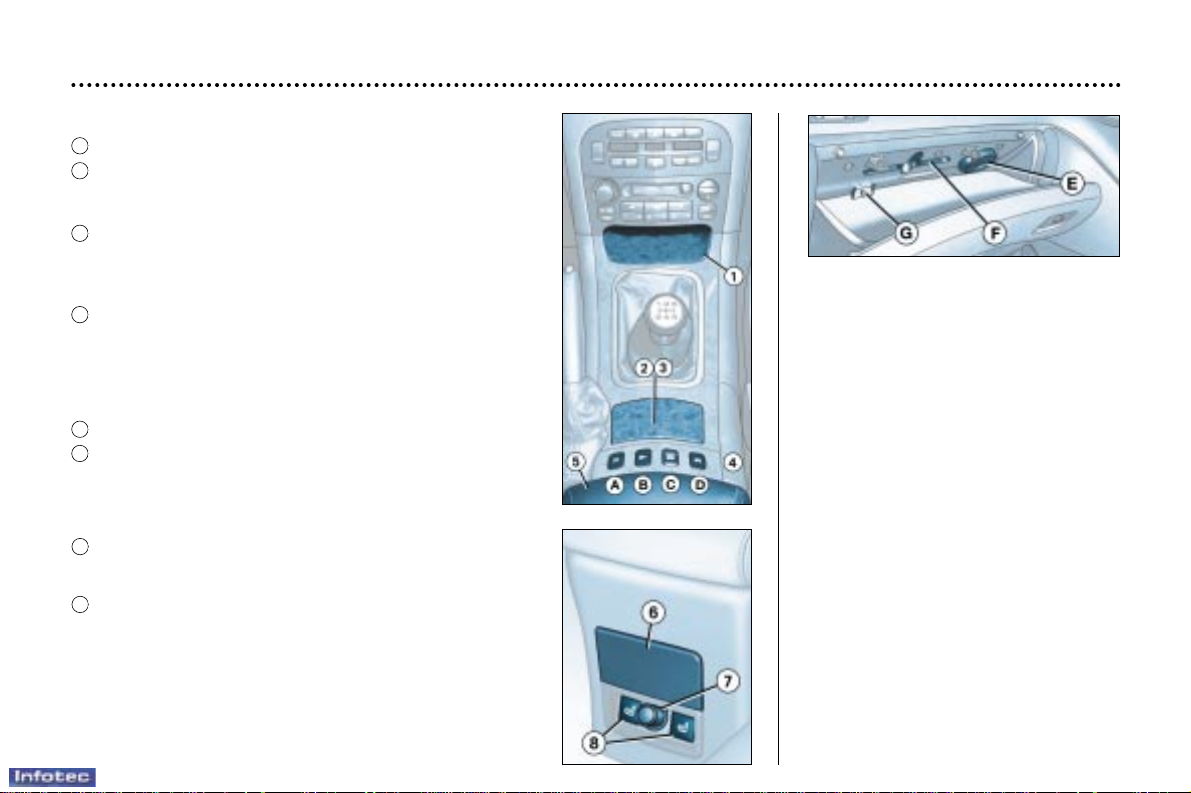
4 Control buttons
A- Switching 'SPORT' suspension on / off
B - Central locking / Unlocking
C - Opening / Closing / Partial opening of sunroof
D - Unrolling / storing of rear screen electric blind
5 Front armrest
6 Rear ashtray
Press the cover to open the ashtray.
To empty the ashtray, open it then release it by pulling it
towards you.
To refit the ashtray, clip it back into its housing.
7 Rear lighter
Push in and wait for a few moments until it springs out automatically.
8 Heated rear seats control
CENTRE CONSOLE
1 Storage compartment
2 Front lighter
Press and wait for a few moments until it springs out
automatically.
Ventilated glove box
To open the glove box, lift the handle.
The glove box is lit up when the
cover is opened.
The glove box has a vent E that can
be closed, which produces the same
conditioned air as the vents in the
passenger compartment.
It also has a pen holder F and three
sockets G for connecting video
equipment.
3 Front ashtray
Press the cover to open the ashtray.
To release the ashtray for emptying, open it then push the cover
downwards. To refit the ashtray, clip it back into its housing.
15-07-2002
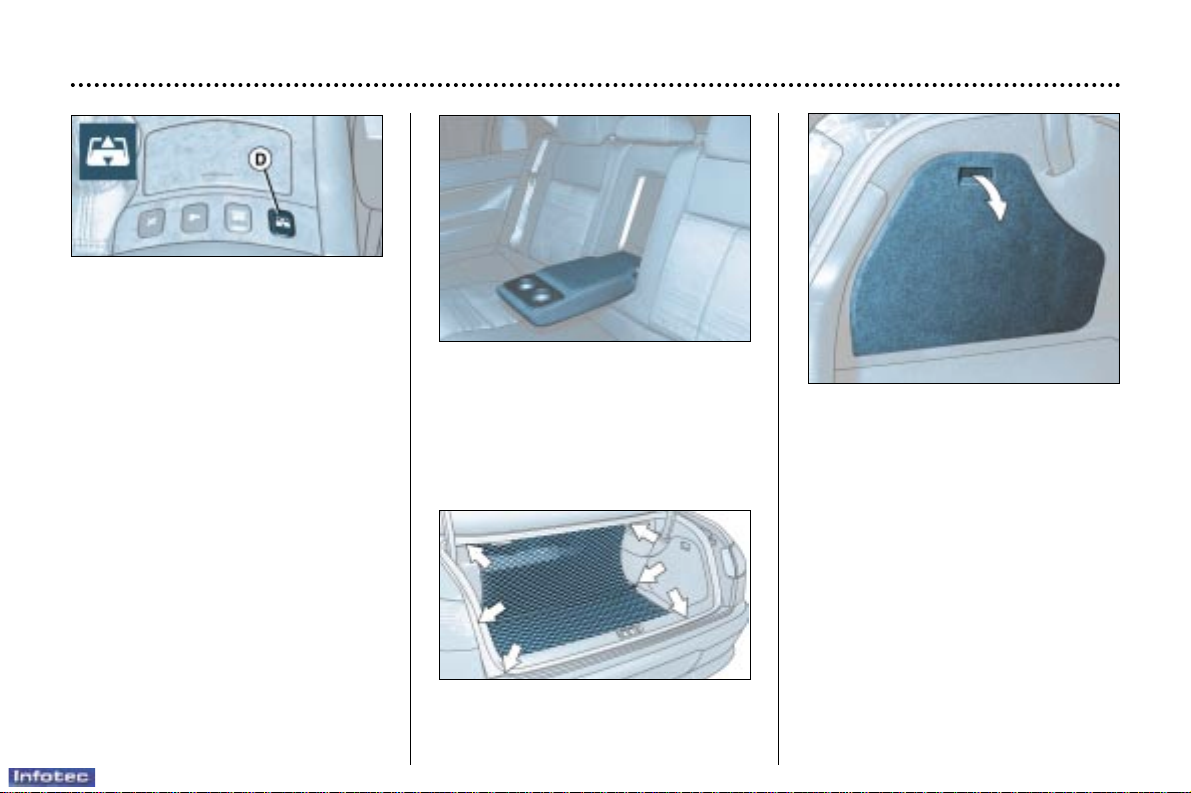
Luggage net
Six stowing rings allow the net to be
placed in different positions.
YOUR 607 IN DETAIL
122
Rear sunblind
The blind, fitted to the rear parcel
shelf, is intended to protect occupants from the glare of the sun and
the lights of cars behind.
Sunblind operation:
With the engine running:
☞ Briefly press button D on the cen-
tre console to open it out.
☞ Briefly press button D again to
store it away.
Warning: Do not place anything on
the blind, to avoid it being damaged.
Rear armrest
This provides access to the ski flap
from the passenger compartment.
It has two cup holders.
Storage compartments
There are two storage compartments
located behind the side trim of the
boot.
The left side storage compartment is
fitted with a CD storage bracket for
eight single CDs and one double CD.
To access a storage compartment:
☞ Push the handle downwards and
fold down the panel.
Rear shelf compartment
This is provided for the storage of a
first aid kit.
The catch on the lid is designed to
withstand a weight of 9 lbs (4kg) on
impact.
YOUR 607 IN DETAIL
123
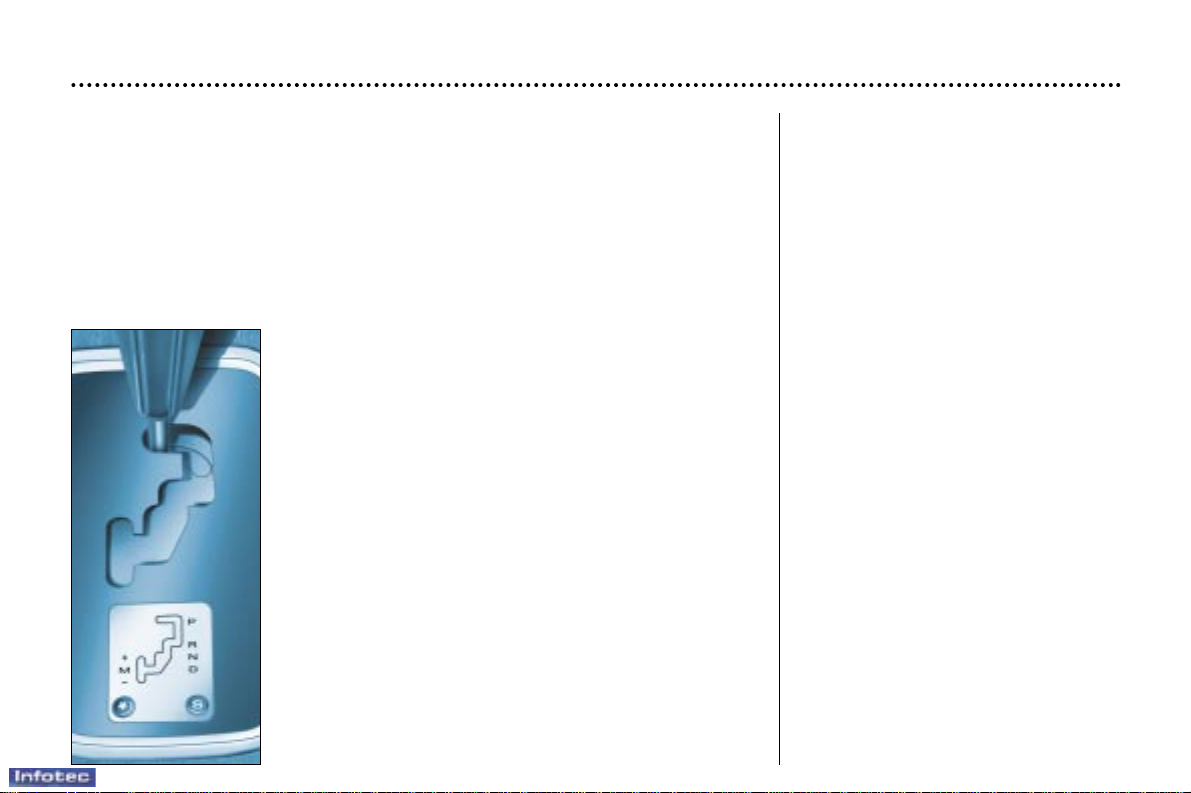
"PORSCHE TIPTRONIC system" AUTOMATIC GEARBOX
The four speed automatic gearbox offers a choice between the comfort of integral automatic operation, enhanced by a sport and a snow programme, or the
pleasure of manual gear changing.
Gear selection gate
☞ Move the lever in the gate to select a function.
Once the function is selected, the corresponding indicator light appears on the
instrument panel screen.
S: sport programme.
: snow programme.
Park: to immobilise the vehicle and to start the
engine, with the handbrake on or off.
Reverse: to reverse (select this function with the vehi-
cle stationary, engine at idle).
Neutral: to start the engine and to park, with the handbrake on.
Note: if position N is inadvertently engaged while driving, allow the engine to return to idle before engaging
function D to accelerate.
Drive: for driving in automatic mode.
Manual: for driving in manual mode.
Moving Off
With the engine running, to move off
from position P:
☞ it is essential to press the brake
pedal to exit position P,
☞ select function R, D or M, then
gradually release the pressure on
the brake pedal; the vehicle
moves off immediately.
Y ou can also move off from position N:
☞ release the handbrake, with your
foot on the brake,
☞ select function R, D or M, then
gradually release the pressure on
the brake pedal; the vehicle
moves off immediately.
WARNING
When the engine is at idle, brakes not
applied, if function R, Dor M is select-
ed, the vehicle moves even without
the accelerator being pressed.
For this reason, do not leave
children unsupervised inside the
vehicle, with the engine running.
When maintenance operations need
to be carried out with the engine running, apply the handbrake and select
position P.
15-07-2002

15-07-2002
Notes
It is only possible to change from one gear
to another if the vehicle speed and engine
speed permit. If they do not, the vehicle will
operate temporarily in automatic mode.
When the vehicle is stationary or moving
very slowly, the gearbox automatically
selects gear M1.
Programmes S (sport) and (snow) do not
operate in manual mode.
Operating abnormality
Any operating abnormality is
shown by illumination of this warning light, accompanied by an audible signal and the message 'Auto-
matic gearbox faulty' on the
multi-function display.
In this situation the gearbox operates in
downgrade mode (locked in 3rd gear). You
may feel a substantial knock when selecting
reverse from P to R and from N to R (this will
not cause any damage to the gearbox).
Do not exceed 60 mph (100 km/h).
Contact a PEUGEOT dealer as soon as
possible.
Automatic operation
Automatic changing of the four gears:
☞
select function D in the gate.
The gearbox always selects the most
suitable gear according to the following parameters:
– the style of driving,
– the road profile,
– the vehicle load.
The gearbox is then operating in auto-
adaptive mode, without any action on
your part.
WARNING
Never select function N when the vehicle is moving.
Never select functions P or R unless
the vehicle is stationary.
Never change betwen functions to
optimise braking on a slippery surface.
Notes
For immediate maximum acceleration
without touching the gear lever, press
the accelerator pedal down as far as it
will go (kickdown). The gearbox will
automatically change down or maintain the gear selected until maximum
engine speed is reached.
When the brake is applied, the gearbox will automatically change down in
order to provide efficient engine braking.
If you take your foot off the accelerator
suddenly, the gearbox will not change
to a higher gear for reasons of safety.
Sport and snow programmes
In addition to the auto-adaptive programme, there are two special programmes.
The programme is displayed on the
instrument panel screen.
Sport programme
☞
Press button S once the vehicle has
been started and function D selected.
The gearbox automatically favours
sporty driving and more dynamic
acceleration.
Snow programme
This programme improves starting and
drive when traction is poor.
☞
Press button once the vehicle has
been started and function D selected.
The gearbox adapts to driving on slippery roads.
Note: you can return to the auto-adaptive programme at any time.
☞
Press button S or again to switch
off the programme you are in.
Manual operation
Manual changing of the four gears:
☞
select function M in the gate,
☞
push the lever to the + sign to
change to a higher gear,
☞
pull the lever to the - sign to change
to a lower gear.
You can change from position D (dri-
ving in automatic mode) to position M
(driving in manual mode) at any time.
YOUR 607 IN DETAIL
124
If the battery is flat and the
lever is in position P, it will
be impossible to change
to another position.
15-07-2002
YOUR 607 IN DETAIL
125
EMERGENCY BRAKING
ASSISTANCE SYSTEM
In an emergency, this system
enables the optimum braking pressure to be reached more quickly,
thus reducing the stopping distance.
It is triggered according to the speed
of activation of the brake pedal. The
effect of this is a reduction in the
resistance of the pedal and an
increase in braking efficiency.
ABS ANTI-LOCK BRAKING
SYSTEM
The ABS with Electronic Brake Force
Distribution (EBFD) increases the stability and manoeuvrability of your
vehicle, particularly on poor or slippery road surfaces.
Note: when changing wheels (tyres
and rims), make sure that these are
approved.
The anti-lock braking system comes
into operation automatically when
there is a risk of wheel lock.
Illumination of this warning
light, accompanied by an
audible signal and the message "Braking fault" on the
multi-function display, indicates a malfunction of the electronic
brake force distribution, which can
cause a loss of control of the vehicle
when braking.
Stop immediately.
Contact a PEUGEOT dealer.
Normal operation of the ABS may
make itself felt by slight vibrations
of the brake pedal.
In emergency braking, press
very firmly without releasing
the pressure.
MANUAL GEARBOX
Reverse
To change to reverse gear, lift the
ring under the gear lever knob and
push the gear lever to the left then to
the front.
Reverse gear can only be engaged
when the vehicle is stationary with
the engine idling.
 Loading...