

Peugeot 407 2007 Owner Manual
SEEING CLEARLY
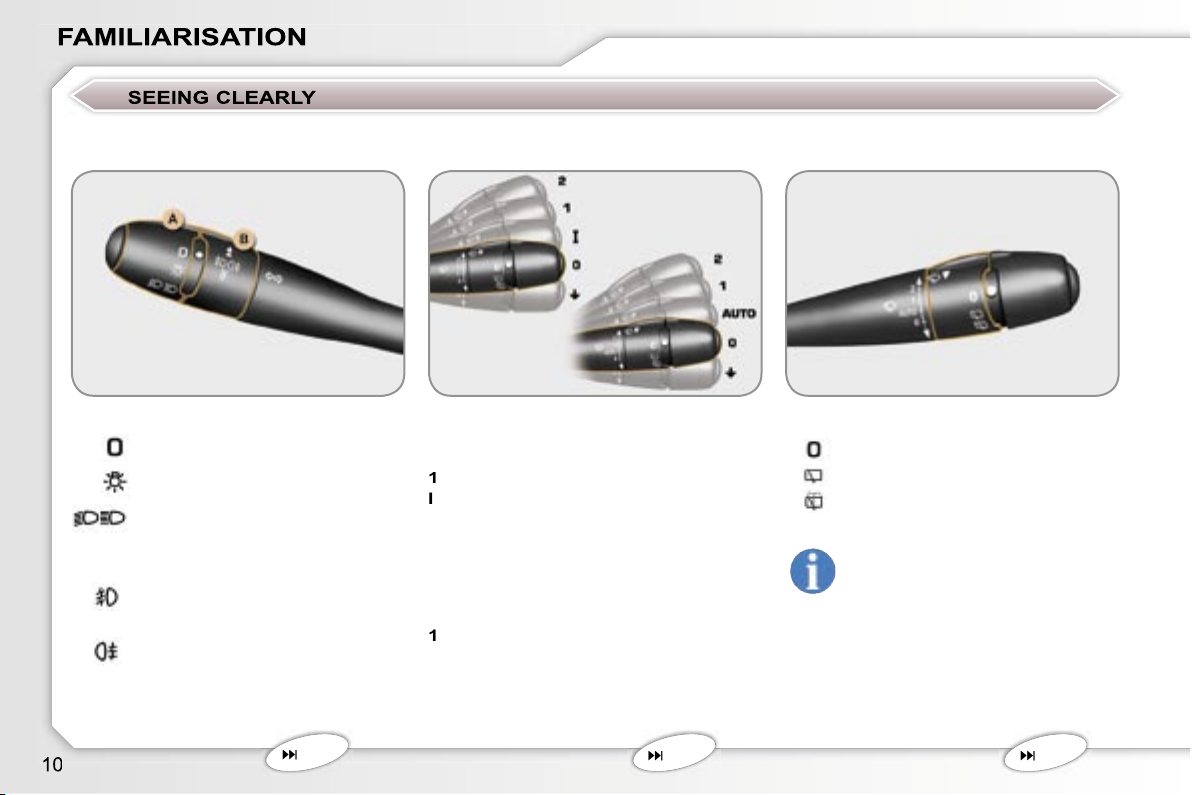
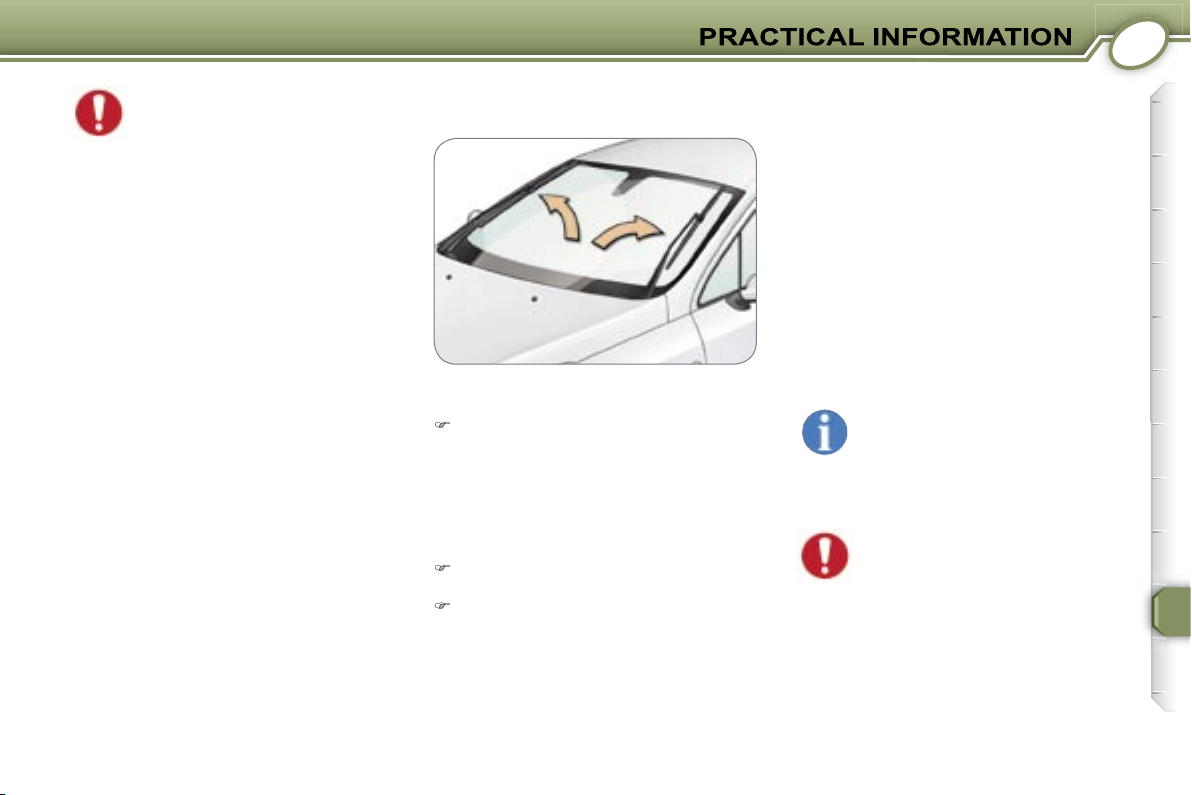
Windscreen wipers
with intermittent wipe
2
Fast wipe.
Normal wipe.
Intermittent wipe.
0
Park.
Single wipe.
Wipers
Wash-wipe.
80
81
Windscreen wipers
with automatic wipe
2
Fast wipe.
Normal wipe.
AUTO
Automatic wipe.
0
Park.
Single wipe.
Also...
When the windscreen wipers
control is activated and you
engage reverse gear, the rear
wiper operates in intermittent
Press switch
cator light comes on and
the
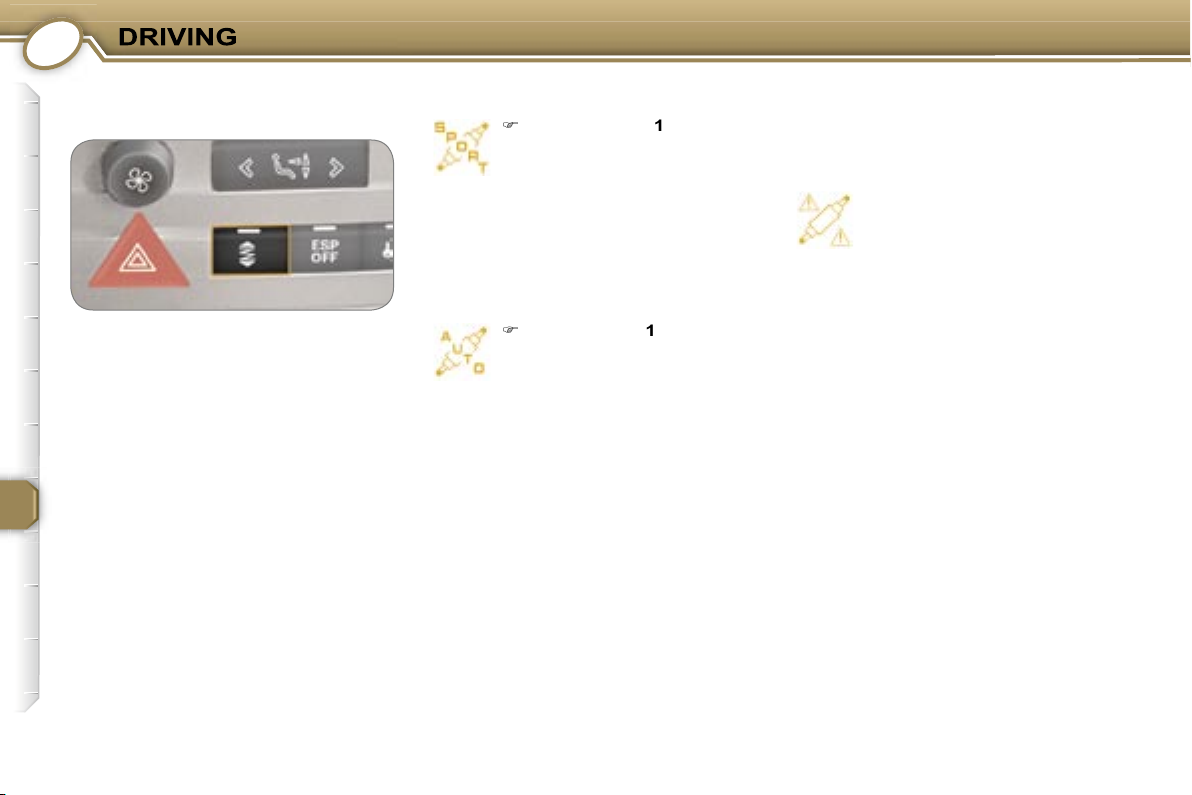
SPORT
warning light
comes on.
Press switch
again. The
off and the
AUTO
indicator
To return to automatic operation
SPORT
position.
comes on, accompanied by an
audible signal and a message
on the multifunction display.
contact a PEUGEOT dealer as soon
as possible.
Operating check
This is confirmed by the switch light
and the indicator lights.
ELECTRONICALLY
CONTROLLED SUSPENSION
The suspension adapts automatically
and instantly to different driving styles
and road characteristics, improving
the comfort of the occupants and the
vehicle’s road holding capabilities. The
suspension favours smooth shock ab-
sorption, ensuring a comfortable ride,
change (sporty driving, tight bends,
avoidance action, etc.) it automatically
selects firmer shock absorption, guar-
anteeing optimum road holding.
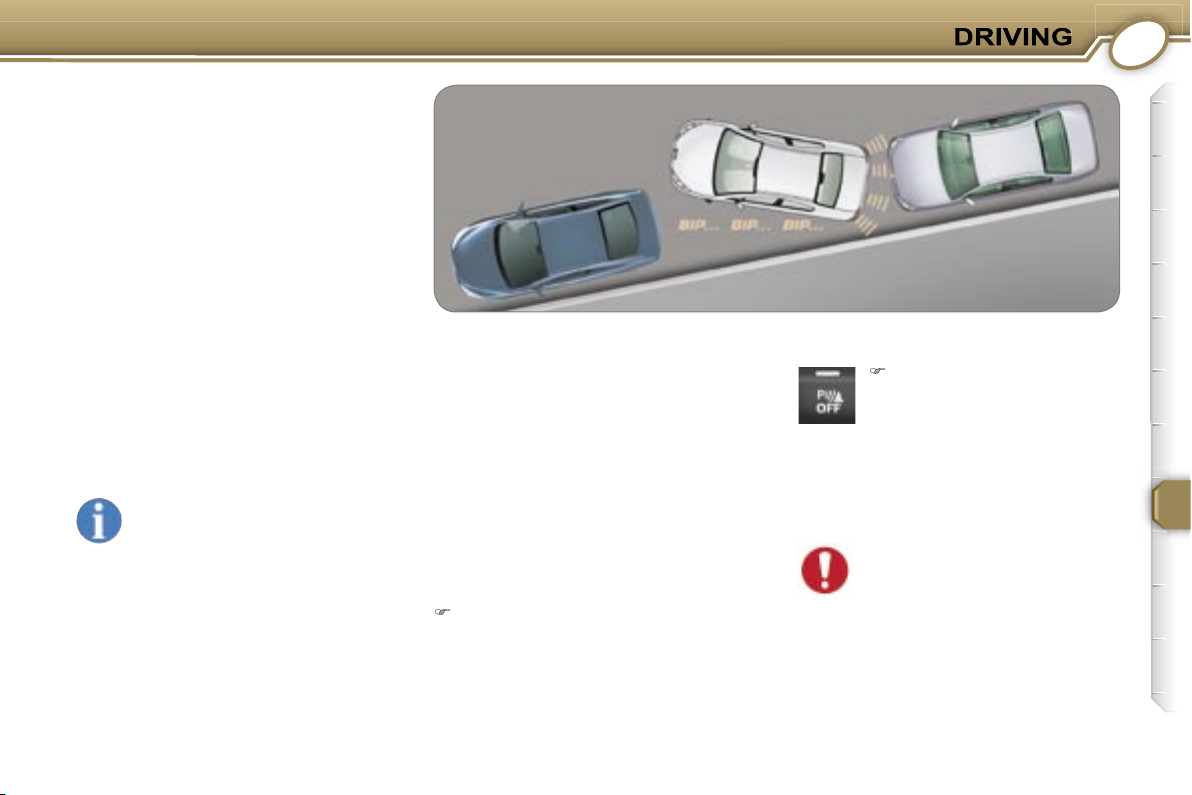
AUDIBLE REAR PARKING
ASSISTANCE
This system consists of four proximity
sensors, located in the rear bumper.
This detects any obstacle (person, cy-
clist, vehicle, tree, gate, etc.) behind
the vehicle. Nevertheless, it cannot
detect obstacles located just below
the bumper.
Warning:
an object, such as a stake,
a roadworks cone or any other similar
object detected at the beginning of the
during the manoeuvre.
To make manoeuvres in reverse gear
easier, adjust your mirrors in accord-
ance with the "Automatic tilting of the
on changing to reverse gear
a warning light on the instru-
and a message on the multifunction
display indicate that there is a system
Your vehicle’s rear speakers emit an
audible signal:
- on the right if an obstacle is detected
on the right,
- on the left if an obstacle is detected
on the left,
- on the right and left if an obstacle is
detected in the centre.
When the distance between the
five centimetres, the audible signal
Activation
The system is activated as soon as
The proximity information is given by
an audible signal, which becomes
the obstacle.
Switching the system off
Change to neutral, the system is
again inactive.
Press the switch on the
centre console.
The indicator light on the switch comes
on and the system becomes com-
ensure that the
sensors are not covered with
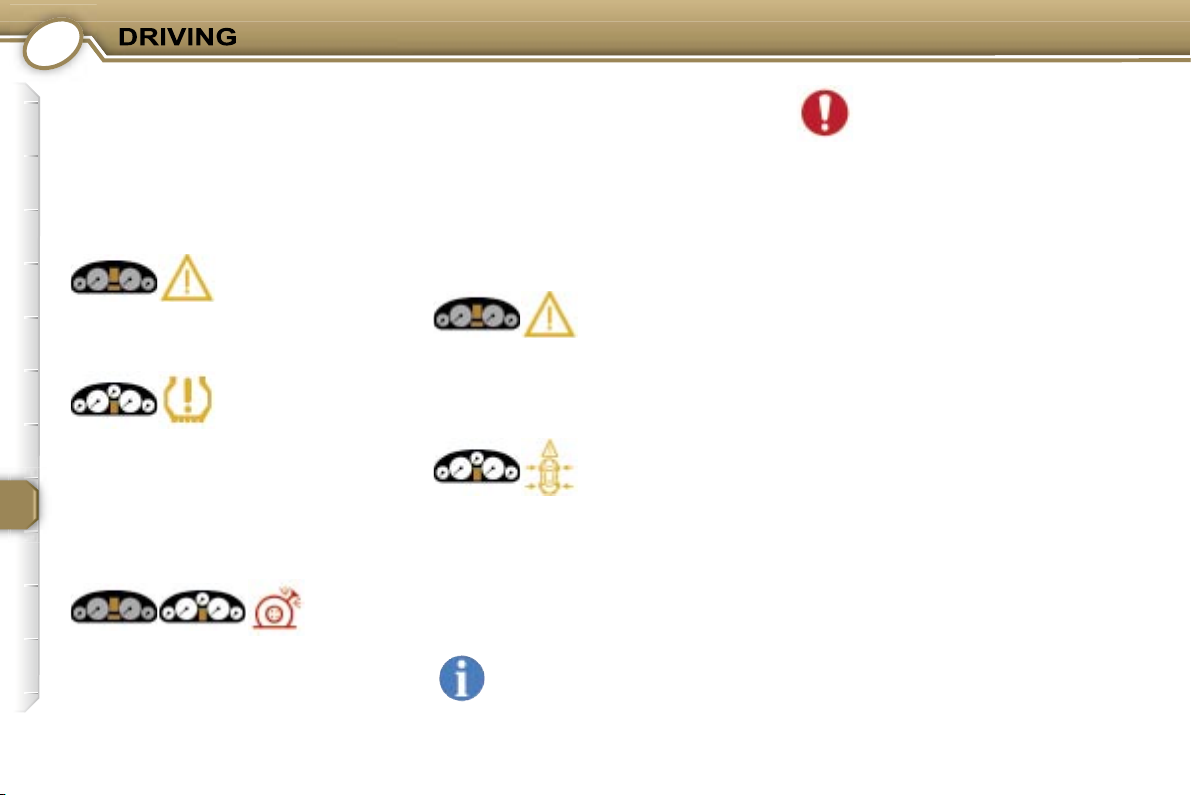
TYRE UNDER-INFLATION
DETECTION
event of malfunction.
warning light.
display warning
This is accompanied by the audible signal
and the message on the multi-function
display locating the wheel concerned.
the tyre pressure checked as soon as
This warning light, accompanied by
the audible signal and the message on
the multi-function display locating the
wheel concerned, is followed by illumi-
warning light.
den movement of the steering wheel
and the brakes.
tured or very deflated tyre), and have
the tyre pressure checked as soon as
Sensor(s) not detected or faulty
warning light.
This is accompanied
display which indicates that under-
fault in the system.
This is accompa-
signal and the message on the multi-
function display which indicates that
from one (or several) wheel(s) or that
there is a fault in the system.
the faulty sensor(s).
All repairs and changing of
tyres on a wheel fitted with this
system must be carried out by
a PEUGEOT dealer.
wheel which is not detected by your
vehicle, you must have the system
The tyre under-inflation detection sys-
tem is an aid to driving which does not
vigilant or to drive responsibly.
This system does not eliminate
the need to have the tyre pressure
checked regularly (see manufacturer’s
the optimum dynamic performance
of the vehicle is maintained and pre-
vent premature wear of the tyres, par-
ticularly in arduous driving conditions
The tyre pressures must be checked
cold, at least once a month. Remem-
wheel.
The tyre under-inflation detection sys-
tem may experience temporary inter-
ference due to radioelectric emissions
on a frequency close to that used by
the system.
This is accompanied by the message
on the multifunction display locating
the wheel concerned.
this message is also
displayed when one of the
wheels is away from the ve-
one or more wheels without a sensor
are fitted.
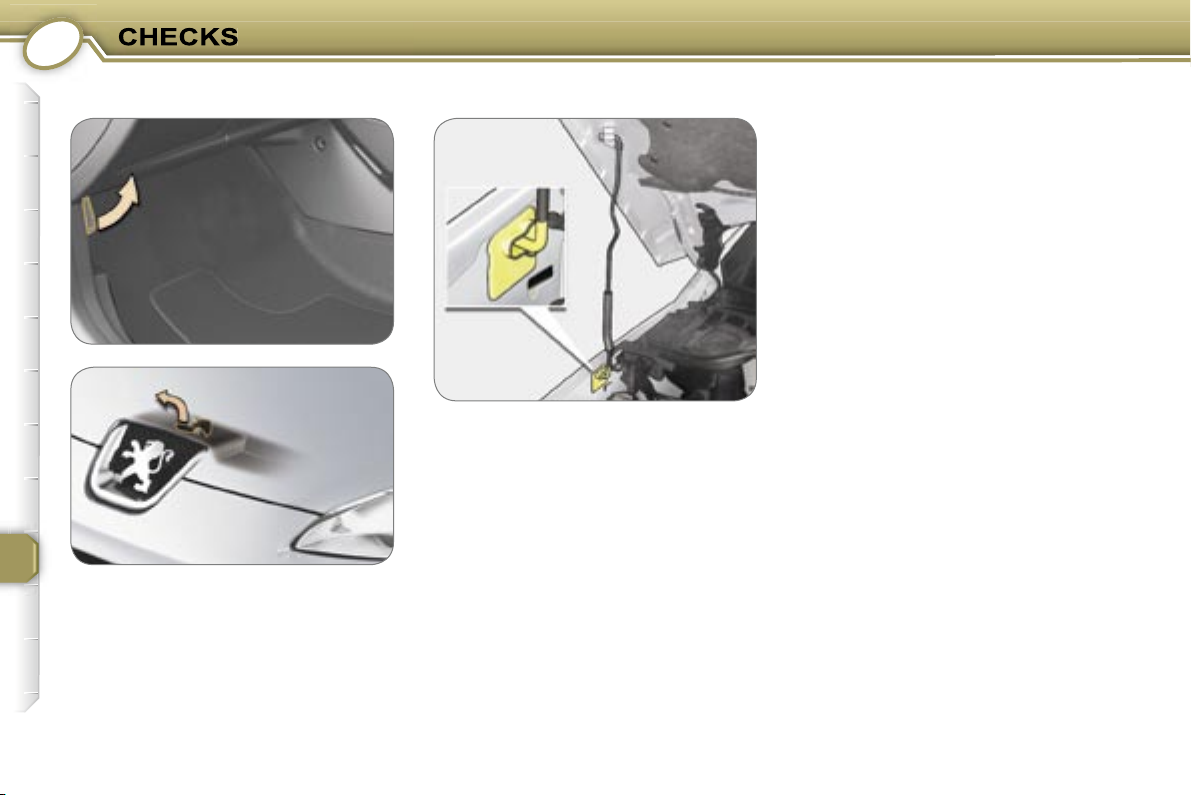
OPENING THE BONNET
To close
end of its travel. Check that the bonnet
pull the handle on the
you.
move the catch to the
the bonnet open.
strut in its clip.
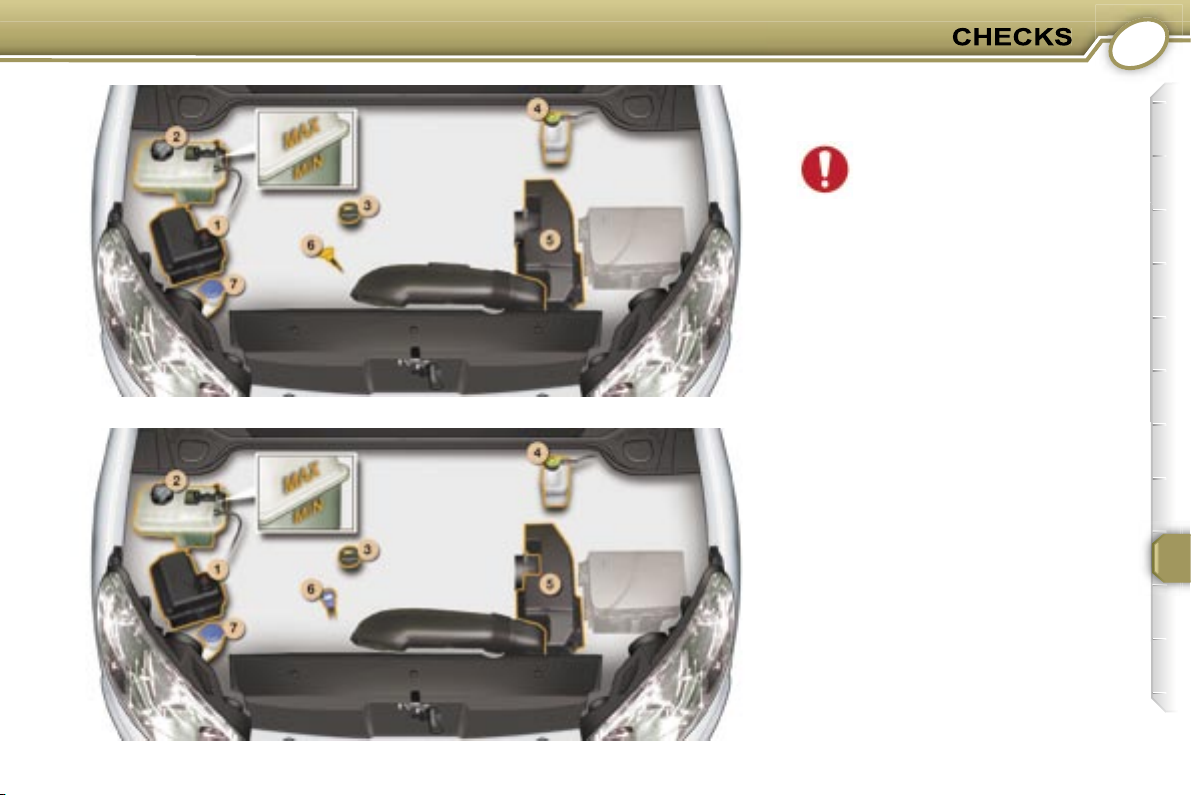
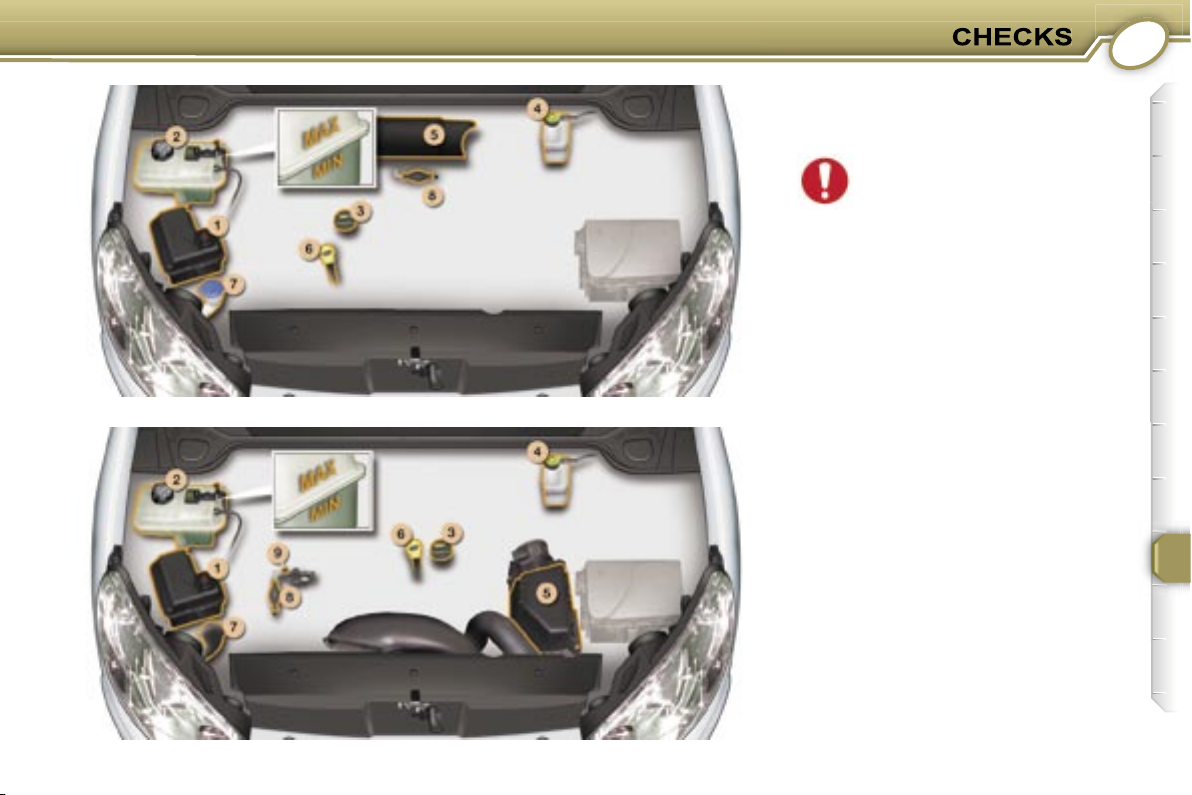
1.8 LITRE 16V and 2 LITRE 16V
PETROL ENGINES
* According to country.
if you have to
cover, handle it with care to
avoid damaging the fixing clips.
Power steering reservoir.
3 -
Engine oil filler cap.
Brake fluid reservoir.
Air filter.
6 -
Dipstick.
Windscreen and headlamp*
wash filler cap.
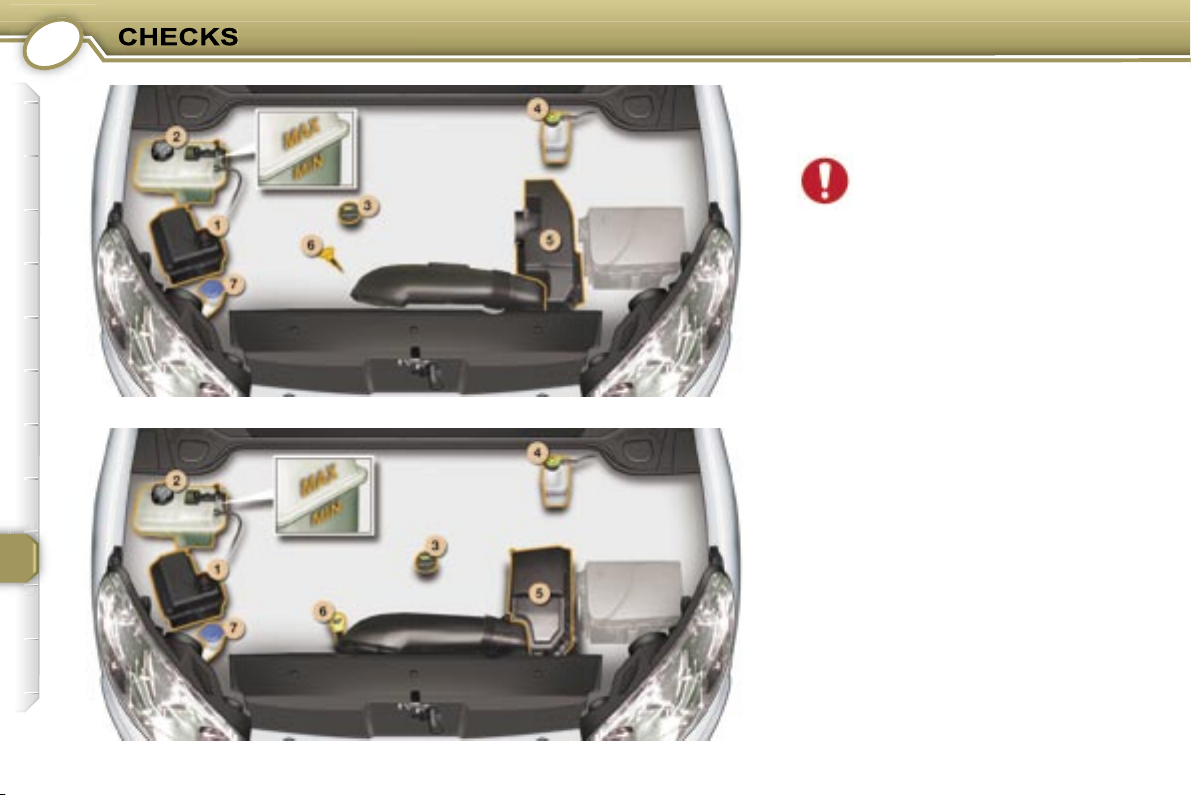
2.2 LITRE 16V and
3 LITRE V6 24V
PETROL ENGINES
* According to country.
if you have to re-
cover, handle it with care to
avoid damaging the fixing clips.
Power steering reservoir.
2 -
3 -
Engine oil filler cap.
4 -
Brake fluid reservoir.
Air filter.
6 -
Dipstick.
7 -
Windscreen and headlamp*
wash filler cap.
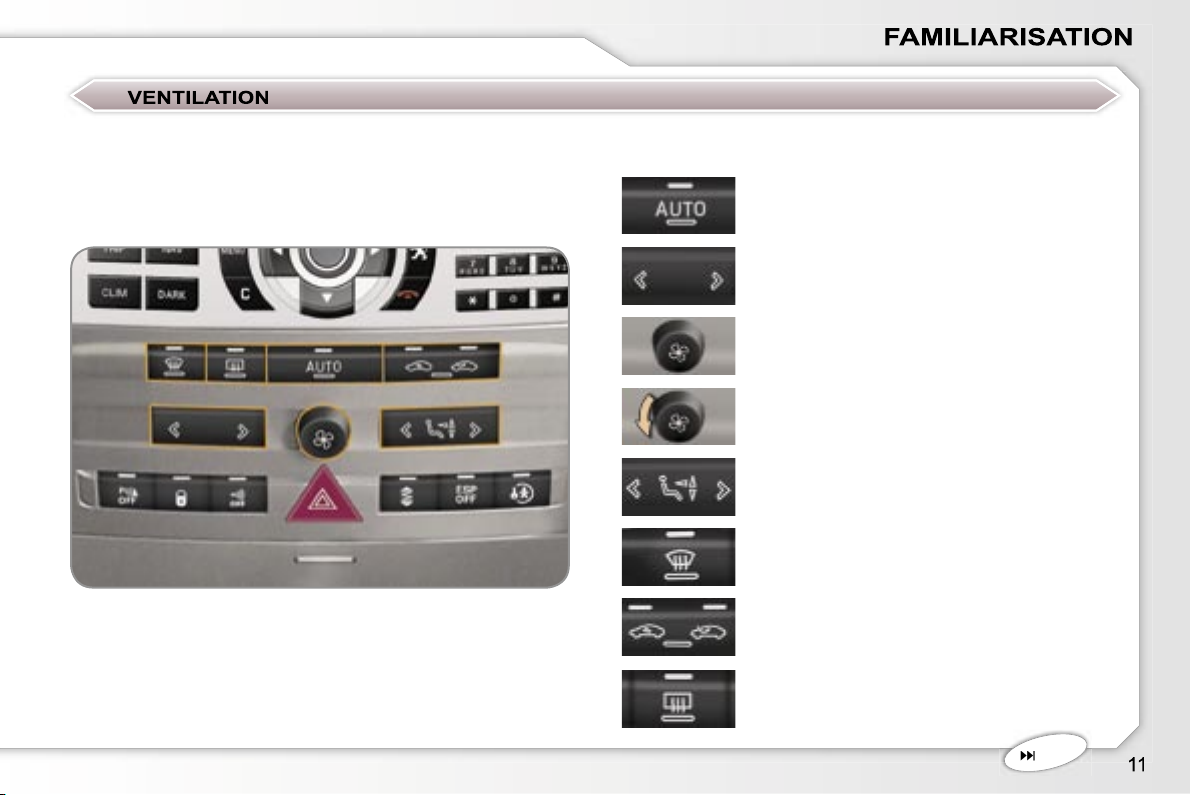
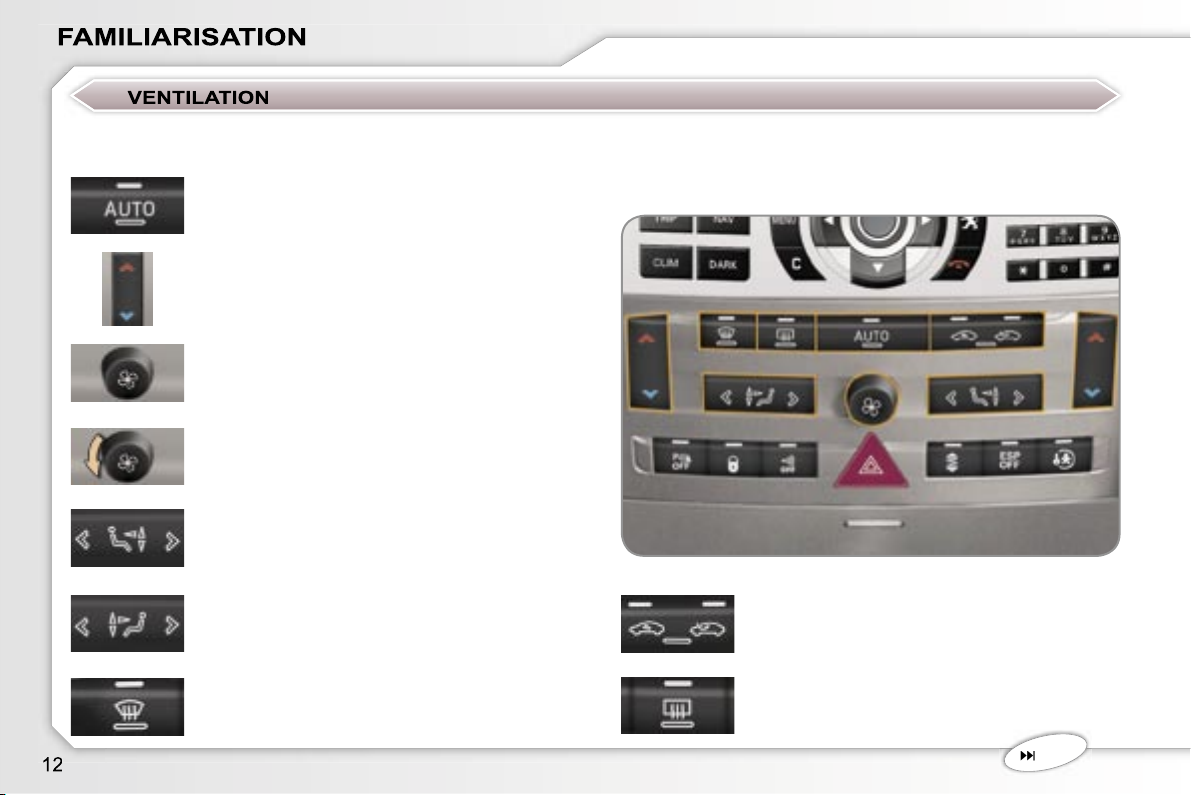
VENTILATION
Automatic air conditioning (mono zone)
Automatic programme (comfort).
Temperature adjustment.
Air flow adjustment.
Air conditioning off.
Air distribution adjustment.
40
1.6 LITRE HDI 16V and
2 LITRE HDI 16V
DIESEL ENGINES
* According to country.
if you have to
cover, handle it with care to
avoid damaging the fixing clips.
Power steering reservoir.
2 -
3 -
4 -
Air filter.
6 -
Dipstick.
7 -
Windscreen and headlamp
wash* filler cap.
8 -
9 -
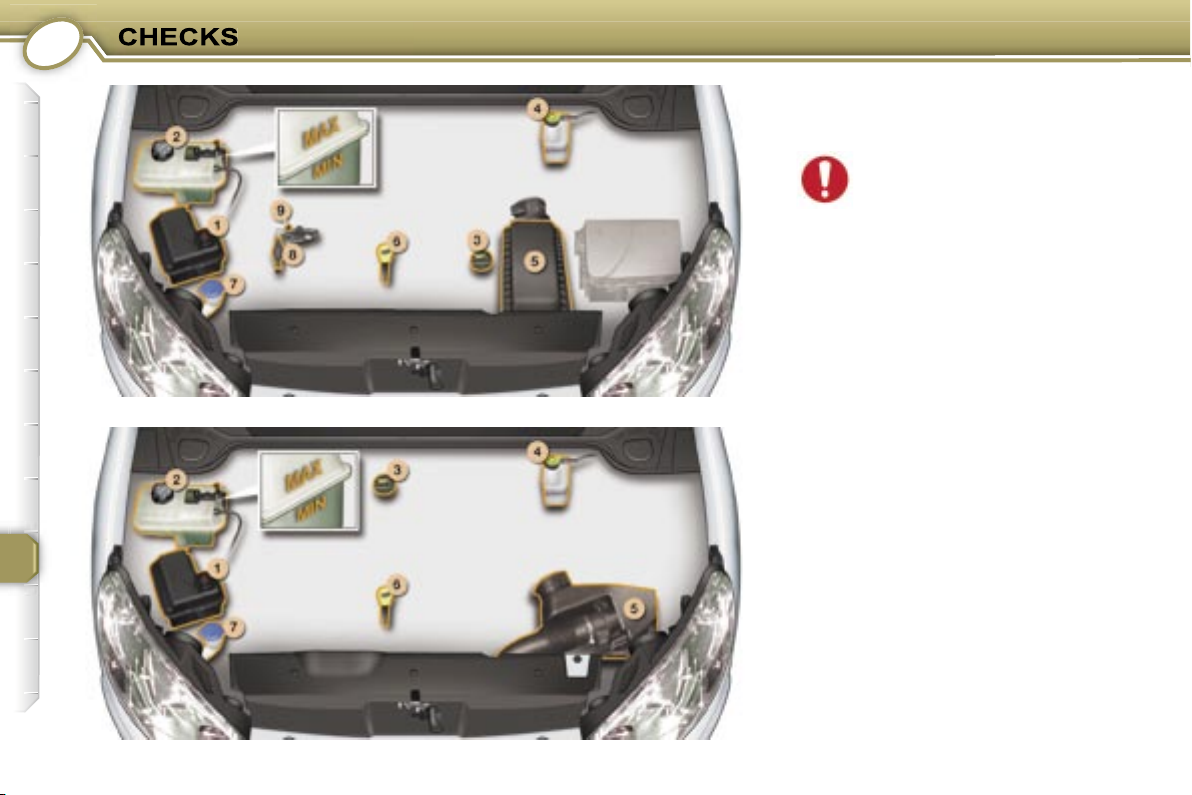
2.2 LITRE HDI 16V and
2.7 LITRE HDI 24V
DIESEL ENGINES
* According to country.
if you have to re-
er, handle it with care to avoid
damaging the fixing clips.
Power steering reservoir.
3 -
4 -
Air filter.
6 -
Dipstick.
7 -
Windscreen and headlamp
wash* filler cap.
8 -
9 -
CHECKING THE LEVELS
These are normal maintenance opera-
tions which keep your vehicle in good
working order. Consult the instructions
fotec site or in the servicing booklet
enclosed with this handbook.
There are two marks on
the dipstick:
A
= maximum
= minimum
To maintain the reliability
of engines and emission
control systems, the use
of additives in engine oil is
the engine having been off for more
than 15 minutes, using the dipstick.
Oil change
oil chosen must meet the requirements
schedule. Consult the instructions in the
site.
avoid used oil coming into pro-
the used oil into the containers provid-
ed for this purpose in the PEUGEOT
system is pressurised, wait for at least
one hour after the engine has stopped
cordance with the recommendations
of the servicing schedule.
changed at the intervals specified in
accordance with the manufacturer’s
servicing schedule.
avoid all contact with the skin,
the brake fluid is harmful to health and
very corrosive.
at ambient temperature. The level
should always be above the MIN.
Windscreen and headlamp
wash level
safety, to see and be seen, we would
advise that you use products of the
407 is fitted with Xenon bulbs.
To prevent damage to the electrical
to release the pressure to pre-
vent any risk of scalding. When
the pressure has dropped, re-
the coolant does not need to be
changed.
When the engine is warm, the
temperature of the coolant is
controlled by the engine fan. As this
fan can operate with the ignition key
drains or onto the ground.
if you have to re-
cover, handle it with care to
avoid damaging the fixing
clips.
CHECKS
At the start of winter, have
your battery checked by a
them twice as often.
Air filter and passenger
filter is maintained in accordance with
the manufacturer’s servicing schedule,
following prolonged operation of
the vehicle at very low speed or at idle,
you may, in exceptional circumstances,
exhaust on acceleration. This does not
the vehicle or the environment.
sembly may operate after the vehicle
cold.
Where the handbrake travel is
too great or there is a reduc-
tion in the performance of the
system, the handbrake should
Disc wear status
dealer.
FUEL SUPPLY CUT-OFF
(PETROL)*
As a safety precaution, in certain cir-
cumstances, a mechanism prevents
fuel from reaching the engine.
To re-establish the fuel supply:
press the red button on the angle
of the front right-hand suspension
assembly, under the bonnet.
RUNNING OUT OF FUEL
(DIESEL)
essary to re-prime the circuit.
The repriming pump and the degas
screw are located under the bonnet
technical data section):
- fill the fuel tank with at least five litres
of diesel,
- squeeze and release the manual re-
the transparent pipe,
- operate the starter until the engine
starts.
2 litre 16V HDI engine
- fill the fuel tank with at least five litres
of diesel,
- unscrew the degas screw,
- squeeze and release the manual
escaping via the degas screw,
- retighten the degas screw,
- operate the starter until the engine
starts.
the style of driving, in particu-
the thickness of the pads,
even between services.
* According to version.
To ensure the best performance
from components as important
as the power steering and the
selects and offers specific products,
only use products recommended by
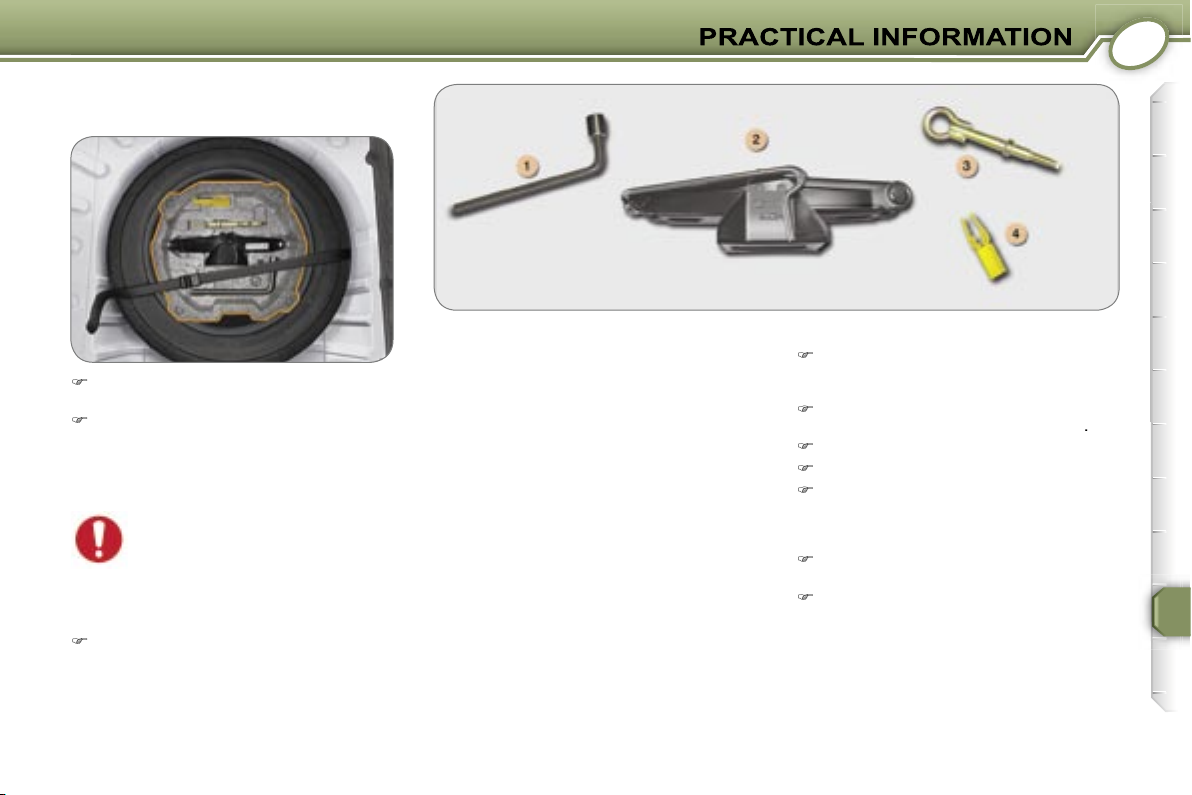
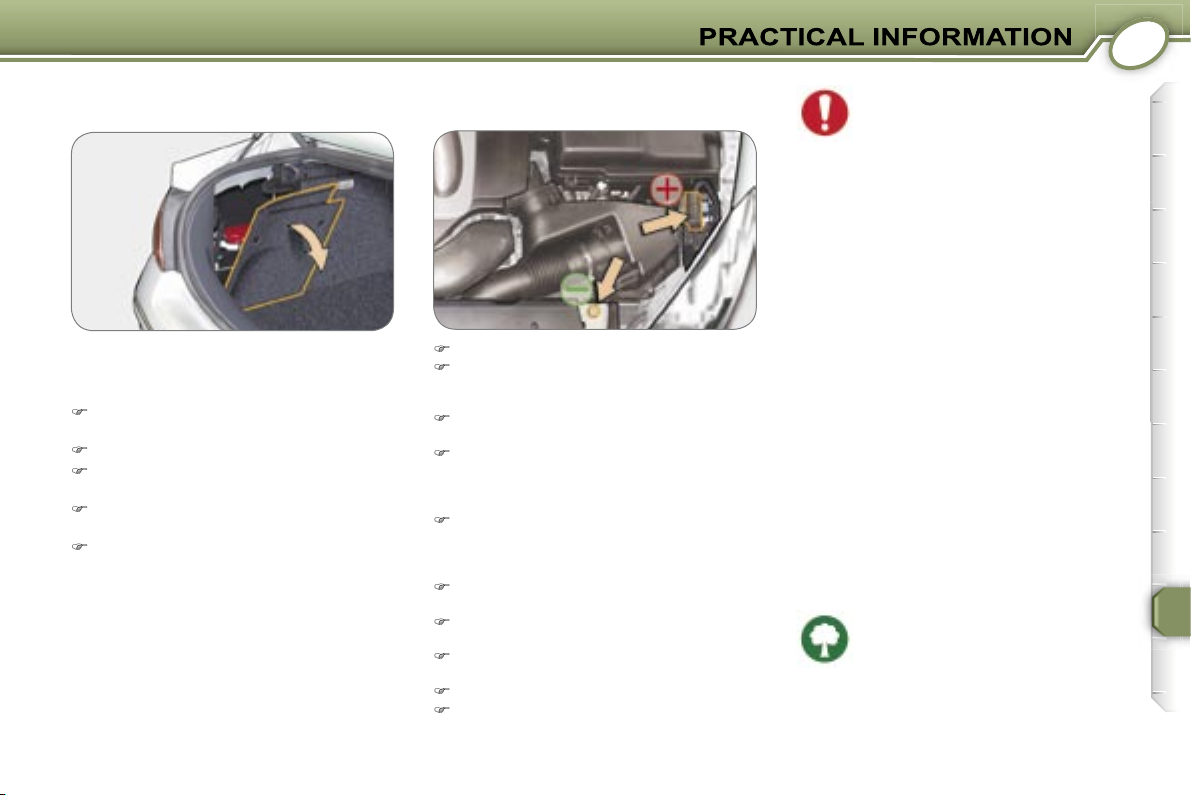
CHANGING A WHEEL
Tools available
The following tools are located in
the holder in the centre of the spare
wheel:
Wheelbrace.
Permits removal of the wheel
trim and removal of the wheel
securing bolts.
Jack with integrated handle.
Permits raising of the vehicle.
3 -
See corresponding section.
4 -
Permits removal of the bolt
wheels.
For vehicles with steel wheels, de-
tach the trim using the wheelbrace
For vehicles with alloy wheels,
4
Loosen the wheel bolts.
Take the jack from the tool kit.
Place the jack
in one of the four
changed).
Extend the jack
2
contact with the ground.
Unscrew the bolts and remove the
wheel.
Access to the spare wheel and the
jack in the boot
Lift the floor using the lifting handle.
seal.
cle which is supported only by
a jack.
Park the vehicle on level, stable
and non-slippery ground.
Apply the handbrake, switch off the
gear (position
for the automatic
gearbox).
Position the wheel.
Tighten the bolts by hand.
Partly tighten the bolts using the
wheelbrace.
Fold the jack
2
and remove it.
Fully tighten the bolts using the
wheelbrace
For vehicles with steel wheels, refit
the wheel trim starting by placing
with the palm of the hand.
For vehicles with alloy wheels, refit
the covers.
Put the tool holder back in position.
This helps to keep the boot floor in its
correct position, to prevent any de-
formation of the floor when loaded.
Tighten the spare wheel securing
strap to prevent noise and for your
safety in the event of impact.
for your safety, always
change a wheel:
- on level, stable, non-slippery
ground,
- with the handbrake applied,
- with first or reverse gear engaged
for the automatic gear-
- never go underneath a vehicle which
Tyre under-inflation
detection system warning
These original wheels are fitted with a
which detects the removal or absence
of a wheel fitted with the indicator
sensor signals the anomaly. Have
the wheel repaired and checked by a
After changing the wheel:
- have the tightening of the bolts and
the tyre pressure of the spare wheel
checked as soon as possible.
- have the punctured wheel repaired
and refit it to the vehicle as soon as
- have the spare wheel checked and
temporary spare wheel*
Your vehicle may be equipped with a
spare wheel with a different rim to that
of the standard wheel.
After use, replace it as soon as
- do not drive above
- do not fit a wheel trim,
- drive carefully,
- check the inflation pressure indicat-
ed on the label.
* According to version and country.

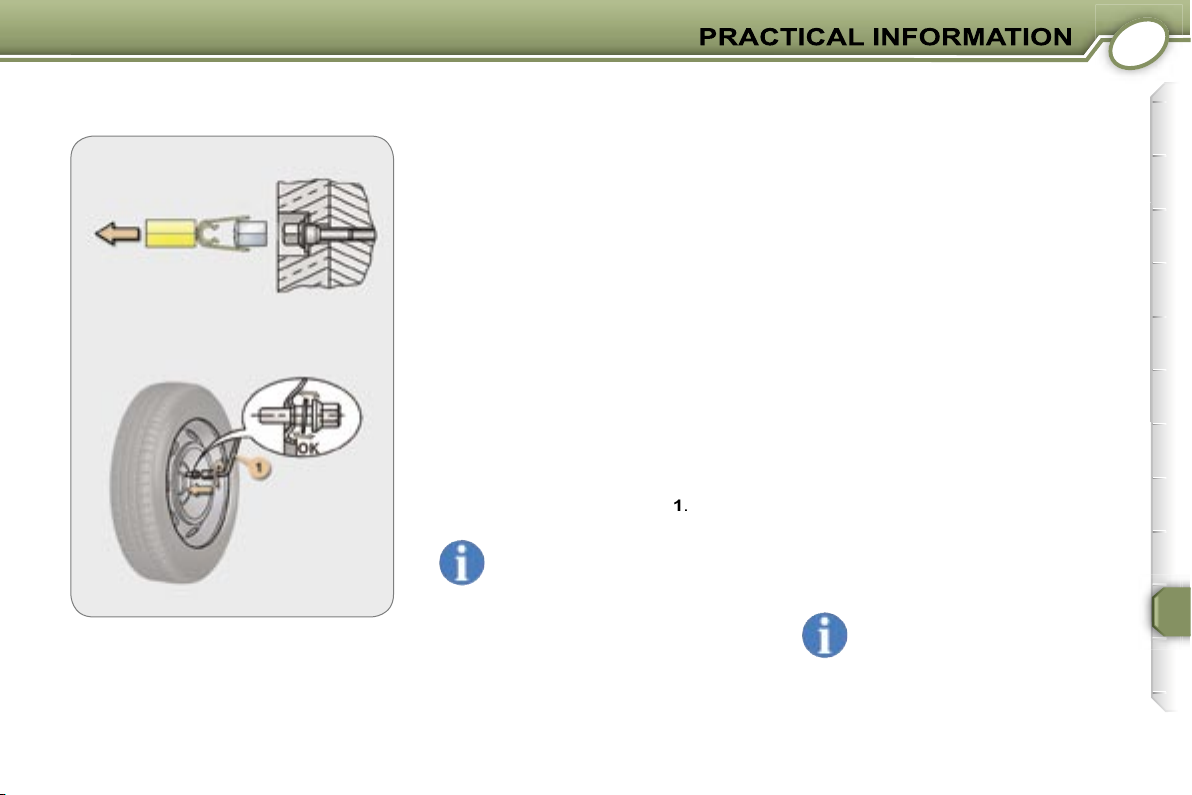
Alloy wheel bolts are covered by
chrome trims.
to remove the trims
spare wheel, when fitting it, it is
when tightening the bolts to
wheel is secured by the cone shape
of each bolt.
VERY COLD CLIMATE
SCREEN*
The very cold climate screen is a par-
tial removable cover which is clipped
onto the air intake grille to prevent the
accumulation of snow due to direct
splashes.
cle, it is imperative that it is removed
when the ambient temperature condi-
tions rise above 10 °C again.
Tyres of size 215/55 R17
cannot be fitted with stand-
ard snow chains, contact a
* According to country.
Special features of alloy
wheels
Anti-theft bolts
Your wheels are fitted with anti-theft
chrome trims which must be removed
are unscrewed using the anti-theft
socket and the wheel brace
wheels onto your vehicle, it is
essen-
tial
to use special bolts available from
your PEUGEOT dealer.
this anti-theft socket
was given to you on delivery
of your vehicle with the dupli-
cate keys and the confidential
card. Make a careful note of the code
anti-theft socket. This will enable you
to obtain a duplicate anti-theft socket
from a Peugeot dealer. You are ad-
vised to do the same for the duplicate
card in the vehicle.
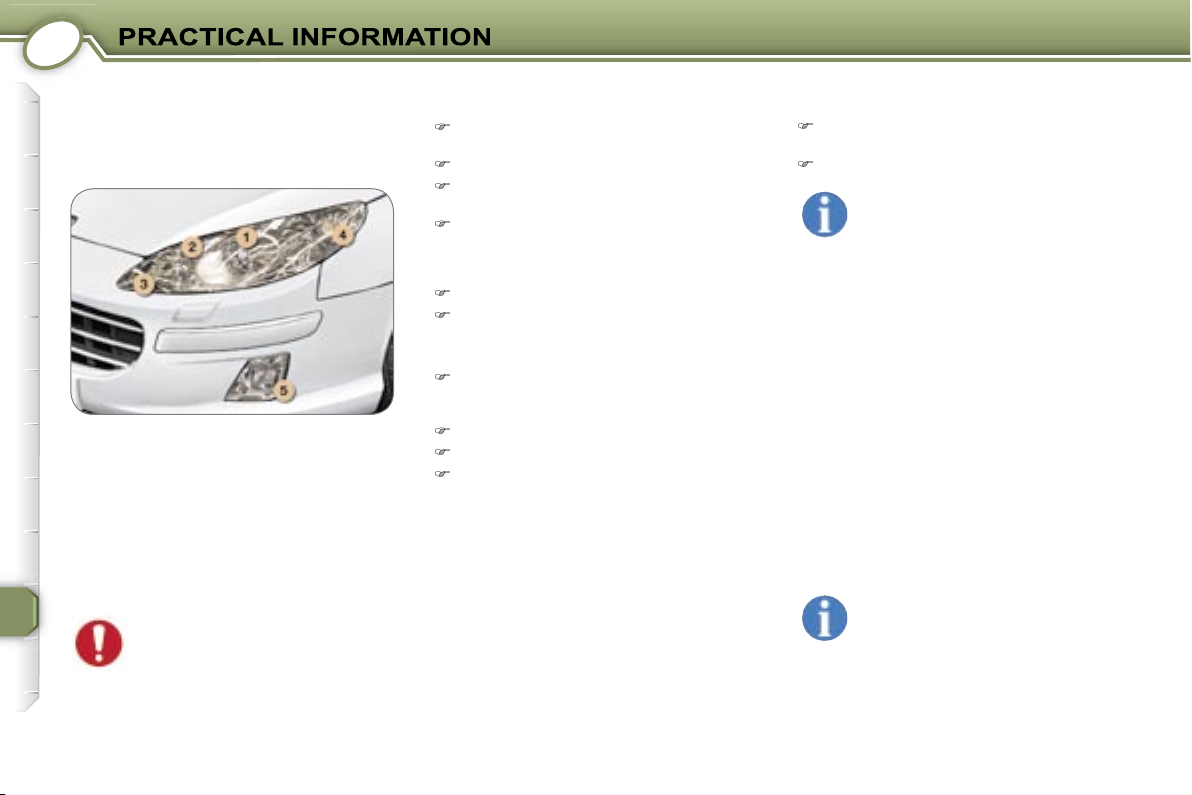
2 - Main beam headlamps:
Remove the protective cover corre-
sponding to the faulty bulb.
Disconnect the connector.
Press the end of the securing clips
to free the bulb. Change the bulb.
When fitting the new bulb, ensure
that the direction notches are po-
sitioned correctly and the securing
clips are fixed properly.
Reconnect the connector.
Refit the protective cover.
3 - Side lights:
W 5 W.
Remove the protective cover, dis-
connect the connector and then re-
Put the connector back in place.
Reconnect the connector.
Refit the protective cover.
4 - Direction indicators:
Turn the bulb holder a quarter turn
and remove it.
Change the bulb.
WARNING: RISK OF
the cover secured by one or two but-
terfly screws, a plastic retainer clip and
two quarter turn screws.
Xenon bulbs must be replaced by a
Amber coloured bulbs (direc-
tion indicators and side re-
with bulbs of identical specifi-
cation and colour.
H11-55 W.
Turn the wheels to full lock.
Access to the bulb is via the flap in the
front mud flap.
The headlamps are fitted with polycar-
cloth, nor with a detergent or solvent
wash-wipe and headlamp wash reser-
voir is of good quality.
condensation on the inside
surface of the headlamp glass
after the lights are switched on.
Third brake light:
either side, perpendicular to its di-
the rear, near the rear screen.
Pull the red transparent cover out-
wards while maintaining the pres-
sure on the tabs.
Change the faulty bulb.
When refitting, ensure that the
tabs of the red transparent cover
are engaged correctly and that the
correctly.
Screw on the light fixing nuts inside
the boot using the towing eye, if
that the light is positioned and fixed
correctly.
Reconnect the connector.
W 5 W.
Remove the transparent cover
Change the faulty bulb.
Push the repeater forwards or
Amber coloured bulbs (direction indi-
cators and side repeaters), must be
fication and colour.
2 - Reversing lights:
P 21 W.
3 - Fog lamps/side lights:
4 - Side lights:
Disconnect the connector.
Unscrew the light fixing nuts in-
side the boot using the towing eye
Remove the seal.
Unclip the bulb holder moving aside
the 5 tabs.
Unscrew the bulb and change it.
Lock the bulb holder in place.
Reposition the seal.
Automatic air conditioning (dual zone)
Temperature adjustment, driver’s side.
Temperature adjustment, passenger side.
Air flow adjustment.
Air conditioning off.
VENTILATION
The electrical system of your
vehicle is designed to operate
with standard or optional equip-
contact a PEUGEOT dealer.
your vehicle or for rectifying the mal-
functions resulting from the installation
of accessories not supplied and not
tions, in particular where the equip-
The maxi-fuses provide additional
All work must be carried out by a
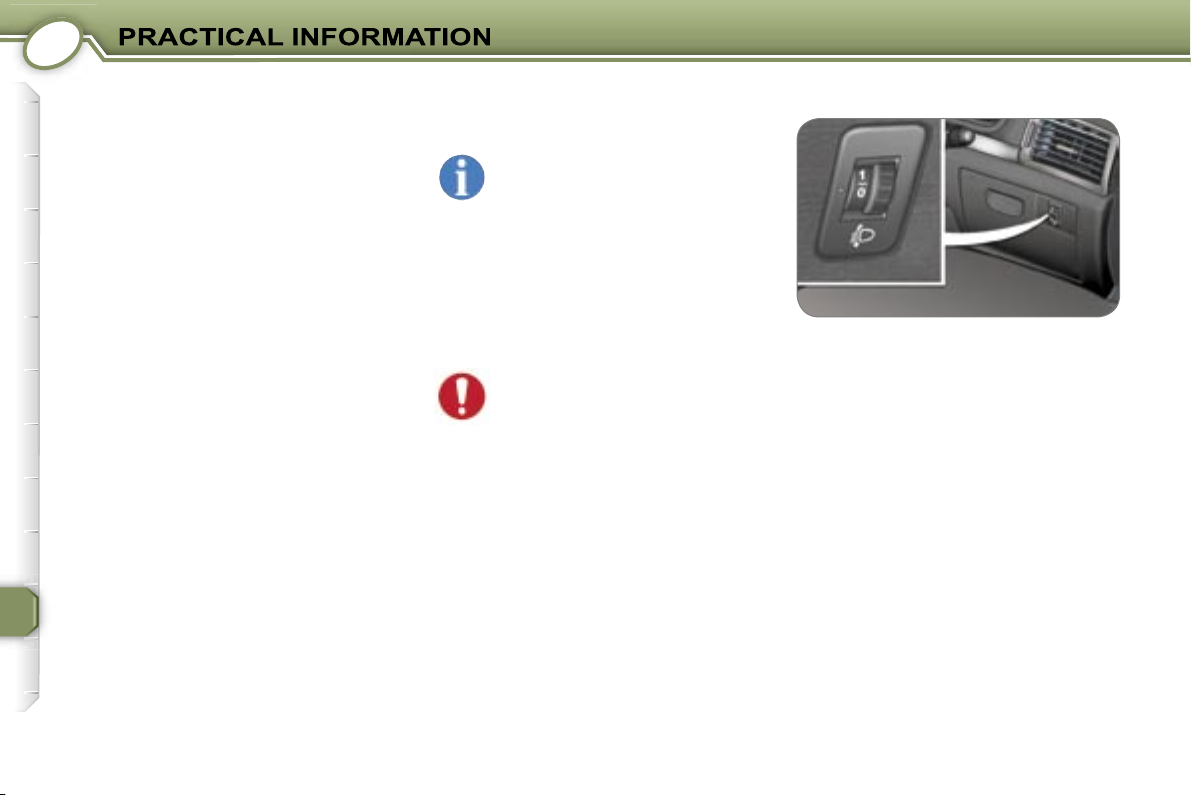
WIPER BLADE
ECONOMY MODE FUNCTION
After the engine has stopped, certain
functions (audio equipment, wind-
screen wiper, electric windows, sun-
etc) are only supplied with power for
approximately thirty minutes, to prevent
complete discharging of the battery.
tion display and the active functions
are
These functions are automatically re-
activated when the vehicle is started.
A flat battery prevents the en-
gine from starting.
As winter approaches, have your bat-
tery checked by a PEUGEOT dealer.
when economy mode starts,
the call.
Less than one minute after switching
off the ignition, press the windscreen
wiper stalk down once to position the
Lift the arm, then unclip the blade
and remove it.
Fit the new blade and fold down the
arm.
To reposition the blades, switch on the
wiper stalk.
To start the vehicle from another
- Connect the red cable to the positive
- Connect one end of the green or
- Connect the other end of the green
or black cable to an earth point on
the broken down vehicle as far as
- Operate the starter, let the engine
- Wait for the engine to return to idle,
then disconnect the cables.
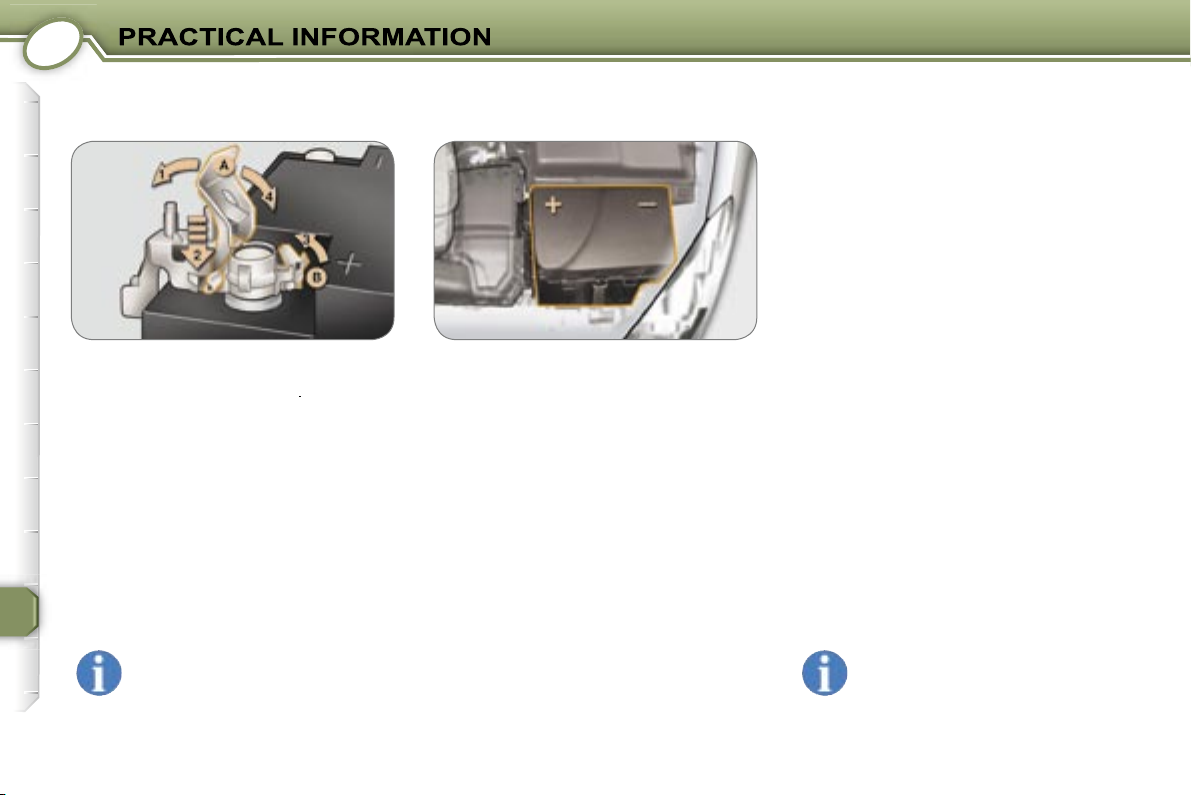
BATTERY (LOCATED IN THE
ENGINE COMPARTMENT)
- Raise the locking plate
- Position the open clip of the cable on
the positive (+) terminal of the bat-
tery.
- Press until the position checking
system
tilts.
- Lock the clip by lowering the locking
the battery if the vehicle is not
to be used for a period of more
than one month.
To charge the battery using a
- Disconnect the battery,
- Follow the instructions for use given
- Reconnect starting with the negative
- Check that the terminals and con-
ered with sulphate (white or greenish
deposit), disconnect them and clean
them.
To start the vehicle from another
BATTERY
(LOCATED IN THE BOOT)*
* Vehicles fitted with the 2.7 litre HDI
24V engine.
The battery is in the left boot trim.
To charge the battery using a bat-
tery charger (boot open):
fold down the panel to gain access
to the battery,
disconnect the battery,
follow the instructions for use given
reconnect starting with the nega-
tive (-) terminal,
raise the panel and close it.
open the bonnet,
use the two additional positive (+)
and negative (-) terminals located
open the red cover of the positive
connect the red cable between the
tive (+) terminal of the slave bat-
tery,
connect the green or black cable
and the negative (-) terminal of the
slave battery,
operate the starter, let the engine
wait for the engine to return to idle,
then disconnect the cables,
close the red cover of the positive
refit the left side cover,
close the bonnet.
2 minutes after switching off
the ignition.
engine is running.
disconnecting the terminals.
they do not operate normally following
tialisation of the electric windows" and
After every reconnection of the bat-
tery, switch on the ignition and wait
electronic systems to be initialised.
On the 2.7 litre 24V HDI engine, if
there is no battery in the boot, do
circuit may occur.
The batteries contain harmful
substances such as sulphu-
with regulations and must never be
discarded with household waste.
Take used batteries to an approved
collection point.
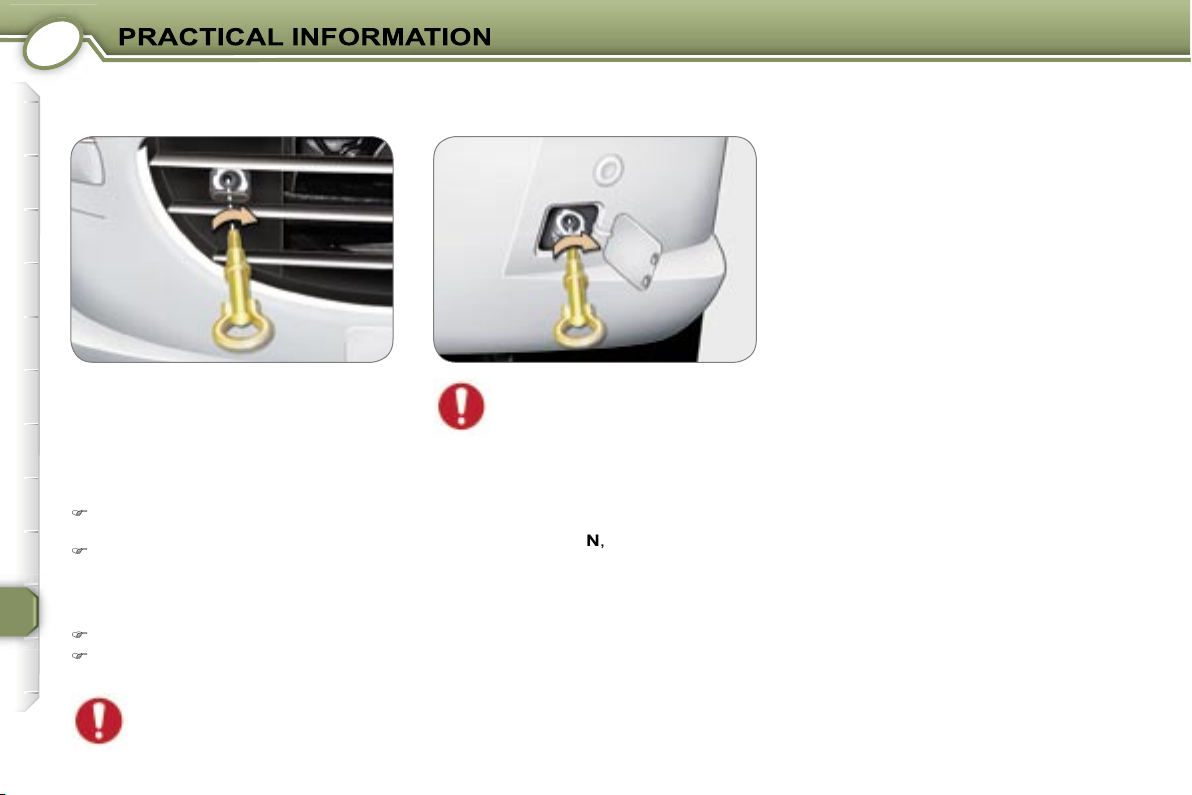
Without lifting
You must always use a towbar.
The removable towing eye is inside
the spare wheel.
Screw in the towing eye as far as it
will go.
Special features of the
automatic gearbox
When towing with the engine
switched off, there is no brak-
TOWING YOUR VEHICLE
Towing a vehicle with an auto-
cation).
When towing with four wheels on the
ground, the following rules must be
obeyed:
- lever in position
- tow the vehicle at less than 30 mph
of 30 miles (50 km).
- do not add oil to the gearbox.
a professional lifting device.
Screw in the towing eye as far as it
will go.

FITTING ROOF BARS
(SALOON)
When fitting transverse roof bars,
for this purpose. Lift the concealing
flaps and adjust the roof bar quick-fit
fixings.
on the roof rack, for a loading
carriers): 80 kg.
speed of the vehicle to the profile of
the road to avoid damaging the roof
for transporting objects which are
When fitting transverse roof bars, en-
sure that they are positioned correctly.
The correct positions are shown by
turer’s fitting instructions.
on the roof bars, for a loading
speed of the vehicle to the condition of
the road, to avoid damaging the roof
comply with the regulations regarding
the transportation of objects which are
A.
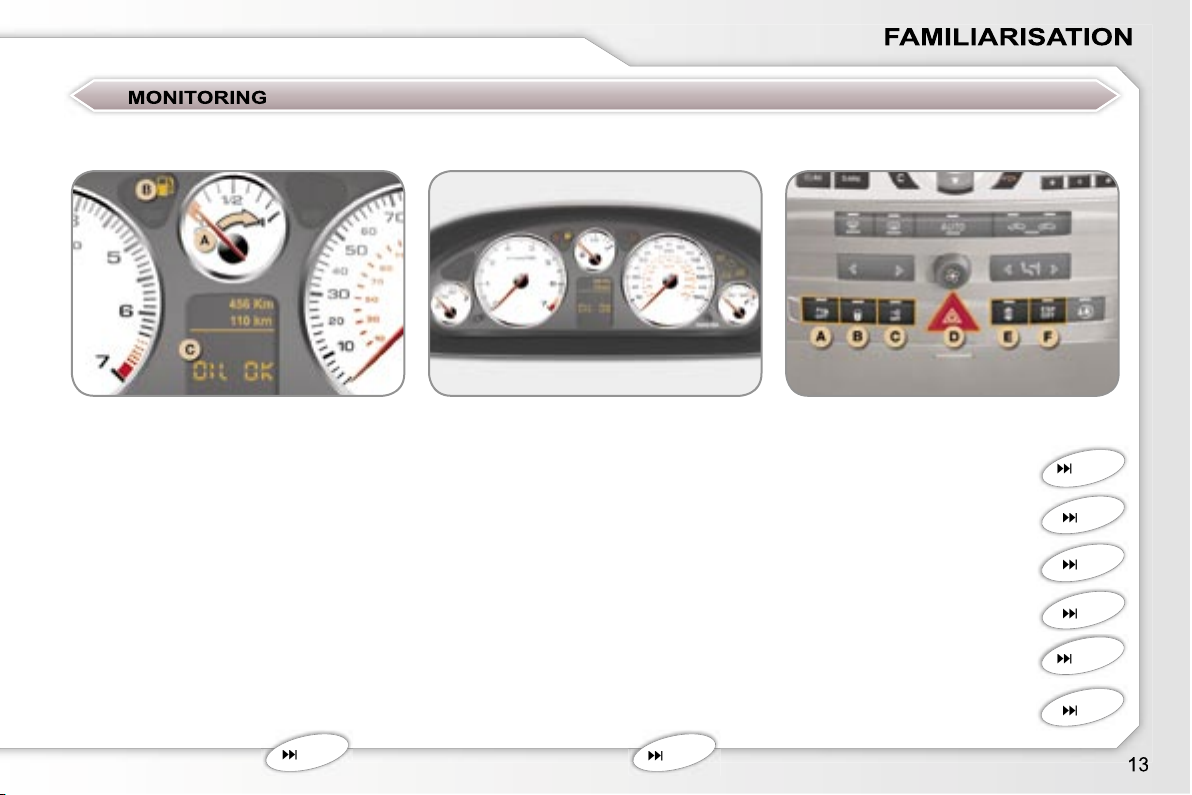
When the ignition is on, the fuel
gauge needle should rise.
When the engine is running, its
associated low level warning light
should switch off.
When the ignition is on, the oil
status of the corresponding function.
When the ignition is on, the orange and
When the engine is running, these
warning lights should switch off.
the page concerned.
Warning lights
20
105
A.
Audible rear parking
assistance off.
Central locking.
Interior protection alarm
off.
Hazard warning lights.
Selection of the
electronically controlled
suspension.
Electronic stability
64
70
89
100
89
ant temperature.
LightingTOWING A TRAILER,
CARAVAN, BOAT, ETC...
We recommend the use of original
tested and approved from the design
stage of your vehicle and that you
entrust the fitting of the towbar to a
distribute the
est loads are as close as possible to
the axle and the nose weight is close
to the maximum authorised without,
towing a trailer on a slope in-
creases the coolant temperature.
As the fan is electrically controlled, its
cooling capacity is not dependent on
the engine speed.
gine running at idle for approximately
20 seconds before switching off the ig-
temperature of the engine after it has
ticularly arduous use (towing
the maximum load in high
temperatures on a steep
slope), the engine automatically lim-
ate automatic gearbox gear in manual
conditioning allows the engine power
to be recovered, and therefore the
towing capacity to be increased.
warning light comes on, stop
the vehicle and switch off the
engine as soon as possible.
Tyres:
check the tyre pressures of the
towing vehicle (label on the central
door pillar on the driver’s side) and of
the trailer towed, observing the recom-
towing increases the braking
distance. Drive at a moderate speed,
change down early and brake gradually.
Side wind:
sensitivity to side wind is
Adjust your headlamps so as not to
dazzle other road users. Check the
electrical signalling of the trailer.

ACCESSORIES FOR YOUR 407
A wide range of accessories recom-
They all benefit from PEUGEOT’s rec-
ommendation.
These accessories and parts, having
The product range offered by
around 5 categories: PROTECTION -
TOURING - IN-CAR TECHNOLOGY -
Anti-theft alarm, parking as-
sistance, engraved windows,
wheel anti-theft devices, first
aid kit, warning triangle, high
visibility safety jacket, snow
chains, dog guard, etc.
side air bags, mats, boot
tray.
sories (bicycle carrier, ski
carrier), roof box, child seats
and booster cushions, rear screen
Trailer towbar which must be fitted by
the PEUGEOT Network.
Telephone, hands-free kits,
satellite navigation, CD
changer, multimedia, con-
Alloy wheels, wheel trims,
spoiler, leather steering wheel,
styling strips, door spoilers,
stainless steel sill protectors.
Windscreen wash fluid, inte-
The fitting of electrical equip-
are not recommended by
failure of your vehicle’s electronic
system.
are advised to contact a representa-
tive of the Marque to be shown the
and accessories.
To avoid any jamming under the
- ensure that the mat is positioned and
secured correctly,
- never place one mat on top of an-
other.
which the vehicle is sold, it
visibility safety jacket, warning
triangle and spare bulbs avail-
able in the vehicle.
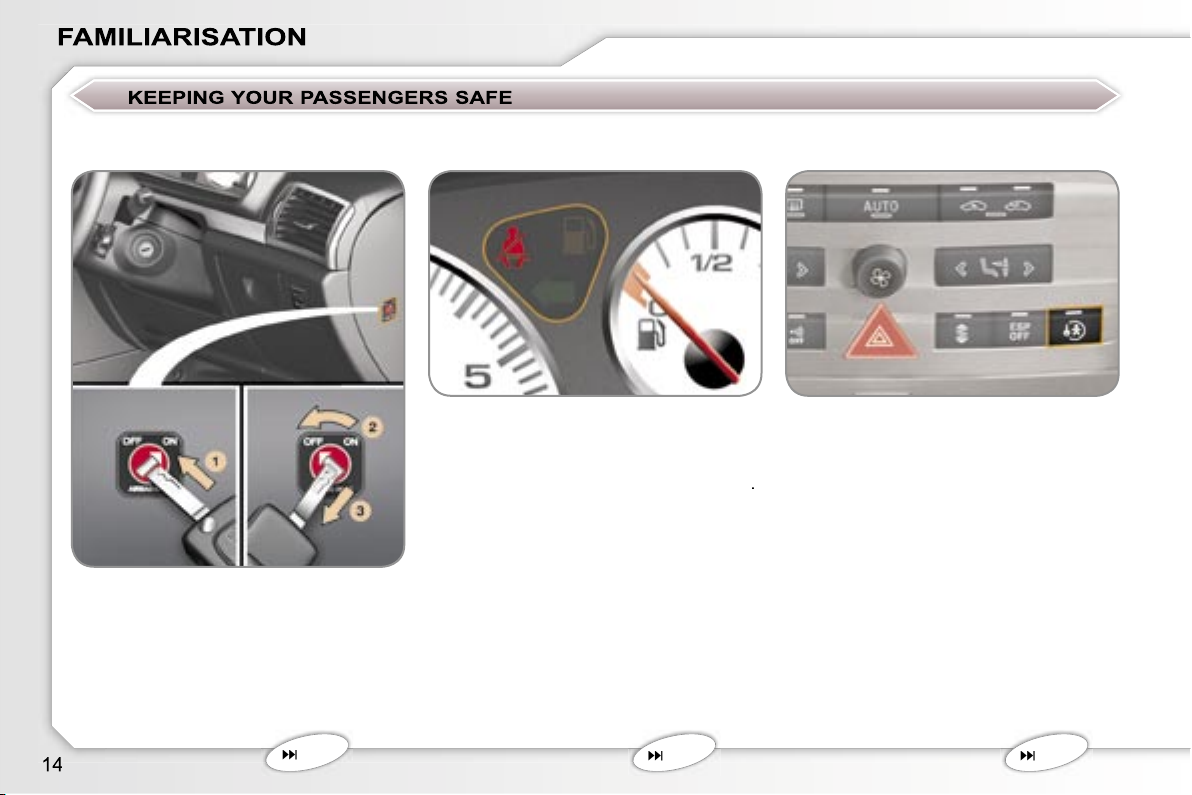
Insertion of the key.
2.
Selection of the
position.
3.
Removal of the key keeping the
switch in this position.
This prevents opening of the two rear
doors from the inside.
With the ignition on, press the button.
A message appears on the multifunction
display.
You are advised to check the activation
of the child lock each time the ignition is
switched on.
When the
front occupant has not fastened his seat
seat belt warning light
The warning light switches off when the
seat belt(s) concerned is(are) fastened.
above 12 mph
of the
seat belt warning light
function display locating the unfastened
seat belt(s).
front seat belts
94
91
69

TECHNICAL DATA
DIMENSIONS (in mm)
407 saloon
407 SW
TECHNICAL DATA
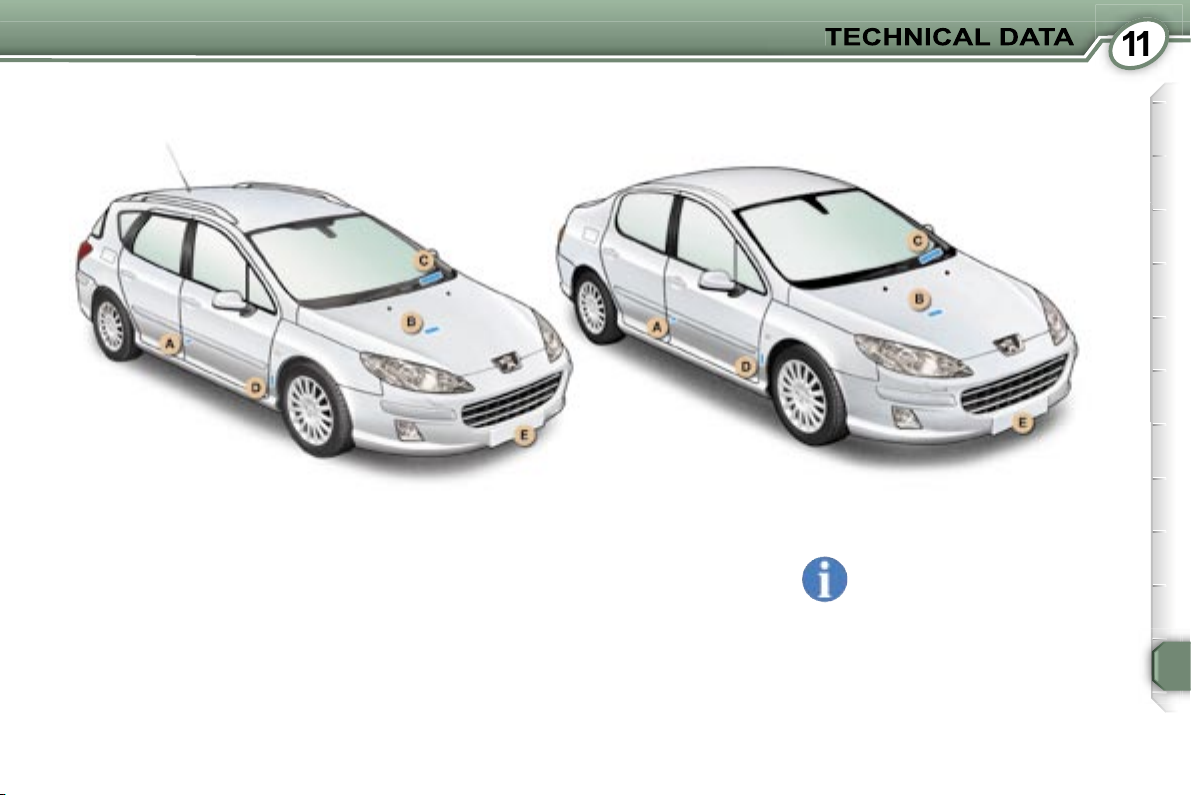
windscreen).
Tyre pressure and paint colour
The label
on the pillar near to the
door hinges on the driver’s side
- the wheel and tyre sizes,
- the brands of tyres approved by the
- the tyre pressures (the
cold
once a month
- the paint colour reference.
IDENTIFICATION FEATURES OF YOUR 407
front number plate of a height
size conforms to current regulations.
 Loading...